

Page 1
Cyber-shot Station
使用説明書
▖⮓☎Ὧ☆
使用说明书
Cyber-shot Station
Cyber-shot 多功能底座
Operating Instructions
Mode d’emploi
Manual de instrucciones
CSS-HD2
GB
FR
ES
CT
CS
KR
Page 2
English
Before operating the product, please read this manual thoroughly and retain it for future reference.
WARNING
To reduce fire or shock hazard, do not expose the unit to rain or
moisture.
This symbol is intended to alert the user to the presence of uninsulated “dangerous
voltage” within the product’s enclosure that may be of sufficient magnitude to constitute
a risk of electric shock to persons.
This symbol is intended to alert the user to the presence of important operating and
maintenance (servicing) instructions in the literature accompanying the appliance.
2-GB
Page 3

IMPORTANT SAFEGUARDS
For your protection, please read these safety instructions completely before operating the appliance, and
keep this manual for future reference. Carefully observe all warnings, precautions and instructions on the
appliance, or the one described in the operating instructions and adhere to them.
Use
Power Sources
This set should be operated only from the type of power source indicated on the marking label. If you are not
sure of the type of electrical power supplied to your home, consult your dealer or local power company. For
those sets designed to operate from battery power, or other sources, refer to the operating instructions.
Polarization
This set may be equipped with a polarized ac power cord plug (a plug having one blade wider than the other).
This plug will fit into the power outlet only one way. This is a safety feature. If you are unable to insert the
plug fully into the outlet, try reversing the plug. If the plug should still fail to fit, contact your electrician to
have a suitable outlet installed.
Do not defeat the safety purpose of the polarized plug by forcing it in.
Overloading
Do not overload wall outlets, extension cords or convenience receptacles beyond their capacity, since this can
result in fire or electric shock.
Object and Liquid Entry
Never push objects of any kind into the set through openings as they may touch dangerous voltage points or
short out parts that could result in a fire or electric shock. Never spill liquid of any kind on the set.
Attachments
Do not use attachments not recommended by the manufacturer, as they may cause hazards.
Cleaning
Unplug the set from the wall outlet before cleaning or polishing it. Do not use liquid cleaners or aerosol
cleaners. Use a cloth lightly dampened with water for cleaning the exterior of the set.
Installation
Water and Moisture
Do not use power-line operated sets near water − for example, near a bathtub, washbowl, kitchen sink, or
laundry tub, in a wet basement, or near a swimming pool, etc.
Power-Cord Protection
Route the power cord so that it is not likely to be walked on or pinched by items placed upon or against them,
paying particular attention to the plugs, receptacles, and the point where the cord exits from the appliance.
Accessories
Do not place the set on an unstable cart, stand, tripod, bracket, or table. The set may fall, causing serious
injury to a child or an adult, and serious damage to the set. Use only a cart, stand, tripod, bracket, or table
recommended by the manufacturer.
Ventilation
The slots and openings in the cabinet are provided for necessary ventilation. To ensure reliable operation of
the set, and to protect it from overheating, these slots and openings must never be blocked or covered.
Never cover the slots and openings with a cloth or other materials.
–
Never block the slots and openings by placing the set on a bed, sofa, rug, or other similar surface.
–
Never place the set in a confined space, such as a bookcase, or built-in cabinet, unless proper ventilation is
–
provided.
Do not place the set near or over a radiator or heat register, or where it is exposed to direct sunlight.
–
3-GB
Page 4

Lightning
For added protection for this set during a lightning storm, or when it is left unattended and unused for long
periods of time, unplug it from the wall outlet and disconnect the antenna or cable system. This will prevent
damage to the set due to lightning and power-line surges.
Service
Damage Requiring Service
Unplug the set from the wall outlet and refer servicing to qualified service personnel under the following
conditions:
When the power cord or plug is damaged or frayed.
–
If liquid has been spilled or objects have fallen into the set.
–
If the set has been exposed to rain or water.
–
If the set has been subject to excessive shock by being dropped, or the cabinet has been damaged.
–
If the set does not operate normally when following the operating instructions. Adjust only those controls
–
that are specified in the operating instructions. Improper adjustment of other controls may result in damage
and will often require extensive work by a qualified technician to restore the set to normal operation.
When the set exhibits a distinct change in performance − this indicates a need for service.
–
Servicing
Do not attempt to service the set yourself as opening or removing covers may expose you to dangerous
voltage or other hazards.
Refer all servicing to qualified service personnel.
Replacement parts
When replacement parts are required, be sure the service technician has used replacement parts specified by
the manufacturer that have the same characteristics as the original parts.
Unauthorized substitutions may result in fire, electric shock, or other hazards.
Safety Check
Upon completion of any service or repairs to the set, as the service technician to perform routine safety
checks (as specified by the manufacturer) to determine that the set is in safe operating condition.
For Customers in the U.S.A.
CAUTION
You are cautioned that any changes or modifications not expressly approved in this manual could void your
authority to operate this equipment.
Note:
This equipment has been tested and found to comply with the limits for a Class B digital device, pursuant
to Part 15 of the FCC Rules. These limits are designed to provide reasonable protection against harmful
interference in a residential installation. This equipment generates, uses, and can radiate radio frequency
energy and, if not installed and used in accordance with the instructions, may cause harmful interference
to radio communications. However, there is no guarantee that interference will not occur in a particular
installation. If this equipment does cause harmful interference to radio or television reception, which can be
determined by turning the equipment off and on, the user is encouraged to try to correct the interference by
one or more of the following measures:
– Reorient or relocate the receiving antenna.
– Increase the separation between the equipment and receiver.
– Connect the equipment into an outlet on a circuit different from that to which the receiver is connected.
– Consult the dealer or an experienced radio/TV technician for help.
The supplied interface cable must be used with the equipment in order to comply with the limits for a digital
device pursuant to Subpart B of Part 15 of FCC Rules.
4-GB
Page 5
Notice on the supplied AC Adaptor for customers in the United
Kingdom
A moulded plug complying with BS1363 is fitted to this equipment for your safety and convenience.
Should the fuse in the plug supplied need to be replaced, a fuse of the same rating as the supplied one and
approved by ASTA or BSI to BS1362, (i.e., marked with or mark) must be used.
If the plug supplied with this equipment has a detachable fuse cover, be sure to attach the fuse cover after you
change the fuse. Never use the plug without the fuse cover. If you should lose the fuse cover, please contact
your nearest Sony service station.
For Customers in Europe
This product has been tested and found compliant with the limits sets out in the EMC Directive for using
connection cables shorter than 3 meters (9.8 feet).
Attention
The electromagnetic field at the specific frequencies may influence the picture and sound of this unit.
Notice for the customers in the countries applying EU Directives
The manufacturer of this product is Sony Corporation, 1-7-1 Konan Minato-ku Tokyo, 108-0075 Japan.
The Authorized Representative for EMC and product safety is Sony Deutschland GmbH, Hedelfinger Strasse
61, 70327 Stuttgart, Germany. For any service or guarantee matters please refer to the addresses given in
separate service or guarantee documents.
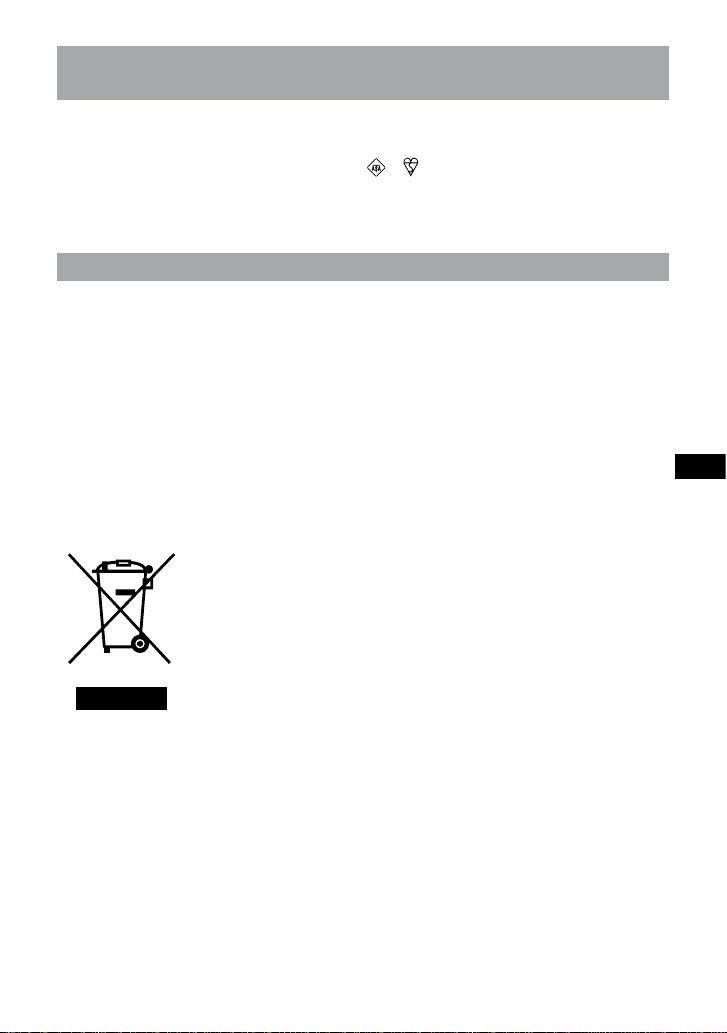
Disposal of Old Electrical & Electronic Equipment (Applicable in
the European Union and other European countries with separate
collection systems)
This symbol on the product or on its packaging indicates that this product shall
not be treated as household waste. Instead it shall be handed over to the applicable
collection point for the recycling of electrical and electronic equipment. By
ensuring this product is disposed of correctly, you will help prevent potential
negative consequences for the environment and human health, which could
otherwise be caused by inappropriate waste handling of this product. The recycling
of materials will help to conserve natural resources. For more detailed information
about recycling of this product, please contact your local Civic Office, your
household waste disposal service or the shop where you purchased the product.
5-GB
Page 6

Disposal of waste batteries (applicable in the European Union and
other European countries with separate collection systems)
This symbol on the battery or on the packaging indicates that the battery provided with
this product shall not be treated as household waste.
By ensuring these batteries are disposed of correctly, you will help prevent potentially
negative consequences for the environment and human health which could otherwise be
caused by inappropriate waste handling of the battery. The recycling of the materials will
help to conserve natural resources.
In case of products that for safety, performance or data integrity reasons require a
permanent connection with an incorporated battery, this battery should be replaced by
qualified service staff only. To ensure that the battery will be treated properly, hand over
the product at end-of-life to the applicable collection point for the recycling of electrical
and electronic equipment.
For all other batteries, please view the section on how to remove the battery from the
product safely.
Hand the battery over to the applicable collection point for the recycling of waste batteries.
For more detailed information about recycling of this product or battery, please contact
your local Civic Office, your household waste disposal service or the shop where you
purchased the product.
6-GB
Page 7

Table of contents
Notes on using the Cyber-shot Station ............................................................................................8
Features ................................................................................................................................................9
Trademarks ..........................................................................................................................................9
Identifying the parts .........................................................................................................................10
Set up ..................................................................................................................................................12
Placing the camera on the Cyber-shot Station ............................................................................14
Removing the camera from the Cyber-shot Station ...................................................................14
Charging the battery pack .............................................................................................................. 14
Viewing images on a TV screen .................................................................................................... 15
Remote Commander functions ......................................................................................................16
Care and maintenance ..................................................................................................................... 17
Changing the battery of the Remote Commander .......................................................................17
Troubleshooting ................................................................................................................................ 18
Specifications ....................................................................................................................................19
7-GB
Page 8

Notes on using the Cyber-shot Station
Refer to the operating instructions for your camera as well as this manual.
The Cyber-shot Station is not a dust-proofed, moist-proofed, or water proofed product.
The CSS-HD2 can be used with the DSC-T300/T75/T70/T2/W300/W170/W150/W130/W125/W120/W115/
W110 digital still cameras. Not all of the above models are available in all countries and regions.
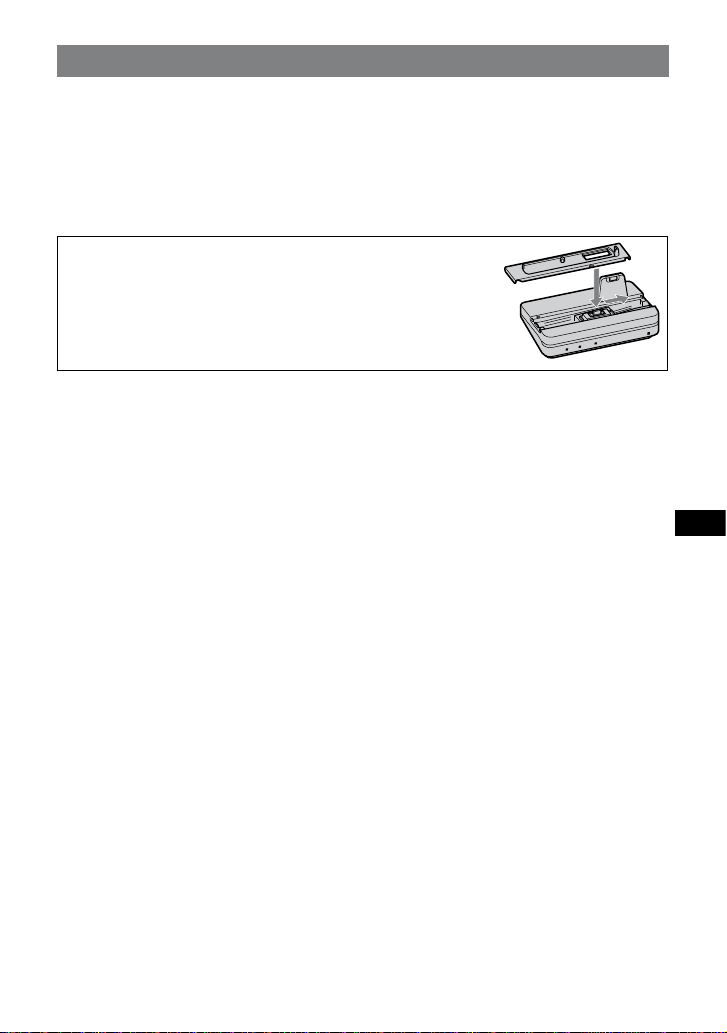
About the station plates
The Cyber-shot Station is supplied with 5 station plates that are
compatible with various digital cameras (hereinafter referred to as the
“camera”). See page 12 for further details.
Be sure to set the correct station plate that is compatible with your camera
before using. If you set the wrong station plate, the I/O unit could be
damaged.
The illustration in this manual shows the combination of DSC-T300 and
station plate for DSC-T300.
Precautions on use and storage locations:
Do not use or keep the Cyber-shot Station in locations subject to the following conditions. Otherwise, the
Cyber-shot Station could malfunction.
Locations subject to extreme high temperature
Temperatures in a hot sun or closed automobiles during summer may be extremely high, causing
deformation or malfunction of the Cyber-shot Station.
Locations under direct sunlight or near heaters
This may cause deformation or a malfunction of the Cyber-shot Station.
Locations subject to vibration
Locations subject to strong magnetism
Locations subject to dust particles in a sandy place or the beach
Precautions on use:
Even if the CHARGE lamp is not lit, the unit is not disconnected from the AC power source (mains) as long
as it is connected to the wall outlet (wall socket). If some trouble occurs while using the unit, immediately
shut off the power by disconnecting the plug from the wall outlet (wall socket).
Use the nearest wall outlet to get the AC Adaptor plugged in. If any malfunctions occur using the product,
unplug the AC Adaptor to cut off the power source.
The set is not disconnected from the AC power source (mains) as long as it is connected to the wall outlet,
even if the set itself has been turned off.
Do not use the AC Adaptor placed in a narrow space, such as between a wall and furniture.
Do not use the Cyber-shot Station in locations that are subject to strong radio waves or radiation. Images
may not be played back properly.
Avoid other metallic objects from coming in contact with the connecting parts of the Cyber-shot Station
and the power cord. It may cause a short circuit.
Precautions on recorded data:
Please note that Sony will not be liable for recorded data such as images and audio data if you cannot record
or play back due to a malfunction of the camera, recording media, or the Cyber-shot Station.
8-GB
Page 9
Features
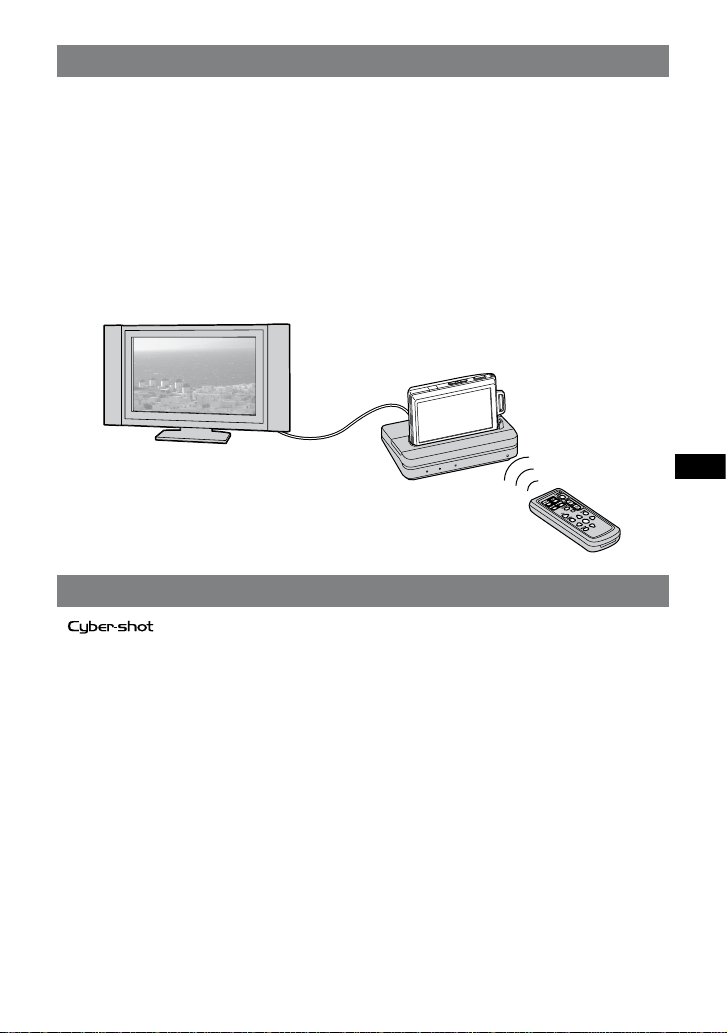
When you place a camera on the Cyber-shot Station, you can use the Cyber-shot Station in the following way.
You can view the images of the camera in high definition by connecting the Cyber-shot Station to a high
definition TV. Images can be viewed in standard definition on a normal TV.
You can easily view images on a TV screen with the wireless Remote Commander.
Using the Remote Commander, you can operate the followings:
Viewing images
–
Slide Show
–
Playback zoom
–
Display the images in index display and switch the way to display images to “Folder,” “Date View,” or
–
“Favorites” (except for DSC-T75/T70/T2/W130/W125/W120/W115/W110).
Display the images in index display and search for the image by “All people,” “Children,” “Smiles,” or
–
“Infants” (except for DSC-T75/T70/T2/W130/W125/W120/W115/W110).
The Cyber-shot Station can charge the battery pack inside the camera faster than the battery charger
supplied with the camera when you simply place the camera on it.
Trademarks
In addition, system and product names used in this manual are, in general, trademarks or registered
trademarks of their respective developers or manufacturers. However, the
and “Cyber-shot Station” are trademarks of Sony Corporation.
or marks are not used in all
cases in this manual.
9-GB
Page 10

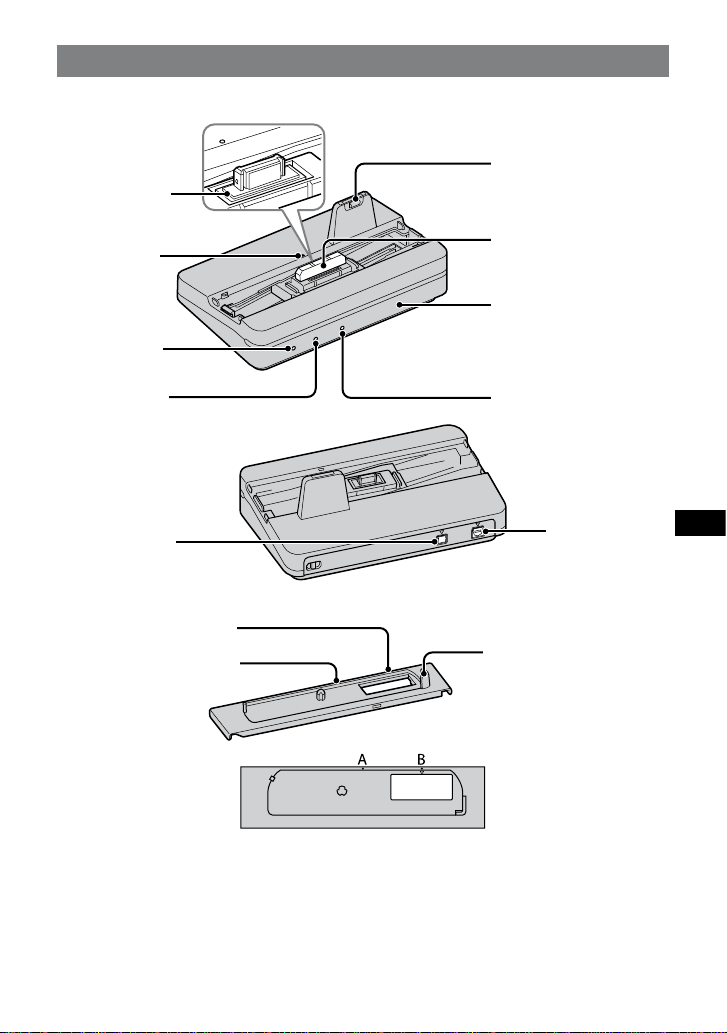
Identifying the parts
Cyber-shot Station
I/O unit
Camera front guide
Positioning marker
POWER lamp
CHARGE lamp
DC IN jack
Station plate
Positioning marker B
Positioning marker A
Protection cover
Detach this cover
before use.
Remote sensor
HD OUTPUT lamp
AV OUT jack
Camera side guide
The Cyber-shot Station is supplied with 5 station plates. Be sure to attach the correct station plate before
use.
See page 12 for further details.
10-GB
Page 11
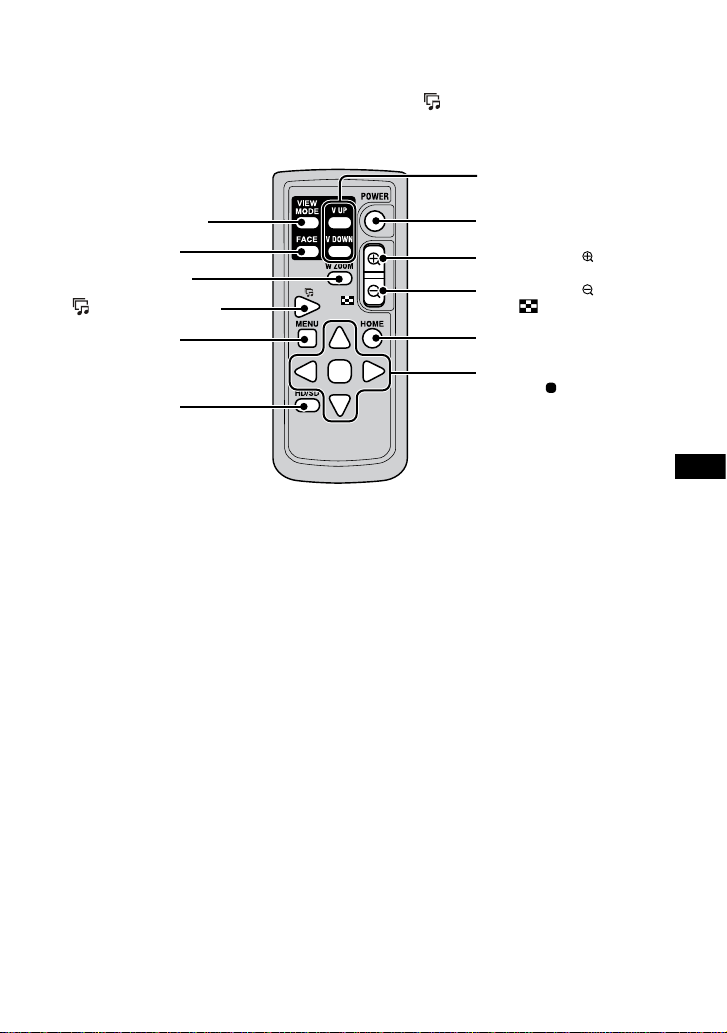
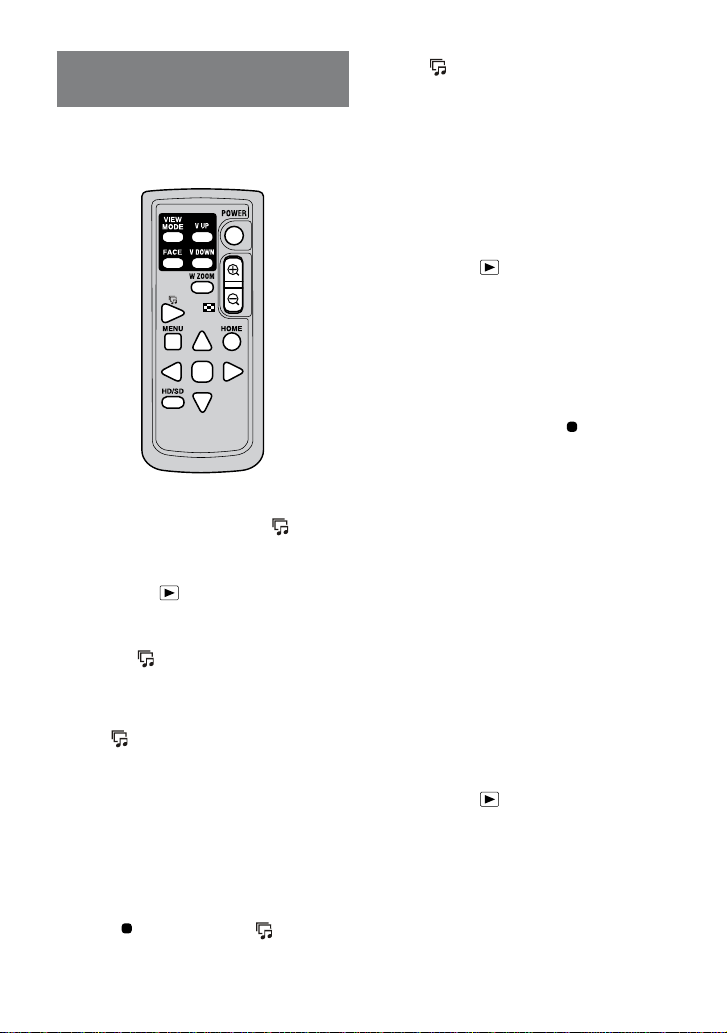
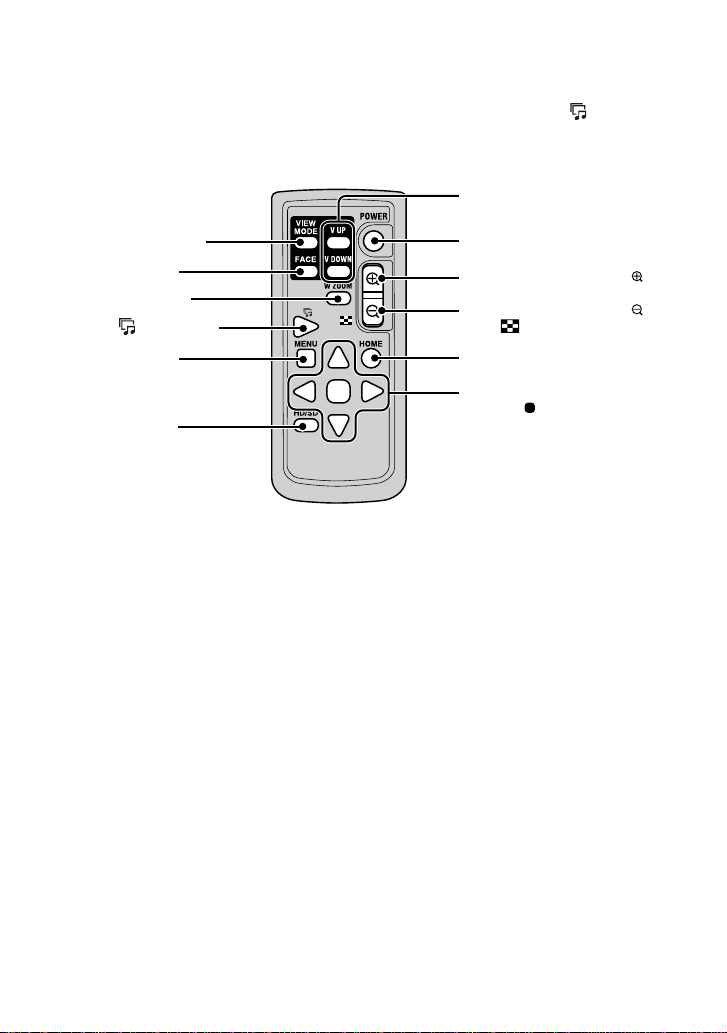
Remote Commander
The functions of the Remote Commander differ depending on the camera you use.
When using DSC-T75/T70/T2, the Remote Commander of the Cyber-shot Station functions the same as the
Remote Commander of CSS-HD1, except for the functions of the (Slide Show) button and the control
buttons.
Also, some buttons do not function at all. For further information on the functions of the control buttons,
refer to the operating instructions supplied with the camera.
V UP button/
V DOWN button
VIEW MODE button
FACE button
W ZOOM button
(Slide Show) button
MENU button
HD/SD button
*1
*1
*2
POWER button (CAMERA)
Playback Zoom ( ) button
Playback Zoom ( )/
Index( ) button
HOME button
Control buttons
*2
(//// )
*1 These functions are not supported for DSC-T75/T70/T2/W130/W125/W120/W115/W110.
*2 These functions are not supported for DSC-T75/T70/T2.
*2
*2
11-GB
Page 12

Set up
Preparing the Cyber-shot Station
1 Select a station plate.
The station plates have a front side and bottom
side.
Front side
Sony logo
Bottom side
Plate name
Select the station plate corresponding with your
camera.
Model name Plate name Sliding
DSC-T300 HD2-A Right
DSC-W110
DSC-W115
DSC-W120
DSC-W125
DSC-W130
DSC-W150
DSC-W170
DSC-W300 HD2-D Left
DSC-T2
DSC-T75
HD2-B Left
HD2-C Left
HD2-E RightDSC-T70
direction
2 Attach the station plate.
Hold the station plate on the front side (the
side with the Sony logo) facing you, and place
it on the I/O unit of the Cyber-shot Station
as if you place it over the protection cover
attached on the I/O unit.
Using a right-sliding station plate (such as
HD2-A)
Using a left-sliding station plate (such as
HD2-B)
Hold the Cyber-shot Station with one hand.
Hold the camera side guide of the station
plate with the other hand and slide the station
plate until it is pushed in all the way.
See the table in step 1 for the sliding direction.
Sliding to the right
Sliding to the left
12-GB
Page 13
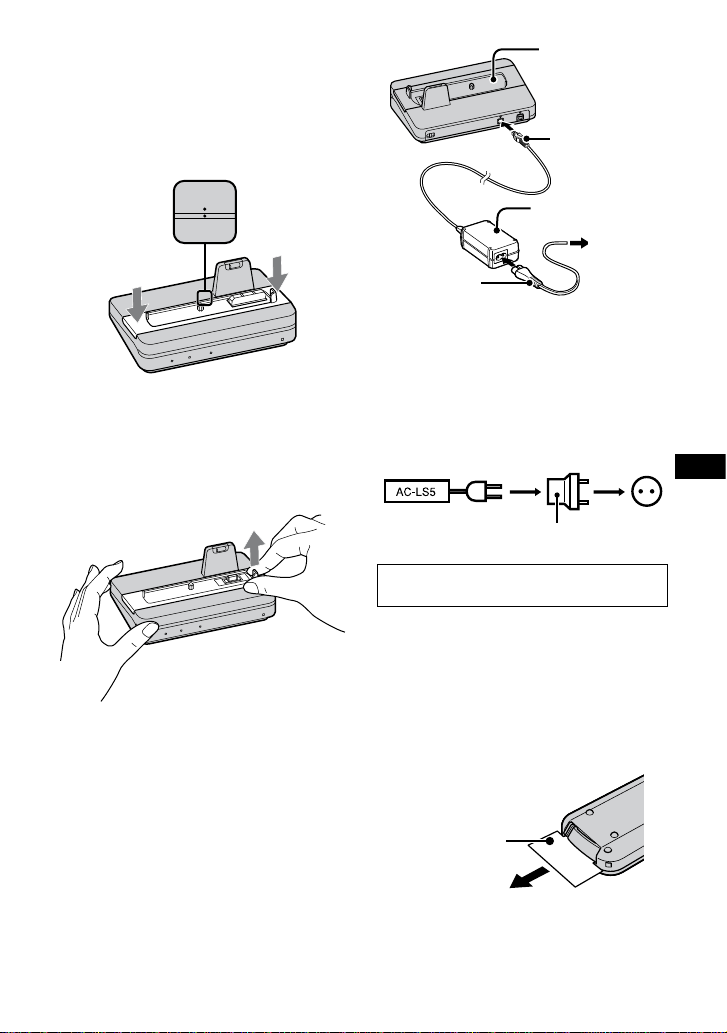
The station plate will sink in when it is slid all
the way to the correct position. You will hear
a click when the plate is attached properly.
If the station plate does not sink in properly,
evenly push down on its left/right sides.
The positioning marker A on the station plate
and positioning marker on the Cyber-shot
Station will be aligned.
Detach the protection cover of the I/O unit.
Before you place a camera on the Cyber-shot
Station, be sure to detach the protection cover.
Detaching the station plate
Hold the Cyber-shot Station with one hand. Hold
the camera side guide of the station plate with the
other hand and pull the station plate upward.
3 Connect the supplied AC Adaptor to the DC
IN jack of the Cyber-shot Station.
The POWER lamp of the Cyber-shot Station
lights up.
Cyber-shot Station
DC plug
AC Adaptor
To a wall
outlet
AC Power cord
(mains lead)
To use your Cyber-shot Station abroad
– Power sources
You can use the Cyber-shot Station and the AC
Adaptor (supplied) in any country or region where
the power supply is within 100 V to 240 V AC
50/60 Hz.
Use a commercially available AC plug adaptor,
if necessary, depending on the design of the wall
outlet (wall socket).
AC plug adaptor
(not supplied)
Do not use an electronic transformer (travel
converter), as this may cause a malfunction.
(wall socket)
Preparing the Remote Commander
Notes on the Remote Commander
The Remote Commander is powered by a button
type lithium battery (CR2025) installed at the
factory. An insulation sheet is inserted to avoid
the battery exhaustion. Remove the insulation
sheet before using the Remote Commander for
the first time.
Insulation sheet
Point the remote sensor of the Cyber-shot Station
away from strong light sources such as direct
sunlight or overhead lightings. Otherwise, the
Remote Commander may not function properly.
13-GB
Page 14

The Remote Commander range is less than
five meters (for indoor use). Point the Remote
Commander at the remote sensor of the Cybershot Station. Try adjusting the angle of the
Remote Commander if you cannot operate the
Cyber-shot Station.
Placing the camera on the
Cyber-shot Station
Remove the Adaptor ring, the Conversion lens,
etc. from the camera.
Attach the camera as shown below.
Be sure to turn off the camera before placing it on
the Cyber-shot Station.
Removing the camera from
the Cyber-shot Station
Hold the Cyber-shot Station down when you
remove the camera from the Cyber-shot Station.
Notes
When removing the camera, make sure to lift the
camera straight up. It may damage the camera or
the Cyber-shot Station when some extra force is
added to the front or the sides.
When attaching the camera, make sure to insert
the camera straight down.
Tips
Make sure that the camera is securely attached to
the Cyber-shot Station.
14-GB
Charging the battery pack
Place the camera with the battery pack
inserted on the Cyber-shot Station.
Charging starts automatically. The CHARGE lamp
of the Cyber-shot Station lights up.
When the camera is turned on, the Cyber-shot
Station cannot charge the battery pack.
When the charging reaches to Normal charge*,
the CHARGE lamp goes off.
Recording and playback time with Normal
*
charge
is
For the time of the full charge for a completely
discharged battery at the temperature of 25 °C
(77 °F), see the table below.
–
approximately
DSC-T300/T75/T70/T2 Approx.
DSCW300/W170/W150//W130/
W125/W120/W115/W110
It may take longer to charge, depending on the
charging condition and environment.
90% of Full
charge.
160 minutes
Approx.
230 minutes
Page 15
Notes
After attaching the camera to the Cyber-shot
Station, the CHARGE lamp may blink slowly for
3 to 10 seconds. This indicates communication
between the camera and the Cyber-shot Station,
and it is not a malfunction.
If CHARGE lamp does not light or blinks for
more than 10 seconds, refer to “Troubleshooting”.
Charging temperature
The temperature range for charging is 0 °C to
40 °C (32 °F to 104 °F). However, to provide
maximum battery efficiency, the recommended
temperature range when charging is 10 °C to
30 °C (50 °F to 86 °F).
On battery life
The battery life is limited. Battery capacity
decreases little by little as you use it more and
more, and as time passes. If the battery operating
time seems shortened considerably, a probable
cause is that the battery pack has reached the end
of its life. Buy a new battery pack.
The battery life varies according to how it
is stored and the operating conditions and
environment in which each battery pack is used.
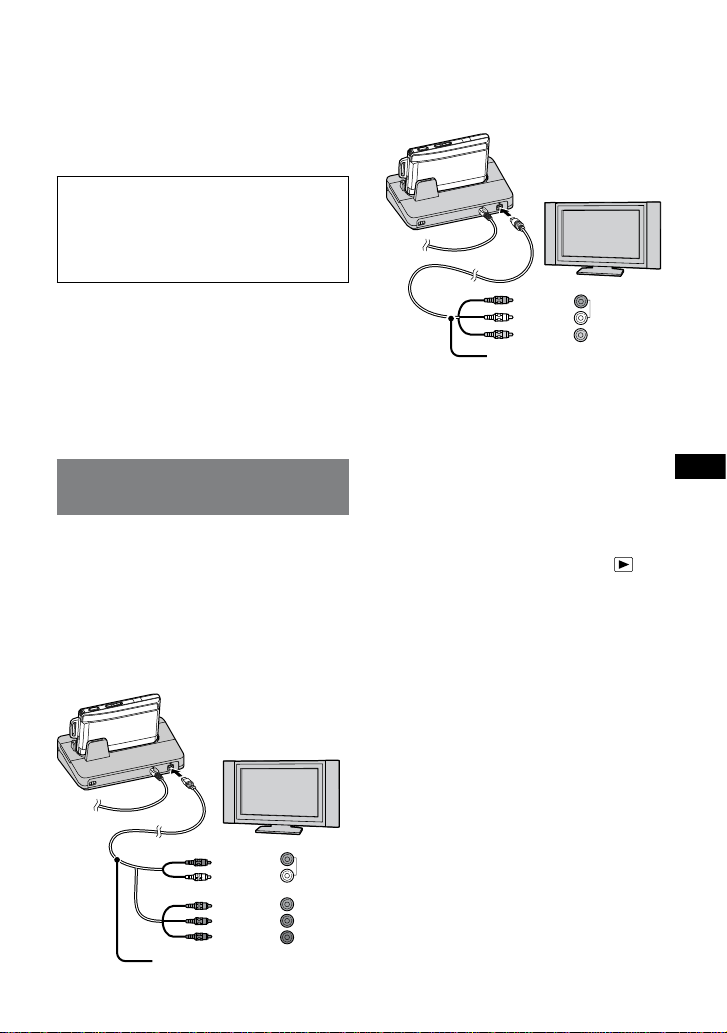
Viewing images on a TV
screen
You can playback images by connecting the Cybershot Station to the TV with the A/V connecting
cable (supplied) or the Component A/V Cable
(supplied).
Refer to the operating instructions supplied with
the TV for connection.
1 Viewing images on a high-definition TV
Connect the A/V OUT jack of the Cyber-shot
Station and the Component AV jacks of the TV.
Red
White
Green
Blue
Red
Component A/V Cable
Audio
Y
Pb/Cb
Pr/Cr
Viewing images on TVs other than highdefinition TV
Connect the A/V OUT jack of the Cyber-shot
Station and the audio/video input jacks of the
TV.
Red
White
Yellow
Turn off the TV before connecting the Cyber-
shot Station and TV with the Component
A/V Cable.
The signal format to be output from the A/V
OUT jack depends on the camera setting.
To view the 1080i format images, you need a
TV compatible with 1080i format.
The audio to be output from the Cyber-shot
Station via the A/V OUT jack is monaural.
The Cyber-shot Station is not compatible with
the S-VIDEO connecting cable.
A/V connecting cable
Audio
Video
2 Turn on the power by pressing the
(playback) button of the camera or the
POWER button on the Remote Commander.
Tips
The buttons on the camera or the Remote
Commander may not function immediately
after the camera is attached to the Cybershot Station. This occurs when the camera is
booting up and is not a malfunction. Wait for
about 10 seconds.
3 Turn on the TV and set the input switch to
the input connected in step 1.
4 Press / on the Control buttons of the
Remote Commander to select the image.
You can also select the image by pressing /
on the Control buttons of the camera.
The Cyber-shot Station is compatible with both
NTSC and PAL TV systems. For further details,
see the operating instructions supplied with the
camera.
15-GB
Page 16
Remote Commander
functions
The functions of the Remote Commander differ
depending on the camera you use.
For further information, refer to the operating
instructions supplied with the camera.
Slide show
You can play back a series of still images recorded
with your camera by only pressing the (Slide
Show) button on the Remote Commander.
1 Turn on the power of the camera by
pressing the
the camera or the POWER button on the
Remote Commander.
(playback) button of
2 Press the (Slide Show) button on the
Remote Commander.
The Slide Show settings screen appears.
The Slide Show settings screen may not be
displayed on some models even if you press
the (Slide Show) button. The Slide Show
will start in the preset conditions. For further
details about the setting method, refer to
the operating instructions supplied with the
camera.
3 Use the control buttons on the Remote
Commander to change the settings of the
Slide Show.
4 Use the control buttons on the Remote
Commander to select [OK] and press the
button or press the (Slide
center
Show) button on the Remote Commander.
To cancel Slide Show
Press the (Slide Show) button on the Remote
Commander again.
For further information, refer to the operating
instructions supplied with the camera.
Switching the view mode
You can change the index display by pressing the
VIEW MODE button on the Remote Commander.
Except for DSC-T75/T70/T2/W130/W125/W120/
W115/W110.
1 Turn on the power of the camera by
pressing the
the camera or the POWER button on the
Remote Commander.
(playback) button of
2 Press the VIEW MODE button on the
Remote Commander.
The view mode screen appears.
3 Use the control buttons on the Remote
Commander to select the desired view
mode and press the center
The images are displayed in index mode using
the view mode you just selected.
When you press the V UP button and V DOWN
button on the Remote Commander, you can
perform the following functions in each view
mode.
Date View mode:
–
Display the previous date and next date.
Folder mode:
–
Display the previous folder and next folder.
Favorites mode:
–
Display the previous page and next page.
Filter by Faces
You can search the images recorded with various
faces by pressing the FACE button on the Remote
Commander.
Except for DSC-T75/T70/T2/W130/W125/W120/
W115/W110.
button.
1 Turn on the power of the camera by
pressing the
the camera or the POWER button on the
Remote Commander.
(playback) button of
2 Press the FACE button on the Remote
Commander.
The Search images menu appears.
16-GB
Page 17

3 Use the control buttons on the Remote
Commander to select the search condition
and press the center
The images are displayed in index mode in
accordance with the search condition.
For further information, refer to the operating
instructions supplied with the camera.
Switching between HD and SD
You can switch the TV display between highdefinition video (HD) and other than highdefinition video (SD) by pressing the HD/SD button
on the Remote Commander.
Except for DSC-T75/T70/T2.
button.
1 Turn on the power of the camera by
pressing the
the camera or the POWER button on the
Remote Commander.
(playback) button of
2 Press the HD/SD button on the Remote
Commander.
Every time you press the HD/SD button, the
setting will change alternately between HD and
SD.
The HD-OUTPUT lamp (blue) of the Cyber-shot
Station lights up while the HD video is viewed
on a TV.
For further information, refer to the operating
instructions supplied with the camera.
Wide Zoom Display
You can display a still image with an angle of view of
4:3 or 3:2 to those of 16:9 by pressing the W ZOOM
button on the Remote Commander, which is the
same as the wide zoom function of the camera.
For DSC-T75/T70, the Wide Zoom functions
when you press the button on the Remote
Commander.
Except for DSC-T2.
1 Turn on the power of the camera by
pressing the
the camera or the POWER button on the
Remote Commander.
(playback) button of
2 Press the W ZOOM button on the Remote
Commander.
Every time you press the W ZOOM button, the
setting will change alternately between Wide
Zoom and Normal modes.
The Wide Zoom mode is canceled when you turn
off the camera or the shooting mode is switched.
Some functions of the Remote Commander will
be unavailable when you are using the Wide
Zoom function.
For further information, refer to the operating
instructions supplied with the camera.
Care and maintenance
Clean the Cyber-shot Station with a soft cloth
slightly moistened with water or tepid water, and
wipe the surface with a dry cloth. Do not use any
type of solvent such as thinner, alcohol or benzine
as this may damage the surface.
Changing the battery of the
Remote Commander
WARNING
Battery may explode if mistreated. Do not recharge,
disassemble, or dispose of in fire.
When the lithium battery becomes weak, the
operating distance of the Remote Commander
may shorten, or the Remote Commander may
not function properly. In this case, replace the
battery with a Sony CR2025 lithium battery. Use
of another battery may present a risk of fire or
explosion.
For the State of California, USA only
Perchlorate Material - special handling may apply,
See www.dtsc.ca.gov/hazardouswaste/perchlorate
Perchlorate Material: Lithium battery contains
perchlorate.
CAUTION
Replace the battery with the specified type only.
Otherwise, fire or injury may result.
Replacing the button type lithium
battery
Do not use any batteries other than CR2025.
*
Pull out the battery holder while pushing the
tab on the holder.
Put a new battery into the holder with its +
side facing upward.
Insert the holder into the Remote
Commander until it clicks.
tab
17-GB
Page 18

Troubleshooting
If any problems occur with your products, refer to the following solutions.
If the problem persists, contact your Sony dealer.
Symptom Cause/Solution
Unable to charge the battery pack or the
CHARGE lamp fails to light.
The CHARGE lamp blinks fast, or blinks
for more than 10 seconds.
Unable to turn on the camera, or
it suddenly gets turned off.
The images cannot be played back on
a TV.
Buttons on the Remote Commander
do not work, and no operations can be
performed.
Unable to attach the camera on the
Cyber-shot Station or the camera is
unstable.
The camera is turned on.
Turn the camera off.
The AC Adaptor is disconnected.
Connect the AC Adaptor properly.
The camera is not placed on the Cyber-shot Station correctly.
Place the camera correctly.
The battery pack is not installed correctly.
Install the battery pack correctly.
The battery pack is completely charged.
The battery pack installed into the camera is inapplicable.
Install the battery pack compatible with your camera.
The battery pack installed into the camera is inapplicable.
Install the battery pack compatible with your camera.
The connection is not correct. The camera is not placed
correctly on the Cyber-shot Station.
Remove the camera from the Cyber-shot Station and
reconnect the AC Adaptor. After the CHARGE lamp goes
off, place the camera on the Cyber-shot Station.
The camera is not placed on the Cyber-shot Station correctly.
Place the camera correctly.
The AC Adaptor is disconnected.
Connect the AC Adaptor properly.
The HD output setting is incorrect.
Refer to the operating instructions supplied with the
camera, and set the HD output setting correctly.
The Component A/V Cable or A/V connecting cable from the
Cyber-shot Station is not connected properly to the TV.
Connect the cable properly or correct the setting.
The camera is not placed correctly on the Cyber-shot Station.
Place the camera correctly.
The AC Adaptor is disconnected.
Connect the AC Adaptor properly.
The battery in the Remote Commander is dead.
Replace the battery with a new one.
The station plate is not attached properly.
Confirm that the station plate is compatible with your
camera and attach it properly.
18-GB
Page 19

Specifications
Cyber-shot Station
Input/Output connectors
A/V OUT jack:
DC IN jack
I/O unit
General
Dimensions (Approx.):
Mass (Approx.): 110 g (3.9 oz.)
Operating temperature:
Storage temperature:
AC Adaptor
Input rating: 100 V to 240 V, AC 50/60 Hz,
Output rating: 4.2 V DC
Dimensions (Approx.):
Mass (Approx.): 130 g (5 oz)
Operating temperature:
Storage temperature:
Component, Video/audio output
connector
124 × 48 × 78 mm
(5 × 1 15/16 × 3 1/8 in.)
(w/h/d)
(including a station plate)
0 °C to 40 °C
(32 °F to 104 °F)
–20 °C to +60 °C
(–4 °F to +140 °F)
11 W
See the label on the AC Adaptor
for other specifications.
48 × 29 × 81 mm
(1 15/16 × 1 3/16 × 3 1/4 inches)
(w/h/d, excluding projecting
parts)
(excluding AC Power cord)
0 °C to 40 °C
(32 °F to 104 °F)
–20 °C to +60 °C
(–4 °F to +140 °F)
Included items
Cyber-shot Station (CSS-HD2) (1)
Wireless Remote Commander (RMT-CSS6)
(A button type lithium battery installed) (1)
Station plate (5)
A/V connecting cable (1)
Component A/V Cable (1)
AC Adaptor (AC-LS5) (1)
AC Power cord (mains lead) (1)
Protection cover (1)
Set of printed documentation
Design and specifications are subject to change
without notice.
19-GB
Page 20

Français
Avant d’utiliser cet appareil, lisez attentivement ce mode d’emploi et conservez-le pour toute référence
ultérieure.
AVERTISSEMENT
Afin de réduire les risques d’incendie ou de décharge électrique,
n’exposez pas cet appareil à la pluie ou à l’humidité.
Note pour les clients européens
Cet appareil a été testé et jugé conforme aux limites établies par la directive EMC visant l’utilisation de câbles
de connexion de moins de 3 mètres.
Attention
Le champ électromagnétique à des fréquences particulières peut avoir une incidence sur l’image et le son de
cet appareil.
Avis aux consommateurs des pays appliquant les Directives UE
Le fabricant de ce produit est Sony Corporation, 1-7-1 Konan Minato-ku Tokyo, 108-0075 Japon. Le
représentant agréé pour la compatibilité électromagnétique et la sécurité du produit est Sony Deutschland
GmbH, Hedelfinger Strasse 61, 70327 Stuttgart, Allemagne. Pour toute question relative à la garantie ou aux
réparations, reportezvous à ladresse que vous trouverez dans les documents ci-joints, relatifs à la garantie et
aux réparations.
Traitement des appareils électriques et électroniques en fin de vie
(Applicable dans les pays de l’Union Européenne et aux autres pays
européens disposant de systèmes de collecte sélective)
Ce symbole, apposé sur le produit ou sur son emballage, indique que ce produit
ne doit pas être traité avec les déchets ménagers. Il doit être remis à un point de
collecte approprié pour le recyclage des équipements électriques et électroniques. En
s'assurant que ce produit est bien mis au rebut de manière appropriée, vous aiderez
à prévenir lesconséquences négatives potentielles pour l'environnement et la santé
humaine. Le recyclage des matériaux aidera à préserver les ressources naturelles. Pour
toute information supplémentaire au sujet du recyclage de ce produit, vous pouvez
contacter votre municipalité, votre déchetterie ou le magasin où vous avez acheté le
produit.
2-FR
Page 21

Elimination des piles et accumulateurs usagés (Applicable dans les
pays de l’Union Européenne et aux autres pays européens disposant
de systèmes de collecte sélective)
Ce symbole, apposé sur les piles et accumulateurs ou sur les emballages, indique que les
piles et accumulateurs fournis avec ce produit ne doivent pas être traités comme de simples
déchets ménagers. En vous assurant que ces piles et accumulateurs sont mis au rebus de
façon appropriée, vous participez activement à la prévention des conséquences négatives
que leur mauvais traitement pourrait provoquer sur l’environnement et sur la santé
humaine. Le recyclage des matériaux contribue par ailleurs à la préservation des ressources
naturelles.
Pour les produits qui pour des raisons de sécurité, de performance ou d’intégrité de
données nécessitent une connexion permanente à une pile ou à un accumulateur,
il conviendra de vous rapprocher d’un service technique qualifié pour effectuer le
remplacement de celle-ci. En rapportant votre appareil électrique en fin de vie à un
point de collecte approprié vous vous assurez que la batterie incorporée sera traitée
correctement.
Pour tous les autres cas de figure et afin d’enlever les piles ou accumulateurs en toute
sécurité de votre appareil, reportez-vous au manuel d’utilisation. Rapporter les batteries
usagées au point de collecte approprié pour le recyclage.
Pour toute information complémentaire au sujet du recyclage de ce produit ou des piles et
batteries, vous pouvez contacter votre municipalité, votre déchetterie locale ou le point de
vente où vous avez acheté ce produit.
3-FR
Page 22

Table des matières
Remarques sur l’utilisation de la Cyber-shot Station ..................................................................... 5
Caractéristiques ..................................................................................................................................6
Marques commerciales ...................................................................................................................... 6
Identification des pièces ....................................................................................................................7
Installation ........................................................................................................................................... 9
Mise en place de l’appareil photo sur la Cyber-shot Station ...................................................... 11
Retrait de l’appareil photo de la Cyber-shot Station ...................................................................11
Recharge de la batterie ....................................................................................................................11
Visualisation d’images sur un écran de téléviseur ....................................................................... 12
Fonctions de la télécommande .......................................................................................................13
Entretien et maintenance ................................................................................................................15
Changement de la pile de la télécommande .................................................................................15
Dépannage ......................................................................................................................................... 16
Spécifications ....................................................................................................................................17
4-FR
Page 23
Remarques sur l’utilisation de la Cyber-shot Station
Consultez le mode d’emploi de votre appareil photo, ainsi que ce manuel.
La Cyber-shot Station n’est pas étanche à la poussière, à l’humidité ou à l’eau.
Le modèle CSS-HD2 peut être utilisé avec les appareils photos numériques DSC-T300/T75/T70/T2/W300/
W170/W150/W130/W125/W120/W115/W110. Il est possible que tous les modèles ci-dessus ne soient pas
disponibles dans tous les pays ou toutes les régions.
A propos de la plaque de la station :
La Cyber-shot Station est fournie avec 5 plaques compatibles avec divers
appareils photo numériques (désignés ci-après par le terme « appareil
photo »). Pour plus d’informations, reportez-vous à la page 9.
Veillez à installer la plaque appropriée avec votre appareil photo avant de
l’utiliser. Si vous installez une plaque inappropriée, le périphérique I/O
pourrait être endommagé.
Les illustrations de ce manuel d’installation montrent le modèle DSC-T300
et la plaque correspondante.
Précautions d’utilisation et de rangement :
N’utilisez pas et ne rangez pas la Cyber-shot Station dans les endroits suivants. Dans le cas contraire, la
Cyber-shot Station risque de fonctionner de manière incorrecte.
Endroits soumis à des températures extrêmes
Les températures en plein soleil ou à l’intérieur d’une voiture fermée pendant l’été peuvent être très élevées
et risquent de déformer la Cyber-shot Station ou d’entraîner un problème de fonctionnement.
Endroits soumis à la lumière directe du soleil ou près de radiateurs
Cela risque de déformer la Cyber-shot Station ou d’entraîner un problème de fonctionnement.
Endroits soumis à des vibrations
Endroits soumis à des champs magnétiques puissants
Endroits soumis à des particules de poussière dans un lieu sableux ou sur une plage
Précautions d’utilisation :
Même si le témoin CHARGE n’est pas allumé, le chargeur de batterie n’est pas isolé du secteur tant qu’il
reste branché à la prise murale. En cas de problème lors de l’utilisation du chargeur de batterie, coupez
immédiatement l’alimentation en débranchant la fiche de la prise murale.
Branchez l’adaptateur secteur sur la prise murale la plus proche. En cas de problème lorsque vous utilisez
cet appareil, débranchez l’adaptateur secteur pour couper la source d’alimentation.
L’appareil n’est pas déconnecté de la source d’alimentation secteur tant qu’il est branché sur la prise murale,
même si l’appareil lui-même a été mis hors tension.
N’utilisez pas un adaptateur secteur situé dans un espace restreint, par exemple entre un mur et un meuble.
N’utilisez pas la Cyber-shot Station dans des endroits soumis à des ondes radio ou à des radiations
puissantes. Les images risquent de ne pas pouvoir être lues correctement.
Evitez tout contact entre des objets métalliques et les pièces de raccordement de la Cyber-shot Station et le
cordon d’alimentation. Cela pourrait entraîner un court-circuit.
Précautions concernant les données enregistrées :
Notez bien que Sony ne pourra être tenue responsable de toutes les données enregistrées comme les images
et les données audio si vous ne pouvez pas les enregistrer ou les lire en raison d’un dysfonctionnement de
l’appareil photo, du support d’enregistrement ou de la Cyber-shot Station.
5-FR
Page 24

Caractéristiques
Si vous placez un appareil photo sur la Cyber-shot Station, vous pouvez utiliser celle-ci de la manière suivante.
Vous pouvez visualiser les images de l’appareil photo en haute définition en raccordant la Cyber-shot
Station à un téléviseur haute définition. Les images peuvent être visionnées en définition standard sur un
téléviseur classique.
Vous pouvez facilement visualiser les images sur l’écran d’un téléviseur via la télécommande.
La télécommande permet d’effectuer les opérations suivantes :
Visualisation d’images
–
Diaporama
–
Zoom de lecture
–
–
Affichage des images sous forme d’index et commutation de l’affichage des images en mode « Dossier »,
« Vue par date » ou « Préférés » (sauf pour les modèles DSC-T75/T70/T2/W130/W125/W120/W115/
W110).
–
Affichage des images sous forme d’index et recherche d’image avec « Toutes personnes », « Enfants »,
« Sourires » ou « Nourrisson » (sauf pour les modèles DSC-T75/T70/T2/W130/W125/W120/W115/
W110).
La Cyber-shot Station vous permet de recharger la batterie de l’appareil photo plus rapidement qu’avec le
chargeur fourni avec l’appareil en installant simplement ce dernier dessus.
Marques commerciales
et « Cyber-shot Station » sont des marques commerciales de Sony Corporation.
En outre, les noms de système et de produits utilisés dans ce manuel sont généralement des marques
commerciales ou des marques déposées de leurs fabricants ou développeurs respectifs. Toutefois, les
symboles ou ne sont pas toujours utilisés dans ce manuel.
6-FR
Page 25
Identification des pièces
Cyber-shot Station
Périphérique I/O
Repère de mise
en place
Témoin POWER
Guide avant de l’appareil
Capuchon de protection
Retirez ce capuchon avant
toute utilisation.
Capteur de télécommande
Témoin CHARGE
Prise DC IN
Témoin HD OUTPUT
Prise AV OUT
Plaque de la station
Repère de mise en place B
Repère de mise en place A
La Cyber-shot Station est fournie avec 5 plaques. Veillez à fixer la plaque appropriée avant utilisation.
Pour plus d’informations, reportez-vous à la page 9.
Guide latéral de l’appareil
photo
7-FR
Page 26
Télécommande
Les fonctions de la télécommande varient en fonction de l’appareil photo utilisé.
Si vous utilisez un DSC-T75/T70/T2, la télécommande de la Cyber-shot Station fonctionne de la même
manière que la télécommande du modèle CSS-HD1, à l’exception des fonctions de la touche (Diaporama)
et des touches de commande.
Par ailleurs, certaines fonctions sont totalement inopérantes. Pour plus d’informations sur les fonctions des
touches de commande, reportez-vous au mode d’emploi fourni avec l’appareil photo.
Touche VIEWMODE
Touche FACE
Touche W ZOOM
*1
*1
*2
Touche (Diaporama)
Touche MENU
Touche HD/SD
*2
Touche V UP/
Touche V DOWN
Touche POWER (CAMERA)
Touche de zoom de lecture ( )
Touche de zoom de lecture ( )/
Index ( )
Touche HOME
Touches de commande
(//// )
*2
*2
*1 Ces fonctions ne sont pas prises en charge pour les modèles DSC-T75/T70/T2/W130/W125/W120/W115/
W110.
*2 Ces fonctions ne sont pas prises en charge pour les modèles DSC-T75/T70/T2.
8-FR
Page 27

Installation
Préparation de la Cyber-shot Station
1 Sélectionnez une plaque.
Les plaques ont un côté avant et un côté arrière.
Côté avant
Logo Sony
Côté arrière
Nom de la plaque
Sélectionnez la plaque appropriée à votre
appareil photo.
Nom du
modèle
DSC-T300 HD2-A Droite
DSC-W110
DSC-W115
DSC-W120
DSC-W125
DSC-W130
DSC-W150
DSC-W170
DSC-W300 HD2-D Gauche
DSC-T2
DSC-T75
Nom de la
plaque
HD2-B Gauche
HD2-C Gauche
HD2-E DroiteDSC-T70
Sens du
coulissement
2 Installez la plaque.
Tenez la plaque avec l’avant (le côté portant
le logo Sony) face à vous et placez-la sur le
périphérique I/O de la Cyber-shot Station
comme si vous la placiez sur le capuchon de
protection du périphérique I/O.
Utilisation d’une plaque coulissant vers la
droite (comme la HD2-A)
Utilisation d’une plaque coulissant vers la
gauche (comme la HD2-B)
Tenez la Cyber-shot Station d’une main.
Tenez le guide latéral de l’appareil photo de
la plaque de l’autre main et faites coulisser la
plaque sur toute sa longueur.
Reportez-vous au tableau de l’étape 1 pour
connaître le sens de coulissement.
Coulissement vers la droite
Coulissement vers la gauche
9-FR
Page 28

La plaque s’emboîte lorsqu’elle est coulissée
sur toute la longueur en position correcte.
Un déclic se fait entendre, indiquant que la
plaque est fixée correctement.
Si la plaque ne s’emboîte pas correctement,
poussez uniformément sur les côtés gauche/
droit.
Le repère de positionnement A de la plaque et
le repère de positionnement de la Cyber-shot
Station sont alignés.
Retirez le capuchon de protection du
périphérique I/O.
Avant de placer un appareil photo sur
la Cyber-shot Station, veillez à retirer le
capuchon de protection.
Retrait de la plaque
Tenez la Cyber-shot Station d’une main. Tenez le
guide latéral de l’appareil photo de la plaque de
l’autre main et tirez la plaque vers le haut.
Cyber-shot Station
Fiche CC
Adaptateur secteur
Vers une
prise murale
Cordon
d’alimentation
secteur
Pour utiliser votre Cyber-shot Station à
l’étranger – Sources d’alimentation
Vous pouvez utiliser la Cyber-shot Station et
l’adaptateur secteur (fourni) dans n’importe quel
pays ou région où la tension d’alimentation est
comprise entre 100 V et 240 V CA, 50/60 Hz.
N’utilisez pas de transformateur
électronique (convertisseur de voyage), car
cela risquerait d’entraîner un problème de
fonctionnement.
Préparation de la télécommande
Remarques sur la télécommande
La télécommande est alimentée par une pile
bouton au lithium (CR2025) mise en place
en usine. Une feuille isolante est insérée pour
protéger la pile. Avant d’utiliser la télécommande
pour la première fois, retirez la feuille isolante.
3 Raccordez l’adaptateur secteur fourni à la
prise DC IN de la Cyber-shot Station.
Le témoin POWER de la Cyber-shot Station
s’allume.
10-FR
Feuille isolante
Eloignez le capteur de télécommande de la
Cyber-shot Station de fortes sources lumineuses
telles que la lumière directe du soleil ou un
plafonnier. Sinon, la télécommande pourrait ne
pas fonctionner correctement.
La télécommande fonctionne dans un rayon
inférieur à cinq mètres (lorsqu’elle est utilisée
en intérieur). Dirigez la télécommande vers
le capteur de télécommande de la Cyber-shot
Station. Si la Cyber-shot Station ne répond pas,
ajustez l’angle de la télécommande.
Page 29

Mise en place de l’appareil
photo sur la Cyber-shot
Station
Retirez la bague adaptatrice, le convertisseur,
etc. de l’appareil photo.
Fixez l’appareil photo comme illustré cidessous.
Mettez l’appareil photo hors tension avant de le
placer sur la Cyber-shot Station.
Lorsque vous fixez l’appareil photo, veillez à
l’insérer bien droit.
Conseils
Vérifiez que l’appareil photo est correctement fixé
à la Cyber-shot Station.
Retrait de l’appareil photo
de la Cyber-shot Station
Maintenez la Cyber-shot Station lorsque vous
retirez l’appareil photo de la Cyber-shot Station.
Remarques
Lorsque vous retirez l’appareil photo, soulevez-
le en le tenant bien droit. Vous risquez
d’endommager l’appareil photo ou la Cyber-shot
Station si vous forcez vers l’avant ou les côtés.
Recharge de la batterie
Placez l’appareil photo avec la batterie insérée
sur la Cyber-shot Station.
La charge commence automatiquement. Le témoin
CHARGE de la Cyber-shot Station s’allume.
Lorsque l’appareil photo est allumé, la Cyber-shot
Station ne peut recharger la batterie.
Lorsque la charge atteint le niveau de recharge
normale*, le témoin CHARGE s’éteint.
La durée d’enregistrement ou de lecture en
*
recharge normale correspond à environ 90 % de
la durée en recharge complète.
Le tableau suivant indique le temps de recharge
complète pour une batterie complètement
déchargée, à une température de 25 °C (77 °F).
DSC-T300/T75/T70/T2 environ
DSCW300/W170/W150//W130/
W125/W120/W115/W110
La charge peut prendre plus de temps, selon les
–
conditions et l’environnement de charge.
160 minutes
environ
230 minutes
11-FR
Page 30

Remarques
Après avoir fixé l’appareil photo sur la Cyber-shot
Station, il est possible que le témoin CHARGE
clignote lentement pendant 3 à 10 secondes. Cela
indique une communication entre l’appareil photo
et la Cyber-shot Station et ne constitue an aucun
cas un problème de fonctionnement.
Si le témoin CHARGE ne s’allume pas ou s’il
clignote pendant plus de 10 secondes, reportezvous à la section « Dépannage ».
Température de charge
La plage des températures de charge est comprise
entre 0 °C et 40 °C (32 °F et 104 °F). Toutefois,
pour offrir un maximum d’efficacité, la plage de
températures de charge recommandée pendant
la charge est comprise entre 10 °C et 30 °C (50 °F
et 86 °F).
Durée de service de la batterie
La durée de service de la batterie est limitée. La
capacité de la batterie diminue progressivement
à l’usage et avec le temps. Si l’autonomie
de la batterie après la recharge diminue
considérablement, il est probable que la batterie
ait atteint la fin de sa durée de service. Dans ce
cas, achetez une batterie neuve.
La durée de service de la batterie varie en fonction
des conditions de stockage, d’utilisation et des
conditions ambiantes.
Visualisation d’images sur
un écran de téléviseur
Vous pouvez lire des images en raccordant la
Cyber-shot Station à un téléviseur à l’aide du câble
de raccordement audio et vidéo (fourni) ou du câble
audio et vidéo composante (fourni).
Reportez-vous au mode d’emploi fourni avec votre
téléviseur concernant le raccordement.
1 Visualisation d’images sur un téléviseur
haute définition
Raccordez la prise A/V OUT de la Cyber-shot
Station et les prises audio et vidéo composante
du téléviseur.
Rouge
Blanc
Vert
Bleu
Câble audio et vidéo composante
Visualisation d’images sur un téléviseur
autre qu’un téléviseur haute définition
Raccordez la prise A/V OUT de la Cyber-shot
Station et les prises d’entrée audio et vidéo du
téléviseur.
Câble de raccordement
audio et vidéo
Mettez le téléviseur hors tension avant
de raccorder la Cyber-shot Station et le
téléviseur au moyen du câble audio et vidéo
composante.
Le format de signal émis via la prise A/V
OUT dépend du réglage de l’appareil photo.
Le téléviseur doit être compatible avec le
format 1080i pour permettre la visualisation
des images au format 1080i.
Le son émis par la Cyber-shot Station via la
prise A/V OUT est monaural.
La Cyber-shot Station n’est pas compatible
avec les câbles de raccordement S-VIDEO.
Rouge
Rouge
Blanc
Jaune
Audio
Y
Pb/Cb
Pr/Cr
Audio
Video
2 Mettez l’appareil photo sous tension en
appuyant sur sa touche (lecture) ou sur
la touche POWER de la télécommande.
12-FR
Page 31

Conseils
Il est possible que les touches de l’appareil
photo ou de la télécommande ne fonctionnent
pas immédiatement après avoir fixé l’appareil
photo sur la Cyber-shot Station. Cela se
produit lorsque l’appareil photo commence
à être rechargé et ne constitue en aucun cas
un dysfonctionnement. Attendez environ
10 secondes.
3 Mettez le téléviseur sous tension et réglez
le commutateur d’entrée sur l’entrée
raccordée à l’étape 1.
4 Appuyez sur / sur les touches de
commande de la télécommande pour
sélectionner l’image.
Vous pouvez également sélectionner l’image en
appuyant sur / sur les touches de commande
de l’appareil photo.
La Cyber-shot Station est compatible avec les
standards de télévision NTSC et PAL. Pour plus
d’informations, reportez-vous au mode d’emploi
fourni avec l’appareil photo.
Fonctions de la
télécommande
Les fonctions de la télécommande varient en
fonction de l’appareil photo utilisé.
Pour plus d’informations, reportez-vous au mode
d’emploi fourni avec l’appareil photo.
Diaporama
Vous pouvez lire une série d’images fixes
enregistrées avec votre appareil photo en appuyant
simplement sur la touche (Diaporama) de la
télécommande.
1 Mettez l’appareil photo sous tension en
appuyant sur la touche (lecture) ou sur
la touche POWER de la télécommande.
2 Appuyez sur la touche (Diaporama) de la
télécommande.
L’écran des réglages du diaporama apparaît.
Il est possible que l’écran des réglages du
diaporama ne s’affiche pas sur certains
modèles même si vous appuyez sur la touche
(Diaporama). Le diaporama démarrera
alors dans les conditions prédéfinies. Pour
plus d’informations sur la méthode de réglage,
reportez-vous au mode d’emploi fourni avec
l’appareil photo.
3 Utilisez les touches de commande de la
télécommande pour changer les réglages
du diaporama.
4 Utilisez les touches de commande de la
télécommande pour sélectionner [OK],
puis appuyez au centre de la touche ou
appuyez sur la touche (Diaporama) de la
télécommande.
13-FR
Page 32

Pour annuler le diaporama
Appuyez à nouveau sur la touche (Diaporama)
de la télécommande.
Pour plus d’informations, reportez-vous au mode
d’emploi fourni avec l’appareil photo.
Commutation du mode de
visualisation
Vous pouvez également modifier l’affichage de
l’index en appuyant sur la touche VIEW MODE de
la télécommande.
Sauf pour les modèles DSC-T75/T70/T2/W130/
W125/W120/W115/W110.
1 Mettez l’appareil photo sous tension en
appuyant sur la touche (lecture) ou sur
la touche POWER de la télécommande.
2 Appuyez sur la touche VIEW MODE de la
télécommande.
L’écran du mode de visualisation apparaît.
3 Utilisez les touches de commande de la
télécommande pour sélectionner le mode
de visualisation souhaité, puis appuyez au
centre de la touche .
Les images sont affichées en mode d’index à
l’aide du mode de visualisation que vous avez
sélectionné.
Lorsque vous appuyez sur la touche V UP et sur
la touche V DOWN de la télécommande, vous
pouvez exécuter les fonctions suivantes dans
chaque mode de visualisation:
–
Mode Vue par date :
Pour afficher la date précédente et la date
suivante.
–
Mode Dossier :
Pour afficher le dossier précédent et le dossier
suivant.
–
Mode Préférés :
Pour afficher la page précédente et la page
suivante.
Filtrer par visages
Vous pouvez rechercher des images enregistrées
avec différents visages en appuyant sur la touche
FACE de la télécommande.
Sauf pour les modèles DSC-T75/T70/T2/W130/
W125/W120/W115/W110.
1 Mettez l’appareil photo sous tension en
appuyant sur la touche (lecture) ou sur
la touche POWER de la télécommande.
14-FR
2 Appuyez sur la touche FACE de la
télécommande.
Le menu de recherche des images apparaît.
3 Utilisez les touches de commande de
la télécommande pour sélectionner les
conditions de recherche souhaitées, puis
appuyez au centre de la touche .
Les images sont affichées en mode d’index selon
les conditions de recherche.
Pour plus d’informations, reportez-vous au mode
d’emploi fourni avec l’appareil photo.
Commutation entre HD et SD
Vous pouvez commuter l’affichage du téléviseur
entre la vidéo haute définition (HD) et la vidéo
autre que haute définition (SD) en appuyant sur la
touche HD/SD de la télécommande.
Sauf pour le modèle DSC-T75/T70/T2.
1 Mettez l’appareil photo sous tension en
appuyant sur la touche (lecture) de
l’appareil photo ou sur la touche POWER de
la télécommande.
2 Appuyez sur la touche HD/SD de la
télécommande.
Chaque fois que vous appuyez sur la touche
HD/SD, le réglage change alternativement entre
HD et SD.
Le témoin HD-OUTPUT (bleu) de la Cyber-shot
Station s’allume pendant que la vidéo HD est
visualisée sur un téléviseur.
Pour plus d’informations, reportez-vous au mode
d’emploi fourni avec l’appareil photo.
Affichage grd zoom
Vous pouvez afficher une image fixe avec un
angle de vue de 4:3 ou 3:2 pour les images16:9
en appuyant sur la touche W ZOOM de la
télécommande, qui est identique à la fonction
Grand zoom de l’appareil photo.
La fonction Grand zoom est inopérante pour le
DSC-T75/T70 lorsque vous appuyez sur la touche
de la télécommande.
Sauf pour le modèle DSC-T2.
1 Mettez l’appareil photo sous tension en
appuyant sur la touche (lecture) ou sur
la touche POWER de la télécommande.
2 Appuyez sur la touche W ZOOM de la
télécommande.
Chaque fois que vous appuyez sur la touche W
ZOOM, le réglage change alternativement entre
Grand zoom et Normal.
Page 33

Le mode Grand zoom est annulé lorsque vous
mettez l’appareil photo hors tension ou lorsque le
mode de prise de vue est changé.
Certaines fonctions de la télécommande sont
indisponibles lorsque vous utilisez la fonction
Grand zoom.
Pour plus d’informations, reportez-vous au mode
d’emploi fourni avec l’appareil photo.
Entretien et maintenance
Nettoyez la Cyber-shot Station avec un chiffon doux
légèrement humidifié, puis essuyez sa surface avec
de l’eau ou de l’eau tiède et essuyez la surface avec
un chiffon sec. N’utilisez pas de solvant, tel que du
diluant, de l’alcool ou de l’essence, qui risquerait
d’abîmer la surface de l’appareil.
Changement de la pile de la
télécommande
AVERTISSEMENT
La pile peut exploser si elle est manipulée de
façon inappropriée. Ne rechargez pas la pile, ne la
démontez pas et ne la jetez pas au feu.
Lorsque la pile au lithium devient faible, le rayon
de fonctionnement de la télécommande peut être
réduit ou cette dernière peut ne pas fonctionner
correctement. Dans ce cas, remplacez la pile
par une pile au lithium Sony de type CR2025.
L’utilisation d’une pile d’un type différent peut
entraîner des risques d’incendie ou d’explosion.
ATTENTION
Remplacez la pile par le type de pile spécifié
uniquement. L’utilisation de tout autre type de
pile présente des risques d’incendie et de blessure.
Remplacement de la pile bouton au
lithium
N’utilisez pas de pile autre qu’une pile CR2025.
*
Retirez le support de la pile tout en appuyant
sur sa languette.
Placez une pile neuve dans le support, pôle +
vers le haut.
Insérez le support dans la télécommande
jusqu’à ce qu’il s’encliquette.
Onglet
15-FR
Page 34

Dépannage
Si un problème survient avec vos produits, reportez-vous aux solutions suivantes.
Si le problème persiste, contactez votre revendeur Sony.
Symptôme Cause/Solution
Impossible de recharger la batterie ou le
témoin CHARGE ne s’allume pas.
Le témoin CHARGE clignote
rapidement ou normalement pendant
plus de 10 secondes.
Impossible de mettre sous tension
l’appareil photo ou il s’éteint de manière
inattendue.
Impossible de lire les images sur un
téléviseur.
Les touches de la télécommande ne
fonctionnent pas et il est impossible
d’exécuter une opération.
Il est impossible d’installer l’appareil
photo sur la Cyber-shot Station ou
l’appareil photo est instable.
L’appareil photo est sous tension.
Mettez-le hors tension.
L’adaptateur secteur est débranché.
Raccordez l’adaptateur secteur correctement.
L’appareil photo n’est pas installé correctement sur la Cyber-
shot Station.
Installez l’appareil photo correctement.
La batterie n’est pas installée correctement.
Installez la batterie correctement.
La batterie est complètement chargée.
La batterie rechargeable installée dans l’appareil photo est
inutilisable.
Utilisez une batterie compatible avec votre appareil photo.
La batterie rechargeable installée dans l’appareil photo est
inutilisable.
Utilisez une batterie compatible avec votre appareil photo.
Le raccordement n’est pas correct. L’appareil photo n’est pas
placé correctement sur la Cyber-shot Station.
Retirez l’appareil photo de la Cyber-shot Station et
rebranchez l’adaptateur secteur. Lorsque le témoin
CHARGE est éteint, placez l’appareil photo sur la Cybershot Station.
L’appareil photo n’est pas installé correctement sur la Cyber-
shot Station.
Installez l’appareil photo correctement.
L’adaptateur secteur est débranché.
Raccordez l’adaptateur secteur correctement.
Le réglage de la sortie HD n’est pas correct.
Reportez-vous au mode d’emploi fourni avec l’appareil
photo et réglez correctement la sortie HD.
Le câble audio et vidéo composante ou le câble de
raccordement audio et vidéo de la Cyber-shot Station n’est pas
correctement raccordé au téléviseur.
Raccordez le câble correctement ou modifiez le réglage.
L’appareil photo n’est pas placé correctement sur la Cyber-shot
Station.
Installez l’appareil photo correctement.
L’adaptateur secteur est débranché.
Raccordez l’adaptateur secteur correctement.
La pile de la télécommande est épuisée.
Remplacez la pile par une nouvelle pile.
La plaque de la station n’est pas fixée correctement.
Vérifiez que la plaque est compatible avec votre appareil et
fixez-la correctement.
16-FR
Page 35

Spécifications
Cyber-shot Station
Connecteurs d’entrée/de sortie
Prise A/V OUT :
Prise DC IN
Périphérique I/O
Généralités
Dimensions (environ) :
Poids (environ) :
Température de fonctionnement :
Température de stockage :
Adaptateur secteur
Tension d’entrée : 100 V à 240 V CA, 50/60 Hz,
Tension de sortie :
Dimensions (environ) :
Poids (environ) :
Température de fonctionnement :
Température de stockage :
Connecteur de sortie
composante, vidéo et audio
124 × 48 × 78 mm
(5 × 1 15/16 × 3 1/8 po.) (l/h/p)
110 g (3,9 onces)
(y compris une plaque de la
station)
0 °C à 40 °C
(32 °F à 104 °F)
– 20 °C à + 60 °C
(–4 °F à +140 °F)
11 W
4,2 V CC
Pour d’autres spécifications,
reportez-vous à l’étiquette
figurant sur l’adaptateur secteur.
48 × 29 × 81 mm
(1 15/16 × 1 3/16 × 3 1/4 po.)
(l/h/p, parties saillantes non
comprises)
130 g (5 onces)
(sans le cordon d’alimentation
secteur)
0 °C à 40 °C
(32 °F à 104 °F)
– 20 °C à + 60 °C
(–4 °F à +140 °F)
Articles inclus
Cyber-shot Station (CSS-HD2) (1)
Télécommande sans fil (RMT-CSS6)
(Pile bouton au lithium déjà installée) (1)
Plaque de la station (5)
Câble de raccordement audio/vidéo (1)
Câble audio/vidéo composante (1)
Adaptateur secteur (AC-LS5) (1)
Cordon d’alimentation (1)
Capuchon de protection (1)
Jeu de documents imprimés
La conception et les spécifications peuvent être
modifiées sans préavis.
17-FR
Page 36

Español
Antes de utilizar la unidad, lea detenidamente este manual de instrucciones, y consérvelo para futuras
referencias.
Nombre del producto: Cyber-shot Station
Modelo: CSS-HD2
POR FAVOR LEA DETALLADAMENTE ESTE MANUAL DE INSTRUCCIONES ANTES DE
CONECTAR Y OPERAR ESTE EQUIPO.
RECUERDE QUE UN MAL USO DE SU APARATO PODRÍA ANULAR LA GARANTÍA.
AVISO
Para reducir el riesgo de incendio o descarga eléctrica, no exponga la
unidad a la Iluvia ni a la humedad.
Atención para los clientes en Europa
Este producto se ha probado y cumple con la normativa que establece la Directiva EMC si se utiliza un cable
de conexión de menos de 3 metros de longitud.
Atención
Los campos electromagnéticos a frecuencias específicas podrán influir en la imagen y el sonido de esta
unidad.
Aviso para los clientes de países en los que se aplican las directivas
de la UE
El fabricante de este producto es Sony Corporation, 1-7-1 Konan Minato-ku Tokyo, 108- 0075, Japón.
El representante autorizado en lo referente al cumplimiento de la directiva EMC y a la seguridad de los
productos es Sony Deutschland GmbH, Hedelfinger Strasse 61, 70327 Stuttgart, Alemania. Para resolver
cualquier asunto relacionado con el soporte técnico o la garantía, consulte las direcciones que se indican en
los documentos de soporte técnico y garantía suministrados por separado.
Tratamiento de los equipos eléctricos y electrónicos al final de su
vida útil (aplicable en la Unión Europea y en países europeos con
sistemas de recogida selectiva de residuos)
Este símbolo en el equipo o el embalaje indica que el presente producto no puede
ser tratado como residuos domésticos normales, sino que debe entregarse en
el correspondiente punto de recogida de equipos eléctricos y electrónicos. Al
asegurarse de que este producto se desecha correctamente, Ud. ayuda a prevenir
las consecuencias negativas para el medio ambiente y la salud humana que podrían
derivarse de la incorrecta manipulación en el momento de deshacerse de este
producto. El reciclaje de materiales ayuda a conservar los recursos naturales. Para
recibir información detallada sobre el reciclaje de este producto, póngase en contacto
con el ayuntamiento, el punto de recogida más cercano o el establecimiento donde ha
adquirido el producto.
2-ES
Page 37

Tratamiento de las baterías al final de su vida útil (aplicable en
la Unión Europea y en países europeos con sistemas de recogida
selectiva de residuos)
Este símbolo en la batería o en el embalaje indica que la batería proporcionada con este
producto no puede ser tratada como un residuo doméstico normal. Al asegurarse de
que estas baterías se desechan correctamente, Ud. ayuda a prevenir las consecuencias
negativas para el medio ambiente y la salud humana que podrían derivarse de la incorrecta
manipulación en el momento de deshacerse de la batería. El reciclaje de materiales ayuda a
conservar los recursos naturales.
En el caso de productos que por razones de seguridad, rendimiento o mantenimiento de
datos, sea necesaria una conexión permanente con la batería incorporada, esta batería solo
deberá de ser reemplazada por personal técnico cualificado para ello.
Para asegurarse de que la batería será tratada correctamente, entregar el producto al
final de su vida útil en un punto de recogida para el reciclado de aparatos eléctricos y
electrónicos. Para las demás baterías, ver la sección donde se indica como quitar la batería
del producto de forma segura. Depositar la batería en el correspondiente punto de recogida
para el reciclado de las mismas Para recibir información detallada sobre el reciclaje de este
producto o de la batería, póngase en contacto con el ayuntamiento, el punto de recogida
más cercano o el establecimiento donde ha adquirido el producto.
3-ES
Page 38

Índice
Notas sobre la utilización de la Cyber-shot Station .......................................................................5
Características ..................................................................................................................................... 6
Marcas comerciales ............................................................................................................................ 6
Identificación de los componentes ...................................................................................................7
Configuración ..................................................................................................................................... 9
Colocación de la cámara en la Cyber-shot Station .....................................................................11
Extracción de la cámara de la Cyber-shot Station ......................................................................11
Carga de la batería ...........................................................................................................................11
Visualización de imágenes en la pantalla del televisor ...............................................................12
Funciones del mando a distancia ................................................................................................... 13
Cuidado y mantenimiento ..............................................................................................................15
Sustitución de la pila del mando a distancia .................................................................................15
Solución de problemas ..................................................................................................................... 16
Especificaciones ................................................................................................................................ 17
4-ES
Page 39

Notas sobre la utilización de la Cyber-shot Station
Consulte el manual de instrucciones de la cámara, así como este manual.
La Cyber-shot Station no es un producto resistente al polvo, a la humedad ni al agua.
El modelo CSS-HD2 puede utilizarse con las cámaras digitales de imágenes fijas DSC-T300/T75/T70/T2/
W300/W170/W150/W130/W125/W120/W115/W110. No todos los modelos anteriores están disponibles en
todos los países y regiones.
Acerca de las placas de estación
La Cyber-shot Station se suministra con 5 placas de estación compatibles
con distintas cámaras digitales (a partir de ahora “cámara”). Consulte la
página 9 para obtener más detalles.
Antes de utilizar la cámara, asegúrese de colocar la placa de estación
adecuada compatible. Si coloca la placa de estación incorrecta, es posible
que se dañe la unidad de E/S.
La ilustración en este manual muestra la combinación de DSC-T300 y la
placa de estación para DSC-T300.
Precauciones sobre los lugares de empleo y almacenamiento:
No utilice ni guarde la Cyber-shot Station en lugares sujetos a las siguientes condiciones. De lo contrario, la
Cyber-shot podría presentar fallos de funcionamiento.
Lugares sujetos a temperaturas excesivamente altas
Las temperaturas bajo la luz solar directa o en automóviles cerrados durante el verano pueden ser muy
altas, lo cual puede provocar deformaciones o fallos de funcionamiento en la Cyber-shot Station.
Lugares sujetos a la luz solar directa o cerca de aparatos de calefacción
Esto puede provocar deformaciones o fallos de funcionamiento en la Cyber-shot Station.
Lugares sujetos a vibraciones
Lugares sujetos a fuertes magnetismos
Lugares expuestos a partículas de polvo en ubicaciones con arena o en la playa
Precauciones de uso:
Aunque la lámpara CHARGE no esté encendida, el cargador de batería no estará desconectado de la
fuente de alimentación de ca en tanto que el mismo esté conectado a la toma de corriente de la pared. Si
ocurre algún problema mientras utiliza el cargador de batería, interrumpa inmediatamente la alimentación
desconectando la clavija de la toma de corriente de la pared.
Utilice la toma de pared más cercana para enchufar el adaptador de alimentación de ca. Si se produce algún
fallo de funcionamiento del producto, desenchufe el adaptador de alimentación de ca para interrumpir la
fuente de alimentación.
El conjunto no se desconectará de la fuente de alimentación de ca (red principal) mientras esté conectado a
la toma de pared, aunque el propio equipo se haya desconectado.
No utilice el adaptador de ca en un lugar estrecho (por ejemplo, entre la pared y un mueble).
No utilice la Cyber-shot Station en lugares sujetos a fuertes radiaciones u ondas de radio. Es probable que
las imágenes no se reproduzcan correctamente.
Evite que otros objetos metálicos entren en contacto con los componentes de conexión de la Cyber-shot
Station y con el cable de alimentación, ya que de lo contrario es posible que se produzca un cortocircuito.
Precauciones sobre los datos grabados:
Tenga en cuenta que Sony no será responsable de los datos grabados como, por ejemplo datos de imagen
y de audio, que no se puedan grabar o reproducir debido a un fallo de funcionamiento de la cámara, el
soporte de grabación o la Cyber-shot Station.
5-ES
Page 40

Características
Al colocar la cámara en la Cyber-shot Station, podrá utilizar esta última del modo que se indica a
continuación.
Puede ver las imágenes de la cámara en alta definición al conectar la Cyber-shot Station a un televisor de
alta definición. Es posible visualizar imágenes en definición estándar en un televisor normal.
Puede ver fácilmente imágenes en una pantalla de televisor mediante el mando a distancia inalámbrico.
Mediante el mando a distancia puede controlar las siguientes operaciones:
Visualización de imágenes
–
Slide Show (Presentación de diapositivas)
–
Zoom en la reproducción
–
Visualización de las imágenes del índice de imágenes y cambio del modo de visualización de las imágenes
–
a “Carpeta”, “Ver datos” o “Favoritos” (excepto para los modelos DSC-T75/T70/T2/W130/W125/W120/
W115/W110).
Visualización de las imágenes del índice de imágenes y búsqueda de la imagen por “Toda la gente”,
–
“Niños”, “Sonrisas” o “Bebés” (excepto para los modelos DSC-T75/T70/T2/W130/W125/W120/W115/
W110).
Mediante la Cyber-shot Station es posible cargar la batería mientras está en la cámara más rápido que
mediante el cargador de batería cuando coloca la cámara en él.
Marcas comerciales
y “Cyber-shot Station” son marcas comerciales de Sony Corporation.
Además, los nombres de sistemas y productos utilizados en este manual son, en general, marcas comerciales
o marcas registradas de sus respectivos desarrolladores o fabricantes. Sin embargo, las marcas
utilizan en cada caso en este manual.
o no se
6-ES
Page 41

Identificación de los componentes
Estación Cyber-shot
Unidad de E/S
Guía frontal de la cámara
Marcador de posición
Indicador luminoso
POWER
Indicador luminoso CHARGE
Toma de entrada de cc
Placa de estación
Marcador de posición B
Marcador de posición A
Cubierta de protección
Extraiga esta cubierta antes
de usar la unidad.
Sensor de mando a
distancia
Indicador luminoso HD
OUTPUT
Toma AV OUT
Guía lateral de la cámara
La Cyber-shot Station se suministra con 5 placas de estación. Asegúrese de instalar la placa correcta antes
de utilizar la unidad.
Consulte la página 9 para obtener más detalles.
7-ES
Page 42

Mando a distancia
Las funciones del mando a distancia varían en función de la cámara que se utilice.
Si utiliza los modelos DSC-T75/T70/T2, el mando a distancia de la Cyber-shot Station funciona del mismo
modo que el mando a distancia del modelo CSS-HD1, excepto las funciones del botón (diapositivas) y los
botones de control.
Asimismo, algunos botones no funcionan. Si desea obtener más información acerca de las funciones de los
botones de control, consulte el manual de instrucciones suministrado con la cámara.
Botón V UP/
Botón V DOWN
Botón VIEW MODE
Botón FACE
Botón W ZOOM
Botón (Diapositivas)
Botón MENU
Botón HD/SD
*1
*1
*2
Botón POWER (CÁMARA)
Botón de zoom de
reproducción ( )
Botón de zoom de
reproducción ( )/
índice ( )
Botón HOME
Botones de control
*2
(//// )
*1 Estas funciones no se admiten en los modelos DSC-T75/T70/T2/W130/W125/W120/W115/W110.
*2 Estas funciones no se admiten en los modelos DSC-T75/T70/T2.
*2
*2
8-ES
Page 43

Configuración
Preparación de la Cyber-shot Station
1 Seleccione una placa de estación.
Las placas de estación tienen una parte frontal y
una parte inferior.
Parte frontal
Logotipo de Sony
Parte inferior
Nombre de la placa
Seleccione la placa de estación que corresponde
a la cámara.
Modelo Nombre de
DSC-T300 HD2-A Parte derecha
DSC-W110
DSC-W115
DSC-W120
DSC-W125
DSC-W130
DSC-W150
DSC-W170
DSC-W300 HD2-D Parte izquierda
DSC-T2
DSC-T75
la placa
HD2-B Parte izquierda
HD2-C Parte izquierda
HD2-E Parte derechaDSC-T70
Dirección de
deslizamiento
2 Conecte la placa de estación.
Sostenga la placa de estación con la parte
frontal (el lado con el logotipo de Sony)
orientada hacia usted, colóquela en la unidad
de E/S de la Cyber-shot como si la colocara
sobre la cubierta de protección conectada a la
unidad de E/S.
Uso de una placa de estación que desliza
hacia la derecha (por ejemplo, HD2-A)
Uso de una placa de estación que desliza
hacia la izquierda (por ejemplo, HD2-B)
Sostenga la Cyber-shot Station con una mano.
Con la otra mano, sostenga la guía lateral de
la cámara de la placa de estación y deslice esta
última hasta que encaje en su lugar.
Consulte la tabla del paso 1 para ver el sentido
del deslizamiento.
Deslizamiento hacia la derecha
Deslizamiento hacia la izquierda
9-ES
Page 44

La placa de estación encajará completamente
en su lugar cuando se deslice por completo en
la posición correcta. Cuando la placa quede
fijada correctamente, oirá un clic de encastre.
Si la placa de estación no encaja
correctamente, presione hacia abajo
uniformemente por los lados izquierdo y
derecho.
El marcador de posición A de la placa de
estación y el marcador de posición de la
Cyber-shot Station estarán alineados.
Extraiga la cubierta de protección de la
unidad de E/S.
Antes de colocar la cámara en la Cyber-shot
Station, asegúrese de extraer la cubierta de
protección.
Extracción de la placa de estación
Sostenga la Cyber-shot Station con una mano. Con
la otra mano, sostenga la guía lateral de la cámara
de la placa de estación y tire de esta última hacia
arriba.
Cyber-shot Station
Clavija de cc
Adaptador de
alimentación de ca
A la toma de
pared
Cable de
alimentación
de ca
Uso de la Cyber-shot Station en el extranjero
– Fuentes de alimentación
Es posible utilizar la Cyber-shot Station y el
adaptador de alimentación de ca (suministrado)
en cualquier país o región donde la fuente de
alimentación se encuentre en el rango de ca de
100 V a 240 V, 50/60 Hz
No utilice un transformador electrónico
(convertidor de viaje), ya que podrían
producirse fallos de funcionamiento.
Preparación del mando a distancia
Notas acerca del mando a distancia
El mando a distancia funciona con una pila de
litio tipo botón (CR2025) instalada en fábrica.
Para evitar posibles fugas de la pila, se inserta una
lámina de aislamiento. Antes de utilizar el mando
a distancia por primera vez, extraiga la lámina de
aislamiento.
3 Conecte el adaptador de alimentación de ca
suministrado a la toma de entrada de cc de
la Cyber-shot Station.
Se iluminará el indicador POWER de la Cybershot Station.
10-ES
Lámina de
aislamiento
Mantenga el sensor remoto de la Cyber-shot
Station alejado de fuentes de iluminación intensa,
tal como la luz solar directa o luces de techo. De
lo contrario, es posible que el mando a distancia
no funcione correctamente.
El alcance del mando a distancia es inferior a
cinco metros (para uso en espacios cerrados).
Apunte el mando a distancia hacia el sensor
remoto de la Cyber-shot Station. Intente ajustar el
ángulo del mando a distancia si no puede utilizar
la Cyber-shot Station.
Page 45

Colocación de la cámara en
la Cyber-shot Station
Extraiga el anillo adaptador, el objetivo de
conversión y otros elementos de la cámara.
Coloque la cámara del modo indicado en la
siguiente ilustración.
Asegúrese de apagar la cámara antes de colocarla
en la Cyber-shot Station.
Al conectar la cámara, asegúrese de insertarla en
línea recta.
Sugerencias
Asegúrese de que la cámara queda colocada
firmemente en la Cyber-shot Station.
Extracción de la cámara de
la Cyber-shot Station
Sujete la Cyber-shot Station cuando extraiga la
cámara.
Notas
Al extraer la cámara, asegúrese de levantarla en
línea recta. Es posible dañar la cámara o la Cybershot Station si se ejerce alguna fuerza adicional en
la parte frontal o en los laterales.
Carga de la batería
Coloque la cámara con la batería insertada en
la Cyber-shot Station.
La carga se inicia automáticamente. El indicador
luminoso CHARGE de la Cyber-shot Station se
iluminará.
Al encender la cámara, la Cyber-shot Station no
puede cargar la batería.
Una vez completada la Carga normal*, el
indicador luminoso CHARGE se apaga.
El tiempo de grabación y reproducción
*
con la opción Carga normal corresponde
aproximadamente al 90% del tiempo de Carga
completa.
Consulte la siguiente tabla para ver el tiempo de
carga total cuando la batería se ha agotado por
completo a una temperatura de 25 °C.
DSC-T300/T75/T70/T2 Aprox.
DSCW300/W170/W150//W130/
W125/W120/W115/W110
Es posible que el tiempo de carga aumente
–
en función de las condiciones de carga y del
entorno.
160 minuto
Aprox.
230 minuto
11-ES
Page 46

Notas
Una vez colocada la cámara en la Cyber-shot
Station, es posible que el indicador luminoso
CHARGE parpadee lentamente de 3 a 10 segundo.
Esto indica que se realiza correctamente la
conexión entre la cámara y la Cyber-shot Station y
no indica ningún fallo de funcionamiento.
Si el indicador luminoso CHARGE no se enciende
o parpadea durante más de 10 segundo, consulte
el apartado “Solución de problemas”.
Temperatura de carga
El rango de temperatura de carga es de 0 ºC a
40 ºC Sin embargo, para conseguir el máximo
rendimiento de la batería, el rango de temperatura
de carga recomendado es de 10 ºC a 30 °C
Duración de la batería
La vida útil de la batería es limitada. La carga de
batería disminuye gradualmente con el uso y con
el paso del tiempo. Si el tiempo disponible de la
batería se reduce considerablemente, una de las
causas probables es que se haya acabado su vida
útil. Adquiera una batería nueva.
La duración de la batería dependerá de cómo se
guarde, de las condiciones de funcionamiento
y de las condiciones ambientales en las que se
utilice.
Visualización de imágenes
en la pantalla del televisor
Puede reproducir imágenes si conecta la Cybershot Station al televisor con el cable de conexión
de audio/vídeo (suministrado) o el cable de
componente de audio/vídeo (suministrado).
Para obtener más información acerca de la
conexión, consulte el manual de instrucciones
suministrado con el televisor.
1 Visualización de imágenes en un televisor
de alta definición
Conecte la toma A/V OUT de la Cyber-shot
Station y a las tomas de componente de audio/
vídeo del televisor.
Rojo
Blanco
Verde
Azul
Rojo
Cable de componente de
Visualización de imágenes en un televisor
que no sea de alta definición
Conecte la toma A/V OUT de la Cyber-shot
Station a las tomas de entrada de audio/vídeo
del televisor.
Apague el televisor antes de conectar la
Cyber-shot Station y el televisor con el cable
de componente de audio/vídeo.
El formato de la señal que va a enviarse desde
la toma A/V OUT depende del ajuste de la
cámara.
Para ver imágenes en formato 1080i, es
necesario que el televisor sea compatible con
dicho formato.
El audio que se emite de la Cyber-shot Station
a través de la toma A/V OUT es monoaural.
La Cyber-shot Station no es compatible con el
cable de conexión S-VIDEO.
audio/vídeo
Rojo
Blanco
Amarillo
Cable de conexión de A/V
Audio
Y
Pb/Cb
Pr/Cr
Audio
Vídeo
2 Active la alimentación pulsando el botón
(reproducción) de la cámara o el botón
POWER del mando a distancia.
12-ES
Page 47

Sugerencias
Es posible que los botones de la cámara
y del mando a distancia no funcionen
inmediatamente después de conectar la
cámara a la Cyber-shot Station. Esto ocurre
cuando la cámara se está iniciando y no se
trata de un fallo de funcionamiento. Espere
durante unos 10 segundo.
3 Encienda el televisor y ajuste el
conmutador de entrada según la entrada
conectada en el paso 1.
4 Pulse / en los botones de control del
mando a distancia para seleccionar la
imagen.
También puede pulsar / en los botones de
control de la cámara para seleccionar la imagen.
La Cyber-shot Station es compatible con los
sistemas de televisión NTSC y PAL. Para
obtener más información, consulte el manual de
instrucciones suministrado con la cámara.
Funciones del mando a
distancia
Las funciones del mando a distancia varían en
función de la cámara que se utilice.
Para obtener más información, consulte el manual
de instrucciones suministrado con la cámara.
Presentación de diapositivas
Es posible reproducir una serie de imágenes fijas
grabadas con la cámara con sólo pulsar el botón
(Diapositivas) del mando a distancia.
1 Active la alimentación de la cámara
pulsando el botón (reproducción)
de ésta o el botón POWER del mando a
distancia.
2 Pulse el botón (Diapositivas) del mando
a distancia.
Aparecerá la pantalla de ajustes de diapositivas.
Es posible que en algunos modelos no se
muestre la pantalla de ajustes Diapositivas,
incluso si pulsa en el botón (Diapositivas).
Las diapositivas se iniciarán según las
condiciones predefinidas. Para obtener
más información acerca del método de
ajuste, consulte el manual de instrucciones
suministrado con la cámara.
3 Utilice los botones de control del mando
a distancia para cambiar los ajustes de las
diapositivas.
4 Utilice los botones de control del mando a
distancia para seleccionar [OK] y pulse el
botón central , o bien pulse el botón
(Diapositivas) del mando a distancia.
13-ES
Page 48

Para cancelar la presentación de diapositivas
Vuelva a pulsar el botón (Diapositivas) del
mando a distancia.
Para obtener más información, consulte el manual
de instrucciones suministrado con la cámara.
Cambio del modo de visualización
Si pulsa el botón VIEW MODE del mando a
distancia puede cambiar el índice de imágenes.
Excepto para los modelos DSC-T75/T70/T2/
W130/W125/W120/W115/W110.
1 Active la alimentación de la cámara
pulsando el botón (reproducción)
de ésta o el botón POWER del mando a
distancia.
2 Pulse el botón VIEW MODE del mando a
distancia.
Aparecerá la pantalla de modo de visualización.
3 Utilice los botones de control del mando
a distancia para seleccionar el modo de
visualización deseado y pulse el botón
central .
Las imágenes se mostrarán en modo de índice
con el modo de visualización seleccionado.
Al pulsar los botones V UP y V DOWN
del mando a distancia, se pueden realizar
las funciones siguientes en cada modo de
visualización.
Modo de ver datos:
–
permite visualizar la fecha anterior y la
siguiente.
Modo de carpeta:
–
permite visualizar la carpeta anterior y la
siguiente.
Modo de favoritos:
–
permite visualizar la página anterior y la
siguiente.
Filtro por caras
Es posible buscar las imágenes fijas grabadas con
distintas caras con sólo pulsar el botón FACE del
mando a distancia.
Excepto para los modelos DSC-T75/T70/T2/
W130/W125/W120/W115/W110.
1 Active la alimentación de la cámara
pulsando el botón (reproducción)
de ésta o el botón POWER del mando a
distancia.
2 Pulse el botón FACE del mando a distancia.
Aparecerá el menú de búsqueda de imágenes.
3 Utilice los botones de control del mando a
distancia para seleccionar la condición de
búsqueda y pulse el botón central .
Las imágenes se mostrarán en modo de índice
según la condición de búsqueda.
Para obtener más información, consulte el manual
de instrucciones suministrado con la cámara.
Cambio entre HD y SD
Es posible cambiar la pantalla del televisor entre
vídeo de alta definición (HD) y vídeo que no sea de
alta definición (SD) al pulsar el botón HD/SD del
mando a distancia.
Excepto para el modelo DSC-T75/T70/T2.
1 Active la alimentación de la cámara
pulsando el botón (reproducción)
de ésta o el botón POWER del mando a
distancia.
2 Pulse el botón HD/SD del mando a
distancia.
Cada vez que pulse el botón HD/SD, el ajuste
alternará entre HD y SD.
Cuando se visualice vídeo HD en el televisor, se
iluminará el indicador HD-OUTPUT (azul) de la
Cyber-shot Station.
Para obtener más información, consulte el manual
de instrucciones suministrado con la cámara.
PantallaZoomAncho
Es posible visualizar una imagen fija con un ángulo
de visualización de 4:3 ó 3:2 en el modo 16:9 al
pulsar el botón W ZOOM del mando a distancia.
Esta operación es igual que la función de zoom
panorámico de la cámara.
En los modelos DSC-T75/T70, el zoom
panorámico funciona cuando se pulsa el botón
del mando a distancia.
Excepto para el modelo DSC-T2.
1 Active la alimentación de la cámara
pulsando el botón (reproducción)
de ésta o el botón POWER del mando a
distancia.
2 Pulse el botón W ZOOM del mando a
distancia.
Cada vez que pulse el botón W ZOOM, el ajuste
alternará entre el modo de zoom panorámico y
normal.
El modo de zoom panorámico se cancela al
apagar la cámara o si cambia el modo de toma de
imágenes.
14-ES
Page 49

Cuando se utilice la función de zoom panorámico,
algunas funciones del mando a distancia no
estarán disponibles.
Para obtener más información, consulte el manual
de instrucciones suministrado con la cámara.
Cuidado y mantenimiento
Limpie la Cyber-shot Station con un paño suave
ligeramente humedecido con agua tibia y, a
continuación, seque la superficie con otro paño
seco. No use ningún tipo de disolvente como
diluyentes, alcohol o bencina, ya que pueden dañar
la superficie.
Sustitución de la pila del
mando a distancia
ADVERTENCIA
La pila puede explotar si no se emplea
adecuadamente. No recargue la pila; tampoco la
desmonte ni la arroje al fuego.
PRECAUCIÓN
Sustituya la pila únicamente por otra del tipo
especificado, ya que de lo contrario es posible
que se produzcan incendios o lesiones.
Sustitución de la pila de litio tipo
botón
No utilice ninguna otra pila que no sea del tipo
*
CR2025.
Tire del soporte para pilas mientras presiona
la lengüeta de éste.
Coloque una pila nueva en el soporte con el
lado + hacia arriba.
Inserte el soporte en el mando a distancia
hasta que haga clic.
lengüeta
15-ES
Page 50

Solución de problemas
Si surge algún problema con los productos, consulte las soluciones siguientes.
Si el problema persiste, consulte con su proveedor Sony.
Problema Causa/solución
La batería no se carga o el indicador
luminoso CHARGE no se enciende.
El indicador luminoso CHARGE
parpadea con rapidez o durante más de
10 segundos
No se enciende la cámara o ésta se apaga
de repente.
Las imágenes no se pueden reproducir
en un televisor.
Los botones del mando a distancia
no funcionan y no se puede realizar
ninguna operación.
No se puede colocar la cámara en la
Cyber-shot Station o la cámara está
inestable.
La cámara está encendida.
Apague la cámara.
El adaptador de alimentación de ca está desconectado.
Conéctelo correctamente.
La cámara no está colocada correctamente en la Cyber-shot
Station.
Colóquela correctamente.
La batería no está instalada correctamente.
Instale la batería correctamente.
La batería está completamente cargada.
La batería instalada en la cámara no es compatible.
Instale una batería compatible con la cámara.
La batería instalada en la cámara no es compatible.
Instale una batería compatible con la cámara.
La conexión no es correcta. La cámara no está instalada
correctamente en la Cyber-shot Station.
Extraiga la cámara de la Cyber-shot Station y vuelva a
conectar el adaptador de alimentación de ca. Una vez
apagado el indicador luminoso CHARGE, coloque la
cámara en la Cyber-shot Station.
La cámara no está colocada correctamente en la Cyber-shot
Station.
Colóquela correctamente.
El adaptador de alimentación de ca está desconectado.
Conéctelo correctamente.
El ajuste de la salida HD es incorrecto.
Consulte el manual de instrucciones suministrado con la
cámara y ajuste la salida HD correctamente.
El cable de componente de audio/vídeo o el cable de conexión
de audio/vídeo de la Cyber-shot Station no están conectados
correctamente al televisor.
Conecte el cable correctamente o corrija el ajuste.
La cámara no está instalada correctamente en la Cyber-shot
Station.
Colóquela correctamente.
El adaptador de alimentación de ca está desconectado.
Conéctelo correctamente.
La pila del mando a distancia está agotada.
Sustituya la pila por una nueva.
La placa de estación no está conectada correctamente.
Confirme que la placa de estación es compatible con la
cámara y conéctela correctamente.
16-ES
Page 51

Especificaciones
Estación Cyber-shot
Conectores de entrada/salida
Toma A/V OUT:
Toma de entrada de cc
Unidad de E/S
Generales
Dimensiones (aprox.):
Peso (aprox.): 110 g
Temperatura de funcionamiento:
Temperatura de almacenamiento:
Adaptador de alimentación de ca
Entrada: ca de 100 V a 240 V, 50/60 Hz
Salida: cc de 4,2 V
Dimensiones (aprox.):
Peso (aprox.): 130 g
Temperatura de funcionamiento:
Temperatura de almacenamiento:
componente, conector de salida
de vídeo/audio
124 × 48 × 78 mm (an/al/prf)
(incluida la placa de estación)
de 0 °C a 40 °C
de –20 °C a 60 °C
11 W
Para obtener más
especificaciones, consulte
la etiqueta del adaptador de
alimentación de ca.
48 × 29 × 81 mm
(an/al/prf, sin incluir piezas
salientes)
(sin incluir el cable de
alimentación de ca)
de 0 °C a 40 °C
de –20 °C a +60 °C
Elementos incluidos
Cyber-shot Station (CSS-HD2) (1)
Mando a distancia inalámbrico (RMT-CSS6)
(la pila de litio tipo botón ya viene instalada)
(1)
Base (5)
Cable de conexión de audio/vídeo (1)
Cable de componente de audio/vídeo (1)
Adaptador de alimentación de ca (AC-LS5) (1)
Cable de alimentación de ca (1)
Cubierta de protección (1)
Juego de documentación impresa
El diseño y las especificaciones están sujetos a
cambios sin previo aviso.
17-ES
Page 52

中文(繁)
僅適用於台灣
廢電池請回收
在操作此機器前,請仔細閱讀本說明書,並妥善保存以備將來之用。
警告
為減少發生火災或電擊的危險,請勿讓本機暴露於雨中或受潮。
注意
本產品已經過測試並確定符合 EMC 指定中所提出的使用連接電纜不得超過 3 公尺的限制。
特定頻率的電磁場可能會影響此機的畫面和聲音。
附屬電纜上附有鐵芯時的注意事項:USB 電纜或 A /V 連接電纜或交流電源轉接器之 D C 輸出線上的一
個鐵芯係抑制電磁波干擾用,請勿任意拆卸。
2-CT
Page 53

目錄
關於使用 Cyber-shot Station 的注意事項................................... 4
特性.................................................................... 5
商標.................................................................... 5
識別部件................................................................ 6
安裝.................................................................... 8
將相機裝入 Cyber-shot Station .......................................... 10
從 Cyber-shot Station 中取出相機
給電池組充電........................................................... 10
在電視機螢幕上查看影像................................................. 11
遙控器功能............................................................. 12
維護及保養............................................................. 13
更換遙控器電池......................................................... 13
故障檢修............................................................... 14
規格................................................................... 15
........................................ 10
3-CT
Page 54

關於使用 Cyber-shot Station 的注意事項
請參閱相機使用說明書及本說明書。
Cyber-shot Station 不屬防塵、防潮或防水之產品。
CSS-HD2 可與 D SC-T300/T75/T70/T2/W300/ W170/W150/W130/ W125/W120/W115/W110 數位相機一同使
用。並非全部數位相機在所有國家都可購得。
關於底座轉接板
隨 Cyber-shot Station 附送 5 塊底座轉接板,分別適用於不同的數
位相機(此後稱作“相機”)。有關進一步的詳情,請參閱第 8 頁。
使用前請務必確認裝上適合您相機的正確底座轉接板。如果裝了錯
誤的底座轉接板,可能損壞 I/O 裝置。
本說明書中的圖示為連接 DS C - T300 和適用於 D S C - T300 的底座轉
接板。
關於使用及存放地點的注意事項:
請勿在易受以下條件影響的地方使用或存放 Cy ber -s h ot S tat io n。否則,可能導致 Cyb er - sh ot
Station 發生故障。
極冷或極熱的地方
烈日下或夏天密閉的汽車中,溫度可能很高,會造成 Cyber-shot Station 變形或故障。
在直射的陽光下或加熱器附近
可能造成 Cyber-shot Station 變形或故障。
易受振動影響的地方
易受強磁影響的地方
在多沙場所或海灘等易受塵粒影響的地方
關於使用的注意事項:
即使 CHARGE 指示燈沒有點亮,只要還連接在墻上的插座上,電池充電器都沒有從交流電源中斷連接。
如果使用電池充電器時發生某些問題,請立即中斷插頭與墻上插座的連接,以關閉電源。
將交流轉接器連接至最近的牆壁插座上。如果在使用本產品時發生任何故障,請拔出交流轉接器
以切斷電源。
只要本裝置連接在牆壁插座上,即使關閉裝置本身的電源,也並未與交流電源斷開。
切勿使用放置在狹窄空間(如牆壁和傢俱之間)中的交流電變壓器。
請勿在易受強無線電波或強輻射影響的地方使用 Cy be r- shot St ation,否則可能無法正確播放
影像。
請避免其他金屬物接觸 Cyber-shot Station 及電源線的連接部位,否則可能造成短路。
關於儲存資料的注意事項:
請注意,如果由於相機、儲存媒體或 Cyber-shot Station 故障而無法進行錄製或播放,Sony 對影
像、聲音資料等儲存資料概不負責。
4-CT
Page 55

特性
將相機裝入 Cyber-shot Station,即可透過以下方式使用 Cyber-shot Station ︰
您可以透過將 Cyber-shot Station 連接到高畫質電視機來查看相機內的高畫質影像。可在普通電
視機上觀看標準畫質的影像。
您可以使用無線遙控器在電視機螢幕上輕鬆地查看影像。
使用遙控器可以進行以下操作:
查看影像
–
幻燈演示
–
播放變焦
–
以索引顯示的方式顯示影像,並可將影像顯示方式切換為“資料夾”、“日期檢視”或“我的最愛”
–
(不包括 DSC-T75/T70/T2/W130/W125/W120/W115/W110)。
以索引顯示的方式顯示影像,並可根據“所有人”、“孩童”、“微笑”或“嬰兒”查尋影像(不包
–
括 DSC-T75/T70/T2/W130/W125/W120/W115/W110)。
簡單地將相機置於 Cyber-shot Station 上,便可使用 Cyber-shot Station 對相機內的電池組進
行充電,其充電速度快於隨機附送的充電器。
商標
此外,本說明書中所使用的系統名稱和產品名稱通常為其各自開發商或製造商的商標或註冊商標。
但本說明書並非在所有情況下均使用或標記。
和“Cyber-shot Station”是 Sony 公司的商標。
5-CT
Page 56

識別部件
Cyber-shot Station
I/O 裝置
定位標記
POWER 指示燈
相機前導板
保護蓋
使用前請取下此蓋。
遙感器
CHARGE 指示燈
DC IN 插孔
HD OUTPUT 指示燈
AV OUT 插孔
底座轉接板
定位標記 B
定位標記 A
隨 Cyber-shot Station 附送 5 塊底座轉接板。使用前請務必確認裝上正確的底座轉接板。
有關進一步的詳情,請參閱第 8 頁。
相機側導板
6-CT
Page 57

遙控器
遙控器的功能因所使用的相機而異。
使用 DSC-T75/T70/T2 時,除 (幻燈演示)按鈕和控制按鈕的功能外,Cyber-shot Station 遙控
器的功能均與 CSS-HD1 的遙控器相同。
此外,某些按鈕不起作用。有關控制按鈕功能的詳細資訊,請參閱相機隨附的使用說明書。
V UP 按鈕/
V DOWN 按鈕
VIEW MODE 按鈕
FACE 按鈕
W ZOOM 按鈕
(幻燈演示)按鈕
MENU 按鈕
HD/SD 按鈕
*1
*1
*2
POWER 按鈕 (CAMERA)
播放放大 ( ) 按鈕
播放縮小 ( ) /
索引 ( ) 按鈕
HOME 按鈕
控制按鈕
*2
(//// )
*1 對於 DSC-T75/T70/T2/W130/W125/W120/W115/W110,不支援以上功能。
*2 對於 DSC-T75/T70/T2,不支援以上功能。
*2
*2
7-CT
Page 58

安裝
準備 Cyber-shot Station
1 選擇底座轉接板
底座轉接板具有前部及底部。
前部
Sony 標識
底部
轉接板名稱
請選擇與您的相機相對應的底座轉接板。
型號名稱 轉接板名稱 滑動方向
DSC-T300 HD2-A 向右
DSC-W110
DSC-W115
DSC-W120
DSC-W125
DSC-W130
DSC-W150
DSC-W170
DSC-W300 HD2-D 向左
DSC-T2
DSC-T75
HD2-B 向左
HD2-C 向左
HD2-E 向右DSC-T70
使用向右滑的底座轉接板(例如 HD2-A)
使用向左滑的底座轉接板(例如 HD2-B)
用一只手按住 Cyber-shot Station。用另
一只手拿住底座轉接板,滑動底座轉接板
直至其完全就位。
有關滑動方向,請參閱步驟 1 中的表格。
向右滑動
向左滑動
2 安裝底座轉接板。
保持底座轉接 板的前部(帶有 So n y 標識
的一側)面 朝自己,將其 安裝到 Cyb e rshot Station 的 I/O 裝置上,正如將其裝
到安裝在 I/O 裝置上的保護蓋上一樣。
8-CT
Page 59

底座轉接板被滑到正確的位置時將會下沉。
當轉接板正確安裝到位時,您將會聽到“哢
嗒”聲。
如果底座轉接板沒有正確地下沉,請均勻
地向下按其左 / 右側。
底座轉接板上的定位標記及 Cyb e r-s h ot
Station 上的定位標記將會對齊。
Cyber-shot Station
DC 插頭
交流轉接器
至牆壁插座
交流電源線
取下 I/O 裝置上的保護蓋。
將相機裝入 Cy b er - sh o t S t at i on 之前,
請務必取下保護蓋。
取下底座轉接板
用一只手按住 Cyber-shot Station。用另一只
手捏住底座轉接板的相機側部導板並向上拉起。
3 將 隨 附的交 流 配接器 連 接到 Cy b er- s ho t
Station 的 DC IN 插孔。
Cyber-shot Station 的 POWER 指示燈將會點
亮。
在國外使用 Cyber-shot Station
- 電源
您可以在電源為 100V 至 240V 交流電 (50/60Hz)
的任何國家或地區使用 Cyber-shot Station 和
交流轉接器(隨機附送)。
請勿使用變壓器(旅行轉換器),否則可能導
致故障。
準備遙控器
關於遙控器的注意事項
遙 控 器 由 在 工 廠 安 裝 好 的 紐 扣 型 鋰 電 池
(CR2025) 提 供 電力。 為 避免 電 池電 力 損耗,
已插入絕緣紙。首次使用遙控器前,應取出絕
緣紙。
絕緣紙
將 Cyber-shot Station 的遙感器遠離強光源,
如直射的陽光或吊頂照明燈等。否則,遙控器
可能無法正常工作。
遙控範圍小於五米(在室內使用時)。將遙控
器對準 Cyber-shot Station 的遙感器。如果
不能操作 Cyber-sh ot S tatio n,可嘗試調整
遙控器的角度。
9-CT
Page 60

將相機裝入
Cyber-shot Station
將轉接環和轉接鏡等從相機上取下。
請按照以下所示裝入相機。
將相機裝入 Cyber-shot Station 之前,請務
必關閉相機電源。
裝入相機時,請務必筆直地向下插入相機。
提示
請確保將相機安全地裝入Cyber-shot Station。
從 Cyber-shot Station 中
取出相機
當您將相機從 Cyber-shot Station 中取出時,
請按住 Cyber-shot Station。
註
當 您取出相機時, 請 務 必 筆 直 地 向 上 提 相
機。對前部或側部用力過度時,可能對相機或
Cyber-shot Station 造成損壞。
給電池組充電
將 已 插 入 電 池 組 的 相 機 安 裝 在 Cy ber - sho t
Station 上。
底 座 自 動 開 始 給 電 池 組 充 電。Cyb e r-s h ot
Station 的 CHARGE 指示燈亮起。
當打開相機電源時,Cyber-s hot Station 停
止對電池組充電。
當充電電量達到正常充電* 時,CHARGE 指示燈
熄滅。
正常充電情況下拍攝及播放的時間約為完全
*
充電情況下的 90%。
有關 25 ℃ 溫度下對完全放電的電池進行完全
充電所需的時間,請參閱下表:
DSC-T300/T75/T70/T2 約 160 分
DSCW300/W170/W150//W130/W125/
W120/W115/W110
根據充電條件及環境的不同,充電可能需要
–
更長的時間。
約 230 分
10-CT
Page 61

註
將相機裝入 Cyber-shot Station 後,CHARGE
指示燈可能閃爍 3 到 10 秒。 此情況表示相機
及 Cy be r-shot Station 之間正在進行通訊,
並非表示故障。
如果 CHARGE 指示燈無法亮起或閃爍達 10 秒以
上,請參閱“故障檢修”。
充電溫度
充電適宜溫度範圍為 0 ℃ 至 40 ℃。然而,為
發揮電池的最大效率,推 薦充電時的溫度範
圍為 10 ℃ 至 30 ℃。
關於電池壽命
電池壽命是有限的。電池容量隨著您使用次數
的增多及時間的流逝而逐漸減少。如電池使用
時間明顯縮短,可能是由於電池組已經到達其
壽命終點。請購買新的電池組。
電池壽命隨其存放方法及每塊電池組使用時的
作業條件及環境而異。
在電視機螢幕上查看影像
將 AV 連接電纜(隨機附送)或分量視訊電纜(隨
機附送 )連接到電視機,您即可在電視機 上播
放影像。
連接時請參考隨電視機附送的使用說明書。
1 在高畫質電視機上查看影像
連接 Cyber-shot Station 的 A/V OUT 插孔
及電視機的分量 AV 插孔。
紅色
白色
綠色
藍色
紅色
分量 A/V 電纜
音訊
Y
Pb/Cb
Pr/Cr
在非高畫質電視機的電視機上查看影像。
連接 Cyber-shot Station 的 A/V OUT 插孔
及電視機的音訊/視訊輸入插孔。
紅色
白色
黃色
A/V 連接電纜
使 用 分 量 A/ V 電 纜 連 接 C ybe r -sh o t
Sta t ion 及電視機之前,請先關閉電視機
的電源。
透過 A/ V OU T 插孔輸出的信號格式取決於
相機設置。
您需要一臺與 1080i 格式相容的電視機才
可查看 1080i 格式的影像。
透過 A/ V OU T 插孔輸出的 音訊 為單 聲道
音訊。
Cyber-shot Station 與 S-VIDEO 連接電纜
不相容。
音訊
視訊
2 按相機上的 (播放)按鈕或遙控器上的
POWER 按鈕,打開電源。
提示
將相機連接到 Cyber-shot Station 上後,
相機 或 遙控 器 上的 按 鈕可 能 不會 立即生
效。此情況發生在相機啟動時,並非故障。
請等待約 10 秒。
3 打開電視機,將輸入開關設為步驟 1 中所連
接的輸入設備。
4 按遙控器上的控制按鈕 /,選擇影像。
您還可以按相機上的控制按鈕 / 來選擇
影像。
Cyber-shot Station 與 NTSC 和 PAL 電視制式
相容。有關進一步的詳情,請參閱隨相機提供
的使用說明書。
11-CT
Page 62

遙控器功能
遙控器的功能因所使用的相機而異。
有關詳情,請參閱相機隨附的使用說明書。
幻燈演示
您只需按遙控器上的 (幻燈演示)按鈕,即
可播放使用相機拍攝的一系列靜態影像。
1 按相機上的 (播放)按鈕或遙控器上的
POWER 按鈕,打開電源。
2 按遙控器上的 (幻燈演示)按鈕。
此時出現幻燈演示設置螢幕。
對於某些型號,即使已經按下了
演示)按鈕,也可能不會出現幻燈演示設
置螢幕。幻燈演示將以預設的條件開始播
放。有關設置方法的進一步詳情,請 參閱
隨相機提供的使用說明書。
(幻燈
3 使 用遙 控器上的控 制按 鈕變 更幻燈演示 的
設置。
4 使用遙控 器上的 控制按鈕選擇[確定],並
且按中央的
燈演示)按鈕。
取消幻燈演示
再次按遙控器上的 (幻燈演示)按鈕。
有關進一步的詳情,請參閱隨相機附送的使用
說明書。
按鈕或按遙控器上的 (幻
切換觀看模式
您可以透過按遙控器上的 VIEW MODE 按鈕來變
更索引播放。
不 包 括 D S C -T75/ T70/ T2/W130/W125/ W120/
W115/W110。
1 按相機上的 (播放)按鈕或遙控器上的
POWER 按鈕,打開電源。
2 按遙控器上的 VIEW MODE 按鈕。
此時出現觀看模式螢幕。
3 使用遙控器上的控制按鈕選擇想要的觀看模
式,並且按中央的
此時將以您剛剛選擇的觀看模式,在索引模
式下顯示影像。
當按遙控器上的 V U P 按鈕和 V DO W N 按鈕時,
可以在各個觀看模式下實現以下功能︰
–
日期檢視模式︰
顯示上一個和下一個日期。
–
資料夾模式︰
顯示上一個和下一個文件夾。
–
我的最愛模式︰
顯示上一個和下一個頁面。
以面孔篩選
您可以透過按遙控器上的 F ACE 按鈕,查尋以不
同人臉記錄的影像。
不 包 括 D S C -T75/ T70/ T2/W130/W125/ W120/
W115/W110。
按鈕。
1 按相機上的 (播放)按鈕或遙控器上的
POWER 按鈕,打開電源。
2 按遙控器上的 FACE 按鈕。
此時將出現查尋影像選單。
3 使用遙控器上的控制按鈕選擇查尋條件,並
且按中央的
此時 將按 照查尋 條件, 在索引 模式 下顯 示
影像。
有關進一步的詳情,請參閱隨相機附送的使用
說明書。
按鈕。
12-CT
Page 63

在 HD 與 SD 之間切換
透過按遙 控器上的 H D /SD 按 鈕,您可以將電視
機顯示在高畫質視訊 (HD) 和非高畫質視訊 (SD)
之間切換。
不包括 DSC-T75/T70/T2。
1 按相機上的 ( 播放 ) 按鈕或遙控器上的
POWER 按鈕,打開電源。
2 按遙控器上的 HD/SD 按鈕。
每按一次 HD/SD 按鈕,設置便會在 HD 和 SD 之
間來回切換。
當在電視機 上觀 看 HD 視訊時,Cy b er- s ho t
Station 的 HD-OUTPUT 指示燈(藍色)亮起。
有關進一步的詳情,請參閱隨相機附送的使用
說明書。
廣角變焦顯示
透過按遙控器上的 W Z OOM 按鈕,您可以將 4︰3
或 3︰2 視 角的 靜像以 16︰9 來顯示,如同相 機
的廣角變焦功能一樣。
使用 DSC-T75/T70 時,按遙控器上的
便可進行廣角變焦。
不包括 DSC-T2。
按鈕
1 按相機上的 (播放)按鈕或遙控器上的
POWER 按鈕,打開電源。
2 按遙控器上的 W ZOOM 按鈕。
每按一次 W ZOO M 按鈕,設置便會在廣角變焦
和普通模式之間來回切換。
當您關閉相機或切換拍攝模式時,廣角變焦模
式被取消。
當您使用廣角變焦功能時,遙控器的部分功能
將不可使用。
有關進一步的詳情,請參閱隨相機附送的使用
說明書。
維護及保養
用蘸有少許水的軟布清潔 Cyber-shot Station,
然後用 乾布擦拭其表面。不要使用任何類 型的
溶劑,如稀釋 劑、酒精或汽 油等,否則會損壞
其表面。
更換遙控器電池
警告
如果使 用不當會造成電池爆炸。切勿給電 池再
充電、拆卸電池或將其丟入火中。
注意
請僅用指定類型的電池進 行更換。否則,可
能造成起火或人員受傷。
更換紐扣型鋰電池
請勿使用除 CR2025 外的任何其他電池。
*
推送電池托架上的突舌,拉出電池托架。
將新電池 + 面朝上裝入電池托架。
將電池托架插入遙控器,直至聽到“哢嗒”
的就位聲。
突舌
13-CT
Page 64

故障檢修
如果您的產品出現故障,請嘗試如下解決方法。
如果故障仍然存在,請與 Sony 經銷商聯繫。
症狀 原因及解決方法
電池組無法充電或 CHA R GE 指示燈無法
亮起。
C HARGE 指示燈快速閃爍,或閃爍時間
超過 10 秒。
無法打開相機電源,或電源突然關閉。 相機未正確安裝在 Cyber-shot Station 上。
不能在電視機上播放影像。 HD 輸入設置不正確。
遙控器上的按鈕不起作用,無法進行任
何操作。
不能將相機裝入 Cyber-shot S tat ion
或相機不穩固。
相機電源被打開。
關閉相機電源。
交流轉接器斷開。
正確連接交流轉接器。
相機未正確裝在 Cyber-shot Station 上。
正確安裝相機。
電池組安裝不正確
正確安裝電池組。
電池組已完全充電。
裝入相機的電池組不適用。
安裝與相機相容的電池組。
裝入相機的電池組不適用。
安裝與相機相容的電池組。
連接錯誤。相機未正確裝在 Cyber-shot Station 上。
從 Cyber-shot S tat ion 上取下相機,重新連接交流
轉接 器。 確認 CH ARG E 指 示燈熄 滅後,將 相機裝 入
Cyber-shot Station。
正確安裝相機。
交流轉接器斷開。
正確連接交流轉接器。
請參閱隨相機附送的使用 說明書, 並正確 地進行 H D
輸出設定。
分量 A/V 電纜或 Cyber-shot Station 上的 A/V 連接電纜
沒有正確連接到電視機上。
正確連接電纜或正確進行設置。
相機未正確裝在 Cyber-shot Station 上。
正確安裝相機。
交流轉接器斷開。
正確連接交流轉接器。
遙控器中的電池已耗盡。
更換新電池。
底座轉接板安裝不正確。
確認底座轉接板適用於您的相機並正確進行安裝。
14-CT
Page 65

規格
Cyber-shot Station
輸入/輸出連接器
AV/OUT 插孔: 分量、視訊/音訊輸出連接器
DC IN 插孔
I/O 裝置
概況
尺寸(約)︰ 124 × 48 × 78 mm
質量(約)︰ 110 g
工作溫度︰ 0 ℃ 至 40 ℃
存放溫度︰ -20 ℃ 至 +60 ℃
交流轉接器
輸入額定值︰ 100 V 至 240 V,交流電 50/60 Hz,
11 W
輸出額定值︰ 4.2 V 直流電
尺寸(約)︰ 48 × 29 × 81 mm
質量(約)︰ 130 g
工作溫度︰ 0 ℃ 至 40 ℃
存放溫度︰ -20 ℃ 至 +60 ℃
( 寬/高/深)
(包括一塊底座轉接板)
其他規 格請參見交流轉接器上
的標籤。
(寬/高/深,不包括突出部分)
(不含交流電電源線)
所含物品
Cyber-shot Station (CSS-HD2) (1)
無線遙控器 (RMT-CSS6)
(已裝有紐扣型鋰電池)(1)
底座轉接板 (5)
A/V 連接電纜 (1)
分量視訊電纜 (1)
交流轉接器 (AC-LS5) (1)
交流電源線 (1)
保護蓋 (1)
成套印刷文件
設計和規格有所變更時,恕不另行奉告。
15-CT
Page 66

中文(简)
在操作此机器前,请仔细阅读本说明书,并妥善保存以备将来之用。
警告
为减少发生火灾或触电的危险,请勿让本装置淋雨或受潮。
为减少火灾或触电的危险,请勿在本装置上放置如花瓶等盛有液体的
物体。
注意
本产品已经过测定并确定符合 EMC 指示中所提出的使用不超过 3 米的连接电缆的限制。
特定频率的电磁场可能会影响此设备的图像和声音。
关于主机外壳金属部分感觉到微弱电流 :
在将电源适配器与主机连接后,根据接触部位和个人的不同,您有时在接触金属外壳或接口时可能
会感觉到微弱电流。
产生这种现象的原因是因为电源适配器中有抑制电磁干扰的元件,该元件在初、次级之间构成了必
要的回路。
您可以放心的是此微弱电流被控制在国家安全标准所规定的限值范围之内,且本产品在生产出厂已
通过严格的质量检查,因此清您放心使用。
如您有疑问,请与附近的索尼维修站联系。
索尼公司
版次 2007 年 12 月
产品中有毒有害物质或元素的名称及含量
部件名称
内置线路板
外壳
显示板
光学块
附件
○ : 表示该有毒有害物质在该部件所有均质材料中的含量均在 SJ/T11363-2006 标准规定的限量要求以下。
× : 表示该有毒有害物质至少在该部件的某一均质材料中的含量超出 SJ/T11363-2006 标准规定的限量要求。
铅(Pb) 汞(Hg) 镉(Cd) 六价铬(Cr(VI)) 多溴联苯(PBB) 多溴二苯醚(PBDE)
× ○ ○ ○ ○ ○
× ○ ○ ○ ○ ○
○ ○ ○ ○ ○ ○
× ○ ○ ○ ○ ○
× ○ ○ ○ ○ ○
有毒有害物质或元素
2-CS
Page 67

目录
关于使用 Cyber-shot 多功能底座的注意事项................................. 4
特性.................................................................... 5
商标.................................................................... 5
识别部件................................................................ 6
安装.................................................................... 8
将相机装入 Cyber-shot 多功能底座........................................ 10
从 Cyber-shot 多功能底座中取出相机...................................... 10
给电池组充电 .......................................................... 10
在电视机屏幕上查看影像................................................. 11
遥控器功能............................................................. 12
维护及保养............................................................. 13
更换遥控器电池......................................................... 13
故障检修............................................................... 14
规格................................................................... 15
3-CS
Page 68

关于使用 Cyber-shot 多功能底座的注意事项
请参阅相机使用说明书及本说明书。
Cyber-shot 多功能底座不属防尘、防潮或防水之产品。
CSS-HD2 可与 D SC-T300/T75/T70/T2/W300/ W170/W150/W130/ W125/W120/W115/W110 数码相机一同使
用。并非全部数码相机在所有国家都可购得。
关于底座转接板
随 Cyber-shot 多功能底座附送 5 块底座转接板,分别适用于不同的
数码相机(此后称作“相机”)。有关详情,请参阅第 8 页。
使用前请务必确认装上适合您相机的正确底座转接板。如果安装错
误的底座转接板,可能损坏 I/O 装置。
本说明书中的图示为连接 DS C- T300 和适用于 DS C- T300 的底座转接
板。
关于使用及存放地点的注意事项:
请勿在易受以下条件影响的地方使用或存放 Cyber-shot 多功能底座。否则,可能导致 Cyber-shot
多功能底座发生故障。
极冷或极热的地方
烈日下或夏天密闭的汽车中,温度可能很高,会造成 Cyber-shot 多功能底座变形或故障。
在直射的阳光下或加热器附近
可能造成 Cyber-shot 多功能底座变形或故障。
易受振动影响的地方
易受强磁影响的地方
在多沙场所或海滩等易受尘粒影响的地方
关于使用的注意事项:
即使 CH ARG E 指示灯未点亮,只要电池充电器连接到墙壁插座,便未与交流电源断开。使用电池充
电器期间如果发生问题,请立即从墙壁插座上拔下插头切断电源。
将交流适配器连接至最近的墙壁插座上。如果在使用本产品时发生任何故障,请拔出交流适配器
以切断电源。
只要本装置连接在墙壁插座上,即使关闭装置本身的电源,也并未与交流电源断开。
切勿使用置于狭窄空间中的交流适配器,如在墙与家具之间的交流适配器。
请勿在易受强无线电波或强辐射影响的地方使用 Cyb er-shot 多功能底座,否则可能无法正确播放
影像。
请避免其它金属物接触 Cyber-shot 多功能底座及电源线的连接部位,否则可能造成短路。
关于存储数据的注意事项:
请注意,如果由于相机、存储媒体或 Cyber-shot 多功能底座故障而无法进行录制或播放,Sony 对
影像、声音数据等存储数据概不负责。
4-CS
Page 69

特性
将相机装入 Cyber-shot 多功能底座,即可通过以下方式使用 Cyber-shot 多功能底座:
您可以通过将 Cyber-shot 多功能底座连接到高画质电视机来查看相机内的高画质影像。可在普通
电视机上观看标准画质的影像。
您可以使用无线遥控器在电视机屏幕上轻松地查看影像。
使用遥控器可以进行以下操作︰
–
查看影像
–
幻灯演示
–
播放变焦
–
以索引显示的方式显示影像,并可将影像显示方式切换为“文件夹”、“日期视窗”或“收藏夹”(不
包括 DSC-T75/T70/T2/W130/W125/W120/W115/W110)。
–
以索引显示的方式显示影像,并可根据“所有人”、“儿童”、“笑脸”或“婴儿”搜索影像(不包
括 DSC-T75/T70/T2/W130/W125/W120/W115/W110)。
简单地将相机置于 Cyber -sh ot 多功能底座上,便可使用 Cybe r-sho t 多功能底座对相机内的电池
组进行充电,其充电速度快于随机附送的充电器。
商标
此外,本说明书中所使用的系统名称和产品名称通常为其各自开发商或制造商的商标或注册商标。
但本说明书并非在所有情况下均使用
和 “Cyber-shot 多功能底座” 是 Sony 公司的商标。
或 标记。
5-CS
Page 70

识别部件
Cyber-shot 多功能底座
I/O 装置
定位标记
POWER 指示灯
相机前导板
保护盖
使用前请取下此盖。
遥感器
CHARGE 指示灯
DC IN 插孔
HD OUTPUT 指示灯
AV OUT 插孔
底座转接板
定位标记 B
定位标记 A
随 Cyber-shot 多功能底座附送 5 块底座转接板。使用前请务必确认装上正确的底座转接板。
有关详情,请参阅第 8 页。
相机侧导板
6-CS
Page 71

遥控器
遥控器的功能因所使用的相机而异。
使用 DSC-T75/ T70/T2 时,除 (幻灯演示)按钮和控制按钮的功能外,Cybe r- shot 多功能底座遥
控器的功能均与 CSS-HD1 的遥控器相同。
此外,某些按钮不起作用。有关控制按钮功能的详细信息,请参阅相机随附的使用说明书。
VIEW MODE 按钮
FACE 按钮
W ZOOM 按钮
*1
*1
*2
(幻灯演示)按钮
MENU 按钮
HD/SD 按钮
*1
对于 DSC-T75/T70/T2/W130/W125/W120/W115/W110,不支持以上功能。
*2
对于 DSC-T75/T70/T2,不支持以上功能。
*2
V UP 按钮 /
V DOWN 按钮
*2
POWER 按钮 (CAMERA)
播放放大 ( ) 按钮
播放缩小 ( )/
索引 ( ) 按钮
HOME 按钮
控制按钮
(//// )
*2
7-CS
Page 72

安装
准备 Cyber-shot 多功能底座
选择底座转接板
1
底座转接板具有前部及底部。
前部
Sony 标识
底部
转接板名称
请选择与您的相机相对应的底座转接板。
型号名称 转接板名称 滑动方向
DSC-T300 HD2-A 向右
DSC-W110
DSC-W115
DSC-W120
DSC-W125
DSC-W130
DSC-W150
DSC-W170
DSC-W300 HD2-D 向左
DSC-T2
DSC-T75
安装底座转接板。
2
保持底座转接板的 前部(带有 S on y 标识
的一侧)面 朝自己,将其 安装到 Cyb e rshot 多功能底座的 I/O 装置上,正如将其
装到安装在 I/O 装置上的保护盖上一样。
HD2-B 向左
HD2-C 向左
HD2-E 向右DSC-T70
使用向右滑的底座转接板 ( 例如 HD2-A)
使用向左滑的底座转接板 ( 例如 HD2-B)
用一只手按 住 Cyb e r-s h ot 多功能底座。
用另一只手拿住底座转接板,滑动底座转
接板直至其完全就位。
有关滑动方向,请参阅步骤 1 中的表格。
向右滑动
向左滑动
8-CS
Page 73

底座转接板被滑到正确的位置时将会下
沉。当转接板正确安装到位时,您将会听
到“咔嗒”声。
如果底座转接板没有正确地下沉,请均匀
地向下按其左 / 右侧。
如果底座转接板没有正确地下沉,请均匀
地向下按其左 / 右侧。
取下 I/O 装置上的保护盖。
将相机装入 Cyb er-shot 多功能底座之前,
请务必取下保护盖。
取下底座转接板
用一只手按住 Cyber-shot 多功能底座。用另一
只手捏 住底座 转接板 的相机 侧部导 板并向 上拉
起。
Cyber-shot 多功能
底座
DC 插头
交流适配器
至墙壁插座
交流电源线
在国外使用 Cyber-shot 多功能底座
– 电源
您可以在电源为 100 V 至 240 V 交流电 (50 /
60Hz) 的任何国家或地区使用 Cyber-shot 多功
能底座和交流适配器(随机附送)。
请勿使用变压器(旅行转换器),否则可能导
致故障。
准备遥控器
关于遥控器的注意事项
遥 控 器 由 在 工 厂 安 装 好 的 纽 扣 型 锂 电 池
(CR2025) 提 供 电力。 为 避免 电 池电 力 损耗,
已插入绝缘纸。首次使用遥控器前,应取出绝
缘纸。
将随附的交流适配器连接到 Cyber-shot 多功
3
能底座的 DC IN 插孔。
Cyber-shot 多功能底座的 POWER 指示灯将会
点亮。
绝缘纸
将 Cyber-s ho t 多功能底座的遥感器远离强光
源,如直射的阳光或吊顶照明灯等。否则,遥
控器可能无法正常工作。
遥控范围小于五米(在室内使用时)。将遥控
器对准 Cyber-s ho t 多功能底座的遥感器。如
果不能操作 Cyber-s ho t 多功能底座,可尝试
调整遥控器的角度。
9-CS
Page 74

将相机装入 Cyber-shot 多功
能底座
将转接环和转接镜等从相机上取下。
请按照以下所示装入相机。
将相机装入 Cy ber-sho t 多功能底座之前,请
务必关闭相机电源。
装入相机时,请务必笔直地向下插入相机。
提示
请确保将相机安全地装入 Cyber-shot 多功能
底座。
从 Cyber-shot 多功能底座中
取出相机
当您将相机从 Cy ber-sho t 多功能底座中取出
时,请按住 Cyber-shot 多功能底座。
注
当您取出相机时,请务必笔直地向上提相
机。对前部或侧部用力过度时,可能对相机或
Cyber-shot 多功能底座造成损坏。
给电池组充电
将已插入电池组的相机安装在 Cyber-shot 多功
能底座上。
底座自动开始给电池组充电。Cyber-shot 多功
能底座的 CHARGE 指示灯亮起。
当打开相机电源时,Cy b er - sh o t 多功能底座
停止对电池组充电。
当充电电量达到正常充电*时,CHA R GE 指示
灯熄灭。
*
正常充电情况下拍摄及播放的时间约为完全
充电情况下的 90%。
有关 25℃温度下对完全放电的电池进行完全
充电所需的时间,请参阅下表︰
DSC-T300/T75/T70/T2 约 160 分
DSC-
W300/W170/W150//W130/W125/
W120/W115/W110
–
根据充电条件及环境的不同,充电可能需要
更长的时间。
约 230 分
10-CS
Page 75

注
将 相 机 装 入 C y ber - sho t 多 功 能 底 座 后,
CHARGE 指示灯可能闪烁 3 到 10 秒。此情况表
示相机及 Cyber-s ho t 多功能底座之间正在进
行通讯,并非表示故障。
如果 CHARGE 指示灯无法亮起或闪烁达 10 秒以
上,请参阅“故障检修”。
充电温度
充电适 宜 温度范 围 为 0 ℃ 至 40 ℃。 然而,
为发挥电池的最大效率, 推荐充电时的温度
范围为 10 ℃至 30 ℃。
关于电池寿命
电池寿命是有限的。电池容量随着您使用次数
的增多及时间的流逝而逐渐减少。如电池使用
时间明显缩短,可能是由于电池组已经到达其
寿命终点。请购买新的电池组。
电池寿命随其存放方法及每块电池组使用时的
作业条件及环境而异。
在电视机屏幕上查看影像
将 AV 连接电缆(随机附送)或分量视讯电缆(随
机附送 )连接到电视机,您即可在电视机 上播
放影像。
连接时请参考随电视机附送的使用说明书。
在高画质电视机上查看影像
1
连接 Cyber-s hot 多功能底座的 A/V OUT 插
孔及电视机的分量 AV 插孔。
红色
白色
绿色
蓝色
红色
分量 A/V 电缆
音频
Y
Pb/Cb
Pr/Cr
在非高画质电视机的电视机上查看影像。
连接 Cyber-s hot 多功能底座的 A/V OUT 插
孔及电视机的音频 / 视频输入插孔。
红色
白色
黄色
使用分量 A/V 电缆连接 Cyber-shot 多功
能底座及电视机之前,请先关闭电视机的
电源。
通过 A/V O UT 插孔输出的信号格式取决于
相机设置。
您需要一台与 1080i 格式兼容的电视机才
可查看 1080i 格式的影像。
通过 A/V O UT 插孔输出的音频为单声道音
频。
Cyber-shot 多功能底座与 S-VIDEO 连接电
缆不兼容。
按相机上的 ( 播放 ) 按钮或遥控器上的
2
POWER 按钮,打开电源。
提示
将相机连接到 Cyb e r-s h ot 多功能底座上
后,相机或遥控器上的按钮可能不会立即
生效。此情况发生在相机启动时,并 非故
障。请等待约 10 秒。
打开电视机,将输入开关设为步骤 1 中所连
3
接的输入设备。
按遥控器上的控制按钮/选择影像。
4
您还可以按相机上的控制 按钮
影像。
Cyber-shot 多功能底座与 NTSC 和 PAL 电视制
式兼容。有关进一步的详情,请参阅随相机提
供的使用说明书。
A/V 连接电缆
音频
视频
/
来选择
11-CS
Page 76

遥控器功能
遥控器的功能因所使用的相机而异。
有关详情,请参阅相机随附的使用说明书。
幻灯演示
您只需按遥控器上的 (幻灯演示)按钮,即
可播放使用相机拍摄的一系列静态影像。
按相机上的 ( 播放 ) 按钮或遥控器上的
1
POWER 按钮,打开电源。
按遥控器上的 (幻灯演示)按钮。
2
此时出现幻灯演示设置屏幕。
对于某些型号,即使已经按下了 (幻
灯演示)按钮,也可能不会出现幻灯演示
设置屏幕。幻灯演示将以预设的条件开始
播放。有关设置方法的进一步详情, 请参
阅随相机提供的使用说明书。
使用遥控器上的控制按钮变更幻灯演示的设
3
置。
使用遥控器上的控制按钮选择 [ 确定 ],并
4
且按中央的
灯演示)按钮。
取消幻灯演示
再次按遥控器上的 (幻灯演示)按钮。
有关进一步的详情,请参阅随相机附送的使用
说明书。
按钮或按遥控器上的 (幻
按相机上的 ( 播放 ) 按钮或遥控器上的
1
POWER 按钮,打开电源。
按遥控器上的 VIEW MODE 按钮。
2
此时出现观看模式屏幕。
使用遥控器上的控制按钮选择想要的观看模
3
式,并且按中央的
此时将以您刚刚选择的观看模式,在索引模
式下显示影像。
当按遥控器上的 V UP 按钮和 V DOWN 按钮时,
可以在各个观看模式下实现以下功能:
–
日期视窗模式:
显示上一个和下一个日期。
–
文件夹模式:
显示上一个和下一个文件夹。
–
收藏夹模式:
显示上一个和下一个页面。
按钮。
以人脸筛选
您可以通过按遥控器上的 F ACE 按钮,搜索以不
同人脸记录的影像。
不包括 DSC-T75/T70/T2/W130/W125/W120/
W115/W110。
按相机上的 ( 播放 ) 按钮或遥控器上的
1
POWER 按钮,打开电源。
按遥控器上的 FACE 按钮。
2
此时将出现搜索影像菜单。
使用遥控器上的控制按钮选择搜索条件,并
3
且按中央的
此时将按照搜索条件,在索引模式下显示影
像。
有关进一步的详情,请参阅随相机附送的使用
说明书。
按钮。
切换观看模式
您可以通过按遥控器上的 VIEW MODE 按钮来变
更索引播放。
不包括 DSC-T75/T70/T2/W130/W125/W120/
W115/W110。
12-CS
Page 77

在 HD 与 SD 之间切换
通过按遥 控器上的 H D /SD 按 钮,您可以将电视
机显示在高画质视频 (HD) 和非高画质视频 (SD)
之间切换。
不包括 DSC-T75/T70/T2。
按相机上的 ( 播放 ) 按钮或遥控器上的
1
POWER 按钮,打开电源。
按遥控器上的 HD/SD 按钮。
2
每按一次 HD/SD 按钮,设置便会在 HD 和 SD 之
间来回切换。
当在电视机上观看 HD 视频时,Cyber-shot 多
功能底座的 HD-OUTPUT 指示灯(蓝色)亮起。
有关进一步的详情,请参阅随相机附送的使用
说明书。
广角变焦显示
通过按遥控器上的 W ZOOM 按钮,您可以将 4:3
或 3:2 视角的静像以 16:9 来显示,如同相机
的广角变焦功能一样。
使用 D SC- T75/ T70 时,按遥控器上的按钮
便可进行广角变焦。
不包括 DSC-T2。
按相机上的 ( 播放 ) 按钮或遥控器上的
1
POWER 按钮,打开电源。
按遥控器上的 W ZOOM 按钮。
2
每按一次 W ZOO M 按钮,设置便会在广角变焦
和普通模式之间来回切换。
当您关闭相机或切换拍摄模式时,广角变焦模
式被取消。
当您使用广角变焦功能时,遥控器的部分功能
将不可使用。
有关进一步的详情,请参阅随相机附送的使用
说明书。
维护及保养
用蘸有少许水的软布清洁 Cyber-shot 多功能底
座,然后用干布擦拭 其表面。不要使用任 何类
型的溶剂,如 稀释剂、酒精 或汽油等,否则会
损坏其表面。
更换遥控器电池
警告
电池如果处置不当, 则可能引起电池爆 炸。切
勿充电、拆卸或丢弃在火中。
小心
请只 使用 指定 类型 的电 池进 行更 换。否 则,
可能造成着火或人员受伤。
更换纽扣型锂电池
*
请勿使用除 CR2025 外的任何其他电池。
推送电池托架上的突舌,拉出电池托架。
将新电池 + 面朝上装入电池托架。
将电池托架插入遥控器,直至听到“咔嗒”
的就位声。
突舌
13-CS
Page 78

故障检修
如果您的产品出现故障,请尝试如下解决方法。
如果故障仍然存在,请与 Sony 经销商联系。
症状 原因及解决方法
电池组无法充电或 CHA R GE 指示灯无法
亮起。
C HARGE 指示灯快速闪烁,或闪烁时间
超过 10 秒。
无法打开相机电 源,或电源突然关闭。 相机未正确安装在 Cyber-shot 多功能底座上。
不能在电视机上播放影像。 HD 输入设置不正确。
遥控器上的按钮不起作用,无法进行任
何操作。
不能将相机装入 Cyber-s hot 多功能底
座 或相机不稳固。
相机电源被打开。
关闭相机电源。
交流转接器断开。
正确连接交流适配器。
相机未正确装在 Cyber-shot 多功能底座上。
正确安装相机。
电池组安装不正确
正确安装电池组。
电池组已完全充电。
装入相机的电池组不适用。
安装与相机兼容的电池组。
装入相机的电池组不适用。
安装与相机兼容的电池组。
连接错误。相机未正确装在 Cyber-shot 多功能底座上。
从 Cy b er -sh ot 多功能底座上取下相机,重新连接交
流适配器。确认 C H ARG E 指示灯熄灭后,将相机装入
Cyber-shot 多功能底座。
正确安装相机。
交流适配器断开。
正确连接交流适配器。
请参阅随相机附送的使用 说明书, 并正确 地进行 H D
输出设定。
分量 A/V 电缆或 Cyber-shot 多功能底座上的 A/V 连接电
缆没有正确连接到电视机上。
正确连接电缆或正确进行设置。
相机未正确装在 Cyber-shot 多功能底座上。
正确安装相机。
交流适配器断开。
正确连接交流适配器。
遥控器中的电池已耗尽。
更换新电池。
底座转接板安装不正确。
确认底座转接板适用于您的相机并正确进行安装。
14-CS
Page 79

规格
Cyber-shot 多功能底座
输入/输出连接器
AV OUT 插孔︰ 分量、视频 / 音频输出连接器
DC IN 插孔
I/O 装置
概况
尺寸(约): 124 × 48 × 78 mm
质量(约): 110 g
工作温度: 0 ℃ 至 40 ℃
存放温度: –20 ℃ 至 +60 ℃
交流适配器
輸入額定值︰ 100 V 至 240 V,交流電
输出额定值: 4.2 V 直流电
尺寸(约): 48 × 29 × 81 mm
质量(约): 130 g
工作温度: 0 ℃ 至 40 ℃
存放温度: –20 ℃ 至 +60 ℃
( 宽/高/深)
(包括一块底座转接板)
50/60 Hz,11 W
其它规格请参见交流适配器上
的标签。
(宽/高/深,不包括突出部分)
(不含交流电电源线)
所含物品
Cyber-shot 多功能底座 (CSS-HD2) (1)
无线遥控器 (RMT-CSS6)
(已装有纽扣型锂电池) (1)
底座转接板 (5)
A/V 连接电缆 (1)
分量视频电缆 (1)
交流适配器 (AC-LS5) (1)
交流电源线 (1)
保护盖 (1)
成套印刷文件
设计或规格如有变动,恕不另行通知。
15-CS
Page 80

한국어
본기를 사용하기 전에 본 사용설명서를 잘 읽으신 다음 장래에 필요한 경우를 위하여 소중히 보관하여 주
십시오.
경고
화재 또는 감전의 위험을 줄이기 위해 장치를 비 또는 습기에 노출시키
지 않도록 하여 주십시오.
주의
본 제품은 검사 를 통하여 3미터 이내의 연결 케이블 을 사용하는 경우 EMC(Electromagnetic
Compatibility: 전자파 적합) 규정의 기준 한계를 준수함이 판명되었습니다.
본 기기의 화상 및 사운드는 특정 주파수의 전자기장으로 인하여 영향을 받을 수도 있습니다.
이 기기는 가정용으로 전자파 적합등록을 한 기기로서 주거지역에서는 물론 모든 지역에서 사용할 수 있
습니다.
2-KR
Page 81

목차
Cyber-shot Station의 사용에 관한 주의 ........................................................4
주요 특징.......................................................................................................5
상표..............................................................................................................5
각 부분 명칭...................................................................................................6
셋업..............................................................................................................8
Cyber-shot Station에 카메라 올려놓기 ........................................................ 10
Cyber-shot Station에서 카메라 분리하기 .....................................................10
배터리팩 충전하기......................................................................................... 10
TV 화면에서 이미지 보기............................................................................... 11
리모컨 기능.................................................................................................. 12
손질 및 유지 관리.......................................................................................... 13
리모컨 배터리 교체하기.................................................................................. 13
고장일까? 하고 생각되면 ................................................................................ 14
주요 제원..................................................................................................... 15
3-KR
Page 82

Cyber-shot Station의 사용에 관한 주의
이 사용설명서 이외에도 카메라의 사용설명서도 참조하십시오.
Cyber-shot Station에 방진성, 방습성, 방수성은 없습니다.
CSS-HD2는 DSC-T300/T75/T70/T2/W300/W170/W150/W130/W125/W120/W115/W110 디
지털 스틸 카메라에서 사용할 수 있습니다. 모든 국가 또는 나라에서 상기의 모든 모델을 판매하는 것은
아닙니다.
스테이션 플레이트에 대하여
Cyber-shot Station에는 각종 디지털 카메라(이하 "카메라")에 대
응하는 5종류의 스테이션 플레이트가 부속되어 있습니다. 자세한 내용
은 8페이지를 참조하십시오.
사용하기 전에 카메라에 대응하는 적절한 스테이션 플레이트를 반드시
세트하십시오. 대응하지 않는 스테이션 플레이트를 세트하면 I/O 유닛
이 손상될 염려가 있습니다.
이 설명서의 그림은 DSC-T300과 DSC-T300용 스테이션 플레이트
를 조합해서 나타냈습니다.
사용 및 보관 장소에 관한 주의
Cyber-shot Station은 다음과 같은 장소에서 사용하거나 보관하지 마십시오. Cyber-shot Station이
정상으로 작동하지 않을 가능성이 있습니다.
온도가 매우 높은 장소
염천하나 여름철 창문을 꼭 닫은 자동차 안의 온도는 매우 높아서 Cyber-shot Station이 변형되거나
고장 날 염려가 있습니다.
직사광선이 닿는 장소나 난방기구 가까이
Cyber-shot Station이 변경되거나 고장 날 염려가 있습니다.
진동이 있는 장소
자기장이 강한 장소
모래가 많은 장소나 해안 등 먼지가 많은 장소
사용상의 주의
배터리 충전기는 CHARGE 램프가 꺼져 있더라도 전원 콘센트에 연결되어 있는 한 AC 전원으로부터
완전히 차단되지 않습니다. 배터리 충전기의 사용 중에 문제가 발생하였을 때는 즉시 전원 콘센트로부
터 플러그를 뽑아 전원을 차단하여 주십시오.
AC 어댑터를 연결할 때에는 가까운 콘센트를 사용하십시오. 제품의 사용 중에 고장 났을 때에는 AC
어댑터를 빼서 전원을 차단하십시오.
본체 전원을 껐어도 콘센트에 연결되어 있는 한 본체에는 AC 전원(주전원)이 공급되고 있습니다.
벽과 가구 사이와 같은 좁은 공간에 AC 어댑터를 두고 사용하지 마십시오.
강한 전파나 방사선이 있는 장소에서 Cyber-shot Station을 사용하지 마십시오. 이미지가 정상으로
재생되지 않는 경우가 있습니다.
Cyber-shot Station의 연결 부분과 전원 코드에 다른 금속이 닿지 않도록 주의하십시오. 단락의 원
인이 되는 경우가 있습니다.
저장한 데이터에 관한 주의
카메라, 저장 매체, Cyber-shot Station의 고장으로 인하여 저장이나 재생하지 못한 경우라도 이미
지나 오디오 데이터 등 저장한 데이터에 대하여 Sony는 책임지지 않습니다.
4-KR
Page 83

주요 특징
Cyber-shot Station에 카메라를 올려 놓고 Cyber-shot Station을 다음과 같이 사용할 수 있습니다.
Cyber-shot Station을 HDTV에 연결하고 카메라의 이미지를 고선명 화질로 볼 수 있습니다. 이미
지는 통상 TV에서 표준 선명도로 볼 수 있습니다.
무선 리모컨을 사용해서 이미지를 간단히 TV 화면에서 볼 수 있습니다.
리모컨을 사용하면 다음과 같은 조작을 할 수 있습니다.
이미지 보기
슬라이드쇼
재생 줌
인덱스 표시 로 이미지를 표시하고 이미지 의 표시 방법을 "폴더" 또는 "날짜별 보기", "즐겨찾기"
(DSC-T75/T70/T2/W130/W125/W120/W115/W110은 제외)로 전환할 수 있습니다.
인덱스 표시로 이미지를 표시하고 "모든 사람" 또는 "어린이", "미소", "아기"(DSC-T75/T70/T2/
W130/W125/W120/W115/W110은 제외)로 이미지를 검색할 수 있습니다.
Cyber-shot Station은 카메라를 올려 놓고 카메라에 장착한 배터리팩을 부속된 배터리 충전기보다
빨리 충전할 수 있습니다.
상표
이 사용설명서에서 사용하는 시스템 및 제품명은 일반적인 각 개발자 또는 제조원의 상표 또는 등록 상
표입니다. 단 이 사용설명서에서는 또는 마크를 모두 생략했습니다.
및 "Cyber-shot Station"은 Sony Corporation의 상표입니다.
5-KR
Page 84

각 부분 명칭
Cyber-shot Station
I/O 유닛
카메라 앞면 가이드
위치결정 마커
POWER 램프
CHARGE 램프
DC IN 단자
스테이션 플레이트
위치결정 마커 B
위치결정 마커 A
보호 커버
사용하기 전에 이 커버
를 분리하십시오.
리모트 센서
HD OUTPUT 램프
AV OUT 단자
카메라 옆면 가이드
Cyber-shot Station에는 5개의 스테이션 플레이트가 부속되어 있습니다. 사용하기 전에 반드시 적
절한 스테이션 플레이트를 장착하십시오.
자세한 내용은 8페이지를 참조하십시오.
6-KR
Page 85

리모컨
사용 중인 카메라에 따라 리모컨 기능은 다릅니다.
DSC-T75/T70/T2를 사용할 때에는 (슬라이드쇼) 버튼과 조작 버튼을 제외 하고 Cyber-shot
Station의 리모컨 기능은 CSS-HD1의 기능과 같습니다.
또 전혀 작동하지 않는 버튼도 있습니다. 조작 버튼의 자세한 기능은 카메라에 부속된 사용설명서를 참조
하십시오.
V UP 버튼/
V DOWN 버튼
VIEW MODE 버튼
FACE 버튼
W ZOOM 버튼
*1
*2
(슬라이드쇼) 버튼
MENU 버튼
HD/SD 버튼
*2
*1
POWER 버튼(CAMERA)
재생 줌( ) 버튼
재생 줌( )/
인덱스( ) 버튼
HOME 버튼
Control 조작 버튼
(//// )
*1 이 기능은 DSC-T75/T70/T2/W130/W125/W120/W115/W110을 지원하지 않습니다.
*2 이 기능은 DSC-T75/T70/T2를 지원하지 않습니다.
*2
*2
7-KR
Page 86

셋업
Cyber-shot Station 준비하기
1 스테이션 플레이트를 선택합니다.
스테이션 플레이트에는 앞면과 뒷면이 있습니다.
앞면
Sony 로고
밑면
플레이트 이름
카메라에 알맞은 스테이션 플레이트를 선택하
십시오.
모델명 플레이트
DSC-T300 HD2-A 오른쪽
DSC-W110
DSC-W115
DSC-W120
DSC-W125
DSC-W130
DSC-W150
DSC-W170
DSC-W300 HD2-D 왼쪽
DSC-T2
DSC-T75
이름
HD2-B 왼쪽
HD2-C 왼쪽
HD2-E 오른쪽DSC-T70
미는 방향
오른쪽 으로 미는 스테이 션 플레이 트(HD2-A
등) 사용하기
왼쪽으로 미는 스테이션 플레이트(HD2-B 등)
사용하기
한 손으로 Cyber-shot Station을 잡습니
다. 다른 한 손으로 스테이션 플레이트의 카
메라 옆면 가이드를 잡고 스테이션 플레이트
를 밀어서 완전히 넣습니다.
미는 방향은 순서 1의 표를 참조하십시오.
오른쪽으로 민다
왼쪽으로 민다
2 스테이션 플레이트를 장착합니다.
앞면(Sony 로고가 있는 쪽)을 앞으로 해서
스테이션 플레이트를 잡고 이것을 I/O 유닛
에 장착한 보호 커버에 겹치도록 Cybershot Station의 I/O 유닛 위에 올려놓습
니다.
8-KR
Page 87

올바른 위치에 완전히 밀면 스테이션 플레이
트는 내려갑니다. 플레이트가 바르게 장착되
면 장착되는 소리가 들립니다.
스테이션 플레이트가 정상으로 내려가지 않
을 때에는 그 왼쪽/오른쪽 면을 균등하게 누
르십시오.
스테 이션 플레이 트의 위치결 정 마 커 A와
Cyber-shot Station의 위치결정 마커가
일치합니다.
I/O 유닛의 보호 커버를 분리합니다.
Cyber-shot Station에 카메라를 올려놓
기 전에 반드시 보호 커버를 분리하십시오.
스테이션 플레이트를 분리합니다.
한 손으로 Cyber-shot St atio n을 잡습니다.
다른 한 손으로 스테이션 플레이트의 카메라 옆
면 가이드를 잡고 스테이션 플레이트를 위로 잡
아당깁니다.
Cyber-shot
Station
DC 플러그
AC 어댑터
콘센트에
연결
AC 전원 코드
Cyber-shot Station을 해외에서 사용하려면
- 전원
Cyb er- shot S tation과 AC 어 댑터(부속)는
100 V ~ 240 V AC 50/60Hz 범위의 전원이면 어
느 나라 또는 지역에서든 사용할 수 있습니다.
전자 변압기(여행용 컨버터)는 고장의 원인이
되므로 사용하지 마십시오.
리모컨 준비하기
리모컨에 관한 주의
리모 컨 은 공장에서 설치된 버튼형 리튬전 지
(CR2025)를 전원으로 사용합니다. 배터리 소
모를 방지하기 위해 절연 시트가 들어 있습니다.
리모컨을 맨처음 사용하기 전에 절연 시트를 제
거하십시오.
3 부속된 AC 어댑터를 Cyber-shot Station
의 DC IN 단자에 연결합니다.
Cyber-shot Station의 POWER 램프가 켜
집니다.
절연 시트
Cyber-shot Station의 리모트 센서에는 직사
광선이나 천정의 조명 등 강한 빛이 닿지 않도록
주의하십시오. 리모컨이 정상으로 작동하지 않
을 경우가 있습니다.
리모컨의 작동 범위는 5미터(실내에서 사용시)
미만입니다. 리모컨은 Cyber-shot Station의
리모트 센서를 향하고 조작하십시오. Cybershot Station을 조작할 수 없을 때에는 리모컨
의 각도를 조절해 보십시오.
9-KR
Page 88

Cyber-shot Station에 카
메라 올려놓기
어댑터 링, 컨버전 렌즈 등을 카메라에서 분리합니
다.
카메라는 다음의 그림과 같이 장착합니다.
카메라 전원은 Cyber-shot Station에 올려놓
기 전에 반드시 끄십시오.
카메라를 장착할 때에는 반드시 카메라를 똑바
로 아래로 삽입하십시오.
잠깐 한마디
카메라가 Cyber-shot Station에 확실하게 장
착되었는지 확인하십시오.
Cyber-shot Station에서
카메라 분리하기
Cyber-shot Station에서 카메라를 분리할 때
에는 Cyber-shot Station을 누르고 있습니다.
주의점
카메라를 분리할 때에는 반드시 카메라를 똑바로
위로 들어올리십시오. 앞면이나 옆면에 필요 없
는 힘을 주면 카메라나 Cyber-shot Station
이 손상될 염려가 있습니다.
배터리팩 충전하기
배 터 리팩을 장 착 한 카 메 라 를 C y b e r- s h o t
Station에 올려놓습니다.
자동으로 충전이 시작됩니다. Cyber-shot
Station의 CHARGE 램프가 켜집니다.
카메라 전원을 켜면 Cyber-shot Station에서
배터리팩을 충전할 수 없습니다.
실용 충전*에 달하면 CHARGE 램프가 꺼집니
다.
실용 충전으로 촬영 및 재생 시간은 만충전 시
*
의 약 90%입니다.
완전히 방전된 배터리를 25 °C에서 만충전하는
데 필요한 시간은 다음 표를 참조하십시오.
DSC-T300/T75/T70/T2 약 160분
DSCW300/W170/W150/ /W130 /
W125/W120/W115/W110
충전 조건이나 환경에 따라서는 충전 시간이
길어지는 경우가 있습니다.
약 230분
10-KR
Page 89

주의점
Cyber-shot Station에 카메라를 장착한 후
CHARGE 램프가 3 ~ 10초간 천천히 깜빡이
는 경우가 있습니다. 이것은 카메라와 Cybershot Station이 통신 중임을 나타내는 것으로
고장이 아닙니다.
CHARGE 램프가 켜지지 않거나 10초 이상 깜
빡일 때에는 "고장일까? 하고 생각되면"을 참조
하십시오.
충전 온도
충전 온도 범위는 0 °C ~ 40 °C입니다. 단 배터
리 효율을 최대한 활용하기 위한 충전 권장 온도
범위는 10 °C ~ 30 °C입니다.
배터리 수명에 대하여
배터리 수명에는 한계가 있습니다. 배터리를 사
용할수록, 그리고 시간이 경과할수록 배터리 용
량은 조금씩 줄어듭니다. 배터리 작동 시간이 현
저하게 줄어들면 배터리팩의 수명이 다 했을 가
능성이 있습니다. 새 배터리팩을 구입하십시오.
배터리의 수명은 보관 방법이나 사용 조건, 배터
리팩을 사용한 환경에 따라 달라집니다.
TV 화면에서 이미지 보기
Cyber-shot Station을 A/V 연결 케이블(부속
품) 또는 컴포넌트 A/V 케이블(부속품)로 TV에
연결하고 이미지를 재생할 수 있습니다.
연결은 TV에 부속된 사용설명서를 참조하십시오.
1
HDTV에서 이미지 보기
Cyber-shot Station의 A/V OUT 단자와
TV의 컴포넌트 AV 단자를 연결합니다.
적색
흰색
녹색
청색
적색
컴포넌트 A/V 케이블
오디오
Y
Pb/Cb
Pr/Cr
HDTV 이외의 TV에서 이미지 보기
Cyber-shot Station의 A/V OUT 단자와
TV의 오디오/비디오 입력 단자를 연결합니다.
적색
흰색
노란색
컴포넌 트 A/ V 케이 블 로 Cy b er -s h ot
Station과 TV를 연결하기 전에 TV 전원
을 끄십시오.
A/V OUT 단자에서 출력되는 신호 형식을
카메라 설정에 따라 결정됩니다.
1080i 형식의 이미지를 보려면 1080i 형식
에 대응하는 TV가 필요합니다.
A/V OUT 단 자를 통해서 C yb er-s ho t
Stati on에서 출력 되는 오디오는 모노럴입
니다.
Cyber-shot Station은 S-VIDEO 연결
케이블에는 대응하지 않습니다.
2
카 메 라 의 (재생) 버 튼 또 는 리 모 컨 의
POWER 버튼을 눌러서 전원을 켭니다.
잠깐 한마디
카메라를 Cyber-shot Station에 장착한
직후에는 카메라 또는 리모컨 버튼이 작동하
지 않는 경우가 있습니다. 이것은 카메라 기
동 중에 발생하는 현상으로 고장이 아닙니다.
10초 정도 기다리십시오.
3
TV 전원을 켜고 입력 스위치를 순서 1에서 연
결한 입력으로 설정합니다.
4
리모컨 조작 버튼
택합니다.
카메라 조작 버튼
택할 수도 있습니다.
Cyber-shot Station은 NTSC 및 PAL 양쪽
의 TV 방식에 대응합니다. 자세한 내용은 카메
라에 부속된 사용설명서를 참조하십시오.
A/V 연결 케이블
/
를 눌러서 이미지를 선
를 눌러서 이미지를 선
/
오디오
비디오
11-KR
Page 90

리모컨 기능
사용 중인 카메라에 따라 리모컨 기능은 다릅니다.
자세한 내용은 카메라에 부속된 사용설명서를 참
조하십시오.
슬라이드쇼
카메 라에서 촬영한 일 련의 정 지영 상을 리모컨
의 (슬라이드쇼) 버튼을 눌러서 재생할 수 있
습니다.
1
카 메 라 의 (재 생 ) 버 튼 또 는 리 모 컨 의
POWER 버튼을 눌러서 전원을 켭니다.
2
리모컨의 (슬라이드쇼) 버튼을 누릅니다.
슬라이드쇼 설정 화면이 나타납니다.
(슬라이드쇼) 버튼을 눌러서 일부 모델에
서는 슬라이드쇼 설정 화면이 나타나지 않는
경우가 있습니다. 슬라이드쇼가 사전 설정한
조건에 따라 시작됩니다. 자세한 설정 방법
은 카메라에 부속된 사용설명서를 참조하십
시오.
3
리모컨의 조작 버튼을 사용해서 슬라이드쇼 설
정을 변경합니다.
4
리모컨의 조작 버튼을 사용해서 [확인]을 선택
하고 리모컨의 중앙
쇼) 버튼을 누릅니다.
슬라이드쇼를 취소하려면
리모컨의 (슬라이드쇼) 버튼을 다시 누릅니다.
자세한 내용은 카메라에 부속된 사용설명서를
참조하십시오.
버튼 또는 (슬라이드
보기 모드 전환하기
리모컨의 VIEW MODE 버튼을 눌러서 인덱스 표
시를 전환할 수 있습니다.
D SC-T 75/T7 0/ T2/W1 30/W1 25/W1 20 /
W115/W110은 제외합니다.
1
카 메 라 의 (재생) 버 튼 또 는 리 모 컨 의
POWER 버튼을 눌러서 전원을 켭니다.
2
리모컨의 VIEW MODE 버튼을 누릅니다.
보기 모드 화면이 나타납니다.
3
리모컨의 조작 버튼을 사용해서 원하는 보기
모드를 선택한 다음에 중앙
선택한 보기 모드로 인덱스 모드 이미지가 표
시됩니다.
리모컨의 V UP 버튼 및 V DOWN 버튼을 누
르면 각 보기 모드에서 다음의 기능을 실행할 수
있습니다.
날짜별 보기 모드:
이전 날짜와 다음 날짜를 표시합니다.
폴더 모드:
이전 폴더와 다음 폴더를 표시합니다.
즐겨찾기 모드:
이전 페이지와 다음 페이지를 표시합니다.
버튼을 누릅니다.
얼굴에 의한 이미지 필터
리모컨의 FACE 버튼을 눌러서 다양한 얼굴이 촬
영된 이미지를 검색할 수 있습니다.
D SC-T 75/T7 0/ T2/W1 30/W1 25/W1 20 /
W115/W110은 제외합니다.
1
카 메 라 의 (재생) 버 튼 또 는 리 모 컨 의
POWER 버튼을 눌러서 전원을 켭니다.
2
리모컨의 FACE 버튼을 누릅니다.
이미지 검색 메뉴가 나타납니다.
3
리모컨의 조작 버튼을 사용해서 검색 조건을
선택한 다음에 중앙
검색 조건에 따라 이미지가 인덱스 모드로 표
시됩니다.
자세한 내용은 카메라에 부속된 사용설명서를
참조하십시오.
버튼을 누릅니다.
12-KR
Page 91

HD 및 SD 전환하기
리모컨의 HD/SD 버튼을 눌러서 TV 표시를 고선
명 비디오(HD)와 고선명 이외의 비디오(SD) 사이
를 전환할 수 있습니다.
DSC-T75/T70/T2는 제외합니다.
1
카 메 라 의 (재생) 버 튼 또 는 리 모 컨 의
POWER 버튼을 눌러서 전원을 켭니다.
2
리모컨의 HD/SD 버튼을 누릅니다.
HD/SD 버튼을 누를 때마다 설정은 HD와 SD
사이를 번갈아 전환합니다.
TV 에서 H D 비디 오를 보 는 동안 은 Cy ber-
shot Station의 HD-OUTPUT 램프(청색)가
켜집니다.
자세한 내용은 카메라에 부속된 사용설명서를
참조하십시오.
와이드 줌 표시
카메라의 와이드 줌 기능과 마찬가지로 리모컨의
W ZOOM 버튼을 눌러서 화면비가 4:3 또는 3:2의
정지영상을 16:9로 표시할 수 있습니다.
DSC-T75/T70에서 와이드 줌은 리모 컨의
버튼을 누르면 작동합니다.
DSC-T2는 제외합니다.
1
카 메 라 의 (재생) 버 튼 또 는 리 모 컨 의
POWER 버튼을 눌러서 전원을 켭니다.
2
리모컨의 W ZOOM 버튼을 누릅니다.
W ZOOM 버튼을 누를 때마다 설정은 와이드
줌과 통상 모드 사이를 번갈아 전환합니다.
카메라 전원을 끄거나 촬영 모드를 전환하면 와
이드 줌 모드는 취소됩니다.
와이드 줌 기능을 사용하고 있는 동안에는 리모
컨의 일부 기능을 사용할 수 없게 됩니다.
자세한 내용은 카메라에 부속된 사용설명서를
참조하십시오.
손질 및 유지 관리
Cyber-shot Station은 물이나 미지근한 물로 살
짝 적신 부드러운 헝겊으로 닦아낸 후 마른 헝겊으
로 물기를 닦아내십시오. 시너, 알코올, 벤진 등의
용제는 표면이 손상될 염려가 있으므로 절대로 사
용하지 마십시오.
리모컨 배터리 교체하기
경고
배터리 는 잘못 취급 하면 파열될 염려가 있습니
다. 충전하거나 분해하거나 또는 불 속에 던지지
마십시오.
주의
반드시 지정된 유형의 배터리로 교체하십시오.
그렇지 않을 경우 화재나 부상의 원인이 될 수
있습니다.
버튼형 리튬전지 교체하기
CR2025 이외의 배터리는 사용하지 마십시오.
*
배터리 홀더 탭을 누르면서 홀더를 잡아당깁
니다.
새 배터리의 +측을 위로 해서 홀더에 넣습
니다.
고정되는 소리가 날 때까지 리모컨에 홀더를
넣습니다.
탭
13-KR
Page 92

고장일까? 하고 생각되면
사용 중인 제품에 문제가 생겼을 때에는 다음의 대책을 참조하십시오.
문제가 해소되지 않을 때에는 Sony 판매점으로 문의하십시오.
증상 원인/대책
배터리팩을 충전할 수 없거나 CHARGE
램프가 켜지지 않는다.
CHAR GE 램프가 빠르게 깜빡이거 나
10초 이상 깜빡인다.
카메라 전원이 켜지지 않거나 갑자기 전
원이 꺼진다.
TV에서 이미지를 재생할 수 없다. HD 출력 설정이 바르지 않습니다.
리모컨 버튼이 작동하지 않아서 아무 조
작도 할 수 없다.
Cyber-shot Station에 카메라를 장착
할 수 없거나 카메라가 불안정하다.
카메라 전원이 켜져 있습니다.
카메라 전원을 끄십시오.
AC 어댑터가 빠져 있습니다.
AC 어댑터를 바르게 연결하십시오.
Cyber-shot Station에 카메라가 바르게 올려져 있지 않
습니다.
카메라를 바르게 올려놓으십시오.
배터리팩이 바르게 장착되지 않았습니다.
배터리팩을 바르게 장착하십시오.
배터리팩이 만충전되어 있습니다.
카메라에 장착한 배터리팩은 사용할 없습니다.
카메라에 대응하는 배터리팩을 장착하십시오.
카메라에 장착한 배터리팩은 사용할 없습니다.
카메라에 대응하는 배터리팩을 장착하십시오.
잘못 연결되어 있습니다. Cyber-shot Station에 카메라
가 바르게 올려져 있지 않습니다.
Cyber-shot Station에서 카메라를 분리하고 AC 어
댑터를 다시 연결하십시오. CHARGE 램프가 꺼진 후
에 카메라를 Cyber-shot Station에 올려놓으십시오.
Cyber-shot Station에 카메라가 바르게 올려져 있지 않
습니다.
카메라를 바르게 올려놓으십시오.
AC 어댑터가 빠져 있습니다.
AC 어댑터를 바르게 연결하십시오.
카메라에 부속된 사용설명서를 참조해서 HD 출력 설정
을 바르게 설정하십시오.
Cyber-shot Station과 연결한 컴포넌트 A/V 케이블이
나 A/V 연결 케이블이 TV에 바르게 연결되지 않았습니다.
케이블을 바르게 연결하거나 바르게 설정하십시오.
Cyber-shot Station에 카메라가 바르게 올려져 있지 않
습니다.
카메라를 바르게 올려놓으십시오.
AC 어댑터가 빠져 있습니다.
AC 어댑터를 바르게 연결하십시오.
리모컨의 배터리가 소모되었습니다.
새 배터리로 교체하십시오.
스테이션 플레이트가 바르게 장착되지 않았습니다.
스테이션 플레이트가 카메라에 대응하는지 확인하고 바
르게 장착하십시오.
14-KR
Page 93

주요 제원
Cyber-shot Station
입력/출력 커넥터
A/V OUT 단자:
DC IN 단자
I/O 유닛
일반적인 제원
외형 치수(약): 124
(w/h/d)
중량(약): 110
(스테이션 플레이트 포함)
동작 온도: 0
보관 온도:
AC 어댑터
정격 입력: 100 V ~ 240 V, AC 50/60 Hz,
11
정격 출력: 4.2
외형 치수(약): 48
(w/h/d, 돌출 부분은 제외)
중량(약): 130
동작 온도: 0
보관 온도:
컴포넌트, 비디 오/오디오 출 력
커넥터
48 78 mm
g
°C ~ 40 °C
–20 °C ~ +60 °C
W
V DC
그 밖의 주요 제원은 AC 어댑터
라벨을 참조하십시오.
29 81 mm
g
(AC 전원 코드는 제외)
°C ~ 40 °C
–20 °C ~ +60 °C
동봉품
Cyber-shot Station(CSS-HD2)(1)
무선 리모컨(RMT-CSS6)
(버튼형 리튬전지 설치완료)(1)
스테이션 플레이트(5)
A/V 연결 케이블(1)
컴포넌트 A/V 케이블(1)
AC 어댑터(AC-LS5)(1)
AC 전원 코드(주전원)(1)
보호 커버(1)
도큐먼트 세트
디자인 및 주요 제원은 예고없이 변경할 경우가 있
습니다.
15-KR
Page 94

Page 95

Page 96

Printed in Japan
Printed on 70% or more recycled paper using VOC (Volatile
Organic Compound)-free vegetable oil based ink.
Imprimé sur papier recyclé à 70 % ou plus avec de l’encre à base
d’huile végétale sans COV (composés organiques volatils).
Impreso en papel reciclado en un 70% o más utilizando tinta
hecha con aceite vegetal exento de compuesto orgánico volátil
(COV).
 Loading...