

Page 1
4-075-164-21(1)
Trinitron Color
Computer Display
Operating Instructions
Mode d’emploi
Bedienungsanleitung
Manual de instrucciones
Istruzioni per l’uso
Инструкция по эксплуатации
Bruksanvisning
Gebruiksaanwijzi ng
GB
FR
DE
ES
IT
RU
SE
NL
CPD-E500E
© 1999 Sony Corporation
Page 2
Owner’s Record
The model and serial numbers are located at the rear of the unit.
Record these numbers in the spaces provided below. Refer to them
whenever you call upon your dealer regarding this product.
Model No.
Serial No.
WARNING
To prevent fire or shock hazard, do not expose the
unit to rain or moisture.
Dangerously high voltages are present inside the
unit. Do not open the cabinet. Refer servicing to
qualified personnel only.
FCC Notice
This equipment has been tested and found to comply with the limits
for a Class B digital device, pursuant to Part 15 of the FCC Rules.
These limits are designed to provide reasonable protection against
harmful interference in a residential installation. This equipment
generates, uses, and can radiate radio frequency energy and, if not
installed and used in accordance with the instructions, may cause
harmful interference to radio communications. However, there is no
guarantee that interference will not occur in a particular installation.
If this equipment does cause harmful interference to radio or
television reception, which can be determined by turning the
equipment off and on, the user is encouraged to try to correct the
interference by one or more of the following measures:
– Reorient or relocate the receiving antenna.
– Increase the separation between the equipment and receiver.
– Connect the equipment into an outlet on a circuit different from
that to which the receiver is connected.
– Consult the dealer or an experi enced radi o/TV techni cian for hel p.
You are cautioned that any changes or modifications not expressly
approved in this manual could void your authority to operate this
equipment.
EN 55022 Compliance (Czech Republic Only)
This device belongs to category B devices as described in EN
55022, unless it is specifically stated that it is a category A
device on the specification label. The following applies to
devices in category A of EN 55022 (radius of protection up to
30 meters). The user of the device is obliged to take all steps
necessary to remove sources of interference to
telecommunication or other devices.
NOTICE
This notice is applicable for USA/Canada only.
If shipped to USA/Canada, install only a UL LISTED/CSA
LABELLED power supply cord meeting the following
specifications:
SPECIFICATIONS
Plug Type Nema-Plug 5-15p
Cord Type SVT or SJT, minimum 3 × 18 AWG
Length Maximum 15 feet
Rating Minimum 7 A, 125 V
NOTICE
Cette notice s’applique aux Etats-Unis et au Canada
uniquement.
Si cet appareil est export* aux Etats-Unis ou au Canada, utiliser
le cordon d’alimentation portant la mention UL LISTED/CSA
LABELLED et remplissant les conditions suivantes:
SPECIFICATIONS
Type de fiche Fiche Nema 5-15 broches
Cordon Type SVT ou SJT, minimum 3 × 18 AWG
Longueur Maximum 15 pieds
Tension Minimum 7 A, 125 V
E
NERGY STAR Partner, Sony
As an
Corporation has determined that this
product meets the
guidelines for energy efficiency.
This monitor complies with the
TCO’99 guidelines.
E
NERGY STAR
Declaration of Conformity
INFORMATION
This product complies with Swedish National Council for Metrology
(MPR) standards issued in December 1990 (MPR II) for very low
frequency (VLF) and extremely low frequency (ELF).
INFORMATION
Ce produit est conforme aux normes du Swedish National Council
for Metrology de décembre 1990 (MPR II) en ce qui concerne les
fréquences très basses (VLF) et extrêmement basses (ELF).
INFORMACIÓN
Este producto cumple las normas del Consejo Nacional Sueco para
Metrología (MPR) emitidas en diciembre de 1990 (MPR II) para
frecuencias muy baj as (VLF) y frecue ncias extrem adamente baja s (ELF).
2
Trade Name: Sony
Model No.: CPD-E500E
Responsible Party: Sony Electronics Inc.
Address: 1 Sony Drive, Park Ridge, NJ. 07656 USA
Telephone No.: 201-930-6970
This device complies with Part 15 of the FCC Rules. Operation is
subject to the following two conditions: (1) This device may not
cause harmful interference, and (2) this device must accept any
interference received, including interference that may cause
undesired operation.
Page 3
Table of Contents
Precautions . . . . . . . . . . . . . . . . . . . . . . . . . . . . . . . . . . . . . . . . . . . 4
Identifying parts and controls . . . . . . . . . . . . . . . . . . . . . . . . . . . . . . 5
Setup . . . . . . . . . . . . . . . . . . . . . . . . . . . . . . . . . . . . . . . . .6
Step 1:
Step 2:
Step 3:
Connect your monitor to your computer . . . . . . . . . . . . . . . 6
Connect the power cord . . . . . . . . . . . . . . . . . . . . . . . . . . . 6
Turn on the monitor and computer . . . . . . . . . . . . . . . . . . . 7
Selecting the on-screen menu language (LANG) . . . . . . . . . . . . . . 7
Customizing Your Monitor . . . . . . . . . . . . . . . . . . . . . . . .8
Navigating the menu . . . . . . . . . . . . . . . . . . . . . . . . . . . . . . . . . . . . 8
Adjusting the brightness and contrast . . . . . . . . . . . . . . . . . . . . . . . 9
Adjusting the size of the picture (SIZE) . . . . . . . . . . . . . . . . . . . . . 10
Adjusting the centering of the picture (CENTER) . . . . . . . . . . . . . 10
Enlarging or reducing the picture (ZOOM) . . . . . . . . . . . . . . . . . . . 10
Adjusting the shape of the picture (GEOM) . . . . . . . . . . . . . . . . . . 10
Adjusting the convergence (CONV) . . . . . . . . . . . . . . . . . . . . . . . . 11
Adjusting the quality of the picture (SCREEN) . . . . . . . . . . . . . . . 11
Adjusting the color of the picture (COLOR) . . . . . . . . . . . . . . . . . . 12
Additional settings (OPTION) . . . . . . . . . . . . . . . . . . . . . . . . . . . . 13
Resetting the adjustments . . . . . . . . . . . . . . . . . . . . . . . . . . . . . . . 14
Technical Features . . . . . . . . . . . . . . . . . . . . . . . . . . . . .14
Preset and user modes . . . . . . . . . . . . . . . . . . . . . . . . . . . . . . . . . 14
Power saving function . . . . . . . . . . . . . . . . . . . . . . . . . . . . . . . . . . 14
GB
• Trinitron is a registered trademark of
Sony Corporation.
• Macintosh is a tr ademark license d to
Apple Computer, Inc., registered in the
U.S.A. and other countries.
• Windows
trademarks of Microsoft Corporation in
the United States and other countries.
• IBM PC/AT and VGA are registered
trademarks of IBM Corporation of the
U.S.A.
• VESA and DDC
Video Electronics Standard
Association.
•
E
mark.
• All other product names ment i one d
herein may be the trademarks or
registered trademarks of their respective
companies.
• Furthermore, “” and “” are not
mentioned in each case in this manual.
and MS-DOS are registered
are trademarks of the
NERGY STAR is a U.S. registered
Troubleshooting . . . . . . . . . . . . . . . . . . . . . . . . . . . . . . .15
If thin lines appear on your screen (damper wires) . . . . . . . . . . . . 15
On-screen messages . . . . . . . . . . . . . . . . . . . . . . . . . . . . . . . . . . . 15
Trouble symptoms and remedies . . . . . . . . . . . . . . . . . . . . . . . . . 16
Self-diagnosis function . . . . . . . . . . . . . . . . . . . . . . . . . . . . . . . . . . 18
Specifications . . . . . . . . . . . . . . . . . . . . . . . . . . . . . . . . .18
Appendix. . . . . . . . . . . . . . . . . . . . . . . . . . . . . . . . . . . . . . . i
Preset mode timing table . . . . . . . . . . . . . . . . . . . . . . . . . . . . . . . . . .i
TCO’99 Eco-document . . . . . . . . . . . . . . . . . . . . . . . . . . . . . . . . . . . .i
3
Page 4
Precautions
90°
5°
90°
15°
Centering dots
Warning on power connections
• Use the supplied power cord. If you use a different power cord,
be sure that it is compatible with your local power supply.
For the customers in the UK
If you use the monitor in the UK, be sure t o use the supplied UK
power cable.
Example of plug types
for 100 to 120 V AC for 200 to 240 V AC for 240 V AC only
• Before disconnecting the power cord, wait at least 30 seconds
after turning off the power to allow the static elec tricity on the
screen’s surface to discharge.
• After the power is turned on, the screen is demagnetized
(degaussed) for about 2 seconds. This generates a strong
magnetic field around the screen which may affect data stored
on magnetic tapes and disks placed near the monitor. Be sure to
keep magnetic recording equipment, tapes, a nd disks away
from the monitor.
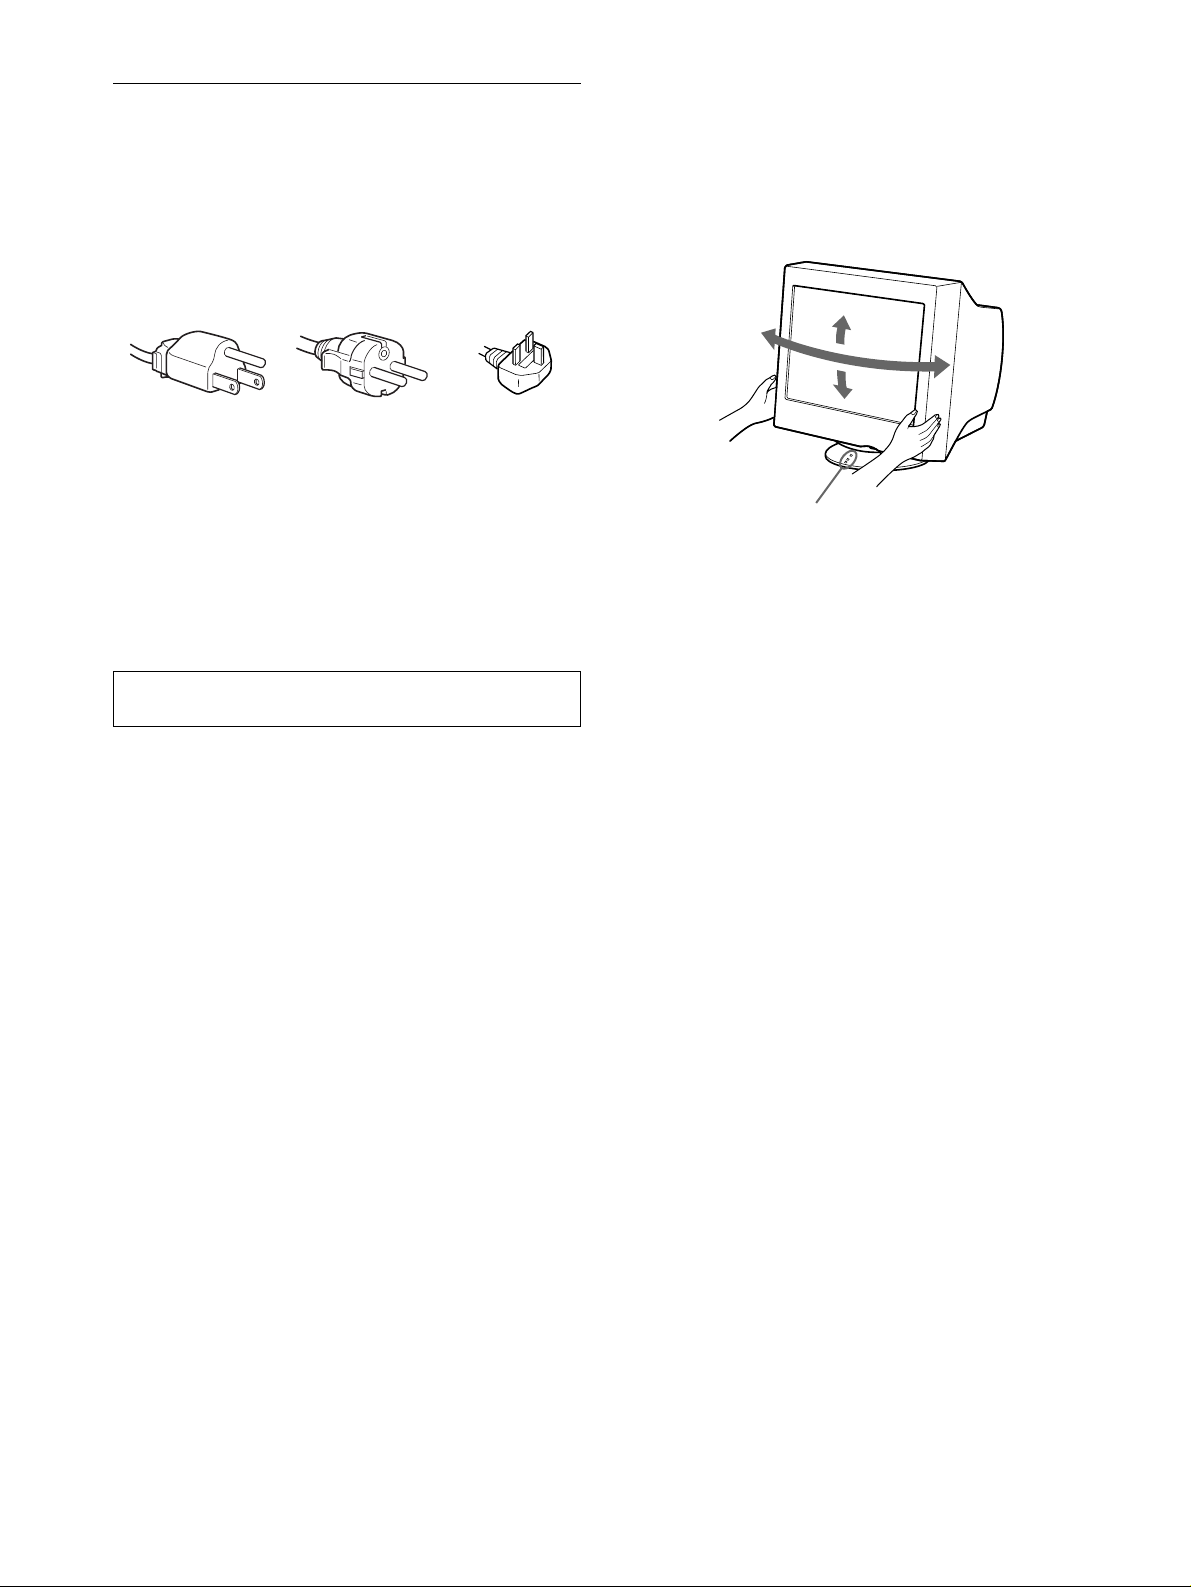
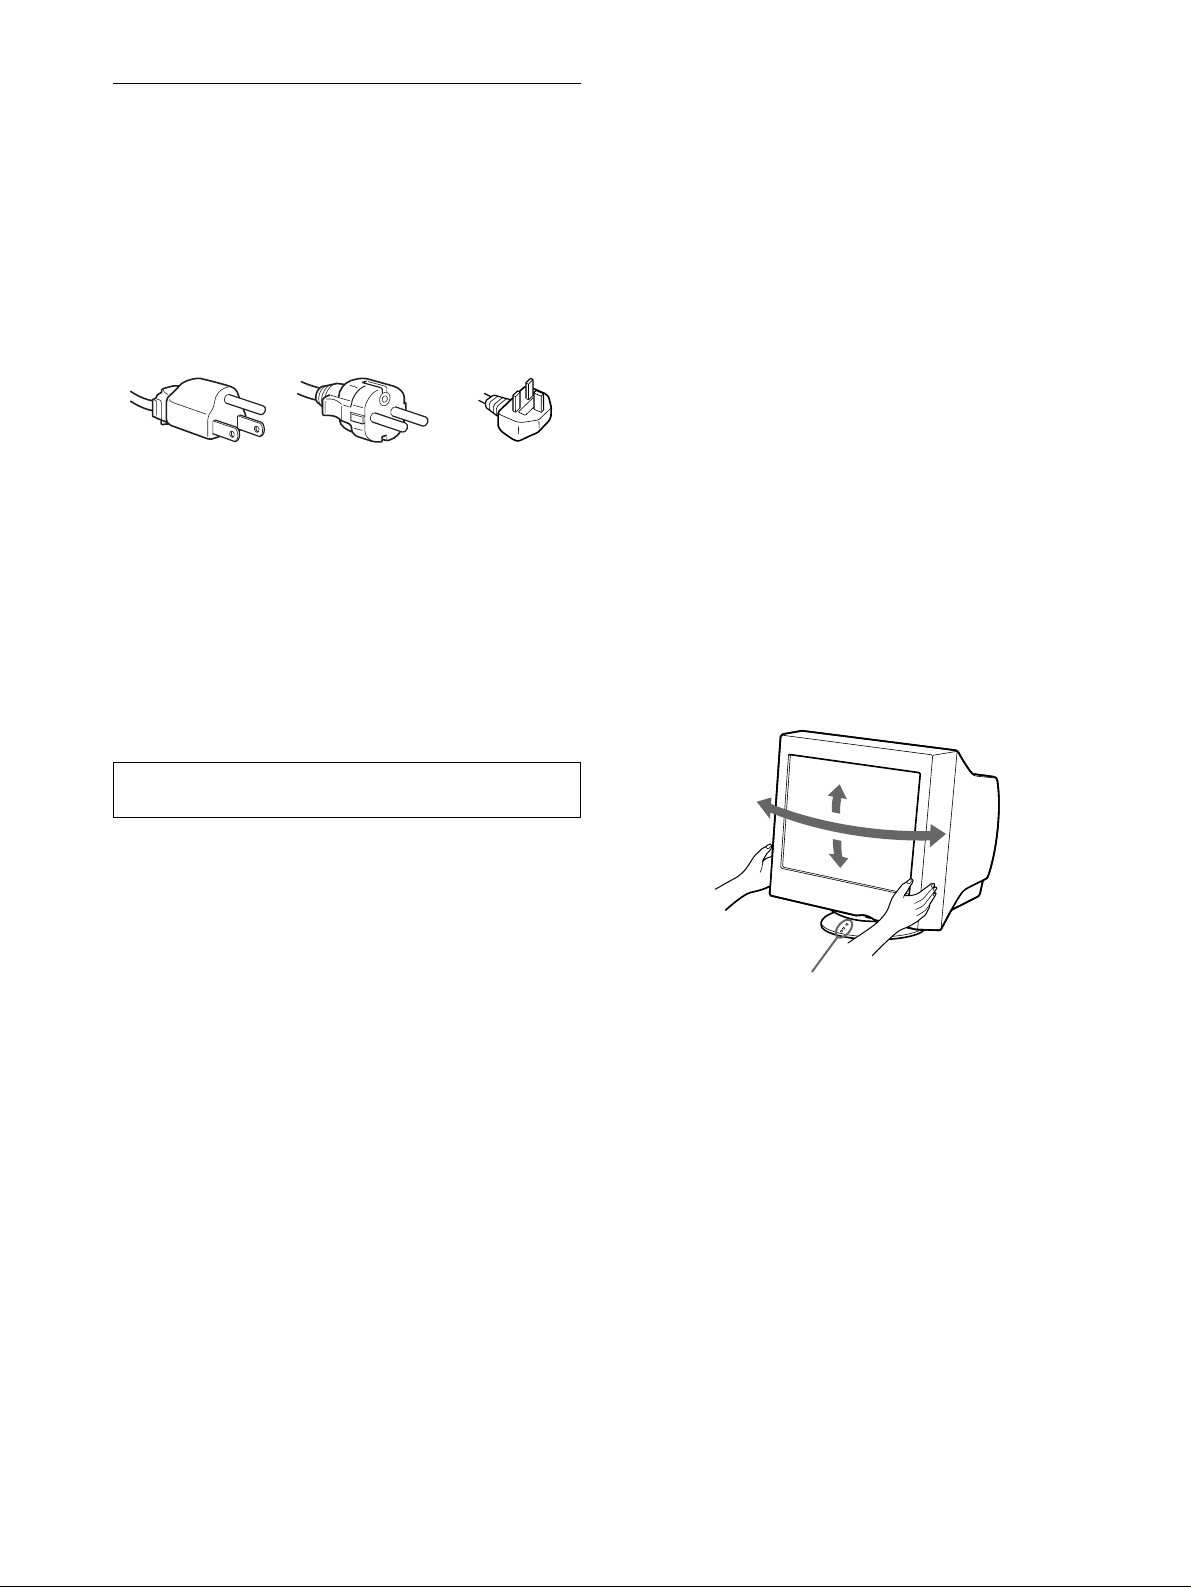
Use of the tilt-swivel
This monitor can be adjusted within the angles shown below. To
find the center of the mon itor’ s turnin g radius, a lign the ce nter of
the monitor’s screen with the centering dots on the stand.
Hold the monitor at the bott om with bo th ha nd s whe n yo u tu rn it
horizontally or vertically. Be careful not to pinch your fingers at
the back of the monitor when you tilt the monitor up vertically.
The equipment should be in stalled near an easily accessible
outlet.
Installation
Do not install the monitor in the following places:
• on surfaces (rugs, blankets, etc.) or near materials (curtains,
draperies, etc.) that may block the ventilation holes
• near heat sources such as radiators or air ducts, or in a place
subject to direct sunlight
• in a place subject to severe temperature changes
• in a place subject to mechanical vibration or shock
• on an unstable surface
• near equipment which generates magnetism, such as a
transformer or high volta g e po w er lines
• near or on an electrically charged metal surface
Maintenance
• Clean the screen with a soft cloth. If you use a glass cleaning
liquid, do not use any t ype of cleaner containing an anti-static
solution or similar additive as this may scratch the screen’s
coating.
• Do not rub, touch, or tap the surface of the screen with sharp or
abrasive items su ch as a ballpoint pe n or screwdrive r. This type
of contact may result in a scratched pict ure tube.
• Clean the cabine t, pane l and co nt rols wi th a soft cloth ligh tly
moistened with a mild detergent solution. Do not use any type
of abrasive pa d, sc ouring powder or solv ent, s uch as a lcohol o r
benzene.
Transportation
When you transport this monitor for repair or shipment, use the
original carton and packing materials.
4
Page 5
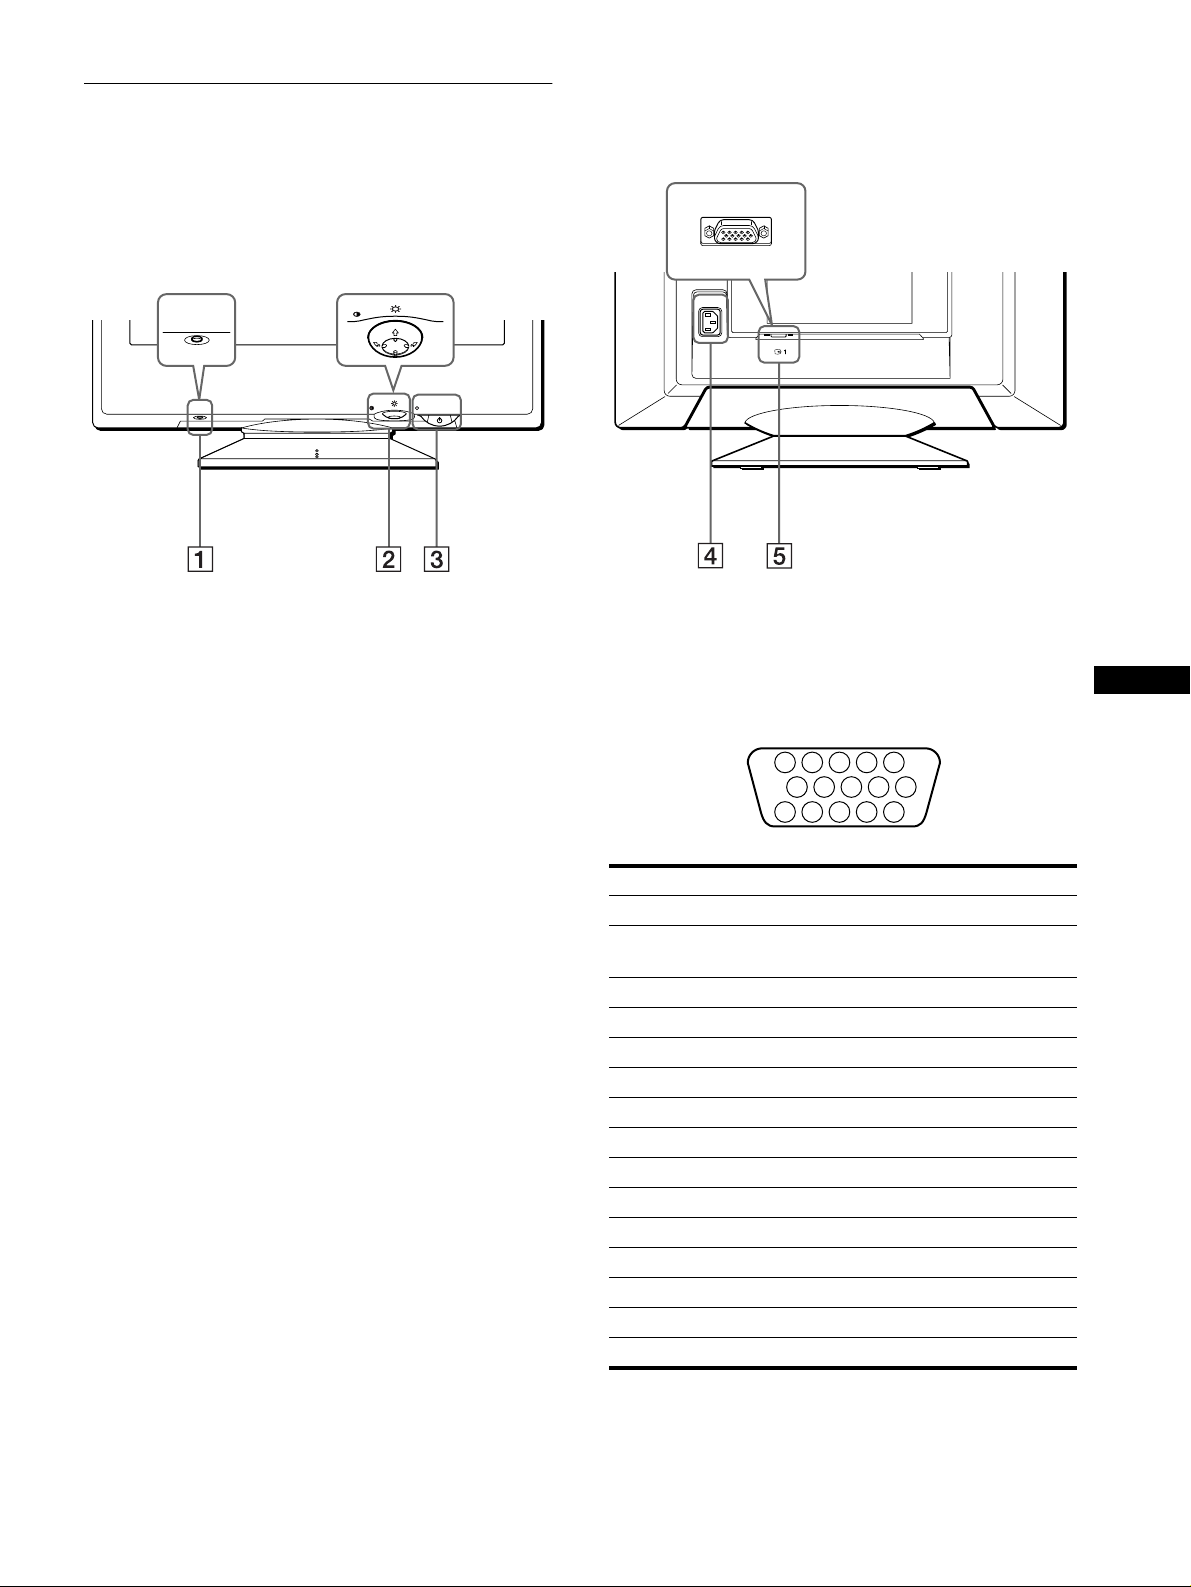
Identifying parts and controls
5 4 3 2
1
678910
1112131415
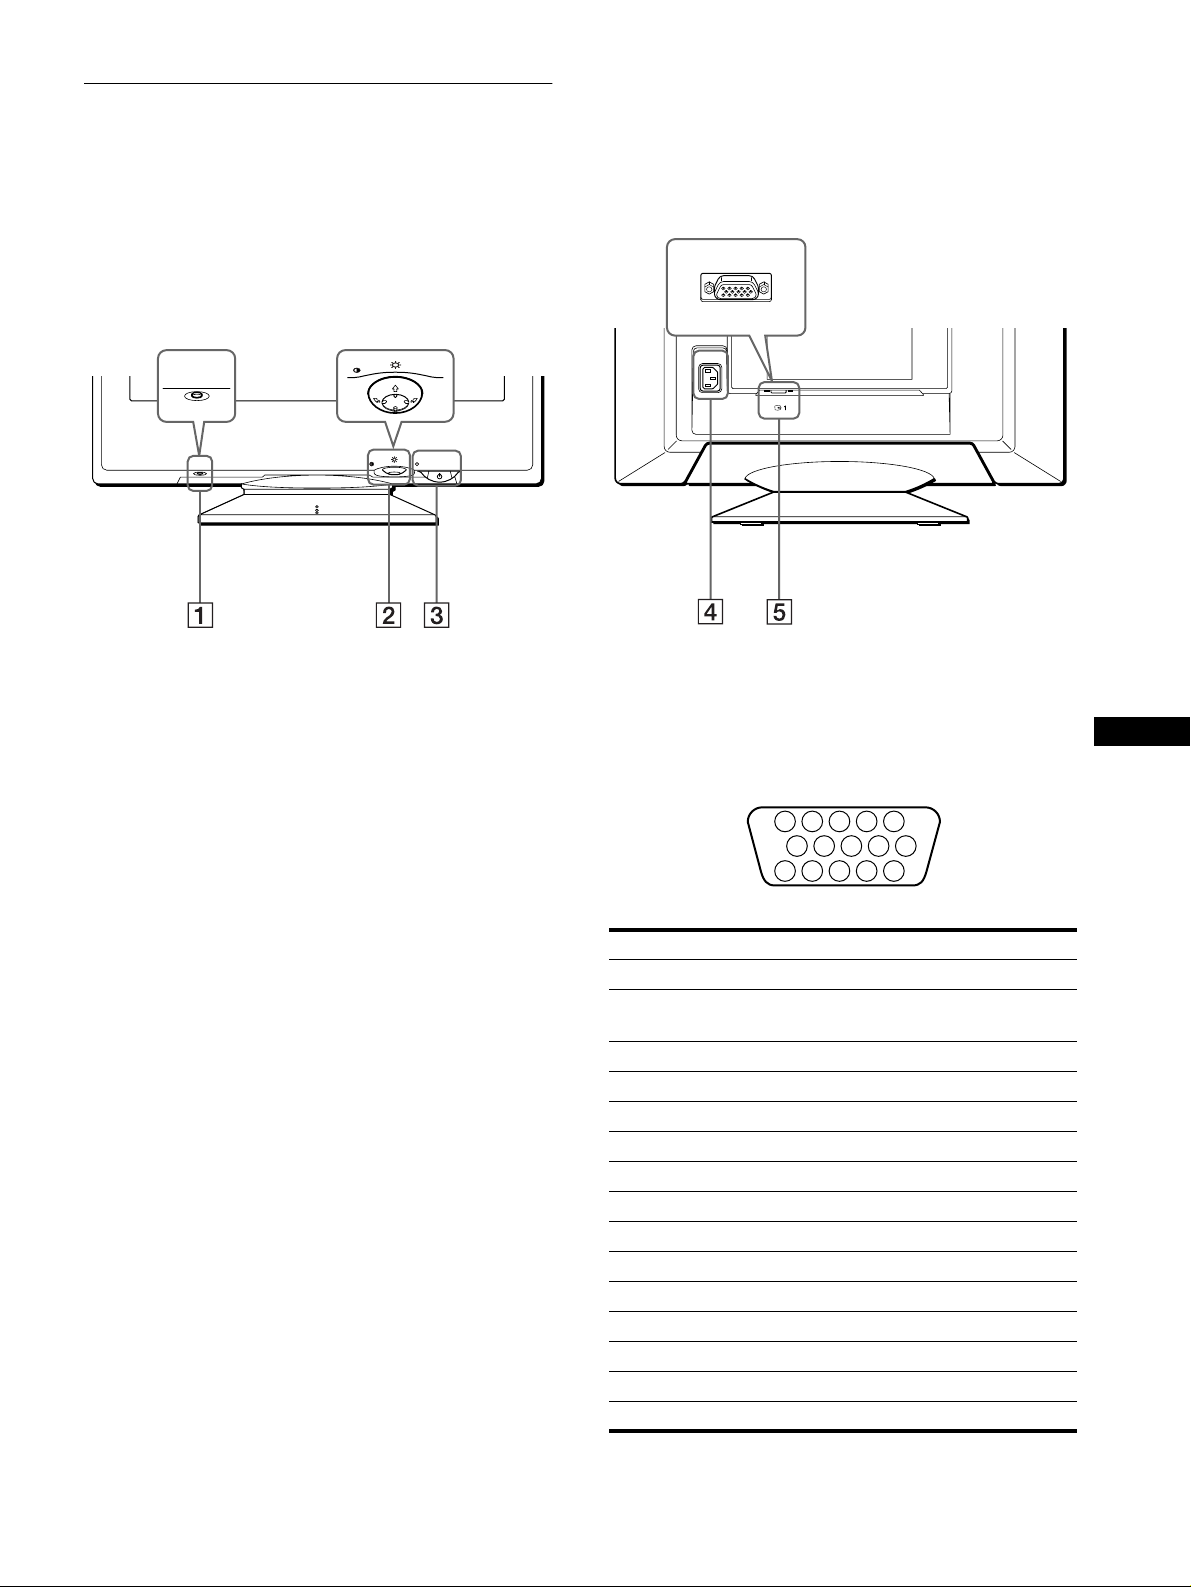
See the pages in parentheses for further details.
MENU
RESET
RESET
MENU
1111 RESET (reset) button (page 14)
This button resets the adjustments to the factory settings.
2222 Control button (page 9)
The control button is used to display the menu and make
adjustments to the monitor, including brightn ess and contrast
adjustments.
RearFront
forward side
rear side
AC IN
(HD15)
4444 AC IN connector (page 6)
This connector provides AC power to the monitor.
5555 Video input connector (HD15) (yyyy1) (page 6)
This connector inputs RGB video sign als (0.700 Vp-p,
positive) and sync signals.
GB
3333 1 (power) switch and indicator (pages 7, 14, 18)
This button turns the monitor on and off. The power ind icator
lights up in green when the monitor is turned on, and either
flashes in green and orange, or lights up in orange when the
monitor is in power saving mode.
Pin No. Signal
1Red
2 Green
(Sync on Green)
3Blue
4 ID (Ground)
5 DDC Ground*
6 Red Ground
7 Green Ground
8 Blue Ground
9 DDC + 5V*
10 Ground
11 ID (Ground)
12 Bi-Directional Data (SDA)*
13 H. Sync
14 V. Sync
15 Data Clock (SCL)*
* DDC (Displ a y Dat a Ch annel) is a standard of VESA.
5
Page 6
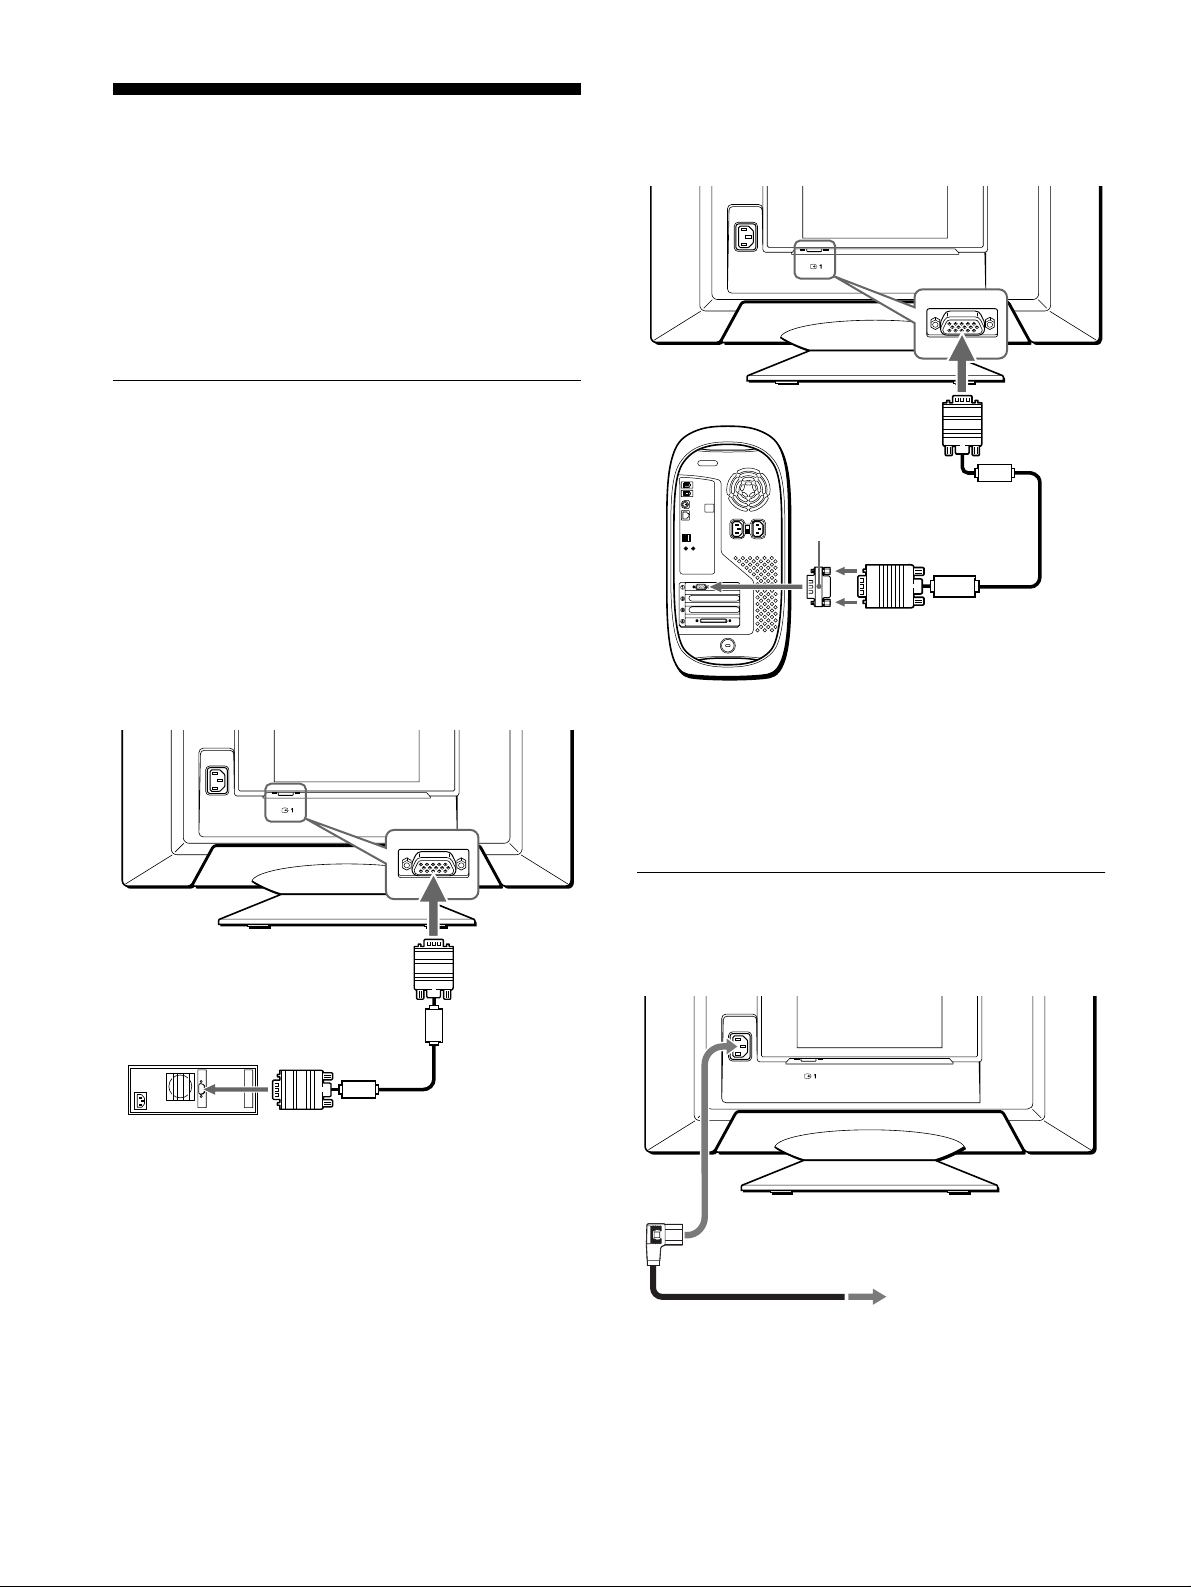
Setup
(HD15)
AC IN
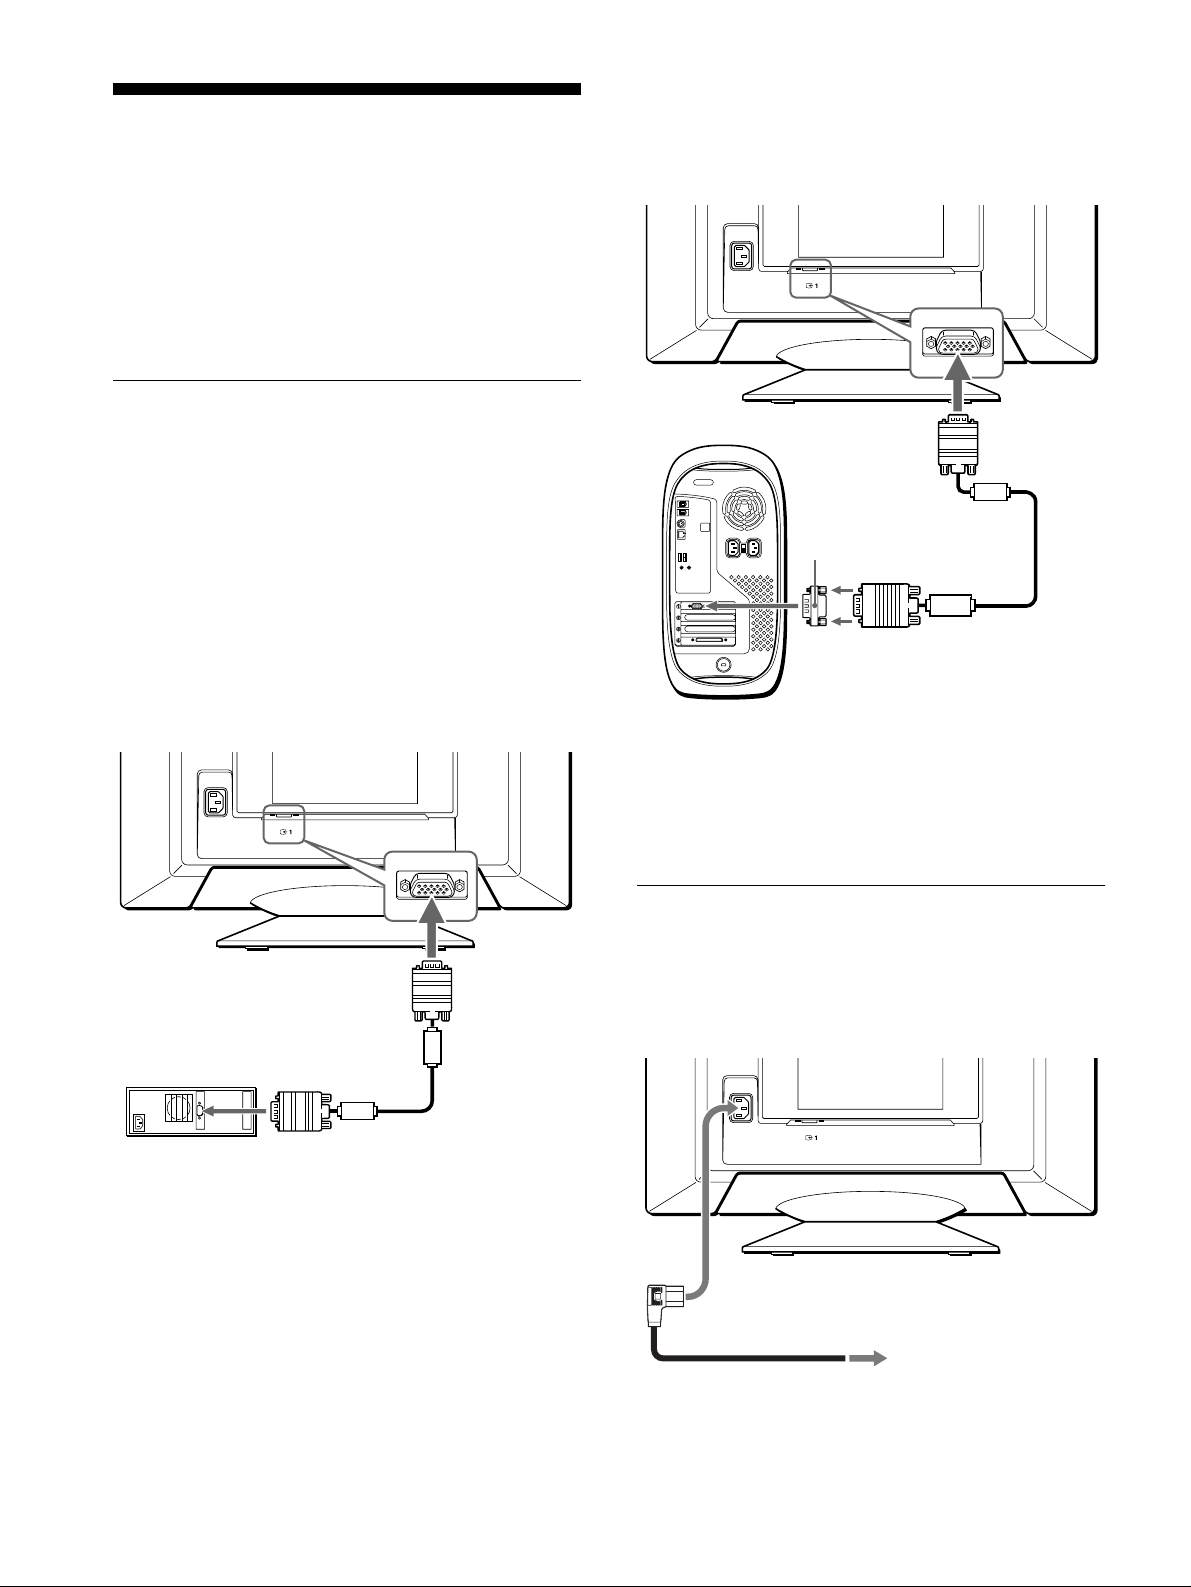
Use the supplied Macintosh G3 adapter (for blue and white
system).
to HD15
Macintosh G3 adapter
(for blue and white
system) (supplied)
*
Power Macintosh G3
to video
output
HD15 video signal
cable (supplied)
(HD15)
AC IN
to AC IN
to a power outlet
power cord (supplied)
Before using your monitor, check that t he following accessories
are included in your carton:
• Power cord (1)
• HD15 video signal cable (1)
• Macintosh G3 adapter (for blue and white system) (1)
• Setup Disk (1)
• Warranty card (1)
• Notes on cleaning the screen’s surface (1)
• This instruction manual (1 )
Step 1:Connect your monitor to
your computer
Turn off the monitor and computer before connecting.
Notes
• Do not touch the pins of the video signal cable connector as this might
bend the pins.
• When connecting the video signal cabl e, che ck the alignment of the
HD15 connector. Do not force the connector in the wro ng way or the
pins might bend.
Connecting to an IBM PC/A T or compatible
xxxx
computer
Connecting to a Macintosh computer
xxxx
AC IN
(HD15)
to video output
HD15 video signal
IBM PC/AT or compatible
computer
cable (supplied)
to HD15
* Connect the suppli e d M ac intosh G3 adapter to the computer befo re
connecting the cabl e. Th is adapter is compatible with the Power
Macintosh G3 computer that has three rows of pi ns. If you a re
connecting to the other version of Power Macintosh G3 series computer
with two rows of pins or other models, you will need a different adapter
(sold separately).
Step 2:Connect the power cord
With the monitor and computer switched off, first connect the
power cord to the monitor, then connect it to a power outlet.
6
Page 7
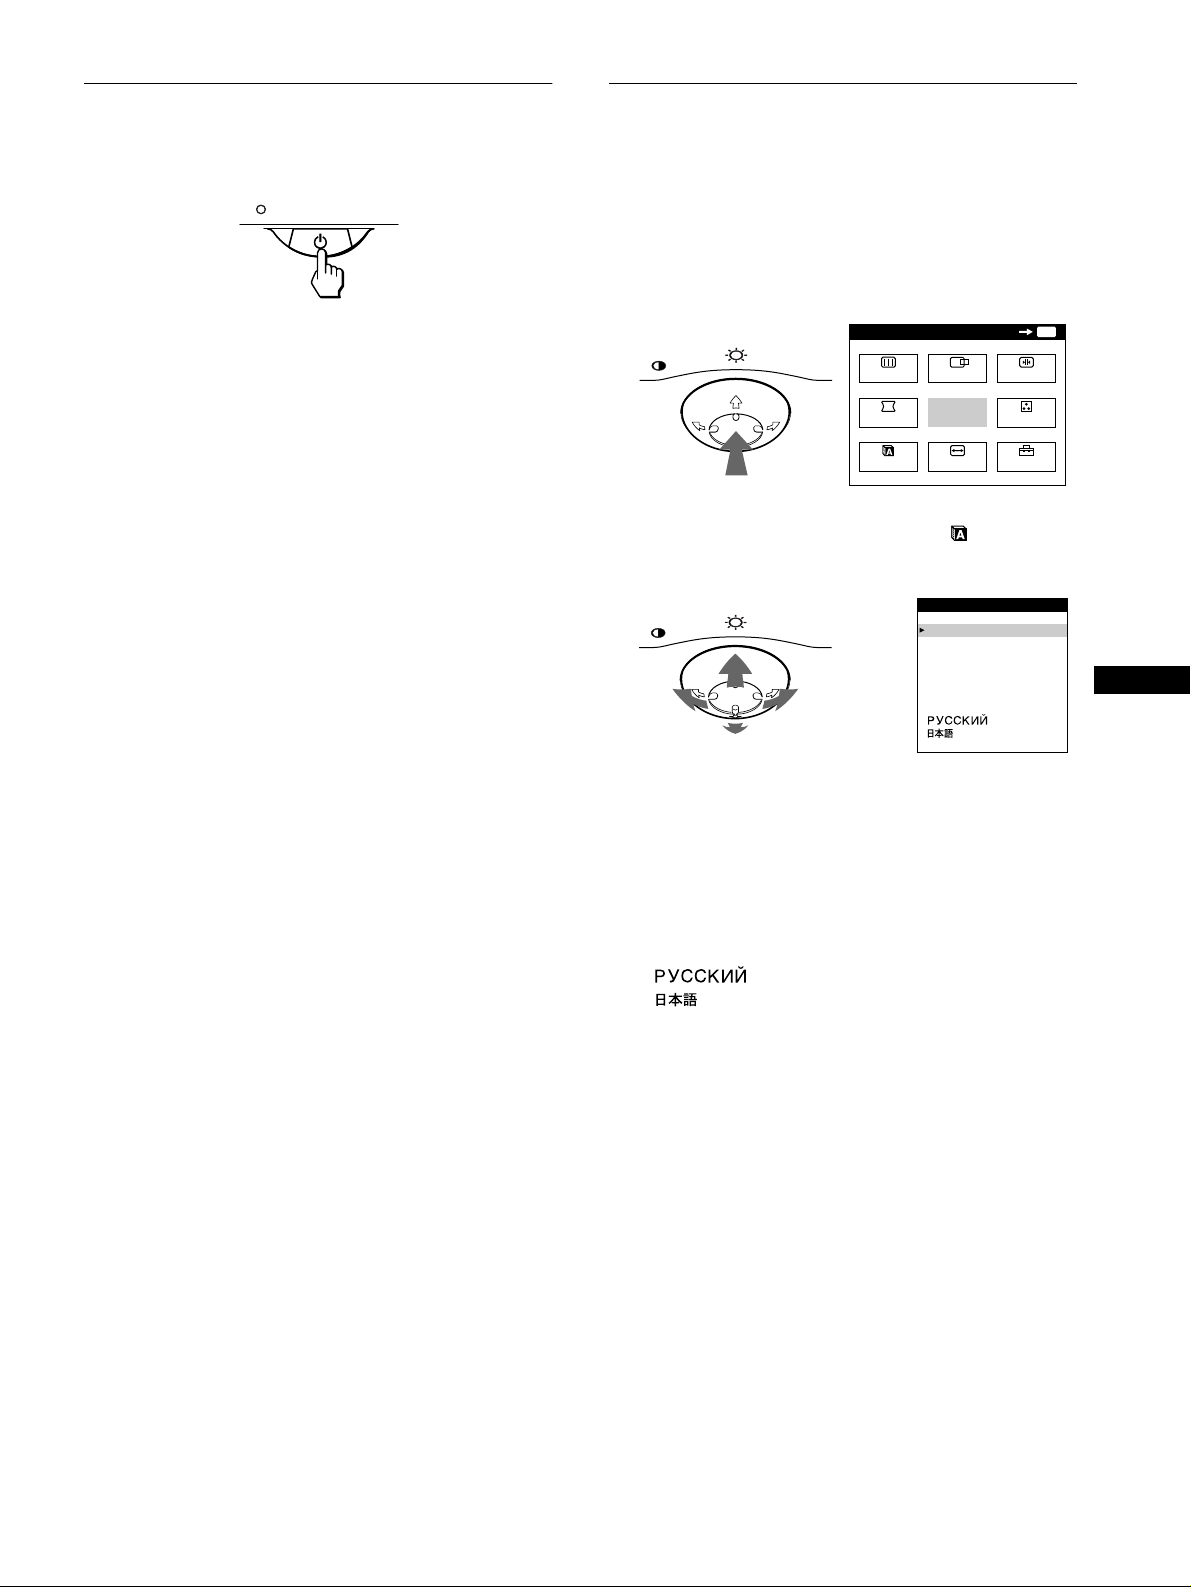
Step 3:Turn on the monitor and
Selecting the on-screen menu
computer
First turn on the monitor, then turn on the computer.
The installation of your monitor is complete.
If necessary, use the monitor’s controls to adjust the picture.
If no picture appears on your screen
• Check that the monitor is correctly connected to the computer.
• If NO INPUT SIGNAL appears on the screen, confirm that
your computer’s graphic board is completely seated in the
correct bus slot.
• If you are replacing an old monitor with this model and OUT
OF SCAN RANGE appears on the screen, reconnect the old
monitor. Then adjust the computer’s graphic board so that the
horizontal frequency is between 30 – 109 kHz, and the vertical
frequency is between 48 – 160 Hz.
For more information about the on-screen messages, see “Trouble
symptoms and remedies” on page 16.
For customers using Windows 95/98
To maximize the potential of your monitor, install the new model
information file from the supplied Setup Disk onto your PC.
This monitor complies with the “VESA DDC” Plug & Play stan dard. If
your PC/graphics board complies with DDC, select “Plug & Play Monitor
(VESA DDC)” or this monitor’s mode l na m e a s the mo nitor type in the
“Control Panel” of Windows 95/98. If your PC/graphics board has
difficulty com municating with th i s m onitor, load the Se tup Disk and
select this monitor’s mo del name as the monitor type.
For customers using Windows NT4.0
Monitor setup in Windows NT4.0 is different from Windows 95/9 8 an d
does not involve the sele c ti on of monitor type. Refer to th e Windows
NT4.0 instruction ma nual for further details on adjusting the resoluti on,
refresh rate, and number of col ors.
language (LANG)
English, French, German, Spanish, Italian, Dutch, Swedish,
Russian and Japanese versions of the on-screen menus are
available. The default setting is English.
1
Press the center of the control button.
See page 9 for more information on using the control button.
MENU
2
Move the control button to highlight LANG and
MENU
SCREEN
GEOM
LANG
CENTER
EXIT
SIZE
press the center of the control button again.
MENU
3
Move the control button m/M to select a language.
LANGUAGE
ENGL ISH
FRANÇA I S
DEUTSCH
ESPAÑOL
ITALIANO
NEDERLANDS
SVENSKA
• ENGLISH
• FRANÇAIS: French
• DEUTSCH: German
• ESPAÑOL: Spanish
• ITALIANO: Italian
• NEDERLANDS: Dutch
• SVENSKA: Swedish
• : Russian
• : Japanese
To close the menu
Press the center of the control button once to return to the main MENU,
and twice to return to normal viewing. If no buttons are pressed, the menu
closes automa tically after about 30 s econds.
OK
CONV
COLOR
OPTION
MENU
GB
To reset to English
Press the RESET button while the LANGUAGE menu is displayed on the
screen.
7
Page 8
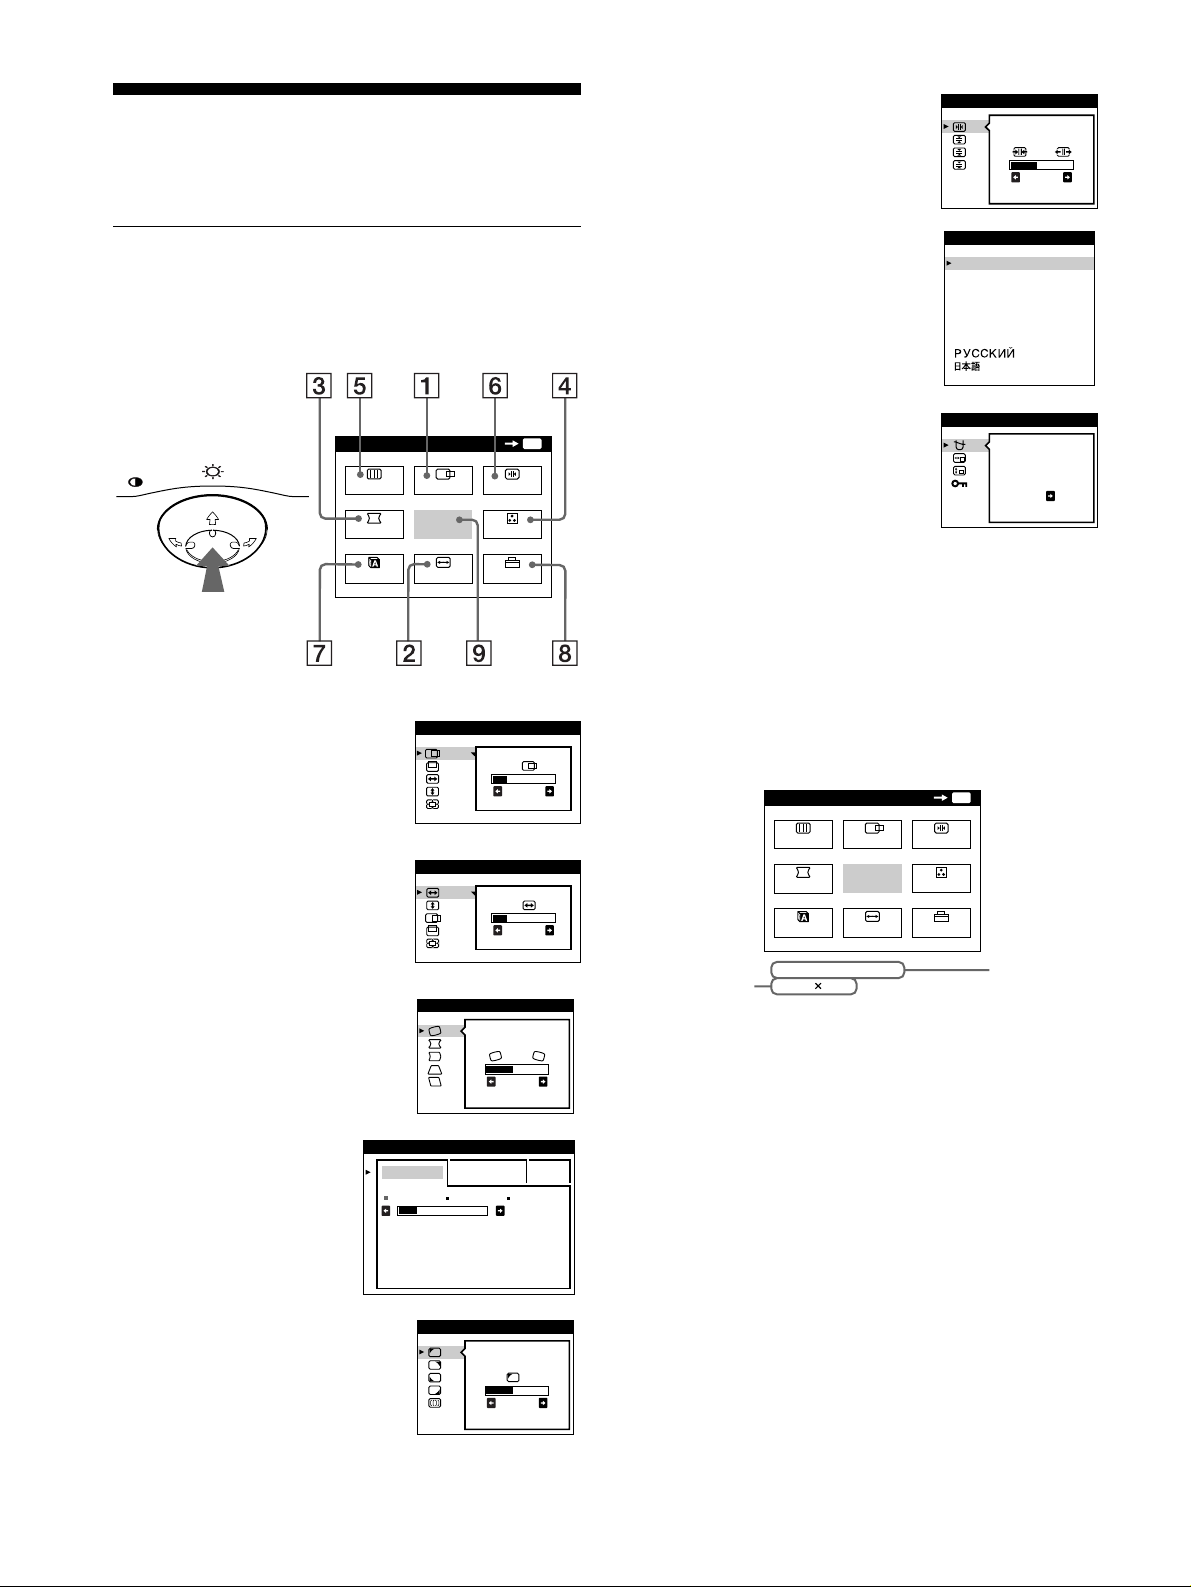
Customizing Your Monitor
MENU
MENU
EXIT
CENTER
SIZE
GEOM
SCREEN
COLOR
LANG
CONV
OPTION
OK
68.7kHz/ 85Hz
1024
768
the horizontal
and vertical
frequencies of
the current
input signal
the resolution
of the current
input signal
You can make numerous adj ustments to your monitor using the
on-screen menu.
6666 CONV (page 11)
Select the CONV menu to adjust the
picture’s horizontal and vertical
convergence.
CONVERGENCE
TOP
BOT
26
Navigating the menu
Press the center of the control button to display the main MENU
on your screen. See page 9 for more information on using the
control button.
MENU
MENU
SCREEN
GEOM
LANG
CENTER
EXIT
SIZE
Use the control button to select one of the following menus.
1111 CENTER (page 10)
SIZE/CENTER
Selects the CENTER menu
to adjust the picture’s
centering, siz e or zoom.
OK
CONV
COLOR
OPTION
MENU
26
7777 LANG (page 7)
Select the LANG menu to choose
the on-screen menu’s languag e.
8888 OPTION (page 13)
Select the OPTION menu to adjust
LANGUAGE
ENGL ISH
FRANÇA I S
DEUTSCH
ESPAÑOL
ITALIANO
NEDERL ANDS
SVENSKA
OPT ION
DEGAUSS
the monitor’s options. The options
include:
• degaussing the screen
ON
• changing the on-screen menu
position
• locking the controls
9999 EXIT
Select EXIT to close the menu.
Displaying the current input signal
xxxx
The horizontal and vertical frequencies of the current input signal
are displayed in the main MENU. If the sign al matches one of this
monitor’s factory preset modes, the resolution is also displayed.
2222 SIZE (page 10)
Selects the SIZE menu to
adjust the picture’s size,
centering or zoom.
3333 GEOM (page 10)
Select the GEOM menu to adjust the
picture’s rotation and shape.
4444 COLOR (page 12)
Select the COLOR menu to
adjust the picture’s color
temperature. You can use
this to match the monitor’s
colors to a printed picture’s
colors.
5555 SCREEN (page 11)
Select the SCREEN menu to adjust
the picture’s quality. You can adjust
the landing and moire cancellation
effect.
SIZE/CENTER
GEOMETRY
COLOR
EASY EXPERT s BGR
5000K 6500K 930 K0
SCREEN
LANDING
26
26
50 K00
26
8
Page 9
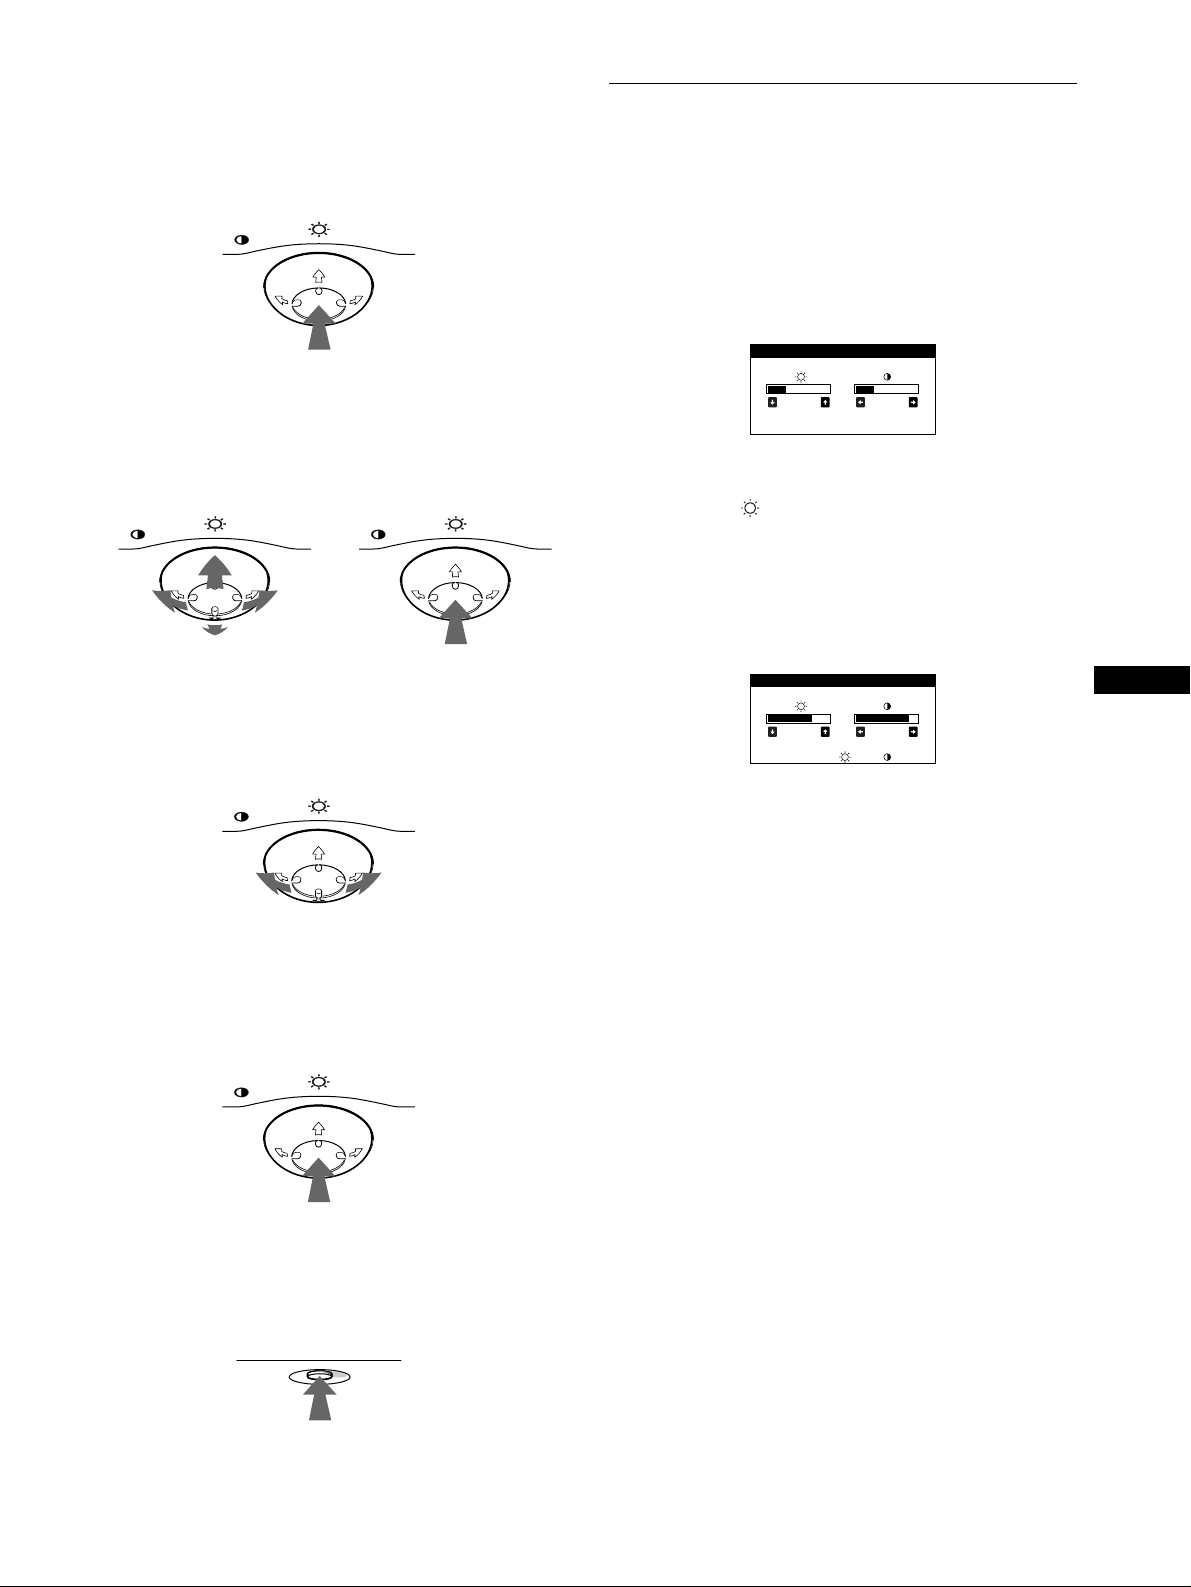
Using the control button
26 26
BR I GHTNESS / CONTRAST
56 76
sRGB : 56 76
BR I GHTNESS / CONTRAST
xxxx
1
Display the main MENU.
Press the center of the control button to display the main
MENU on your screen.
MENU
2
Select the menu you want to adjust.
Highlight the desired menu by moving the control button
towards the rear to go up (M), towards the front to go down
(m), and left (<) or right (,) to move sideways.
FRONT
MENU MENU
REAR
3
Adjust the menu.
Move the control button left (<) or right (,) to make the
adjustment.
Adjusting the brightness and contrast
Brightness and contrast adjust ments are made using a separate
BRIGHTNESS/CONTRAST menu.
These settings are stored in memory for all input signals.
1
Move the control button in any direction.
The BRIGHTNESS/CONTRAST menu appears on the
screen.
2
Move the control button m/M to adjust the
brightness ( ), and </, to adjust the contrast
(6).
If you are using the sRGB mode
If you selected the sRGB mode in the COLOR menu, the
following BRIGHTNE SS/CONTRAST menu appe ars on the
screen.
GB
MENU
4
Close the menu.
Press the center of the control button once to return to the
main MENU, and twice to return to normal viewing. If no
buttons are pressed, the menu closes automatically after about
30 seconds.
MENU
Resetting the adjustments
xxxx
Press the RESET button. See page 14 for more information on
resetting the adjustments.
RESET
For more information about u s ing the sRGB mode, see
“Adjusting the color of the pict ure (COLOR)” on page 12.
The menu automatically disappears after about 3 seconds.
9
Page 10
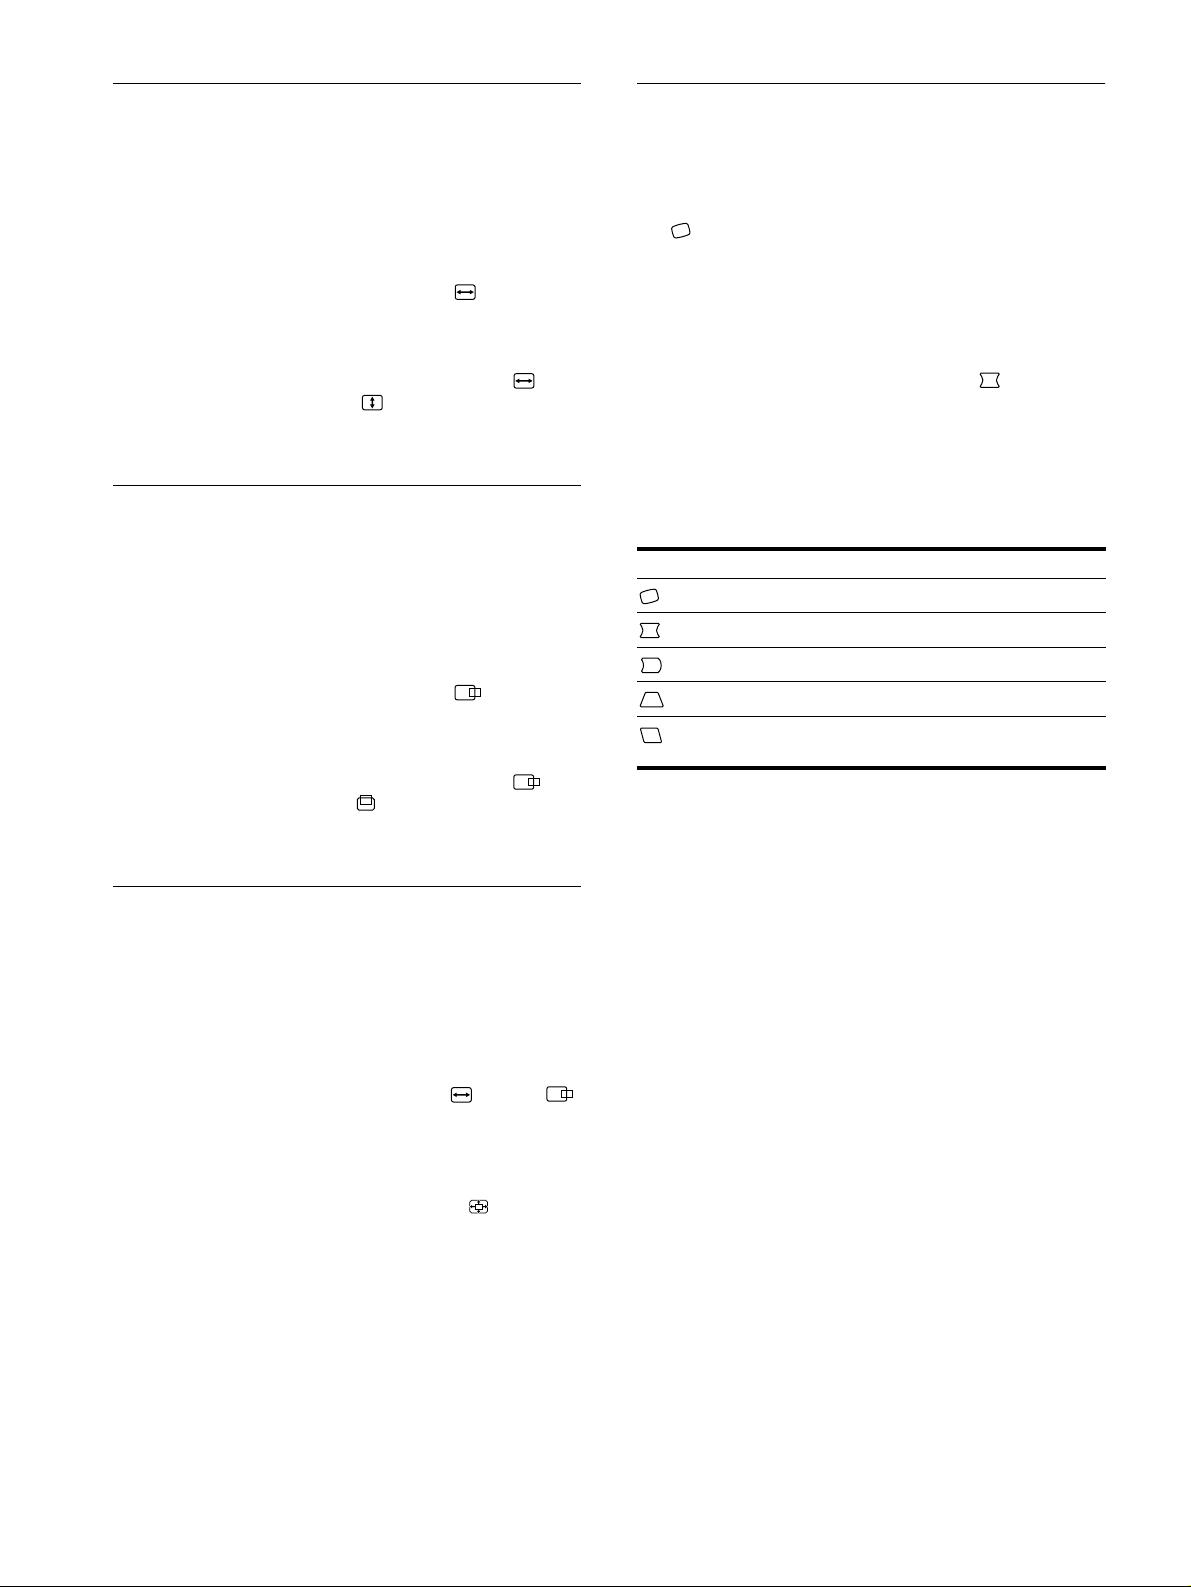
Adjusting the size of the picture
Adjusting the shape of the picture
(SIZE)
This setting is stored in memory for the current input signal.
1
Press the center of the control button.
The main MENU appears on the screen .
2
Move the control button to highlight SIZE and
press the center of the control button again.
The SIZE/CENTER menu appears on the screen.
3
First move the control button m/M to select for
horizontal adjustment, or for vertical
adjustment. Then move the c ontrol button </, to
adjust the size.
Adjusting the centering of the picture (CENTER)
This setting is stored in memory for the current input signal.
1
Press the center of the control button.
The main MENU appears on the screen .
2
Move the control button to highlight CENTER
and press the center of the control button again.
The SIZE/CENTER menu appears on the screen.
3
First move the control button m/M to select for
horizontal adjustment, or for vertical adjustment.
Then move the control button </, to adjust the
centering.
(GEOM)
The GEOM settings allow you to adjust t he rotation a nd shape of
the picture.
The (rotation) setting is stored in memory for a ll input signals.
All other settings are stored in memory for the current input
signal.
1
Press the center of the control button.
The main MENU appears on the screen.
2
Move the control button to highlight GEOM and
press the center of the control button again.
The GEOMETRY menu appears on the screen.
3
First move the control button m/M to select the
desired adjustment item. Then move the control
button </, to make the adjustment.
Select To
rotate the picture
expand or contract the picture sides
shift the picture sides to the left or right
adjust the picture width at the top of the screen
shift the picture to the left or rig ht at the top of the
screen
Enlarging or reducing the picture (ZOOM)
This setting is stored in memory for the current input signal.
1
Press the center of the control button.
The main MENU appears on the screen .
2
Move the control b utton to highl ight SIZE or
CENTER and press the center of the control button
again.
The SIZE/CENTER menu appears on the screen.
3
Move the control button m/M to select (zoom),
and move </, to enlarge or reduce the picture.
Note
Adjustment stops when either the horizontal or vertical size reaches its
maximum or minimum value.
10
Page 11
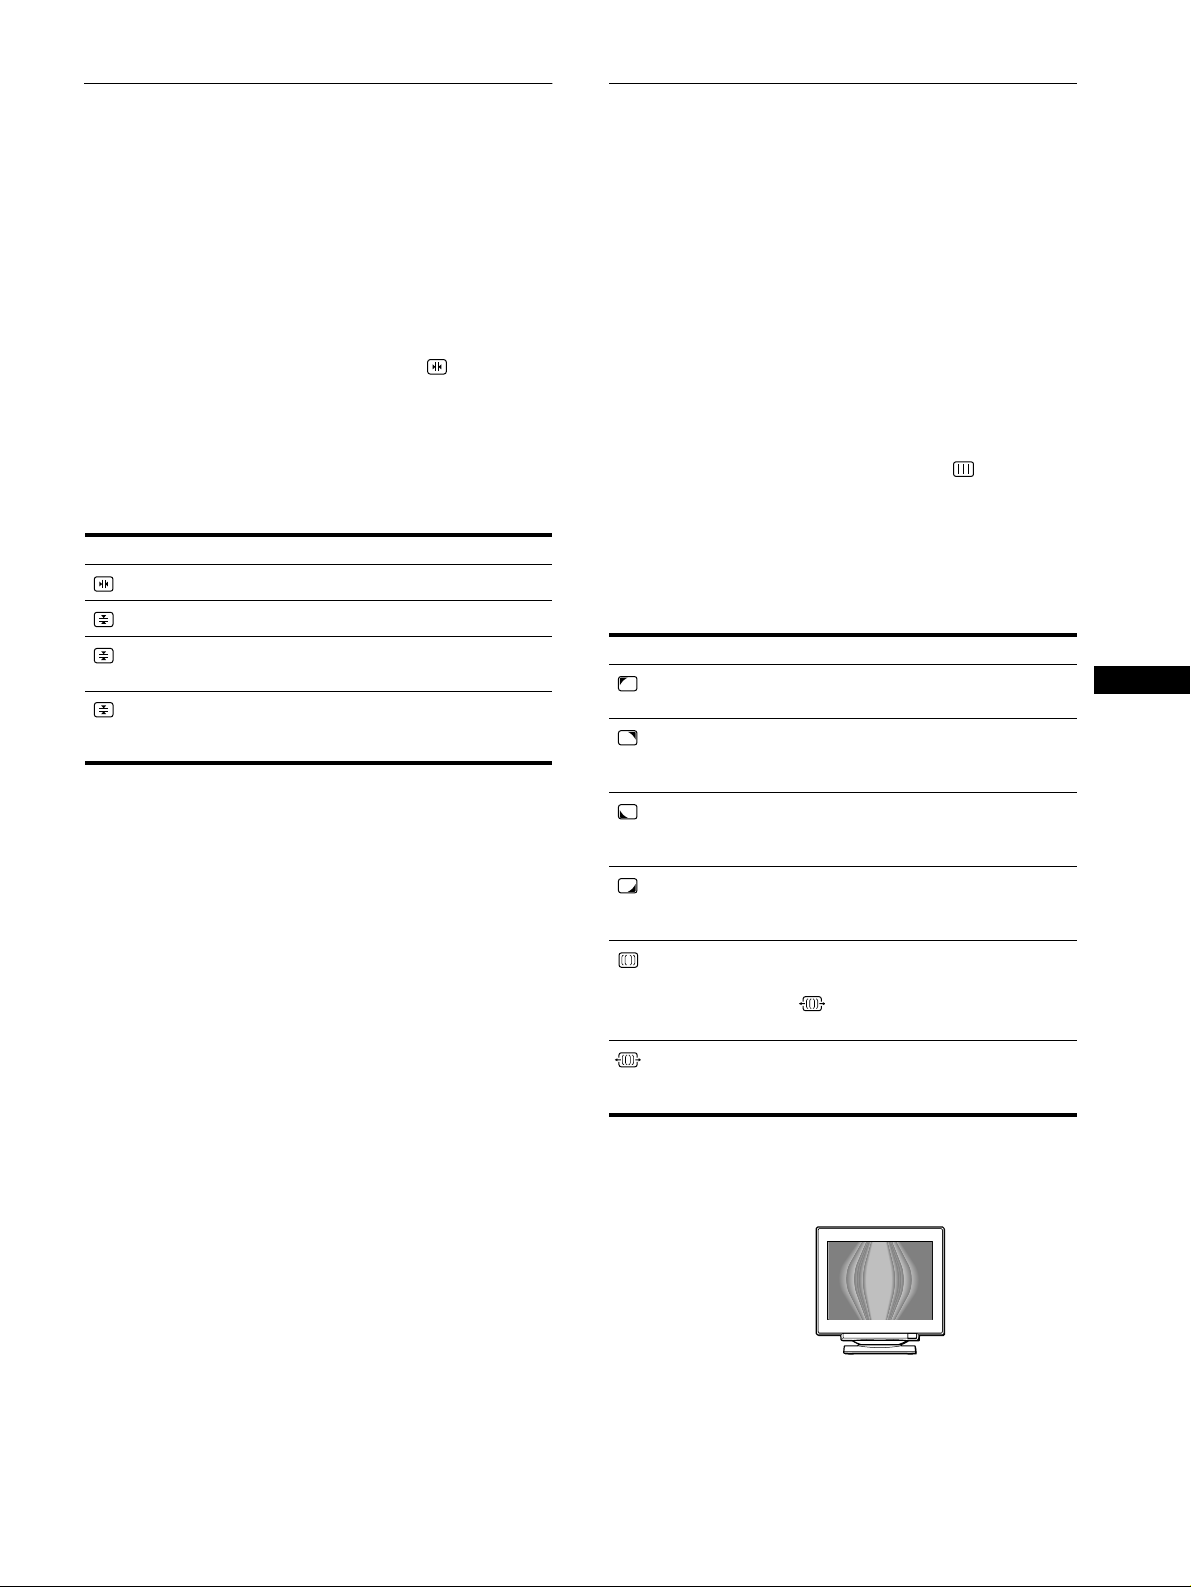
Adjusting the convergence (CONV)
Adjusting the quality of the picture
The CONV settings allow yo u t o a d just the q ua lit y o f th e pi ctur e
by controlling the converg ence. The convergence refers to the
alignment of the r ed, green, and blue c olor signals.
If you see red or blue shadows around letters or lines, adjust the
convergence.
These settings are stored in memory for all input signals.
1
Press the center of the control button.
The main MENU appears on the screen.
2
Move the control button to highlight CONV and
press the center of the control button again.
The CONVERGENCE menu appears on the screen.
3
First move the control button m/M to select the
desired adjustment item. Then move the control
button </, to make the adjustment.
Select To
TOP
V CONVER TOP
BOT
V CONVER
BOTT OM
horizontally shift red or blue shadows
vertically shift red or blue shadows
vertically shift red or blue shado ws at
the top of the screen
vertically shift red or blue shado ws at
the bottom of the screen
(SCREEN)
The SCREEN settings allow you to adjust the quality of the
picture by controll ing the moire and landing.
• If the color is irregular at the corners of the screen, adjust the
landing.
• If elliptical or wavy patterns appear on the screen, cancel the
moire.
The CANCEL MOIRE and MOIRE ADJUST settings are stored
in memory for the current input signal. All other settings are
stored in memory for all input signals.
1
Press the center of the control button.
The main MENU appears on the screen .
2
Move the control button to highlight SCREEN
and press the center of the control button again.
The SCREEN menu appears on the screen.
3
First move the control button m/M to select the
desired adjustment item. Then move the control
button </, to make the adjustment.
Select To
LANDING
LANDING
LANDING
LANDING
CANCEL MOIRE
MOIRE ADJUST
reduce any color irregularities in the
screen’s top left corner to a minimum.
reduce any color irregularities in the
screen’s top ri g h t corner to a
minimum.
reduce any color irregularities in the
screen’s bot t om le f t co r ner to a
minimum.
reduce any color irregularities in the
screen’s bottom right corner to a
minimum.
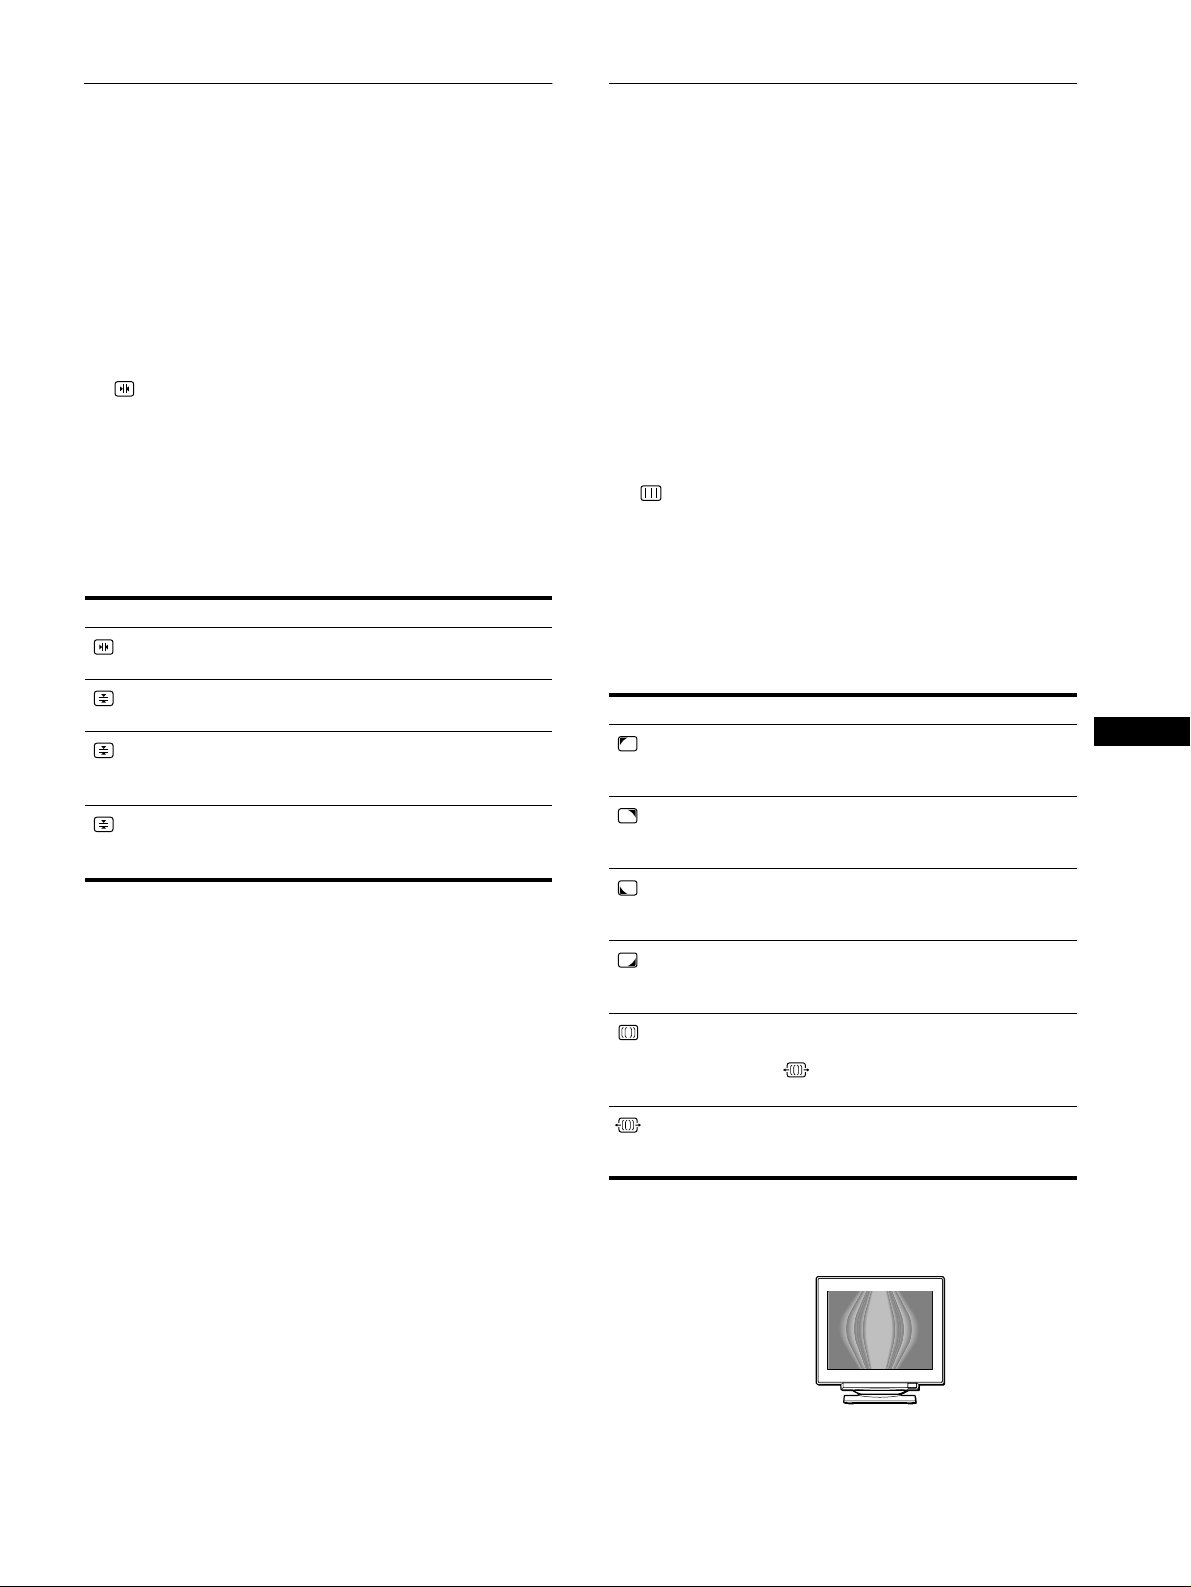
turn the moire cance llation function
ON or OFF.
*
(MOIRE ADJUST) appears in
the menu when you select ON.
adjust the degree of moire
cancellation until the moire is at a
minimum.
GB
* Moire is a type of natural interference which produces soft, wavy lines
on your screen. It may app ea r due to interference betwee n the pattern
of the picture on the screen and the phosphor pitch pattern of the
monitor.
Example of moire
Note
The picture may become fuzzy when CANCEL MOIRE is set to ON.
11
Page 12
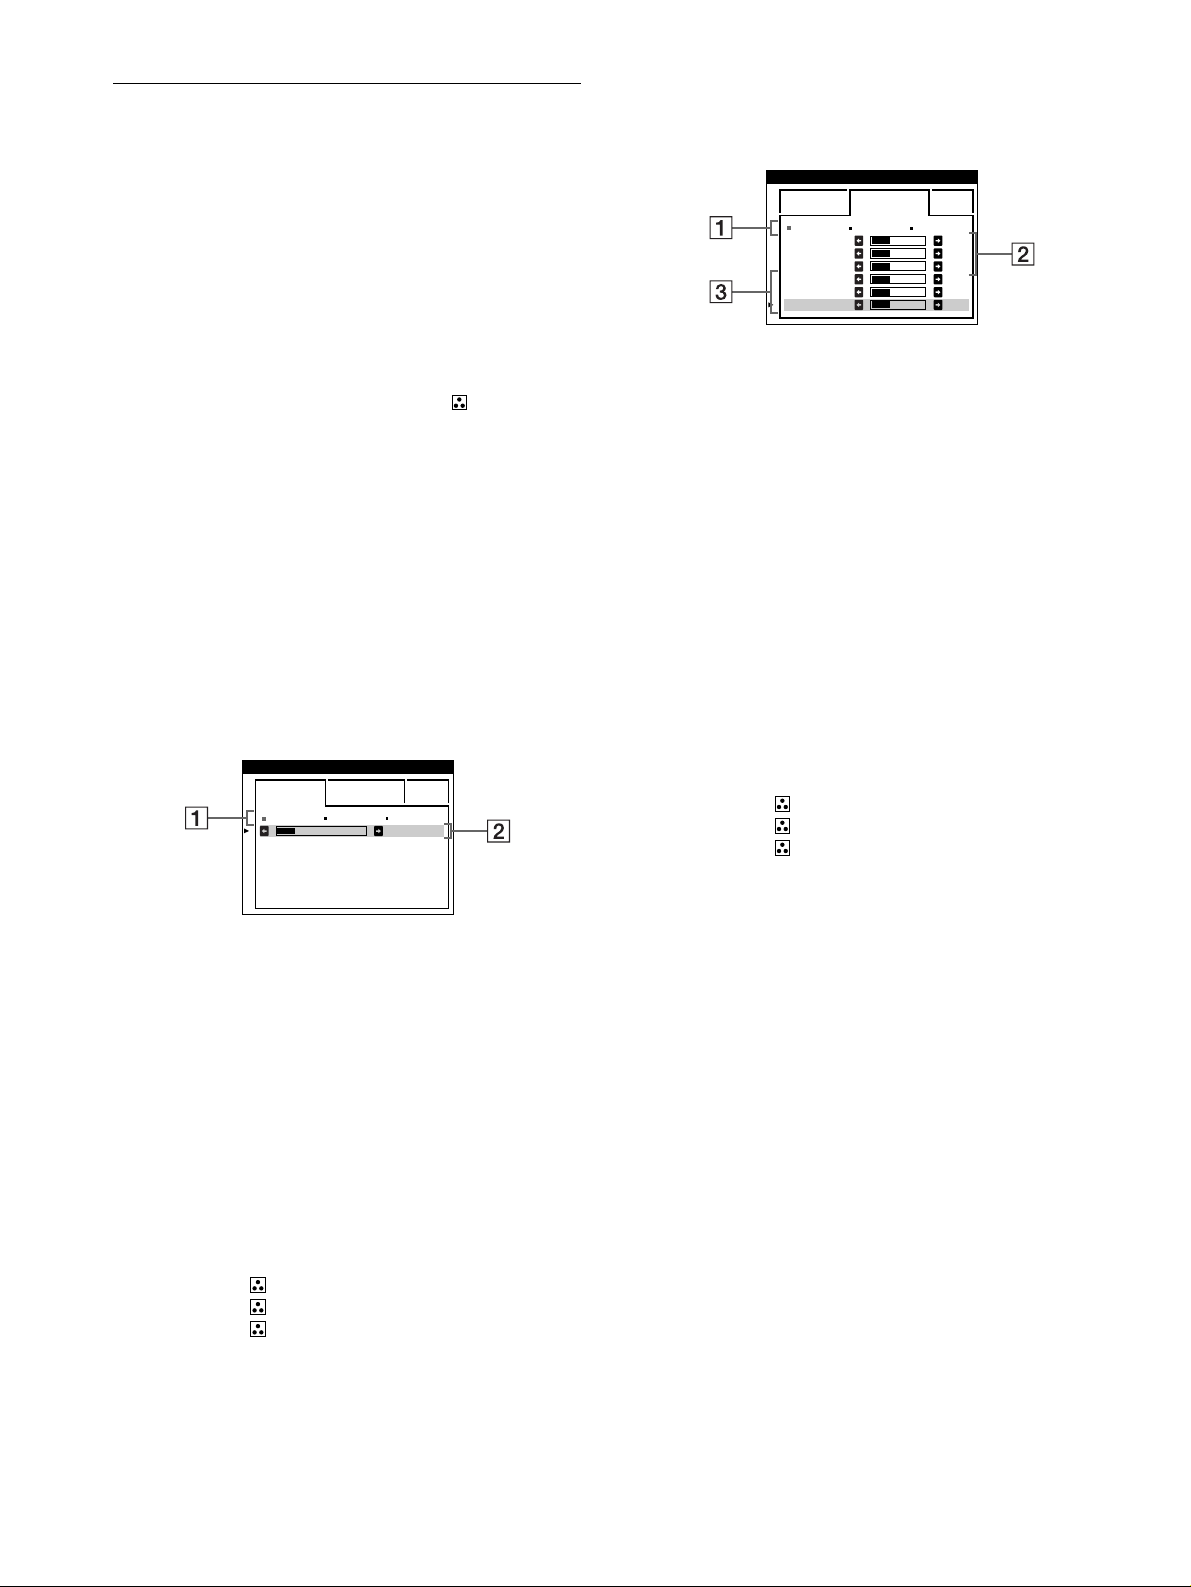
Adjusting the color of the picture (COLOR)
The COLOR settings allow you to adjust the picture’s color
temperature by changing th e color level of the white color field.
Colors appear reddish if the temperature is low, and bluish if the
temperature is high. This adjustment is useful for matching the
monitor’s color to a printed picture’s colors.
These settings are stored in memory for all input signals.
1
Press the center of the control button.
The main MENU appears on the screen .
2
Move the control butto n to highlight COLOR and
press the center of the control button again.
The COLOR menu appears on the screen.
3
Move the control button
adjustment mode.
There are three types of adjustment modes, EASY, EXPERT
and sRGB.
4
First move the control button m/M to select the
desired adjustment item. Then move the control
button </, to make the adjustment.
Adjust the selected mode according to the following
instructions.
<<<</,,,,
to select the
EXPERT mode
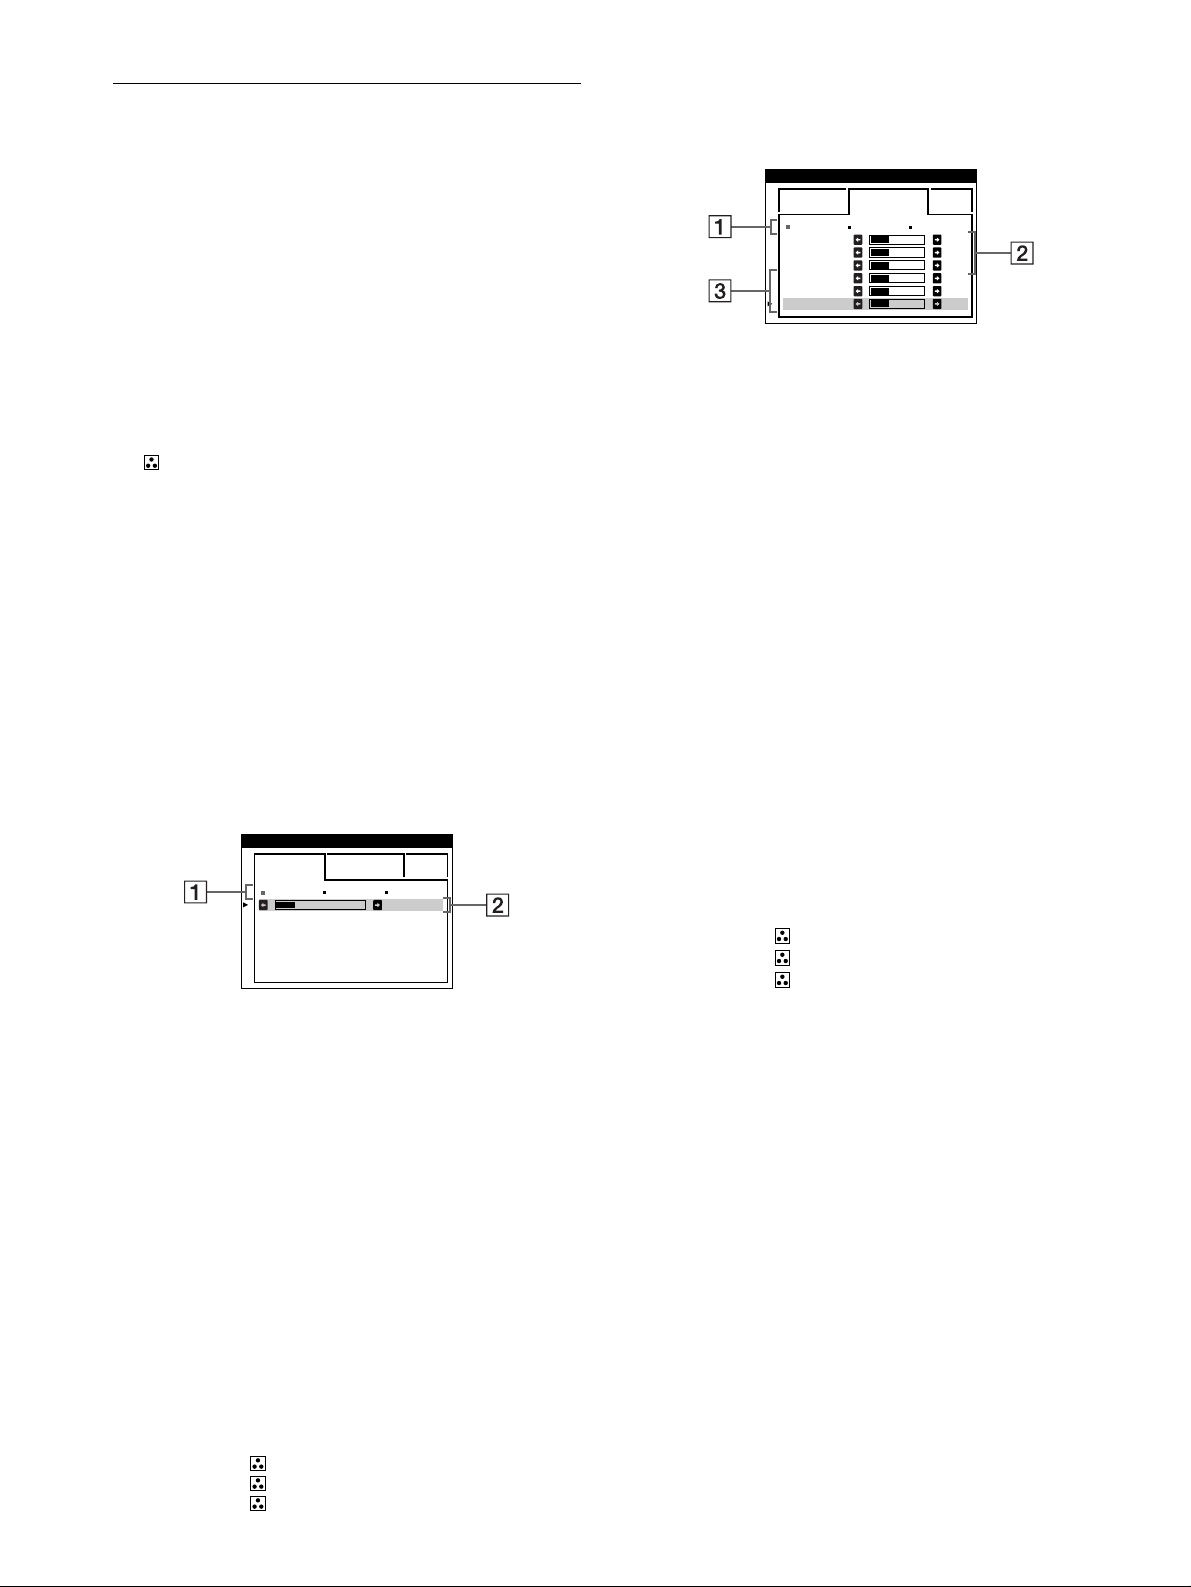
You can make additional adjustments to the color in g reater detail
by selecting the EXPERT mode.
COLOR
EASY EXPERT s BGR
5000K 6500K 930 K0
R BIAS 05
G BIAS 05
B BIAS 05
RGAIN 05
GGAIN 05
BGAIN 05
1
Move the control button
temperature row
<<<</,,,,
to select a color temperature.
2
Move the control button
adjustment item
<<<</,,,,
to adjust the BIAS (black level).
1111
2222
This adjusts the dark areas of an image.
3
Move the control button
adjustment item
<<<</,,,,
to adjust the GAIN (white level).
3333
This adjusts the light areas of an image.
You can adjust the R (red), G (green), B (blue) component of
the input signal when making changes to items 2 and 3.
mmmm/MMMM
to select the color
. Then move the control button
mmmm/MMMM
to select the
. Then move the control button
mmmm/MMMM
to select the
. Then move the control button
EASY mode
COLOR
EASY EXPERT s BGR
5000K 6500K 930 K0
1
Move the control button
temperature row
<<<</,,,,
to select a color temperature.
1111
. Then move the control button
The preset color temperatures are 5000K, 6500K, and 9300K.
Since the default setting is 9300K, the whites will change
from a bluish hue to a reddish hue as the temperature is
lowered to 6500K and 500 0K .
2
If necessary, fine tune the color temperature.
Move the control button
temperature row
<<<</,,,,
to fine tune the color temperature.
2222
. Then move the control button
If you fine tune the color temperatu re, the ne w color settings
are stored in memory for each of the three color temperatures
and item 1 of the on-screen menu changes as follows.
• [5000K]t[1]
• [6500K]t[2]
• [9300K]t[3]
50 K00
mmmm/MMMM
to select the color
mmmm/MMMM
to select the color
If you fine tune the color temperature, the new color settings
are stored in memory for each of the three color temperatures
and item 1 of the on-screen menu change as follows.
• [5000K]t[1]
• [6500K]t[2]
• [9300K]t[3]
12
Page 13
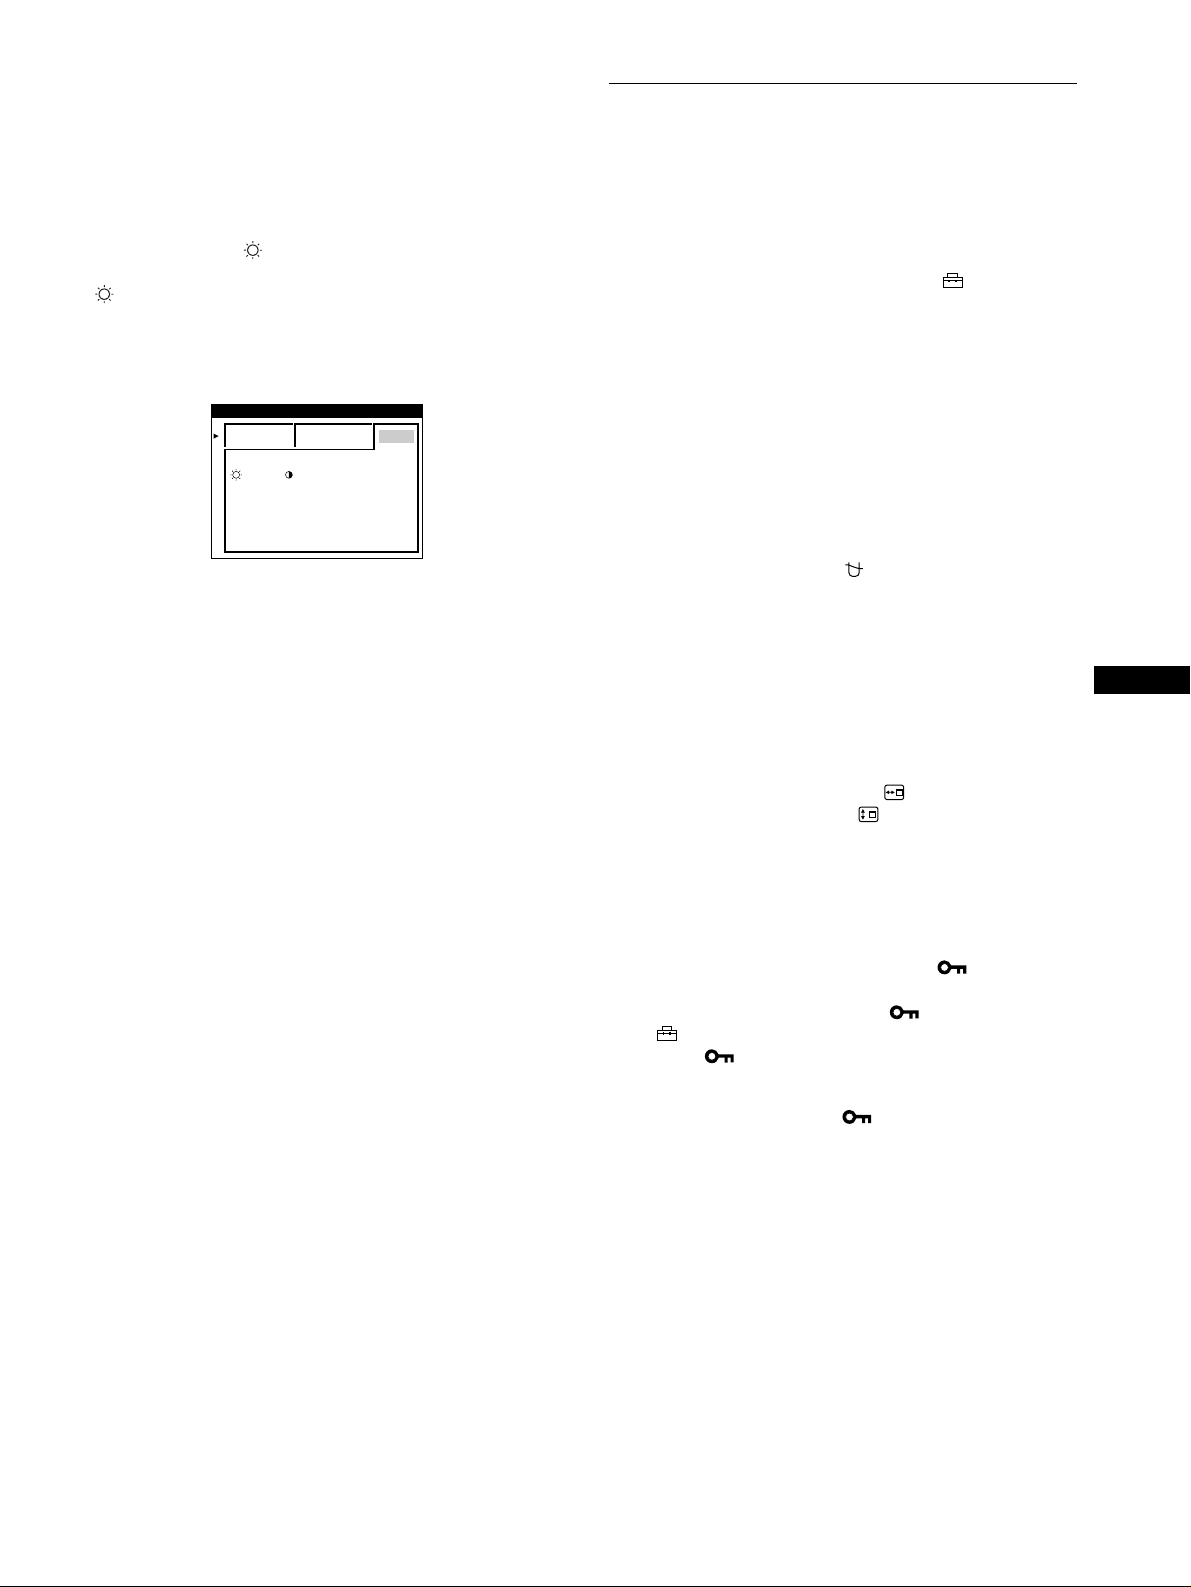
sRGB mode
The sRGB color setting is an industry standard color space
protocol designed to correlate the displayed and printed colors of
sRGB compliant computer products. To adjust the colors to the
sRGB profile, simply select the sRGB mode in the COLOR menu.
However, in order to display the sRGB colors correctly (γ=2.2,
6500K), you must set your computer to the sRGB profil e and
adjust the brightness ( ) and contrast (6) to the numbers shown
in the menu. For information on how to change the brightness
( ) and contrast (6), see page9.
Note
Your computer and other connected products (such as a printer), must be
sRGB comp li ant.
COLOR
EASY EXPERT s BGR
Additional settings (OPTION)
You can manually degauss (demagnetize) the monitor, change the
menu position, and lock the controls.
1
Press the center of the control button.
The main MENU appears on the screen .
2
Move the control button to highl ight OPTION and
press the center of the control button again.
The OPTION menu appears on the screen.
3
Move the control button m/M to select the desired
adjustment item.
Adjust the selected item according to the following
instructions.
:56 :76 FOR s BGR
Degaussing the screen
The monitor is automaticall y demagnetized (deg aussed) when the
power is turned on.
To manually degauss the monitor, first move the
control button m/M to select (DEGAUSS). Then move
the control button ,.
The screen is degaussed for about 2 seconds. If a second degauss
cycle is needed, allow a minimum interval of 20 minutes for the
best result.
GB
Changing the menu’s position
Change the menu’s position if it is blocking an image on the
screen.
To change the menu’s on-screen position, first move
the control button m/M to select (OSD H POSITION)
for horizontal adjustment, or (OSD V POSITION) for
vertical adjustment. Then move the control button
</, to shift the on-screen menu.
Locking the controls
To protect adjustment data by locking the cont rols, first
move the control button m/M to select (CONTROL
LOCK). Then move the control button ,, to select O N .
Only the 1 (power) switch, EXIT, and (CONTROL LOCK)
of the OPTION menu will operate. If any other items are
selected, the mark ap pears on the screen.
To cancel the control lock
Repeat the procedure above and set (CONTROL LOCK) to OFF.
13
Page 14

Resetting the adjustments
This monitor has the following three reset methods. Use the
RESET button to reset the adjustments.
RESET
Resetting a single adjustment item
Use the control button to select the adjustment item you want to
reset, and press the RESET button.
Resetting all of the adjustment data for the
current input signal
Press the RESET button when no menu is disp layed on the scre en.
Note that the following items are not reset by this method:
• on-screen menu language (page 7)
• adjustment mode in the COLOR menu (EASY, EXPERT,
sRGB) (page 12)
• on-screen menu position (page 13)
• control lock (page 13)
Resetting all of the adjustment data for all input
signals
Press and hold the RESET button for more than two seconds.
Technical Features
Preset and user modes
When the monitor receives an input signal, it automatically
matches the signal to one of the factory preset modes stored in the
monitor’s memory to provide a high quality picture at the center of
the screen.
For input signals that do not match one of the factory preset modes,
the digital Multiscan technology of this monitor ensures that a
clear picture appears on the screen for any timing in the monitor’s
frequency range (horizontal: 30 – 109 kHz, vertical: 48 – 160 Hz).
If the picture is adjusted, the adjustment data is stored as a user
mode and automatically recalled whenever the same input signal
is received.
Note for Windows users
For Windows users, check your vide o board man ual or the utility
program which comes wi th your graphic board and select the
highest available refresh rate to maximize monitor performance.
Power saving function
This monitor meets the power-saving guidelines set by VESA,
E
NERGY STAR, and NUTEK. If the monitor is connected to a
computer or video graphics board that is DPMS (Display Power
Management Signaling) compliant, the monitor will automatically
reduce power consumption in three stages as shown below
(See Appendix for a list of the factory preset modes.)
.
Note
The RESET button does not function when
is set to ON.
(CONTROL LOCK)
Power mode Power consumption1 (power)
normal
operation
1 standby ≤ 15 W green and orange
2 suspend
(sleep)*
3 active off**
(deep sleep)*
power off 0 W off
* “Sleep” and “deep sleep” are power saving mo des defined by the
Environmental Protection Agency.
** When your computer enters in a power saving mode, the input signal
is cut and NO INPUT SIGNAL appears on the screen. After a few
seconds, the monitor enters powe r saving mode.
≤ 145 W green
≤ 15 W green and orange
Approx. 1 W orange
indicator
alternate
alternate
14
Page 15
Troubleshooting
Before contacting technical support, refer to this section.
On-screen messages
If there is something wrong with the input signal, one of the
following messages appears on the screen.
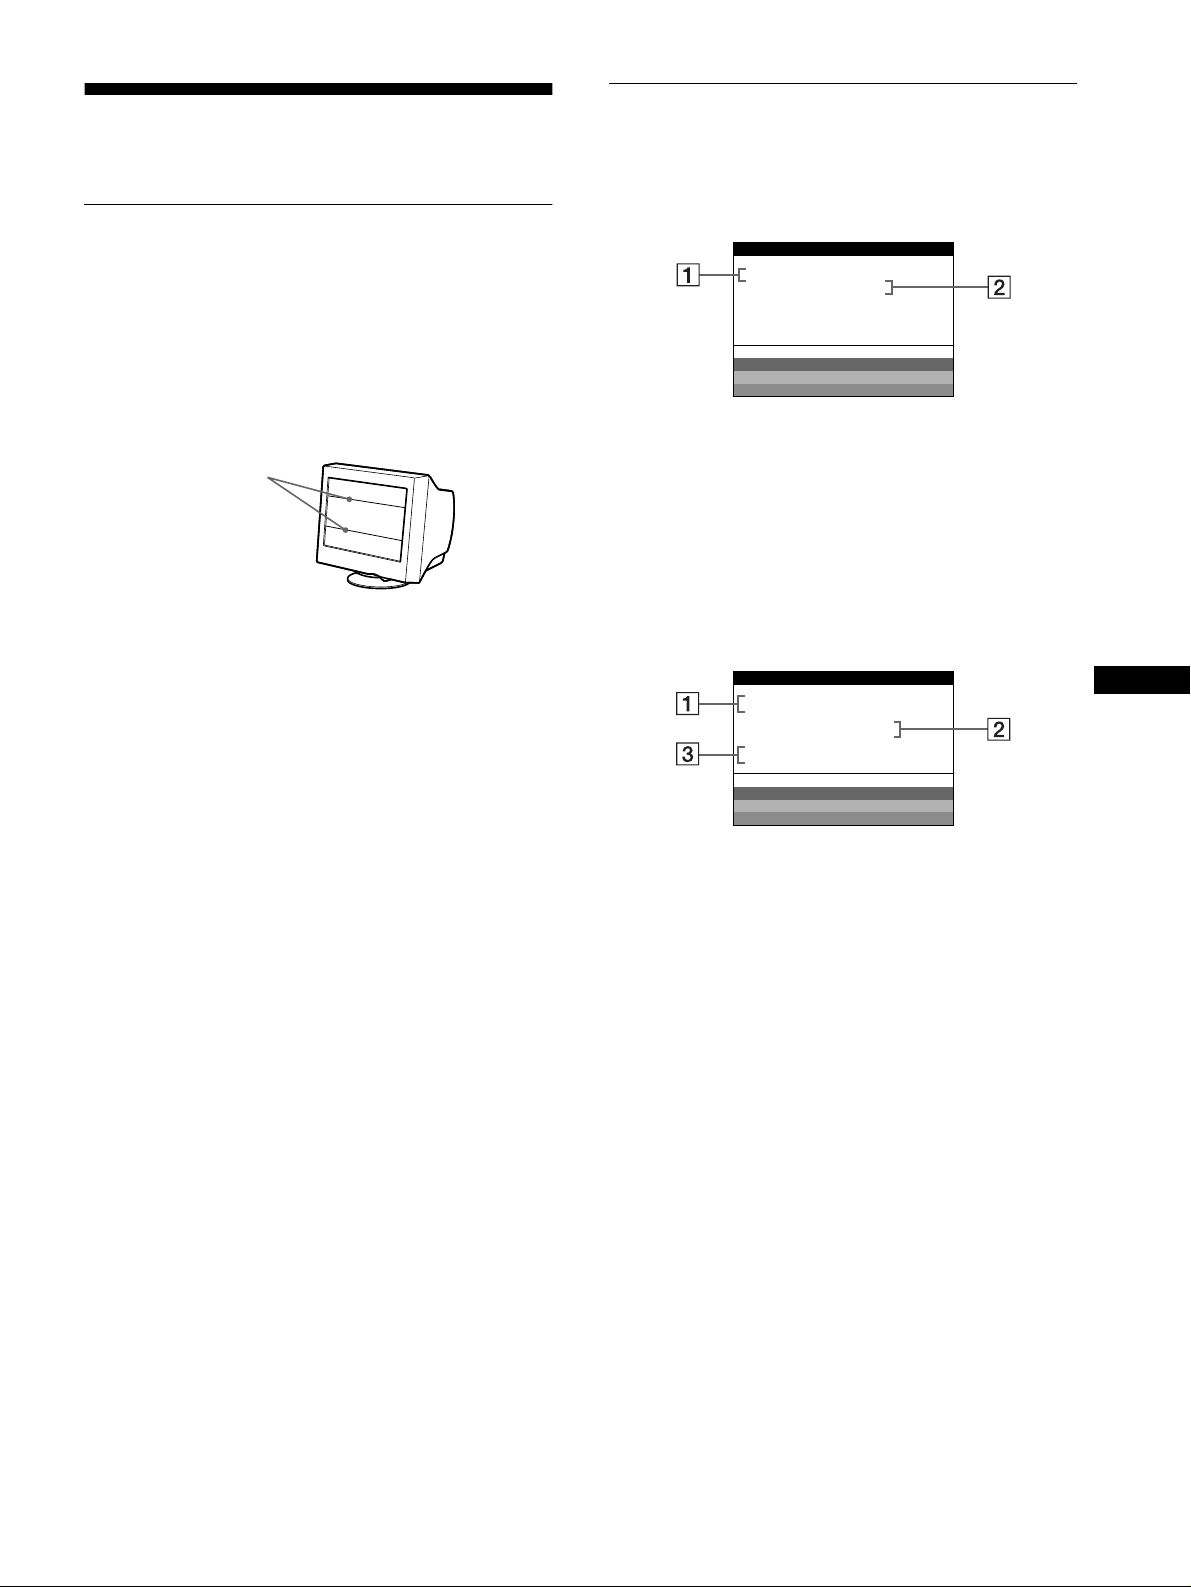
If thin lines appear on your screen (damper wires)
The lines you are experiencing on your screen are normal for the
Trinitron monitor and are not a malfunction. These are shadows
from the damper wires used to stabilize the aperture grille and are
most noticeable when the screen’s background is light (usually
white). The aperture grille is the essential element that makes a
Trinitron picture tube un iqu e by allo wing m ore lig h t to reac h t he
screen, resulting in a brighter, more detailed picture .
Damper wires
If NO INPUT SIGNAL appears on the screen
INFORMATION
MONI T OR I S WORK I NG
INPUT : 68.7kHz/ H58z
NO INPUT S I GNAL
WH I T E
RED
GREEN
BLUE
1111 The frequencies of the current input signal
If the monitor recognizes the frequencies of the current input
signal, the horizontal and vertical frequencies are displayed.
2222 The input signal condition
NO INPUT SINGAL
This indicates that no signal is input.
If OUT OF SCAN RANGE appears on the screen
INFORMATION
MONI TOR I S WORK I NG
INPUT :130.0kHz/ H57
OUT OF SCAN RANGE
CHANGE S IGNAL T I MI NG
WH I T E
RED
GREEN
BLUE
z
GB
1111 The frequencies of the current input signal
If the monitor recognizes the frequencies of the current input
signal, the horizontal and vertical frequencies are displayed.
2222 The input signal condition
OUT OF SCAN RANGE
This indicates that the input signal is not supported by the
monitor’s specifications.
3333 The remedies
CHANGE SIGNAL TIMING appears on the screen. If you
are replacing an old mo ni tor wi th this monitor, reconnect t he
old monitor. Then adjust the computer’s graphic board so that
the horizontal frequency is between 30 - 109 kHz, and the
vertical frequency is between 48 - 160 Hz.
For more information, see “Trouble symptoms and remedies” on
page 16.
15
Page 16

Trouble symptoms and remedies
If the problem is caused by the con nected computer or other equip ment, please refer to the connected equ ip ment’s instruction manual.
Use the self-diagnosis function (page 18) if the following recommendations do not resolve the problem.
Symptom Check these items
No picture
If the 1 (power) indicator is not lit • Check that the power cord is properly connected.
• Check that the 1 (power) switch is in the “on” position.
If the NO INPUT SIGNAL message
appears on the screen, or if the 1
(power) indicator is either orange or
alternating between green and
orange
If the OUT OF SCAN RANGE
message appears on the screen
If no message is displayed and the 1
(power) indicator is green or flashing
orange
If using Windows 95/98 • If you replaced an old monitor with this monitor, reconnect the old monitor and do the
If using a Macintosh system • When connecting to a Power Macintosh G3 series computer that has three rows of pins,
Picture flickers, bounces,
oscillates, or is scrambled
• Check tha t the video signal cable is properly co nnected and all plugs are firmly seated in
their sockets (page 6).
• Check that the HD15 video input connector’s pins are not bent or pushed in.
x
Problems caused by the connected computer or other equipment
• The computer is in power saving mode. Try pressing any key on the computer keyboard or
moving the mouse.
• Check that the computer’s power is “on.”
• Check that the graphic board is completely seated in the proper bus slot.
x
Problems caused by the connected computer or other equipment
• Check that the video frequency range is within that specified for the monitor. If you
replaced an old monitor with this monitor, reconnect the old monitor and adjust the
frequency range to the following.
Horizontal: 30 – 109 kHz
–
Vertical: 48
• Use the Self-diagnosis function (page 18).
following. Install the Setup Disk (page7) and select this monitor (“CPD-E500E”) from
among the Sony monitors in the Windo ws 95/98 mo n itor selectio n screen .
check that the supplied Macintosh G3 adapter and the video signal cable are properly
connected (page 6).
• For Power Macintosh G3 or other models which have two rows of pins, you will need a
different adapter which is sold separately.
• Isolate and eliminate any potential sources of electric or magnetic fields such as other
monitors, laser printers, electric fans, fluorescent lighting, or televisions.
• Move the monitor away from power lines or place a magnetic shield near the monitor.
• Try plugging the monitor into a dif ferent AC outle t, pref er ably on a dif fe re n t circui t.
• Try turning the monitor 90° to the left or right.
160 Hz
Picture is fuzzy
16
x
Problems caused by the connected computer or other equipment
• Check your graphics board manual for the proper monitor setting.
• Confirm that the graphics mode (VE SA, Macintosh 21" Color, etc.) and the frequency of
the input signal are su pp ort ed by this monitor (Appen dix ). Even if the frequency is within
the proper range, some graphics boards may have a sync pulse that is too na rrow for the
monitor to sync correctly.
• Adjust the computer’s refresh rate (ve rtical frequency) to obtain the best possible picture.
• Adjust the brightness and co ntrast (page 9).
• Degauss the monitor* (page 13).
• If CANCEL MOIRE is ON, the pi cture may become fuzzy. Decrease the moire
cancellation effect or set CANCEL MOIRE to OFF (page 11).
Page 17
Symptom Check these items
Picture is ghosting • Eliminate the use of video cable extensions and/or video switch boxes.
• Check that al l plugs are firmly seated in their sockets.
Picture is not centered or sized
properly
Edges of the image are curved • Adjust the geometry (page 10).
Wavy or elliptical pattern (moire)
is visible
Color is not uniform • Degauss the monitor* (page 13). If you place equipment that g enerates a magnetic field,
White does not look white • Adjust the color temperature (page 12).
Letters and lines show red or blue
shadows at the edges
Monitor buttons do not operate
( appears on the screen)
A hum is heard right after the
power is turned on
* If a seco nd de gauss cycle is needed, allo w a m in im um interval of 20 minute s fo r the best result. A humming noise ma y be heard, but this is not a
malfunction.
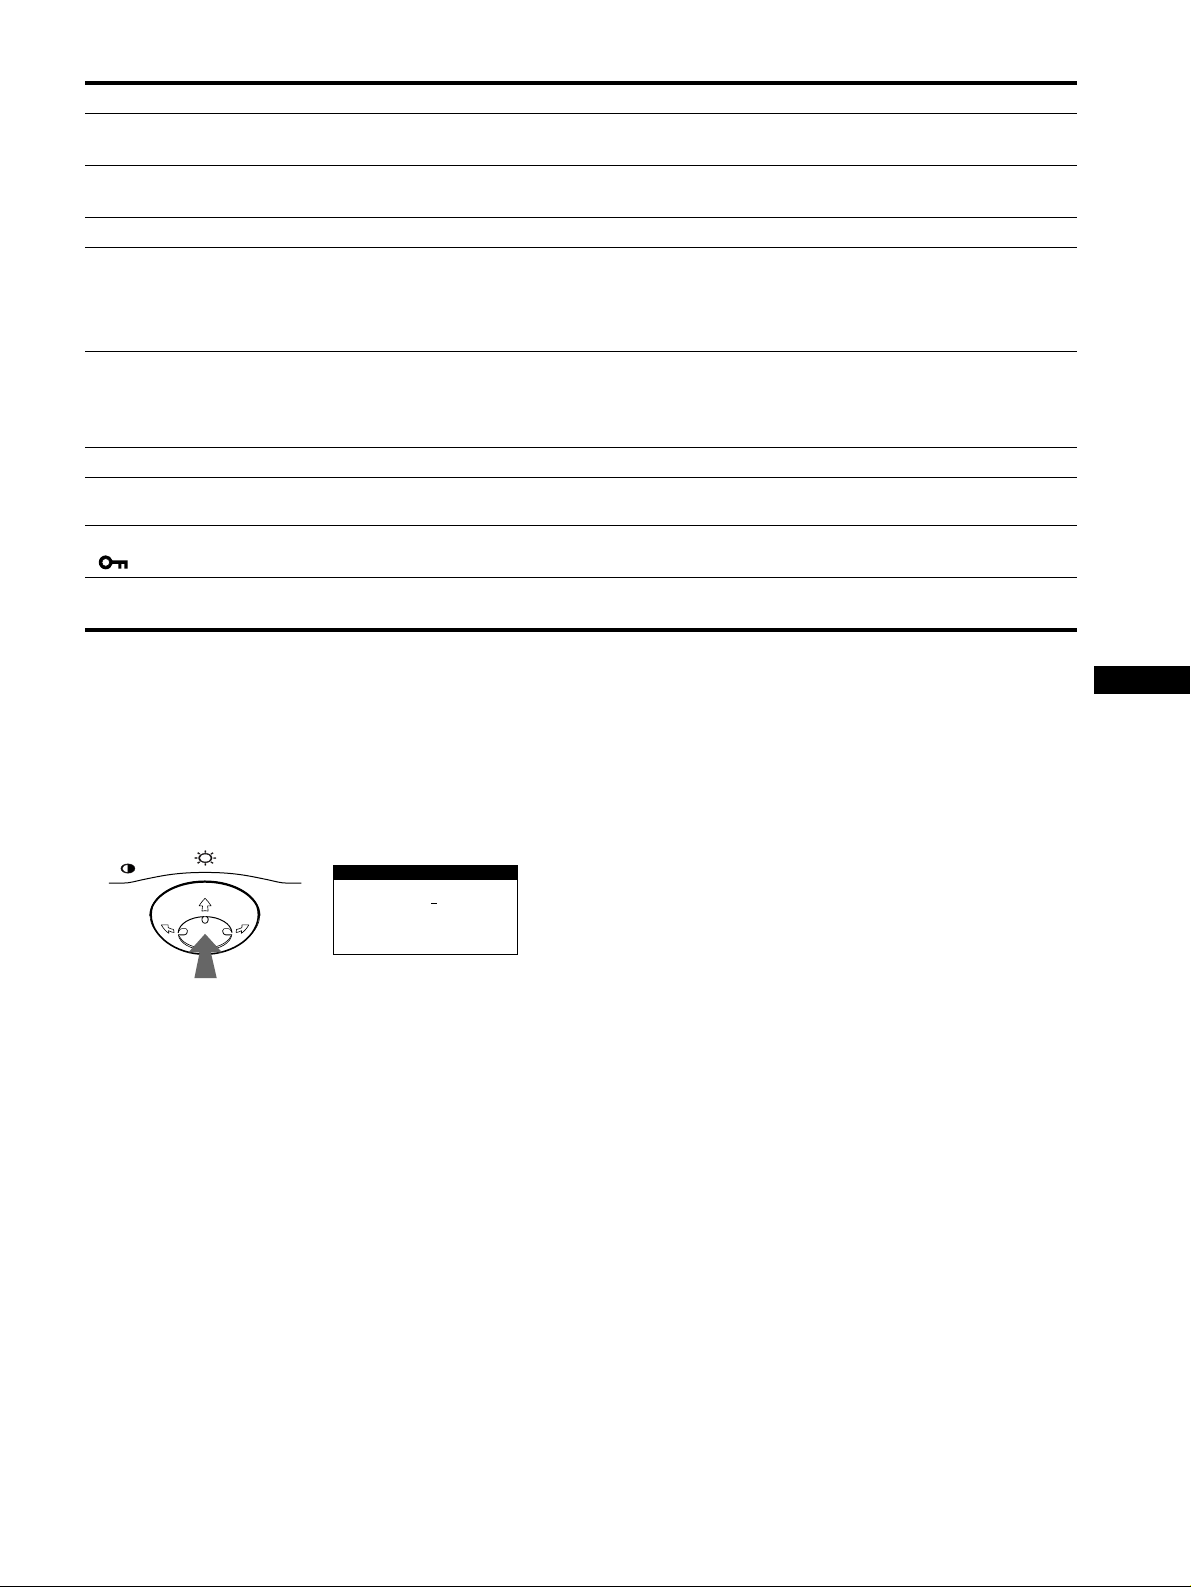
Displaying this monitor’s name, serial number,
and date of manufacture.
While the monitor is receiving a video signal, press and hold the
center of the control button for more than five seconds to display
this monitor’s information box.
• Adjust the size (page 10) or centering (page 10). Note that some video modes do not fill
the screen to the edges.
• Set CANCEL MOIRE to ON and adjust the degree of moire cancellatio n until the moire is
at a minimum (page 11).
xProblems caused by the connected computer or other equipment
• Change your desktop pattern.
such as a speaker, nea r the monitor, or if you change the direction the monito r faces, colo r
may lose uniformity.
• Adjust the landing (page 11).
• Adjust the convergence (page 11).
• If the control lock is set to ON, set it to OFF (page 13).
• This is the sound of the auto-degauss cycle. When the power is turned on, the monitor is
automatically degaussed for two seconds.
If the problem persists, call your authorized Sony dealer and give
the following information.
• Model name: CPD-E500E
• Serial number
• Name and specifications of your computer and graphics board.
GB
MENU
b
Example
INFORMATION
MODEL : CPD E500E
SER NO : 1234567
MANUFACTURED
: 1999-52
17
Page 18
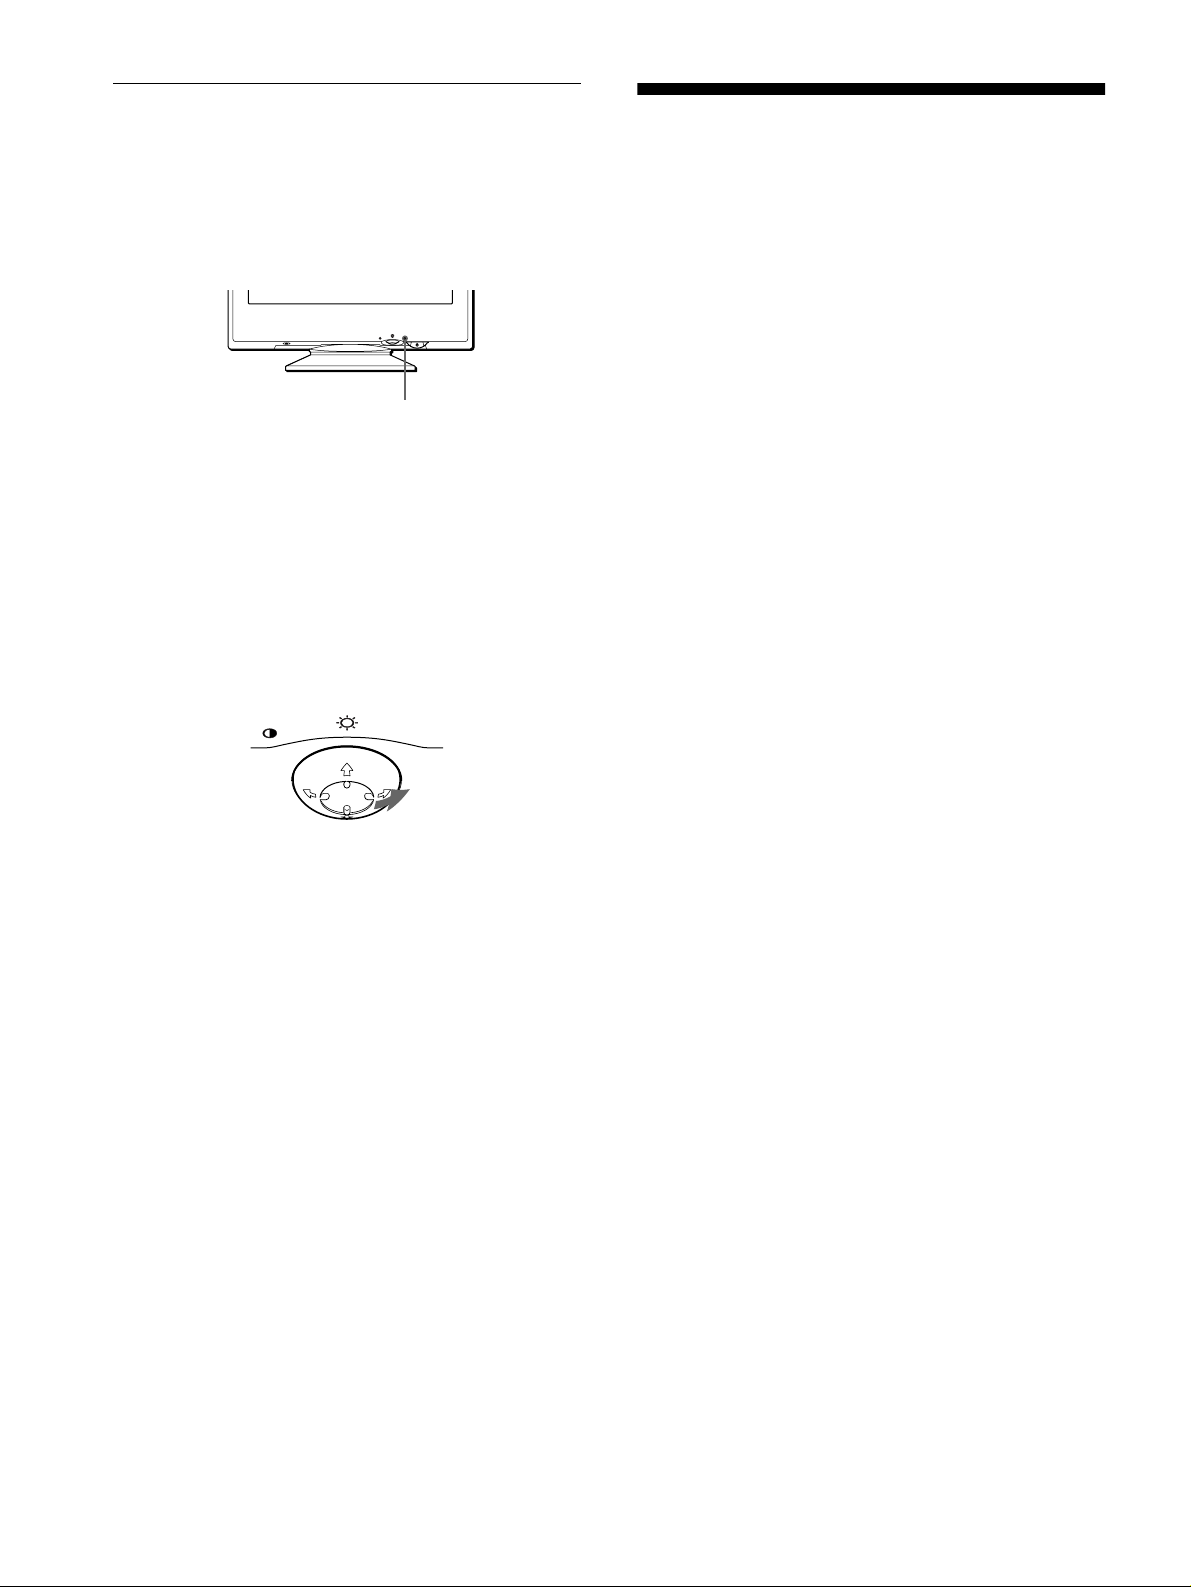
Self-diagnosis function
This monitor is equipped with a self-diagnosis function . If there is
a problem with your monitor or computer, the screen will go
blank and the 1 (power) indicator will either light up green or
flash orange. If the 1 (power) indicator is lit in orange, the
computer is in power saving mode. Try pressing any key on the
keyboard.
RESET
If the 1 (power) indicator is green
1
Disconnect the video input cable or turn off the
connected computer.
2
Press the
off and then on.
3
Move the control button , for 2 seconds before the
monitor enters power saving mode.
1111
(power) button twice to turn the monitor
MENU
MENU
(power) indicator
1
Specifications
CRT 0.24 mm aperture grille pitch
21 inches measured diag onally
90-degree deflection
FD Trinitron
Viewable image size Approx. 403.8 × 302.2 mm (w/h)
(16 × 12 inches)
19.8" viewing image
Resolution
Maximum Horizontal: 2048 dots
Vertical: 1536 lines
Recommended Horizontal: 1600 dots
Vertical: 1200 lines
Standard image area Approx. 388 × 291 mm (w/h)
Deflection frequency* Horizontal: 30 to 109 kHz
AC input voltage/current 100 to 240 V, 50 – 60 Hz, 2.0 – 1.0 A
Power consum ption Approx. 145 W
Dimensions
Mass Approx. 32 kg (70 lb 9 oz)
Plug and Play DDC1/2B/2Bi, GTF**
Supplied accessories See page 6
3
/8 × 11 1/2 inches)
(15
or
Approx. 364 × 291 mm (w/h)
3
/8 × 11 1/2 inches)
(14
Vertical: 48 to 160 Hz
Approx. 497 × 480 × 478 mm (w/h/d)
5
(19
/8 × 19 × 18 7/8 inches)
If all four color bars appear (white, red, green, blue), the monitor
is working proper ly. Reconnect the video input cable and ch eck
the condition of your co m pu t e r.
If the color bars do not appear, there is a potential m onitor failure.
Inform your authorized Sony dealer of the monitor’s condition.
If the 1 (power) indicator is flashing orange
Press the 1 (power) button twice to turn the monitor off
and then on.
If the 1 (power) indicator l ights up green , the monitor i s working
properly.
If the 1 (power) indicator is still flashing, there is a potential
monitor failure. Count the number of seconds between orange
flashes of the 1 (power) indicator and inform your authorized
Sony dealer of the mo nitor’s condi tion. Be sure to note the m odel
name and serial number of your monitor. Also note the make and
model of your c omputer and video board.
* Recommended horizontal and vertical timing condition
• Horizontal sync w idth duty shou ld be more tha n 4.8% of tot al
horizontal time or 0.8 µs, whichev e r is larger.
• Horizontal blanking width should be more than 2.3 µsec.
• Vertical blanking width shoul d be more than 450 µsec.
** If the input signal is Generalized Timing Formula (GTF)
compliant, the GTF feature of the monitor will automatically
provide an optimal image for the screen.
Design and specifications are subject to change without noti ce.
18
Page 19
Table des Matières
Précautions. . . . . . . . . . . . . . . . . . . . . . . . . . . . . . . . . . . . . . . . . . . . 4
Identification des composants et des commandes. . . . . . . . . . . . . . 5
Installation . . . . . . . . . . . . . . . . . . . . . . . . . . . . . . . . . . . . .6
• Trinitron est une marque comm ercial e
déposée de Sony Corporation .
• Macintosh est une marque commerciale
sous licence d’Apple Com puter, Inc.,
déposée aux Etats-Unis et dans d’autres
pays.
• Windows
marques déposées de Microsoft
Corporation aux Etats-Unis et dans
d’autres pays.
• IBM PC/AT et VGA sont des marques
commerciales déposées d’IBM
Corporation aux Etats-Unis.
• VESA et DDC
commerciales de Video Electronics
Standard Association.
•
E
déposée aux Etats-Unis.
• Tous les autres noms de produ it s
mentionnés dans le pré sent mode
d’emploi peuvent ê tre de s m a rques
commerciales ou des marqu es
commerciales déposées de leurs
sociétés respectives.
• Les symboles “” et “” ne sont pas
mentionnés systématiquement dans le
présent mode d’emploi.
et MS-DOS sont des
sont des marques
NERGY STAR est une marque
1re étape:
2e étape:
3e étape:
Raccordez le moniteur à l’ordinateur . . . . . . . . . . . . . . . 6
Branchez le cordon d’alimentation. . . . . . . . . . . . . . . . . . 6
Mettez le moniteur et l’ordinateur sous tension . . . . . . . . 7
Sélection de la langue d’affichage des menus (LANG) . . . . . . . . . . 7
Personnalisation de votre moniteur. . . . . . . . . . . . . . . . .8
Pilotage par menus. . . . . . . . . . . . . . . . . . . . . . . . . . . . . . . . . . . . . . 8
Réglage de la luminosité et du contraste . . . . . . . . . . . . . . . . . . . . . 9
Réglage de la taille de l’image (TAILLE) . . . . . . . . . . . . . . . . . . . . 10
Réglage du centrage de l’image (CENTRE). . . . . . . . . . . . . . . . . . 10
Agrandir ou réduire l’image (ZOOM) . . . . . . . . . . . . . . . . . . . . . . . 10
Réglage de la forme de l’image (GEOM) . . . . . . . . . . . . . . . . . . . . 10
Réglage de la convergence (CONV) . . . . . . . . . . . . . . . . . . . . . . . 11
Réglage de la qualité de l’image (ECRAN). . . . . . . . . . . . . . . . . . . 11
Réglage des couleurs de l’image (COULEUR). . . . . . . . . . . . . . . . 12
Réglages supplémentaires (OPTION) . . . . . . . . . . . . . . . . . . . . . . 13
Réinitialisation des réglages. . . . . . . . . . . . . . . . . . . . . . . . . . . . . . 14
Caractéristiques techniques. . . . . . . . . . . . . . . . . . . . . .14
Modes présélectionné et utilisateur . . . . . . . . . . . . . . . . . . . . . . . . 14
Fonction d’économie d’énergie. . . . . . . . . . . . . . . . . . . . . . . . . . . . 14
Dépannage . . . . . . . . . . . . . . . . . . . . . . . . . . . . . . . . . . . .15
Si de fines lignes apparaissent à l’écran (fils d’amortissement) . . . 15
Messages affichés à l’écran . . . . . . . . . . . . . . . . . . . . . . . . . . . . . . 15
Symptômes et remèdes . . . . . . . . . . . . . . . . . . . . . . . . . . . . . . . . . 16
Fonction d’autodiagnostic. . . . . . . . . . . . . . . . . . . . . . . . . . . . . . . . 18
Spécifications. . . . . . . . . . . . . . . . . . . . . . . . . . . . . . . . . .18
Appendix. . . . . . . . . . . . . . . . . . . . . . . . . . . . . . . . . . . . . . . i
Preset mode timing table . . . . . . . . . . . . . . . . . . . . . . . . . . . . . . . . . .i
TCO’99 Eco-document . . . . . . . . . . . . . . . . . . . . . . . . . . . . . . . . . . . .i
FR
3
Page 20
Précautions
90°
5°
90°
15°
Points de centrage
Avertissement sur le raccordement à la source
d’alimentation
• Utilisez le cordon d’alimentation fourni. Si vous utilisez un
cordon d’alimentation différent, assurez-vous qu’il est
compatible avec votre tension d’alimentation secteur locale.
Pour les clients au Royaume-Uni
Si vous utilisez ce mon iteur au Royaume-Uni, utilisez le cordon
d’alimentation fourni au Royaume-Uni.
Exemple de types de fiches
pour 100 à 120 V CA pour 200 à 240 V CA pour 240 V CA
uniquement
Entretien
• Nettoyez l’écran à l’aide d’un chiffon doux. Si v ous utilisez un
produit nettoyant pour vitres, n’utilisez aucun type de produit
contenant une solution antistatique ou des additifs similaires
parce que vous risquez de rayer le revêtement de l’écran.
• Ne frottez pas, ne touchez pas et ne tapotez pas la surface de
l’écran avec des objets abrasifs ou aux arêtes vives comme un
stylo à bill e o u un tournevis. Ce ty pe de contact r i s qu e e n ef fe t
de rayer le tube image.
• Nettoyez le châss is, le pa nnea u et les comma ndes à l ’aid e d’un
chiffon doux légèrement imprégné d’une solution détergente
neutre. N’utilisez jamais de tampons abrasifs, de poudre à
récurer ou de solv ants tels que de l’alcool ou du benzène.
Transport
Pour transpor ter ce moniteur en vue de réparations ou de son
expédition, utilisez le carton d’emballage et les matériaux de
conditionne ment d’origine.
• Avant de débrancher le cordon d’ali mentation, attendez au
moins 30 secondes après avoir actionné le commutateur
d’alimentation de manière à permettre la décharge de
l’électricité statique à la surface de l’écran.
• Après que le courant a été branché, l’écran est démagnétisé
pendant environ 2 secondes. Cela génère un puissant champ
magnétique autour de l’encadrement métallique qui peut
affecter les données mémorisées sur une bande magnétique ou
des disquettes situées à proximité. Placez ces systèmes
d’enregistrem e nt ma g né tiq u e, ba n de s e t dis q ue tte s à l ’ éc a rt d u
moniteur.
L’appareil doit être installé à proximité d’une prise murale
aisément accessible.
Installation
N’installez pas le moniteur dans les endroits suivants:
• sur des sur faces molles (moquette, nappe, etc.) ou à proximité
de tissus (rideaux, t entures, etc.) qui risquent d’obstruer les
orifices de ventilation
• à proximité de sour ces de chale ur co mme d es radi ateu rs ou des
conduits d’air, ni dans un endr oi t di re cte m e nt ex po s é au
rayonnement solaire
• sujet à de fortes variations de température
• soumis à des vibrations ou à des chocs mécani ques
• sur une surface instable
• à proximité d’appa reils gé nérant un champ ma gnétique comme
un transformateur ou des lignes à haute tension
• à proximité de ou sur une surface métallique chargée
électriquement
Utilisation du support pivotant
Ce moniteur peut êtr e réglé su ivant le s angles p récisés ci-dess ous.
Pour localiser le centre du rayon de pivotement du moniteur,
alignez le centre de l’écran du mon iteur sur les point s de centr age
du support.
Pour faire pivoter le moniteur horizontalement ou verticalement,
saisissez-le des deux mains par la base. Veillez à ne pas vous
coincer les doigts à l’arrière du moniteur lorsque vous le faites
pivoter verticalement.
4
Page 21
Identification des composants et
5 4 3 2
1
678910
1112131415
des commandes
Pour plus de détails, reportez-vous aux pages indiquées entre
parenthèses.
MENU
RESET
RESET
MENU
1111 Touche RESET (réinitialisation) (page 14)
Cette touche réinitialise les réglages aux valeurs par défaut.
2222 Manette de commande (page 9)
La manette de commande sert à affic her l e menu et à ajuster
les paramètres de réglage du moniteur, y compris la
luminosité et le contraste.
ArrièreAvant
avant
arrière
AC IN
(HD15)
4444 Connecteur AC IN (page 6)
Ce connecteur assure l’alimentation du moniteur.
5555 Connecteur d’entrée vidéo (HD15) (y1) (page 6)
Ce connecteur assure l’entrée des signaux vidéo RVB
(0,700 Vp-p, positifs) et des signaux de synchronisation.
FR
3333 Commutateur et indicateur 1 (alimentation)
(pages 7, 14, 18)
Cette touche met le moniteur sous et hors tension.
L’indicateur d’alimentation s’allume en vert lorsque le
moniteur est sous tension et clignote en vert et en orange ou
s’allume en orange lorsque le moniteur se trouve en mode
d’économie d’énergie.
Broche n° Signal
1 Rouge
2Vert
(Synchronisation sur le vert)
3Bleu
4 ID (Masse)
5 Masse DDC*
6 Masse rouge
7 Masse vert
8 Masse bleu
9 DDC +5 V*
10 Masse
11 ID (Masse)
12 Données bidirectionnelles (SDA)*
13 Synchro H
14 Synchro V
15 Données d’horloge (SCL)*
* DDC (Displ a y Dat a Ch annel) est une norme de VESA.
5
Page 22
Installation
(HD15)
AC IN
Adaptateur G3 Macintosh (pour
système bleu et blanc) (fourni)
*
Power Macintosh G3
vers la sortie vidéo
Utilisez l’adaptateur G3 Macintosh fourni (pour système bleu
et blanc)
vers HD15
Câble de signal
vidéo HD15 (fourni)
(HD15)
AC IN
vers AC IN
vers une prise murale
cordon d’alimentation (fourni)
Avant de mettre ce moniteur en service, vérifiez si tous les
accessoires suivants se trouvent bien dans le carton:
• Cordon d’alimentation (1)
• Câble de si gnal vidéo HD15 (1)
• Adaptateur G3 Macintosh (pour système bleu et blanc) (1)
• Disquette d’installation (1)
• Carte de garantie (1)
• Remarques sur l ’entretien de la surface de l’écran (1)
• Ce mode d’emploi (1)
1re étape:Raccordez le moniteur à
l’ordinateur
Mettez le moniteur et l’o rdina teur hor s tens ion av ant de procéd er
au raccordement.
Remarques
• Ne touchez pas les broches du connecteur du câble de signal vidéo, car
vous risqueriez de les plier.
• Lorsque vous branchez le câble de signal vidéo, vérifi ez l’alignement
du connecteur HD15. Ne forcez pas le connecteur dans le mauvais sens,
car vous risquez sinon de plier les bro ches.
Raccordement à un ordinateur Macintosh
xxxx
ou compatible
Raccordement à un PC/AT IBM ou à un
xxxx
ordinateur compatible
AC IN
(HD15)
vers la sortie vidéo
PC/AT IBM ou ordinateur
compatible
Câble de signal vidéo
HD15 (fourni)
vers HD15
* Raccordez l’adaptateur G3 Macintosh fourni à l’ordinateur avant de
brancher le câ ble. Cet adapta teur est compatible avec les ordinateurs
Power Macintosh G3 doté de trois rang ée s de bro ch es. Si vous
établissez la connexi on avec une autre version d’ordinateur Power
Macintosh G3 dotée de deux rangées de broches ou d’un autre modèle,
vous aurez besoin d’un a daptateur différent (ven du séparément).
2e étape:Branchez le cordon
d’alimentation
Le moniteur et l’ordina te ur étant hors tension, bra n ch e z d’a b or d
le cordon d’alimentation sur le moniteur et ensuite sur une prise
murale.
6
Page 23
3e étape:Mettez le moniteur et
Sélection de la langue d’affichage
l’ordinateur sous tension
Mettez d’abord le moniteur sous tension et pu is l’ord inate u r.
L’installation de votre moniteur est à présent terminée.
Si nécessaire, utilisez les commandes du moniteur pour rég ler
l’image.
Si aucune image n’apparaît à l’écran
• Vérifiez si le moniteur est correctement raccordé à l’ordinateur.
• Si l’indication PAS ENTREE VIDEO apparaît à l’écran,
vérifiez si la carte graphique de votre ordinateur est
complètement introduite dans la fente de bus appropriée.
• Si vous remplacez un ancien moniteur par ce modèle et si
l’indication HORS PLAGE DE BALAYAGE apparaît à
l’écran, rebranchez l’ancien moniteur. Ajustez ensuite la carte
graphique de l’ordinateur de façon à ce que la fréquence
horizontale soit comprise entre 30 et 109 kHz et la fréquence
verticale entre 48 et 160 Hz.
Pour plus d’informations sur les messages affichés à l’écran,
reportez-vous à la section “Symptômes et remèdes” à la page16.
des menus (LANG)
Les écrans de menu peuvent être affichés en franç ais, anglais,
allemand, espagnol, italien, néerlandais, suédois, russe et
japonais. La sélection par défaut est l’anglais.
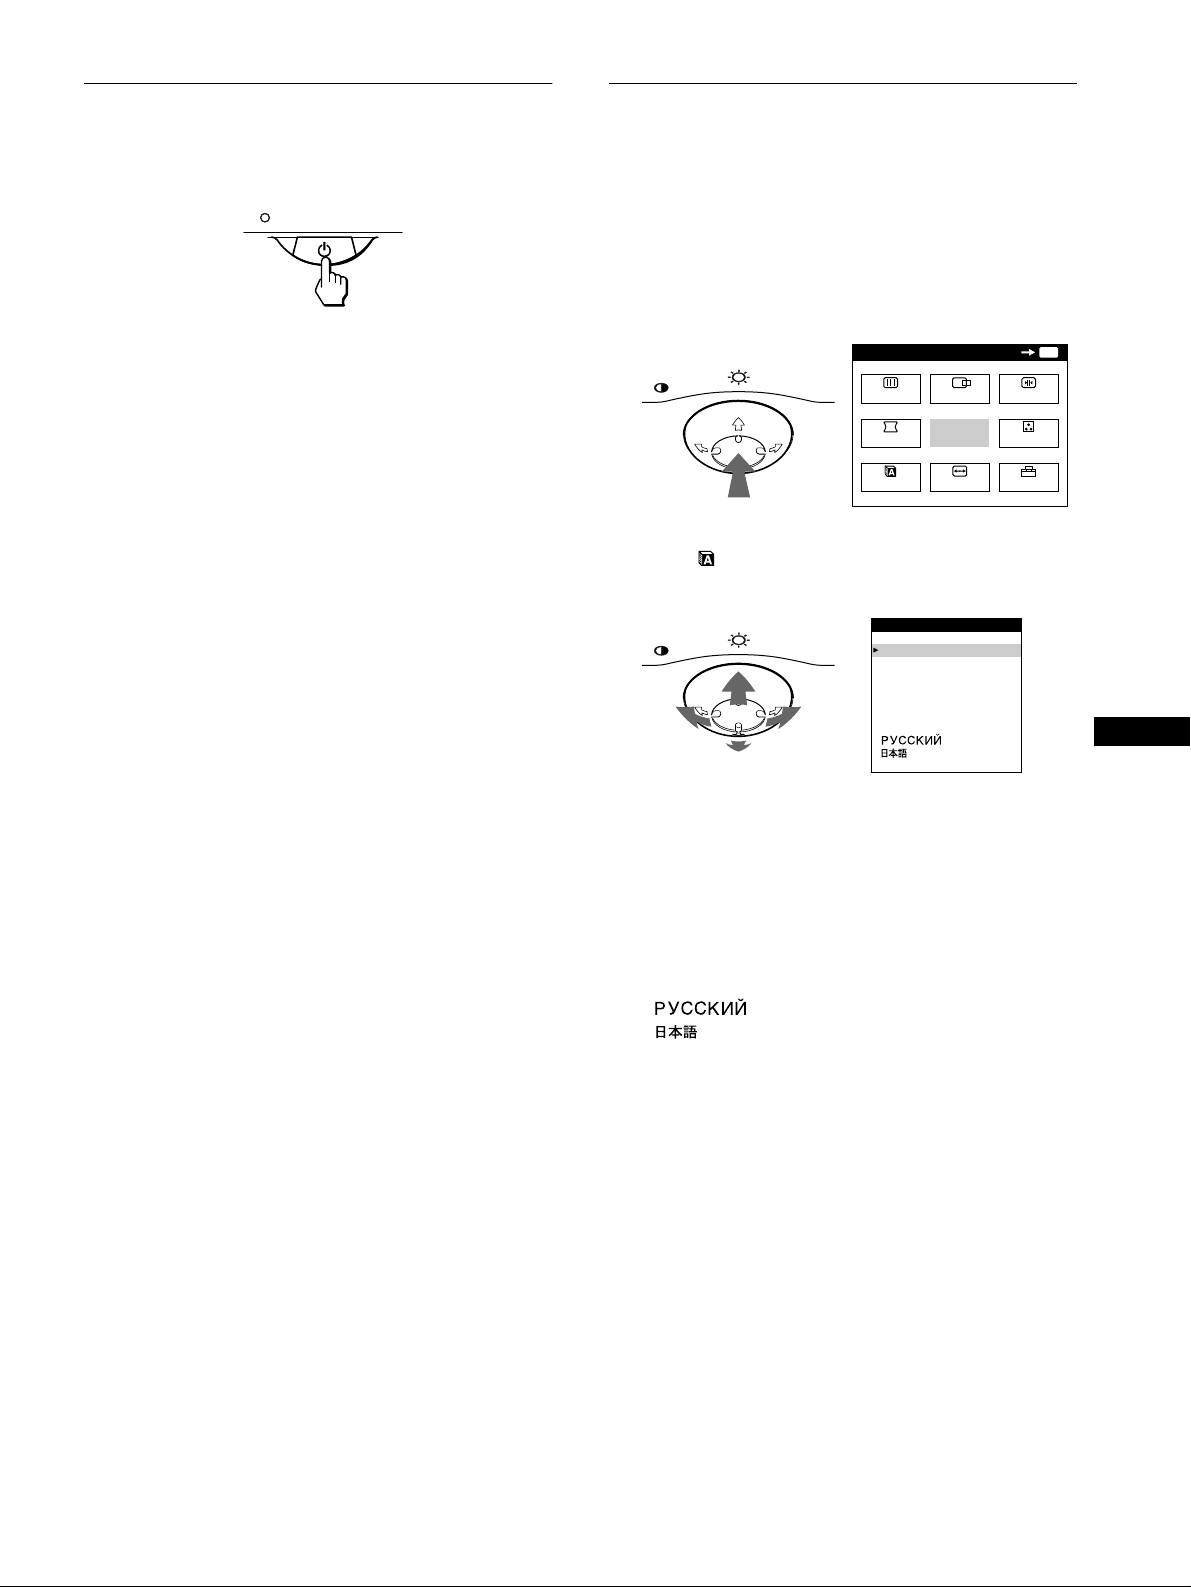
1
Appuyez au centre de la manette de commande.
Voir page 9 pour plus d’informations sur l’utilisation de la
manette de commande.
MENU
2
Déplacez la manette de commande de façon à
MENU
ECRAN
GEOM
LANG
CENTRE
SORTIR
TAILLE
mettre LANG en évidence et appuyez à nouveau
au centre de la manette de commande.
MENU
LANGU AGE
ENGL I SH
FRANÇA I S
DEUTSCH
ESPAÑOL
ITALIANO
NEDERL ANDS
SVENSKA
OK
CONV
COUL.
OPTION
MENU
FR
Pour les clients utilisant Windows 95/98
Pour maximiser le potentiel de votre moniteur, installez le fichier
d’information sur les nouveaux modèles de la disquette d’installation sur
votre PC.
Ce moniteur est conforme à la norme Plug & Play “VESA DDC”. Si votre
PC/carte graphiqu e est conforme à la norme DDC, sélectionnez “Plug &
Play Monitor (VESA DDC)” ou la désignation de ce moniteur comme
type de moniteur dans le “Con trol Panel” sous Windows 95/98. Si votre
carte PC/graphique communique difficilement avec ce moniteur, chargez
la disquette d’ins t allation et sélect ionnez le nom de ce modèle comme
type de moniteur.
Pour les clients utilisant Windows NT4.0
L’installation du moniteu r sous Wi ndows NT4.0 est différente de
Windows 95/98 et n’im plique pas la sélection du type de moniteur.
Reportez-vous au mode d’emploi Windows NT4.0 pour plus de détails sur
le réglage de la résolu ti on, le taux de régénérati on et le nombre de
couleurs.
3
Déplacez la manette de commande vers le haut ou
le bas m/M pour sélectionner une langue.
• ENGLISH: Anglais
• FRANÇAIS
• DEUTSCH: Allemand
• ESPAÑOL: Espagnol
• ITALIANO: Italien
• NEDERLANDS: Néerlandais
• SVENSKA: Suédois
• : Russe
• : Japonais
Pour quitter le menu
Appuyez une fois au centre de la manette de commande pour revenir au
MENU principal et deux fois po ur re ve nir à la visualisation normale. Si
vous n’actionnez aucune touche, le menu se referme automatiquement au
bout de 30 secondes environ.
Pour restaurer l’anglais
Appuyez sur la touche RESET pendant que le menu LANGUAGE est
affiché à l’écra n.
7
Page 24
Personnalisation de votre
MENU
MENU
SORTIR
CENTRE
TAILLE
GEOM
ECRAN
COUL.
LANG
CONV
OPTION
OK
68.7kHz/ 85Hz
1024
768
les fréquences
horizontale et
verticale du
signal d’entrée
en cours
la résolution du
signal d’entrée
en cours
moniteur
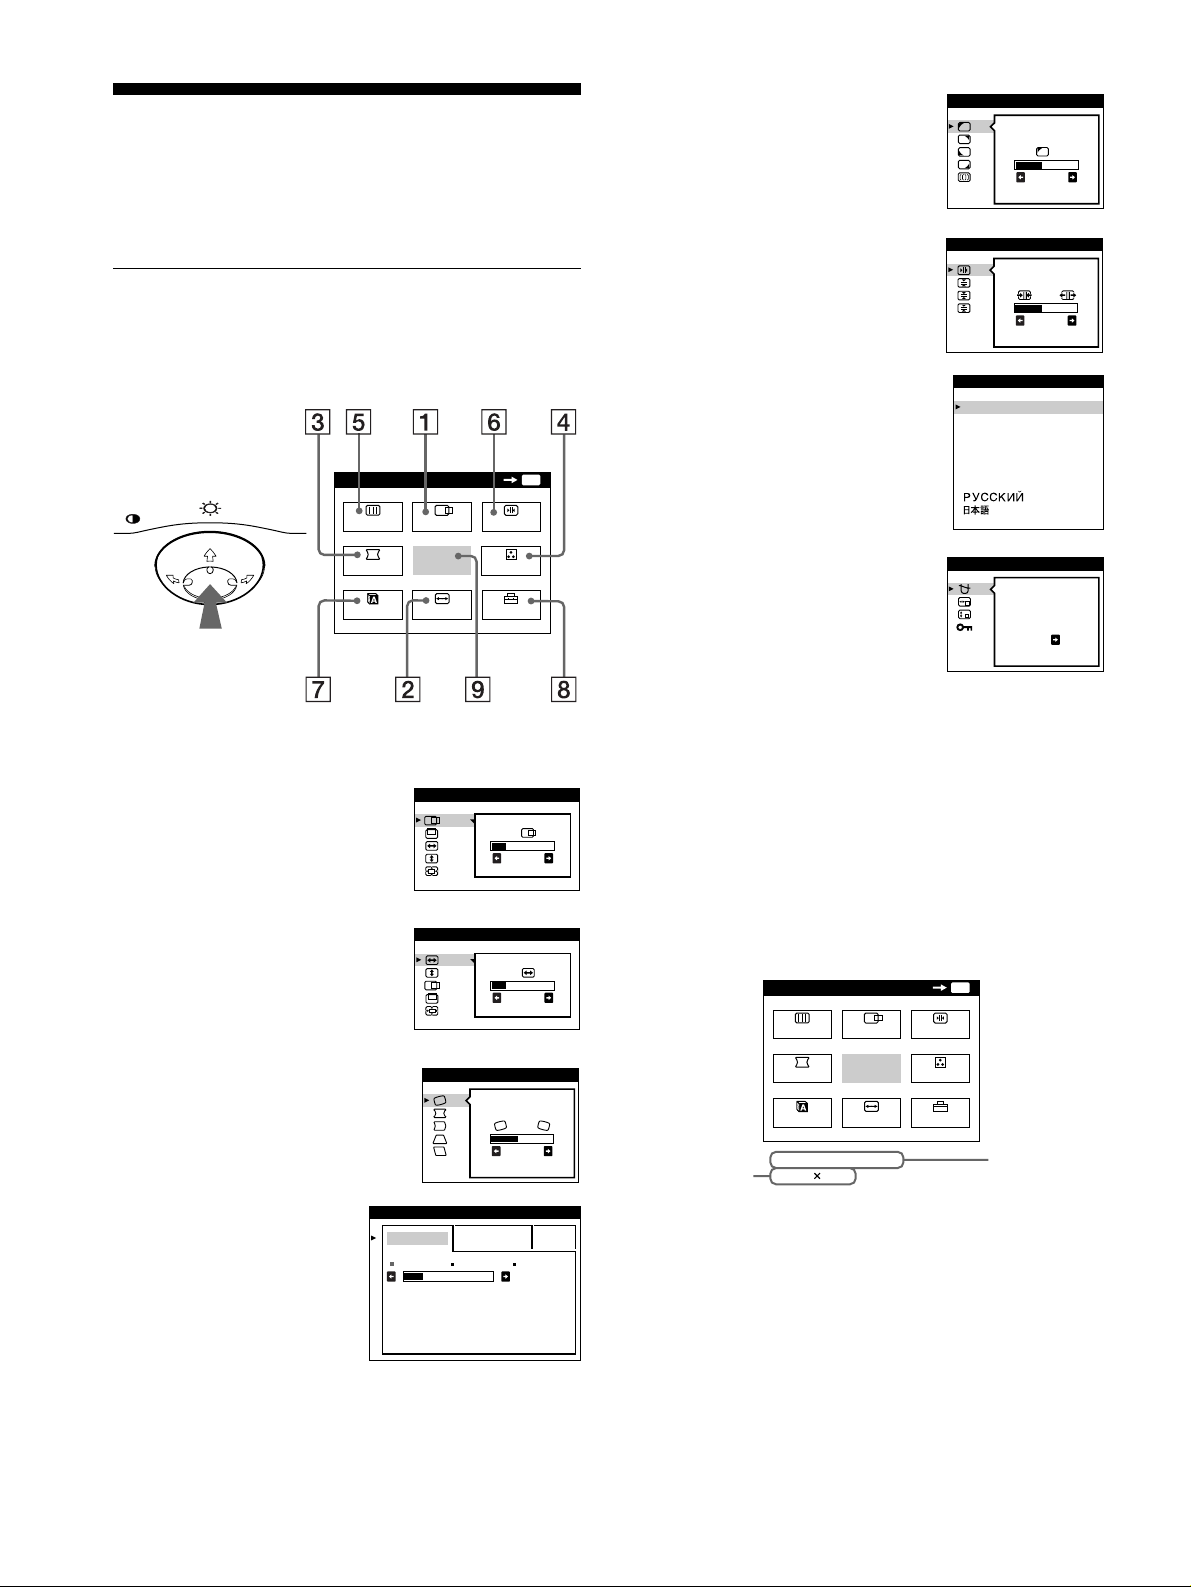
Vous pouvez effectuer d e multiples régla ges sur votre moniteur à
l’aide des écrans de menu.
Pilotage par menus
Appuyez au centre de la manette de commande pour afficher le
MENU principal à l’écran. Voi r pa g e9 pour plus d’inform at ions
sur l’utilisation de la manette de commande.
MENU
MENU
ECRAN
CENTRE
OK
CONV
MENU
5555 ECRAN (page 11)
Sélectionnez le menu ECRAN pour
ajuster la qualité de l’image. Vous
pouvez ajuster l’alignement et
l’effet de suppression du moiré.
6666 CONV (page 11)
Sélectionnez le menu CONV pour
régler la convergence horizontale et
verticale de l’image.
7777 LANG (page 7)
Sélectionnez le menu LANG pour
choisir la langue d’affichage des
menus.
ECRAN
PURETE
COUL EUR
CONVERGENCE
TOP
BOT
LANGUAGE
ENGL ISH
FRANÇA I S
DEUTSCH
ESPAÑOL
ITALIANO
NEDERL ANDS
SVENSKA
26
26
GEOM
LANG
SORTIR
TAILLE
COUL.
OPTION
Utilisez la manette de commande pour sélectionner l’un des
menus suivants.
1111 CENTRE (page 10)
TA ILLE / CENTRE
Sélectionnez le menu CENTRE
pour régler le centrage de l’image,
la taille ou le zoom.
2222 TAILLE (page 1 0)
TA ILLE / CENTRE
26
Sélectionnez le menu TAILLE pour
régler la taille de l’image, le
centrage ou le zoom.
3333 GEOM (page 10)
GEOMETR I E
26
Sélectionnez le menu GEOM pour
régler la rotation et la forme de
l’image.
26
8888 OPTION (page 13)
Sélectionnez le menu OPTION pour
OPT ION
DEGAUSS
régler les options du moniteur. Les
options comprennent:
• démagnétisation de l’écran
ON
• changement de la position des
écrans de menu
• verrouillage des commandes
9999 SORTIR
Sélectionnez SORTIR pour quitter
le menu.
Affichage du signal d’entrée en cours
xxxx
Les fréquences horizontale et verticale du signal d’entrée en cours
sont affichées dans le MENU principal. Si le signal correspond à
l’un des modes présélectionnés de ce mon iteur, la résolution est
également affichée.
4444 COULEUR (page 12)
Sélectionnez le menu
COULEUR pour régler la
température de couleur de
l’image. Vous pouvez
utiliser ce menu pour fair e
correspondre les couleurs
du moniteur aux co uleurs
d’une image imprimée.
8
COUL EUR
S I MPL E EXPERT s BGR
5000K 6500K 930 K0
50 K00
Page 25
Utilisation de la manette de commande
26 26
LUMI NOS I TE /CONTRASTE
56 76
sRGB : 56 76
LUMI NOS I TE /CONTRASTE
xxxx
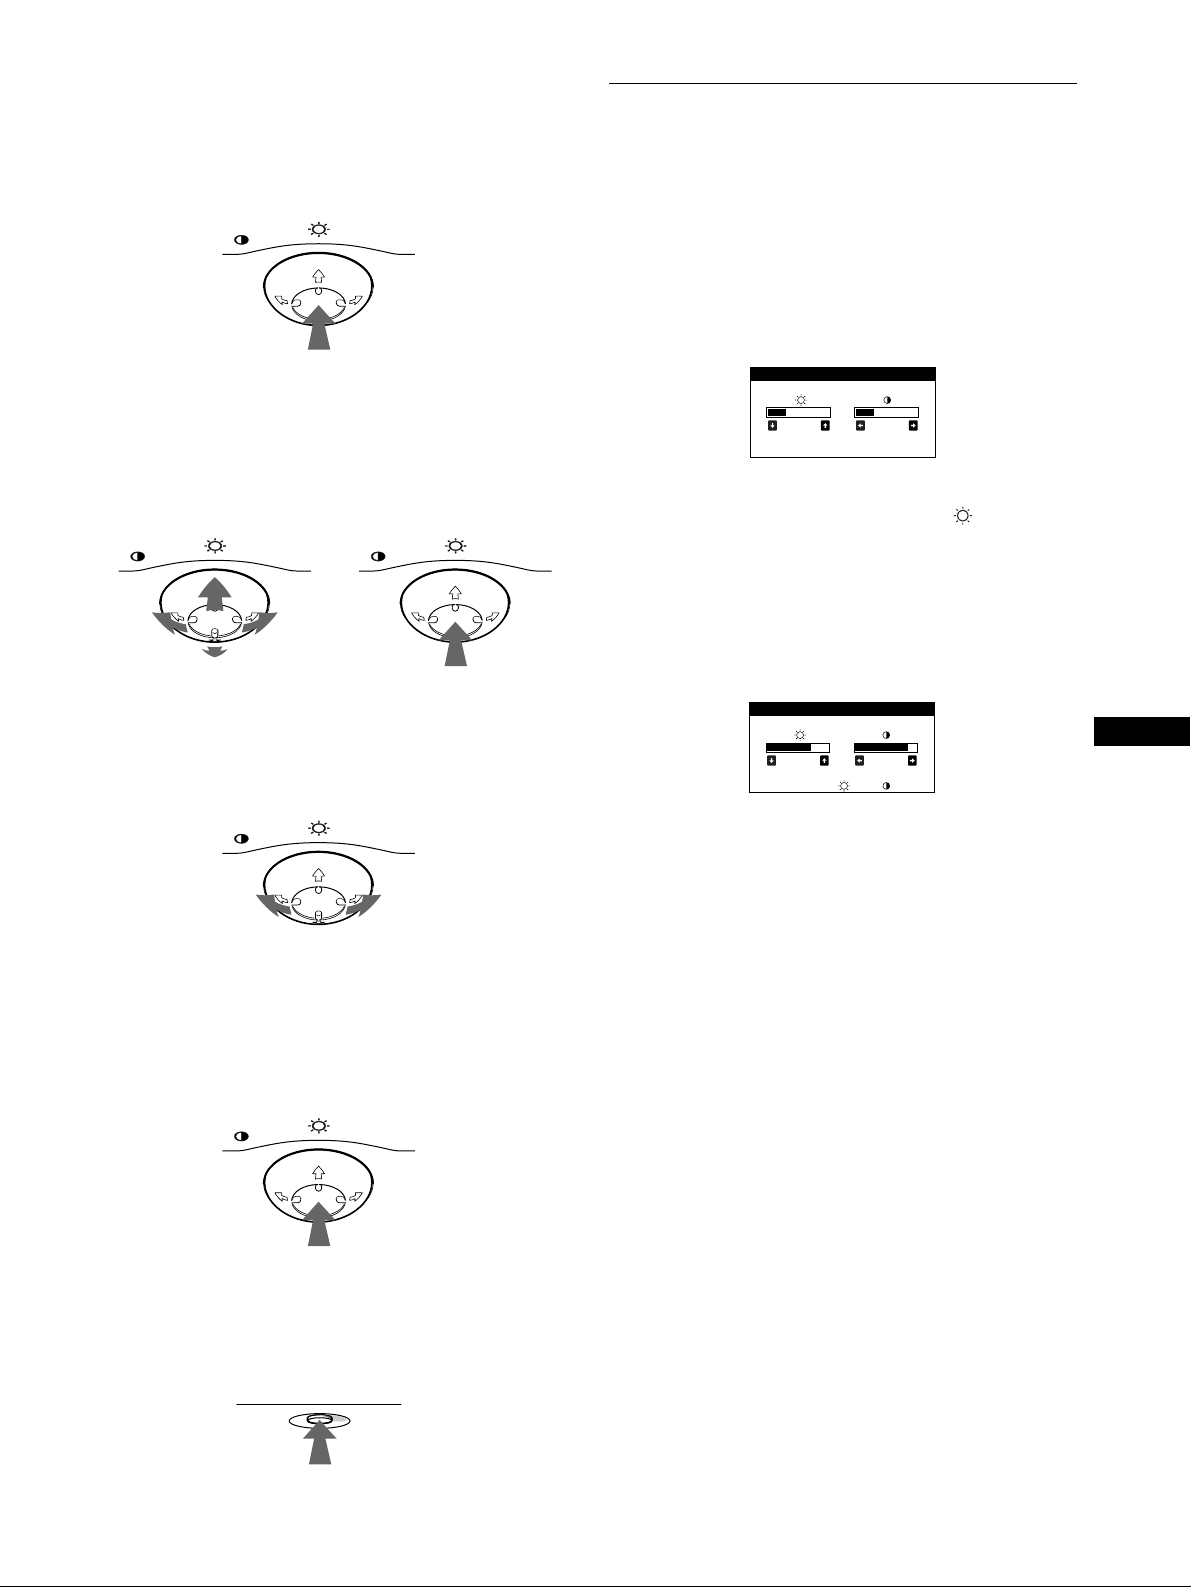
1
Affichez le MENU principal.
Appuyez au centre de la manette de commande pour afficher
le MENU principal sur l’ écran.
MENU
2
Sélectionnez le menu que vous voulez régler.
Mettez en évidence le menu de votre choix en déplaçant la
manette de comman de ver s l’ a r ri è re po ur mo nter (M), vers
l’avant pour descendre (m) et vers la gauche (<) ou vers la
droite (,) pour vous déplacer latéralement.
AVANT
MENU MENU
ARRIERE
Réglage de la luminosité et du
contraste
Les réglages de la luminosit é et du contraste sont effectués au
moyen d’un menu LUMINOSITE/CONTRASTE séparé.
Ces réglages sont enregistrés dans la mémoire pour tous les
signaux d’entrée.
1
Déplacez la manette de commande dans n’importe
quel sens.
Le menu LUMINOSITE/CONTRASTE apparaît à l’écran.
2
Déplacez la manette de commande vers le haut ou
le bas m/M pour régler la luminosité ( ), et vers la
gauche ou la droite </, pour régler le contraste
(6).
Si vous utilisez le mode sRGB
Si vous avez sélectionné le mode sRGB dans le menu
COULEUR, le menu LUMINOSITE/CONTRASTE apparaît à
l’écran.
3
Réglez le menu.
Déplacez la manette de commande vers la gauche (<) ou la
droite (,) pour effectuer le réglage.
MENU
4
Quittez le menu.
Appuyez une fois au centre de la manette de commande pour
revenir au MENU principal et deux fois pour revenir à la
visualisation normale. Si vous n’actionnez aucune touche, le
menu se referme automatiquement au bout de 30 secondes
environ.
MENU
Réinitialisation des réglages
xxxx
Appuyez sur la touch e RESET. Voir page 14 pour plus
d’informations sur la réinitialisation des réglages.
FR
Pour plus d’informations sur l’utilisation du mode sRGB, voir
“Réglage des couleurs de l’image (COULEUR)” à la page 12.
Le menu disparaît aut omatiquement au bout d’environ
3 secondes.
RESET
9
Page 26
Réglage de la taille de l’image
Réglage de la forme de l’image
(TAILLE)
Ce réglage est enregistré dans la mémoire pour le signal d’entrée
en cours.
1
Appuyez au centre de la manette de commande.
Le MENU principal apparaît à l’écran.
2
Déplacez la manette de commande pour mettre
TAILLE en évidence et appuyez à nouveau au
centre de la manette de commande.
Le menu TAILLE/CENTRE apparaît à l’écran.
3
Déplacez d’abord la manette de commande vers le
haut ou le bas m/M afin de sélectionner pour le
réglage horizontal ou pour le réglage vertical.
Déplacez ensuite la manette de commande vers la
gauche ou la droite </, pour régler la taille.
Réglage du centrage de l’image
(CENTRE)
Ce réglage est enregistré dans la mémoire pour le signal d’entrée
en cours.
1
Appuyez au centre de la manette de commande.
Le MENU principal apparaît à l’écran.
2
Déplacez la manette de commande pour mettre
CENTRE en évidence et appuyez à nouveau au
centre de la manette de commande.
Le menu TAILLE/CENTRE apparaît à l’écran.
3
Déplacez d’abord la manette de commande vers le
haut ou le bas m/M afin de sélectionner pour le
réglage horizontal ou pour le réglage vertical.
Déplacez ensuite la manette de commande vers la
gauche ou la droite </, pour régler le centrage.
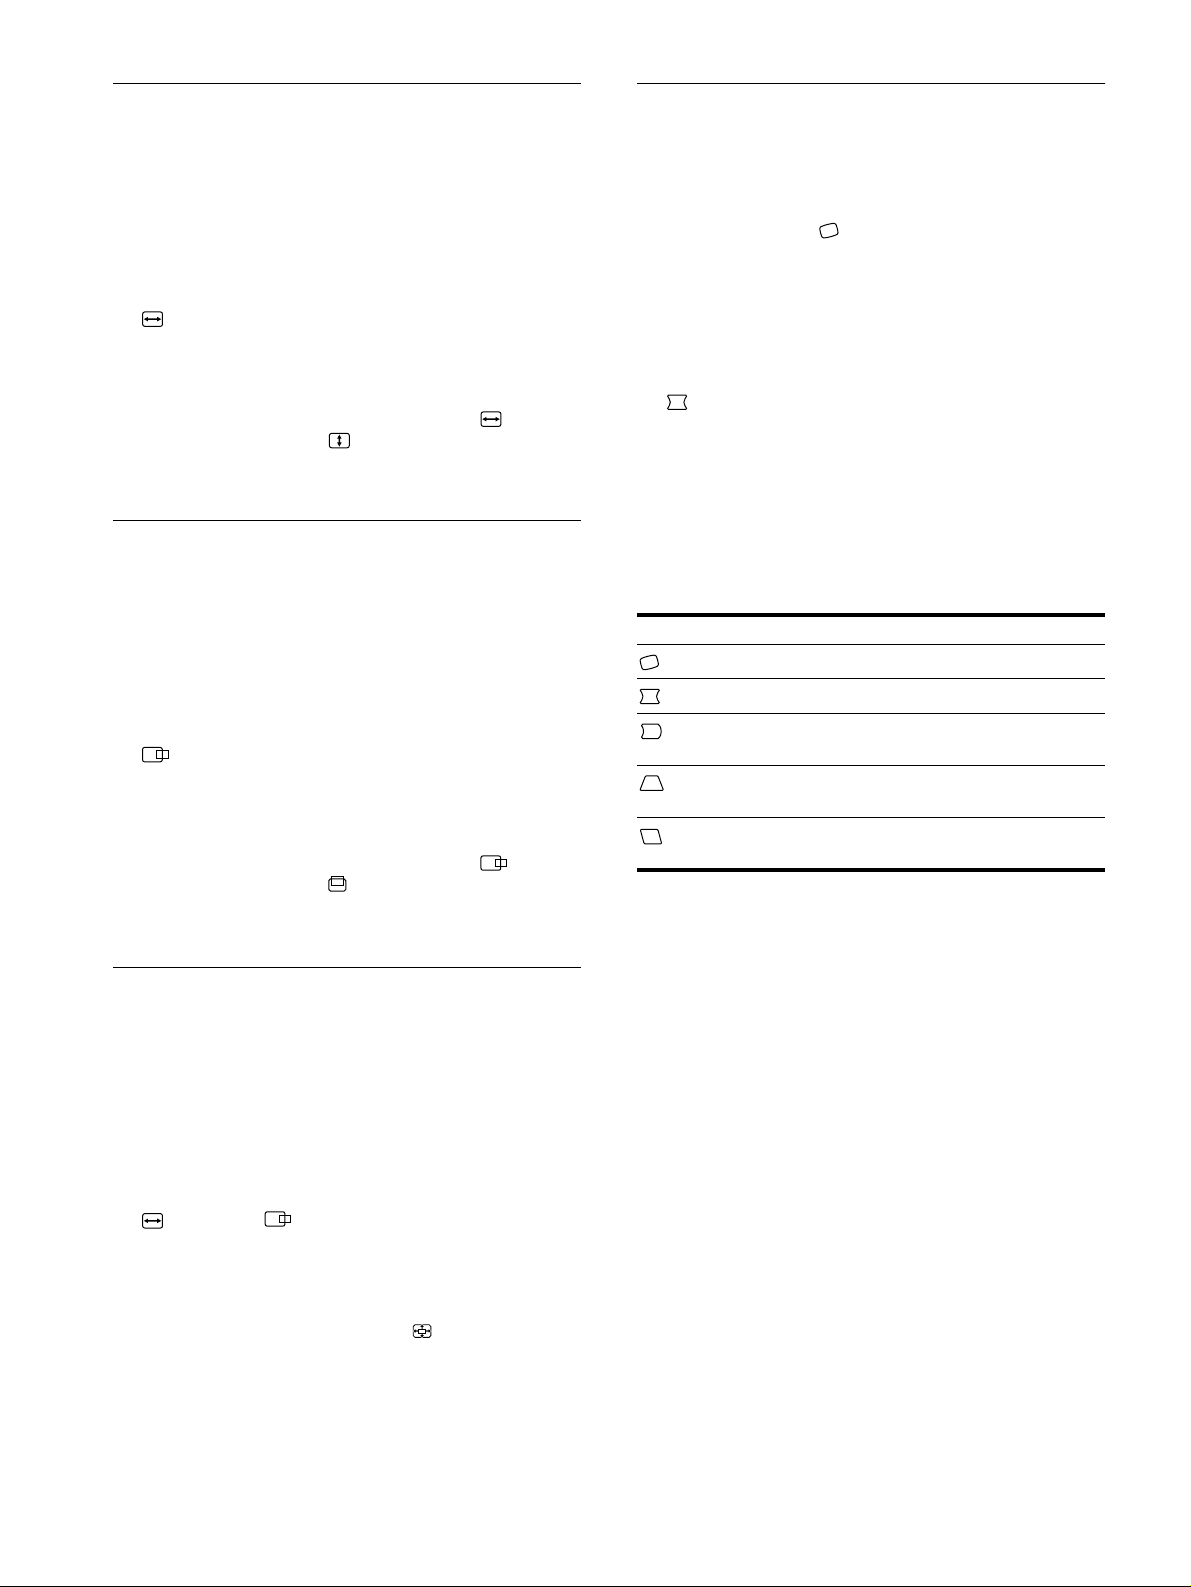
(GEOM)
Les réglages GEOM vous permettent de régler la rotation et la
forme de l’image.
Le réglage de la rotation est enregistré dans la mémoire pour
tous les signaux d’entrée. Tous les autres réglages sont enregistrés
dans la mémoire pour le signal d’entrée en cours.
1
Appuyez au centre de la manette de commande.
Le MENU principal apparaît à l’écran.
2
Déplacez la manette de commande pour mettre
GEOM en évidence et appuyez à nouveau au
centre de la manette de commande.
Le menu GEOMETRIE apparaît à l’écran.
3
Déplacez d’abord la manette de commande vers le
haut ou le bas m/M pour sélectionner le paramètre
de réglage voulu. Déplacez ensuite la manette de
commande vers la gauche ou la droite </, pour
exécuter le réglage.
Sélectionnez Pour
faire pivoter l’image
élargir ou rétrécir les côtés de l’image
décaler les côtés de l’image vers la gauche ou
la droite
régler la largeur de l’image dans le haut de
l’écran
décaler l’image vers la gauche ou la droite
dans le haut de l’écran
Agrandir ou réduire l’image
(ZOOM)
Ce réglage est enregistré dans la mémoire pour le signal d’entrée
en cours.
1
Appuyez au centre de la manette de commande.
Le MENU principal apparaît à l’écran.
2
Déplacez la manette de commande pour mettre
TAILLE ou CENTRE en évidence et appuyez
à nouveau au centre de la manette de commande.
Le menu TAILLE/CENTRE apparaît à l’écran.
3
Déplacez la manette de commande vers le haut ou
le bas m/M afin de sélectionner (zoom), et
déplacez-la vers la gauche ou la droite </, pour
agrandir ou réduire l’image.
Remarque
Le réglage s’arrête lorsque la plage de réglage horizontal ou vertical
atteint sa valeur limite maximum ou minimum.
10
Page 27
Réglage de la convergence (CONV)
Réglage de la qualité de l’image
Les réglages CONV vous permettent de régler la qualité de
l’image en contrôlant la convergence. La conv ergence est
l’alignement des signaux de couleur rouge, vert et bleu.
Si vous voyez des ombres rouges ou bleues autour des lettres ou
des lignes, réglez la convergence.
Ces réglages sont enregistrés dans la mémoire pour tous les
signaux d’entrée.
1
Appuyez au centre de la manette de commande.
Le MENU principal apparaît à l’écran.
2
Déplacez la manette de commande pour mettre
CONV en évidence et appuyez à nouveau au
centre de la manette de commande.
Le menu CONVERGENCE apparaît à l’écran.
3
Déplacez d’abord la manette de commande vers le
haut ou le bas m/M pour sélectionner le paramètre
de réglage voulu. Déplacez ensuite la manette de
commande vers la gauche ou la droite </, pour
exécuter le réglage.
Sélectionnez Pour
TOP
CONVER V HAUT
BOT
CONVER V BAS
décaler horizontalement les ombres
rouges ou bleu e s
décaler verticalement les ombres
rouges ou bleu e s
décaler verticalement les ombres
rouges ou bleues dans le haut de
l’écran
décaler verticalement les ombres
rouges ou bleues dans le bas de
l’écran
(ECRAN)
Les réglages ECRAN vous permettent de régler la qualité de
l’image en contrôlant le moiré et l’alignement.
• Si les couleurs sont irrégulières dans les angles de l’écran,
réglez l’alignement.
• Si des motifs elliptiques ou ondulatoires apparaissent à l’écran,
supprimez le moiré.
Les réglages SUPPRIMER MOIRE et REGLAGE MOIRE sont
enregistrés dans la mémoire pour le signal d’entrée en cours. Tous
les autres réglages sont enregistré s dans la mémo ire pour tous le s
signaux d’entrée.
1
Appuyez au centre de la manette de commande.
Le MENU principal apparaît à l’écran.
2
Déplacez la manette de commande pour mettre
ECRAN en évidence et appuyez à nouveau au
centre de la manette de commande.
Le menu ECRAN apparaît à l’écran.
3
Déplacez d’abord la manette de commande vers le
haut ou le bas m/M pour sélectionner le paramètre
de réglage voulu. Déplacez ensuite la manette de
commande vers la gauche ou la droite </, pour
exécuter le réglage.
Sélectionnez Pour
PURETE
COULEUR
PURETE
COULEUR
PURETE
COULEUR
PURETE
COULEUR
SUPPRIMER
MOIRE
*
REGLAGE MOIRE
* Le m o i r é e s t comme une interférence naturelle qui produit des ligne s
douces ondulatoires sur votre écran. Le moiré peut apparaître à la suite
d’interférences entre le motif de l’image à l’écran et le motif de
luminophores du moni teur.
Exemple de moiré
réduire au minimum les irrégularités
des couleurs dans l’angle supérieur
gauche de l’écran.
réduire au minimum les irrégularités
des couleurs dans l’angle supérieur
droit de l’écran.
réduire au minimum les irrégularités
des couleurs dans l’angle inférieur
gauche de l’écran.
réduire au minimum les irrégularités
des couleurs dans l’angle inférieur droit
de l’écran.
activer (ON) ou désactiver (OFF) la
fonction de suppression du moiré.
(REGLAGE MOIRE) apparaît dans
le menu si vous sélectionnez ON.
régler le degré de suppression du moiré
jusqu’à ce que le moiré ait été réduit au
minimum.
FR
Remarque
L’image peut devenir floue lorsque SUPPRIMER MOIRE est réglé sur
ON.
11
Page 28
Réglage des couleurs de l’image
(COULEUR)
Les réglages COULEUR vous permette nt d’ajuster la températu re
des couleurs de l’image en changeant le niveau des couleurs des
champs de couleur blanche. Les couleurs apparaissent rougeâtres
lorsque la température est basse et bleuâtres lorsque la
température est élevée. Ce réglage s’avère bien pratique pour faire
correspondre les couleurs du moniteur aux couleurs d’une image
imprimée.
Ces réglages sont enregistrés dans la mémoire pour tous les
signaux d’entrée.
1
Appuyez au centre de la manette de commande.
Le MENU principal apparaît à l’écran.
2
Déplacez la manette de commande pour mettre
COUL. en évidence et appuyez à nouveau au
centre de la manette de commande.
Le menu COULEUR apparaît à l’écran.
3
Déplacez la touche de commande </, pour
sélectionner le mode de réglage.
Il existe trois types de modes de réglage, SIMPLE, EXPERT
et sRGB.
4
Déplacez d’abord la manette de commande vers le
haut ou le bas m/M pour sélectionner le paramètre
de réglage voulu. Déplacez ensuite la manette de
commande vers la gauche ou la droite </, pour
exécuter le réglage.
Procédez au réglage du mode sél ectionné en suivant les
instructions ci-dessous.
Mode SIMPLE
Mode EXPERT
Vous pouvez effectuer des réglages additio nnels plus détaillés des
couleurs en sélectionnant le mode EXPERT.
COUL EUR
S I MPL E EXPERT s BGR
5000K 6500K 930 K0
R BIAS 05
V BIAS 05
B BIAS 05
RGAIN 05
VGAIN 05
BGAIN 05
1
Déplacez la touche de commande m/M pour
sélectionner la rangée 1 de température de
couleur. Déplacez ensuite la touche de commande
</,
pour sélectionner une température de
couleur.
2
Déplacez la touche de commande m/M pour
sélectionner le paramètre de réglage 2. Déplacez
ensuite la touche de comma nde </, pour ajuster
BIAS (niveau de noir).
Ce paramètre ajuste les zones foncées d’une image.
3
Déplacez la touche de commande m/M pour
sélectionner le paramètre de réglage 3. Déplacez
ensuite la touche de comma nde </, pour ajuster
GAIN (niveau de blanc).
Ce paramètre ajuste les zones claires d’une image.
Vous pouvez régler les composantes R (rouge), V (verte) et B
(bleue) du signal d’entrée lorsque vous effectuez des
changements aux paramètres 2 et 3.
COUL EUR
S I MPL E EXPERT s BGR
5000K 6500K 930 K0
1
Déplacez la touche de commande m/M pour
50 K00
sélectionner la rangée 1 de température de
couleur. Déplacez ensuite la touche de commande
</,
pour sélectionner une température de
couleur.
Les températures de couleur présélectionnées sont 5000 K,
6500K et 9300K. Eta nt donné que le réglage par défaut est
9300K, les blancs passent d’une teinte bleuâtre à une nuance
rougeâtre lorsque la température est abaissée à 6500K et
5000K.
2
Si nécessaire, ajustez finement la température de
couleur.
Déplacez la touche de commande m/M pour
sélectionner la rangée 2 de température de
couleur. Déplacez ensuite la touche de commande
</,
pour ajuster finement la température de
couleur.
Si vous ajustez finement la température de couleur, les
nouveaux réglages de la couleur sont enregistrés dans la
mémoire pour chacune des trois températures de couleur et le
paramètre 1 du menu change selon la séq uence suivante.
• [5000K]t[1]
• [6500K]t[2]
• [9300K]t[3]
12
Si vous ajustez f inement la tempéra ture de couleur, les
nouveaux réglages de couleur sont enregistrés dans la
mémoire pour chacune des trois températures de couleur et le
paramètre 1 du menu change selon la séquence suivante.
• [5000K]t[1]
• [6500K]t[2]
• [9300K]t[3]
Page 29
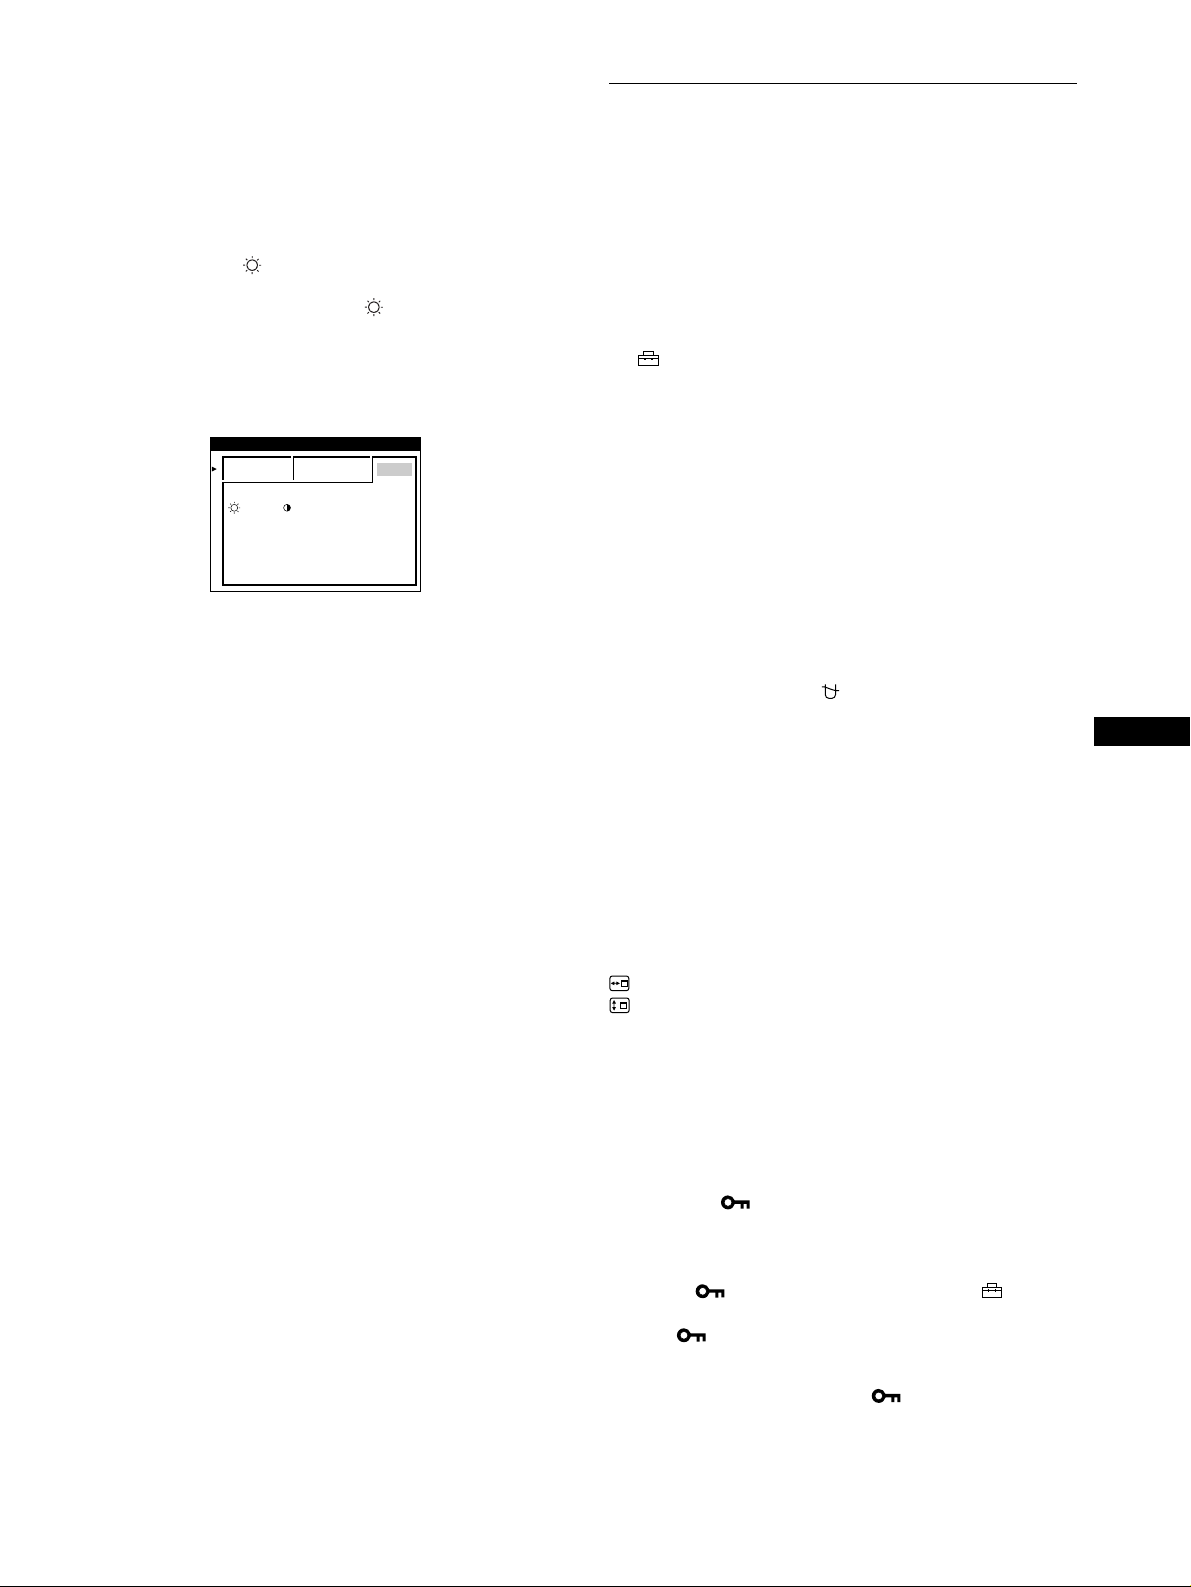
Mode sRGB
Le réglage de couleur sRGB est un protocole d’espace couleur
standard conçu pour corréler les couleurs affichées et imprimées
des systèmes informatiques compa tibles avec sRGB. Pour ajuste r
les couleurs suivant le profil sRGB, sélectionnez simplement le
mode sRGB dans le menu COULEUR. Pour pouvoir afficher
correctement les couleurs sRGB (γ=2,2, 6500K), vous devez
cependant configure r votre ordinateur suivant le profil sRGB et
ajuster la luminosité ( ) et le contraste (6) suivant les numéros
affichés dans le menu. Pour plus d’informations sur la façon de
changer les réglages de la luminosité ( ) et du contraste (6),
voir page 9.
Remarque
Votre ordinateur et les autres appareils raccordés (une imprimante, par
exemple) doivent être compatibles avec sRGB.
COUL EUR
S I MPL E EXPERT s BGR
:56 :76 POUR s BGR
Réglages supplémentaires
(OPTION)
Vous pouvez démagnétiser (dégausser) manuellement le
moniteur, chan ger la position des menus et verrouiller les
commandes.
1
Appuyez au centre de la manette de commande.
Le MENU principal apparaît à l’écran.
2
Déplacez la manette de commande pour mettre
OPTION en évidence et appuyez à nouveau au
centre de la manette de commande.
Le menu OPTION apparaît à l’écran.
3
Déplacez la manette de commande vers le haut ou
le bas m/M pour sélectionner le paramètre de
réglage voulu.
Procédez au réglage du paramètre sélectionné en suivant les
instructions ci-dessous.
Démagnétisation de l’écran
L’écran du moniteur e st au tom a tiq ue m ent d ém a gn é tisé à la mi se
sous tension.
Pour démagnétiser manuellement l’écran, déplacez
d’abord la manette de comm ande vers le haut ou le bas
m/M afin de sélectionner (DEGAUSS). Déplacez
ensuite la manette de commande vers la droite ,.
L’écran est démagnétisé pendant environ 2 secondes. Si un
second cycle de démagnétisation s’avère nécessaire, laissez
s’écouler un intervalle de 20 minutes pour obtenir de meil leurs
résultats.
FR
Changement de la position d’affichage des
écrans de menu
Changez la position du menu s’il bloque une image à l’écran.
Pour changer la position d’affichage des écrans de
menu, déplacez d’abord la m anette d e comma nde ve rs
le haut ou le bas m/M afin de sélectionner
(POSITION H OSD) pour le réglage horizontal ou
(POSITION V OSD) pour le réglage vertica l. Déplacez
ensuite la manette de commande vers la gauche ou la
droite </, pour déplacer le menu.
Verrouillage des commandes
Pour protéger les données de réglage en verrouillant
les commandes, déplacez d’abord la manette de
commande vers le haut ou le bas m/M afin de
sélectionner (MENU VERROUILLE). Déplacez
ensuite la manette de commande vers la droi te ,, pour
sélectionner ON.
Seuls le commutateur 1 (alimentation), et les paramètres
SORTIR et (MENU VERROUILLE) du menu OPTION
restent opérationnels. Si d’autres paramètres sont sélectionnés, le
symbole apparaît à l ’ écran.
Pour désactiver le verrouillage des commandes
Répétez la proc édure ci-des s us et réglez (MENU VERROUILLE)
sur OFF.
13
Page 30
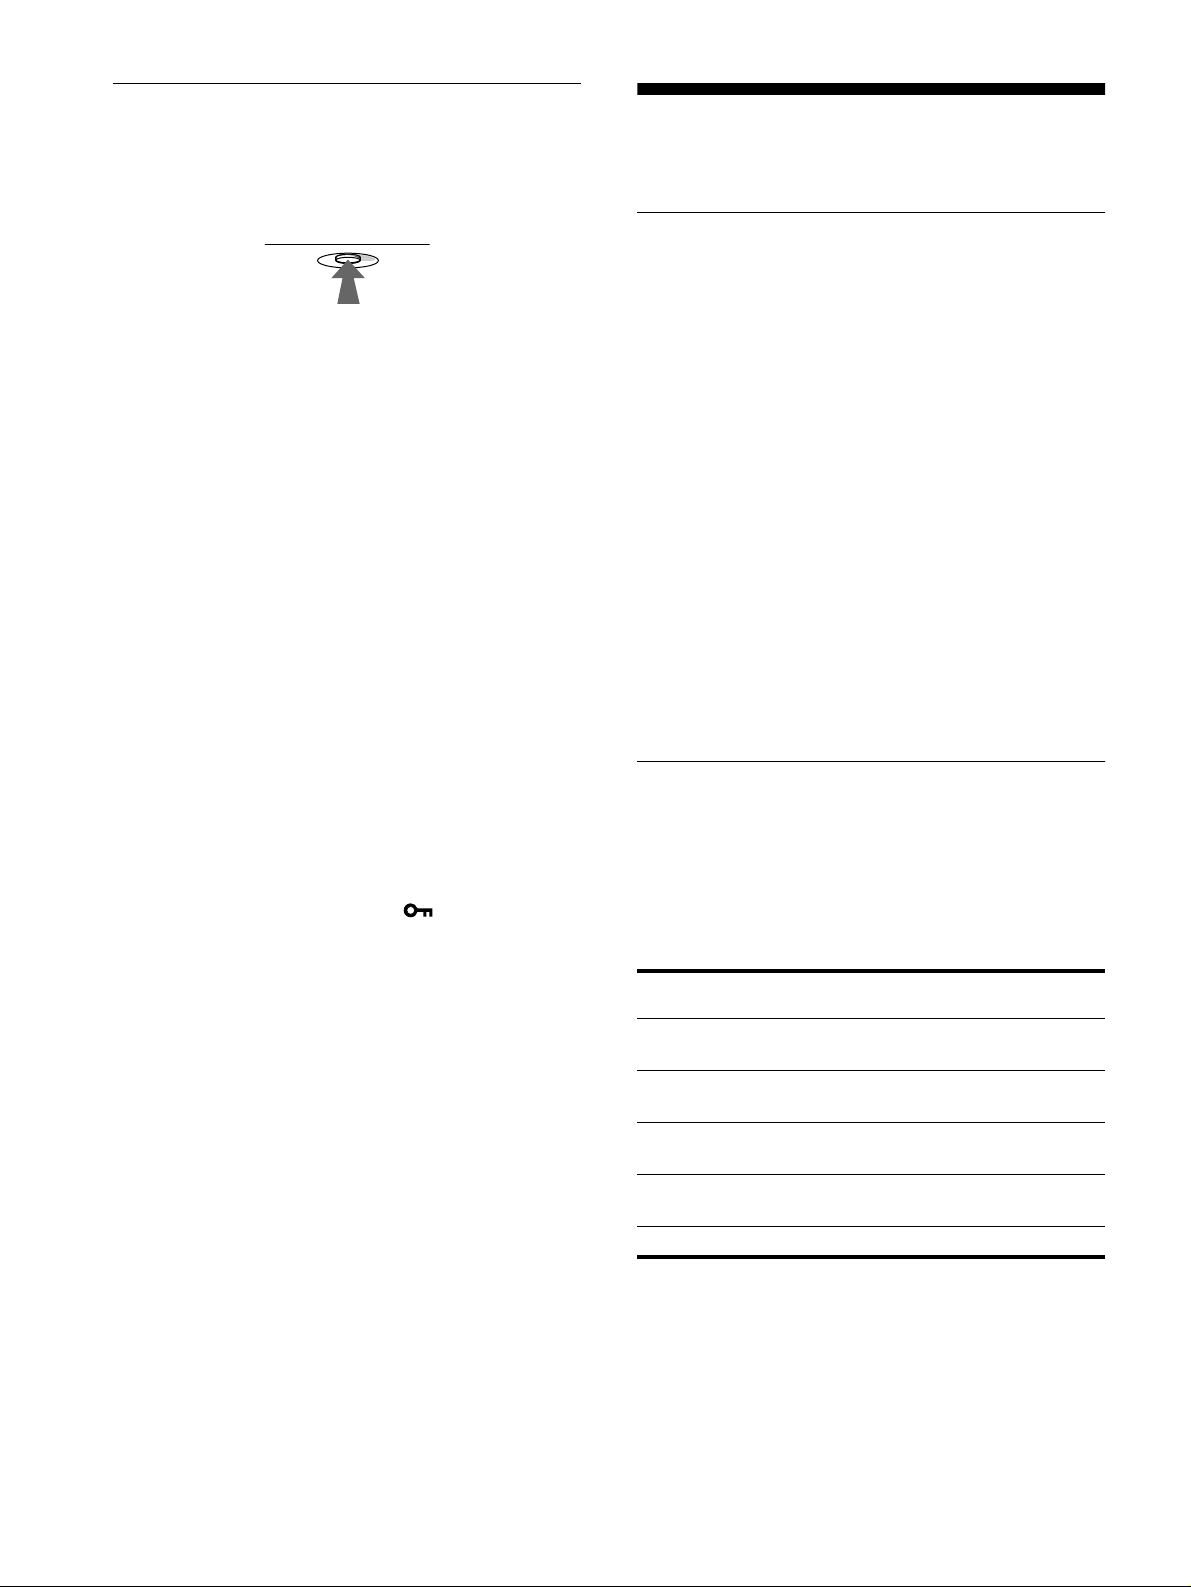
Réinitialisation des réglages
Ce moniteur offre trois méthodes de réinitialisation. Utilisez la
touche RESET pour réinitialiser les réglages.
RESET
Réinitialisation d’un seul paramètre de réglage
Utilisez la manette de commande pour sélectionner le paramètre
de réglage que vous voulez réinitialiser et appuyez sur la touche
RESET.
Réinitialisation de toutes les données de réglage
pour le signal d’entrée en cours
Appuyez sur la touche RESET lorsqu’aucun menu n’est affiché
sur l’écran.
Attention que les paramè tres su ivants n e sont pas réinitia lisés par
cette méthod e:
• langue d’affichage des menus (page 7)
• mode de réglage dans le menu COULEUR (SIMPLE,
EXPERT, sRGB) (page 12)
• positi on d’affichage des menus (page 13)
• verrouillage des commandes (page 13)
Caractéristiques
techniques
Modes présélectionné et utilisateur
Lorsque le moniteur reçoit un signal d’entrée, il fait
automatiquement correspondre le signal à l’un des modes
présélectionnés qui sont enregistrés dans la mémoire du moniteur
de manière à offrir une image de haute qualité au centre de
l’écran. (Voir Appendix pour une liste des modes
présélectionnés.) Pour les signaux d’entrée qui ne correspondent
pas à l’un des modes présélectionnés, la technologie Multiscan
numérique intégrée dans ce moniteur fait en sorte qu’une image
claire apparaisse à l’écran pour toutes les synchronisations dans la
plage de fréquences du moniteur (hori zontale: 30 à 109 kHz ;
verticale: 48 à 160 Hz). Lorsque l’image est réglée, les données
de réglage sont mémorisées comme un mode utilisateur et sont
rappelées automatiquement chaque fois que le même signal
d’entrée est reçu.
Remarque à l’intention des utilisateurs de
Windows
Vérifiez le mode d’e mploi de votre car te vidéo ou le progra m me
utilitaire fourni avec la carte g r aph iqu e et sélec tio nn e z l e tau x de
régénération le plus élevé de manière à maximiser les
performances du moniteur.
Réinitialisation de toutes les données de réglage
pour tous les signaux d’entrée
Maintenez la touche RESET enfoncée pendant au moins deux
secondes.
Remarque
La touche RESET ne fonctionne pas lorsque
VERROUILLE) est réglé sur ON.
(MENU
Fonction d’économie d’énergie
Ce moniteur satisfait aux critères d’économie d’énergie VESA,
E
NERGY STAR et NUTEK. Lorsque le moniteur est raccordé à
un ordinateur ou une carte graphique vidéo compatible DPMS
(Display Power Management Signaling), le moniteur réduit
automatiquement sa cons ommation d’énergie en trois étapes
comme indiqué ci-dessous.
Mode
d’alimentation
fonctionnement
normal
1 veille ≤ 15 W vert et orange en
2 interruption
(sommeil)*
3 inactif**
(sommeil profond)*
hors tension 0 W désactivé
* “Sommeil” et “sommeil profond” sont des modes d’écono mi e
d’énergie définis par l’ Environmental Protec ti on Age n c y.
** Lorsque votre ordinateur passe en mode d’économie d’énergie, le
signal d’entrée est coupé et PAS ENTREE VIDEO apparaît à l’écran.
Au bout de quelques secondes, le moniteur passe en mode d’économie
d’énergie.
Consommation
d’énergie
≤ 145 W vert
≤ 15 W vert et orange en
Approx. 1 W orange
L’indicateur 1
(alimentation)
alternance
alternance
14
Page 31
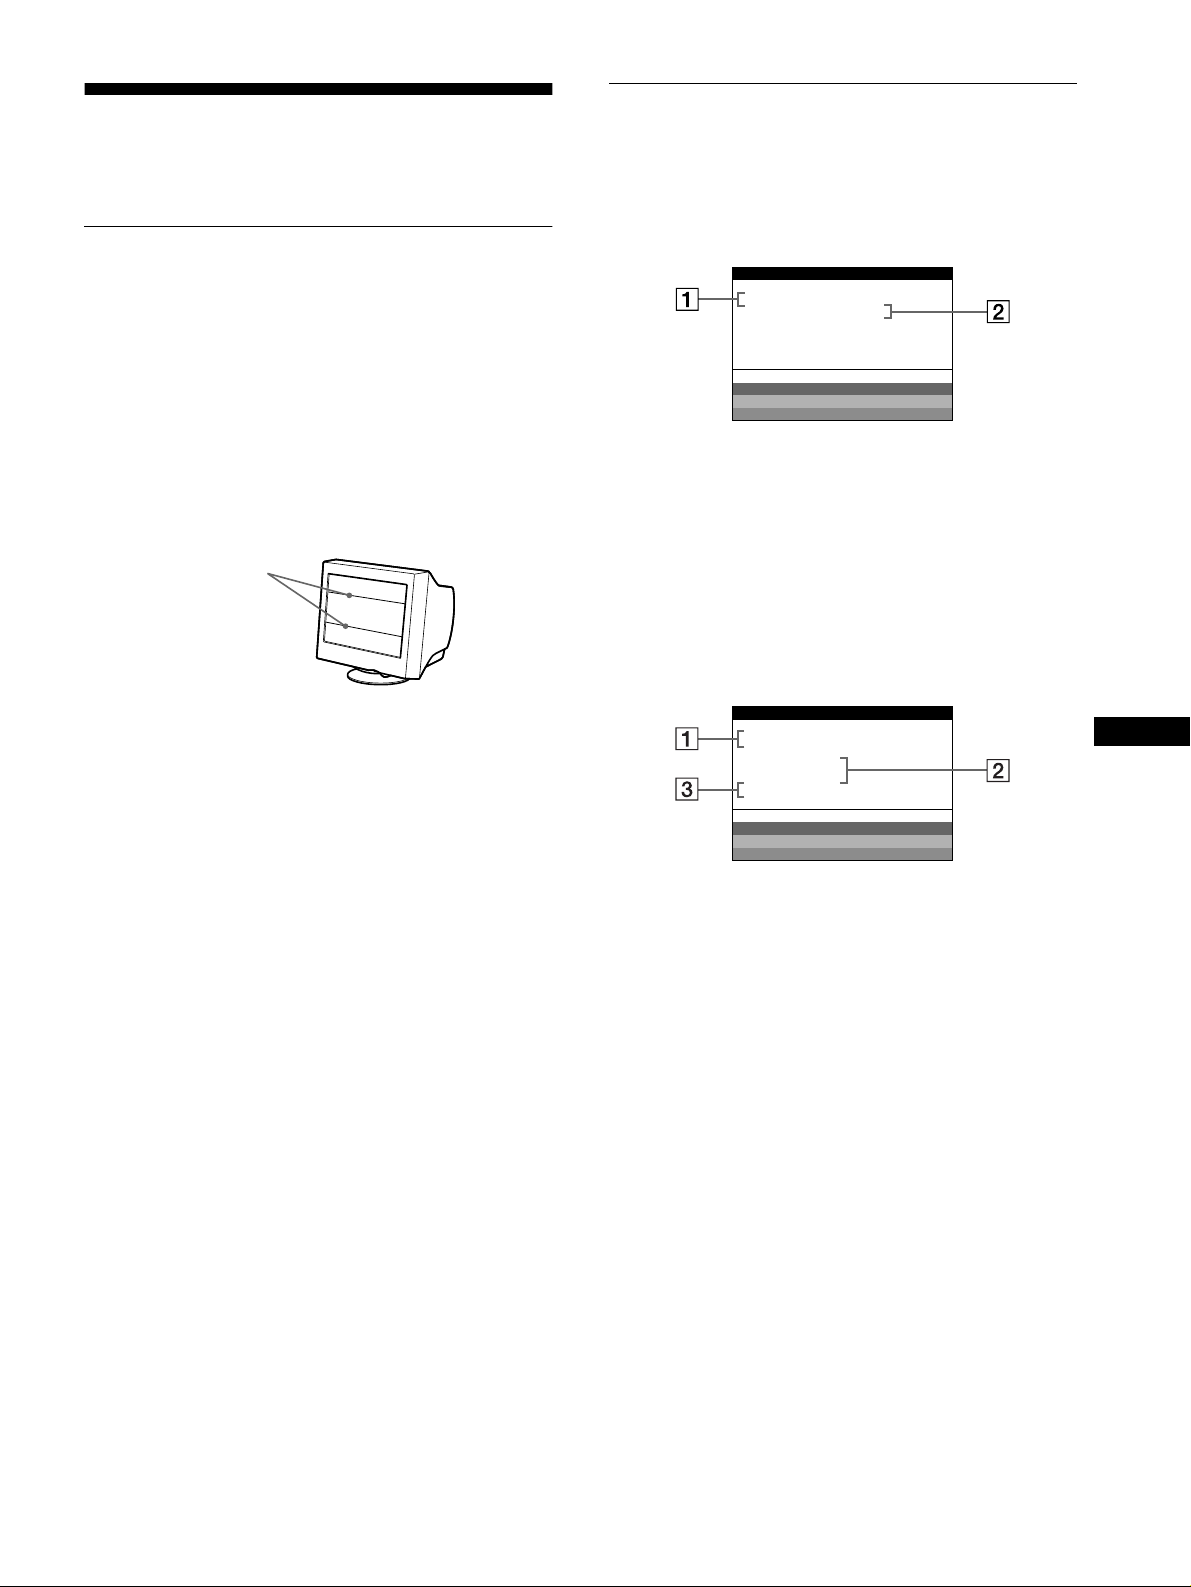
Dépannage
Consultez cette section avant de faire appel au service
d’assistance technique.
Si de fines lignes apparaissent à
l’écran (fils d’amortissement)
Les lignes que vous apercev ez sur votre écran sont une
caractéristique normale des monite u rs Trin itro n et n e con stitue n t
donc pas un dysfonc tionnement. Il s’agit de l’ombre des fils
d’amortissement employés pour stabiliser la grille d’ouverture
qui sont le plus facilement visibles lorsque l’arrière-plan de
l’écran est clair (généralement blanc). La grille d’ouverture est
l’élément essentiel qui rend le s tub e s imag e T rini tron un iq ue s e n
permettant le passage d’u ne p l u s gra n de q ua n tité d e lu mi ère v e rs
l’écran, ce qui garantit une image plus lumineuse et plus finement
détaillée.
Fils d’amortissement
Messages affichés à l’écran
Si le signal d’entrée présente une anomalie, l’un des messages
suivants apparaît à l’écran.
Si l’indication PAS ENTREE VIDEO apparaît à
l’écran
INFORMAT I ONS
ECRAN FONCT IONNE
PAS ENTREE V IDEO
WH I T E
RED
GREEN
BLUE
1111 Fréquences du signal d’entrée en cours
Si le moniteur reconnaît les fréquences du signal d’entrée en
cours, les fréquences horizontales et vert icales s’affichent.
2222 La condition du signal d’entrée
PAS ENTREE VIDEO
Cela indique qu’il n’y a pas de signal d’entrée.
Si HORS PLAGE DE BALAYAGE apparaît à
l’écran
: 68.7kHz/ H58zENTRE E
INFORMAT I ONS
ECRAN FONCT IONNE
ENTRE E
HORS PLAGE
DE BAL AYAGE
CHANGER SYNC S I GNAL
WH I T E
RED
GREEN
BLUE
:130.0kHz/ H57z
1111 Fréquences du signal d’entrée en cours
Si le moniteur reconnaît les fréquences du signal d’entrée en
cours, les fréquences horizontales et vert icales s’affichent.
2222 La condition du signal d’entrée
HORS PLAGE DE BALAYAGE
Indique que le signal entré n’est pas sup porté par les
spécifications du monite ur.
3333 Les remèdes
CHANGER SYNC SIGNAL apparaît à l’écran. Si vous
remplacez un ancien moniteur par ce moniteur, rebranchez
l’ancien moniteur. Ajustez ensuite la carte graphique de
l’ordinateur sur une fréquence horizontale comprise entre
30 et 109 kHz et une fréquence verticale entre 48 et 160 Hz.
Pour plus d’inform ations, voir “Symptômes et remèdes” à la
page 16.
FR
15
Page 32

Symptômes et remèdes
Si le problème est provoqué par l’ordinateur ou tout autre appareil raccordé, veuillez vous référer au mode d’emploi de l’appareil raccordé.
Utilisez la fonction d’autodiagnostic (page 18) si les recommandations suivantes ne vous permettent pas de résoudre le problème survenu.
Symptôme Vérifiez
Pas d’image
Si l’indicateur 1 (alimentation) ne
s’allume pas
Si le message PAS ENTREE
VIDEO apparaît à l’écran ou si
l’indicateur 1 (alimentation) est
allumé en orange ou alterne entre l e
vert et l’orange
Si le message HORS PLAGE DE
BALAYAGE apparaît à l’écran
Si aucun message ne s’affiche et si
l’indicateur 1 (alimentation) est vert
ou clignote en orange
Si vous utilisez Windows 95/98 • Si vous remplacez un ancien moniteur par ce moniteur, reconnectez l’ancien moniteur et
Si vous utilisez un système
Macintosh
L’image scintille, sautille, oscille
ou est brouillée
• Vérifiez si le cordon d’alimentation est correctement branché.
• Vérifiez si le commutateur 1 (alimentation) est réglé sur la position “on”.
• Vérifiez si le câble de signal vidéo est correctement branché et si les fiches sont
fermement enfoncées dans leurs prises resp ectives (page 6).
• Vérifiez si les broches du connecteur d’entrée vidéo HD15 ne sont pas pliées ou
enfoncées.
x
Problèmes causés par l’ordinateur ou tout autre appareil raccordé
• L’ordinateur se trouve en mode d’économie d’énergie. Appuyez sur une touche
quelconque du clavier ou déplacez la souris.
• Vérifiez si l’ordinateur est sous t ension (“on”).
• Vérifiez si la carte graphique est complètement enfoncée dans la fente de bus correcte .
x
Problèmes causés par l’ordinateur ou tout autre appareil raccordé
• Vérifiez si la plage de fréquence vidéo correspond aux spécifications du moniteur. Si vous
remplacez un ancien moniteur par ce moniteur, reconnectez l’ancien moniteur et ajustez la
plage de fréquence comme suit.
Horizontale: 30 à 109 kHz
Verticale: 48 à 160 Hz
• Activez la fonction d’autodiagnostic (page 18).
procédez comme suit. Installez la disquette d’installation (page 7) et sélectionnez ce
moniteur (“CPD-E500E”) parmi les moniteurs Sony dans l’écran de sélection de moniteur
de Windows 95/98.
• Si vous raccordez l’adaptateur à un ordinateur Power Macintosh G3 doté de deux rangées
de broches, vérifiez si l’adaptateur G3 Macintosh fourni et le câble de signal vidéo sont
correctement raccordés (page 6).
• Pour les Power Macintosh G3 ou d’autres modèles dotés de connecteurs à deux rangées de
broches, vous devez utiliser un adaptateur différent vendu séparément.
• Isolez et éliminez les sources potentielles de champs électriques ou magnétiques tels que
d’autres moniteurs, des imprimantes laser, des ventilateurs électriques, des lampes
fluorescentes ou des téléviseurs.
• Éloignez le moniteur des lignes à haute tension ou placez un blindage magnétique à
proximité du moniteur.
• Branchez le moniteur sur une autre prise secteur, de préférence raccordée à un autre
circuit.
• Fait e s pivoter le monite ur de 90° vers la ga uche ou la droite.
L’image est floue
16
x
Problèmes causés par l’ordinateur ou tout autre appareil raccordé
• Vérifiez le réglage adéquat pour le moniteur dans le mode d’emploi de votre carte
graphique.
• Assurez-vous que le mode graphique (VESA, Macintos h 21" Color, etc.) et la fréquence
du signal d’entrée sont supportés par ce moniteur (Appendix). Même si la fréquen ce est
comprise dans la plage adéquate,certaines cartes graphiques peuvent avoir une impulsion
de synchronisation trop étroite pour que le moniteur puisse se synchroniser correctement.
• Ajustez le taux de régénération de l’ordinateur (fréquence verticale) de façon à obtenir la
meilleure image possible.
• Ajustez la luminosité et le contraste (page 9).
• Démagnét isez le moniteur* (page 13).
• Si SUPPRIMER MOIRE est réglé sur ON, il se peut que l’image devienne floue.
Réduisez l’effet de suppression du moiré ou réglez SUPPRIMER MOIRE sur OFF
(page 11).
Page 33

Symptôme Vérifiez
Des images fantômes
apparaissent
L’image n’est pas centrée ou de
taille incorrecte
Les bords de l’image sont
incurvés
Un motif ondulatoire ou elliptique
(moiré) est visible
Les couleurs ne sont pas
uniformes
Le blanc n’est pas blanc • Ajustez la température de co uleur (page 1 2).
Les lettres et les lignes sont
soulignées d’une ombre rouge ou
bleue
Les touches du moniteur sont
inopérantes
( apparaît sur l’écran)
Un souffle est audible juste après
la mise sous tension
* Si un sec ond cycle de démagnétisat ion s’avère nécessaire, laissez s’écouler un interva lle de 20 minutes pour obtenir de meilleurs résultats. Un bruit de
souffle peut se faire entend re, m ai s il ne s’agi t pas d’un dysfonctionnement.
Affichage de la désignation, du numéro de série et
de la date de fabrication de ce moniteur.
Pendant que le moniteur reçoit un signal vidéo, maintenez le
centre de la manette de commande enfoncé pendant au moins cinq
secondes pour afficher la case d’informations relatives à ce
moniteur.
MENU
Exemple
INFORMATIONS
MODEL : CPD E500E
SER NO : 1234567
b
MANUFACTURED
• N’utilisez pas de prolongateurs de câble vidéo et/ou de boîtiers de commutation vidéo.
• Vérifiez si toutes les fiches sont fermement connectées dans l eurs prises respectives.
• Ajustez la taille (page 10) ou le centrage (page 10) de l’image. Attention que certains
modes vidéo ne remplissent pas l’écran jusqu’aux bords.
• Ajustez la géométrie (page 10).
• Mettez SUPPRIMER MOIRE sur ON et ajustez le degré de suppression de moiré jusqu’à
ce que le moiré ait été réduit au minimum (page 11 ).
xProblèmes causés par l’ordinateur ou tout autre appareil raccordé
• Changez le motif de votre bureau.
• Démagnétisez le moniteur* (page 13). Si vous placez à côté du moniteur un appareil qui
génère un champ magnétique, comme un haut-parleur, ou si vous changez l’orientation du
moniteur, il se peut que les couleurs perdent leur uniformité.
• Ajustez l’alignement (page 11).
• Ajustez la convergence (page 11).
• Si la fonction de verrouillage des commandes est réglée sur ON, réglez-la sur OFF
(page 13).
• C’est le son provoqué par le c ycle d e dém agnétisat ion auto matiqu e. Lorsqu ’il est mis so us
tension, le moniteur est automatiquement démagnétisé pendant deux secondes.
Si le problème persiste, appelez votre revendeur Sony agréé et
fournissez-lui les informations suivantes.
• Désignation du modèle: CPD-E500E
• Numéro de série
• Marque et spécifications de votre ordinateur et de votre carte
graphique.
: 1999-52
FR
17
Page 34

Fonction d’autodiagnostic
Ce moniteur est équipé d’une fonction d’autodiagnostic. S’il y a
un problème au niveau de notre moniteur ou de l’ordinateur,
l’écran se vide et l’indicateur 1 (alimentation) s’allume en vert
ou clignote en orange. Si l’indicateur 1 (alimentation) s’allume
en orange, c’est que l ’ordinateur se tro uve en mode d’économie
d’énergie. Appuyez sur une touche quelconque du clavier.
RESET
Indicateur 1 (alimentation)
Si l’indicateur 1 (alimentation) est allumé en vert
1
Déconnectez le câble d’entrée vidéo ou mettez
l’ordinateur raccordé hors tension.
2
Appuyez deux fois sur la touche 1 (alimentation)
pour mettre le moniteur hors et sous tension.
3
Déplacez la manette de com mande vers la droite ,
pendant 2 secondes avan t que le moniteur passe en
mode d’économie d’énergie.
MENU
MENU
Spécifications
Tube cathodique Pas d’ouv er ture de gril le de 0 ,24 mm
21 pouces mesurés en diagonale
Déflexion de 90 degr é s
Trinitron FD
Taille de l’image affichée Approx. 403,8 × 302,2 mm (l/h)
(16 × 12 po)
Zone de visualisation de 19,8"
Résolution
Maximum Horizontale: 2048 points
Verticale: 1536 lignes
Recommandée Horizontale: 1600 points
Verticale: 1200 lignes
Zone d’image standa rd Approx. 388 × 291 mm (l/h)
Fréquence de déflexion* Horizontale: 30 à 109 kHz
Tension/courant d’entrée 100 à 240 V, 50 – 60 Hz,
Consommati on éle c t r ique Approx. 145 W
Dimensions Approx
Masse Approx. 32 kg (70 lb 9 oz)
Plug & Play DDC1/2B/2Bi, GTF**
Accessoires fournis Voir page6
3
/8 × 11 1/2 po)
(15
ou
Approx. 364 × 291 mm (l /h)
3
/8 × 11 1/2 po)
(14
Verticale: 48 à 160 Hz
2,0 – 1,0 A
. 497 × 480 × 478 mm (
(19 5/8 × 19 × 18 7/8 po)
l/h/p
)
Si les quatre barres de couleur apparaissent (blanc, rouge, vert,
bleu), c’est que le moniteur fonctionne correctement.
Reconnectez l e câble d’entrée vidé o et vér if i ez l a co nd itio n de
votre ordinateur.
Si les barres de couleur n’apparaissent pas, c’est probablement
parce qu’une anomalie s’est pr oduite au niveau du moniteur.
Informez votre revendeur Sony agréé de l’état du moniteur.
Si l’indicateur 1 (alimentation) clignote en orange
Appuyez deux fois sur la touche 1 (alimentation) pour
mettre le moniteur hors et puis sous tension.
Si l’indicateur 1 (alimentation) s’allume en vert, c’est que le
moniteur fonctionne correctement.
Si l’indicateur 1 (alimentation) clignote toujours, c’est
probablement parce qu’il y a une anomalie au niveau du moniteur.
Comptez le nombre de secondes ent re les clignotements oranges
de l’indicateur 1 (alimentation) et informez votre revendeur
Sony agréé de l’état du moniteur. Notez également la désignation
du modèle et le numéro de série de votre moniteur. Notez
également la marque et le mod è le de votre ordinateur et de votre
carte vidéo.
* Condition de synchronisation horizontale et verticale
recommandée
• La largeur de synchronisation horizontale do it être
supérieure à 4,8% de la durée horizontale totale ou 0,8 µs,
suivant la valeur la plus grande .
• La largeur de suppression horizontale doit être supérieure à
2,3 µsec.
• La largeur de suppression verticale doit être supérieure à
450 µsec.
** Si le signal d’entrée est compatible avec la Generalized
Timing Formula (GTF), la fonction GTF du moniteu r four nit
automatiquement un e image optimale pour l’écra n.
La conception et les spécifications sont sujettes à modifications
sans préavis.
18
Page 35
Inhalt
Hinweis
Dieses Gerät erfüllt bezüglich
tieffrequenter (very low frequency) und
tiefstfrequenter (extremely low frequency)
Strahlung die Vorschriften des „Swedish
National Council for Metrology (MPR)“
vom Dezember 1990 (MPR II).
Dieses Garät entspricht den folgenden
europäischen EMV-Vorschriften für
Betrieb in Wohngebieten, gewerblicher
Gebleten und Leichtindustriegebieten.
EN55022/1994 Klasse B
EN50082-1/1997
EN61000-3-2/1995
Sicherheitsmaßnahmen . . . . . . . . . . . . . . . . . . . . . . . . . . . . . . . . . . 4
Lage und Funktion der Teile und Bedienelemente . . . . . . . . . . . . . . 5
Anschließen des Geräts . . . . . . . . . . . . . . . . . . . . . . . . . .6
Schritt 1:
Schritt 2:
Schritt 3:
Auswählen der Sprache für die Bildschirmmenüs (LANG). . . . . . . . 7
Anschließen des Monitors an den Computer. . . . . . . . . . 6
Anschließen des Netzkabels . . . . . . . . . . . . . . . . . . . . . . 6
Einschalten von Monitor und Computer . . . . . . . . . . . . . . 7
Einstellen des Monitors. . . . . . . . . . . . . . . . . . . . . . . . . . .8
Navigieren in den Menüs . . . . . . . . . . . . . . . . . . . . . . . . . . . . . . . . . 8
Einstellen von Helligkeit und Kontrast . . . . . . . . . . . . . . . . . . . . . . . 9
Einstellen der Bildgröße (GRÖSSE). . . . . . . . . . . . . . . . . . . . . . . . 10
Einstellen der Bildposition (BILDLG) . . . . . . . . . . . . . . . . . . . . . . . 10
Vergrößern oder Verkleinern des Bildes (ZOOM) . . . . . . . . . . . . . 10
Einstellen der Form des Bildes (GEOM). . . . . . . . . . . . . . . . . . . . . 10
Einstellen der Konvergenz (KONVG.) . . . . . . . . . . . . . . . . . . . . . . 11
Einstellen der Bildqualität (BILD) . . . . . . . . . . . . . . . . . . . . . . . . . . 11
Einstellen der Farben des Bildes (FARBE). . . . . . . . . . . . . . . . . . . 12
Weitere Einstellungen (OPTION) . . . . . . . . . . . . . . . . . . . . . . . . . . 13
Zurücksetzen der Einstellungen . . . . . . . . . . . . . . . . . . . . . . . . . . . 14
DE
• Trinitron ist ein eingetragenes
Warenzeichen de r Sony Corporation.
• Macintosh ist ein Warenzeichen der
Apple Computer, Inc., in den USA und
anderen Ländern.
• Windows
eingetragene Warenzeichen der
Microsoft Corporation in den USA und
anderen Ländern.
• IBM PC/AT und VGA sind
eingetragene Warenzeichen der IBM
Corporation in den USA.
• VESA und DDC
der Video Electronics Stand ard
Association.
•
E
Warenzeichen in den USA.
• Alle anderen in diesem Handbuch
erwähnten Produktnamen können
Warenzeichen oder eingetragene
Warenzeichen der jeweiligen
Eigentümer sein.
• Im Handbuch sind die Waren ze i che n
und eingetragenen Warenzeichen nicht
überall ausdrücklich durch „“ und „“
gekennzeichnet.
und MS-DOS sind
sind Warenzeichen
NERGY STAR ist ein eingetragenes
Technische Merkmale . . . . . . . . . . . . . . . . . . . . . . . . . . .14
Vordefinierte Modi und Benutzermodi . . . . . . . . . . . . . . . . . . . . . . 14
Die Energiesparfunktion . . . . . . . . . . . . . . . . . . . . . . . . . . . . . . . . . 14
Störungsbehebung . . . . . . . . . . . . . . . . . . . . . . . . . . . . .15
Wenn auf dem Bildschirm dünne Linien (Dämpfungsdrähte)
erscheinen . . . . . . . . . . . . . . . . . . . . . . . . . . . . . . . . . . . . . . . . . . . 15
Bildschirmmeldungen . . . . . . . . . . . . . . . . . . . . . . . . . . . . . . . . . . . 15
Symptome für Fehler und Abhilfemaßnahmen. . . . . . . . . . . . . . . . 16
Selbstdiagnosefunktion. . . . . . . . . . . . . . . . . . . . . . . . . . . . . . . . . . 18
Technische Daten . . . . . . . . . . . . . . . . . . . . . . . . . . . . . .18
Appendix. . . . . . . . . . . . . . . . . . . . . . . . . . . . . . . . . . . . . . . i
Preset mode timing table . . . . . . . . . . . . . . . . . . . . . . . . . . . . . . . . . .i
TCO’99 Eco-document . . . . . . . . . . . . . . . . . . . . . . . . . . . . . . . . . . . .i
3
Page 36
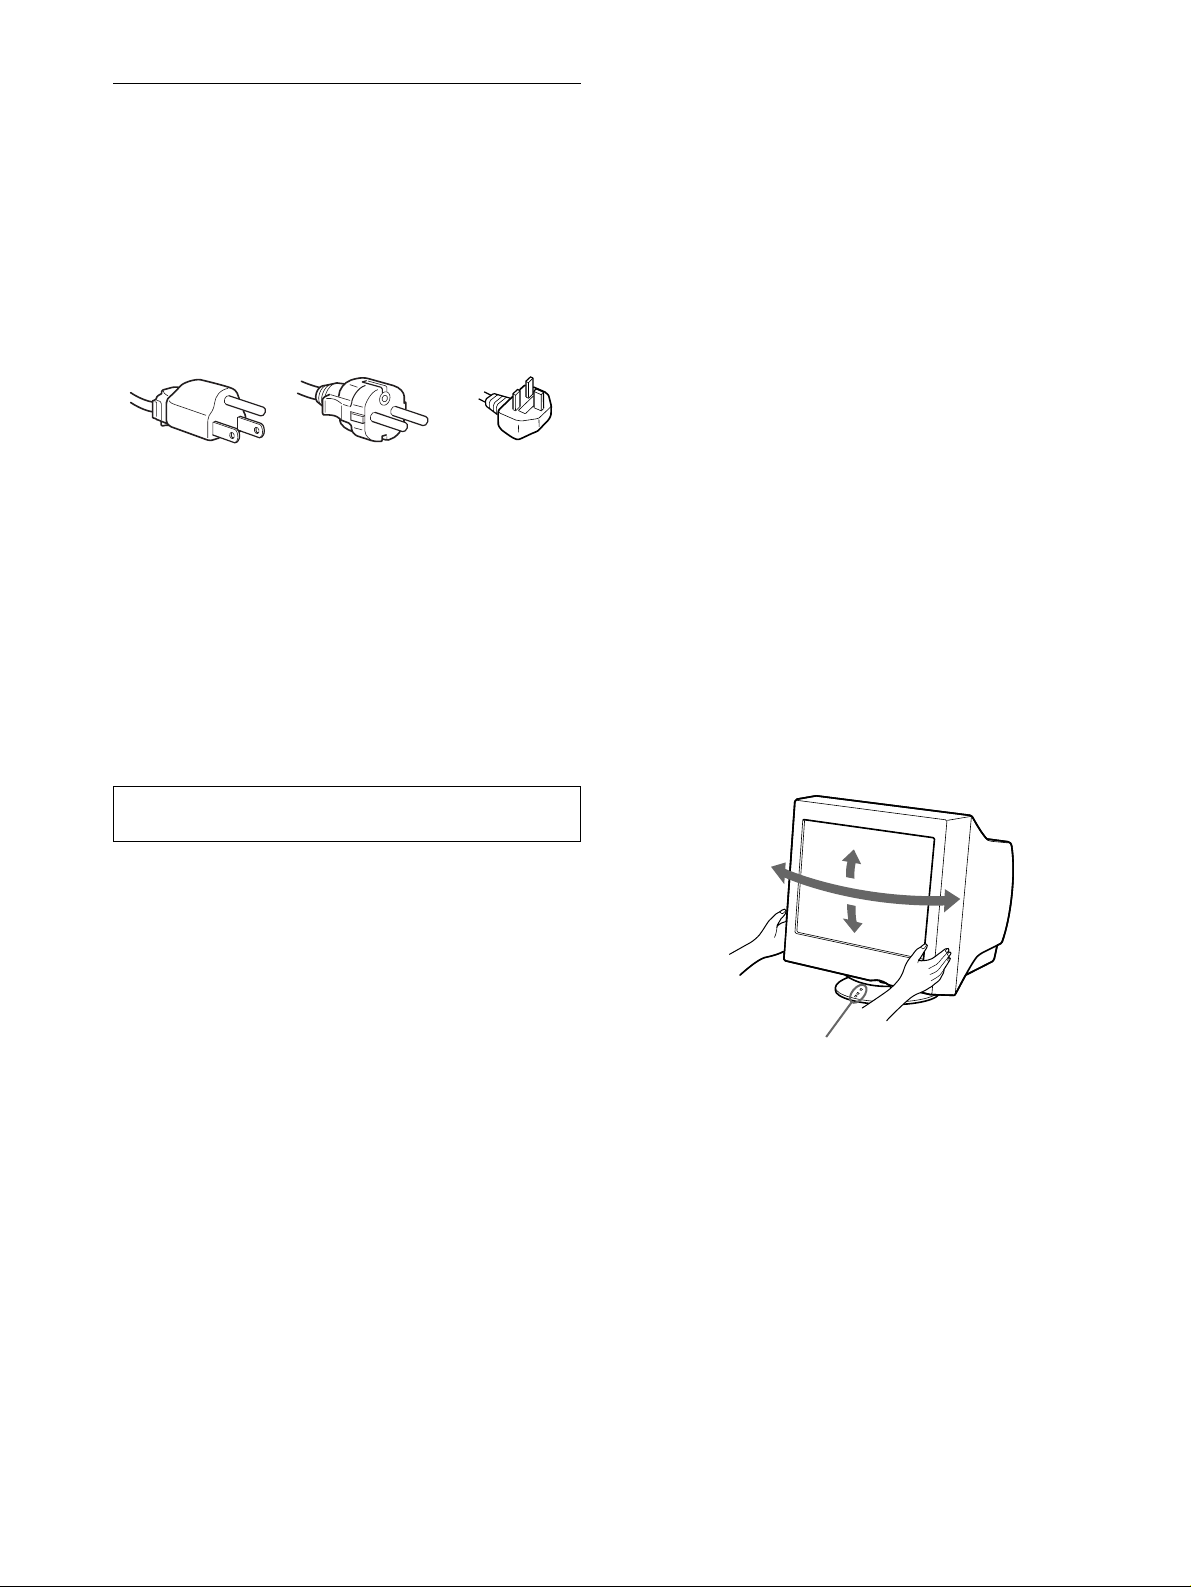
Sicherheitsmaßnahmen
90°
5°
90°
15°
Zentrierpunkte
Warnhinweis zum Netzanschluß
• Verwenden Sie ausschließlich das mitgelieferte Netzkabel.
Wenn Sie ein anderes Netzkabel verwenden, achten Sie darauf,
daß es für die Stromversorgung in Ihrem Land geeignet ist.
Für Kunden in Großbrita nn i en
Wenn Sie den Monitor in Gr oßbritannie n verwenden, ben utzen
Sie bitte das mitgelieferte Kabel mit dem für Großbritannien
geeigneten Stecker.
Beispiele für Steckertypen
Wartung
• Reinigen Sie den Bildschirm mit einem weichen Tuch. Wenn
Sie ein Glasreinigungsmittel verwenden, achten Sie darauf, daß
es keine Antistatik-Lösung oder ähnlich e Zusätz e enthält, da
diese zu Kratzern auf der Beschichtung des Bildschirms führen
könnten.
• Berühren Sie die Bildschirmoberfläche nicht mit scharfen,
rauhen oder sp itz e n Ge g e ns tä nden wie zum Beis piel
Kugelschreibern oder Schraubenziehern. Andernfalls könnte
die Bildschirmoberfläche zerkratzt werden.
• Reinigen Sie Gehäuse, Bedienfeld und Bedienelemente mit
einem weichen Tuch, das Sie leicht mit einem milden
Reinigungsmittel angefeuchtet ha ben. Verwenden Sie ke ine
Scheuermittel, Scheuerschwämme oder Lösungsmittel wie
Alkohol oder Benz in.
für 100 bis 120 V
Wechselstrom
• Warten Sie nach dem Ausschalten des Geräts mindestens
30 Sekunden, bevor Sie das Netzkabel lösen. In dieser Zeit
kann sich die statische Elektrizitä t auf der Oberfläche des
Bildschirms entladen.
• Wenn Sie das Gerät einschalten, wird der Bildschirm etwa
2 Sekunden lang entmagnetisiert. Dadurch entsteht um den
Bildschirm ein starkes magnetisches Feld, das Daten auf
Magnetbändern, Disketten oder anderen Datenträgern in der
Nähe beschädigen kann. Legen Sie magnetische Datenträger
und Bänder/Disketten daher nicht zu nahe bei diesem Monitor
ab.
Die Netzsteckdose sollte sich in der Nähe des Ge räts befinden
und leicht zugänglich sein.
für 200 bis 240 V
Wechselstrom
nur für 240 V
Wechselstrom
Aufstellung
Stellen Sie den Monitor nicht an folgenden Standorten auf:
• auf Oberflächen wie Teppichen oder Decken oder in der Nähe
von Materialien wie Gardinen und Wandbehängen, die die
Lüftungsöffnungen blockieren könnten
• in der Nähe von Wärmequellen wie Heizkörpern oder
Warmluftauslässen oder an einem Ort, an dem der Monitor
direktem Sonnenlicht ausgesetzt ist
• an einem Ort, an dem der Monitor starken
Temperaturschwankungen ausgesetzt ist
• an einem Ort, an dem der Monitor mechanischen Vibrationen
oder Stößen ausgesetzt ist
• auf einer instabilen Oberfläche
• in der Nähe anderer Geräte, die ein starkes Magnet feld
generieren, wie zum Beispiel ein Transformator oder eine
Hochspannungsleitung
• in der Nähe von oder auf einer elektrisch geladenen
Metallfläche
Transport
Wenn Sie den Monitor zur Reparatur oder bei einem Umzug
transportieren müssen, verpacken Sie ihn mit Hilfe der
Originalverpackungsmaterialien wieder im Originalkarton.
Der dreh- und neigbare Ständer
Mit dem dreh- un d neigbaren Ständer können Sie den Monitor
innerhalb der unten abgebildeten Winkel nach Bedarf einstellen.
Um die Mitte des Drehradius des Monitors zu finden, richten Sie
die Mitte des Monitorbildschirms an den Zentrierpunkten am
Ständer aus.
Stützen Sie den Monitor bitte mit beiden Händen unte n ab, wenn
Sie ihn drehen oder neigen. Achten Sie darauf, die Finger nicht an
der Rückseite des Moni tors einzuklemmen, wenn Sie den
Monitor nach ob en schwenken.
4
Page 37
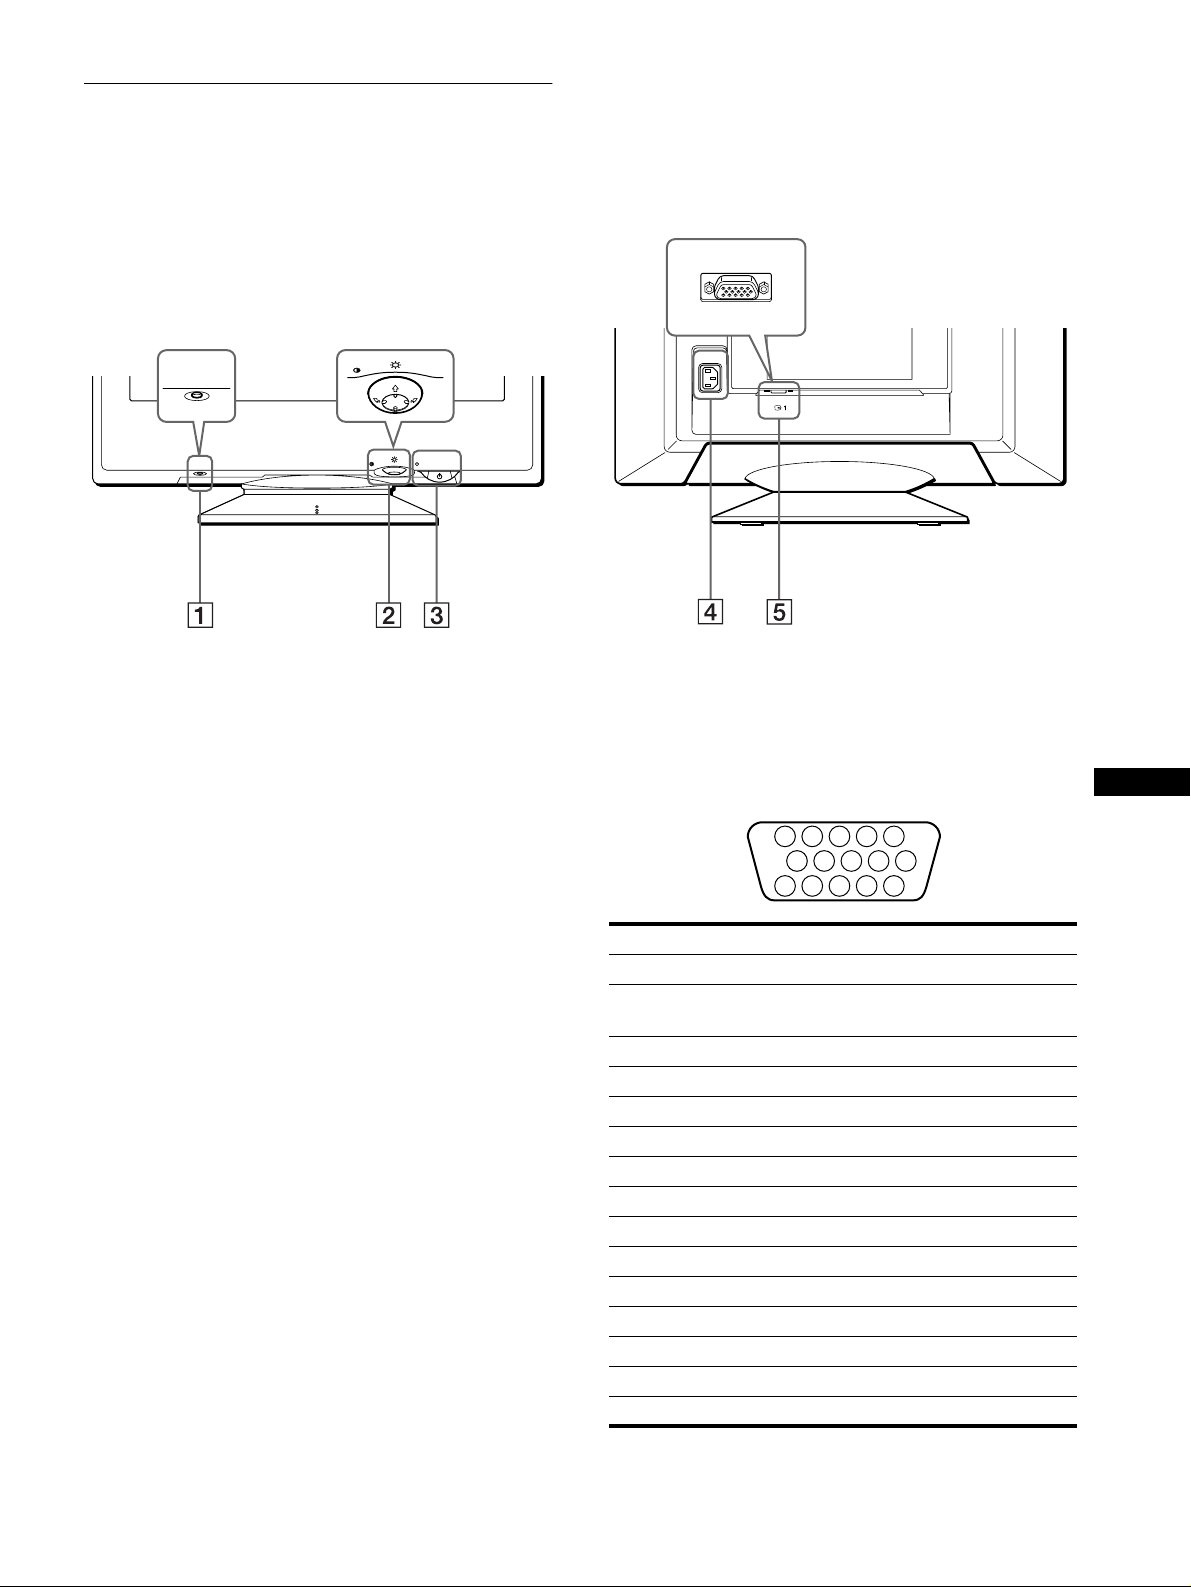
Lage und Funktion der Teile und
5 4 3 2
1
678910
1112131415
Bedienelemente
Weitere Informationen finden Sie auf den in Klammern
angegebenen Seiten.
MENU
RESET
RESET
MENU
1 Taste RESET (Zurücksetzen) (Seite 14)
Diese Taste dient zum Zurücksetzen de r Werte auf die
werkseitigen Einstellungen.
2222 Steuertaste (Seite 9)
Mit der Steuerta ste können Sie die Menüs aufrufen und die
Einstellungen des Monitors, einschließlich der Helligkeitsund Kontrasteins tellungen, ändern.
RückseiteVorderseite
vorne
hinten
AC IN
(HD15)
4444 Netzeingang AC IN (Seite 6)
Dieser Anschluß dient zur Stromversorgung des Monitors.
5555 Videoeingang (HD15) (y1) (Seite 6)
Dieser Anschluß dient zum Einspeisen von RGBVideosignalen (0,700 Vp-p, positiv) und
Synchronisationssignalen.
DE
3333 Netzschalter und -anzeige 1 (Seite 7, 14, 18)
Dieser Schalter dient zum Ein- und Ausschalten des
Monitors. Die Netzanzeige leuchtet grün, wenn der Monitor
eingeschaltet ist, und blinkt grün und orange bzw. leuchtet
orange, wenn sich der Monitor im Energiesparmodus
befindet.
Stift Nr. Signal
1Rot
2 Grün
(Grünsignal mit Sync h r on is a tio n)
3Blau
4 ID (Masse)
5 DDC-Masse*
6 Masse Rot
7 Masse Grün
8 Masse Blau
9 DDC + 5V*
10 Masse
11 ID (Masse)
12 Bidirektionale Daten (SDA)*
13 H. Sync
14 V. Sync
15 Datentakt (SCL)*
* DDC (Displ ay Data Channel) ist ein Standa rd der VESA.
5
Page 38
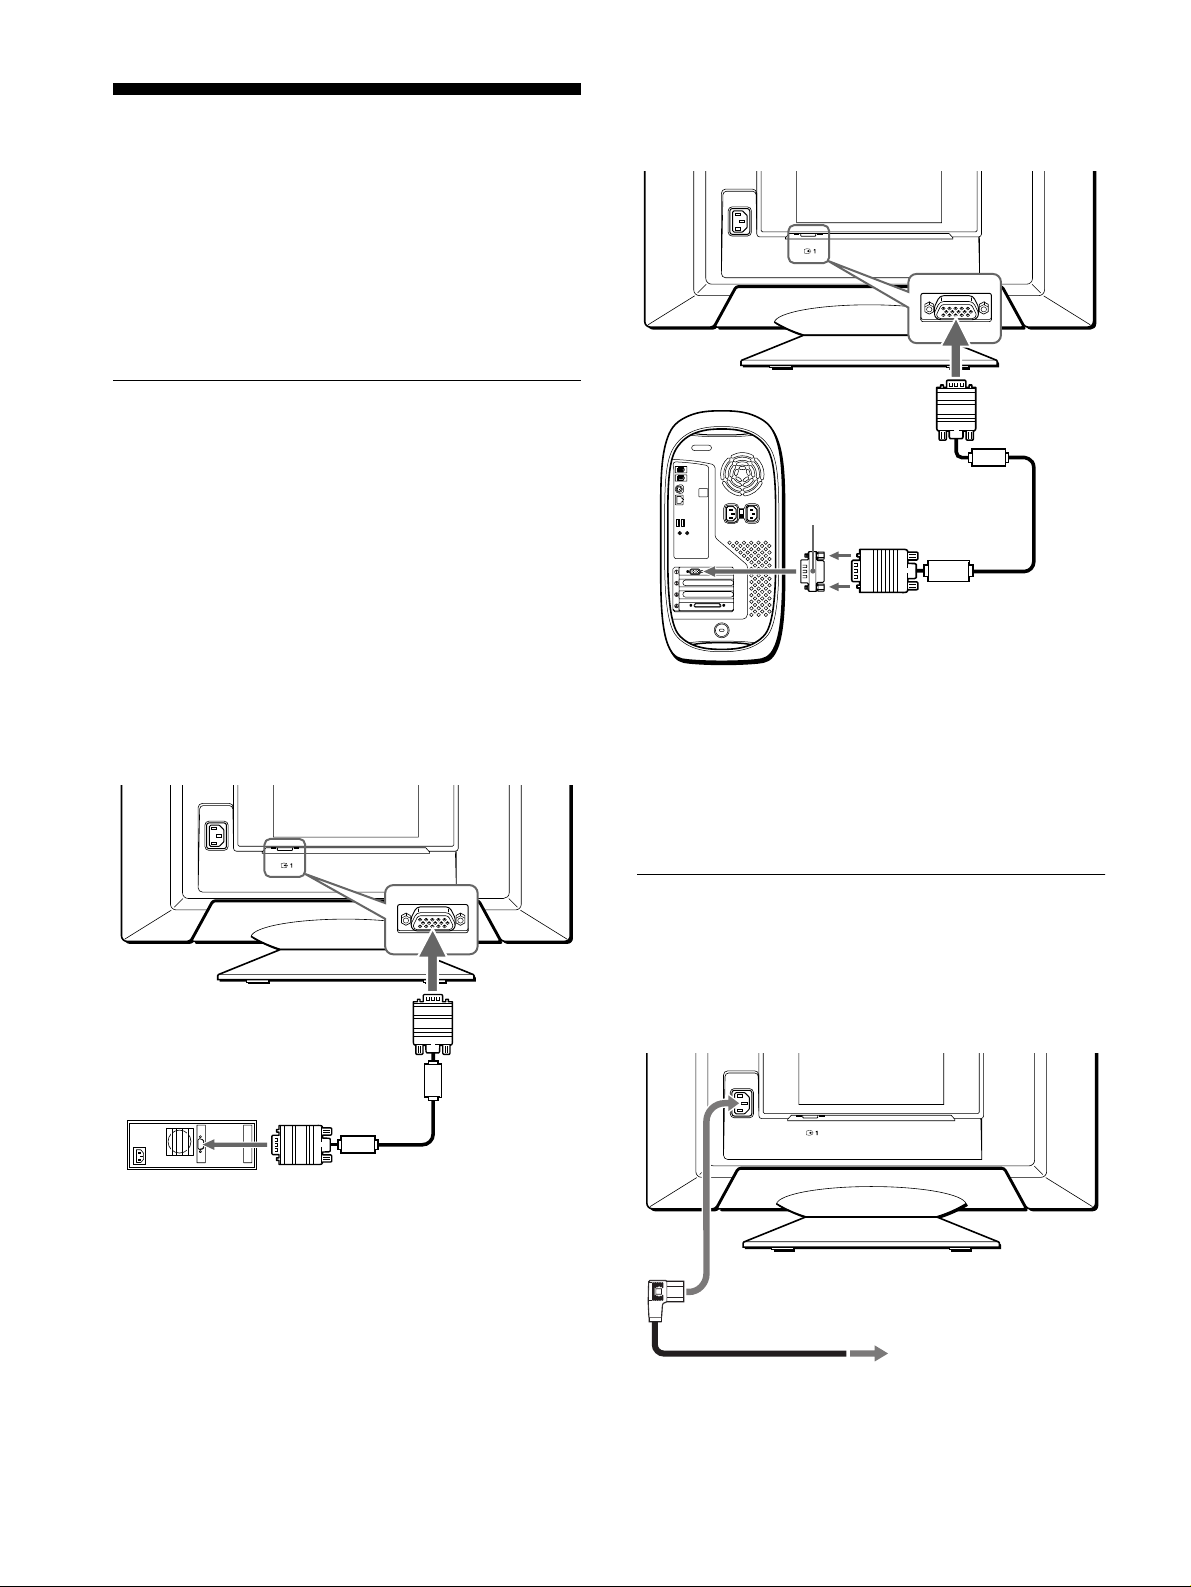
Anschließen des Geräts
(HD15)
AC IN
Verwenden Sie den mitgelieferten Macintosh-G3-Adapter
(für blauweißes System).
an HD15
Macintosh-G3-Adapter
(für blauweißes System)
(mitgeliefert)
*
Power Macintosh G3
HD15-Videosignalkabel
(mitgeliefert)
an Videoausgang
(HD15)
AC IN
an
AC IN
an eine Netzsteckdose
Netzkabel (mitgeliefert)
Bevor Sie mit dem Monitor arbeiten, überprüfen Sie bitte, ob
folgende Zubehörteile mitgeliefert wurden:
• Netzkabel (1)
• HD15-Videosignalkabel (1)
• Macintosh-G3-Adapter (für blauweißes System) (1)
• Installationsdiskette (1)
• Garantiekarte (1)
• Hinweise zum Reinigen der Bildschirmoberfläche (1)
• Diese Bedienungsanleitung (1)
Schritt 1:Anschließen des
Monitors an den
Computer
Schalten Sie vor dem Anschließen den Monitor und den
Computer aus.
Hinweise
• Berühren Sie die Stifte de s Vide osignalkabelanschlusses nicht. Sie
könnten die Stifte sonst möglicherwei se ve rbiegen.
• Achten Sie beim Anschließen des Videosignalkabels a uf di e
Ausrichtung des HD15-Anschlusses. Stecke n Si e de n Anschluß nicht
mit Gewalt falsch ein. Andernfalls könnten die Stift e ve rbiegen.
Anschließen an einen Macin tosh-Comput er
xxxx
Anschließen an einen IBM PC/AT oder
x
kompatiblen Computer
AC IN
(HD15)
IBM PC/AT oder kompatibler
Computer
an Videoausgang
HD15-Videosignalkabel
(mitgeliefert)
an HD15
* Schließen Sie den mitgelieferten Macintosh-G3-Adapter an den
Computer an, bevor Sie das Kabe l a nschließen. Dieser Adapter ist
kompatibel mit dem Comp uter Power Macintosh G3, der drei
Stiftreihe n hat. We nn Sie Mod elle de r andere n Versio n der Seri e Power
Macintosh G3, die zwei Stiftreihen haben, oder andere Modelle
anschließen wollen, benötigen Sie einen anderen Adapter (gesondert
erhältlich).
Schritt 2:Anschließen des
Netzkabels
Schließen Sie bei a usges cha lt etem Monito r und C omp ut er zue rst
das Netzkabel an den Monitor an, und steck en Sie den dann
Netzstecker in eine Netzsteckdose.
6
Page 39

Schritt 3:Einschalten von Monitor
Auswählen der Sprache für die
und Computer
Schalten Sie zunächst den Monitor und dann den Computer ei n.
Die Installation des Monitors ist damit abgeschlossen.
Stellen Sie gegebenenfalls das Bild mit den Bedienelementen des
Monitors nach Ihren Wünschen ein.
Wenn auf dem Bildschirm kein Bild erscheint
• Überprüfen Sie, ob der Monitor korrekt an den Computer
angeschlossen ist .
• Wird KEIN EINGANGSSIGNAL auf dem Bildschirm
angezeigt, überprüfen Sie, ob die Grafikkarte des Computers
korrekt in den richtigen Steckplatz eingebaut ist.
• Wenn Sie einen älteren Monitor durch diesen Monitor ersetzt
haben und NICHT IM ABTASTBEREICH auf dem
Bildschirm erscheint, schließen Sie den alten Monitor wieder
an. Stellen Sie dann die Grafikkarte des Comp uters auf eine
Horizontalfrequenz zwischen 30 und 109 kHz und eine
Vertikalfrequenz zwischen 48 und 160 Hz ein.
Weitere Informationen über die Bildschirmmeldungen finden Sie
unter “Symptom e für Fe hle r und Abhilfemaßna h me n ” auf
Seite 16.
Für Benutzer von Windows 95/98
Damit Sie den Monitor optimal nutzen können, installie ren Sie die Datei
mit den neuen Modell informationen von der mitgelieferten
Installationsdiskette auf Ihrem PC.
Dieser Monitor entspricht dem Plug-and-Play-Standard „VESA DDC“.
Wenn Ihr PC bzw. Ihre Grafikkarte dem DDC-Standard entspricht, geben
Sie bitte „Plug & Play Moni tor (VESA DDC)“ oder den Modellnam e n
dieses Monitors als Monitortyp unter „Control Panel“ (Systemsteuerung)
von Windows 95/98 an. Wenn bei der Kom m unikation zwischen Ihrem
PC bzw. Ihrer Grafikkarte und dem Monitor Probleme auftreten, legen Sie
die Installationsdiske tte ein, und wählen Sie den Mo del lnamen dieses
Monitors als Monitortyp aus.
Bildschirmmenüs (LANG)
Für die Bildschirmmenüs stehen die Sprachen Englisch,
Französisch, Deutsch, Spa ni s ch, Italienisch, Niederländisch,
Schwedisch, Russisch und Japanisch zur Verfügung. Die
Standardeinstellung ist Englisch.
1
Drücken Sie auf die Mitte der Steuertaste.
Weitere Informationen zur Steuertaste finden Sie auf Seite 9.
MENU
2
Bewegen Sie die Steuertaste, um die Option
LANG hervorzuheben, und drücken Sie erneut
auf die Mitte der Steuertaste.
MENU
3
Bewegen Sie die Steuertaste m/M, um eine Sprache
auszuwählen.
• ENGLISH: Englisch
• FRANÇAIS: Französisch
• DEUTSCH
• ESPAÑOL: Sp anisch
• ITALIANO: Italienisch
• NEDERLANDS: Niederländisch
• SVENSKA: Schwedisch
• : Russisch
• : Japanisch
MENU
BILD
GEOM
LANG
OK
BILDLG
ENDE
GRÖSSE
LANGU AGE
ENGL I SH
FRANÇA I S
DEUTSCH
ESPAÑOL
ITALIANO
NEDERL ANDS
SVENSKA
KONVG.
FARBE
OPTION
MENU
DE
Für Benutzer von Windows NT 4.0
Die Installation des Monit ors un ter Windows NT 4.0 ist anders als un te r
Windows 95/98. So brauchen Sie z. B. den Monitortyp nicht
auszuwählen. Näheres zum Einstel l en der Auflösung, der
Auffrischungsrate und der Anzahl der Farbe n finden Sie im
Benutzerhandbuch zu W in dows NT 4.0.
So schließen Sie das Menü
Drücken Sie einmal auf die Mitte der Steuertaste, um zum Hauptmenü
MENU zu wechseln. Wenn Sie zur normalen Anzeige wechseln wollen,
drücken Sie die Ta s te zweimal. Wenn Sie keine weitere Taste drücken,
wird das Bildschirmmenü nach etwa 30 Sekunden automatisch
ausgeblendet.
So setzen Sie die Menüsprache auf Englisch zurück
Drücken Sie die Taste RESET, wenn das Menü LANGUAGE auf dem
Bildschirm angezeigt wird.
7
Page 40
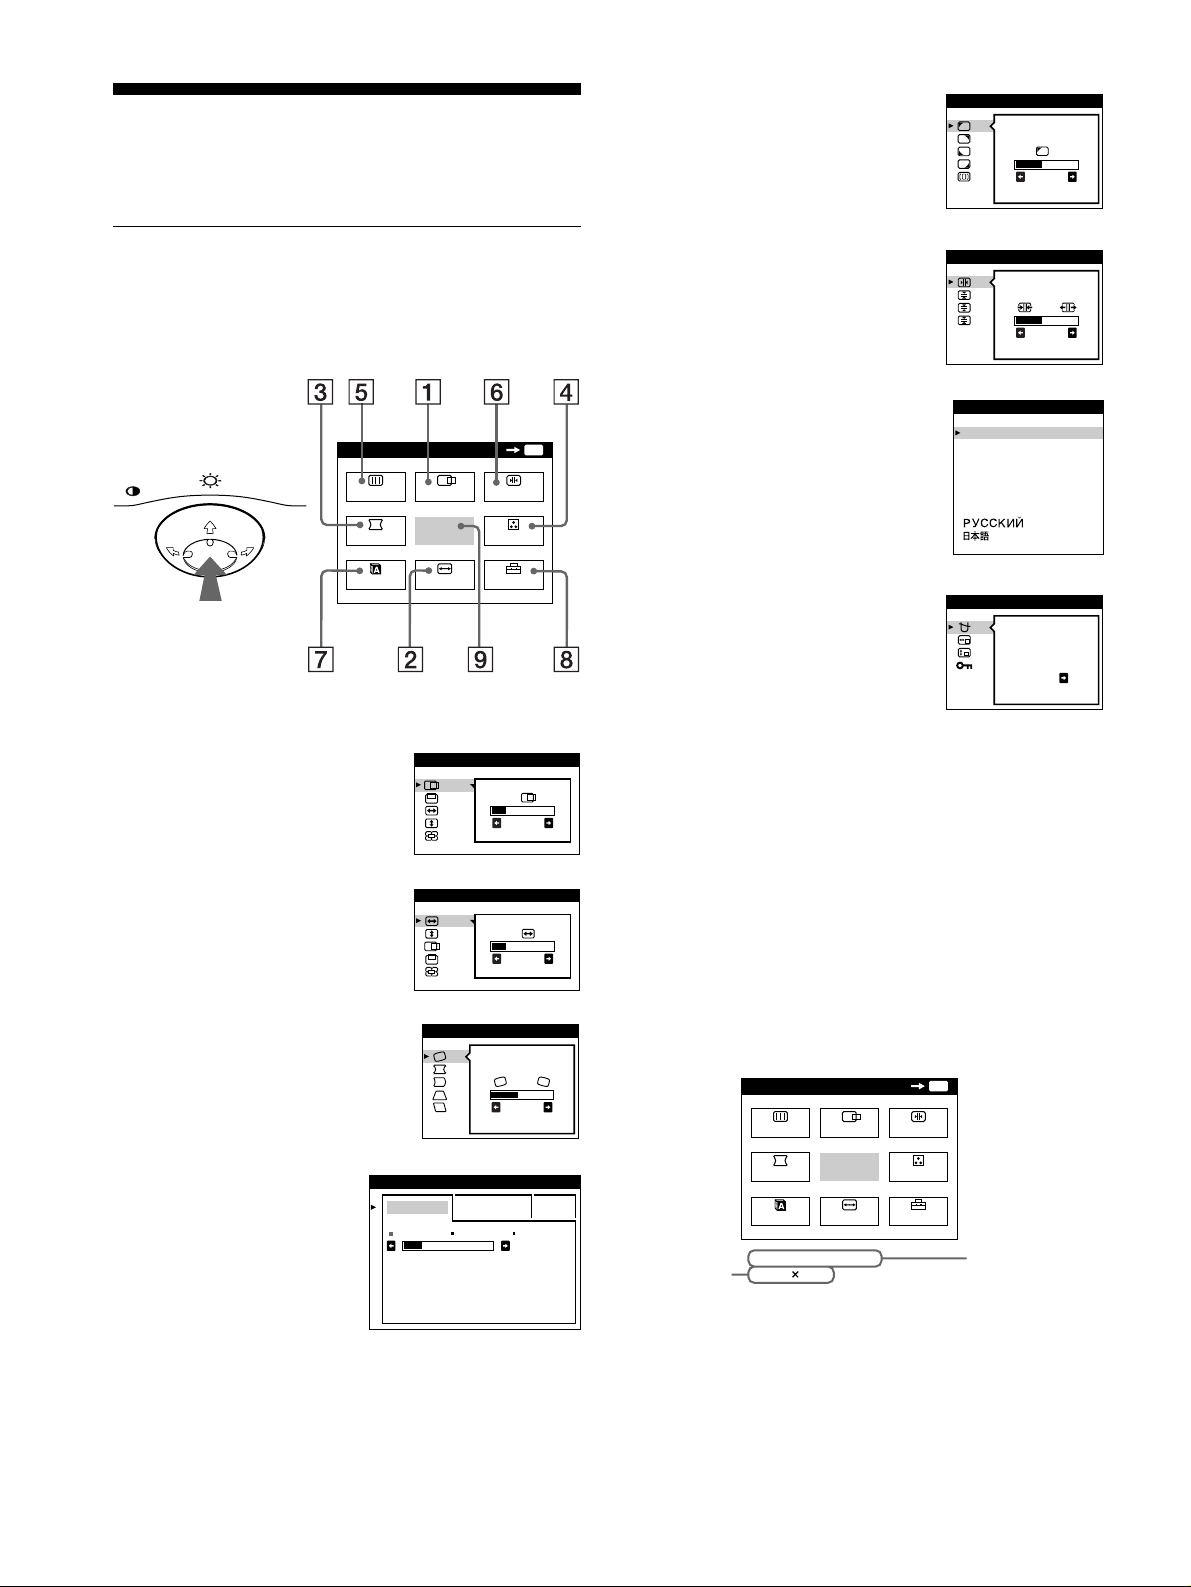
Einstellen des Monitors
MENU
MENU
ENDE
BILDLG
GRÖSSE
GEOM
BILD
FARBE
LANG
KONVG.
OPTION
OK
68.7kHz/ 85Hz
1024
768
Horizontal- und
Vertikalfrequenz
des aktuellen
Eingangssignals
Auflösung
des aktuellen
Eingangssignals
Mit den Bildschirmm e nü s können Sie eine Viel za h l von
Einstellungen vor nehmen.
5555 BILD (Seite 11)
Wählen Sie BILD, wenn Sie die
Bildqualität einstellen wollen. Als
Optionen stehen di e Farbreinheit
und die Moiré-Korrektur zur
Verfügung.
BILD
FARB-
RE I NHE I T
26
Navigieren in den Menüs
Drücken Sie auf die Mitte der Steuertaste, um das Hauptmenü
MENU auf dem Monitor aufzurufen. Weitere Informationen zur
Steuertaste finden Sie auf Seite 9.
MENU
MENU
BILD
GEOM
LANG
BILDLG
ENDE
GRÖSSE
Wählen Sie mit der Steuertaste eines der folgenden Menüs aus.
1 BILDLG (Seite 10)
GRÖSSE/BILDLG
Wählen Sie BILDLG, wenn Sie
Position, Größe un d Zoom des
Bildes einstellen wollen.
2222 GRÖSSE (Seite 10)
GRÖSSE/BILDLG
Wählen Sie GRÖSSE, wenn Sie
Größe, Position und Zoom des
Bildes einstellen wollen.
3333 GEOM (Seite 10)
GEOMETR I E
Wählen Sie GEOM, wenn Si e die
Bildrotation und die Form des
Bildes festlegen wollen.
OK
KONVG.
FARBE
OPTION
MENU
26
26
26
6666 KONVG. (Seite 11)
KONVERGENZ
Wählen Sie KONVG., wenn Sie die
horizontale und vertikale
Konvergenz des Bildes einstell en
wollen.
7777 LANG (Seite 7)
Wählen Sie LANG, wenn Sie für
das Bildschirmmenü eine andere
Sprache wählen wollen.
8888 OPTION (Seite13)
Wählen Sie OPTION, wenn Sie die
TOP
BOT
LANGUAGE
ENGL I SH
FRANÇA I S
DEUTSCH
ESPAÑOL
ITALIANO
NEDERL ANDS
SVENSKA
OPT ION
DEGAUSS
26
sonstigen Op tionen des Monitors
einstellen wollen. Zu den Optionen
gehören:
EIN
• Entmagnetisieren des
Bildschirms
• Ändern der Position des
Bildschirmmenüs
• Sper ren der Bedienelemente
9999 ENDE
Wählen Sie ENDE, wenn Sie das
Hauptmenü schließen wollen.
Anzeigen des aktuellen Eingangssignals
xxxx
Die Horizontal- und die Vertikalfrequen z des aktuellen
Eingangssignals werden im Hauptmenü MENU angezeigt. Wenn
das Eingangssignal einem der werkseitig voreingestellten Modi
des Monitors entspricht, wird auch die Auflösung angezeigt.
4444 FARBE (Seite 12)
Wählen Sie FARBE, wenn
Sie die Farbtemperatur des
Bildes einstellen wollen. Mit
Hilfe dieser Funkt ion können
Sie die Farben auf dem
Monitor an die Farben eines
gedruckten Bildes anpassen.
8
FARBE
E INFACH KOMPLEX s BGR
5000K 6500K 930 K0
50 K00
Page 41
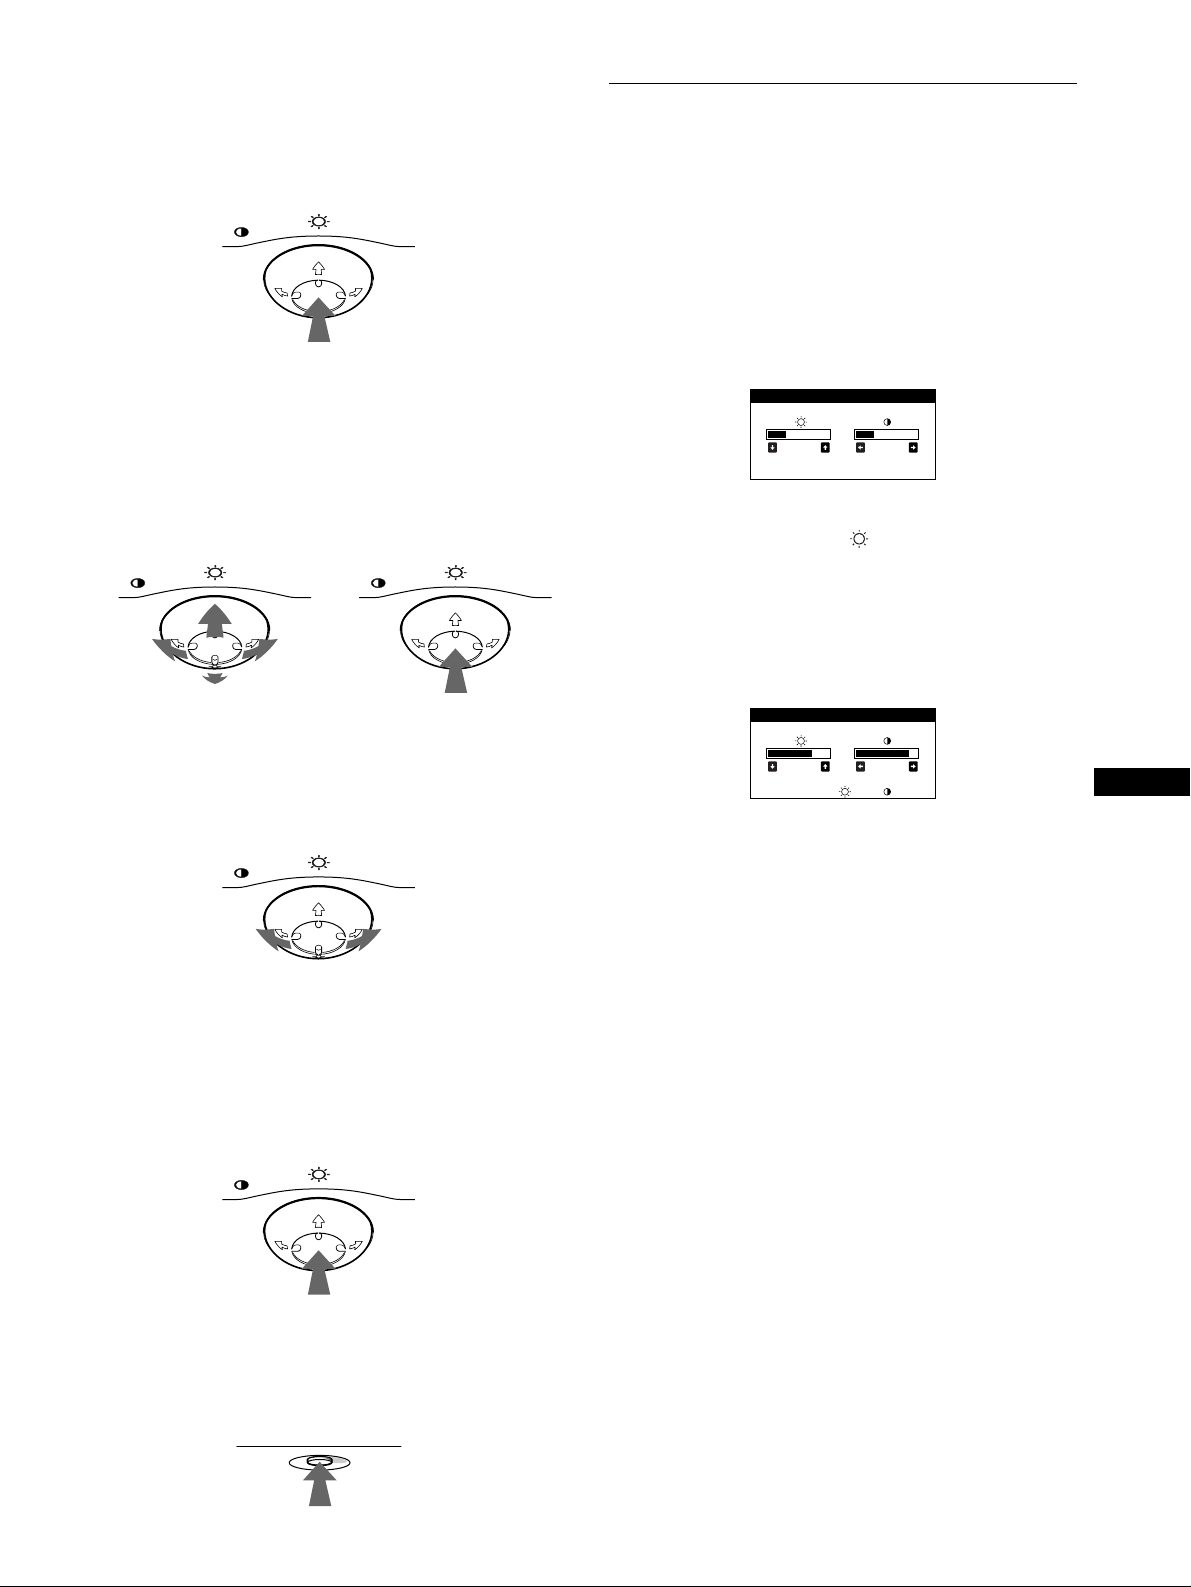
Die Steuertast e
26 26
HEL L I GKE I T / KONTRAST
56 76
sRGB : 56 76
HEL L I GKE I T / KONTRAST
x
1
Rufen Sie das Hauptmenü MENU auf.
Drücken Sie auf die Mitte der S teuertaste, um das Hauptmenü
MENU auf dem Monitor aufzurufen.
MENU
2
Wählen Sie das Menü aus, in dem Sie Einstellunge n
vornehmen wollen.
Heben Sie das gewünschte Menü hervor. Nach oben (M)
gelangen Sie, indem Sie die Steuertaste nach hinten bewegen,
nach unten (m), indem Sie sie nach vorne bewegen, und zur
Seite, indem Sie sie nach links (<) bzw. rechts (,)
bewegen.
VORN
MENU MENU
Einstellen von Helligkeit und
Kontrast
Helligkeit und Kontrast können Sie über ein spezielles Menü,
HELLIGKEIT/KONTRAST, einstellen.
Diese Einstellungen werden gespeichert und gelten für alle
Eingangssignale.
1
Bewegen Sie die Steuertaste in eine beliebige
Richtung.
Das Menü HELLIGKEIT/KONTRAST wird auf dem
Bildschirm angezeigt.
2
Bewegen Sie die Steuertaste in Richtung m/M zum
Einstellen der Helligkeit ( ) und in Richtung </,
zum Einstellen des Kontrasts (6).
Wenn Sie im sRGB-Modus arbeiten
Wenn Sie im Menü FARBE den sRGB-Modus ausgewählt haben,
erscheint das folgende Menü HELLIGKEIT/KONTRAST auf
dem Bildschirm.
HINTEN
3
Nehmen Sie im Menü die gewünschten
Einstellungen vor.
Bewegen Sie die Steuertast e nach links (<) oder rechts
(,), um den Wert oder die Einstellung auszuwählen.
MENU
4
Schließen Sie das Menü.
Drücken Sie einmal auf die Mitte der Steuertaste, um zum
Hauptmenü MENU zu wechseln. Wenn Sie zur normalen
Anzeige wechseln wollen, dr ücken Sie die Taste zweimal.
Wenn Sie keine weitere Taste drücken, wird das
Bildschirmmenü nach etwa 30 Sekunden automatisch
ausgeblendet.
MENU
DE
Weitere Informationen zum sRGB-Modus finden Sie unter
“Einstellen der Farben des Bildes (FARBE)” auf Seite 12.
Nach etwa 3 Sekunden wird das Menü automatisch ausgeblendet.
Zurücksetzen der Einstellungen
x
Drücken Sie die Taste RESET. Weitere Informationen zum
Zurücksetzen der Einstellungen finden Sie auf Seite 14.
RESET
9
Page 42
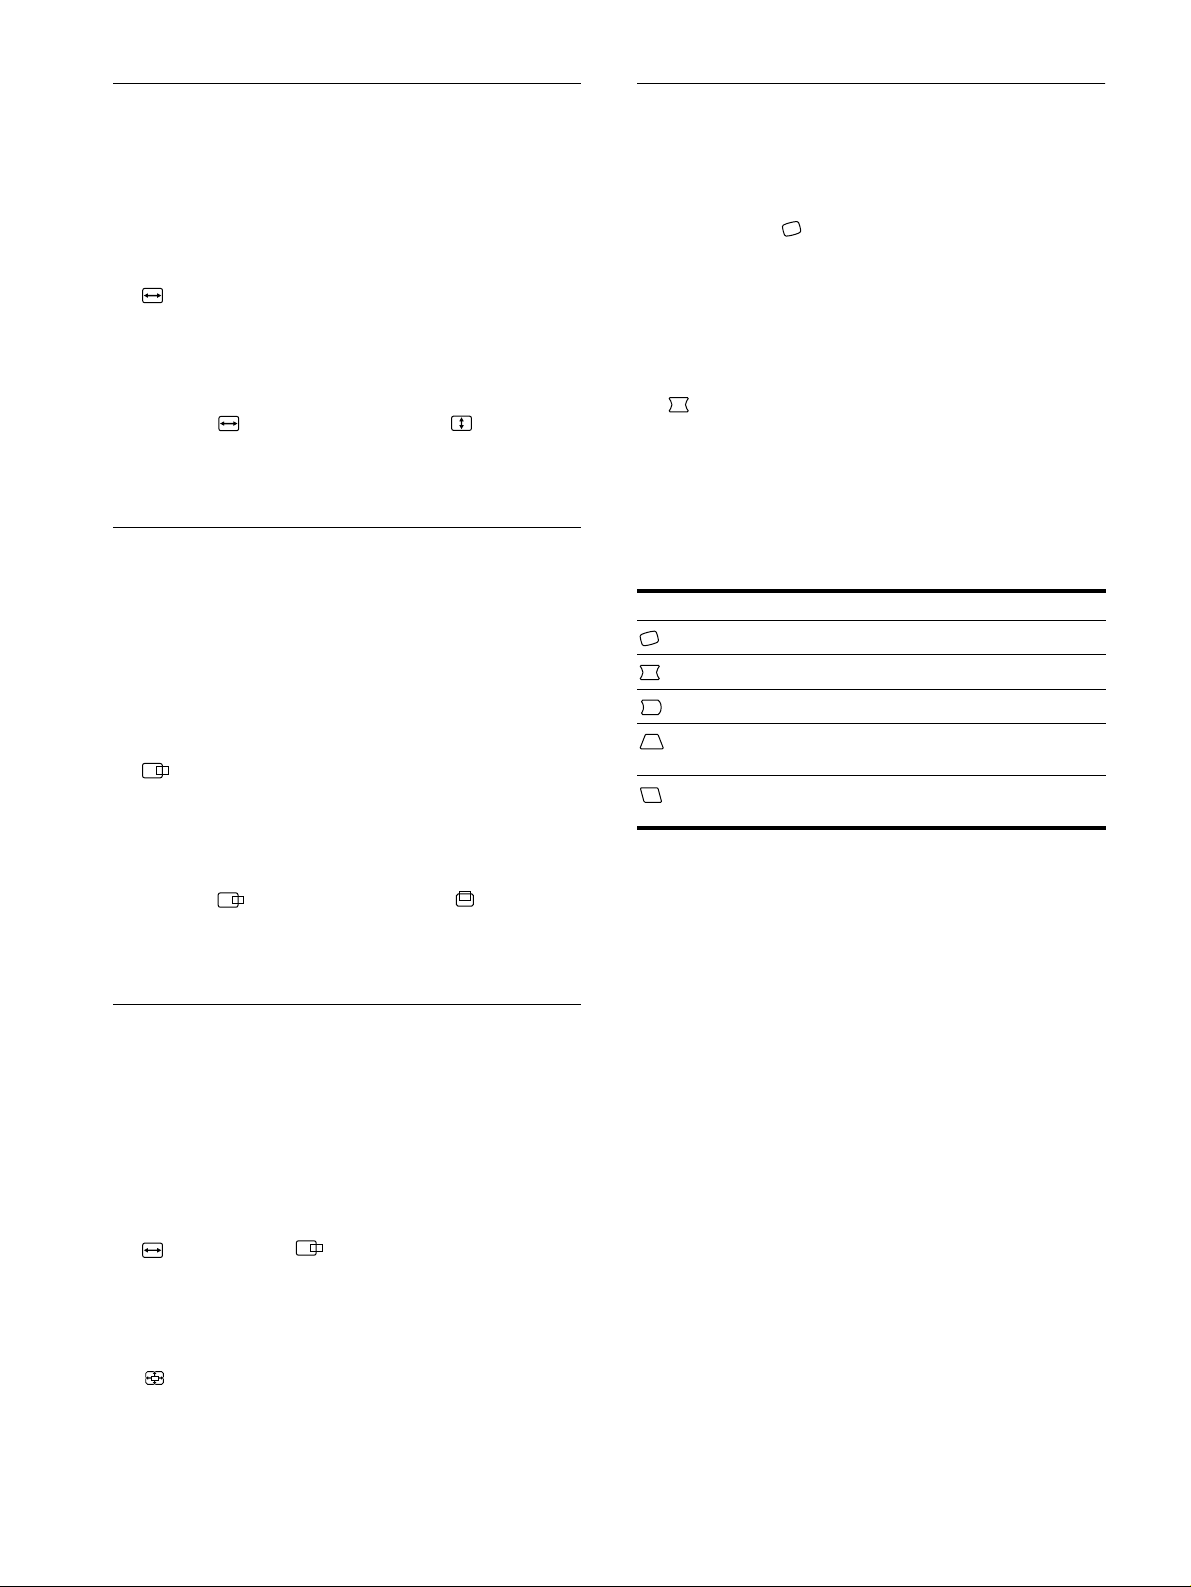
Einstellen der Bildgröße (GRÖSSE)
Einstellen der Form des Bildes
Diese Einstellung wird gespeichert und gilt nur für das aktuelle
Eingangssignal.
1
Drücken Sie auf die Mitte der Steuertaste.
Das Hauptmenü MENU erscheint auf dem Bildschirm.
2
Bewegen Sie die Steuertaste, um die Option
GRÖSSE hervorzuheben, und drücken Sie
erneut auf die Mitte der Steuertaste.
Das Menü GRÖSSE/BILDLG wird auf dem Bildschirm
angezeigt.
3
Bewegen Sie zunächst die Steuertaste in Richtung
m/M
, um für die horizontale bzw. für die
vertikale Einstellung auszuwählen. Bewegen Sie
dann die Steuertaste in Richtung </,, um die
Größe einzustellen.
Einstellen der Bildposition
(BILDLG)
Diese Einstellung wird gespeichert und gilt nur für das aktuelle
Eingangssignal.
1
Drücken Sie auf die Mitte der Steuertaste.
Das Hauptmenü MENU erscheint auf dem Bildschirm.
2
Bewegen Sie die Steuertaste, um die Option
BILDLG hervorzuheben, und drüc ken Sie erneut
auf die Mitte der Steuertaste.
Das Menü GRÖSSE/BILDLG wird auf dem Bildschirm
angezeigt.
(GEOM)
Mit den Optionen im Menü GEOM können Sie Rotation und
Form des Bildes festlegen.
Die Einstellung für (Rotation) wird für alle Eingangssignale
gespeichert. Alle anderen Einste llungen werden nur für das
gerade eingespeiste Ein gangssignal gespeichert.
1
Drücken Sie auf die Mitte der Steuertaste.
Das Hauptmenü MENU erscheint auf dem Bildschirm.
2
Bewegen Sie die Steuertaste, um die Option
GEOM hervorzuheben, und drücken Sie erneut
auf die Mitte der Steuertaste.
Das Menü GEOMETRIE wird auf dem Bildschirm angezeigt.
3
Bewegen Sie die Steuertaste in Richtung m/M, um
die gewünschte Einstelloption auszuwählen.
Bewegen Sie dann die Steuertaste in Richtung
</,
, um die Einstellung vorzunehmen.
Option Funktion
Festlegen der Bildrotatio n
Wölben der Bildränder nach außen oder innen
Verschieben der Bildränder nach links oder rechts
Einstellen der Bildbreite im oberen
Bildschirmbereich
Verschieben des Bildes nach links oder rechts im
oberen Bildschirmbereich
3
Bewegen Sie zunächst die Steuertaste in Richtung
m/M
, um für die horizontale bzw. für die
vertikale Einstellung auszuwählen. Bewegen Sie
dann die Steuertaste in Richtung </,, um die
Bildlage einzustellen.
Vergrößern oder Verkleinern des
Bildes (ZOOM)
Diese Einstellung wird gespeichert und gilt nur für das aktuelle
Eingangssignal.
1
Drücken Sie auf die Mitte der Steuertaste.
Das Hauptmenü MENU erscheint auf dem Bildschirm.
2
Bewegen Sie die Steuertaste, um die Option
GRÖSSE oder BILDLG hervorzuheben, und
drücken Sie erneut auf die Mitte der Steuertaste.
Das Menü GRÖSSE/BILDLG wird auf dem Bildschirm
angezeigt.
3
Bewegen Sie die Steuertaste in Richtung m/M, um
(Zoom) auszuwählen, und vergrößern oder
verkleinern Sie das Bild durch Bewegen der
Steuertaste in Richtung </,.
Hinweis
Sobald die maxima le bzw. mi nimale Höhe bzw. Brei te des Bi ldes erre icht
ist, läßt sich der Zoom ni cht weiter ändern.
10
Page 43

Einstellen der Konvergenz
Einstellen der Bildqualität (BILD)
(KONVG.)
Mit den Optionen im Menü KONVG. können Sie die Bildqualität
steuern, indem Sie die Konvergenz einstellen. Die Konvergenz
bezieht sich auf die Ausrichtung der Farbsignale für Rot, Grün
und Blau.
Wenn Buchstaben oder Linien rot e oder blaue Schatten
aufweisen, stellen Sie die Konvergenz ein.
Diese Einstellungen werden gespeichert und gelten für alle
Eingangssignale.
1
Drücken Sie auf die Mitte der Steuertaste.
Das Hauptmenü MENU erscheint auf dem Bildschirm.
2
Bewegen Sie die Steuertaste, um die Option
KONVG. hervorzuheben, und drücken Sie erneut
auf die Mitte der Steuertaste.
Das Menü KONVERGENZ wird auf dem Bildschirm
angezeigt.
3
Bewegen Sie die Steuertaste in Richtung m/M, um
die gewünschte Einstelloption auszuwählen.
Bewegen Sie dann die Steuertaste in Richtung
</,, um die Einstellung vorzunehmen.
Option Funktion
TOP
V KONVER OBEN
BOT
V KONVER UNTEN
horizontales Verschieben roter oder
blauer Schatten
vertikales Verschieben roter oder
blauer Schatten
vertikales Verschieben roter oder
blauer Schatten im oberen
Bildschirmbereich
vertikales Verschieben roter oder
blauer Schatten im unteren
Bildschirmbereich
Mit den Optionen im Menü BILD können Sie die Bildqualität
steuern, indem Sie die Moiré-Korrek tur und die Farbreinheit
einstellen.
• Wenn die Farbe in den Bildschirmecken ungleichmäßig
erscheint, stellen Sie die Farbreinheit ein.
• Wenn ellip tische oder wellenförmige Muster auf dem
Bildschirm erscheinen, stellen Sie die Moiré-Korrektur ein.
Die Werte für MOIRE-KORREKTUR und MOIRE EINST, die
Sie hier einstellen, werden nur für das gerade eingespeiste
Eingangssignal gespeichert. Alle anderen Einstellungen werden
für alle Eingangssignale ge speichert.
1
Drücken Sie auf die Mitte der Steuertaste.
Das Hauptmenü MENU erscheint auf dem Bildschirm.
2
Bewegen Sie die Steuertaste, um die Option
BILD hervorzuheben, und drücken Sie erneut
auf die Mitte der Steuertaste.
Das Menü BILD wird auf dem Bildschirm angezeigt.
3
Bewegen Sie die Steuertaste in Richtung m/M, um
die gewünschte Einstelloption auszuwählen.
Bewegen Sie dann die Steuertaste in Richtung
</,, um die Einstellung vorzunehmen.
Option Funktion
FARBREINHEIT
FARBREINHEIT
FARBREINHEIT
FARBREINHEIT
MOIREKORREKTUR
MOIRE EINST
Reduzieren der Farbungleichmäßigkeiten
in der linken oberen Bildschirmecke auf
ein Minimum.
Reduzieren der Farbungleichmäßigkeiten
in der rechten oberen Bildschirmecke auf
ein Minimum.
Reduzieren der Farbungleichmäßigkeiten
in der linken unteren Bildschirmecke auf
ein Minimum.
Reduzieren der Farbungleichmäßigkeiten
in der rechten unteren Bildschirmecke
auf ein Minimu m.
Ein- bzw. Ausschalten der MoiréKorrektur (EIN/AUS).
*
(MOIRE EINST) erscheint im Menü,
wenn Sie EIN wählen.
Einstellen des Grads der Moiré-
Korrektur, so daß der Moiré-Effekt
möglichst gering ausfällt.
DE
* Moiré ist eine natürliche Interferenz, die weiche, wellenförmige Linien
auf dem Bildschirm verursacht. Diese Linien können durch die
Interferenz zwischen dem Muster des Bildes au f de m Bildschirm und
dem Phosphor-Pitch-Muster de s Monitors entstehen.
Beispiel für den Moiré-Effekt
Hinweis
Das Bild kann verschwommen sein, wenn MOIRE -KOR RE KT UR a uf
EIN gesetzt ist.
11
Page 44
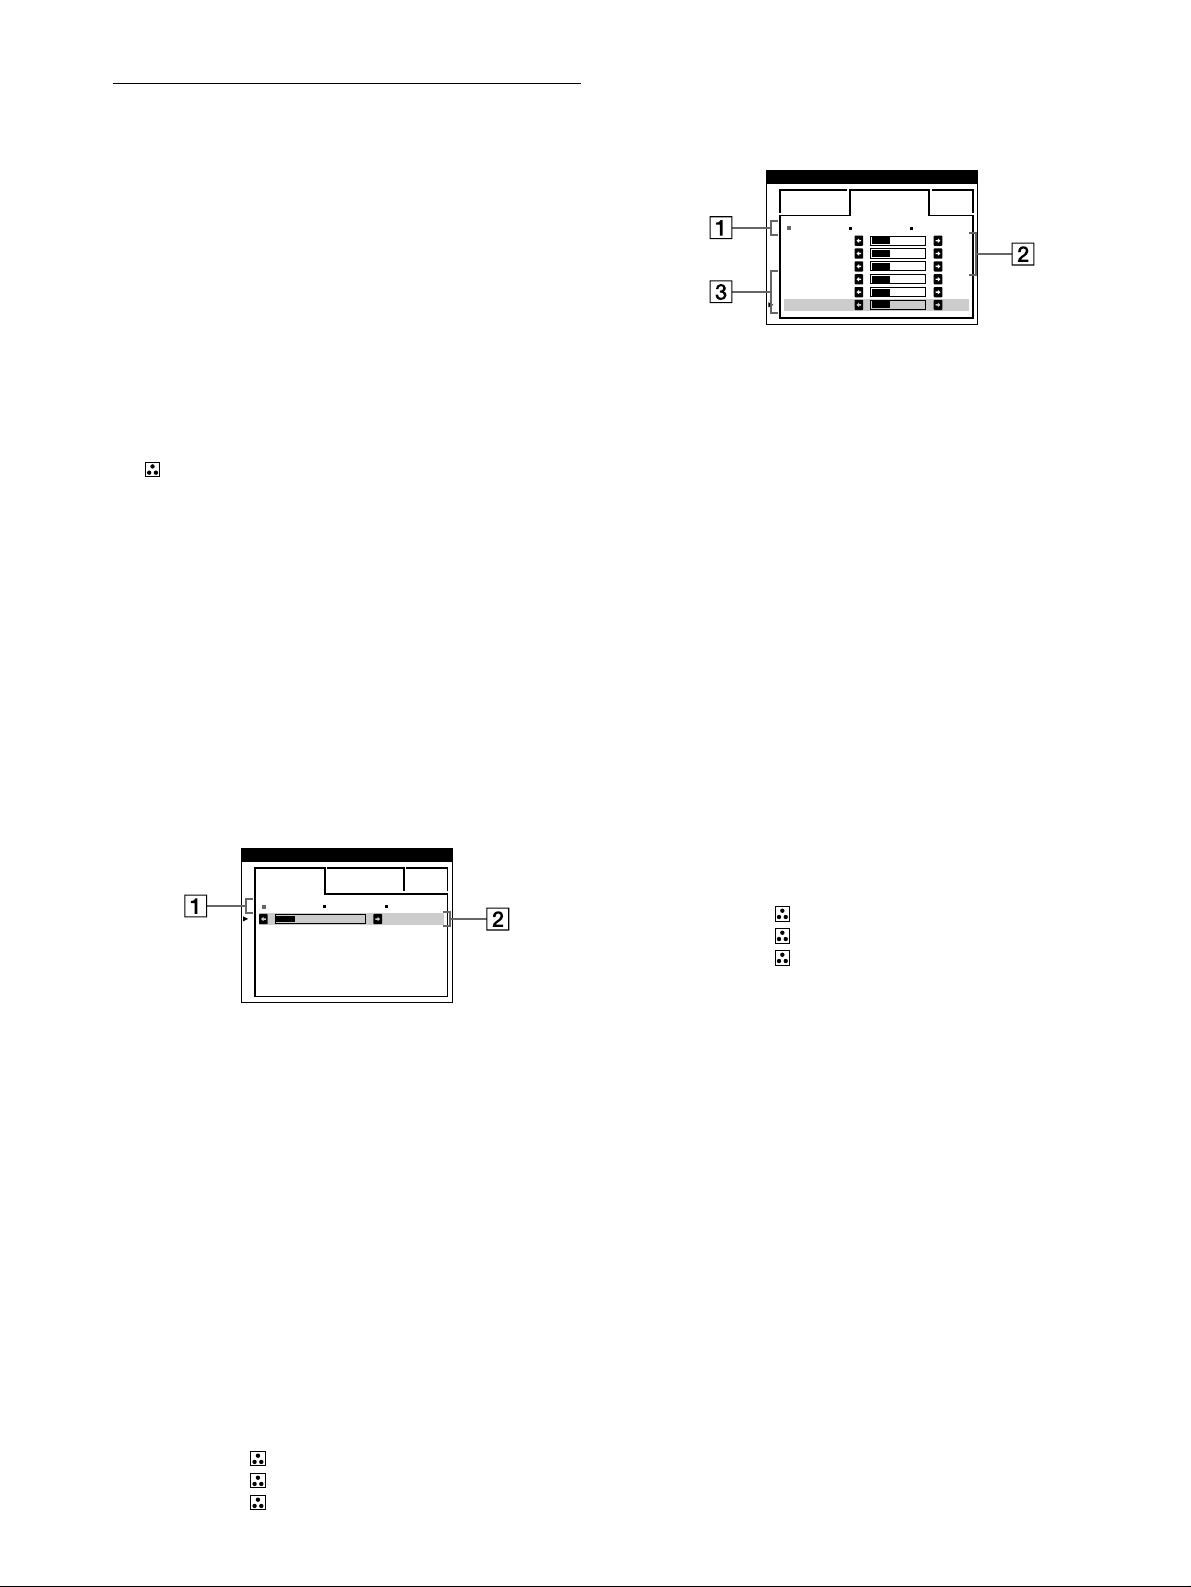
Einstellen der Farben des Bildes
(FARBE)
Mit den Optionen im Menü FARBE können Sie die
Farbtemperatur des Bildes einstellen. Dabei ändert sich der
Farbwert im weißen Farbfeld. Farben erscheinen bei einer
niedrigen Farbtemperatur rötlich, bei einer hohen Farbtemperatur
bläulich. Mit Hilfe dieser Funktion können Sie die Farben auf
dem Monitor an die Farben eines gedruckten Bildes anpassen.
Diese Einstellungen werden gespeichert und gelten für alle
Eingangssignale.
1
Drücken Sie auf die Mitte der Steuertaste.
Das Hauptmenü MENU erscheint auf dem Bildschirm.
2
Bewegen Sie die Steuertaste, um die Option
FARBE hervorzuheben, und drücken Sie erneut
auf die Mitte der Steuertaste.
Das Menü FARBE wird auf dem Bildschirm angezeigt.
3
Bewegen Sie die Steuertaste in Ric htung </,, um
den Einstellmodus auszuwählen.
Es gibt drei verschiedene Einstellmodi: EINFACH,
KOMPLEX und sRGB.
4
Bewegen Sie die Steuertaste in Richtung m/M, um
die gewünschte Einstelloption auszuwählen.
Bewegen Sie dann die Steuertaste in Richtung
</,
, um die Einstellung vorzunehmen.
Stellen Sie den ausgewählten Modus dann anhan d der
folgenden Anweisungen ein.
Modus KOMPLEX
Sie können in größerem Detail weitere Farbeinstellungen
vornehmen, indem Sie den Modus KOMPLEX auswähl en.
FARBE
E INFACH KOMPLEX s BGR
5000K 6500K 930 K0
R BIAS 05
G BIAS 05
B BIAS 05
RGAIN 05
GGAIN 05
BGAIN 05
1
Bewegen Sie die Steuertaste in Richtung m/M, um
die Farbtemperaturzeile 1 auszuwählen. Bewegen
Sie dann die Steuertaste in Richtun g </,, um eine
Farbtemperatur auszuwählen.
2
Bewegen Sie die Steuertaste in Richtung m/M, um
die Einstelloption 2 auszuwählen. Bewegen Sie
dann die Steuertaste in Richtung </,, um den
Schwarzwert (BIAS) einzustellen.
Damit werden die dunklen Bildbereiche einges tellt.
3
Bewegen Sie die Steuertaste in Richtung m/M, um
die Einstelloption 3 auszuwählen. Bewegen Sie
dann die Steuertaste in Richtung </,, um den
Weißwert (GAIN) einzustellen.
Damit werden die hellen Bildbereiche eingestellt.
Wenn Sie die Optionen 2 und 3 ändern, können Sie die R(Rot), G- (Grün) und B-Komponente (Blau) des
Eingangssignals getrennt einstellen.
Modus EINFACH
FARBE
E INFACH KOMPLEX s BGR
5000K 6500K 930 K0
1
Bewegen Sie die Steuertaste in Richtung m/M, um
die Farbtemperaturzeile 1 auszuwählen. Bewege n
Sie dann die Steuertaste in Richtung </,, um eine
Farbtemperatur auszuwählen.
5000K, 6500K und 93 00K sind die voreinge st e llten
Farbtemperaturen. Der Standardwert ist 9300K. Wenn Sie die
Farbtemperat ur auf 6500K und 5000K se nken, erscheinen
weiße Flächen nicht mehr bläulich, sondern rötlich.
2
Nehmen Sie bei Bedarf eine Feineinstellung der
Farbtemperatur vor.
Bewegen Sie die Steuertaste in Richtung m/M, um
die Farbtemperaturzeile 2 auszuwählen. Bewege n
Sie dann die Steuertaste in Ric htung </,, um die
Farbtemperatur feineinzustellen.
Wenn Sie eine Feineinstellung der Farbtemperatur
vornehmen, werden die neuen Einstellungen für alle drei
Farbtemperaturoptionen gespeichert. Die Option 1 des
Menüs ändert sich wie folgt:
• [5000K]t[1]
• [6500K]t[2]
• [9300K]t[3]
50 K00
Wenn Sie eine Feineinstellung der Farbtemperatur
vornehmen, werden die neuen Einstellungen für alle drei
Farbtemperaturoptionen gespeichert. Die Option 1 des
Menüs ändert sich wie folgt:
• [5000K]t[1]
• [6500K]t[2]
• [9300K]t[3]
12
Page 45
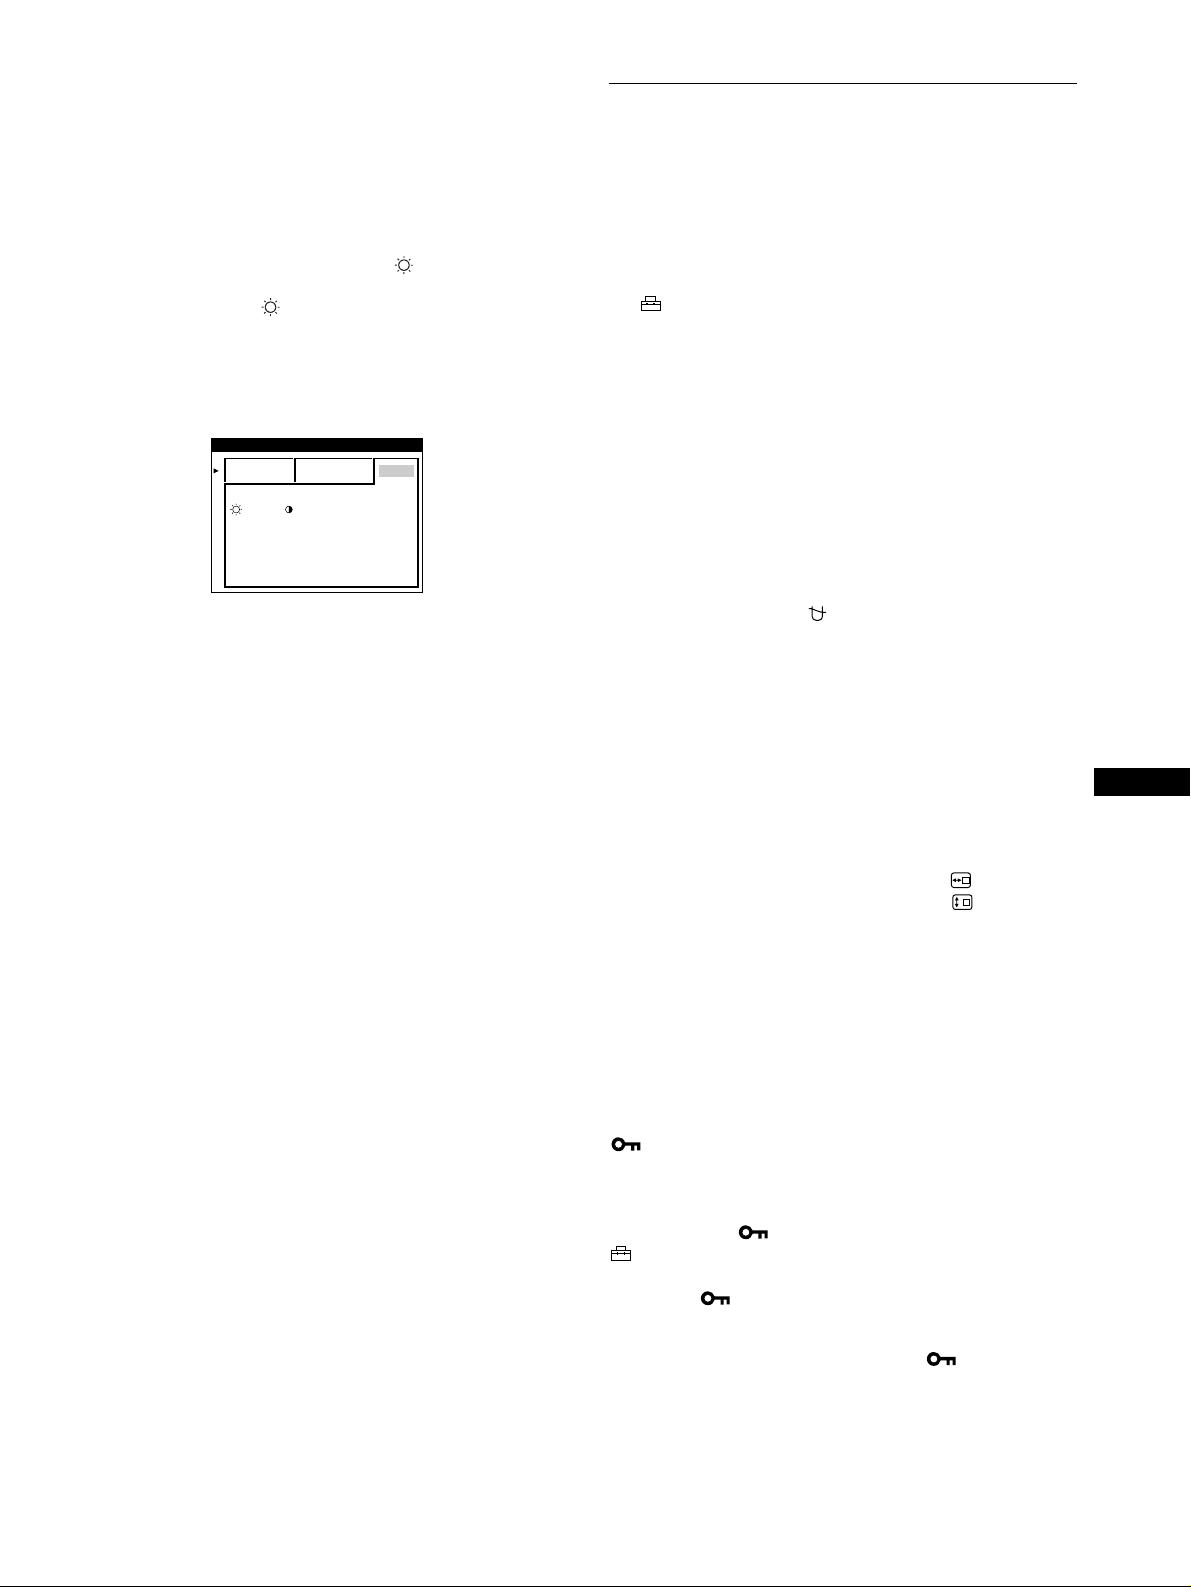
Modus sRGB
Die sRGB-Farbeinstellung ist ein Farbraumprotokoll nach
Industriestandard, mit dem die ange zeigten und die gedruckten
Farben sRGB-kompatibler Computer-Produkte in
Übereinstimmung gebracht werden sollen. Zum Einstellen der
Farben für das sRGB-Profil wählen Sie einfach den Modus sRGB
im Menü FARBE aus. Damit die sRGB-Farben allerdings korrekt
angezeigt werden (γ=2,2, 6500K), müssen Sie an Ihrem Computer
das sRGB-Profil einstellen und Helligkeit ( ) und Kontrast (6)
auf die im Menü gezeigten Zahlen einstellen. Informationen zum
Ändern von Helligkeit ( ) und Kontrast (6) finden Sie auf
Seite 9.
Hinweis
Der Computer und andere angeschlossene Geräte (z. B. ein Drucker)
müssen sRGB-kompatibel sein.
FARBE
E INFACH KOMPLEX s BGR
:56 :76 FÜR s BGR
Weitere Einstellungen (OPTION)
Sie können den Monitor von Hand entmag netisieren, die
Menüposition ändern und die Bedienelemente sperren.
1
Drücken Sie auf die Mitte der Steuertaste.
Das Hauptmenü MENU erscheint auf dem Bildschirm.
2
Bewegen Sie die Steuertaste, um die Option
OPTION hervorzuheben, und drücken Sie erneut
auf die Mitte der Steuertaste.
Das Menü OPTION wird auf dem Bildschirm angezeigt.
3
Bewegen Sie die Steuertaste in Richtung m/M, um
die gewünschte Einstelloption auszuwählen.
Stellen Sie die ausgewählte Option dann anhand der
folgenden Anweisungen ein.
Entmagnetisieren d es Bildschirms
Der Monitor wird automatisch entmagnetisiert, wenn das Gerät
eingeschaltet wird.
Um den Monitor manuell zu entmagnetisieren,
bewegen Sie zunächst die Steuerta ste in Richtung m/M
und wählen die Option (DEGAUSS) aus. Bewegen
Sie dann die Steuertaste in Richtung ,.
Der Bildschirm wird etwa 2 Sekunden lang entmagnetisiert. Ist
ein zweiter Entmagnetisierungszyklus erforderlich, warten Sie
nach dem ersten Zyklus mindestens 20 Minuten. Auf diese Weise
erzielen Sie die besten Ergebnisse.
Ändern der Menüposition
Sie können das Menü ve rschieben, wenn es das Bild auf dem
Bildschirm verdeckt.
Wenn Sie die Position des Bildschirmmenüs ändern
wollen, wählen Sie zunächst durch Bewegen der
Steuertaste in Richtung m/M die Option (POSITION
H OSD) für horizontale Einstellung ode r (POSITION
V OSD) für vertikale Einstellung aus. Verschieben Sie
dann durch Bewegen der Steuertaste in Richtung
</, das Menü auf dem Bildschirm.
Sperren der Bedienelemente
Wenn Sie verhindern wollen, daß die Einstellungen
geändert werden, können Sie die Bedienelemente
sperren. Wählen Sie dazu zunächst durch Bewege n der
Steuertaste in Richtung m/M die Option
(TASTATURSPERRE) aus. Bewegen Sie
anschließend die Steuertaste in Richtung ,, und
wählen Sie EIN aus.
Jetzt können Sie nur noch den Netzschalter 1, die Option ENDE
sowie die Option (TASTATURSPERRE) im Menü
OPTION benutzen. Wenn Sie ein anderes Bedienelement
betätigen oder ein anderes Menü auswählen, erscheint die
Markierung auf dem Bildschirm.
So heben Sie die Sperrung der Bedienelemente wieder auf
Gehen Sie wie oben erläutert vor, und setzen Sie (TASTATURSPERRE) auf AUS.
DE
13
Page 46
Zurücksetzen der Einstellungen
Bei diesem Monitor haben Sie drei Möglichkeiten, die
Einstellungen zurückzusetzen. Drücke n Sie die Taste RESET, um
die Einstellungen zurück zusetzen.
Technische Merkmale
Vordefinierte Modi und
RESET
Zurücksetzen einer einzelnen Option
Wählen Sie mit der Steuertaste die Option aus, die Sie
zurücksetzen wollen, und drücken Sie die Taste RESET.
Zurücksetzen aller Einstellungen für das aktuelle
Eingangssignal
Drücken Sie die Taste RESET, wenn kein Menü auf dem
Bildschirm angezeigt wird.
Beachten Sie, daß die folgenden Einstellungen bei die s em
Verfahren nicht zurückgesetzt werden:
• Sprac he der Bildschirmmenüs (Seite 7)
• Einstellmodus im Menü FARBE (EINFACH, KOMPLEX,
sRGB) (Seite 12)
• Position der Bildschirmmenüs (Seite 13)
• Sperrung der Bedienelemente (Seite 13)
Zurücksetzen aller Einstellungen für alle
Eingangssignale
Halten Sie die Taste RESET mehr als zwei Sekunden lang
gedrückt.
Hinweis
Die Taste RESET funktioniert nicht, wenn (TASTATURSPERRE)
auf EIN gesetzt ist.
Benutzermodi
Wenn ein Eingangssignal in den Monit or eingespeist wird,
vergleicht der Monitor dieses Signal mit den werkseitig
vordefinierten Modi im Speicher des Monitors und wählt
automatisch den Modus aus, bei d em sich in der Bild schirmmitte
eine hohe Bildqualität erzielen läßt. Eine Liste der werkseitig
vordefinierten Modi finden Sie im Appen dix . Bei
Eingangssignale n, die keinem der werk seitig vordefinie rten Modi
entsprechen, sorgt der Monitor mit Hilfe seiner digitalen
Multiscan-Technologie dafür, da ß be i ein e m belie b ige n Timin g
innerhalb des für den Monitor gültigen Frequenzbereichs ein
scharfes Bild angezeigt wird (horizontal: 3 0 – 109 kHz, ve rtik al:
48 – 160 Hz). Wenn Sie das Bild einstellen, werden die
Einstellungen als Benutzermodus automatisch gespeichert und
abgerufen, wann i mmer das betreffende Eingangssignal ei ngeht.
Hinweis für Benutzer von Windows
Wenn Sie mit Windows arbeiten, sehen Sie in der Dokumentation
oder im Dienstprogramm zu Ihrer Grafikkarte nach, welches die
höchste Auffrischungsrate ist, und wählen Sie diese aus, um die
Leistung des Geräts zu optimieren.
Die Energiesparfunktion
Dieser Monitor erfüllt die Energiesparrichtlinien der VESA, des
E
NERGY STAR
der Monitor an einen Computer oder eine Grafikkarte
angeschlossen ist, der bzw. die DPMS (Display Power
Management Si gnaling) u nterstützt, wird der S tromverbr auch des
Geräts in drei Stufen wie unt en erläutert reduziert.
Betriebsmodus Leistungsaufnahme Netzanzeige
Normalbetrieb ≤ 145 W grün
1 Bereitschaft ≤ 15 W abwechselnd grün
2 Unterbrechun g
(Schlaf)*
3 Deaktiviert**
(Tiefschlaf)*
Ausgeschaltet 0 W aus
-Programms und des NU TEK-Stand ards. W enn
1
und orange
≤ 15 W abwechselnd grün
und orange
ca. 1 W orange
14
* „Schlaf“ und „Tiefschlaf“ sind Energiesparmodi, die von der
EPA (Umweltschutzbehörde der USA) definiert wurden.
** Wenn de r Com puter in einen Energiesparmodus wechselt, geht kein
Eingangssignal mehr ein, und KEIN EINGANGSSIGNAL erscheint
auf dem Bildschirm. Nac h einigen Sekunden schalte t der Monitor in
den Energiesparm odus.
Page 47
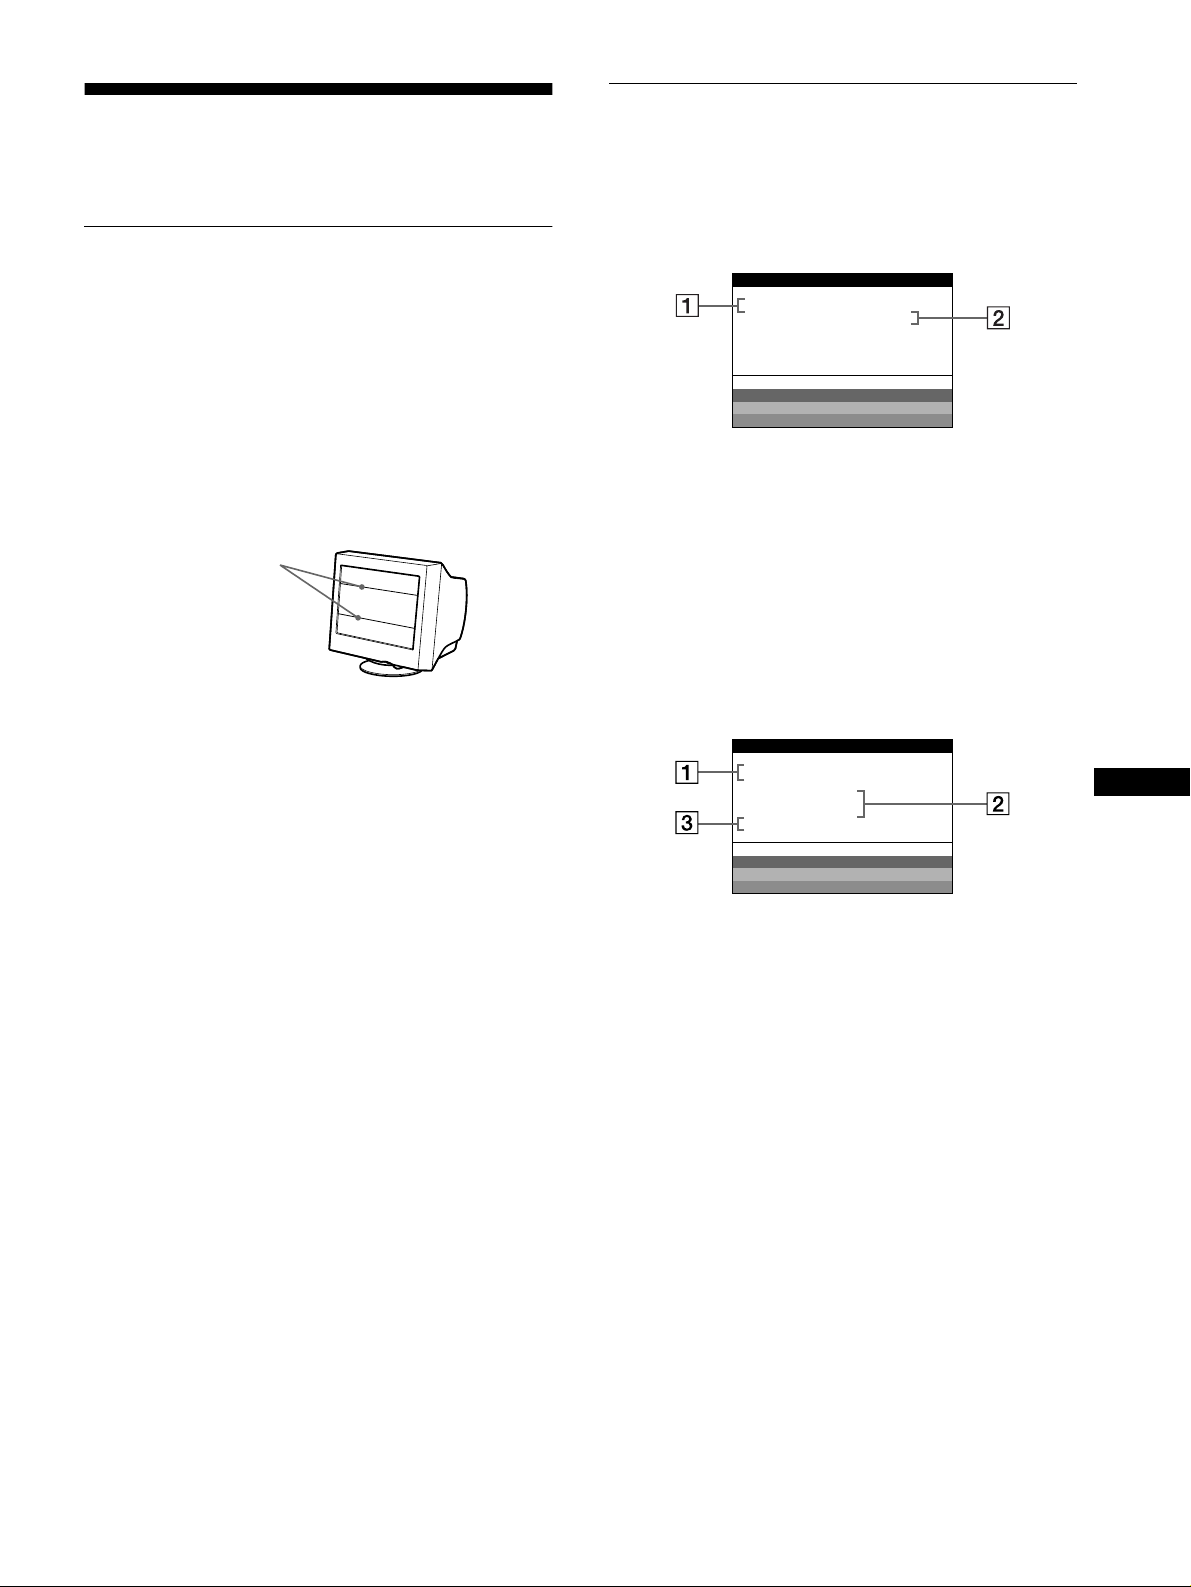
Störungsbehebung
Lesen Sie bitte im folgenden Abschnitt nach, bevor Sie sich an
den Kundendienst wenden.
Wenn auf dem Bildschirm dünne
Linien (Dämpfungsdrähte)
erscheinen
Diese Linien sind bei einem Trinitron-Monitor normal und stellen
keine Fehlfunktion dar. Es handelt sich dabei um Schatten der
Dämpfungsdrähte, mit denen die Streifenmaske stabilisiert wird.
Besonders deutlich si nd sie bei einem hellen (normalerweise
weißen) Bildschirmhintergrund zu sehen. Die Streifenmaske ist
ein wichtiges Merkmal der Trinitron-Bildröhre. Sie bewirkt, daß
mehr Licht auf den Bildschirm gelangt, und ermöglicht eine
höhere Farbintens it ät un d D eta il ge na u igkeit.
Dämpfungsdrähte
Bildschirmmeldungen
Wenn am Eingangssignal ein Fehler vor li egt, erscheint eine der
folgenden Warn meldungen auf dem Bildschirm.
Die Meldung KEIN EINGANGSSIGNAL erscheint
auf dem Bildschirm
INFORMATION
MONITOR FUNKTIONIERT
EINGANG : 68.7kHz/ H58z
KEIN EINGANGSSIGNAL
WH I T E
RED
GREEN
BLUE
1 Frequenzen des aktuellen Eingangssignals
Wenn der Monitor die Frequenzen des aktuellen
Eingangssignals erkennt, werden die Horizontal- und die
Vertikalfrequenz angezeigt.
2222 Status des Eingangssignals
KEIN EINGANGSSIGNAL
Diese Meldung bes a gt, daß kein Signal eingeht.
Die Meldung NICHT IM ABTASTBEREICH
erscheint auf dem Bildschirm
INFORMATION
MONITOR FUNKTIONIERT
EINGANG :130.0kHz/ H57
NICHT IM
ABTASTBEREI CH
S I GNAL - T IM I NG ÄNDERN
WH I T E
RED
GREEN
BLUE
z
1 Frequenzen des aktuellen Eingangssignals
Wenn der Monitor die Frequenzen des aktuellen
Eingangssignals erkennt, werden die Horizontal- und die
Vertikalfrequenz angezeigt.
2222 Status des Eingangssignals
NICHT IM ABTASTBEREICH
Gibt an, daß das Eingangssignal nicht den technischen Daten
des Monitors entspricht.
3333 Abhilfemaßnahmen
SIGNAL-TIMING ÄNDERN erscheint auf dem Bildschirm.
Wenn Sie einen älteren Monitor durch diesen Monitor
ersetzen, schließen Sie den alten Monitor wieder an. Stellen
Sie dann die Grafikkarte des Computers auf eine
Horizontalfrequenz zwischen 30 und 109 kHz und eine
Vertikalfrequenz z w ischen 48 und 160 Hz ein.
DE
Weitere Informationen finden Sie unter “Symptome für Fehler
und Abhilfemaßnahmen” auf Seite 16.
15
Page 48

Symptome für Fehler und Abhilfemaßnahmen
Wenn ein Problem auf den angeschlossenen Computer oder andere Geräte zurückzuführen ist, schlagen Sie bitte in der Dokumentation zu
dem angeschlossene n Gerät nach.
Führen Sie die Selbstdiagnosefunktion (Seite 18) aus, wenn sich ein Problem mit den im folgenden empfohlenen Maßnahmen nicht beheben
läßt.
Symptom Überprüfen Sie bitte folgendes:
Kein Bild
Die Netzanzeige 1 leuchtet nicht • Das Netzkabel muß korrek t an ge s c hlo ss en sein .
Die Meldung KEIN
EINGANGSSIGNAL erscheint auf
dem Bildschirm, oder die
Netzanzeige 1 leuchtet orange oder
wechselt zwischen grün und orange
Die Meldung NICHT IM
ABTASTBEREICH erscheint auf
dem Bildschirm
Es wird keine Meldung angezeigt,
und die Netzanzeige 1 leuchtet grün
oder blinkt orange
Sie arbeiten mit einem Windows 95/
98-System
Sie arbeiten mit einem MacintoshSystem.
Das Bild flimmert, springt,
oszilliert oder ist gestört
• Der Monitor muß am Netzschalter 1 eingeschaltet sein.
• Das Videosignalkabel muß korrekt angeschlossen sein, und alle Stecker müssen fest in den
Buchsen sitzen (Seite 6).
• Achten Sie darauf, daß am HD 15 - Videoeingangsanschluß ke in e Stifte verboge n od er
eingedrückt sind.
x
Durch den angeschlossenen Computer oder andere Geräte verursachte
Probleme
• Der Computer befindet si ch im Energiesparmodus. Drücken Sie eine bel iebige Taste auf
der Computer-Tastatur, oder bewegen Sie die Maus.
• Überprüfen Sie, ob der Computer eingeschaltet ist.
• Die Grafikkarte muß korrekt im richtigen Bus-Steckplatz sitzen.
x
Durch den angeschlossenen Computer oder andere Geräte verursachte
Probleme
• Die Videofrequenz muß im für den Monitor angegebenen Bereich liegen. Wenn Sie einen
älteren Monitor durch diesen Monitor ersetzt haben, schl ießen Sie den alten Monitor
wieder an und stellen eine Frequenz im folgenden Bereich ein:
Horizontal: 30 – 109 kHz
Vertikal: 48 – 16 0 Hz
• Verwenden Sie die Selbstdiagnosefunktion (Seite 18).
• Wenn Sie einen älteren Monit or durch diesen Monit or ersetzt haben, schlie ßen Sie den
alten Monitor wieder an, und gehen Sie folgendermaßen vor: Installieren Sie die
Installationsdiskette (Seite 7), und wählen Sie diesen Monitor („CPD-E500E“) aus den
Sony-Monitoren im Monitorauswahlfenster in Windows 95/98 aus.
• Wenn Sie einen Computer der Serie Power Macintosh G3 anschließen, der drei Stiftreihen
hat, überprüfen Sie, ob der mitgelieferte Macintosh-G3-Adapter und das Videosignalkabel
richtig angeschlossen sind (Seite 6).
• Beim Power Macintos h G3 oder anderen Modellen mi t zwei Stiftreihen benöt igen Sie
einen anderen Adapter, der gesondert erhältlich ist.
• Entfernen Sie alle möglichen Quellen elektrischer oder magnetischer Felder wie andere
Monitore, Lase rdrucker, Ventilatoren, Leuchtstoffröh r en od e r Fe r nse hgeräte aus der Nä he
des Monitors.
• Halten Sie den Monitor von Stromleitungen fern, od er schützen Sie den Moni tor durch
eine Magnetabschirmung.
• Schließen Sie das Netzkabel des Monitors an eine andere Steckdose, möglichst an einem
anderen Stromkreis, an.
• Versuchen Sie, den Monitor um 90 Grad nach links oder rechts zu drehen .
x
Durch den angeschlossenen Computer oder andere Geräte verursachte
Probleme
• Schlagen Sie in der Anleitung zur Grafikkarte die korrekte Monitoreinstellung nach.
• Überpr üfen Sie, ob der Grafikmodus (VESA, Macintosh 21 Z oll, Color usw.) und die
Frequenz des Eingangssignals von diesem Monitor unterstützt werden (Appendix). Auch
wenn die Frequenz innerhalb des unterstützten Bereichs liegt, arbeiten einige Grafikkarten
möglicherweise mit einem Synchro nisatio nsim p uls, de r fü r e ine korrekte Synchronisation
des Monitors zu kurz ist.
• Stellen Sie die Auffrischungsrate am Computer (Vertikalfrequenz) auf den Wert ein, mit
dem Sie die besten Bilder erzielen.
16
Page 49
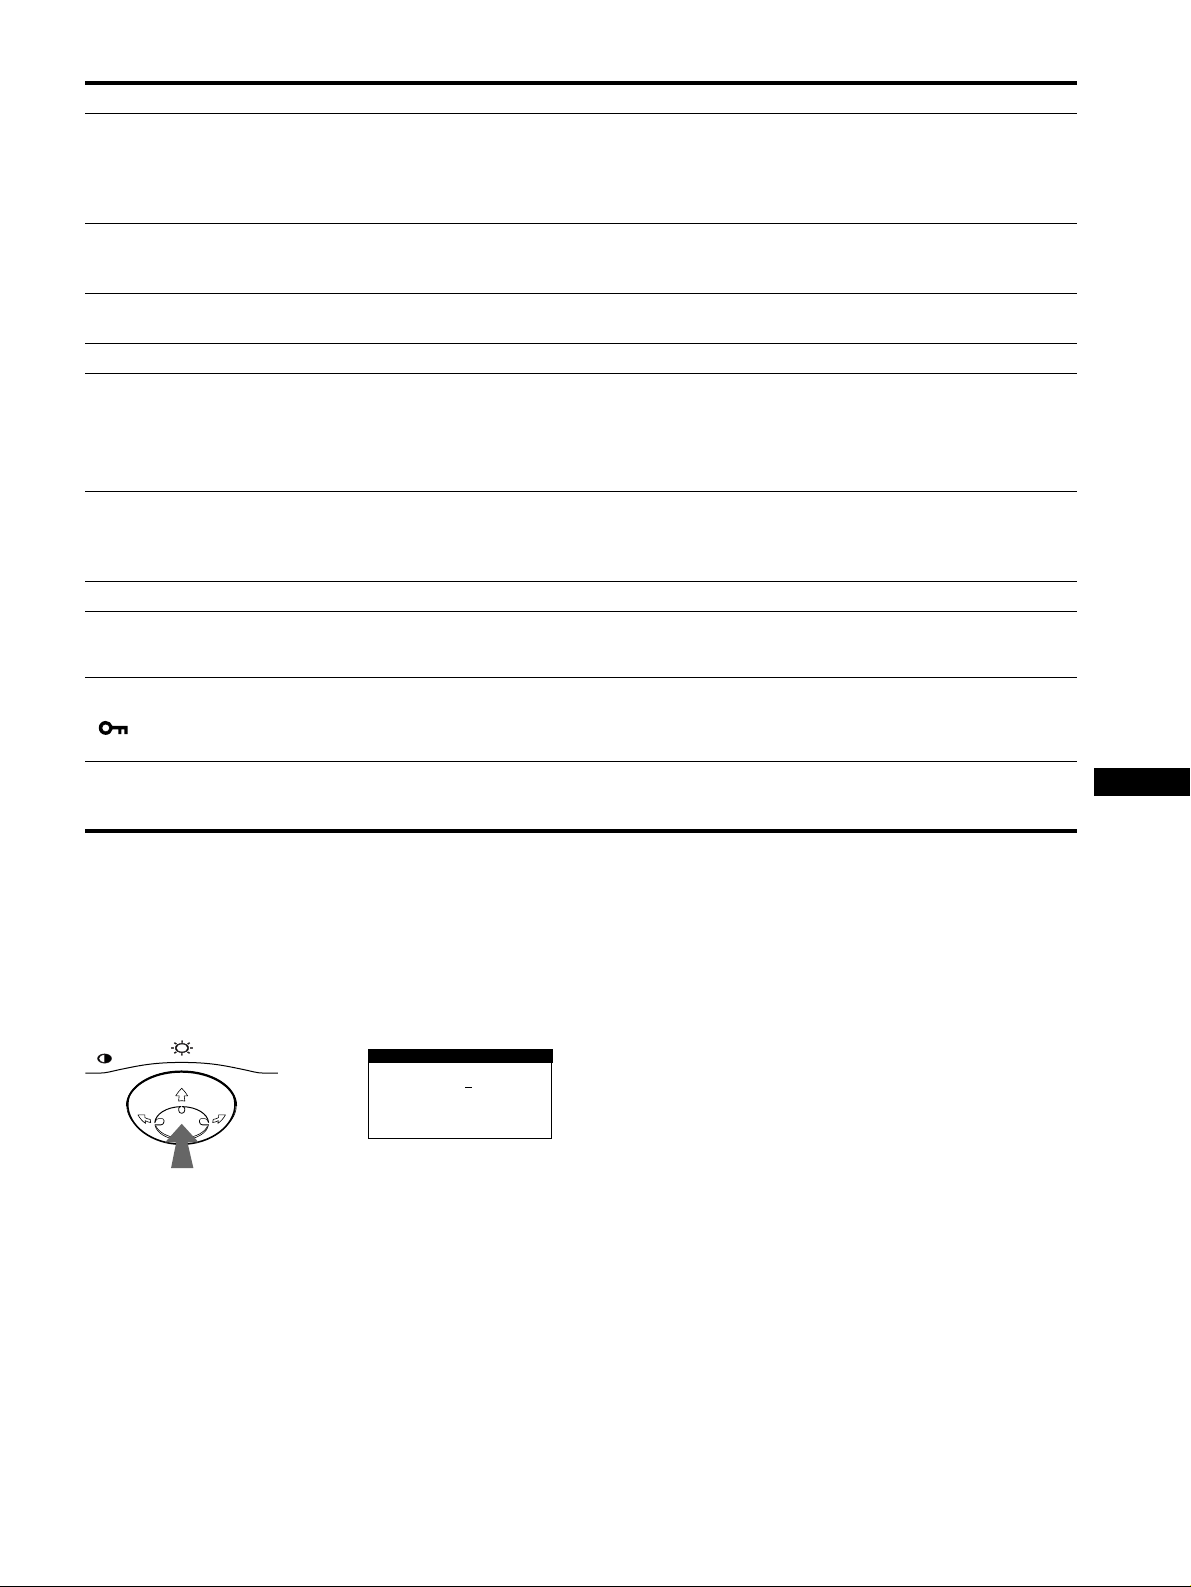
Symptom Überprüfen Sie bitte folgendes:
Das Bild ist verschwommen • Stellen Sie Helligkeit und Kontrast ein (Seite 9).
• Entmagnetisieren Sie den Monitor* (Seite 13).
• Wenn Sie MOIRE-KORREKTUR auf EIN gesetzt haben, kann das Bild verschwommen
sein. Schwächen Sie in diesem Fall d ie Moiré-Korrektur ab, oder setzen Sie MOIREKORREKTUR auf AUS (Seite 11).
Doppelbilder sind zu sehen • Verwenden Sie keine Bildschirmverlängerungskabel und/oder Videoschaltboxen, wenn
Das Bild ist nicht zentriert, oder
die Bildgröße ist nicht korrekt
Die Bildränder sind gekrümmt • Stellen Sie die Geometrie ein (Seite 10).
Wellenförmige oder elliptische
Moiré-Effekte sind sichtbar
Die Farbe ist nicht gleichmäßig • Entmagnetisieren Sie den Monitor* (Seite 13). Wenn Sie ein Gerät, das ein Magnetfeld
Weiß sieht nicht weiß aus • Stellen Sie die Farbtemperatur ein (Seite 12).
An den Rändern von Buchstaben
und Linien sind rote oder blaue
Schatten zu sehen
Die Bedienelemente am Monitor
funktionieren nicht
( erscheint auf dem
Bildschirm.)
Unmittelbar nach dem Einsch alten
ist ein Summgeräusch zu hören
* Ist ein zweiter Entmagnetisierungszyklus erforderlich, warten Sie nach dem ersten Zyklus mindestens 20 Minuten. Auf diese Weise erzielen Sie die best en
Ergebnisse. Dabei ist möglicherweise ein Summge räusch zu hören, aber dies ist keine Fehlfunktion.
dieses Phänomen auftritt.
• Überpr üf en Sie, ob alle Stecker fest in den jeweiligen Buchs e n sitzen.
• Stellen Sie die Bildgröße (Seite 10) bzw . die Position (Seite 10) ein. Beachten Sie, daß bei
bestimmten Videomodi die Anzeige nicht den gesamten Bildschirm füllt.
• Setzen Sie MOIRE-KORREKTUR auf EIN, und regulieren Sie den Grad der MoiréKorrektur, bis der Moiré-Effekt auf ein Minimum reduziert ist (Seite 11).
xDurch den angeschlossenen Computer oder andere Geräte verursachte
Probleme
• Wählen Sie ein anderes Muster für Ihren Desktop.
erzeugt (z. B. einen Lautsprecher), in der Nähe des Monitors aufstellen oder wenn Sie die
Richtung des Monitors ändern, sind die Farben möglicherwei se nicht mehr gleichmäßig.
• Stellen Sie die Farbreinheit ein (Seite 11).
• Stellen Sie die Konvergenz ein (Seite 11).
• Wenn die Tastatursperre auf EIN gesetzt ist, setzen Sie sie auf AUS (Seite 13).
• Dieses Geräusch wird vom automatischen Entmagn etisierungszyklus verursacht. Wenn
Sie das Gerät einschalten, wird der Monitor automatisch etwa zwei S ekunden lang
entmagnetisiert.
DE
Anzeigen des Namens, der Seriennummer und
des Herstellungsdatums des Monitors
Während Videos ignale am Monitor ei ngehen, halten Sie die Mitte
der Steuertaste mehr als fünf Sekunden lang gedrückt, um ein
Feld mit Informationen zum Monitor anzuzeigen.
MENU
b
Beispiel
INFORMATION
MODEL : CPD E500E
SER NO : 1234567
MANUFACTURED
: 1999-52
Bleibt das Problem bestehen, wenden Sie sich an Ihren
autorisierten Sony - H än dl er . Ha lte n Sie die folge n de n
Informationen bereit:
• Model lbezeichnung: CPD- E500E
• Seriennummer
• Model lbezeichnung und technische Daten des Computers und
der Grafikkarte
17
Page 50
Selbstdiagnosefunktion
Dieser Monitor verfügt über eine Selbstdiagn osef unktion. Wenn
an dem Monitor oder am Com puter ein Problem auft ritt, erscheint
ein leerer Bildschirm, und die Netzanzei ge 1 le uchtet grün auf
oder blinkt orange. Wenn di e Netzanzeige 1 orange leuchtet,
befindet sich der Computer im En er g i e s pa rmodus. Drück en Si e
eine beliebige Taste auf der Tastatur.
RESET
Wenn die Netzanzeige 1 grün leuchtet
1
Lösen Sie das Videoeingangskabel, oder schalten
Sie den angeschlossenen Computer aus.
2
Schalten Sie den Monitor am Netzschalter 1 aus
und dann wieder ein.
3
Bewegen Sie die Steuertaste zwei Seku nden lang in
Richtung ,, bevor der Monitor in den
Energiesparmodus wechselt.
MENU
Wenn alle vier Farbbalken (weiß, rot, grün, blau ) angezeigt
werden, funktioniert der Monitor ordnungsgemäß. Schließen Sie
das Videoeingangskabel wieder an, und überprüfen Sie den
Zustand Ihres Computers.
MENU
Netzanzeige
1
Technische Daten
Kathodenstra hlröhre Streifenabstand 0,24 mm
Bildschirmdiagonale 54 cm (21 Zoll)
Ablenkung 90 Grad
FD-Trinitron
Effektive Bildgröße ca. 403,8 × 302,2 mm (B/H)
Anzeigegröße 51 cm (19,8 Zol l)
Auflösung
Maximum Horizontal: 2048 Punkte
Vertikal: 1536 Zeilen
Empfohlen Horizontal: 1600 Punkte
Vertikal: 1200 Zeilen
Standardanzeigegröße ca. 388 × 291 mm (B/H)
oder
ca. 364 × 291 mm (B/H)
Ablenkfrequenz* Horizontal: 30 bis 10 9 kHz
Vertikal: 48 bis 160 Hz
Betriebsspannung 100 bis 240 V Wechselstrom,
50 – 60 Hz, 2,0 – 1,0 A
Leistungsaufnahme ca. 145 W
Abmessungen ca. 497 × 480 × 478 mm (B/H/T)
Gewicht ca. 32 kg
Plug and Play DDC1/2B/2Bi, GTF**
Mitgeliefertes Zubehör Siehe Seite 6
* Empfohlene Werte für das horizont ale und vertikale Timing
• Das horizontale Synchronbreitenverhältnis sollte bei mehr
als 4,8 % des horizontalen Gesamt-Timing oder bei 0,8 µSek.
liegen, je nachdem, welcher Wert höher ist.
• Die horizontale Austastbreite sollte über 2,3 µSek. liegen.
• Die vertikale Austastbreite sollte über 450 µSek. liegen.
** Wenn das Eingangssignal GTF-kompatibel ist
(GTF = Generalized Timing Fo rmula) stellt die GTF-Fu nktion
des Monitors das Bild automatisch optimal ein.
Änderungen, die dem technischen Fortschritt dienen, bleiben
vorbehalten.
Wenn die Farbbalken nicht erschein en, liegt möglicherweise ein
Fehler am Monitor vor. Wenden Sie sich mit der Beschreibun g
des Problems an einen autori sierten Sony-Händler.
Wenn die Netzanzeige 1 orange blinkt
Schalten Sie den Monitor am Netzschalter 1 aus und
dann wieder ein.
Wenn die Netzanzeige 1 jetzt grün leuchtet, funktioniert der
Monitor ordnung s gem ä ß.
Wenn die Netzanzeige 1 immer noch blinkt, liegt
möglicherweise ein Fehler am Monitor vor. Ermitteln Sie das
Intervall, in dem die Netzanzeige 1 blinkt (in Sekunden), und
wenden Sie sich mit der B eschreibung des Problem s an einen
autorisierten Sony-Händler. Notieren Sie sich unbedingt die
Modellbezeichnun g und die Seriennummer des Monitors.
Notieren Sie sich außerdem das Fabrikat und Modell Ihres
Computers und der Grafi kkarte.
18
Page 51
Índice
Precauciones . . . . . . . . . . . . . . . . . . . . . . . . . . . . . . . . . . . . . . . . . . 4
Identificación de los componentes y los controles . . . . . . . . . . . . . . 5
Instalación . . . . . . . . . . . . . . . . . . . . . . . . . . . . . . . . . . . . .6
Paso 1:
Paso 2:
Paso 3:
Conexión del monitor al ordenador. . . . . . . . . . . . . . . . . . . 6
Conexión del cable de alimentación . . . . . . . . . . . . . . . . . . 6
Encendido del monitor y del ordenador . . . . . . . . . . . . . . . 7
Selección del idioma de los menús en pantalla (LANG). . . . . . . . . . 7
Personalización del monitor. . . . . . . . . . . . . . . . . . . . . . .8
Navegación por el menú. . . . . . . . . . . . . . . . . . . . . . . . . . . . . . . . . . 8
Ajuste del brillo y del contraste. . . . . . . . . . . . . . . . . . . . . . . . . . . . . 9
Ajuste del tamaño de la imagen (TAMAÑO). . . . . . . . . . . . . . . . . . 10
Ajuste del centrado de la imagen (CENTRO). . . . . . . . . . . . . . . . . 10
Ampliación o reducción de la imagen (ZOOM). . . . . . . . . . . . . . . . 10
Ajuste de la forma de la imagen (GEOM). . . . . . . . . . . . . . . . . . . . 10
Ajuste de la convergencia (CONV). . . . . . . . . . . . . . . . . . . . . . . . . 11
Ajuste de la calidad de la imagen (PANTAL) . . . . . . . . . . . . . . . . . 11
Ajuste del color de la imagen (COLOR) . . . . . . . . . . . . . . . . . . . . . 12
Ajustes complementarios (OPCION) . . . . . . . . . . . . . . . . . . . . . . . 13
Restauración de los ajustes . . . . . . . . . . . . . . . . . . . . . . . . . . . . . . 14
Características técnicas . . . . . . . . . . . . . . . . . . . . . . . . .14
Modos predefinidos y de usuario . . . . . . . . . . . . . . . . . . . . . . . . . . 14
Función de ahorro de energía . . . . . . . . . . . . . . . . . . . . . . . . . . . . 14
ES
• Trinitron es una marca comercial
registrada de Sony Corporation.
• Macintosh es una marca comercial de
Apple Computer, Inc., registrada en
EE.UU. y otros países.
• Windows
comerciales registrada s de Mi crosoft
Corporation en Estad os Unidos y otros
países.
• IBM PC/AT y VGA son marcas
comerciales registradas de IBM
Corporation de EE.UU.
• VESA y DDC
de Video Electronics Standard
Association.
•
E
registrada de EE.UU.
• El resto de los nombres de productos
mencionados en este manual pueden ser
marcas comerc iales o marcas
comerciales registradas de sus
respectivas compañías.
•Además, “” y “” no se mencionan en
cada caso en este manual.
y MS-DOS son marcas
son marcas comerciales
NERGY STAR es una marca
Solución de problemas . . . . . . . . . . . . . . . . . . . . . . . . . .15
Si aparecen líneas finas en pantalla (hilos de amortiguación) . . . . 15
Mensajes en pantalla . . . . . . . . . . . . . . . . . . . . . . . . . . . . . . . . . . . 15
Problemas y soluciones . . . . . . . . . . . . . . . . . . . . . . . . . . . . . . . . . 16
Función de autodiagnóstico . . . . . . . . . . . . . . . . . . . . . . . . . . . . . . 18
Especificaciones . . . . . . . . . . . . . . . . . . . . . . . . . . . . . . .18
Appendix. . . . . . . . . . . . . . . . . . . . . . . . . . . . . . . . . . . . . . . i
Preset mode timing table . . . . . . . . . . . . . . . . . . . . . . . . . . . . . . . . . .i
TCO’99 Eco-document . . . . . . . . . . . . . . . . . . . . . . . . . . . . . . . . . . . .i
3
Page 52

Precauciones
90°
5°
90°
15°
Puntos de centrado
Advertencia sobre las conexiones de
alimentación
• Utilice el cable de alimentación suministrado. Si emplea otro
tipo de cable, asegúrese de que es compatible con el suministro
de alimentación local.
Para los clientes en el Reino Unido
Si utiliza el monit or en e l Rein o Uni do, ase gúres e de u tilizar el
cable de alimentació n suministrado para dicho país.
Ejemplo de tipos de enchufe
Uso del soporte basculante giratorio
Este monitor puede ajustarse en los ángulos mostrados a
continuación. Para encontrar el centro del radio de giro del
monitor, alinee el centro de la pantalla de dicho monitor con los
puntos de centrado del soporte.
Agarre el monitor por su parte inferior con las dos manos cuando
lo gire horizontal o verticalmente. Tenga cuidado de no pillarse
los dedos en la parte trasera del monitor cuando lo incline hacia
arriba verticalmente.
para 100 a 120 V CA para 200 a 240 V CA para 240 V CA
• Antes de desconectar el cable de alimentación, espere al menos
30 segundos después de desactivar la alimentación para que se
descargue la electricidad estática de la super ficie de la pan talla.
• Una vez activada la alimentación, la pantalla se desmagnetiza
durante unos 2 segundos. Esto genera un intenso campo
magnético alrededor de la pantalla que puede afectar a los datos
almacenados en discos y cin tas magnéticas situados cerca del
monitor. Asegúr e s e de ma nte n er dis c o s, cintas y equipos de
grabación magnéticos alejados del monitor.
El equipo debe instalarse cerca de una toma de fácil acceso.
solamente
Instalación
No instale el monitor en los siguientes lugares:
• sobre superficies (mantas, colchas, etc.) ni cerca de materiales
(cortinas, tapices, etc.) que puedan bloquear los orificios de
ventilación
• cerca de fuentes de ca lo r, c omo ra di ador es o c ondu ct os de air e
caliente, ni en lugares expuestos a la luz sola r di rect a
• en lugares sujetos a cambios bruscos de temperatura
• en lugares sujetos a golpes o vibraciones mecánicas
• sobre superficies inestables
• cerca de eq uipos que generen magnetismo, como
transformadores o líneas eléc tricas de alta tensión
• cerca o sobre una superficie metálica con carga el éctrica
Mantenimiento
• Limpie la pantalla con un paño suave. Si utiliza algún líquido
limpiador de cri s tales, no emplee ningún tipo de producto de
limpieza que contenga soluciones antiestáticas o aditivos
similares, ya que pueden rayar la superficie de la pantalla.
• No frote, toque ni golpee la sup erficie de la panta lla con objetos
afilados o abrasivos, como un bolígrafo o un destornillador.
Este tipo de contacto puede rayar el tubo de imagen.
• Limpie el ex terior, el panel y los controles con un paño suave
ligeramente humedecido con una solución detergente poco
concentrada. No utilice estropajos abrasivos, detergente en
polvo ni disolventes , com o alc oh ol o benc in a .
Transporte
Cuando transporte este monitor para su reparación o traslado,
utilice la caja y materiales de embalaje originales.
4
Page 53
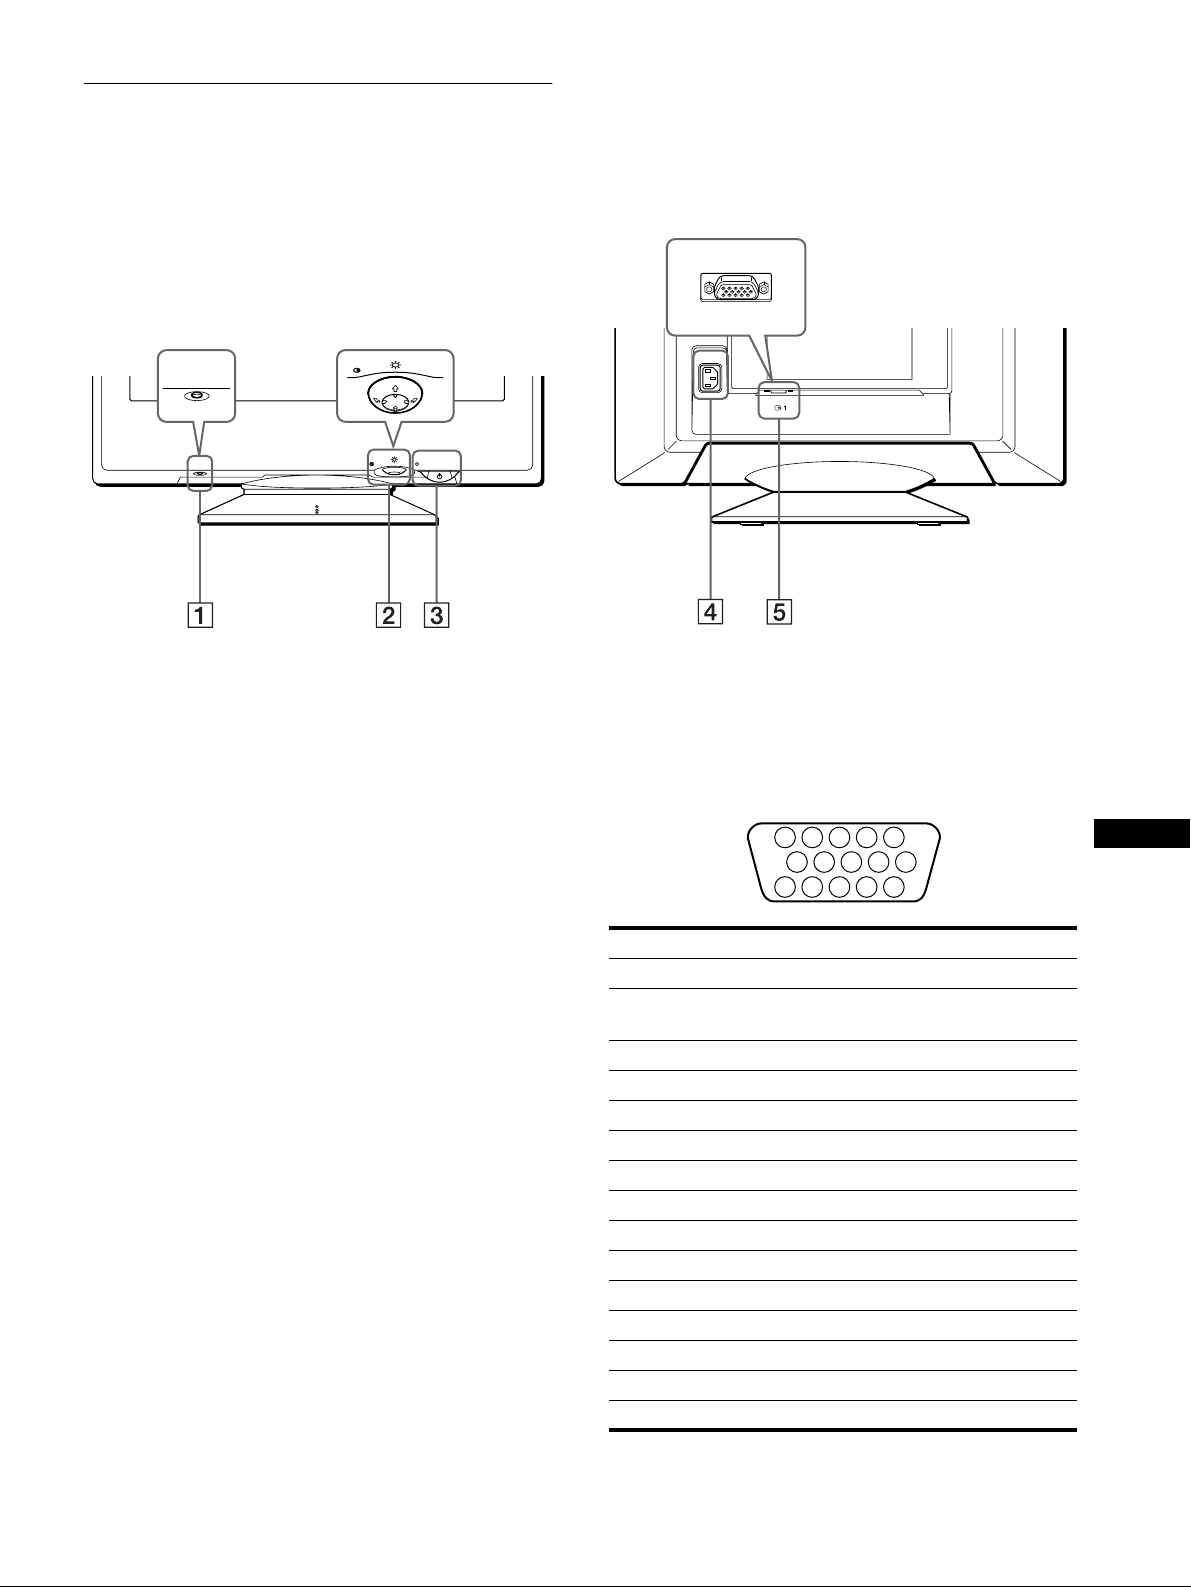
Identificación de los componentes
5 4 3 2
1
678910
1112131415
y los controles
Consulte las página s in dic a da s entre paréntesis pa ra ob te ne r m ás
información.
Parte
frontal
MENU
RESET
RESET
1111 Botón RESET (restauración) (página 14)
Este botón recupera los valores de fábrica.
2222 Botón de control (página 9)
El botón de control se utiliza para most rar el men ú y rea liz ar
ajustes del monitor, incluidos los de brillo y contraste.
3333 Interruptor e indicador 1 (alimentación)
(páginas 7, 14, 18)
Este botón enciende y a paga el monitor. El indicador de
alimentación se ilumina en verde cuando el monitor está
encendido, y parpadea en verde y en naranja, o se ilumina en
naranja cuando dicho monitor se encuentra en el modo de
ahorro de energía.
MENU
Parte
posterior
lado delantero
lado trasero
AC IN
(HD15)
4444 Conector AC IN (página 6)
Este conector proporciona aliment ación de CA al monitor.
5555 Conector de entrada de vídeo (HD15) (y1)
(página 6)
Este conector int r oduce las señales de vídeo RVA
(0,700 Vp-p, positivas) y de sincronización.
Terminal nº Señal
1Roja
2Verde
(Sincronización en verde)
3Azul
4 Identificación (Masa)
5 Masa DDC*
6Masa roja
7 Masa verde
8 Masa azul
9 DDC+5V*
10 Masa
11 Identificación (Masa)
12 Datos bidireccionales (SDA)*
13 Sincronización H.
14 Sincronización V.
15 Reloj de datos (SCL)*
ES
* DDC (Display Data Channel) es un estándar de VESA.
5
Page 54

Instalación
(HD15)
AC IN
a HD15
Adaptador Macintosh G3 (para
sistemas azul y blanco)
(suministrado)
*
Power Macintosh G3
a salida de vídeo
Cable de señales de
vídeo HD15
(suministrado)
Utilice el adaptador Macintosh G3 suministrado (para sistemas
azul y blanco).
(HD15)
AC IN
a AC IN
a una toma de corriente
Cable de alimentación
(suministrado)
Antes de utilizar el monitor, compruebe que ha rec ibido los
siguientes accesorios:
• Cable de al imentación (1)
• Cable de señales de vídeo HD15 (1)
• Adaptador Macintosh G3 (para sistema azul y bl anco) (1)
• Disco de instalación (1)
• Tarjeta de garantía (1)
• Notas sobre la limpieza de la sup e rf ic i e de la pa ntalla (1)
• Este manual de instrucciones (1)
Paso 1:Conexión del monitor al
ordenador
Apague el monitor y el ordenador antes de r ealizar la conexión .
Notas
• No toque los terminales del conector del cable de señal de vídeo, ya que
dichos terminales po drí an doblarse.
• Cuando conecte el cable de señal de vídeo, compruebe la alineación del
conector HD15. No fuerce el conector en el sentido incorrecto, ya que
los terminales podrían do bla rse.
Conexión a un ordenador IBM PC/AT o
xxxx
compatible
Conexión a un ordenador Macintosh o
xxxx
compatible
AC IN
(HD15)
Ordenador IBM PC/AT o
compatible
a salida de vídeo
Cable de señales de
vídeo HD15
(suministrado)
* Conecte el adaptador Macintosh G3 suministrado al ordenador antes de
conectar el cable. Este adaptador es compati ble con sistemas Power
Macintosh de la serie G3 qu e di sponen de tres filas de terminales. Si
conecta otra versión de Power Ma ci nt osh de la serie G3 con tres filas
de terminales o mode l os dife rentes a los especificado s anteriormente,
necesitará un adaptador di fe rente (vendido por separado).
Paso 2:Conexión del cable de
alimentación
a HD15
Con el monitor y el ordenador apagados, primero conecte el cable
de alimentación al monitor y, a continuación, a una toma de
corriente.
6
Page 55
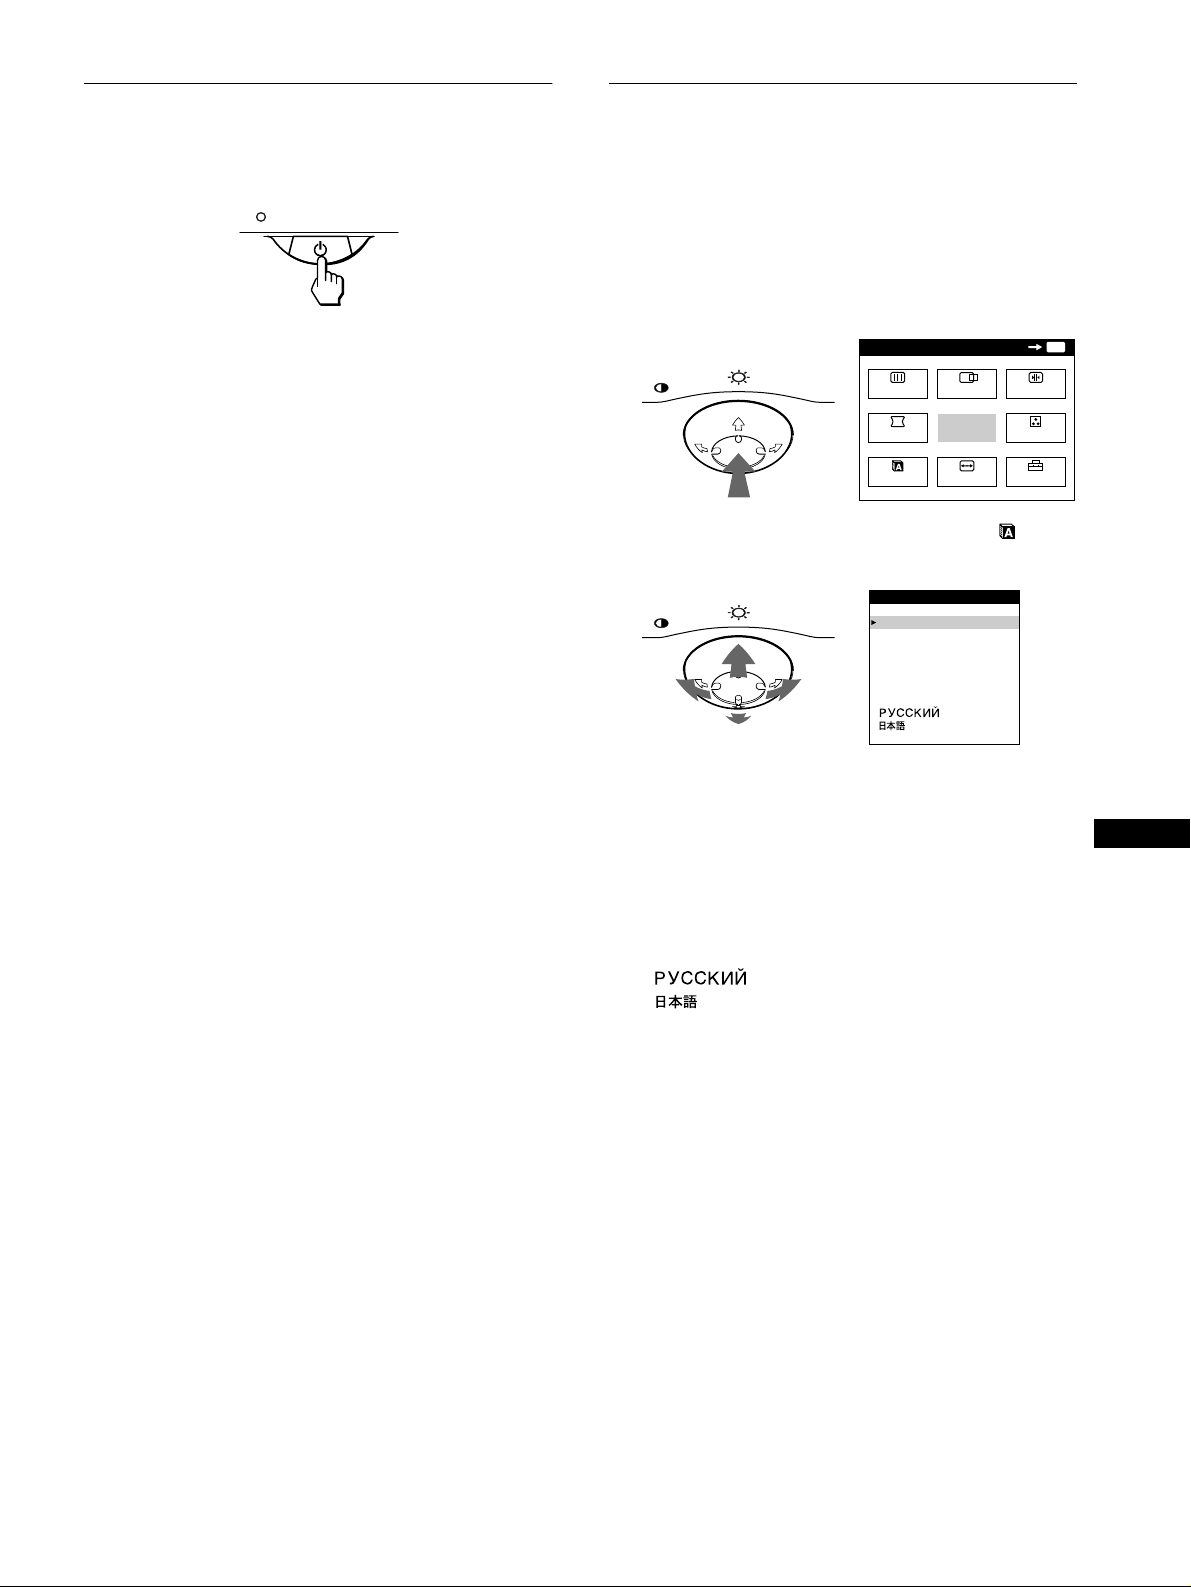
Paso 3:Encendido del monitor y
Selección del idioma de los menús
del ordenador
Primero encienda el monitor y, a continuación, el ordenador.
La instalación del monitor ha finalizado.
Si fuese necesario, utilice los cont roles del monitor p ara ajustar la
imagen.
Si las imágenes no aparecen en pantalla
• Compruebe que el monitor esté correctamente conectado al
ordenador.
• Si SIN SEÑAL DE ENTRADA aparece en la pantalla,
compruebe que la tarjeta gráfic a del ordenador esté
completamente insertada en la ranura bus correcta.
• Si sustituye un monitor antiguo por este modelo y el mensaje
FUERA DEL RANGO DE AJUSTE aparece en pantalla,
vuelva a conectar el monitor antiguo. A continuación, ajuste la
tarjeta gráfica del ordenador de forma que la frecuencia
horizontal se encuentre entre 30 – 109 kHz, y la vertical entre
48 – 160 Hz.
Para obtener más información sobre los mensajes en pantalla,
consulte “Problemas y soluciones” en la página 16.
en pantalla (LANG)
Los idiomas disponibles para los menús en pantalla son inglés,
francés, alemán, español, italiano, holandés, sueco, ruso y
japonés. El ajuste por omisión es el idioma inglés.
1
Pulse el centro del botón de control.
Consulte la pági na 9 para obtener más información sobre el
uso del botón de control.
MENU
2
Desplace el botón de control para resal tar LANG
MENU
PANTAL
GEOM
LANG
CENTRO
SALIR
TAMAÑO
y vuelva a pulsar el centro de dicho botón.
MENU
LANGUAGE
ENGL I SH
FRANÇA I S
DEUTSCH
ESPAÑOL
ITALIANO
NEDERL ANDS
SVENSKA
OK
CONV
COLOR
OPCION
MENU
Para los usuarios que utilicen Windows 95/98
Para maximiza r el potencial del mo nitor, instale en e l PC e l archivo de
información de nuevo modelo del disco de instalación sumi ni stra do.
Este monitor cumple con el estándar Plug & Play “VESA DDC”. Si su PC/
tarjeta gráfica cumple con DDC, seleccione “Plug & Play Monitor (VESA
DDC)” o el nombre de mode lo de este monitor como tipo de monitor en
“Control Panel” de Windows 95/98. Si la tarjeta gráfica/PC presenta
dificultades de comunicación con este monitor, cargue el disco de
instalación y seleccione el nombre de modelo de este monitor como tipo
de monitor.
Para los usuarios que utilicen Windows NT4.0
La instalación del monitor en Windows NT4.0 difiere de la de Win dows
95/98 y no implica selección de tipo de monitor. Consulte el manual de
instrucciones de Windows NT4. 0 para obtener más informa ci ón sob re el
ajuste de la resolució n, la frec uencia de barrido y el número de colores.
3
Desplace el botón de control m/M para seleccionar
algún idioma.
• ENGLISH: Inglés
• FRANÇAIS: Francés
• DEUTSCH: Alemán
• ESPAÑOL
• ITALIANO: Italiano
• NEDERLANDS: Holandés
• SVENSKA: Sueco
•: Ruso
• : Japonés
Para cerrar el menú
Pulse el centro del botón de con tro l una vez para volver al MENU
principal, y dos veces para volver a la v isualización nor mal. Si no pulsa
ningún botón, el menú se ce rra rá aut om át i ca m ent e transcurridos unos
30 segundos.
Para restaurar el idioma inglés
Pulse el botón RESET mientras el menú LANGUAGE se encuentra en
pantalla.
ES
7
Page 56

Personalización del
MENU
MENU
SALIR
CENTRO
TAMAÑO
GEOM
PANTAL
COLOR
LANG
CONV
OPCION
OK
68.7kHz/ 85Hz
1024
768
frecuencias
horizontal y
vertical de la
señal de
entrada actual
resolución de
la señal de
entrada actual
monitor
Es posible realizar diversos ajustes del monitor mediante el menú
en pantalla.
Navegación por el menú
Pulse el centro del botón de control para que aparezca el MENU
principal en pantalla. Consulte la página9 para obtener más
información sobre el empleo del botón de control.
MENU
MENU
PANTAL
GEOM
LANG
CENTRO
SALIR
TAMAÑO
Utilice el botón de control para seleccionar uno de los siguientes
menús.
1111 CENTRO (página 10)
TAMAÑO / CENTRO
Seleccione el menú CENTRO para
ajustar el centrado, tamaño o zoom
de la imagen.
2222 TAMAÑO (página 10)
TAMAÑO / CENTRO
Seleccione el menú TAMAÑO para
ajustar el tamaño, centrado o zoom
de la imagen.
OK
CONV
COLOR
OPCION
MENU
26
26
5555 PANTAL (página 11)
Seleccione el menú PANTAL para
PANTALLA
PUREZA
ajustar la calidad de la imagen. Es
posible ajustar la pureza y el efecto
de cancelación del muaré.
6666 CONV (página 11)
CONVERGENC I A
26
Seleccione el menú CONV para
ajustar la convergencia horizontal y
vertical de la imagen.
7777 LANG (página 7)
Seleccione el menú LANG para
elegir el idioma de los menús en
pantalla.
8888 OPCION (página 13)
Seleccione el menú OPCION para
TOP
BOT
LANGUAGE
ENGL I SH
FRANÇA I S
DEUTSCH
ESPAÑOL
ITALIANO
NEDERL ANDS
SVENSKA
OPCION
DESMAGNET
26
ajustar las opciones del monitor.
Éstas incluyen:
• la desmag netización de la
SI
pantalla
• el cambio de la posición del menú
en pantalla
• el bloqueo de los controles
9999 SALIR
Seleccione SALIR para cerrar el
menú.
Visualización de la señal de entrada actual
xxxx
Las frecuencias horizontal y vertical de la señal de entrada actual
aparecen en el MENU principal. Si la señal se corresponde con
uno de los modos predefin idos en fábrica de es te monitor, también
aparecerá la resolución.
3333 GEOM (página 10)
4444 COLOR (página 12)
8
Seleccione el menú GEOM para
ajustar la rotación y forma de la
imagen.
Seleccione el menú
COLOR para ajustar la
temperatura del color de la
imagen. Puede utilizarlo
para hacer coincidir los
colores del monitor con los
de una imagen impresa.
GEOMETR I A
26
COLOR
FAC I L EXPERTO s BGR
5000K 6500K 930 K0
50 K00
Page 57
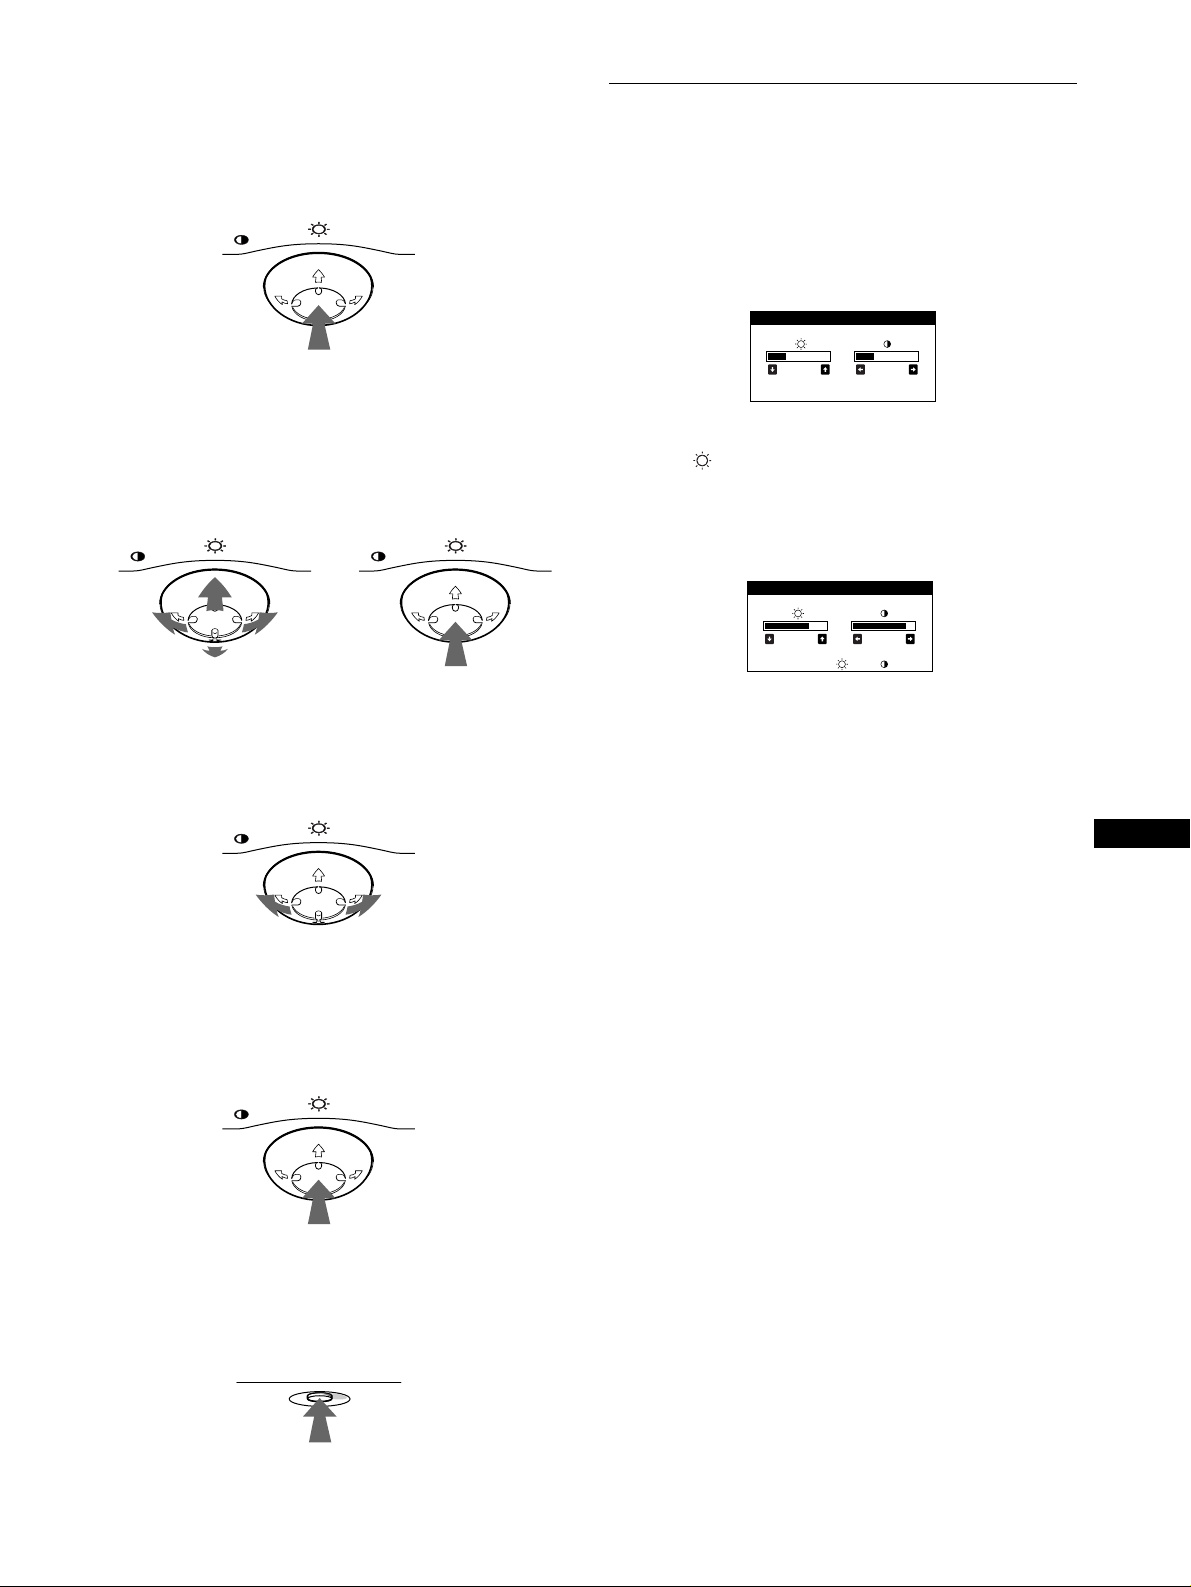
Uso del botón de control
26 26
BR I LLO /CONTRASTE
56 76
sRGB : 56 76
BR I LLO /CONTRASTE
xxxx
1
Muestre el MENU principal.
Pulse el centro del botón de control para que aparezca en
pantalla el MENU principal.
MENU
2
Seleccione el menú que desee ajustar.
Resalte el menú de se ado desplazando el botón de control
hacia atrás para subir (M), hacia delante para bajar (m), y a la
izquierda (<) o a la derecha (,) para desplazarse hacia los
lados.
FRONTAL
MENU MENU
Ajuste del brillo y del contraste
Los ajustes de brillo y contraste se realizan mediante un menú
BRILLO/CONTRASTE independiente.
Estos ajustes se almacenan en la memoria para todas las señales
de entrada.
1
Desplace el botón de control en cualq uier dirección.
El menú BRILLO/CONTRASTE aparece en pantalla.
2
Desplace el botón de control m/M para ajustar el
brillo ( ), y </, para ajustar el contraste (6).
Si emplea el modo sRGB
Si ha seleccionado el modo sRGB en el menú COLOR, la pantalla
mostrará el siguiente menú BRILLO/CONTRASTE.
POSTERIOR
3
Ajuste el menú.
Desplace el botón de cont rol hacia la izquierda (<) o la
derecha (,) para realizar el ajuste.
MENU
4
Cierre el menú.
Pulse el centro del botón de control un a vez para volver al
MENU principal, y dos veces para vo lv er a la visualización
normal. Si no pulsa ningún botón, el menú se cerrar á
automáticamente transcurridos unos 30 segundos.
MENU
Para obtener más información sobre el empleo del modo sRGB,
consulte “Ajuste del color de la imagen (COLOR)” en la
página 12.
El menú desaparece automáti camente transcurridos unos
3 segundos.
ES
Restauración de los ajustes
xxxx
Pulse el botón RESET. Consulte la página 14 para obtener más
información sobre la restauración de los ajustes.
RESET
9
Page 58

Ajuste del tamaño de la imagen
Ajuste de la forma de la imagen
(TAMAÑO)
Este ajuste se almacena en la memoria para la señal de entrada
actual.
1
Pulse el centro del botón de control.
El MENU principal aparece en pantalla.
2
Desplace el botón de control para resaltar
TAMAÑO y vuelva a pulsar el centro de dicho
botón.
El menú TAMAÑO/CENTRO aparece en pantalla.
3
Primero, desplace el botó n de control m/M con el fin
de seleccionar para el ajuste horizontal, o
para el vertical. A continuación, desplace el botón
de control </, para ajustar el tamaño.
Ajuste del centrado de la imagen
(CENTRO)
Este ajuste se almacena en la memoria para la señal de entrada
actual.
1
Pulse el centro del botón de control.
El MENU principal aparece en pantalla.
2
Desplace el botón de control para resaltar
CENTRO y vuelva a pulsar el centro de dicho
botón.
El menú TAMAÑO/CENTRO aparece en pantalla.
(GEOM)
Los ajustes de GEOM permiten ajustar la rotación y la forma de
la imagen.
El ajuste (rotación) se almacena en la memoria para todas las
señales de entrada. El resto de ajustes se almacenan en la memoria
para la señal de entrada actual.
1
Pulse el centro del botón de control.
El MENU principal aparece en pantalla.
2
Desplace el botón de control para resaltar GEOM
y vuelva a pulsar el centro de dicho botón.
El menú GEOMETRIA aparece en pan talla.
3
Primero, desplace el botón de control m/M para
seleccionar la opción de ajuste que desee. A
continuación, desplace el botón </, para realizar
el ajuste.
Seleccione Para
girar la imagen
expandir o contraer los lados de la imagen
desplazar los lados de la imagen hacia la
izquierda o la derecha
ajustar la anchura de la imagen en la parte
superior de la pant alla
desplazar la imagen hacia la izquierda o la
derecha en la parte superior de la pantalla
3
Primero, desplace el botó n de control m/M con el fin
de seleccionar para el ajuste horizontal, o
para el vertical. A continuación, desplace el botón
de control </, para ajustar el centrado.
Ampliación o reducción de la
imagen (ZOOM)
Este ajuste se almacena en la memoria para la señal de entrada
actual.
1
Pulse el centro del botón de control.
El MENU principal aparece en pantalla.
2
Desplace el botón de control para resaltar
TAMAÑO o CENTRO y vuelva a pulsar el
centro de dicho botón.
El menú TAMAÑO/CENTRO aparece en pantalla.
3
Desplace el botón de control m/M con el fin de
seleccionar (zoom), y desplace </, para
ampliar o reducir la imagen.
Nota
El ajuste se detiene cuando el tamaño horizontal o vertical alcanza su valor
máximo o mínimo.
10
Page 59
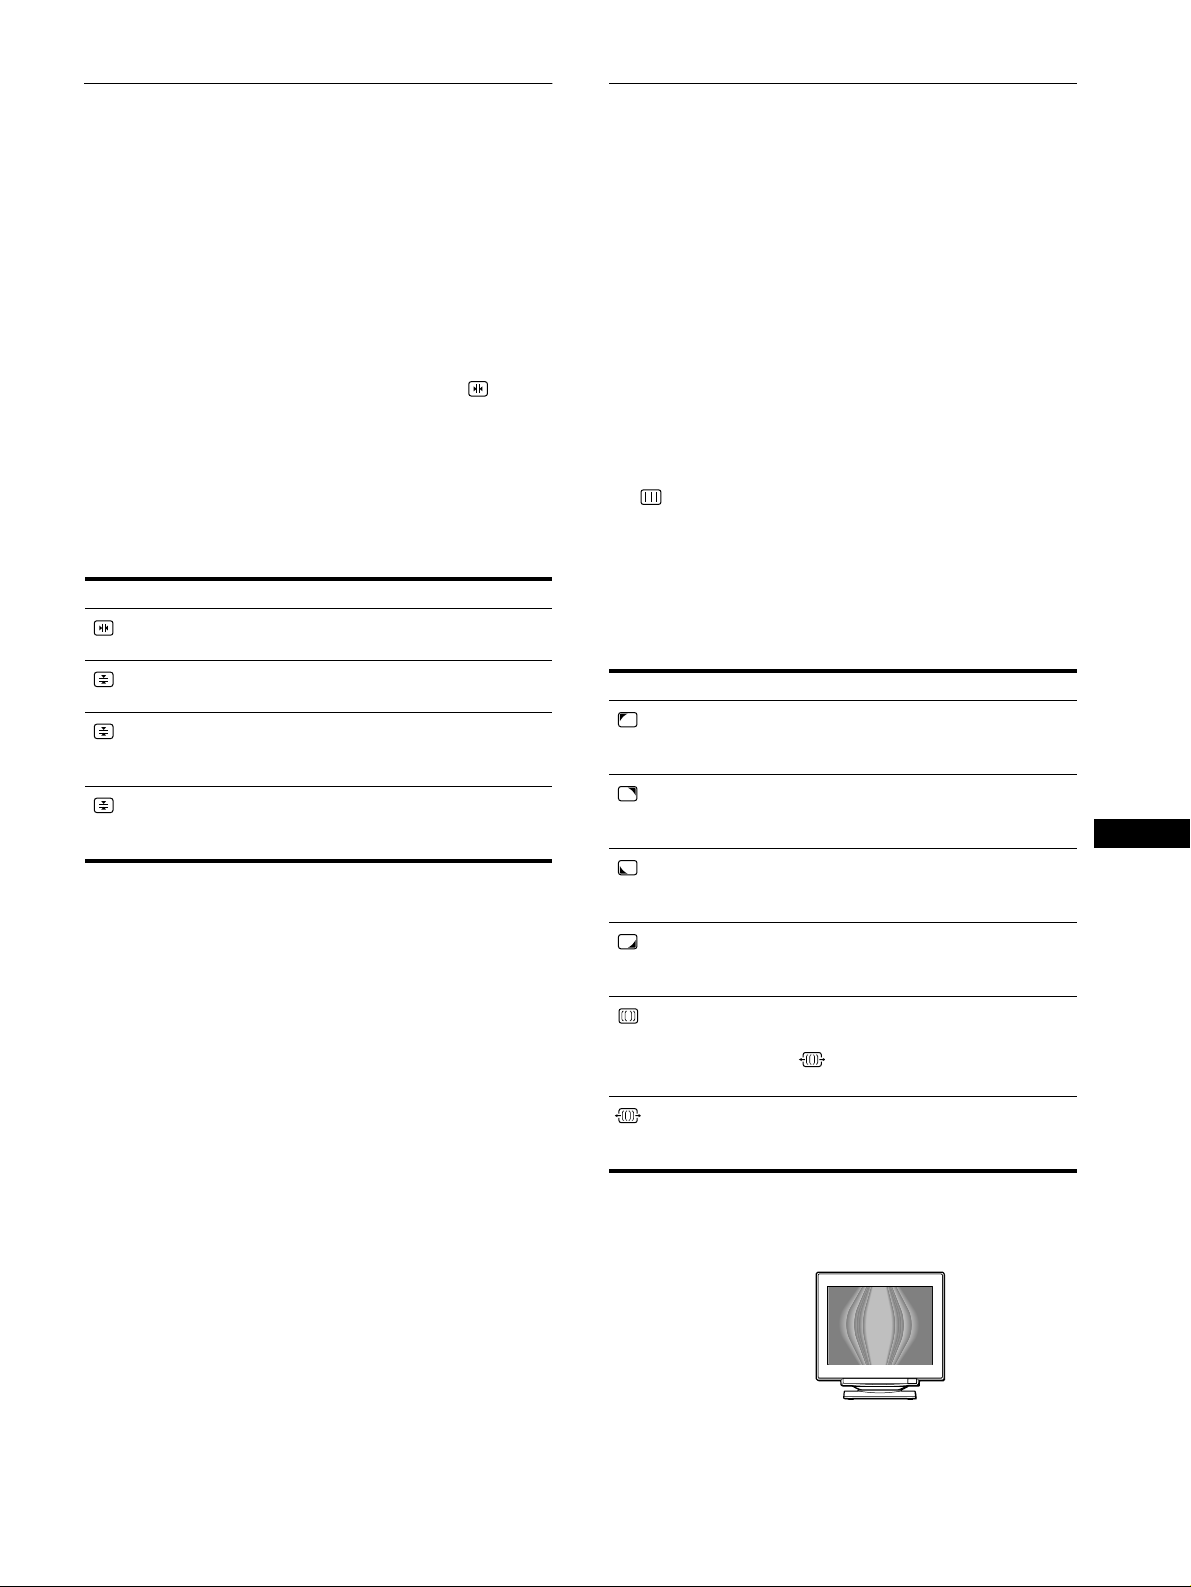
Ajuste de la convergencia (CONV)
Ajuste de la calidad de la imagen
Los ajustes de CONV permiten ajustar la calidad de la imagen
mediante el control de la convergencia. Ésta se refiere a la
alineación de las señales de color rojo, verde y azul.
Si se aprecian sombras rojas o azules alrededor de las letras o de
las líneas, ajuste la convergencia.
Estos ajustes se almacenan en la memoria para todas las señales
de entrada.
1
Pulse el centro del botón de control.
El MENU principal aparece en pantalla.
2
Desplace el botón de control para resaltar CONV
y vuelva a pulsar el centro de dicho botón.
El menú CONVERGENCIA aparece en pantalla.
3
Primero, desplace el botón de control m/M para
seleccionar la opción de ajuste que desee. A
continuación, desplace el botón </, para realiza r
el ajuste.
Seleccione Para
TOP
CONVER V SUP
BOT
CONVER V INF
que las sombras rojas o azules se
desplacen en sentido horizontal
que las sombras rojas o azules se
desplacen en sentido vertical
que las sombras rojas o azules de la
parte superior de la pa ntalla se
desplacen en sentido vertical
que las sombras rojas o azules de la
parte inferior de la pantalla se
desplacen en sentido vertical
(PANTAL)
Los ajustes de PANTAL permit en aju star la cali dad de la imagen
controlando el muaré y la purez a .
• Si el color es irregular en las esquinas de la pantalla, ajuste la
pureza.
• Si aparecen patrones elípticos u ondulados en pantalla, cancele
el muaré.
Los ajustes ELIMINAR MUARE y AJUSTE MUARE se
almacenan en la memoria para la señal de entrada actual. Los
demás ajustes se almacenan en la memoria para todas las señales
de entrada.
1
Pulse el centro del botón de control.
El MENU principal aparece en pantalla.
2
Desplace el botón de control para resaltar
PANTAL y vuelva a pulsar el centro de dicho
botón.
El menú PANTALLA aparece en pantalla.
3
Primero, desplace el botón de control m/M para
seleccionar la opción de ajuste que desee. A
continuación, desplace el botón </, para realizar
el ajuste.
Seleccione Para
PUREZA
PUREZA
PUREZA
PUREZA
ELIMINAR MUARE
AJUSTE MUARE
* El m u a r é es un ti po de interferenci a natural que produce líneas suaves
y onduladas en la pantalla. Puede aparecer debido a la interferencia
entre el patrón de la ima gen en pantalla y el de paso de fósfo ro de l
monitor.
Ejemplo de muaré
reducir al mínimo las irregularidades
del color del ángulo superior
izquierdo de la pantalla.
reducir al mínimo las irregularidades
del color del ángulo superior derecho
de la pantalla.
reducir al mínimo las irregularidades
del color del ángulo inferior izqu ierdo
de la pantalla.
reducir al mínimo las irregularidades
del color del ángulo inferior derecho
de la pantalla.
activar (SI) o desactivar (NO) la
función de cancelación de muaré.
*
(AJUSTE MUARE) aparece en
el menú al seleccionar SI.
ajustar el grado de cancelación de
muaré hasta que éste se encuentr e al
mínimo.
ES
Nota
Es posible que la imagen aparezca borrosa si ELIMINAR MUARE se
ajusta en SI.
11
Page 60

Ajuste del color de la imagen
(COLOR)
Los ajustes de COLOR permiten ajustar la temperatura del color
de la imagen mediante la modi ficación del nivel de color del
campo de color blanco. Los co lo res aparecen con un tono rojizo
si la temperatura es baja, y azulado si ésta es alta. Este ajuste
resulta útil para hacer coincidir el color del monitor con los
colores de una imagen impresa.
Estos ajustes se almacenan en la memoria para todas las señales
de entrada.
1
Pulse el centro del botón de control.
El MENU principal aparece en pantalla.
2
Desplace el botón de control para resaltar
COLOR y vuelva a pulsar el centro de dicho
botón.
El menú COLOR aparece en pantalla.
3
Desplace el botón de control </, para
seleccionar el modo de ajuste.
Hay tres tipos de modo de ajuste: FACIL, EXPERTO y
sRGB.
4
Primero, desplace el botón de control m/M para
seleccionar la opción de ajuste que desee. A
continuación, desplace el botón </, para realizar
el ajuste.
Ajuste el modo seleccionado de acuerdo con las siguientes
instrucciones.
Modo EXPERTO
Es posible realizar ajustes adiciona les en el color en mayo r detalle
seleccionando el modo EXPERTO.
COLOR
FAC I L EXPERTO s BGR
5000K 6500K 930 K0
R BIAS 05
V BIAS 05
A BIAS 05
RGAIN 05
VGAIN 05
AGAIN 05
1
Desplace el botón de control m/M para seleccionar
la fila 1 de temperatura del color. Después
desplace el botón de control </, para seleccionar
una temperatura del color.
2
Desplace el botón de control m/M para seleccionar
la opción 2 de ajuste. A continuación, desplace el
botón de control </, para ajustar BIAS (nivel de
negro).
De esta forma se ajustan las partes oscuras de la imagen.
3
Desplace el botón de control m/M para seleccionar
la opción 3 de ajuste. Después desplace el botón
de control </, para ajustar GAIN (nivel de
blanco).
De esta forma se ajustan las partes luminosas de la imagen.
Es posible ajustar el componente R (rojo), V (verde), A (azul)
de la señal de entrada al realiza r cambios en las opciones 2
y 3.
Modo FACIL
COLOR
FAC I L EXPERTO s BGR
5000K 6500K 930 K0
1
Desplace el botón de control m/M para seleccionar
la fila 1 de temperatura del color. Después
desplace el botón de control </, para seleccionar
una temperatura del color.
Las temperaturas del color pred efinida s son 50 00K, 6 500K y
9300K. Puesto q ue el ajuste por om isión e s 9300K , el to no de
los blancos cambiará de azulado a rojizo al disminuir la
temperatura hasta 6500K y 5000K.
2
Si es necesario, ajuste la temperatu ra de l color co n
precisión.
Desplace el botón de control m/M para seleccionar
la fila 2 de temperatura del color. Después
desplace el botón de control </, para ajustar la
temperatura del color con precisión.
Si ajusta la temperatura del color con precisión, los nuevos
ajustes del color se almacenarán en la memoria para cada una
de las tres temperaturas del c olor y la opc ión 1 del menú en
pantalla cambiará de la siguiente forma.
• [5000K]t[1]
• [6500K]t[2]
• [9300K]t[3]
50 K00
Si ajusta la temperatura del color con precisión, los nuevos
ajustes del color se almacenarán en la memoria para cada una
de las tres temperaturas del color y la opción 1 del menú en
pantalla cambiará de la siguiente forma.
• [5000K]t[1]
• [6500K]t[2]
• [9300K]t[3]
12
Page 61
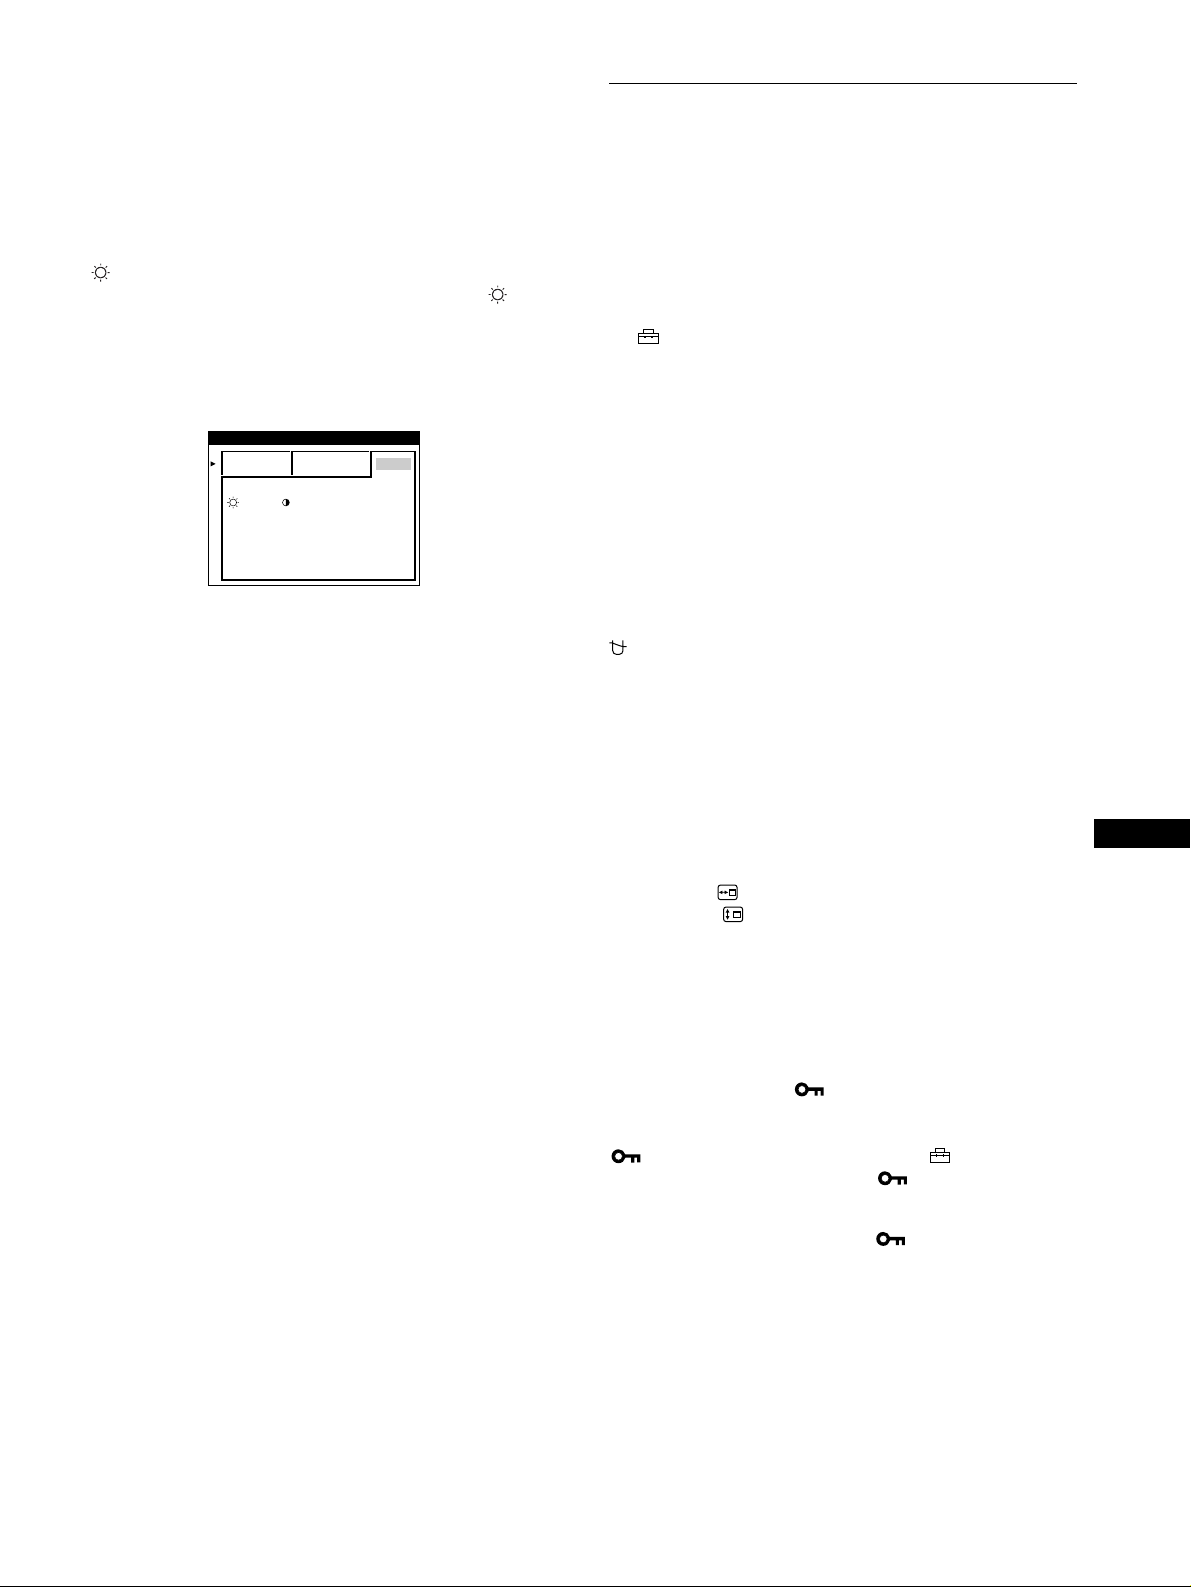
Modo sRGB
El ajuste de color sRGB es un protocolo de espacio de color del
sector estándar diseñado para correlacionar los colores mostrados
e impresos de productos informáticos que cumplan con sRGB.
Para ajustar los colores en el perfil sRGB, basta con seleccionar el
modo sRGB en el menú COLOR. No obstante, con el fin de
mostrar correctamente los colores sRGB (γ=2,2, 6500K), es
preciso definir el ordenador en el perfil sRGB y ajustar el brillo
( ) y el contraste (6) en los números mostrados en el menú.
Para obtener informac ión sobre cómo cambia r e l brillo ( ) y el
contraste (6), consulte la página 9.
Nota
El ordenador y otros produc tos conectados (como una impre sora) deben
admitir el modo sRGB.
COLOR
FAC I L EXPERTO s BGR
: 56 : 76 PARA s BGR
Ajustes complementarios
(OPCION)
Es posible desmagnet izar el monitor, cambiar la posición del
menú y bloquear los controles manualmente.
1
Pulse el centro del botón de control.
El MENU principal aparece en pantalla.
2
Desplace el botón de control para resaltar
OPCION y vuelva a pulsar el centro de dicho
botón.
El menú OPCION aparece en pantall a.
3
Desplace el botón de control m/M para seleccionar
la opción de ajuste que desee.
Ajuste la opción seleccionada de acuerdo con las siguientes
instrucciones.
Desmagnetización de la pantalla
El monitor se desmagnetiza automáticamente al activar la
alimentación.
Para desmagnetizarlo m anualm ente, p rimero despla ce
el botón de control m/M para seleccionar
(DESMAGNET). A continuación, desplace el botón
,.
La pantalla se desmagnet iza durante unos 2 segundos. Si es
preciso aplicar un segu ndo ciclo de desmagneti zación, espere al
menos 20 minutos antes de aplicarlo para obtener los mejores
resultados posibles.
Cambio de la posición del menú
Cambie la posición del menú si bloquea la imagen en pantalla.
Para cambiar la posición del menú en pantalla, primero
desplace el botón de control m/M con el fin de
seleccionar (POSICION MENU H) para el ajuste
horizontal, o (POSICION MENU V) para el vertical. A
continuación, desplace el botón </, para desplazar
el menú en pantalla.
Bloqueo de los controles
Para proteger datos de ajuste mediante el bloqueo de
los controles, primero desplace el botón de control
m/M para seleccionar (BLOQUEO DE AJUSTES). A
continuación, desplace el bot ón , para seleccionar SI.
Sólo funcionarán el interruptor 1 (alimentación), SALIR y
(BLOQUEO DE AJUSTES) del menú OPCION. Si se
seleccionan otras opciones, la marca aparecerá en pantalla.
Para cancelar el bloqueo de los controles
Repita el anterior procedimiento y ajuste (BLOQUE O DE
AJUSTES) en NO.
ES
13
Page 62

Restauración de los ajustes
Este monitor dispone de los siguientes métodos de restauración.
Utilice el botón RESET para restaurar los ajustes.
RESET
Restauración de una sola opción de ajuste
Emplee el botón de control para seleccionar la opción de ajuste
que desee restaurar, y pulse el botón RESET.
Restauración de todos los datos de ajuste para la
señal de entrada actual
Pulse el botón RESET cuando la pantalla no muestre ningún
menú.
Tenga en cuenta que las siguientes opciones no se restauran
mediante este método:
• idioma de los menús en pantalla (pá gina 7)
• modo de ajuste del menú COLOR (FACIL, EXPERTO, sRGB)
(página 12)
• posición de los menús en pantalla (página 13)
• bloqueo de los co ntroles (página 13)
Características técnicas
Modos predefinidos y de usuario
Cuando el monitor recibe una señal de entrada, hace coincidir
automáticamente dicha señal con uno d e los modos predefinidos
en fábrica almacenados en la memoria para mostrar imágenes de
alta calidad en el centro de la pantalla. (Consulte Appendix para
comprobar la lista de los modos predefinidos en fábrica.) Con
respecto a las señales de entra da que no se correspondan con
ninguno de los modos predefinidos en fábrica, la tecnologí a
digital Multiscan de este monitor garantiza la presentación en
pantalla de imágenes nítidas para cualquier sincronización dentro
del margen de frecuencias del monitor (horizontal: 30 – 109 kHz,
vertical: 48 – 160 Hz). Si la imagen se ajusta, los datos de ajuste
se almacenan como modo de usuario y se recuperan
automáticamente al recibirse la misma señal de entr ada
Nota para los usuarios de Windows
Consulte el manual de la tarjeta de vídeo o el programa de
utilidades suministrad o con la tarjeta gráfica, y seleccion e la
frecuencia de barrido más alta disponible para maximizar el
rendimiento del monitor.
Función de ahorro de energía
.
Restauración de todos los datos de ajuste para
todas las señales de entrada
Mantenga pulsado el botón RESET durante más de dos segundos.
Nota
El botón RESET no funcionará si
ajustado en SI
.
(BLOQUEO DE AJUSTES) está
Este monitor cumple las directrices de ahorro de energía
establecidas por VESA,
monitor se conecta a un ordenador o una tar jeta gráfica de vídeo
conforme con DPMS (Display Power Management Signaling) ,
dicho monitor reducirá automáticamente el consumo de energía
en tres etapas como se muestra a continuación.
Modo de
alimentación
funcionamiento
normal
1 espera ≤ 15 W alternancia entre
2 reposo
(sleep)*
3 activo inactivo**
(deep sleep)*
alimentación
desactivada
* “Sleep” y “deep sleep” son modos de ahorro de energía definidos por
la Agencia de protecc ión del medio ambie nt e (E nvironmental
Protection Agency).
** Cuand o el orde nador entre en un modo de ahorro de energía, la señal
de entrada se interrumpirá y el mensaje SIN SEÑAL DE ENTRADA
aparecerá en pantalla. Transcurridos unos segundos, el monitor entrar
en el modo de ahorro de energía.
E
NERGY STAR y NUTEK. Si el
Consumo de
energía
≤ 145 W verde
≤ 15 W alternancia entre
Aprox. 1 W naranja
0 W apagado
Indicador 1
(alimentación)
verde y naranja
verde y naranja
á
14
Page 63

Solución de problemas
Antes de ponerse en contacto con personal de servicio técnico,
consulte esta sección.
Si aparecen líneas finas en pantalla
(hilos de amortiguación)
Las líneas que se aprecian en la pantal la son normales en el
monitor Trinitron y no son ningún fallo de funcionamiento. Son
las sombras de los hilos de amortiguación utilizados para
estabilizar la rejilla de apertura y se aprecian en mayor medida
cuando el fondo de la pantalla es luminoso (normalmente blanco).
La rejilla de apertura es el elem ento esencial p or el que el tub o de
imagen Trinitron es único, permitie ndo que la pantalla reciba más
iluminación, por lo que las imágenes aparecen con más brillo y
más detalle.
Hilos de
amortiguación
Mensajes en pantalla
Si la señal de entrada presenta algún problema, la pantalla
mostrará alguno de los siguientes mensajes.
Si el mensaje SIN SEÑAL DE ENTRADA apparece
en pantalla
INFORMACI ON
MON I TOR FUNC I ONA
S I N SEÑA L DE ENTRADA
WH I T E
RED
GREEN
BLUE
1111 Frecuencias de la señal de entrada actual
Si el monitor reconoce las frecuencias de la señal de entrada
actual, aparecerán las frecuencias horizontal y vertical .
2222 Condición de la señal de entrada
SIN SEÑAL DE ENTRADA
Indica que no se recibe ni nguna señal.
Si el mensaje FUERA DEL RANGO DE AJUSTE
aparece en pantalla
: 68.7kHz/ H58zENTRA AD
INFORMACI ON
MON I TOR FUNC I ONA
ENTRA AD
FUERA DE L
RANGO DE A JUS T E
CAMBIE SINCRO
DE SEÑAL
WH I T E
RED
GREEN
BLUE
:130.0kHz/ H57z
1111 Frecuencias de la señal de entrada actual
Si el monitor reconoce las frecuencias de la señal de entrada
actual, aparecerán las frecuencias horizontal y vertical .
2222 Condición de la señal de entrada
FUERA DEL RANGO DE AJUSTE
Esto indica que las especificacio nes del monitor no admiten la
señal de entrada.
3333 Soluciones
CAMBIE SINCRO DE SEÑAL aparece en pantalla. Si
sustituye un monitor antiguo por éste, vuelva a conectar el
monitor antiguo. A continuación, ajuste la tarjeta gráfica del
ordenador de forma que la frecuencia horizontal se encuentre
entre 30 – 109 kHz, y la vertical entre 48 – 160 Hz.
Para más información, consulte “Problemas y soluciones” en la
página 16.
ES
15
Page 64

Problemas y soluciones
Si el problema lo causa el ordenador u otro equipo conectado, c onsulte el manual de instrucciones del equi po conectado.
Utilice la función de autodiagnóstico (página 18) si las siguientes recomendaciones no ayudan a solucionar el problema.
Problema Compruebe lo siguiente
Ausencia de imagen
Si el indicador 1 (alimentación) no
está iluminado
Si el mensaje SIN SEÑAL DE
ENTRADA aparece en pantalla, o si
el indicador 1 (alimentaci ón) está
iluminado en naranja o alterna entre
verde y naranja
Si el mensaje FUERA DEL RANGO
DE AJUSTE aparece en pantalla
Si no aparece ningún mensaje y el
indicador 1 (alimentación ) se
ilumina en verde o parpadea en
naranja
Si utiliza Windows 95/98 • Si ha sustituido un monitor antiguo por éste, vuelva a conectar el antiguo y realice lo
Si utiliza un sistema Macintosh • Si realiza la conexión a un ordenador Power Macintosh de la serie G3 con tres filas de
La imagen parpadea, se ondula,
oscila o aparece codificada
• Comprue be que el cable de alimentación esté correctamente conectado.
• Compruebe que el interrupt or 1 (alimentación) esté en la posición de “activado”.
• Compruebe que el cable de señales de vídeo esté correctamente conectado y que todos los
enchufes estén firmemente insertados en las tomas (página 6).
• Compruebe que los terminales del conector de entrada de vídeo HD15 no estén doblados
ni arrancados.
x
Problemas causados por el ordenador u otro equipo conectado
• El ordenador se encuentra en el modo de ahorro de energía. Pulse cualquier tecla del
teclado del ordenado r o mueva el ratón.
• Compruebe que la alimentaci ón del ordenador esté activada.
• Compruebe que la tarjeta gráfica esté completamente insertada en la ranura bus adecuada.
x
Problemas causados por el ordenador u otro equipo conectado
• Compruebe que el margen de fre c uencia de vídeo se encuentre dentro del especificado
para el monitor. Si ha sustitu ido un monitor antiguo por és te, vu e lva a co nec ta r el anti gu o
y ajuste el margen de frecuencia de acuerdo con lo siguiente.
Horizontal: 30 – 109 kHz
Vertical: 48 – 160 Hz
• Utilice la función de autodiagnóstico (pág ina18).
siguiente. Cargue el disco de instalación (página 7) y seleccione este monitor
(“CPD-E500E”) entre los monitore s Sony mostrados en la pantalla de selección de
monitores de Windows 95/98.
terminales, compruebe que el ada pt ador Macintosh G3 suministrado y el cable de señales
de vídeo están correctamente conectados (página 6).
• Para Power Macintosh G3 u otros modelos que dispongan de dos filas de terminales,
necesitará un adaptador diferente vendido por separado.
• Aísle y elimine las fuentes potenciales de campos eléctricos o magnéticos, como otros
monitores, impresoras láser, ventiladores eléctricos, lámparas fluorescentes o televisores.
• Aleje el monitor de líneas eléctricas o instale una protección magnética cerca del monitor.
• Enchufe el monitor en una toma de CA diferente, preferiblemente de otro circuito.
• Gire el monitor 90° hacia la izquierda o la derecha.
La imagen aparece borrosa
16
x
Problemas causados por el ordenador u otro equipo conectado
• Consulte el manual de la tarjeta gráfica para obtener información sobre el ajuste adecuado
del monitor.
• Asegúrese de que este monitor acepta el modo gráfico (VESA, Macintosh 21" Color, etc.)
y la frecuencia de la señal de entrada (Appendix). Aunque la frecuencia se encuentre
dentro del margen adecuado, algun as tarjetas gráficas pueden tener un impulso de
sincronización demasiado estrecho para que el monitor se sincronice correctamente.
• Ajuste la frecuenci a de barrido del ordenador (frecuencia vertical) para que la imagen
presente la mejor calidad posible.
• Ajuste el brillo y el contraste (página 9).
• Desmagnet ice el monitor* (página 13).
• Si ELIMINAR MUARE está activada (SI), la imagen puede aparecer borrosa. Disminuya
el efecto de cancelación de muaré o ajuste ELIMINAR MUARE en NO (página 11).
Page 65

Problema Compruebe lo siguiente
Aparecen imágenes fantasma • No utilice cables prolongadores de vídeo ni dispositivos de conmutación de vídeo.
• Compruebe que todos los enchufes estén firmemente insertado en sus tomas.
La imagen aparece descentrada o
con un tamaño incorrecto
Los bordes de la ima gen apare cen
curvos
Se aprecian patrone s ondulados o
elípticos (muaré)
El color no es uniforme • Desmagnetice el monitor* (página 13). Si coloca equipos qu e generen campos
El blanco no parece blanco • Ajuste la temperatura del color (página 12).
Las letras y las líneas presentan
sombras rojas o azules en los
bordes
Los botones del monitor no
funcionan
( aparece en pantalla)
Se oye un zumbido
inmediatamente después de
activar la alimentación
* Si es necesario aplicar un segundo ciclo de desmagnetización, deje que transcurran al menos 20 minutos antes de volver a aplicarlo para obtener el mejor
resultado posible. Es po sibl e que se oiga un zumbido, per o no es un fallo de funcionamient o.
• Ajuste el tamaño (página 10) o el centrado (página 10). Tenga en cuenta que ciertos
modos de vídeo no ll enan la pantalla hasta los bordes.
• Ajuste la geometría (página 10).
• Ajuste ELIMINAR MUARE en SI y ajuste el grado de cancelación de muaré hasta que
éste sea mínimo (página 11).
xProblemas causados por el ordenador u otro equipo conectado
• Cambie el patrón de escritorio.
magnéticos, como altavoces, cerca del monitor, o si cambia la orientación del monitor, el
color puede perder uniformidad.
• Ajuste la pureza (página 11).
• Ajuste la convergencia (página 11).
• Si la función de bloqueo de los controles está ajustada en SI, ajústela en NO (página 13).
• Se trata del sonido producido por el ciclo de desmagnetización automática. Al activar la
alimentación, el monitor se desmagnetiza automáticamente durante 2 segu ndos.
Visualización del nombre, el número de serie y la
fecha de fabricación de este monitor.
Mientras el monitor recibe una señal de vídeo, mantenga pulsado
el centro del botón de control durante más de cinco segundos para
que aparezca el cuadro de informac ión de este monitor.
MENU
Ejemplo
INFORMACION
MODEL : CPD E500E
SER NO : 1234567
b
MANUFACTURED
: 1999-52
Si el problema persiste, póngase en contacto con un proveedor
Sony autorizado y proporciónele la siguiente información.
• Nombre del modelo: CPD-E500E
• Número de serie
• Nombre y especif icacion es del ordena dor y de l a tarj eta grá fica.
ES
17
Page 66
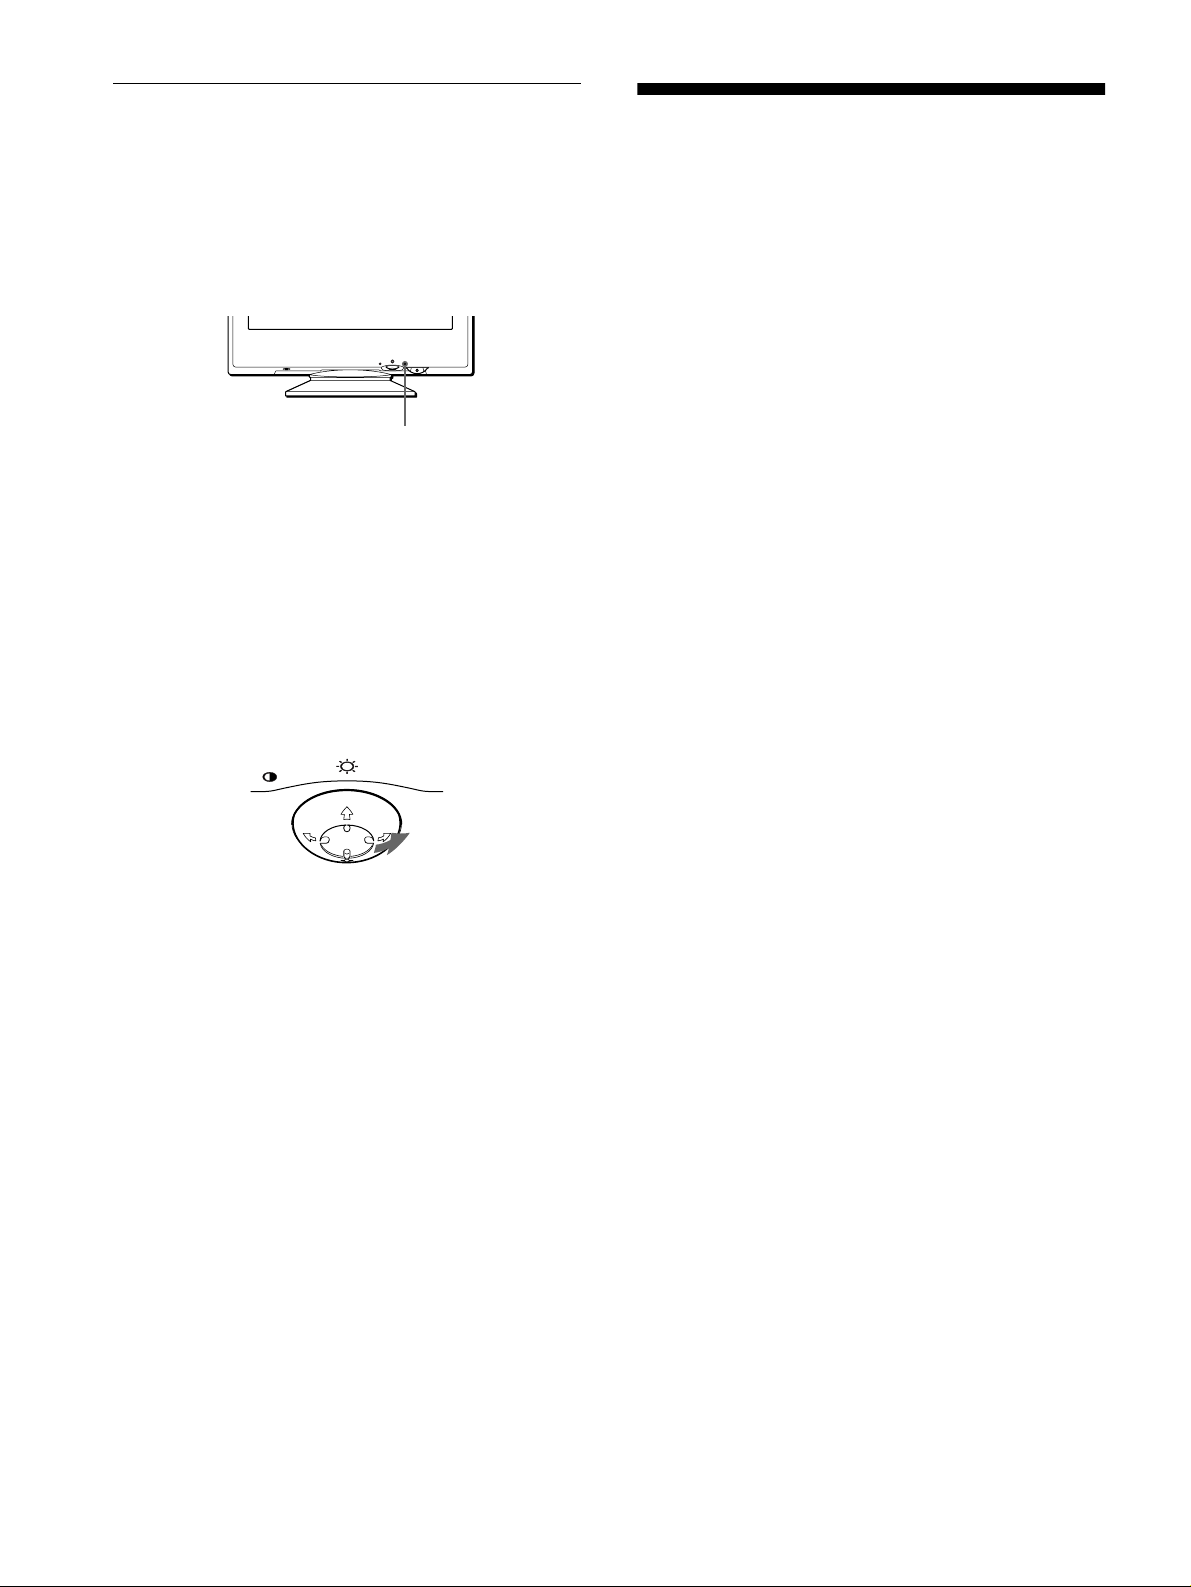
Función de autodiagnóstico
Este monitor está equipado con una función de autodiagnóst ico.
Si existe algún problema con el monitor o el ordenador, la pantalla
aparecerá en blanco y el indicador 1 (alimentación) se iluminará
en verde o parpadeará en naranja. Si el indicador
1 (alimentación) está iluminado en naranja, sig ni f ica que el
ordenador se encuentra en el modo de ahorro de energía. Pulse
cualquier tecla del teclad o.
RESET
Si el indicador 1 (alimentación) está iluminado en
verde
1
Desconecte el cable de entrada de vídeo o apague
el ordenador conectado.
2
Pulse el botón 1 (alimentación) dos veces para
apagar el monitor y volver a encenderlo.
3
Mantenga desplazado el botón de control ,
durante 2 segundos antes de que el monitor entre
en el modo de ahorro de energía.
MENU
MENU
Indicador 1 (alimentación)
Especificaciones
TRC Paso de la rejilla de apertura de
0,24 mm
21 pulgadas, medida diagonal
90 grados de deflexión
FD Trinitron
Tamaño de imagen vis ualizable
Aprox. 403,8 × 302,2 mm (an/al)
(16 × 12 pulgadas)
Imagen de visualización de 19,8"
Resolución
Máxima Horizon tal: 2048 puntos
Vertical: 1536 líneas
Recomendada Horizontal: 1600 puntos
Vertical: 1200 líneas
Área de imagen estándar Aprox. 388 × 291 mm ( a n/al)
Frecuencia de deflexi ón* Horizontal: 30 – 109 kHz
Corriente/tensión de entrada de CA
Consumo de ener gía Aprox. 145 W
Dimensiones Aprox . 497 × 480 × 478 mm
Peso Aprox. 32 kg
Plug and Play DDC1/2B/2Bi, GTF**
Accesorios suministrados Consulte la página 6
3
/8 × 11 1/2 pulgadas)
(15
o
aprox. 364 × 291 mm (an/al)
3
/8 × 11 1/2 pulgadas)
(14
Vertical: 48 – 160 Hz
100 a 240 V, 50 – 60 Hz, 2,0 – 1,0 A
(an/al/prf)
5
/8 × 19 × 18 7/8 pulgadas)
(19
Si aparecen las cuatro barras de color (bl anco, rojo, verde, azul),
significa que el monitor funciona correctamente. Vuelva a
conectar el cable de entrada de vídeo y compruebe el est ado del
ordenador.
Si las barras de color no aparecen, sig ni fica que hay un fallo
potencial del monitor. Info rme al prov e ed or Sony au to rizad o del
estado del monitor.
Si el indicador 1 (alimentación) parpadea en
naranja
Pulse el botón 1 (alimentación) dos ve ces para apagar
el monitor y volver a encenderlo.
Si el indicador 1 (alimentación) se ilumina en verde, significa
que el monitor funciona correctamente.
Si el indicador 1 (alimentación) sigue parpadeando, significa que
hay un fallo potencial del monitor. Cuente el número de segundos
entre los parpadeos en naranj a del indicador 1 (alimentación) e
informe al proveedor Sony autorizado sobre el estado del monitor.
Asegúrese de anotar el nombre del modelo y el número de serie
de dicho monitor. Tome nota también del fabricante y del modelo
del ordenador y de la tarjeta de vídeo.
* Condición de s incro nizac ión horiz ontal y ve rtical recom endad a
• La anchura de sincronización horizontal debe ser superior al
4,8% del tiempo t otal horizontal o 0,8 µs, según el que sea
superior.
• La anchura de supresión horiz ontal debe ser super ior a
2,3 µseg.
• La anchu r a de supresión vertical debe ser superior a
450 µseg.
** Si la señal de entrada cumple con la GTF (Fórmula de
sincronización generalizada), la función GTF del monitor
proporcionará automáticamente una imagen óptima para la
pantalla.
Diseño y especificaciones sujetos a cambios sin previo avi so.
18
Page 67

Indice
Precauzioni. . . . . . . . . . . . . . . . . . . . . . . . . . . . . . . . . . . . . . . . . . . . 4
Identificazione dei componenti e dei comandi . . . . . . . . . . . . . . . . . 5
Installazione . . . . . . . . . . . . . . . . . . . . . . . . . . . . . . . . . . . .6
Punto 1:
Punto 2:
Punto 3:
Collegamento del monitor al computer . . . . . . . . . . . . . . . 6
Collegamento del cavo di alimentazione. . . . . . . . . . . . . . 6
Accensione del monitor e del computer . . . . . . . . . . . . . . 7
Selezione della lingua dei menu a schermo (LANG) . . . . . . . . . . . . 7
Personalizzazione del monitor . . . . . . . . . . . . . . . . . . . . .8
Come spostarsi all’interno del menu. . . . . . . . . . . . . . . . . . . . . . . . . 8
Regolazione della luminosità e del contrasto . . . . . . . . . . . . . . . . . . 9
Regolazione delle dimensioni dell’immagine (DIMENS). . . . . . . . . 10
Regolazione della centratura dell’immagine (CENTRO) . . . . . . . . 10
Ingrandimento o riduzione dell’immagine (ZOOM). . . . . . . . . . . . . 10
Regolazione della forma dell’immagine (GEOM.). . . . . . . . . . . . . . 10
Regolazione della convergenza (CONV.). . . . . . . . . . . . . . . . . . . . 11
Regolazione della qualità dell’immagine (SCHERMO). . . . . . . . . . 11
Regolazione del colore dell’immagine (COLORE) . . . . . . . . . . . . . 12
Impostazioni aggiuntive (OPZIONI) . . . . . . . . . . . . . . . . . . . . . . . . 13
Ripristino delle regolazioni . . . . . . . . . . . . . . . . . . . . . . . . . . . . . . . 14
Caratteristiche . . . . . . . . . . . . . . . . . . . . . . . . . . . . . . . . .14
Modo preimpostato e modo utente. . . . . . . . . . . . . . . . . . . . . . . . . 14
Funzione di risparmio energetico . . . . . . . . . . . . . . . . . . . . . . . . . . 14
IT
• Trinitron è un marchio di fabbrica
registrato di Sony Corporation.
• Macintosh è un marchio di fabbrica
concesso in licenza a Ap p le Computer,
Inc., registrato negli U.S.A. e in altri
paesi.
• Windows
fabbrica registrati di Microsoft
Corporation negli U.S.A. e in altri paesi.
• IBM PC/AT e VGA sono marchi di
fabbrica registrati di IBM Corporation
degli U.S.A.
• VESA e DDC
di Video Electronics Standard
Association.
•
E
registrato negli U.S.A.
• Tutti i nomi degli altri prodotti citati in
questo manu al e potrebbero es s ere
marchi di fabbrica o marchi di fabbrica
registrati delle rispettive compagnie.
• Inoltre, “” e “” non sempre vengono
riportati nel manuale.
e MS-DOS sono marchi di
sono marchi di fabbrica
NERGY STAR è un marchio
Guida alla soluzione dei problemi . . . . . . . . . . . . . . . . .15
Se sullo schermo appaiono delle linee sottili
(cavi di smorzamento) . . . . . . . . . . . . . . . . . . . . . . . . . . . . . . . . . . 15
Messaggi a schermo. . . . . . . . . . . . . . . . . . . . . . . . . . . . . . . . . . . . 15
Sintomi e soluzioni dei problemi . . . . . . . . . . . . . . . . . . . . . . . . . . . 16
Funzione di autodiagnostica. . . . . . . . . . . . . . . . . . . . . . . . . . . . . . 18
Caratteristiche tecniche . . . . . . . . . . . . . . . . . . . . . . . . .18
Appendix. . . . . . . . . . . . . . . . . . . . . . . . . . . . . . . . . . . . . . . i
Preset mode timing table . . . . . . . . . . . . . . . . . . . . . . . . . . . . . . . . . .i
TCO’99 Eco-document . . . . . . . . . . . . . . . . . . . . . . . . . . . . . . . . . . . .i
3
Page 68
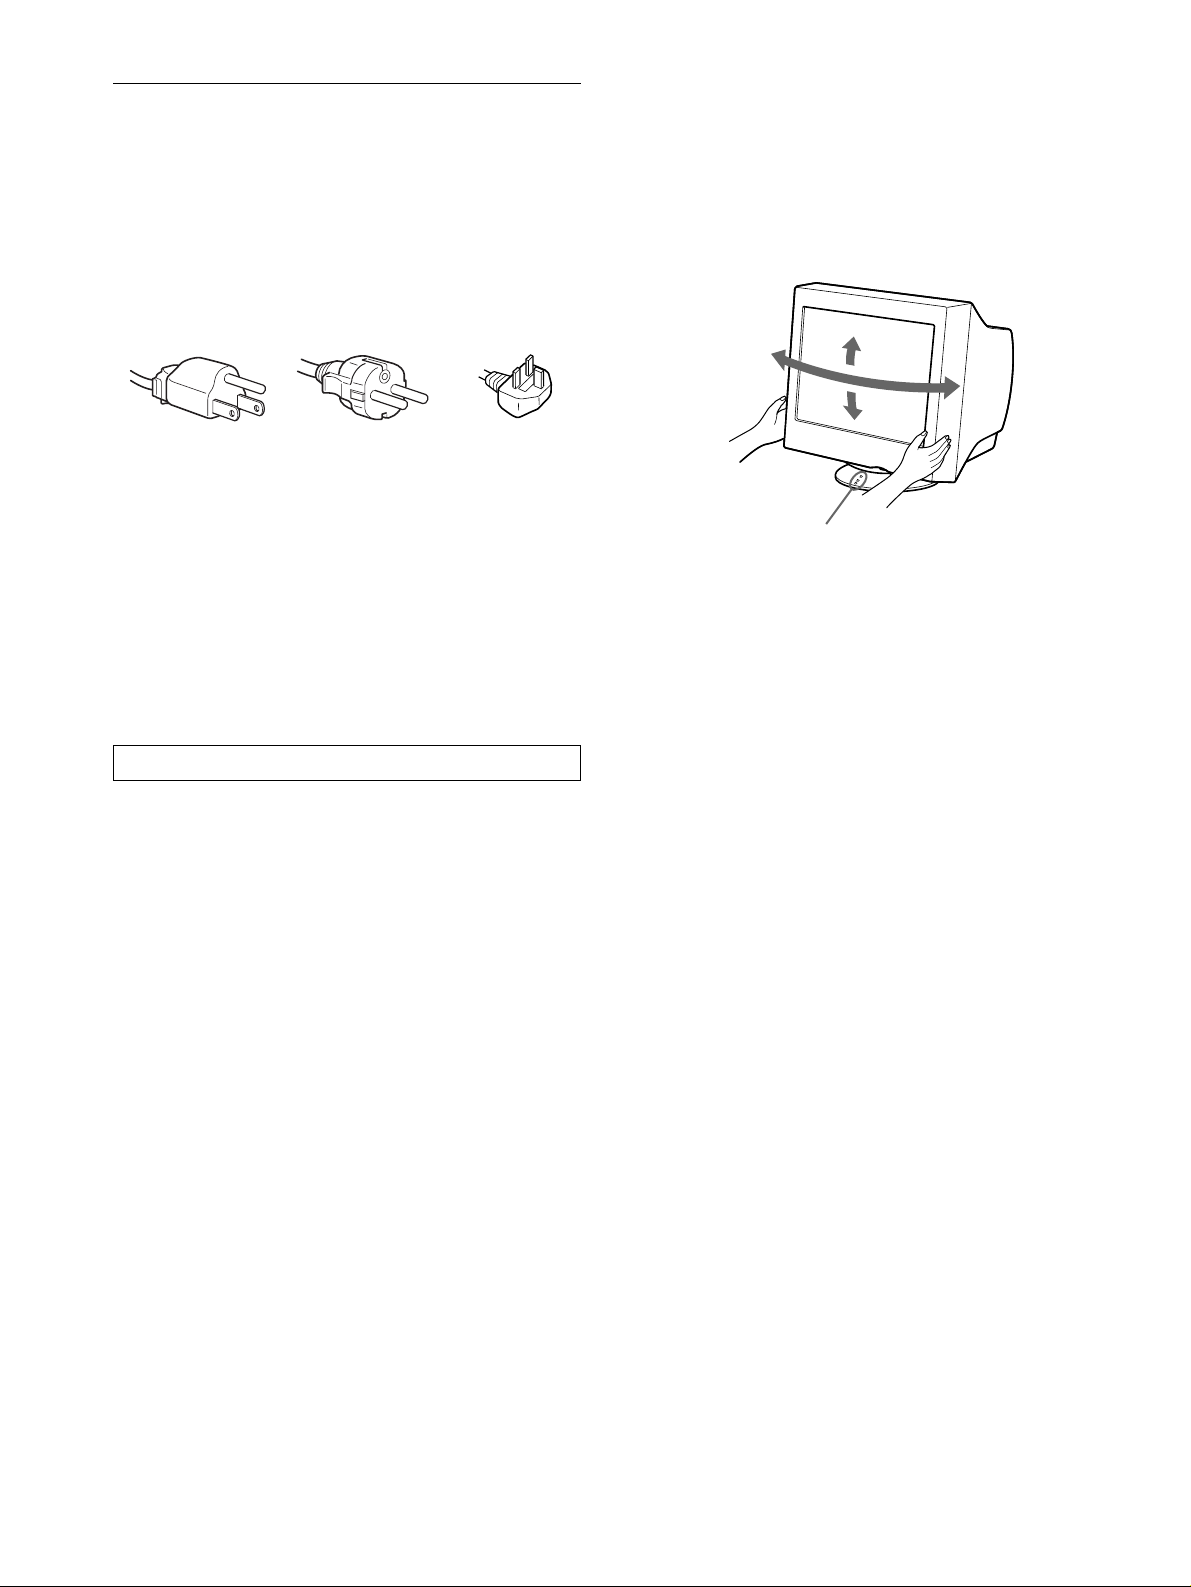
Precauzioni
90°
5°
90°
15°
Punti di centratura
Avvertenze per i collegamenti dell’alimentazione
• Utilizzare il cavo di alimentazione in dotazione. Se si utilizza
un cavo diverso, accertarsi che sia compatibile con la tensione
operativa locale.
Per i clienti nel Regno Unito
Se si utilizza il monitor nel Regno Unito, utilizzare il cavo di
alimentazione in dotazione.
Esempio di tipi di spine
da 100 a 120 V CA da 200 a 240 V CA solo 240 V CA
• Prima di scollegare il cavo di alimentazione, attendere almeno
30 secondi dallo spegnimento dell’unità per permettere la
dispersione dell’elettricità statica sulla superficie dello
schermo.
• Non appen a si accende l’apparecchio, lo schermo viene
smagnetizzato per circa 2 secon di . Questa operazione crea un
forte campo magnetico attorno allo schermo che potrebbe
danneggiare i dati memorizzati su nastri magnetici o dischi
situati vicino al monitor. Collocare eventuali apparecchiat ure
per la registrazione magnetica, nas tr i e dis c h i lont ano dal
monitor.
Uso del sistema orientabile
È possibile regolare il monitor entro l’angolazione illustrata qui
sotto. Per trovare il centro del raggio di rotazione del monitor,
allineare il centro dello schermo del monitor con i punti di
centratura del supporto.
Per ruotare il monitor verticalmente o orizzontalmente, afferrarlo
alla base con entrambe le mani. Quan do si inclina verticalmente il
monitor, fare attenzione a non schiacciarsi le dita.
Installare l’unità vicino ad una presa facilmente accessibile.
Installazione
Non collocare il monitor nei seguenti luoghi:
• su superfici (tappeti, coperte, ecc.) né vicino a materiali (tende,
tessuti, ecc.) che potrebbero bloccarne le prese di ventilazione
• vicino a fon ti di calore come radiatori o condotti d’aria calda,
né in luoghi soggetti alla luce diretta del sole
• in luoghi soggetti a forti escursioni termiche
• in luoghi soggetti a scosse o vi brazioni meccaniche
• su superfici instabili
• vicino ad apparecchiature che generano campi magnetici, come
un trasformatore o linee ad alta tensione
• vicino o su superfici metalliche con carica elettrica
Manutenzione
• Pulire lo schermo con un panno morbido. Se si utilizza un
detergente liquido per vetri, assicurarsi che non contenga
soluzioni antistatiche o additivi simili, onde evitare di graffiare
il rivestimento dello schermo.
• Non strofinare, to ccare o tamburellare sulla superficie dello
schermo con oggetti appu n titi o abra sivi, co m e la p unta di u na
penna o un cacciavite, onde evitare di graffiare il cinescopio a
colori.
• Pulire il rivestimento esterno, il pannello e i comandi con un
panno morbido leggermente inum idito con un soluzio ne
detergente neutra. Non utilizzare alcun tipo di spugnette o
polveri abrasive o solventi, come alcool o benzene.
Trasporto
Per trasportare il monitor o inviarlo in riparazione, utilizzare il
materiale di imballaggio originale.
4
Page 69

Identificazione dei componenti e
5 4 3 2
1
678910
1112131415
dei comandi
Per ulteriori informazioni, vedere le pagine tra parentesi.
Fronte Retro
MENU
RESET
RESET
1111 Tasto RESET (ripristina) (pagina 14)
Utilizzare questo tasto per ripristinare le impostazioni di
fabbrica.
2222 Tasto di comando (pagina 9)
Utilizzare questo tasto per visualizzare il menu ed effettuare
le regolazioni relative a l monitor, incluse le reg olazio ni d ell a
luminosit à e del co ntrasto.
MENU
4444 Connettore AC IN (pagina 6)
5555 Connettore di ingresso video (HD15) (y1)
fronte
retro
AC IN
(HD15)
Utilizzare questo connettore per alimentare il monitor con
corrente alternata .
(pagina 6)
Utilizzare questo connettore per immettere i segnali video
RGB (0,700 Vp-p, positivo) e i segnali sincronici.
3333 Interruttore e indicatore di accensione
1 (alimentazione) (pagine 7, 14, 18)
Utilizzare questo tasto per accendere e spegnere il monitor.
Quando il monitor viene acceso, l’indicatore di accensione si
illumina in verde, quindi lampeggia in verde o in arancione;
si illumina in arancione quando il monitor entra nel modo di
risparmio energetico.
IT
Numero piedini Segnale
1 Rosso
2Verde
(Sincronismo su verde)
3Blu
4 ID (Terra)
5 Terra DDC*
6 Terra Rosso
7 Terra Verde
8 Terra Blu
9 DDC + 5V*
10 Terra
11 ID (Terra)
12 Dati bidirezionali (SDA)*
13 Sincronia O
14 Sincronia V
15 Orologio Dati (SCL)*
* DDC (Displ a y Dat a Ch annel) è uno standard di VESA.
5
Page 70

Installazione
(HD15)
AC IN
Utilizzare l’adattatore G3 Macintosh in dotazione (per sistema
blu e bianco).
all’HD15
Adattatore G3 Macintosh
(per sistema blu e bianco)
(in dotazione)
*
Power Macintosh G3
all’uscita video
cavo del segnale video
HD15 (in dotazione)
(HD15)
AC IN
a AC IN
alla presa a muro
cavo di alimentazione
(in dotazione)
Prima di utilizzare il monitor, verificare che la confezione
contenga i seguenti accessori.
• Cavo di al imentazione (1)
• Cavo del segnale video HD15 (1)
• Adattatore G3 Macintosh (per sistema blu e bianco) (1)
• Disco di installazione (1)
• Scheda d i garanzia (1)
• Note sulla pulizia della superficie dello schermo (1)
• Il presente manuale di istruzioni (1)
Punto 1:Collegamento del monitor
al computer
Spegnere il monitor e il computer prima del collegamento.
Note
• Non toccare i piedini del connettore del cavo del segna le video onde
evitare di piegarli.
• Durante il collegamento del cavo del segnale video, controllare
l’allineamento del connettore HD15. Non inserire forzatamente il cavo
nel connettore in modo errato onde evita re di piegare i piedini.
Collegamento ad un computer IBM PC/A T o
xxxx
compatibile
AC IN
(HD15)
Collegamento ad un computer Macintosh
xxxx
* Prima di collegare il cavo, collegare al computer l’adattatore G3
Macintosh in dota zio n e. Questo adattato re è compatibile con il
computer Power Macin to sh G 3 dot ato di tre file di piedini. Se si
effettua il collegamento all’ al tra versione dei com puter serie Power
Macintosh G3 dotati di due file di piedini o ad altri modelli, sarà
necessario un adatta tore diverso (in vendita sepa ra tamente).
computer IBM PC/AT o
compatibile
all’uscita video
cavo del segnale video
HD15 (in dotazione)
all’HD15
Punto 2:Collegamento del cavo di
alimentazione
Con il monitor e il computer spenti, collegare prima il cavo di
alimentazione al monitor, quindi collegarlo alla presa di rete.
6
Page 71

Punto 3:Accensione del monitor e
Selezione della lingua dei menu a
del computer
Accendere prima il monitor, quindi accendere il computer.
L’installazione del monitor è ora termin ata.
Se necessario, utilizzare i comandi del monitor per regolare
l’immagine.
Se sullo schermo non appaiono le immagini
• Controllare che il monitor sia stato collegat o correttamente al
computer.
• Se sullo schermo appare il messaggio NO
SEGNALESINGRESSO, assicurarsi che la scheda grafica del
computer sia completamente inserita nel corretto
alloggiamento del bus.
• Se si sostituisce un monitor vecchio con questo mo dello e sullo
schermo appare il messaggio FUORI GAMMA SCANS,
ricollegare il vecchio monitor. Quindi regolare la scheda
grafica del computer in modo che la frequenza orizzontale sia
compresa tra 30 e 109 kHz e la frequenza verticale sia compresa
tra 48 e 160 Hz.
Per ulteriori informazione sui messaggi a schermo, vedere la
sezione “Sintomi e soluzioni dei problemi” del monitor a
pagina 16.
Per gli utenti di Windows 95/98
Per potenziare al massimo il monitor, installare sul computer il nuovo file
di informazioni sul mode llo contenuto nel disco di inst al lazione in
dotazione.
Questo monitor è conforme allo standard Plug & Play “VESA DDC”. Se
la scheda grafica/PC è conforme a DDC, seleziona re “P lug & Play
Monitor (VESA DDC)” o il nome del modello di questo monito r come
tipo di monitor dal “C ont rol Panel” di Windows 95/98. Se la sche da
grafica/PC ha diffic oltà a comunicare c on il monitor, caricare il di sco di
installazione e sel ez i onare il nome di questo m ode llo come tipo di
monitor.
Per gli utenti di Windows NT4.0
L’installazione del monitor in Windows NT4.0 è diversa da Windows 95/
98 e non occorre selezionare il tipo di monitor. Per maggiori informazioni
sulla regolazione della risoluzione, della frequenza di refresh e del numero
di colori, consultare le ist ruz ioni per l’uso di Windows NT4.0.
schermo (LANG)
I menu a schermo sono disponibili nelle seguenti lin gue: ing lese,
francese, tedesco, spagnolo, italiano, olandese, svedese, russo e
giapponese. L’impostazione predefinita è la lingua inglese.
1
Premere il tasto di comando al centro.
Per ulteriori informazioni sul tasto di comando, vedere a
pagina 9.
MENU
2
Per evidenziare LANG spostare il tasto di
MENU
SCHERM
GEOM
LANG
CENTRO
USCITA
DIMENS
comando quindi premerlo di nuovo al centro.
MENU
3
Per selezionare la lingua desiderata, spostare il
LANGUAGE
ENGL I SH
FRANÇA I S
DEUTSCH
ESPAÑOL
ITALIANO
NEDERL ANDS
SVENSKA
tasto di comando m/M.
• ENGLISH: Inglese
• FRANÇAIS: Francese
• DEUTSCH: Tedesco
• ESPAÑOL: Spagnolo
• ITALIANO
• NEDERLANDS: Olandese
• SVENSKA: Svedese
• : Russo
• : Giapponese
Per chiudere il menu
Premere una volta il ta sto di comando al centro per rito rnare al MENU
principale, premerlo due volte per ritornare al modo di visualizza zione
normale. Se non si preme alcun tasto, il menu ve rrà chiuso
automaticamente dopo c irc a 30 sec ondi .
Per reimpostare la lingua inglese
Durante la visualizzazione del menu LANGUAGE, premere il tasto
RESET (ripristina).
OK
CONV.
COLORE
OPZION
MENU
IT
7
Page 72
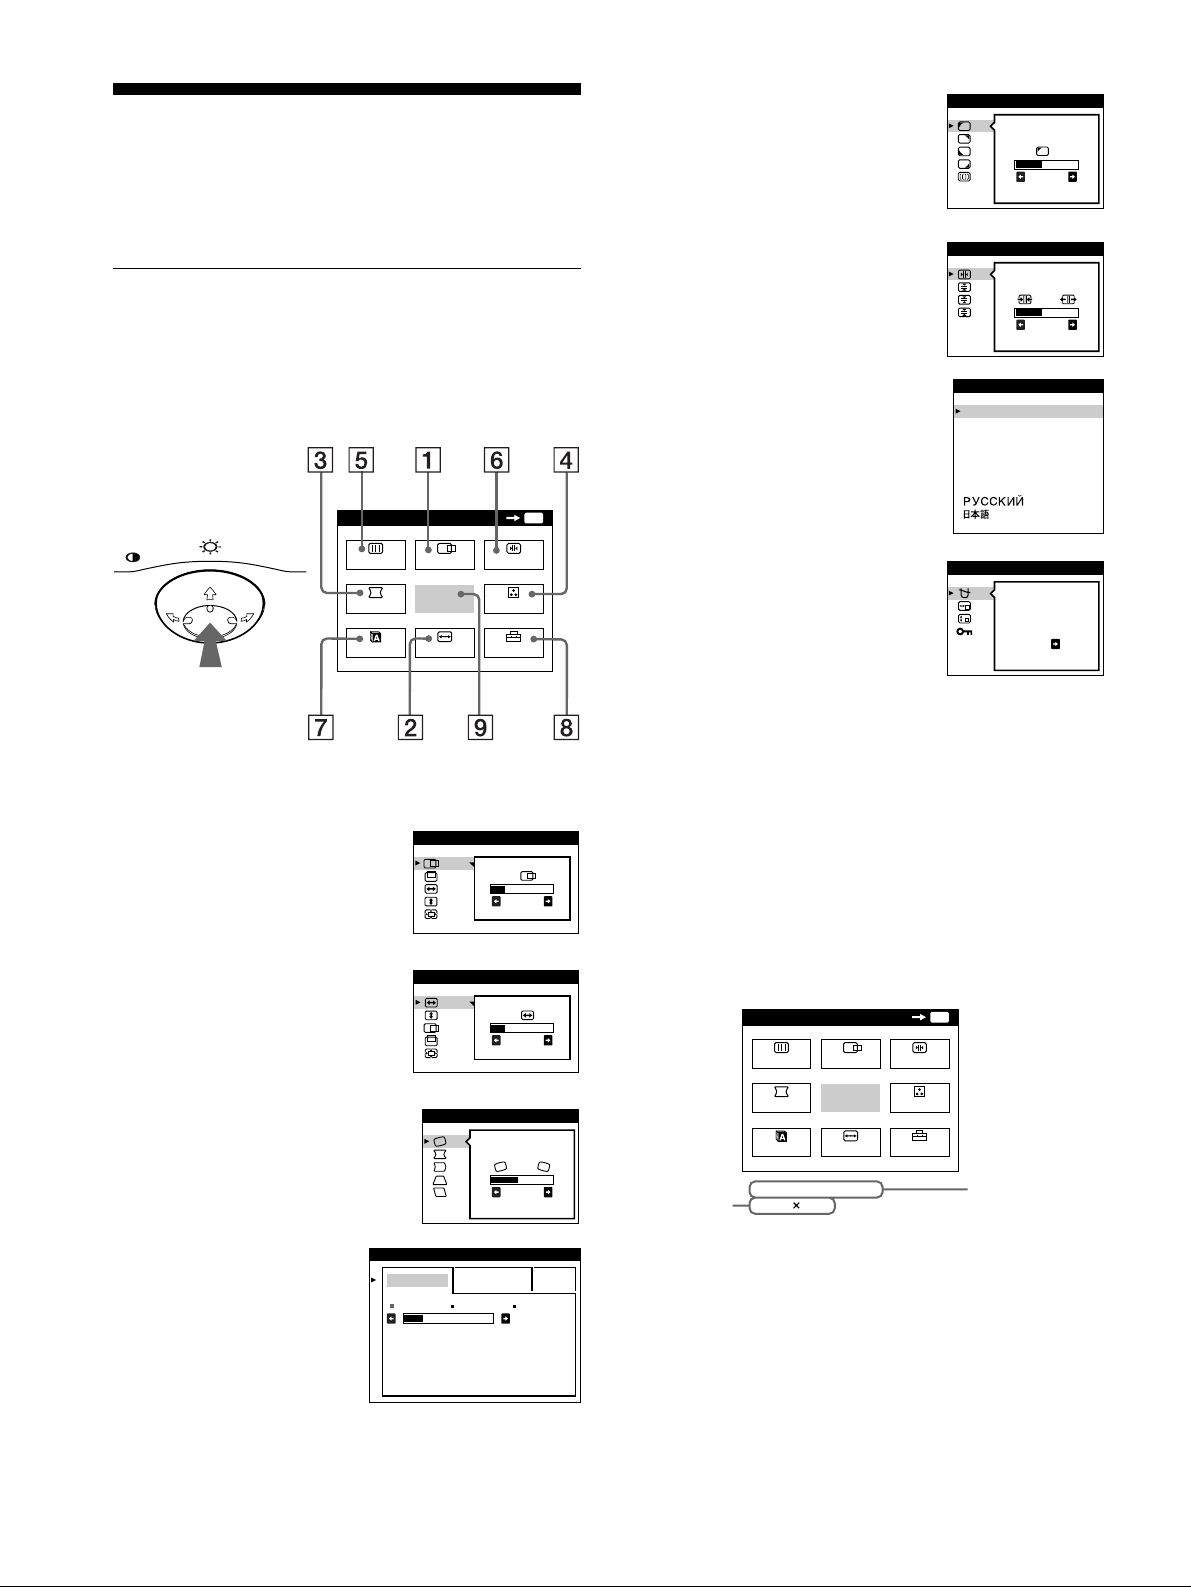
Personalizzazione del
MENU
MENU
USCITA
CENTRO
DIMENS
GEOM
SCHERM
COLORE
LANG
CONV.
OPZION
OK
68.7kHz/ 85Hz
1024
768
frequenze
verticali e
orizzontali del
segnale di
ingresso corrente
risoluzione
del segnale di
ingresso
corrente
monitor
È possibile effettuare numerose regolazioni relative al monitor
utilizzando i menu a schermo.
Come spostarsi all’interno del
menu
5555 SCHERMO (pagina 11)
Selezionare il menu SCHERMO per
regolare la qualità dell’immagine.
È possibile regolare la purezza del
colore e l’effetto di cancellazione
moiré.
6666 CONV. (pagina 11)
Selezionare il menu CONV. per
regolare la convergenza orizzontale
e verticale dell’immagine.
SCHER MO
LANDING
CONVERGENZA
TOP
BOT
26
26
Premere il tasto di comando al centro per visualizzare il MENU
principale. Per ulteriori informazioni sull’utilizzo del tasto di
comando vedere a pa gina 9.
MENU
MENU
SCHERM
GEOM
LANG
CENTRO
USCITA
DIMENS
OK
CONV.
COLORE
OPZION
MENU
Utilizzare il tasto di comando per selezionare uno dei seguenti
menu.
1111 CENTRO (pagina 10)
DI MENS /CENTRO
Selezionare il menu CENTRO per
regolare la centratura, le dimensioni
o lo zoom dell’immagine.
2222 DIMENS (pagina 10)
DI MENS /CENTRO
26
Selezionare il menu DIMENS per
regolare le dimensioni, la centratura
o lo zoom dell’immagine.
26
7777 LANG (pagina 7)
Selezionare il menu LANG per
selezionare la lingu a del menu a
schermo.
8888 OPZION (pagina 13)
Selezionare il menu OPZION per
LANGUAGE
ENGL ISH
FRANÇA I S
DEUTSCH
ESPAÑOL
ITALIANO
NEDERLANDS
SVENSKA
OPZ ION I
SMAGNET.
regolare le seguenti opzioni del
monitor:
• smagnet izzazione dello schermo
SI
• modifica della posizione del
menu a schermo
• blocc aggio dei comandi
9999 USCITA
Selezionare USCITA per chiudere il
menu.
Visualizzazione del segnale di ingresso
xxxx
corrente
Le frequenze verticali e orizzontali del segnale di ingresso
corrente vengono visualizzate nel MENU pri ncipale. Se il segnale
corrisponde ad u no dei modi pr eimpostati in f abbrica del m onitor,
viene visualizzata anche la risoluzione.
3333 GEOM. (pagina 10)
4444 COLORE (pagina 12)
8
Selezionare il menu GEOM. per
regolare la rotazione e la forma
dell’immagine.
Selezionare il menu
COLORE per regolare la
temperatura di colore
dell’immagine. Utilizzare
questo menu per fare
corrispondere i colori del
monitor ai colori di
un’immagine stampata.
GEOMETR I A
26
COLORE
FAC I LE ESPERTO s BGR
5000K 6500K 930 K0
50 K00
Page 73
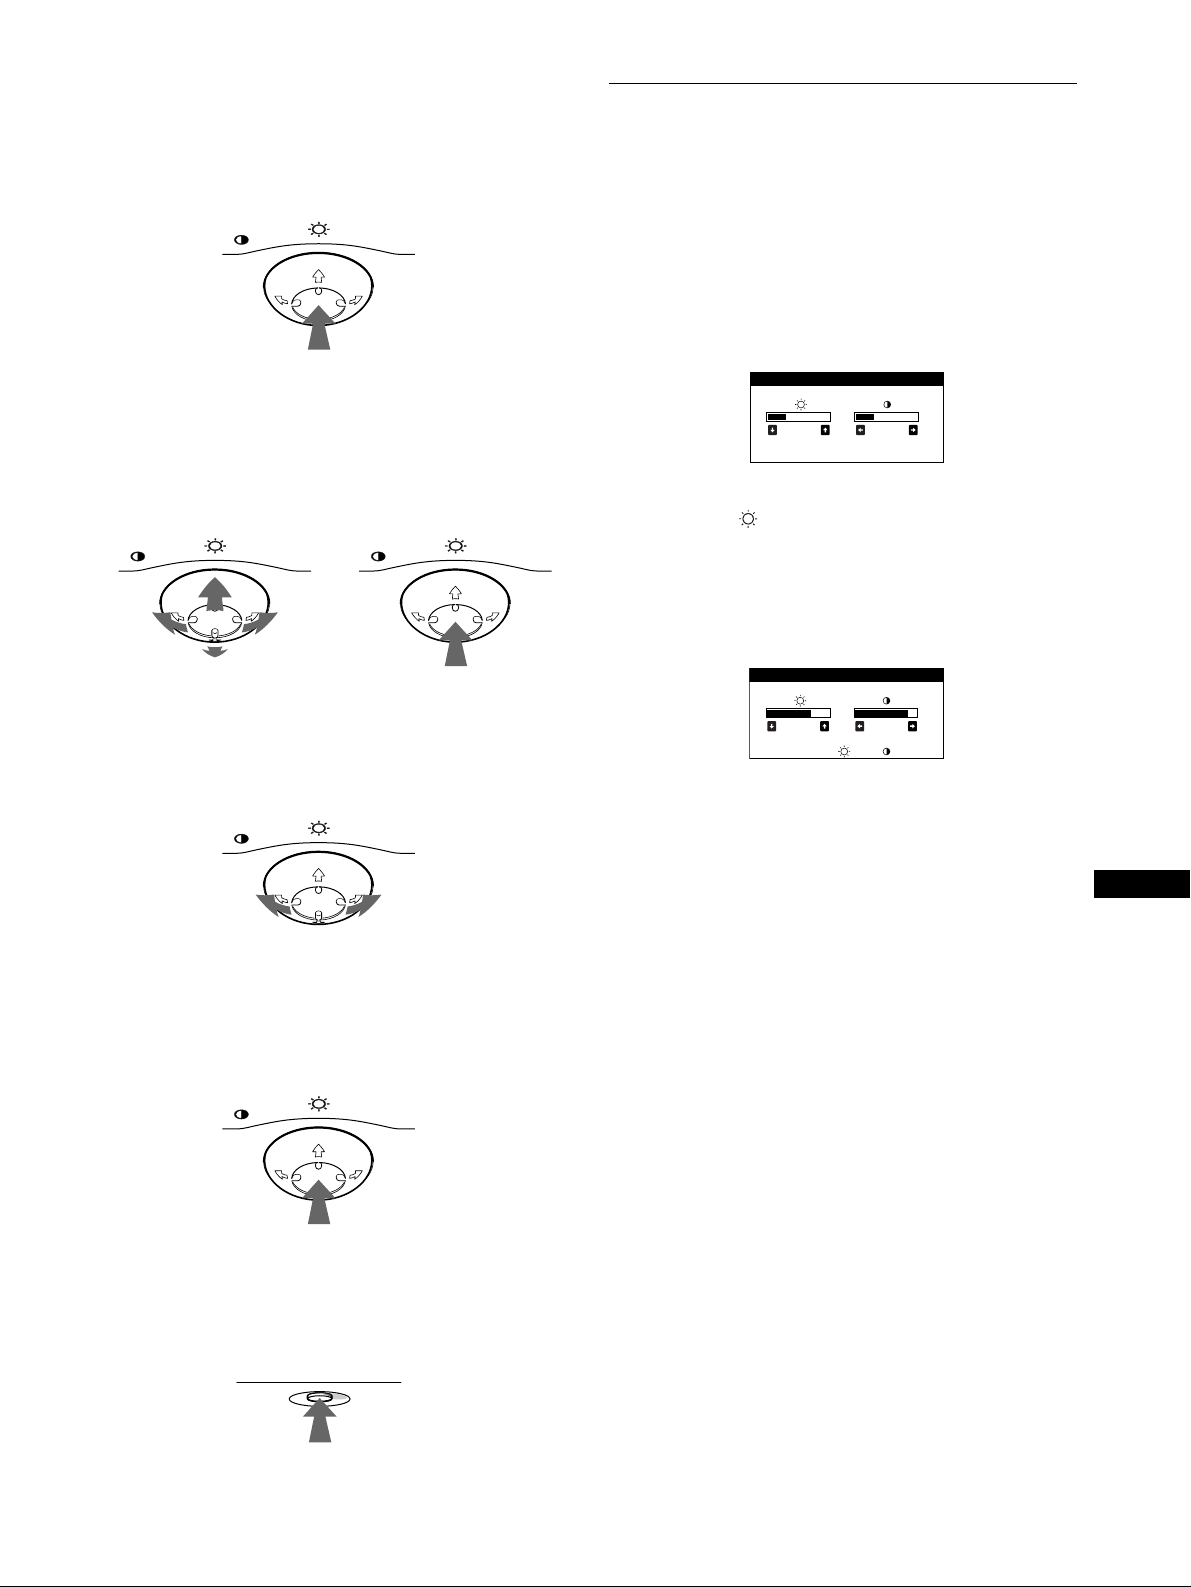
Utilizzo del tasto di comando
26 26
LUMI NOS I TA / CONTRASTO
56 76
sRGB : 56 76
LUMI NOS I TA / CONTRASTO
xxxx
1
Per visualizzare il MENU principale.
Premere il tasto di comando al centro per visualizzare il
MENU principale.
MENU
2
Per selezionare il menu da regolare.
Per evidenziare il menu desiderato, spostare il tasto di
comando verso la parte posteriore per spostarsi in alto (M),
spostarlo verso la parte anteriore per spostarsi in basso (m) e
a sinistra (<) o a destra (,) per spostarsi di lato.
FRONTE
MENU MENU
Regolazione della luminosità e del
contrasto
È possibile regolare la luminosità e il contrasto tramite il menu
LUMINOSITA/CONTRASTO.
Queste impostazioni vengono memorizzate per tutti i segnali di
ingresso.
1
Spostare il tasto di comando in qualsiasi direzione.
Sullo schermo appare il menu
LUMINOSITA/CONTRASTO.
2
Spostare il tasto di comando m/M per regolare la
luminosità ( ), e </, per regolare il contrasto
(6666).
Se si utilizza il modo sRGB
Se si seleziona il modo sRGB tramite il menu COLORE, sullo
schermo appare il seguente menu LUMINOSITA/CONTRASTO.
RETRO
3
Per regolare il menu.
Spostare il tasto di comando a sinistra (<) o a destra (,)
per effettuare le regolazioni.
MENU
4
Per chiudere il menu.
Premere una volta il tast o di co m an do al centro per ritornar e
al MENU principale, premerlo due volte per ritornare al modo
di visualizzazione normale. Se non si preme alcun tasto, il
menu verrà chiuso automatic amente dopo circa 30 secondi.
MENU
Per ulteriori informazioni su come utilizzare il modo sRGB,
vedere la sezione “Regolazione del colore dell’immagine
(COLORE)” a pagina 12.
Il menu scompare automaticamente dopo circa 3 secondi.
IT
Ripristino delle regolazioni
xxxx
Premere il tasto RESET. Per ulteriori informazioni sul ripristino
delle regolazioni, vedere a pa gina 14.
RESET
9
Page 74

Regolazione delle dimensioni
Regolazione della forma
dell’immagine (DIMENS)
Questa impostazione è memorizzata per il segnale di ingresso
corrente.
1
Premere il tasto di comando al centro.
Sullo schermo appare il MENU principale.
2
Per evidenziare DIMENS spostare il tasto di
comando, quindi premerlo di nuovo al centro.
Sullo schermo appare il menu DIMENS/CENTRO.
3
Spostare prima il tasto di comando m/M per
selezionare per la regolazione orizzontale,
oppure per la regolazione verticale. Quindi
spostare il tasto di comando </, per regolare la
dimensione.
Regolazione della centratura
dell’immagine (CENTRO)
Questa impostazione è memorizzata per il segnale di ingresso
corrente.
1
Premere il tasto di comando al centro.
Sullo schermo appare il MENU principale.
2
Per evidenziare CENTRO spostare il tasto di
comando, quindi premerlo di nuovo al centro.
Sullo schermo appare il menu DIMENS/CENTRO.
dell’immag ine (GEOM.)
Le impostazioni del menu GEOM. consent ono di regolare la
rotazione e la forma dell’immagi ne.
L’impostazione (rotazione) è memorizzata per tutti i segnali di
ingresso. Tutte le altre impostazioni sono memorizzate per il
segnale di ingresso corrente.
1
Premere il tasto di comando al centro.
Sullo schermo appare il MENU principale.
2
Per evidenziare GEOM. spostare il tasto di
comando, quindi premerlo di nuovo al centro.
Sullo schermo appare il menu GEOMETRIA.
3
Spostare prima il tasto di comando m/M per
selezionare la voce di regolazione desiderata.
Quindi spostare il tasto di comando </, per
effettuare la regolazione.
Selezionare Per
ruotare l’immagine
espandere o contrarre i bordi dell’immagine
spostare i bordi dell’immagine verso sinistra o
verso destra
regolare la larghezza dell’immagine nella pa rte
superiore dello schermo
spostare l’immagine verso sinistra o verso
destra nella parte superiore dello schermo
3
Spostare prima il tasto di comando m/M per
selezionare per la regolazione orizzontale, o
per la regolazione verticale . Quindi spos tare il tasto
di comando </, per regolare la centratura.
Ingrandimento o riduzione
dell’immagine (ZOOM)
Questa impostazione è memorizzata per il segnale di ingresso
corrente.
1
Premere il tasto di comando al centro.
Sullo schermo appare il MENU principale.
2
Spostare il tasto di comando per evidenziare
DIMENS o CENTRO, quindi premere di nuovo
il tasto di comando al centro.
Sullo schermo appare il menu DIMENS/CENTRO.
3
Spostare il tasto di comando m/M per selezionare
(zoom), quindi spostare </, per ingrandire o
ridurre l’immagine.
Nota
Quando le dimensioni verticali o orizzontali raggiungono i valori massimi
o minimi, non è possi bile regolarle ulte ri ormente.
10
Page 75
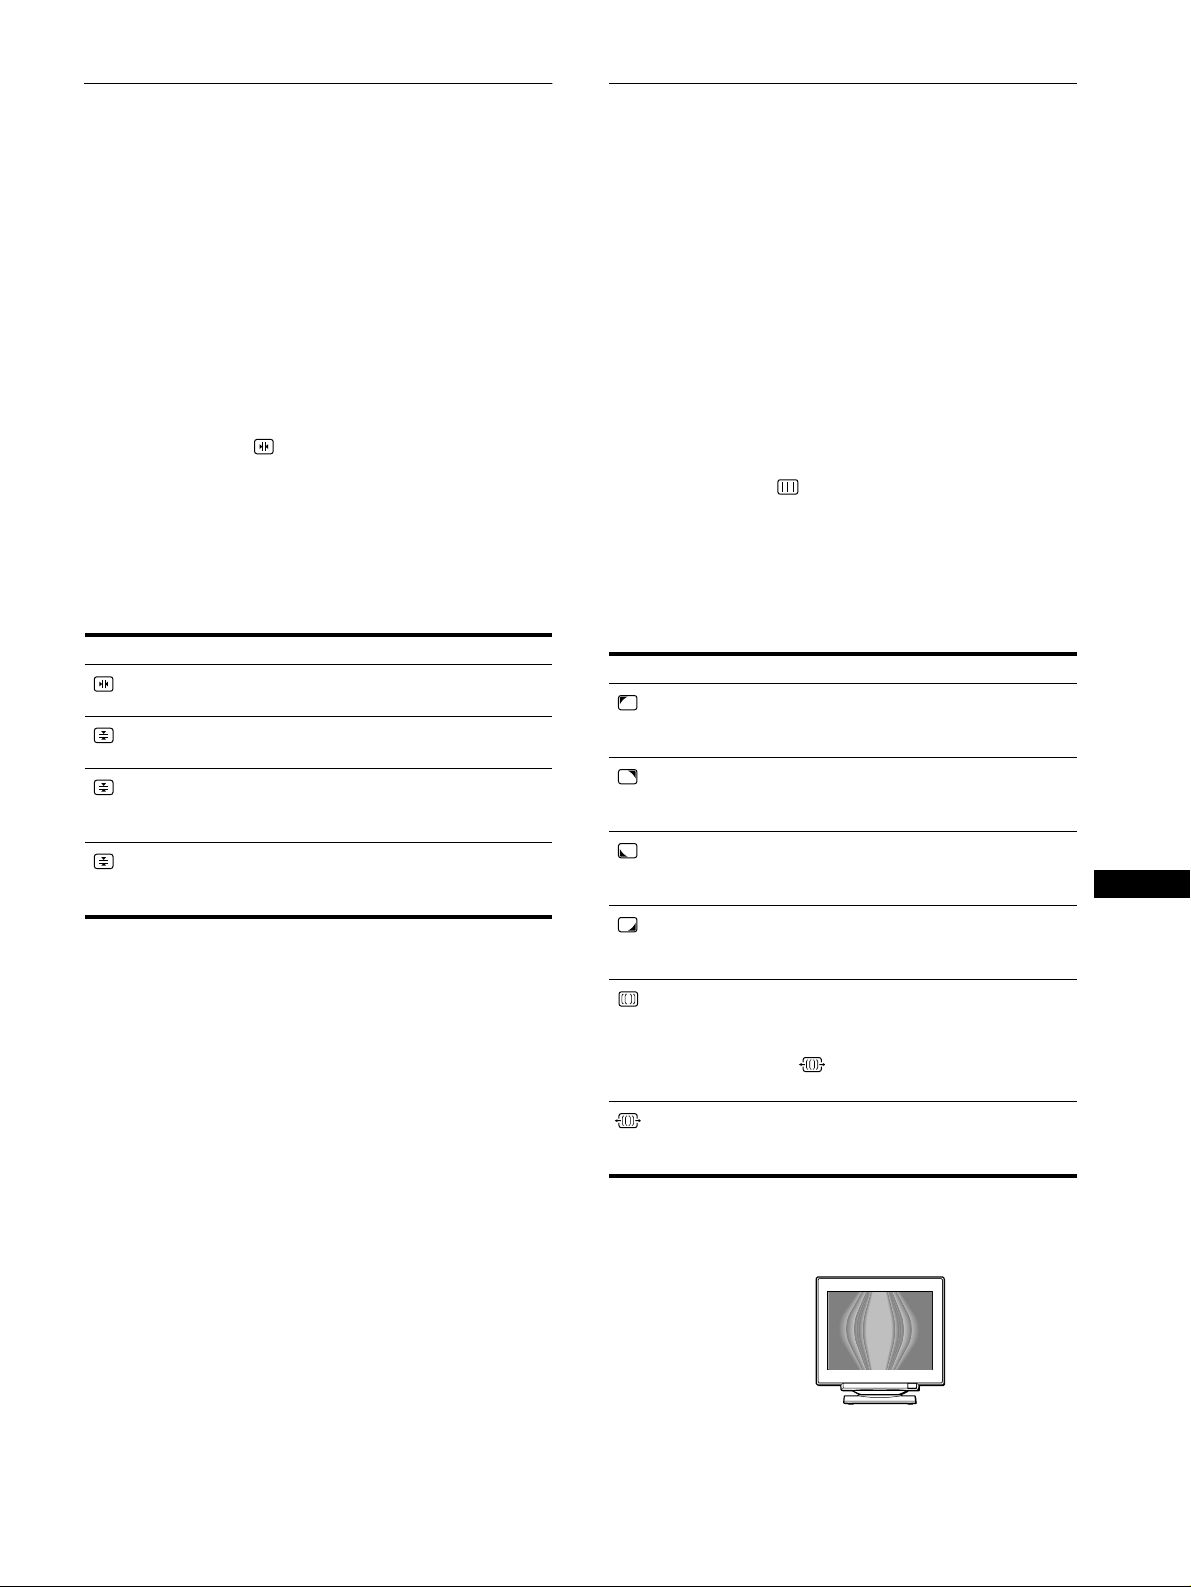
Regolazione della con vergenza
Regolazione della qualità
(CONV.)
Le impostazioni del menu CONV. consentono di regolare la
qualità dell’immagine tramite il controllo della convergenza. La
convergenza riguarda l’allin eam e nto d ei se gn al i d ei c olori rosso,
verde e blu.
Se vengono visualizzate ombre rosse o blu attorno ai caratteri o
alle linee, regolare la convergenza.
Queste impostazioni vengono memorizzate per tutti i segnali di
ingresso.
1
Premere il tasto di comando al centro.
Sullo schermo appare il MENU principale.
2
Per evidenziare CONV. spostare il tasto di
comando, quindi premerlo di nuovo al centro.
Sullo schermo appare il menu CONVERGENZA.
3
Spostare prima il tasto di comando m/M per
selezionare la voce di regolazione desiderata.
Quindi spostare il tasto di comando </, per
effettuare la regolazione.
Selezionare Per
TOP
CONV VERT SUP
BOT
CONV VERT INF
spostare le ombre blu o ross e in sens o
orizzontale
spostare le ombre blu o ross e in sens o
verticale
spostare le ombre blu o ross e in sens o
verticale nell a parte superior e dello
schermo
spostare le ombre blu o ross e in sens o
verticale nella parte inferiore dello
schermo
dell’immagine (SCHERMO)
Le impostazioni del menu SCHERMO consentono di regolare la
qualità dell’immagine tramite il controllo dell’effetto moiré e
della purezza del colore.
• Se il colore appare irregolare negli angoli dello schermo,
regolare la purezza del colore.
• Se sullo schermo appaiono disturbi ellittici o ondulati,
annullare l’effetto moiré.
Le impostazioni ELIMINA MOIRE e REGOLAZ. MOIRE
vengono memorizzate nella memoria per il segnale di ingresso
corrente. Tutte le altre impostazioni vengono memorizzate nella
memoria per tutti i segnali di ingresso.
1
Premere il tasto di comando al centro.
Sullo schermo appare il MENU principale.
2
Per evidenziare SCHERMO spostare il tasto di
comando quindi premerlo di nuovo al centro.
Sullo schermo appare il menu SCHERMO.
3
Spostare prima il tasto di comando m/M per
selezionare la voce di regolazione desiderata.
Quindi spostare il tasto di comando </, per
effettuare la regolazione.
Selezionare Per
LANDING
LANDING
LANDING
LANDING
ELIMINA MOIRE
REGOLAZ. MOIRE
* L’e ffetto moiré è un tipo di i nterferenza natural e c he produce leggere
linee ondulate sullo schermo. Questo effetto può verificarsi a causa
dell’interferenza tra il motivo dell’immagine sullo schermo e il motivo
a punti di fosforo sul monitor.
Esempio di effetto moiré
ridurre al minimo le irregolarità del
colore nella parte superiore sinistra
dello schermo.
ridurre al minimo le irregolarità del
colore nella parte superiore destra
dello schermo.
ridurre al minimo le irregolarità del
colore nella parte inferiore sinistra
dello schermo.
ridurre al minimo le irregolarità del
colore nella parte inferiore destra
dello schermo.
per impostare la funzione di
eliminazione dell’effetto moiré su SI
*
o NO.
(REGOLAZ. MOIRE) appare nel
menu se si seleziona SI.
regolare il grado di eliminazione
dell’effetto moiré fino a ridurlo al
minimo.
IT
Nota
L’immagine potrebbe diventare sfocata se ELIMINA MOIRE è impostato
su SI.
11
Page 76

Regolazione del colore
dell’immagine (COLORE)
Modo ESPERTO
È possibile effettuare ulterior i e più precise rego lazioni del colore
selezionando il modo ESPERTO.
Le impostazioni del menu COLORE consentono di rego la re la
temperatura di colore dell’immagine modificando il livello del
colore del campo del colore bian co. I colori appaio no ro ssastri se
la temperatura è bassa e bluastri se l a temperatura è alta. Questa
regolazione risulta utile per far corrisponder e i colori del monitor
ai colori di un’immagine stampata.
Queste impostazioni vengono memorizzate per tutti i segnali di
ingresso.
1
Premere il tasto di comando al centro.
Sullo schermo appare il MENU principale.
2
Per evidenziare COLORE spostare il tasto di
comando, quindi premerlo di nuovo al centro.
Sullo schermo appare il menu COLORE.
3
Spostare il tasto di coman do </, per selezionare
il modo di regolazione.
I modi di regolazione disponibili sono i seguenti: FACILE,
ESPERTO e sRGB.
4
Spostare prima i tasti m/M per selezionare la voce di
regolazione desiderata. Quindi premere i tasti
</,
per effettuare le regolazioni.
Per regolare il modo selezionato, eseguire le istruzioni
riportate di seguito.
Modo FACILE
COLORE
FAC I LE ESPERTO s BGR
5000K 6500K 930 K0
1
Spostare il tasto di comando m/M per selezionare la
riga della temperatura di colore 1. Quindi spostare
il tasto di comando </, per selezionare una
temperatura di colore.
Le temperature di colore predefinite sono 5000 K, 6500K e
9300K. Poiché l’impostazion e prede finita è 9300K, i bianchi
cambieranno da una tinta bluastra ad una tinta rossastra
abbassando la temperat ura a 6500K e 5000K.
50 K00
COLORE
FAC I LE ESPERTO s BGR
5000K 6500K 930 K0
R BIAS 05
V BIAS 05
B BIAS 05
RGAIN 05
VGAIN 05
BGAIN 05
1
Spostare il tasto di comando m/M per selezionare la
riga della temperatura di colore 1. Quindi spostare
il tasto di comando </, per selezionare una
temperatura di colore.
2
Spostare il tasto di comando m/M per selezionare la
voce di regolazione 2. Quindi spostare il tasto di
comando </, per regolare la voce BIAS (livello
del nero).
In questo modo vengono regolate le aree scure di
un’immagine.
3
Spostare il tasto di comando m/M per selezionare la
voce di regolazione 3. Quindi spostare il tasto di
comando </, per regolare la voce GAIN (livello
del bianco).
In questo modo vengono regolate le aree chiare di
un’immagine.
È possibile regolare il componente R (rosso), V (verde),
B (blu) del segnale di ingresso quando si modificano le voci
2 e 3.
Se si effettua la sintonia fine della temperatura di colore, le
nuove impostazioni del colore vengono memorizzate per
ciascuna delle tre temperature di colore e la voce 1 del menu
a schermo cambia come descritto di seguito.
• [5000K]t[1]
• [6500K]t[2]
• [9300K]t[3]
2
Se necessario, effettuare la sintonia fine della
temperatura di colore.
Spostare il tasto di comando m/M per selezionare la
riga della temperatura di colore 2. Quindi spostare
il tasto di comando </, per effettuare la sintonia
fine della temperatura di colore.
Se si effettua la sintonia fine della temperatura di colore, le
nuove impostazioni del co lore vengono memorizzate per
ciascuna de lle tre t emperat ure di co lore e la voce 1 del m enu
a schermo cambia come descritto di segu ito.
• [5000K]t[1]
• [6500K]t[2]
• [9300K]t[3]
12
Page 77
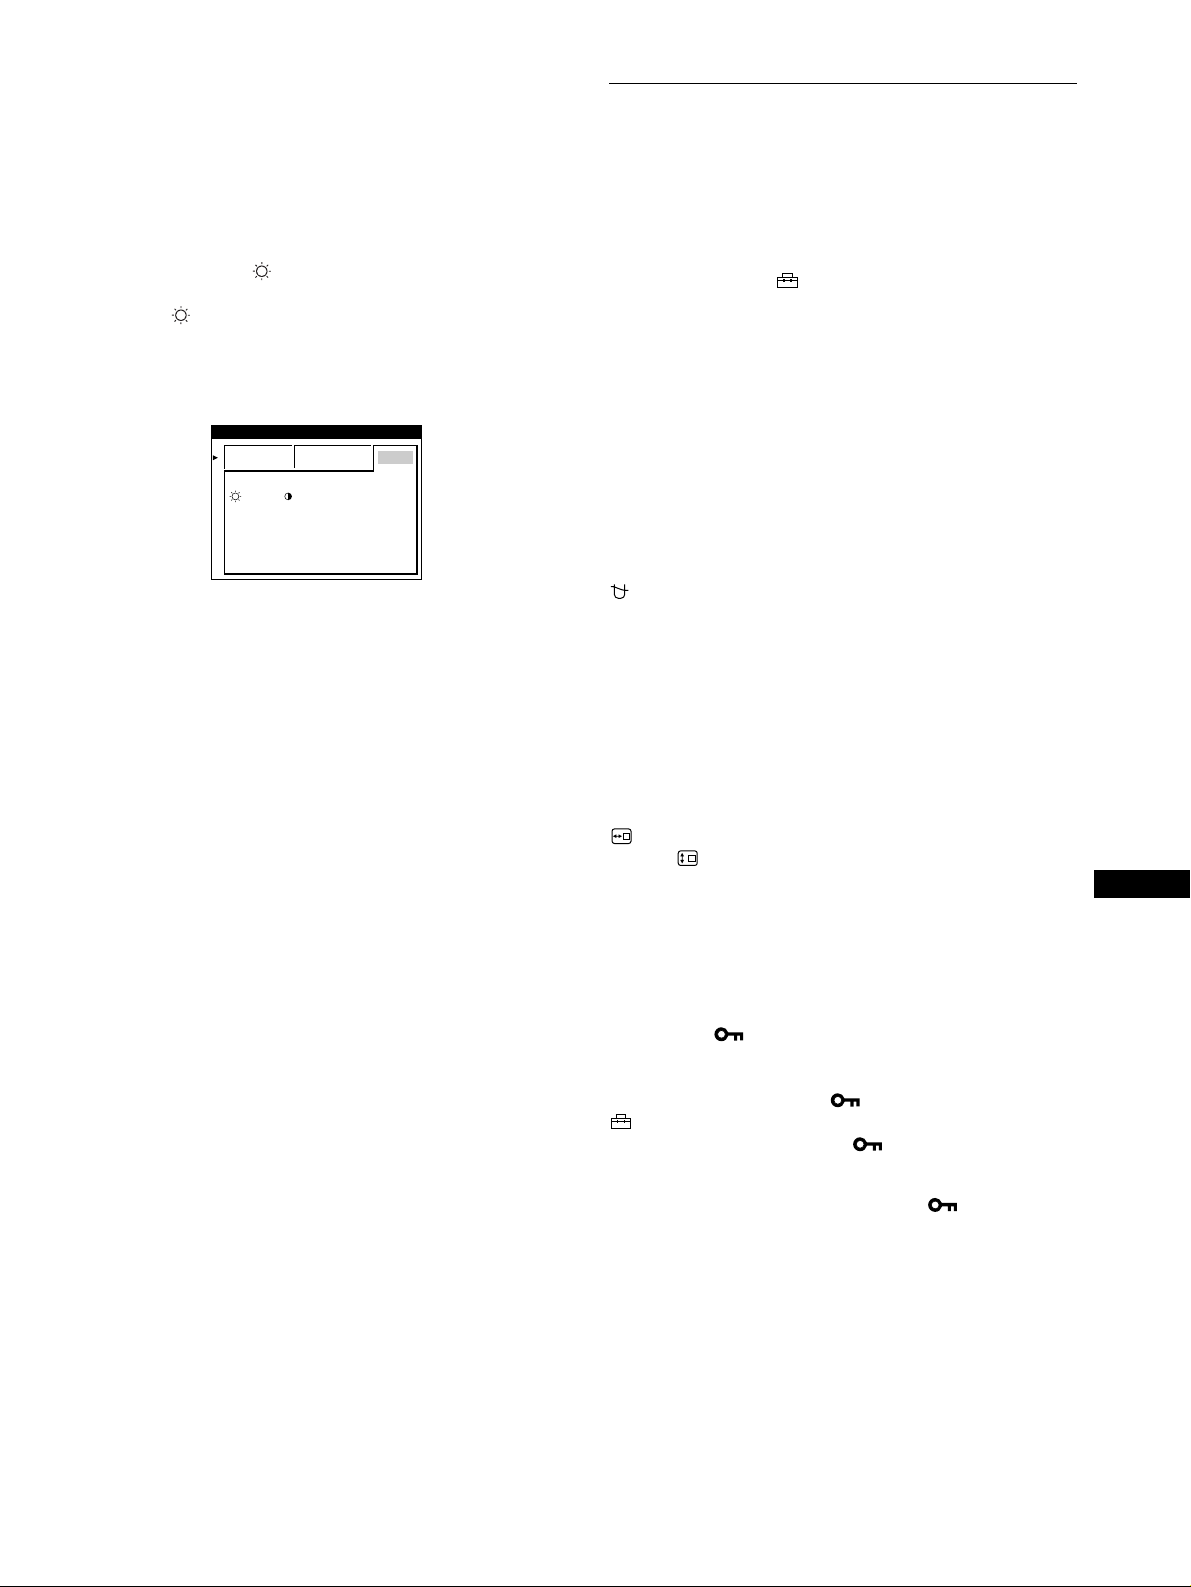
Modo sRGB
L’impostazione del colore sRGB è un protocoll o di separazione
colori standard industriale progettato per mettere in c orrelazione i
colori stampati e visualizzati delle apparecchiature per computer
sRGB compatibili. Per regolare i colori in base al profilo sRGB,
selezionare semplicemente il modo sRGB nel menu COLORE.
Tuttavia, per visualizzare correttamente i colori sRGB (γ=2,2,
6500K), è necessario impostare il computer sul profilo sRGB e
regolare la luminosità ( ) e il contrasto (6) sui valori
visualizzati nel menu. Per informazioni su come modificare la
luminosità ( ) e il contrasto (6), vedere a pagi na 9.
Nota
Assicurarsi che il computer e gli altri dispositivi collegati (ad esempio una
stampante) siano sRGB compatibili.
COLORE
FAC I LE ESPERTO s BGR
:56 :76 PER s BGR
Impostazioni aggiuntive (OPZIONI)
È possibile effettuare la smagnetizzazione manuale del monitor,
modificare la posizione del menu e bloccare i comandi.
1
Premere il tasto di comando al centro.
Sullo schermo appare il MENU principale.
2
Per evidenziare OPZIONI spostare il tasto di
comando, quindi premerlo di nuovo al centro.
Sullo schermo appare il menu OPZIONI.
3
Spostare il tasto di comando m/M per sele zionare la
voce di regolazione desiderata.
Per regolare la voce selezionata, eseguire le istruzioni
riportate di seguito.
Smagnetizzazione dello schermo
Il monitor viene smagnetizzato automaticamente quando viene
attivata l’alimentazione.
Per smagnetizzare il monitor manualmente, spostare
prima il tasto di comando m/M per selezionare
(SMAGNET.). Quindi spostare il tasto di comando
,.
Lo schermo viene smagnetizzato per circa 2 secondi. Nel caso in
cui sia necessario un secondo ciclo di smagnetizzazione ,
attendere almeno 20 minuti per ottenere un risultato migliore.
Modifica della posizione del menu
Modificare l a posizione del menu quando copre un’ immagine
sullo schermo.
Per modificare la posizione del menu a schermo,
spostare prima il tasto di comando m/M per selez ionare
(POSIZ MENU ORIZZ) per la regolazione orizzontale
oppure (POSIZ MENU VERT) per la regolazione
verticale. Quindi spostare il tasto di comando </,
per spostare il menu a schermo.
Bloccaggio dei comandi
Per proteggere i dati di regolazione bloccando i
comandi, spostare prima il tasto di comando m/M per
selezionare (BLOCCO MENU), quindi spostare il
tasto di comando ,, per selezionare SI.
Funzioneranno solo l’interruttore di accensione
1 (alimentazione), USCITA e (BLOCCO MENU) del menu
OPZIONI. Qualsiasi altra voce venga selezi onata, sullo
schermo apparirà il contrassegno .
Per sbloccare i comandi
Ripetere la procedura sopra descritta e impostare (BLOCCO
MENU) su NO.
IT
13
Page 78
Ripristino delle regolazioni
Questo monitor dispone dei tre metodi di ripristino descritti di
seguito. Per ripristinare le regolazioni, utilizzare il tasto RESET
(ripristina).
Caratteristiche
Modo preimpostato e modo utente
RESET
Ripristino di una sola voce di regolazione
Utilizzare il tasto di comando per selezionare la voce di
regolazione che si desidera ripristinare, quindi premere il tasto
RESET (ripristina).
Ripristino di tutti i dati di regolazione per il
segnale di ingresso corrente
Premere il tasto RESET (ripristina) quando sullo schermo non è
visualizzato alcun menu.
Si noti che con questo metodo non vengono riprist inati:
• la lingu a per il menu a schermo (pagina 7)
• il modo di regolazione nel menu COLORE (FACILE,
ESPERTO, sRGB) (pagina 12)
• la posizione del menu a schermo (pagina 13)
• il blocco dei comandi (pagina13)
Ripristino di tutti i dati di regolazione per tutti i
segnali di ingresso
Premere e mantenere premuto il tasto RESET (ripristina) per più
di due secondi.
Quando il monitor riceve un segnale di ingresso, lo fa
corrisponder e automaticamente ad uno dei modi preimpostati in
fabbrica e memorizzati nel monitor, per fornire un’immagine di
alta qualità al centro dello schermo. Per un elenco dei modi
preimpostati in fabbrica, vedere a Appendix. Per i segnali di
ingresso che non corrispondono ai modi preimpostati in fabbrica,
la tecnologia Multiscan digitale di questo monitor assicura una
visualizzazion e dell’immagine ni tida per qualsiasi
sincronizzazione nella gamma di frequenza del monitor
(orizzontale: da 30 a 109 kHz, vertica le: da 48 a 160 Hz). Se
l’immagine viene regolata, i dati di regolazione vengono
memorizzati come modo utente e richiamati automaticamente
qualora venga r i c ev u t o lo stesso segnal e di ing r e s so.
Nota per gli utenti di Windows
Gli utenti di Windows devono controllare il manuale della scheda
video o il programma della utility fornit o con la sched a grafi ca e
quindi selezionare la frequenza di refresh più elevata per
massimizzare le prestazioni del monitor.
Funzione di risparmio energetico
Questo monitor è conforme alle direttive sul risparmio energetico
di VESA,
collegato ad u n comp uter o ad una sche da graf ica vi deo co nfor mi
a DPMS (Display Power Management Signaling), il monitor
ridurrà automaticamente il consumo energetico in tre stadi come
descritto di seguito.
E
NERGY STAR e NUTEK. Se il monitor viene
Nota
Il tasto RESET (ripristin a) non funziona se (BLOCCO ME NU) è
impostato su SI.
Modo di
alimentazione
Funzionamento
normale
1 attesa ≤ 15 W verde e arancione
2 sospeso
(sleep)*
3 attivo-spento**
(deep sleep)*
spento 0 W spento
* “Sleep” e “deep sleep” sono modalità di risparmio energetico definite
dalla Environmenta l Prot ection Agency.
** Quando il computer è nella modali t à di rispa rm io energetico, il
segnale di ingresso viene interrotto e sullo schermo appare NO
SEGNALESINGRESSO. Dopo alcuni secondi, il monitor entra nel
modo di risparmio en ergetico.
Consumo
energetico
≤ 145 W verde
≤ 15 W verde e arancione
Circa 1 W arancione
Indicatore di
accensione 1
(alimentazione)
alternato
alternato
14
Page 79

Guida alla soluzione dei
problemi
Messaggi a schermo
In caso di problemi con il segnale di ingr esso, sullo schermo
appare uno dei seguenti messaggi.
Prima di rivolgersi al servizio di assistenza tecnica, leggere la
seguente sezione.
Se sullo schermo appaiono delle
linee sottili (cavi di smorzamento)
Questo tipo di linee sullo schermo sono normali per il monitor
Trinitron e non rappresentano un problema di funzionamento.
Queste righe sono l’ombra dei cavi di smorzamento usati per
stabilizzare la griglia di ap ertura, visibili maggiormente qu ando lo
sfondo dello scherm o è ch iaro (s olita men te bian co). La gri glia di
apertura è l’elemento essenz iale che caratterizza il cinescopio a
colori Trinitron, consentendo una maggiore illuminazione dello
schermo con il risultato di un’immagine più luminosa e
dettagliata.
Cavi di smorzamento
Se sullo schermo appare il messaggio NO
SEGNALESINGRESSO
INFORMAZIONI
MONI TOR ESEGUE
INPUT : 68.7kHz/ H58z
NO SEGN A LES I NGRESSO
WH I T E
RED
GREEN
BLUE
1111 Frequenze del segnale di ingresso corrente
Se il monitor riconosce le frequenze del segnale di ingresso
corrente, le frequenze orizzontali e verticali vengono
visualizzate.
2222 Condizione del segnale di ingresso
NO SEGNALESINGRESSO
Questo messaggio indica che non viene immesso alcun
segnale.
Se sullo schermo appare il messaggio FUORI
GAMMA SCANS
INFORMAZIONI
MONI TOR ESEGUE
INPUT :130.0kHz/ H57z
FUORI GAMMA SCANS
MOD I F I CARE TEMP .
SEGN .
WH I T E
RED
GREEN
BLUE
IT
1111 Frequenze del segnale di ingresso corrente
Se il monitor riconosce le frequenze del segnale di ingresso
corrente, le frequenze orizzontali e verticali vengono
visualizzate.
2222 Condizione del segnale di ingresso
FUORI GAMMA SCANS
Questo messaggio indica che il segnale di ingresso non è
supportato tra le caratteristiche tecniche del monitor.
3333 Rimedi
Sullo schermo appare il messaggio MODIFICARE TEMP.
SEGN. Se si è sostituito un monitor vecchio con questo
monitor, ricollegare il monitor vecchi o. Quindi regolare la
scheda grafica del computer in modo che la frequenza
orizzontale sia compres a tra 30 e 109 kHz e la frequenza
verticale sia compresa tra 48 e 16 0 Hz.
Per ulteriori informazioni, vedere la sez ione “Sintom i e soluzion i
dei problemi” de l monitor a pagina 16.
15
Page 80

Sintomi e soluzioni dei problemi
Se il problema è causato dal computer o da altre apparecchiature collegate, consultare le istru zioni per l’uso di qu este apparecchiature.
Se il problema non viene risolto con le indicazioni descritte di seguito, usare la funzione di autodiagnostica (pagina 18).
Sintomo Controllare quanto segue
Assenza d’immagine
Se l’indicatore di accensione
1 (alimentazione) no n è illumi na to
Se sullo schermo appare il
messaggio NO
SEGNALESINGRESSO o se
l’indicatore di accensione
1 (alimen t az i o ne) è di color e
arancione o si alterna tra il verde e
l’arancione
Se sullo schermo appare il
messaggio FUORI GAMMA
SCANS
Se non viene visualiz zato alcun
messaggio e l’indica tore di
accensione 1 (alimentazione) è
illuminato in verde o lampeggia in
arancione
Se si usa Windo ws 95/98 • Se con questo monitor è stato sostituito un ve cchio monitor, rico llegare il vecchio m onitor
Se si utilizza un sistema Macintosh • Quando si effettua il collegamento ad un computer serie Power Macintosh G3 dotato di tre
L’immagine è tremolante, salta,
oscilla oppure è confusa
• Controllare che il cavo di alimentazione si a collegato correttamente.
• Controllare che l’interruttore 1 (alimentazione) sia nella posi zione di accensione.
• Controllare che il cavo del segnal e video sia collegato correttamente e che tutte le spine
siano saldamente inserite nelle prese (pagina 6).
• Controllare che i piedini del connettore di ingresso video HD15 non siano piegati o
danneggiati.
x
Problemi causati dal computer o da altre apparecchiature collegate
• Il computer è nel modo di risparmio energetico. Premere un tasto qualsiasi sulla tastiera
del computer oppure muovere il mouse.
• Controllare che l’alimentazione del computer sia attivata.
• Controllare che la scheda grafica sia completamente inserita nell’alloggiamento del bus
corretto.
x
Problemi causati dal computer o da altre apparecchiature collegate
• Controllare che la gamma di frequenza vide o rientri in qu ella specif icata pe r il monitor. Se
con questo monitor è stato sostituito un vecchio monitor, ricollegare il vecchio monitor e
regolare la gamma di frequenza come descritto di seguito.
Orizzontale: 30 – 109 kHz
–
Verticale: 48
• Utilizzare la funzione di autodiagnostica (pagina 18).
e effettuare le seguenti operazioni. Installare il disco di installazione (vedere pagina 7) e
selezionare questo monitor (“CPD-E500E”) tra i monito r Sony presenti ne lla schermata di
selezione dei monitor di Windows 95/98.
file di piedini, assicurarsi c h e l’a dattato re G3 M acintosh i n d ota zion e e il cavo del se gna le
video siano collegati saldamente (pagina 6).
• Per i computer Power Macintosh G3 o per gli altri modelli dotati di due file di piedini, è
necessario un adatta tore diverso in vendita separatam ente.
• Isolare ed eliminare le potenziali sorgenti di campi elettrici o magnetici, quali altri
monitor, stampanti laser, ventilatori elettrici, illuminazioni fluorescenti o televisori.
• Spostare il monitor lontano dalle linee di alimentazione oppure collocare uno schermo
magnetico vicino al monitor.
• Provare a collegare il monitor ad un’altra presa di rete CA, preferibilmente su un circuito
differente.
• Provare a girare il monitor di 90° verso sinistra o verso destra.
x
Problemi causati dal computer o da altre apparecchiature collegate
• Controllare il manuale della scheda grafica per le corrette impostazioni del monitor.
• Controllare che il modo grafica (VESA, Macintosh 21" Col or, ecc.) e la frequenza de l
segnale di ingre sso si ano su pporta ti da qu esto monitor (App endi x). Anch e se la fre que nza
rientra nella gamma prevista, alcune schede grafiche potrebbero avere un impulso
sincronico troppo breve per permettere al monitor di sincro nizzarsi correttamente.
• Regolare la frequenza di refresh del computer (frequenza verticale) per ottenere
l’immagine migliore.
160 Hz
16
Page 81

Sintomo Controllare quanto segue
L’immagine è sfocata • Regolare la luminosità e il contrasto (pagina 9).
• Smagnetizzare il monitor* (pagina 13).
• Se ELIMINA MOIRE è impostato su SI, l’immagine potrebbe diventare sfocata.
Diminuire il livello di eliminazione dell’effetto moiré o impostare ELIMINA MOIRE su
NO (pagina 1 1).
L’immagine è sdoppiata • Eliminare l’uso di prolunghe del cavo video e/o di cassette per l’interruttore video.
• Controllare che tutte le spine siano saldamente inserite nelle apposite prese.
L’immagine non è centrata o non è
delle dimensioni corrette
I bordi dell’immagine sono
incurvati
Sono visibili disturbi ondulati o
ellittici (effetto moiré)
Il colore non è uniforme • Smagnetizzare il monitor* (pagina 13). Se si colloca vicino al monitor un’apparecchiatura
Il bianco non è perfetto • Regolare la temperatura di colore (pagina 12).
Lettere e linee presentano ombre
rosse o blu sui bordi
I tasti sul monitor non funzionano
( appare sullo schermo)
Non appena si accende
l’apparecchio si sente un ronzio
• Regolare l a dimensione (pagina 10) o la centratura (pagina 10). Si noti che alcuni modi
video non riempiono lo schermo fino ai bordi.
• Regolare la geometria (pagina 10).
• Impostare ELIMINA MOIRE su SI e regolare l’elim inazione dell’e ffett o moiré fin ché tale
effetto non viene ridotto al minimo (pagina 11).
xProblemi causati dal computer o da altre apparecchiature collegate
• Modificare il motivo del desktop.
che genera un campo ma gnet ico, qua le un dif fusor e, oppu re se si modif ica la dir ezion e del
monitor, il colore potrebbe perdere uniformità.
• Regolare la purezza del colore (pagina 11).
• Regolare la convergenza (pagina 11).
• Se la funzione di blocco dei comandi è impostata su SI, impostarla su NO (pagina 13).
• È il rumore del ciclo di smagnetizzazione automatica. Quando si attiva l’alimentazione, il
monitor viene automaticamente smagnetizzato per due secondi.
* Nel caso in cui sia necessario un secondo ciclo di smagnetizzazione, attendere almeno 20 minuti per ottenere un risultato migliore. Potrebbe venire udito
un ronzio che non indica però un problema di funzionamento.
Visualizzazione del nome del monitor, del numero
di serie e della data di produzione.
Quando il monitor riceve un segnale video e si des idera
visualizzare le informazioni sul monitor, premere e mantenere
premuto il tasto di comando al centro per più di cinque secondi.
MENU
b
Esempio
INFORMAZIONI
MODEL : CPD E500E
SER NO : 1234567
MANUFACTURED
: 1999-52
Se il problema persiste, rivo lgersi al rivendi tore autorizz ato Sony
comunicando le seguenti informazioni.
• Nome del modello: CPD-E500E
• Numero di serie
• Nome e caratteristiche tecniche del comput er e della scheda
grafica.
IT
17
Page 82
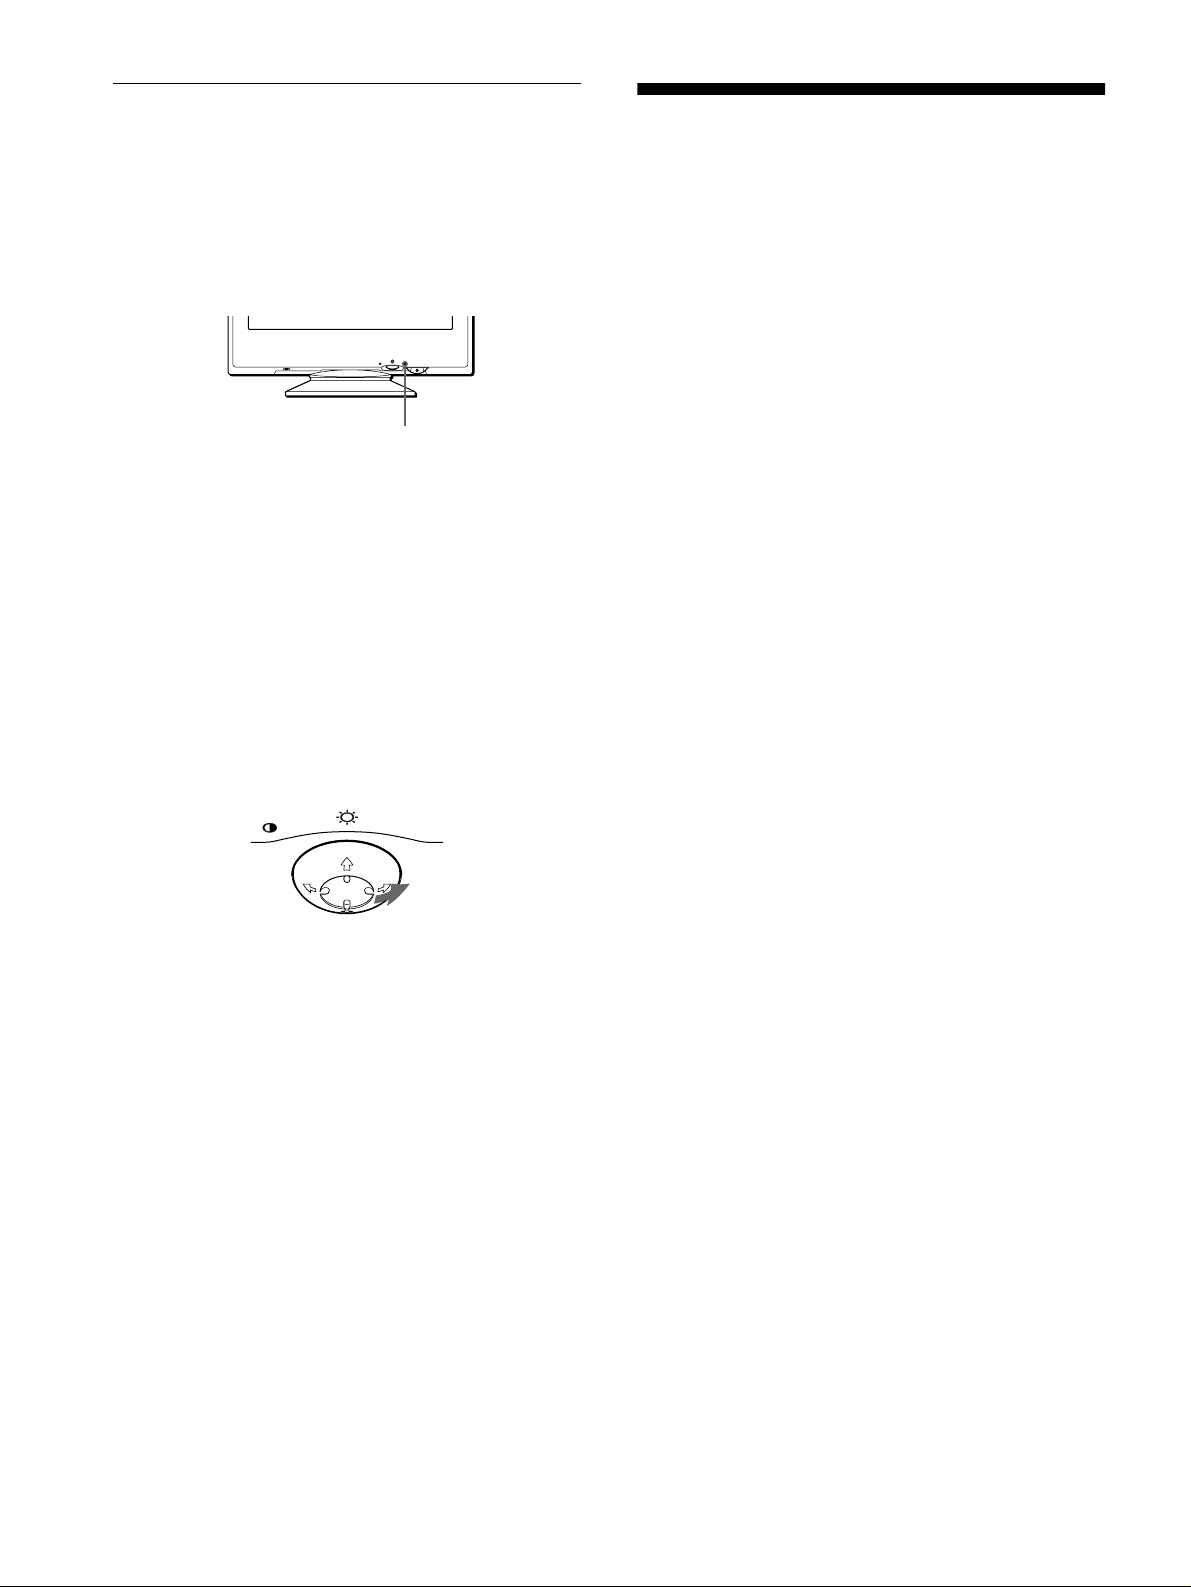
Funzione di autodiagnostica
Questo monitor dispone di una funzione di autodiagnostica. Se si
presenta un problema con il monitor o con il comput er, lo
schermo si oscura e l’indicatore 1 (alimentazione) si illumina in
verde o lampeggia in arancione. Se l’indicatore di accensione
1 (alimentazione) si illumina in arancione, significa che il
computer si trova nel modo di ris parmio energetico. Provare a
premere un tasto qualsiasi sulla tastiera.
RESET
Se l’indicatore di accensione 1 (alimentazione) è
verde
1
Scollegare il cavo di ingresso video oppure
spegnere il computer collegato.
2
Premere due volte il tasto di accensione
1
(alimentazione) per spegnere e accendere il
monitor.
3
Spostare il tasto di coman do , per 2 secondi prima
che il monitor entri nel modo di risparmio
energetico.
MENU
Indicatore di accensione
(alimentazione)
1
Caratteristiche tecniche
Tubo a raggi catodici (CRT)
passo della griglia di apertura
0,24 mm
21 pollici misurati in diagonale
Deflessione di 90 gr ad i
FD Trinitron
Dimensioni dell’immagine visibile
Circa 403,8 × 302,2 mm (l/a)
Immagine visibile 19,8"
Risoluzione
Massimo Orizzontale: 2048 punt i
Verticale: 1536 linee
Consigliata Orizzontale: 1600 punti
Verticale: 1200 linee
Area dell’immagine standard
Circa 388 × 291 mm (l/a)
o
Circa 364 × 291 mm (l/a)
Frequenza di deflessione* Orizzo ntale: da 30 a 109 kHz
Verticale: da 48 a 160 Hz
Tensione/corrente di ingresso CA
da 100 a 240 V, 50 – 60 Hz,
2,0 – 1,0 A
Consumo energetico Circa 145 W
×
Dimensioni Circa 497
Peso Circa 32 kg
Plug and Play DDC1/2B/2Bi, GTF**
Accessori in dotazione Vedere a pagina 6
480 × 478 mm (l/a/p)
MENU
Se vengono vis u alizzate le qu attro barre d i c o lor e ( b ia n co , ro s s o,
verde e blu), significa che il monitor funziona correttamente.
Collegare di n uovo il cavo di ingresso video e controllare le
condizioni del computer.
Se le barre di colore non appaiono, si tratta di un potenziale guasto
al monitor. Rivolgersi al rivenditore aut orizzato Sony.
Se l’indicatore di accensione 1 (alimentazione)
lampeggia in arancione
Premere due volte il tasto di accensione
1
(alimentazione) per spegne re e ac cendere il monitor.
Se l’indicatore di accensione 1 (alimentazione) si illumina in
verde, significa che il monitor funziona correttamente.
Se l’indicatore di accensione 1 (alimentazione) contin ua a
lampeggiare, si trat ta di un po tenz iale gu asto al monit or. Cont are
il numero di secondi tra il lampeggiamento nel colore arancione
dell’indicatore di accensione 1 (alimentazione) e informare il
rivenditore autorizzato Sony circa le condizioni del monitor.
Annotare il nome del modello e il numero di serie del monitor.
Inoltre, annotare la marca e il modello del proprio computer e
della scheda video.
* Condizione di sincronizzazione verticale e orizzontale
consigliata
• L’ampiezza della sincronizzazione orizzontale dovrebbe
essere superiore del 4,8% rispet to al tempo orizzontale
complessivo o 0,8 µs, a seconda di quale è più ampio.
• L’ampiezza di oscuramento orizzontale dovrebbe essere più
di 2,3 µsec.
• L’ampiezza di oscuramento verticale dovrebbe essere più di
450 µsec.
** Se il segnale di ingresso è conforme a Generalized Timing
Formula (GTF), la funzione GTF del monitor fornisce
automaticamente l’immagine migliore per lo schermo.
Il design e le caratteristiche tecniche sono soggetti a modifi che
senza preavviso.
18
Page 83

Содержание
Меры предосторожности. . . . . . . . . . . . . . . . . . . . . . . . . . . . . . . . 4
Идентификация деталей частей и органов управления . . . . . . 5
Подготовка к работе. . . . . . . . . . . . . . . . . . . . . . . . . . . .6
• Trinitron является
зарегистрированным торговым
знаком Корпорации Sony.
• Macintosh является
запатентованным торговым
знаком Apple Computer, Inc.,
зарегистрированным в США и
других странах.
• Windows
зарегистрированными торговыми
знаками Microsoft Corporation в
Соединенных Штатах и других
странах.
• IBM PC/AT и VGA являются
зарегистрированными торговыми
знаками IBM Corporation США.
• VESA и DDC
торговыми знаками Ассоциации
по стандартам электронной
видеоаппаратуры.
•
E
зарегистрированным в США
знаком.
• Все прочие упомянутые ниже
названия продуктов могут быть
торговыми знаками или
зарегистрированными торговыми
знаками соответствующих
компаний.
• Далее в руководстве в каждом
случае не указываются символы
“” и “”.
и MS-DOS являются
являются
NERGY STAR является
Шаг 1:
Шаг 2:
Шаг 3:
Подключите монитор к компьютеру. . . . . . . . . . . . . . . . . 6
Подключите кабель питания. . . . . . . . . . . . . . . . . . . . . . . 6
Включите монитор и компьютер. . . . . . . . . . . . . . . . . . . . 7
Выбор языка в экранном меню (LANG) . . . . . . . . . . . . . . . . . . . . 7
Подстройка монитора. . . . . . . . . . . . . . . . . . . . . . . . . . .8
Перемещение по экранному меню . . . . . . . . . . . . . . . . . . . . . . . . 8
Регулировка яркости и контрастности изображения . . . . . . . . . 9
Регулировка размера изображения (PAЗMEP) . . . . . . . . . . . . . 10
Регулировка центровки изображения (ЦEHTP) . . . . . . . . . . . . 10
Увеличение или уменьшение изображения (ZOOM). . . . . . . . . 10
Регулировка формы изображения (ГEOM) . . . . . . . . . . . . . . . . 10
Регулировка совмещения цветов (СВЕДЕН) . . . . . . . . . . . . . . . 11
Регулировка качества изображения (ЭКРАН) . . . . . . . . . . . . . 11
Регулировка цвета изображения (ЦВЕТ). . . . . . . . . . . . . . . . . . 12
Дополнительные настройки (ПPOЧEE) . . . . . . . . . . . . . . . . . . . 13
Сброс настроек . . . . . . . . . . . . . . . . . . . . . . . . . . . . . . . . . . . . . . . 14
Технические особенности . . . . . . . . . . . . . . . . . . . . . .14
Предустановленные и пользовательские режимы . . . . . . . . . . 14
Функция энергосбережения . . . . . . . . . . . . . . . . . . . . . . . . . . . . 14
Устранение неисправностей . . . . . . . . . . . . . . . . . . . .15
Демпферные нити. . . . . . . . . . . . . . . . . . . . . . . . . . . . . . . . . . . . . 15
Экранные сообщения . . . . . . . . . . . . . . . . . . . . . . . . . . . . . . . . . . 15
Симптомы неполадок и действия по их устранению . . . . . . . . 16
Функция самодиагностики. . . . . . . . . . . . . . . . . . . . . . . . . . . . . . 18
Технические характеристики . . . . . . . . . . . . . . . . . . .18
Appendix. . . . . . . . . . . . . . . . . . . . . . . . . . . . . . . . . . . . . . . i
Preset mode timing table . . . . . . . . . . . . . . . . . . . . . . . . . . . . . . . . . .i
TCO’99 Eco-document . . . . . . . . . . . . . . . . . . . . . . . . . . . . . . . . . . . .i
RU
3
Page 84

Меры предосторожности
90°
5°
90°
15°
Центрирующие точки
Меры предосторожности при подключении к
сети электропитания
• Используйте кабель питания, поставляемый с
монитором. При использовании другого кабеля
питания убедитесь в том, что он подходит для
использования в местной сети.
Для покупателей в Великобритании
При использовании монитора в Великобритании
пользуйтесь поставляемым с монитором кабелем
питания с разъемом для Великобритании.
Пример типов вилок
для 100 - 120 В
переменного тока
• Отсоединяйте кабель питания от сети не раньше,
чем через 30 секунд после выключения питания
монитора, когда уменьшится заряд статического
электричества на поверхности экрана.
• После включения питания в течение приблизительно
2 секунд происходит размагничивание трубки
монитора. При этом вокруг экрана возникает
сильное магнитное поле, способное повредить
данные на магнитных лентах и дискетах,
находящихся рядом с монитором. Поэтому
магнитофоны, кассеты и дискеты следует держать
на некотором расстоянии от прибора.
для 200 - 240 В
переменного тока
только для 240 В
переменного тока
Уход
• Протирайте экран мягкой тканью. При
использовании химических средств для чистки
стекла не применяйте жидкости, содержащие
антистатические или аналогичные добавки, так как
они могут повредить покрытие экрана.
• Не следует прикасаться к дисплею, скрести или
стучать по нему острыми или шершавыми
предметами (шариковой ручкой, отверткой). Это
может привести к появлению царапин на
поверхности электронно-лучевой трубки.
• Протирайте корпус, дисплей и панель управления
мягкой тканью, слегка смоченной в слабом растворе
моющего средства. Не пользуйтесь грубыми
терками, абразивными пастами или такими
растворителями, как спирт или бензин.
Транспортировка
При перевозке монитора или его доставке в
ремонтную мастерскую пользуйтесь заводской
картонной коробкой и упаковочными материалами.
Использование шарнирной опоры с
изменяемым углом наклона
Монитор можно устанавливать в удобное положение,
изменяя углы наклона, как показано на рисунке ниже.
Чтобы найти центр радиуса поворота монитора,
совместите центр экрана монитора с центрирующими
точками на подставке.
Поворачивая монитор по горизонтали или вертикали,
держите его за нижнюю часть обеими руками. Будьте
осторожны, не прищемите пальцы с обратной стороны
монитора, поворачивая его вверх по вертикали.
Сетевая розетка должна находиться в
легкодоступном месте вблизи от прибора.
Установка
Не устанавливайте монитор в следующих местах:
• на мягких поверхностях (коврики, одеяла и т.д.) или
вблизи от других материалов (занавески, шторы и
т.п.), которые могут преградить доступ воздуха к
вентиляционным отверстиям
• вблизи от источников тепла, таких как батареи или
воздуховоды, а также в местах, где возможно
попадание прямого солнечного света
• где наблюдаются резкие колебания температуры
• где присутствует вибрация или резкие механические
воздействия
• на неустойчивых поверхностях
• рядом с источниками магнитных полей, такими как
трансформаторы или высоковольтные кабели
• рядом или на металлической поверхности с
наличием электрического заряда
4
Page 85
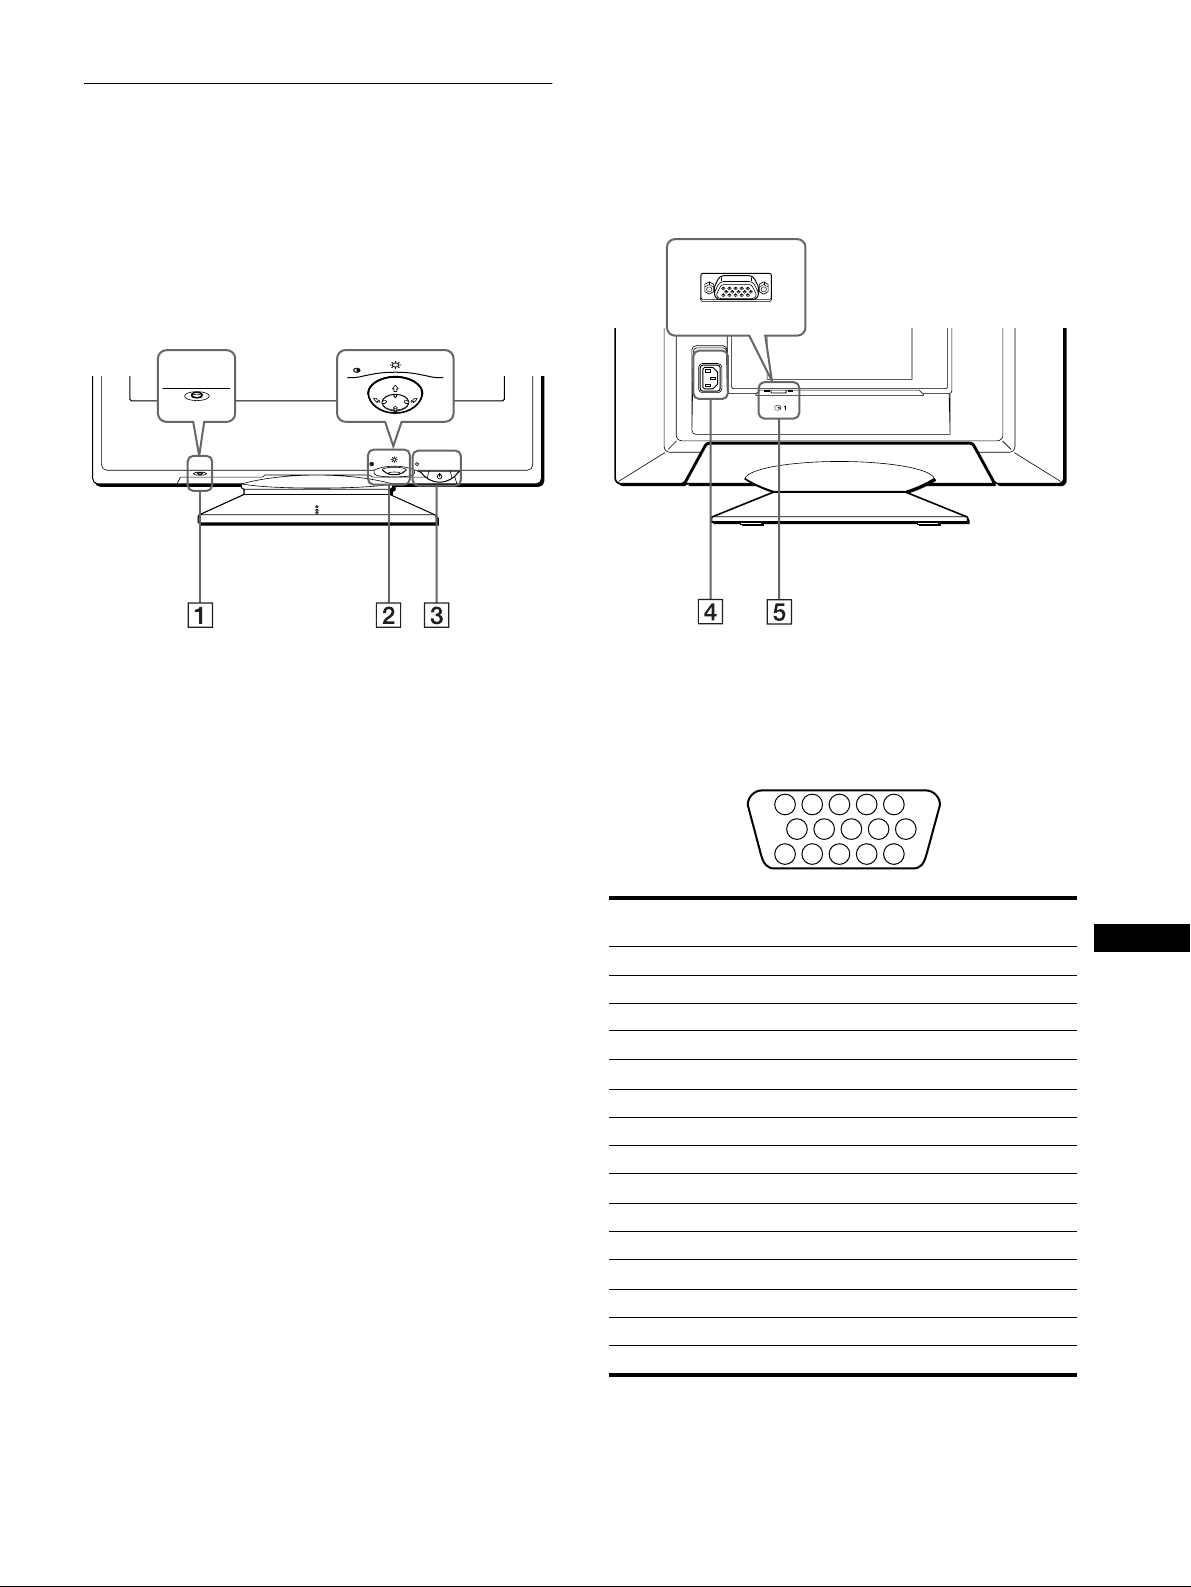
Идентификация деталей частей
5 4 3 2
1
678910
1112131415
и органов управления
См. страницы в скобках для получения подробных
сведений.
Передняя панель
MENU
RESET
RESET
1111
Кнопка RESET (сброс) (стр. 14)
Возвращает параметры к исходным значениям,
установленным на заводе.
2222
Кнопка управления (стр. 9)
Кнопка управления используется для отображения
меню и выполнения настроек монитора, включая
регулировку яркости и контрастности.
MENU
Задняя
передняя сторона
панель
задняя сторона
AC IN
(HD15)
4444
Гнездо AC IN (стр. 6)
Подает электрическое питание на монитор.
5555
Гнездо видеовхода (HD15) (y1) (стр. 6)
Подает видеосигналы RGB (0,700 Vp-p, положит.) и
сигналы синхронизации.
3333
Выключатель и индикатор 1 (питание)
(стр.7,14,18)
Эта кнопка включает и выключает монитор.
Когда монитор включен, индикатор горит зеленым,
а когда монитор в режиме экономии энергии, он
мигает зеленым и оранжевым или просто
оранжевым.
No.
Сигнал
контакта
1 Красный
2 Зеленый (Синхронизация по зеленому)
3 Синий
4 ID (Заземление)
5
6 Заземление красного
7 Заземление зеленого
8 Заземление синего
9
10 Заземление
11 ID (Заземление)
12
13 Горизонтальная синхронизация
14 Вертикальная синхронизация
15
Display Data Channel (DDC) является стандартом VESA.
*
Заземление DDC
DDC + 5 В
Канал двустороннего обмена данных (SDA)
Хронометраж данных (SCL)
*
*
*
RU
*
5
Page 86

Подготовка к работе
(HD15)
AC IN
Используйте прилагаемый переходник G3 для Macintosh
(для сине-белой системы).
Переходник G3 для Macintosh
(для сине-белой системы)
(входит в комплект)
*
Power Macintosh G3
к видеовыходу
к HD 15
Кабель
видеосигнала
HD 15
(входит в
комплект)
(HD15)
AC IN
к гнезду
AC IN
к электрической розетке
кабель питания (входит в комплект)
Перед использованием монитора проверьте наличие в
коробке следующих принадлежностей:
• Кабель питания (1)
• Кабель видеосигнала HD15 (1)
• Переходник G3 для Macintosh (для сине-белой
системы) (1)
• Установочный диск (1)
• Гарантийный талон (1)
• Примечания по чистке поверхности экрана (1)
• Настоящая инструкция по эксплуатации (1)
Шаг 1: Подключите монитор к
компьютеру
Перед подключением монитор и компьютер должны
быть выключены.
Примечания
• Не следует прикасаться к штырькам разъема кабеля
видеосигнала, так как при этом их можно согнуть.
• При подсоединении кабеля видеосигнала следите за тем, чтобы
разъем HD15 был расположен правильно. Не прилагайте
излишних усилий при неверном подсоединении разъема, чтобы
случайно не согнуть штырьки.
x
Подключение к IBM PC/AT или к
совместимому компьютеру
AC IN
x
Подключение к компьютеру Macintosh
Входящий в комплект переходник G3 для Macintosh необходимо
*
подключать к компьютеру до подключения кабеля. Входящий в
комплект переходник для Macintosh совместим с компьютерами
серии Power Macintosh G3, которые имеют разъемы с тремя
рядами штырьков. При подключении к другим компьютерам
серии Power Macintosh G3, которые имеют разъемы с двумя
рядами штырьков, или к другим моделям необходимо
использовать другой переходник (продается отдельно).
(HD15)
IBM PC/AT или совместимый
компьютер
6
к видеовыходу
Кабель видеосигнала
HD 15
(входит в комплект)
Шаг 2: Подключите кабель
питания
Не включая монитор и компьютер, подключите
сначала кабель питания к монитору, затем включите
его в розетку электропитания.
к HD 15
Page 87
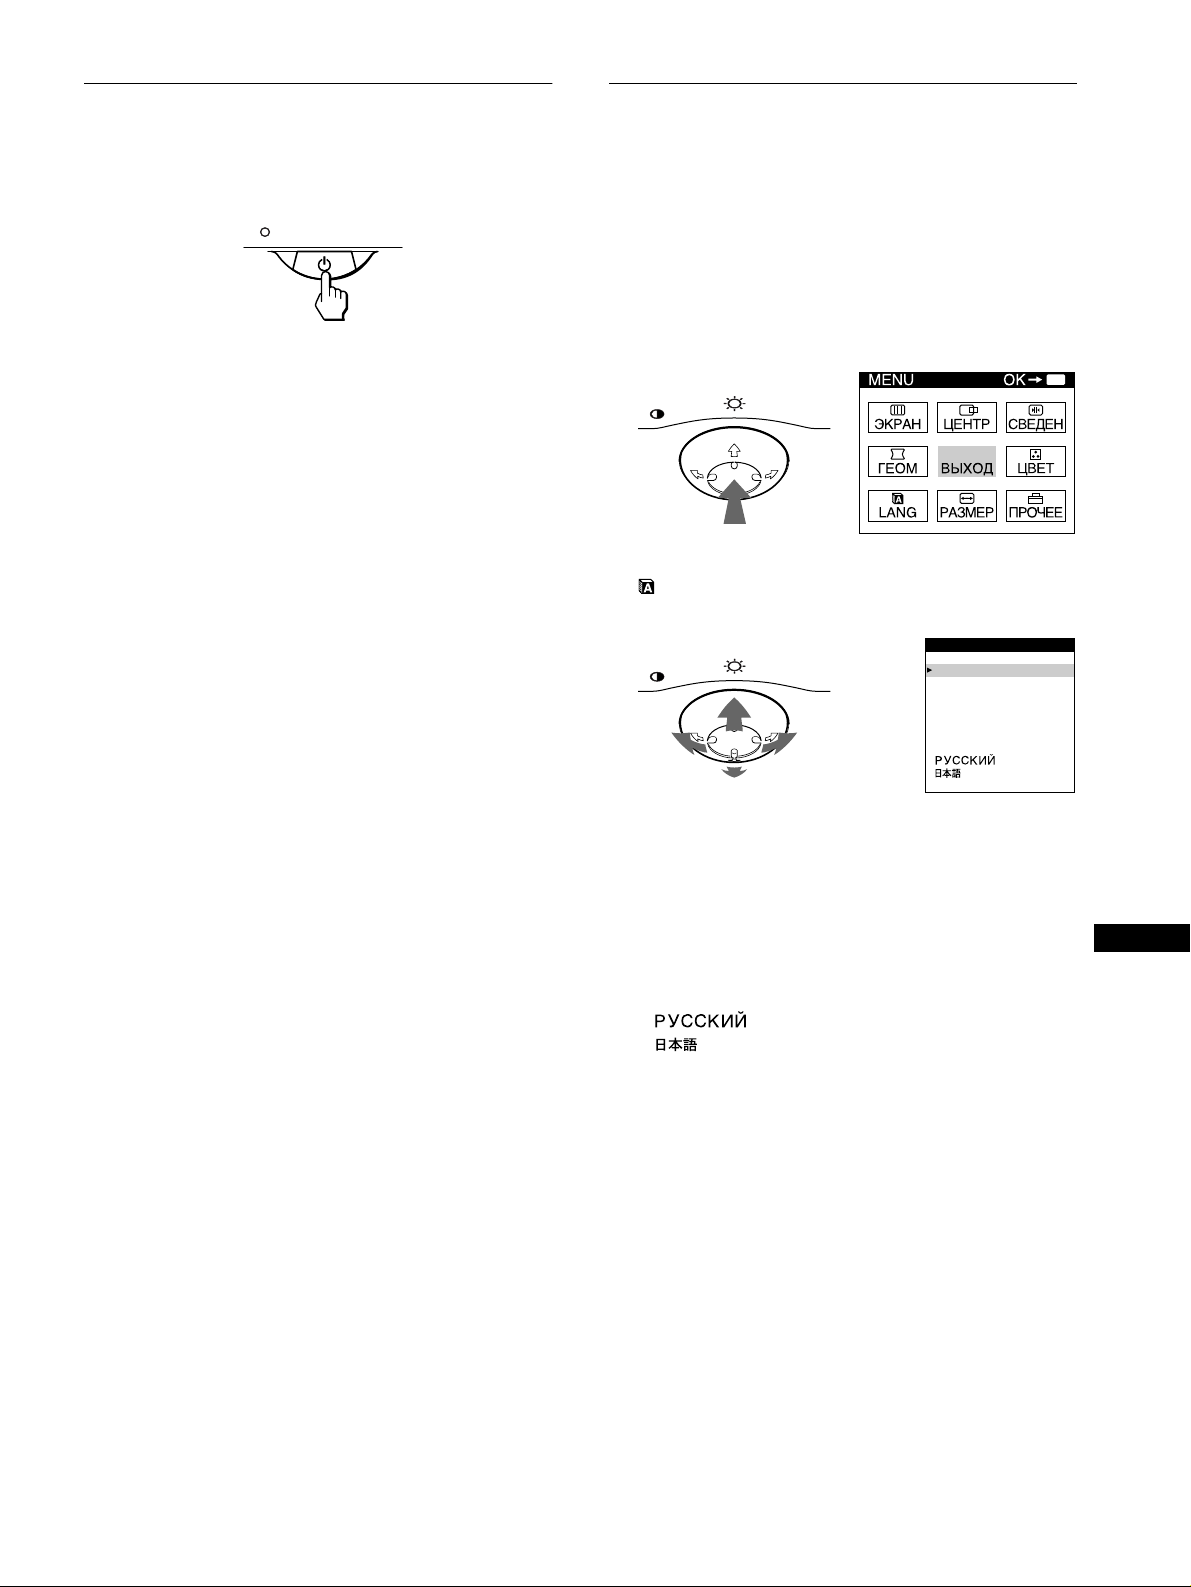
Шаг 3: Включите монитор и
Выбор языка в экранном меню
компьютер
Сначала включите монитор, затем включите
компьютер.
Установка монитора завершена.
В случае необходимости пользуйтесь органами
управления монитора для настройки изображения.
Если изображение не появляется на экране
• Проверьте правильность подключения монитора к
компьютеру.
• Если на экране появляется сообщение НЕТ
ВХОДНОГО СИГНАЛА, убедитесь, что плата
графического адаптера компьютера надежно
вставлена в гнездо шины.
• Если данная модель устанавливается вместо
старого монитора, и на экране появляется
сообщение НЕДОПУСТИМЫЙ ГРАФИЧЕСКИЙ
РЕЖИМ, верните прежний монитор на место. Затем
настройте графическую плату, так чтобы частота
горизонтальной развертки была в диапазоне 30 - 109
кГц, а частота вертикальной развертки - в диапазоне
48 – 160 Гц.
Дополнительные сведения об экранных сообщениях
см. в разделе “Симптомы неполадок и действия по их
устранению” на стр. 16.
(LANG)
Можно пользоваться версиями экранных меню на
английском, французском, немецком, испанском,
итальянском, голландском, шведском, русском и
японском языках. По умолчанию используется
английский язык.
1
Нажмите в центре кнопки управления.
Для получения подробных сведений о кнопке
управления см. стр. 9.
MENU
2
Сместите кнопку управления, чтобы высветить
LANG, и нажмите в центре кнопки управления
еще раз.
MENU
LANGUAGE
ENGL I SH
FRANÇA I S
DEUTSCH
ESPAÑOL
ITALIANO
NEDERL ANDS
SVENSKA
MENU
Для пользователей Windows 95/98
Для максимального использования возможностей монитора
установите на своем компьютере файл, содержащий
сведения о новых моделях мониторов, с прилагаемого
установочного диска.
Данный монитор соответствует стандарту Plug & Play “VESA
DDC”. Если компьютер, графическая плата совместимы с
DDC, выберите в качестве типа монитора в панели
управления “Control Panel” Windows 95/98 элемент “Plug &
Play Monitor (VESA DDC)” или название данной модели. Если
компьютер или графическая карта не могут правильно
установить связь с монитором, загрзите установочный диск и
укажите название данной модели в качестве типа монитора.
Для пользователей Windows NT4.0
Настройка монитора в Windows NT4.0 производится иначе,
чем в Windows 95/98, и не требует выбора типа монитора.
Подробные сведения о выборе нужного разрешения, частоты
регенерации и количества воспроизводимых цветов см. в
руководстве для Windows NT4.0.
3
Сместите кнопку управления m/M для выбора
языка.
• ENGLISH: АНГЛИЙСКИЙ
FRANÇAIS:
•
Французский
• DEUTSCH: Немецкий
ESPAÑOL:
•
ITALIANO
•
NEDERLANDS
•
SVENSKA
•
Испанский
: Итальянский
: Голландский
: Шведский
•
• : Японский
Чтобы закрыть меню
Один раз нажмите в центре кнопки управления, чтобы
вернуться в главное меню (MENU), и еще раз - для возврата в
нормальный режим просмотра. Если кнопки не были нажаты,
то экранное меню автоматически исчезает приблизительно
через 30 секунд.
Для возврата к английскому языку
Нажмите кнопку RESET, пока меню LANGUAGE выведено на
экран.
RU
7
Page 88

Подстройка монитора
MENU
68.7kHz/ 85Hz
1024
768
частоты для
горизонтальной
и вертикальной
разверток
текущего
входного
сигнала
разреш
ение
тек
ущ
его
вход
ного
сигнал
а
Большая часть настроек монитора производится с
помощью экранного меню.
Перемещение по экранному
меню
Нажмите в центре кнопки управления для
отображения на экране главного меню (MENU). См.
стр. 9 для получения подробных сведений о кнопке
управления.
5555
ЭКРАН (стр. 11)
Выводит на дисплей меню
ЭКРАН для подстройки
качества изображения. Дает
возможность
скорректировать
разбалансировку цветовой
гаммы и устранить муаровый
эффект.
6666
CBEДEH (стр. 11)
Выводит на дисплей меню
СВЕДEH для подстройки
совмещения цветов по
горизонтали и вертикали
изображения.
TOP
BOT
26
26
MENU
MENU
При помощи кнопки управления выберите одно из
следующих меню.
1111
ЦEHTP (стр. 10)
Выводит на дисплей меню
ЦЕНТР для подстройки
центровки, размера,
26
уменьшения и увеличения
изображения.
2222
PAЗMEP (стр. 10)
Выводит на дисплей меню
РАЗМЕР для подстройки
размера, центровки,
26
уменьшения и увеличения
изображения.
3333
ГEOM (стр. 10)
Выводит на дисплей меню
ГЕОМ для подстройки
поворота и формы растра.
26
7777
LANG (стр. 7)
Выводит на дисплей меню
LANG для выбора языка.
8888
ПPOЧEE (стр. 13)
LANGUAGE
ENGL I SH
FRANÇA I S
DEUTSCH
ESPAÑOL
ITALIANO
NEDERL ANDS
SVENSKA
Выводит на дисплей меню
ПPOЧEE для настройки
дополнительных функций
монитора. К ним относятся:
• размагничивание экрана
• изменение положения
экранного меню
• блокировка органов
управления
9999
ВЫХОД
Выберите ВЫХОД, чтобы
закрыть меню.
x
Отображение текущего входного
сигнала
Частоты для горизонтальной и вертикальной
разверток текущего входного сигнала отображаются в
главном меню (MENU). Также отображается
разрешение, если сигнал соответствует одному из
режимов данного монитора, предварительно
установленных на заводе.
4444
ЦBET (стр. 12)
Выводит на дисплей
меню ЦВЕТ для
подстройки цветовой
температуры. Может
использоваться для
приведения в
соответствие цветов
монитора с цветами
распечатываемых
изображений.
8
Page 89
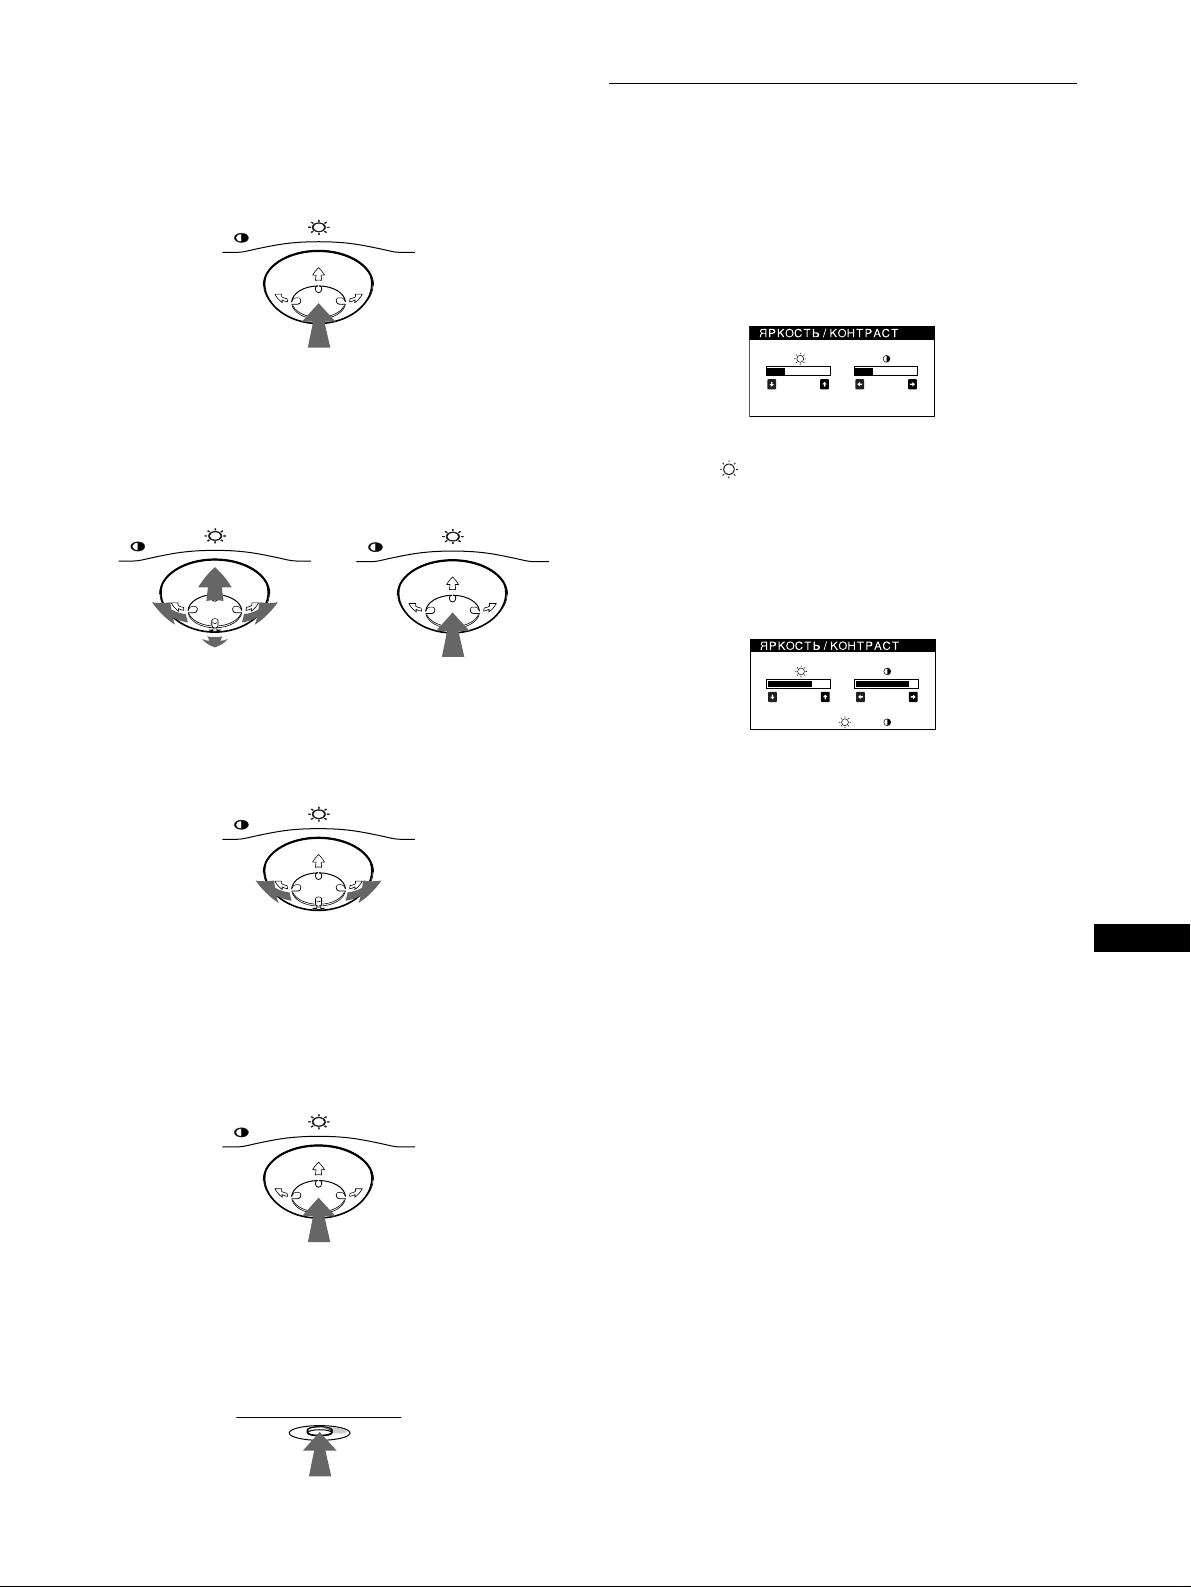
x Использование кнопки управления
26 26
56 76
sRGB : 56 76
1
Отображение главного меню (MENU).
Нажмите в центре кнопки управления для
отображения на экране главного меню (MENU).
MENU
2
Выделите меню, которое нужно настроить.
Высветите нужное меню смещением кнопки
управления назад для движения вверх (M), вперед
для движения вниз (m), влево (<) или вправо (,)
для движения в сторону.
Вперед
MENU
MENU
Регулировка яркости и
контрастности изображения
Регулировка яркости и контрастности выполняется
посредством раздельных меню ЯPKOCTЬ/KOHTPACT.
Данные настройки хранятся в памяти для всех
входных сигналов.
1
Сместите кнопку управления в любом направлении.
На экране появляется меню ЯPKOCTЬ/KOHTPACT.
2
Сместите кнопку управления m/M для настройки
яркости ( ), и </, для настройки
контрастности (6).
Использование режима sRGB
Если в меню ЦВЕТ был выбран режим sRGB, то на
экране появляется следующее меню ЯРКОСТЬ/
КОНТРАСТ.
Назад
3
Настройте меню.
Сместите кнопку управления влево (<) или вправо
(,) для настройки.
MENU
4
Закройте меню.
Один раз нажмите в центре кнопки управления,
чтобы вернуться в главное меню (MENU), и второй
раз - для возврата в нормальный режим просмотра.
Если кнопки не были нажаты, то экранное меню
автоматически исчезает приблизительно через
30 секунд.
MENU
Для получения дополнительных сведений об
использовании режима sRGB см. раздел “Регулировка
цвета изображения (ЦВЕТ)” нa стр. 12.
Меню автоматически исчезает приблизительно через
3 секунды.
RU
x Сброс настроек
Нажмите кнопку RESET (сброс). См. стр. 14 для
получения подробных сведений о выполнении сброса
настроек.
RESET
9
Page 90

Регулировка размера
Регулировка формы
изображения (PAЗMEP)
Данная настройка хранится в памяти для текущего
входного сигнала.
1
Нажмите в центре кнопки управления.
На экране появляется главное меню (MENU).
2
Сместите кнопку управления, чтобы высветить
PAЗMEP, и еще раз нажмите в центре кнопки
управления.
На экране появляется меню PAЗMEP/ЦEHTP.
3
Сначала сместите кнопку управления m/M,
чтобы выбрать для настройки по
горизонтали, или для настройки по
вертикали. Затем сместите кнопку управления
</,
для настройки размера изображения.
Регулировка центровки
изображения (ЦEHTP)
Данная настройка хранится в памяти для текущего
входного сигнала.
1
Нажмите в центре кнопки управления.
На экране появляется главное меню (MENU).
2
Сместите кнопку управления, чтобы высветить
ЦEHTP, и нажмите в центре кнопки
управления еще раз.
На экране появляется меню PAЗMEP/ЦEHTP.
изображения (ГEOM)
Настройки меню ГЕОМ позволяют отрегулировать
поворот и форму растра изображения.
Настройка (поворота) хранится в памяти для всех
входных сигналов. Все остальные настройки хранятся
в памяти для текущего входного сигнала.
1
Нажмите в центре кнопки управления.
На экране появляется главное меню (MENU).
2
Сместите кнопку управления, чтобы высветить
ГEOM, и нажмите в центре кнопки
управления еще раз.
На экране появляется меню ГEOMETPИЯ.
3
Сначала сместите кнопку управления m/M,
чтобы выбрать нужный элемент для настройки.
Затем сместите кнопку управления </, для
выполнения настройки.
Выберите Чтобы
повернуть растр
расширить или сузить края изображения
сдвинуть края изображения влево или
вправо
настроить ширину изображения в верхней
части экрана
сдвинуть изображение влево или вправо в
верхней части экрана
3
Сначала сместите кнопку управления m/M,
чтобы выделить для настройки
изображения по горизонтали, или для
настройки по вертикали. Затем сместите кнопку
управления </, для настройки центровки.
Увеличение или уменьшение
изображения (ZOOM)
Данная настройка хранится в памяти для текущего
входного сигнала.
1
Нажмите в центре кнопки управления.
На экране появляется главное меню (MENU).
2
Сместите кнопку управления, чтобы высветить
PAЗMEP или ЦEHTP, и нажмите в центре
кнопку управления еще раз.
На экране появляется меню PAЗMEP/ЦEHTP.
3
Сместите кнопку управления m/M, чтобы
выбрать (zoom), и сместите </, для
пропорционального увеличения или
уменьшения размеров.
Примечание
Настройка прекращается, когда размер по горизонтали или
по вертикали достигает своего максимального или
минимального значения.
10
Page 91

Регулировка совмещения
Регулировка качества
цветов (СВЕДЕН)
Настройки меню СВЕДЕН позволяют отрегулировать
качество изображения благодаря управлению
совмещением цветов. Совмещение цветов
предполагает регулировку сигналов красного,
зеленого и синего цветов.
При наличии красных или синих оттенков вокруг букв
или линий необходимо подстроить совмещение цветов.
Данные настройки хранятся в памяти для всех
входных сигналов.
1
Нажмите в центре кнопки управления.
На экране появляется главное меню (MENU).
2
Сместите кнопку управления, чтобы высветить
CBEДEH, и нажмите в центре кнопку
управления еще раз.
На экране появляется меню CBEДEHИE.
3
Сначала сместите кнопку управления m/M,
чтобы выбрать нужный элемент для настройки.
Затем сместите кнопку управления </, для
выполнения настройки.
Выберите Чтобы
TOP
В СВЕД. BEPXHИЙ
BOT
В СВЕД. НИЖН
сместить красные или синие
оттенки по горизонтали
сместить красные или синие
оттенки по вертикали
сместить красные или синие
оттенки по вертикали в верхней
части экрана
сместить красные или синие
оттенки по вертикали в нижней
ИЙ
части экрана
изображения (ЭКРАН)
Настройки меню ЭКРАН позволяют отрегулировать
качество изображения с помощью управления
функцией устранения муарового фона и балансировки
цветов по углам монитора.
• При наличии неравномерных цветов по углам экрана
необходимо откорректировать разбалансировку
цвета.
• В случае возникновения на экране волнистых или
дугообразных линий необходимо убрать муаровый
фон.
Настройки функций ПОДАВЛЕНИЕ МУАРА и
НАСТРОЙКА МУАРА сохраняются в памяти для
текущего входного сигнала. Все остальные настройки
сохраняются в памяти для всех входных сигналов.
1 Нажмите в центре кнопки управления.
На экране появляется главное меню (MENU).
2 Переместите кнопку управления, чтобы
выделить элемент ЭКРАН, и нажмите снова
в центре кнопки управления.
На экране появляется меню ЭКРАН.
3 Сначала переместите кнопку управления m/M
для выбора элемента, который нужно
подстроить. Затем переместите кнопку
управления </, для выполнения подстройки.
Выберите Чтобы
КОМП ЗЕМ МГН
КОМП ЗЕМ МГН
КОМП ЗЕМ МГН
КОМП ЗЕМ МГН
ПОДАВЛЕНИЕ
МУАРА*
НАСТРОЙКА
МУАРА
уменьшить разбалансировку цвета в
левом верхнем углу экрана до
минимума.
уменьшить разбалансировку цвета в
правом верхнем углу экрана до
минимума.
уменьшить разбалансировку цвета в
левом нижнем углу экрана до
минимума.
уменьшить разбалансировку цвета в
правом нижнем углу экрана до
минимума.
перевести функцию устранения
муарового фона в режим “ВКЛ” или
“ВЫКЛ”.
(НАСТРОЙКА МУАРА)
появляется в меню, когда функция
переведена в режим “ВКЛ”.
откорректировать степень
устранения муарового фона, пока
он не будет сведен до минимума.
RU
Муаровый фон представляет собой разновидность
*
естественных помех на изображении, которая имеет вид
плавных волнистых линий. Он может возникать в результате
интерференции между текстурой изображения,
формируемого данным входным сигналом, и решеткой
точечных элементов экрана электронно-лучевой трубки.
Пример муарового фона
Примечание
Изображение может становиться размытым при переводе
функции ПОДАВЛЕНИЕ МУАРА в режим “ВКЛ”.
11
Page 92
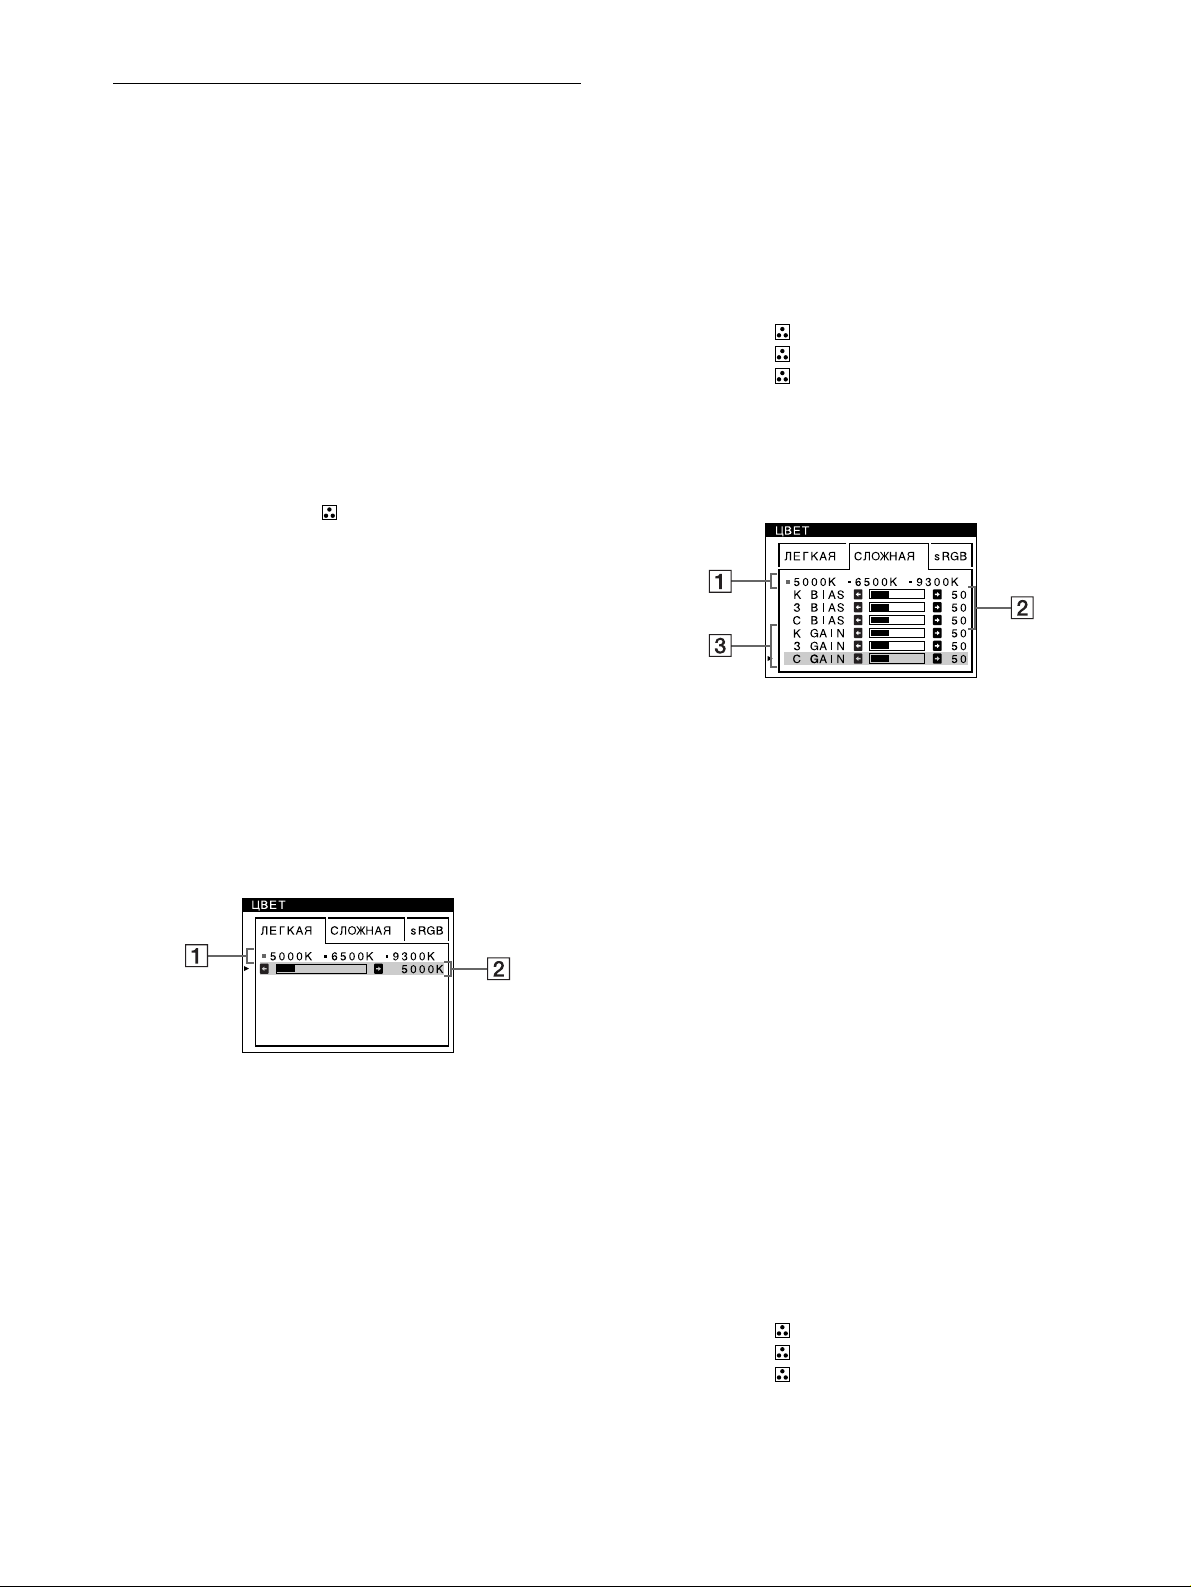
Регулировка цвета изображения
(ЦВЕТ)
Настройки меню ЦВЕТ позволяют отрегулировать
цветовую температуру изображения путем изменения
уровня насыщенности поля белого цвета. В цветовой
гамме доминирует красный цвет при небольшой
температуре, и синий цвет - при высокой температуре.
Данная настройка может пригодиться для приведения
в соответствие цветов монитора с цветами
распечатываемых изображений.
Данные настройки хранятся в памяти для всех
входных сигналов.
2 Если необходимо, выполните точную
настройку. Переместите кнопку управления
m/M
, чтобы выбрать ряд цветовой температуры
2
. Затем переместите кнопку управления
для выполнения точной настройки цветовой
температуры.
При выполнении точной настройки цветовой
температуры новые цветовые установки
сохраняются в памяти для каждой из трех
цветовых температур, и элемент 1 экранного
меню изменяется следующим образом.
• [5000K]t[1]
• [6500K]t[2]
• [9300K]t[3]
</,
1 Нажмите в центре кнопки управления.
На экране появляется главное меню (MENU).
2 Переместите кнопку управления, чтобы
выделить элемент ЦВЕТ, и нажмите снова в
центре кнопки управления.
На экране появляется меню ЦВЕТ.
3 Переместите кнопку управления
выбора режима подстройки.
Режимы подстройки делятся на три типа: ЛЕГКАЯ,
СЛОЖНАЯ и sRGB.
4 Сначала переместите кнопку управления m/M
для выбора элемента, который нужно
подстроить. Затем переместите кнопку
управления
Настройте выбранный режим в соответствии со
следующими указаниями.
</,
для выполнения подстройки.
</,
для
Режим ЛЕГКАЯ
1 Переместите кнопку управления
выбрать ряд цветовой температуры 1. Затем
переместите кнопку управления
выбрать цветовую температуру.
Заданные цветовые температуры: 5000K, 6500K и
9300K. Так как 9300K является установкой по
умолчанию, то при уменьшении температуры до
6500K и 5000K синеватые оттенки в белом цвете
будут сменяться красноватыми.
m/M
, чтобы
</,
, чтобы
Режим СЛОЖНАЯ
С помощью режима СЛОЖНАЯ можно выполнить
дополнительные, более точные настройки цвета.
1 Переместите кнопку управления
выбрать ряд цветовой температуры 1. Затем
переместите кнопку управления
выбрать цветовую температуру.
2 Переместите кнопку управления
выбора настраиваемого элемента 2. Затем
переместите кнопку управления
настройки BIAS (уровня черного).
При этом подстраиваются темные области
изображения.
3 Переместите кнопку управления
выбора настраиваемого элемента 3. Затем
переместите кнопку управления
настройки GAIN (уровня белого).
При этом подстраиваются светлые области
изображения.
При изменении элементов 2 и 3 можно настроить
составляющие входного сигнала: К (красный), З
(зеленый), С (синий).
При выполнении точной настройки цветовой
температуры новые цветовые установки
сохраняются в памяти для каждой из трех
цветовых температур, и элемент 1 экранного
меню изменяется следующим образом.
• [5000K]t[1]
• [6500K]t[2]
• [9300K]t[3]
m/M
, чтобы
</,
m/M
для
</,
m/M
для
</,
, чтобы
для
для
12
Page 93
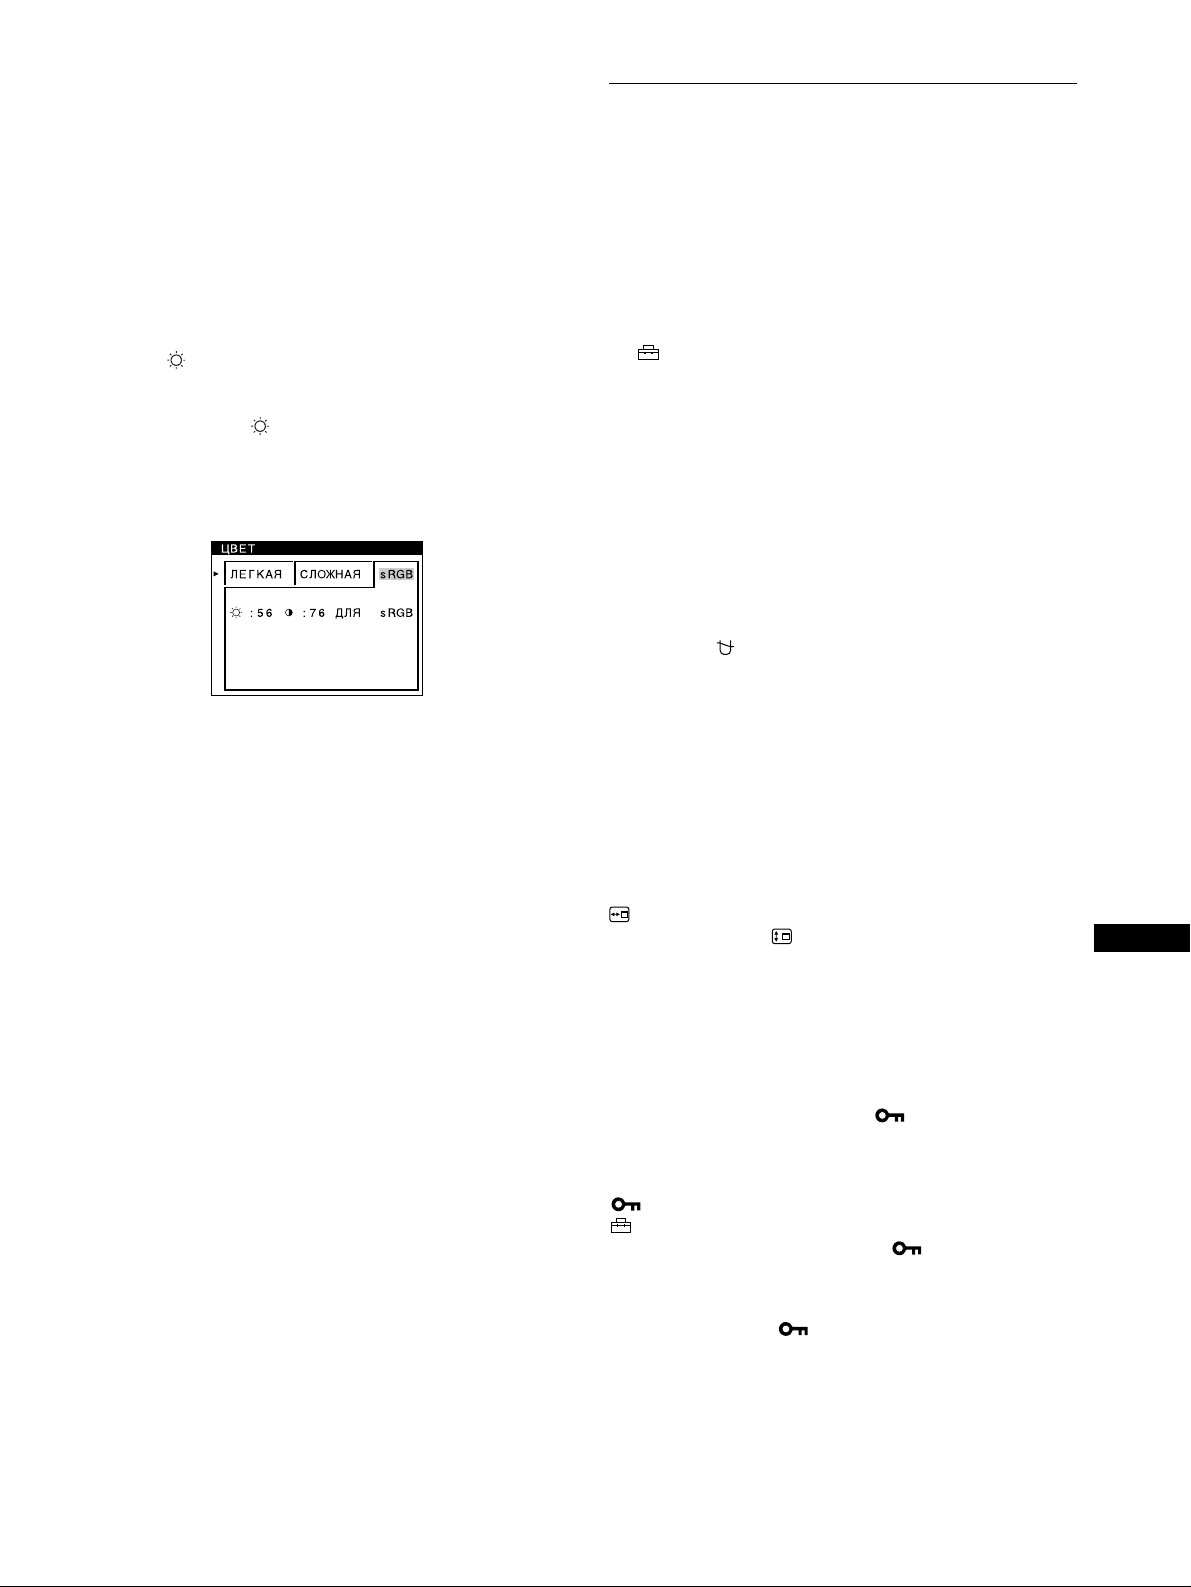
Режим sRGB
Модель смешения цветов sRGB (красный-зеленыйсиний) является стандартным промышленным
протоколом для описания цвета изображения; она
создана для приведения в соответствие
отображаемых и распечатываемых цветных
изображений в компьютерной продукции, совместимой
с технологией sRGB. Чтобы настроить цвета согласно
профилю sRGB, просто выберите режим sRGB в меню
ЦВЕТ. Однако, для того чтобы цвета sRGB
отображались правильно (γ=2,2, 6500K), необходимо
установить на компьютере профиль sRGB и настроить
яркость ( ) и контрастность (6) в соответствии с
числовыми значениями, которые показаны в меню.
Для получения дополнительных сведений о том, как
изменить яркость ( ) и контрастность (6) см. стр. 9.
Примечание
Ваш компьютер и другие подсоединяемые к нему аппараты
(например, принтер) должны быть sRGB совместимыми.
Дополнительные настройки
(ПPOЧEE)
Размагничивание монитора, изменение положения
меню и блокировку органов управления можно
производить вручную.
1
Нажмите в центре кнопку управления.
На экране появляется главное меню (MENU).
2
Сместите кнопку управления, чтобы высветить
ПPOЧEE, и нажмите в центре кнопку
управления еще раз.
На экране появляется меню ПPOЧEE.
3
Сместите кнопку управления m/M для выбора
нужного элемента для настройки.
Настройте выделенный элемент в соответствии со
следующими инструкциями.
Размагничивание монитора
Монитор автоматически размагничивается, когда на
него вновь подается напряжение.
Чтобы размагнитить монитор в ручном режиме,
сначала сместите кнопку управления m/M для
выделения (РАЗМАГНИЧИВАНИЕ). Затем
сместите кнопку управления ,.
Экран размагничивается примерно за 2 секунды. Если
потребуется повторить процесс размагничивания, это
можно сделать, как минимум, через 20 минут, для того
чтобы получить наилучший результат.
Изменение положения меню
Измените положение меню, если оно загораживает
изображение на экране.
Для изменения положения меню сначала сместите
кнопку управления m/M, чтобы выбрать
(ҐOPИЗOHT. ПOЗ. MEHЮ) для настройки по
горизонтали или (BEPTИКAЛ. ПOЗ. MEHЮ) для
настройки по вертикали. Затем сместите кнопку
управления </, для перемещения экранного
меню.
Блокировка органов управления
Для защиты данных настройки путем блокировки
органов управления сначала сместите кнопку
управления m/M для выбора (БЛOKИPOBKA
УПPABЛEHИЯ). Затем сместите кнопку управления
,
для выбора BKЛ.
В работе остаются только выключатель 1, ВЫХОД и
(БЛOKИPOBKA УПPABЛEHИЯ) в меню
ПPOЧEE. При выборе любого другого элемента на
экране появляется обозначение .
Для снятия блокировки
Повторите действия, описанные выше, и переведите
функцию блокировки (БЛОКИРОВКА УПРАВЛЕНИЯ) в
режим ВЫКЛ.
RU
13
Page 94

Сброс настроек
В данном мониторе существует три способа сброса
настроек. Для сброса настроек воспользуйтесь
кнопкой RESET (сброс).
Технические
особенности
RESET
Сброс отдельного элемента настройки
Воспользуйтесь кнопкой управления для выбора
элемента, который нужно подстроить, и нажмите
кнопку RESET (сброс).
Сброс всех данных настройки для текущего
входного сигнала
Нажмите кнопку RESET (сброс), когда на экране
отсутствуют меню.
Необходимо помнить, что этим способом нельзя
сбросить настройки следующих элементов:
• язык экранного меню (стр. 7)
• режим подстройки в меню ЦВЕТ (ЛЕГКАЯ,
СЛОЖНАЯ, sRGB) (стр. 12)
• положение экранного меню (стр. 13)
• блокировка органов управления (стр. 13)
Сброс всех данных настройки для всех
входных сигналов
Нажмите и удерживайте кнопку RESET (сброс) не
менее 2 секунд.
Примечание
Кнопка RESET не действует, когда
УПPABЛEHИЯ
находится в положении
)
(БЛOKИPOBKA
BKЛ.
Предустановленные и
пользовательские режимы
Когда монитор получает входной сигнал, он
автоматически согласовывает его с одним из режимов
предварительной заводской настройки, хранящимся в
памяти монитора, для обеспечения
высококачественного изображения в центре экрана.
(См. список предустановленных режимов в Appendix.)
Для входных сигналов, не соответствующих ни одному
из заводских режимов, с помощью технологии
цифрового мультисканирования данного монитора
производятся все настройки, необходимые для
получения четкого изображения при любой
синхронизации в его частотном диапазоне (по
горизонтали: 30 – 109 кГц, по вертикали: 48 – 160 Гц).
При регулировке изображения данные настройки
заносятся в память как пользовательский режим и
автоматически вызываются из нее каждый раз при
получении данного входного сигнала.
Примечание для пользователей Windows
Пользователям Windows следует обратиться к
руководству по использованию видеоплаты или
воспользоваться утилитами, поставляемыми с
графической платой, и выбрать самую высокую из
возможных частот регенерации для оптимизации работы
монитора.
Функция энергосбережения
Монитор соответствует нормам по энергосбережению,
разработанным VESA,
монитор подключен к компьютеру или к графической
видеоплате типа DPMS (система передачи сигналов
управления питанием монитора), он автоматически
сокращает энергопотребление в три этапа, как показано
ниже.
NERGY STAR и NUTEK. Если
E
14
Режим
потребления
энергии
Обычная работа
Ожидание (nepвый
режим экономии)
Перерыв в работе
(втopoй режим
экономии)
Выход из активного
состояния
(тpeтий режим
экономии)
Выключение 0 Вт Выключен
“Bтopoй режим экономии” и “тpeтий режим экономии”
*
определены агенством защиты окружающей среды (EPA).
Когда компьютер переходит в режим пониженного потребления
**
энергии, входной сигнал отключается, и на экране появляется
сообщение НЕТ ВХОД НОГО СИГНАЛА. Через несколько секунд
монитор переходит в режим пониженного потребления энергии.
*
**
*
Потребляемая
мощность
145 Вт Горит
≤
15 Вт Горит
≤
15 Вт Горит
≤
Прибл. 1 Вт Горит
Индикатор
1
(питание)
зеленым
зеленым и
оранжевым
попеременно
зеленым и
оранжевым
попеременно
оранжевым
Page 95
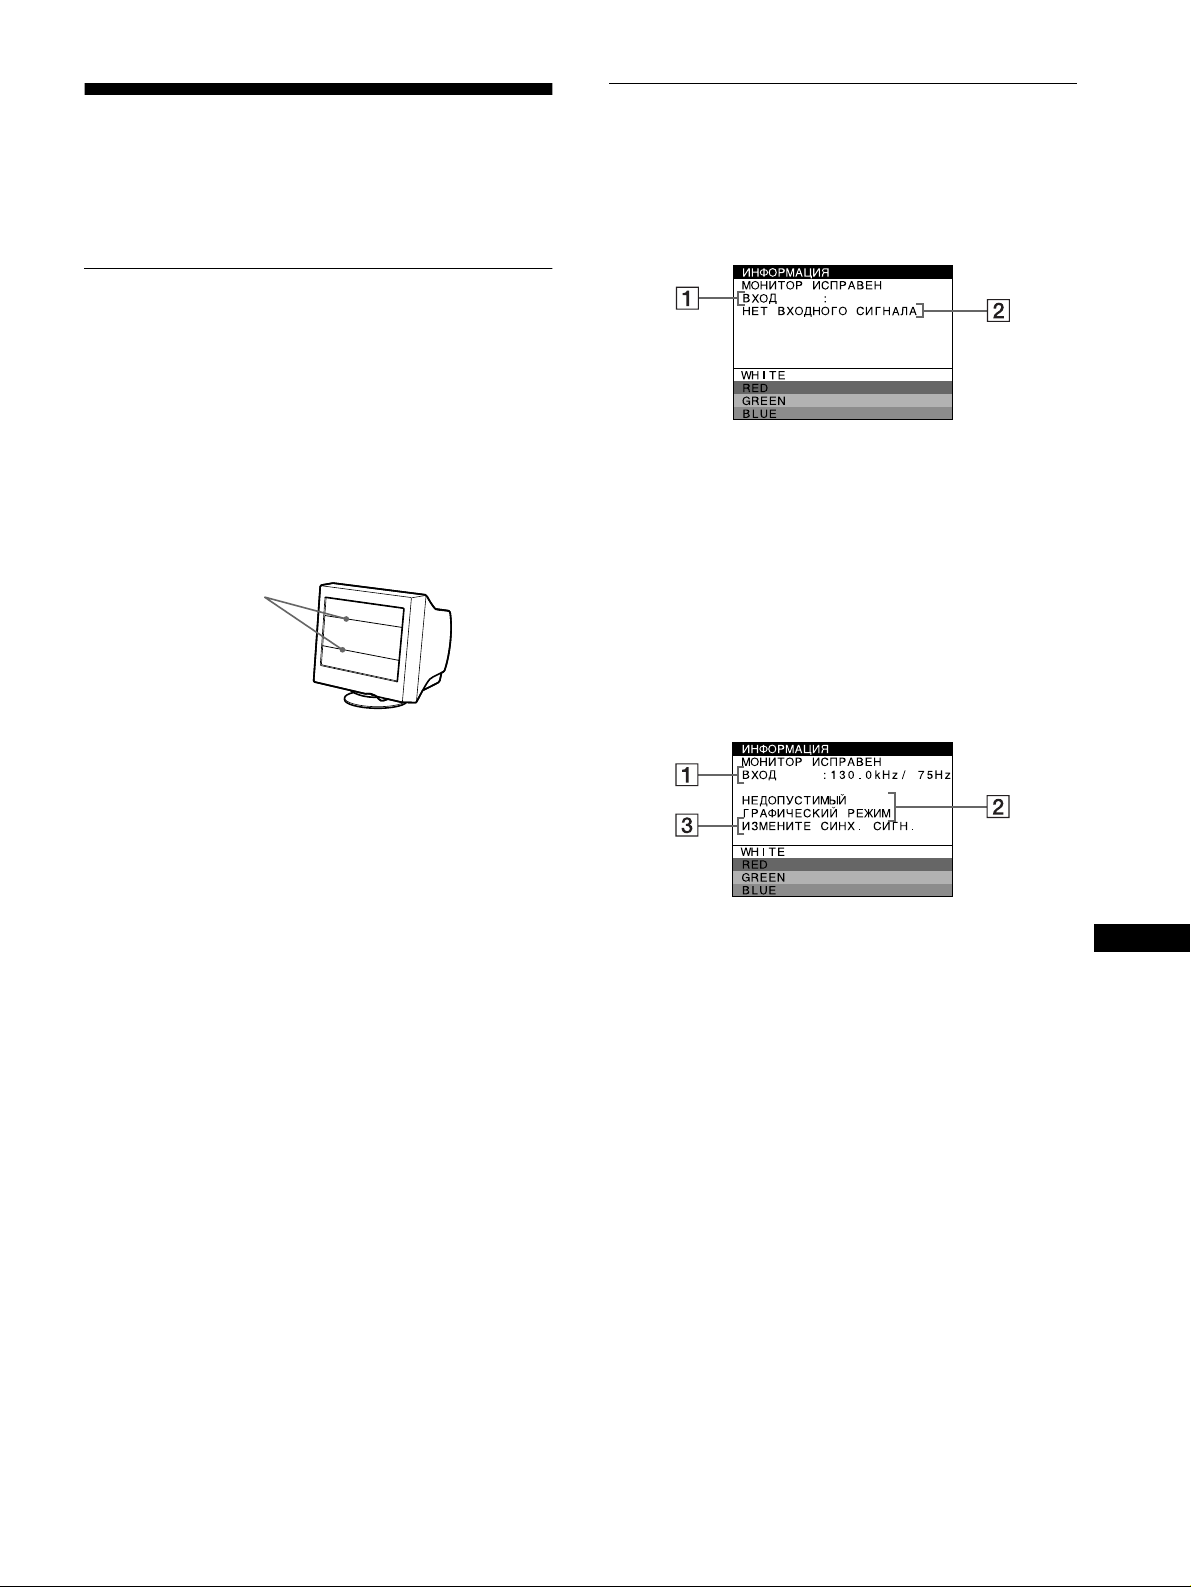
Устранение
неисправностей
Экранные сообщения
При неправильном входном сигнале на экране
появится одно из нижеуказанных сообщений.
Прежде чем обратиться в службу технической
поддержки, ознакомьтесь с данным разделом.
Демпферные нити
Тонкие линии, которые могут появляться на экране,
характерны для мониторов Trinitron, но не являются
неполадкой. Это тени демпферных нитей, которые
гасят вибрацию апертурной решетки; наиболее
заметными они становятся при выводе на экран
светлого фона (обычно белого). Апертурная решетка это очень важный элемент, который делает
электронно-лучевые трубки Trinitron уникальными и
обеспечивает более интенсивные светлые тона на
экране, благодаря чему изображение становится ярче
и отчетливее.
Демпферные нити
Если на экране появляется сообщение НЕТ
ВХОДНОГО СИГНАЛА
68.7kHz/ H58
1111
Частоты текущего входного сигнала
Если монитор распознает частоты текущего
входного сигнала, то отображаются частоты для
горизонтальной и вертикальной разверток.
2222
Состояние входного сигнала
НЕТ ВХОДНОГО СИГНАЛА
Указывает на то, что входной сигнал не подается.
Если на экране появляется сообщение
z
НЕДОПУСТИМЫЙ ГРАФИЧЕСКИЙ РЕЖИМ
1111
Частоты текущего входного сигнала
Если монитор распознает частоты текущего
входного сигнала, то отображаются частоты для
горизонтальной и вертикальной разверток.
2222
Состояние входного сигнала
НЕДОПУСТИМЫЙ ГРАФИЧЕСКИЙ РЕЖИМ
Указывает на то, что входной сигнал не
соответствует характеристикам монитора.
3333
Действия по устранению
На экране появляется сообщение “ИЗМЕНИТЕ
СИНХ. СИГН.”. Если данная модель
устанавливается вместо старого монитора,
верните прежний монитор на место. Затем
настройте графический адаптер, так чтобы частота
горизонтальной развертки была в диапазоне 30 –
109 кГц, а частота вертикальной развертки - в
диапазоне 48 – 160 Гц.
Для получения дополнительных сведений см. раздел
“Симптомы неполадок и действия по их устранению”
нa стр. 16.
RU
15
Page 96

Симптомы неполадок и действия по их устранению
Если причиной неполадок стали компьютер или другое оборудование, обратитесь к инструкциям по эксплуатации этого
оборудования.
Воспользуйтесь функцией самодиагностики (стр. 18), если проблема не устраняется с помощью следующих
рекомендаций.
Симптом Проверьте эти позиции
Нет изображения
Если индикатор 1 не горит • Проверьте правильность подключения кабеля питания.
Если на экране появляется
сообщение HET BXOДHOГO
CИГHAЛA, или если индикатор 1
горит оранжевым или
поочередно зеленым и
оранжевым светом
Если на экране появляется
сообщение НЕДОПУСТИМЫЙ
ГРАФИЧЕСКИЙ РЕЖИМ
Если на дисплее нет сообщений,
и индикатор 1 горит зеленым
или мигает оранжевым светом
При использовании Windows 95/98 • Если данная модель устанавливается вместо старого монитора, верните
При использовании системы
Macintosh
Скачки, дрожание или
волнообразные колебания
изображения
Изображение размыто
• Проверьте, чтобы выключатель 1 был в положении “on” (вкл).
• Убедитесь, что кабель видеосигнала подключен правильно и все разъемы
надежно вставлены в свои гнезда (стр. 6).
• Проверьте, чтобы контакты входного видеоразъема HD15 не были согнуты или утоплены
внутрь вилки.
x
Неполадки, связанные с подключением компьютера или другого
оборудования
• Компьютер в режиме энергосбережения. Попробуйте нажать любую клавишу на
клавиатуре компьютера или передвинуть мышь.
• Проверьте, чтобы компьютер был подключен к сети.
• Проверьте, чтобы графическая плата была надежно закреплена в соответствующем
гнезде.
x
Неполадки, связанные с подключением компьютера или другого
оборудования
• Проверьте, чтобы видеочастотный диапазон находился в указанных для
монитора пределах. При замене старого монитора на новый вновь подключите
старый монитор и настройте частотный диапазон следующим образом.
Частота строк: 30 – 109 кГц
Частота кадров: 48 – 160 Гц
• Пользуйтесь функцией самодиагностики (стр. 18).
прежний монитор на место и выполните следующее. Загрузите установочный
диск (стр. 7) и выберите данный монитор (“CPD-E500E”) в списке мониторов
Sony в экране выбора мониторов для Windows 95/98.
• При подключении к компьютеру серии Power Macintosh G3, в котором имеются
разъемы с тремя рядами штырьков, убедитесь, что прилагаемый переходник G3
для Macintosh
• Для Power Macintosh G3 или других моделей, имеющих разъемы с двумя рядами
штырьков, необходимо использовать другой переходник, который продается
отдельно.
• Изолируйте и устраните все потенциальные источники электрических или
магнитных полей, например, другие мониторы, лазерные принтеры,
электрические вентиляторы, флуоресцентные лампы или телевизоры.
• Удалите монитор от линий электроснабжения или поставьте магнитный экран
около монитора.
• Попробуйте подключить монитор к другой розетке переменного тока и по
возможности другой цепи.
• Попробуйте повернуть монитор на 90° влево или вправо.
x
Неполадки, связанные с подключением компьютера или другого
и кабель видеосигнала подсоединены правильно (стр. 6).
оборудования
• Обратитесь к руководству по графической плате, чтобы проверить, правильные
ли параметры установлены для Вашего монитора.
• Удостоверьтесь в том, что графический режим (VESA, Macintosh 21"Color и др.)
и частота входного сигнала соответствуют характеристикам монитора
(Appendix). Даже в подходящем частотном диапазоне некоторые видеокарты
подают слишком узкий для корректной синхронизации монитора
синхронизирующий импульс.
• Подстройте частоту регенерации компьютера (частоту вертикальной развертки)
для получения оптимального изображения.
• Настройте контраст и яркость (стр. 9).
• Попробуйте размагнитить монитор* (стр. 13).
• Если функция “ПОДАВЛЕНИЕ МУАРА” находится в состоянии “ВКЛ”, изображение
может стать размытым. Уменьшите эффект подавления муарового фона или
установите функцию “ПОДАВЛЕНИЕ МУАРА” в положение “ВЫКЛ” (стр. 11).
16
Page 97

Симптом Проверьте эти позиции
Многоконтурное изображение
Неправильные центровка или
размер изображения
Закругленные края
изображения
Виден волнистый или
эллиптический рисунок (муар)
Неоднородный цвет
Белый цвет не похож на белый
От букв и строк падают красные
или синие тени по краям
Не работают кнопки управления
монитором
(На экране появляется )
Слышен фон сразу после подачи
питания
*
Если потребуется повторить процесс размагничивания, это можно сделать, как минимум, через 20 минут, для того чтобы получить
наилучший результат. Гудящий звук, который слышен, не является неисправностью.
• Не используйте удлинители видеокабелей и коммутаторы видеосигнала.
• Проверьте, надежно ли закреплены в своих гнездах все разъемы.
• Подстройте размер (стр. 10) или отцентрируйте изображение (стр. 10).
Необходимо помнить, что в некоторых видеорежимах экран не заполняется до
краев.
• Настройте геометрию (стр. 10).
• Переведите функцию “ПОДАВЛЕНИЕ МУАРА” в положение “ВКЛ” и
откорректируйте степень подавления муарового фона, пока он не будет сведен
до минимума (стр. 11).
x
Неполадки, связанные с подключением компьютера или другого
оборудования
• Замените рисунок рабочего стола.
• Выполните размагничивание монитора* (стр. 13). Однородность цвета может
нарушаться в тех случаях, когда вблизи монитора находятся источники
магнитного поля, такие как громкоговорители, или когда Вы поворачиваете
монитор.
• Откорректируйте разбалансировку цвета по углам экрана (стр. 11).
• Настройте цветовую температуру (стр. 12).
• Настройте сведение лучей (стр. 11).
• Если блокировка управления установлена на BKЛ, настройте ее на BЫKЛ
(стр. 13).
• Этот звук сопутствует процессу автоматического размагничивания. При подаче
напряжения монитор автоматически размагничивается в течение двух секунд.
Отображение названия модели монитора,
серийного номера и даты выпуска.
В момент получения монитором видеосигнала нажмите
в центре кнопки управления и не отпускайте в течение
не менее 5 секунд, чтобы вывести на экран
информационное окно для данной модели монитора.
MENU
Пример
b
Если проблема сохраняется, обратитесь к
официальному дилеру компании Sony и сообщите ему
следующие данные.
• Название модели: CPD-E500E
• Серийный номер
• Название и характеристики вашего компьютера и
графической платы.
RU
17
Page 98

Функция самодиагностики
Монитор оснащен функцией самодиагностики. Если
возникает какая-либо проблема с монитором или
компьютером, экран очищается, а индикатор
1 (питание) загорится зеленым или замигает
оранжевым. Если индикатор 1 горит оранжевым
светом, компьютер находится в режиме
энергосбережения. Нажмите любую клавишу на
клавиатуре.
RESET
Если индикатор 1 горит зеленым светом
1
Отсоедините кабель видеовхода или
выключите подсоединенный к монитору
компьютер.
2
Нажмите кнопку питания
выключить и включить монитор.
3
Переместите кнопку управления , и
удерживайте 2 секунды перед тем, как монитор
перейдет в режим экономного потребления
энергии.
MENU
MENU
индикатор
1
1
дважды, чтобы
Технические
характеристики
Кинескоп Шаг апертурной решетки
0,24 мм
Размер экрана по диагонали
21 дюйм
Развертка 90 градусов
FD Trinitron
Размер экранного изображения
Прибл. 403,8 x 302,2 мм (ш/в)
Видимое изображение 19,8"
Разрешение
Максимум По горизонтали: 2048 точек
По вертикали: 1536 линий
Рекомендуется По горизонтали: 1600 точек
По вертикали: 1200 линий
Стандартная площадь изображения
Прибл. 388 × 291 мм (ш/в)
или
Прибл. 364 × 291 мм (ш/в)
Частота развертки* По горизонтали: от 30 до
109 кГц
По вертикали: от 48 до 160 Гц
Параметры сетевого питания
от 100 до 240 В, 50 – 60 Гц,
2,0 – 1,0 A
Потребляемая мощность
Прибл. 145 Вт
Габариты Прибл. 497 × 480 × 478 мм
(ш/в/д)
Вес Прибл. 32 кг
Plug and Play DDC1/2B/2Bi, GTF
Входящие в комплект принадлежности
См. стр. 6
**
Если появляются все четыре цветные полосы (белая,
красная, зеленая, голубая), это означает, что монитор
работает корректно. Вновь подсоедините кабель к
видеовходу и проверьте состояние компьютера.
Если цветные полосы не появляются, то монитор,
возможно, неисправен. Сообщите официальному
дилеру фирмы Sony о состоянии монитора.
Если индикатор 1 мигает оранжевым светом
Нажмите кнопку кнопку 1 два раза, чтобы
выключить и включить монитор.
Если индикатор 1 загорается зеленым светом,
монитор работает должным образом.
Если индикатор 1 продолжает мигать, то монитор,
возможно, неисправен. Подсчитайте количество
секунд между вспышками оранжевого света
индикатора 1 и сообщите официальному дилеру Sony
о состоянии монитора. Не забудьте указать название
модели и серийный номер своего монитора. Также
отметьте тип и модель своего компьютера и
видеоплаты.
* Рекомендуемый режим синхронизации по
горизонтали и вертикали
• Ширина импульса горизонтальной синхронизации
должна быть больше 4,8% общего периода
горизонтальной развертки или 0,8 мкс, в
зависимости от того, которая из них больше.
• Интервал между сигналами горизонтальной
развертки должен быть больше 2,3 мкс.
• Интервал между сигналами вертикальной
развертки должен быть больше 450 мкс.
** Если входной сигнал соответствует параметрам
GTF (Generalized Timing Formula), то оптимальное
изображение для дисплея будет автоматически
обеспечиваться функцией GTF.
Конструкция и характеристики могут изменяться без
предварительного уведомления.
18
Page 99
Inhoud
Voorzorgsmaatregelen . . . . . . . . . . . . . . . . . . . . . . . . . . . . . . . . . . . 4
Identificatie van onderdelen en bedieningselementen . . . . . . . . . . . 5
Installatie . . . . . . . . . . . . . . . . . . . . . . . . . . . . . . . . . . . . . .6
Stap 1:
Stap 2:
Stap 3:
De monitor aansluiten op uw computer . . . . . . . . . . . . . . . . 6
Het netsnoer aansluiten. . . . . . . . . . . . . . . . . . . . . . . . . . . . 6
De monitor en de computer aanzetten . . . . . . . . . . . . . . . . 7
De taal van de schermmenu’s selecteren (LANG) . . . . . . . . . . . . . . 7
De monitor instellen . . . . . . . . . . . . . . . . . . . . . . . . . . . . .8
Het menu gebruiken . . . . . . . . . . . . . . . . . . . . . . . . . . . . . . . . . . . . . 8
De helderheid en het contrast instellen . . . . . . . . . . . . . . . . . . . . . . 9
De afmeting instellen (AFM.) . . . . . . . . . . . . . . . . . . . . . . . . . . . . . 10
De centrering van het beeld instellen (CENTR.). . . . . . . . . . . . . . . 10
Het beeld vergroten of verkleinen (ZOOM). . . . . . . . . . . . . . . . . . . 10
De beeldvorm instellen (GEOM). . . . . . . . . . . . . . . . . . . . . . . . . . . 10
De convergentie instellen (CONV) . . . . . . . . . . . . . . . . . . . . . . . . . 11
De beeldkwaliteit regelen (SCHERM). . . . . . . . . . . . . . . . . . . . . . . 11
De beeldkleur regelen (KLEUR) . . . . . . . . . . . . . . . . . . . . . . . . . . . 12
Extra instellingen (OPTIES) . . . . . . . . . . . . . . . . . . . . . . . . . . . . . . 13
De instellingen resetten . . . . . . . . . . . . . . . . . . . . . . . . . . . . . . . . . 14
Technische kenmerken. . . . . . . . . . . . . . . . . . . . . . . . . .14
Fabrieks- en gebruikersinstellingen . . . . . . . . . . . . . . . . . . . . . . . . 14
Functie voor energiebesparing . . . . . . . . . . . . . . . . . . . . . . . . . . . . 14
• Trinitron is een geregistreerd
handelsmerk van Sony Corporation.
• Macintosh is een handelsmerk waarvan
de licentie beh oort aan Apple
Computer, Inc., gere gi streerd in de
U.S.A. en andere landen.
• Windows
geregistreerde hande l s merken van
Microsoft Corporation in de Vereni gde
Staten en in and ere landen.
• IBM PC/AT en VGA zijn geregistreerde
handelsmerken van IBM Corporation in
de U.S.A.
• VESA en DDC
van de Video Electronics Standard
Association.
•
E
geregistreerd handelsm e rk.
• Alle andere in deze document atie
genoemde produc tnamen zijn de
handelsmerken of de geregistreerde
handelsmerk en van de respectie velijke
bedrijven.
• De aanduidingen “” en “” worden in
deze gebruiksaanwijzing niet altijd
aangegeven.
en MS-DOS zijn
zijn handelsm erken
NERGY STAR is een in de U. S .
Problemen oplossen . . . . . . . . . . . . . . . . . . . . . . . . . . . .15
Indien er dunne lijnen op uw scherm verschijnen
(dempingsdraden). . . . . . . . . . . . . . . . . . . . . . . . . . . . . . . . . . . . . . 15
Schermberichten. . . . . . . . . . . . . . . . . . . . . . . . . . . . . . . . . . . . . . . 15
Foutsymptomen en oplossingen. . . . . . . . . . . . . . . . . . . . . . . . . . . 16
Zelfdiagnosefunctie. . . . . . . . . . . . . . . . . . . . . . . . . . . . . . . . . . . . . 18
Specificaties. . . . . . . . . . . . . . . . . . . . . . . . . . . . . . . . . . .18
Appendix. . . . . . . . . . . . . . . . . . . . . . . . . . . . . . . . . . . . . . . i
Preset mode timing table . . . . . . . . . . . . . . . . . . . . . . . . . . . . . . . . . .i
TCO’99 Eco-document . . . . . . . . . . . . . . . . . . . . . . . . . . . . . . . . . . . .i
NL
3
Page 100

Voorzorgsmaatregelen
90°
5°
90°
15°
Centreermarkeringen
Waarschuwing bij aansluiting op het net
• Gebruik het bijgeleverde netsnoer. Indien u een ander netsnoer
gebruikt, dient u er zeker van te zijn dat dit compatibel is met
het elektriciteitsnet ter plaatse.
Voor klanten in het Verenigd Koninkrijk
Indien u de monitor in het Verenigd Koninkrijk gebruikt, dient
u het bijgeleverde Engelse netsnoer te gebruiken.
Voorbeeld van stekkertypes
Onderhoud
• Maak het scherm schoon met een zachte doek. Als u een
reinigingsmiddel voor glas gebruikt, mag u geen middelen
gebruiken die een antistatische oplossin g of soo rtge lijke
toevoeging bevatten, aangezien dit krassen op de laag van het
scherm kunnen veroorzaken.
• Kom niet met scherpe of schurende voorwerpen, zoals
bijvoorbeeld een ballpoint of een schroevendraaier, aan het
schermoppervlak. Dit kan namelijk kr assen op de beeldbuis
veroorzaken.
• Maak de behuizing, de b eeldbuis en de bedieningsknoppen
schoon met een zachte doek die licht bevochtigd is met een
mild reinigende oplossing. Gebruik geen schuursponsjes,
schuurpoeder of oplosmiddel, zoals bijv oor beeld alcohol of
benzeen.
voor 100 tot 120 V AC voor 200 tot 240 V AC
• Alvorens het netsno er af te kopp elen d ient u nadat u de s troom
heeft uitgeschakeld tenminste 30 seconden te wachten, zodat de
statische elektriciteit van het schermoppervlak kan worden
ontladen.
• Nadat d e stroom is ingeschakeld, wordt het sche rm gedurende
ongeveer 2 seconden gedemagnetiseerd. Dit genereert een sterk
magnetisch veld rond het scherm, dat data op magnet ische
tapes en diskettes in de buurt van de monitor kan aantasten.
Zorg ervoor dat u ma gnetische opname-a pparatuur, tapes en
diskettes uit de buurt van de monitor houdt.
Het apparaat moet in de buurt van een gem a kk elijk
toegankelijk stopcontact word en geïnsta lle er d .
alleen voor 240 V AC
Installatie
De monitor mag niet op de volgende plaatsen worden
geïnstalleerd:
• op opper vlakken (kleed, dekens, etc.) of in de buurt van
materialen (gordijnen, lamellen, etc.) die de ventilatieopeningen kunnen afsluiten
• in de buurt van warmtebronnen zoals radiatoren of luchtkanalen,
of op een plaats die is blootgesteld aan direct zonlicht
• op een plaats die is blootgesteld aan sterke
temperatuurschommeling en
• op een plaats die is blootgesteld aan mechanische trilling e n of
schokken
• op een onstabiel oppervlak
• in de buurt van apparat e n die magnetische velden genereren,
zoals een transformator of hoogspanningsleidingen
• in de buurt van of op elektrisch geladen metalen oppervlakken
Transport
Wanneer u deze monitor transpo r teert voor reparatie of
verzending, dient u de oorspronkelijke doos en
verpakkingsmaterialen te gebruiken.
Gebruik van de draai/kantelvoet
Deze monitor kan binnen de hieronder getoonde hoeken worden
geplaatst. Om het midden van de draaicirkel van de monitor te
vinden, brengt u het midden van het scherm van de monitor op één
lijn met de centreermarkeringen op de standaard.
Houd de monitor met beide handen vast a an de onderkant
wanneer u hem in ho rizontale of verticale richting draait. Pas op
dat uw vingers niet bekneld raken aan de achterkant van de
monitor wanneer u de monitor in verticale richting kantelt.
4
 Loading...