

Page 1
4-084-759-21 (1)
â
Trinitron Color
Computer Display
Operating Instructions
Mode d’emploi
Bedienungsanleitung
Manual de instrucciones
Istruzioni per l’uso
Инструкция по эксплуатации
Bruksanvisning
Gebruiksaanwijzing
GB
FR
DE
ES
IT
RU
SE
NL
CPD-E430
© 2001 Sony Corporation
Page 2
Owner’s Record
The model and serial numbers are located at the rear of the unit.
Record these numbers in the spaces provided below. Refer to them
whenever you call upon your dealer regarding this product.
Model No.
Serial No.
WARNING
To prevent fire or shock hazard, do not expose the
unit to rain or moisture.
Dangerously high voltages are present inside the
unit. Do not open the cabinet. Refer servicing to
qualified personnel only.
FCC Notice
This equipment has been tested and found to comply with the limits
for a Class B digital device, pursuant to Part 15 of the FCC Rules.
These limits are designed to provide reasonable protection against
harmful interference in a residential installation. This equipment
generates, uses, and can radiate radio frequency energy and, if not
installed and used in accordance with the instructions, may cause
harmful interference to radio communications. However, there is no
guarantee that interference will not occur in a particular installation.
If this equipment does cause harmful interference to radio or
television reception, which can be determined by turning the
equipment off and on, the user is encouraged to try to correct the
interference by one or more of the following measures:
– Reorient or relocate the receiving antenna.
– Increase the separation between the equipment and receiver.
– Connect the equipment into an outlet on a circuit different from
that to which the receiver is connected.
– Consult the dealer or an experienced radio/TV technician for
help.
You are cautioned that any changes or modifications not expressly
approved in this manual could void your authority to operate this
equipment.
EN 55022 Compliance (Czech Republic Only)
NOTICE
This notice is applicable for USA/Canada only.
If shipped to USA/Canada, install only a UL LISTED/CSA
LABELLED power supply cord meeting the following
specifications:
SPECIFICATIONS
Plug Type Nema-Plug 5-15p
Cord Type SVT or SJT, minimum 3
Length Maximum 15 feet
Rating Minimum 7 A, 125 V
× 18 AWG
NOTICE
Cette notice s’applique aux Etats-Unis et au Canada
uniquement.
Si cet appareil est export* aux Etats-Unis ou au Canada,
utiliser le cordon d’alimentation portant la mention UL LISTED/
CSA LABELLED et remplissant les conditions suivantes:
SPECIFICATIONS
Type de fiche Fiche Nema 5-15 broches
Cordon Type SVT ou SJT, minimum 3
Longueur Maximum 15 pieds
Tension Minimum 7 A, 125 V
As an
ENERGY STAR Partner, Sony
Corporataion has determined that this
product meets the
guidelines for energy efficiency.
× 18 AWG
ENERGY STAR
This device belongs to category B devices as described in EN
55022, unless it is specifically stated that it is a category A
device on the specification label. The following applies to
devices in category A of EN 55022 (radius of protection up to
30 meters). The user of the device is obliged to take all steps
necessary to remove sources of interference to
telecommunication or other devices.
INFORMATION
This product complies with Swedish National Council for Metrology
(MPR) standards issued in December 1990 (MPR II) for very low
frequency (VLF) and extremely low frequency (ELF).
INFORMATION
Ce produit est conforme aux normes du Swedish National Council
for Metrology de décembre 1990 (MPR II) en ce qui concerne les
fréquences très basses (VLF) et extremement basses (ELF).
INFORMACIÓN
Este producto cumple las normas del Consejo Nacional Sueco
para Metrología (MPR) emitidas en diciembre de 1990 (MPR II)
para frecuencias muy bajas (VLF) y frecuencias extremadamente
bajas (ELF).
This monitor complies with the TCO’99
guidelines.
If you have any questions about this product, you may call:
Sony Customer Information Center
1-800-222-SONY (7669)
or write to:
Sony Customer Information Center
1 Sony Drive, Mail Drop #T1-11, Park Ridge, NJ 07656
Declaration of Conformity
Trade Name: SONY
Model No.: CPD-E430
Responsible Party: Sony Electronics Inc.
Address: 680 Kinderkamack Road, Oradell,
NJ 07649 USA
Telephone No.: 201-930-6972
This device complies with Part 15 of the FCC Rules. Operation
is subject to the following two conditions: (1) This device may
not cause harmful interference, and (2) this device must accept
any interference received, including interference that may
cause undesired operation.
2
Page 3

Table of Contents
Setup . . . . . . . . . . . . . . . . . . . . . . . . . . . . . . . . . . . 3
Adjustments . . . . . . . . . . . . . . . . . . . . . . . . . . . . . 4
Troubleshooting . . . . . . . . . . . . . . . . . . . . . . . . . . 6
Specifications . . . . . . . . . . . . . . . . . . . . . . . . . . . . 7
Precautions . . . . . . . . . . . . . . . . . . . . . . . . . . . . . . 8
Appendix . . . . . . . . . . . . . . . . . . . . . . . . . . . . . . . . . i
Preset mode timing table. . . . . . . . . . . . . . . . . . . . . i
TCO’99 Eco-document . . . . . . . . . . . . . Back Cover
Setup
•Trinitronâ is a registered trademark of Sony Corporation.
• Macintosh is a trademark licensed to Apple Computer, Inc., registered in
the U.S.A. and other countries.
• Windows
Corporation in the United States and other countries.
• IBM PC/AT and VGA are registered trademarks of IBM Corporation of
the U.S.A.
• VESA and DDC
Association.
•
ENERGY STAR is a U.S. registered mark.
• All other product names mentioned herein may be the trademarks or
registered trademarks of their respective companies.
• Furthermore, “
â
and MS-DOS are registered trademarks of Microsoft
ä
are trademarks of the Video Electronics Standard
ä” and “â” are not mentioned in each case in this manual.
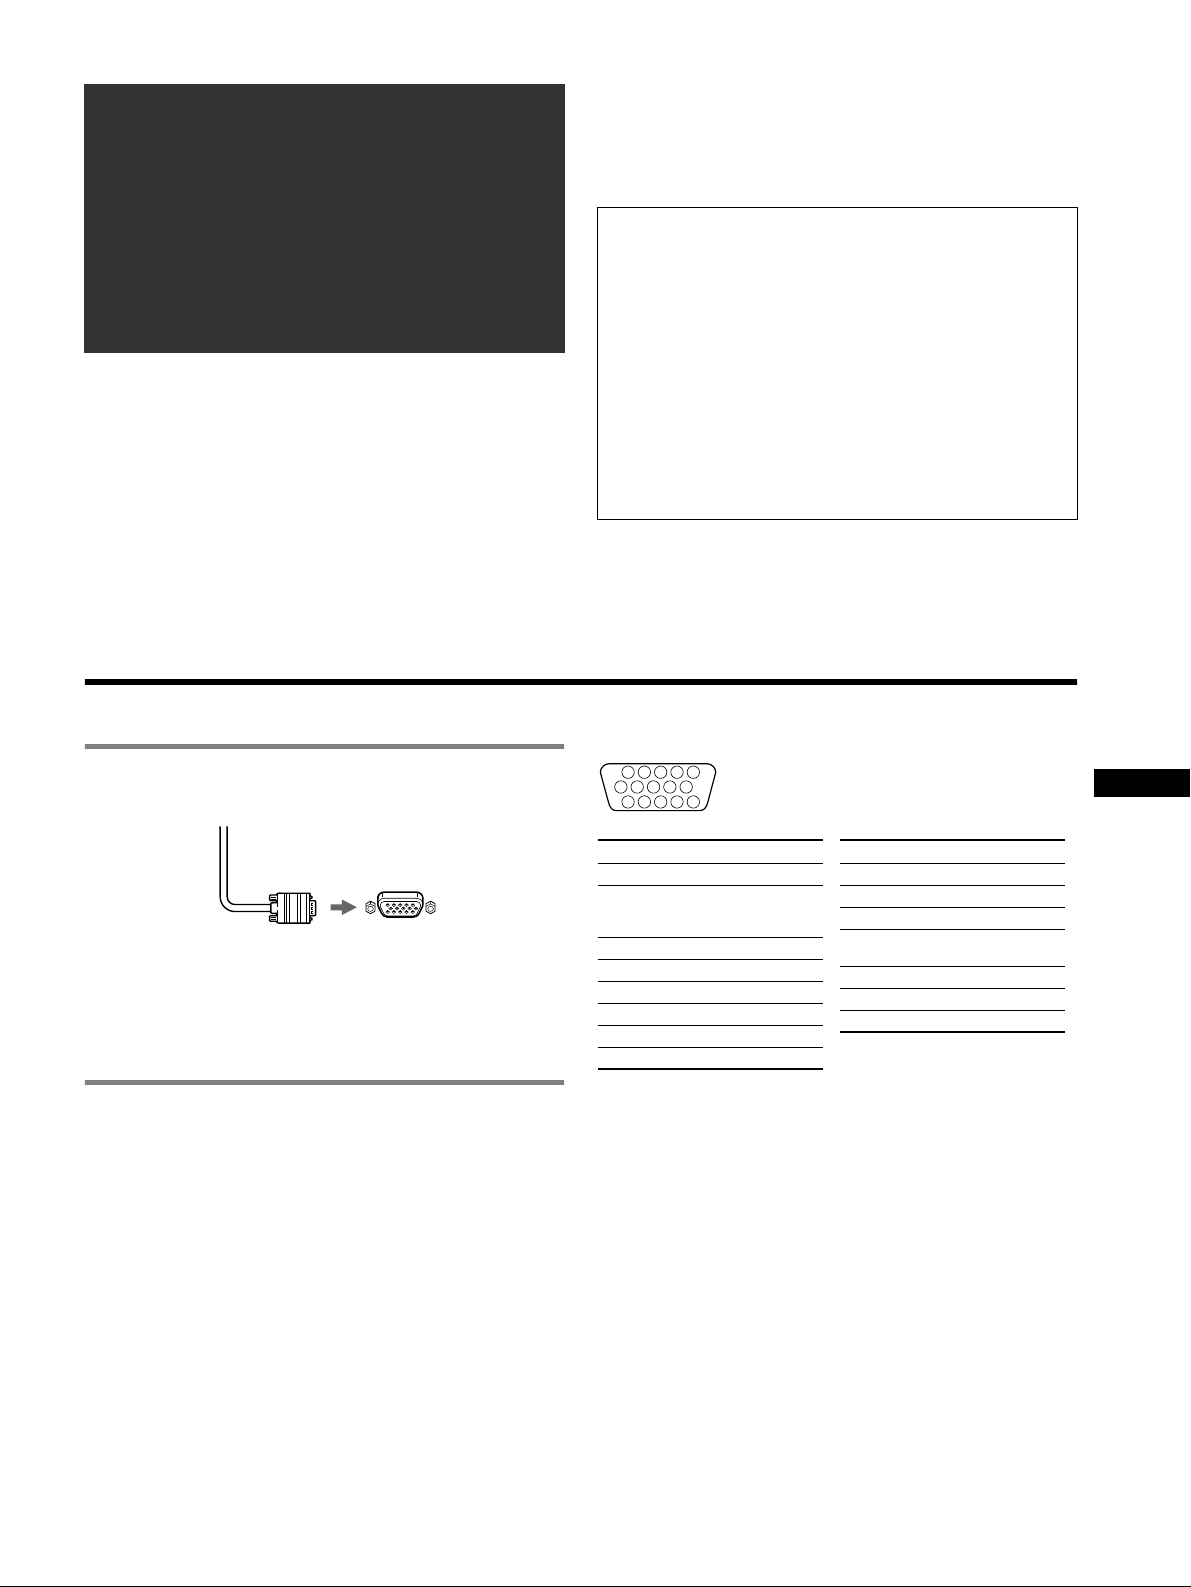
1 Connecting your monitor to your
computer
x To connect to the HD15 input connector
Video signal cable
of the monitor
Connecting to a Macintosh or compatible
computer
When connecting this monitor to a Power Mac G3/G4 computer,
use the Macintosh adapter (not supplied) if necessary.
to HD15 of the
connecting computer
2 Turning on the monitor and computer
1 Connect the power cord to the monitor and press the
! (power) switch to turn on the monitor.
2 Turn on the computer.
No need for specific drivers
This monitor complies with the “DDC” Plug & Play standard and
automatically detects all the monitor’s information. No specific driver
needs to be installed to the computer.
The first time you turn on your PC after connecting the monitor, the setup
Wizard may appear on the screen. In this case, follow the on-screen
instructions. The Plug & Play monitor is automatically selected so that you
can use this monitor.
Notes
• Do not touch the pins of the video signal cable connector.
• Check the alignment of the HD15 connector to prevent bending the pins
of the video signal cable connector.
The pin assignment of the HD 15 video signal cable
1
678910
11 12 13 14 15
Pin No. Signal
1Red
2 Green (Sync on
3Blue
4 ID (Ground)
5 CPU Sense
6 Red Ground
7 Green Ground
8 Blue Ground
* DDC (Display Data Channel) is a standard of VESA.
5432
Green)
Pin No. Signal
9 DDC + 5V*
10 Ground
11 ID (Ground)
12 Bi-Directional
Data (SDA)*
13 H. Sync
14 V. Sync
15 Data Clock
(SCL)*
GB
3
Page 4
Adjustments
Navigating the menu
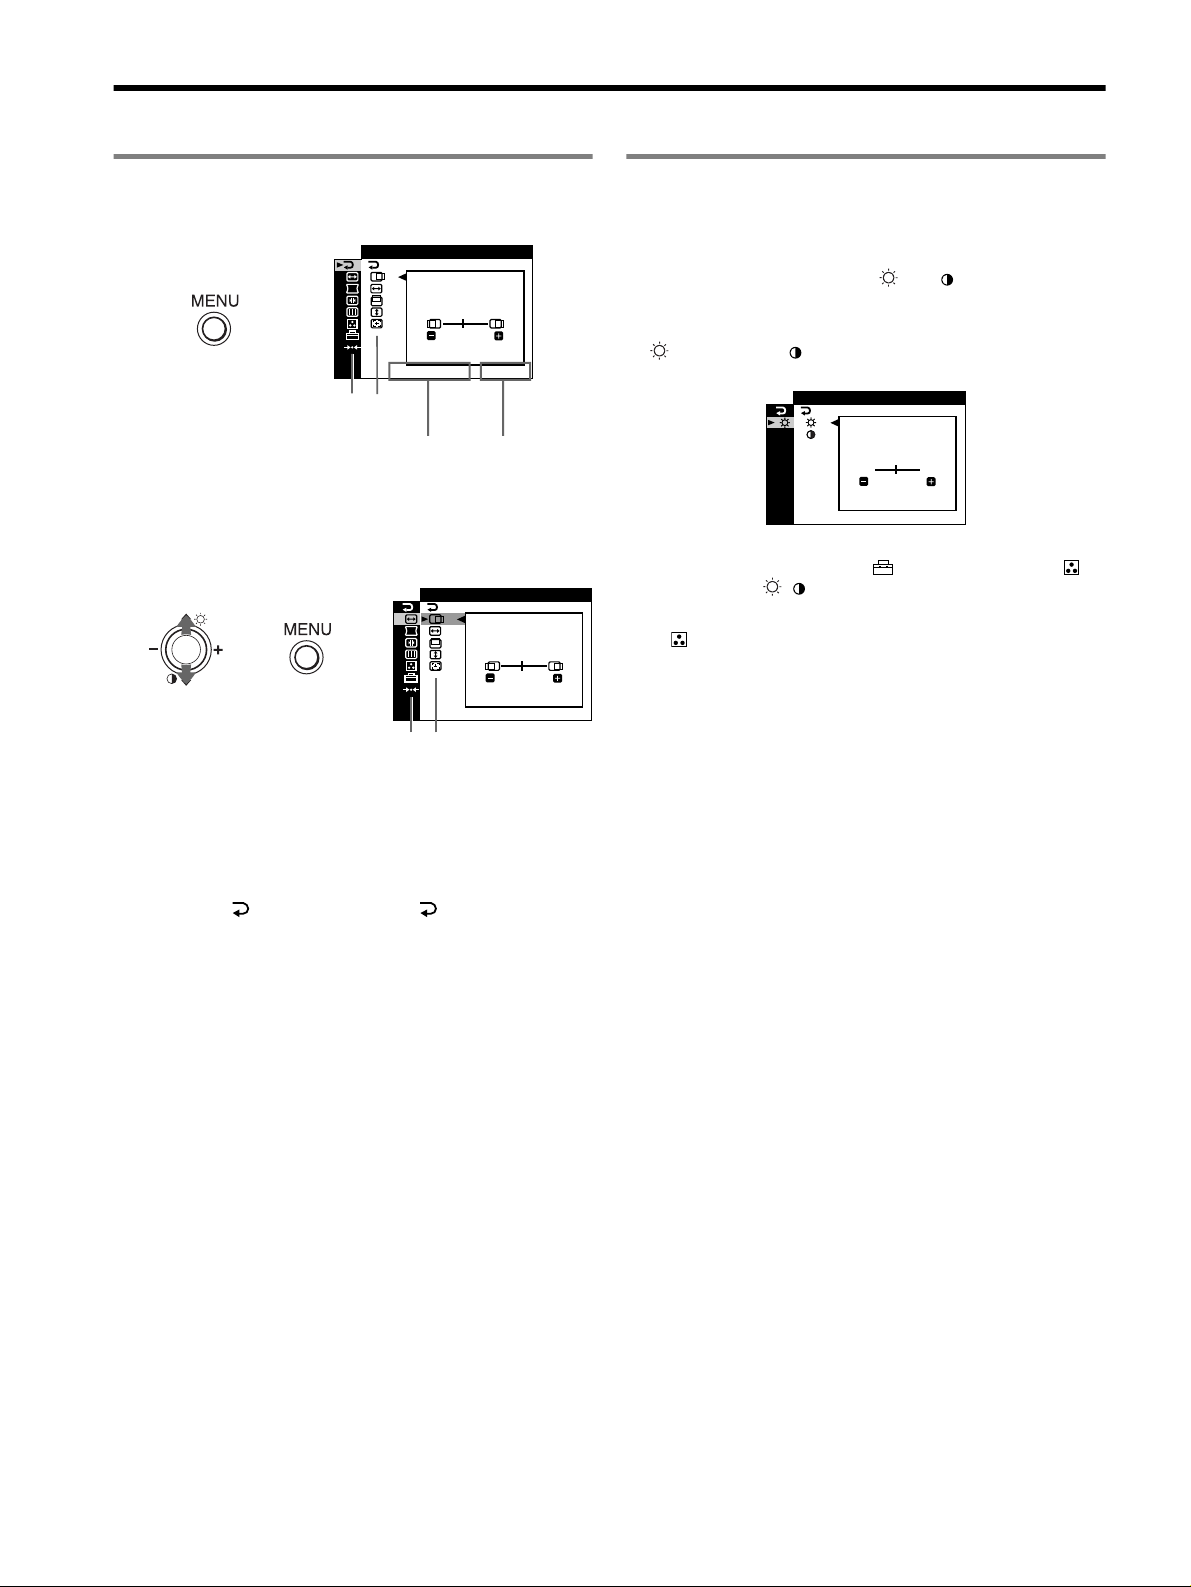
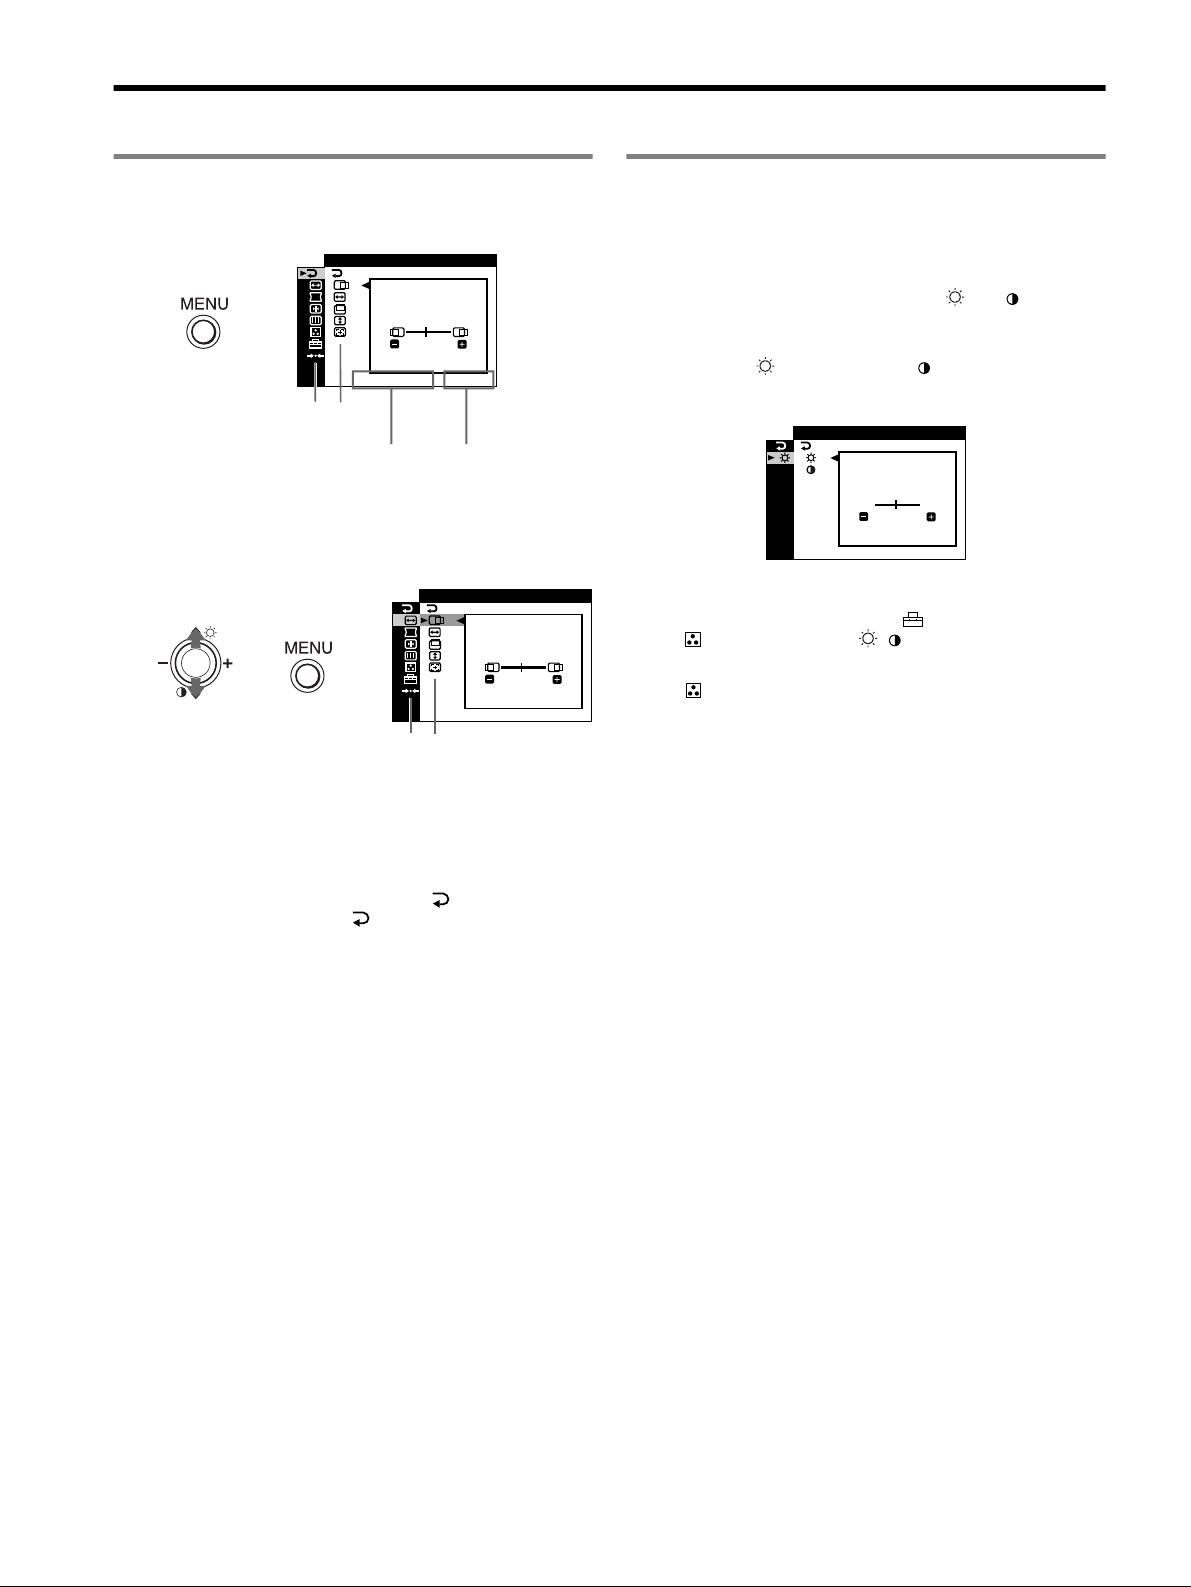
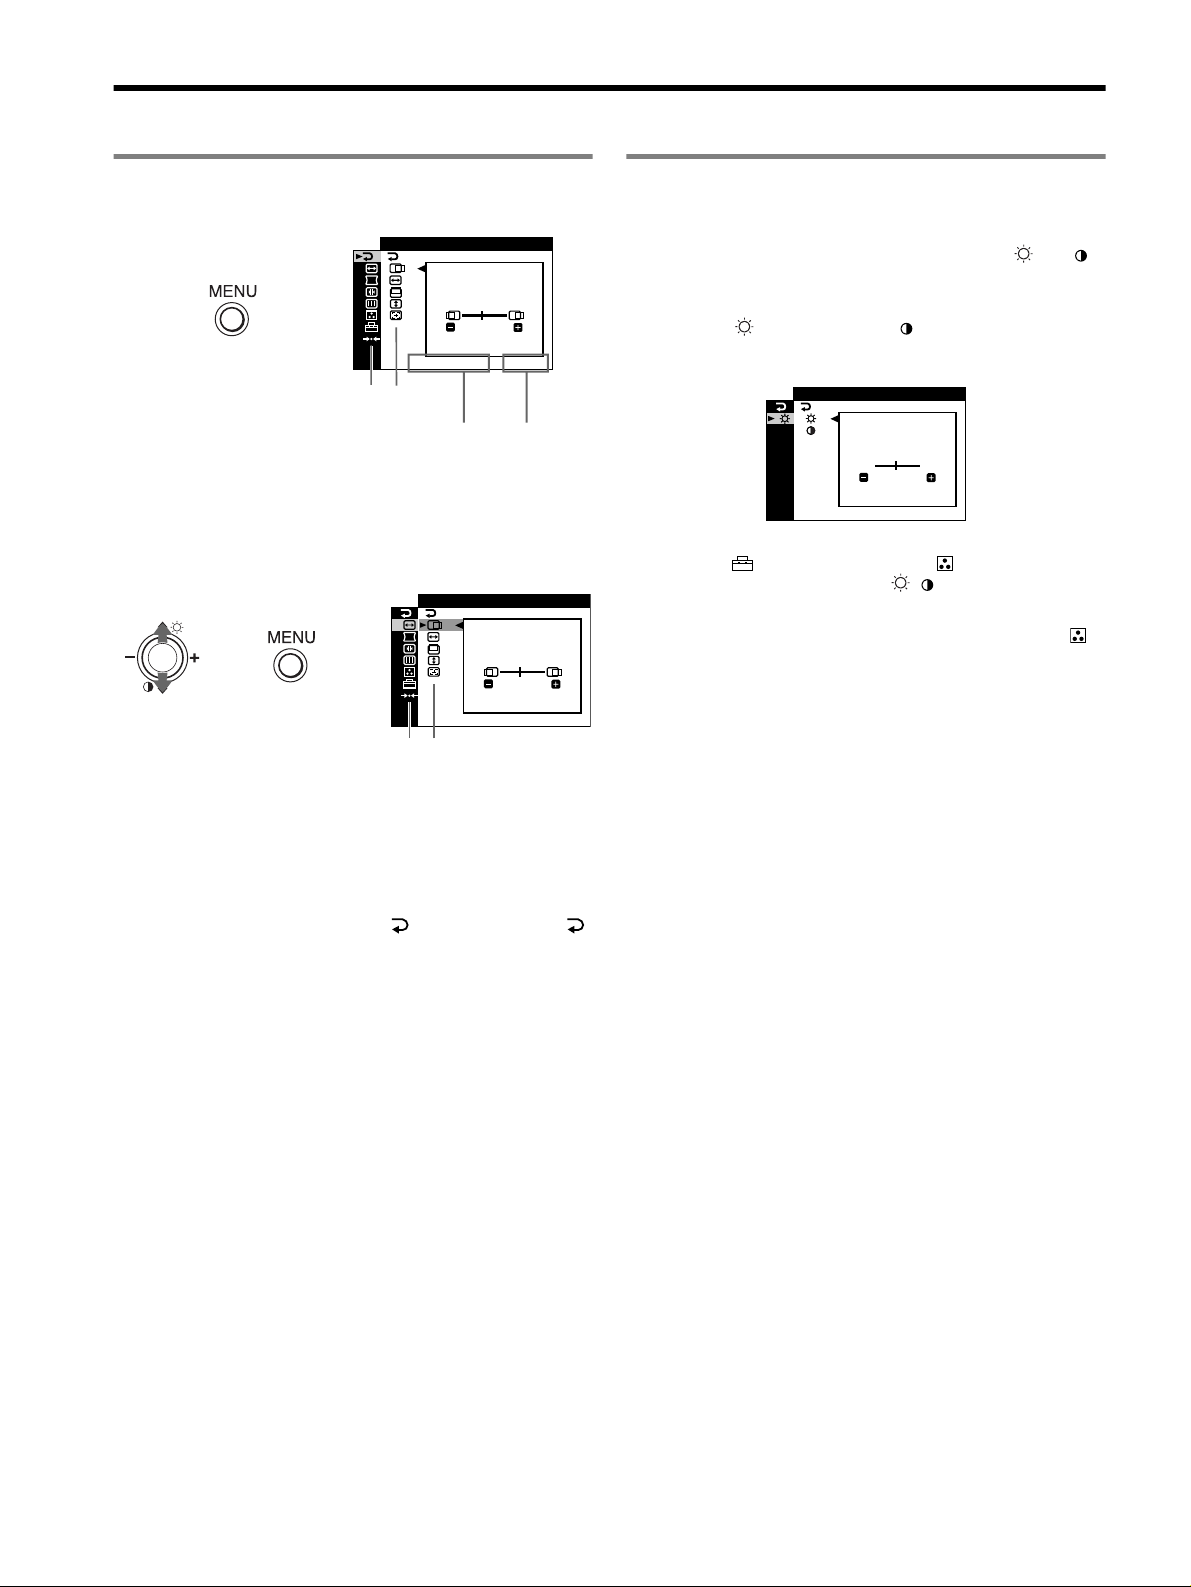
1 Press the MENU button to display the main menu.
EX I T
,
1280x1024 / 85Hz
Main
Sub
menu
menu
The horizontal frequencies/resolution
of the current input signal (only if the
signal matches to one of this monitor’s
factory preset modes)
2 Move the control button m/M to highlight the main
menu you want to adjust and press the control button.
,,
Main
menu
45
The vertical
frequencies
of the current
input signal
SZE45/I CENTER
1280x1024 / 85Hz
Sub
menu
Adjusting the brightness and contrast
Brightness and contrast adjustments are made using a separate
BRIGHT/CONTRAST menu. These adjustments are effective for
all input signals.
1 Move the control button M ()/m ( ) to display the
BRIGHT/CONTRAST menu.
2 Move the control button m/M to select the brightness
( ) or contrast ( ). Then move the control button –/+
to make adjustments.
CONTRAST
/IBR GHT
BR I GHTNESS
45
1280x1024 / 85Hz
Note
If you selected the sRGB mode in the (COLOR MODE) of the
(COLOR) menu, the / (BRIGHT/CONTRAST) menu for the sRGB
mode appears and you cannot adjust the brightness nor the contrast on this
screen. For more information about using the sRGB mode, see sRGB mode
in the (COLOR) menu.
3 Move the control button m/M to highlight the sub menu
you want to adjust. Then move the control button –/+
to make adjustments.
To close the menu
Press MENU button twice to return to the main menu. The defaultselected item is . Each time you select and press MENU
button, the menu exits. If no buttons are pressed, the menu closes
automatically after about 30 seconds.
4
Page 5

On-Screen menu adjustments
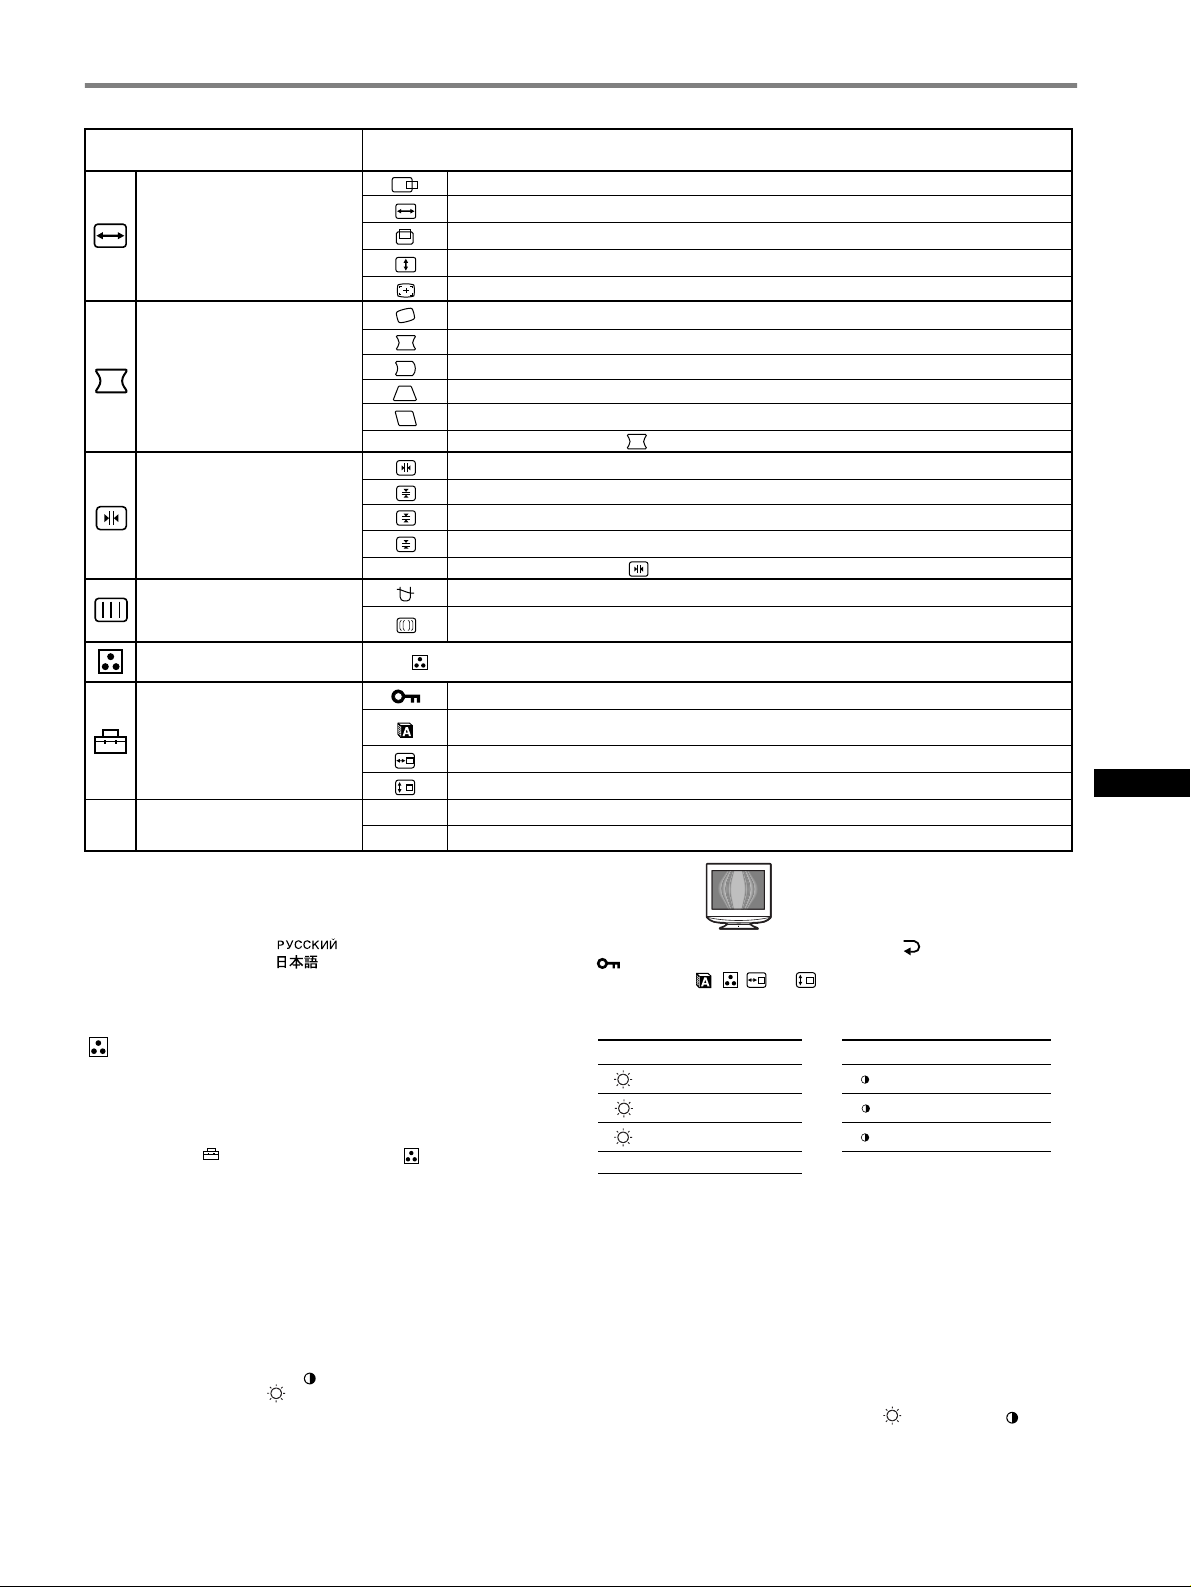
Main menu icons and adjustment
items
Adjusting the size or centering of
the picture
1
*
Adjusting the shape of the picture
Adjusting the convergence
Adjusting the picture quality
Adjusting the color of the picture See “ : To adjust the color of the picture”.
Additional settings
0 Resetting the adjustments
1
*
This adjustment is effective for the current input signal.
2
*
This adjustment is effective for all input signals.
3
Language Menu
*
• ENGLISH • NEDERLANDS: Dutch
• FRANÇAIS: French • SVENSKA: Swedish
• DEUTSCH: German • : Russian
• ESPAÑOL: Spanish • : Japanese
• ITALIANO: Italian
Sub menu icons and adjustment items
Horizontal position
Horizontal size
Vertical position
Ve r t ic al si ze
Auto Size Center
Rotating the picture
Expanding or contracting the picture sides
Shifting the picture sides to the left or right*
Adjusting the picture width at the top of the screen*
Shifting the picture to the left or right at the top of the screen*
0 RESET: Returns all settings to their factory default settings.
Horizontally shifts red or blue shadows
Vertically shifts red or blue shadows
2
*
Vertically shifts red or blue shadows at the top of the screen
T
Vertically shifts red or blue shadows at the bottom of the screen
B
0 RESET: Returns all settings to their factory default settings.
DEGAUSS: demagnetizes the monitor.
CANCEL MOIRE
Protecting adjustment data (CONTROL LOCK)
Selecting the on-screen menu language/Confirming the monitor’s information LANGUAGE/
INFORMATION
Changing the menu’s position for horizontal adjustment
Changing the menu’s position for vertical adjustment
1
01
02
Resetting all the adjustment data for the current input signal.*6 Select “OK”.
*
2
Resetting all of the adjustment data for all input signals. Select “OK”.
*
1
*
1
1
1
4
*
: adjusts the degree of moire cancellation until the moire is at a minimum.*
5
*
3
*
*4Example of Moire
5
Only the ! (power) switch, and (CONTROL LOCK) menu will
*
operate.
6
*
The menu items , , and are not reset by this method.
1
GB
: To adjust the color of the picture
The COLOR settings allow you to adjust the picture’s color
temperature by changing the color level of the white color field.
Colors appear reddish if the temperature is low, and bluish if the
temperature is high. This adjustment is useful for matching the
monitor’s color to a printed picture’s colors.
Select one of the color temperature setting modes from among
4 modes; PRESET, VARIABLE, EXPERT and sRGB on
(COLOR MODE) in the (COLOR) menu.
x PRESET (Default setting)
You can select the preset color temperature from 5000K, 6500K, or
9300K. The default setting is 9300K.
x VARIABLE
You can adjust the color temperature from 5000K to 11000K.
x EXPERT
You can make additional fine adjustments to the color by selecting
this mode. GAIN ( ) adjusts the bright areas of the screen, while
BIAS ( ) adjusts the dark areas of the screen.
Select for Select for
R R (Red) BIAS R R (Red) GAIN
G
G (Green)
BIAS
G G (Green) GAIN
B B (Blue) BIAS B B (Blue) GAIN
0 RESET*
* Returns all the settings in the EXPERT mode to their factory settings.
x sRGB
The sRGB color setting is an industry standard color space protocol
designed to correlate the colors displayed on the monitor and those
printed. In order to display the sRGB colors correctly (γ = 2.2,
6500K), select the sRGB mode and your connected computer to the
sRGB profiles. If you select sRGB, you cannot operate the
BRIGHT/CONTRAST menu adjustments.
Note
Confirm that the brightness ( ) and contrast ( ) values are adjusted
respectively to the numbers to be set in the sRGB mode shown in the
BRIGHT/CONTRAST menu. If not, select 01 in the 0 (RESET) menu.
5
Page 6
Troubleshooting
x No picture
If the ! (power) indicator is not lit
• Check that the power cord is properly connected.
• Check that the ! (power) switch is in the “on” position.
The ! (power) indicator is orange
• Check that the video signal cable is properly connected and all plugs
are firmly seated in their sockets.
• Check that the HD15 video input connector’s pins are not bent or
pushed in.
• Check that the computer’s power is “on”.
• The computer is in power saving mode. Try pressing any key on the
computer keyboard or moving the mouse.
• Check that the graphic board is completely seated in the proper bus
slot.
If the ! (power) indicator is green or flashing orange
• Use the Self-diagnosis function.
x Picture flickers, bounces, oscillates, or is scrambled
• Isolate and eliminate any potential sources of electric or magnetic
fields such as other monitors, laser printers, electric fans, fluorescent
lighting, or televisions.
• Move the monitor away from power lines or place a magnetic shield
near the monitor.
• Try plugging the monitor into a different AC outlet, preferably on a
different circuit.
• Try turning the monitor 90° to the left or right.
• Check your graphics board manual for the proper monitor setting.
• Confirm that the graphics mode and the frequency of the input signal
are supported by this monitor (see “Preset mode timing table” on
page i). Even if the frequency is within the proper range, some
graphics board may have a sync pulse that is too narrow for the
monitor to sync correctly.
• Adjust the computer’s refresh rate (vertical frequency) to obtain the
best possible picture.
x Picture is fuzzy
• Adjust the brightness, contrast.
• Degauss the monitor.*
• Adjust the degree of moire cancellation until the moire is minimal,
or set CANCEL MOIRE to OFF.
x Picture is ghosting
• Eliminate the use of video cable extensions and/or video switch
boxes.
• Check that all plugs are firmly seated in their sockets.
x Picture is not centered or sized properly
• Perform the Auto Size Center function.
• Adjust the size or centering. Note that with some input signals and/
or graphics board the periphery of the screen is not fully utilized.
• Just after turning on the power switch, the size/center may take a
while to adjust properly.
x Edges of the image are curved
• Adjust the geometry.
x Wavy or elliptical pattern (moire) is visible
• Adjust the degree of moire cancellation until the moire is minimal.
• Change your desktop pattern.
x Color is not uniform
• Degauss the monitor.* If you place equipment that generates a
magnetic field, such as a speaker, near the monitor, or if you change
the direction the monitor faces, color may lose uniformity.
x White does not look white
• Adjust the color temperature.
x Monitor buttons do not operate ( appears on the
screen)
• If the control lock is set to ON, set it to OFF.
x Letters and lines show red or blue shadows at the
edges
• Adjust the convergence.
x A hum is heard right after the power is turned on
• This is the sound of the auto-degauss cycle. When the power is
turned on, the monitor is automatically degaussed for a few seconds.
* If a second degauss cycle is needed, allow a minimum interval of
20 minutes for the best result. A humming noise may be heard, but this is
not a malfunction.
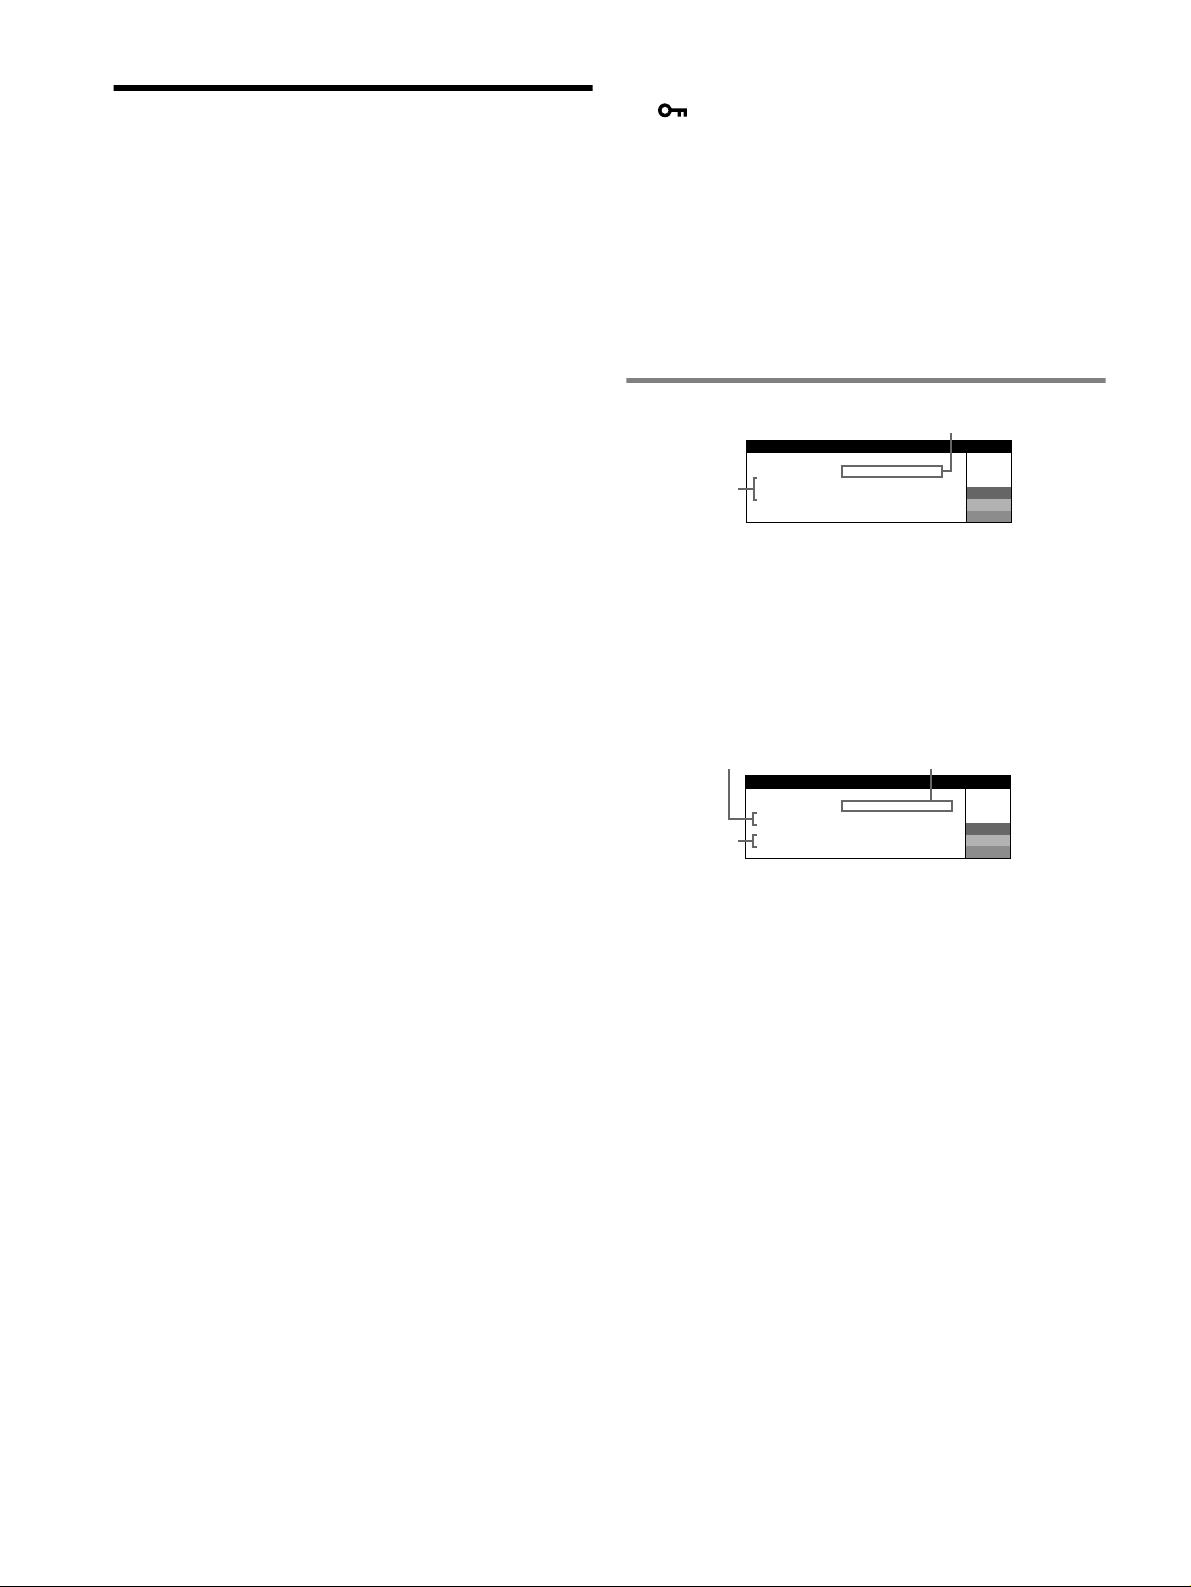
On-screen messages
GNALI
COMPUTER
RANGE
1
2
W
R
G
B
W
R
G
B
IIONNFORMAT
MON I I I NGS WORKTOR
NPUT
2
I
ACT
CHECK
I VATE
S GNAL CABLEI
:NOBYS
1 If “NO SIGNAL” appears:
This indicates that no signal is input from the connector.
2 Shows the remedies.
• If ACTIVATE BY COMPUTER appears on the screen, try
pressing any key on the computer or moving the mouse, and
confirm that your computer’s graphic board is completely seated
in the correct bus slot.
• If CHECK SIGNAL CABLE appears on the screen, check that
the monitor is correctly connected to the computer.
1
IIONNFORMAT
MON I I I NGS WORKTOR
NPUT
I :200.0kHz/ 85Hz
OUT OF SCAN
3
CHANGE
S GNAL TIIINGM
1 If “OUT OF SCAN RANGE” appears:
This indicates that the input signal is not supported by the monitor’s
specifications.
2 Shows the input signal frequency.
3 Shows the remedy.
CHANGE SIGNAL TIMING appears on the screen. If you are
replacing an old monitor with this monitor, reconnect the old
monitor. Then adjust the computer’s graphic board so that the
horizontal frequency is between 30 – 96 kHz, and the vertical
frequency is between 48 – 170 Hz.
6
Page 7
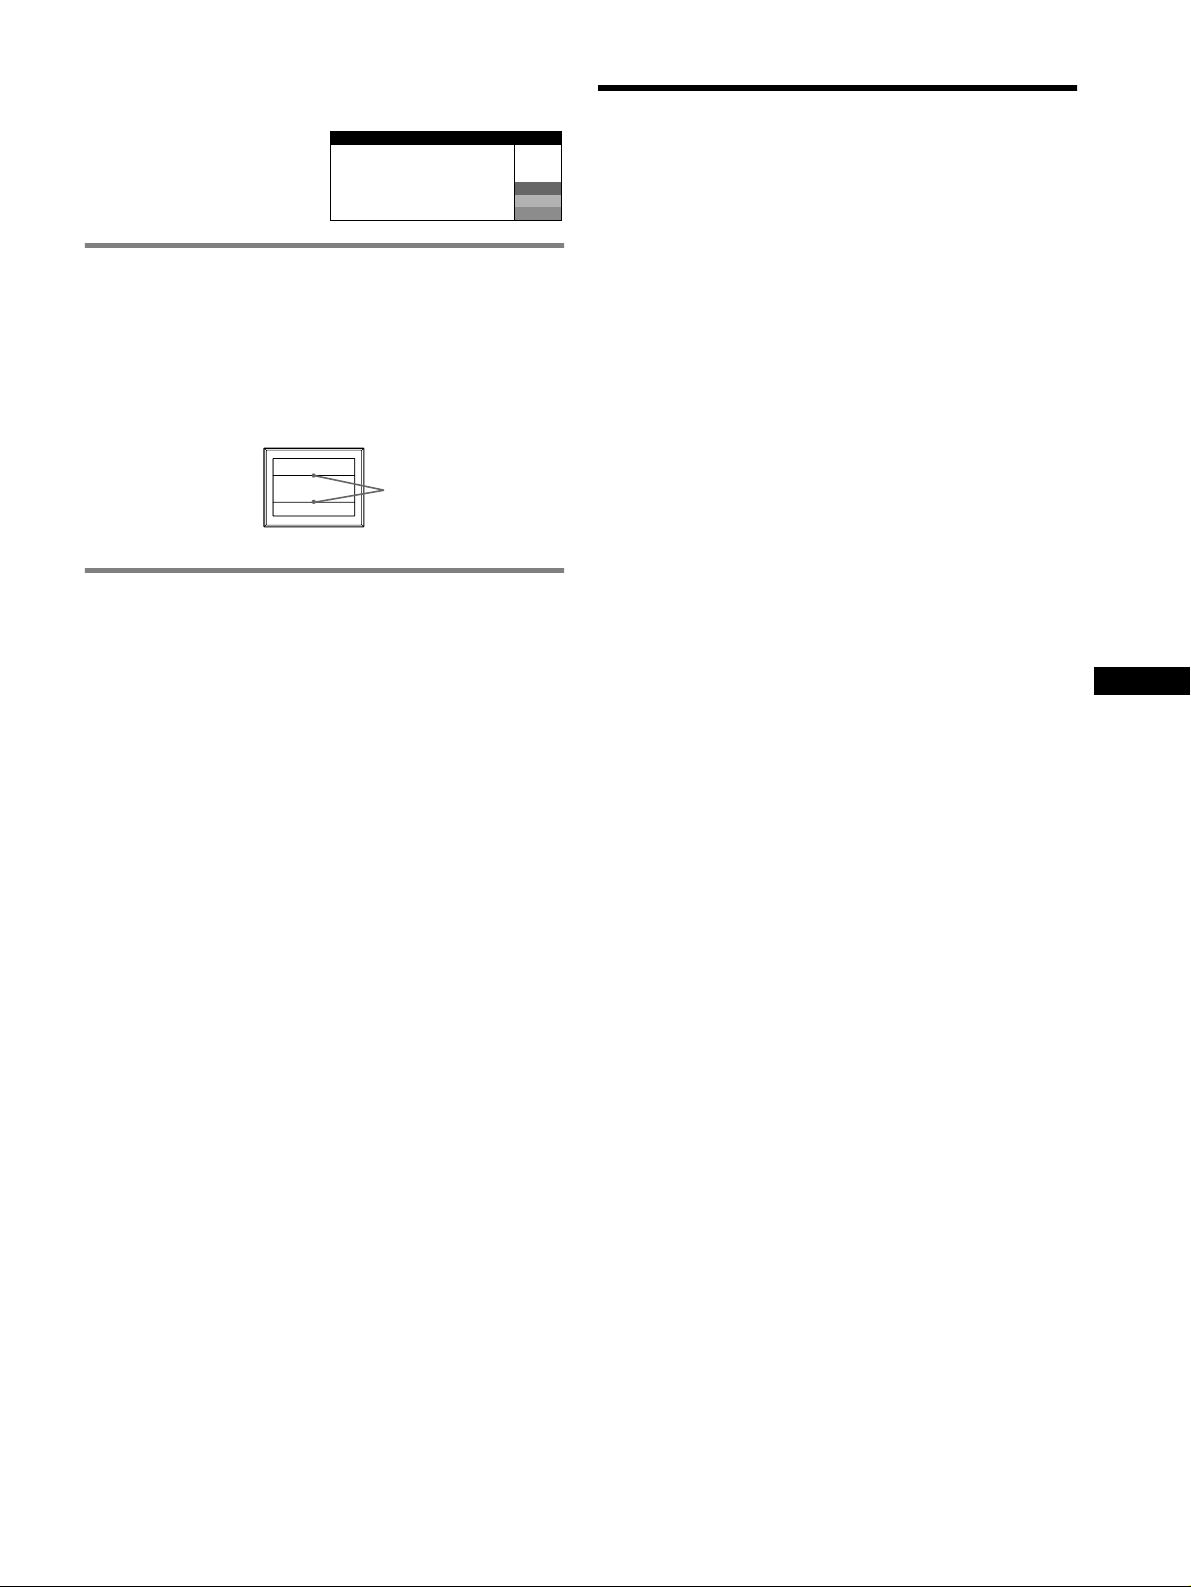
To display this monitor’s name, serial number, and
date of manufacture.
While the monitor is receiving a
video signal, press and hold the
MENU button for more than
5 seconds to display this
monitor’s information box.
INFORMATION
MODEL : CPD-E430
SER NO : 1234567
MANUFACTURED
: 2001-30
W
R
G
B
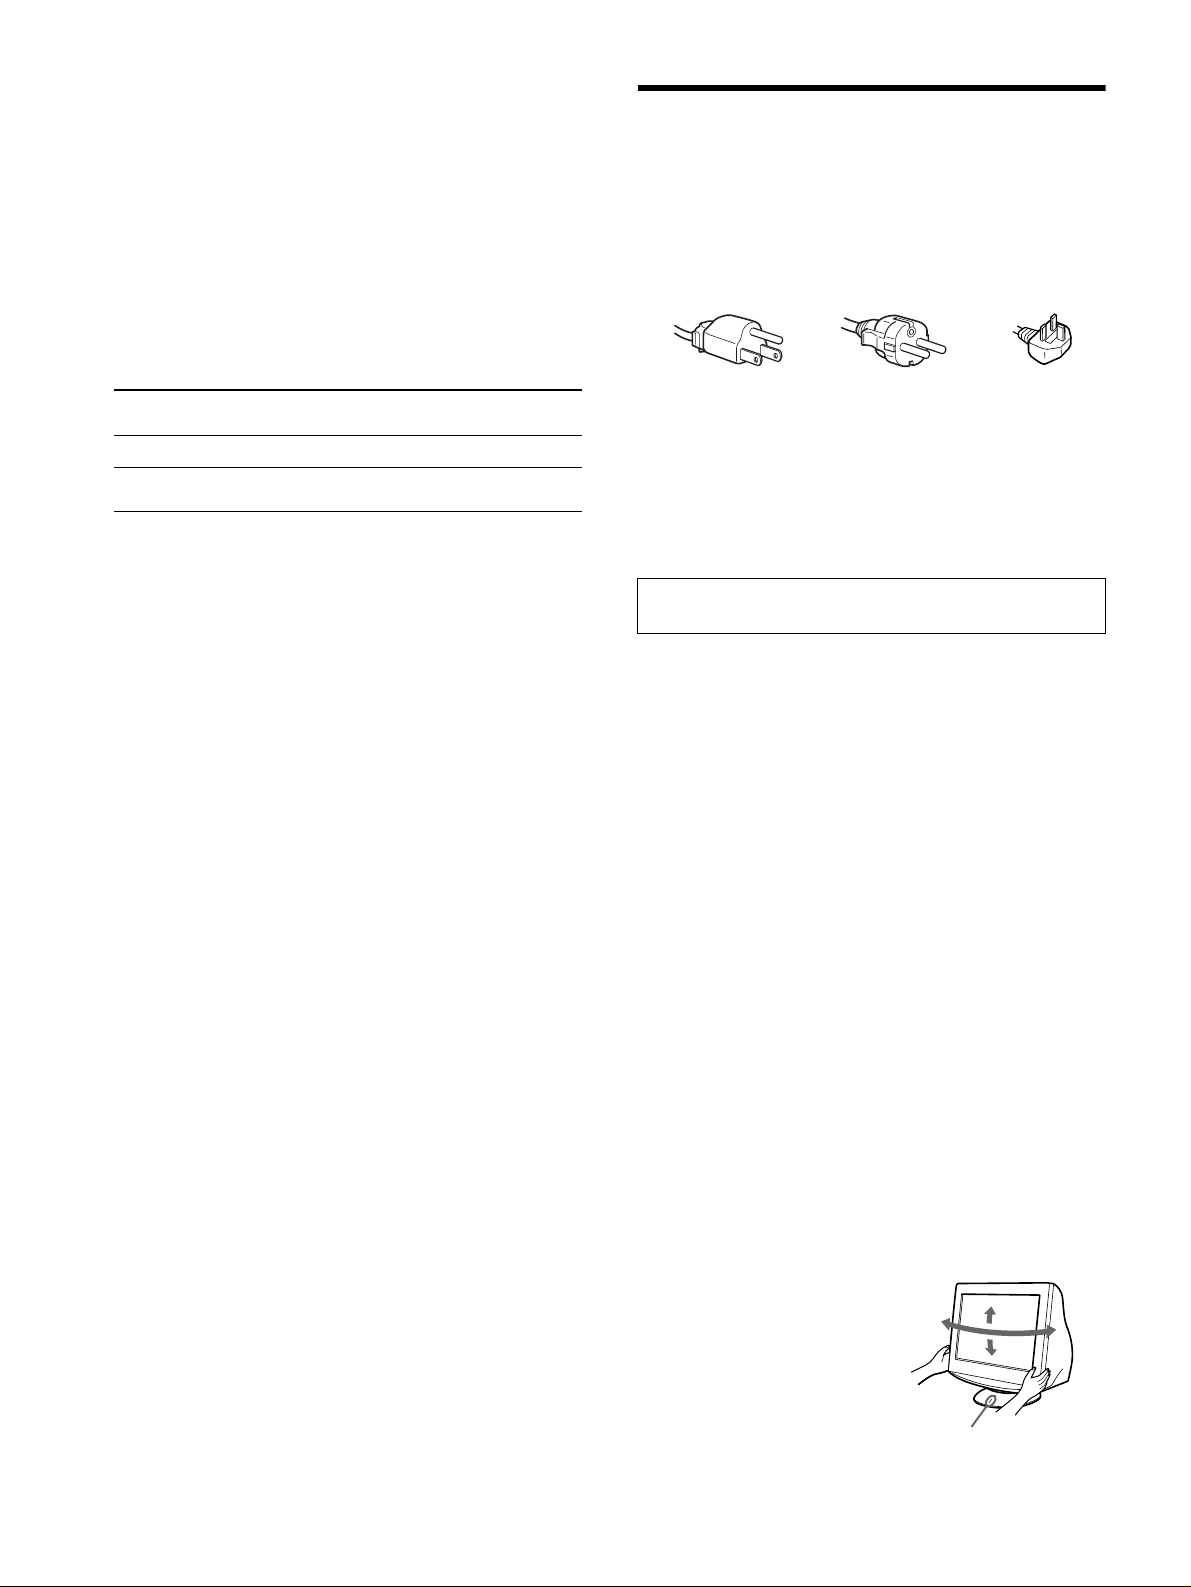
If thin lines appear on the screen
(damper wires)
These lines do not indicate a malfunction; they are a normal
effect of the Trinitron picture tube with this monitor. These are
shadows from the damper wires used to stabilize the aperture grille.
The aperture grille is the essential element that makes a Trinitron
picture tube unique by allowing more light to reach the screen,
resulting in a brighter, more detailed picture.
Damper
wires
Self-diagnosis function
This monitor is equipped with a self-diagnosis function. If there is
a problem with your monitor or computer, the screen will go blank
and the ! (power) indicator will either light up green or flash
orange. If the ! (power) indicator is lit in orange, the computer is
in power saving mode. Try pressing any key on the keyboard or
moving the mouse.
x If the ! (power) indicator is green
Specifications
CRT
0.24 mm aperture grille pitch, 90-degree deflection, FD Trinitron
19 inches measured diagonally
Viewable image size
Resolution (H:Horizontal, V:Vertical)
Input signal levels
Video signal: Analog RGB: 0.700 Vp-p (positive), 75
SYNC signal: H/V separate or composite sync:
Standard image area
Deflection frequency (H:Horizontal, V:Vertical)
AC input voltage/current
Power Consumption
Operating temperature
Dimensions Approx. 451
Mass Approx. 25.5 kg (56 lb 3 oz)
Plug and Play DDC2B/DDC2Bi
Supplied accessories
Approx. 365
18.0" viewing image
Maximum: H: 1920 dots, V: 1440 lines
Recommended: H: 1280 dots, V: 1024 lines
TTL 2 k
Sync on Green: 0.3 Vp-p (negative)
Approx. 352
(13
H: 30 to 96 kHz, V: 48 to 170 Hz
100 to 240 V, 50 – 60 Hz, 2.0 – 1.0 A
Approx. 135 W
10 ºC to 40 ºC
(17
GTF
Power cord
This instruction manual
× 274 mm (w/h) (14
Ω, Polarity free
× 264 mm
7
/8 × 10 1/2 inches)
× 471 × 461 mm (w/h/d)
7
/8 × 18 5/8 × 18 1/4 inches)
3
/8 × 10 7/8 inches)
Ω
GB
1 Disconnect the video signal cable, or turn off the
connected computer.
2 Turn the monitor OFF and then ON.
3 Hold the control button upward for a few seconds
before the monitor enters power saving mode.
If all 4 color bars appear (white, red, green, blue), the monitor is
working properly. Reconnect the video input cables and check the
condition of your computer.
If the color bars do not appear, there is a potential monitor failure.
Inform your authorized Sony dealer of the monitor’s condition.
x If the ! (power) indicator is flashing orange
Turn the monitor OFF and then ON.
If the ! (power) indicator lights up green, the monitor is working
properly.
If the ! (power) indicator is still flashing, there is a potential
monitor failure. Count the number of seconds between orange
flashes of the ! (power) indicator and inform your authorized Sony
dealer of the monitor’s condition. Be sure to note the model name
and serial number of your monitor. Also note the make and model
of your computer and graphics board.
(continued)
7
Page 8
Preset and user modes
When the monitor receives an input signal, it automatically matches the
signal to one of the factory preset modes stored in the monitor’s memory
to provide a high quality picture
page i)
. If the input signals do not match one of the factory preset modes,
the monitor automatically provides the most appropriate picture for the
input signal that is within the range of the vertical or horizontal
frequencies (page 7) corresponding to the Generalized Timing Formula.
When the picture is adjusted, the adjustment data is stored as a user mode
and automatically recalled whenever the same input signal is received.
Power saving function
This monitor meets the power-saving guidelines set by VESA, TCO’99,
and
ENERGY STAR. If no signal is input to the monitor from your
computer, the monitor will automatically reduce power consumption as
shown below.
Power mode Power consumption ! (power)
normal operation
active off*
(deep sleep)*
1
*
2
*
Design and specifications are subject to change without notice.
1
When your computer enters power saving mode, NO SIGNAL appears
on the screen. After a few seconds, the monitor enters power saving
mode.
“Deep sleep” is power saving mode defined by the Environmental
Protection Agency.
≤ 135 W green
≤ 3 W orange
2
(see “Preset mode timing table” on
indicator
Precautions
Warning on power connections
• Use the supplied power cord. If you use a different power cord,
be sure that it is compatible with your local power supply.
For the customers in the UK
If you use the monitor in the UK, be sure to use the supplied UK
power cable.
Example of plug types
for 100 to 120 V AC for 200 to 240 V AC for 240 V AC only
• Before disconnecting the power cord, wait at least 30 seconds
after turning off the power to allow the static electricity on the
screen’s surface to discharge.
• After the power is turned on, the screen is demagnetized
(degaussed) for about a few seconds. This generates a strong
magnetic field around the screen which may affect data stored
on magnetic tapes and disks placed near the monitor. Be sure to
keep magnetic recording equipment, tapes, and disks away
from the monitor.
The equipment should be installed near an easily accessible
outlet.
Installation
Do not install the monitor in the following places:
• on surfaces (rugs, blankets, etc.) or near materials (curtains,
draperies, etc.) that may block the ventilation holes
• near heat sources such as radiators or air ducts, or in a place
subject to direct sunlight
• in a place subject to severe temperature changes
• in a place subject to mechanical vibration or shock
• on an unstable surface
• near equipment which generates magnetism, such as a
transformer or high voltage power lines
• near or on an electrically charged metal surface
• inside an enclosed rack
Maintenance
• Clean the screen with a soft cloth. If you use a glass cleaning
liquid, do not use any type of cleaner containing an anti-static
solution or similar additive as this may scratch the screen’s
coating.
• Do not rub, touch, or tap the surface of the screen with sharp or
abrasive items such as a ballpoint pen or screwdriver. This type
of contact may result in a scratched picture tube.
• Clean the cabinet, panel and controls with a soft cloth lightly
moistened with a mild detergent solution. Do not use any type
of abrasive pad, scouring powder or solvent, such as alcohol or
benzine.
Transportation
When you transport this monitor for repair or shipment, use the
original carton and packing materials.
Use of the tilt-swivel
This monitor can be adjusted
within the angles shown right. To
turn the monitor vertically or
horizontally, hold it at the bottom
with both hands. Be careful not to
90°
90°90°
15°
5°
90°
pinch your fingers at the back of
the monitor when you tilt the
monitor up vertically.
Centering dot
8
Page 9
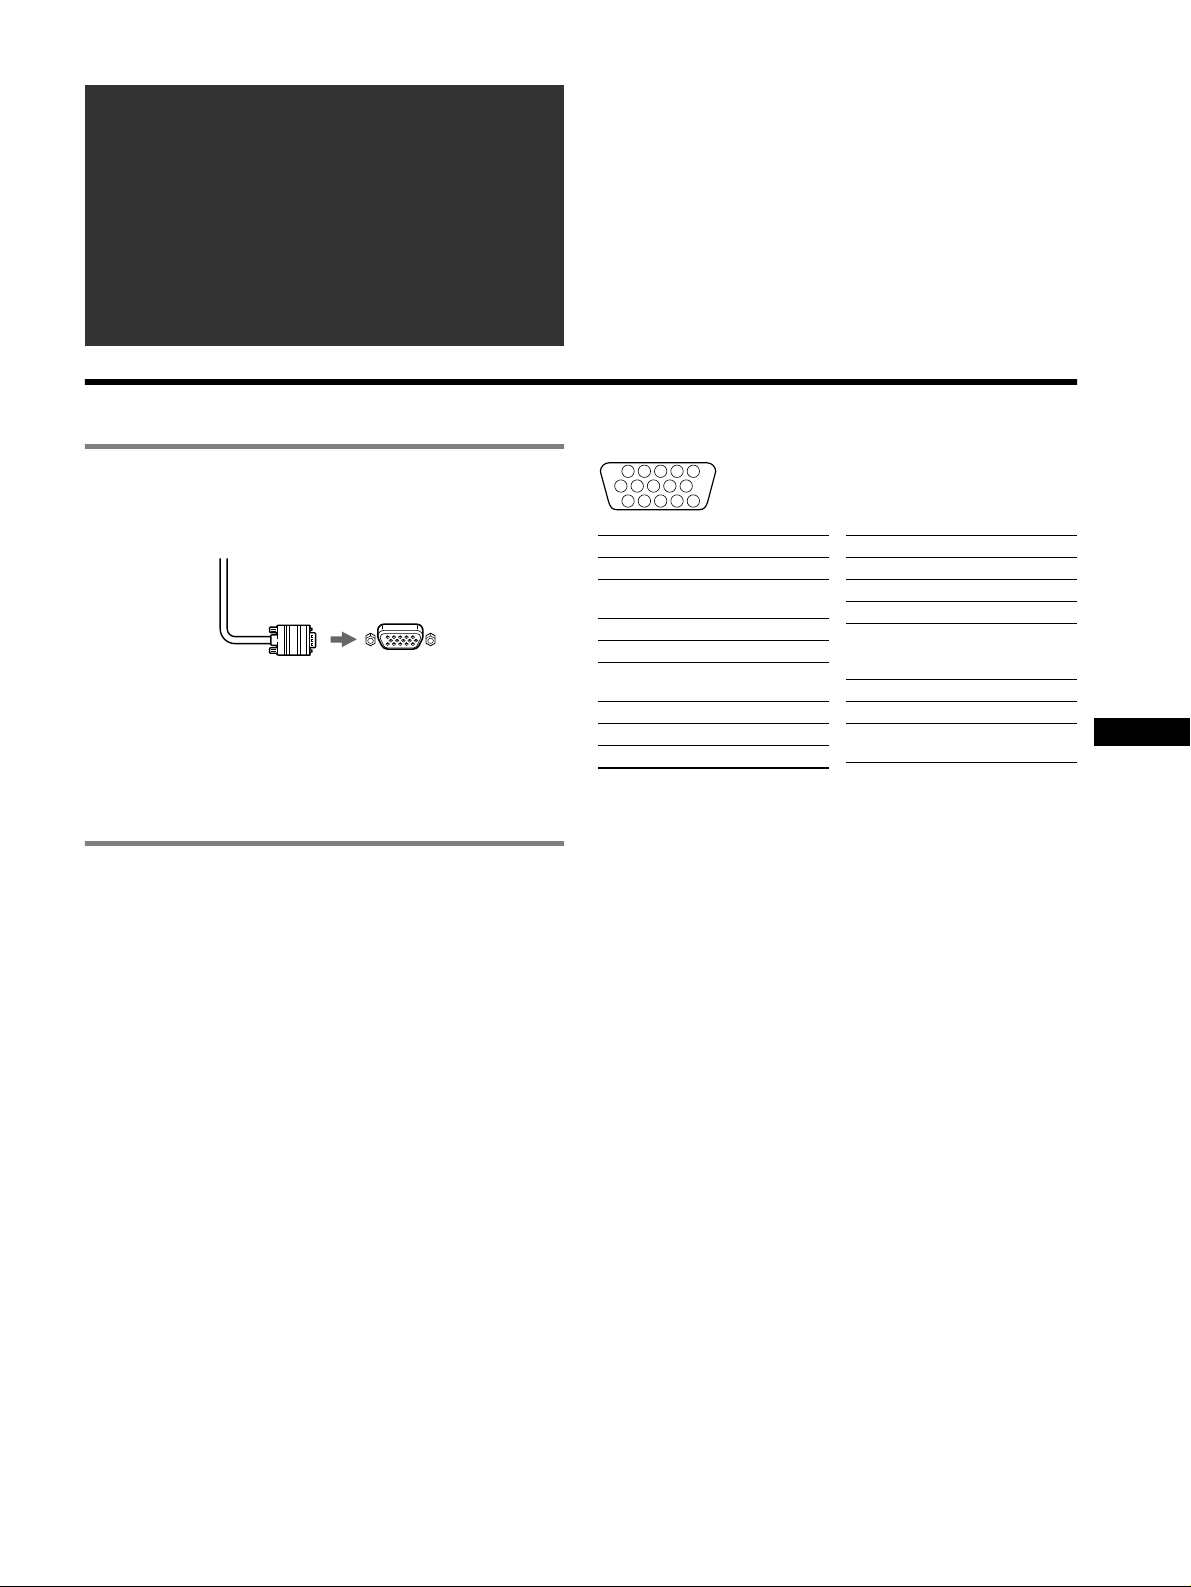
Table des Matières
Configuration. . . . . . . . . . . . . . . . . . . . . . . . . . . . . . . 3
Réglages. . . . . . . . . . . . . . . . . . . . . . . . . . . . . . . . . . . 4
Dépannage . . . . . . . . . . . . . . . . . . . . . . . . . . . . . . . . . 6
Spécifications . . . . . . . . . . . . . . . . . . . . . . . . . . . . . . 7
Précautions . . . . . . . . . . . . . . . . . . . . . . . . . . . . . . . . 8
Appendix . . . . . . . . . . . . . . . . . . . . . . . . . . . . . . . . . . . i
Preset mode timing table . . . . . . . . . . . . . . . . . . . . . . . i
TCO’99 Eco-document. . . . . . . . . . . . . .Couverture dos
Configuration
• Trinitronâ est une marque commerciale déposée de Sony Corporation.
• Macintosh est une marque commerciale sous licence d’Apple Computer, Inc.,
déposée aux Etats-Unis et dans d’autres pays.
•Windows
• IBM PC/AT et VGA sont des marques commerciales déposées d’IBM
• VESA et DDC
•
• Tous les autres noms de produits mentionnés dans le présent mode d’emploi
• Les symboles “
â
aux Etats-Unis et dans d’autres pays.
Corporation aux Etats-Unis.
Standard Association.
et MS-DOS sont des marques déposées de Microsoft Corporation
ä
sont des marques commerciales de Video Electronics
ENERGY STAR est une marque déposée aux Etats-Unis.
peuvent être des marques commerciales ou des marques commerciales
déposées de leurs sociétés respectives.
présent mode d’emploi.
ä” et “â” ne sont pas mentionnés systématiquement dans le
1 Raccordez votre moniteur à votre
ordinateur
x Raccordement au connecteur d’entrée HD15
Câble de signal vidéo
du moniteur
Raccordement à un Macintosh ou un ordinateur
compatible
Lorsque vous raccordez ce moniteur à un ordinateur Power Mac
G3/G4, utilisez l’adaptateur Macintosh (non fourni), le cas échéant.
vers le HD15 de
l’ordinateur raccordé
2 Mettez le moniteur et l’ordinateur sous
tension
1 Raccordez le cordon d’alimentation au moniteur puis
appuyez sur l’interrupteur ! (alimentation) afin de mettre
le moniteur sous tension.
2 Mettez l’ordinateur sous tension.
Vous n’avez pas besoin de pilotes spécifiques
Ce moniteur est conforme à la norme Plug & Play “DDC” et détecte
automatiquement l’ensemble des informations relatives au moniteur. Il n’est pas
nécessaire d’installer un pilote spécifique sur l’ordinateur.
Lorsque vous mettez votre ordinateur sous tension pour la première fois, après
l’avoir raccordé au moniteur, il est possible que l’Assistant d’ajout de nouveau
matériel apparaisse à l’écran. Dans ce cas, suivez les instructions affichées. Le
moniteur Plug & Play approprié est sélectionné automatiquement, vous
permettant ainsi de l’utiliser.
Remarques
• Ne touchez pas les broches du connecteur du câble de signal vidéo.
• Vérifiez l’alignement du connecteur HD15 pour ne pas tordre les broches du
connecteur du câble de signal vidéo.
Configuration des broches du câble de signal vidéo HD 15
1
678910
11 12 13 14 15
N° de broche Signal
1 Rouge
2 Vert (Sync sur
3Bleu
4 ID (Masse)
5 Détection de
6 Masse Rouge
7Masse Vert
8Masse Bleu
* DDC (Display Data Channel) est une norme de VESA.
5432
Ve r t)
l’unité centrale
N° de broche Signal
9 DDC + 5V*
10 Masse
11 ID (Masse)
12 Données
bi-directionnelles
(SDA)*
13 Sync H
14 Sync V
15 Horloge de
données (SCL)*
FR
3
Page 10
Réglages
Navigation dans le menu
1 Appuyez sur la touche MENU pour afficher le menu
principal.
SORT I R
,
45
1280x1024 / 85Hz
Menu principal
fréquences horizontales/résolution du
signal d’entrée courant (uniquement si le
signal correspond à l’un des modes
prédéfinis en usine de ce moniteur)
2 Déplacez la touche de commande m/M pour mettre en
surbrillance le menu principal que vous souhaitez régler
et appuyez sur la touche de commande.
,,
3 Déplacez la touche de commande m/M pour mettre le
sous-menu que vous souhaitez régler en surbrillance.
Déplacez ensuite la touche de commande –/+ pour
effectuer les réglages.
Pour fermer le menu
Appuyez deux fois sur la touche MENU pour revenir au menu
principal. L’option sélectionnée par défaut est . Le menu est fermé
chaque fois que vous sélectionnez et que vous appuyez sur la
touche MENU. Si aucune touche n’est activée, le menu se ferme
automatiquement dans un délai d’environ 30 secondes.
Sousmenu
Menu principal
fréquences verticales du
signal d’entrée courant
TAI LLE45/ CENTRAGE
1280x1024 / 85Hz
Sous-menu
Réglage de la luminosité et du contraste
Vous pouvez modifier la luminosité et le contraste à l’aide du menu
LUMIN/CONTR. Ces réglages s’appliquent à tous les signaux
d’entrée.
1 Déplacez la touche de commande M ()/m ( ) pour
afficher le menu LUMIN/CONTR.
2 Déplacez la touche de commande m/M pour sélectionner
la luminosité ( ) ou le contraste ( ). Déplacez ensuite la
touche de commande –/+ pour effectuer les réglages.
CONTR
/LUMIN
LUMINOSI TE
45
1280x1024 / 85Hz
Remarque
Si vous avez sélectionné le mode sRGB dans (MODE COULEUR) dans
le menu (COULEUR), le menu / (LUMIN/CONTR) du mode
sRGB apparaît et il vous est impossible de r
à l’écran. Pour obtenir davantage d’informations, reportez-vous au mode sRGB
du menu
(COULEUR).
égler la luminosité ou le contraste
4
Page 11
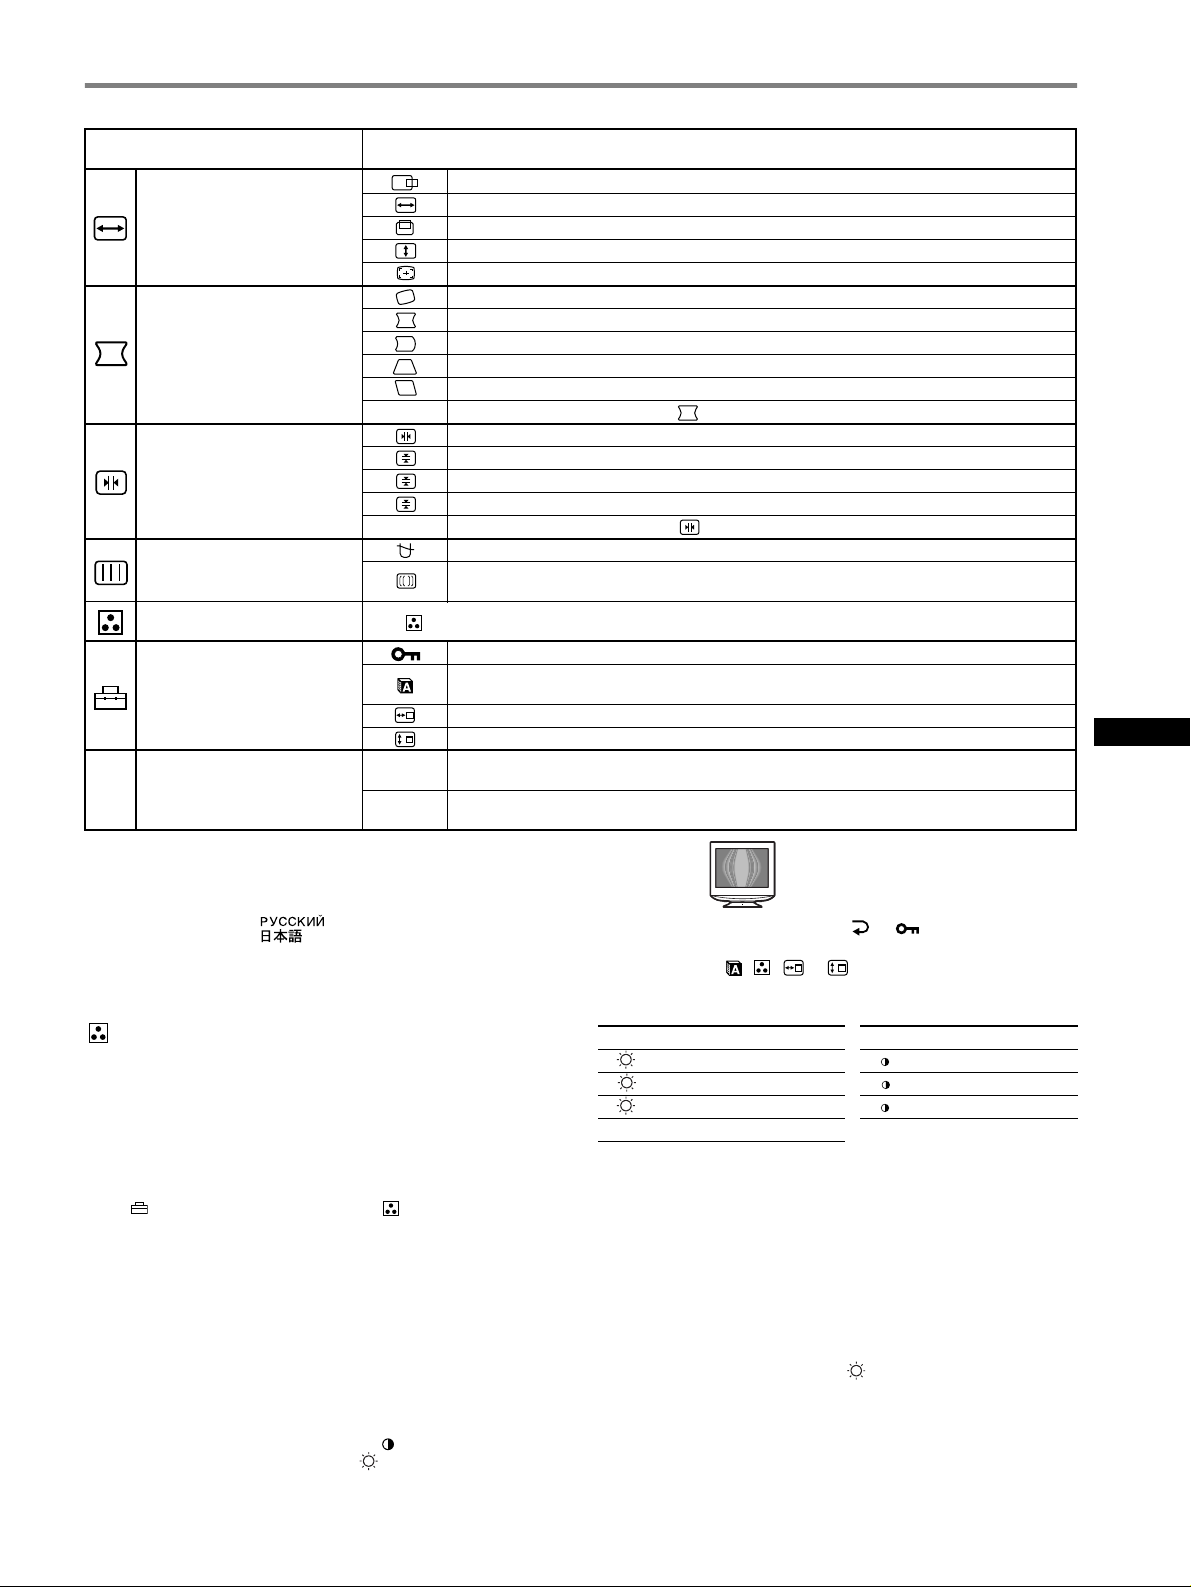
Réglages du menu d’écran
Icônes du menu principal et éléments
de réglage
Réglage de la taille ou du centrage
de l’image
Réglage de la forme de l’image
Réglage de la convergence
Réglage de la qualité de l’image
Réglage de la couleur de l’image Voir “ : pour régler la couleur de l’image”.
Réglages supplémentaires
0 Réinitialisation des réglages
1
Ce réglage est effectif pour le signal d’entrée courant.
*
2
*
Ce réglage est effectif pour tous les autres signaux d’entrée.
3
*
Menu de langues
• ENGLISH : Anglais • NEDERLANDS : Néerlandais
• FRANÇAIS • SVENSKA : Suédois
• DEUTSCH : Allemand • : Russe
• ESPAÑOL : Espagnol • : Japonais
• ITALIANO : Italien
1
*
*
Icônes du sous-menu et éléments de réglage
Position horizontale
Taille horizontale
Position verticale
Taille verticale
Centrage de taille automatique
Rotation de l’image
Étirement ou contraction des côtés de l’image
Déplacement des bords de l’image vers la droite ou la gauche*
Réglage de la largeur de l’image en haut de l’écran*
Déplacement de l’image vers la droite ou la gauche en haut de l’écran*
0 REINITIALISATION : Les réglages sont tous réinitialisés sur les valeurs par défaut.
Décalage horizontal des ombres rouges ou bleues
2
01
02
Décalage vertical des ombres rouges ou bleues
Décalage vertical des ombres rouges ou bleues en haut de l’écran
T
B
Décalage horizontal des ombres rouges ou bleues en bas de l’écran
0 REINITIALISATION : Les réglages sont tous réinitialisés sur les valeurs par défaut.
DEMAGNET : démagnétise le moniteur.
SUPPRESSION MOIRAGE
minimum.
Protection des données de réglage (VERROU MENU)
Sélection de la langue d’affichage à l’écran/Confirmation des informations relatives au moniteur
LANGUAGE/INFORMATIONS
Modification de la position du menu pour le réglage horizontal
Modification de la position du menu pour le réglage vertical
Réinitialisation de l’ensemble des données de réglage pour le signal d’entrée actuel.*6 Appuyez sur
1
*
“OK”.
Réinitialisation de l’ensemble des données de réglage pour tous les signaux d’entrée. Appuyez sur
2
*
“OK”.
1
*
1
4
*
1
*
: règle le degré de suppression du moiré afin de réduire le moiré au
3
*
1
1
5
*
FR
4
*
Exemple de moiré
*5Seul le commutateur (d’alimentation) !, et (VERROU MENU)
fonctionnent.
6
*
Les options de menu , , et ne sont pas réinitialisées par cette
méthode.
: pour régler la couleur de l’image
Les paramètres COULEUR permettent de régler la température des
couleurs de l’image en changeant le niveau de couleur des champs de
couleur blanche. Les couleurs apparaissent rougeâtres lorsque la
température est basse et bleuâtres lorsqu’elle est élevée. Ce réglage
s’avère pratique pour faire correspondre les couleurs du moniteur avec
les couleurs d’une image imprimée.
Sélectionnez l’un des quatre modes de réglage de la température des
couleurs (PRESELECT, VARIABLE, EXPERT et sRGB) dans le
menu (MODE COULEUR) et le menu
x PRESELECT (Réglage par défaut)
Vous pouvez sélectionner une température des couleurs prédéfinie, à
savoir 5000K, 6500K ou 9300K. Le réglage par défaut est 9300K.
x VARIABLE
Vous pouvez régler la température des couleurs dans une plage
comprise entre 5000K et 11000K.
x EXPERT
Vous pouvez effectuer des réglages affinés supplémentaires des
couleurs en sélectionnant ce mode. GAIN ( ) règle les zones
lumineuses de l’écran, alors que BIAS ( ) règle les zones sombres.
(COULEUR).
Sélectionnez pour Sélectionnez pour
R R (Rouge) BIAS R R (Rouge) GAIN
GG (Vert) BIASGG (Vert) GAIN
B B (Bleu) BIAS B B (Bleu) GAIN
0 REINITIALISATION
*
* Restaure tous les réglages du mode EXPERT à leurs valeurs par défaut.
x sRGB
Le réglage de couleur sRGB est un protocole industriel standard pour
les espaces colorimétriques. Il est conçu pour harmoniser les couleurs
affichées sur le moniteur et les couleurs imprimées. Pour afficher les
couleurs sRGB correctement (
γ = 2,2, 6500K), sélectionnez le mode
sRGB et réglez l’ordinateur raccordé sur les profils sRGB. Il est
impossible d’utiliser les réglages du menu LUMIN/CONTR. lorsque
vous sélectionnez le mode sRGB.
Remarque
Confirmez que les valeurs de luminosité ( ) et de contraste (6) correspondent
à celles du mode sRGB dans le menu LUMIN/CONTR. Sinon, sélectionnez 01
dans le menu 0 (REINITIALISATION).
5
Page 12
Dépannage
x Aucune image
Si l’indicateur ! (alimentation) est éteint
• Assurez-vous que le cordon d’alimentation est raccordé correctement.
• Vérifiez que l’interrupteur ! (alimentation) est en position activée (on).
L’indicateur ! (alimentation) est allumé en orange
• Vérifiez que le câble de signal vidéo est correctement raccordé et que
toutes les prises sont complètement enfichées.
• Vérifiez que les broches du connecteur d’entrée vidéo HD15 ne sont pas
pliées ni enfoncées.
• Assurez-vous que l’ordinateur est sous tension.
• L’ordinateur est en mode d’économie d’énergie. Essayez d’appuyer sur
une touche ou de déplacer la souris.
• Vérifiez que la carte graphique est bien insérée dans le connecteur de bus
approprié.
Si l’indicateur ! (alimentation) est vert ou orange clignotant
• Utilisez la fonction d’auto-diagnostic.
x L’image scintille, sautille, oscille ou est brouillée
• Isolez et supprimez les sources potentielles de champs électriques ou
magnétiques tels que d’autres moniteurs, des imprimantes laser, des
éclairages fluorescents ou des téléviseurs.
•Éloignez le moniteur des lignes à haute tension ou placez un blindage
magnétique à proximité du moniteur.
• Banchez le moniteur sur une autre prise secteur, de préférence raccordée
à un autre circuit.
• Faites pivoter le moniteur de 90° vers la gauche ou la droite.
• Vérifiez le réglage adéquat pour le moniteur dans le mode d’emploi de
votre carte graphique.
• Assurez-vous que le mode graphique et la fréquence du signal d’entrée
sont pris en charge par ce moniteur (voir le tableau de modes prédéfinis
(Preset mode timing table) page i). Même si la fréquence est comprise
dans la plage appropriée, il est possible que certaines cartes graphiques
aient une impulsion de synchronisation trop étroite pour que le moniteur
puisse se synchroniser correctement.
• Ajustez le taux de régénération de l’ordinateur (fréquence verticale) de
façon à obtenir la meilleure image possible.
x L’image est floue
• Réglez la luminosité, le contraste.
• Démagnétisez le moniteur.*
• Réglez le degré de suppression du moiré afin de réduire le moiré au
minimum ou réglez SUPPRESSION MOIRAGE sur INACTIF.
x Des images fantômes apparaissent
• N’utilisez pas de prolongateurs de câble vidéo et/ou de boîtiers de
commutation vidéo.
• Vérifiez que toutes les fiches sont bien connectées dans leurs prises
respectives.
x L’image n’est pas centrée ou est de taille incorrecte
• Exécutez le Centrage de taille automatique.
• Ajustez la taille ou le centrage. Veuillez noter que pour certains signaux
d’entrée et/ou cartes graphiques, il est possible que l’image ne remplisse
pas totalement la surface de l’écran.
• Juste après la commutation de l’interrupteur d’alimentation, le réglage
correct de la taille et du centrage peut prendre un certain temps.
x Les bords de l’image sont incurvés
• Réglez la géométrie.
x Un motif ondulatoire ou elliptique (moiré) est visible
• Réglez le degré de suppression du moiré afin de réduire le moiré au
minimum.
• Changez le motif de votre bureau.
x Les couleurs ne sont pas uniformes
• Démagnétisez le moniteur.* Si vous placez à côté du moniteur un
appareil qui génère un champ magnétique, comme un haut-parleur, ou si
vous changez l’orientation du moniteur, il est possible que les couleurs
perdent leur uniformité.
x Le blanc n’est pas blanc
• Réglez la température des couleurs.
x Les touches du moniteur ne fonctionnent pas
( apparaît à l’écran)
• Si la fonction de verrouillage des commandes est réglée sur ACTIF,
réglez-la sur INACTIF.
x Les bords des lettres et des lignes sont soulignés d’une
ombre rouge ou bleue
• Réglez la convergence.
x Un bourdonnement est audible juste après la mise sous
tension
• Il s’agit du son provoqué par le cycle de démagnétisation automatique.
Lorsque le moniteur est mis sous tension, il est automatiquement
démagnétisé pendant quelques secondes.
* Si un deuxième cycle de démagnétisation est nécessaire, attendez au
minimum 20 minutes pour un résultat optimal. Un bourdonnement peut être
audible, ceci est normal.
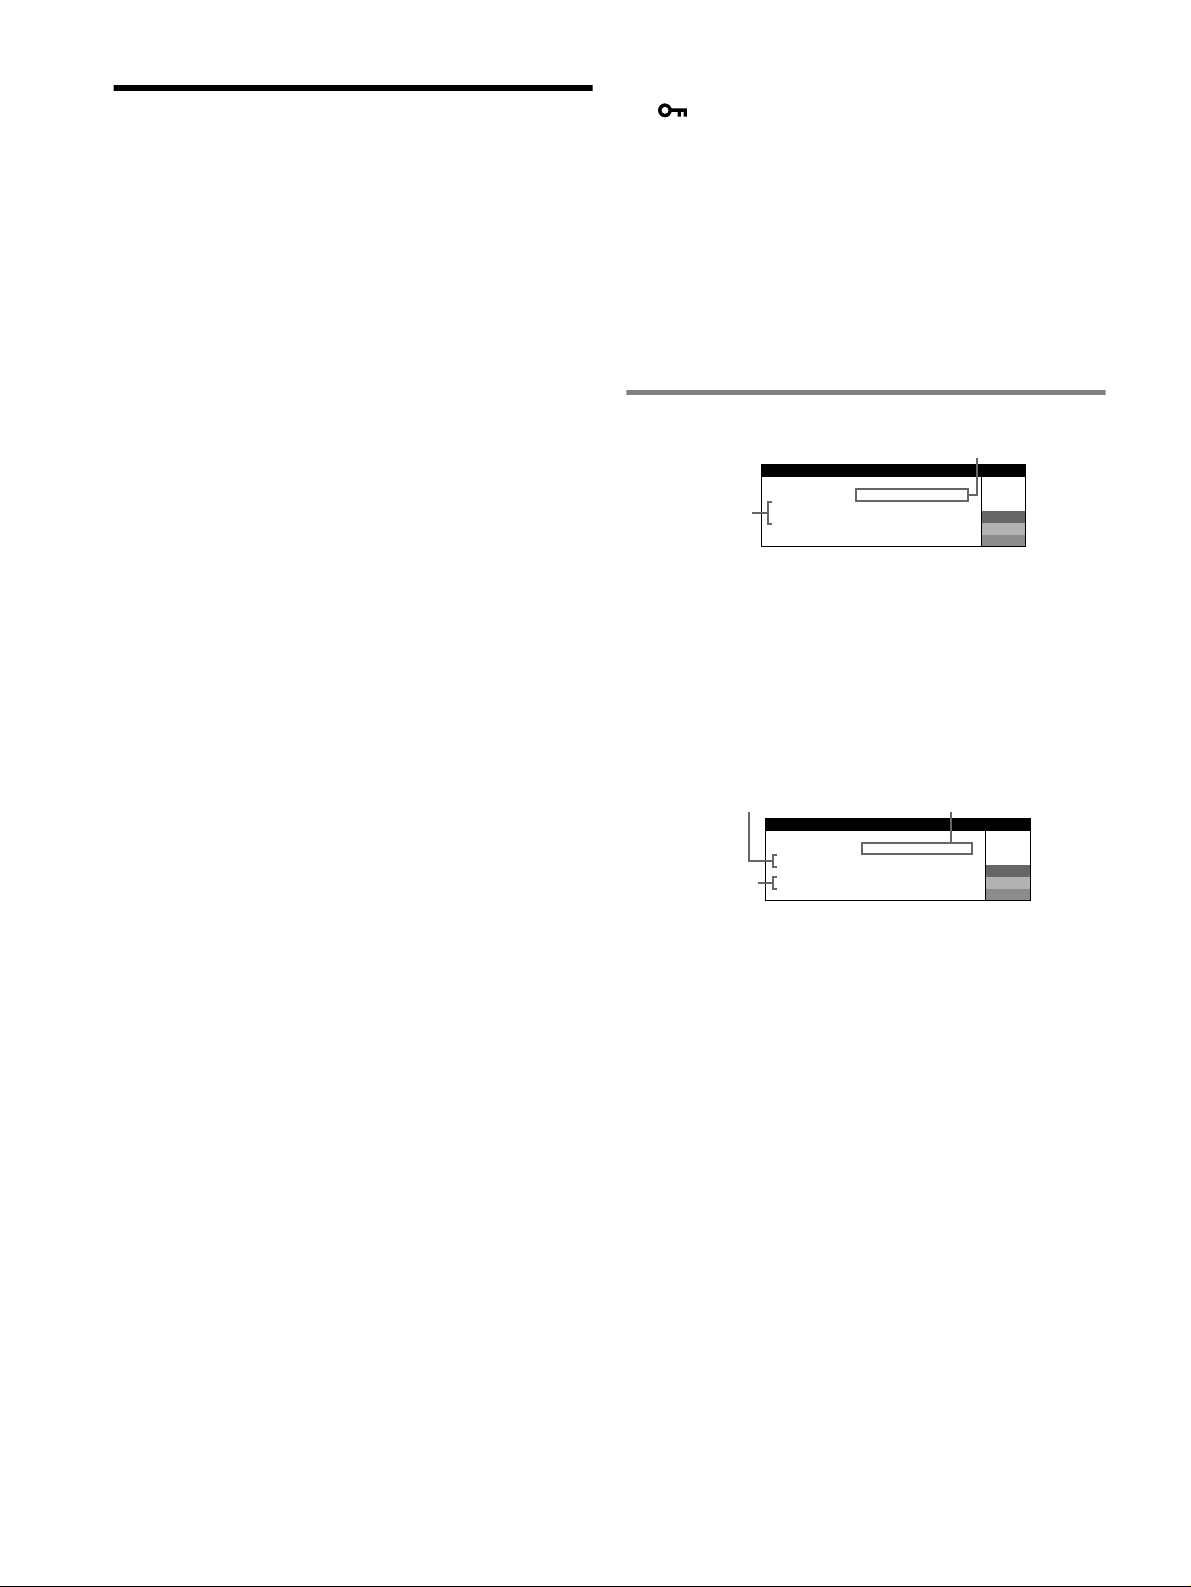
Messages à l’écran
2
1
W
R
G
B
W
R
G
B
I I ONSNFORMAT
L, ECRAN FONCT I ONNE
ENTREE
ACT
2
VER I I ER CABLE V IDEOF
I
VER
PAR
: PAS DE V IDEO
L,
ORDINATEUR
1 Si “PAS DE VIDEO” s’affiche :
Ceci indique qu’aucun signal ne provient du connecteur.
2 Indique les remèdes.
• Si le message ACTIVER PAR L’ORDINATEUR apparaît à l’écran,
essayez d’appuyer sur une touche quelconque du clavier ou de
déplacer la souris et assurez-vous que la carte graphique est
correctement et totalement insérée dans le connecteur de bus
adéquat.
• Si le message VERIFIER CABLE VIDEO apparaît à l’écran,
vérifiez que le moniteur est connecté correctement à l’ordinateur.
1
I I ONSNFORMAT
L, ECRAN FONCT I ONNE
ENTREE :
HORS PLAGE DE BALAYAGE
CHANGE
3
200.0kHz/ 85Hz
S GNAL PAR AMETREI
1 Si “HORS PLAGE DE BALAYAGE” s’affiche :
Ceci indique que le signal d’entrée n’est pas pris en charge par les
spécifications du moniteur.
2 Affiche la fréquence du signal d’entrée.
3 Indique le remède.
Le message CHANGE SIGNAL PARAMETRE apparaît à l’écran. Si
vous remplacez votre ancien moniteur par ce moniteur, rebranchez
l’ancien moniteur. Ajustez ensuite la carte graphique de l’ordinateur de
sorte que la fréquence horizontale soit comprise entre 30 et 96 kHz, et
que la fréquence verticale soit comprise entre 48 et 170 Hz.
6
Page 13
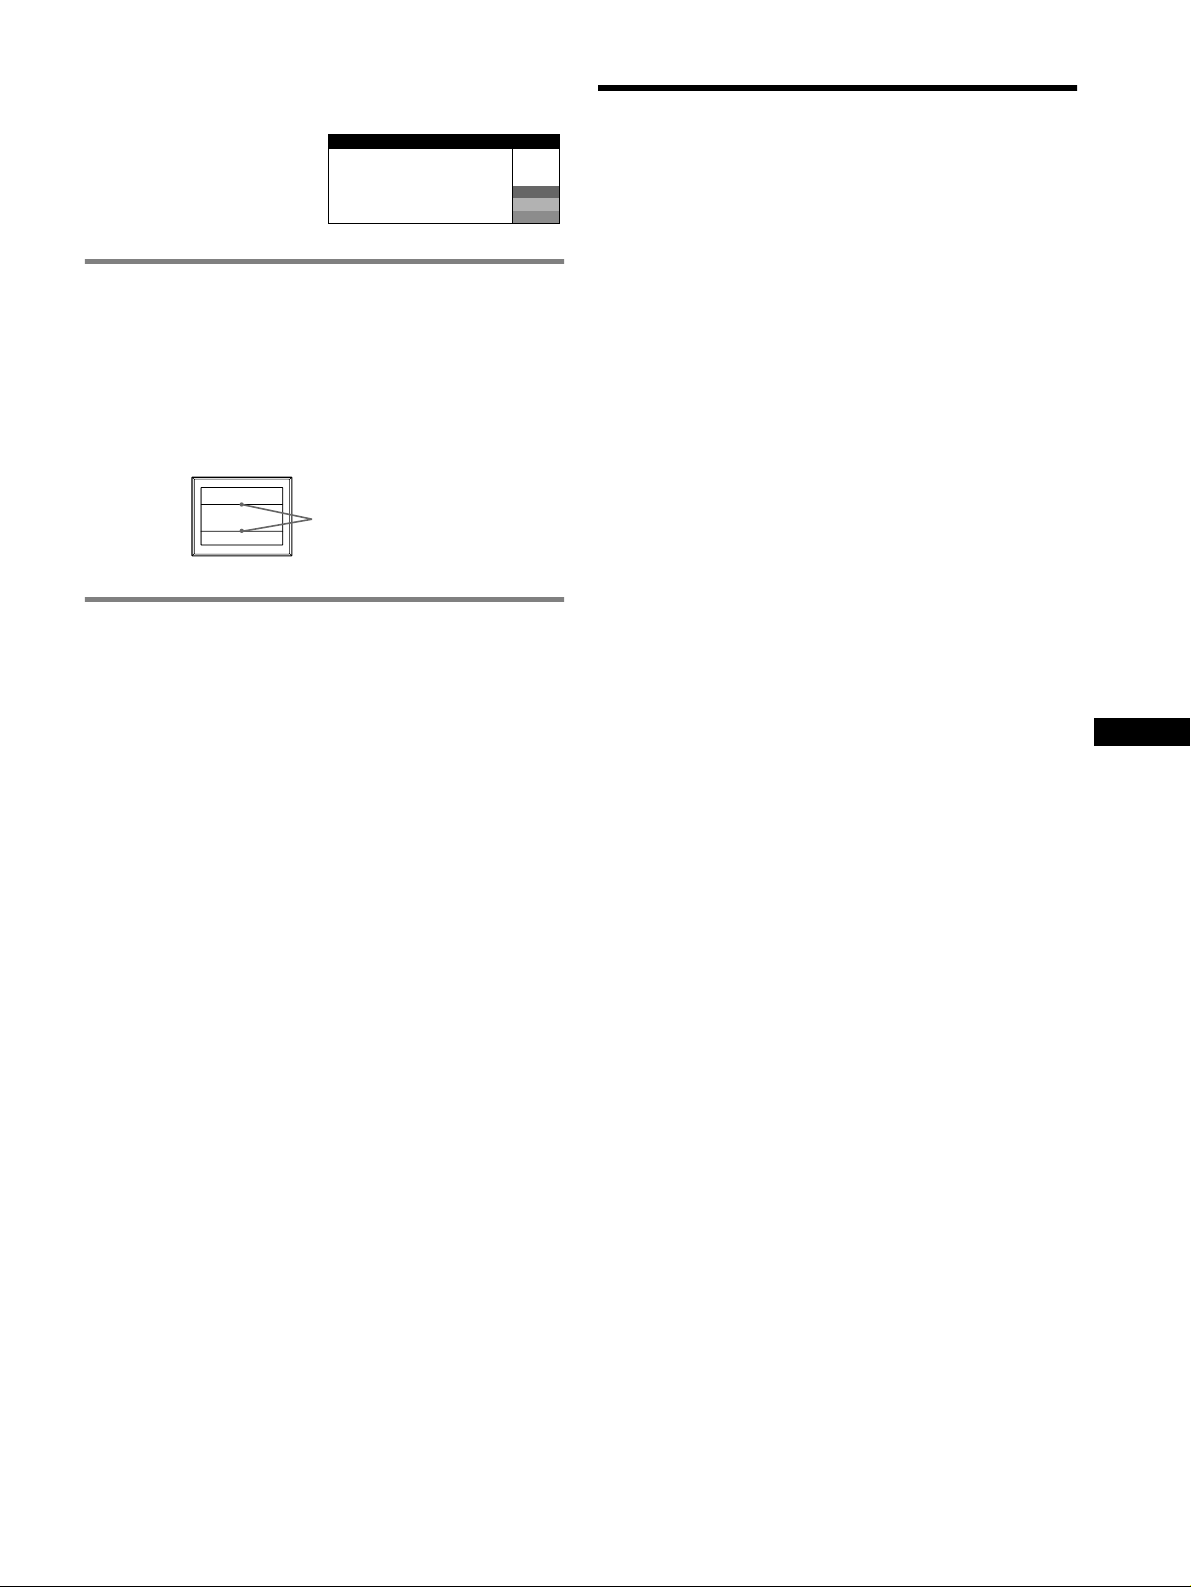
Affichage de l’identification du moniteur, du
numéro de série et de la date de fabrication.
Alors que l’écran reçoit un signal
vidéo, maintenez la touche
MENU enfoncée pendant plus de
5 secondes pour afficher les
informations relatives à ce
moniteur.
INFORMATIONS
MODEL : CPD-E430
SER NO : 1234567
MANUFACTURED
: 2001-30
W
R
G
B
Si des lignes fines apparaissent à
l’écran
Ces lingnes ne constituent aucunement un dysfonctionnement ;
elles résultent de l’utilisation du tube image Trinitron sur ce moniteur.
Ces lignes sont en fait l’ombre des fils d’amortissement employés pour
stabiliser la grille d’ouverture. Cette grille est un composant essentiel
qui rend le tube d’image Trinitron unique en laissant passer une plus
grande quantité de lumière vers l’écran, permettant ainsi d’obtenir une
image plus lumineuse et plus détaillée.
(fils d’amortissement)
Fils d’amortissement
Fonction d’auto-diagnostic
Ce moniteur est équipé d’une fonction d’auto-diagnostic. En cas de
problème avec votre moniteur ou votre ordinateur, rien n’est affiché à
l’écran et le témoin ! (alimentation) s’allume en vert ou clignote en
orange. Si l’indicateur ! (alimentation) est allumé en orange,
l’ordinateur est en mode d’économie d’énergie. Essayez d’appuyer sur
une touche ou de déplacer la souris.
Spécifications
CRT
Pas d’ouverture de grille de 0,24 mm, déflexion de 90 degrés
FD Trinitron, 19 pouces en diagonale
Taille de l’image affichée
Résolution (H : Horizontal, V : Vertical)
Niveaux des signaux d’entrée
Signal vidéo : RVB analogique : 0,700 Vcc (positif), 75
Signal SYNC : H/V séparé ou sync composite :
Zone d’image standard
Fréquence de déflexion (H : Horizontal, V : Vertical)
Voltage d’entrée secteur
Consommation électrique
Température d’utilisation
Dimensions Environ 451
Poids Environ 25,5 kg (56 lb 3 oz)
Plug and Play DDC2B/DDC2Bi
Accessoires fournis Cordon d’alimentation
Environ 365
Zone de visualisation de 18,0"
Maximum H : 1920 points, V : 1440 lignes
Recommandé H : 1280 points, V : 1024 lignes
TTL 2 k
Sync sur Vert : 0,3 Vcc (négatif)
Environ 352
(13
H : 30 à 96 kHz, V : 48 à 170 Hz
100 à 240 V, 50 – 60 Hz, 2,0 – 1,0 A
Environ 135 W
10°C à 40°C
(17
GTF
Le présent mode d’emploi
× 274 mm (l/h) (14
Ω, sans polarité
× 264 mm
7
/8 × 10 1/2 pouces)
× 471 × 461 mm (l/h/p)
7
/8 × 18 5/8 × 18 1/4 pouces)
3
/8 × 10 7/8 pouces)
Ω
FR
x Si l’indicateur ! (alimentation) s’allume en vert
1 Débranchez le câble de signal vidéo ou mettez
l’ordinateur raccordé hors tension.
2 Eteignez, puis rallumez le moniteur.
3 Maintenez le bouton de commande vers le haut pendant
quelques secondes avant que le moniteur n’entre en
mode d’économie d’énergie.
Si les quatre barres de couleurs apparaissent (blanc, rouge, vert et bleu),
le moniteur fonctionne correctement. Rebranchez les câbles d’entrée
vidéo et vérifiez l’état de votre ordinateur.
Si les barres de couleur n’apparaissent pas, il est possible que le
moniteur ne fonctionne pas normalement. Informez votre revendeur
Sony agréé de l’état du moniteur.
x Si l’indicateur ! (alimentation) clignote en orange
Eteignez, puis rallumez le moniteur.
Si l’indicateur ! (alimentation) est allumé en vert, le moniteur
fonctionne correctement.
Si l’indicateur ! (alimentation) clignote toujours, il est possible que le
moniteur ne fonctionne pas normalement. Comptez le nombre de
secondes entre les clignotements oranges de l’indicateur
! (alimentation) et informez votre revendeur Sony agréé de l’état du
moniteur. Notez soigneusement le modèle et le numéro de série du
moniteur. Notez également la marque et le modèle de l’ordinateur et de
la carte graphique.
(suite page suivante)
7
Page 14
Modes préréglés et personnalisés
Lorque le moniteur reçoit un signal d’entrée, il compare automatiquement le
signal à l’un des modes prédéfinis en usine mémorisés afin de fournir une
image de haute qualité
timing table) page i).
prédéfinis en usine, le moniteur fournit automatiquement l’image la plus
appropriée à ce signal d’entrée, dans la plage de fréquences verticales ou
horizontales (page 7), selon la formule de minutage généralisée. Lorsque
l’image est réglée, les données de réglage sont mémorisées comme un mode
utilisateur et sont automatiquement utilisées dès qu’un signal d’entrée
identique est reçu.
Fonction d’économie d’énergie
Ce moniteur satisfait aux critères d’économie d’énergie VESA, TCO’99 et
(voir le tableau de modes prédéfinis (Preset mode
Si le signal d’entrée ne correspond à aucun des modes
ENERGY STAR. Lorsqu’aucun signal n’est envoyé au moniteur par
l’ordinateur, le moniteur réduit automatiquement la consommation d’énergie
comme indiqué ci-dessous.
Précautions
Avertissement relatif au raccordement secteur
• Utilisez le cordon d’alimentation fourni. Si vous utilisez un cordon
d’alimentation différent, assurez-vous que ce dernier est
compatible avec votre réseau d’alimentation électrique.
Pour les utilisateurs au Royaume-Uni
Si vous utilisez le moniteur au Royaume-Uni, assurez-vous
d’utiliser le cordon d’alimentation correct.
Exemple de types de prises
Mode
d’alimentation
fonctionnement
normal
1
inactif*
(sommeil profond)*
1
*
PAS DE VIDEO s’affiche à l’écran lorsque votre ordinateur passe en mode
d’économie d’énergie. Le moniteur passe en mode d’économie d’énergie
quelques secondes plus tard.
2
*
“Sommeil profond” es t le mode d’économie d’énergie défini par l’agence de
protection de l’environnement.
La conception et les spécifications sont sujettes à modifications sans préavis.
Consommation
électrique
≤ 135 W vert
≤ 3 W orange
2
indicateur
! (alimentation)
pour 100 à 120 V CA pour 200 à 240 V CA
pour 240 V CA
uniquement
• Avant de débrancher le cordon d’alimentation, attendez au moins
30 secondes avant de couper l’alimentation afin de permettre le
déchargement de l’électricité statique de la surface de l’écran.
• Après la mise sous tension, l’écran est démagnétisé pendant
quelques secondes. Ceci génère un champ magnétique puissant
autour de l’écran, susceptible d’altérer les données stockées sur les
cassettes ou bandes placées à proximité du moniteur. Assurez-vous
de ne pas placer d’équipement d’enregistrement magnétique, de
bandes ou de disquettes à proximité du moniteur.
La prise électrique doit être installée à proximité de l’appareil et
facile d’accès.
Installation
N’installez pas le moniteur dans les endroits suivantes :
• sur des surfaces textiles (tapis, couvertures, etc.) ni à proximité de
tissus (rideaux, draperies, etc.) qui risquent d’obstruer les orifices
de ventilation
• près de sources de chaleur telles que des radiateurs ou des conduits
d’air chaud ou à un emplacement exposé aux rayons directs du
soleil
• dans un endroit sujet à de fortes variations de température
• dans un endroit sujet à des vibrations mécaniques ou à des chocs
• sur une surface instable
• près d’un équipement générant un champ magnétique, tel qu’un
transformateur ou des lignes à haute tension
• près ou sur une surface métallique chargée d’électricité
• dans un rack fermé
Entretien
• Nettoyez l’écran en utilisant un chiffon doux et sec. Si vous utilisez
un nettoyant pour vitres, n’utilisez pas de produits contenant une
solution antistatique ou une solution similaire qui risque d’abîmer
le revêtement de l’écran.
• Ne frottez pas, ne touchez pas et ne tapotez pas la surface de l’écran
avec des objets pointus ou abrasifs, tels que la pointe d’un stylo ou
un tournevis. Dans le cas contraire, vous pourriez rayer le tube de
l’écran.
• Nettoyez le châssis, l’écran et les commandes à l’aide d’un chiffon
doux légèrement imbibé d’une solution détergente non agressive.
N’utilisez pas d’éponge abrasive, de poudre à récurer ou de
solvant, tel que de l’alcool ou de la benzine.
Transport
Lorsque vous transportez ce moniteur, utilisez le carton et les
matériaux d’emballage d’origine.
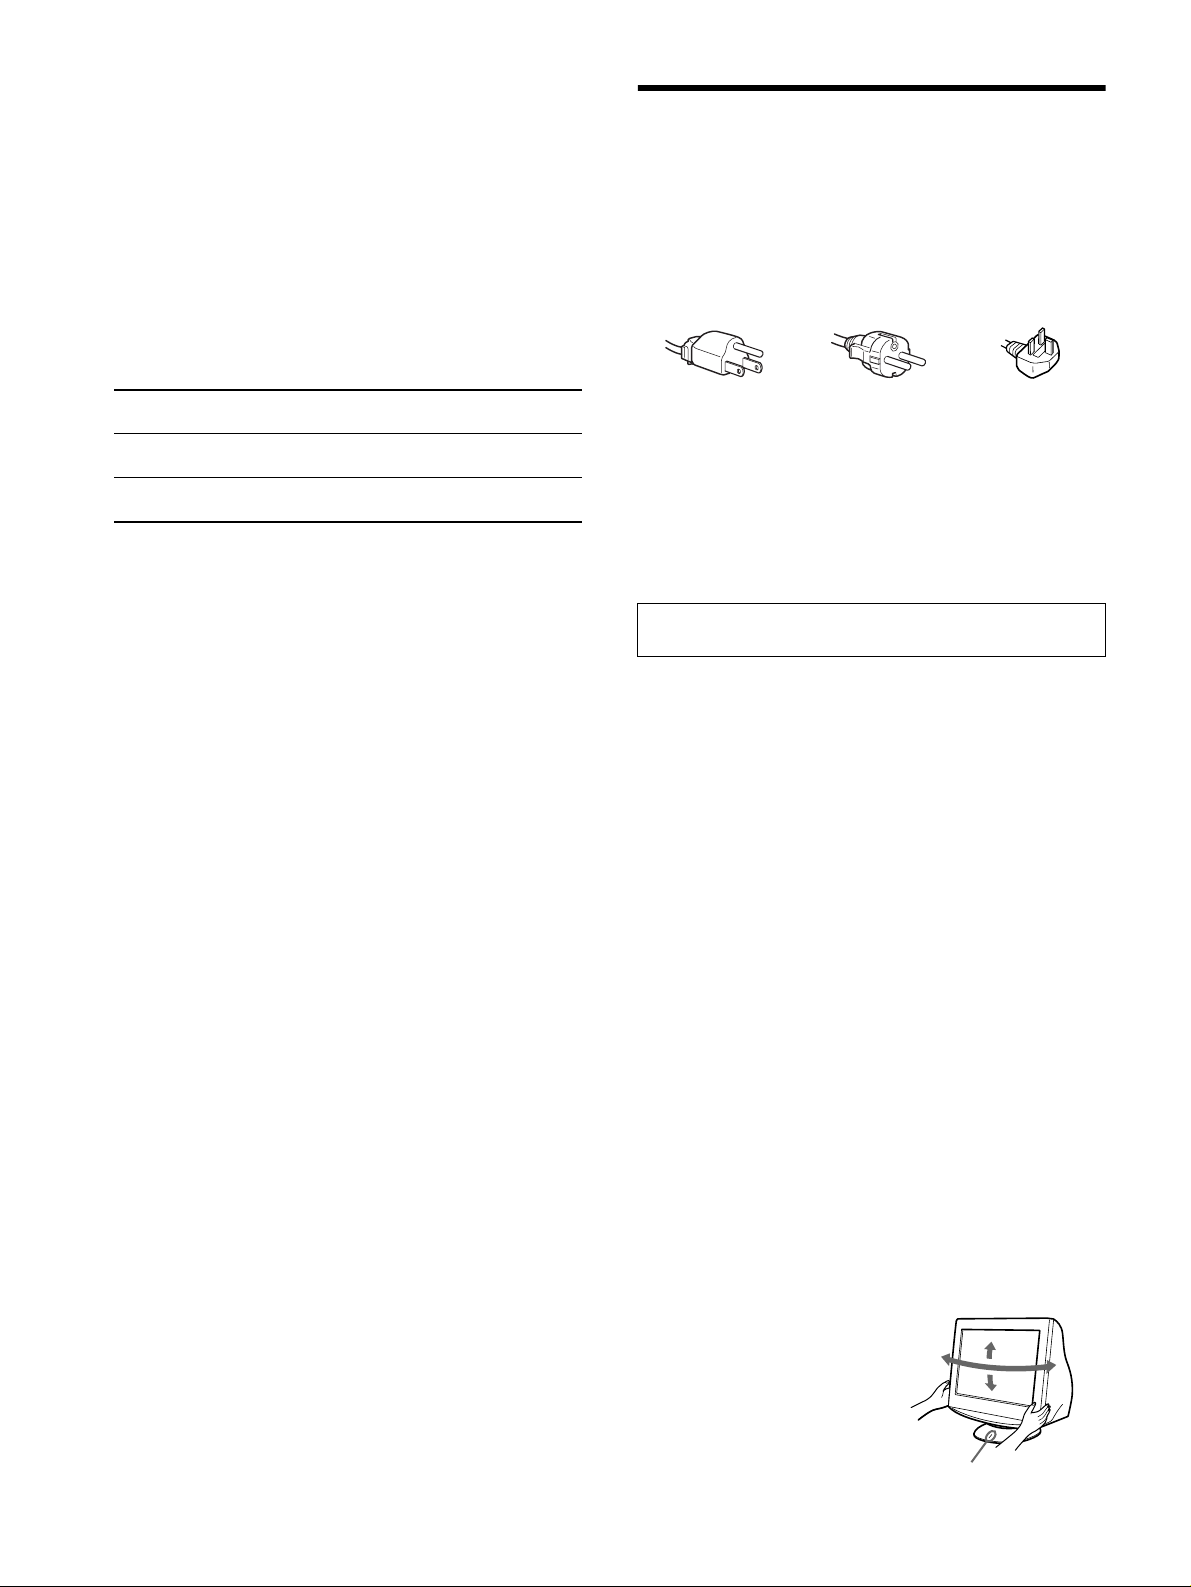
Utilisation du pied pivotant
Ce moniteur peut être ajusté selon les
angles illustrés ci-contre. Pour
tourner le moniteur verticalement ou
horizontalement, tenez sa base avec
les deux mains. Prenez garde de ne
90°
15°
5°
90°
pas vous coincer les doigts derrière le
moniteur lorsque vous l’inclinez à la
verticale.
Point de centrage
8
Page 15
Inhalt
Anschließen des Monitors . . . . . . . . . . . . . . . . . . . . 3
Einstellen des Monitors . . . . . . . . . . . . . . . . . . . . . . 4
Störungsbehebung . . . . . . . . . . . . . . . . . . . . . . . . . . 6
Technische Daten . . . . . . . . . . . . . . . . . . . . . . . . . . . 7
Sicherheitsmaßnahmen . . . . . . . . . . . . . . . . . . . . . . 8
Appendix . . . . . . . . . . . . . . . . . . . . . . . . . . . . . . . . . . . i
Preset mode timing table . . . . . . . . . . . . . . . . . . . . . . . i
TCO’99 Eco-document. . . . . . . .Hintere Umschlagseite
•Trinitronâ ist ein eingetragenes Warenzeichen der Sony Corporation.
• Macintosh ist ein Warenzeichen der Apple Computer, Inc., in den USA
und anderen Ländern.
• Windows
Corporation in den USA und anderen Ländern.
• IBM PC/AT und VGA sind eingetragene Warenzeichen der IBM
Corporation in den USA.
• VESA und DDC
Association.
•
ENERGY STAR ist ein eingetragenes Warenzeichen in den USA.
• Alle anderen in diesem Handbuch erwähnten Produktnamen können
Warenzeichen oder eingetragene Warenzeichen der jeweiligen
Eigentümer sein.
• Im Handbuch sind die Warenzeichen und eingetragenen Warenzeichen
nicht überall ausdrücklich durch „
â
und MS-DOS sind eingetragene Warenzeichen der Microsoft
ä
sind Warenzeichen der Video Electronics Standard
ä“ und „â“ gekennzeichnet.
Hinweis
Dieses Gerät erfüllt bezüglich tieffrequenter (very low frequency) und
tiefstfrequenter (extremely low frequency) Strahlung die Vorschriften
des „Swedish National Council for Metrology (MPR)“ vom Dezember
1990 (MPR II).
Hinweise
• Aus ergonomischen Gründen wird empfohlen, die Grundfarbe
Blau nicht auf dunklem Untergrund zu verwenden (schlechte
Erkennbarkeit, Augenbelastung bei zu geringem
Zeichenkontrast).
• Aus ergonomischen Gründen (flimmern) sollten nur
Darstellungen bei Vertikalfrequenzen ab 70 Hz (ohne
Zeilensprung) verwendet werden.
• Die Konvergenz des Bildes kann sich auf Grund des
Magnetfeldes am Ort der Aufstellung aus der korrekten
Grundeinstellung verändern. Zur Korrektur empfiehlt es sich
deshalb, die Regler an der Frontseite für Konvergenz so
einzustellen, daß die getrennt sichtbaren Farblinien für Rot,
Grün und Blau bei z.B. der Darstellung eines Buchstabens zur
Deckung (Konvergenz) gelangen.
Siehe hierzu auch die Erklärungen zu Konvergenz.
Anschließen des Monitors
1 Anschließen des Monitors an den Computer
x Anschließen an einen HD15-Eingang
Videosignalkabel
des Monitors
Anschließen an einen Macintosh oder kompatiblen
Computer
Wenn Sie diesen Monitor an einen Power Mac G3/G4 anschließen wollen,
benötigen Sie einen Macintosh-Adapter (nicht mitgeliefert).
2 Einschalten von Monitor und Computer
1 Verbinden Sie das Netzkabel mit dem Monitor, und
schalten Sie den Monitor am Netzschalter ! ein.
2 Schalten Sie den Computer ein.
Keine speziellen Treiber erforderlich
Dieser Monitor entspricht dem Plug-and-Play-Standard „DDC“, so daß alle
Daten des Monitors automatisch erkannt werden. Daher muß kein spezifischer
Treiber auf dem Computer installiert werden.
Wenn Sie den Monitor an den PC anschließen und diesen dann zum ersten Mal
starten, wird möglicherweise der Hardware-Assistent auf dem Bildschirm
angezeigt. Gehen Sie in diesem Fall nach den Anweisungen auf dem Bildschirm
vor. Der Plug-and-Play-Monitor ist automatisch ausgewählt, so daß Sie ohne
weitere Vorbereitungen mit diesem Monitor arbeiten können.
Hinweise
• Berühren Sie nicht die Stifte am Stecker des Videosignalkabels.
• Achten Sie darauf, den Stecker des Videosignalkabels korrekt am HD15Anschluß auszurichten, damit die Stifte am Stecker des Videosignalkabels
nicht verbogen werden.
an HD15 des
anzuschließenden Computers
Die Stiftbelegung des HD15-Videosignalkabels
1
678910
11 12 13 14 15
Stift Nr. Signal
1
2Grün
3Blau
4ID (Masse)
5 CPU-Abfrage
6 Masse Rot
7 Masse Grün
8 Masse Blau
* DDC (Display Data Channel) ist ein Standard der VESA.
5432
Rot
(Grünsignal mit
Synchronisation)
Stift Nr. Signal
9 DDC + 5V*
10 Masse
11 ID (Masse)
12 Bidirektionale
13 H. Sync
14 V. Sync
15
Daten (SDA)*
Datentakt (SCL)*
DE
3
Page 16
Einstellen des Monitors
Navigieren in den Menüs
1 Rufen Sie mit der Taste MENU das Menü auf.
ENDE
,
1280x1024 / 85Hz
Hauptmenü
Horizontalfrequenz/Auflösung
des aktuellen Eingangssignals
(nur wenn das Signal einem
der werkseitig voreingestellten
Modi des Monitors entspricht)
Untermenü
2 Bewegen Sie die Steuertaste nach m/M, um das
Hauptmenü hervorzuheben, in dem Sie Einstellungen
vornehmen wollen, und drücken Sie die Steuertaste.
,,
Hauptmenü
45
Vertikalfrequenz
des aktuellen
Eingangssignals
GRÖSSE45/BI LDLAGE
1280x1024 / 85Hz
Untermenü
Einstellen von Helligkeit und Kontrast
Helligkeit und Kontrast können Sie über ein spezielles Menü, HELL/
KONTRAST, einstellen. Die Einstellungen gelten für alle Eingangssignale.
1 Bewegen Sie die Steuertaste in Richtung M ()/m (),
um das Menü HELL/KONTRAST aufzurufen.
2 Bewegen Sie die Steuertaste in Richtung m/M, um
Helligkeit ( ) bzw. Kontrast ( ) auszuwählen.
Bewegen Sie dann die Steuertaste in Richtung –/+, um
die Einstellung vorzunehmen.
KONTRAST
/HEL L
HELL I I TGKE
45
1280x1024 / 85Hz
Hinweis
Wenn Sie unter (FARBMODUS) im Menü (FARBE) den sRGBModus ausgewählt haben, wird das Menü / (HELL/KONTRAST) für
den sRGB-Modus angezeigt, und Sie können auf diesem Bildschirm
Helligkeit und Kontrast nicht einstellen. Weitere Informationen zum sRGBModus finden Sie in den Erläuterungen zum sRGB-Modus im Menü
(FARBE).
3 Bewegen Sie die Steuertaste in Richtung m/M, um das
Untermenü hervorzuheben, in dem Sie Einstellungen
vornehmen wollen. Bewegen Sie dann die Steuertaste
in Richtung –/+, um die Einstellung vorzunehmen.
So schließen Sie das Menü
Drücken Sie die Taste MENU zweimal. Nun erscheint wieder das
Hauptmenü. Standardmäßig ist die Option ausgewählt. Wenn Sie
auswählen und die Taste MENU drücken, wird das Menü ausgeblendet.
Wenn Sie keine weitere Taste drücken, wird das Bildschirmmenü nach etwa
30 Sekunden automatisch ausgeblendet.
4
Page 17
Einstellungen über das Bildschirmmenü
Hauptmenüsymbole und
Einstelloptionen
Einstellen von Größe oder Zentrierung
des Bildes
Einstellen der Form des Bildes
Einstellen der Konvergenz
Einstellen der Bildqualität
Einstellen der Farben des Bildes Siehe „ : Einstellen der Farben des Bildes“.
Weitere Einstellungen
0 Zurücksetzen der Einstellungen
1
*
Diese Einstellung gilt für das aktuelle Eingangssignal.
2
*
Diese Einstellung gilt für alle Eingangssignale.
3
*
Sprachmenü
• ENGLISH: Englisch • NEDERLANDS: Niederländisch
• FRANÇAIS: Französisch • SVENSKA: Schwedisch
• DEUTSCH • : Russisch
• ESPAÑOL: Spanisch • : Japanisch
• ITALIANO: Italienisch
1
*
2
*
Untermenüsymbole und Einstelloptionen
Horizontale Position
Breite
Vertikale Position
Höhe
Automatische Einstellung von Bildgröße und -zentrierung
Drehen des Bildes
Wölben der Bildränder nach außen oder innen
Verschieben der Bildränder nach links oder rechts*
Einstellen der Bildbreite im oberen Bildschirmbereich*
Verschieben des Bildes nach links oder rechts im oberen Bildschirmbereich*
0 ZURÜCKSETZEN: Setzt alle -Einstellungen auf ihre werkseitigen Standardwerte zurück.
Horizontales Verschieben roter oder blauer Schatten
Vertikales Verschieben roter oder blauer Schatten
Vertikales Verschieben roter oder blauer Schatten im oberen Bildschirmbereich
T
Vertikales Verschieben roter oder blauer Schatten im unteren Bildschirmbereich
B
0 ZURÜCKSETZEN: Setzt alle -Einstellungen auf ihre werkseitigen Standardwerte zurück.
ENTMAGNETISIEREN: Entmagnetisieren des Monitors.
0
0
MOIRE-KORREKTUR
gering ausfällt.
Schützen von Einstellungen (TASTENSPERRE)
Auswählen der Sprache für die Bildschirmmenüs/Anzeigen der Monitorinformationen (LANGUAGE/
INFORMATION)
Ändern der horizontalen Menüposition
Ändern der vertikalen Menüposition
1
Zurücksetzen aller Einstellungen für das aktuelle Eingangssignal.*6 Wählen Sie „OK“.
1*
2
Zurücksetzen aller Einstellungen für alle Eingangssignale. Wählen Sie „OK“.
2*
1
*
3
*
1
*
1
1
1
4
*
: Einstellen des Grads der Moiré-Korrektur, so daß der Moiré-Effekt möglichst
5
*
4
*
Beispiel für Moire
5
*
Jetzt können Sie nur noch den Netzschalter !, die Option sowie
(TASTENSPERRE) benutzen.
6
*
Die Menüoptionen , , und werden auf diese Weise nicht zurückgesetzt.
DE
: Einstellen der Farben des Bildes
Mit den Optionen im Menü FARBE können Sie die Farbtemperatur des
Bildes einstellen. Dabei ändert sich der Farbwert im weißen Farbfeld.
Farben erscheinen bei einer niedrigen Farbtemperatur rötlich, bei einer
hohen Farbtemperatur bläulich. Mit Hilfe dieser Funktion können Sie die
Farben auf dem Monitor an die Farben eines gedruckten Bildes anpassen.
Wählen Sie unter (FARBMODUS) im Menü (FARBE) einen der 4
Farbtemperatureinstellmodi VORDEF, VARIABEL, KOMPLEX und
sRGB aus.
x VORDEF (Standardeinstellung)
Hier stehen drei voreingestellte Farbtemperaturen zur Verfügung: 5000 K,
6500 K und 9300 K. Die Standardeinstellung ist 9300 K.
x VARIABEL
Die Farbtemperatur läßt sich auf einen Wert zwischen 5000 K und 11000 K
einstellen.
x KOMPLEX
Wenn Sie diesen Modus auswählen, können Sie weitere Feineinstellungen
für die Farbe vornehmen. GAIN ( ) dient zum Einstellen der hellen
Bildschirmbereiche, BIAS ( ) zum Einstellen der dunklen
Bildschirmbereiche.
Option Funktion Option Funktion
RR (Rot) BIAS
GG (Grün) BIAS
BB (Blau) BIAS
0 ZURÜCKSETZEN*
R
G
B
R (Rot) GAIN
G (Grün) GAIN
B (Blau) GAIN
* Alle im Modus KOMPLEX vorgenommenen Einstellungen werden auf die
werkseitigen Werte zurückgesetzt.
x sRGB
Die sRGB-Farbeinstellung ist ein Farbraumprotokoll nach
Industriestandard, mit dem die am Bildschirm angezeigten mit den
gedruckten Farben in Übereinstimmung gebracht werden sollen. Damit die
sRGB-Farben korrekt angezeigt werden (
γ = 2,2, 6500 K), wählen Sie den
Modus sRGB, und stellen Sie an Ihrem Computer das sRGB-Profil ein.
Wenn Sie sRGB auswählen, können Sie keine Menüeinstellungen für
HELL/KONTRAST vornehmen.
Hinweis
Überprüfen Sie, ob die Werte für Helligkeit ( ) und Kontrast ( ) jeweils
auf die im sRGB-Modus einzustellenden Zahlen eingestellt sind, die im
Menü HELL/KONTRAST angezeigt werden. Ist dies nicht der Fall, wählen
Sie 01 im Menü 0 (ZURÜCKSETZEN).
5
Page 18
Störungsbehebung
1
x Es wird kein Bild angezeigt
Die Netzanzeige ! leuchtet nicht
• Das Netzkabel muß korrekt angeschlossen sein.
• Der Monitor muß am Netzschalter ! eingeschaltet sein.
Die Netzanzeige ! leuchtet orange
•Überprüfen Sie, ob das Videosignalkabel korrekt angeschlossen ist und
alle Stecker fest in den Buchsen sitzen.
• Achten Sie darauf, daß am HD15-Videoeingangsanschluß keine Stifte
verbogen oder eingedrückt sind.
•Überprüfen Sie, ob der Computer eingeschaltet ist.
• Der Computer befindet sich im Energiesparmodus. Drücken Sie eine
beliebige Taste auf der Computer-Tastatur, oder bewegen Sie die Maus.
• Die Grafikkarte muß korrekt im richtigen Bus-Steckplatz sitzen.
Die Netzanzeige ! leuchtet grün oder blinkt orange
• Verwenden Sie die Selbstdiagnosefunktion.
x Das Bild flimmert, springt, oszilliert oder ist gestört
• Entfernen Sie alle möglichen Quellen elektrischer oder magnetischer
Felder wie andere Monitore, Laserdrucker, Ventilatoren,
Leuchtstoffröhren oder Fernsehgeräte aus der Nähe des Monitors.
• Halten Sie den Monitor von Stromleitungen fern, oder schützen Sie den
Monitor durch eine Magnetabschirmung.
• Schließen Sie das Netzkabel des Monitors an eine andere Steckdose,
möglichst an einem anderen Stromkreis, an.
• Versuchen Sie, den Monitor um 90 Grad nach links oder rechts zu
drehen.
• Schlagen Sie in der Anleitung zur Grafikkarte die korrekte
Monitoreinstellung nach.
•Überprüfen Sie, ob der Grafikmodus und die Frequenz des
Eingangssignals von diesem Monitor unterstützt werden (siehe “Preset
mode timing table” auf Seite i). Auch wenn die Frequenz innerhalb des
unterstützten Bereichs liegt, arbeiten einige Grafikkarten
möglicherweise mit einem Synchronisationsimpuls, der für eine korrekte
Synchronisation des Monitors zu kurz ist.
• Stellen Sie die Auffrischungsrate am Computer (Vertikalfrequenz) auf
den Wert ein, mit dem Sie die besten Bilder erzielen.
x Das Bild ist verschwommen
• Stellen Sie Helligkeit und Kontrast ein.
• Entmagnetisieren Sie den Monitor.*
• Regulieren Sie den Grad der Moiré-Korrektur, bis der Moiré-Effekt auf
ein Minimum reduziert ist, oder setzen Sie MOIRE-KORREKTUR auf
AUS.
x Doppelbilder sind zu sehen
• Verwenden Sie keine Bildschirmverlängerungskabel und/oder
Videoschaltboxen, wenn dieses Phänomen auftritt.
•Überprüfen Sie, ob alle Stecker fest in den jeweiligen Buchsen sitzen.
x Das Bild ist nicht zentriert, oder die Bildgröße ist nicht
korrekt
• Führen Sie die Funktion zur automatischen Einstellung von Bildgröße
und -zentrierung aus.
• Stellen Sie die Bildgröße oder -zentrierung ein. Beachten Sie bitte, daß
bei einigen Eingangssignalen und/oder Grafikkarten das Bild den
Bildschirm nicht ganz bis zum Rand ausfüllt.
• Unmittelbar nach dem Einschalten des Geräts am Netzschalter dauert es
eine Weile, bis Bildgröße und -zentrierung richtig eingestellt sind.
x Die Bildränder sind gekrümmt
• Stellen Sie die Geometrie ein.
x Wellenförmige oder elliptische Moiré-Effekte sind
sichtbar
• Regulieren Sie den Grad der Moiré-Korrektur, bis der Moiré-Effekt auf
ein Minimum reduziert ist.
• Wählen Sie ein anderes Muster für Ihren Desktop.
x Die Farbe ist nicht gleichmäßig
• Entmagnetisieren Sie den Monitor.* Wenn Sie ein Gerät, das ein
Magnetfeld erzeugt (z. B. einen Lautsprecher), in der Nähe des Monitors
aufstellen oder wenn Sie die Richtung des Monitors ändern, sind die
Farben möglicherweise nicht mehr gleichmäßig.
x Weiß sieht nicht weiß aus
• Stellen Sie die Farbtemperatur ein.
x Die Bedienelemente am Monitor funktionieren nicht
( erscheint auf dem Bildschirm)
• Wenn die Tastatursperre auf EIN gesetzt ist, setzen Sie sie auf AUS.
x An den Rändern von Buchstaben und Linien sind rote
oder blaue Schatten zu sehen
• Stellen Sie die Konvergenz ein.
x Unmittelbar nach dem Einschalten ist ein
Summgeräusch zu hören
• Dieses Geräusch wird vom automatischen Entmagnetisierungszyklus
verursacht. Wenn Sie das Gerät einschalten, wird der Monitor
automatisch einige Sekunden lang entmagnetisiert.
* Ist ein zweiter Entmagnetisierungszyklus erforderlich, warten Sie nach
dem ersten Zyklus mindestens 20 Minuten. Auf diese Weise erzielen Sie
die besten Ergebnisse. Dabei ist möglicherweise ein Summgeräusch zu
hören, aber dies ist keine Fehlfunktion.
Bildschirmmeldungen
IIONNFORMAT
MON I FUNKT I ION ERTTOR
E I I IGNALNSNGANG
AM
2
SPRÜFENIGNALKABEL
1 Wenn „KEIN SIGNAL“ angezeigt wird:
Gibt an, daß am Eingang kein Eingangssignal eingeht.
2 Zeigt mögliche Abhilfemaßnahmen an.
• Wird AM COMPUTER AKTIVIEREN auf dem Bildschirm angezeigt,
drücken Sie eine beliebige Taste am Computer, oder bewegen Sie die
Maus. Überprüfen Sie gegebenenfalls, ob die Grafikkarte des Computers
korrekt in den richtigen Steckplatz eingebaut ist.
• Wenn SIGNALKABEL PRÜFEN auf dem Bildschirm erscheint,
überprüfen Sie, ob der Monitor korrekt an den Computer angeschlossen
ist.
1
IIONNFORMAT
MON I FUNKT I ION ERTTOR
E I NGANG :
NI I ICHM ABTASTBERECHT
S GNAL T
IIINGÄNDERNM
3
1 Wenn „NICHT IM ABTASTBEREICH“ angezeigt wird:
Diese Meldung gibt a n, daß das Eingangssignal nicht den technischen Daten
des Monitors entspricht.
2 Gibt die Frequenz des Eingangssignals an.
3 Zeigt die Abhilfemaßnahmen an.
SIGNAL-TIMING ÄNDERN erscheint auf dem Bildschirm. Wenn Sie
einen älteren Monitor durch diesen Monitor ersetzen, schließen Sie den
alten Monitor wieder an. Stellen Sie dann die Grafikkarte des Computers
auf eine Horizontalfrequenz zwischen 30 und 96 kHz, und eine
Vertikalfrequenz zwischen 48 und 170 Hz ein.
:KE
COMPUTER AK T I I ERENV
200.0kHz/ 85Hz
–
2
W
R
G
B
W
R
G
B
6
Page 19
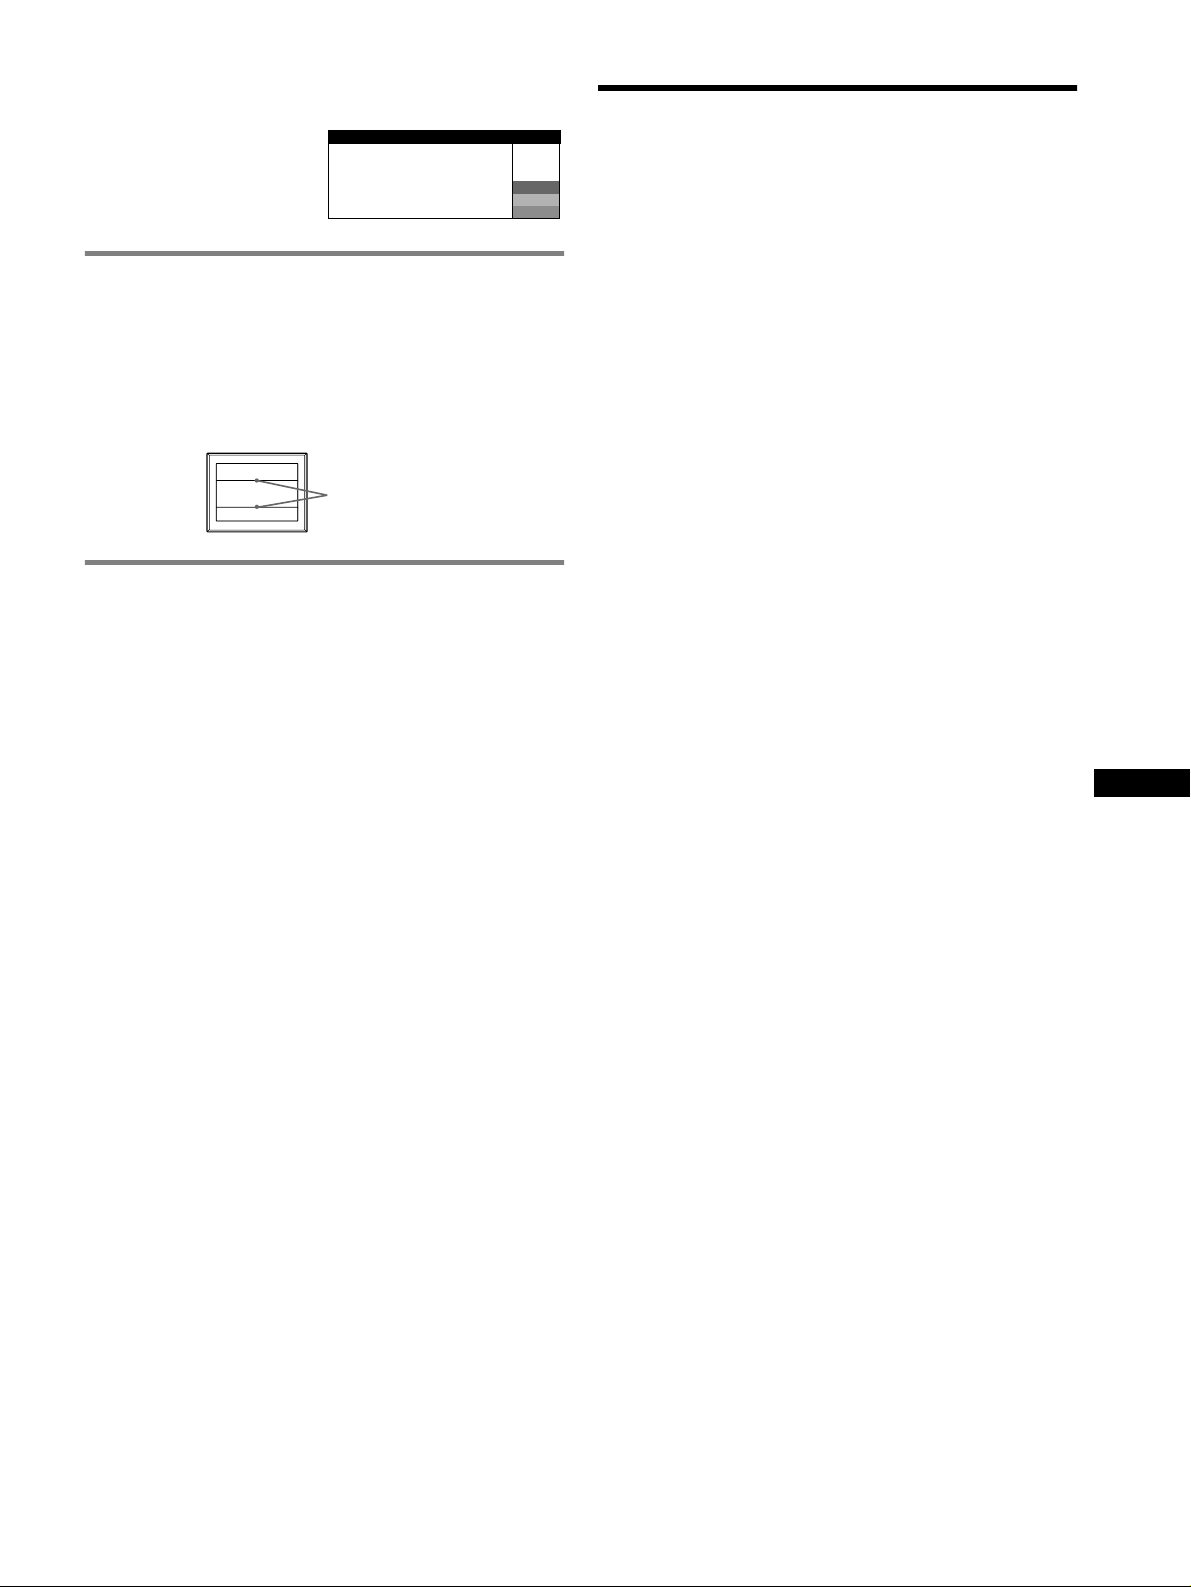
Anzeigen des Namens, der Seriennummer und des
Herstellungsdatums des Monitors.
Während Videosignale am Monitor
eingehen, halten Sie die Taste
MENU mehr als fünf Sekunden
lang gedrückt, um ein Feld mit
Informationen zum Monitor
anzuzeigen.
INFORMATION
MODEL : CPD-E430
SER NO : 1234567
MANUFACTURED
: 2001-30
W
R
G
B
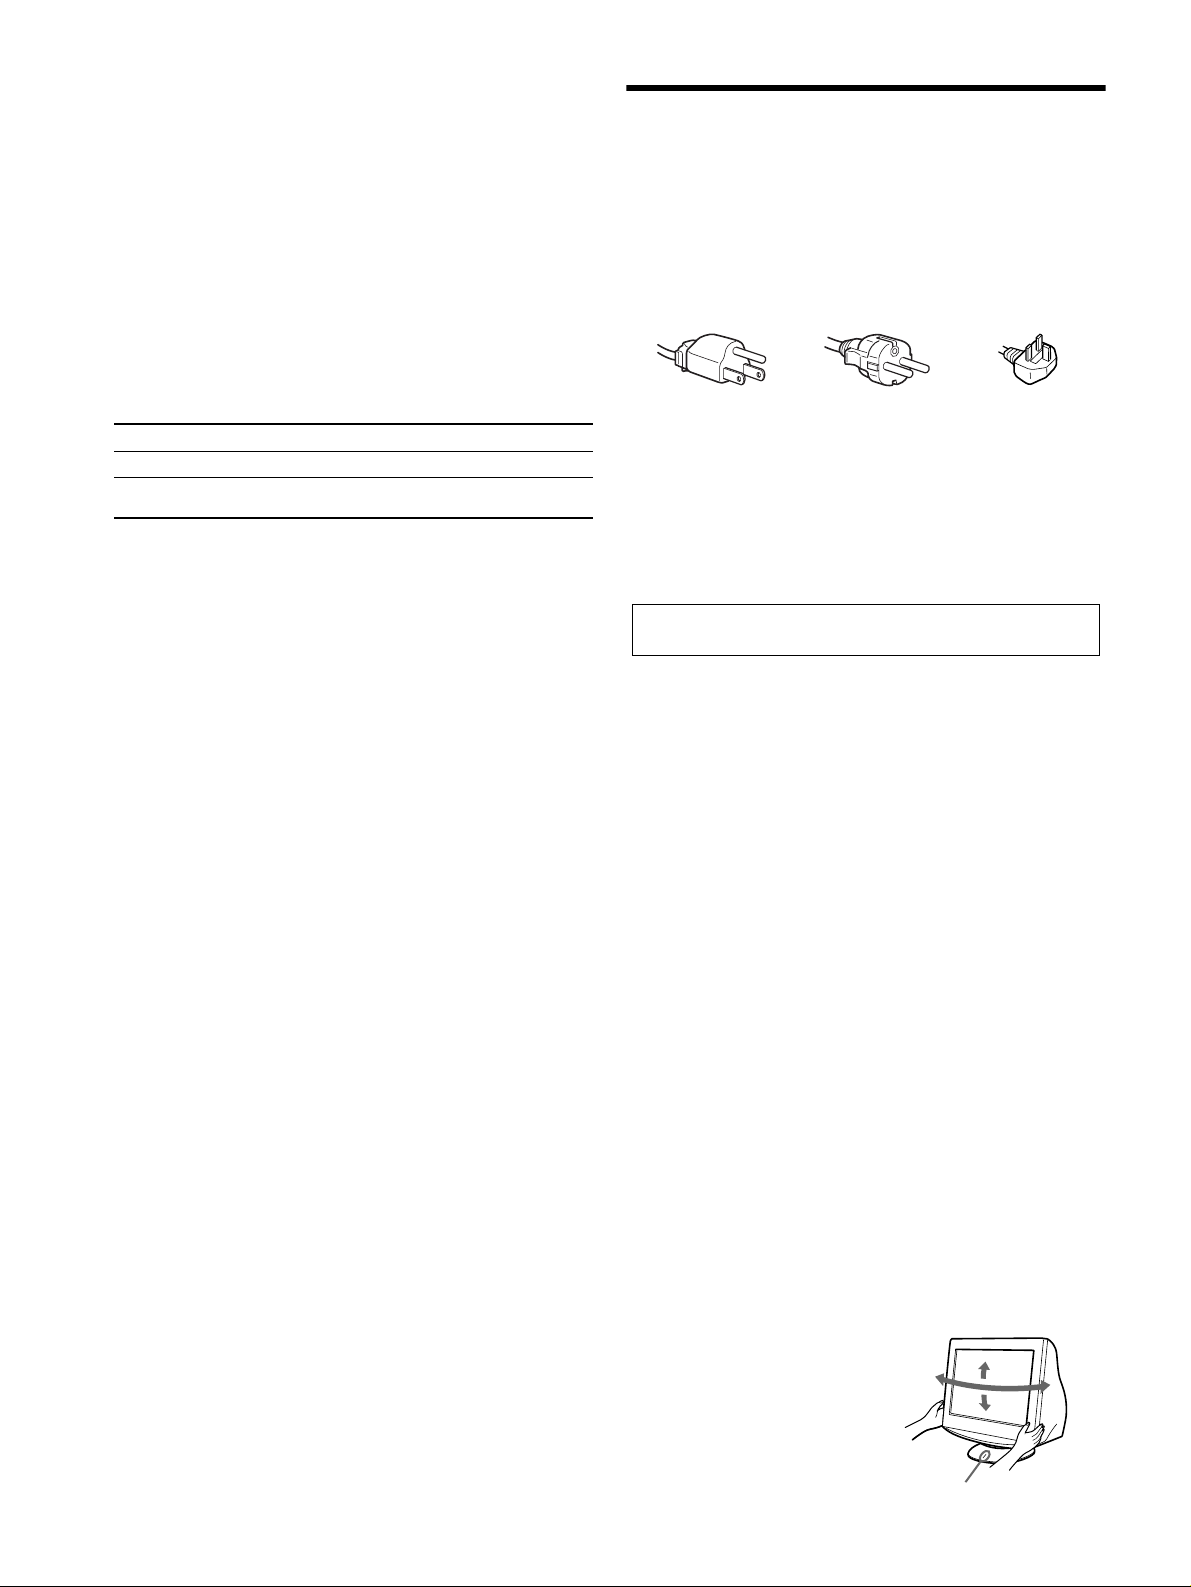
Wenn auf dem Bildschirm dünne
Linien erscheinen
Diese Linien sind keine Fehlfunktion. Sie sind bei einem Monitor mit
Trinitron-Bildröhre normal. Es sind die Schatten der Dämpfungsdrähte, die
die Streifenmaske stabilisieren. Die Streifenmaske ist ein wichtiges
Merkmal der Trinitron-Bildröhre. Sie bewirkt, daß mehr Licht auf den
Bildschirm gelangt, und ermöglicht eine höhere Farbintensität und
Detailgenauigkeit.
(Dämpfungsdrähte)
Dämpfungsdrähte
Selbstdiagnosefunktion
Dieser Monitor verfügt über eine Selbstdiagnosefunktion. Wenn an dem
Monitor oder am Computer ein Problem auftritt, erscheint ein leerer
Bildschirm, und die Netzanzeige ! leuchtet grün auf oder blinkt orange.
Wenn die Netzanzeige ! orange leuchtet, befindet sich der Computer im
Energiesparmodus. Drücken Sie eine beliebige Taste auf der ComputerTastatur, oder bewegen Sie die Maus.
Technische Daten
Kathodenstrahlröhre
Streifenabstand 0,24 mm, Ablenkung 90 Grad, FD-Trinitron
Bildschirmdiagonale 49 cm
Effektive Bildgröße
Auflösung (H: Horizontal, V: Vertikal)
Eingangssignalpegel
Videosignal: Analoges RGB-Signal: 0,700 Vp-p (positiv), 75
Synchronisationssignal:
Standardanzeigegröße
Ablenkfrequenz (H: Horizontal, V: Vertikal)
Betriebsspannung 100 bis 240 V Wechselstrom, 50 – 60 Hz, 2,0 – 1,0 A
Leistungsaufnahme ca. 135 W
Betriebstemperatur 10 °C bis 40 °C
Abmessungen ca. 451
Gewicht ca. 25,5 kg
Plug and Play DDC2B/DDC2Bi
Mitgeliefertes Zubehör
ca. 365
× 274 mm (B/H), Anzeigegröße 46 cm
Maximum: H: 1920 Punkte, V: 1440 Zeilen
Empfohlen: H: 1280 Punkte, V: 1024 Zeilen
Getrenntes H/V- oder zusammengesetztes
Synchronisationssignal:
TTL, 2 k
Ω, ohne Polarität
Grünsignal mit Sync: 0,3 Vp-p (negativ)
ca. 352
× 264 mm
H: 30 bis 96 kHz, V: 48 bis 170 Hz
× 471 × 461 mm (B/H/T)
GTF
Netzkabel
Diese Bedienungsanleitung
Ω
x Wenn die Netzanzeige ! grün leuchtet
1 Lösen Sie das Videosignalkabel, oder schalten Sie den
angeschlossenen Computer aus.
2 Schalten Sie den Monitor aus (OFF) und dann wieder
ein (ON).
3 Halten Sie die Steuertaste einige Sekunden nach oben
gedrückt, bevor der Monitor in den Energiesparmodus
wechselt.
Wenn alle vier Farbbalken (weiß, rot, grün, blau) angezeigt werden,
funktioniert der Monitor ordnungsgemäß. Schließen Sie das
Videoeingangskabel wieder an, und überprüfen Sie den Zustand Ihres
Computers.
Wenn die Farbbalken nicht erscheinen, liegt möglicherweise ein Fehler am
Monitor vor. Wenden Sie sich mit der Beschreibung des Problems an einen
autorisierten Sony-Händler.
x Wenn die Netzanzeige ! orange blinkt
Schalten Sie den Monitor aus (OFF) und dann wieder ein
(ON).
Wenn die Netzanzeige ! jetzt grün leuchtet, funktioniert der Monitor
ordnungsgemäß.
Wenn die Netzanzeige ! immer noch blinkt, liegt möglicherweise ein
Fehler am Monitor vor. Ermitteln Sie das Intervall, in dem die Netzanzeige
! orange blinkt (in Sekunden), und wenden Sie sich mit der Beschreibung
des Problems an einen autorisierten Sony-Händler. Notieren Sie sich
unbedingt die Modellbezeichnung und die Seriennummer des Monitors.
Notieren Sie sich außerdem das Fabrikat und Modell Ihres Computers und
der Grafikkarte.
DE
(Fortsetzung)
7
Page 20
Vordefinierte Modi und Benutzermodi
Wenn ein Eingangssignal in den Monitor eingespeist wird, vergleicht der
Monitor dieses Signal mit den werkseitig vordefinierten Modi im Speicher des
Monitors und wählt automatisch den Modus aus, bei dem sich eine möglichst
hohe Bildqualität erzielen läßt (siehe “Preset mode timing table” auf Seite i). Bei
einem Eingangssignal, das keinem der werkseitig voreingestellten Modi
entspricht, erzeugt der Monitor auf der Basis des Eingangssignals automatisch
ein möglichst gutes Bild, sofern die Vertikal- und Horizontalfrequenzen des
Eingangssignals im angegebenen Bereich liegen (Seite 7) und das
Eingangssignal GTF-kompatibel ist (GTF = Generalized Timing Formula).
Beim Einstellen des Bildes werden die Einstellungen automatisch als
Benutzermodus gespeichert und abgerufen, wann immer das betreffende
Eingangssignal eingeht.
Die Energiesparfunktion
Dieser Monitor erfüllt die Energiesparrichtlinien der VESA, des TCO’99-
Standards und des
Signal am Monitor eingeht, wird der Stromverbrauch des Monitors wie unten
erläutert automatisch verringert.
ENERGY STAR-Programms. Wenn vom Computer kein
Betriebsmodus Leistungsaufnahme Netzanzeige !
Normalbetrieb ≤ 135 W grün
Deaktiviert*
(Tiefschlaf)*
1
*
2
*
Änderungen, die dem technischen Fortschritt dienen, bleiben vorbehalten.
1
2
Wenn der Computer in den Energiesparmodus schaltet, erscheint „KEIN
SIGNAL“ auf dem Bildschirm. Nach einigen Sekunden schaltet der Monitor
in den Energiesparmodus.
„Tiefschlaf“ ist ein Energiesparmodus, der von der EPA
(Umweltschutzbehörde der USA) definiert wurde.
≤ 3 W orange
Sicherheitsmaßnahmen
Warnhinweis zum Netzanschluß
• Verwenden Sie ausschließlich das mitgelieferte Netzkabel. Wenn Sie ein
anderes Netzkabel verwenden, achten Sie darauf, daß es für die
Stromversorgung in Ihrem Land geeignet ist.
Für Kunden in Großbritannien
Wenn Sie den Monitor in Großbritannien verwenden, benutzen Sie bitte
das mitgelieferte Kabel mit dem für Großbritannien geeigneten Stecker.
Beispiele für Steckertypen
für 100 bis 120 V
Wechselstrom
• Warten Sie nach dem Ausschalten des Geräts mindestens 30 Sekunden,
bevor Sie das Netzkabel lösen. In dieser Zeit kann sich die statische
Elektrizität auf der Oberfläche des Bildschirms entladen.
• Wenn Sie das Gerät einschalten, wird der Bildschirm einige Sekunden
lang entmagnetisiert. Dadurch entsteht um den Bildschirm ein starkes
magnetisches Feld, das Daten auf Magnetbändern, Disketten oder
anderen Datenträgern in der Nähe beschädigen kann. Legen Sie
magnetische Datenträger und Bänder/Disketten daher nicht zu nahe bei
diesem Monitor ab.
Die Netzsteckdose sollte sich in der Nähe des Geräts befinden und
leicht zugänglich sein.
Aufstellung
Stellen Sie den Monitor nicht an folgenden Standorten auf:
• Auf Oberflächen wie Teppichen oder Decken oder in der Nähe von
Materialien wie Gardinen und Wandbehängen, die die
Lüftungsöffnungen blockieren könnten.
• In der Nähe von Wärmequellen wie Heizkörpern oder
Warmluftauslässen oder an einem Ort, an dem der Monitor direktem
Sonnenlicht ausgesetzt ist.
• An einem Ort, an dem der Monitor starken Temperaturschwankungen
ausgesetzt ist.
• An einem Ort, an dem der Monitor mechanischen Vibrationen oder
Stößen ausgesetzt ist.
• Auf einer instabilen Oberfläche.
• In der Nähe anderer Geräte, die ein starkes Magnetfeld generieren, wie
zum Beispiel ein Transformator oder eine Hochspannungsleitung.
• In der Nähe von oder auf einer elektrisch geladenen Metallfläche.
• In einem geschlossenen Gestell.
Wartung
• Reinigen Sie den Bildschirm mit einem weichen Tuch. Wenn Sie ein
Glasreinigungsmittel verwenden, achten Sie darauf, daß es keine
Antistatik-Lösung oder ähnliche Zusätze enthält, da diese zu Kratzern
auf der Beschichtung des Bildschirms führen könnten.
• Berühren Sie die Bildschirmoberfläche nicht mit scharfen, rauhen oder
spitzen Gegenständen wie zum Beispiel Kugelschreibern oder
Schraubenziehern. Andernfalls könnte die Bildschirmoberfläche
zerkratzt werden.
• Reinigen Sie Gehäuse, Bedienfeld und Bedienelemente mit einem
weichen Tuch, das Sie leicht mit einer milden Reinigungslösung
angefeuchtet haben. Verwenden Sie keine Scheuermittel,
Scheuerschwämme oder Lösungsmittel wie Alkohol oder Benzin.
Transport
Wenn Sie den Monitor zur Reparatur oder bei einem Umzug transportieren
müssen, verpacken Sie ihn mit Hilfe der Originalverpackungsmaterialien
wieder im Originalkarton.
Der dreh- und neigbare Ständer
Mit dem Ständer können Sie den
Monitor innerhalb der rechts
abgebildeten Winkel nach Bedarf
einstellen. Wenn Sie den Monitor
drehen oder neigen, stützen Sie ihn
bitte mit beiden Händen unten ab.
Achten Sie darauf, die Finger nicht
an der Rückseite des Monitors
einzuklemmen, wenn Sie den
Monitor nach oben schwenken.
für 200 bis 240 V
Wechselstrom
90°
Zentrierlinie
nur für 240 V
Wechselstrom
15°
5°
90°
8
Page 21

\
Índice
Configuración . . . . . . . . . . . . . . . . . . . . . . . . . . . . . . 3
Ajustes . . . . . . . . . . . . . . . . . . . . . . . . . . . . . . . . . . . . 4
Solución de problemas. . . . . . . . . . . . . . . . . . . . . . . 6
Especificaciones . . . . . . . . . . . . . . . . . . . . . . . . . . . . 7
Precauciones . . . . . . . . . . . . . . . . . . . . . . . . . . . . . . . 8
Appendix . . . . . . . . . . . . . . . . . . . . . . . . . . . . . . . . . . . i
Preset mode timing table . . . . . . . . . . . . . . . . . . . . . . . i
TCO’99 Eco-document. . . . . . . . . . . .Cubierta posterior
Configuración
• Trinitronâ es una marca comercial registrada de Sony Corporation.
• Macintosh es una marca comercial de Apple Computer, Inc., registrada en
EE.UU. y otros países.
•Windows
• IBM PC/AT y VGA son marcas comerciales registradas de IBM Corporation
• VESA y DDC
•
• El resto de los nombres de productos mencionados en este manual pueden ser
• Además, “
â
Corporation en Estados Unidos y otros países.
de EE.UU.
Association.
y MS-DOS son marcas comerciales registradas de Microsoft
ä
son marcas comerciales de Video Electronics Standard
ENERGY STAR es una marca registrada de EE.UU.
marcas comerciales o marcas comerciales registradas de sus respectivas
compañías.
ä” y “â” no se mencionan en cada caso en este manual.
1 Conexión del monitor al ordenador
x Para conectarlo al conector de entrada HD15
Cable de señal de
vídeo del monitor
a HD15 del ordenador
conectado
Conexión de un ordenador Macintosh o
compatible
Cuando conecte este monitor a un ordenador Power Mac G3/G4, utilice
el adaptador Macintosh (no suministrado) en caso de ser necesario.
2 Encendido del monitor y el ordenador
1 Conecte el cable de alimentación al monitor y pulse el
interruptor ! (alimentación) para encender dicho
monitor.
2 Encienda el ordenador.
Innecesario para controladores específicos
Este monitor cumple con el estándar Plug & Play “DDC” y detecta
automáticamente toda la información de dicho monitor. No es preciso instalar
ningún controlador específico en el ordenador.
La primera vez que encienda el PC después de conectar el monitor, es posible que
aparezca el asistente de instalación en pantalla. En este caso, siga las
instrucciones en pantalla. Se selecciona automáticamente el monitor Plug & Play
para que pueda utilizar este monitor.
Notas
• No toque los terminales del conector del cable de señal de vídeo.
• Compruebe la alineación del conector HD15 para evitar que se doblen los
terminales del conector del cable de señal de vídeo.
Asignación de pines del cable de señal de vídeo HD 15
1
678910
11 12 13 14 15
Terminal nº Señal
1 Rojo
2Verde
3Azul
4 Identificación
5 Detección de CPU
6 Masa roja
7 Masa verde
8 Masa azul
* DDC (Canal de datos de visualización) es un estándar de VESA.
5432
(Sincronización en
verde)
(Masa)
Terminal nº Señal
9 DDC + 5V*
10 Masa
11 Identificación
(Masa)
12 Datos
bidireccionales
(SDA)*
13 Sincronización H.
14 Sincronización V.
15 Reloj de datos
(SCL)*
ES
3
Page 22
Ajustes
Navegación por el menú
1 Pulse el botón MENU para visualizar el menú principal.
SAL I R
,
45
1280x1024 / 85Hz
Menú principal
resolución/frecuencias horizontales de la
señal de entrada actual (sólo si la señal
coincide con uno de los modos
predefinidos de fábrica del monitor)
2 Desplace el botón de control m/M para resaltar el menú
principal que desee ajustar y pulse el botón de control.
,
Submenú
,
Menú principal
frecuencias
verticales de la señal
de entrada actual
TAMAÑO45/ CENTRO
1280x1024 / 85Hz
Submenú
Ajuste del brillo y el contraste
El ajuste del brillo y el contraste se efectúa mediante un menú
BRILLO/CONTRASTE separado. Estos ajustes son adecuados para
todo tipo de señales de entrada.
1 Mueva el botón de control M ()/m ( ) para visualizar el
menú BRILLO/CONTRASTE.
2 Mueva el botón de control m/M para seleccionar el brillo
( ) o el contraste ( ). A continuación, mueva el botón de
control –/+ para hacer los ajustes.
CONTRASTE
/BRI LLO
BRI LLO
45
1280x1024 / 85Hz
Nota
Si selecciona el modo sRGB en el elemento (MODO DE COLOR) del menú
(COLOR), aparecerá el menú /
dicho modo y no podr
obtener más información sobre el uso del modo sRGB, consulte Modo sRGB en
el menú (COLOR).
á ajustar el brillo ni el contraste en esa pantalla. Para
(BRILLO/CONTRASTE) para
3 Mueva el botón de control m/M para destacar el submenú
que desee ajustar. A continuación, mueva el botón de
control –/+ para hacer los ajustes.
Para cerrar el menú
Pulse el botón MENU dos veces para volver al menú principal. El
elemento seleccionado de forma predeterminada es . Cada vez que
seleccione y pulse el botón MENU, saldrá del menú. Si no se pulsa
ningún botón, el menú se cierra automáticamente al cabo de
aproximadamente 30 segundos.
4
Page 23

Ajustes de menús en pantalla
Iconos del menú principal y
elementos de ajuste
Ajuste del tamaño o centrado de la
1
*
imagen
Ajuste de la forma de la imagen
Ajuste de la convergencia
Ajuste de la calidad de imagen
Ajuste del color de la imagen Consulte “ : Para ajustar el color de la imagen”.
Ajustes adicionales
0 Restauración de los ajustes
1
Este ajuste es efectivo para la señal de entrada actual.
*
2
*
Este ajuste es efectivo para todas las señales de entrada.
3
*
Menú de idiomas
• ENGLISH: Inglés • NEDERLANDS: Holandés
• FRANÇAIS: Francés • SVENSKA: Sueco
• DEUTSCH: Alemán • : Ruso
• ESPAÑOL • : Japonés
• ITALIANO: Italiano
2
*
Iconos del submenú y elementos de ajuste
Posición horizontal
Tam año horizontal
Posición vertical
Tam año vertical
Centrado de tamaño automático
Giro de la imagen
Expansión o contracción de los lados de la imagen
Desplazamiento de los lados de la imagen a la izquierda o la derecha*
Ajuste de la anchura de la imagen en la parte superior de la pantalla*
Desplazamiento de la imagen a la izquierda o la derecha en la parte superior de la pantalla*
0 RESTAURAR: recupera todos los ajustes de fábrica.
Desplazamiento de las sombras rojas o azules en sentido horizontal
Desplazamiento de las sombras rojas o azules en sentido vertical
Desplazamiento de las sombras rojas o azules en sentido vertical en la parte superior de la pantalla
T
B
Desplazamiento de las sombras rojas o azules en sentido vertical en la parte inferior de la pantalla
0 RESTAURAR: recupera todos los ajustes de fábrica.
DESMAGNET: desmagnetiza el monitor.
ELIMINAR MOIRE
Protección de los datos de ajuste (BLOQUEO DE AJUSTES)
Selección del idioma de los menús en pantalla/Comprobación de la información del monitor
LANGUAGE/INFORMACION
Cambio de la posición de los menús para el ajuste horizontal
Cambio de la posición de los menús para el ajuste vertical
1
0
0
Restauración de todos los datos de ajuste para la señal de entrada actual.*6 Seleccione “ACEPTAR”.
1*
2
Restauración de todos los datos de ajuste para todas las señales de entrada. Seleccione “ACEPTAR”.
2*
1
*
4
*
: ajusta el grado de cancelación de muaré hasta que éste sea mínimo.*
3
*
4
*
Ejemplo de muaré
*5Sólo funcionará el interruptor ! (alimentación), y el menú
(BLOQUEO DE AJUSTES).
6
*
Los elementos de menú , , y no se restauran mediante este
método.
1
1
5
*
1
1
ES
: Para ajustar el color de la imagen
Los ajustes de COLOR permiten definir la temperatura del color de la
imagen cambiando el nivel de color del campo de color blanco. Los
colores aparecerán con un tono rojizo si la temperatura es baja, y con
un tono azulado si es alta. Este ajuste es útil para hacer coincidir el color
del monitor con los colores de imágenes impresas.
Seleccione uno de los modos de configuración de la temperatura de
colores de entre los 4 modos existentes; PREDEFIN, VARIABLE,
EXPERTO y sRGB en (MODO DE COLOR) del menú
(COLOR).
x PREDEFIN (Ajuste de fábrica)
Puede seleccionar la temperatura del color predefinida entre 5000K,
6500K o 9300K. El ajuste de fábrica es 9300K.
x VARIABLE
Puede ajustar la temperatura del color entre 5000K y 11000K.
x EXPERTO
Puede realizar ajustes adicionales con precisión en el color mediante la
selección de este modo. GAIN ( ) ajusta las partes luminosas de la
pantalla, mientras que BIAS ( ) ajusta las partes oscuras.
Seleccione para Seleccione para
R R (Rojo) BIAS R R (Rojo) GAIN
G G (Verde) BIAS G G (Verde) GAIN
B B (Azul) BIAS B B (Azul) GAIN
0 RESTAURAR
* Devuelve a la configuración del modo EXPERTO la configuración de fábrica.
*
x sRGB
El ajuste de color sRGB es un protocolo estándar de espacio de color
diseñado para establecer una equivalencia entre los colores mostrados
en el monitor y los impresos. Para visualizar los colores de sRGB
correctamente (
γ = 2,2, 6500K), seleccione el modo sRGB y el
ordenador conectado a los perfiles sRGB. Si selecciona sRGB, no
podrá utilizar los ajustes del menú BRILLO/CONTRASTE.
Nota
Compruebe que los valores de brillo ( ) y contraste (6) están ajustados
respectivamente en los números que van a ajustarse en el modo sRGB mostrados
en el menú BRILLO/CONTRASTE. Si no, seleccione 01 en el menú
0 (RESTAURAR).
5
Page 24
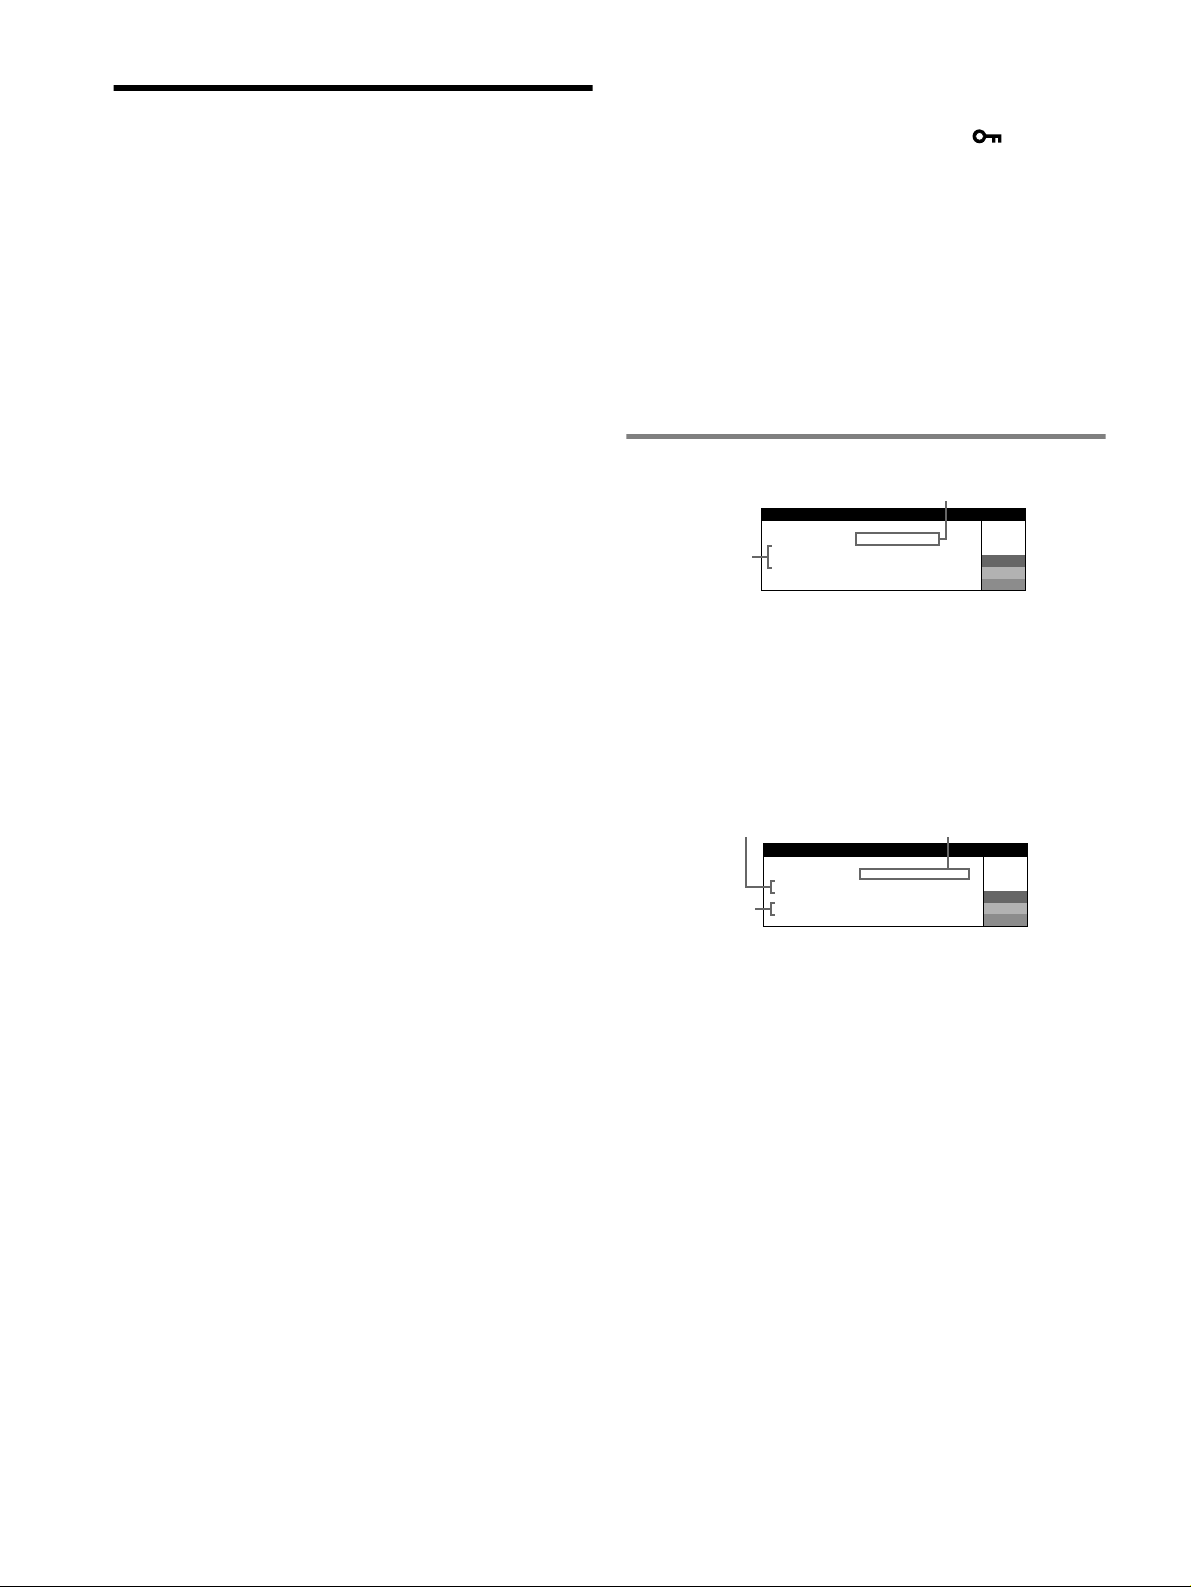
Solución de problemas
x No aparece la imagen
Si el indicador ! (alimentación) no se ilumina
• Compruebe que el cable de alimentación está correctamente conectado.
• Compruebe que el interruptor ! (alimentación) se encuentra en la
posición de encendido.
El indicador ! (alimentación) aparece en naranja
• Compruebe que el cable de señal de vídeo está correctamente conectado
y que todos los enchufes están perfectamente insertados en sus clavijas.
• Compruebe que los terminales del conector de entrada de vídeo HD15 no
están doblados ni aplastados.
• Compruebe que la alimentación del ordenador está activada.
• El ordenador está en el modo de ahorro de energía. Pulse cualquier tecla
del teclado del ordenador o mueva el ratón.
• Compruebe que la tarjeta gráfica se encuentra completamente insertada
en la ranura de bus adecuada.
Si el indicador ! (alimentación) se ilumina en verde o parpadea
en naranja
• Utilice la función de autodiagnóstico.
x La imagen parpadea, se ondula, oscila o aparece
codificada
• Aísle y elimine las fuentes potenciales de campos eléctricos o
magnéticos, como otros monitores, impresoras láser, ventiladores
eléctricos, luces fluorescentes o televisores.
• Aleje el monitor de líneas eléctricas o instale una protección magnética
cerca del monitor.
• Enchufe el monitor en una toma de CA diferente, preferiblemente de un
circuito diferente.
• Gire el monitor 90° a la izquierda o la derecha.
• Consulte el manual de la tarjeta gráfica para obtener información sobre
el ajuste adecuado para el monitor.
• Compruebe que este monitor admite el modo gráfico y la frecuencia de
la señal de entrada (consulte la “Tabla de temporización de modo
predefinido (Preset mode timing table)” en la página i). Aunque la
frecuencia se encuentre dentro del margen adecuado, algunas tarjetas
gráficas pueden tener un impulso de sincronización demasiado estrecho
para que el monitor se sincronice correctamente.
• Ajuste la frecuencia de barrido (frecuencia vertical) del ordenador para
obtener la mejor imagen posible.
x La imagen es borrosa
• Ajuste el brillo, el contraste.
• Desmagnetice el monitor.*
• Ajuste el grado de cancelación de muaré hasta que éste sea mínimo, o
ajuste ELIMINAR MOIRE en NO.
x Aparecen imágenes fantasma
• Deje de utilizar cables prolongadores de vídeo y/o dispositivos de
conmutación de vídeo.
• Compruebe que todos los enchufes están firmemente insertados en sus
receptáculos.
x La imagen no está centrada o su tamaño no es correcto
• Realice la función de centrado y tamaño automáticos.
• Ajuste el tamaño o el centrado. Tenga en cuenta que con determinadas
señales de entrada y/o tarjetas gráficas, la periferia de la pantalla no se
utiliza por completo.
• Inmediatamente después de activar el interruptor de alimentación, el
tamaño/centrado pueden tardar unos instantes en ajustarse
adecuadamente.
x Los bordes de la imagen aparecen curvos
• Ajuste la geometría.
x Aparece un patrón ondulado o elíptico (muaré)
• Ajuste el grado de cancelación de muaré hasta que éste sea mínimo.
• Cambie el patrón de escritorio.
x El color no es uniforme
• Desmagnetice el monitor.* Si coloca equipos que generen campos
magnéticos, como altavoces, cerca del monitor, o si cambia la
orientación de éste, el color puede perder uniformidad.
x El blanco no parece blanco
• Ajuste la temperatura del color.
x Los botones del monitor no funcionan ( aparece en
pantalla)
• Si el bloqueo de los controles está ajustado en SI, ajústelo en NO.
x Las letras y líneas muestran sombras rojas o azules en
los bordes
• Ajuste la convergencia.
x Se oye un zumbido inmediatamente después de activar la
alimentación
• Este es el sonido del ciclo de desmagnetización automática. Cuando se
activa la alimentación, el monitor se desmagnetiza durante unos
segundos.
* Si es necesario aplicar un segundo ciclo de desmagnetización, deje que
transcurra un intervalo mínimo de 20 minutos para obtener resultados
óptimos. Es posible que se oiga un zumbido, pero esto no es fallo de
funcionamiento.
Mensajes en pantalla
IIONNFORMAC
MON I FUNCIONATOR
ENTRADA :S I N SEÑAL
ACT I VAR POR ORDENADOR
2
REV I SE CABL E SEÑAL
1 Si aparece “SIN SEÑAL”:
Esto indica que no existe ninguna señal de entrada del conector.
2 Muestra las soluciones.
• Si ACTIVAR POR ORDENADOR aparece en pantalla, pulse
cualquier tecla del ordenador o mueva el ratón, y verifique que la
tarjeta gráfica de dicho ordenador se encuentra completamente
insertada en la ranura de bus correcta.
• Si REVISE CABLE SEÑAL aparece en pantalla, compruebe que el
monitor está correctamente conectado al ordenador.
1
IIONNFORMAC
MON I FUNCIONATOR
ENTRADA :
FUERA DEL DE AJUSTERANGO
CAMB SI I NCRO D E S EÑALE
3
200.0kHz/ 85Hz
1 Si aparece “FUERA DEL RANGO DE AJUSTE”:
Esto indica que la señal de entrada no cumple las especificaciones del
monitor.
2 Muestra la frecuencia de la señal de entrada.
3 Muestra la solución.
CAMBIE SINCRO DE SEÑAL aparece en pantalla. Si sustituye un
monitor antiguo por este monitor, vuelva a conectar el antiguo. A
continuación, ajuste la tarjeta gráfica del ordenador de forma que la
frecuencia horizontal se encuentre entre 30 – 96 kHz, y la vertical entre
48 – 170 Hz.
1
2
W
R
G
B
W
R
G
B
6
Page 25
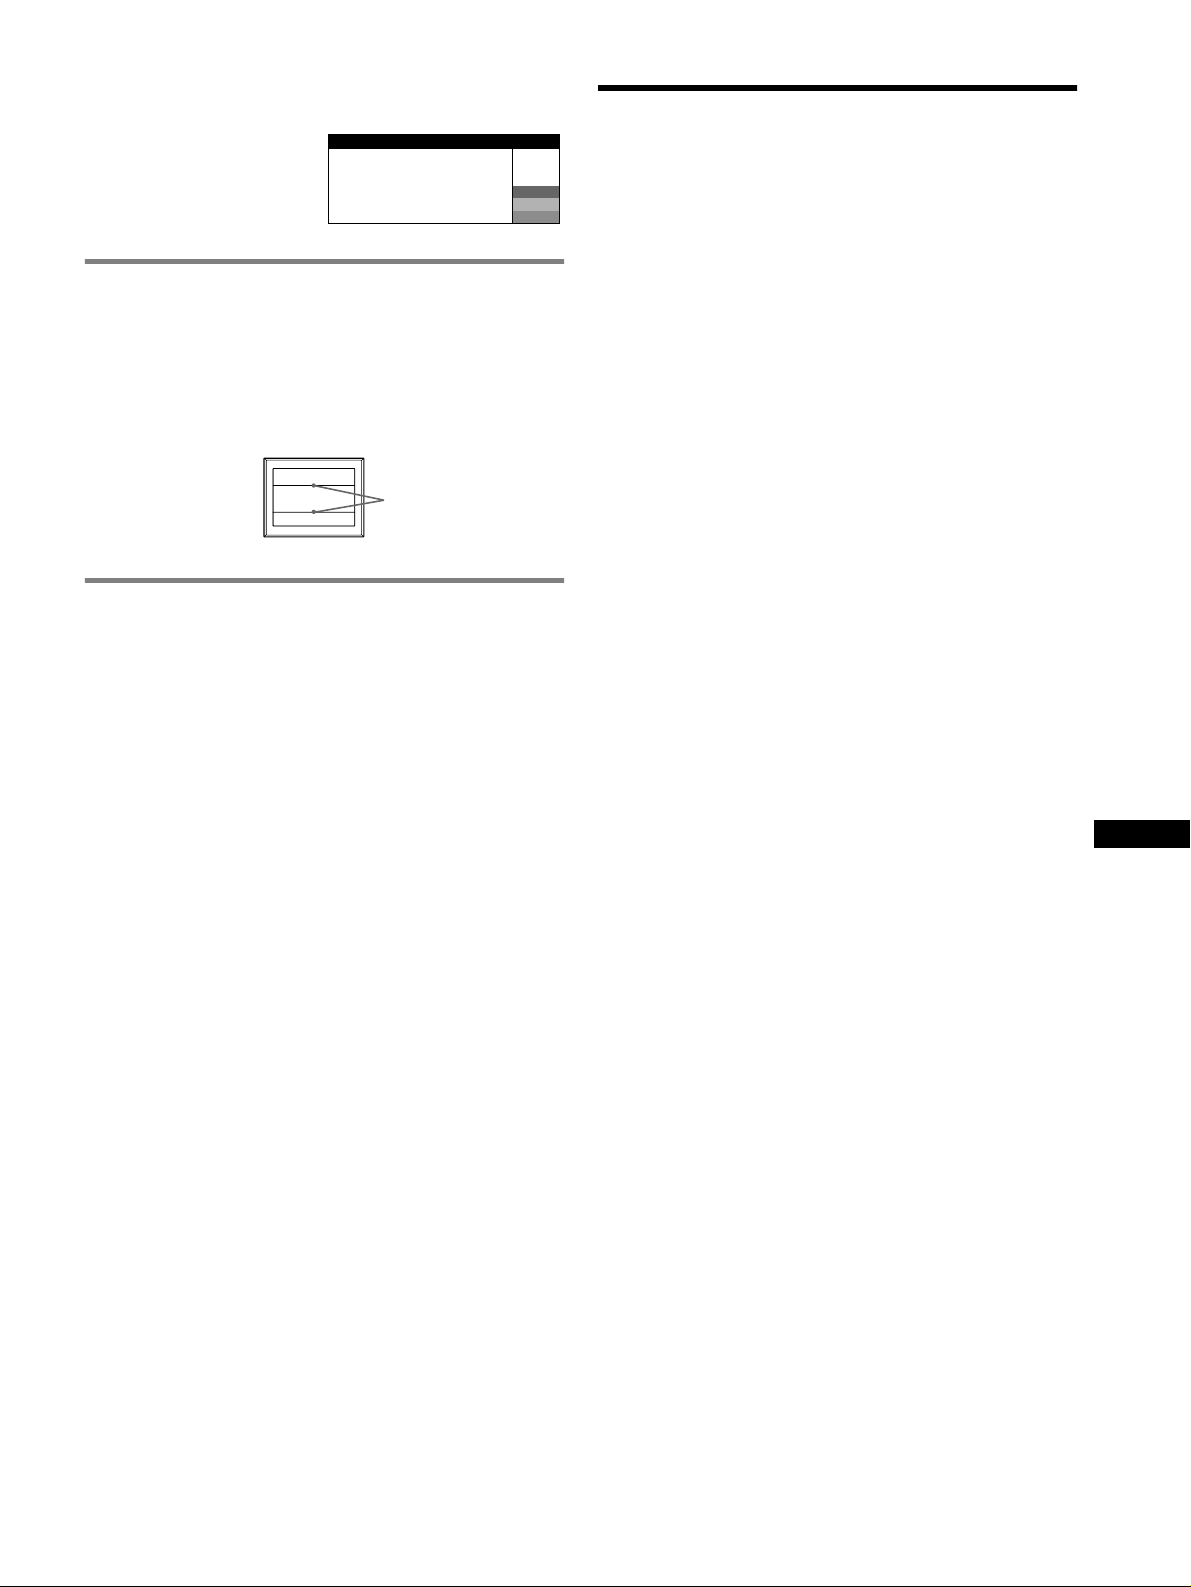
Para visualizar el nombre, número de serie y fecha
de fabricación de este monitor.
Mientras el monitor recibe una
señal de vídeo, pulse y mantenga
pulsado el botón MENU durante
más de 5 segundos para visualizar
el cuadro de información de este
monitor.
INFORMACION
MODEL : CPD-E430
SER NO : 1234567
MANUFACTURED
: 2001-30
W
R
G
B
Si aparecen líneas finas en pantalla
(hilos de amortiguación)
Estas líneas no indican fallo de funcionamiento; son un efecto
normal del tubo de imagen Trinitron con este monitor. Se trata de
sombras de los hilos de amortiguación utilizados para estabilizar la
rejilla de apertura. La rejilla de apertura es el elemento esencial que
hace que el tubo de imagen Trinitron sea único al permitir que llegue
más luz a la pantalla, obteniéndose imágenes con mayor brillo y detalle.
Hilos de
amortiguación
Función de autodiagnóstico
Este monitor dispone de una función de autodiagnóstico. Si existe un
problema con su monitor o con su ordenador, la pantalla se quedará sin
imagen y el indicador ! (alimentación) se iluminará en verde o
parpadeará en naranja. Si el indicador ! (alimentación) se ilumina en
naranja, significa que el ordenador está en el modo de ahorro de
energía. Pulse cualquier tecla del teclado o mueva el ratón.
x Si el indicador ! (alimentación) se ilumina en verde
1 Desconecte el cable de la señal de vídeo o apague el
ordenador conectado.
2 Apague (OFF) el monitor y vuelva a encenderlo (ON).
3 Mantenga el botón de control desplazado hacia arriba
durante unos segundos antes de que el monitor entre en
el modo de ahorro de energía.
Especificaciones
TRC
Paso de la rejilla de apertura de 0,24 mm, 90 grados de deflexión
FD Trinitron, 19 pulgadas, medido en diagonal
Tamaño de imagen visualizable
Resolución (H:Horizontal, V:Vertical)
Niveles de señal de entrada
Señal de vídeo: RGB analógica: 0,700 Vp-p (positiva), 75
Señal SYNC: Sincronización H/V separada o compuesta:
Área de imagen estándar
Frecuencia de deflexión (H:Horizontal, V:Vertical)
Corriente/tensión de entrada de CA
Consumo de energía
Temperatura de funcionamiento
Dimensiones Aprox. 451
Peso Aprox. 25,5 kg (56 lb 3 oz)
Plug and Play DDC2B/DDC2Bi
Accesorios suministrados
Aprox. 365
Imagen de visualización de 18,0"
Máxima: H: 1920 puntos, V: 1440 líneas
Recomendada: H: 1280 puntos, V: 1024 líneas
TTL 2 k
Sincronización en verde: 0,3 Vp-p (negativa)
Aprox. 352
(13
H: 30 a 96 kHz, V: 48 a 170 Hz
100 a 240 V, 50 – 60 Hz, 2,0 – 1,0 A
Aprox. 135 W
10°C a 40°C
(17
GTF
Cable de alimentación
Este manual de instrucciones
× 274 mm (an/al) (14
Ω, Sin polaridad
× 264 mm
7
/8 × 10 1/2 pulgadas)
× 471 × 461 mm (an/al/prf)
7
/8 × 18 5/8 × 18 1/4 pulgadas)
3
/8 × 10 7/8 pulgadas)
Ω
ES
Si aparecen cuatro barras de color (blanco, rojo, verde, azul), significa
que el monitor funciona correctamente. Vuelva a conectar los cables de
entrada de vídeo y compruebe el estado de su ordenador.
Si las barras de color no aparecen, significa que existe un fallo potencial
del monitor. Informe a un proveedor Sony autorizado sobre el estado
del monitor.
x Si el indicador ! (alimentación) parpadea en naranja
Apague (OFF) el monitor y vuelva a encenderlo (ON).
Si el indicador ! (alimentación) se ilumina en verde, significa que el
monitor funciona correctamente.
Si el indicador ! (alimentación) aún parpadea, significa que existe un
fallo potencial del monitor. Cuente el número de segundos entre los
parpadeos en naranja del indicador ! (alimentación) e informe a un
proveedor Sony autorizado sobre el estado del monitor. Asegúrese de
anotar el nombre del modelo y el número de serie del monitor. Tome
nota también del fabricante y modelo del ordenador y de la tarjeta
gráfica.
(continúa)
7
Page 26
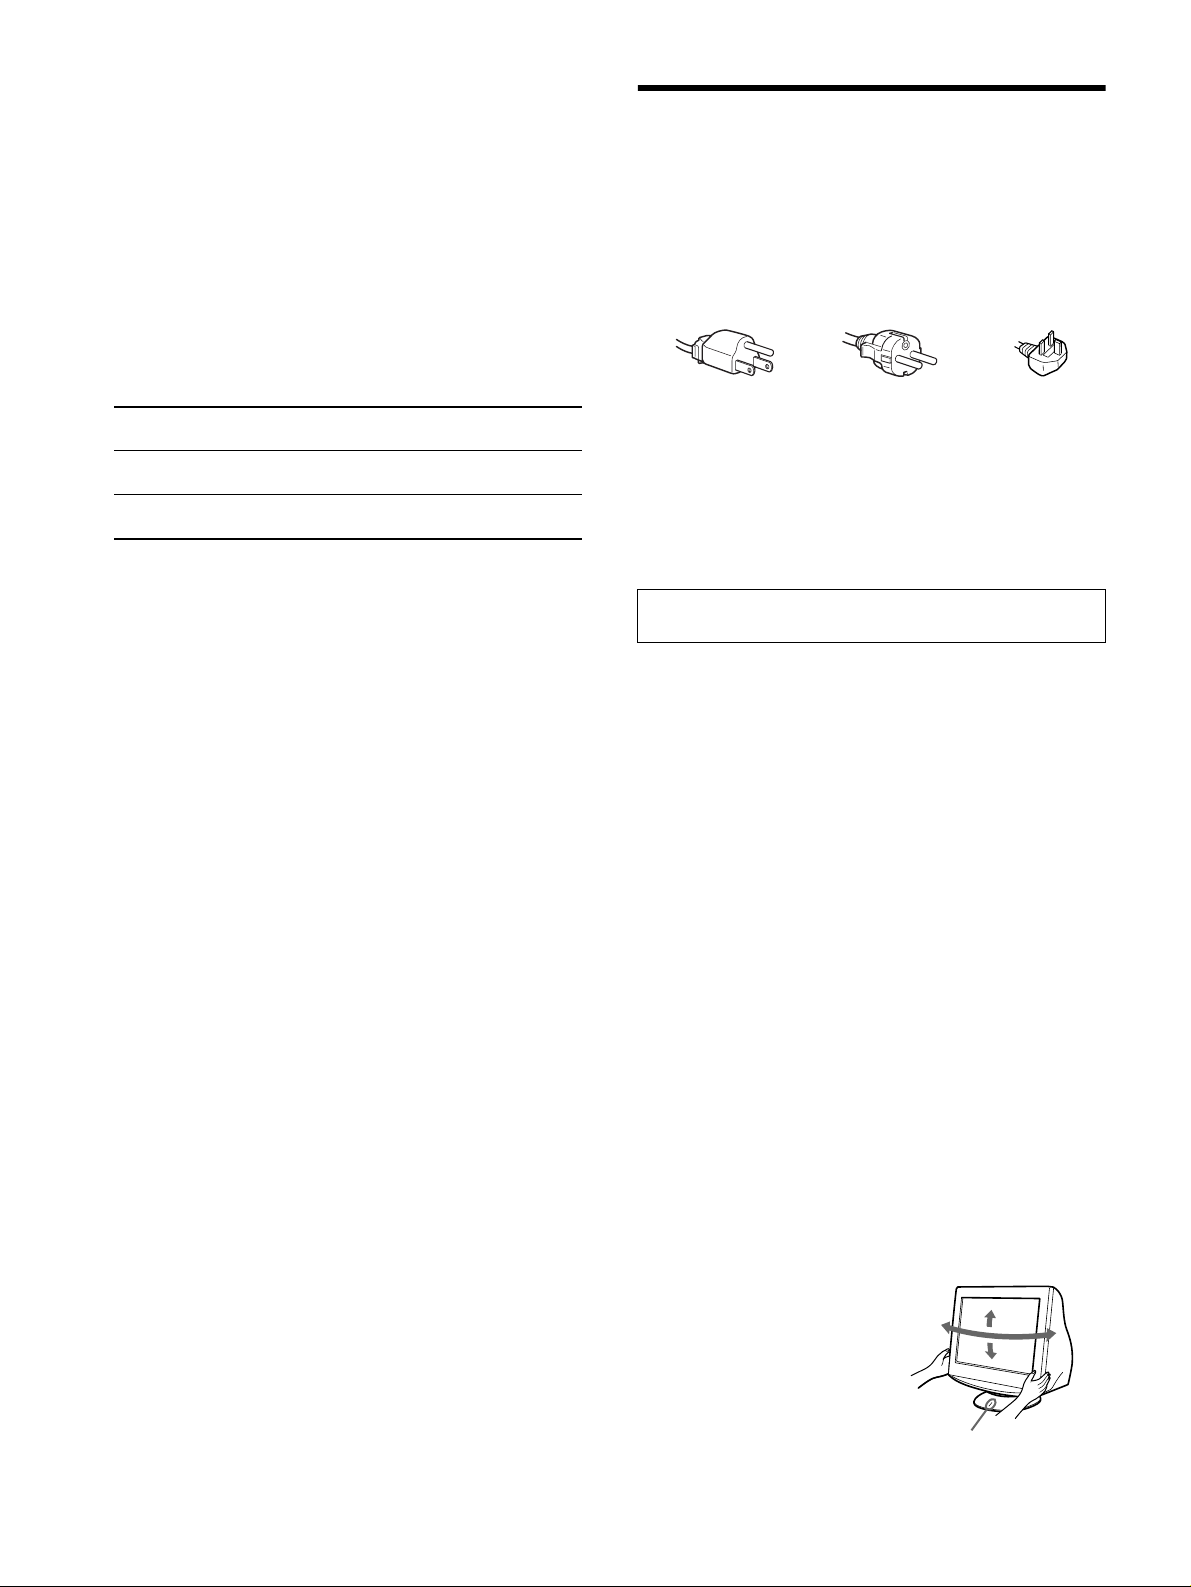
Modos predefinidos y de usuario
Cuando el monitor recibe una s eñal de entrada, hace coincidir automáticamente
la señal con uno de los modos predefinidos en fábrica almacenados en la
memoria del monitor para mostrar una imagen de alta calidad
“Tabla de temporización de modo predefi nido (Preset mode timing table)”
en la página i).
los modos predefinidos en fábrica, el monitor proporcionará automáticamente
la imagen más adecuada a la señal de entrada que se encuentre dentro del
margen de las frecuencias verticales u horizontales (página 7) correspondi entes
a la Generalized Timing Formula. Al ajustarse la imagen, los datos de ajuste se
almacenarán como un modo de usuario y se recuperarán automáticamente
siempre que se reciba la misma señal de entrada.
Función de ahorro de energía
Este monitor cumple con las directrices de ahorro de energía definidas por
VESA, TCO’99 y
monitor desde el ordenador, dicho monitor reducirá automáticamente el
consumo de energía como se muestra a continuación.
Modo de
alimentación
funcionamiento
normal
activo inactivo*
(deep sleep)*
1
*
Cuando el ordenador entra en el modo de ahorro de energía, aparece SIN
SEÑAL en pantalla. Después de unos segundos, el monitor entra en el modo
de ahorro de energía.
2
*
“Deep sleep” es un modo de ahorro de energía definido por la Agencia de
protección del medio ambiente.
El diseño y las especificaciones están sujetos a cambios sin previo aviso.
Si las señales de entrada no se corresponden con ninguno de
ENERGY STAR. Si no se introduce ninguna señal en el
Consumo de energíaIndicador
≤ 135 W verde
1
≤ 3 W naranja
2
(consulte la
! (alimentación)
Precauciones
Advertencia sobre las conexiones de la alimentación
• Utilice el cable de alimentación suministrado. Si utiliza un cable de
alimentación diferente, asegúrese de que es compatible con el
suministro eléctrico local.
Para los usuarios en el Reino Unido
Si emplea el monitor en el Reino Unido, asegúrese de utilizar el
cable de alimentación suministrado para dicho país.
Ejemplo de tipos de enchufe
para 100 a 120 V CA
para 200 a 240 V CA
• Antes de desconectar el cable de alimentación, espere al menos
30 segundos tras desactivar la alimentación para permitir que se
descargue la electricidad estática de la superficie de la pantalla.
• Tras activar la alimentación, la pantalla se desmagnetiza durante
unos segundos. Esto genera un intenso campo magnético alrededor
de la pantalla que puede afectar a los datos almacenados en discos
y cintas magnéticas que se encuentren cerca del monitor.
Asegúrese de mantener discos, cintas y equipos de grabación
magnética alejados del monitor.
El equipo debe instalarse cerca de una toma de corriente de fácil
acceso.
Instalación
No instale el monitor en los siguientes lugares:
• sobre superficies (alfombras, mantas, etc.) ni cerca de materiales
(cortinas, tapices, etc.) que puedan bloquear los orificios de
ventilación
• cerca de fuentes de calor, como radiadores o conductos de aire
caliente, ni en lugares expuestos a la luz solar directa
• en lugares expuestos a cambios bruscos de temperatura
• en lugares sujetos a vibraciones mecánicas o golpes
• sobre una superficie inestable
• cerca de equipos que generen magnetismo, como transformadores
o líneas eléctricas de alto voltaje
• cerca o sobre superficies metálicas con carga eléctrica
• dentro de un soporte cerrado
Mantenimiento
• Limpie la pantalla con un paño suave. Si utiliza un producto líquido
de limpieza de cristales, no emplee ningún tipo de producto que
contenga soluciones antiestáticas ni aditivos similares, ya que
puede dañar el revestimiento de la pantalla.
• No frote, toque ni golpee la superficie de la pantalla con objetos
afilados o abrasivos, como un bolígrafo o un destornillador. Este
tipo de contacto puede rayar el tubo de imagen.
• Limpie el exterior, el panel y los controles con un paño suave
ligeramente humedecido con una solución detergente poco
concentrada. No utilice ningún tipo de estropajo abrasivo,
detergente concentrado ni disolvente, como por ejemplo alcohol o
bencina.
Transporte
Cuando transporte este monitor para su reparación o desplazamiento,
utilice la caja de cartón y materiales de embalaje originales.
Uso del soporte basculante giratorio
Este monitor puede ajustarse en los
ángulos que se muestran a la derecha.
Para girar el monitor en vertical o en
90°
horizontal, agárrelo por la base con
ambas manos. Al elevar
verticalmente el ordenador, tenga
cuidado de no pillarse los dedos en la
parte posterior del monitor.
Punto de centrado
para 240 V CA
solamente
15°
90°
5°
8
Page 27
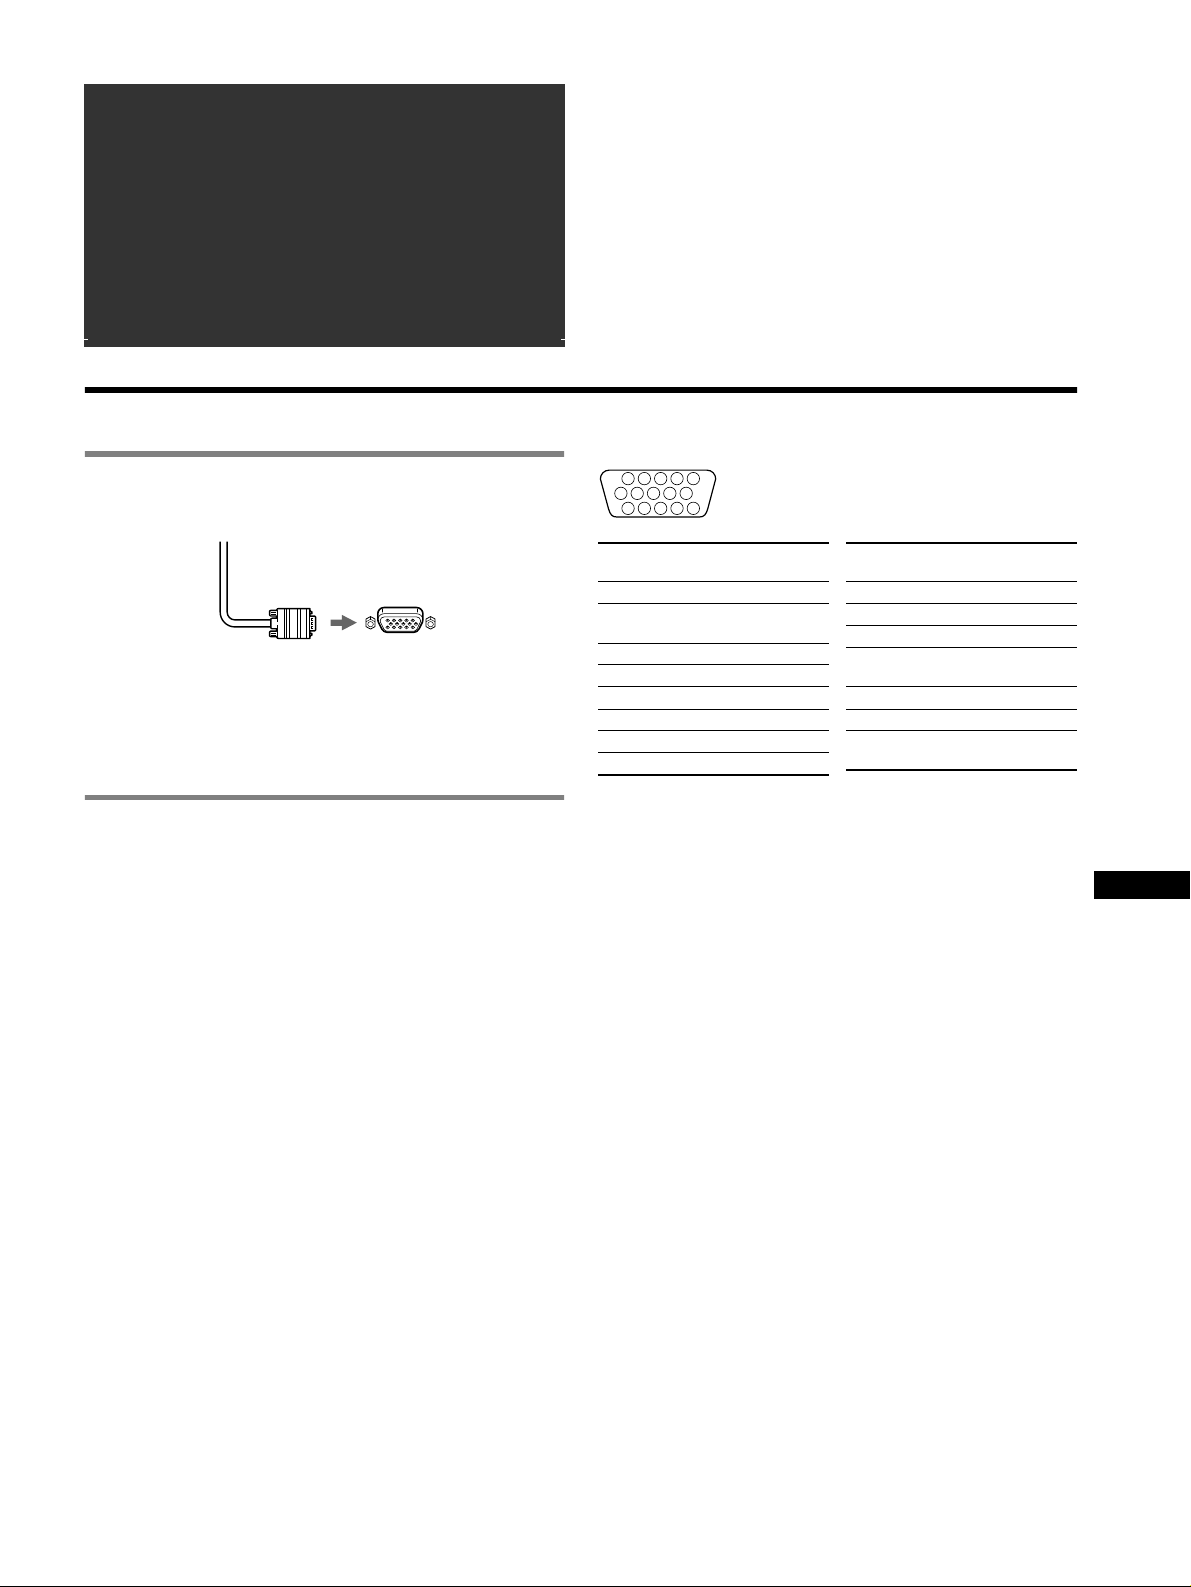
Indice
Installazione. . . . . . . . . . . . . . . . . . . . . . . . . . . . . . . . 3
Regolazioni . . . . . . . . . . . . . . . . . . . . . . . . . . . . . . . . 4
Guida alla soluzione dei problemi . . . . . . . . . . . . . . 6
Caratteristiche tecniche . . . . . . . . . . . . . . . . . . . . . . 7
Precauzioni . . . . . . . . . . . . . . . . . . . . . . . . . . . . . . . . 8
Appendix . . . . . . . . . . . . . . . . . . . . . . . . . . . . . . . . . . . i
Preset mode timing table . . . . . . . . . . . . . . . . . . . . . . . i
TCO’99 Eco-document. . . . . . . . . . . Pannello anteriore
Installazione
• Trinitronâ è un marchio di fabbrica registrato di Sony Corporation.
• Macintosh è un marchio di fabbrica concesso in licenza a Apple Computer,
Inc., registrato negli U.S.A. e in altri paesi.
•Windows
• IBM PC/AT e VGA sono marchi di fabbrica registrati di IBM Corporation
• VESA e DDC
•
• Tutti i nomi degli altri prodotti citati in questo manuale potrebbero essere
• Inoltre, “
â
Corporation negli U.S.A. e in altri paesi.
degli U.S.A.
Association.
e MS-DOS sono marchi di fabbrica registrati di Microsoft
ä
sono marchi di fabbrica di Video Electronics Standard
ENERGY STAR è un marchio di fabbrica registrato negli U.S.A.
marchi di fabbrica o marchi di fabbrica registrati delle rispettive compagnie.
ä” e “â” non sempre vengono riportati nel manuale.
1 Collegamento del monitor al computer
x Collegamento al connettore di ingresso HD15
Cavo del segnale
video del monitor
a HD15 del computer
da collegare
Collegamento ad un computer Macintosh o compatibile
Se il presente monitor viene collegato ad un computer Power Mac G3/
G4, utilizzare l'adattatore Macintosh (non in dotazione), se necessario.
2 Accensione del monitor e del computer
1 Collegare al monitor il cavo di alimentazione, quindi
premere l’interruttore
monitor.
2 Accendere il computer.
Non sono necessari driver specifici
Questo monitor è conforme allo standard Plug & Play “DDC” ed individua
automaticamente tutte le informazioni relative al monitor. Non è dunque
necessaria l’installazione di un driver specifico nel computer.
La prima volta che si accende il computer dopo avere effettuato il collegamento
del monitor, potrebbe venire visualizzata la finestra del programma di
installazione guidata. In questo caso, seguire le indicazioni a schermo. Il monitor
Plug & Play viene selezionato automaticamente ed è possibile procedere
all’utilizzo.
Note
• Non toccare i piedini del connettore del cavo del segnale video.
• Controllare l’allineamento del connettore HD15 onde evitare il piegamento
dei piedini del connettore del cavo del segnale video.
! (alimentazione) per accendere il
Assegnazione dei piedini del cavo del segnale video HD 15
1
678910
11 12 13 14 15
Numero
piedini
1Rosso
2Verde
3Blu
4 ID (Terra)
5Segnale CPU
6 Terra rosso
7 Terra verde
8 Terra blu
* DDC (Display Data Channel) è uno standard di VESA.
5432
Segnale
(Sinc su verde)
Numero
piedini
9 DDC + 5V*
10 Terra
11 ID (Terra)
12 Dati bidirezionali
13 Sincronia O
14 Sincronia V
15 Orologio Dati
Segnale
(SDA)*
(SCL)*
IT
3
Page 28
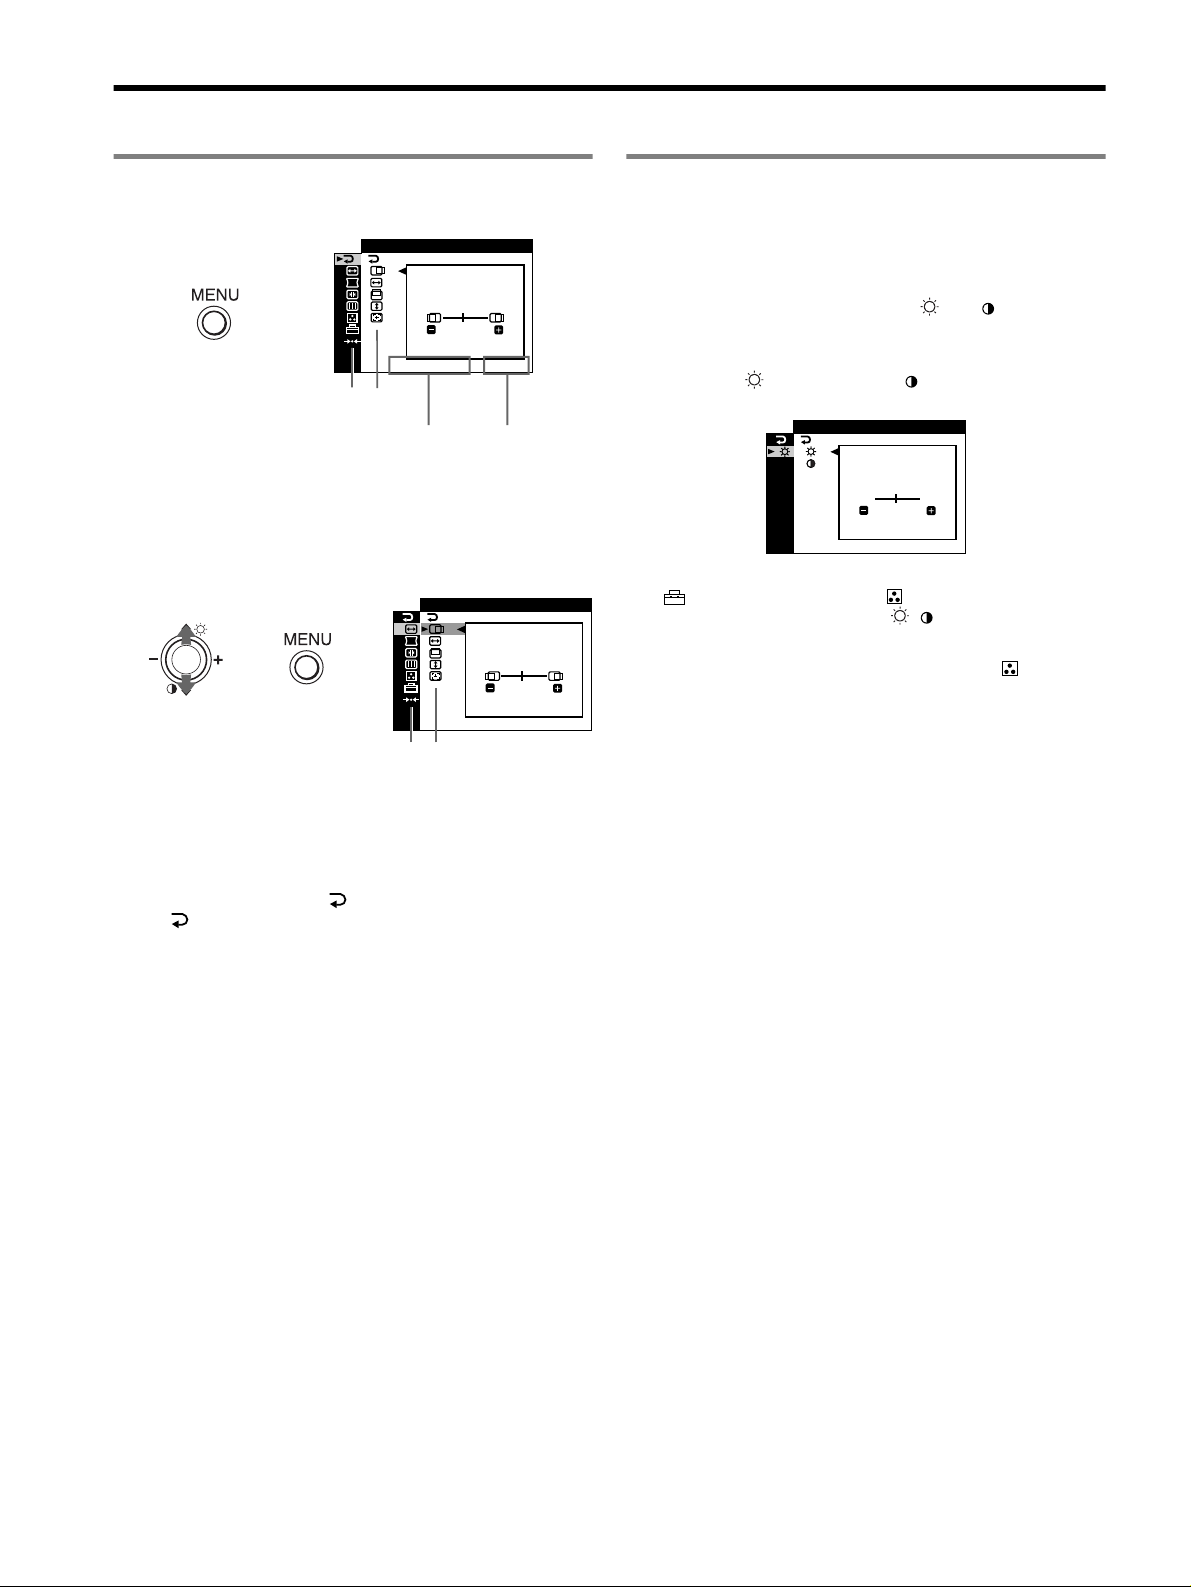
Regolazioni
Come spostarsi all’interno dei menu
1 Premere il tasto MENU per visualizzare il menu principale.
USC I TA
,
1280x1024 / 85Hz
Menu principale
frequenze orizzontali/risoluzione del
segnale di ingresso corrente (solo se
il segnale corrisponde a uno dei modi
del monitor preimpostati in fabbrica)
Sottomenu
2 Spostare il tasto di comando m/M per evidenziare il menu
principale che si desidera regolare, quindi premere il tasto
di comando.
,,
Menu principale
45
frequenze verticali
del segnale di
ingresso corrente
D MENS45/I I ONE CENTRO
1280x1024 / 85Hz
Sottomenu
Regolazione della luminosità e del contrasto
Le regolazioni relative alla luminosità e al contrasto vengono effettuate
utilizzando un menu LUMIN/CONTRASTO separato. Tali regolazioni
sono efficaci per tutti i segnali di ingresso.
1 Spostare il tasto di comando M ()/m () per
visualizzare il menu LUMIN/CONTRASTO.
2 Spostare il tasto di comando m/M per selezionare la
luminosità ( ) o il contrasto ( ), quindi spostare il
tasto di comando –/+ per effettuare le regolazioni.
CONTRASTO
/LUMI N
LUMI I TANOS
45
1280x1024 / 85Hz
Nota
Se in (MODO COLORE) del menu (COLORE) è stato selezionato
il modo sRGB, viene visualizzato il menu / (LUMIN/CONTRASTO)
per il modo sRGB e in questa schermata non è possibile regolare né la
luminosità né il contrasto. Per ulteriori informazioni sull’utilizzo del modo
sRGB, vedere la sezione relativa al modo sRGB nel menu (COLORE).
3 Spostare il tasto di comando m/M per evidenziare il
sottomenu che si desidera regolare, quindi utilizzare il
tasto di comando
–/+ per effettuare le regolazioni.
Come chiudere il menu
Premere due volte il tasto MENU per tornare al menu principale. La
voce selezionata in fabbrica è . Ogni volta che viene selezionata
la voce e premuto il tasto MENU, il menu viene chiuso. Se non
viene premuto alcun tasto, il menu viene chiuso automaticamente
dopo circa 30 secondi.
4
Page 29
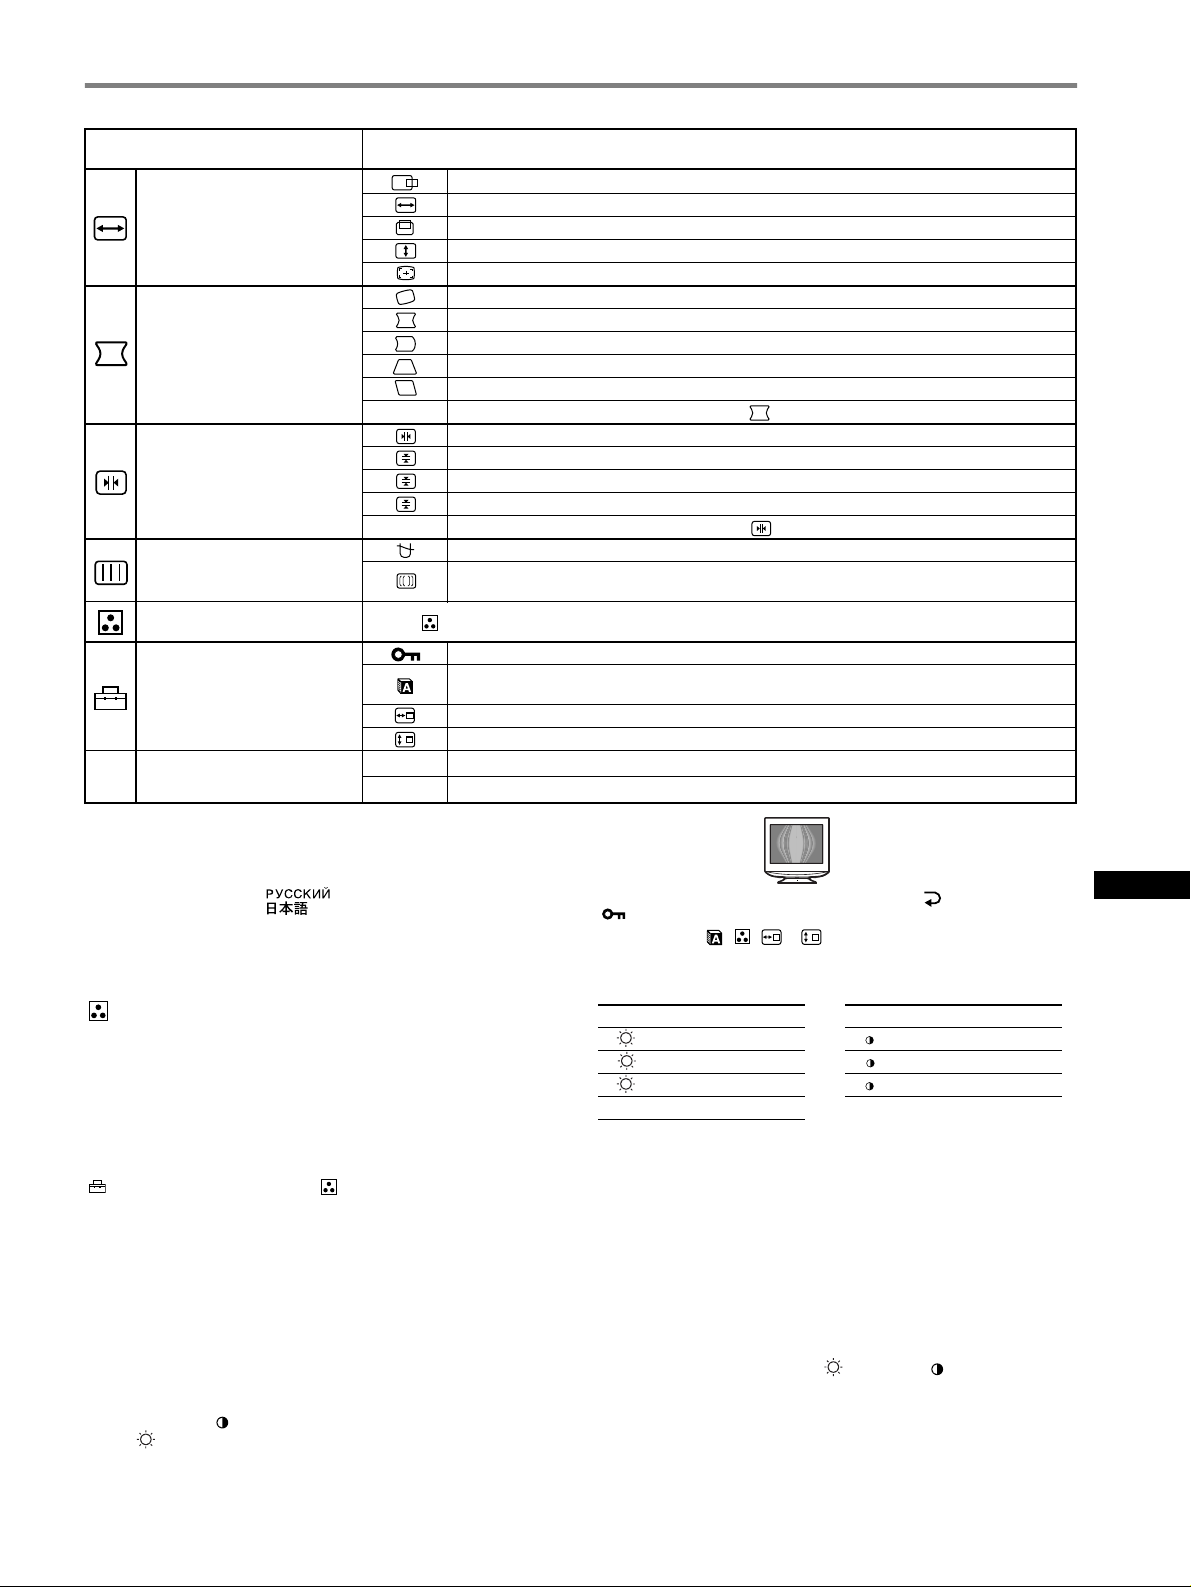
Regolazione dei menu a schermo
Icone dei menu principali e voci di
regolazione
Regolazione delle dimensioni o
della centratura dell’immagine
Regolazione della forma
dell’immagine
Regolazione della convergenza
Regolazione della qualità
dell’immagine
Regolazione del colore
dell’immagine
Impostazioni aggiuntive
0 Ripristino delle regolazioni
1
*
Questa regolazione funziona per il segnale di ingresso corrente.
2
*
Questa regolazione funziona per tutti i segnali di ingresso.
3
*
Menu delle lingue
• ENGLISH: Inglese • NEDERLANDS: Olandese
• FRANÇAIS: Francese • SVENSKA: Svedese
• DEUTSCH: Tedesco • : Russo
• ESPAÑOL: Spagnolo • : Giapponese
• ITALIANO
Icone dei sottomenu e voci di regolazione
Posizione orizzontale
Dimensione orizzontale
1
*
2
*
Vedere “ : Per regolare il colore dell’immagine”.
01
02
Posizione verticale
Dimensione verticale
Centratura e dimensionamento automatici
Ruotare l’immagine
Espandere o contrarre i bordi dell’immagine
Spostare i bordi dell’immagine verso sinistra o verso destra*
Regolare la larghezza dell’immagine nella parte superiore dello schermo*
Spostare l’immagine verso destra o verso sinistra nella parte superiore dello schermo*
0 RIPRISTINO: per riportare tutte le impostazioni ai valori predefiniti.
Per spostare le ombre blu o rosse in senso orizzontale
Per spostare le ombre blu o rosse in senso verticale
Per spostare le ombre blu o rosse in senso verticale nella parte superiore dello schermo
T
B
Per spostare le ombre blu o rosse in senso verticale nella parte inferiore dello schermo
0 RIPRISTINO: per riportare tutte le impostazioni ai valori predefiniti.
SMAGNETIZZ: per smagnetizzare il monitor.
ANNULLA MOIRE
minimo.
Protezione dei dati di regolazione (BLOCCO MENU)
Selezione della lingua dei menu a schermo/Conferma delle informazioni relative al monitor
LANGUAGE/INFORMAZIONI
Modifica della posizione dei menu per la regolazione in senso orizzontale
Modifica della posizione dei menu per la regolazione in senso verticale
1
Ripristino di tutti i dati di regolazione relativi al segnale di ingresso corrente.*6 Selezionare “OK”.
*
2
Ripristino di tutti i dati di regolazione relativi a tutti i segnali di ingresso. Selezionare “OK”.
*
1
*
4
*
1
*
: per regolare il grado di eliminazione dell’effetto moiré fino a ridurlo al
3
*
*4Esempio di effetto moiré
*5Funzioneranno solo l’interruttore ! (alimentazione), e il menu
(BLOCCO MENU).
6
*
Le voci dei menu , , e non vengono ripristinate tramite questo
metodo.
1
1
1
5
*
IT
: Per regolare il colore dell’immagine
Le impostazioni del menu COLORE consentono di regolare la
temperatura del colore dell’immagine modificando il livello del colore
del campo di colore bianco. I colori appaiono rossastri se la temperatura
è bassa e bluastri se la temperatura è alta. Questa regolazione risulta
utile per fare corrispondere i colori del monitor ai colori di
un’immagine stampata.
Selezionare uno dei modi di impostazione della temperatura del colore
fra i 4 seguenti, PREDEF, VARIABILE, ESPERTO e sRGB in
(MODO COLORE) nel menu (COLORE).
x PREDEF (Impostazione predefinita)
È possibile selezionare la temperatura del colore da 5000K, 6500K o
9300K. L’impostazione predefinita è 9300K.
x VARIABILE
È possibile impostare la temperatura del colore su un valore compreso
tra 5000 K e 11000 K.
x ESPERTO
Selezionando questo modo, è possibile effettuare ulteriori regolazioni
del colore. GAIN ( ) regola le aree luminose dello schermo, mentre
BIAS ( ) regola le aree scure.
Selezionare per Selezionare per
R R (rosso) BIAS R R (rosso) GAIN
G G (verde) BIAS G G (verde) GAIN
B B (blu) BIAS B B (blu) GAIN
0 RIPRISTINO
*
* Consente di riportare tutte le impostazioni del modo ESPERTO ai valori
preimpostati in fabbrica.
x sRGB
L’impostazione del colore sRGB è un protocollo sullo spazio del colore
di standard industriale creato per fare corrispondere i colori visualizzati
sul monitor con quelli stampati. Per visualizzare correttamente i colori
γ = 2,2, 6500 K), selezionare il modo sRGB e impostare il
sRGB (
computer collegato sui profili sRGB. Se si seleziona il modo sRGB,
non è possibile effettuare le regolazioni nel menu LUMIN/
CONTRASTO.
Nota
Verificare che i valori di luminosità ( ) e contrasto ( ) siano regolati
rispettivamente sui livelli da impostare nel modo sRGB come indicato nel menu
LUMIN/CONTRASTO. In caso contrario, selezionare 0 1 nel menu
0 (RIPRISTINO).
5
Page 30
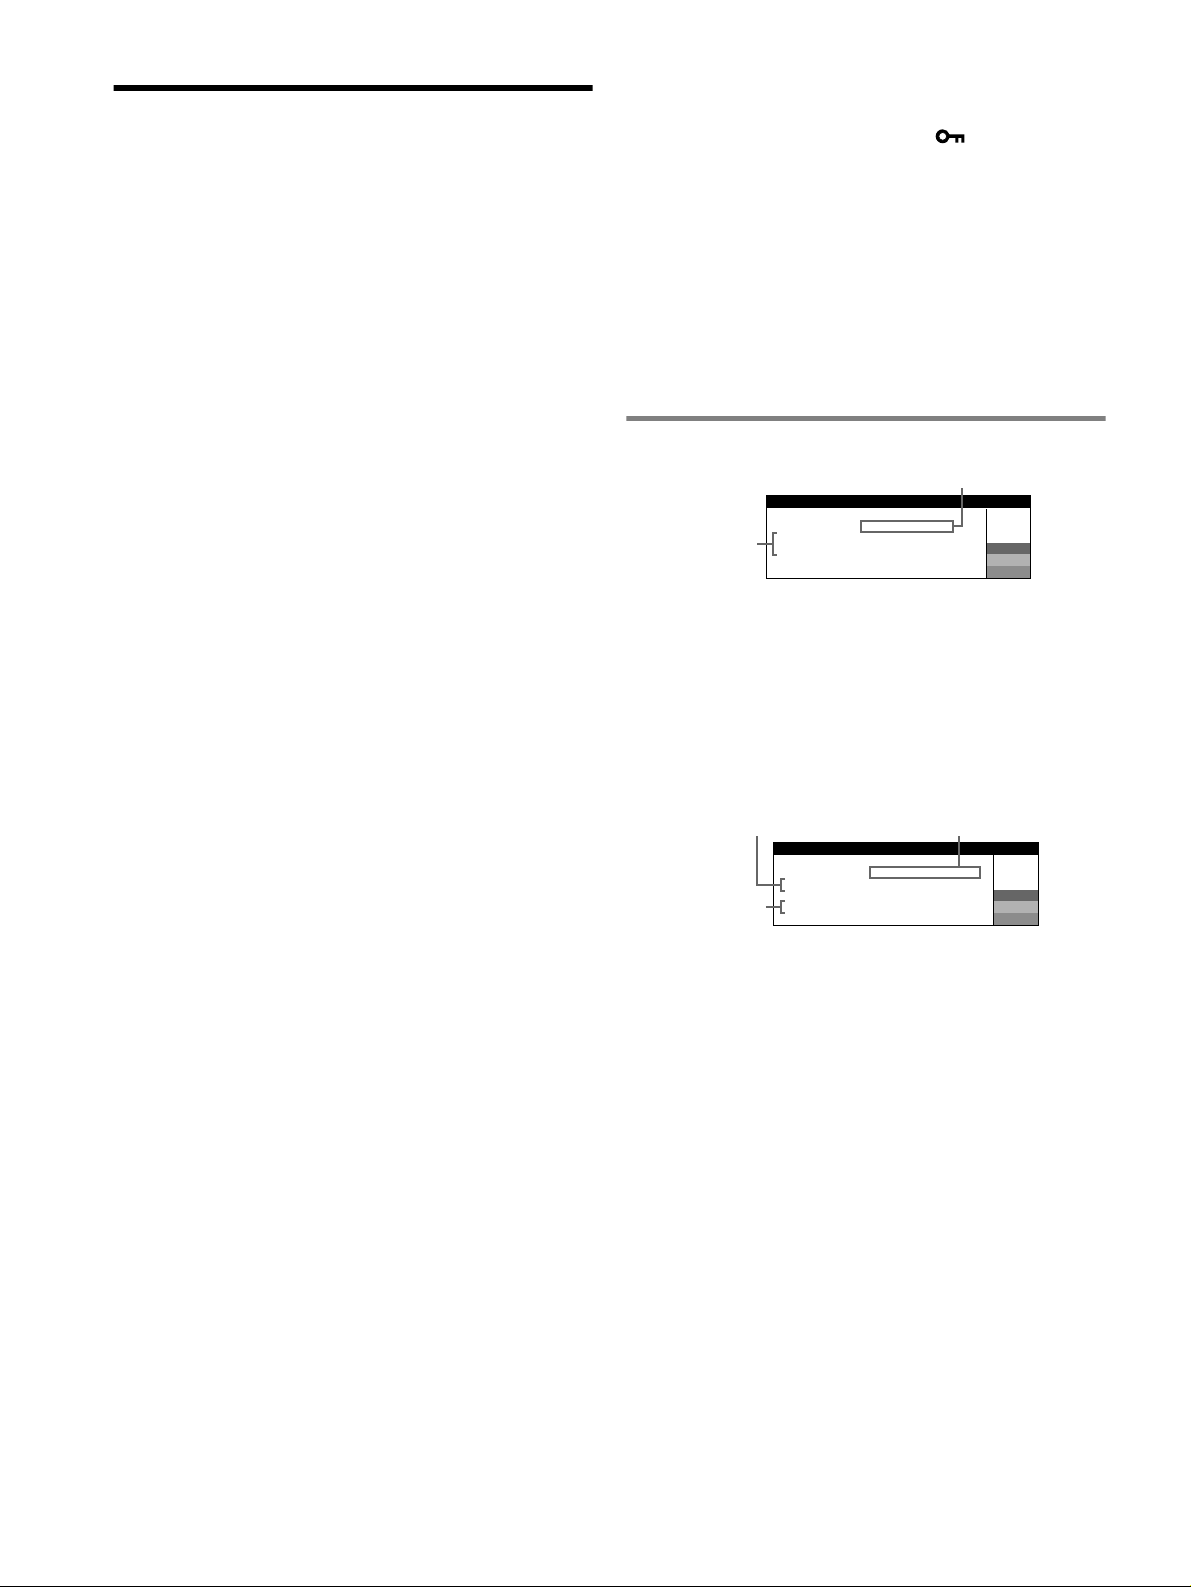
Guida alla soluzione dei problemi
x Assenza di immagini
Se l’indicatore ! (alimentazione) non è illuminato
• Controllare che il cavo di alimentazione sia collegato correttamente.
• Controllare che l’interruttore ! (alimentazione) sia nella posizione di
accensione.
L’indicatore ! (alimentazione) è arancione
• Controllare che il cavo del segnale video sia collegato correttamente e
che tutte le spine siano inserite saldamente nelle apposite prese.
• Controllare che i pi edini del connettore di ingresso vide o HD15 non siano
piegati o danneggiati.
• Controllare che l’alimentazione del computer sia attivata.
• Il computer si trova nel modo di risparmio energetico. Premere un tasto
qualsiasi della tastiera o muovere il mouse.
• Controllare che la scheda grafica sia inserita completamente
nell’alloggiamento del bus corretto.
Se l’indicatore ! (alimentazione) è verde o lampeggia in
arancione
• Utilizzare la funzione di autodiagnostica.
x L’immagine è tremolante, salta, oscilla oppure è confusa
• Isolare ed eliminare qualsiasi fonte potenziale di elettricità o di campi
magnetici quali altri monitor, stampanti laser, ventilatori, lampade a
fluorescenza o televisori.
• Allontanare il monitor dalle linee di alimentazione oppure collocare uno
schermo magnetico in prossimità del monitor.
• Collegare il monitor ad un’altra presa di rete CA, preferibilmente su un
circuito differente.
• Ruotare il monitor di 90° verso sinistra o verso destra.
• Controllare il manuale della scheda grafica per le corrette impostazioni
del monitor.
• Assicurarsi che il modo grafica e la frequenza del segnale di ingresso
siano supportati dal presente monitor (vedere la sezione “Preset mode
timing table” relativa alla tabella degli intervalli del modo di preselezione
a pagina i). Anche se la frequenza rientra nella gamma prevista, alcune
schede grafiche potrebbero avere un impulso sincronico insufficiente a
permettere al monitor di sincronizzarsi correttamente.
• Regolare la frequenza di refresh del computer (frequenza verticale) per
ottenere immagini di qualità superiore.
x L’immagine è sfocata
• Regolare la luminosità, quindi il contrasto.
• Smagnetizzare il monitor.*
• Regolare il livello di eliminazione dell’effetto moiré fino a ridurlo al
minimo, oppure impostare ANNULLA MOIRE su NO.
x L’immagine appare sdoppiata
• Eliminare l’utilizzo di prolunghe del cavo video e/o di cassette per
l’interruttore video.
• Controllare che tutte le spine siano saldamente inserite nelle apposite
prese.
x L’immagine non è centrata o non è delle dimensioni
corrette
• Attivare la funzione di regolazione automatica di dimensione e
centratura.
• Regolare la dimensione o la centratura. Con alcuni segnali di ingresso e/
o schede grafiche lo schermo non viene utilizzato completamente.
• Dopo avere attivato l’interruttore dell’alimentazione, potrebbero essere
necessari alcuni istanti prima che la dimensione/centratura venga
regolata correttamente.
x I bordi dell’immagine appaiono incurvati
• Regolare la geometria.
x Sono visibili disturbi ondulati o ellittici (effetto moiré)
• Regolare il livello di eliminazione dell’effetto moiré finché tale effetto
non viene ridotto al minimo.
• Modificare il motivo del desktop.
x Il colore non è uniforme
• Smagnetizzare il monitor.* Se in prossimità del monitor viene collocata
un’apparecchiatura che genera campi magnetici quale ad esempio un
diffusore oppure se si modifica la direzione del monitor, il colore
potrebbe perdere uniformità.
x Il bianco non è perfetto
• Regolare la temperatura del colore.
x I tasti del monitor non funzionano ( appare sullo
schermo)
• Se la funzione di bloccaggio dei comandi è impostata su SI, impostarla
su NO.
x Lettere e linee presentano ombre rosse o blu sui lati
• Regolare la convergenza.
x Non appena si accende l’apparecchio si avverte un
ronzio
•È il rumore del ciclo di smagnetizzazione automatica. Al momento
dell’accensione il monitor viene automaticamente smagnetizzato per
alcuni secondi.
* Nel caso in cui sia necessario un secondo ciclo di smagnetizzazione, attendere
almeno 20 minuti per ottenere il risultato ottimale. Potrebbe venire avvertito
un ronzio che tuttavia non indica un problema di funzionamento.
Messaggi a schermo
IIIONNFORMAZ
MON I ESEGUETOR
NGRESSO
I
ATT
2
CONTROL LARE
I VARE
:NOILSEGNALE
COMPUTER
SEGNALE
1 Se viene visualizzato il messaggio “NO SEGNALE”:
Questo messaggio indica che il connettore non trasmette alcun segnale.
2 Indica i rimedi.
• Se sullo schermo appare il messaggio ATTIVARE IL COMPUTER,
premere un tasto qualsiasi del computer o muovere il mouse, quindi
assicurarsi che la scheda grafica del computer sia completamente
inserita nell’alloggiamento del bus corretto.
• Se sullo schermo appare il messaggio CONTROLLARE
SEGNALE, assicurarsi che il monitor sia collegato correttamente al
computer.
1
IIIONNFORMAZ
MON I ESEGUETOR
I NGRESSO
FUOR I GAMMA SCANS
MOD FI I CARE S EGNAL E
3
:200.0kHz/ 85Hz
1 Se viene visualizzato il messaggio “FUORI GAMMA
SCANS”:
Questo messaggio indica che il segnale di ingresso non è presente tra le
caratteristiche tecniche del monitor.
2 Indica la frequenza del segnale di ingresso.
3 Indica il rimedio.
Sullo schermo appare il messaggio MODIFICARE SEGNALE. Se si è
sostituito un monitor vecchio con questo monitor, ricollegare il monitor
vecchio. Quindi regolare la scheda grafica del computer in modo che la
frequenza orizzontale sia compresa tra 30 – 96 kHz e la frequenza verticale
sia compresa tra 48 – 170 Hz.
1
2
W
R
G
B
W
R
G
B
6
Page 31
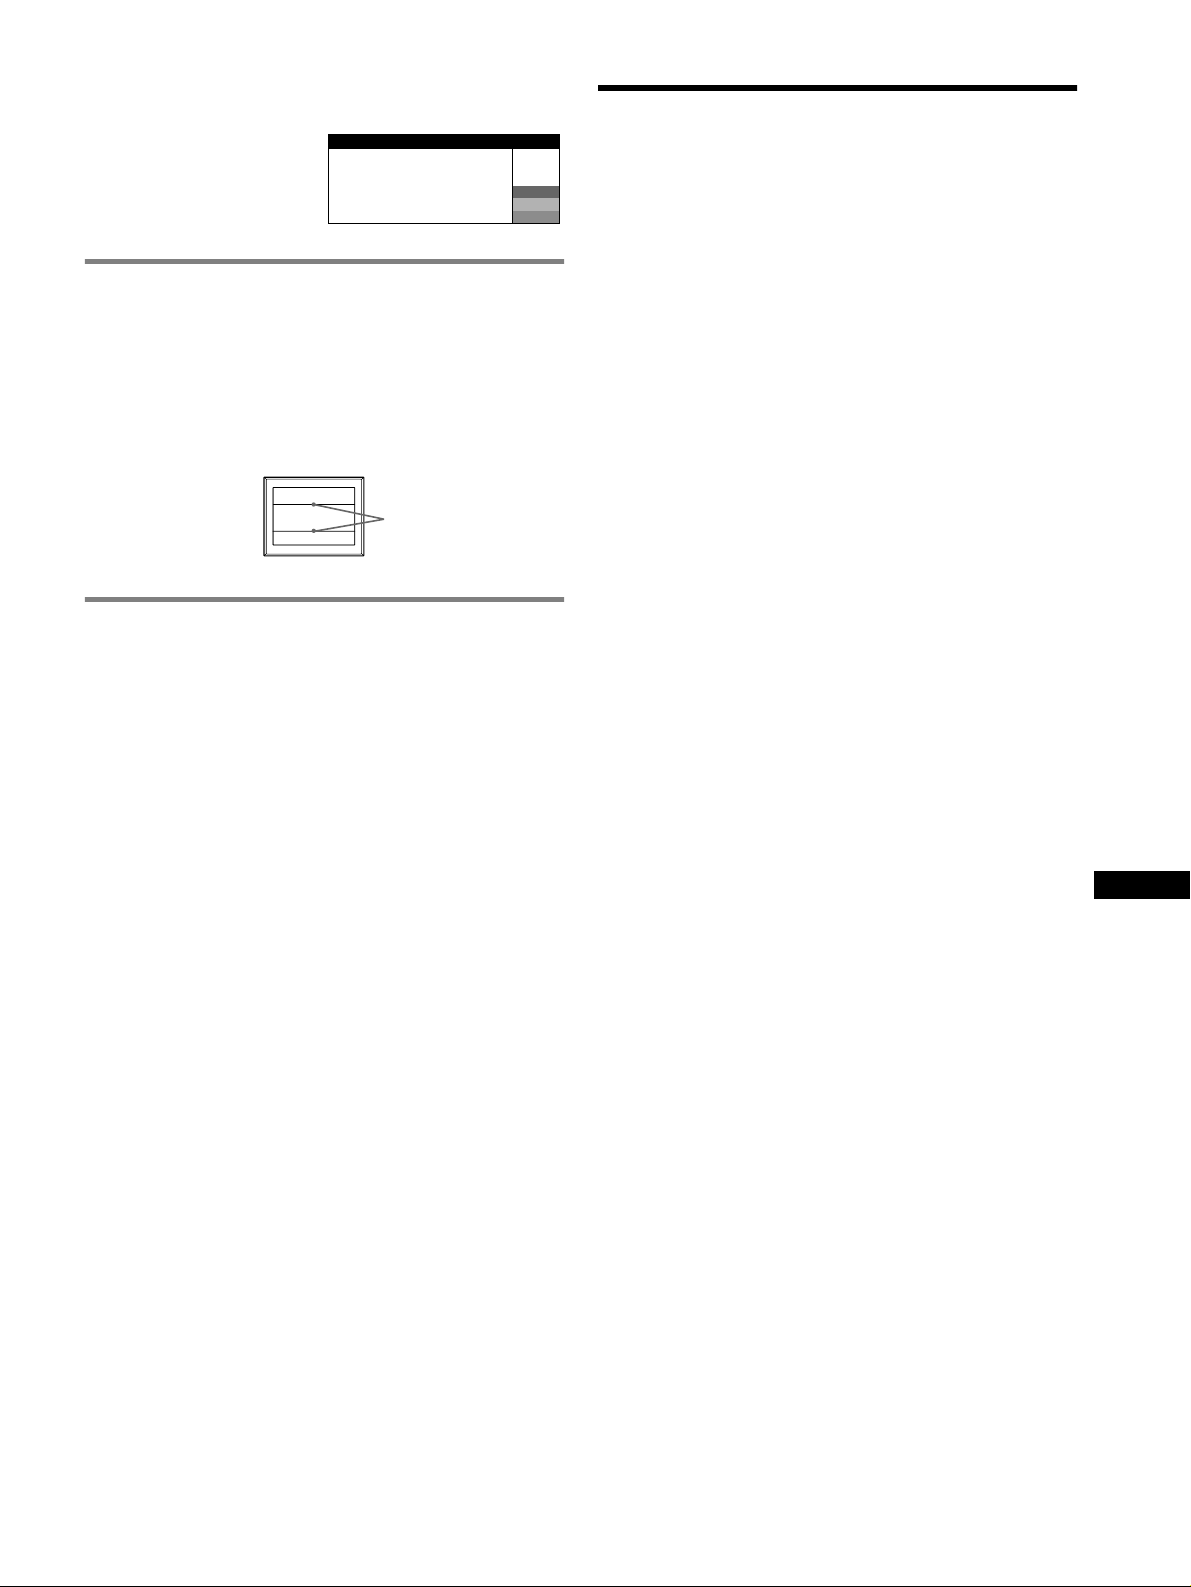
Per visualizzare il nome, il numero di serie e la data
di produzione del monitor.
Mentre il monitor riceve un
segnale video, premere e tenere
premuto il tasto MENU per oltre
5 secondi per visualizzare la
finestra delle informazioni
relative al monitor.
INFORMAZIONI
MODEL : CPD-E430
SER NO : 1234567
MANUFACTURED
: 2001-30
W
R
G
B
Se sullo schermo appaiono delle linee
sottili
Queste linee non indicano un problema di funzionamento, ma sono
il risultato del normale effetto del cinescopio a colori Trinitron con il
presente monitor. Si tratta dell’ombra dei cavi di smorzamento
utilizzati per stabilizzare la griglia di apertura. La griglia di apertura è
l’elemento essenziale che caratterizza il cinescopio a colori Trinitron
consentendo una maggiore illuminazione dello schermo con il risultato
di immagini più nitide e dettagliate.
(cavi di smorzamento)
Cavi di
smorzamento
Funzione di autodiagnostica
Questo monitor è dotato di una funzione di autodiagnostica. Se si
verificano problemi con il monitor o il computer, lo schermo non
visualizza alcunché e l’indicatore ! (alimentazione) si illumina in
verde o lampeggia in arancione. Se l’indicatore ! (alimentazione) si
illumina in arancione, significa che il computer si trova nel modo di
risparmio energetico. Premere un tasto qualsiasi della tastiera o
muovere il mouse.
Caratteristiche tecniche
Tubo a raggi catodici (CRT)
Passo della griglia di apertura 0,24 mm, Deflessione di 90 gradi
FD Trinitron, 19 pollici misurati in diagonale
Dimensioni dell’immagine visibile
Risoluzione (O: Orizzontale, V: Verticale)
Livelli dei segnali di ingresso
Segnale video: RVB analogico: 0,700 Vp-p (positivo), 75
Segnale SYNC:Sincronismo O/V separato o composito:
Area dell’immagine standard
Frequenza di deflessione (O: Orizzontale, V: Verticale)
Tensione/corrente di ingresso CA
Consumo energetico (senza periferiche USB collegate)
Temperatura di utilizzo
Dimensioni Circa 451
Peso Circa 25,5 kg
Plug and Play DDC2B/DDC2Bi
Accessori in dotazione
Circa 365
Immagine visibile 18,0"
Massima: O: 1920 punti, V: 1440 linee
Consigliata: O: 1280 punti, V: 1024 linee
TTL 2 k
Sincronismo libero su verde: 0,3 Vp-p (negativo)
Circa 352
O: da 30 a 96 kHz, V: da 48 a 170 Hz
da 100 a 240 V, 50 – 60 Hz, 2,0 – 1,0 A
Circa 135 W
Da 10°C a 40°C
GTF
Cavo di alimentazione
Il presente manuale delle istruzioni
× 274 mm (l/a)
Ω, polarità
× 264 mm
× 471 × 461 mm (l/a/p)
Ω
x Se l’indicatore ! (alimentazione) è verde
1 Scollegare il cavo del segnale video o disattivare il
computer collegato.
2 Spegnere il monitor, quindi riaccenderlo.
3 Tenere premuto verso l’alto il tasto di comando per alcuni
secondi prima che il monitor entri nel modo di risparmio
energetico.
Se vengono visualizzate le quattro barre del colore (bianco, rosso,
verde, blu), significa che il monitor funziona correttamente.
Ricollegare i cavi di ingresso video e controllare le condizioni dei
computer.
Se le barre del colore non vengono visualizzate, potrebbe trattarsi di un
potenziale guasto al monitor. Rivolgersi ad un rivenditore Sony
autorizzato.
x Se l’indicatore ! (alimentazione) lampeggia in
arancione
Spegnere il monitor, quindi riaccenderlo.
Se l’indicatore ! (alimentazione) si illumina in verde, significa che il
monitor funziona correttamente.
Se l’indicatore ! (alimentazione) continua a lampeggiare, potrebbe
trattarsi di un potenziale guasto al monitor. Contare il numero di
secondi che intercorrono tra i lampeggiamenti in arancione
dell’indicatore ! (alimentazione) e rivolgersi ad un rivenditore Sony
autorizzato. Prendere nota del nome del modello e del numero di serie
del monitor. Prendere inoltre nota della marca e del modello del
computer e della scheda grafica.
IT
(continua)
7
Page 32

Modo preimpostato e modo utente
Se il monitor riceve un segnale di ingresso, tale segnale viene fatto
corrispondere automaticamente ad uno dei modi preimpostati in fabbrica
contenuti nella memoria del monitor allo scopo di ottenere un’immagine di
qualità superiore (vedere la sezione “Preset mode timing table” relativa alla
tabella degli intervalli del modo di preselezione a pagina i). Se i segnali di
ingresso non corrispondono a nessuno dei modi preimpostati, il monitor
fornisce automaticamente l’immagine più appropriata per il segnale di ingresso
compreso nella gamma delle frequenze verticali o orizzontali (pagina 7) che
corrispondono alla Generalized Timing Formula. Se l’immagine è stata
regolata, i dati relativi alla regolazione vengono memorizzati come modo
utente e vengono richiamati automaticamente al momento della ricezione dello
stesso segnale di ingresso.
Funzione di risparmio energetico
Questo monitor è conforme alle direttive sul risparmio energetico di VESA,
TCO’99 e
computer, il consumo energetico verrà automaticamente ridotto come descritto
di seguito.
*
*
Il design e le caratteristiche tecniche sono soggetti a modifiche senza
preavviso.
ENERGY STAR. Se il monitor non riceve alcun segnale dal
Modo di
alimentazione
Funzionamento
normale
Attivo spento*
(deep sleep)*
1
Se il computer entra nel modo di risparmio energetico, sullo schermo viene
visualizzato il messaggio NO SEGNALE. Dopo alcuni secondi, il monitor
entra nel modo di risparmio energetico.
2
“Deep sleep” è il modo di risp armio energetico definito dalla Environmental
Protection Agency.
Consumo energetico Indicatore di
≤ 135 W verde
1
≤ 3 W arancione
2
accensione
! (alimentazione)
Precauzioni
Avvertenze sui collegamenti dell’alimentazione
• Utilizzare il cavo di alimentazione in dotazione. Se si utilizza un
cavo di alimentazione diverso, assicurarsi che sia compatibile con
la tensione operativa locale.
Per gli utenti nel Regno Unito
Se si utilizza il monitor nel Regno Unito, utilizzare il relativo cavo
di alimentazione in dotazione.
Esempio di tipi di spine
da 100 a 120 V CA da 200 a 240 V CA solo 240 V CA
• Prima di scollegare il cavo di alimentazione, attendere almeno 30
secondi dalla disattivazione dell’alimentazione per permettere la
dispersione dell’elettricità statica sulla superficie dello schermo.
• Non appena si accende l’apparecchio, lo schermo viene
smagnetizzato per alcuni secondi. Questa operazione crea un forte
campo magnetico attorno allo schermo che potrebbe danneggiare i
dati memorizzati su nastri e dischi magnetici collocati in prossimità
del monitor. Collocare le apparecchiature per le registrazioni, i
nastri e i dischi magnetici lontano dal monitor.
Installare l’apparecchio in prossimità di una presa facilmente
accessibile.
Installazione
Non installare il monitor nei seguenti luoghi:
• su superfici (tappeti, coperte e così via) o in prossimità di materiali
(tende, tessuti e così via) che potrebbero bloccarne le prese di
ventilazione
• in prossimità di fonti di calore quali radiatori o condotti d’aria calda
né in luoghi soggetti alla luce diretta del sole
• in luoghi soggetti a forti escursioni termiche
• in luoghi soggetti a scosse o vibrazioni di tipo meccanico
• su superfici instabili
• in prossimità di apparecchiature che generano campi magnetici,
quali un trasformatore o linee ad alta tensione
• in prossimità o su superfici metalliche con carica elettrica
• all’interno di uno scaffale chiuso
Manutenzione
• Pulire lo schermo con un panno morbido. Se si utilizza un
detergente liquido per vetri, assicurarsi che non contenga soluzioni
antistatiche o additivi simili onde evitare di graffiare il
rivestimento dello schermo.
• Non strofinare, toccare o tamburellare la superficie dello schermo
con oggetti appuntiti o abrasivi quali la punta di una penna o un
cacciavite onde evitare di graffiare il cinescopio a colori.
• Pulire il rivestimento, il pannello e i comandi con un panno
morbido leggermente inumidito con una soluzione detergente
neutra. Non utilizzare alcun tipo di spugnetta o polvere abrasiva, né
solventi quali alcool o benzina.
Trasporto
Per trasportare il monitor o inviarlo in riparazione, utilizzare il
materiale di imballaggio originale.
Utilizzo del sistema orientabile
È possibile regolare questo monitor
entro le angolazioni riportate a
destra. Per ruotare il monitor
orizzontalmente o verticalmente,
afferrarlo alla base con entrambe le
mani. Durante l’inclinazione
verticale verso l’alto, fare attenzione
a non incastrare le dita nella parte
posteriore del monitor.
90°
90°90°
Linea di centratura
15°
5°
90°
8
Page 33
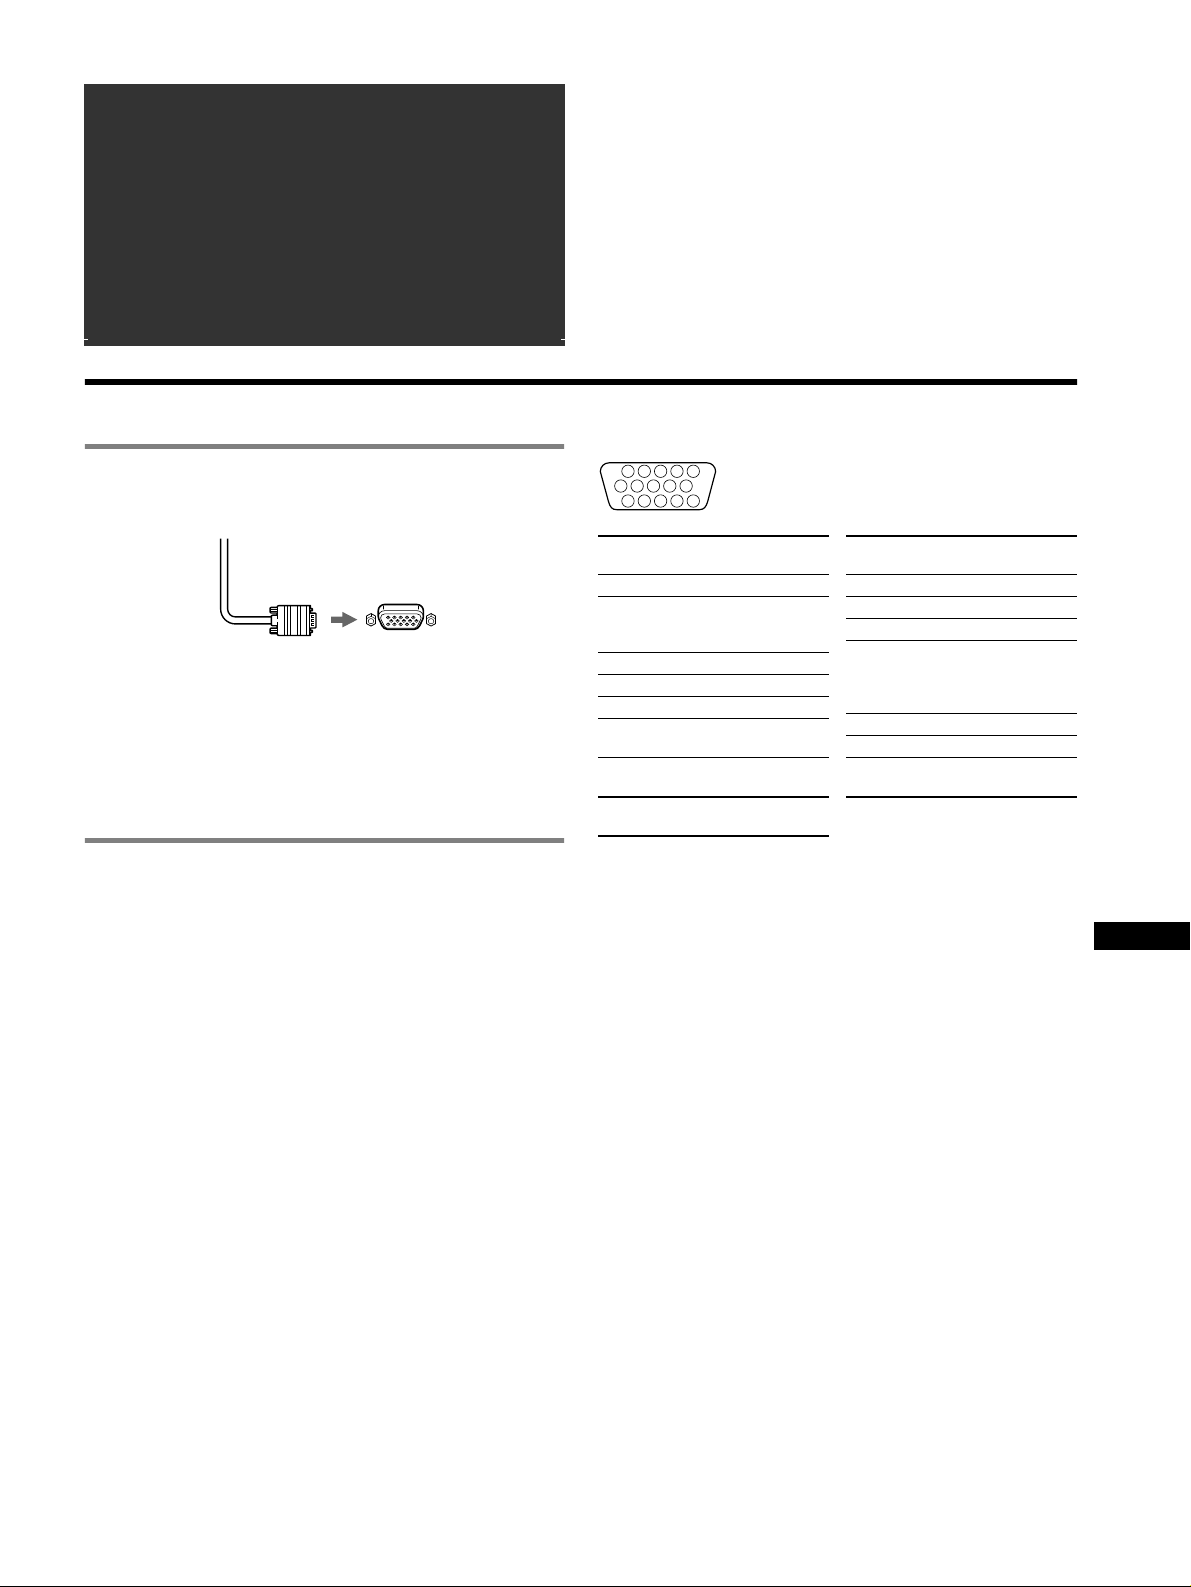
Coдepжaниe
Подготовка к работе. . . . . . . . . . . . . . . . . . . . . . . . 3
Регулировка . . . . . . . . . . . . . . . . . . . . . . . . . . . . . . . 4
Устранение неисправностей . . . . . . . . . . . . . . . . . 6
Технические характеристики . . . . . . . . . . . . . . . . 7
Меры предосторожности. . . . . . . . . . . . . . . . . . . . 8
Appendix . . . . . . . . . . . . . . . . . . . . . . . . . . . . . . . . . . . i
Preset mode timing table . . . . . . . . . . . . . . . . . . . . . . . i
TCO’99 Eco-document. . . . . . . . . . . . Зaдняя крышкa
Подготовка к работе
• Trinitronâ зарегистрированная торговая марка Sony Corporation.
• Macintosh является торговой маркой Apple Computer, Inc.,
зарегистрированной в США и других странах.
• Windowsâ и MS-DOS являются зарегистрированными торговыми
марками Microsoft Corporation в США и других странах.
• IBM PC/AT и VGA являются зарегистрированными торговыми
марками IBM Corporation в США.
• VESA и DDCä являются торговыми марками Video Electronics
Standard Association.
• ENERGY STAR является маркой, зарегистрированной в США.
• Остальные названия продуктов, упомянутые в этом документе,
могут являться зарегистрированными торговыми марками или
торговыми марками соответствующих владельцев.
• В дальнейшем символы “ä” и “â” не упоминаются в этом
руководстве.
1 Подключение монитора к компьютеру
x Подключение к входному разъему HD15
Кабель видеосигнала
монитора
к разъему HD15
подключаемого
компьютера
Подключение к компьютеру Macintosh или
совместимому с ним
При подключении этого монитора к компьютеру Power Mac
G3/G4 используйте при необходимости прилагаемый
адаптер для Macintosh (не входит в комплект).
2 Включение монитора и компьютера
1 Подключите кабель питания к монитору и нажмите
кнопку ! (питание), чтобы включить монитор.
2 Включите компьютер.
Специальные драйверы не требуются
Данный монитор отвечает требованиям стандарта “DDC” Plug &
Play, и компьютер автоматически обнаруживает всю информацию
о мониторе. Необязательно устанавливать на компьютере какиелибо специальные драйверы.
При первом включении ПК после подключения монитора на экране
может появиться диалоговое окно программы установки. В этом
случае следуйте указаниям на экране. Монитор Plug & Play
выбирается автоматически, что позволяет сразу начать его
использовать.
Примечания
• Не прикасайтесь к штырькам разъема кабеля видеосигнала.
• Проверьте правильность расположения разъема HD15 для
предотвращения сгибания штырьков разъема кабеля
видеосигнала.
Расположение штырьков кабеля видеосигнала HD 15
1
678910
11 12 13 14 15
Номер
штырька
1 Красный
2 Зеленый
3 Синий
4 ID (Заземление)
5Датчик ЦП
6 Заземление
7 Заземление
8 Заземление
* Display Data Channel (DDC) является стандартом VESA.
5432
Сигнал
(Синхронизация
по зеленому)
красного
зеленого
синего
Номер
штырька
9 DDC + 5 B*
10 Заземление
11 ID (Заземление)
12 Канал
13 Г. Cинxp.
14 B. Cинxp.
15 Xpонометpаж
Сигнал
двустороннего
обмена данныx
(SDA)*
данныx (SCL)*
RU
3
Page 34
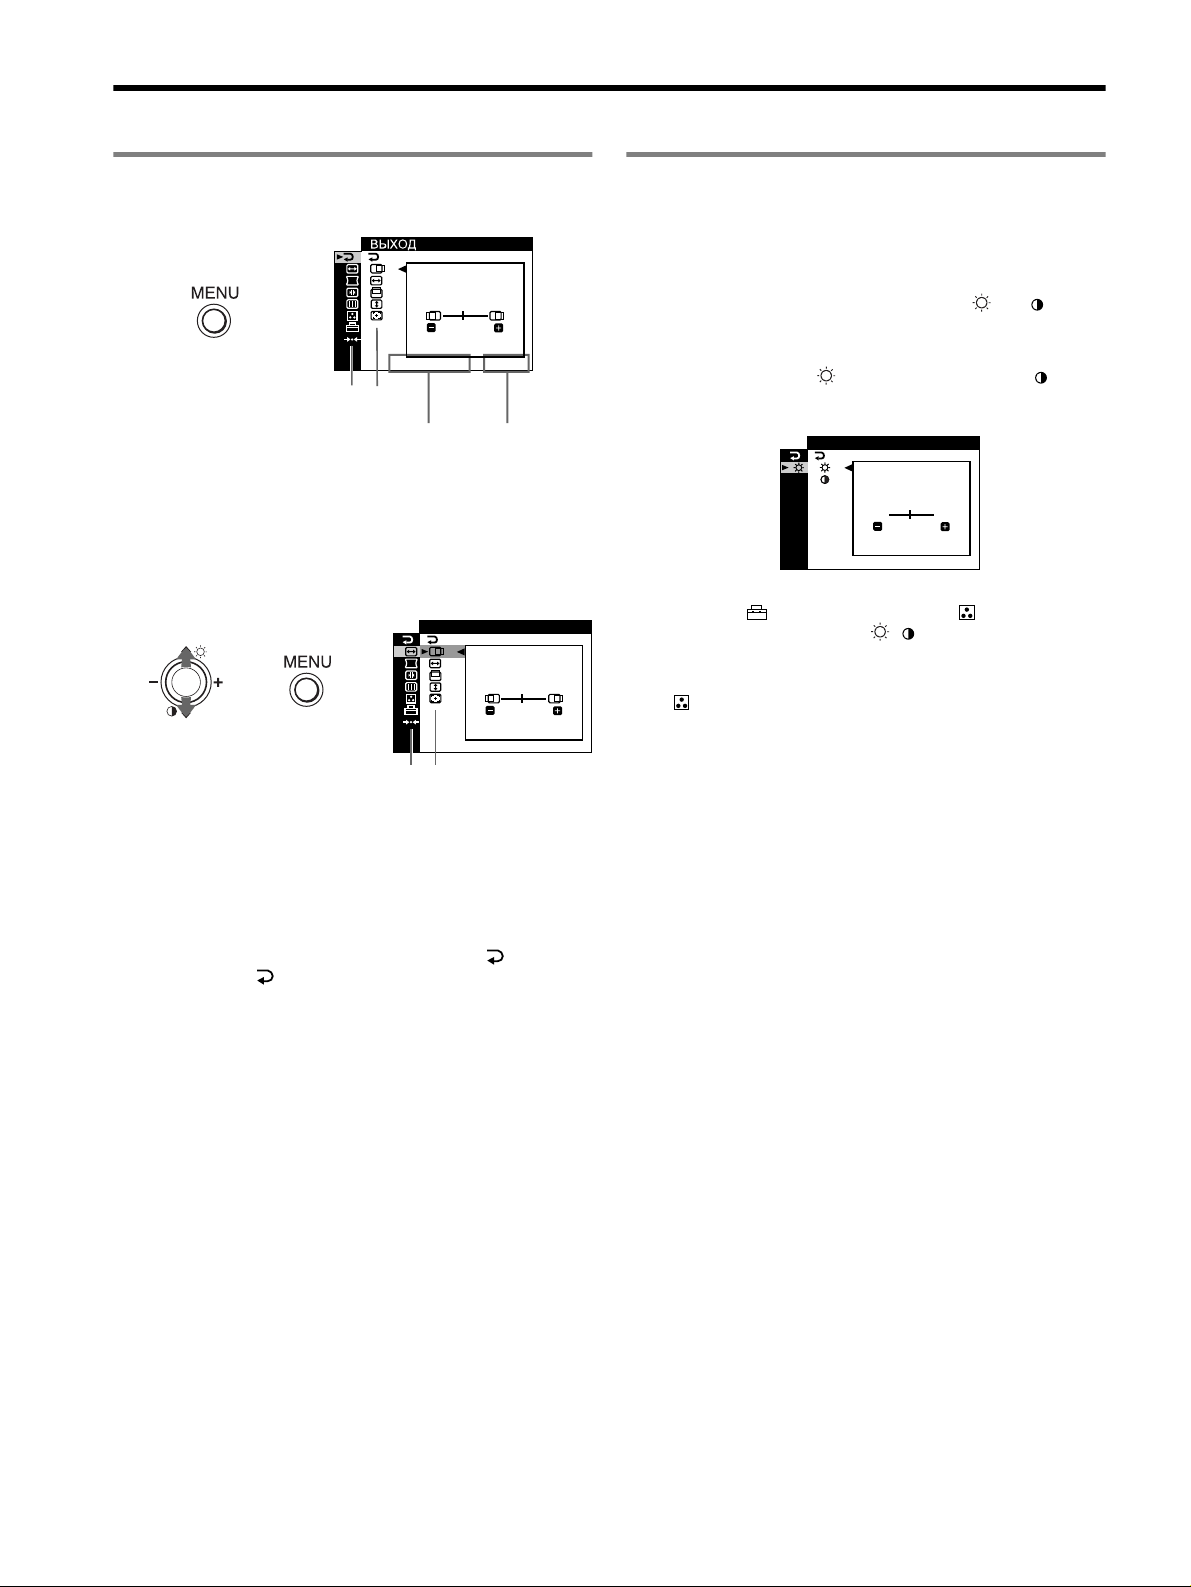
Регулировка
Перемещение по экранному меню
1 Нажмите кнопку MENU для отображения меню.
,
1280x1024 / 85Hz
Главное
Подменю
меню
частота горизонтальной
развертки/разрешение
текущего входного сигнала
(если только сигнал
соответствует одному из
режимов данного монитора)
2 Переместите кнопку управления m/M, чтобы
выделить главное меню, которое необходимо
настроить, и нажмите кнопку управления.
,,
Главное
меню
45
частота
вертикальной
развертки
текущего
входного
сигнала
PA3MEP45/ ЦEHTP
1280x1024 / 85Hz
Подменю
Регулировка яркости и контрастности изображения
Регулировка яркости и контрастности выполняется с
помощью отдельного меню ЯРКОСТЬ/КОНТРАСТ. Эти
настройки действительны для всех входных сигналов.
1 Переместите кнопку управления M ( )/m ( ) для
отображения меню ЯРКОСТЬ/КОНСТРАСТ.
2 Переместите кнопку управления m/M для выбора
значения яркости ( ) или контрастности ( ).
Затем переместите кнопку управления –/+ для
выполнения подстройки.
KOHTPACT
/ЯPKOCT Ь
ЯPKOCT Ь
45
1280x1024 / 85Hz
Примечание
Если в режиме (МЕНЮ ЦВЕТА) в меню (ЦВЕТ) выбран
режим sRGB, то появится меню / (ЯРКОСТЬ/КОНТРАСТ)
для режима sRGB и будет невозможно настроить яркость или
контрастность на экране. Для получения дополнительных
сведений об использовании режима sRGB см. режим sRGB в
меню (ЦВЕТ).
3 Переместите кнопку управления m/M, чтобы
выделить подменю, которое необходимо настроить.
Затем переместите кнопку управления
выполнения подстройки.
–/+ для
Чтобы закрыть меню
Дважды нажмите кнопку MENU для возврата в главное
меню. Выбранный элемент по умолчанию - . При
каждом выборе и нажатии кнопки MENU меню
закрывается. Если кнопки не были нажаты, то экранное
меню автоматически исчезает приблизительно через 30
секунд.
4
Page 35
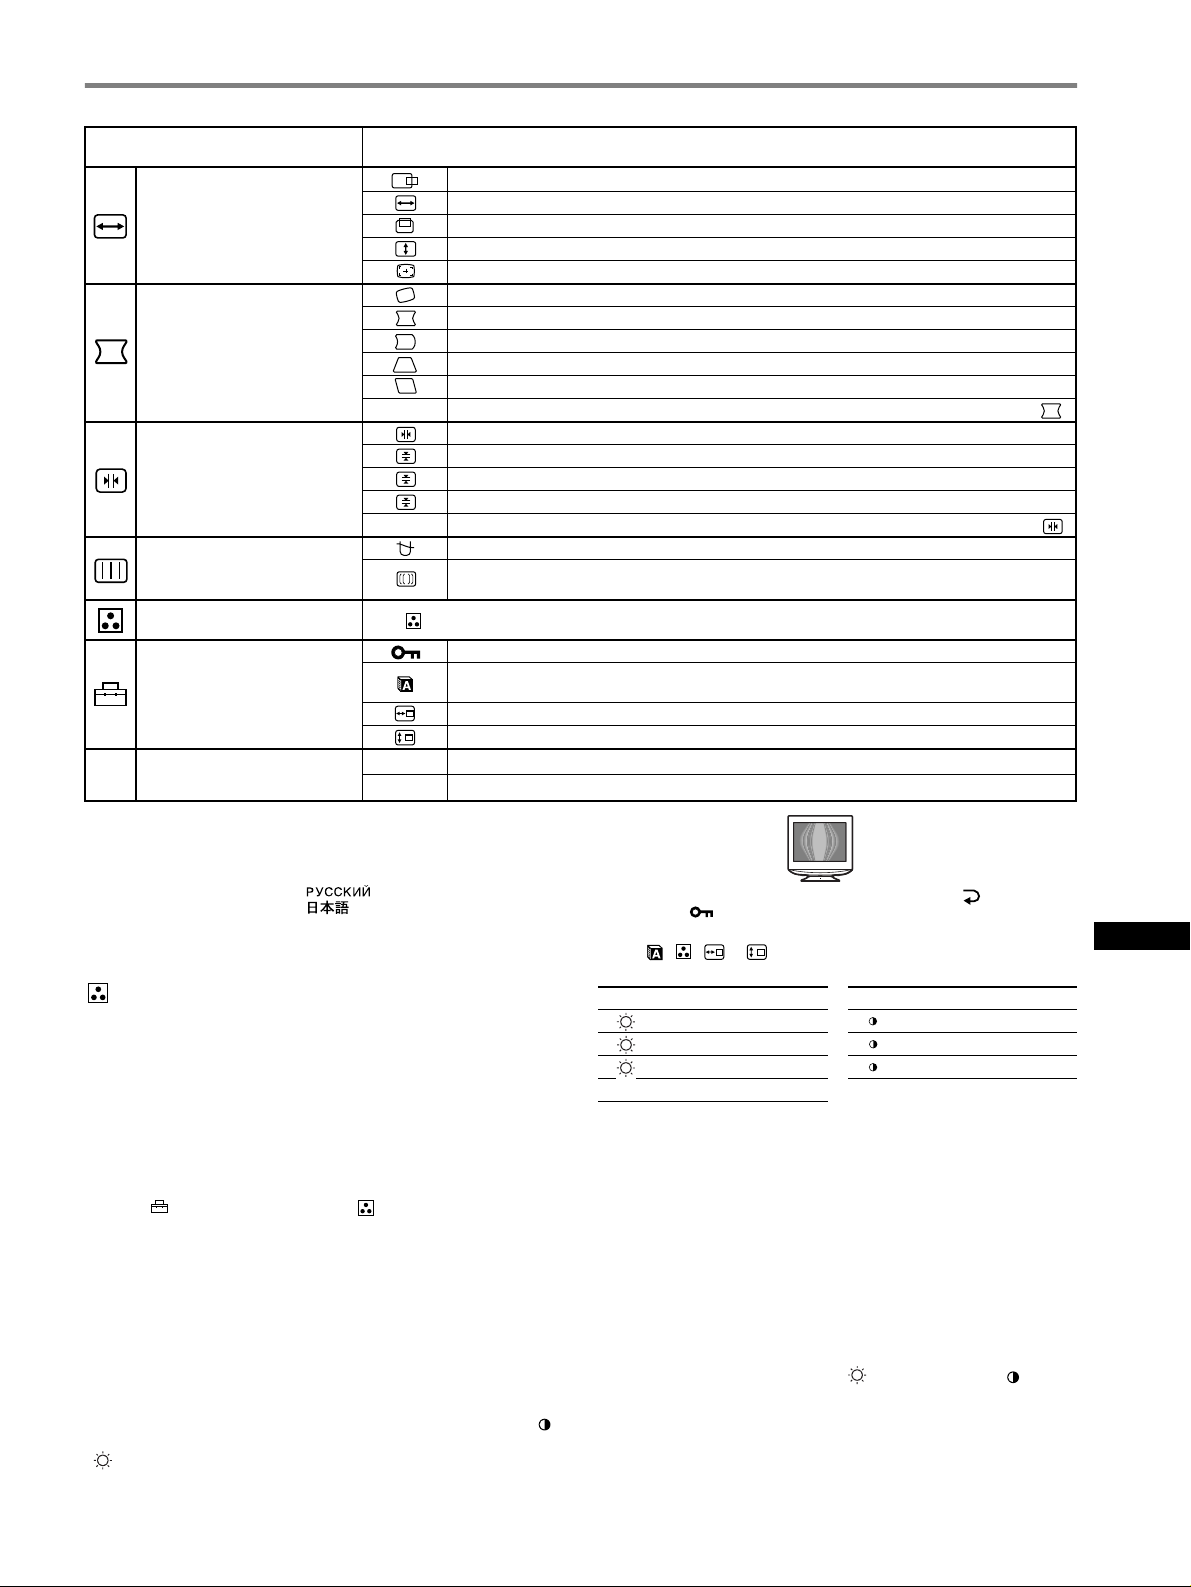
Настройка экранного меню
Значки главного меню и
настраиваемые элементы
Подстройка размера или
центровки изображения*
Регулировка формы
изображения
Регулировка совмещения
2
цветов*
Регулировка качества
изображения
Регулировка цвета
изображения
Дополнительные настройки
0 Cброс настроек
*1Эта настройка эффективна для текущего входного сигнала.
*2Эта настройка эффективна для всех входных сигналов.
*3Меню Language
• ENGLISH: Английский • NEDERLANDS: Голландский
• FRANÇAIS: Французский • SVENSKA: Шведский
• DEUTSCH: Немецкий •
• ESPAÑOL: Испанский • : Японский
• ITALIANO: Итальянский
Значки подменю и настраиваемые элементы
Положение по горизонтали
Горизонтальный размер
1
См. “ : Для регулировки цвета изображения”.
01*
02*
Положение по вертикали
Вертикальный размер
Авто-Размер-Центр
Поворот изображения
Расширение или сужение краев изображения*
Смещение краев изображения влево или вправо*
Регулировка ширины изображения в верхней части экрана*
Смещение изображения влево или вправо в верхней части экрана*
0 СБРОС: Восстановление заводских настроек по умолчанию для всех параметров .
Смещение красных или синих оттенков по горизонтали
Смещение красных или синих оттенков по вертикали
Смещение красных или синих оттенков по вертикали в верхней части экрана
T
B
Смещение красных или синих оттенков по вертикали в нижней части экрана
0 СБРОС: Восстановление заводских настроек по умолчанию для всех параметров .
РАЗМАГНИЧИВАНИЕ: размагничивание монитора.
ПOДABЛEHИE MУАРА*4: регулировка степени устранения муарового фона, пока он не
будет сведен до минимума.*
Защита данных настройки (БЛОКИРОВКА УПРАВЛЕНИЯ)*
Выбор языка в экранном меню/Подтверждение информации на мониторе LANGUAGE/
ИНФОРМАЦИЯ*
Изменение положения меню для подстройки по горизонтали
Изменение положения меню для подстройки по вертикали
1
Сброс всех данных настройки для текущего входного сигнала.*6 Выберите “OK”.
2
Сброс всех данных настройки для всех входных сигналов. Выберите “OK”.
1
1
1
1
1
5
3
*4Пример муарового фона
*5Будут работать только выключатель ! (питание), , а также
блокировка (БЛОКИРОВКА УПРАВЛЕНИЯ)
*6Этим способом нельзя сбросить настройки следующих элементов
меню: , , и .
RU
: Для регулировки цвета изображения
Настройки меню ЦВЕТ позволяют отрегулировать
цветовую температуру изображения путем изменения
уровня насыщенности поля белого цвета. В цветовой гамме
доминирует красный цвет при небольшой температуре, и
синий цвет - при высокой температуре. Данная настройка
может пригодиться для приведения в соответствие цветов
монитора с цветами распечатываемых изображений.
Выберите один из следующих четырех режимов установки
цветовой температуры:
4 режима; ЗАДАННАЯ, ИЗМЕНЯЕМАЯ, СЛОЖНOE и sRGB
в меню (МЕНЮ ЦВЕТА) меню (ЦВЕТ).
x ЗАДАННЫЙ (Установка по умолчанию)
Можно выбрать одну из стандартных цветовых температур:
5000K, 6500K или 9300K. Установка по умолчанию - 9300K.
x ИЗМЕНЯЕМАЯ
Можно настроить цветовую температуру в диапазоне от
5000K до 11000K.
x СЛОЖНOE
При выборе этого режима можно выполнить
дополнительные, более точные настройки цвета. GAIN ( )
настраивает светлые области экрана, в то время, как BIAS
( ) - темные.
Выберите для Выберите для
R R (красный) BIAS R R (красный) GAIN
G G (зеленый) BIAS G G (зеленый) GAIN
B B (синий) BIAS B B (синий) GAIN
0 СБРОС*
* Восстановление заводских настроек по умолчанию для всех
параметров в режиме Сложная.
x sRGB
Модель смешения цветов sRGB (красный-зеленый-синий)
является промышленным стандартом для описания цвета
изображения и приведения в соответствие отображаемых
на мониторе и распечатываемых цветных изображений.
Для того чтобы цвета sRGB отображались правильно (γ =
2,2, 6500K), необходимо выбрать режим sRGB и установить
на подключенном компьютере профиль sRGB. При выборе
режима sRGB невозможно выполнить настройки в меню
ЯРКОСТЬ/КОНТРАСТ.
Примечание
Убедитесь, что значения яркости ( ) и контрастности ( )
настроены в соответствии с цифрами, которые должны быть
установлены в режиме sRGB, отображенном в меню ЯРКОСТЬ/
КОНТРАСТ. В противном случае выберите 0 1 в меню
0 (СБРОС).
5
Page 36
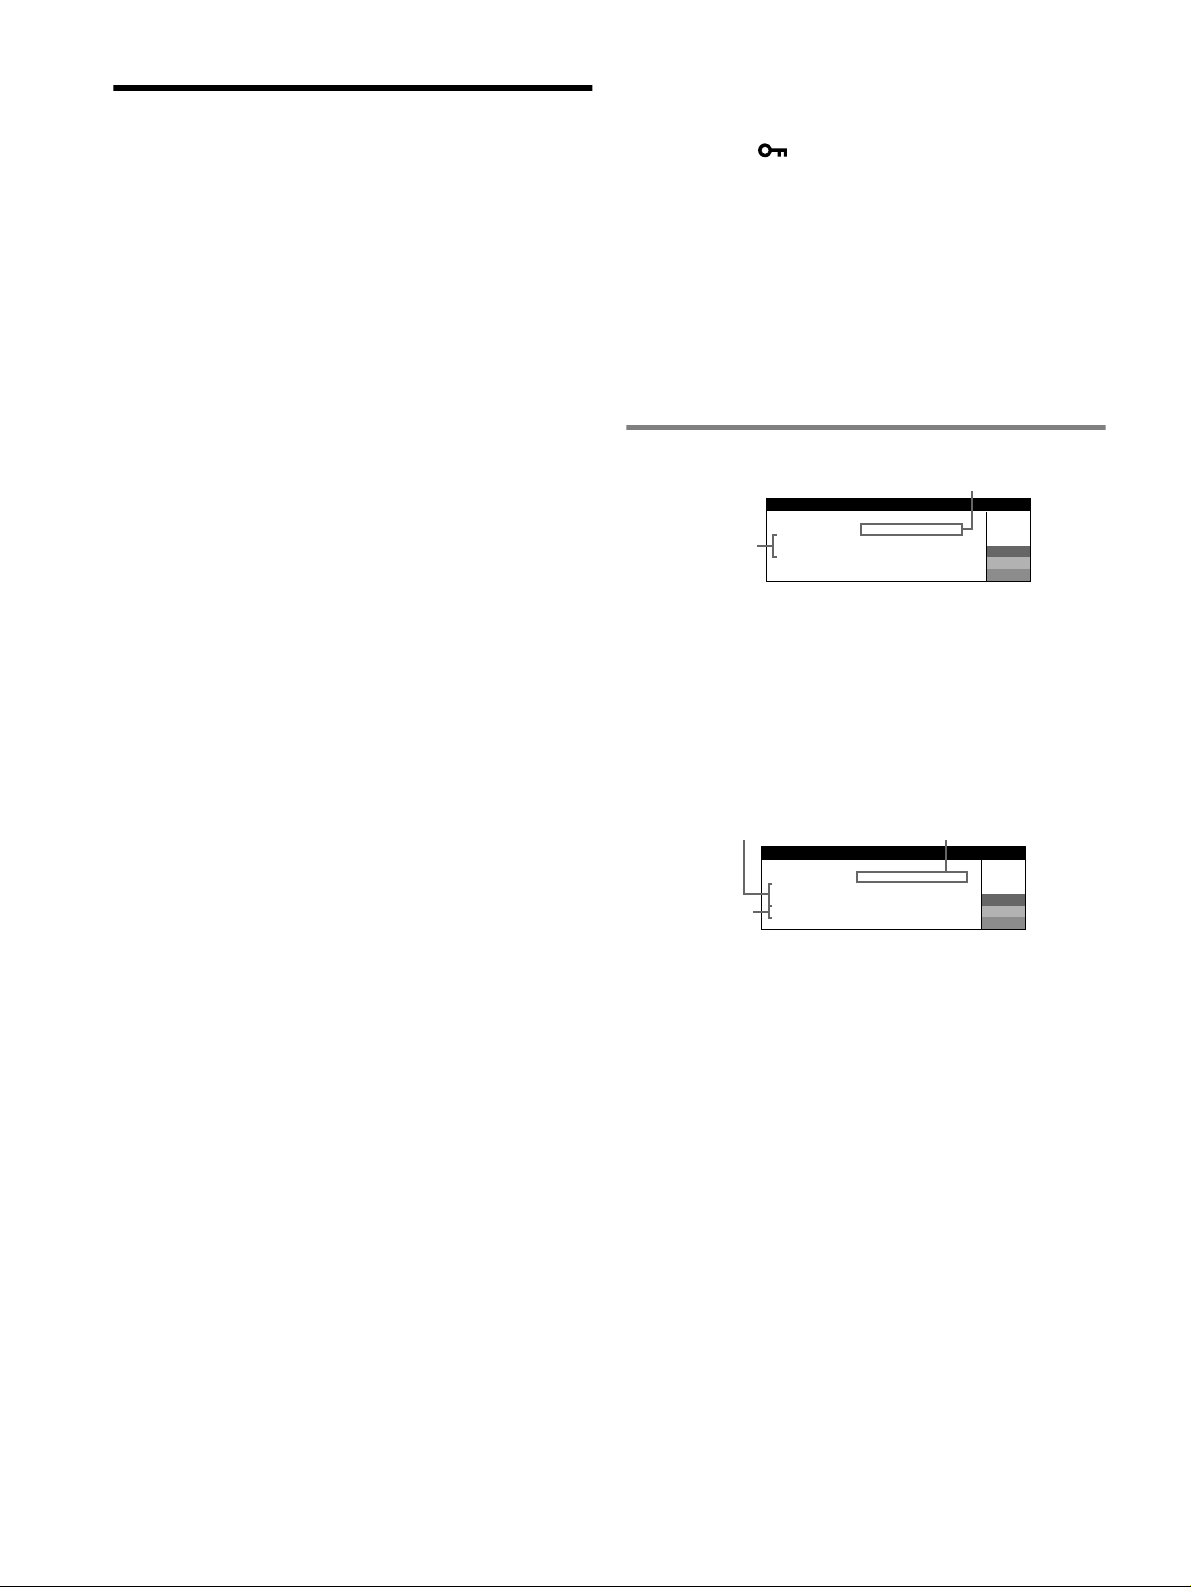
Устранение неисправностей
x Нет изображения
Если индикатор ! (питание) не горит
• Проверьте, правильно ли подключен кабель питания.
• Проверьте, находится ли выключатель ! (питание) в
положении “on” (вкл.).
Индикатор ! (питание) горит оранжевым
• Убедитесь, что кабель видеосигнала подключен правильно,
и все разъемы надежно вставлены в свои гнезда.
• Убедитесь, что ни один из штырьковых контактов
видеокабеля HD15 не является изогнутым и не утоплен
внутрь вилки.
• Проверьте, находится ли выключатель компьютера в
положении “on” (вкл.).
• Компьютер находится в режиме экономии энергии.
Попробуйте нажать любую клавишу на клавиатуре
компьютера или передвинуть мышь.
• Убедитесь, что графический адаптер правильно и надежно
закреплен в разъеме подключения к шине.
Если индикатор ! (питание) горит зеленым или мигает
оранжевым
• Используйте функцию самодиагностики.
x Скачки, дрожание, волнообразные колебания или
помехи изображения
• Изолируйте и устраните любые потенциальные источники
электрических или магнитных полей, например, другие
мониторы, лазерные принтеры, электрические вентиляторы,
флуоресцентные лампы или телевизоры.
• Отодвиньте монитор подальше от линий электропитания или
установите возле него магнитный экран.
• Попробуйте подключить монитор к другой сетевой розетке,
желательно от другого контура.
• Попробуйте повернуть монитор на 90° влево или вправо.
• Обратитесь к руководству по графическому адаптеру, чтобы
проверить, правильные ли параметры установлены для
монитора.
• Удостоверьтесь в том, что графический режим и частота
входного сигнала соответствуют характеристикам монитора
(см. раздел “Preset mode timing table” на стр. i). Даже в
подходящем частотном диапазоне некоторые графические
адаптеры подают слишком узкий для корректной
синхронизации монитора синхронизирующий импульс.
• Подстройте частоту регенерации компьютера (частоту
вертикальной развертки) для получения оптимального
изображения.
x Нечеткое изображение
• Подстройте яркость и контрастность.
• Выполните размагничивание монитора.*
• Откорректируйте степень устранения муарового фона, пока
он не будет сведен до минимума, или установите для
параметра ПОДАВЛЕНИЕ МУАРА значение ВЫКЛ.
x “Тени” на изображении
• Не используйте удлинители видеокабелей и коммутаторы
видеосигнала.
• Проверьте, надежно ли закреплены в своих гнездах все
разъемы.
x Неправильные центровка или размер изображения
• Выполните функцию Авто-Размер-Центр.
• Подстройте размер или отцентрируйте изображение.
Следует иметь в виду, что в сочетании входных сигналов с
определенными графическими платами края экрана
используются не полностью.
• Сразу после нажатия кнопки питания, изображение
некоторое время подстраивается по размеру и центру
экрана.
x Края изображения искривлены
• Подстройте геометрические параметры.
x Волнистые или муаровые разводы на экране
• Откорректируйте степень устранения муарового фона, пока
он не будет сведен до минимума.
• Смените рисунок рабочего стола.
x Неравномерная окраска изображения
• Выполните размагничивание монитора.* Однородность
цвета может нарушаться в тех случаях, когда вблизи
монитора находятся источники магнитного поля, такие как
громкоговорители, или при повороте монитора.
x Белый цвет не выглядит белым
• Подстройте цветовую температуру.
x Кнопки монитора не работают (на экране
появляется )
• Если функция блокировки органов управления включена положение ВКЛ, переведите ее в положение ВЫКЛ.
x Красные или синие оттенки по краям букв или линий
• Подстройте совмещение цветов.
x Сразу после включения монитора раздается
непродолжительное гудение
• Этот звук сопутствует процессу автоматического
размагничивания. После включения питания в течение
нескольких секунд происходит автоматическое
размагничивание трубки монитора.
* Если потребуется повторить процесс размагничивания, это
можно сделать как минимум через 20 минут, для того чтобы
получить наилучший результат. Гудящий звук, который слышен,
не является неисправностью.
Экранные сообщения
2
1
W
R
G
B
W
R
G
B
ИHФOP МАЦ ИЯ
MOHИTOP ИCПPABEH
BXOД : HET CИГHAЛA
AKTИBИPУЙTE C KOMПЬЮTEPA
2
ПPOBEPЬTE KAБEЛЬ
1 Если на экране появляется сообщение “НЕТ
СИГНАЛА”:
Указывает на то, что входной сигнал не подается с гнезда.
2 Отображает действия по устранению.
• Если на экране появляется сообщение АКТИВИPУЙTE С
КОМПЬЮТЕРА, попробуйте нажать любую клавишу на
компьютере или переместить мышь и убедитесь, что
плата графического адаптера компьютера надежно
вставлена в гнездо шины.
• Если на экране появляется сообщение ПРОВЕРЬTE
КАБЕЛЬ, проверьте, правильно ли монитор подключен к
компьютеру.
1
ИHФOP МАЦ ИЯ
MOHИTOP ИCПPABEH
BXOД
HEДOПУCTИMЫЙ
ГP AФИЧECKИЙ
И3MEHИTE Г PAФ PEЖИM
3
:200.0kHz/ 85Hz
PEЖИM
1 Если на экране появляется сообщение
“НЕДОПУСТИМЫЙ ГРАФИЧЕСКИЙ РЕЖИМ”:
Указывает на то, что входной сигнал не соответствует
характеристикам монитора.
2 Отображение частоты входного сигнала.
3 Отображает действие по устранению.
На экране появляется сообщение ИЗМЕНИТЕ ГРАФ
PEЖИM. Если данная модель устанавливается вместо
старого монитора, верните прежний монитор на место.
Затем настройте графический адаптер, так чтобы частота
горизонтальной развертки была в диапазоне 30 – 96 кГц, а
частота вертикальной развертки - в диапазоне 48 – 170 Гц.
6
Page 37

Отображение названия модели монитора,
серийного номера и даты выпуска.
В момент получения
монитором видеосигнала
нажмите кнопку MENU и не
отпускайте в течение не
менее 5 секунд, чтобы
вывести на экран
информационное окно для данной модели монитора.
MODEL : CPD-E430
SER NO : 1234567
MANUFACTURED
: 2001-30
W
R
G
B
Демпферные нити
Эти линии не свидетельствуют о неисправности и
являются обычным эффектом электронно-лучевых трубок
Trinitron, которые устанавливаются в данных мониторах.
Это тени демпферных нитей, которые гасят вибрацию
апертурной решетки. Апертурная решетка - это очень
важный элемент, который делает электронно-лучевые
трубки Trinitron уникальными и обеспечивает более
интенсивные светлые тона на экране, благодаря чему
изображение становится ярче и отчетливее.
Дeмпфepныe Hити
Функция самодиагностики
Данный монитор оснащен функцией самодиагностики. Если
возникает какая-либо проблема с монитором или
компьютером, экран очищается, а индикатор ! (питание)
горит зеленым или мигает желтым цветом. Если индикатор
! (питание) горит оранжевым, то компьютер находится в
режиме экономии энергии. Попробуйте нажать любую
клавишу на клавиатуре или передвинуть мышь.
Технические характеристики
Кинескоп
Шаг апертурной решетки 0,24 мм, Развертка 90 градусов,
FD Trinitron, Размер экрана по диагонали 19 дюймов
Размер экранного изображения
Прибл. 365 × 274 мм (ш/в)
Видимое изображение 18,0"
Разрешение (Г:по горизонтали, B:по вертикали)
Максимальное: Г: 1920 точек, B: 1440 линий
Рекомендуется: Г: 1280 точек, B: 1024 линий
Уровни входных сигналов
Видеосигнал:Аналоговые RGB: 0,700 Vp-p (положит.), 75 Ω
Сигнал синхронизации:
Г/В отдельная или комбинированная
синхронизация:
TTL 2 кΩ, без соблюдения полярности
Синхронизация по зеленому: 0,3 Vp-p
(отрицательная)
Стандартная площадь изображения
Прибл. 352 × 264 мм
Частота развертки (Г:по горизонтали, B:по вертикали)
Г: 30 – 96 кГц, B: 48 – 170 Гц
Параметры сетевого питания
100 – 240 В, 50 – 60 Гц, 2,0 – 1,0 А
Потребляемая мощность (без подключенных устройств USB)
Прибл. 135 Вт
Paбoчaя тeмпepaтypa
10°C – 40°C
Габариты Прибл. 451 × 471 × 461 мм (ш/в/г)
Масса Прибл. 25,5 кг
Plug and Play DDC2B/DDC2Bi
GTF
Входящие в комплект принадлежности
Кабель питания
Настоящая инструкция по эксплуатации
x Если индикатор ! (питание) горит зеленым
1 Отсоедините кабель видеосигнала или выключите
подсоединенный к монитору компьютер.
2 Выключите монитор, а затем снова включите.
3 Сдвиньте кнопку управления вверх и удерживайте в
таком положении в течение нескольких секунд перед
тем, как монитор перейдет в режим экономии
энергии.
Если появятся все четыре цветные полоски (белого,
красного, зеленого, синего), то монитор работает
правильно. Вновь подсоедините кабели к видеовходам и
проверьте состояние компьютера.
Если цветные полоски не появляются, то монитор,
возможно, неисправен. Проинформируйте местного
официального дилера Sony о состоянии своего монитора.
x Если индикатор ! (питание) мигает оранжевым
Выключите монитор, а затем снова включите.
Если индикатор ! (питание) горит зеленым, то монитор
работает нормально.
Если индикатор ! (питание) продолжает мигать, то,
возможно, монитор неисправен. Сосчитайте количество
секунд в интервалах между загоранием индикатора
! (питание) и проинформируйте местного официального
дилера Sony о состоянии своего монитора. Не забудьте
предоставить название модели и серийный номер своего
монитора. Также необходимо указать марку и модель
Вашего компьютера и графического адаптера.
RU
(продолжение на следующей странице)
7
Page 38

Предустановленный и пользовательский режимы
При приеме входного сигнала монитор автоматически
согласовывает его с одним из режимов, предварительно
установленных на заводе и хранящихся в памяти монитора, для
обеспечения высококачественного изображения (см. раздел
“Preset mode timing table” на стр. i). Если входные сигналы не
соответствуют ни одному из заводских режимов, монитор
автоматически подбирает наиболее подходящий режим для
входного сигнала, находящегося в диапазоне частот
горизонтальной и вертикальной развертки (стр. 7), в
соответствии с формулой GTF (Generalized Timing Formula). При
регулировке изображения данные настройки заносятся в память
как пользовательский режим и автоматически вызываются из
нее каждый раз при получении данного входного сигнала.
Функция экономии энергии
Данный монитор соответствует нормам экономии
электроэнергии, установленным VESA, TCO’99 и ENERGY STAR.
Если на монитор не подается сигнал с компьютера, монитор будет
автоматически снижать потребление энергии, как показано ниже.
Режим
потребления
энергии
Oбычная работа ≤ 135 Bт горит зеленым
Выход из
активного
состояния
(тpeтий режим
экономии)*
*1Когда компьютер переходит в режим экономии энергии, на
экране появляется сообщение “НЕТ СИГНАЛА”. Через
несколько секунд монитор переходит в режим экономии
энергии.
*2“3 режим экономии” определен агентством защиты
окружающей среды (EPA).
Конструкция и характеристики могут изменяться без
предварительного уведомления.
Потребляемая
мощность
≤ 3 Bт горит оранжевым
1
*
2
Индикатор
! (питание)
8
Меры предосторожности
Меры предосторожности при подключении к сети
электропитания
• Используйте кабель питания, поставляемый с монитором.
При использовании другого кабеля питания убедитесь в
том, что он подходит для использования в местной сети.
Для покупателей в Великобритании
При использовании монитора в Великобритании
пользуйтесь поставляемым с монитором кабелем питания с
разъемом для Великобритании.
Примеры сетевых вилок
для 100 - 120 В
переменного тока
• Отсоединяйте кабель питания от сети не раньше, чем через
30 секунд после выключения питания монитора, когда
уменьшится заряд статического электричества на
поверхности экрана.
• После включения питания в течение нecкoлькиx секунд
происходит размагничивание трубки монитора. При этом
вокруг экрана возникает сильное магнитное поле,
способное повредить данные на магнитных лентах и
дискетах, находящихся рядом с монитором. Поэтому
магнитофоны, кассеты и дискеты следует держать на
некотором расстоянии от прибора.
Сетевая розетка должна находиться в легкодоступном
месте вблизи прибора.
Установка
Не устанавливайте монитор в следующих местах:
• на мягких поверхностях (коврики, одеяла и т.д.) или вблизи
других материалов (занавески, портьеры), которые могут
преградить доступ воздуха к вентиляционным отверстиям
• вблизи таких источников тепла, как батареи или
воздуховоды, а также в местах, где возможно попадание
прямого солнечного света
• где наблюдаются резкие колебания температуры
• где присутствует вибрация или резкие механические
воздействия
• на неустойчивой поверхности
• рядом с источниками магнитных полей, такими как
трансформаторы или высоковольтные кабели
• рядом или на металлической поверхности с наличием
электрического заряда
• в закрытой полке
Техническое обслуживание
• Протирайте экран мягкой тканью. При использовании
химических средств для чистки стекла не применяйте
жидкости, содержащие антистатические или аналогичные
добавки, так как они могут повредить покрытие экрана.
• Не следует прикасаться к дисплею, скрести или стучать по
нему острыми предметами (шариковой ручкой, отверткой).
Это может привести к появлению царапин на поверхности
электронно-лучевой трубки.
• Протирайте корпус, дисплей и панель управления мягкой
тканью, слегка смоченной в слабом растворе моющего
средства. Не пользуйтесь грубыми щетками, абразивными
пастами или такими растворителями, как спирт или бензин.
Транспортировка
При перевозке монитора или его доставке в ремонтную
мастерскую пользуйтесь заводской картонной коробкой и
упаковочными материалами.
Использование шарнирной опоры с изменяемым
углом наклона
Монитор можно устанавливать
в удобное положение, изменяя
углы наклона, как показано на
рисунке справа. Поворачивая
прибор по вертикали или
горизонтали, держите его за
нижнюю часть обеими руками.
Будьте осторожны, не
прищемите пальцы с обратной
стороны монитора,
поворачивая его вверх по
вертикали.
для 200 - 240 В
переменного тока
90°
90°90°
Центрирующая линия
только для 240 В
переменного тока
15°
5°
90°
Page 39
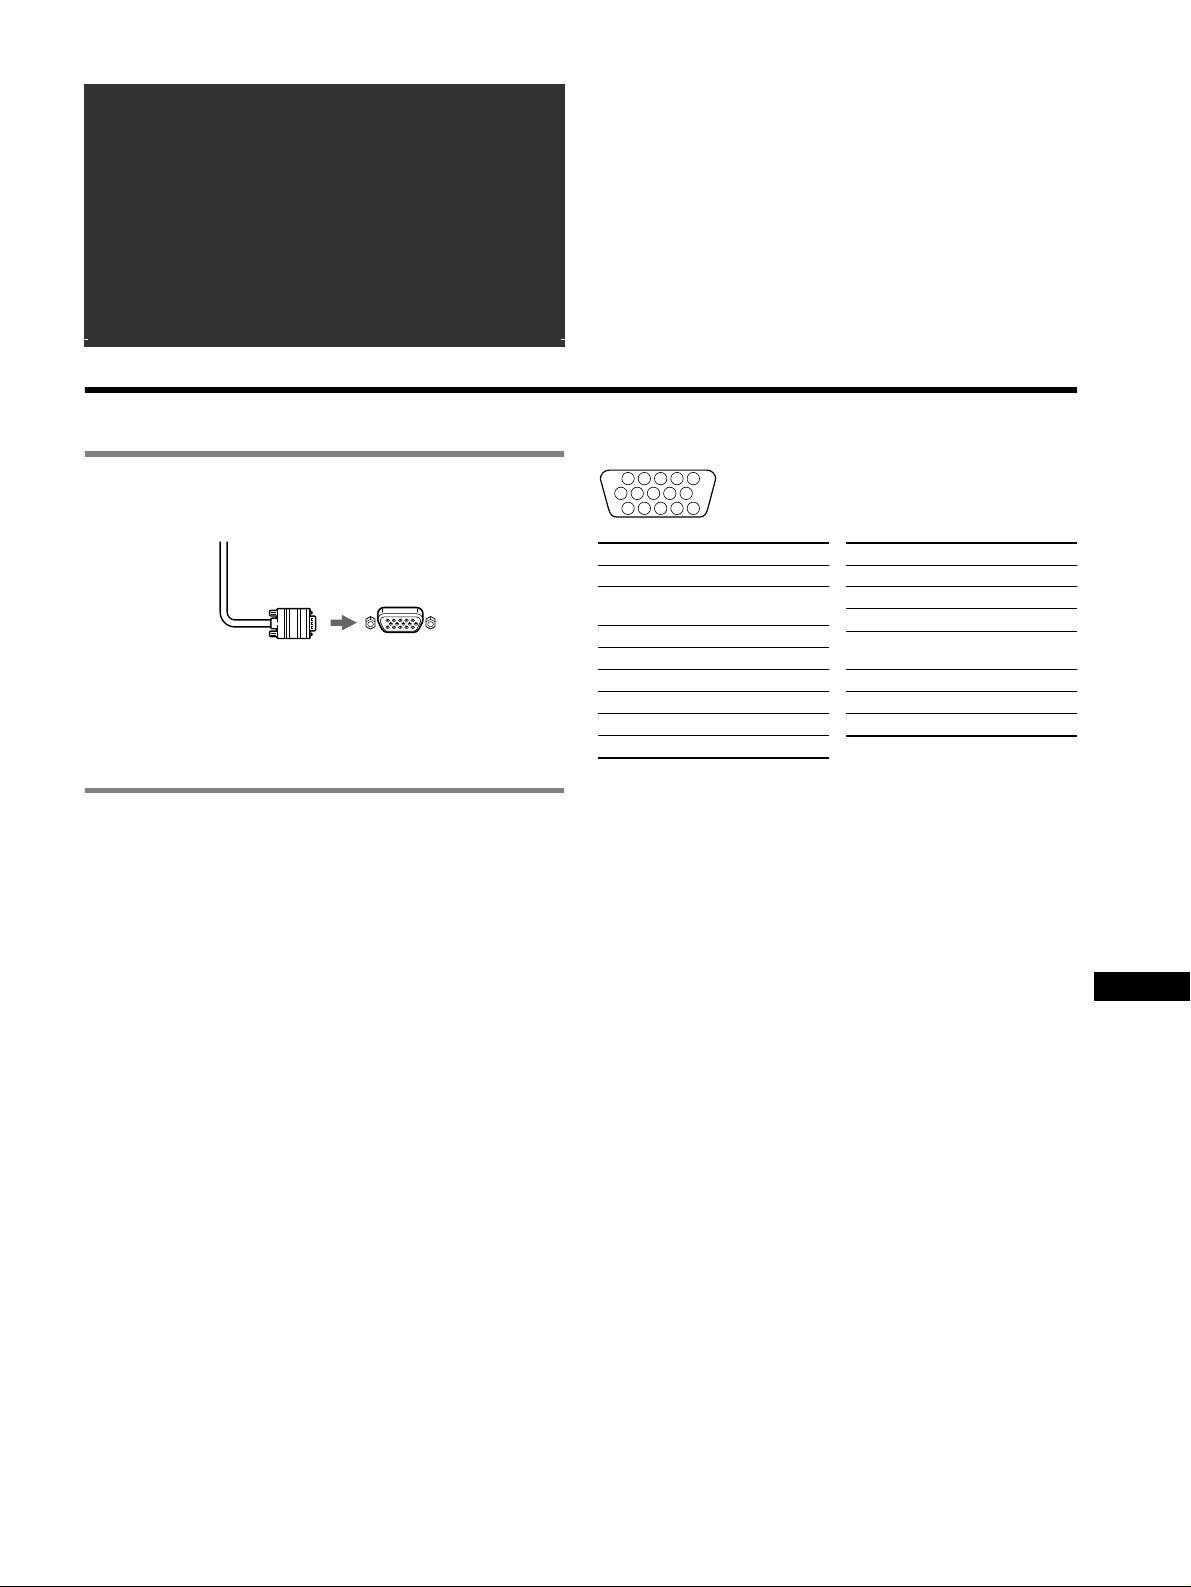
Innehållsförteckning
Installation . . . . . . . . . . . . . . . . . . . . . . . . . . . . . . . . . 3
Inställningar . . . . . . . . . . . . . . . . . . . . . . . . . . . . . . . . 4
Felsökning . . . . . . . . . . . . . . . . . . . . . . . . . . . . . . . . . 6
Specifikationer. . . . . . . . . . . . . . . . . . . . . . . . . . . . . . 7
Försiktighetsåtgärder . . . . . . . . . . . . . . . . . . . . . . . . 8
Appendix . . . . . . . . . . . . . . . . . . . . . . . . . . . . . . . . . . . i
Preset mode timing table . . . . . . . . . . . . . . . . . . . . . . . i
TCO’99 Eco-document. . . . . . . . . . . . . . . . . . . Baksida
Installation
• Trinitronâ är ett registrerat varumärke som tillhör Sony Corporation.
• Macintosh är ett varumärke som tillhör Apple Computer, Inc, registrerat i
USA och andra länder.
•Windows
• IBM PC/AT och VGA är registrerade varumärken som tillhör IBM
• VESA och DDC
•
• Alla andra produktnamn som nämns i denna handbok kan vara varumärken
• Dessutom nämns inte “
â
Corporation i USA och andra länder.
Corporation i U.S.A.
Association.
och MS-DOS är registrerade varumärken som tillhör Microsoft
ä
är varumärken som tillhör Video Electronics Standard
ENERGY STAR är ett registrerat varumärke i USA.
eller registrerade varumärken som tillhör respektive företag.
ä” och “â” vid varje tillfälle i denna handbok.
1 Anslut bildskärmen till datorn
x Ansluta till HD15-kontakten
Bildskärmens videokabel
till HD15 på datorn
Ansluta till en Macintosh eller kompatibel dator
När du ansluter den här bildskärmen till en Power Mac G3/G4-dator
använder du vid behov Macintosh-adaptern (medföljer ej).
2 Slå på strömmen till bildskärmen och
datorn
1 Anslut nätkabeln till bildskärmen och slå sedan på
skärmen genom att trycka på ! (ström)-omkopplaren.
2 Slå på datorn.
Inga särskilda drivrutiner behövs
Den här bildskärmen uppfyller kraven enligt standarden “DDC” Plug & Play,
vilket innebär att bildskärmsinformationen automatiskt kan identifieras. Därför
behöver du inte installera någon speciell drivrutin på datorn.
När du startar datorn för första gången efter det att du har anslutit bildskärmen
kan det hända att en installationsguide visas på skärmen. Följ anvisningarna på
bildskärmen. Plug & Play är automatiskt valt så att du direkt kan börja använda
den här bildskärmen.
Obs!
• Vidrör inte stiften i videokabelns kontakt.
• När du ansluter videokabeln bör du först kontrollera hur stiften sitter i HD 15kontakten. Om du vänder kontakten fel och trycker in den för hårt kan stiften
i videokabelns kontakt böjas.
Stiftplacering för videokabeln HD 15
1
678910
11 12 13 14 15
Stift Nr. Signal
1Röd
2 Grön (synk på
3Blå
4 ID (Jord)
5 CPU-avkänning
6Röd jord
7 Grön jord
8Blå jord
* DDC (Display Data Channel) är en VESA-standard.
5432
grön)
Stift Nr. Signal
9 DDC + 5V*
10 Jord
11 ID (Jord)
12 Dubbelriktad data
13 H. Synk
14 V. Synk
15 Dataklocka (SCL)*
(SDA)*
SE
3
Page 40
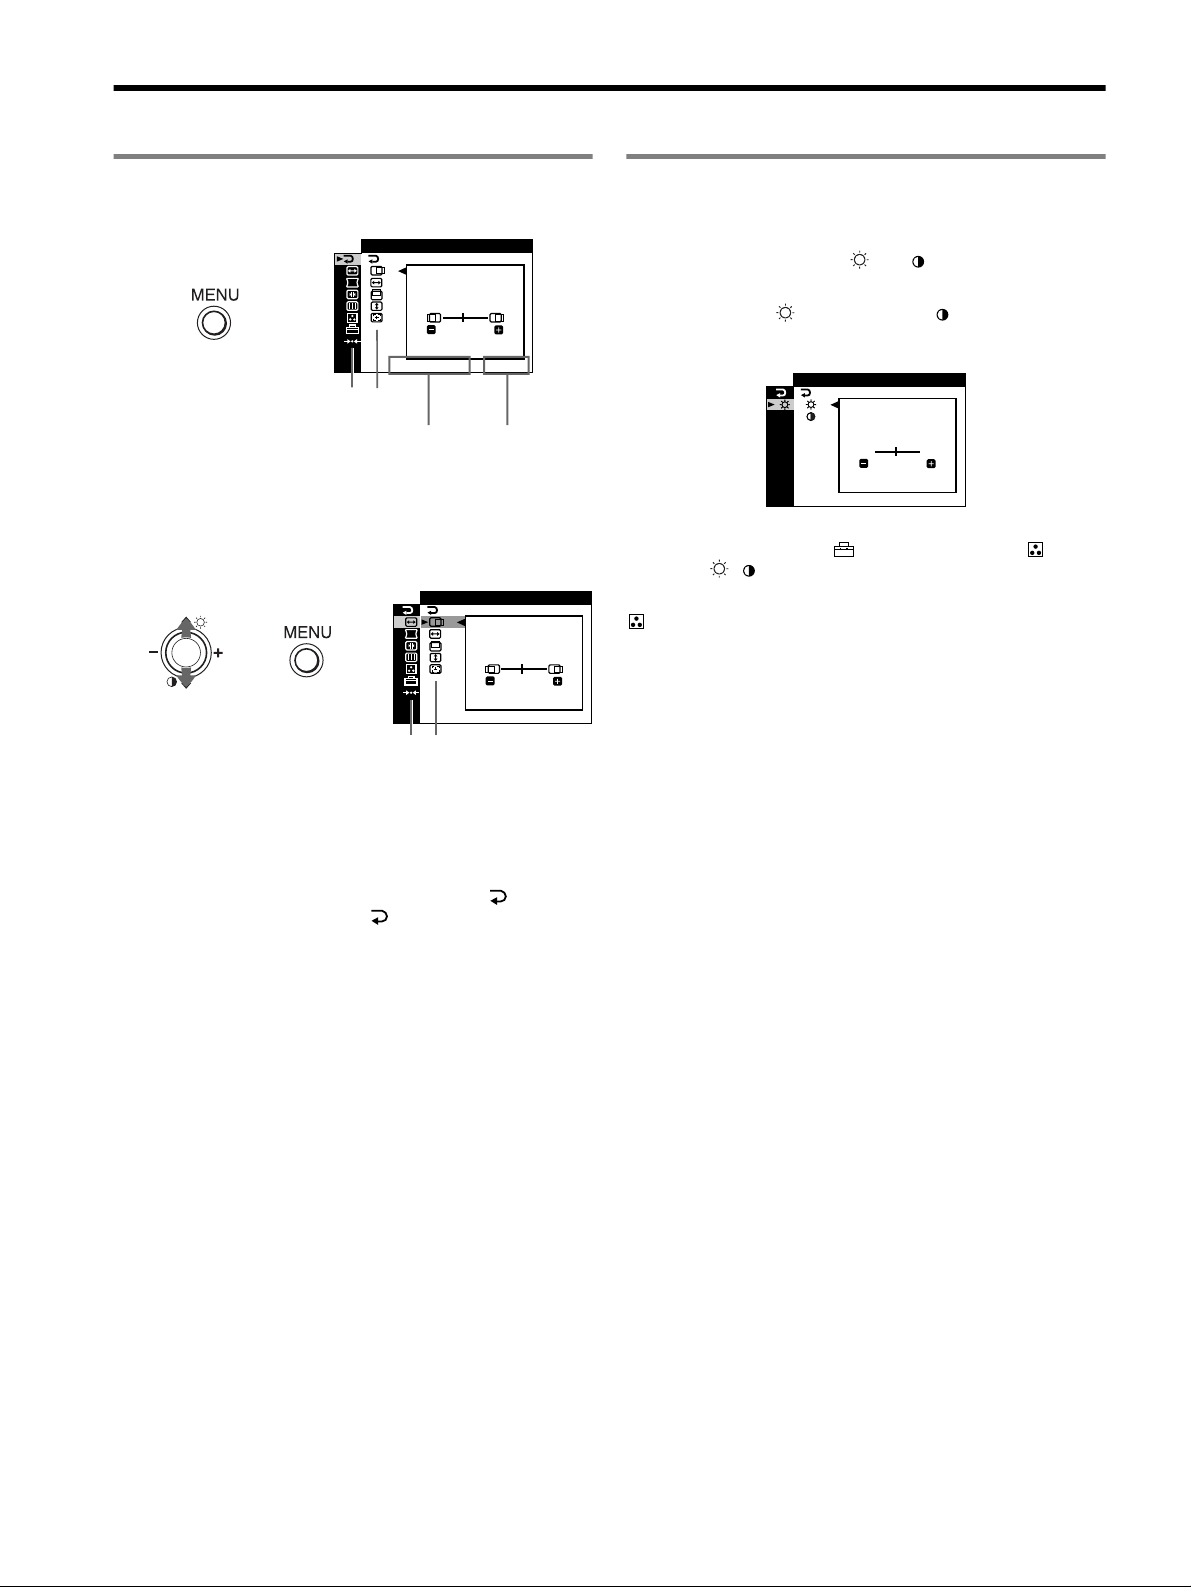
Inställningar
Använda menyn
1 Tryck på MENU-knappen för att visa huvudmenyn.
SLUTA
,
1280x1024 / 85Hz
Huvudmeny
horisontell frekvens/upplösning för
aktuell insignal (endast om signalen
stämmer överens med något av
bildskärmens fabriksinställda lägen)
Undermeny
2 Rör på kontrollknappen m/M för att markera den
huvudmeny du vill justera och tryck sedan på
kontrollknappen.
,,
Huvudmeny
45
vertikal
frekvens för
aktuell
insignal
STORLEK45/ CENTER
1280x1024 / 85Hz
Undermeny
Justera ljusstyrka och kontrast
Ljusstyrka och kontrast justerar du via en särskild meny, LJUS/
KONTRAST. De inställningar du gör här påverkar alla insignaler.
1 Rör kontrollknappen M ()/m ( ) för att öppna
menyn LJUS/KONTRAST.
2 Välj ljusstyrka ( ) eller kontrast ( ) genom att röra
kontrollknappen
för att göra justeringarna.
Obs!
Om du valde sRGB-läget under (FÄRGLÄGE) på menyn (FÄRG)
visas menyn / (LJUS/KONTRAST) för sRGB-läget. Du kan nu inte
justera ljusstyrkan eller kontrasten på den här skärmen. Mer information om
hur du använder sRGB-läget finns under sRGB-läget på menyn
(FÄRG).
m/M. Rör sedan kontrollknappen –/+
KONTRAST
/LJUS
LJUS
45
1280x1024 / 85Hz
3 Rör kontrollknappen m/M för att markera den undermeny
du vill justera. Rör sedan kontrollknappen
justeringarna.
–/+ för att göra
Stänga menyn
Tryck på MENU-knappen två gånger för att återgå till
huvudmenyn. Det ursprungligt valda alternativet är . Du
avslutar menyn genom att markera och trycka på MENUknappen. Om du inte trycker på några knappar inom 30 sekunder
stängs menyn automatiskt.
4
Page 41

Inställningar på skärmmenyn
Ikoner på huvudmeny och
justeringsalternativ
Justering av bildens storlek och
centrering
Justering av bildens form
Justering av konvergensen
Justering av bildkvaliteten
Justering av bildens färger Se “ : Justera bildens färg”.
Övriga inställningar
0 Återställning av inställningarna
1
Den här inställningen gäller den aktuella insignalen.
*
2
*
Den här inställningen gäller alla insignaler.
3
*
Språkmeny
• ENGLISH: Engelska • NEDERLANDS: Holländska
• FRANÇAIS: Franska • SVENSKA
• DEUTSCH: Tyska • : Ryska
• ESPAÑOL: Spanska • : Japanska
• ITALIANO: Italienska
1
*
2
*
Ikoner på undermeny och justeringsalternativ
0 ÅTERSTÄLL: Återställer alla inställningar till fabriksinställningarna.
T
B
0 ÅTERSTÄLL: Återställer alla inställningar till fabriksinställningarna.
1
01
*
2
02
*
Horisontell position
Ställa in horisontell storlek
Vertikal position
Ställa in vertikal storlek
Få storlek och centrering automatiskt utförd
Rotera bilden
Expandera eller dra samman bildens sidor
Förskjuta bildens sidor åt vänster eller höger*
Justera bildens bredd upptill*
Förskjuta bildens övre del åt vänster eller höger*
Förskjuta röda eller blå skuggor horisontellt
Förskjuta röda eller blå skuggor vertikalt
Förskjuta röda eller blå skuggor vertikalt upptill på skärmen
Förskjuta röda eller blå skuggor vertikalt nedtill på skärmen
DEGAUSS: Avmagnetisera skärmen.
ELIMINERA MOARE
1
möjligt.
*
Skydda inställningarna (KONTROLL LÅS)
Välja språk för skärmmeny/bekräfta skärmens information (LANGUAGE/INFORMATION)*
Ändra menyns horisontella placering
Ändra menyns vertikala placering
Återställa alla justeringar för den aktuella insignalen.*6 Välj “OK”.
Återställa alla justeringar för alla insignaler. Välj “OK”.
1
4
*
: Justera graden av moaréupphävning tills moaréeffekten blivit så liten som
*4Exempel på moaré
5
*
Du kan bara använda ! (ström) omkopplaren, och (KONTROLL
LÅS).
6
*
Menyalternativen , , och återställs inte på det här sättet.
1
*
1
1
5
*
3
: Justera bildens färg
Med FÄRG-inställningarna kan du justera bildens färgtemperatur
genom att ändra färgnivån på det vita färgfältet. Vid låg färgtemperatur
verkar färgerna rödare och vid hög färgtemperatur framstår de som
blåare. Den här inställningen kan du använda om du vill anpassa
färgerna på bildskärmen till färgerna på utskrifterna.
Du kan välja ett av 4 inställningslägen för färgtemperaturen:
FÄRGRESET, VARIABEL, EXPERT och sRGB under
(FÄRGLÄGE) på menyn (FÄRG).
x FÄRGRESET (Standardinställning)
Du kan välja mellan tre förinställda färgtemperaturer, 5000 K, 6500 K
och 9300 K. Standardinställning är 9300 K.
x VARIABEL
Du kan justera färgtemperaturen från 5000K till 11000K.
x EXPERT
Du kan göra ytterligare finjusteringar av färgerna genom att välja det
här läget. Med GAIN ( ) justerar du de ljusa partierna av skärmen,
med BIAS ( ) justerar du de mörka partierna.
Välj förVälj för
RR (röd) BIAS R R (röd) GAIN
GG (grön) BIAS G G (grön) GAIN
BB (blå) BIAS B B (blå) GAIN
0 ÅTERSTÄLL
* Återställer alla inställningar i expertläget till motsvarande
fabriksinställningar.
x sRGB
Färginställningen sRGB är en industristandard för färgrymdsprotokoll
som har utvecklats för att kalibrera bildskärmens färger mot färgerna på
utskrifterna. För att sRGB-färgerna ska visas korrekt (γ = 2,2, 6500K)
väljer du sRGB-läget och ställer in den anslutna datorn på sRGBprofilen. Om du väljer sRGB kan du inte göra några justeringar på
menyn LJUS/KONTRAST.
Obs!
Kontrollera att värdena för ljusstyrka ( ) och kontrast ( ) är inställda på de
värden för sRGB-läget som visas på menyn LJUS/KONTRAST. Om värdena
inte stämmer väljer du
0 1 på menyn 0 (ÅTERSTÄLL).
5
SE
Page 42

Felsökning
x Ingen bild
Om ! (ström)-indikatorn inte lyser
• Kontrollera att nätkabeln är ordentligt ansluten.
• Kontrollera att ! (ström)-omkopplaren är i påslaget läge (“on”).
! (ström) indikatorn lyser orange
• Kontrollera att videokabeln är ordentligt ansluten och att alla kontakter
är ordentligt anslutna och sitter stadigt förankrade på sina platser.
• Kontrollera att stiften på HD15-kontakten inte är böjda eller har tryckts
in i kontakten.
• Kontrollera att strömmen till datorn är påslagen (“on”).
• Datorn är i energisparläge. Pröva att trycka på någon tangent på
tangentbordet eller att röra på musen.
• Kontrollera att grafikkortet i datorn sitter som det ska i sin kortplats.
Om indikatorn ! (ström) lyser grön eller blinkar orange
• Använda självdiagnosfunktionen.
x Bilden fladdrar, hoppar, oscillerar eller är förvrängd
• Isolera och avlägsna möjliga källor till elektromagnestiska fält, t.ex.
andra bildskärmar, laserskrivare, elektriska fläktar eller TV-apparater.
• Flytta bildskärmen bort från strömkablar eller placera en magnetisk
avskärmning nära den.
• Försök ansluta bildskärmen till ett annat vägguttag, helst ett som ligger
på en annan gruppsäkring.
• Pröva att vrida bildskärmen 90° åt vänster eller höger.
• Information om rätt inställning för bildskärmen finns i bruksanvisningen
till grafikkortet.
• Kontrollera att bildskärmen kan hantera grafikläget och insignalens
frekvens (se “Grafiklägen och frekvenser (Preset mode timing table)” på
sidan i). Även om frekvensen ligger inom korrekt intervall, kan vissa
grafikkort ha en synkpuls som är för kort för att bildskärmen ska synka
korrekt.
• Justera datorns uppdateringsfrekvens (vertikal frekvens) för att få bästa
möjliga bild.
x Bilden är otydlig
• Justera ljusstyrkan och kontrasten.
• Avmagnetisera bildskärmen.*
• Ställ in moareupphävningen så att den blir så liten som möjligt eller ställ
ELIMINERA MOARE på AV.
x Bilden har skuggor
• Undvik att använda förlängningskablar och/eller omkopplingsdon till
videokabeln.
• Kontrollera att alla kontakter är ordentligt anslutna och sitter stadigt.
x Bilden har fel storlek eller är inte centrerad
• Aktivera funktionen för automatisk storlek och centrering.
• Justera storleken eller centreringen. Vissa insignaler och/eller grafikkort
använder inte bildskärmens yta fullt ut.
• Direkt efter det att du har slagit på strömbrytaren kan det hända att det tar
ett tag innan storleken/centreringen har rättat till sig.
x Bildens kanter är inte raka
• Justera geometrin.
x Vågformiga eller elliptiska mönster (moaré) syns
• Ställ in moareupphävningen så att moareeffekten blir så liten som
möjligt.
•Ändra mönster på skrivbordet.
x Färgen är ojämn
• Avmagnetisera bildskärmen.* Om du placerar utrustning som skapar
magnetfält, t.ex. högtalare i närheten av bildskärmen eller om du ändrar
riktning på bildskärmen (vrider på den), kan det hända att färgerna blir
ojämna.
x Vitt ser inte ut som vitt
• Justera färgtemperaturen.
x Knapparna på bildskärmen fungerar inte ( visas på
skärmen)
• Om kontrollåset står i läge PÅ ställer du det i läge AV.
x Bokstäver och linjer är omgivna av röda och blå skuggor
• Justera konvergensen.
x Ett brum hörs just efter det att du slagit på strömmen
• Det är ljudet från den automatiska avmagnetiseringen. När du slår på
strömmen avmagnetiseras bildskärmen automatiskt under några
sekunder. (Funktionen kallas på engelska “degauss”.)
* Om du behöver avmagnetisera skärmen ytterligare en gång bör du, för att få
bästa resultat, vänta minst 20 minuter. Ett surrande ljud kan höras, men det är
normalt och innebär inte att något är fel.
Skärmmeddelanden
IIONNFORMAT
SKÄRMEN FUNGERAR
I I GNAL
AKT
2
KONTROLLERA S GNALKABELI
I VERA
: I NGEN
VIASDATORN
1 Om “INGEN SIGNAL” visas:
Visar att det inte kommer in någon signal från anslutningen.
2 Visar åtgärderna.
• Om AKTIVERA VIA DATORN visas på skärmen kan du pröva att
trycka på någon av tangenterna på tangentbordet eller röra på musen,
och sedan kontrollera att datorns grafikkort sitter ordentligt i rätt
kortplats.
• Om KONTROLLERA SIGNALKABEL visas på skärmen
kontrollerar du att bildskärmen är korrekt ansluten till datorn.
1
IIONNFORMAT
SKÄRMEN FUNGERAR
I I GNALNS
UTANFÖR FREKVENSOMFÅNG
ÄNDRA
3
:200.0kHz/ 85Hz
B LDFREKVENSENI
1 Om “UTANFÖR FREKVENSOMFÅNG” visas:
Detta meddelande visar att insignalen inte kan hanteras av bildskärmen.
2 Visar insignalens frekvens.
3 Visar vilken åtgärd som behövs.
ÄNDRA BILDFREKVENSEN visas på skärmen. Om du har bytt ut en
gammal bildskärm mot den här skärmen, ansluter du den gamla
skärmen igen och ställer sedan in grafikkortet så att den horisontella
frekvensen ligger mellan 30 och 96 kHz och den vertikala mellan 48
och 170 Hz.
1
GNALINS
W
R
G
B
2
W
R
G
B
6
Page 43

Visa bildskärmens namn, serienummer och
tillverkningsdatum.
Medan bildskärmen tar emot en
videosignal trycker du på
MENU-knappen och håller den
intryckt i mer än 5 sekunder. Då
visas bildskärmens
informationsruta.
INFORMATION
MODEL : CPD-E430
SER NO : 1234567
MANUFACTURED
: 2001-30
W
R
G
B
Om tunna linjer syns på skärmen
(dämpartrådar)
Linjerna du ser på skärmen är en del av konstruktionen i
Trinitrons bildrör; som används i den här bildskärmen, och innebär
inte att något är fel. Det du ser är skuggorna av dämpartrådarna som
håller skuggmasken på plats. De syns mest när bakgrunden är ljus
(normalt vit). Skuggmasken är det viktiga element som gör Trinitron
bildrör unika genom att släppa igenom mer ljus till bildskärmen, vilket
i sin tur ger klarare och detaljrikare bilder.
Dämpartrådar
Sjävldiagnosfunktion
Den här bildskärmen är utrustad med en självdiagnosfunktion. Om det
är något fel på bildskärmen eller datorn, släcks skärmen och indikatorn
! (ström) lyser antingen grönt eller blinkar orange. Om ! (ström)-
indikatorn lyser orange betyder det att datorn är i energisparläge. Prova
att trycka på någon av tangenterna på tangentbordet eller att röra på
musen.
Specifikationer
CRT
0,24 mm skuggmask, 90 graders avböjning, FD Trinitron
19 tum uppmätt diagonalt
Verklig bildstorlek Ca. 365
Upplösning (H:Horisontellt, V:Vertikalt)
Insignalnivåer
Videosignal: Analog RGB: 0,700 Vp-p (positiv), 75
SYNC-signal: Separata horisontella och vertikala
-
Standardbildstorlek Ca. 352
Avböjningsfrekvens (H:Horisontellt, V:Vertikalt)
Strömspänning/styrka
Strömförbrukning (när inga USB-enheter är anslutna)
Driftstemperatur 10° C till 40° C
Mått Ca. 451
Vikt Ca. 25,5 kg
Plug and Play DDC2B/DDC2Bi
Medföljande tillbehör
× 274 mm (b/h)
18,0 tum visningsyta
Max.: H: 1920 punkter, V: 1440 linjer
Rekommenderad: H: 1280 punkter, V: 1024 linjer
synksignaler eller sammansatt synksignal:
Ω, fri polaritet
TTL 2 k
Synkning på grön: 0,3 Vp-p (negativ)
× 264 mm
H: 30 till 96 kHz, V: 48 till 170 Hz
100 till 240 V, 50 – 60 Hz, 2,0 – 1,0 A
Ca. 135 W
× 471 × 461 mm (b/h/d)
GTF
Nätkabel
Denna bruksanvisning
Ω
x Om ! (ström)-indikatorn lyser grönt
1 Koppla ur videokabeln eller slå av strömmen till den
anslutna datorn.
2 Slå av (OFF) bildskärmen och slå sedan på (ON) den igen.
3 För kontrollknappen uppåt och håll den där några
sekunder innan bildskärmen går in i energisparläget.
Om alla fyra färgstaplarna (vit, röd, grön, blå) visas, betyder det att
bildskärmen fungerar som den ska. Återanslut videokablarna och
kontrollera datorn.
Om färgstaplarna inte visas är det risk för att något är fel med
bildskärmen. Kontakta din Sony-återförsäljare och berätta vad som
hänt med bildskärmen.
x Om ! (ström)-indikatorn blinkar orange
Slå av (OFF) bildskärmen och slå sedan på (ON) den igen.
Om ! (ström)-indikatorn lyser grönt fungerar bildskärmen som den
ska.
Om ! (ström)-indikatorn fortfarande blinkar kan det vara något fel på
bildskärmen. Räkna antalet sekunder mellan de orange blinkningarna
hos ! (ström)-indikatorn och informera din Sony-återförsäljare om
förhållandet. Tänk på att skriva ned modellnamnet och bildskärmens
serienummer och ha dessa uppgifter till hands. Ytterligare uppgifter
som kan behövas är märke och modell på dator och grafikkort.
SE
(forts.)
7
Page 44
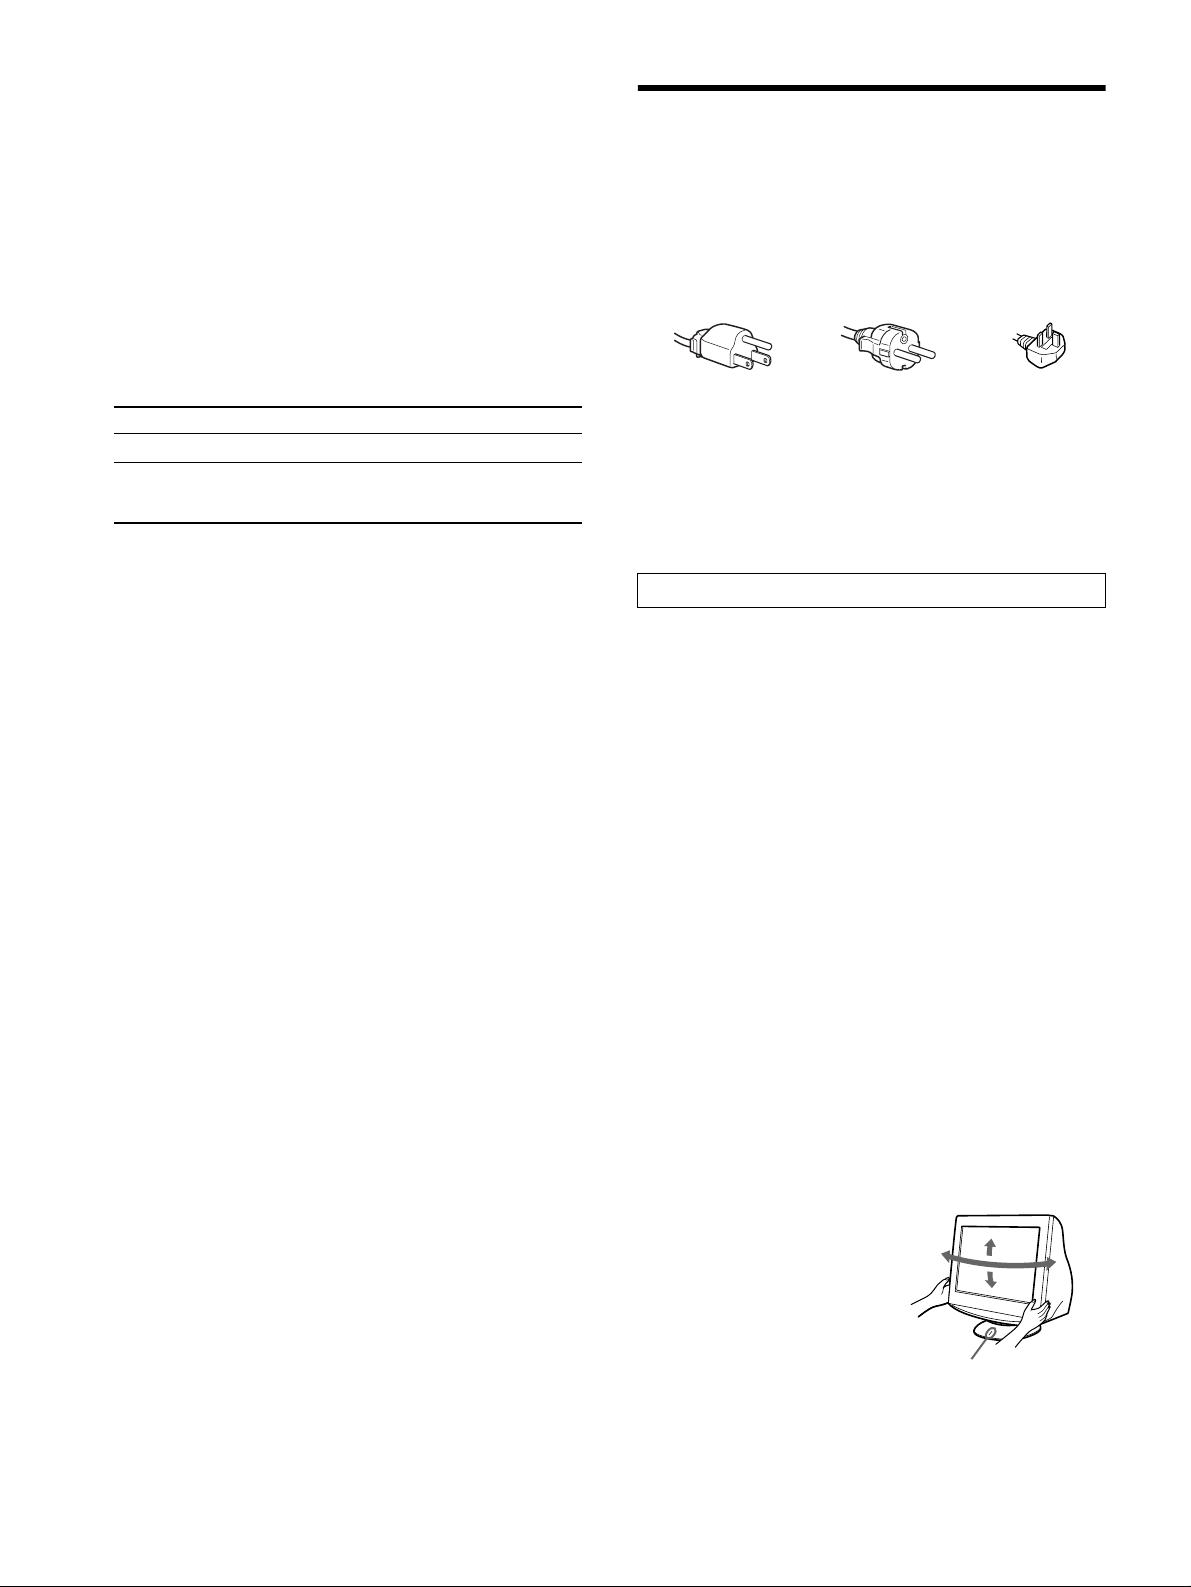
Förinställda och användardefinierade lägen
När bildskärmen registrerar en insignal, sker en automatisk anpassning av
signalen till något av de förinställda lägen som finns lagrade i bildskärmens
minne. Detta gör att skärmen ka n visa en bild av hög kvalitet under många olika
förhållanden (se “Grafiklägen och frekvenser (Preset mode timing table)” på
sidan i). Om insignalen inte överensstämmer med något av de fabriksinställda
lägena väljs automatiskt det läge som bäst stämmer överens med den aktuella
insignalen inom gränserna för de vertikala och horisontella frekvenser som
bildskärmen kan hantera (sidan 7) i överensstämmelse med GTF (Generalized
Timing Formula). När bilden är inställd lagras inställningarna som ett
användarläge och kan automatiskt återställas när samma insignal på nytt tas
emot.
Energisparfunktion
Den här bildskärmen uppfyller kraven för energibesparing enligt de normer
som ställts upp av VESA, TCO’99 och
matas in till bildskärmen från datorn minskas bildskärmens energiförbrukning
automatiskt på följande vis.
Energiläge Strömförbrukning ! (ström) indikator
normal användning
1
ej aktiv*
(energisparläge,
“deep sleep”)*
1
*
När datorn växlar över till energisparläge visas INGEN SIGNAL på
bildskärmen. Efter ytterligare några sekunder växlar skärmen över till
energisparläge.
2
*
Energisparläget “Deep sleep” är definierat av Environmental Protection
Agency.
Utformning och specifikationer kan ändras utan föregående meddelande.
≤ 135 W grön
≤ 3 W orange
2
ENERGY STAR. Om ingen signal
Försiktighetsåtgärder
Varning rörande strömanslutningar
• Använd den medföljande nätkabeln. Om du använder en annan
nätkabel måste du kontrollera att den är godkänd för det lokala
elnätet.
För kunder i Storbritannien
Om du använder bildskärmen i Storbritannien använder du den
kabel som är avsedd för användning i Storbritannien.
Exempel på kontakttyper
för 100 till 120 V AC för 200 till 240 V AC endast för 240 V AC
• Innan du drar ur nätkabeln bör du vänta minst 30 sekunder efter det
att du har stängt av bildskärmen. Då ger du den statiska
elektriciteten på bildskärmens yta tillfälle att laddas ur.
• Det första som händer när du slår på bildskärmen är att den
avmagnetiseras. Det tar några få sekunder. Det här är en process
som skapar starka magnetfält runt skärmen, fält som kan påverka
den information som finns lagrad på magnetband och disketter i
närheten av bildskärmen. Se därför till att du inte förvarar medier
med magnetisk lagrad information i närheten av bildskärmen.
Utrustningen bör anslutas till ett lättåtkomligt vägguttag.
Installation
Placera inte bildskärmen på följande platser:
• på ytor (t.ex. mattor och filtar) eller nära material (t.ex. gardiner
och draperier) som kan täppa för ventilationshålen
• nära värmekällor, som element och varmluftkanaler, eller på
platser som är utsatt för direkt solljus
• på platser där temperaturen kan variera kraftigt
• på platser där den kan utsättas för vibrationer eller stötar
• på ytor som inte är stabila
• nära utrustning som genererar magnetfält, t ex transformatorer och
högspänningsledningar
• i närheten av eller på elektriskt laddade metallytor
• i tillslutna utrymmen
Underhåll
• Rengör bildskärmen med en mjuk duk. Om du använder en
rengöringsvätska för glas, måste du kontrollera att den inte
innehåller antistatmedel eller andra tillsatser som kan repa
bildskärmens ytbehandling.
• Vidrör eller knacka aldrig på skärmen med vassa föremål och
använd aldrig heller någon form av slipmedel för rengöring. De
repor du riskerar på bildröret går inte att få bort.
• Rengör höljet, panelen och kontrollerna med en mjuk duk fuktad
med ett milt rengöringsmedel. Använd inte någon typ av slipduk
eller skurpulver och inte heller lösningsmedel, som alkohol eller
bensen.
Transport
Transportera alltid bildskärmen i originalkartongen och använd de
insatser som den levererades förpackad med.
Använda det svängbara stödet
Bildskärmen kan justeras inom de
vinklar som anges till höger. Håll i
bildskärmens undersida med båda
händerna då du vrider den
horisontellt eller vertikalt.Var
försiktig så att du inte klämmer
fingrarna på bildskärmens baksida
när du vinklar upp skärmen.
90°
90°90°
Centreringslinje
15°
5°
90°
8
Page 45
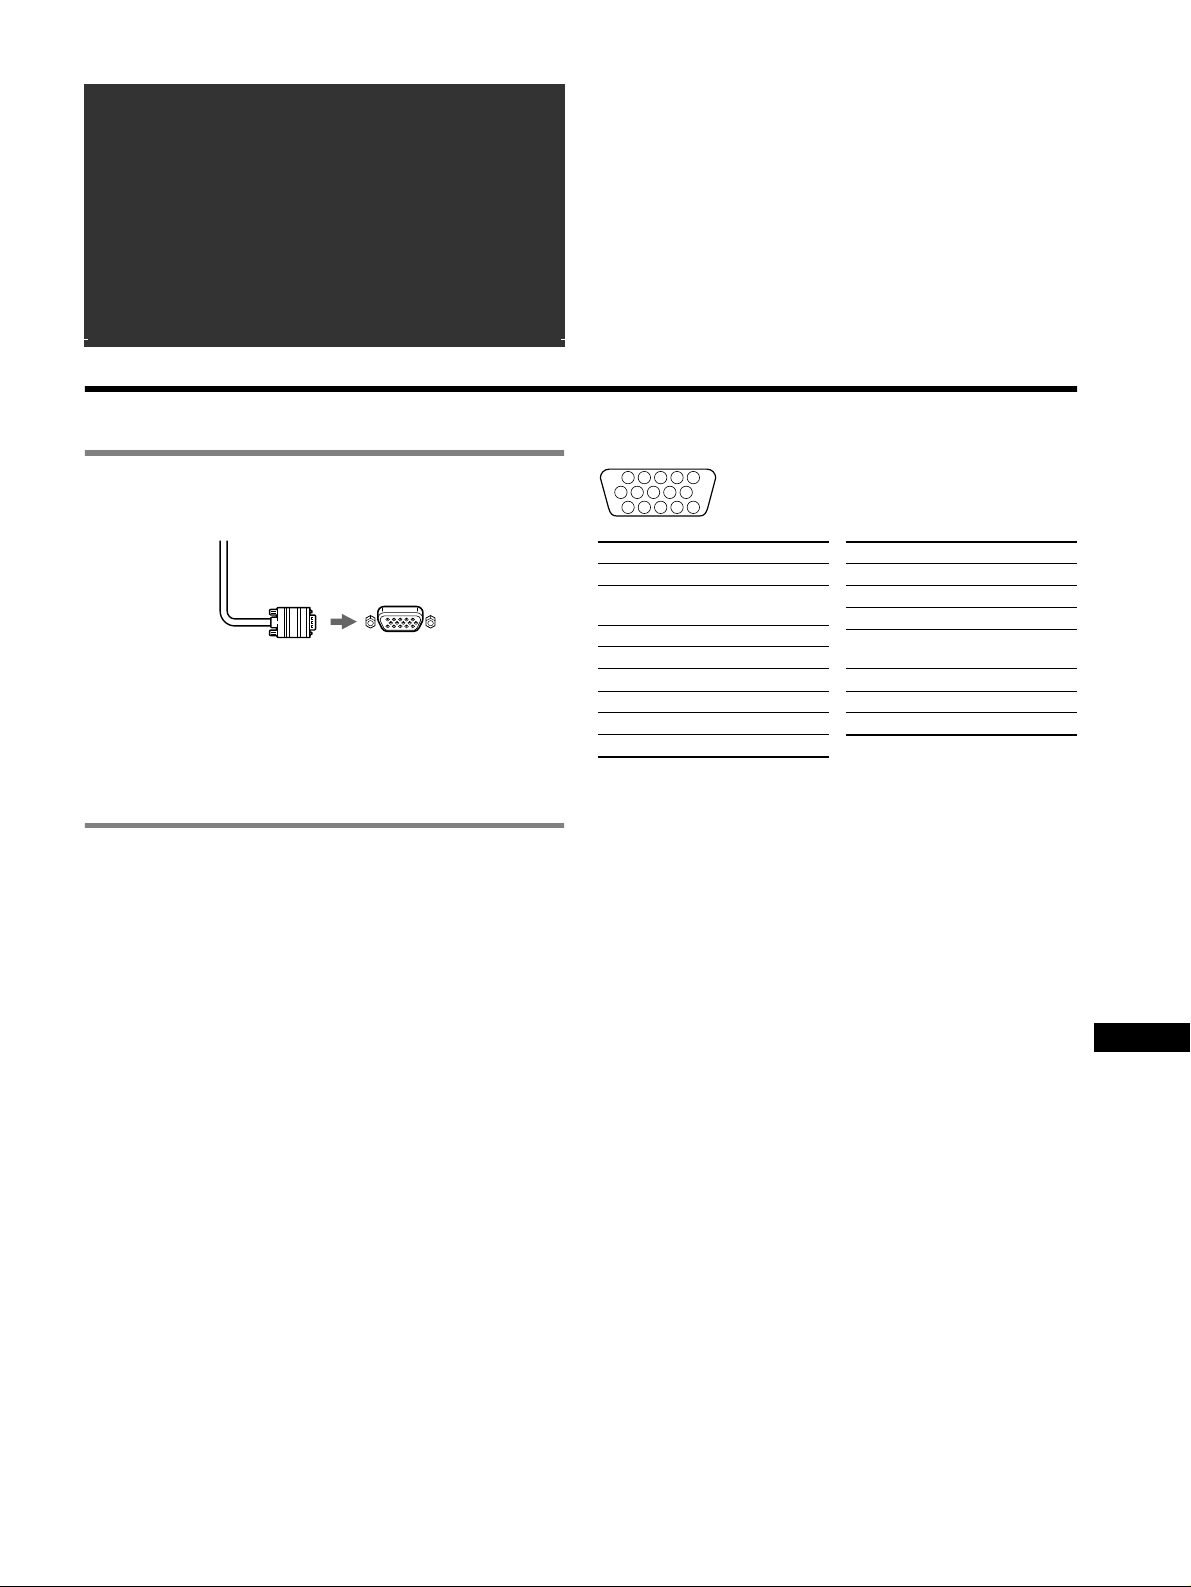
Inhoudsopgave
Opstelling. . . . . . . . . . . . . . . . . . . . . . . . . . . . . . . . . . 3
Regelingen . . . . . . . . . . . . . . . . . . . . . . . . . . . . . . . . . 4
Verhelpen van storingen. . . . . . . . . . . . . . . . . . . . . . 6
Technische gegevens . . . . . . . . . . . . . . . . . . . . . . . . 7
Voorzorgsmaatregelen . . . . . . . . . . . . . . . . . . . . . . . 8
Appendix . . . . . . . . . . . . . . . . . . . . . . . . . . . . . . . . . . . i
Preset mode timing table . . . . . . . . . . . . . . . . . . . . . . . i
TCO’99 Eco-document. . . . . . . . . . . . . . . . . .Achterflap
Opstelling
• Trinitronâ is een geregistreerd handelsmerk van Sony Corporation.
• Macintosh is een handelsmerk in licentie gegeven aan Apple Computer, Inc.,
geregistreerd in de U.S.A. en andere landen.
•Windows
• IBM PC/AT en VGA zijn geregistreerde handelsmerken van IBM
•VESA en DDC
•
• Alle andere vermelde productnamen kunnen handelsmerken of geregistreerde
• Bovendien zijn “
â
Corporation in de Verenigde Staten en andere landen.
Corporation of the U.S.A.
Association.
en MS-DOS zijn geregisteerde handelsmerken van Microsoft
ä
zijn handelsmerken van de Video Electronics Standard
ENERGY STAR is een in de V.S. geregistreerd merk.
handelsmerken zijn van hun respectieve bedrijven.
ä” en “â” niet telkens vermeld in deze handleiding.
1 De monitor aansluiten op uw computer
x Aansluiten op de HD15 ingang
Videosignaalkabel van
de monitor
naar HD15 van de
aangesloten computer
Aansluiting op een Macintosh of compatibele
computer
Gebruik eventueel een Macintosh adapter (niet meegeleverd) om deze
monitor aan te sluiten op een Power Mac G3/G4 computer.
2 De monitor en de computer aanzetten
1 Sluit het netsnoer aan op de monitor en druk op de
! (aan/uit) schakelaar om de monitor aan te schakelen.
2 Zet de computer aan.
Er zijn geen specifieke drivers nodig
Deze monitor beantwoordt aan de “DDC” Plug & Play norm en detecteert
automatisch alle monitorinformatie. Op de comput er hoeft geen specifieke driv er
te worden geïnstalleerd.
Wanneer u de PC voor het eerst aanzet nadat de monitor werd aangesloten, kan
de installatie-wizard op het scherm verschijnen. Volg dan de instructies op het
scherm. De Plug & Play monitor wordt automatisch gekozen zodat u deze
monitor kunt gebruiken.
Opmerkingen
• Raak de pinnen van de videokabelstekker niet aan.
• Controleer de uitlijning van de HD15 connector om te voorkomen dat de
pinnen van de videokabelstekker verbogen worden.
De pentoewijzing van de HD 15 videosignaalkabel
1
678910
11 12 13 14 15
Pin Nr. Signaal
1 Rood
2Groen
3Blauw
4ID (Massa)
5 CPU richting
6 Rood Massa
7 Groen Massa
8 Blauw Massa
* DDC (Display Data Channel) is een VESA standaard.
5432
(Sync op Groen)
Pin Nr. Signaal
9 DDC + 5V*
10 Massa
11 ID (Massa)
12 Bi-directionele data
(SDA)*
13 H. Sync
14 V. Sync
15 Dataklok (SCL)*
NL
3
Page 46
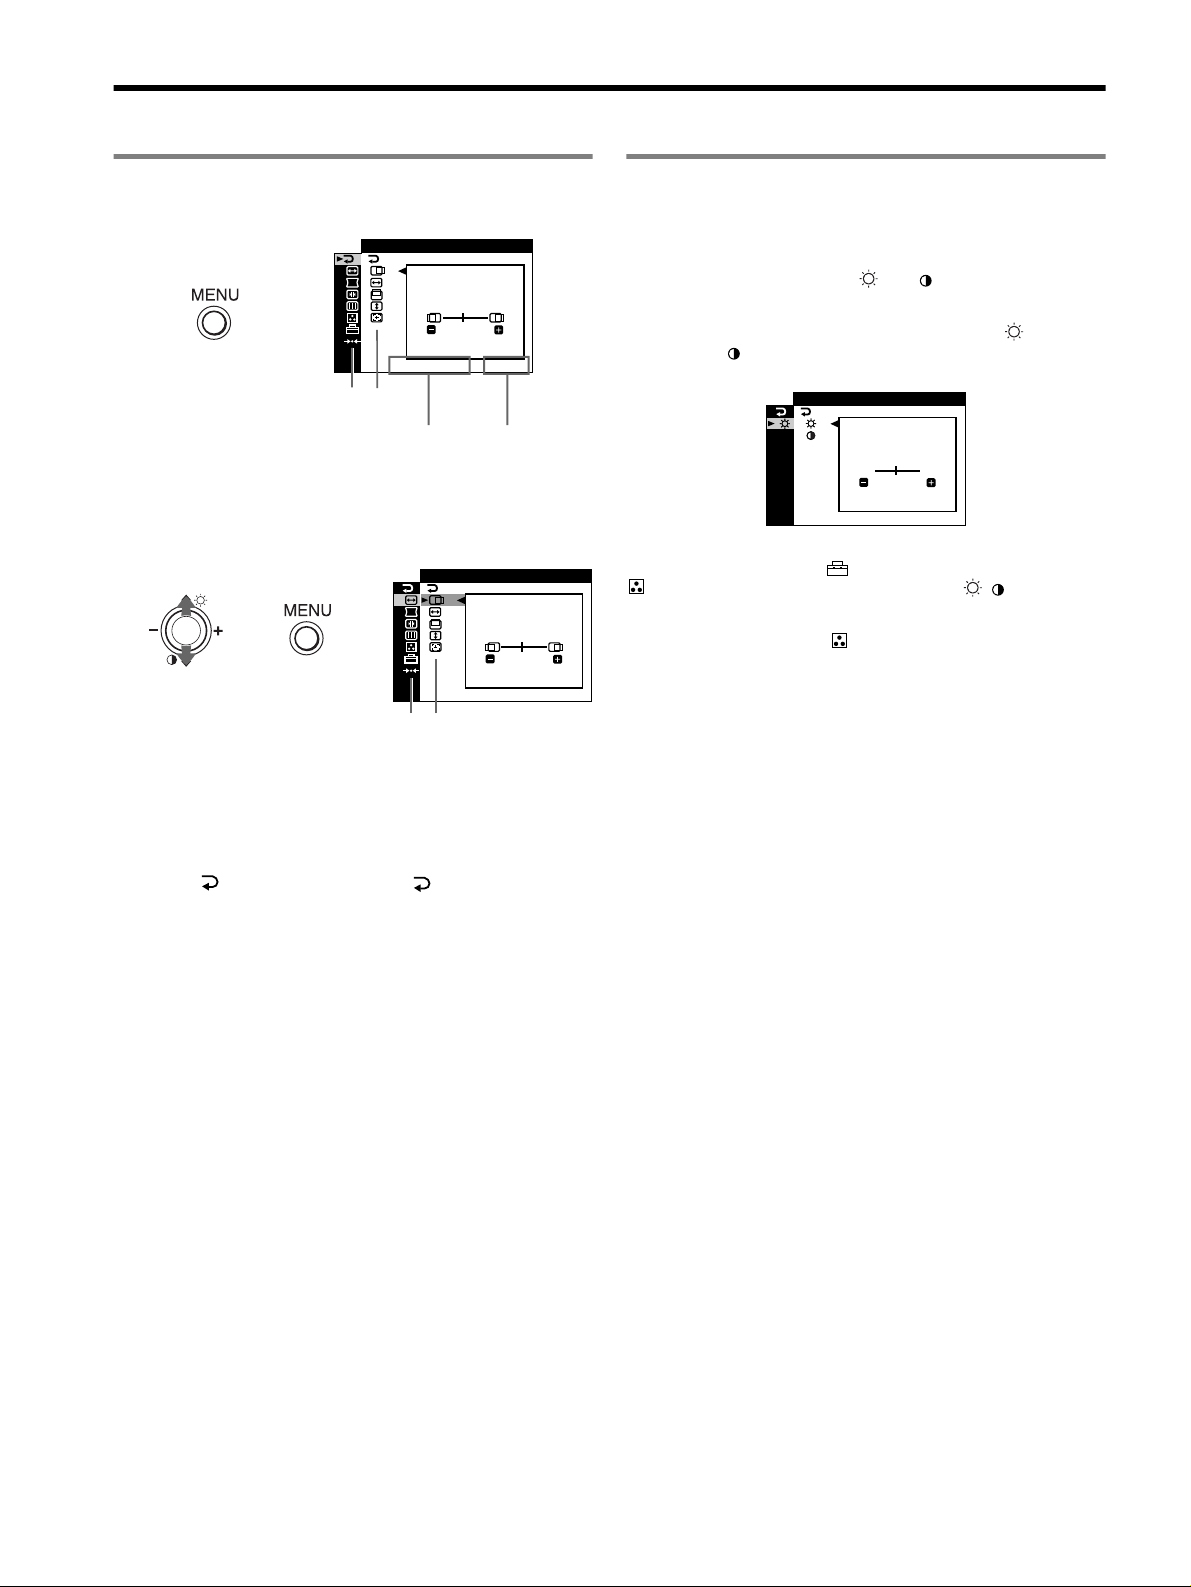
Regelingen
Het menu gebruiken
1 Druk op de MENU toets om het hoofdmenu te tonen.
UIT
,
1280x1024 / 85Hz
Hoofdmenu
de horizontale frequenties/resolutie
van het huidige ingangssignaal (alleen
indien het signaal overeenkomt met
één van de fabrieksvoorinstellingen)
Submenu
2 Beweeg de joystick m/M om het hoofdmenu te laten
oplichten dat u wilt instellen en druk op de joystick.
,,
Hoofdmenu
45
de verticale
frequenties van
het huidige
ingangssignaal
AFME T45/I NG CENTR
1280x1024 / 85Hz
Submenu
Contrast en helderheid regelen
Contrast en helderheid worden geregeld via een apart HELDER/
CONTRAST menu. Deze instellingen gelden voor alle
ingangssignalen.
1 Beweeg de regelknop M ()/m ( ) om het HELDER/
CONTRAST menu te laten verschijnen.
2 Beweeg de regelknop m/M om helderheid ( ) of
contrast ( ) te kiezen. Beweeg vervolgens de
regelknop –/+ om in te stellen.
CONTRAST
/HELDER
HELDERHE I D
45
1280x1024 / 85Hz
Opmerking
Indien u de sRGB mode in het (KLEUR MODUS) of het
(KLEUREN) menu hebt gekozen, verschijnt het / (HELDER/
CONTRAST) menu voor de sRGB mode en kunt u helderheid noch contrast
via dit scherm regelen. Voor meer informatie over het gebruik van de sRGB
mode, zie “sRGB mode” in het (KLEUREN) menu.
3 Beweeg de regelknop m/M om het submenu te laten
oplichten dat u wilt instellen. Beweeg vervolgens de
regelknop –/+ om in te stellen.
Het menu sluiten
Druk tweemaal op de MENU knop om terug te keren naar het
hoofdmenu. is standaard gekozen. Door te kiezen en de MENU
knop in te drukken, wordt het menu verlaten. Indien er geen knop wordt
ingedrukt, sluit het menu automatisch na ongeveer 30 seconden.
4
Page 47
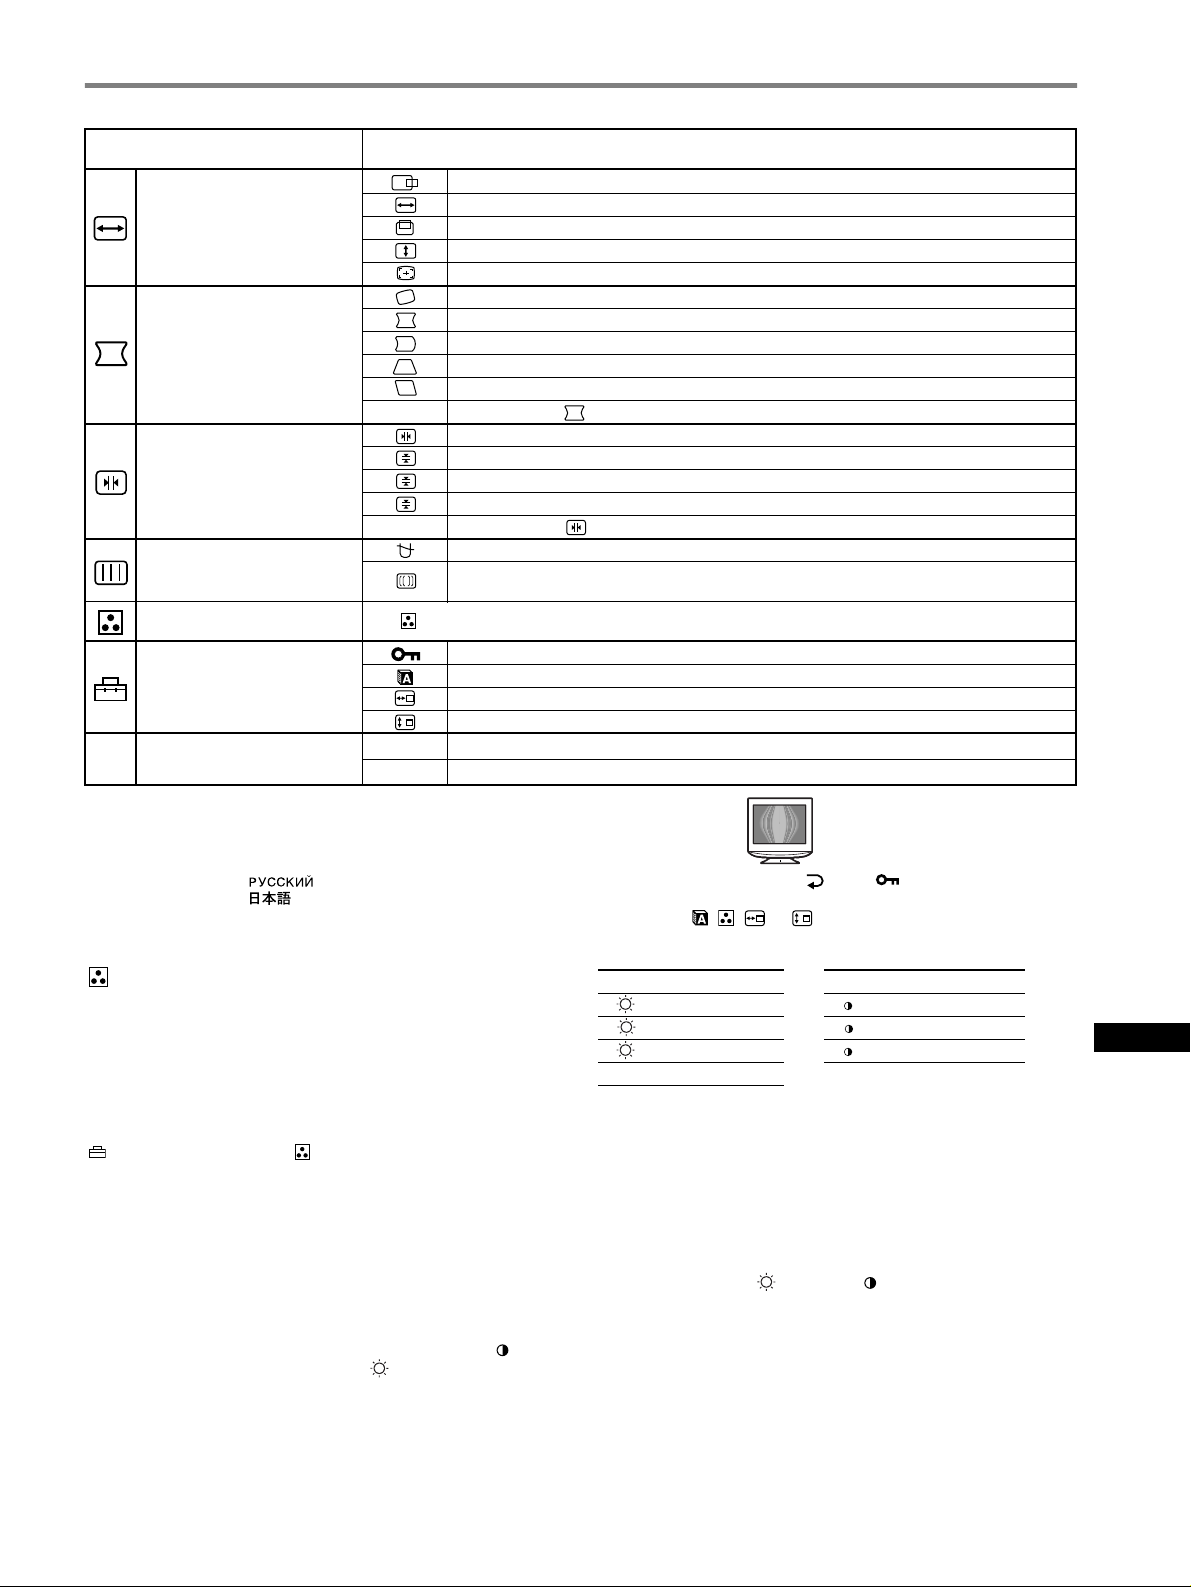
On-screen Menu-instellingen
Hoofdmenu-pictogrammen en
regelpunten
Beeldformaat en -centrering
1
*
regelen
De beeldvorm regelen
Convergentie regelen
De beeldkwaliteit regelen
De beeldkleur regelen Zie “ : Beeldkleur regelen”.
Extra instellingen
0 Regelingen terugstellen
1
Deze instelling geldt voor het huidige ingangssignaal.
*
2
*
Deze instelling geldt voor alle ingangssignalen.
3
*
Taalmenu
• ENGLISH: Engels • NEDERLANDS
• FRANÇAIS: Frans • SVENSKA: Zweeds
• DEUTSCH: Duits • : Russisch
• ESPAÑOL: Spaans • : Japans
• ITALIANO: Italiaans
2
*
Submenu-pictogrammen en regelpunten
0 RESET: Stelt alle instellingen terug.
T
B
0 RESET: Stelt alle instellingen terug.
1
01
*
2
02
*
Horizontale positie
Horizontale grootte
Verticale positie
Verticale grootte
Automatische beeldformattering en - centrering
Beeld roteren
De zijkanten van het beeld doen uitzetten of inkrimpen
De zijden van het beeld naar links of rechts verschuiven*
De breedte van het beeld aan de bovenkant van het scherm aanpassen*
Het beeld naar links of rechts verschuiven aan de bovenkant van het scherm*
Rode of blauwe schaduwen horizontaal verschuiven
Rode of blauwe schaduwen verticaal verschuiven
Rode of blauwe schaduwen bovenaan het scherm verticaal verschuiven
Rode of blauwe schaduwen onderaan het scherm verticaal verschuiven
DEMAGN: monitor demagnetiseren.
ONDERDRUK MOIRE
beperkt blijft.
Instellingen beveiligen (TOETSEN SLOT)
Schermmenutaal kiezen/Monitorinformatie bevestigen LANGUAGE/INFORMATIE*
De menupositie wijzigen voor horizontale regeling
De menupositie wijzigen voor verticale regeling
Alle instelgegevens voor het huidige ingangssignaal terugstellen.*6 Kies “OK”.
Alle instelgegevens voor alle ingangssignalen terugstellen. Kies “OK”.
1
*
4
*
: het moiré-onderdrukkingseffect zo regelen dat moiré tot een minimum
5
*
*4Voorbeeld van Moiré
5
*
Alleen de ! (aan/uit) schakelaar, en het (TOETSEN SLOT) menu
werken.
6
*
De menu items , , en worden op deze manier niet teruggesteld.
1
*
1
1
1
3
: Beeldkleur regelen
Met de KLEUREN instellingen kunt u de beeldkleurtemperatuur
regelen door het kleurniveau van het witte kleurveld te veranderen. De
kleuren hebben een rode tint bij lage temperatuur en een blauwe tint bij
hoge temperatuur. Deze regeling is handig om de monitorkleuren af te
stemmen op drukkleuren.
Deze regeling is handig om de monitorkleuren af te stemmen op
drukkleuren.
4 modes; PRESET, VARIABEL, GEAVANC en sRGB onder
(KLEUR MODUS) in het (KLEUREN) menu.
x PRESET (Standaard instelling)
U kunt kiezen uit vooringestelde kleurtemperaturen van 5000K, 6500K
of 9300K. De standaard instelling is 9300K.
x VARIABEL
U kunt de kleurtemperatuur regelen van 5000K tot 1100K.
x GEAVANC
In deze mode kunt u de kleuren nauwkeurig regelen. GAIN ( ) regelt
de heldere zones op het scherm en BIAS ( ) regelt de donkere zones
op het scherm.
Kies voor Kies voor
R R (rood) BIAS R R (rood) GAIN
G G (groen) BIAS G G (groen) GAIN
B B (blauw) BIAS B B (blauw) GAIN
0 RESET
*
* Stelt alle instellingen in de GEAVANC mode terug.
x sRGB
De kleurinstelling sRGB is een gestandaardiseerd kleurprotocol om de
beeld- en drukkleuren van computerapparatuur te harmoniseren. Om de
sRGB kleuren correct te tonen (γ = 2,2, 6500K), kiest u de sRGB mode
en stelt u de aangesloten computer in op sRGB. In de sRGB stand
werken de instellingen van het HELDER/CONTRAST menu niet.
Opmerking
Controleer of helderheid ( ) en contrast ( ) zijn ingesteld op de waarden
voor de sRGB mode zoals die in het HELDER/CONTRAST menu verschijnen.
Kies anders 0 1 in het 0 (RESET) menu.
NL
5
Page 48
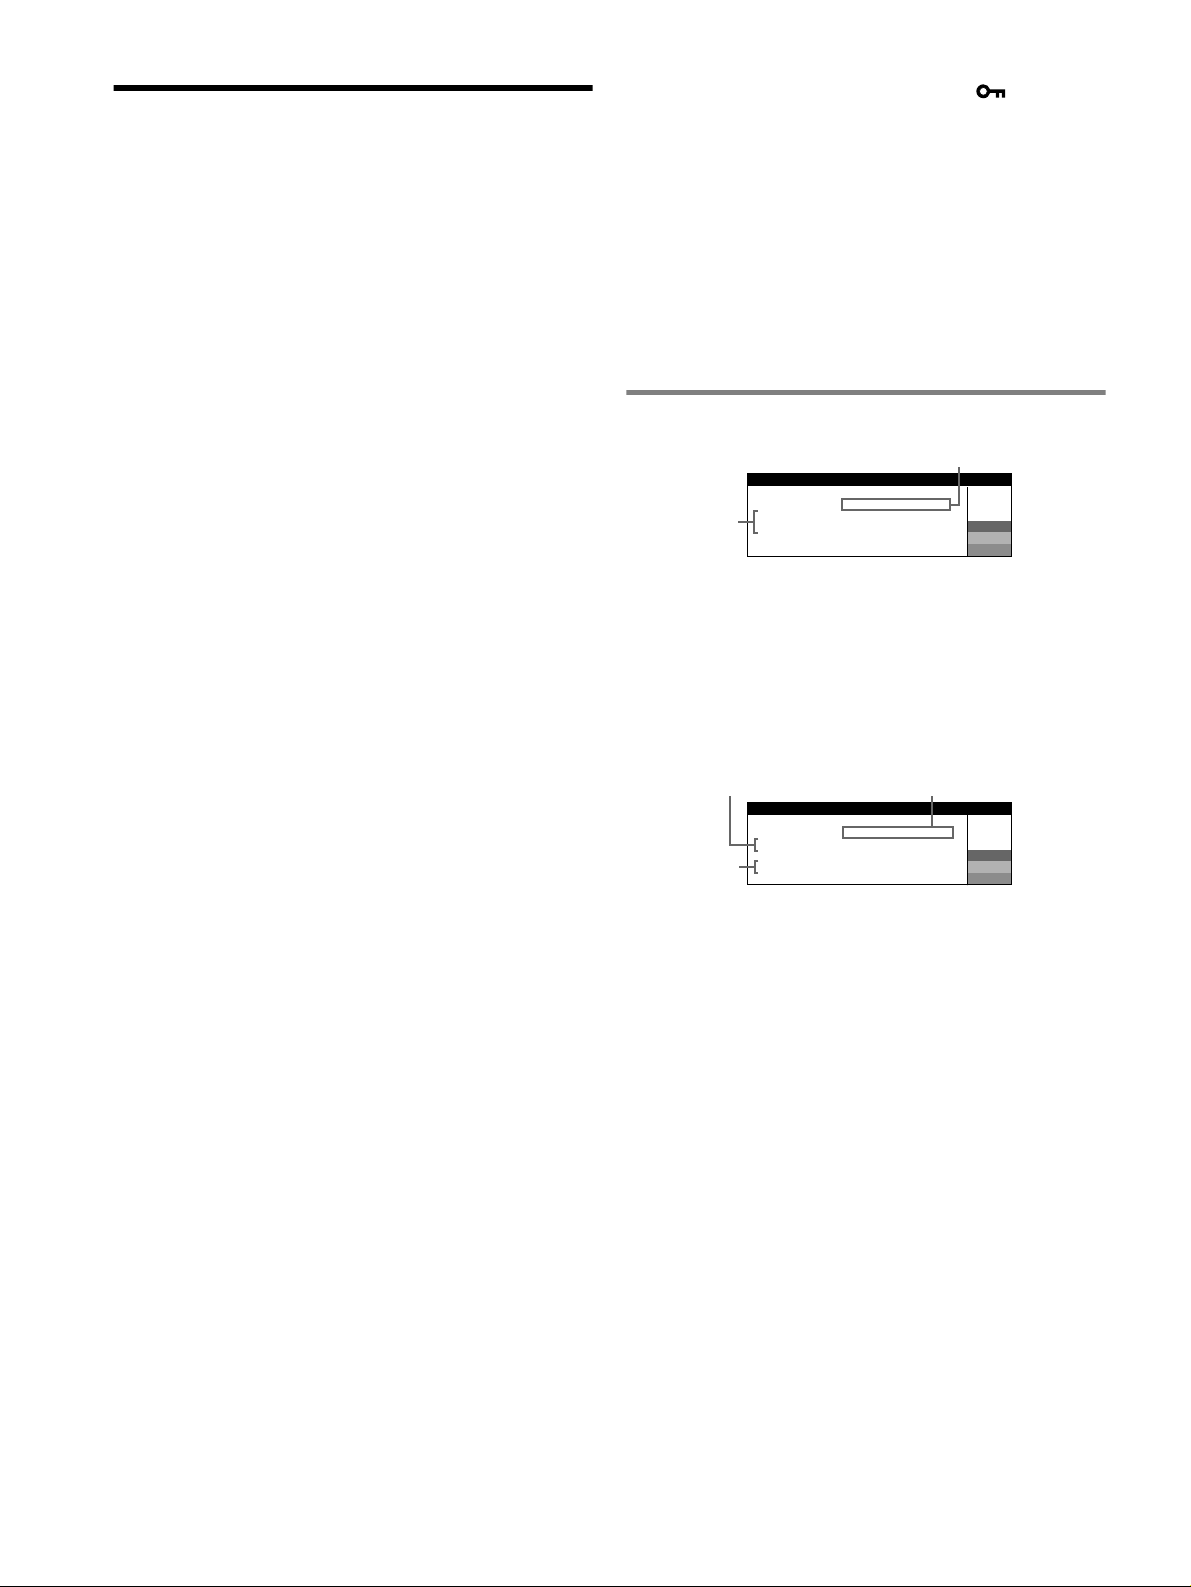
Verhelpen van storingen
x Geen beeld
Indien de ! (aan/uit) indicator niet verlicht is
• Controleer of het netsnoer goed is aangesloten.
• Controleer of de ! (aan/uit) schakelaar “aan” staat.
De ! (aan/uit) indicator is oranje
• Controleer of de videosignaalkabel goed is aangesloten en alle stekkers
goed vastzitten.
• Controleer of de pinnen van de HD15 video-ingangsconnector niet
verbogen of naar binnen gedrukt zijn.
• Controleer of de stroom van de computer “aan” is.
• De computer staat in de stroomspaarstand. Druk op een willekeurige
toets op het toetsenbord of verplaats de muis.
• Controleer of de grafische kaart volledig in de correcte busaansluiting zit.
Indien de ! (aan/uit) indicator groen is of oranje knippert
• Gebruik de zelfdiagnosefunctie.
x Het beeld flikkert, springt, oscilleert of is vervormd
• Isoleer en elimineer potentiële bronnen van elektrische of magnetische
velden zoals monitors, laser printers, elektrische ventilatoren,
fluorescentieverlichting of televisietoestellen.
• Plaats de monitor uit de buurt van stroomkabels of plaats een
magnetische afscherming bij de monitor.
• Probeer de monitor aan te sluiten op een ander stopcontact, bij voorkeur
op een ander circuit.
• Probeer de monitor 90° naar links of naar rechts te draaien.
• Controleer de handleiding van uw grafische kaart voor de juiste instelling
van de monitor.
• Controleer of de grafische mode en de frequentie van het ingangssignaal
worden ondersteund door de monitor (zie “Preset mode timing table” op
pagina i). Sommige grafische kaarten hebben een synchronisatiepuls die
te smal is om de monitor correct te laten synchroniseren, ook al ligt de
frequentie binnen het juiste bereik.
• Pas de verversingsfrequentie van de computer aan (verticale frequentie)
om een optimaal beeld te verkrijgen.
x Het beeld is wazig
• Regel helderheid en contrast.
• Demagnetiseer de monitor.*
• Regel moiré-onderdrukking tot moiré minimaal is of zet ONDERDRUK
MOIRE op UIT.
x Echobeeld (ghosting)
• Gebruik geen videoverlengkabels en/of videoschakeldozen.
• Controleer of alle aansluitingen goed vastzitten.
x Het beeld is niet gecentreerd of heeft niet de juiste
afmetingen
• Verricht de Auto Afmeting Centreer-functie.
• Regel formaat en centrering. Merk op dat het scherm met sommige
ingangssignalen en/of grafische kaarten niet volledig is gevuld.
• Na het aanzetten van de aan/uit-schakelaar kan een correcte formattering/
centrering enige tijd in beslag nemen.
x De hoeken van het beeld zijn krom
• Regel de geometrie.
x Golvend of elliptisch patroon (moiré)
• Regel het moiré-onderdrukkingseffect zo dat moiré tot een minimum
beperkt blijft.
• Verander uw desktoppatroon.
x De kleur is niet gelijkmatig
• Demagnetiseer de monitor*. Indien u ap paratuur die een magnetisch veld
genereert, bijvoorbeeld een luidspreker, in de buurt van de monitor
opstelt, of wanneer u de richting van de monitor verandert, is het
mogelijk dat de kleuren niet meer gelijkmatig zijn.
x Onzuivere witweergave
• Regel de kleurtemperatuur.
x De knoppen op de monitor werken niet ( verschijnt
op het scherm)
• Indien de vergrendeling van de bedieningen op AAN staat, moet u deze
op UIT zetten.
x Letters en regels hebben rode of blauwe schaduwen aan
de hoeken
• Convergentie regelen.
x U hoort een brommend geluid direct na het inschakelen
van de monitor
• Dit is het geluid van de zelf-demagnetiserende cyclus. Bij het
aanschakelen wordt de monitor automatisch gedurende enkele seconden
gedemagnetiseerd.
* Indien er een tweede demagnetiseringscyclus nodig is, dient u voor het beste
resultaat 20 minuten te wachten. U hoort eventueel een bromgeluid maar dat
is normaal.
Schermberichten
IIENFORMAT
MON I FUNCT
I NGANG : GEEN
AANZETTEN
2
CONTROLEER V DEOKABELI
TOR
ONEER T
I
VIASCOMPUTER
1 Indien “GEEN SIGNAAL” verschijnt:
Dit geeft aan dat er geen signaal via de aansluiting wordt ingevoerd.
2 Toont de oplossingen.
• Als AANZETTEN VIA COMPUTER verschijnt op het scherm,
probeer dan een toets op het toetsenbord van de computer in te
drukken of de muis te bewegen en controleer of de grafische kaart
van de computer in de juiste aansluiting zit.
• Als CONTROLEER VIDEOKABEL op het scherm verschijnt,
controleer dan of de monitor correct is aangesloten op de computer.
1
IIENFORMAT
MON I FUNCT
TOR
I NGANG
BU I I KTEN SCANBEL E
WI I I GNAALT I INGMGSJZ
3
ONEER T
I
:200.0kHz/ 85Hz
1 Indien “BUITEN SCANBEREIK” verschijnt:
Dit geeft aan dat het ingangssignaal niet door de monitor kan worden
verwerkt.
2 Toont de ingangssignaalfrequentie.
3 Toont de oplossing.
WIJZIG SIGNAALTIMING verschijnt op het scherm. Wanneer u een
bestaande monitor vervangt, moet u de oude monitor opnieuw
aansluiten. Stel vervolgens de grafische kaart van de computer zo in dat
de horizontale frequentie 30 – 96 kHz en de verticale frequentie 48 –
170 Hz bedraagt.
1
GNAALI
W
R
G
B
2
W
R
G
B
6
Page 49

Weergave van de naam van de monitor, het
serienummer en de productiedatum.
Als de monitor een videosignaal
ontvangt, moet u de MENU toets
meer dan 5 seconden ingedrukt
houden om de informatiebox van
deze monitor te laten verschijnen.
INFORMATIE
MODEL : CPD-E430
SER NO : 1234567
MANUFACTURED
: 2001-30
W
R
G
B
Indien er dunne lijnen op uw scherm
verschijnen
Deze lijnen duiden niet op een defect en zijn normaal voor een
Trinitron-beeldbuis. Dit zijn de schaduwen van de demperdraden die
gebruikt worden om het apertuurrooster te stabiliseren. Het
apertuurrooster is het fundamentele element dat een Trinitron beeldbuis
onderscheidt van alle andere, doordat er meer licht bij het scherm kan
komen, hetgeen resulteert in een contrastrijker, meer gedetailleerd
beeld.
(demperdraden)
Demperdraden
Zelfdiagnosefunctie
Deze monitor heeft een zelfdiagnosefunctie. Indien er een probleem
met de monitor of computer is, zal het scherm leeg worden en zal de
! (aan/uit) indicator groen oplichten of oranje knipperen. Indien de
! (aan/uit) indicator oranje oplicht, bevindt de computer zich in de
energiebesparende stand. Druk op een willekeurige toets op het
toetsenbord of verplaats de muis.
Technische gegevens
CRT
0,24 mm apertuurrooster pitch, afbuiging van 90 graden, FD Trinitron
19 inch diagonaal gemeten
Zichtbare grootte Ong. 365
18,0" zichtbaar beeld
Resolutie (H:Horizontaal, V:Verticaal)
Maximum H: 1920 punten, V: 1440 lijnen
Aanbevolen H: 1280 punten, V: 1024 lijnen
Ingangssignaalniveaus
Videosignaal: Analoog RGB: 0,700 Vp-p (positief), 75
SYNC signaal: Apart H/V of composietsync:
TTL 2 k
Sync op groen: 0,3 Vp-p (negatief)
Standaard beeldformaat
Ong. 352
Afbuigingsfrequentie (H:Horizontaal, V:Verticaal)
H: 30 tot 96 kHz, V: 48 tot 170 Hz
Ingangsspanning/stroomsterkte
100 tot 240 V, 50 – 60 Hz, 2,0 – 1,0 A
Stroomverbruik (zonder USB apparatuur aangesloten)
Ong. 135 W
Bedrijfstemperatuur 10°C tot 40°C
Afmetingen Ong. 451
Gewicht Ong. 25,5 kg
Plug and Play DDC2B/DDC2Bi
GTF
Meegeleverde toebehoren
Netsnoer
Deze gebruiksaanwijzing
× 274 mm (b/h)
Ω
Ω, polariteitsvrij
× 264 mm
× 471 × 461 mm (b/h/d)
x Indien de ! (aan/uit) indicator groen is
1 Koppel de videokabel los of zet de aangesloten computer
af.
2 Zet de monitor UIT en weer AAN.
3 Beweeg de joystick gedurende enkele seconden naar
boven voor hij overschakelt naar de stroomspaarstand.
Als alle vier de kleurbalken verschijnen (wit, rood, groen, blauw),
betekent dit dat de monitor goed werkt. Sluit de videokabels weer aan
en controleer de instelling van uw computer.
Indien de kleurbalken niet verschijnen, gaat het mogelijk om een defect
van de monitor. Informeer uw erkende Sony dealer over het probleem.
x Indien de ! (aan/uit) indicator oranje knippert
Zet de monitor UIT en weer AAN.
Indien de ! (aan/uit) indicator groen oplicht, betekent dit dat de
monitor goed werkt.
Indien de ! (aan/uit) indicator nog steeds knippert, gaat het mogelijk
om een defect aan de monitor. Tel het aantal seconden tussen het oranje
aanflitsen van de ! (aan/uit) indicator en neem contact op met uw
erkende Sony dealer over het probleem. Vergeet niet de modelnaam en
het serienummer van de monitor op te schrijven. Noteer ook het merk
en model van uw computer en grafische kaart.
NL
(wordt vervolgd)
7
Page 50
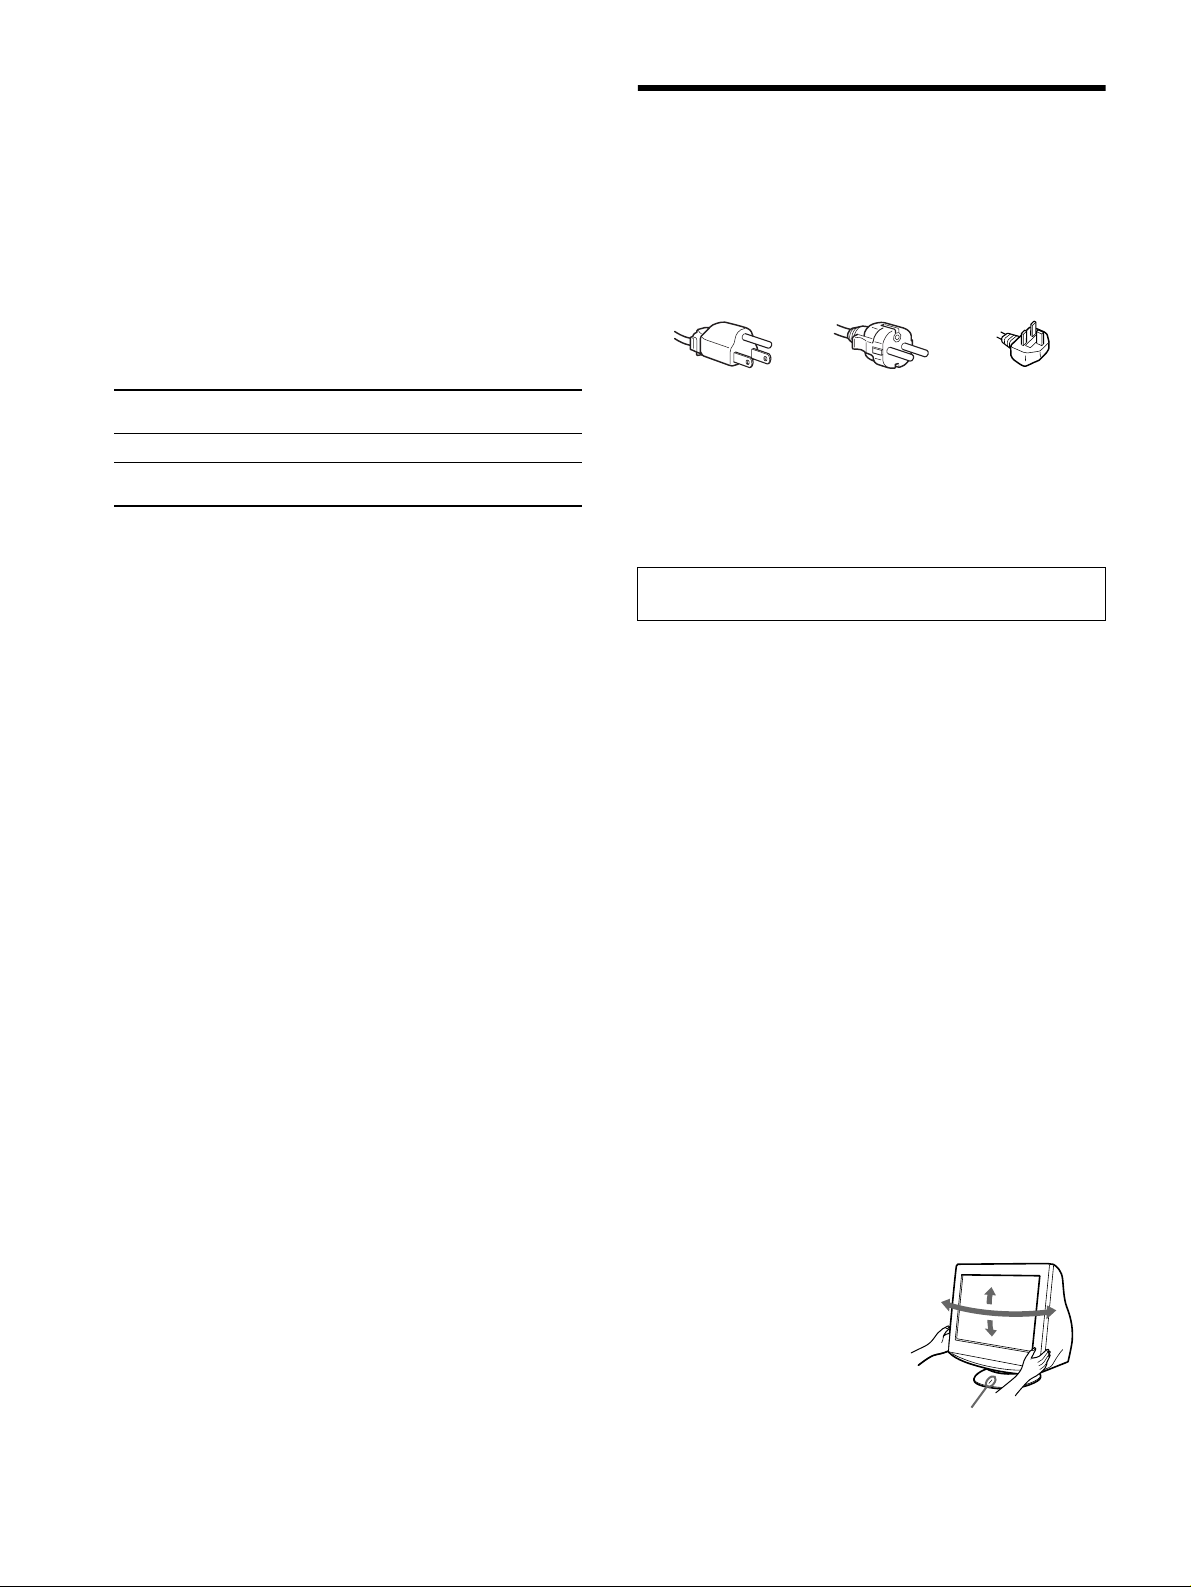
Fabrieks- en gebruikersinstellingen
Wanneer de monitor een ingangssignaal ontvangt, stemt deze dit signaal
automatisch af op één van de fabrieksinstellingen die in het geheugen van de
monitor zijn opgeslagen, om een beeld van hoge kwaliteit te verkrijgen (zie
“Preset mode timing table” op pagina i). Indien de ingangssignalen niet
overeenstemmen met de fabrieksinstellingen, produceert de monitor
automatisch het meest geschikte beeld voor het ingangssignaal dat binnen het
verticale of horizontale frequentiebereik valt (pagina 7) conform de algemene
timingformule. Indien het beeld wordt bijgesteld, worden de instelgegevens
opgeslagen als gebruikersinstelling en automatisch weer opgeroepen op het
moment dat hetzelfde ingangssignaal wordt ontvangen.
Stroomspaarfunctie
Deze monitor voldoet aan de richtlijnen voor energiebesparing die zijn
opgesteld door VESA, TCO’99 en
signaal van de computer ontvangt, zal hij het energieverbruik automatisch
verminderen zoals hieronder beschreven.
Energiestand Energieverbruik ! (aan/uit)
normale werking
actief uit*
(diepe sluimer)*
*
*
1
1
Wanneer uw computer overschakelt naar de stroomspaarstand, verschijnt
GEEN SIGNAAL op het scherm. Na enkele seconden schakelt de monitor
over naar de stroomspaarstand.
2
“Diepe sluimer” is een energiebesparende instelling gedefinieerd door de
Environmental Protection Agency.
≤ 135 W groen
≤ 3 W oranje
2
ENERGY STAR. Indien de monitor geen
indicator
Voorzorgsmaatregelen
Waarschuwing betreffende voedingsaansluitingen
• Gebruik het meegeleverde netsnoer. Als u een ander netsnoer
gebruikt, moet u nagaan of het compatibel is met de lokale
stroomvoorziening.
Voor de klanten in het VK
Als u de monitor in het VK gebruikt, gebruik dan altijd het
bijgeleverde netsnoer voor het VK.
Voorbeeld van stekkertypes
voor 100 tot 120 V
wisselstroom
• Wacht na het afzetten van het toestel minstens 30 seconden
alvorens de stekker uit het stopcontact te trekken zodat de statische
elektriciteit op het scherm kan ontladen.
• Na het aanschakelen wordt het scherm gedurende enkele seconden
gedemagnetiseerd. Hierbij ontstaat rond het scherm een sterk
magnetisch veld dat gegevens op magneetbanden en diskettes kan
beschadigen. Hou dergelijke zaken dan ook uit de buurt van de
monitor.
Het toestel moet in de buurt van een makkelijk bereikbaar
stopcontact worden geplaatst.
voor 200 tot 240 V
wisselstroom
alleen voor 240 V
wisselstroom
Wijzigingen in ontwerp en technische gegevens voorbehouden zonder
voorafgaande kennisgeving.
Installatie
Installeer de monitor niet op de volgende plaatsen:
• op een zacht of wollig oppervlak (een kleedje of deken), of tegen
gordijnen, waardoor de ventilatie-openingen geblokkeerd kunnen
worden.
• nabij warmtebronnen zoals radiatoren of luchtkanalen, of op een
plek waar het bloot staat aan directe zonnestraling
• op een plek waar het bloot staat aan grote
temperatuurschommelingen
• op een plek waar het bloot staat aan mechanische trillingen of
schokken
• op een onstabiele ondergrond
• nabij apparatuur die een magnetisch veld opwekt, zoals een
transformator of hoogspanningslijnen
• nabij of op een elektrisch geladen metalen oppervlak
• in een gesloten rek
Onderhoud
• Reinig het scherm met een zachte doek. Gebruik geen
glasreinigingsmiddel dat een antistatische oplossing of soortgelijk
additief bevat omdat de schermcoating hierdoor kan worden
gekrast.
• Wrijf, druk of tik niet op het scherm met een scherp of schurend
voorwerp zoals een balpen of schroevendraaier. Daardoor kan de
beeldbuis immers worden gekrast.
• Reinig de behuizing, het voorpaneel en de bedieningselementen
met een zachte doek die lichtjes is bevochtigd met een mild
zeepsopje. Gebruik geen schuursponsje, schuurpoeder noch
solventen zoals alcohol of benzine.
Transport
Transporteer deze monitor altijd in de originele verpakking.
Gebruik van de zwenkvoet
Deze monitor kan in de hieronder
getoonde hoeken worden versteld.
Hou de monitor onderaan met beide
handen vast om hem verticaal of
horizontaal te verstellen. Let op dat
90°
90°90°
15°
5°
90°
uw vingers achteraan de monitor niet
klem raken wanneer u hem verticaal
kantelt.
Centreerlijntje
8
Page 51

Appendix
Preset mode timing table
No. Resolution
(dots × lines)
1640 × 480 31.5 kHz 60 Hz VGA-G
2640 × 480 37.5 kHz 75 Hz EVGA
3640 × 480 43.3 kHz 85 Hz VESA
4720 × 400 31.5 kHz 70 Hz VGA-Text
5720 × 400 37.9 kHz 85 Hz VESA
6800 × 600 37.9 kHz 60 Hz SVGA
7800 × 600 46.9 kHz 75 Hz VESA
8800 × 600 53.7 kHz 85 Hz VESA
9832 × 624 49.7 kHz 75 Hz Macintosh
10 1024 × 768 48.4 kHz 60 Hz VESA
11 1024 × 768 56.5 kHz 70 Hz VESA
12 1024 × 768 60.0 kHz 75 Hz EUVGA
13 1024 × 768 60.2 kHz 75 Hz Macintosh
14 1024 × 768 68.7 kHz 85 Hz VESA
15 1152 × 864 67.5 kHz 75 Hz VESA
16 1152 × 864 77.5 kHz 85 Hz VESA
17 1152 × 870 68.7 kHz 75 Hz Macintosh
18 1280 × 960 60.0 kHz 60 Hz VESA
19 1280 × 960 85.9 kHz 85 Hz VESA
20 1280 × 1024 64.0 kHz 60 Hz VESA
21 1280 × 1024 80.0 kHz 75 Hz VESA
22 1280 × 1024 91.1 kHz 85 Hz VESA
23 1600 × 1200 75.0 kHz 60 Hz VESA
24 1600 × 1200 81.3 kHz 65 Hz VESA
25 1600 × 1200 87.5 kHz 70 Hz VESA
26 1600 × 1200 93.8 kHz 75 Hz VESA
Horizontal
Frequency
Vertical
Frequency
Graphics
Mode
16" Color
19" Color
21" Color
If the input signal does not match one of the factory preset modes
above, the Generalized Timing Formula feature of this monitor
will automatically provide an optimal image for the screen as long
as the signal is GTF compliant.
i
Page 52

TCO’99 Eco-document
x Congratulations!
You have just purchased a TCO’99 approved and labelled
product! Your choice has provided you with a product developed
for professional use. Your purchase has also contributed to
reducing the burden on the environment and also to the further
development of environmentally adapted electronics products.
x Why do we have environmentally labelled
computers?
In many countries, environmental labelling has become an
established method for encouraging the adaptation of goods and
services to the environment. The main problem, as far as
computers and other electronics equipment are concerned, is that
environmentally harmful substances are used both in the products
and during their manufacture. Since it is not so far possible to
satisfactorily recycle the majority of electronics equipment, most
of these potentially damaging substances sooner or later enter
nature.
There are also other characteristics of a computer, such as energy
consumption levels, that are important from the viewpoints of
both the work (internal) and natural (external) environments.
Since all methods of electricity generation have a negative effect
on the environment (e.g. acidic and climate-influencing
emissions, radioactive waste), it is vital to save energy.
Electronics equipment in offices is often left running
continuously and thereby consumes a lot of energy.
x What does labelling involve?
This product meets the requirements for the TCO’99 scheme
which provides for international and environmental labelling of
personal computers. The labelling scheme was developed as a
joint effort by the TCO (The Swedish Confederation of
Professional Employees), Svenska Naturskyddsforeningen (The
Swedish Society for Nature Conservation) and Statens
Energimyndighet (The Swedish National Energy
Administration).
Approval requirements cover a wide range of issues:
environment, ergonomics, usability, emission of electric and
magnetic fields, energy consumption and electrical and fire
safety.
The environmental demands impose restrictions on the presence
and use of heavy metals, brominated and chlorinated flame
retardants, CFCs (freons) and chlorinated solvents, among other
things. The product must be prepared for recycling and the
manufacturer is obliged to have an environmental policy which
must be adhered to in each country where the company
implements its operational policy.
The energy requirements include a demand that the computer and/
or display, after a certain period of inactivity, shall reduce its
power consumption to a lower level in one or more stages. The
length of time to reactivate the computer shall be reasonable for
the user.
Labelled products must meet strict environmental demands, for
example, in respect of the reduction of electric and magnetic
fields, physical and visual ergonomics and good usability.
Below you will find a brief summary of the environmental
requirements met by this product. The complete environmental
criteria document may be ordered from:
TCO Development
SE-114 94 Stockholm, Sweden
Fax: +46 8 782 92 07
Email (Internet): [email protected]
Current information regarding TCO’99 approved and labelled
products may also be obtained via the Internet, using the
address: http://www.tco-info.com/
x Environmental requirements
Flame retardants
Flame retardants are present in printed circuit boards, cables,
wires, casings and housings. Their purpose is to prevent, or at
least to delay the spread of fire. Up to 30% of the plastic in a
computer casing can consist of flame retardant substances. Most
flame retardants contain bromine or chloride, and those flame
retardants are chemically related to another group of
environmental toxins, PCBs. Both the flame retardants containing
bromine or chloride and the PCBs are suspected of giving rise to
severe health effects, including reproductive damage in fisheating birds and mammals, due to the bio-accumulative*
processes. Flame retardants have been found in human blood and
researchers fear that disturbances in foetus development may
occur.
The relevant TCO’99 demand requires that plastic components
weighing more than 25 grams must not contain flame retardants
with organically bound bromine or chlorine. Flame retardants are
allowed in the printed circuit boards since no substitutes are
available.
Cadmium**
Cadmium is present in rechargeable batteries and in the colourgenerating layers of certain computer displays. Cadmium
damages the nervous system and is toxic in high doses. The
relevant TCO’99 requirement states that batteries, the colourgenerating layers of display screens and the electrical or
electronics components must not contain any cadmium.
Mercury**
Mercury is sometimes found in batteries, relays and switches. It
damages the nervous system and is toxic in high doses. The
relevant TCO’99 requirement states that batteries may not contain
any mercury. It also demands that mercury is not present in any of
the electrical or electronics components associated with the
labelled unit.
CFCs (freons)
The relevant TCO’99 requirement states that neither CFCs nor
HCFCs may be used during the manufacture and assembly of the
product. CFCs (freons) are sometimes used for washing printed
circuit boards. CFCs break down ozone and thereby damage the
ozone layer in the stratosphere, causing increased reception on
earth of ultraviolet light with e.g. increased risks of skin cancer
(malignant melanoma) as a consequence.
Lead**
Lead can be found in picture tubes, display screens, solders and
capacitors. Lead damages the nervous system and in higher doses,
causes lead poisoning. The relevant TCO’99 requirement permits
the inclusion of lead since no replacement has yet been developed.
* Bio-accumulative is defined as substances which accumulate
within living organisms.
** Lead, Cadmium and Mercury are heavy metals which are Bio-
accumulative.
Sony Corporation Printed in U.K.
Chroline free paper- 100% recyclable
Printed on 100% recycled paper
 Loading...