

Page 1
3-867-659-11 (1)
Trinitron Color
Computer Display
Operating Instructions
Mode d’emploi
Bedienungsanleitung
Manual de instrucciones
Istruzioni per l’uso
Инструкция по эксплуатации
GB
FR
DE
ES
IT
RU
CPD-E100E
© 1999 by Sony Corporation
Page 2

Owner’s Record
The model and serial numbers are located at the rear of the unit.
Record these numbers in the spaces provided below. Refer to them
whenever you call upon your dealer regarding this product.
Model No.
Serial No.
WARNING
To prevent fire or shock hazard, do not expose the
unit to rain or moisture.
Dangerously high voltages are present inside the
unit. Do not open the cabinet. Refer servicing to
qualified personnel only.
FCC Notice
This equipment has been tested and found to comply with the limits
for a Class B digital device, pursuant to Part 15 of the FCC Rules.
These limits are designed to provide reasonable protection against
harmful interference in a residential installation. This equipment
generates, uses, and can radiate radio frequency energy and, if not
installed and used in accordance with the instructions, may cause
harmful interference to radio communications. However, there is no
guarantee that interference will not occur in a particular installation.
If this equipment does cause harmful interference to radio or
television reception, which can be determined by turning the
equipment off and on, the user is encouraged to try to correct the
interference by one or more of the following measures:
– Reorient or relocate the receiving antenna.
– Increase the separation between the equipment and receiver.
– Connect the equipment into an outlet on a circuit different from
that to which the receiver is connected.
– Consult the dealer or an experi enced radi o/TV techni cian for hel p.
You are cautioned that any changes or modifications not expressly
approved in this manual could void your authority to operate this
equipment.
EN 55022 Compliance (Czech Republic Only)
This device belongs to category B devices as described in EN
55022, unless it is specifically stated that it is a category A
device on the specification label. The following applies to
devices in category A of EN 55022 (radius of protection up to
30 meters). The user of the device is obliged to take all steps
necessary to remove sources of interference to
telecommunication or other devices.
Hinweise
• Aus ergonomischen Gründen wird empfohlen, die
Grundfarbe Blau nicht auf dunklem Untergrund zu verwenden
(schlechte Erkennbarkeit, Augenbelastung bei zu geringem
Zeichenkontrast).
• Aus ergonomischen Gründen (flimmern) sollten nur
Darstellungen bei Vertikalfrequenzen ab 70 Hz (ohne
Zeilensprung) verwendet werden.
• Die Konvergenz des Bildes kann sich auf Grund des
Magnetfeldes am Ort der Aufstellung aus der korrekten
Grundeinstellung verändern. Zur Korrektur empfiehlt es sich
deshalb, die Regler an der Frontseite für Konvergenz so
einzustellen, daß die getrennt sichtbaren Farblinien für Rot,
Grün und Blau bei z.B. der Darstellung eines Buchstabens
zur Deckung (Konvergenz) gelangen.
Siehe hierzu auch die Erklärungen zu Konv ergenz.
NOTICE
This notice is applicable for USA/Canada only.
If shipped to USA/Canada, install only a UL LISTED/CSA
LABELLED power supply cord meeting the following
specifications:
SPECIFICATIONS
Plug Type Nema-Plug 5-15p
Cord Type SVT or SJT, minimum 3 × 18 AWG
Length Maximum 15 feet
Rating Minimum 7 A, 125 V
NOTICE
Cette notice s’applique aux Etats-Unis et au Canada
uniquement.
Si cet appareil est export* aux Etats-Unis ou au Canada, utiliser
le cordon d’alimentation portant la mention UL LISTED/CSA
LABELLED et remplissant les conditions suivantes:
SPECIFICATIONS
Type de fiche Fiche Nema 5-15 broches
Cordon Type SVT ou SJT, minimum 3 × 18 AWG
Longueur Maximum 15 pieds
Tension Minimum 7 A, 125 V
E
NERGY STAR Partner, Sony
As an
Corporation has determined that this
product meets the
guidelines for energy efficiency.
E
NERGY STAR
INFORMATION
This product complies with Swedish National Council for Metrology
(MPR) standards issued in December 1990 (MPR II) for very low
frequency (VLF) and extremely low frequency (ELF).
INFORMATION
Ce produit est conforme aux normes du Swedish National Council
for Metrology de décembre 1990 (MPR II) en ce qui concerne les
fréquences très basses (VLF) et extrêmement basses (ELF).
Hinweis
Dieses Gerät erfüllt bezüglich tieffrequenter (very low frequency)
und tiefstfrequenter (extremely low frequency) Strahlung die
Vorschriften des „Swedish National Council for Metrology (MPR)“
vom Dezember 1990 (MPR II).
INFORMACIÓN
Este producto cumple las normas del Consejo Nacional Sueco para
Metrología (MPR) emitidas en diciembre de 1990 (MPR II) para
frecuencias muy bajas (VLF) y frecuencias extremadamente bajas (ELF).
Dieses Garät entspricht den folgenden europäischen EMVVorschriften für Betrieb in Wohngebieten, gewerblicher Gebleten
und Leichtindustriegebieten.
EN55022/1994 Klasse B
EN50082-1/1997
EN61000-3-2/1995
2
This monitor complies with the
TCO’99 guidelines.
Declaration of Conformity
Trade Name: Sony
Model No.: CPD-E100E
Responsible Party: Sony Electronics Inc.
Address: 1 Sony Drive, Park Ridge, NJ. 07656 USA
Telephone No.: 201-930-6970
This device complies with Part 15 of the FCC Rules. Operation is
subject to the following two conditions: (1) This device may not
cause harmful interference, and (2) this device must accept any
interference received, including interference that may cause
undesired operation.
Page 3
Table of Contents
Precautions. . . . . . . . . . . . . . . . . . . . . . . . . . . . . . . . . . . . . . . . . . . . 4
Identifying parts and controls . . . . . . . . . . . . . . . . . . . . . . . . . . . . . . 5
Setup. . . . . . . . . . . . . . . . . . . . . . . . . . . . . . . . . . . . . . . . . .6
Step 1:
Step 2:
Step 3:
Connect your monitor to your computer . . . . . . . . . . . . . . . 6
Connect the power cord. . . . . . . . . . . . . . . . . . . . . . . . . . . . 6
Turn on the monitor and computer . . . . . . . . . . . . . . . . . . . 7
Selecting the on-screen menu language (LANGUAGE/
INFORMATION) . . . . . . . . . . . . . . . . . . . . . . . . . . . . . . . . . . . . . . . . 7
Customizing Your Monitor . . . . . . . . . . . . . . . . . . . . . . . .8
Navigating the menu. . . . . . . . . . . . . . . . . . . . . . . . . . . . . . . . . . . . . 8
Adjusting the brightness and contrast. . . . . . . . . . . . . . . . . . . . . . . . 9
Adjusting the horizontal size or centering of the picture (H-SIZE/
CENTER) . . . . . . . . . . . . . . . . . . . . . . . . . . . . . . . . . . . . . . . . . . . . 10
Adjusting the vertical size or centering of the picture (V-SIZE/
CENTER) . . . . . . . . . . . . . . . . . . . . . . . . . . . . . . . . . . . . . . . . . . . . 10
Adjusting the curvature of the picture’s sides (PIN/PIN BALANCE)10
Adjusting the angle of the picture’s sides (KEY/KEY BALANCE). . 10
Adjusting the picture’s rotation (ROTATION) . . . . . . . . . . . . . . . . . 11
Enlarging or reducing the picture (ZOOM) . . . . . . . . . . . . . . . . . . . 11
Adjusting the color of the picture (COLOR) . . . . . . . . . . . . . . . . . . 11
Additional settings (DEGAUSS/CANCEL MOIRE) . . . . . . . . . . . . . 12
Resetting the adjustments . . . . . . . . . . . . . . . . . . . . . . . . . . . . . . . 12
GB
• Trinitron is a registered trademark of
Sony Corporation.
• Macintosh is a trademark license d to
Apple Computer, Inc., registered in the
U.S.A. and other countries.
• Windows
trademarks of Microsoft Corporation in
the United States and other countries.
• IBM PC/AT and VGA are registered
trademarks of IBM Corporation of the
U.S.A.
• VESA and DDC
Video Electronics Standard
Association.
•
E
mark.
• All other product names m ent i one d
herein may be the trademarks or
registered trademarks of their respective
companies.
• Furthermo re, “” and “” are not
mentioned in each case in this manual.
and MS-DOS are registered
are trademarks of the
NERGY STAR is a U.S. registered
Technical Features . . . . . . . . . . . . . . . . . . . . . . . . . . . . .13
Preset and user modes. . . . . . . . . . . . . . . . . . . . . . . . . . . . . . . . . . 13
Power saving function. . . . . . . . . . . . . . . . . . . . . . . . . . . . . . . . . . . 13
Troubleshooting. . . . . . . . . . . . . . . . . . . . . . . . . . . . . . . .13
If thin line appears on your screen (damper wire) . . . . . . . . . . . . . 13
On-screen messages . . . . . . . . . . . . . . . . . . . . . . . . . . . . . . . . . . . 13
Trouble symptoms and remedies . . . . . . . . . . . . . . . . . . . . . . . . . . 14
Self-diagnosis function . . . . . . . . . . . . . . . . . . . . . . . . . . . . . . . . . . 16
Specifications. . . . . . . . . . . . . . . . . . . . . . . . . . . . . . . . . .16
Appendix. . . . . . . . . . . . . . . . . . . . . . . . . . . . . . . . . . . . . . . i
Preset mode timing table . . . . . . . . . . . . . . . . . . . . . . . . . . . . . . . . . .i
TCO’99 Eco-document . . . . . . . . . . . . . . . . . . . . . . . . . . . . . . . . . . . .i
3
Page 4

Precautions
90°
5°
90°
15°
Centering dots
Warning on power connections
• Use the supplied power cord. If you use a different power cord,
be sure that it is compatible with your local power supply.
For the customers in the UK
If you use the monitor in the UK, be sure t o use the supplied UK
power cable.
Example of plug types
for 100 to 120 V AC for 200 to 240 V AC for 240 V AC only
• Before disconnecting the power cord, wait at least 30 seconds
after turning off the power to allow the static elec tricity on the
screen’s surface to discharge.
• After the power is turned on, the screen is demagnetized
(degaussed) for about 5 seconds. This generates a strong
magnetic field around the screen which may affect data stored
on magnetic tapes and disks placed near the monitor. Be sure to
keep magnetic recording equipment, tapes, a nd disks away
from the monitor.
Use of the tilt-swivel
This monitor can be adjusted within the angles shown below. To
find the center of the mon itor’ s turnin g radius, a lign the ce nter of
the monitor’s screen with the centering dots on the stand.
Hold the monitor at the bott om with bo th ha nd s whe n yo u tu rn it
horizontally or vertically. Be careful not to pinch your fingers at
the back of the monitor when you tilt the monitor up vertically.
The equipment should be in stalled near an easily accessible
outlet.
Installation
Do not install the monitor in the following places:
• on surfaces (rugs, blankets, etc.) or near materials (curtains,
draperies, etc.) that may block the ventilation holes
• near heat sources such as radiators or air ducts, or in a place
subject to direct sunlight
• in a place subject to severe temperature changes
• in a place subject to mechanical vibration or shock
• on an unstable surface
• near equipment which generates magnetism, such as a
transformer or high volta g e po w er lines
• near or on an electrically charged metal surface
Maintenance
• Clean the screen with a soft cloth. If you use a glass cleaning
liquid, do not use any t ype of cleaner containing an anti-static
solution or similar additive as this may scratch the screen’s
coating.
• Do not rub, touch, or tap the surface of the screen with sharp or
abrasive items su ch as a ballpoint pe n or screwdrive r. This type
of contact may result in a scratched pict ure tube.
• Clean the cabin e t, pane l and co nt rols wi th a soft cloth ligh tly
moistened with a mild detergent solution. Do not use any type
of abrasive pa d, sc ouring powder or solv ent, s uch as a lcohol o r
benzene.
Transportation
When you transport this monitor for repair or shipment, use the
original carton and packing materials.
4
Page 5
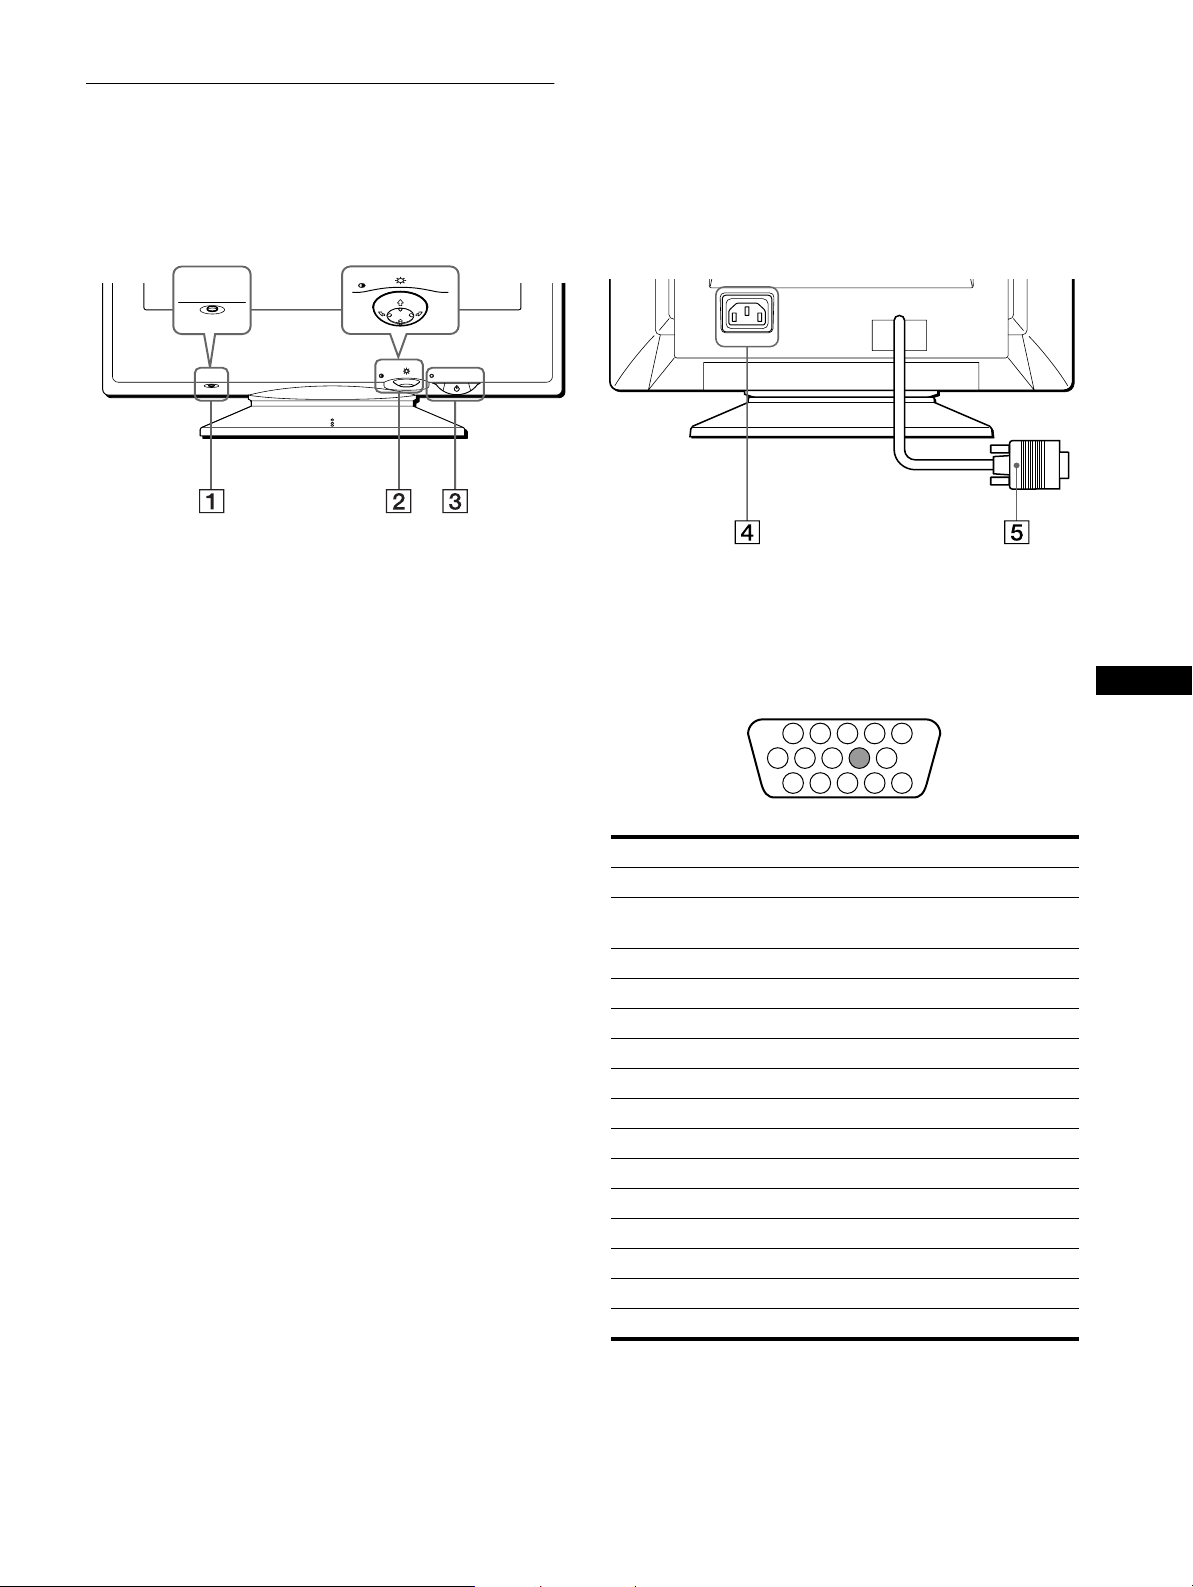
Identifying parts and controls
1 2 3 4
5
876
11 12 13 14 15
10
9
See the pages in parentheses for further details.
MENU
RESET
RESET
MENU
RearFront
AC IN
1 RESET button (page 12)
This button resets the adjustments to the factory settings.
2 Control button (page 9)
The control button is used to display the menu and make
adjustments to the monitor, including brightn ess and contrast
adjustments.
3 1 (power) switch and indicator (pages 7, 13, 16)
This button turns the monitor on and off. The power ind icator
lights up in green when the monitor is turned on, and either
flashes in green and orange, or lights up in orange when the
monitor is in power saving mode.
4 AC IN connector (page 6)
This connector provides AC power to the monitor.
5 Video input connector (HD15) (page 6)
This connector inputs RGB video sign als (0.700 Vp-p,
positive) and sync signals.
Pin No. Signal
1Red
2 Green
(Sync on Green)
3Blue
4 ID (Ground)
5 DDC Ground*
6 Red Ground
7 Green Ground
8 Blue Ground
9–
10 Ground
11 ID (Ground)
12 Bi-Directional Data (SDA)*
13 H. Sync
14 V. Sync
15 Data Clock (SCL)*
GB
* DDC (Displ a y Dat a Ch annel) is a standard of VESA.
5
Page 6

Setup
AC IN
You will need a Macintosh adapter (not supplied).
Macintosh adapter (not supplied)
to video output
Macintosh or
compatible computer
AC IN
to AC IN
to a power outlet
power cord (supplied)
Before using your monitor, check that t he following accessories
are included in your carton:
• Power cord (1)
• Windows Monitor Information Disk (1)
• Warranty card (1)
• Notes on cleaning the screen’s surface (1)
• This instruction manual (1)
Step 1:Connect your monitor to
your computer
Turn off the monitor and computer before connecting.
Note
Do not touch the pins of the video cable connector as this might bend the
pins.
Connecting to an IBM PC/A T or compatible
x
computer
Connecting to a Macintosh or compatible
x
computer
AC IN
to video output
IBM PC/AT or
compatible computer
Step 2:Con nect the power cord
With the monitor and computer switched off, first connect the
power cord to the monitor, then connect it to a power outlet.
6
Page 7
Step 3:Turn on the monitor and
Selecting the on-screen menu
computer
First turn on the monitor, then turn on the computer.
The installation of your monitor is complete.
If necessary, use the monitor’s controls to adjust the picture.
If no picture appears on your screen
• Check that the monitor is correctly connected to the computer.
• If NO INPUT SIGNAL appears on the screen, confirm that
your computer’s graphic board is completely seated in the
correct bus slot.
• If you are replacing an old monitor with this model and OUT
OF SCAN RANGE appears on the screen, reconnect the old
monitor. Then adjust the computer’s graphic board so that the
horizontal frequency is between 30 – 70 kHz, and the vertical
frequency is between 48 – 120 Hz.
For more information about the on-screen messages, see “Trouble
symptoms and remedies” on page 14.
For customers using Windows 95/98
To maximize the potential of your monitor, install the new model
information file from the supplied Windows Monitor Inform at ion Disk
onto your PC.
This monitor complies with the “VESA DDC” Plug & Play stan dard. If
your PC/graphics board complies with DDC, select “Plug & Play Monitor
(VESA DDC)” or this monitor’s mode l na m e a s the mo nitor type in the
“Control Panel” of Windows 95/98. If your PC/graphics board has
difficulty commu nicating with this monitor, loa d the Windows Monitor
Information Disk and select this monitor’s model name as the monitor
type.
For customers using Windows NT4.0
Monitor setup in Windows NT4.0 is different from Windows 95/9 8 an d
does not involve the sele c ti on of monitor type. Refer to th e Windows
NT4.0 instruction ma nual for further details on adjusting the resoluti on,
refresh rate, and number of col ors.
Adjusting the monitor’s resolution and color number
Adjust the monitor’s resolution and color number by referring to your
computer’s instruction manual. The color number may vary according to
your computer or video board. The color palette setting and the actual
number of colors are as follows:
• High Color (16 bit) t 65,536 colors
• True Color (24 bit) t about 16.77 million colors
In true color mode (24 bit), speed may be slower.
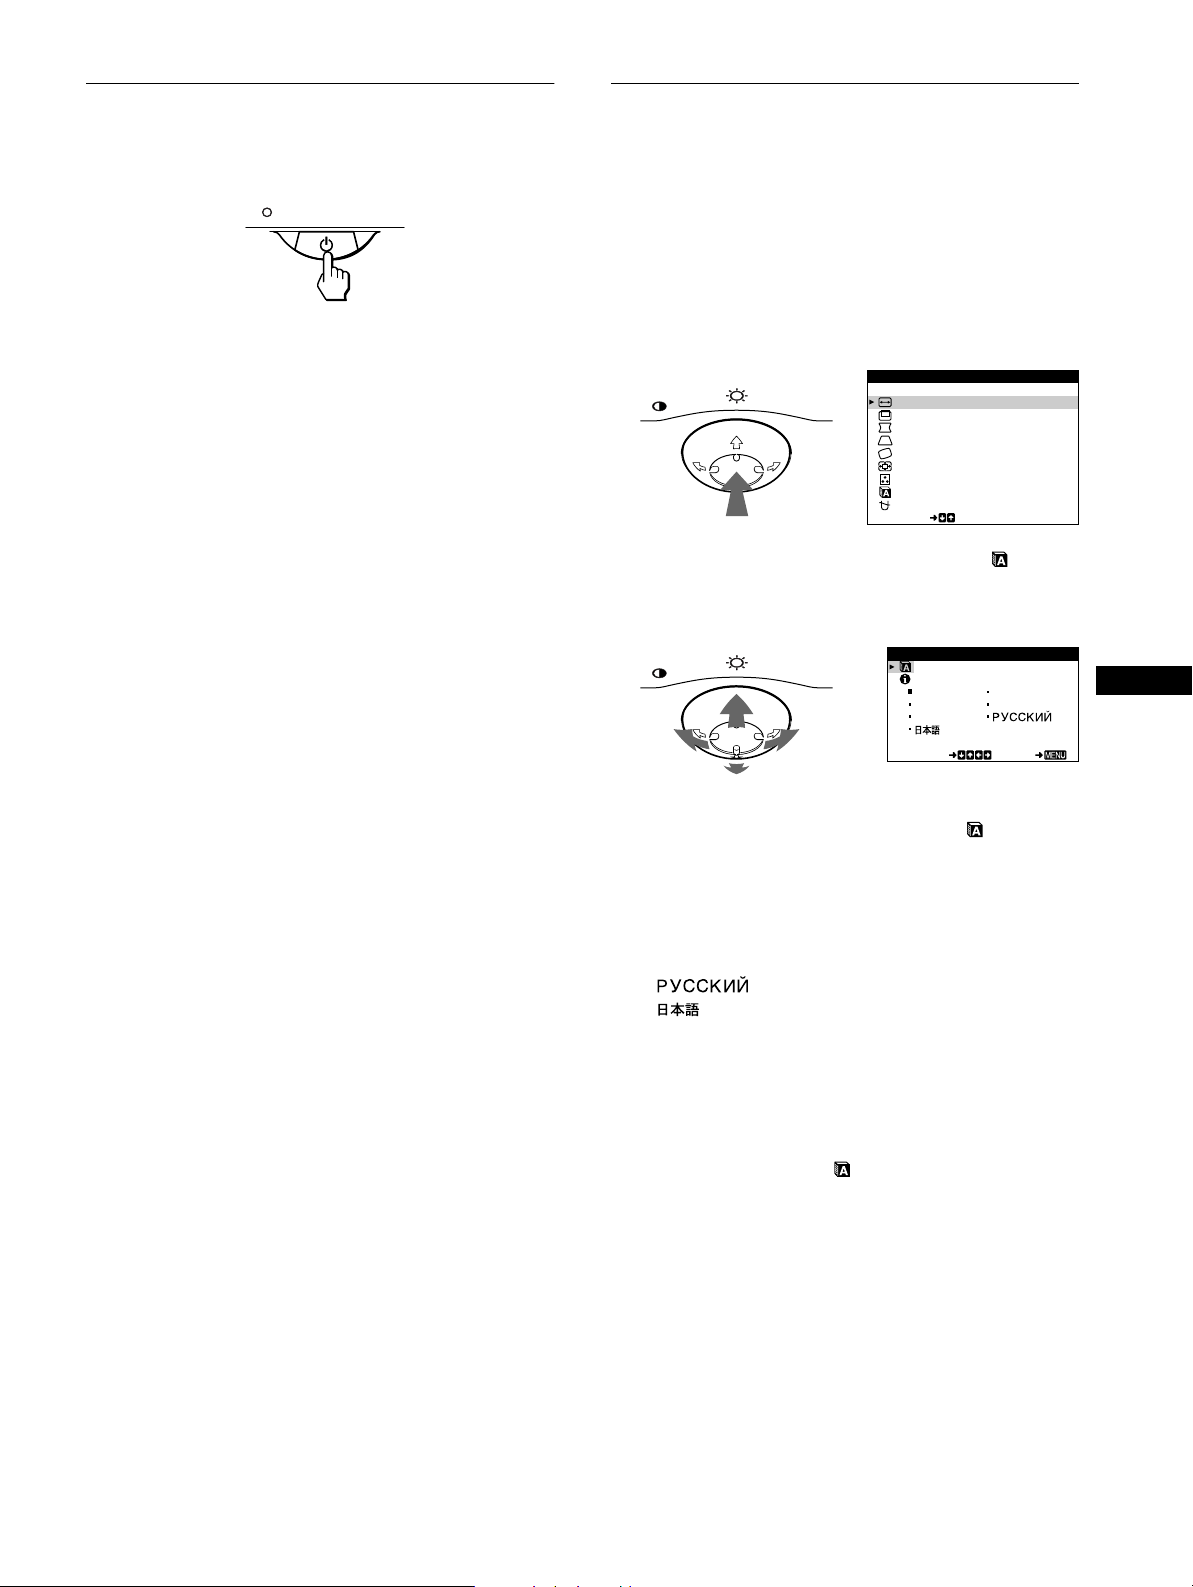
language (LANGUAGE/
INFORMATION)
English, French, German, Italian, Sp anish, Russian and Japan ese
versions of the on-screen menus are available. The de fault setting
is English.
1
Press the center of the control button.
See page 9 for more information on using the control button.
MENU
2
Move the control button m/M to highlight
LANGUAGE/INFORMATION and press the center of
the control button again.
MENU
3
Move the control button m/M to select
(LANGUAGE) and move </, to select a language.
• ENGLISH
• FRANÇAIS: French
• DEUTSCH: German
• ITALIANO: Italian
• ESPAÑOL: Spanish
• : Russian
• : Japanese
To close the menu
Press the center of the control button once to return to the main MENU,
and press again selecting EXIT to return to normal viewing. If no buttons
are pressed, the menu closes automatically after about 30 seconds.
To reset to English
Press the RESET button while the (LANGUAGE) menu is displayed
on the screen.
MENU
EX I T
H- S I ZE / CENTER
V-SIZE/CENTER
PIN/PIN BALANCE
KEY / KEY BA L ANCE
ROTAT I ON
ZOOM
COLOR
LANGU AGE / I NFORMA T NOI
DEGAUSS/ CANCEL MO ERI
SELECT
LANGUAGE / INFORMAT ION
ENGL I SH FRANÇA I S
DEUTSCH I T A L IANO
ESPAÑOL
SELECT EXI T
GB
7
Page 8
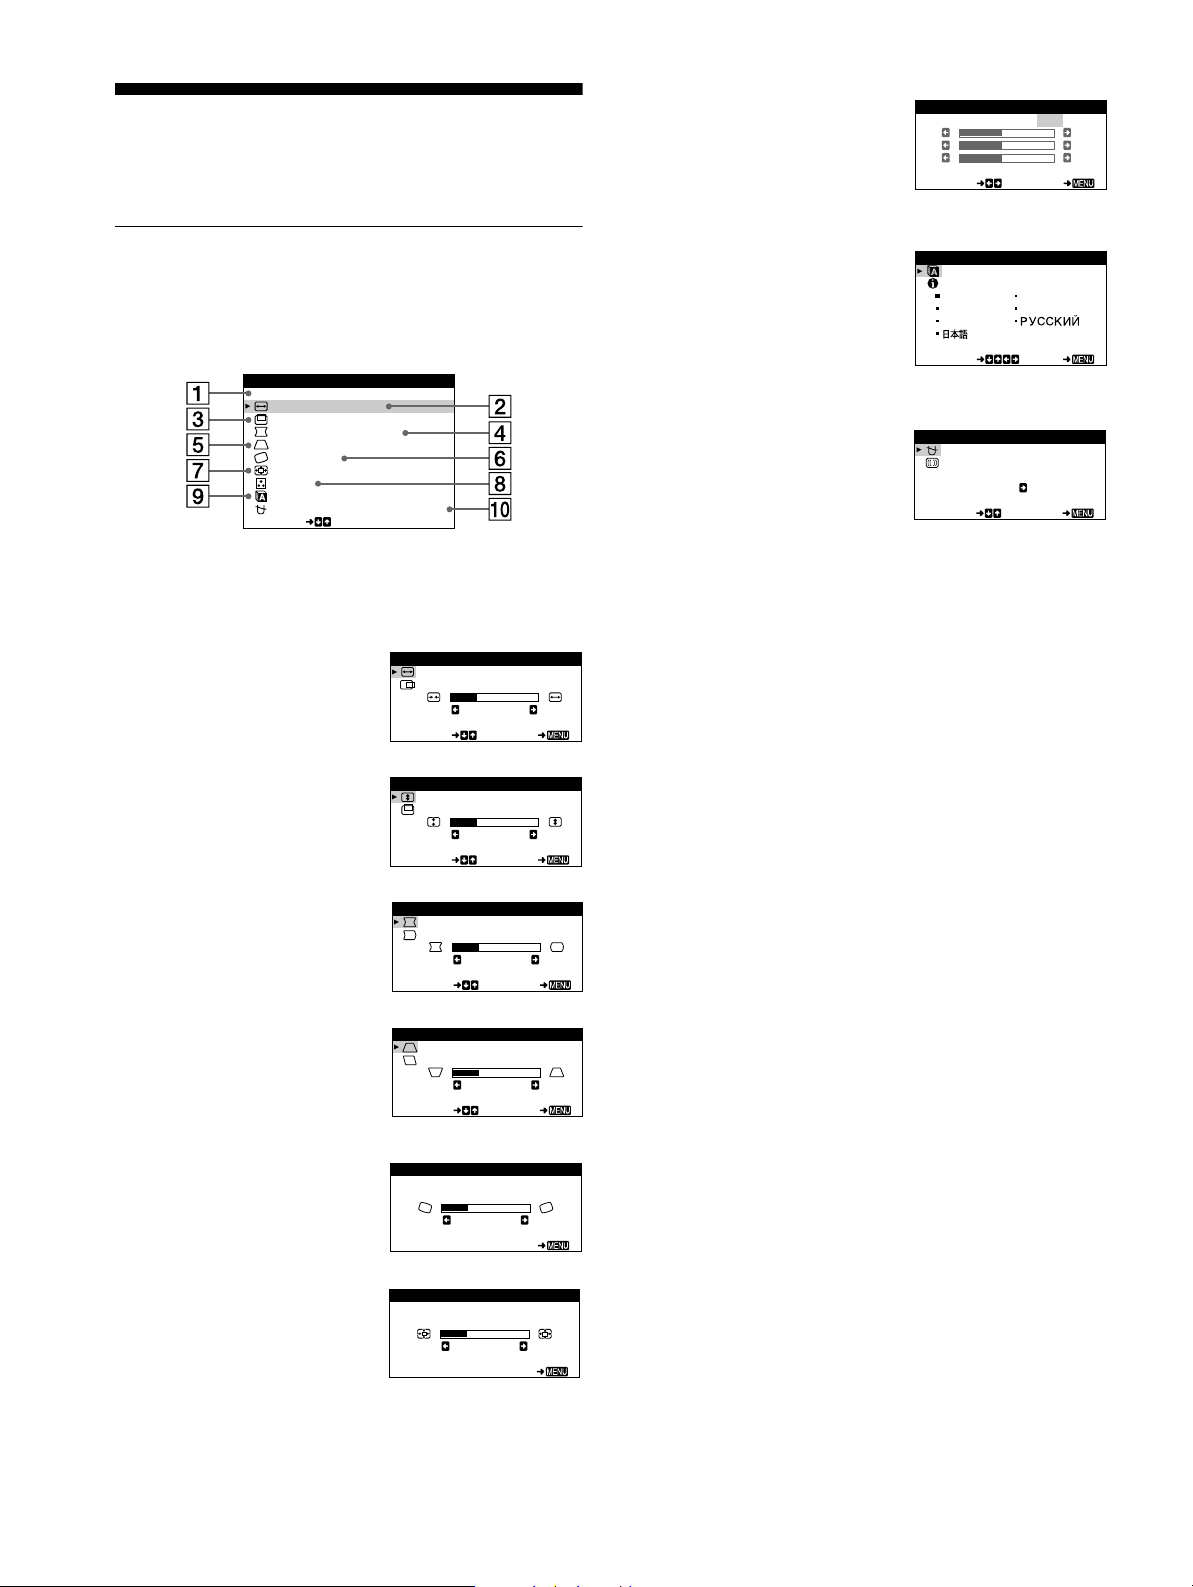
Customizing Your Monitor
You can make numerous adj ustments to your monitor using the
on-screen menu.
COLOR (page 11)
8
Select the COLOR menu to adjust
the picture’s color temperature.
You can use this to match the
monitor’s colors to a printed
picture’s colors.
COLOR
R50
G50
B50
SELECT EXI T
KKK
5000 6500 9300
USER
Navigating the menu
Press the center of the control button to display the main MENU
on your screen. See page 9 for more information on using the
control button.
MENU
EX I T
H- S I ZE / CENTER
V-SIZE/CENTER
PIN/PIN BALANCE
KEY / KEY BALANCE
ROTAT I ON
ZOOM
COLOR
LANGUAGE / I NFORMAT NOI
DEGAUSS/ CANCEL MO ERI
SELECT
Use the control button to select one of the following menus.
EXIT
1
Select EXIT to close the menu.
H-SIZE/CENTER (page 10)
2
Select the H-SIZE/CENTER
menu to adjust the picture’s
horizontal size and centeri ng.
V-SIZE/CENTER (page 10)
3
Select the V-SIZE/CENTER
menu to adjust the picture’s
vertical size and centering.
H -S I ZE/CENTER
H-SIZE
26
SELECT EXI T
V-SIZE/CENTER
V-SIZE
26
SELECT EXI T
LANGUAGE/INFORMATION
9
(page 7, 15)
Select the LANGUAGE/
INFORMATION menu to choose
the on-screen menu’s languag e
and display this moni tor ’s
information box.
DEGAUSS/CANCEL MOIRE
q;
(page 12)
Select the DEGAUSS/CANCEL
MOIRE menu to deg a uss the
screen and ad j ust the moire
cancellation level.
LANGUAGE / INFORMAT ION
ENGL I SH FRANÇA I S
DEUTSCH I T A L IANO
ESPAÑOL
SELECT EXI T
DEGAUSS/ CANCEL MOI RE
DEGAUSS
ON
SELECT EXI T
PIN/PIN BALANCE (page 10)
4
Select the PIN/PIN BALANCE
menu to adju st the curvatu r e
picture’s sides.
KEY/KEY BALANCE
5
(page 10)
Select the KEY/KEY BALANCE
menu to adju st the angle of the
picture’s sides.
ROTATION (page 11)
6
Select the ROTATION menu to
adjust the picture’s rotation.
ZOOM (page 11)
7
Select the ZOOM menu to enla rge
or reduce the picture.
PIN/PIN BALANCE
PIN
26
SELECT EXI T
KEY/ KEY BAL ANCE
KEY
26
SELECT EXI T
ROTAT ION
ROTAT ION
26
EX I T
ZOOM
ZOOM
26
EX I T
8
Page 9
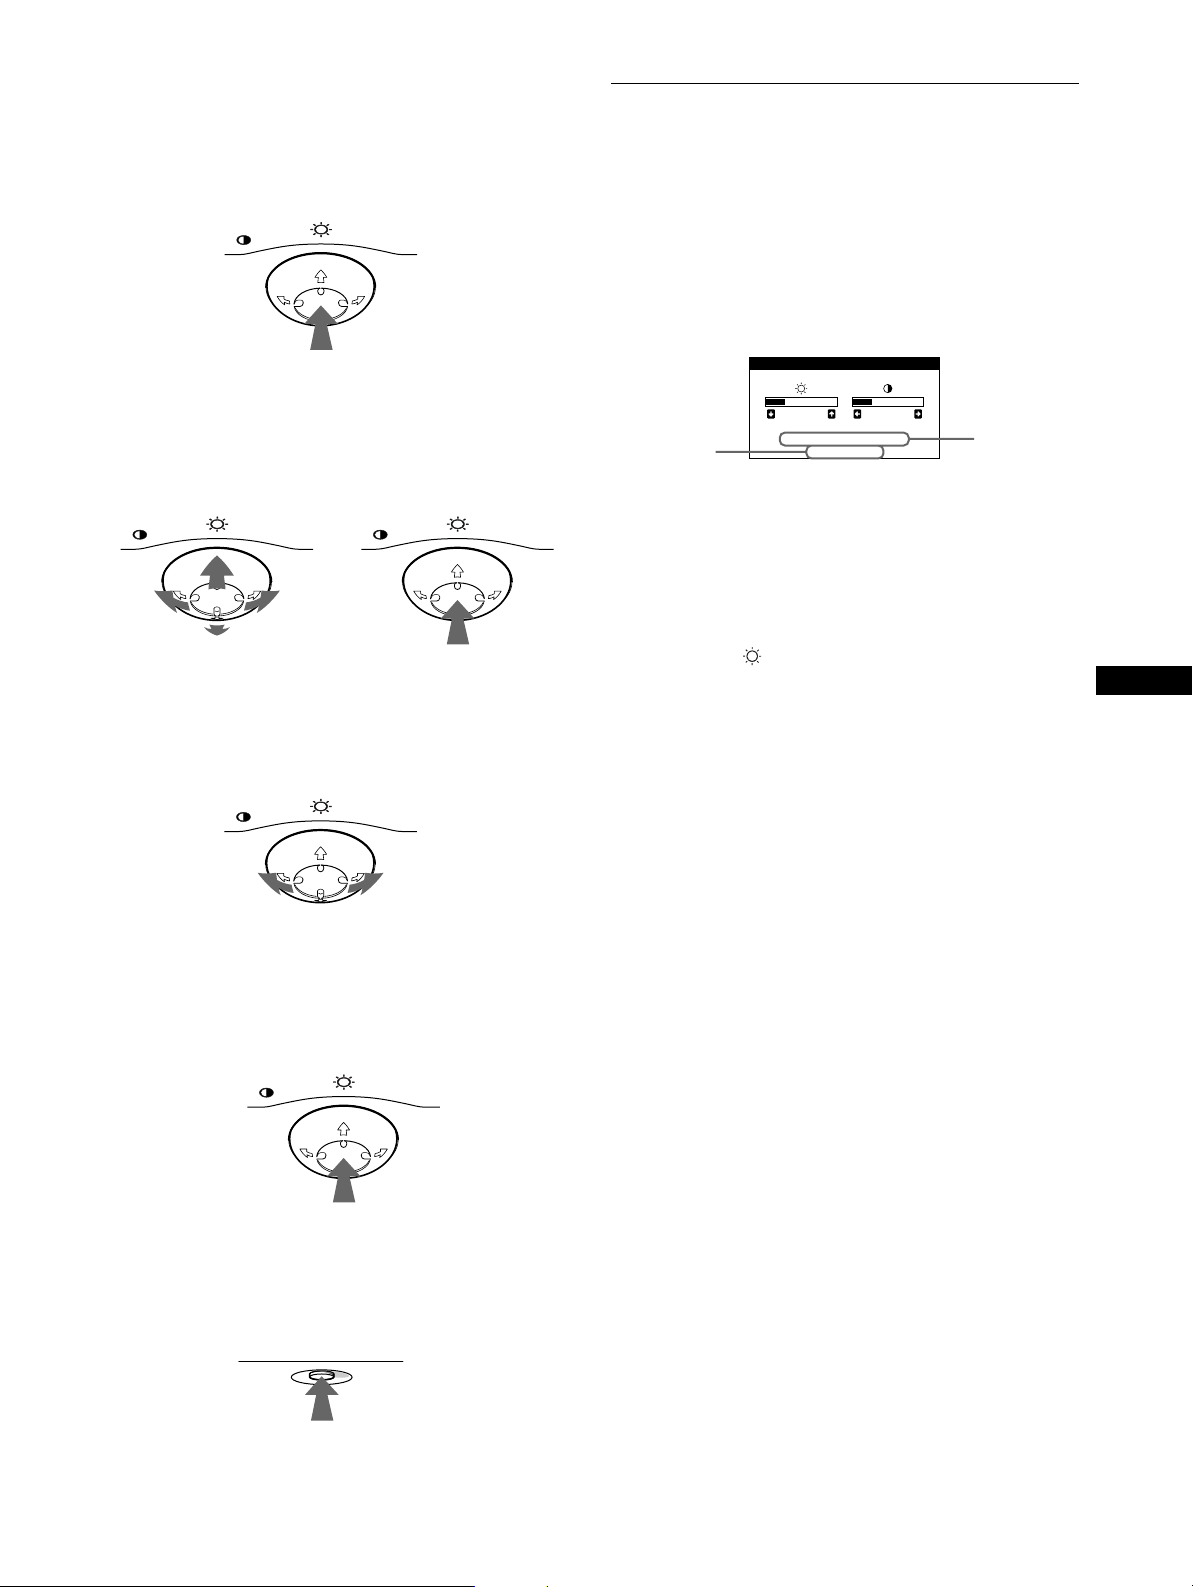
Using the control button
x
1
Display the main MENU.
Press the center of the control button to display the main
MENU on your screen.
MENU
2
Select the menu you want to adjust.
Highlight the desired menu by moving the control button
towards the rear to go up (M), towards the front to go down
(m), and left (<) or right (,) to move sideways.
FRONT
MENU MENU
REAR
3
Adjust the menu.
Move the control button left (<) or right (,) to make the
adjustment.
Adjusting the brightness and contrast
Brightness and contrast adjust ments are made using a separate
BRIGHTNESS/CONTRAST menu.
These settings are stored in memory for all input signals.
1
Move the control button in any direction.
The BRIGHTNESS/CONTRAST menu appears on the
screen.
BR I GHTNESS/ CONTRAST
26 26
the resolution
of the current
input signal
68.7kHz/85.0Hz
1024X768
The horizontal and vertical frequencies of the current input
signal are displayed in the BRIGHTNESS/CONTRAST
menu. If the signal matches one of this monitor’s factory
preset modes, the resolution is also displayed.
2
Move the control button m/M to adjust the
brightness ( ), and </, to adjust the contrast
(6).
The menu automatically disappears after about 3 seconds.
the horizontal
and vertical
frequencies of
the current
input signal
GB
MENU
4
Close the menu.
Press the center of the control button once to return to the
main MENU, and press again selecting EXIT to return to
normal viewing. If no buttons are pressed, the menu closes
automatically after about 30 seconds.
MENU
Resetting the adjustments
x
Press the RESET button. See page 12 for more information on
resetting the adjustments.
RESET
9
Page 10
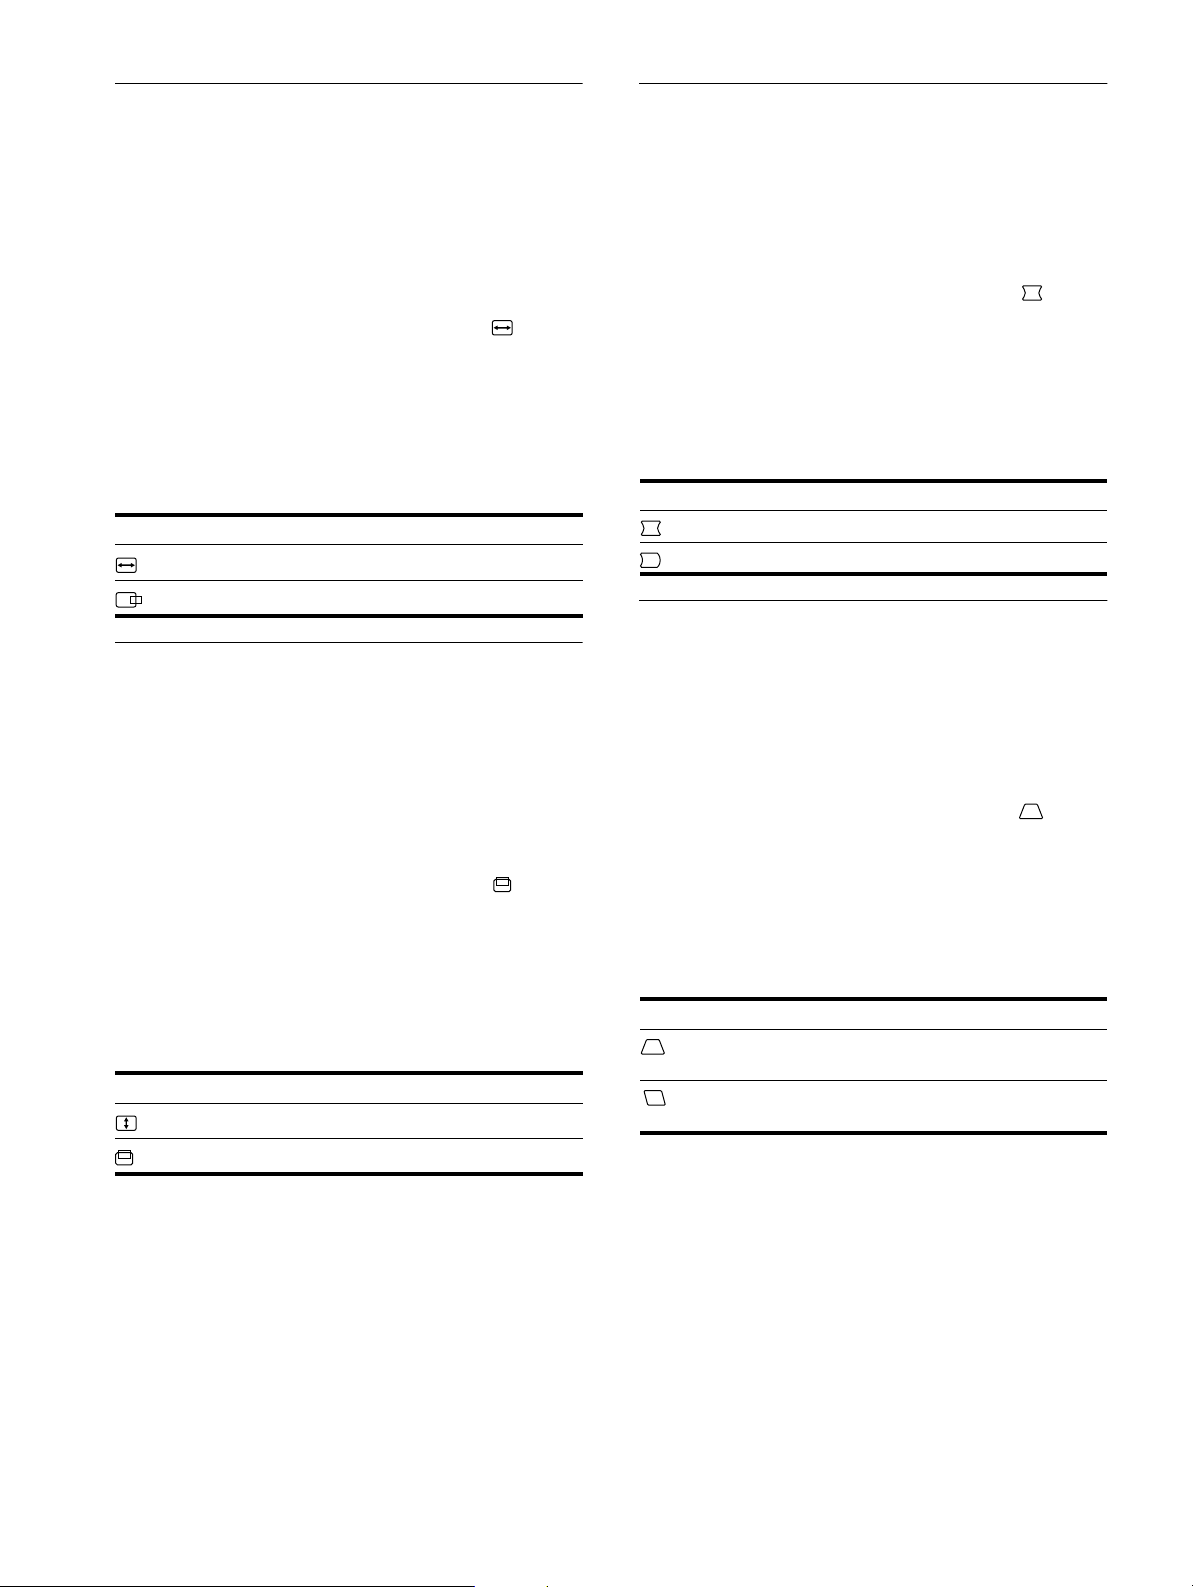
Adjusting the horizontal size or
Adjusting the curvature of the
centering of the picture (H-SIZE/
CENTER)
These settings are stored in memory for the current input signal.
1
Press the center of the control button.
The main MENU appears on the screen .
2
Move the control button m/M to highlight H-SIZE/
CENTER and press the center of the control button
again.
The H-SIZE/CENTER menu appears on the screen.
3
First move the control button m/M to select the
desired adjustment item. Then move the control
button </, to make the adjustment.
Select To
H-SIZE
H-CENTER
adjust the horizontal size
adjust the horizontal centering
Adjusting the vertical size or centering of the picture (V-SIZE/ CENTER)
These settings are is stored in memory for the c urrent input signal .
picture’s sides (PIN/PIN BALANCE)
These settings are stored in memory for the current input signal.
1
Press the center of the control button.
The main MENU appears on the screen.
2
Move the control button m/M to highlight PIN/
PIN BALANCE and press the center of the control
button again.
The PIN/PIN BALANCE menu appears on the screen.
3
First move the control button m/M to select the
desired adjustment item. Then move the control
button </, to make the adjustment.
Select To
PIN
PIN BALANCE
expand or contract the picture sides
shift the picture sides to the left or right
Adjusting the angle of the picture’ s
sides (KEY/KEY BALA NCE)
These settings are stored in memory for the current input signal.
1
Press the center of the control button.
The main MENU appears on the screen.
1
Press the center of the control button.
The main MENU appears on the screen .
2
Move the control button m/M to highlight V-SIZE/
CENTER and press the center of the control button
again.
The V-SIZE/CENTER menu appears on the screen.
3
First move the control button m/M to select the
desired adjustment item. Then move the control
button </, to make the adjustment.
Select To
V-SIZE
V-CENTER
adjust the vertical size
adjust the vertical centering
2
Move the control button m/M to highlight KEY/
KEY BALANCE and press the center of the control
button again.
The KEY/KEY BALANCE menu appears on the screen.
3
First move the control button m/M to select the
desired adjustment item. Then move the control
button </, to make the adjustment.
Select To
KEY
KEY BALANCE
adjust the picture width at the t op of
the screen
shift the picture to the left or right at
the top of the screen
10
Page 11
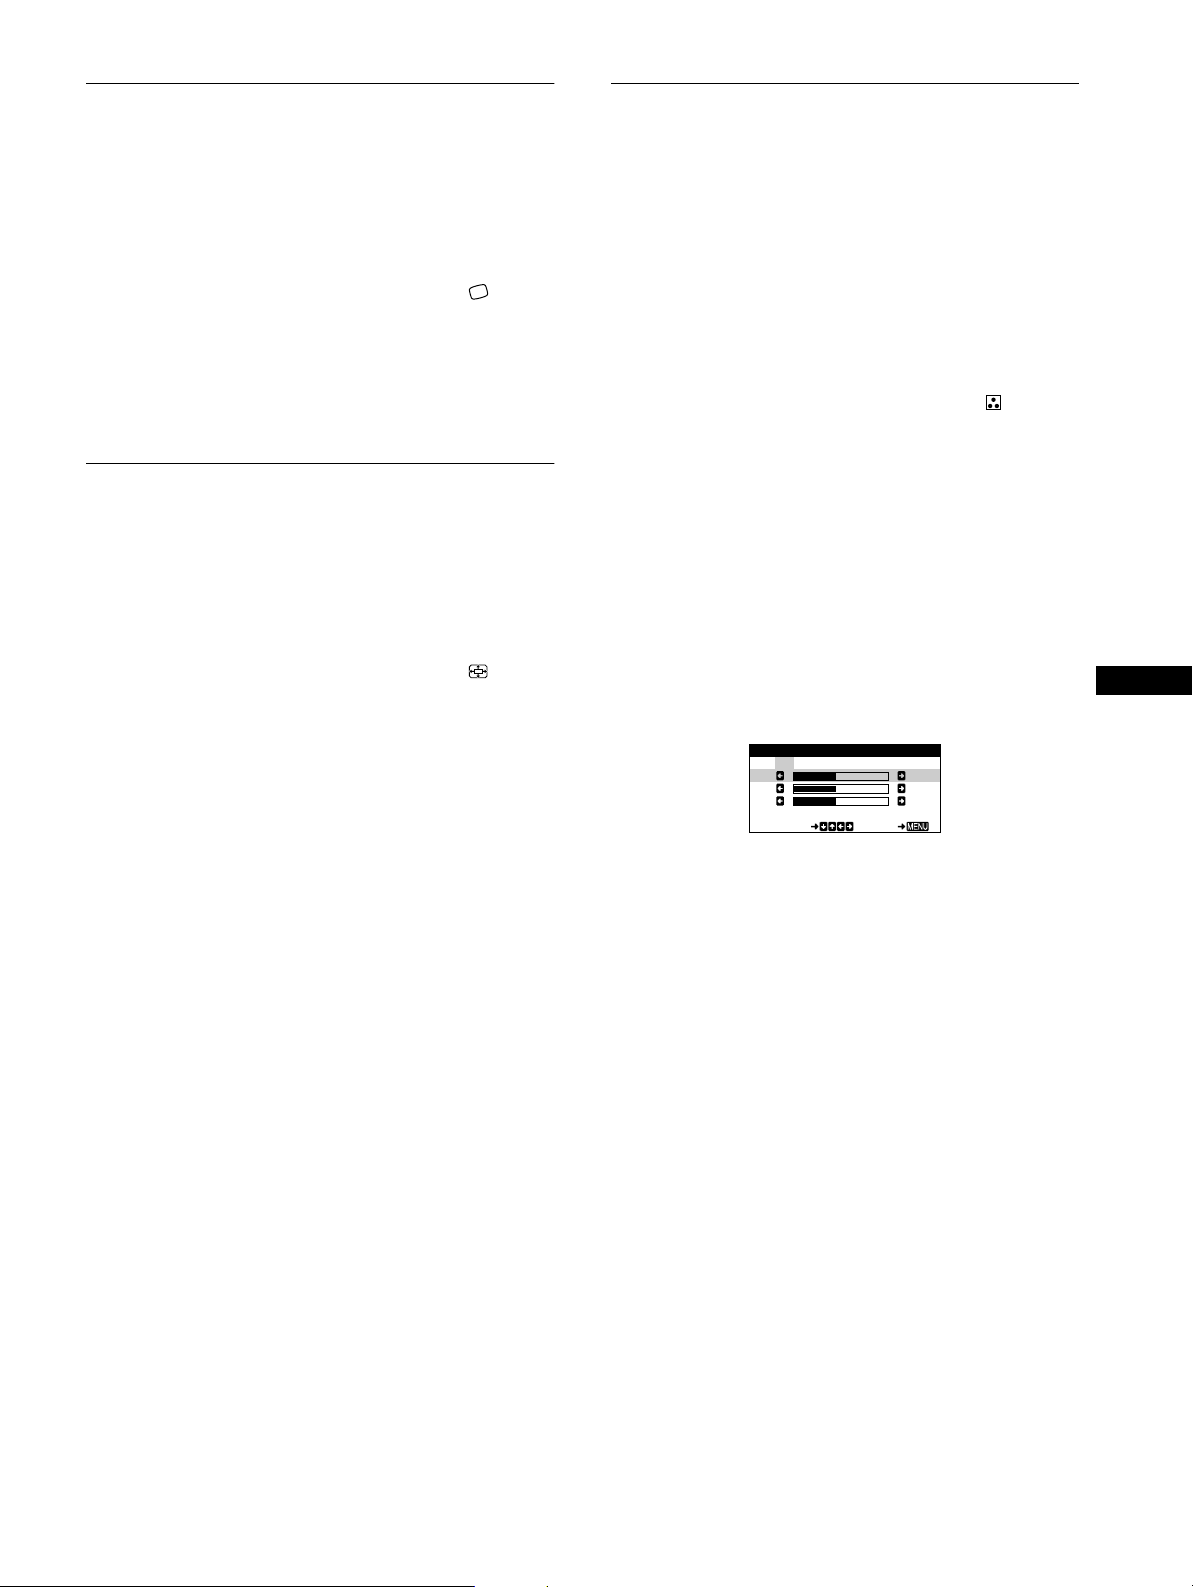
Adjusting the picture’s rotation
KKK
R50
G50
B50
SELECT EXI T
COLOR
5000 6500 9300
USER
Adjusting the color of the picture
(ROTATION)
This setting is stored in memory for all input signals.
1
Press the center of the control button.
The main MENU appears on the screen.
2
Move the control button m/M to highlight
ROTATION and press the center of the control
button again.
The ROTATION menu appears on the screen.
3
Move the control button </, to rotate the picture.
Enlarging or reducing the picture (ZOOM)
This setting is stored in memory for the current input signal.
1
Press the center of the control button.
The main MENU appears on the screen.
2
Move the control m/M button to highlight ZOOM
and press the center of the control button again.
The ZOOM menu appears on the screen.
(COLOR)
The COLOR settings allow you to adjust the picture’s color
temperature by changing th e color level of the white color field.
Colors appear reddish if the temperature is low, and bluish if the
temperature is high. This adjustment is useful for matching the
monitor’s colors to a printed picture’s colors.
This setting is stored in memory for all input signals.
1
Press the center of the control button.
The main MENU appears on the screen .
2
Move the control button m/M to hi ghlight COLOR
and press the center of the control button again.
The COLOR menu appears on the screen.
3
Move the control button </, to select a color
temperature.
The preset color temperatures are 5000K, 6500K, and 9300K.
Since the default setting is 9300K, the whites will change
from a bluish hue to a reddish hue as the temperature is
lowered to 6500K and 500 0K .
4
If necessary, fine tune the color temperature.
First move the control button </, to select USER. Then
move the control but ton m/M to select R (red), G (green), or
B (blue) and move </, to make the adjustment.
GB
3
Move the control button </, to enlarge or reduce
the picture.
Note
Adjustment stops when either the horizontal or vertical size rea ches its
maximum or minimum value.
If you fine tune the color temperature, the new color settings
are stored in memory and recalled whenever you select
USER.
11
Page 12

Additional settings (DEGAUSS/
RESET
Resetting the adjustments
CANCEL MOIRE)
You can manually degauss (demagnetize) the monitor, and adjust
the moire cancellation level.
1
Press the center of the control button.
The main MENU appears on the screen .
2
Move the control button m/M to highlight
DEGAUSS/CANCEL MOIRE and press the center of
the control button again.
The DEGAUSS/CANCEL MOIRE menu appears on the
screen.
3
Move the control button m/M to select the desired
adjustment item.
Adjust the selected item according to the following
instructions.
Degaussing the screen
The monitor is automaticall y demagnetized (deg aussed) when the
power is turned on.
To manually degauss the monitor, first move the
control button m/M to select (DEGAUSS). Then move
the control button ,.
The screen is degaussed for about 5 seconds. If a second degauss
cycle is needed, allow a minimum interval of 20 minutes for the
best result.
This monitor has the following three reset methods. Use the
RESET button to reset the adjustments.
Resetting a single adjustment item
Use the control button to select the adjustment item you want to
reset, and press the RESET button.
Resetting all of the adjustment data for the
current input signal
Press the RESET button when no menu is displ ayed on the sc reen.
Note that the following items are not reset by this method:
• on-screen menu language (page 7)
• picture’s rotation (page 11)
Resetting all of the adjustment data for all input
signals
Press and hold the RESET button for more than two seconds.
Note that the following item is not reset by this method:
• color menu user settings (page 11)
Adjusting the moire*
If elliptical or wavy patterns appear on the screen, adjust the
moire cancellation level.
To adjust the amount of moire cancellation, first move
the control button m/M to select (CANCEL MOIRE).
Then move the control button </, until the moire
effect is at a minimum.
* Moire is a type of natural interference which produces soft, wavy lines
on your screen. It may app ea r due to interference betwee n the pattern
of the picture on the screen and the phosphor pitch pattern of the
monitor.
Example of moire
12
Page 13
Technical Features
INFORMATION
OUT OF SCAN RANGE
Preset and user modes
Troubleshooting
Before contacting technical support, refer to this section.
When the monitor receives an input signal, it automatically
matches the signal to one of the factory preset modes stored in the
monitor’s memory to provide a high quality picture at the center of
the screen.
For input signals that do not match one of the factory preset modes,
the digital Multiscan technology of this monitor ensures that a
clear picture appears on the screen for any timing in the monitor’s
frequency range (horizontal: 30 – 70 kHz, vertical: 48 – 120 Hz).
If the picture is adjusted, the adjustment data is stored as a user
mode and automatically recalled whenever the same input signal
is received.
(See Appendix for a list of the factory p reset modes.)
Note for Windows users
For Windows users, ch eck you r vide o b oard m anual or th e uti lity
program which co m es with your graphic board and select the
highest available refresh rate to maximize monitor performance.
Power saving function
This monitor meets the power-saving guidelines set by VESA,
E
NERGY STAR, and NUTEK. If the monitor is connected to a
computer or video graphics board that is DPMS (Display Power
Management Signaling) compliant, the monitor wi ll automatically
reduce power consumption in three stages as shown below
Power mode Power consumption 1 (power)
normal
operation
1 standby ≤ 15 W green and orange
2 suspend
(sleep)*
3 active off**
(deep sleep)*
power off 0 W off
≤ 95 W green
≤ 15 W green and orange
≤ 5 W orange
indicator
alternate
alternate
.
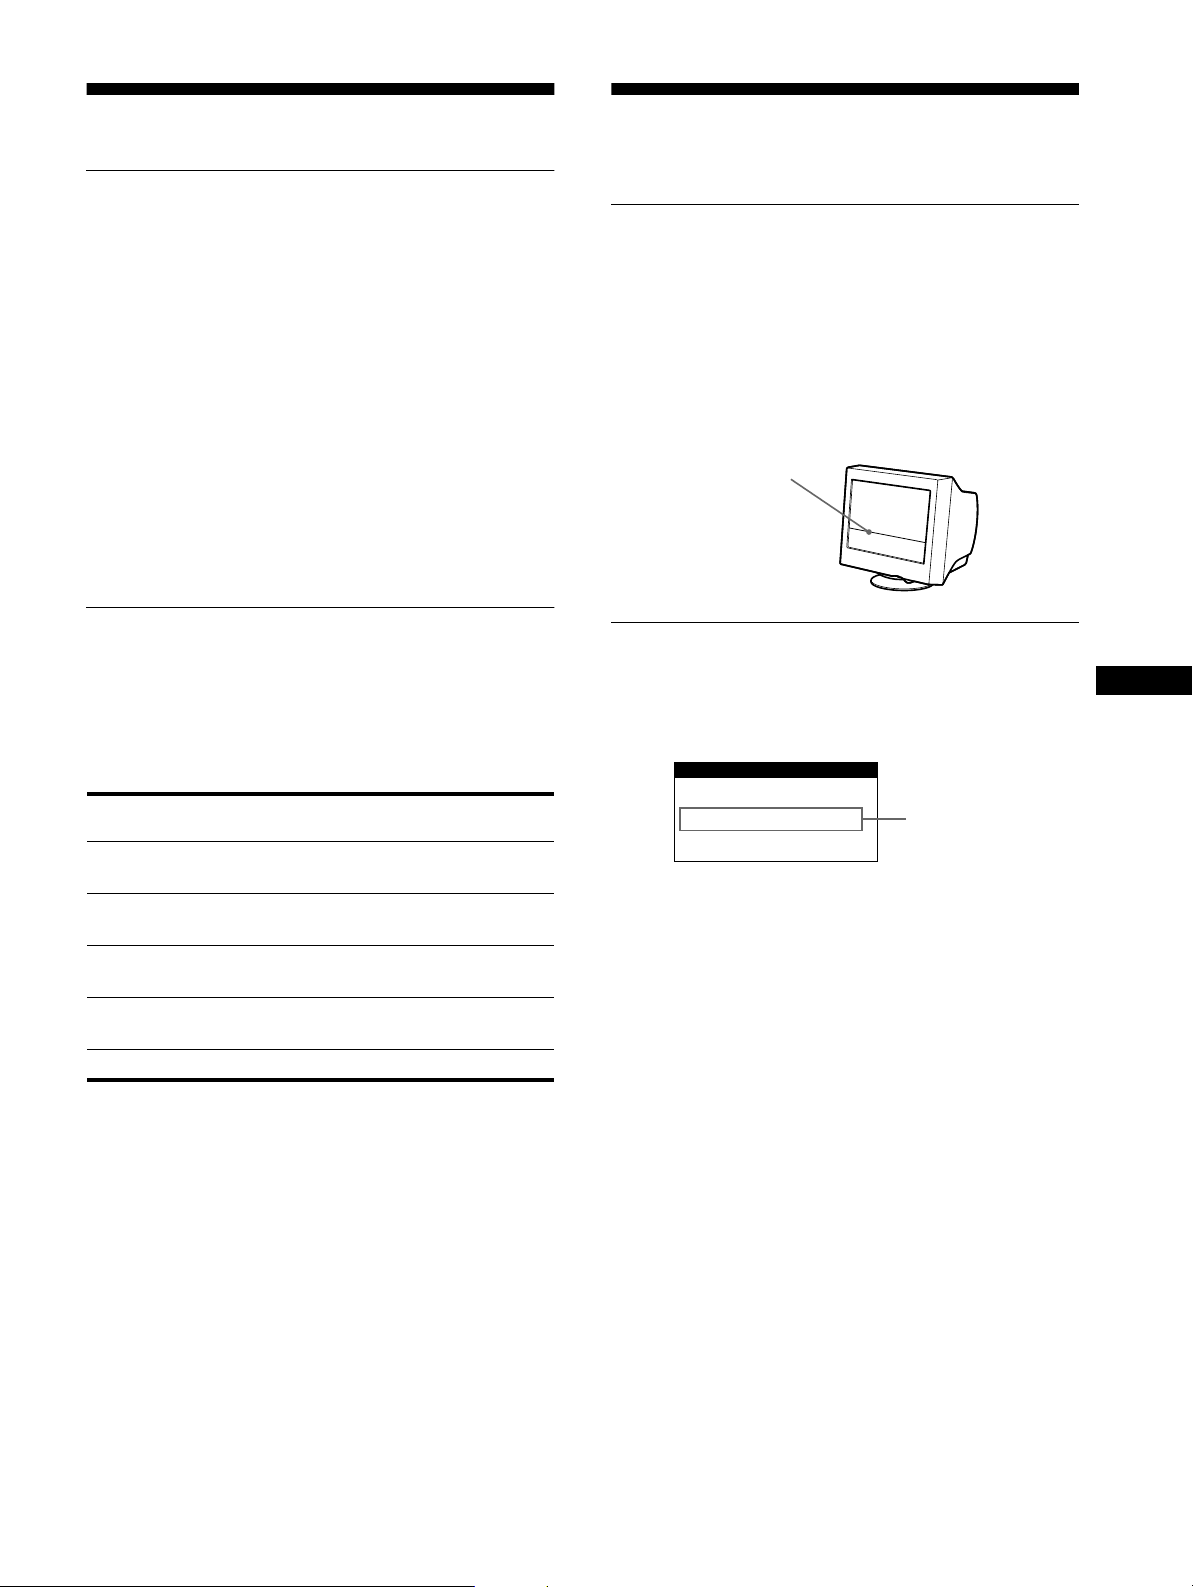
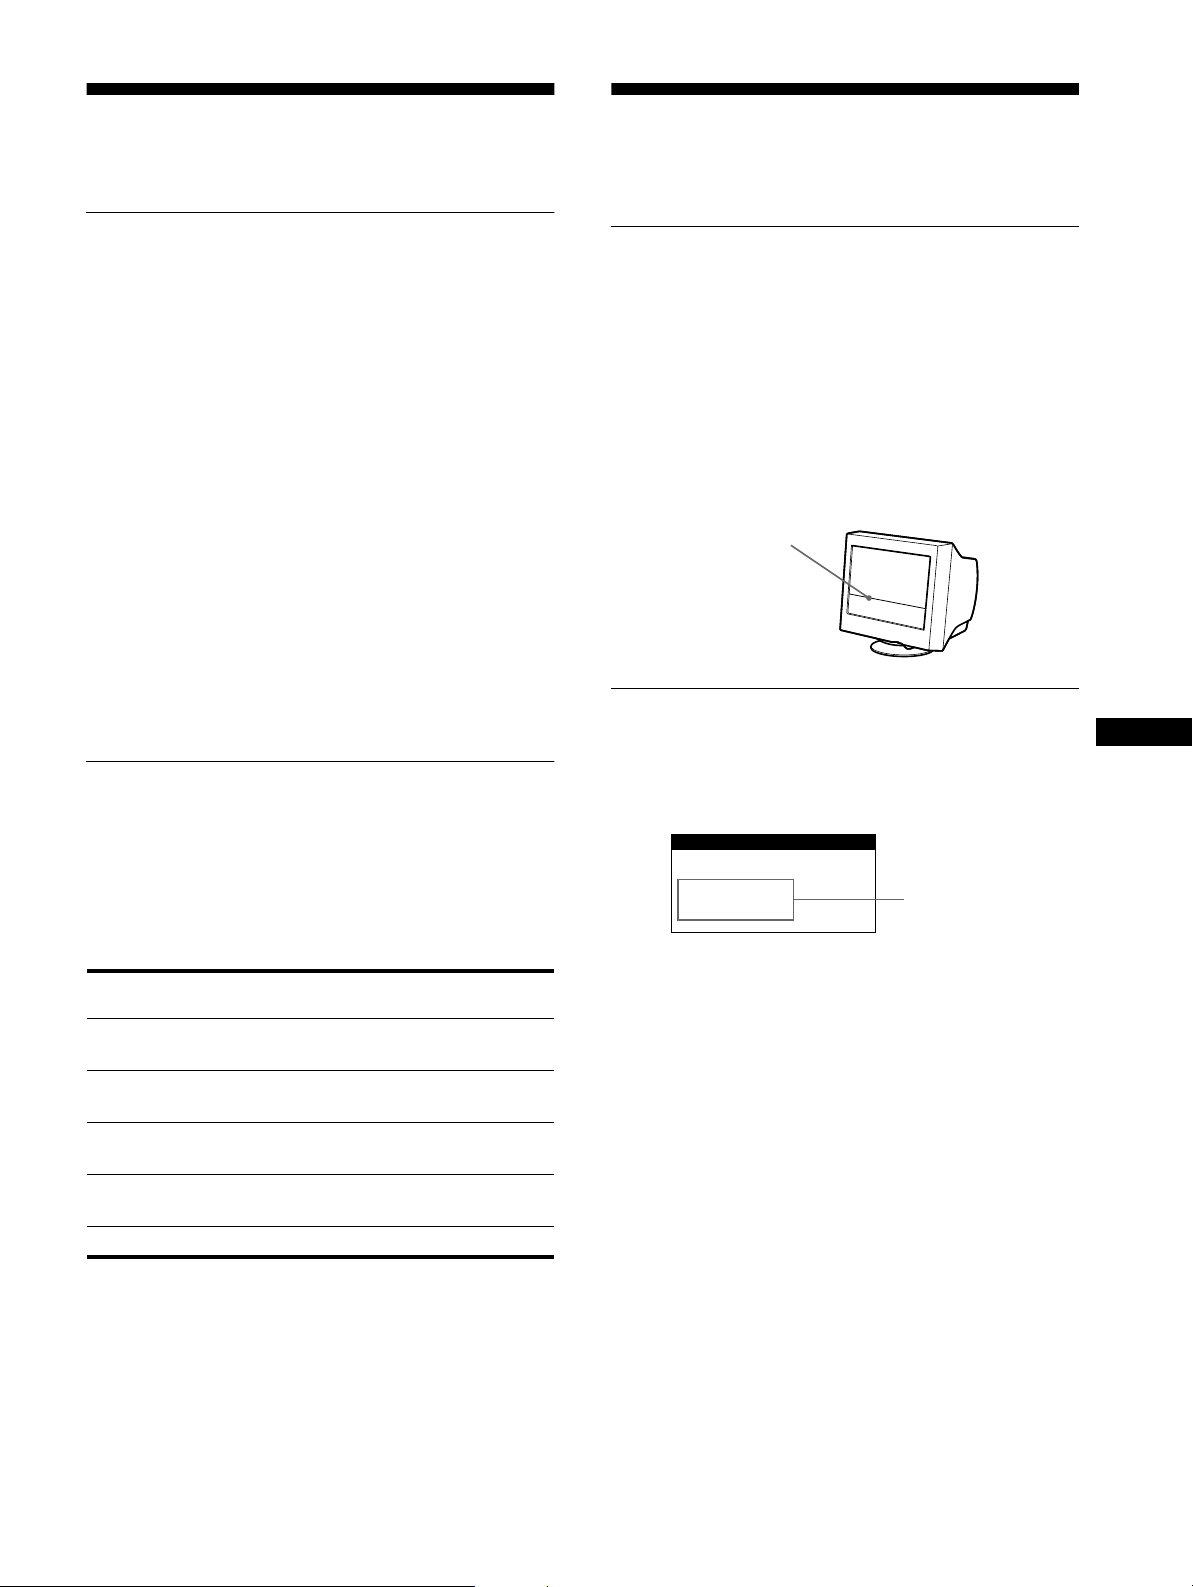
If thin line appears on your screen (damper wire)
The line you are experiencing on your screen is normal for the
Trinitron monitor and is not a malfunction. This is shadow from
the damper wire used to stabilize the aperture grille and is most
noticeable when the screen’s b ackgr ound is light (usuall y white).
The aperture grille is the e ssential element that make s a Trinit ron
picture tube unique by allowing more light to reac h the scree n,
resulting in a brighter, more detailed picture.
Damper wire
On-screen messages
If there is something wrong with the input signal, one of the
following messages appears on the screen. To solve the problem,
see “Trouble symptoms and remedies” on page 14.
Input signal
condition
The input signal condition
OUT OF SCAN RANGE
indicates that the input signal is not supported by the monitor’s
specifications.
NO INPUT SIGNAL
indicates that no signal is being input to the monitor.
GB
* “Sleep” and “deep sleep” are power saving modes defined by the
Environmental Protection Agency.
** When your computer ente rs the “active off” mo de, the input signal is
cut and NO INPUT SIGNAL appears on the screen. After 20 seconds,
the monitor enters the power savi ng m ode .
13
Page 14

Trouble symptoms and remedies
If the problem is caused by the con nected computer or other equip ment, please refer to the connected equ ip ment’s instruction manual.
Use the self-diagnosis function (page 16) if the following recommendations do not resolve the problem.
Symptom Check these items
No picture
If the 1 (power) indicator is not lit • Check that the power cord is properly connected.
• Check that the 1 (power) switch is in the “on” position.
If the NO INPUT SIGNAL message
appears on the screen, or if the 1
(power) indicator is either orange or
alternating between green and
orange
If the OUT OF SCAN RANGE
message appears on the screen
If no message is displayed and the 1
(power) indicator is green or flashing
orange
If using Windows 95/98 • If you replaced an old monitor with this monitor, reconnect the old monitor and do the
If using a Macintosh system • Check that the Macintosh adapter (not supplied) and the video signal cable are properly
Picture flickers, bounces,
oscillates, or is scrambled
Picture is fuzzy
• Check that the video signal cable i s properly connected and all plugs are firmly seat ed in
their sockets (page 6).
• Check that the HD15 vide o input connector’s pins are not bent or pushed in.
Problems caused by the connected computer or other equipment
x
• T he computer is in power saving mode. Try pressing any key on the computer keyboard.
• Check that the computer’s power is “on.”
• Check that the graphic board is completely seated in the proper bus slot.
Problems caused by the connected computer or other equipment
x
• Check that the video frequency range is within that specified for the monitor. If you
replaced an old monitor with this monitor, reconnect the old monitor and adjust the
frequency range to the following.
Horizontal: 30 – 70 kHz
Vertical: 48 – 120 Hz
• Use the Self-diagnosis function (page 16).
following. Install the Windows Monitor Information Disk (page 7) and select this monitor
(“CPD-E100E”) from among the Sony monitors in the Windows 95/98 monitor selection
screen.
connected (page 6).
• Isolate and eliminate any potential sources of electric or mag netic fields such as other
monitors, laser printers, electric fans, fluorescent lighting, or televisions.
• Move the monitor away from power lines or place a magnetic shield near the monitor.
• Try plugging the monitor into a diff eren t AC outlet, preferably on a different circuit.
• Try turning the monitor 90° to the left or right.
Problems caused by the connected computer or other equipment
x
• Check your graphics board manual for the proper monitor setting.
• Confirm that the graphics mode (VESA, Macintosh 16" Color, etc.) and the frequency of
the input signal are su pp ort ed by this monitor (Appendix). Even if the freque n cy is within
the proper range, some video boards may have a sync pulse that is too narrow for the
monitor to sync correctly.
• Adjust the computer’s refresh rate (vertical frequen cy) to obtain the best possible picture.
• Adjust the brightness and contrast (page 9 ).
• Degauss the mo nitor* (page 12).
• Sel ect CANCEL MOIRE and adjust the moire cancellation effect (page 12).
14
Page 15

Symptom Check these items
Picture is ghosting • Eliminate the use of video cable extensions and/or video switch boxes.
• Check that all plugs are firmly seated in their socket s.
Picture is not centered or sized
properly
• Adj ust the size or centering (page 10). Note that some video modes do not fill the screen
to the edges.
Edges of the image are curved • Select PIN/PIN BALANCE, KEY/KEYBALANCE, or ROTATION, and adjust the
picture’s shape and rotation (page10, 11).
Wavy or elliptical pattern (moire)
• Sel ect CANCEL MOIRE and adjust the moire cancellation effect (page 12).
is visible
xProblems caused by the connected computer or other equipment
• Change your desktop pattern.
Color is not uniform • Degauss the monitor* (page 12). If you place equipment that generates a magnetic field,
such as a speaker, nea r the monitor, or if you change the direction the monitor faces, color
may lose uniformity.
White does not look white • Adjust the color temperature (page 11 ) .
A hum is heard right after the
power is turned on
* If a second degauss cycle is needed, allow a minimum inte rval of 20 minutes for the best resu lt. A humming noise may be hea rd, but this is not a
malfunction.
• This is the sound of the auto-degauss cycle. When the power is turned on, the monitor is
automatically degaussed for five seconds.
Displaying this monitor’s name, serial number,
and date of manufacture (INFORMATION)
1
Press the center of the control button.
The main MENU appears on the screen.
2
Move the control button m/M to highlight
LANGUAGE/INFORMATION and press the ce nter of
the control button again.
The LANGUAGE/INFORMATION menu appears on the
screen.
3
Move the control button m/M to select
(INFORMATION).
This monitor’s information box appears on the screen.
Example
LANGUAGE / INFORMAT ION
MODE L : CPD - E100 E
SERI AL: 12345678
MANUF ACTURED: 1 9 99 - 5 2
SELECT EXI T
If the problem persists, call your authorized Sony dealer and give
the following information.
• Model name: CPD-E100E
• Serial number
• Name and specifications of your computer and graphics board.
GB
15
Page 16
Self-diagnosis function
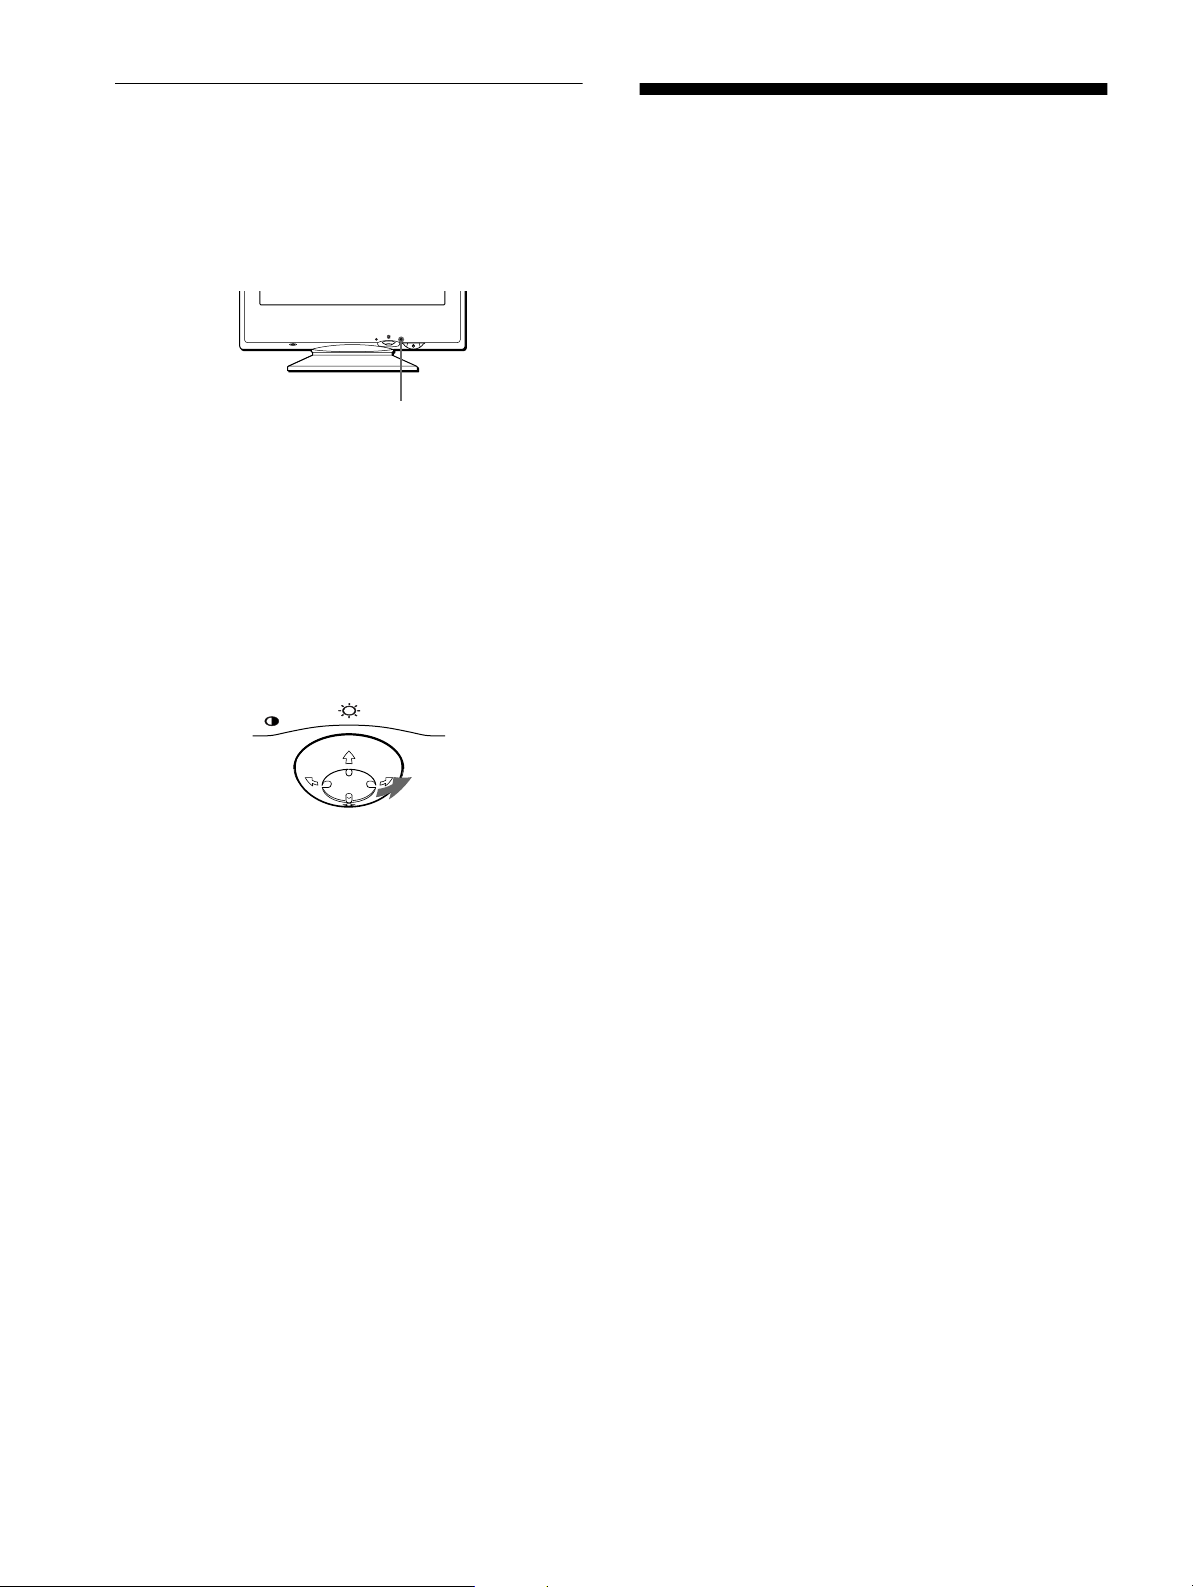
This monitor is equipped with a self-diagnosis function . If there is
a problem with your monitor or computer, the screen will go
blank and the 1 (power) indicator will either light up green or
flash orange. If the 1 (power) indicator is lit in orange, the
computer is in power saving mode. Try pressing any key on the
keyboard.
(power) indicator
1
MENU
MENU
RESET
If the 1 (power) indicator is green
1
Disconnect the video input cable or turn off the
connected computer.
2
Press the 1 (power) button twice to turn the monitor
off and then on.
3
Move the control button , for 2 seconds before the
monitor enters power saving mode.
Specifications
CRT 0.24 mm aperture gri lle p itc h (cen te r)
15 inches measured diag onally
90-degree deflection
Viewable image size Approx. 285 × 214 mm (w/h)
(11 1/4 × 8 1/2 inches)
14.0" viewing image
Resolution
Maximum Horizontal: 1280 dots
Vertical: 1024 lines
Recommended Horizontal: 800 dots
Vertical: 600 lines
Standard image area Approx. 270 × 202 mm (w/h)
Deflection frequency* Horizontal: 30 to 70 kHz
AC input voltage/current 100 to 240 V, 50 – 60 Hz, 1.2 – 0.6 A
Power consump tion Max. 95 W
Dimensions
Mass Approx. 14 kg ( 30 lb 14 oz)
Plug and Play DDC1/DDC2B
Supplied accessories See page 6
* Recommended horizontal and vertical timi ng condition
• Horizontal sync width should be more than 1.0 µsec.
• Horizontal blanking width shoul d be more than 3.6 µsec.
• Verti cal blanking width shou ld be more than 500 µsec.
3
/4 × 8 inches)
(10
Vertical: 48 to 120 Hz
Approx. 356 × 378 × 388 mm (w/h/d)
1
/8 × 15 × 15 3/8 inches)
(14
If all four color bars appear (white, red, green, blue), the monitor
is working proper ly. Reconnect the video input cable and ch eck
the condition of your co m pu t e r.
If the color bars do not appear, there is a potential m onitor failure.
Inform your authorized Sony dealer of the monitor’s condition.
If the 1 (power) indicator is flashing orange
Press the 1 (power) button twice to turn the monitor off
and then on.
If the 1 (power) indicator l ights up green , the monitor i s working
properly.
If the 1 (power) indicator is still flashing, there is a potential
monitor failure. Count the number of seconds between orange
flashes of the 1 (power) indicator and inform your authorized
Sony dealer of the mo nitor’s condi tion. Be sure to note the m odel
name and serial number of your monitor. Also note the make and
model of your c omputer and video board.
Design and specifications are subject to change without noti ce.
16
Page 17
Table des Matières
Précautions. . . . . . . . . . . . . . . . . . . . . . . . . . . . . . . . . . . . . . . . . . . . 4
Identification des composants et des commandes. . . . . . . . . . . . . . 5
Installation . . . . . . . . . . . . . . . . . . . . . . . . . . . . . . . . . . . . .6
• Trinitron est une marque comm ercial e
déposée de Sony Corporation .
• Macintosh est une marque commerciale
sous licence d’Apple Com puter, Inc.,
déposée aux Etats-Unis et dans d’autres
pays.
• Windows
marques déposées de Microsoft
Corporation aux Etats-Unis et dans
d’autres pays.
• IBM PC/AT et VGA sont des marques
commerciales déposées d’IBM
Corporation aux Etats-Unis.
• VESA et DDC
commerciales de Video Electronics
Standard Association.
•
E
déposée aux Etats-Unis.
• Tous les autres noms de produ its
mentionnés dans le pré sent mode
d’emploi peuvent ê tre de s m a rques
commerciales ou des marqu es
commerciales déposées de leurs
sociétés respectives.
• Les symboles “” et “” ne sont pas
mentionnés systématiquement dans le
présent mode d’emploi.
et MS-DOS sont des
sont des marques
NERGY STAR est une marque
1re étape:
2e étape:
3e étape:
Raccordez le moniteur à votre ordinateur. . . . . . . . . . . . 6
Branchez le cordon d’alimentation. . . . . . . . . . . . . . . . . . 6
Mettez le moniteur et l’ordinateur sous tension . . . . . . . . 7
Sélection de la langue d’affichage des menus
(LANGUE/INFORMATION) . . . . . . . . . . . . . . . . . . . . . . . . . . . . . . . 7
Personnalisation de votre moniteur. . . . . . . . . . . . . . . . .8
Pilotage par menus. . . . . . . . . . . . . . . . . . . . . . . . . . . . . . . . . . . . . . 8
Réglage de la luminosité et du contraste . . . . . . . . . . . . . . . . . . . . . 9
Réglage de la taille horizontale ou du centrage de l’image
(TAILLE H/POSITION) . . . . . . . . . . . . . . . . . . . . . . . . . . . . . . . . . . 10
Réglage de la taille verticale ou du centrage de l’image
(TAILLE V/POSITION) . . . . . . . . . . . . . . . . . . . . . . . . . . . . . . . . . . 10
Réglage de l’incurvation des côtés de l’image
(COUSSIN/PIN BALANCE) . . . . . . . . . . . . . . . . . . . . . . . . . . . . . . 10
Réglage de l’angle des côtés de l’image
(TRAPÉZOÏD/PARALLÉL) . . . . . . . . . . . . . . . . . . . . . . . . . . . . . . . 10
Réglage de la rotation de l’image (ROTATION) . . . . . . . . . . . . . . . 11
Agrandir ou réduire l’image (ZOOM) . . . . . . . . . . . . . . . . . . . . . . . 11
Réglage de la couleur de l’image (COULEUR) . . . . . . . . . . . . . . . 11
Réglages supplémentaires (DÉMAGNÉTISÉ/MOIRÉ). . . . . . . . . . 12
Réinitialisation des réglages. . . . . . . . . . . . . . . . . . . . . . . . . . . . . . 12
Caractéristiques techniques. . . . . . . . . . . . . . . . . . . . . .13
Modes présélectionné et utilisateur . . . . . . . . . . . . . . . . . . . . . . . . 13
Fonction d’économie d’énergie. . . . . . . . . . . . . . . . . . . . . . . . . . . . 13
Dépannage . . . . . . . . . . . . . . . . . . . . . . . . . . . . . . . . . . . .13
Si une fine ligne apparaît à l’écran (fil d’amortissement) . . . . . . . . 13
Messages affichés à l’écran . . . . . . . . . . . . . . . . . . . . . . . . . . . . . . 13
Symptômes et remèdes . . . . . . . . . . . . . . . . . . . . . . . . . . . . . . . . . 14
Fonction d’autodiagnostic. . . . . . . . . . . . . . . . . . . . . . . . . . . . . . . . 16
Spécifications. . . . . . . . . . . . . . . . . . . . . . . . . . . . . . . . . .16
Appendix. . . . . . . . . . . . . . . . . . . . . . . . . . . . . . . . . . . . . . . i
Preset mode timing table . . . . . . . . . . . . . . . . . . . . . . . . . . . . . . . . . .i
TCO’99 Eco-document . . . . . . . . . . . . . . . . . . . . . . . . . . . . . . . . . . . .i
FR
3
Page 18
Précautions
90°
5°
90°
15°
Points de centrage
Avertissement sur le raccordement à la source
d’alimentation
• Utilisez le cordon d’alimentation fourni. Si vous utilisez un
cordon d’alimentation différent, assurez-vous qu’il est
compatible avec votre tension d’alimentation secteur locale.
Pour les clients au Royaume-Uni
Si vous utilisez ce mon iteur au Royaume-Uni, utilisez le cordon
d’alimentation fourni au Royaume-Uni.
Exemple de types de fiches
pour 100 à 120 V CA pour 200 à 240 V CA pour 240 V CA
uniquement
Entretien
• Nettoyez l’écran à l’aide d’un chiffon doux . Si vous util isez un
produit nettoyant pour vitres, n’utilisez aucun type de produit
contenant une solution antistatique ou des additifs similaires
parce que vous risquez de rayer le revêtement de l’écran.
• Ne frottez pas, ne touchez pas et ne tapo tez pas la surface de
l’écran avec des objets abrasifs ou aux arêtes vives comme un
stylo à bill e o u un tournevis. Ce ty pe de contact r i s qu e e n ef fe t
de rayer le tube image.
• Nettoyez le châssis , le pan neau et les comm and es à l’ai de d’u n
chiffon doux légèrement imprégné d’une solution détergente
neutre. N’utilisez jamais de tampons abrasifs, de poudre à
récurer ou de solv ants tels que de l’alcool ou du benzène.
Transport
Pour transpor ter ce moniteur en vue de réparations ou de son
expédition, utilisez le carton d’emballage et les matériaux de
conditionne ment d’origine.
• Avant de débrancher le cordon d’al imentation, attendez au
moins 30 secondes après avoir actionné le commutateur
d’alimentation de manière à permettre la décharge de
l’électricité statique à la surface de l’écran.
• Après que le courant a été branché, l’écran est démagnétisé
pendant environ 5 secondes. Cela génère un puissant champ
magnétique autour de l’encadrement métallique qui peut
affecter les données mémorisées sur une bande magnétique ou
des disquettes situées à proximité. Placez ces systèmes
d’enregistrem e nt ma g né tiq u e, ba n de s e t dis q ue tte s à l ’ éc a rt d u
moniteur.
L’appareil doit être installé à proximité d’une prise murale
aisément accessible.
Installation
N’installez pas le moniteur dans les endroits suivants:
• sur de s surfaces molles (moq uette, nappe, etc.) ou à proximité
de tissus (rideaux, t entures, etc.) qui risquent d’obstruer les
orifices de ventilation
• à proximité de sour ces de chale ur com me des radi ateur s ou de s
conduits d’air, ni dans un endr oi t di re cte m e nt ex po s é au
rayonnement solaire
• sujet à de fortes variations de température
• soumis à des vibrations ou à des chocs mécaniques
• sur une surface instable
• à proximité d’appar eils géné rant un c hamp magn étique c omme
un transformateur ou des lignes à haute tension
• à proximité de ou sur une surface métallique chargée
électriquement
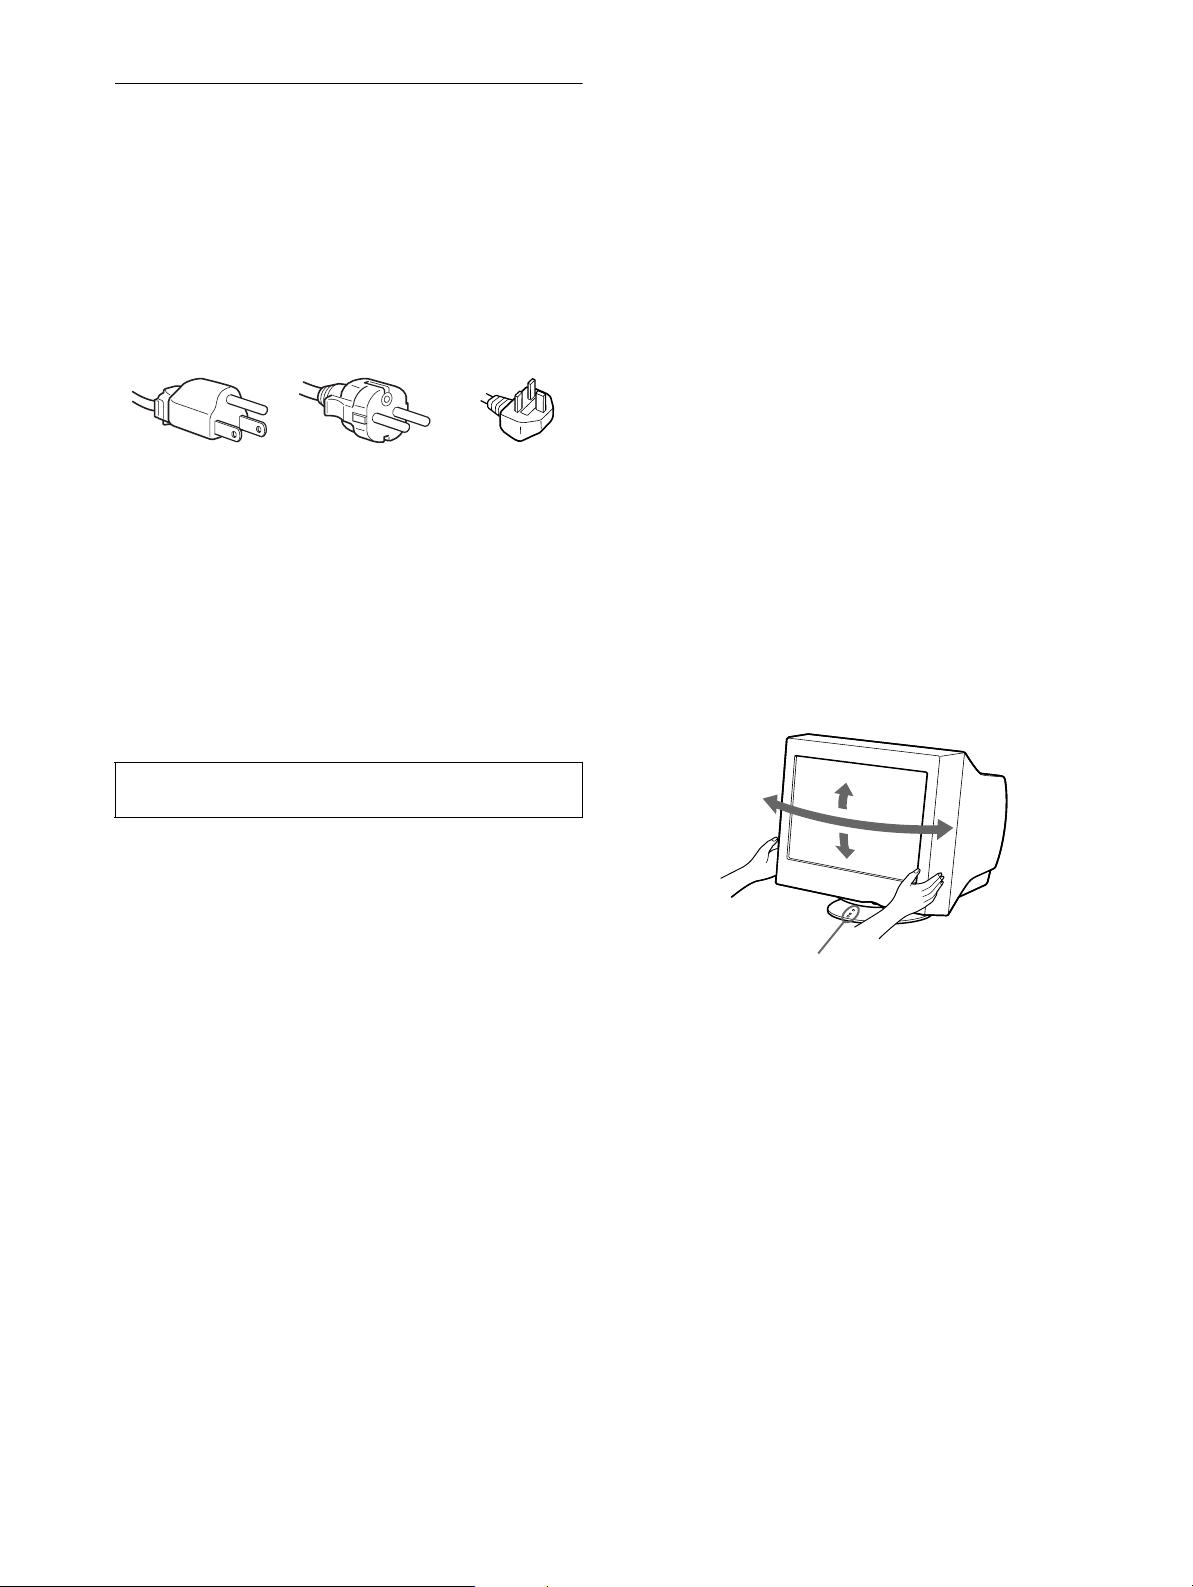
Utilisation du support pivotant
Ce moniteur peut êtr e réglé su ivant le s angles p récisés ci-dess ous.
Pour localiser le centre du rayon de pivotement du moniteur,
alignez le centre de l’écran du mon iteur sur les point s de centr age
du support.
Pour faire pivoter le moniteur horizontalement ou verticalement,
saisissez-le des deux mains par la base. Veillez à ne pas vous
coincer les doigts à l’arrière du moniteur lorsque vous le faites
pivoter verticalement.
4
Page 19
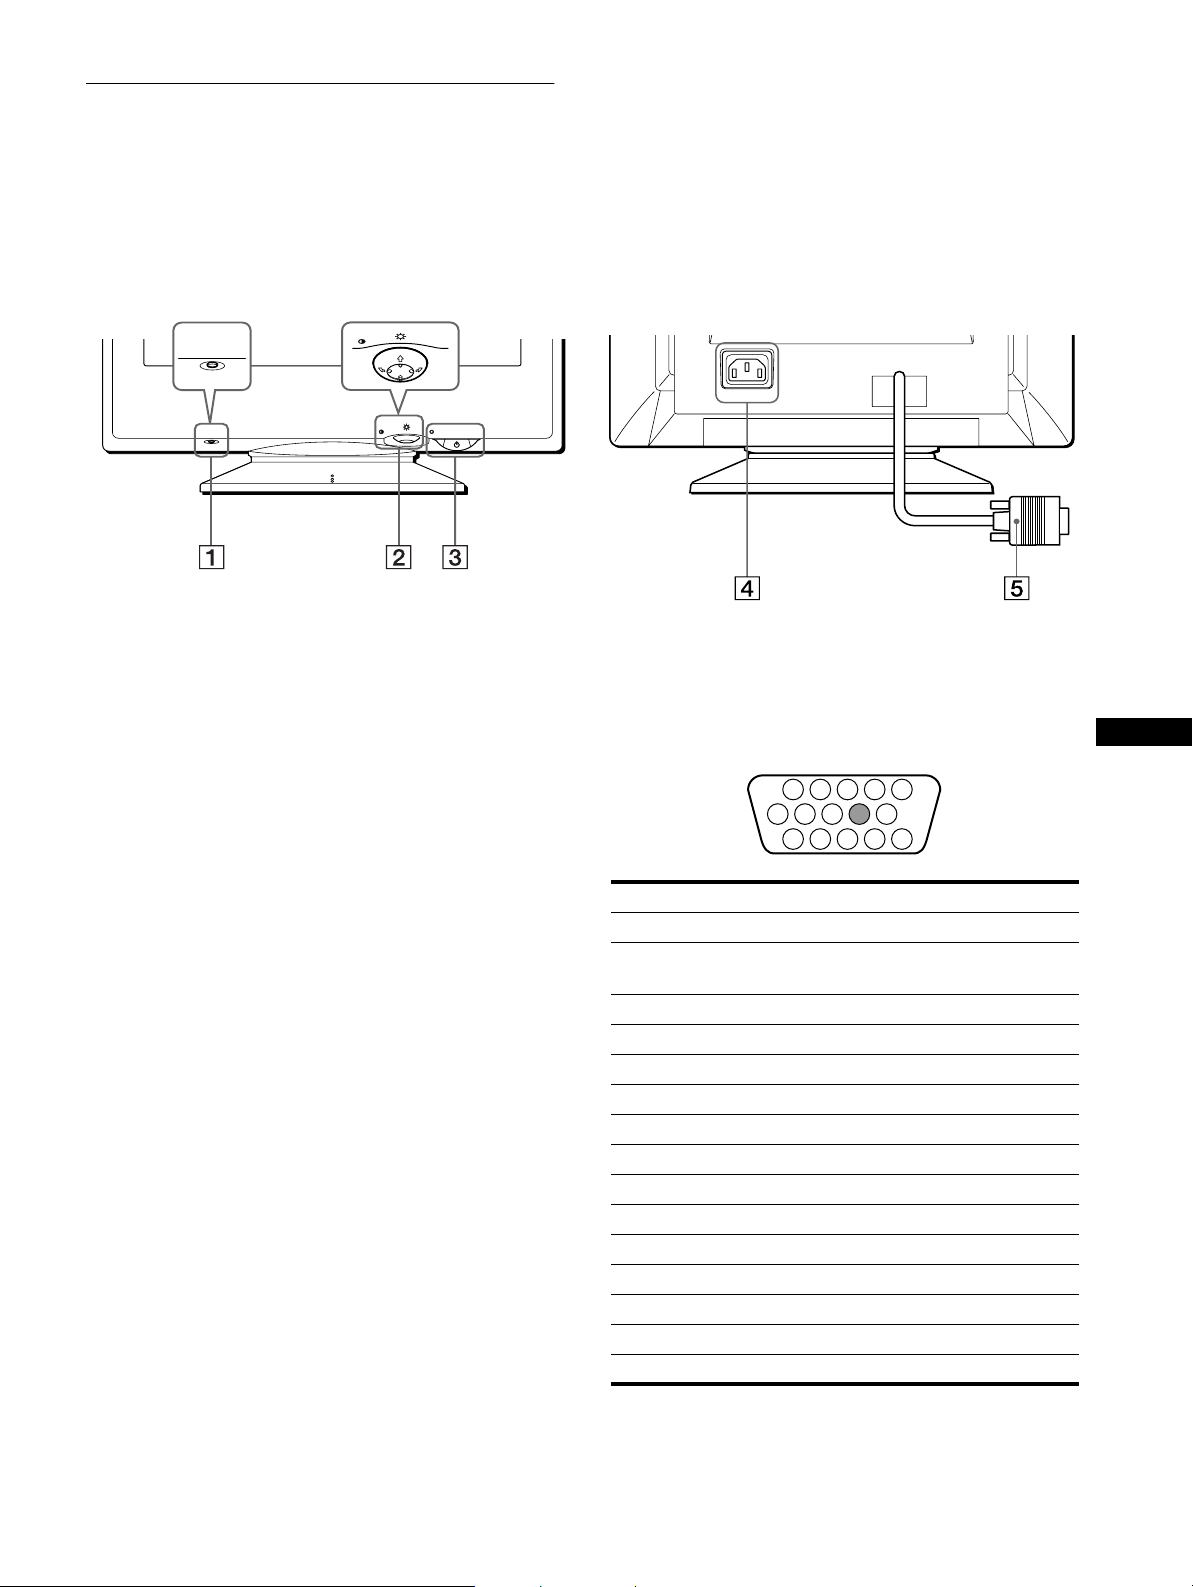
Identification des composants et
1 2 3 4
5
876
11 12 13 14 15
10
9
des commandes
Pour plus de détails, reportez-vous au pages indiquées entre
parenthèses.
MENU
RESET
RESET
MENU
ArrièreAvant
AC IN
Touche RESET (réinitialisation) (page 12)
1
Cette touche réinitialise les réglages aux valeurs par défaut.
Manette de commande (page9)
2
La manette de commande sert à affic her l e menu et à ajuster
les paramètres de réglage du moniteur, y compris la
luminosité et le contraste.
Commutateur et indicateur 1 (alimentation)
3
(pages 7, 13, 16)
Cette touche met le moniteur sous et hors tension.
L’indicateur d’alimentation s’allume en vert lorsque le
moniteur est sous tension et clignote en vert et en orange ou
s’allume en orange lorsque le moniteur se trouve en mode
d’économie d’énergie.
Connecteur AC IN (page 6)
4
Ce connecteur assure l’alimentation du moniteur.
Connecteur d’entrée vidéo (HD15) (page 6)
5
Ce connecteur assure l’entrée des signaux vidéo RVB
(0,700 Vp-p, positifs) et des signaux de synchronisation.
Broche n° Signal
1 Rouge
2Vert
(Synchronisation sur le vert)
3Bleu
4 ID (masse)
5 Masse DDC*
6 Masse rouge
7 Masse vert
8 Masse bleu
9–
10 Masse
11 ID (masse)
12 Données bidirectionnelles (SDA)*
13 Synchro H
14 Synchro V
15 Données d’horloge (SCL)*
FR
* DDC (Displ a y Dat a Ch annel) est une norme de VESA.
5
Page 20

Installation
AC IN
Vous avez besoin d’un adaptateur Macintosh (non fourni).
Adaptateur Macintosh (non fourni)
Macintosh ou ordinateur
compatible
vers la sortie vidéo
AC IN
vers AC IN
vers une prise
murale
cordon d’alimentation
(fourni)
Avant de mettre ce moniteur en service, vérifiez si tous les
accessoires suivants se trouvent bien dans le carton:
• Cordon d’alimentation (1)
• Windows Monitor Information Disk (1)
• Carte de garantie (1)
• Remarques sur l’entretien de la surface de l’écran (1)
• Ce mode d’emploi (1)
1re étape:Raccordez le moniteur à
vo tre ordinateur
Mettez le moniteur et l’o rdina teur hor s tens ion av ant de procéd er
au raccordement.
Remarque
Ne touchez pas les broches du connecteur de câble vidéo, car vo us
risqueriez de les plier.
Raccordement à un PC/AT IBM ou à un ordi-
x
nateur compatible
Raccordement à un ordinateur Macintosh
x
ou compatible
AC IN
vers la
sortie vidéo
PC/AT IBM ou
ordinateur compatible
2e étape:Branchez le cordon
d’alimentation
Le moniteur et l’ordina te ur étant hors tension, branchez d’abord
le cordon d’alimentation sur le moniteur et ensuite sur une prise
murale.
6
Page 21

3e étape:Mettez le moniteur et
Sélection de la langue d’affichage
l’ordinateur sous tension
Mettez d’abord le moniteur sous tension et pu is l’ord ina teu r .
L’installation de votre moniteur est à présent terminée.
Si nécessaire, utilisez les commandes du moniteur pour rég ler
l’image.
Si aucune image n’apparaît à l’écran
• Vérifiez si le moniteur est correctement raccordé à l’ordinateur.
• Si l’indication PAS ENTREE VIDEO apparaît à l’écran,
vérifiez si la carte graphique de votre ordinateur est
complètement introduite dans la fente de bus correcte.
• Si vous remplacez un ancien moniteur par ce modèle et si
l’indication HORS PLAGE DE BALAYAGE apparaît à
l’écran, rebranchez l’ancien moniteur. Ajustez ensuite la carte
graphique de l’ordinateur de façon à ce que la fréquence
horizontale soit comprise entre 30 et 70 kHz et la fréquence
verticale entre 48 et 120 Hz.
Pour plus d’informations sur les messages affichés à l’écran,
reportez-vous à la section “Symptômes et remèdes” à la page 14.
Pour les clients utilisant Windows 95/98
Pour maximaliser le po tentiel de votre moniteur, installez su r vo tre
ordinateur le nouvea u fichier d’informations modèle depuis la disquette
Windows Monitor Information Disk.
Ce moniteur est conforme à la norme Plug & Play “VESA DDC”. Si votre
PC/carte graphiqu e est conforme à la norme DDC, sélectionnez “Plug &
Play Monitor (VESA DDC)” ou la désignation de ce moniteur comme
type de moniteur dans le “Control Panel” de Windows 95/98. Si votre PC/
carte graphique a des di ffi cultés à communiqu er avec ce moniteur,
chargez la disquette W indows Monitor Information Disk et séle c ti onnez
la désignation de ce moni teur comme type de moniteur.
Pour les clients utilisant Windows NT4.0
L’installation du moniteu r sous Wi ndows NT4.0 est différente de
Windows 95/98 et n’im plique pas la sélection du type de moniteur.
Reportez-vous au mode d’emploi de Windows NT4.0 pour plus de détails
sur le réglage de la résolution, le taux de régénération et le nombre de
couleurs.
Réglage de la résolution du moniteur et du nombre de
couleurs
Ajustez la résolution du moniteur et le nombre de c oul eurs en vous
référant au mode d’em pl oi de votre ordinateur. Le nombre de couleurs
peut varier selon votre ordinateur ou votre carte vidéo. Le réglage de la
palette de couleurs et le nombre réel de couleurs se présentent comme suit:
• High Color (16 bit) t 65.536 couleurs
• True Color (24 bit) t environ 16 ,7 7 m illi ons de couleurs
En mode True Color (24 bi ts), la vit esse peut être inférieure.
des menus (LANGUE/
INFORMATION)
Les écrans de menu peuvent être affichés en franç ais, anglais,
allemand, italien, espagnol, russe et japonais. La sélection par
défaut est l’anglais.
1
Appuyez au centre de la manette de commande.
Voir page 9 pour plus d’informations sur l’utilisation de la
manette de commande.
MENU
2
Déplacez la manette de commande vers le haut ou
le bas m/M pour mettre en évidence LANGUE/
INFORMATION et appuyez de no uveau au c entre de
la manette de commande.
MENU
3
Déplacez la manette de commande vers le haut ou
le bas m/M pour sélectionner (LANGUE) et
déplacez vers la gauche ou la droite </, pour
sélectionner une langue.
• ENGLISH: Anglais
• FRANÇAIS
• DEUTSCH: Allemand
• ITALIANO: Italien
• ESPAÑOL: Espagnol
• : Russe
• : Japonais
Pour quitter le menu
Appuyez une fois au centre de la manette de commande pour revenir au
MENU principal et appuyez ensuite de nouveau en sél e ct ionnant
QUITTER pour revenir à la vi sua li s at ion normale. Si vous n’actionnez
aucune touche, le me nu se referme automatiquement au bout de 30
secondes environ.
Pour restaurer l’anglais
Appuyez sur la touche RESET pendant que le menu
affiché à l’écra n.
MENU
QU I TTE R
TA I L L E H / POS I T I ON
TA I L L E V / POS I T ION
COUSSIN/PINBALANEC
TRAPÉZOÏ D / PARAL L ÉL
ROTAT I ON
ZOOM
COUL EUR
LANGUE / I NF ORMAT ION
DÉMAGNÉT I SÉ / MOI RÉ
SELECT
LANGUE / I NFORMAT I ON
ENGL I SH FRANÇA I S
DEUTSCH I T A L IANO
ESPAÑOL
SELECT EXI T
(LANGUE) est
FR
7
Page 22
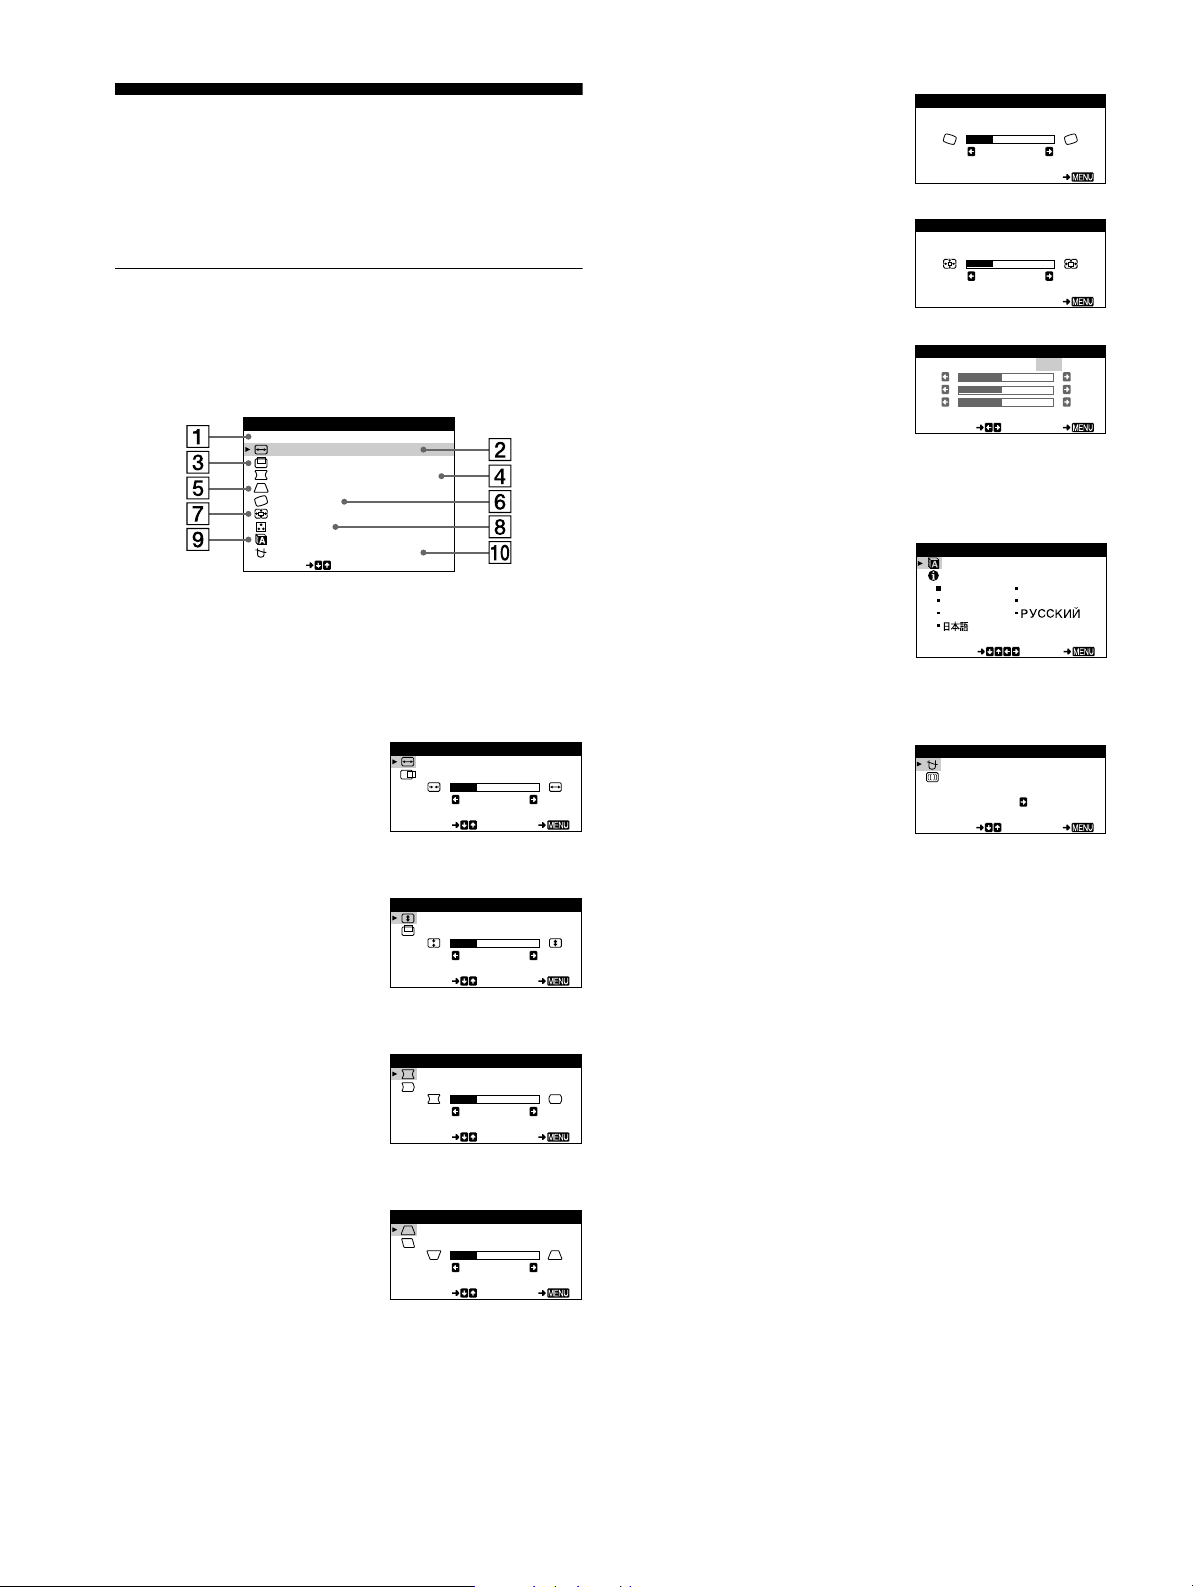
Personnalisation de votre
moniteur
Vous pouvez effectuer d e multiples régla ges sur votre moniteur à
l’aide des écrans de menu.
Pilotage par menus
Appuyez au centre de la manette de commande pour afficher le
MENU principal à l’écran. Voir page 9 pour plus d’informations
sur l’utilisation de la manette de commande.
MENU
QU I TTER
TA I LL E H / POS I T I ON
TA I LL E V / POS I T ION
COUSSIN/PINBALANEC
TRAPÉZOÏ D / PARAL L ÉL
ROTAT I ON
ZOOM
COUL EUR
LANGUE / I NF ORMAT ION
DÉMAGNÉT I SÉ / MOI RÉ
SELECT
Utilisez la manette de commande pour sélectionner l’un des
menus suivants.
QUITTER
1
Sélectionnez QUITTER pour
quitter le menu.
ROTATION (page 11)
6
Sélectionnez le menu
ROTATION pour régler la
rotation de l’image.
ZOOM (page 11)
7
Sélectionnez le menu ZOOM
pour agrandir ou po ur réd u i re
l’image.
COULEUR (page 11)
8
Sélectionnez le menu
COULEUR pour régler la
température des couleurs de
l’image. Vous pouvez utiliser ce
menu pour faire correspondre les
couleurs du moniteur aux
couleurs d’une image imprimée.
LANGUE/INFORMATION
9
(pages 7, 15)
Sélectionnez le menu LANGUE/
INFORMATION pour
sélectionner la langue
d’affichage des menus et afficher
la fenêtre d’information de ce
moniteur.
ROTAT ION
ROTAT ION
26
EX I T
ZOOM
ZOOM
26
EX I T
COULEUR
R50
G50
B50
SELECT EXI T
SELECT EXI T
KKK
5000 6500 9300
USER
LANGUE / I NFORMAT I ON
ENGL I SH FRANÇA I S
DEUTSCH I T A L I ANO
ESPAÑOL
TAILLE H/POSITION
2
(page 10)
Sélectionnez le menu TAILLE
H/POSITION pour régler la
taille horizontale et le centrage
de l’image.
TAILLE V/POSITION
3
(page 10)
Sélectionnez le menu TAILLE
V/POSITION pour régler la
taille verticale et le centrage de
l’image.
COUSSIN/PIN BALANCE
4
(page 10)
Sélectionnez le menu
COUSSIN/PIN BALANCE pour
régler l’incurvation des côtés de
l’image.
TRAPÉZOÏD/PARALLÉL
5
(page 10)
Sélectionnez le menu
TRAPÉZOÏD/PARALLÉL pour
régler l’angle des côtés de
l’image.
TA I L LE H / POS I T I ON
TA I LL E H
26
SELECT EXI T
TA I L LE V / POS I T I ON
TA I LL E V
26
SELECT EXI T
COUSS I N / P I N BALANCE
COUS S I N
26
SELECT EXI T
TRAPÉZO Ï D/ PARALL É L
TRAPÉZO Ï D
26
SELECT EXI T
DÉMAGNÉTISÉ/MOIRÉ
0
(page 12)
Sélectionnez le menu
DÉMAGNÉTISÉ/MOIRÉ pour
démagnétiser l’écran et ajustez le
niveau de suppression du moiré.
DÉMAGNÉT I SÉ / MO I RÉ
DÉMAGN É T I S É
OU I
SELECT EXI T
8
Page 23
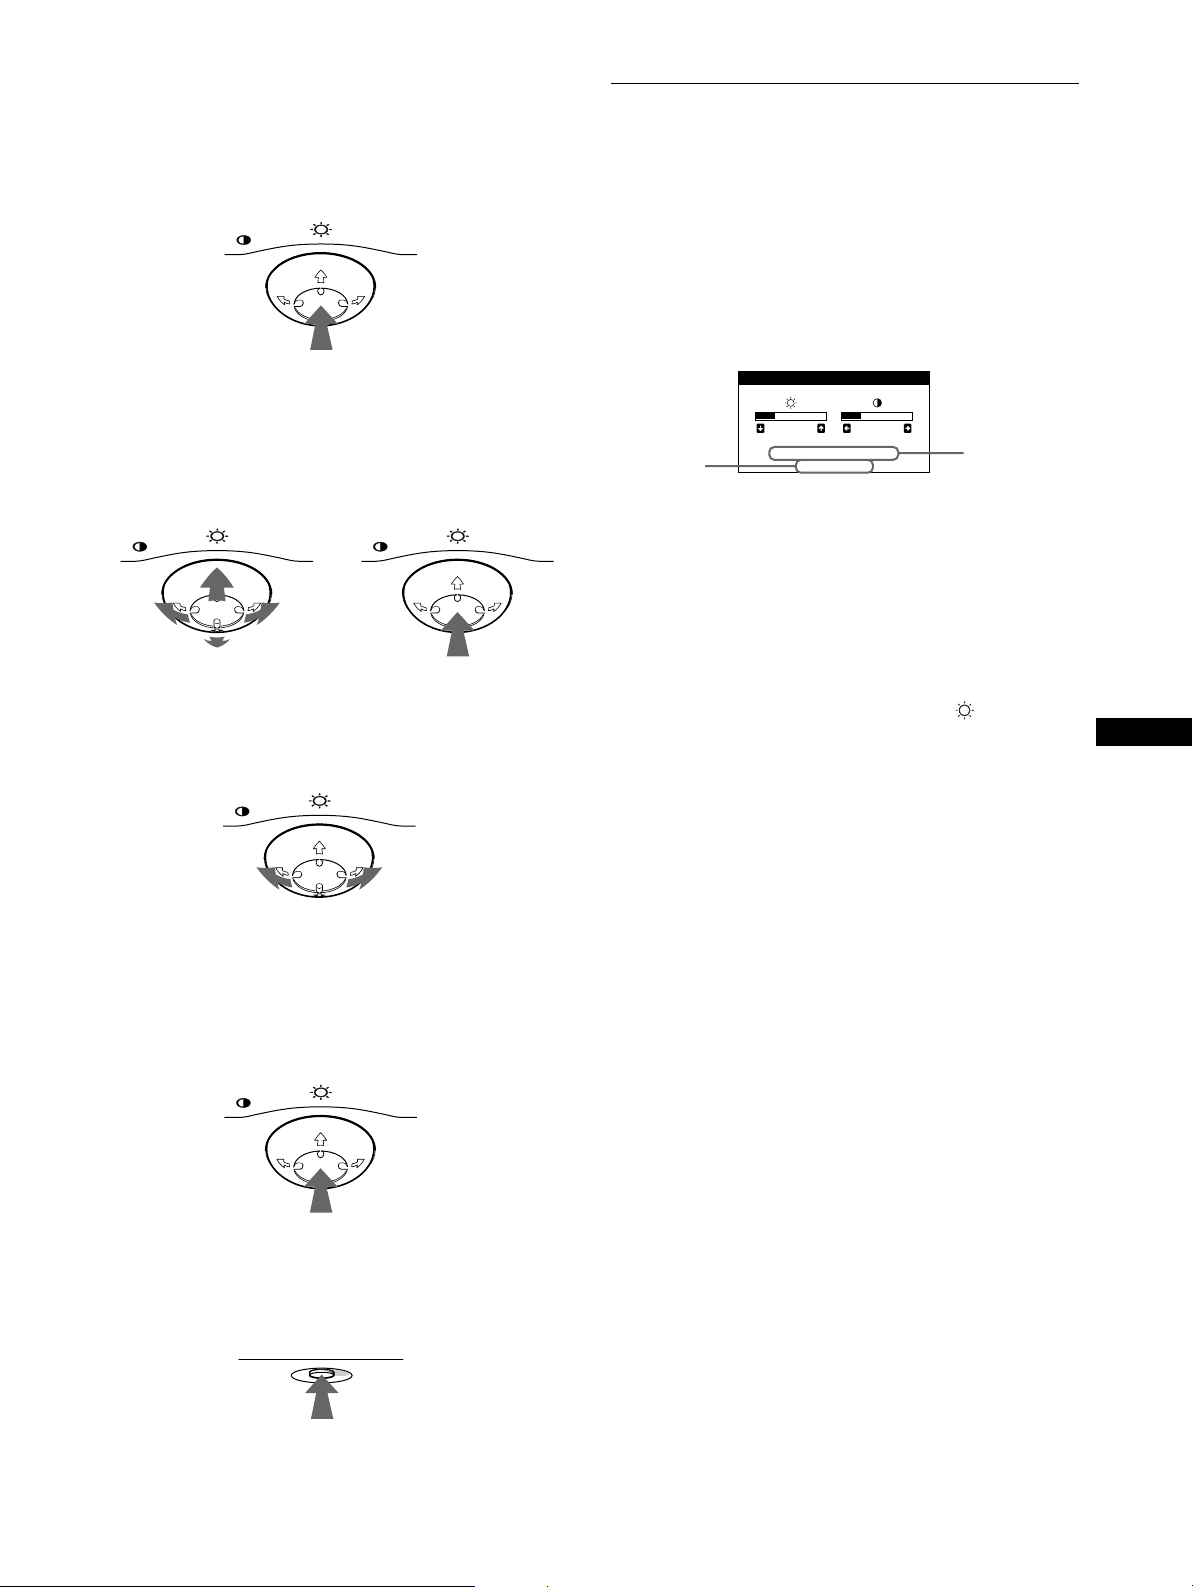
Utilisation de la manette de commande
x
1
Affichez le MENU principal.
Appuyez au centre de la manette de commande pour afficher
le MENU principal sur l’ écran.
MENU
2
Sélectionnez le menu que vous voulez régler.
Mettez en évidence le menu de votre choix en déplaçant la
manette de comman de ver s l’ a r ri è re po ur mo nter (M), vers
l’avant pour descendre (m) et vers la gauche (<) ou vers la
droite (,) pour vous déplacer latéralement.
AVANT
MENU MENU
ARRIERE
3
Réglez le menu.
Déplacez la manette de commande vers la gauche (<) ou la
droite (,) pour effectuer le réglage.
MENU
Réglage de la luminosité et du
contraste
Les réglages de la luminosit é et du contraste sont effectués au
moyen d’un menu LUMINOSITÉ/CONTRASTE séparé.
Ces réglages sont enregistrés dans la mémoire pour tous les
signaux entrants.
1
Déplacez la manette de commande dans n’importe
quel sens.
Le menu LUMINOSITÉ/CONTRASTE apparaît à l’écran.
LUM I NOS ITÉ / CONTRASTE
26 26
68.7kHz/85.0Hz
la résolution
du
signal d’entrée
en cours
1024X768
Les fréquences horizontales et verticales du signal d’entrée en
cours sont affichées dans le menu LUMINOSITÉ/
CONTRASTE. Si le signal correspond à l’un des modes
présélectionnés par défaut de ce moniteur, la résolution
s’affiche également.
2
Déplacez la manette de commande vers le haut ou
le bas m/M pour régler la luminosité ( ), et vers la
gauche ou la droite </, pour régler le contraste
(6).
Le menu disparaît automatiquement au bout d’environ
3 secondes.
les fréquences
horizontales et
verticales du
signal d’entrée
en cours
FR
4
Quittez le menu.
Appuyez une fois au centre de la manette de commande pour
revenir au ME NU pri ncipa l et app uyez en suite d e nouv eau en
sélectionnant QUITTER pour revenir à la visualisation
normale. Si vous n’actionnez aucune touche, le menu se
referme automatiquement au bout de 30 secondes environ.
MENU
Réinitialisation des réglages
x
Appuyez sur la touch e RESET. Voir page 12 pour plus
d’informations sur la réinitialisation des réglages.
RESET
9
Page 24
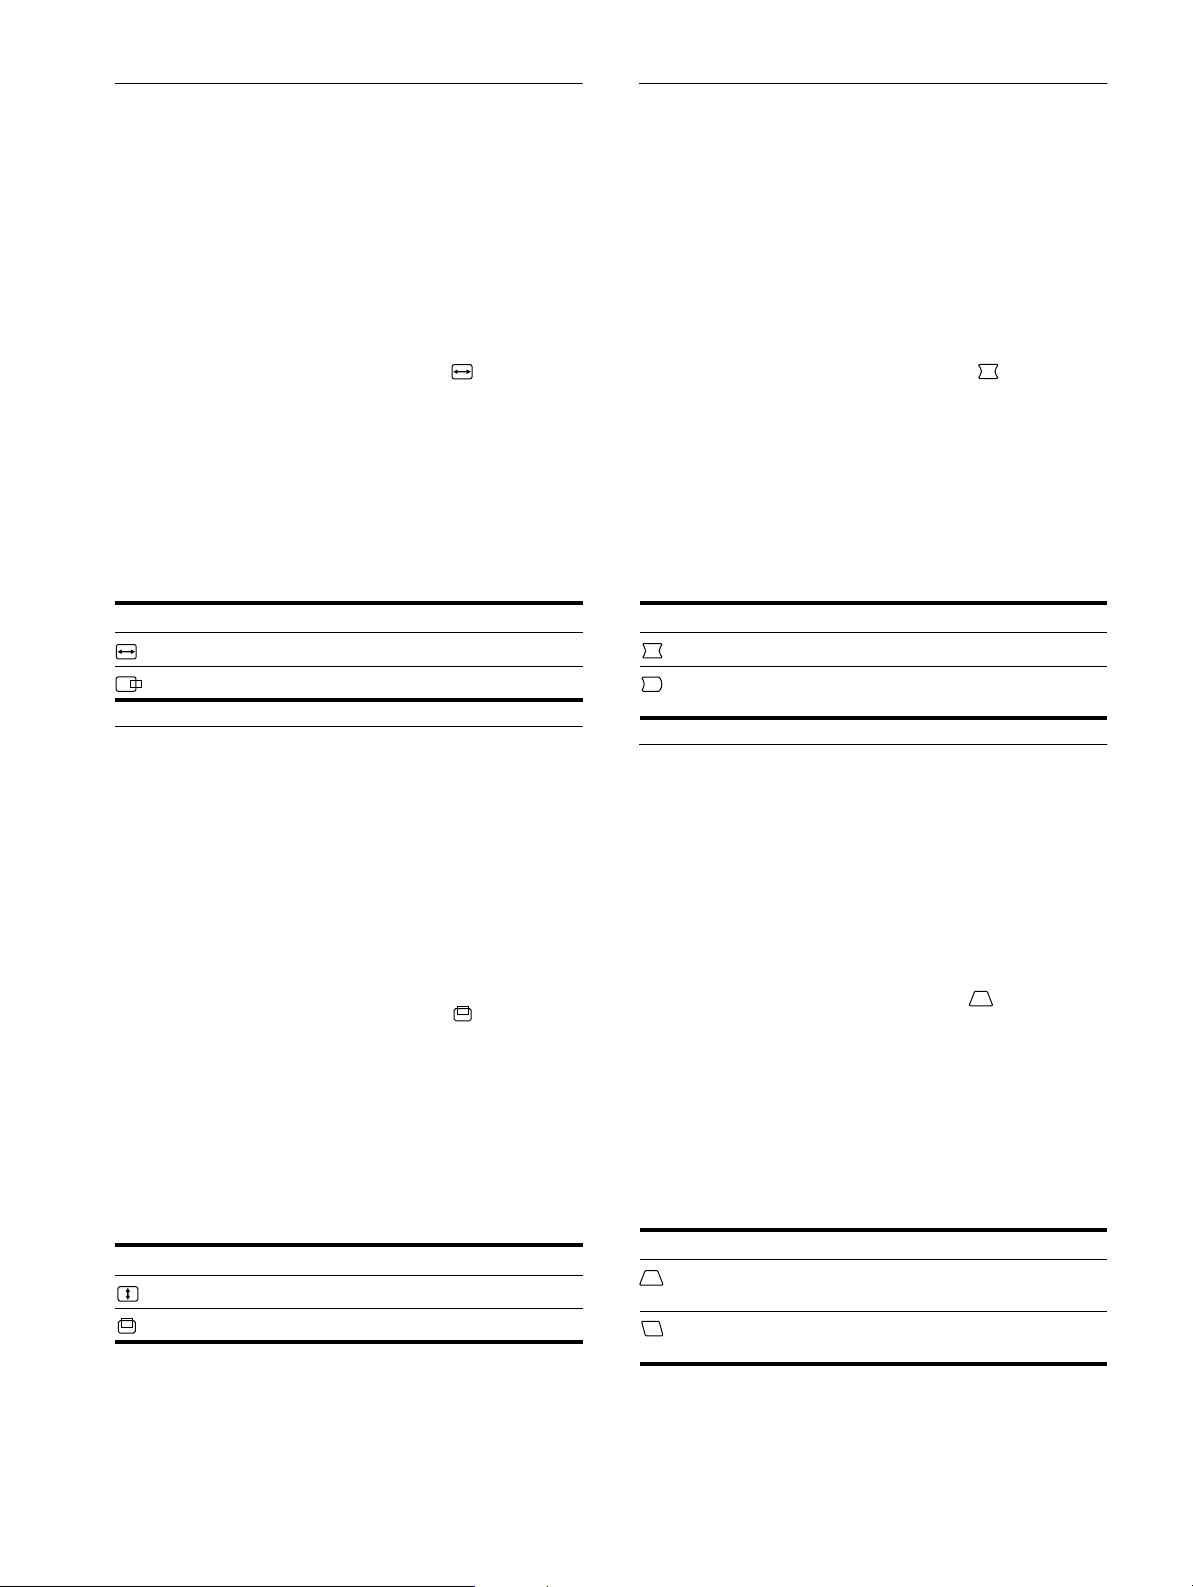
Réglage de la taille horizontale ou
Réglage de l’incurvation des côtés
du centrage de l’image (TAILLE H/
POSITION)
Ces réglages sont enre gistrés dans la mémoire pour le signal
d’entrée en cours.
1
Appuyez au centre de la manette de commande.
Le MENU principal apparaît à l’écran.
2
Déplacez la manette de commande vers le haut ou
le bas m/M pour mettre en évidence TAILLE H/
POSITION et appuyez de nouveau au centre de la
manette de commande.
Le menu TAILLE H/POSITION apparaît à l’écran.
3
Déplacez d’abord la manette de commande vers le
haut ou le bas m/M pour sélectionner le paramètre
de réglage voulu. Déplacez ensuite la manette de
commande vers la gauche ou la droite </, pour
exécuter le réglage.
Sélectionnez Pour
TAILLE H
POSITION H
régler la taille horizontale
régler le centra ge ho r iz on t a l
de l’image (COUSSIN/PIN
BALANCE)
Ces réglages so nt en r e gistrés dans la mémoire pour le signal
d’entrée en cours.
1
Appuyez au centre de la manette de commande.
Le MENU principal apparaît à l’écran.
2
Déplacez la manette de commande vers le haut ou
le bas m/M pour mettre en évidence COUSSIN/
PIN BALANCE et appuyez de nouveau au centre de
la manette de commande.
Le menu COUSSIN/PIN BALANCE apparaît à l’écran.
3
Déplacez d’abord la manette de commande vers le
haut ou le bas m/M pour sélectionner le paramètre
de réglage voulu. Déplacez ensuite la manette de
commande vers la gauche ou la droite </, pour
exécuter le réglage.
Sélectionnez Pour
COUSSIN
PIN BALANCE
élargir ou rétrécir les côtés de l’image
décaler les côtés de l’image vers la
gauche ou la droite
Réglage de la taille verticale ou du
centrage de l’image (TAILLE V/
POSITION)
Ces réglages sont enre gistrés dans la mémoire pour le signal
d’entrée en cours.
1
Appuyez au centre de la manette de commande.
Le MENU principal apparaît à l’écran.
2
Déplacez la manette de commande vers le haut ou
le bas m/M pour mettre en évidence TAILLE V/
POSITION et appuyez de nouveau au centre de la
manette de commande.
Le menu TAILLE V/POSITION apparaît à l’écran.
3
Déplacez d’abord la manette de commande vers le
haut ou le bas m/M pour sélectionner le paramètre
de réglage voulu. Déplacez ensuite la manette de
commande vers la gauche ou la droite </, pour
exécuter le réglage.
Sélectionnez Pour
TAILLE V
POSITION V
régler la taille verticale
régler le centrage vertical
Réglage de l’angle des côtés de
l’image (TRAPÉZOÏD/PARALLÉL)
Ces réglages so nt en r e gistrés dans la mémoire pour le signal
d’entrée en cours.
1
Appuyez au centre de la manette de commande.
Le MENU principal apparaît à l’écran.
2
Déplacez la manette de commande vers le haut ou
le bas m/M pour mettre en évidence TRAPÉZOÏD/
PARALLÉL et appuyez de nouveau au centre de la
manette de commande.
Le menu TRAPÉZOÏD/PARALLÉL apparaît à l’écran.
3
Déplacez d’abord la manette de commande vers le
haut ou le bas m/M pour sélectionner le paramètre
de réglage voulu. Déplacez ensuite la manette de
commande vers la gauche ou la droite </, pour
exécuter le réglage.
Sélectionnez Pour
TRAPÉZOÏD
PARALLÉL
régler la largeur de l’image dans le
haut de l’écran
décaler l’image vers la gauche ou la
droite dans le haut de l’é cra n
10
Page 25

Réglage de la rotation de l’image
KKK
R50
G50
B50
SELECT EXI T
COULEUR
5000 6500 9300
USER
Réglage de la couleur de l’image
(ROTATION)
Ce réglage est enregistré dans la mémoire pour tous le s signaux
d’entrée.
1
Appuyez au centre de la manette de commande.
Le MENU principal apparaît à l’écran.
2
Déplacez la manette de commande vers le haut ou
le bas m/M pour mettre en évidence ROTATION
et appuyez de nouveau au centre de la manette de
commande.
Le menu ROTATION apparaît à l’écran.
3
Déplacez la manette de commande vers la gauche
ou la droite
pour faire pivoter l’image.
</,
Agrandir ou réduire l’image
(ZOOM)
Ce réglage est enregistré dans la mémoire pour le signal d’entrée
en cours.
1
Appuyez au centre de la manette de commande.
Le MENU principal apparaît à l’écran.
2
Déplacez la manette de commande vers le haut ou
le bas m/M pour mettre en évidence ZOOM et
appuyez de nouveau au centre de la manette de
commande.
Le menu ZOOM apparaît à l’écran.
3
Déplacez la manette de commande vers la gauche
ou la droite
pour agrandir ou réduire l’image.
</,
(COULEUR)
Les réglages COULEUR permettent de régler la température de
couleur de l’image en chang eant le niveau de couleur du champ
de couleur blanc. Les couleurs apparaissent rougeâtres lorsque la
température est basse et bleuâtres lorsqu’elle est élevée. Ce
réglage est pratique pour faire correspondre les couleurs du
moniteur aux couleurs d’une image imprimée.
Ce réglage est enregistré dans la mémoire pour tous les signaux
d’entrée.
1
Appuyez au centre de la manette de commande.
Le MENU principal apparaît à l’écran.
2
Déplacez la manette de commande vers le haut ou
le bas m/M pour mettre en évidence COULEUR et
appuyez de nouveau au centre de la manette de
commande.
Le menu COULEUR apparaît à l’écran.
3
Déplacez la manette de commande vers la gauche
ou la droite
température de couleur.
Les températures de couleur présélectionnées sont 5000 K,
6500K, et 9300K . Comme le régla ge par défau t est 9300K, les
blancs passent d’une nuance bleuâtre à une nuance rougeâtre
lorsque la température est aba issée de 6500K à 5000K.
4
Si nécessaire, accordez fi nement l a tempéra ture de
couleur.
Déplacez d’ab ord la ma nette de c omman de vers la gauch e ou
la droite </, pour sé lectionner USER. Déplac ez ensuite la
manette de com m ande vers le haut ou le bas m/M pour
sélectionner R (rouge), G (vert) ou B (bleu) et déplac ez vers
la gauche ou la droite </, pour effectuer le réglage.
pour sélectionner une
</,
FR
Remarque
Le réglage s’arrête lorsque la plage de réglage horizontal ou vertic al
atteint sa valeur limite maximum ou minimum.
Si vous procédez au réglage pr écis de la température des
couleurs, le nouveau régla ge des couleurs est mémorisé et
rappelé chaque fois que vous sélectionne z USER.
11
Page 26

Réglages supplémentaires
RESET
Réinitialisation des réglages
(DÉMAGNÉTISÉ/MOIRÉ)
Vous pouvez dégausser (démagnétiser) manuel lement le
moniteur et ajuster le niveau de suppression du moiré.
1
Appuyez au centre de la manette de commande.
Le MENU principal apparaît à l’écran.
2
Déplacez la manette de commande vers le haut ou
le bas m/M pour mettre en évidence
DÉMAGNÉTISÉ/MOIRÉ et appuyez de nouveau
au centre de la manette de commande.
Le menu DÉMAGNÉTISÉ/MOIRÉ apparaît à l’écran.
3
Déplacez la manette de commande vers le haut ou
le bas m/M pour sélectionner le paramètre de
réglage voulu.
Procédez au réglage du paramètre sélectionné en suivant les
instructions ci-dessous.
Démagnétisation de l’écran
L’écran du moniteur e st au tom a tiq ue m ent d ém a gn é tisé à la mi se
sous tension.
Pour démagnétiser manuellement l’écran, déplacez
d’abord la manette de comm ande vers le haut ou le bas
afin de sélectionner (DÉMAGNÉTISÉ). Déplacez
m/M
ensuite la manette de commande vers la droite ,.
L’écran est démagnétisé pendant environ 5 secondes. Si un
second cycle de démagnétisation s’avère nécessaire, laissez
s’écouler un intervalle de 20 minutes pour obtenir de meil leurs
résultats.
Réglage du moiré*
Si des motifs elliptiques ou ondulés apparaissent sur l’écran,
réglez le niveau de suppression du moiré.
Pour régler le niveau de suppression du moiré,
déplacez d’abord la ma nette de comma nde vers le hau t
ou le bas m/M afin de sélectionner (ADAPTE
MOIRÉ). Déplacez ensuite la manette de commande
vers la gauche ou la droite </, jusqu’à ce que l’effet
de moiré soit minimal.
Ce moniteur offre trois méthodes de réinitialisation. Utilisez la
touche RESET pour réinitialiser les réglages.
Réinitialisation d’un seul paramètre de réglage
Utilisez la manette de commande pour sélectionner le paramètre
de réglage que vous voulez réinitialiser et appuyez sur la touche
RESET.
Réinitialisation de toutes les données de réglage
pour le signal d’entrée en cours
Appuyez sur la touche RESET lorsqu’aucun menu n’est affiché
sur l’écran.
Attention que les paramètres su ivants n e sont pas réinitialisés par
cette méth od e:
• langue d’affichage des menus (page 7)
• rotation de l’image (page 11)
Réinitialisation de toutes les données de réglage
pour tous les signaux d’entrée
Maintenez la touche RESET enfoncée pendant au moins deux
secondes.
Attention que le paramètre suivant ne peut être réinitialisé suivant
cette méth od e:
• réglages utilisateur du menu couleur (page 11)
* L’e ffet de moiré est un type d’i nt erférence naturelle qui produit de
légères lignes ondulé es sur l’écran. Il peut résulter d’une interférence
entre le motif de l’ima ge à l’écran et la disposition des poi nt s du
moniteur.
Exemple de moiré
12
Page 27
Caractéristiques
INFORMATIONS
HORS PLAGE
DE BALAYAGE
Dépannage
techniques
Modes présélectionné et utilisateur
Lorsque le moniteur reçoit un signal d’entrée, il fait
automatiquement correspondre le signal à l’un des modes
présélectionnés qui sont enregistrés da ns la mémoire du moniteur
de manière à offrir une image de haute qualité au centre de
l’écran. (Voir Appendix pour une liste des modes
présélectionnés.) Pour les signaux d’entrée qui ne correspondent
pas à l’un des modes présélectionnés, la technologie Multiscan
numérique intégrée dans ce moniteur fait en sorte qu’une image
claire apparaisse à l’écran p our toutes les sync hronisations dans la
plage de fréquences du moniteur (horizontale: 30 à 70 kHz;
verticale: 48 à 120 Hz). Lorsque l’image est réglée, les données
de réglage sont mémorisées comme un mode utilisateur et sont
rappelées automatiqueme nt cha que fois qu e le même signal
d’entrée est reçu.
Remarque à l’intention des utilisateurs de
Windows
Vérifiez le mode d’emploi de votre carte vidéo ou le programme
utilitaire fourni avec la c art e gr aph iq ue e t sél ectio n nez le taux de
régénération le plus élevé de manière à maximiser les
performances du moniteur.
Fonction d’économie d’énergie
Ce moniteur satisfa it aux critères d’économie d’énergie VESA,
E
NERGY STAR et NUTEK. Lorsque le moniteur est raccordé à
un ordinateur ou une carte graphique vidéo compatible DPMS
(Display Power Management Signaling), le moniteur réduit
automatiquement sa conso mmation d’énergie en trois étapes
comme indiqué ci-dessous.
Consultez cette section avant de faire appel au service
d’assistance technique.
Si une fine ligne apparaît à l’écran
(fil d’amortissement)
La ligne que vous apercevez sur votre écran est une
caractéristique normale du moniteur Trinitron et ne constitue
donc pas un dysfonctionnement. Il s’agit de l’ombre du fil
d’amortissem ent em ployé pour stabili ser la grille d’ouve rture q ui
est le plus facilement visi ble lorsque l’arrière-plan de l’écran est
clair (généralement blanc). La grille d’ou verture est l’élément
essentiel qui rend les tubes image Trinitron uniq ues en permettant
le passage d’une plus grande quan tité de lumière vers l’écran, ce
qui garantit une image plus lumineuse et plus finement détaillée.
Fil d’amortissement
Messages affichés à l’écran
FR
Lorsqu’une anomalie du signal d’entrée est détectée, l’un des
messages suivants apparaît à l’écran. Pour remédier au prob lème,
voir “Symptômes et remèdes” à la page 14.
Condition du
signal d’entrée
Mode
d’alimentation
fonctionnement
normal
1 veille ≤ 15 W vert et orange en
2 interruption
(sommeil)*
3 inactif**
(sommeil profond)*
hors tension 0 W désactivé
* “Sommeil” et “sommeil profond” sont des mod es d’é conomie
** Lorsque vot re ordinateur passe en mode “ ina ctif”, le signal d’entrée
Consommation
d’énergie
≤ 95 W vert
≤ 15 W vert et orange en
≤ 5 W orange
d’énergie définis par l’Environmental Prote ction Agency.
est coupé et l’indication PAS ENTREE VIDEO apparaît à l’écran. Au
bout de 20 secondes, le moniteur passe en mode d’économie
d’énergie.
L’indicateur 1
(alimentation)
alternance
alternance
Condition du signal d’entrée
HORS PLAGE DE BALAYAGE
indique que le signal d’entr ée n’est pas supporté par les
spécifications du moniteu r .
PAS ENTREE VIDEO
indique qu’aucu n signal n’est entré sur le moniteur.
13
Page 28

Symptômes et remèdes
Si le problème est provoqué par l’ordinateur ou tout autre appareil raccordé, veuillez vous référer au mode d’emploi de l’appareil raccordé.
Utilisez la fonction d’autodiagnostic (page 16) si les recommandations suivantes ne vous permettent pas de résoudre le problème survenu.
Symptôme Vérifiez
Pas d’image
Si l’indicateur 1 (alimentation) ne
s’allume pas
Si le message PAS ENTREE
VIDEO apparaît à l’écran ou si
l’indicateur 1 (alimentation) est
orange ou clignote alternativement
en vert et en orange
Si le message HORS PLAGE DE
BALAYAGE apparaît à l’écran
Si aucun message ne s’affiche et si
l’indicateur 1 (alimentation) est vert
ou clignote en orange
Si vous utilisez Windows 95/ 98 • Si vous remplacez un ancien moni teur par ce moniteur, reconnectez l ’a nci en moniteur et
Si vous utilisez un système
Macintosh
L’image scintille, sautille, oscille
ou est brouillée
L’image est floue
• Vérifiez si le cordon d’alimentation est correctement branché.
• Vérifiez si le commutateur 1 (alimentation) est réglé sur la position “on”.
• Vérifiez si le câble de signal vidéo est correctement branché et si les fiches sont
fermement enfoncées dans leurs prises resp ectives (page 6).
• Vérifiez si les broches du connecteu r d’ entrée vidéo HD15 ne sont pas faus sées ou
enfoncées.
Problèmes causés par l’ordinateur ou tout autre appareil raccordé
x
• L’ordinateur est en mode d’économie d’énergie. Essayez d’appuyer sur une touche du
clavier de l’ordinateur.
• Vérifiez si le commutateur d’alimentation de l’ordinateur est sur “on”.
• Vérifiez si la carte graphique est complèt ement enfoncée dans la fente de bus appropriée.
Problèmes causés par l’ordinateur ou tout autre appareil raccordé
x
• Vérifiez si la plage de fréquence vidéo correspond aux spécifications du moniteur. Si vous
remplacez un ancien moniteur par ce moniteur, reconnectez l’ancien moniteur et ajustez la
plage de fréquence comme suit.
Horizontale: 30 à 70 kHz
Verticale: 48 à 120 Hz
• Activez la fonction d’autodiagnostic (page 16).
procédez comme suit. Installez la disquette Windows Monitor Information Disk (page 7)
et sélectionnez ce moniteur (“CPD-E100E”) parmi les moniteurs Sony dans l’écran de
sélection de mon it eur de Windows 95/98.
• Vér ifiez si l’adaptateur Macintosh (non fourni) et le câble de signal vidéo sont
correctement raccordés (page 6).
• Isolez et éliminez les sources potentielles de champs électriques ou magnétiques tels que
d’autres moniteurs, des imprimantes laser, des ventilateurs électriques, des lampes
fluorescentes ou des téléviseurs.
• É loignez le moniteur des lignes à haute tension ou placez un blindage magnétique à
proximité du moniteur.
• Bran chez le moniteur sur une autre prise secteur, de préférence raccordée à un autre
circuit.
• Faites pivoter le moniteur de 90° ver s la gauche ou la droite.
Problèmes causés par l’ordinateur ou tout autre appareil raccordé
x
• Vérifiez le réglage adéquat pour le moniteur dans le mode d’emploi de vot r e carte
graphique.
• Assurez-vous que le mode graphique (VESA, Macintosh 16" Color, etc.) et la fréquence
du signal d’entrée sont supportés par ce moniteur (Appendix). Même si la fréquen ce est
comprise dans la plage adéquate, il arrive que certaines cartes vidéo présentent une
impulsion de synchronisation trop étroite pour que le moniteur puisse se synchroniser
correctement.
• Ajustez le taux de régénération de l’ordinateur (fréquence verticale) de façon à obtenir la
meilleure image possible.
• Ajustez la luminosité et le contraste (page 9).
• Démagnétisez le moniteur* (pag e 12).
• Sélectionnez ADAPTE MOIRÉ et réglez le niveau de suppressi on de moiré (page 12).
14
Page 29
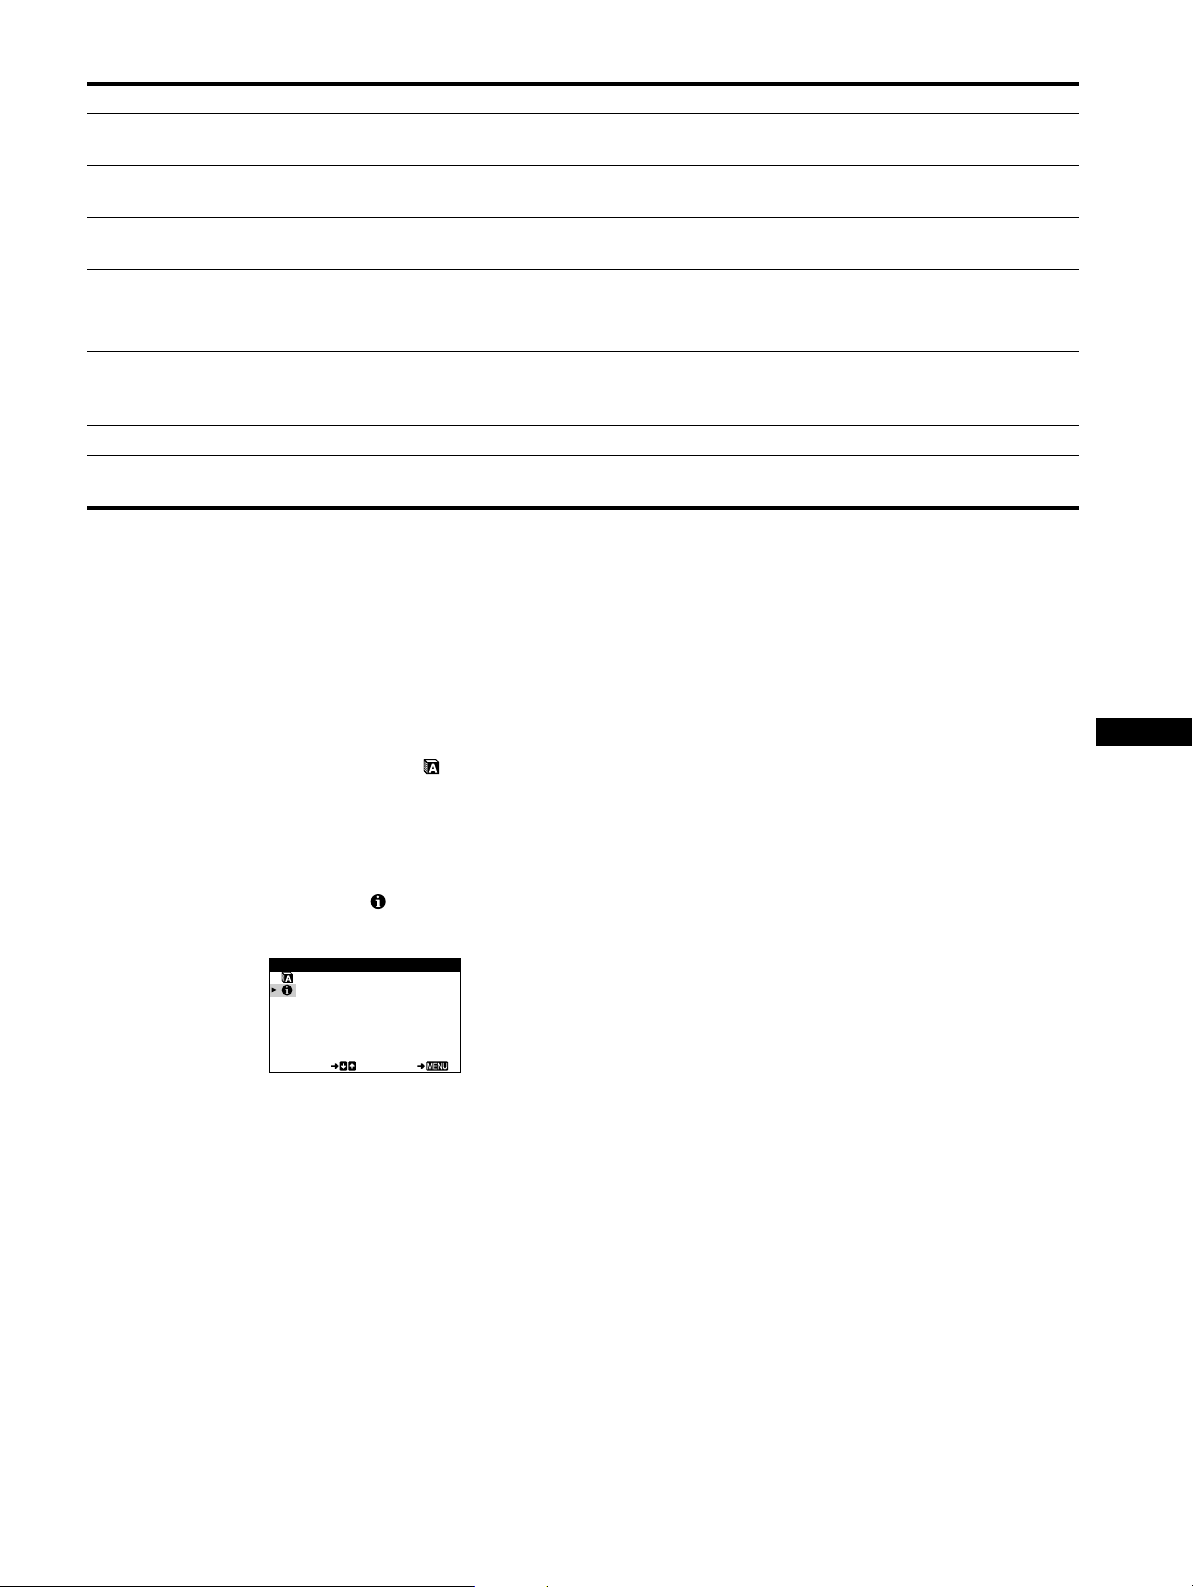
Symptôme Vérifiez
Des images fantômes
apparaissent
L’image n’est pas centrée ou de
taille incorrecte
Les bords de l’image sont
incurvés
Un motif ondulatoire ou elliptique
• N’utilisez pas de prolongateurs de câble vidéo et/ou de boîtiers de commutation vidéo.
• Vérifiez si toutes les fiches sont fermement connec tées dans leurs prises respectives.
• Ajustez la taille ou le centrage (page 10) de l’image. Attention que certains modes vidéo
ne remplissent pas l’écran jusqu’aux bords.
• Sélection nez COUSSIN/PIN BALANCE, TRAPÉZOÏD/PARALLÉL ou ROTATION et
réglez la forme et la rotation de l’image (pages 10, 11).
• Sé lectionnez ADAPTE MOIRÉ et réglez le niveau de suppression de moiré (page 12).
(moiré) est visible
Problèmes causés par l’ordinateur ou tout autre appareil raccordé
x
• Changez le motif de votre bureau.
Les couleurs ne sont pas
uniformes
• Démagnétisez le moniteur* (page 12). Si vous placez à côté du moniteur un appare il qui
génère un champ magnétique, comme un haut-parleur, ou si vous changez l’orientation du
moniteur, il se peut que les couleurs perdent leur uniformité.
Le blanc n’est pas blanc
Un souffle est audible juste après
la mise sous tension
* Si un second cycle de démagné ti s at ion s’avère nécessaire, laissez s’écouler un interva l le de 20 minutes pour obtenir de m ei ll eu rs résultats. Un bruit de
souffle peut se faire entend re, m ai s il ne s’agi t pas d’un dysfonctionnement.
• Ajust ez la température de couleur (page 11).
• C’est le son provoqué par le cycle de démagnétisation automatique. Lorsque le moniteur
est mis sous tension, il est automatiquement démagnétisé pendant cinq secondes.
Affichage de la désignation, du numéro de série et
de la date de fabrication du moniteur
(INFORMATION)
1
Appuyez au centre de la manette de commande.
Le MENU principal apparaît à l’écran.
2
Déplacez la manette de commande vers le haut ou
le bas m/M pour mettre en évidence LANGUE/
INFORMATION et appuyez de no uveau au c entre de
la manette de commande.
Le menu LANGUE/INFORMATION apparaît à l’écran.
3
Déplacez la manette de commande vers le haut ou
le bas m/M pour sélectionner (INFORMATION).
Cette fenêtre d’information sur le monit eur apparaît à l’
Exemple
LANGUE / I NFORMAT I ON
MODE L : CPD - E 1 0 0 E
SERI AL: 12345678
MANUF ACTURED: 1 9 9 9 - 5 2
SELECT EXI T
éc
ran.
Si le problème persiste, appelez votre revendeur Sony agréé et
fournissez-lui les informations suivantes.
• Désignation du modèle: CPD-E100E
• Numéro de série
• Marque et spécifications de votre ordinateur et de votre carte
graphique.
FR
15
Page 30
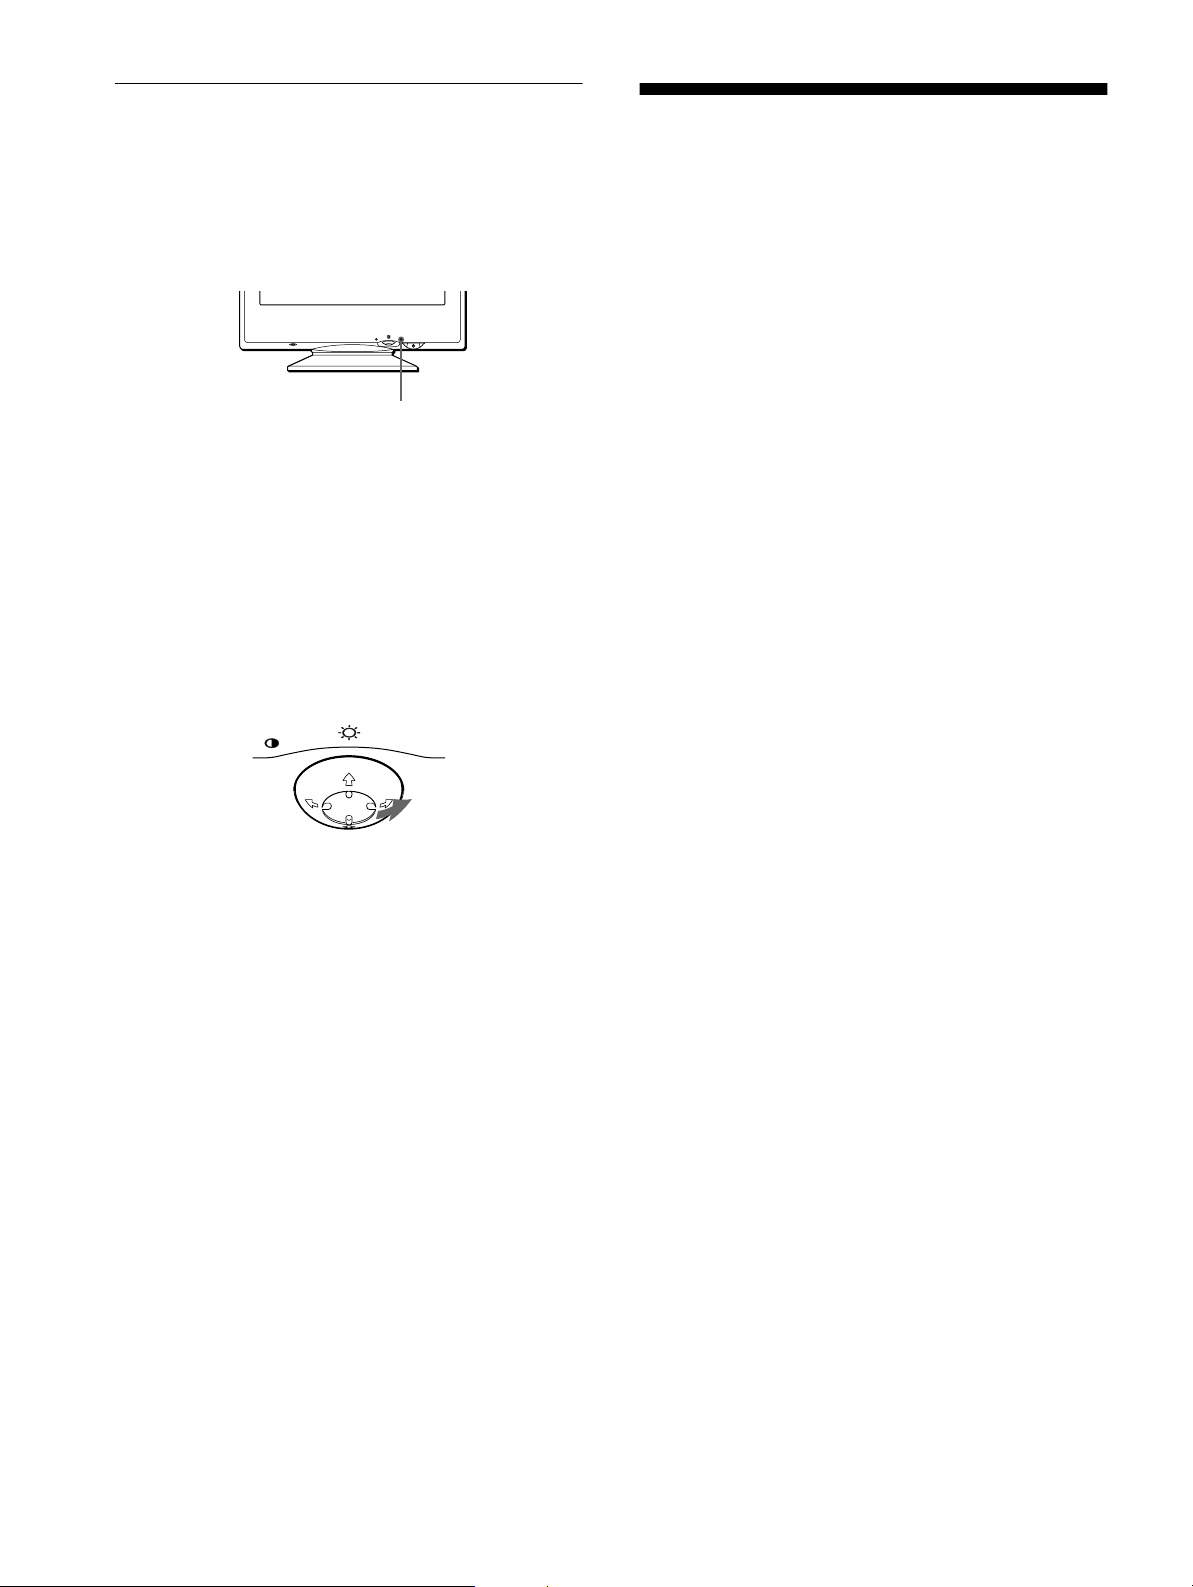
Fonction d’autodiagnostic
Ce moniteur est doté d’une fonction d’autodiagnostic. S’il y a un
problème avec vo tre moniteur ou ordinateur, l’écran devient
blanc et l’indicateur 1 (alimentation) s’allume en vert ou clignote
en orange. Si l’indicateur 1 (alimentation) s’allume en orange,
c’est que l’ordinateur se trouve en mode d’économie d’énergie.
Appuyez sur une touche quelconque du clavier.
RESET
Si l’indicateur 1 (alimentation) est allumé en vert
1
Débranchez le câble d’entrée vidéo ou mettez
l’ordinateur raccordé hors tension.
2
Appuyez deux fois sur la touche 1 (alimentation)
pour mettre le moniteur hors et sous tension.
3
Déplacez la manette de com mande vers la droite ,
pendant 2 secondes avan t que le moniteur passe en
mode d’économie d’énergie.
MENU
L’indicateur 1 (alimentation)
MENU
Spécifications
Tube cathodique Pas d’ouv er ture de gril le de 0 ,24 mm
(central)
15 pouces mesurés en diagonale
Déflexion de 90 degr é s
Taille de l’image affichée Approx. 285 × 214 mm (l/h)
Zone de visualisation de 14,0"
Résolution
Maximum Horizontale: 1280 points
Verticale: 1024 lignes
Recommandé e H orizontale: 800 points
Verticale: 600 ligne
Zone d’image standa rd Approx. 270 × 202 mm (l/h)
Fréquence de déflexion* Horizontale: 30 à 70 kHz
Verticale: 48 à 120 Hz
Tension/courant d’entrée CA
100 à 240 V, 50 – 60 Hz,
1,2 – 0,6 A
Consommation électrique Max. 95 W
Dimensions Approx
Poids Approx. 14 kg
Plug & Play DDC1/DDC2B
Accessoires fournis Voir page 6
* Condition de synchronisation horizontale et verticale
• La largeur de synchronisation horizontale doit être
supérieure à 1,0 µsec.
• La largeur de suppression horizontale doit être supérieure à
3,6 µsec.
• La largeur de suppression verticale doit être supérieure à
500 µsec.
. 356 × 378 × 388 mm
(
l/h/p
)
Si les quatre barres de couleur apparaissent (blanc, rouge, vert,
bleu), c’est que le moniteur fonctionne correctement. Rebranchez
le câble d’entrée vidéo et vérifiez l’état de votre ordinateur.
Si les barres de couleur n’apparaissent pas, c’est probablement
parce qu’une anomalie s’est pr oduite au niveau du moniteur.
Informez votre revendeur Sony agréé de l’état du moniteur.
Si l’indicateur 1 (alimentation) clignote en orange
Appuyez deux fois sur la touche 1 (alimentation) pour
mettre le moniteur hors et puis sous tension.
Si l’indicateur 1 (alimentation) s’allume en vert, c’est que le
moniteur fonctionne correctement.
Si l’indicateur 1 (alimentation) clignote toujours, c’est
probablement parce qu’il y a une anomalie au niveau du moniteur.
Comptez le nombre de secondes ent re les clignotements oranges
de l’indicateur 1 (alimentation) et informez votre revendeur
Sony agréé de l’état du moniteur. Notez également la désignation
du modèle et le numéro de série de votre moniteur. Notez
également la marque et le mod è le de votre ordinateur et de votre
carte vidéo.
La conception et les spécifications sont sujettes à modifications
sans préavis.
16
Page 31
Inhalt
Sicherheitsmaßnahmen . . . . . . . . . . . . . . . . . . . . . . . . . . . . . . . . . . 4
Lage und Funktion der Teile und Bedienelemente. . . . . . . . . . . . . . 5
Anschließen des Geräts . . . . . . . . . . . . . . . . . . . . . . . . . .6
• Trinitron ist ein eingetragenes
Warenzeichen de r Sony Corporation.
• Macintosh ist ein Warenzeichen der
Apple Computer, Inc., in den USA und
anderen Ländern.
• Windows
eingetragene Warenzeichen der
Microsoft Corporation in den USA und
anderen Ländern.
• IBM PC/AT und VGA sind
eingetragene Warenzeichen der IBM
Corporation in den USA.
• VESA und DDC
der Video Electronics Stand ard
Association.
•
E
Warenzeichen in den USA.
• Alle anderen in dies em Handbuch
erwähnten Produktnamen können
Warenzeichen oder eingetragene
Warenzeichen der jeweiligen
Eigentümer sein.
• Im Handbuch sind die Waren zeichen
und eingetragenen Warenzeichen nicht
überall ausdrücklich durch „“ und „“
gekennzeichnet.
und MS-DOS sind
sind Warenzeichen
NERGY STAR ist ein eingetragenes
Schritt 1:
Schritt 2:
Schritt 3:
Anschließen des Monitors an den Computer. . . . . . . . . . 6
Anschließen des Netzkabels . . . . . . . . . . . . . . . . . . . . . . 6
Einschalten von Monitor und Computer. . . . . . . . . . . . . . 7
Auswählen der Sprache für die Bildschirmmenüs
(SPRACHE/INFORMATION) . . . . . . . . . . . . . . . . . . . . . . . . . . . . . . 7
Einstellen des Monitors. . . . . . . . . . . . . . . . . . . . . . . . . . .8
Navigieren in den Menüs . . . . . . . . . . . . . . . . . . . . . . . . . . . . . . . . . 8
Einstellen von Helligkeit und Kontrast . . . . . . . . . . . . . . . . . . . . . . . 9
Einstellen von Breite oder horizontaler Position des Bildes
(H-GRÖSSE/LAGE) . . . . . . . . . . . . . . . . . . . . . . . . . . . . . . . . . . . . 10
Einstellen von Höhe oder vertikaler Position des Bildes
(V-GRÖSSE/LAGE) . . . . . . . . . . . . . . . . . . . . . . . . . . . . . . . . . . . . 10
Korrigieren der Wölbung der Bildränder
(KISSENVERZ/BALANCE). . . . . . . . . . . . . . . . . . . . . . . . . . . . . . . 10
Einstellen des Winkels der Bildränder
(TRAPEZFORM/PARALLEL) . . . . . . . . . . . . . . . . . . . . . . . . . . . . . 10
Einstellen der Bildrotation (DREHUNG) . . . . . . . . . . . . . . . . . . . . . 11
Vergrößern oder Verkleinern des Bildes (ZOOMEN) . . . . . . . . . . . 11
Einstellen der Farben des Bildes (FARBE). . . . . . . . . . . . . . . . . . . 11
Weitere Einstellungen (ENTMAGNETIS/MOIRE). . . . . . . . . . . . . . 12
Zurücksetzen der Einstellungen . . . . . . . . . . . . . . . . . . . . . . . . . . . 12
Technische Merkmale . . . . . . . . . . . . . . . . . . . . . . . . . . .13
Vordefinierte Modi und Benutzermodi . . . . . . . . . . . . . . . . . . . . . . 13
Die Energiesparfunktion . . . . . . . . . . . . . . . . . . . . . . . . . . . . . . . . . 13
Störungsbehebung . . . . . . . . . . . . . . . . . . . . . . . . . . . . .13
Wenn auf dem Bildschirm eine dünne Linie (Dämpfungsdraht)
erscheint . . . . . . . . . . . . . . . . . . . . . . . . . . . . . . . . . . . . . . . . . . . . . 13
Bildschirmmeldungen . . . . . . . . . . . . . . . . . . . . . . . . . . . . . . . . . . . 13
Symptome für Fehler und Abhilfemaßnahmen. . . . . . . . . . . . . . . . 14
Selbstdiagnosefunktion. . . . . . . . . . . . . . . . . . . . . . . . . . . . . . . . . . 16
Technische Daten . . . . . . . . . . . . . . . . . . . . . . . . . . . . . .16
Appendix. . . . . . . . . . . . . . . . . . . . . . . . . . . . . . . . . . . . . . . i
Preset mode timing table . . . . . . . . . . . . . . . . . . . . . . . . . . . . . . . . . .i
TCO’99 Eco-document . . . . . . . . . . . . . . . . . . . . . . . . . . . . . . . . . . . .i
DE
3
Page 32
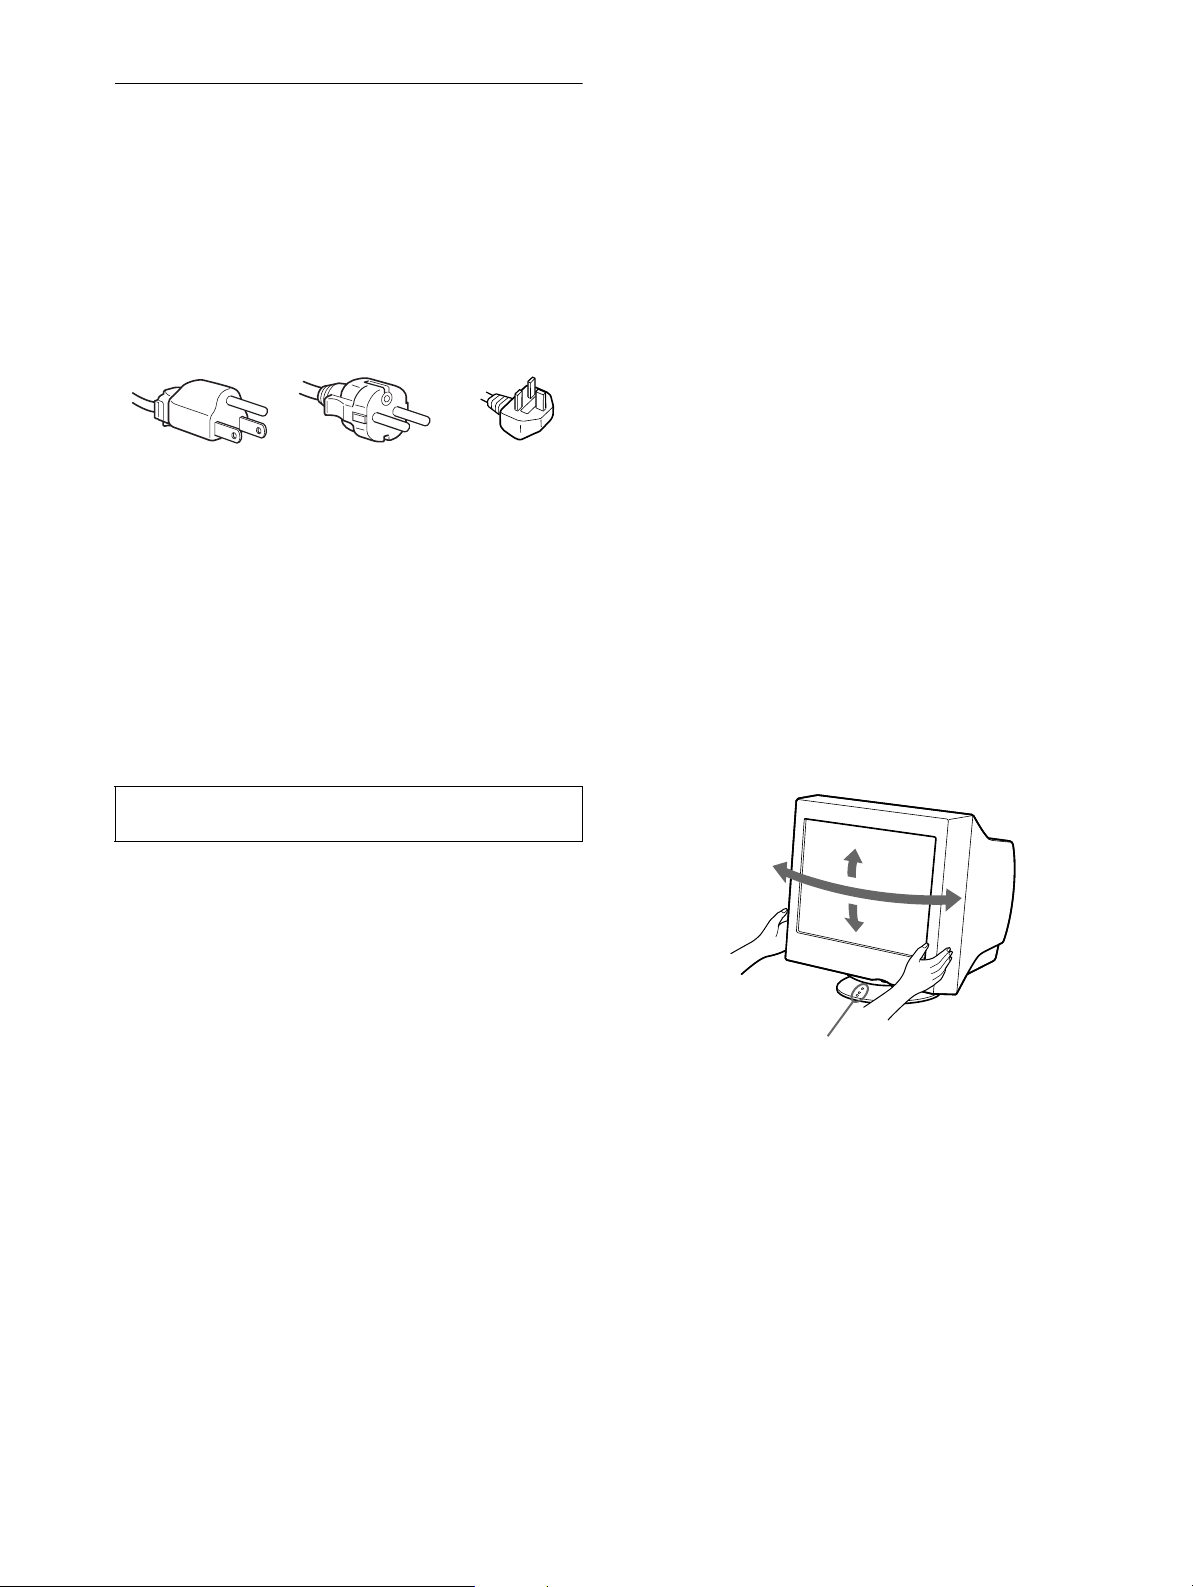
Sicherheitsmaßnahmen
90°
5°
90°
15°
Zentrierpunkte
Warnhinweis zum Netzanschluß
• Verwenden Sie ausschließlich das mitgelieferte Netzkabel.
Wenn Sie ein anderes Netzkabel verwenden, achten Sie darauf,
daß es für die Stromversorgung in Ihrem Land geeignet ist.
Für Kunden in Großbrita nn i en
Wenn Sie den Monitor in Gr oßbritannie n verwenden, ben utzen
Sie bitte das mitgelieferte Kabel mit dem für Großbritannien
geeigneten Stecker.
Beispiele für Steckertypen
Wartung
• Reinigen Sie den Bildschirm mit einem weichen Tuch. Wenn
Sie ein Glasreinigungsmittel verwenden, achten Sie darauf, daß
es keine Antistatik-Lösung oder ähnlich e Zusätz e enthält, da
diese zu Kratzern auf der Beschichtung des Bildschirms führen
könnten.
• Berühren Sie d ie Bildschirmoberfläche nicht mit scharfen,
rauhen oder sp itz e n Ge g e ns tä nden wie zum Beis piel
Kugelschreibern oder Schraubenziehern. Andernfalls könnte
die Bildschirmoberfläche zerkratzt werden.
• Rei nigen Sie Gehäuse, Bedienfeld und Bedienelemente mit
einem weichen Tuch, das Sie leicht mit einem milden
Reinigungsmittel angefeuchtet ha ben. Verwenden Sie ke ine
Scheuermittel, Scheuerschwämme oder Lösungsmittel wie
Alkohol oder Benz in.
für 100 bis 120 V
Wechselstrom
• Warten Sie nach dem Ausschalten des Geräts mindestens
30 Sekunden, bevor Sie das Netzkabel lösen. In dieser Zeit
kann sich die statische Elektrizitä t auf der Oberfläche des
Bildschirms entladen.
• Wenn Sie das Gerät einschalten, wird der Bildschirm etwa
5 Sekunden lang entmagnetisiert. Dadurch entsteht um den
Bildschirm ein starkes magnetisches Feld, das Daten auf
Magnetbändern, Disketten oder anderen Datenträgern in der
Nähe beschädigen kann. Legen Sie magnetische Datenträger
und Bänder/Disketten daher nicht zu nahe bei diesem Monitor
ab.
Die Netzsteckdose sollte sich in der Nähe des Ge räts befinden
und leicht zugänglich sein.
für 200 bis 240 V
Wechselstrom
nur für 240 V
Wechselstrom
Aufstellung
Stellen Sie den Monitor nicht an folgenden Standorten auf:
• auf Oberflächen wie Teppichen oder Decken oder in der Nähe
von Materialien wie Gardinen und Wandbehängen, die die
Lüftungsöffnungen blockieren könnten
• in der Nähe von Wärmequellen wie Heizkörpern oder
Warmluftauslässen oder an einem Ort, an dem der Monitor
direktem Sonnenlicht ausgesetzt ist
• an einem Ort, an dem der Monitor starken
Temperaturschwankungen ausgesetzt ist
• an einem Ort, an dem der Monitor mechanischen Vibrationen
oder Stößen ausgesetzt ist
• auf einer instabilen Oberfläche
• in d er Nähe anderer Geräte, die ein starkes Magnetfeld
generieren, wie zum Beispiel ein Transformator oder eine
Hochspannungsleitung
• in d er Nähe von oder auf einer elektrisch geladenen
Metallfläche
Transport
Wenn Sie den Monitor zur Reparatur oder bei einem Umzug
transportieren müssen, verpacken Sie ihn mit Hilfe der
Originalverpackungsmaterialien wieder im Originalkarton.
Der dreh- und neigbare Ständer
Mit dem dreh- un d neigbaren Ständer können Sie den Monitor
innerhalb der unten abgebildeten Winkel nach Bedarf einstellen.
Um die Mitte des Drehradius des Monitors zu finden, richten Sie
die Mitte des Monitorbildschirms an den Zentrierpunkten am
Ständer aus.
Stützen Sie den Monitor bitte mit beiden Händen unte n ab, wenn
Sie ihn drehen oder neigen. Achten Sie darauf, die Finger nicht an
der Rückseite des Moni tors einzuklemmen, wenn Sie den
Monitor nach ob en schwenken.
4
Page 33
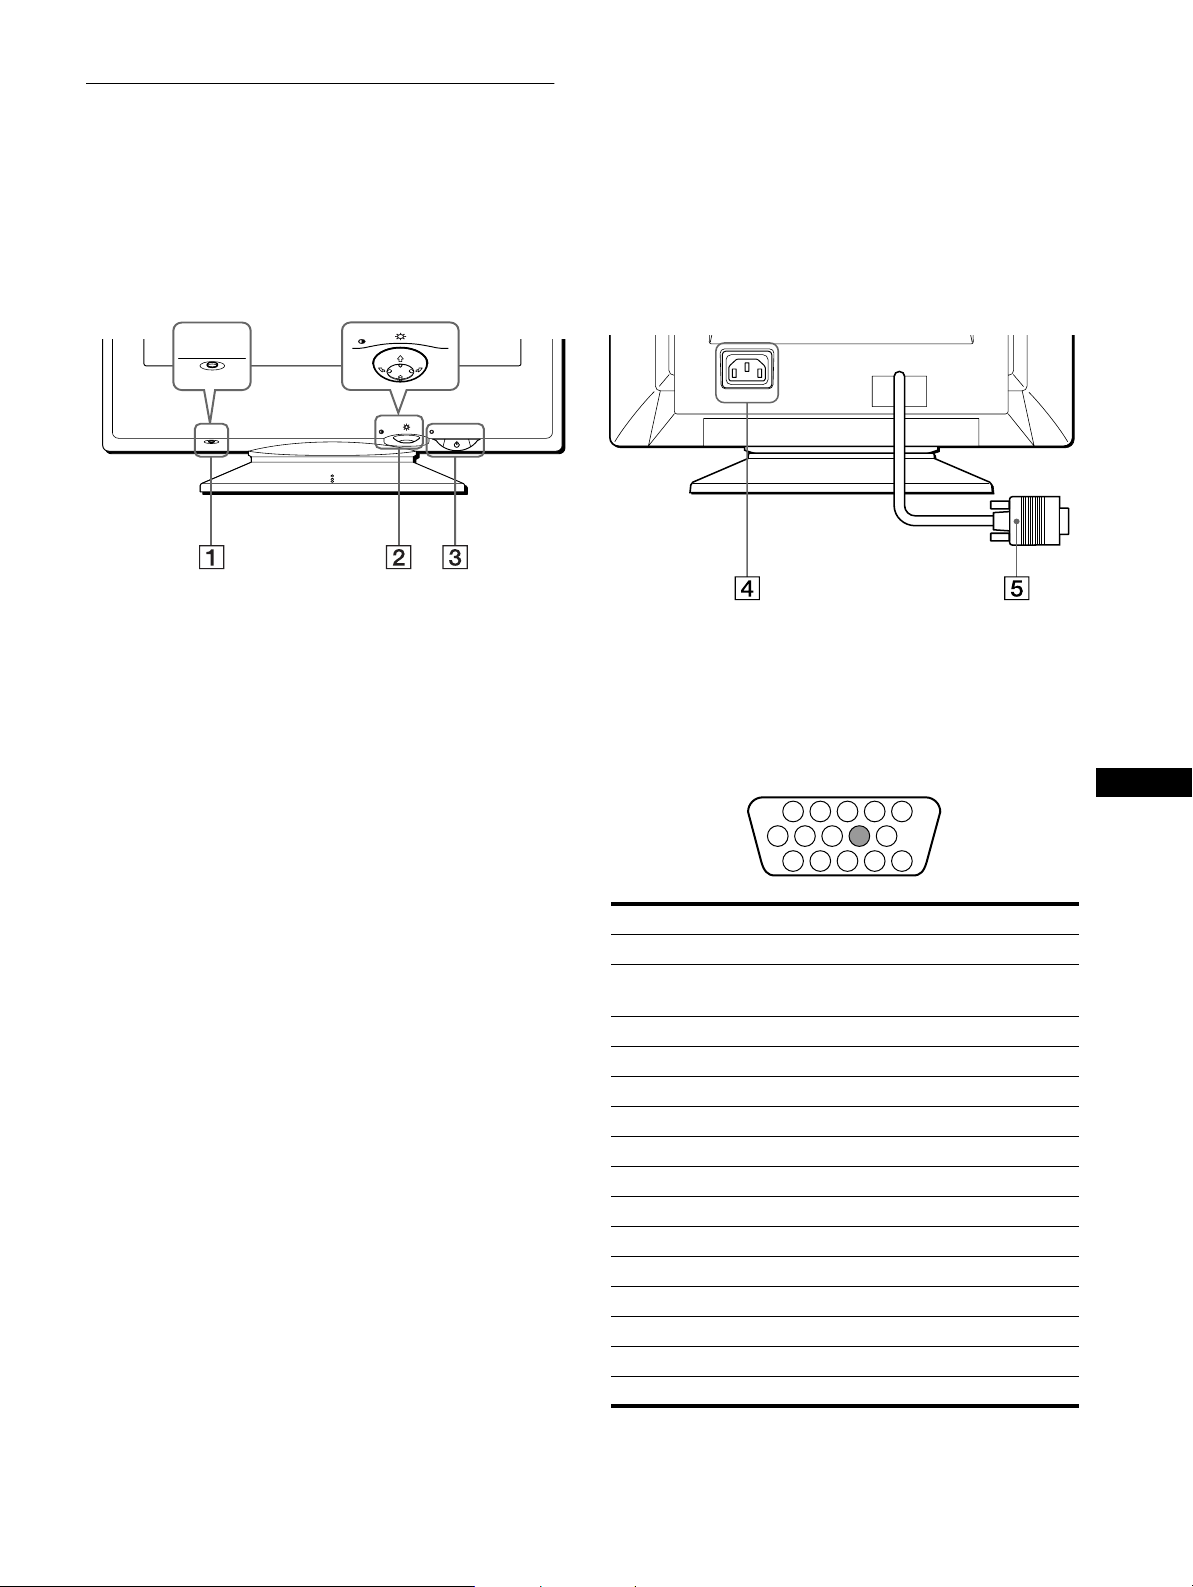
Lage und Funktion der Teile und
1 2 3 4
5
876
11 12 13 14 15
10
9
Bedienelemente
Weitere Informationen finden Sie auf den in Klammern
angegebenen Seiten.
MENU
RESET
RESET
MENU
RückseiteVorderseite
AC IN
Taste RESET (Seite 12)
1111
Diese Taste dient zum Zurücksetzen de r Werte auf die
werkseitigen Einstellungen.
Steuertaste (Seite 9)
2222
Mit der Steuerta ste können Sie die Menüs aufrufen und die
Einstellungen des Monitors, einschließlich der Helligkeitsund Kontrasteins tellungen, ändern.
Netzschalter und -anzeige 1 (Seite 7, 13, 16)
3333
Dieser Schalter dient zum Ein- und Ausschalten des
Monitors. Die Netzanzeige leuchtet grün, wenn der Monitor
eingeschaltet ist, und blinkt grün und orange bzw. leuchtet
orange, wenn sich der Monitor im Energiesparmodus
befindet.
Netzeingang AC IN (Seite 6)
4
Dieser Anschluß dient zur Stromversorgung des Monitors.
Videoeingang (HD15) (Seite 6)
5555
Dieser Anschluß dient zum Einspeisen von RGBVideosignalen (0,700 Vp-p, positiv) und
Synchronisationssignalen.
Stift Nr. Signal
1Rot
2 Grün
(Grünsignal mit Sync h r on is a tio n)
3Blau
4 ID (Masse)
5 DDC-Masse*
6 Masse Rot
7 Masse Grün
8 Masse Blau
9–
10 Masse
11 ID (Masse)
12 Bidirektionale Daten (SDA)*
13 H. Sync
14 V. Sync
15 Datentakt (SCL)*
DE
* DDC (Displ ay Data Channel) ist ein Standa rd der VESA.
5
Page 34
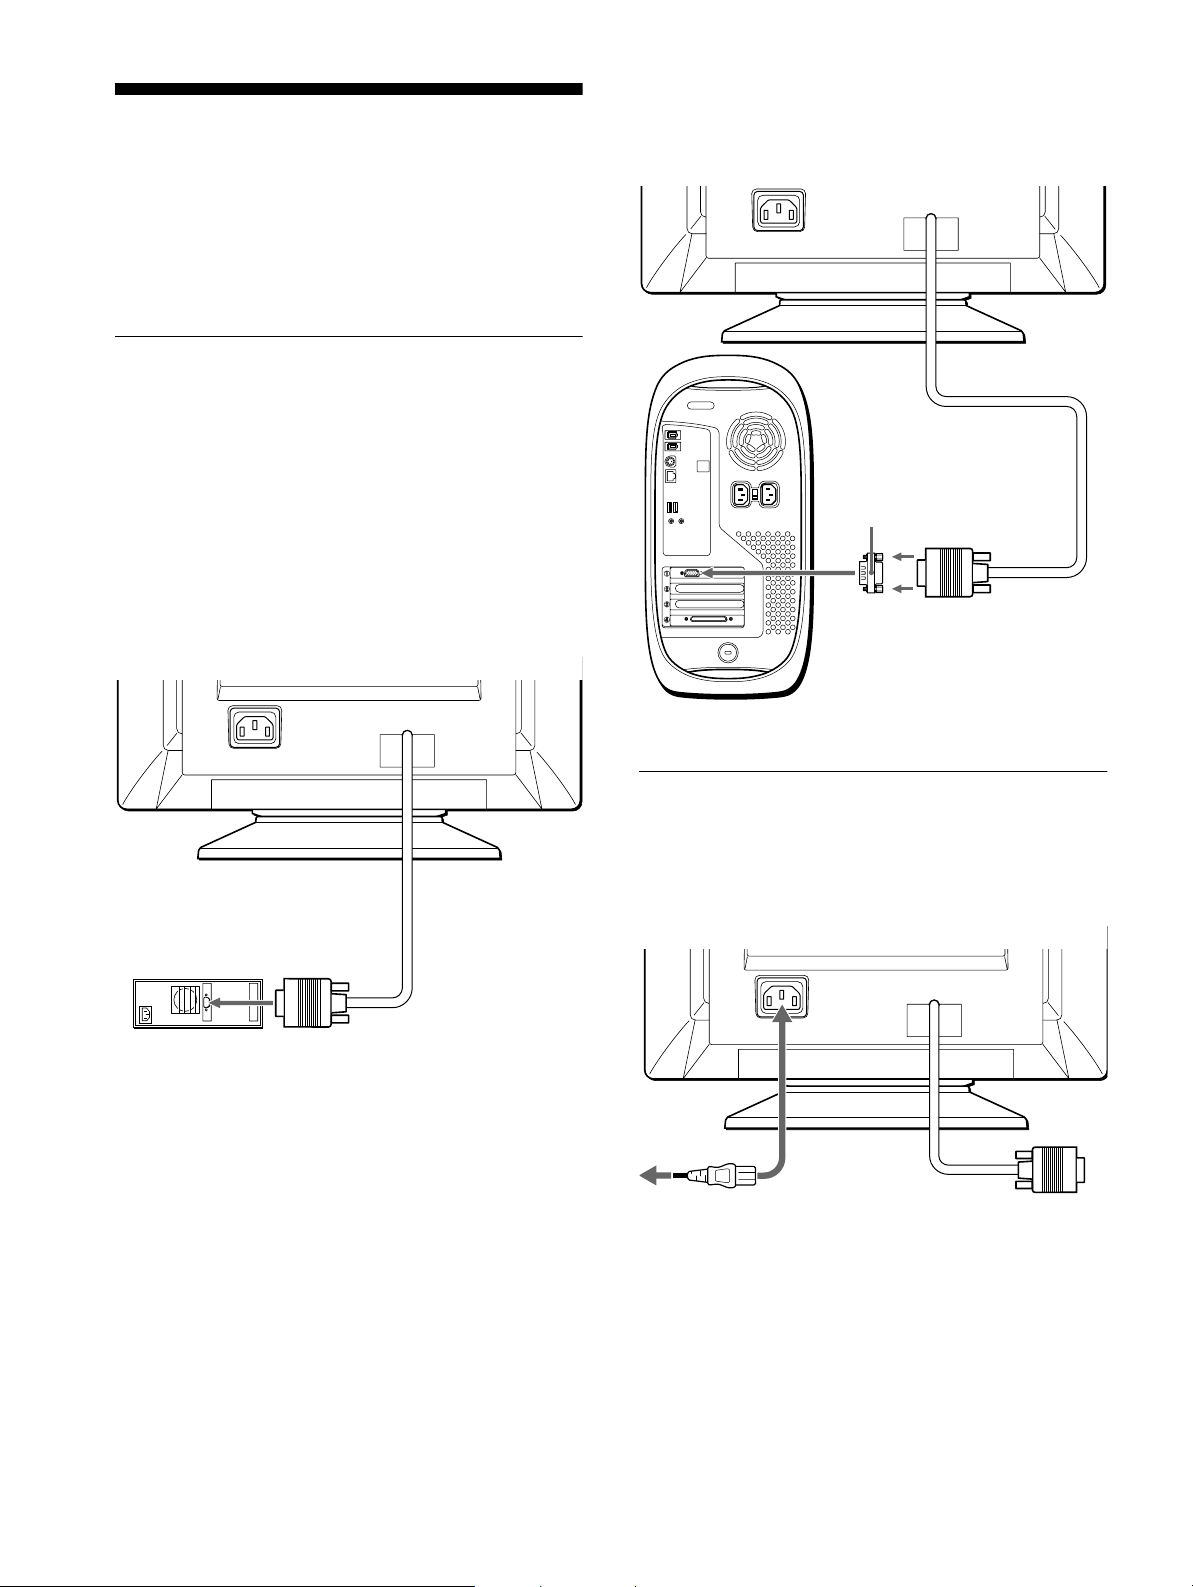
Anschließen des Geräts
AC IN
Dazu benötigen Sie einen Macintosh-Adapter (nicht mitgeliefert).
Macintosh-Adapter
(nicht mitgeliefert)
Macintosh oder
kompatibler Computer
an Videoausgang
AC IN
an AC IN
an eine
Netzsteckdose
Netzkabel (mitgeliefert)
Bevor Sie mit dem Monitor arbeiten, überprüfen Sie bitte, ob
folgende Zubehörteile mitgeliefert wurden:
• Netzkabel (1)
• Windows Monitor Information Disk (1)
• Garantiekarte (1)
• Hinweise zum Reinigen der Bildschirmoberfläche (1)
• Diese Bedienungsanleitung (1)
Schritt 1:Anschließen des
Monitors an den
Computer
Schalten Sie vor dem Anschließen den Monitor und den
Computer aus.
Hinweis
Berühren Sie die Stifte des Vide osi gnalkabelanschlusses nicht. Sie
könnten die Stifte sonst mö glicherweise verbiegen.
Anschließen an einen IBM PC/AT oder
xxxx
kompatiblen Computer
Anschließen an einen Macin tosh oder
xxxx
kompatiblen Computer
AC IN
an Videoausgang
IBM PC/AT oder kompatibler
Computer
Schritt 2:Anschließen des
Netzkabels
Schließen Sie bei ausgeschaltetem Monitor und Computer das
Netzkabel an den Monitor an, und stecken Sie den Netzstecker in
eine Netzsteckdose.
6
Page 35
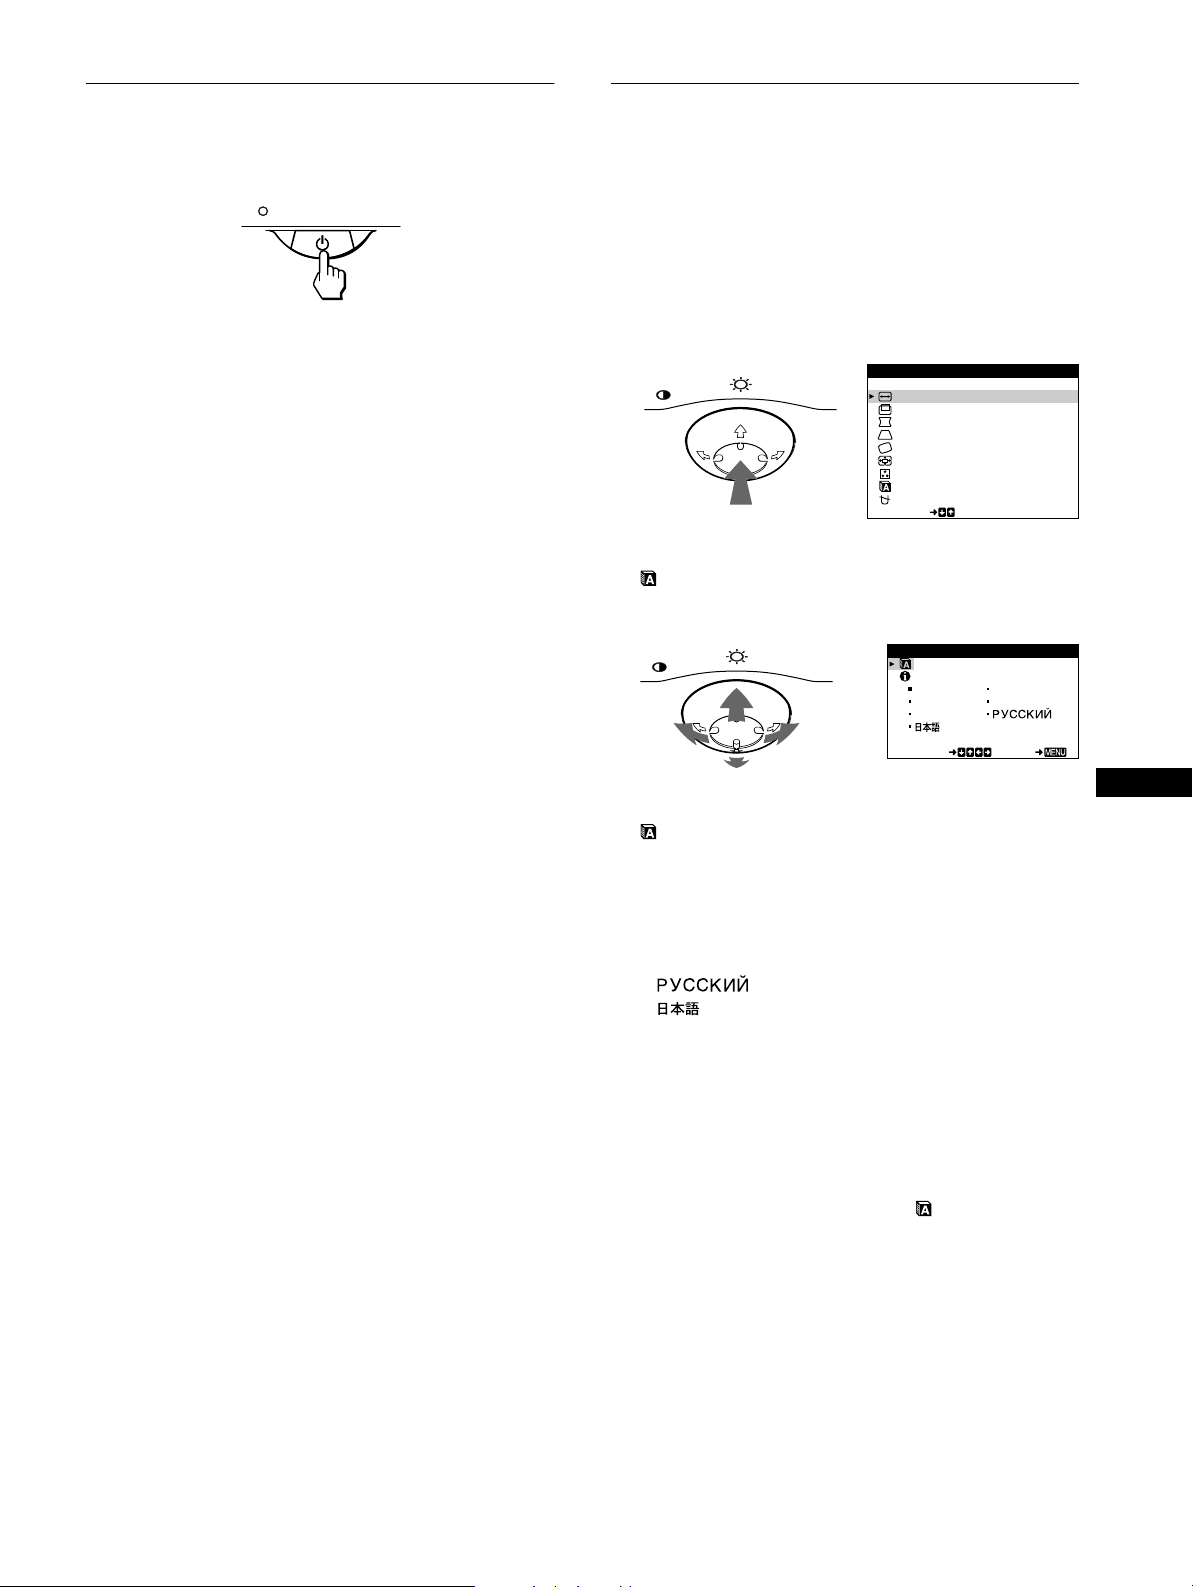
Schritt 3:Einschalten von Monitor
Auswählen der Sprache für die
und Computer
Schalten Sie zunächst den Monitor und dann den Computer ei n.
Die Installation des Monitors ist damit abgeschlossen.
Stellen Sie gegebenenfalls das Bild mit den Bedienelementen des
Monitors nach Ihren Wünschen ein.
Wenn auf dem Bildschirm kein Bild erscheint
• Überprüfen Sie, ob der Monitor korrekt an den Computer
angeschlossen ist .
• Wird KEIN EINGANGSSI GNAL auf dem Bildschirm
angezeigt, überprüfen Sie, ob die Grafikkarte des Computers
korrekt in den richtigen Steckplatz eingebaut ist.
• Wenn Sie einen älteren Monitor durch diesen Monitor ersetzt
haben und NICHT IM ABTASTBEREICH auf dem
Bildschirm erscheint, schließen Sie den alten Monitor wieder
an. Stellen Sie dann die Grafikkarte des Comp uters auf eine
Horizontalfrequenz zwischen 30 und 70 kHz und eine
Vertikalfrequenz zwischen 48 und 120 Hz ein.
Weitere Informationen über die Bildschirmmeldungen finden Sie
unter „Symptom e für Fe hle r und Abhilfemaßna h me n“ au f
Seite 14.
Bildschirmmenüs (SPRACHE/
INFORMATION)
Für die Bildschirmmenüs stehen die Sprachen Englisch,
Französisch, Deutsch, Italienisch, Spanisch, Russisch und
Japanisch zur Verfügung. Die Standardeinstellung ist Englisch.
1
Drücken Sie auf die Mitte der Steuertaste.
Weitere Informationen zur Steuertaste finden Sie auf Seite 9.
MENU
2
Bewegen Sie die Steuertaste in Richtung m/M, um
SPRACHE/INFORMATION hervorzuheben, und
drücken Sie erneut auf die Mitte der Steuertaste.
MENU
MENÜ
VERLASSEN
H - GRÖSS E / LAG E
V -GRÖSSE / L AGE
K I SS ENVER Z / BA L ANCE
TRAPEZFORM / PARAL L LE
DREHUNG
ZOOMEN
FARBE
SPRACHE / I NFORMATI NO
ENTMAGNET I S / MO I RE
SELECT
SPRACHE / I NFORMAT I ON
ENGL I SH FRANÇA I S
DEUTSCH I T A L IANO
ESPAÑOL
SELECT EXI T
Für Benutzer von Windows 95/98
Damit Sie den Monitor optimal nutzen können, installie ren Sie die Datei
mit den neuen Modell informationen von der mitgelieferten Diskette
„Windows Monitor Informat ion Disk“ auf Ihrem PC.
Dieser Monitor entspricht dem Plug-and-Play-Standard „VESA DDC“.
Wenn Ihr PC bzw. Ihre Grafikkarte dem DDC-Standard entspricht, geben
Sie bitte „Plug & Play Moni tor (VESA DDC)“ oder den Modellnam e n
dieses Monitors als Monitortyp in der „Systems te uerung“ von Windows
95/98 an. Wenn bei der Kom mu nikation zwischen Ihrem PC bzw. Ihre r
Grafikkarte und dem Monitor Probleme auftreten, legen Sie di e Diskette
„Windows Monitor Informat ion Disk“ ein, und wählen Sie den
Modellnamen dieses Monitors als Monitortyp aus.
Für Benutzer von Windows NT4.0
Die Installation des Monit ors un ter Windows NT4.0 ist anders als unter
Windows 95/98. So brauchen Sie z. B. den Monitortyp nicht
auszuwählen. Näheres zum Einstel l en der Auflösung, der
Auffrischungsrate und der Anzahl der Farbe n finden Sie im
Benutzerhandbuch zu W in dows NT4.0.
Einstellen der Auflösung des Monitors und der Anzahl der
Farben
Stellen Sie die Auflösung des Monitors und die Anzahl der Farben anhand
der Anweisungen im Benu tzerhandbuch zu Ihrem Com puter ein. Die
Anzahl der Farben kann je nach Computer oder Grafikkarte variieren. Je
nach der Einstellung unter „Farbpalette“ werden unterschiedlich viele
Farben dargestellt:
• High Color (16 Bit) t 65. 536 Farben
• True Color (24 Bit) t ca. 16,77 Mio. Farb en
Im True Color-Modus (24 Bit) kann sich die Geschwindigkeit verringern.
3
Bewegen Sie die Steuertaste in Richtung m/M, um
(SPRACHE) hervorzuheben und dann in
Richtung </, um eine Sprache auszuwählen.
• ENGLISH: Englisch
• FRANÇAIS : Französisch
• DEUTSCH
• ITALIANO: Italienisch
• ESPAÑOL: Spanisch
• : Russisch
• : Japanisch
So schließen Sie das Menü
Drücken Sie einmal auf die Mitte der Steuertaste, um zum Hauptmenü
MENU zu wechseln. Drücken Sie die Taste erneut, und wählen Sie
VERLASSEN aus, um zur normalen Anzeige zu wechseln. Wenn Sie
keine weitere Taste drü cken, wird das Bildschirmmenü nach etwa
30 Sekunden autom atisc h ausgeblendet.
So setzen Sie die Menüsprache auf Englisch zurück
Drücken Sie die Taste RESET, wenn das Menü (SPRACHE) auf dem
Bildschirm angezeigt wird.
DE
7
Page 36
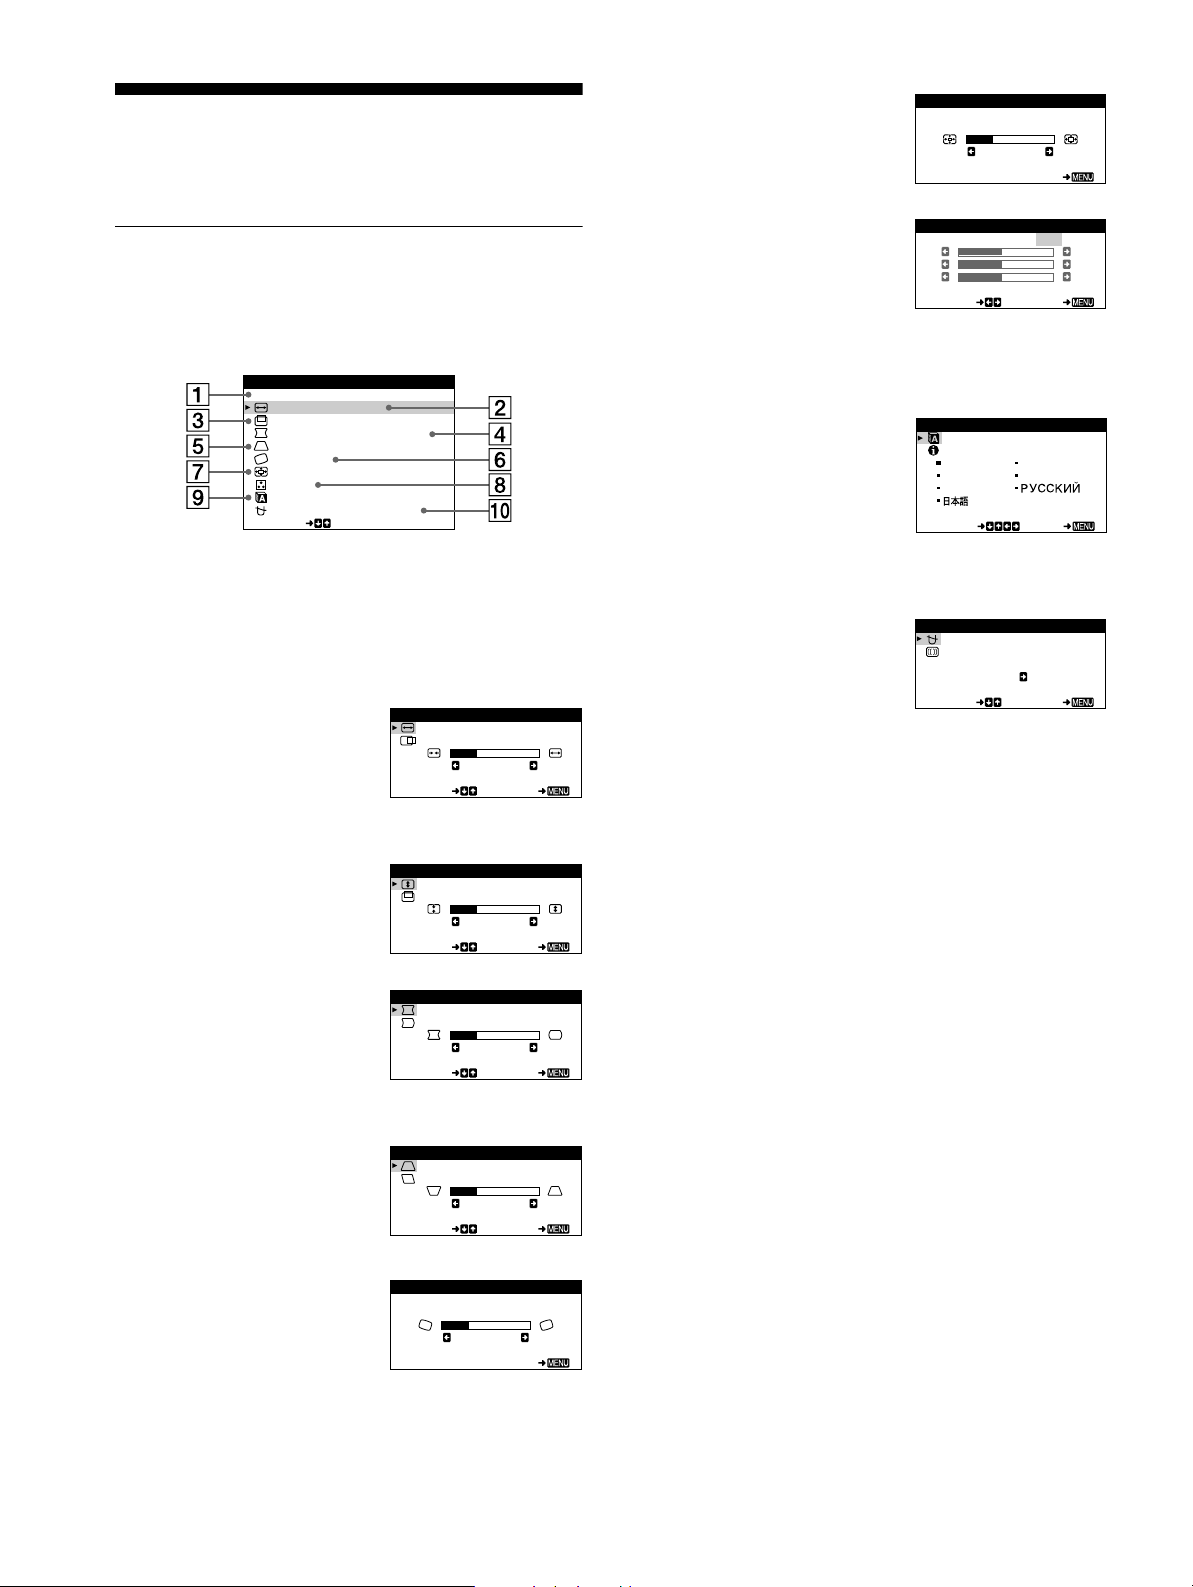
Einstellen des Monitors
Mit den Bildschirmm e nü s können Sie eine Viel za h l von
Einstellungen vor nehmen.
Navigieren in den Menüs
Drücken Sie auf die Mitte der Steuertaste, um das Hauptmenü
MENU auf dem Monitor aufzurufen. Weitere Informationen zur
Steuertaste finden Sie auf Seite 9.
MENÜ
VERLASSEN
H - GRÖSS E / LAGE
V -GRÖSSE / L AGE
K I SS ENVER Z / BA L ANCE
TRAPEZFORM / PARAL L LE
DREHUNG
ZOOMEN
FARBE
SPRACHE / I NFORMATI NO
ENTMAGNET I S / MO I RE
SELECT
Wählen Sie mit der Steuertaste eines der folgenden Menüs aus.
VERLASSEN
1111
Wählen Sie VERLASSEN, wenn
Sie das Hauptmenü schließen
wollen.
H-GRÖSSE/LAGE
2222
(Seite 10)
Im Menü H-GRÖSSE/LAGE
können Sie Breite und
horizontale Position des Bildes
einstellen.
H -GRÖSSE / L AGE
H -GRÖ S S E
26
SELECT EXI T
ZOOMEN (Seite 11)
7777
Im Menü ZOOMEN können Sie
das Bild vergrößern oder
verkleinern.
FARBE (Seite 11)
8888
Im Menü FARBE können Sie die
Farbtemperatur des Bildes
einstellen. Mit Hilfe dieser
Funktion können Sie die Farben
auf dem Monitor an die Farben
eines gedruckten B ildes
anpassen.
SPRACHE/INFORMATION
9999
(Seite 7, 15)
Im Menü SPRACHE/
INFORMATION könn en Sie die
Sprache für die
Bildschirmanzeigen wählen und
Informationen zu diesem
Monitor anzeigen lassen.
ENTMAGNETIS/MOIRE
0000
(Seite 12)
Im Menü ENTMAGNETIS/
MOIRE können Sie den
Bildschirm entmagnetisieren und
den Moiré-Effekt korrigieren.
ZOOMEN
ZOOMEN
26
EX I T
FARBE
R50
G50
B50
SELECT EXI T
SPRACHE / I NFORMAT I ON
SELECT EXI T
ENTMAGNET I S /MOIRE
SELECT EXI T
KKK
5000 6500 9300
USER
ENGL I SH FRANÇA I S
DEUTSCH I T AL I ANO
ESPAÑOL
ENTMAGNE T I S
EIN
V-GRÖSSE/LAGE (Seite 10)
3333
Im Menü V-GRÖSSE/LAGE
können Sie Höhe und ve rtikale
Position des Bildes einstellen.
KISSENVERZ/BALANCE
4444
(Seite 10)
Im Menü KISSENVERZ/
BALANCE können Sie die
Wölbung der Bildränder
korrigieren.
TRAPEZFORM/PARALLEL
5
(Seite 10)
Im Menü TRAPEZFORM/
PARALLEL können Sie den
Winkel der Bildränder einstellen.
DREHUNG (Seite 11)
6666
Im Menü DREHUNG können
Sie die Rotation des Bildes
einstellen.
V - GRÖSSE / LAGE
V - GRÖS S E
26
SELECT EXI T
K I SSENVERZ / BALANCE
K I S SENVERZ
26
SELECT EXI T
TRAPEZFORM/ PARALLEL
TRAPEZFORM
26
SELECT EXI T
DREHUNG
DREHUNG
26
EX I T
8
Page 37
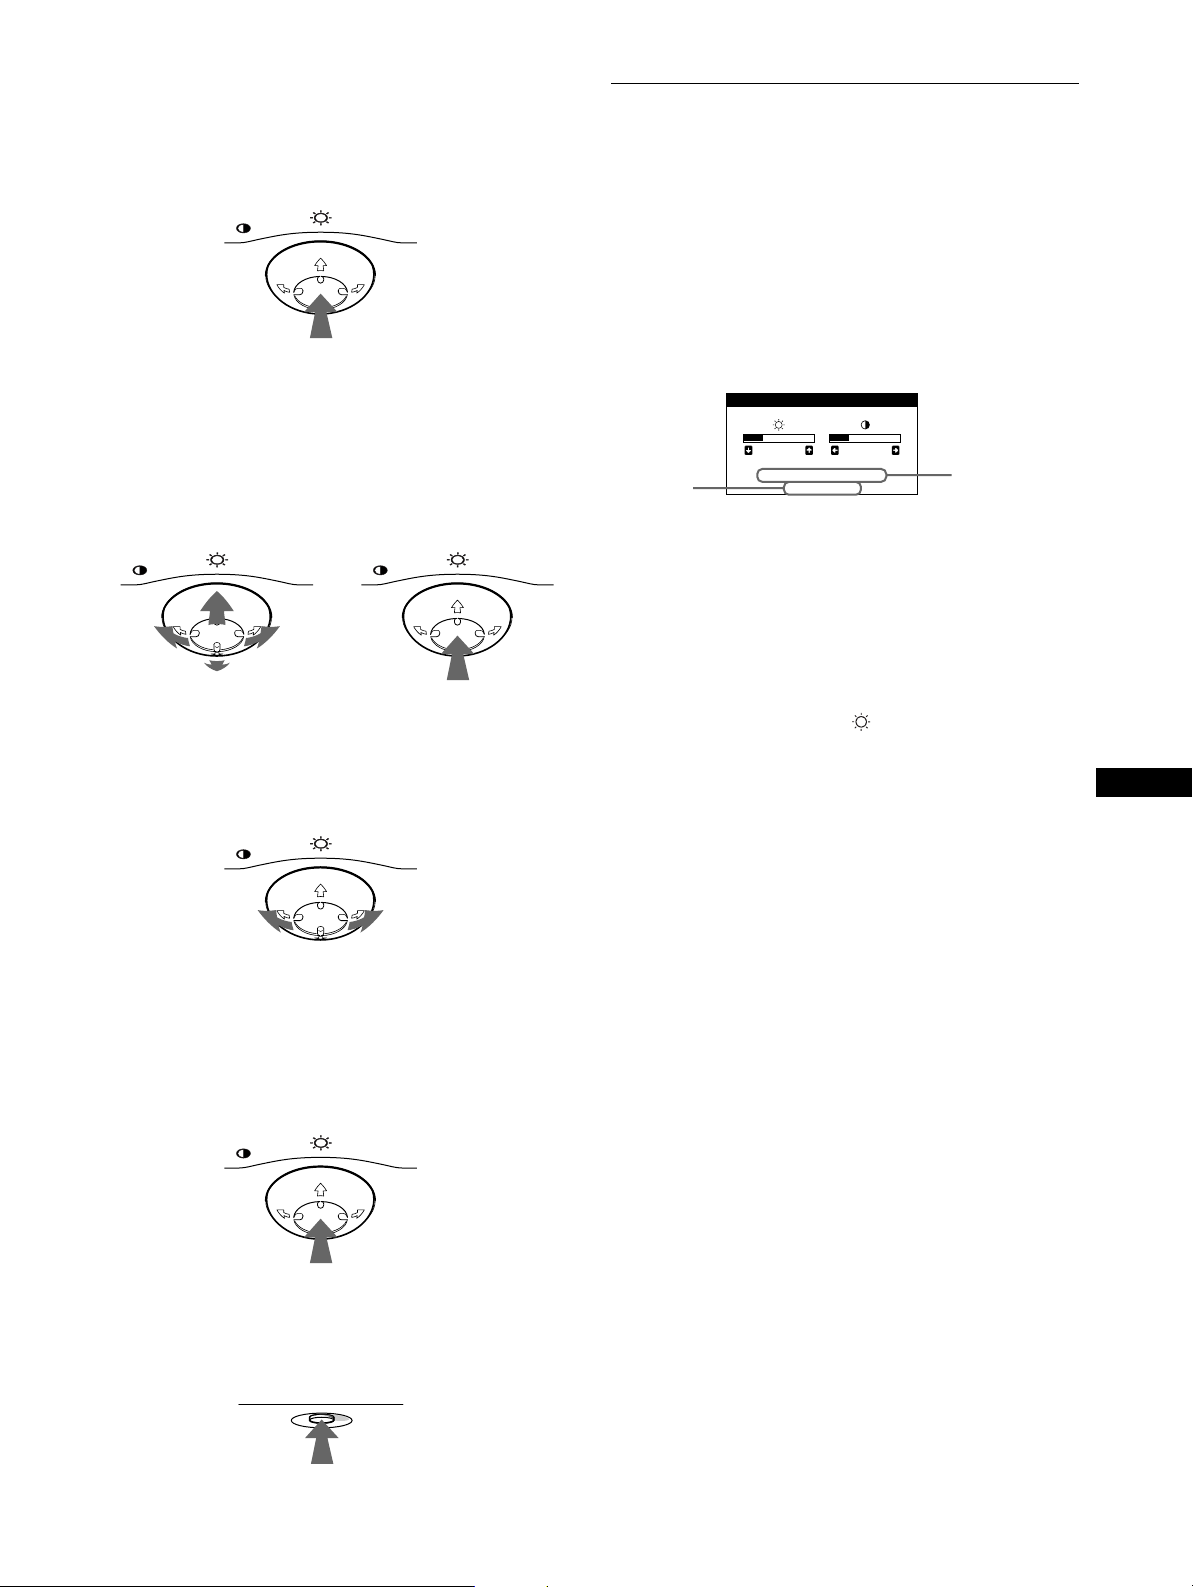
Die Steuertast e
x
1
Rufen Sie das Hauptmenü MENU auf.
Drücken Sie auf die Mitte der S teuertaste, um das Hauptmenü
MENU auf dem Monitor aufzurufen.
MENU
2
Wählen Sie das Menü aus, in dem Sie Einstellunge n
vornehmen wollen.
Heben Sie das gewünschte Menü hervor. Nach oben (M)
gelangen Sie, indem Sie die Steuertaste nach hinten bewegen,
nach unten (m), indem Sie sie nach vorne bewegen, und zur
Seite, indem Sie sie nach links (<) bzw. rechts (,)
bewegen.
VORN
MENU MENU
Einstellen von Helligkeit und
Kontrast
Helligkeit und Kontrast können Sie über ein spezielles Menü,
HELLIGKEIT/KONTRAST, einstellen.
Diese Einstellungen werden gespeichert und gelten für alle
Eingangssignale.
1
Bewegen Sie die Steuertaste in eine beliebige
Richtung.
Das Menü HELLIGKEIT/KONTRAST wird auf dem
Bildschirm angezeigt.
HEL L I GKE I T /KONTRAST
26 26
Auflösung
des aktuellen
Eingangssignals
68.7kHz/85.0Hz
1024X768
Die Horizontal- und die Vertikalfrequen z des aktuellen
Eingangssignals werden im Menü HELLIGKEIT/
KONTRAST angezeigt. Wenn das Eingangssignal einem der
werkseitig voreingestellten Modi des Monitors entspr icht,
wird auch die Auflösung angezeigt.
Horizontal- und
Vertikalfrequenz
des aktuellen
Eingangssignals
HINTEN
3
Nehmen Sie im Menü die gewünschten
Einstellungen vor.
Bewegen Sie die Steuertast e nach links (<) oder rechts
(,), um den Wert oder die Einstellung auszuwählen.
MENU
4
Schließen Sie das Menü.
Drücken Sie einmal auf die Mitte der Steuertaste, um zum
Hauptmenü MENU zu wechseln. Drücken Sie die Taste
erneut, und wählen Sie VERLASSE N aus, um zur normalen
Anzeige zu wechseln. Wenn Sie keine weitere Taste drücken,
wird das Bildschirmmenü nach etwa 30 Sekunden
automatisch ausgeblendet.
MENU
2
Bewegen Sie die Steuertaste in Richtung m/M zum
Einstellen der Helligkeit ( ) und in Richtung </,
zum Einstellen des Kontrasts (6).
Nach etwa 3 Sekunden wird das Menü automatisch
ausgeblendet.
DE
Zurücksetzen der Einstellungen
x
Drücken Sie die Taste RESET. Weitere Informationen zum
Zurücksetzen der Einstellungen finden Sie auf Seite 12.
RESET
9
Page 38
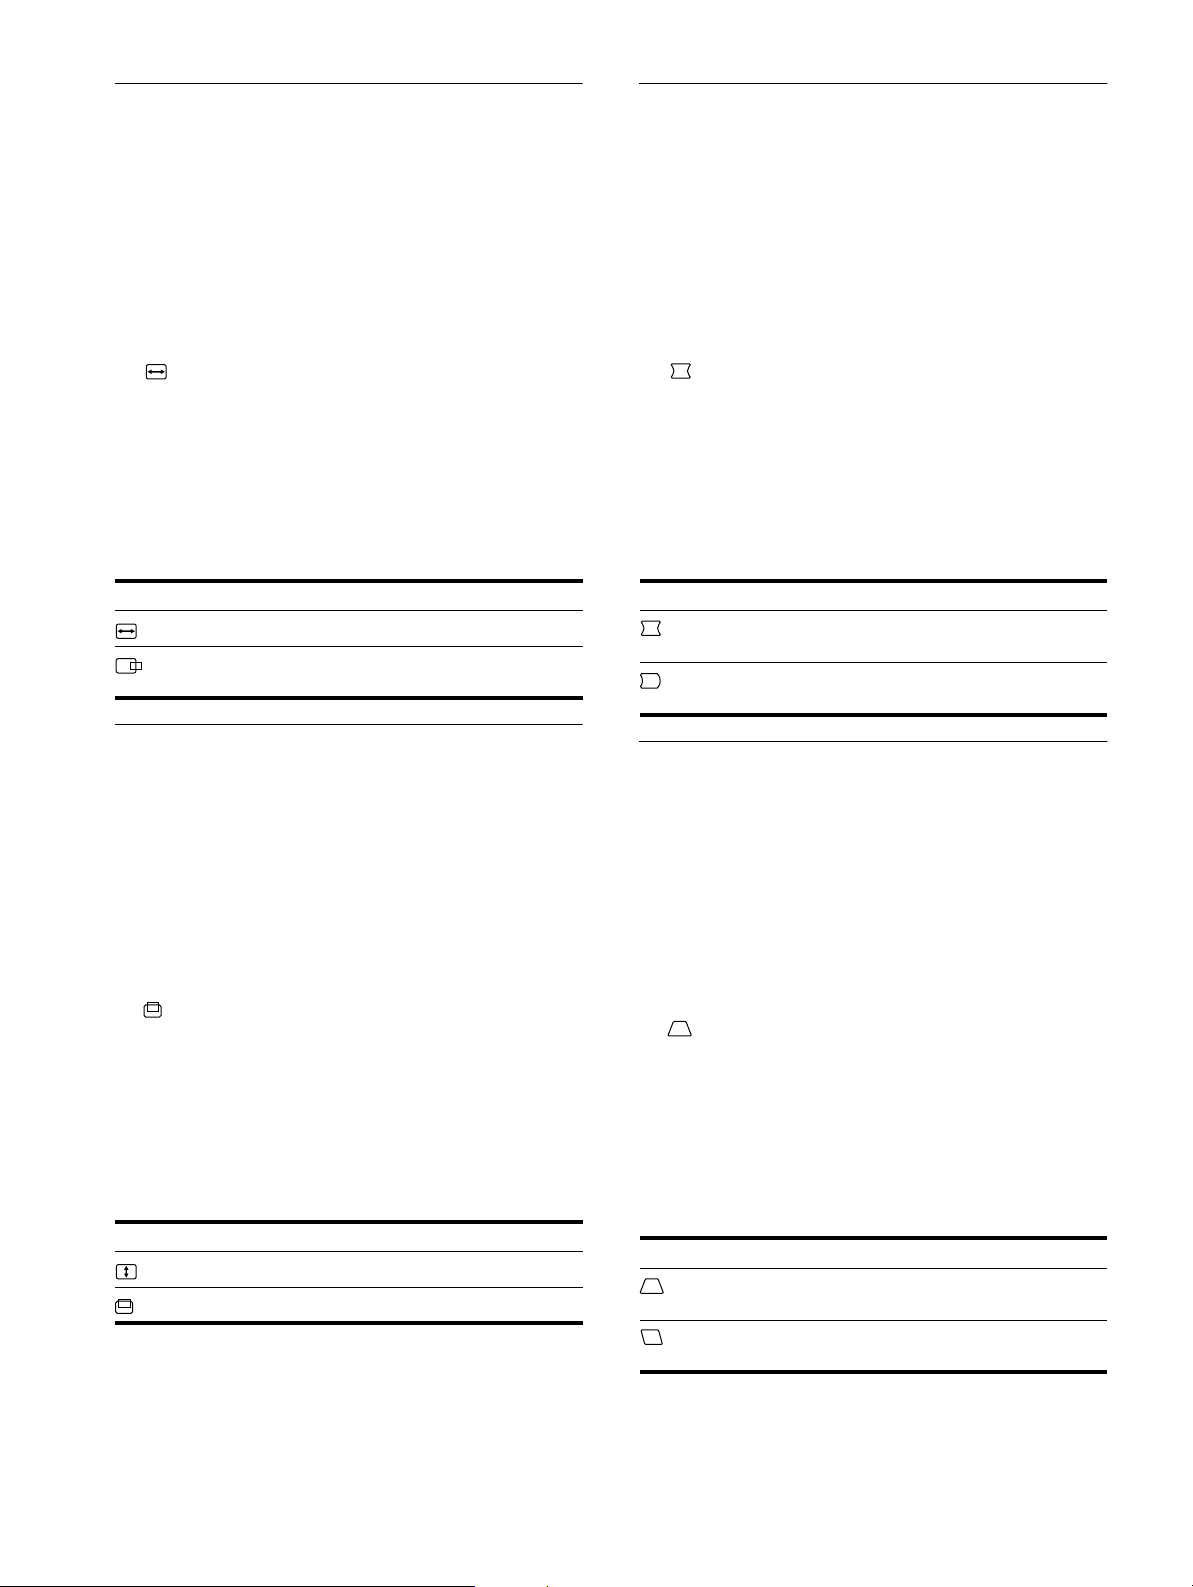
Einstellen von Breite oder
Korrigieren der Wölbung der
horizontaler Position des Bildes
(H-GRÖSSE/LAGE)
Diese Einstellung wird gespeichert und gilt nur für das aktuelle
Eingangssignal.
1
Drücken Sie auf die Mitte der Steuertaste.
Das Hauptmenü MENU erscheint auf dem Bildschirm.
2
Bewegen Sie die Steuertaste in Richtung m/M, um
H-GRÖSSE/LAGE hervorzuheben, und drücken
Sie erneut auf die Mitte der Steuertaste.
Das Menü H-GRÖSSE/LAGE wird auf dem Bildschirm
angezeigt.
3
Bewegen Sie die Steuertaste in Richtung m/M, um
die gewünschte Einstelloption auszuwählen.
Bewegen Sie dann die Steuertaste in Richtung
, um die Einstellung vorzunehmen.
</,
Option Funktion
H-GRÖSSE
H-LAGE
Einstellen der Breite
Einstellen der horizontalen
Bildposition
Bildränder
(KISSENVERZ/BALANCE)
Diese Einstellungen werden nur für das gerade eingespeiste
Eingangssignal gespeichert.
1
Drücken Sie auf die Mitte der Steuertaste.
Das Hauptmenü MENU erscheint auf dem Bildschirm.
2
Bewegen Sie die Steuertaste in Richtung m/M, um
KISSENVERZ/BALANCE hervorzuheben, und
drücken Sie erneut auf die Mitte der Steuertaste.
Das Menü KISSENVERZ/BALANCE erscheint auf dem
Bildschirm.
3
Bewegen Sie die Steuertaste in Richtung m/M, um
die gewünschte Einstelloption auszuwählen.
Bewegen Sie dann die Steuertaste in Richtung
, um die Einstellung vorzunehmen.
</,
Option Funktion
KISSENVERZ
KIS BALANCE
Wölben der Bi l d r ä nder nach außen
oder innen
Verschieben der Bildränder nach links
oder rechts
Einstellen von Höhe oder vertikaler
Position des Bildes
(V-GRÖSSE/LAGE)
Diese Einstellung wird gespeichert und gilt nur für das aktuelle
Eingangssignal.
1
Drücken Sie auf die Mitte der Steuertaste.
Das Hauptmenü MENU erscheint auf dem Bildschirm.
2
Bewegen Sie die Steuertaste in Richtung m/M, um
V-GRÖSSE/LAGE hervorzuheben, und drücken
Sie erneut auf die Mitte der Steuertaste.
Das Menü V-GRÖSSE/LAGE wird auf dem Bildschirm
angezeigt.
3
Bewegen Sie die Steuertaste in Richtung m/M, um
die gewünschte Einstelloption auszuwählen.
Bewegen Sie dann die Steuertaste in Richtung
, um die Einstellung vorzunehmen.
</,
Option Funktion
V-GRÖSSE
V-LAGE
Einstellen der Höhe
Einstellen der vertikalen Bildposition
Einstellen des Winkels der
Bildränder
(TRAPEZFORM/PARALLEL)
Diese Einstellungen werden nur für das gerade eingespeiste
Eingangssignal gespeichert.
1
Drücken Sie auf die Mitte der Steuertaste.
Das Hauptmenü MENU erscheint auf dem Bildschirm.
2
Bewegen Sie die Steuertaste in Richtung m/M, um
TRAPEZFORM/PARALLEL hervorzuheben, und
drücken Sie erneut auf die Mitte der Steuertaste.
Das Menü TRAPEZFORM/PARALLEL erscheint auf dem
Bildschirm.
3
Bewegen Sie die Steuertaste in Richtung m/M, um
die gewünschte Einstelloption auszuwählen.
Bewegen Sie dann die Steuertaste in Richtung
, um die Einstellung vorzunehmen.
</,
Option Funktion
TRAPEZFORM
PARALLEL
Einstellen der Bildbreite im oberen
Bildschirmbereich
Verschieben des Bildes nach links oder
rechts im oberen Bildschirmbereich
10
Page 39
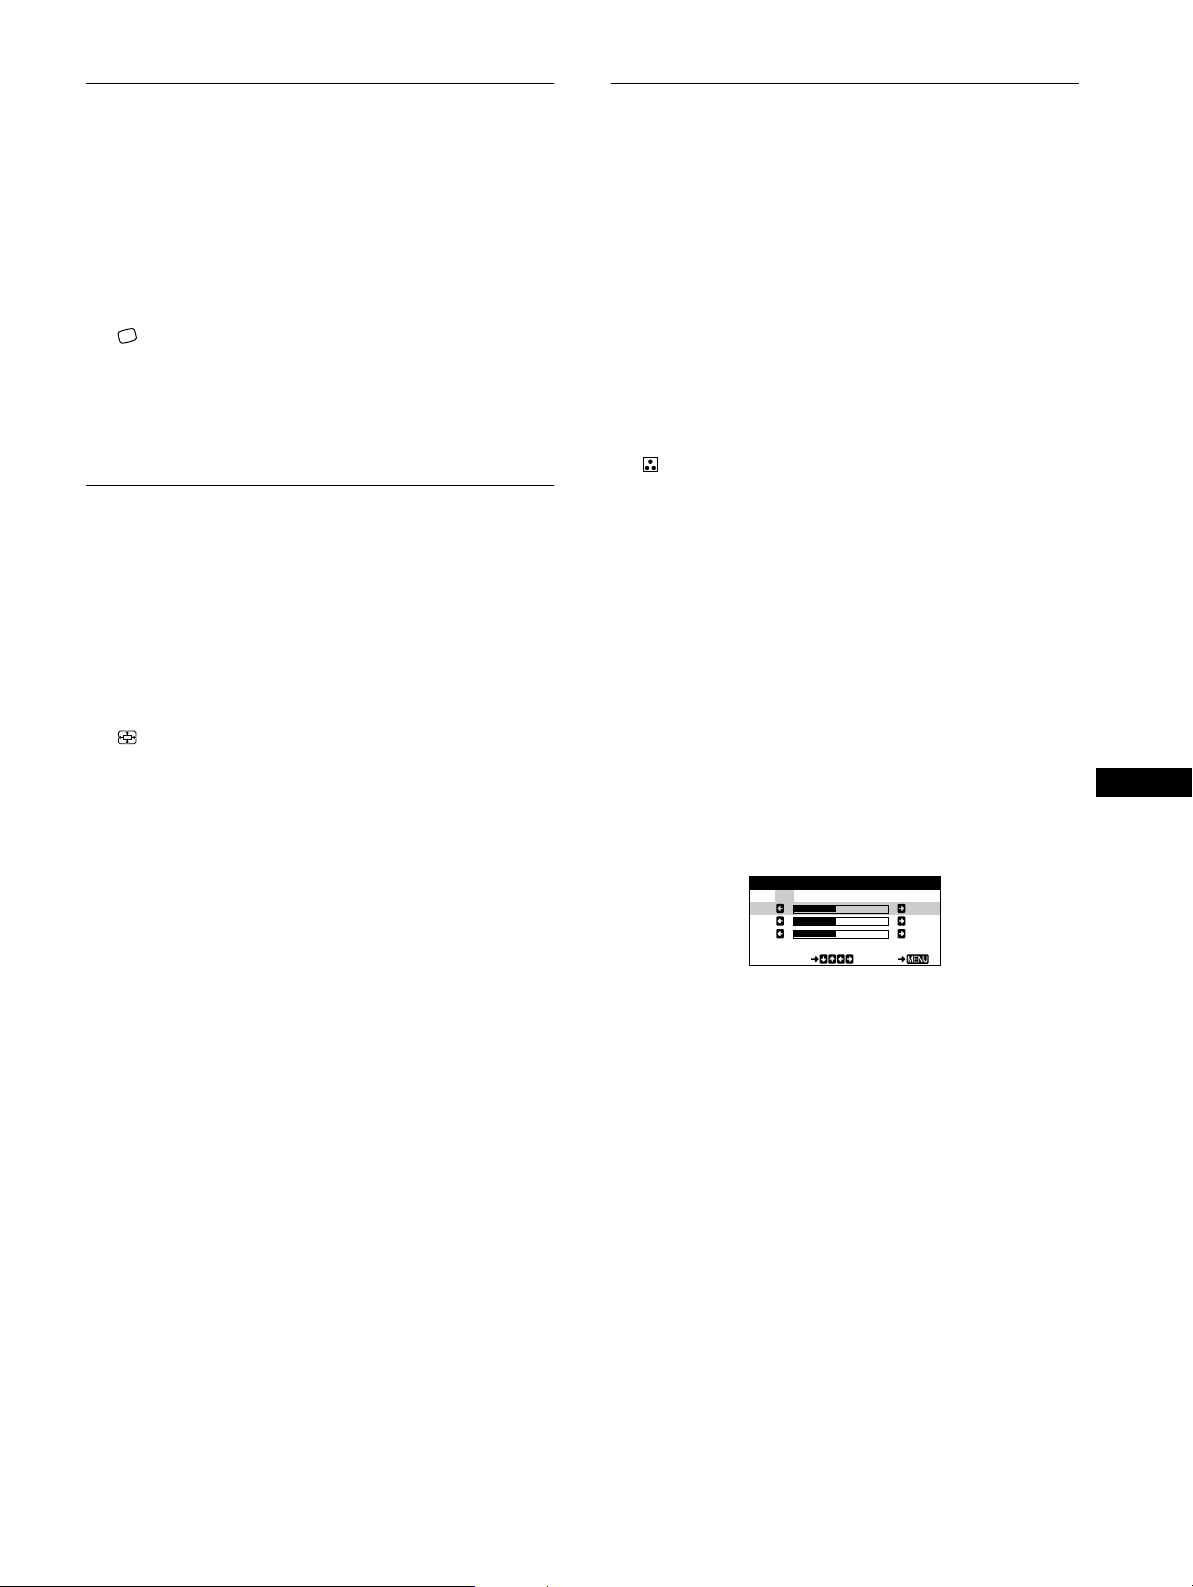
Einstellen der Bildrotation
KKK
R50
G50
B50
SELECT EXI T
FARBE
5000 6500 9300
USER
Einstellen der Farben des Bildes
(DREHUNG)
Diese Einstellung wird gespeichert und gilt für alle
Eingangssignale.
1
Drücken Sie auf die Mitte der Steuertaste.
Das Hauptmenü MENU erscheint auf dem Bildschirm.
2
Bewegen Sie die Steuertaste in Richtung m/M, um
DREHUNG hervorzuheben, und drücken Sie
erneut auf die Mitte der Steuertaste.
Das Menü DREHUNG wird auf dem Bildschirm angezeigt.
3
Bewegen Sie die Steuertaste in Richtung </,, um
das Bild zu drehen.
Vergrößern oder Verkleinern des
Bildes (ZOOMEN)
Diese Einstellung wird gespeichert und gilt nur für das aktuelle
Eingangssignal.
1
Drücken Sie auf die Mitte der Steuertaste.
Das Hauptmenü MENU erscheint auf dem Bildschirm.
2
Bewegen Sie die Steuertaste in Richtung m/M, um
ZOOMEN hervorzuheben, und drücken Sie
erneut auf die Mitte der Steuertaste.
Das Menü ZOOMEN wird auf dem Bildschirm angezeigt.
3
Bewegen Sie die Steuertaste in Richtung </,, um
das Bild zu vergrößern bzw. zu verkleinern.
(FARBE)
Mit den Optionen im Menü FARBE können Sie die
Farbtemperatur des Bildes einstellen. Dabei ändert sich der
Farbwert im weißen Farbfeld. Farben erscheinen bei einer
niedrigen Farbtemperatur rötlich, bei einer hohen Farbtemperatur
bläulich. Mit Hilfe dieser Funktion können Sie die Farben auf
dem Monitor an die Farben ei nes gedruckten Bildes anpassen.
Diese Einstellung wird gespeichert und gilt für alle
Eingangssignale.
1
Drücken Sie auf die Mitte der Steuertaste.
Das Hauptmenü MENU erscheint auf dem Bildschirm.
2
Bewegen Sie die Steuertaste in Richtung m/M, um
FARBE hervorzuheben, und drücken Sie erneut
auf die Mitte der Steuertaste.
Das Menü FARBE wird auf dem Bildschirm angezeigt.
3
Bewegen Sie die Steuertaste in Ric htung </,, um
eine Farbtemperatur auszuwählen.
5000K, 6500K und 9300K sind die voreingestellten
Farbtemperatu ren. Der Standardw ert ist 9300 K. Wenn S ie die
Farbtemperat ur auf 6500K und 5000K se nken, erscheinen
weiße Flächen nicht mehr bläulich, sondern rötlich.
4
Nehmen Sie bei Bedarf eine Feineinstellung der
Farbtemperatur vor.
Bewegen Sie zunächst die Steuertaste in Richtung </,,
um USER auszuwählen. Bewegen Sie die Steuertaste in
Richtung m/M, um R (rot), G (grün) oder B (blau)
auszuwählen, und dann in Richtu ng </,, um die
Einstellung vorzunehm en .
DE
Hinweis
Sobald die maximale bzw. minimale Höhe bzw. Breite des Bildes erreicht
ist, läßt sich der Zoom nicht weiter änder n.
Wenn Sie die Farbtemperatur fei neinstellen, werden die
neuen Farbeinste llu ngen gespeicher t und immer abgeruf en ,
wenn Sie USER auswählen.
11
Page 40
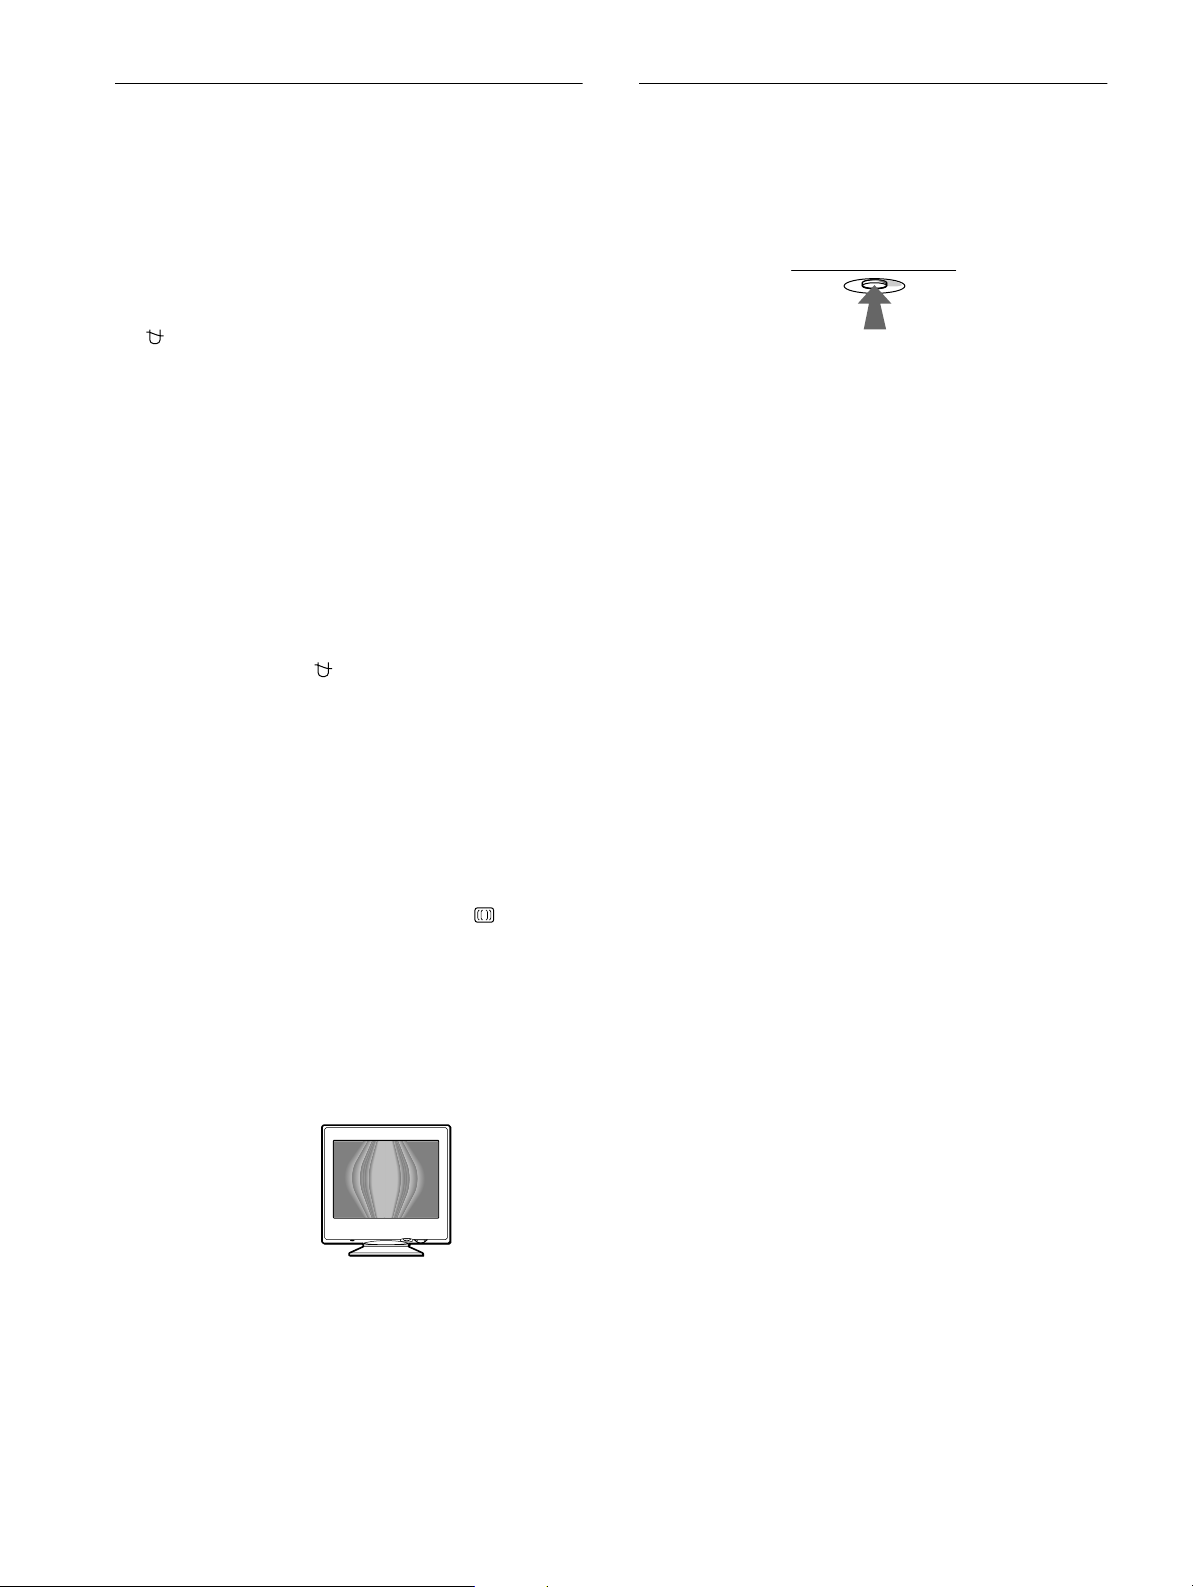
Weitere Einstellungen
RESET
Zurücksetzen der Einstellungen
(ENTMAGNETIS/MOIRE)
Sie können den Bildschirm manuell entmagnetisieren und den
Grad der Moiré-Korrektur einstellen.
1
Drücken Sie auf die Mitte der Steuertaste.
Das Hauptmenü MENU erscheint auf dem Bildschirm.
2
Bewegen Sie die Steuertaste in Richtung m/M, um
ENTMAGNETIS/MOIRE hervorzuheben, und
drücken Sie erneut auf die Mitte der Steuertaste.
Das Menü ENTMAGNETIS/MOIRE wird auf dem
Bildschirm angezeigt.
3
Bewegen Sie die Steuertaste in Richtung m/M, um
die gewünschte Einstelloption auszuwählen.
Stellen Sie die ausgewählte Option dann anhand der
folgenden Anweisungen ein.
Entmagnetisieren d es Bildschirms
Der Monitor wird automatisch entmagnetisiert, wenn das Gerät
eingeschaltet wird.
Um den Monitor manuell zu entmagnetisieren,
bewegen Sie zunächst die Steuerta ste in Richtung m/M
und wählen die Option (ENTMAGNETIS) aus.
Bewegen Sie dann die Steuertaste in Richtung ,.
Der Bildschirm wird etwa 5 Sekunden lang entmagnetisiert. Ist
ein zweiter Entmagnetisierungszyklus erforderlich, warten Sie
nach dem ers ten Zyk lus mi ndeste ns 20 Mi nuten . Auf di ese Wei se
erzielen Sie die besten Ergebnisse.
Korrigieren des Moiré-Effekts
Wenn elliptische oder wellenförmige Muster auf dem Bildschirm
erscheinen, stellen Sie den Grad der Moiré-Korrektur ein.
Zum Einstellen der Moiré-Korrektur bewegen Sie die
Steuertaste zunächst in Richtung m/M, um (CANCEL
MOIRE) auszuwählen. Bewegen Sie die Steuertaste
dann in Richtung </,, bis der Moiré-Effekt auf ein
Minimum reduziert ist.
*
Bei diesem Monitor haben Sie drei Möglichkeite n, die
Einstellungen zurückzusetzen. Drücken Sie die Taste RESET, um
die Einstellungen zurückzusetzen.
Zurücksetzen einer einzelnen Option
Wählen Sie mit der Steuertaste die Optio n aus, die Sie
zurücksetzen wollen, und dr ücken Sie die Taste RESET.
Zurücksetzen aller Einstellungen für das aktuelle
Eingangssignal
Drücken Sie die Taste RESET, wenn kein Menü auf dem
Bildschirm angezeigt wird.
Beachten Sie, daß die fol genden Einstellungen bei diesem
Verfahren nicht zurückgeset zt werden:
• S prache der Bildschirmm enüs (Seite 7)
• Bildrotation (Seite 11)
Zurücksetzen aller Einstellungen für alle
Eingangssignale
Halten Sie die Taste RESET mehr als zwei Sekunden lang
gedrückt.
Beachten Sie, daß die folgen de Einstellung bei diesem Verfahren
nicht zurückgesetzt wird:
• USER-Einstellungen im Menü FARBE (Seite 11)
* Moiré ist eine natürliche Interferenz, die weiche, wellenförmige Linien
auf dem Bildschirm verursacht. Diese Linien können durch die
Interferenz zwischen dem Muster des Bildes au f de m Bildschirm und
dem Phosphor-Pitch-Muster des Monitors entstehen.
Beispiel für den
Moiré-Effekt
12
Page 41
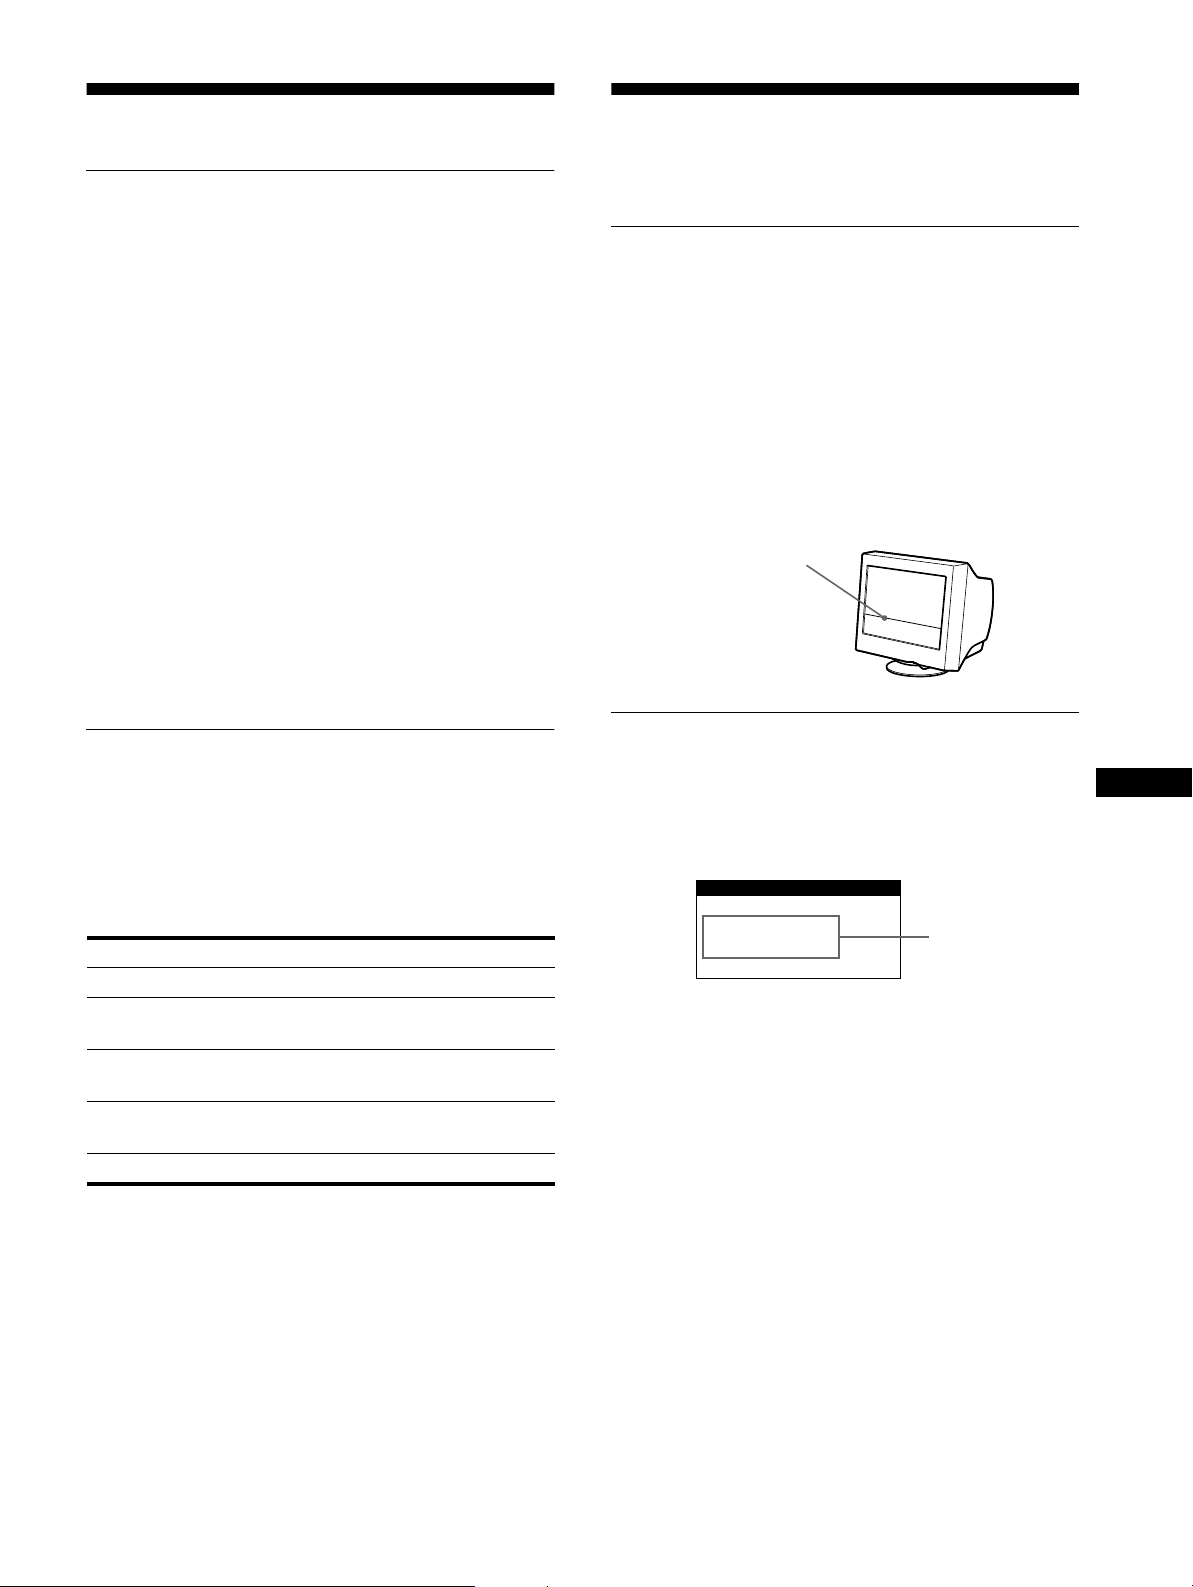
Technische Merkmale
INFORMATION
NICHT IM
ABTASTBEREICH
Vordefinierte Modi und
Benutzermodi
Wenn ein Eingang ssignal in den Monito r eingespeist wird,
vergleicht der Monitor dieses Signal mit den werkseitig
vordefinierten Modi im Speich er des Monitors und wählt
automatisch den Modus aus, bei dem sich in der Bildschirm mitte
eine hohe Bildqualität erzielen läßt. Eine Liste der werkseitig
vordefinierten Modi finden Sie im Appendix. Bei
Eingangssignalen, die keinem der werkseitig vord efinierten Modi
entsprechen, sorgt der Monitor mit Hilfe seiner digitalen
Multiscan-Technologie dafür, daß bei einem beliebigen Timing
innerhalb des für den Monitor gültigen Frequenzbereichs ein
scharfes Bild angezeigt wird (horizontal: 30 – 70 kHz, vertikal:
48 – 120 Hz). Wenn Sie das Bild einstellen, werden die
Einstellungen als Benutzermo dus automatisch gespeiche r t und
abgerufen, wann immer das betreffende Eingangssignal eingeht.
Hinweis für Benutzer von Windows
Wenn Sie mit Window s arbeiten, seh en Sie in der D okumentatio n
oder im Dienstprogramm zu Ihrer Grafikkarte nac h, wel ches die
höchste Auffrischungsrate ist, und wählen Sie diese aus, um die
Leistung des Geräts zu optimieren.
Störungsbehebung
Lesen Sie bitte im folgenden Abschnitt nach, bevor Sie sich an
den Kundendienst wenden.
Wenn auf dem Bildschirm eine
dünne Linie (Dämpfungsdraht)
erscheint
Diese Linie ist bei einem Trinitron-Monit or normal un d stell t
keine Fehlfunktio n dar. Es handelt s ich dabei um den Sch atten des
Dämpfungsdrahtes, mit dem die Streifenmaske stabilisiert wird.
Besonders deutlich ist er bei einem hellen (normalerweise
weißen) Bildschirmhintergrund zu sehen. Die Streifenmaske ist
ein wichtiges Merkmal der Trinitron-Bildröhre. Sie bewirkt, daß
mehr Licht auf den Bildschirm gelangt, und ermöglicht eine
höhere Farbintensität und Detailgenauigkeit.
Dämpfungsdraht
Die Energiesparfunktion
Dieser Monitor erfüllt die Energiesparrichtlini en der VESA, des
E
NERGY STAR
der Monitor an einen Computer oder eine Grafikkarte
angeschlossen ist, der bzw. die DPMS (Display Power
Management Signaling) unterstützt, wird der Stromverbrauch des
Geräts in drei Stufen wie unten erläutert reduziert.
Betriebsmodus Leistungsaufnahme Netzanzeige
Normalbetrieb ≤ 95 W grün
1 Bereitschaft ≤ 15 W abwechselnd grün
2 Unterbrechung
(Schlaf)*
3 Deaktiviert**
(Tiefschlaf)*
Ausgeschaltet 0 W aus
* „Schlaf“ und „Tiefschlaf“ sind Energiesparmodi, die von der
EPA (Umweltschutzb ehörde der USA) definiert wurd en.
** Wenn der C omputer in den Modus „Deakti viert“ wechselt, geht kein
Eingangssignal mehr ein, und KEIN EINGANGSSIGNAL erscheint
auf dem Bildschirm. Nach 20 Sekunden schaltet der Monitor in den
Energiesparmodus.
-Programms und des NUTEK-Standards. Wenn
1
und orange
≤ 15 W abwechselnd grün
und orange
≤ 5 W orange
Bildschirmmeldungen
Wenn am Eingangssignal ein Fehler vor li egt, erscheint eine der
folgenden Warn meldungen auf dem Bildschirm. Wie Sie das
Problem beheben, schlagen Sie unter „Symptome für Fehler und
Abhilfemaßnahmen“ auf Seite 14 nach.
Status des
Eingangssignals
Status des Eingangssignals
NICHT IM ABTASTBEREICH
Gibt an, daß das Eingangssignal nicht den technischen Daten des
Monitors entspricht.
KEIN EINGANGSSIGNAL
Zeigt an, daß kein Signal in den Monitor eingespeist wird.
DE
13
Page 42

Symptome für Fehler und Abhilfemaßnahmen
Wenn ein Problem auf den angeschlossenen Computer oder andere Geräte zurückzuführen ist, schlagen Sie bitte in der Dokumentation zu
dem angeschlossene n Gerät nach.
Führen Sie die Selbstdiagnosefunktion (Seite 16) aus, wenn sich ein Problem mit den im folgenden empfohlenen Maßnahmen nicht beh eben
läßt.
Symptom Überprüfen Sie bitte folgendes:
Kein Bild
Die Netzanzeige 1 leuchtet nicht • Das Netzkabel muß korrekt ange sc hlo s s en sein .
• Der Monitor muß am Netzschalter 1 eingeschaltet sein.
Die Meldung KEIN
EINGANGSSIGNAL erscheint auf
dem Bildschirm, oder die
Netzanzeige 1 leuchtet orange oder
wechselt zwischen grün und orange
Die Meldung NICHT IM
ABTASTBEREICH erscheint auf
dem Bildschirm
Es wird keine Meldung angezeigt,
und die Netzanzeige 1 leuchtet grün
oder blinkt orange
Sie arbeiten mit einem Windows 95/
98-System
Sie arbeiten mit einem MacintoshSystem
Das Bild flimmert, springt, oszilliert
oder ist gestört
Das Bild ist verschwommen
• Das Videosignalkabel muß korrekt angeschlossen sein, und alle Stecker müssen fest in den
Buchsen sitzen (Seite 6).
• Achten Sie darauf, daß am HD15- Videoeingangsans c hlu ß ke ine Stifte verbog e n oder
eingedrückt sind.
Durch den angeschlossenen Computer oder andere Geräte verursachte
x
Probleme
• Der Computer befindet sich im Energiesparmodus. Drücken S ie eine beliebige Taste auf
der Computer-Tastatur .
• Überprüfen Sie, ob der Computer eingeschaltet ist.
• Die Grafikkart e muß korrekt im richtigen Bus-Steck platz sitzen.
Durch den angeschlossenen Computer oder andere Geräte verursachte
x
Probleme
• Die Videofrequenz muß im für den Monitor angegebenen Bereich liegen. Wenn Sie einen
älteren Monitor durch diesen Monitor ersetzt haben, schl ießen Sie den alten Monitor
wieder an und stellen eine Frequenz im folgenden Bereich ein:
Horizontal: 30 – 70 kHz
Vertikal: 48 – 120 Hz
• Verwenden Sie die Selbstdiagnosefunktion (Seite 16).
• Wenn Sie einen älteren Monitor durch diesen Monitor ersetzt haben, schließen Sie den alten
Monitor wieder an, und gehen Sie folgendermaßen vor: Installieren Sie die Diskette
„Windows Monitor Information Disk“ (Seite 7), und wählen Sie diesen Monitor
(„CPD-E100E“) aus den Sony-Monitoren im Monitorauswahlfenster in Windows 95/98
aus.
• Der Macintosh-Adapter (nicht mitgelief e rt) und das Videosignalkabel müssen richtig
angeschlossen sein (Seite 6).
• Entfernen Sie alle möglichen Quellen elektrischer oder magnetischer Felder wie andere
Monitore, Laserdrucker, Ventilatoren, Leuchtstoffröhren oder Fernsehgeräte aus der Nähe
des Monitors.
• Halten Sie den Monitor von St romleitungen fern, oder schützen Sie de n Monitor durch
eine Magnetabschirmung.
• S chließen Sie das Netzkabel des Monitors an eine ande re Steckdose, möglichst an einem
anderen Stromkreis, an.
• Versuchen Sie, den Monitor um 90 Grad nach links oder rechts zu drehen.
Durch den angeschlossenen Computer oder andere Geräte verursachte
x
Probleme
• Schlagen Sie in der Anleitung zur Grafikkarte die korrekte Monitoreinstellung nach.
• Überprüfen Sie, ob der Grafikmodus (VESA, Macin tosh 16 Zoll, Color usw.) und die
Frequenz des Eingangssignals von diesem Monitor unterstützt werden (Appendix). Auch
wenn die Frequenz innerhalb des unterstützten Bereichs liegt, arbeiten einige Grafikkarten
möglicherweise mit einem Synchronisationsimpuls, der für eine korrekte Synchronisation
des Monitors zu kurz ist.
• Stellen Sie die Auffrischungsrate am Computer (Vertikalfrequenz) auf den Wert ein, mit
dem Sie die besten Bilder erzielen.
• Stellen Sie Helligkeit und Kontrast ein (Seite 9).
• Entmagnetisieren Sie den Monitor* (Seite 12).
• Wählen Sie CANCEL MOIRE, und stellen Sie die Moiré-Korrektur ein (Seite 12).
14
Page 43
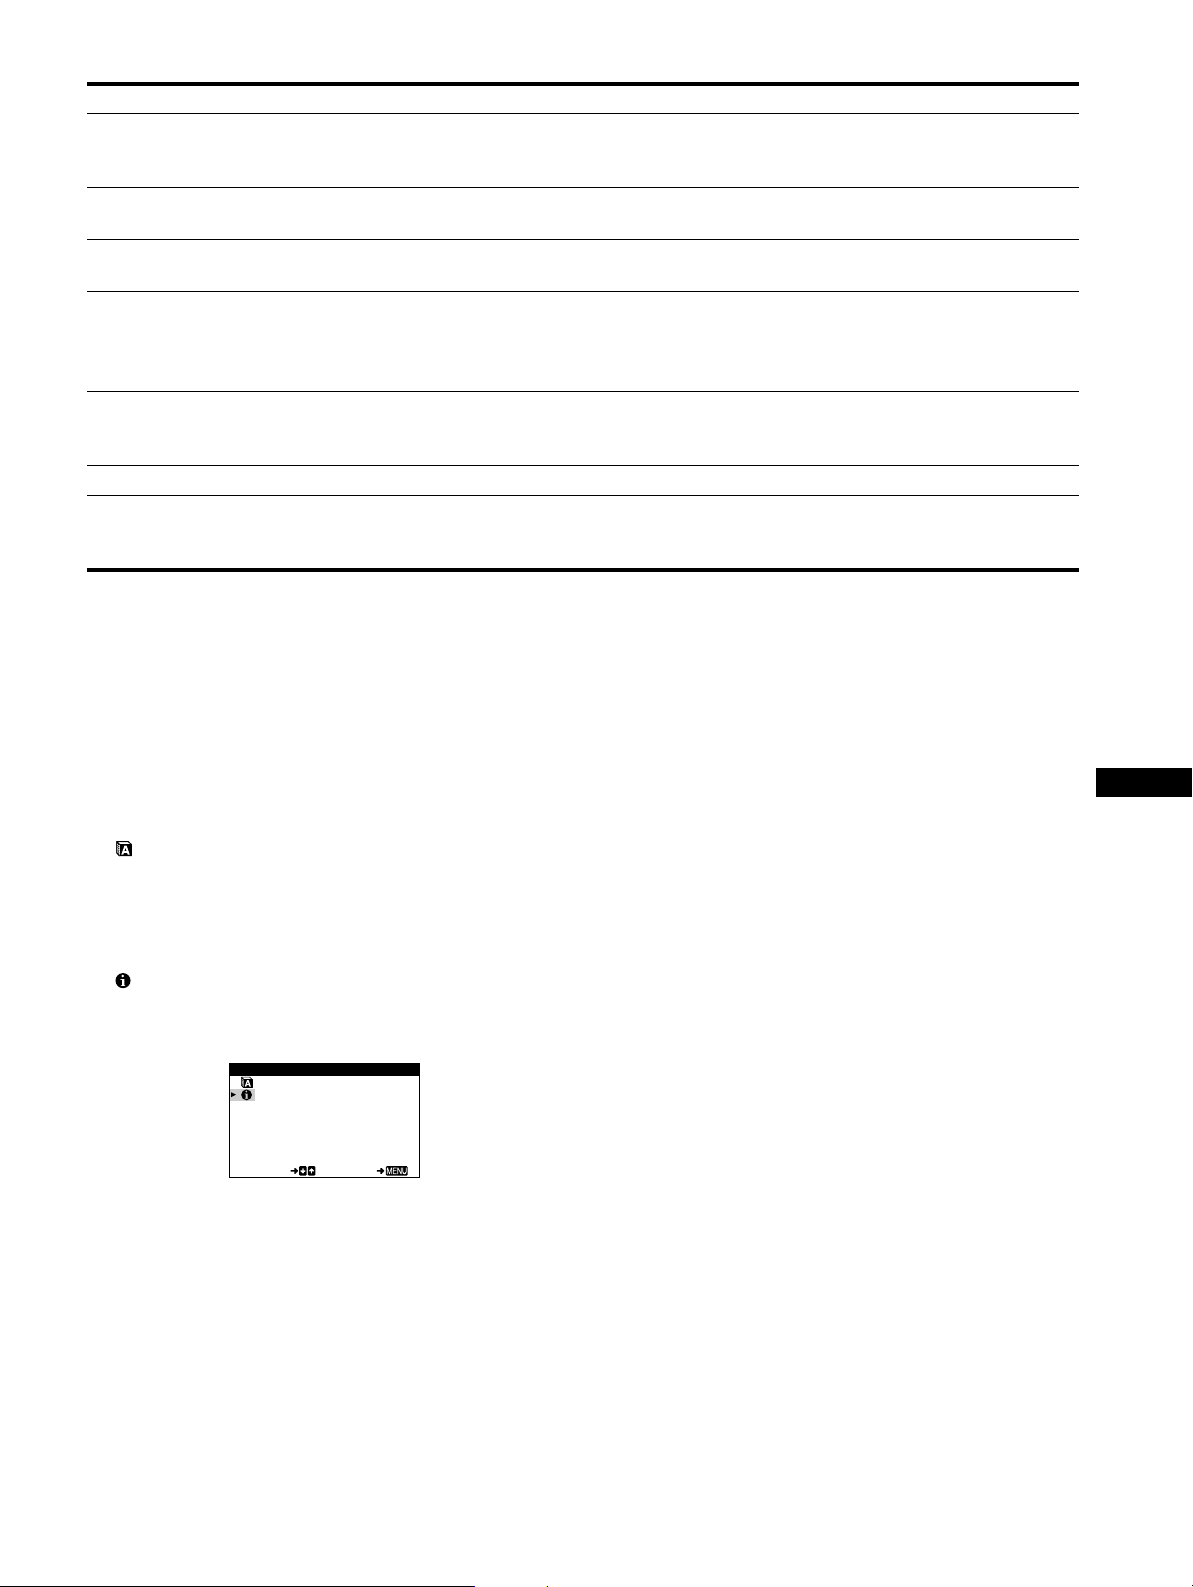
Symptom Überprüfen Sie bitte folgendes:
Doppelbilder sind zu sehen
• Verwenden Sie keine Bildschirmverlängerungskabel und/oder Videoschaltboxen, wenn
dieses Phänomen auftritt.
• Überprüfen Sie, ob alle Stecker fest in den jeweiligen Buchsen sitzen.
Das Bild ist nicht zentriert, oder die
Bildgröße ist nicht korrekt
Die Bildränder sind gekrümmt
• Stellen Sie die Bildgröße bzw. die Position (Seite 10) ein. Beachten Sie, daß bei
bestimmten Videomodi die Anzeige nicht den gesamten Bildschirm füllt.
• Wählen Sie KISSENVERZ/BALANCE, TRAPEZFORM/PARALLEL oder DREHUNG,
um Form und Drehung des Bildes einzustellen (Seite 10, 11).
Wellenförmige oder elliptische
• Wählen Sie CANCEL MOIRE, und stellen Sie die Moiré-Korrektur ein (Seite 12).
Moiré-Effekte sind sichtbar
Durch den angeschlossenen Computer oder andere Geräte verursachte
x
Probleme
• Wählen Sie ein anderes Muster für Ihren Desktop.
Die Farbe ist nicht gleichmäßig
• E ntmagnetisieren Si e den Monitor* (Seit e 12). Wenn Sie ein Gerät, das ein Magnetfeld
erzeugt (z. B. einen Lautsprecher), in der Nähe des Monitors aufstellen oder wenn Sie die
Richtung des Monitors ändern, sind die Farben möglicherwei se nicht mehr gleichmäßig.
Weiß sieht nicht weiß aus
Unmittelbar nach dem Einschalten
ist ein Summgeräusch zu hören
• Stellen Sie die Farbtemperatur ein (Se ite 1 1).
• Dieses Geräusch wird vom automatischen Entmagnetisierungszyklu s verursacht. Wenn Sie
das Gerät einschalten, wird der Mon itor automatisch etwa zwei Sekunden lang
entmagnetisiert.
* Ist ein zweiter Entmagnetisierungszyklus erforderlich, warten Sie nach dem ersten Zyklus mindestens 20 Minuten. Auf diese Weise erzielen Sie die besten
Ergebnisse. Dabei ist möglicherweise ein Summge räusch zu hören, aber dies ist keine Fehlfunktion.
Anzeigen des Namens, der Seriennummer und
des Herstellungsdatums des Monitors
(INFORMATION)
1
Drücken Sie auf die Mitte der Steuertaste.
Das Hauptmenü MENU erscheint auf dem Bildschirm.
2
Bewegen Sie die Steuertaste in Richtung m/M, um
SPRACHE/INFORMATION hervorzuheben, und
drücken Sie erneut auf die Mitte der Steuertaste.
Das Menü SPRACHE/INFORMATION erscheint auf dem
Bildschirm.
3
Bewegen Sie die Steuertaste in Richtung m/M, um
(INFORMATION) auszuwählen.
Ein Feld mit Informatione n zu d ie sem M on itor wird auf dem
Bildschirm angezeigt.
Beispiel
SPRACHE / I NFORMATION
MODE L : CPD - E100 E
SERI AL: 12345678
MANUF ACTURED: 1 9 99 - 5 2
SELECT EXI T
Bleibt das Problem bestehen, wenden Sie sich an Ihren
autorisierten Sony - H än dl er . Ha lte n Sie die folge n de n
Informationen bereit:
• Mod ellbezeichnung: CPD-E100E
• Seriennummer
• Mod ellbezeichnung und technische Daten des C omputers und
der Grafikkarte.
DE
15
Page 44
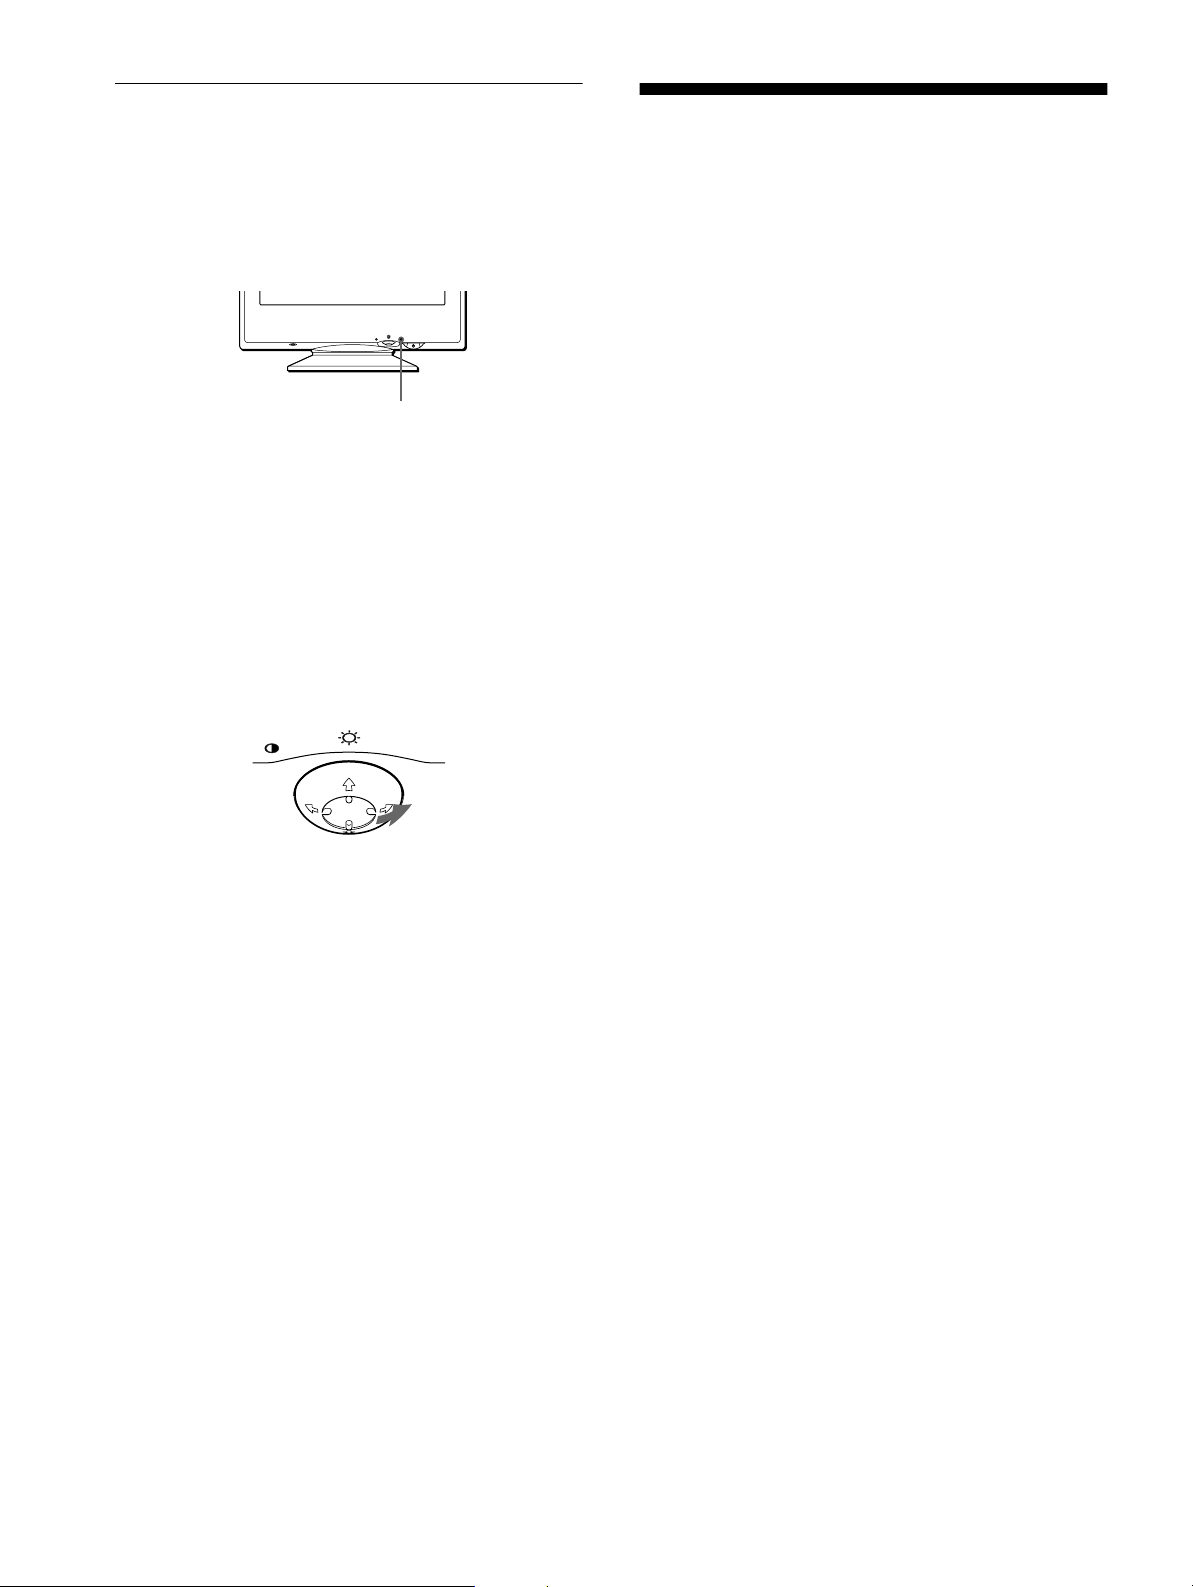
Selbstdiagnosefunktion
Dieser Monitor verfügt über eine Selbstdiagn osef unktion. Wenn
an dem Monitor oder am Com puter ein Problem auft ritt, erscheint
ein leerer Bildschirm, und die Netzanzei ge 1 le uchtet grün auf
oder blinkt orange. Wenn di e Netzanzeige 1 orange leuchtet,
befindet sich der Computer im En er g i e s pa rmodus. Drück en Si e
eine beliebige Taste auf der Tastatur.
Netzanzeige
MENU
MENU
1
RESET
Wenn die Netzanzeige 1 grün leuchtet
1
Lösen Sie das Videoeingangskabel, oder schalten
Sie den angeschlossenen Computer aus.
2
Schalten Sie den Monitor am Netzschalter 1 aus
und dann wieder ein.
3
Bewegen Sie die Steuertaste zwei Seku nden lang in
Richtung ,, bevor der Monitor in den
Energiesparmodus wechselt.
Technische Daten
Kathodenstrahlröhre S treifenabstand 0,24 mm (Mitte)
Bildschirmdiagonale 15 Zoll
Ablenkung 90 Grad
Effektive Bildgröße ca. 285 × 214 mm (B/H)
Anzeigegröße 14,0 Zoll
Auflösung
Maximum Horizontal: 1280 Punkte
Vertikal: 1024 Zeilen
Empfohlen Horizontal: 800 Punkte
Vertikal: 600 Zeilen
Standardanzeigegröße ca. 270 × 202 mm (B/H)
Ablenkfrequenz* Horizontal: 30 bis 70 kH z
Vertikal: 48 bis 120 Hz
Betriebsspannung 100 bis 240 V Wechselstrom,
50 – 60 Hz, 1,2 – 0,6 A
Leistungsaufnahme max. 95 W
Abmessungen ca. 356 × 378 × 38 8 mm (B/H/T)
Gewicht ca. 14 kg
Plug and Play DDC1/DDC2B
Mitgeliefertes Zubehör Siehe Seite 6
* Empfohlene Werte für das horizontale und vertikale Timing
• Das hor izontale Synchro nbreitenverhält nis sollte über
1,0 µSek. liegen.
• Die horizontale Austastbreite sollte über 3,6 µSek. liegen.
• Die vertikale Austastbreite sollte über 500 µSek. liegen.
Wenn alle vier Farbbalken (weiß, rot, grün, blau ) angezeigt
werden, funktioniert der Monitor ordnungsgemäß. Schließen Sie
das Videoeingangskabel wieder an, und überprüfen Sie den
Zustand Ihres Computers.
Wenn die Farbbalken nicht erschein en, liegt möglicherweise ein
Fehler am Monitor vor. Wenden Sie sich mit der Beschreibun g
des Problems an einen autori sierten Sony-Händler.
Wenn die Netzanzeige 1 orange blinkt
Schalten Sie den Monitor am Netzschalter 1 aus und
dann wieder ein.
Wenn die Netzanzeige 1 jetzt grün leuchtet, funktioniert der
Monitor ordnung s gem ä ß.
Wenn die Netzanzeige 1 immer noch blinkt, liegt
möglicherweise ein Fehler am Monitor vor. Ermitteln Sie das
Intervall, in dem die Netzanzeige 1 blinkt (in Sekunden), und
wenden Sie sich mit der B eschreibung des Problem s an einen
autorisierten Sony-Händler. Notieren Sie sich unbedingt die
Modellbezeichnun g und die Seriennummer des Monitors.
Notieren Sie sich außerdem das Fabrikat und Modell Ihres
Computers und der Grafi kkarte.
Änderungen, die dem technischen Fortschritt dienen, bleiben
vorbehalten.
16
Page 45
Índice
Precauciones . . . . . . . . . . . . . . . . . . . . . . . . . . . . . . . . . . . . . . . . . . 4
Identificación de los componentes y los controles . . . . . . . . . . . . . . 5
Instalación . . . . . . . . . . . . . . . . . . . . . . . . . . . . . . . . . . . . .6
Paso 1:
Paso 2:
Paso 3:
Conexión del monitor al ordenador. . . . . . . . . . . . . . . . . . . 6
Conexión del cable de alimentación . . . . . . . . . . . . . . . . . . 6
Encendido del monitor y del ordenador . . . . . . . . . . . . . . . 7
Selección del idioma de los menús en pantalla
(LENGUAJE/INFORMACIÓN) . . . . . . . . . . . . . . . . . . . . . . . . . . . . . 7
Personalización del monitor. . . . . . . . . . . . . . . . . . . . . . .8
Navegación por el menú. . . . . . . . . . . . . . . . . . . . . . . . . . . . . . . . . . 8
Ajuste del brillo y del contraste. . . . . . . . . . . . . . . . . . . . . . . . . . . . . 9
Ajuste del tamaño o centrado horizontal de la imagen
(TAMAÑO H/POSICIÓN) . . . . . . . . . . . . . . . . . . . . . . . . . . . . . . . . 10
Ajuste del tamaño o centrado vertical de la imagen
(TAMAÑO V/POSICIÓN) . . . . . . . . . . . . . . . . . . . . . . . . . . . . . . . . 10
Ajuste de la curvatura de los lados de la imagen
(COJÍN/BAL COJÍN). . . . . . . . . . . . . . . . . . . . . . . . . . . . . . . . . . . . 10
Ajuste del ángulo de los lados de la imagen
(TRAPECIO/PARALELO). . . . . . . . . . . . . . . . . . . . . . . . . . . . . . . . 10
Ajuste de la rotación de la imagen (ROTACIÓN) . . . . . . . . . . . . . . 11
Ampliación o reducción de la imagen (ZOOM). . . . . . . . . . . . . . . . 11
Ajuste del color de la imagen (COLOR) . . . . . . . . . . . . . . . . . . . . . 11
Ajustes complementarios (DESMAGNETIZAR/MUARE). . . . . . . . 12
Restauración de los ajustes . . . . . . . . . . . . . . . . . . . . . . . . . . . . . . 12
ES
• Trinitron es una marca comercial
registrada de Sony Corporation.
• Macintosh es una marca comercial de
Apple Computer, Inc., registrada en
EE.UU. y otros países.
• Windows
comerciales registrada s de Mi crosoft
Corporation en Estad os Unidos y otros
países.
• IBM PC/AT y VGA son marcas
comerciales registradas de IBM
Corporation de EE.UU.
• VESA y DDC
de Video Electronics Standard
Association.
•
E
registrada de EE.UU.
• El resto de los nombres de produc t os
mencionados en este manual pueden ser
marcas comerc iales o marcas
comerciales registradas de sus
respectivas compañías.
•Además, “” y “” no se mencionan en
cada caso en este manual.
y MS-DOS son marcas
son marcas comerciales
NERGY STAR es una marca
Características técnicas . . . . . . . . . . . . . . . . . . . . . . . . .13
Modos predefinidos y de usuario . . . . . . . . . . . . . . . . . . . . . . . . . . 13
Función de ahorro de energía . . . . . . . . . . . . . . . . . . . . . . . . . . . . 13
Solución de problemas . . . . . . . . . . . . . . . . . . . . . . . . . .13
Si aparece una línea fina en pantalla (hilo de amortiguación) . . . . 13
Mensajes en pantalla . . . . . . . . . . . . . . . . . . . . . . . . . . . . . . . . . . . 13
Problemas y soluciones . . . . . . . . . . . . . . . . . . . . . . . . . . . . . . . . . 14
Función de autodiagnóstico . . . . . . . . . . . . . . . . . . . . . . . . . . . . . . 16
Especificaciones . . . . . . . . . . . . . . . . . . . . . . . . . . . . . . .16
Appendix. . . . . . . . . . . . . . . . . . . . . . . . . . . . . . . . . . . . . . . i
Preset mode timing table . . . . . . . . . . . . . . . . . . . . . . . . . . . . . . . . . .i
TCO’99 Eco-document . . . . . . . . . . . . . . . . . . . . . . . . . . . . . . . . . . . .i
3
Page 46
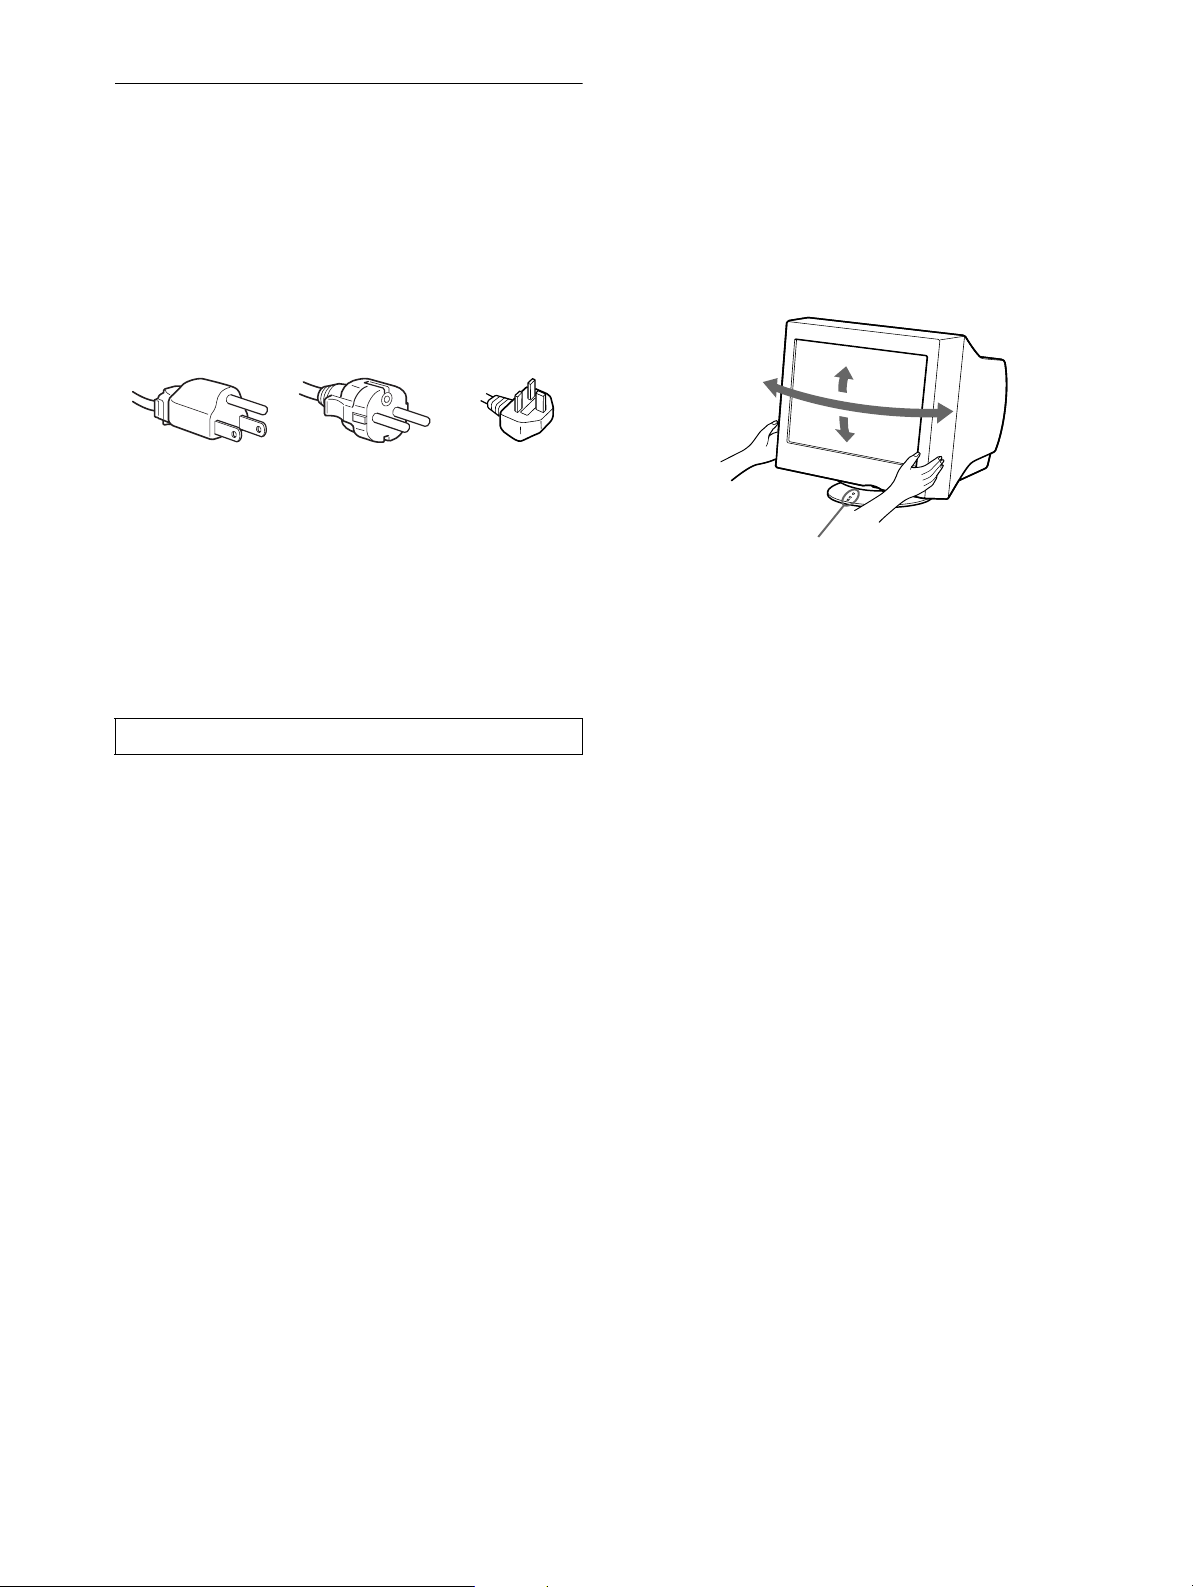
Precauciones
90°
5°
90°
15°
Puntos de centrado
Advertencia sobre las conexiones de
alimentación
• Utilice el cable de alimentación suministrado. Si emplea otro
tipo de cable, asegúrese de que es compatible con el suministro
de alimentación local.
Para los clientes en el Reino Unido
Si utiliza el monit or en e l Rein o Uni do, ase gúres e de u tilizar el
cable de alimentació n suministrado para dicho país.
Ejemplo de tipos de enchufe
Uso del soporte basculante giratorio
Este monitor puede ajustarse en los ángulos mostrados a
continuación. Para encontrar el centro del radio de giro del
monitor, alinee el centro de la pantalla de dicho monitor con los
puntos de centrado del soporte.
Agarre el monitor por su parte inferior con las dos manos cuando
lo gire horizontal o verticalmente. Tenga cuidado de no pillarse
los dedos en la parte trasera del monitor cuando lo incline hacia
arriba verticalmente.
para 100 a 120 V CA para 200 a 240 V CA par a 240 V CA
• Antes de desconectar el cable de alimentación, espere al menos
30 segundos después de desactivar la alimentación para que se
descargue la electricidad estática de la super ficie de la pan talla.
• Una vez activada la alimentación, la pantalla se desmagnetiza
durante unos 5 segundos. Esto genera un intenso campo
magnético alrededor de la pantalla que puede afectar a los datos
almacenados en discos y cin tas magnéticas situados cerca del
monitor. Asegúr e s e de ma nte n er dis c o s, cintas y equipos de
grabación magnéticos alejados del monitor.
El equipo debe instalarse cerca de una toma de fácil acceso.
solamente
Instalación
No instale el monitor en los siguientes lugares:
• sobre superfici es (mantas, colchas, etc.) ni cerca de materiales
(cortinas, tapices, etc.) que puedan bloquear los orificios de
ventilación
• cerca de fuentes de ca lor, com o radi ad ore s o con du ctos de air e
caliente, ni en lugares sujetos a la luz solar directa
• en lugares sujetos a cambios bruscos de temperatura
• en lugares sujetos a golpes o vibraciones mec ánicas
• sobre superficies inestables
• cerca de equipos que generen magnetismo, como
transformadores o líneas eléc tricas de alta tensión
• cerca o sobre una superficie metálica con carga eléctrica
Mantenimiento
• Limpie la pantalla con un paño suave. Si utiliza algún líquido
limpiador de cri s tales, no emplee ningún tipo de producto de
limpieza que contenga soluciones antiestáticas o aditivos
similares, ya que pueden rayar la superficie de la pantalla.
• No frote, toque ni manipule la superficie de la pantalla con
objetos afilados o abrasivos, como un bolígrafo o un
destornillador. Este tipo de contacto puede rayar el tubo de
imagen.
• Limpie el exterior, el panel y los controles con un paño suave
ligeramente humedecido con una solución detergente poco
concentrada. No utilice estropajos abrasivos, detergente en
polvo ni disolventes , com o alc oh ol o benc in a .
Transporte
Cuando transporte este monitor para su reparación o traslado,
utilice la caja y materiales de embalaje originales.
4
Page 47
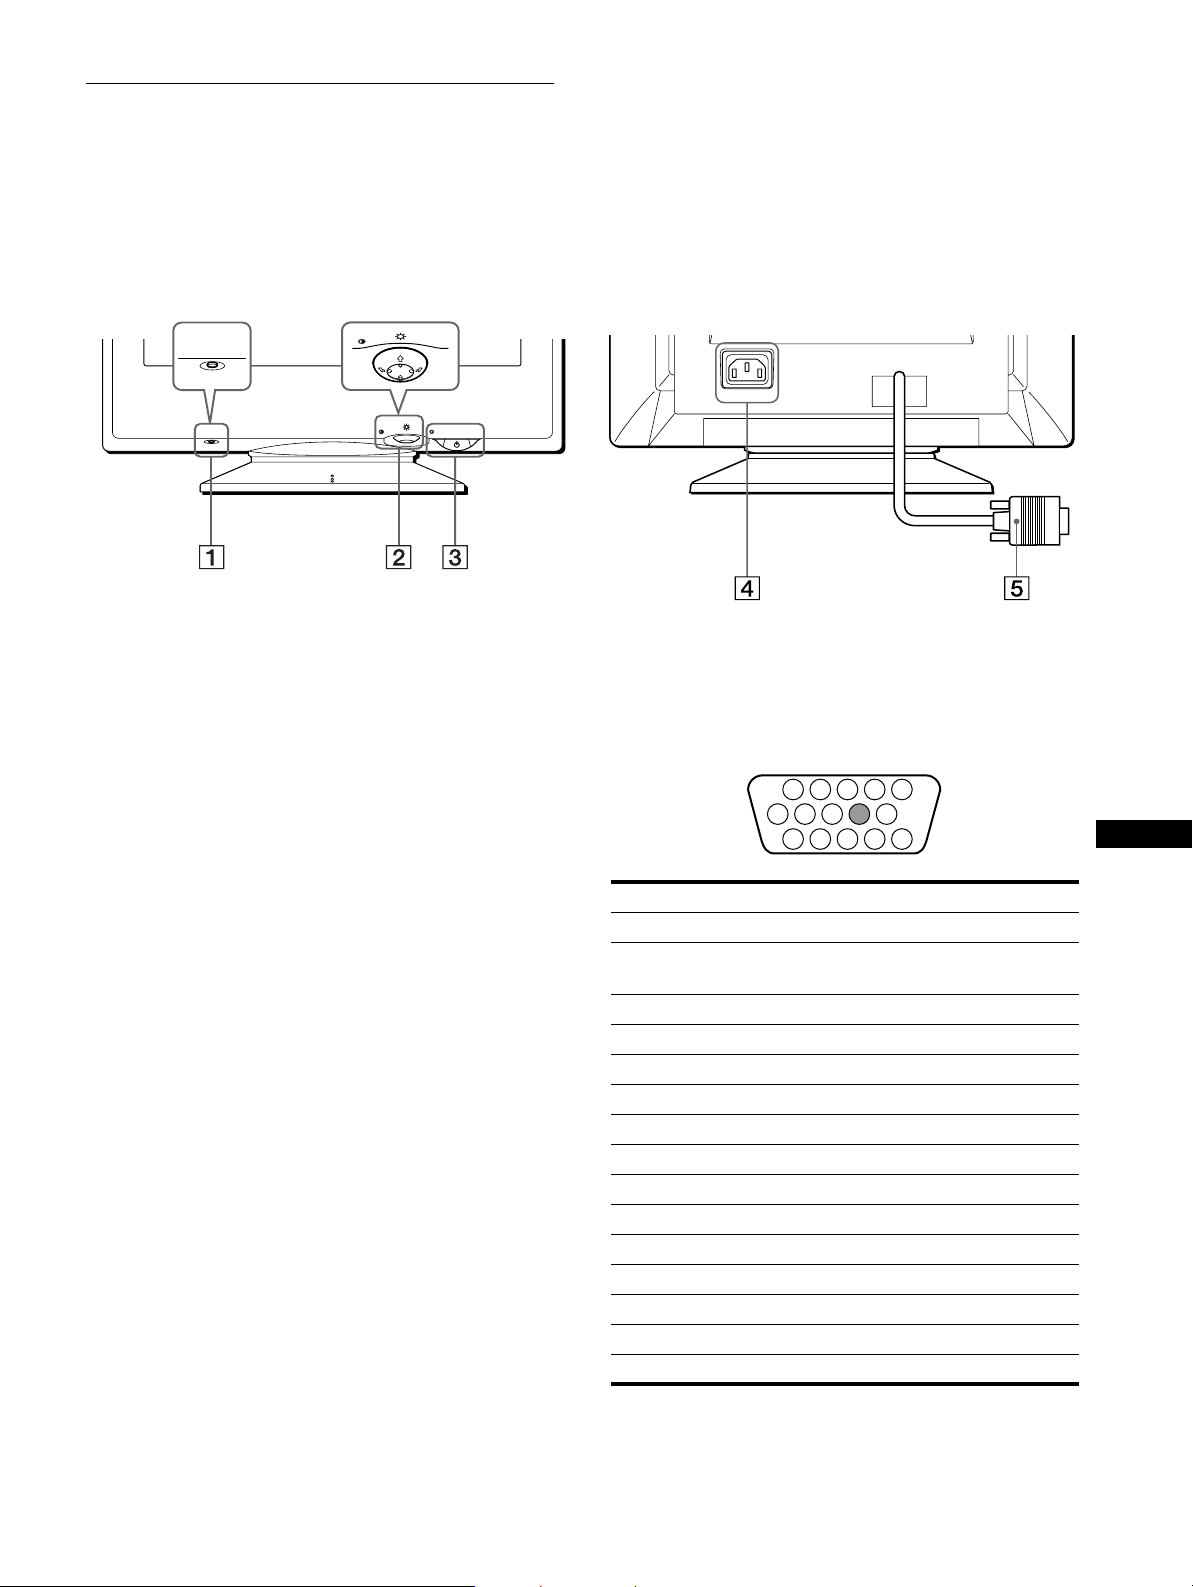
Identificación de los componentes
1 2 3 4
5
876
11 12 13 14 15
10
9
y los controles
Consulte las página s in dic a da s entre paréntesis pa ra ob te ne r m ás
información.
MENU
RESET
RESET
MENU
Parte posteriorParte frontal
AC IN
Botón RESET (restauración) (página 12)
1
Este botón recupera los valores de fábrica.
Botón de control (página 9)
2
El botón de control se utiliza para most rar el men ú y rea liz ar
ajustes del monitor, incluidos los de brillo y contraste.
Interruptor e indicador 1 (alimentación)
3
(páginas 7, 13, 16)
Este botón enciende y a paga el monitor. El indicador de
alimentación se ilumina en verde cuando el monitor está
encendido, y parpadea en verde y en naranja, o se ilumina en
naranja cuando dicho monitor se encuentra en el modo de
ahorro de energía.
Conector AC IN (página 6)
4
Este conector proporciona aliment ación de CA al monitor.
Conector de entrada de vídeo (HD15) (página 6)
5
Este conector in troduce las señales de vídeo RGB
(0,700 Vp-p, positivas) y de sincronización.
Terminal nº Señal
1Roja
2Verde
(Sincronización en verde)
3Azul
4 Identificación (Masa)
5 Masa DDC*
6Masa roja
7 Masa verde
8 Masa azul
9–
10 Masa
11 Identificación (Masa)
12 Datos bidireccionales (SDA)*
13 Sincronización H.
14 Sincronización V.
15 Reloj de datos (SCL)*
ES
* DDC (Display Data Channel) es un estándar de VESA.
5
Page 48
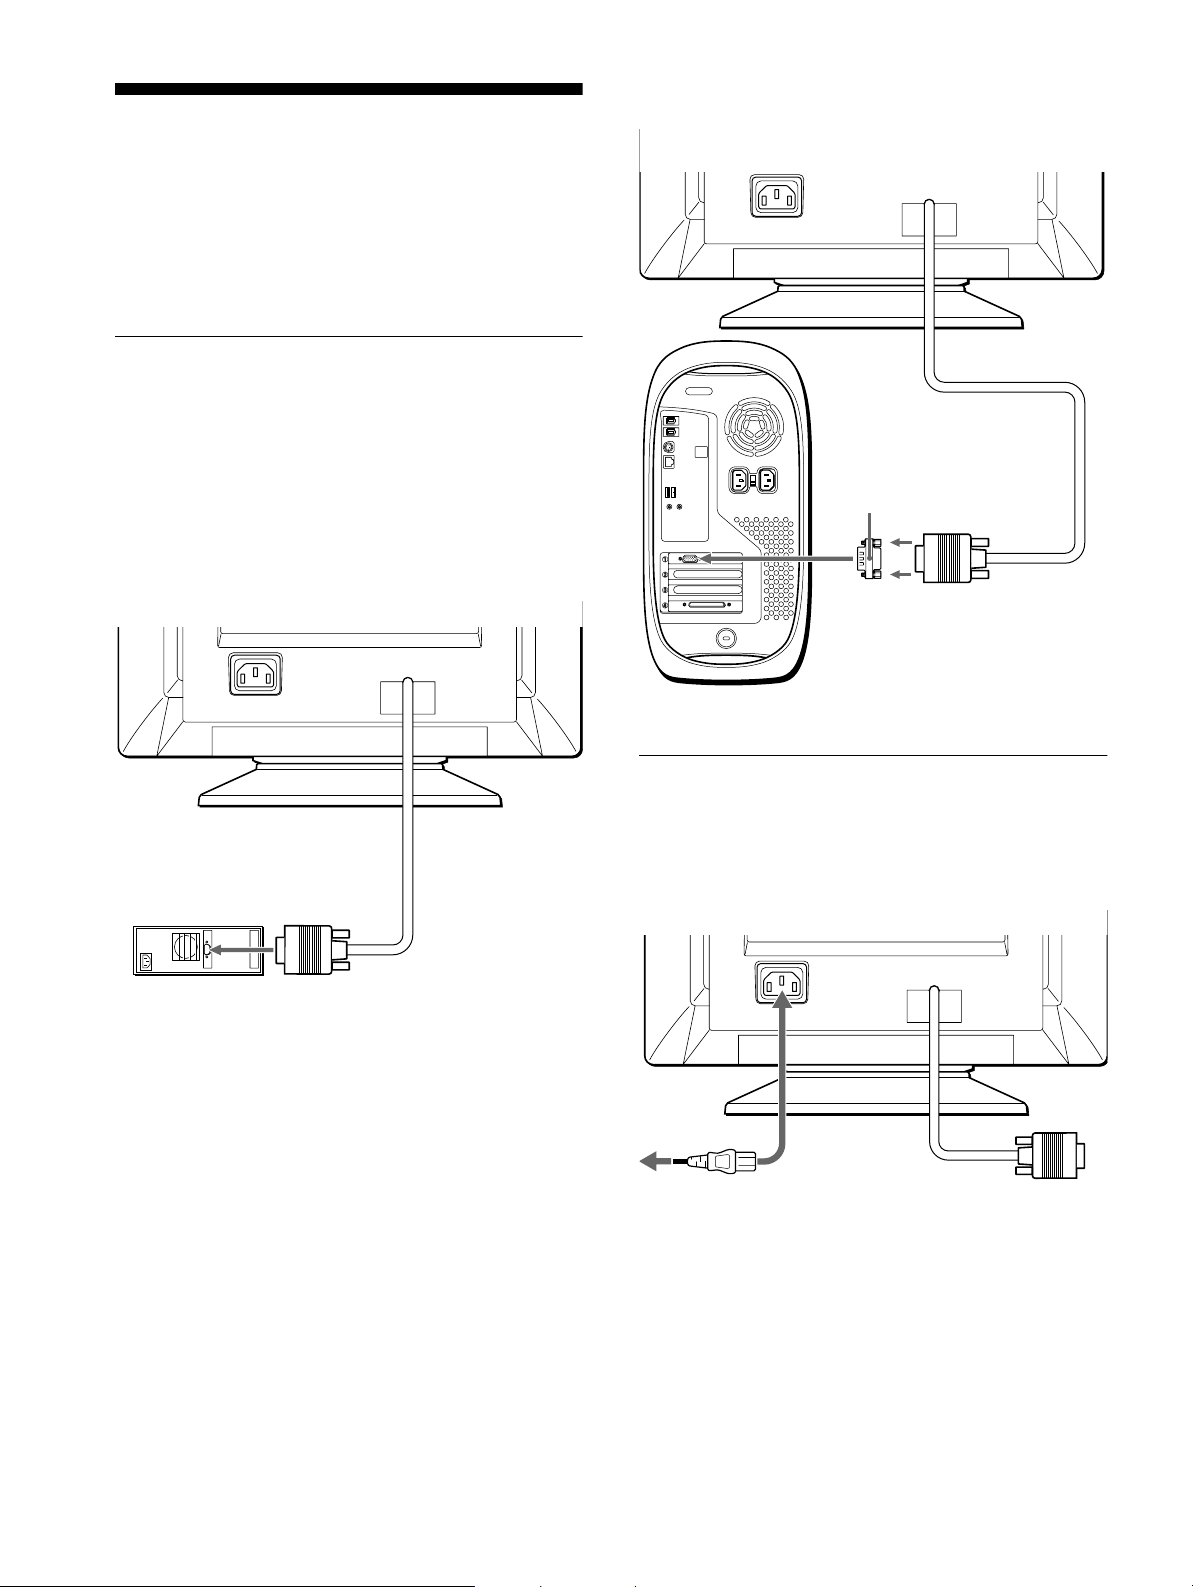
Instalación
AC IN
Es necesario un adaptador Macintosh (no suministrado).
Adaptador Macintosh
(no suministrado)
Ordenador Macintosh o
compatible
a salida de vídeo
AC IN
a AC IN
a una toma de
corriente
Cable de alimentación
(suministrado)
Antes de utilizar el monitor, compruebe que los siguientes
accesorios se hayan incluido en la caja:
• Cabl e de alimentación (1)
• Windows Monitor Information Disk (1)
• Tarjeta de garantía (1)
• Notas sobre la limpieza de la sup e rf ic i e de la pa ntalla (1)
• Este man ual de instrucciones (1)
Paso 1:Conexión del monitor al
ordenador
Apague el monitor y el ordenador antes de r ealizar la conexión .
Nota
No toque los terminales de l conector de cable de víde o, ya que podría
dañar dichos terminales.
Conexión a un ordenador IBM PC/AT o
x
compatible
Conexión a un ordenador Macintosh o
x
compatible
AC IN
a salida de vídeo
Ordenador IBM PC/AT
o compatible
Paso 2:Conexión del cable de
alimentación
Con el monitor y el ordenador apagados, primero conecte el cable
de alimentación al monitor y, a continuación, a una toma de
corriente.
6
Page 49
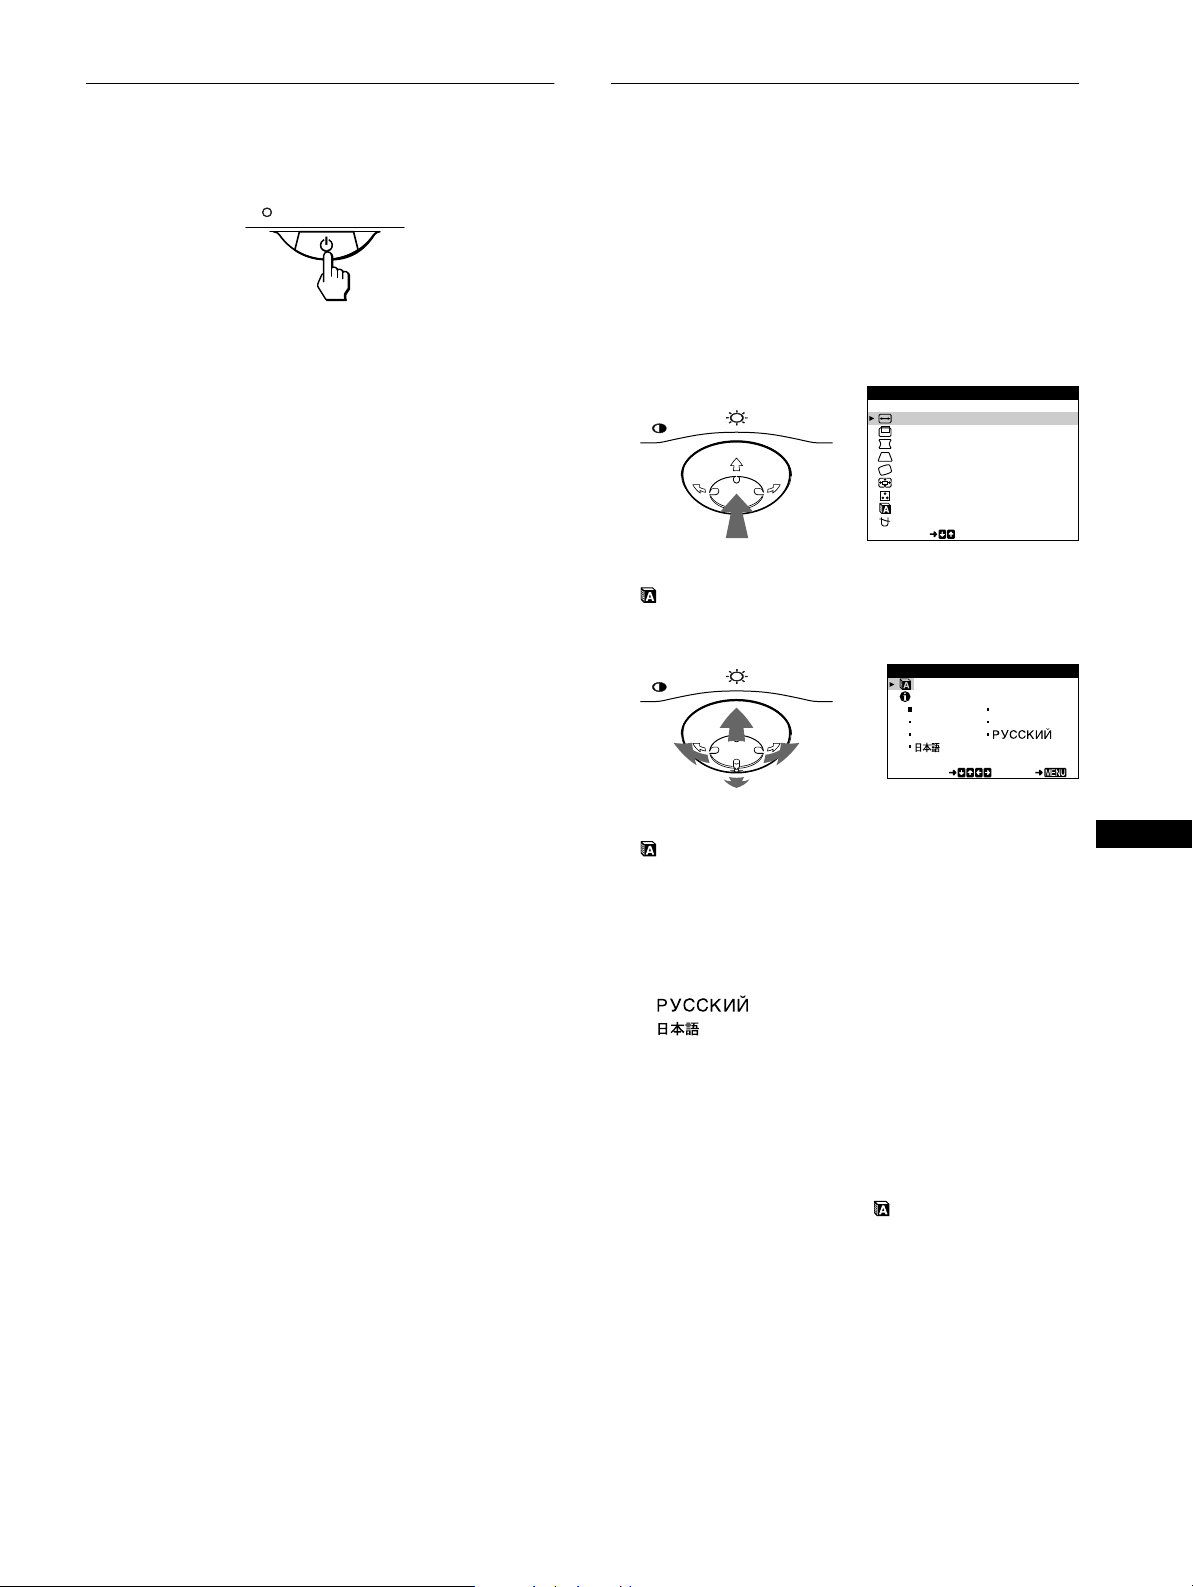
Paso 3:Encendido del monitor y
Selección del idioma de los menús
del ordenador
Primero encienda el monitor y, a continuación, el ordenador.
La instalación del monitor ha finalizado.
Si fuese necesario, utilice los cont roles del monitor p ara ajustar la
imagen.
Si las imágenes no aparecen en pantalla
• Compruebe que el monitor esté correctamente conectado al
ordenador.
• Si NO SEÑAL DE ENTRADA aparece en pantalla, compruebe
que la tarjeta gráfica del ordenador esté completamente
insertada en la ranura de bus correcta.
• Si sustituye un monitor antiguo por este modelo y el mensaje
FUERA DEL RANGO DE AJUSTE aparece en pantalla,
vuelva a conectar el monitor antiguo. A continuación, ajuste la
tarjeta gráfica del ordenador de forma que la frecuencia
horizontal se encuentre entre 30 – 70 kHz, y la vertical entre
48 – 120 Hz.
Para obtener más información sobre los mensajes en pantalla,
consulte “Problemas y soluciones” en la página 14.
en pantalla (LENGUAJE/
INFORMACIÓN)
Los idiomas disponibles para los menús en pantalla son inglés,
francés, alemán, italiano, español, ruso y japonés. El ajuste por
omisión es el idioma inglés.
1
Pulse el centro del botón de control.
Consulte la pági na 9 para obtener más información sobre el
uso del botón de control.
MENU
2
Desplace el botón de control m/M para resaltar
LENGUAJE/INFORMACIÓN y pulse de nuevo el
centro del botón de control.
MENU
MENÚ
SAL I DA
TAMAÑO H / POS I C I ÓN
TAMAÑO V / POS I C I ÓN
COJÍN/BAL COJÍN
TRAPECI O/ PARALELO
ROTAC I ÓN
ZOOM
COLOR
LENGU A JE / I NFORMAC NÓI
DESMAGNE T I Z AR / MUA ER
SELECT
LENGUAJ E / INFORMAC IÓN
ENGL I SH FRANÇA I S
DEUTSCH I T A L IANO
ESPAÑOL
Para los usuarios que utilicen Windows 95/98
Para maximiza r el potencial del mo nitor, instale en e l PC e l archivo de
información sobre el nuevo modelo del disquete Windows Monitor
Information Disk suministrado.
Este monitor cumple con el estándar Plug & Play “VESA DDC”. Si el PC/
tarjeta gráfica cumple con DDC, seleccione “Plug & Play Monitor (VESA
DDC)” o el nombre de mode lo de este monitor como tipo de monitor en
el “Control Panel” de Windows 95/98. Si el PC/tarjeta gráfica presenta
problemas de com uni cación con este mo ni tor, cargue el disquete
Windows Monitor Information Disk y seleccione el nombre de modelo de
este monitor com o ti po de monitor.
Para los usuarios que utilicen Windows NT4.0
La instalación del mo ni tor en Windows NT4.0 difiere de la uti li za da en
Windows 95/98 y no implica selección de tipo de monitor. Consulte el
manual de instrucciones de Windows NT4.0 para obtener más
información sobre el ajuste de la resolución, frecuencia de barrido y
número de colores.
Ajuste de la resolución y el número de colores del monitor
Ajuste la resolución y el número de colores del monitor. Para ello,
consulte el manual de instruc ciones del ordenador. El número de colores
puede variar de acuerdo con el ordenador o la tarjeta de vídeo. El ajuste
de la paleta de colores y el número real de colores son de la si guiente
forma:
• High Color (16 bit) t 65.536 colores
• True Color (24 bit) t aproxim adamente 16,77 mi ll ones de colores
En el modo True color (2 4 bit s ), la velocidad puede ser más lenta.
SELECT EXI T
3
Desplace el botón de control m/M para seleccionar
(LENGUAJE), y desplace </, para seleccionar
un idioma.
• ENGLISH: Inglés
• FRANÇAIS : Francés
• DEUTSCH: Alemán
• ITALIANO: Italiano
• ESPAÑOL
•: Ruso
• : Japonés
Para cerrar el menú
Pulse el centro del botón de con tro l una vez para volver al MENÚ
principal, y púlsel o de nuevo seleccionando SAL IDA para volver a la
visualización normal. Si no pulsa ningún botón, el m en ú se cerrará
automáticamente transcu rrid os unos 30 segundos.
Para restaurar el idioma inglés
Pulse el botón RESET mientras el menú (LENGUAJE) se encuentra
en pantalla.
ES
7
Page 50
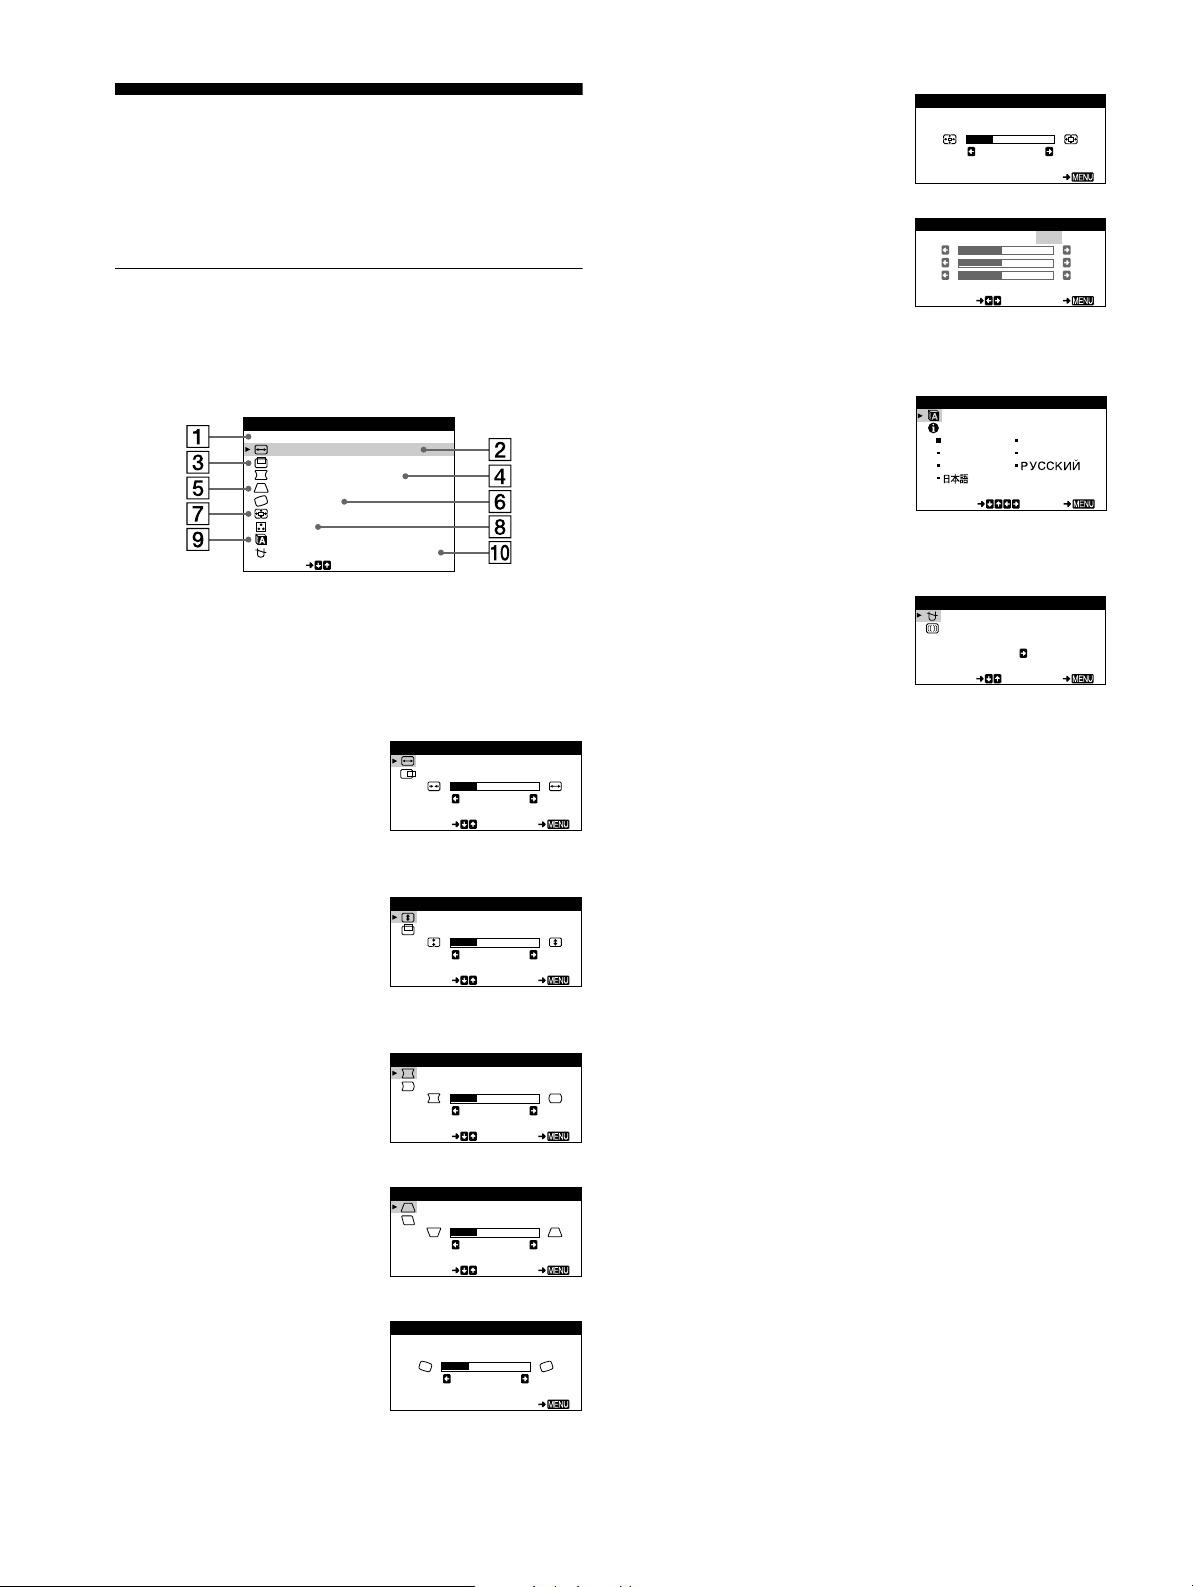
Personalización del
monitor
Es posible realizar diversos ajustes del monitor mediante el menú
en pantalla.
Navegación por el menú
Pulse el centro del botón de control para que aparezca el MENÚ
principal en pantalla. Consulte la página9 para obtener más
información sobre el empleo del botón de control.
MENÚ
SAL I DA
TAMAÑO H / POS I C I ÓN
TAMAÑO V / POS I C I ÓN
COJÍN/BAL COJÍN
TRAPECI O/ PARALELO
ROTAC I ÓN
ZOOM
COLOR
LENGUAJ E / I N FORMAC NÓI
DESMAGNE T I Z AR / MUA ER
SELECT
ZOOM (página 11)
7
Seleccione el menú ZOOM p ara
aumentar o reducir la imagen.
COLOR (página 11)
8
Seleccione el menú COLOR para
ajustar la temperatura del color
de la imagen. Puede utilizar e st a
función para hacer que los
colores del monitor coincidan
con los de una imagen impresa.
LENGUAJE/INFORMACIÓN
9
(páginas 7, 15)
Seleccione el menú
LENGUAJE/INFORMACIÓN
para seleccionar el idioma de los
menús en pant alla y visua liza r el
cuadro de información sobre este
monitor.
ZOOM
ZOOM
26
EXI T
COLOR
R50
G50
B50
SELECT EXI T
SELECT EXI T
KKK
5000 6500 9300
USER
LENGUAJ E / INFORMAC IÓN
ENGL I SH FRANÇA I S
DEUTSCH I TAL IANO
ESPAÑOL
Utilice el botón de control para seleccionar uno de los siguientes
menús.
SALIDA
1
Seleccione SALIDA para cerrar
el menú.
TAMAÑO H/POSICIÓN
2
(página 10)
Seleccione el menú TAMAÑO
H/POSICIÓN para ajustar el
tamaño y centrado horizontal de
TAMAÑO H / POS I C I ÓN
T AMAÑO H
26
SELECT EXI T
la imagen.
TAMAÑO V/POSICIÓN
3
(página 10)
Seleccione el menú TAMAÑO
V/POSICIÓN para ajustar el
tamaño y centrado vertical de la
TAMAÑO V / POS I C IÓN
T AMAÑO V
26
SELECT EXI T
imagen.
COJÍN/BAL COJÍN
4
(página 10)
Seleccione el menú COJÍN/BAL
COJÍN para ajustar la curvatura
de los lados de la imagen.
COJ ÍN/BAL COJÍN
CO J Í N
26
SELECT EXI T
DESMAGNETIZAR/MUARE
0
(página 12)
Seleccione el menú
DESMAGNETIZAR/MUARE
para desmagnetizar la pantalla y
ajustar el nivel de cancelación de
muaré.
DESMA G NET I ZAR/ MUARE
DESMAGN ET I ZAR
SI
SELECT EXI T
TRAPECIO/PARALELO
5
(página 10)
Seleccione el menú T R APECIO/
PARALELO para ajustar el
ángulo de los lados de la imagen.
ROTACIÓN (página 11)
6
Seleccione el menú ROTACIÓN
para ajustar la rotación de la
imagen.
8
TRAPEC I O / PARALELO
TRAPEC IO
26
SELECT EXI T
ROTAC I ÓN
ROT A C I ÓN
26
EX I T
Page 51
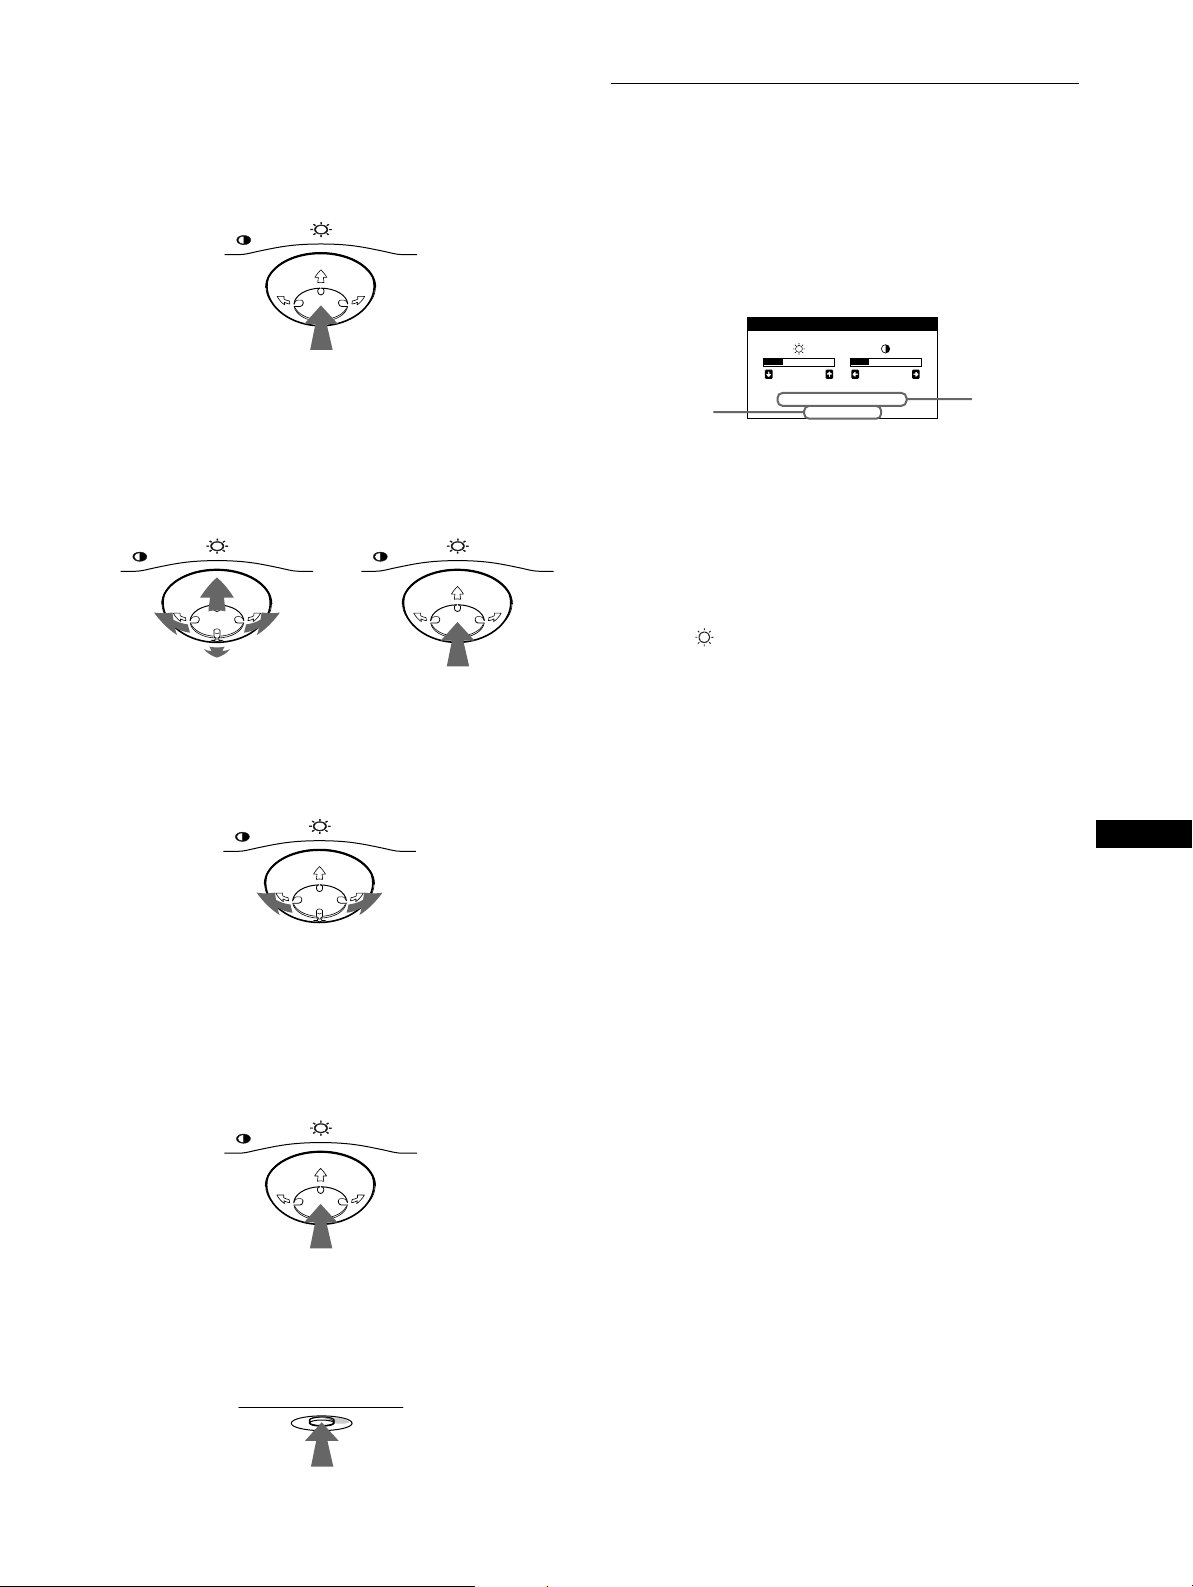
Uso del botón de control
x
1
Muestre el MENÚ principal.
Pulse el centro del botón de control para que aparezca en
pantalla el MENÚ principal.
MENU
Ajuste del brillo y del contraste
Los ajustes de brillo y contraste se realizan mediante un menú de
BRILLO/CONTRASTE independiente.
Estos ajustes se almacenan en la memoria para todas las señales
de entrada.
1
Desplace el botón de control en cualq uier dirección.
El menú de BRILLO/CONTRASTE aparece en pantalla.
BR I LLO /CONTRASTE
2
Seleccione el menú que desee ajustar.
Resalte el menú de se ado desplazando el botón de control
hacia atrás para subir (M), hacia delante para bajar (m), y
hacia la izquierda (<) o la derecha (,) para desplazarse
hacia los lados.
FRONTAL
MENU MENU
POSTERIOR
3
Ajuste el menú.
Desplace el botón de cont rol hacia la izquierda (<) o la
derecha (,) para realizar el ajuste.
MENU
26 26
resolución
de la señal
de entrada
actual
68.7kHz/85.0Hz
1024X768
frecuencias
horizontal y
vertical de la
señal de
entrada actual
Las frecuencias horizontal y vert ical de la señal de entrada
actual aparecen en el menú BRILL O /CONTRASTE. Si la
señal se corres ponde con alguno de los modos pred efinidos de
fábrica de este monitor, tambi én aparecerá la resolución.
2
Desplace el botón de control m/M para ajustar el
brillo ( ), y </, para ajustar el contraste (6).
El menú desaparece automá ticamente transcurridos unos
3 segundos.
ES
4
Cierre el menú.
Pulse el centro del botón de control un a vez para volver al
MENÚ principal, y púlselo de nuevo seleccionando SALIDA
para volver a la visualización normal. Si no pulsa ningún
botón, el menú se cerrará automáticamente transcurridos unos
30 segundos.
MENU
Restauración de los ajustes
x
Pulse el botón RESET. Consulte la página 12 para obtener más
información sobre la restauración de los ajustes.
RESET
9
Page 52
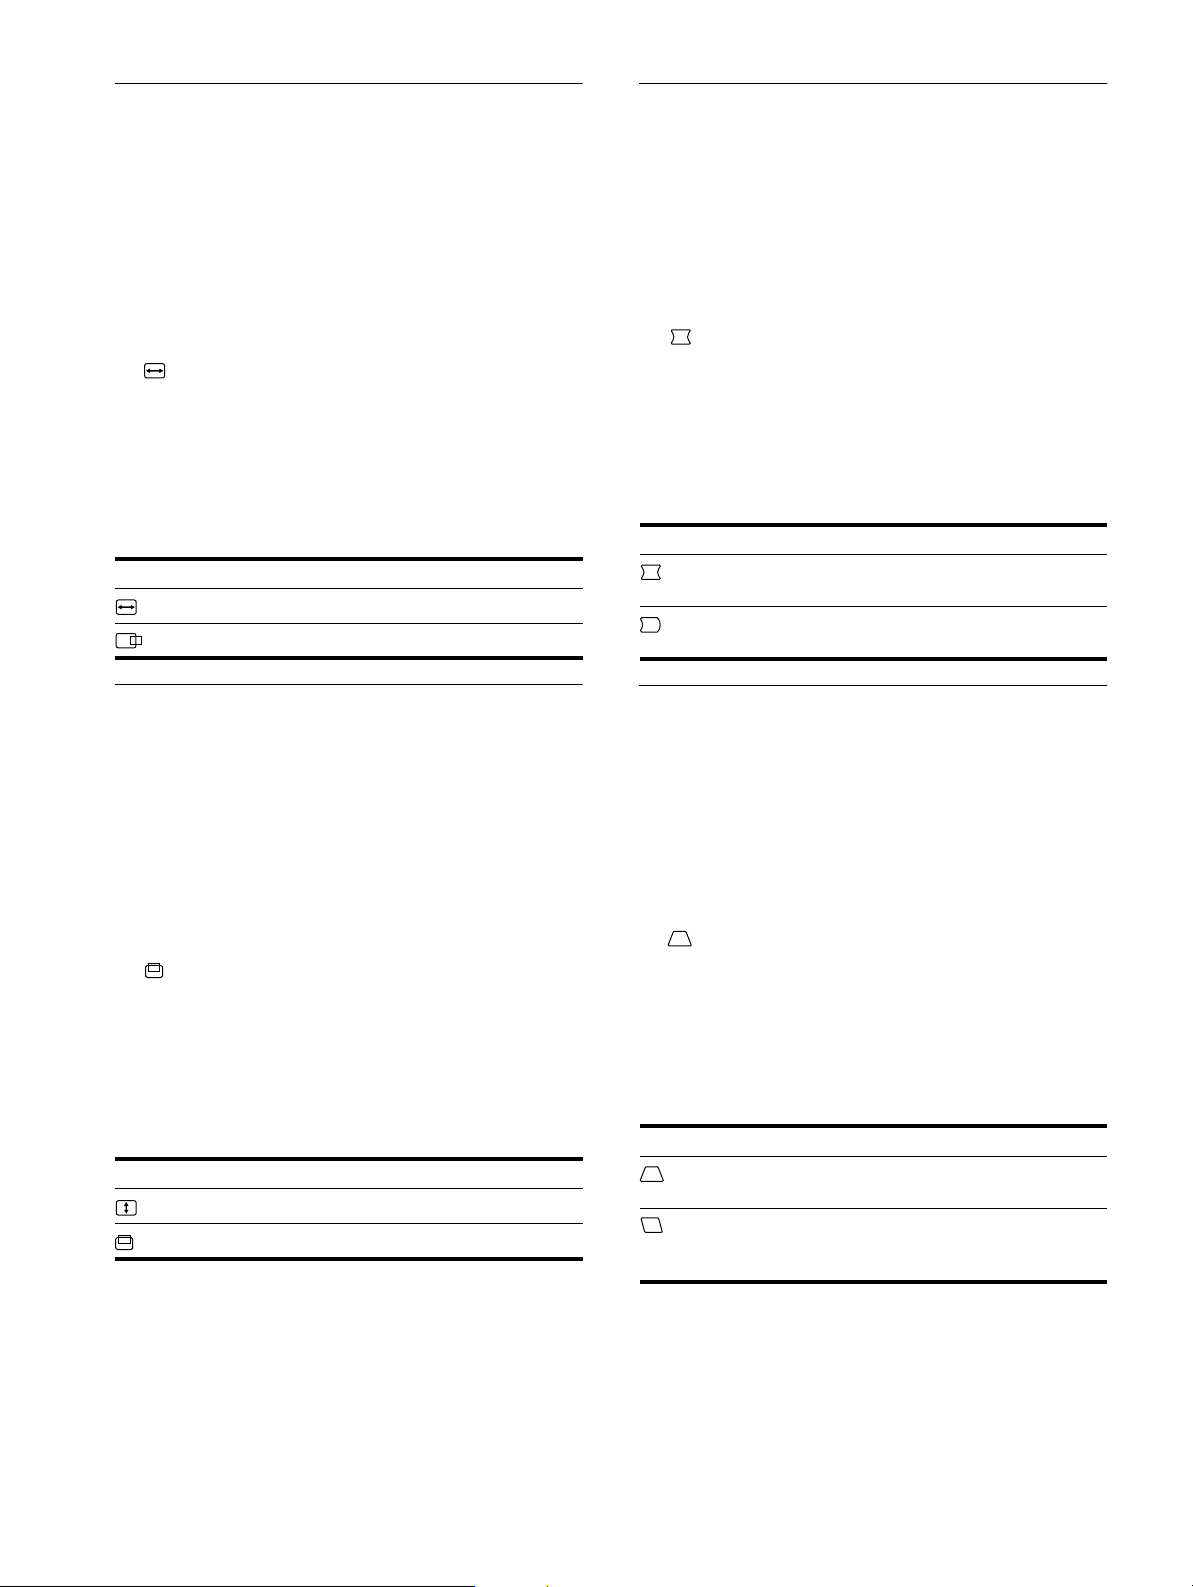
Ajuste del tamaño o centrado
Ajuste de la curvatura de los lados
horizontal de la imagen (TAMAÑO
H/POSICIÓN)
Estos valores se almacenan en memoria para la señal de entrada
actual.
1
Pulse el centro del botón de control.
El MENÚ principal aparece en pantalla.
2
Desplace el botón de control m/M para resaltar
TAMAÑO H/POSICIÓN y pulse de nuevo el
centro del botón de control.
El menú TAMAÑO H/POSICIÓN aparece en pantalla.
3
Primero, desplace el botón de control m/M para
seleccionar la opción de ajuste que desee. A
continuación, desplace el botón </, para realizar
el ajuste.
Seleccione Para
TAM AÑO H
POSICIÓN H
ajustar el tamaño horizontal
ajustar el centrado horizontal
Ajuste del tamaño o centrado
vertical de la imagen (TAMAÑO V/
POSICIÓN)
Estos valores se almacenan en memoria para la señal de entrada
actual.
1
Pulse el centro del botón de control.
El MENÚ principal aparece en pantalla.
2
Desplace el botón de control m/M para resaltar
TAMAÑO V/POSICIÓN y pulse de nu evo el centro
del botón de control.
El menú TAMAÑO V/POSICIÓN aparece en pantalla.
3
Primero, desplace el botón de control m/M para
seleccionar la opción de ajuste que desee. A
continuación, desplace el botón </, para realizar
el ajuste.
Seleccione Para
TAM AÑO V
POSICIÓN V
ajustar el tamaño vertical
ajustar el centrado vertical
de la imagen (COJÍN/BAL COJÍN)
Estos valores se almacenan en memoria para la señal de entrada
actual.
1
Pulse el centro del botón de control.
El MENÚ principal aparece en pantalla.
2
Desplace el botón de control m/M para resaltar
COJÍN/BAL COJÍN y pulse de nuevo el centro del
botón de control.
El menú COJÍN/BAL COJÍN aparece en pantalla.
3
Primero, desplace el botón de control m/M para
seleccionar la opción de ajuste que desee. A
continuación, desplace el botón </, para realizar
el ajuste.
Seleccione Para
COJÍN
BAL COJÍN
expandir o contraer los lados de la
imagen
desplazar los lados de la imagen hacia
la izquierda o la derecha
Ajuste del ángulo de los lados de
la imagen (TRAPECIO/PARALELO)
Estos valores se almacenan en memoria para la señal de entrada
actual.
1
Pulse el centro del botón de control.
El MENÚ principal aparece en pantalla.
2
Desplace el botón de control m/M para resaltar
TRAPECIO/PARALELO y pulse de nuevo el
centro del botón de control.
El menú TRAPECIO/PARALELO aparece en pantalla.
3
Primero, desplace el botón de control m/M para
seleccionar la opción de ajuste que desee. A
continuación, desplace el botón </, para realizar
el ajuste.
Seleccione Para
TRAPECIO
PARALELO
ajustar la anchura de la imagen en la
parte superior de l a pantalla
desplazar la imagen hacia la izquierda
o la derecha en la parte superior de la
pantalla
10
Page 53
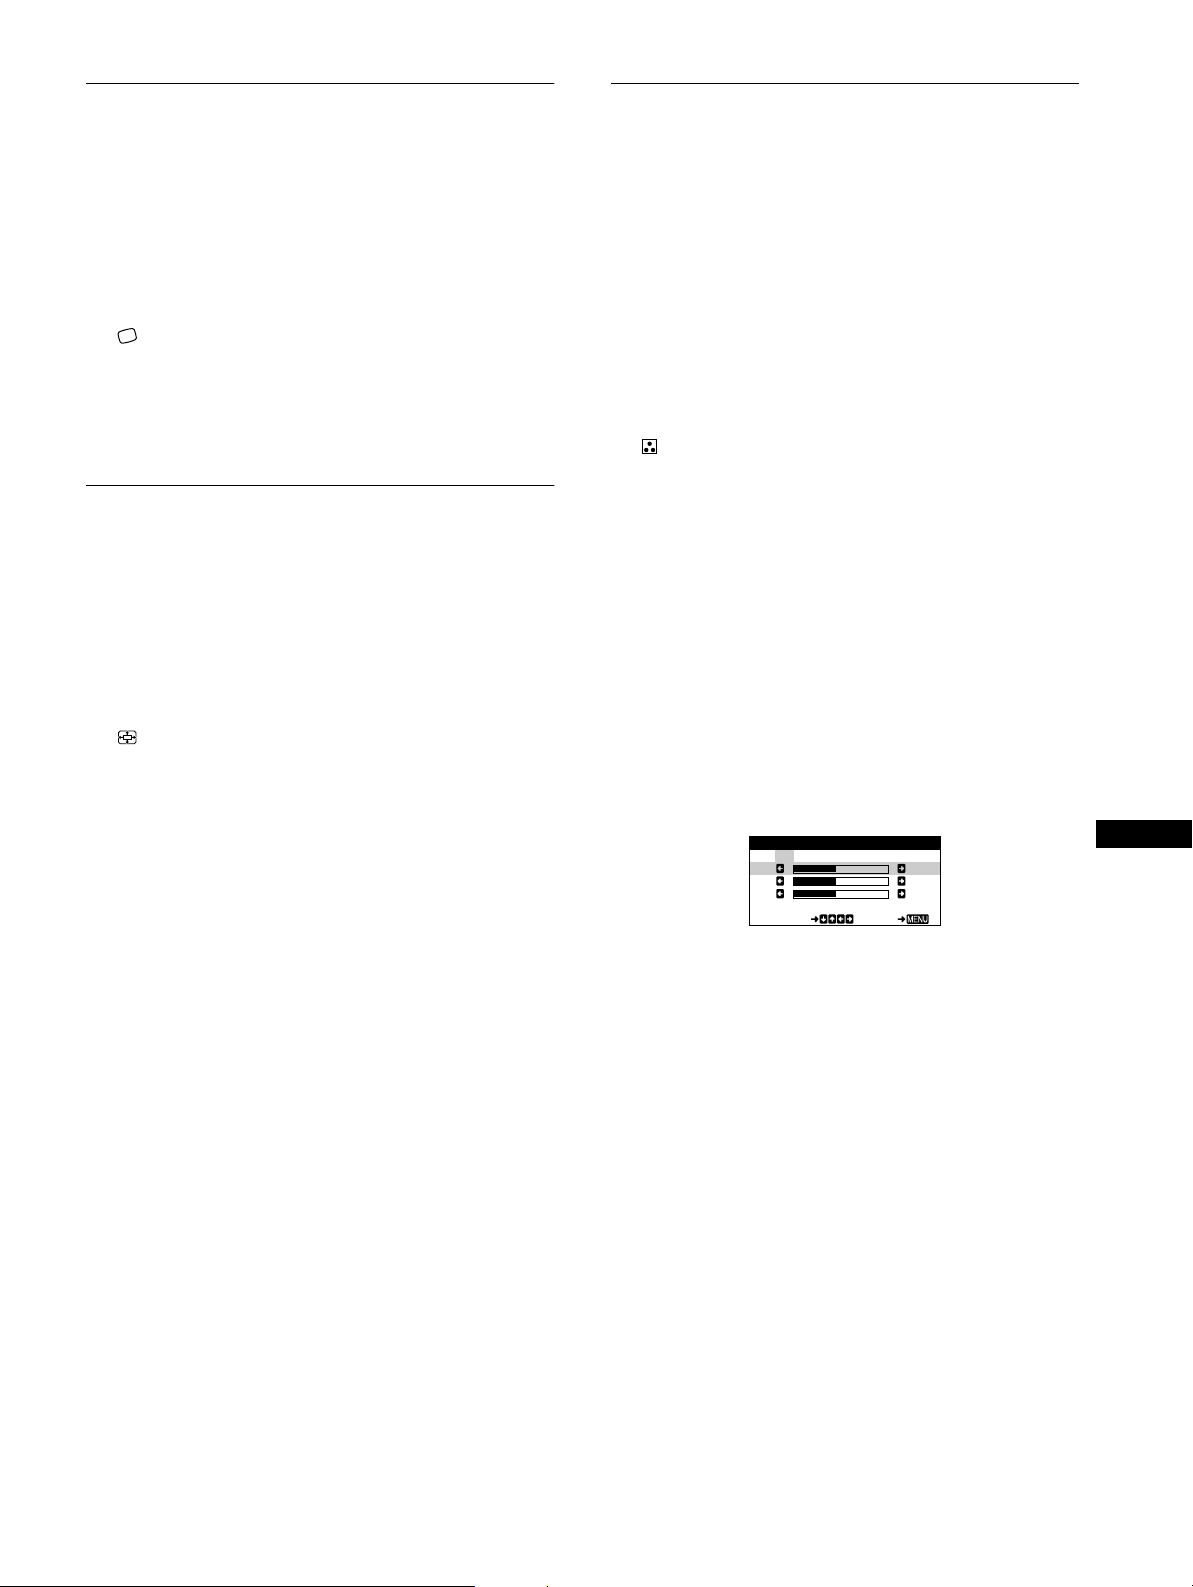
Ajuste de la rotación de la imagen
KKK
R50
G50
B50
SELECT EXI T
COLOR
5000 6500 9300
USER
Ajuste del color de la imagen
(ROTACIÓN)
Este ajuste se almacena en memoria para todas l as señales de
entrada.
1
Pulse el centro del botón de control.
El MENÚ principal aparece en pantalla.
2
Desplace el botón de control m/M para resaltar
ROTACIÓN y pulse de nu evo el ce ntro del botón
de control.
El menú ROTACIÓN aparece en pantal la.
3
Desplace el botón de control </, para girar la
imagen.
Ampliación o reducción de la
imagen (ZOOM)
Este ajuste se almacena en la memoria para la señal de entrada
actual.
1
Pulse el centro del botón de control.
El MENÚ principal aparece en pantalla.
2
Desplace el botón de control m/M para resaltar
ZOOM y pulse de nuevo el centro del botón de
control.
El menú ZOOM aparece en pantalla.
3
Desplace el botón de contro l </, para aumentar o
reducir la imagen.
(COLOR)
Los ajustes de COLOR permiten ajustar la temperatura del color
de la imagen mediante el cambio del nivel de color del campo de
color blan co. Los c olores se mostra rán rojizo s si la te mperat ura es
baja, y azulados si ésta es alta. Este ajuste resulta útil para hacer
coincidir los colores del monitor con los de una imagen impresa.
Este ajuste se almacena en la memoria para todas las señales de
entrada.
1
Pulse el centro del botón de control.
El MENÚ principal aparece en pantalla.
2
Desplace el botón de control m/M para resaltar
COLOR y pulse de nuevo el centro del botón de
control.
El menú COLOR aparece en pantalla.
3
Desplace el botón de control </, para
seleccionar una temperatura del color.
Las temperaturas predefinidas son 5000K, 6500K y 9300K.
Puesto que el valor ajustado en fábrica es de 9300K, la
tonalidad del color blanco cambiará de azulada a rojiza al
disminuir la temperatura hasta 6500K y 5000K.
4
Si fuese necesario, ajuste con precisión la
temperatura del color.
Primero desplace el botón de control </, para seleccionar
USER. Después desplace el botón de control m/M para
seleccionar R (rojo), V (verde) o A (azul), y desplace </,
para realizar el ajuste.
ES
Nota
El ajuste se detiene cuando el tamaño horizontal o el vertical alcanza su
valor máximo o mínimo.
Si sintoniza la temperatu ra con precisión, lo s valores del color
nuevos se almacenan en memoria y se recuperan siempre que
seleccione USER.
11
Page 54
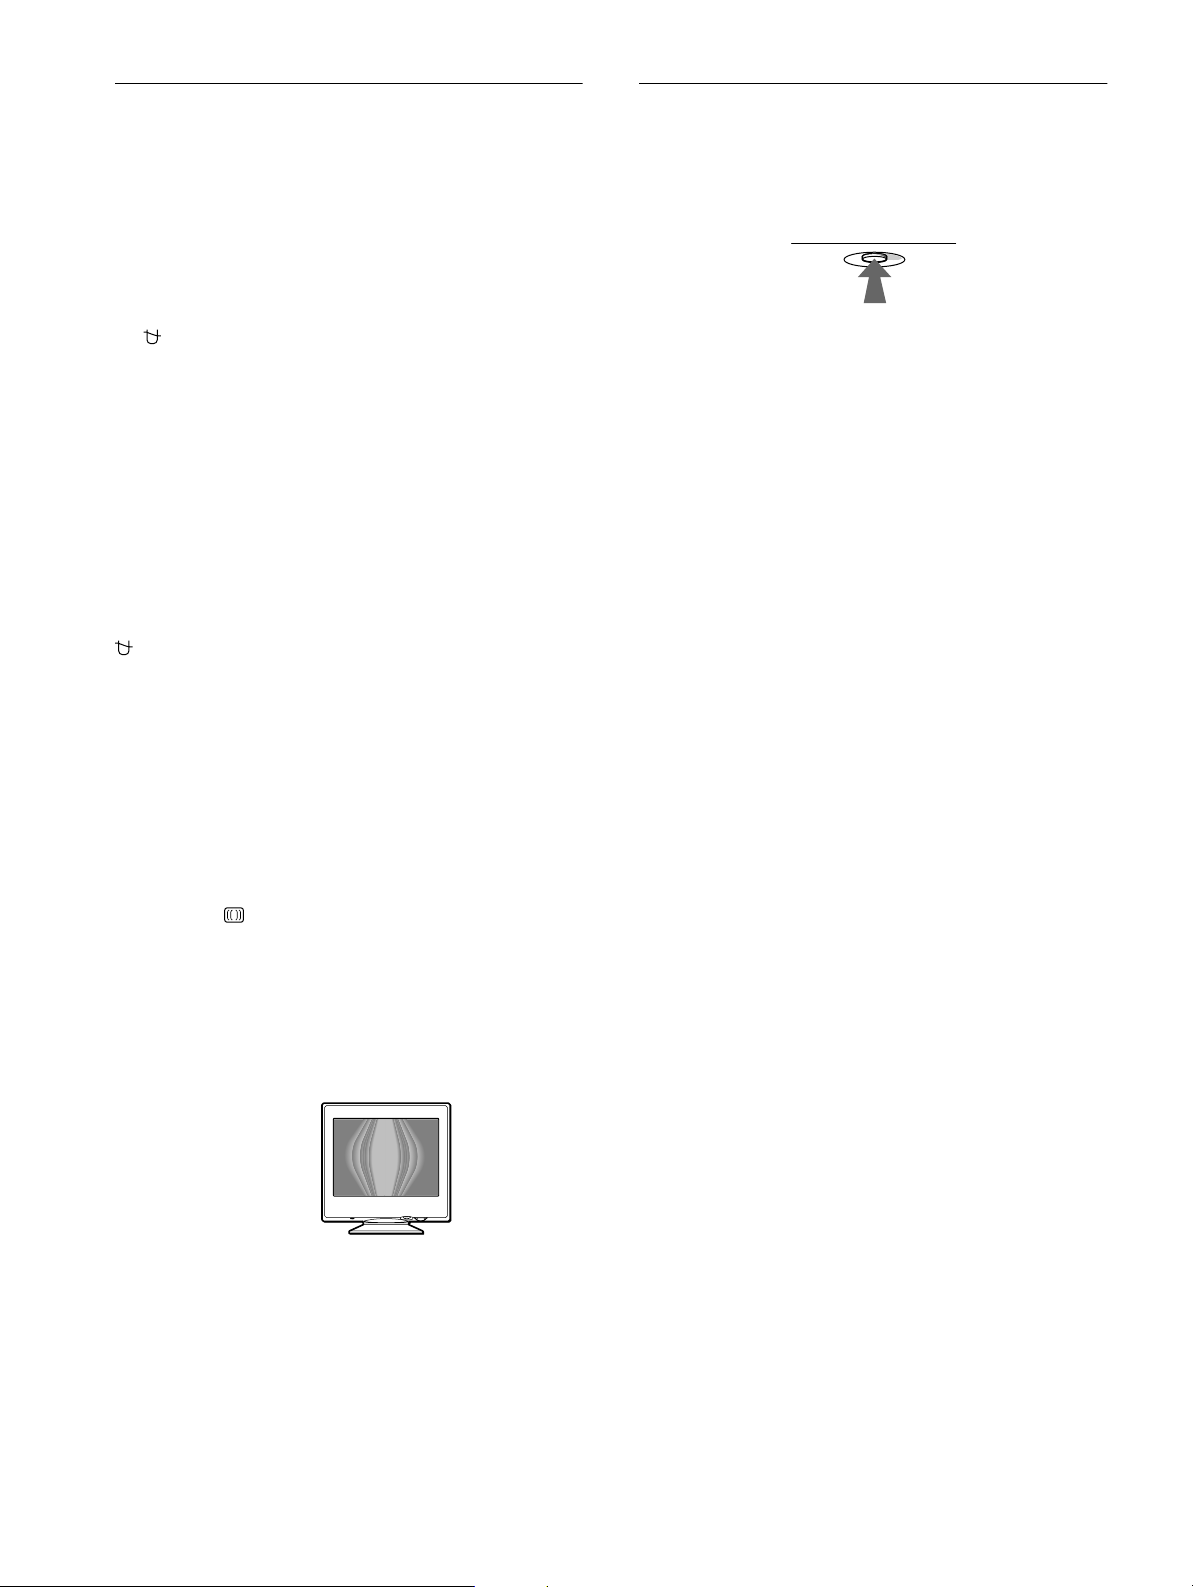
Ajustes complementarios
RESET
Restauración de los ajustes
(DESMAGNETIZAR/MUARE)
Es posible desmagnet izar el monitor manualmente, y ajusta r el
nivel de cancelación de muaré.
1
Pulse el centro del botón de control.
El MENÚ principal aparece en pantalla.
2
Desplace el botón de control m/M para resaltar
DESMAGNETIZAR/MUARE y pulse de nuevo el
centro del botón de control.
El menú DESMAGNETIZAR/MUARE aparece en pantalla.
3
Desplace el botón de control m/M para seleccionar
la opción de ajuste que desee.
Ajuste la opción seleccionada de acuerdo con las siguientes
instrucciones.
Desmagnetización de la pantalla
El monitor se desmagnetiza automáticamente al activar la
alimentación.
Para desmagnetizarlo m anualm ente, p rimero despla ce
el botón de control m/M para seleccionar
(DESMAGNETIZAR). A continuación, desplace el
botón ,.
La pantalla se desmagnet iza durante unos 5 segundos. Si es
preciso aplicar un segu ndo ciclo de desmagneti zación, espere al
menos 20 minutos antes de aplicarlo para obtener los mejores
resultados posibles.
Ajuste del muaré*
Si aparecen patrone s elíp tic o s u on du la do s en pantalla, ajuste el
nivel de cancelación de muaré.
Para ajustar la cantidad de cancelación de muaré,
primero desplace el botón de control m/M para
seleccionar (CANCELAR MUARE). A continuació n,
desplace el botón </, hasta que el efecto de muaré
sea mínimo.
Este monitor dispone de los siguientes métodos de restauración.
Utilice el botón RESET para restaurar los ajustes.
Restauración de una sola opción de ajuste
Emplee el botón de control para seleccionar la opción de ajuste
que desee restaurar, y pulse el botón RESET.
Restauración de todos los datos de ajuste para la
señal de entrada actual
Pulse el botón RE SET cuando la pantalla no muestre ningún
menú.
Tenga en cuenta que las sigu ientes opciones no se restauran
mediante este método:
• idioma de los menús en pantalla (página 7)
• rotación de la imagen (página 11)
Restauración de todos los datos de ajuste para
todas las señales de entrada
Pulse y mantenga pulsado el botón RESET durante más de dos
segundos.
Tenga en cuenta que la siguiente opción no se restaura mediante
este método:
• ajustes de usuario del menú de color (página 11)
* El m u a r é es un ti po de interferenci a natural que produce líneas suaves
y onduladas en la pantalla. Puede aparecer debido a la interferencia
entre el patrón de la ima gen en pantalla y el de paso de fósfo ro del
monitor.
Ejemplo de muaré
12
Page 55
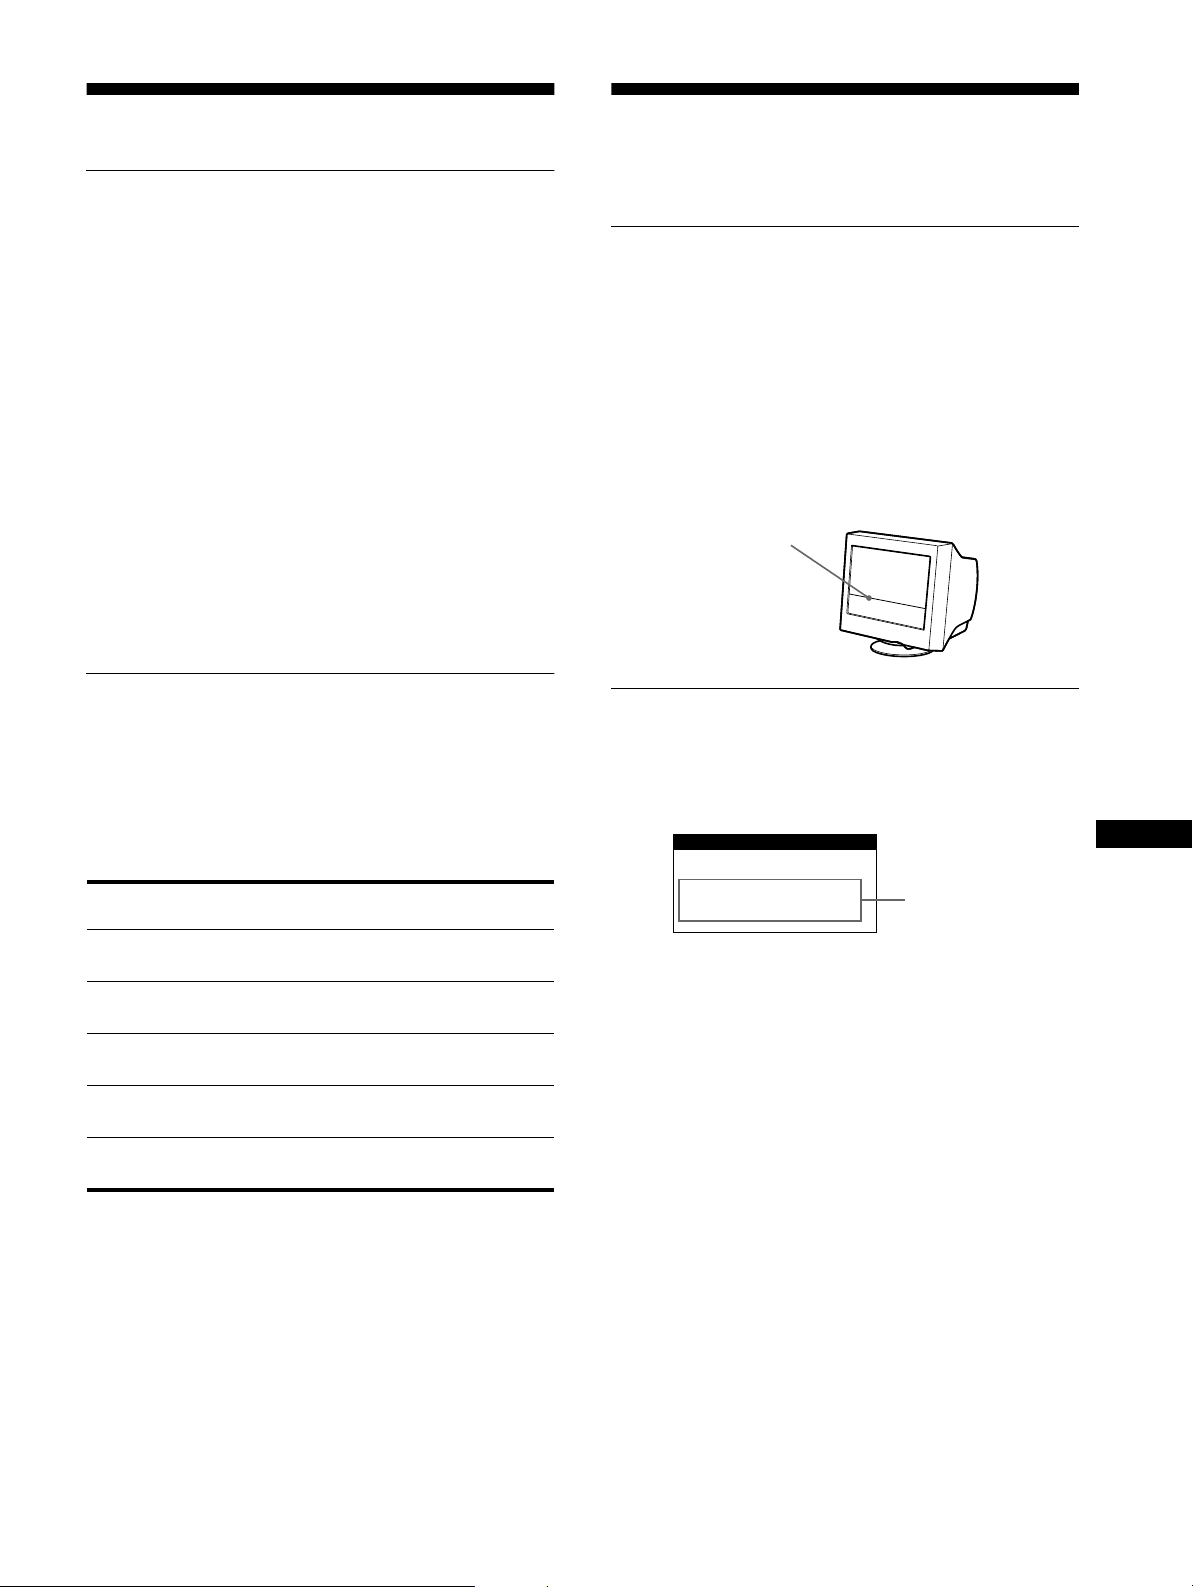
Características técnicas
INFORMACION
FUERA DEL
RANGO DE AJUSTE
Modos predefinidos y de usuario
Solución de problemas
Antes de ponerse en contact o con personal de servicio técnico ,
consulte esta sección.
Cuando el monitor recibe una se ñal de entrada, hace coincidir
automáticamente dicha señal con uno de los modos predefinidos
en fábrica almacenados en la memoria para mostrar imágenes de
alta calidad en el centro de la pantalla. (Consulte Appendix para
comprobar la lista de los modos predefinidos en fábrica.) Con
respecto a las señales de entrad a que no se correspondan con
ninguno de los modos predefin idos de fábrica, la tecnología
digital Multiscan de este monitor garantiza la presentación en
pantalla de imágenes nítida s para cualquier sincroni zación dentro
del margen de frec uencias del monitor (horizontal: 30 – 70 kHz,
vertical: 48 – 120 Hz). Si la imagen se ajusta, los datos de ajuste
se almacenan como modo de usuari o y se recuperan
automáticamente al recibirse la misma señal de entrada
.
Nota para los usuarios de Windows
Consulte el manual de la tarjeta de vídeo o el programa de
utilidades suministrado con la tarjeta gráfica, y seleccione la
frecuencia de barrido más alta disponible para maximizar el
rendimiento del monitor.
Función de ahorro de energía
Este monitor cumple las directrices de ahorro de energía
establecidas por VESA,
monitor se conecta a un ordenador o tarjet a gráfica de vídeo
conforme con DPMS (Di s play Power Manageme nt Signaling),
dicho monit or reducirá aut omáticame nt e el co ns umo de energí a
en tres etap a s como se muestra a continu a ción.
E
NERGY STAR y NUTEK. Si el
Si aparece una línea fina en
pantalla (hilo de amortiguación)
La línea que se aprecia en el pantalla es normal en el monitor
Trinitron y no indica que exista un fallo de funcionamiento. Se
trata de la sombra del hilo de amortiguación utilizado para
estabilizar la rejilla de apertura y se aprecia en mayor medida
cuando el fondo de la pantalla es luminoso (normalmente blanco).
La rejilla de apertura es el elem ento esencial p or el que el tubo de
imagen Trinitron es único, permitien do que la pantalla reciba más
iluminación, por lo que las imágenes aparecen con más brillo y
más detalle.
Hilo de amortiguación
Mensajes en pantalla
Si la señal de entrada presenta algún problema, la pantalla
mostrará uno de los siguientes mensajes. Para solucionar el
problema, consulte “Problemas y soluciones” en la página 14.
ES
Modo de
alimentación
funcionamiento
normal
1 espera ≤ 15 W alternación entre
2 reposo
(sleep)*
3 activo inactivo**
(deep sleep)*
alimentación
desactivada
* “Sleep” y “deep sleep” son modos de ahorro de energía definidos por
la Agencia de protecc ión del medio ambie nt e (Environmental
Protection Agency).
** Cuand o el ordenador entra en el modo “activo-inactivo”, la señal de
entrada se interrumpe y la pantalla muestra NO SEÑAL DE
ENTRADA. Transcurridos 20 segundos, el monitor entra en el modo
de ahorro de energía.
Consumo de
energía
≤ 95 W verde
≤ 15 W alternación entre
≤ 5 W naranja
0 W apagado
Indicador 1
(alimentación)
verde y naranja
verde y naranja
Condición de
la señal de
entrada
Condición de la señal de entrada
FUERA DEL RANGO DE AJUSTE
indica que las especificacio nes del monito r no admiten la señal de
entrada.
NO SEÑAL DE ENTRADA
indica que el monitor no recibe ninguna señal.
13
Page 56

Problemas y soluciones
Si el problema lo causa el ordenador conectado u otro equipo, consulte el manual de instrucciones del equipo conectado .
Utilice la función de autodiagnóstico (página 16) si las siguientes recomendaciones no ayudan a solucionar el problema.
Problema Compruebe lo siguiente
Ausencia de imagen
Si el indicador 1 (alimenta c ión ) no
está iluminado
Si el mensaje NO SEÑAL DE
ENTRADA aparece en pantalla, o si
el indicador 1 (alimentación) se
iluminado en naranja o alterna entre
verde y naranja
Si el mensaje FUERA DEL RANGO
DE AJUSTE aparece en pantalla
Si no aparece ningún mensaje y el
indicador 1 (alimentación) se
ilumina en verde o parpadea en
naranja
Si utiliza Windows 95/98 • Si ha sustituido un monitor antiguo por este, vuelva a conectar el antiguo y realice lo
Si utiliza un sistema Macintosh • Com pruebe que el adaptador Macinto s h (no suministrado) y el cable de señales de vídeo
La imagen parpadea, se ondula,
oscila o aparece codificada
La imagen aparece borrosa
• Compruebe que el cable de aliment ación esté correctamente conectado.
• Compruebe que el interruptor 1 (aliment ación) esté en la posición de “activado”.
• Aseg úrese de que el cable de señal de vídeo esté correctamente conectado y de que todos
los enchufes estén firmemente insertados en sus tomas (página 6).
• Compruebe que los termi nales del conector de entrada de vídeo HD15 no estén doblados
ni arrancados.
Problemas causados por el ordenador u otro equipo conectado
x
• El ordenador se encuentra en el modo de ahorro de energía. Pulse cualqu ier tecla del
teclado del ordenador.
• Compruebe que la alimentación del ordenador esté activada.
• Compruebe que la tarjeta gráfica esté completamente insertada en la ranura bu s adecuada.
Problemas causados por el ordenador u otro equipo conectado
x
• Compruebe que el margen de frecuencia de vídeo se encuentre dentr o del especificado
para el monitor. Si ha sustitu ido un monitor antiguo por es te, vu e lva a co nec ta r el anti gu o
y ajuste el margen de frecuencia de acuerdo con lo siguiente.
Horizontal: 30 – 70 kHz
Vertical: 48 – 120 Hz
• Utilice la función de autodiagnóstico (página 16).
siguiente. Instale el disquete Windows Monitor Information Disk (página 7) y seleccione
este monitor (“CPD-E100E”) entre los monitores de Sony en la pantalla de selección de
éstos de Windows 95/98.
estén correctamente conectados (página 6).
• Aísle y elimine las fuentes potenciales de campos eléctricos o magnéticos, como otros
monitores, impresoras láser, ventiladores eléctricos, lámparas fluorescentes o televisores.
• Aleje el monitor de líneas eléctricas o instale una protección magnética cerca del monitor.
• E nchufe el monitor en una toma de CA diferente, preferiblemente de otro circuito.
• Gire el monitor 90° hacia la izqu ierda o la derecha.
Problemas causados por el ordenador u otro equipo conectado
x
• Consulte el manual de la tarjeta gráfica para obtener información sobre el ajuste adecuado
al monitor.
• Confirme que este monitor admite el modo gráfico (VESA, Macintosh 16" Color, etc.) y
la frecuencia de la señal de entrada (Appendix). Aunque la frecuencia se encuentre dentro
del margen adecuado, ciertas t arjetas de vídeo pueden presentar un impulso de
sincronización demasiado estrecho para que el monitor se sincronice correctamente.
• Ajuste la frecuencia de barrido del ordenador (frecuencia vertical) para que la imagen
presente la mejor calidad posible.
• Ajuste el brillo y el contraste (página 9).
• Desmagnetice el monitor* (p ágina 12).
• Seleccione CANCELAR MUARE y ajuste el efecto de cancelación de muaré (página 12).
14
Page 57
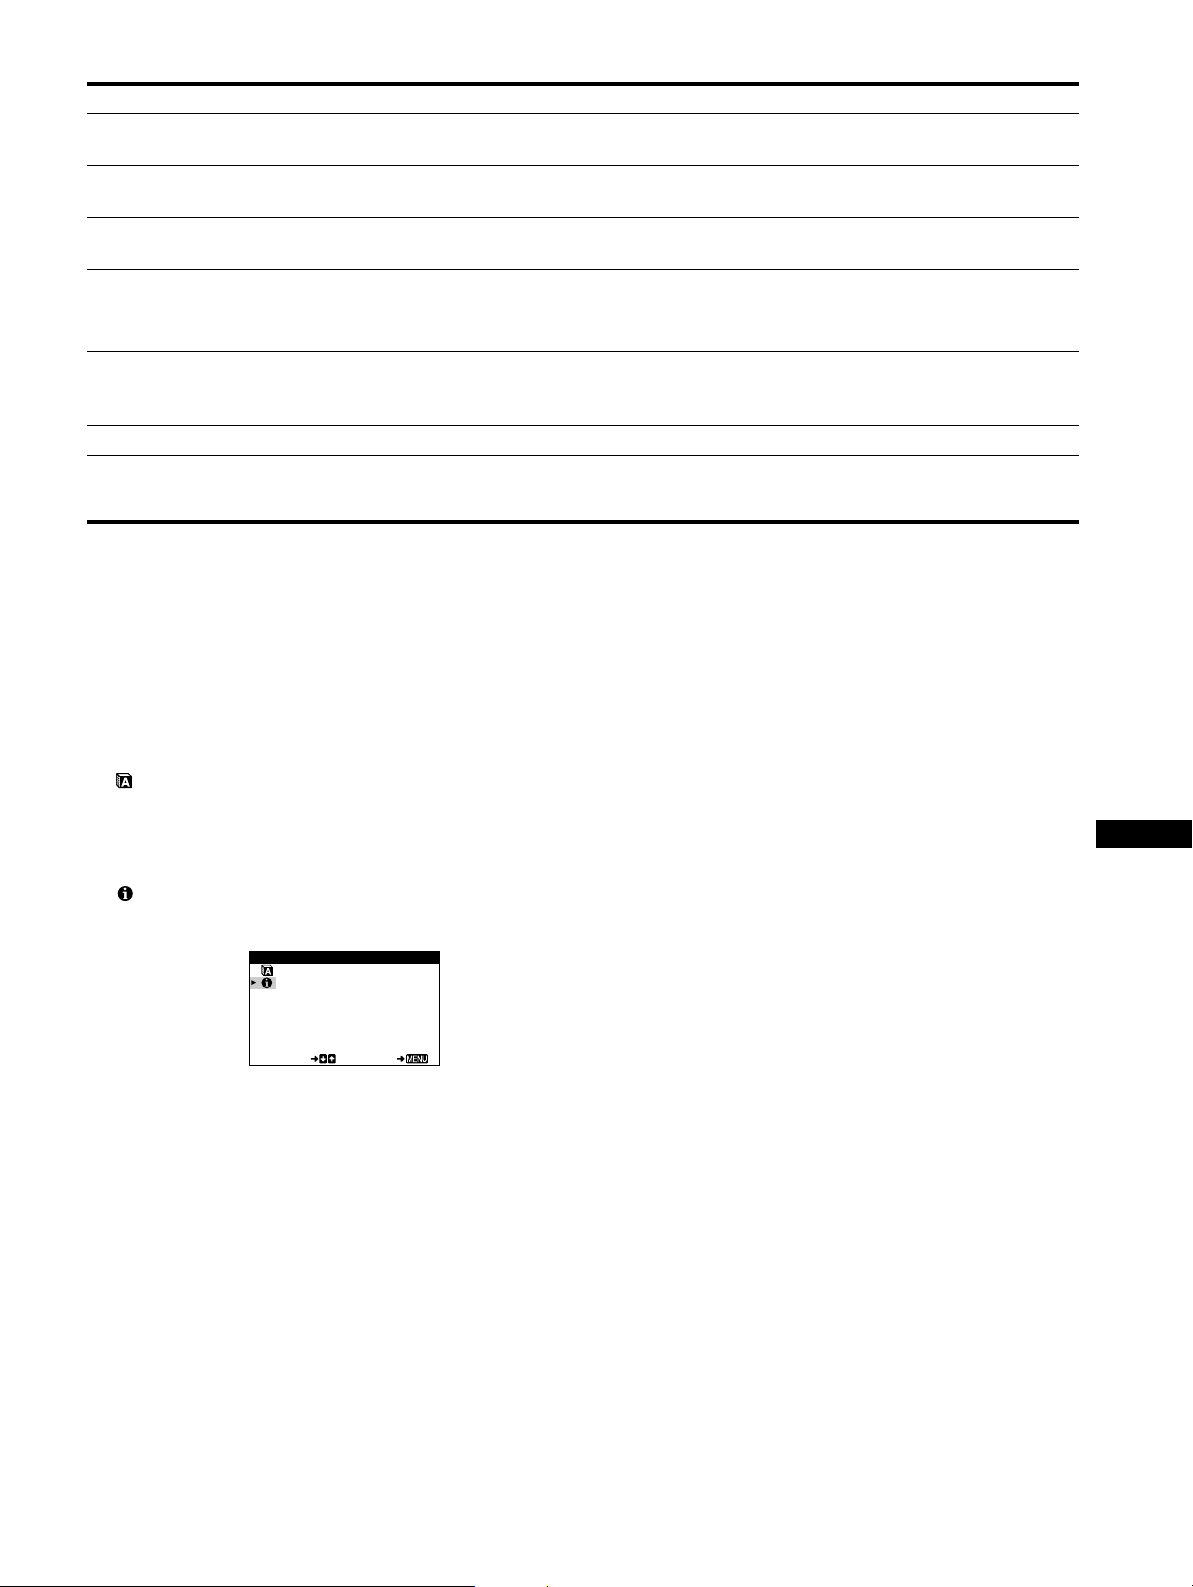
Problema Compruebe lo siguiente
Aparecen imágenes fantasma
• No utilice cables prolongadores de vídeo ni dispositivos de conmutación de vídeo.
• Compruebe que todos los enchufes estén firmemente insertado en sus toma s.
La imagen aparece descentrada o
con un tamaño incorrecto
Los bordes de la ima gen apare cen
curvos
Se aprecian patrone s ondulados o
• Ajust e el tamaño o el centrado (página 10). Ten ga en cuenta que ciertos modos de víd eo
no llenan la pantalla hasta los bordes .
• Selecci one COJÍN/BAL COJÍN, TRAPECIO/PARALELO o ROTACIÓN, y ajuste la
forma y la rotación de la imagen (páginas 10, 11).
• Seleccione CANCELAR MUARE y ajuste el efecto de cancelación de muaré (página 12).
elípticos (muaré)
Problemas causados por el ordenador u otro equipo conectado
x
• Cambie el patrón de escritorio.
El color no es uniforme
• Desmagnetice el monitor* (página 12). Si coloca equipos que generen campos
magnéticos, como altavoces, cerca del monitor, o si cambia la orientación del monitor, el
color puede perder uniformidad.
El blanco no parece blanco
Se oye un zumbido
inmediatamente después de
activar la alimentación
* Si es necesario aplicar un segundo ciclo de desmagnetización, deje que transcurran al menos 20 minutos antes de volver a aplicarlo para obtener el mejor
resultado posible. Es po sibl e que se oiga un zumbido, per o no es un fallo de funcionamient o.
• Ajuste la temperatura del color (página11).
• Se trata del sonido producido por el ciclo de desmagnetización automática. Al activar la
alimentación, el monitor se desmagnetiza automáticamente durante cinco segundos.
Visualización del nombre, número de serie y
fecha de fabricación de este monitor
(INFORMACIÓN)
1
Pulse el centro del botón de control.
El MENÚ principal aparece en pantalla.
2
Desplace el botón de control m/M para resaltar
LENGUAJE/INFORMACIÓN y pulse de nuevo el
centro del botón de control.
El menú LENGUAJE/INFORMACIÓN aparece en pantalla.
3
Desplace el botón de control m/M para seleccionar
(INFORMACIÓN).
Aparece en pantalla el cuadro de información de este monitor.
Ejemplo
LENGUAJ E / I NFORMAC I ÓN
MODE L : CPD - E100 E
SERI AL: 12345678
MANUF ACTURED: 1 9 99 - 5 2
SELECT EXI T
Si el problema persiste, póngase en contacto con un proveedor
Sony autorizado y proporciónele la siguiente información.
• Nombre del modelo: CPD-E100E
• Número de serie
• Nombre y especifi cacion es del or denado r y de l a tarjet a gráf ica.
ES
15
Page 58
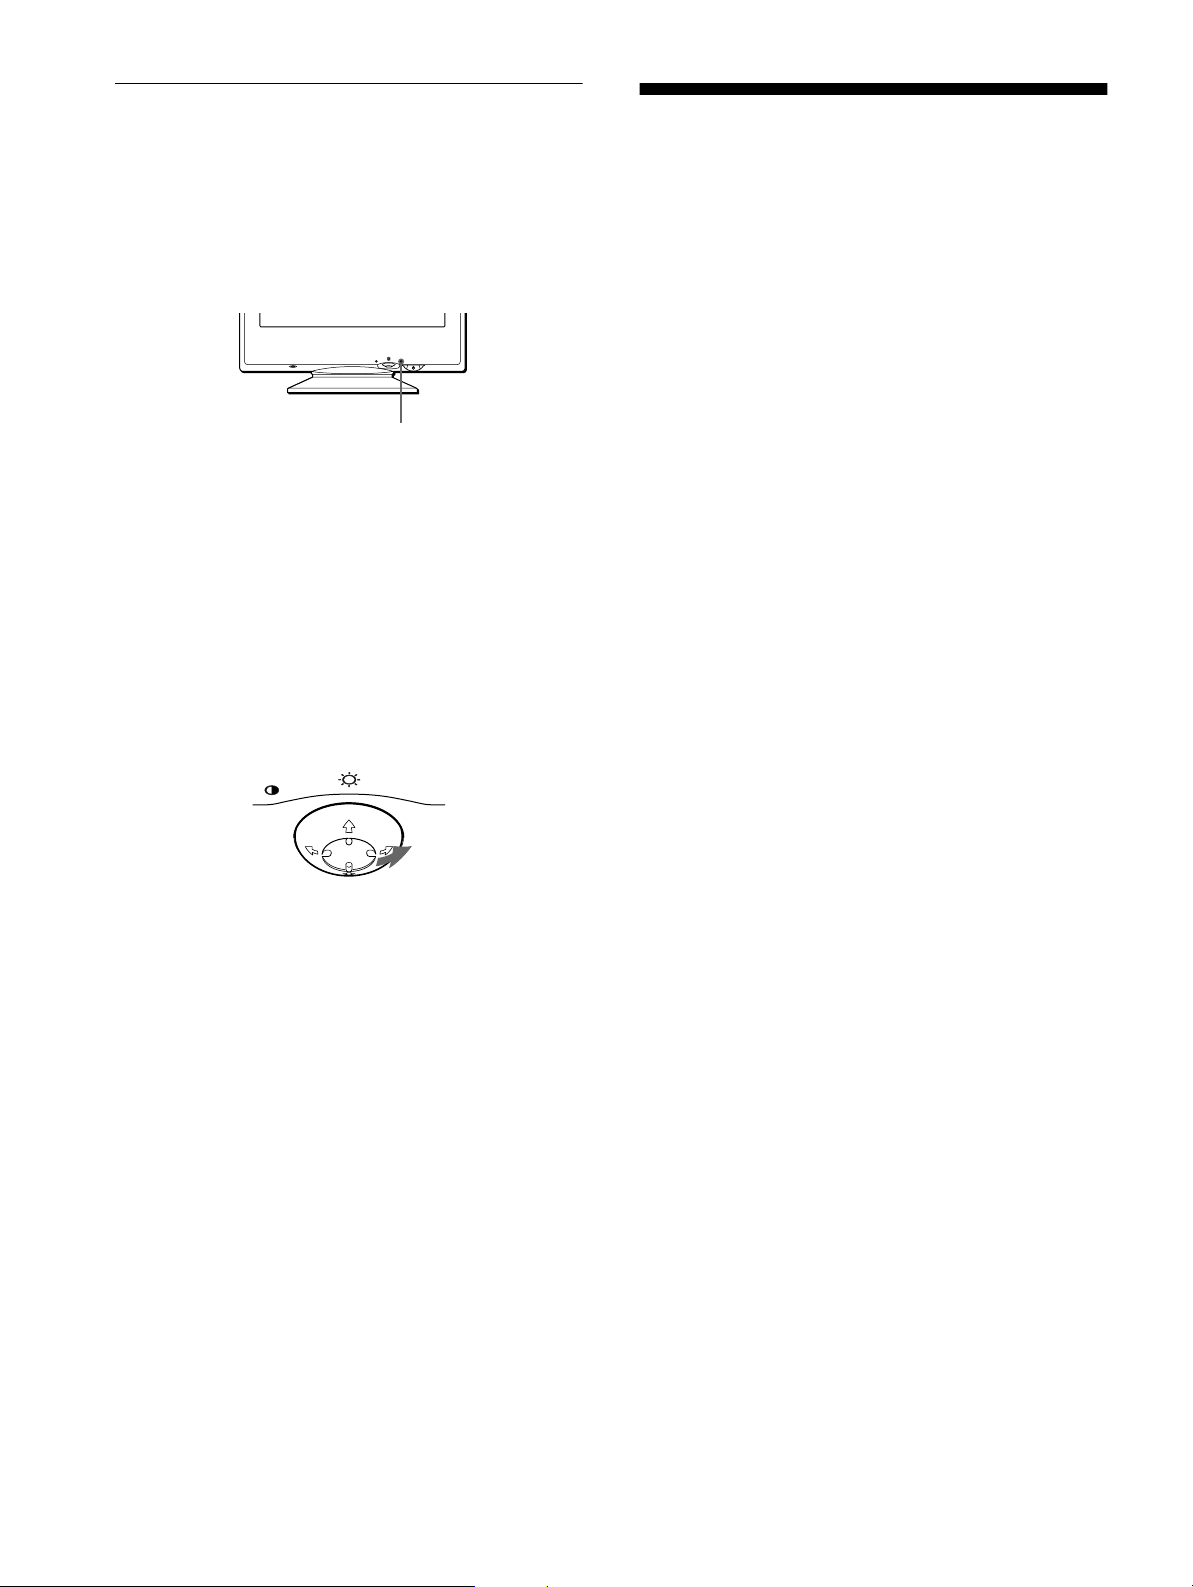
Función de autodiagnóstico
Este monitor dispone de una fu nción de autodiag nóstico. Si existe
algún problema con el monitor o con el ordenador, la pantalla se
mostrará en blanco y el indicador 1 (alimentación) se iluminará
en verde o parpadeará en naranja. Si el indicador
1 (alimentación) está iluminado en naranja, significa que el
ordenador se encuentra en el modo de ahorro de energía. Pulse
cualquier tecla del teclad o.
RESET
Si el indicador 1 (alimentación) está iluminado en
verde
1
Desconecte el cable de entrada de vídeo o apague
el ordenador conectado.
2
Pulse el botón 1 (alimentación) dos veces para
apagar el monitor y, a continuación, encenderlo.
3
Mantenga desplazado el botón de control ,
durante 2 segundos antes de que el monitor entre
en el modo de ahorro de energía.
MENU
Indicador 1 (alimentación)
MENU
Especificaciones
TRC Paso de la rejilla de apertura de
0,24 mm (central)
15 pulgadas, medida diagonal
90 grados de deflexión
Tamaño de imagen vis ualizable
Aprox. 285 × 214 mm (an /al)
Imagen de visualización de 14,0"
Resolución
Máxima Horizontal: 1280 puntos
Vertical: 1024 líneas
Recomendada Horizon tal: 800 punto s
Vertical: 600 líneas
Área de imagen estándar Aprox. 270 × 202 mm ( a n/al)
Frecuencia de deflexión* Horizontal: 30 a 70 kHz
Vertical: 48 a 120 Hz
Corriente/tensión de entrada de CA
100 a 240 V, 50 – 60 Hz,
1,2 – 0,6 A
Consumo de energí a Máx. 95 W
Dimensiones Aprox. 356 × 378 × 388 mm
(an/al/prf)
Peso Aprox. 14 kg
Plug and Play DDC1/DDC2B
Accesorios suministrados Consulte la página 6
* Condición d e sinc roni zaci ón ho rizon tal y vertic al re come ndada
• La anchura de sincronización horizontal debe ser superi or a
1,0 µseg.
• La an chura de supresión horizontal debe ser superior a
3,6 µseg.
• La anchura de supresión vertical debe ser superior a
500 µseg.
Si aparecen las cuatro barras de color (bl anco, rojo, verde, azul),
significa que el monitor funciona correctamente. Vuelva a
conectar el cable de entrada de vídeo y compruebe el est ado del
ordenador.
Si las barras de color no aparecen, sig ni fica que hay un fallo
potencial del monitor. Info rme al prov e ed or Sony au to rizad o del
estado del monitor.
Si el indicador 1 (alimentación) parpadea en
naranja
Pulse el botón 1 (alimentación) dos ve ces para apagar
el monitor y, a continuación, encenderlo.
Si el indicador 1 (alimentación) se ilumina en verde, significa
que el monitor funciona correctamente.
Si el indicador 1 (alimentación) sigue parpadeando, significa que
hay un fallo potencial del monitor. Cuente el número de segundos
entre los parpadeos en naranj a del indicador 1 (alimentación) e
informe al proveedor Sony autorizado sobre el estado del monitor.
Asegúrese de anotar el nombre del modelo y el número de serie
de dicho monitor. Tome nota también del fabricante y del modelo
del ordenador y de la tarjeta de vídeo.
Diseño y especificaciones sujetos a cambios sin previo avi so.
16
Page 59
Indice
Precauzioni. . . . . . . . . . . . . . . . . . . . . . . . . . . . . . . . . . . . . . . . . . . . 4
Identificazione dei componenti e dei comandi . . . . . . . . . . . . . . . . . 5
Installazione . . . . . . . . . . . . . . . . . . . . . . . . . . . . . . . . . . . .6
Punto 1:
Punto 2:
Punto 3:
Collegamento del monitor al computer . . . . . . . . . . . . . . . 6
Collegamento del cavo di alimentazione. . . . . . . . . . . . . . 6
Accensione del monitor e del computer . . . . . . . . . . . . . . 7
Selezione della lingua dei menu a schermo
(LINGUA/INFORMAZIONE) . . . . . . . . . . . . . . . . . . . . . . . . . . . . . . . 7
Personalizzazione del monitor . . . . . . . . . . . . . . . . . . . . .8
Come spostarsi all’interno del menu. . . . . . . . . . . . . . . . . . . . . . . . . 8
Regolazione della luminosità e del contrasto . . . . . . . . . . . . . . . . . . 9
Regolazione della dim ens i one oriz zo nta le o dell a centrat u ra
dell’immagine (DIM.ORIZ/POSIZIONE) . . . . . . . . . . . . . . . . . . . . . 10
Regolazione della dim ens i one ve rti cale o della centratura
dell’immagine (DIM.VERT/POSIZIONE). . . . . . . . . . . . . . . . . . . . . 10
Regolazione della curvatura dell’immagine ai lati
(CUSCINO/PIN BALANCE) . . . . . . . . . . . . . . . . . . . . . . . . . . . . . . 10
Regolazione dell’angolo dei lati dell’immagine
(TRAPEZIO/PARALL). . . . . . . . . . . . . . . . . . . . . . . . . . . . . . . . . . . 10
Regolazione della rotazione dell’immagine (ROTAZIONE) . . . . . . 11
Ingrandimento o riduzione dell’immagine (ZOOM). . . . . . . . . . . . . 11
Regolazione del colore dell’immagine (COLORE) . . . . . . . . . . . . . 11
Impostazioni aggiuntive (SMAGNETIZ/MOIRE). . . . . . . . . . . . . . . 12
Ripristino delle regolazioni . . . . . . . . . . . . . . . . . . . . . . . . . . . . . . . 12
IT
• Trinitron è un marchio di fabbrica
registrato di Sony Corporation.
• Macintosh è un marchio di fabbrica
concesso in licenza a Ap p le Computer,
Inc., registrato negli U.S.A. e in altri
paesi.
• Windows
fabbrica registrati di Microsoft
Corporation negli U.S.A. e in altri paesi.
• IBM PC/AT e VGA sono marchi di
fabbrica registrati di IBM Corporation
degli U.S.A.
• VESA e DDC
di Video Electronics Standard
Association.
•
E
fabbrica registrato negli U.S.A.
• Tutti i nomi degli altri prodotti citati in
questo manu al e potrebbero es s ere
marchi di fabbrica o marchi di fabbrica
registrati delle rispettive compagnie.
• Inoltre, “” e “” non sempre vengono
riportati nel manuale.
e MS-DOS sono marchi di
sono marchi di fabbrica
NERGY STAR è un marchio di
Caratteristiche . . . . . . . . . . . . . . . . . . . . . . . . . . . . . . . . .13
Modo preimpostato e modo utente. . . . . . . . . . . . . . . . . . . . . . . . . 13
Funzione di risparmio energetico . . . . . . . . . . . . . . . . . . . . . . . . . . 13
Guida alla soluzione dei problemi . . . . . . . . . . . . . . . . .13
Se sullo schermo appare una linea sottile
(cavo di smorzamento) . . . . . . . . . . . . . . . . . . . . . . . . . . . . . . . . . . 13
Messaggi a schermo. . . . . . . . . . . . . . . . . . . . . . . . . . . . . . . . . . . . 13
Sintomi e soluzioni dei problemi . . . . . . . . . . . . . . . . . . . . . . . . . . . 14
Funzione di autodiagnostica. . . . . . . . . . . . . . . . . . . . . . . . . . . . . . 16
Caratteristiche tecniche . . . . . . . . . . . . . . . . . . . . . . . . .16
Appendix. . . . . . . . . . . . . . . . . . . . . . . . . . . . . . . . . . . . . . . i
Preset mode timing table . . . . . . . . . . . . . . . . . . . . . . . . . . . . . . . . . .i
TCO’99 Eco-document . . . . . . . . . . . . . . . . . . . . . . . . . . . . . . . . . . . .i
3
Page 60
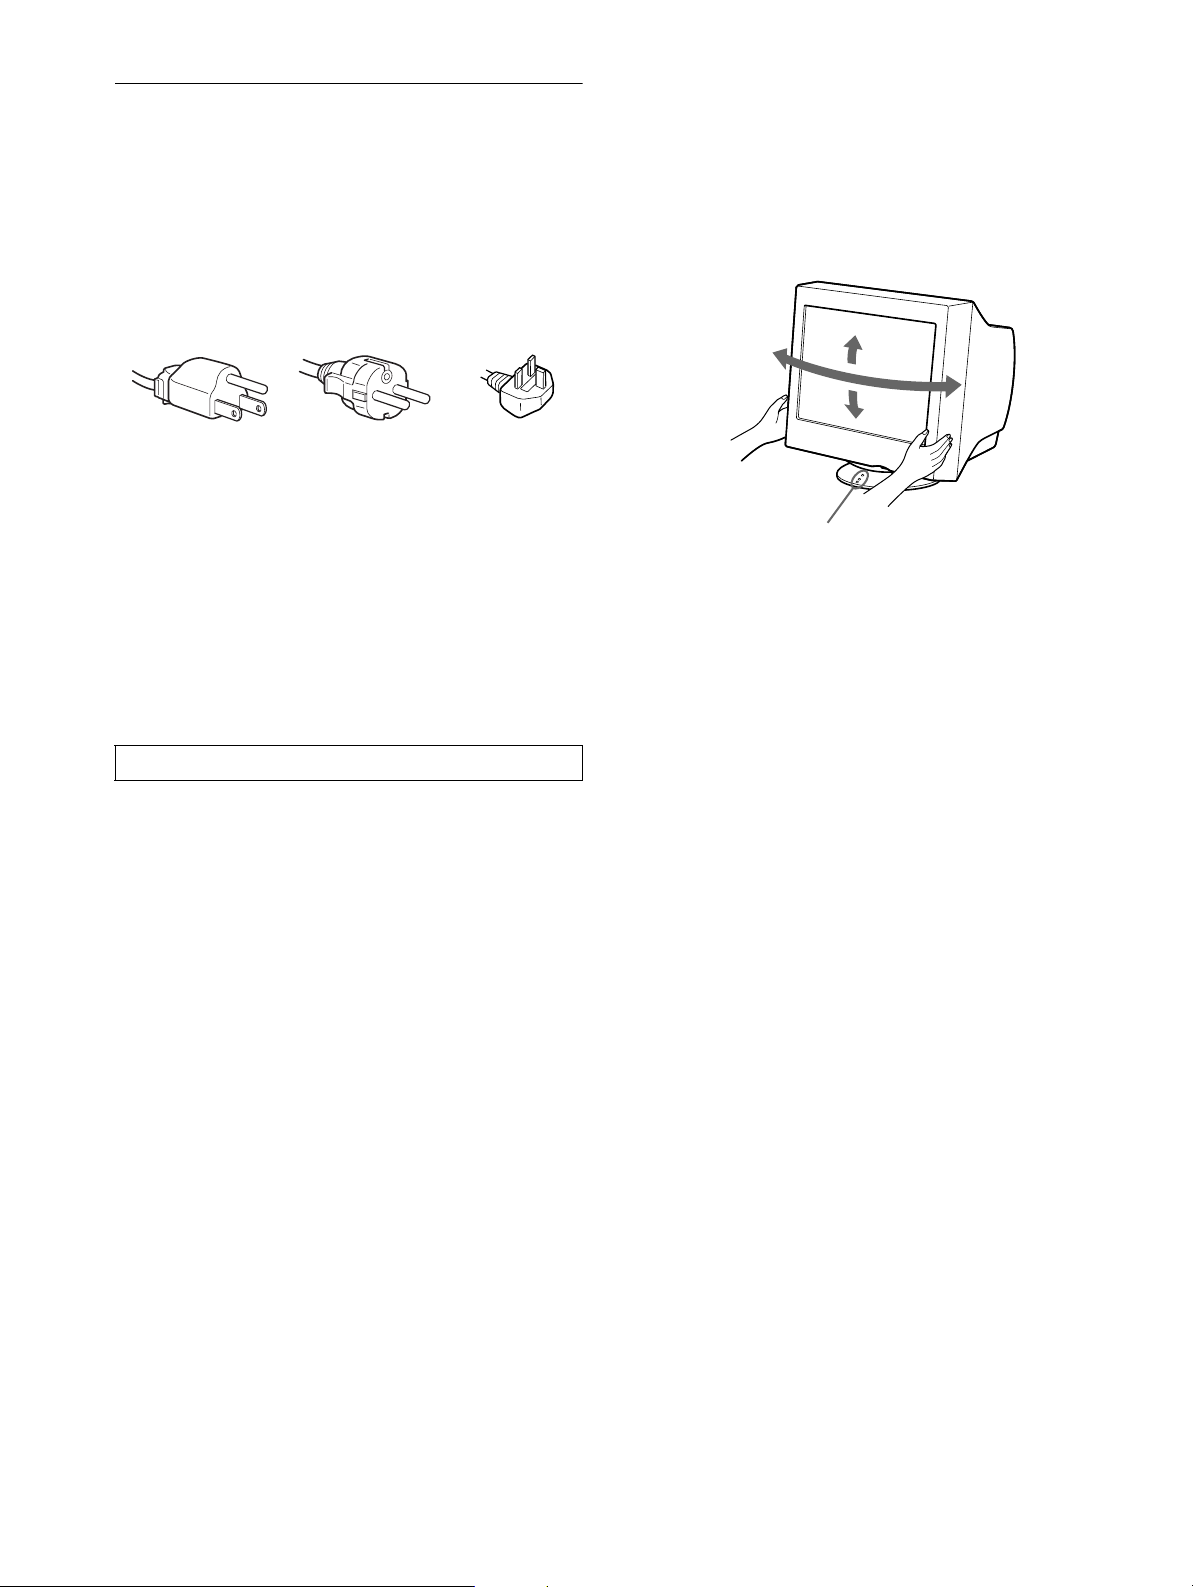
Precauzioni
90°
5°
90°
15°
Punti di centratura
Avvertenze per i collegamenti dell’alimentazione
• Utilizzare il cavo di alimentazione in dotazione. Se si utilizza
un cavo diverso, accertarsi che sia compatibile con la tensione
operativa locale.
Per i clienti nel Regno Unito
Se si utilizza il monitor nel Regno Unito, accertarsi di utilizzare
il cavo di alimentazione in dotazione per il Regno Unito .
Esempio di tipi di spine
da 100 a 120 V CA da 200 a 240 V CA solo 240 V CA
• Prima di scollegare il cavo di alimentazione, attendere almeno
30 secondi dallo spegnimento dell’unità per permettere la
dispersione dell’elettricità statica sulla superficie dello
schermo.
• Non appena si accende l’apparecchio, lo schermo viene
smagnetizzato per circa 5 secon di . Questa operazione crea un
forte campo magnetico attorno allo schermo che potrebbe
danneggiare i dati memorizzati su nastri magnetici o dischi
situati vicino al monitor. Collocare eventuali apparecchiat ure
per la registrazione magnetica, nas tr i e dis c h i lont ano dal
monitor.
Uso del sistema orientabile
È possibile regolare il monitor entro l’angolazione illustrata qui
sotto. Per trovare il centro del raggio di rotazione del monitor,
allineare il centro dello schermo del monitor con i punti di
centratura del supporto.
Per ruotare il monitor verticalmente o orizzontalmente, afferrarlo
alla base con entrambe le mani. Quan do si inclina verticalmente il
monitor, fare attenzione a non schiacciarsi le dita.
Installare l’unità vicino ad una presa facilmente accessibile.
Installazione
Non collocare il monitor nei seguenti luoghi:
• su superfici (tappeti, coperte, ecc.) né vicino a materiali (tende,
tessuti, ecc.) che potrebbero bloccarne le prese di ventilazione
• vicino a fonti di calore come radiatori o con dotti d’aria calda,
né in luoghi soggetti alla luce diretta del sole
• in luoghi soggetti a forti escursioni termiche
• in luoghi soggetti a scosse o vibrazioni di tipo meccanico
• su superfici instabili
• vicino ad apparecchiature che generano campi magnetici, come
un trasformatore o linee ad alta tensione
• vicino o su superfici metalliche con carica elettrica
Manutenzione
• Pulire lo schermo con un panno morbido. Se si utilizza un
detergente liquido per vetri, assicurarsi che non contenga
soluzioni antistatiche o additivi simili, onde evitare di graffiare
il rivestimento dello schermo.
• Non strofinare, toccare o tamburellare sulla superficie dello
schermo con oggetti appu n titi o abra sivi, co m e la p unta di u na
penna o un cacciavite, onde evitare di graffiare il cinescopio a
colori.
• Pulire il rivestimento esterno, il pannello e i comandi con un
panno morbido leggermente inum idito con una soluzion e
detergente neutra. Non utilizzare alcun tipo di spugnette o
polveri abrasive o solventi, come alcool o benzene.
Trasporto
Per trasportare il monitor o inviarlo in riparazione, utilizzare il
materiale di imballaggio originario.
4
Page 61
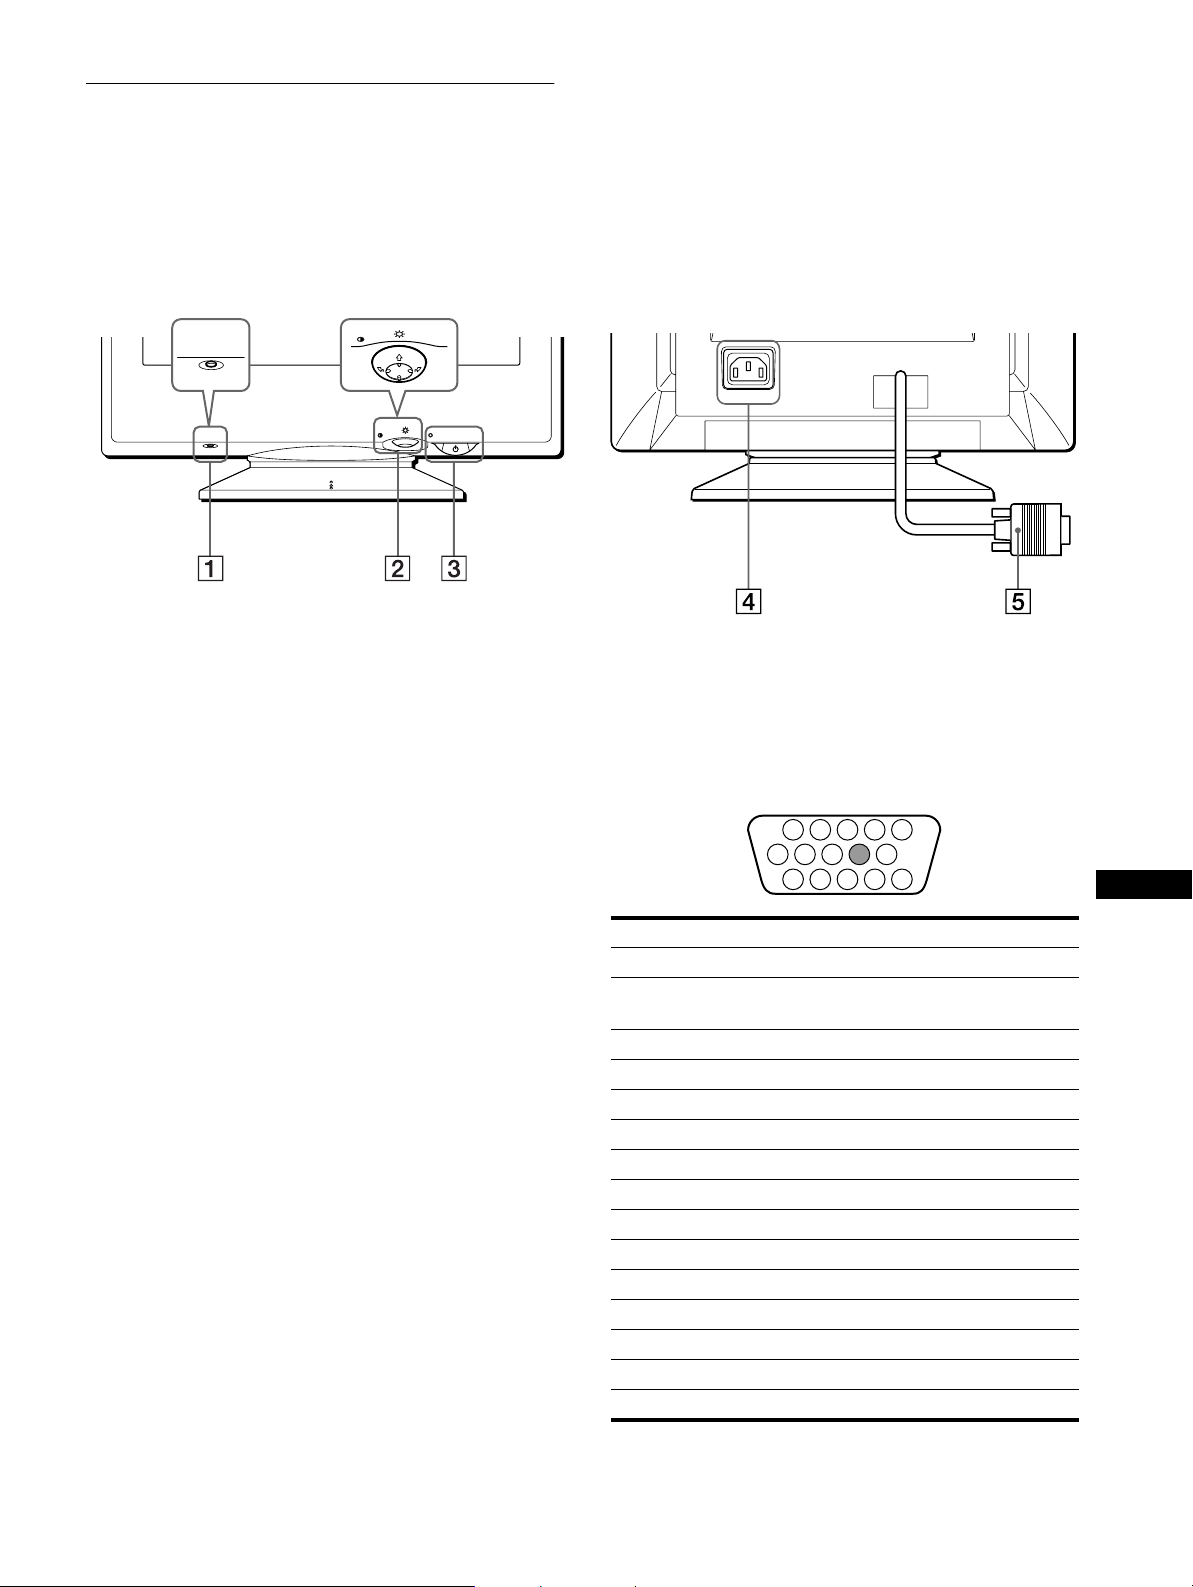
Identificazione dei componenti e
1 2 3 4
5
876
11 12 13 14 15
10
9
dei comandi
Per ulteriori informazioni, vedere le pagine tra parentesi.
Fronte Retro
MENU
RESET
RESET
MENU
AC IN
Tasto RESET (pagina 12)
1111
Utilizzare questo tasto per ripristinare le impostazioni di
fabbrica.
Tasto di comando (pagina 9)
2222
Utilizzare questo tasto per visualizzare il menu ed effettuare
le regolazioni relative a l monitor, incluse le reg olazio ni d ell a
luminosit à e del co ntrasto.
Interruttore e indicatore di accensione
3333
(alimentazione) (pagine 7, 13, 16)
1
Utilizzare questo tasto per accendere e spegnere il monitor.
Quando il monitor viene acceso, l’indicatore di accensione si
illumina in verde e lampegg ia in ve rde o in ara ncio ne oppur e
si illumina in arancione quando il monitor entra nel modo di
risparmio energetico.
Connettore AC IN (pagina 6)
4
Utilizzare questo connettore per alimentare il monitor con
corrente alternata.
Connettore di ingresso video (HD15) (pagina 6)
5555
Utilizzare questo connettore per immettere i segnali video
RGB (0,700 Vp-p, positivo) e i segnali sincronici.
Numero piedini Segnale
1 Rosso
2Verde
(Sincronismo su verde)
3Blu
4 ID (Terra)
5 Terra DDC*
6 Terra Rosso
7 Terra Verde
8 Terra Blu
9–
10 Terra
11 ID (Terra)
12 Dati bidirezionali (SDA)*
13 Sincronia O
14 Sincronia V
15 Orologio Dati (SCL)*
IT
* DDC (Displ a y Dat a Ch annel) è uno standard di VESA.
5
Page 62
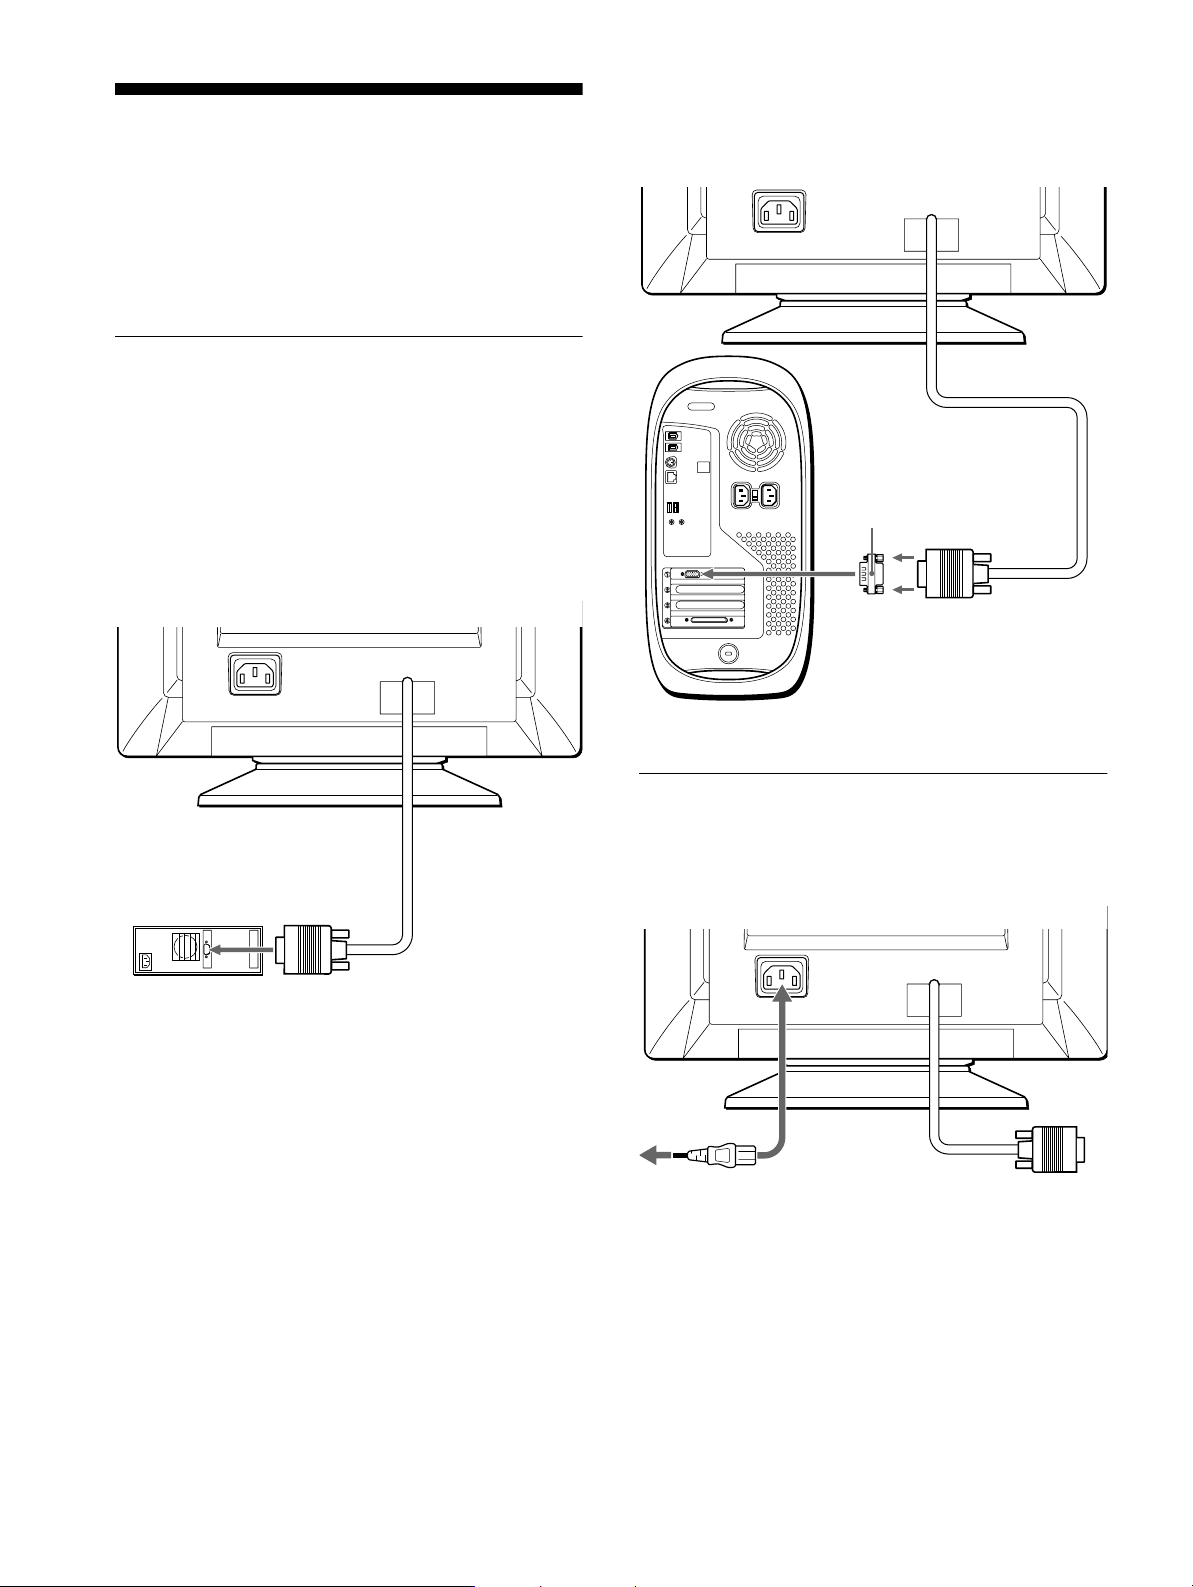
Installazione
AC IN
È necessario un adattatore Macintosh (non in dotazione).
Adattatore Macintosh
(non in dotazione)
computer Macintosh o
compatibile
all’uscita video
AC IN
a AC IN
alla presa a muro
cavo di alimentazione
(in dotazione)
Prima di utilizzare il monitor, verificare che la confezione
contenga i seguenti accessori.
• Cavo di alimentazione (1)
• Windows Monitor Information Disk (1)
• Sche da di garanzia (1)
• Note sulla pulizia della superficie dello schermo (1)
• Il presente manuale di istruzioni (1)
Punto 1:Collegamento del monitor
al computer
Spegnere il monitor e il computer prima del collegamento.
Nota
Non toccare i piedini del connettore del cavo del segna le video onde
evitare di piegarli.
Collegamento ad un computer IBM PC/A T o
x
compatibile
Collegamento ad un computer Macintosh o
xxxx
compatibile
AC IN
all’uscita video
computer IBM PC/AT o
compatibile
Punto 2:Collegamento del cavo di
alimentazione
Con il monitor e il computer spenti, collegare prima il cavo di
alimentazione al monitor, quindi collegarlo alla presa di rete.
6
Page 63
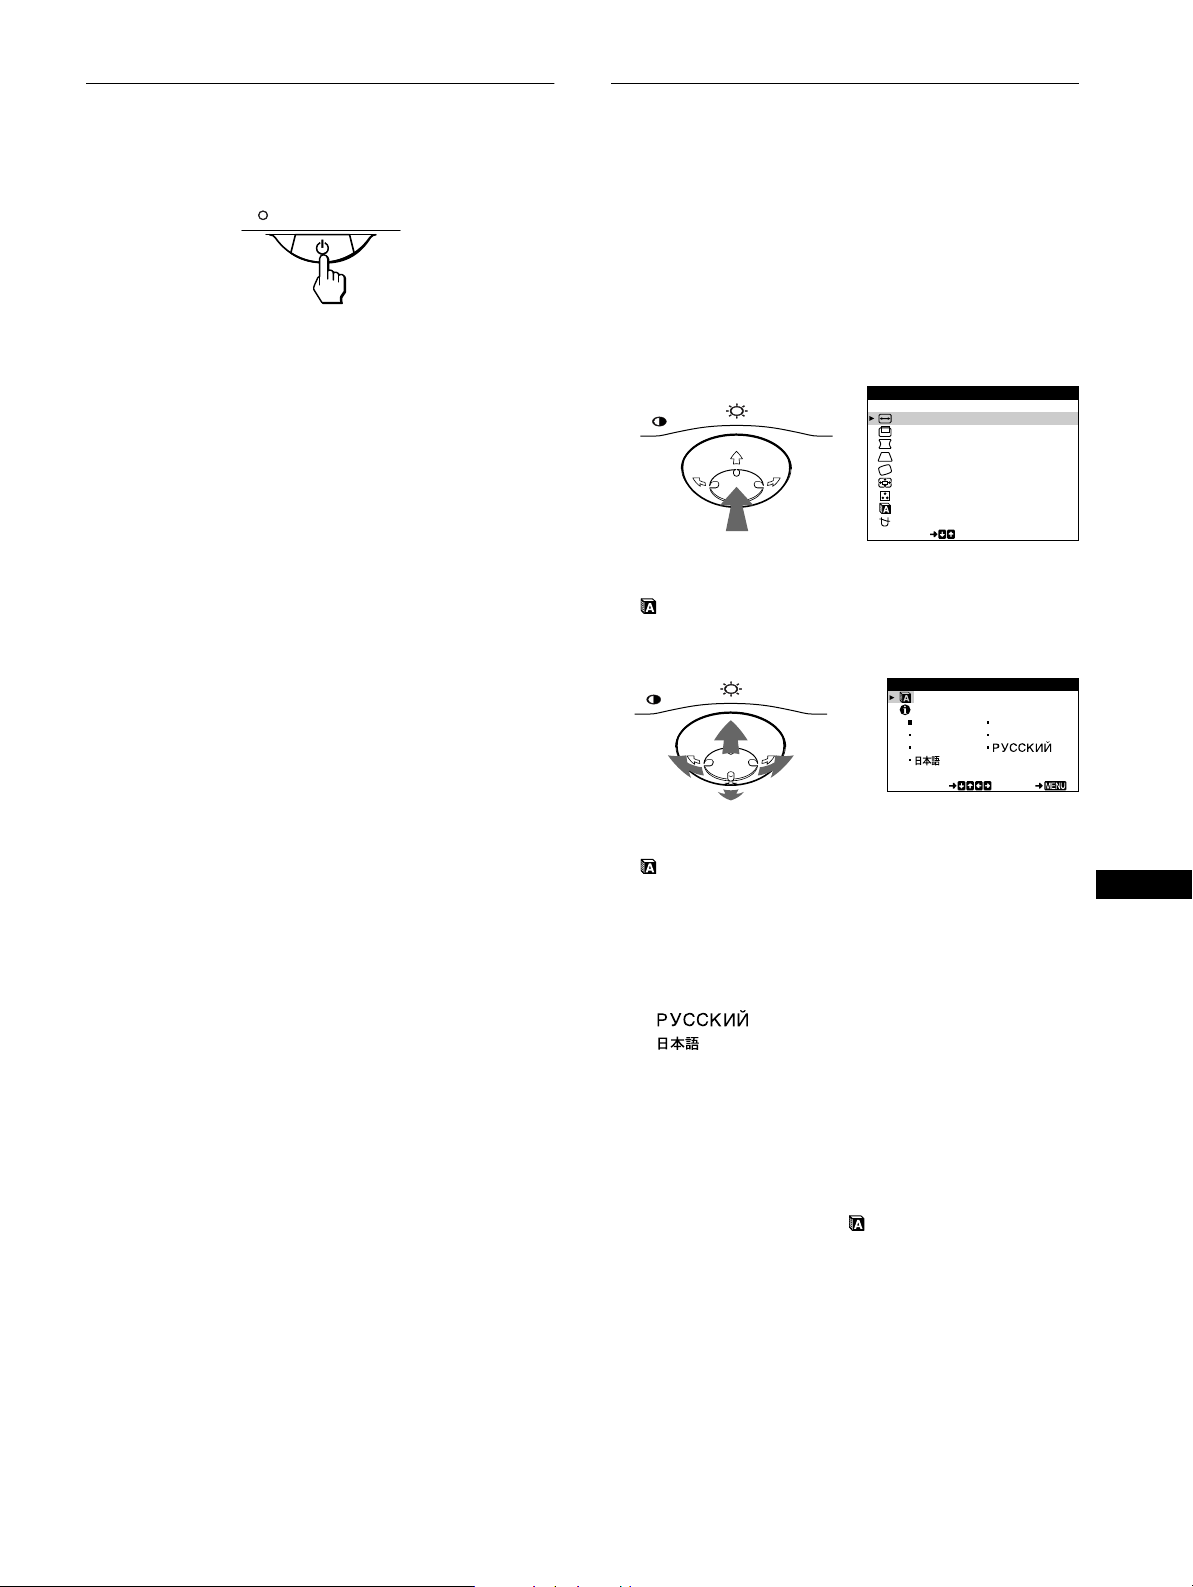
Punto 3:Accensione del monitor e
Selezione della lingua dei menu a
del computer
Accendere prima il monitor, quindi accendere il computer.
L’installazione del monitor è ora termin ata.
Se necessario, utilizzare i comandi del monitor per regolare
l’immagine.
Se sullo schermo non appaiono le immagini
• Controllare che il monitor sia stato collegato correttamente al
computer.
• Se sullo sch ermo appare il messaggio NO SEGNALE
INGRESSO, verificare che la scheda grafica del computer sia
completamente inserita nel corretto alloggiamento del bus.
• Se si sostituisce un monitor vecchio con questo modello e sul lo
schermo appare il messaggio FUORI GAMMA SCANS,
ricollegare il vecchio monitor. Quindi regolare la scheda
grafica del computer in modo che la frequenza orizzontale sia
compresa tra 30 e 70 kHz e la frequenza verticale sia compresa
tra 48 e 120 Hz.
Per ulteriori informazioni sui messaggi a schermo, vedere la
sezione “Sintomi e soluzioni dei problemi” del monitor a
pagina 14.
schermo
(LINGUA/INFORMAZIONE)
I menu a schermo sono disponibili nelle seguenti lin gue: inglese,
francese, tedesco, italiano, spagnolo, russo e giapponese.
L’impostazione predefinita è la lingua inglese.
1
Premere il tasto di comando al centro.
Per ulteriori informazioni sul tasto di comando, vedere a
pagina 9.
MENU
2
Spostare il tasto di comando m/M per evidenziare
LINGUA/INFORMAZIONE, quindi premere di
nuovo il tasto di comando al centro.
MENU
MENU
ESC I
DIM.ORIZ/POSIZIONE
D I M . VERT / POS I Z I ONE
CUSCINO/PINBALANEC
TRAPEZ I O / PARAL L
ROTAZ I ONE
ZOOM
COLORE
L I NGUA / I NFORMAZ I O EN
SMAGNETIZ/MOIRE
SELECT
L I NGUA/ I NFORMAZI ONE
ENGL I SH FRANÇA I S
DEUTSCH I T A L IANO
ESPAÑOL
Per gli utenti di Windows 95/98
Per potenziare al massimo il monitor, insta llare sul proprio computer il
nuovo file di informazioni sul modello dal disco W i ndows Monitor
Information Disk.
Questo monitor è conforme allo standard Plug & Play “VESA DDC”. Se
la scheda grafica/PC è conforme a DDC, seleziona re “P lug & Play
Monitor (VESA DDC)” o il nome del modello di questo monito r come
tipo di monitor dal “C ont rol Panel” di Windows 95/98. Se la sche da
grafica/PC ha difficoltà a comunicare con questo monitor, caricare il disco
Windows Monitor Information Disk e selezionare il nome del modello di
questo monitor come tipo di monitor.
Per gli utenti di Windows NT4.0
L’installazione del monitor in Windows NT4.0 è diversa da Windows 95/
98 e non occorre selezionare il tipo di monitor. Per maggiori informazioni
sulla regolazione della risoluzione, della frequenza di refresh e del numero
di colore, consultare le ist ruz ioni per l’uso di Windows NT4.0.
Regolazione della risoluzione del monitor e del numero di
colore
Regolare la risoluzione del monitor e il nume ro di col ore facendo
riferimento alle istruzioni per l’uso del prop rio computer. Il numero di
colore può variare in ba se a l computer o alla scheda vide o.
L’impostazione della tavolozza dei colori e il num ero reale dei colo ri è
descritto qui di seguit o:
• High Color (16 bit) t 65.536 colori
• True Color (24 bit) t circa 16 ,7 7 milioni di colori
Nel modo True Color (24 bit), la vel oc it à po tre bbe essere inferiore.
SELECT EXI T
3
Spostare il tasto di comando m/M per selezionare
(LINGUA), quindi spostare </, per selezionare
la lingua desiderata.
• ENGLISH: Inglese
• FRANÇAIS : Francese
• DEUTSCH: Tedesco
• ITALIANO
• ESPAÑOL: Spagnolo
• : Russo
• : Giapponese
Per chiudere il menu
Premere una volta il ta sto di comando al centro per rito rnare al MENU
principale, selezionare ESCI e premere di nuovo per ritornare al modo di
visualizzazione normale. Se non si preme alcun tasto, il menu verrà chiuso
automaticamente dopo c irc a 30 sec ondi .
Per reimpostare la lingua inglese
Durante la visualizzazione del menu (LINGUA) sullo schermo,
premere il tasto RESET (ripristina).
IT
7
Page 64
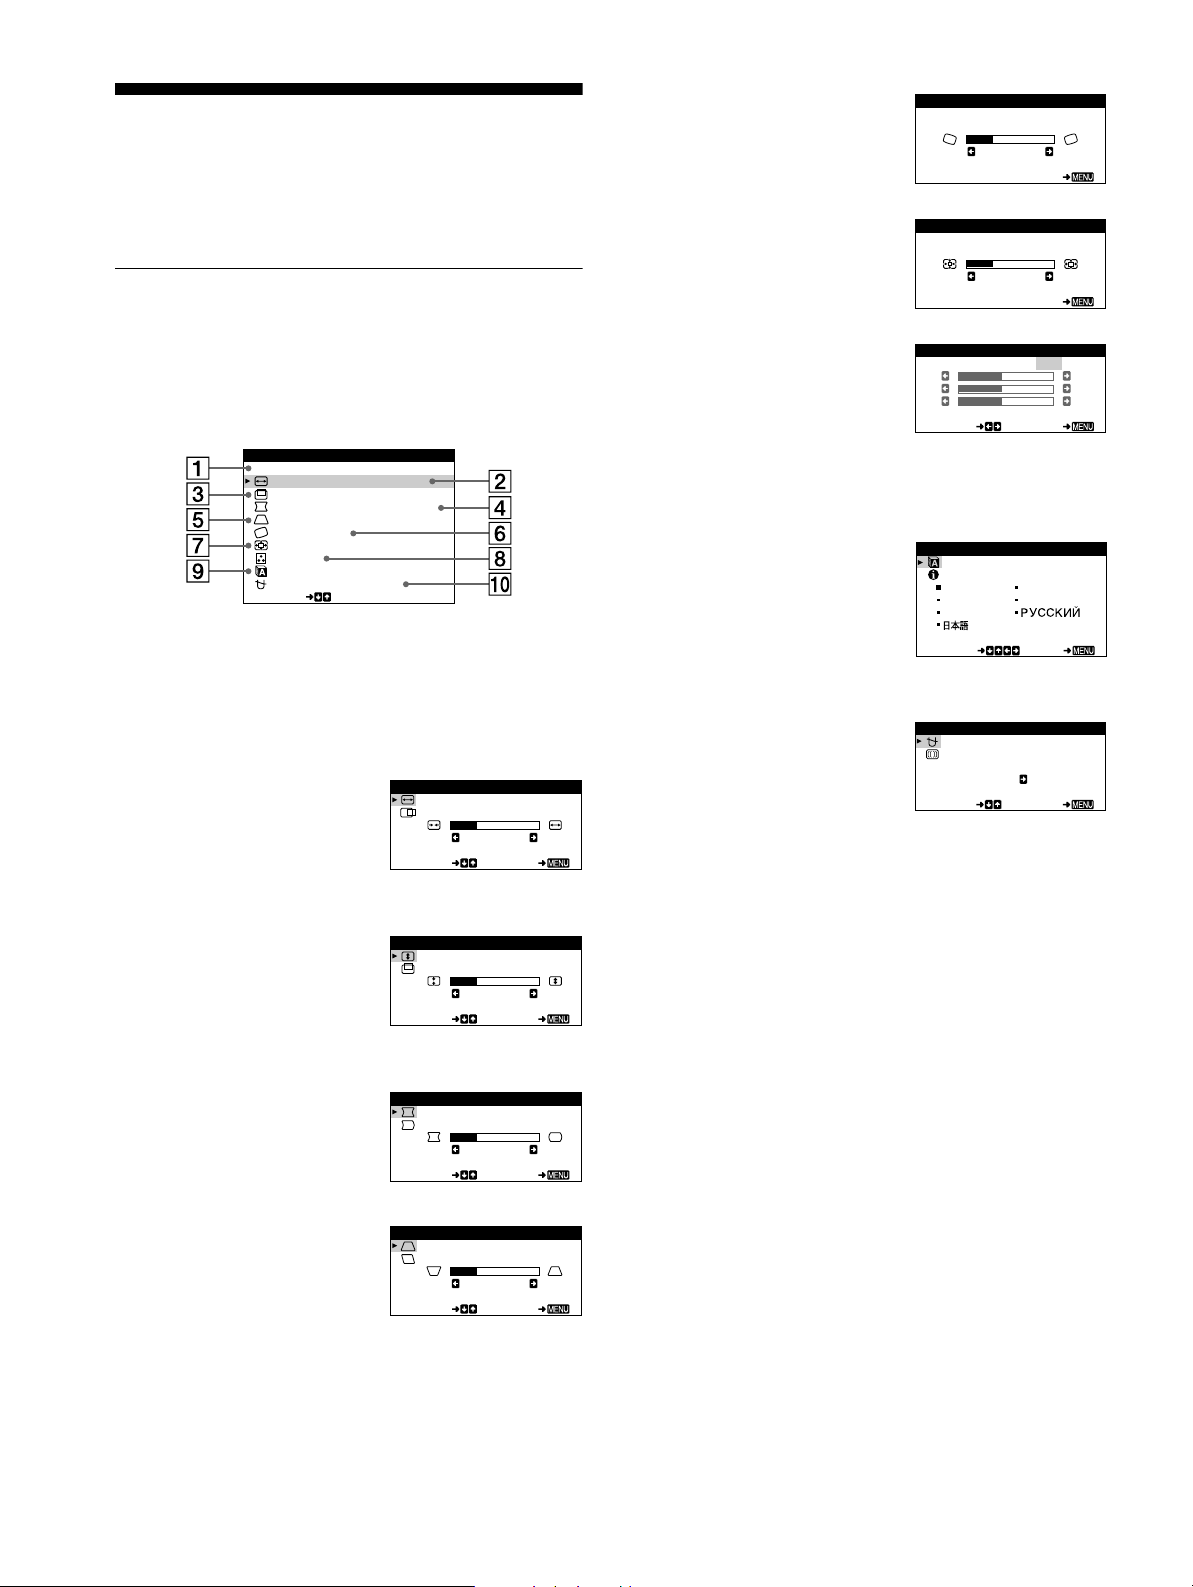
Personalizzazione del
monitor
È possibile effettuare numerose regolazioni relative al monitor
utilizzando i menu a schermo.
Come spostarsi all’interno del
menu
Premere il tasto di comando al centro per visualizzare sullo
schermo il MENU principale. Per ulteriori informazioni
sull’utilizzo del tasto di comando vedere a pagina 9.
MENU
ESC I
DIM.ORIZ/POSIZIONE
D I M. VERT / POS I Z I ONE
CUSCINO/PINBALANEC
TRAPEZ I O / PARAL L
ROTAZ I ONE
ZOOM
COLORE
L I NGUA / I NFORMAZ I O EN
SMAGNETIZ/MOIRE
SELECT
Utilizzare il tasto di comando per selezionare uno dei seguenti
menu.
ESCI
1111
Selezionare ESCI per chiudere il
menu.
DIM.ORIZ/POSIZIONE
2222
(pagina 10)
Selezionare il menu DIM.ORIZ/
POSIZIONE per regolare la
dimensione orizzontale e la
centratura dell’immagine.
DIM.ORIZ/POSIZIONE
DIM.ORIZ
26
SELECT EXI T
ROTAZIONE (pagina 11)
6666
Selezionare il menu
ROTAZIONE per regolare la
rotazione dell’immagine.
ZOOM (pagina 11)
7777
Selezionare il menu ZOOM per
ingrandire o ridurre l’immagine.
COLORE (pagina 11)
8888
Selezionare il menu COLORE
per regolare la temperatura di
colore dell’immagine. È
possibile usare questo menu per
far corrispondere i colori del
monitor ai colori di un’immagine
stampat a.
LINGUA/INFORMAZIONE
9999
(pagina 7, 15)
Selezionare il menu LINGUA/
INFORMAZIONE per scegliere
la lingua del menu a schermo e
visualizzare il riquadro
informazioni del monitor.
SMAGNETIZ/MOIRE
0000
(pagina 12)
Selezionare il menu
SMAGNETIZ/MOIRE per
smagnetizzare lo schermo e
regolare il livello di eliminazion e
dell’effetto moiré.
ROTAZIONE
ROTAZ IONE
26
EX I T
ZOOM
ZOOM
26
EX I T
COLORE
R50
G50
B50
SELECT EXI T
SELECT EXI T
SMAGNETIZ /MOI RE
SELECT EXI T
KKK
5000 6500 9300
USER
L I NGUA/ I NFORMAZI ONE
ENGL I SH FRANÇA I S
DEUTSCH I T A L IANO
ESPAÑOL
SMAGNET I Z
SI
DIM.VERT/POSIZIONE
3333
(pagina 10)
Selezionar e il menu DIM.V ERT/
POSIZIONE per regolare la
dimensione verticale e la
centratura dell’immagine.
CUSCINO/PIN BALANCE
4444
(pagina 10)
Selezionare il menu CUSCINO/
PIN BALANCE per regolare la
curvatura ai lati dell’immagi ne.
TRAPEZIO/PARALL
5555
(pagina 10)
Selezionare il menu T RAPEZIO/
PARALL per regolare l’angolo
dei lati dell’immagine.
DIM. VERT /PO SI Z I ONE
D I M. VERT
26
SELECT EXI T
CUSCINO/PIN BALANCE
CUSCINO
26
SELECT EXI T
TRAPEZ IO/ PARALL
TRAPEZ I O
26
SELECT EXI T
8
Page 65
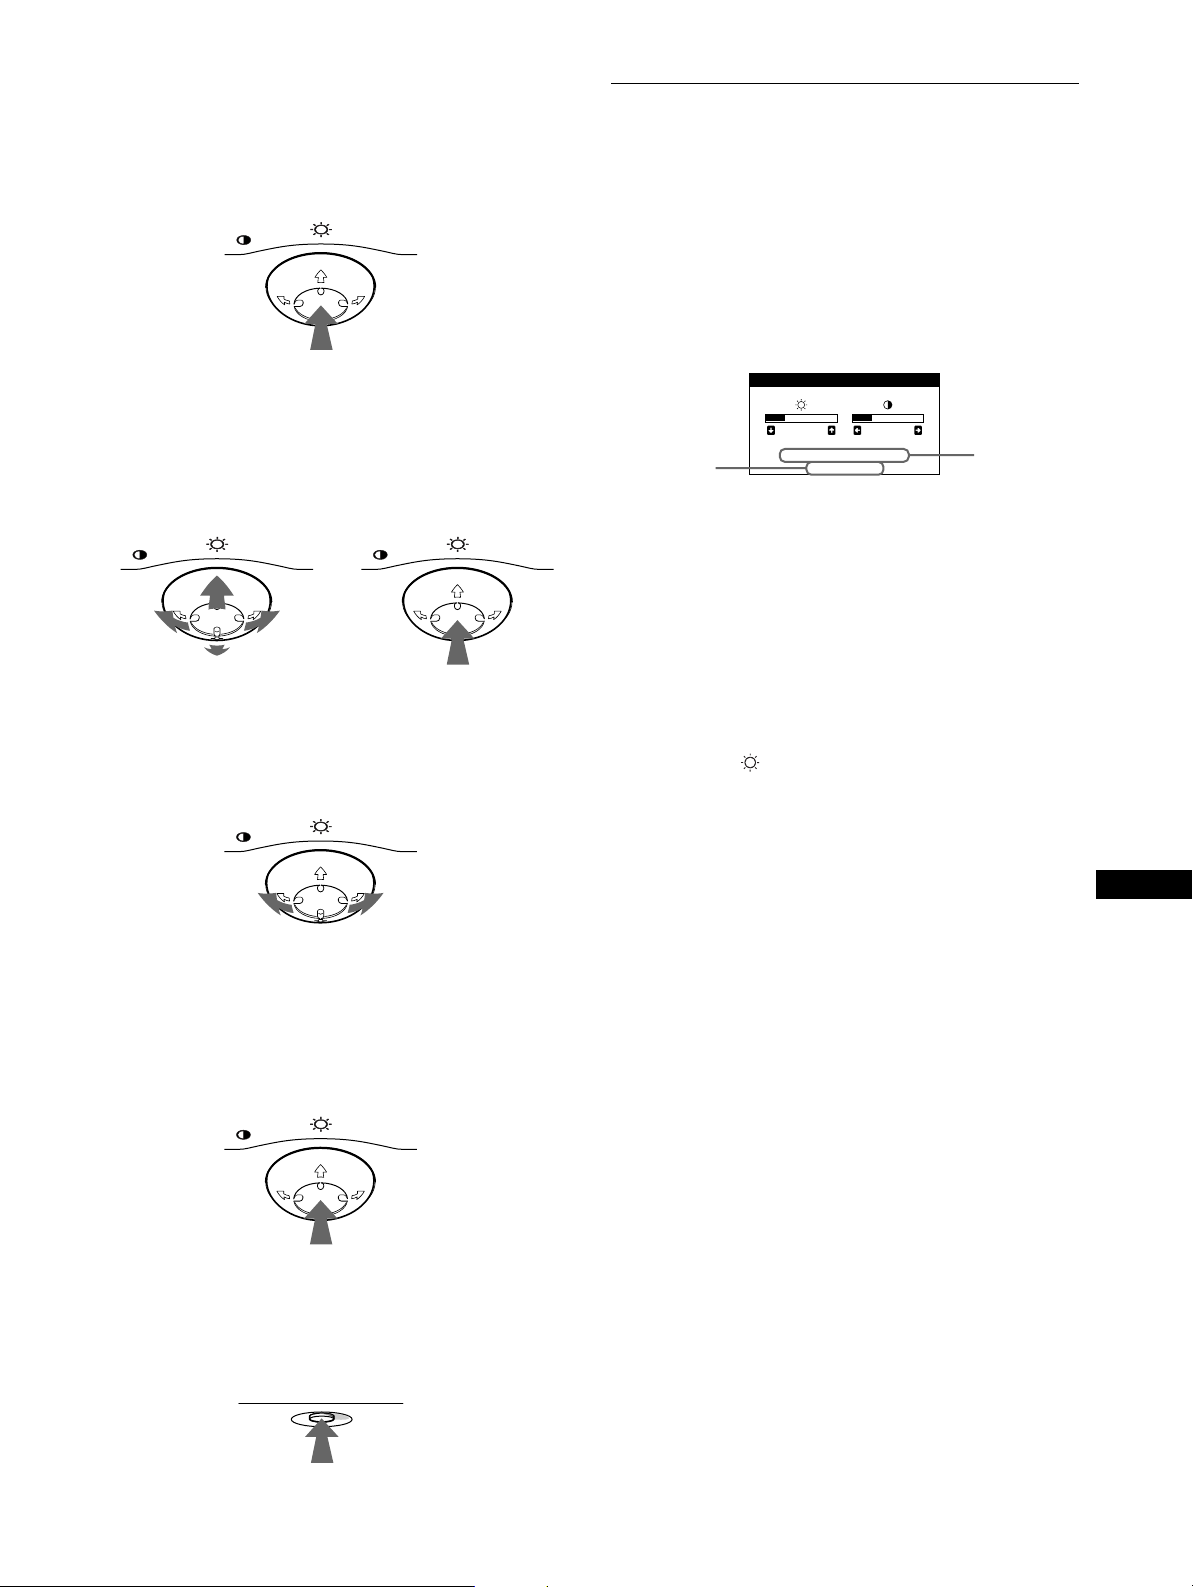
Utilizzo del tasto di comando
x
1
Per visualizzare il MENU principale.
Premere il tasto di comando al centro per visualizzare sullo
schermo il MENU principale.
MENU
Regolazione della luminosità e del
contrasto
È possibile regolare la luminosità e il contrasto tramite il menu
LUMINOSITA/CONTRASTO.
Queste impostazioni vengono memorizzate per tutti i segnali di
ingresso.
1
Spostare il tasto di comando in qualsiasi direzione.
Sullo schermo appare il menu LUMINOSITA/
CONTRASTO.
2
Per selezionare il menu da regolare.
Per evidenziare il menu desiderato, spostare il tasto di
comando verso la parte posteriore per spostarsi in alto (M),
spostarlo verso la parte anteriore per spostarsi in basso (m) e
a sinistra (<) o a destra (,) per spostarsi di lato.
FRONTE
MENU MENU
RETRO
3
Per regolare il menu.
Spostare il tasto di comando a sinistra (<) o a destra (,)
per effettuare le regolazioni.
MENU
LUMINOS I TA/ CONTRASTO
26 26
la risoluzione
del segnale di
ingresso
corrente
68.7kHz/85.0Hz
1024X768
le frequenze
orizzontali e
verticali del
segnale di
ingresso
corrente
Le frequenze orizzontali e vert icali del segnale di ingresso
corrente sono vi sualizzate nel menu LUMINOSITA/
CONTRASTO. Se il segnale corrisponde ad uno dei modi
preimpostati in fabbrica di questo monitor, anche la
risoluzione è visualizzata.
2
Spostare il tasto di comando m/M per regolare la
luminosità ( ), e </, per regolare il contrasto
(6).
Il menu scompare automaticam ente dopo circa 3 secondi.
IT
4
Per chiudere il menu.
Premere una volta il tast o di co m an do al centro per ritornar e
al MENU principale, selezionare ESCI e premere di nuovo
per ritornare al modo di visualizzazione normale. Se non si
preme alcun tasto, il menu verrà chiuso automaticamente
dopo circa 30 secondi.
MENU
Ripristino delle regolazioni
xxxx
Premere il tasto RESET. Per ulteriori informazioni sul ripristino
delle regolazioni, vedere a pa gina 12.
RESET
9
Page 66
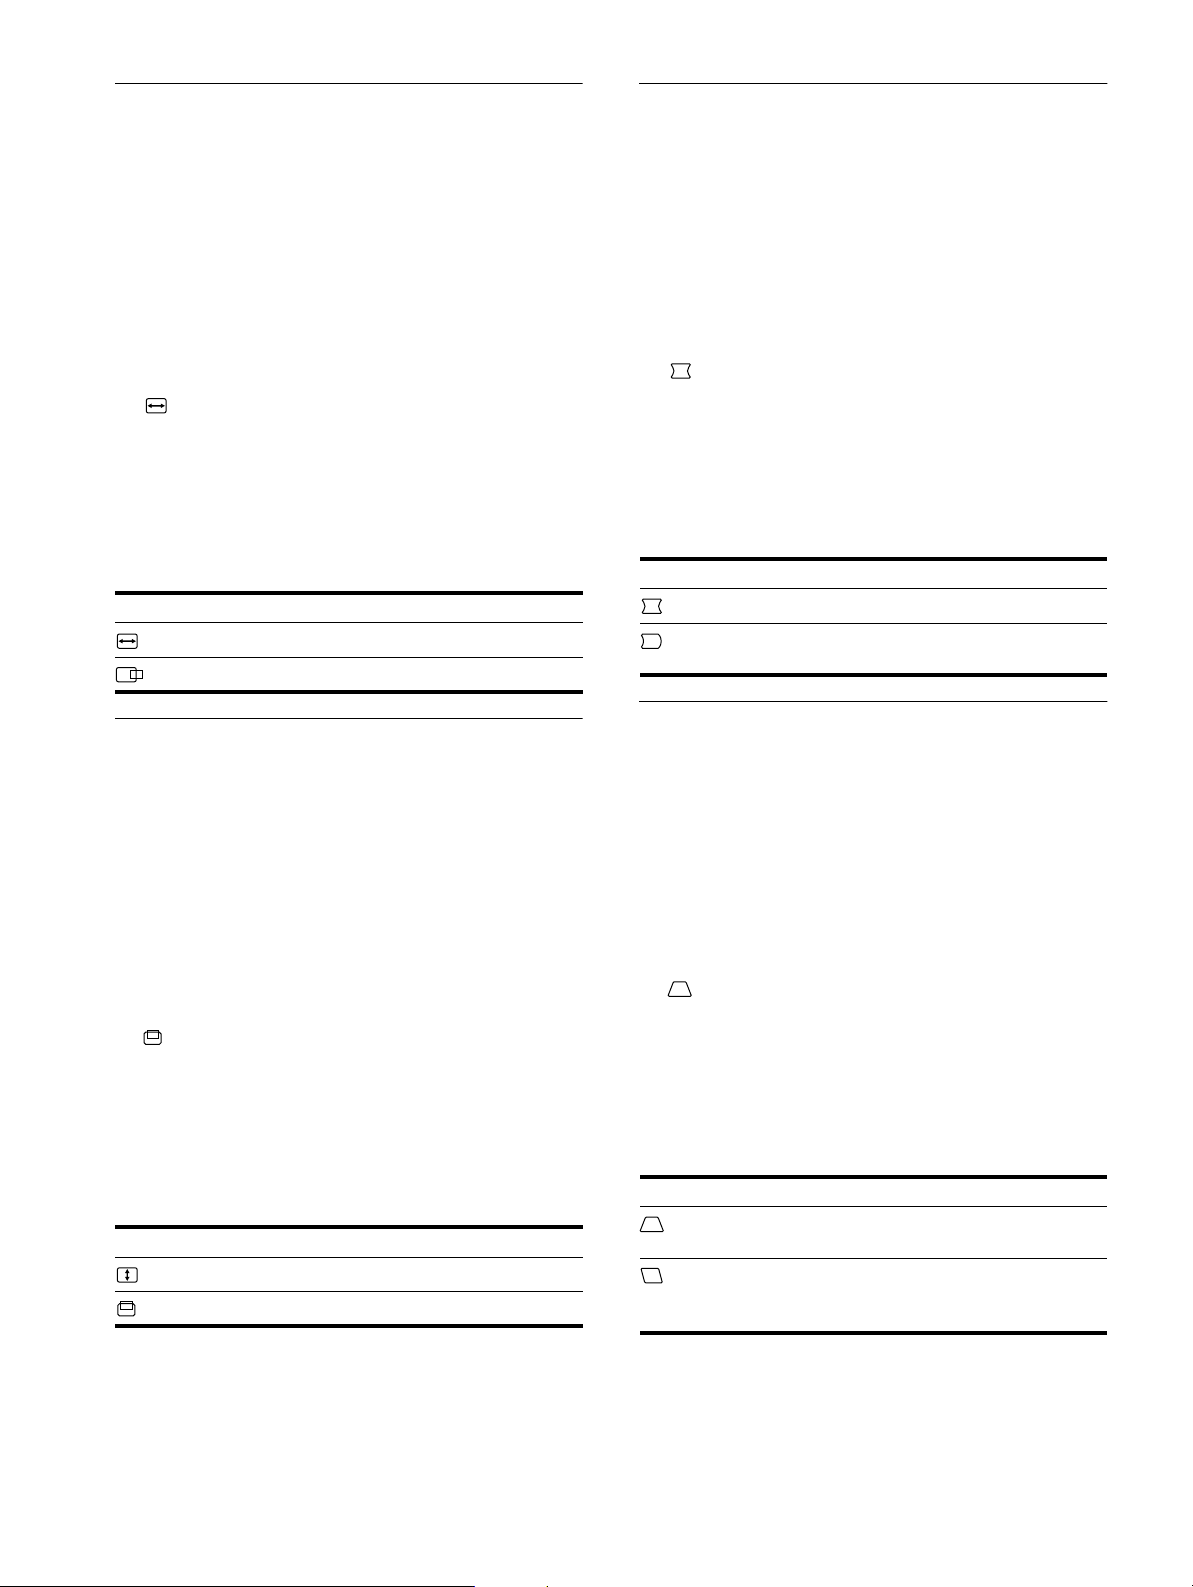
Regolazione della dimensione
Regolazione della curvatura
orizzontale o della centratura
dell’immagine
(DIM.ORIZ/POSIZIONE)
Questa impostazione è memorizzata nella memoria per il segnale
di ingresso corrente.
1
Premere il tasto di comando al centro.
Sullo schermo appare il MENU principale.
2
Spostare il tasto di comando m/M per evidenziare
DIM.ORIZ/POSIZIONE, quindi premere di nuovo
il tasto di comando al centro.
Sullo schermo appare il menu DIM.ORIZ/POSIZIONE.
3
Spostare prima il tasto di comando m/M per
selezionare la voce di regolazione desiderata.
Quindi spostare il tasto di comando </, per
effettuare la regolazione.
Selezionare Per
DIM.ORIZ
POSIZIONE O
regolare la dimensione orizzontale
regolare la centratura orizzontale
dell’immagine ai lati
(CUSCINO/PIN BALANCE)
Queste impostazioni vengono memorizzate per il segnale di
ingresso corrente.
1
Premere il tasto di comando al centro.
Sullo schermo appare il MENU principale.
2
Spostare il tasto di comando m/M per evidenziare
CUSCINO/PIN BALANCE, quindi premere di
nuovo il tasto di comando al centro.
Sullo schermo appare il menu CUSCINO/PIN BALANCE.
3
Spostare prima il tasto di comando m/M per
selezionare la voce di regolazione desiderata.
Quindi spostare il tasto di comando </, per
effettuare la regolazione.
Selezionare Per
CUSCINO
PIN BALANCE
espandere o ridurre l’immagine ai lati
spostare i lati dell’immagine verso
sinistra o verso destra
Regolazione della dimensione
verticale o della centratura
dell’immagine
(DIM.VERT/POSIZIONE)
Questa impostazione è memorizzata nella memoria per il segnale
di ingresso corrente.
1
Premere il tasto di comando al centro.
Sullo schermo appare il MENU principale.
2
Spostare il tasto di comando m/M per evidenziare
DIM.VERT/POSIZIONE, quindi premere di nuo vo
il tasto di comando al centro.
Sullo schermo appare il menu DIM.VERT/POSIZIONE.
3
Spostare prima il tasto di comando m/M per
selezionare la voce di regolazione desiderata.
Quindi spostare il tasto di comando </, per
effettuare la regolazione.
Selezionare Per
DIM.VERT
POSIZIONE V
regolare la dimensione verticale
regolare la centratura verticale
Regolazione dell’angolo dei lati
dell’immagine
(TRAPEZIO/PARALL)
Queste impostazioni vengono memorizzate per il segnale di
ingresso corrente.
1
Premere il tasto di comando al centro.
Sullo schermo appare il MENU principale.
2
Spostare il tasto di comando m/M per evidenziare
TRAPEZIO/PARALL, quindi premere di nuovo il
tasto di comando al centro.
Sullo schermo appare il menu TRAPEZIO/PARALL.
3
Spostare prima il tasto di comando m/M per
selezionare la voce di regolazione desiderata.
Quindi spostare il tasto di comando </, per
effettuare la regolazione.
Selezionare Per
TRAPEZIO
PARALL
regolare la larghezza dell’immagine
nella parte superiore dello schermo
spostare l’immagine verso sinistra o
verso destra nella parte superiore dello
schermo
10
Page 67
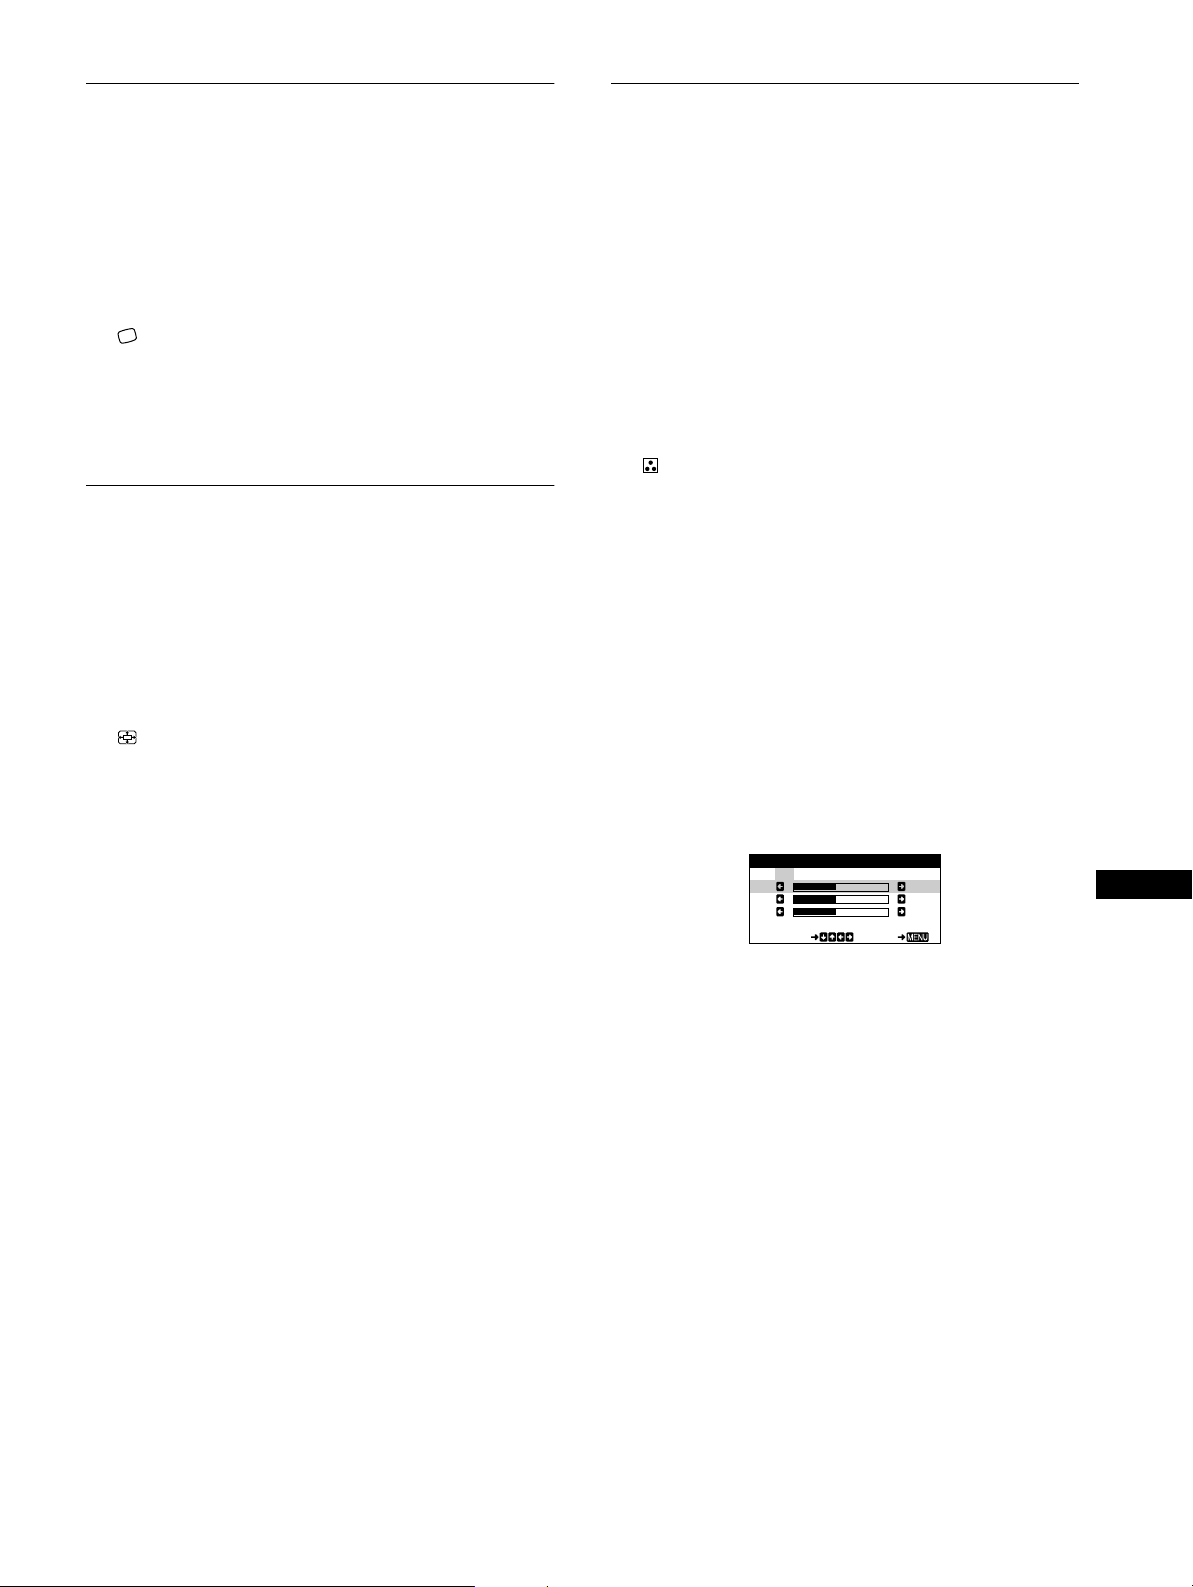
Regolazione della rotazione
KKK
R50
G50
B50
SELECT EXI T
COLORE
5000 6500 9300
USER
dell’immagine (ROTAZI ONE)
Regolazione del colore
dell’immagine (COLORE)
Questa impostazione viene memorizzata per tutti i segnali
d’ingresso.
1
Premere il tasto di comando al centro.
Sullo schermo appare il MENU principale.
2
Spostare il tasto di comando m/M per evidenziare
ROTAZIONE, quindi premere di nuovo il tasto di
comando al centro.
Sullo schermo appare il menu ROTAZIONE.
3
Spostare il tasto di comando </, per ruotare
l’immagine.
Ingrandimento o riduzione
dell’immagine (ZOOM)
Questa impostazione è memorizzata nella m emoria per il segnale
di ingresso corrente.
1
Premere il tasto di comando al centro.
Sullo schermo appare il MENU principale.
2
Spostare il tasto di comando m/M per evidenziare
ZOOM, quindi premere di nuovo il tasto di
comando al centro.
Sullo schermo appare il menu ZOOM.
3
Spostare il tasto di comando </, per ingrandire o
ridurre l’immagine.
Le impostazioni del menu COLORE consentono di rego la re la
temperatura di colore dell’immagine modificando il livello del
colore del campo del colore bian co. I colori appaio no ro ssastri se
la temperatura è bassa e bluastri se la temperat ura è alta. Questa
regolazione risulta utile per far corrisponder e i colori del monitor
ai colori di un’immagine stampata.
Questa impostazione viene memorizzata per tutti i segnali di
ingresso.
1
Premere il tasto di comando al centro.
Sullo schermo appare il MENU principale.
2
Spostare il tasto di comando m/M per evidenziare
COLORE, quindi premere di nuovo il tasto di
comando al centro.
Sullo schermo appare il menu COLORE.
3
Spostare il tasto di coman do </, per selezionare
una temperatura di colore.
Le temperature di colore preimpostate sono 5000K, 6500K e
9300K. Poiché l’impostazion e prede finita è 9300K, i bianchi
cambieranno da una tinta bluastra ad una tinta rossastra
abbassando la temperat ura a 6500K e 5000K.
4
Se necessario, effettuare la sintonizzazione fine
della temperatura di colore.
Spostare prima il tasto di comando </, per selezionare
USER, quindi spostare il tasto di comando m/M per
selezionare R (rosso), G (verde) o B (blu) e spostare </,
per effettuare le regolazioni.
Nota
Quando le dimensioni verticali o orizzontali raggiungono i valori
massimi, non è possibile re golarle ulteriormente.
IT
Se si effettua la sintonia fine della temperatura di colore, le
nuove impostazioni di co lo re vengono memorizzate e
richiamate ogni volta che si seleziona USER.
11
Page 68
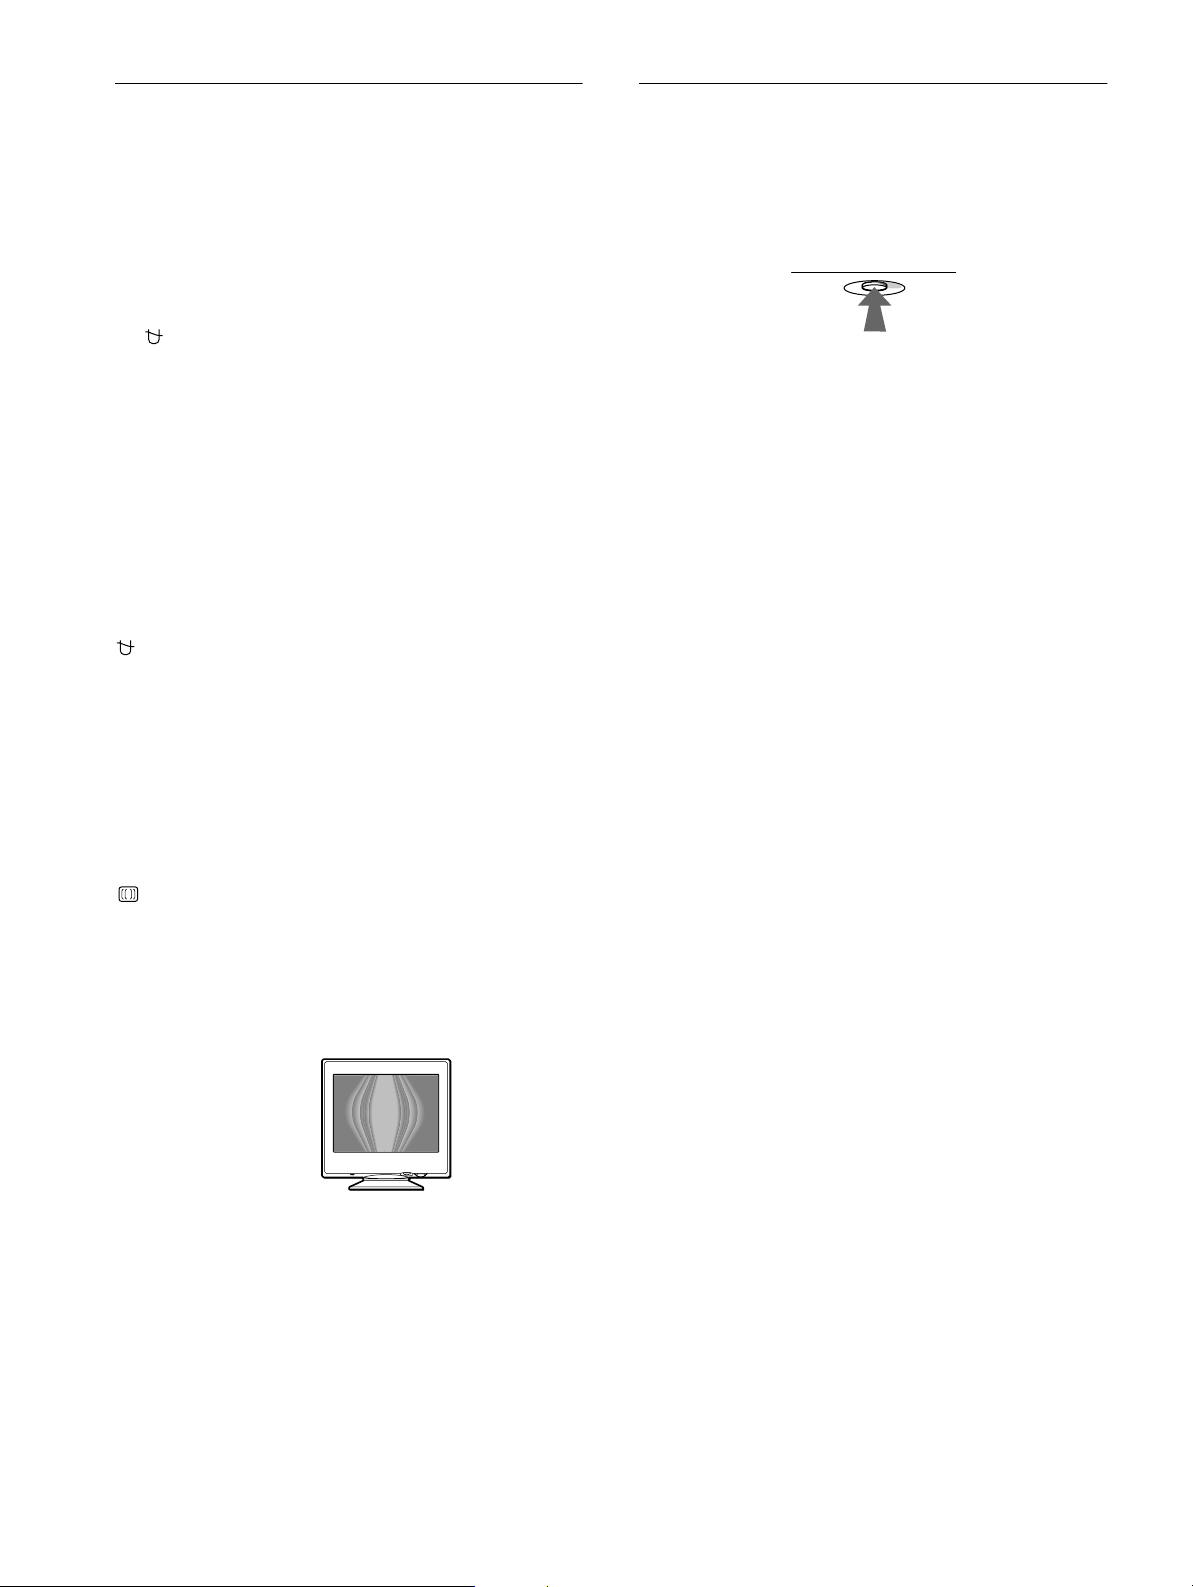
Impostazioni aggiuntive
RESET
Ripristino delle regolazioni
(SMAGNETIZ/MOIRE)
È possibile smagnetizzare il monitor manualmente e regolare il
livello di eliminazione dell’eff ett o moiré.
1
Premere il tasto di comando al centro.
Sullo schermo appare il MENU principale.
2
Spostare il tasto di comando m/M per evidenziare
SMAGNETIZ/MOIRE, quindi premere di nuovo il
tasto di comando al centro.
Sullo schermo appare il menu SMAGNETIZ/MOIRE.
3
Spostare il tasto di comando m/M per selezionare la
voce di regolazione desiderata.
Per regolare la voce selezionata, eseguire le istruzioni
riportate di seguito.
Smagnetizzazione dello schermo
Il monitor viene smagnetizzato automaticamente quando viene
attivata l’alimentazione.
Per smagnetizzare il monitor manualmente, spostare
prima il tasto di comando m/M per selezionare
(SMAGNETIZ). Quindi spostare il tasto di comando
.
,
Lo schermo viene smagnetizzato per circa 5 secondi. Nel caso in
cui sia necessario un secondo ciclo di smagnetizzazione ,
attendere almeno 20 minuti per ottenere un risultato migliore.
Regolazione dell’effetto moiré
Se sullo schermo appaio no di sturbi e llittici o ondul ati, rego lare il
livello di eliminazione dell’eff ett o moiré.
Per regolare il grado di eliminazione dell’effetto mo iré,
spostare prima il tasto di comando m/M per selezionare
(ELIMINA MOIRÉ). Quindi spostare il tasto di
comando </, fino a ridurre l’effetto moiré al minimo.
*
Questo monitor dispone dei tre metodi di ripristino descritti di
seguito. Per ripristinare le regolazioni, utilizzare il tasto RESET
(ripristina).
Ripristino di una sola voce di regolazione
Utilizzare il tasto di comando per selezionare la voce di
regolazione che si desidera ripristinare, quindi premere il tasto
RESET (ripristina).
Ripristino di tutti i dati di regolazione per il
segnale di ingresso corrente
Premere il tasto RE SET (ripristina) quando sullo schermo non è
visualizzato alcun menu.
Si noti che con questo metodo non vengono ripristinati:
• la lingua per il menu a schermo (pagina 7)
• la rotazione dell’immagine (pagina 11)
Ripristino di tutti i dati di regolazione per tutti i
segnali di ingresso
Premere e mantenere premuto il tasto RESET (ripristina) per più
di due secondi.
Tenere presente che non è possib ile uti liz zare qu es to m eto do pe r
reimpostare la voce seguente:
• impostazioni utente del menu COLORE (pagina 11)
* L’e ffetto moiré è un tipo di i nterferenza natural e c he produce leggere
linee ondulate sullo schermo. Questo effetto può verificarsi a causa
dell’inter feren za tr a il motiv o de ll’imma gin e sullo sch erm o e il moti vo
a punti di fosforo del monitor.
Esempio di effetto moiré
12
Page 69
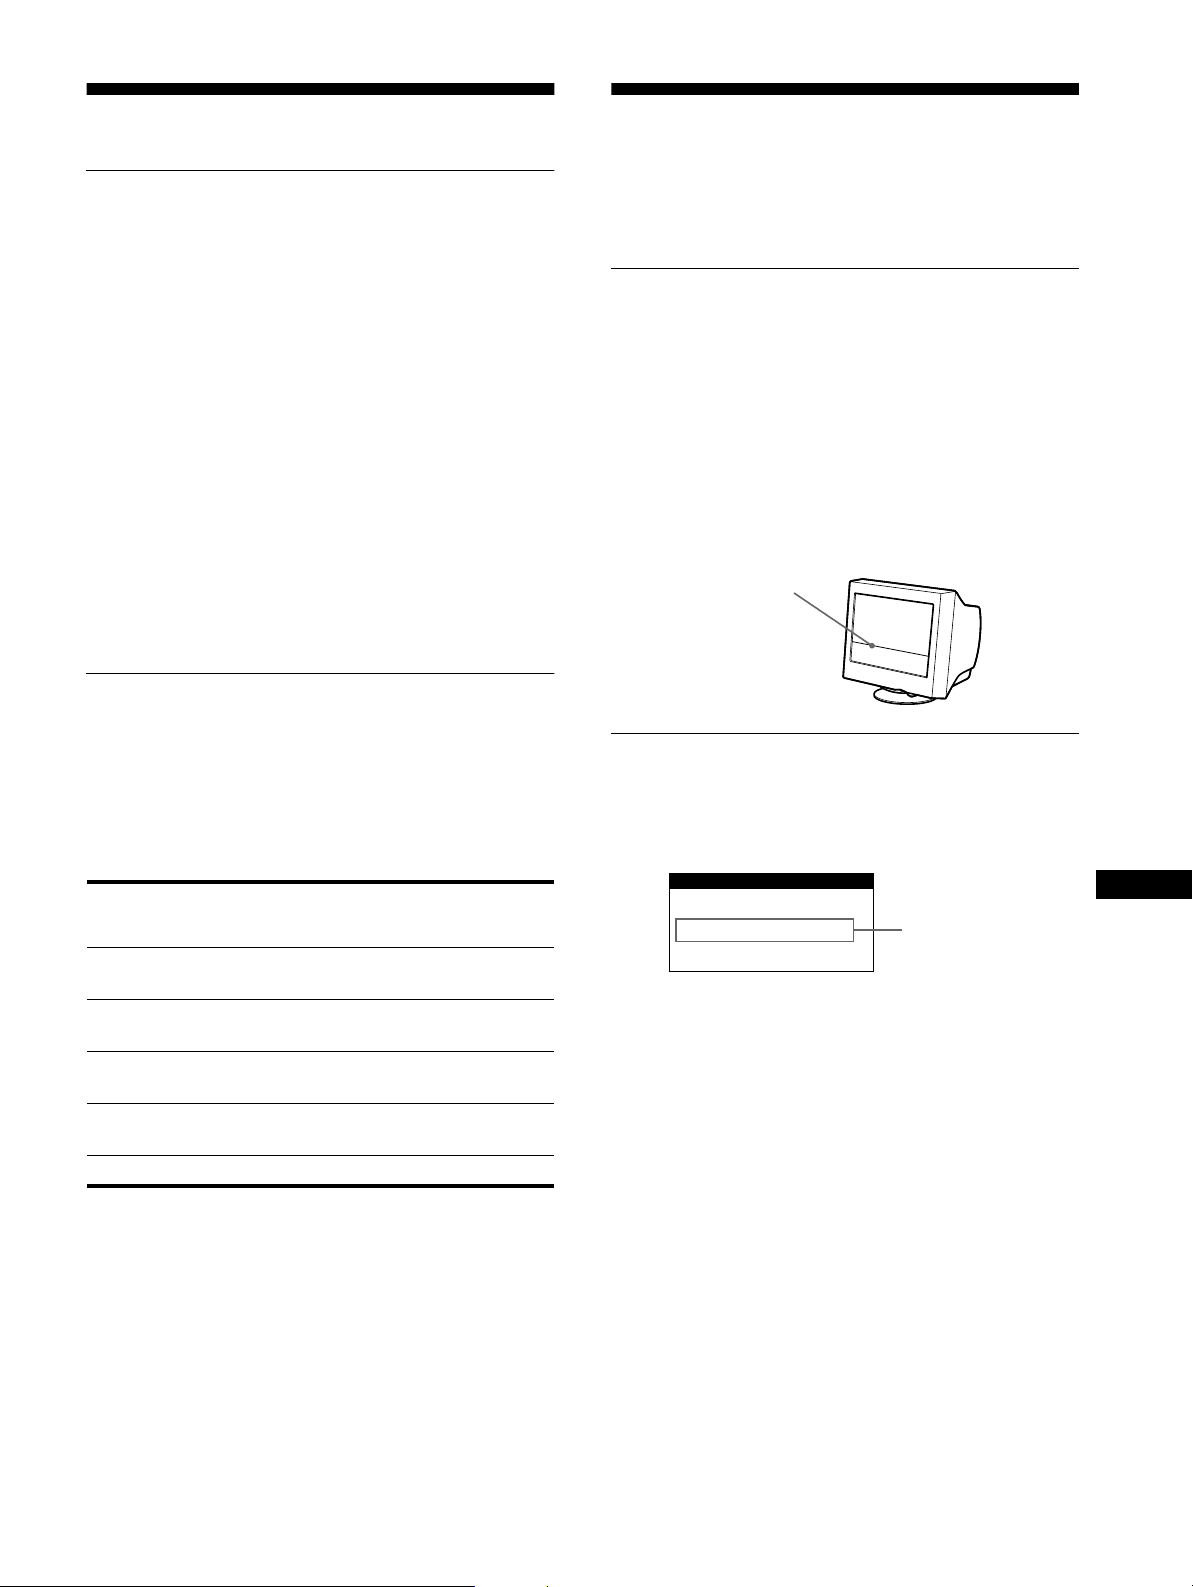
Caratteristiche
INFORMAZIONI
FUORI GAMMA SCANS
Modo preimpostato e modo utente
Quando il monitor riceve un segnale di ingresso , lo fa
corrispondere automaticamente ad uno dei modi preimpostati in
fabbrica e memorizzati nel monitor, per fornire un’immagine di
alta qualità al centro dello schermo. Per un elenco dei modi
preimpostati in fabbrica, veder e l’App end ix. Per i segnali di
ingresso che n on corr ispon dono ai modi pr eimpo stati in fa bbric a,
la tecnologia Multiscan digi tale di questo monitor assicura una
visualizzazione dell’immagine nitida per qualsiasi
sincronizzazione nella gamma di frequenza del monitor
(orizzontale: da 30 a 70 kHz, verticale: da 48 a 120 Hz). Se
l’immagine viene regolata, i dati di regolazione vengono
memorizzati come modo utente e richiamati automaticamente
qualora venga ricevuto lo stesso segnale di ingresso.
Nota per gli utenti di Windows
Gli utenti di Windows devono controllare il manuale della scheda
video o il programma della utility forn ito c on la sch eda graf ica e
quindi selezionare la frequenza di refresh più elevata per
massimizzare le prestazioni del monitor.
Funzione di risparmio energetico
Guida alla soluzione dei
problemi
Prima di rivolgersi al servizio di assistenza tecnica, leggere la
seguente sezione.
Se sullo schermo appare una linea
sottile (cavo di smo rzame nto)
Questo tipo di linea sullo schermo è normale per il monitor
Trinitron e non rappresenta un problema di funzionamento.
Questa riga è l’ombra del cavo di smorzamento usat o per
stabilizzare la griglia di apertura, visibile maggiormente quando
lo sfondo dello schermo è chia ro (solitamente bianco). La griglia
di apertura è l’elemento essenziale che caratterizza il cinescopio a
colori Trinitron, consentendo una maggiore illuminazione dello
schermo con il risultato di un’immagi ne più luminosa e
dettagliata.
Cavo di smorzamento
Questo monitor è conforme alle direttive sul risparmio e nergetico
di VESA,
collegato ad un computer o ad una scheda grafica video conformi
a DPMS (Display Power Management Signaling), il monitor
ridurrà automaticamente il consumo energetico in tre stadi come
descritto di seguito.
Modo di
alimentazione
Funzionamento
normale
1 attesa ≤ 15 W verde e arancione
2 sospeso
(sleep)*
3 attivo-spento**
(deep sleep)*
spento 0 W spento
* “Sleep” e “deep sleep” sono modalità di risparmio energetico definite
** Quando il co mputer entra nel mod o “attivo-spento”, il segnale di
E
NERGY STAR e NUTEK. Se il monitor viene
Consumo
energetico
≤ 95 W verde
≤ 15 W verde e arancione
≤ 5 W aranc io ne
dalla Environmental Prot ection Agency.
ingresso viene interrotto e sullo schermo ap pare il messaggio NO
SEGNALE INGRESSO. Dopo circa 20 secondi il monitor entra nel
modo di risparmio energ et ic o.
Indicatore di
accensione 1
(alimentazione)
alternato
alternato
Messaggi a schermo
In caso di problemi per il segnale di ingresso, sullo schermo
appare uno dei seguenti messaggi. Per risolvere il problema,
vedere la sezion e “ Sintom i e s olu zion i dei pro blemi ” a pag ina14.
IT
Condizione del
segnale di ingresso
Condizioni del segnale di ingresso
FUORI GAMMA SCANS
indica che il segnale di ingresso non viene supportato dalle
caratteristiche tecniche del monitor.
NO SEGNALE INGRESSO
indica che non viene immesso alcun segnale al monitor.
13
Page 70

Sintomi e soluzioni dei problemi
Se il problema è causato dal computer o da altre apparecchiature collegate, consultare le istru zioni per l’uso di qu este apparecchiature.
Se il problema non viene risolto con le indicazioni descritte di seguito, usare la funzione di autodiagnostica (pagina 16).
Sintomo Controllare quanto segue
Assenza d’immagine
Se l’indicatore di accensione
1 (alimentazione) non è illuminato
Se sullo schermo appare il
messaggio NO SEGNALE
INGRESSO o se l’indicatore di
accensione 1 (alimen tazione) è di
colore arancione o si alterna tra i l
verde e l’arancione
Se sullo schermo appare il
messaggio FUORI GAMMA
SCANS
Se non viene visualiz zato alcun
messaggio e l’indica tore di
accensione 1 (alimentazi one) è
illuminato in verde o lampeggia in
arancione
Se si usa Windo ws 95/98 • Se con questo monitor è stato sostituito un vecchio monitor, ricolleg are il vecchio mon itor
Se si utilizza un sistema Macintosh • Controllare che l’adattatore Macintosh (non in dotazione) e il cavo del segnale video siano
L’immagine è tremolante, salta,
oscilla oppure è confusa
L’immagine è sfocata
• Controllare che il cavo di alimentazione sia collegato correttamente.
• Controllare che l’interruttore 1 (alimentazione) sia nella posizione di accensione.
• Controllare che il cavo del segnale video sia colleg ato correttamente e che tutte le spine
siano saldamente inserite nelle prese (pagina 6).
• Controllare che i piedini del connett ore di ingresso video HD15 non siano piegati o
danneggiati.
Problemi causati dal computer o da altre apparecchiature collegate
x
• Il computer è nel modo di risparmio energetico. Provare a premere un tasto qualsiasi sulla
tastiera del computer.
• Controllare che l’alimentazione del computer sia attivata.
• Controllare che la scheda grafica sia completamente inserita nell’alloggiamento del bus
corretto.
Problemi causati dal computer o da altre apparecchiature collegate
x
• Controllare che la gamma di frequenza video rien tri in quella specif icata per il monito r. Se
con questo monitor è stato sostituito un vecchio monitor, ricollegare il vecchio monitor e
regolare la gamma di frequenza come descritto di seguito.
Orizzontale: 30 – 70 kHz
–
Verticale: 48
• Utilizzare la funzione di autodiagnostica (pagina 16).
e effettuare le seguenti operazioni. Installare il Windows Monitor Information Disk
(pagina 7) e selezionare questo monitor (“CPD-E100E”) tra i monitor Sony nella
schermata di sele z io ne mo nitor Windows 95/98 .
correttamente collegati (pagina6).
• Isolare ed eliminare le potenziali sorgenti di campi elettrici o magnetici, quali altri
monitor, stampanti laser, ventilatori elettrici, illuminazioni fluorescenti o televisori.
• Spostare il monitor lontano dalle linee di alimentazione oppure collocare uno schermo
magnetico vicino al monitor.
• Provare a collegare il monitor ad un’altra presa di rete CA, preferibilmente su un circuito
differente.
• Provare a girare il monitor di 90° verso sinistra o verso destra.
Problemi causati dal computer o da altre apparecchiature collegate
x
• Controllare il manuale della scheda grafica per le corrette impostazioni del monitor.
• Controllare che il modo grafica (VESA, Macin to s h 16" Color, ecc.) e la frequenza del
segnale di ingre sso si ano su pporta ti da qu esto monitor (App endi x). Anch e se la fre que nza
rientra nella gam ma pr e v ista, a lcu ne s ched e vid eo potr ebber o avere un impulso sincro nico
troppo piccolo per permettere al monitor di sincronizzarsi correttamente.
• Regolare la frequenza di refresh del computer (frequenza verticale) per ottenere
l’immagine migliore.
• Regolare la luminosità e il contrasto (pagina 9).
• Smagnetizzare il monitor* (pagina 12).
• Selezionare ELIMINA MOIRÉ e regolare l’eliminazione dell’effetto moiré (pagina 12).
120 Hz
14
Page 71
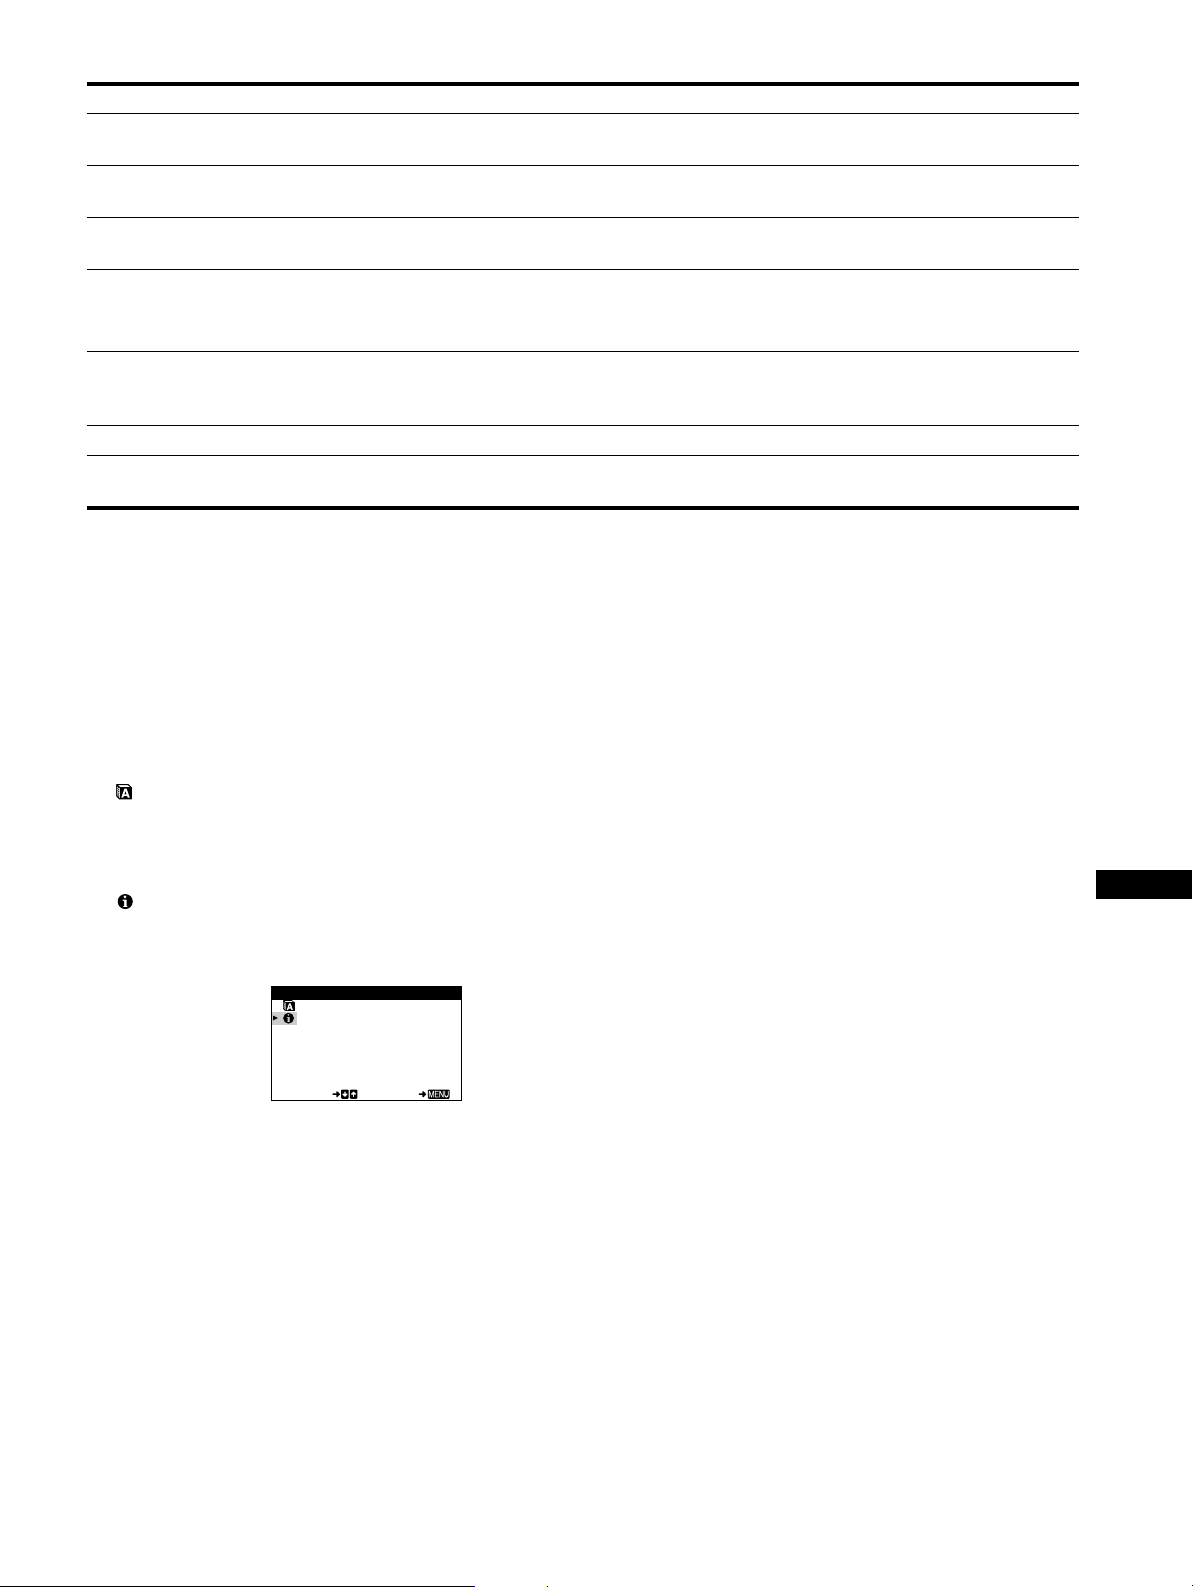
Sintomo Controllare quanto segue
L’immagine è sdoppiata
• Eliminare l’uso di prolunghe del cavo video e/o di cassette per l’interruttore video.
• Controllare che tutte le spine siano saldamente inserite nelle apposite prese.
L’immagine non è centrata o non è
delle dimensioni corrette
I bordi dell’immagine sono
incurvati
Sono visibili disturbi ondulati o
• Regolare la dimensione o la centratura (pagina 10). Si not i che alcuni modi video non
riempiono lo sc h er m o fino ai bordi.
• Selezion are CUSCINO/PIN BALANCE, TRAPEZIO/PARALL o ROTAZIONE, quindi
regolare la forma e la rotazione dell’immagine (pagine 10, 11).
• Selezionare ELIMINA MOIRÉ e regolare l’eliminazione dell’effetto moiré (pagina12).
ellittici (effetto moiré)
Problemi causati dal computer o da altre apparecchiature collegate
x
• Modificare il motivo del desktop.
Il colore non è uniforme
• Smagnetizzare il monitor* (pagina 12). Se si colloca vicino al monitor un’apparecchiatura
che genera un campo ma gnet ico, qua le un dif fusor e, oppu re se si modif ica la dir ezion e del
monitor, il colore potrebbe perdere uniformità.
Il bianco non è perfetto
Non appena si accende
l’apparecchio si sente un ronzio
* Nel caso in cui sia necessario un secondo ciclo di smagnetizzazione, attendere almeno 20 minuti per ottenere un risultato migliore. Potrebbe venire udito
un ronzio che non indica però un problema di funzionamento.
• Regolare la temperatura di colore (pagina 11).
• È il rumore del ciclo di smagnetizzazione automatica. Quando si attiva l’alimentazione, il
monitor viene automaticamente smagnetizzato per cinq ue secondi.
Visualizzazione del nome del monitor, del numero
di serie e della data di produzione
(INFORMAZIONE)
1
Premere il tasto di comando al centro.
Sullo schermo appare il MENU principale.
2
Spostare il tasto di comando m/M per evidenziare
LINGUA/INFORMAZIONE, quindi premere di
nuovo il tasto di comando al centro.
Sullo schermo appare il menu LINGUA/INFORMAZIONE.
3
Spostare il tasto di comando m/M per selezionare
(INFORMAZIONE).
Sullo schermo apparirà la finestra con le informazioni sul
monitor.
Esempio
L I NGUA/ I NFORMAZI ONE
MODE L : CPD - E100 E
SERI AL: 12345678
MANUF ACTURED: 1 9 99 - 5 2
SELECT EXI T
Se il problema persiste, rivo lgersi al rivendi tore autorizz ato Sony
comunicando le seguenti informazioni.
• Nom e del modello: CP D-E100E
• Numero di serie
• Nome e cara tteristiche tecniche del comp uter e della scheda
grafica.
IT
15
Page 72
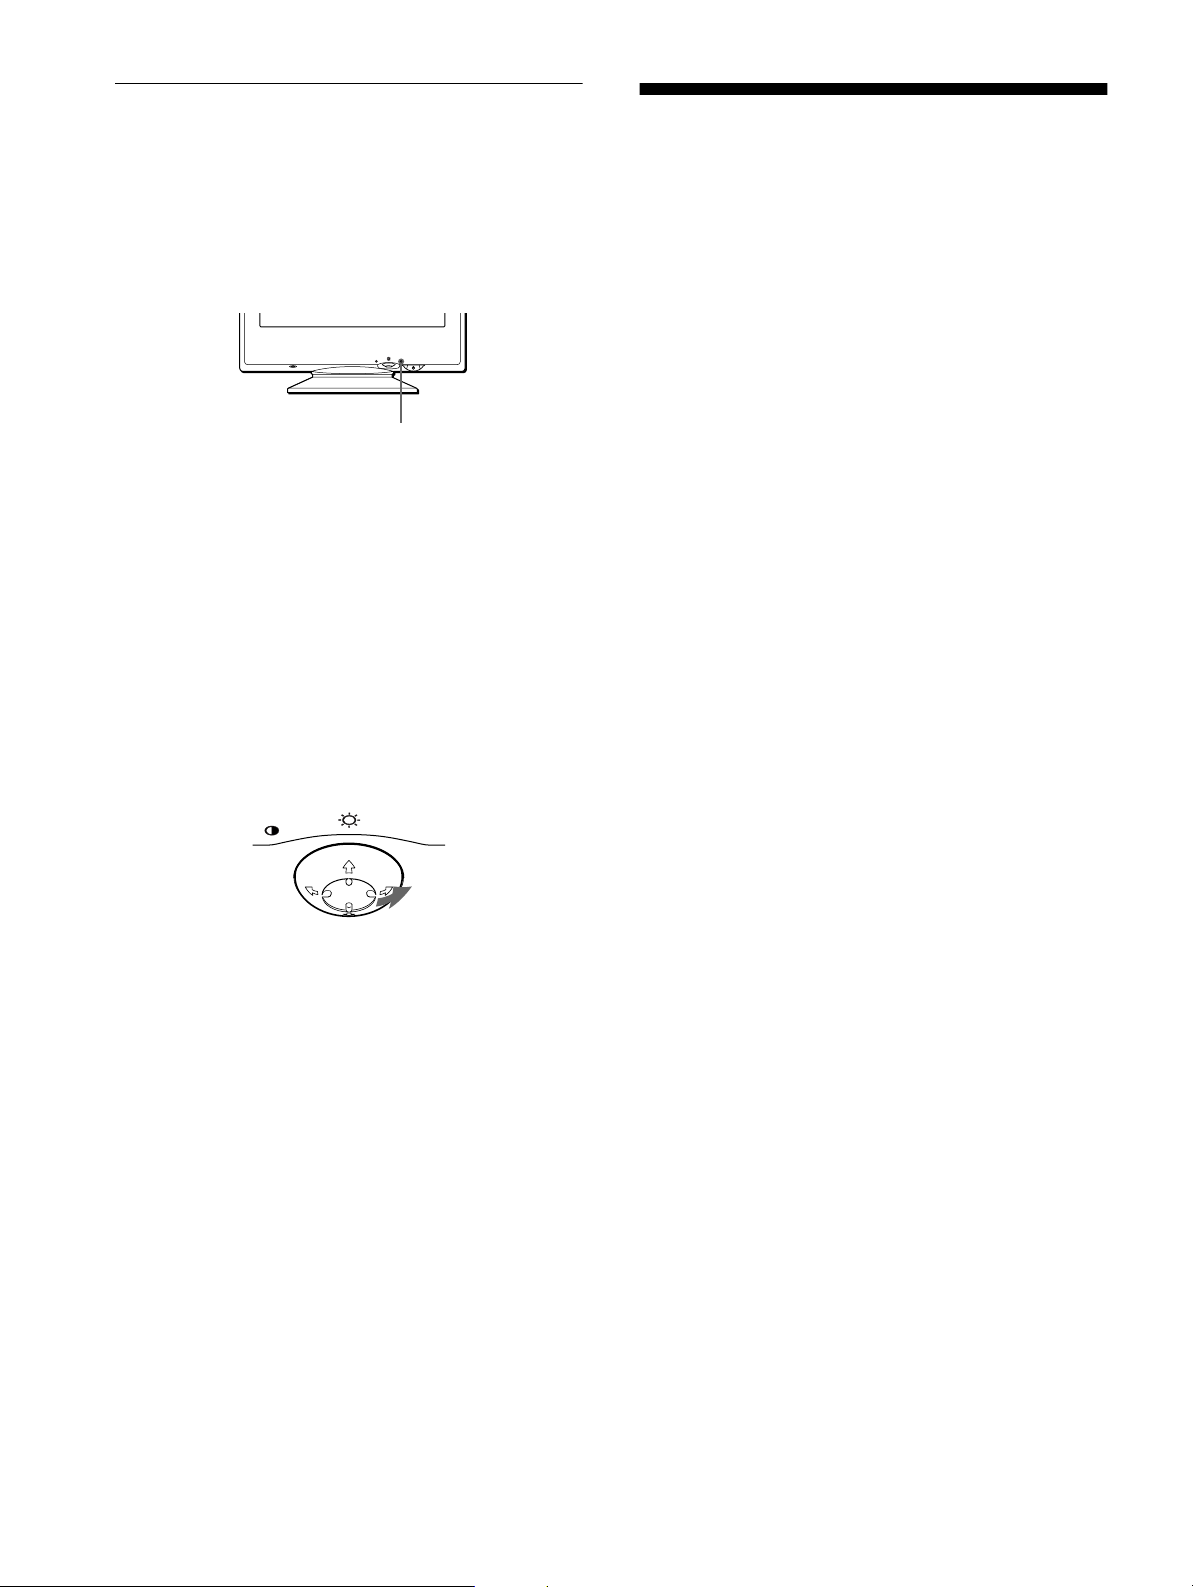
Funzione di autodiagnostica
Questo monitor dispone di una funzione di autodiagnostica. Se si
verificano problemi al monitor o al computer, lo schermo apparirà
vuoto e l’indicatore 1 (alimentazione) si illuminerà in verde o
lampeggerà in arancione. S e l’i ndicatore di accensione
1 (alimentazione) si illumina in arancione, significa che il
computer si trova nel modo di ris parmio energetico. Provare a
premere un tasto qualsiasi sulla tastiera.
RESET
Se l’indicatore di accensione 1 (alimentazione) è
verde
1
Scollegare il cavo di ingresso video o disattivare il
computer collegato.
2
Premere due volte il tasto di accensione
(alimentazione) per spegnere e accendere il
1
monitor.
3
Spostare il tasto di coman do , per 2 secondi prima
che il monitor entri nel modo di risparmio
energetico.
MENU
Indicatore di accensione
(alimentazione)
1
MENU
Caratteristiche tecniche
Tubo a raggi catodici (CRT)
passo della griglia di apertura (centro)
0,24 mm
15 pollici misurati in diagonale
Deflessione di 90 gr ad i
Dimensioni dell’immagine visibile
Circa 285 × 214 mm (l/a)
Immagine visibile 14,0"
Risoluzioni
Massimo Orizzontale: 1280 punti
Verticale: 1024 linee
Consigliate Orizzontale: 800 punti
Verticale: 600 linee
Area dell’immagine standard
Circa 270 × 202 mm (l/a)
Frequenza di deflessione* Orizzontale: da 30 a 70 kHz
Verticale: da 48 a 120 Hz
Tensione/corrente di ingresso CA
da 100 a 240 V, 50 – 60 Hz,
1,2 – 0,6 A
Consumo energetico 95 W max.
×
Dimensioni Circa 356
Peso Circa 14 kg
Plug and Play DDC1/DDC2B
Accessori in dotazione Vedere a pagina 6
* Condizione di sincronizzazione verticale e orizzontale
consigliata
• L’ampi ezza della sincronizzazione ori zzontale dovrebbe
essere superiore a 1,0 µsec.
• L’ampiezza di oscuramento orizzontale dovrebbe essere più
di 3,6 µsec.
• L’ampiezza di oscuramento verticale dovrebbe essere più di
500 µsec.
378 × 388 mm (l/a/p)
Se vengono vis u alizzate le quattro barre d i c olore (bianco , r o s s o,
verde e blu), significa che il monitor funziona correttamente.
Ricollegare il cavo di ingresso video e controllare le condizioni
del computer.
Se le barre a colori non appaiono, si tratta di un potenzia le guasto
al monitor. Rivolgersi al rivenditore aut orizzato Sony.
Se l’indicatore di accensione 1 (alimentazione)
lampeggia in arancione
Premere due volte il tasto di accensione
(alimentazione) per spegne re e ac cendere il monitor.
1
Se l’indicatore di accensione 1 (alimentazione) si illumina in
verde, significa che il monitor funziona correttamente.
Se l’indicatore di accensione 1 (alimentazione) continua a
lampeggiare, si trat ta di un po tenz iale gu asto al monit or. Cont are
il numero di secondi tra il lampeggiamento nel colore arancione
dell’indicatore di accensione 1 (alimentazione) e rivolgersi al
rivenditore autorizzato Sony. Annotare il nome del modello e il
numero di serie del monitor. Inoltre, annotare la marca e il
modello del proprio computer e della scheda video.
Il design e le caratteristiche tecniche sono soggetti a modifi che
senza preavviso.
16
Page 73
Содержание
Меры предосторожности. . . . . . . . . . . . . . . . . . . . . . . . . . . . . . . . 4
Идентификация деталей и органов управления. . . . . . . . . . . . . 5
Подготовка к работе. . . . . . . . . . . . . . . . . . . . . . . . . . . .6
• Trinitron зарегистрированная
торговая марка Sony Corporation.
• Macintosh является торговой
маркой Apple Computer, Inc.,
зарегистрированной в США и
других странах.
• Windows
зарегистрированными торговыми
марками Microsoft Corporation в
США и других странах.
• IBM PC/AT и VGA являются
зарегистрированными торговыми
марками IBM Corporation в США.
• VESA и DDC
торговыми марками Video
Electronics Standard Association.
•
E
зарегистрированной маркой в
США.
• Остальные названия продуктов,
упомянутые в этом документе,
могут являться
зарегистрированными торговыми
марками или торговыми марками
соответствующих владельцев.
• В дальнейшем “” и “” не
упоминаются в этом
руководстве.
и MS-DOS являются
являются
NERGY STAR является
Шаг 1:
Шаг 2:
Шаг 3:
Подключите монитор к компьютеру. . . . . . . . . . . . . . . . . 6
Подключите кабель питания. . . . . . . . . . . . . . . . . . . . . . . 6
Включите монитор и компьютер . . . . . . . . . . . . . . . . . . . . 7
Выбор языка в экранном меню
(LANGUAGE/ИНФОРМАЦИЯ) . . . . . . . . . . . . . . . . . . . . . . . . . . . . 7
Подстройка монитора. . . . . . . . . . . . . . . . . . . . . . . . . . .8
Перемещение по экранному меню . . . . . . . . . . . . . . . . . . . . . . . . 8
Регулировка яркости и контрастности изображения . . . . . . . . . 9
Подстройка размера или центровки изображения по
горизонтали (ГОРИЗ.РАЗМЕР/ЦЕНТР). . . . . . . . . . . . . . . . . . . . 10
Подстройка размера и центровки изображения по вертикали
(ВЕРТИК.РАЗМЕР/ЦЕНТР) . . . . . . . . . . . . . . . . . . . . . . . . . . . . . 10
Подстройка изгибов сторон изображения
(ПОДУШКА/ДУГА) . . . . . . . . . . . . . . . . . . . . . . . . . . . . . . . . . . . . . 10
Подстройка угла сторон изображения
(ТРАПЕЦ/ПАРАЛЛЕЛОГРАМ) . . . . . . . . . . . . . . . . . . . . . . . . . . . 10
Регулировка поворота растрового изображения
(ВРАЩЕНИЕ). . . . . . . . . . . . . . . . . . . . . . . . . . . . . . . . . . . . . . . . . 11
Увеличение или уменьшение изображения (МАСШТАБ) . . . . . 11
Регулировка цвета изображения (ЦВЕТ). . . . . . . . . . . . . . . . . . 11
Дополнительные настройки (РАЗМАГ./ПОДАВЛ.МУАРА) . . . . 12
Cброс настроек. . . . . . . . . . . . . . . . . . . . . . . . . . . . . . . . . . . . . . . 12
Технические особенности . . . . . . . . . . . . . . . . . . . . . .13
Предустановленные режимы и настройка пользователем . . . 13
Функция экономии энергии . . . . . . . . . . . . . . . . . . . . . . . . . . . . . 13
Устранение неисправностей . . . . . . . . . . . . . . . . . . . .13
Демпферная нить . . . . . . . . . . . . . . . . . . . . . . . . . . . . . . . . . . . . . 13
Экранные сообщения . . . . . . . . . . . . . . . . . . . . . . . . . . . . . . . . . . 13
Симптомы неполадок и действия по их устранению . . . . . . . . 14
Функция самодиагностики. . . . . . . . . . . . . . . . . . . . . . . . . . . . . . 16
Технические характеристики . . . . . . . . . . . . . . . . . . .16
Appendix. . . . . . . . . . . . . . . . . . . . . . . . . . . . . . . . . . . . . . . i
Preset mode timing table . . . . . . . . . . . . . . . . . . . . . . . . . . . . . . . . . .i
TCO’99 Eco-document . . . . . . . . . . . . . . . . . . . . . . . . . . . . . . . . . . . .i
RU
3
Page 74
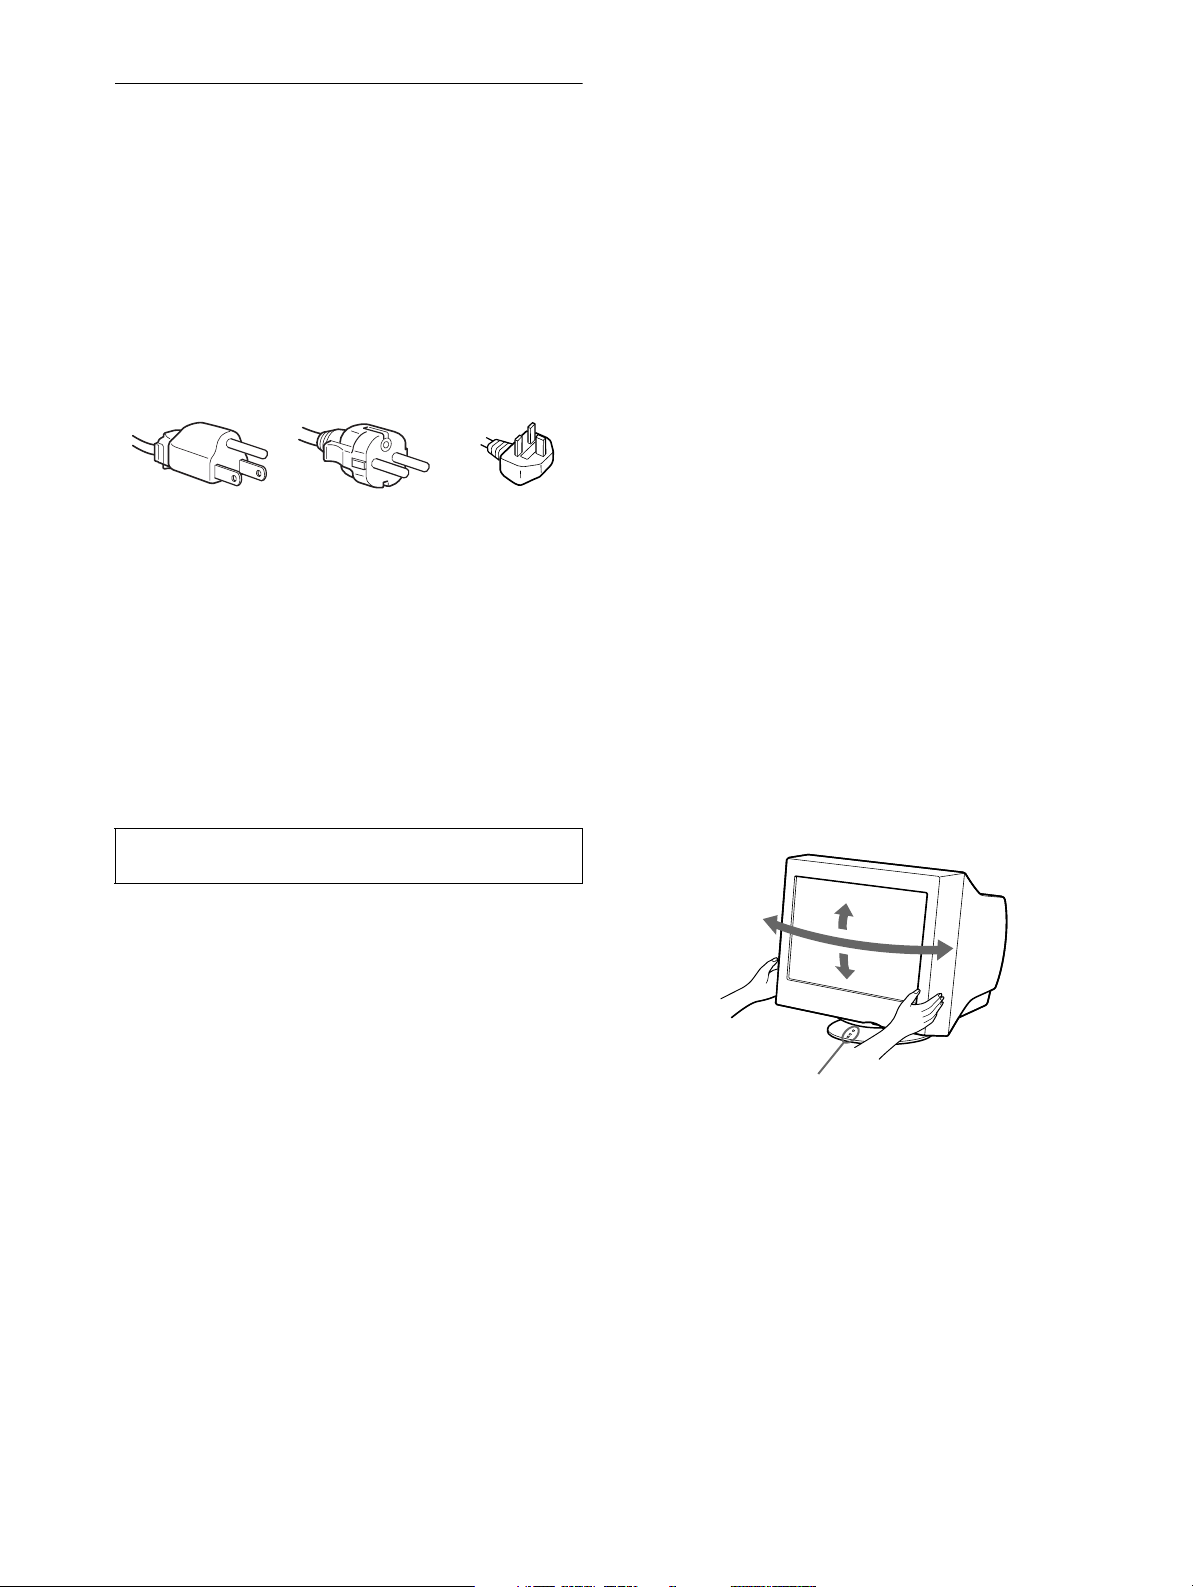
Меры предосторожности
а
90°
5°
90°
15°
Центрирующие точки
Меры предосторожности при подключении к
сети электропитания
• Используйте кабель питания, поставляемый с
монитором. При использовании другого кабеля
питания убедитесь в том, что он подходит для
использования в местной сети.
Для покупателей в Великобритании
При использовании монитора в Великобритании
пользуйтесь поставляемым с монитором кабелем
питания с разъемом для Великобритании.
Примеры сетевых вилок
для 100 - 120 В
переменного тока
• Отсоединяйте кабель питания от сети не раньше,
чем через 30 секунд после выключения питания
монитора, когда уменьшится заряд статического
электричества на поверхности экрана.
• После включения питания в течение приблизительно
5 секунд происходит размагничивание трубки
монитора. При этом вокруг экрана возникает
сильное магнитное поле, способное повредить
данные на магнитных лентах и дискетах,
находящихся рядом с монитором. Поэтому
магнитофоны, кассеты и дискеты следует держать
на некотором расстоянии от прибора.
для 200 - 240 В
переменного тока
только для 240 В
переменного ток
Уход
• Протирайте экран мягкой тканью. При
использовании химических средств для чистки
стекла не применяйте жидкости, содержащие
антистатические или аналогичные добавки, так как
они могут повредить покрытие экрана.
• Не следует прикасаться к дисплею, скрести или
стучать по нему острыми или шершавыми
предметами (шариковой ручкой, отверткой). Это
может привести к появлению царапин на
поверхности электронно-лучевой трубки.
• Протирайте корпус, дисплей и панель управления
мягкой тканью, слегка смоченной в слабом растворе
моющего средства. Не пользуйтесь грубыми
терками, абразивными пастами или такими
растворителями, как спирт или бензин.
Транспортировка
При перевозке монитора или его доставке в
ремонтную мастерскую пользуйтесь заводской
картонной коробкой и упаковочными материалами.
Использование шарнирной опоры с
изменяемым углом наклона
Монитор можно устанавливать в удобное положение,
изменяя углы наклона, как показано на рисунке ниже.
Чтобы найти центр радиуса поворота монитора,
совместите центр экрана монитора с центрирующими
точками на подставке.
Поворачивая монитор по горизонтали или вертикали,
держите его за нижнюю часть обеими руками. Будьте
осторожны, не прищемите пальцы с обратной стороны
монитора, поворачивая его вверх по вертикали.
Сетевая розетка должна находиться в легко
доступном месте вблизи прибора.
Установка
Не устанавливайте монитор в следующих местах:
• на мягких поверхностях (коврики, одеяла и т.д.) или
вблизи других материалов (занавески, портьеры),
которые могут преградить доступ воздуха к
вентиляционным отверстиям
• вблизи источников тепла, таких как батареи или
воздуховоды, а также в местах, где возможно
попадание прямого солнечного света
• где наблюдаются резкие колебания температуры
• где присутствует вибрация или резкие механические
воздействия
• на неустойчивой поверхности
• рядом с источниками магнитных полей, такими как
трансформаторы или высоковольтные кабели
• рядом или на металлической поверхности с
наличием электрического заряда
4
Page 75
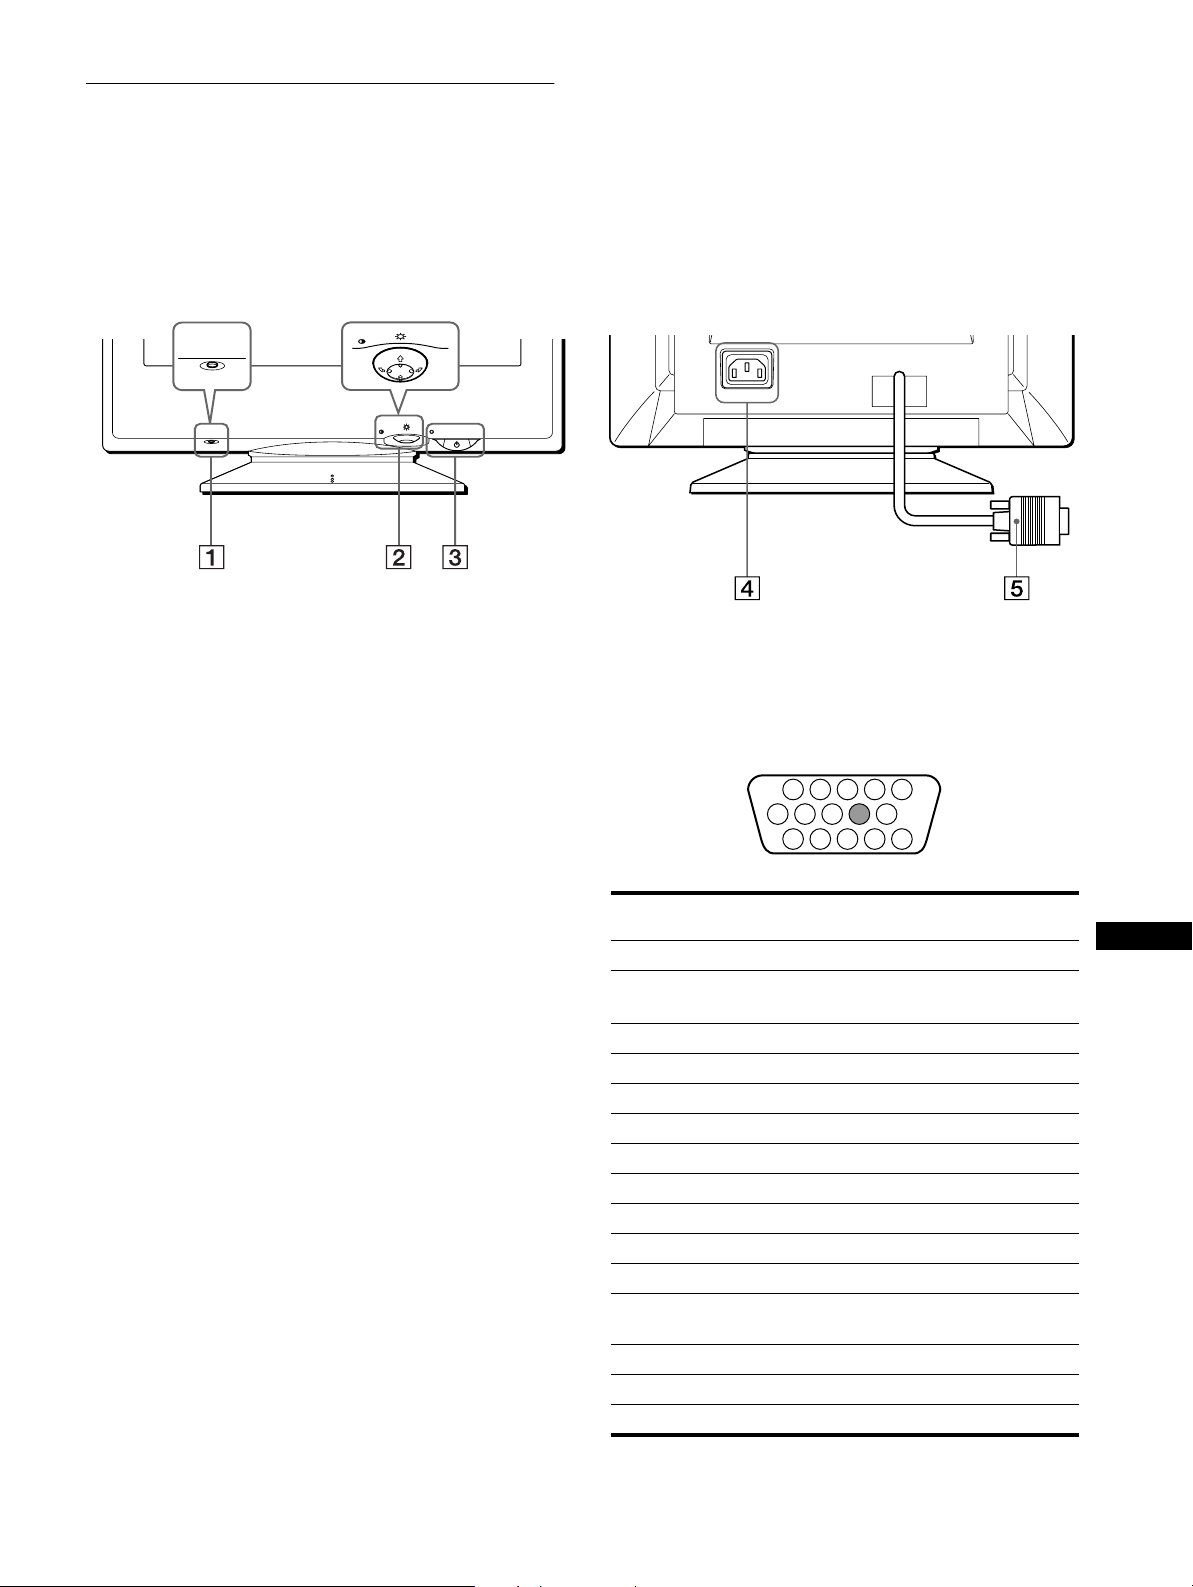
Идентификация деталей и
1 2 3 4
5
876
11 12 13 14 15
10
9
органов управления
См. страницы в скобках для получения подробных
сведений.
MENU
RESET
RESET
MENU
Задняя панельПередняя панель
AC IN
1111 Кнопка RESET (сброс) (стр. 12)
Возвращает параметры к исходным значениям,
установленным на заводе.
2222 Кнопка управления (стр. 9)
Кнопка управления используется для отображения
меню и выполнения настроек монитора, включая
регулировку яркости и контрастности.
3333 Выключатель и индикатор 1 (питание)
(стр.7,13,16)
Включает и выключает монитор. Когда монитор
включен, индикатор горит зеленым, а когда
монитор в режиме экономии энергии, он горит или
мигает зеленым и оранжевым, или просто
оранжевым.
4 Гнездо AC IN (стр. 6)
Подает электрическое питание на монитор.
5555 Гнездо видеовхода (HD15) (стр. 6)
Подает видеосигналы RGB (0,700 Vp-p, положит.) и
сигналы синхронизации.
Номер
Сигнал
штырька
1Красный
2 Зеленый
(Синхронизация по зеленому)
3 Синий
4 ID (Заземление)
5 Заземление DDC
*
6 Заземление красного
7 Заземление зеленого
8 Заземление синего
9–
10 Заземление
11 ID (Заземление)
12 Канал двустороннего обмена данных
*
(SDA)
13 Гориз. синхронизация
14 Верт. синхронизация
15 Хронометраж данных (SCL)
*
RU
* Display Data Channel (DDC) является стандартом VESA.
5
Page 76
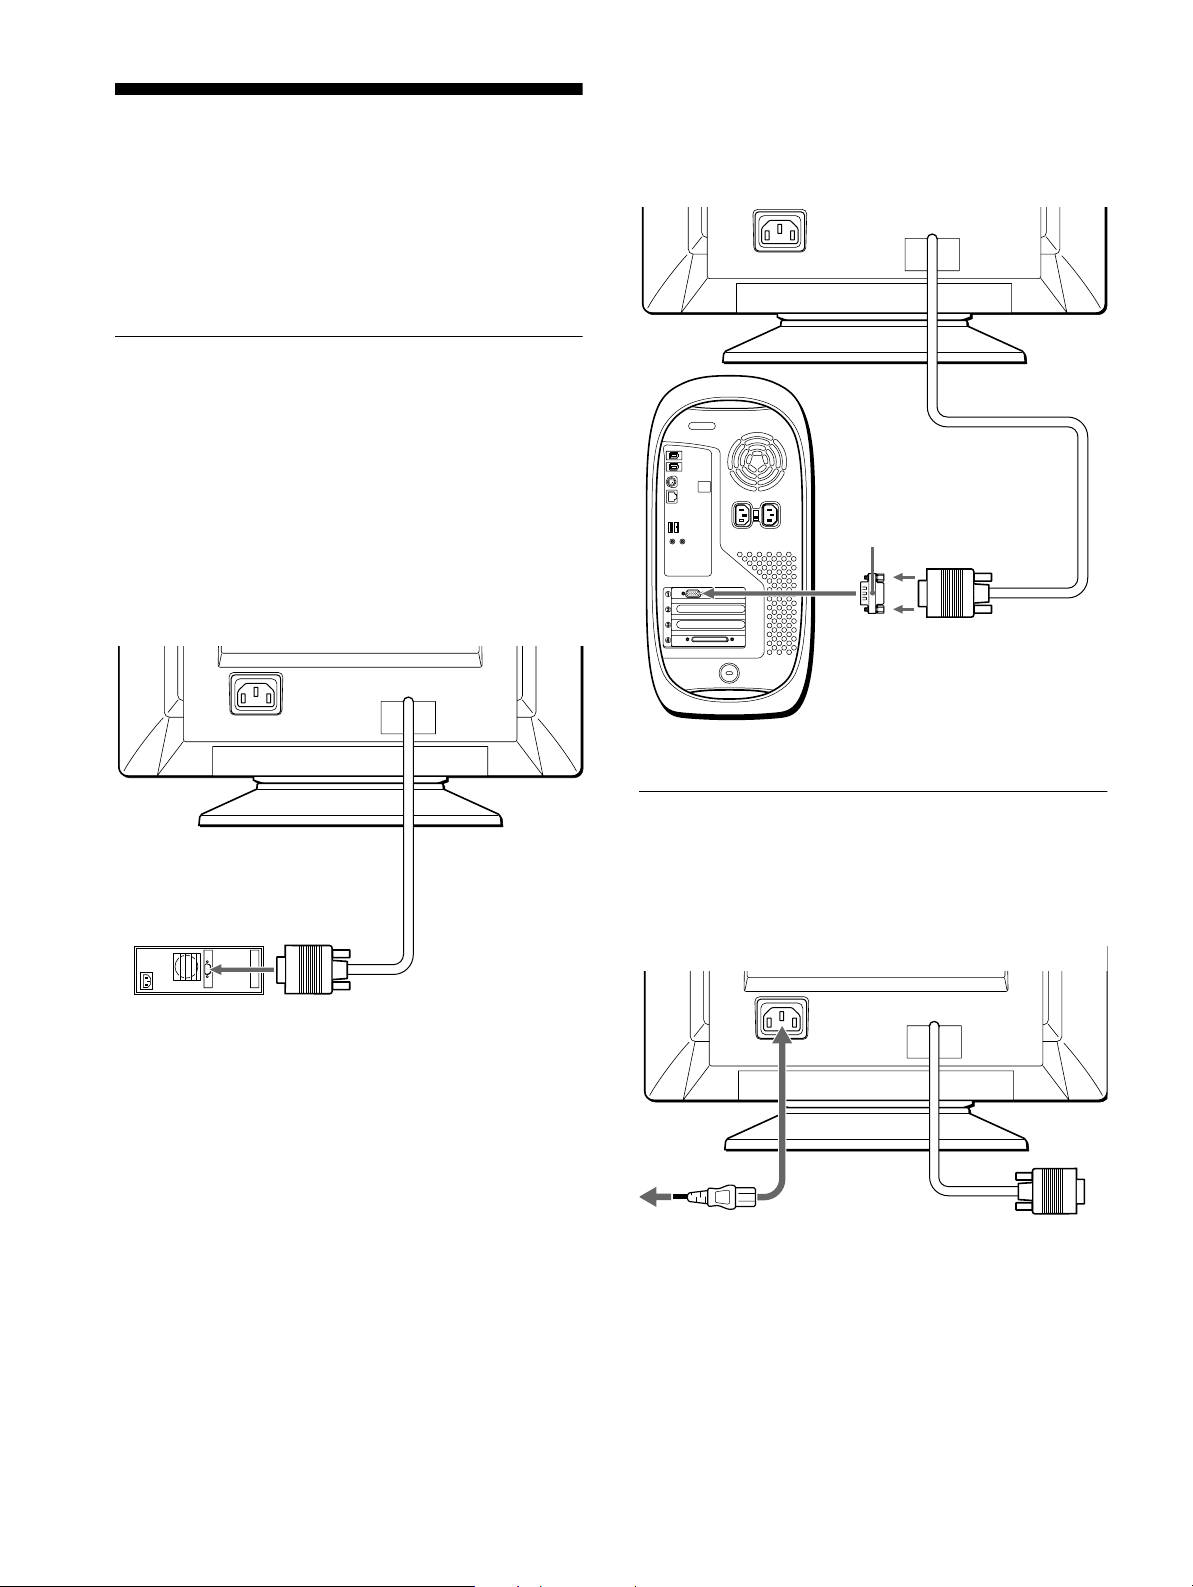
Подготовка к работе
AC IN
Необходимо использовать переходник для Macintosh
(не входит в комплект).
Переходник для Macintosh
(не входит в комплект)
Компьютер Macintosh
или совместимый с ним
к видеовыходу
AC IN
к гнезду
AC IN
к сетевой розетке
кабель питания
(входит в комплект)
Перед использованием монитора проверьте наличие в
коробке следующих принадлежностей:
• Кабель питания (1)
• Дискета Windows Monitor Information Disk (1)
• Гарантийный талон (1)
• Примечания по чистке поверхности экрана (1)
• Настоящая инструкция по эксплуатации (1)
Шаг 1: Подключите монитор к
компьютеру
Перед подключением монитор и компьютер должны
быть выключены.
Примечание
Не следует прикасаться к штырькам разъема кабеля
видеосигнала, так как при этом их можно согнуть.
x Подключение к компьютеру IBM PC/AT
или совместимому с ним
x Подключение к компьютеру Macintosh
или совместимому с ним
AC IN
к видеовыходу
Компьютер IBM PC/AT
или совместимый
Шаг 2: Подключите кабель
питания
Не включая монитор и компьютер, подключите
сначала кабель питания к монитору, затем включите
его в розетку электропитания.
6
Page 77
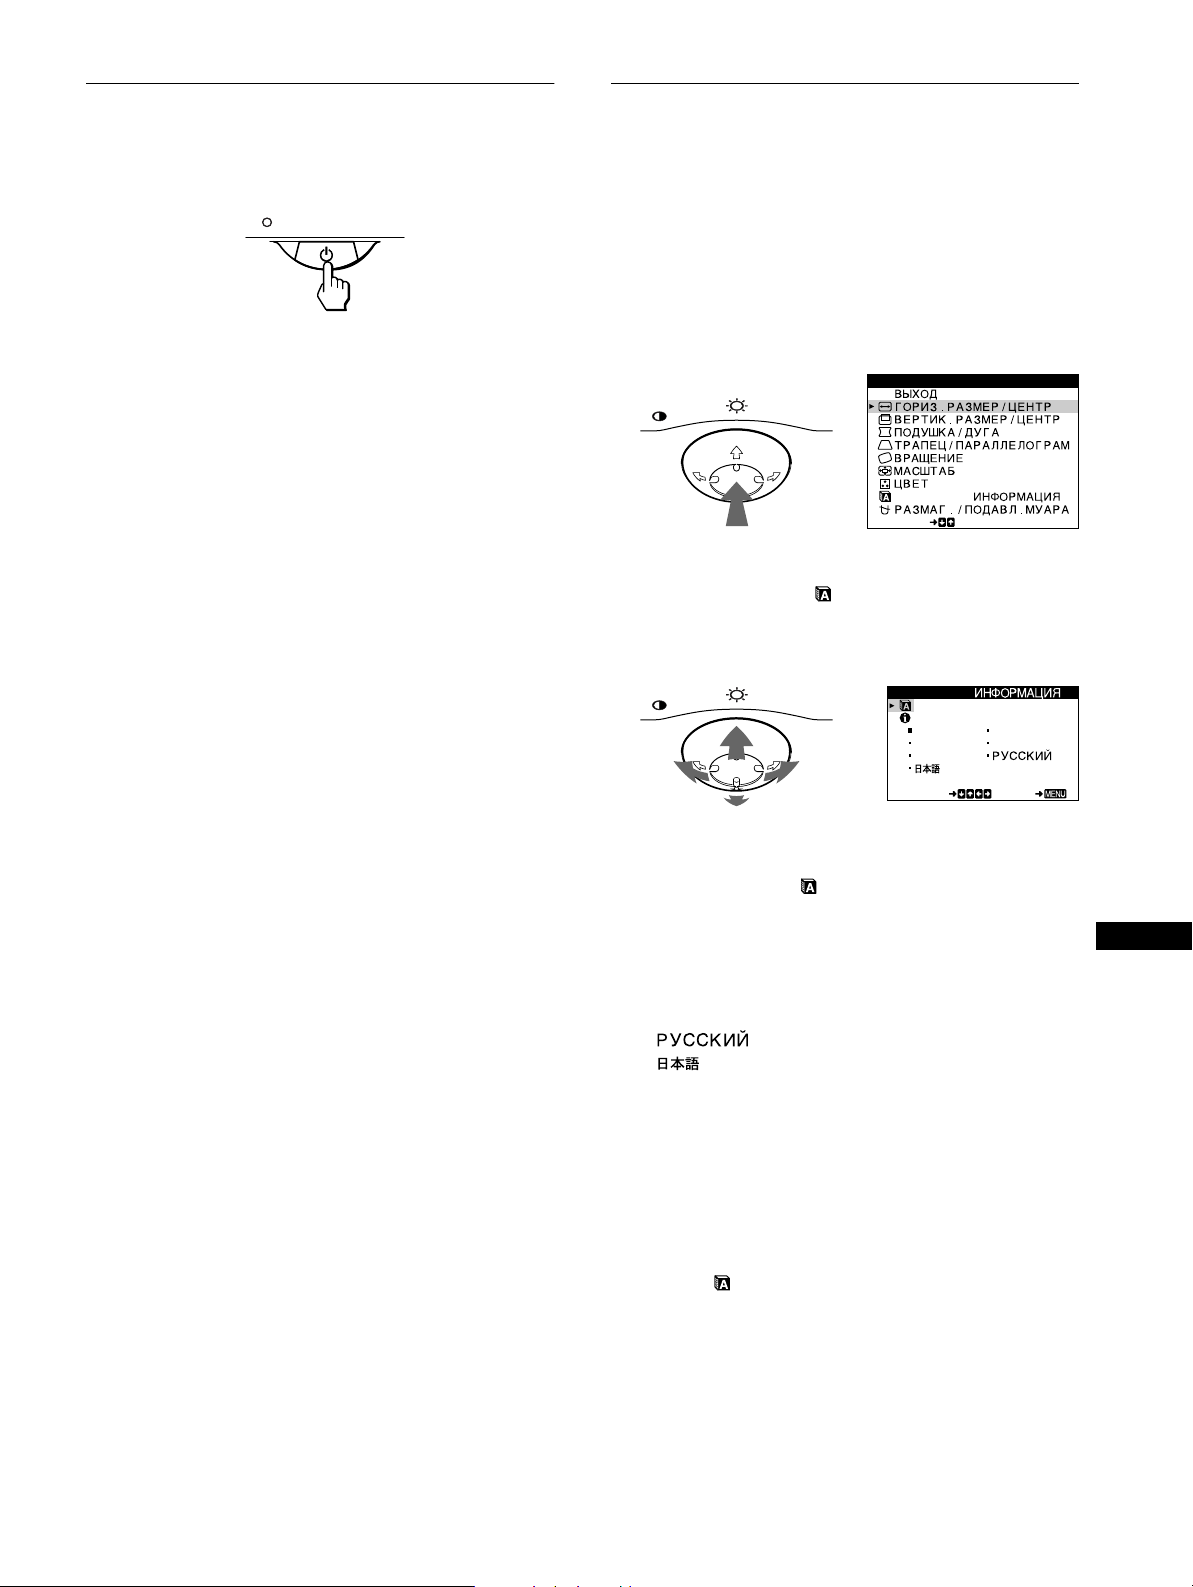
Шаг 3: Включите монитор и
компьютер
Сначала следует включить монитор, а затем
компьютер.
Подключение монитора завершено.
Если необходимо, воспользуйтесь органами
управления монитора для настройки изображения.
Если на экране отсутствует изображение
• Проверьте, правильно ли монитор подключен к
компьютеру.
• Если на экране появляется сообщение “НЕТ
ВХОДНОГО СИГНАЛА”, убедитесь, что плата
графического адаптера компьютера надежно
вставлена в гнездо шины.
• Если данная модель устанавливается вместо
старого монитора, и на экране появляется
сообщение “НЕДОПУСТИМЫЙ ГРАФИЧЕСКИЙ
РЕЖИМ”, верните прежний монитор на место. Затем
настройте графический адаптер, так чтобы частота
горизонтальной развертки была в диапазоне
30 – 70 кГц, а частота вертикальной развертки - в
диапазоне 48 – 120 Гц.
Выбор языка в экранном меню
(LANGUAGE/ИНФОРМАЦИЯ)
Можно пользоваться версиями экранных меню на
английском, французском, немецком, итальянском,
испанском, русском и японском языках. По умолчанию
используется английский язык.
1
Нажмите в центре кнопки управления.
См. стр. 9 для получения подробных сведений о
кнопке.
MENU
2
Переместите кнопку управления m/M, чтобы
выделить элемент LANGUAGE/
ИНФОРМАЦИЯ, и нажмите снова в центре
кнопки управления.
MENU
MENU
LANGUAGE /
SELECT
LANGUAGE /
Дополнительные сведения об экранных сообщениях
см. “Симптомы неполадок и действия по их
устранению” на стр. 14.
Для пользователей Windows 95/98
Для максимального использования возможностей монитора
установите на своем компьютере файл, содержащий
сведения о новых моделях мониторов, с прилагаемой
дискеты “Windows Monitor Information Disk”.
Данный монитор соответствует стандарту Plug & Play “VESA
DDC”. Если компьютер, графическая карта совместимы с
DDC, выберите в качестве типа монитора в панели
управления “Control Panel” Windows 95/98 элемент “Plug &
Play Monitor (VESA DDC)” или название данной модели. Если
компьютер, графическая карта не могут правильно
установить контакт с монитором, загрузите дискету “Windows
Monitor Information Disk” и укажите название данной модели в
качестве типа монитора.
Для пользователей Windows NT4.0
Настройка монитора в Windows NT4.0 производится иначе,
чем в Windows 95/98, и не требует выбора типа монитора.
Подробные сведения о выборе нужного разрешения, частоты
регенерации и количества воспроизводимых цветов см. в
руководстве для Windows NT4.0.
Регулировка разрешения монитора и количества
воспроизводимых цветов
Регулировку разрешения монитора и количества цветов
выполняйте с помощью инструкции по эксплуатации
компьютера. Количество цветов может варьироваться в
зависимости от модели компьютера или видеокарты. Ниже
перечислены параметры настройки цветовой палитры и
действительное количество цветов:
• High Color (16 бит) t 65 536 цветов
• True Color (24 бит) t около 16,77 миллионов цветов
В режиме “true color” (24 бит) скорость может снижаться.
ENGL I SH FRANÇA I S
DEUTSCH I T AL I ANO
ESPAÑOL
SELECT EXI T
3
Переместите кнопку управления m/M, чтобы
выбрать элемент (LANGUAGE), и переместите
для выбора языка.
</,
• ENGLISH: Английский
FRANÇAIS
•
: Французский
• DEUTSCH: Немецкий
• ITALIANO: Итальянский
ESPAÑOL
•
: Испанский
•
• : Японский
Чтобы закрыть меню
Один раз нажмите в центре кнопки управления, чтобы
вернуться в главное меню (MENU), а затем нажмите снова,
выбрав элемент ВЫХОД, - для возврата в нормальный режим
просмотра. Если кнопки не были нажаты, то экранное меню
автоматически исчезает приблизительно через 30 секунд.
Чтобы снова установить английский язык
Нажмите кнопку RESET (сброс) во время отображения на
экране меню (LANGUAGE) (язык).
RU
7
Page 78
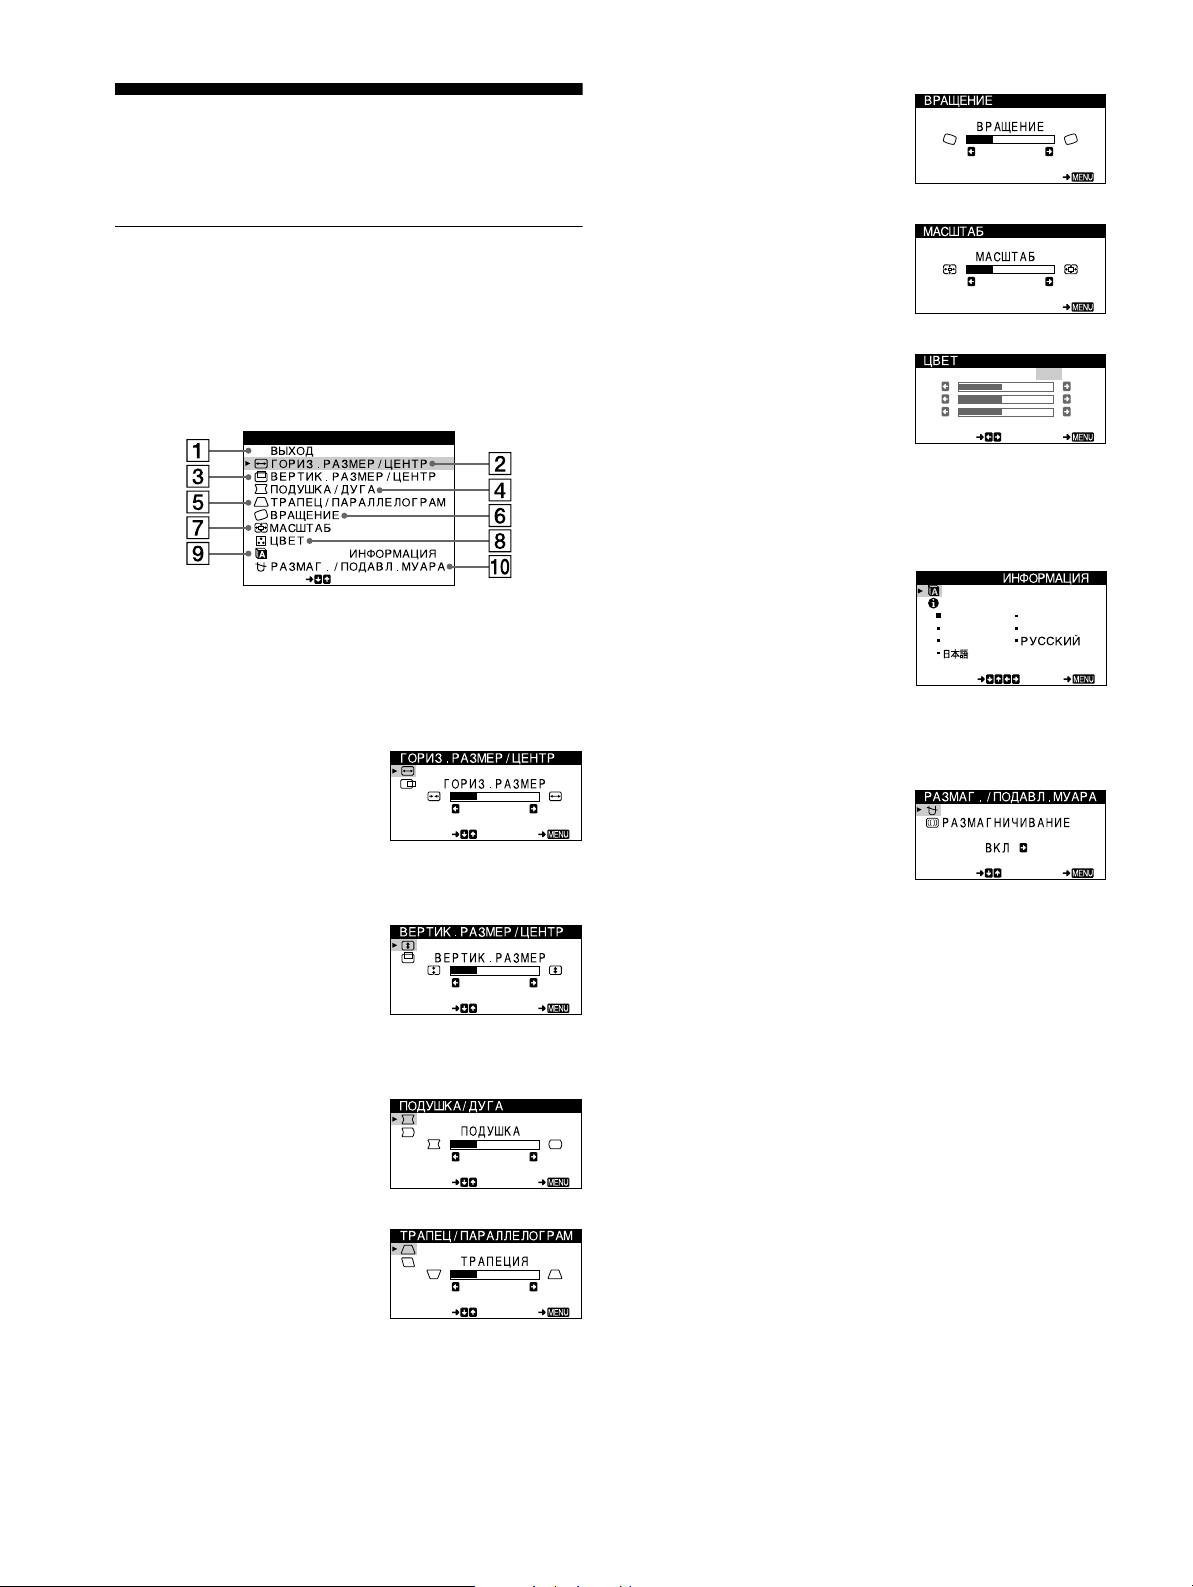
Подстройка монитора
Большая часть настроек монитора производится с
помощью экранного меню.
Перемещение по экранному
меню
Нажмите в центре кнопки управления для
отображения на экране главного меню (MENU). См.
стр. 9 для получения подробных сведений о кнопке
управления.
MENU
LANGUAGE /
SELECT
Используйте кнопку управления для выбора любого из
следующих меню.
1111 ВЫХОД
Выберите ВЫХОД, чтобы
закрыть меню.
2222 ГОРИЗ.РАЗМЕР/ЦЕНТР
(стр. 10)
Выводит на дисплей меню
ГОРИЗ.РАЗМЕР/ЦЕНТР
для подстройки размера и
центровки изображения по
горизонтали.
3333 ВЕРТИК.РАЗМЕР/ЦЕНТР
(стр. 10)
Выводит на дисплей меню
ВЕРТИК.РАЗМЕР/ЦЕНТР
для подстройки размера и
центровки изображения по
вертикали.
SELECT EXI T
SELECT EXI T
26
26
6666 ВРАЩЕНИЕ (стр. 11)
Выводит на дисплей меню
ВРАЩЕНИЕ для
подстройки поворота
изображения.
7777 МАСШТАБ (стр. 11)
Выводит на дисплей меню
МАСШТАБ для уменьшения
или увеличения
изображения.
8888 ЦВЕТ (стр. 11)
Выводит на дисплей меню
ЦВЕТ для подстройки
цветовой температуры.
Может использоваться для
приведения в соответствие
цветов монитора с цветами
распечатываемых
изображений.
9999 LANGUAGE/
ИНФОРМАЦИЯ
(стр. 7, 15)
Выводит на дисплей меню
LANGUAGE/
ИНФОРМАЦИЯ для выбора
языка и отображения
информационного окна для
данной модели монитора.
0000 РАЗМАГ./ПОДАВЛ.МУАРА
(стр. 12)
Выводит на дисплей меню
РАЗМАГ./ПОДАВЛ.МУАРА
для размагничивания
экрана и устранения
муарового фона.
26
EX I T
26
EX I T
KKK
5000 6500 9300
USER
R50
G50
B50
SELECT EXI T
LANGUAGE /
ENGL I SH FRANÇA I S
DEUTSCH I T A L IANO
ESPAÑOL
SELECT EXI T
SELECT EXI T
4444 ПОДУШКА/ДУГА (стр. 10)
Выводит на дисплей меню
ПОДУШКА/ДУГА для
подстройки изгиба сторон
изображения.
5555 ТРАПЕЦ/
ПАРАЛЛЕЛОГРАМ
(стр. 10)
Выводит на дисплей меню
ТРАПЕЦ/ПАРАЛЛЕЛОГРАМ
для подстройки угла сторон
изображения.
8
26
SELECT EXI T
26
SELECT EXI T
Page 79
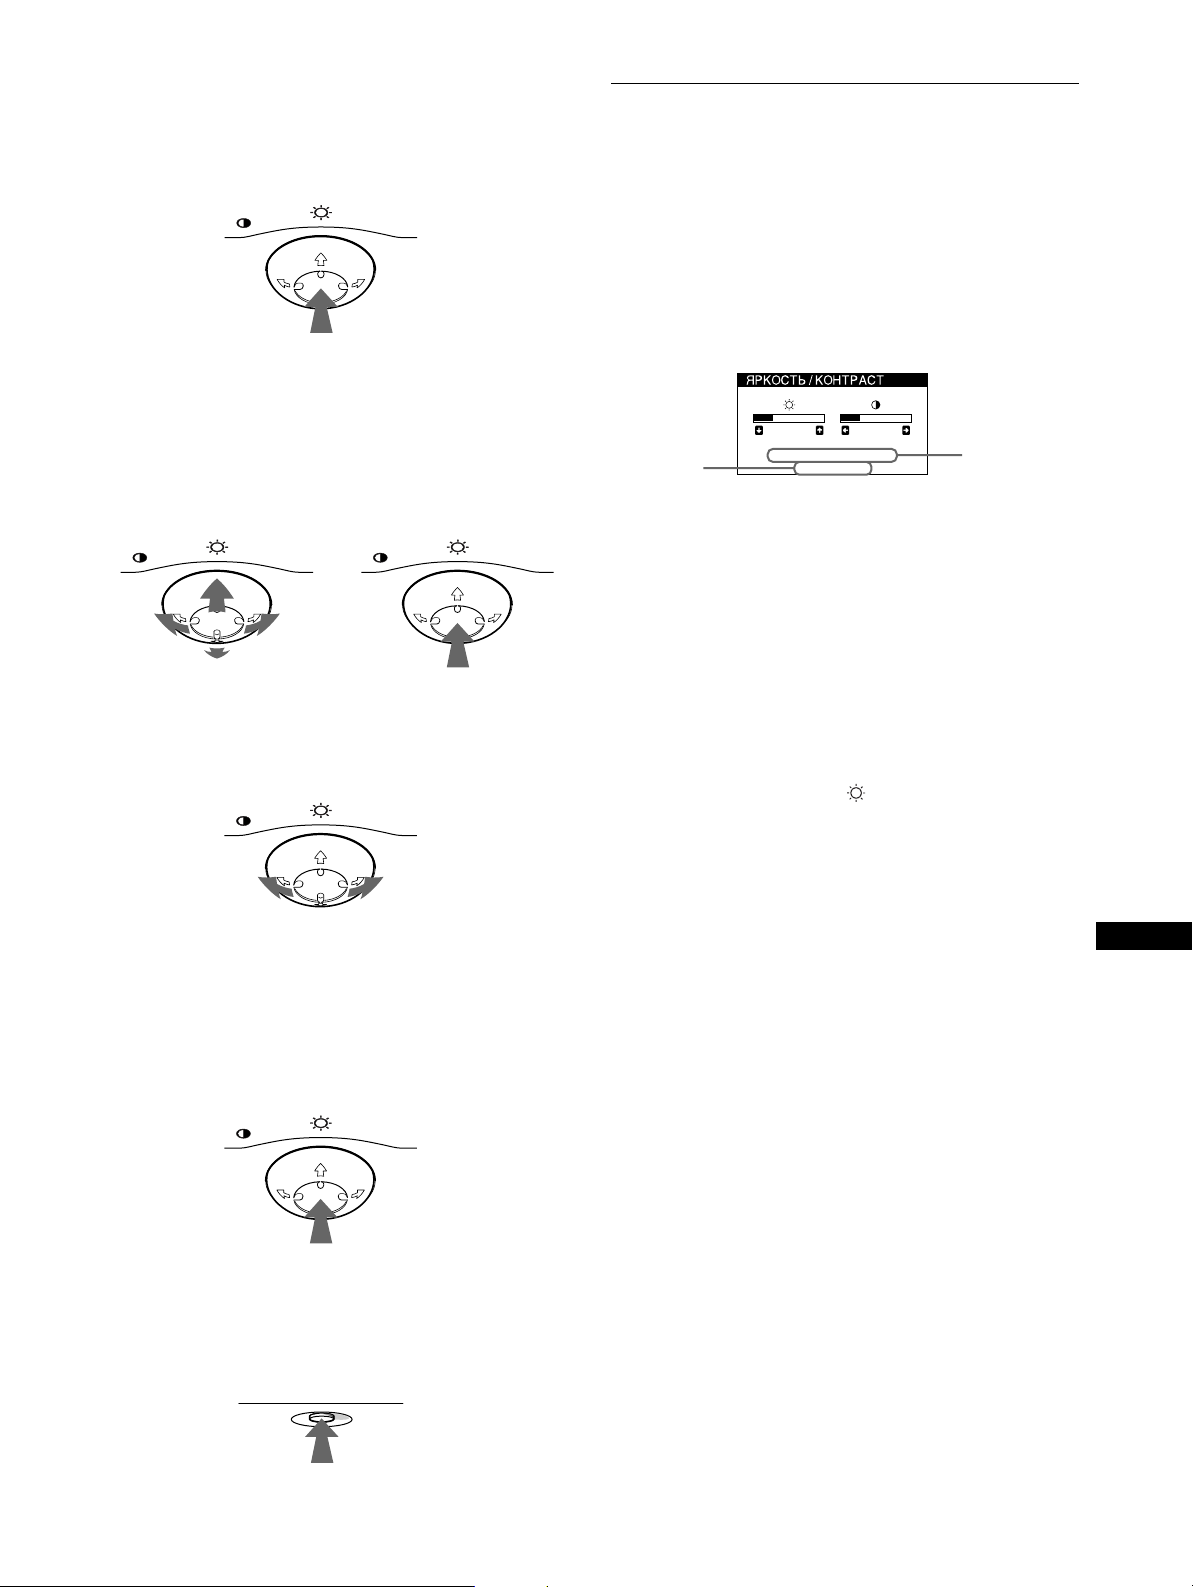
x Использование кнопки управления
разрешение
текущего
входного
сигнала
частоты для
горизонтальной
и вертикальной
разверток
текущего
входного
сигнала
1
Отображение главного меню (MENU).
Нажмите в центре кнопки управления для
отображения на экране главного меню (MENU).
MENU
2
Выберите меню, в котором необходимо
выполнить подстройку.
Выделите нужное меню путем перемещения кнопки
управления вперед - для перехода вверх (M),
назад - для перехода вниз (m), а также влево (<)
или вправо (,) - для перехода в ту или иную
сторону.
ВПЕРЕД
MENU MENU
НАЗАД
3
Выполните подстройку меню.
Переместите кнопку управления влево (<) или
вправо (,) для выполнения подстройки.
MENU
Регулировка яркости и
контрастности изображения
Регулировка яркости и контрастности выполняется с
помощью отдельного меню ЯРКОСТЬ/КОНТРАСТ.
Все настройки сохраняются в памяти для всех входных
сигналов.
1
Переместите кнопку управления в любом
направлении.
На экране появляется меню ЯРКОСТЬ/КОНТРАСТ.
26 26
68.7kHz/85.0Hz
1024X768
Частоты для горизонтальной и вертикальной
разверток текущего входного сигнала
отображаются в главном меню (ЯРКОСТЬ/
КОНТРАСТ). Также отображается разрешение,
если сигнал соответствует одному из режимов
данного монитора, предварительно установленных
на заводе.
2
Переместите кнопку управления m/M для
регулировки яркости ( ) и </, для
регулировки контрастности (6).
Меню автоматически исчезает приблизительно
через 3 секунды.
4
Закройте меню.
Один раз нажмите в центре кнопки управления,
чтобы вернуться в главное меню (MENU), а затем
нажмите снова, выбрав элемент ВЫХОД, - для
возврата в нормальный режим просмотра. Если
кнопки не были нажаты, то экранное меню
автоматически исчезает приблизительно через 30
секунд.
MENU
xxxx Cброс настроек
Нажмите кнопку RESET (сброс). См. стр. 12 для
получения подробных сведений о выполнении сброса
настроек.
RESET
RU
9
Page 80
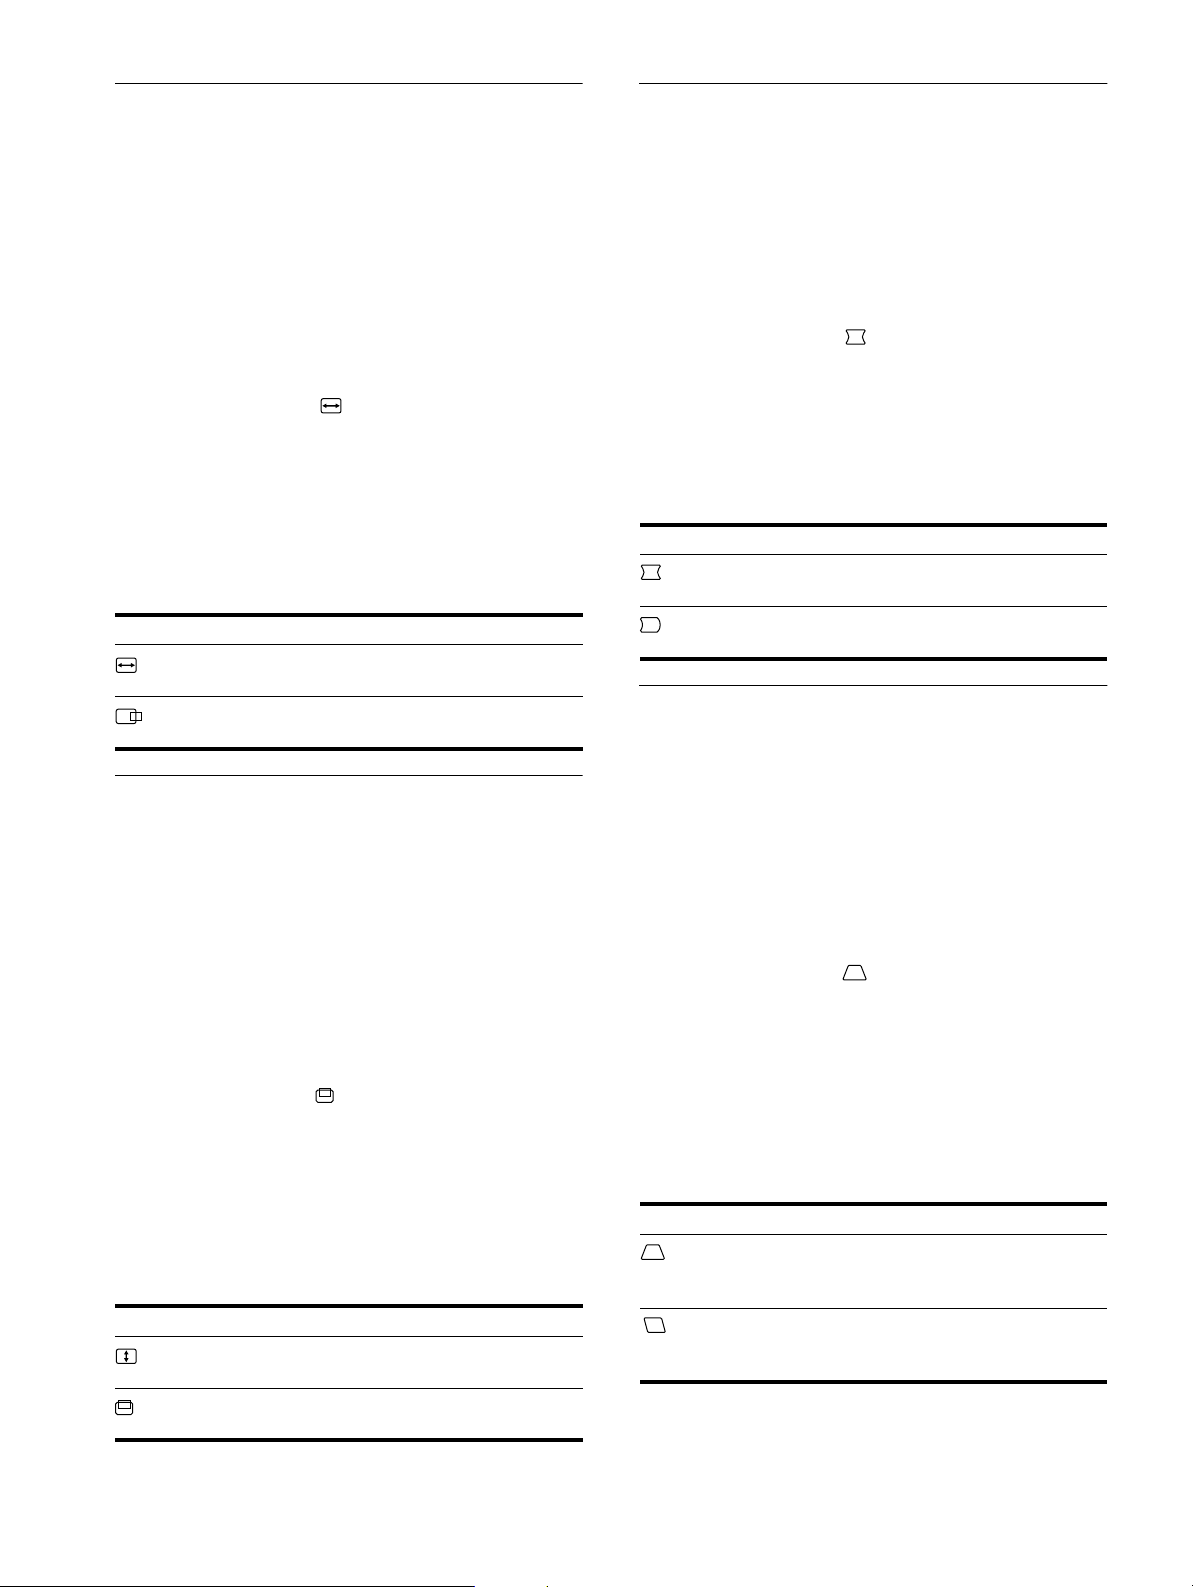
Подстройка размера или
Подстройка изгибов сторон
центровки изображения по
горизонтали
(ГОРИЗ.РАЗМЕР/ЦЕНТР)
Эта настройка сохраняется в памяти для текущего
входного сигнала.
1
Нажмите в центре кнопки управления.
На экране появляется главное меню (MENU).
2
Переместите кнопку управления m/M, чтобы
выделить элемент ГОРИЗ.РАЗМЕР/ЦЕНТР, и
нажмите снова в центре кнопки управления.
На экране появляется меню ГОРИЗ.РАЗМЕР/
ЦЕНТР.
3
Сначала переместите кнопку управления m/M
для выбора элемента, который нужно
подстроить. Затем переместите кнопку
управления </, для выполнения подстройки.
Выберите Чтобы
ГОРИЗ.РАЗМЕР
ГОРИЗ.ЦЕНТР
подстроить размер по
горизонтали
подстроить центровку по
горизонтали
Подстройка размера и
центровки изображения по
вертикали
(ВЕРТИК.РАЗМЕР/ЦЕНТР)
изображения (ПОДУШКА/ДУГА)
Данные настройки сохраняются в памяти для текущего
входного сигнала.
1
Нажмите в центре кнопки управления.
На экране появляется главное меню (MENU).
2
Переместите кнопку управления m/M, чтобы
выделить элемент ПОДУШКА/ДУГА, и
нажмите снова в центре кнопки управления.
На экране появляется меню ПОДУШКА/ДУГА.
3
Сначала переместите кнопку управления m/M
для выбора элемента, который нужно
подстроить. Затем переместите кнопку
управления </, для выполнения подстройки.
Выберите Чтобы
ПОДУШКА
ДУГА
расширить или сузить края
изображения
сместить края изображения
влево или вправо
Подстройка угла сторон
изображения
(ТРАПЕЦ/ПАРАЛЛЕЛОГРАМ)
Данные настройки сохраняются в памяти для текущего
входного сигнала.
1
Нажмите в центре кнопки управления.
На экране появляется главное меню (MENU).
Эта настройка сохраняется в памяти для текущего
входного сигнала.
1
Нажмите в центре кнопки управления.
На экране появляется главное меню (MENU).
2
Переместите кнопку управления m/M, чтобы
выделить элемент ВЕРТИК.РАЗМЕР/ЦЕНТР, и
нажмите снова в центре кнопки управления.
На экране появляется меню ВЕРТИК.РАЗМЕР/
ЦЕНТР.
3
Сначала переместите кнопку управления m/M
для выбора элемента, который нужно
подстроить. Затем переместите кнопку
управления </, для выполнения подстройки.
Выберите Чтобы
ВЕРТИК.РАЗМЕР
ВЕРТИК.ЦЕНТР
подстроить размер по
вертикали
подстроить центровку по
вертикали
2
Переместите кнопку управления m/M, чтобы
выделить элемент ТРАПЕЦ/
ПАРАЛЛЕЛОГРАМ, и нажмите снова в центре
кнопки управления.
На экране появляется меню ТРАПЕЦ/
ПАРАЛЛЕЛОГРАМ.
3
Сначала переместите кнопку управления m/M
для выбора элемента, который нужно
подстроить. Затем переместите кнопку
управления </, для выполнения подстройки.
Выберите Чтобы
ТРАПЕЦ
ПАРАЛЛЕЛОГРАМ
отрегулировать ширину
изображения в верхней
части экрана
сместить изображение влево
или вправо в верхней части
экрана
10
Page 81
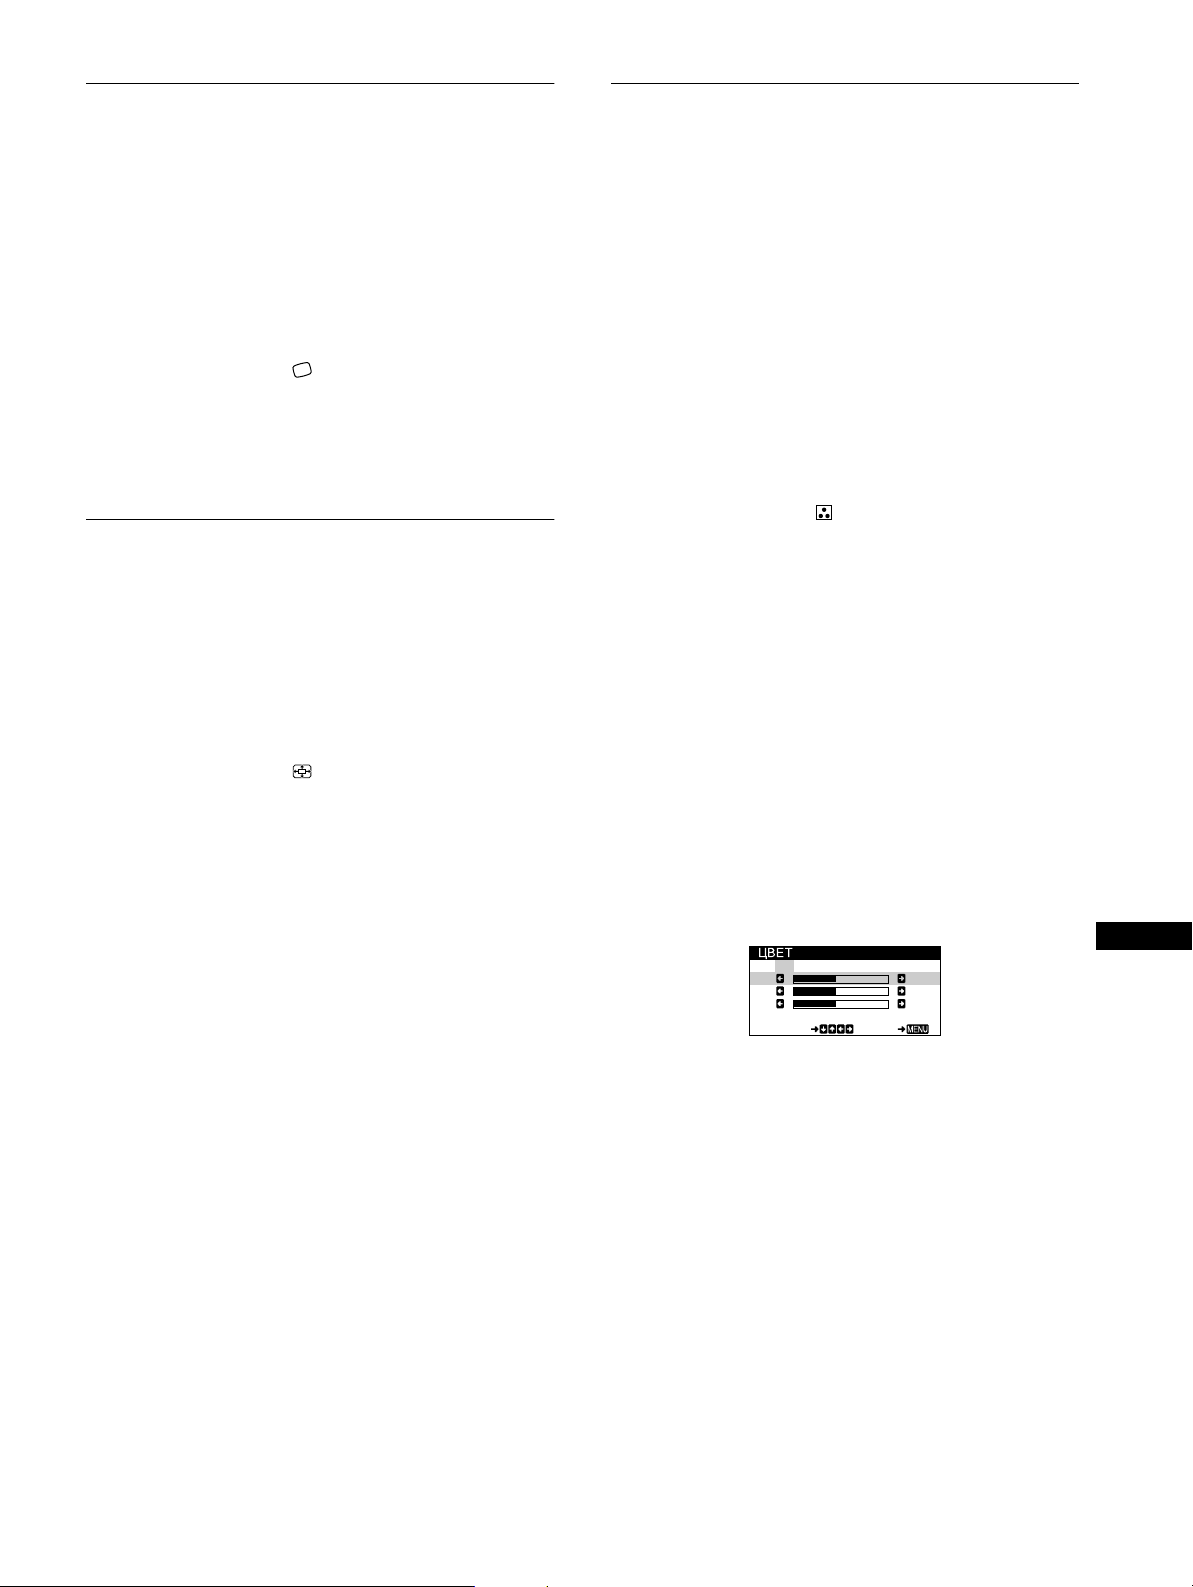
Регулировка поворота
KKK
R50
G50
B50
SELECT EXI T
5000 6500 9300
USER
Регулировка цвета изображения
растрового изображения
(ВРАЩЕНИЕ)
Эта настройка сохраняется в памяти для всех входных
сигналов.
1
Нажмите в центре кнопки управления.
На экране появляется главное меню (MENU).
2
Переместите кнопку управления m/M, чтобы
выделить элемент ВРАЩЕНИЕ, и нажмите
снова в центре кнопки управления.
На экране появляется меню ВРАЩЕНИЕ.
3
Переместите кнопку управления </, для
поворота изображения.
Увеличение или уменьшение
изображения (МАСШТАБ)
Эта настройка сохраняется в памяти для текущего
входного сигнала.
1
Нажмите в центре кнопки управления.
На экране появляется главное меню (MENU).
2
Переместите кнопку управления m/M, чтобы
выделить элемент МАСШТАБ, и нажмите
снова в центре кнопки управления.
На экране появляется меню МАСШТАБ.
3
Переместите кнопку управления </, для
увеличения или уменьшения изображения.
Примечание
Регулировка прекращается, когда размер по вертикали или
горизонтали достигает своего максимального или
минимального значения.
(ЦВЕТ)
Настройки меню ЦВЕТ позволяют отрегулировать
цветовую температуру изображения путем изменения
уровня насыщенности поля белого цвета. В цветовой
гамме доминирует красный цвет при небольшой
температуре, и синий цвет - при высокой температуре.
Данная настройка может пригодиться для приведения
в соответствие цветов монитора с цветами
распечатываемых изображений.
Эта настройка сохраняется в памяти для всех входных
сигналов.
1
Нажмите в центре кнопки управления.
На экране появляется главное меню (MENU).
2
Переместите кнопку управления m/M, чтобы
выделить элемент ЦВЕТ, и нажмите снова в
центре кнопки управления.
На экране появляется меню ЦВЕТ.
3
Переместите кнопку управления </,, чтобы
выбрать цветовую температуру.
Заданные цветовые температуры: 5000K, 6500K и
9300K. Так как 9300K является установкой по
умолчанию, то при уменьшении температуры до
6500K и 5000K синеватые оттенки в белом цвете
будут сменяться красноватыми.
4
Если необходимо, выполните точную
настройку.
Сначала переместите кнопку управления </,,
чтобы выбрать функцию USER. Затем переместите
кнопку управления m/M, чтобы выбрать R
(красный), G (зеленый) или B (голубой), и
переместите </, для выполнения подстройки.
RU
Если выполняется точная настройка цветовой
температуры, то новые цветовые настройки
сохраняются в памяти и вызываются из нее
каждый раз при выборе функции USER.
11
Page 82
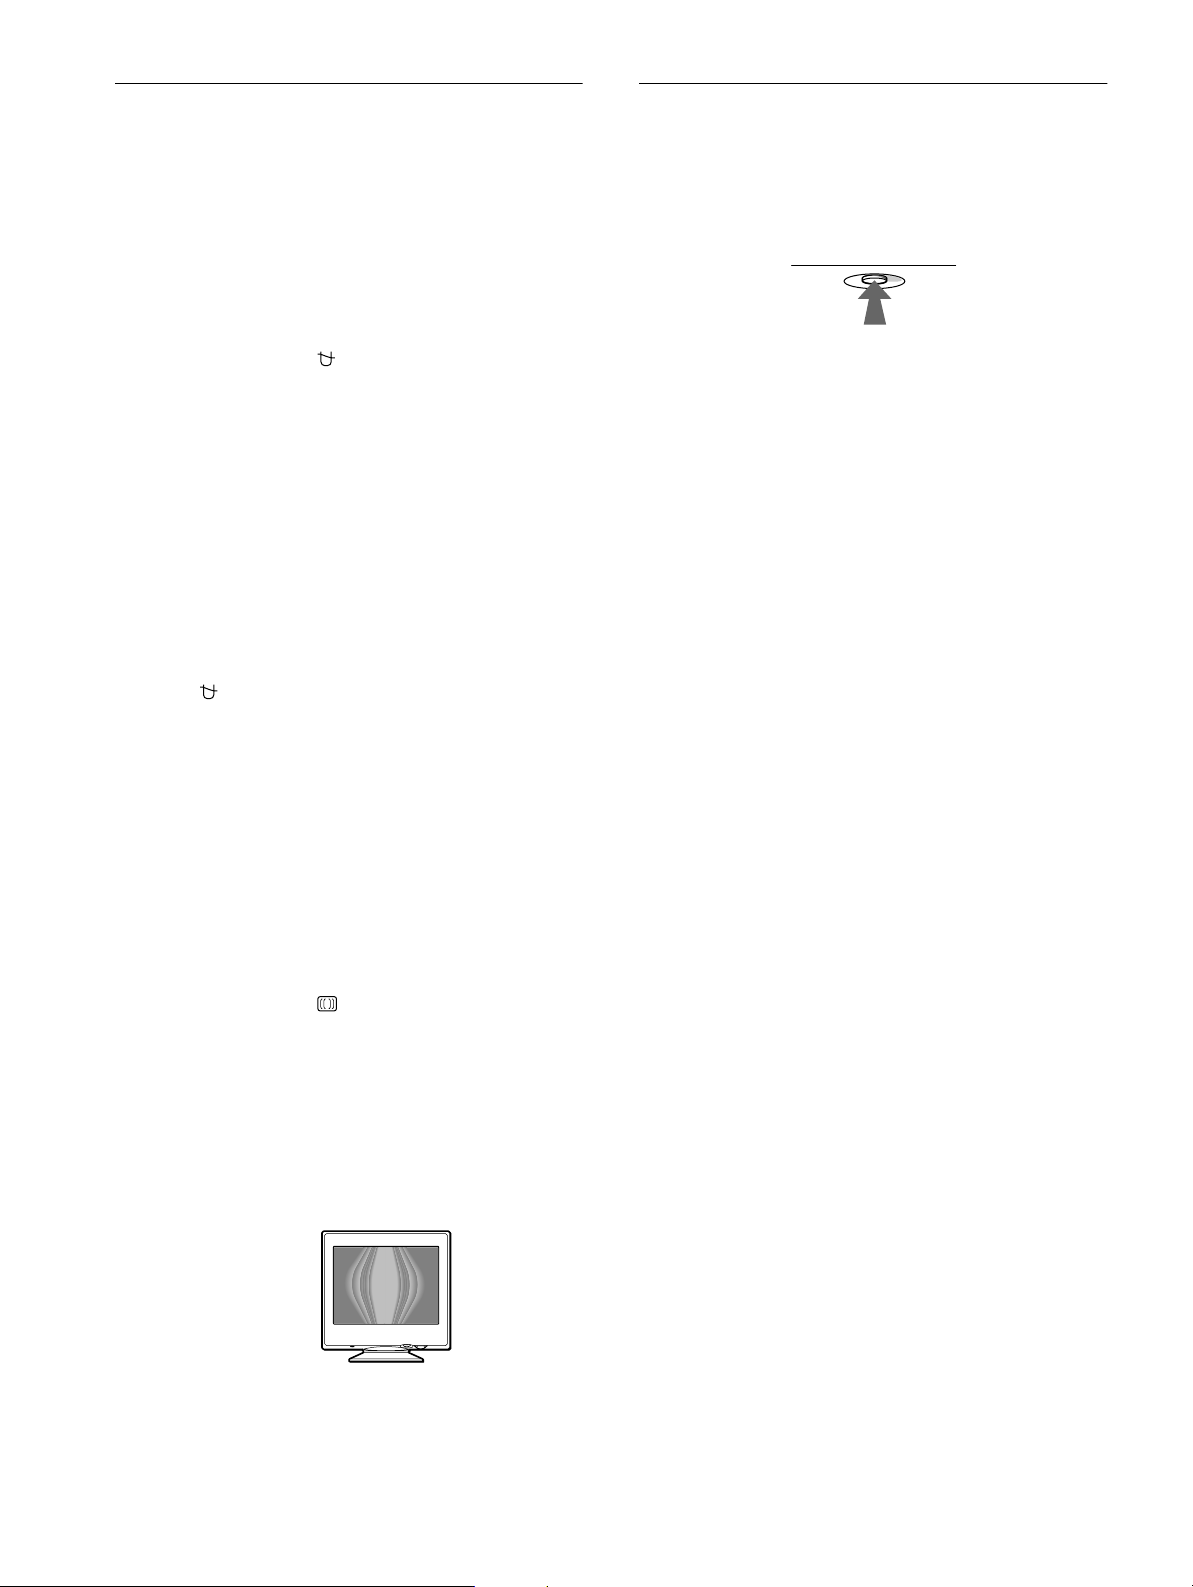
Дополнительные настройки
RESET
Cброс настроек
(РАЗМАГ./ПОДАВЛ.МУАРА)
Размагничивание монитора, регулировку уровня
устранения муарового фона можно производить
вручную.
1
Нажмите в центре кнопки управления.
На экране появляется главное меню (MENU).
2
Переместите кнопку управления m/M, чтобы
выделить элемент РАЗМАГ./ПОДАВЛ.МУАРА,
и нажмите снова в центре кнопки управления.
На экране появляется меню РАЗМАГ./
ПОДАВЛ.МУАРА.
3
Переместите кнопку управления m/M для
выбора элемента, который нужно подстроить.
Настройте выбранный элемент в соответствии со
следующими указаниями.
Размагничивание экрана
После включения питания происходит автоматическое
размагничивание монитора.
Для размагничивания монитора вручную сначала
переместите кнопку управления m/M для выбора
функции (РАЗМАГНИЧИВАНИЕ). Затем
переместите кнопку управления ,.
В течение приблизительно 5 секунд происходит
размагничивание трубки монитора. Если потребуется
повторить процесс размагничивания, это можно
сделать, как минимум, через 20 минут, для того чтобы
получить наилучший результат.
Регулировка муарового фона
В случае возникновения на экране волнистых или
дугообразных линий необходимо подстроить уровень
устранения муарового фона.
Для регулировки степени устранения муарового
фона сначала переместите кнопку управления m/M
для выбора функции (ПОДАВЛЕНИЕ МУАРА).
Затем переместите кнопку управления </,, пока
муаровый эффект не будет сведен до минимума.
*
В данном мониторе существует три способа сброса
настроек. Для сброса настроек воспользуйтесь
кнопкой RESET (сброс).
Сброс отдельного элемента настройки
Воспользуйтесь кнопкой управления для выбора
элемента, который нужно подстроить, и нажмите
кнопку RESET (сброс).
Сброс всех данных настройки для текущего
входного сигнала
Нажмите кнопку RESET (сброс), когда на экране
отсутствуют меню.
Необходимо помнить, что этим способом нельзя
сбросить настройки следующих элементов:
• язык экранного меню (стр. 7)
• поворот изображения (стр. 11)
Сброс всех данных настройки для всех
входных сигналов
Нажмите и удерживайте кнопку RESET (сброс) не
менее 2 секунд.
Необходимо помнить, что этим способом нельзя
сбросить настройки следующего элемента:
• пользовательские настройки в меню ЦВЕТ (стр. 11)
* Муаровый фон представляет собой разновидность
естественных помех на изображении, которая имеет вид
плавных волнистых линий. Он может возникать в
результате интерференции между текстурой изображения,
формируемого данным входным сигналом, и решеткой
точечных элементов экрана электронно-лучевой трубки.
Пример
муарового фона
12
Page 83
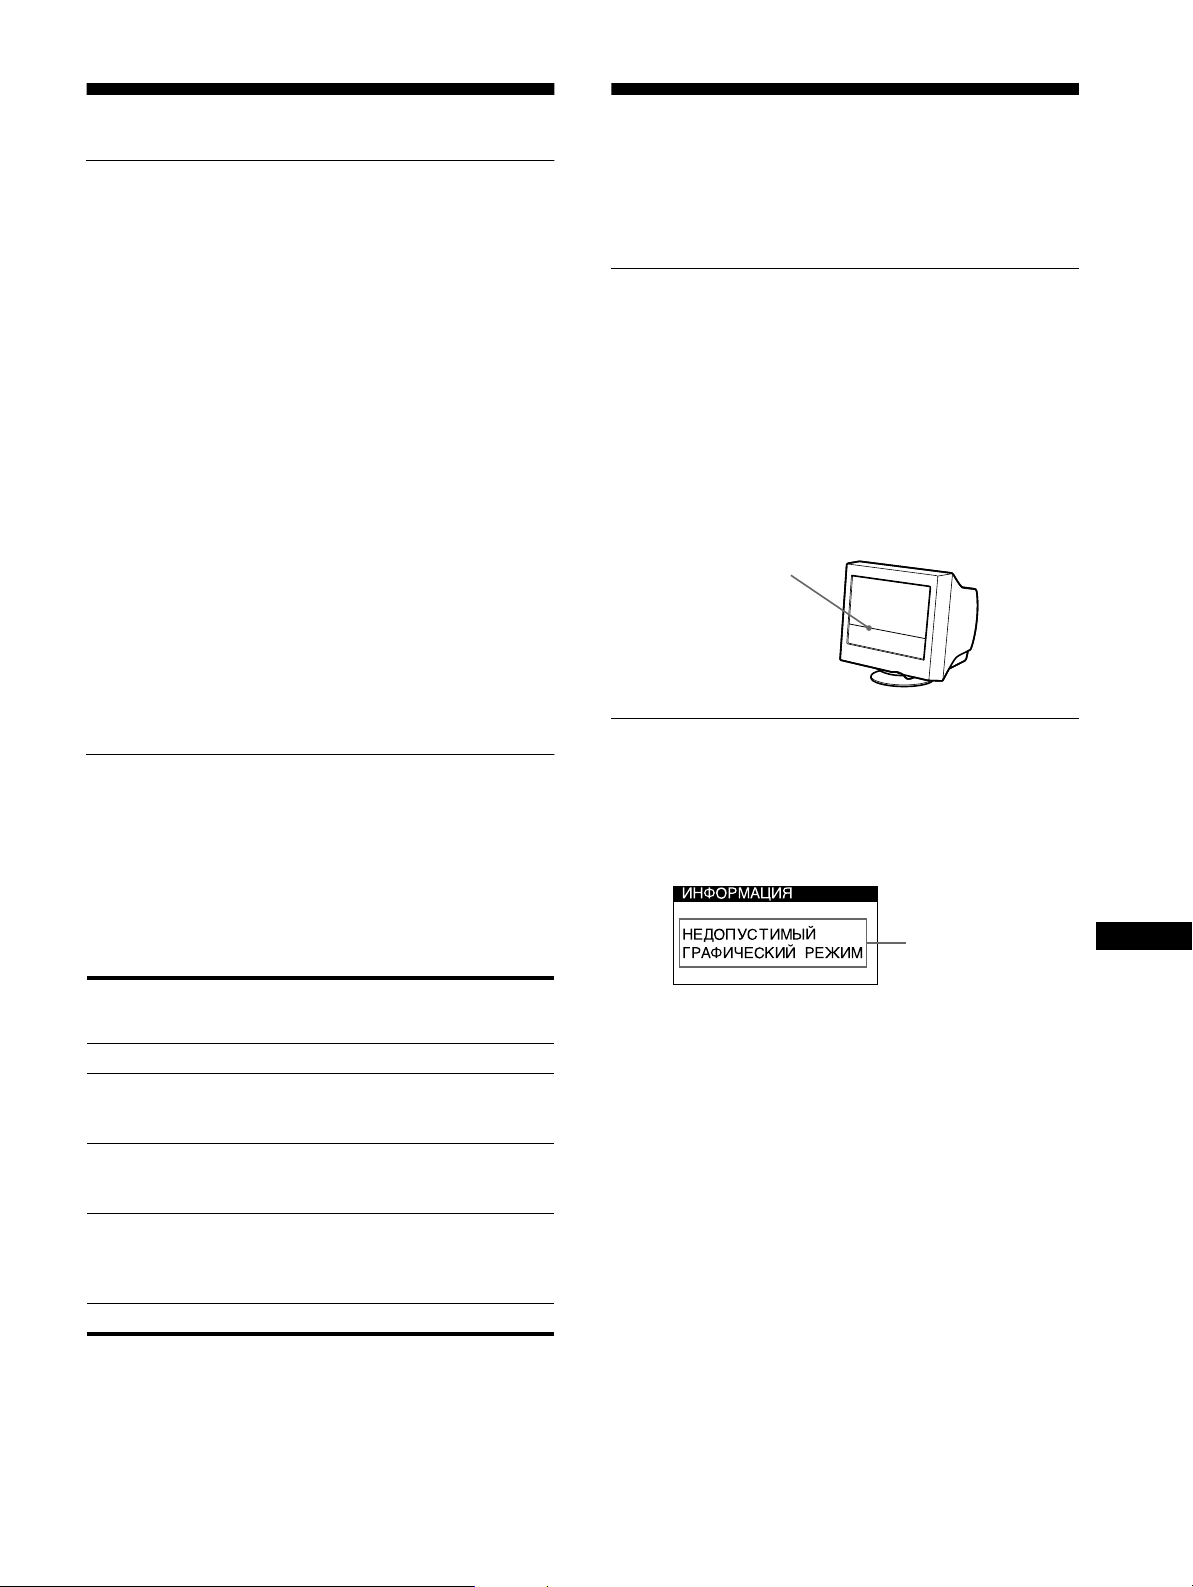
Технические особенности
Устранение
Предустановленные режимы и
настройка пользователем
При приеме входного сигнала монитор автоматически
согласовывает его с одним из режимов,
предварительно установленных на заводе и
хранящихся в памяти монитора, для обеспечения
высококачественного изображения в центре экрана.
(См. список предустановленных режимов в Appendix.)
Для входных сигналов, не соответствующих ни одному
из заводских режимов, с помощью технологии
цифрового мультисканирования данного монитора
производятся все настройки, необходимые для
получения четкого изображения при любой
синхронизации в его частотном диапазоне (по
горизонтали: 30 – 70 кГц, по вертикали: 48 – 120 Гц). При
регулировке изображения данные настройки заносятся
в память как пользовательский режим и автоматически
вызываются из нее каждый раз при получении данного
входного сигнала.
Примечание для пользователей Windows
Пользователям Windows следует обратиться к
руководству по использованию видеокарты или
воспользоваться утилитами, поставляемыми с
графической картой, и выбрать самую высокую из
возможных частот регенерации для оптимизации
работы монитора.
неисправностей
Прежде чем обратиться в службу технической
поддержки, ознакомьтесь с данным разделом.
Демпферная нить
Тонкая линия, которая может появляться на экране,
характерна для мониторов Trinitron, но не является
неполадкой. Это тень демпферной нити, которая гасит
вибрацию апертурной решетки; наиболее заметной
она становится при выводе на экран светлого фона
(обычно белого). Апертурная решетка - это очень
важный элемент, который делает электронно-лучевые
трубки Trinitron уникальными и обеспечивает более
интенсивные светлые тона на экране, благодаря чему
изображение становится ярче и отчетливее.
Демпферная нить
Экранные сообщения
Функция экономии энергии
Данный монитор соответствует нормам экономии
электроэнергии, установленным VESA,
и NUTEK. Если монитор подключен к компьютеру или
видеографическому адаптеру, поддерживающим
стандарт DPMS (система передачи сигналов
управления питанием монитора), монитор будет
автоматически снижать потребление энергии в три
этапа согласно таблице ниже.
Режим
потребления
энергии
Обычная работа
Ожидание (первый
режим экономии)
Перерыв в работе
(второй режим
экономии)
Выход из активного
состояния
(третий режим
экономии)
Выключение 0 Вт Выключен
* “Второй режим экономии” и “третий режим экономии”
определены агентством защиты окружающей среды (EPA).
** При входе компьютера в режим “Выход из активного
состояния” входной сигнал отключается, и на экране
появляется сообщение “НЕТ ВХОДНОГО СИГНАЛА”.
Через 20 секунд монитор снова перейдет в режим
пониженного потребления энергии.
*
**
*
Потребляемая
мощность
≤
95 Вт Горит зеленым
≤
15 Вт Горит зеленым
≤
15 Вт Горит зеленым
≤
5 Вт Горит
NERGY STAR
E
Индикатор
1 (питание)
и оранжевым
попеременно
и оранжевым
попеременно
оранжевым
При неправильном входном сигнале на экране
появится одно из нижеуказанных сообщений. Для
устранения неполадки см. “Симптомы неполадок и
действия по их устранению” на стр. 14.
Состояние
входного сигнала
Состояние входного сигнала
НЕДОПУСТИМЫЙ ГРАФИЧЕСКИЙ РЕЖИМ
Указывает на то, что входной сигнал не соответствует
характеристикам монитора.
НЕТ ВХОДНОГО СИГНАЛА
Указывает на то, что входной сигнал не подается на
вход монитора.
RU
13
Page 84

Симптомы неполадок и действия по их устранению
Если причиной неполадок стали компьютер или другое оборудование, обратитесь к инструкциям по эксплуатации
этого оборудования.
Воспользуйтесь функцией самодиагностики (стр. 16), если проблема не устраняется с помощью следующих
рекомендаций.
Симптом Проверьте эти позиции
Нет изображения
Если индикатор 1 (питание) не
горит
Если на экране появляется
сообщение “НЕТ ВХОДНОГО
СИГНАЛА”, или индикатор
питания 1 горит оранжевым
или мигает попеременно
зеленым и оранжевым
Если на экране появляется
сообщение “НЕДОПУСТИМЫЙ
ГРАФИЧЕСКИЙ РЕЖИМ”
Если на экране нет сообщений,
и индикатор питания 1 горит
зеленым или мигает
оранжевым
При использовании
Windows 95/98
При использовании системы
Macintosh
Скачки, дрожание или
волнообразные колебания
изображения
• Проверьте, правильно ли подключен кабель питания.
• Проверьте, находится ли выключатель питания 1 в положении “on” (вкл).
• Убедитесь, что кабель видеосигнала подключен правильно и все разъемы
надежно вставлены в свои гнезда (стр. 6).
• Убедитесь, что ни один из штырьковых контактов видеокабеля HD15 не
является изогнутым и не утоплен внутрь вилки.
xНеполадки, связанные с подключением компьютера или другого
оборудования
• Компьютер находится в режиме экономного потребления энергии.
Попробуйте нажать любую клавишу на клавиатуре компьютера.
• Проверьте, находится ли выключатель компьютера в положении “on” (вкл).
• Убедитесь, что видеокарта правильно и надежно закреплена в разъеме
подключения к шине.
xНеполадки, связанные с подключением компьютера или другого
оборудования
• Проверьте, входят ли видеочастоты в заданный для монитора диапазон.
Если данная модель устанавливается вместо старого монитора, верните
прежний монитор на место и подстройте частотный диапазон согласно
следующим техническим параметрам.
По горизонтали: 30 – 70 кГц
По вертикали: 48 – 120 Гц
• Воспользуйтесь функцией самодиагностики (стр. 16).
• Если данная модель устанавливается вместо старого монитора, верните
прежний монитор на место и выполните следующее. Загрузите дискету
“Windows Monitor Information Disk” (стр. 7) и выберите данный монитор
(“CPD-E100E”) в списке мониторов Sony в экране выбора мониторов для
Windows 95/98.
• Убедитесь, что переходник для Macintosh (не входит в комплект) и кабель
видеосигнала подключены правильно (стр. 6).
• Изолируйте и устраните любые потенциальные источники электрических и
магнитных полей, например, лазерные принтеры, электрические
вентиляторы, флуоресцентные лампы или телевизоры.
• Отодвиньте монитор подальше от линий электропитания или установите
возле него магнитный экран.
• Попробуйте подключить монитор к другой сетевой розетке, желательно от
другого контура.
• Попробуйте повернуть монитор на 90° влево или вправо.
xНеполадки, связанные с подключением компьютера или другого
оборудования
• Обратитесь к руководству по графическому адаптеру, чтобы проверить,
правильные ли параметры установлены для Вашего монитора.
• Удостоверьтесь в том, что графический режим (VESA, Macintosh 16“Color и
др.) и частота входного сигнала соответствуют характеристикам монитора
Appendix
(
видеокарты подают слишком узкий для корректной синхронизации
монитора синхронизирующий импульс.
• Подстройте частоту регенерации компьютера (частоту вертикальной
развертки) для получения оптимального изображения.
). Даже в подходящем частотном диапазоне некоторые
14
Page 85
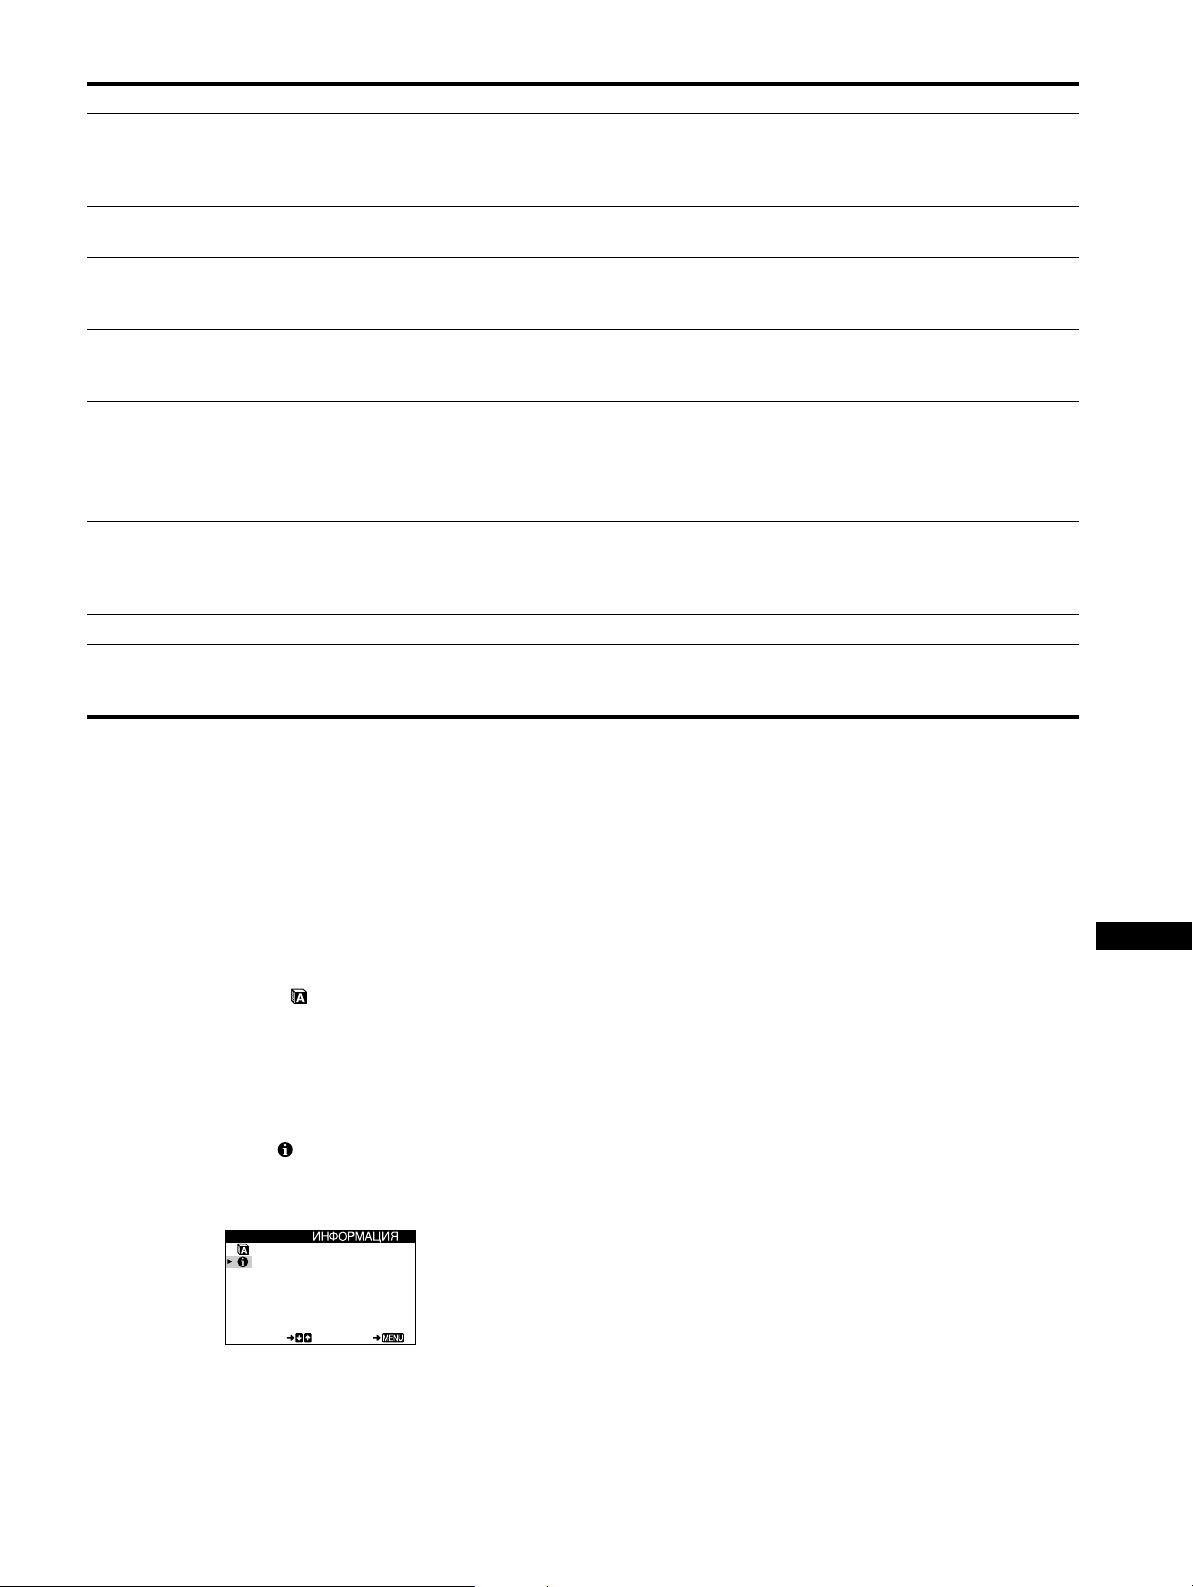
Симптом Проверьте эти позиции
Нечеткое изображение
• Подстройте контрастность и яркость (стр. 9).
• Выполните размагничивание монитора* (стр. 12).
• Выберите функцию ПОДАВЛЕНИЕ МУАРА и откорректируйте эффект
устранения муарового фона (стр. 12).
“Тени” на изображении
• Не используйте удлинители видеокабелей и коммутаторы видеосигнала.
• Проверьте, надежно ли закреплены в своих гнездах все разъемы.
Неправильные центровка или
размер изображения
• Подстройте размер (стр. 10) или отцентрируйте изображение (стр. 10).
Необходимо помнить, что в некоторых видеорежимах экран не заполняется
до краев.
Края изображения искривлены
• Выводит на дисплей меню ПОДУШКА/ДУГА, ТРАПЕЦИЯ/
ПАРАЛЛЕЛОГРАММ или ВРАЩЕНИЕ для подстройки формы и поворота
растрового изображения (стр. 10, 11).
Волнистые или муаровые
разводы на экране
• Выберите функцию ПОДАВЛЕНИЕ МУАРА и откорректируйте эффект
устранения муарового фона (стр. 12).
xНеполадки, связанные с подключением компьютера или другого
оборудования
• Смените рисунок рабочего стола.
Неравномерная окраска
изображения
• Выполните размагничивание монитора* (стр. 12). Однородность цвета
может нарушаться в тех случаях, когда вблизи монитора находятся
источники магнитного поля, такие как громкоговорители, или когда Вы
поворачиваете монитор.
Белый цвет не выглядит белым
Сразу после включения
монитора раздается
непродолжительное гудение
* Если потребуется повторить процесс размагничивания, это можно сделать, как минимум, через 20 минут, для того чтобы
получить наилучший результат. Гудящий звук, который слышен, не является неисправностью.
• Подстройте цветовую температуру (стр. 11).
• Этот звук сопутствует процессу автоматического размагничивания. После
включения питания в течение приблизительно 5 секунд происходит
автоматическое размагничивание трубки монитора.
Отображение названия модели монитора,
серийного номера и даты выпуска
(ИНФОРМАЦИЯ)
1
Нажмите в центре кнопки управления.
На экране появляется главное меню (MENU).
2
Переместите кнопку управления m/M, чтобы
выделить элемент LANGUAGE/
ИНФОРМАЦИЯ, и нажмите снова в центре
кнопки управления.
На экране появляется меню LANGUAGE/
ИНФОРМАЦИЯ.
3
Переместите кнопку управления m/M, чтобы
выбрать элемент (ИНФОРМАЦИЯ).
На экране появляется информационное окно для
данной модели монитора.
Пример
LANGUAGE /
MODE L : CPD - E10 0 E
SERI AL: 12345678
MANUF ACTURED: 1 9 99 - 5 2
SELECT EXI T
При возникновении неполадок свяжитесь с местным
официальным дилером Sony и предоставьте
следующую информацию.
• Название модели: CPD-E100E
• Серийный номер
• Название и характеристики Вашего компьютера и
графического адаптера.
RU
15
Page 86
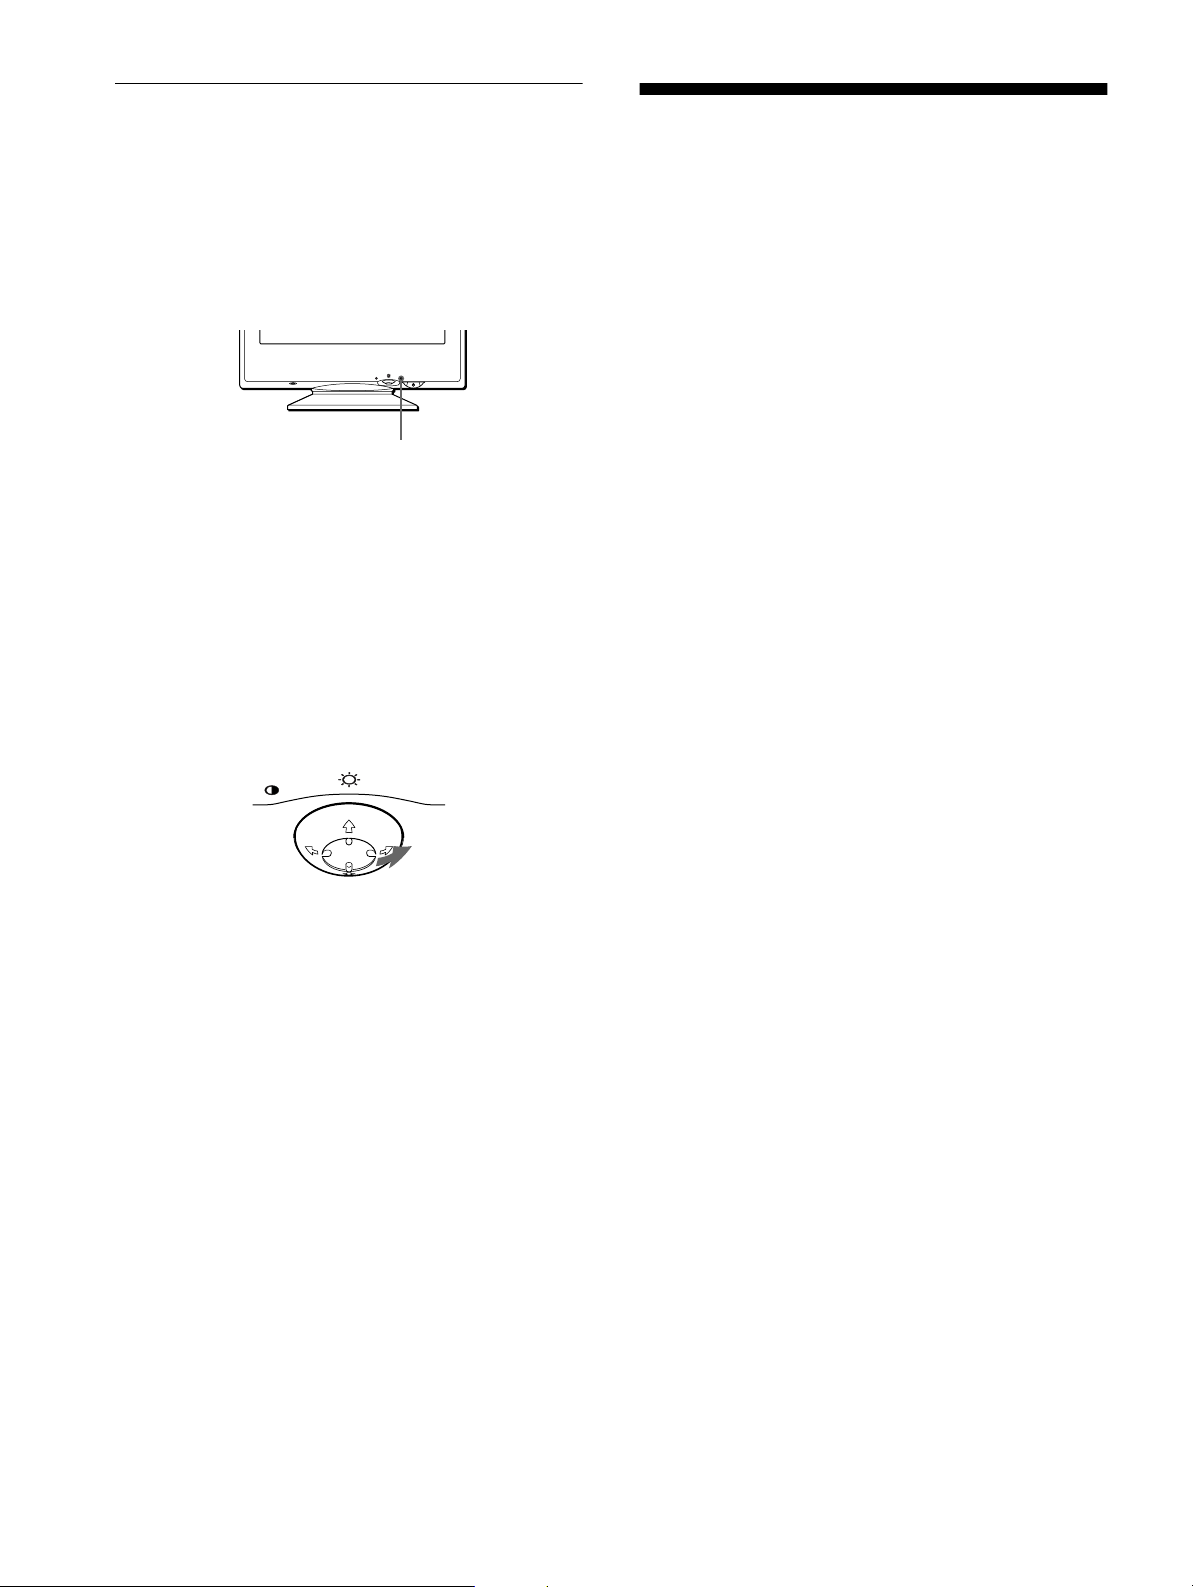
Функция самодиагностики
Данный монитор оснащен функцией самодиагностики.
Если возникает какая-либо проблема с монитором или
компьютером (компьютерами), экран очищается, а
индикатор питания 1 горит зеленым или мигает
оранжевым. Если индикатор питания 1 горит
оранжевым, то компьютер находится в режиме
экономного потребления энергии. Попробуйте нажать
любую клавишу на клавиатуре компьютера.
RESET
Если индикатор 1 (питание) горит зеленым
1
Отсоедините кабель видеовхода или
выключите подсоединенный к монитору
компьютер.
2
Нажмите кнопку питания 1 дважды, чтобы
выключить монитор и затем включить.
3
Переместите кнопку управления , и
удерживайте 2 секунды перед тем, как монитор
перейдет в режим экономного потребления
энергии.
MENU
Индикатор 1 (питание)
MENU
Технические
характеристики
Кинескоп Шаг апертурной решетки
0,24 мм (центр)
Размер экрана по диагонали
15 дюймов
Развертка 90 градусов
Размер экранного изображения
Прибл. 285 × 214 мм (ш/в)
Видимое изображение 14,0“
Разрешение
Максимальное По горизонтали: 1280 точек
По вертикали: 1024 линии
Рекомендуемое По горизонтали: 800 точек
По вертикали: 600 линий
Стандартная площадь изображения
Прибл. 270 × 202 мм (ш/в)
Частота развертки*По горизонтали: 30 – 70 кГц
По вертикали: 48 – 120 Гц
Параметры сетевого питания
100 – 240 В, 50 – 60 Гц,
1,2 – 0,6 А
Потребляемая мощность
Макс. 95 Вт
Габариты
Масса Прибл. 14 кг
Plug and Play DDC1/DDC2B
Входящие в комплект принадлежности
Прибл. 356 × 378 × 388 мм
(ш/в/д)
См. стр. 6
Если появятся все четыре цветные полоски (белого,
красного, зеленого, синего), то монитор работает
корректно. Вновь подсоедините кабель к видеовходу и
проверьте состояние компьютера.
Если цветные полоски не появляются, то монитор,
возможно, неисправен. Проинформируйте местного
официального дилера Sony о состоянии своего
монитора.
Если индикатор питания 1 мигает оранжевым
Нажмите кнопку питания 1 дважды, чтобы
выключить монитор и затем включить.
Если индикатор питания 1 горит зеленым, то монитор
работает нормально.
Если индикатор питания 1 продолжает мигать, то,
возможно, монитор неисправен. Сосчитайте
количество секунд в интервалах между загоранием
индикатора питания 1 и проинформируйте местного
официального дилера Sony о состоянии своего
монитора. Не забудьте предоставить название модели
и серийный номер своего монитора. Также необходимо
указать марку и модель Вашего компьютера и
видеокарты.
*
Рекомендуемый режим синхронизации по
горизонтали и вертикали
• Ширина синхроимпульса горизонтальной
развертки должна быть больше 1,0 мкс.
• Интервал между сигналами горизонтальной
развертки должен быть больше 3,6 мкс.
• Интервал между сигналами вертикальной
развертки должен быть больше 500 мкс.
Конструкция и характеристики могут изменяться без
предварительного уведомления.
16
Page 87

Appendix
Preset mode timing table
TCO’99 Eco-document
No. Resolution
(dots × lines)
1640 × 480 31.5 kHz 60 Hz VGA-G
2640 × 480 43.3 kHz 85 Hz VESA
3720 × 400 31.5 kHz 70 Hz VGA-Text
4800 × 600 46.9 kHz 75 Hz VESA
5800 × 600 53.7 kHz 85 Hz VESA
6832 × 624 49.7 kHz 75 Hz Macintosh 16"
7 1024 × 768 60.0 kHz 75 Hz VESA
8 1024 × 768 68.7 kHz 85 Hz VESA
9 1280 × 1024 64.0 kHz 60 Hz VESA
Horizontal
Frequency
Vertical
Frequency
Graphics
Mode
Color
Congratulations!
x
You have just purchased a TCO’99 approved and labelled
product! Your choice has provided you with a product developed
for professiona l use. Your purchase has also contributed to
reducing the burden on the envi ronment and also to the further
development of environmentally adapted electronics produc ts.
Why do we have environmentally labelled
x
computers?
In many countries, environmental labelling has become an
established met hod for encouraging the adaptation of goods and
services to the environment. The main problem, as far as
computers and other electronics equipment are concerned, is that
environmentally harmful substances are used both in the products
and during their m a nufacture. Since it is not so far possible to
satisfactorily recycle the majority of electronics equipment, most
of these potentially damaging substances sooner or later enter
nature.
There are also other characteristics of a computer, such as energy
consumption levels, that are important from the viewpoints of
both the work (internal) and natural (external) environments.
Since all methods of elec tric ity g ene ra tio n h ave a n e gativ e e ffect
on the environment (e.g. acidi c and climate-influencing
emissions, radioactive waste), it is vital to save energy.
Electronics equipment in offices is often left running
continuously and thereby consumes a lot of energ y.
What does labelling involve?
x
This product meets the requirements for the TCO’99 scheme
which provides for international and environmental labelling of
personal computers. The labelling scheme was developed as a
joint effort by the TCO (The Swedish Confederation of
Professional Employees), Svenska Naturskyddsforeningen (The
Swedish Society for Nature Conservation) and Statens
Energimyndig het (The Swedish Nati onal Energy
Administration).
Approval requirements cover a wide range of issues:
environment, ergonomics, usability, emission of electric and
magnetic fields, energy co nsumption and electrical and fire
safety.
(continued)
i
Page 88

The environmental demands impose restrictions on the presence
and use of heavy metals, brominated and chlorinated flame
retardants, CFCs (freons) and chlorinated solvents, among other
things. The product must be prepared for recycling and the
manufacturer is obliged to hav e an env iro nm e nt al polic y whic h
must be adhered to in each country where the company
implements its operational policy.
The energy requirements include a demand that the computer and/
or display, after a certain period of inactivity, shall reduce its
power consumption to a lower level in one or more stages. The
length of time to reactivate the computer shall be reasonable for
the user.
Labelled products must meet strict environmental demands, for
example, in respect of the reduction of electric and ma g netic
fields, physical and visual ergonomics and good usability.
Below you will find a brief summary of the environmental
requirements met by this product. The complete environmental
criteria documen t may be ordered from:
TCO Development
SE-114 94 Stockholm, Sweden
Fax: +46 8 782 92 07
Email (Internet): development@tc o. se
Current information regarding TCO’99 approved and labelled
products may also be obtained via the Internet, using the
address: http://www.tco-info.com/
any mercury. It also demands that mercury is not present in any of
the electrical or electronics components associated with the
labelled unit.
CFCs (freons)
The relevant TCO’99 requirement states that neither CFCs nor
HCFCs may be used during the manufacture and assembly of the
product. CFCs (freons) are sometimes used for washing printed
circuit boards. CFCs break down ozone and thereby damage the
ozone layer in the stratosphere, causing increased reception on
earth of ultraviolet light with e.g. in creased risks of skin cancer
(malignant me la noma) as a conseq ue nc e.
Lead**
Lead can be found in picture tubes, display screens, solders and
capacitors. Lead damages the nervous system and in higher doses,
causes lead poisoning. The relevant TCO’99 requirement permits
the inclusion of lead since no replaceme nt has yet bee n developed.
* Bio-accumulative is defined as substances which accumulate
within living organisms.
Environmental requirements
x
Flame retardants
Flame retardants are present in printed circuit boards, cables,
wires, casings and housings. Their purpose is to prevent, or at least
to delay the spread of fire. Up to 30% of the plastic in a computer
casing can consist of flame retardant substances. Most flame
retardants contain bromine or chloride, and those flame re tardants
are chemically related to another group of environmental toxins,
PCBs. Both the flame retardants containing bromine or chloride
and the PCBs are suspected of giving rise t o severe healt h effe cts,
including reproductive damage in fish-eating birds and mammals,
*
due to the bio-accumulative
been found in human blood and researchers fear that disturbances
in foetus development may occur.
The relevant TCO’99 demand requires that plastic components
weighing more than 25 grams must not contain flame retardants with
organically bound bromine or chlorine. Flame retardants are allow ed
in the printed circuit boards since no substitutes are available.
processes. Flame retardants have
Cadmium**
Cadmium is present in rechargeable batteries and in the colourgenerating layers of certain computer displays. Cadmium
damages the nervous system and is toxic in high doses. The
relevant TCO’99 requiremen t states that batteries, the colourgenerating lay e rs of display screens and the electrical or
electronics components must not cont ain any cadmium.
Mercury**
Mercury is someti mes found in batteries, relays and switches. It
damages the nervous system and is toxic in high doses. The
relevant TCO’99 requirement states that batteries may not contain
Sony Corporation Printed in Thailand
 Loading...