

Page 1
Color Computer Display
CPD-17F03
3-810-435-12 (1)
Operating Instructions
Mode d’emploi
Bedienungsanleitung
Manual de instrucciones
Istruzioni per l’uso
取扱説明書
EN
F
D
ES
I
J
Page 2
Owner’s Record
The model and serial numbers are located at the rear of the unit.
Record the serial number in the space provided below. Refer to
these numbers whenever you call upon your dealer regarding this
product.
Model No. CPD-17F03 Serial No.
WARNING
To prevent fire or shock hazard, do not
expose the unit to rain or moisture.
Dangerously high voltages are present
inside the unit. Do not open the
cabinet. Refer servicing to qualified
personnel only.
This equipment has been tested and found to comply with the
limits for a Class B digital device, pursuant to Part 15 of the FCC
Rules. These limits are designed to provide reasonable protection
against harmful interference in a residential installation. This
equipment generates, uses, and can radiate radio frequency energy
and, if not installed and used in accordance with the instructions,
may cause harmful interference to radio communications.
However, there is no guarantee that interference will not occur in a
particular installation. If this equipment does cause harmful
interference to radio or television reception, which can be
determined by turning the equipment off and on, the user is
encouraged to try to correct the interference by one or more of the
following measures:
– Reorient or relocate the receiving antenna.
– Increase the separation between the equipment and receiver.
– Connect the equipment into an outlet on a circuit different from
that to which the receiver is connected.
– Consult the dealer or an experienced radio/TV technician for help.
You are cautioned that any changes or modifications not expressly
approved in this manual could void your authority to operate this
equipment.
Hinweis
Gemäß der Amtsblätter des BMPT Nrn. 61/1991 und 6/1992
wird der Betreiber darauf aufmerksam gemacht, daß die von
ihm mit diesem Gerät zusammengestellte Anlage auch den
technischen Bestimmungen dieser Amtsblätter genügen muß.
Hinweise
• Aus ergonomischen Gründen wird empfohlen, die
Grundfarbe Blau nicht auf dunklem Untergrund zu
verwenden (schlechte Erkennbarkeit, Augenbelastung bei zu
geringem Zeichenkontrast).
• Aus ergonomischen Gründen sollten nur Darstellungen mit
Vertikalfrequenzen oberhalb von 70 Hz benutzt werden.
NOTICE
This notice is applicable for USA/Canada only.
If shipped to USA/Canada, install only a UL LISTED/CSA
LABELLED power supply cord meeting the following
specifications:
SPECIFICATIONS
Plug Type Nema-Plug 5-15p
Cord Type SVT or SJT, minimum 3 × 18 AWG
Length Maximum 15 feet
Rating Minimum 7 A, 125 V
NOTICE
Cette notice s’applique aux Etats-Unis et au Canada
uniquement.
Si cet appareil est exporté aux Etats-Unis ou au Canada,
utiliser le cordon d’alimentation portant la mention UL
LISTED/CSA LABELLED et remplissant les conditions
suivantes:
SPECIFICATIONS
Type de fiche Fiche Nema 5-15 broches
Type de cordon SVT ou SJT, minimum 3 × 18 AWG
Longueur Maximum 15 pieds
Tension Minimum 7 A, 125 V
INFORMATION
This product complies with Swedish National Council for
Metrology (MPR) standards issued in December 1990 (MPR II) for
very low frequency (VLF) and extremely low frequency (ELF).
INFORMATION
Ce produit est conforme aux normes du Swedish National Council
for Metrology de décembre 1990 (MPR II) en ce qui concerne les
fréquences très basses (VLF) et extrêmement basses (ELF).
Hinweis
Dieses Gerät erfüllt bezüglich tieffrequenter (very low frequency)
und tiefstfrequenter (extremely low frequency) Strahlung die
Vorschriften des „Swedish National Council for Metrology (MPR)“
vom Dezember 1990 (MPR II).
INFORMACIÓN
Este producto cumple las normas del Consejo Nacional Sueco para
Metrología (MPR) emitidas en diciembre de 1990 (MPR II) para
frecuencias muy bajas (VLF) y frecuencias extremadamente bajas (ELF).
Dieses Garät entspricht den folgenden europäischen EMVVorschriften für Betrieb in Wohngebieten, gewerblicher Gebleten
und Leichtindustriegebieten.
EN55022/1987 Klasse B
EN50082-1/1992
EN60555-2/1987
この装置は、第二種情報装置(住宅地域またはその隣接した
地域において使用されるべき情報装置)で、住宅地域での電
波障害防止を目的とした情報処理装置等電波障害自主規制協
議会(VCCI)基準に適合しております。
しかし、本装置をラジオ、テレビジョン受信機等に近接して
ご使用になると、受信障害の原因となることがあります。
取扱説明書に従って正しい取り扱いをしてください。
2
Page 3
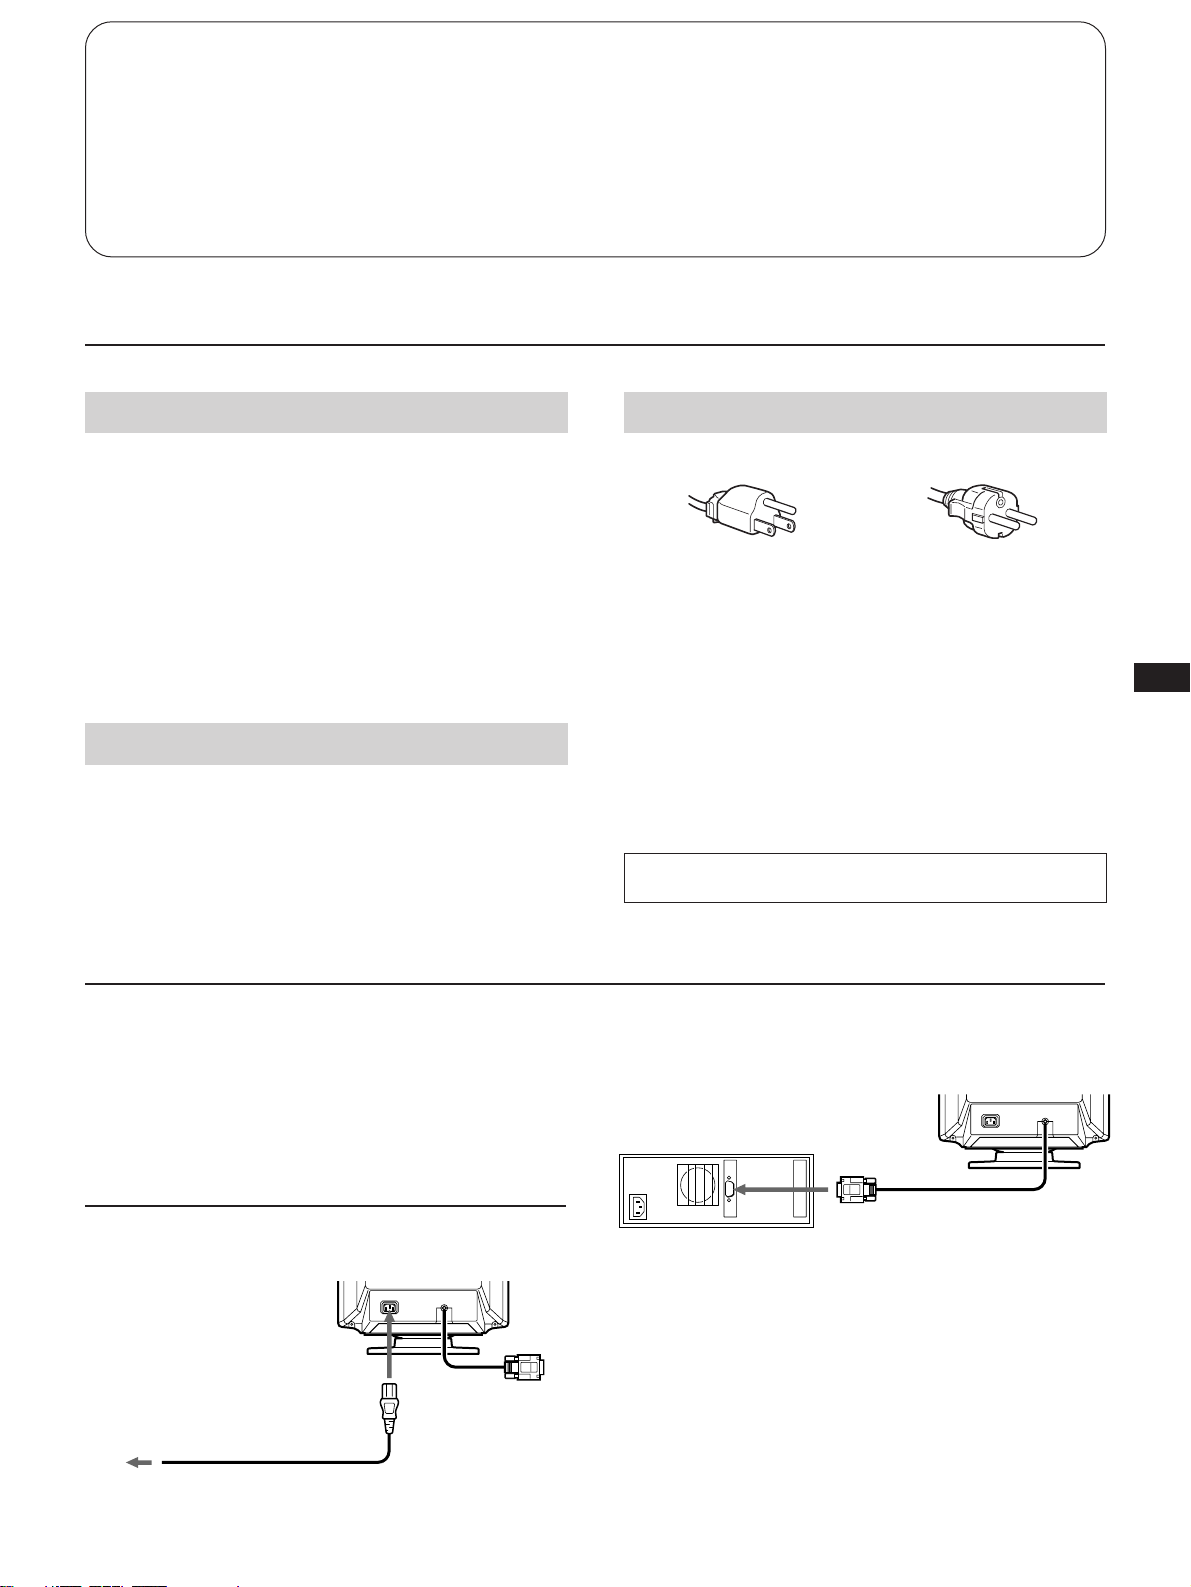
Table of Contents
Precautions ............................................................................... 3
Getting Started ......................................................................... 3
Adjustments .............................................................................. 4
Power Saving Function ........................................................... 5
Plug and Play ........................................................................... 6
Precautions
Installation
• Prevent internal heat buildup by allowing adequate air
circulation. Do not place the unit on surfaces (rugs,
blankets, etc.) or near materials (curtains, draperies) that
may block the ventilation holes.
• Do not install the unit near heat sources such as radiators
or air ducts, or in a place subject to direct sunlight,
excessive dust, mechanical vibration or shock.
• Do not place the unit near equipment that generates
magnetism, such as a converter or high-voltage power
lines.
Maintenance
Clean the cabinet, glass panel, and controls with a soft cloth,
lightly moistened with a mild detergent solution. Do not use
any type of abrasive pad, scouring powder, or solvent, such
as alcohol or benzine.
Damper Wire ..........................................................................6
Use of the Tilt-Swivel ............................................................6
Specifications ..........................................................................6
Troubleshooting ..................................................................... 7
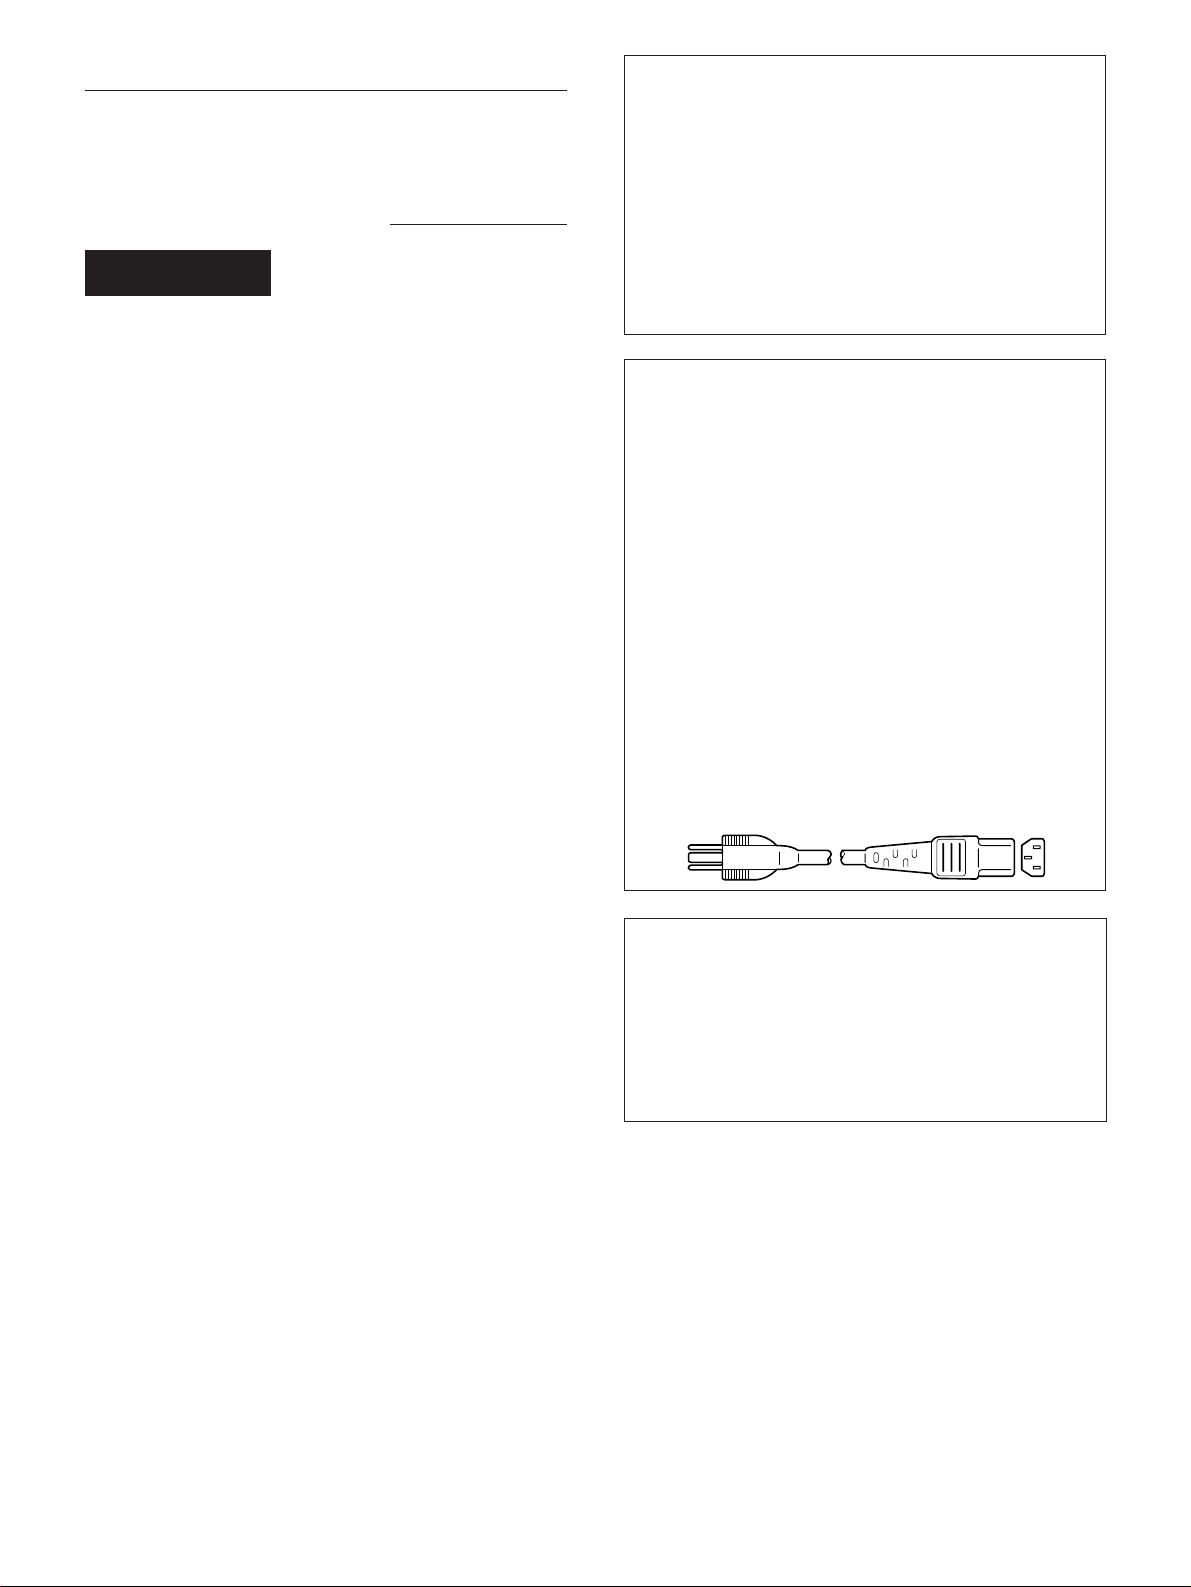
Warning on Power Connection
• Use the supplied power cord.
for 100 to 120 V AC
For the customers in U.S.A.
If you do not do this, this monitor will not conform to
mandatory FCC standards.
• Before disconnecting the power cord, wait for at least
30 seconds after turning off the power switch to allow for the
discharging of static electricity on the CRT display surface.
• After the power has been turned on, the CRT is
demagnetized for approximately 5 seconds. This,
generates a strong magnetic field around the bezel, which
may affect the data stored on magnetic tape or disks near
the bezel. Place such magnetic recording equipment and
tapes/disks at a distance from this unit.
The socket-outlet shall be installed near the equipment
and shall be easily accessible.
for 220 to 240 V AC
EN
Getting Started
Before using this monitor, make sure that the following
items are included in your package:
the monitor, power cord and this operating instruction
manual.
This monitor will sync to platforms running at horizontal
frequencies between 31.5 and 64 kHz.
Connecting the Computer
Step 1: With the monitor switched off, attach the power
cord to the monitor and then to the power outlet.
to the power
outlet
Power cord (supplied)
Step 2: With the computer switched off, attach the video
signal cable to the video output.
Computer
to the video output
Step 3: Turn on the monitor and computer.
Step 4: If necessary, adjust the user controls according to
your personal preference.
The installation is complete.
3
Page 4
Adjustments
POWER
SAVING
A number of digital controls are provided to allow you to
optimize the display parameters to your preferences.
You can adjust the picture to your preferences by following
the procedure described below.
You can adjust all items on the OSD (On Screen Display).
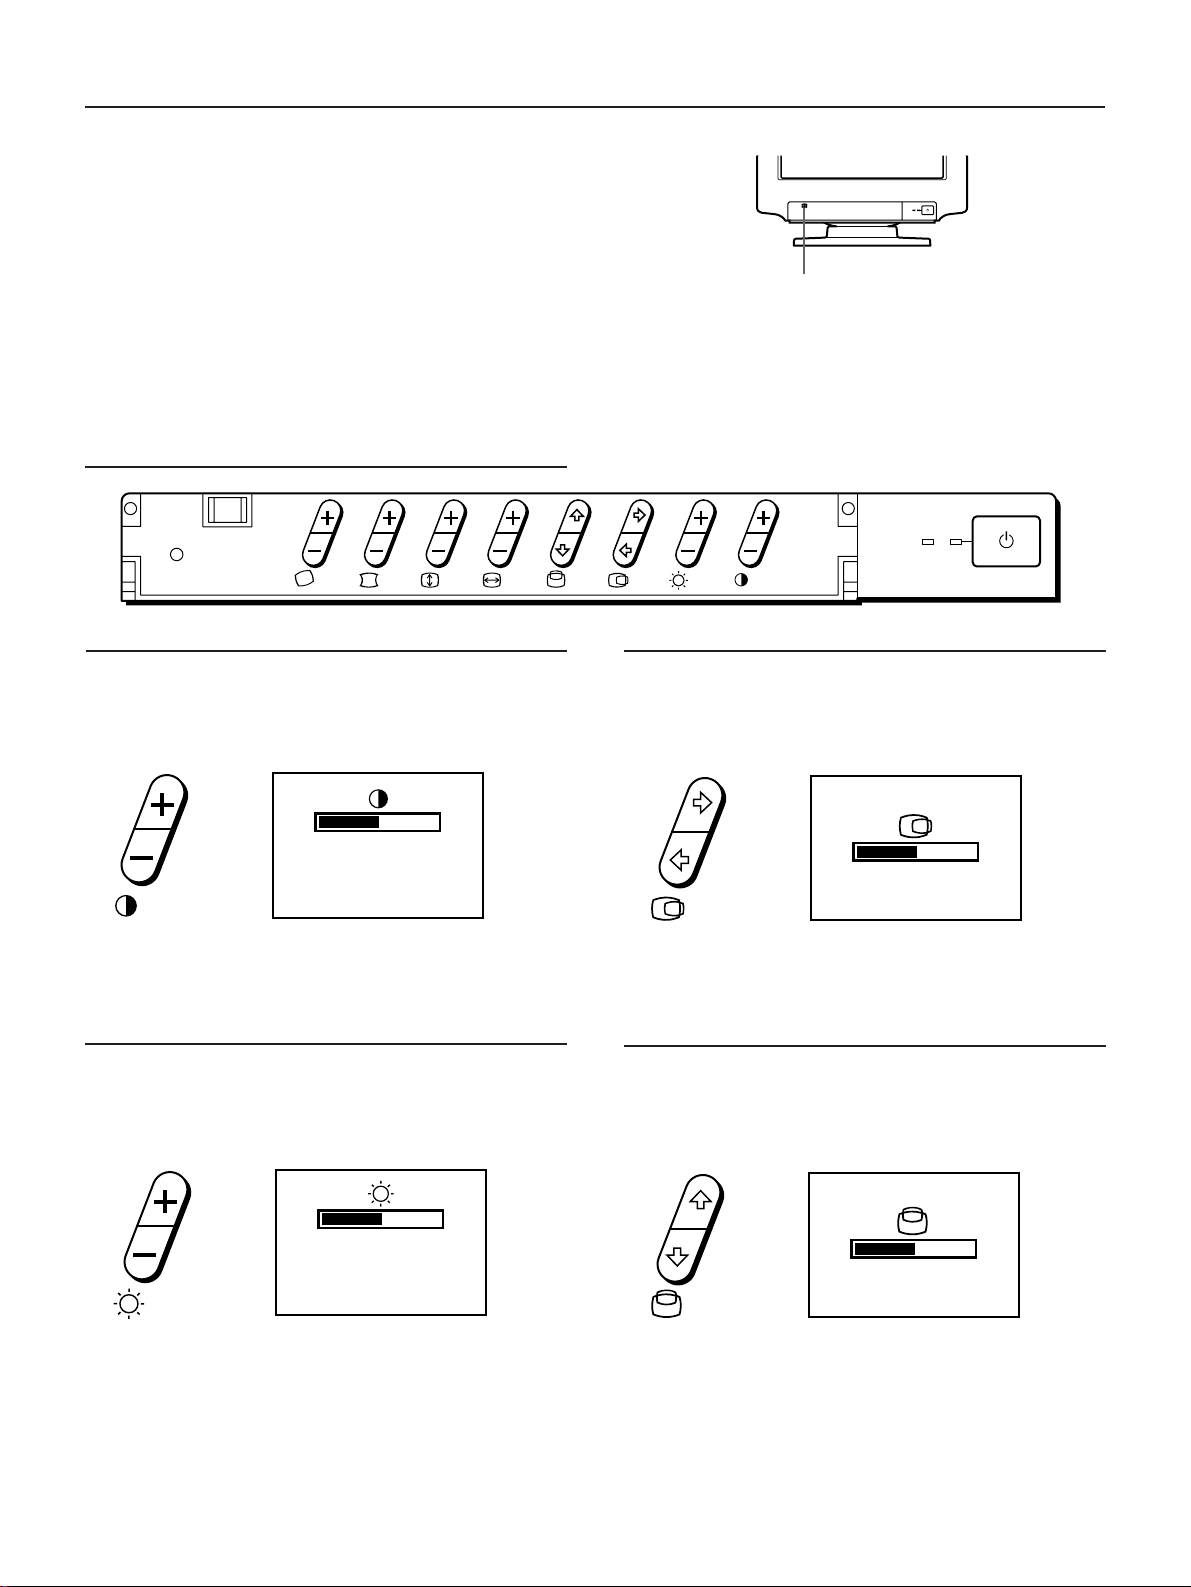
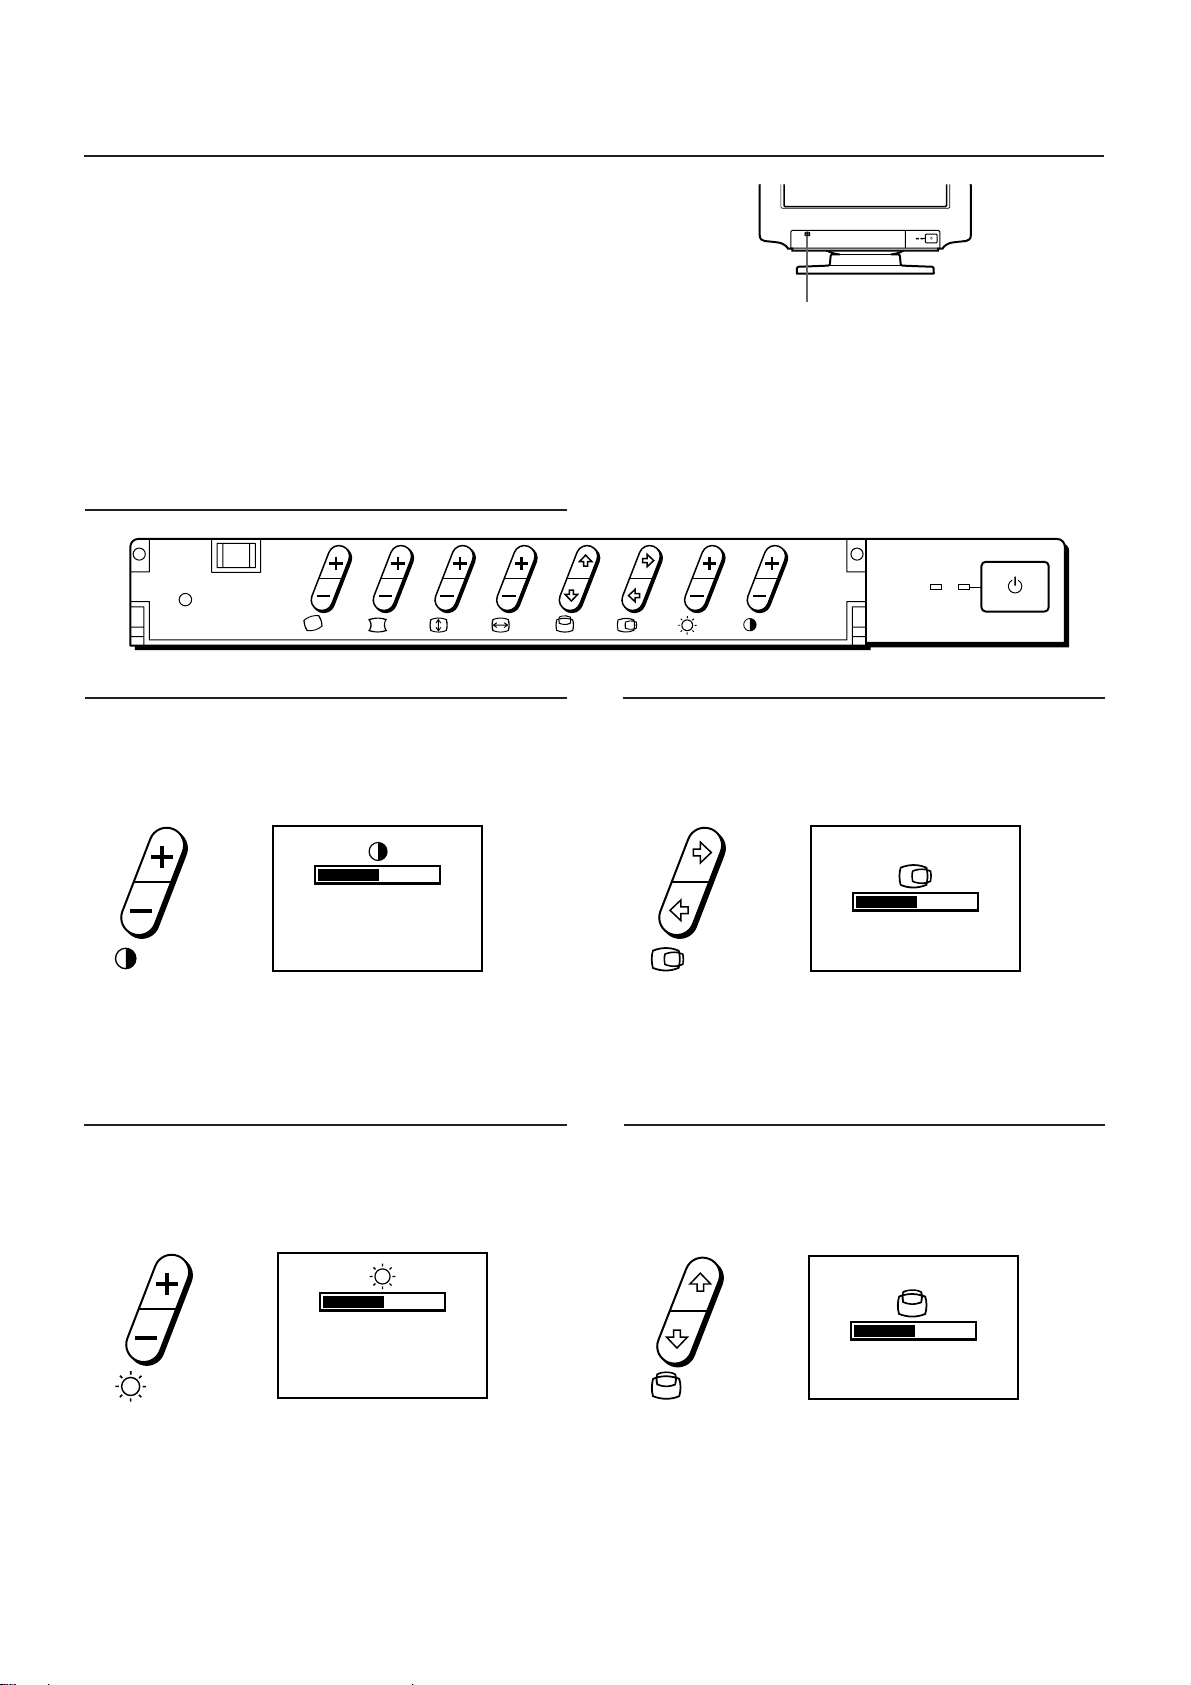
Control Panel
RESET
Push this part to open the control panel cover.
p When the limit value is reached, the POWER SAVING
indicator will begin to flash.
p Adjustments will be stored automatically.
p The OSD automatically disappears 2 seconds after you
release the buttons.
POWER
SAVING
Contrast
The adjustment data becomes the common setting for all
input signals.
1 Press the >+/– button.
The > OSD (On Screen Display) appears.
50
31.5kHz/70Hz
2 Press the >+/– button to adjust picture contrast.
+ ...for more contrast
– ...for less contrast
Brightness
The adjustment data becomes the common setting for all
input signals.
1 Press the ¨+/– button.
The ¨ OSD (On Screen Display) appears.
Horizontal centering
The adjustment data becomes the unique setting for the
input signal received.
1 Press the S∫/ı button.
The S OSD (On Screen Display) appears.
50
2 Press the S∫/ı button.
∫ ...to move right
ı ...to move left
Vertical centering
The adjustment data becomes the unique setting for the
input signal received.
1 Press the s◊ /√ button.
The s OSD (On Screen Display) appears.
50
31.5kHz/70Hz
2 Press the ¨+/– button to adjust picture brightness.
+ ...for more brightness
– ...for less brightness
4
50
2 Press the s◊ /√ button.
◊ ...to move up
√ ...to move down
Page 5
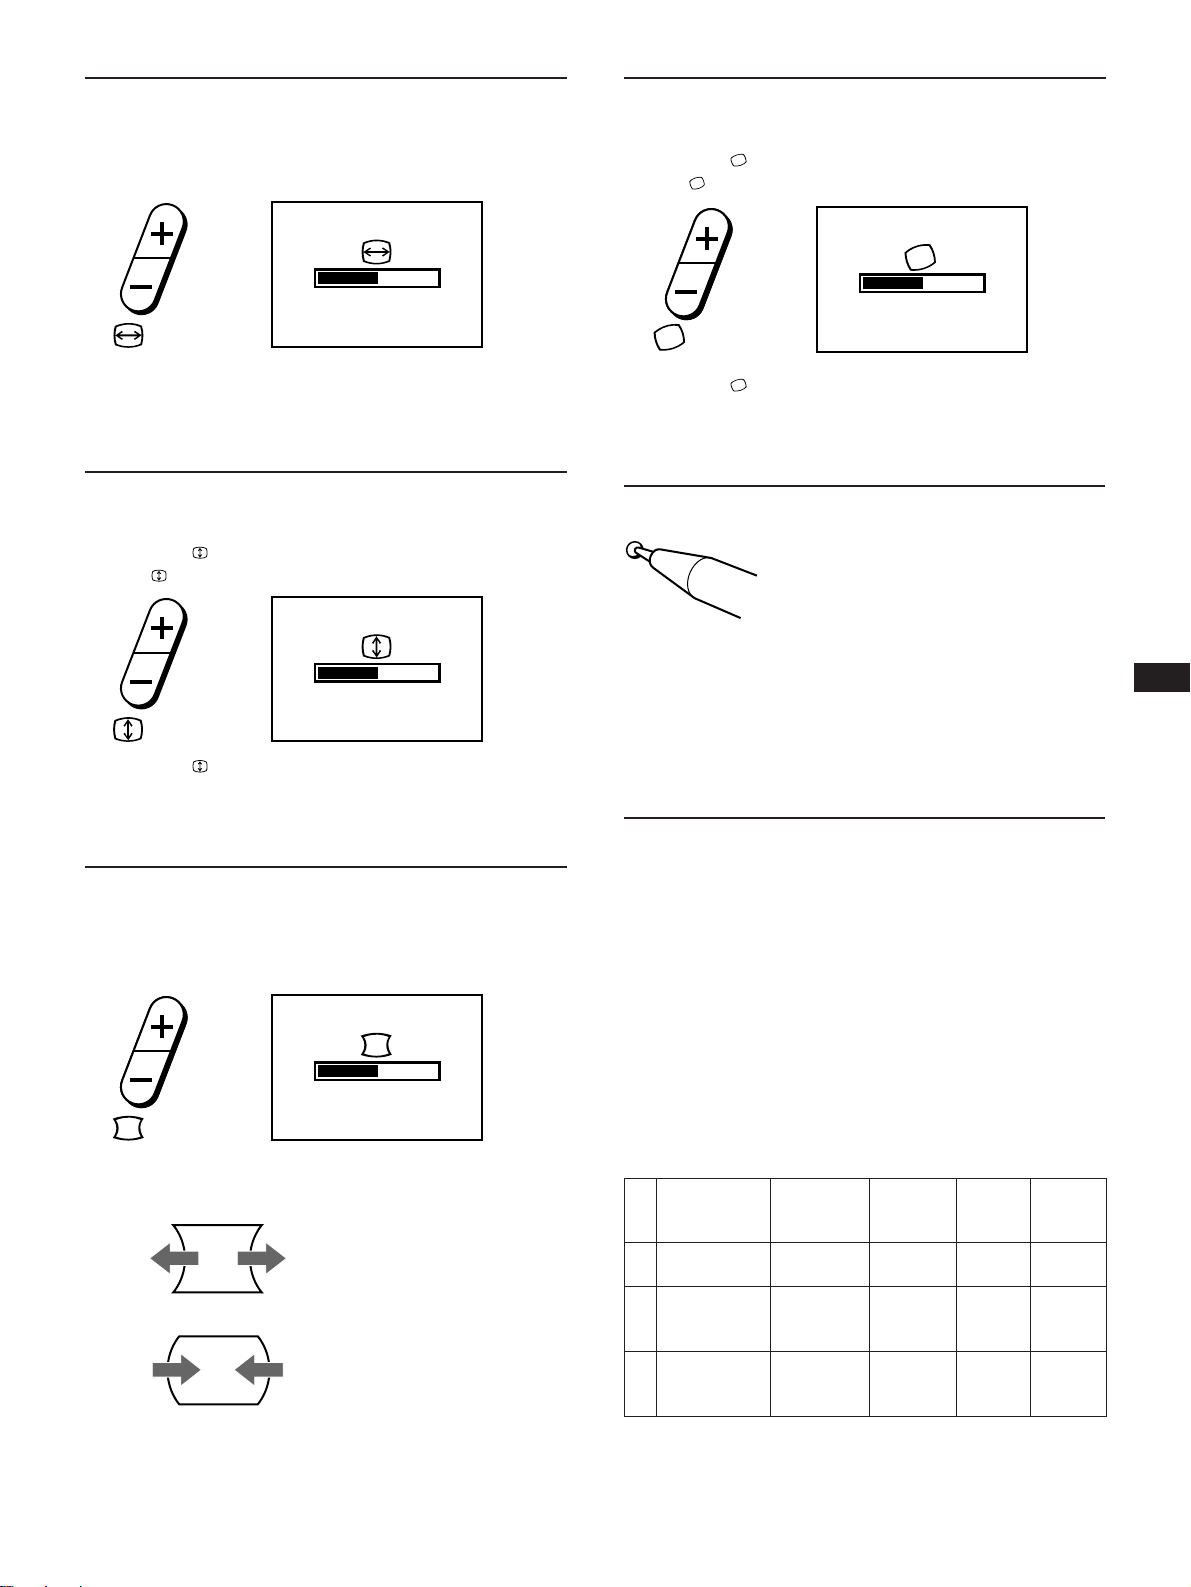
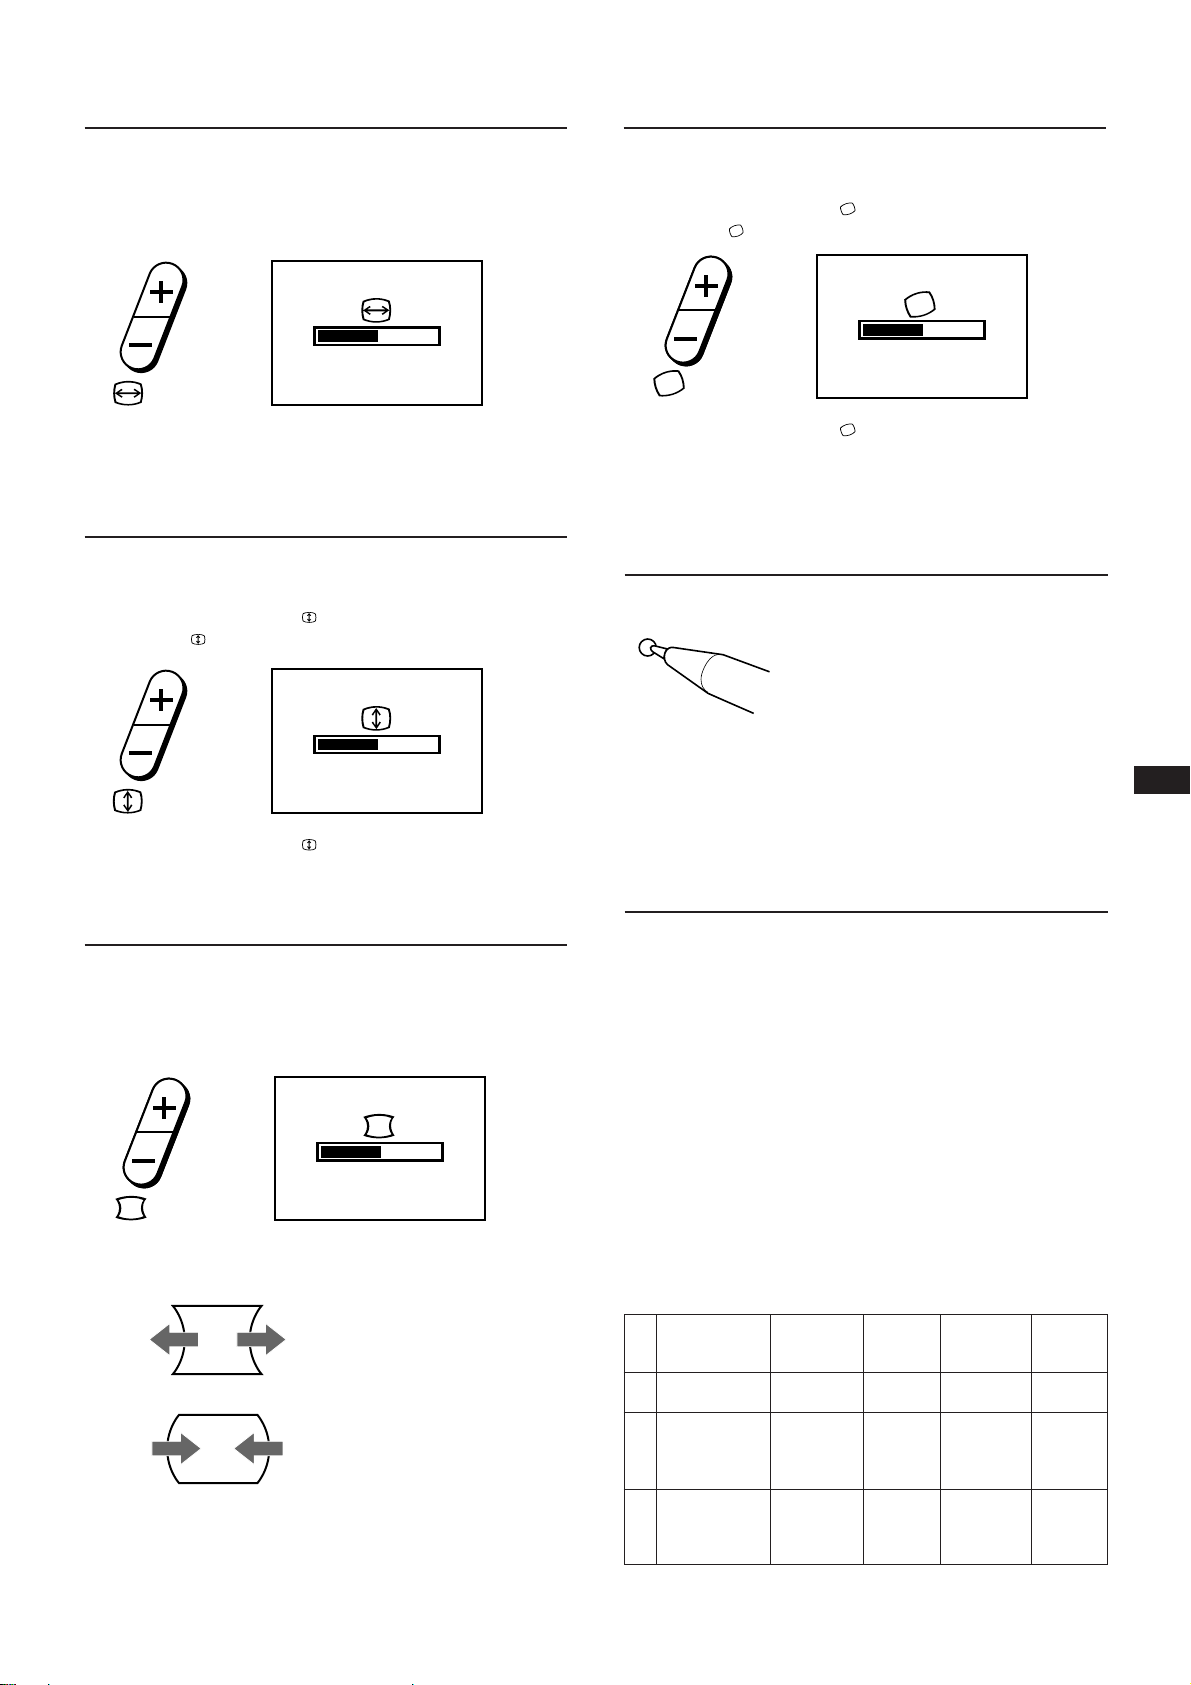
Horizontal size
Rotation
The adjustment data becomes the unique setting for the
input signal received.
1 Press the Å+/– button.
The Å OSD (On Screen Display) appears.
50
2 Press the Å+/– buttons.
+ ...to enlarge
– ...to diminish
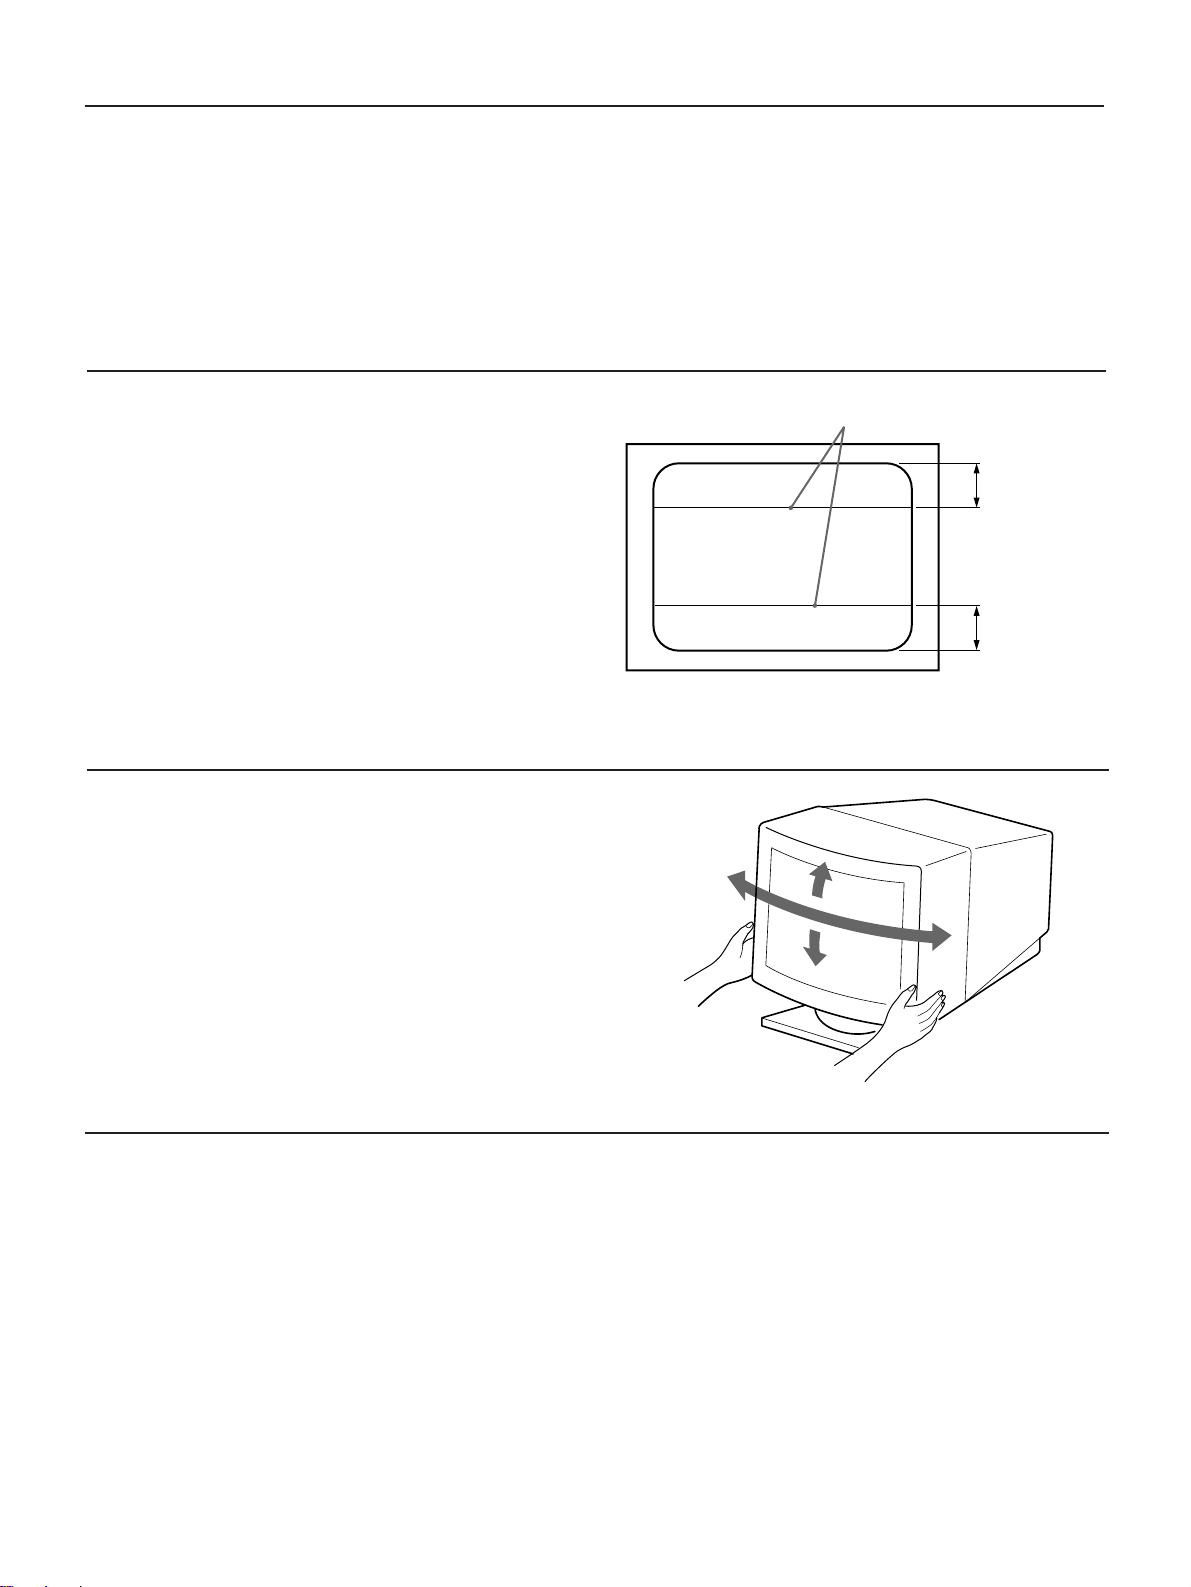
Vertical size
The adjustment data becomes the unique setting for the
input signal received.
1 Press the +/– button.
The
OSD (On Screen Display) appears.
50
The adjustment data becomes the common setting for all
input signals.
1 Press the +/– button.
The
OSD (On Screen Display) appears.
50
2 Press the +/– button.
+.... to rotate clockwise
– .... to rotate counterclockwise
Resetting
• Press the RESET button to recall the
factory settings for brightness, contrast,
pincushions, horizontal and vertical
RESET
size, and center for the mode currently
in use.
• Press and hold the RESET button for 2
seconds to recall factory settings for all
adjustments in all modes.
EN
2 Press the +/– button.
+ ...to enlarge
– ...to diminish
Pincushion
The adjustment data becomes the unique setting for the
input signal received.
1 Press the d+/– button.
The d OSD (On Screen Display) appears.
50
2 Press the d+/– button.
+ ...to expand the picture sides
– ...to diminish the picuture sides
Power Saving
Function
This monitor meets the power-saving guidelines set by the
EPA Energy Star program as well as the more stringent
NUTEK 803299 (TCO92) guidelines. It is capable of reduced
power consumption when used with a computer equipped
with Display Power Management Signaling (DPMS). By
sensing the absence of the sync signal coming from the
computer, it will reduce the power consumption as follows:
CAUTION: The Power Saving function will automatically
put the monitor into Active-off state if the power
switch is turned on without any video signal
input. Once the horizontal and vertical syncs are
sensed, the monitor will automatically return to
its Normal operation state.
Normal
1
operation
Suspend
2
(1st step of
power saving)
Active-off
(2nd step of
3
power saving)
State
Power
consumption
100%
approx. 10%
approx. 7%
Required
resumption
time
—
approx. 3
sec.
approx. 10
sec.
u Power
indicator
green on
green on
off
POWER
SAVING
indicator
off
orange on
orange on
5
Page 6
Plug and Play
This monitor complies with the DDC1 and DDC2B, which
are the Display Data Channel (DDC) standards of VESA.
When a DDC1 host system is connected, the monitor
synchronizes with the V.CLK in accordance with the VESA
standards and outputs the EDID (Extended Display
Indentification) to the data line.
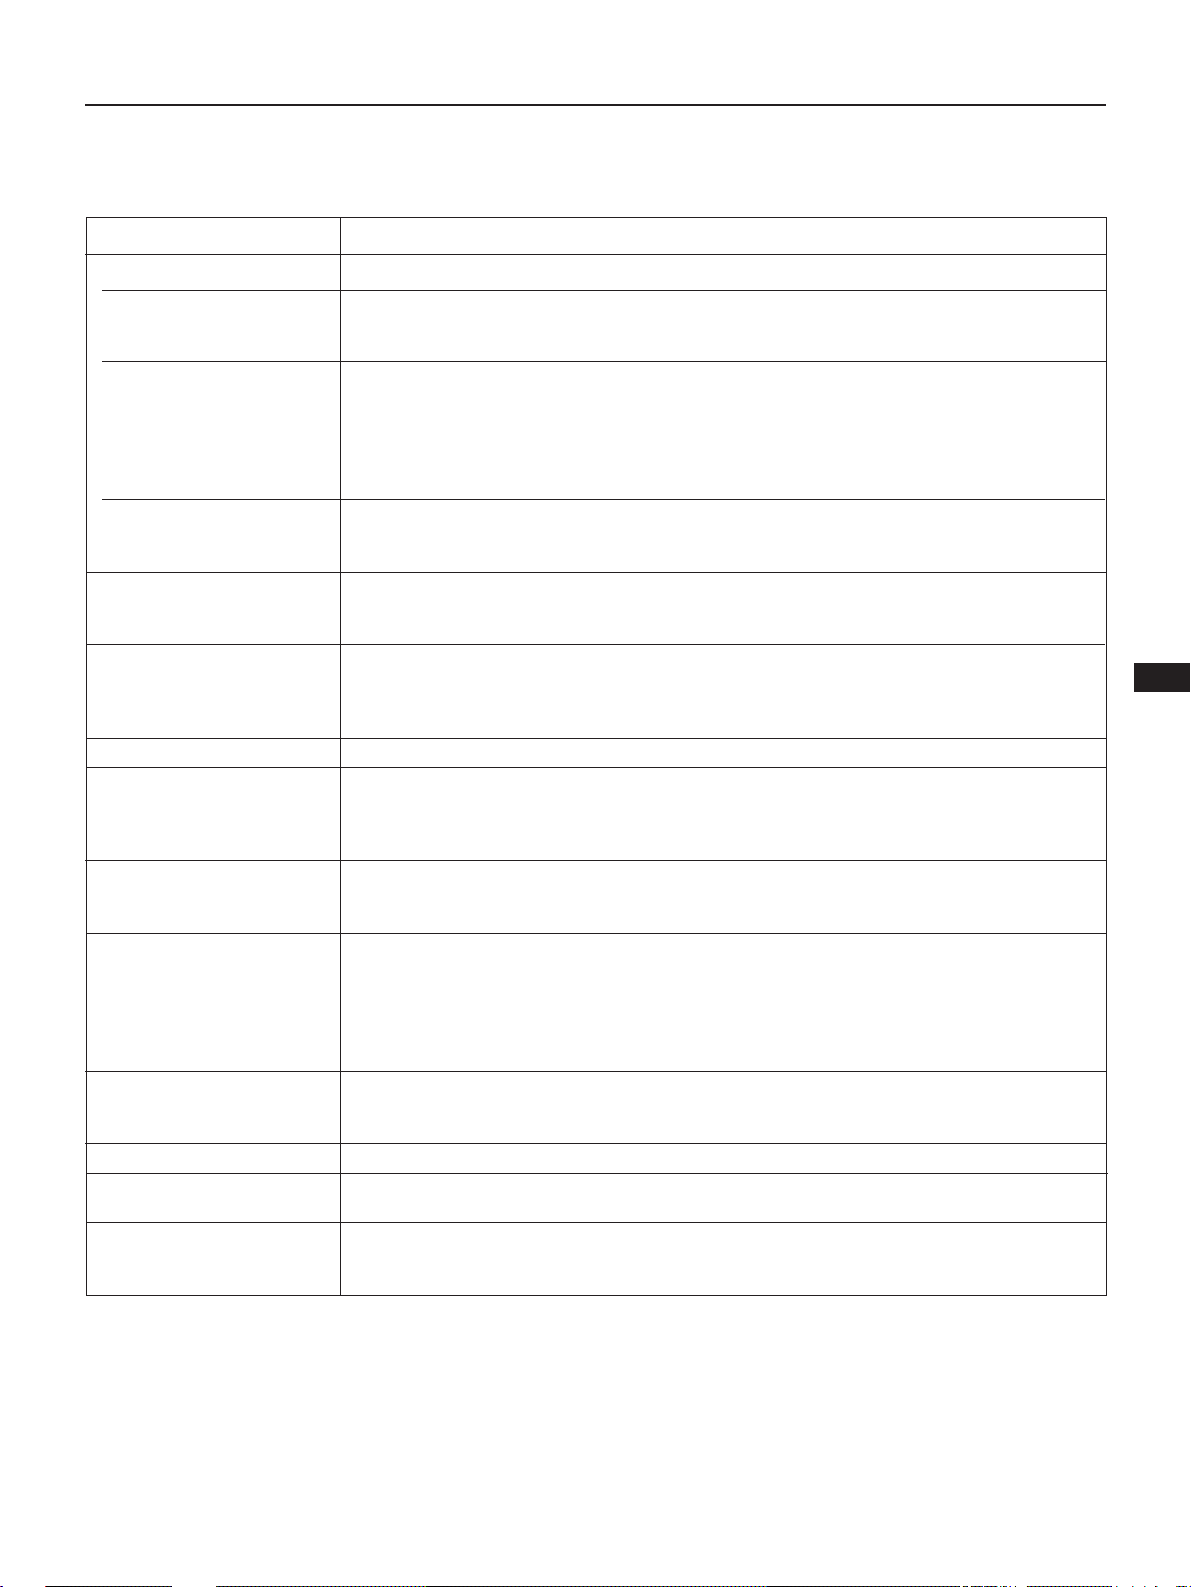
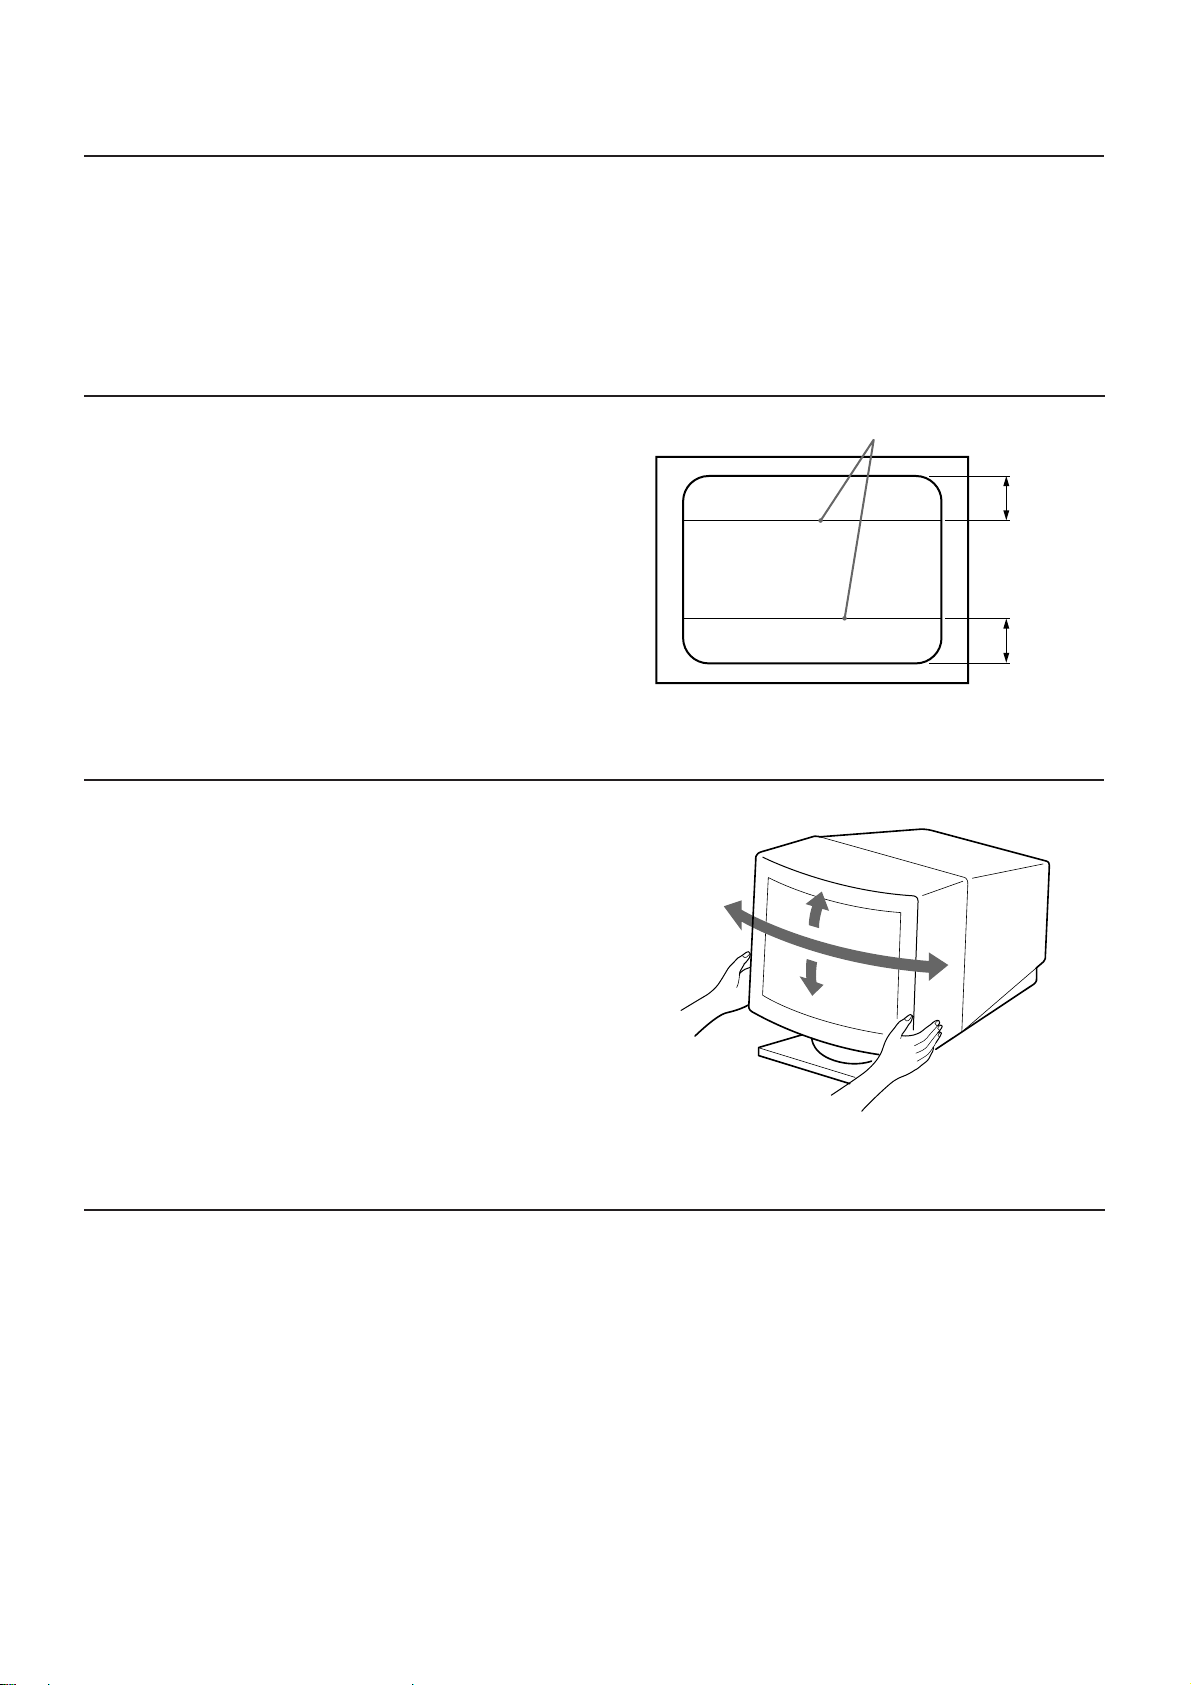
Damper Wire
Using a white background, very thin horizontal stripes on
the screen are visible as shown right. These stripes are
damper wires. These wires are attached to the aperture
grille inside the Trinitron tube and are there to damp
vibrations of the aperture grille in order to prevent them
from influencing to the picture quality.
When a DDC2B host system is connected, the monitor
automatically switches to the DDC2B communication.
DDC is a trademark of Video Electronics Standards
Association.
Damper wire
Approx. 6 cm
Approx. 6 cm
Use of the Tilt-Swivel
With the tilt-swivel base, this unit can be adjusted to be
viewed at your desired angle within 90° horizontally and
20° vertically.
To turn the unit vertically and horizontally, hold it at its
bottom with both hands.
Specifications
Picture tube 0.25 mm aperture grille pitch, 17
inches measured diagonally (16”
visual), 90-degree deflection
Effective picture size
Resolution Horizontal: Max. 1280 dots
Display picture size Approx. 300 × 225 mm (w/h)
Approx. 328 × 242 mm (w/h)
5
7
/8 × 8
/8 inches)
7
/8 inches)
(13 × 9
Vertical: Max. 1024 lines
(11
15°
45°
45°
5°
Deflection frequency Horizontal: 31.5 to 64 kHz
Vertical: 50 to 120 Hz
AC input voltage/current
100 to 120 V, 50/60 Hz, 1.8 A
220 to 240 V, 50 – 60 Hz, 1 A
Dimensions 406 × 426.5 × 451 mm (w/h/d)
(16 × 16
Mass Approx. 19.0 kg (41 lb 14 oz)
Design and specifications are subject to change without
notice.
7
/8 × 17
7
/8 inches)
6
Page 7
Troubleshooting
This section may help you isolate a problem and, as a result, eliminate the need to contact technical support, allowing continued
productivity.
Symptom
No picture
If neither the u (power)
indicator nor the POWER
SAVING indicator is lit
If the POWER SAVING
indicator is lit
If the u (power) and the
POWER SAVING
indicators are both flashing
If the message of “OUT OF
SCAN RANGE” appears on
the screen
Picture is scrambled
Color is not uniform
Screen image is not
centered or sized properly
Picture is fuzzy
Picture bounces or has
wavy oscillations
A fine horizontal line (wire)
is visible
Screen image is tilted
Edges of the image are
curved.
Wavy or elliptical (moire)
pattern is visible
Check these items
• Check that the power cord is properly connected.
• Check that the power switch is in the ON position.
• Check that your computer power switch is in the ON position.
• The monitor will recover when you press any key on the keyboard or the computer.
• Check that the video cable is properly connected.
• Ensure that no pins are bent or pushed in the HD15 connector of the cable.
• Check that the video card is seated completely in a proper bus slot.
• Check that the video sync signal is within that specified for the monitor.
• Turn the monitor off and on. If the indicator is not flashing, the monitor is in the normal
condition.
• There is a potential monitor failure. Contact your dealer.
• Check that the video sync signal is specified for the monitor.
• Check your graphics board manual for the proper monitor setting on your monitor.
• Check this manual and confirm that the graphics mode and the frequency at which you
are trying to operate is supported. Even within the proper range, some video boards
may have a sync pulse that is too narrow for the monitor to sync correctly.
• Trip the power switch once to activate the Auto-degauss cycle*.
• Adjust centering or size (pages 4, 5).
• Some video modes do not fill the screen to the edge of the monitor. There is no single
answer to solve the problem. There is tendency to have this problem on higher refresh
timings.
• Adjust the Contrast and Brightness controls (page 4). Several brands of SVGA boards
have an excessive video output level which creates a fuzzy picture at max contrast.
• Trip the power switch once to activate the Auto-degauss cycle*.
• Move electrical (magnetic) devices that may be creating electrical interference away from
the monitor.
• If you have another monitor close to this monitor, increase the distance between them to
reduce the interference.
• Your office may have electric power wiring behind the wall. Move the monitor away
from the wall.
• This wire stabilizes the vertically striped Aperture Grille. This Aperture Grille allows
more light to pass through to the screen giving the Trinitron
brightness.
• Trip the power switch once to active the Auto-degauss cycle*. Then, adjust the Rotation (page 5).
• Adjust the Pincushion (page 5).
• Due to the relationship between resolution, monitor dot pitch, and the pitch of some
image patterns, certain screen backgrounds, especially gray, sometimes show moire.
This can only be eliminated by changing your desktop pattern.
** CRT more color and
EN
* The Auto-degauss function demagnetizes the metal frame of the CRT in order to obtain a
neutral field for uniform color reproduction. If a second degauss cycle is needed, allow a
minimum interval of 20 minutes for the best result.
** Trinitron
• If the problem persists, call your authorized dealer from a location near your monitor.
• Note the model name and the serial number of your monitor. Also note the make and name of your computer and video
board.
is a registered trademark of Sony Corporation.
7
Page 8

8
Page 9
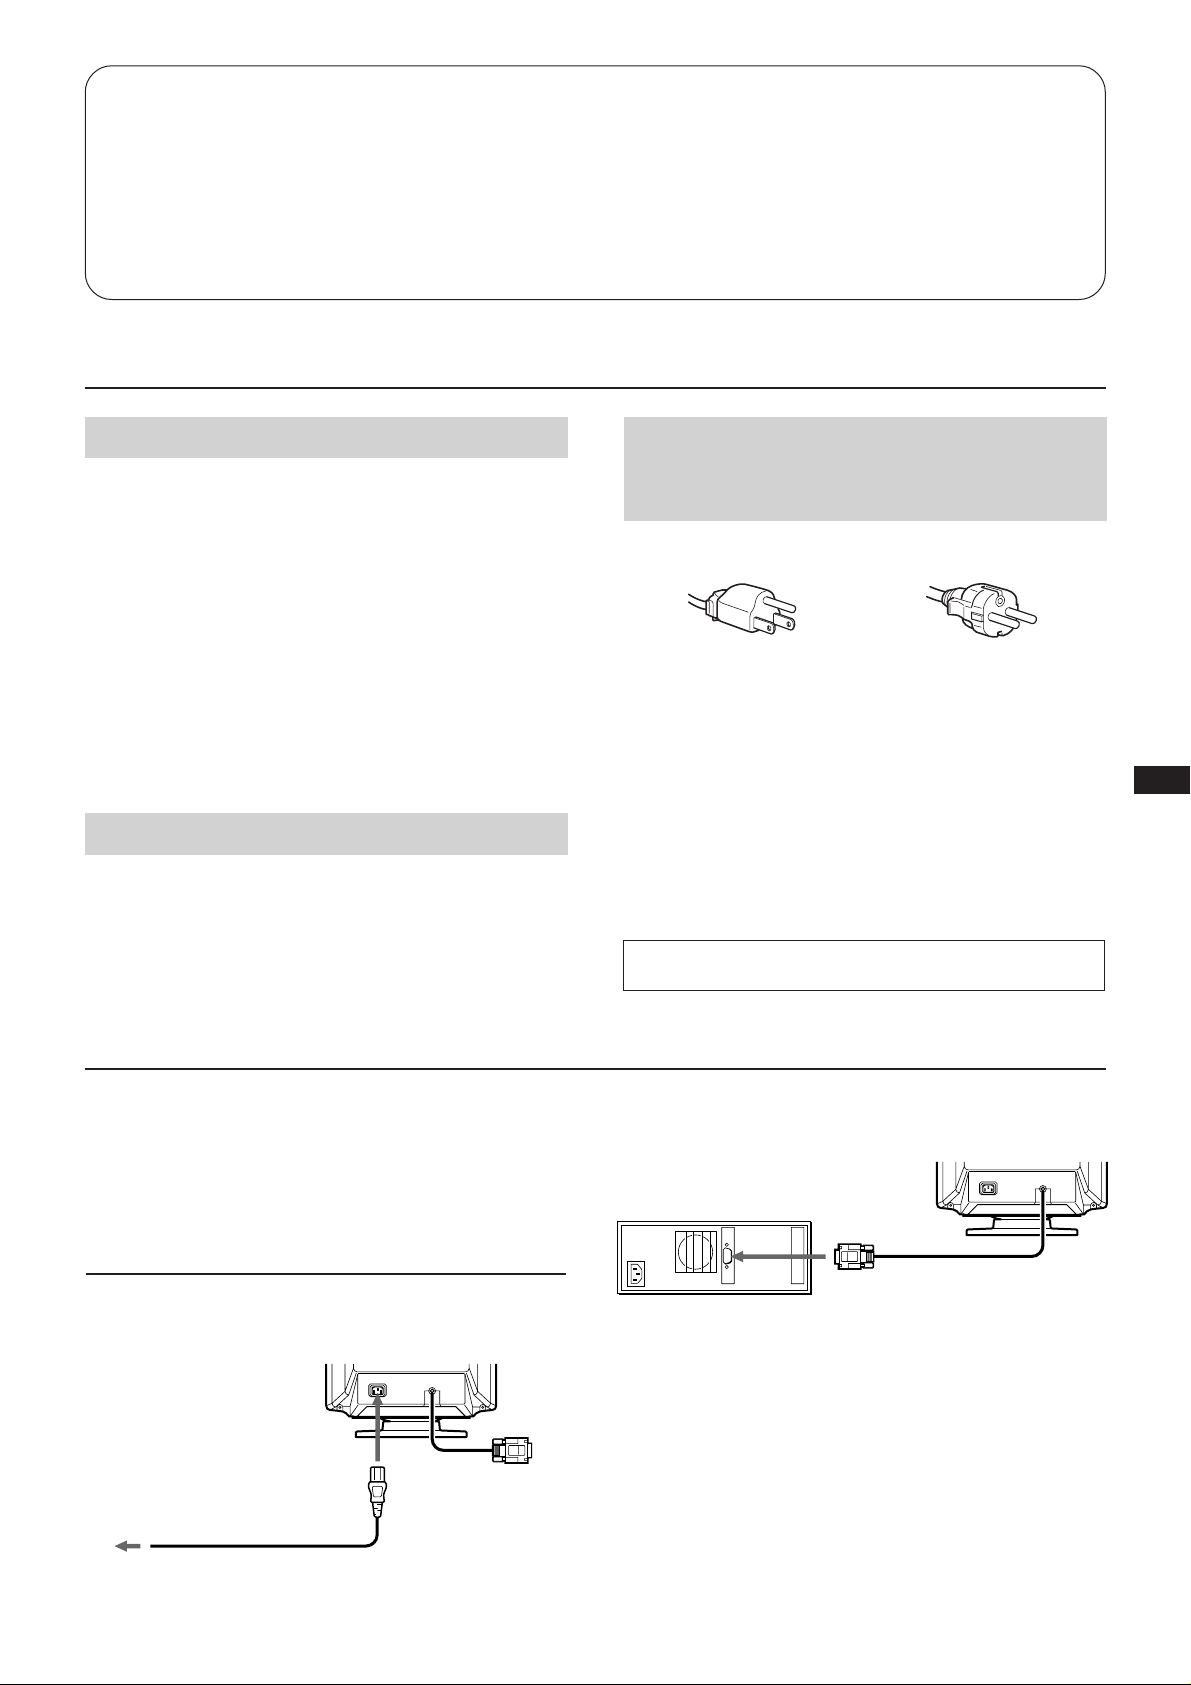
Table des matières
Précautions ................................................................................ 9
Préparation ................................................................................ 9
Réglages ................................................................................... 10
Fonction d’économie d’énergie ............................................ 11
Un moniteur prêt à l’emploi ................................................. 12
Précautions
Installation
• Veillez à assurer une circulation d’air adéquate pour
éviter une surchauffe interne de l’appareil. Ne placez pas
l’appareil sur des surfaces textiles (tapis, couvertures, etc.)
ou à proximité de rideaux ou de draperies susceptibles
d’obstruer les orifices de ventilation.
• N’installez pas l’appareil à proximité de sources de
chaleur comme un radiateur ou une bouche d’air chaud,
ni dans un endroit exposé au rayonnement solaire direct,
à des poussières excessives, à des vibrations ou à des
chocs mécaniques.
• N’installez pas l’appareil à proximité d’un équipement
qui génère un champ magnétique comme un
convertisseur ou des lignes à haute tension.
Entretien
Nettoyez le châssis, le panneau de verre et les commandes à
l’aide d’un chiffon doux légèrement imprégné d’une
solution détergente douce. N’utilisez jamais de tampons
abrasifs, de poudre à récurer ou de solvants tels que l’alcool
ou le benzène.
Fil d’amortissement ............................................................... 12
Utilisation du support pivotant ........................................... 12
Spécifications .......................................................................... 12
Dépannage .............................................................................. 13
Avertissement sur le
raccordement à la source
d’alimentation
• Utilisez le cordon d’alimentation fourni.
pour CA 220 à 240 Vpour CA 100 à 120 V
• Avant de débrancher le cordon d’alimentation, attendez
au moins 30 secondes après avoir actionné l’interrupteur
d’alimentation de manière à permettre la décharge de
l’électricité statique sur la surface de l’écran CRT.
• Après que le courant a été branché, le CRT est
démagnétisé pendant environ 5 secondes. Cela génère un
puissant champ magnétique autour de l’encadrement qui
peut affecter les données mémorisées sur une bande
magnétique ou des disquettes situées à proximité. Placez
ces systèmes d’enregistrement magnétique et ces bandes/
disquettes à l’écart de cet appareil.
La prise murale doit être installée à proximité de
l’équipement et être aisément accessible.
F
Préparation
Avant d’utiliser ce moniteur, assurez-vous que les éléments
suivants figurent dans l’emballage: le moniteur, le cordon
d’alimentation et ce mode d’emploi .
Ce moniteur se synchronise à d’autres plates-formes
fonctionnant sur des fréquences horizontales comprises
entre 31,5 et 64 kHz.
Raccordement à un ordinateur
1e étape: Le moniteur étant hors tension, raccordez le
cordon d’alimentation au moniteur et, ensuite, à
la prise murale.
Vers la prise
d’alimentation sécteur
cordon d’alimentation (fourni)
2e étape: L’ordinateur étant hors service, branchez le câble
de signalisation vidéo sur la sortie vidéo.
ordinateur
vers sortie
vidéo
3e étape: Mettez le moniteur et l’ordinateur sous tension.
4e étape: Si nécessaire, réglez les commandes utilisateur
selon vos préférences personnelles.
L’installation est terminée.
9
Page 10
Réglages
Plusieurs commandes numériques ont été prévues pour
vous permettre d’optimiser les paramètres d’affichage selon
vos préférences.
Vous pouvez régler l’image selon vos préférences en
appliquant la procédure décrite ci-dessous.
Vous pouvez régler tous les paramètres du menu
d’affichage OSD (On Screen Display).
Panneau de commande
RESET
POWER
SAVING
Appuyez sur cette partie pour ouvrir le couvercle du panneau
de commande.
p Lorsque la valeur limite est atteinte, l’indicateur POWER
SAVING commence à clignoter.
p Les réglages sont mémorisés automatiquement.
p Le menu OSD disparaît automatiquement 2 secondes
après que vous avez relâché les touches.
POWER
SAVING
Contraste
La valeur de réglage devient le réglage commun à tous les
signaux d’entrée.
1 Appuyez sur la touche >+/–.
Le menu > apparaît.
50
31.5kHz/70Hz
2 Appuyez sur la touche >+/– pour régler le contraste de
l’image.
+ ...pour plus de contraste
– ...pour moins de contraste
Luminosité
La valeur de réglage devient le réglage commun à tous les
signaux d’entrée.
1 Appuyez sur la touche ¨+/–.
Le menu ¨ apparaît.
Centrage horizontal
La valeur de réglage devient le réglage unique pour le
signal d’entrée reçu.
1 Appuyez sur la touche S∫/ı.
Le menu S apparaît.
50
2 Appuyez sur la touche S∫/ı.
∫ ...pour déplacer vers la droite
ı ...pour déplacer vers la gauche
Centrage vertical
La valeur de réglage devient le réglage unique pour le
signal d’entrée reçu.
1 Appuyez sur la touche s◊/√.
Le menu s apparaît.
50
31.5kHz/70Hz
2 Appuyez sur la touche ¨+/– pour régler la luminosité
de l’image.
+ ...pour plus de luminosité
– ...pour moins de luminosité
10
50
2 Appuyez sur la touche s◊/√.
◊ ...pour déplacer vers le haut
√ ...pour déplacer vers le bas
Page 11
Format horizontal
Rotation
La valeur de réglage devient le réglage unique pour le
signal d’entrée reçu.
1 Appuyez sur la touche Å+/–.
Le menu Å apparaît.
50
2 Appuyez sur la touche Å+/–.
+ ...pour agrandir
– ...pour réduire
Format verticale
La valeur de réglage devient le réglage unique pour le
signal d’entrée reçu.
1 Appuyez sur la touche +/–.
Le menu
apparaît.
50
La valeur de réglage devient le réglage commun à tous les
signaux d’entrée.
1 Appuyez sur la touche +/–.
Le menu
apparaît.
50
2 Appuyez sur la touche +/–.
+ ...pour une rotation dans le sens des aiguilles
d’une montre
– ...pour une rotation dans le sens contraire des
aiguilles d’une montre
Réinitialisation
• Appuyez sur le bouton RESET pour
rétablir les réglages d’usine de la
luminosité, du contraste, de la distorsion
RESET
en coussin, de la taille horizontale et
verticale et du centrage pour le mode
utilisé en ce moment.
• Pressez et maintenez la touche RESET
enfoncée pendant 2 secondes pour
restaurer les réglages par défaut de tous
les paramètres dans tous les modes.
F
2 Appuyez sur la touche +/–.
+ ...pour agrandir
– ...pour réduire
Distorsion en coussin
La valeur de réglage devient le réglage unique pour le
signal d’entrée reçu.
1 Appuyez sur la touche d+/–.
Le menu d apparaît.
50
2 Appuyez sur la touche d+/–.
+ ...pour élargir les côtés de l’image
– ...pour rétrécir les côtés de l’image
Fonction d’économie
d’énergie
Ce moniteur répond aux directives de réduction de la
consommation reprises dans l’EPA Energy Star program
ainsi qu’aux normes plus strictes NUTEK 803299 (TCO92). Il
est capable de réduire la consommation d’énergie s’il est
utilisé avec un ordinateur équipé du Display Power
Management Signaling (DPMS). S’il détecte l’absence du
signal de synchronisation provenant de l’ordinateur, il
réduit la consommation électrique de la façon suivante:
ATTENTION: La fonction d’économie d’énergie met
automatiquement le moniteur en mode
Active-off si l’interrupteur d’alimentation est
actionné sans qu’il y ait d’entrée de signal
vidéo. Dès que les synchronisations
horizontale et verticale sont détectées, le
moniteur revient automatiquement en mode
de fonctionnement normal.
Fonctionnement
1
normal
Interruption
(1re étape de
2
l’économie
d’énergie)
Active-off
(2e étape de
3
l’économie
d’énergie)
Etat
Consommation
électrique
100%
approx. 10%
approx. 7%
Temps de
reprise
requis
—
approx. 3
sec.
approx. 10
sec.
u Indicateur
d’alimentation
vert allumé
vert allumé
éteint
Indicateur
POWER
SAVING
éteint
orange
allumé
orange
allumé
11
Page 12
Un moniteur prêt à l’emploi
Ce moniteur satisfait aux normes DDC1 et DDC2B qui
sont les normes Display Data Channel (DDC) de VESA.
Si un système hôte DDC1 est connecté, le moniteur se
synchronise avec V.CLK suivant les normes VESA et
transmet Extended Display Identification (EDID) à la ligne
de données.
Si un système hôte DDC2B est connecté, le moniteur
commute automatiquement la communication DDC2B.
DDC est une marque déposée de Video Electronics
Standards Association.
Fil d’amortissement
Sur un fond blanc, il se peut que vous observiez sur l’écran
de très fines lignes horizontales comme dans l’illustration.
Il s’agit des fils d’amortissement. Ces fils sont fixés à la grille
d’ouverture à l’intérieur du tube Trinitron et sont destinés à
amortir les vibrations de la grille d’ouverture pour éviter
qu’elles n’altèrent la qualité de l’image.
Fil d’amortissement
Utilisation du support pivotant
Env. 6 cm
Env. 6 cm
Le support pivotant permet de régler cet appareil suivant
l’angle de vision de votre choix dans une plage de 90°
horizontalement et 20° verticalement.
Pour faire pivoter l’appareil verticalement et
horizontalement, maintenez-le des deux mains par la base.
Spécifications
Tube image 0,25 mm de pas d’ouverture de grille,
17 pouces en diagonale (16” image
réelle), 90˚ de déflexion
Taille de l’image réelle
Approx. 328 × 242 mm (l/h)
5
(13 × 9
Résolution Horizontale: Max. 1280 points
Verticale: Max. 1024 lignes
Taille de l’image sur écran
Approx. 300 × 225 mm (l/h)
(11
/8 pouces)
7
/8 × 8 7/8 pouces)
15°
45°
45°
5°
Fréquence de déflexion
Horizontale: de 31,5 à 64 kHz
Verticale: de 50 à 120 Hz
Tension/ courant d’entrée
De CA 100 à 120 V, 50/60 Hz, 1,8 A
De 220 à 240 V, 50 – 60 Hz, 1 A
Dimensions 406 × 426,5 × 451 mm (l/h/p)
(16 × 16
Masse Approx. 19,0 kg (41 lb 14 oz)
La conception et les spécifications sont sujettes à
modification sans préavis.
7
/8 × 17 7/8 pouces)
12
Page 13

Dépannage
Cette section peut vous aider à localiser un problème et, par conséquent, vous éviter de devoir consulter un service technique,
ce qui vous permet de ne pas interrompre votre productivité.
Symptôme
Pas d’image
Les indicateurs u
(alimentation) et POWER
SAVING ne sont pas
allumés
L’indicateur POWER
SAVING est allumé
Les indicateurs u
(alimentation) et POWER
SAVING clignotent
Le message “OUT OF
SCAN RANGE” apparaît à
l’écran
L’image vacille
La couleur n’est pas
uniforme
L'image écran n’est pas
centrée ou correctement
dimensionnée
L’image est floue
L’image sautille ou oscille
fortement
Une fine ligne horizontale
(fil) est visible
Image inclinée
Bords de l´image incurvés
Une trame ondulatoire ou
elliptique (moirée) est
visible sur l’écran
Vérifiez
• Vérifiez si le cordon d’alimentation est correctement raccordé.
• Vérifiez si l’interrupteur d’alimentation est en position ON.
• Vérifiez si l’interrupteur d’alimentation de votre ordinateur est en position ON.
• L‘écran sera réactivé lorsque vous actionnerez une touche du clavier.
• Vérifiez si le câble vidéo est correctement raccordé.
• Assurez-vous qu’aucune broche n’est pliée ou enfoncée dans le connecteur HD15 du câble.
• Vérifiez si la carte vidéo est complètement introduite dans la fente appropriée.
• Vérifiez si le signal de synchronisation vidéo correspond à celui spécifié pour le
moniteur.
• Mettez le moniteur hors et puis à nouveau sous tension. Si l’indicateur ne clignote pas, le
fonctionnement est normal.
• Il se peut que votre moniteur soit en panne. Consultez votre distributeur.
• Vérifiez si le signal de synchronisation vidéo est spécifié pour le moniteur.
• Consultez le manuel de vos cartes graphiques pour le réglage adéquat du moniteur sur
votre moniteur.
• Consultez ce manuel et vérifiez si le mode graphique et la fréquence que vous essayez
d’utiliser sont supportées. Certaines cartes vidéo peuvent avoir une impulsion de
synchronisation trop étroite pour une synchronisation correcte du moniteur, même dans
la plage adéquate.
• Actionnez l’interrupteur d’alimentation une fois pour activer le cycle Auto-degauss*.
• Réglez le centrage, la dimension ou la rotation de trame (pages 10, 11).
• Certains modes vidéo ne remplissent pas l’écran jusqu’aux bords du moniteur. Aucun
remède à ce problème. Ce problème a tendance à se manifester au niveau des
synchronisations de régénération supérieures et des synchronisations vidéo Macintosh.
• Réglez le Contraste et la Brillance (page 10). Plusieurs marques de cartes SVGA
présentent un niveau de sortie vidéo excessif qui crée une image floue lorsque le
contraste est au maximum.
• Actionnez l’interrupteur d’alimentation une fois pour activer le cycle Auto-degauss*.
• Ecartez du moniteur les appareils électriques (magnétiques) susceptibles de créer des
interférences électriques.
• Si vous avez installé un autre moniteur à proximité de ce moniteur, écartez-les
davantage l’un de l’autre de manière à réduire les interférences.
• Il est possible que des câbles électriques passent derrière le mur de votre bureau. Ecartez
le moniteur du mur.
• Ce fil stabilise la Grille d’Ouverture rayée verticale. Cette Grille d’Ouverture permet le
passage de plus de lumière, optimisant ainsi les couleurs et la brillance du Trinitron
CRT**.
• Actionnez l’interrupteur d’alimentation une fois pour activer le cycle Auto-degauss*.
Ensuite, ajustez la Rotation (page 11).
• Ajustez la Distorsion en coussin (page 11).
• En fonction de la relation entre la résolution, l’espacement des points du moniteur et
l’espacement des points de certaines trames d’image, il est possible que l’arrière-plan
visible à l’écran, et plus particulièrement le gris, soit moiré. Cet inconvénient ne peut
être éliminé qu’en changeant votre trame de desktop.
F
* La fonction Auto-degauss sert à démagnétiser le cadre métallique du CRT de façon à
obtenir un champ neutre pour une reproduction uniforme des couleurs. Si un second cycle
degauss est nécessaire, laissez s’écouler un intervalle d’au moins 20 minutes pour obtenir
les meilleurs résultats.
** Trinitron
• Si le problème persiste, appelez votre distributeur agréé depuis un téléphone situé à proximité de votre moniteur.
• Inscrivez la désignation du modèle et le numéro de série de votre moniteur, de même que la marque et la désignation de
votre ordinateur et de la carte vidéo.
est une marque déposée de Sony Corporation.
13
Page 14

14
Page 15

Inhalt
Sicherheitsmaßnahmen ........................................................ 15
Anschließen des Monitors.................................................... 15
Anpassungen .......................................................................... 16
Energiesparfunktion ............................................................. 17
Plug & Play ............................................................................. 18
Technische Daten ...................................................................18
Schwenk-und Neigevorrichtung .........................................18
Stabilisierungsdrähte.............................................................18
Fehlerbehebung ......................................................................19
Sicherheitsmaßnahmen
Installation
• Sorgen Sie für eine ausreichende Belüftung des Gerätes,
um einen internen Hitzestau zu vermeiden.
Stellen Sie das Gerät nicht auf Oberflächen, wie
Teppichen oder Decken, bzw. in die Nähe von Vorhängen
oder Wandbehängen auf, die die Lüftungsschlitze
blockieren könnten.
• Stellen Sie das Gerät nicht in der Nähe von Wärmequellen
wie Heizkörpern oder Warmluftauslässen oder an Orten
auf, an denen es direkter Sonneneinstrahlung, viel Staub
oder mechanischen Vibrationen oder Erschütterungen
ausgesetzt ist.
• Stellen Sie das Gerät nicht in der Nähe von Geräten auf,
die Magnetfelder erzeugen, wie. z. B. ein Stromrichter
oder Hochspannungsleitungen.
Wartung
Reinigen Sie das Gehäuse, die Scheibe und die
Bedienelemente mit einem weichen Tuch, das Sie leicht mit
einem milden Reinigungsmittel anfeuchten. Verwenden Sie
kein grobes Scheuertuch und keine Scheuerpulver oder
Lösungsmittel, wie Alkohol oder Benzin.
Achtung bei der
Netzverbindung!
• Verwenden Sie das mitgelieferte Netzkabel
• Warten Sie nach dem Ausschalten des Gerätes
• Nach dem Einschalten des Geräts wird die
für 100 bis 120 V
Wechselstrom
mindestens 30 Sekunden, bevor Sie das Netzkabel lösen.
In dieser Zeit kann sich die statische Elektrizität von der
Oberfläche der Kathodenstrahlröhre entladen.
Kathodenstrahlröhre (CRT) für ca. 5 Sekunden
entmagnetisiert. Dadurch wird ein starkes magnetisches
Feld um den Metallrand der Röhre erzeugt, das Daten auf
Magnetbändern oder Disketten, die in der Nähe liegen,
beschädigen könnte. Bitte plazieren Sie daher keine
magnetischen Aufzeichnungsgeräte bzw. Bänder/
Disketten in unmittelbarer Nähe.
Die Netzsteckdose sollte sich in der Nähe des Geräts
befinden und problemlos zugänglich sein.
für 220 bis 240 V
Wechselstrom
D
Anschließen des Monitors
Bevor Sie mit dem Monitor arbeiten, vergewissern Sie sich
bitte zuerst, daß folgende Teile in Ihrem Lieferpaket enthalten
sind: Monitor, Netzkabel und diese Bedienungsanleitung.
Der Monitor eignet sich für Systeme mit einer horizontalen
Frequenz von 31,5 – 64 kHz.
Anschließen an einen Computer
Schritt 1: Schließen Sie bei ausgeschaltetem Monitor das
zur Netzsteckdose
Netzkabel an den Monitor und an die
Netzsteckdose an.
Netzkabel (mitgeliefert)
Schritt 2: Schließen Sie bei ausgeschaltetem Computer das
Computer
Schritt 3: Schalten Sie den Monitor und den Rechner ein.
Schritt 4: Stellen Sie gegebenenfalls die Bedienelemente
Die Installation ist abgeschlossen.
Videosignalkabel an den Bildschirmausgang
Ihrer Grafikkarte an.
an Videoausgang
nach Ihren Wünschen ein.
15
Page 16

Anpassungen
POWER
SAVING
Wählen Sie den gewünschten Einstellparameter und
nehmen Sie die Einstellungen, wie im folgenden
beschrieben vor. Als Hilfsmittel steht Ihnen eine
Bildschirmanzeige (On-Screen-Display) zur Verfügung.
Sie können sofort wieder in den normalen Betriebsmodus
wechseln, wenn Sie die entsprechende Parametertaste ein
zweites Mal drücken; die Bildschirmanzeige erlischt wieder.
Die Einstellungen werden automatisch gespeichert und
immer abgerufen, wenn Sie mit diesem Modus arbeiten.
Bedienfeld
RESET
Drücken Sie an der markierten Stelle, um die Abdeckung des
Bedienfeldes zu öffnen.
p Ist der Grenzwert einer Einstellung erreicht, beginnt die
Anzeige POWER SAVING zu blinken.
p Anpassungen werden automatisch gespeichert.
p Die Bildschirmanzeige wird ausgeblendet, zwei
Sekunden, nachdem Sie die Tasten losgelassen haben.
POWER
SAVING
Kontrast
Der eingestellte Wert gilt für alle Auflösungen.
1 Benutzen Sie zum Einstellen die Taste >+/–.
Die Bildschirmanzeige > erscheint.
50
31.5kHz/70Hz
2 Stellen Sie mit der Taste >+/– den Bildkontrast ein.
+ ...Kontrast wird stärker
– ...Kontrast wird schwächer
Helligkeit
Der eingestellte Wert gilt für alle Auflösungen.
1 Benutzen Sie zum Einstellen die Taste ¨+/–.
Die Bildschirmanzeige ¨ erscheint.
50
Horizontale Zentrierung
Der eingestellte Wert gilt für die dargestellte Auflösung.
1 Benutzen Sie zum Einstellen die Taste S∫/ı.
Die Bildschirmanzeige S erscheint.
50
2 Stellen Sie mit der Taste S∫/ı die horizontale
Zentrierung des Bildes ein.
∫ ...Bild verschiebt sich nach rechts
ı ...Bild verschiebt sich nach links
Vertikale Zentrierung
Der eingestellte Wert gilt für die dargestellte Auflösung.
1 Benutzen Sie zum Einstellen die Taste s◊/√.
Die Bildschirmanzeige s erscheint.
31.5kHz/70Hz
2 Stellen Sie mit der Taste ¨+/– die Bildhelligkeit ein.
+ ...Bild wird heller
– ...Bild wird dunkler
16
50
2 Stellen Sie mit der Taste s◊/√ die vertikale Zentrierung
des Bildes ein.
◊ ...Bild verschiebt sich nach oben
√ ...Bild verschiebt sich nach unten
Page 17

Bildbreite
Rotation
Der eingestellte Wert gilt für die dargestellte Auflösung.
1 Benutzen Sie zum Einstellen die Taste Å+/–.
Die Bildschirmanzeige Å erscheint.
50
2 Stellen Sie mit der Taste Å+/– die horizontale Größe
des Bildes ein.
+ ...Bild wird breiter
– ...Bild wird schmäler
Bildhöhe
Der eingestellte Wert gilt für die dargestellte Auflösung.
1 Benutzen Sie zum Einstellen die Taste +/–.
Die Bildschirmanzeige
erscheint.
50
2 Stellen Sie mit der Taste +/– die vertikale Größe des
Bildes ein.
+ ...Bild wird größer
– ...Bild wird kleiner
Kissenverzerrung
Der eingestellte Wert gilt für die dargestellte Auflösung.
1 Benutzen Sie zum Einstellen die Taste d+/–.
Die Bildschirmanzeige d erscheint.
50
2 Korrigieren Sie mit der Taste d+/– die Kissenverzerrung,
wie unten dargestellt.
+ ...zum Korrigieren der Bildwölbung nach außen
Der eingestellte Wert gilt für alle Auflösungen.
1 Benutzen Sie zum Einstellen die Taste +/–.
Die Bildschirmanzeige
erscheint.
50
2 Stellen Sie mit der Taste +/– die Bildrotation ein.
+ ...Bild dreht im Uhrzeigersinn
– ...Bild dreht entgegen dem Uhrzeigersinn
Zurücksetzen der Einstelldaten auf werkseitige
Voreinstellungen
Beim Zurücksetzen gibt es zwei Möglichkeiten:
RESET
• Zurücksetzen des aktuellen Modus
Drücken Sie kurz die Taste RESET, um
die werkseitigen Einstellungen für
Helligkeit, Kontrast, Kisssenverzerrung,
horizontale und vertikale Bildgröße und
Zentrierung für den aktuellen Modus
einzustellen.
• Zurücksetzen aller Modi
Halten Sie die Taste RESET mehr als 2
Sekunden lang gedrückt. Alle
Einstellparameter, einschließlich
Helligkeit und Kontrast, werden auf die
werkseitigen Voreinstellungen
zurückgesetzt.
Energiesparfunktion
Dieser Monitor entspricht den Energiesparrichtlinien des
EPA Energy Star Programmes, sowie den strengeren
NUTEK 803299 Richtlinien. Reduzierte Leistungsaufnahme
ist möglich, wenn der Monitor mit einem Computer
eingesetzt wird, der mit DPMS (Display Power
Management Signaling) arbeitet.
Wenn der Monitor feststellt, daß kein Synchronisationsignal
vom Computer (Grafikkarte) bereitgestellt wird, reduziert
er die Leistungsaufnahme folgendermaßen:
Wichtiger Hinweis: Die Energiesparfunktion schaltet den
Monitor automatisch in den Status
Deaktiviert, wenn das Gerät
eingeschaltet wird, aber keine
Videosignale eingehen. Wenn
horizontale und vertikale
Synchronisationssignale festgestellt
werden, kehrt der Monitor
automatisch in den Status
Normalbetrieb zurück.
D
– ...zum Korrigieren der Bildwölbung nach innen
Status
Normalbetrieb
1
Bereitschaft
(1. Stufe der
2
Energiesparfunktion)
Deaktiviert
(2. Stufe der
3
Energiesparfunktion)
Leistungsaufnah-
me
100 %
ca. 10 %
ca. 7 %
Erforderli-
che
Wiederauf-
nahmezeit
—
ca. 3 Sek.
ca. 10 Sek.
u
Netzanzeige
Leuchtet grün
Leuchtet grün
Leuchtet
nicht
Anzeige
POWER
SAVING
Leuchtet
nicht
Leuchtet
orange
Leuchtet
orange
17
Page 18

Plug & Play
Dieser Monitor entspricht den DDC-Standards (DDC =
Display Data Channel) DDC1 und DDC2B.
Ist eine DDC1-fähige Grafikkarte angeschlossen, so
synchronisiert sich der Monitor entsprechend den VESA
Standards mit V CLK und gibt die EDID (Extended Display
ID) an die Datenleitung aus. Ist eine DDC2B-fähige
Grafikkarte angeschlossen, so schaltet der Monitor
automatisch in die DDC2B-Kommunikation.
DDC ist ein Warenzeichen der Video Electronics
Standards Association (VESA).
Technische Daten
Bildröhre Streifenmasken-Pitch 0,25 mm
Bildschirmdiagonale 44 cm (17 Zoll),
sichtbarer Bildbereich 40,8 cm,
Ablenkung 90 Grad
Effektive Bildgröße
Auflösung Horizontal: max. 1280 Punkte
Anzeigegröße ca. 300
ca. 328 × 242 mm (B/H)
Vertikal: max. 1024 Zeilen
×
225 mm (B/H)
Ablenkfrequenz Horizontal: 31,5 bis 64 kHz
Vertikal: 50 bis 120 Hz
Betriebsspannung 220 bis 240 V, 50 – 60 Hz, 1 A
Abmessungen 406 × 426,5 × 451 mm (B/H/T)
Gewicht ca. 19,0 kg
Änderungen an Design und technischen Daten bleiben
vorbehalten.
Schwenk- und Neigevorrichtung
Mit der Schwenk- und Neigevorrichtung können Sie das
Gerät auf jeden gewünschten Winkel zwischen 90°
horizontal und 20° vertikal einstellen.
Wenn Sie das Gerät vertikal und horizontal neigen bzw.
schwenken, halten Sie es mit beiden Händen unten fest.
45°
15°
Stabilisierungsdrähte
Bei einem weißen Hintergrund sind, wie abgebildet, sehr
dünne, horizontale Streifen auf dem Bildschirm zu sehen.
Bei diesen Streifen handelt es sich um zwei
Stabilisierungsdrähte im Inneren der TrinitronStreifenmaske. Sie dämpfen Vibrationen der Streifenmaske
und verhindern damit eine Beeinträchtigung der
Bildqualität.
45°
5°
Stabilisierungsdrähte
ca. 6 cm
ca. 6 cm
18
Page 19

Fehlerbehebung
Der folgende Abschnitt soll es Ihnen ermöglichen, eine Fehlerursache selbst zu erkennen und den Fehler zu beheben. Damit
können Sie gegebenenfalls auf den technischen Kundendienst verzichten.
Symptom
Kein Bild
Netzanzeige und die Anzeige
POWER SAVING leuchten
nicht.
Die Anzeige POWER
SAVING leuchtet.
Die Netzanzeige und die
Anzeige POWER SAVING
blinken beide.
Die Meldung „OUT OF SCAN
RANGE” erscheint
auf dem Bildschirm.
Bild ist verzerrt
Die Farbe ist nicht gleichmäßig
(Farbreinheitsprobleme)
Das Bild ist nicht
ordnungsgemäß zentriert bzw.
die Bildgröße stimmt nicht.
Das Bild ist unscharf
Das Bild springt oder zittert
Zwei feine horizontale
Linien sind zu erkennen
Bildlage schräg
Die Bildränder sind gekrümmt
Ein Wellen- oder Moiré-
Muster ist zu sehen
• Laßt sich das Problem nicht beheben, wenden Sie sich bitte telefonisch an Ihren autorisierten Händler. Sie sollten während
des Gesprächs Zugang zu dem Monitor haben.
• Notieren Sie bitte die Modellbezeichnung und Seriennummer Ihres Monitors, sowie Marke und Modell Ihres Computers und
Ihrer Grafikkarte.
Überprüfen Sie bitte folgendes:
• Das Netzkabel muß richtig angeschlossen sein.
• Der Netzschalter muß betätigt sein und muß auf „ON” stehen.
• Der Netzschalter Ihres Computers muß auf „ON” stehen.
• Wenn Sie eine beliebige Taste drücken, schaltet der Monitor wieder in den normalen
Betriebsmodus.
• Das Videokabel muß korrekt angeschlossen sein.
• Die Stifte im HD-15-Anschluß des Signalkabels dürfen nicht verbogen sein.
• Die Grafikkarte muß ordnungsgemäß in den richtigen Erweiterungssteckplatz eingesteckt sein.
Es ist möglich, daß Ihre Grafikkarte in einem speziellen Steckplatz auf dem ComputerMotherboard (Hauptplatine) betrieben werden muß.
• Das Videosynchronisationssignal muß den Spezifikationen des Monitors entsprechen (d. h.
Horiz.: 31,5 – 64 kHz, Vert.: 50 – 120 Hz).
• Schalten Sie den Monitor ein oder aus. Leuchtet die Anzeige nicht mehr, befindet sich das
Gerät im normalen Betriebsmodus.
• Möglicherweise ist ein Fehler am Monitor aufgetreten. Wenden Sie sich bitte an Ihren
Händler.
• Das Videosynchronisationssignal muß den Spezifikationen des Monitors entsprechen (d. h.
Horiz.: 31,5 – 64 kHz, Vert.: 50 –120 Hz).
• Kontrollieren Sie bitte in der Dokumentation zu Ihrer Grafikkarte die korrekte Einstellung für
Ihren Monitor.
• Überprüfen Sie in der Anleitung zu Ihrer Grafikkarte, ob der Grafikmodus und die Frequenz,
die Sie verwenden unterstützt wird. Auch innerhalb des korrekten Wertebereiches arbeiten
bestimmte Grafikkarten mit einem.
Synchronisationsimpuls, der für den Monitor zu kurz ist, so daß der Monitor nicht korrekt
synchronisieren kann.
• Der HD15-Anschluß am Videokabel muß fest in die Buchse der Grafikkarte gesteckt sein.
• Die Stifte am HD-15-Anschluß dürfen nicht verbogen sein.
• Betätigen Sie einmal den Netzschalter, um den Auto-Degauss-Zyklus zu aktivieren*.
• Verändern Sie den Einstellparameter für die Zentrierung (Horiz. bzw. Vertikal, Seite 16) und
die Bildgröße (Breite bzw. Höhe, Seite 17).
• In einigen Videomodi wird der Bildschirm nicht bis zum Rand ausgefüllt. Für dieses Problem
sind mehrere Faktoren verantwortlich. Das Problem tritt in der Regel bei hohen
Bildwiederholraten und bei Nicht-Standard-Timings auf.
• Stellen Sie die Regler für Kontrast und Helligkeit ein (Seite 16). Die Graphikkarten
einiger Hersteller weisen einen zu hohen Videoausgangspegel auf, der bei maximalem
Kontrast ein verschwommenes Bild erzeugt.
• Betätigen Sie einmal den Netzchalter, um den Auto-Degauss-Zyklus zu aktivieren*.
• Entfernen Sie elektrische bzw. magnetische Geräte, die möglicherweise Interferenzen mit dem
Monitor verursachen (z. B. elektrische Ventilatoren, Leuchtstoffröhren, Laserdrucker u. ä.)
• Befindet sich in der Nähe ein anderer Monitor, so vergrößern Sie den Abstand zwischen den
Beiden, um die Interferenzen zu verringern. Interferenzen können auch durch Stromleitungen
hervorgerufen werden, die innerhalb oder auf der Wand verlaufen. Stellen Sie bitte einen
geeigneten Aufstellungsort fest.
• Es handelt sich um zwei feine Drähte, die zur Stabilisierung der vertikalen Streifenmaske dienen.
Diese Maßnahme ermöglicht es, daß mehr Licht auf den Bildschirm trifft und somit eine bessere
Farbbrillianz und Helligkeit mit einer Trinitron-Röhre** erzielt werden kann.
• Betätigen Sie einmal den Netzschalter, um den automatischen Entmagnetisierungszyklus zu
starten. Verändern Sie dann die Bildrotation (Seite 17).
• Verändern Sie die Einstellparameter für die Kissenverzerrung (Seite 17).
• Aufgrund des Zusammenwirkens von Auflösung, der Bildpunktgröße des Monitors und der
Punktgröße bestimmter Bildmuster, können bei bestimmten Hintergründen (Grautöne) Wellenoder Moiré-Effekte auftreten. Eine Abhilfe kann nur durch einen Wechsel Ihres DesktopHintergrundes erzielt werden.
* Mit der automatischen Entmagnetisierungsfunktion (Auto-Degauss) wird der
Metallrahmen der Kathodenstrahlröhre entmagnetisiert, um eine gleichmäßige
Farbwiedergabe zu gewährleisten.
** Trinitron
ist ein eingetragenes Warenzeichen der Sony Corporation.
19
D
Page 20

20
Page 21

Indice
Precauciones ........................................................................... 21
Primeros pasos ....................................................................... 21
Ajustes ..................................................................................... 22
Función de ahorro de energía.............................................. 23
Función Plug and Play .......................................................... 24
Precauciones
Instalación
• Coloque la unidad en un lugar debidamente ventilado
para evitar el recalentamiento interno. No sitúe la unidad
sobre superficies (alfombras, mantas, etc.) o cerca de
materiales (cortinas, tapices) que puedan bloquear los
orificios de ventilación.
• No instale la unidad cerca de fuentes de calor como
radiadores o tubos de ventilación, ni la exponga a la luz
directa del sol, a polvo excesivo, o a vibraciones o
sacudidas mecánicas.
• Mantenga la unidad alejada de cualquier equipo que
emita radiaciones magnéticas, como transformadores o
líneas eléctricas de alta tensión.
Mantenimiento
Limpie la caja, el cristal y los controles con un paño suave y
ligeramente humedecido en una solución detergente poco
concentrada. No utilice ningún tipo de estropajo, productos
de limpieza en polvo ni disolventes, como alcohol o bencina.
Hilos de amortiguación.........................................................24
Uso de la base inclinable/giratoria ..................................... 24
Especificaciones ......................................................................24
Solución de problemas ..........................................................25
Advertencia sobre la
conexión de la alimentación
• Utilice el cable de alimentación suministrado.
para tensiones de
100 a 120 V CA
• Para desconectar el cable de alimentación, espere al
menos 30 segundos tras apagar la alimentación para
permitir la descarga de la electricidad estática acumulada
en la superficie del tubo de imagen.
• Tras activar la alimentación, el tubo de imagen se
desmagnetiza durante 5 segundos aproximadamente. Este
proceso genera un intenso campo magnético que puede
alterar los datos contenidos en las cintas o discos
magnéticos situados en las proximidades. Por ello, es
aconsejable situar tales materiales magnéticos lejos del
monitor.
La toma de corriente debe instalarse en las proximidades
del monitor y ser fácilmente accesible.
para tensiones de
220 a 240 V CA
ES
Primeros pasos
Antes de usar el monitor asegúrese de que en el paquete se
incluyen los accesorios siguientes: el monitor, cable de
alimentación y este manual de instrucciones.
Este monitor puede sincronizarse con plataformas que
operen con frecuencias horizontales comprendidas entre
31,5 y 64 kHz.
Conexión del ordenador
Paso 1: Con el monitor apagado, enchufe el cable de
alimentación al monitor y a continuación a la toma
de corriente.
a la toma de corriente Cable de alimentación (suministrado)
Paso 2: Con el ordenador apagado, conecte el cable de
señal de vídeo a la salida de vídeo.
Ordenador
a la salida de
video
Paso 3: Encienda el monitor y el ordenador.
Paso 4: Si es necesario, ajuste los controles de usuario
según sus preferencias.
La instalación está finalizada.
21
Page 22

Ajustes
POWER
SAVING
El monitor cuenta con diversos controles digitales que le
permiten optimizar los parámetros de visualización según
sus preferencias.
Para ajustar la imagen según sus necesidades utilice el
procedimiento que se indica a continuación.
Todos los elementos incluidos en la función OSD
(visualización en pantalla) se pueden ajustar.
Panel de control
RESET
Presione aquí para abrir la tapa del panel de control.
p Cuando se alcanza el valor límite, comienza a parpadear
el indicador POWER SAVING.
p Los ajustes se almacenan automáticamente.
p Al liberar los botones, OSD desaparece de forma
automática 2 segundos después.
POWER
SAVING
Contraste
Los datos de ajuste pasan a ser el parámetro común en todas
las señales de entrada.
1 Pulse el botón >+/–.
Aparece > OSD (visualización en pantalla).
50
31.5kHz/70Hz
2 Pulse el botón >+/– para ajustar el contraste de la
imagen.
+ ...para aumentar el contraste
– ...para reducir el contraste
Brillo
Los datos de ajuste pasan a ser el parámetro común en todas
las señales de entrada.
1 Pulse el botón ¨+/–.
Aparece ¨ OSD (visualización en pantalla).
Centrado horizontal
Los datos de ajuste se convierten en el parámetro específico
de las señales de entrada que se reciben.
1 Pulse el botón S∫/ı.
Aparece S OSD (visualización en pantalla).
50
2 Pulse el botón S∫/ı.
∫ ...para desplazar la imagen hacia la derecha
ı ...para desplazar la imagen hacia la izquierda
Centrado vertical
Los datos de ajuste se convierten en el parámetro específico
de las señales de entrada que se reciben.
1 Pulse el botón S◊/√.
Aparece S OSD (visualización en pantalla).
50
31.5kHz/70Hz
2 Pulse el botón ¨+/– para ajustar el brillo de la imagen.
+ ...para aumentar el brillo
– ...para reducir el brillo
22
50
2 Pulse el botón S◊/√.
◊ ...para desplazar la imagen hacia arriba
√ ...para desplazar la imagen hacia abajo
Page 23

Tamaño horizontal
Rotación
Los datos de ajuste se convierten en el parámetro específico
de las señales de entrada que se reciben.
1 Pulse el botón Å+/–.
Aparece Å OSD (visualización en pantalla).
50
2 Pulse el botón Å+/–.
+ ...para ampliarlo
– ...para reducirlo
Tamaño vertical
Los datos de ajuste se convierten en el parámetro específico
de las señales de entrada que se reciben.
1 Pulse el botón +/–.
Aparece
OSD (visualización en pantalla).
50
Los datos de ajuste pasan a ser el parámetro común en todas
las señales de entrada.
1 Pulse el botón +/–.
Aparece
OSD (visualización en pantalla).
50
2 Pulse el botón +/–.
+ ...para que gire en el sentido de las agujas del reloj
– ...para que gire en sentido contrario a las agujas
del reloj
Recuperación de los valores por defecto
• Pulse el botón RESET para restaurar los
ajustes de fábrica de brillo, contraste,
distorsión de la imagen, tamaño vertical
RESET
y horizontal y centrado del modo
actualmente en uso.
• Mantenga pulsado el botón RESET
durante 2 segundos para recuperar los
valores de fábrica de todos los ajustes
para todos los modos.
2 Pulse el botón +/–.
+ ...para ampliarlo
– ...para reducirlo
Distorsión de la imagen
Los datos de ajuste se convierten en el parámetro específico
de las señales de entrada que se reciben.
1 Pulse el botón d+/–.
Aparece d OSD (visualización en pantalla).
50
2 Pulse el botón d+/–.
+ ...para ampliar los márgenes de la imagen
– ...para reducir los márgenes de la imagen
Función de ahorro
de energía
El monitor cumple las directrices de ahorro de energía
establecidas por EPA Energy Star program, así como la
normativa más exigente NUTEK 803299 (TCO92). Puede
reducir el consumo de energía si se utiliza juntamente con
un ordenador equipado con Display Power Management
Signaling (DPMS). Cuando detecta la ausencia de señal de
sincronización procedente del ordenador, el monitor reduce
el consumo de energía de la siguiente forma:
PRECAUCION:
Si se activa el interruptor de corriente sin que exista una
señal de video de entrada, la función de ahorro de energía
situará al monitor en estado de reposo. En el momento en
que el monitor detecte señales de sincronismo horizontal y
vertical, se situará automáticamente en estado de
funcionamiento normal.
Estado
Funcionamiento
1
normal
En espera
(1º nivel de
2
ahorro de
energía)
En reposo
(2º nivel de
3
ahorro de
energía)
Consumo de
energía
100%
aprox. 10 %
aprox. 7 %
Tiempo de
recuperación
—
aprox. 3 seg.
aprox. 10 seg.
u Indicador
de
alimentación
verde
iluminado
verde
iluminado
apagado
Indicador
POWER
SAVING
apagado
naranja
iluminado
naranja
iluminado
ES
23
Page 24

Función Plug and Play
Este monitor cumple las normas DDC (Display Data
Channel) DDC1 y DDC2B de VESA.
Al conectar un sistema central DDC1, el monitor se
sincroniza con V.CLK de acuerdo con las normas VESA y
envía la EDID (Extended Display ldentification) a la línea de
datos.
Al conectar un sistema central DDC2B, el monitor cambia
automáticamente a la comunicación DDC2B.
DDC es una marca comerial de Video Electronics
Standards Association.
Hilos de amortiguación
Si utiliza un fondo blanco, en la pantalla aparecen estrías
horizontales muy finas como se muestra a la derecha. Estas
estrías son hilos de amortiguación que están conectados a
una rejilla de apertura dentro del tubo Trinitron y que
sirven para absorber las vibraciones de la rejilla de apertura
con el fin de evitar que afecten a la calidad de la imagen.
Hilos de amortiguación
Aprox. 6 cm
Aprox. 6 cm
Uso de la base inclinable/giratoria
La base inclinable/giratoria permite ajustar el monitor en el
ángulo de visión más conveniente, hasta un máximo de 90°
en sentido horizontal y de 20° en sentido vertical.
Para girar o inclinar el monitor sujételo por su parte inferior
con ambas manos.
45°
15°
5°
Especificaciones
Tubo de imagen 17 pulgadas en diagonal (16" visual),
con un paso de rejilla de apertura de
0,25- mm; deflexión de, 90 grados
Tamaño de imagen real
328 × 242 mm (an/al) aprox.
Resolución Horizontal: Máx. 1280 puntos
Vertical: Máx. 1024 líneas
Tamaño de imagen de visualización
300 × 225 mm (an/al) aprox.
Frecuencia de deflexión
Horizontal: 31,5 a 64 kHz
Vertical: 50 a 120 Hz
Tensión/intensidad de entrada CA
100 a 120 V, 50/60 Hz, 1,8 A
220 a 240 V, 50 – 60 Hz, 1 A
Dimensiones 406 × 426,5 × 451 mm (an/al/prf)
Masa 19,0 kg aprox.
Diseño y especificaciones sujetos a cambio sin previo aviso.
45°
24
Page 25

Solución de problemas
Esta sección le ayudará a identificar los posibles problemas, para que no tenga necesidad de ponerse en contacto con el servicio
técnico e interrumpir así su productividad.
Síntoma
No aparece ninguna imagen
Si no se iluminan los
indicadores u
(alimentación) ni POWER
SAVING
Si se ilumina el indicador
POWER SAVING
Si parpadean los
indicadores u
(alimentación) y POWER
SAVING
Si aparece en pantalla el
mensaje “OUT OF SCAN
RANGE”
Aparecen rayas en la
imagen
El color no es uniforme
La imagen no está centrada
en la pantalla o tiene un
tamaño incorrecto
La imagen aparece borrosa
La imagen salta o sufre
oscilaciones
Se observa una línea
horizontal fina
La imagen aparece
inclinada en pantalla
La imagen tiene bordes
curvos
Se observa en la imagen
una trama ondulada o
elíptica (efecto muaré)
• Si el problema continúa, póngase en contacto con el distribuidor autorizado más próximo.
• Tome nota del modelo y número de serie de su monitor, así como de la marca y modelo del ordenador y la tarjeta de video.
Proceda de la forma siguiente
• Compruebe si el cable de alimentación está debidamente conectado.
• Compruebe si el interruptor de corriente se encuentra en la posición ON.
• Compruebe si el interruptor de corriente del ordenador se encuentra en la posición ON.
• El monitor se recupera al pulsar cualquier tecla del teclado.
• Compruebe si el cable de video se encuentra debidamente conectado.
• Compruebe que el conector HD15 del cable no tenga clavijas torcidas o arrancadas.
• Compruebe si la tarjeta de video se encuentra correctamente conectada a la ranura de bus.
• Compruebe si la señal de sincronía de video se encuentra en el margen especificado para
el monitor.
• Apague y vuelva a encender el monitor. Si el indicador no parpadea, el monitor se
encuentra en estado normal.
• Se ha producido un fallo potencial del monitor. Consulte a su proveedor.
• Compruebe si la señal de sincronización de vídeo es la especificada para el monitor.
• Consulte en el manual de la tarjeta gráfica el ajuste adecuado para el monitor.
• Consulte este manual y compruebe si son posibles el modo de gráficos y la frecuencia
que está tratando de utilizar. Aun funcionando dentro del margen adecuado, algunas
tarjetas de video utilizan un impulso de sincronía demasiado corto para que el monitor
se sincronice debidamente.
• Pulse una vez el interruptor de corriente para iniciar el ciclo de desmagnetización
automática*.
• Ajuste los controles de centrado o tamaño (páginas 22, 23).
• Algunos modos de video no llenan completamente la pantalla hasta el borde. No hay
una respuesta única para resolver este problema, que suele estar relacionado con
frecuencias de refresco altas.
• Ajuste los controles de contraste y brillo (página 22). Algunas marcas de tarjetas SVGA
utilizan un nivel de salida de video excesivo, el cual da origen a imágenes borrosas y
máximo contraste.
• Pulse una vez el interruptor de corriente para iniciar el ciclo de desmagnetización automática*.
• Aleje del monitor cualquier dispositivo eléctrico (o magnético) que pueda generar
interferencias eléctricas.
• Si tiene instalado otro monitor en las inmediaciones de este monitor, aumente la
distancia entre ambos para reducir las interferencias.
• Es posible que el cableado eléctrico de la habitación pase por la pared situada detrás del
monitor. Aleje el monitor de la pared.
• Esta línea sirve para estabilizar la rejilla de apertura. La rejilla de apertura permite que
pase mayor cantidad de luz a través de la pantalla, aumentando así la intensidad del
color y el brillo del tubo de pantalla Trinitron
• Pulse una vez el interruptor de corriente para iniciar el ciclo de desmagnetización automática*.
A continaución, ajuste la Rotación (página 23).
• Ajuste la Distorsión de la imagen (página 23).
• Debido a la relación entre la resolución, la densidad de punto del monitor y algunas
tramas de imagen, determinados fondos de pantalla, especialmente los de color gris,
muestran a veces un efecto muaré. La única forma de eliminarlo es cambiar la trama del
escritorio.
* La finalidad de esta función es desmagnetizar el bastidor metálico del tubo de imagen
para obtener un campo neutro que uniformiza la reproducción de los colores. Si necesita
iniciar un segundo ciclo de desmagnetización automática, deje que transcurran al menos
20 minutos.
** Trinitron es una marca registrada de Sony Corporation.
**.
ES
25
Page 26

26
Page 27

Indice
Precauzioni ............................................................................. 27
Per iniziare .............................................................................. 27
Regolazioni ............................................................................. 28
Funzione di risparmio energetico ....................................... 29
Uso immediato del monitor ................................................. 30
Precauzioni
Installazione
• Consentire un’adeguata circolazione d’aria per prevenire
il surriscaldamento interno dell’apparecchio. Non
collocare l’apparecchio su superfici (come tappeti e
coperte) o vicino a tessuti (tende, drappeggi, ecc.) che
possano ostruire le prese di ventilazione.
• Non installare l’apparecchio in prossimità di fonti di
calore, come termosifoni o condotti d’aria calda, oppure
in luoghi esposti alla luce diretta del sole, eccessivamente
polverosi o soggetti a vibrazioni meccaniche o scosse.
• Non collocare l’apparecchio in prossimità di dispositivi
che generano campi magnetici, come ad esempio
adattatori o linee di alta tensione.
Manutenzione
Pulire il rivestimento, il pannello di vetro ed i comandi con
un panno morbido leggermente inumidito con una blanda
soluzione detergente. Non usare alcun tipo di straccio
graffiante, polvere abrasiva o solventi come alcool o
benzina.
Cavi di smorzamento ............................................................ 30
Uso del sistema di orientamento .........................................30
Specifiche .................................................................................30
Soluzione dei problemi .........................................................31
Avvertenza sui collegamenti
per l’alimentazione
• Usare il cavo di alimentazione in dotazione.
per CA da 220-240 Vper CA da 100-120 V
• Prima di scollegare il cavo di alimentazione, attendere
almeno 30 secondi dallo spegnimento dell’apparecchio
per consentire la dispersione dell’elettricità statica sulla
superficie del tubo catodico.
• Appena l’apparecchio viene acceso, il tubo catodico viene
smagnetizzato per cinque secondi circa. Questa
operazione determina un forte campo magnetico attorno
alla lunetta che può danneggiare i dati di dischi o nastri
magnetici situati nelle immediate vicinanze. Allontanare
l’apparecchio di registrazione magnetica e i nastri/dischi
da questo monitor.
La presa di rete deve essere situata in prossimità
dell’apparecchio e deve essere facilmente accessibile.
I
Per iniziare
Prima di usare questo monitor, verificare che la confezione
contenga i seguenti elementi: monitor, cavo di alimentazione
e manuale di istruzioni (il presente manuale).
Questo monitor può sincronizzarsi con sistemi di piattaforme
diverse a frequenze orizzontali comprese tra 31,5 e 64 kHz.
Collegamento al computer
Punto 1: con il monitor spento, collegare il cavo di
alimentazione al monitor e l’altro capo alla presa
di rete.
alla presa di rete
Cavo di alimentazione (in dotazione)
Punto 2: con il computer spento, collegare il cavo del
segnale video all’uscita video.
Computer
all’uscita video
Punto 3: accendere il monitor e il computer.
Punto 4: se occorre, regolare i controlli dell’utente secondo
le proprie esigenze.
L’installazione è così completata.
27
Page 28

Regolazioni
POWER
SAVING
L’apparecchio è dotato di vari comandi digitali che
permettono di ottimizzare i parametri di visualizzazione
secondo le proprie preferenze.
É possibile regolare l’immagine secondo le proprie
preferenze con il procedimento sotto indicato.
Tutte le voci possono essere regolate usando l’OSD
(visualizzazione sullo schermo).
Pannello di controllo
RESET
Premere qui per aprire il pannello di controllo anteriore.
p Quando il valore estremo viene raggiunto, l’indicatore
POWER SAVING inizia a lampeggiare.
p Tutte le regolazioni vengono memorizzate
automaticamente.
p Il controllo OSD scompare 2 secondi dopo il rilascio del
tasto.
POWER
SAVING
Contrasto
I dati della regolazione diventano l’impostazione comune di
tutti i segnali d’ingresso.
1 Premere il tasto >+/–.
Il controllo > OSD appare.
50
31.5kHz/70Hz
2 Premere il tasto >+/– per regolare il contrasto
dell’immagine.
+ ...per aumentare il contrasto
– ...per ridurre il contrasto
Luminosità
I dati della regolazione diventano l’impostazione comune di
tutti i segnali d’ingresso.
1 Premere il tasto ¨+/–.
Il controllo ¨ OSD appare.
Centratura orizzontale
I dati della regolazione diventano l’unica impostazione per
il segnale di ingresso ricevuto.
1 Premere il tasto S∫ /ı.
Il controllo S OSD appare.
50
2 Premere il tasto S∫ /ı.
∫ ...per spostare l’immagine a destra
ı ...per spostare l’immagine a sinistra
Centratura verticale
I dati della regolazione diventano l’unica impostazione per
il segnale di ingresso ricevuto.
1 Premere il tasto s◊/√.
Il controllo s OSD appare.
50
31.5kHz/70Hz
2 Premere il tasto ¨+/– per regolare la luminosità
dell’immagine.
+ ...per aumentare la luminosità
– ...per ridurre la luminosità
28
50
2 Premere il tasto s◊/√.
◊ ...per alzare l’immagine
√ ...per abbassare l’immagine
Page 29

Dimensioni orizzontali
Rotazione
I dati della regolazione diventano l’unica impostazione per
il segnale di ingresso ricevuto.
1 Premere il tasto Å+/–.
Il controllo Å OSD appare.
50
2 Premere il tasto Å+/–.
+ ...per ingrandire
– ...per diminuire
Dimensioni verticali
I dati della regolazione diventano l’unica impostazione per
il segnale di ingresso ricevuto.
1 Premere il tasto +/–.
Il controllo
OSD appare.
50
I dati della regolazione diventano l’impostazione comune
per tutti i segnali di ingresso.
1 Premere il tasto +/–.
Il controllo
OSD appare.
50
2 Premere il tasto +/–.
+ ...per una rotazione in senso orario
– ...per una rotazione in senso antiorario
Ripristino
• Premere il tasto RESET per ripristinare
le impostazioni di fabbrica relative a
luminosità, contrasto, dimensioni
RESET
orizzontali e verticali, centratura e
distorsione a cuscino del modo
correntemente utilizzato.
• Tenere premuto per 2 secondi il tasto
RESET per ripristinare le impostazioni
di fabbrica per tutti i modi.
2 Premere il tasto +/–.
+ ...per ingrandire
– ...per diminuire
Distorsione a cuscino
I dati della regolazione diventano l’unica impostazione per
il segnale di ingresso ricevuto.
1 Premere il tasto d+/–.
Il controllo d OSD appare.
50
2 Premere il tasto d+/–.
+ ...per espandere i bordi dell’immagine
– ...per restringere i bordi dell’immagine
Funzione di
risparmio energetico
Questo monitor è conforme alle direttive dell’EPA (Energy
Star program), nonché alle più rigorose direttive NUTEK
803299 (TCO92). È in grado di ridurre il consumo di energia
elettrica se utilizzato con un computer dotato di DPMS
(Display Power Management Signalling). Rilevando
l’assenza del segnale di sincronizzazione proveniente dal
computer, il monitor riduce il consumo di energia elettrica
nel seguente modo:
ATTENZIONE: la funzione di risparmio energetico
determina automaticamente lo stato
attivo-spento del monitor qualora
l’interruttore di accensione sia attivato e non
vi sia alcun ingresso di segnale video.
Appena vengono rilevate sincronizzazioni
orizzontali e verticali, il monitor ritornerà
automaticamente allo stato di
funzionamento normale.
u
Indicatore
POWER
verde acceso
verde acceso
spento
Indicatore
POWER
SAVING
spento
arancione
acceso
arancione
acceso
Stato
Funzionamento
1
normale
Interruzione
(prima fase
2
del risparmio)
Attivo-spento
(seconda fase
3
del risparmio)
Consumo
100%
circa 10%
circa 7%
Tempi di
ripresa
necessari
—
circa 3 secondi
circa 10 secondi
I
29
Page 30

Uso immediato del monitor
Il presente monitor è conforme agli standard DDC™1 e
DDC2B (Display Data Channel) del marchio VESA.
Quando un sistema ospite DDC1 viene collegato, il monitor
si sincronizza con il V, CLK secondo gli standard VESA ed
emette EDID (Extended Display Identification) sulla riga di
dati.
Cavi di smorzamento
Se si utilizza uno sfondo bianco, sullo schermo sono visibili
strisce orizzontali molto sottili, mostrate nell’illustrazione a
destra. Tali strisce sono cavi di smorzamento; questi cavi
sono collegati alla griglia di apertura all’interno del tubo
Trinitron ed hanno la funzione di smorzare le vibrazioni
della griglia di apertura per impedire che queste influenzino
la qualità dell’immagine.
Quando viene collegato un sistema ospite DDC2B, il
monitor opera automaticamente in modo di comunicazione
DDC2B.
DDC™ è un marchio registrato di un’organizzazione non a
scopo di lucro, la Video Electronics Standards Association.
Cavi di smorzamento
Circa 6 cm
Circa 6 cm
Uso del sistema di orientamento
Il monitor è dotato di un sistema che consente il suo
orientamento entro un massimo di 90° orizzontalmente e
20° verticalmente.
Durante l’orientamento in senso verticale e orizzontale,
afferrare l’apparecchio dalla parte inferiore con entrambe le
mani.
45°
15°
5°
Specifiche
Cinescopio 0,25 mm griglia di apertura, 17 pollici
misurati diagonalmente (16 pollici
visivi), deviazione da 90 gradi
Dimensioni effettive dell’immagine
Circa 328 × 242 mm (l/a)
Risoluzione Orizzontale: Max. 1280 punti
Verticale: Max. 1024 linee
Dimensioni dell’immagine visualizzata
Circa 300 × 225 mm (l/a)
Frequenza di deviazione
Orizzontale: da 31,5 a 64 kHz
Verticale: da 50 a 120 Hz
Tensione/corrente di ingresso CA
100 – 120 V, 50/60 Hz, 1,8 A
220 – 240 V, 50 – 60 Hz, 1 A
Dimensioni 406 × 426,5 × 451 mm (l/a/p)
Peso Circa 19 kg
Il disegno e le specifiche sono soggetti a modifica senza
preavviso.
45°
30
Page 31

Soluzione dei problemi
Questa sezione può rivelarsi utile per identificare un problema e di conseguenza eliminare la necessità di rivolgersi a un centro
di assistenza tecnica, senza quindi dover interrompere la produttività.
Sintomo
Non si vede alcuna
immagine
Se l’indicatore u
(accensione) e l’indicatore
POWER SAVING non si
illuminano
Se l’indicatore POWER
SAVING è illuminato
Se gli indicatori u
(accensione) e POWER
SAVING lampeggiano
contemporaneamente
Se il messaggio “OUT OF
SCAN RANGE” appare sullo
schermo
L’immagine è confusa
Il colore non è uniforme
L’immagine sullo schermo
non è centrata o non è
proporzionata correttamente
L’immagine è sfocata
L’immagine salta o ondeggia
È visibile una piccola riga
orizzontale
L’immagine è inclinata
L’immagine presenta una
distorsione a cuscino
L’immagine è disturbata da
strisce ondeggianti o
ellittiche (effetto moire)
• Se il problema persiste, rivolgersi ad un rivenditore autorizzato.
• Prendere nota del nome del modello e del numero di serie del monitor, nonché del nome del computer e della scheda video.
Controllare quantro segue:
• Verificare che il cavo di alimentazione sia saldamente collegato.
• Verificare che l’interruttore principale sia nella posizione “ON”.
• Verificare che l’interruttore principale del computer sia nella posizione “ON”.
• Il monitor riprenderà a funzionare premendo qualsiasi tasto sulla tastiera.
• Verificare che il cavo del segnale video sia correttamente collegato.
• Controllare che nel connettore HD15 del cavo non vi siano terminali piegati.
• Controllare che la scheda video sia installata a fondo nell’apposito alloggiamento del
bus.
• Verificare che il segnale di sincronizzazione video sia compreso tra quelli specificati per
il monitor.
• Accendere e spegnere il monitor. Se l’indicatore è spento, il monitor è nella posizione
normale.
• Si tratta di un potenziale guasto del monitor. Rivolgersi al rivenditore.
• Controllare che il segnale di sincronizzazione video sia quello specificato per il monitor.
• Consultare il manuale della scheda grafica per vedere la corretta impostazione per il
monitor.
• Consultare questo manuale per sapere con certezza se il modo grafico e la frequenza
impostati possano essere utilizzati. Talvolta, anche all’interno della corretta gamma
alcune schede video potrebbero avere un impulso di sincronizzazione troppo stretto
affinché il monitor possa sincronizzarsi correttamente.
• Spegnere una volta l’interruttore per attivare il ciclo di autosmagnetizzazione*.
• Regolare la centratura e le dimensioni. (pagine 28, 29)
• Alcuni modi video non riempiono lo schermo per tutta la grandezza del monitor. Per
risolvere questo problema, le soluzioni sono molteplici. Questo problema tende a
verificarsi con i tempi di rinfresco immagine più alti.
• Regolare il contrasto e la luminosità (pagina 28). Ci sono varie marche di schede SVGA
che determinano un eccessivo livello di uscita che crea immagini sfocate con il massimo
contrasto.
• Spegnere una volta l’interruttore per attivare il ciclo di autosmagnetizzazione*.
• Allontanare dal monitor eventuali dispositivi elettrici (magnetici) che possono creare
interferenze elettriche.
• Se vi è un altro monitor in prossimità di questo monitor, aumentare la distanza tra i due
apparecchi per ridurre l’interferenza.
• Se i cavi dell’elettricità sono posti dietro alla parete, allontanare il monitor dalla parete.
• Questa riga stabilizza la griglia di apertura verticale. Questa apertura consente l’accesso
di più luce attraverso lo schermo conferendo al tubo catodico Trinitron
luminosità.
• Spegnere una volta l’interruttore per attivare il ciclo di autosmagnetizzazione*.
Regolare quindi la rotazione (pagina 29).
• Regolare la distorsione a cuscino (pagina 29).
• A causa del rapporto tra la risoluzione, la distanza tra i punti luminosi del monitor e
quella di alcuni tipi di immagini, certi sfondi dello schermo (soprattutto il grigio)
determinano talvolta l’effetto moiré. Questo problema può essere eliminato modificando
il motivo del desktop.
* La funzione di autosmagnetizzazione consente di smagnetizzare il telaio metallico del
tubo catodico in modo da ottenere un campo neutrale per la riproduzione uniforme dei
colori. Se occorre un secondo ciclo, attendere almeno 20 minuti prima di procedere.
** Trinitron
è un marchio registrato Sony Corporation.
** più colore e
I
31
Page 32

32
Page 33

目次
使用上のご注意 .........................................................................33
お使いになる前に .....................................................................33
調整のしかた .............................................................................34
パワーセービング機能 .............................................................35
プラグアンドプレイ .................................................................36
使用上のご注意
設置上のご注意
通風孔はふさがないでください。
じゅうたんなどの上に置いたり、カーテンなどの近くや風通し
の悪いところに置いたりしないでください。
次のような場所には置かないでください。
・ 直射日光のあたる場所や熱器具の近くなど、温度の高い所。
・ 温度変化の激しい所。
・ 湿度やほこりの多い所。
・ 振動の多い所。
・ 不安定な台の上。
・ 高圧送電線や変圧機など強い磁界を発生する機器のそば。
お手入れのしかた
・ キャビネットやパネル面の汚れは、中性洗剤溶液を少し含ま
せた柔らかい布で拭いてください。シンナー、ベンジン、ア
ルコールなどは表面を傷めますので使わないでください。
ダンパーワイヤー ...................................................................36
ディスプレイスタンドの使いかた ........................................36
主な仕様...................................................................................36
故障かな?と思ったら ...........................................................37
電源接続についてのご注意
• 付属の電源コードをお使いください。
プラグ形状例
AC220〜240V 用AC100〜120V 用
・ CRT管面に帯電した静電気を放電させるために、電源スイッ
チを切ったあと少なくとも30秒間放置し、その後電源コー
ドを抜いてください。
・ 本機は電源を入れると約5秒間、画面が消磁されます。その
とき、周辺に強い磁界が発生しますので、磁気テープや磁気
ディスクを本機の近くに置いておくと、データに異常が生じ
ることがあります。磁気記憶装置やテープ、ディスクはモニ
ターから離してお使いください。
お使いになる前に
本機をお使いになる前に、下記のものが同梱されているか、ご
確認ください。
モニター、電源コード、取扱説明書。
本機は、31.5〜64kHzの水平周波数のコンピューターに対応
しています。
コンピューターに接続する
準備1: 本機の電源を切り、電源コードを本機とACコンセン
トにつなぐ。
ACコンセントへ
電源コード(付属)
J
準備2: コンピューターの電源を切り、ビデオ信号ケーブルを
ビデオ出力に接続する。
コンピューター
ビデオ出力へ
準備3: 本機とコンピューターの電源を入れる。
準備4: 必要ならば、希望の状態に調整する。
これで本機の準備が完了です。
33
Page 34

調整のしかた
POWER
SAVING
各種の項目を前面パネルのボタンで調整することにより適切な
画像を得ることができます。
以下の手続きでお好みの画像に調整できます。OSD(オン ス
クリーン ディスプレイ)上で全ての項目が調整できます。
前面パネル
RESET
この部分を押して、前面パネルのふたを開けます。
p 調整範囲の限界に達すると、POWERSAVINGインジケー
ターが点滅します。
p 調整後、調整値は自動的に記憶され、通常の動作に戻りま
す。
p OSDを消したい時は、ボタンをもう一度押します。
ボタンをはなすと、2秒後にOSDは自動的に消えます。
POWER
SAVING
画面のコントラストを調整する
各信号に共通の調整値になります。
1 >+/−ボタンを押します。
>OSD(オン スクリーン ディスプレイ)が現れます。
50
31.5kHz/70Hz
2 画像のコントラストを調整するために>+/−ボタンを押
します。
+…コントラストが強くなります。
−…コントラストが弱くなります。
画面の明るさを調節する
各信号に共通の調整値になります。
1 ¨+/−ボタンを押します。
¨OSD(オン スクリーン ディスプレイ)が現れます。
画像位置を調整する(水平方向)
調整時の入力信号に固有の調整値になります。
1 S∫/ıボタンを押します。
SOSD(オン スクリーン ディスプレイ)が現れます。
50
2 画像の位置を調整するためにS∫/ıボタンを押します。
∫…右に移動します。
ı…左に移動します。
画像位置を調整する(垂直方向)
調整時の入力信号に固有の調整値になります。
1 s◊/√ボタンを押します。
sOSD(オン スクリーン ディスプレイ)が現れます。
50
31.5kHz/70Hz
2 画像の明るさを調整するために¨+/−ボタンを押します。
+…明るくなります。
−…暗くなります。
34
50
2 画像の位置を調整するためにs◊/√ボタンを押します。
◊…上に移動します。
√…下に移動します。
Page 35

画像の水平サイズを調整する
画像の傾きを調整する
調整時の入力信号に固有の調整値になります。
1 Å+/−ボタンを押します。
ÅOSD(オン スクリーン ディスプレイ)が現れます。
50
2 水平サイズはÅ+/−ボタンで調整します。
+…大きくなります。
−…少さくなります。
画像の垂直サイズを調整する
調整時の入力信号に固有の調整値になります。
1 +/−ボタンを押します。
OSD(オン スクリーン ディスプレイ)が現れます。
50
各信号に共通の調整値になります。
1 +/−ボタンを押します。
OSD(オン スクリーン ディスプレイ)が現れます。
50
2 +/−ボタンを押します。
+…画像が時計回りに回転します。
−…画像が反時計回りに回転します。
工場出荷時の設定に戻す
・ 調整モードでRESETボタンを押すと、画
像の明るさ、コントラスト、糸巻き、水
平方向および垂直方向の画像の位置およ
RESET
び大きさが工場出荷時の設定に戻りま
す。
・ RESETボタンを2秒以上押したままにす
ると、すべてのモードのすべての設定が
工場出荷時の状態に戻ります。
2 垂直サイズは +/−ボタンで調整します。
+…大きくなります。
−…少さくなります。
画像の糸巻き歪みの調整をする
調整時の入力信号に固有の調整値になります。
1 d+/−ボタンを押します。
dOSD(オン スクリーン ディスプレイ)が現れます。
50
2 d+/−ボタンを押します。
+…画像の両側が膨らむ。
−…画像の両側がへこむ。
パワーセービング機能
本機は3段階のパワーセービング(省電力)状態で動作します。
コンピューターから水平・垂直の一方または両方の同期信号が
入力されないと、下記のようにパワーセービング状態になりま
す。
ご注意
ビデオ信号が入力されていないとき本機の電源を入れると、自
動的にアクティブオフ状態になり、POWERSAVINGインジ
ケーターが点灯します。水平・垂直同期信号が入力されると、
自動的に通常の動作状態になります。
POWER
SAVING
インジケーター
(オレンジ)
消灯
点灯
点灯
状態
1
通常動作
サスペンド
2
(第1段階)
アクティブオフ
3
(第2段階)
電力消費
100%
約10%
約7%
復帰する
までの時間
―
約3秒
約10秒
u電源
インジケーター
(緑)
点灯
点灯
消灯
J
35
Page 36

プラグアンドプレイ
このモニターは、VESAのDisplayDataChannel(DDC=
ディスプレイ・データ・チャンネル)規格である、DDC1/
DDC2Bに対応しています。
DDC1のホストシステムがこのモニターに接続された場合、
VESAスタンダードに基づき、V.CLKに同期してEDID
(ExtendedDisplayldentification)をデータラインに出力し
ます。
ダンパーワイヤー
画像によっては、細い水平な線が現れることがあります。
ダンパーワイヤーと呼ばれるもので、位置は右の図に示さ
れているとおりです。ダンパーワイヤーはトリニトロン管
内部のアパーチャーグリルに取り付けられており、画質に
影響をあたえるアパーチャーグリルの振動を抑える働きを
しています。
DDC2Bのホストシステムが接続された場合、自動的に
DDC2B通信に切り換わります。
DDCはVideoElectronicsStandardsAssociationの登録
商標です。
ダンパーワイヤー
約6cm
約6cm
ディスプレイスタンドの使いかた
画面の向きを水平方向に90度、垂直方向に20度調節すること
ができます。
本機を上下左右に動かすときは、右図のように両手を添えて回
してください。
45°
主な仕様
受像管 0.25mmアパーチャーグリルピッチ、
90゜偏向、17インチ
有効表示画面 約328×242mm(幅/高さ)
解像度 水平:最大1280ドッ ト
垂直:最大1024ライン
表示画面 約300×225mm(幅/高さ)
偏向周波数 水平:31.5〜64kHz
垂直:50〜120Hz
入力電圧/電流 100〜120V、50/60Hz、最 大 1.8A
220〜240V、50− 60Hz、 最 大 1A
最大外形寸法 406×426.5×451mm(幅/高さ/奥行き)
質量 約19.0kg
本機の仕様および外観は、改良のため予告なく変更することが
ありますが、ご了承ください。
15°
45°
5°
36
Page 37

故障かな?と思ったら
修理にお出しになる前に、もう1度点検してください。それでも正常に動作しないときは、お買い上げ店にお問い合わせください。
こんなときは
画像が出ない
u(電源)インジケーターも
POWERSAVINGインジケーター
も点灯しない場合
POWERSAVINGインジケーター
が点灯している場合
u(電源)インジケーターと
POWERSAVINGインジケーター
が両方とも点滅している場合
「OUTOFSCANRANGE」という
メッセージが現れた
画像が乱れている
色むらがある
画像が画面の中央からずれている、画
像の大きさが画面に合っていない
画像がくっきりしていない
画像が上下にゆれる、波状に乱れる
画面に細い横線が出る
画像が傾いている
画面の両側が曲がっている
波模様やだ円状の模様(モワレ)が出る
ご確認ください
・ 電源コードはきちんとつながれていますか。
・ 電源スイッチは入っていますか。
・ コンピューターの電源は入っていますか。
・ コンピューターのキーボードのキーをどれか押してみてください。
・ 信号ケーブルはきちんと接続されていますか。
・ HD15プラグのピンが曲がっていませんか。
・ ビデオカードは正しいバススロットに確実に装着されていますか。
・ ビデオ同期信号は本機の仕様に適合していますか。
(水平:31.5〜64kHz、垂直:50〜120Hz)
・ モニターの電源を入れ直してみてください。それでインジケーターが消えれば正常
な状態です。
・ 本機に異常が発生しています。お買い上げ店にお問い合わせください。
・ 入力信号の周波数帯域は合っていますか?
・ グラフィックボードの説明書をご覧になったうえで、本機を調整してください。
・ グラフィックモードと周波数が本機で使用できるものかどうかを、この説明書で確
認してください。信号は本機で使用できる範囲であっても、ビデオボードによって
は同期パルス幅が狭すぎて本機では正しく同期できない場合があります。
・ 電源を入れ直し、自動デガウス回路*を働かせて画面を消磁してください。
・ 画像の位置や大きさを調整します。(34、35ページ)
信号によっては、画面の隅から隅まできれいに入らない場合があります。この場合、
確実な対処のしかたはありません。ハイリフレッシュタイミングの信号ではこのよ
うになる傾向があります。
・ コントラストや明るさを調節します。(34ページ)
SVGAボードによっては、ビデオ出力レベルが高すぎてコントラストを最大にする
と画像がぼんやりすることがあります。
・ 電源スイッチを押し、自動デガウス回路*を働かせて画面を消磁してください。
・ 本機を電気機器や磁気を発生する機器から離してください。
・ 本機の近くに別のモニターがある場合は、離してください。
・ 壁の裏側に電線が通っている可能性があります。本機を壁から離してください。
・ 縦縞構造アパーチャーグリルを安定させるために出ています。
このアパーチャーグリルは画面へ、より多くの光線を届け、トリニトロン
ターの色と明るさを極立たせます。
・ 電源を入れ直し、自動デガウス回路*を働かせ画面を消磁してください。(35ページ)
・ 画面の糸巻き歪みの調整をします。(35ページ)
・ 解像度、モニターのドット・ピッチ、またはいくつかの画像パターンのピッチ間の
関係によって、特定の画面の背景(特に灰色)にモワレが出ることがあります。
これを取り除くには、お使いの機器のデスクトップパターンを変えるしか方法はあ
りません。
**
モニ
J
* 自動デガウス回路は受信管の金属枠を消磁することによって、磁界を中立にし、むらのない色再生
を実現します。再度デガウス回路が必要なときは、20分以上間隔を置くと、最高の効果が得られ
ます。
** トリニトロン
は、ソニー株式会社の登録商標です。
37
Page 38

38
Page 39

Printed in Japan
 Loading...