

Page 1

4-118-106-01(1)
Supplement
Video Camera (compliant with Ver.1.200 or later) 2
Photo and video upload (compliant with Ver.1.200 or later) 4
Video (compliant with Ver.1.100 or later) 6
Game (compliant with Ver.1.200 or later) 7
SHOUTcast Widget (compliant with Ver.1.100 or later) 8
Shortcuts for Web (compliant with Ver.1.200 or later) 9
URL input box and navigation bar of the Web browser
Formatting a “Memory Stick Duo” 10
Optimizing System Memory
(compliant with Ver.1.100 or later)
(compliant with Ver.1.200 or later)
(compliant with Ver.1.200 or later) 11
About the supplied “Operating Instructions”
manual (PDF)
To download the latest version of “Operating Instructions”
manual (PDF), visit the following Web site:
http://www.sony.com/mylo/support
Note
The “Operating Instructions” manual (PDF) does not include the
contents of this “Supplement” booklet. Be sure to keep this booklet for
your reference.
10
©2008 Sony Corporation Printed in Japan
Page 2
Video Camera (compliant with Ver.1.200 or later)
You can shoot videos and photos using the camera of this unit.
Shooting Videos
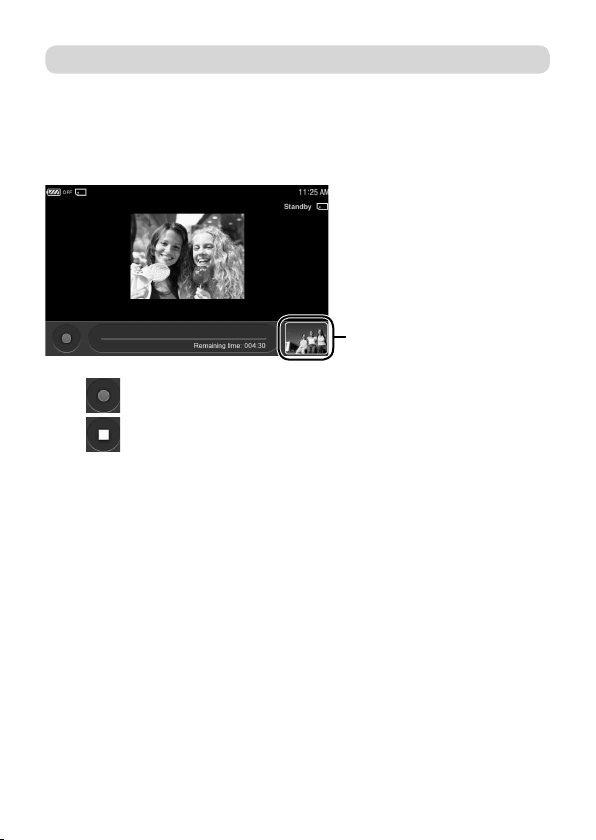
On the Home menu, select “Camera,” followed by “Video Camera.”
The Standby screen appears.
Thumbnail
Select to start shooting a video.
Select to stop shooting the video.
Hints
To take a photo, select “Camera” from the Home menu, followed by “Still Camera.” For
details on how to take photos, refer to the “Operating Instructions” manual (PDF).
You can also use the shutter button, the Operation key or the Enter key on the keyboard
to start/stop shooting videos.
When you start up the camera by pressing and holding the shutter button, the still
camera monitor screen is displayed. Select “Video Camera” from the OPTION menu to
change to the video Standby screen.
The maximum video length is 10 minutes for 1 video.
Even if the destination folder is set to “Memory Stick,” videos may be saved on the
internal memory if a “Memory Stick Duo” is not inserted into this unit.
Videos are saved in the “MP_ROOT” folder of either the “Memory Stick Duo” or the
internal memory that is set as the destination.
Notes
You cannot disable the start/stop sound for the video shooting from the loudspeaker.
If you use a “Memory Stick Duo” that was formatted using a computer, reformat it using
the “Format Storage” function of the unit ( page 10).
2
Page 3

If the recording continues to fail unintentionally with the WIRELESS LAN switch set to
“OFF,” an error may occur to the file system. The following message is displayed: “Failed
to continue recording video. If the WIRELESS LAN switch is ON, please turn it OFF.”
In this case, formatting of the save destination may recover the file system. Backing
up data on the destination to your PC, etc., before formatting the destination is highly
recommended, because all of the data on it will erased.
If an incoming Skype call occurs during recording, the recording will be stopped.
Viewing a video
On the Standby screen, tapping the thumbnail at the bottom right starts the
playback of the last shot video. To go back to the Standby screen, tap the BACK
button.
Hint
You can also play back the video by tapping “Video” on the Home menu.
Changing to the still camera/changing the save to destination of
videos
Select the desired item from the OPTION menu on the Standby screen to take
a photo or to change the save to destination.
Item Result or setting options
Still Camera Changes to still camera for taking photos.
Save To Sets the media to which videos are saved.
<Memory Stick/Internal Memory>
Video Camera supported formats
Supported file format:
Memory Stick Video Format
Supported video codec:
MPEG-4 Simple Profile
Bit rate: 384 kbps
Frame rate: 15 fps
Resolution: 320 × 240
Supported audio codec:
AAC-LC
Bit rate: 64 kbps
Sampling frequency: 24 kHz
3
Page 4

Photo and video upload (compliant with Ver.1.200 or later)
There are many Web sites where you can upload photos and videos, such as
social networking services, digital photography services, etc.
You can upload photos and videos easily by registering Web sites in advance.
Registering Web sites
On the Home menu, select “Web,” and then display the desired Web site of
“Jump to upload site” from the OPTION menu of “Photo” or “Video.”
Tap “Add as upload site” from the OPTION menu, and then tap “Photo” or
“Video.”
Tap “OK” to complete the registration.
Hints
When you put a checkmark on “Set as upload site,” the Web site will be displayed when
you select “Jump to upload site” from the OPTION menu of “Photo” or “Video.”
To register a Web site by inputting its URL, select “Photo” or “Video” on the Home
menu, followed by “Upload Settings” from the OPTION menu and “New.”
The following Web sites are set by default as a upload sites:
Photos: Facebook
http://www.facebook.com/photos.php?ref=sb
Videos: YouTube
http://www.youtube.com/my_videos_upload?client=web-sony-us-mylo
Note
The maximum number of Web sites that can be registered is 10 each for photos and
videos.
Uploading photos and videos
On the Home menu, select “Photo” or “Video,” then display the desired photo
or video for upload.
Tap “Jump to upload site” from the OPTION menu and a registered Web site
will be displayed.
Follow the instruction of the Web site to upload files.
Following these steps makes the upload process easier, because the file you
want to upload that is displayed on the “Photo” or “Video” screen has already
been selected as the upload file from the file selection dialog, and you do not
need to select the file from the file tree.
4
Page 5

Changing the settings
To change the upload settings for photos, select “Photo” on the Home menu,
followed by “Upload Settings” from the OPTION menu.
To change the upload settings for videos, select “Video” on the Home menu,
followed by “Upload Settings” from the OPTION menu.
Select the Web site that is to be displayed after selecting “Jump to upload site”
from the OPTION menu of “Photo” or “Video,” and tap to switch it to .
To register a Web site by inputting its address, select “New.”
To change the settings of a registered Web site, highlight the Web site and then
select the desired item from the OPTION menu.
Item Result
Open with Web browser Displays the registered Web site in the Web browser.
Edit Edits “Title” or “Address.”
Delete Deletes the registered Web site.
Notes
Web sites marked with cannot be deleted because they are in-use.
To delete a registered Web site, highlight the Web site using the operation key and then
select “Delete” from the OPTION menu. Note that if you tap the Web site, it is set as the
destination of “Jump to upload site” for “Photo” or “Video,” and therefore, cannot be
deleted because it is in-use.
Uploading may take time or may fail, due to heavy network traffic, etc.
5
Page 6

Video (compliant with Ver.1.100 or later)
About supported video formats
This unit also supports WMV formats in addition to those stated in “Supported
video formats” described in “Operating Instructions” manual (PDF).
Supported file format:
ASF
Supported file extension:
wmv
Supported video codec:
WMV9 (VC-1) (Simple Profile)
Bit rate: 768 kbps (maximum)
Frame rate: 30 fps (maximum)
Resolution: 320 × 240 (maximum)
Supported audio codec:
WMA
Bit rate: 256 kbps (maximum)
Sampling frequencies: 24/44.1/48 kHz
USB mode when transferring video files from a computer
You can use “MTP (Media Transfer Protocol)” in addition to “MSC (Mass
Storage Class),” which is explained in “Operating Instructions” manual (PDF).
USB mode Software program Transfer To
MTP (Media Transfer Protocol)
To change the USB mode to “MTP,” select “Tools” on the Home menu, and
then select “Settings,” followed by the “USB Mode.” After that, tap of
“MTP” to switch it to .
Windows Explorer
Windows Media Player 10, 11
Internal memory
Using Windows Media Player 10 or 11
You can transfer video files or playlists to the unit using Windows Media Player.
Before transferring video files, be sure to set the unit’s USB mode to “MTP” and
connect the unit to a computer. To transfer video files, start Windows Media
Player, and click “Sync” at the top of the window, and then select this unit in the
right pane. This unit is displayed as “Personal Communicator.” Select video files
to transfer in the left pane, and click “Start Sync.”
6
Page 7

Hint
The transferred video files will be stored in the “VIDEO” folder.
Using Windows Explorer (Drag and drop)
You can transfer video files with the “.wmv” extension by dragging and
dropping them to the unit using Windows Explorer.
Note
Some video file cannot be played on this unit even with the file name extension is
“.wmv.”
Game (compliant with Ver.1.200 or later)
The system software Ver.1.100 includes a simplified version of this application.
On the Home menu, select “Game” and then select the desired game from the
game list.
The game starts.
Tapping the BACK button ends the game and returns the display to the game
list.
Tapping the HOME button ends the game and returns the display to the Home
menu.
Notes
You can download them using this unit from the following Web site:
http://www.sony.com/mylo
Games that are not designed for this unit may not be playable, even if they are displayed
on the list.
When downloading a game, be sure to confirm the system software version that the
game supports.
Tap the game screen if the keys do not work or sounds are not output.
7
Page 8

If the System Software version is earlier than 1.200, the games that support displaying
thumbnails and titles cannot be downloaded.
Hints
The games displayed are stored in the “GAME” folder of the internal memory.
When you start downloading a game via the Web site mentioned above using the Web
browser of this unit, the game will be installed onto this unit automatically.
SHOUTcast Widget
(compliant with Ver.1.100 or later)
The “SHOUTcast Widget” is an application that allows you to tune in and
listen to SHOUTcast Internet radio stations you select. You can also save a
selected station as a preset channel in the widget.
Notes
The “SHOUTcast Widget” is not on the supplied CD-ROM. You can download it from
the following Web site:
http://www.sony.com/mylo
Some radio stations use audio formats that are not supported by the Music Player of
this unit, such as “AAC+,” and cannot be played back.
Station selection screen Preset screen
How to preset channels
You can preset SHOUTcast Internet radio stations to channels in the
“SHOUTcast Widget.”
To preset stations, tap the SHOUTcast icon to display the SHOUTcast
homepage on the mylo Web browser.
Tap the “Tune In!” icon of the Internet radio station you want to preset and
play on with the Music Player.
On the mylo Screen, tap “Preset” of the “SHOUTcast Widget” on the Station
selection screen. The screen changes to the Preset screen. Select the channel by
tapping or , and tap “Set” to complete.
Note
“Set” is not available if you have not tuned into a station yet.
8
Page 9

Hints
When you tap “Clear” on the Preset screen, the preset station for the current channel is
erased.
On the Preset screen, the channel number and broadcasting station name are displayed
on the top line, and the last tuned broadcast station is displayed on the bottom line.
You can register up to 8 channels on the “SHOUTcast Widget.”
How to select a channel
On the Station selection screen, tap or to select a channel, and then tap
to listen.
Hints
When you tap “Last Tuned,” the last channel selected will begin playing. If there is no
last tuned channel, the message “Click Logo and Tune In!” is displayed.
When you tap , the play back is paused.
On the Station selection screen, the channel number and broadcasting station name are
displayed on the top line, and the information of the current music track is displayed on
the bottom line.
Shortcuts for Web (compliant with Ver.1.200 or later)
When using the Web, you can use the following keys for shortcuts, as well as
those listed in the “Operating Instructions” manual (PDF).
To Keyboard operation
Next Window Press Fn + “Y.”
Previous Window Press Fn + “T.”
Close Window Press Fn + “W.”
9
Page 10

URL input box and navigation bar of the Web browser
(compliant with Ver.1.100 or later)
The URL input box at the top, and the navigation bar at the bottom may or
may not be displayed, depending on the method used to open the window.
When you open a new window by selecting “New Window” from the OPTION
menu or by tapping “New Window” at the top level of the Web browser left
pane, the URL input box and navigation bar are always displayed. The URL
input box and navigation bar will continue to be displayed on the new window
until you choose not to display them.
When using other means, the previous display status is remembered, and the
URL input box and navigation bar may not be displayed if the URL input box
and/or navigation bar were hidden by the DISP (Display) button.
Tap the DISP button to control the display of these items.
Formatting a “Memory Stick Duo”
(compliant with Ver.1.200 or later)
If the unit fails repeatedly to save recordings to a “Memory Stick Duo” when
the WIRELESS LAN switch is set to “OFF,” try formatting the “Memory Stick
Duo” using the “Format Storage” function of the unit.
How to format a “Memory Stick Duo”
On the Home menu, select “Tools” and then select “Settings,” followed by
“System.”
Select “Format Storage” and then select “Memory Stick Duo” followed by “OK”
to start formatting the “Memory Stick Duo.”
Notes
Formatting a commercially available “Memory Stick Duo” is unnecessary, as it is
already formatted.
If you format media in which data has been already written, all the data and software
will be erased. Please be cautious not to mistakenly erase any important data.
Backing up data on a “Memory Stick Duo” to your PC, etc., before formatting the
“Memory Stick Duo” is highly recommended.
A “Memory Stick Duo” formatted with a computer is not guaranteed to operate with
this unit.
10
Page 11

Optimizing System Memory (compliant with Ver.1.200 or later)
If there is not enough System Memory available, an “Error,” “Information” or
“Task Manager” screen will be displayed.
To optimize System Memory, tap “Optimize Memory” when the “Error” or
“Information” screen appears, or tap “Optimize” when the “Task Manager”
screen appears.
Notes
Optimizing the system memory will affect the following in use applications as follows:
The Web browser, RSS/Podcast or Game will be exited.
The mylo Screen will be restarted.
The current Wi-Fi connection will be disconnected.
The Communication applications other than Skype will be signed out.
The Music or Video playback will be ended.
The free space of the System Memory may not increase, even when you optimize the
System Memory.
“mylo” and are trademarks of Sony Corporation.
YouTube is a trademark of Google Inc.
SHOUTcast is a registered trademark of AOL LLC.
“Memory Stick”, “Memory Stick Duo”, “MagicGate”, “MagicGate Memory Stick”,
“Memory Stick PRO”, “Memory Stick PRO Duo”, “Memory Stick PRO-HG”, “Memory
Stick Micro”, “M2”, , ATRAC, ATRAC3, ATRAC3plus, ATRAC Advanced
Lossless and their logos are trademarks or registered trademarks of Sony Corporation.
Microsoft, Windows, Windows Vista and Windows Media are trademarks or registered
trademarks of Microsoft Corporation in the United States and/or other countries.
Skype is a trademark of Skype Limited.
11
Page 12

Printed on 70% or more recycled paper using
VOC (Volatile Organic Compound)-free vegetable
oil based ink.
 Loading...