

Page 1

Table of
Contents
Index
2-668-393-12(2)
© 2006 Sony Corporation
Personal Communicator COM-1
Operating
Instructions
Page 2

2
Index
Table of
Contents
2
Owner’s Record
The serial number is located inside battery compartment. Record the serial
number in the space provided below. Refer to these numbers whenever you
call upon your Sony dealer regarding this product.
Model No. COM-1
Serial No._______________________
WARNING
You are cautioned that any changes or modifications not expressly approved in
this manual could void your authority to operate this equipment.
This equipment has been tested and found to comply with the limits for a
Class B digital device, pursuant to Part 15 of the FCC Rules. These limits
are designed to provide reasonable protection against harmful interference
in a residential installation. This equipment generates, uses, and can radiate
radio frequency energy and, if not installed and used in accordance with
the instructions, may cause harmful interference to radio communications.
However, there is no guarantee that interference will not occur in a particular
installation. If this equipment does cause harmful interference to radio or
television reception, which can be determined by turning the equipment off
and on, the user is encouraged to try to correct the interference by one or more
of the following measures:
– Reorient or relocate the receiving antenna.
– Increase the separation between the equipment and receiver.
– Connect the equipment into an outlet on a circuit different from that to which
the receiver is connected.
– Consult the dealer or an experienced radio/TV technician for help.
This transmitter must not be co-located or operated in conjunction with any
other antenna or transmitter.
This equipment complies with FCC radiation exposure limits set forth for
uncontrolled equipment and meets the FCC radio frequency (RF) Exposure
Guidelines in Supplement C to OET65. This equipment has very low levels of
RF energy that it is deemed to comply without testing of specific absorption
rate (SAR).
Page 3

3
Index
Table of
Contents
3
This device complies with Part 15 of the FCC Rules. Operation is subject
to the following two conditions: (1) this device may not cause harmful
interference, and (2) this device must accept any interference received,
including interference that may cause undesired operation.
The supplied interface cable must be used with the equipment in order to
comply with the limits for a digital device pursuant to Subpart B of Part 15 of
FCC Rules.
If you have any questions about this product:
Visit:
http://www.sony.com/mylo
Contact:
Sony Customer Information Services Center at 1-(866)-420-7669
Write:
Sony Customer Information Services Center
12451 Gateway Blvd.,
Ft. Myers, FL 33913
For an accessory or part not available from your authorized dealer, call:
1-800-488-SONY (7669)
Model COM-1
Declaration of Conformity
Trade Name:
Model No.:
Responsible Party:
Address:
Telephone No.:
RECYCLING LITHIUM-ION BATTERIES
Lithium-ion batteries are recyclable.
You can help preserve our environment by returning your
used rechargeable batteries to the collection and recycling
location nearest you.
For more information regarding recycling of rechargeable batteries, call toll
free 1-800-822-8837, or visit http:// www.rbrc.org/ .
Caution: Do not handle damaged or leaking Lithium-ion batteries.
SONY
COM-1
Sony Electronics Inc.
16530 Via Esprillo
San Diego, CA 92127
USA
858-942-2230
Page 4

4
Index
Table of
Contents
4
Notes on using
IP communication is not a replacement for your ordinary telephone and
should not be used for emergency calling.
Notes on this manual
Screen shots in this manual may be different from the actual displays in the
supplied software.
LCD display
The LCD of your Personal Communicator is designed with precision
technology. However, in some cases, individual pixels may remain lit or may
not light at all. Also, the brightness of the display may appear inconsistent,
depending on the angle of view. Such anomalies are caused by the nature of
the LCD and do not indicate a malfunction.
Please note that Sony does not guarantee a replacement or refund for such
cases.
Do not expose the LCD to direct sunlight for prolonged periods of time. It
may result in a malfunction. Do not store your Personal Communicator in
areas subject to sunlight, such as near windows, and be careful when using
outdoors.
No guarantee for lost or damaged data
Sony does not provide any guarantee for lost or damaged data.
Copyrights
Television programs, films, video tapes, music, and other materials may be
copyrighted. Unauthorized recording of such materials may violate copyright
laws.
Third Party Service Features and Availability
Certain features, such as Skype, Yahoo! and Google branded services, are
provided by third parties. Sony does not guarantee such services or warrant
their continued availability. Sony expects the features and nature of such
services will change over time.
Page 5

5
Table of
Contents
Index
5
Table of Contents
Getting Started
Parts and Controls ....................................................................... 12
Using the supplied headset ....................................................15
Using the keyboard ...............................................................16
Preparing a Power Source ............................................................ 18
Installing the battery .............................................................18
Charging the battery using the supplied AC power adaptor ..19
Charging the battery using the supplied USB cable ..............
Checking the remaining battery power .................................21
Starting the Unit .......................................................................... 22
Turning on the unit ................................................................22
Entering initial settings .........................................................
About the sample data stored in the unit ...............................23
Displaying the Home menu ...................................................
Viewing details of new events and viewing music
information .........................................................................
Locking the controls (HOLD) ...............................................
Setting the Connecting Method for Wireless LAN in
Infrastructure Mode ...................................................................
Registering a wireless network for “Auto Connect” ..............28
Listing Your Friends for Ad Hoc Application — Contact List ..... 31
Accepting a registration request from other user ..................32
20
23
24
25
26
27
What’s Up
Displaying the What’s Up Screen ................................................ 33
Creating
Editing a What’s Up screen entr
Starting communication with a contact ....................................... 40
Context Menus on What’s Up Screens .........................................
entries on the What’s Up screen .................................... 35
y ................................................ 37
Copying and pasting entries on the What’s Up screen ..........38
Removing entries from the What’s Up screen .......................39
41
Continued
Page 6

6
Index
Table of
Contents
6
Table of Contents
Communication — Skype
Signing in Skype ......................................................................... 42
Starting Skype .............................................................................
Signing in to Skype ...............................................................44
Signing out of Skype .............................................................46
Switching between screens ...................................................47
Checking the status bar .........................................................
Using the My Status Screen ......................................................... 51
Selecting your status .............................................................51
Entering comments ...............................................................53
Editing your profile ...............................................................
Adding a User to Your Contacts .................................................. 55
Adding a new contact ............................................................55
Resending a request to exchange contact details to
a contact .............................................................................
Accepting a request to exchange contact details from
other users ..........................................................................
Editing your
Making and Receiving a Call ...................................................... 59
Calling a Skype user .............................................................60
Calling a regular phone number (SkypeOut) .........................61
Receiving a call .....................................................................
Ending a call .........................................................................63
Starting a Chat ............................................................................. 64
Starting a new chat ................................................................64
Answering a new chat ...........................................................65
Returning to ongoing chat .....................................................
Ending a chat ........................................................................66
Chatting with multiple contacts (Multi Chat) ........................67
Transferring Files (File Transfer) ................................................ 69
Sending a file ........................................................................69
Receiving a file .....................................................................
Playing a Voicemail ..................................................................... 72
Sending a voicemail ..............................................................73
Adjusting Settings (Tools) ........................................................... 74
Items on the Tools screen ......................................................74
Context Menus in Skype .............................................................. 76
Contacts ...........................................................58
44
50
54
56
57
62
66
71
Continued
Page 7

7
Index
Table of
Contents
7
Table of Contents
Communication — Google Talk
Starting Google Talk .................................................................... 80
Signing in to Google Talk .....................................................80
Signing out of Google Talk ...................................................
Switching between screens ...................................................84
Checking the status bar .........................................................
Using the My Status Screen ......................................................... 87
Selecting your status .............................................................87
Entering comments ...............................................................88
Changing my picture .............................................................
Adding a User to Your Contacts .................................................. 90
Accepting an invitation from other user ................................91
Editing your
Starting a Chat ............................................................................. 92
Starting a new chat ................................................................92
Answering a new chat ...........................................................
Returning to ongoing chat .....................................................93
Ending a chat ........................................................................94
Adjusting Settings (Tools) ........................................................... 95
Items on the Tools screen ......................................................95
Context Menus in Google Talk .................................................... 96
Contacts ...........................................................91
83
86
89
93
Communication — Yahoo! Messenger
Starting Yahoo! Messenger .......................................................... 98
Signing in to Yahoo! Messenger ...........................................98
Signing out of Yahoo! Messenger .......................................10
Switching between screens .................................................102
Checking the status bar .......................................................10
Using the My Status Screen ....................................................... 105
Selecting your status ...........................................................105
Entering comments .............................................................10
Changing my picture ...........................................................107
Adding a User to Your Contacts ................................................ 108
Accepting “Add a Contact” requests from other user ..........109
Editing your Contacts .........................................................109
1
4
6
Continued
Page 8

8
Index
Table of
Contents
8
Table of Contents
Communication — Yahoo! Messenger (continued)
Starting a Conversation .............................................................. 110
Starting a new conversation ................................................110
Answering a new
Returning to ongoing conversation .....................................112
Ending a conversation .........................................................112
Adjusting Yahoo! Messenger Settings (Tools) ........................... 113
Items on the Tools screen ....................................................113
Context Menus in Yahoo! Messenger ........................................ 115
conversation ............................................111
Communication — Ad Hoc Application
Starting the Ad Hoc Application ................................................ 117
Turning on the wireless LAN in Ad Hoc mode ...................117
Registering a user to your Ad Hoc Contact List ..................11
Enjoying Audio Files with Another User (Music Streaming) ... 120
Enjoying music on other user’s unit ....................................120
Sharing music on your unit for other users to stream ..........12
Quitting the Ad Hoc Application ........................................124
Viewing your unit’s streaming log ......................................12
Context Menus in Ad Hoc Application ...................................... 126
8
2
5
Web
Viewing Websites ...................................................................... 127
Adding a Bookmark for the currently displayed
Web page ..........................................................................12
Saving a Web page ..............................................................12
Setting the currently displayed Web page as the
Home website ...................................................................12
Basic Operation of the Web Browser ......................................... 130
Context Menus on Web Screens ................................................ 13
8
8
9
2
Continued
Page 9

9
Index
Table of
Contents
9
Table of Contents
Music
Transferring Audio Files from Your Computer .......................... 134
Available software programs to transfer audio files ............134
Available audio codecs ........................................................13
Switching the USB mode ....................................................135
Connecting the unit to a computer ......................................13
Using SonicStage ................................................................137
Using Windows Media Player 10 ........................................13
Using Windows Explorer (Drag and drop) ..........................138
About the folder structure ...................................................13
Playing Music – Basic Operations ............................................. 141
About the Now Playing screen ............................................142
Playing selected tracks ........................................................143
Changing the play mode .....................................................14
Creating My Playlist .................................................................. 148
Playing the tracks in My Playlist ........................................149
Context Menus on Music Screens ............................................. 150
4
6
8
9
6
Photo
Transferring Photo Files from Your Computer ........................... 151
Available image formats .....................................................151
Connecting the unit to a computer ......................................151
Using mylo Image Transfer .................................................15
Using Windows Explorer (Drag and drop) ..........................153
About the folder structure ...................................................15
Displaying Photo Files .............................................................. 156
Photo file display operations ...............................................156
Playing a slideshow ............................................................15
Displaying photo files transferred from another unit
(Drop Box) .......................................................................157
Adding a photo to My Picture .............................................15
Adding a photo to Wallpaper ..............................................158
Context Menus on Photo Screens .............................................. 159
2
4
7
7
Continued
Page 10

10
Index
Table of
Contents
10
Table of Contents
Video
Transferring Video Files from Your Computer ........................... 160
Available video formats ......................................................160
Connecting the unit to a computer ......................................16
Using Image Converter 2 ....................................................161
Viewing Video Files .................................................................. 162
Basic playback operations ...................................................164
Context Menus on Video Screens .............................................. 165
Text
Transferring Text Files from Your Computer ............................. 166
Connecting the unit to a computer ......................................166
Using Windows Explorer (Drag and drop) ..........................16
Creating a New Text File ........................................................... 168
Opening a Text File ................................................................... 16
Opening text files transferred from another unit
(Drop Box) .......................................................................16
Context Menus on Text Screens ................................................ 170
0
7
9
9
Tools
Using the Settings Menu ........................................................... 171
General Settings ..................................................................172
Network Settings .................................................................17
Communication Settings .....................................................175
Web Settings .......................................................................17
Music Settings ....................................................................177
Photo Settings .....................................................................17
Video Settings .....................................................................179
Text Settings .......................................................................17
Using the Connection Manager ................................................. 180
Displaying the Connection Manager ...................................181
Connecting to wireless network from the Connection
Manager ............................................................................18
Registering a wireless network ...........................................18
4
6
8
9
1
2
Continued
Page 11

11
Index
Table of
Contents
11
Table of Contents
Tool (continued)
Using the File Manager ............................................................. 184
Copying a folder or a file ....................................................184
Moving a folder or a file .....................................................18
Using Multi Select mode ....................................................186
Using the Hotspot Database ...................................................... 187
Viewing the Drop Box ............................................................... 18
Updating the Unit’s Software .................................................... 18
Displaying the System Information ........................................... 19
Context Menus on Tools Screens ............................................... 19
Additional Information
Troubleshooting ......................................................................... 193
Precautions ................................................................................ 20
On safety .............................................................................204
On installation .....................................................................204
Preventing the LCD display from damages .........................20
On heat build-up .................................................................204
On the headphones ..............................................................20
On cleaning .........................................................................205
On software .........................................................................20
On handling the personal information .................................206
On servicing ........................................................................20
Others .................................................................................207
On the “Memory Stick” ............................................................. 208
On Copyrights and Licenses ...................................................... 21
Skype End User License Agreement .......................................... 22
Skype Terms of Service ......................................................233
Yahoo! Terms of Service ........................................................... 247
Specifications ............................................................................ 24
Index .......................................................................................... 25
5
8
9
0
1
4
4
5
6
7
0
3
8
0
Page 12
12
Table of
Contents
Index
12
Getting Started
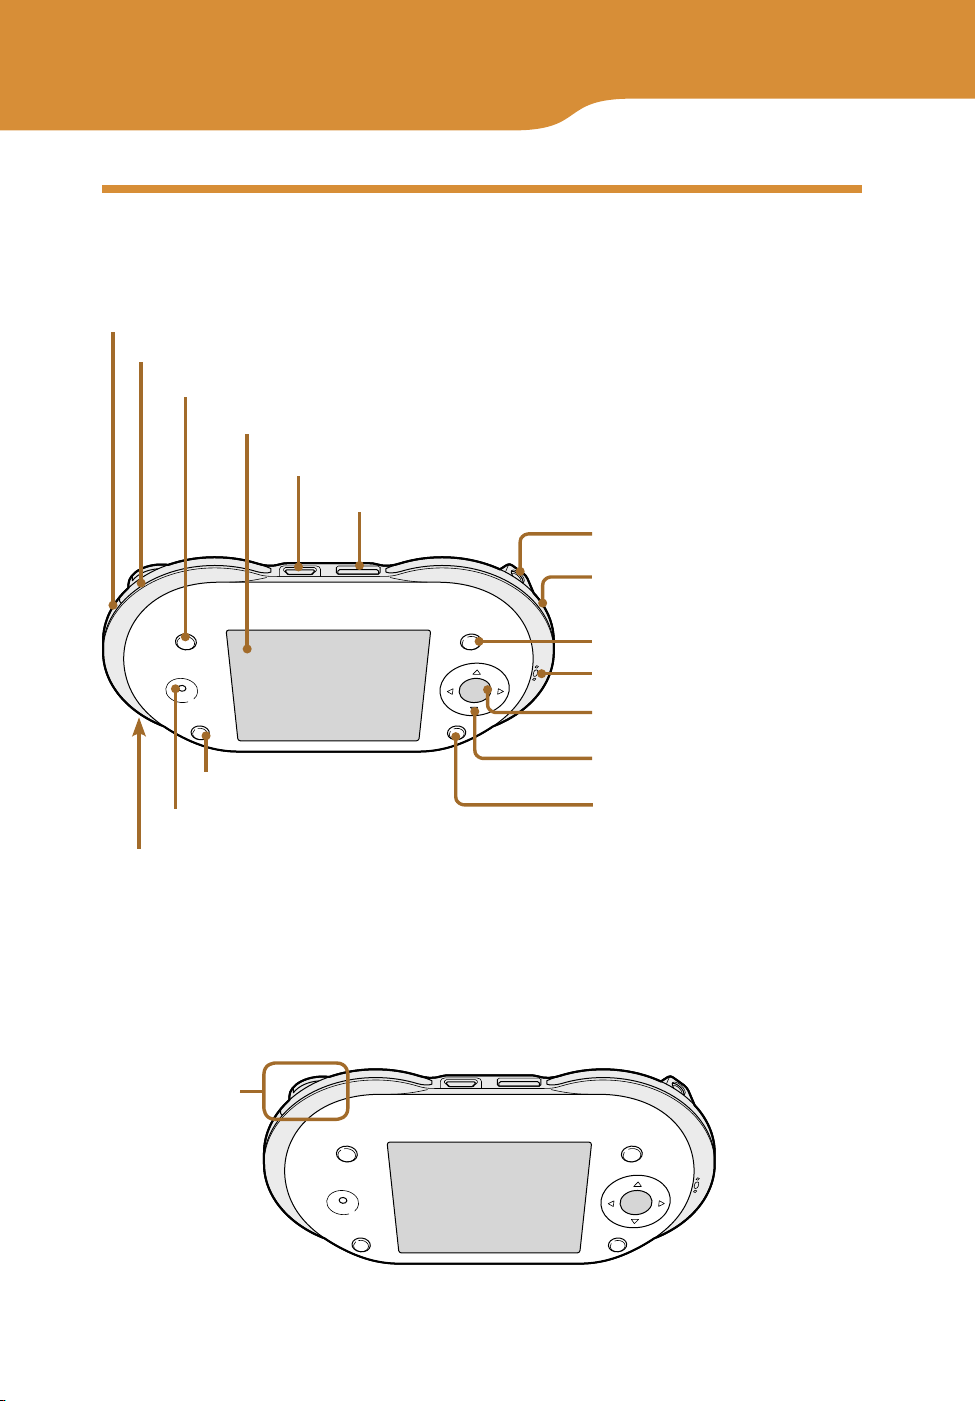
Parts and Controls
Front
“Memory Stick Duo” access indicator ( page 14)
WIRELESS LAN switch/indicator ( page 28)
INFO button ( page 25)
Display*
(USB) connector (
(headset) jack (
HOME button ( page 24)
Speaker ( page 59)
POWER switch/indicator ( page 22)
CHARGE indicator ( page 19)
* Remove the protective sheet from the display before using the unit.
page 20)
page 15)
DC IN 6V jack ( page 19)
Status indicator
( page 28)
OPTION button
Microphone ( page 59)
Center button
4-way button (///)
BACK button
About the built-in antenna
The built-in antenna is used by the unit to connect to the wireless LAN.
Built-in antenna
Continued
Page 13
13
Index
Table of
Contents
13
Getting Started…Parts and Controls
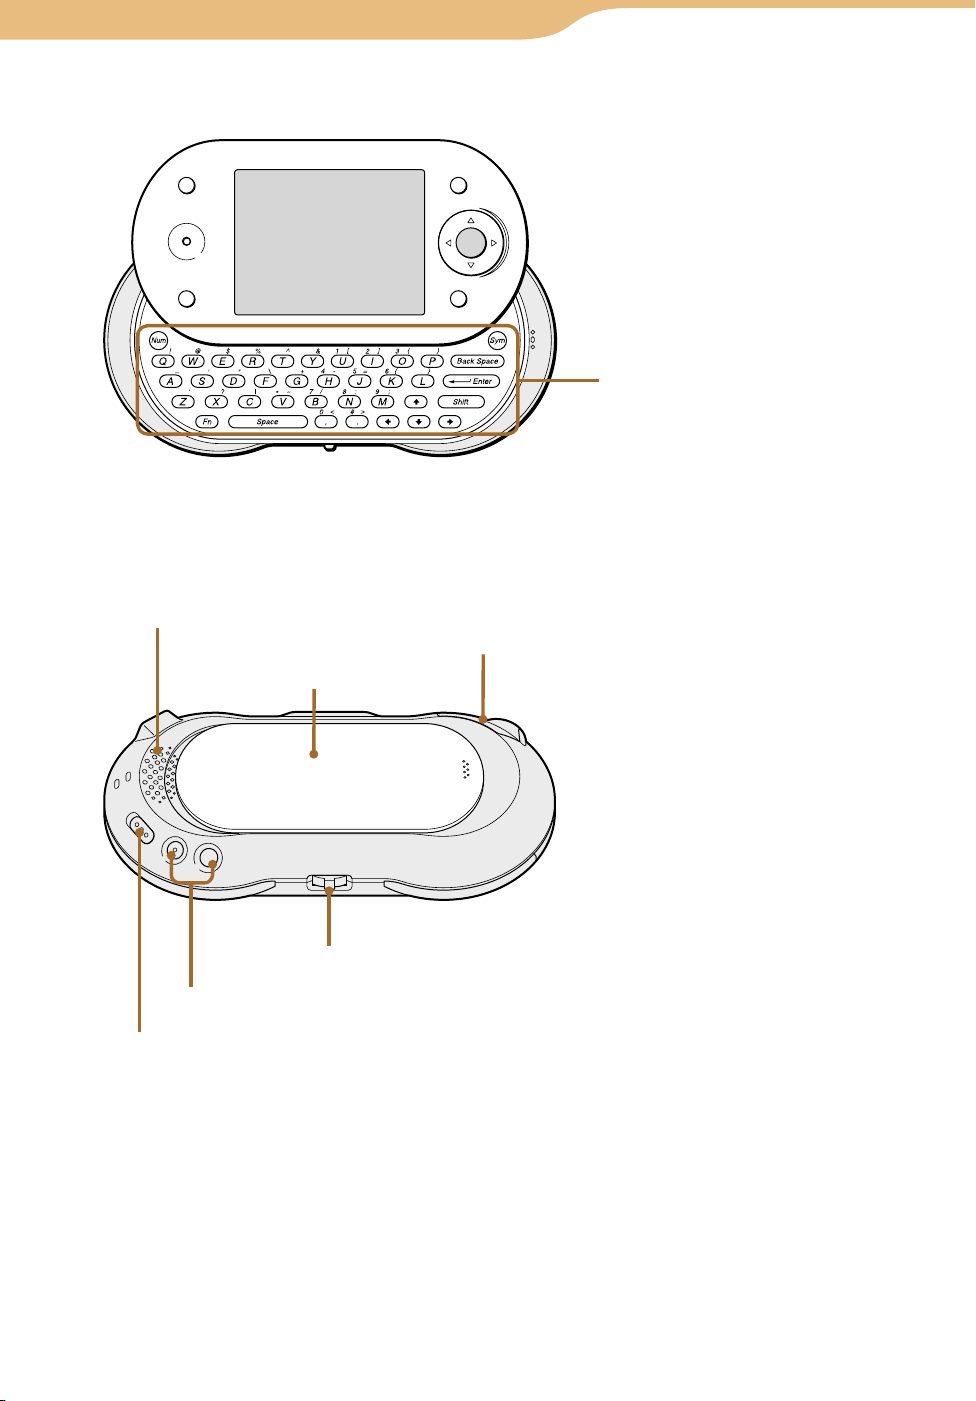
Front panel opened
Keyboard ( page 16)
Back
Loudspeaker
Battery compartment
cover ( page 18)
Jog lever (///) ( page 24)
VOL (volume) +/– buttons ( page 24)
HOLD switch ( page 26)
“Memory Stick Duo” slot
( page 14)
Page 14
14
Index
Table of
Contents
14
Getting Started…Parts and Controls
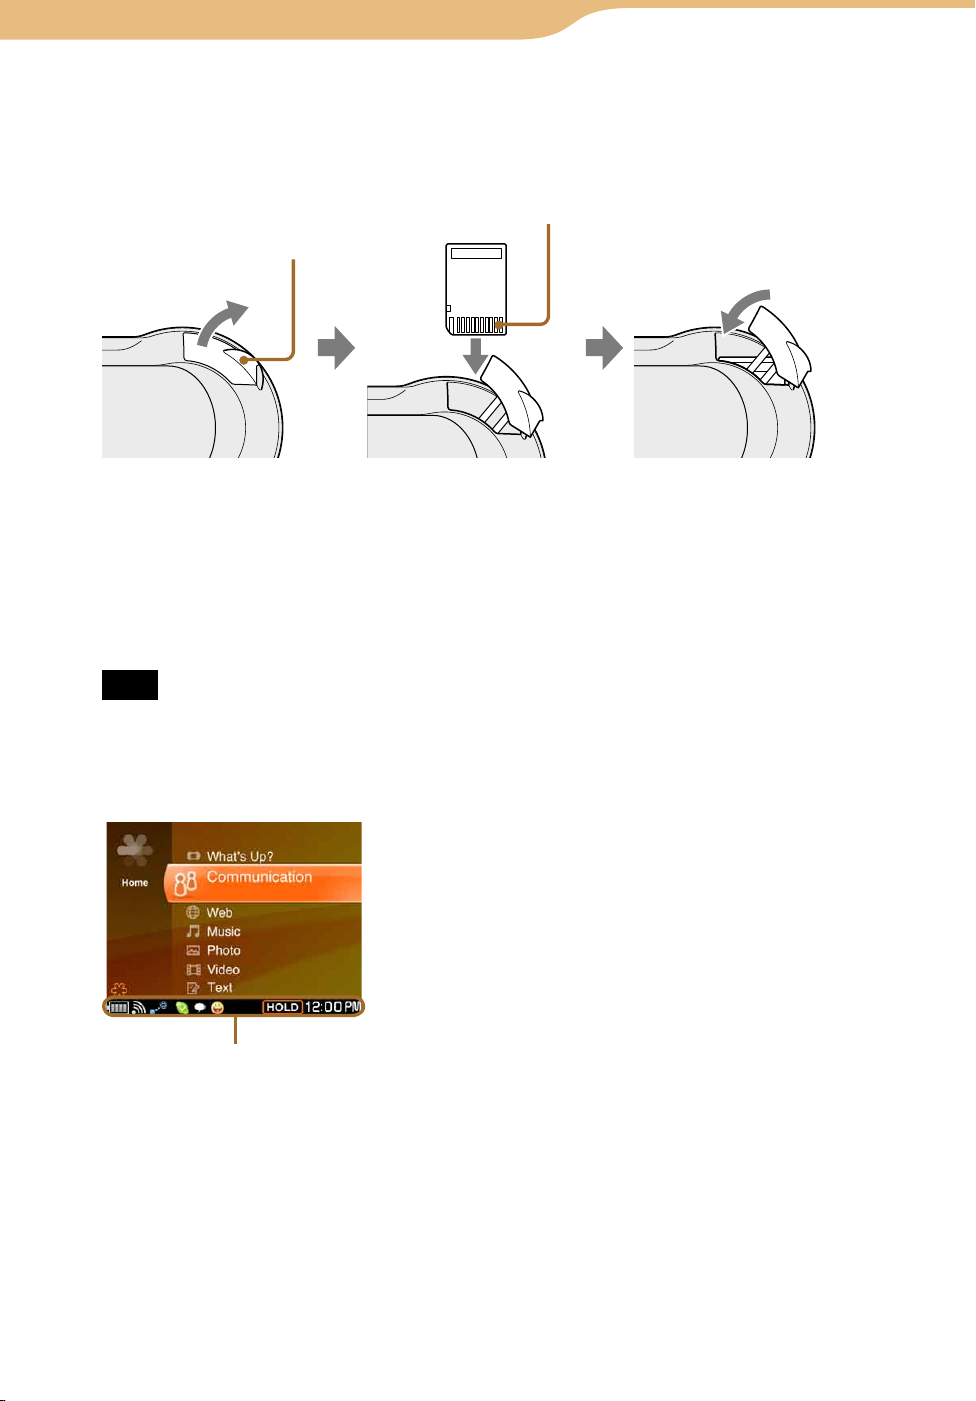
To insert and remove a “Memory Stick Duo”
Insert a “Memory Stick Duo” as illustrated below. When the unit accesses the
“Memory Stick Duo,” the “Memory Stick Duo” access indicator lights up.
Grip the groove with your finger,
and gently pull in the direction
indicated by the arrow.
Insert the “Memory Stick Duo”
in the direction indicated by the
arrow on the unit, and gently
push until it clicks into place.
Terminal side
To remove the “Memory Stick Duo,” push and release the “Memory Stick
Duo” to make it pop out.
Note
• To avoid data corruption, do not remove a “Memory Stick Duo” while the “Memory
Stick Duo” access indicator lights up.
The Status bar
Status bar
Continued
Page 15
15
Index
Table of
Contents
15
Getting Started…Parts and Controls
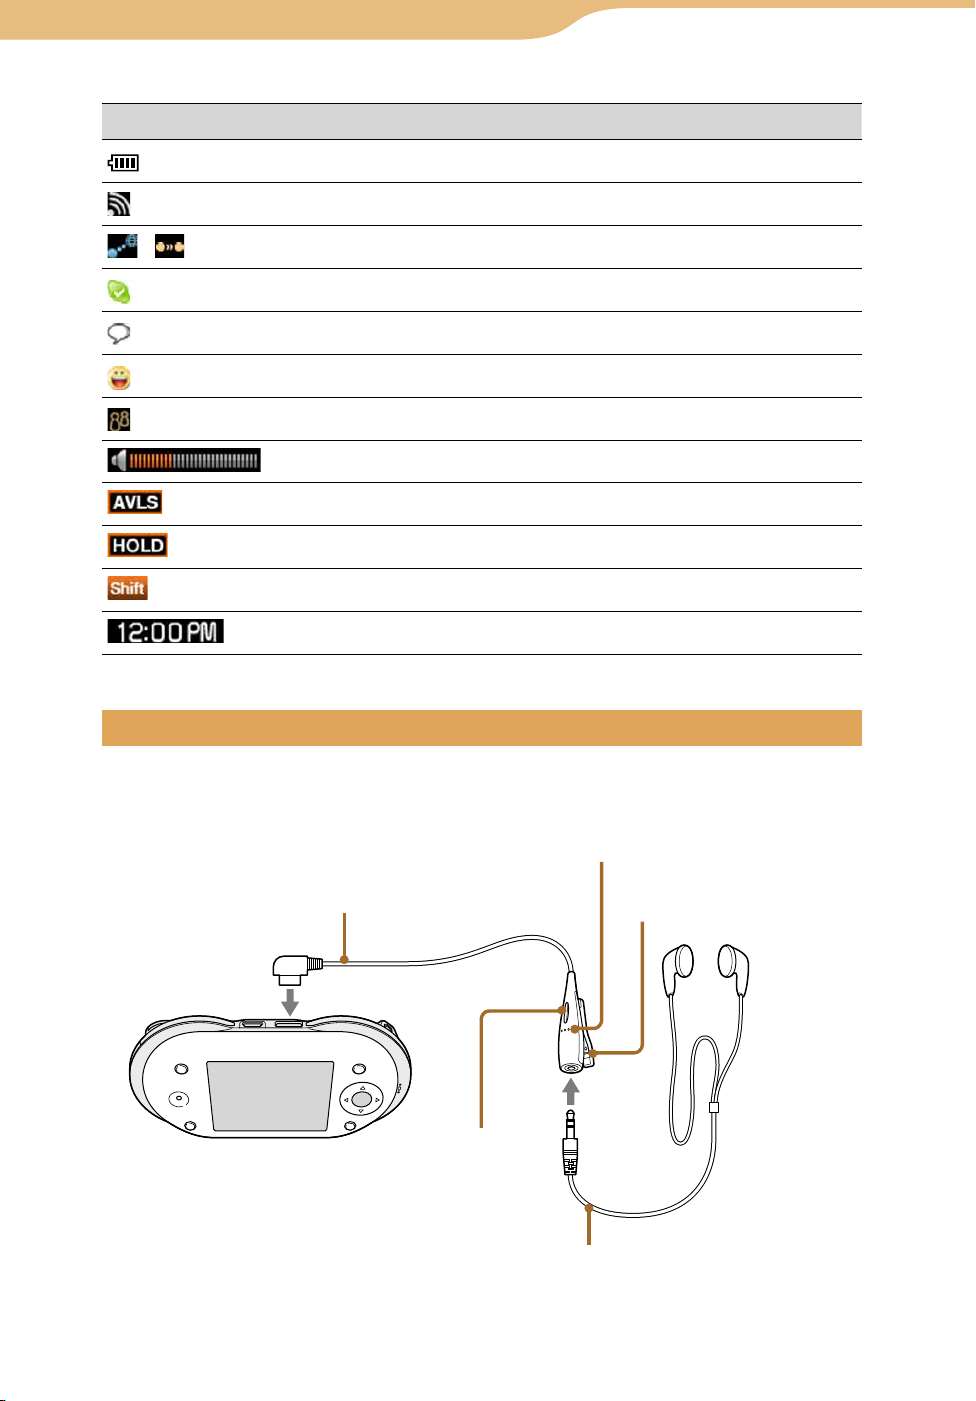
Icon on the status bar Meanings
Remaining battery power ( page 21)
Wireless LAN signal strength ( page 30)
/
Wireless LAN status ( page 28, 31)
Skype status or events (
page 50)
Google Talk status or events ( page 86)
Yahoo! Messenger status or events (
Ad Hoc Application status ( page 32, 119, 121, 124)
Volume bar
AVLS ( page 174)
HOLD status ( page 26)
Modifier keys status for the keyboard ( page 16)
Clock ( page 172)
Using the supplied headset
Attach the supplied headset to the unit as illustrated below.
Microphone: Picks up your
voice during an Internet call.
One touch answer remote
controller (supplied)
Clip: Holds the remote
controller to your clothes.
page 104)
(headset) jack
To
Remote Call Control
button: Answers or
ends an Internet call.
Headphones (supplied)
Continued
Page 16
16
Index
Table of
Contents
16
Getting Started…Parts and Controls
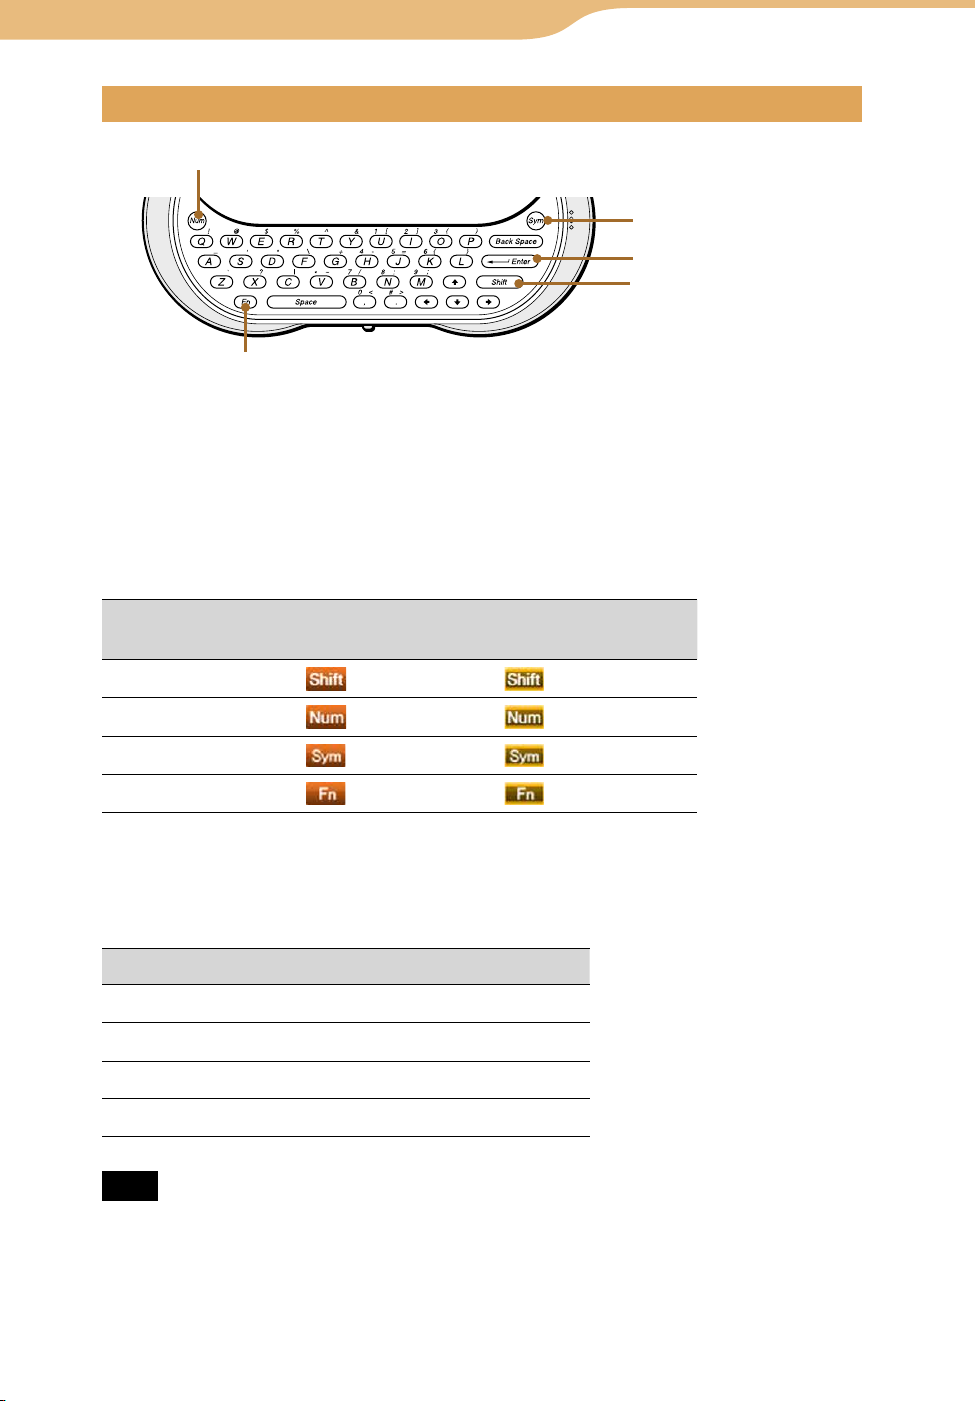
Using the keyboard
Num key
Sym key
Enter key
Shift key
Fn key
To enter capital letters, numbers, and symbols
Press the modifier key (Shift, Num, Sym, or Fn) first, and then press another
key. For the key arrangement, refer to the chart on
After modifier keys are pressed, the following icons appear on the status bar of
the display.
To lock a modifier key, press it twice. To unlock it, press it again.
page 17.
Modifier key Icon after pressing it
once
Shift
Num
Sym
Fn
Icon after pressing it
twice
(Caps Locked)
To use shortcuts
For shortcuts of common editing tasks, press and release the Fn key, and then
press one of the keys listed in the following table.
Key Press Fn to select
Fn + “A” Select all
Fn + “X” Cut
Fn + “C” Copy
Fn + “V” Paste
Note
• All shortcuts may not be available in all application programs.
Continued
Page 17
17
Index
Table of
Contents
17
Getting Started…Parts and Controls
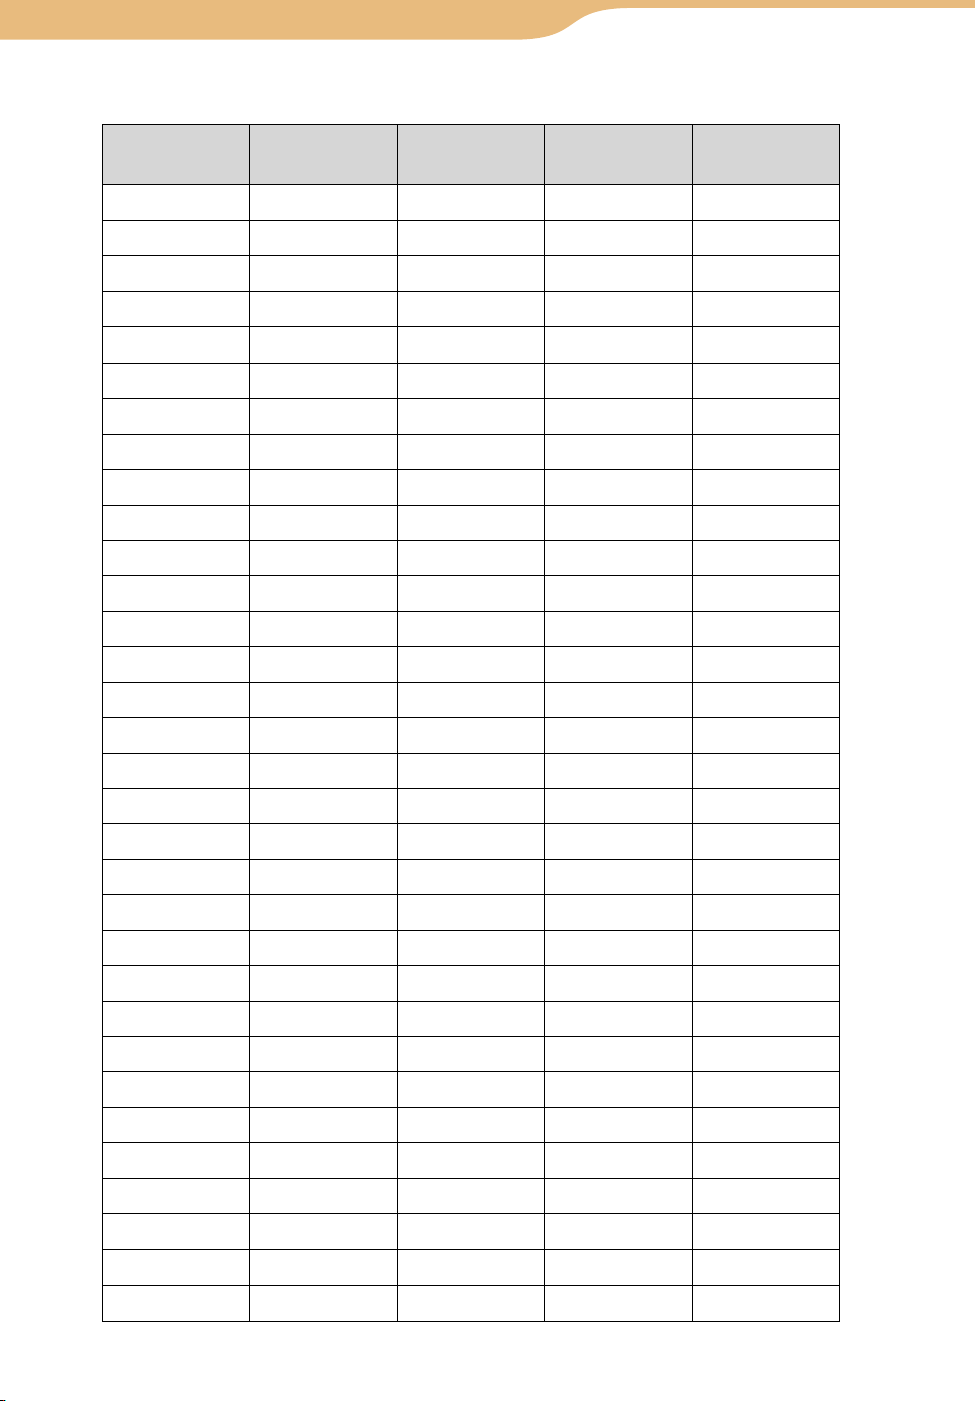
Key arrangement
Display on the
key
Normal key Press Shift to
select
Press Num to
select
Q q Q q !
W w W w @
E e E e $
R r R r %
T t T t ^
Y y Y y &
U u U 1 [
I i I 2 ]
O o O 3 (
P p P p )
A a A a _
S s S s ’
D d D d ”
F f F f \
G g G + +
Press Sym to
select
H h H 4 -
J j J 5 =
K k K 6 {
L l L l }
Z z Z z `
X x X x ?
C c C c |
V v V * ˜
B b B 7 /
N n N 8 :
M m M 9 ;
, , , 0 <
. . . # >
Text selection
Text selection
Text selection
Text selection
Page 18
18
Index
Table of
Contents
18
Getting Started
Preparing a Power Source
Make sure that the battery is inserted before using the unit.
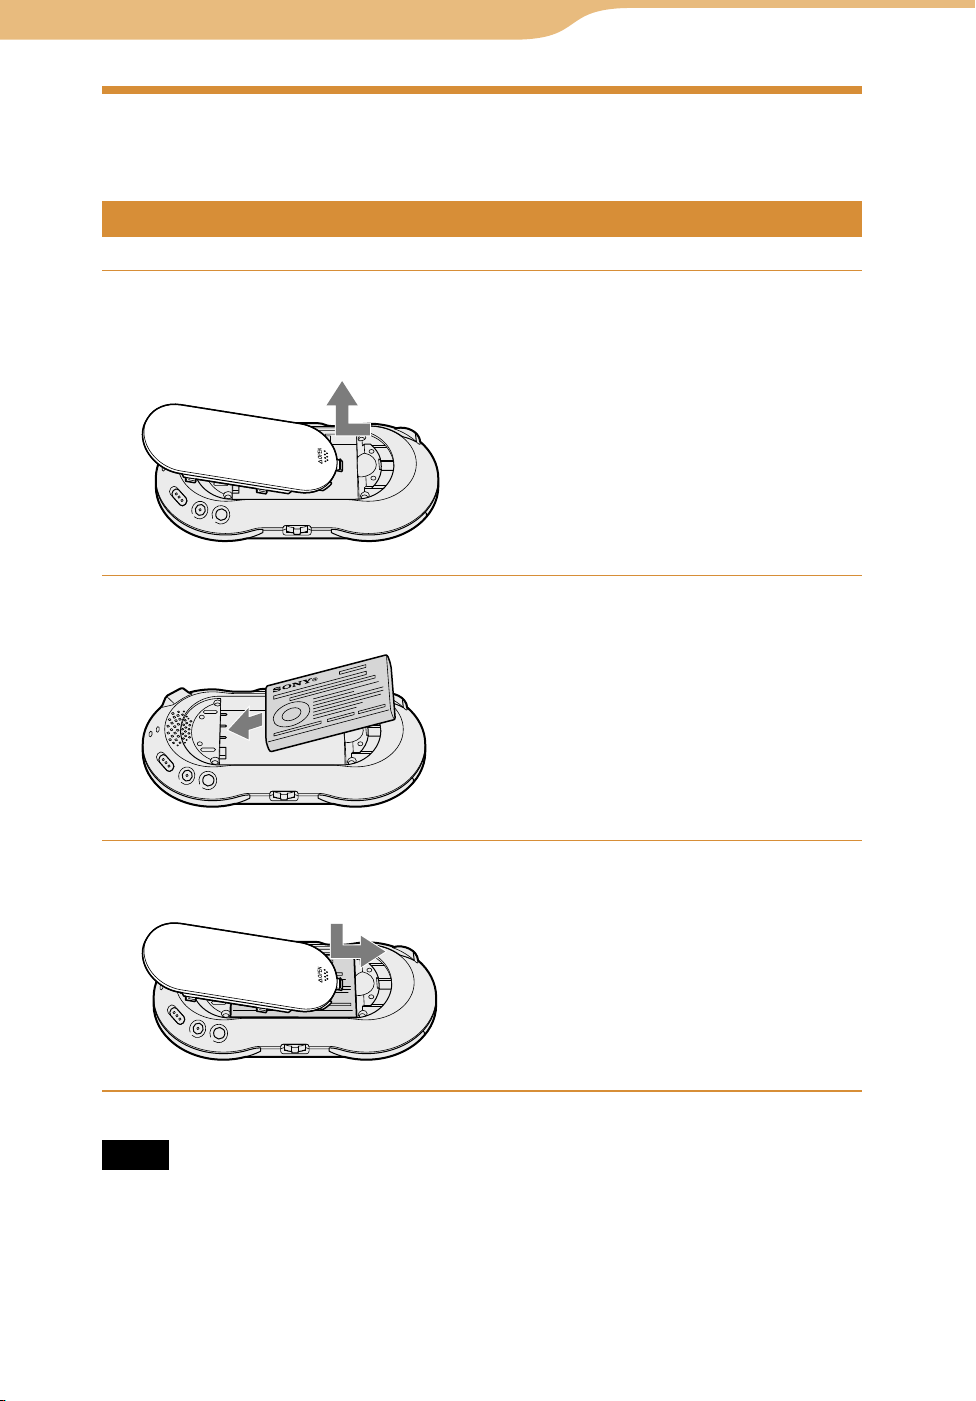
Installing the battery
Open the battery compartment cover by placing your thumb
or finger on the word “Open” on one end of the cover and
pressing towards the other end of the cover.
Insert the battery, label side up, aligning the metal contacts on
the battery with the contacts inside the battery compartment.
Slide the battery compartment cover onto the back of the unit
until it clicks into place.
Notes
• Turn off the unit before replacing the battery. Removing the battery while the unit is
turned on may damage data in the unit and cause a malfunction.
• Be sure the battery is inserted when the unit is in use. Using the unit without the battery
is neither recommended nor supported.
• Do not use any other type of battery in your unit.
Continued
Page 19
19
Index
Table of
Contents
19
Getting Started…Preparing a Power Source
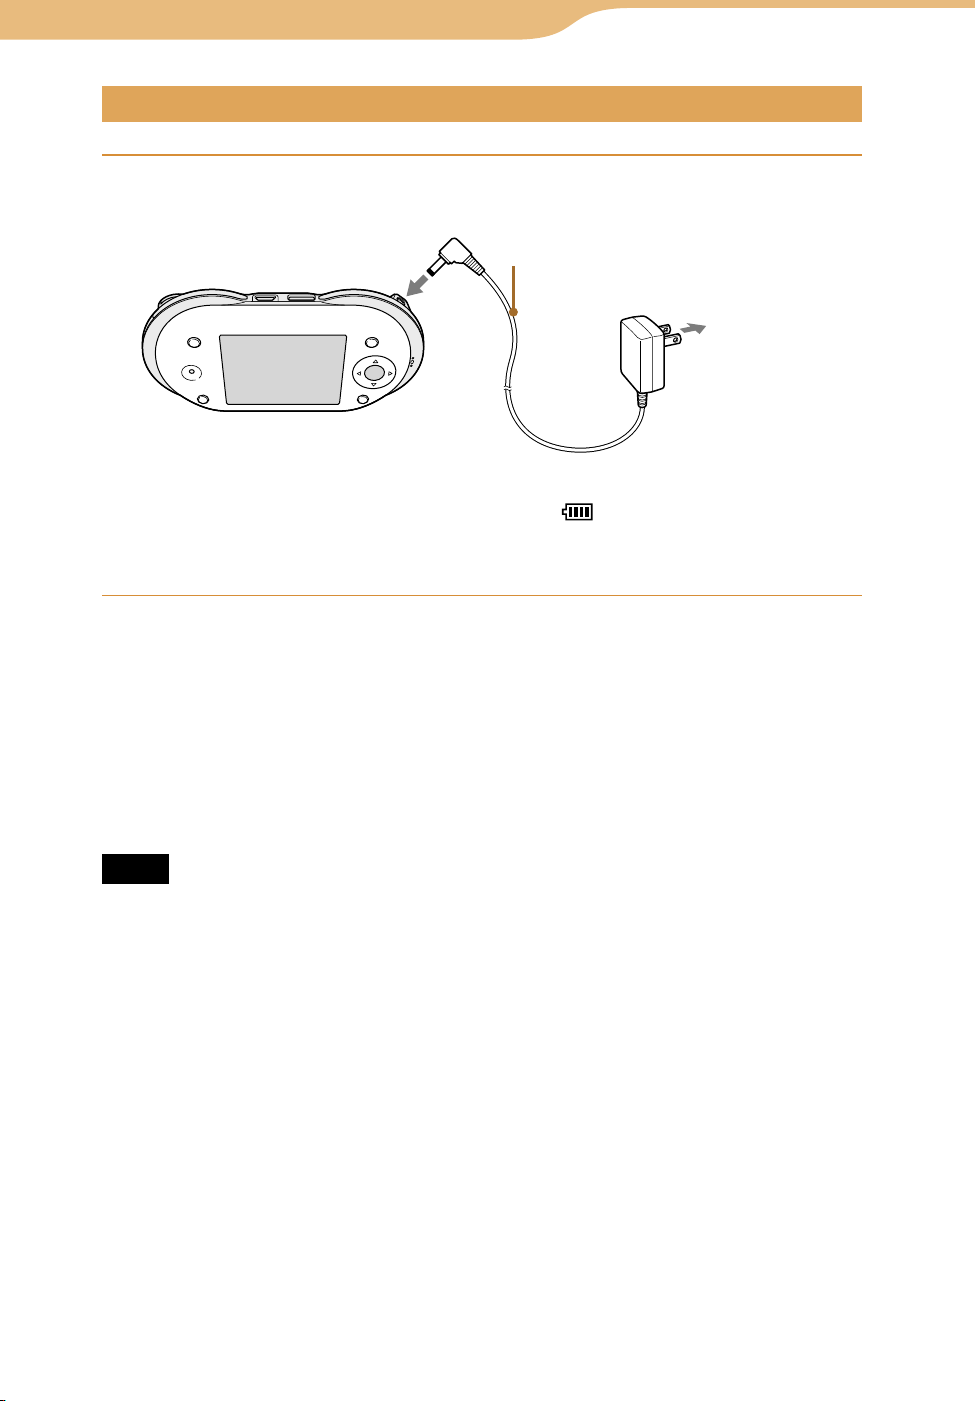
Charging the battery using the supplied AC power adaptor
Connect the supplied AC power adaptor to the DC IN 6V jack
of the unit, and then connect the adaptor to a wall outlet.
To DC IN 6V jack
AC power adaptor (supplied)
To wall outlet
The unit automatically turns on. The CHARGE and POWER indicators
light up, and the battery indicator sections ( ) appear on the display in
succession as charging progresses.
A complete charge requires approximately 3 to 7.5 hours*.
* Charging may take a long time depending on the operating conditions.
The unit is in a standby mode for charging while the unit is performing any of the
following:
– Playing music without the headset
– Playing video
– Viewing photos
– Viewing Web pages
– Wireless LAN is turned on (except for a standby mode for incoming chats and calls)
Notes
• If “Auto Power Off” is set to “NO,” a complete charge may require 7.5 hours or longer.
• Charging may take a long time if you operate the unit while it is charging.
Continued
Page 20
20
Index
Table of
Contents
20
Getting Started…Preparing a Power Source
Charging the battery using the supplied USB cable
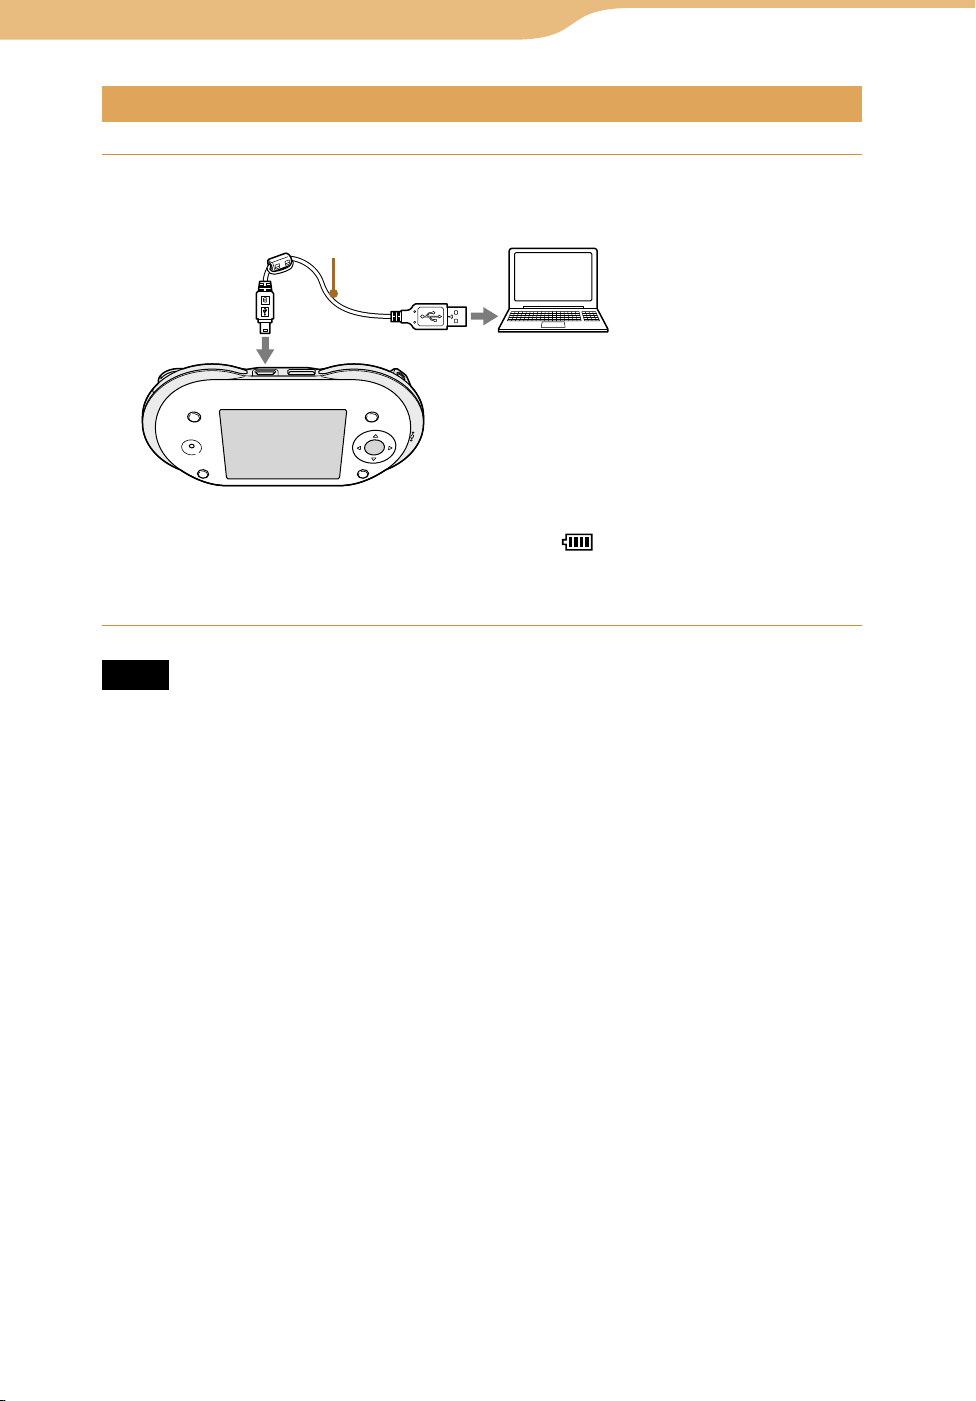
Connect the supplied USB cable to the (USB) connector of
the unit, and then connect the USB cable to the computer.
USB cable (supplied)
To (USB)
connector
The unit automatically turns on. The CHARGE and POWER indicators
light up, and the battery indicator sections ( ) appear on the display in
succession as charging progresses.
A complete charge requires approximately 4 hours.
Notes
• The supplied interface cable must be used with the equipment in order to comply with
the limits for a digital device pursuant to Subpart B of Prat 15 of FCC Rules.
• If your unit is connected to your computer via the included USB cable and the computer
enters a power saving mode (such as system suspend, sleep, or hibernation), then your
unit’s battery will begin discharging.
• Do not leave the unit connected for extended periods to a notebook computer that is not
connected to AC power, because the unit may discharge the computer’s battery.
• If the unit does not automatically turn on when you connect it to your computer using
the USB cable, wait a few minutes, and then turn it on by sliding the POWER switch
down (
• Connecting the unit via a USB hub may not work and is not supported. Connect the
USB cable directly to the computer.
• Charging may take a long time if you operate the unit while it is charging.
page 22).
Continued
Page 21

21
Index
Table of
Contents
21
Getting Started…Preparing a Power Source
Checking the remaining battery power
The remaining battery power is displayed on the status bar of the display. As
the battery runs down, the black portion of the indicator becomes smaller.
When the battery runs out, the unit turns off automatically after displaying
“Low Battery! Please charge” for 5 seconds. Before turning the unit back on,
charge the battery (
“Low Battery! Please charge.”
Note
• The charging time varies with the temperature. Charging is possible in an environment
of between 41 to 95°F (5 to 35ºC). If the temperature is not in this range, the batteries
may not be charged properly.
Hints
• The battery indicator on the display is only an estimate. For example, an indication of
“ ” will not always mean exactly half of the battery’s charge.
• The accuracy of the battery indicator on the display may vary depending on the
operating conditions and environment of the unit.
page 19).
Page 22
22
Index
Table of
Contents
22
Getting Started
Starting the Unit
Turning on the unit
Make sure that the battery is fully charged first. For how to connect the unit,
refer to page 18.
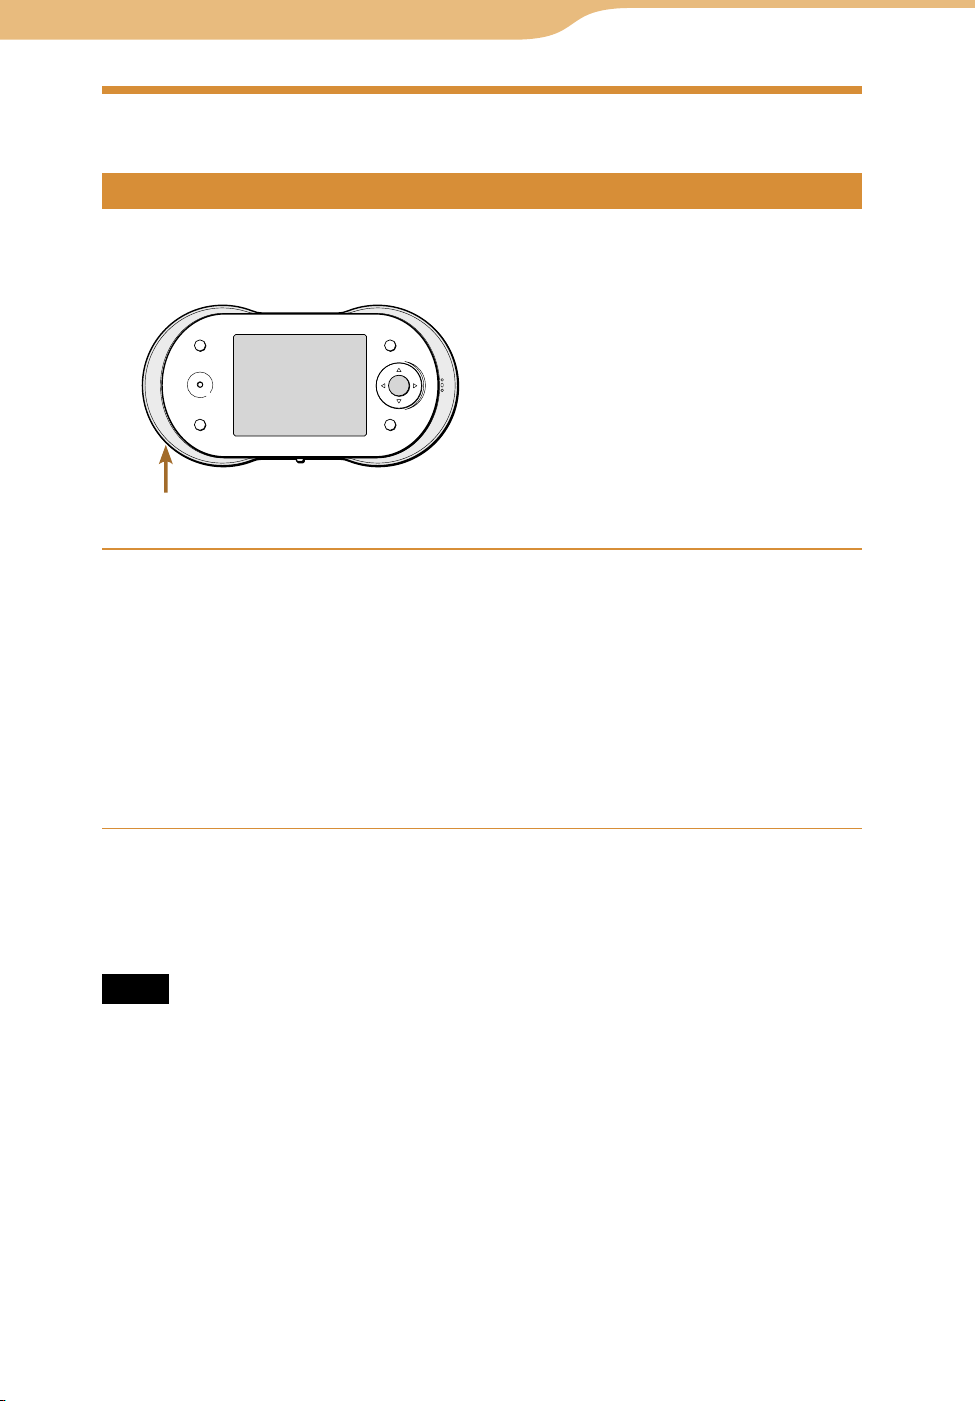
POWER switch/indicator
Slide down and hold the POWER switch.
The unit turns on, and the POWER indicator lights up green. The Home
menu appears after the start-up screen is displayed for about 30 seconds.
When you turn on the unit for the first time, the initial set-up wizard
appears. Follow the instructions on the display.
If it has been more than three days since the last time the unit was used,
the start-up screen is displayed.
In other situations, the screen that was being displayed when the unit was
turned off appears.
To turn off the unit
Slide down and hold the POWER switch. The unit turns off, and the POWER
indicator turns off.
Notes
• Do not remove the battery and disconnect the AC power adaptor while the start-up
screen is displayed.
• The unit cannot be turned off while the HOLD feature is on. You can, however, turn on
the unit while the HOLD feature is on by sliding down and holding the POWER switch.
Continued
Page 23

23
Index
Table of
Contents
23
Getting Started…Starting the Unit
Hint
• When “Auto Power Off” is set to “YES,” and you do not operate the unit for
approximately ten minutes, the unit automatically turns itself off (Auto Power Off)
unless the unit is performing one of the following operations:
– Playing music
– Playing video
– Playing a photo slide show
– Updating its software
– Updating its media database after the USB is disconnected
– Formatting storage
– Resetting its settings
– The unit is connected to wireless network.
– The unit is connected to your computer via the supplied USB cable.
Entering initial settings
When you turn on the unit for the first time, the set-up wizard appears. Follow
the instructions on the display to set the following items.
• Time Zone
• Date & Time
• My profile
To set up these items later, see
page 172.
About the sample data stored in the unit
The sample data are stored in the internal memory of your unit so that you can
try to use it. When you want to make more space for your own data, you can
delete the sample data as below.
To delete sample data
Sample data Use
Music File Manager
Photo Context menu
Video Context menu
Text Context menu
Note
• Recommend to back up the sample data before deleting because they are provided
only in the internal memory. To back up the data, use the supplied application software
“mylo Utility.”
Continued
Page 24
24
Index
Table of
Contents
24
Getting Started…Starting the Unit
Displaying the Home menu
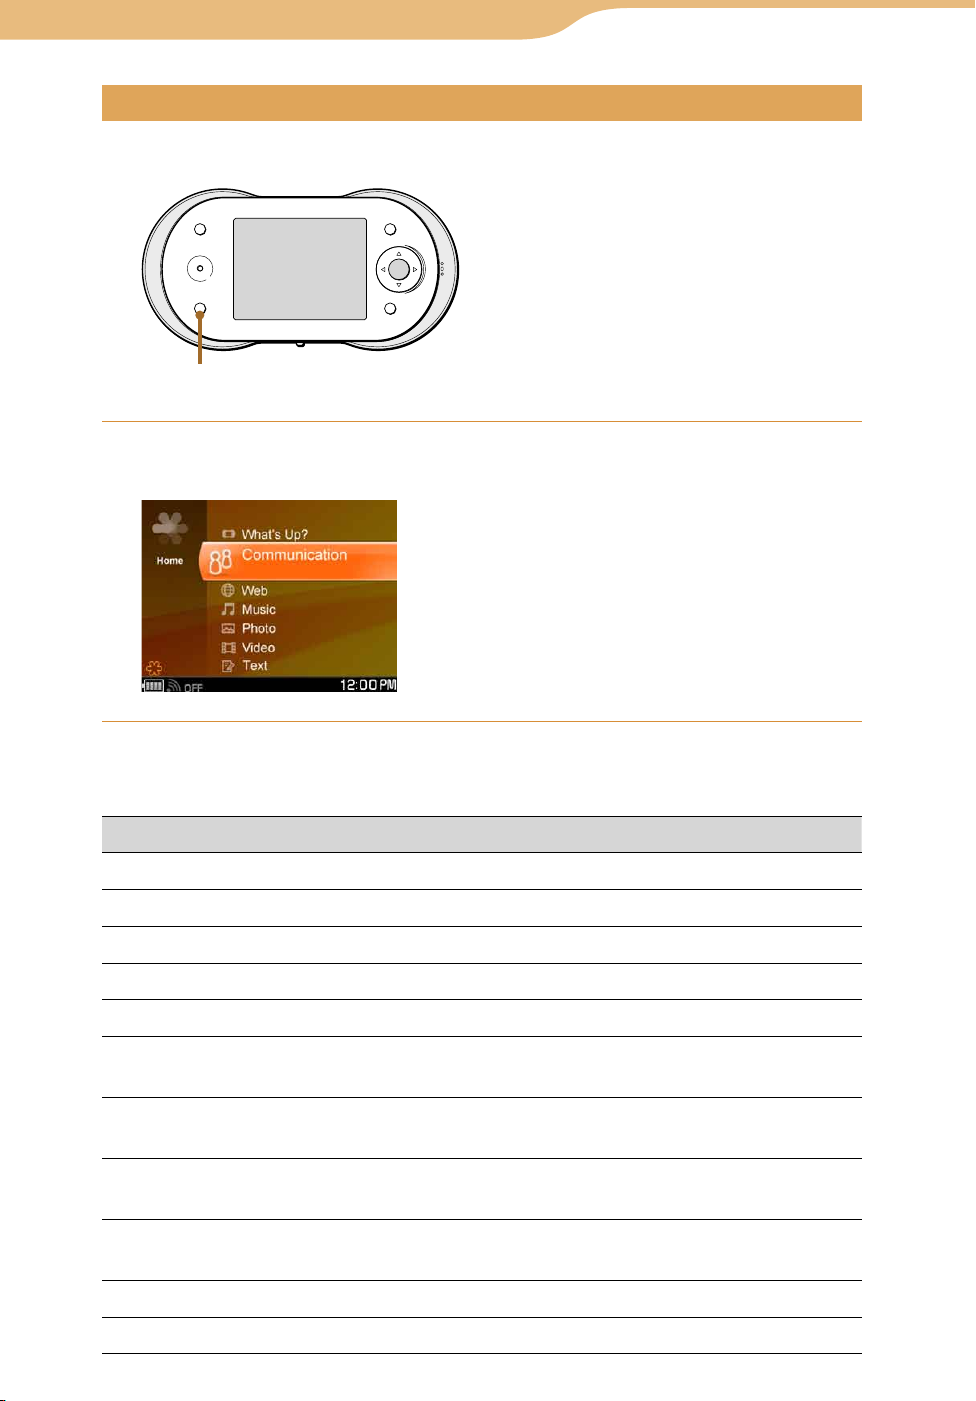
Use the Home menu to open applications and use various features of the unit.
HOME button
Press HOME.
The Home menu appears.
Basic Home menu operations
To Operation
Move the cursor up or down. Press /.
View
Info screen Press INFO.
Playback music Press the jog lever ().
Stop playback music Press the jog lever ().
Adjust the volume Press the VOL +/– buttons.
Find the beginning of the current
music track
Find the beginning of previous
music tracks
Find the beginning of the next music
track
Find the beginning of succeeding
music tracks
Go backward quickly Hold the jog lever toward
Go forward quickly Hold the jog lever toward .
Flick the jog lever toward
Flick the jog lever toward
Flick the jog lever toward
Flick the jog lever toward
once.
repeatedly.
once.
repeatedly.
.
Continued
Page 25
25
Index
Table of
Contents
25
Getting Started…Starting the Unit
Viewing details of new events and viewing music information
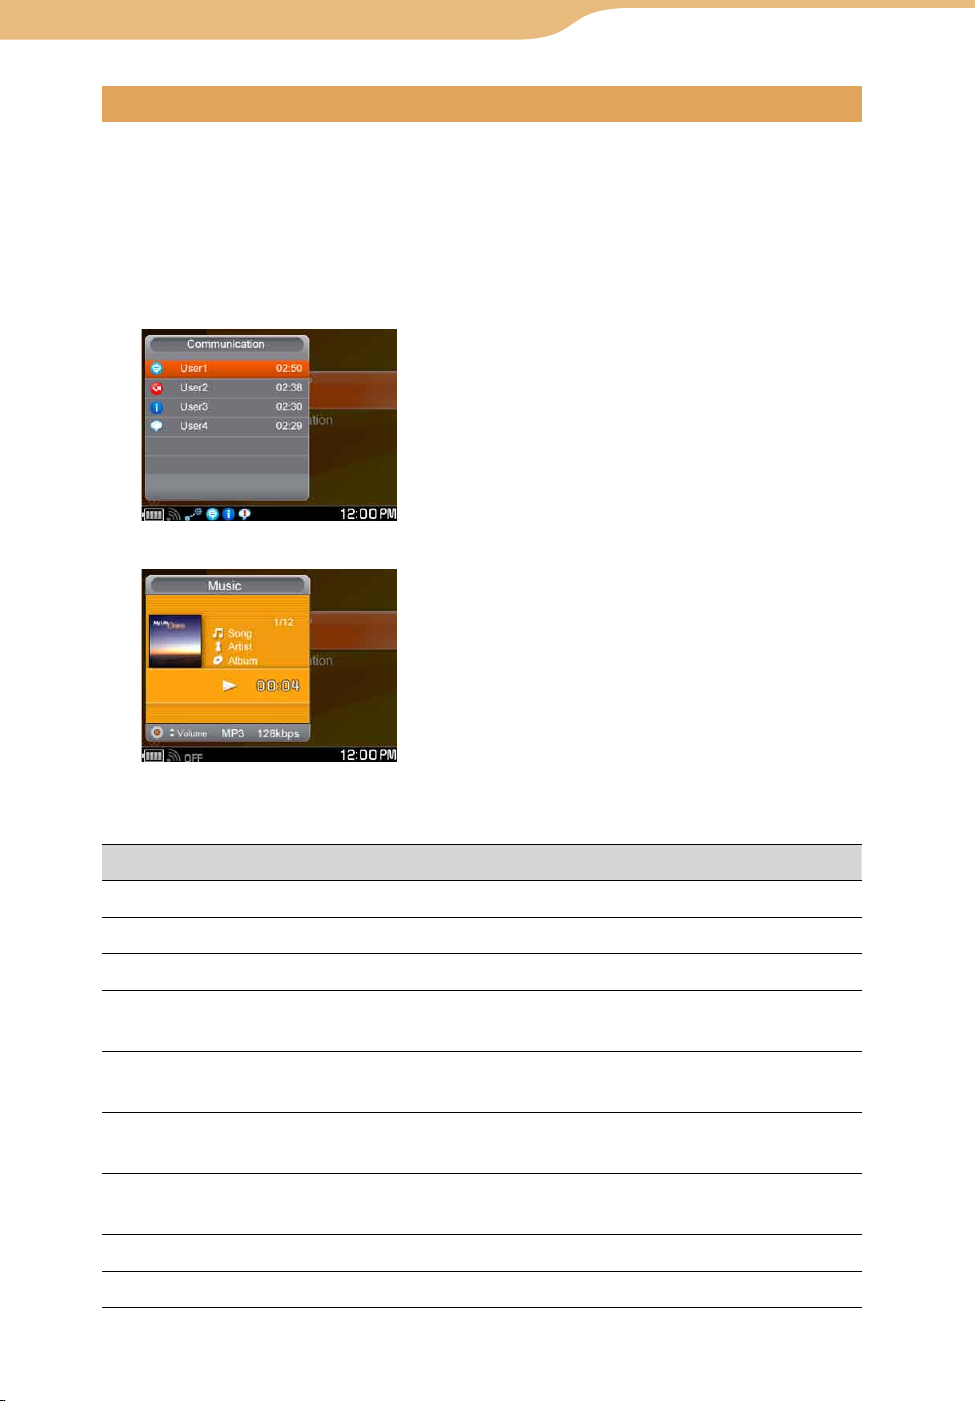
When an event occurs, such as a new message being received or a chat
invitation arriving, an event icon appears on the status bar of the display. When
this happens, press INFO to view detailed information about the event.
To see information about the currently playing music when viewing another
application window, press
Press INFO once.
Press INFO twice.
INFO twice.
Basic Music Panel operations
To Operation
Playback music Press the center button.
Stop playback music Press the center button.
Adjust the volume Press the VOL +/– buttons or
Find the beginning of the
current music track
Find the beginning of
previous music tracks
Find the beginning of the
next music track
Find the beginning of
succeeding music tracks
Go backward quickly
Go forward quickly Press and hold . (Hold the jog lever toward .)
Press .
(Flick the jog lever toward
Press repeatedly.
(Flick the jog lever toward
Press .
(Flick the jog lever toward
Press repeatedly.
(Flick the jog lever toward
Press and hold . (Hold the jog lever toward .)
/.
once.)
repeatedly.)
once.)
repeatedly.)
Continued
Page 26

26
Index
Table of
Contents
26
Getting Started…Starting the Unit
Locking the controls (HOLD)
You can lock the unit’s controls/buttons to prevent accidental operation.
Slide the HOLD switch on the back of the unit in the direction
of the arrow (
appears on the status bar of the display.
To unlock the controls
Slide the HOLD switch in the opposite direction of the arrow (
Hints
• The unit cannot be turned off while the HOLD feature is on. You can, however, turn on
the unit while the HOLD feature is on by sliding down and holding the POWER switch.
• You can receive an Internet call and operate the unit in relation to receiving an Internet
call even when the HOLD feature is activated.
).
).
Page 27
27
Index
Table of
Contents
27
Getting Started
Setting the Connecting Method for Wireless LAN in Infrastructure Mode
If you usually use the same wireless network, you can set the unit to connect
automatically to specific pre-registered wireless networks.
If you often move between different wireless networks, you select a wireless
network each time from a list of available wireless networks.
On the Home menu, press / to select “Tools,” and then
press the center button.
Press / to select “Settings,” and then press the center
button.
Press / to select “Network Settings,” and then press the
center button.
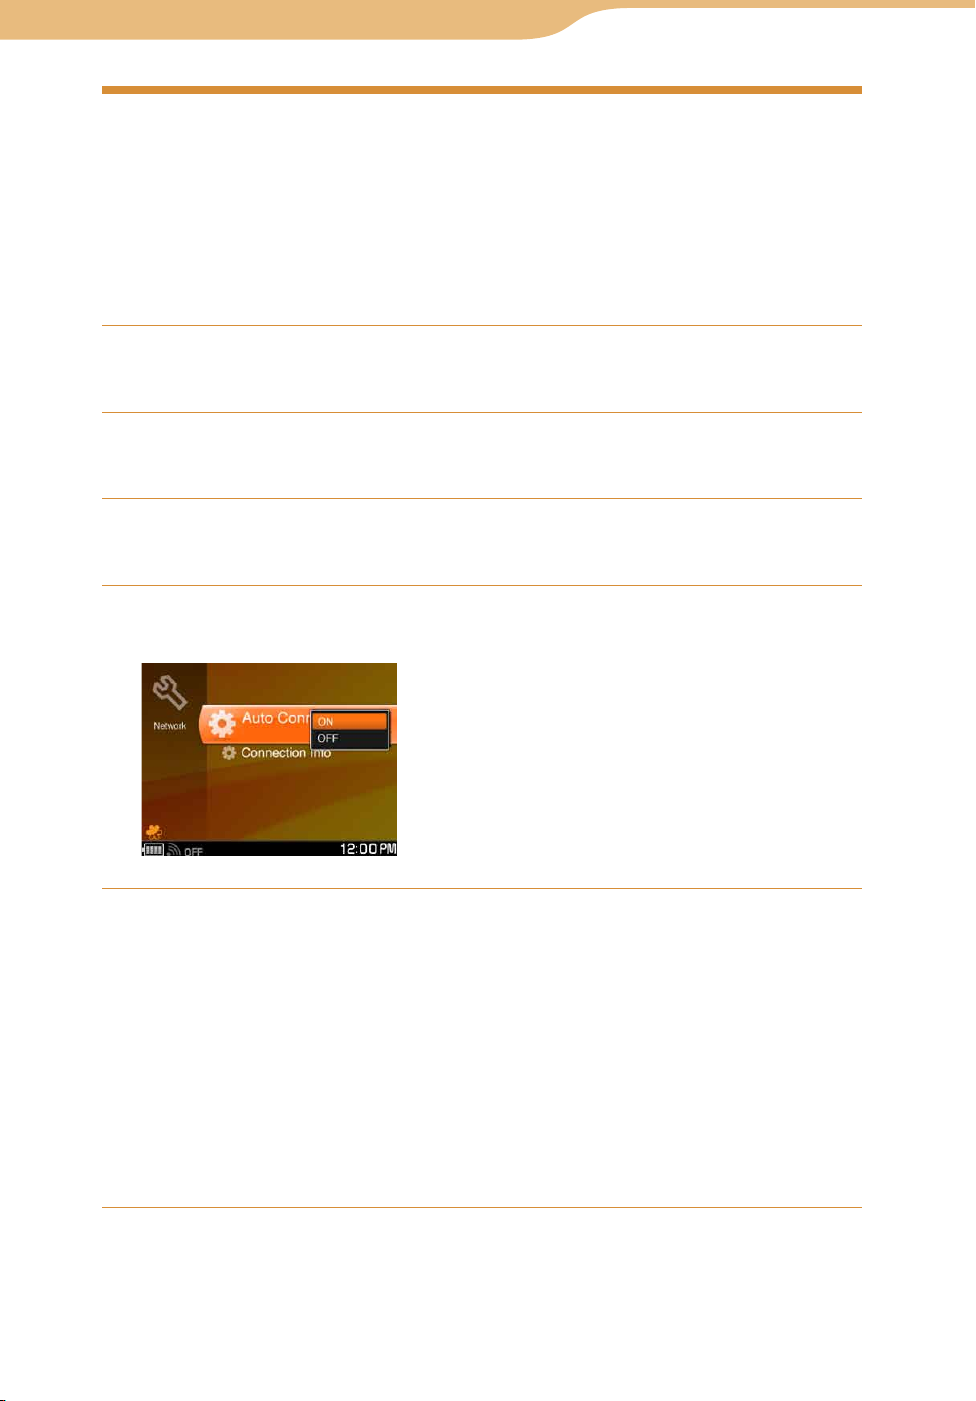
Press / to select “Auto Connect,” and then press the center
button.
Press / to select “ON” or “OFF,” and then press the center
button.
If you set to “ON”
When you turn on the wireless LAN, the unit tries to connect to the preregistered wireless networks until a successful connection is made. Before
using, register the wireless network (
If you set to “OFF”
When you turn on the wireless LAN, the available wireless networks are
listed in the Connection Dialog. Select the wireless network from the list
each time.
page 28).
Continued
Page 28

28
Index
Table of
Contents
28
Getting Started…Setting the Connecting Method
Registering a wireless network for “Auto Connect”
When you select “ON” in “Auto Connect,” you must register wireless network
you want to automatically connect to. Usually this will be wireless network
you use most often.
WIRELESS LAN
switch/indicator
Slide and hold the WIRELESS LAN switch upward to turn on
the wireless LAN.
The WIRELESS LAN indicator lights up green, and the status indicator
lights up blue. The
Connection Dialog appears.
Status indicator
If there is wireless network you want to register, press / to
select wireless network, and then press the center button.
The unit connects to wireless network, and
on the status bar of the display has the following meanings:
Blinks blue: The unit is attempting to connect to wireless network.
Lights up blue: The unit has connected to wireless network.
Lights up white: The unit has been unable to connect to wireless network.
If the status indicator lights up orange, the unit turns on the wireless LAN in
Ad Hoc mode. See the “To change to the infrastructure mode” (
Note
• The unit is compatible only with the IEEE 802.11b wireless LAN standard. Both
of the IEEE 802.11b and 802.11g wireless networks may be displayed, but the unit
can connect only to networks capable of and configured for the 802.11b. Check
with the administrator of your network for the status.
After the connection is completed, follow the instructions on
the display to register the selected wireless network.
The next time you turn on the wireless LAN in the infrastructure mode,
the unit will automatically connect to this registered wireless network if
available/nearby.
If the wireless network you want to register is not displayed in the
Connection Dialog, register the network using the Connection Manager
( page 180).
appears on the status bar.
page 30).
Continued
Page 29
29
Index
Table of
Contents
29
Getting Started…Setting the Connecting Method
Note
• When a connection to a wireless hotspot is successfully performed, certain types of
wireless hotspots, such as commercial service providers’ hotspots, require additional
log-in processes using the unit’s Web Browser. In order to assist determining if the
connected wireless hotspot requires such steps, the unit tries to access a specific
Website. For the details about this test access, please see below:
Access address for connection type detection: http://www.sony.com/mylo/test; the Web
address contains a simple static HTML page used for the test purposes only. There is no
personal or network information sent from the unit. The Web server provided by Sony
will not collect any information about the unit or the user.
When wireless network requires a WEP/WPA-PSK security key
If you select wireless network that requires a WEP/WPA-PSK security key, the
Wireless Network Settings screen appears. Follow the instructions on the
display to complete the connection.
Item Options
Display Name Enter a name to describe the wireless network in Connection
Manager.
SSID Wireless network SSID (Service Set Identifier)
WEP/WPA Select from among “Do Not Use,” “Use WEP KEY,” or “Use
WPA-PSK.”
KEY Enter the security key of wireless network, if required. (If you
do not know the security key, contact the administrator of
your network.)
IP Address When the network provides the IP address assignment
service, the unit detects the following settings automatically:
• IP address
• Subnet mask
• Gateway
• DNS server
You can also set these settings manually. If you must
manually enter these settings, but do not know what to enter,
contact the administrator of your network.
WEB Proxy If the unit is connected to a secured private network, such as
an office network which has a firewall to the Internet, the unit
may need to use Web proxy servers. If you are not sure if this
setting is necessary, contact the administrator of your
network.
If “Use Web Proxy” is selected, you can enter the following
settings.
If “Use Web Proxy” is not selected (default setting), the
following settings are unavailable.
• Proxy address
• Proxy port
Continued
Page 30
30
Index
Table of
Contents
30
Getting Started…Setting the Connecting Method
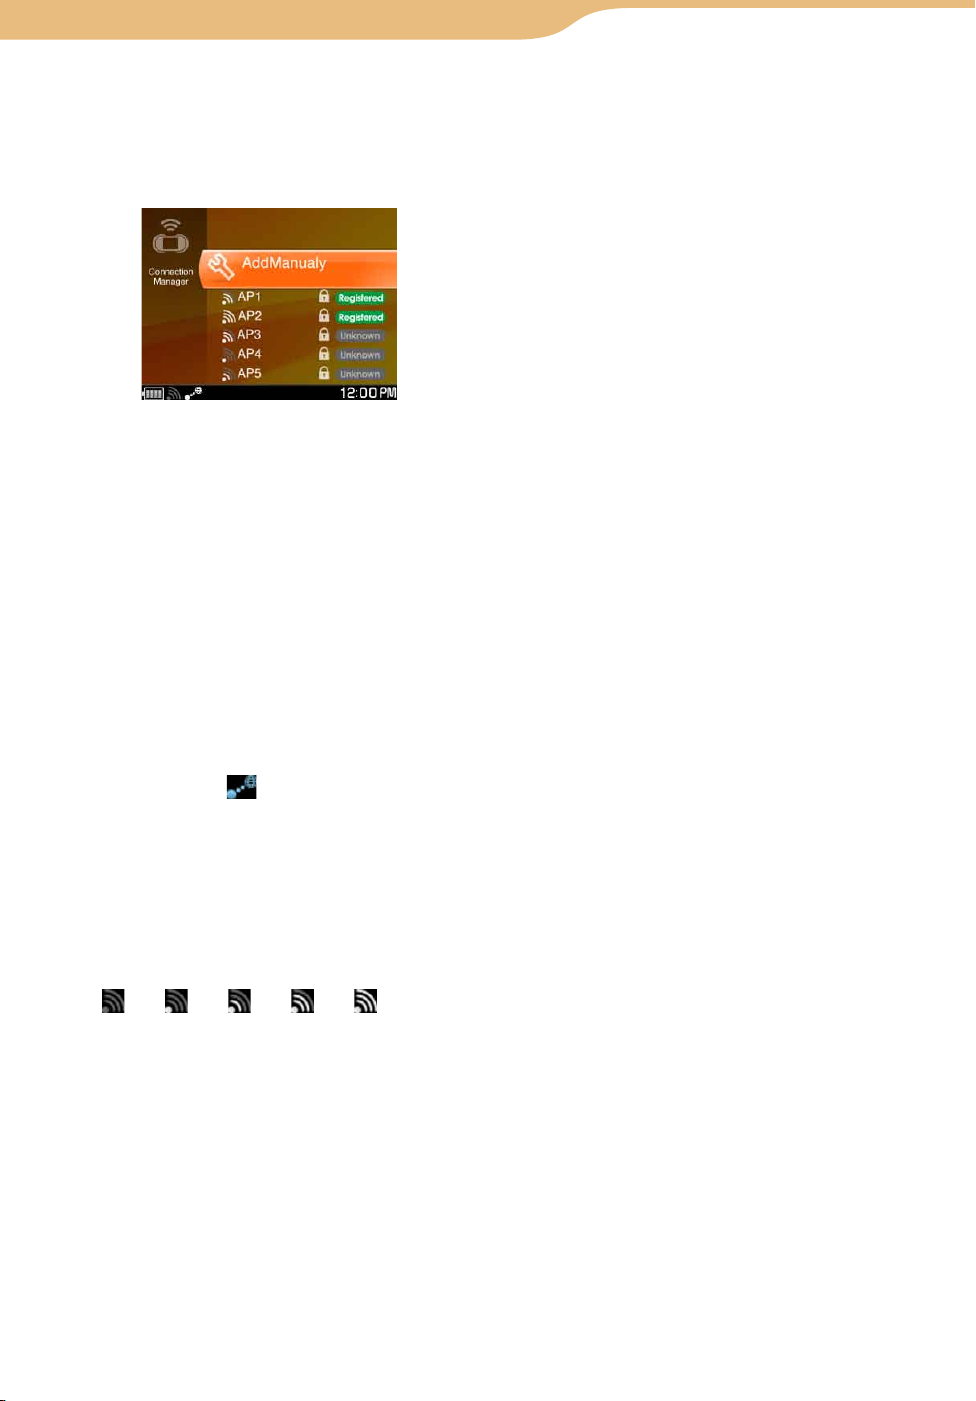
To add wireless network manually
Select “Add Manually” on the Connection Manager screen
Wireless Network Settings screen appears. Fill in the listed items on the screen
with the information about wireless network you want to register.
To change to the infrastructure mode
( page 180)
. The
1 Press and hold HOME to display the What’s Up screen.
2 Press OPTION.
The Context menu appears.
3 Press / to select “Switch Wireless LAN Mode,” and then press
the center button.
To disconnect from wireless network
Slide and hold the WIRELESS LAN switch upward. The unit disconnects
from wireless network. The WIRELESS LAN indicator and Status indicator
turn off, and
To check the signal strength of the network connection
The signal strength of the connected network connection is displayed on the
status bar of the display. The more circles displayed around the antenna, the
stronger the signal of the network connection. When the unit is not connected
to wireless network, a gray antenna is displayed.
changes to “OFF” on the status bar.
Page 31

31
Index
Table of
Contents
31
Getting Started
Listing Your Friends for Ad Hoc Application — Contact List
When using Ad Hoc Application features such as Music Streaming ( page
120), you must select a user from your Ad Hoc Contact List to communicate
with.
To prepare for this, add your friends to your Ad Hoc Contact List beforehand.
WIRELESS LAN
switch/indicator
Status indicator
On the Home menu, press / to select “Communication,” and
then press the center button.
Press / to select “Ad Hoc Application,” and then press the
center button.
The unit automatically turns on the wireless LAN in Ad Hoc mode. The
WIRELESS LAN indicator lights up green, and the status indicator lights
up orange.
When the connection to wireless network in Ad Hoc mode is completed,
the Ad Hoc Contact screen appears, and
bar of the display.
A list of nearby users who connect their unit to the wireless network in Ad
Hoc mode is displayed.
To register a specific user, the user’s unit and your unit must both be
turned on wireless network in Ad Hoc mode at the same time.
starts blinking on the status
Continued
Page 32
32
Index
Table of
Contents
32
Getting Started…Listing Your Friends for Ad Hoc
Press / to select a user with a status of “unknown,” and
then press the center button.
When the connection with the selected user is completed, is displayed
continuously.
Follow the instructions on the display to send a registration
request to the selected user.
If the selected user agrees to be added to your Ad Hoc Contact List, the
user’s profile information is registered in your Contact List, and your
profile information is registered in his or her Contact List.
Accepting a registration request from other user
When another user sends you a registration request, appears on the status
bar of the display ( page 15).
Press INFO.
The communication panel appears.
Press the center button to open “Open Event.”
The confirmation dialog appears.
Press / to select “OK,” and then press the center button.
The user is registered in your Ad Hoc Contact List.
Page 33

33
Table of
Contents
Index
33
What’s Up
Displaying the What’s Up Screen
The What’s Up screen has 90 boxes you can assign to friends to make
connecting to them virtually effortless.
If a friend has accounts on multiple communication services, you can gather
them into single box, from which you can select how you want to
communicate with that friend. You can also assign group of IDs of multiple
contacts of a multi chat, making it easy to see the status of each of them and
enabling you to easily select and start communicating with the entire group.
The What’s Up screen also shows music information.
Press and hold HOME. Or, on the Home menu, press / to
select “What’s Up,” and then press the center button.
The What’s Up screen appears.
If the unit is not connected to wireless network in infrastructure or Ad Hoc
mode, it automatically turns on the wireless LAN in the same mode as the
last time the unit connected.
To change the wireless LAN mode, press OPTION, and then select
“Switch Wireless LAN Mode” from the Context menu.
Note
• If you are connecting to a public wireless hotspot, you may be required to log in using
the web browser once connected to the wireless network.
Continued
Page 34

34
Index
Table of
Contents
34
What’s Up…Displaying the What’s Up screen
To disconnect from wireless network
Slide and hold the WIRELESS LAN switch upward. The unit disconnects
from wireless network. The WIRELESS LAN indicator and status indicator
turn off, and
or changes to “OFF” on the status bar.
To check the signal strength of the network connection
The signal strength of the connected network connection is displayed on the
status bar of the display. The more circles displayed around the antenna, the
stronger the signal of the network connection. When the unit is not connected
to wireless network, a gray antenna is displayed.
Page 35
35
Index
Table of
Contents
35
What’s Up
Creating entries on the What’s Up screen
To add a friend’s user ID for a communication service, sign in
to that communication service.
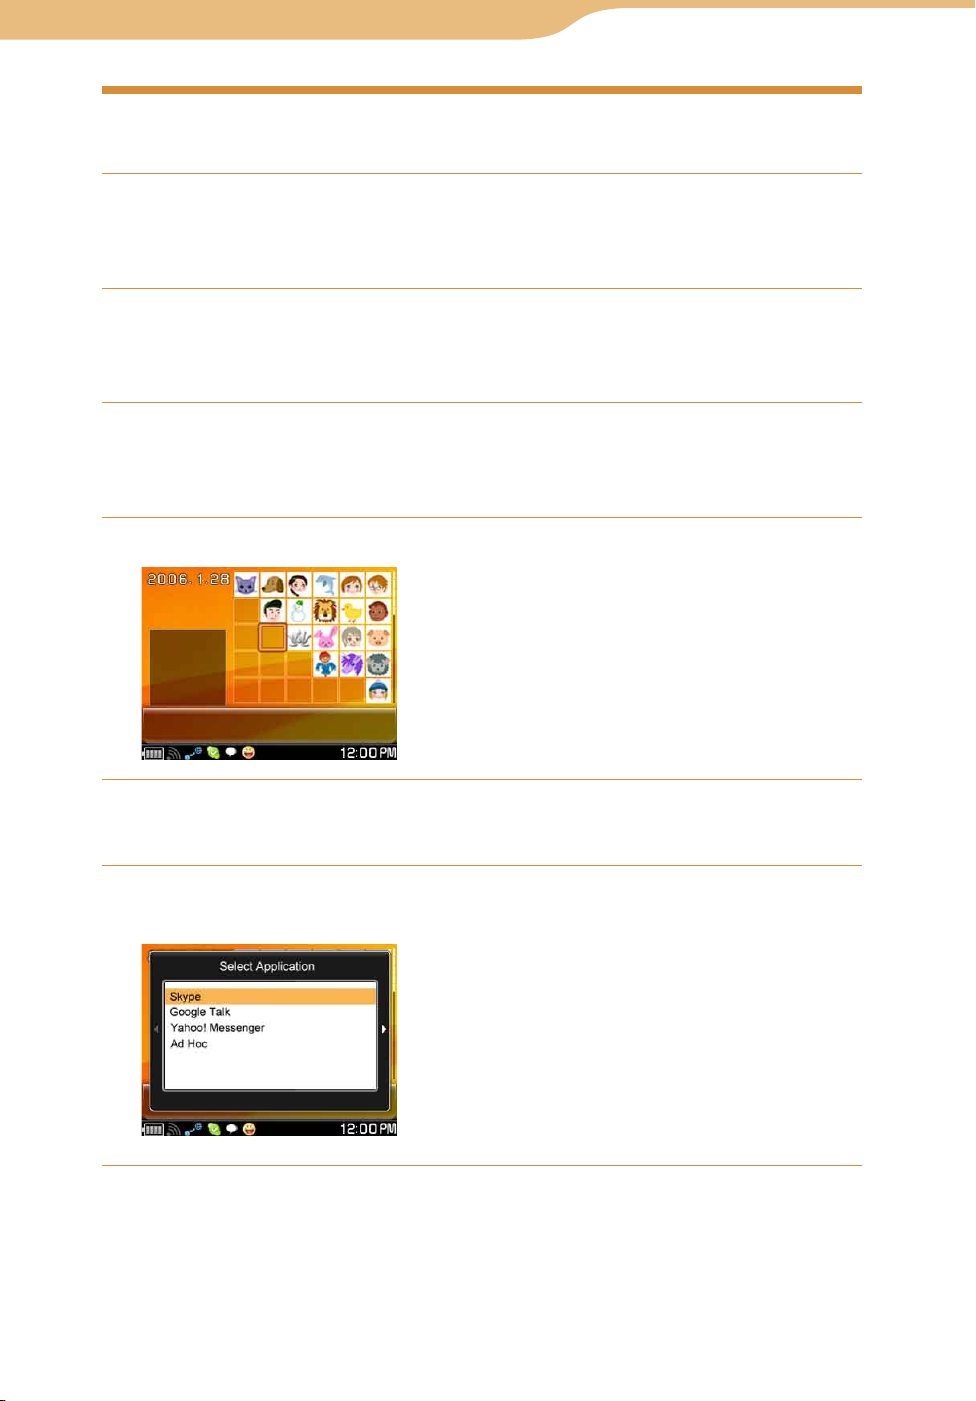
To add an Ad Hoc Application user, start with step .
Press and hold HOME. Or, on the Home menu, press / to
select “What’s Up,” and then press the center button.
The What’s Up screen appears.
On the What’s Up screen, press / to select a page, and then
press the center button.
Each screen displays 30 boxes and there are three pages, 90 boxes in total.
Press /// to select the box you want add an ID.
Press the center button.
“Add an ID” appears.
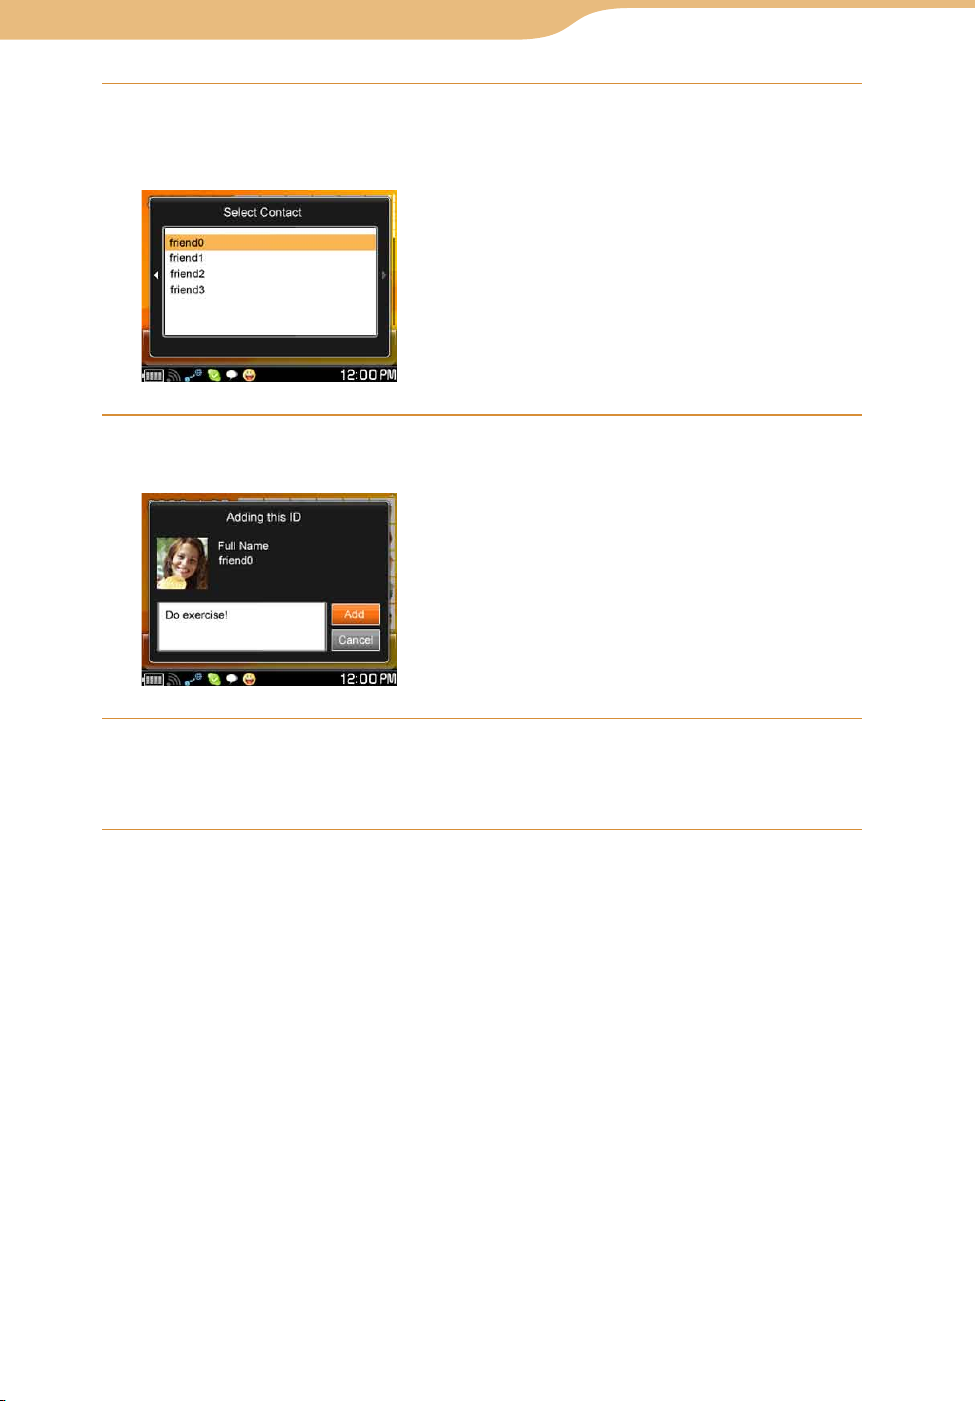
Press the center button again.
A application selection screen appears.
Continued
Page 36
36
Index
Table of
Contents
36
What’s Up…Creating entries on the What’s Up screen
Press / to select the application in which your friend’s ID is
registered, and then press the center button.
A user selection screen appears.
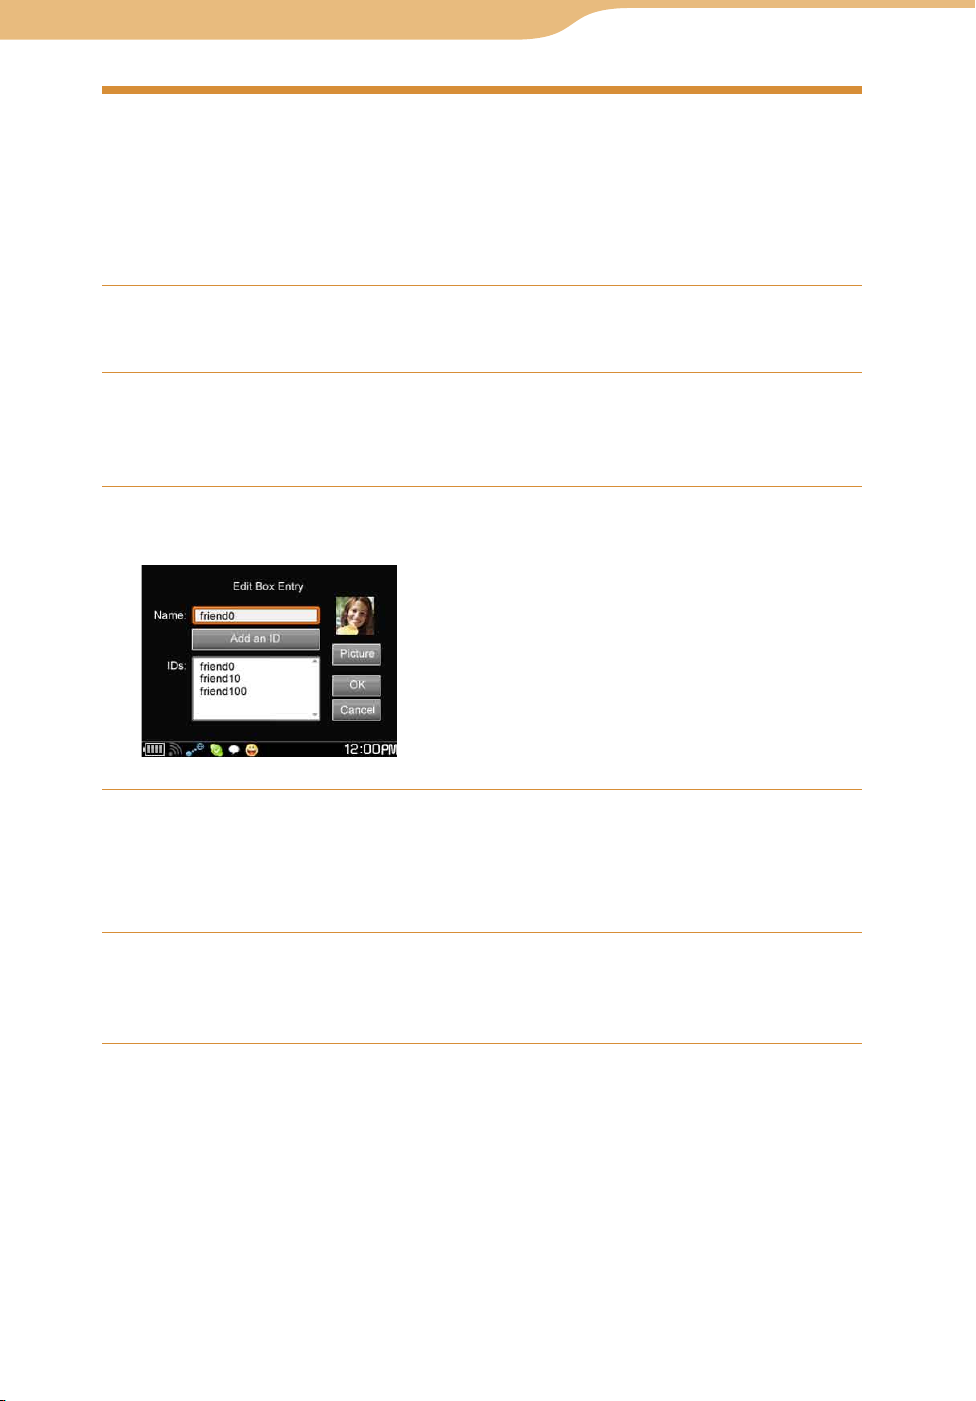
Press / to select the user ID you want to add, and then
press the center button.
Press / to select “Add,” and then press the center button.
A What’s Up screen entry is created for your friend that includes the
friend’s ID from the selected application.
Continued
Page 37
37
Index
Table of
Contents
37
What’s Up
Editing a What’s Up screen entry
If a friend has accounts on multiple communication services, you can gather
all of the friend’s connection info in a single box, from which you can select
how you want to connect with that friend.
You can also add multiple friends into a single box.
On the What’s Up screen, press / to select a page, and then
press the center button.
Press /// to select the box you want to edit, and then
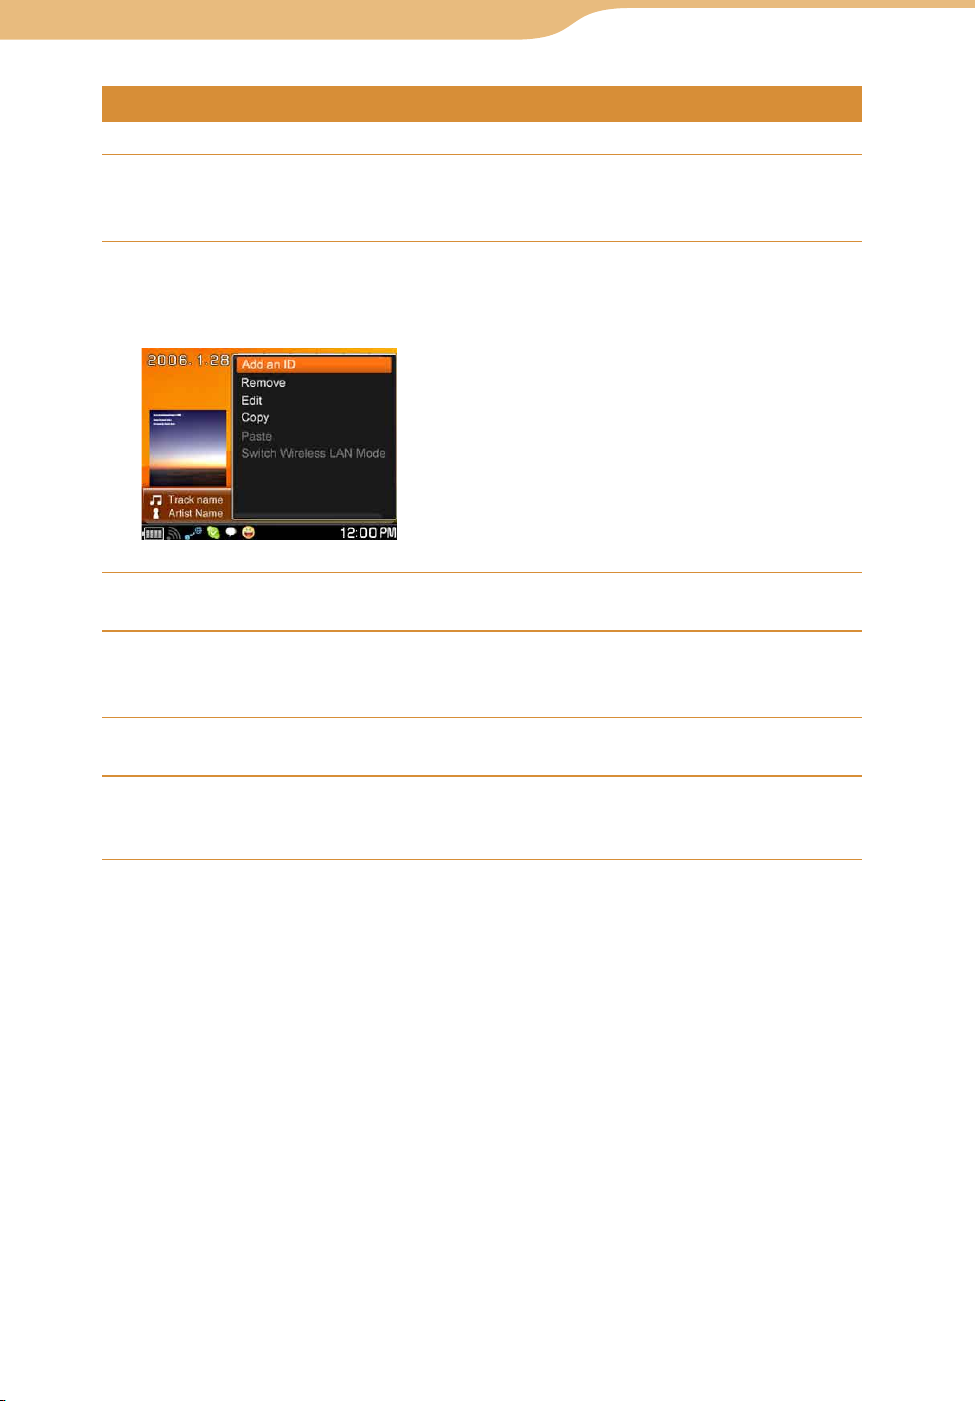
press OPTION.
The Context menu appears.
Press / to select “Edit,” and then press the center button.
An edit screen appears.
Press / to select “Add an ID” (to add an ID) or “Picture” (to
change the picture displayed on the What’s Up screen), and
then press the center button.
Follow the instructions on the display.
Press /// to select “OK,” and then press the center button
on the Edit Box Entry screen.
The entry editing process is completed.
Continued
Page 38
38
Index
Table of
Contents
38
What’s Up…Editing a What’s Up screen entry
Copying and pasting entries on the What’s Up screen
On the What’s Up screen, press / to select a page, and then
press the center button.
Press /// to select the box you want to copy, and then
press OPTION.
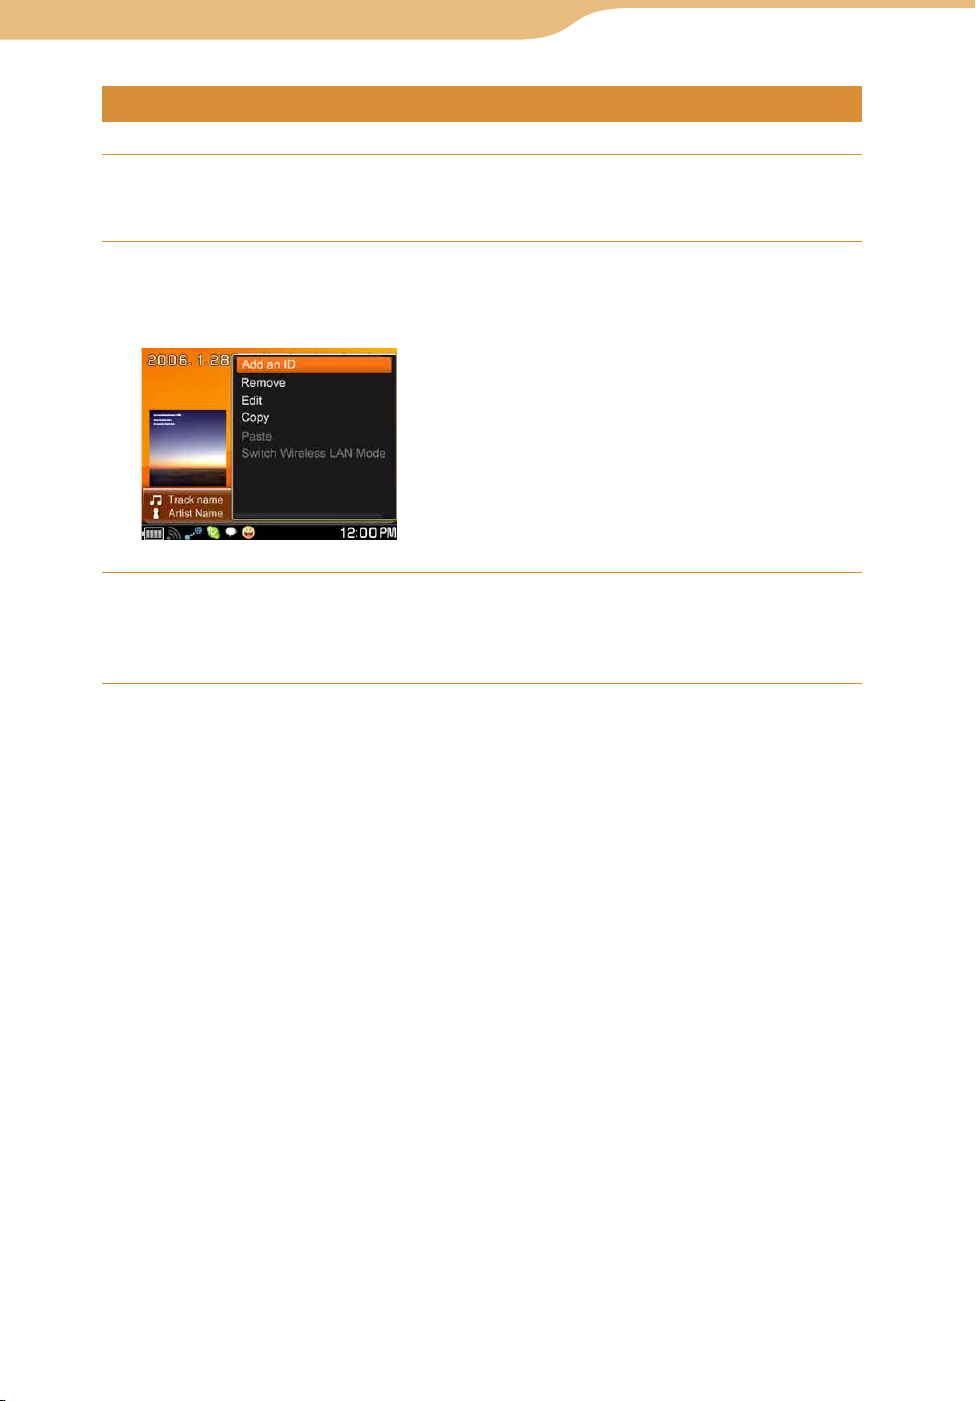
The Context menu appears.
Press / to select “Copy,” and then press the center button.
Press /// to select the position where you want to paste
the box.
Press OPTION to display the Context menu.
Press / to select “Paste,” and then press the center button.
The selected box is added.
Continued
Page 39
39
Index
Table of
Contents
39
What’s Up…Editing a What’s Up screen entry
Removing entries from the What’s Up screen
On the What’s Up screen, press / to select a page, and then
press the center button.
Press /// to select the box you want to remove, and then
press OPTION.
The Context menu appears.
Press / to select “Remove,” and then press the center
button.
The selected box is removed.
Page 40

40
Index
Table of
Contents
40
What’s Up
Starting communication with a contact
On the What’s Up screen, press / to select a page, and then
press the center button.
Press /// to select the box you want to start
communication with, and then press the center button.
A list of all of the IDs registered with the selected box appears.
Press / to select the ID you want to start communicating
with, and then press the center button.
The communication application’s contact list appears. Follow the
instructions on the display.
Note
• Pressing the BACK button on the communication application’s contact list screen does
not return you to the What’s Up screen. To return to the What’s Up screen, press and
hold the Home button, or press the Home button, select “What’s Up,” and then press the
center button.
Page 41
41
Index
Table of
Contents
41
What’s Up
Context Menus on What’s Up Screens
To display the Context menu from the What’s Up screen, press the OPTION
button. You can select the following operations from the Context menu.
Item What’s Up
screen
Add an ID
Remove
Edit
Copy
Paste
Switch Wireless LAN Mode
Up
Down
View Profile
Use Picture of this ID
Use Name of this ID
Edit Box Entry
Page 42
42
Table of
Contents
Index
42
Communication
— Skype
Signing in Skype
If you already have a Skype Name, go to the next section “Starting Skype” (
page 44). If not, follow the steps below to create a Skype Name before using
Skype.
On the Home menu, press / to select “Communication,” and
then press the center button.
Press / to select “Skype,” and then press the center button.
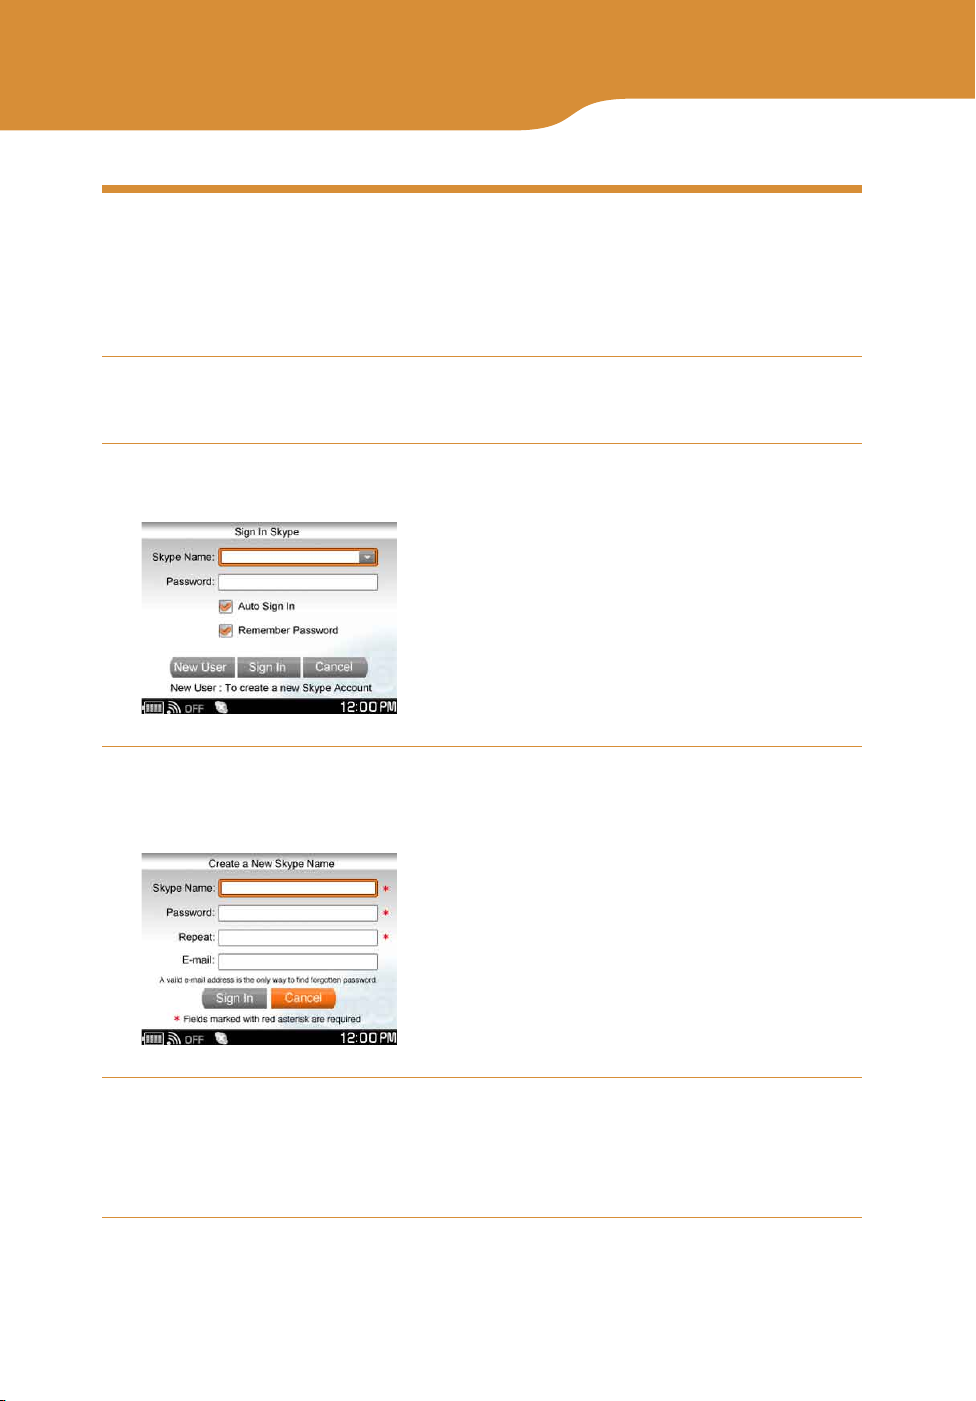
The Sign In screen appears.
Press / to select “New User,” and then press the center
button.
The Create a New Skype Name screen appears.
Fill out the information form on the screen, and follow the
instructions on the display to sign in and create a new Skype
Name.
Information you enter here is used for your Skype profile.
Continued
Page 43

43
Index
Table of
Contents
43
Communication – Skype…Signing in Skype
Press / to select “Sign In,” and then press the center button.
The unit turns on the wireless LAN in infrastructure mode. The
WIRELESS LAN indicator lights up green, the status indicator lights up
blue, and appears on the status bar.
on the status bar of the display has the following meanings:
Blinks blue: The unit is attempting to connect to wireless network.
Lights up blue: The unit has connected to wireless network.
Lights up white: The unit has been unable to connect to wireless network.
When the connection to wireless network is completed, press BACK to
close the Connection Dialog. Then, select “Sign In,” and press the center
button again. A confirmation dialog appears. Follow the instructions on
the display to sign in to Skype.
Note
• If you are connecting to a public wireless hotspot, you may be required to log in using
the web browser once connected to the wireless network.
To disconnect from wireless network
Slide and hold the WIRELESS LAN switch upward. The unit disconnects
from wireless network. The WIRELESS LAN indicator and status indicator
turn off, and
changes to “OFF” on the status bar.
To check the signal strength of the network connection
The signal strength of the connected network connection is displayed on the
status bar of the display. The more circles displayed around the antenna, the
stronger the signal of the network connection. When the unit is not connected
to wireless network, a gray antenna is displayed.
Continued
Page 44
44
Index
Table of
Contents
44
Communication – Skype
Starting Skype
Signing in to Skype
Register for a Skype Name before using Skype ( page 42).
On the Home menu, press / to select “Communication,” and
then press the center button.
Press / to select “Skype,” and then press the center button.
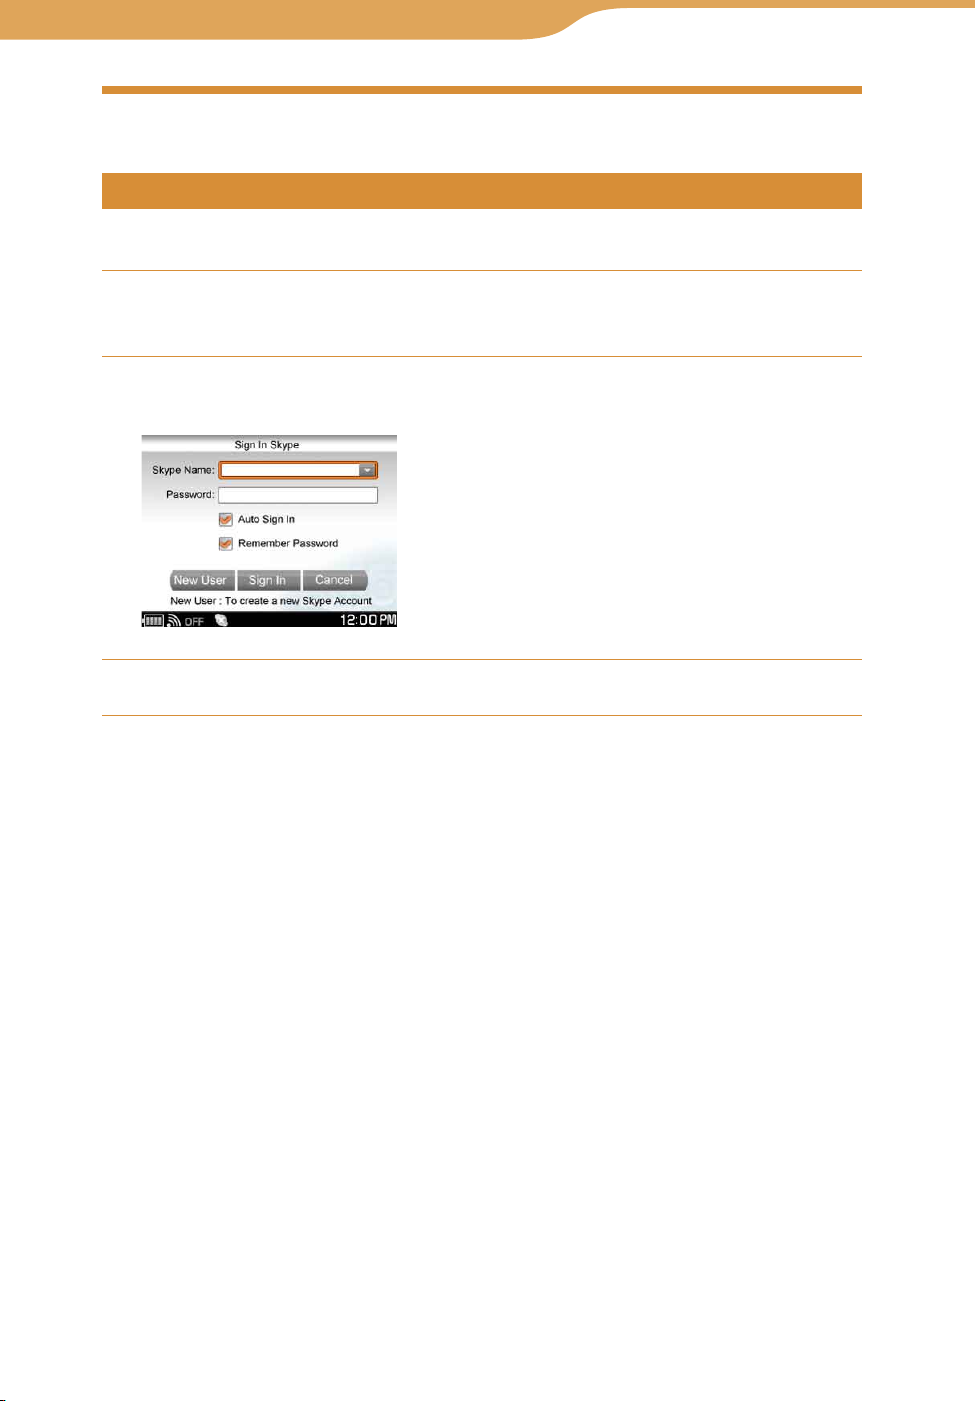
The Sign In screen appears.
Enter your Skype Name and password using the keyboard.
Continued
Page 45
45
Index
Table of
Contents
45
Communication – Skype…Starting Skype
Press /// to select “Sign In,” and then press the center
button.
The unit turns on the wireless LAN in infrastructure mode. The
WIRELESS LAN indicator lights up green, the status indicator lights up
blue, and appears on the status bar.
on the status bar of the display has the following meanings:
Blinks blue: The unit is attempting to connect to wireless network.
Lights up blue: The unit has connected to wireless network.
Lights up white: The unit has been unable to connect to wireless network.
When the connection to wireless network is completed, press BACK to
close the Connection Dialog. Then, select “Sign In,” and press the center
button again. If you are signing in to Skype with a Skype Name that you
have not previously used with the unit, a confirmation dialog appears.
Follow the instructions on the display to sign in to Skype.
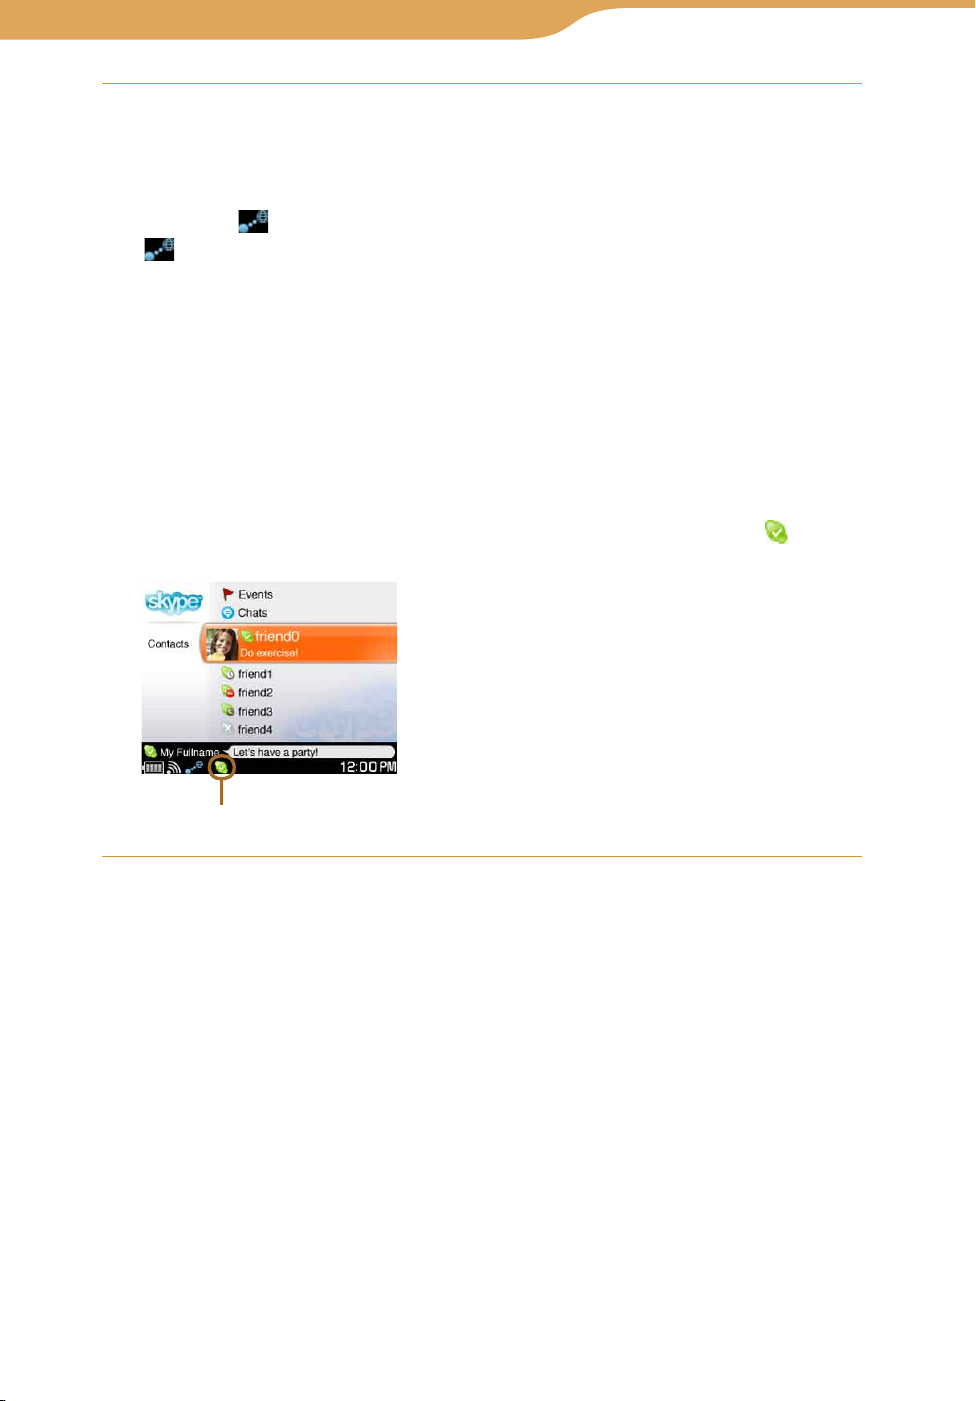
When the sign in is successful, the Contacts screen appears, and
(online) appears on the status bar of the display.
Online icon
To sign in to Skype automatically
To have the unit automatically sign you in to Skype when it connects to
wireless LAN in infrastructure mode, select both the “Auto Sign In” and
“Remember Password” check boxes on the Sign In screen.
To delete all personal information regarding your Skype Name
Reset the settings of the unit to delete your personal information stored on the
unit. For detailed information, see
page 174.
Continued
Page 46
46
Index
Table of
Contents
46
Communication – Skype…Starting Skype
Signing out of Skype
You cannot sign out of Skype even if you disconnect the unit from the wireless
network. To sign out of Skype, follow the process below.
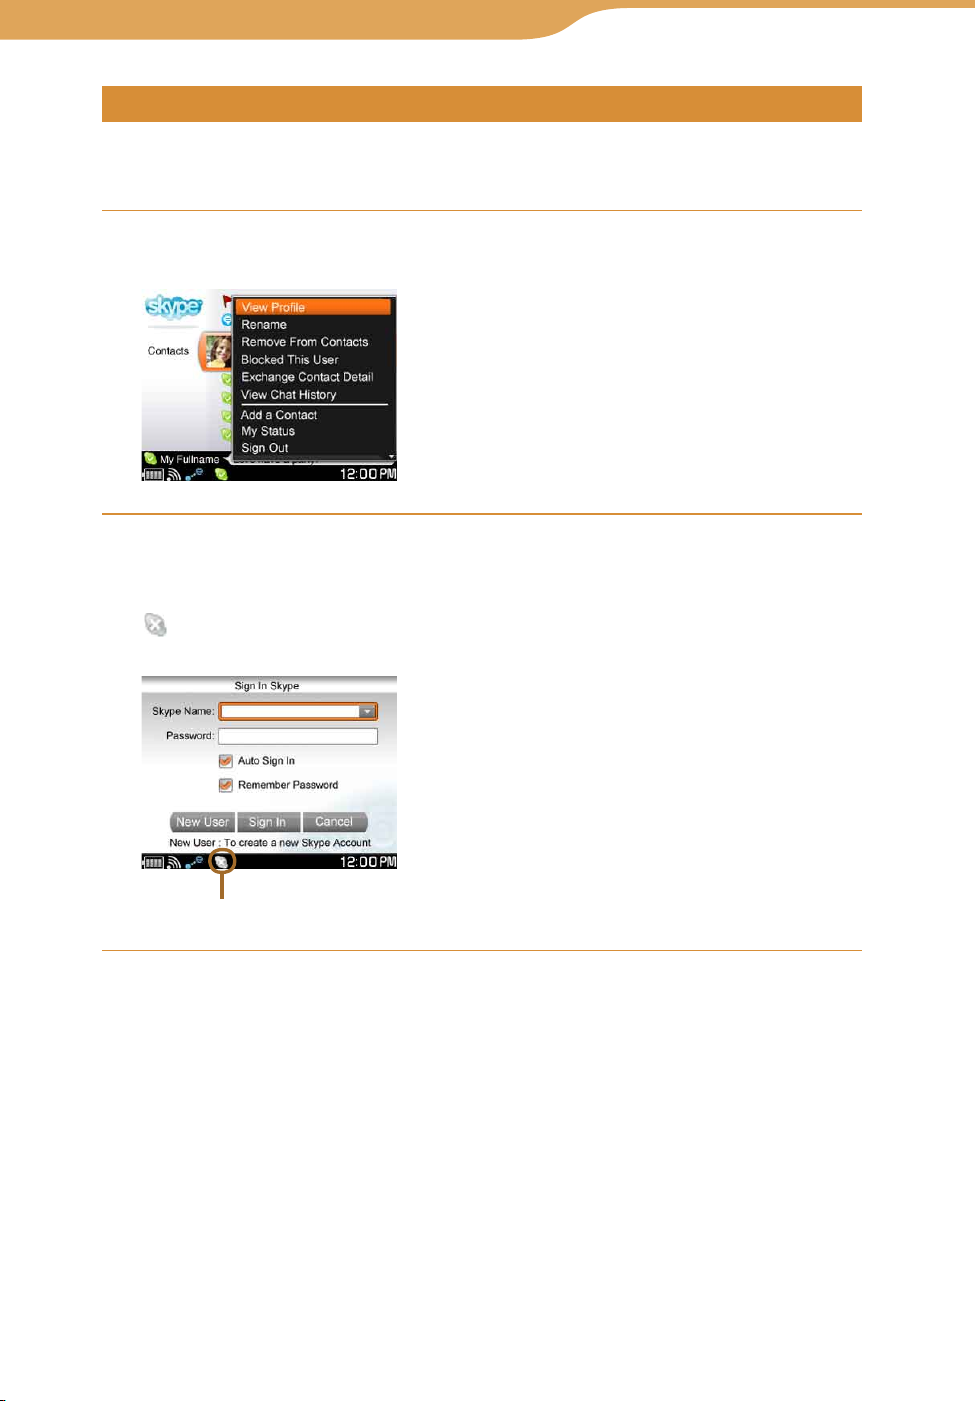
On any Skype screen, press OPTION.
The Context menu appears.
Press / to select “Sign Out,” and then press the center
button.
After you successfully sign out of Skype, the Sign In screen appears, and
(offline) appears on the status bar of the display.
To return to the menu, press BACK.
Offline icon
Continued
Page 47
47
Index
Table of
Contents
47
Communication – Skype…Starting Skype
Switching between screens
After signing in to Skype, you can switch between the following screens to
access various features.
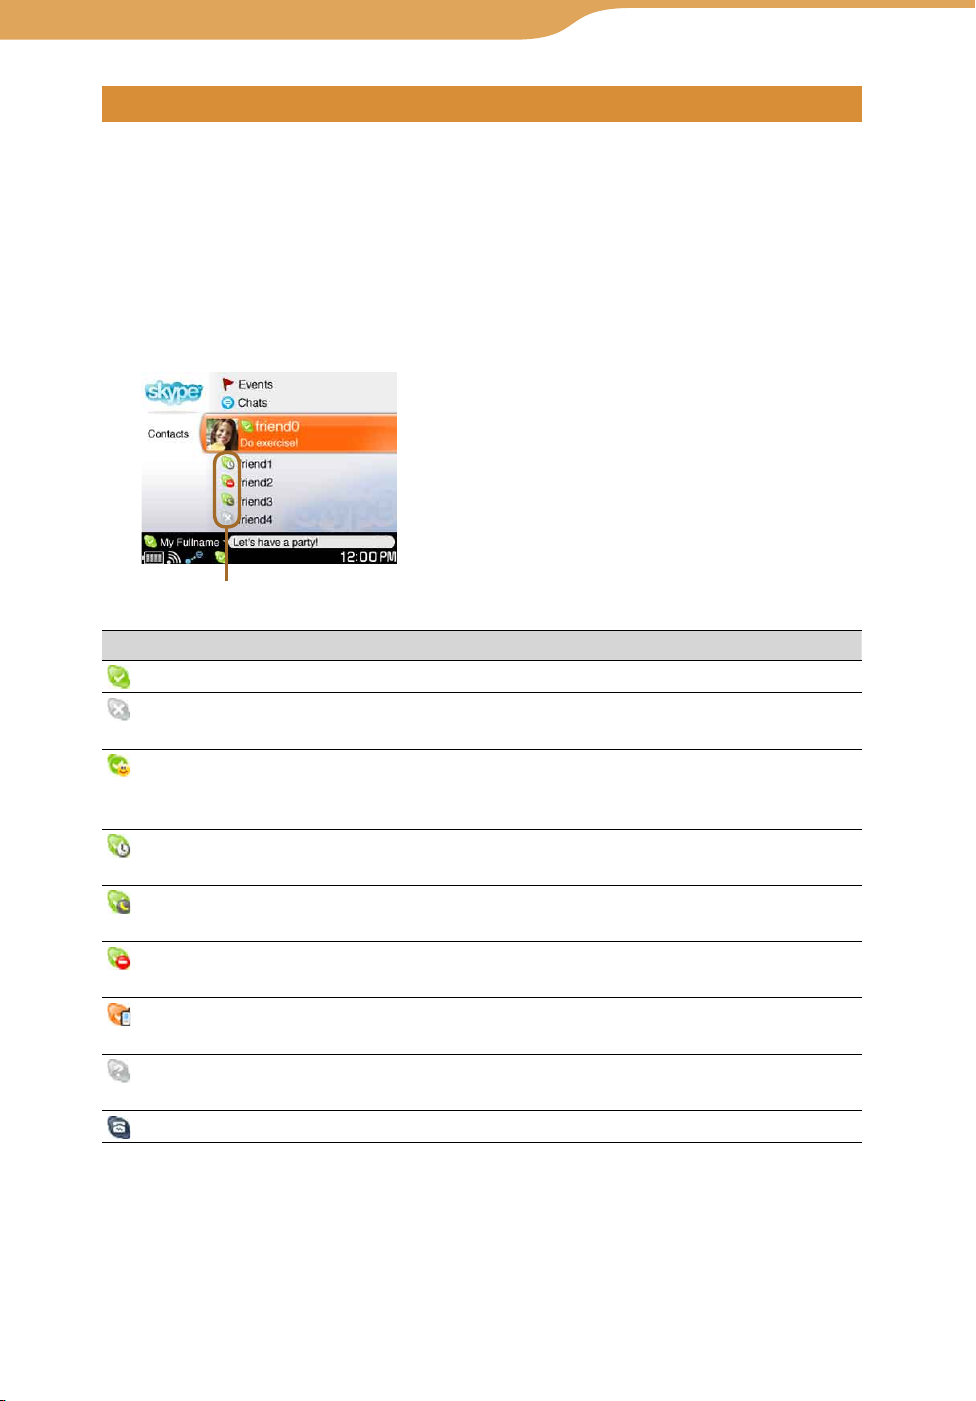
Contacts screen
After signing in to Skype, the Contacts screen appears.
All of your contacts ( page 55) are displayed.
When a contact is highlighted, his or her comment is displayed.
The meaning of the status icons are described in the table below.
Contact Status
Icon Status
(Online)
(Offline)
(Skype Me)
(Away)
(Not Available)
(Do not
disturb)
(Call
forwarding)
(Not
Accepted Yet)
(SkypeOut)
The default status when the contact has signed in to Skype.
The contact is not currently signed in to Skype, or has chosen to
appear invisible or offline.
The contact is letting everyone know that he or she is available
and interested to Skype with them. This includes people whom
he or she does not know or have not accepted.
If the contact is signed in to Skype, but has not used his or her
unit for a while.
If the contact is signed in to Skype, but has not used his or her
unit for an extended period of time.
Use this status to indicate that the contact is busy.
The contact can redirect incoming Skype calls to another Skype
Name, mobile or landline number.
The contact has not accepted you yet ( page 56).
This icon means SkypeOut (calls to regular telephones) contact.
Continued
Page 48
48
Index
Table of
Contents
48
Communication – Skype…Starting Skype
Chats screen
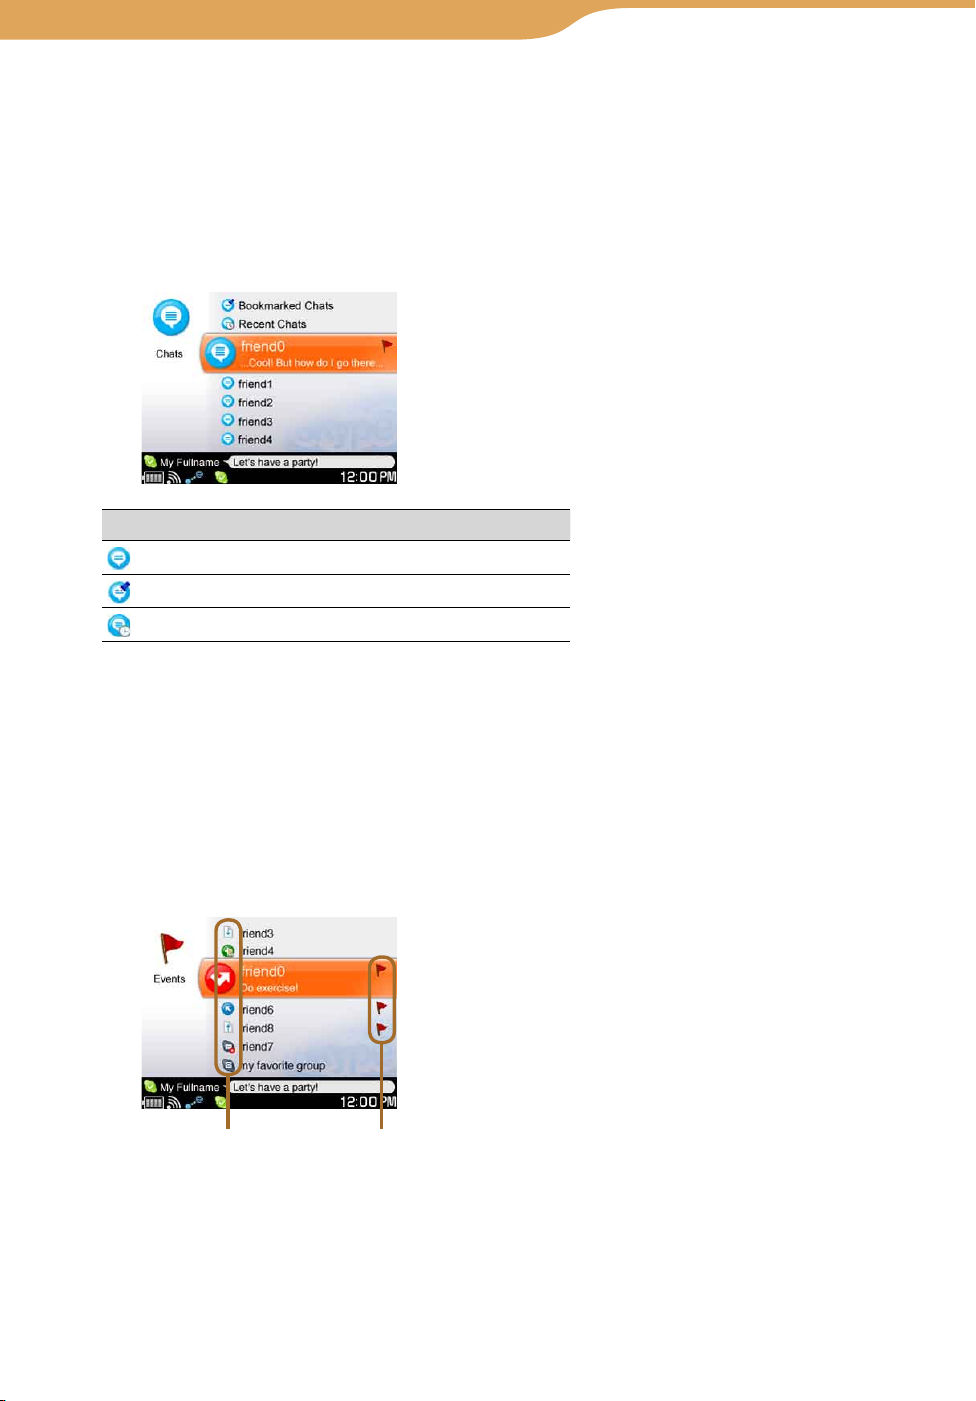
The Chats screen appears when you select “Chats” on the Contacts screen by
pressing / and then pressing the center button.
To go back to the Contacts screen, press BACK.
The Chats screen displays any ongoing chats you have. Each ongoing chat
session has its own Chat screen.
The meanings of the chat icons are described in the table below.
Icon Meaning
Ongoing chats
Bookmarked chats
Recent chats
Events screen
The Events screen appears when you select “Events” on the Contacts screen
by pressing / and then pressing the center button.
To go back to the Contacts screen, press BACK.
The Events screen displays a history of calls made and received, calls missed,
voicemails received, requests to exchange contact details, file transfer requests,
and so on.
The meanings of the event icons are described in the following table.
Event icon New event icon
Continued
Page 49
49
Index
Table of
Contents
49
Communication – Skype…Starting Skype
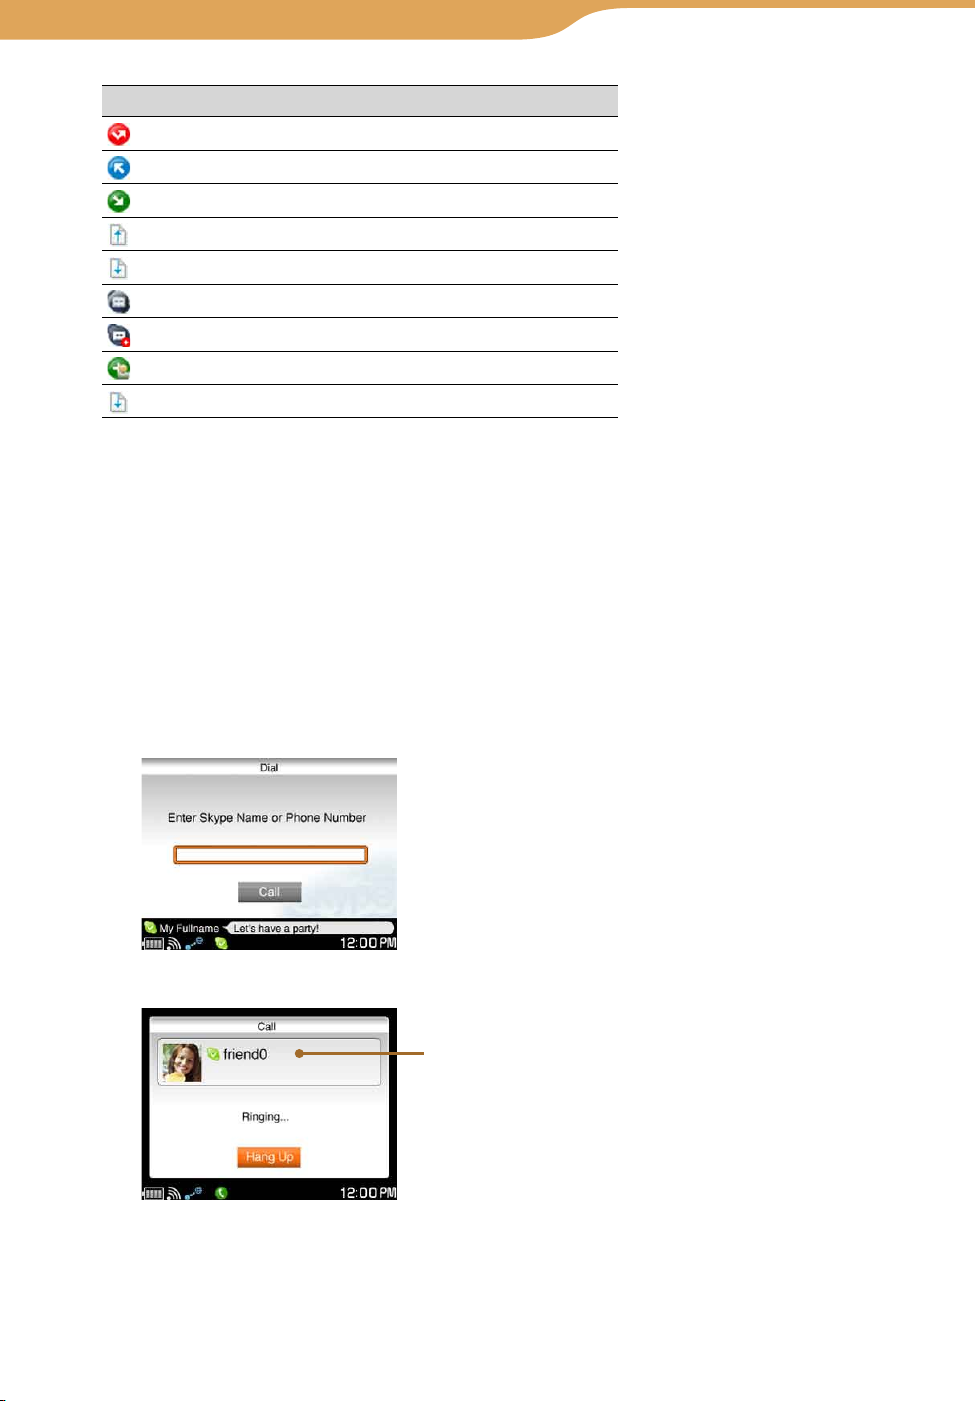
Icon Meaning
Missed call
Outgoing call
Incoming call
Sent file
Received file
Played voicemail
New voicemail
Request to exchange contact details
File transfer request
Dial screen
The Dial screen appears when you select “Dial” on the Contacts screen by
pressing / and then pressing the center button.
To go back to the Contacts screen, press BACK.
On the Dial screen, you can directly enter a Skype Name or Skype/SkypeOut
phone number to make a Skype call.
The Call screen is displayed when you initiate or receive a Skype call. The
Skype Name of the person you are calling is displayed as the title of the Call
screen when you are initiate a call.
Dial screen
Call screen (Initiating a call)
Contact whom
you are calling
Continued
Page 50
50
Index
Table of
Contents
50
Communication – Skype…Starting Skype
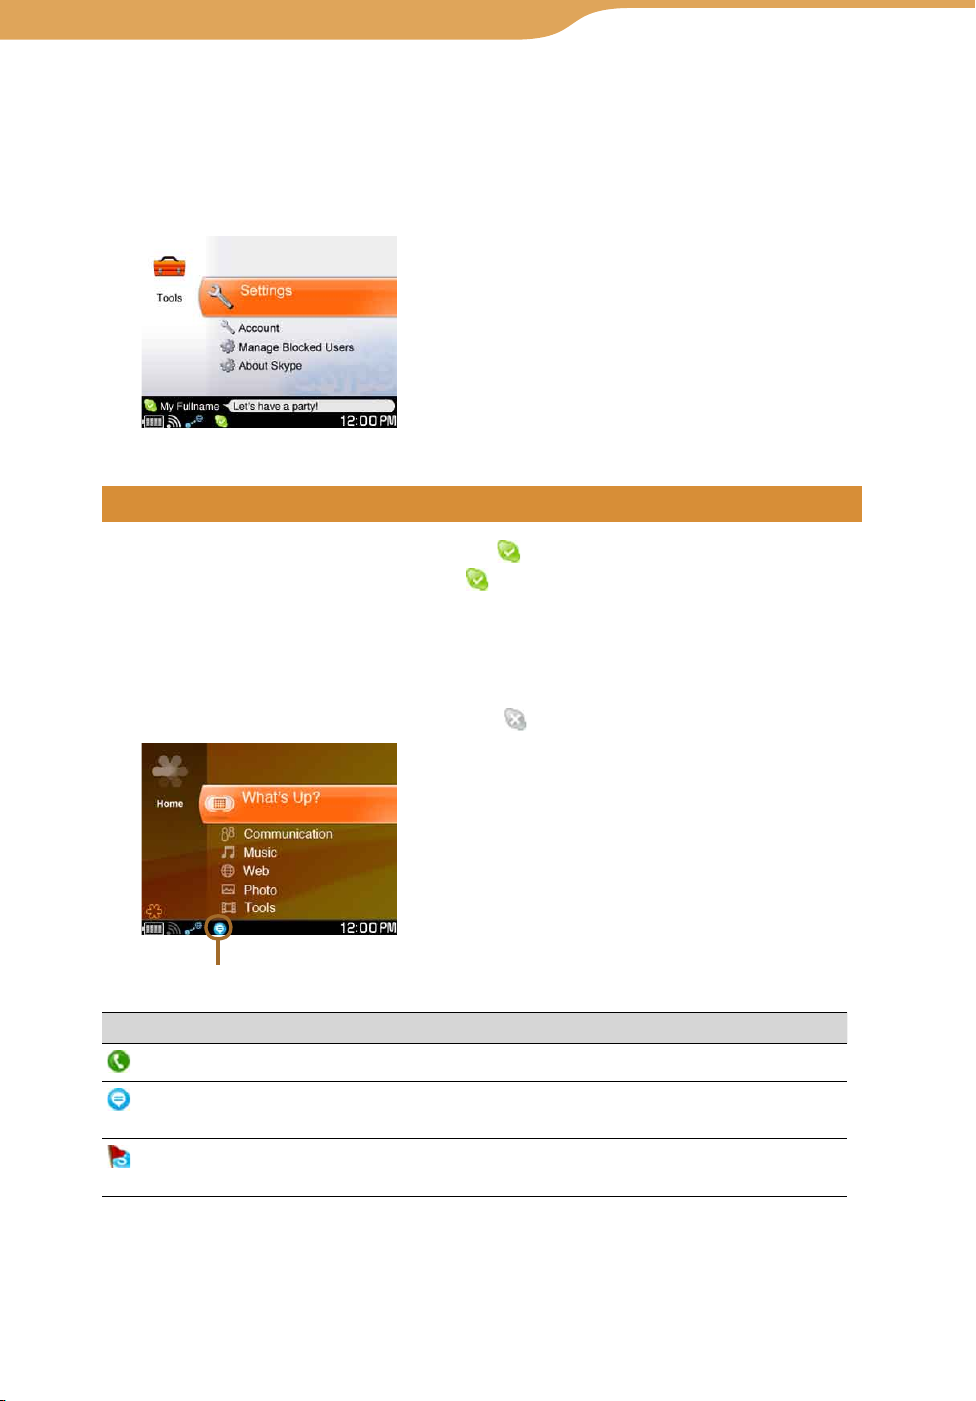
Tools screen
The Tools screen appears when you select “Tools” on the Contacts screen by
pressing / and then pressing the center button.
To go back to the Contacts screen, press BACK.
The Tools screen displays and enables you to change the settings (
page 74).
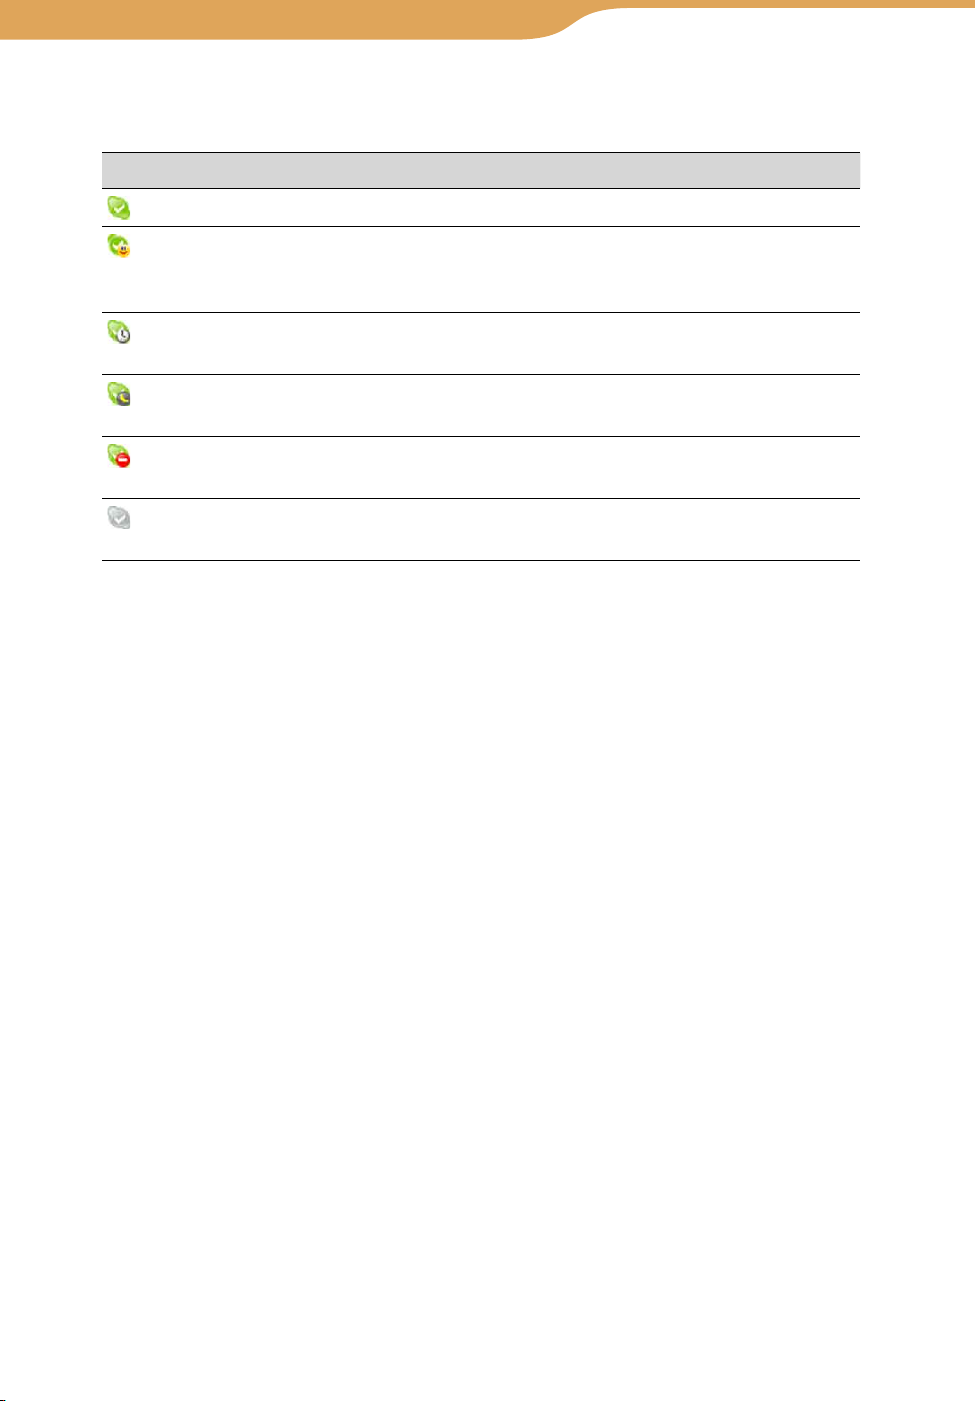
Checking the status bar
When you successfully sign in to Skype, (online) appears on the status bar
of the display. When an event occurs,
following event icons.
To display detailed information about the event when viewing another
application window, press INFO, and navigate to the communication panel to
view additional information about the event.
After you successfully sign out of Skype,
(online) changes to one of the
(offline) appears.
Event icon
Icon Meaning
Outgoing call or Incoming call
New incoming chat, or when both any events and new chat are
received
Missed call, Requests to exchange contact details, File transfer
request, or Voicemail received
Page 51

51
Index
Table of
Contents
51
Communication – Skype
Using the My Status Screen
Selecting your status
On any Skype screen, press OPTION.
The Context menu appears.
Press / to select “My Status,” and then press the center
button.
The My Status screen appears.
Press / to select “Status,” and then press the center button.
The list of status options appears.
Press / to select an option, and then press the center
button.
Press / to select “Save,” and then press the center button.
Continued
Page 52
52
Index
Table of
Contents
52
Communication – Skype…Using the My Status Screen
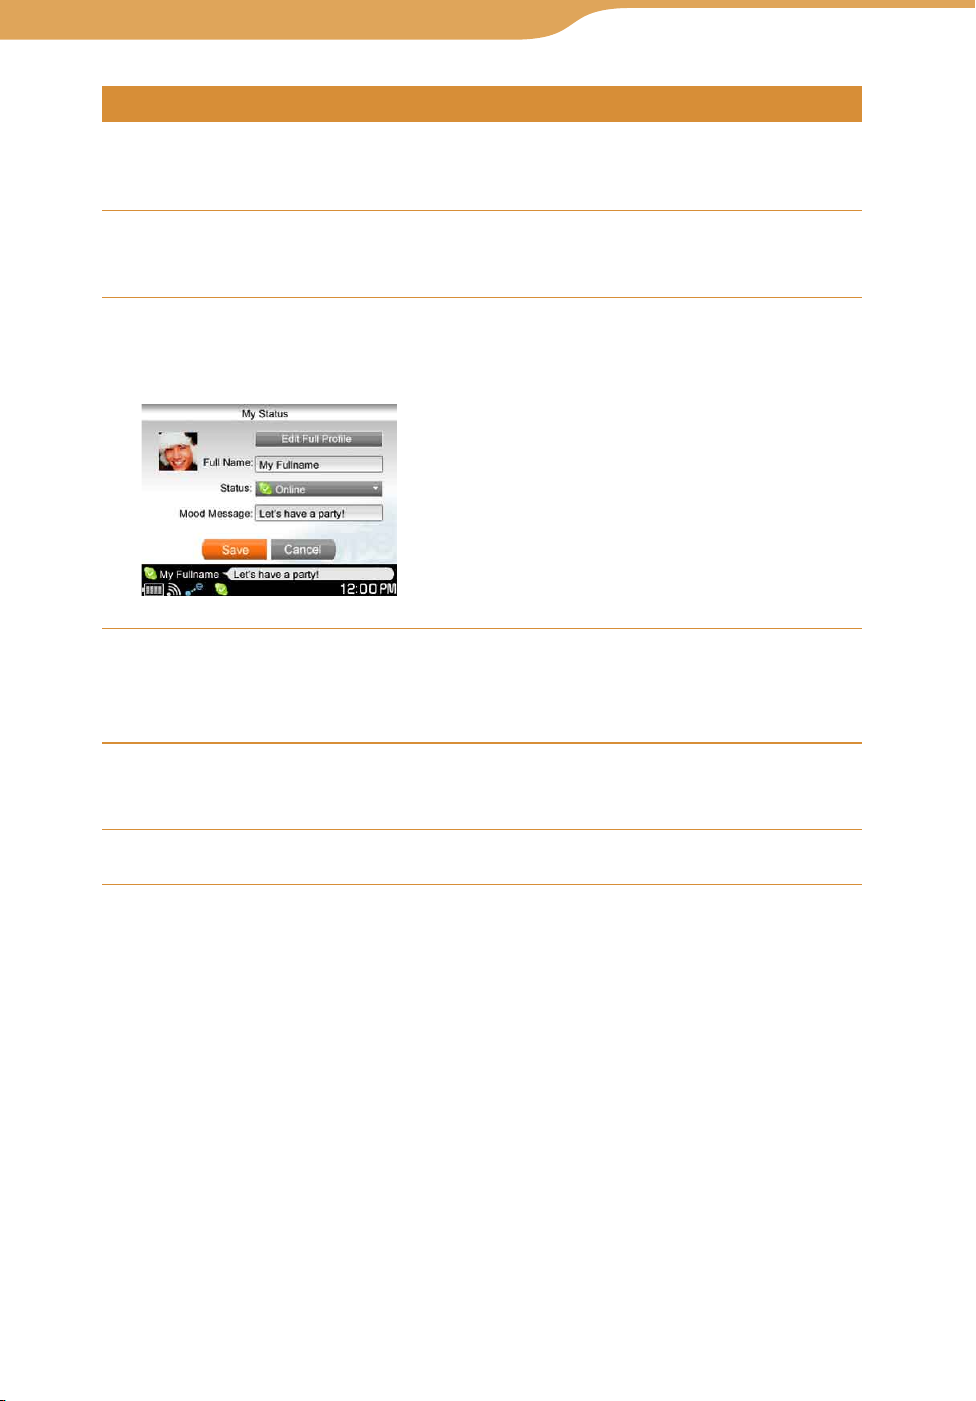
About My status
The following status options are available.
Icon Status
(Online)
(Skype Me)
(Away)
(Not Available)
(Do not
disturb)
(Invisible)
The default status when you have signed in to Skype.
You are letting everyone know that you are available and
interested to Skype with them. This includes people whom you
do not know or have not accepted.
If you are signed in to Skype, but have not used your unit for a
while.
If you are signed in to Skype, but have not used your unit for an
extended period of time.
Use this status to indicate that you are busy.
When using this status you can use Skype as if you were online,
but others will see you as offline.
Continued
Page 53
53
Index
Table of
Contents
53
Communication
– Skype…Using the My Status Screen
Entering comments
You can enter short comments, such as description of yourself or a message to
your friends, into your profile to be viewed by other users.
On any Skype screen, press OPTION.
The Context menu appears.
Press / to select “My Status,” and then press the center
button.
The My Status screen appears.
Press / to select “Mood Message,” and then press the
center button.
A Mood Message box is selected.
Enter messages using the keyboard, and then press the center
button.
Press / to select “Save,” and then press the center button.
Continued
Page 54
54
Index
Table of
Contents
54
Communication – Skype…Using the My Status Screen
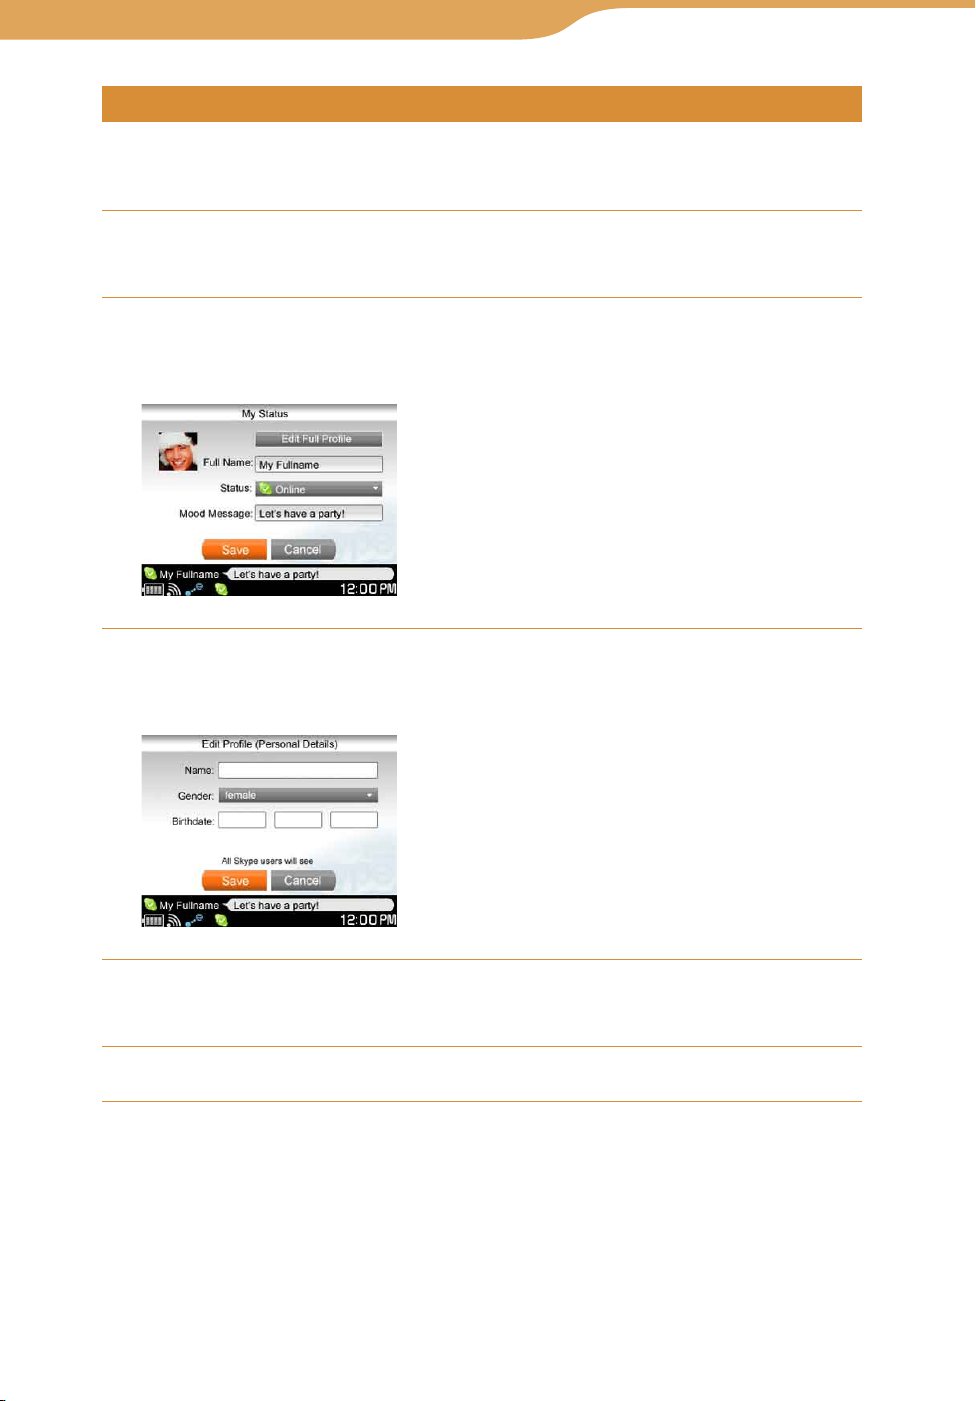
Editing your profile
You can edit your profile to indicate details about yourself, such as your
gender, birthday, or country.
On any Skype screen, press OPTION.
The Context menu appears.
Press / to select “My Status,” and then press the center
button.
The My Status screen appears.
Press / to select “Edit Full Profile,” and then press the
center button.
A profile editing screen appears.
Press / to select an item you want to edit, and then press
the center button.
Press / to select “Save,” and then press the center button.
Page 55
55
Index
Table of
Contents
55
Communication
–
Skype
Adding a User to Your Contacts
For many Skype features, such as making a call or starting a chat, your friends
must be added in your Contacts.
Adding a new contact
A Skype Name with more than 300 contacts on its contact list cannot be used
with the unit. If your Skype Name has more than 300 contacts on its contact
list, use a Skype Name that has fewer than 300 contacts, or register a new
Skype Name for use with your Personal Communicator.
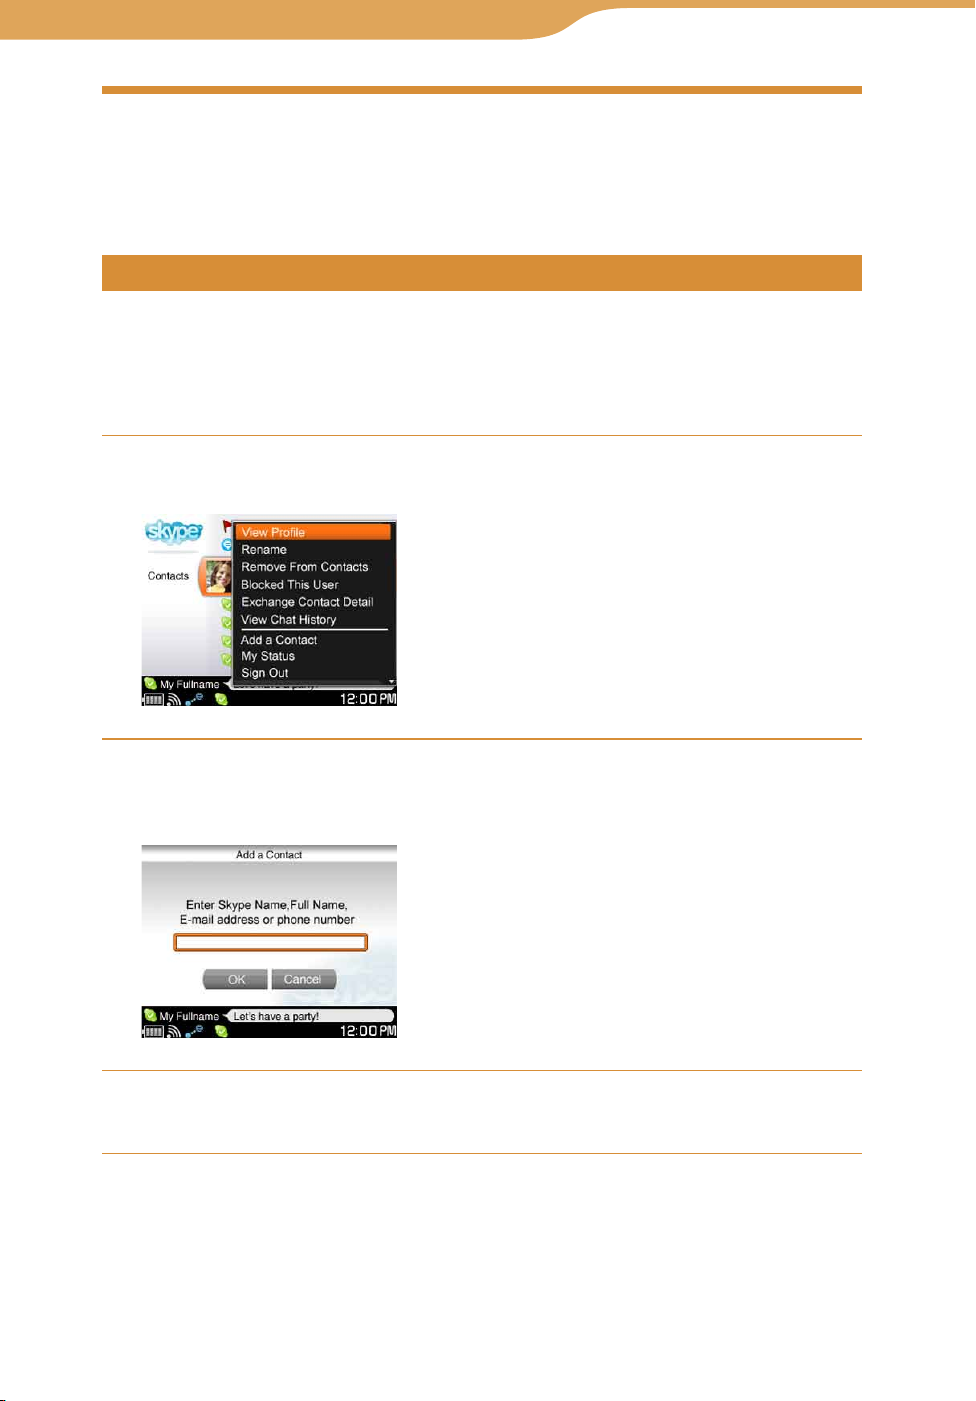
On the Contacts screen, press OPTION.
The Context menu appears.
Press / to select “Add a Contact,” and then press the center
button.
The Add a Contact screen appears.
Use the keyboard to enter the user’s Skype Name, full name,
e-mail address, or SkypeOut phone number.
Continued
Page 56
56
Index
Table of
Contents
56
Communication
Press / to select “OK,” and then press the center button.
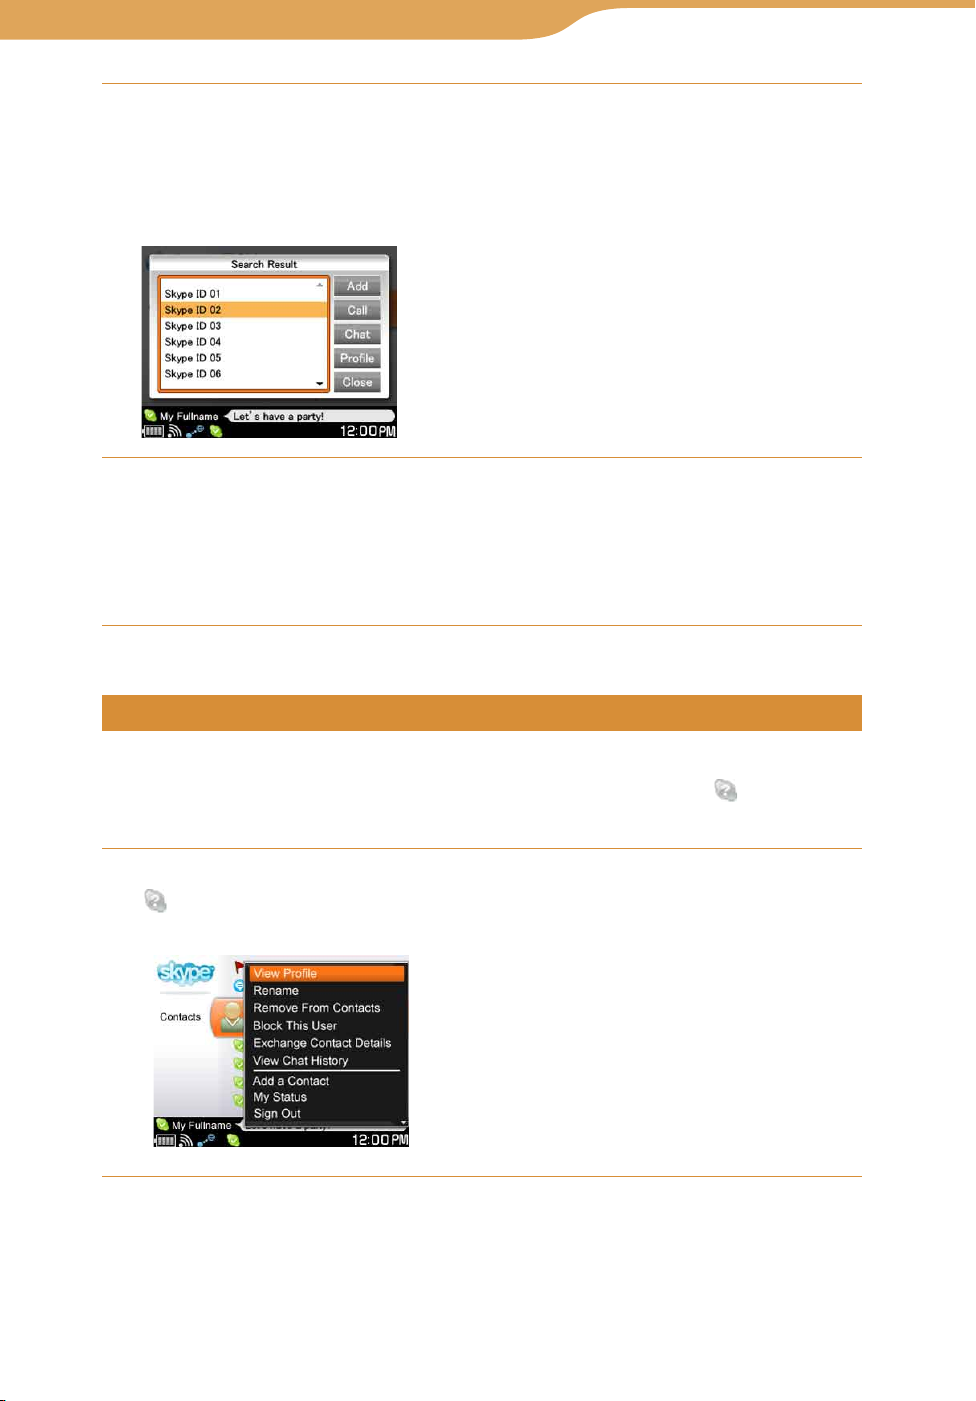
The unit begins searching the Skype system for the Skype Name, full
name, or e-mail address that you entered in step and then displays the
results of the search. If you entered a SkypeOut phone number in step
the name input screen appears.
Press /// to select “Add,” and then press the center
button.
A request to exchange contact details is sent to the selected user. If the
user agrees to be added to your Contact List, his or her personal details is
registered in your Skype Contact List.
–
Skype
…Adding a User
,
Resending a request to exchange contact details to a contact
If a user to whom you have sent a request to exchange contact details has not
yet agreed to be added to your Contacts, the user is shown with
Accepted Yet). To send the registration request again, follow the steps below.
On the Contacts screen, press / to select the contact with
(Not Accepted Yet), and then press OPTION.
The Context menu appears.
(Not
Continued
Page 57
57
Index
Table of
Contents
57
Communication
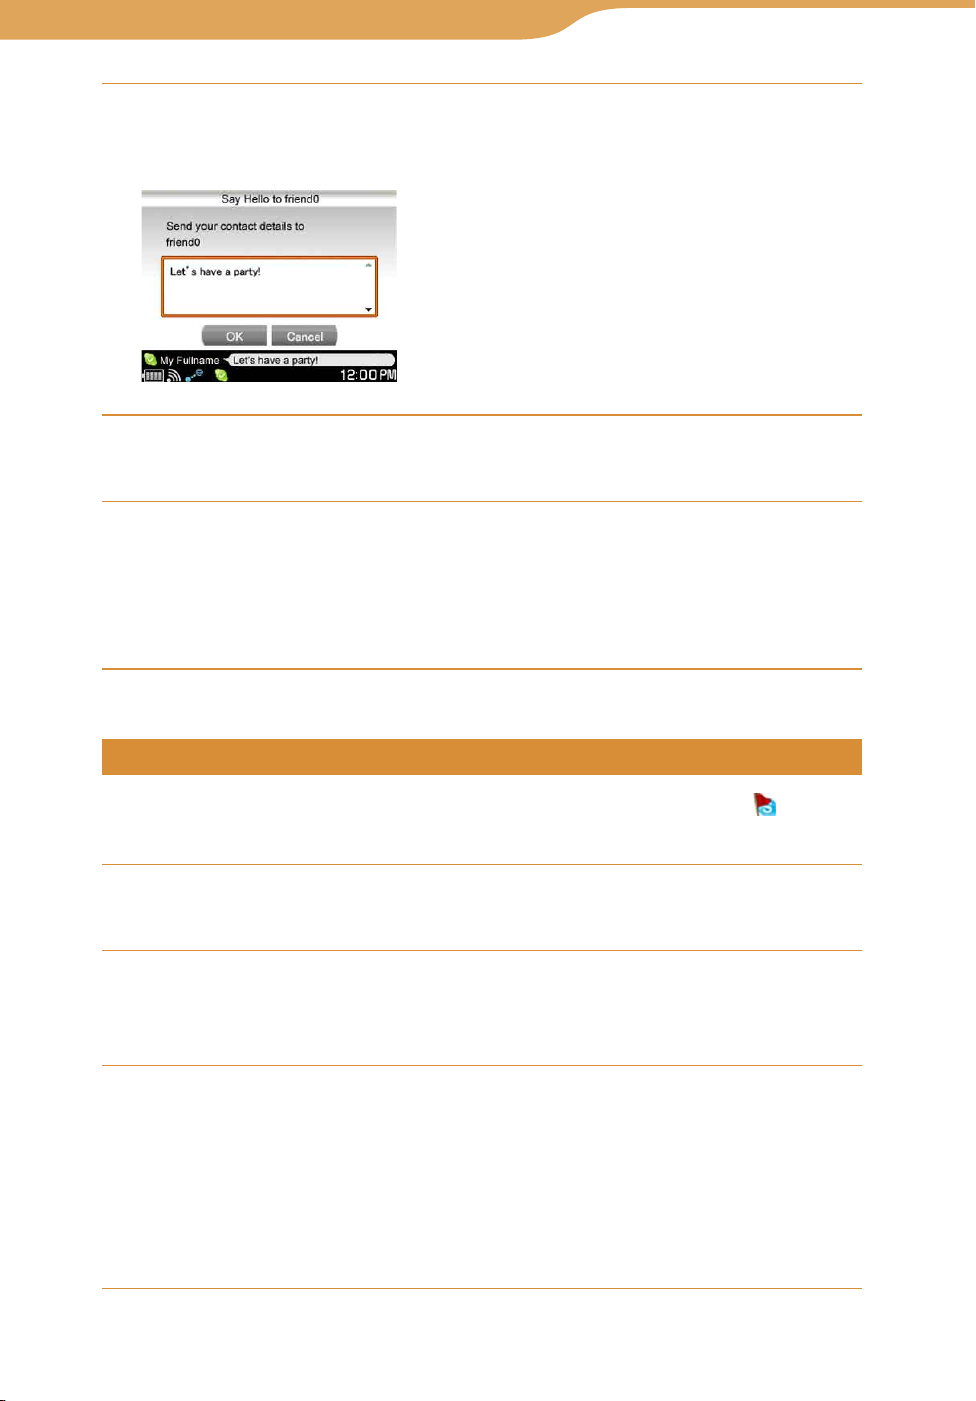
Press / to select “Exchange Contact Details,” and then
press the center button.
The request to exchange contact details screen appears.
Enter messages to be sent to the selected contact using the
keyboard.
Press /// to select “OK,” and then press the center
button.
A request to exchange contact details is sent to the selected contact. If the
user agrees to your request, his or her personal details is registered in your
Contacts.
–
Skype
…Adding a User
Accepting a request to exchange contact details from other users
When another user sends you a request to exchange contact details, appears
on the status bar of the display ( page 50).
Press INFO.
The communication panel appears.
Press / to select the new request to exchange contact
details event, and then press the center button.
The user request screen appears.
Press to select “Add,” and then press the center button.
The user is added in your Contact List.
If you select “Ignore,” the request to exchange contact details is ignored.
If you select “Block,” the user is added in your Blocked Users list. When
you ignore or block the request, the user is not added to your Contacts,
and you are listed in the other user’s contact list as a contact whose details
have not been exchanged.
Continued
Page 58

58
Index
Table of
Contents
58
Communication
–
Skype
…Adding a User
To unblock a user
To be able to contact a user on your Blocked Users list, use the “Manage
Blocked Users” feature to remove the user from the list (
page 75).
Editing your Contacts
You can edit your Contacts using the Context menu.
On the Contacts screen, press / to select the contact you
want to edit, and then press OPTION.
The Context menu appears.
Press / to select the desired function, and then press the
center button (
page 76).
Page 59
59
Index
Table of
Contents
59
Communication
–
Skype
Making and Receiving a Call
First, sign in to Skype using your Skype Name.
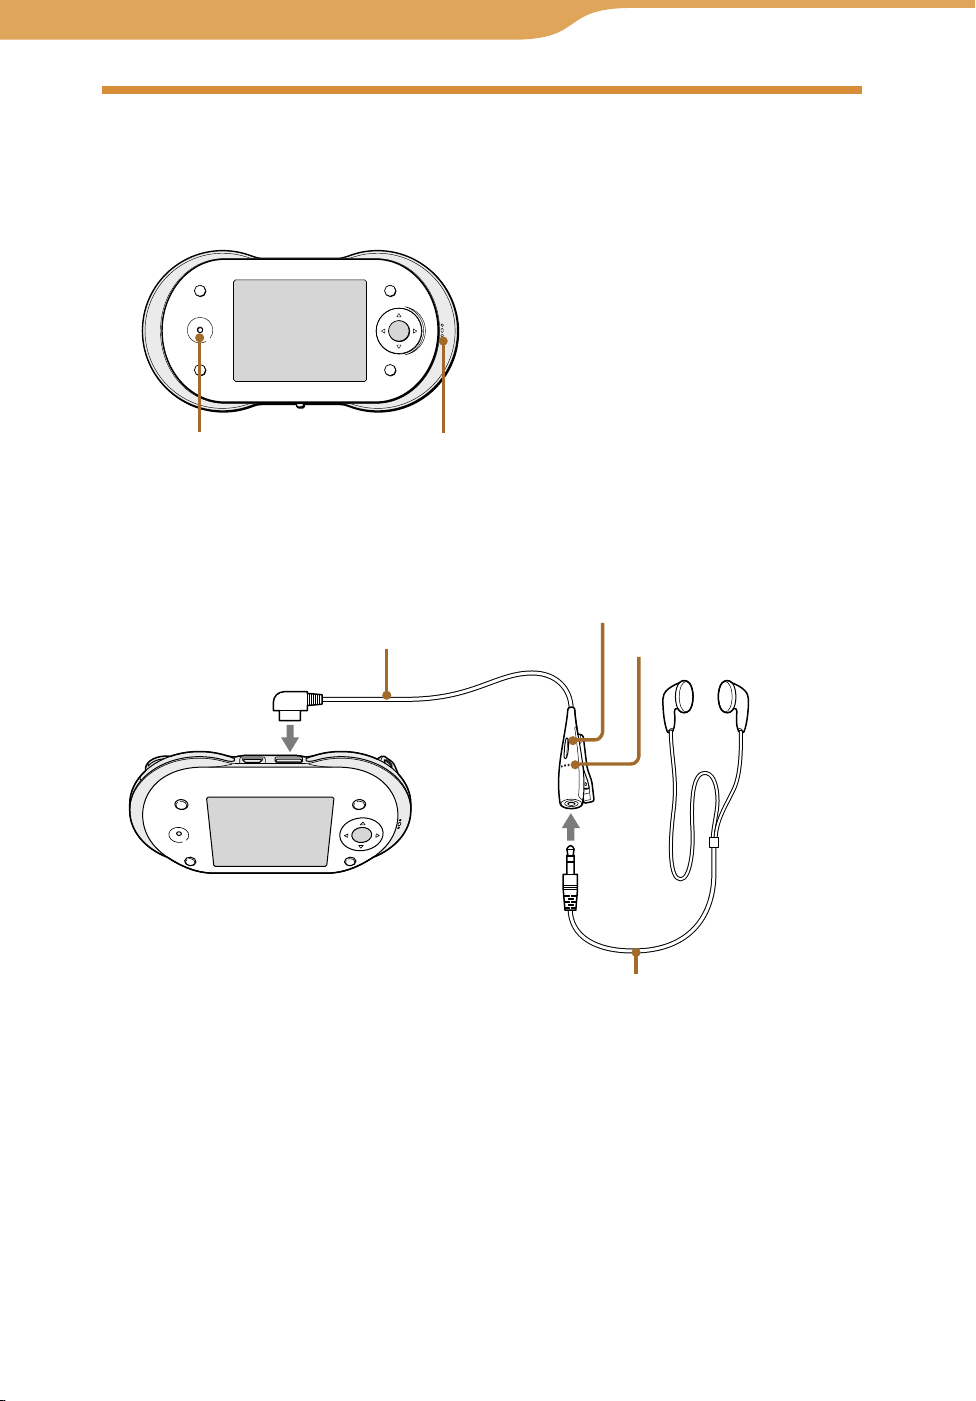
To talk on a Skype call, you can use either the speaker and microphone on the
front of the unit or the supplied headset connected to the unit.
Speaker Microphone
To connect the supplied headset
When you use the headset, press the Remote Call Control button to receive a
call.
One touch answer remote
controller (supplied)
Remote Call Control button
Microphone
(headset) jack
To
To adjust the volume
Press the VOL +/– buttons during a call.
Headphones (supplied)
Continued
Page 60
60
Index
Table of
Contents
60
Communication
–
Skype
…
Making and Receiving a Call
Calling a Skype user
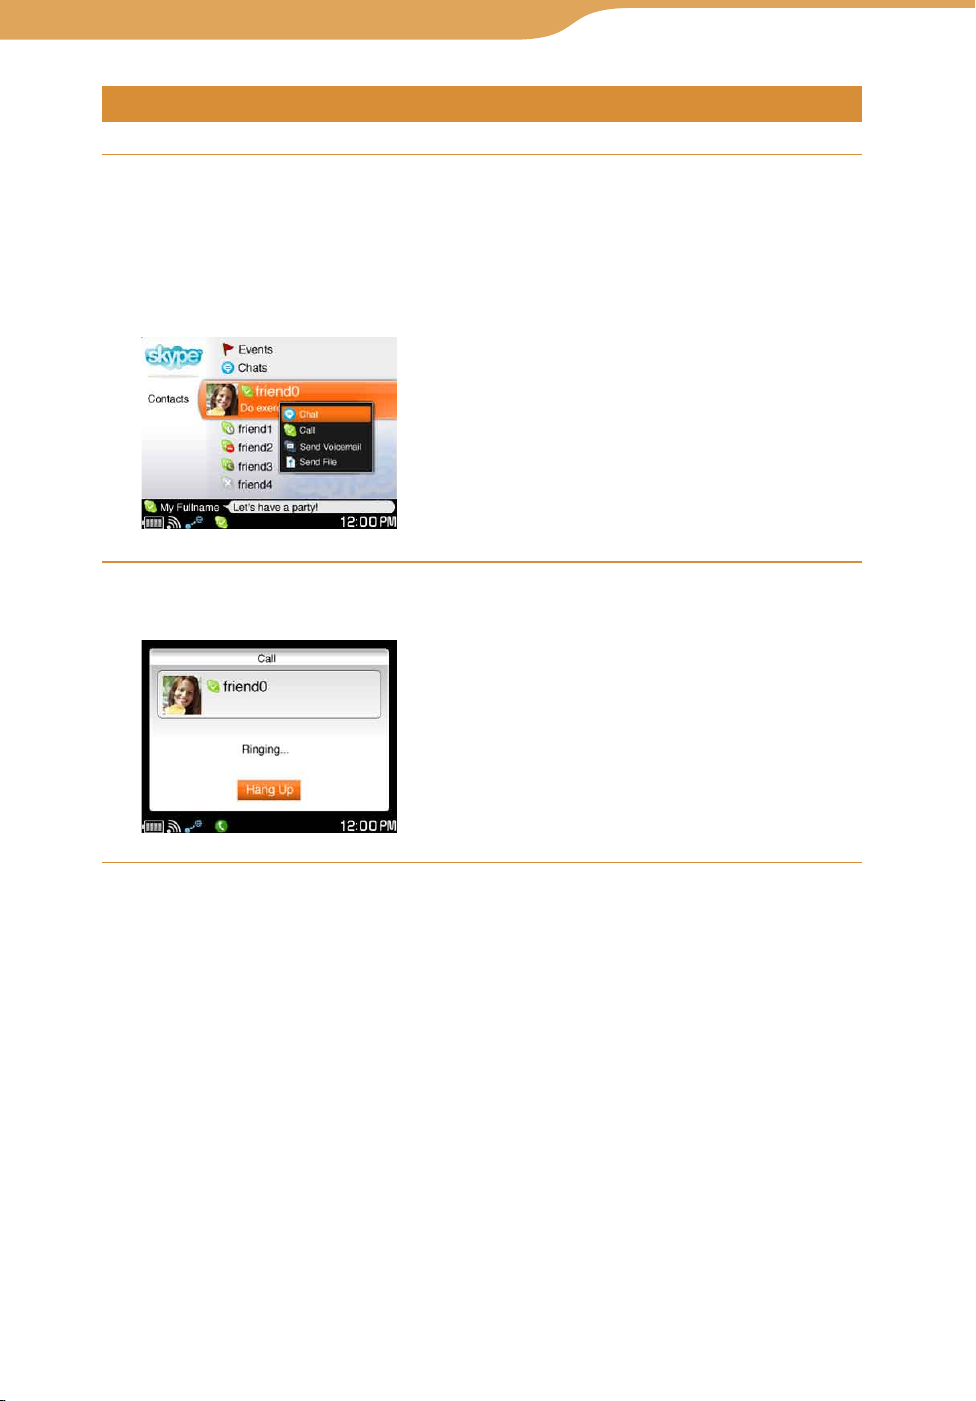
On the Contacts screen or the Events screen, press / to
select the contact you want to call, and then press the center
button.
A list of options appears.
On the Contacts screen
Press / to select “Call,” and then press the center button.
A call to the selected user is started, and the Call screen appears.
To call to a user by entering the contact’s Skype Name
On the Dial screen, use the keyboard to enter the Skype Name of the user you
want to call, and then press the center button.
Hint
• On the Chats screens, you can call Skype users by selecting “Call” from the Context
menu.
Continued
Page 61
61
Index
Table of
Contents
61
Communication
–
Skype
…
Making and Receiving a Call
Calling a regular phone number (SkypeOut)
To call a non-Skype number, you must have signed up for the SkypeOut
feature and have purchased Skype Credit. For information about SkypeOut and
about purchasing Skype Credit, visit <http://www.skype.com>.
On the Contacts screen, press / to select “Dial,” and then
press the center button.
The Dial screen appears.
Use the keyboard to enter the number you want to call, and
then press the center button.
A call to the entered phone number is started, and the Call screen appears.
To call a contact from the Contacts screen or the Events screen
1 On the Contacts screen or the Events screen, press / to select
the user you want to call, and then press the center button.
A list of options appears.
2 Press / to select “Call,” and then press the center button.
A call to the selected contact is started, and the Call screen appears.
Continued
Page 62
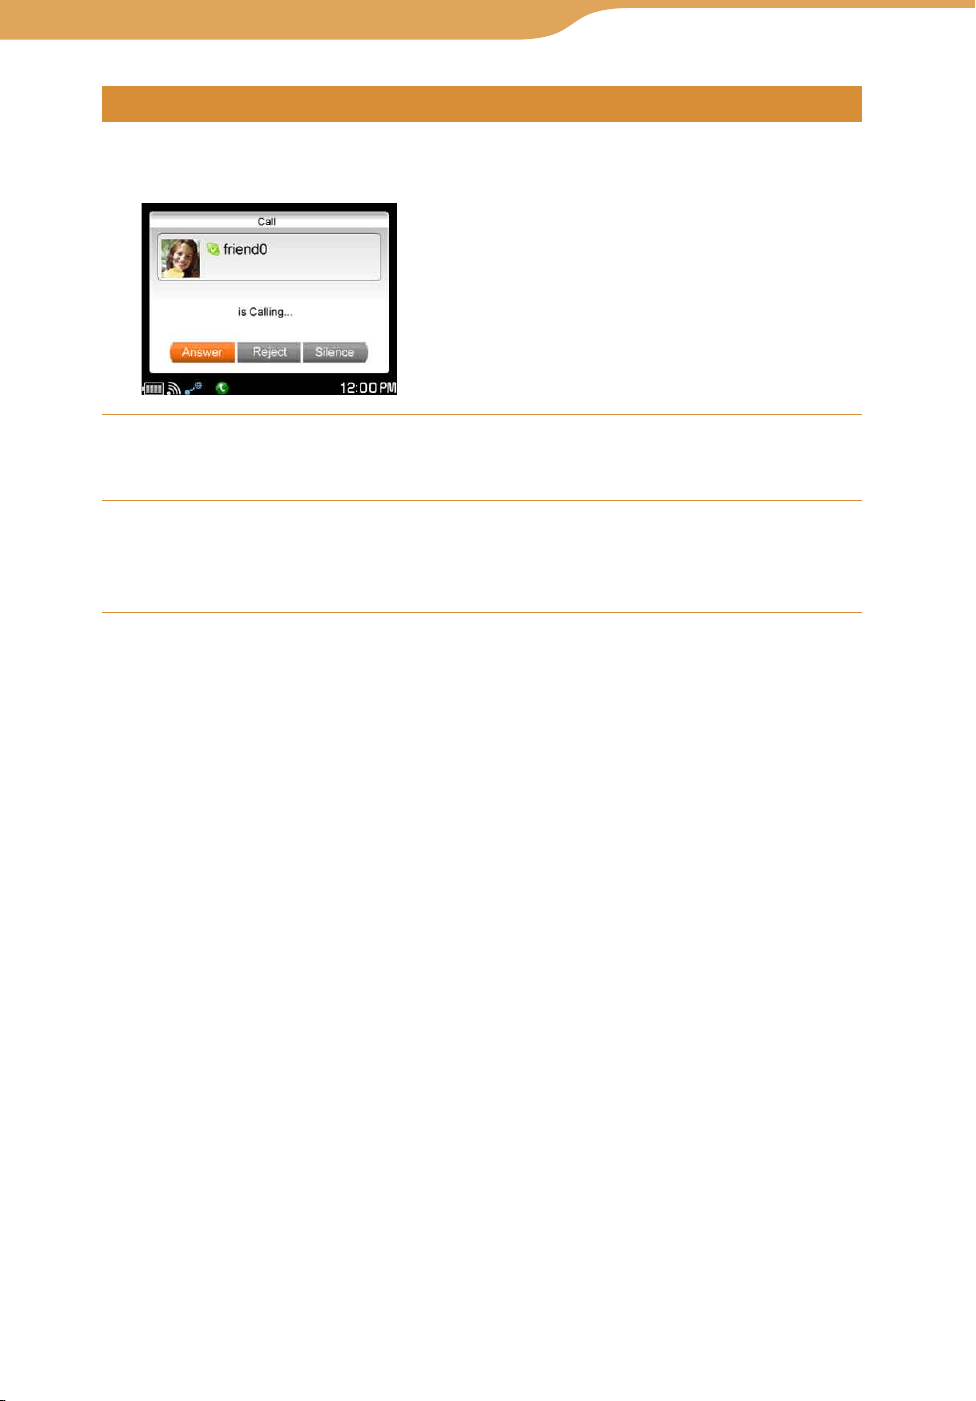
62
Index
Table of
Contents
62
Communication
–
Skype
…
Making and Receiving a Call
Receiving a call
When an incoming call is received, the unit rings, the status indicator flashes,
and the calling window appears.
Press / to select “Answer,” and then press the center
button.
Using the speaker and microphone on the front of the unit or
the headset, begin your conversation.
The Call screen appears.
To ignore a call
Select “Silence” in the calling window. The window disappears, and the unit
stops ringing, but the incoming call continues.
To reject a call
Select “Reject” in the calling window. The window disappears, the unit stops
ringing, and the incoming call is disconnected.
To put a call on hold
Select “Hold” on the Call screen. The call is placed on hold, and the unit
reminds you that a call is hold. To return to the call, select “Resume.”
To enter the muting function
Select “Mic Off” on the Call screen. The microphone is turned off. You can
hear the caller, but the caller cannot hear you.
To answer a call while using the supplied headset
Press the Remote Call Control button.
Continued
Page 63

63
Index
Table of
Contents
63
Communication – Skype…
Making and Receiving a Call
Hints
• If you receive a call while an audio file, a video file, or a photo slide show is playing,
playback pauses until the call ends. After the call ends, playback of audio files and
photo slide shows resumes from the point where playback stopped. To resume playback
of a video file from the point where playback stopped, press the center button.
• The calling window appears whenever there is an incoming call, allowing you to answer
even if you are using another application.
• To receive a call from a non-Skype number, you must have signed up for the SkypeIn
feature and have received a SkypeIn phone number. For information about SkypeIn and
SkypeIn phone numbers, visit <http://www.skype.com>.
• You can adjust the volume of the ring alert and of the other party’s voice on the Tools
screen.
• You can adjust the volume of the other party’s voice during Internet calls by using
VOL+/-.
Note
• While you are engaged in a call, you cannot receive calls from other contacts.
Ending a call
On the Call screen, press / to select “Hang up,” and press
the center button.
The call is disconnected.
Page 64
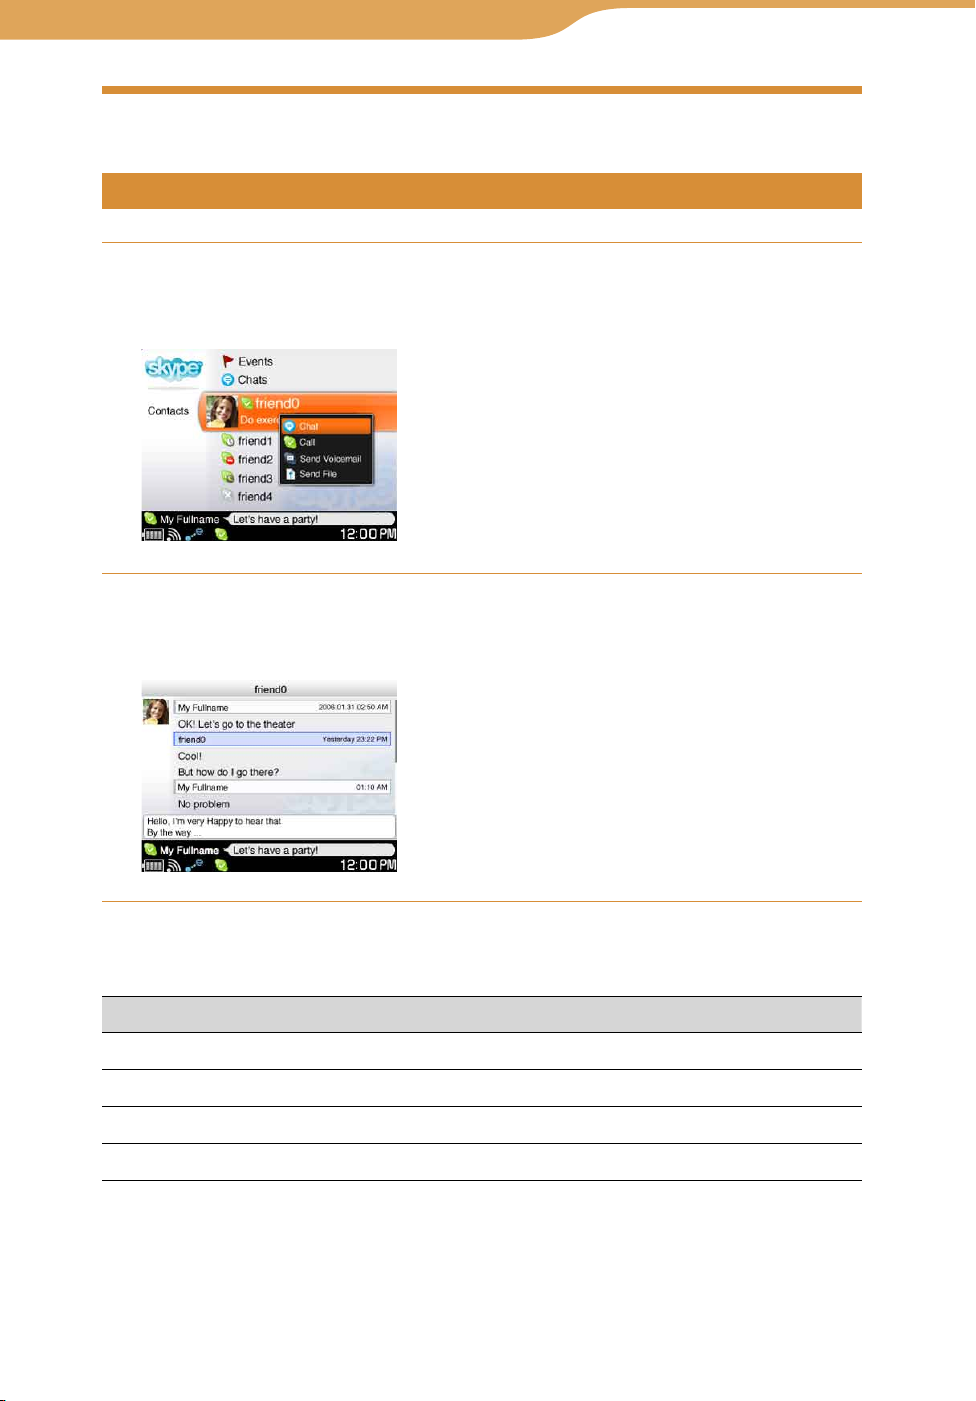
64
Index
Table of
Contents
64
Communication
–
Skype
Starting a Chat
Starting a new chat
On the Contacts screen, press / to select the contact you
want to chat with, and then press the center button.
A list of options appears.
Press / to select “Chat,” and then press the center button.
A chat screen appears, and you can begin your conversation with the
selected contact.
Basic operations on the chat screen
To Operation
Scroll Press Fn + /.
Move the cursor up or down Press
Create a new line Press Fn + Enter.
Send a message Press Enter.
///
.
Continued
Page 65

65
Index
Table of
Contents
65
Communication
–
Skype
…
Starting a Chat
To insert emoticons in chat messages
Press the /// keys on the keyboard or the 4-way button (///) to
move the cursor to the position where you want to insert the emoticons, and
select “Insert Emoticon” from the Context menu. Select an emoticon from the
emoticon list. The selected emoticon is inserted to the right of the cursor.
Answering a new chat
When another contact sends a new message, appears on the status bar of the
display ( page 50).
Press INFO.
The communication panel appears.
Press / to select the new chat event, and then press the
center button.
The chat screen appears, displaying the new message.
To start a new chat from the Events screen
1 On the Skype Contacts screen, press / to select “Events,” and
then press the center button.
2 Press / to select the user you want to chat with, and then press
the center button.
A list of options appears.
3 Press / to select “Chat,” and then press the center button.
A chat screen appears, and you can begin typing a message to the selected user.
Continued
Page 66
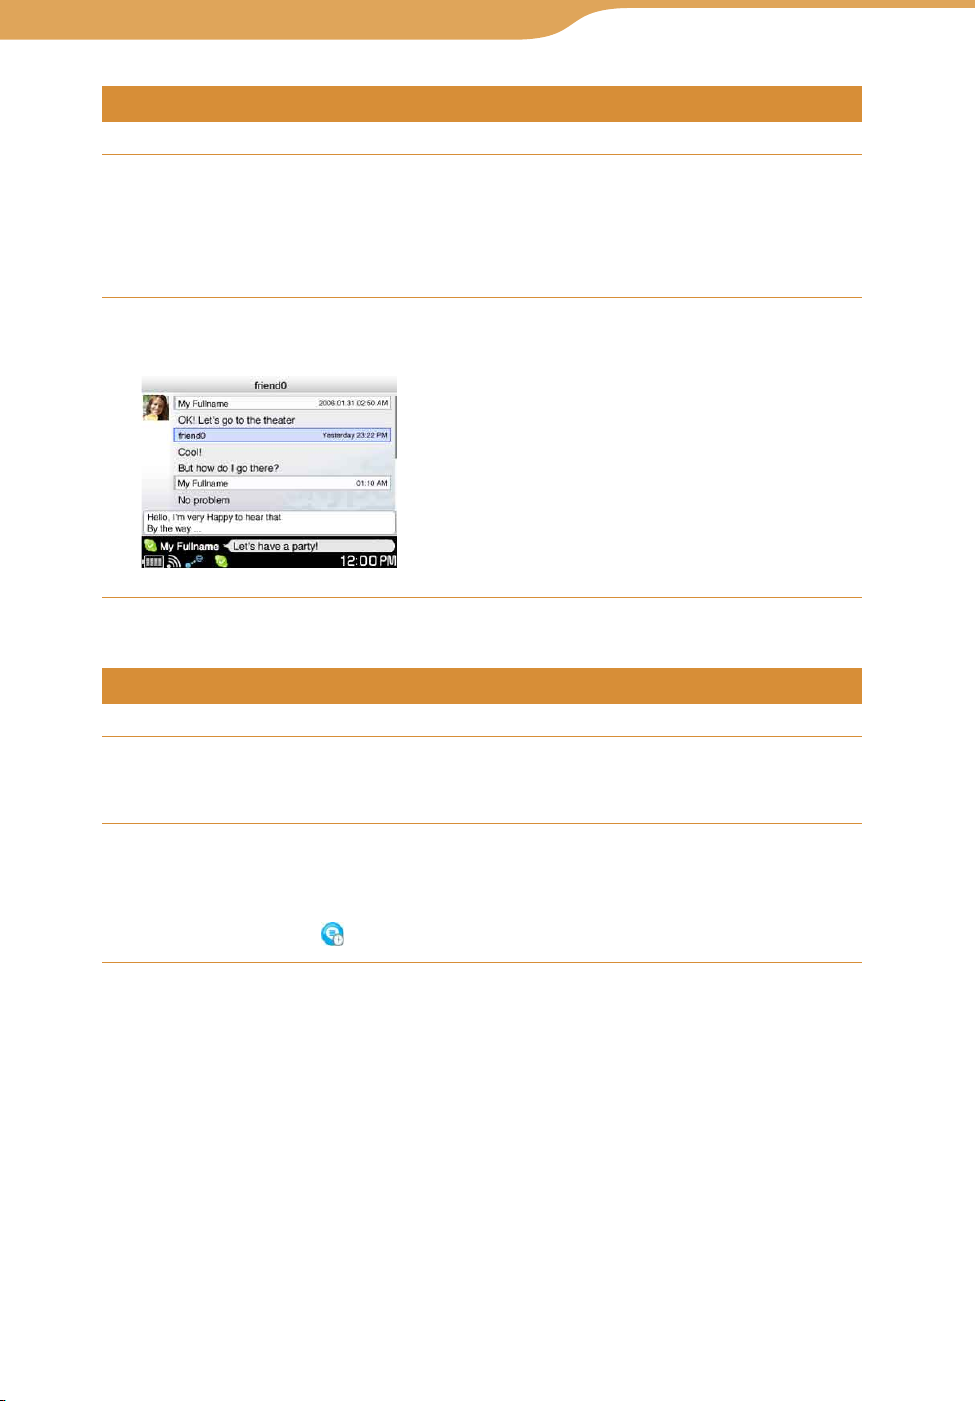
66
Index
Table of
Contents
66
Communication
–
Skype
…
Starting a Chat
Returning to ongoing chat
On the Contacts screen, press / to select “Chats,” and then
press the center button.
The Chats screen appears. The users with whom you have ongoing chats
are listed.
Press / to select “Chat,” and then press the center button.
The chat screen appears, and you can type a message to the selected user.
Ending a chat
On the chat screen, press OPTION.
The Context menu appears.
Press / to select “Close Chat,” and then press the center
button.
The chat ends, and the chat screen disappears. The chat appears on the
Chats screen with (Recent chats).
Continued
Page 67
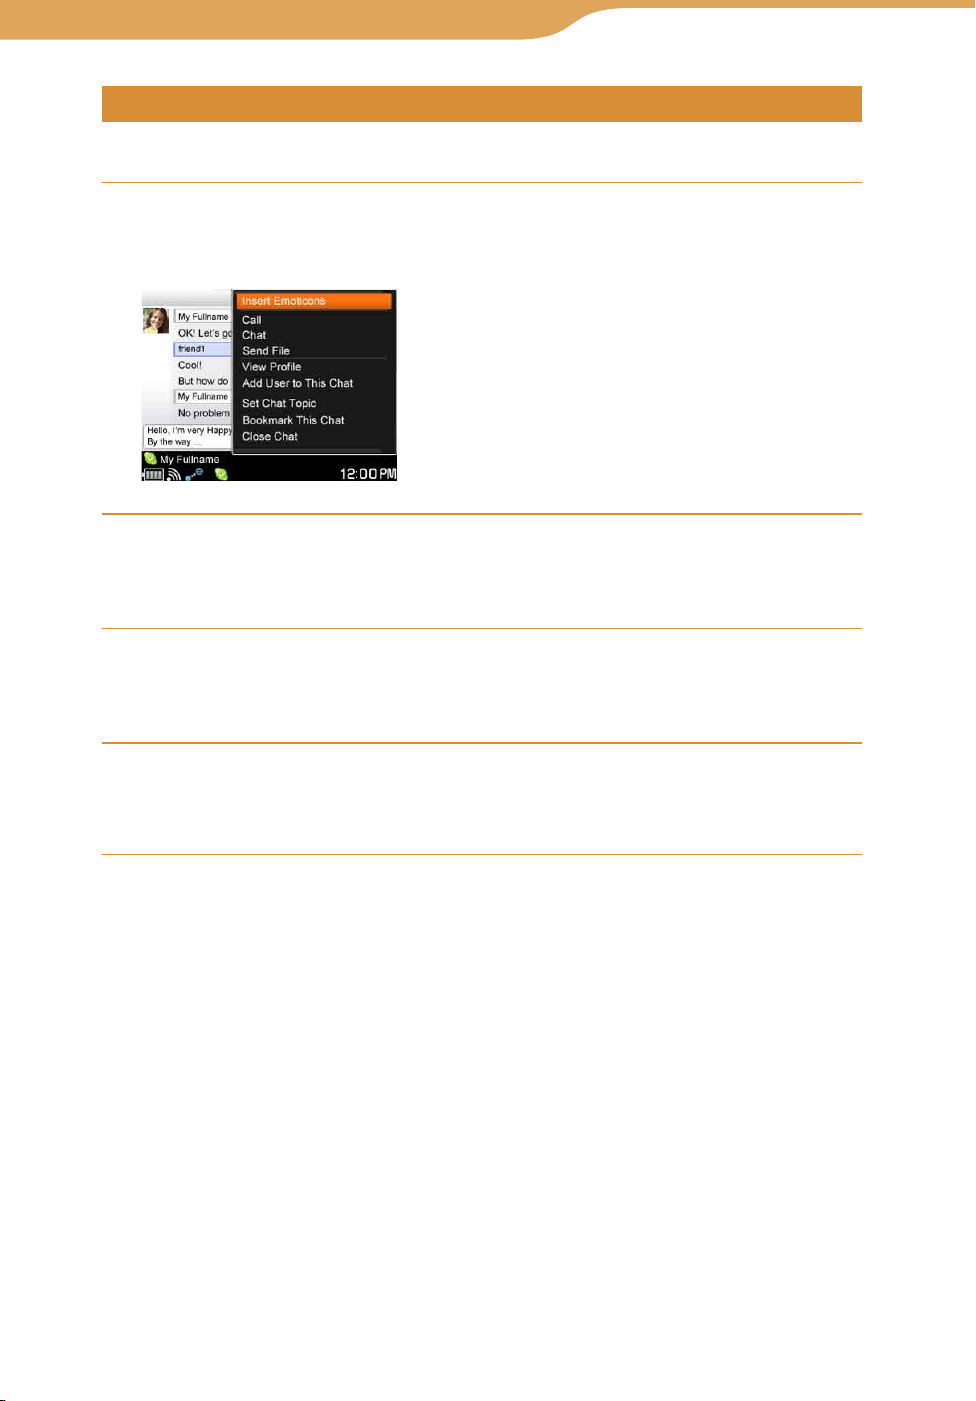
67
Index
Table of
Contents
67
Communication
–
Skype
…
Starting a Chat
Chatting with multiple contacts (Multi Chat)
You can add additional contacts to an ongoing chat.
While viewing the screen of the chat to which you want to add
additional contacts, press OPTION.
The Context menu appears.
Press / to select “Add User to This Chat,” and then press
the center button.
The contact list appears.
Press / to select the contact you want to add to the chat,
and then press the center button.
The contact’s check box is selected.
Press / to select “OK,” and then press the center button.
The selected contact joins the chat and can exchange messages with the
contacts already in the chat.
To bookmark a multi chat
You can bookmark and save a multi chat for future access.
1 On the chat screen, press OPTION.
The Context menu appears.
2 Press / to select “Bookmark This Chat,” and then press the
center button.
Continued
Page 68

68
Index
Table of
Contents
68
Communication
–
Skype
…
Starting a Chat
To close a multi chat
Press OPTION to display the Context menu, and then select “Close Chat.”
Closed Multi chats are listed in Recent chats.
Hints
• You can reenter a closed multi chat by selecting it in Recent chats.
• Up to 50 users (including yourself) can participate in a single Multi chat.
• Photos of the first four chat contacts appear on the display.
To leave a multi chat
When you leave a chat, you can no longer receive messages from the chat.
Others in the chat will see that you have left, and your Name is removed from
the chat. To reenter the multi chat you left, you must be invited.
1 On the chat screen, press OPTION.
The Context menu appears.
2
Press / to select “Leave Chat,” and then press the center button.
You leave the chat, and the chat screen disappears.
Page 69
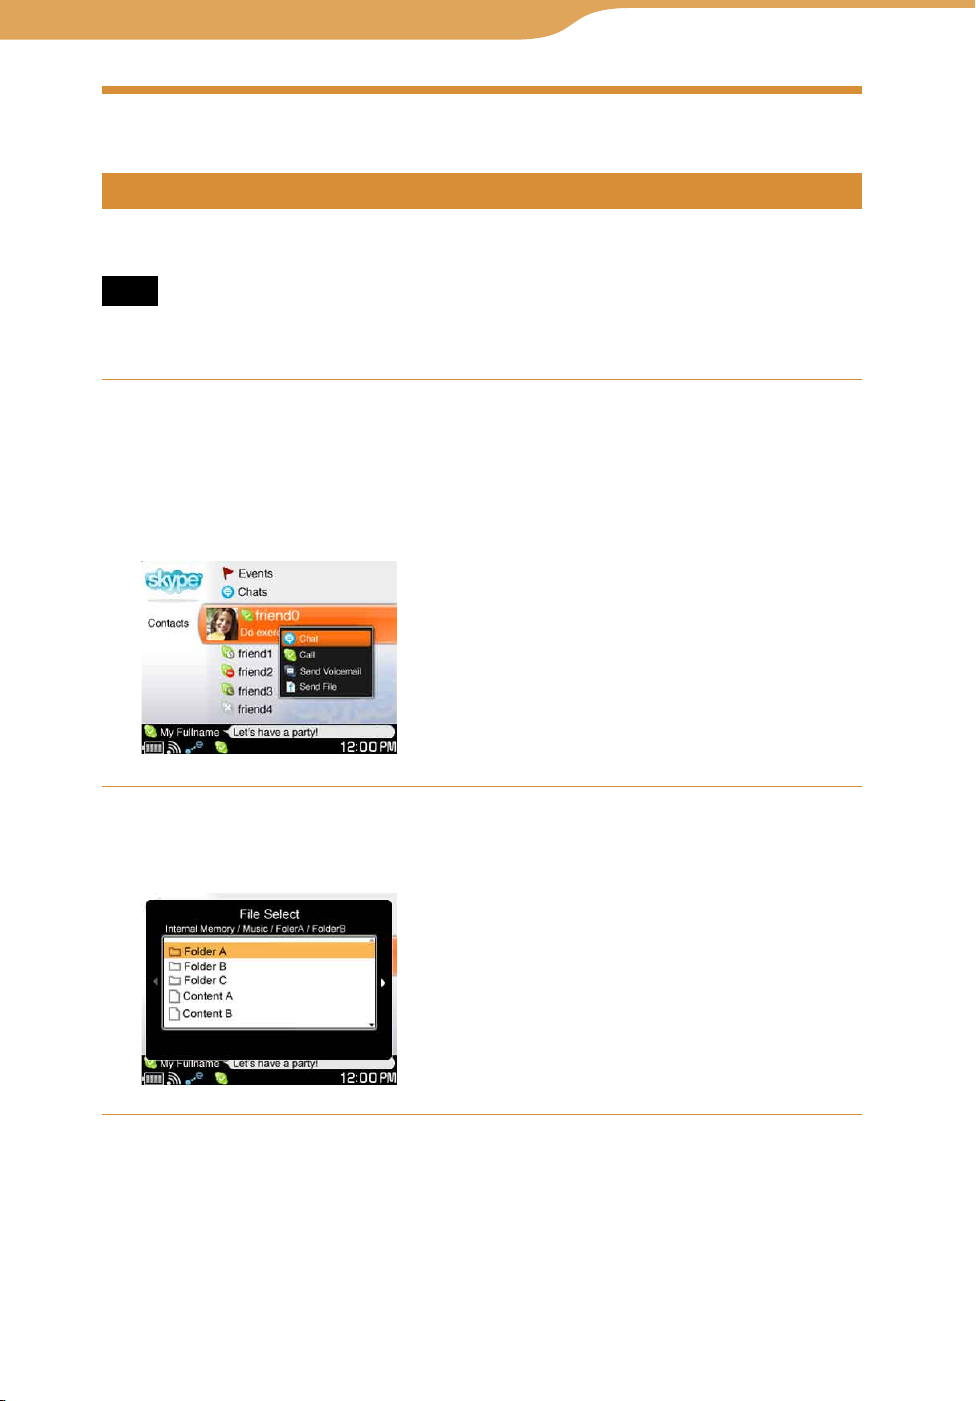
69
Index
Table of
Contents
69
Communication – Skype
Transferring Files (File Transfer)
Sending a file
You can send a file stored in the unit to other Skype contacts.
Note
• It may be prohibited to transfer content, without the copyright holders permission under
applicable copyright law.
On the Contacts screen or the Events screen, press / to
select the user you want to send a file to, and then press the
center button.
A list of options appears.
On the Contacts screen
Press / to select “Send File,” and then press the center
button.
The list of files stored in the unit appears.
Continued
Page 70

70
Index
Table of
Contents
70
Communication – Skype…Transferring Files
Select a file to send, and then press the center button.
The file transfer process starts.
To stop a file transfer
Select “Cancel” during the file transfer.
Continued
Page 71
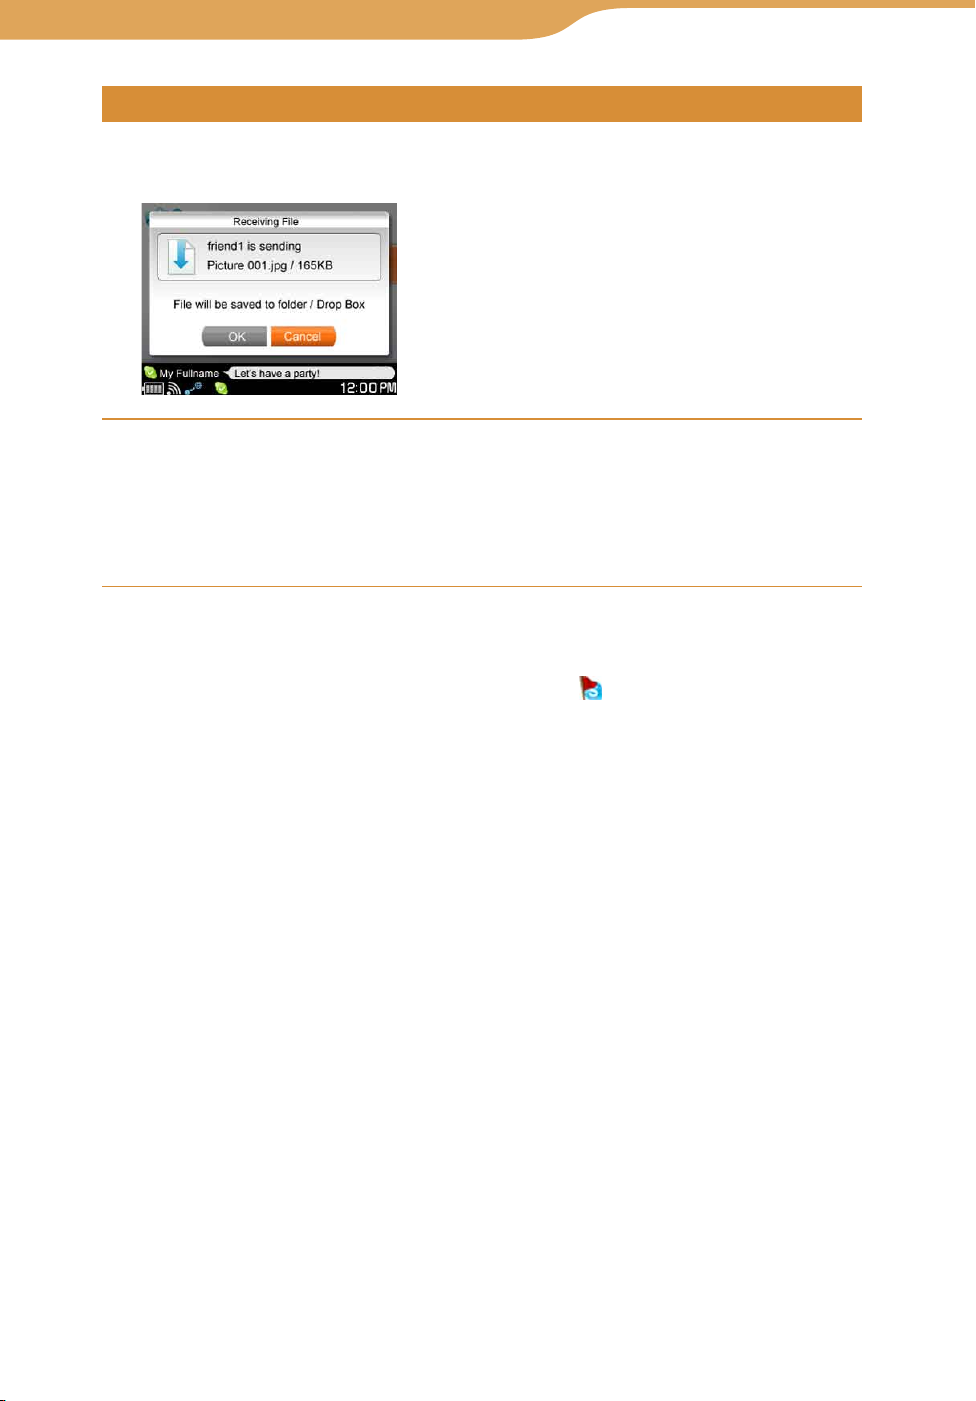
71
Index
Table of
Contents
71
Communication – Skype…Transferring Files
Receiving a file
When your contact attempts to send a file to you, a message appears, asking
whether you want to receive the file.
Press / to select “OK,” and then press the center button.
The file transfer process starts. The transferred file is stored in “Drop
Box” ( page 188).
If a file with the same name already exists in “Drop Box,” a message
appears. Follow the instructions on the display to rename the file.
When another application window is displayed
When your contact attempts to send a file to you, appears on the status bar
of the display ( page 50).
1 Press INFO.
The communication panel appears.
2 Press / to select the new file transfer event, and then press the
center button.
The file transfer starts.
To reject a file
Select “Cancel” when the file transfer permission dialog appears. The sender
receives a message informing them that the file transfer request has been
rejected, and the file transfer is cancelled.
Page 72
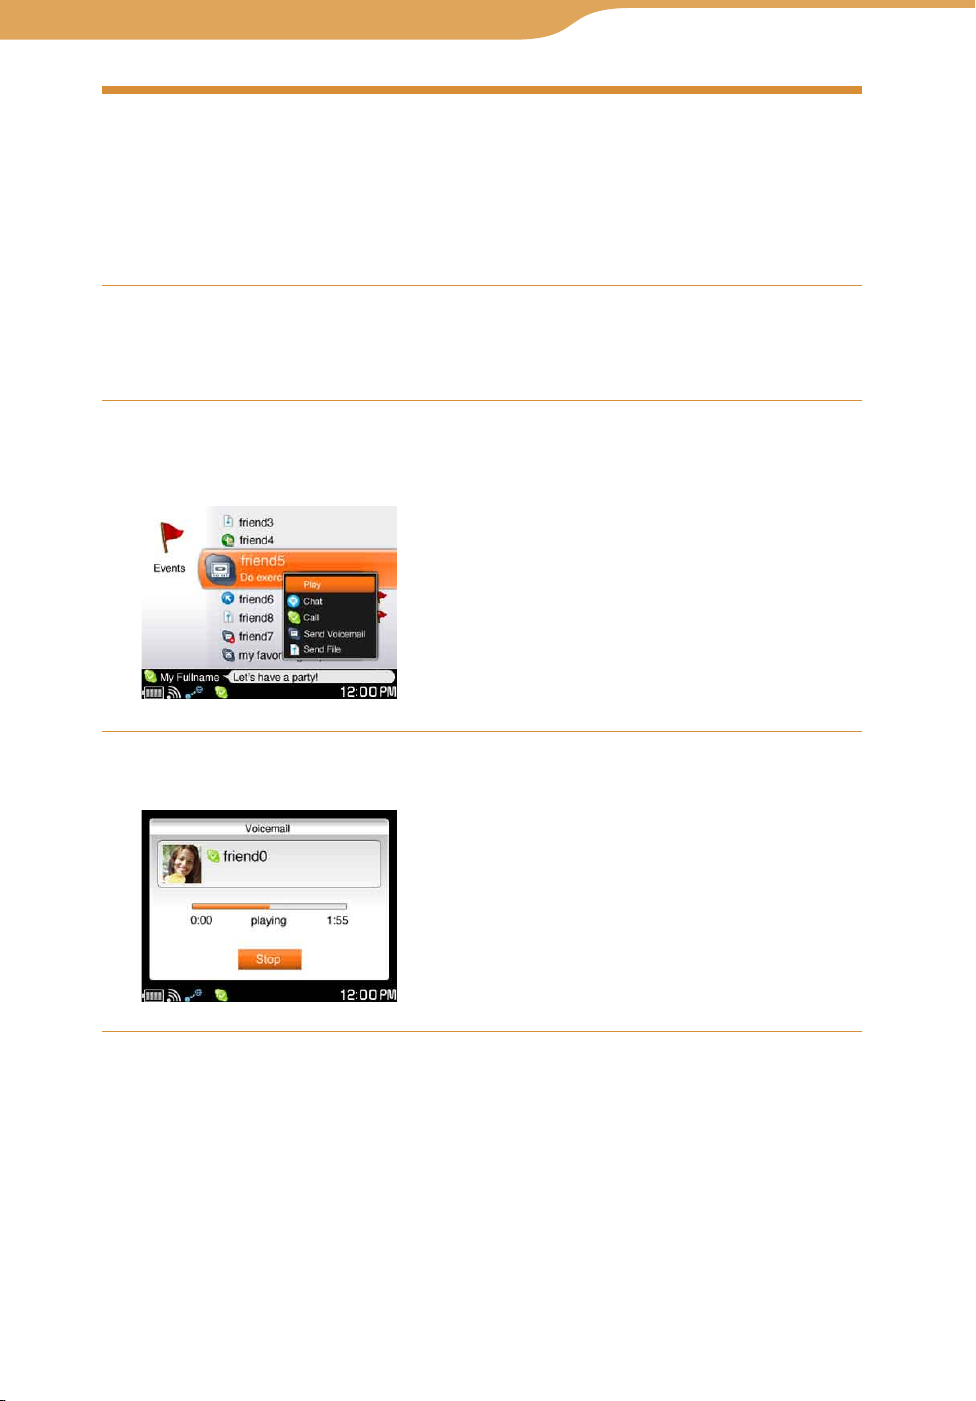
72
Index
Table of
Contents
72
Communication – Skype
Playing a Voicemail
To play a voicemail, you must have purchased Skype Credit. For information
about purchasing Skype Credit, visit <http://www.skype.com>.
When you receive a voicemail, the voicemail event is listed with the new
voicemail icon on the Events screen.
On the Contacts screen, press / to select “Events,” and then
press the center button.
The Events screen appears.
Press / to select the contact who left the voicemail, and
then press the center button.
A list of options appears.
Press / to select “Play,” and then press the center button.
The Voicemail screen appears, and the voicemail starts playing.
Continued
Page 73
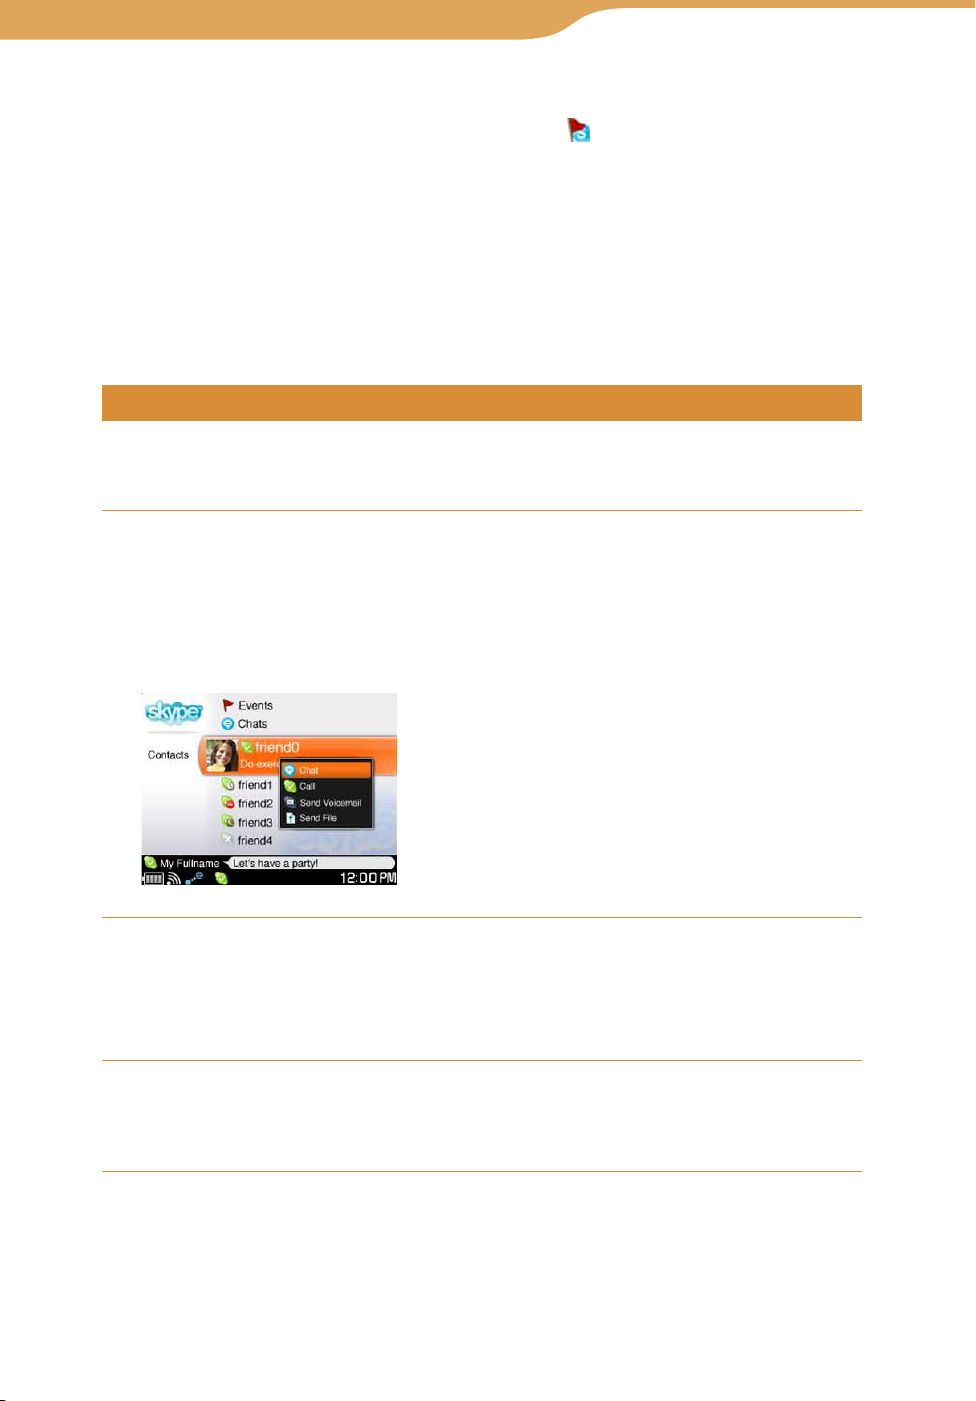
73
Index
Table of
Contents
73
Communication – Skype…Playing a Voicemail
When another application window is displayed
When another contact sends a voicemail to you, appears on the status bar of
the display ( page 50).
1 Press INFO.
The communication panel appears.
2 Press / to select the new voicemail event, and then press the
center button.
The voicemail starts playing.
Sending a voicemail
You can send a voicemail to other Skype contacts who have a Voicemail
subscription.
On the Contacts screen or the Events screen, press / to
select the contact you want to send a voicemail, and then
press the center button.
A list of options appears.
On the Contacts screen
Press / to select “Send Voicemail,” and then press the
center button.
The Voicemail screen appears. Follow the instructions on the display to
leave a message.
Press / to select “Hang Up,” and then press the center
button.
The Contacts screen appears.
To stop the sending a voicemail
Select “Cancel” during sending.
Page 74
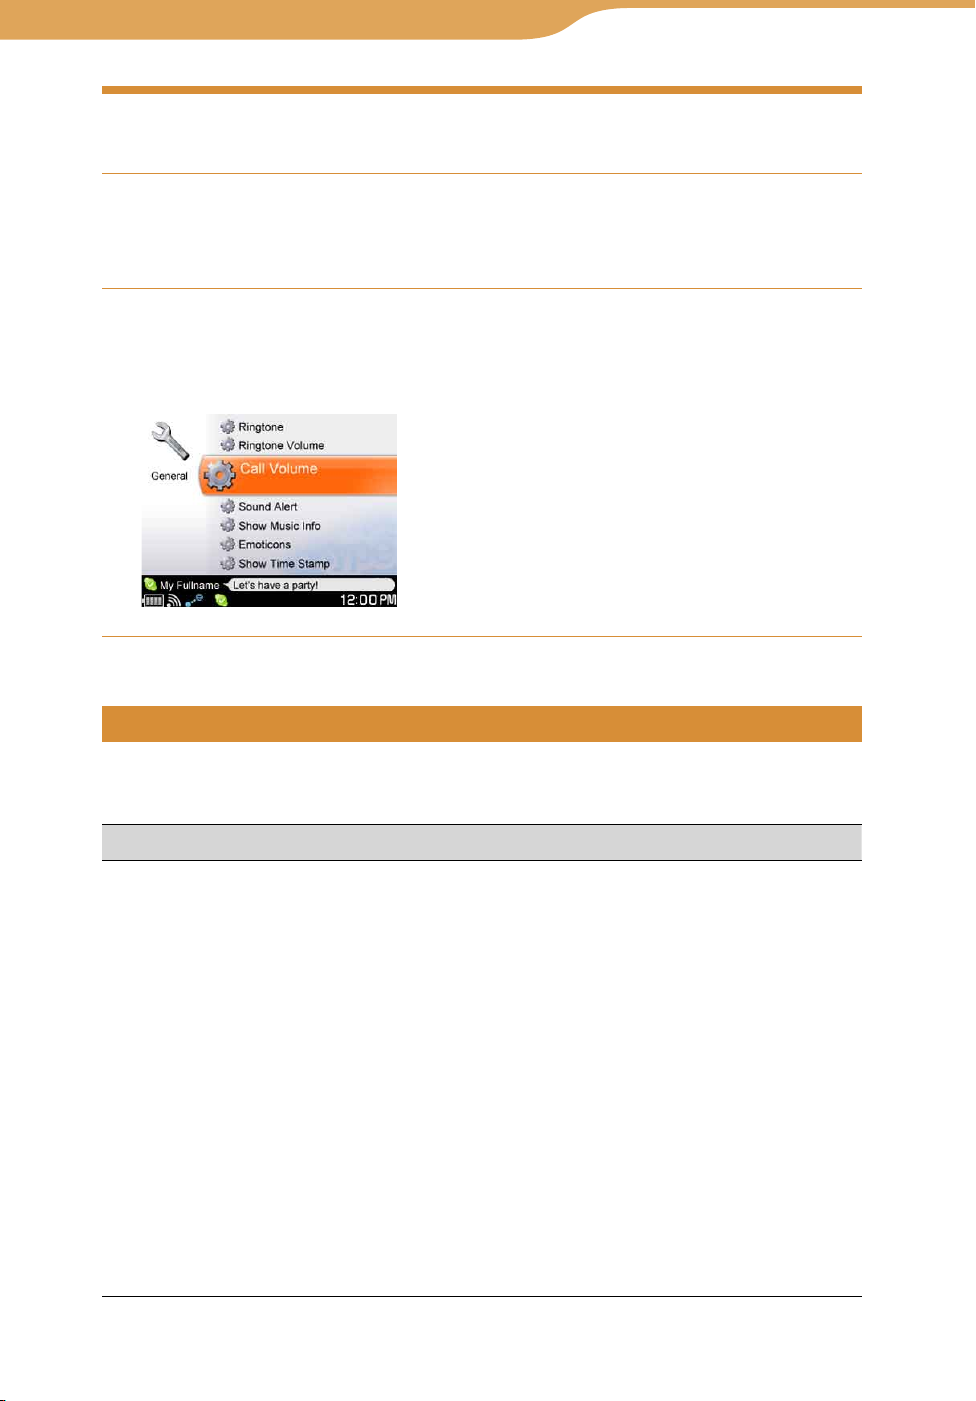
74
Index
Table of
Contents
74
Communication – Skype
Adjusting Settings (Tools)
On the Contacts screen, press / to select “Tools,” and then
press the center button.
The Tools screen appears.
Press / to select an item, and then press the center button.
The options or settings display for the selected item appears.
Example: “General” settings
Items on the Tools screen
On the Tools screen, you can adjust the following settings and perform the
following operations.
Item Setting or operation
Settings
- General
• Ringtone: Selects the ring tone sound: OFF/Bubbly/Old Phone/
Bounce/Boing/Sing-a-Long. The default setting is “Sing-aLong.”
• Ringtone Volume: Adjusts the ringtone volume between 0
(silent) and 5 (loudest). The default setting is 3.
• Call Volume: Adjusts the volume of caller’s voice between 0
(silent) and 5 (loudest). The default setting is 3.
• Sound Alert: If set to “ON” (default setting), alert sounds when
new event comes in.
• Show Music Info: If set to “ON,” the name of the track you are
listening to is displayed to your contacts. The default setting is
“OFF.”
• Emoticons: When set to “Show” (default setting), emoticons
entered during chats appear on your screen as graphic images.
• Show Time Stamp: If set to “ON” (default setting), a time stamp
is attached to each conversation entry.
Continued
Page 75

75
Index
Table of
Contents
75
Communication – Skype…Adjusting Settings
Item Setting or operation
Settings
- Privacy
Settings
- Connection
Account • Skype Credit: Shows information about your currently available
• Allow Calls: Selects users who are allowed to call you. The
options are “Anyone” (default setting), “Contacts Only,” and
“Accepted Only.”
• Allow Chats: Selects users who are allowed to start a chat with
you. The options are “Anyone” (default setting), “Contacts
Only,” and “Accepted Only.”
• Chat History: If set to “ON” (default setting), the text contents of
chats are saved in the unit.
• Clear Chat History: Deletes all saved chats.
• Show My Picture: Selects users who can view your picture. The
options are “Anyone” (default setting) and “Contacts Only.”
• Port: Sets the network port number used by Skype.
Skype credit.
• Voicemail: Shows information about your SkypeIn voicemails
(“Active” or “Not Active”).
• SkypeIn: Shows information about SkypeIn (“Active” or “Not
Active”).
• Manage Account: Displays the My Account Page.
• Change Password: Changes your password to sign in to Skype.
Manage
Blocked
Users
About Skype Displays the version number of the Skype application.
Enables you to unblock a user from the Blocked Users list by
selecting the user’s check box, and then selecting “Unblock.”
Users on the Blocked Users list cannot call you, start a chat with
you, send you files, or leave you voicemails.
Page 76
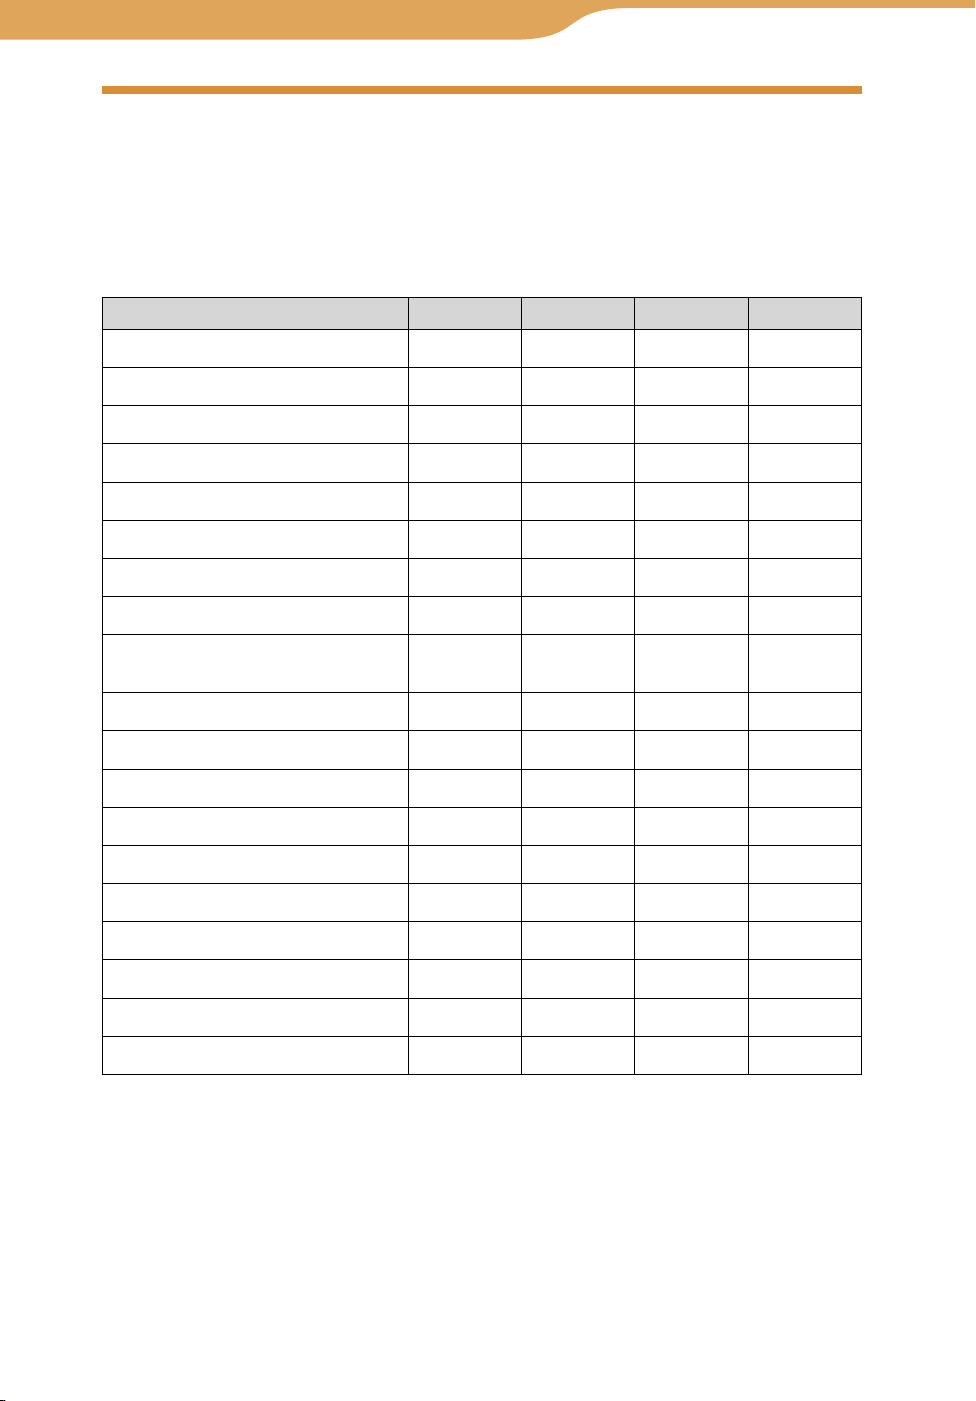
76
Index
Table of
Contents
76
Communication – Skype
Context Menus in Skype
Context menus appear when you press the OPTION button, enabling you to
perform various operations. What options appear on a Context menu depends
upon what screen you are currently viewing, as described in the tables on
pages 76 to 79.
Item Sign In Contacts Events Dial
Password Reminder
Chat
Call
Send File ( page 69)
View Profile
Delete
View
Chat History
Block This User*
Exchange Contact Details
( page 56)
Rename
Remove from Contacts
Add to Contacts
Clear All Events
Cut ( page 79)
Copy (
page 79)
Paste (
Add a Contact ( page 55)
My Status ( page 51)
Sign Out ( page 46)
* If you select this item, the selected user is added in your Blocked Users list and
disappears in the Contacts and Events. To be able to contact a user on your Blocked
Users list, use the “Manage Blocked Users” feature to remove the user from the list (
page 75).
page 79)
Continued
Page 77
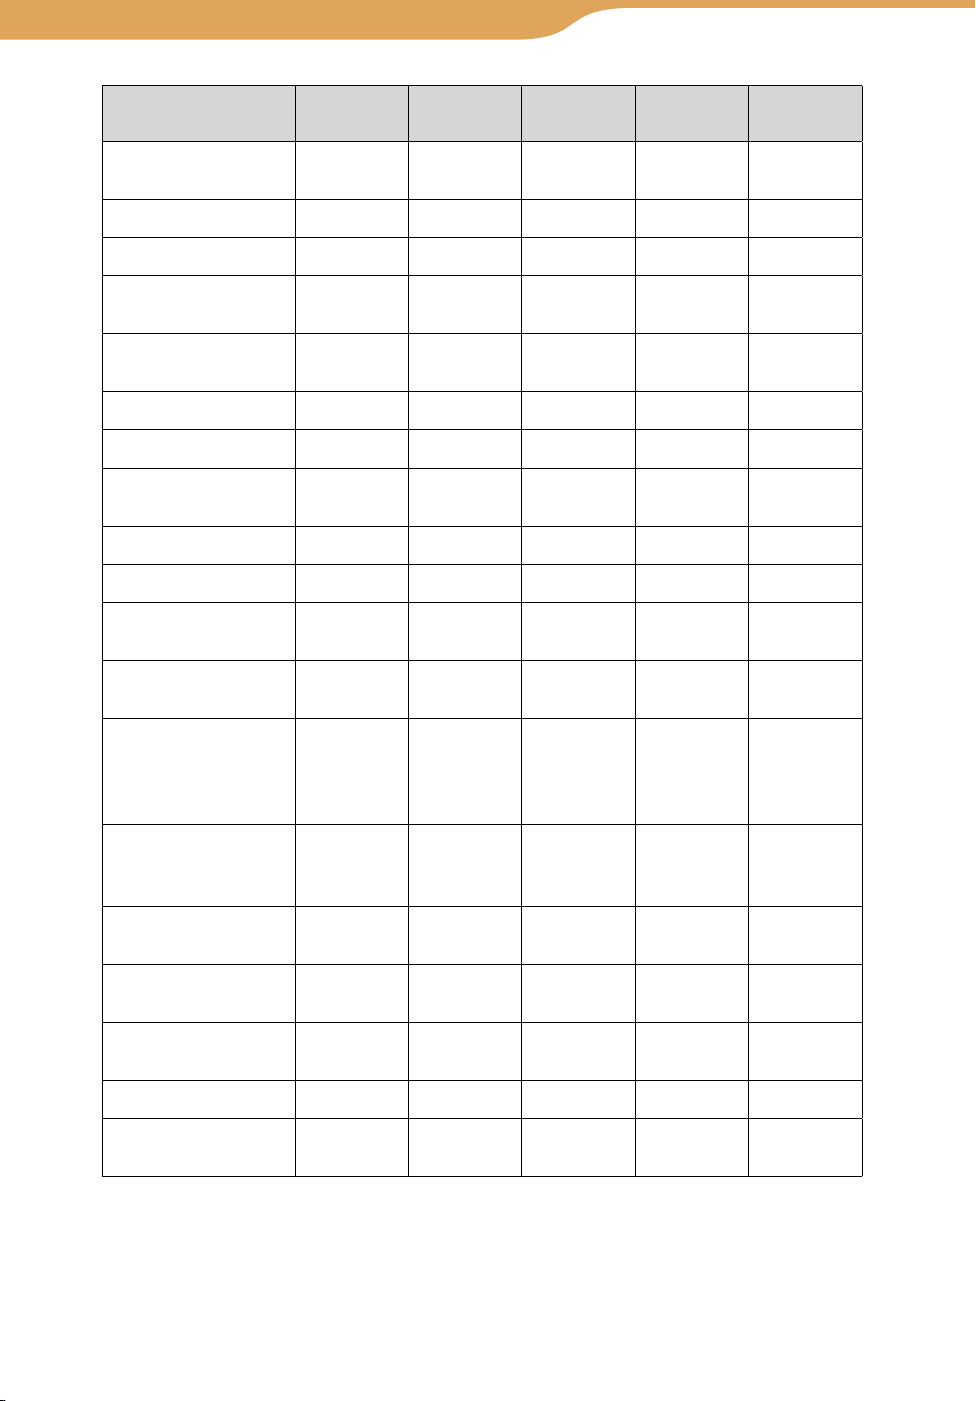
77
Index
Table of
Contents
77
Communication – Skype…Context Menus in Skype
Item Chats Recent
Chats
Insert Emoticons
( page 65)
Chat
Call
Send Voicemail
( page 73)
Send File
( page 69)
View Profile
Delete
Add User to This
Chat
Set Chat Topic
View
Chat History
Bookmark This
Chat
Remove
Bookmark
Bookmark This
Chat/Remove
Bookmark
( page 67)
Exchange Contact
Details
( page 56)
Close Chat
( page 66, 68)
Leave Chat
( page 68)
My Status
( page 51)
Bookmark
Chats
Single Chat Multi Chat
Help
Sign Out
( page 46)
* If you select this item, the selected user is added in your Blocked Users list and
disappears in the Contacts and Events. To be able to contact a user on your Blocked
Users list, use the “Manage Blocked Users” feature to remove the user from the list (
page 75).
Continued
Page 78

78
Index
Table of
Contents
78
Communication – Skype…Context Menus in Skype
Item Tools Chat
History
Cut ( page 79)
Copy (
Paste (
page 79)
page 79)
My Status
( page 51)
Sign Out
( page 46)
View
Profile
Exchange
Contact
Details
Continued
Page 79

79
Index
Table of
Contents
79
Communication – Skype…Context Menus in Skype
Item Add a
Contact
Cut (
Copy (
Paste (
My Status
( page 51)
Sign Out
( page 46)
below)
below)
below)
Edit Full
Profile
Connection
(Proxy
Setting)
Input Dial My Status
To cut characters
Press the Shift and /// keys on the keyboard to select the characters you
want to cut, and select “Cut” from the Context menu. The selected characters
are saved in the clipboard.
To copy characters
Press the Shift and /// keys on the keyboard to select the characters you
want to copy, and select “Copy” from the Context menu. The selected
characters are saved in the clipboard.
To paste characters
Press the /// keys on the keyboard to move the cursor to the position
where you want to paste, and select “Paste” from the Context menu. The
characters saved in the clipboard are pasted.
Page 80
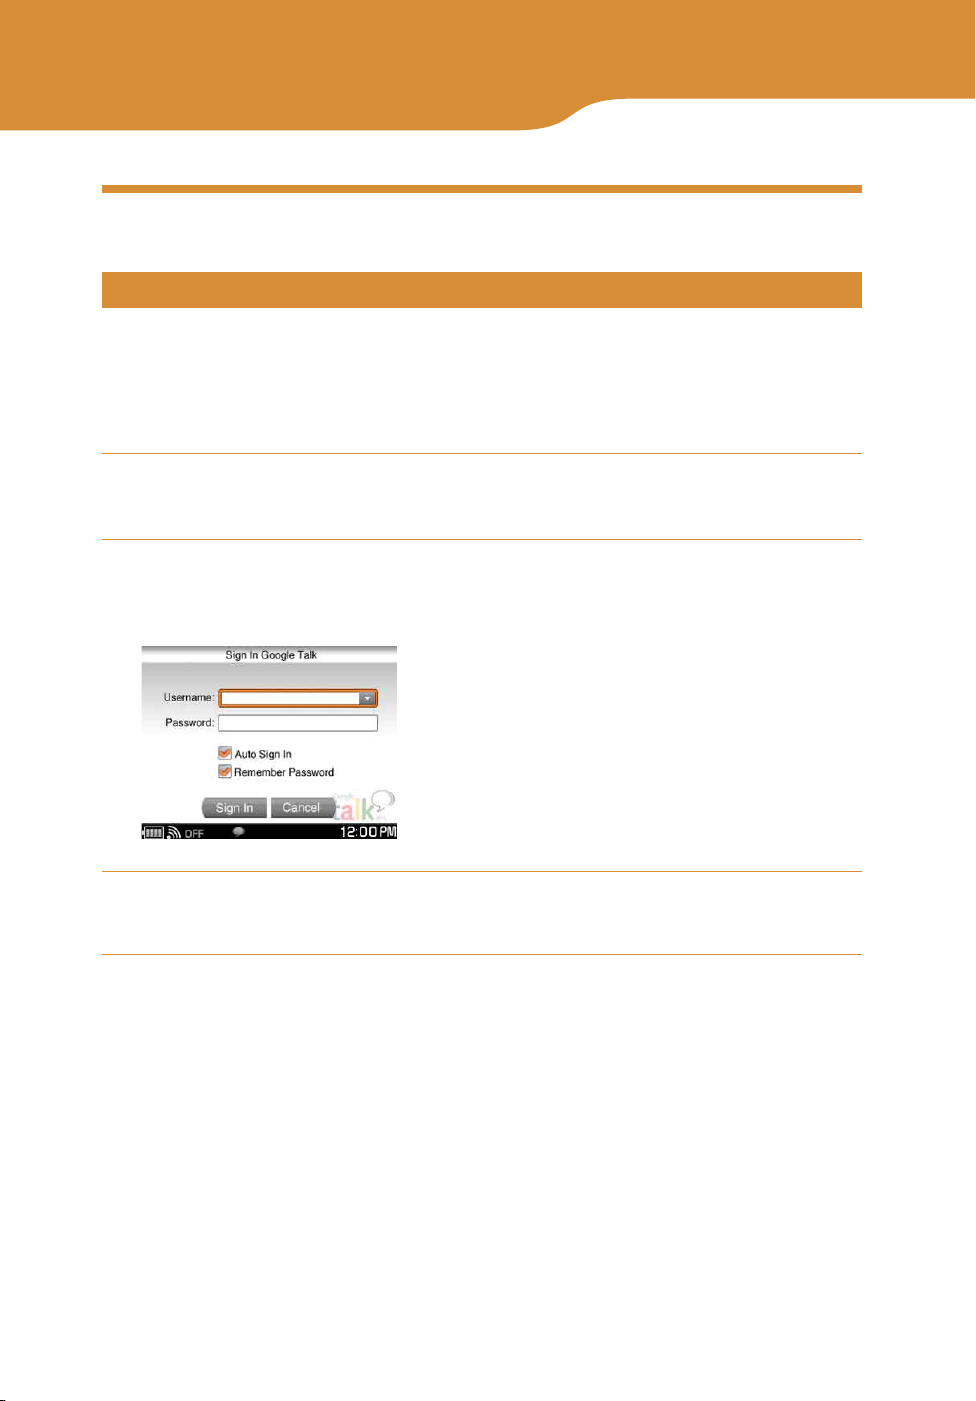
80
Table of
Contents
Index
80
Communication
— Google Talk
Starting Google Talk
Signing in to Google Talk
Register for a Gmail account before using Google Talk. If you have not yet
signed up for Google Talk, visit <http://www.sony.com/mylo/partners> to get a
Gmail account. If you already have a Gmail account, you can use your existing
account with your unit.
On the Home menu, press / to select “Communication,” and
then press the center button.
Press / to select “Google Talk,” and then press the center
button.
The Sign In screen appears.
Enter your username (Gmail account) and password using the
keyboard.
Continued
Page 81
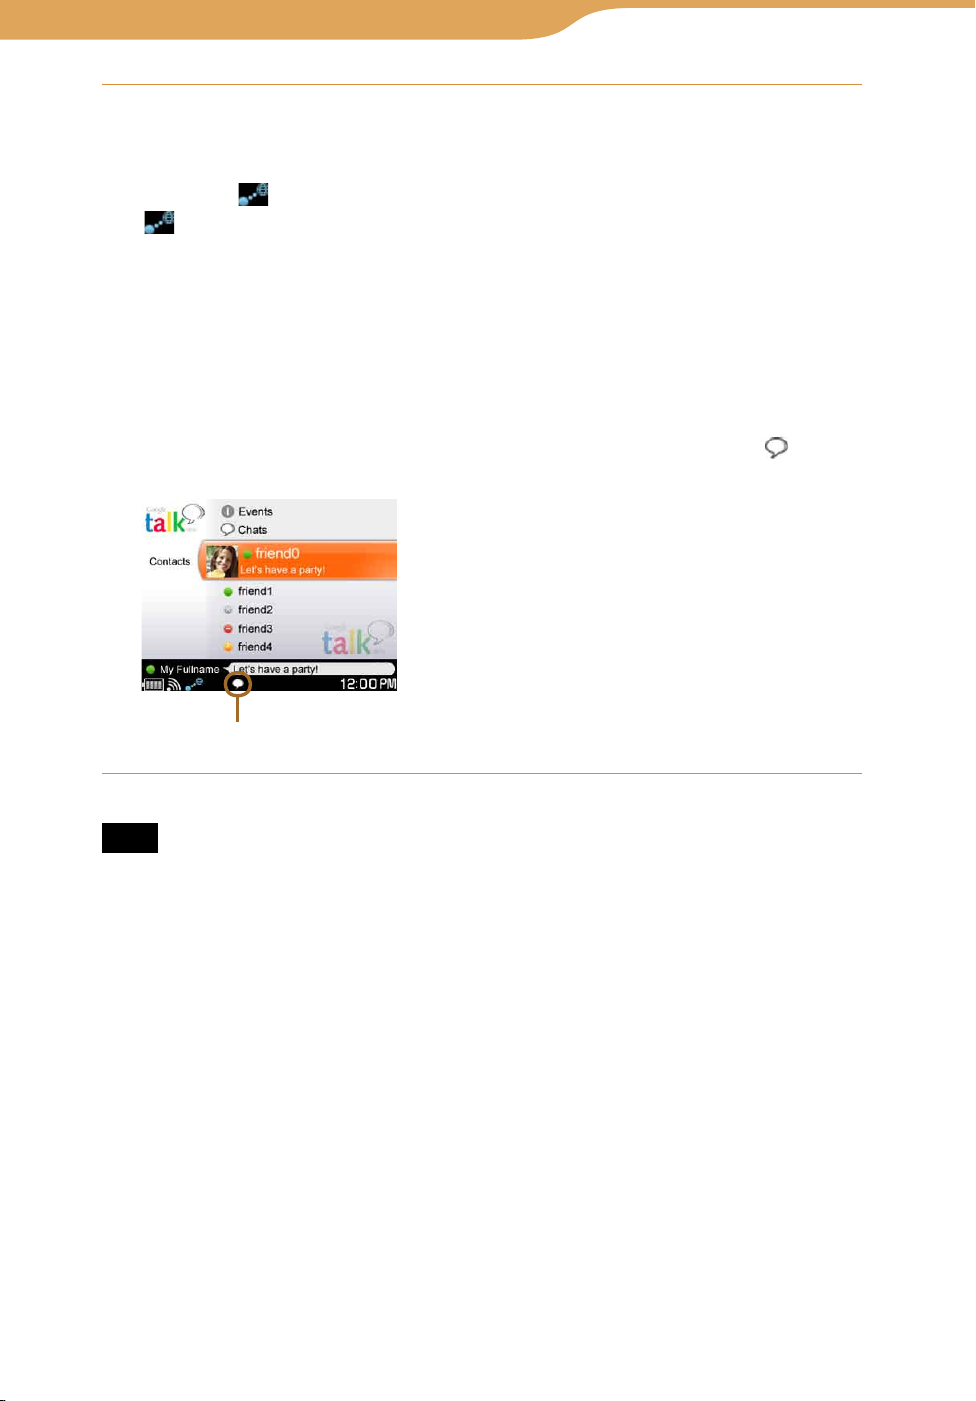
81
Index
Table of
Contents
81
Communication – Google Talk…Starting Google
Press / to select “Sign In,” and then press the center button.
The unit turns on the wireless LAN in infrastructure mode. The
WIRELESS LAN indicator lights up green, the status indicator lights up
blue, and appears on the status bar.
on the status bar of the display has the following meanings:
Blinks blue: The unit is attempting to connect to wireless network.
Lights up blue: The unit has connected to wireless network.
Lights up white: The unit has been unable to connect to wireless network.
When the connection to wireless network is completed, press BACK to
close the Connection Dialog. Then, select “Sign In,” and press the center
button again.
When the sign in is successful, the Contacts screen appears, and
(online) appears on the status bar of the display.
Online icon
Note
• If you are connecting to a public wireless hotspot, you may be required to log in using
the web browser once connected to the wireless network.
To sign in to Google Talk automatically
To have the unit automatically sign you in to Google Talk when it connects to
wireless LAN in infrastructure mode, select both the “Auto Sign In” and
“Remember Password” check boxes on the Sign In screen.
Continued
Page 82

82
Index
Table of
Contents
82
Communication – Google Talk…Starting Google
To delete all personal information regarding your Gmail account
Reset the settings of the unit to delete your personal information stored on the
unit. For detailed information, see
page 174.
To disconnect from wireless network
Slide and hold the WIRELESS LAN switch upward. The unit disconnects
from wireless network. The WIRELESS LAN indicator and status indicator
turn off, and
from wireless network, you are automatically signed out of Google Talk.
changes to “OFF” on the status bar. When the unit disconnects
To check the signal strength of the network connection
The signal strength of the connected network connection is displayed on the
status bar of the display. The more circles displayed around the antenna, the
stronger the signal of the network connection. When the unit is not connected
to wireless network, a gray antenna is displayed.
Continued
Page 83
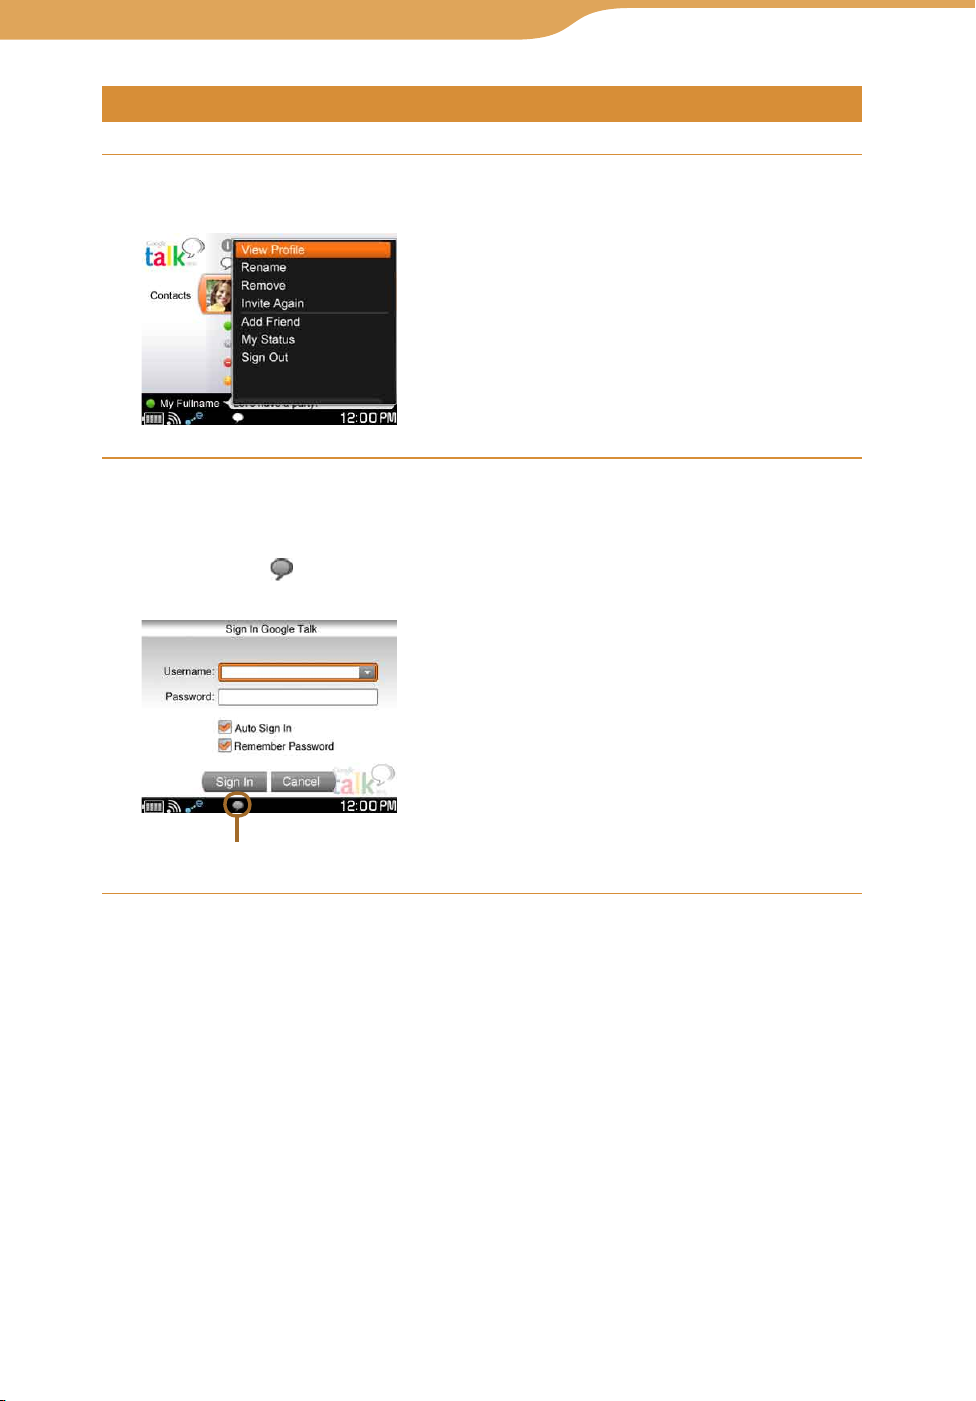
83
Index
Table of
Contents
83
Communication – Google Talk…Starting Google
Signing out of Google Talk
On any Google Talk screen, press OPTION.
The Context menu appears.
Press / to select “Sign Out,” and then press the center
button.
After you successfully sign out of Google Talk, the Sign In screen
appears, and (offline) appears on the status bar of the display.
To return to the Communication menu, press BACK.
Offline icon
Continued
Page 84
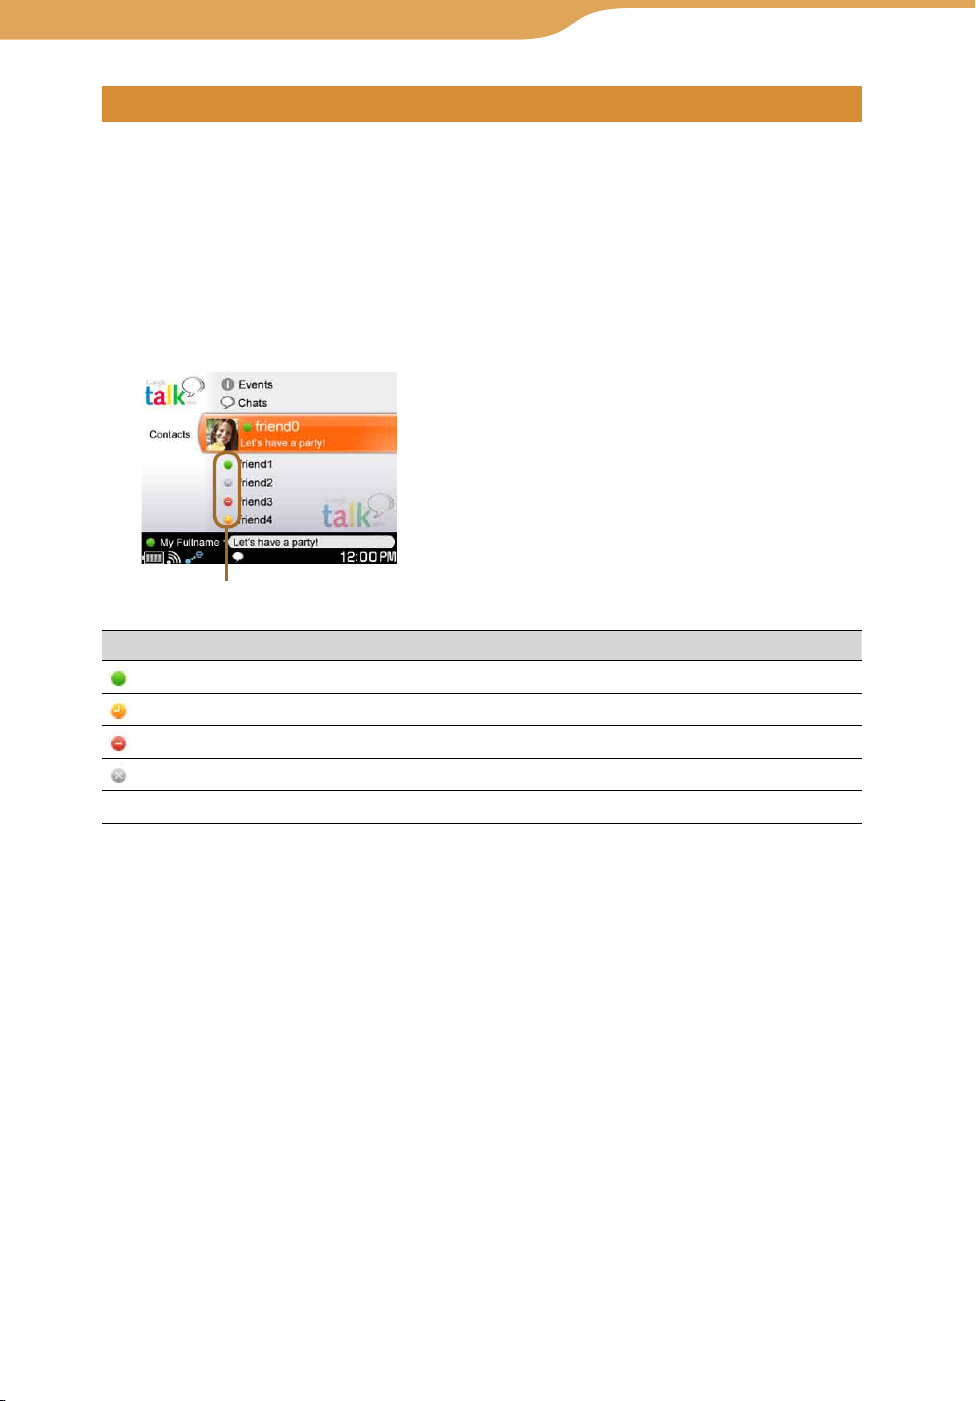
84
Index
Table of
Contents
84
Communication – Google Talk…Starting Google
Switching between screens
After signing in to Google Talk, you can switch between the following screens
to access various features.
Contacts screen
After signing in to Google Talk, the Contacts screen appears.
All of your contacts ( page 90) are displayed.
When a
The meaning of the status icons are described in the table below.
contact
Contact Status
is highlighted, his or her comment is displayed.
Icon Meaning
(Online)
(Idle)
(Busy)
(Offline)
– (Invited)
Your contact is online.
Your contact is idle.
Your contact is busy.
Your contact is offline.
The contact has not yet accepted your invitation.
Continued
Page 85
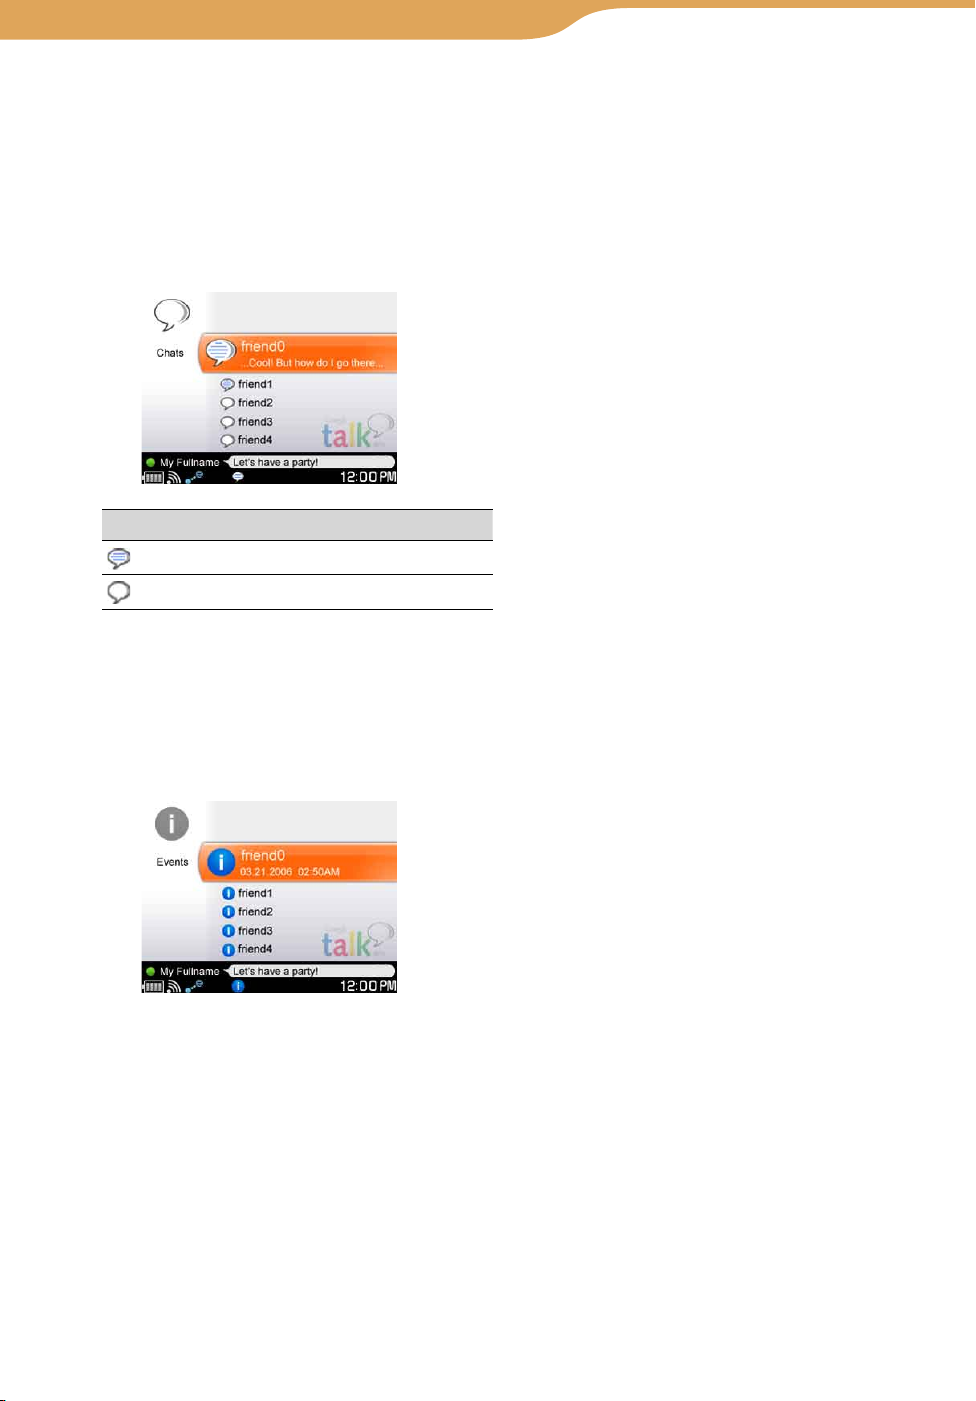
85
Index
Table of
Contents
85
Communication – Google Talk…Starting Google
Chats screen
The Chats screen appears when you select “Chats” on the Contacts screen by
pressing / and then pressing the center button.
To go back to the Contacts screen, press BACK.
The Chats screen displays any ongoing chats you have. Each ongoing chat
session has its own Chat screen.
The meanings of the chats icons are described in the table below.
Icon Meaning
Unread message
Ongoing chat
Events screen
The Events screen appears when you select “Events” on the Contacts screen
by pressing / and then pressing the center button.
To go back to the Contacts screen, press BACK.
The Events screen displays an invitation from other Google Talk users.
Gmail
When you select “Gmail Inbox” on the Contacts screen by pressing / and
then pressing the center button, the unit opens to Web Browser.
Continued
Page 86
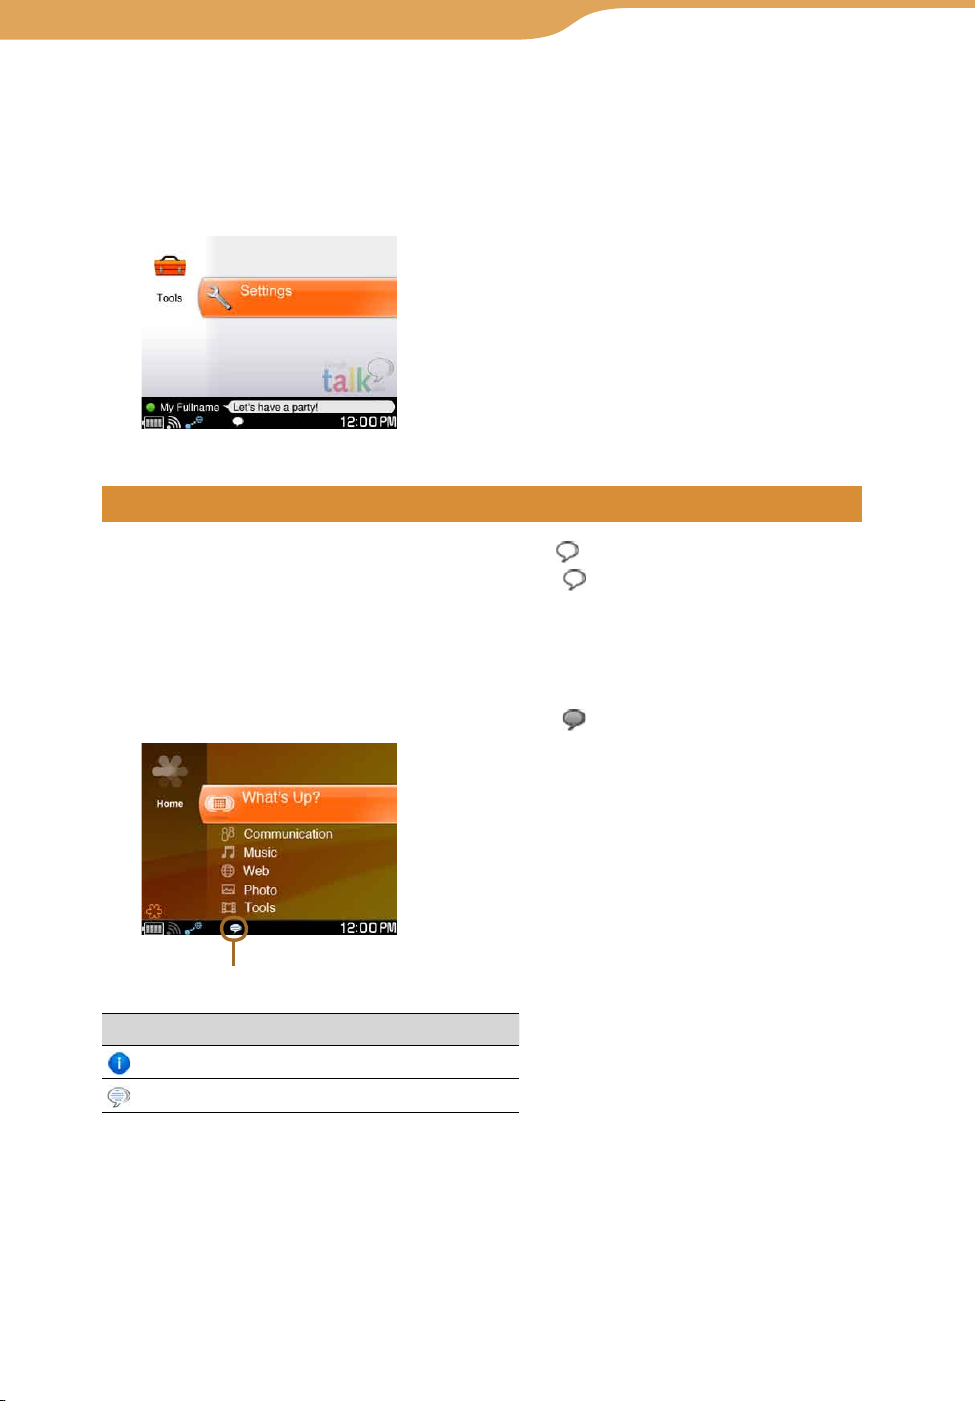
86
Index
Table of
Contents
86
Communication – Google Talk…Starting Google
Tools screen
The Tools screen appears when you select “Tools” on the Contacts screen by
pressing / and then pressing the center button.
To go back to the Contacts screen, press BACK.
The Tools screen displays and enables you to change the settings (
page 95).
Checking the status bar
When you successfully sign in to Google Talk, (online) appears on the
status bar of the display. When an event occurs,
the following event icons.
To display detailed information about the event when viewing another
application window, press INFO, and navigate to the communication panel to
view additional information about the event.
After you successfully sign out of Google Talk,
(online) changes to one of
(offline) appears.
Event icon
Icon Meaning
New invitation
New incoming chat
Continued
Page 87
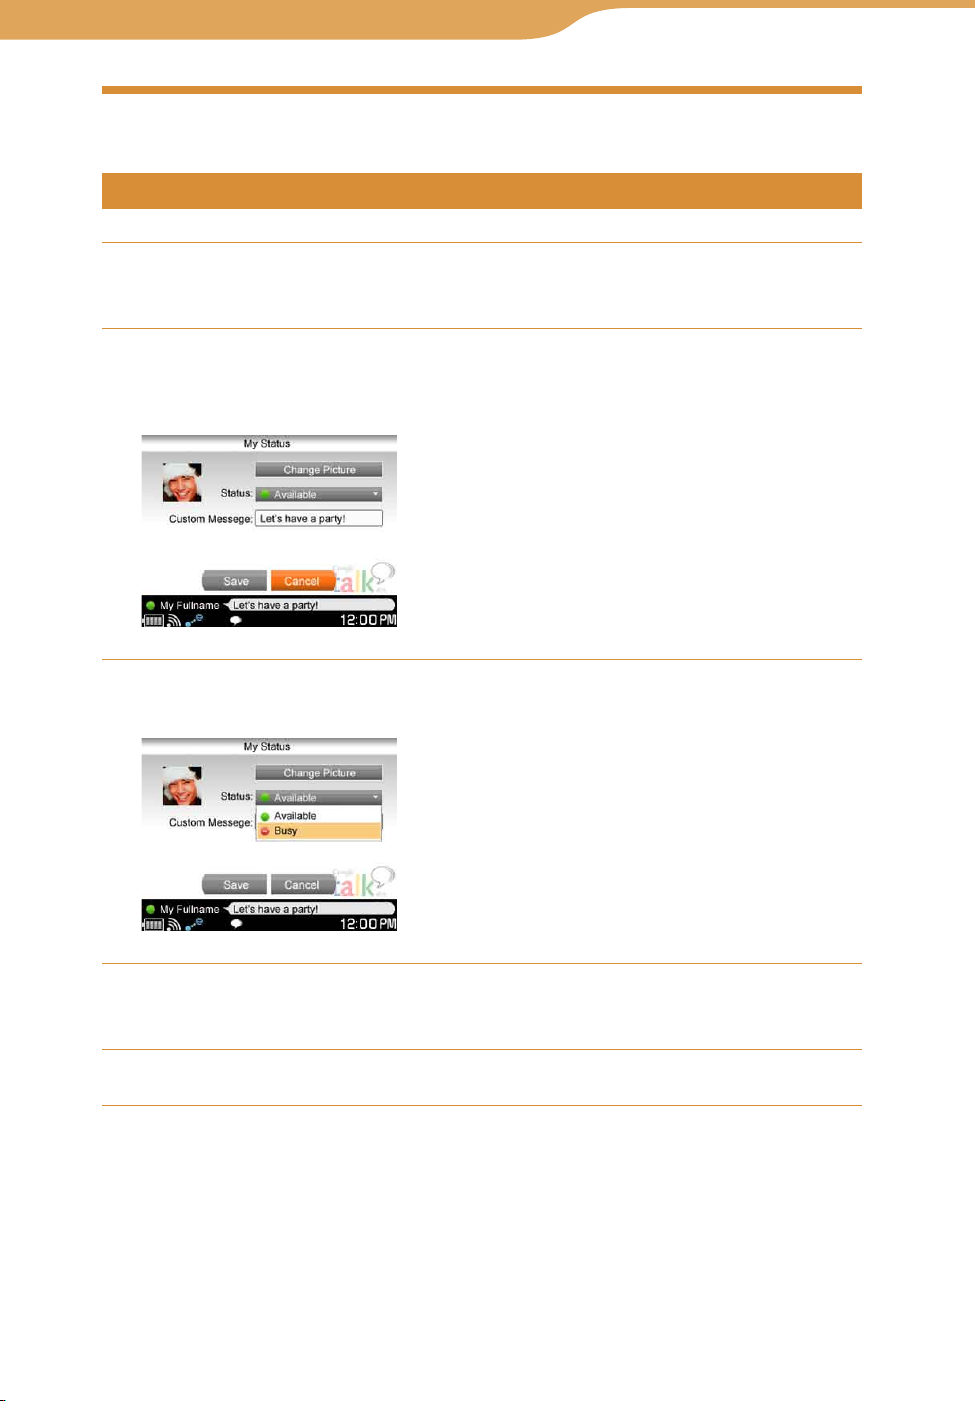
87
Index
Table of
Contents
87
Communication – Google Talk
Using the My Status Screen
Selecting your status
On any Google Talk screen, press OPTION.
The Context menu appears.
Press / to select “My Status,” and then press the center
button.
The My Status screen appears.
Press / to select “Status,” and then press the center button.
The list of status options appears.
Press / to select an option, and then press the center
button.
Press / to select “Save,” and then press the center button.
Continued
Page 88

88
Index
Table of
Contents
88
Communication – Google Talk…My Status
About My status
The following status options are available.
Icon Meaning
(Online)
(Busy)
You appear online to your contacts.
You appear busy to your contacts.
Entering comments
You can enter short comments, such as description of yourself or a message to
your friends, into your profile to be viewed by other users.
On any Google Talk screen, press OPTION.
The Context menu appears.
Press / to select “My Status,” and then press the center
button.
The My Status screen appears.
Press / to select “Custom Message,” and then press the
center button.
A Custom Message box is selected.
Enter messages using the keyboard, and then press the center
button.
Press / to select “Save,” and then press the center button.
Continued
Page 89
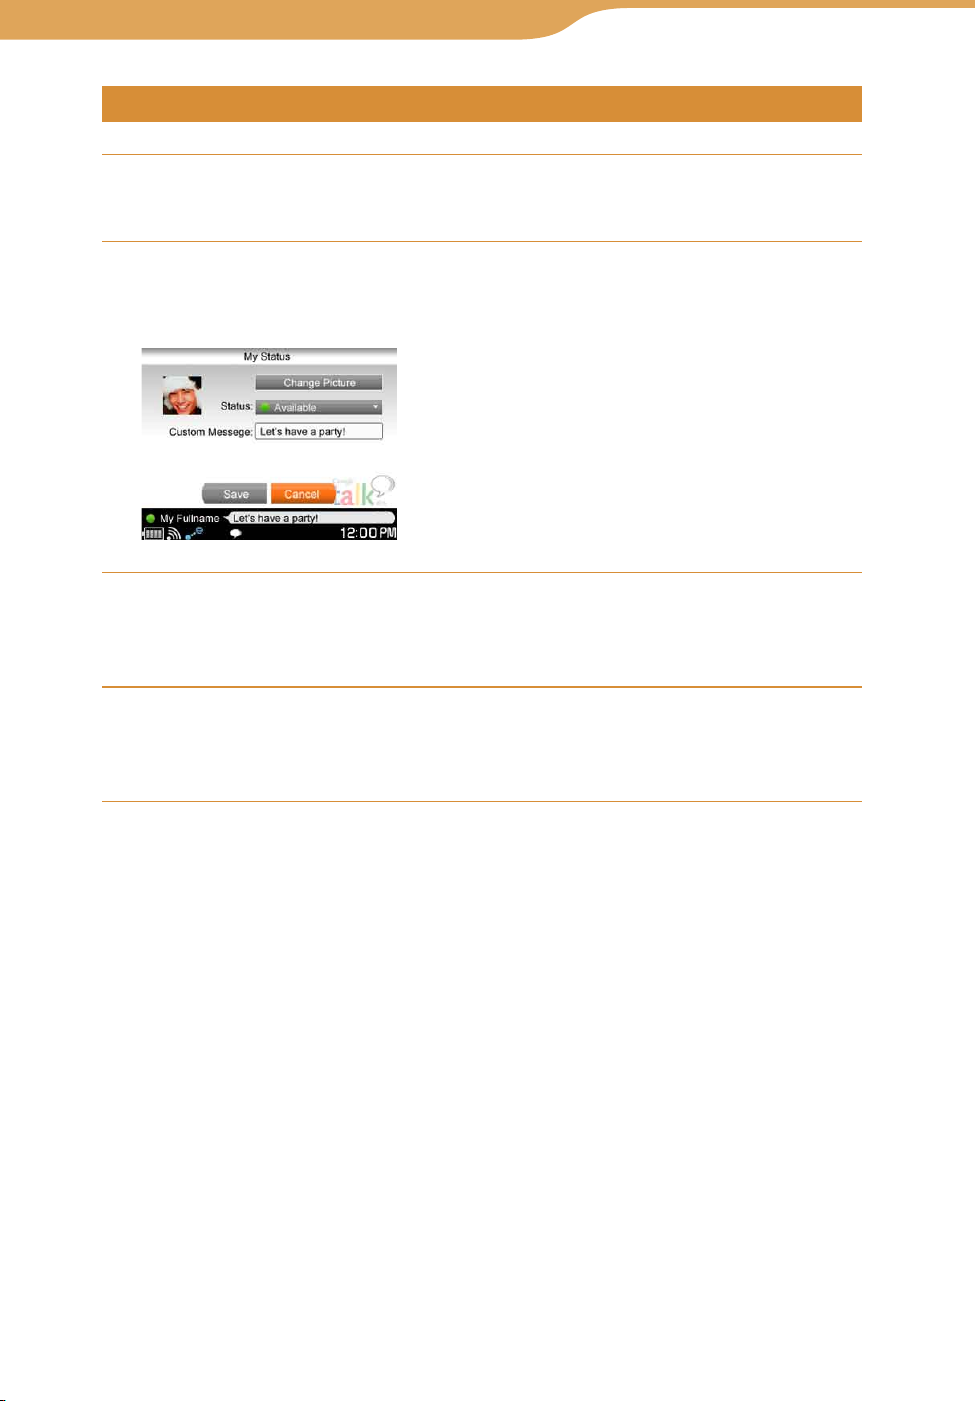
89
Index
Table of
Contents
89
Communication – Google Talk…My Status
Changing my picture
On any Google Talk screen, press OPTION.
The Context menu appears.
Press / to select “My Status,” and then press the center
button.
The My Status screen appears.
Press / to select “Change Picture,” and then press the
center button.
My Picture screen appears.
Press /// to select the picture you want to use, and then
press the center button.
The picture is changed.
Page 90
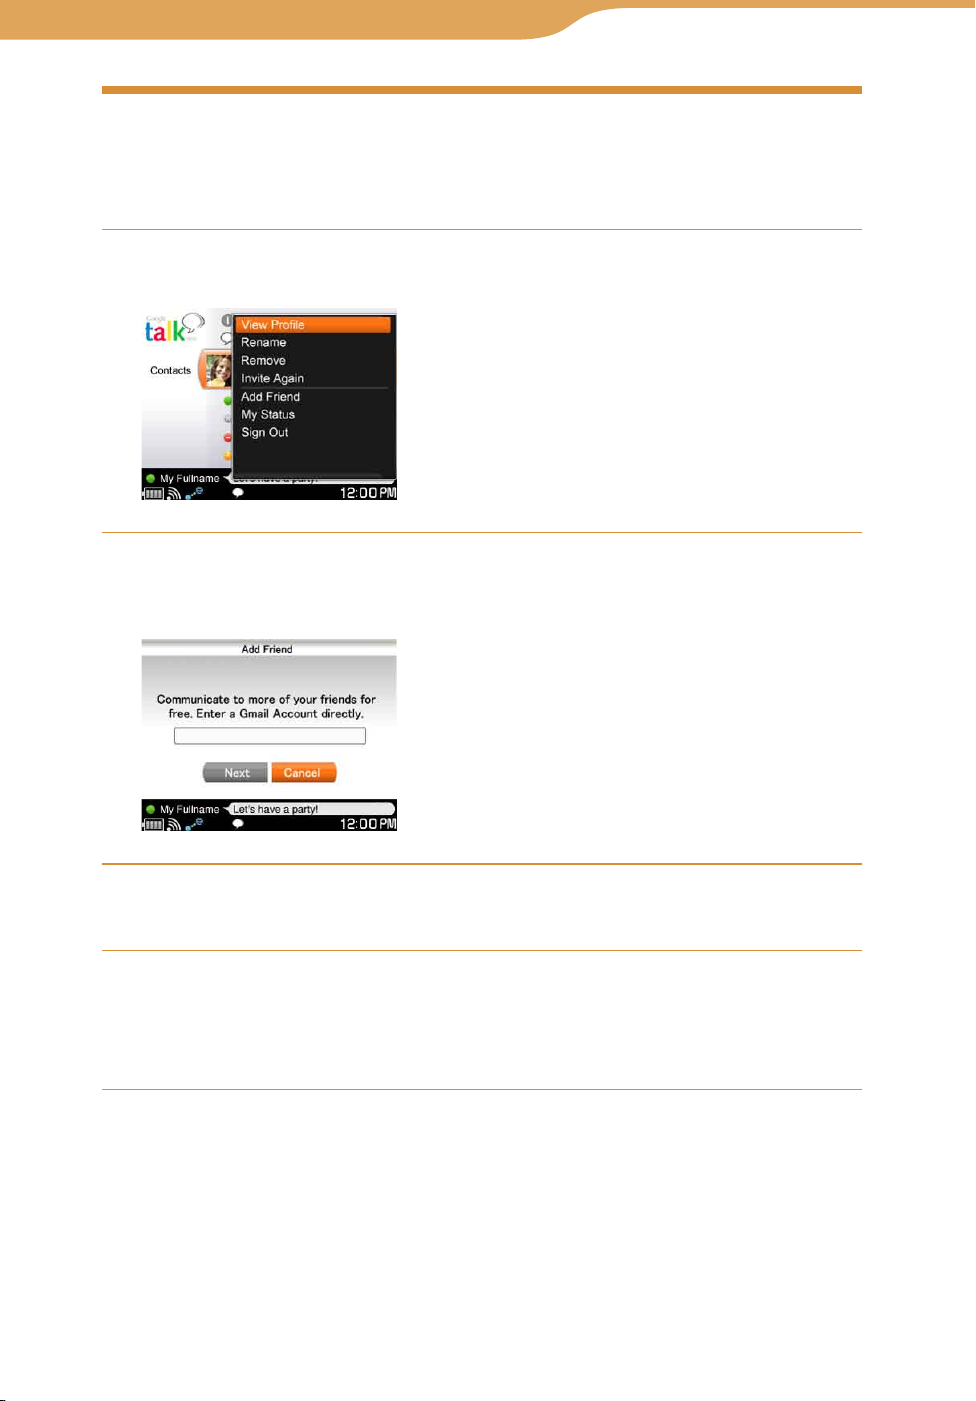
90
Index
Table of
Contents
90
Communication – Google Talk
Adding a User to Your Contacts
For many Google Talk features, such as starting a chat, your friends must be
added in your Google Talk Contacts.
On the Contacts screen, press OPTION.
The Context menu appears.
Press / to select “Add Friend,” and then press the center
button.
The Gmail account entry screen appears.
Use the keyboard to enter the user’s Gmail account.
The confirmation dialog appears.
Press / to select “Finish,” and then press the center button.
An invitation is sent to the selected user, and the user’s name is listed on
the contacts list. If the user accepts your invitation, the contact’s status
icon appears ( page 84).
Continued
Page 91

91
Index
Table of
Contents
91
Communication – Google Talk…Adding a User
To invite again
1 On the Contacts screen, press / to select the contact
(unregistered contacts have a status of “Invited”), and then press
OPTION.
The Context menu appears.
2 Press / to select “Invite Again,” and then press the center
button.
An invitation is sent to the selected contact, and the user’s name is listed on the
contacts list. If the user accepts your invitation, the contact’s status icon
appears ( page 84).
Accepting an invitation from other user
When another user invites you, (new invitation) appears on the status bar of
the display ( page 86).
Press INFO.
The communication panel appears.
Press / to select the new invitation, and then press the
center button.
The confirmation screen appears.
Press / to select “YES,” and then press the center button.
The user is added to your contacts list.
Editing your Contacts
You can edit your Contacts using the Context menu.
On the Contacts screen, press / to select the contact you
want to edit, and then press OPTION.
The Context menu appears.
Press / to select the desired function, and then press the
center button (
page 96).
Page 92
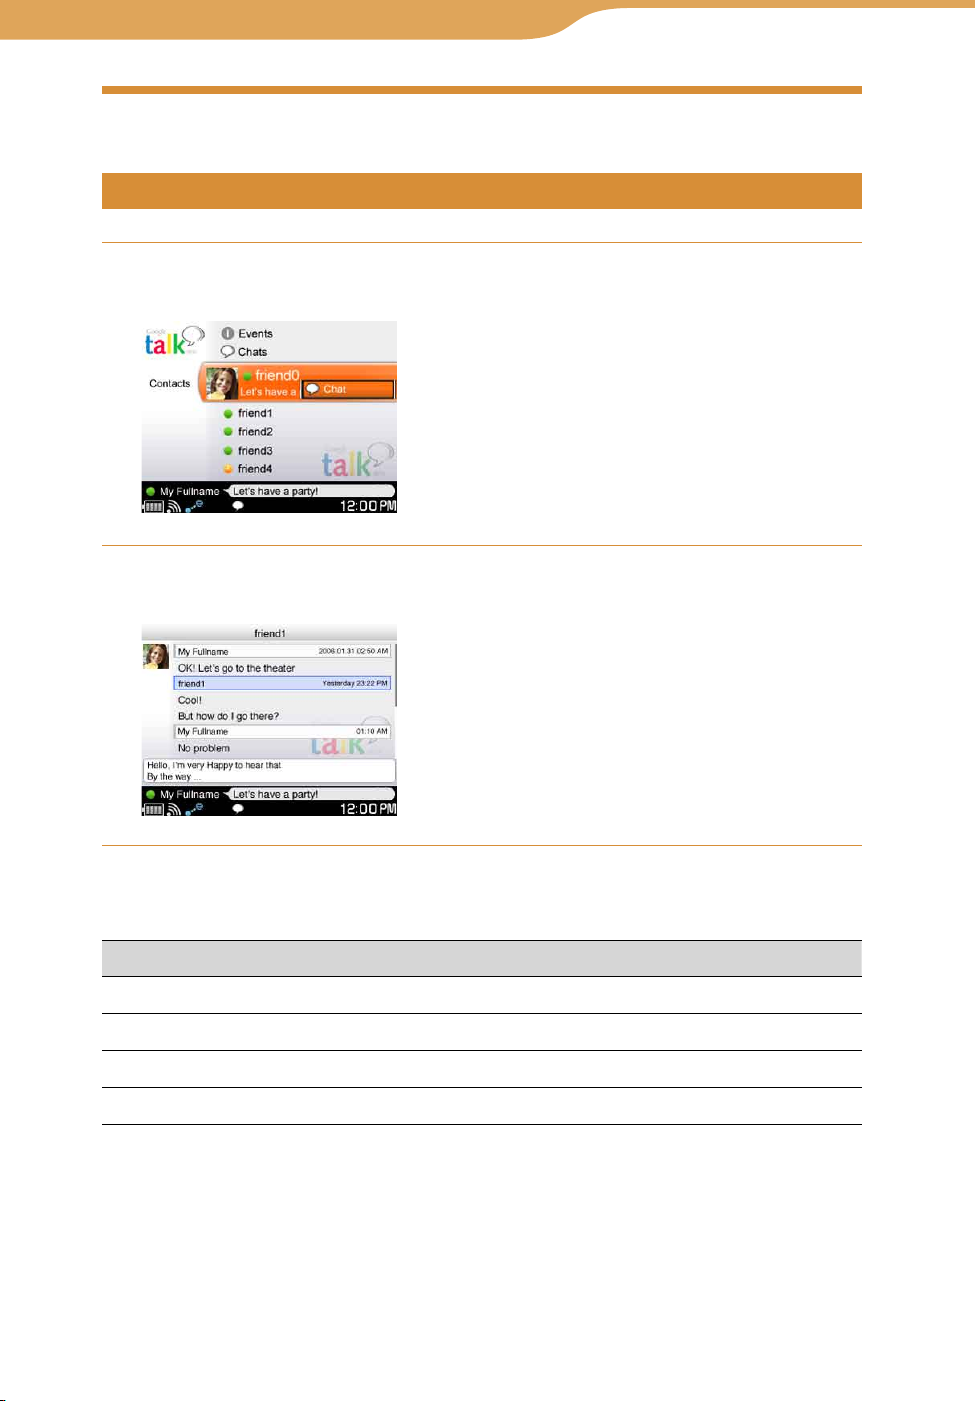
92
Index
Table of
Contents
92
Communication
–
Google Talk
Starting a Chat
Starting a new chat
On the Contacts screen, press / to select the contact you
want to chat with, and then press the center button.
Press the center button.
A chat screen appears, and you can begin your chat.
Basic operations on the chat screen
To Operation
Scroll Press Fn + /.
Move the cursor up or down Press
Create a new line Press Fn + Enter.
Send a message Press Enter.
///
.
Continued
Page 93
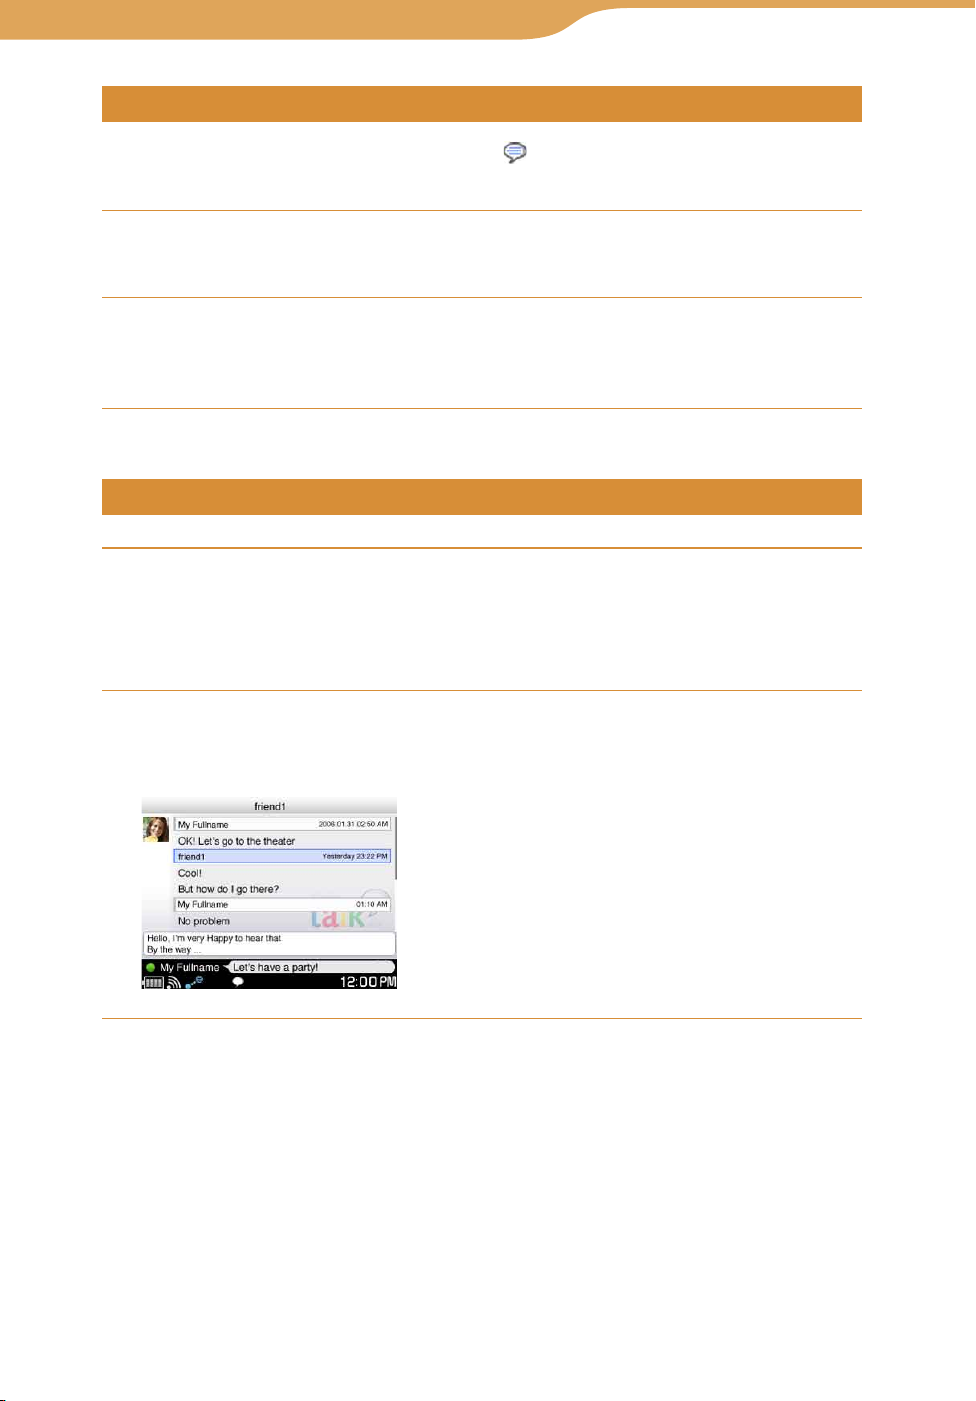
93
Index
Table of
Contents
93
Communication – Google Talk…Starting a Chat
Answering a new chat
When another user sends a new message, (new incoming chat) appears on
the status bar of the display ( page 86).
Press INFO.
The communication panel appears.
Press / to select the new incoming chat, and then press the
center button.
The chat screen appears, displaying the new message.
Returning to ongoing chat
On the Contacts screen, press / to select “Chats,” and then
press the center button.
The Chats screen appears. The contacts with whom you have ongoing
chats are listed.
Press / to select the contact you want to chat with, and then
press the center button.
The chat screen appears, and you can type a message.
Continued
Page 94

94
Index
Table of
Contents
94
Communication – Google Talk…Starting a Chat
Ending a chat
On the chat screen, press OPTION.
The Context menu appears.
Press / to select “End Chat,” and then press the center button.
The chat ends, and the chat screen disappears.
Page 95
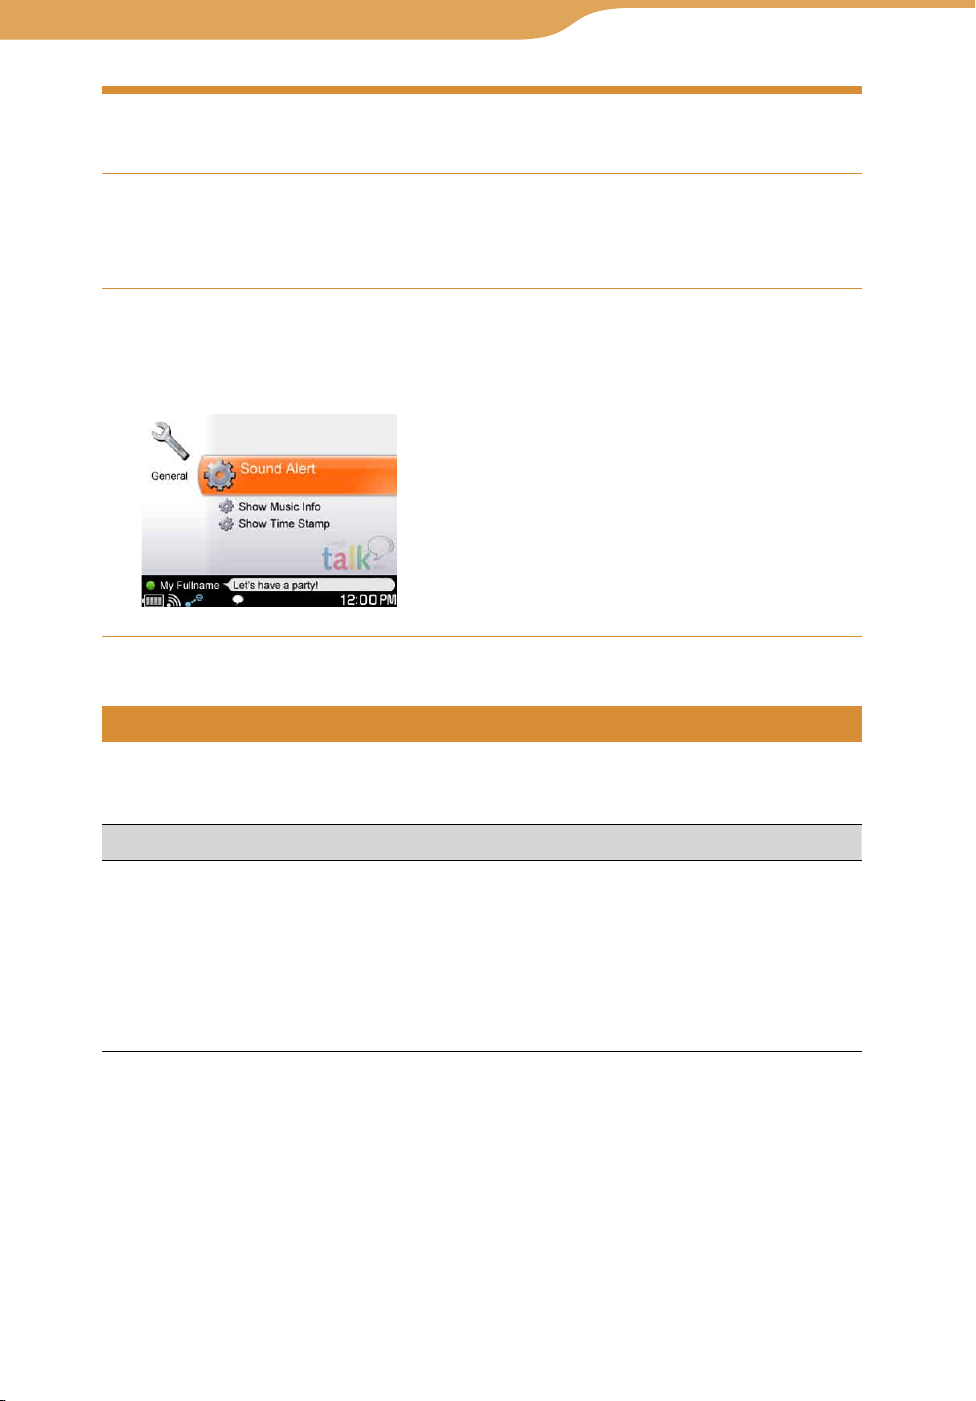
95
Index
Table of
Contents
95
Communication – Google Talk
Adjusting Settings (Tools)
On the Contacts screen, press / to select “Tools,” and then
press the center button.
The Tools screen appears.
Press / to select an item, and then press the center button.
The options appear.
Example: “General” settings
Items on the Tools screen
On the Google Talk Tools screen, you can adjust the following settings and
perform the following operations.
Item Setting or operation
General
• Sound Alert: If set to “ON” (default setting), alert sounds when
new event comes in.
• Show Music Info: If set to “ON,” the name of the track you are
listening to is displayed to your contacts. The default setting is
“OFF.”
• Show Time Stamp: If set to “ON” (default setting), a time stamp
is attached to each conversation entry.
Page 96
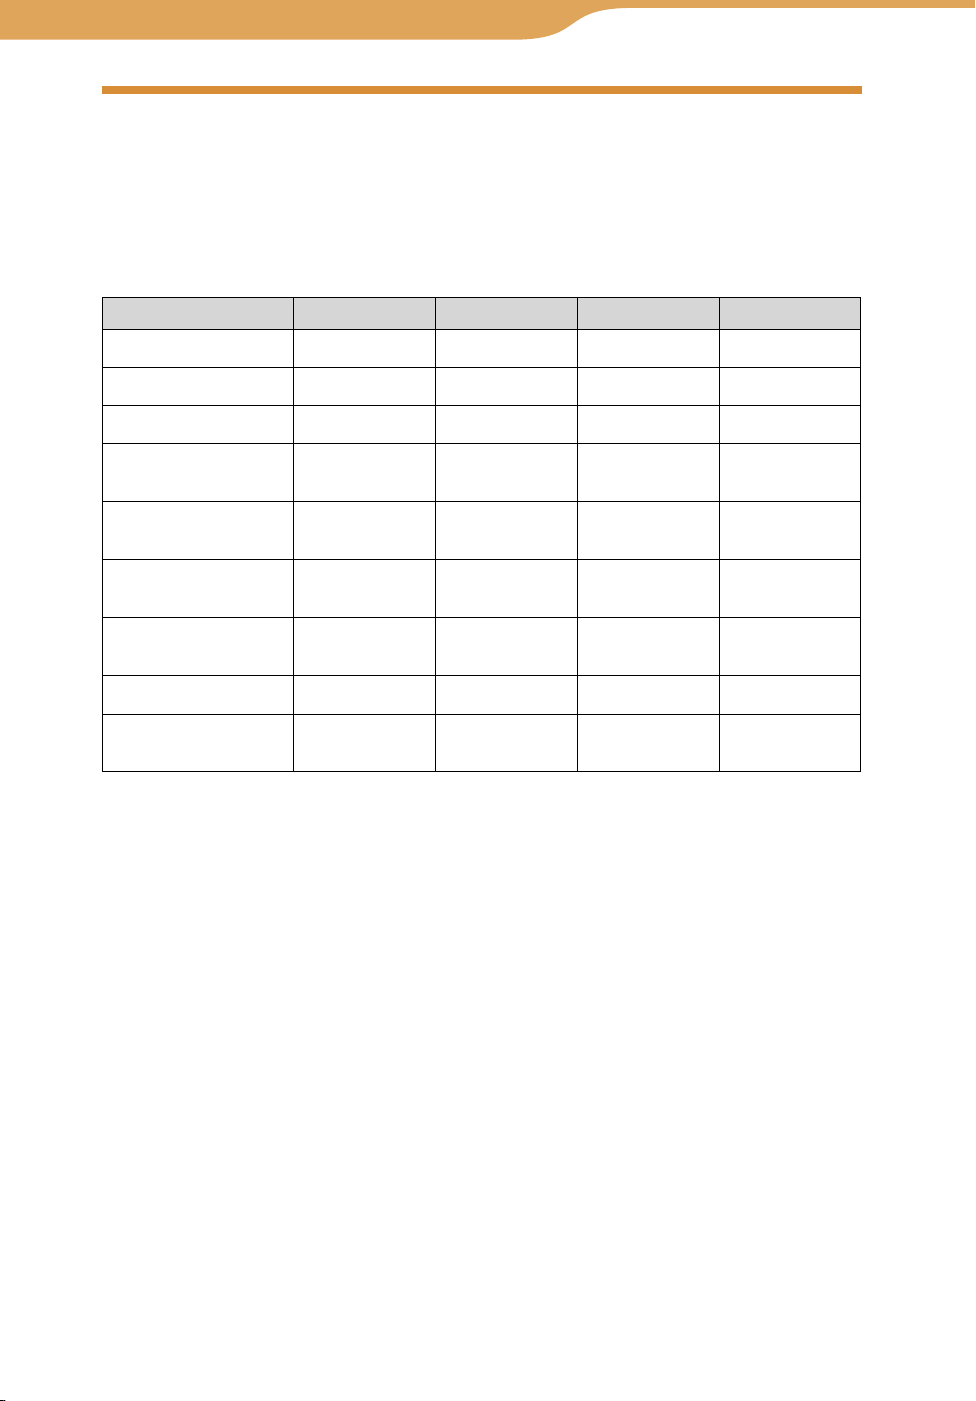
96
Index
Table of
Contents
96
Communication
–
Google Talk
Context Menus in Google Talk
Context menus appear when you press the OPTION button, enabling you to
perform various operations. What options appear on a Context menu depends
upon what screen you are currently viewing, as described in the tables on
pages 96 to 97.
Item Contacts Events Chats Ongoing Chat
View Profile
Rename
Remove
Invite Again
( page 91)
End Chat
( page 94)
Add Friend
( page 90)
My Status
( page 87)
Help
Sign Out
( page 83)
Continued
Page 97

97
Index
Table of
Contents
97
Communication –
Item Tools View Profile Add Friend My Status
Google Talk
…Context Menus
Cut (
Copy (
Paste (
My Status
( page 87)
Sign Out
( page 83)
below)
below)
below)
To cut characters
Press the Shift and /// keys on the keyboard to select the characters you
want to cut, and select “Cut” from the Context menu. The selected characters
are saved in the clipboard.
To copy characters
Press the Shift and /// keys on the keyboard to select the characters you
want to copy, and select “Copy” from the Context menu. The selected
characters are saved in the clipboard.
To paste characters
Press the /// keys on the keyboard to move the cursor to the position
where you want to paste, and select “Paste” from the Context menu. The
characters saved in the clipboard are pasted.
Page 98
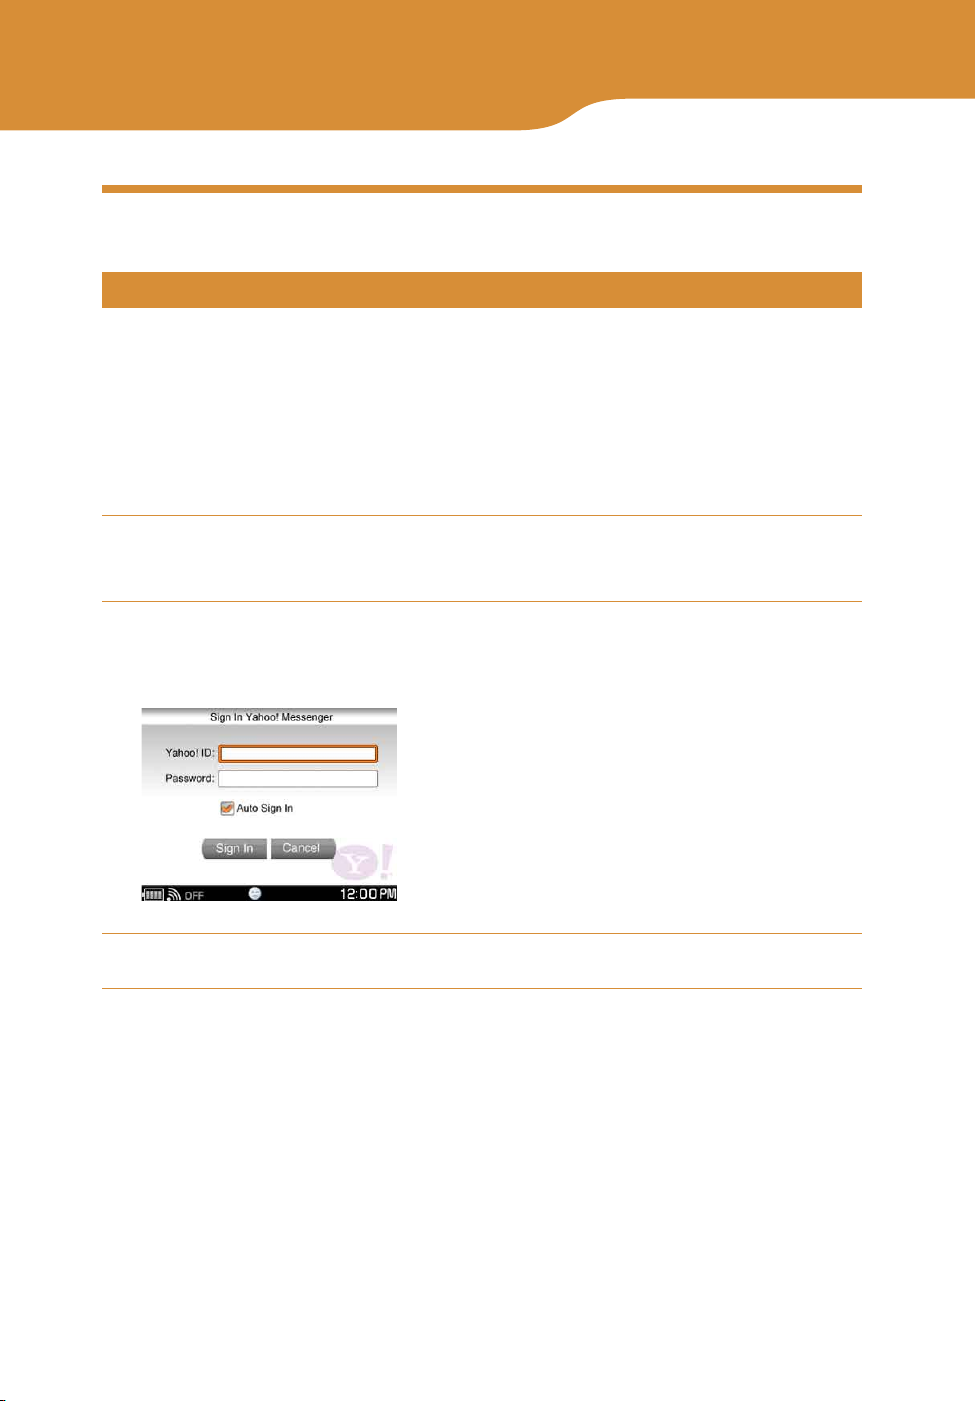
98
Table of
Contents
Index
98
Communication
— Yahoo! Messenger
Starting Yahoo! Messenger
Signing in to Yahoo! Messenger
Register for a Yahoo! ID before using Yahoo! Messenger If you have not yet
signed up for Yahoo! Messenger, visit <http://www.sony.com/mylo/partners>
to get a Yahoo! ID. If you already have a Yahoo! ID, you can use your existing
ID with your unit.
Yahoo!, Y! and the Yahoo! and Y! logos are the trademarks and/or registered trademarks
of Yahoo! Inc.
On the Home menu, press / to select “Communication,” and
then press the center button.
Press / to select “Yahoo! Messenger,” and then press the
center button.
The Sign In screen appears.
Enter your Yahoo! ID and password using the keyboard.
Continued
Page 99
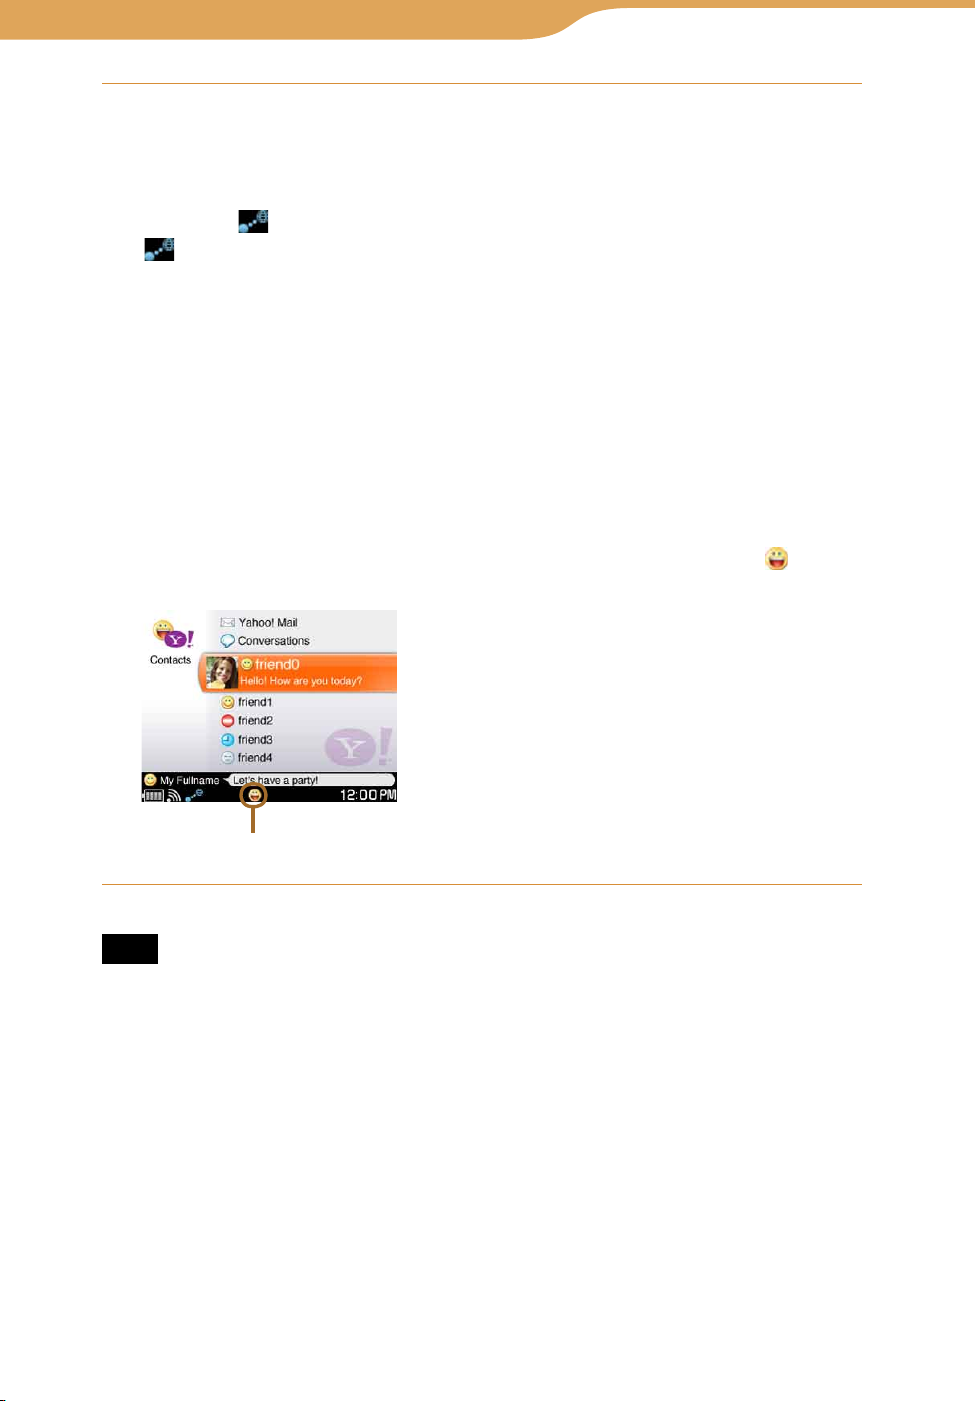
99
Index
Table of
Contents
99
Communication – Yahoo! Messenger
Press /// to select “Sign In,” and then press the center
…Starting Yahoo!
button.
The unit turns on the wireless LAN in infrastructure mode. The
WIRELESS LAN indicator lights up green, the status indicator lights up
blue, and appears on the status bar.
on the status bar of the display has the following meanings:
Blinks blue: The unit is attempting to connect to wireless network.
Lights up blue: The unit has connected to wireless network.
Lights up white: The unit has been unable to connect to wireless network.
When the connection to wireless network is completed, press BACK to
close the Connection Dialog. Then, select “Sign In,” and press the center
button again. If you are signing in to Yahoo! Messenger with a Yahoo! ID
that you have not previously used with the unit, Terms of Service screen
appears. Follow the instructions on the display to sign in to Yahoo!
Messenger.
When the sign in is successful, the Contacts screen appears, and
(online) appears on the status bar of the display.
Online icon
Note
• If you are connecting to a public wireless hotspot, you may be required to log in using
the web browser once connected to the wireless network.
To sign in to Yahoo! Messenger automatically
To have the unit automatically sign you in to Yahoo! Messenger when it
connects to wireless LAN in infrastructure mode, select the “Auto Sign In”
check box on the Sign In screen.
Continued
Page 100

100
Index
Table of
Contents
100
Communication – Yahoo! Messenger
…Starting Yahoo!
To delete all personal information regarding your Yahoo! ID
Reset the settings of the unit to delete your personal information stored on the
unit. For detailed information, see
page 174.
To disconnect from wireless network
Slide and hold the WIRELESS LAN switch upward. The unit disconnects
from wireless network. The WIRELESS LAN indicator and status indicator
turn off, and
from wireless network, you are automatically signed out of Yahoo! Messenger.
changes to “OFF” on the status bar. When the unit disconnects
To check the signal strength of the network connection
The signal strength of the connected network connection is displayed on the
status bar of the display. The more circles displayed around the antenna, the
stronger the signal of the network connection. When the unit is not connected
to wireless network, a gray antenna is displayed.
Continued
 Loading...