

Sony COM-1 STARTUP GUIDE
2-668-392-12(1)
© 2006 Sony Corporation

2
Owner’s Record
The serial number is located inside battery compartment. Record the serial
number in the space provided below. Refer to these numbers whenever you
call upon your Sony dealer regarding this product.
Model No. COM-1
Serial No. _______________________
WARNING
You are cautioned that any changes or modifications not expressly approved
in this manual could void your authority to operate this equipment.
This equipment has been tested and found to comply with the limits for a
Class B digital device, pursuant to Part 15 of the FCC Rules. These limits
are designed to provide reasonable protection against harmful interference
in a residential installation. This equipment generates, uses, and can radiate
radio frequency energy and, if not installed and used in accordance with
the instructions, may cause harmful interference to radio communications.
However, there is no guarantee that interference will not occur in a particular
installation. If this equipment does cause harmful interference to radio or
television reception, which can be determined by turning the equipment off
and on, the user is encouraged to try to correct the interference by one or
more of the following measures:
– Reorient or relocate the receiving antenna.
– Increase the separation between the equipment and receiver.
– Connect the equipment into an outlet on a circuit different from that to
which the receiver is connected.
– Consult the dealer or an experienced radio/TV technician for help
This transmitter must not be co-located or operated in conjunction with any
other antenna or transmitter.
This equipment complies with FCC radiation exposure limits set forth for
uncontrolled equipment and meets the FCC radio frequency (RF) Exposure
Guidelines in Supplement C to OET65. This equipment has very low levels of
RF energy that it is deemed to comply without testing of specific absorption
rate (SAR).
This device complies with Part 15 of the FCC Rules. Operation is subject
to the following two conditions: (1) this device may not cause harmful

3
interference, and (2) this device must accept any interference received,
including interference that may cause undesired operation.
The supplied interface cable must be used with the equipment in order to
comply with the limits for a digital device pursuant to Subpart B of Part 15 of
FCC Rules.
If you have any questions about this product:
Visit:
http://www.sony.com/mylo
Contact:
Sony Customer Information Services Center at 1-(866)-420-7669
Write:
Sony Customer Information Services Center
12451 Gateway Blvd.,
Ft. Myers, FL 33913
For an accessory or part not available from your authorized dealer, call:
1-800-488-SONY (7669)
Model COM-1
Declaration of Conformity
Trade Name: SONY
Model No.: COM-1
Responsible Party: Sony Electronics Inc.
Address: 16530 Via Esprillo
San Diego, CA 92127
USA
Telephone No.: 858-942-2230
RECYCLING LITHIUM-ION BATTERIES
Lithium-ion batteries are recyclable.
You can help preserve our environment by returning your
used rechargeable batteries to the collection and recycling
location nearest you.
For more information regarding recycling of rechargeable batteries, call
toll free 1-800-822-8837, or visit http:// www.rbrc.org/ .
Caution: Do not handle damaged or leaking Lithium-ion batteries.

Note on using
IP communication is not a replacement for your ordinary telephone and should
not be used for emergency calling.
Notes on this manual
Screen shots in this manual may be different from the actual displays in the
supplied software.
LCD display
The LCD of your Personal Communicator is designed with precision
technology. However, in some cases, individual pixels may remain lit or may
not light at all. Also, the brightness of the display may appear inconsistent,
depending on the angle of view. Such anomalies are caused by the nature of
the LCD and do not indicate a malfunction.
Please note that Sony does not guarantee a replacement or refund for such
cases.
Do not expose the LCD to direct sunlight for prolonged periods of time. It
may result in a malfunction. Do not store your Personal Communicator in
areas subject to sunlight, such as near windows, and be careful when using
outdoors.
No guarantee for lost or damaged data
Sony does not provide any guarantee for lost or damaged data.
Copyrights
Television programs, films, video tapes, music, and other materials may
be copyrighted. Unauthorized recording of such materials may violate
copyright laws.
Third Party Service Features and Availability
Certain features, such as Skype, Yahoo! and Google branded services, are
provided by third parties. Sony does not guarantee such services or warrant
their continued availability. Sony expects the features and nature of such
services will change over time.
4

5
Table of Contents
Overview ......................................6
For Detailed Information ..............
8
What’s in the Box .........................
8
Preparation
The Parts of Your Personal
Communicator ..........................9
The status bar ......................... 12
Using the keyboard ................
14
Step 1: Preparing a Power
Source ....................................15
Installing the supplied battery ... 15
Charging the battery ............... 16
Step 2: Setting up Your Personal
Communicator ........................18
Turning on your unit ................. 18
Entering your information ........
19
Wireless LAN Settings
— Infrastructure Mode ............20
Turning on wireless LAN in
infrastructure mode ................
21
Wireless LAN Settings
— Ad Hoc Mode .....................24
Turning on wireless LAN in
Ad Hoc mode ......................... 25
Adding users to your Ad Hoc
Contact list ............................. 25
Basic Operations
Home Menu ...............................27
Context Menu ............................
28
What’s Up Screen ......................28
Info
Screen ................................29
Things to Do With Your
Personal Communicator
Communication — Skype ..........30
Communication
— Google Talk ........................31
Communication
— Yahoo! Messenger ..............32
Communication
— Ad Hoc Application .............33
Web ...........................................
34
Music .........................................35
Photo .........................................36
Video .........................................37
Text ............................................
38
Tools ..........................................
39
For More Information
File Structures ...........................40
Folder structure of the internal
memory ...................................
40
Folder structure of “Memory
Stick Duo” ............................... 42
Supplied CD-ROM .....................44
About the Operating
Instructions PDF file ................ 44
About the supplied software ...
44
System requirements ...............
46
Installing the PDF file and the
supplied software ...................
47
Starting up the
supplied
software .................................. 48
When installation is not
successful – Q&A ................... 49
On Copyrights and Licenses .....50
Index ..........................................
54
6
Overview
This explains some of the main features of your Personal Communicator, such
as making calls with Skype and playing music.
For detailed information about each feature, see the Operating
Instructions, available as a PDF file on the supplied CD-ROM.
The features described below are only a few of your unit’s capabilities.
Explore the unit and the Operating Instructions PDF file to find the features
most interesting to you.
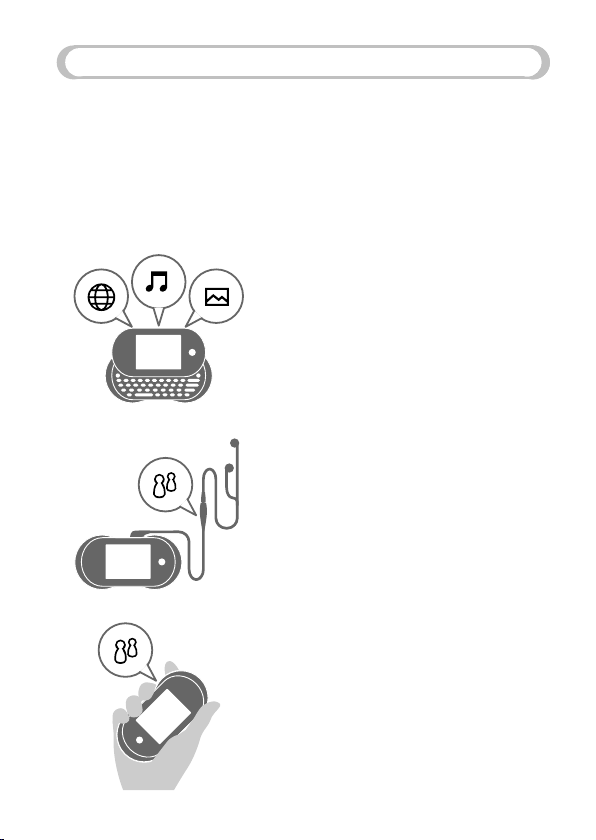
With your Personal Communicator,
you can chat with friends, browse
websites on the Internet, listen to
music, and view photos.
You can make an Internet Call, such
as Skype calls, using the supplied
headset and operating the unit
from the one touch answer remote
controller.
You can make an Internet Call using
the speaker and microphone on the
unit instead of using the headset.

7
You can listen to music wirelessly
from a friend’s Personal
Communicator, and a friend can
listen to music wirelessly from your
Personal Communicator.
For Detailed Information
This “Start-up Guide” provides steps for setting up
your Personal Communicator COM-1 and a quick
overview of how to operate the unit. For more detailed
information about your unit, including troubleshooting
information, refer to the Operating Instructions,
available as a PDF file on the supplied CD-ROM (
page 44).
The cover page of the Operating Instructions PDF file
is shown on the right.
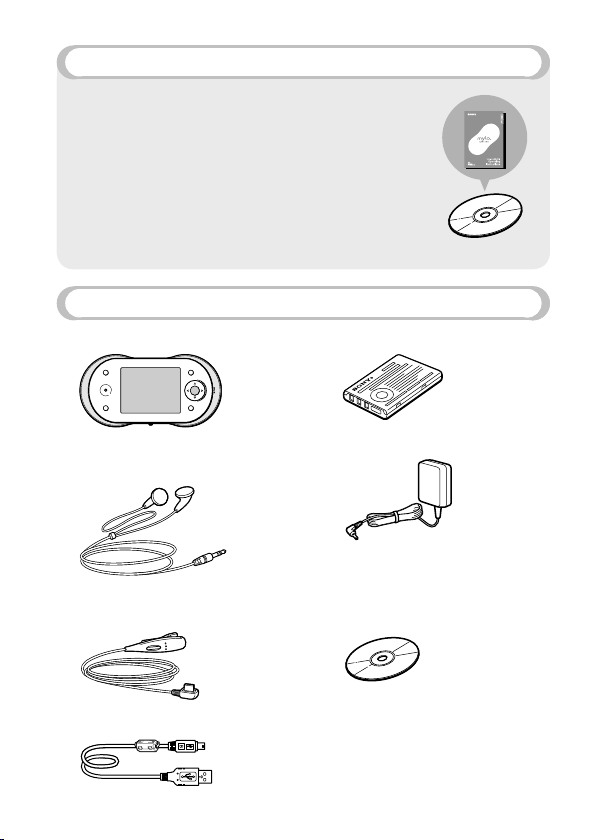
What’s in the Box
• Personal communicator
• Rechargeable battery
• Headset
– Headphones
– One touch answer remote
controller
• USB cable
8
• AC power adaptor
• CD-ROM
(containing the Operating
Instructions PDF file and the
supplied software)
• Battery case
• Start-up Guide (this book)
• Carrying pouch
• Other printed materials
9
Preparation
Preparation
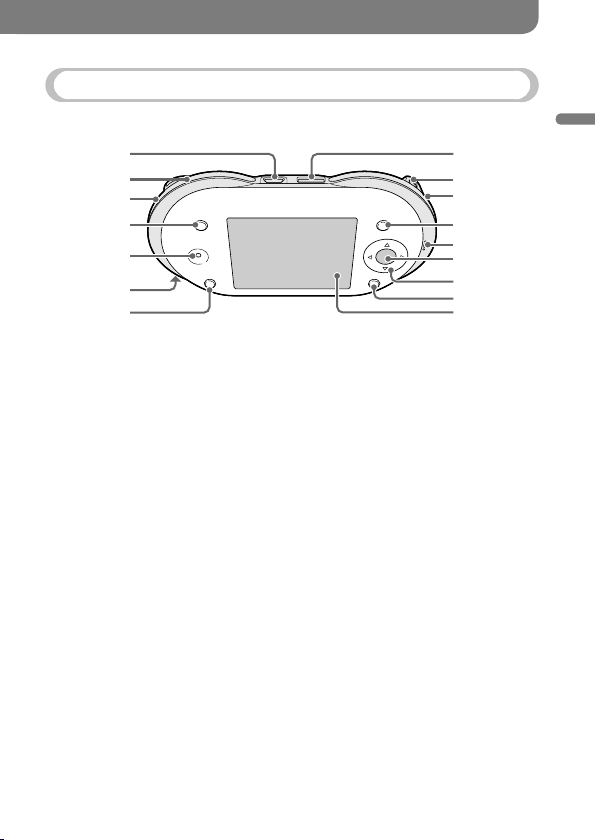
The Parts of Your Personal Communicator
Front
(USB) connector ( page 17)
Connects your unit to a computer.
WIRELESS LAN switch/
indicator ( page 21, 25)
Turns on wireless LAN. When it
turns on, the indicator lights up.
“Memory Stick Duo” access
indicator ( page 12)
When the unit accesses the
“Memory Stick Duo,” the
indicator lights up.
INFO button ( page 29)
Displays detailed information
about outstanding notifications
for communication applications
and about music playing on the
device. For example, you can
quickly find notifications of
incoming messages you have
received or easily view the title
of the music track currently
playing on your unit.
Speaker
Outputs the other user’s voice
during an Internet call.
POWER switch/indicator
( page 18)
Turns your unit on and off.
When the unit is turned on, the
indicator lights up.
CHARGE indicator
( page 16)
While the unit is charging or
when the unit is in a standby
mode for charging, the indicator
lights up. When the battery is
completely charged, the indicator
goes off.
HOME button (
pages 27, 28)
Pressing
displays the Home
menu. Pressing and holding
displays the What’s Up screen.
(headset) jack
Connects to the supplied headset.
Continued

10
DC IN 6V jack
( page 16)
Connects to the supplied AC
power adaptor.
Status indicator
( page 21, 25)
Lights up blue when the unit
turns on wireless LAN in
infrastructure mode. Lights up
orange for Ad Hoc mode.
OPTION button ( page 28)
Displays a menu of options
relating to what you are
currently doing.
Microphone
Picks up your voice for
applications requiring voice
input.
Center button
Activates the selected item or
confirms an entry.
4-way button (///)
Moves the highlight or cursor.
BACK button
Returns to the previous screen.
Display
Remove the protective sheet
from the display before using
the unit.
Back
Loudspeaker
Outputs audio from non-voice
features, such as music and
video playback and ringing
alerts for an Internet call.
HOLD switch
Locks the controls on the unit.
VOL (volume) +/– buttons
Adjusts the volume.
“Memory Stick Duo” slot
( page 12)
Open the cover to insert or
remove a “Memory Stick Duo.”
Jog lever (///)
Starts and stops playback. Finds
the beginning of the current/
previous/next tracks. Goes
forward/backward quickly.
11
Preparation
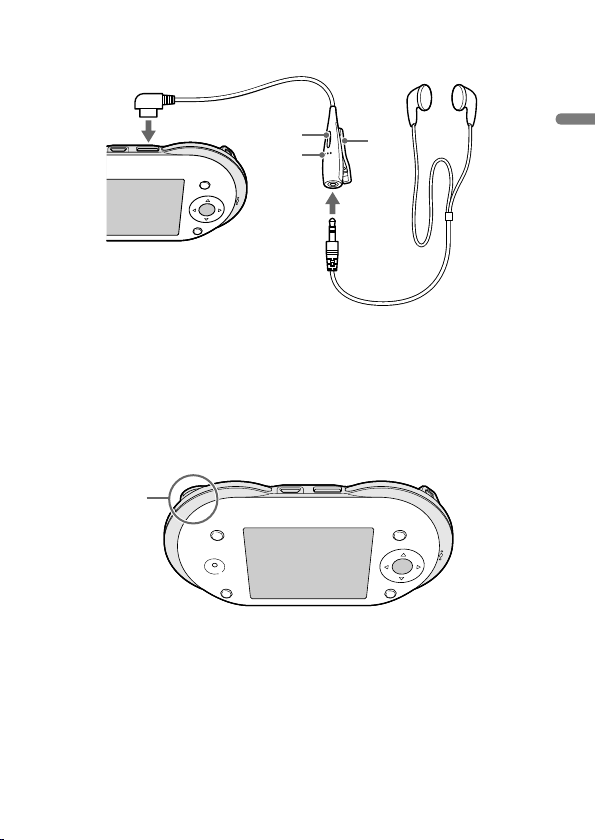
To connect the supplied headset
To (headset) jack
Remote call control button
Answers or ends an Internet call.
Microphone
Picks up your voice during an
Internet call.
Clip
Holds the remote controller to
your clothes.
About the built-in antenna
Built-in antenna
Used by the unit to connect to
the wireless network.
Continued
12
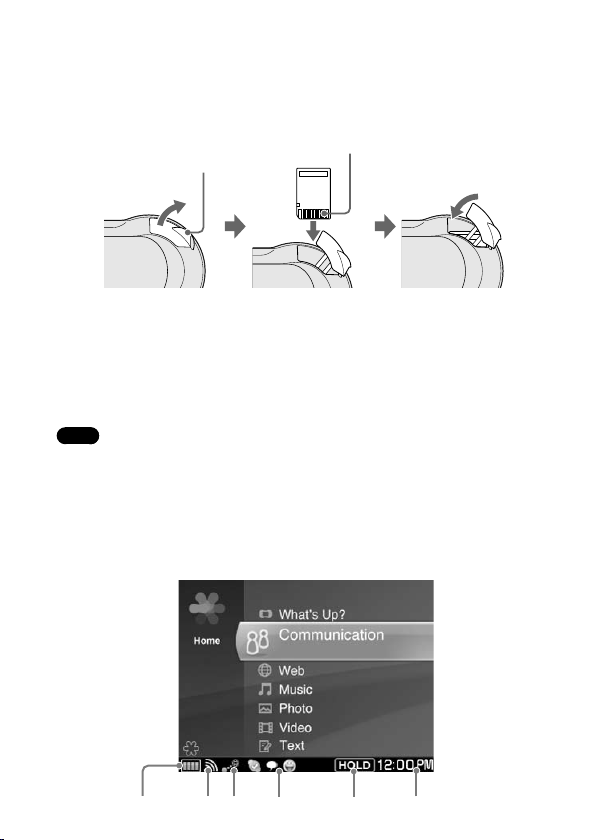
To insert and remove a “Memory Stick Duo” (not supplied)
Insert a “Memory Stick Duo” as illustrated below. When the unit accesses the
“Memory Stick Duo,” the “Memory Stick Duo” access indicator lights up.
Insert the “Memory Stick
Duo” in the direction
indicated by the arrow on
the unit, and gently push
until it clicks into place.
Terminal side
Grip the groove with
your finger, and gently
pull in the direction
indicated by the arrow.
To remove the “Memory Stick Duo,” push and release the “Memory Stick
Duo” to make it pop out.
Note
• To avoid data corruption, do not remove a “Memory Stick Duo” while the “Memory
Stick Duo” access indicator lights up.
The status bar
The status bar at the bottom of the display shows a variety of icons that provide
constant information about how your unit is operating. For more detailed
information about status bar icons, refer to the Operating Instructions PDF file.
-

13
Preparation
Remaining battery power
The number of illuminated
segments indicates how much
battery power remains. As the
battery runs down, the segments
of the indicator disappear.
Signal strength of the network
connection
The more circles displayed
around the antenna, the stronger
the signal of the network
connection.
Wireless LAN status
Displays icons indicating
whether your unit is connected to
wireless network in infrastructure
mode or Ad Hoc mode
( page
21, 25)
.
Various communication
applications
Volume bar
Ad Hoc Application status
During Music Streaming, displays
the Music Streaming icon and the
name of the user whose unit your
unit is connected to.
AVLS
AVLS is an abbreviation of
the Automatic Volume Limiter
System. When “AVLS” is
set to “ON,” AVLS keeps the
volume from climbing above a
predetermined level to protect
your hearing. Whenever the
AVLS acts to limit the volume,
the AVLS icon appears.
HOLD status
Displays an icon when you’ve
locked your unit’s controls by
turning on the HOLD feature.
Shift/Num/Sym/Fn key status
Indicates the currently active
keyboard modifier keys (if any),
such as Num (Number), Sym
(Symbol), Fn (Function), or
Shift.
Clock
Continued
14
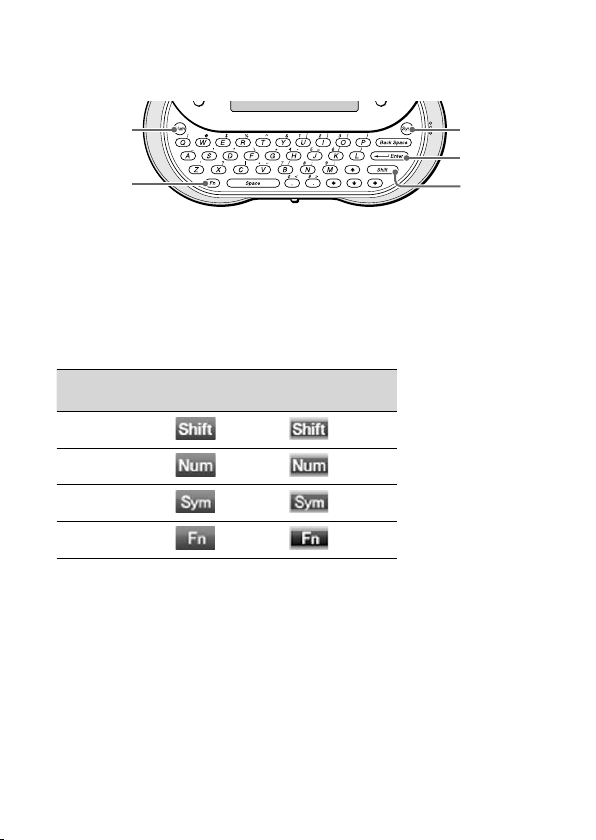
Using the keyboard
Slide the front panel of the unit upward to use the keyboard.
Num key
Sym key
Enter key
Shift key
Fn key
To enter capital letters, numbers, and symbols
Press the modifier key (Shift, Num, Sym, or Fn) first, and then press another
key. For the key arrangement, refer to the chart of the Operating Instructions
PDF file.
After modifier keys are pressed, the following icons appear on the status bar of
the display ( page 12).
To lock a modifier key, press it twice. To unlock it, press it again.
Modifier key Icon after
pressing it once
Icon after
pressing it twice
Shift
Num
Sym
Fn
Preparation
15
Step 1: Preparing a Power Source
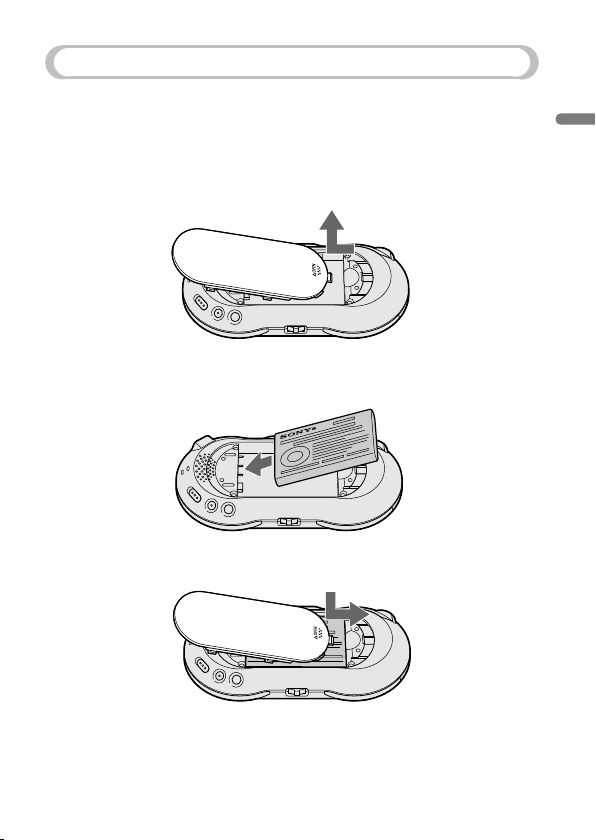
Installing the supplied battery
Make sure that the battery is inserted before using the unit.
1 Open the battery compartment cover by placing your thumb or finger on
the word “Open” on one end of the cover and pressing towards the other
end of the cover.
2 Insert the battery, label side up, aligning the metal contacts on the battery
with the contacts inside the battery compartment.
3 Slide the battery compartment cover back onto the back of the unit until it
clicks into place.
Continued
16
Notes
• Turn off the unit before replacing the battery. Removing the battery while the unit is
turned on may damage data in the unit and cause a malfunction.
• Be sure the battery is inserted when the unit is in use. Using the unit without the battery
is neither recommended nor supported.
• Do not use any other type of battery in your unit.
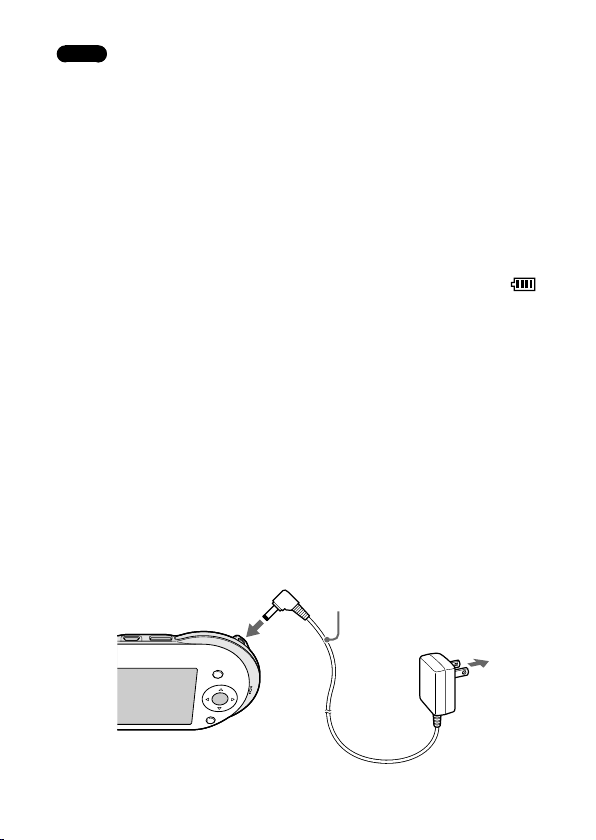
Charging the battery
Charge the battery using either the supplied AC power adaptor or the supplied
USB cable. Connect your unit and power source as shown in the following
illustration.
The unit automatically turns on and starts charging the battery, the POWER
and the CHARGE indicators light up, and the battery indicator sections ( )
appear in the display in succession as charging progresses.
When the supplied AC power adaptor is used, a complete charge requires
approximately 3 hours (when the unit is turned off) to 7.5 hours. Charging
may take a long time depending on the operating conditions. The unit is in a
standby mode for charging while the unit is performing any of the following:
– Playing music without the headset
– Playing video
– Viewing photos
– Viewing Web pages
– Wireless LAN is turned on (except for a standby mode for incoming chats
and calls)
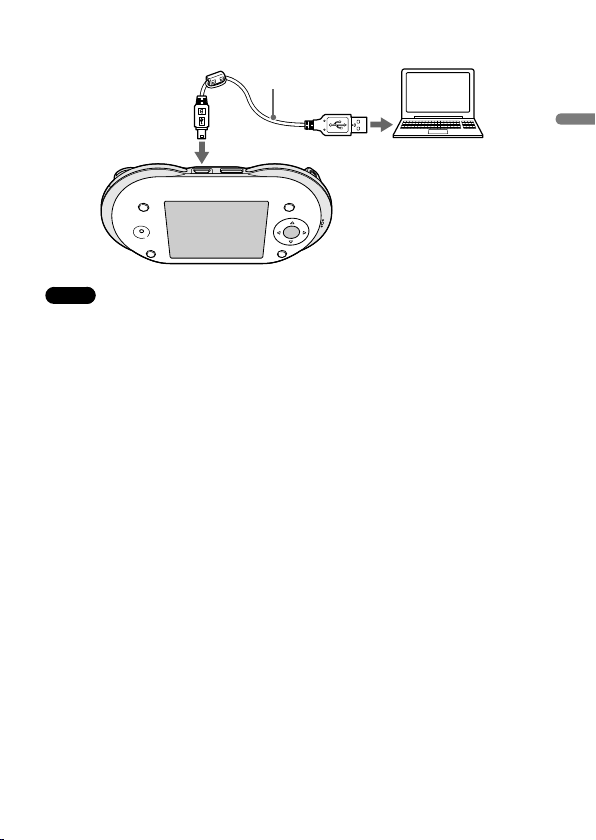
When the USB cable is used, a complete charge requires approximately 4
hours.
Connection using the supplied AC power adaptor
To wall outlet
To DC IN 6V jack
AC power adaptor (supplied)
Preparation
17
Connection using the supplied USB cable
To (USB)
connector
USB cable (supplied)
Notes
• If your unit is connected to your computer via the included USB cable and the computer
enters a power saving mode (such as system suspend, sleep, or hibernation), then your
unit’s battery will begin discharging.
• Do not leave the unit connected for extended periods to a notebook computer that is not
connected to AC power, because the unit may discharge the computer’s battery.
• If the unit does not automatically turn on when you connect it to your computer using
the USB cable, wait a few minutes, and then turn it on by sliding the POWER switch
down (
page 18).
• Connecting the unit via a USB hub may not work and is not supported. Connect the
USB cable directly to the computer.
• If “Auto Power Off” is set to “NO,” and the unit is connected to the AC power adaptor, a
complete charge may require 7.5 hours or longer.
• Charging may take a long time if you operate the unit while it is charging.
Continued
 Loading...