

Page 1

4-236-466-11(1)
Micro Hi-Fi
Component
System
Operating Instructions
Owner’s Record
The model and serial numbers are located on the rear panel of the unit. Record the serial
number in the space provided below. Refer to them whenever you call upon your Sony
dealer regarding this product.
Model No.
Serial No.
CMT-EX200
© 2001 Sony Corporation
Page 2

Warning
To prevent fire or shock hazard, do not
expose the unit to rain or moisture.
To avoid electrical shock, do not open the cabinet.
Refer servicing to qualified personnel only.
Don’t throw a battery, dispose it as the
injurious wastes.
NOTICE FOR THE CUSTOMERS IN THE
U.S.A.
This symbol is intended to alert the
user to the presence of uninsulated
“dangerous voltage” within the
product’s enclosure that may be of
sufficient magnitude to constitute a
risk of electric shock to persons.
This symbol is intended to alert the
user to the presence of important
operating and maintenance
(servicing) instructions in the
literature accompanying the
appliance.
CAUTION
The use of optical instruments with this product will
increase eye hazard.
WARNING
This equipment has been tested and found to comply
with the limits for a Class B digital device, pursuant
to Part 15 of the FCC Rules. These limits are
designed to provide reasonable protection against
harmful interference in a residential installation. This
equipment generates, uses, and can radiate radio
frequency energy and, if not installed and used in
accordance with the instructions, may cause harmful
interference to radio communications. However, there
is no guarantee that interference will not occur in a
particular installation. If this equipment does cause
harmful interference to radio or television reception,
which can be determined by turning the equipment
off and on, the user is encouraged to try to correct the
interference by one or more of the following
measures:
– Reorient or relocate the receiving antenna.
– Increase the separation between the equipment and
receiver.
– Connect the equipment into an outlet on a circuit
different from that to which the receiver is
connected.
– Consult the dealer or an experienced radio/TV
technician for help.
CAUTION
You are cautioned that any changes or modifications
not expressly approved in this manual could void
your authority to operate this equipment.
CAUTION
TO PREVENT ELECTRIC SHOCK, DO NOT USE
THIS POLARIZED AC PLUG WITH AN
EXTENSION CORD, RECEPTACLE OR OTHER
OUTLET UNLESS THE BLADES CAN BE FULLY
INSERTED TO PREVENT BLADE EXPOSURE.
Note to CATV system installer:
This reminder is provided to call the CATV system
installer’s attention to Article 820 – 40 of the NEC
that provides guidelines for proper grounding and, in
particular, specifies that the cable ground shall be
connected to the grounding system of the building, as
close to the point of cable entry as practical.
CAUTION
Use of this appliance with some systems may present
a shock or fire hazard. Do not use with any units
which have the following marking located near
output,
“WARNING! HAZARDOUS ENERGY!
...
”
ENERGY STAR
®
is a U.S.
registered mark.
As an ENERGY STAR® Partner,
Sony Corporation has determined
that this product meets the ENERGY
®
STAR
guidelines for energy
efficiency.
2
Page 3

Table of Contents
Parts Identification
Main unit ................................................... 4
Sub Woofer ............................................... 5
Remote Control ......................................... 6
Getting Started
Hooking up the system.............................. 7
Replacing the battery in the remote ........ 10
Setting the time ....................................... 10
CD
Loading a CD .......................................... 11
Playing a CD
— Normal Play/Shuffle Play/
Repeat Play ....................................... 11
Programing CD tracks
— Program Play ............................... 12
Using the CD display .............................. 13
Tuner
Presetting radio stations .......................... 13
Listening to the radio
— Preset Tuning............................... 14
Sound Adjustment
Adjusting the sound
— DSG ............................................. 15
Adjusting the sub woofer ........................ 15
Timer
Falling asleep to music
— Sleep Timer ................................. 16
Waking up to music
— Daily Timer ................................. 16
Optional Components
Hooking up the optional components ..... 17
Additional Information
Precautions .............................................. 18
Troubleshooting ...................................... 19
Messages ................................................. 21
Specifications .......................................... 21
3
Page 4

Parts Identification
The items are arranged in alphabetical order. Refer to the pages indicated in parentheses ( ) for
details.
Main unit
Display window 0
FUNCTION 7 (11, 17)
OPEN/CLOSE Z 1 (11)
Remote sensor 9
TUNER/BAND 6 (13)
TUNING +/– 3 (13)
VOL +/– 2
4
BUTTON DESCRIPTIONS
m/M 3
./> 3
x 4
NX 5
?/1 8
Page 5

Sub Woofer
Parts Identification
CUT OFF FREQ 3 (15)
LEVEL 1 (15)
PHASE 4 (15)
Power indicator 2
5
Page 6

Remote Control
1234
BASS +/– qg (15)
CD N qk (11)
CLOCK/TIMER SELECT 6
(17)
CLOCK/TIMER SET 7 (10, 16)
DISPLAY 5 (10, 13)
DSG qd (15)
ENTER 8 (10, 12, 13, 16)
FM MODE 3 (14)
FUNCTION ws (11, 17)
MEMORY 9 (13)
ws
wa
w;
ql
qk
qj
qh
qg
Number buttons w; (12)
OPEN/CLOSE Z 1 (11)
PC/TAPE q; (17)
PLAY MODE wa (11, 12)
REPEAT 3 (12)
SLEEP 2 (16)
SURROUND qh (15)
TREBLE +/– qf (15)
TUNER BAND qj (13)
TUNING MODE wa (13)
VOL +/– qs
5
6
7
8
9
0
qa
qs
qd
qf
BUTTON DESCRIPTIONS
@/1 4
+/– qa
. qa
> qa
X qk
x qk
m ql
M ql
6
Page 7

Getting Started
Hooking up the system
Perform the following procedure 1 to 7 to hook up your system using the supplied cords and
accessories.
The front cover is made of tempered glass. Please remember to handle this system carefully.
AM loop antenna
Rear cover
Right satellite speaker Left satellite speaker
Getting StartedParts Identification/Getting Started
continued
7
Page 8

Hooking up the system (continued)
1 Remove the rear cover.
Push in on the tabs and
pull up the cover
3 Connect the satellite speakers to the
sub woofer.
Connect the speaker cords from the satellite
speakers to the SPEAKER OUTPUT
terminals on the sub woofer as shown
below.
Sub woofer
Lined
2 Connect the sub woofer to the system.
Connect the speaker cords from the system
to the SPEAKER INPUT terminals on the
sub woofer as shown below.
CMT-EX200 main unit
Lined
Clear
Insert this portion
Lined
Clear
Sub woofer
Clear
To the terminals
on the satellite speaker
Insert this portion
4 Connect the AM antenna.
Set up the AM loop antenna, then connect
it.
Connect the white cord to the U terminal,
and the red cord to the other terminal.
AM loop
antenna
White
Red
8
Page 9

5 Reinstall the rear cover.
Put the wires through the hole at the bottom
of the rear cover.
6 Connect the power cords of system
and the sub woofer to the wall outlet
after you complete all the connections.
The sub woofer switches to standby mode
automatically after a certain time (Auto
Power Off).
7 To use the remote, pull out the
insulating sheet to allow power to flow
from the battery.
The remote already contains a battery.
Note on the glass cover of CD player
The CD player cover is made of tempered glass.
Under normal conditions, this tempered glass is
more shock resistant and able to bear more weight
than ordinary glass. This glass, however, may
shatter if it receives a sharp blow or if it is
scratched.
To connect optional components
See “Optional Components” on page 17.
Placing the sub woofer
Since the human ear cannot detect the direction
and position where the bass sound being
reproduced by a woofer (below 150 Hz) comes
from, you can place the woofer wherever you
like in your room. To obtain a better bass
reproduction, we recommend you to place the
woofer on a solid floor where the resonance is
unlikely to occur.
Notes
• Always place the woofer vertically, keeping a few
centimeters from away the wall.
• If the woofer is placed in the center of a room, the
bass could be extreamely weakened. This is due to
the influence of the standing wave of the room. If
this happened, move the woofer away from the
center of a room or eliminate the cause of the
standing wave, by placing a bookshelf on the wall,
etc.
Getting Started
9
Page 10

Replacing the battery in
Setting the time
the remote
1 Slide out and remove the battery case.
2 Insert a new lithium battery CR2025
with the + side facing up.
A lithium battery CR2025
3 Slide the battery case back in.
Tip
When the remote no longer operates the system,
replace the battery with a new one.
Notes
• If you do not use the remote for a long period of
time, remove the battery to avoid possible damage
from battery leakage.
• Keep the lithium battery out of the reach of
children. Should the battery be swallowed,
immediately consult a doctor.
CAUTION
Danger of explosion if battery is incorrectly replaced.
Replace only with the same or equivalent type
recommend by the manufacturer. Discard used
batteries according to the manufacturer’s instructions.
WARNING
Battery may explode if mistreated.
Do not recharge, disassemble or dispose of in fire.
1 Turn on the system.
2 Press CLOCK/TIMER SET on the
remote.
Proceed to step 4 when you set the clock for
the first time.
3 Press . or > repeatedly to select
“CLOCK SET”, then press ENTER on
the remote.
The day indication flashes.
4 Press . or > repeatedly to set the
day, then press ENTER on the remote.
The hour indication flashes.
5 Press . or > repeatedly to set the
hour, then press ENTER on the remote.
The minute indication flashes.
6 Press . or > repeatedly to set the
minute, then press ENTER on the
remote.
The clock starts working.
Tip
If you made a mistake or want to change the time,
start over from step 1.
Turning off the clock display
in standby mode
Press DISPLAY on the remote while the
system is off.
To turn on the clock display, press DISPLAY
on the remote again.
Notes
• When the Daily Timer is set, you cannot turn off the
clock display.
• The clock display will appear when you set the
Daily Timer during turning off the display.
10
Page 11
CD
Loading a CD
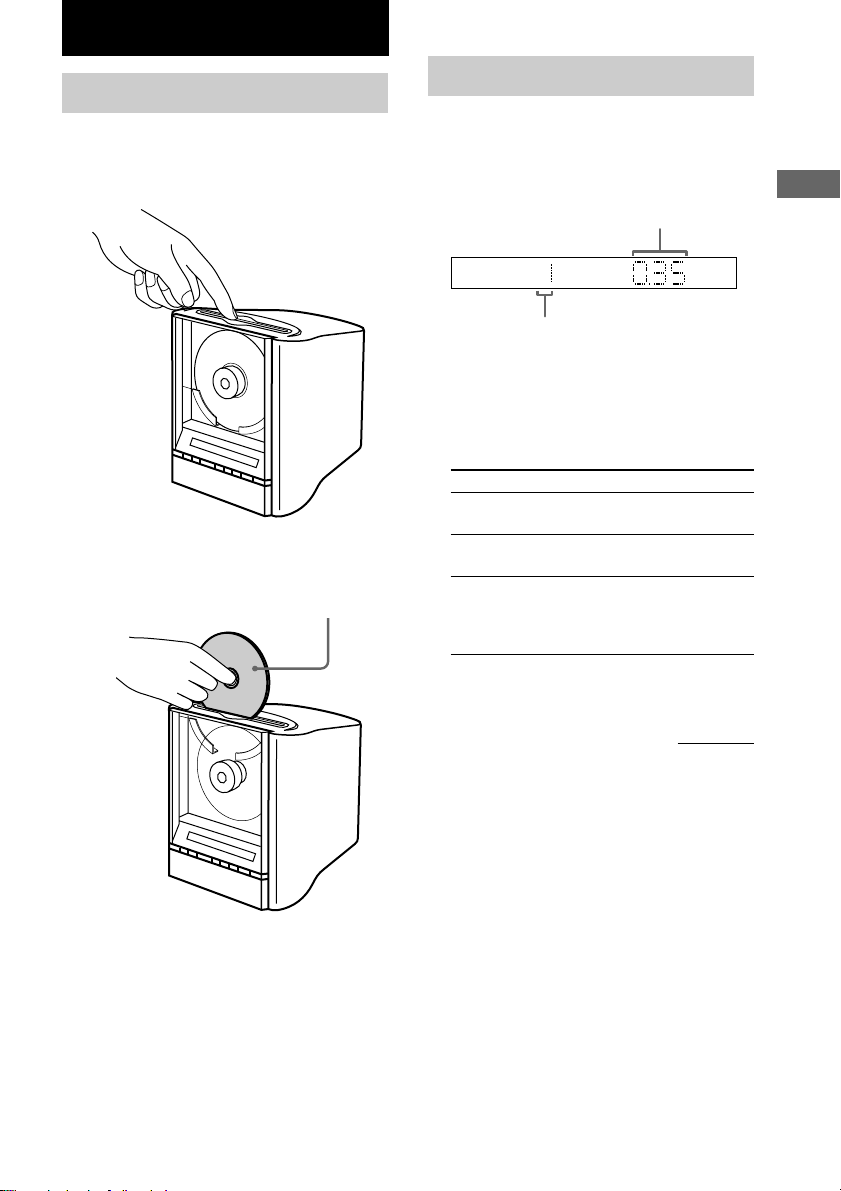
1 Touch OPEN/CLOSE Z (or press OPEN/
CLOSE Z on the remote) to raise the
disc tray.
2 Place a CD vertically in the disc tray.
With the label side facing front.
When you play a CD single (8 cm
CD), use the optional adaptor.
Playing a CD
— Normal Play/Shuffle Play/Repeat
Play
This system lets you play the CD in different
play modes.
Playing time
Track number
1 Press FUNCTION repeatedly to switch
the function to CD.
2 Press PLAY MODE on the remote
repeatedly until the mode you want
appears in the display.
Select To play
No display
(Normal Play)
SHUF
(Shuffle Play)
PGM
(Program Play)
All the tracks in original
order.
All the tracks in random
order.
All the tracks in the order
you want them to be played
(see “Programing CD
tracks” on page 12).
Getting Started/CD
3 Touch OPEN/CLOSE Z (or press OPEN/
CLOSE Z on the remote) again to lower
the disc tray.
Note
Do not touch the playing side of the CD with your
fingers, as this may damage CD or cause the CD to
load prematurely.
3 Press NX (or CD N on the remote).
continued
11
Page 12

Playing a CD (continued)
Programing CD tracks
Other Operations
To Do this
Stop play Press x.
Pause Press NX (or X on the remote).
Select a track Press . or > repeatedly until
Find a point in
a track
Remove a CD Touch OPEN/CLOSE Z (or press
Play repeatedly
(Repeat Play)
* You cannot repeat only one track during Shuffle
Play and Program Play.
Tip
If you press a number button on the remote, the track
corresponding to the pressed number on the disc starts
playing (Track Direct Play).
To enter track number 10 or over
on the remote
Press again to resume play.
you find the desired track.
Keep pressing m or M during
play and release it at the desired
point.
OPEN/CLOSE Z on the remote).
Press REPEAT on the remote
during play until “REP” or
“REP 1” appears.
REP: For all the tracks on the CD.
REP 1*: For a single track only.
To cancel playing repeatedly, press
REPEAT on the remote until
“REP” or “REP 1” disappears.
1 Press >10.
2 Enter the corresponding number buttons.
To enter 0, press 10/0 instead.
Example:
To enter track number 30, press >10, then 3 and 10/0.
Notes
• Do not forcibly press the disc down with your
finger, as this may cause CD player trouble.
Furthermore, do not obstruct the ejecting CD. Be
sure to touch OPEN/CLOSE Z (or press OPEN/
CLOSE Z on the remote) to lower the disc tray.
• The disc tray will not operate if you touch OPEN/
CLOSE Z while wearing gloves. Touch OPEN/
CLOSE Z with bare hands or press OPEN/
CLOSE Z on the remote.
— Program Play
You can make a program of up to 24 tracks.
1 Press FUNCTION repeatedly to switch
the function to CD.
2 Press PLAY MODE on the remote
repeatedly until “PGM” appears.
3 Press . or > repeatedly until the
desired track number appears.
Playing time of the selected track
Track number
4 Press ENTER on the remote.
The track is programed.
The total playing time of the program and
the number of the last programed track are
displayed.
5 To program additional tracks, repeat
steps 3 and 4.
6 Press NX (or CD N on the remote).
Other Operations
To Do this
Cancel Program
Play
Clear the entire
program
Select the desired
track using
number buttons
Tips
• The program you made remains after Program Play
finishes. To play the same program again, press
NX (or CD N on the remote).
• When the total playing time has exceeded
100 minutes, the time is not displayed and the total
number of programed tracks is displayed.
Press PLAY MODE on the
remote repeatedly until “PGM”
and “SHUF” disappear.
Press x in stop mode.
Press number buttons on the
remote instead of performing
steps 3 to 5.
12
Page 13

Tuner
Using the CD display
Press DISPLAY on the remote repeatedly.
When a CD TEXT disc is loaded, you can
check the information recorded on the disc,
such as the titles. The display changes
cyclically as follows:
During normal play
Track number and elapsed playing time on the
current track t Track number and remaining
time on the current track t Remaining time
on the CD t Track title of the current track*
t Clock
In stop mode
Total number of tracks and total playing time
t CD disc title* t Artist name* t Clock
* If a CD that has no title is loaded, nothing appears.
When the CD contains more than 20 tracks, CD
TEXT is not displayed from track 21 on.
Presetting radio stations
You can preset 20 stations for FM and 10
stations for AM.
1 Press TUNER/BAND (or TUNER BAND
on the remote) repeatedly to select
“FM” or “AM”.
2 Press TUNING MODE on the remote
repeatedly until “AUTO” appears.
3 Press TUNING – or + (or – or + on the
remote).
The frequency indication changes and the
scanning stops when the system tunes in a
station. “TUNED” and “STEREO” (for a
stereo program) appear.
4 Press MEMORY on the remote.
A preset number flashes.
Proceed to step 5 while the preset number is
flashing. If the system is not operated for
more than 16 seconds, the preset number
disappears and the system returns to the
status of step 2. If this happens, start over
from step 3.
5 Press . or > to select the preset
number you want.
6 Press ENTER on the remote.
The station is stored.
7 Repeat steps 1 to 6 to store other
stations.
CD/Tuner
continued
13
Page 14

Presetting radio stations (continued)
Listening to the radio
To stop scanning
Press TUNING MODE on the remote.
To tune in a station with a weak
signal
Press TUNING MODE on the remote
repeatedly in step 2. “MANUAL” appears.
Then press TUNING – or + (or – or + on the
remote) repeatedly to tune in the station
manually and continue from step 4.
To change the preset number
Start over from step 1.
To change the AM tuning interval
The AM tuning interval is factory-set to 9 kHz
(10 kHz in some areas). To change the AM
tuning interval, tune in any AM station first,
then turn off the system. While holding
TUNING + on the system, turn the system back
on. When you change the interval, all the AM
preset stations are erased. To reset the interval,
repeat the same procedure.
Tips
• The preset stations are retained for about a week
even if you disconnect the power cord or if a power
failure occurs.
• When a new station is memorized, the station
formerly memorized at that preset number is erased.
— Preset Tuning
Preset radio stations in the tuner’s memory first
(see “Presetting radio stations” on page 13).
1 Press TUNER/BAND (or TUNER BAND
on the remote) repeatedly to select
“FM” or “AM”.
2 Press TUNING MODE on the remote
repeatedly until “PRESET” appears.
3 Press . or > to select the desired
preset station.
Listening to non-preset radio
stations
• Press TUNING MODE on the remote
repeatedly in step 2. “MANUAL” appears.
Then press TUNING – or + (or – or + on the
remote) repeatedly to tune in the desired
station (Manual Tuning).
• Press TUNING MODE on the remote
repeatedly until “AUTO” appears in step 2
then press TUNING – or + (or – or + on the
remote). The frequency indication changes
and the scanning stops when the system
tunes in a station (Automatic Tuning).
To cancel Automatic Tuning
Press TUNING MODE on the remote.
Tips
• If noise is heard while listening to an FM station,
remove the FM antenna from the rear panel and
place the antenna outside the cabinet.
• To improve broadcast reception, adjust the supplied
antennas, or connect a commercially available
external antenna.
• When an FM stereo program has static noise, press
FM MODE on the remote repeatedly until
“MONO” appears. There will be no stereo effect,
but the reception will improve.
14
Page 15

Sound Adjustment
Adjusting the sound
Generating a more dynamic
sound
— DSG
You can use the DSG (Dynamic Sound
Generator) function to produce a more powerful
sound.
Press DSG on the remote.
Each time you press the button, the display
changes cyclically as follows:
DSG 1 t DSG 2 t DSG OFF
When DSG is on, “DSG” lights up.
Press DSG on the remote repeatedly to cancel
DSG.
Selecting the surround effect
Press SURROUND on the remote.
“SURR” appears in the display.
Press again to cancel surround effect.
Adjusting the bass
Press BASS + or – on the remote
repeatedly to adjust the bass.
You can adjust the bass in 7 steps (from –3 to
+3).
Adjusting the treble
Press TREBLE + or – on the remote
repeatedly to adjust the treble.
You can adjust the treble in 7 steps (from –3 to
+3).
Tips
• You can enjoy the original sound by setting BASS
and TREBLE to 0.
• You cannot activate DSG and Bass/Treble
adjustment at the same time.
Adjusting the sub woofer
You can adjust the sound of the sub woofer to
suit the sound source and adjustment on the
system.
1 Start playing the sound source.
Male vocal tunes and voice containing bass
sounds are most suitable for adjustment. The
volume for the system should be set to the
same level as usual.
2 Turn CUT OFF FREQ on the sub woofer to
adjust the cut-off frequency.
3 Turn LEVEL on the sub woofer to adjust
the volume level of the sub woofer.
4 Press PHASE on the sub woofer
repeatedly to select the phase polarity.
The polarity changes as follows:
NORMAL (normal) y REVERSE
(reverse)
5 Repeat step 2 to 4 to adjust for your
preference.
Tips
• The power indicator lights red in standby mode.
During playing, the indicator turns green. The sub
woofer switches to standby mode automatically a
few minutes after the music ends and sound is no
longer produced.
• If the sound distorts when you turn on the bass
reinforcement (such as DSG, Bass, etc.), turn off
the bass reinforcement and adjust the sound.
• Once you have adjusted the sub woofer to the
setting you desire, you can use VOL – or + on the
system to adjust the volume of the sub woofer
linked to the satellite speakers.
• Reversing the polarity with PHASE on the sub
woofer may provide better bass reproduction in
certain listening environments (depending on the
position of the sub woofer/satellite and adjustment
of the cut-off frequency). It may also change the
expanse and tightness of the sound, and effect the
feeling of the sound field.
Note
Never set the system’s tone control (Bass, Treble) or
DSG output to a high level or input sinewaves of
20 Hz to 50 Hz recorded on a commercially available
test disc or special sound (bass sound of electronic
musical instrument, pop noise of analog disc
turntable, sound with abnormally enhanced bass, etc.)
in a high level to this system. These actions may
cause damage to the speakers. When a special disc
containing abnormally enhanced bass is played, noise
may be output. In such a case, decrease the sound
level.
Tuner/Sound Adjustment
15
Page 16
Timer
Falling asleep to music
— Sleep Timer
You can set the system to turn off after a
certain time, so that you can fall asleep to
music.
Press SLEEP on the remote to select a
desired time.
Each time you press the button, the minute
display (the turn-off time) changes cyclically as
follows:
AUTO* t 90MIN t 80MIN t 70MIN t
…
t 10MIN t OFF
* The system automatically turns off after the current
CD finishes playing (up to 100 minutes).
When the function is TUNER, the system turns off
in 100 minutes.
Other Operations
To Press
Check the
remaining time
Change the time
to turn off
Cancel the Sleep
Timer function
Note
When the Sleep Timer is used, you cannot use the
Daily Timer.
SLEEP on the remote once.
SLEEP on the remote repeatedly to
select the time you want.
SLEEP on the remote repeatedly
until “OFF” appears.
Waking up to music
— Daily Timer
You can wake up to music at a preset time.
Make sure you have set the clock (see “Setting
the time” on page 10).
1 Prepare the sound source you want to
play.
• CD: Place a CD. To start from a
specific track, make a program (see
“Programing CD tracks” on page 12).
• Radio: Tune in a station (see
“Listening to the radio” on page 14).
• Tape: Make the same setting on the
timer of the component connected to the
PC/TAPE jacks.
2 Press VOL – or + to adjust the volume.
3 Press CLOCK/TIMER SET on the
remote.
4 Press . or > repeatedly until
“TIMER SET” appears, then press
ENTER on the remote.
The hour indication flashes.
5 Set the time to start playing.
Press . or > repeatedly to set the
hour, then press ENTER on the remote.
The minute indication flashes.
Press . or > repeatedly to set the
minute, then press ENTER on the remote.
The hour indication flashes again.
6 Set the time to stop playing following
the procedure in step 5.
The sound source indication flashes.
16
Page 17

7 Press . or > repeatedly to select
the desired sound source.
The indication changes as follows:
Optional Components
Hooking up the optional components
* Select “PC/TAPE” to use an optional
component connected to the PC/TAPE jacks as
the sound source.
8 Press ENTER on the remote.
The start time, the stop time, and the sound
source appear in turn, before the original
display returns. “DAILY” lights up.
9 Press ?/1 to turn off the system.
Other Operations
To Do this
Check the setting
Change the setting Start over from step 1.
Cancel the timer Press CLOCK/TIMER
Notes
• If the system is on about 30 seconds before the
preset time, the Daily Timer will not be activated.
• Do not operate the system from the time the system
turns on until the play starts (about 30 seconds
before the preset time).
• Once you set the Daily Timer, it functions every
day until you cancel it.
Press CLOCK/TIMER
SELECT on the remote
repeatedly until “DAILY”
appears. The start time,
followed by the stop time, the
sound source appears, then
original display appears.
SELECT on the remote
repeatedly until “TIMER
OFF” appears.
You can connect a digital or an analog
component to this system.
To connect optional components, remove the
small rear cover first.
To the audio input
jacks of an optional
component
PHONES jack
To Do this
Make a digital
recording to a
digital component
Make an analog
recording to an
analog component
Listen to the
connected optional
component
Listen through the
headphones
To the digital input jack
of a digital component
Connect a optical cable.
Connect the audio cords.
Press FUNCTION repeatedly
until “PC/TAPE” appears (or
press PC/TAPE on the remote).
Connect the headphones to the
PHONES jack.
To the audio output
jacks of an optional
component
Timer/Optional Components
17
Page 18

Additional Information
Precautions
The nameplate is located on the bottom
exterior.
On safety
• The glass over the display window on the cover is
made of tempered glass.
Under normal conditions, this tempered glass is
more shock resistant and able to bear more weight
than ordinary glass. This glass, however, may
shatter if it receives a sharp blow or if it is
scratched.
• The system is not disconnected from the AC power
source (mains) as long as it is connected to the wall
outlet, even if the system itself has been turned off.
• Unplug the system from the wall outlet if it is not to
be used for an extended period of time.
To disconnect the power cord, pull it out by the
plug. Never pull the cord itself.
• Should any solid object or liquid fall into the
system, unplug the system and have it checked by
qualified personnel before operating it any further.
• AC power cord must be changed only at the
qualified service shop.
• When you connect the power cord to a wall outlet,
even if the power is off, the system begins charging
for remote and timer functions. Therefore the
surface of this unit become warm, this is normal.
On placement
• Place the system in a location with adequate air
circulation, and do not place anything on top of the
system.
• Do not place the system in an inclined position.
• Do not place the system in locations where it is:
— Extremely hot or cold
— Dusty or dirty
— Very humid
— Subject to vibrations
— Subject to direct sunlight.
On heat build up
—Although the system heats up during operation,
this is not a malfunction.
—Place the system in a location with adequate
ventilation to prevent heat build up in the system.
If you continuously use this system at a large volume,
the cabinet temperature of the top, side and bottom
rises considerably. To avoid burning yourself, do not
touch the cabinet.
To prevent a malfunction, do not cover the ventilation
hole for the cooling fan.
On installing
When you move the system, remove the CD.
On operation
If the system is brought directly from a cold to a
warm location, or is placed in a very damp room,
moisture may condense on the lens inside the CD
player. Should this occur, the system will not operate
properly. Remove the CD and leave the system turned
on for about an hour until the moisture evaporates.
If you have any questions or problems concerning
your system, please consult your nearest Sony dealer.
On the speaker system
This speaker system is magnetically shielded and can
be used near TV sets. However, the picture on certain
TV sets may become magnetically distorted. In such a
case, turn off the power of the TV set once, and after
15 to 30 minutes turn it on again.
If there seems to be no improvement, locate the
speaker system further away from the TV set. Also,
be sure not to place objects in which magnets are
attached or used near the TV set, such as audio racks,
TV stands and toys. These may cause magnetic
distortion to the picture due to their interaction with
the system.
Notes on CDs
• Before playing, clean the CD with a cleaning cloth.
Wipe the CD from the center out.
• Do not use a CD with tape, seals, or paste on it as
this may damage the player.
• Do not use solvents.
• Do not expose the CD to direct sunlight or heat
sources.
• Discs with non-standard shapes (e.g., heart, square,
star) cannot be played on this system. Attempting to
do so may damage the system. Do not use such
discs.
Cleaning the cabinet
Use a soft cloth slightly moistened with mild
detergent solution.
To avoid damaging the sub woofer
• Be careful in setting the volume control to avoid an
excessive input power.
• Do not attempt to open the enclosuer or remold
speaker units and networks.
18
Page 19
Troubleshooting
If you have any problem using this system, use
the following checklist.
First, check that the power cord is connected
firmly and that the speakers are connected
correctly and firmly.
Should any problem persist, consult your
nearest Sony dealer.
General
There is no sound.
• Press VOL +.
• Make sure the headphones are not connected.
• Check the speaker connections (see page 8).
Sound comes from one channel, or unbalanced
left and right volume.
• Connect the speaker cords properly (see page 8).
• Place the speakers as symmetrically as possible.
• Connect only one of the supplied speakers to
each set of speaker terminals.
• Connect the supplied speakers.
There is severe hum or noise.
• Move the system away from the source of noise
such as TV, VCR, etc.
• Connect the system to a different wall outlet.
• Install a noise filter (commercially available) to
the power line.
“12:00 AM” flashes in the display.
• Set the clock again (see page 10).
The timer cannot be set.
• Set the clock again (see page 10).
The timer does not function.
• Press CLOCK/TIMER SELECT on the remote to
set the timer and light up “DAILY” in the
display (see page 17).
• Check the set contents and set the correct time
(see page 17).
• Cancel the Sleep Timer function (see page 16).
The remote does not function.
• Remove the obstacle.
• Move the remote closer to the system.
• Point the remote at the system’s sensor.
• Replace the battery.
• Locate the system away from the fluorescent
light.
CD Player
The CD tray does not lower.
• Place the CD vertically in the tray.
• Always lower the tray by touching OPEN/
CLOSE Z or pressing OPEN/CLOSE Z on the
remote.
The CD does not eject.
• Consult your nearest Sony dealer.
Play does not start.
• Wipe the CD clean (see page 18).
• Replace the CD.
• Place the CD vertically in the tray.
• Place the CD in the tray with the label side front.
• Remove the CD and wipe away the moisture on
the CD, then leave the system turned on for a
few hours until the moisture evaporates.
• Press NX (or CD N on the remote) to start
play.
The sound skips.
• Wipe the CD clean (see page 18).
• Replace the CD.
• Try moving the system to a place without
vibration (e.g., on top of a stable stand).
• Try moving the speakers away from the system,
or placing them on separate stands.
• When you listen to a track with bass sounds at
high volume, the speaker vibration may cause the
sound to skip.
Play does not start from the first track.
• Press PLAY MODE on the remote repeatedly
until “PGM” and “SHUF” disappear to return to
normal play.
Additional Information
continued
19
Page 20

Troubleshooting (continued)
Sub woofer and satellite speakers
There is no sound.
• Connect the component properly (see page 8)
while checking:
– if the cords are connected properly.
– if the cord plugs are firmly inserted all the way.
• Turn LEVEL on the sub woofer clockwise.
The sound has suddenly stopped.
• Connect the speaker cords properly (see page 8).
The sound is distorted.
• Connect the speaker cords properly (see page 8).
• Press VOL – on the system.
• Turn LEVEL on the sub woofer
counterclockwise.
• Turn CUT OFF FREQ on the sub woofer to
adjust cut-off frequency.
Howling occurs.
• Relocate the sub woofer or press VOL – on the
system.
Severe hum or noise is heard.
• Connect the speaker cords properly (see page 8).
• The system is picking up some noise from a TV
set. Move the system away from the TV set or
turn the TV set off.
Optional components
There is no sound.
• Refer to General item “There is no sound.” on
page 19 and check the condition of the system.
• Connect the component properly (see page 17)
while checking:
– if the cords are connected properly.
– if the cord plugs are firmly inserted all the way.
• Turn on the connected component.
• Refer to the operating instructions included with
the connected component and start playing.
The sound is distorted.
• Set the volume of the connected component
lower.
Tuner
Severe hum or noise/stations cannot be
received.
• Set the proper band and frequency (see page 13).
• Connect the antenna properly (see page 8).
• Find a place and an orientation that provide good
reception, then set up the antenna again. If you
cannot obtain good reception, we recommend
you connect a commercially available external
antenna.
• Locate the antennas as far away from the speaker
cords as possible.
• Consult your nearest Sony dealer if the supplied
AM antenna has come off the plastic stand.
• Try turning off surrounding electrical
equipments.
• Remove the FM antenna from the rear panel and
place the antenna outside the cabinet. Adjust the
antenna.
A stereo FM program cannot be received in
stereo.
• Press FM MODE until “STEREO” appears in the
display.
• See “Severe hum or noise/stations cannot be
received.”, and check the antenna condition.
If the system still does not operate
properly after performing the above
measures, reset the system as
follows:
1 Unplug the power cord.
2 Hold down ?/1, then plug the power cord
into the wall outlet again.
The system is reset to the factory settings. All
the settings you made such as the preset
stations, clock, and timer are cleared and must
be set again.
20
Page 21
Messages
Specifications
One of the following messages may appear or
flash in the display during operation.
CD
NO DISC
There is no CD.
OVER
You have reached the end of the CD while
pressing M during play or pause.
STEP FULL
You tried to program 25 or more tracks (steps).
Main Unit (HCD-EX200)
Amplifier section
For the U.S. model
AUDIO POWER SPECIFICATIONS
POWER OUTPUT AND TOTAL HARMONIC
DISTORTION:
With 4 ohms loads, both channels driven, from
120 – 10,000 Hz; rated 12 watts per channel
minimum RMS power, with no more than 10% total
harmonic distortion from 250 milli watts to rated
output.
Canadian model:
Continuous RMS power output (Reference):
Inputs
PC/TAPE IN: voltage 250 mV,
Outputs
PC/TAPE OUT: voltage 250 mV,
CD DIGITAL OUT: Optical
PHONES (stereo mini jack):
15 + 15 watts
(4 ohms at 1 kHz,
10% THD)
impedance 47 kilohms
impedance 1 kilohms
accepts headphones of
8 ohms or more
CD player section
System Compact disc and digital
Laser Semiconductor laser
Frequency response 20 Hz – 20,000 Hz
audio system
(λ=780 nm)
Emission duration:
continuous
Additional Information
Tuner section
FM stereo, FM/AM superheterodyne tuner
FM tuner section
Tuning range 87.5 – 108.0 MHz
Antenna FM wire antenna
Antenna terminals 75 ohms unbalanced
Intermediate frequency 10.7 MHz
(100 kHz step)
continued
21
Page 22

Specifications (continued)
Sub woofer (SA-WEX200)
AM tuner section
Tuning range 530 – 1,710 kHz
Antenna AM loop antenna
Intermediate frequency 450 kHz
(with the interval set at
10 kHz)
531 – 1,710 kHz
(with the interval set at
9 kHz)
External antenna terminals
Satellite speaker (SS-CEX200)
Speaker system 2-way, bass-reflex type
Speaker units
Woofer: 9 cm dia., cone type
Tweeter: 5 cm dia., cone type
Impedance 4 ohms
Dimensions 130 × 220 × 183 mm
Mass Approx 2.0 kg net per
(w/h/d, incl. projecting
parts and controls)
speaker
General
Power requirements 120 V AC, 60 Hz
Power consumption 40 watts
Dimensions 175 × 222 × 201 mm
Mass Approx. 3.2 kg
Supplied accessories Remote commander with
1.8 watts (in standby
mode)
(w/h/d, incl. projecting
parts and controls)
battery (1)
AM loop antenna (1)
FM wire antenna (1)
Speaker cords (4)
Amplifier section
For the U.S. model
AUDIO POWER SPECIFICATIONS
POWER OUTPUT AND TOTAL HARMONIC
DISTORTION:
With 4 ohms loads, from 50 – 150 Hz; rated 30 watts
per channel minimum RMS power, with no more than
10% total harmonic distortion from 250 milli watts to
rated output.
Canadian model:
Continuous RMS power output (reference):
Speaker system Active sub woofer
Speaker unit 10 cm dia, cone type
Practical maximum output 30 watts
Reproduction frequency range
High frequency cut-off range
Phase selector Normal, reverse
Input SPEAKER INPUT:
Output SPEAKER OUTPUT:
Power requirements 120 V AC, 60 Hz
Power consumption 40 watts
Dimensions Approx. 150 × 220 ×
Mass Approx. 6.2 kg
Design and specifications are subject to change
without notice.
30 watts
(4 ohms at 55 Hz, 10%
THD)
(magnetically shielded
design)
woofer (×2)
45 – 150 Hz
70 – 150 Hz
Input terminal
Output terminal
345 mm (w/h/d, incl.
projecting parts and
controls)
22
Page 23

Page 24

Sony Corporation Printed in China
 Loading...