

Page 1

FM Stereo/SW/MW/LW PLL Synthesized Receiver ICF-SW07
3-865-472-04(1)
FM Stereo/SW/MW/LW
PLL Synthesized Receiver
取扱説明書
お買い上げいただき、ありがとうございます。
電気製品は安全のための注意事項を守らないと、
警告
火災や人身事故になることがあります。
この取扱説明書と別冊の「安全のために」をよくお読みのうえ、製品
を安全にお使いください。お読みになったあとは、いつでも見られ
るところに必ず保管してください。
Operating Instructions
Manual de instrucciones
XXXXX Korean
XXXXX Chinese(simplified)
JP
GB
ES
KR
CS
ICF-SW07
1998 Sony Corporation
Page 2

こんなことができます
世界の現地時刻がわかります。
•
都市名を選ぶだけで、簡単に世界
の現地時刻を調べることができま
す。
世界中の放送が受信できます。
•
ー
ー国内では以下の放送が受信できま
テレビ音声 :1〜
• SW STATION CALL
•
フェーズ ロックト ループ
PLL(Phase Locked Loop
セサイザー方式を採用し、簡単で
正確な選局ができます。
す。(詳しくは付属の「ウェーブハ
ンドブック」および「ハウトゥ
キャッチザウェーブ」をご覧くだ
さい。)
3ch(90
108MHz
FM
SW(
:76〜
短波) : 国内外の短波放
送、業務用通信な
ど
1621
)シン
〜
)
90MHz
〜
29999kHz
中波):
MW(
長波) : ロシアなどの長波
LW(
530〜1620kHz
放送の一部、ラジ
オビーコン(航空無
線標識局、船舶無
線標識局)など
150〜529kHz
主要短波放送局の局名ボタンを押
すだけで、ROMに収められた
データから時差帯に合った周波数
を呼び出すことができます。
マイメモリー選局
最大100の周波数をあらかじめ登
録しておき、スキャンして呼び出
すことができます。
目的に合わせて、その他4種類の
•
選局方法でも受信できます。
ー周波数を直接指定して選局する、
ダイレクト選局。
ー手動で少しずつ周波数を調節す
る、マニュアル選局。
ー自動的に放送局を探す、スキャン
選局。
ーあらかじめ放送局を登録してお
き、ワンタッチで選局できる、プ
リセット選局。
ラベルを変更できます。
•
プリセットした周波数や選択した
時差に、放送局名や都市名などの
ラベルをつけることができます(英
数文字で6桁まで)。
聞きたい時刻に受信できます。
•
内蔵の2つのタイマーで、お聞き
になりたい放送をお好きな時刻に
受信することができます。
ラジオを聞きながらおやすみにな
•
れます。
スリープタイマーを使うと約60分
で自動的に電源が切れますので、
ラジオを聞きながら安心しておや
すみになれます。
付属のステレオヘッドホンで
•
放送がステレオで楽しめます。
FM
JP
こんなことができます
2
Page 3

目次
はじめに
受信のしかた
各部の名称と働き ...........................................
電源について ..................................................
乾電池で使う ...................................................
付属のACパワーアダプターで使う ..............
時計を合わせる .............................................
現在時刻を合わせる ......................................
他地域の現地時刻を知る ...............................
いろいろな受信のしかた ..............................
周波数を直接指定して聞く
ダイレクト選局..................................
—
手動で周波数を選んで聞く
マニュアル選局..................................
—
自動的に局を探して聞く
スキャン選局 .....................................
—
いつも聞く局を記憶させて聞く
プリセット選局 ................................
—
局名ボタンで探して聞く
— SW STATION CALL
記憶させた局を探して聞く
マイメモリー選局 ..............................
—
SSBやCW
放送を良い状態で受信する
AM
同期検波 ..................................................
—
を受信する .................................
.......................
11
12
12
14
16
16
18
20
22
24
27
30
31
4
9
9
JP
便利な使いかた
その他
付属の外部アンテナを使う ...........................
放送を録音する .............................................
ラベルを編集する .........................................
タイマーを使う .............................................
ラジオまたはブザーで目覚める
スタンバイ機能..................................
—
ラジオを聞きながら眠る
スリープタイマー機能 .......................
—
誤操作を防ぐ— ホールド機能......................
ビープ音を消す .............................................
使用上のご注意とお手入れ ...........................
故障かな?と思ったら ..................................
保証書とアフターサービス ...........................
主な仕様........................................................
ミニ知識........................................................
目次
32
35
36
38
38
41
42
43
44
46
48
49
51
JP
3
Page 4

zはじめに
各部の名称と働き
( )内のページに詳しい説明があります。
表面
1
2
4
5
3
6
7
8
9
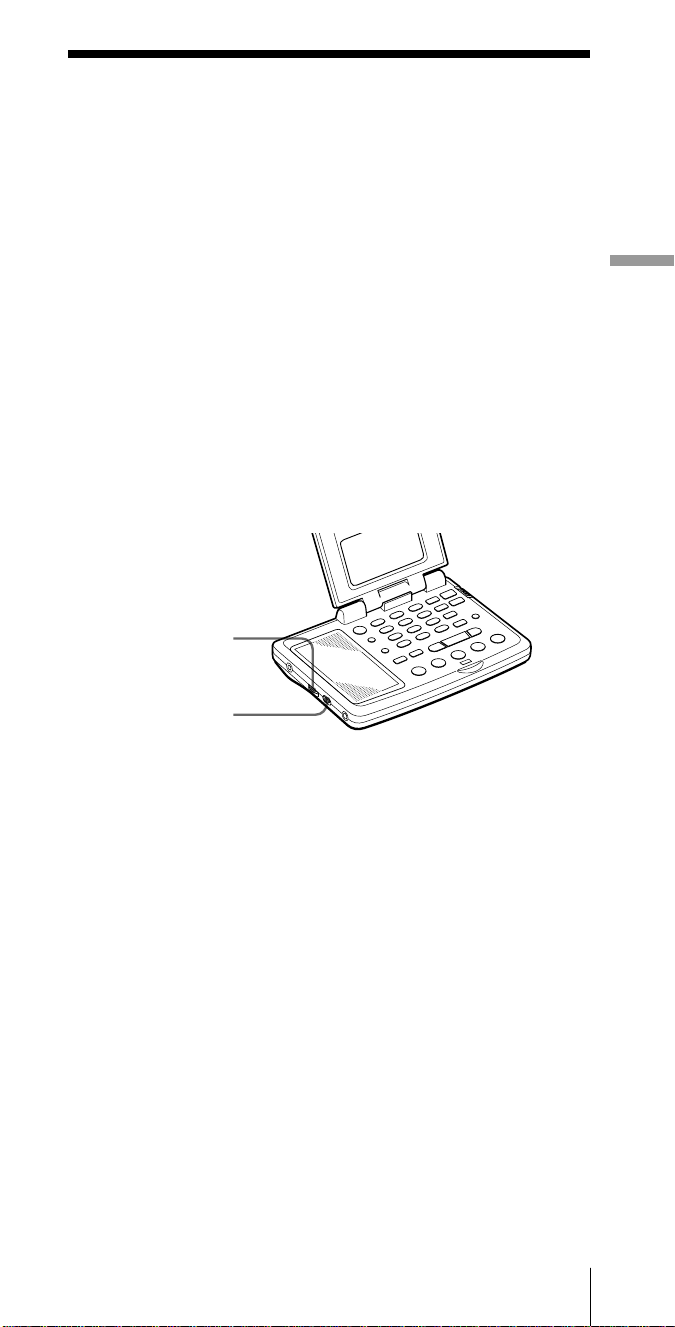
ライン アウト
7
1 表示窓(7)
2 スピーカー
3 操作部(6)
オープン
4
OPEN(開く)ボタン(4)
ホールド
5
HOLD(誤操作防止)スイッチ
(42)
6 2(ヘッドホン)端子
LINEOUT(録音出力)端子
(35)
トーン ステレオ
8
TONE(音質切り換え)/ST・
モノラル
MONO(ステレオ・モノラル
切り換え)スイッチ(17)
ボリューム
9
音量調節)つまみ(17)
VOL(
ふたの開けかた
OPENボタンを押しながら、ふたを上にあげます。お好きな角度に調節
してください。
JP
はじめに
4
Page 5
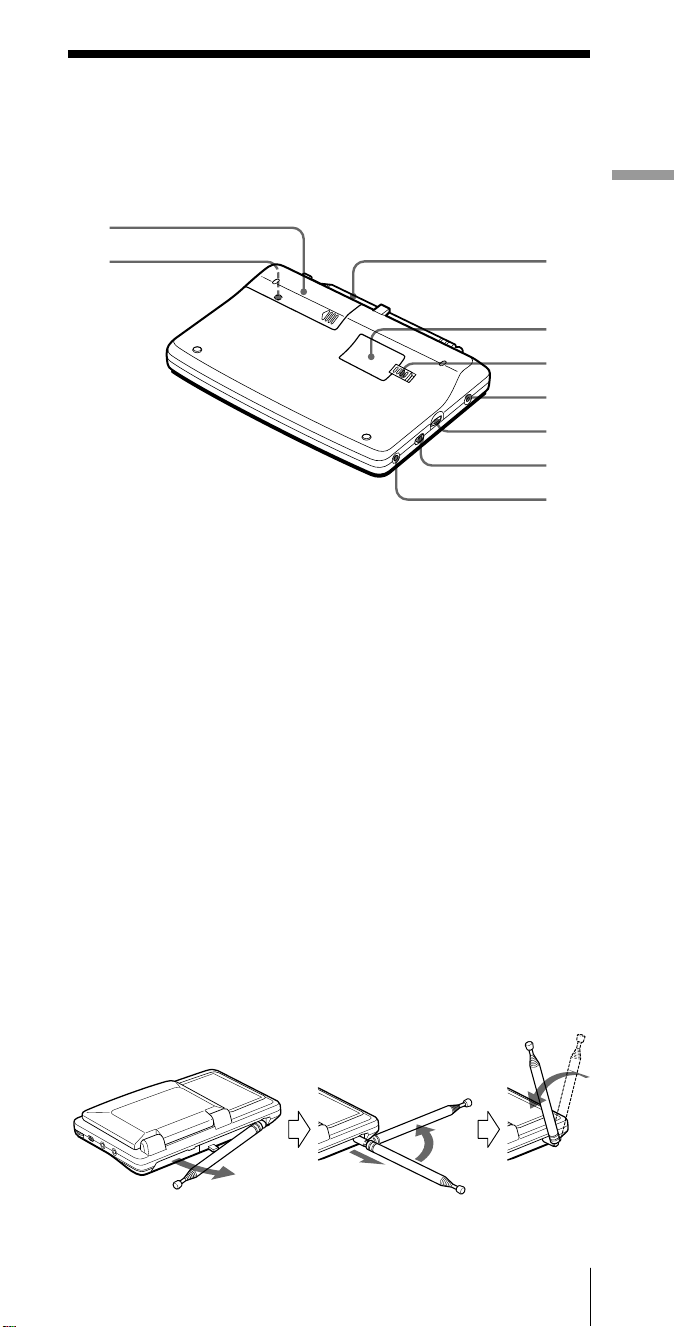
裏面
1
2
1 電池ぶた(9)
リセット
2
RESETボタン
電池収納部にあります。不具
合が生じたときなどに先の細
いものでボタンを押すと時計
などがリセットされ、出荷時
の状態に戻ります。記憶させ
た周波数は保持されます。
3 ロッドアンテナ(17)
4 ROM収納部ぶた(45)
3
4
5
6
7
8
9
リリース
5
RELEASE(ROM収納部ぶた
開け)つまみ(45)
6 DCIN3V¥(外部電源
入力端子)(11)
アッテネーター
7
ATTコントロール(減衰量調
節)つまみ(21)
アッテネーター
8
ATTON・OFF(減衰器ON/
OFF)スイッチ(21)
エイエムエクスターナルアンテナ
9
AMEXTANT(AM外部アン
テナ入力)端子(33)
は
じ
め
に
アンテナの伸ばしかた
イラストのように、アンテナロッドの受け軸をまっすぐ引っぱり出して
からアンテナを回転させてください。
2 真横にする。
1 引き出す
はじめに
JP
5
Page 6
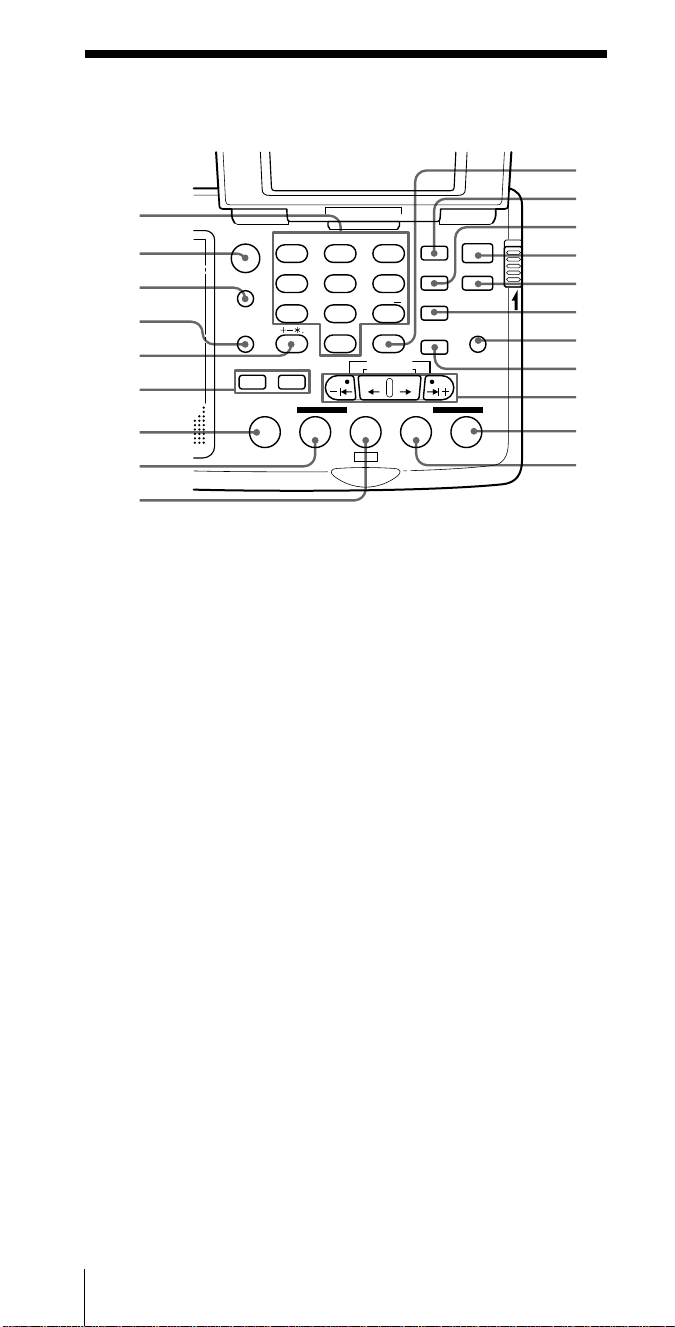
操作部
1
LABEL EDIT
スタンバイ
ディスプレイ
FM/
AM
AM BAND
LOCAL/
WORLD
TIMERSTANDBY/
STANDBY TIME SET
ab
STANDBY MEMORY
2
3
4
5
6
7
8
9
1 数字ボタン(16,22,36)
2 FM/AM切り換えボタン(16,
43)
3
4
5
6
7マイMYボタン(27)
8
9
!º
ラジオを聞いているときにボ
JP
6
バンド
AMBAND(AMバンド)
ローカル ワールド
•LOCAL/WORLD(地域時刻
/世界時刻)切り換えボタン
(14,18)
レーベル エディット
LABELEDIT(ラベル編集)ボ
タン(36)
ダイレクト
DIRECT(ダイレクト選局)ボ
タン(16)
スタンバイ メモリー
STANDBYMEMORY
タイマー
TIMERSTANDBY
スタンバイ タイム セット
STANDBYTIMESET(スタ
ンバイメモリー•スタンバイ
設定/スタンバイ時刻設定)ボ
タン(38)
ドイチェヴェレ
DWボタン(24)
ヴィーオーエー
VOAボタン(24)
エクセキュート
EXE•DISPLAY(実行•表
示)ボタン(13,16,36)
タンを押すと、時刻表示に切
り換わり、もう一度押すと戻
ります。押さないと約10秒
後に自動的に戻ります。
はじめに
ABC1DEF2GHI
JKL4MNO5PQR
STU
7
DIRECT
MY DW VOA BBC OTH
VWX8YZ
<>
/
DISPLAY
EXE
0
TIME SET
TIME DIFF
SW STATION CALL
!¡
!™
!£
3
6
9
SYNC(同期検波)ボタン
(31)
エスエスビー
SSBボタン(30)
POWERON/OFF(電源入/
切)ボタン(16)
!¢
SLEEPボタン(41)
!∞
ERASE•DST(削除•サ
POWER
SYNC
SSB
DST
ERASE
TIME SET
ENTER
JOG/
TUNE/
SCAN˚
シンク
パワー オン オフ
スリープ
イレース ディーエスティー
マータイム)ボタン(12,23,
29,40)
ライト
!§
LIGHT(照明)ボタン
このボタンを押すと約30秒
•
/
間表示窓が照明され、暗いと
ころでも表示が読めます。
エンター タイム セット
!¶
ENTER•TIMESET(入力•
時刻設定)ボタン(12,22,
27,38)
ジョグ チューン スキャン
!•
TUNE/SCAN•TIME
JOG/
ディファレンス
タイム セット
DIFF/TIMESET(マニュア
ル選局/スキャン選局•時差
設定/時計合わせ)ボタン(12,
18,20)
アザース
!ª
OTHボタン(25)
ビービーシー
@º
BBCボタン(24)
ON/
OFF
SLEEP
LIGHT
HOLD
!º
!¡
!™
!£
!¢
!∞
!§
!¶
!•
!ª
@º
タイム
Page 7

表示部
18
2
3
4
5
6
9
!º
!¡
!™
!£
は
じ
め
に
!¢
7
スリープ
1
SLEEP(スリープタイマー)
表示(41)
スリープタイマーが動作中に
点灯します。
2 時差帯指示表示(12,14)
指定された時差になる時差帯
を指し示します。
チューン
3
TUNE(選局)表示(16)
放送を受信したときに点灯し
ます。
4 s(サマータイム)表示(12,
14)
サマータイムを設定している
ときに点灯します。
ワールド ローカル
5
WORLD•LOCAL表示(12,
14)
6 時刻/周波数表示欄(12,
16)
7 メモリー番号/時差表示欄
(12,22,27)
8 ホールド(誤操作防止)表示
(42)
表示されているときはボタン
操作を受け付けません。
9 電池消耗表示(10)
!º
!¡
ユー
シンク
SYNCU•SYNCL(同期検
波)表示(31)
スタンバイ
STANDBYa•b表示(38)
シンク
タイマー予約しているときに
点灯します。
ロック
!™
LOCK(同期ロック)表示
(31)
同期検波が働いているときに
点灯します。
ユーエスビー エルエスビー シーダブリュー
!£
USB•LSB/CW(SSB/
CW方式)表示(30)
エスダブリューステーションコール
!¢
SWSTATIONCALL表示
(24)
!∞ ラベル表示欄(12,16)
放送局名や都市名、バンド、
メーターバンドなどが表示さ
れます。
!∞
エル
はじめに
JP
7
Page 8
短波
(SW)
アクティブアンテナの使い方については32ページをご覧ください。
アンテナコントローラー
放送専用アクティブアンテナ
AN-LP2
1
2
1 巻き取り
2 短いコード
3 長いコード
パワー
4
POWERランプ
5 電池入れ
3
4
5
アンテナモジュール
1 クリップ
2 吸盤
JP
はじめに
8
1
2
Page 9

電源について
乾電池で使う
コンセントで使う/「付属のACパワーアダプターで使う」(11ページ )
1 電池ぶたをスライドさせたあと、開く。
2 単
形乾電池を2本入れる。
3
表示に合わせて]}を正しく入れる
は
じ
め
に
3 電池ぶたを閉める。
はじめに
JP
9
Page 10
乾電池の交換時期
乾電池が消耗すると表示窓に「i」が点滅し音が小さくなったりひずんだ
りする場合があります。
さらに消耗すると「i」が点灯しラジオの電源が切れます。その場合は乾
電池を新しいものと交換してください。
乾電池の持続時間
(JEITA*)
ソニー単3形アルカリ乾電池 ソニー単3形マンガン乾電池
FM
約32時間
約10時間
AM 約23時間 約8時間
*
JEITA(電子情報技術産業協会)規格による測定値です。
実際の電池持続時間は使用する機器の状況により変動する可能性があります。
ちょっと一言
• 乾電池の交換は3分以内に行ってください。
3分以上経過すると、設定した時刻は消えてしまいます。この場合は、もう一度
設定をやり直してください。メモリーに記憶させた周波数は消えません。
• 乾電池が完全に消耗するとLIGHTボタン以外のすべてのボタン操作ができなく
なります。
乾電池を交換してラジオの電源を入れ直すと「i」表示が消え、再び操作ができ
るようになります。
乾電池についてのご注意
乾電池の使いかたを誤ると、液もれや破裂のおそれがあります。次のことは必ずお
守りください。
• +と−の向きを正しく入れてください。
• 新しい乾電池と使用した乾電池、または種類の違う乾電池を混ぜて使用しないで
ください。
• 乾電池は充電できません。
• 長い間乾電池を使わないときは、取り出しておいてください。
万一液もれが起こったときは、電池入れについた液をよくふきとってから新しい乾
電池を入れてください。
10
JP
はじめに
Page 11
電源について(つづき)
付属のACパワーアダプターで使う
付属のACパワーアダプターAC-E323(日本国内モデル、ワールドモデ
ルに付属)をDCIN3V端子につなぎます。
お使いになる前に
ACパワーアダプターのインプットセレクターを、お使いになる国の電源
電圧に合わせてからつないでください。
インプットセレクターはドライバーを使って回してください。
インプットセレクターをOFFの位置にするとACパワーアダプターが働き
ませんので、ご注意してください。
コンセントにつないだ状態で切り換えをすると、故障の原因となりま
す。
は
じ
め
に
2
DC IN 3V
へ
1
ドライバー
コンセントへ
ご注意
• 電源コードは、無理に曲げたり、上に重い物を載せたりしないでください。
• コードを抜くときは、必ずプラグを持って抜いてください。
• 長い間使わないときは、必ずACパワーアダプターをコンセントから抜いてくだ
さい。このときは必ず本体からプラグも抜いてください。
ちょっと一言
DCIN3V端子にACパワーアダプターをつなぐと、乾電池が入っていても自動的
に外部電源に切り換わります。
ご注意
• 外部電源で本機を使うときも、内蔵のマイコンのバックアップ用として電池を入
れておいてください。この場合も乾電池は消耗しますので、約1年で交換してく
ださい。
• 外部電源のプラグを抜き差しするときは、本体の電源を切ってから行ってくださ
い。電源を入れたまま行うと、電源が切れて「i」表示が出ることがあります。こ
の場合、もう一度本体の電源を入れると表示は消えます。
• 乾電池で使うときは、必ずACパワーアダプターをコンセントから抜いたあと、本
機のDCIN3V端子からプラグを抜いてください。DCIN3V端子に外部電源のプ
ラグがつながっていると乾電池で動作しません。
• ACパワーアダプターは、ソニーの推奨品または同等品をお使いください。プラ
グの極性、その他の仕様の違う製品を使うと、故障した
り性能を充分に発揮できないことがあります。
• 海外の220〜240V地域でお使いになる場合、ACパ
ワーアダプターの形が壁のコンセントに合わないとき
は、付属のACプラグアダプターをお使いください。
3
極性統一形プラグ
はじめに
11
JP
Page 12
時計を合わせる
現在時刻を合わせる
はじめて電池を入れたときや時計がリセットされたときには、表示窓に
「0:00」が点滅しますので、時計を合わせてください。
設定はラジオを切った状態で行ってください。
ABC1DEF2GHI
FM/
AM
JKL4MNO5PQR
AM BAND
STU
LOCAL/
WORLD
LABEL EDIT
TIMERSTANDBY/
STANDBY TIME SET
ab
STANDBY MEMORY
VWX8YZ
7
<>
/
DIRECT
MY DW VOA BBC OTH
DISPLAY
EXE
0
TIME SET
TIME DIFF
SW STATION CALL
POWER
ON/
SYNC
3
6
9
SSB
DST
ERASE
TIME SET
ENTER
LIGHT
JOG/
TUNE/
SCAN˚
OFF
SLEEP
POWER
ON/OFF
DST
HOLD
TIMESET
¿/÷
ー1¿/÷1+
LOCAL時刻とはお使いになる地域(国内)の時刻、WORLD時刻とは世
界のその他地域の時刻のことです。
時計合わせはLOCAL時刻で行います。時計合わせを行う前に15ページ
の表を見て、お使いになる地域のUTC(協定世界時刻)との時差を調べて
ください。本機には主要都市名とその時差がプリセットされています。
1 ラジオの電源が入っていたら、
POWER ON/OFF
を押して
電源を切る。
2
TIME SET
地域の都市名または
WORLD時刻表示が出ている場合で
も、TIMESETを押すと自動的に
LOCAL時刻が表示されます。
LOCAL表示が点滅し、¿または÷
を押すごとに時差帯指示表示が左右
に移動します。
TIMESETを離すと、LOCAL表示が点灯に変わり、UTCとの時差
が決定します。
を押しながら¿または÷を押し、お使いになる
との時差を選ぶ。
UTC
3 サマータイムに設定する場合は、
す。
サマータイムが採用されていない地域や、サマータイムでないと
き、あるいはすでにs表示が出ているときは、手順4に進んでくだ
さい。
JP
12
はじめに
を押してs表示を出
DST
Page 13
4
TIME SET
LOCAL
ーI¿または÷I+を1回押すたびに1分ずつ変わり、押し続けると
速く変わります。
5
TIME SET
「:」が点滅し始め、時計が動き出し
ます。
ラジオ受信中に時刻を見るには
EXEを押します。もう一度EXEを押すか約10秒たつと、もとの表示に
戻ります。ただし、スキャン動作中は時計表示になりません。
サマータイムを採用している地域では
サマータイム時期にはDSTを押してs表示を出してください(前ページ
手順3)。サマータイム終了時には、DSTを押してs表示を消します。
時刻表示は自動的に変わります。
サマータイムでないときに時計合わせを行った場合は、サマータイム開
始時にDSTを押してください。時刻表示は自動的に変わります。
ご注意
ラジオを聞いているときは時計合わせはできません。
POWERON/OFFを押してラジオの電源を切ってから時刻を合わせてください。
を押しながらーI¿または÷I+を押し、現在の
時刻を合わせる。
を離す。
は
じ
め
に
ちょっと一言
• 本機の時計は24時間表示です。
• 「0:00」の点滅を止めるには、TIMESETを押します。
• 秒まで正確に合わせるには、電話の時報サービス(117)をご利用になると便利
です。
はじめに
13
JP
Page 14
時計を合わせる(つづき)
他地域の現地時刻を知る
世界の各地の現在時刻(WORLDTIME)を調べることができます(ラジオ
がOFFのときのみ)。
ABC1DEF2GHI
FM/
AM
JKL4MNO5PQR
AM BAND
STU
LOCAL/
WORLD
LOCAL/
WORLD
LABEL EDIT
TIMERSTANDBY/
STANDBY TIME SET
ab
STANDBY MEMORY
VWX8YZ
7
<>
DIRECT
0
MY DW VOA BBC OTH
1 ラジオの電源が入っていたら、
/
DISPLAY
EXE
TIME SET
TIME DIFF
SW STATION CALL
POWER ON/OFF
POWER
ON/
SYNC
3
6
9
SSB
DST
ERASE
TIME SET
ENTER
LIGHT
JOG/
TUNE/
SCAN˚
OFF
SLEEP
電源を切る。
2 表示窓に「
WORLD
LOCAL
を押して「
」が表示されているときには、
WORLD
」を表示させる。
3 ¿または÷を押して、知りたい地域の都市名か
差を表示させる。
4 その地域がサマータイムのときは、
出す。
知りたい地域の現在時刻が表示され
ます。
を押してs表示を
DST
POWER
ON/OFF
DST
HOLD
¿/÷
を押して
LOCAL/
UTC
との時
LOCAL
時刻の表示に戻すには
LOCAL/WORLDをもう一度押します。
希望の都市名または地域名が設定されていないときは
希望の地域を、UTCとの時差によって選択します。
表示される都市名(ラベル)を変更したい場合は(/「ラベルを編集す
る」、36ページ)。
JP
14
はじめに
Page 15
各地の時差について
各地のUTC時刻との時差は次の表を参考にしてください。
時差+1:00はUTC時刻より1時間先、時差−1:00はUTC時刻より1時
間前を表します。
UTC時刻、LOCAL時刻、時差の関係は次のようになっています。
(時差)=(LOCAL時刻*)−(UTC時刻)
* DST(サマータイム)を設定していない時刻。DSTを押してs表示を出している
場合も、時差表示は変わりません。
時差
ラベル**
LONDON
±
0
C.EURO
+1
CAIRO
+2
JEDDAH
+3
DUBAI
+4
KARACH
+5
DHAKA
+6
BNGKOK
+7
S.PORE
+8
TOKYO
+9
SYDNEY
+10
SOLMON
+11
AUKLND
+12
SAMOA
–11
HAWAII
–10
ANCHRG
–9
L.A.
–8
DENVER
–7
CHICAG
–6
N.Y.
–5
CARACS
–4
RIO
–3
FN.ISL
–2
AZORES
–1
** 工場出荷時のラベル。変更したい場合は/「ラベルを編集する」(36ページ)。
地域または都市名
ロンドン
中央ヨーロッパ
カイロ
ジェッダ
ドバイ
カラチ
ダッカ
バンコク
シンガポール
東京
シドニー
ソロモン
オークランド
サモア
ハワイ
アンカレジ
ロサンゼルス
デンバー
シカゴ
ニューヨーク
カラカス
リオデジャネイロ
フェルナンド
デノロニャ島
アゾレス諸島
その他の都市
アムステルダム、ストックホルム、チューリ
ヒ、パリ、ウィーン、ブリュッセル、ベルリ
ン、マドリード、リスボン、ローマ
アテネ、イスタンブール
リヤド、ナイロビ、モスクワ
ジャカルタ
北京、ホンコン
ソウル
グアム
ヌメア
フィジー
ホノルル、タヒチ
サンフランシスコ、バンクーバー
カルガリー
ダラス、メキシコ
トロント、パナマ、リマ
サンチアゴ
サンパウロ、ブエノスアイレス
スキャン間隔
9kHz
10kHz
9kHz
は
じ
め
に
(中波)放送の周波数ステップ(間隔)について
MW
日本をはじめ世界の大多数の国々ではMW放送の周波数は9kHz間隔で配
置されていますが、北米や南米など10kHz間隔で放送が行われている地
域もあります。スキャン選局またはマニュアル選局では周波数ステップ
をお使いの地域に合わせる必要がありますが、本機ではLOCAL時刻、
WORLD時刻に関係なく、ラジオOFF時に表示されているUTCとの時差
により、自動的に設定されます。
はじめに
15
JP
Page 16

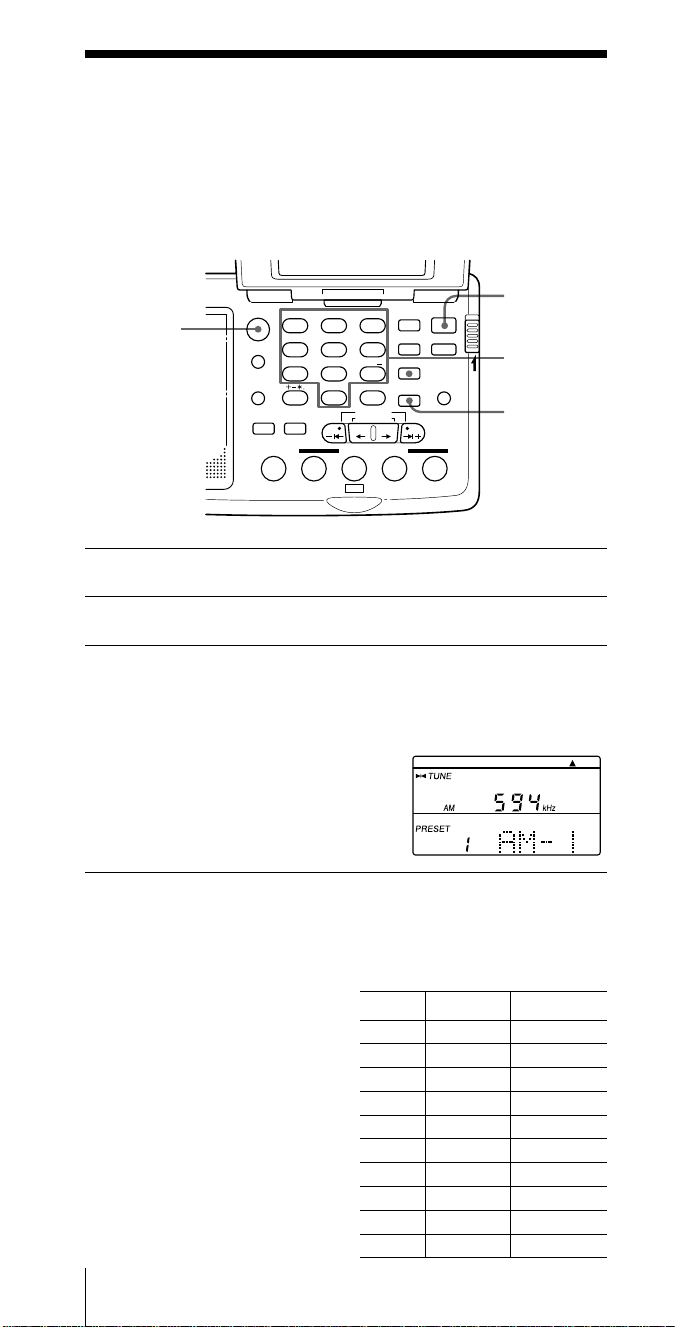
z受信のしかた
いろいろな受信のしかた
周波数を直接指定して聞く
ダイレクト選局
—
周波数がわかっているときは、数字ボタンで入力すれば、すばやく正確
に選局できます。
POWER
ON/OFF
数字ボタン
HOLD
EXEDIRECT
FM/AM
1
POWER ON/OFF
2
FM/AM
を押してFMまたはAMを選ぶ。
ABC1DEF2GHI
FM/
AM
JKL4MNO5PQR
AM BAND
STU
LOCAL/
WORLD
LABEL EDIT
TIMERSTANDBY/
STANDBY TIME SET
ab
STANDBY MEMORY
VWX8YZ
7
<>
/
DIRECT
MY DW VOA BBC OTH
DISPLAY
EXE
0
TIME SET
TIME DIFF
SW STATION CALL
POWER
ON/
SYNC
3
6
9
SSB
DST
ERASE
TIME SET
ENTER
SLEEP
LIGHT
JOG/
TUNE/
SCAN˚
OFF
を押してラジオの電源を入れる。
短波(SW)、中波(MW)、長波(LW)を聞くときはAMを選びます。
3
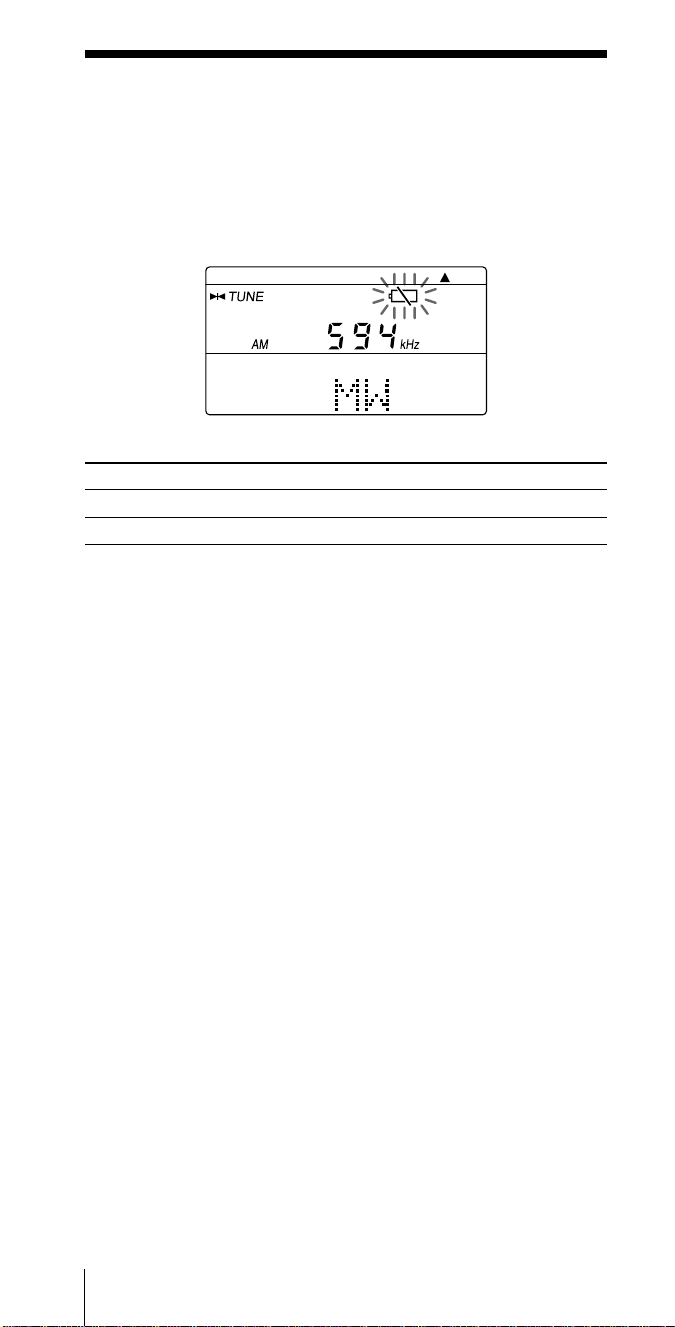
DIRECT
を押す。
表示窓の周波数表示が消え、
「DIRECT」と表示されます。
4 数字ボタンを押して、聞きたい放送局の周波数を入力する。
の場合:小数点を入力する必要はありません。
FM
例)84.7MHzのときは、8→4→7の順に押します。
の場合:周波数の最後に0が3つ続くときは省略で
AM
きます。
例)10000kHzのときは、1→0の順に押します。
それぞれのボタン操作は、10秒以内に行ってください。
最小入力桁は、FMが0.05MHz(50kHz)で、AMが1kHzです。
16
5
EXE
放送を受信すると「
が点灯します。
JP
受信のしかた
を押して決定する。
TUNE
」表示
Page 17
入力を間違えたときは
DIRECTを押すと入力が取り消されます。手順3から操作をやり直して
ください。
TRY AGAIN
表示が出たら
選んだバンドの受信可能周波数以外の周波数を入力すると、ビープ音が
鳴り、「TRY」、「AGAIN」と順に表示されます。
周波数を確かめて、手順3から操作をやり直してください。
ご注意
• 手順3〜5の各操作は10秒以内に行ってください。10秒以上たつとそれまで聞
いていた周波数に戻ってしまいます。このときは、もう一度手順3からやり直し
てください。
• ビープ音はBEEPOFFに設定されていると鳴りません(/「ビープ音を消す」、
43ページ)。
その他の操作
こんなときは 使うつまみ、押すボタン
周波数を微調整する ーI¿、¿、÷、÷I+
音量を調節する
VOL
ラジオの電源を切る* POWERON/OFF
* 電源を入れると、電源を切る前に聞いていた放送局を受信します。
受信状態を良くするには
放送
FM
ロッドアンテナを伸ばして向きや角度を変える。
(/「アンテナの伸ばしかた」、5ページ)。
受
信
の
し
か
た
MW、LW
放送
内蔵のバーアンテナが働くので、ロッドアンテナを
たたみ、本体の向きを変える。
放送
SW
ロッドアンテナを垂直いっぱいに伸ばす。
SWは、付属の外部アンテナをお使いいただくとより安定した
受信をお楽しみいただけます(/「付属の外部アンテナを使う」、
32ページ)。
ちょっと一言
• ヘッドホンを使うと、FMステレオ放送を楽しむことができます。FMステレオ
放送はST・MONOスイッチでステレオとモノラルを切り換えることができま
す。雑音が多くて聞き取りにくい場合は、MONOにしてください。ステレオ効
果はなくなりますが、雑音が減り、より安定した受信状態が得られます。
• ニュース番組などを聞くときは、TONEスイッチをNEWSに合わせると人の声
などが聞きやすくなります。音楽番組を聞くときはMUSICに合わせます。
• このラジオは、内部スプリアス(ラジオ内部に使われている発振器の信号を受信
すること)により、3.0MHzおよび3.64MHzの周波数付近では受信しにくいこ
とがあります。
受信のしかた
17
JP
Page 18
いろいろな受信のしかた(つづき)
手動で周波数を選んで聞く
マニュアル選局
—
ーI¿、÷I+または¿、÷ボタンで周波数を送ります。外側のボタン
では大きく、内側のボタンでは細かく周波数が変わります。
FM/AM
AMBAND
1
POWER ON/OFF
2
FM/AM
を押してFMまたはAMを選ぶ。
ABC1DEF2GHI
FM/
AM
JKL4MNO5PQR
AM BAND
STU
LOCAL/
WORLD
LABEL EDIT
TIMERSTANDBY/
STANDBY TIME SET
ab
STANDBY MEMORY
VWX8YZ
7
<>
/
DIRECT
0
MY DW VOA BBC OTH
を押してラジオの電源を入れる。
3
6
9
DISPLAY
EXE
TIME SET
TIME DIFF
SW STATION CALL
SYNC
SSB
DST
ERASE
TIME SET
ENTER
SW、MW、LWを聞くときはAMにします。
3
を選んだときは、
AM
+ボタンを押して、MW(中波)、LW(長波)またはメー
÷
I
AM BAND
を押したままーI¿または
ターバンド(短波)を選ぶ。
バンドまたはメーターバンド名と、最
小周波数が表示されます。
FM放送を聞く場合は手順4に進んでく
ださい。
POWER
ON/
OFF
SLEEP
LIGHT
JOG/
TUNE/
SCAN˚
POWER
ON/OFF
HOLD
¿/÷
ー1¿/÷1+
4 ー
¿、÷I+または¿、÷ボタンをくり返し押して、聞き
I
たい局を探す。
ボタンを押すたびに、次の間隔で周波数が変わります。(カッコ内は
SSBモード)
バンド −I¿または÷I+ ¿または÷
FM 0.05MHz 0.05MHz
SW 5kHz(1kHz) 1kHz (0.1kHz**)
MW 9kHzまたは10kHz*(1kHz) 1kHz(0.1kHz**)
LW 9kHz(1kHz) 1kHz(0.1kHz**)
* 周波数間隔は、LOCAL時刻、WORLD時刻に関係なく、ラジオOFF時に表示さ
れている時差に対応して自動的に設定されます(/「MW(中波)放送の周波数ス
テップ(間隔)について」、15ページ)。
**0.1kHzの単位は表示窓には表示されません。
JP
18
受信のしかた
Page 19
ちょっと一言
• −I¿または÷I+ボタンを押したままにすると、スキャン選局になります(/
「自動的に局を探して聞く−スキャン選局」、20ページ)。
• ¿または÷ボタンを押したままにすると、周波数が速く進み、離すと止まりま
す。AMバンド(MW、SW、LW)では、150〜29999kHzの範囲で周波数が連
続して変わります。
各バンド
放送バンド 周波数範囲 スキャン選局時 メーターバンド
AM 7100〜7400 41メーター
* 周波数ステップが10kHzのとき(15ページ)
** 周波数ステップが9kHzのとき(15ページ)
メーターバンドの周波数範囲
•
(単位:AMはkHz、FMはMHz)
LW 150〜529 153〜522 −
MW 530〜1620
SW 1621〜29999
FM 76.00〜108.00 76.00〜108.00 −
530〜1620* −
531〜1620** −
2250〜2550 120メーター
3150〜3450 90メーター
3850〜4050 75メーター
4700〜5100 60メーター
5900〜6250 49メーター
9400〜10000 31メーター
11500〜12150 25メーター
13500〜13900 22メーター
15000〜15700 19メーター
17450〜18000 16メーター
18850〜19100 15メーター
21450〜21950 13メーター
25600〜26100 11メーター
受
信
の
し
か
た
ご注意
実際の短波(SW)の放送バンドと本機のメーターバンドは多少異なっています。
詳しくは「ウェーブハンドブック」をご覧ください。
受信のしかた
19
JP
Page 20
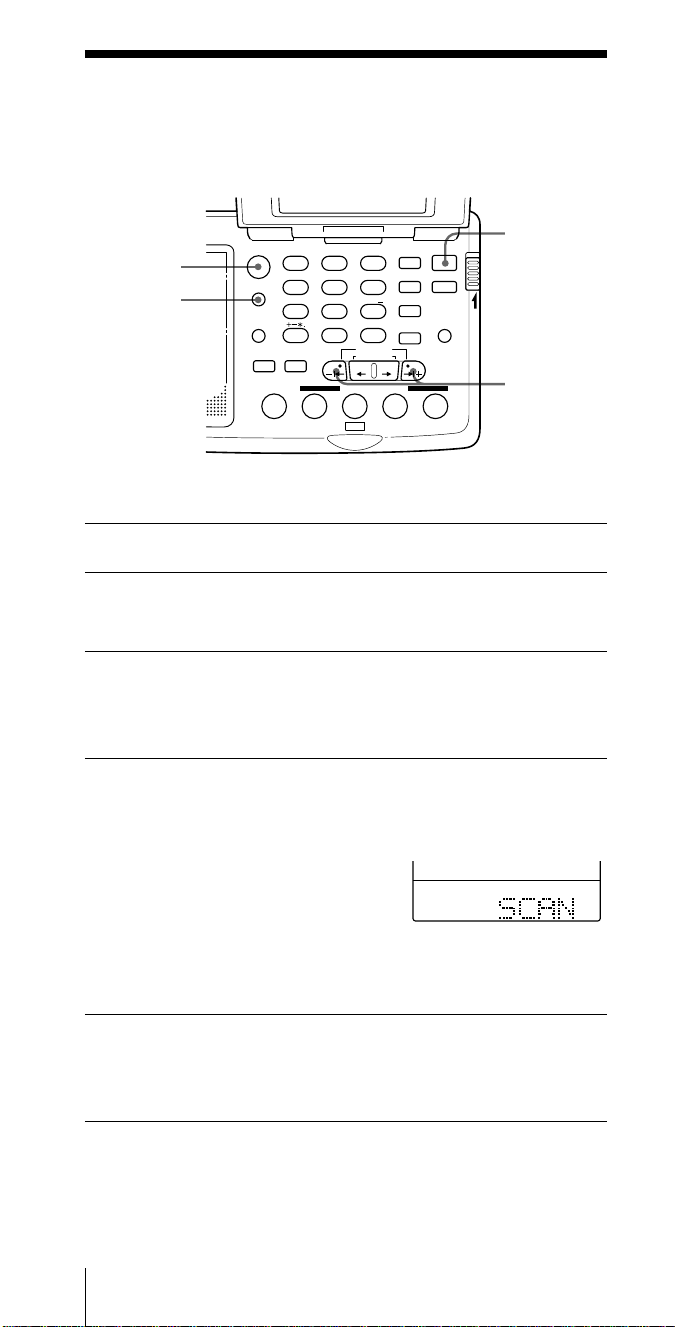
いろいろな受信のしかた(つづき)
自動的に局を探して聞く
スキャン選局
—
POWER
ON/OFF
HOLD
ー1¿/÷1+
FM/AM
AMBAND
1
POWER ON/OFF
2
FM/AM
を押してFMまたはAMを選ぶ。
ABC1DEF2GHI
FM/
AM
JKL4MNO5PQR
AM BAND
STU
LOCAL/
WORLD
LABEL EDIT
TIMERSTANDBY/
STANDBY TIME SET
ab
STANDBY MEMORY
VWX8YZ
7
<>
/
DIRECT
MY DW VOA BBC OTH
DISPLAY
EXE
0
TIME SET
TIME DIFF
SW STATION CALL
POWER
ON/
SYNC
3
6
9
SSB
DST
ERASE
TIME SET
ENTER
OFF
SLEEP
LIGHT
JOG/
TUNE/
SCAN˚
を押してラジオの電源を入れる。
SW、MW、LWを聞くときはAMにします。
3
を選んだときは、
AM
÷
+を押して、MW、LWまたはメーターバンドを選ぶ。
I
AM BAND
を押したままーI¿または
FM放送を聞く場合は手順4に進んでください。
4 ー
¿または÷I+を押したままにし、数字が動き始めたら
I
指を離す。
「SCAN」が表示されます。
放送局を自動的に受信して、約3秒間
止まり、次の放送局を探します(スキャ
ン選局)。
バンドまたはメーターバンド内でスキャンをくり返します(/「各バ
ンド・メーターバンドの周波数範囲」、19ページ)。
SSB受信時は150〜29999kHzの間でスキャンをくり返します。
5 聞きたい局が受信されたところで、ー
してスキャンを止める。
「SCAN」表示が消え、バンド名が表示されます。
JP
20
受信のしかた
¿または÷I+を押
I
Page 21
ちょっと一言
• ーI¿を押し続けてスキャンを開始すると周波数の降順に、÷I+で開始すると
昇順にスキャンします。
• スキャン方向を変えるには、逆方向のーI¿または÷I+を3秒以上押してくださ
い。スキャン再開してしまったあと、直前にスキャン停止していた局に戻りたい
場合などに便利です。
• 電波の強い夜間のMW放送や混信が多いときは、スキャンで止まる周波数が多す
ぎることがあります。この場合はATTスイッチをONにして、ATTコントロール
つまみで調節してください(/「スキャンストップを調節するには」、下記)。通
常はOFFにして使います。
スキャンストップを調節するには
スイッチと
— ATT
受信感度を調節することができます。
スキャン動作中、ひんぱんにスキャンストップが起きる場合や、混信が
多いときなどにお使いください。通常はATTスイッチをOFF(受信感度
が最大の状態)にしてお使いください。
コントロール
ATT
つまみ
コントロールつまみの使いかた
ATT
受
信
の
し
か
た
スイッチ
ATT
ATTスイッチをONにすると、ATTコントロールつまみが有効になりま
す。ATTコントロールつまみをMAXの方向に回すほど受信感度が低くな
り、弱い信号は受信しないで、強い信号だけを受信するようになりま
す。
ご注意
ATTコントロールつまみをMAXの方向に回しすぎると、弱い信号が受信できなく
なります。ATTコントロールを使う必要がないときは、必ずATTスイッチをOFF
にしてください。
受信のしかた
21
JP
Page 22
いろいろな受信のしかた(つづき)
いつも聞く局を記憶させて聞く
プリセット選局
—
数字ボタンにFM10局、AM局10局の計20局を記憶できます。
局を記憶させる
POWER
ON/OFF
数字ボタン
HOLD
ENTER
FM/AM
1
POWER ON/OFF
ABC1DEF2GHI
FM/
AM
JKL4MNO5PQR
AM BAND
STU
LOCAL/
7
WORLD
LABEL EDIT
DIRECT
TIMERSTANDBY/
STANDBY TIME SET
ab
STANDBY MEMORY
MY DW VOA BBC OTH
VWX8YZ
<>
/
DISPLAY
0
TIME SET
TIME DIFF
SW STATION CALL
3
6
9
EXE
SYNC
SSB
DST
ERASE
TIME SET
ENTER
POWER
ON/
OFF
SLEEP
LIGHT
JOG/
TUNE/
SCAN˚
を押してラジオの電源を入れる。
2 記憶させたい放送局を受信する。
3
ENTER
す。
ENTERを押したままにすると「PRESETMY」表示が点滅します。
数字ボタンを押すとビープ音が鳴り、
選んだボタンに放送局が記憶されま
す。プリセット番号とプリセットラベ
ルが表示されます。
を押したまま、数字ボタン(0から9)のいずれかを押
ご注意
選んだ番号のボタンにあらかじめ放送局が記憶されていた場合、新しい放送局が上書
きされ、記憶されていた放送局は消えます。また、ラベルは初期設定に戻ります。
プリセットラベルの初期設定
周波数を新たに記憶させた場合、
ラベルは右の初期設定に戻りま
す。
ラベルを変更したい場合は/「ラ
ベルを編集する」(36ページ)。
JP
22
受信のしかた
ボタン
1
2
3
4
5
6
7
8
9
0
AM
AM-1
AM-2
AM-3
AM-4
AM-5
AM-6
AM-7
AM-8
AM-9
AM-0
FM
FM-1
FM-2
FM-3
FM-4
FM-5
FM-6
FM-7
FM-8
FM-9
FM-0
Page 23

記憶させた局を受信するには
POWER
DISPLAY
EXE
TIME SET
TIME DIFF
3
6
9
SYNC
SSB
DST
ERASE
TIME SET
ENTER
POWER
ON/
OFF
SLEEP
LIGHT
HOLD
JOG/
TUNE/
SCAN˚
0から9
ON/OFF
数字ボタン
)を押す。
ABC1DEF2GHI
FM/
FM/AM
1
POWER ON/OFF
2
FM/AM
を押してFMまたはAMを選ぶ。
AM
JKL4MNO5PQR
AM BAND
STU
VWX8YZ
LOCAL/
7
WORLD
<>
LABEL EDIT
TIMERSTANDBY/
STANDBY TIME SET
STANDBY MEMORY
/
DIRECT
0
ab
SW STATION CALL
MY DW VOA BBC OTH
を押してラジオの電源を入れる。
3 聞きたい局が入っている数字ボタン(
記憶させている放送局が受信されます。
メモリーに周波数が記憶されていない場合
ボタン(0から9)を押すとビープ音が鳴り、「MEMORY」、「EMPTY」と
順に表示され、もとの状態に戻ります。
ご注意
• お買い上げ時、プリセットメモリーに周波数が記憶されている場合があります。
• BEEPOFFに設定されているとビープ音は鳴りません(/「ビープ音を消す」、
43ページ)。
受
信
の
し
か
た
記憶させた局を消すには
HOLD
数字ボタン
ERASE
)を押す。
受信のしかた
ABC1DEF2GHI
FM/
AM
JKL4MNO5PQR
AM BAND
STU
VWX8YZ
LOCAL/
7
WORLD
<>
LABEL EDIT
TIMERSTANDBY/
STANDBY TIME SET
ab
STANDBY MEMORY
/
DIRECT
0
SW STATION CALL
MY DW VOA BBC OTH
1 消したい局が入っている数字ボタン(
2
ERASE
を押し続ける。
3
6
9
DISPLAY
EXE
TIME SET
TIME DIFF
SYNC
ERASE
TIME SET
ENTER
SSB
DST
POWER
ON/
OFF
SLEEP
LIGHT
JOG/
TUNE/
SCAN˚
0から9
ERASEを押している間プリセット番号が点滅します。
約3秒後にビープ音が鳴り、記憶されていた放送局が消えます。プ
リセット番号とプリセットラベル表示が消えます。
ご注意
記憶させた放送局を消した場合、ラベルも同時に消えます。
23
JP
Page 24

いろいろな受信のしかた(つづき)
局名ボタンで探して聞く
— SW STATION CALL
DW,VOA,BBC,OTH(others)の各局名ボタンを押すと、本機底面に収
納されているROM*(SWSTATIONCALLROM)に記憶されている各局
の周波数を順次スキャンし、受信できた周波数で自動的に止まります。
ABC1DEF2GHI
FM/
AM
JKL4MNO5PQR
AM BAND
STU
LOCAL/
WORLD
LABEL EDIT
TIMERSTANDBY/
STANDBY TIME SET
ab
STANDBY MEMORY
VWX8YZ
7
<>
/
DIRECT
MY DW VOA BBC OTH
DISPLAY
EXE
0
TIME SET
TIME DIFF
SW STATION CALL
POWER
ON/
SYNC
3
6
9
SSB
DST
ERASE
TIME SET
ENTER
OFF
SLEEP
LIGHT
JOG/
TUNE/
SCAN˚
POWER
ON/OFF
HOLD
局名ボタン
*ReadOnlyMemory=読み出し専用メモリー
1 お使いになる地域の時差を正しく合わせる。
LOCAL時刻の場合/「現在時刻を合わせる」(12ページ)。
WORLD時刻の場合/「他地域の現在時刻を知る」(14ページ)。
SWSTATIONCALLは、LOCAL時刻、WORLD時刻に関係なく、設
定されている時差に対応する地域で受信できる周波数だけを選択して
呼び出します。時差設定はお使いになる地域に合わせて正しく行って
ください。
2
POWER ON/OFF
3
希望の局名ボタンを押す。
「SWSTATIONCALL」と、選択した
放送局名と周波数が表示されます。
UTCとの時差と時差帯指示表示が3秒
間点滅し、点灯に変わります。
時差設定が正しいかどうか、確認して
ください。
イラストの周波数は、実際に表示される周波数と異なる場合があり
ます。
を押してラジオの電源を入れる。
24
4
もう一度、同じ局名ボタンを押す。
選択した放送局の周波数を低い順にスキャンし、放送を受信すると
止まります。
同じ局名ボタンを押すと、スキャンを再開します。
JP
受信のしかた
Page 25
スキャンを止めるには
スキャン中に同じ局名ボタンを押します。
スキャンを行わないで1つずつ周波数を呼び出すには
局名ボタンを押しながら¿、÷またはーI¿、÷I+を押します。
ーI¿または÷I+を押し続けると速く進み、離すと止まります。
ちょっと一言
電波の強い夜間や混信が多いときは、スキャンで止まる周波数が多すぎることがあ
ります。この場合はATTスイッチをONにして、ATTコントロールつまみで調節し
てください(/「スキャンストップを調節するには」、21ページ)。通常はOFFにし
て使います。
SW STATION CALL
局名ボタン
DW
VOA
BBC
OTH
放送局
DW
VOA
BBC
以下の5局のうち、あらかじめ1つを設定して使用
R.NED
RFI
R.JPN
REE
CRI
ボタンの放送局の設定のしかた
*OTH
で受信できる放送局
(Deutsche Welle)
(
Voice of America
(
British Broadcasting Corporation
(
Radio Nederland
(
Radio France International
(
Radio Japan
(
Radio Exterior de España
(
China Radio International
の英語、ドイツ語放送
)
の英語放送
)
の英語、オランダ語放送
)
の英語、フランス語放送
)
の英語、日本語放送
)
の英語、スペイン語放送
)
の英語、中国語放送
)
の英語放送
*:
設定はラジオの電源を切った状態で行います。
OTHボタンを押しながら¿または÷ボタンを押して、設定したい放送
局が表示されたらOTHボタンを離します。
受
信
の
し
か
た
DISPLAY
EXE
TIME SET
TIME DIFF
POWER
ON/
SYNC
3
OFF
SLEEP
SSB
6
DST
ERASE
9
LIGHT
TIME SET
HOLD
ENTER
JOG/
TUNE/
SCAN˚
¿/÷
OTH
ABC1DEF2GHI
FM/
AM
JKL4MNO5PQR
AM BAND
STU
VWX8YZ
LOCAL/
7
WORLD
LABEL EDIT
STANDBY TIME SET
STANDBY MEMORY
<>
/
DIRECT
0
TIMERSTANDBY/
ab
SW STATION CALL
MY DW VOA BBC OTH
受信の操作は、他のSWSTATIONCALL局名ボタンと同じです。
受信のしかた
25
JP
Page 26

放送局が受信できないとき
スキャンしたすべての周波数で放送が受信できなかった場合、スキャン
を開始した周波数に戻ったところでスキャンが止まり、ビープ音が鳴り
ます。
最小周波数 スキャン開始周波数 最大周波数
短波放送は、太陽の黒点による大気圏現象など、さまざまな要因によっ
て電波の伝わり方に影響がでます。また、SWSTATIONCALLROM
に収められている主要放送局は、季節の変わり目、その他の理由により
周波数や放送時間を変更することがあります。このような場合、SW
STATIONCALLによる放送局の受信ができない場合があります。
SW STATION CALL ROM
の更新について
放送局の周波数変更に対応するため、本機はSWSTATIONCALL
ROMを新しいものと交換できるようになっています。最新のSW
STATIONCALLROMは有償にて(株)Fコーポレーションより販売し
ています。ROMは毎年10月頃更新されます。2〜3年に一度更新してい
ただくことをおすすめします。
購入については、同梱の「最新のSWSTATIONCALLROMの購入につ
いて」をご覧の上、(株)Fコーポレーションにお申し込みください。
ROMの交換方法については、「SWSTATIONCALLROMの交換のし
かた」(45ページ)をご覧ください。
ご注意
• SWSTATIONCALLROMに収められている主要短波放送局の国際放送の周波
数は、放送時間帯が限られているものが多くあります。放送時間帯以外の時に
は、何も受信できないか、お使いの地域のローカル局など他の放送局を受信する
ことがあります。
• 「SWSTATIONCALL」
局方法で周波数を変えると、「SWSTATIONCALL」
• 設定している時差の地域で受信できる周波数がROMに1つもないときに局名ボ
タンを押した場合、ビープ音が鳴り、「MEMORY」、「EMPTY」と順に表示さ
れ、もとの状態に戻ります。
• SWSTATIONCALLROMが入っていないときに局名ボタンを押した場合、
ビープ音が鳴り、「NO」、「ROM」と順に表示され、もとの状態に戻ります。
また、「SWSTATIONCALL」が表示されているときにSWSTATIONCALL
ROMが外れると、ビープ音が鳴り、「NO」、「ROM」と順に表示され、マニュア
ル選局になります。
• SWSTATIONCALLROMが入っているにもかかわらず、「NO」、「ROM」と順
に表示された場合、ROM接点部の接触不良の可能性があります。ROM接点部を
綿棒でクリーニングしてください(/「SWSTATIONCALLROM接点部のク
リーニングのしかた」、45ページ)。
ラジオ本体のROM収納部の接点バネは、クリーニング等しないでください。変
形して接触不良の原因となります。
が表示されているときに、マニュアル選局など他の選
表示は消えます。
26
JP
受信のしかた
Page 27
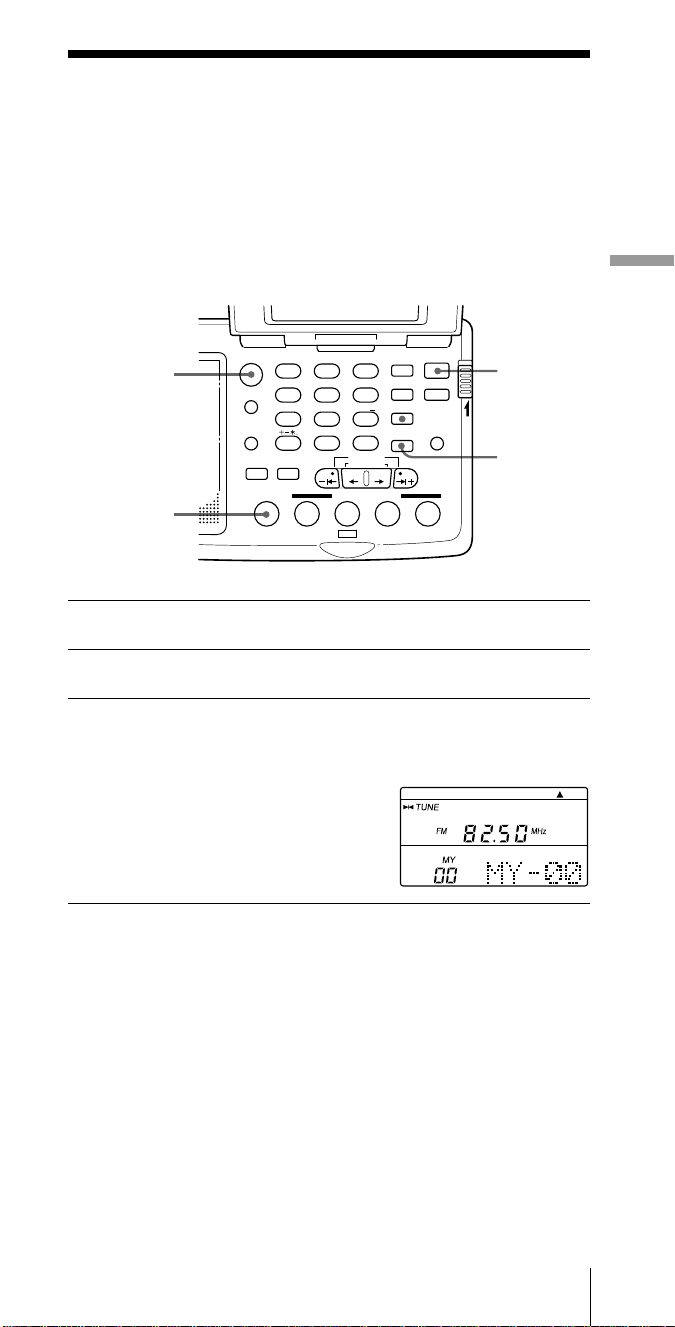
いろいろな受信のしかた(つづき)
記憶させた局を探して聞く
マイメモリー選局
—
FM/SW/MW/LWの周波数を、最大100個までMYボタンに記憶し、メ
モリースキャンすることができます。
周波数を記憶させる
FM/AM
MY
ABC1DEF2GHI
FM/
AM
JKL4MNO5PQR
AM BAND
STU
LOCAL/
WORLD
LABEL EDIT
TIMERSTANDBY/
STANDBY TIME SET
ab
STANDBY MEMORY
VWX8YZ
7
<>
/
DIRECT
MY DW VOA BBC OTH
DISPLAY
EXE
0
TIME SET
TIME DIFF
SW STATION CALL
POWER
ON/
SYNC
3
6
9
SSB
DST
ERASE
TIME SET
ENTER
SLEEP
LIGHT
JOG/
TUNE/
SCAN˚
OFF
POWER
ON/OFF
HOLD
ENTER
受
信
の
し
か
た
1
POWER ON/OFF
を押してラジオの電源を入れる。
2 記憶させたい放送局を受信する。
3
ENTER
ENTERを押したままにすると「PRESETMY」表示が点滅します。
MYを押すとビープ音が鳴り、マイメモ
リー番号OO〜99のなかで、まだ記憶
されていない最小の番号に記憶されま
す。マイメモリー番号とマイメモリー
ラベルが表示されます。
マイメモリーラベルの初期設定
マイメモリーに周波数を記憶させると、「MY-xx」(xxはメモリー番号)と
いうラベルが自動的につきます。
ラベルを変更したい場合は/「ラベルを編集する」(36ページ)。
ご注意
お買い上げ時、マイメモリーに周波数が記憶されている場合があります。その場合
は消去してから記憶させてください(/「記憶させたマイメモリーを消すには」、
29ページ)。
ちょっと一言
• マイメモリー番号00〜99まですべて記憶された状態でMYを押すと、ビープ音
が鳴り、「MEMORY」、「FULL」と順に表示され、もとの状態に戻ります。
• マイメモリー選局は、時差の設定とは関係ありません。
を押したまま、MYを押す。
受信のしかた
27
JP
Page 28
記憶させたマイメモリーをスキャンする
3
6
9
DISPLAY
EXE
TIME SET
TIME DIFF
SYNC
ERASE
TIME SET
ENTER
POWER
ON/
OFF
SLEEP
SSB
DST
LIGHT
JOG/
TUNE/
SCAN˚
POWER
ON/OFF
HOLD
MY
1
POWER ON/OFF
2
MY
を押す。
ABC1DEF2GHI
FM/
AM
JKL4MNO5PQR
AM BAND
STU
VWX8YZ
LOCAL/
7
WORLD
LABEL EDIT
STANDBY TIME SET
STANDBY MEMORY
<>
/
DIRECT
0
TIMERSTANDBY/
ab
SW STATION CALL
MY DW VOA BBC OTH
を押してラジオの電源を入れる。
マイメモリーが呼び出されます。
3 もう一度
MY
を押す。
マイメモリーのスキャンが始まり、放送を受信すると止まります。
もう一度MYを押すとスキャンを再開します。
スキャンを止めるには
マイメモリースキャン中にMYを押します。
スキャンを行わないで1つずつ周波数を呼び出すには
MYを押しながら¿、÷またはーI¿、÷I+を押します。
ーI¿または÷I+を押し続けると速く進み、離すと止まります。
ちょっと一言
• マイメモリーは、記憶されているマイメモリー番号のみをスキャンし、記憶され
ていない番号は飛ばします。
• 周波数の順にマイメモリーに記憶させると、スキャン速度が最も速い条件にする
ことができます。
• マイメモリーに周波数が1つも記憶されていないときにMYボタンを押した場
合、ビープ音が鳴り、「MEMORY」、「EMPTY」と順に表示され、もとの状態に
戻ります。
• 電波の強い夜間や混信が多いときは、スキャンで止まる周波数が多すぎることが
あります。この場合はATTスイッチをONにして、ATTコントロールつまみで調
節してください(/「スキャンストップを調節するには」、21ページ)。通常は
OFFにして使います。
JP
28
受信のしかた
Page 29

放送局が受信できないとき
スキャンしたすべての周波数で放送が受信できなかった場合、スキャン
を開始したメモリー番号に戻ったところでスキャンが止まり、ビープ音
が鳴ります。
記憶されている最小の
メモリー番号
スキャン開始
メモリー番号
記憶されている最大の
メモリー番号
記憶させたマイメモリーを消すには
ABC1DEF2GHI
FM/
AM
JKL4MNO5PQR
AM BAND
STU
VWX8YZ
LOCAL/
7
WORLD
<>
LABEL EDIT
TIMERSTANDBY/
STANDBY TIME SET
ab
STANDBY MEMORY
/
DIRECT
0
SW STATION CALL
MY DW VOA BBC OTH
3
6
9
DISPLAY
EXE
TIME SET
TIME DIFF
SYNC
ERASE
TIME SET
ENTER
POWER
ON/
OFF
SSB
SLEEP
DST
LIGHT
JOG/
TUNE/
SCAN˚
ERASE
HOLD
1 消したいマイメモリー番号を呼び出す。
2
ERASE
ERASEを押している間マイメモリー番号が点滅します。
約3秒後にビープ音が鳴り、記憶されていた放送局が消えます。マ
イメモリー番号とマイメモリーラベル表示が消えます。
を押し続ける。
受
信
の
し
か
た
ご注意
記憶させた放送局を消した場合、ラベルも同時に消えます。
記憶させたマイメモリーを変更するには
すでに記憶されているマイメモリー番号に、別の周波数を記憶させるこ
とはできません。一度そのメモリー番号に記憶されている周波数を消し
てから、新しい周波数を記憶させてください。
ご注意
マイメモリーは、まだ記憶されていない最小の番号に記憶されます。変更するため
に消したメモリー番号より小さい番号のメモリーが空になっていると、新しい周波
数はその番号に記憶されてしまいます。
受信のしかた
29
JP
Page 30

SSB
や
CW
を受信する
SSB(SingleSideBand)通信やCW(ContinuousWave)通信を受信
することができます。
FM/AM
1
POWER ON/OFF
2
3
FM/AM
SSB
を押して、AMを選ぶ。
を押して、「
ABC1DEF2GHI
FM/
AM
JKL4MNO5PQR
AM BAND
STU
LOCAL/
7
WORLD
LABEL EDIT
DIRECT
TIMERSTANDBY/
STANDBY TIME SET
ab
STANDBY MEMORY
MY DW VOA BBC OTH
VWX8YZ
<>
/
DISPLAY
0
TIME SET
TIME DIFF
SW STATION CALL
3
6
9
EXE
を押してラジオの電源を入れる。
」または「
USB
LSB/CW
SYNC
SSB
DST
ERASE
TIME SET
ENTER
POWER
ON/
OFF
SLEEP
LIGHT
JOG/
TUNE/
SCAN˚
」を選ぶ
HOLD
。
SSBを押すごとに次のように表示が
切り換わります。
(通常)→USB→LSB/CW
4 周波数を合わせて受信する。
受信のしかたは「いろいろな受信のしかた」(16〜29ページ)をご覧
ください。
POWER
ON/OFF
SSB
ちょっと一言
SSB、CWについて詳しくは「ミニ知識」(52ページ)をご覧ください。
ご注意
• USBやLSB/CWの状態を各メモリーに記憶させることはできません。受信中は
USBやLSB/CWではO.1kHz単位で選局ができますが、メモリーに記憶すると
きは、周波数の小数点以下は切り捨てられます。
• USBやLSB/CWの状態で、AM周波数が記憶されているメモリーを呼び出した
場合、USBやLSB/CWの状態は継続されます。
JP
30
受信のしかた
Page 31

AM
—
放送を良い状態で受信する
同期検波
同期検波回路により、AM放送(特にSW)を明瞭に受信することができま
す。
SYNC
POWER
ON/OFF
HOLD
1
POWER ON/OFF
ABC1DEF2GHI
FM/
AM
JKL4MNO5PQR
AM BAND
STU
LOCAL/
WORLD
LABEL EDIT
TIMERSTANDBY/
STANDBY TIME SET
ab
STANDBY MEMORY
VWX8YZ
7
<>
/
DIRECT
MY DW VOA BBC OTH
DISPLAY
EXE
0
TIME SET
TIME DIFF
SW STATION CALL
POWER
ON/
SYNC
3
6
9
SSB
DST
ERASE
TIME SET
ENTER
LIGHT
JOG/
TUNE/
SCAN˚
OFF
SLEEP
を押してラジオの電源を入れる。
2 放送を受信する。
受信のしかたは「いろいろな受信のしかた」(16〜29ページ)をご覧
ください。
3
SYNCを押すごとに次のように表示が
(通常)→SYNCU→SYNCL
をくり返し押して、「
SYNC
いずれか聞きやすい方を選ぶ
切り換わります。
SYNC U
。
」または「
SYNC L
受
信
の
し
か
た
」の
同期検波が働くと「LOCK」表示が点灯します。
ちょっと一言
同期検波について詳しくは「ミニ知識」(52ページ)をご覧ください。
ご注意
• 電池が消耗していると、同期検波が解除されることがあります。
• SYNCL(またはU)が表示されていても、受信している信号が弱いと同期検波
が働かず、「LOCK」表示が点灯しないことがあります。
• SYNCL(またはU)の状態を各メモリーに記憶させることはできません。
• SYNCL(またはU)の状態で、AM周波数が記憶されているメモリーを呼び出し
た場合、SYNCL(またはU)の状態は継続されます。
受信のしかた
31
JP
Page 32

z便利な使いかた
付属の外部アンテナを使う
付属の短波放送専用アクティブアンテナAN-LP2を使って、より安定し
たSW受信をお楽しみいただけます。アンプが内蔵されていますので、
室内でも屋外同様に良好な受信状態が得られます。
付属の外部アンテナが使用できる周波数は、19ページの表にある120
メーターから11メーターの各メーターバンドの短波放送帯です。FM、
MW、LWを受信する場合は必ずラジオから本アンテナをはずしてくださ
い。
乾電池を入れる
1 アンテナコントローラーの電池入れのふたを開ける。
2 単
形乾電池を2本入れる。
3
3 ふたを閉める。
乾電池の持続時間
ソニー単3形(R6)マンガン乾電池使用時(JEITA*) 約40時間
*
JEITA(電子情報技術産業協会)規格による測定値です。
実際の電池持続時間は使用する機器の状況により変動する可能性があります。
乾電池の交換時期
乾電池が消耗してくると、アンテナコントローラーのPOWERランプが
暗くなります。そのときは、2本とも新しい乾電池に交換してくださ
い。
JP
便利な使いかた
32
Page 33

外部アンテナを使う
1 アンテナモジュールをゆっくり広げる。
顔や、周りの人や物にぶつからないように注意してください。
2 アンテナコントローラーから、内部に巻き取られた長いコー
ドを止まるところまで引き出し、アンテナモジュールにつな
ぐ。
3 アンテナモジュールを窓ガラスやカーテンにつける。
前ページのイラストのように、吸盤やクリップを使い固定してくだ
さい。
便
利
な
使
い
か
た
4 アンテナコントローラーの短いコードを、ラジオの
EXT ANT
アンテナコントローラーの電源がラジオの電源に連動し、POWER
ランプが点灯します。
ラジオのATTスイッチは、OFFにしてください。
設置について
• アンテナモジュールは、窓際など、受信状態のよいところに設置してください。
• アンテナコントローラーの長いコードをラジオに近づけると感度が悪くなること
がありますので、なるべく離してお使いください。
• 蛍光灯やテレビ、電話、パソコンなどは雑音の原因となることがありますので、
ラジオやアンテナをなるべく離してお使いください。
• 外部アンテナはなるべく道路から離れたところに設置してください。
• 屋外では使わないでください。
• 外部アンテナでお使いになるときは、ラジオのロッドアンテナはたたんでおいて
ください。
(AM外部アンテナ入力)端子につなぐ。
AM EXT ANT
AM
へ
便利な使いかた
33
JP
Page 34

収納する
1 アンテナモジュール、アンテナコントローラー、ラジオの接続をは
ずす。
2 長いコードをアンテナコントローラー内部に巻き取る。
3 短いコードはアンテナコントローラーの周りに巻き付けて、
固定する。
4 アンテナモジュールをひねるようにしてたたんで、固定し、
キャリングケースに入れる。
ご注意
• FM、MW、LWを受信する場合は必ずラジオから付属のアンテナをはずしてく
ださい。取り付けたままではロッドアンテナやラジオ内部のMW/LW用バーア
ンテナが働かず、受信できません。
• 付属の外部アンテナは本機専用のアンテナです。他のラジオでは使えません。
• AMEXTANT端子に推奨以外の外部アンテナをつながないでください。この端
子にはアンテナ用電源として直流電圧が出力されています。
JP
便利な使いかた
34
Page 35

放送を録音する
本機を接続ケーブルでカセットレコーダーとつなぎ、放送を録音するこ
とができます。
カセットレコーダー
LINE
OUT
へ
MIC IN
または
LINE IN
へ
1 接続ケーブル(別売り)を使って、本機とカセットレコーダー
をつなぐ。
カセットレコーダーに合った接続ケーブルをお使いください。
カセットレコーダー 接続ケーブル
タイプ 接続ジャック (別売り)
モノラル MICIN(ミニジャック) RK-G135
MICIN(ミニジャック) RK-G134
ステレオ LINEIN(ミニジャック) RK-G136
LINEIN(ピンジャック) RK-G129
2 録音したいラジオ番組を受信する。
3 テープレコーダーを録音状態にする。
ステレオのテープレコーダーで録音したとき
FMステレオ放送はステレオで録音され、AM放送はモノラルで両方の
チャンネルに録音されます。
便
利
な
使
い
か
た
ちょっと一言
録音レベルは、ラジオのVOL(音量)調節つまみの位置に関係なく一定です。
便利な使いかた
35
JP
Page 36

ラベルを編集する
ラベル(プリセットした周波数の放送局名や、UTCとの時差の都市名と
して表示させる名前)を、6文字までの英数字によって自由につけること
ができます。
POWER
ON/
SYNC
3
6
9
SSB
DST
ERASE
TIME SET
ENTER
SLEEP
LIGHT
JOG/
TUNE/
SCAN˚
OFF
数字ボタン
HOLD
EXE
¿/÷
LABELEDIT
DIRECT
1 プリセット選局(
ジ)、世界時計機能(
ABC1DEF2GHI
FM/
AM
JKL4MNO5PQR
AM BAND
STU
LOCAL/
WORLD
LABEL EDIT
TIMERSTANDBY/
STANDBY TIME SET
ab
STANDBY MEMORY
ページ)、マイメモリー選局(27ペー
22
VWX8YZ
7
<>
/
DIRECT
MY DW VOA BBC OTH
ページ)、スタンバイ機能(38ページ)
14
DISPLAY
EXE
0
TIME SET
TIME DIFF
SW STATION CALL
によって、編集したいラベルを表示させる。
2
LABEL EDIT
ラベルの1文字目が点滅します。
を押す。
3 ¿または÷を押して、文字の点滅を変更したい文字に移動
する。
4 数字ボタン(
0から9
)および
DIRECT
ボタンを押して、入力
したい文字を選ぶ。
各ボタンを押すとボタンの上に書かれている文字の1文字目が入力
されます。同じボタンを続けて押すと入力される文字が次のように
変わります。
数字ボタン1を押した場合:AnBnCn1
(1) (2) (3)
ABC1 DEF2 GHI3
(4) (5) (6)
JKL4 MNO5 PQR6
36
JP
(7) (8) (9)
STU7 VWX8 YZ
(DIRECT) (0)
+−*. <>/0
便利な使いかた
(注)
9
﹈
_
(注)
空白文字
(空白文字は_
[アンダーバー]
が点滅します)
Page 37

5 手順
それぞれのボタン操作は、20秒以内に行ってください。
を繰り返して、すべての文字を編集する。
3と4
6
文字の点滅が止まったときは
文字編集中の各操作は20秒以内に行ってください。20秒以上たつとも
とのラベル表示に戻ってしまいます。このときは、もう一度はじめから
やり直してください。
編集を途中でやめるには
LABELEDITを押します。
ご注意
• SWSTATIONCALLのラベルを変更することはできません。
• ビープ音はBEEPOFFに設定されていると鳴りません(/「ビープ音を消す」、
• プリセットボタンに新たな放送局を上書きすると、ラベルは初期設定に戻ります
(/「プリセットラベルの初期設定」、22ページ)。
を押す。
EXE
ビープ音が鳴り、表示中の文字がラベルとして設定されます。
43ページ)。
便
利
な
使
い
か
た
便利な使いかた
37
JP
Page 38

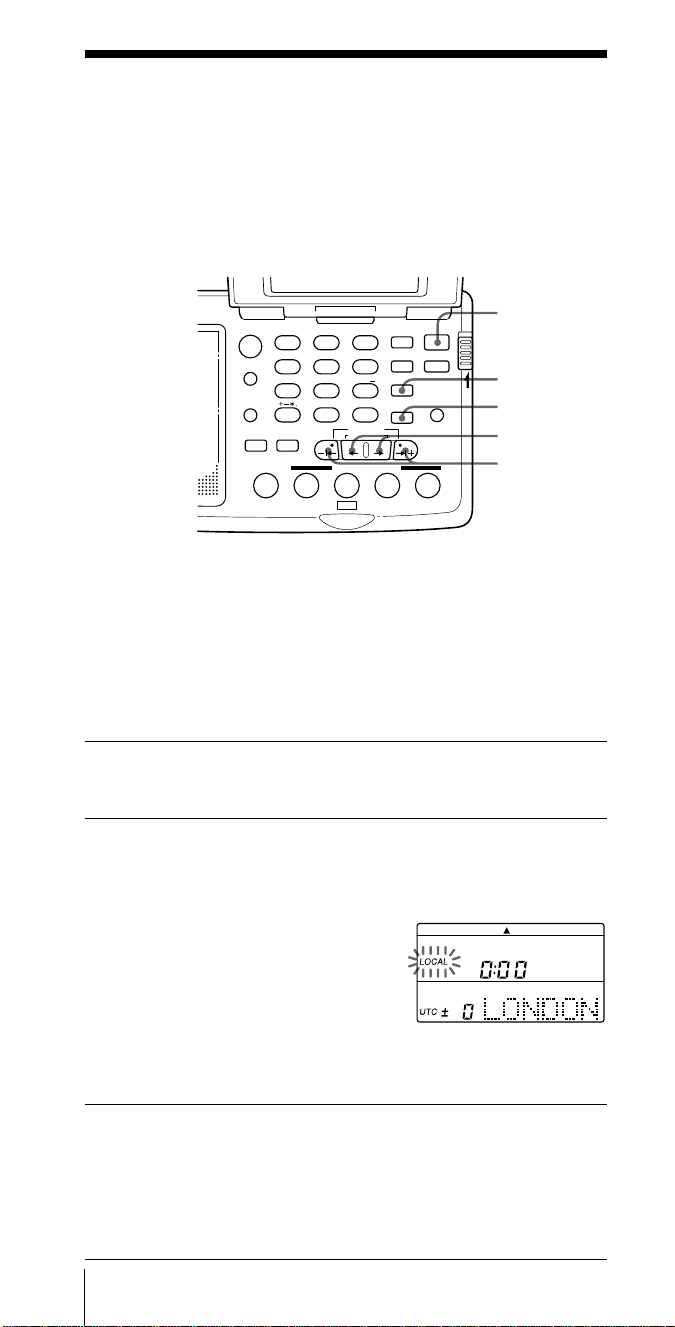
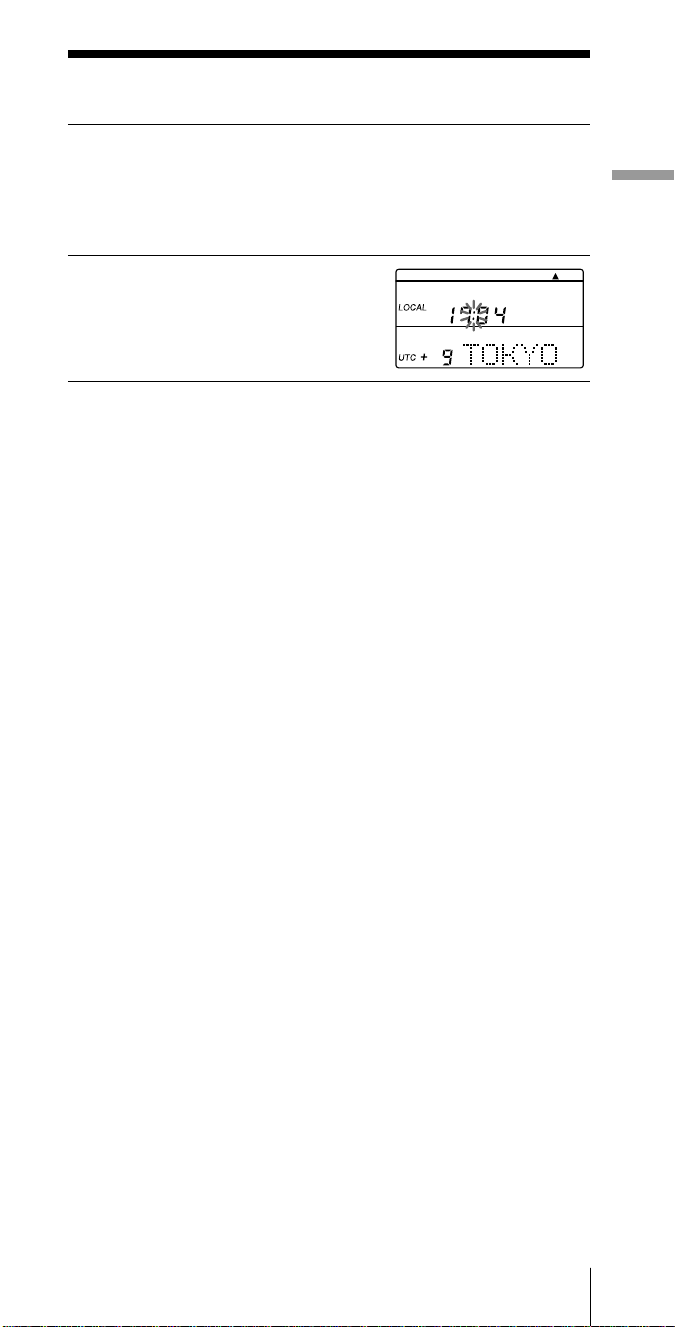
タイマーを使う
ラジオまたはブザーで目覚める
スタンバイ機能
—
ラジオ番組を目覚ましとして使うことができます。a/bボタンに別々の
放送局と時刻を設定できます。
ブザーで目覚めたいときは、「ブザーで目覚めるには」(40ページ)をご覧
ください。
POWER
ON/
SYNC
3
6
9
SSB
DST
ERASE
TIME SET
ENTER
SLEEP
LIGHT
JOG/
TUNE/
SCAN˚
OFF
POWER
ON/OFF
HOLD
ENTER
ー1¿/÷1+
VOL
STANDBY
MEMORY
a/b
ABC1DEF2GHI
FM/
AM
JKL4MNO5PQR
AM BAND
STU
LOCAL/
WORLD
LABEL EDIT
TIMERSTANDBY/
STANDBY TIME SET
ab
STANDBY MEMORY
VWX8YZ
7
<>
/
DIRECT
MY DW VOA BBC OTH
DISPLAY
EXE
0
TIME SET
TIME DIFF
SW STATION CALL
本機の時計を合わせてから操作してください。(12ページ)
1 聞きたい放送局を受信する。
2
3
つまみで音量を調節する。
VOL
ENTER
を押したまま
STANDBY MEMORY
aまたはbを
押す。
ENTERを押したままにすると「PRESETMY」表示が点滅します。
STANDBYMEMORYaまたはbを
押すとビープ音が鳴り、選んだスタン
バイメモリーボタンに放送局が記憶さ
れます。スタンバイメモリー番号
(「a」か「b」)とスタンバイメモリーラ
ベルが表示されます。
38
JP
4
POWER ON/OFF
5 手順
で選んだ、
3
したまま、ー
を押してラジオの電源を切る。
STANDBY MEMORY
¿または÷I+をくり返し押して、ラジオを
I
のaまたはbを押
つけたい時刻を設定する。
aまたはbを押している間、表示窓に「STANDBY」と「a」または
「b」が点滅します。
便利な使いかた
Page 39

6
STANDBY MEMORY
aまたはbを離す。
「STANDBY」と「a」または「b」は点灯
に変わり、予約が完了します。
設定した時刻になると予約した放送局
を受信します。
時計表示は現在の時刻表示に戻ります。
予約を確認するには
電源を切った状態で、STANDBYMEMORYのaまたはbを押し続けま
す。押している間、予約されている時刻が表示されます。
予約した時刻を変更するには
手順4以降の操作をして、新たに時刻を予約します。
予約を解除するには
電源を切った状態で、STANDBYMEMORYのaまたはbを押して
「STANDBY」「a」または「b」表示を消します。
このときaまたはbボタンは1秒以内に離してください。
1秒以上押し続けた場合は手順5の状態になり、再度予約時刻を設定する
ことができます。
設定した時刻になり予約が働くと
ラジオの電源が入り、「SLEEP」が点灯し、予約した放送局を受信しま
す。約60分後に自動的に電源が切れます。
便
利
な
使
い
か
た
ご注意
• スタンバイ機能は表示窓の時計設定と設定された時刻が一致したときに働きま
す。LOCAL、WORLDのうち、働かせたい時刻を表示させておいてください。
• 新しく放送局を記憶させると前に記憶させていた放送局は消え、ラベルは初期設
定に戻ります。
a=「STBY-a」
b=「STBY-b」
ラベルを変更したい場合は/「ラベルを編集する」(36ページ)。
• 予約時刻を設定するときは、必ず電源を切ってください。ラジオ受信中は、時刻
設定はできません。
ちょっと一言
• 予約を一時解除するときはラジオの電源を切り、HOLDスイッチを矢印方向に
ずらし「H」を表示させます。「H」表示を消すと予約は復帰します(/「誤動作
を防ぐ−ホールド機能」、42ページ)。
• 一度設定した予約は、STANDBYMEMORYaまたはbボタンを押して、
「STANDBY」「a」または「b」表示を消して予約を解除しない限り、毎日働きま
す。また予約を解除しても、新しい設定を記憶させない限り、STANDBY
MEMORYaまたはbに記憶されている放送局と予約時刻は消えません。
• 予約が働くと、ラジオを聞いていても、自動的に予約した放送局の受信に切り換
わります。
• STANDBYabを同時に設定できます。一方の予約でラジオがついているとき
に、もう一方の予約が働いた場合、後の予約に設定した放送局の受信に切り換わ
ります。
• STANDBYabに同じ時刻を設定したときは、STANDBYaのみが働きます。
便利な使いかた
39
JP
Page 40

タイマーを使う(つづき)
ブザーで目覚めるには
STANDBYMEMORYのaまたはbに周波数が記憶されていない場合、
予約時刻になると、ブザー音が鳴ります。周波数が記憶されている場合
は消去してください。
POWER
ON/
SYNC
3
6
9
SSB
DST
ERASE
TIME SET
ENTER
LIGHT
JOG/
TUNE/
SCAN˚
OFF
SLEEP
HOLD
POWER
ON/OFF
ERASE
STANDBY
MEMORY
a/b
1
POWER ON/OFF
2
STANDBY MEMORY
ABC1DEF2GHI
FM/
AM
JKL4MNO5PQR
AM BAND
STU
LOCAL/
WORLD
LABEL EDIT
TIMERSTANDBY/
STANDBY TIME SET
ab
STANDBY MEMORY
VWX8YZ
7
<>
/
DIRECT
MY DW VOA BBC OTH
DISPLAY
EXE
0
TIME SET
TIME DIFF
SW STATION CALL
を押してラジオの電源を入れる。
aまたはbを押す。
記憶されている放送局が呼び出されます。
周波数が記憶されていない場合は、ビープ音が鳴り、
「MEMORY」、「EMPTY」と順に表示されます。手順4に進んでく
ださい。
3
ERASE
を押し続ける。
ERASEを押している間スタンバイメモリー番号が点滅します。
約3秒後にビープ音が鳴り、記憶されていた放送局が消えます。ス
タンバイメモリー番号とスタンバイメモリーラベル表示が消えま
す。
4 「ラジオまたはブザーで目覚める」(
ページ)の手順4以降の
38
操作をして、ブザーを鳴らしたい時刻を設定する。
設定した時刻になるとブザーが鳴ります。
途中でブザーを止めるには
LIGHTボタン以外のボタンを押します。
止めない場合、約60分後に自動的に止まります。
ご注意
• ブザー音の音量はVOLつまみで調節できません。
• スタンバイメモリーのブザー音はBEEPOFFに設定されていても鳴ります。
• 記憶していた放送局が消された場合、ラベルも同時に消えます。
JP
便利な使いかた
40
Page 41

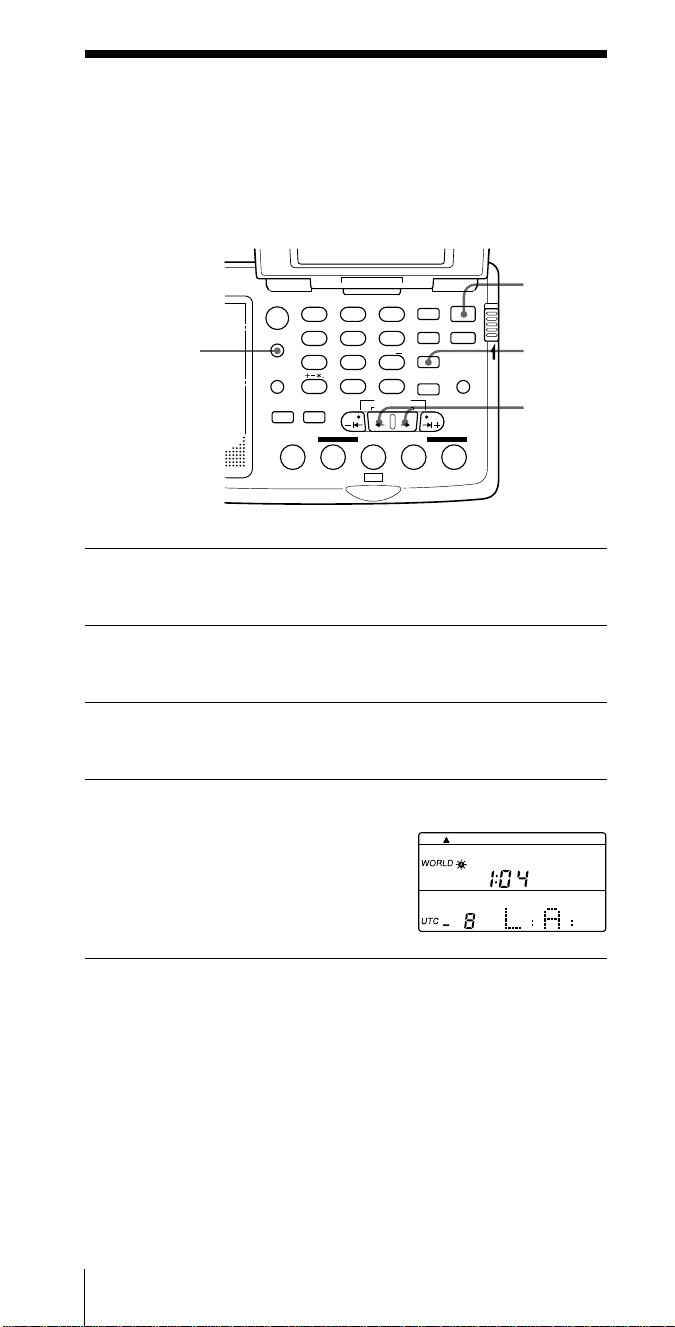
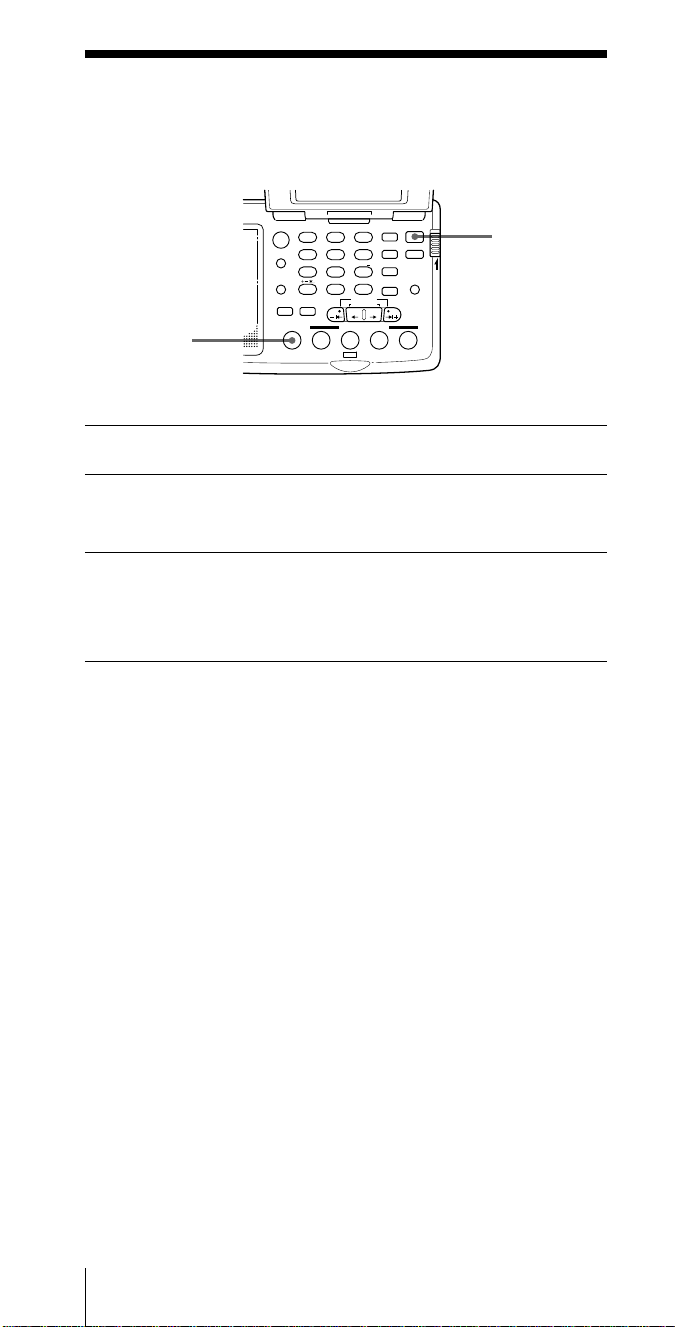
タイマーを使う(つづき)
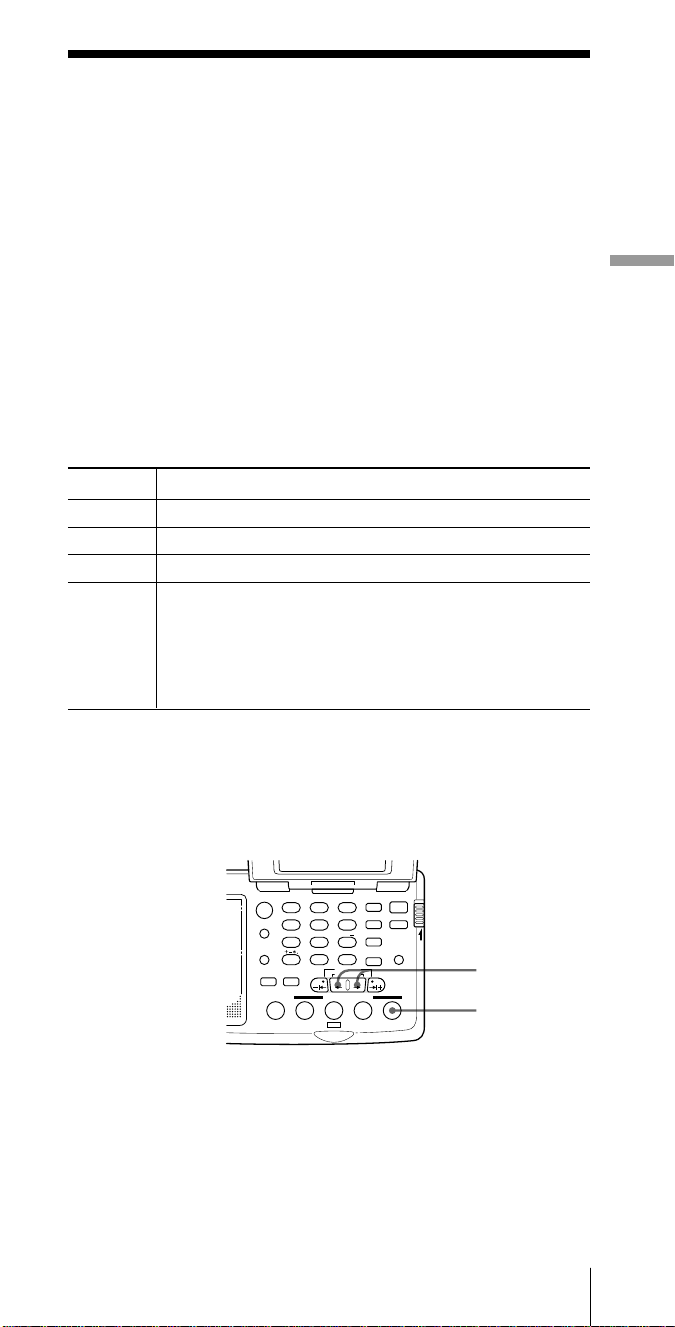
ラジオを聞きながら眠る
スリープタイマー機能
—
スリープタイマーを使って約60分後に自動的に電源を切ることができま
す。
POWER
ON/
SYNC
3
6
9
SSB
DST
ERASE
TIME SET
ENTER
LIGHT
JOG/
TUNE/
SCAN˚
OFF
SLEEP
SLEEP
HOLD
1
SLEEP
AM BAND
LOCAL/
WORLD
LABEL EDIT
STANDBY TIME SET
STANDBY MEMORY
を押す。
ABC1DEF2GHI
FM/
AM
JKL4MNO5PQR
STU
VWX8YZ
7
<>
/
DIRECT
TIMERSTANDBY/
ab
MY DW VOA BBC OTH
DISPLAY
EXE
0
TIME SET
TIME DIFF
SW STATION CALL
ラジオがOFFの場合は電源が入ります。
「SLEEP」が点灯します。
2 聞きたい放送局を選ぶ。
約60分後に、自動的に電源が切れます。
途中でラジオを止めるには
POWERON/OFFを押します。
ちょっと一言
• ラジオの電源が入った状態でSLEEPを押した場合は、そのままで「SLEEP」が点
灯し、約60分後に自動的に電源が切れます。
• SLEEPを押して電源を入れると、前に聞いていた放送局が受信されます。
• 「SLEEP」が表示されている状態でSLEEPを押すと、新たに押した時点から約60
分後に電源が切れます。
便
利
な
使
い
か
た
便利な使いかた
41
JP
Page 42

誤操作を防ぐ
ホールド機能
—
ホールド機能を働かせると、ボタン操作を受けつけなくなり、持ち運ぶ
ときにあやまって電源が入ったり、ラジオを聞いているときの誤操作を
防ぐことができます。
また、ホールドによりスタンバイ機能を一時的に解除することができま
す。
POWER
ON/
SYNC
3
6
9
SSB
DST
ERASE
TIME SET
ENTER
SLEEP
LIGHT
JOG/
TUNE/
SCAN˚
OFF
HOLD
HOLD
1
ABC1DEF2GHI
FM/
AM
JKL4MNO5PQR
AM BAND
STU
LOCAL/
WORLD
LABEL EDIT
TIMERSTANDBY/
STANDBY TIME SET
ab
STANDBY MEMORY
スイッチを矢印の方向にずらします。
HOLD
VWX8YZ
7
<>
/
DIRECT
0
MY DW VOA BBC OTH
SW STATION CALL
DISPLAY
EXE
TIME SET
TIME DIFF
「H」表示が点灯し、ボタン操作を受
け付けなくなります。
ホールドを解除するには
HOLDスイッチを矢印と反対の方向にずらして「H」表示を消します。
スタンバイの設定を一時解除するには
ホールド機能を働かせると、スタンバイの設定を一時解除することがで
きます(/「ラジオまたはブザーで目覚める−スタンバイ機能」、38ペー
ジ)。
この機能は電源を切っているときのみ働きます。
42
JP
便利な使いかた
Page 43

ビープ音を消す
お好みにより、ビープ音(操作時に鳴る確認音)を消すことができます。
設定は電源を切った状態で行ってください。
ABC1DEF2GHI
FM/AM
FM/
AM
JKL4MNO5PQR
AM BAND
STU
LOCAL/
WORLD
LABEL EDIT
TIMERSTANDBY/
STANDBY TIME SET
ab
STANDBY MEMORY
VWX8YZ
7
<>
/
DIRECT
0
MY DW VOA BBC OTH
SW STATION CALL
1 ラジオの電源が入っていたら、
DISPLAY
EXE
TIME SET
TIME DIFF
POWER ON/OFF
POWER
ON/
SYNC
3
6
9
SSB
DST
ERASE
TIME SET
ENTER
SLEEP
LIGHT
JOG/
TUNE/
SCAN˚
OFF
POWER
ON/OFF
HOLD
を押して
電源を切る。
2
FM/AM
ビープ音が鳴り、「BEEP」、「OFF」と順に表示されます。ビープ音
が鳴らなくなります。
もう一度FM/AMボタンを2秒以上押し続けると、「BEEP」、「ON」
と順に表示され、ビープ音が鳴るようになります。
ちょっと一言
ビープ音を切る設定にしても、スタンバイ機能のブザー音は影響を受けません(/
「ブザーで目覚めるには」、40ページ)。
ボタンを2秒以上押し続ける。
便
利
な
使
い
か
た
便利な使いかた
43
JP
Page 44

zその他
使用上のご注意とお手入れ
置き場所について
次のような場所には置かないでください。故障の原因となることがあります。
• 暖房器具の近く、窓を閉め切った自動車内(特に夏季)。
• 直射日光や紫外線が長時間当たる場所(夏季の海岸など)。
• 極端に温度が高いところ(周囲温度40℃以上)や寒いところ(0℃以下)。暑いと
ころでは、表示が「88.88…」と見えることがあります。寒いところでは表示文
字の変わりかたがゆっくりになることがあります。(常温に戻せばもとに戻りま
す)。
• 湿度の高いところ(風呂場など)。
• ほこりの多いところ。
• 強い振動や衝撃のあるところ。
本体について
• 汚れたときは、柔らかい布でからぶきしてください。シンナーやベンジンなどは
表面をいためますので使わないでください。
• キャッシュカード、定期券など磁気を利用したカード類をスピーカーに近づけな
いでください。スピーカー内部の磁石の影響でカードの磁気が変化し、使えなく
なることがあります。
• イヤーレシーバーをご使用中、肌に合わないと感じたときは早めに使用を中止し
て医師またはお客様ご相談センターに相談してください。
アクティブアンテナ
• アンテナモジュールを水洗いしないでください。
• アンテナモジュールをたたむ時に折らないように注意してください。
• 長い間使わないときは、しまっておいてください。
異常や不具合が起きたら
万一、異常や不具合が起きたとき、異物が中に入ったときは、すぐに電源を切り、
(ACパワーアダプターは必ずコンセントから抜いて)内部を開けずにお買い上げ
店、またはソニーサービス窓口にご相談ください。
サービス依頼について
修理のために本体をお預けになると、修理内容により、プリセット局の記憶が消え
てしまう場合があります。重要なデータは控えをとっておくことをおすすめしま
す。
特定の相手方に対して行われる無線通信を傍受して、その存在または内容を
漏らしたり窃用したりすることは、電波法で禁止されています。
AN-LP2
せつよう
の取り扱いについて
44
JP
その他
Page 45

SW STATION CALL ROM
SWSTATIONCALLROMの購入については、同梱の「最新のSWSTATION
CALLROMの購入について」をご覧の上、(株)Fコーポレーションにお申し込みく
ださい。
1 底面にあるROM収納部ぶたを押さ
えたままRELEASEつまみを矢印の
方向に動かし、ゆっくりとふたから
手を離します。
2 浮き上がったふたを矢印の方向に
引っ張ってはずし、ROMおよび収
納部の接点に触れないように、入っ
ていたROMを取り出す。
3 新しいROMを、接点を下にし、突
起が収納部の穴に入るようにして置
く。
ROMおよび収納部の接点には触れ
ないでください。
の交換のしかた
穴
そ
の
他
4 ROM収納部ぶたの2箇所の突起を
収納部の穴に差し込み、ふたを上か
ら押さえた状態で、RELEASEつま
みを矢印と逆の方向に動かしてロッ
クする。
穴
ご注意
ROMの接点部分やラジオ本体のROM収納部の接点バネには手を触れないでくださ
い。故障の原因となります。
SW STATION CALL ROM
SWSTATIONCALLROMが入っているにもかかわらず、「NO」、「ROM」と順に
表示された場合、ROM接点部の接触不良の可能性があります。
上記の手順に従いROMをはずし、接点部を綿棒でクリーニングしてください。
接点部のクリーニングのしかた
ご注意
ラジオ本体のROM収納部の接点バネは、クリーニング等しないでください。変形
して接触不良の原因となります。
その他
45
JP
Page 46

故障かな?と思ったら
本機の調子が悪い場合、修理に出す前にもう一度取扱説明書をお読みに
なり、次のような点検をしてください。
悪いところは?
ボタン操作を受け
付けない
POWERON/
OFFを押しても電
源が入らない
表示窓に表示が出
ない
表示窓の文字が薄
く見にくい
表示窓の文字の変
わりかたが遅い
音がまったく聞こ
えない
雑音が入る、音が
悪い
ダイレクト選局が
できない
放送局を覚えさせ
られない
覚えさせたはずの
放送局が受信でき
ない
原因は?
ホールド機能が働いている
電池の入れかたが違う
電池が消耗している
ACパワーアダプターがは
ずれている
電池の入れかたが違う
電池が消耗している
極端に寒いところ、湿気の
多いところで使っている
極端に寒いところで使って
いる
音量が最小になっている
ヘッドホンが差し込まれて
いる
電池の入れかたが違う
電池が消耗している
選局やアンテナの調節が不
充分
電波が弱い
ATTスイッチがONになっ
ている
ボタン操作の間隔が10秒
以上空いている
覚えさせかたが間違ってい
る
覚えさせた放送局の番号が
間違っている
覚えさせた周波数を誤って
消去した
直しかた
HOLDスイッチを矢印と反
対の方向にずらす(「H」表
示を消す)(42ページ)
]}を正しく入れ直す
新しい電池を入れる
しっかり差し込む
]}を正しく入れ直す
新しい電池を入れる
適当な場所を選ぶ
適当な場所を選ぶ
音量を調節する
ヘッドホンを抜く
]}を正しく入れ直す
新しい電池を入れる
正しく同調する、または、
アンテナを正しく使う
建物や乗り物の中などでは
窓際で聞く
ATTスイッチをOFFに切り
換える(21ページ)
それぞれのボタン操作を
10秒以内に行う
ENTERを押したまま数字ボ
タン0 〜9を押 す(22ページ)
正しい番号を選ぶ
もう一度覚えさせる(22
ページ)
46
JP
その他
Page 47

予約した時刻にラ
ジオが鳴らない
SWSTATION
CALLが動作しな
い
マイメモリーに記
憶できない
STANDBYMEMORYa
またはbを押し忘れている
ホールド機能が働いている
電池交換に3分以上かかっ
た
音量が最小になっている
STANDBYMEMORYに
周波数が記憶されていない
ROMが入っていない
ROMが接触不良
00〜99番まですべて記憶
されている
押す(38ページ)
HOLDスイッチを矢印と反
対の方向ににずらす
(「H」表示を消す)(42ペー
ジ)
タイマー予約をやり直す
音量を調節しておく
記憶させる(38ページ)
ROMを入れる(45ページ)
ROMの接点をクリーニン
グする(45ページ)
入れたい番号のメモリーを
消去してから記憶させる
(29ページ)
そ
の
他
その他
47
JP
Page 48

保証書とアフターサービス
保証書
• この製品には保証書が添付されていますので、お買い上げの際お受け取
りください。
• 所定事項の記入および記載内容をお確かめのうえ、大切に保存してくだ
さい。
• 保証期間はお買い上げ日より1年間です。
アフターサービス
調子が悪いときはまずチェックを
この説明書をもう一度ご覧になってお調べください。
それでも具合の悪いときはサービスへ
お買い上げ店、テクニカルインフォメーションセンターまたは添付の「ソニ
−ご相談窓口のご案内」にあるお近くのソニ−サ−ビス窓口にご相談くださ
い。
保証期間中の修理は
保証書の記載内容に基づいて修理させていただきます。詳しくは保証書を
ご覧ください。
保証期間経過後の修理は
修理によって機能が維持できる場合は、ご要望により有料修理させていた
だきます。
ソニーワールドモデルをお買い上げのお客様へ
ワールドモデルとは
日本でも海外でも使用できるように海外、国内の電気事情(電源電圧AC
100〜240V)に合わせた規格と仕様で作られたモデルです。
海外での保証とアフターサービスについて
• 保証期間は、お買い上げ日より、日本国内では1年間、海外では90日間
です。
• 海外での修理やアフターサービスについてご不明な点は、保証書に記載
の海外ソニーサービス特約店にお問い合わせください。
部品の保有期間について
当社ではラジオの補修用性能部品(製品の機能を維持するために必要な部
品)を、製造打ち切り後6年間保有しています。この部品保有期間を修理可
能な期間とさせていただきます。保有期間が経過した後も、故障箇所に
よっては修理可能の場合がありますので、お買い上げ店、テクニカルイン
フォメーションセンターまたはサ−ビス窓口にご相談ください。
JP
48
その他
Page 49

主な仕様
ICF-SW07
回路方式 FM:スーパーヘテロダイン方式
AM:デュアルコンバージョンスーパーヘテロダイン方式
受信周波数 FM:76〜108MHz(TV:1〜3ch*1)
SW:1621〜29999kHz
MW:530〜1620kHz
LW:150〜529kHz
中間周波数 FM:10.7MHz
SW/MW/LW:55.845MHz(1st)、455kHz(2nd)
出力端子 録音端子(ステレオミニジャック)1個
録音出力レベル約245mV、出力インピーダンス10kΩ以下
2端子(ステレオミニジャック)1個 16Ω
スピーカー 直径 約40mm、8Ω、1個
実用最大出力 200mW(JEITA*
電源 DC3V、単3形乾電池 2本
外部電源端子 DCIN3V
・付属のACパワーアダプターAC-E323を接続して日本国内に
てAC100V、海外にて120V、付属のACプラグアダプター
を使って220-240V、50/60Hzで使用可能
最大外形寸法 約135×32.5×91mm(幅/高さ/奥行き)(JEITA)
質量 約220g
ご使用時 約257g(単3形乾電池含む)
2
/DC)
そ
の
他
アクティブアンテナ
電源 DC3V単3形乾電池2本
大きさ アンテナモジュール
重さ アンテナモジュール 約92g
AN-LP2
ご使用時:約490×480×17.8mm
収納時:約205×180×17.8mm(幅/高さ/奥行き)(JEITA)
アンテナコントローラー
約120×29.5×72mm(幅/高さ/奥行き)(JEITA)
アンテナコントローラー 約144g(電池含む)
付属品
ソニー単3形(R6)乾電池(4)*3 (お試し用*5)
ステレオヘッドホン(1)
イヤーパッド(2)
ACパワーアダプター(1)*
ACプラグアダプター(1)*
アクティブアンテナAN-LP2(1)
本体キャリングケース(1)
アンテナキャリングケース(1)
ウェーブハンドブック(1)
ハウトゥキャッチザウェーブ(1)*
取扱説明書(1)
保証書(1)
ソニーご相談窓口のご案内(1)*
1
*
日本国内モデルのみ
2
*
(電子情報技術産業協会)規格による測定値です
JEITA
3
*
日本国内モデル、ワールドモデルのみ
4
*
イギリス、オーストラリア、中国(香港含む)、アルゼンチンモデルを除く
5
*
付属の乾電池はお試し用です。購入する場合は、ソニーアルカリ乾電池をおすすめし
ます。
4
4
1
1
その他
49
JP
Page 50

主な仕様(つづき)
別売りアクセサリー
日本国内のみ販売
LW/MW/SWワイドレンジアンテナ AN-1、AN-102
接続ケーブルRK-G135(ステレオミニプラグ˜ミニプラグ)
RK-G134(ステレオミニプラグ˜ステレオミニプラグ)
RK-G136(ステレオミニプラグ˜ステレオミニプラグ)
RK-G129(ステレオミニプラグ˜ピンプラグx2)
国によって扱っているアクセサリーが違います。詳しくはお買い上げ店、サービス
窓口、海外ソニーサービス特約店にご相談ください。
本機の仕様および外観は、改良のため予告なく変更することがありますが、ご了承
ください。
ソニーではお客様技術相談窓口として「テクニカルインフォメーションセン
ご案内
ター」を開設しています。お使いになってご不明な点、技術的なご質問、故障と
思われるときの相談は下記までお問合せください。
受付時間:月〜金 午前9時から午後6時まで(祝日、年末年始、弊社休日を除く)
ご相談になるときは次のことをお知らせください。
型名
•
故障の状態:できるだけ詳しく
•
お買い上げ年月日
•
テクニカルインフォメーションセンター
電話
:048-794-5194
50
JP
その他
Page 51

ミニ知識
上空を埋めつくす世界の電波。この電波の種類や特長をよくつかんだう
え、ラジオ放送受信をお楽しみください。
付属のウェーブバンドブックは、そのためのわかりやすいガイドブック
となるはずです。よく読んで、ラジオと一緒に保管してください。
以下はよく使われる用語の説明です。
フェージング
短波放送などを聞いていると、音が大きくなったりすることがあります
が、これはラジオの故障ではなく、フェージングと呼ばれる現象です。
フェージングは、電離層の変化で反射される電波の強さが変わったり、
いろいろな経路を通って伝わってきた電波がお互いに干渉し合ったりし
て起こるものです。たとえば、電離層で1回反射された電波と2回反射さ
れた電波とが同時にラジオに入ってくると、2つの電波の位相(波形の位
相)がずれていることがあり、それらが干渉し合って電波の強いところと
弱いところができ、音が大きくなったり小さくなったりするわけです。
そ
の
他
送信アンテナ
位相の違う
電波
受信機
受信した放送局の判別のしかた
選局すると、次から次へと多くの放送が聞こえてきますが、その中のど
れが自分の聞きたい局か、今受信しているのはどの放送か、というのは
なかなかわかりにくいものです。このようなときは次のことに注意して
みてください。
• 受信周波数…表示周波数を放送局の周波数一覧表示などで調べます。
• 放送中のアナウンス…通常15〜30分おきに局名やコールサインをア
ナウンスしています。
• インターバルシグナル…たいていの放送局では番組の初めや終わりに
特有の音楽や動物の鳴き声を放送します。これらを覚えておくと次か
らはその判別が容易です。
放送時間や番組内容について詳しく知りたいかたは、希望の放送局に申
し込むとプログラムやパンフレットを送ってくれます。
受信機
その他
51
JP
Page 52

シングル サイド バンド
SSB(Single Side Band)
とは
普通の放送では音声などの信号は、下図のように上側波帯と下側波帯という2
つの周波数成分を用いて送られています。これらのうちどちらか一方をもち
いるのがSSB方式で、搬送波より高いものをUSB(上側波帯)、低いものを
LSB(下側波帯)と言います。両方を用いるDSB
ダブル サイド バンド
(DoubleSideBand)
に比べ
て混信が少なく、業務用通信やアマチュア無線で広く利用されています。
SSB方式では一般には、USBが採用されていますが、10MHz以下のアマ
チュアバンドでは、LSBが使われることが多くなっています。SSB波は普通
のラジオで受信してもモガモガという音が聞こえるだけで、音声としては聞
けません。SSB波を正常な音声に戻すためには、本機に内蔵されているよう
なBFO
CW(Continuous Wave
ビート フリクエンシイ オシレーター
(BeatFrequencyOscillator)
振幅 搬送波
LSB
(下側波帯)
コンティニュアス ウェーブ
)とは
という特殊な回路が必要です。
USB
(上側波帯)
周波数
普通の放送は搬送波を音声信号で変調して行いますが、CWでは変調しない、
搬送波の断続によって信号を送るもので、一般にモールス信号で通信が行わ
れます。この通信もBFO回路を通すことによりビート音の断続として受信で
きるようになりますが、通信内容を判断するためにはモールス符号を理解す
る必要があります。CW通信も各種業務用やアマチュア無線に用いられていま
す。
同期検波とは
短波放送の受信を困難にしている大きな原因は、フェージング(51ページ)に
よるひずみと隣接局によるビート妨害です。この2つの障害の改善に大きな効
果を発揮するのが同期検波方式です。フェージングによるひずみは、途中経
路でさまざまな電波の干渉によって搬送波が弱められた結果、過変調となっ
て発生するものです。本機では、まず受信した電波から搬送波のみを取り出
し、その後、同期検波回路によって、この搬送波と周波数はもちろん、位相
まで同期したレベル変動のない純粋な周波数を作り出して、この周波数を搬
送波として受信信号に補っています。これにより、ひずみが軽減されます。
また、AM(短波、中波、長波)放送では、普通、搬送波の上下の周波数帯
(USBとLSB)を使って変調信号を送るDSB(DoubleSideBand)方式が用い
られていますが、隣接局による妨害はUSBかLSBのどちらか一方のみが影響
を受けている場合が多いのです。本機の同期検波回路では、DSB方式のUSB
かLSBのどちらか一方のみを抽出できますので、妨害を受けていない方を探
して受信することにより、妨害のない明瞭な受信を楽しむことができます。
振幅 搬送波
LSB
(下側波帯)
USB
(上側波帯)
隣接局による
妨害
周波数
52
妨害のない側だけ受信する
JP
その他
Page 53

この説明書は再生紙を使用しています。
Page 54

Warning
To prevent fire or shock hazard,
do not expose the unit to rain or
moisture.
To avoid electrical shock, do not
open the cabinet.
Refer servicing to qualified
personnel only.
Features
• World clock feature
Find out the time for any place in
the world by selecting a city name.
• Worldwide coverage with FM
stereo/SW/MW/LW reception
Simple and precise tuning with
the quartz controlled PLL (Phase
Locked Loop) synthesizer system.
FM: 76–108 MHz
SW: 1621–29999 kHz
MW: 530–1620 kHz
LW: 150–529 kHz
Refer to the supplied “Wave
Handbook” for more information.
• SW STATION CALL tuning
Tune in to major short wave
stations just by pressing the
station buttons. The radio
automatically chooses the
frequencies used in your time
zone from the ROM data and
scans for them.
• MY-Memory tuning
Memorizes and scans up to 100
frequencies of your choice.
• Four other tuning methods to
suit your needs
– Direct tuning: tune in by
inputting the frequency digits
directly.
– Manual tuning: tune in by
manually changing the
frequency step by step.
– Scan tuning: scans
automatically through the band
and stops at reception.
– Preset tuning: tune in by
recalling a preset broadcast
station with the single press of a
button.
• Label editing
Label preset frequencies, time
zones, etc., with a station name,
city name, etc., or any
combination of up to 6
alphanumeric letters.
• Built-in timer operation
Turns on the radio automatically at
any preset time to a station of your
choice. Preset two individual
standby-times and frequencies
under STANDBY MEMORY a and b.
• Sleep timer
Set the sleep timer and fall asleep
to the radio. The timer turns off
the radio automatically after
approximately 60 minutes.
• Stereo FM reception
Use the supplied stereo
headphones to enjoy stereo FM.
GB
Introduction2
Page 55

Table of contents
Preparation
Location of parts and controls ...........................4
Power sources ...................................................... 9
Operating on batteries ................................... 9
Operating on house current........................11
Setting the clock.................................................12
Setting the Local Time .................................12
Finding out the time in other areas of the
world .............................................................. 14
Listening to the radio
Various ways of reception ............................... 16
Direct tuning .................................................16
Manual tuning ..............................................18
Scan tuning....................................................20
Preset tuning .................................................22
SW STATION CALL tuning ....................... 24
MY-Memory tuning .....................................27
Receiving SSB and CW Transmissions........... 30
Adjusting for optimum AM reception
—Synchronous detection .................................31
Other operations
Using the supplied external antenna.............. 32
Recording broadcasts........................................ 35
Editing labels...................................................... 36
Using the timer ..................................................38
Waking up to the radio or buzzer
— Standby function .....................................38
Falling asleep listening to the radio
— Sleep timer................................................41
Using the hold function....................................42
Turning off the beep ......................................... 43
Additional information
Precautions and maintenance.......................... 44
Troubleshooting ................................................ 47
Specifications ..................................................... 49
Tips on radio waves .......................................... 50
Table of Contents
GB
GB
3
Page 56

Preparation
Location of parts and controls
Refer to the pages in the parentheses for details.
Front
4
1
2
5
3
1 Display (7)
2 Speaker
3 Controls (6)
4 OPEN button (4)
5 HOLD switch (42)
6 2 (headphones) jack
Opening the cover
Push the OPEN button to open the cover. Adjust the angle to
your choice.
7 LINE OUT (recording
output) jack (35)
8 TONE/ST•MONO
(stereo•monaural)
selector (17)
9 VOL (volume) control
(17)
6
7
8
9
GB
Preparation4
Page 57

Rear
1
2
1 Battery compartment (9)
2 RESET button
Press this button in the
battery compartment
with a pointed object
when the radio fails to
function properly. The
clock settings, etc., will
revert to the factory
preset. The frequencies
you have preset in the
memory are retained.
3 Telescopic antenna (17)
4 ROM compartment lid
(46)
Preparation
3
4
5
6
7
8
9
5 RELEASE (ROM
compartment lid slide
open) switch (46)
6 DC IN 3V ¥ (external
power input) jack (11)
7 ATT (attenuator) control
(21)
8 ATT ON•OFF
(attenuator on•off)
selector (21)
9 AM EXT ANT (external
antenna) jack (33)
Extending the antenna
Gently pull out the base of the antenna before rotating it, as shown
below.
2Turn horizontally
to a right angle
1Pull out
Preparation
GB
5
Page 58

Controls
1
2
3
4
5
6
7
8
9
ABC1DEF2GHI
FM/
AM
JKL4MNO5PQR
AM BAND
STU
LOCAL/
7
WORLD
LABEL EDIT
DIRECT
TIMERSTANDBY/
STANDBY TIME SET
ab
STANDBY MEMORY
MY DW VOA BBC OTH
VWX8YZ
<>
/
DISPLAY
EXE
0
TIME SET
TIME DIFF
SW STATION CALL
3
6
9
SYNC
SSB
DST
ERASE
TIME SET
ENTER
POWER
ON/
OFF
SLEEP
LIGHT
JOG/
TUNE/
SCAN˚
HOLD
!º
!¡
!™
!£
!¢
!∞
!§
!¶
!•
!ª
@º
1 Number buttons (16, 22,
36)
2 FM/AM button (16, 43)
3 AM BAND•LOCAL/
WORLD (local time/
world time) button (14,
18)
4 LABEL EDIT button (36)
5 DIRECT button (16)
6 STANDBY
MEMORY•TIMER
STANDBY/STANDBY
TIMESET button (38)
7 MY button (27)
8 DW button (24)
9 VOA button (24)
!º EXE•DISPLAY button
(13, 16, 36)
Press to switch to clock
display while operating
the radio. Press again to
return to the previous
display. If you do not
press the button, the
display will return to the
previous condition in
about 10 seconds.
!¡ SYNC (Synchronous
detection) button (31)
!™ SSB (Single Side Band)
button (30)
!£ POWER ON/OFF button
(16)
!¢ SLEEP button (41)
!∞ ERASE•DST (Daylight
Saving Time) button (12,
23, 29, 40)
!§ LIGHT button
Press this button to
illuminate the display for
approximately 30
seconds.
!¶ ENTER•TIME SET button
(12, 22, 27, 38)
!• JOG/TUNE/
SCAN•TIME DIFF/TIME
SET buttons (12, 18, 20)
!ª OTH (others) button (25)
@º BBC button (24)
GB
Preparation6
Page 59

Display
18
2
3
4
5
6
9
!º
!¡
!™
!£
Preparation
!¢
7
1 SLEEP indicator (41)
Appears when the sleep
timer is in effect.
2 Time zone indicator (12,
14)
Points at the time zone
on the map
corresponding to your
time difference setting.
3 TUNE indicator (16)
Appears when a station
is tuned in.
4 s (Daylight Saving
Time) indicator (12, 14)
Appears when the time
display is adjusted to the
Daylight Saving Time.
5 WORLD•LOCAL
indicator (12, 14)
6 Time/frequency display
(12, 16)
7 Memory number/time
difference display (12, 22,
27)
8 HOLD indicator (42)
Appears when HOLD is
9 Battery indicator (10)
!º SYNC U•SYNC L
(synchronous detection)
indicators (31)
!¡ STANDBY a•b
indicators
(38)
Appear when standing
by for timer activated
reception.
!™ LOCK (synchronous
detection lock) indicator
(31)
Appears when
synchronous detection is
in effect.
!£ USB•LSB/CW (single
side band/continuous
wave) indicators (30)
!¢ SW STATION CALL
indicator (24)
!∞ Label display (12, 16)
Names of the preset
stations, cities, bands or
meter bands are
displayed.
!∞
in effect. All buttons will
be inoperative.
Preparation
GB
7
Page 60

Short wave active antenna AN-LP2
Refer to page 32 on how to use the active antenna.
Antenna controller
1
2
1 Cord winder
2 Short cord
3 Long cord
4 Power lamp
5 Battery compartment
3
4
5
Antenna module
1 Clip
2 Suction cup
GB
Preparation8
1
2
Page 61

Power sources
Operating on batteries
To operate the unit on house current, see “Operating on house current”,
page 11.
1 Slide and open the battery compartment lid.
2 Insert two R6 (size AA) batteries in the battery
compartment.
Insert with correct polarity as shown.
Preparation
3 Close the battery compartment lid.
Preparation
GB
9
Page 62

Replacing the batteries
When the batteries become weak, the sound may become weak
or distorted, and “i” will flash in the display. After that, when
the batteries are used up, “i” will light and the power of the
unit will be turned off. If this happens, replace the batteries with
new ones. The unit will switch to the clock mode from any other
mode.
Battery Life (JEITA*)
Sony LR6 alkaline (size AA) Sony R6(size AA)
FM approx. 32 hours approx. 10 hours
AM approx. 23 hours approx. 8 hours
* Measured by JEITA (Japan Electronics and Information Technology
Industries Association) standards. The actual battery life may vary
depending on the circumstance of the unit.
Tips
• Replace the batteries within 3 minutes. Otherwise, the clock setting
will be erased. Frequencies preset in the memory are not erased.
• When the batteries are completely exhausted, all buttons except the
LIGHT button will become inoperable.
The buttons will not become operable again until you replace the
batteries and press POWER ON/OFF to turn on the power and clear
the “i” indications.
Notes on dry batteries
• Insert the batteries with the correct polarity.
• Do not mix new and used batteries. Do not mix different types of
batteries.
• Do not try to charge dry batteries, as they cannot be charged.
• Remove the batteries when the unit is not to be used for a long time.
• Should any battery leakage occur, wipe the battery compartment
thoroughly before installing new batteries.
GB
Preparation10
Page 63

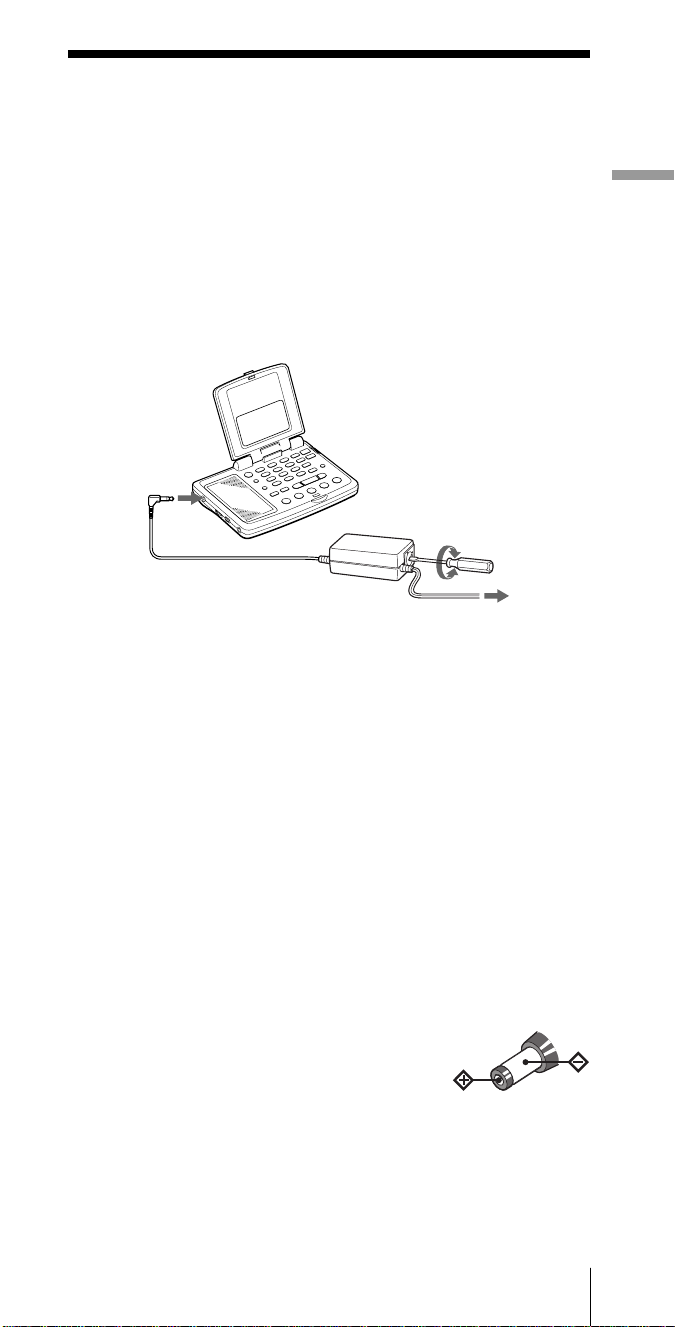
Operating on house current
To operate the unit on house current, connect the supplied AC power
adaptor* to the DC IN 3V jack of the unit.
Before connecting the AC power adaptor, be sure to set the voltage of the
adaptor to your local power line voltage with a screwdriver as illustrated.
The AC power adaptor does not operate when set to OFF.
Do not set the voltage while connected to the outlet, since this may cause
malfunction.
2
to the DC IN
3V jack
Screwdriver
1
Preparation
Notes on the AC power adaptor
• Do not bend or twist the power cord forcibly. Do not place heavy
objects on the power cord.
• When disconnecting the AC power adaptor from the wall outlet, pull
out by the plug. Do not pull the cord itself.
• Disconnect the AC power adaptor from the wall outlet and the radio
when the unit is not to be used for a long period of time.
Tip
When the AC power adaptor is plugged into the DC IN 3V jack, the
batteries are disconnected, and the unit automatically switches to
external power source.
Notes on external power sources
• Keep the batteries installed even when operating on external power, as
they supply power for the unit’s memory backup. Replace the batteries
once a year.
• Turn off the unit when connecting or disconnecting external power
sources. Otherwise, the power may go off and “i” may appear. In
this case, turn on the power again to clear the “i” indication.
• When operating the unit on batteries, first disconnect the AC power
adaptor from the wall outlet, then disconnect the AC power adaptor
from the DC IN 3V jack of the unit. The unit will not run on batteries as
long as the DC IN 3V jack is plugged in.
• Use only the recommended AC power adaptor
manufactured by Sony. Using AC power adaptors
with different specifications (polarity of the plug,
etc.) will result in malfunction and damage to the
unit.
• Use the supplied AC plug adaptor* if the AC power adaptor plug does
not match your wall outlet.
3 to a wall outlet
Polarity of the plug
* Not supplied for models for certain countries. See “Specifications”.
Preparation
11
GB
Page 64

Setting the clock
Setting the Local Time
Set the clock if “0:00” flashes in the display (i.e., when you installed the
batteries for the first time or after you reset the clock). Set the clock with
the radio turned off.
HOLD
POWER
ON/OFF
DST
TIME SET
¿/÷
–
|¿/÷|
+
ABC1DEF2GHI
FM/
AM
JKL4MNO5PQR
AM BAND
STU
LOCAL/
7
WORLD
LABEL EDIT
DIRECT
TIMERSTANDBY/
STANDBY TIME SET
ab
STANDBY MEMORY
MY DW VOA BBC OTH
VWX8YZ
<>
/
DISPLAY
0
TIME SET
TIME DIFF
SW STATION CALL
3
6
9
EXE
SYNC
SSB
DST
ERASE
TIME SET
ENTER
POWER
ON/
OFF
SLEEP
LIGHT
JOG/
TUNE/
SCAN˚
LOCAL time signifies the time for your time zone, while WORLD time is
the time for any other time zone in the world.
Clock adjustment is done in LOCAL time. Before setting the clock, refer
to the table on page 15 and check the time difference between your area
and the UTC (Coordinated Universal Time). Names of major cities and
their time differences from the UTC are preset in the unit’s memory.
1 If the radio is turned on, press POWER ON/OFF to
turn it off.
2 Hold down TIME SET and press ¿ or ÷ to choose a
city or the time difference between your local time and
the UTC.
When TIME SET is pressed, the clock display will automatically
switch to LOCAL time if WORLD time had been displayed.
The LOCAL indication flashes. Each
time you press ¿ or ÷, the time
zone indicator will move to the right
or left.
When you release TIME SET, LOCAL
indication will stop flashing and light
up. Your local time zone has been selected.
3 Press DST if your area is now under daylight saving
time.
s appears in the display.
If daylight saving time is not used in your area, or if s is already
displayed, skip this step.
GB
Preparation12
Page 65

4 Hold down TIME SET and press
–
1¿ or ÷1+ to set
the local time.
Each time you press –1¿ or ÷1+, the current time will decrease or
increase by a minute.
To change the digits rapidly, hold down –1¿ or ÷1
+.
5 Release TIME SET.
“ : ” starts flashing and the clock
starts running.
To switch to clock display while the radio is turned on
Press EXE. The current time appears for about 10 seconds and
then returns to the previous display. Press EXE again to return to
the previous display manually.
The display will not switch to the clock while the radio is
running scan.
For areas adopting daylight saving time (summer time)
Press DST to light up the s indication if you are now in the
summer time period (step 3 in the previous page). If you are now
in the standard time period, press DST at the beginning of the
daylight saving time period. Press again at the end of the
daylight saving time period to clear the indication. The time
display will be adjusted accordingly.
Preparation
Note
You cannot set the clock while listening to the radio.
If the radio is on, press POWER ON/OFF first to turn off the radio.
Tips
• The clock is displayed in the 24 hour system.
• Press TIME SET to stop the flashing of “0:00”.
• To adjust the time to the second, release TIME SET at the time of the
tone.
Preparation
13
GB
Page 66

Setting the clock (continued)
Finding out the time in other areas of the world
Besides your local time, you can display the time for any other area in the
world (WORLD time). Turn off the radio to display the WORLD time.
POWER
ON/OFF
DST
HOLD
¿/÷
LOCAL/
WORLD
ABC1DEF2GHI
FM/
AM
JKL4MNO5PQR
AM BAND
STU
LOCAL/
7
WORLD
LABEL EDIT
DIRECT
TIMERSTANDBY/
STANDBY TIME SET
ab
STANDBY MEMORY
MY DW VOA BBC OTH
VWX8YZ
<>
/
DISPLAY
0
TIME SET
TIME DIFF
SW STATION CALL
3
6
9
EXE
SYNC
SSB
DST
ERASE
TIME SET
ENTER
POWER
ON/
OFF
SLEEP
LIGHT
JOG/
TUNE/
SCAN˚
1 If the radio is turned on, press POWER ON/OFF to
turn it off.
2 If the LOCAL indication is displayed, press LOCAL/
WORLD to switch the indication to WORLD.
3 Press ¿ or ÷ to choose a city or the time difference
with the UTC.
4 Press DST to light up the s indication if the specified
area is now under daylight saving time.
If daylight saving time is not used in
the desired area, or if s is already
displayed, skip this step.
The current time for the area you have
specified will appear in the display.
To switch back to the LOCAL time display
Press LOCAL/WORLD again.
If the desired city name or area name is not preset
Select the area by selecting the time difference with the UTC.
To edit the label (i.e., name of the city) for the time zone, see
”Editing labels”, page 36.
GB
Preparation14
Page 67

Time difference between local time and UTC
The table shows the time difference of each time zone with the
UTC, which could be formulated as follows:
Time difference = Local time* – UTC
The number of hours marked with a plus sign (+) indicate the
hours ahead of the UTC, while those marked with a minus sign
(–) indicate the hours behind the UTC.
Preparation
Time
difference
± 0 LONDON London
+ 1 C.EURO Central Europe Amsterdam, Berlin, Brussels,
+ 2 CAIRO Cairo Athens, Istanbul
+ 3 JEDDAH Jeddah Nairobi, Riyadh, Moscow
+ 4 DUBAI Dubai
+ 5 KARACH Karachi
+ 6 DHAKA Dhaka(Dacca)
+ 7 BNGKOK Bangkok Jakarta
+ 8 S.PORE Singapore Beijing, Hongkong
+ 9 TOKYO Tokyo Seoul
+ 10 SYDNEY Sydney Guam
+ 11 SOLMON Solomon Noumea
+ 12 AUKLND Auckland Fiji
– 11 SAMOA Samoa
– 10 HAWAII Hawaii Honolulu, Tahiti
– 9 ANCHRG Anchorage
– 8 L.A. Los Angeles San Francisco, Vancouver
– 7 DENVER Denver Calgary
– 6 CHICAG Chicago Dallas, Mexico City
– 5 N.Y. New York Lima, Panama, Toronto
– 4 CARACS Caracas Santiago
– 3 RIO Rio de Janeiro Buenos Aires, San Paulo
– 2 FN.ISL Fernando island
– 1 AZORES Azores Island
Label **
City or area Other cities in the area
Lisbon, Madrid, Paris, Rome,
Stockholm, Vienna, Zurich
Scan step
9 kHz
10 kHz
9 kHz
* Local time prior to DST (daylight saving time) adjustment. The DST
setting does not affect the time difference indication.
** Default labels. To change the labels, see ”Editing labels”, page 36.
Automatic adjustment of the MW channel step
A channel step is the basic interval unit in a frequency allocation
system. The MW channel step differs from country to country (10
kHz for North and South American countries, and 9 kHz for
Japan, Europe and other countries). Normally, the scanning or
tuning steps needs to be adjusted to match the system for the
area to scan or manually tune MW frequencies. This unit,
however, determines your local area from your time zone setting
(the time difference from the UTC) and automatically chooses the
appropriate channel step.
Preparation
15
GB
Page 68

Listening to the radio
Various ways of reception
Direct tuning
If you know the frequency of the station you want to listen to, enter the
frequency digits with the number buttons directly.
HOLD
POWER
ON/OFF
Number
buttons
EXEDIRECT
FM/AM
ABC1DEF2GHI
FM/
AM
JKL4MNO5PQR
AM BAND
STU
LOCAL/
7
WORLD
LABEL EDIT
DIRECT
TIMERSTANDBY/
STANDBY TIME SET
ab
STANDBY MEMORY
MY DW VOA BBC OTH
VWX8YZ
<>
/
DISPLAY
0
TIME SET
TIME DIFF
SW STATION CALL
3
6
9
EXE
SYNC
SSB
DST
ERASE
TIME SET
ENTER
POWER
ON/
OFF
SLEEP
LIGHT
JOG/
TUNE/
SCAN˚
1 Press POWER ON/OFF to turn on the radio.
2 Press FM/AM to select either band.
To listen to SW (short wave), MW (medium wave) or LW (long
wave) broadcasts, select AM.
3 Press DIRECT.
The frequency disappears and
”DIRECT” appears in the
display.
4 Press the number buttons and input the frequency of
the desired station.
FM band: You can ignore the decimal point.
To enter 84.7 MHz, for example, press 8, 4 and 7.
AM band: You can ignore the last 3 digits if they are all zero.
To enter 10,000 kHz, for example, press 1 and 0.
Complete each button operation within 10 seconds.
The minimum frequency step for direct input is 0.05 MHz (50 kHz)
for FM, and 1 kHz for AM.
5 Press EXE to enter.
“
when the station is tuned in.
To correct input
Press DIRECT and repeat from step 3.
GB
Listening to the radio16
” appears in the display
TUNE
Page 69

If “TRY” ”AGAIN” appears in the display
When you enter an invalid frequency (i.e., a figure that is not within the
frequency range of the band you chose), you will hear a beep and ”TRY”
”AGAIN” appears in the display.
Check the frequency and repeat from step 3.
Notes
• Complete each operation from step 3 to 5 within 10 seconds. If the
display returns to the previously tuned frequency, repeat from step 3.
• The unit will not beep if the beep is set to BEEP OFF (see ”Turning off
the beep”, page 43).
Other operations
To Press or adjust
Fine tune the reception
Adjust the volume VOL
Turn off the radio* POWER ON/OFF
*The radio tunes to the previously tuned frequency when you turn on the
radio.
–
1¿, ¿, ÷, ÷1
+
To improve reception
FM reception
Gently pull out the telescopic antenna
and adjust the length, angle and
direction (see ”Extending the antenna”,
page 5).
Listening to the radio
MW/LW reception
Retract the telescopic antenna and rotate
the unit to reorient the built-in ferrite
bar antenna.
SW reception
Gently pull out the telescopic antenna
vertically to its full length.
For SW reception, you can enjoy even
better reception by using the supplied
external antenna (see ”Using the
supplied external antenna”, page 32).
Tips
• Plug in the supplied stereo headphones to enjoy FM stereo reception.
Set ST • MONO to ST or MONO to select stereo or monaural
reception. Select MONO when reception is noisy or unclear.
• When listening to news programs, etc., set TONE to NEWS. Speaking
voices will be heard clearer. When listening to music programs, set
TONE to MUSIC.
• Reception of frequencies around 3.0MHz and 3.64 MHz may be
difficult due to internal spurious signals generated by the built-in
oscillators.
Listening to the radio
17
GB
Page 70

Various ways of reception (continued)
Manual tuning
Use –1¿, ÷1+ or ¿, ÷ to change the frequency manually step by step.
The outer buttons (–1¿ and ÷1+) change the frequency in large
frequency steps, and the inner buttons (¿ and ÷) in small frequency
steps.
HOLD
POWER
ON/OFF
¿/÷
–
|¿/÷|
FM/AM
AM BAND
ABC1DEF2GHI
FM/
AM
JKL4MNO5PQR
AM BAND
STU
LOCAL/
7
WORLD
LABEL EDIT
DIRECT
TIMERSTANDBY/
STANDBY TIME SET
ab
STANDBY MEMORY
MY DW VOA BBC OTH
VWX8YZ
<>
/
DISPLAY
0
TIME SET
TIME DIFF
SW STATION CALL
3
6
9
EXE
SYNC
SSB
DST
ERASE
TIME SET
ENTER
POWER
ON/
OFF
SLEEP
LIGHT
JOG/
TUNE/
SCAN˚
1 Press POWER ON/OFF to turn on the radio.
2 Press FM/AM to select either band.
To listen to SW, MW or LW broadcasts, select AM.
3 For the AM bands, hold down AM BAND and press
–
1¿ or ÷1+ to select MW (medium wave), LW (long
wave) or a meter band (short
wave).
The name of the band or the meter
band and its lowest frequency appears
in the display.
For FM, skip this step.
+
4 Press
GB
Listening to the radio18
–
1¿, ÷1+ or ¿, ÷ repeatedly to tune in to the
desired broadcast station.
With each press, the frequency changes in the channel steps shown
below. (The figures in the parentheses indicate the steps in the SSB
mode).
Band
–
1¿ or ÷1
FM 0.05 MHz 0.05 MHz
SW 5 kHz (1 kHz) 1 kHz (0.1 kHz**)
MW 9 or 10 kHz* (1 kHz) 1 kHz (0.1 kHz**)
LW 9 kHz (1 kHz) 1 kHz (0.1 kHz**)
* The frequency step is adjusted automatically to your time zone
according to your local time zone setting (see ”Automatic
adjustment of the MW channel step”, page 15).
** Units of 0.1 kHz are not indicated in the display.
+
¿ or ÷
Page 71

Tips
• The unit starts scan tuning when
–
1¿ or ÷1+ is held down (see ”Scan
tuning”, page 20).
• The frequency changes rapidly when ¿ or ÷ is held down, and stops
when released. In the AM bands (MW, SW, and LW), the unit scans
continuously in the range of 150 to 29,999 kHz.
Frequency range of the bands/meter bands
The short wave range is divided into 14 bands that are generally
referred to as ”meter bands”.
(kHz for AM / MHz for FM)
Band
Frequency Range Scan Frequency Range
LW 150–529 153–522 —
MW 530–1620
AM
SW 1621–29999
FM 76.00–108.00 76.00–108.00 —
*1 10 kHz channel step (see page 15).
*2 9 kHz channel step (see page 15).
530–1620 *
531–1620 *
2250–2550 120 meter band
3150–3450 90 meter band
3850–4050 75 meter band
4700–5100 60 meter band
5900–6250 49 meter band
7100–7400 41 meter band
9400–10000 31 meter band
11500–12150 25 meter band
13500–13900 22 meter band
15000–15700 19 meter band
17450–18000 16 meter band
18850–19100 15 meter band
21450–21950 13 meter band
25600–26100 11 meter band
1
2
Meter band
—
Listening to the radio
Note
The actual frequency range of short wave broadcasts and the range of the
meter bands for this unit may differ. Refer to the supplied “Wave
Handbook” for more information.
Listening to the radio
19
GB
Page 72

Various ways of reception (continued)
Scan tuning
HOLD
POWER
ON/OFF
–
|¿/÷|
FM/AM
AM BAND
ABC1DEF2GHI
FM/
AM
JKL4MNO5PQR
AM BAND
STU
LOCAL/
7
WORLD
LABEL EDIT
DIRECT
TIMERSTANDBY/
STANDBY TIME SET
ab
STANDBY MEMORY
MY DW VOA BBC OTH
VWX8YZ
<>
/
DISPLAY
0
TIME SET
TIME DIFF
SW STATION CALL
3
6
9
EXE
SYNC
SSB
DST
ERASE
TIME SET
ENTER
POWER
ON/
OFF
SLEEP
LIGHT
JOG/
TUNE/
SCAN˚
1 Press POWER ON/OFF to turn on the radio.
2 Press FM/AM to select either band.
To listen to SW, MW or LW broadcasts, select AM.
3 For AM bands, hold down AM BAND and press –1¿
or ÷1+ to select MW (medium wave), LW (long wave)
or a meter band (short wave).
The name of the band or the meter band and its lowest frequency
appear in the display.
For FM, skip this step.
4 Hold down
scanning.
”SCAN” is displayed. The unit stops at each reception and
resumes scanning after about 3 seconds.
The unit scans within the frequency
range of the chosen band or meter
band (see ”Frequency range of the
bands/meter bands”, page 19). In the
SSB reception mode, the unit scans the
whole 150 to 29999 kHz frequency range.
–
1¿ or ÷1+. Release when the unit starts
+
5 Press
GB
Listening to the radio20
–
1¿ or ÷1+ to stop scanning and listen to the
desired broadcast.
”SCAN” disappears and the name of the band appears in the
display.
Page 73

Tips
• The unit scans the frequencies in descending order when holding
down –1¿, and in ascending order when holding down ÷1+.
• To the change scanning direction, hold down either –1¿ or ÷1
opposite to the current direction. This is convenient when, for example,
you want to return to the previous reception after the unit has resumed
scanning.
• When scanning for MW broadcasts at night when reception is intense,
or when scanning under prevalent interference, the unit may stop
scanning to null broadcasts frequently. Switch ATT to ON and adjust
sensitivity with the ATT Control (see ”Controlling scan stops”, below).
Under normal conditions, set ATT to OFF.
+
Controlling scan stops — using the ATT switch and the ATT
Control
Use the ATT (attenuator) switch and the ATT Control to control
reception sensitivity when the unit stops scanning to null
broadcasts frequently or when scanning under prevalent
interference. Under normal conditions, use the radio with ATT
set to OFF (i.e., with maximum sensitivity).
ATT Control
Listening to the radio
ATT
The ATT Control is activated when ATT is switched ON. Turn
the ATT Control toward MAX to reduce sensitivity. The radio
will skip weaker signals and stop at only stronger ones.
Note
If the ATT Control is turned too much toward MAX, the radio will not
stop on any weaker signals at all. Switch ATT to OFF if you do not need
to use the attenuator.
Listening to the radio
21
GB
Page 74

Various ways of reception (continued)
Preset tuning
You can preset a total of 20 stations of your choice to the number buttons
(10 for FM and 10 for AM).
Presetting stations
HOLD
POWER
ON/OFF
Number
buttons
ENTER
FM/AM
ABC1DEF2GHI
FM/
AM
JKL4MNO5PQR
AM BAND
STU
LOCAL/
7
WORLD
LABEL EDIT
DIRECT
TIMERSTANDBY/
STANDBY TIME SET
ab
STANDBY MEMORY
MY DW VOA BBC OTH
VWX8YZ
<>
/
DISPLAY
0
TIME SET
TIME DIFF
SW STATION CALL
3
6
9
EXE
SYNC
SSB
DST
ERASE
TIME SET
ENTER
POWER
ON/
OFF
SLEEP
LIGHT
JOG/
TUNE/
SCAN˚
1 Press POWER ON/OFF to turn on the radio.
2 Tune in to the station you want to preset.
3 Hold down ENTER and press a number button (0–9) of
your choice.
When ENTER is held down, “PRESET MY” will flash in the
display.
A beep sounds when a number button
is pressed. The station is stored to the
selected button. The preset number
and the preset label are displayed.
Note
If a station is already stored to the button you chose, it will be
overwritten by the new preset. If the preset label had been edited, it will
return to the default setting.
Default preset labels
Each time a station is preset, the
preset key is assigned the default
preset label as shown.
To change labels, see
”Editing labels”, page 36.
GB
Listening to the radio22
Button AM FM
1 AM-1 FM-1
2 AM-2 FM-2
3 AM-3 FM-3
4 AM-4 FM-4
5 AM-5 FM-5
6 AM-6 FM-6
7 AM-7 FM-7
8 AM-8 FM-8
9 AM-9 FM-9
0 AM-0 FM-0
Page 75

Tuning in to a preset station
POWER
DISPLAY
EXE
TIME SET
TIME DIFF
POWER
ON/
SYNC
3
OFF
SSB
SLEEP
6
DST
ERASE
9
LIGHT
TIME SET
ENTER
JOG/
TUNE/
SCAN˚
ON/OFF
Number
HOLD
buttons
FM/AM
ABC1DEF2GHI
FM/
AM
JKL4MNO5PQR
AM BAND
STU
VWX8YZ
LOCAL/
7
WORLD
<>
LABEL EDIT
TIMERSTANDBY/
STANDBY TIME SET
STANDBY MEMORY
/
DIRECT
0
ab
SW STATION CALL
MY DW VOA BBC OTH
1 Press POWER ON/OFF to turn on the radio.
2 Press FM/AM to select either band.
3 Press a number button (0–9) of your choice.
The radio receives the station assigned to the button.
If no station is preset
A beep sounds and ”MEMORY” ”EMPTY” appears in the
display. Then the display will return to the previous condition.
Notes
• The radio may have frequencies stored in the preset memory at factory
shipment.
• The unit will not beep if the beep is set to BEEP OFF (see ”Turning off
the beep”, page 43).
Listening to the radio
Erasing a preset station
ABC1DEF2GHI
FM/
AM
JKL4MNO5PQR
AM BAND
STU
VWX8YZ
LOCAL/
7
WORLD
<>
/
DIRECT
DISPLAY
0
TIME SET
TIME DIFF
SW STATION CALL
EXE
LABEL EDIT
TIMERSTANDBY/
STANDBY TIME SET
ab
STANDBY MEMORY
MY DW VOA BBC OTH
POWER
ON/
SYNC
3
OFF
SSB
SLEEP
6
DST
ERASE
9
LIGHT
TIME SET
ENTER
JOG/
TUNE/
SCAN˚
Number
buttons
ERASE
HOLD
1 Press a number button (0–9) for the preset station you
want to erase.
2 Hold down ERASE.
The preset number flashes in the display while ERASE is held
down.
A beep sounds after 3 seconds and the station assigned to the
button you chose is erased. The preset number and the preset label
disappear.
Note
When a preset station is erased, any changes to its default label is erased
as well.
Listening to the radio
23
GB
Page 76

Various ways of reception (continued)
SW STATION CALL tuning
Tune in to major short wave stations by just pressing the station buttons:
DW, VOA, BBC and OTH (others). The radio automatically chooses the
frequencies used in your time zone from the SW STATION CALL ROM*
encased at the bottom of the unit, scans for them, and stops scan at
reception.
ABC1DEF2GHI
FM/
AM
JKL4MNO5PQR
AM BAND
STU
LOCAL/
WORLD
LABEL EDIT
TIMERSTANDBY/
STANDBY TIME SET
ab
STANDBY MEMORY
VWX8YZ
7
<>
/
DIRECT
MY DW VOA BBC OTH
DISPLAY
EXE
0
TIME SET
TIME DIFF
SW STATION CALL
POWER
ON/
SYNC
3
6
9
SSB
DST
ERASE
TIME SET
ENTER
SLEEP
LIGHT
JOG/
TUNE/
SCAN˚
OFF
POWER
ON/OFF
HOLD
Station
name
buttons
*ROM = Read Only Memory
1 Set the time zone to your area.
For LOCAL time, see ”Setting the Local Time”, page 12.
For WORLD time, see ”Finding out the time in other areas of the
world”, page 14.
SW STATION CALL automatically selects only the frequencies
that are receivable in the area corresponding to your time
zone setting, regardless of LOCAL or WORLD time. Thus, it is
crucial that you set the time zone properly to match your current
location before using SW STATION CALL.
2 Press POWER ON/OFF to turn on the radio.
3 Press the station button of your choice.
”SW STATION CALL”, the station
name and a frequency is displayed.
The time difference from the UTC
and the time zone indicator flash for
about 3 seconds, and then light up.
Confirm your time zone setting.
The frequency actually displayed
may be different from the illustration.
4 Press the same station button again.
The radio scans the frequencies for your area in ascending order,
and stops at reception.
Press the button again to resume scanning.
To stop scanning
Press the same station button during scan.
GB
Listening to the radio24
Page 77

To manually recall the selected frequencies one by one
Hold down the station button and press ¿ , ÷ or –1¿ , ÷1
+.
The frequency changes quickly when –1¿ or ÷1+ is held down,
and stops when released.
Tip
When scanning at night when reception is intense, or when scanning
under prevalent interference, the unit may stop scanning to null
broadcasts frequently. Switch ATT to ON and adjust sensitivity with the
ATT Control (see ”Controlling scan stops”, page 21). Under normal
conditions, set ATT to OFF.
Stations recalled by the SW STATION CALL station buttons
Button Station and program
DW English and German programs of Deutsche Welle
VOA English programs of Voice of America
BBC English programs of British Broadcasting Corporation
OTH Choose one of the following*;
R.NED – English and Dutch programs of Radio Nederland
RFI –
English and French programs of Radio France International
R.JPN – English and Japanese programs of Radio Japan
REE –
English and Spanish programs of Radio Exterior de España
CRI –
English and Chinese programs of China Radio International
*Selecting the station for the OTH button
Listening to the radio
DISPLAY
EXE
TIME SET
TIME DIFF
POWER
ON/
SYNC
3
OFF
SSB
SLEEP
6
DST
ERASE
9
LIGHT
TIME SET
HOLD
ENTER
JOG/
TUNE/
SCAN˚
¿/÷
OTH
ABC1DEF2GHI
FM/
AM
JKL4MNO5PQR
AM BAND
STU
VWX8YZ
LOCAL/
7
WORLD
<>
LABEL EDIT
TIMERSTANDBY/
STANDBY TIME SET
ab
STANDBY MEMORY
/
DIRECT
0
SW STATION CALL
MY DW VOA BBC OTH
Turn off the radio if it is turned on.
Hold down OTH and press ¿ or ÷. Release OTH when the
station of your choice appears in the display.
Steps for reception is the same as the other SW STATION CALL
buttons.
Listening to the radio
25
GB
Page 78

When there is no reception
If the radio was not able to receive any of the frequencies for the
time zone stored in the ROM, scanning stops with a beep when
the radio returns to the frequency where it started scanning.
Lowest
frequency
Scan start
frequency
Highest
frequency
Short wave reception may be difficult at times due to various
factors, such as sunspot activity and atmospheric conditions.
Furthermore, the major broadcast stations whose data are stored
in the ROM may change the broadcast time and/or frequencies
at the change of season, etc. In such cases, the radio may not be
able to receive the frequencies stored in the SW STATION CALL
ROM.
Updating the SW STATION CALL ROM
To conform with possible changes in frequencies, the SW
STATION CALL ROM is designed to be replaceable by the user
to an updated version of the ROM. The newest SW STATION
CALL ROM is sold by F Corporation. The ROM is to be updated
in around October every year. We recommend the ROM to be
replaced at least once in 2 to 3 years.
To purchase the newest ROM, refer to ”Purchasing the latest SW
STATION CALL ROM” and contact F Corporation.
To exchange the ROM, see ”Exchanging the SW STATION CALL
ROM”, page 46.
Notes
• Many of the worldwide broadcast programs of the major broadcast
stations stored in the ROM are broadcast only at certain times of the
day. If the station is not broadcasting on the scanned frequency at the
time, the radio will not receive any broadcast or receive broadcast by
some other station, such as a local station, broadcasting on the same
frequency.
• If the frequency is changed by manual tuning, etc., when ”SW
STATION CALL” indication is lit in the display, the radio will exit SW
STATION CALL and the indication will disappear.
• If there is no frequency for the station corresponding to the time zone
stored in the ROM, a beep sounds, ”MEMORY” ”EMPTY” appears in
the display, and the radio returns to the previous condition.
• If you press a station button without the ROM in the ROM
compartment of the radio, a beep sounds, ”NO” ”ROM” appears in the
display, and the radio returns to the previous condition. If the ROM is
displaced when ”SW STATION CALL” indication is lit in the display,
a beep sounds, ”NO” ”ROM” appears in the display, and the radio
changes to manual tuning.
• If ”NO” ”ROM” is displayed with the SW STATION CALL ROM
inserted in the ROM compartment, the contact surface of the ROM
may be dirty. See ”Cleaning the SW STATION CALL ROM contact
surface”, page 46, and clean the contact surface with a cotton swab.
Do not clean the contact springs of the main unit, as they may deform
and cause a malfunction.
GB
Listening to the radio26
Page 79

Various ways of reception (continued)
MY-Memory tuning
Preset up to 100 frequencies of any band (FM, SW, MW or LW) to the MY
button. You can scan these stations or tune in one by one.
Presetting stations to MY-Memory
FM/AM
MY
ABC1DEF2GHI
FM/
AM
JKL4MNO5PQR
AM BAND
STU
LOCAL/
WORLD
LABEL EDIT
TIMERSTANDBY/
STANDBY TIME SET
ab
STANDBY MEMORY
VWX8YZ
7
<>
/
DIRECT
MY DW VOA BBC OTH
DISPLAY
EXE
0
TIME SET
TIME DIFF
SW STATION CALL
POWER
ON/
SYNC
3
6
9
SSB
DST
ERASE
TIME SET
ENTER
LIGHT
JOG/
TUNE/
SCAN˚
OFF
SLEEP
POWER
ON/OFF
HOLD
ENTER
1 Press POWER ON/OFF to turn on the radio.
2 Tune in to the station you want to preset.
Listening to the radio
3 Hold down ENTER and press MY.
When ENTER is held down, “PRESET MY” will flash in the
display.
A beep sounds when MY is pressed.
The station is stored to the lowest
available MY-Memory number (00 to
99). The MY-Memory number and the
MY-Memory label are displayed.
Default MY-Memory labels
Each time a station is stored to MY-Memory, it is assigned the
default MY-Memory label ”MY-xx” (with the memory number in
place of ”xx”) .
To change labels, see ”Editing labels”, page 36.
Note
The radio may have frequencies stored in MY-Memory at factory
shipment. In this case, erase them before presetting stations to MYMemory (see ”Erasing a MY-Memory preset”, page 29).
Tips
• If you press MY with all the MY-Memory numbers (00 to 99) assigned
a station, a beep sounds, ”MEMORY” ”FULL” appears in the display,
and the radio returns to the previous condition.
• MY-Memory tuning is not affected by the time zone setting.
Listening to the radio
27
GB
Page 80

Tuning in to a MY-Memory station
DISPLAY
EXE
TIME SET
TIME DIFF
POWER
ON/
SYNC
3
OFF
SLEEP
SSB
6
DST
ERASE
9
LIGHT
TIME SET
ENTER
JOG/
TUNE/
SCAN˚
POWER
ON/OFF
HOLD
MY
ABC1DEF2GHI
FM/
AM
JKL4MNO5PQR
AM BAND
STU
VWX8YZ
LOCAL/
7
WORLD
<>
LABEL EDIT
TIMERSTANDBY/
STANDBY TIME SET
STANDBY MEMORY
/
DIRECT
0
ab
SW STATION CALL
MY DW VOA BBC OTH
1 Press POWER ON/OFF to turn on the radio.
2 Press MY.
The radio enters the MY-Memory tuning mode.
3 Press MY again.
The radio scans the frequencies stored in MY-Memory and stops at
reception.
Press the button again to resume scanning.
To stop scanning
Press MY during scan.
To manually recall the MY-Memory frequencies one by one
Hold down MY and press ¿ , ÷ or –1¿ , ÷1
The frequency changes quickly when –1¿ or ÷1+ is held down
and stops when released.
+.
Tips
• MY-Memory scans only the stored memory numbers and skips the
empty ones.
• MY-Memory scans fastest if the frequencies are stored in ascending or
descending order.
• If MY is pressed with no frequency stored in MY-Memory, a beep
sounds and ”MEMORY” ”EMPTY” appears in the display. Then the
display returns to the previous condition.
• When scanning at night when reception is intense, or when scanning
under prevalent interference, the unit may stop scanning to null
broadcasts frequently. Switch ATT to ON and adjust sensitivity with
the ATT Control (see ”Controlling scan stops”, page 21). Under normal
conditions, set ATT to OFF.
When there is no reception
If any of the frequencies stored in MY-Memory was not received,
scanning stops with a beep when the radio returns to the
frequency where it started scanning.
Lowest stored
MY-Memory number
GB
Listening to the radio28
Scan start
MY-Memory number
Highest stored
MY-Memory number
Page 81

Erasing a MY-Memory preset
DISPLAY
EXE
TIME SET
TIME DIFF
POWER
ON/
SYNC
3
OFF
SLEEP
SSB
6
DST
ERASE
9
LIGHT
TIME SET
ENTER
JOG/
TUNE/
SCAN˚
ERASE
HOLD
ABC1DEF2GHI
FM/
AM
JKL4MNO5PQR
AM BAND
STU
VWX8YZ
LOCAL/
7
WORLD
LABEL EDIT
<>
/
DIRECT
0
TIMERSTANDBY/
STANDBY TIME SET
ab
STANDBY MEMORY
SW STATION CALL
MY DW VOA BBC OTH
1 Recall the MY-Memory number you want to erase.
2 Hold down ERASE.
The MY-Memory number flashes in the display while ERASE is
held down.
A beep sounds after 3 seconds and the station assigned to the MYMemory number is erased. The MY-Memory number and the MYMemory label disappear.
Note
When a MY-Memory station is erased, any changes to its default label is
erased as well.
To change the station stored in MY-Memory
You cannot overwrite a frequency stored in MY-Memory with a
new one. Erase the particular MY-Memory number first, then
store a new frequency.
Listening to the radio
Note
MY-Memory stores stations to the lowest available MY-Memory number.
Note, thus, that if a MY-Memory number lower than the one you erased
is available, the new frequency will be stored to that number.
Listening to the radio
29
GB
Page 82

Receiving SSB and CW Transmissions
You can receive SSB (Single Side Band) and CW (Continuous Wave)
transmissions with the built-in BFO circuit.
FM/AM
ABC1DEF2GHI
FM/
AM
JKL4MNO5PQR
AM BAND
STU
LOCAL/
WORLD
LABEL EDIT
TIMERSTANDBY/
STANDBY TIME SET
ab
STANDBY MEMORY
VWX8YZ
7
<>
/
DIRECT
MY DW VOA BBC OTH
DISPLAY
EXE
0
TIME SET
TIME DIFF
SW STATION CALL
POWER
ON/
SYNC
3
6
9
SSB
DST
ERASE
TIME SET
ENTER
OFF
SLEEP
LIGHT
JOG/
TUNE/
SCAN˚
HOLD
1 Press POWER ON/OFF to turn on the radio.
2 Press FM/AM and select AM.
3 Press SSB to select USB or LSB/CW.
Each time SSB is pressed, the display
changes as follows:
(Normal mode) USB LSB/CW
4 Tune in to the desired station.
For tuning methods, see ”Various ways of reception”, pages 16 to
29.
POWER
ON/OFF
SSB
Tip
For more on SSB and CW, refer to “Tips on radio waves”, page 50.
Notes
• The USB or the LSB/CW mode cannot be preset to memory. You can
tune in to stations in 0.1 kHz steps in the USB or the LSB/CW mode,
but the frequency digit below the decimal point is ignored when
memorized.
• If a preset AM frequency is recalled during the USB or the LSB/CW
mode, the mode setting remains active and the frequency is received in
the respective mode.
GB
Listening to the radio30
Page 83

Adjusting for optimum AM reception —Synchronous detection
Adjust AM reception (especially SW reception) to optimum condition
with synchronous detection.
ABC1DEF2GHI
FM/
AM
JKL4MNO5PQR
AM BAND
STU
LOCAL/
7
WORLD
LABEL EDIT
DIRECT
TIMERSTANDBY/
STANDBY TIME SET
ab
STANDBY MEMORY
MY DW VOA BBC OTH
VWX8YZ
<>
/
DISPLAY
0
TIME SET
TIME DIFF
SW STATION CALL
3
6
9
EXE
SYNC
SSB
DST
ERASE
TIME SET
ENTER
POWER
ON/
OFF
SLEEP
LIGHT
JOG/
TUNE/
SCAN˚
SYNC
POWER
ON/OFF
HOLD
1 Press POWER ON/OFF to turn on the radio.
2 Tune in to the desired station.
For tuning methods, see ”Various ways of reception”, pages 16 to
29.
3 Press SYNC repeatedly to select the synchronous
detection mode with better reception (SYNC U or
SYNC L).
Each time SYNC is pressed, the display changes as follows:
(Normal mode) SYNC LSYNC U
“LOCK” appears in the display when
synchronous detection is in effect.
Listening to the radio
Tip
For more on synchronous detection, see “Tips on radio waves”, page 50.
Notes
• Synchronous detection may be cancelled when the batteries become
weak.
• Even when you have chosen either of the synchronous detection
modes and SYNC U or SYNC L is lit in the display, synchronous
detection may not take effect if reception is weak. In this case, “LOCK”
will not light up.
• Synchronous detection setting cannot be preset to memory.
• If a preset AM frequency is recalled when either synchronous detection
mode is in effect, the mode setting remains active and the frequency is
received in the respective mode.
Listening to the radio
31
GB
Page 84

Other operations
Using the supplied external antenna
Use the supplied Short Wave Active Antenna AN-LP2 for better short
wave reception. The antenna gives you stable indoor reception with the
built-in amplifier.
This antenna can be used only to receive the short wave meter bands
from the 120 meter band to the 11 meter band as seen in ”Frequency
range of the bands/meter bands”, page 19. Be sure to disconnect it for
FM, MW or LW reception.
Inserting the Batteries
1 Open the battery compartment lid of the antenna
controller.
2 Insert two R6 (size AA) batteries with correct polarity.
3 Close the lid.
Battery life of the active antenna
Using Sony R6 (size AA) dry batteries (JEITA*): approx. 40 hours
* Measured by JEITA (Japan Electronics and Information Technology
Industries Association) standards. The actual battery life may vary
depending on the circumstance of the unit.
When to replace the batteries
When the batteries become weak, the POWER lamp of the
antenna controller dims. Replace both batteries with new ones.
GB
Other operations32
Page 85

Setting Up
1 Unfold the antenna module slowly.
Be careful not to hit anyone or anything when unfolding the
antenna module.
2 Pull out the long cord with the double pin plug from
the antenna controller until it stops, and connect it to
the antenna module.
3 Attach the antenna module to the window glass or the
curtain.
Fix the antenna with the supplied clip or the suction cup, as seen in
the illustration on the previous page.
4 Connect the short cord with a single pin plug to the
AM EXT ANT (AM external antenna) jack of the radio.
To AM EXT ANT
The power supply of the antenna controller is linked to the power
supply of the radio. The POWER lamp lights up on the controller.
Switch ATT to OFF on the radio.
On setup
• Place the antenna module where reception is well, such as by the
window.
• Reception may become poorer if the long cord of the antenna
controller is kept near the radio. Keep it as far away from the radio as
possible.
• Keep the radio and the antenna away from fluorescent lamps,
television sets, telephones, personal computers, etc., as they may
generate noise interference.
• Set up the antenna as far away from the street as possible.
• Do not use the antenna outdoors.
• When using the external antenna, be sure to retract the telescopic
antenna on the main unit.
Other operations
Other operations
33
GB
Page 86

After use
1 Disconnect the antenna module, antenna controller
and radio.
2 Reel up the long cord.
3 Wrap the short cord to the antenna controller and set it
in place.
4 Twist and fold the antenna module, set it in place, and
put it in the carrying case.
Note
• When receiving FM, MW or LW broadcasts, be sure to disconnect the
active antenna. The radio cannot receive these bands with the external
antenna plugged in, as the telescopic antenna and the built-in ferrite
bar antenna will be disconnected.
• The supplied external antenna is to be used only with this unit. It
cannot be used on other radios.
• Do not connect any other antennas other than the recommended active
antennas to the AM EXT ANT jack of the unit, as the jack supplies DC
voltage to power the recommended active antennas.
GB
Other operations34
Page 87

Recording broadcasts
Connect the radio to a cassette recorder with connecting cables to record
radio broadcasts.
Cassette
recorder
to LINE OUT
to MIC IN or
LINE IN
1 Connect the radio to a cassette recorder with
connecting cords (not supplied).
Use the appropriate cord for the type of cassette corder.
Cassette recorder
Type Jack
Monaural MIC IN (minijack) RK-G135
MIC IN (minijack) RK-G134
Stereo
LINE IN (minijack) RK-G136
LINE IN (pinjack) RK-G129
Connecting cord
2 Tune in to the station you want to record.
3 Record on the cassette recorder.
If you record with a stereo recorder
FM stereo programs are recorded in stereo. AM programs are recorded
monaurally to both channels.
Tip
Adjusting VOL on the radio has no effect on the recording.
Other operations
Other operations
35
GB
Page 88

Editing labels
A BC1
You can change the default label for a station preset, time zone, etc., to
any combination of up to 6 alphanumeric letters.
POWER
ON/
SYNC
3
6
9
SSB
DST
ERASE
TIME SET
ENTER
LIGHT
JOG/
TUNE/
SCAN˚
OFF
SLEEP
HOLD
Number
buttons
EXE
¿/÷
LABEL EDIT
DIRECT
ABC1DEF2GHI
FM/
AM
JKL4MNO5PQR
AM BAND
STU
LOCAL/
WORLD
LABEL EDIT
TIMERSTANDBY/
STANDBY TIME SET
ab
STANDBY MEMORY
VWX8YZ
7
<>
/
DIRECT
MY DW VOA BBC OTH
DISPLAY
EXE
0
TIME SET
TIME DIFF
SW STATION CALL
1 Display the label you want to edit by preset tuning
(page 22), MY-Memory tuning (page 27), WORLD time
display (page 14) or the Standby function (page 38).
2 Press LABEL EDIT.
The first letter of the label flashes.
3 Press ¿ or ÷ to move the cursor to the letter you
want to change.
4 Press one of the number buttons (0 to 9) or DIRECT to
enter the letter of your choice.
The first letter written above the number button is entered when
the button is pressed. Every press of the button changes the letter
as follows.
Ex. Pressing number button (1):
GB
Other operations36
(1) (2) (3)
A B C 1 D E F 2 G H I 3
(4) (5) (6)
J K L 4 M N O 5 P Q R 6
(7) (8) (9)
S T U 7 V W X 8 Y Z
(DIRECT) (0)
+ – ∗ . < > / 0
†
†
indicates a
9
—
blank space.
Page 89

5 Repeat steps 3 and 4 to change other letters.
Complete each button operation within 20 seconds.
6 Press EXE.
A beep sounds and the displayed letters are stored as the label.
If the flashing of the character stops
You took more than 20 seconds to complete a button operation.
If the display returns to the original label, press LABEL EDIT
again and start over.
To cancel editing
Press LABEL EDIT before pressing EXE.
Notes
• The SW STATION CALL labels cannot be edited.
• The unit does not beep if the beep is set to BEEP OFF (see ”Turning off
the beep”, page 43).
• An edited preset label returns to the default setting if a station is
overwritten to the preset button (see ”Default preset labels”, page 22).
Other operations
Other operations
37
GB
Page 90

Using the timer
Waking up to the radio or buzzer — Standby function
You can wake up to your favorite radio program using the Standby
function. You can preset different frequencies and standby times to
STANDBY MEMORY a and b.
To wake up to the buzzer, see ”To wake up to the buzzer”, page 40.
POWER
ON/
SYNC
3
6
9
SSB
DST
ERASE
TIME SET
ENTER
SLEEP
LIGHT
JOG/
TUNE/
SCAN˚
OFF
HOLD
POWER
ON/OFF
ENTER
–
|¿/÷|
STANDBY
MEMORY
a/b
ABC1DEF2GHI
FM/
AM
JKL4MNO5PQR
AM BAND
STU
LOCAL/
WORLD
LABEL EDIT
TIMERSTANDBY/
STANDBY TIME SET
ab
STANDBY MEMORY
VWX8YZ
7
<>
/
DIRECT
MY DW VOA BBC OTH
DISPLAY
EXE
0
TIME SET
TIME DIFF
SW STATION CALL
VOL
Make sure the clock is set correctly before using the Standby function
(page 12).
1 Tune in to the station you want to preset.
2 Adjust VOL to your choice.
3
Hold down ENTER and press STANDBY MEMORY a
or b.
When ENTER is held down, “PRESET
MY” will flash in the display.
A beep sounds when STANDBY
MEMORY a or b is pressed. The station
is stored to the selected button. The
STANDBY MEMORY number (a or b)
and the STANDBY MEMORY label are
displayed.
4 Press POWER ON/OFF to turn off the radio.
+
5 Hold down the STANDBY MEMORY button you
pressed in step 3 and press –1¿ or ÷1+ repeatedly to
set the standby time (i.e., the time the radio is to turn
on).
”STANDBY” and ”a” or ”b” flash while the STANDBY
MEMORY button is held down.
6 Release the STANDBY MEMORY button.
”STANDBY” and ”a” or ”b” light
up and the standby setting is complete.
The clock indication returns to the
current time.
The radio turns on at the standby time
to receive the preset broadcast station.
GB
Other operations38
Page 91

To check the standby time
Hold down STANDBY MEMORY a or b with the radio turned
off. The preset standby time is displayed while the button is
pressed.
To change the standby time
Repeat steps 4 to 6 and preset a new standby time.
To cancel the standby function
Press STANDBY MEMORY a or b with the radio turned off so
that “STANDBY” ”a” or ”b” is cleared from the display.
Make sure to release the button within a second. If the button is
pressed for longer than a second, the radio goes to step 5.
At the standby time
The radio turns on, ”SLEEP” lights up, and the preset broadcast
station is tuned in. The radio turns off after about 60 minutes.
Notes
• The Standby function is activated when the currently displayed time,
whether in LOCAL or WORLD display mode, reaches the standby
time. Make sure, therefore, that the time display is in the mode of your
choice.
• If a station was already stored to the STANDBY MEMORY button, the
previous preset station is overwritten by the new preset. If the preset
label had been edited, it will return to the following default;
a = ”STBY-a”
b = ”STBY-b”
To change labels, see ”Editing labels”, page 36.
• Make sure that the radio is turned off before setting the standby time.
You cannot set the standby time with the radio turned on.
Other operations
Tips
• To temporarily cancel the Standby function, turn off the radio and
slide HOLD in the direction of the arrow so that “H” is displayed.
The standby timer goes back to effect when HOLD is turned off (“H”
is cleared from the display). See ”Using the hold function”, page 42.
• Once the standby presets are set, the radio turns on at the preset time
everyday unless the standby status is canceled (see ”To cancel the
standby function”, above). Canceling the standby status does not erase
the standby setting itself. The setting can be put back to the standby
status by pressing STANDBY MEMORY a or b with the radio turned
off so that ”STANDBY” ”a” or ”b” is lit in the display.
• If the standby memory is in standby status, it takes effect even when
you are listening to the radio. The radio switches to the preset standby
frequency at the standby time.
• You can set both STANDBY memories to the standby status at the
same time (i.e., both the a and b indicators are lit in the display).
The radio turns on at the first standby time to receive the first standby
frequency, then switches to the second standby frequency at the
second standby time.
• If both STANDBY memories are set to the same standby time,
STANDBY a takes precedence.
Other operations
39
GB
Page 92

To wake up to the buzzer
If a STANDBY MEMORY without a frequency preset is activated, the
buzzer sounds at the standby time. Erase if a frequency is preset.
SYNC
SSB
DST
ERASE
TIME SET
ENTER
POWER
ON/
OFF
SLEEP
LIGHT
JOG/
TUNE/
SCAN˚
HOLD
POWER
ON/OFF
ERASE
STANDBY
MEMORY
a/b
ABC1DEF2GHI
FM/
AM
JKL4MNO5PQR
AM BAND
STU
LOCAL/
7
WORLD
LABEL EDIT
DIRECT
TIMERSTANDBY/
STANDBY TIME SET
ab
STANDBY MEMORY
MY DW VOA BBC OTH
VWX8YZ
<>
/
DISPLAY
0
TIME SET
TIME DIFF
SW STATION CALL
3
6
9
EXE
1 Press POWER ON/OFF to turn on the radio.
2 Press STANDBY MEMORY a or b.
The preset frequency is recalled.
If no frequency is stored, a beep sounds and ”MEMORY”
”EMPTY” appears in the display. Go to step 4.
3 Hold down ERASE.
The Standby Memory number flashes in the display while ERASE
is held down.
A beep sounds after 3 seconds and the station assigned to the
STANDBY MEMORY button is erased. The Standby Memory
number and the Standby Memory label disappear.
4 Follow steps 4 to 6 of ”Waking up to the radio or
buzzer”, page 38 to set the standby time (i.e., the time
the buzzer is to sound).
The buzzer sounds at the standby time.
To stop the buzzer
Press any button except LIGHT.
The buzzer stops after about 60 minutes if it is left on.
Notes
• The buzzer volume cannot be adjusted with VOL.
• The Standby Memory buzzer sounds regardless of the BEEP OFF
setting.
• When a Standby Memory preset is erased, any changes to its default
label is erased as well.
GB
Other operations40
Page 93

Falling asleep listening to the radio — Sleep timer
You can turn off the radio automatically after about 60 minutes using the
sleep timer.
ABC1DEF2GHI
FM/
AM
JKL4MNO5PQR
AM BAND
STU
LOCAL/
WORLD
LABEL EDIT
TIMERSTANDBY/
STANDBY TIME SET
ab
STANDBY MEMORY
VWX8YZ
7
<>
/
DIRECT
MY DW VOA BBC OTH
DISPLAY
EXE
0
TIME SET
TIME DIFF
SW STATION CALL
POWER
ON/
SYNC
3
6
9
SSB
DST
ERASE
TIME SET
ENTER
SLEEP
LIGHT
JOG/
TUNE/
SCAN˚
OFF
SLEEP
HOLD
1 Press SLEEP.
If the radio was off, the radio turns on.
“SLEEP” lights up.
2 Tune in to the station of your choice.
The radio turns off automatically after about 60 minutes.
To turn off the radio before the 60 minute duration
Press POWER ON/OFF.
Tips
• If SLEEP is pressed with the radio turned on, ”SLEEP” lights up and
the radio turns off after about 60 minutes.
• If you press SLEEP to turn on the radio, the radio tunes to the
previously tuned frequency.
• If SLEEP is pressed when ”SLEEP” is already lit, the sleep countdown
is reset and the radio turns off after about 60 minutes from this point.
Other operations
Other operations
41
GB
Page 94

Using the hold function
When the hold function is activated, all buttons become inoperative,
preventing accidental operation when the radio is being carried or used.
The hold function can also be used to temporarily cancel the Standby
timer function.
ABC1DEF2GHI
FM/
AM
JKL4MNO5PQR
AM BAND
STU
LOCAL/
WORLD
LABEL EDIT
TIMERSTANDBY/
STANDBY TIME SET
ab
STANDBY MEMORY
VWX8YZ
7
<>
/
DIRECT
MY DW VOA BBC OTH
DISPLAY
EXE
0
TIME SET
TIME DIFF
SW STATION CALL
POWER
ON/
SYNC
3
6
9
SSB
DST
ERASE
TIME SET
ENTER
OFF
SLEEP
LIGHT
JOG/
TUNE/
SCAN˚
HOLD
HOLD
1 Slide HOLD in the direction of the arrow.
“H” lights up and all buttons become
inoperative.
To cancel the hold function
Slide HOLD in the direction opposite to the arrow so that “H”
disappears in the display.
To temporarily cancel the Standby timer
When the hold function is activated, the Standby timer function
is temporarily canceled (see ”Waking up to the radio or buzzer
— Standby function”, page 38).
Temporary cancellation of the Standby timer by the hold
function is effective only when the power is turned off.
GB
Other operations42
Page 95

Turning off the beep
The confirmation beep can be turned off. Do so with the power turned
off.
FM/AM
ABC1DEF2GHI
FM/
AM
JKL4MNO5PQR
AM BAND
STU
LOCAL/
WORLD
LABEL EDIT
TIMERSTANDBY/
STANDBY TIME SET
ab
STANDBY MEMORY
VWX8YZ
7
<>
/
DIRECT
MY DW VOA BBC OTH
DISPLAY
EXE
0
TIME SET
TIME DIFF
SW STATION CALL
POWER
ON/
SYNC
3
6
9
SSB
DST
ERASE
TIME SET
ENTER
SLEEP
LIGHT
JOG/
TUNE/
SCAN˚
OFF
POWER
ON/OFF
HOLD
1 If the radio is turned on, press POWER ON/OFF to
turn it off.
2 Hold down FM/AM for longer than 2 seconds.
A beep sounds and ”BEEP” ”OFF” appears in the display. The
beep has been turned off.
To turn the beep back on, hold down FM/AM for longer than 2
seconds again. ”BEEP” ”ON” appears in the display and the beep
turns on.
Tip
The beep setting does not affect the buzzer sound for the Standby timer
function (see ”To wake up to the buzzer”, page 40).
Other operations
Other operations
43
GB
Page 96

Additional information
Precautions and maintenance
On placement
• Do not leave the unit near heat sources, such as radiators or air
ducts, or in a place subject to direct sunlight, excessive dust,
humidity, rain, mechanical vibration or shock.
• Use the unit within a temperature range of 0°C to 40°C (32°F to
104°F). If it is used in temperatures outside this range, an
irregular display (i.e., 88.88) may appear. If it is used in
temperatures below this range, the display may change very
slowly. The unit will return to its normal condition when the
unit is used in its recommended temperature range once again.
• Reception may be difficult or noisy in vehicles or buildings.
Try listening near a window.
On safety
• Operate the unit only on 3 V DC with two R6 (size AA)
batteries.
For AC operation, use the supplied AC power adaptor*. Do not
use any other type of AC power adaptor.
• The unit is not disconnected from the AC power source
(mains) as long as it is connected to the wall outlet, even if the
unit itself has been turned off.
• Disconnect the AC power adaptor from the wall outlet when
the unit is not to be used for a long period of time.
• The name plate indicating operating voltage, etc., is located at
the bottom of the unit.
• Should any solid object or liquid fall into the unit, unplug the
unit, and have it checked by qualified personnel before
operating it any further. Make sure that no liquid or foreign
material enters the DC IN 3V jack of the unit. This may lead to
malfunction of the unit.
• When the casing becomes soiled, clean it with a soft dry cloth
dampened with mild detergent solution. Never use abrasive
cleansers or chemical solvents, as they may mar the casing.
• Since a strong magnet is used for the speaker, keep personal
credit cards using magnetic coding or spring-wound watches
away from the unit to prevent them from possible damage
caused by the magnet.
• If there is lightning and when using the external antenna,
disconnect the AC power adaptor immediately from the wall
outlet, if connected. Never touch the antenna wire when there
is a lightning storm.
• Never connect a ground wire to a gas pipe.
* Not supplied for models for certain countries. See “Specifications”.
GB
Additional information44
Page 97

On the active antenna AN-LP2
• Do not wash the antenna module.
• Be careful not to break the antenna module when folding it.
• Keep the antenna in its case when it is not to be used for a
period of time.
Service and repair
When taking your unit for service or repair, take note of
important preset settings. They may be deleted depending on the
type of necessary repair.
If you have any questions or problems concerning your unit,
please consult your nearest Sony dealer.
Additional information
Additional information
45
GB
Page 98

Exchanging the SW STATION CALL ROM
To purchase the newest ROM, refer to ”Purchasing the latest SW
STATION CALL ROM” and contact F Corporation.
1 Hold down the ROM
compartment lid at the bottom of
the unit and slide RELEASE in
the direction of the arrow. Then,
release your finger slowly from
the lid.
2 Remove the ROM compartment
lid and the ROM in the
compartment. Be careful not to
touch the contact surfaces
(metallic parts).
3 Insert the projection of the ROM
in the compartment cavity and
place the replacement ROM in
the ROM compartment with the
contact surface facing down.
Be careful not to touch the
Cavity
contact surfaces.
4 Insert the projections of the
ROM compartment lid in the
compartment cavities and lock
the cover by sliding RELEASE
Cavities
opposite the direction of the
arrow while holding down the
lid.
Note
Do not touch the contact surfaces on the ROM or the radio, as this may
cause a malfunction.
Cleaning the SW STATION CALL ROM contact surface
If ”NO” ”ROM” is displayed with the SW STATION CALL ROM
inserted in the ROM compartment, the contact surface of the ROM may
be dirty.
Remove the ROM following the steps above and clean the contact surface
with a cotton swab.
Note
Do not clean the contact springs of the main unit, as they may deform
and cause a malfunction.
GB
Additional information46
Page 99

Troubleshooting
If you have any trouble with the unit, check the following before
consulting your nearest Sony dealer.
Symptom
The radio does
not accept button
input.
The power does
not turn on when
POWER ON/OFF
is pressed.
The display is not
operating.
The display is
dim.
The display is
slow.
There is no sound
output.
Poor reception.
Cannot complete
direct tuning.
Cause
•The HOLD function is
activated.
•Improper installation of
batteries.
•Weak batteries (“i”
flashes in the display).
•The AC power adaptor
is disconnected.
•Improper installation of
batteries.
•Weak batteries (“i”
flashes in the display).
•The unit is being used
in extremely low
temperatures or in
extreme humidity.
•The unit is being used
in extremely low
temperatures.
•VOL is turned down
completely.
•The stereo headphones
are plugged in.
•Improper installation of
batteries.
•Weak batteries (“i”
flashes in the display).
•Improper tuning or
antenna adjustment.
•Weak radio signal.
•ATT is set to ON.
•You took more than 10
seconds for a button
operation.
Remedy
•Slide HOLD in the
opposite direction of
the arrow so that “H”
disappears in the
display (page 42).
•Insert the batteries with
correct polarity.
•Replace with new
batteries.
•Check and make sure
that the AC power
adaptor is connected
properly.
•Insert the batteries with
correct polarity.
•Replace with new
batteries.
•Avoid subjecting the
unit to extremely low
temperatures or
extreme humidity.
•Avoid subjecting the
unit to extremely low
temperatures.
•Adjust VOL to the
desired setting.
•Unplug the stereo
headphones for speaker
output.
•Insert the batteries with
correct polarity.
•Replace with new
batteries.
•Adjust tuning and
antenna properly.
•Listen to the radio near
a window when in a
vehicle or building.
•Set ATT to OFF (page
21).
•Complete each button
operation within 10
seconds.
Additional information
Additional information
47
GB
Page 100

Troubleshooting (continued)
Symptom
Cannot preset a
station.
Cannot recall a
preset station.
The radio does
not turn on at the
standby time.
SW STATION
CALL does not
operate.
Cannot preset a
station in MYMemory.
Cause
•Incorrect procedure.
•You pressed an
incorrect number
button for the desired
station.
•The preset setting was
accidentally erased.
•You forgot to press
STANDBY a or b.
•The HOLD function is
activated.
•The standby time
setting was erased
because you took more
than 3 minutes to
replace the batteries.
•VOL is turned down
completely.
•No frequencies are
stored in the STANDBY
MEMORY (the buzzer
sounds at the preset
time).
•The ROM compartment
is empty.
•Bad connection of the
ROM.
•MY-Memory is full (00
to 99).
Remedy
•Hold down ENTER and
press a number button
(0-9) (see page 22).
•Press the correct
number button for the
desired preset.
•Preset the station again
(see page 22).
•Press STANDBY a or b
(see page 38).
•Slide HOLD in the
direction opposite to
the arrow so that “H”
disappears in the
display (see page 42).
•Preset the standby time
again.
•Adjust VOL.
•Store a frequency in the
STANDBY MEMORY
(see page 38).
•Insert the ROM (page
46).
•Clean the ROM contact
surface (page 46).
•Erase a memory preset
and preset the station
(page 29).
GB
Additional information48
 Loading...