

Page 1
Руководство по эксплуатации
Before using this product, carefully read all product documentation and retain it for future reference.
Перед использованием продукта внимательно прочтите документацию и сохраните ее для дальнейшего использования.
Instruction Manual
CECH-2508A
4-209-275-21(1)
Page 2
WARNING
To avoid electrical shock, do not open the cabinet. Refer
servicing to qualified personnel only.
Caution
Use of controls or adjustments or performance of
procedures other than those specified herein may result in
hazardous radiation exposure.
The use of optical instruments with this product will
increase eye hazard.
CLASS 1 LASER PRODUCT
LASER KLASSE 1 PRODUKT
This appliance is classified as a CLASS 1 LASER product under
IEC60825-1:2007.
The manufacturer of this product is Sony Computer Entertainment Inc., 2-6-21
Minami-Aoyama, Minato-ku Tokyo, 107-0062 Japan.
Distributed by Sony Computer Entertainment Europe Ltd, 10 Great Marlborough
Street, London, W1F 7LP.
Seizures induced by light stimulation (Photosensitive
Epilepsy)
If you have an epileptic condition or have had seizures, consult your doctor prior
to playing. Some individuals may experience eye soreness, altered vision,
migraine, muscle twitching, convulsion, blackout, loss of awareness or
disorientation when exposed to flashing or flickering lights or other light
stimulation on a television screen or while playing video games. If you experience
any of the above symptoms while playing, discontinue use immediately and
consult your doctor.
Stop playing immediately when you experience the following symptoms
In addition to the above symptoms, whilst playing if you have a headache,
dizziness, nausea, fatigue, similar symptoms to motion sickness, or if you feel a
discomfort or pain in any body part such as eyes, ears, hands, arms, feet,
discontinue use immediately. If the condition persists, seek medical attention.
Radio waves
Radio waves may affect electronic equipment or medical devices (for example,
pacemakers), which may cause malfunctions and possible injuries.
If you use a pacemaker or other medical device, consult your physician or the
manufacturer of your medical device before using the wireless networking
feature (Bluetooth
Do not use the wireless networking feature in the following locations:
– Areas where wireless network use is prohibited, such as in hospitals. Abide
by medical institution regulations when using the system on their premises.
– Areas near fire alarms, automatic doors and other types of automated
equipment.
and wireless LAN).
®
2
Page 3
3D images
Some people may experience discomfort (such as eye strain, eye fatigue, or
nausea) while watching 3D video images or playing stereoscopic 3D games on
3D televisions. If you experience such discomfort you should immediately
discontinue use of your television until the discomfort subsides.
Generally we recommend that you avoid prolonged use of your PlayStation®3
system and take 15 minutes breaks during each hour of play. However, when
playing stereoscopic 3D games or watching 3D video, the length and frequency
of necessary breaks may vary from person to person – please take breaks that
are long enough to allow any feelings of discomfort to subside. If symptoms
persist, consult your doctor.
The vision of young children (especially those under six years old) is still under
development. Consult with your child’s doctor or optometrist before allowing
young children to watch 3D video images or play stereoscopic 3D games. Adults
should supervise young children to ensure they follow the recommendations listed
above.
System software
The System Software included within this product is subject to a limited licence
from Sony Computer Entertainment Inc. Refer to
http://www.scei.co.jp/ps3-eula for further details.
About national export control
This product may fall within the scope of national export control legislation. You
must comply fully with the requirements of such legislation and of all other
applicable laws of any jurisdiction in relation to this product.
GB
WARNING
3
Page 4

Table of contents
WARNING ......................................................................................... 2
Precautions ....................................................................................... 5
Online information about the PS3™ system ................................... 10
XMB™ (XrossMediaBar) menu ....................................................... 11
Part names ............................................................................... 12
Getting started ..........................................................................13
Connection methods ......................................................................13
Performing initial setup of the system software ..............................15
Video output on the PS3™ system ................................................16
Connecting digital audio devices ...................................................20
Turning the PS3™ system on and off .......................................21
Using the wireless controller ..................................................... 22
Playing content .........................................................................24
Blu-ray Disc (BD)/DVD/CD .............................................................24
Playing content on USB devices ....................................................25
File formats that can be played or viewed ......................................25
Playing games .......................................................................... 26
Game compatibility ........................................................................26
Playing games ...............................................................................26
Controller settings .......................................................................... 26
Saved data for PlayStation®3 format software ...............................27
Saved data for PlayStation® format software .................................27
Adjusting network settings ........................................................ 28
Adjusting network settings (wired) .................................................29
Adjusting network settings (wireless) .............................................29
Adjusting custom settings ..............................................................31
Connecting to the Internet ........................................................ 32
Using the Internet browser .............................................................32
Viewing the user’s guide ................................................................ 32
Creating a PlayStation®Network account ....................................... 32
PS3™ system updates ............................................................. 33
Using the on-screen keyboard .................................................. 34
Parental control ........................................................................35
Replacing the hard disk ............................................................ 36
Backing up data .............................................................................36
Removing the hard disk .................................................................37
Replacing the hard disk .................................................................38
Reinstalling the system software ...................................................39
Restoring data that has been backed up .......................................40
Transferring data to another PS3™ system /
restoring the system ................................................................. 41
Transferring data to another PS3™ system ................................... 41
Restoring the PS3™ system ..........................................................41
Before disposing of or transferring the PS3™ system ................... 41
Before requesting service ......................................................... 42
Specifications .................................................................................. 47
GUARANTEE .................................................................................. 50
Copyright and trademarks ...............................................................52
4
Page 5

Precautions
Safety
This product has been designed with the highest concern for safety. However, any
electrical device, if used improperly, has the potential for causing fire, electrical
shock or personal injury. To help ensure accident-free operation, follow these
guidelines:
Observe all warnings, precautions and instructions.
Regularly inspect the AC power cord for damage and for dust build-up around
the power plug or electrical outlet.
Stop use, unplug the AC power cord from the electrical outlet and disconnect
any other cables immediately if the device functions in an abnormal manner,
produces unusual sounds or smells or becomes too hot to touch.
Contact the appropriate PlayStation
found within every PlayStation
Use and handling
Use in a well-lit area and keep a safe distance from the TV screen.
Avoid prolonged use of the PS3™ system. Take a 15-minute break during each
hour of play.
Avoid playing when you are tired or need sleep.
Stop using the system immediately if you begin to feel tired or if you experience
discomfort or pain in your hands or arms while operating the Wireless
Controller. If the condition persists, consult a doctor.
If you experience any of the following health problems, discontinue use of the
system immediately. If symptoms persist, consult a doctor.
– Dizziness, nausea, fatigue or symptoms similar to motion sickness
– Discomfort or pain in a part of the body, such as eyes, ears, hands or arms
Keep the system and accessories, including cable ties and fasteners, out of the
reach of small children.
Do not connect cables other than a USB cable while the system is turned on
(power indicator lit solid green).
customer service helpline which can be
®
3 software manual.
®
Do not touch the system or connected cables or accessories during an
electrical storm.
Do not use the system or accessories near water.
Do not allow liquid, small particles or other foreign objects to get into the
system or accessories.
Do not touch the connectors of the system or accessories.
Do not expose the system or accessories to dust, smoke or steam. Also, do not
place the system in an area subject to excessive dust or cigarette smoke. Dust
build-up or cigarette smoke residue on the internal components (such as the
lens) may cause the system to malfunction.
Do not expose the system or accessories to high temperatures, high humidity
or direct sunlight.
Do not place the system or accessories on surfaces that are unstable, tilted or
subject to vibration.
Do not set the system other than in the vertical or horizontal position. When
setting the system in the vertical position, use the vertical stand (sold
separately) for this model of the system. Also, do not change the position while
the system is turned on.
Be careful when carrying the system. If you do not have a good grip, the
system may drop causing potential damage or injury.
Do not move or change the position of the system with a disc inserted. The
vibration may result in scratching of the disc or the system.
Do not turn off the system while data is being saved on or loaded from the hard
disk.
Do not stand on or put objects on the system, and do not stack the system with
other devices.
Do not place the system and connected accessories on the floor or in a place
where they may cause someone to trip or stumble.
Do not allow bodily contact with the system or air from the system vents for an
extended period of time while in use. Extended contact under these conditions
may cause low-temperature burns.
GB
Precautions
5
Page 6
Precautions
When connecting the system to a plasma or projection* TV, do not leave a still
image on the TV screen for an extended period of time, as this may leave a
faint image permanently on the screen.
* Except LCD screen types
Parents are encouraged to monitor children in online activities to ensure safe
and responsible Internet usage. Refer to http://www.ps-playsafeonline.com for
further details.
Notes on safety when using the DUALSHOCK®3
Wireless Controller*
Do not use the vibration function if you have any ailment or injury to the bones,
joints or muscles of your hands or arms. If you have an ailment or an injury, do
not play such titles using the DUALSHOCK
have set the vibration function to [Off].
When using the motion sensor function of the Wireless Controller, be cautious of
the following points. If the controller hits a person or object, this may cause
accidental injury or damage.
– Before using the motion sensor function, make sure you have enough space
to move around.
– Firmly grip the Wireless Controller to prevent it from slipping out of your grasp
and causing damage or injury.
– When using the Wireless Controller with a USB cable, ensure that the cable
cannot hit a person or any object, and do not pull the cable out of the PS3™
system whilst playing.
* These notes also apply to other controllers.
3 Wireless Controller unless you
®
Vents
Do not block any vents. To maintain good ventilation, follow the guidelines below:
Place the system at least 10 cm away from a wall surface.
Do not place on a carpet or rug with long fibres.
Do not place in a narrow or cramped space.
6
Do not cover with cloth.
Do not allow dust to build up on the vents.
AC power cord use
To help ensure safe operation, regularly inspect the AC power cord. If
damaged, stop use immediately and contact the appropriate PlayStation
customer service helpline which can be found within every PlayStation
software manual.
Do not use a power cord other than the supplied AC power cord. Do not modify
the cord.
Do not touch the plug of the AC power cord with wet hands.
Protect the AC power cord from being walked on or pinched particularly at
plugs, expansion receptacles and the point where the cord exits from the
system.
Do not place heavy items on the cord.
Do not place the AC power cord near heating equipment and do not expose
the cord to heat.
Do not allow dust or foreign matter to build up around the AC IN connector.
Before connecting or plugging in the AC power cord, check that there is no
dust or foreign matter in or on the power plug or connecting end of the cord,
the electrical outlet or the AC IN connector on the system rear. If the plug or
connector becomes dirty, wipe off with a dry cloth before connecting.
Unplug the AC power cord from the electrical outlet before cleaning or moving
the system, or when you do not intend to use the system for an extended period
of time. When disconnecting, grasp the power cord by the plug and pull
straight out of the electrical outlet. Never pull by the cord and do not pull out at
an angle.
Do not connect the AC power cord to a voltage transformer or inverter.
Connecting the AC power cord to a voltage transformer for overseas travel or
an inverter for use in an automobile may cause heat to build up in the system
and may cause burns or a malfunction.
®
3
®
Page 7
Never disassemble or modify the system or accessories
Use the PS3™ system and accessories according to the instructions in the
product documentation. No authorisation for the analysis or modification of the
system or accessories, or the analysis and use of its circuit configurations, is
provided. Unauthorised modification of the system or accessories will void your
warranty. There are no user serviceable components inside the PS3™ system (the
supplied hard disk may be removed but not disassembled or modified).
Additionally, there is a risk of exposure to laser radiation as well as to electrical
shock.
Network
A broadband Internet connection is required to connect to a network.
User is responsible for Internet service fees. For details, refer to the information
provided in your service contract or contact your Internet service provider.
Use only an Ethernet cable compatible with 10BASE-T, 100BASE-TX or
1000BASE-T networks. Do not use a cord for a standard residential telephone
line or cables of types other than those mentioned here. Using the wrong type
of cord or cable can cause more electrical current than necessary to flow
through the LAN connector, which may lead to heat build-up, fire or
malfunction.
Wireless networking feature
The 2.4 GHz range of radio waves used by the wireless networking feature of
this product is a range shared by various devices. This product has been
designed to minimise the effect of other devices using the same range.
However, in some cases interference from other devices may reduce the
connection speed, shorten the signal range or cause the connection to be
terminated unexpectedly.
When using the PS3™ system’s scan function to select a wireless LAN access
point, access points that are not intended for public use may be displayed.
Only connect to an access point that you are authorised to use, or one that is
available through a public wireless LAN or hotspot service.
Moisture condensation
If the system or disc is brought directly from a cold location to a warm one,
moisture may condense on the lens inside the system or on the disc. Should this
occur, the system may not operate properly. In this case, remove the disc and
turn off and unplug the system. Do not put the disc back in until the moisture
evaporates (this may take several hours). If the system still does not operate
properly, contact the appropriate PlayStation
can be found within every PlayStation
customer service helpline which
®
3 software manual.
®
Cleaning
For safety reasons, before cleaning the system or connected accessories,
disconnect the AC power cord from the electrical outlet.
Exterior surfaces (plastic cover of system and Wireless
Controller)
Follow the instructions below to help prevent the product exterior from
deteriorating or becoming discoloured.
Wipe with a soft, dry cloth.
Do not apply insecticides or other volatile substances.
Do not place any rubber or vinyl materials on the product exterior for an
extended period of time.
Do not use solvents or other chemicals. Do not wipe with a chemically-treated
cleaning cloth.
GB
Precautions
7
Page 8
Precautions
Vents
When dust accumulates in the system vents, remove the dust with a low-powered
vacuum cleaner.
Connectors
Do not use when the connectors of the system or the AC power cord are not
clean. If used when dirty, the flow of electrical current may be obstructed.
Remove the dirt with a dry cloth.
Discs
Note on compatibility
Some media may have region or territorial restrictions and may not work with your
system. See media packaging for details.
Handling
Do not touch the disc surface when handling a disc; hold it by the edges.
Do not stick paper or tape onto discs and do not write on discs.
Fingerprints, dust, dirt or scratches on the disc can distort the picture or reduce
sound quality. Always handle carefully and check that discs are clean before
use.
Storage
Do not expose discs to high temperatures, high humidity or direct sunlight.
When discs will not be used for an extended period of time, store them in their
cases. Stacking uncased discs or storing them at an angle can cause them to
warp.
Cleaning method
Clean discs with a soft cloth, lightly wiping from the centre
outwards.
Do not use solvents, record cleaners, anti-static spray or other
chemicals as these can damage the discs.
8
Page 9

GB
Precautions
9
Page 10
Online information about the PS3™ system
This manual explains hardware features and provides basic information about how to
set up and operate the PS3™ system, including warnings and precautions for the safe
and proper use of the system. You can also access the following information available
on the Internet.
Online user’s guide access from : eu.playstation.com/manuals
This guide contains detailed information about using the PS3™ system.
System software updates http://eu.playstation.com/ps3
This site provides the latest information about system software updates.
PlayStation®3 official site http://eu.playstation.com/ps3
The official site for PlayStation®3 products provides the latest information about software titles and
hardware accessories.
Support http://eu.playstation.com/help-support
The official site for PlayStation® product support provides the latest questions and answers about
your product.
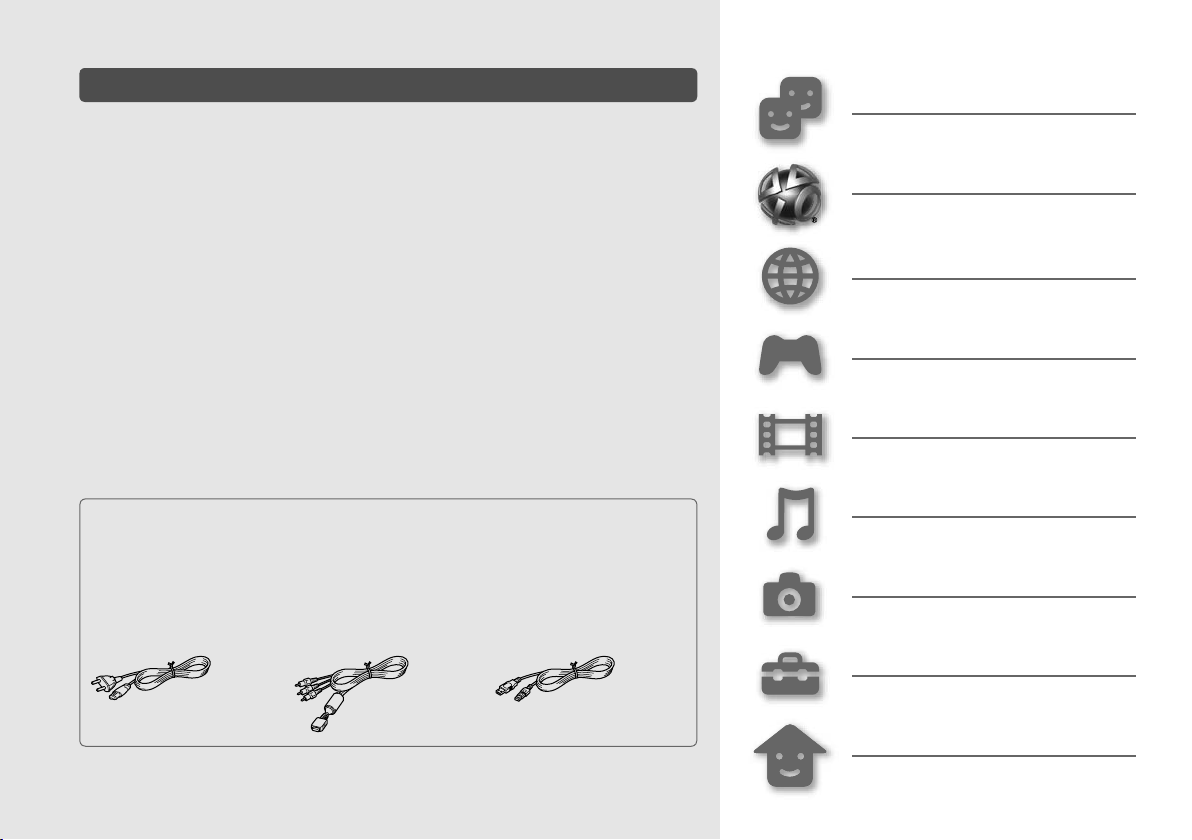
Friends
Chatting and exchanging messages
PlayStation®Network
Using PlayStation®Network services
Network
Connecting to the Internet
Game
Playing games
Video
Playing video
Check that you have all of the following items. If any items are missing, contact the
appropriate PlayStation® customer service helpline which can be found within
every PlayStation®3 software manual.
PlayStation
Printed materials
AC Power Cord
Information about system functionality and images published in this document may vary from
those for your PS3™ system, depending on the system software version in use.
3 system
®
AV Cable USB Cable
DUALSHOCK®3 Wireless Controller
10
Music
Playing music
Photo
Displaying images
Settings
Adjusting PS3™ system settings
Users
Selecting users to log in to the PS3™
system
Page 11
XMB™ (XrossMediaBar) menu
The PS3™ system includes a user interface called XMB™ (XrossMediaBar).
Item
Options menu Control panel
Displayed by selecting an icon and
pressing the button
Displayed by pressing the button during
content playback
Category
PS button :
Displays the XMB™ menu
Turns the system on/off
Quits a game
Directional buttons:
Used to select on-screen
categories/items
button:
Displays the options
menu/control panel
button:
Cancel an operation
button:
Confirm the selected
item
11
Page 12
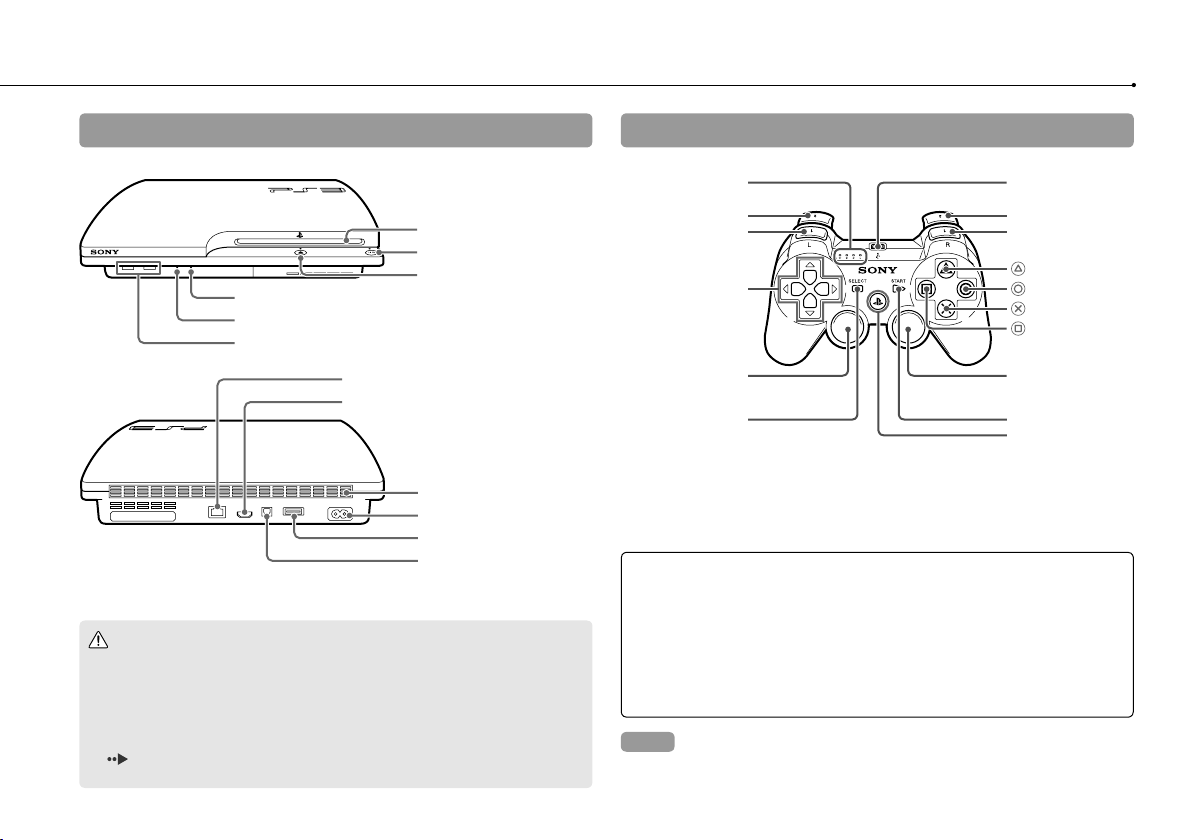
Part names Gett
12
System front / rear
Disc slot
Power button
Eject button
WLAN access indicator
HDD access indicator
USB connectors
LAN connector
HDMI OUT connector
Vent
AC IN connector
AV MULTI OUT connector
DIGITAL OUT (OPTICAL)
connector
Caution
Do not use the system in a closed cabinet or other locations where heat may
build up. Doing so may cause the system to overheat and may lead to fire,
injury or malfunction.
If the system’s internal temperature becomes elevated, the power indicator
will flash alternately in red and green. In this case, turn off the system
page 21) and leave it unused for a while. After the system cools down,
(
move it to a location with good ventilation, and then resume use.
DUALSHOCK®3 Wireless Controller
Port indicators
L2 button
L1 button
Directional
buttons
Left stick/
L3 button*
SELECT button
* The L3 and R3 buttons function when the sticks are pressed.
Notices
Do not place the system in an area subject to excessive dust or cigarette
smoke. Dust build-up or cigarette smoke residue on the internal
components (such as the lens) may cause the system to malfunction.
Do not move or change the position of the system while the power indicator
is lit solid green or flashing green. The vibration that occurs as a result of
moving the system may cause data loss or corruption, or damage to the
system.
Hint
When placing the system in a vertical position, use the vertical stand (sold
separately).
USB connector
R2 button
R1 button
button
button
button
button
Right stick/
R3 button*
START button
PS button
Page 13
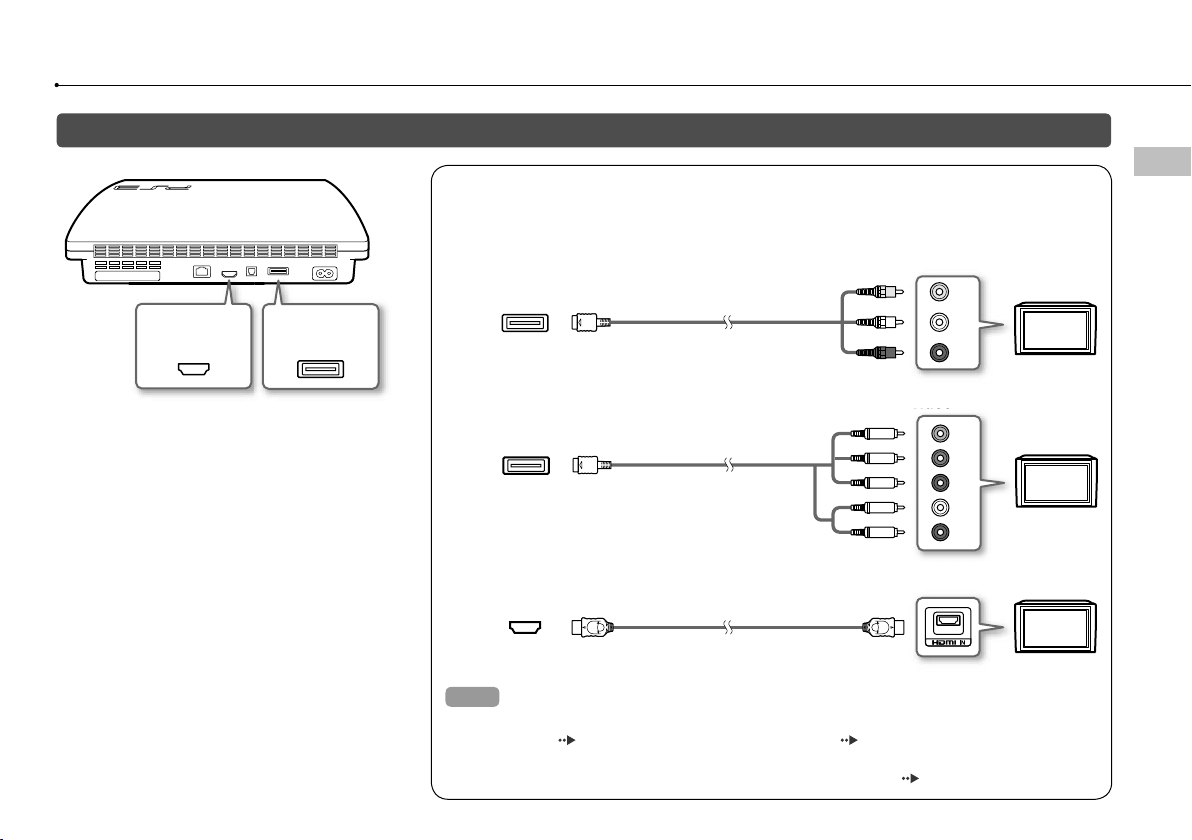
Getting started
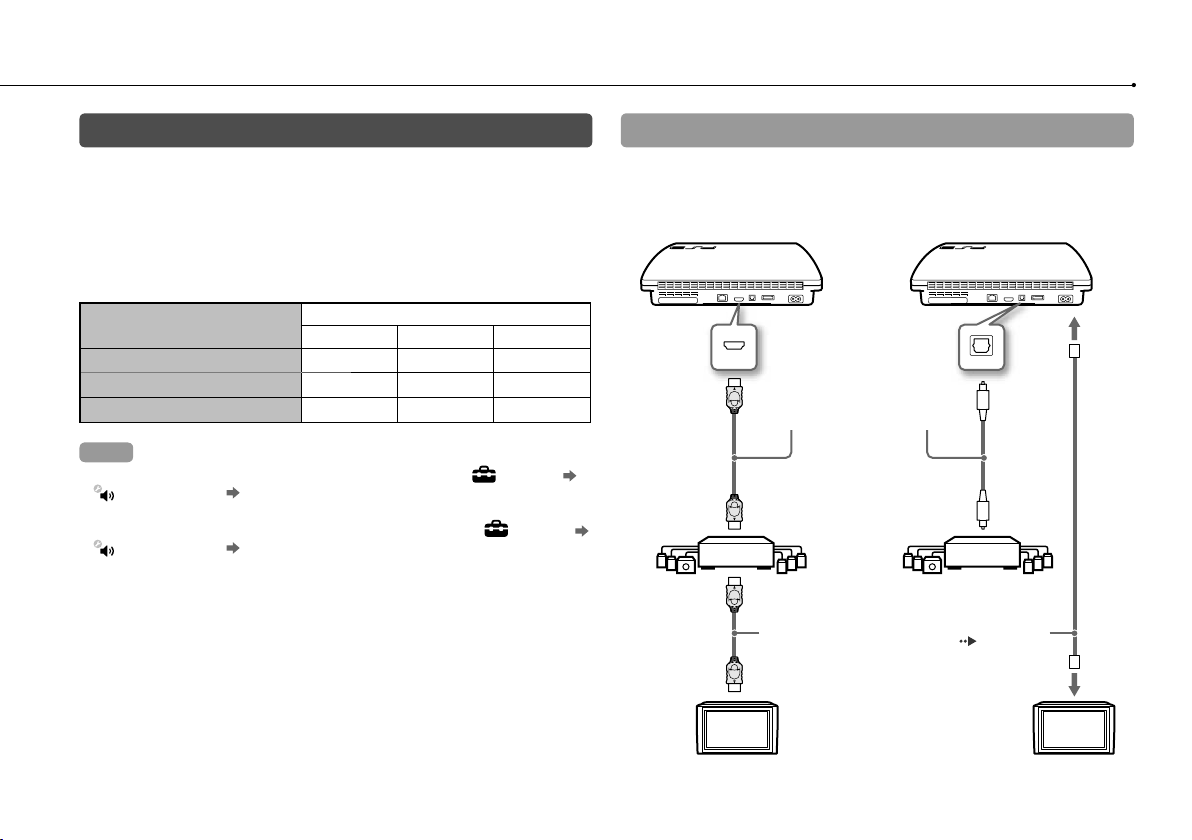
Connection methods
Connect your system to a TV
You can use any of the following methods to connect your system to a TV.
GB
Getting started
HDMI OUT
connector
AV MULTI OUT
connector
If video is not displayed on the screen
If you change the type of cable used to connect the
system to a TV, video may not appear on the screen. If
video does not appear, turn off the system and then
turn it on again by pressing the power button for at
least five seconds (until the system beeps twice). The
video output setting will be reset and video will be
output at standard definition (SD) resolution.
Video output in SD (Standard Definition) resolution
AV MULTI OUT
connector
AV Cable
Video output in HD (High Definition) resolution - component video
AV MULTI OUT
connector
Component AV Cable
(sold separately)
VIDEO L
AUDI O
R
COMPONENT VIDEO IN AUDIO IN
YLR
P
B
/C
B
P
R
/C
R
Video output in HD (High Definition) resolution - HDMI™
HDMI OUT
connector
Hints
For details about video output cable types and supported video modes, see "Video output on the
PS3™ system" (
You can connect audio devices that support digital audio playback, such as an AV receiver for home
entertainment use. For details, see "Connecting digital audio devices" (
HDMI Cable (sold separately)
page 16) and "Video output cable types" ( page 17).
page 20).
TV
TV
TV
13
Page 14
Getting started
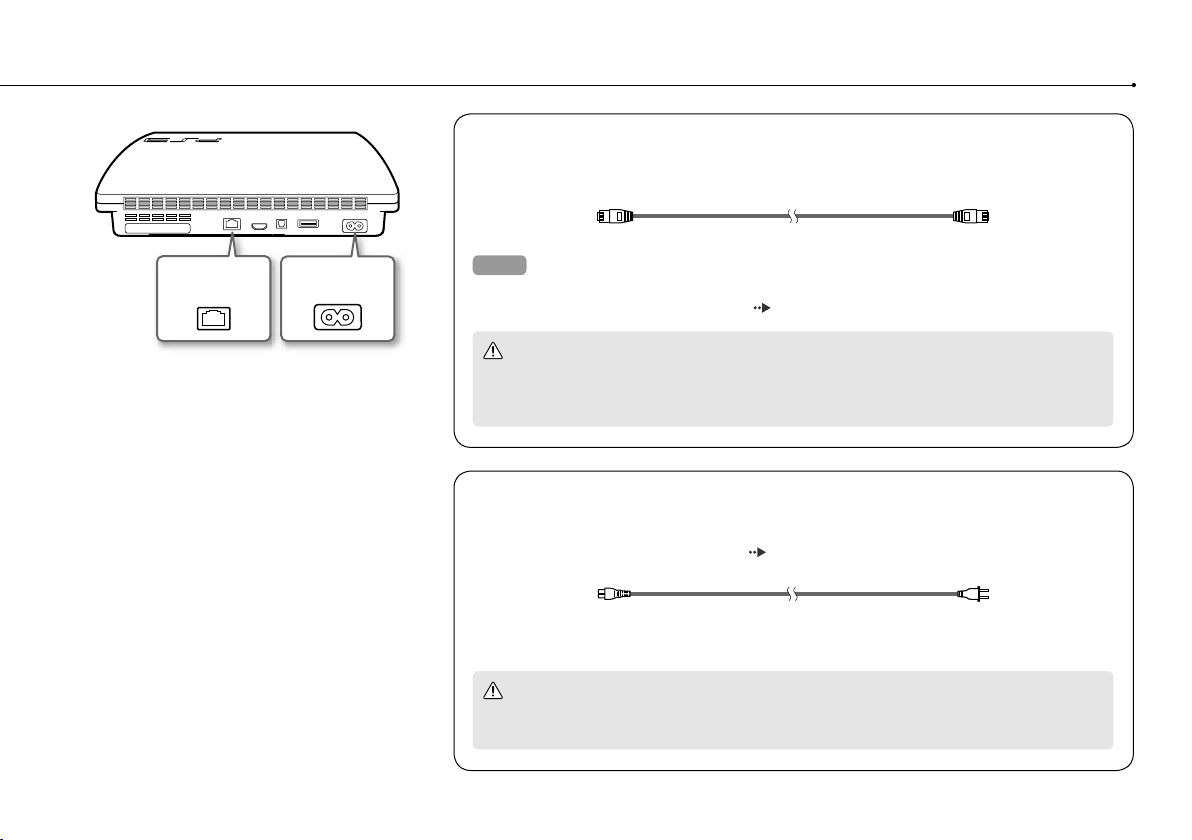
Connect an Ethernet cable (sold separately)
Use an Ethernet cable to connect the system to the Internet.
14
LAN connector AC IN connector
Hint
You can use a wireless network connection to connect to the Internet without using an Ethernet cable.
For details, see "Adjusting network settings" (
Caution
Do not connect a standard telephone line or other types of cords or cables that are not compatible
with the system directly to the LAN connector on the system, as this may cause heat build-up, fire
or malfunction.
Connect the AC power cord
After plugging the AC power cord into the electrical outlet, the power indicator on the
PS3™ system will light up in solid red ( page 21).
Caution
Do not plug the AC power cord for the system into an electrical outlet until you have made all other
connections.
page 28).
Some regions and countries may use a
different electrical outlet plug from the
one illustrated.
Page 15
Performing initial setup of the system software
After turning on the system, perform initial setup.
1 Turn on the TV, and then switch the video input of the TV to
match the input connector used by the PS3™ system.
2 Press the power button.
The power indicator turns green and the picture is displayed on the TV
screen.
5 Perform initial setup.
GB
Getting started
Power indicator
Power button
3 Connect the wireless controller to the system using a USB
cable.
4 Press the PS button on the controller.
The system will recognise the controller. After it has recognised the controller,
the initial setup screen will be displayed.
Follow the on-screen instructions to enter settings for system language, time
zone, date and time, and user name.
The screen for setting up the Internet connection will be displayed. When
connecting using an Ethernet cable, basic settings will be selected
automatically if you follow the on-screen instructions. When connecting over
a wireless LAN, follow the instructions in "Adjusting network settings
(wireless)" (
After the settings have been completed, the XMB™ menu (
be displayed on the TV screen.
Hints
When using an HDMI cable to connect the system to the TV, a screen for
changing the video output resolution will be displayed during initial setup. If you
select [Yes] on the screen and then press the
resolution will be selected automatically.
For details on entering text, see "Using the on-screen keyboard" (
Settings entered during initial setup can be changed under (Settings) or
(Users). For details, refer to the online user’s guide
(access from : eu.playstation.com/manuals).
page 29) to set up the connection.
page 11) will
button, the optimal output
page 34).
15
Page 16
Getting started
Video output on the PS3™ system
The PS3™ system can output two types of resolution: HD and SD. Refer to the instruction manual for the TV in use to check which video mode is
supported.
Video mode *
Aspect ratio
1
*
This number indicates the number of scan lines. Note that "i" stands for "interlace" and "p" stands for "progressive". Using progressive results in high-quality video with
minimal flickering.
2
*
The video output setting on the system will display as [Standard (PAL)].
1
1080p 1080i 720p 576p 576i *
16:9 16:9 16:9
Screens showing the difference in resolution
HD screen SD screen
16
(High Definition)
HD
16:9
4:3
SD
(Standard Definition)
16:9
4:3
2
Page 17
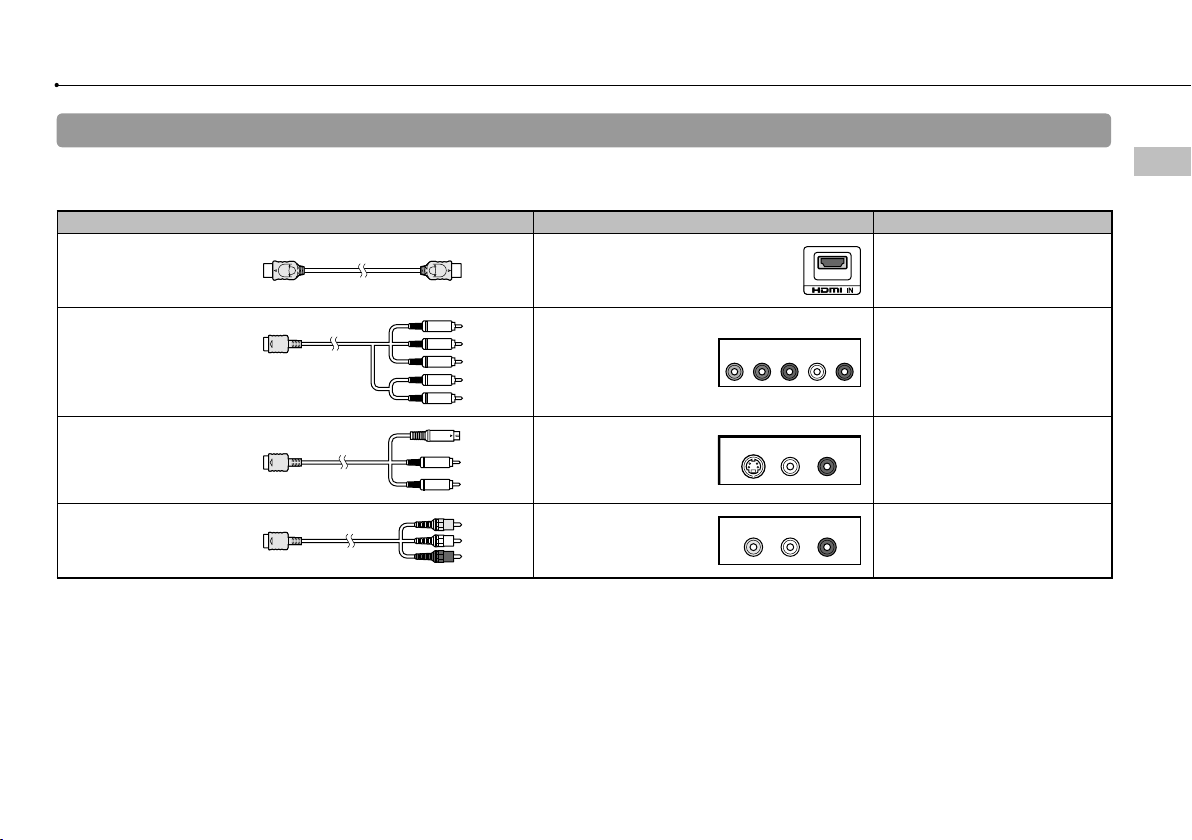
Video output cable types
The resolution displayed on the TV varies depending on the input connectors on the TV and the type of cable in use. Select a cable to match the TV
in use.
Cable type Input connector on the TV Supported video modes*¹
GB
Getting started
HDMI Cable*²
(sold separately)
Component AV Cable
(sold separately)
S VIDEO Cable
(sold separately)
AV Cable
(supplied)
HDMI IN connector
Component VIDEO IN
connector
S VIDEO IN connector
VIDEO IN connector
(composite)
COMPONENT VIDEO IN AUDIO IN
YLRPR/CRPB/CB
S VIDEO L-AUDI O-R
VIDEO L-AUDI O-R
1080p / 1080i / 720p / 576p
1080p / 1080i / 720p / 576p / 576i*
576i*
576i*
*1 Depending on the type of TV or content to be played, some video modes may not be supported.
2
*
Connect the system to the TV using an HDMI cable (sold separately). An HDMI cable can output both video and audio and enables you to enjoy digital-quality
video and audio.
3
The video output setting on the system will display as [Standard (PAL)] .
*
3
3
3
17
Page 18
Getting started
Adjusting video output settings
Depending on the type of cables and the connectors used, you may
need to adjust the PS3™ system's video output settings to display
video at HD resolutions (
If video is not displayed
Switch the video input of the TV to match the input connector used to
connect to the system.
Turn off the system, and then turn it on again by pressing the power button
for at least five seconds (until the system beeps twice). The video output
setting will be reset and video will be output at standard definition (SD)
resolution.
page 16) on a TV.
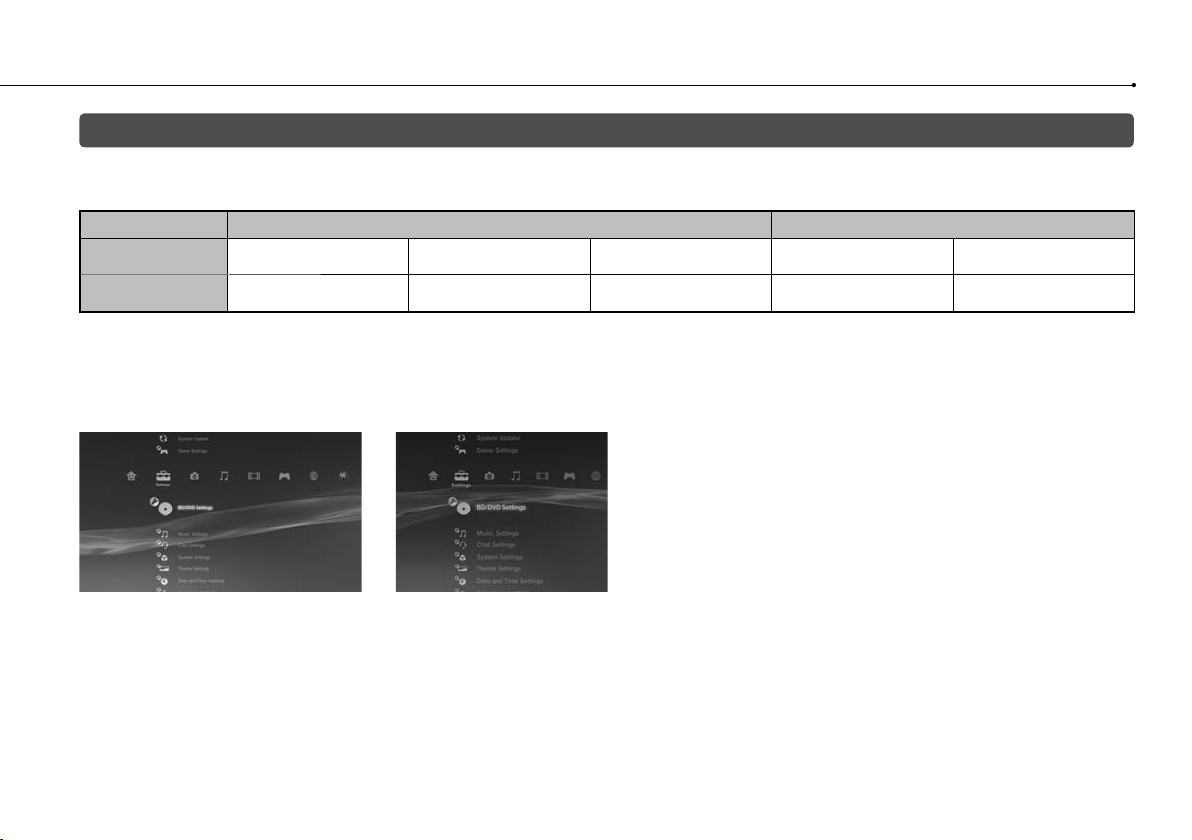
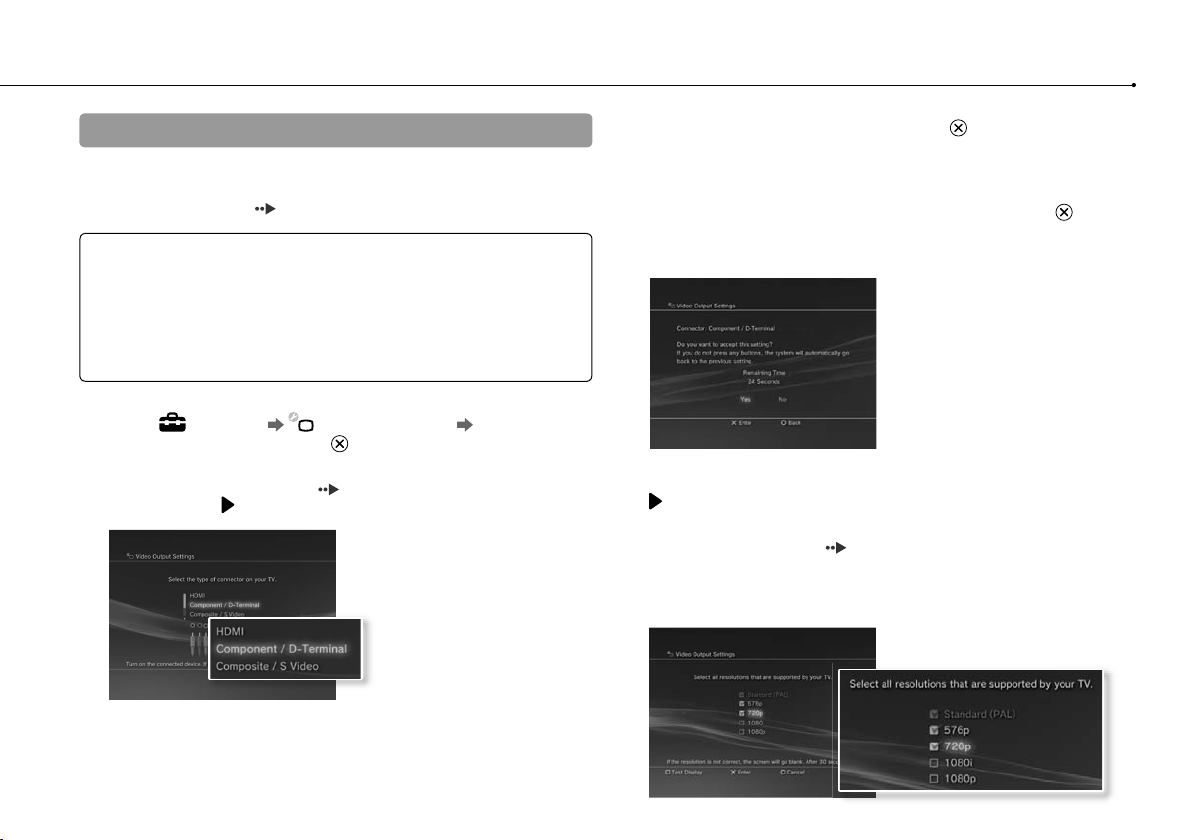
1 Select (Settings) (Display Settings) [Video Output
Settings], and then press the button.
2 Select the input connector ( page 17) in use on the TV, and
then press the button.
3 Confirm the screen, and then press the button.
If you changed the connector in step 2, a screen for confirming the change
will be displayed.
4 Confirm the settings, select [Yes], and then press the button.
If you changed the connector in step 2, a screen for confirming the settings
will be displayed.
5 Select the resolutions supported by the TV, and then press the
button.
The resolution displayed on the TV varies depending on the input connector
and the type of cable used (
selected will be used for video output.
Depending on the connector selected in step 2, this screen may not be
displayed.
page 17). The highest resolution you
18
If you select [HDMI], you will have the option to choose [Automatic] or
[Custom] on the next screen. In most cases, select [Automatic], and video
output settings will be completed automatically.
If you select [AV MULTI / SCART], you must choose the type of output signal
on the next screen. In most cases, select [Y Pb/Cb Pr/Cr].
Page 19
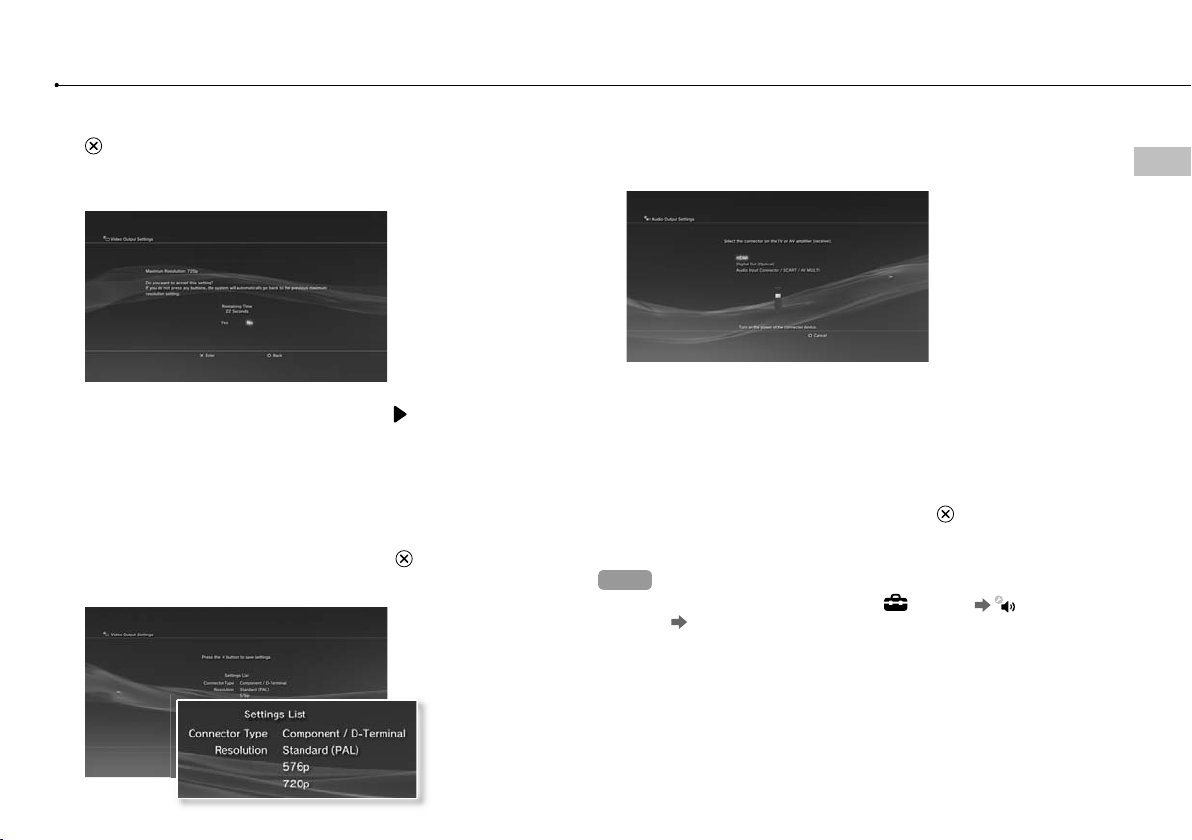
6 Confirm the settings, select [Yes], and then press the
button.
Depending on the connector selected in step 2 and the resolutions selected
in step 5, this screen may not be displayed.
7 Select the type of TV, and then press the button.
If you selected [Standard (PAL)] or [576p] in step 5, a screen for selecting the
TV screen size will be displayed. Adjust the setting to match the TV in use.
If you selected [720p] or a higher resolution in step 5, the TV type will
automatically be set to 16:9 and the screen for selecting the TV screen size
will not be displayed.
8 Confirm the settings, and then press the button.
The video output settings will be saved on the system.
9 Adjust audio output settings.
Continue on to adjust audio output settings. Adjust settings to match the TV
or audio device in use.
If you select [HDMI], you will have the option to choose [Automatic] or
[Manual] on the next screen. In most cases, select [Automatic].
If using a cable other than an HDMI cable to output audio from the TV, select
[Audio Input Connector / SCART / AV MULTI]. If using an optical digital cable
to output audio, select [Digital Out (Optical)] and choose the output format
on the next screen.
10 Confirm the settings, and then press the button.
The audio output settings will be saved on the system.
Hints
You can adjust audio output settings under
Settings)
If the TV in use supports 3D Stereoscopic display, a screen for setting the TV’s
screen resolution will be displayed after step 2. Follow the on-screen
instructions to adjust the settings. Connect the PS3™ system to a TV that
supports 3D Stereoscopic display using an HDMI cable.
[Audio Output Settings].
(Settings) (Sound
GB
Getting started
19
Page 20
Getting started
Connecting digital audio devices
You can connect audio devices that support digital audio playback,
such as an AV receiver for home entertainment use.
Audio output on the PS3™ system
The supported channels may vary depending on the output connector
to be used.
PS3™ system output connectors
AV MULTI OUT connector
DIGITAL OUT (OPTICAL) connector
HDMI OUT connector
Hints
When connecting a digital audio device to the system, go to
(Sound Settings) [Audio Output Settings], and then adjust the settings as
necessary for the audio device.
For simultaneous audio output from multiple connectors, go to
(Sound Settings) [Audio Multi-Output], and set the option to [On].
The system can output both audio and video through an HDMI cable. If both
the TV and the audio device have HDMI connectors, you can output the TV
picture to the TV through a connected audio device.
If a device is connected to the PS3™ system via an HDMI cable, do not turn off
the device while the system is turned on (power indicator is lit solid green), as
doing so may cause sound distortion or produce abnormal sounds.
Channels that can be used for output
2 Ch. 5.1 Ch. 7.1 Ch.
(Settings)
(Settings)
Examples when connecting an audio device
An HDMI cable or optical digital cable can be used to connect an
audio device to the PS3™ system.
HDMI cable Optical digital cable
HDMI cable
(sold separately)
Digital audio device
HDMI cable
(sold separately)
Optical digital
cable for audio
(sold separately)
Video output cable for the
TV in use (
page 17)
20
TV TV
Page 21
Turning the PS3™ system on and off
Turning on the system
1 Press the power button.
The power indicator lights up in solid green to indicate that the system is
turned on.
Power indicator:
solid green
Power button
2 Press the PS button on the controller.
After the controller number is assigned, you can use the controller to operate
the system.
PS button
Power indicator status
You can check the power indicator on the PS3™ system to see the
current status of the system.
Solid green
Flashing green
Solid red
System on
System turning off
System off (in standby mode)
Turning off the system
1 Press the power button.
The power indicator lights up in solid red.
Power indicator:
solid red
Power button
Notice
When the power indicator is lit solid green or flashing green, be sure to abide
by the notices below. If you do not, data loss or corruption, or damage to the
system may occur.
Do not unplug the AC power cord from the electrical outlet.
Do not move or change the position of the system.
Hints
Before using a wireless controller, you must first pair it with the system
page 22).
(
You can also turn the PS3™ system on and off using the PS button on the
wireless controller. If you use the PS button to turn on the system, the controller
number will be assigned at the same time. To turn off the system, press the PS
button for more than one second, and then follow the on-screen instructions.
You can also turn off the PS3™ system from the XMB™ menu. Select
(Users) (Turn Off System).
If you will not be using the system for a long period of time, check that the
power indicator is lit solid red, and then unplug the AC power cord from the
electrical outlet.
GB
Turning the PS3™ system on and off
21
Page 22
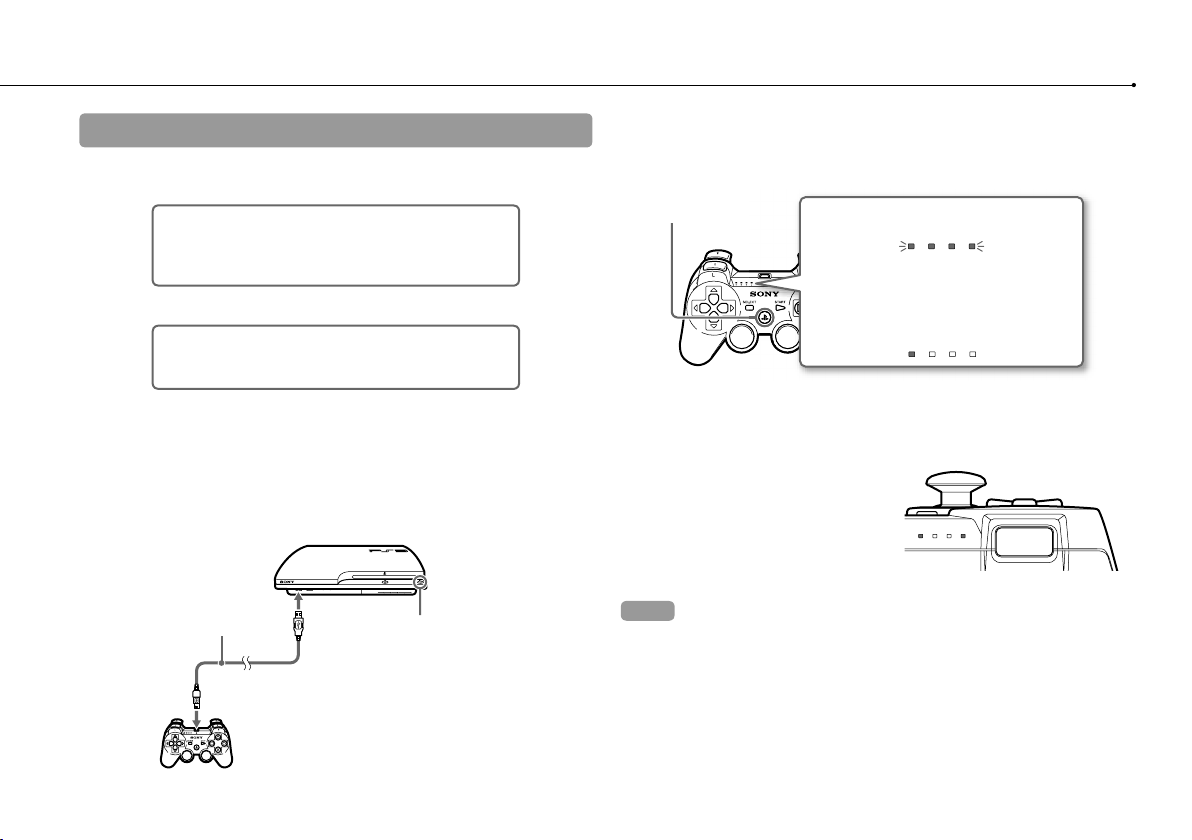
Using the wireless controller
Preparing for use
To use a wireless controller, you must first register or "pair" the controller
with the PS3™ system and assign a number to the controller.
Step 1: Pair the system and the controller.
When using for the first time
When using with a different PS3™ system
Step 2: Assign a controller number.
Every time the system is turned on
Step 1: Pair the system and the controller
When using the controller for the first time or when using with a different
PS3™ system, you must first pair the devices. If you turn on the system
and connect the controller using a USB cable, the pairing will be
completed automatically.
USB cable (supplied)
Check that the system is turned on
(power indicator is lit solid green).
Step 2: Assign a controller number
Each time you turn on the system, a number must be assigned to the
controller.
Press the PS button.
All of the port indicators flash.
1 234
When the controller has been assigned a
number, the port indicators for the assigned
number turn solid red.
1 234
You can connect up to 7 controllers at one time. The controller number
is shown by the number above the port indicators. For numbers 5-7,
add the numbers of the lit indicators.
Example: Controller number 5 has been assigned.
11234
Hints
Pairing and assigning controller numbers can only be done when the system is
turned on (power indicator is lit solid green).
When a paired controller is used with another PS3™ system, the pairing with
the original system is cleared. Pair the controller with the system again if the
controller has been used with another system.
If the controller or the system is turned off, the port indicators on the controller
will turn off and the assigned number will be cleared.
22
Page 23
Using the controller wirelessly
If you disconnect the USB cable, you can use the controller wirelessly.
To use it wirelessly, the controller’s battery must be charged.
Hints
The USB cable can be connected or disconnected while the controller and the
system are turned on.
If the controller does not function, press the PS button, and then reassign the
controller number.
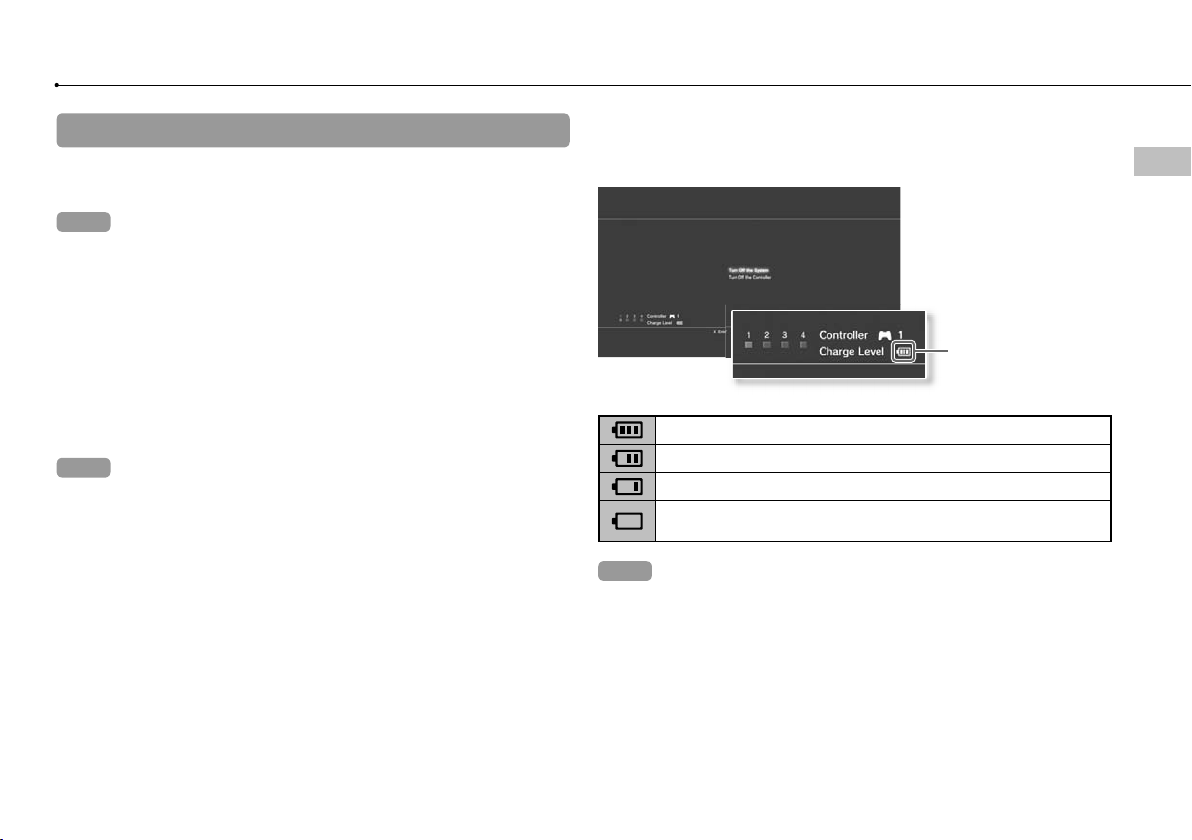
Battery charge level
If you press and hold down the PS button for more than one second,
you can check the battery charge level on the screen.
GB
Using the wireless controller
Charging the controller
With the system turned on (power indicator is lit solid green), connect
the controller to the system using a USB cable. The port indicators of
the controller flash slowly and charging begins. When charging has
completed, the port indicators stop flashing.
Hints
The controller can be used while charging.
Charge in an environment where the temperature range is between
10°C - 30°C. Charging may not be as effective when performed in other
environments.
The controller cannot be charged when the system is off (in standby mode).
Charge Level
The battery has plenty of charge.
The battery has started losing its charge.
The battery charge level is low.
The battery has no charge. The port indicators on the controller flash
rapidly. Charge the controller.
Hint
Depending on the environment or the conditions of use, the remaining charge
level may not display correctly and the battery duration may vary.
23
Page 24
Playing content
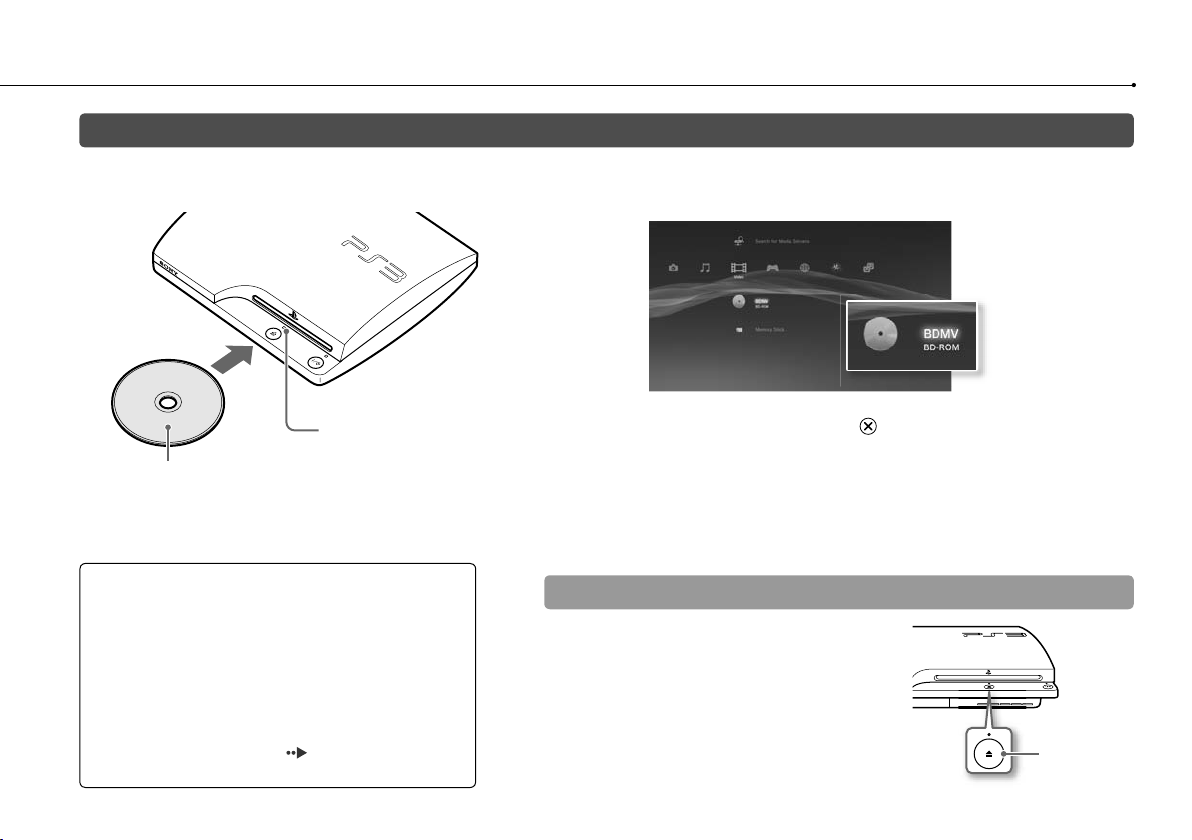
Blu-ray Disc (BD)/DVD/CD
1 Insert the disc.
The eject indicator turns solid
blue when the disc is inserted.
Insert the disc with the
label side facing up.
Notices
Do not insert multiple discs or foreign objects into the
disc slot, because this may cause the system to
malfunction.
Discs that are not compatible with the system cannot be
played.
To play commercially available BD video software, in
some cases the encryption key* may need to be
renewed. The encryption key can be renewed when the
system software is updated (
* AACS (Advanced Access Control System) key
page 33).
2 An icon is displayed in the XMB
disc begins.
If the disc does not automatically start, select the icon for the disc from the
XMB™ menu, and then press the
Ejecting a disc
Stop playback, and then press the eject button.
menu, and playback of the
™
button.
Eject button
24
Page 25
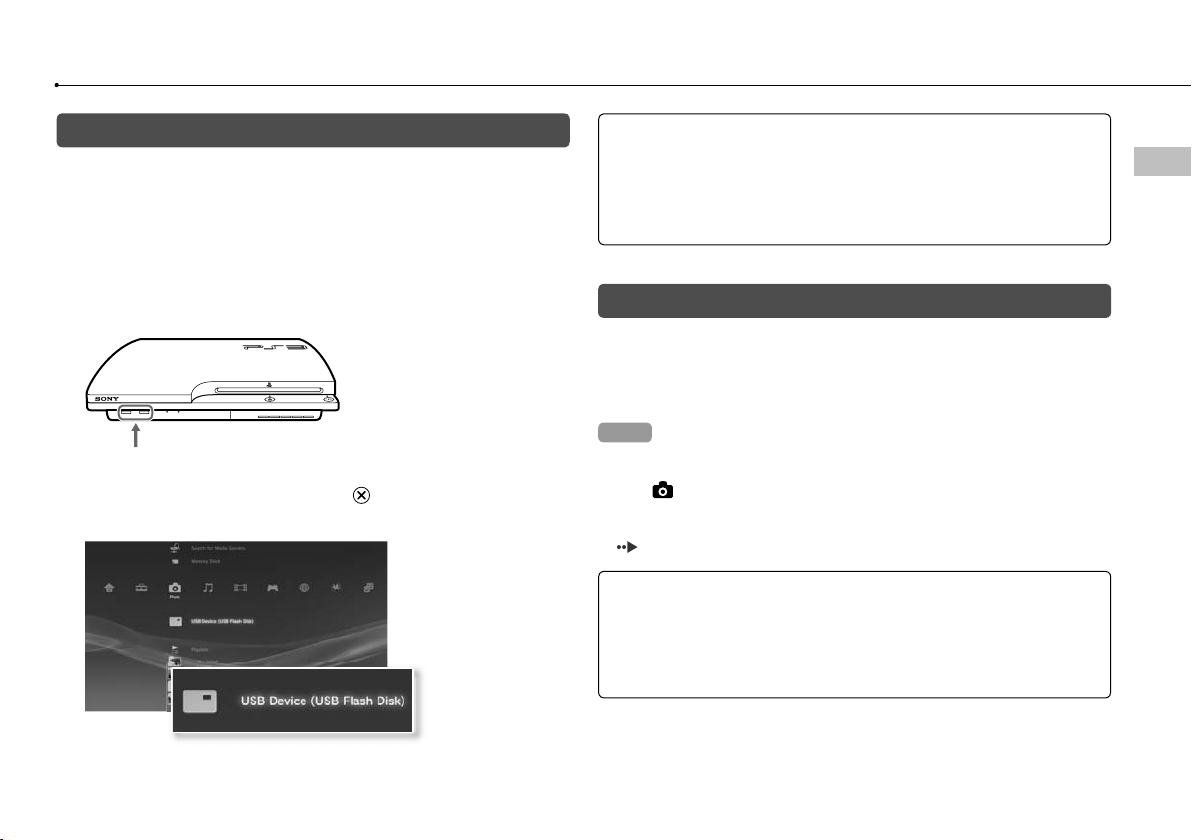
Playing content on USB devices
You can connect external devices, such as devices that are compatible
with USB Mass Storage Class, using a USB cable. Devices can be
connected while the system is turned on. Refer also to the instructions
supplied with the device.
1 Connect the USB device.
An icon is displayed on the screen.
External device such as a digital camera
2 Select the icon, and then press the button.
A list of playable content is displayed.
Notices
Do not remove USB devices or turn off the system while data is being
saved, loaded or deleted. Doing so may cause data loss or corruption.
When using a USB flash drive with a write-protect switch, do not operate
the switch when the device is connected to the system. Doing so may
cause data loss or corruption.
File formats that can be played or viewed
File formats that can be played or viewed on this system include
ATRAC™, MP3, AAC, JPEG and MPEG-4. For the latest information,
refer to the online user’s guide
(access from : eu.playstation.com/manuals).
Hints
Only files that are playable or viewable on the PS3™ system are displayed in
the column for the compatible category (Example: Image data is displayed
under
Depending on the storage media, only a subset of the folders on the media
may be displayed. If you select [Display All] from the options menu
(
Notice
You should where possible make periodic back-ups of data stored on the
hard disk drive as a precaution against possible loss or corruption. If for any
reason software or data loss or corruption occurs, it is not possible to restore
or repair the software or data. Note that SCEE will not be liable for any loss or
corruption of data, files or software.
(Photo)).
page 11), all folders saved on the media will be displayed.
GB
Playing content
25
Page 26
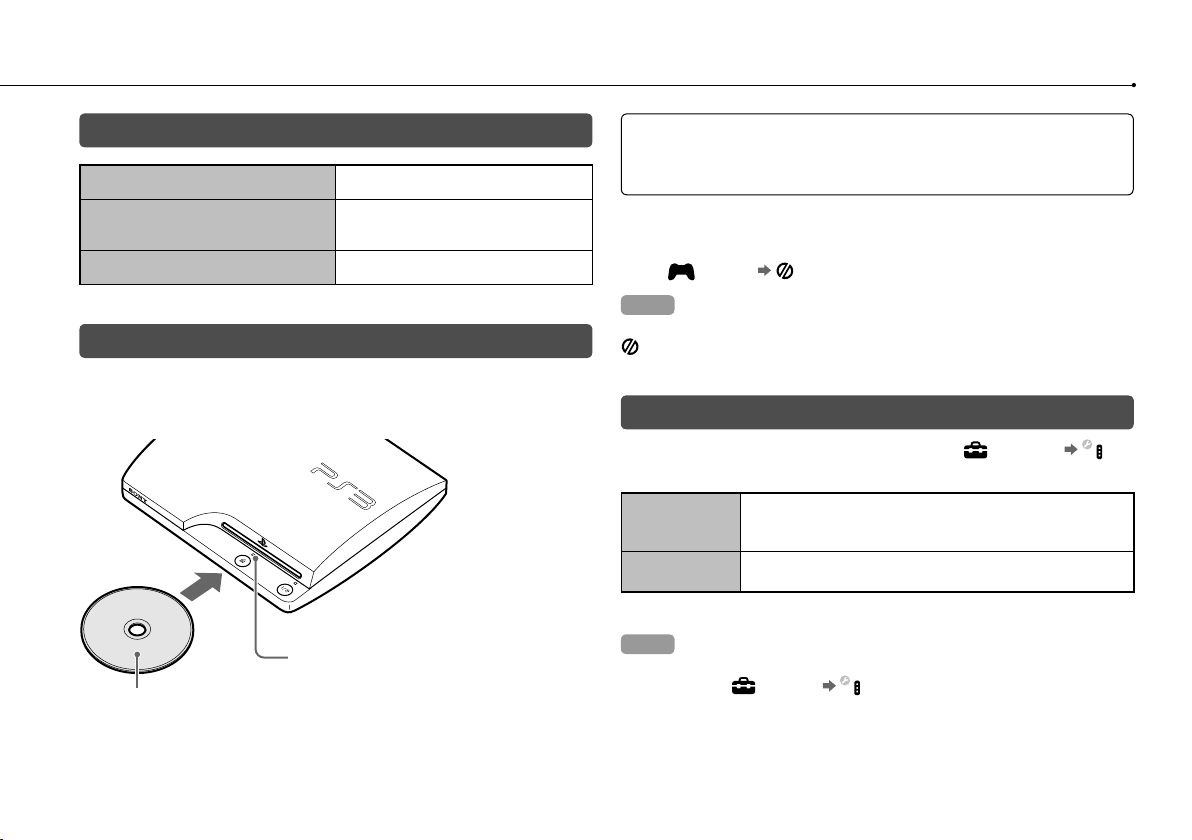
Playing games
Game compatibility
PlayStation®3 format software
PlayStation
PlayStation
format software
®
2 format software
®
Can be played on this system
Can be played, but may not always
perform correctly
Cannot be played on this system
Playing games
Starting a game
When you insert the disc, the game starts
The eject indicator turns solid
blue when the disc is inserted.
Insert the disc with the
label side facing up.
automatically.
Notice
Do not insert multiple discs or foreign objects into the disc slot, because this
may cause the system to malfunction.
Quitting a game
During gameplay, press the PS button on the Wireless Controller. Then
select (Game) (Quit Game) to quit the game.
Hint
Depending on the type of software, such as PlayStation® format software,
(Quit Game) may not be displayed when the PS button is pressed. In this
case, select [Quit Game] from the screen that is displayed.
Controller settings
You can change controller settings by selecting (Settings)
(Accessory Settings).
Reassign
Controllers
Controller
Vibration Function
* You cannot assign controller port 2-D using this system.
Hint
You can change settings for the controller during gameplay by pressing the
PS button. Select
or select [Controller Settings] from the screen that is displayed.
If a controller port or number is specified by the software,
you can use this setting to assign the appropriate controller
port or number.*
You can set the vibration function to on or off. It is set to [On]
by default.
(Settings) (Accessory Settings) in the XMB™ screen,
26
Page 27
Saved data for PlayStation®3 format software
Saved data for PlayStation®3 format software is saved on the system’s
hard disk. The data is displayed under (Game) (Saved Data
Utility).
Assigning slots
1 Select (Game) (Memory Card Utility (PS/PS2)), and
then press the
button.
GB
Playing games
Saved data for PlayStation® format software
To save data from PlayStation® format software, you must create the
internal memory cards on the hard disk and assign the cards to slots.
Notice
This system does not support playback of PlayStation®2 format software. Even
if you create an internal memory card for PlayStation
will not be able to use it to play games.
2 format software, you
®
Creating internal memory cards
1 Select (Game) (Memory Card Utility (PS/PS2)), and
then press the button.
2 Select (Create New Internal Memory Card), and then press
the button.
3
Select [Internal Memory Card (PS)], and then press the button.
Follow the on-screen instructions to complete the operation.
2 Select the internal memory card that you want to use, and then
press the button.
Select [Assign Slots], and then assign [Slot 1] or [Slot 2].
Hints
Depending on the software, slots may be preassigned. For details, refer to the
instructions supplied with the software.
You can assign slots during gameplay. Press the PS button on the wireless
controller, and then select [Assign Slots] from the screen that is displayed.
27
Page 28
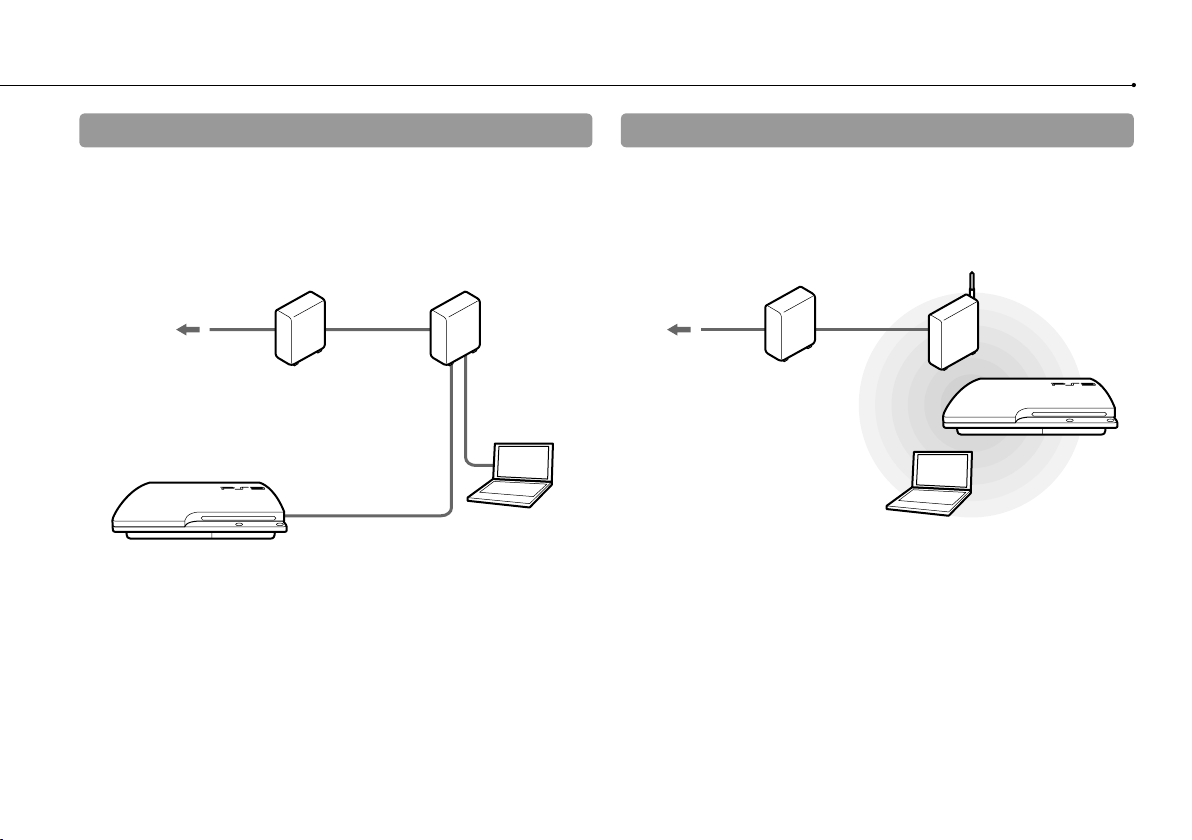
Adjusting network settings
Example of a network configuration (wired)
A wired network configuration requires items , and .
Network gateway device
such as a DSL modem*
To the Internet line
*1 The connection method may vary depending on the environment in use. For example, you may be able to connect Ethernet cables directly into the wall outlet in
housing complex units that have preinstalled LAN ports. If you are using such a network environment, you do not need a network gateway device.
2
*
Dial-up Internet is not recommended.
3
A router is a device that enables multiple devices to be connected to one Internet line. A router is necessary if a PC and a PS3™ system will be connected to the
*
Internet at the same time using one Internet connection. A router is not necessary if the DSL or cable modem or other network device has built-in router functionality.
4
A wireless router is a device that adds access point functionality to a router.
*
1*2
Ethernet cable
Router*
PC
3
Example of a network configuration (wireless)
A wireless network configuration requires items and .
Network gateway device
such as a DSL modem*
To the Internet line
1*2
PC
Wireless router
(access point) *
3*4
28
Page 29
Adjusting network settings (wired)
1 Connect an Ethernet cable (sold separately) to the system.
Adjusting network settings (wireless)
1 Check that an Ethernet cable is not connected to the system.
GB
Adjusting network settings
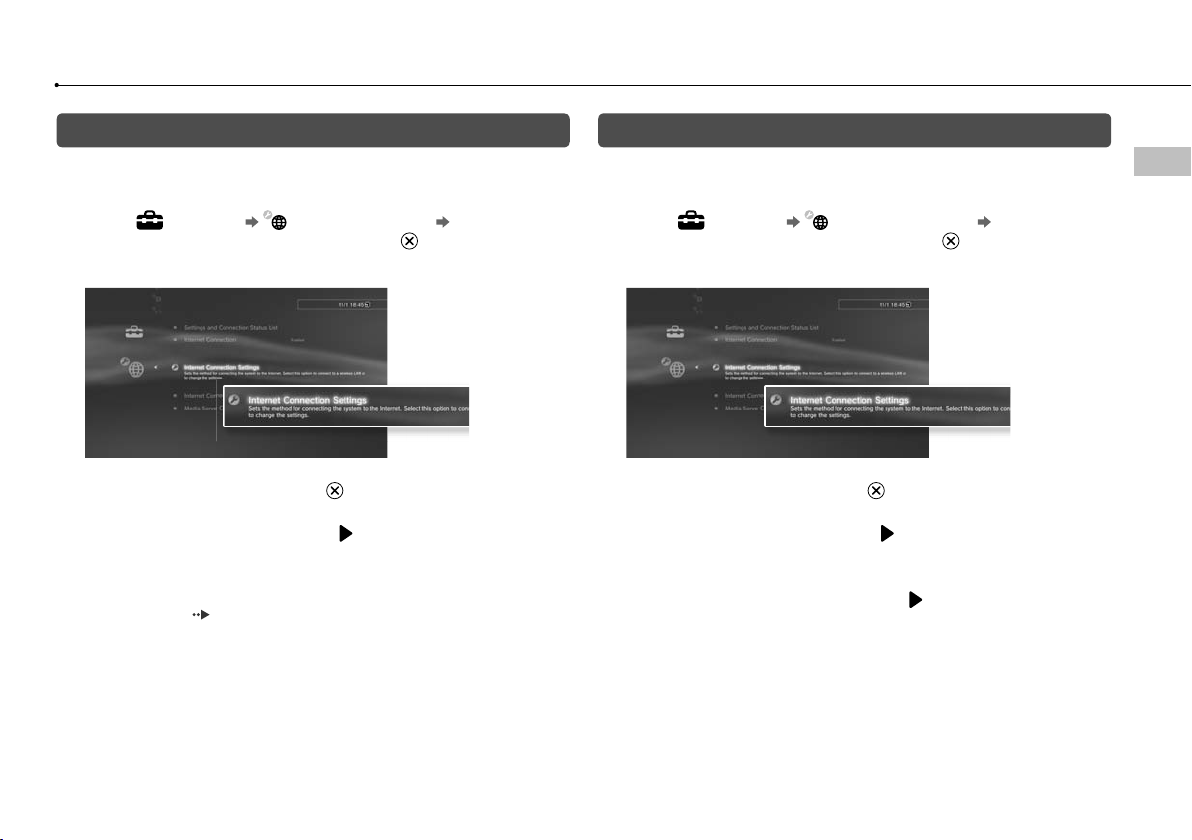
2 Select (Settings) (Network Settings) [Internet
Connection Settings], and then press the button.
A confirmation message about the Ethernet cable is displayed.
3 Select [OK], and then press the button.
4 Select [Easy], and then press the button.
Basic settings are adjusted automatically, and a list of the settings is
displayed. If the list is not displayed, you must adjust custom settings. Refer
to the instructions supplied by your Internet service provider to adjust the
custom settings (
page 31).
5 Perform the Internet connection test.
If the connection is successful, you will be able to connect to the Internet.
2 Select (Settings) (Network Settings) [Internet
Connection Settings], and then press the button.
A confirmation message about the Ethernet cable is displayed.
3 Select [OK], and then press the button.
4 Select [Easy], and then press the button.
Basic settings are adjusted automatically.
5 Select [Wireless], and then press the button.
29
Page 30
Adjusting network settings
6 Adjust wireless LAN settings.
Select the access point that you want to use. You can usually select [Scan]
and choose an access point within range of your system.
Scan
Enter Manually
System scans for a nearby access point. Select the
access point that you want to use.
Specify the access point by entering its SSID manually.
7 Adjust the security settings for the wireless network.
Enter the encryption key for the access point.
None
WEP
WPA-PSK/
WPA2-PSK
Encryption key is not set.
Enter the encryption key. The encryption key field will
display an asterisk (*) for each character you enter.
8 Check the settings.
A list of the settings is displayed. If the list is not displayed, you must adjust
custom settings. Refer to the instructions supplied by your Internet service
provider to adjust the custom settings (
page 31).
9 Perform the Internet connection test.
If the connection is successful, you will be able to connect to the Internet.
Hints
SSID and WEP/WPA keys are types of security information that are required
when connecting to an access point. If you do not have this information,
contact the person who set up or maintains the access point.
Depending on the access point you use, you may need the MAC address for
the PS3™ system when connecting to the Internet. You can find the MAC
address for the PS3™ system by going to
Settings)
When connecting to the Internet wirelessly, signal interference may occur
depending on the usage condition of the wireless network devices. If the
Internet data transfer speed is decreased or the wireless controller does not
function properly, try using a wired Internet connection.
[System Information].
(Settings) (System
30
Page 31

Adjusting custom settings
In certain network environments, some settings may not be adjusted
automatically by selecting [Easy]. Refer to the information below and
also follow the on-screen instructions to adjust custom settings.
Ethernet operation mode
Specify the Ethernet data transfer rate and operation method. You can
usually select [Auto-Detect].
IP Address Setting
Specify the method for obtaining an IP address when connecting to the
Internet. The method varies depending on the Internet service provider
you use.
MTU
Specify the MTU value used when transmitting data. You can usually
select [Automatic].
Proxy Server
Specify the proxy server to be used. You can usually select [Do Not Use].
UPnP
Enable or disable UPnP (Universal Plug and Play). You can usually
select [Enable].
Hint
If [UPnP] is set to [Disable], online communication may be restricted when using
the voice / video chat feature or communication features in games.
GB
Adjusting network settings
Automatic
Manual
PPPoE
Use the IP address allocated by the DHCP server.
Enter the IP address manually.
Connect to the Internet using PPPoE. Enter the user name
and password supplied by your Internet service provider.
DHCP host name
Specify the DHCP server host name. You can usually select [Do Not Set].
DNS Setting
Specify the DNS server. The method varies depending on the Internet
service provider you use.
Automatic
Manual
System acquires the DNS server address automatically.
Enter the DNS server address manually. Enter the IP
addresses of the primary and secondary DNS servers that
are supplied by your Internet service provider.
31
Page 32

Connecting to the Internet
If network settings are already completed, the PS3™ system will
automatically connect to the Internet when the system is turned on. The
connection will remain active as long as the system is on.
Using the Internet browser
1 Select (Network) (Internet Browser), and then press
the button.
The Internet browser opens. A busy icon is displayed while the page is
loading.
Busy icon
Basic operations of the Internet browser
Directional buttons
Right stick
L1 button
START button
button
Move the pointer to a link.
Scroll in the desired direction.
Go back to the previous page.
Enter an address.
Switch between displaying and not displaying
the menu.
Viewing the user’s guide
You can use the Internet browser to view the online user’s guide for the
PS3™ system. Select (Network) (Online Instruction Manuals),
and then press the
button.
Online user’s guide access from : eu.playstation.com/manuals
This guide contains detailed information about using the PS3™ system.
Creating a PlayStation®Network account
By creating a PlayStation®Network account, you can enjoy
communicating with your Friends or download games or videos from
(PlayStation®Store).
Select
PlayStation®Network), and then press the button. The screen for
creating an account will be displayed.
Hints
(PlayStation®Network) (Sign Up for
An Internet connection is required to create an account.
PlayStation
Network service content may vary depending on the region.
®
32
Page 33

PS3™ system updates
By updating the PS3™ system software, you can add features and/or
security patches. Frequently update your system to use the latest
version of the system software.
System software updates http://eu.playstation.com/ps3
This site provides the latest information about system software updates.
Use the update data to overwrite
the existing system software.
Notices
During an update, do not turn off the system or remove media. If an update
is cancelled before completion, the system software may become
damaged, and the system may require servicing or exchange.
During an update, the power button on the system and PS button of the
controller are inactive.
Depending on the content, you may not be able to play without first
updating the system software.
After you have updated the system software, you cannot go back to an
earlier version.
The system software is updated.
Checking the system software version
You can check system version information by selecting (Settings)
(System Settings) [System Information]. The current version is
displayed in the [System Software] field.
Update methods
You can perform an update in any of the ways described below.
Network update
You can update by downloading the update data from the Internet. The
latest update is automatically downloaded.
Select
(Settings) (System Update) [Update via Internet].
Update using storage media
You can update using the update data saved on a USB flash drive or
other media.
Select
Media].
(Settings) (System Update) [Update via Storage
Update using disc media
Update data may also be contained in some game discs and other
types of disc media. When you play a disc that contains update data, a
screen will be displayed to guide you through the update process.
Hint
If you cannot perform an update in any of the ways described above, contact
your local Customer Service helpline (listed in PlayStation
3 software manuals).
®
GB
PS3™ system updates
33
Page 34

Using the on-screen keyboard
Cursor Displays predictive options
Operation keys Displays when
Text entry field
predictive mode is on
Input mode
display
Entering text
The following steps explain how to enter text, using the word "fun" as an
example.
1 Select [f] on the keyboard, and then press the button.
Repeat this step for the characters [u] and [n].
2 Select [Enter], and then press the button.
The characters you entered are confirmed.
3 Select [Enter], and then press the button again.
The text is entered and the keyboard closes.
Hints
For details about using the on-screen keyboard, refer to the online user’s guide
(access from : eu.playstation.com/manuals).
You can also enter text using a USB keyboard or Bluetooth
keyboard (both sold separately). With the on-screen keyboard displayed, press
any key on the connected keyboard to start entering text.
-compatible
®
List of keys
Keys that are displayed vary depending on the input mode and other
conditions.
Keys Explanation
Inserts a line break
Moves the cursor
Deletes the character to the left of the cursor
Inserts a space
Switches the input mode
Confirms characters that have been typed and
then closes the keyboard
Switches to the mini-size keyboard
/
/
/
Inserts a symbol or emoticon
Switches the type of characters to be entered
Copies or pastes text
34
Page 35

Parental control
The PS3™ system includes a parental control feature. You can use this
feature to set a password and limit the playback of content restricted by
a parental control level (games, videos and other content). By setting
the parental control level on the system, you can prevent the playback
of restricted content by children.
Changing the security settings
You can set a parental control level for games or Blu-ray Discs or other
content under (Settings) (Security Settings).
A password is required to change parental control settings. You can set
a password under
The password is set to "0000" in the default settings.
(Security Settings) [Change Password].
Parental control levels for games
You can set the parental control level for games under (Security
Settings) [Parental Control]. Select from [Off] or one of 11 levels.
Play any content regardless of parental control level.
Off
Set the parental control level based on the number. Note that the lower
11-1
the number, the tighter the restriction.
The combination of the parental control levels of both the PS3™ system
and the content determine whether the content can be played.
Example: If the parental control level of the system is set to [7], content
with a level from [1] to [7] can be played on the system.
Refer to http://www.ps-playsafeonline.com for further details.
Other security settings
You can set parental control limitations on content other than games
under (Security Settings), as described below.
When playing a BD with parental control settings, restrict
BD Parental Control
DVD parental control
Internet Browser
Start Control
Hint
Security settings menu options may vary depending on the version of the system
software in use. For the latest information, refer to the online user’s guide
(access from : eu.playstation.com/manuals).
playback based on the age you have set. The lower the
setting, the tighter the restriction.
When playing a DVD with parental control settings, restrict
playback based on the level you have set.
Select from [Off] or one of eight levels.
The lower the number, the tighter the restriction.
Restrict the ability to start the Internet Browser with a
password.
GB
Parental control
35
Page 36

Replacing the hard disk
You can replace the hard disk that is installed in the PS3™ system.
Caution
Remove the hard disk in a location out of the reach of small children to help
prevent accidental swallowing of small parts such as screws.
The inside of the system is hot directly after use. Allow time for the system to
cool down before starting to remove the hard disk.
Be careful not to injure yourself when removing or handling the screw cover
or the hard disk.
Be sure to reattach the screw cover and the HDD bay cover before turning
the PS3™ system on. If these covers are not attached, heat may build up
inside the system.
To attach or remove screws, use an appropriate crosshead screwdriver. If
the size does not match, the groove on the screw’s head may be damaged.
Notices
Depending on the type of service performed, the hard disk that had been in
use prior to servicing may need to be reformatted. Be sure to back up
important data in advance.
To help protect your personal information and prevent misuse of this
information by others, be sure to clear passwords for all
PlayStation
the PS3™ system for service.
Network accounts and remove the hard disk before submitting
®
Backing up data
You can back up data that is saved on the hard disk using either of the
following methods.
Notice
You should where possible make periodic back-ups of data stored on the
hard disk as a precaution against possible loss or corruption. If for any reason
software or data loss or corruption occurs or the hard disk must be formatted
during authorised service, it may not be possible to restore or repair the
software or data. Note that SCEE will not be liable for any loss or corruption of
data, files or software.
Backing up data in a single operation
You can back up data that is saved on the hard disk to a USB mass
storage device in a single operation. Select (Settings)
(System Settings) [Backup Utility], and then follow the on-screen
instructions to perform this operation.
Hints
In some cases, you may not be able to use the backup utility feature to back up
the system correctly. It is recommended that you create a spare backup for files
that can be moved or copied separately. For details, refer to "Backing up
selected data" (
For details on the backup utility feature, refer to the online user’s guide
(access from : eu.playstation.com/manuals).
page 36).
Backing up selected data
The following file types saved on the system’s hard disk can be copied
or moved to a USB device. Select the file, press the button, and then
select [Copy] or [Move] from the options menu. For some types of
video files, you may need to select [Back Up] instead.
36
File type Back up destination
Saved data from games; video, music
or photo files
USB mass storage device
(USB flash drive, etc.)
Page 37

Hints
Some data cannot be copied, moved or backed up.
By using a card reader/writer (USB connector type, sold separately), you can
back up files saved on the hard disk to storage media such as a Memory
Stick™ or an SD Memory Card.
Removing the hard disk
Caution
For safety reasons, be sure to turn off and unplug the system before
attempting to remove the hard disk.
The system may not be stable when placed upside down. Be careful not to
injure yourself when removing the screw.
3 Place the system upside down on a soft, dry cloth, and then
open the screw cover.
Use the notch located above the screw cover to slightly pull up the cover.
Then rotate the cover as shown in the diagram. If the cover is hard to pull up,
insert a tool such as a flathead screwdriver in the notch and gently pull the
cover up.
Screw cover
4 Remove the screw that fastens the hard disk in place, and then
remove the HDD bay cover.
Remove the blue screw with an appropriate crosshead screwdriver.
Slide the HDD bay cover to the left, and then remove the cover.
GB
Replacing the hard disk
1 Press the power button to turn off the system.
The power indicator turns solid red and the system enters standby mode.
2 Unplug the AC power cord, and then disconnect the other
cables from the system.
For safety reasons, remove the plug for the power cord from the electrical
outlet, and then detach the other cables.
HDD bay cover
37
Page 38

Replacing the hard disk
5 Remove the hard disk.
Pull the handle upwards, and then pull out the hard disk from the system.
Notices
The hard disk is a sensitive piece of equipment and should be handled with
care at all times. To help prevent software or data loss or corruption, or
damage to the hard disk, carefully follow the precautions listed below:
Do not throw or drop the system or hard disk, or otherwise expose either
device to strong vibrations or strong physical impact.
Do not allow liquid or small particles to get into the system or hard disk.
Do not touch the connectors or insert foreign objects into the connectors.
Do not place the system or hard disk close to magnetic fields such as those
produced by magnets or loudspeakers. Also, do not place devices that
may be sensitive to magnetic forces (such as a wrist watch or a credit card)
near the hard disk.
Do not put heavy objects on the hard disk.
When handling the hard disk, hold it only by the edges or metal frame.
The hard disk is sensitive to static electricity. Ensure that proper handling
methods are used when installing the hard disk.
Store in a cool, dry location.
Replacing the hard disk
Caution
For safety reasons, be sure to turn off and unplug the system before attempting
to replace the hard disk.
When replacing the hard disk, follow the procedure below to remove
the metal frame.
1 Using a crosshead screwdriver, remove the screws (4 places).
2 Hold the hard disk by the edges, and then turn it over.
Grasp firmly by the opening on
either side to prevent slipping.
38
Page 39

3 Remove the hard disk from the metal frame.
4 Place the replacement hard disk on the metal frame for the
PS3™ system’s hard disk, and then attach using the screws
(4 places).
Do not overtighten the screws.
5 Install the hard disk in the system.
Refer to the instructions in "Removing the hard disk" ( page 37) and follow
the steps in reverse order when installing. Be sure to fully insert the hard disk
in the HDD bay.
6 Reinstall the system software.
After the hard disk has been replaced, the system software must be
reinstalled (
page 39).
Hint
If you lose the HDD bay cover, screw cover, screws or the metal frame, contact
your local Customer Service helpline (see manual back cover) for availability of
replacement parts.
Reinstalling the system software
If the system software does not start when the system is turned on
(such as when the hard disk has been replaced), a screen such as the
one shown below is displayed. In this case, you must reinstall the
system software using downloaded update data.
GB
Replacing the hard disk
Replacement hard disks
You can use hard disks of the following types with the PS3™ system.
Size
Interface format
*1 Proper operation is not guaranteed for all models.
2
Parallel ATA is not supported.
*
2.5 inch (internal type) *
Serial ATA *
2
1
Downloading system software update data
Using a PC with Internet access, download the system software update
data from the website shown below. Follow the instructions available on
the website to copy the update data from the PC to storage media.
http://eu.playstation.com/ps3
39
Page 40

Replacing the hard disk
Hints
Use the latest version of the update data available on the website. You cannot
reinstall the system software using a version that is earlier than the system
software version that had previously been used. If the appropriate update data
for your system is not available at the website, contact your local Customer
Service helpline (see manual back cover).
If you have a game disc or other disc that contains update data, you may be
able to use that disc to reinstall the system software. If you insert the disc in the
PS3™ system and follow the on-screen instructions, you can verify whether the
update data can be used.
If you do not have Internet access from a PC, contact your local Customer
Service helpline (see manual back cover).
Installing the system software
Turn on the PS3™ system, and then insert the storage media containing
the update data. Follow the on-screen instructions to reinstall the
system software.
Notices
Do not turn off the system or remove the storage media during the
installation. If the installation is cancelled before completion, the system
software may become damaged, and the system may require servicing or
exchange.
During the installation, the power button on the system and the PS button
on the wireless controller are not active.
Restoring data that has been backed up
You can restore data that you backed up using either of the following
methods.
Restoring data in a single operation
You can restore data that you backed up in a single operation by
selecting (Settings) (System Settings) [Backup Utility].
Connect the USB mass storage device that contains the backup data,
and then follow the on-screen instructions to perform this operation.
Hints
In some cases, you may not be able to use the backup utility feature to restore
data correctly.
For details on the backup utility feature, refer to the online user’s guide
(access from : eu.playstation.com/manuals).
Restoring selected data
You can manually restore files using the options menu for the file.
Connect the USB mass storage device that contains the file, select the
file that you want to restore, and then press the button. Select [Copy]
or [Move] from the options menu.
Hint
Some data cannot be copied, moved or backed up.
40
Page 41

Transferring data to another PS3™ system / restoring the system
Transferring data to another PS3™ system
You can transfer data that is saved on the hard disk of one PS3™
system (the source system) to the hard disk of another PS3™ system
(the destination system) by selecting
Settings) [Data Transfer Utility].
Notice
When you perform this operation, all of the data that is stored on the PS3™
system that will receive the data (the destination system) will be deleted.
For details on how to use the utility and its limitations, refer to the online user’s
guide (http://manuals.playstation.net/document/).
(Settings) (System
Restoring the PS3™ system
Notices
If you restore the default settings or restore the PS3™ system, changes to
the settings cannot be undone. Data loss or corruption is the responsibility
of the user.
Do not turn off the PS3™ system during this operation. If the operation is
cancelled before completion, the system software may become damaged,
and the system may require servicing or exchange.
During this operation, the power button on the system and the PS button on
the wireless controller are not active.
You cannot use this feature to go back to an earlier version of the system
software.
Restoring default settings
You can restore from the current settings under (Settings) to the
default settings by selecting
[Restore Default Settings].
After you complete the operation and restart the system, the initial
setup screen will be displayed. Follow the on-screen instructions to
perform initial setup of the system software (
(Settings) (System Settings)
page 15).
Deleting data on the hard disk drive
You can delete all data on the system’s hard disk and restore from the
current setting under (Settings) to the default settings by selecting
(Settings) (System Settings) [Restore PS3™ System].
You can shorten the time required to perform this operation by selecting
[Quick Format] from the list of hard disk format options. It is
recommended that you select [Full Format] when formatting a hard disk
that contains important or sensitive data.
After you complete the operation and restart the system, the initial
setup screen will be displayed. Follow the on-screen instructions to
perform initial setup of the system software (
page 15).
Before disposing of or transferring the PS3™ system
Before disposing of your PS3™ system or giving your PS3™ system to
a third party for any reason, including return (where permitted), be sure
to follow the instructions in "Deleting data on the hard disk drive" and
select [Full Format] to delete all the data on your PS3™ system. This will
help prevent unauthorised access to or use of your credit card or other
personal details.
GB
Transferring data to another PS3™ system / restoring the system
41
Page 42

Before requesting service
Go through this section if you experience difficulty in operating the
PS3™ system. Should any problem persist, contact the appropriate
PlayStation® customer service helpline which can be found within every
PlayStation®3 software manual.
Power
The system does not turn on.
Check that the AC power cord is securely inserted in the system
and the electrical outlet.
When the power button is pressed, the system beeps repeatedly
and then the power indicator will turn off
The temperature inside the system is becoming too high. Check
whether the system is being used in a location that is too warm.
Ensure that vents are not blocked and that there is adequate airflow
around the system. Press the power button. (The power indicator
will become solid red.) Wait a while, and then turn on the system
again.
Picture
There is no picture on the TV screen.
Check that the cable is securely inserted. Try disconnecting the
cable from the PS3™ system or TV and then reconnecting it.
There may be a problem with the AV cable in use. Try using another
cable that is compatible with the PS3™ system.
Adjust the video input on the TV to match the input connector that is
being used to connect to the PS3™ system.
If the video output settings on the system do not match those of the
cable or TV in use, there may be no picture. If the screen goes
blank, turn off the system. Then, with only the system and the TV
connected, press the system’s power button for more than 5
seconds to turn the system back on. The video output settings will
automatically be reset to the standard definition (SD) resolution.
The picture is distorted.
Check that the cable is securely inserted. Try disconnecting the
cable from the PS3™ system or TV and then reconnecting it.
The Blu-ray Disc (BD) or DVD cannot be played, or the picture is
distorted.
When outputting DVD content or PlayStation
standard definition (SD) resolution, only discs recorded in the PAL
standard can be played.
If the system is connected to a VCR, copy protection encoding on
some BDs and DVDs may cause image distortion, or may cause the
image to become lighter or darker. In such cases, connect the
system to the TV directly. You may also see a similar occurrence if
using a combination TV/VCR unit.
If the BD or DVD does not match the region code set in the system,
it cannot be played. For details, see "Region codes" (
Some DVDs are preset with parental control restrictions. Enter the
password that was set in
increase the parental control level.
If you record video content on DVD-R, DVD-RW, DVD+R or
DVD+RW media using a device such as a DVD recorder, you must
finalise the media before playing it on the PS3™ system. Finalise the
media using the recording device.
Some BDs are preset with parental control restrictions. Enter the
password that was set in
parental control level.
(Security Settings) to temporarily
(Security Settings) to change the
3 format software in
®
page 48).
42
Page 43

The BD may be disc-locked. Enter the password that was set when
the disc was created.
See also the notices under "Playable discs" (
Certain BDs cannot be played.
To play commercially available BD video software, in some cases
the encryption key for AACS (Advanced Access Control System)
may need to be renewed. The encryption key can be renewed when
the system software is updated.
The size of the video image and the TV screen do not match.
The settings of the connected TV and the video output settings of
the system may not match. Check the following items:
Check that the system’s settings under
(Display Settings) [Video Output Settings] are correct.
Check that the settings of the connected TV are correct. For
details, refer to the instructions supplied with your TV.
With some video content, the screen size cannot be changed.
The screen colour does not seem right.
If set to the default setting, the background colour changes as the
time, day and month changes.
page 48).
(Settings)
Audio
There is no sound.
Check that the muting function on the TV or speakers is turned off.
Also check that the volume is at the appropriate level.
If an audio device is connected, check the settings of the device.
For details, refer to the instructions supplied with the audio device.
There may be a problem with the AV cable. Try using another cable
that is compatible with the PS3™ system.
Some software do not support digital audio output.
If the system’s audio output settings do not match the cable or
device in use, the system may not produce sound. Check that the
system’s settings under
[Audio Output Settings] are correct.
Some content that support Dolby Digital, DTS, and other formats
may not produce audio from all channels.
Music files do not play.
Playback methods may be limited for some music files that are
distributed via the Internet. In such cases, it may not be possible to
play the content on the PS3™ system.
(Settings) (Sound Settings)
Network
A connection to the network cannot be established.
If using a wired connection, check that the Ethernet cable is
securely connected.
Check that the network settings are correct. Refer to the instructions
supplied by your Internet service provider or in the software manual
to make the correct network settings.
GB
Before requesting service
43
Page 44

Before requesting service
The message [An error occurred during communication with the
server. This is a DNS error. (80710102)] is displayed during the
Internet connection test.
If you connect the system to a modem that does not have a router
feature (bridge modem), you may need to set PPPoE settings.
Select
Connection Settings] [Custom] to start configuring the Internet
connection. Continue adjusting settings until you see the IP address
setting screen. Select [PPPoE], and then enter the user name and
password provided by your Internet service provider.
If you connect your system to a router, complete initial settings on
the router first. After completing the settings on the router, try to
adjust the network settings again by selecting
(Network Settings) [Internet Connection Settings] [Easy] again.
For details about the router settings, refer to the instructions
supplied with your router.
The message [The attempt to obtain an IP address timed out.] is
displayed during the Internet connection test.
If you disconnected the Ethernet cable that is used to connect to a
device such as a PC, and then reconnected it to the system, you
must restart both your system and the modem. After restarting both
devices, update your network settings by selecting
For details about restarting your modem, refer to the instructions
supplied with your modem.
If you are using a wireless connection, the WEP key may be wrong.
Check that you have the correct WEP key, and then enter it again.
The message [The PPPoE user name or password is not correct.] is
displayed during the Internet connection test.
Enter the correct user name and password for PPPoE. If you do not
know the user name and password, contact your Internet service
provider.
(Settings) (Network Settings) [Internet
(Settings)
(Network Settings) [Internet Connection Settings] [Easy].
44
(Settings)
The Web page does not display properly.
Certain content, such as content that requires specialized software,
may not display properly on some Web pages.
Disc Media and USB Devices
The system does not recognise the disc.
Remove the disc and reinsert it.
If the disc has a label, insert it with the label side up.
Check whether the disc is scratched or dirty. If dirty, wipe it gently
with a soft cloth.
See also the notices under "Playable discs" ( page 48).
The disc cannot be removed.
Press the eject button for 10 seconds or longer to force the disc to
eject. After removing and before reinserting a disc into the system,
turn off the system, and then turn on the system again to resume
use.
The system does not recognise the USB device, or the USB device
does not operate properly.
Check that the device is inserted correctly.
The connected device may not be usable with the system.
Try using a different USB connector on the PS3™ system. The
device may not be recognised depending on the combination of
USB connectors in use.
In some cases, the system may not recognise the device if an
external USB hub is used and more than the allotted number of
devices are connected. Try removing unused devices.
Page 45

When connecting a USB device, the message [An unknown USB
device has been connected.] is displayed.
The connected device may not be compatible with the system or
software application.
The device may be compatible with specific software only. Use
software that is compatible with the device.
There may be too many USB hubs connected. Try removing a USB
hub.
Wireless controller
The wireless controller operates in an abnormal manner.
Try resetting the wireless controller by pushing the reset button on
the controller rear with a thin-tipped object such as a pen.
The wireless controller does not vibrate.
Select
Vibration Function], and then try setting [Vibration Function] to [On].
The software may not support the vibration function. Refer to the
instruction manual for the software. For software downloaded from
included in the software’s online description.
(Settings) (Accessory Settings) [Controller
(PlayStation®Store), refer to the compatibility notice information
GB
Before requesting service
The wireless controller does not function.
When using the wireless controller, you must pair it with the system
and assign a controller number. With the system turned on (power
indicator is lit solid green), connect the system and the controller
using the USB cable, and then press the PS button on the controller.
The controller number may have been cleared. Press the PS button
on the controller to reassign the number.
With some software, you may need to use a specified controller
number. Refer to the manual for the software in use.
Check the charge level of the wireless controller battery. When the
controller is used in wireless mode, it will not function if the battery
does not have any charge left. Charge the battery by connecting
the controller to the system with the USB cable.
If you cannot use the controller even after checking the items
above, try resetting the wireless controller by pushing the reset
button on the controller rear with a thin-tipped object such as a pen.
Reset button
The response to button operations is slow.
The response speed may be slow on an LCD display or PC display.
This is not a malfunction.
The battery does not charge or does not fully recharge.
The battery can only be charged when the system is turned on
(power indicator is lit solid green).
See "Wireless controller battery" ( page 49).
The battery charge does not last long.
The battery may be wearing out. Battery duration will gradually
decrease with repeated usage and age. See "Wireless controller
battery" (
Even when the wireless controller is not being used, it loses its
charge over time.
The controller’s battery slowly loses its charge even when the
controller is not in use. It is recommended that you charge the
controller frequently.
page 49).
45
Page 46

Before requesting service
Other issues
The system makes noise.
When using the system in a location where heat can build up, such
as in an enclosed AV cabinet, on carpet or a cushion, or near a wall
(within 10cm of the wall), the internal fan will rotate rapidly to reduce
the system’s temperature and this may generate increased noise.
Move the system to a location with good ventilation.
Depending on how a disc is being used, such as when copying an
audio CD to the hard disk or starting software from a disc, disc
noise may be louder than normal.
Furthermore, some software may cause more disc noise than
others.
You forgot your password for security settings.
If you restore the system using (Settings) (System Settings)
[Restore Default Settings], your password will return to "0000".
However, note that all settings other than the password will also be
reset. Once these settings are reset, they cannot be recovered.
The system is warm.
When the system is being used or is turned on, it may become
warm. This is not a malfunction.
The screen freezes during gameplay.
Check whether the disc is scratched or dirty. If dirty, wipe it gently
with a soft cloth.
If you have game data for PlayStation
try deleting the game data and reinstalling the software. Select
(Game)
then delete the game data from the options menu. Next, reinstall the
PlayStation®3 format software. Be careful not to delete the saved
data for the game.
(Game Data Utility), press the button, and
46
3 format software installed,
®
The screen is frozen. The system does not operate.
Disconnect all accessories such as USB devices from the system,
and then restart the system. Pressing the power button for 15
seconds or longer will force the system to turn off (enter standby
mode). After the system turns off, turn it on again.
The power indicator is flashing red and green alternately.
The interior of the system has become hot. Check whether the
system is being used in a hot location or whether the vents are
blocked. Continuing to use the system in the above condition will
cause it to stop functioning. Turn the system off and leave it unused
until it cools down. After the system cools down, turn it on again.
The system does not recognise content.
The content may be of a format that is not supported by the system.
Content of types not supported by the system will not be
recognised. For information on supported formats, refer to the
online user’s guide (access from : eu.playstation.com/manuals).
Page 47

Specifications
Design and specifications are subject to change without notice. Information about
system functionality and images published in this document may vary from those
for your PS3™ system, depending on the system software version in use.
PlayStation®3 system
CPU
GPU
Audio output
Memory
Hard disk 2.5" Serial ATA
Inputs/
outputs*
Networking
Controller
AV output
BD/DVD/
CD drive
(read only)
Hi-Speed USB
2
(USB 2.0)
Resolution
HDMI OUT connector*
AV MULTI OUT connector
Digital out (optical) connector
Maximum read rate
3
Cell Broadband Engine™
RSX™
LPCM 7.1ch, Dolby Digital,
Dolby Digital Plus, Dolby TrueHD, DTS,
Ethernet (10BASE-T, 100BASE-TX,
DTS-HD, AAC
256 MB XDR Main RAM,
256 MB GDDR3 VRAM
1000BASE-T) × 1
IEEE 802.11 b/g
Bluetooth
Wireless Controller (Bluetooth
1080p, 1080i, 720p, 576p, 576i
BD × 2 (BD-ROM)
DVD × 8 (DVD-ROM)
CD × 24 (CD-ROM)
160 GB*
2
2.0 (EDR)
®
1
1
1
1
)
®
Type: Semiconductor, continuous
BD Wavelength: 400 - 410 nm
Power: Max. 17.5 mW
Laser
Power
Power consumption
External dimensions
(excluding maximum projecting part)
Mass
Operating temperature
Country of production
1
*
Hard disk capacity calculated using base 10 mathematics (1GB =
1,000,000,000 bytes). The system software for this PS3™ system calculates
capacity using binary mathematics (1GB = 1,073,741,824 bytes) and
subsequently displays lower capacity and free space. The difference in
displayed values does not indicate a difference in the actual number of bytes.
2
Usability of all connected devices is not guaranteed.
*
3
*
"3D", "Deep Colour", "x.v.Colour" and "HD lossless audio format" are supported.
DVD Wavelength: 655 - 664 nm
Power: Max. 2.6 mW
CD Wavelength: 770 - 800 nm
Power: Max. 4.0 mW
AC 220 - 240 V, 50 / 60 Hz
Approx. 230 W
Approx. 290 × 65 × 290 mm
(width × height × length)
Approx. 3.0 kg
5°C - 35°C
China
DUALSHOCK®3 Wireless Controller
Battery type
Voltage
Battery capacity
Mass
Country of production
Built-in rechargeable Lithium-Ion battery
DC 3.7 V
610 mAh
Approx. 180 g
China
GB
Specifications
47
Page 48

Specifications
BRAVIA™ Sync
"BRAVIA™ Sync" is a Sony product feature that allows you to use the remote
controls of BRAVIA™ televisions (Sony Corporation products) to operate various
devices
that are connected to each other through HDMI cables. BRAVIA™ Sync
uses the control signals that are transferred through the HDMI connections.
To enable the BRAVIA™ Sync feature, go to (Settings) (System Settings)
[Control for HDMI], and set the option to [On]. For details, refer to the online
user’s guide (access from : eu.playstation.com/manuals) and the instructions
supplied with the BRAVIA™ products in use.
Hint
This feature can only be used on devices that support the BRAVIA™ Sync feature.
Compatibility with all devices that comply with the HDMI CEC specification is not
guaranteed.
1
Playback of BD-RE ver. 1.0 discs is not supported.
*
2
*
PlayStation®2 format software titles do not perform on this system.
3
*
This product has limited backward compatibility with PlayStation® format
software. Many PlayStation
format software titles operate, but full compatibility
®
is not guaranteed.
4
Playback of Super Audio CDs is not supported.
*
Region codes
Depending on the disc, a region code that is based on the geographic region
where the disc is distributed may be assigned. This system can play discs
marked with the following region codes.
Disc Region code
Blu-ray Disc (BD)
DVD
ALL
48
Playable discs
Blu-ray Disc (BD)
DVD
CD
PlayStation
3 format BD-ROM
®
BD-ROM
BD-R
1
BD-RE*
DVD-ROM
DVD+R/RW
DVD-R/RW
AVCHD
DSD Disc
PlayStation
format CD-ROM*2*
®
CD-DA (audio CD)*
CD-R/RW
PlayStation®3 format BD-ROM
PlayStation® format CD-ROM
DVD and PlayStation®3 format software
When outputting DVD content or PlayStation
only discs recorded in the PAL standard will definitely be playable. You may not
be able to play discs recorded for other standards (such as NTSC) on this
system (unless an NTSC compatible TV is used).
When playing PlayStation
3
4
video playback at 59.94 Hz is required.
3 format software in HD resolution, a TV that supports
®
3 format software in SD resolution,
®
Page 49

DVD-R/DVD-RW/DVD+R/DVD+RW discs
Discs that have not been finalised cannot be played.
Notices
Use only circular-shaped discs with the system. Do not use irregularly-shaped
discs (for example, heart- or star-shaped discs). Using irregularly-shaped discs
may cause a malfunction.
Do not use damaged, re-shaped or repaired discs. Use of such discs may
cause a malfunction.
When using an 8 cm disc, insert the disc in the system without an adaptor.
The audio CD playback feature of this system is designed to conform to the
Compact Disc (CD) standard. Some record companies have started marketing
music discs encoded with copyright protection technologies. Some of these
music discs do not conform to the CD standard and may not be playable on
this system.
A DualDisc is a dual-sided disc that combines a DVD side and an audio side.
Note that the audio side is not guaranteed to play because this type of disc
does not conform to the specifications required for an audio Compact Disc
(CD).
If a device that is not compatible with the HDCP (High-bandwidth Digital
Content Protection) standard is connected to the system using an HDMI cable,
video or audio cannot be output from the system.
When you use the AV MULTI OUT connector of the system to connect to a TV,
copyright-protected video from a BD or from video files may be output at
resolutions lower than 1080p. Also, these types of video will be output at
resolutions of 576p or lower if recorded at 1080i (50 Hz) or 720p (50 Hz).
When playing discs with content that was copied fraudulently, abnormal sounds
may be produced or the content may not play correctly.
To continuously enjoy playback of copyright-protected BDs, in some cases the
encryption key for AACS (Advanced Access Control System) may need to be
renewed. To renew the encryption key, the system must be updated.
Some discs may not be playable due to scratches, dust, the quality of
recording, or the characteristics of the recording device.
In rare instances, CDs, DVDs, BDs and other media may not operate properly
when played on the PS3™ system. This is primarily due to variations in the
manufacturing process or encoding of the software.
Wireless controller battery
Caution
If you come into contact with material from a leaking battery, take the
following actions:
– If the material gets into the eyes, do not rub. Immediately flush the eyes
with clean water and seek medical attention.
– If the material comes into contact with the skin or clothes, immediately
rinse the affected area with clean water. Consult your physician if
inflammation or soreness develops.
Do not allow the battery to come into contact with fire or subject it to extreme
temperatures such as in direct sunlight, in a vehicle exposed to the sun or
near a heat source.
Wireless controller battery life
The battery has a limited lifespan. Battery duration will gradually decrease with
repeated usage and age.
Battery life also varies depending on the storage method, usage state,
environment and other factors.
Storage
When the wireless controller is not used for an extended period of time, it is
recommended that you fully charge it at least once a year in order to maintain
battery functionality.
GB
Specifications
49
Page 50

GUARANTEE
Thank you for buying this Product. We hope that you enjoy using it.
The term "Product" means the PlayStation
PS3™ system") and any official PlayStation
the PS3™ system. The system software pre-installed in the PS3™ system or
subsequently provided via updates or upgrade releases is licensed to you, not
sold, and is for use only as part of the PS3™ system. The terms of such system
software licence are at http://www.scei.co.jp/ps3-eula.
This Guarantee does not cover your data, any separate software or PlayStation
games whether or not packaged or included with the Product, or any PlayStation
accessories or peripheral devices that are not manufactured by or for Sony
Computer Entertainment Europe Ltd ("SCEE").
This Guarantee is given to you, the first user of the Product. It is personal to you
and cannot be used by anyone else.
SCEE guarantees that this Product is free from defects in materials and
workmanship that result in Product failure during normal usage in accordance
with the terms set out in below and will, for a period of 1 (one) year from the date
of original purchase, repair or (at SCEE’s option) replace any component part of
this Product, free of charge, where it is faulty due to defective materials or
workmanship. Replacement will be with a new or refurbished component or unit,
at SCEE’s option, which is guaranteed for the remainder of the original Guarantee
Period.
This Guarantee is in addition to your statutory consumer rights (under applicable
law) and does not affect them in any way.
This Guarantee is given to you as first user by Sony Computer Entertainment
Europe Ltd of 10 Great Marlborough Street, London, W1F 7LP, United Kingdom.
3 computer entertainment system ("the
®
3 peripherals supplied in the box with
®
®
IMPORTANT
1. If you need to claim under this Guarantee, please call your local Customer
Service helpline (please see separate insert for helpline details) for return
instructions.
2. This Guarantee is only valid:
i. in Russia and Ukraine; and
ii. when the original sales receipt or invoice or other proof of purchase
(indicating the date of purchase and retailer’s name) is presented together
®
with the defective Product within the Guarantee period (and has not been
altered or defaced since the date of original purchase); and
iii. when the Guarantee seal and the serial number on the Product have not
been damaged, altered, defaced or removed.
3. SCEE may elect at its option to repair or replace the Product with a new or
refurbished component or unit.
4. Repair or replacement will involve installation of the latest software or firmware
updates for the Product.
5. When arranging for warranty service under this Guarantee, our Customer
Service helpline will discuss with you whether you should leave the hard disk
drive ("HDD") included in the PS3™ system on purchase inside the PS3™
system, or remove and retain the HDD prior to the return of the system for
warranty service.
6. If the PS3™ system is returned with the HDD for warranty service, repair or
replacement of the Product will involve reformatting of the HDD. This is the
quickest form of warranty service we can offer.
7. If the PS3™ system is returned without the HDD for warranty service, we will
where possible ensure the repaired or replaced unit has the same unique
internal identification as the returned PS3™ system. Please note this form of
warranty service will take longer than the service described in the previous
paragraph. If for any reason we are unable to rewrite the original system ID
and you wish to receive warranty service, you will need to reformat your HDD
before you are able to use it with your repaired or replaced PS3™ system.
50
Page 51

8. You understand and agree that reformatting of the HDD will result in loss of
your stored data, files or software. To avoid loss or erasure of any software,
data or files you may have stored on the hard disk and which you consider
private or confidential or which you wish to retain, before submitting the
Product for guarantee service you should where possible back these up and
remove them. Clearing your PlayStation
your information.
9. You understand that this Guarantee does not cover stored data and you agree
that SCEE is not liable to you for any loss or corruption of your data, files or
software resulting from repair or replacement of the Product under this
Guarantee.
10. You should back up your hard disk regularly to prevent loss or alteration of
data, although some content cannot be back up and must be reinstalled by
the user.
11. To avoid damage to or loss or erasure of removable external data storage
media or peripherals or non-PS3™ components, you must remove these
before submitting the Product for guarantee service.
12. You may not claim under this Guarantee when the Product is damaged as a
result of:
i. commercial use, accident, fair wear and tear, negligence, abuse, or misuse
(including, without limitation, failure to use this Product for its normal
purpose and/or in accordance with instructions on proper use and
maintenance, or installation or use in a manner inconsistent with applicable
local technical or safety standards);
ii. use in conjunction with any unauthorised peripheral (including, without
limitation, game enhancement devices, hard disk drives, adaptors and
power supply devices);
iii. any adaptation or adjustment to, or alteration of, the Product carried out for
any reason, and whether properly carried out or not;
iv. maintenance or repair or attempted repair carried out other than by a SCEE
authorised service facility;
v. use in conjunction with unauthorised software, virus infection, or fire, flood
or other natural calamity; or
Network password is helpful to protect
®
vi. operation or treatment of the Product inconsistent with normal personal or
domestic use or operation outside the Product specifications.
13. You may not claim under this Guarantee where you are in material breach of
your system software licence (see http://www.scei.co.jp/ps3-eula).
14. To the extent permitted by applicable law, this Guarantee will be your sole and
exclusive remedy in relation to defects in this Product and all other guarantees,
warranties, terms and conditions, express or implied by statue or otherwise, in
respect of this Product are excluded and neither SCEE nor any its affiliates or
suppliers, will be liable for any special, incidental, indirect or consequential
loss or damage including loss of data, howsoever arising.
15. SCEE does not warrant or guarantee any third party product or service which
may be offered in connection with the Product.
If this Product needs any repair which is not covered by this Guarantee, please
call your local Customer Service helpline for advice (please see separate insert
for helpline details).
GB
GUARANTEE
51
Page 52

Copyright and trademarks
" ", "PlayStation", "DUALSHOCK", " " and " " are registered
trademarks of Sony Computer Entertainment Inc. "
same company.
"XMB" and "xross media bar" are trademarks of Sony Corporation and Sony
Computer Entertainment Inc.
"SONY" and "
"Memory Stick Duo", "
name and logo are trademarks or registered trademarks of Sony Corporation.
"AVCHD" and "AVCHD" logo are trademarks of Panasonic Corporation and Sony
Corporation.
" are registered trademarks of Sony Corporation. "Memory Stick",
", "ATRAC", "BRAVIA" logo, "BRAVIA" and the "x.v.Colour"
" is a trademark of the
Contains Macromedia® Flash® Player technology by Adobe
Copyright © 1995-2008 Adobe Systems Incorporated. All rights reserved. Flash,
Macromedia, and Macromedia Flash are either trademarks or registered
trademarks of Adobe Systems Incorporated in the United States and/or other
countries.
© 2006 All Media Guide, LLC
Content and technology provided by All Media Guide
"Blu-ray Disc" and
Copyright © 2004-2006 Cambridge Silicon Radio Ltd.
The Bluetooth
any use of such marks by Sony Computer Entertainment Inc. is under license.
Other trademarks and trade names are those of their respective owners.
word mark and logos are owned by the Bluetooth SIG, Inc. and
®
are trademarks.
.
®
52
Page 53

DivX, DivX Certified, and associated logos are trademarks of DivX, Inc. and are
used under license.
DLNA and DLNA CERTIFIED are trademarks and/or service marks of Digital
Living Network Alliance.
Manufactured under license under U.S. Patent #’s: 5,451,942; 5,956,674;
5,974,380; 5,978,762; 6,226,616; 6,487,535 & other U.S. and worldwide patents
issued & pending.
DTS is a registered trademark and the DTS logos, Symbol, DTS-HD and DTS-HD
Master Audio are trademarks of DTS, Inc.
© 1996-2008 DTS, Inc. All Rights Reserved.
Manufactured under licence from Dolby Laboratories. Dolby and the double-D
symbol are trademarks of Dolby Laboratories.
GB
Copyright and trademarks
U.S. and foreign patents licensed from Dolby Laboratories.
The DVD logo is a trademark.
All of the Japanese fonts and some parts of the Latin fonts in this machine use
characters provided by Fontworks Japan, Inc.
HDMI, the HDMI logo and High-Definition Multimedia Interface are trademarks or
registered trademarks of HDMI Licensing, LLC.
ATOK is a registered trademark of JUSTSYSTEM CORP. in Japan and other
countries.
53
Page 54

Copyright and trademarks
Anti-Grain Geometry - Version 2.0
Copyright © 2002-2004 Maxim Shemanarev (McSeem)
Permission to copy, use, modify, sell and distribute this software is granted
provided this copyright notice appears in all copies.
This software is provided "as is" without express or implied warranty, and with no
claim as to its suitability for any purpose.
This product includes RSA BSAFE
Inc.
RSA, BSAFE are either registered trademarks or trademarks of RSA Security Inc.
in the United States and/or other countries.
RSA Security Inc. All rights reserved.
This product adopts S3TC texture compression technology under licence from S3
Graphics, Co., Ltd.
Cryptographic software from RSA Security
®
Java and all Java based trademarks and logos are trademarks or registered
trademarks of Sun Microsystems, Inc. in the U.S. and other countries.
@(#)fdlibm.h 1.5 95/01/18
Copyright © 1993 by Sun Microsystems, Inc. All rights reserved
Developed at SunSoft, a Sun Microsystems, Inc. business.
Permission to use, copy, modify, and distribute this software is freely granted,
provided that this notice is preserved.
MPEG Layer-3 audio coding technology and patents licenced from Fraunhofer IIS
and Thomson.
Mp3Surround audio coding technology and patents licensed from Fraunhofer IIS,
Thomson, and Agere.
The USB-IF Logos are trademarks of Universal Serial Bus Implementers Forum,
Inc.
54
Page 55

and Zi® are registered trademarks of Zi Corporation.
eZiText
®
Portions of this software are copyright © 1996-2008 The FreeType Project
(www.freetype.org). All rights reserved.
This software is based in part on the work of the Independent JPEG Group.
Visit http://www.scei.co.jp/ps3-license/index.html for other licensees and
trademarks.
All other trademarks are the property of their respective owners.
GB
Copyright and trademarks
55
Page 56

ПРЕДУПРЕЖДЕНИЕ
Bо избeжaниe поpaжeния элeктpичecким током
нe откpывaйтe коpпyc aппapaтa. Для peмонтa
обpaщaйтecь только к квaлифициpовaнномy
cпeциaлиcтy.
Пpeдyпpeждeниe
Использование, регулировка или
обслуживание изделия способами, не
упомянутыми в данном руководстве, может
привести к воздействию опасного излучения.
Иcпользовaниe оптичecкиx пpибоpов c дaнным
издeлиeм являeтcя пpичиной повышeнной
опacноcти для зpeния.
CLASS 1 LASER PRODUCT
LASER KLASSE 1 PRODUKT
Изделие относится к 1 КЛАССУ ЛАЗЕРОВ согласно
IEC60825-1:2007.
Изготовитель данного устройства - Sony Computer Entertainment Inc., 2-6-21
Minami-Aoyama, Minato-ku Tokyo, 107-0062 Japan.
Распространитель - Sony Computer Entertainment Europe Ltd, 10 Great
Marlborough Street, London, W1F 7LP.
Приступ при воздействии мельканий света
(фотосенситивная или светочувствительная
эпилепсия)
Если вы страдаете эпилепсией или тяжелыми приступами, то перед
воспроизведением игр на этом устройстве проконсультируйтесь у врача. При
воздействии мелькающего света или при другом световом воздействии
экрана телевизора или экрана с видеоигрой некоторые люди испытывают
дискомфорт глаз, ухудшение зрения, головную боль, мышечные судороги,
конвульсии. Может также наступить потеря сознания или потеря
ориентации. Если во время игры у вас наблюдаются какие-либо из
перечисленных выше симптомов, немедленно прекратите использование
системы и проконсультируйтесь у врача.
При появлении следующих симптомов немедленно прекратите игру
Кроме перечисленных симптомов, игру следует прекратить при
возникновении следующих ощущений: головная боль, головокружение,
тошнота, утомление, симптомы как при укачивании, дискомфорт или боль
в любой части тела - глазу, ухе, ладони, руке, ноге и т.п. Если такое
состояние не проходит, обратитесь за медицинской помощ ью.
Радиоизлучение
Радиоизлучение может создать помехи для электронного оборудования и
медицинских приборов (например, для кардиостимуляторов) или вызвать их
повреждение, что приведет к тяжелым последствиям.
Лица, пользующиеся электрокардиостимуляторами и другими
медицинскими приборами, перед работой в беспроводной сети (с
применением функций Bluetooth
должны проконсультироваться с врачом или изготовителем медицинского
прибора.
или беспроводной локальной сети)
®
56
Page 57

Работа в беспроводной сети не допускается в следующих местах:
– Зоны, в которых работа в беспроводной сети запрещена, например,
больницы. При работе с системой на территории медицинских
учреждений соблюдайте правила, установленные для этих учреждений.
– Вблизи пожарной сигнализации, автоматических дверей и другого
автоматизированного оборудования.
3D-изображения
Некоторые люди могут испытывать неприятные ощущения (чрезмерное
напряжение зрения, утомление глаз, тошноту) при просмотре видео в
стереорежиме или при игре в видеоигры на телевизорах с поддержкой
стереоизображения. При появлении неприятных ощущений следует
немедленно прекратить использование телевизора.
Обычно рекомендуется избегать продолжительного использования системы
PlayStation
Однако при просмотре видео в стереорежиме или при игре в видеоигры в
стереорежиме на телевизорах с поддержкой стереоизображения
необходимая продолжительность и периодичность перерывов различаются
для разных людей – пожалуйста, делайте достаточно долгие перерывы,
чтобы не испытывать никаких неприятных ощущений. Если симптомы
сохраняются, обратитесь к врачу.
Зрение маленьких детей (особенно в возрасте до шести лет) продолжает
развиваться. Проконсультируйтесь с педиатром или детским офтальмологом
перед тем, как разрешить маленьким детям смотреть видео в стереорежиме
или играть в видеоигры на телевизорах с поддержкой стереоизображения.
Взрослые должны проконтроллировать соблюдение маленькими детьми
изложенных выше рекомендаций.
3 и делать 15-минутные перерывы после каждого часа игры.
®
Системное программное обеспечение
На системное программное обеспечение, входящее в состав данного
продукта, распространяется действие ограниченной лицензии Sony
Computer Entertainment Inc. Подробнее см. веб-сайт
http://www.scei.co.jp/ps3-eula
Контроль над экспортом
Это изделие может подпадать под действие местного законодательства по
контролю экспорта. В отношении данного изделия вы должны полностью
соблюдать требования такого законодательства и всех других применимых
законов любой юрисдикции.
RU
ПРЕДУПРЕЖДЕНИЕ
57
Page 58

Содержание
ПРЕДУПРЕЖДЕНИЕ..................................................................... 56
Меры предосторожности .............................................................. 59
Информация о системе PS3™ в Интернете ............................... 64
Меню XMB™ (XrossMediaBar).......................................................65
Названия основных частей ...................................................66
Начало работы ........................................................................ 67
Способы подключения ................................................................ 67
Выполните первоначальную настройку системного
программного обеспечения ......................................................... 69
Видеовыход системы PS3™ ........................................................ 70
Подключение цифровых аудиоустройств .................................. 74
Включение и выключение системы PS3™ ........................... 76
Использование беспроводного контроллера ....................... 77
Воспроизведение данных ......................................................79
Blu-ray Disc (BD)/DVD/CD .............................................................79
Воспроизведение данных с устройств USB .............................. 80
Поддерживаемые форматы файлов ..........................................80
Игры ......................................................................................... 81
Совместимость игр ......................................................................81
Запуск/выход из игры ..................................................................81
Настройки контроллера .............................................................. 81
Сохраненные данные для программного обеспечения
формата PlayStation®3 ................................................................. 82
Сохраненные данные для программного обеспечения
формата PlayStation® ................................................................... 82
Настройка сети .......................................................................83
Настройка сети (проводной) ....................................................... 84
Настройка сети (беспроводной) .................................................84
58
Настройка специальных параметров.........................................86
Подключение к Интернету .................................................... 87
Использование Веб-браузера .....................................................87
Просмотр руководства пользователя ........................................ 87
Создание учетной записи PlayStation
Network ......................... 87
®
Обновления системы PS3™ ..................................................88
Использование экранной клавиатуры .................................. 90
Родительский контроль ......................................................... 91
Замена жесткого диска .......................................................... 92
Резервное копирование данных ................................................92
Извлечение жесткого диска .......................................................93
Замена жесткого диска ............................................................... 94
Переустановка программного обеспечения системы ...............96
Восстановление данных из резервной копии ...........................97
Перенос данных в другую систему PS3™/
восстановление системы ....................................................... 98
Перенос данных в другую систему PS3™..................................98
Прежде чем выбросить или передать кому-либо
систему PS3™ ..............................................................................98
Перед обращением в службу ................................................. 99
Характеристики .......................................................................... 105
ГАРАНТИЯ .................................................................................... 109
Авторские права и товарные знаки ...........................................112
Page 59

Меры предосторожности
Безопасность
При разработке данного изделия учтены все требования к обеспечению
полной безопасности пользователя. Однако любой электрический прибор
при неправильном использовании является потенциальным источником
возгорания, поражения электрическим током или травмы. Для обеспечения
безопасной работы изделия следуйте данной инструкции.
Ознакомьтесь со всеми предупреждениями, мерами предосторожности и
инструкциями.
Регулярно проверяйте шнур питания на наличие повреждений, пыли и
грязи на сетевой вилке или розетке.
Если устройство работает неправильно, издает необычные звуки,
испускает запахи или разогревается настолько, что к нему невозможно
прикоснуться, прекратите использование, отключите шнур питания от
электросети и отсоедините все прочие кабели.
Обращайтесь в соответствующую службу технической поддержки
PlayStation
программному обеспечению PlayStation
, адрес которой можно найти в каждом руководстве по
®
3.
®
Использование и обслуживание
Используйте устройство в хорошо освещенном помещении, располагая его
на безопасном расстоянии от телевизионного экрана.
Старайтесь не использовать систему PS3™ слишком долго. Включайте в
каждый час игры 15-минутный перерыв.
Не рекомендуется играть, если вы чувствуете усталость или нуждаетесь в
отдыхе.
Если у вас появилось чувство усталости, дискомфорта или боли в руках
при работе с беспроводным контроллером, немедленно прекратите
использование системы. Если такое состояние не проходит, обратитесь к
врачу.
Если у вас имеются какие-либо из перечисленных ниже проблем со
здоровьем, немедленно прекратите использование системы. Если
симптомы сохраняются, обратитесь к врачу.
– Головокружение, тошнота, усталость или симптомы, похожие на
укачивание
– Дискомфорт или боль в какой-либо части тела, например, в глазах,
ушах, к истях рук или предплечьях
Храните систему и принадлежности, включая кабели и крепеж, в
недоступном для маленьких детей месте.
Не подключайте к системе никакие кабели, кроме кабеля USB, когда
устройство включено (индикатор питания горит зеленым).
Не прикасайтесь к системе, подключенным к ней кабелям и аксессуарам
во время грозы.
Не используйте систему или аксессуары вблизи водоемов.
Не допускайте попадания внутрь системы жидкости, мелких частиц или
инородных предметов.
Не касайтесь разъемов системы или аксессуаров.
Не подвергайте систему и аксессуары воздействию сигаретного дыма,
пыли или пара. Кроме того, не устанавливайте систему в местах,
подверженных большому скоплению пыли или сигаретного дыма. Частицы
пыли или сигаретного дыма осаждаются на внутренних компонентах
(например, на линзе), что может привести к возникновению неполадок в
системе.
Не подвергайте систему или аксессуары воздействию высоких
температур, высокой влажности или прямых солнечных лучей.
Не устанавливайте систему и аксессуары на неустойчивые, наклонные или
вибрирующие поверхности.
Устанавливайте систему только в горизонтальном или вертикальном
положении. Для размещения системы в вертикальном положении
используйте вертикальную подставку (продается отдельно) для
соответствующей модели системы. Не меняйте положение системы, когда
она включена.
Соблюдайте осторожность при переноске системы. При недостаточно
надежном захвате возможно падение системы, которое может привести к
повреждению оборудования или травме.
RU
Меры предосторожности
59
Page 60

Меры предосторожности
Не перемещайте систему и не изменяйте ее положение, если установлен
диск. При вибрации диск или система могут быть повреждены.
Не выключайте систему во время сохранения или загрузки данных с
жесткого диска.
Не вставайте и не кладите предметы на систему, не ставьте ее так,
чтобы она тесно соприкасалась с другими устройствами.
Не устанавливайте систему и подключенные аксессуары на пол или в
места х, где об них можно споткнуться.
Во время использования не допускайте долгого контакта тела с
системой, а также воздухом, выходящим из вентиляционных отверстий
системы. Длительный контакт может привести к низкотемпературному
ожогу.
При подк лючении системы к плазменному или проекционному*
телевизору не оставляйте на экране неподвижное изображение в
течение длительного времени. Это может привести к тому, что слабое
изображение останется на экране постоянно.
* Это не касается ЖК-экранов
Родителям рекомендуется следить за игрой детей через Интернет для
обеспечения безопасного и ответственного использования Интернета.
Подробнее см.веб-сайт http://www.ps-playsafeonline.com.
Правила техники безопасности при
использовании беспроводного контроллера
DUALSHOCK
Не используйте функцию вибрации при заболеваниях или повреждениях
костей, суставов или мышц рук. Если вы больны или травмированы,
используйте беспроводной контроллер DUALSHOCK
выключенной функц ией вибрации ([Выключить]).
При использовании датчика перемещения бес проводного контроллера
необходимо соблюдать следующие требования. Если контроллер
заденет окружающих людей или предметы, это может вызвать его
повреждение и причинить вред окружающим.
3*
®
3 только с
®
– Перед началом использования убедитесь, что вокруг вас достаточно
свободного места.
– Крепко держите беспроводной контроллер, чтобы избежать его
случайного повреждения и причинения вреда окружающим.
– Используя беспроводной контроллер с кабелем USB, не выдергивайте
кабель из системы PS3™ и следите, чтобы он не задевал окружающих
людей и предметы.
* А также других контроллеров.
Вентиляционные отверстия
Не перекрывайте вентиляционные отверстия. Для обеспечения надлежащей
вентиляции следуйте приведенным ниже инструкциям.
Расположите систему на расстоянии не менее 10 см от поверхности
стены.
Не устанавливайте систему на ковровое покрытие или ковер с длинным
ворсом.
Не устанавливайте систему в узком, тесном пространстве.
Не накрывайте систему тканью.
Не допускайте скопления пыли на вентиляционных отверстиях.
Использование шнура питания
Для обеспечения безопасной работы регулярно проверяйте шнур
питания. Если шнур поврежден, немедленно прекратите использование
системы и обратитесь в соответствующую службу технической
поддержки PlayStation
руководстве к программному обеспечению PlayStation
Используйте только прилагаемый шнур питания. Не модифицируйте
шнур питания.
Не касайтесь мокрыми руками сетевой вилки.
, адрес которой можно найти в каждом
®
3.
®
60
Page 61

Не допускайте сжатия и перегиба шнура питания, в особенности у
сетевой вилки, у розетки и в месте присоединения шнура к системе.
Не ставьте на шнур тяжелых предметов.
Не располагайте шнур питания вблизи нагревательного оборудования и
не подвергайте его воздействию тепла.
Не допускайте скопления пыли или посторонних веществ у разъема AC
IN. Перед подключением к системе или к электрической розетке шнура
питания проверьте, нет ли пыли или посторонних веществ на сетевой
вилке, соединительном конце шнура, электрической розетке или на
разъеме AC IN на задней панели системы. Если сетевая вилка или
разъем загрязнены, перед подключением протрите их сухой тканью.
Перед чисткой системы или ее перемещением, а также в случае
продолжительного перерыва в ее использовании извлеките сетевую
вилку шнура питания из электрической розетки. Вынимая шнур питания
из розетки, держитесь за сетевую вилк у и тяните его из розетки прямо.
Запрещается тянуть за шнур и вытаскивать сетевую вилку под углом к
розетке.
Не подсоединяйте шнур питания к трансформатору или инвертору.
Подсоединение шнура питания к транс форматору напряжения для
заграничных поездок или к инвертеру д ля использования системы в
автомобиле может привести к перегреву системы, что в свою очередь
может стать причиной ожогов или неисправности.
Не разбирайте и не вносите изменения в
систему или аксессуары
Используйте систему PS3™ и аксессуары в соответствии с инструкциями в
данном руководстве. Не разрешается анализ или модификация системы и
аксессуаров, а также анализ и использование примененных в них
схемотехнических решений. В случае несанкционированной модификации
системы или аксессуаров гарантия будет аннулирована. В системе PS3™ нет
компонентов, обслуживание которых может выполняться пользователем
(прилагаемый жесткий диск разрешается извлекать, но не разбирать или
модифицировать). Кроме того, существует риск попадания под лазерное
излучение, а также поражения электрическим током.
Сеть
Для подключения к сети необходим широкополосный доступ в
Интернет.
Все расходы, связанные с доступом в Интернет, несет пользователь.
Для получения подробных сведений см. информацию, предоставленную
вашим сервисным центром, или обратитесь к поставщику услуг
Интернета.
Используйте только кабель Ethernet, совместимый с сетями 10BASE-T,
100BASE-TX или 100 0BASE-T. Не используйте кабель, предназначенный
для традиционной телефонной линии или кабели, не упомянутые в
настоящей документации. При использовании кабеля неподходящего
типа через разъем LAN может проходить больше электрического тока,
чем необходимо, что может стать причиной перегревания, возгорания
или неисправности.
Функция беспроводной связи
Диапазон радиоволн 2,4 ГГц, используемый функцией беспроводной
связи данного продук та, характерен для различных устройств. Данный
продук т менее подвержен помехам со стороны устройств, работающих в
таком же диапазоне. Однако в отдельных случаях помехи от других
устройств могут уменьшить скорость соединения, сократить диапазон
сигна ла или привести к внезапному прерыванию связи.
При использовании функции сканирования системы PS3™ для выбора
точки доступа беспроводной сети могут быть найдены точки доступа,
не предназначенные для общего поль зования. Подк лючайтесь только к
разрешенной точке доступа, либо к точке, доступной через
беспроводные сети общего пользования или общественные точки
доступа.
RU
Меры предосторожности
61
Page 62

Меры предосторожности
Конденсация влаги
Если система или диск переносятся с холода в теплое помещение, то на
линзе внутри системы или на диске может сконденсироваться влага. В этом
случае система может работать неправильно. Извлеките диск, выключите
систему и извлеките вилку из розетки. Не вставляйте диск в систему до тех
пор, пока влага не испарится (этот процесс может занять несколько часов).
Если система продолжает работать неправильно, обратитесь в
соответствующую службу технической поддержки PlayStation
которой можно найти в каждом руководстве по программному обеспечению
PlayStation
3.
®
, адреса
®
Очистка
По соображениям безопасности перед очисткой системы или подключенных
к ней аксессуаров отсоедините шнур питания от электросети.
Внешние поверхности (пластиковый корпус
системы и беспроводного контроллера)
Следуйте приведенным ниже инструкциям по предотвращению повреждения
или обесцвечивания внешней поверхности продукта.
Протирайте сухой мягкой тканью.
Не применяйте инсектициды или другие летучие вещества.
Не оставляйте на внешней поверхности продукта материалы из резины
или винила в течение длительного времени.
Не применяйте растворители и другие химикаты. Не используйте для
очистки химически обработанную чистящую ткань.
Вентиляционные отверстия
При скоплении пыли в вентиляционных отверстиях системы удалите ее с
помощью пылесоса малой мощности.
Разъемы
Не используйте систему, если загрязнены разъемы или шнур питания. В
противном случае электропитание системы может быть нарушено. Удалите
пыль с помощью мягкой материи.
Диски
Примечание относительно совместимости
Некоторые носители, имеющие региональные или территориальные
ограничения, могут не поддерживаться системой. Подробности см. на
упаковке носителя.
Использование
При выполнении каких-либо действий с диском держите его за края, не
касаясь поверхности.
Не пишите на дисках, не приклеивайте на них бумагу или скотч.
Отпечатки пальцев, пыль, грязь или царапины на диске могут стать
причиной искажения изображения или ухудшения качества звука.
Обращайтесь с дисками аккуратно, перед использованием диска
проверяйте чистоту его поверхности.
Хранение
Не подвергайте диски воздействию высоких температур, высокой
влажности или прямых солнечных лучей.
Диски, которые не планируется использовать в течение долгого времени,
следует хранить в специальных футлярах. Складывание дисков в стопку
без футляров, а также размещение их под углом может привести к
деформации дисков.
62
Page 63

Способ очистки
Протирайте диски мягкой материей в направлении от
центра к краям, слегка нажимая.
Во избежание повреждения дисков не применяйте
растворители, чистящие средства, антистатические спреи
и другие химикаты.
RU
Меры предосторожности
63
Page 64

Информация о системе PS3™ в Интернете
В данном руководстве описаны характеристики оборудования и представлены
базовые сведения о настройке и работе системы PS3™, а также рекомендации
по технике безопасности и правильному использованию системы. Помимо этого,
вы можете получить следующую информацию через Интернет.
Интерактивное руководство пользователя
адрес: eu.playstation.com/manuals
Это руководство содержит подробные инструкции по использованию системы PS3™.
Обновления программного обеспечения системы
http://eu.playstation.com/ps3
На этом веб-сайте представлены последние обновления системного программного
обеспечения.
PlayStation®3 - официальный веб-сайт http://eu.playstation.com/ps3
На официальном веб-сайте PlayStation®3 представлена информация о программном
обеспечении, оборудовании и аксессуарах.
Поддержка http://eu.playstation.com/help-support
Официальный веб-сайт технической поддержки PlayStation® содержит ответы на наиболее
часто встречающиеся вопросы о вашем продукте.
Друзья
Чат и обмен сообщениями
PlayStation®Network
Использование служб
PlayStation®Network
Сеть
Подключение к Интернету
Игра
Игры
Видео
Воспроизведение видео
Проверьте наличие следующих элементов. Если что-либо отсутствует, обратитесь
в соответствующую службу технической поддержки PlayStation®, адрес которой
можно найти в каждом руководстве по программному обеспечению PlayStation®3.
Система PlayStation®3
Печатные материалы
Шнур питания AC
Информация о функциях системы и приведенные в данном документе изображения могут
отличаться от вашей системы PS3™ - это зависит от используемой версии программного
обеспечения системы.
Кабель AV Кабель USB
Беспроводной контроллер
DUALSHOCK®3
64
Mузыка
Воспроизведение музыки
Фото
Отображение изображений
Настройки
Настройка параметров системы
PS3™
Пользователи
Выбор пользователей, которые
имеют доступ в систему PS3™
Page 65

Меню XMB™ (XrossMediaBar)
Система PS3™ имеет пользовательский интерфейс, который называется XMB™ (XrossMediaBar).
Категория
Элемент
Меню параметров Панель управления
Отображается при выборе значка и
нажатии кнопки
Отображается при нажатии кнопки
во время воспроизведения
Кнопка PS :
Отображение меню XMB
Включение/выключение
системы
Выход из игры
Кнопки
направлений:
Используются для выбора
категорий/элементов
экрана
Кнопка :
™
Отображение меню
параметров/панели
управления
Кнопка :
Отмена операции
Кнопка :
Подтверждение
выбора элемента
65
Page 66

Названия основных частей Нач
66
Передняя/задняя панель системы
Щель дисковода
Кнопка питания
Кнопка извлечения
Индикатор WLAN
Индикатор HDD
Разъемы USB
Разъем LAN
Разъем HDMI OUT
Внимание
Не используйте систему в местах, к которым закрыт доступ воздуха,
или в местах, где система может нагреться. При невыполнении
данной рекомендации система может перегреться, что приведет к
возгоранию, травме или возникновению неисправности.
Если температура вну три системы поднимается, индикатор питания
начинает поочередно мигать красным и зеленым. В данном с лучае
выключите систему (
время. После того как система остынет, установите ее в месте с
хорошей вентиляцией, а затем ее можно использовать.
стр. 76) и не используйте ее некоторое
диска
Вентиляционное отверстие
Разъем AC IN
Разъем AV MULTI OUT
Разъем DIGITAL OUT
(OPTICAL)
Беспроводной контроллер DUALSHOCK®3
Индикаторы портов
Кнопка L2
Кнопка L1
Кнопки направлений
Левый джойстик/
кнопка L3*
Кнопка SELECT
* Функции кнопок L3 и R3 доступны при нажатии джойстика.
Примечания
Не устанавливайте систему в местах, подверженных большому
скоплению пыли или сигаретного дыма. Частицы пыли или сигаретного
дыма осаждаются на внутренних компонентах (например, на линзе),
что может привести к возникновению неполадок в системе.
Не перемещайте систему и не меняйте ее положение, когда индикатор
питания мигает зеленым светом. Вибрация в результате перемещения
системы может привести к потере или повреждению данных или к
повреждению системы.
Подсказка
При размещении системы в вертикальном положении используйте
вертикальную подставку (продается отдельно).
Разъем USB
Кнопка R2
Кнопка R1
Кнопка
Кнопка
Кнопка
Кнопка
Правый джойстик/
кнопка R3*
Кнопка START
Кнопка PS
Page 67

Начало работы
Способы подключения
Разъем
HDMI OUT
Если на экране не появляется
изображение
При изменении типа кабеля, используемого для
подключения системы к телевизору,
видеоизображение может не отображаться на
экране. Если изображение не появляется,
выключите и снова включите систему нажатием на
кнопку питания в течение пяти и более секунд
(прозвучат два звуковых сигнала). Параметры
вывода видео будут сброшены и видеоизображение
отобразится со стандартным разрешением (SD).
Разъем
AV MULTI OUT
Подключите систему к телевизору
Подключить систему к телевизору можно любым из приведенных ниже способов.
Вывод видео в SD (стандартном разрешении)
Разъем
AV MULTI OUT
Кабель AV
VIDEO L
AUDI O
R
Телевизор
Вывод видео в HD (высоком разрешении) - компонентный
COMPONENT VIDEO IN AUDIO IN
YLR
P
B
/C
B
P
R
/C
Разъем
AV MULTI OUT
Компонентный кабель аудио/
видео (продается отдельно)
R
Телевизор
Вывод видео в HD (высоком разрешении) - HDMI™
Разъем
HDMI OUT
Подсказки
Подробнее о типах кабелей вывода видео и поддерживаемых режимах см. в разделах
"Видеовыход системы PS3™" (
Вы не сможете подключить аудиоустройства, поддерживающие цифровое воспроизведение
звука, такие как AV-ресивер для домашнего использования. Подробнее см. в разделе
"Подключение цифровых аудиоустройств" (
Кабель HDMI (продается отдельно)
Телевизор
стр. 70) и "Типы кабелей видеовыхода" ( стр. 71).
стр. 74).
RU
Начало работы
67
Page 68

Начало работы
Подключите кабель Ethernet (продается отдельно)
Используйте кабель Ethernet для подключения системы к Интернету.
68
Разъем LAN Разъем AC IN
Подсказка
Для подключения к Интернету без использования кабеля Ethernet воспользуйтесь
беспроводным сетевым соединением. Подробнее см. в разделе "Настройка сети" (
Внимание
Не подключайте кабель стандартной телефонной линии или другие типы проводов, которые
несовместимы с системой, непосредственно к разъему LAN системы - это может привести к
нагреванию, возгоранию или возникновению неисправностей.
Подключите шнур питания AC
После подключения шнура питания AC к розетке индикатор питания на системе
PS3™ загорится красным светом ( стр. 76).
В некоторых регионах и странах могут
использоваться отличные от
приведенной на иллюстрации вилки
для электрических розеток.
Внимание
Не подключайте шнур питания AC системы к электрической розетке, пока все не будет
подключено.
стр. 83).
Page 69

Выполните первоначальную настройку
системного программного обеспечения
После включения системы выполните первоначальную настройку.
1 Включите телевизор, затем установите режим видеовхода,
соответствующий входному разъему, используемому
системой PS3™.
2 Нажмите кнопку питания.
Индикатор питания загорится зеленым, и изображение отобразится
на экране телевизора.
Индикатор питания
Кнопка питания
3 Подключите беспроводной контроллер к системе с
помощью кабеля USB.
4 Нажмите кнопку PS на контроллере.
Система распознает контроллер. Пос ле распознавания контроллера
отобразится экран первоначальной настройки.
5 Выполните первоначальную настройку.
Следуя инс трукциям на экране, введите настройки языка системы,
часового пояса, даты, времени и имени пользователя.
Открывается экран для настройки с оединения с Интернетом. При
соединении с исполь зованием кабеля Ethernet базовые настройки
будут выбраны автоматически при выполнении инструкций,
отобра жаемых на экране. При подключении к беспроводной
локальной сети следуйте инструкциям по настройке соединения в
разделе "Настройка сети (беспроводной)" (
После завершения настройки на экарне телевизора отобразится
меню XMB™ (
Подсказки
Если для подключения системы к телевизору используется кабель HDMI,
во время первоначальной настройки отображается экран для изменения
разрешения изображения. Если выбрать [Да] и нажать кнопку
автоматически задается оптимальное разрешение изображения.
Для получения дополнительной информации о вводе текста см. pаздел
"Использование экранной клавиатуры" (
Параметры, введенные при первоначальной настройке, можно изменить в
меню
подробной информации см. интерактивное руководство пользователя
(адрес: eu.playstation.com/manuals).
стр. 65).
(Настройки) или (Пользователи). Для получения более
стр. 84).
,
стр. 90).
RU
Начало работы
69
Page 70

Начало работы
Видеовыход системы PS3™
Система PS3™ может выводить данные с разрешением двух типов: HD и SD. Чтобы узнать, какой видеорежим поддерживается, см.
руководство по эксплуатации телевизора.
Видеорежим *
Форматное
соотношение
1
*
Этот номер показывает количество линий сканирования. Следует заметить, что "i" используется для обозначения "чересстрочной развертки" и "p"
используется для обозначения "прогрессивной развертки". Прогрессивная развертка используется для получения высококачественного видео с
минимальным мерцанием.
2
Параметры видеовыхода в системе будут отображаться как [Стандартные (PAL)].
*
1
1080p 1080i 720p 576p 576i *
16:9 16:9 16:9
Демонстрация разницы разрешений
Экран HD Экран SD
70
(Высокое разрешение)
HD
(Стандартное разрешение)
SD
16:9
4:3
16:9
4:3
2
Page 71

Типы кабелей видеовыхода
Разрешение телевизора изменяется в зависимости от входных разъемов телевизора и типа используемого кабеля. Выберите кабель,
соответствующий используемому телевизору.
RU
Начало работы
Поддерживаемые
видеорежимы*
1
1080p / 1080i / 720p / 576p
1080p / 1080i / 720p / 576p / 576i*
576i*
576i*
Кабель HDMI*2
(продается отдельно)
Компонентный кабель
аудио/видео
(продается отдельно)
Кабель S VIDEO
(продается отдельно)
Кабель AV
(прилагается)
Тип кабеля Входной разъем на телевизоре
Разъем HDMI IN
Компонентный разъем
VIDEO IN
Разъем S VIDEO IN
COMPONENT VIDEO IN AUDIO IN
YLRPR/CRPB/CB
S VIDEO L-AUDI O-R
Разъем VIDEO IN
(композитный)
VIDEO L-AUDI O-R
*1 В зависимости от типа телевизора или воспроизводимых материалов некоторые видеорежимы могут не поддерживаться.
2
*
Подключите систему к телевизору с помощью кабеля HDMI (продается отдельно). С помощью кабеля HDMI можно выводить видео- и аудиоданные,
благодаря чему видео и звук воспроизводятся в цифровом качестве.
3
Параметры видеовыхода в системе будут отображаться как [Стандартные (PAL)].
*
3
3
3
71
Page 72

Начало работы
Настройка параметров видеовыхода
В зависимости от настроек видеовыхода и типа используемого
кабеля может потребоваться настроить параметры видеовыхода
системы PS3™ для отображения с разрешением HD на экране
телевизора (
Если видео не отображается
Установите видеовход телевизора в соответствии с входным
разъемом, используемым для подключения системы.
Выключите и снова включите систему нажатием на кнопку питания в
течение пяти и более секунд (прозвучат два звуковых сигнала).
Параметры вывода видео будут сброшены и видеоизображение
отобразится со стандартным разрешением (SD).
стр. 70).
1 Выберите (Настройки) (Настройки экрана)
[Настройки вывода видео] и нажмите кнопку .
2 Выберите входной разъем ( стр. 71), используемый на
телевизоре, и нажмите кнопку .
Если выбрать [HDMI], на следующем экране необходимо выбрать
[Автоматически] или [Специальные]. В большинстве случаев достаточно
выбрать [Автоматически], параметры видеовыхода задаются
автоматически.
Если выбрать [AV MULTI / SCART], то на следующем экране необходимо
выбрать тип выходного сигнала. В большинстве случаев достаточно
выбрать [Y Pb/Cb Pr/Cr].
3 Подтвердите внесенные изменения и нажмите кнопку .
Если на шаге 2 изменен разъем, отобразится экран с запросом на
подтверждение изменения.
4 Подтвердите внесенные изменения, выбрав [Да], затем
нажмите кнопку .
Если на шаге 2 изменен разъем, отображается экран с запросом на
подтверждение параметров.
72
Page 73

5 Выберите разрешение, поддерживаемое телевизором, и
нажмите кнопку .
Разрешение телевизора изменяется в зависимости от входных
разъемов телевизора и типа используемого кабеля (
видеовыхода будет использовано максимальное выбранное разрешение.
В зависимости от разъема, выбранного на шаге 2, данный экран может
не отображаться.
стр. 71). Для
6 Подтвердите внесенные изменения, выбрав [Да], затем
нажмите кнопку .
В зависимости от разъема, выбранного на шаге 2, и разрешения,
выбранного на шаге 5, данный экран может не отображаться.
7 Выберите тип телевизора и нажмите кнопку .
Если в шаге 5 выбран параметр [Нормальный (PAL)] или [576p],
отображается экран для выбора размера экрана телевизора.
Настройте параметр в соответствии с используемым телевизором. Если
на шаге 5 выбрано разрешение [720p] или более высокое, тип
телевизора автоматически устанавливается как 16:9, экран для выбора
размера экрана телевизора не отображается.
8 Подтвердите настройки и нажмите кнопку .
Параметры видеовыхода сохраняются в системе.
RU
Начало работы
73
Page 74

Начало работы
9 Задайте настройки выхода аудио.
Далее задайте настройки выхода аудио. Задавайте настройки в
соответствии с используемым телевизором или аудиоустройством.
Если выбрать [HDMI], на следующем экране необходимо выбрать
[Автоматически] или [Вручную]. В большинстве случаев достаточно
выбрать [Автоматически].
Если для аудиовыхода с телевизора используется кабель, отличный от
кабеля HDMI, выберите [Разъем аудиоввода / SCART / AV MULTI]. Если
для вывода аудиосигнала используется оптический цифровой кабель,
выберите [Цифровой выход (Оптический)], а на следующем экране
выберите выходной формат.
10 Подтвердите настройки и нажмите кнопку .
Параметры аудиовыхода сохраняются в системе.
Подсказки
Настройку аудиовыхода можно выполнить в меню
(Настройки звука) [Настройки вывода аудио].
Если телевизор поддерживает воспроизведение стереоизображения 3D,
после шага 2 откроется окно настройки разрешения экрана телевизора.
Настройте необходимые параметры, следуя инструкциям на экране.
Подключите систему PS3™ к телевизору с поддержкой воспроизведения
стереоизображения 3D с помощью кабеля HDMI.
(Настройки)
Подключение цифровых аудиоустройств
Вы можете подключить аудиоустройства, поддерживающие
цифровое воспроизведение звука, такие как AV-ресивер для
домашнего использования.
Аудиовыход системы PS3™
Поддерживаемые каналы могут отличаться в зависимости от
используемого выходного разъема.
Выходные разъемы системы
PS3™
Разъем AV MULTI OUT
Разъем DIGITAL OUT (OPTICAL)
Разъем HDMI OUT
Подсказки
При подключении цифрового аудиоустройства к системе выберите
(Настройки) (Настройки звука) [Настройки вывода аудио] и
выполните настройку, необходимую для аудиоустройства.
Для одновременного вывода аудиосигнала с нескольких разъемов для
параметра
вывод аудио] следует выбрать значение [Включить].
Звук и видео могут выводиться из системы через кабель HDMI. Если на
телевизоре и аудиоустройстве есть разъемы HDMI, можно вывести
изображение на телевизор через подключенное аудиоустройство.
Если устройство подключено к системе PS3™ с помощью кабеля HDMI, не
отключайте устройство, пока система включена (индикатор питания
светится зеленым). Это может привести к искажению звука или
воспроизведению необычных звуков.
(Настройки) (Настройки звука) [Многоканальный
Каналы, которые можно использовать
для выхода
2 Ch. 5.1 Ch. 7.1 Ch.
74
Page 75

Примеры подключения аудиоустройства
Кабель HDMI или оптический цифровой кабель можно
использовать для подключения аудиоустройства к системе PS3™.
Кабель HDMI Оптический цифровой кабель
RU
Начало работы
Кабель HDMI
(продается
отдельно)
Кабель HDMI
(продается
отдельно)
Телевизор Телевизор
Оптический цифровой
кабель для аудио
(продается отдельно)
Цифровое аудиоустройство
Кабель видеовыхода
для используемого
телевизора (
стр. 71)
75
Page 76

Включение и выключение системы PS3™ Исп
Включение системы
1 Нажмите кнопку питания.
Индикатор питания загорится зеленым светом, указывая, что система
включена.
Индикатор питания:
светится зеленым
Кнопка питания
2 Нажмите кнопку PS на контроллере.
Назначив контроллеру номер, вы сможете использовать контроллер для
управления системой.
Кнопка PS
Состояние индикатора питания
Состояние индикатора питания отражает состояние системы
PS3™.
Постоянный зеленый
Мигающий зеленый
Постоянный красный
Система включена
Система выключена
Система выключена (в режиме ожидания)
Выключение системы
1 Нажмите кнопку питания.
Индикатор питания светится красным.
Индикатор питания:
светится красным
Кнопка питания
Примечание
Когда индикатор питания светится или мигает зеленым, следуйте
приведенным ниже рекомендациям. В противном случае может
произойти потеря или повреждение данных или повреждение системы.
Не отключайте шнур питания AC от розетки.
Не перемещайте систему и не меняйте ее положение.
Подсказки
Перед использованием беспроводного контроллера его необходимо
зарегистрировать (создать пару) в системе (
Включить и отключить систему PS3™ можно также с помощью кнопки PS
на беспроводном контроллере. При использовании кнопки PS для
включения системы одновременно произойдет назначение контроллеру
номера. Чтобы отключить систему, нажмите кнопку PS, удерживайте ее
более одной секунды, и следуйте инструкциям на экране.
Выключить систему PS3™ можно также с помощью меню XMB™.
Выберите
Если вы не собираетесь использовать систему в течение длительного
времени, убедитесь, что индикатор питания светится красным, и
отключите шнур питания AC от розетки.
(Пользователи) (Отключить систему).
стр. 77).
76
Page 77

Использование беспроводного контроллера
Подготовка к использованию
Чтобы использовать беспроводной контроллер, сначала
необходимо зарегистрировать его (как пару) в системе PS3™ и
назначить номер контроллеру.
Шаг 1. Регистрация контроллера в системе.
При использовании в первый раз
При использовании с другой системой PS3™
Шаг 2. Назначьте номер контроллера.
При каждом включении системы
Шаг 1. Подключите контроллер к системе
При первом использовании контроллера или при использовании
его с другой системой PS3™ сначала необходимо подключить
устройства. Если включить систему и подсоединить контроллер с
помощью кабеля USB, подключение выполнится автоматически.
Кабель USB (прилагается)
Проверьте, включена ли система
(индикатор питания постоянно
горит зеленым).
Шаг 2. Назначьте номер контроллера
При каждом включении системы необходимо назначать номер
контроллеру.
Нажмите кнопку PS.
Все индикаторы портов будут мигать.
1 234
Если для контроллера был назначен номер,
индикаторы портов для назначенного
номера будут постоянно гореть красным.
1 234
Можно подключить до 7 контроллеров одновременно. Номер
контроллера указывается над индикаторами портов. Для номеров
5-7 сложите номера горящих индикаторов.
Пример: был назначен номер контроллера 5.
11234
Подсказки
Подключение и назначение номеров контроллеров можно выполнять
только при включенной системе (когда индикатор питания постоянно
горит зеленым).
Когда подключенный контроллер используется с другой системой PS3™,
выполняется отключение от исходной системы. Снова подключите
контроллер к системе, если он использовался с другой системой.
Если контроллер или система выключены, индикаторы портов на
контроллере выключатся и назначенный номер будет отменен.
RU
Использование беспроводного контроллера
77
Page 78

Использование беспроводного контроллера
Использование контроллера по
беспроводной сети
Если отключить кабель USB, можно будет использовать
контроллер по беспроводной сети. Для использования контроллера
по беспроводной сети необходимо зарядить его батарею.
Подсказки
Кабель USB может быть подключен или отключен, когда контроллер и
система включены.
Если контроллер не работает, нажмите кнопку PS и еще раз назначьте
номер контроллера.
Зарядка контроллера
Когда система включена (индикатор питания горит зеленым),
подключите контроллер к системе с помощью кабеля USB.
Индикаторы портов контроллера начнут медленно мигать, и
начинается зарядка. По завершении зарядки индикаторы портов
перестанут мигать.
Подсказки
Контроллер можно использовать во время зарядки.
Выполняйте зарядку при температуре от 10°C до 30°C. При других
условиях зарядка может занять больше времени.
Когда система отключена (в режиме ожидания), зарядить контроллер
нельзя.
Уровень заряда батареи
Если нажать и удерживать кнопку PS более одной секунды, можно
увидеть уровень заряда батареи на экране.
Уровень заряда
Батарея полностью заряжена.
Батарея начала разряжаться.
Низкий уровень заряда батареи.
Батарея полностью разряжена. Индикаторы портов контроллера
быстро мигают. Зарядите контроллер.
Подсказка
В зависимости от условий использования оставшийся уровень заряда может
отображаться неправильно и время работы батареи может отличаться.
78
Page 79

Воспроизведение данных
Blu-ray Disc (BD)/DVD/CD
1 Вставьте диск.
Когда диск находится в
дисководе, индикатор
Установите диск стороной с
этикеткой вверх.
Примечания
Не вставляйте несколько дисков или посторонние
предметы в щель дисковода, это может привести к
поломке системы.
Воспроизведение дисков, не совместимых с
системой, невозможно.
Для воспроизведения имеющихся в продаже
видеодисков BD в некоторых случаях может
потребоваться обновление ключа кодировки*. Ключ
кодировки можно обновить при обновлении
системного программного обеспечения (
Ключ AACS (Система управления расширенным
*
доступом)
извлечения диска светится
синим.
стр. 88).
2 В меню XMB
воспроизведение.
Если воспроизведение не начнется автоматически, выберите значок
диска в меню XMB™ и нажмите кнопкуe
появится значок диска, и начнется
™
Извлечение диска
Остановите воспроизведение и нажмите
кнопку извлечения диска.
RU
Воспроизведение данных
.
Кнопка
извлечения диска
79
Page 80

Воспроизведение данных
Воспроизведение данных с устройств USB
Нельзя подключить внешние устройства, например, устройства,
совместимые с устройствами-накопителями USB, с помощью
кабеля USB. Устройства можно подключить, когда система
включена. См. также инструкции, прилагающиеся к устройству.
1 Подключите устройство USB.
На экране появится значок.
Внешнее устройство, например,
цифровая фотокамера
2 Выберите значок и нажмите кнопку .
Отобразятся воспроизводимые данные.
Примечания
Не отключайте устройства USB и не выключайте систему во время
сохранения, загрузки или удаления данных. Это может привести к
потере или повреждению данных.
При использовании флэш-накопителя USB с перек лючателем
защиты от записи не перемещайте переключатель, когда устройство
подключено к системе. Это может привести к потере или
повреждению данных.
Поддерживаемые форматы файлов
Данная система поддерживает следующие форматы файлов:
ATRAC™, MP3, AAC, JPEG и MPEG-4. Для получения последней
информации см. интерактивное руководство пользователя
(адрес: eu.playstation.com/manuals).
Подсказки
В столбце совместимой категории отображаются только файлы, которые
можно воспроизводить или просматривать с помощью системы PS3™
(пример: данные изображений отображаются в категории
В зависимости от носителя может отображаться только часть папок на
носителе. При выборе в меню параметров пункта [Отображать все]
стр. 65) будут отображаться все папки, сохраненные на носителе.
(
Примечание
Следует по возможности периодически выполнять резервное
копирование данных на жестком диске во избежание потери или
повреждения. Если вследствие каких-либо причин произошла потеря
или повреждение программного обеспечения или данных, восстановить
программное обеспечение или данные не удастся. Компания SCEE не
несет ответственности за любую потерю или повреждение данных,
файлов или программного обеспечения.
(Фото)).
80
Page 81

Игры
Совместимость игр
Программное обеспечение
формата PlayStation
Программное обеспечение
формата PlayStation
Программное обеспечение
формата PlayStation
3
®
®
2
®
Работает на этой системе
Работает на этой системе, но может
функционировать некорректно
Не работает на этой системе
Запуск/выход из игры
Запуск игры
Когда пользователь вставляет диск, игра начинается
автоматически.
Когда диск находится в
дисководе, индикатор
Установите диск стороной с
этикеткой вверх.
извлечения диска светится
синим.
Примечание
Не вставляйте несколько дисков или посторонние предметы в щель
дисковода, это может привести к поломке системы.
Выход из игры
Во время игры нажмите кнопку PS на беспроводном контроллере.
Выберите (Игра) (Выйти из игры), чтобы выйти из игры.
Подсказка
Для некоторых типов программного обеспечения, например, программного
обеспечения формата PlayStation
отображаться при нажатии кнопки PS. В таком случае выберите вариант
[Выйти из игры] в меню на экране.
, (Выйти из игры) может не
®
Настройки контроллера
Чтобы изменить параметры настройки контроллера, выберите
(Настройки) (Настройки дополнительных устройств).
Назначить
контроллеры
снова
Функция
вибрации
контроллера
* В данной системе невозможно назначить порт контроллера 2-D.
Подсказка
Вы можете изменить параметры настройки контроллера в ходе игры, нажав
кнопку PS. Выберите
устройств) на экране XMB™ или выберите [Настройки контроллера] на
открывшемся экране.
Если в программном обеспечении указан требуемый
порт или номер контроллера, вы можете использовать
эти данные, чтобы назначить соответствующий порт или
номер контроллера.*
Для функции вибрации можно установить значение
[Включить] или [Выключить]. По умолчанию эта функция
включена.
(Настройки) (Настройки дополнительных
RU
Игры
81
Page 82

Игры
Сохраненные данные для программного
обеспечения формата PlayStation
Сохраненные данные для программного обеспечения формата
PlayStation
отображаются в разделе (Игра) (Управление
сохраненными данными).
3 сохраняются на жестком диске системы. Данные
®
3
®
Сохраненные данные для программного
обеспечения формата PlayStation
Для сохранения данных из программного обеспечения формата
PlayStation® необходимо создать внутренние Memory Card на
жестком диске и назначить соответствие карт гнездам.
Примечание
Данная система не поддерживает воспроизведение программного
обеспечения формата PlayStation
Memory Card для программного обеспечения формата PlayStation
невозможно будет использовать для игровых программ.
2. Даже если создать внутреннюю
®
®
2, ее
®
Создание внутренних Memory Card
1 Выберите (Игра) (Управление Memory Card
(PS/PS2)) и нажмите кнопку .
3 Выберите [Внутренняя Memory Card (PS)], а затем нажмите
кнопку .
Для завершения операции выполните инструкции, которые
отображаются на экране.
Назначение гнезд
1 Выберите (Игра) (Управление Memory Card (PS/
PS2)) и нажмите кнопку .
2 Выберите внутреннюю Memory Card, которую необходимо
использовать, и нажмите кнопку .
Выберите [Назначить гнезда], затем назначьте [Гнездо 1] или [Гнездо 2].
Подсказки
В зависимости от программного обеспечения гнезда могут быть назначены
предварительно. Для получения подробной информации см. инструкции,
прилагаемые к программному обеспечению.
Гнезда можно назначить во время игры. Нажмите кнопку PS на
беспроводном контроллере, а затем выберите [Назначить гнезда] на
отображающемся экране.
2 Выберите (Создать новую внутреннюю Memory Card), а
затем нажмите кнопку .
82
Page 83

Настройка сети
Пример конфигурации сети (проводной)
Для создания проводной сети необходимо следующее: , и .
Сетевое устройство шлюза,
например модем DSL*
К Интернету
*1 Способ подключения зависит от используемого оборудования. Например, вы можете подключить кабель Ethernet прямо в гнездо на стене, если ваше
помещение оборудовано портами локальной сети. В таком случае вам не понадобится сетевое устройство шлюза.
2
*
Не рекомендуется использовать подключение с использованием телефонной линии.
3
Маршрутизатор - это устройство, позволяющее одновременно подключать несколько устройств к одной линии Интернета. Маршрутизатор необходим для
*
одновременного подключения к Интернету компьютера и системы PS3™ с использованием одного Интернет-соединения. Маршрутизатор не является
необходимым, если в модеме DSL, кабельном модеме или другом сетевом устройстве есть встроенный маршрутизатор.
4
Беспроводной маршрутизатор - это устройство, добавляющее маршрутизатору функцию точки доступа.
*
1*2
Кабель Ethernet
Маршрутизатор*
ПК
Пример конфигурации сети (беспроводной)
Для создания беспроводной сети необходимо следующее: и .
3
Сетевое устройство шлюза,
например модем DSL*
К Интернету
1*2
ПК
Беспроводной
маршрутизатор
(точка доступа) *
RU
Настройка сети
3*4
83
Page 84

Настройка сети
Настройка сети (проводной)
1 Подключите к системе кабель Ethernet (продается
отдельно).
2 Выберите (Настройки) (Настройки сети)
[Настройки соединения с Интернетом] и нажмите
кнопку .
Появится сообщение о кабеле Ethernet.
3 Выберите [OK] и нажмите кнопку .
4 Выберите [Простые], а затем нажмите кнопку .
Основные параметры будут настроены автоматически, и на экране
появится список параметров. Если список не отображается, вы должны
настроить некоторые параметры самостоятельно. Информация о
настройке специальных параметров находится в инструкциях,
предоставленных поставщиком услуг подключения к Интернету
(
стр. 86).
Настройка сети (беспроводной)
1 Убедитесь, что кабель Ethernet не подключен к системе.
2 Выберите (Настройки) (Настройки сети)
[Настройки соединения с Интернетом] и нажмите
кнопку .
Появится сообщение о кабеле Ethernet.
3 Выберите [OK] и нажмите кнопку .
4 Выберите [Простые], а затем нажмите кнопку .
Основные параметры будут настроены автоматически.
5 Выберите [Беспроводное] и нажмите кнопку .
5 Выполните проверку соединения с Интернетом.
Если соединение прошло успешно, вы сможете подключиться к
Интернету.
84
Page 85

6 Настройте параметры беспроводной сети.
Выберите точку доступа, которую хотите использовать. Вы можете
воспользоваться функцией [Сканировать] и затем выбрать точку
доступа, которая находится поблизости от вашей системы.
Система выполняет сканирование имеющихся точек
Сканировать
Ввести
вручную
доступа. Выберите точку доступа, которую хотите
использовать.
Введите SSID точки доступа вручную.
7 Настройте параметры безопасности беспроводной сети.
Введите ключ кодировки для точки доступа.
Подсказки
SSID и WEP/WPA - это разные виды кодирования информации,
используемые для защиты подключения к точке доступа. Если вы не
знаете ключа кодировки, обратитесь к тому, кто задал ключ или
обслуживает точку доступа.
Для использования некоторых точек доступа необходимо знать MAC
адрес системы PS3™, чтобы подключиться к Интернету. Чтобы узнать
MAC адрес системы PS3™, выберите
системы)
При беспроводном подключении к Интернету возможна интерференция
сигнала - это зависит от условий использования беспроводных сетевых
устройств. Если скорость передачи данных снижается или беспроводной
контроллер работает неправильно, попробуйте использовать проводное
соединение с Интернетом.
[Информация о системе].
(Настройки) (Настройки
RU
Настройка сети
Отсутствует
WEP
WPA-PSK/
WPA2-PSK
Ключ кодировки не установлен.
Введите ключ кодировки. При вводе ключа
кодировки все символы будут отображаться как
звездочки (*).
8 Проверьте параметры настройки.
На экране появится список параметров. Если список не отображается,
вы должны настроить некоторые параметры самостоятельно.
Информация о настройке специальных параметров находится в
инструкциях, предоставленных поставщиком услуг подключения к
Интернету (
стр. 86).
9 Выполните проверку соединения с Интернетом.
Если соединение прошло успешно, вы сможете подключиться к
Интернету.
85
Page 86

Настройка сети
Настройка специальных параметров
В некоторых сетях невозможно настроить все параметры
автоматически при выборе варианта [Простые]. В таком случае
настройте специальные параметры, следуя приведенным ниже
инструкциям и инструкциям на экране.
Рабочий режим Ethernet
Укажите скорость и метод передачи данных по сети Ethernet. Как
правило, выбирается параметр [Определять автоматически].
Настройки IP Адреса
Укажите способ получения IP адреса при подключении к
Интернету. Способ зависит от поставщика услуг подключения к
Интернету.
Автоматически
Вручную
PPPoE
Использование IP-адреса, выделенного сервером DHCP.
IP адрес вводится вручную.
Подключение к Интернету с использованием PPPoE.
Введите имя пользователя и пароль, предоставленные
поставщиком услуг доступа к Интернету.
Имя хоста DHCP
Укажите имя хоста сервера DHCP. Как правило, выбирается
параметр [Не устанавливать].
Настройки DNS
Укажите сервер DNS. Способ зависит от поставщика услуг
подключения к Интернету.
Автоматически
Вручную
Система получает адрес сервера DNS автоматически.
Введите адрес сервера DNS вручную. Введите IP адреса
основного и дополнительного серверов DNS,
предоставленные поставщиком услуг подключения к
Интернету.
MTU
Укажите значение MTU, используемое при передаче данных. Как
правило, выбирается параметр [Автоматически].
Прокси-сервер
Укажите прокси-сервер, который будет использоваться. Как
правило, выбирается параметр [Не использовать].
UPnP
Включите или выключите поддержку UPnP (Universal Plug and
Play). Как правило, выбирается параметр [Включить].
Подсказка
Если для параметра [UPnP] выбрано значение [Выключить], сетевое
общение с использованием голосового/видео чата в играх может быть
ограничено.
86
Page 87

Подключение к Интернету
Если настройки сети выполнены, при включении система PS3™
автоматически подключится к Интернету. Соединение будет
активным, пока система будет находиться во включенном
состоянии.
Использование Веб-браузера
1 Выберите (Сеть) (Веб-браузер) и нажмите кнопку
.
Откроется Веб-браузер. При загрузке страницы отображается значок
активности.
Значок активности
Основные операции Веб-браузера
Кнопки направлений
Правый джойстик
Кнопка L1
Кнопка START
Кнопка
Перемещение указателя на ссылку.
Прокрутка в нужном направлении.
Возврат к предыдущей странице.
Ввод адреса.
Переключение между режимами отображения
и скрытия меню.
Просмотр руководства пользователя
С помощью веб-браузера вы можете просмотреть интерактивное
руководство пользователя системы PS3™. Выберите (Сеть)
(Сетевое руководство пользователя) и нажмите кнопку .
Интерактивное руководство пользователя
адрес: eu.playstation.com/manuals
Это руководство содержит подробные инструкции по использованию
системы PS3™.
Создание учетной записи PlayStation®Network
Создав учетную запись PlayStation®Network, вы сможете общаться
с друзьями или загружать игры и видеозаписи из
(PlayStation®Store).
Выберите
PlayStation®Network) и нажмите кнопку . Отобразится экран
создания учетной записи.
Подсказки
Для создания учетной записи требуется Интернет-соединение.
Материалы службы PlayStaion
от региона.
(PlayStation®Network) (Зарегистрируйтесь в
Network могут различаться в зависимости
®
RU
Подключение к Интернету
87
Page 88

Обновления системы PS3™
С помощью обновления системного программного обеспечения
PS3™ можно добавлять функции и/или пакеты исправлений
системы безопасности. Чаще выполняйте обновление системы для
использования самой последней версии системного программного
обеспечения.
Обновления программного обеспечения системы
http://eu.playstation.com/ps3
На этом веб-сайте представлены последние обновления системного
программного обеспечения.
Используйте данные для обновления,
чтобы заменить существующее
системное программное обеспечение.
Системное программное
обеспечение будет обновлено.
Примечания
В процессе обновления не выключайте систему и не извлекайте
носитель. Если отменить обновление до его завершения, это может
привести к повреждению системного программного обеспечения, а
также к возникновению необходимости ремонта или замены системы.
Во время обновления кнопка питания, расположенная на передней панели
системы, и кнопка PS, расположенная на контроллере, не работают.
Некоторые игры невозможно запустить без предварительного
обновления программного обеспечения.
После обновления программного обеспечения нельзя вернуться к его
предыдущей версии.
Проверка версии системного программного
обеспечения
Можно проверить информацию о версии системного программного
обеспечения, выбрав
[Информация о системе]. Текущая версия отображается в поле
[Системное программное обеспечение].
(Настройки) (Настройки системы)
Способы обновления
Обновление можно выполнить одним из следующих способов.
Сетевое обновление
Можно выполнить обновление, загрузив данные обновления из
Интернета. Автоматически загружается самое последнее
обновление.
Выберите
(Настройки) (Обновление системы) [Сетевое
обновление].
Обновление с помощью носителя
Можно выполнить обновление с помощью данных обновления,
сохраненных на флэш-накопителе USB или на другом носителе.
Выберите
[Обновление с носителя информации].
(Настройки) (Обновление системы)
88
Page 89

Обновление с помощью дискового носителя
Данные обновления могут также содержаться на некоторых
игровых дисках и на других дисковых носителях. При
воспроизведении диска, содержащего данные обновления,
отобразится экран, который поможет провести процесс
обновления.
Подсказка
Если не удалось выполнить обновление любым из описанных выше
способов, обратитесь в соответствующую службу технической поддержки,
адрес которой можно найти в каждом руководстве по программному
обеспечению PlayStaion
3.
®
RU
Обновления системы PS3™
89
Page 90

Использование экранной клавиатуры
Отображение параметров
Курсор
Функциональные
клавиши
Поле ввода текста
Отображение включения
предиктивного режима.
предиктивного режима.
Отображение
режима ввода
Ввод текста
Ниже показано, как вводить текст, на примере слова fun.
1 Выберите на клавиатуре символ [f] и нажмите кнопку .
Точно так же выберите символы [u] и [n].
2 Выберите [Ввод] и нажмите кнопку .
Так вы подтвердите ввод выбранных символов.
3 Выберите [Ввод] и нажмите кнопку еще раз.
Текст будет введен и экранная клавиатура закроется.
Подсказки
Подробнее об использовании экранной клавиатуры рассказано в
интерактивном руководстве пользователя
(адрес: eu.playstation.com/manuals).
Для ввода текста можно также использовать клавиатуру USB или
Bluetooth
клавиатура, нажмите любую клавишу на подключенной клавиатуре, чтобы
начать ввод текста.
(продаются отдельно). Когда отображается экранная
®
Список клавиш
Отображаемые клавиши могут различаться в зависимости от
режима ввода и других условий.
Клавиши Назначение
Разрыв строки
Перемещение курсора
Удаление символов слева от курсора
Пробел
Переключение режима ввода
Подтверждение ввода символов и закрытие
клавиатуры
Переключение на миниатюрную клавиатуру
/
/
/
Вставка символа или значка эмоции
Переключение типа вводимых символов
Копирование и вставка текста
90
Page 91

Родительский контроль
Система PS3™ включает функцию родительского контроля. Эту
функцию можно использовать, чтобы установить пароль и
ограничить воспроизведение материалов, для которых выбран
уровень родительского контроля (игры, видео и другие материалы).
Если установить уровень родительского контроля для системы,
можно предотвратить воспроизведение материалов, не
предназначенных для детей.
Изменение настроек безопасности
Можно установить уровень родительского контроля для игр,
дисков Blu-ray или другого содержимого, выбрав (Настройки)
(Настройки безопасности).
Для изменения настроек родительского контроля требуется
пароль. Можно установить пароль, выбрав
(Настройки
безопасности) [Изменить пароль]. Пароль "0000" задан в
настройках по умолчанию.
Уровни родительского контроля для игр
Можно установить уровень родительского контроля для игр,
выбрав (Настройки безопасности) [Родительский контроль].
Можно выбрать значение [Выключить] или один из 11 уровней.
Выключить
11- 1
Комбинация уровней родительского контроля, установленных в
системе PS3™ и для материалов, определяет доступ для
воспроизведения материалов.
Воспроизведение любых материалов независимо от уровня
родительского контроля.
Установите уровень родительского контроля в виде числа.
Чем меньше число, тем строже ограничения.
Пример: если в системе установлен уровень родительского
контроля [7], то можно воспроизводить материалы с уровнем от [1]
до [7].
Подробнее см. веб-сайт http://www.ps-playsafeonline.com.
Другие настройки безопасности
Можно установить ограничения родительского контроля для
материалов помимо игр, выбрав (Настройки безопасности), как
описано ниже.
Уровень
родительского
контроля BD
Родительский
контроль DVD
Контроль
запуска Веббраузера
Подсказка
Параметры меню настроек безопасности могут различаться в зависимости
от версии используемого программного обеспечения. Для получения
последней информации см. интерактивное руководство пользователя
(адрес: eu.playstation.com/manuals).
При воспроизведении BD с использованием настроек
родительского контроля установите ограничения на
воспроизведение, задав возраст. Чем меньше число,
тем строже ограничения.
При воспроизведении DVD с использованием настроек
родительского контроля установите ограничения на
воспроизведение, задав уровень.
Можно выбрать значение [Выключить] или один из
восьми уровней.
Чем меньше число, тем строже ограничения.
Задайте ограничение на запуск Веб-браузера,
установив пароль.
RU
Родительский контроль
91
Page 92

Замена жесткого диска
Вы можете заменить жесткий диск, установленный в системе
PS3™.
Внимание
Извлекайте жесткий диск в месте, недоступном для маленьких детей,
чтобы они не могли случайно проглотить мелкие детали, например,
винтики.
Непосредственно после использования внутренние части системы
остаются горячими. Перед извлечением жесткого диска подождите
некоторое время, чтобы система остыла.
Во избежание травм будьте осторожны при снятии накладки и
извлечении жесткого диска.
Обязательно установите на место накладку и крышку отсека HDD
перед включением системы PS3™. Если крышка и накладка не
установлены на место, это может привести к нагреванию внутренних
элементов системы.
Для закручивания и откручивания винтов пользуйтесь крестовой
отверткой соответствующего размера. Отвертка неподходящего
размера может повредить шлицы на головке винта.
Примечания
В зависимости от выполняемого вида обслуживания
использовавшийся жесткий диск до выполнения сервисных функций
может быть отформатирован. Необходимо предварительно сделать
резервную копию данных.
Для защиты личной информации и предотвращения
несанкционированного доступа посторонних лиц к этой информации
перед передачей системы PS3™ в центр технического обслуживания
обязательно удалите пароли для всех учетных записей
PlayStaion
Network и извлеките жесткий диск.
®
Резервное копирование данных
Вы можете создать резервную копию данных, сохраненных на
жестком диске.
92
Примечание
Следует по возможности периодически выполнять резервное
копирование данных на жестком диске во избежание их потери или
повреждения. Если вследствие каких-либо причин произошла потеря
или повреждение программного обеспечения или данных, или при
обслуживании в уполномоченном сервисном центре был
отформатирован жесткий диск, восстановить программное обеспечение
и данные не удастся. Компания SCEE не несет ответственности за
любую потерю или повреждение данных, файлов или программного
обеспечения.
Создание резервной копии всех данных
Вы можете создать резервную копию всех данных, сохраненных на
жестком диске, и сохранить копию на устройстве хранения данных
USB. Выберите (Настройки) (Настройки системы)
[Резервная утилита] и следуйте инструкциям на экране.
Подсказки
В некоторых случаях невозможно использовать резервную утилиту для
копирования всех сохраненных данных. Рекомендуется создать
дополнительные копии тех файлов, которые можно переместить или
скопировать отдельно. Подробнее см. в разделе "Копирование файлов"
стр. 92).
(
Подробные сведения о резервной утилите представлены в интерактивном
руководстве пользователя (адрес: eu.playstation.com/manuals).
Копирование файлов
Ниже указаны типы файлов, которые можно скопировать или
переместить с жесткого диска компьютера на устройство USB.
Выберите файл, нажмите кнопку , затем выберите [Копировать]
или [Переместить] в меню параметров. Для некоторых типов видео
файлов нужно выбрать вариант [Создать резервную копию].
Page 93

Тип файла Назначение архивации
Сохраненные данные игр, видео,
музыка или файлы изображений
Подсказки
Некоторые данные нельзя скопировать, переместить или создать их
резервную копию.
Используя устройство считывания/записи карт (с подключением через
разъем USB, продается отдельно), можно скопировать файлы,
сохраненные на жестком диске, на устройство хранения данных например, карту Memory Stick™ или SD Memory Card.
Запоминающее устройство большой
емкости USB (флэш-накопитель
USB и т. д.)
Извлечение жесткого диска
Внимание
В целях безопасности перед извлечением жесткого диска обязательно
выключите систему и отключите ее от источника питания.
Если перевернуть систему нижней поверхностью вверх, она будет
неустойчивой. Во избежание травм будьте осторожны при извлечении
винта.
1 Нажмите кнопку питания, чтобы включить систему.
Индикатор питания загорится красным и система перейдет в режим
ожидания.
2 Сначала отключите шнур питания от электросети, а затем
отсоедините все прочие кабели от системы.
В целях безопасности отсоедините вилку шнура питания от
электрической розетки, а затем отключите другие кабели.
3 Переверните систему нижней стороной вверх, разместив ее
на мягкой, сухой, чистой ткани, и снимите накладку.
Используя выемку, расположенную над накладкой, слегка потяните за
край накладки. Затем поверните накладку, как показано на рисунке.
Если накладка открывается с трудом, подденьте ее инструментом например, плоской отверткой.
Накладка
RU
Замена жесткого диска
93
Page 94

Замена жесткого диска
4 Отвинтите винт, который ударживает на месте жесткий
диск, затем извлеките крышку отсека HDD.
Отвинтите синий винт соответствующей крестообразной отверткой.
Сдвиньте крышку отсека HDD влево, затем извлеките ее.
Крышка отсека HDD
5 Извлеките жесткий диск.
Потяните ручку вверх, затем извлеките жесткий диск из системы.
94
Примечания
Жесткий диск представляет собой хрупкое оборудование, поэтому при
обращении с ним всегда следует соблюдать осторожность. Во избежание
потери или повреждения программного обеспечения или данных, а
также жесткого диска, тщательно соблюдайте меры предосторожности,
приведенные ниже.
Не бросайте и не роняйте систему или жесткий диск и не подвергайте
любое из устройств воздействию сильной вибрации иди сильных ударов.
Не допускайте попадания жидкости или мелких частиц внутрь
системы или жесткого диска.
Не касайтесь разъемов системы и не вставляйте в них посторонние
предметы.
Не располагайте систему или жесткий диск вблизи электромагнитных
полей, производимых магнитами или громкоговорителями, а также не
располагайте устройства, чувствительные к электромагнитному
воздействию (например, наручные часы или кредитные карты), вблизи
жесткого диска.
Не ставьте на жесткий диск тяжелые предметы.
При выполнении каких-либо действий с жестким диском держите его
только за края или за металлическую рамку.
Жесткий диск чувствителен к воздействию статического
электричества. Убедитесь, что при установке жесткого диска приняты
надлежащие меры.
Храните жесткий диск в прохладном сухом месте.
Замена жесткого диска
Внимание
В целях безопасности перед заменой жесткого диска обязательно
выключите систему и отсоедините ее от источника питания.
При замене жесткого диска выполняйте действия, описанные
ниже, чтобы снять металлическую рамку.
Page 95

1 С помощью крестовой отвертки выверните винты (в 4
местах).
2 Возьмите жесткий диск за края и переверните его.
Крепко держите диск, чтобы он
не выскользнул у вас из рук.
3 Извлеките жесткий диск из металлической рамки.
4 Установите сменный жесткий диск в металлическую рамку
для жесткого диска системы PS3™ и закрепите его в рамке
с помощью винтов (в 4 местах).
Не следует затягивать винты слишком сильно.
5 Установите жесткий диск в систему.
Для установки диска повторите в обратном порядке действия,
описанные в инструкции в разделе "Извлечение жесткого диска"
(
стр. 93). Убедитесь, что жесткий диск полностью вошел в отсек
HDD.
6 Переустановите программное обеспечение системы.
После замены жесткого диска переустановите программное
обеспечение системы (
Сменные жесткие диски
В системе PS3™ можно использовать следующие типы жестких
дисков.
Размер
Формат интерфейса
*1 Нормальная работа гарантируется не для всех моделей.
2
Parallel ATA не поддерживается.
*
Подсказка
Если вы потеряете крышку отсека HDD, накладку, винты или
металлическую рамку, обратитесь в службу технической поддержки вашего
региона (см. контакты на обложке руководства пользователя) за запасными
частями.
стр. 96).
2,5 дюйма (внутреннего типа) *
Serial ATA *
2
1
RU
Замена жесткого диска
95
Page 96

Замена жесткого диска
Переустановка программного обеспечения
системы
Если программное обеспечение системы не запускается при
включении системы (например, после замены жесткого диска), на
экране появится следующее сообщение. В этом случае необходимо
переустановить системное программное обеспечение, используя
загружаемые обновленные данные.
Загрузка обновлений программного
обеспечения системы
Используя компьютер с доступом в Интернет, загрузите
обновленные данные программного обеспечения системы с
указанного ниже веб-сайта. Скопируйте данные обновления с
компьютера на устройство хранения данных, следуя инструкциям
на веб-сайте.
http://eu.playstation.com/ps3
Подсказки
Используйте последнюю версию обновленных данных, доступную на веб-
сайте. Невозможно переустановить программное обеспечение системы
более ранней версии, чем программное обеспечение системы, которое
использовалось прежде. Если обновленные данные для вашей системы
недоступны на веб-сайте, обратитесь в службу технической поддержки
вашего региона (см. контакты на обложке руководства пользователя).
Если у вас есть диск с игрой или иной диск с обновлениями, его можно
использовать для переустановки программного обеспечения системы.
Вставьте этот диск в систему PS3™ и следуйте инструкциям на экране.
Проверьте, можно ли использовать данные обновления с этого диска.
Если у вас нет доступа в Интернет с ПК, обратитесь в службу технической
поддержки вашего региона (см. контакты на обложке руководства
пользователя).
Установка программного обеспечения
системы
Включите систему PS3™ и подключите к ней устройство хранения
с данными обновления. Для переустановки программного
обеспечения системы следуйте инструкциям на экране.
Примечания
Запрещается выключать систему или извлекать запоминающее
устройство во время установки. Если установка была отменена до
завершения, программное обеспечение системы может быть
повреждено. В этом случае необходимо обратиться в сервисную
службу или произвести замену системы.
Во время установки кнопка питания на системе и кнопка PS на
беспроводном контроллере не работают.
96
Page 97

Восстановление данных из резервной копии
Сохраненные в резервной копии данные можно восстановить.
Восстановление всех скопированных данных
Все сохраненные в резервной копии данные можно восстановить,
выбрав (Настройки) (Настройки системы) [Резервная
утилита]. Подключите устройство хранения данных USB,
сожержащее резервную копию данных, и следуйте инструкциям на
экране.
Подсказки
В некоторых случаях невозможно использовать резервную утилиту для
восстановления всех сохраненных данных.
Подробные сведения о резервной утилите представлены в интерактивном
руководстве пользователя (адрес: eu.playstation.com/manuals).
Восстановление файлов
Восстановить отдельные файлы можно с помощью меню
параметров файла. Подключите устройство хранения данных USB,
на котором сохранен файл, выберите файл для восстановления и
нажмите кнопку . Выберите [Копировать] или [Переместить] в
меню параметров.
Подсказка
Некоторые данные нельзя скопировать, переместить или создать их
резервную копию.
RU
Замена жесткого диска
97
Page 98

Перенос данных в другую систему PS3™/восстановление системы
Перенос данных в другую систему PS3™
Вы можете перенести данные, сохраненные на жестком диске
одной cистемы PS3™ (система-источник), на жесткий диск другой
системы PS3™ (система-адресат), выбрав
(Настройки системы) [Утилита переноса данных].
Примечание
При выполнении этой операции все данные, сохраненные в системе PS3™,
в которую вы переносите данные (система-адресат), будут удалены.
Подробнее об использовании утилиты и ее ограничениях см. в сетевом
руководстве пользователя (http://manuals.playstation.net/document/).
(Настройки)
Восстановление системы PS3™
Примечания
При восстановлении стандартных параметров настройки или
восстановлении системы PS3™ отменить принятые изменения
невозможно. Пользователь несет ответственность за возможную
потерю или повреждение данных.
Не отключайте систему PS3™ во время операции. Если операция
будет прервана до завершения, системное программное обеспечение
может быть повреждено, и, возможно, вам придется заменить систему
или восстановить ее в центре технического обслуживания.
Во время операции кнопка питания на системе и кнопка PS на
беспроводном контроллере не работают.
Вы не сможете с помощью этой функции установить более раннюю
версию программного обеспечения системы.
Восстановление настроек по умолчанию
Вы можете восстановить все параметры в меню (Настройки) до
значений по умолчанию, выбрав (Настройки) (Настройки
системы) [Восстановить настройки по умолчанию].
98
После завершения этой операции и перезапуска системы
отобразится экран начальной установки. Следуйте инструкциям на
экране для выполнения начальной установки программного
обеспечения системы (
стр. 69).
Удаление данных с жесткого диска
Вы можете удалить все данные с жесткого диска системы и
восстановить все параметры в меню (Настройки) до значений
по умолчанию, выбрав (Настройки) (Настройки системы)
[Восстановить систему PS3™].
Чтобы сократить время выполнения операции, выберите [Быстрое
форматирование] в списке параметров форматированоя жесткого
диска. При форматировании жесткого диска, содержащего важные
данные, рекомендуется выбрать вариант [Полное
форматирование].
После завершения этой операции и перезапуска системы
отобразится экран начальной установки. Следуйте инструкциям на
экране для выполнения начальной установки программного
обеспечения системы (
стр. 69).
Прежде чем выбросить или передать комулибо систему PS3™
Прежде чем выбросить систему PS3™ или передать вашу систему
PS3™ кому-либо по какой-либо причине, включая возврат (если
допустимо), обязательно следуйте инструкциям в разделе
"Удаление данных с жесткого диска" и выберите вариант [Полное
форматирование], чтобы удалить из системы PS3™ все данные.
Это позволит предотвратить несанкционированный доступ или
использование вашей кредитной карты и другой персональной
информации.
Page 99

Перед обращением в службу
Если при использовании системы PS3™ возникнут трудности, см.
данный раздел. Если не удается устранить проблему, обратитесь в
соответствующую службу технической поддержки PlayStation®,
адрес которой можно найти в каждом руководстве к программному
обеспечению PlayStation
3.
®
Питание
Система не включается.
Проверьте, надежно ли подсоединен шнур питания к системе и
электрической розетке.
При нажатии кнопки питания система издает прерывистый
звуковой сигнал, после чего индикатор питания выключается.
Система перегрелась. Проверьте, не находится ли система в
слишком теплом месте. Убедитесь, что вентиляционные
отверстия не заблокированы и вокруг системы достаточный
поток воздуха. Нажмите кнопку питания. (Индикатор питания
загорится красным.) Подождите немного, затем снова включите
систему.
Изображение
На экране телевизора отсутствует изображение.
Проверьте подсоединение кабеля. Попробуйте отсоединить
кабель от системы PS3™ или телевизора и снова подсоединить
его.
Возможно, поврежден используемый кабель AV. Используйте
другой кабель, который совместим с системой PS3™.
Проверьте, соответствует ли видеовход, установленный на
телевизоре, входному разъему, используемому для
подсоединения системы PS3™.
Если настройки видеовыхода системы не соответствуют
настройкам используемого кабеля или телевизора,
изображение может отсутствовать. Если на экране ничего не
отображается, выключите систему. Затем, сохранив
подключенными только систему и телевизор, нажмите кнопку
питания системы и удерживайте не менее 5 секунд, чтобы
снова включить систему. Будет выполнен автоматический
сброс параметров настройки видеовыхода до стандартного
разрешения (SD).
Изображение искажено.
Проверьте правильность подключения кабеля. Попробуйте
отключить кабель от системы PS3™ или телевизора, затем
подключить его снова.
Диски Blu-ray (BD) или DVD не воспроизводятся или
воспроизводятся с искажением изображения.
При воспроизведении дисков DVD или программного
обеспечения формата PlayStation
(SD) будут воспроизводиться только диски, записанные в
стандарте PAL.
Если система подключена к видеомагнитофону, средства
защиты от копирования, используемые в некоторых дисках BD
и DVD, могут вызвать искажение или заметное изменение
яркости изображения. В таких случаях поключите систему к
телевизору напрямую. Такие же искажения изображения
возможны при использовании телевизора со встроенным
видеомагнитофоном.
Если код региона на диске BD или DVD не совпадает с кодом
региона системы, его воспроизведение невозможно. Подробнее
см. в разделе "Коды регионов" (
На некоторых дисках DVD установлены ограничения
родительского контроля. Введите пароль, заданный в пункте
(Настройки безопасности), чтобы временно отключить эти
ограничения.
3 в стандартном разрешении
®
стр. 107).
RU
Перед обращением в службу
99
Page 100

Перед обращением в службу
При записи видеоданных на диск DVD-R, DVD-RW, DVD+R или
DVD+RW с помощью такого устройства, как записывающий
проигрыватель DVD, необходимо завершить запись диска перед
тем, как воспроизводить его в системе PS3™. Завершите
запись диска, используя записывающее устройство.
На некоторых дисках BD установлены ограничения
родительского контроля. Введите пароль, заданный в пункте
(Настройки безопасности), чтобы изменить уровень
родительского контроля.
Возможно, диск BD заблокирован. Введите пароль, заданный
при создании диска.
См. также примечания раздела "Воспроизводимые диски"
(
стр. 106).
Воспроизведение некоторых дисков BD невозможно.
Для воспроизведения видеоизображения на дисках BD с
помощью имеющегося в продаже программного обеспечения в
некоторых случаях требуется обновление ключа кодировки для
AACS (Advanced Access Control System). Ключ кодировки можно
обновить в процессе обновления программного обеспечения
системы.
Размеры видеоизображения и экрана телевизора не
соответствуют друг другу.
Настройки подключенного телевизора и настройки вывода
видео в системе не совпадают. Проверьте следующее:
Убедитесь, что системные настройки в (Настройки)
(Настройки экрана) окне [Настройки вывода видео]
правильные.
Убедитесь, что настройки подключенного телевизора
правильные. Для получения подробной информации см.
инструкции, прилагаемые к телевизору.
Размер экрана с видеоматериалами не может быть изменен.
Цвет экрана отображается неверно.
В соответствии с настройками по умолчанию цвет фона экрана
автоматически меняется при изменении времени суток, дня
недели и месяца.
Звук
Звук отсутствует.
Проверьте работу функции отключения звука на телевизоре
или проверьте, выключены ли динамики. Проверьте также,
установлен ли соответствующий уровень громкости.
Если подключено аудиоустройство, проверьте его настройки.
Для получения подробной информации см. инструкции,
прилагаемые к аудиоустройству.
Возможно, поврежден кабель AV. Используйте другой кабель,
который совместим с системой PS3™.
Некоторые программы не поддерживают цифровой аудиовыход.
Если настройки аудиовыхода системы не соответствуют
настройкам используемого кабеля или устройства, звук в
системе может не воспроизводиться. Убедитесь, что системные
настройки в
[Настройки вывода аудио] установлены правильно.
При воспроизведении некоторых типов данных,
поддерживающих Dolby Digital, DTS и другие форматы, звук
может воспроизводиться не по всем каналам.
Музыкальные файлы не воспроизводятся.
Для некоторых музыкальных данных, распространяемых через
Интернет, поддерживаются не все способы воспроизведения. В
частности, воспроизведение таких данных с помощью системы
PS3™ может не поддерживаться.
(Настройки) (Настройки звука) окне
100
 Loading...