

Page 1

3-261-840-41(1)
FM/AM Compact Disc
Player
AUTOESTEREO PARA
DISCO COMPACTO
Operating Instructions
M an ua l d e i n st ru cc io n es
For installation and connections, see the supplied installation/connections manual.
Para obtener información sobre la instalación y las conexiones, consulte el manual
de instalación/conexiones suministrado.
GB
ES
CT
CDX-S2000
© 2004 Sony Corporation
Page 2
Welcome !
Thank you for purchasing this Sony Compact
Disc Player. You can enjoy its various features
even more with:
Optional controller accessory
Card remote commander RM-X114
This label is located on the bottom of the
chassis.
2
Page 3

Table of Contents
Location of controls . . . . . . . . . . . . . . . . . . . 4
Precautions . . . . . . . . . . . . . . . . . . . . . . . . . . 5
Notes on discs . . . . . . . . . . . . . . . . . . . . . . . . 6
Getting Started
Resetting the unit. . . . . . . . . . . . . . . . . . . . . . 7
Detaching the front panel . . . . . . . . . . . . . . . 7
Setting the clock . . . . . . . . . . . . . . . . . . . . . . 8
CD Player
Playing a disc. . . . . . . . . . . . . . . . . . . . . . . . . 9
Display items. . . . . . . . . . . . . . . . . . . . . . . . . 9
Playing tracks repeatedly
— Repeat Play . . . . . . . . . . . . . . . . . . . . 10
Playing tracks in random order
— Shuffle Play . . . . . . . . . . . . . . . . . . . . 10
Radio
Storing stations automatically
— Best Tuning Memory (BTM). . . . . . . 10
Receiving the stored stations. . . . . . . . . . . . 11
Storing only the desired stations . . . . . . . . . 11
Other Functions
Adjusting the balance and fader . . . . . . . . . 12
Quickly attenuating the sound . . . . . . . . . . 12
Changing the sound and display
settings . . . . . . . . . . . . . . . . . . . . . . . . . . 12
Setting the equalizer (EQ3). . . . . . . . . . . . . 13
Additional Information
Maintenance . . . . . . . . . . . . . . . . . . . . . . . . 14
Removing the unit. . . . . . . . . . . . . . . . . . . . 15
Specifications . . . . . . . . . . . . . . . . . . . . . . . 16
Troubleshooting . . . . . . . . . . . . . . . . . . . . . 17
Error displays/Message. . . . . . . . . . . . . . . . 18
3
Page 4

Location of controls
Refer to the pages listed for details.
SEL
MODE
SOURCE
SENS
ATT DSPL
1
REP SHUF
2 3 4 5 6
SEEK
OFF
EQ3
BTM
CDX-S2000
a Volume +/– button
b SEL (select) button
Selecting items.
c MODE button
Changing the operation.
d Display window
e OFF (Stop/Power off) button* 7, 9
f Z (eject) button 9
g (front panel release) button 7
h SOURCE (Power on/Radio/CD) button
Selecting the source.
i ATT (attenuate) button 12
j SENS button 11
k RESET button (located on the front side of
the unit, behind the front panel) 7
l Number buttons 12
Radio:
Storing the desired station on each number
button.
CD:
(3): REP 10
(4): SHUF 10
m Frequency select switch (located on the
bottom of the unit)
See “Frequency select switch” in the
Installation/ Connections manual.
n BTM (Best Tuning Memory) button 10
o DSPL (display mode change) button
8, 9
p EQ3 button 13
q Receptor for the card remote
commander
r SEEK +/– button
Radio:
Tuning in stations automatically/finding a
station manually.
CD:
Skipping tracks/fast-forwarding, reversing a
track.
* Warning when installing in a car without
an ACC (accessory) position on the
ignition switch
After turning off the ignition, be sure to press
and hold (OFF) on the unit until the display
disappears.
Otherwise, the display does not turn off and this
causes battery drain.
4
Page 5
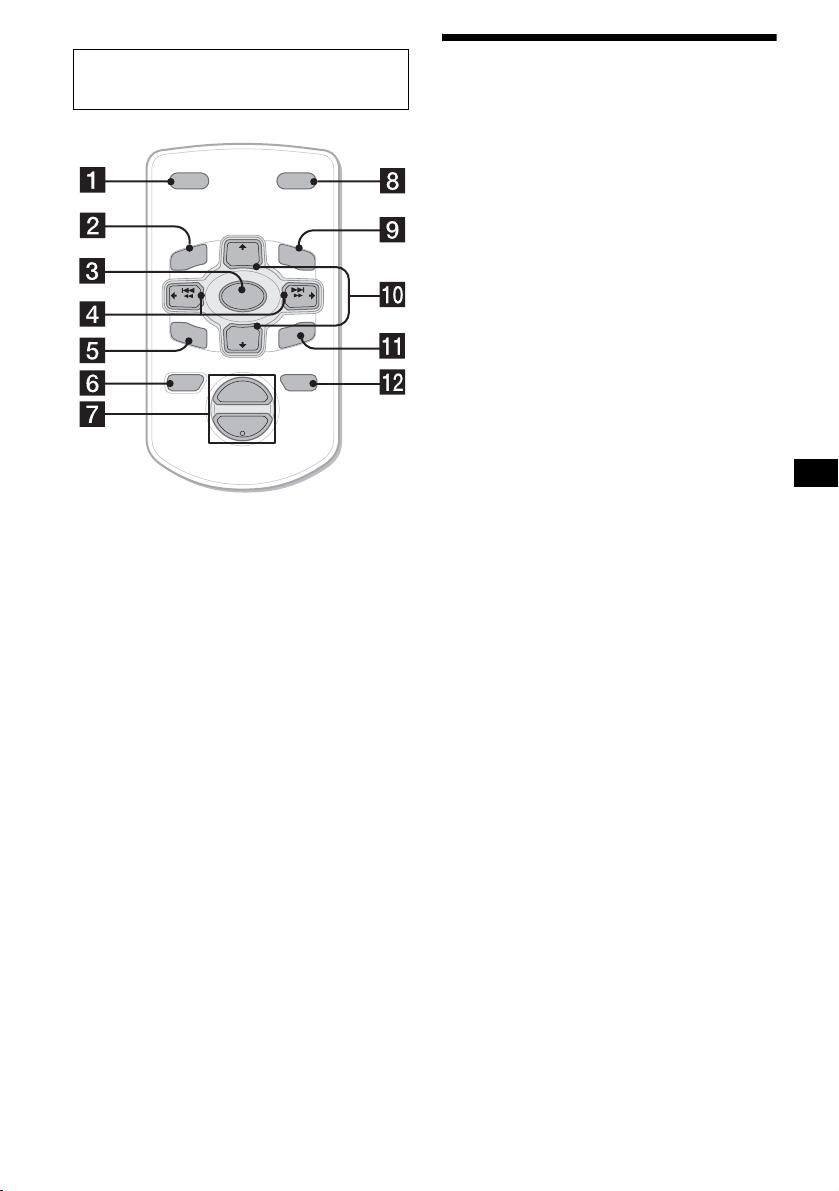
Card remote commander RM-X114
(optional)
DSPL MODE
+
PRESET
LIST
+
DISC
MENU
–
SEEK
SOUND
SOURCE
DISC
PRESET –
+
VOL
+
SEEK
–
ENTER
ATTOFF
–
The corresponding buttons of the card
remote commander control the same
functions as those on this unit.
a DSPL button
b MENU button*
c SOURCE button
d SEEK (–/+) buttons
e SOUND button
f OFF button
g VOL (+/–) buttons
h MODE button
i LIST button*
j DISC*/PRESET (+/–) button
k ENTER button*
l ATT button
Precautions
• If your car has been parked in direct sunlight,
allow the unit to cool off before operating it.
• Power aerial will extend automatically while
the unit is operating.
If you have any questions or problems
concerning your unit that are not covered in this
manual, please consult your nearest Sony dealer.
Moisture condensation
On a rainy day or in a very damp area, moisture
condensation may occur inside the lenses and
display of the unit. Should this occur, the unit
will not operate properly. In such a case, remove
the disc and wait for about an hour until the
moisture has evaporated.
To maintain high sound quality
Be careful not to splash juice or other soft drinks
onto the unit or discs.
* Not available for this unit
Note
If the display disapears by pressing (OFF), it cannot
be operated with the card remote commander unless
(SOURCE) on the unit is pressed, or a disc is inserted
to activate the unit first.
Tip
Refer to “Replacing the lithium battery” for details on
how to replace the battery (page 14).
5
Page 6

Notes on discs
• To keep a disc clean, do not touch its surface.
Handle the disc by its edge.
• Keep your discs in their cases or disc
magazines when not in use.
• Do not subject discs to heat/high temperature.
Avoid leaving them in a parked car or on a
dashboard/rear tray.
• Do not attach labels, or use discs with sticky
ink/residue. Such discs may stop spinning
when used, causing a malfunction, or may ruin
the disc.
• Before playing, clean the discs with a
commercially available cleaning cloth. Wipe
each disc from the centre out. Do not use
solvents such as benzine, thinner, commercially
available cleaners, or antistatic spray intended
for analogue discs.
Notes on CD-R/CD-RW discs
• You can play CD-Rs (recordable CDs)/CDRWs (rewritable CDs) designed for audio use
on this unit.
Look for these marks to distinguish CD-Rs/
CD-RWs for audio use.
These marks denote that a disc is not for audio
use.
• Do not use any discs with labels or stickers
attached.
The following malfunctions may result from
using such discs:
– Inability to eject a disc (due to a label or
sticker peeling off and jamming the eject
mechanism).
– Inability to read audio data correctly (e.g.,
playback skipping, or no playback) due to
heat shrinking of a sticker or label causing a
disc to warp.
• Discs with non-standard shapes (e.g., heart,
square, star) cannot be played on this unit.
Attempting to do so may damage the unit. Do
not use such discs.
• You cannot play 8 cm CDs.
6
• Some CD-Rs/CD-RWs (depending on the
equipment used for its recording or the
condition of the disc) may not play on this unit.
• You cannot play a CD-R/a CD-RW that is not
finalized*.
* A process necessary for a recorded CD-R/CD-RW
disc to be played on the audio CD player.
Page 7

Getting Started
Detaching the front panel
You can detach the front panel of this unit to
protect the unit from being stolen.
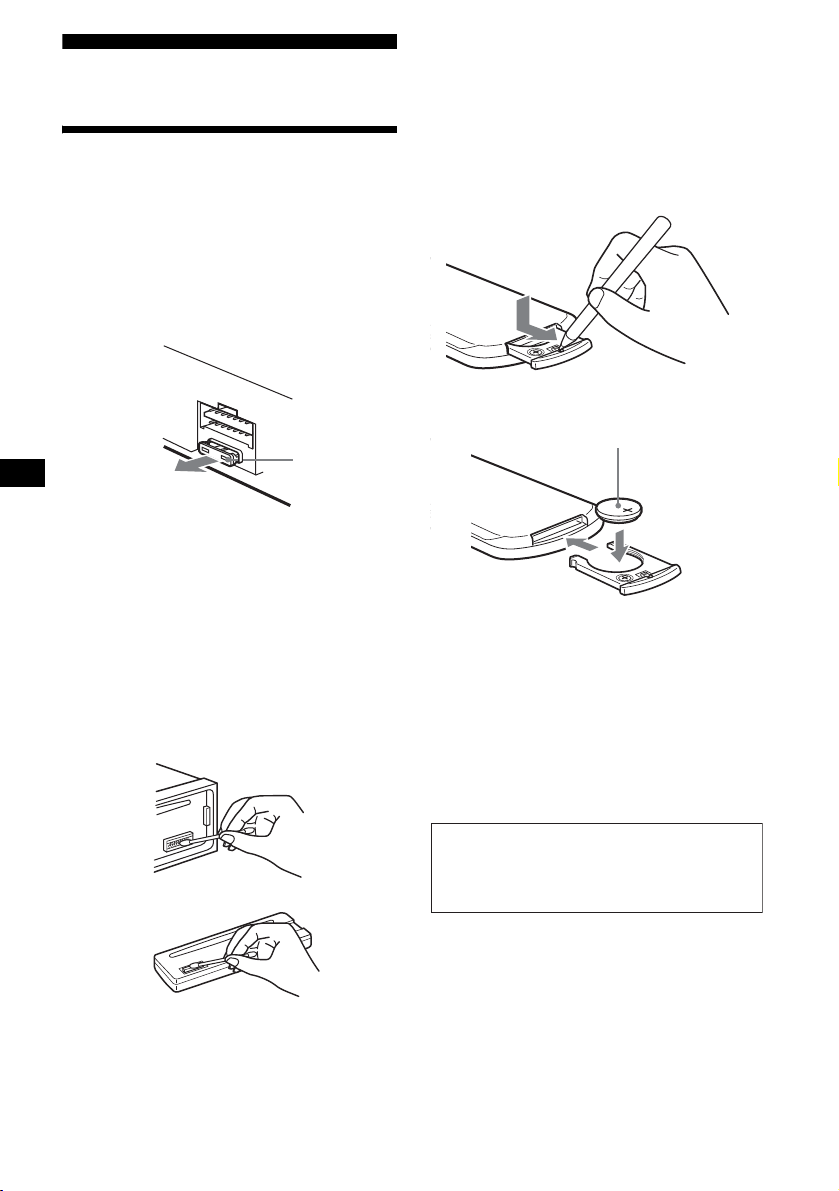
Resetting the unit
Before operating the unit for the first time, or
after replacing the car battery or changing the
connections, you must reset the unit.
Remove the front panel and press the RESET
button with a pointed object, such as a ballpoint
pen.
RESET button
Note
Pressing the RESET button will erase the clock setting
and some stored contents.
Caution alarm
If you turn the ignition switch to the OFF
position without removing the front panel, the
caution alarm will beep for a few seconds.
If you connect an optional amplifier and do not
use the built-in amplifier, the beep sound will be
deactivated.
1 Press (OFF)*.
CD playback or radio reception stops (the key
illumination and display remain on).
* If your car has no ACC (accesssory) position on
the ignition switch, be sure to tur n the unit off by
pressing (OFF) until the display disappears to
avoid car battery drain.
2 Press , then pull it off towards you.
(OFF)
Notes
• If you detach the panel while the unit is still turned
on, the power will turn off automatically to prevent
the speakers from being damaged.
• Do not drop or put excessive pressure on the front
panel and its display window.
• Do not subject the front panel to heat/high
temperature or moisture. Avoid leaving it in a parked
car or on a dashboard/rear tray.
Tip
When carrying the front panel with you, use the
supplied front panel case.
continue to next page t
7
Page 8

Attaching the front panel
Attach part A of the front panel to part B of the
unit as illustrated and push the left side into
position until it clicks.
Setting the clock
The clock uses a 12-hour digital indication.
Example: To set the clock to 10:08
1 Press (DSPL) for 2 seconds.
The hour indication flashes.
A
B
Note
Do not put anything on the inner surface of the front
panel.
1Press the volume +/– button to set
the hour.
2Press (SEL).
The minute indication flashes.
3Press the volume +/– button to set
the minute.
2 Press (DSPL).
The clock starts. After the clock setting is
completed, the display returns to normal play
mode.
8
Page 9

CD Player
Display items
The following items can be displayed.
Playing a disc
Insert the disc (labelled side up).
Playback starts automatically.
If a disc is already inserted, press (SOURCE)
repeatedly until “CD” appears to start playback.
To Press
Stop playback Z or (OFF)
Eject the disc Z
Skip tracks
– Automatic
Music Sensor
Fast-forward/
reverse
– Manual Search
Notes
• While the first/last track on the disc is playing, if
(SEEK) (–) or (SEEK) (+) is pressed, playback skips
to the last/first track of the disc.
• When the last track on the disc is over, playback
restarts from the first track of the disc.
(SEEK) (–/+)
(./>)
[once for each track]
(SEEK) (–/+)
(m/M)
[hold to desired point]
Source
Track number
To Press
Switch display item (DSPL)
Displayable items
• Elapsed playing
•Clock
time
9
Page 10

Playing tracks repeatedly
— Repeat Play
The current track will repeat itself when it
reaches the end.
During playback, press (3) (REP) until
“REP” indicator appears in the
display.
“REP” indicator is displayed.
Repeat Play starts.
To return to normal play mode, press (3) (REP)
again.
Radio
The unit can store up to 6 stations per band
(FM1, FM2, FM3, AM1, and AM2).
Caution
When tuning in stations while driving, use Best
Tuning Memory to prevent accidents.
Storing stations
automatically
— Best Tuning Memory (BTM)
The unit selects the stations with the strongest
signals within the selected band, and stores them
in the order of their frequency.
Playing tracks in random
order
— Shuffle Play
You can select to play the tracks in the current
disc in random order.
During playback, press (4) (SHUF)
until “SHUF” indicator appears in the
display.
“SHUF” indicator is displayed.
Shuffle Play starts.
To return to normal play mode, press (4)
(SHUF) again.
1 Press (SOURCE) repeatedly to select
the radio.
2 Press (MODE) repeatedly to select the
band.
3 Press (BTM) for 2 seconds.
The unit stores stations in the order of their
frequencies on the number buttons.
A beep sounds when the setting is stored.
Notes
• If only a few stations can be received due to weak
signals, some number buttons will retain their former
settings.
• When a number is indicated in the display, the unit
starts storing stations from the one currently
displayed.
10
Page 11

Receiving the stored stations
1 Press (SOURCE) repeatedly to select
the radio.
2 Press (MODE) repeatedly to select the
band.
3 Press the number button ((1) to (6))
on which the desired station is stored.
If preset tuning does not work
— Automatic tuning/Local Seek Mode
Automatic tuning:
Press (SEEK) (+) or (SEEK) (–) to
search for the station.
Scanning stops when the unit receives a
station. Repeat the operation until the desired
station is received.
Local Seek Mode:
If the automatic tuning stops too
frequently, press (SENS) repeatedly
until “LCL” indicator appears in the
display.
“LCL” indicator is displayed.
Only the stations with relatively strong
signals will be tuned in.
To cancel the local seek mode, press ( SEN S)
twice when receiving FM.
Note
When receiving AM, to cancel the local seek mode,
press (SENS) (“LCL” indicator turns off).
Tip
If you know the frequency of the station you want to
listen to, press and hold (SEEK) (+) or (SEEK) (–) to
locate the approximate frequency, then press
(SEEK) (+) or (SEEK) (–) repeatedly to fine adjust to
the desired frequency (manual tuning).
If FM stereo reception is poor
— Monaural Mode
During radio reception, press (SENS)
repeatedly until “MONO” indicator
appears in the display.
“MONO” indicator is displayed.
The sound improves, but becomes monaural
(“ST” disappears).
To return to normal radio reception mode, press
(SENS) again (“MONO” indicator turns off).
Storing only the desired
stations
You can manually preset the desired stations on
any chosen number button.
1 Press (SOURCE) repeatedly to select
the radio.
2 Press (MODE) repeatedly to select the
band.
3 Press (SEEK) (+) or (SEEK) (–) to tune
in the station that you want to store.
4 Press the desired number button ((1)
to (6)) for 2 seconds until “MEM”
appears.
The number button indication appears in the
display.
Note
If you try to store another station on the same number
button, the previously stored station will be erased.
11
Page 12

Other Functions
Adjusting the balance and
fader
You can adjust the balance and fader.
1 Press (SEL) repeatedly until “BAL” or
“FAD” appears.
Each time you press (SEL), the item changes
as follows:
LOW* t MID* t HI* t
BAL (left-right)
* When EQ3 is activated (page 13).
2 Press the volume +/– button to adjust
the selected item.
Note
Adjust within 3 seconds after selecting the item.
Quickly attenuating the
sound
Press (ATT).
“ATT” appears in the display.
t FAD (front-rear)
Changing the sound and
display settings
The following items can be set:
• DEMO* — to turn the demonstration display
on or off.
– Select “ON” to activate the demonstration
display (The demonstration starts about 10
seconds after the unit is turned off).
– Select “OFF” to deactivate the demonstration
display.
• BEEP — to turn the beeps on or off.
Selecting the desired item
Press (SEL) and the desired preset
number button simultaneously.
(SEL) + (4): DEMO*
(SEL) + (6): BEEP
* When the unit is turned off.
To cancel the item, press (SEL) and the preset
number button simultaneously again.
To restore the previous volume level, press
(ATT) again.
12
Page 13
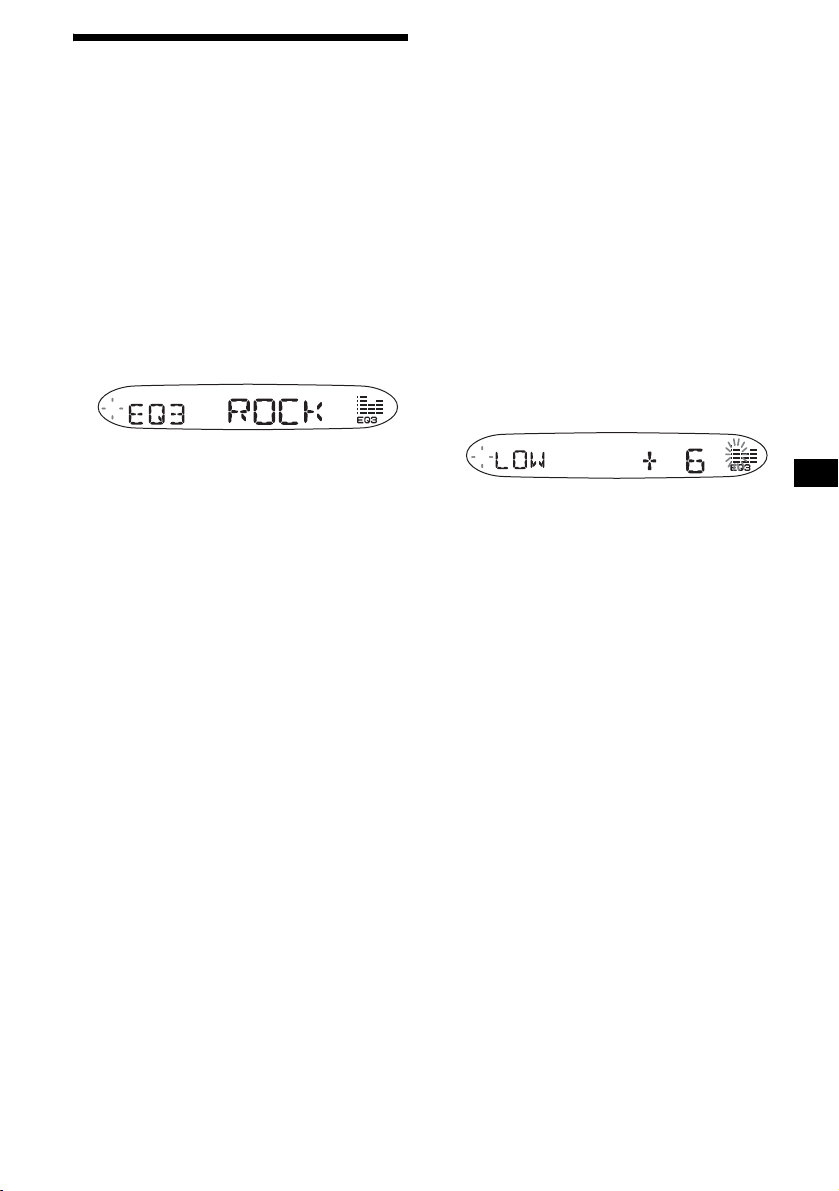
Setting the equalizer (EQ3)
You can select an equalizer curve for 7 music
types (XPLOD, VOCAL, CLUB, JAZZ, N-AGE,
ROCK, CUST, and OFF (equalizer OFF)).
You can store a different equalizer setting for
each source.
Selecting the equalizer curve
1 Press (SOURCE) to select a source
(Radio or CD).
2 Press (EQ3) repeatedly until the
desired equalizer curve.
Each time you press (EQ3), the item
changes.
To cancel the equalizing effect, select “OFF.”
Adjusting the equalizer curve
You can store and adjust the equalizer settings
for different tone ranges.
1 Press (SOURCE) to select a source
(Radio or CD).
2 Press (EQ3) repeatedly to select the
desired equalizer curve.
3 Adjusting the equalizer curve.
1 Press (SEL) repeatedly to select the
desired tone range.
Each time you press ( SEL ), the tone range
changes.
LOW t MID t HI (t BAL t FAD)
2 Press the volume +/– button
repeatedly to adjust to the desired
volume level.
The volume level is adjustable by 1 dB
steps from –10 dB to +10 dB.
3 Repeat step 1 and 2 to adjust the
equalizer curve.
To restore the factory-set equalizer curve,
press (SEL) for 2 seconds.
After 3 seconds, the display returns to
normal play mode.
Note
When EQ3 is set to “OFF,” you cannot adjust the
equalizer curve settings.
13
Page 14
Additional Information
Maintenance
Fuse replacement
When replacing the fuse, be sure to use one
matching the amperage rating stated on the
original fuse. If the fuse blows, check the power
connection and replace the fuse. If the fuse blows
again after replacement, there may be an internal
malfunction. In such a case, consult your nearest
Sony dealer.
Fuse (10 A)
Warn ing
Never use a fuse with an amperage rating
exceeding the one supplied with the unit as this
could damage the unit.
Cleaning the connectors
The unit may not function properly if the
connectors between the unit and the front panel
are not clean. In order to prevent this, detach the
front panel (page 7) and clean the connectors
with a cotton swab dipped in alcohol. Do not
apply too much force. Otherwise, the connectors
may be damaged.
Replacing the lithium battery
Under normal conditions, battery will last
approximately 1 year. (The service life may be
shorter, depending on the conditions of use.)
When the battery becomes weak, the range of the
card remote commander becomes shorter.
Replace the battery with a new CR2025 lithium
battery. Use of any other battery may present a
risk of fire or explosion.
x
+ side up
Notes on lithium battery
• Keep the lithium battery out of the reach of
children. Should the battery be swallowed,
immediately consult a doctor.
• Wipe the battery with a dry cloth to assure a
good contact.
• Be sure to observe the correct polarity when
installing the battery.
• Do not hold the battery with metallic tweezers,
otherwise a short-circuit may occur.
Main unit
Back of the front panel
Notes
• For safety, turn off the ignition before cleaning the
connectors, and remove the key from the ignition
switch.
• Never touch the connectors directly with your fingers
or with any metal device.
14
WARNING
Battery may explode if mistreated.
Do not recharge, disassemble, or dispose of
in fire.
Page 15
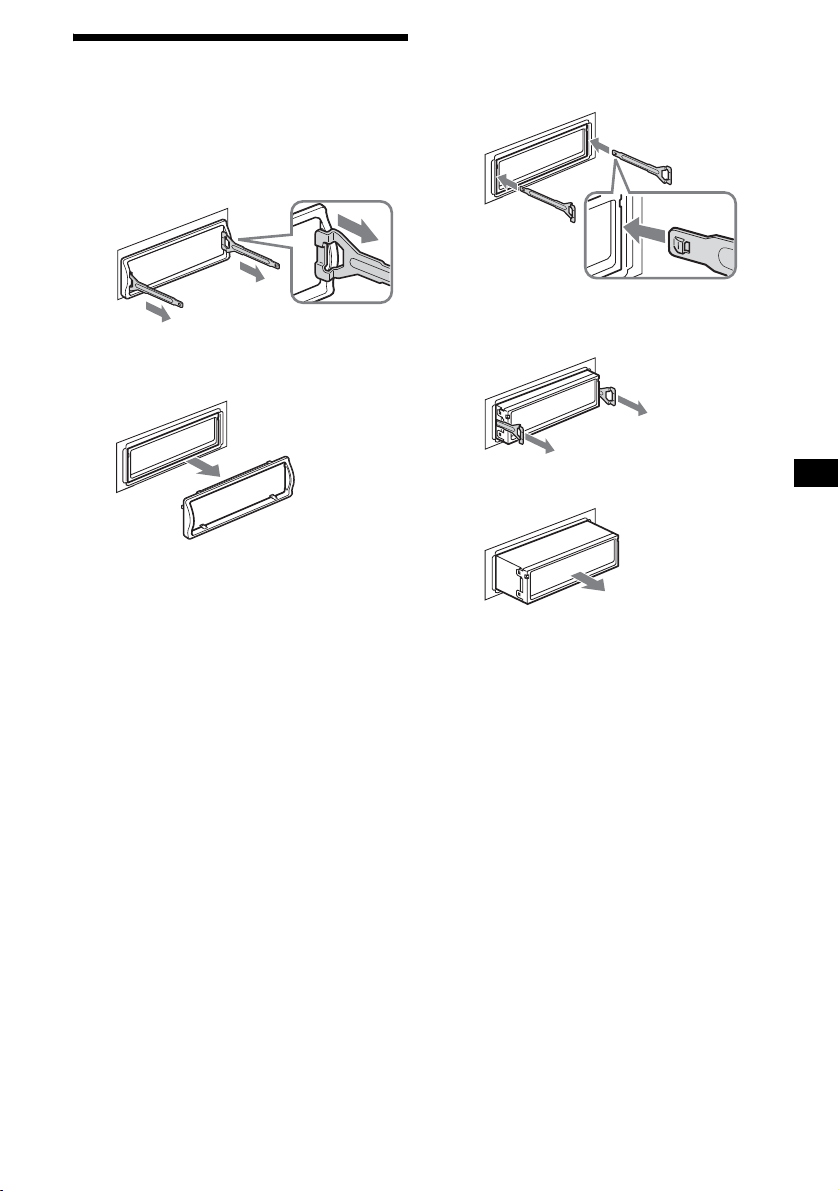
Removing the unit
1 Remove the protection collar.
1 Detach the front panel (page 7).
2 Engage the release keys together
with the protection collar.
2 Remove the unit.
1 Insert both release keys together
until they click.
Face the hook
inwards.
Orient the release
key correctly.
3 Pull out the release keys to remove
the protection collar.
2 Pull the release keys to unseat the
unit.
3 Slide the unit out of the mounting.
15
Page 16

Specifications
CD Player section
Signal-to-noise ratio 120 dB
Frequency response 10 – 20,000 Hz
Wow and flutter Below measurable limit
Tuner section
FM
Tuning range FM tuning interval:
Aerial terminal External aerial connector
Intermediate frequency 10.7 MHz/450 kHz
Usable sensitivity 9 dBf
Selectivity 75 dB at 400 kHz
Signal-to-noise ratio 67 dB (stereo),
Harmonic distortion at 1 kHz
Separation 35 dB at 1 kHz
Frequency response 30 – 15,000 Hz
AM
Tuning range AM tuning interval:
Aerial terminal External aerial connector
Intermediate frequency 10.7 MHz/450 kHz
Sensitivity 30 µV
50 kHz/200 kHz
switchable
87.5 – 108 MHz
(at 50 kHz step)
87.5 – 107.9 MHz
(at 200 kHz step)
69 dB (mono)
0.5 % (stereo),
0.3 % (mono)
9 kHz /10 kHz switchable
531 – 1,602 kHz
(at 9 kHz step)
530 – 1,710 kHz
(at 10 kHz step)
General
Outputs Audio outputs terminal
Input Aerial input terminal
Tone controls Low:
Power requirements 12 V DC car battery
Dimensions Approx. 178 × 50 × 176 mm
Mounting dimensions Approx. 182 × 53 × 161 mm
Mass Approx. 1.2 kg
Supplied accessories Parts for installation and
Optional accessory Card remote commander
Design and specifications are subject to change
without notice.
(rear)
Power aerial relay control
terminal
Power amplifier control
terminal
±10 dB at 60 Hz (XPLOD)
Mid:
±10 dB at 1 kHz (XPLOD)
High:
±10 dB at 10 kHz (XPLOD)
(negative earth)
(w/h/d)
connections (1 set)
Front panel case (1)
RM-X114
Power amplifier section
Outputs Speaker outputs
Speaker impedance 4 – 8 ohms
Maximum power output 52 W × 4 (at 4 ohms)
(sure seal connectors)
16
Page 17
Troubleshooting
The following checklist will help you remedy
problems you may encounter with your unit.
Before going through the checklist below, check
the connection and operating procedures.
General
No sound.
• Press the volume + button to adjust the
volume.
• Cancel the ATT function.
• Set the fader control to the centre position for
a 2-speaker system.
The contents of the memory have been
erased.
• The RESET button has been pressed.
t Store again into the memory.
• The power lead or battery has been
disconnected.
• The power connecting lead is not connected
properly.
No beep sound.
• The beep sound is cancelled (page 12).
• An optional power amplifier is connected
and you are not using the built-in amplifier.
The display disappears from/does not
appear in the display window.
• The display disappears if you press and hold
(OFF).
t Press and hold (OFF) again until the
display appears.
• Remove the front panel and clean the
connectors. See “Cleaning the connectors”
(page 14) for details.
Stored stations and correct time are erased.
The fuse has blown.
Makes noise when the ignition key is in the
ON, ACC, or OFF position.
The leads are not matched correctly with the
car’s accessory power connector.
No power is being supplied to the unit.
• Check the connection. If everything is in
order, check the fuse.
• The car does not have an ACC position.
t Press (SOURCE) (or insert a disc) to turn
on the unit.
The power is continuously supplied to the
unit.
The car does not have an ACC position.
The power aerial does not extend.
The power aerial does not have a relay box.
CD playback
A disc cannot be loaded.
• Another CD is already loaded.
• The CD has been forcibly inserted upside
down or in the wrong way.
Playback does not begin.
• Defective dirty CD.
• CD-R/CD-RW that is not finalized.
• You tried to playback a CD-R/CD-RW not
designed for audio use.
• Some CD-Rs/CD-RWs may not play due to
its recording equipment or the disc
condition.
A disc is automatically ejected.
The ambient temperature exceeds 50°C.
The operation buttons do not function.
CD will not be ejected.
Press the RESET button.
The sound skips from vibration.
• The unit is installed at an angle of more than
45°.
• The unit is not installed in a sturdy part of
the car.
The sound skips.
Dirty or defective disc.
continue to next page t
17
Page 18

Radio reception
Preset tuning is not possible.
• Store the correct frequency in the memory.
• The broadcast signal is too weak.
The stations cannot be received.
The sound is hampered by noises.
• Connect a power aerial control lead (blue) or
accessory power supply lead (red) to the
power supply lead of a car’s aerial booster.
(Only when your car has built-in FM/AM
aerial in the rear/side glass.)
• Check the connection of the car aerial.
• The auto aerial will not go up.
t Check the connection of the power aerial
control lead.
• Check the frequency.
Automatic tuning is not possible.
• The local seek mode is set to “ON.”
t Set the local seek mode to “OFF”
(page 11).
• The broadcast signal is too weak.
t Perform manual tuning.
The “ST” indication flashes.
• Tune in the frequency accurately.
• The broadcast signal is too weak.
t Set the monaural reception mode to
“ON” (page 11).
A programme broadcast in stereo is heard
in monaural.
The unit is in monaural reception mode.
t Cancel monaural reception mode
(page 11).
Error displays/Message
Error displays
The following indications will flash for about 5
seconds (and in the case of “Err04”, an alarm
will be heard).
Err04
A CD is dirty or inserted upside down.
t Clean or insert the CD correctly.
Err50
The connection of speakers/amplifiers is
incorrect.
t See the installation guide manual of this
model to check the connection.
Err60
There may be an internal malfunction.
t Check the connection. If the error
indication remains on in the display,
consult your nearest Sony dealer.
Err99
The CD unit cannot be operated because of
some problem.
t Press the RESET button on the unit.
Message
“” or “”
You have reached the beginning or the end of
the disc and you cannot go any further.
If these solutions do not help improve the
situation, consult your nearest Sony dealer.
18
Page 19

Page 20

Bienvenido
E
Gracias por adquirir este Reproductor de discos
compactos Sony. Puede disfrutar aún más sus
varias carácterísticas con:
Accesorio de controlador opcional
El control remoto de tarjeta RM-X114
sta etiqueta está situada en la parte
inferior del chasis.
2
Page 21

Tabla de Contenido
Ubicación de los controles. . . . . . . . . . . . . . . 4
Precauciones . . . . . . . . . . . . . . . . . . . . . . . . . 5
Notas sobre los discos . . . . . . . . . . . . . . . . . . 6
Procedimientos iniciales
Restauración de la unidad . . . . . . . . . . . . . . . 7
Extracción del panel frontal. . . . . . . . . . . . . . 7
Ajuste del reloj . . . . . . . . . . . . . . . . . . . . . . . 8
Reproductor de CD
Reproducción de discos. . . . . . . . . . . . . . . . . 9
Elementos del visor . . . . . . . . . . . . . . . . . . . . 9
Reproducción repetida de pistas
— Reproducción repetida . . . . . . . . . . . . 10
Reproducción de pistas en orden aleatorio
— Reproducción aleatoria . . . . . . . . . . . 10
Radio
Memorización automática de emisoras
— Memoria de la mejor sintonía
(BTM) . . . . . . . . . . . . . . . . . . . . . . . . . . . 10
Recepción de las emisoras memorizadas. . . 11
Memorización de las emisoras deseadas . . . 11
Otras funciones
Ajuste del balance y el equilibrio . . . . . . . . 12
Atenuación rápida del sonido . . . . . . . . . . . 12
Cambio de los ajustes de sonido y la
pantalla . . . . . . . . . . . . . . . . . . . . . . . . . . 12
Ajuste del ecualizador (EQ3) . . . . . . . . . . . 13
Información complementaria
Mantenimiento . . . . . . . . . . . . . . . . . . . . . . 14
Extracción de la unidad. . . . . . . . . . . . . . . . 15
Especificaciones . . . . . . . . . . . . . . . . . . . . . 17
Solución de problemas . . . . . . . . . . . . . . . . 18
Mensaje/indicaciones de error . . . . . . . . . . 19
3
Page 22

Ubicación de los controles
Consulte las páginas indicadas para obtener información detallada.
SEL
MODE
SOURCE
SENS
ATT DSPL
1
REP SHUF
2 3 4 5 6
CDX-S2000
SEEK
OFF
EQ3
BTM
a Botón de volumen +/–
b Botón SEL (selección)
Selección de elementos.
c Botón MODE
Cambio de la operación.
d Visor
e Botón OFF (Detener/Apagar)* 7, 9
f Botón Z (expulsar) 9
g Botón (extracción del panel frontal)
7
h Botón SOURCE (Encendido/Radio/
CD)
Selección de la fuente.
i Botón ATT (atenuación) 12
j Botón SENS 11
k Botón RESET (ubicado en la parte frontal
de la unidad, detrás del panel frontal) 7
l Botones numéricos 12
Radio:
Memorización de la emisora deseada en cada
botón numérico.
CD:
(3): REP 10
(4): SHUF 10
m Selector de frecuencias (ubicado en la
parte inferior de la unidad)
Consulte “Selector de frecuencias” en el
manual de instalación/conexiones.
n Botón BTM (Memoria de la mejor
sintonía) 10
o Botón DSPL (cambio del modo de
indicación) 8, 9
p Botón EQ3 13
q Receptor del control remoto de tarjeta
r Botón SEEK +/–
Radio:
Sintonización automática de emisoras/
localización manual de una emisora.
CD:
Omisión de pistas/avance o retroceso rápido
de una pista.
* Advertencia sobre la instalación en un
automóvil que no disponga de una
posición ACC (auxiliar) en la llave de
encendido
Tras apagar el motor, mantenga presionado
(OFF) en la unidad hasta que se apague la
indicación.
De lo contrario, la indicación no se apagará y la
batería se desgastará.
4
Page 23

Control remoto de tarjeta RM-X114
(opcional)
DSPL MODE
+
PRESET
LIST
+
DISC
MENU
–
SEEK
SOUND
SOURCE
DISC
PRESET –
+
VOL
+
SEEK
–
ENTER
ATTOFF
–
Los botones correspondientes del
control remoto de tarjeta controlan las
mismas funciones que los de esta
unidad.
a Botón DSPL
b Botón MENU*
c Botón SOURCE
d Botones SEEK (–/+)
e Botón SOUND
f Botón OFF
g Botones VOL (+/–)
h Botón MODE
i Botón LIST*
j Botón DISC*/PRESET (+/–)
k Botón ENTER*
l Botón ATT
Precauciones
• Si estaciona el automóvil bajo la luz directa del
sol, deje que la unidad se enfríe antes de
utilizarla.
• Las antenas motorizadas se extenderán
automáticamente mientras la unidad se
encuentra en funcionamiento.
Si desea realizar alguna consulta o solucionar
algún problema relativo a la unidad y que este
manual no trate, consulte con el distribuidor
Sony más cercano a su domicilio.
Condensación de humedad
En días lluviosos o en áreas muy húmedas, puede
presentarse condensación dentro de las lentes y
el visor de la unidad. Si esto ocurriera, la unidad
no funcionará correctamente. En tal caso,
extraiga el disco de la unidad y espere alrededor
de una hora hasta que se haya evaporado la
humedad.
Para mantener una alta calidad de
sonido
Asegúrese de no derramar zumos ni refrescos
sobre la unidad o los discos.
* No disponible en esta unidad
Nota
Si la indicación se apaga al presionar (OFF), la
unidad no puede utilizarse mediante el control remoto
de tarjeta, a menos que se presione (SOURCE) en la
unidad o que se inser te un disco para activar primero
la unidad.
Sugerencia
Consulte “Sustitución de la pila de litio” para obtener
más información sobre cómo sustituir la pila
(página 15).
5
Page 24

Notas sobre los discos
• Para mantener los discos limpios, no toque su
superficie. Tómelos por los bordes.
• Guarde los discos en sus cajas o en los
cargadores de discos cuando no los utilice.
• No someta los discos al calor ni a altas
temperaturas. Evite dejarlos en un automóvil
estacionado o sobre el tablero o la bandeja
trasera.
• No adhiera etiquetas a los discos, ni use discos
con residuos o tinta pegajosos. Tales discos
pueden dejar de girar durante el uso, causando
fallos de funcionamiento, o pueden dañarse.
• Antes de realizar la reproducción, limpie los
discos con un paño de limpieza disponible en el
mercado. Pase el paño desde el centro hacia el
borde exterior. No utilice disolventes como
bencina, diluyente, limpiadores disponibles en
el mercado ni aerosoles antiestáticos para
discos analógicos.
Notas sobre discos CD-R/CD-RW
• Puede reproducir discos CD-R (discos
compactos grabables) y discos CD-RW (discos
compactos reescribibles) diseñados para uso de
audio en esta unidad.
Busque estas marcas con el fin de distinguir los
discos CD-R y CD-RW para uso de audio.
Estas marcas indican que el disco no es para uso
de audio.
• No use discos con etiquetas o adhesivos
pegados.
Si usa tales discos se pueden producir las
siguientes fallas de funcionamiento:
– No se puede expulsar el disco (dado que se ha
despegado la etiqueta o el adhesivo y se
obstruye el mecanismo de expulsión).
– No se pueden leer datos de audio
correctamente (por ejemplo, se interrumpe la
reproducción o bien no se reproduce) debido
a la contracción a causa del calor de un
adhesivo o etiqueta que hace que el disco se
distorsione.
• No se pueden reproducir en esta unidad discos
de formas no estándar (por ejemplo, en forma
de corazón, cuadrado o estrella). Tratar de
hacerlo puede dañar la unidad. No utilice este
tipo de discos.
• No se pueden reproducir CD de 8 cm.
6
• Algunos discos CD-R y CD-RW (según el
equipo utilizado para su grabación o la
condición del disco) no pueden reproducirse en
esta unidad.
• No es posible reproducir un disco CD-R o un
CD-RW que no esté finalizado*.
* Proceso necesario para reproducir en el reproductor
de CD de audio un disco CD-R o CD-RW grabado.
Page 25

Procedimientos iniciales
Extracción del panel frontal
Puede extraer el panel frontal de esta unidad para
evitar que la roben.
Restauración de la unidad
Antes de utilizar la unidad por primera vez, o
después de sustituir la batería del automóvil o de
cambiar las conexiones, debe restaurar dicha
unidad.
Extraiga el panel frontal y presione el botón
RESET con un objeto puntiagudo, como por
ejemplo un bolígrafo.
Botón RESET
Nota
Al presionar RESET, se borra el ajuste del reloj y
algunos contenidos memorizados.
Alarma de precaución
Si gira la llave de encendido hasta la posición
OFF sin haber extraído el panel frontal, la alarma
de precaución emite un pitido durante unos
segundos.
Si conecta un amplificador opcional de potencia
y no utiliza el incorporado, el pitido se desactiva.
1 Presione (OFF)*.
Se detiene la reproducción de CD o la
recepción de la radio (la iluminación de las
teclas y el visor permanecen activados).
* Si su automóvil no dispone de una posición ACC
(accesorio) en la llave de encendido, asegúrese
de apagar la unidad presionando (OFF) hasta
que desaparezca la indicación a fin de evitar que
la batería se desgaste.
2 Presione , deslice y sáquelo tirando
hacia fuera.
(OFF)
Notas
• Si extrae el panel con la unidad encendida, la
alimentación se desactiva automáticamente para
evitar que los altavoces se dañen.
• No deje caer el panel frontal ni su pantalla. Tampoco
ejerza excesiva presión sobre éstos.
• No someta el panel frontal al calor o a altas
temperaturas. Evite dejarlo en automóviles
estacionados o en tableros o bandejas traseras.
Sugerencia
Al transportar el panel frontal, utilice el estuche
suministrado.
continúa en la página siguiente t
7
Page 26

Instalación del panel frontal
Instale la parte A del panel frontal en la parte B
de la unidad, tal como muestra la ilustración, y
presione el lado izquierdo hasta que encaje en
posición.
Ajuste del reloj
El reloj emplea una indicación digital de
12 horas.
Ejemplo: Para ajustar el reloj a las 10:08
1 Presione (DSPL) durante 2 segundos.
La indicación de hora parpadea.
A
B
Nota
No coloque nada sobre la superficie interior del panel
frontal.
1Presione el botón de volumen +/–
para ajustar la hora.
2Presione (SEL).
La indicación de minutos parpadea.
3Presione el botón de volumen +/–
para ajustar los minutos.
2 Presione (DSPL).
El reloj se inicia. Al finalizar el ajuste del
reloj, el visor vuelve al modo de reproducción
normal.
8
Page 27

Reproductor de CD
Elementos del visor
Se pueden mostrar los siguientes elementos.
Reproducción de discos
Inserte el disco (con la etiqueta hacia
arriba).
La reproducción se inicia automáticamente.
Si ya hay un disco insertado, presione
(SOURCE) varias veces hasta que aparezca
“CD” para iniciar la reproducción.
Para Presione
Detener la
reproducción
Expulsar el disco Z
Omitir pistas
–Sensor de música
automático
Avanzar/retroceder
rápidamente
– Búsqueda
manual
Z o (OFF)
(SEEK) (–/+)
(./>)
[una vez por pista]
(SEEK) (–/+)
(m/M)
[manténgalo presionado
hasta alcanzar el punto
deseado]
Origen
Número de pista
Para Presione
Cambiar el
elemento del visor
Elementos visualizables
• Tiempo de
reproducción
transcurrido
•Reloj
(DSPL)
Notas
• Mientras se esté reproduciendo la primera o última
pista del disco, si se presiona (SEEK) (–) o
(SEEK) (+), la reproducción salta a la última o
primera pista del disco.
• Cuando finalice la última pista del disco, la
reproducción se reiniciará a partir de la primera
pista del disco.
9
Page 28

Reproducción repetida de
pistas
— Reproducción repetida
La pista actual se repetirá cuando llegue a su
final.
Durante la reproducción, presione (3)
(REP) varias veces hasta que el
indicador “REP” aparezca en la el
visor.
Radio
La unidad puede memorizar hasta 6 emisoras por
banda (FM1, FM2, FM3, AM1 y AM2).
Precaución
Para sintonizar emisoras mientras conduce,
utilice la función Memoria de la mejor sintonía
para evitar accidentes.
Aparece el indicador “REP”.
Se inicia la reproducción repetida.
Para volver al modo normal de reproducción,
presione (3) (REP) nuevamente.
Reproducción de pistas en
orden aleatorio
— Reproducción aleatoria
Tiene la opción de reproducir las pistas del disco
actual en orden aleatorio.
Durante la reproducción, presione
(4) (SHUF) hasta que el indicador
“SHUF” aparezca en el visor.
Aparece el indicador “SHUF”.
Se inicia la reproducción aleatoria.
Para volver al modo normal de reproducción,
presione (4) (SHUF) nuevamente.
Memorización automática de
emisoras
— Memoria de la mejor sintonía (BTM)
La unidad selecciona las emisoras de señal más
intensa dentro de la banda seleccionada y las
memoriza por orden de frecuencia.
1 Presione (SOURCE) varias veces para
seleccionar la radio.
2 Presione (MODE) varias veces para
seleccionar la banda.
3 Presione (BTM) durante 2 segundos.
La unidad memoriza las estaciones en el
orden de sus frecuencias en los botones
númericos.
La unidad emite un pitido al memorizar el
ajuste.
Notas
• Si se reciben pocas emisoras debido a que las
señales son débiles, algunos botones numéricos
conservarán sus valores anteriores.
• Si el visor muestra un número, la unidad comienza a
memorizar emisoras a partir de la que se muestra
actualmente.
10
Page 29

Recepción de las emisoras
memorizadas
1 Presione (SOURCE) varias veces para
seleccionar la radio.
2 Presione (MODE) varias veces para
seleccionar la banda.
3 Presione el botón numérico ((1) a (6))
en el que esté memorizada la emisora
deseada.
Si la sintonización programada no
funciona
— Sintonización automática/Modo de
búsqueda local
Sintonización automática:
Presione (SEEK) (+) o (SEEK) (–) para
buscar la emisora.
La exploración se detiene cuando la unidad
recibe una emisora. Repita la operación hasta
que se reciba la emisora deseada.
Modo de búsqueda local:
Si la sintonización automática se
detiene con demasiada frecuencia,
presione (SENS) varias veces hasta
que aparezca el indicador “LCL” en el
visor.
Aparece el indicador “LCL”.
Sólo se sintonizan las emisoras con señales
relativamente intensas.
Para cancelar el modo de búsqueda local,
presione (SENS) dos veces durante la recepción
FM.
Nota
Durante la recepción AM, presione (SENS) para
cancelar el modo de búsqueda local (se apaga el
indicador “LCL”).
Sugerencia
Si conoce la frecuencia de la emisora que desea
escuchar, presione y mantenga presionado
(SEEK) (+) o (SEEK) (–) para localizar la frecuencia
aproximada y, a continuación, presione
(SEEK) (+) o (SEEK) (–) varias veces para ajustar
con más precisión la frecuencia deseada
(sintonización manual).
Si la recepción de FM en estéreo es de
mala calidad
— Modo monoaural
Durante la recepción de radio,
presione (SENS) varias veces hasta
que aparezca el indicador “MONO” en
el visor.
Aparece el indicador “MONO”.
El sonido mejora, aunque es monoaural (“ST”
desaparece).
Para volver a la recepción normal de radio,
presione (SENS) nuevamente (se apaga el
indicador “MONO”).
Memorización de las
emisoras deseadas
Puede memorizar manualmente las emisoras que
desee en cualquier botón numérico.
1 Presione (SOURCE) varias veces para
seleccionar la radio.
2 Presione (MODE) varias veces para
seleccionar la banda.
3 Presione (SEEK) (+) o (SEEK) (–) para
sintonizar la emisora que desee
memorizar.
4 Presione el botón numérico que desee
((1) a (6)) durante 2 segundos hasta
que aparezca “MEM”.
La indicación de botón numérico aparece en
el visor.
Nota
Si intenta memorizar otra emisora en el mismo botón
numérico, se borra la emisora antes memorizada.
11
Page 30

Otras funciones
Ajuste del balance y el
equilibrio
Es posible ajustar el balance y el equilibrio.
1 Presione (SEL) varias veces hasta que
aparezca “BAL” o “FAD”.
Cada vez que presione (SEL), el elemento
cambia de la siguiente forma:
LOW* t MID* t HI* t
BAL (izquierdo-derecho) t
FAD (frontal-posterior)
* Si está activado EQ3 (página 13).
2 Presione el botón de volumen +/–
para ajustar el elemento seleccionado.
Nota
Realice el ajuste antes de que transcurran 3
segundos después de seleccionar el elemento.
Atenuación rápida del sonido
Presione (ATT).
Aparece “ATT” en la pantalla.
Cambio de los ajustes de
sonido y la pantalla
Es posible ajustar los siguientes elementos:
• DEMO* — para activar o desactivar la pantalla
de demostración.
– Seleccione “ON” para activar la pantalla de
demostración (la demostración se inicia
aproximadamente 10 segundos después de
que se haya encendido la unidad).
– Seleccione “OFF” para desactivar la pantalla
de demostración.
• BEEP — para activar o desactivar los pitidos.
Selección del elemento deseado
Presione (SEL) y el botón numérico
programado que desee
simultáneamente.
(SEL) + (4): DEMO*
(SEL) + (6): BEEP
* Cuando la unidad se apaga.
Para cancelar el elemento, vuelva a presionar
(SEL) y el botón numérico programado
simultáneamente.
Para recuperar el nivel anterior de volumen,
presione (ATT) de nuevo.
12
Page 31

Ajuste del ecualizador (EQ3)
Es posible seleccionar una curva de ecualizador
para 7 tipos de música distintos (XPLOD,
VOCAL, CLUB, JAZZ, N-AGE, ROCK, CUST
y OFF (ecualizador OFF)).
Puede memorizar un ajuste diferente del
ecualizador para cada fuente.
Selección de la curva de ecualizador
1 Presione (SOURCE) para seleccionar
una fuente (Radio o CD).
2 Presione (EQ3) varias veces hasta
seleccionar la curva de ecualizador
que desee.
Cada vez que presione (EQ3), el elemento
cambiará.
Para cancelar el efecto de ecualización,
seleccione “OFF”.
Ajuste de la curva de ecualizador
Puede memorizar y definir los ajustes del
ecualizador para distintos rangos tonales.
1 Presione (SOURCE) para seleccionar
una fuente (Radio o CD).
2 Presione (EQ3) varias veces para
seleccionar la curva de ecualizador
que desee.
3 Ajuste de la curva de ecualizador.
1 Presione (SEL) varias veces para
seleccionar el rango de pitidos
deseado.
Cada vez que presione (SEL), el rango de
pitidos cambiará.
LOW t MID t HI (t BAL t FAD)
2 Presione el botón de volumen +/–
varias veces para ajustar el nivel de
volumen deseado.
El nivel de volumen puede ajustarse en
intervalos de 1 dB entre –10 dB y +10 dB.
3 Repita los pasos 1 y 2 para
ajustar la curva de ecualizador.
Para restaurar la curva de ecualizador
ajustada en fábrica, presione (SEL)
durante 2 segundos.
Transcurridos 3 segundos, el visor vuelve
al modo de reproducción normal.
Nota
Si ajusta EQ3 en “OFF”, no podrá ajustar los valores
de la curva del ecualizador.
13
Page 32

Información
complementaria
Mantenimiento
Sustitución del fusible
Cuando cambie el fusible, asegúrese de usar uno
cuyo amperaje sea idéntico al especificado en el
original. Si el fusible se funde, revise las
conexiones de energía eléctrica y reemplace el
fusible. Si el fusible se funde de nuevo después
de reemplazarlo, puede que haya un problema de
funcionamiento interno. En tal caso, consulte a
su distribuidor Sony más cercano.
Fusible (10 A)
Advertencia
No utilice nunca un fusible cuyo amperaje supere
al del suministrado con la unidad, ya que ésta
podría dañarse.
Limpieza de los conectores
Es posible que la unidad no funcione
correctamente si los conectores entre dicha
unidad y el panel frontal están sucios. Para
evitarlo, extraiga el panel frontal (página 7) y
limpie los conectores con un hisopo de algodón
humedecido en alcohol. No aplique demasiada
fuerza. De hacerlo, podría dañar los conectores.
Unidad principal
Parte posterior del panel frontal
Notas
• Por razones de seguridad, apague el motor antes de
limpiar los conectores y extraiga la llave del
encendido.
• No toque nunca los conectores directamente con los
dedos ni con un dispositivo metálico.
14
Page 33

Sustitución de la pila de litio
En condiciones normales, las pilas duran
aproximadamente 1 año. (El tiempo de servicio
puede ser menor en función de las condiciones
de uso.) El alcance del control remoto disminuye
cuando se agota la pila. Reemplace la pila por
una pila de litio CR2025 nueva. El uso de
cualquier otra pila puede ocasionar incendio o
explosión.
x
Lado + hacia arriba
Extracción de la unidad
1 Extraiga el marco de protección.
1 Extraiga el panel frontal (página 7).
2 Fije las llaves de liberación con el
marco de protección.
Oriente la llave de
liberación en la
dirección correcta.
3 Tire de las llaves de liberación para
extraer el marco de protección.
Notas sobre la pila de litio
• Mantenga la pila de litio fuera del alcance de
los niños. En caso de ingerirse, consulte a un
médico inmediatamente.
• Limpie la pila con un paño seco para garantizar
un contacto óptimo.
• Asegúrese de observar la polaridad correcta al
instalar la pila.
• No agarre la pila con pinzas metálicas, ya que
si lo hace puede producirse un cortocircuito.
ADVERTENCIA
La pila puede explotar si no se emplea
adecuadamente.
No recargue la pila; tampoco la desmonte ni
la arroje al fuego.
continúa en la página siguiente t
15
Page 34

2 Extraiga la unidad.
1 Inserte las dos llaves de liberación
a la vez hasta que oiga un “clic”.
El gancho
debe
encontrarse
en la parte
interior.
2 Tire de las llaves de liberación para
extraer la unidad.
3 Deslice la unidad para extraerla del
emplazamiento.
16
Page 35

Especificaciones
Sección del reproductor de CD
Relación señal-ruido 120 dB
Respuesta de frecuencia 10 – 20 000 Hz
Fluctuación y trémolo Inferior al límite medible
Sección del sintonizador
FM
Rango de sintonización Intervalo de sintonización
Terminal de la antena aérea
Frecuencia intermedia 10,7 MHz/450 kHz
Sensibilidad útil 9 dBf
Selectividad de 75 dB a 400 kHz
Relación señal-ruido 67 dB (estéreo),
Distorsión armónica a 1 kHz
Separación 35 dB a 1 kHz
Respuesta de frecuencia 30 – 15 000 Hz
AM
Rango de sintonización Intervalo de sintonización
Terminal de la antena aérea
Frecuencia intermedia 10,7 MHz/450 kHz
Sensibilidad 30 µV
de FM:
50 kHz/200 kHz
conmutable
87,5 – 108 MHz
(a intervalos de 50 kHz)
87,5 – 107,9 MHz
(a intervalos de 200 kHz)
Conector de antena aérea
69 dB (mono)
0,5 % (estéreo),
0,3 % (mono)
de AM:
9kHz/10kHz
conmuntable
531 – 1 602 kHz
(a intervalos de 9 kHz)
530 – 1 710 kHz
(a intervalos de 10 kHz)
Conector de antena aérea
Generales
Salidas Terminal de salidas de audio
Entrada Terminal de entrada de
Controles de tono Graves:
Requisitos de alimentación
Dimensiones Aprox. 178 × 50 × 176 mm
Dimensiones de montaje Aprox. 182 × 53 × 161 mm
Peso Aprox. 1,2 kg
Accesorios suministrados Componentes para la
Accesorio opcionales Control remoto de tarjeta
El diseño y las especificaciones están sujetos a
cambios sin previo aviso.
(posterior)
Terminal de control de relé
de antena motorizada
Terminal de control del
amplificador de potencia
antena
±10 dB a 60 Hz (XPLOD)
Medios:
±10 dB a 1 kHz (XPLOD)
Agudos:
±10 dB a 10 kHz (XPLOD)
Batería de automóvil de
cc 12 V (tierra negativa)
(an/al/prf)
instalación y las conexiones
(1 juego)
Estuche para el pa nel frontal
(1)
RM-X114
Sección del amplificador de potencia
Salidas Salidas de altavoz
Impedancia de altavoz 4 – 8 Ω
Salida máxima de potencia
(conectores de sellado
seguro)
52 W × 4 (a 4 Ω)
17
Page 36

Solución de problemas
La siguiente lista de comprobaciones le ayudará
a solucionar los problemas que puedan
producirse con la unidad.
Antes de consultar la siguiente lista, compruebe
los procedimientos de conexión y de
funcionamiento.
Generales
No se oye el sonido.
• Presione el botón de volumen + para ajustar
el volumen.
• Cancele la función ATT.
• Ajuste el control de equilibrio en la posición
central para un sistema de 2 altavoces.
El contenido de la memoria se ha borrado.
• Ha presionado el botón RESET.
t Vuelva a almacenar el contenido en la
memoria.
• Se han desconectado el cable de
alimentación o las pilas.
• El cable de conexión de la alimentación no
está conectado correctamente.
No se oyen los pitidos.
• El sonido de los pitidos está cancelado
(página 12).
• Un amplificador opcional de potencia está
conectado y usted no está usando el
amplificador incorporado.
La indicación desaparece o no aparece en
el visor.
• La indicación desaparece si mantiene
presionado (OFF).
t Vuelva a presionar (OFF) hasta que
aparezca la indicación.
• Extraiga el panel frontal y limpie los
conectores. Consulte “Limpieza de los
conectores (página 14) para obtener detalles.
Las emisoras memorizadas y la hora
correcta se han borrado.
El fusible se ha fundido.
Se oye ruido cuando la llave de encendido
se encuentra en la posición ON, ACC u OFF.
Los cables no coinciden con el conector de
alimentación auxiliar del automóvil.
La unidad no recibe alimentación.
• Compruebe la conexión. Si todo está en
orden, compruebe el fusible.
• El automóvil no dispone de una posición
ACC.
t Presione (SOURCE) (o inserte un disco)
para que se encienda la unidad.
La unidad recibe alimentación de forma
continua.
El automóvil no dispone de una posición ACC.
La antena motorizada no se extiende.
La antena motorizada no dispone de caja de
relé.
Reproducción de CD
No es posible insertar un disco.
• Ya hay un CD insertado.
• El CD se ha insertado a la fuerza al revés o
de forma incorrecta.
La reproducción no se inicia.
• CD defectuoso o sucio.
• CD-R o CD-RW que no está finalizado.
• Ha intentado reproducir un CD-R o CD-RW
no diseñado para uso de audio.
• Ciertos discos CD-R o CD-RW pueden no
reproducirse debido al equipo de grabación o
al estado del disco.
El disco se expulsa automáticamente.
La temperatura ambiente es superior a 50°C.
Los botones de operación no funcionan.
El CD no se expulsa.
Presione el botón RESET.
Se producen saltos de sonido debido a
vibraciones.
• La unidad está instalada en un ángulo
superior a 45°.
• La unidad no está instalada en una parte
segura del automóvil.
Se producen saltos de sonido.
Disco sucio o defectuoso.
18
Page 37

Recepción de la radio
No es posible utilizar la sintonización
programada.
• Almacene la frecuencia correcta en la
memoria.
• La señal de emisión es demasiado débil.
No es posible recibir las emisoras.
Hay ruidos que obstaculizan el sonido.
• Conecte un cable de control de antena
motorizada (azul) o un cable de fuente de
alimentación auxiliar (rojo) al cable de
suministro de alimentación del amplificador
de antena del automóvil. (Sólo si su auto
tiene una antena FM/AM incorporada en el
cristal posterior o lateral.)
• Compruebe la conexión de la antena del
automóvil.
• La antena automática no se extiende.
t Compruebe la conexión del cable de
control de antena motorizada.
• Compruebe la frecuencia.
No es posible utilizar la sintonización
automática.
• El modo de búsqueda local está ajustado en
“ON”.
t Ajuste el modo de búsqueda local en
“OFF” (página 11).
• La señal de emisión es demasiado débil.
t Utilice la sintonización manual.
La indicación “ST” parpadea.
• Sintonice la frecuencia con precisión.
• La señal de emisión es demasiado débil.
t Ajuste el modo de recepción monaural en
“ON” (página 11).
Un programa emitido en estéreo se oye en
monoaural.
La unidad se encuentra en el modo de
recepción monoaural.
t Cancele el modo de recepción monoaural
(página 11).
Mensaje/indicaciones de
error
Indicaciones de error
Las siguientes indicaciones parpadearán durante
5 segundos aproximadamente (y, en el caso del
“Err04”, se escuchará una alarma).
Err04
El CD está sucio o insertado al revés.
t Límpielo o insértelo correctamente.
Err50
La conexión de altavoces y amplificadores es
incorrecta.
t Consulte el manual de instalación de este
modelo para comprobar la conexión.
Err60
Es posible que se haya producido una falla
interna.
t Verifique la conexión. Si el indicador de
error permanece en el visor, póngase en
contacto con el distribuidor Sony más
cercano.
Err99
La unidad de CD no puede utilizarse debido a
algún problema.
t Presione el botón RESET de la unidad.
Mensaje
“” o “”
Ha llegado al principio o al final del disco y no
es posible avanzar más.
Si estas soluciones no ayudan a mejorar la
situación, consulte con el proveedor Sony más
cercano.
19
Page 38

鳴謝惠顧!
感謝您惠購 Sony 光碟播放機。 使用以
下附件,您更能涉趣於本機的多項功能 :
選購的操作附件
卡片式遙控器 RM-X114
2
Page 39

目錄
控制器位置 ..........................4
使用前注意事項 ......................5
光碟注意事項 ........................6
開始使用之前
復原本機 ............................7
拆卸前面板 ..........................7
設定時鐘 ............................8
CD 播放機
播放光碟 ............................9
顯示項目 ............................9
反覆播放樂曲
─ 重複播放 .....................10
以隨機順序播放樂曲
─ 任選播放 .....................10
收音機
自動存儲電台
─ 最佳調諧記憶功能 (BTM) ......10
收聽已存儲的電台 ...................11
僅存儲所要的電台 ...................11
其它功能
調節平衡和音量衰減器 ..............12
快速降低音量 ...................... 12
改變聲音和顯示設定 ................ 12
設定均衡器 (EQ3) ................. 13
附加資訊
保養 .............................. 14
拆卸本機 ..........................15
規格 .............................. 16
故障排除 ..........................17
出錯顯示 / 資訊 .................... 18
3
Page 40

控制器位置
詳細說明,請參見列出頁。
SEL
MODE
SOURCE
ATT DSPL
SENS
1
REP SHUF
2 3 4 5 6
SEEK
OFF
EQ3
BTM
CDX-S2000
a 音量 +/- 按鈕
b SEL (選擇)按鈕
選擇項目。
c MODE( 模式 ) 按鈕
變換操作。
d 顯示窗
e OFF (停止 / 電源關閉)按鈕 * 7,9
f Z ( 退出 ) 按鈕 9
g (前面板釋放)按鈕 7
h SOURCE (電源開 / 收音機 /CD)按鈕
選擇音源。
i ATT (降低)按鈕 12
j SENS 按鈕 11
k RESET 按鈕
(位於本機正面,前面板後) 7
l 數字按鈕 12
收音機:
將所要的電台儲存在每個數字按鈕上。
CD:
(3):REP 10
(4):SHUF 10
m 頻率選擇開關 (位於本機底部)
參見安裝 / 連接手冊中的 “頻率選擇開
關”。
n BTM (最佳調諧記憶功能)按鈕 10
o DSPL (顯示方式變換)按鈕 8,9
p EQ3 按鈕 13
q 卡片式遙控器感應器
r SEEK +/- 按鈕
收音機:
自動調諧 / 手動搜台。
CD:
跳過曲目 / 快進,後退曲目。
* 裝在發動機開關上沒有 ACC (附件)位置的
汽車上時的報警
關閉汽車發動機後,必須按住 (OFF) 不
放,直至顯示消失。
否則顯示不會關閉,並耗費電池。
4
Page 41

卡片式遙控器 RM-X114 (選購件)
DSPL MODE
+
PRESET
LIST
+
DISC
MENU
–
SEEK
SOUND
SOURCE
DISC
PRESET –
+
VOL
+
SEEK
–
ENTER
ATTOFF
–
卡片式遙控器上與本機上對應的按鈕控
制相同的功能。
a DSPL 按鈕
b MENU 按鈕 *
c SOURCE 按鈕
d SEEK (-/+)按鈕
e SOUND 按鈕
f OFF 按鈕
g VOL (+/-)按鈕
h MODE 按鈕
i LIST 按鈕 *
j DISC */PRESET (+/-)按鈕
k ENTER 按鈕 *
l ATT 按鈕
使用前注意事項
• 倘若您的座車停在直射陽光下,則在操作前
須先使本機充分冷卻。
• 本機工作時,電動天線將自動伸出。
若您有什麼關於本機的問題或困難,而本
說明書沒有提及,請向您附近的 Sony 經銷商
諮詢。
關於濕氣凝結
在雨天或非常潮濕的地區,本機的透鏡和
顯示幕內會產生濕氣凝結。一旦如此,本機將
無法正常運行。此時,請將光碟取出,並等待
約一小時,直至濕氣蒸發。
為保持高品質聲音
時刻當心,切勿將果汁或其它飲料濺在本
機或光碟上。
* 本機不可用
註
如果顯示是通過按 (OFF) 消失的,則只有先按裝
置上的 (SOURCE) 或插入光碟來啟動裝置,否則將無
法用卡片式遙控器操作裝置。
提示
關於如何更換電池的詳細說明,請參閱 “更換鋰
電池”(第 14 頁)。
5
Page 42

光碟注意事項
• 為保持光碟清潔,切勿接觸其表面。拿取光
碟時請持其邊緣。
• 不使用時請將光碟裝入光碟盒或光碟匣內。
• 切勿使光碟受到熱源/高溫的影響。避免將光
碟遺留在停泊的車內,或儀表板/後托架上。
CD-R/CD-RW 光碟的注意事項
• 本機可播放專為音頻設計的CD-R(可錄 CD)
/CD-RW (可重寫 CD)。
注意這些標誌,來區別作為音頻使用的
CD-R/CD-RW 光碟。
這些標誌表示此光碟非音頻使用。
• 切勿貼標籤,或使用帶有黏性墨水/殘留物的
光碟。這類光碟在使用時會停止轉動,從而
造成故障或毀壞光碟。
• 不要使用任何貼有標簽或粘紙的光碟。
使用下列光碟將引起如下故障:
– 不能彈出光碟 (因為標簽或粘紙脫落並堵
塞彈出裝置)。
– 不能正確讀取聲音資料 (例如,跳躍播放
或不播放),因為熱源使粘紙或標簽皺縮造
成光碟彎曲。
• 本機不能播放非標準形狀的光碟 (如,心
型,正方 形,星型)。若試圖播放此類光碟,
則可能損壞本機。切勿使用此類光碟。
• 本機不能播放 8cm 光碟。
• 在播放之前,請使用商用清潔布清潔光碟。
從光碟的中心向外擦拭。切勿使用酒精、稀
釋劑、市場銷售的清潔劑,以及用於留聲機
唱片的抗靜電噴霧劑等溶劑。
• 本機可能無法播放某些 CD-R/CD-RW 光碟
(視光碟錄製時所用設備或光碟狀況而定)。
• 本機無法播放尚未最終化 * 的 CD-R/CD-RW光
碟。
* 為使錄製的 CD-R/CD-RW 光碟能在音頻 CD 播放機上
播放而必需的一個處理過程。
6
Page 43

開始使用之前
拆卸前面板
為防止本機被盜,您可拆下本機前面板。
復原本機
在第一次使用本機前,或更換汽車電池或
改變連接後,必須使本機復原。
卸下前面板,並用帶尖頭的物體,如原子筆
等,按下 RESET 按鈕。
RESET 按鈕
註
按 RESET 按鈕,將消除時鐘設定和某些已存儲的
內容。
報警
若您未拆除前面板即把點火開關旋轉至
OFF 檔,報警器將發出數秒鐘的“嘟嘟”聲。
若您連接選購的功率放大器,而不用內置
放大器,則不會發出警報聲。
1 按 (OFF) 按鈕 * 。
光碟播放或無線電接收停止 (按鈕照明和
顯示仍保留)。
* 如果您的汽車引擎開關上沒有 ACC (附件)位
置,則必須通過按 (OFF) 關閉本裝置,直至顯示
消失,以免消耗汽車電池。
2 按下 ,然後將其朝自己身體方向拉出。
(OFF)
註
• 若您在本機仍開著時卸下前面板,電源將會自動關閉
以防揚聲器受損。
• 切勿摔落或猛按本機的前面板及顯示窗。
• 切勿使前面板受熱 / 高溫或受潮。避免將前面板遺留
在停泊的車廂內或儀表盤 / 後托架上。
提示
當您要攜帶前面板時,請將它放在附帶的前面板
盒內。
續下頁 t
7
Page 44

安裝前面板
如圖所示將前面板的 A 部分安裝至本機
的 B 部分,然後推進左端直至聽到咯嗒聲。
設定時鐘
時鐘採用 12 小時制數字顯示。
例如: 將時鐘設定為 10:08
1 按住 (DSPL) 按鈕 2 秒鐘。
小時指示閃爍。
A
B
註
不要在前面板內表面放任何東西。
1按音量 +/- 按鈕設置小時。
2按 (SEL)。
分鐘指示閃爍。
3按音量 +/- 按鈕設置分鐘。
2 按 (DSPL) 按鈕。
時鐘開始走時。時鐘設定完畢之後,顯示
返回正常播放模式。
8
Page 45

CD 播放機
播放光碟
裝入光碟 (標簽面向上)。
顯示項目
以下項目可以顯示:
音源
播放自動開始。
若已裝入光碟,要開始播放請反覆按
(SOURCE) 按鈕,直至出現 “CD”。
要按
停止播放 Z 或 (OFF)
退出光碟 Z
跳過樂曲
-自動
音樂傳感器
快進 / 後退
- 手動搜索
註
• 播放光碟上的第一首 / 最後一首樂曲時,若按
(SEEK) (-)或 (SEEK) (+),則跳至光碟的最後一
首 / 第一首樂曲處開始播放。
• 當光碟內最後一首樂曲結束,則從光碟的第一首樂曲
重新開始播放。
(SEEK) (-/+)
(./>)
[ 一次跳過一首樂曲 ]
(SEEK) (-/+)
(m/M)
[ 按住直至想要的位置 ]
樂曲號碼
要按
切換顯示項目 (DSPL)
可顯示項目
• 已播放時間
• 時鐘
9
Page 46

反覆播放樂曲
─ 重複播放
當前曲目播放完畢時將重複播放。
在播放中,反覆按 (3) (REP)直至
“REP”指示出現在顯示幕上。
顯示 “REP”指示。
收音機
本機在每一波段上(FM1,FM2,FM3,AM1
和 AM2)最多可存儲 6 個電台。
警告
當在駕車過程中要調諧電台時,須使用最
佳調諧記憶功能,以免發生事故。
重複播放開始。
要回到正常播放模式,請再次按 (3)
(REP)。
以隨機順序播放樂曲
─ 任選播放
您可以選擇以任意順序播放當前光碟中
的樂曲。
在播放中,反覆按 (4) (SHUF)直至
“SHUF”指示出現在顯示幕上。
顯示 “SHUF”指示。
任選播放開始。
要回到正常播放模式,請再次按 (4)
(SHUF)。
自動存儲電台
─ 最佳調諧記憶功能 (BTM)
本機在選定的波段上篩選訊號最強的電
台,並按照它們的頻率順序進行存儲。
1 反覆按 (SOURCE) 按鈕,選擇收音機。
2 反覆按 (MODE) 按鈕選擇波段。
3 按住 (BTM) 按鈕 2 秒鐘。
本機將各電台按其頻率順序存儲到數字按
鈕之中。
當設定存儲完畢時,本機發出 “嘟”的一
聲。
註
• 若因訊號微弱之故僅能接收到很少電台,則某些數字
按鈕仍將保留其以前的設定。
• 當顯示幕上顯示一個數字時,本機會從當前顯示的數
字開始存儲電台。
10
Page 47

收聽已存儲的電台
僅存儲所要的電台
1 反覆按 (SOURCE) 按鈕,選擇收音機。
2 反覆按 (MODE) 按鈕選擇波段。
3 按存有所要電台的數字按鈕((1) 至(6))。
如果預設的調諧無效
─ 自動調諧功能 / 本地搜索模式
自動調諧功能:
按 (SEEK) (+)或 (S EEK) (-)按鈕搜
索電台。
當本機接收到一個電台時,掃描停止。如
此反覆直至接收到所要的電台。
本地搜索模式:
若自動調諧經常停止,請反覆按 (SENS)
按鈕直至 “LCL”指示顯示在顯示幕上。
顯示 “LCL”指示。
僅具有較強訊號的電台會被調入。
若要取消本地搜索模式,則在接收 FM 時
按兩次 (SENS )。
註
當接收 AM 時,若要取消本地搜索模式,則按 (SENS)
(“LCL”指示熄滅)。
提示
如果知道想要收聽的電台的頻率,請按 (SEEK)
(+)或 (SEEK) (-)定位到大致的頻率,然後反覆按
(SEEK) (+) 或 (SEEK) (-)精細調整到想要的頻
率 (手動調諧)。
您可在任何指定的數字按鈕上手動預設
所想要的電台。
1 反覆按 (SOURCE) 按鈕,選擇收音機。
2 反覆按 (MODE) 按鈕選擇波段。
3 按 (SEEK)(+)或 (SEEK) ( - )按 鈕,調
諧想要存儲的電台。
4 按住所要的數字按鈕 ((1) 至 (6))持續
2 秒鐘,直至顯示 “MEM”。
數字按鈕指示在顯示幕上出現。
註
若您試圖在已存儲有電台的數字按鈕上存儲另一
個電台,則以前存入的電台將被消除。
若 FM 立體聲的收音狀況不良
─ 單聲道模式
收聽電台時,反覆按 (SENS) 按鈕,直
至 “MONO”指示出現在顯示幕上。
顯示 “MONO”指示。
聲音狀況得到改善,但變成了單聲道
(“ST”顯示消失)。
若要回到正常電台接收模式,則再按一次
(SENS) (“MONO”指示熄滅)。
11
Page 48

其它功能
調節平衡和音量衰減器
您可以調節平衡和音量衰減。
改變聲音和顯示設定
可以設定以下項目:
• DEMO* — 關閉或開啟示範顯示。
– 選擇 “ON”則開啟示範顯示(示範在本裝
置關閉後 10 秒鐘左右開始)。
– 選擇 “OFF”則關閉示範顯示。
• BEEP — 開啟或關閉提示音。
1 反覆按 (SEL) 按鈕,直至出現 “BAL”或
“FAD”。
每按一次 (SEL) 按鈕,項目變化如下:
LOW (
低音) * t MID (中音) * t
HI (高音) * t BAL(左-右) t
FAD(前-後)
* 當EQ3被激活(第13頁)。
2 按音量 +/- 按鈕調整選中的項目。
註
選擇了項目之後,須在 3 秒內進行調節。
快速降低音量
按 (ATT) 按鈕。
顯示幕中出現 “ATT”。
要恢復原先的音量電平時,請再按一次
(ATT) 按鈕。
選擇想要的項目
同時按 (SEL) 和想要的預設號碼。
(SEL) + (4): DEMO*
(SEL) + (6): BEEP
* 本裝置關閉時。
若要取消項目,則再同時按 (SEL) 和想要的
預設號碼。
12
Page 49

設定均衡器 (EQ3)
您可選擇 7 種音樂類型(XPLOD,VOCAL,
CLUB,JAZZ,N-AGE,ROCK CUST 和 OFF (均
衡器 OFF))的均衡曲線。
您可以為每個音源存儲不同的均衡設置。
選擇均衡曲線
1 按 (SOURCE) 按鈕選擇音源 (收音機或
CD)。
2 反覆按 (EQ3) 按鈕,直至您所要的均衡曲
線。
每按一次 (EQ3) 按鈕,顯示項目便隨之改
變。
要取消均衡效果選擇 “OFF”。
調節均衡曲線
您可以存儲和調節均衡器設定的不同音
調範圍。
1 按 (SOURCE) 按鈕選擇音源 (收音機或
CD)。
2 反覆按 (EQ3) 按鈕,選擇您所要的均衡曲
線。
3 調節均衡曲線。
1 反覆按 (SEL) 按鈕選擇想要的音調範
圍。
每按一次 (SEL) 按鈕,音調範圍便隨
之改變。
LOW (
低音) t MID (中音) t
HI (
高音)( t BAL (左 - 右) t
FAD (前 - 後))
2 反覆按音量 +/- 按鈕調整到想要的音量
電平。
音量電平以 1 dB 退縮,從 -10 dB 至
+10 dB 進行調節。
3 重複步驟 1 和步驟 2,調整均衡曲線。
如要復原至出廠設定的均衡曲線,請按
住 (SEL) 按鈕持續 2 秒鐘。
3 秒鐘後,顯示幕返回正常播放模式。
註
當 EQ3 設為 “OFF”時,不能調整均衡曲線設置。
13
Page 50

附加資訊
保養
更換保險絲
更換保險絲時,必須確保所使用的保險絲
與原保險絲的安培數相同。若保險絲燒斷,請
檢查電源連接並再更換保險絲。若保險絲更換
後又被燒斷,則可能是內部故障。此時,請向
最近的 Sony 經銷商諮詢。
保險絲 (10 A)
警告
切勿使用額定安培數超過本機附帶保險
絲安培數的保險絲,否則會損壞本機。
清潔連接器
若本機與前面板之間的連接器不乾淨,則
本機可能不能正常工作。為防止這種情況發
生,請卸下前面板 (第 7 頁),然後用蘸有酒
精的棉籤清潔連接器。切勿施加太大的力量。
否則,可能損壞連接器。
更換鋰電池
在一般情況下,電池將維持 1 年左右。
(使用壽命可能會變短,這取決於電池的使用
狀況。)當電池的電力變弱時,卡片式遙控器
的操作距離將變短。此時,請更換一個新的
CR2025 鋰電池。使用任何其他電池,可能存
在火災或爆炸的危險。
x
+極面朝上
鋰電池的注意事項
• 鋰電池應放在兒童不易觸及的地方。萬一誤
吞了電池,請立即找醫生。
• 用乾布擦拭電池,以保持接觸良好。
• 安裝電池時,必須保証極性正確。
• 別用金屬鑷子去夾電池,否則會引起短路。
主機
前面板的背部
註
• 為了安全起見,在清潔連接器之前,應關閉發動機並
從點火開關上取出鑰匙。
• 千万不要用手指或任何金屬工具直接觸摸連接器。
14
警告
電池操作不當可能引起爆炸。
請勿對電池充電、拆解或投入火中。
Page 51

拆卸本機
1 拆卸保護環。
1 拆卸前面板 (第 7 頁)。
2 將開鎖鑰匙與保護環嚙合。
2 取出裝置。
1 將兩把開鎖鑰匙一起插入,直至聽到喀
嗒聲。
掛鉤朝裡面。
正確定位開鎖鑰匙。
3 拉出開鎖鑰匙以拆下保護環。
2 拉出開鎖鑰匙,使裝置脫離原位。
3 將本機從安裝位置滑出。
15
Page 52

規格
CD 播放機部分
訊噪比 120 dB
頻率響應 10 - 20,000 Hz
抖晃率 低於可測限制
調諧器部分
FM
調諧范圍 FM 調諧間隔:
天線端子 外接天線連接器
中頻 10.7 MHz/450 kHz
可用靈敏度 9 dBf
選擇度 400 kHz 時為 75 dB
訊噪比 67 dB (立體聲),
1 kHz 時諧波失真
分離度 1 kHz 時 35 dB
頻率響應 30 - 15,000 Hz
AM
調諧范圍 AM 調諧間隔:
天線端子 外接天線連接器
中頻 10.7 MHz/450 kHz
靈敏度 30 μV
50 kHz/200 kHz
可切換
87.5 - 108 MHz
( 以 50 kHz 增減 )
87.5 - 107.9 MHz
( 以 200 kHz 增減 )
69 dB ( 單聲道 )
0.5 % (立體聲),
0.3 % ( 單聲道 )
9 kHz/10 kHz 可切換
531 - 1,602 kHz
( 以 9 kHz 增減 )
530 - 1,710 kHz
( 以 10 kHz 增減 )
一般情況
輸出 音頻輸出端子 (後)
輸入 天線輸入端子
音調控制 低音:
電源要求 12 V DC 汽車電池
尺寸 約 178 × 50 × 176 mm
安裝尺寸 約 182 × 53 × 161 mm
重量 約 1.2 kg
提供的附件 安裝和連接用部件
選購附件 卡片式遙控器 RM-X114
設計和規格若有變更,恕不另行通知。
電動天線繼電控制端子
功率放大器控制端子
±10 dB,60 Hz 時 (XPLOD)
中音:
±10 dB,1 kHz 時 (XPLOD)
高音:
±10 dB,10 kHz 時 (XPLOD)
(負極接地)
(寬/高/深)
(1 套)
前面板盒 (1)
功率放大器部分
輸出 揚聲器輸出
揚聲器阻抗 4 - 8 Ω
最大輸出功率 52 W × 4(4Ω時)
(可靠的密封連接器)
16
Page 53

故障排除
下列檢查表有助於解決您使用本機時可
能遇到的問題。
在使用下面的檢查表之前,請檢查連接和
操作步驟是否正確。
一般情況
無聲。
• 按音量 + 按鈕調節音量。
• 取消 ATT 功能。
• 將雙路揚聲器系統的衰減控制設定在中心
位置。
記憶內容已被消除。
• 已按下 RESET 按鈕。
t 再將設定存入記憶中。
• 電源線或電池連接已經斷開。
• 電源連接線未正確連接。
無 “嘟嘟”聲。
•“嘟嘟”聲功能被取消 (第 12 頁)。
• 連接了選購的功率放大器,而未使用內置
功率放大器。
畫面從顯示幕上消失 / 未出現在顯示幕上。
• 如果按住 (OFF) 不放則顯示消失。
t 再次按住 (OFF) 不放,直至顯示出現。
• 拆卸前面板,然後清潔連接器。詳細情況,
請參見 “清潔連接器”(第 14 頁)。
儲存之電台及正確走時被消除。
保險絲已熔斷。
點火鑰匙處於 ON、ACC 或 OFF 位置時,裝置會
產生噪聲。
導線與汽車附件電源連接器未正確匹配。
裝置無供電。
• 檢查電源的連接。若一切正常,則請檢查
保險絲。
• 汽車不具有 ACC 位置。
t 按 (SOURCE) 按鈕 (或裝入一張光
碟),使裝置開啟。
本機始終處於通電狀態。
汽車不具有 ACC 位置。
電動伸縮天線未伸出。
電動伸縮天線未裝繼電器。
CD 播放
無法裝入光碟。
• 已裝入另外的 CD。
• CD 被上下顛倒或以錯誤的方法強行裝入。
無法開始播放。
• 殘缺的髒 CD。
• CD-R/CD-RW 未最終化。
• 您試圖播放的是非音頻使用的
CD-R/CD-RW。
• 由於錄製裝置或光碟狀況的原因,有些
CD-R/CD-RW 可能無法播放。
光碟被自動退出。
環境溫度超過 50℃。
操作按鈕無效。
CD 無法退出。
按 RESET 按鈕。
聲音顫動產生跳音。
• 本機安裝角度大於 45℃。
• 本機未安裝在汽車上較堅固的位置。
跳音。
光碟髒了或有缺陷。
續下頁 t
17
Page 54

無線電接收
不能預設調諧。
• 將正確的頻率存儲在記憶體內。
• 廣播訊號太弱。
無法接收電台。
有噪音干擾。
• 請連接電動天線控制導線 (藍色)或附件
電源導線(紅色)至汽車天線升壓器的電
源導線。(當您的汽車僅在後 / 側玻璃內
有內置 FM/AM 天線時。)
• 檢查汽車天線的連接。
• 自動天線不能上升。
t 檢查電動天線控制導線的連接。
• 檢查頻率。
不能自動調諧。
• 本地搜尋模式設定在 “ON”。
t 將本地搜尋模式設定在 “OFF”
(第 11 頁)。
• 廣播訊號太弱。
t 進行手動調諧。
“ST”指示閃爍。
• 精確地調諧電台頻率。
• 廣播訊號太弱。
t 設定單聲道接收模式為 “ON”
(第 11 頁)。
收聽到的立體聲廣播節目是單聲道。
本機處在單聲道接收模式。
t 取消單聲道接收模式 (第 11 頁)。
出錯顯示 / 資訊
出錯顯示
以下指示約閃爍 5 秒鐘(在“Err04”情況下
還將聽到警告聲)。
Err04
CD 髒了或 CD 上下裝反了。
t 將 CD 擦拭乾淨或正確地裝入 CD。
Err50
揚聲器 / 放大器連接不正確。
t 請參閱本機型的安裝指南手冊以檢查線
路連接。
Err60
可能發生內部故障。
t 檢查電源的連接。如果此出錯指示仍然
顯示在顯示幕中,請洽接當地的 Sony
經銷商。
Err99
因某些原因 CD 裝置不能工作。
t 按下本機的 RESET 按鈕。
資訊
“”或“”
您已到達光碟的開頭或結尾,無法再繼續
向前。
如果這些解答仍無法助您改善情況,請向距您
最近的 Sony 經銷商諮詢。
18
Page 55

Page 56

• Lead-free solder is used for soldering certain parts.
• Halogenated flame retardants are not used in the certain printed wiring boards.
• Halogenated flame retardants are not used in cabinets.
• Paper is used for the packaging cushions.
Sony Corporation Printed in Korea
 Loading...