

Page 1

FM/AM
Compact Disc
Player
3-047-692-13 (1)
Operating Instructions
Mode d’emploi
Manual de instrucciones
Owner’s Record
The model and serial numbers are located on the bottom of the unit.
Record these numbers in the space provided below.
Refer to these numbers whenever you call upon your Sony dealer regarding this
product.
Model No. CDX-M750/M650/M600 Serial No.
For installation and connections, see the supplied installation/connections manual.
En ce qui concerne l’installation et les connexions, consulter le manuel
d’installation/connexions fourni.
Para obtener información sobre la instalación y las conexiones, consulte el manual
de instalación/conexiones suministrado.
CDX-M750 CDX-M650
US
FR
ES
CDX-M600
© 2000 Sony Corporation
Page 2

Warning
Welcome !
This equipment has been tested and found to
comply with the limits for a Class B digital
device, pursuant to Part 15 of the FCC Rules.
These limits are designed to provide
reasonable protection against harmful
interference in a residential installation. This
equipment generates, uses, and can radiate
radio frequency energy and, if not installed
and used in accordance with the instructions,
may cause harmful interference to radio
communications. However, there is no
guarantee that interference will not occur in a
particular installation. If this equipment does
cause harmful interference to radio or
television reception, which can be determined
by turning the equipment off and on, the user
is encouraged to try to correct the interference
by one or more of the following measures:
— Reorient or relocate the receiving antenna.
— Increase the separation between the
equipment and receiver.
— Connect the equipment into an outlet on a
circuit different from that to which the
receiver is connected.
— Consult the dealer or an experienced radio/
TV technician for help.
Supplied card remote commander complies
with Part 15 of the FCC Rules. Operation is
subject to the following two conditions: (1)
This device may not cause harmful
interference, and (2) this device must accept
any interference received, including
interference that may cause undesired
operation.
You are cautioned that any changes or
modifications not expressly approved in this
manual could void your authority to operate
this equipment.
CAUTION
The use of optical instruments with this
product will increase eye hazard.
Thank you for purchasing the Sony Compact
Disc Player. This unit lets you enjoy a variety
of features using the following controller
accessories:
Supplied accessory
Card remote commander
RM-X94 (for the CDX-M650)
RM-X93 (for the CDX-M600)
RM-X92 (for the CDX-M750)
Optional accessory
Rotary commander RM-X4S
In addition to the CD playback and radio
operations, you can expand your system by
connecting optional CD/MD units*1.
When you operate this unit or a connected
optional CD unit with the CD TEXT function,
the CD TEXT information will appear in the
display when you play a CD TEXT disc*2.
*1You can connect MD changers, CD changers, MD
players, or CD players.
2
A CD TEXT disc is an audio CD that includes
*
information such as the disc name, artist name
and track names.
This information is recorded on the disc.
Precautions
•If your car was parked in direct sunlight
resulting in a considerable rise in
temperature inside the car, allow the unit to
cool off before operating it.
•If no power is being supplied to the unit,
check the connections first. If everything is in
order, check the fuse.
•If your car is equipped with a power
antenna, it will extend automatically while
the unit is operating.
•Do not use the Custom file feature while
driving, or perform any other function which
could divert your attention from the road.
If you have any questions or problems
concerning your unit that are not covered in
this manual, please consult your nearest Sony
dealer.
Notes on moisture condensation
On a rainy day or in a very damp area,
moisture may condense on the lenses inside
the CD player. Should this occur, the unit will
not operate properly. In this case, remove the
disc and wait for about an hour until the
moisture evaporates.
2
Page 3

Notes on CDs
A dirty or defective disc may cause sound
dropouts while playing. To enjoy optimum
sound, handle the disc as follows.
Handle the disc by its edge. To keep the disc
clean, do not touch the surface.
Notes on discs
If you use the discs explained below, the sticky
residue can cause the CD to stop spinning and
may cause malfunction or ruin your discs.
Do not use second-hand or rental CDs that
have a sticky residue on the surface (for
example, from peeled-off stickers or from ink,
or glue leaking from under the stickers).
There are paste residue.
Ink is sticky.
Do not stick paper or tape on the disc.
Do not expose the discs to direct sunlight or
heat sources such as hot air-ducts, or leave
them in a car parked in direct sunlight where
there can be a considerable rise in temperature
inside the car.
Before playing, clean the discs with an optional
cleaning cloth. Wipe each disc from the center
out.
Do not use rental CDs with old labels that are
beginning to peel off.
Stickers that are beginning
to peel away, leaving a
sticky residue.
Do not use your CDs with labels or stickers
attached.
Labels are attached.
When you play 8 cm (3 in.) CDs
Use the optional Sony compact disc single
adapter (CSA-8) to protect the CD player from
damage.
Notes on CD-R discs
•You can play CD-Rs (recordable CDs) on this
unit. However depending on the conditions
of the recording equipment or the CD-R disc
itself, some CD-Rs cannot be played on this
unit.
•You cannot play a CD-R that is not finalized
(Finalization is necessary for a recorded CDR disc to be played on the audio CD player).
•You cannot play CD-RWs (rewritable CDs)
on this player.
Do not use solvents such as benzine, thinner,
commercially available cleaners, or antistatic
spray intended for analog discs.
3
Page 4

Table of Contents
Location of controls ................................................. 5
Getting Started
Resetting the unit ................................................ 8
Turning the unit on/off ..................................... 8
How to use the menu ......................................... 8
Setting the clock .................................................. 9
CD Player
CD/MD Unit (optional)
Listening to a CD
(with this unit only) ..................................... 10
Playing tracks repeatedly
— Repeat Play .............................................. 12
Playing tracks in random order
— Shuffle Play .............................................. 12
Labeling a CD
— Disc Memo (For a CD unit with the
custom file function).................................... 13
Locating a disc by name
— List-up (For a CD unit with the custom
file function or an MD unit) ....................... 14
Selecting specific tracks for playback
— Bank (For a CD unit with the custom file
function) ........................................................ 15
Radio
Memorizing stations automatically
— Best Tuning Memory (BTM) ................. 16
Memorizing only the desired stations ........... 16
Receiving the memorized stations.................. 17
Storing the station names
— Station Memo .......................................... 18
Locating a station by name
— List-up ...................................................... 19
Other Functions
Labeling the rotary commander ..................... 23
Using the rotary commander .......................... 24
Adjusting the sound characteristics ............... 26
Attenuating the sound ..................................... 26
Changing the sound and display settings ..... 26
Boosting the bass sound
— D-bass (CDX-M600 only) ....................... 27
Selecting the spectrum analyzer ..................... 28
Adjusting the sound and frequency of the
equalizer preamplifier (CDX-M650 only) 28
TV/Video
Watching the TV ............................................... 29
Watching a video .............................................. 29
Memorizing TV channels automatically ....... 29
Memorizing only the desired TV channels ... 30
Storing the TV channel names ........................ 30
Displaying the information stored on discs .. 31
Watching the TV or video while listening to a
CD or MD
— Simultaneous Play .................................. 31
Additional Information
Maintenance ....................................................... 32
Dismounting the unit ....................................... 33
Specifications ..................................................... 35
Troubleshooting guide ..................................... 36
DSP (CDX-M750 only)
Setting the equalizer ......................................... 19
Selecting the listening position ....................... 20
Selecting a soundstage menu
— Dynamic Soundstage Organizer
(DSO) ............................................................. 21
Adjusting the balance (BAL) ........................... 21
Adjusting the front and rear fader ................. 21
Adjusting the volume of the subwoofer(s).... 22
Listening to each programme source in its
registered DSO
— Source Sound Memory (SSM) ............... 23
4
Page 5

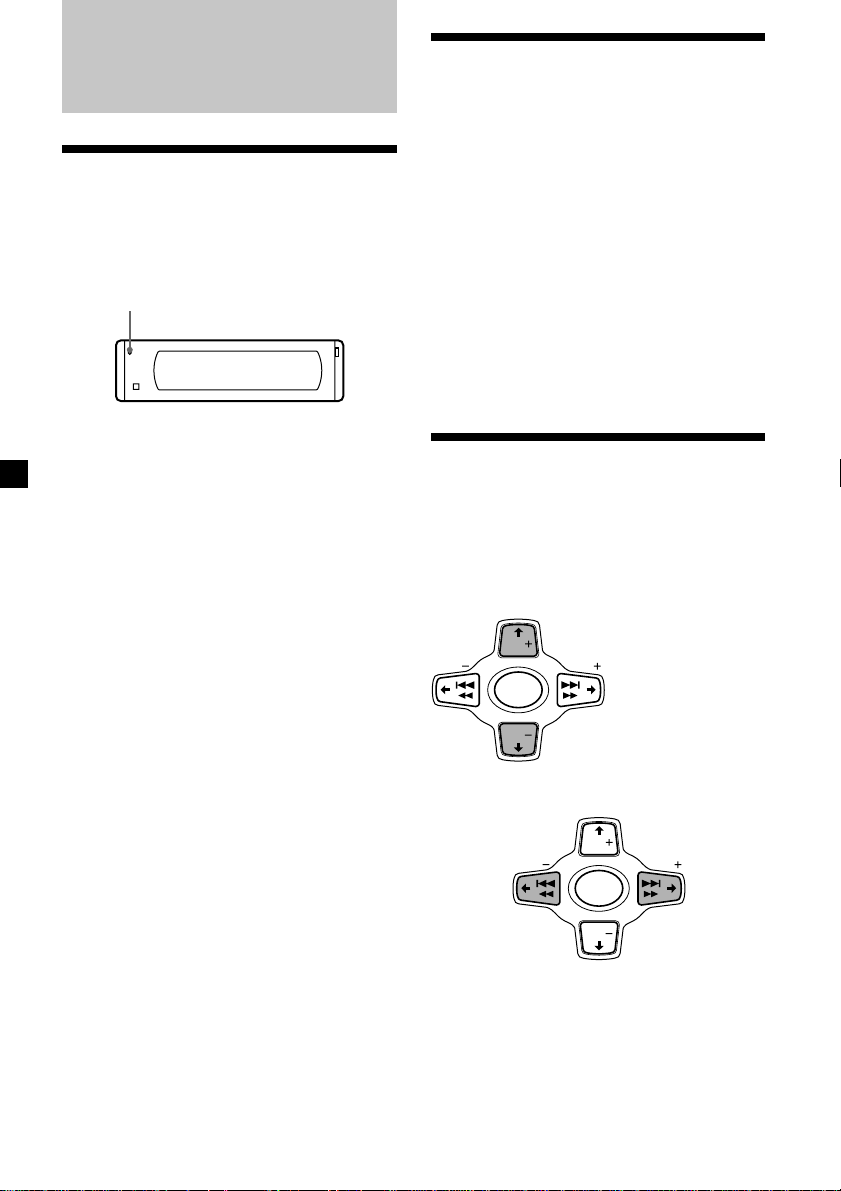
Location of controls
Card remote
commander
Refer to the pages listed for details.
1 OFF button 8, 10
2 MENU button 9, 12, 13, 14, 15, 16, 17,
18, 22, 27, 28, 29, 31
3 SOURCE (TUNER/CD/MD/TV) button
8, 10, 11, 14, 16, 17, 19, 20, 21, 22, 28,
29, 30, 31
4 </, (SEEK/AMS –/+) buttons
8, 9, 11, 12, 15, 16, 17, 19, 20, 21, 22, 23,
26, 28, 30, 31
Automatic Music Sensor (./>) 11
Manual Search (m/M) 11
Seek 16, 28
5 SOUND button 19, 20, 21, 22, 26
6 DSPL (display mode change) button
10, 11, 13, 18, 19, 25
7 ATT (attenuate) button 26
8 CDX-M750:
DSO (Dynamic Soundstage Organaizer)
button 21
CDX-M600:
D-BASS button 27
9 OPEN/CLOSE button 10
0 LIST button 13, 14, 18, 19, 30, 31
List-up 14, 19, 30, 31
OFF
MENU LIST
SEEK SEEK
SOUND
DSPL MODE
OPEN/CLOSE
DSO
DISC
SOURCE
DISC
ENTER
VOLATT
qa M/m (PRST/DISC +/–) buttons
8, 9, 11, 12, 13, 14, 15, 17, 18, 19, 20, 22,
23, 27, 28
During CD/MD playback:
Disc change 11
During radio reception:
Preset stations select 17
During TV reception:
Band select 29
qs ENTER button 9, 11, 13, 14, 15, 16, 17,
18, 19, 20, 22, 23, 27, 29, 31
qd MODE button 10, 14, 16, 17, 29, 31
During CD/MD playback:
CD/MD unit select 10, 14
During radio reception:
BAND select 16, 17
During TV reception:
Unit select 29
qf VOL (volume adjust) buttons
A unit turned off by pressing (OFF) for two
seconds cannot be operated with the card
remote commander unless (SOURCE) on the
unit is pressed or a CD is inserted to activate
the unit first.
5
Page 6

Location of controls
Security side
Operation side
P
S
L
OFF
D
SOURCE
M
E
O
D
REP SHUF
123456
MENU
SOUND
DISC
DSO
DISC
LIST
ENTER
CLOSE
CDX-M750/M650/M600
6
Page 7

The corresponding buttons of the unit
control the same functions as those on
the card remote commander.
17 Reset button 8
2 Main display window
3 OPEN button
4qf Receptor for the card remote
commander
5 Volume adjust buttons
6
Z (eject) button 10
8 DSPL (display mode change) button
9 Sub display window
0 MENU button
qa DISC/PRST +/– (cursor up/down) buttons
SEEK/AMS –/+ (cursor left/right) buttons
16
qs CDX-M750:
DSO button
CDX-M600:
D-BASS button
qd LIST button
qg OFF button* 8
qh MODE button
qj SOURCE button
qk Number buttons
During radio reception:
Preset number select 16, 17
During CD/MD playback:
(1) REP 12
(2) SHUF 12
During TV reception:
Preset number select 30
ql SOUND button
w; ENTER button
wa CLOSE button
* Warning when installing in a car
without ACC (accessory) position on
the ignition key switch
Be sure to press (OFF) on the unit for two
seconds to turn off the clock display after
turning off the engine.
When you press (OFF) only momentarily,
the clock display does not turn off and this
causes battery wear.
7
Page 8
Getting Started
Resetting the unit
Before operating the unit for the first time or
after replacing the car battery, you must reset
the unit.
Press the reset button with a pointed object,
such as a ball-point pen.
Reset button
Note
Pressing the reset button will erase the clock
setting and some memorized functions.
Turning the unit on/off
Turning on the unit
Press (SOURCE) or insert a CD in the unit. For
details on operation, refer to page 10 (CD/MD)
and page 16 (radio).
Turning off the unit
Press (OFF) to stop CD/MD playback or FM/
AM reception (the key illumination and
display remains on.)
Press (OFF) for two seconds to completely
turn off the unit.
Note
If your car has no ACC position on the ignition key
switch, be sure to turn the unit off by pressing
(OFF) for two seconds to avoid car battery wear.
How to use the menu
This unit is operated by selecting items from a
menu.
To select, first enter the menu mode and
choose M/m (up/down), or choose </,
(left/right).
M/m
DISC
SEEK SEEK
SOURCE
M : to select upwards
DISC
m : to select downwards
</,
DISC
SEEK SEEK
SOURCE
< :to select
leftwards
DISC
, :to select
rightwards
8
Page 9
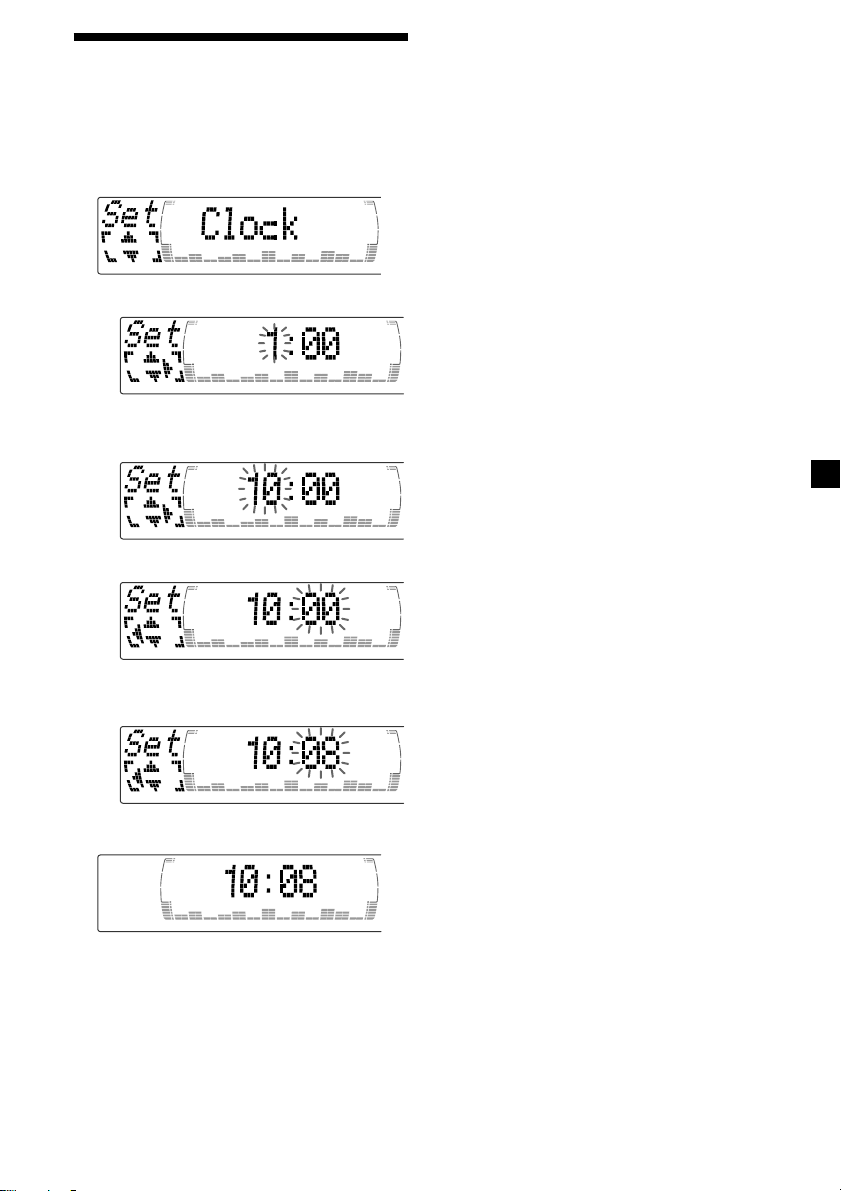
Setting the clock
The clock uses a 12-hour digital indication.
Example: To set the clock to 10:08
1 Press (MENU), then press M or m
repeatedly until “Clock” appears.
1 Press (ENTER).
The hour indication flashes.
2 Press M or m to set the hour.
3 Press ,.
Note
In the initial setting, the clock indication appears
while the unit is turned off.
When the D.Info mode is set to “on,” the time is
always displayed (except for some functions of SA
mode) (page 26).
The minute indication flashes.
4 Press M or m to set the minute.
2 Press (ENTER).
The clock starts.
9
Page 10
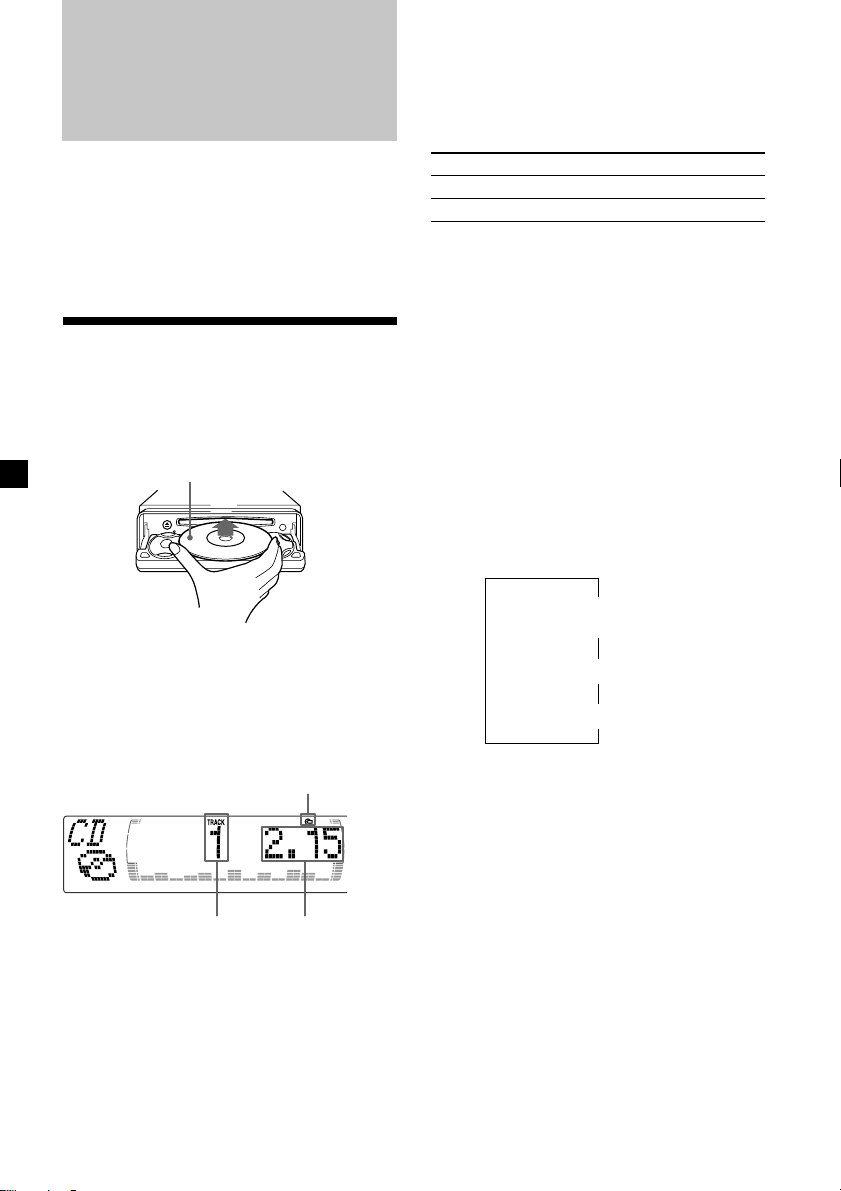
CD Player
CD/MD Unit (optional)
When the last track on the CD is
over
The track number indication returns to “1,”
and playback restarts from the first track of the
CD.
In addition to playing a CD with this unit
alone, you can also control external CD/MD
units.
If you connect an optional CD unit with the
CD TEXT function and the custom file
function, the CD TEXT information will appear
in the display when you play a CD TEXT disc.
Listening to a CD
(with this unit only)
1 Press (OPEN/CLOSE) of the card remote
commander and insert the CD.
Playback starts automatically.
Labeled side up
2 Press (OPEN/CLOSE) of the card remote
commander to close the front panel.
If a CD is already inserted, press (SOURCE)
repeatedly until “CD” appears to start
playback.
CD indication
Elapsed playing timeTrack number
Note
To play back an 8 cm (3 in.) CD, use the optional
Sony compact disc single adapter (CSA-8).
To Press
Stop playback (OFF)
Eject the CD (OPEN/CLOSE) then Z
Playing a CD or MD
(with optional CD/MD unit)
1 Press (SOURCE) repeatedly to select
“CD” or “MD.”
2 Press (MODE) until the desired unit
appears.
CD/MD playback starts.
All the discs in the current CD/MD unit is
played from the top.
Changing the display item
Each time you press (DSPL) during CD, CD
TEXT disc or MD playback, the item changes
as follows:
Disc number*1/Track number/
Elapsed playback time
Disc name*
*1While an optional CD/MD unit is connected.
2
If you have not labeled the CD or CD TEXT disc
*
(“Labeling a CD” page 13), or if there is no disc
name prerecorded on the MD, “NO D.Name”
appears momentarily in the display.
3
If you play a CD TEXT disc, the artist name
*
appears in the display after the disc name. (Only
for CD TEXT discs with the artist name.)
4
If the track name of a CD TEXT disc or MD is not
*
prerecorded, “NO T.Name” appears
momentarily in the display.
V
V
2
/Artist name*
V
Track name*
3
4
10
Page 11
After you select the desired item, the display
will automatically change to the Motion
Display mode after a few seconds.
In the Motion Display mode, all the items are
scrolled in the display one by one in order.
Note
If you use personalized labels, they will always
take priority over the original CD TEXT
information when such information is displayed.
Tip
The Motion Display mode can be turned off. (See
“Changing the sound and display settings” on
page 26).
Automatically scrolling a disc name
— Auto Scroll
If the disc name, artist name, or track name on
an MD or a CD TEXT disc exceeds 10
characters and the Auto Scroll function is on,
information automatically scrolls across the
display as follows:
• The disc name appears when the disc has
changed (if the disc name is selected as the
display item).
• The track name appears when the track has
changed (if the track name is selected as the
display item).
• The disc or track name appears depending on
the setting when you press (SOURCE) to select
an MD or CD TEXT disc.
If you press (DSPL) to change the display
item, the disc or track name of the CD TEXT
disc or MD is scrolled automatically whether
you set the function on or off.
1 During playback, press (MENU).
2 Press M or m repeatedly until “A.Scrl”
appears.
3 Press , to select “A.Scrl on.”
4 Press (ENTER).
To cancel Auto Scroll, select “A.Scrl off” in
step 3.
Locating a specific track
— Automatic Music Sensor (AMS)
During playback, press < or ,
momentarily for each track you want to
skip.
< (.) :
To locate
preceding
tracks
DISC
SEEK SEEK
SOURCE
DISC
, (>) :
To locate
succeeding
tracks
Locating a specific point in a track
— Manual Search
During playback, press and hold < or
,. Release when you have found the
desired point.
DISC
< (m) :
To search
backward
Note
If “
display, you have reached the beginning or the
end of the disc and you cannot go any further.
SEEK SEEK
SOURCE
DISC
” or “ ” appears in the
, (M) :
To search
forward
Locating a disc
— Disc Selection
When an optional CD/MD unit is
connected, press M or m to select the
desired disc.
M (DISC +) : For succeeding discs
DISC
SEEK SEEK
SOURCE
DISC
m (DISC –) : For preceding discs
The desired disc in the current optional
CD/MD unit begins playback.
Note
For some CD TEXT discs with very many characters,
the following cases may happen:
— Some of the characters are not displayed.
— Auto Scroll does not work.
11
Page 12
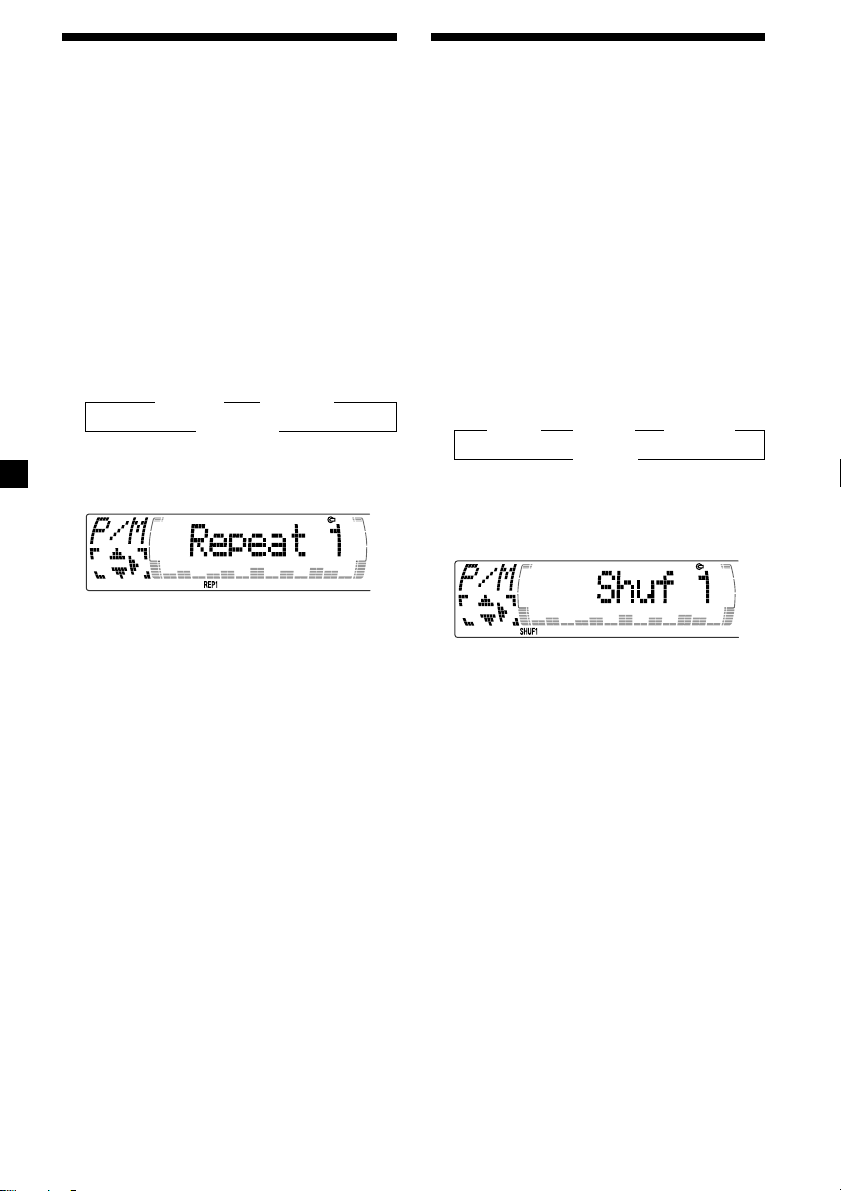
Playing tracks repeatedly
— Repeat Play
The CD in the main unit will automatically
repeat itself when it reaches the end. For repeat
play, you can select:
•Repeat 1 – to repeat a track.
•Repeat 2 – to repeat a disc in the optional
CD/MD unit.
1 During playback, press (MENU).
2 Press M or m repeatedly until “Repeat”
appears.
3 Press , repeatedly until the desired
setting appears in the display.
B Repeat 1 B Repeat 2*
Repeat off b
* “Repeat 2” is only available when you
connect one or more optional CD units, or
when you connect the optional MD units.
Repeat Play starts.
Playing tracks in random
order — Shuffle Play
You can select:
•Shuf 1 – to play the tracks on the current disc
in random order.
•Shuf 2 – to play the tracks in the current
optional CD/MD unit in random order.
•Shuf all – to play all the tracks in all the
optional CD/MD units in random order.
1 During playback, press (MENU).
2 Press M or m repeatedly until “Shuf”
appears.
3 Press , repeatedly until the desired
setting appears in the display.
B Shuf 1 B Shuf 2* B Shuf All*
Shuf off b
* “Shuf 2” and “Shuf all” are only available
when you connect one or more optional CD
units, or when you connect the optional MD
units.
To return to normal play mode, select “Repeat
off” in step 3.
Tip
If you select the mode using the buttons on the
unit, press (1) (REP) repeatedly until the desired
mode appears.
12
Shuffle Play starts.
To return to normal play mode, select “Shuf
off” in step 3.
Tip
If you select the mode using the buttons on the
unit, press (2) (SHUF) repeatedly until the desired
mode appears.
Page 13
Labeling a CD — Disc Memo
(For a CD unit with the custom file function)
You can label each disc with a personalized
name. You can enter up to eight characters for
a disc. If you label a CD, you can locate the
disc by name (page 14) and select the specific
tracks for playback (page 15).
1 Start playing the disc you want to label.
2 Press (MENU), then press M or m
repeatedly until “Name Edit” appears.
Tips
• To erase or correct a name, enter “
character.
• There is another way to start labeling a CD. Press
(LIST) for two seconds instead of steps 2 and 3.
You can also complete the operation by pressing
(LIST) for two seconds instead of step 5.
” for each
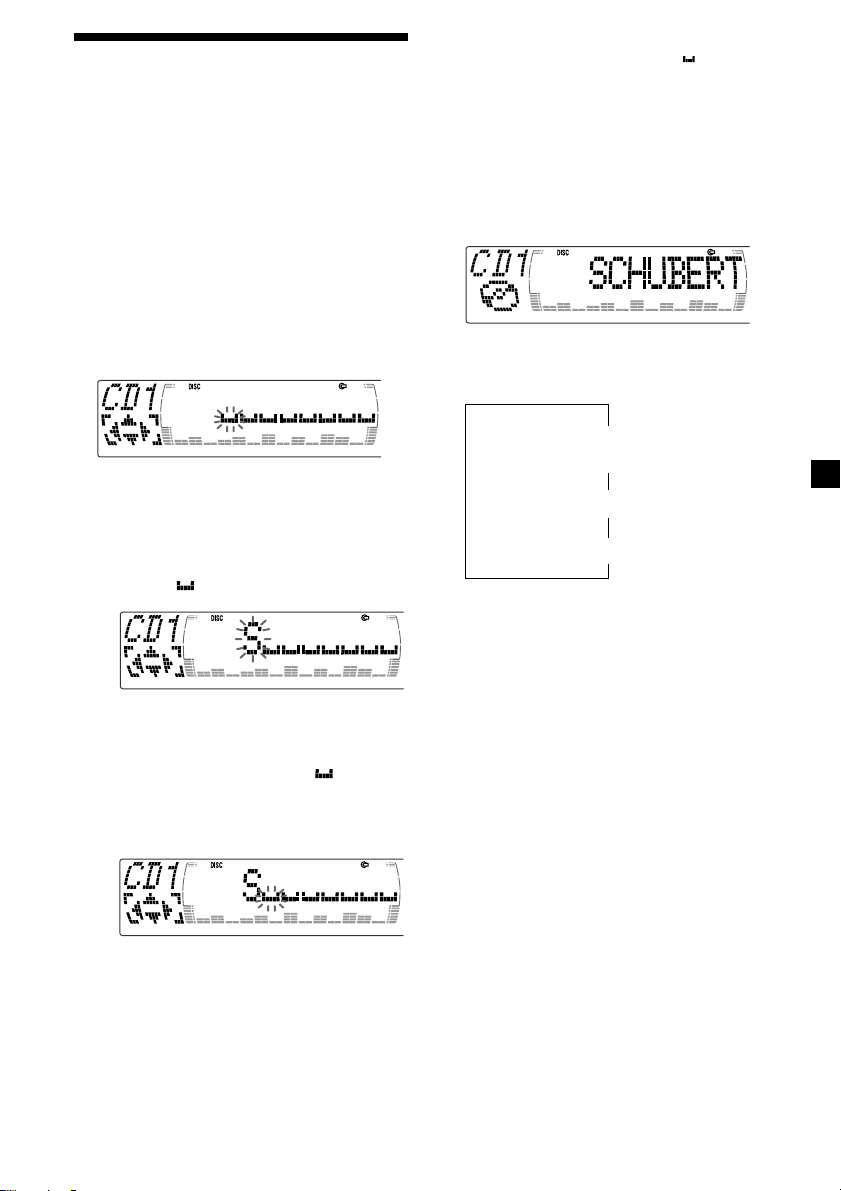
Displaying the disc memo
Press (DSPL) during CD or CD TEXT disc
playback.
3 Press (ENTER).
Name edit mode
4 Enter the characters.
1 Press M repeatedly to select the
desired characters.
(A t B t C t ··· Z t 0 t 1 t 2 t
··· 9 t + t – t * t / t \ t > t <
t . t )
If you press m repeatedly, the characters
will appear in reverse order.
If you want to put a blank space
between characters, select “ .”
2 Press , after locating the desired
character.
The next character flashes.
Each time you press (DSPL) during CD or
CD TEXT disc playback, the item changes
as follows:
V
1
Disc number*
Elapsed playback time
*1While an optional CD unit is connected.
2
If you connect an optional CD unit with the
*
CD TEXT function, the CD TEXT information
will appear in the display when you play a
CD TEXT disc.
Note
Do not use the Custom file feature while driving,
or perform any other function which could divert
your attention from the road.
/Track number/
V
Disc memo name
V
Track name*
2
If you press <, the previous character
flashes.
3 Repeat steps 1 and 2 to enter the
entire name.
5 To return to normal CD play mode, press
(ENTER).
13
Page 14

Erasing the disc memo
1 Press (SOURCE) repeatedly to select
“CD.”
2 Press (MODE) repeatedly to select the CD
unit with the custom file function.
3 Press (MENU), then press M or m
repeatedly until “Name Del” appears.
4 Press (ENTER).
5 Press M or m repeatedly to select the disc
name you want to erase.
6 Press (ENTER) for two seconds.
The name is erased.
Repeat steps 5 and 6 if you want to erase
other names.
Locating a disc by name
— List-up (For a CD unit with the custom
file function or an MD unit)
You can use this function for discs that have
been assigned a custom name. For more
information on disc memo names, refer to
“Labeling a CD” (page 13).
1 Press (LIST).
The name assigned to the current disc
appears in the display.
When you assign a disc memo name to a
CD TEXT disc, it takes priority over the
original CD TEXT information.
7 Press (MENU) twice.
The unit returns to normal CD play mode.
Notes
• When a personalized label is erased, the original
CD TEXT information will appear in the display.
• When you erase all of the disc names, “No Data”
appears in step 6.
2 Press M (DISC +) or m (DISC –) repeatedly
until you find the desired disc.
3 Press (ENTER) to play the disc.
Notes
• The track names are not displayed during CD
TEXT disc or MD playback.
• If there are no discs in the magazine, “NO Disc”
appears in the display.
• If a disc has not been assigned a custom file,
“********” appears in the display.
• If the disc information has not been read by the
unit, “?” appears in the display. To load a disc,
first press the number button, then choose the
disc that has not been loaded.
• Some letters cannot be displayed during CD TEXT
disc or MD playback.
• If an optional TV system is connected, the disc
memo name appears in the display of the TV
system but not in the unit’s display.
14
Page 15
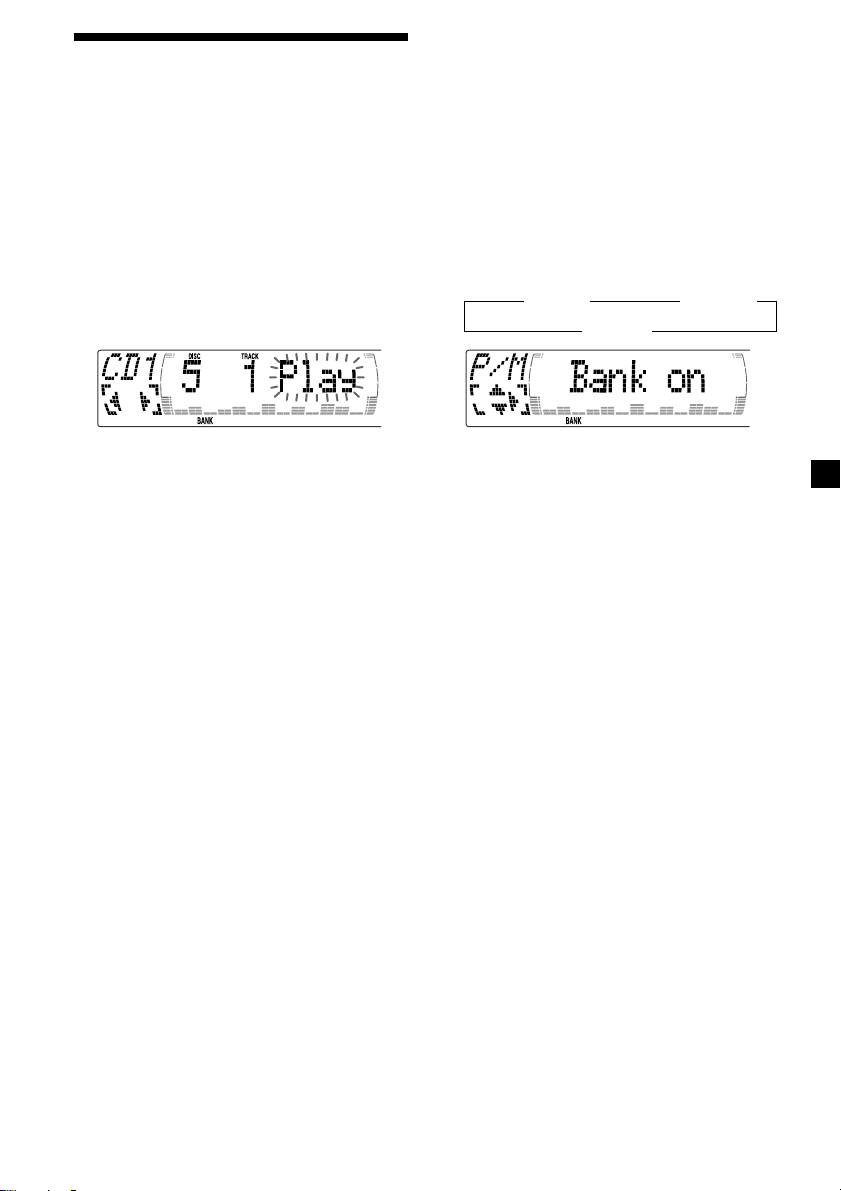
Selecting specific tracks
for playback
(For a CD unit with the custom file function)
If you label the disc, you can set the unit to
skip or play the tracks of your choice.
1 Start playing the disc you want to label.
2 Press (MENU), then press M or m
repeatedly until “Bank Sel” appears.
3 Press (ENTER).
Bank edit mode
— Bank
Playing specific tracks only
You can select:
•“Bank on” — to play the tracks with the
“Play” setting.
•“Bank inv” (Inverse) — to play the tracks
with the “Skip” setting.
1 During playback, press (MENU), then
press M or m repeatedly until “Bank”
appears.
2 Press , repeatedly until the desired
setting appears.
B Bank on B Bank inv
Bank off b
4 Label the tracks.
1 Press < or , repeatedly to select the
track you want to label.
2 Press (ENTER) repeatedly to select
“Play” or “Skip.”
5 Repeat step 4 to set “Play” or “Skip” for
all the tracks.
6 Press (MENU) twice.
The unit returns to normal CD play mode.
Notes
• You can set “Play” and “Skip” for up to 24
tracks.
• You cannot set “Skip” for all the tracks on a CD.
3 Press (ENTER).
Playback starts from the track following the
current one.
To return to normal play mode, select
“Bank off” in step 2.
15
Page 16

Radio
Memorizing stations
automatically
— Best Tuning Memory (BTM)
The unit selects the stations with the strongest
signals and memorizes them in the order of
their frequencies. You can store up to six
stations on each band (FM1, FM2, FM3, AM1,
and AM2).
Caution
When tuning in stations while driving, use
Best Tuning Memory to prevent accidents.
1 Press (SOURCE) repeatedly to select the
tuner.
Each time you press (SOURCE), the source
changes as follows:
B Tuner B CD B MD* B TV*
* If the corresponding optional equipment is
not connected, this item will not appear.
2 Press (MODE) repeatedly to select the
band.
Each time you press (MODE), the band
changes as follows:
B FM1 B FM2 B FM3
AM2 b AM1b
Memorizing only the
desired stations
You can preset up to 18 FM stations (6 each for
FM1, FM2, and FM3), up to 12 AM stations (6
each for AM1 and AM2) in the order of your
choice.
1 Press (SOURCE) repeatedly to select the
tuner.
2 Press (MODE) repeatedly to select the
band.
3 Press . or > of the unit to tune in
the station that you want to store on the
number button.
4 Press the desired number button ((1) to
(6)) of the unit until “MEM” appears.
The number button indication appears in
the display.
Note
If you try to store another station on the same
number button, the previously stored station will
be erased.
3 Press (MENU), then press M or m
repeatedly until “BTM” appears.
4 Press (ENTER).
The unit stores stations in the order of their
frequencies on the number buttons.
A beep sounds when the setting is stored.
Notes
• The unit does not store stations with weak
signals. If only a few stations can be received,
some number buttons will retain their former
setting.
• When a number is indicated in the display, the
unit starts storing stations from the one currently
displayed.
• If a CD is not in the unit, only the tuner band
appears even if you press (SOURCE).
16
Page 17

Receiving the memorized
stations
1 Press (SOURCE) repeatedly to select the
tuner.
2 Press (MODE) repeatedly to select the
band.
If FM stereo reception is poor
— Monaural Mode
1 During radio reception, press (MENU),
then press M or m repeatedly until
“Mono” appears.
2 Press , until “Mono on” appears.
The sound improves, but becomes
monaural (“ST” disappears).
3 Press M (preset up) or m (preset down)
repeatedly to receive the stations in the
order they are stored in the memory.
Tip
If you memorizing the station using the buttons of
the unit, press the number button ((1) to (6)) on
which the desired station is stored.
If you cannot tune in a preset
station
Press < or , to search for the station
(automatic tuning).
Scanning stops when the unit receives a
station. Press < or , repeatedly until the
desired station is received.
Note
If the automatic tuning stops too frequently, press
(MENU), then press M or m repeatedly until
“Local” (local seek mode) is displayed. Then press
, to select “Local on.” Press (ENTER).
Only the stations with relatively strong signals will
be tuned in.
Tips
• When you select the “Local on” setting,
“LCL Seek” appears while the unit is searching
for a station.
• If you know the frequency of the station you
want to listen to, press and hold < or , until
the desired frequency appears (manual tuning).
3 Press (ENTER).
To return to normal mode, select “Mono off”
in step 2.
If FM stereo broadcast becomes
monaural
If interference occurs, the “IF Auto” function of
this unit will automatically avoid noise and
narrow the reception frequency. In such cases,
some FM stereo broadcasts may become
monaural. If you would like to hear such
broadcasts in stereo, manually switch to the
“Wide” setting.
1 During radio reception, press (MENU),
then press M or m repeatedly until “IF
Auto” appears.
2 Press , until “Wide” appears.
3 Press (ENTER).
Note
When you widen the frequency signal reception
setting (“Wide” mode), some interference may
occur.
17
Page 18
Storing the station names
— Station Memo
You can assign a name to each radio station
and store it in memory. The name of the
station currently tuned in appears in the
display. You can assign a name of up to eight
characters for a station.
Storing the station names
1 Tune in a station whose name you want
to store.
Tips
• To erase or correct a name, enter “
bar) for each character.
• There is another way to start storing station
names. Press (LIST) for two seconds instead of
steps 2 and 3. You can also complete the
operation by pressing (LIST) for two seconds
instead of step 5.
” (under-
Displaying the station name
Press (DSPL) during radio reception.
2 Press (MENU), then press M or m
repeatedly until “Name edit” appears.
3 Press (ENTER).
4 Enter the characters.
1 Press M repeatedly to select the
desired characters.
(A t B t C t ··· Z t 0 t 1 t 2 t
··· 9 t + t – t * t / t \ t > t <
t . t )
If you press m repeatedly, the characters
appear in the reverse order.
If you want to put a blank space
between characters, select “ .”
2 Press , after locating the desired
character.
The next character flashes.
Each time you press (DSPL), the item
changes as follows:
B Station name* B Frequency
* If the station name of a station is not stored,
“NO Name” appears in the display for one
second.
Erasing the station name
1 Tune in a station you want to erase.
2 Press (MENU), then press M or m
repeatedly until “Name Del” appears.
3 Press (ENTER).
4 Press M or m to select the station name
you want to erase.
5 Press (ENTER) for two seconds.
The name is erased.
Repeat steps 1 through 4 if you want to
erase other names.
6 Press (MENU) twice.
The unit returns to the normal radio
reception mode.
If you press <, the previous character
flashes.
3 Repeat steps 1 and 2 to enter the
entire name.
5 To return to the normal radio reception,
press (ENTER).
18
Note
When you erase all of the station names, “NO
Data” appears in step 5.
Page 19
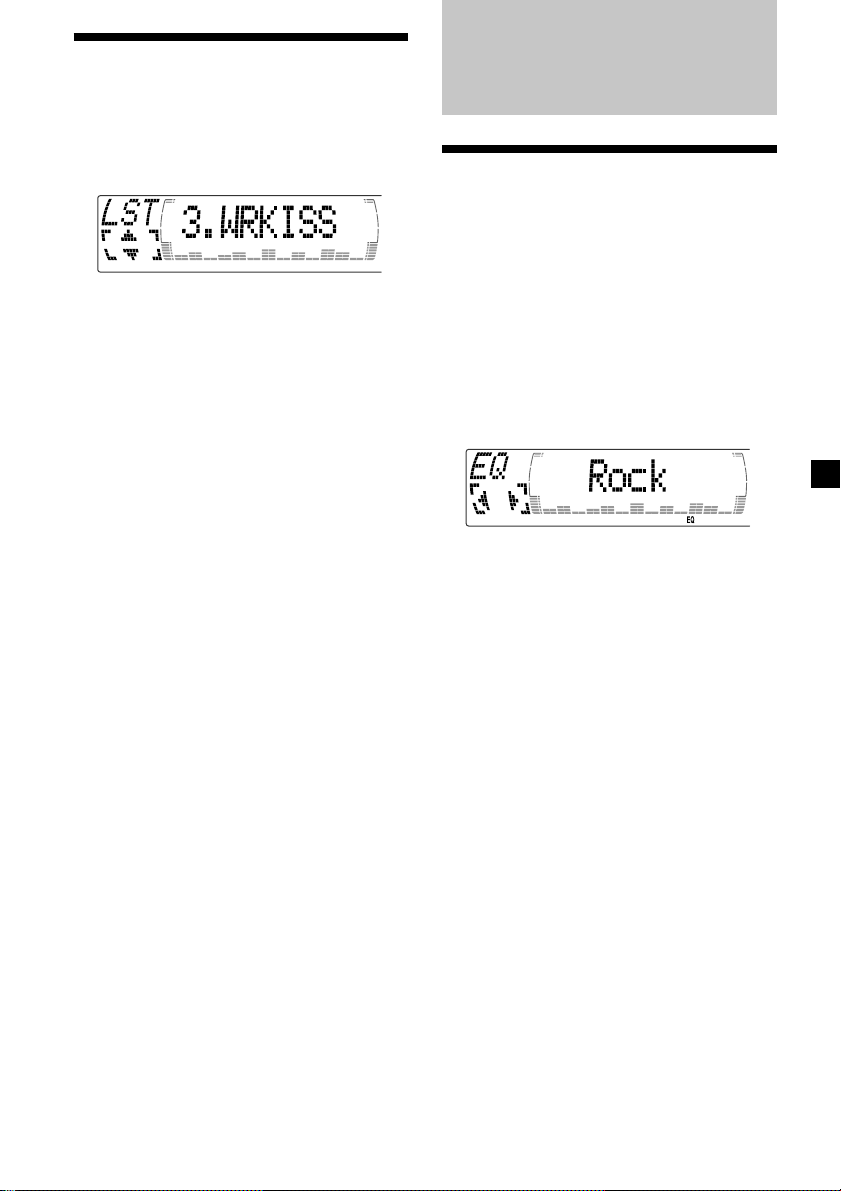
Locating a station by
name — List-up
1 Press (LIST) momentarily.
The name assigned to the station currently
tuned appears in the display.
2 Press M or m repeatedly until you find
the desired station.
When no name is assigned to the selected
station, the frequency appears in the
display.
DSP (CDX-M750 only)
Setting the equalizer
You can select an equalizer curve for five
music types (Rock, Vocal, Groove, Techno and
Custom).
You can store and adjust the equalizer settings
for frequency and level.
Selecting the equalizer curve
1 Press (SOURCE) to select a source (tuner,
CD, or MD).
3 Press (ENTER) to tune in the desired
station.
Note
When you connect a TV tuner, the list-up
indication will not appear in the display of the
unit.
2 Press (SOUND) repeatedly until “EQ”
appears.
3 Press < or , to select the desired
equalizer curve.
Rock y Vocal y Groove y Techno y
Custom y off
To cancel the equalizing effect, select “off.”
After three seconds, the display returns to
the normal playback mode.
19
Page 20
Adjusting the equalizer curve
1 Press (MENU).
2 Press M or m repeatedly until “EQ Tune”
appears.
3 Press (ENTER).
4 Press < or , to select the desired
equalizer curve.
Rock y Vocal y Groove y Techno y
Custom y off
5 Press (ENTER).
6 Press < or , to select the desired
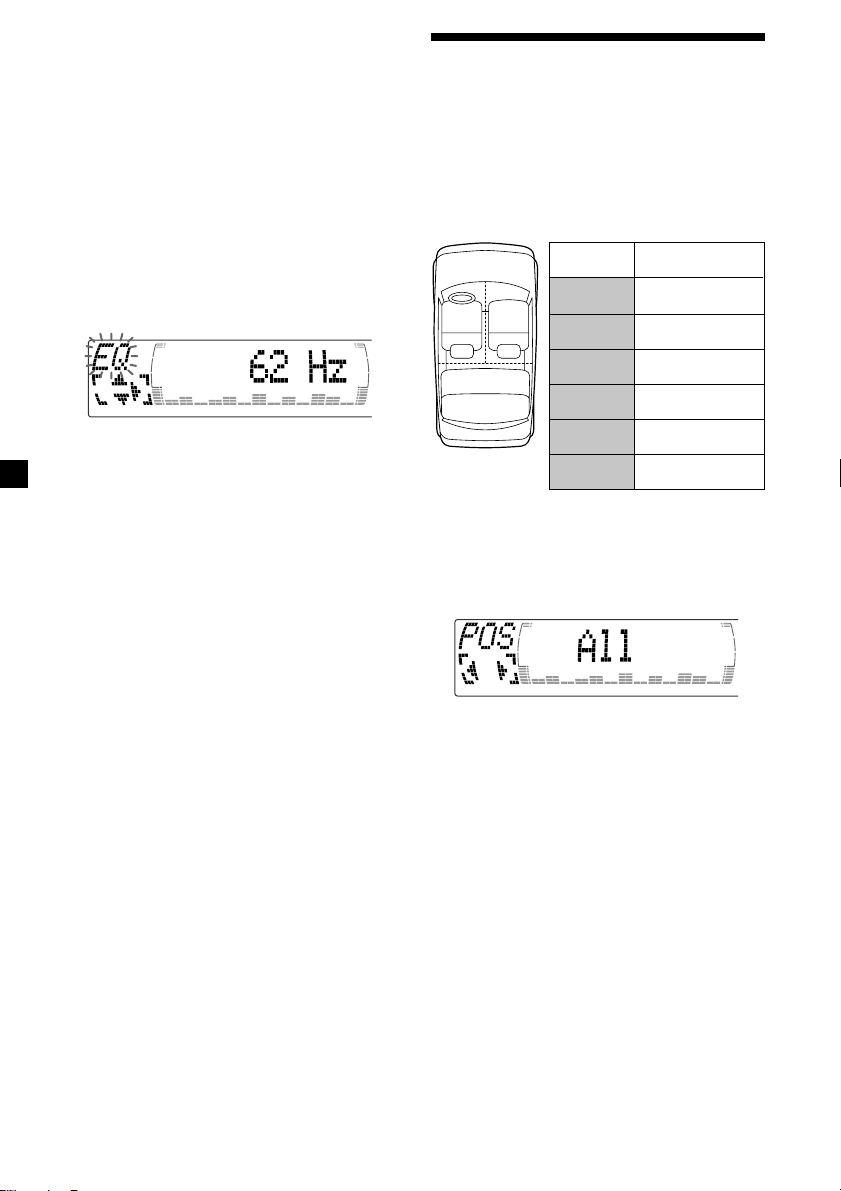
frequency.
62 Hz y 157 Hz y 396 Hz y 1.0 kHz y
2.5 kHz y 6.3 kHz y 16.0 kHz
7 Press M or m to select the desired level.
The volume is adjustable by 1 dB steps
from –12 dB to +12 dB.
To restore the factory-set equalizer curve,
press (ENTER) for two seconds.
Selecting the listening
position
You can set a delayed time for the sound to
reach the listeners from the speakers.
In this way, the unit can simulate a natural
sound field so that you feel as if you are in the
center of the sound field no matter where you
sit in the car.
Display
window
POS
21
3
All
POS
Front
POS
Front-R
POS
Front-L
POS
Rear
POS
off
1 Press (SOURCE) to select a source (tuner,
CD, or MD).
2 Press (SOUND) momentarily until “POS”
appears.
Centre of sound
field
Normal setting
(1 + 2 + 3)
Front part
(1 + 2)
Right front (2)
Left front (1)
Rear part (3)
Cancel
8 Press (MENU) twice.
When the effect setting is complete, the
normal playback mode appears.
20
3 Press < or , to select the desired
listening position.
All y Front y Front-R y Front-L y Rear y
off
The listening positions appear in the order
shown above.
To cancel the POS mode, select “off.”
After three seconds, the display returns to
the normal playback mode.
Page 21
Selecting a soundstage
menu
— Dynamic Soundstage Organizer (DSO)
If your speakers are installed into the lower
part of the doors, the sound will come from
below and may not be clear.
The DSO (Dynamic Soundstage Organizer)
function creates a more ambient sound as if
there were speakers in the dashboard (virtual
speakers).
Soundstage menu
Memory presets Meaning
DSO1 – 3 Virtual speakers (Standard)
DSO Wide Virtual speakers (Wide)
DSO off Cancel
Image of virtual speakers
1
*
1
*
2
*
3
*
*1Standard
2
*
Wide
3
*
Acutual speakers position (lower part of the
front doors).
2
*
3
*
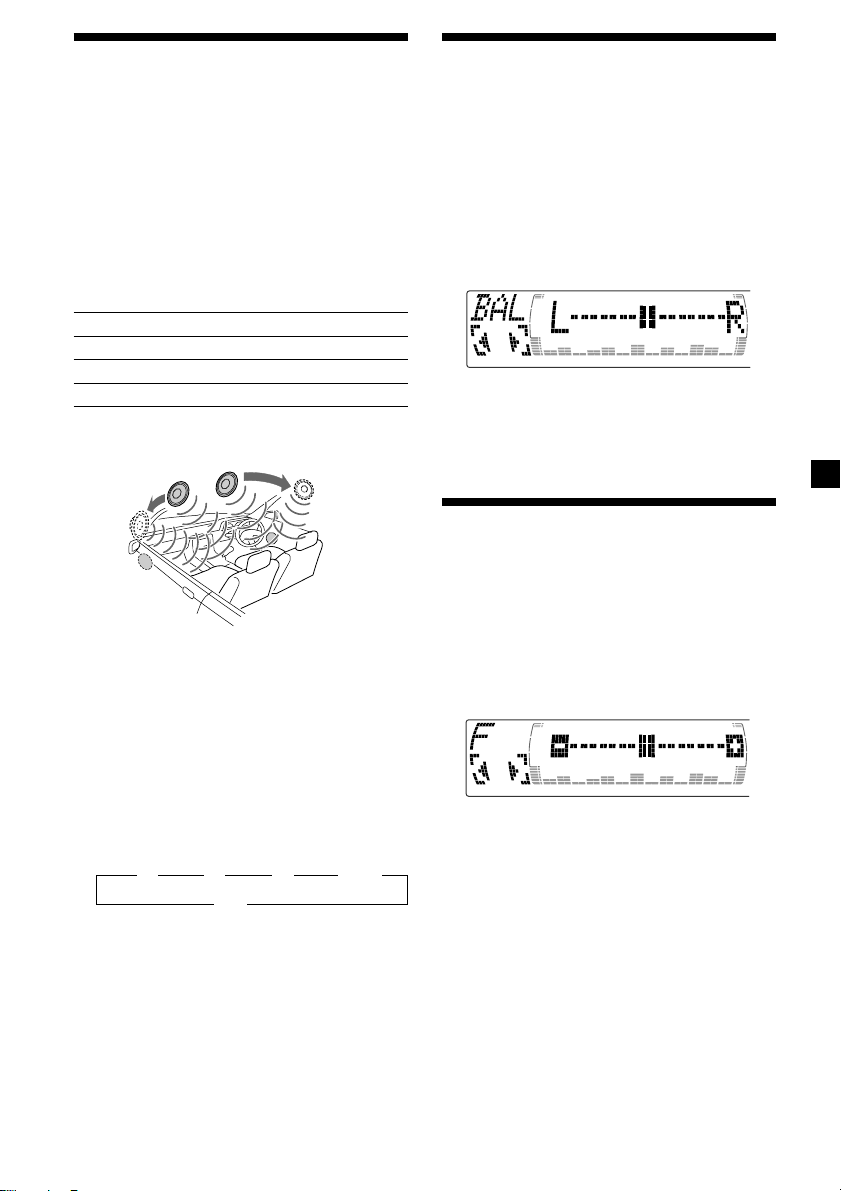
Adjusting the balance
(BAL)
You can adjust the sound balance from the left
and right speakers.
1 Press (SOURCE) to select a source (tuner,
CD, or MD).
2 Press (SOUND) repeatedly until “BAL”
appears.
3 Press < or , to adjust the balance.
After three seconds, the display returns to
the normal playback mode.
Adjusting the front and
rear fader
1 Press (SOURCE) to select a source (tuner,
CD, or MD).
2 Press (SOUND) repeatedly to select the
“F” for the front speakers or “R” for the
rear speakers.
Selecting the DSO
1 Press (SOURCE) to select a source (tuner,
CD, or MD).
2 Press (DSO) repeatedly to select the
desired DSO mode.
B 1 B 2 B 3 B Wide
bb
off
b
bb
To cancel the DSO mode, select “off.”
After three seconds, the display returns to
the normal playback mode.
3 Press < or , to adjust the volume of
front/rear speakers.
After three seconds, the display returns to
the normal playback mode.
21
Page 22
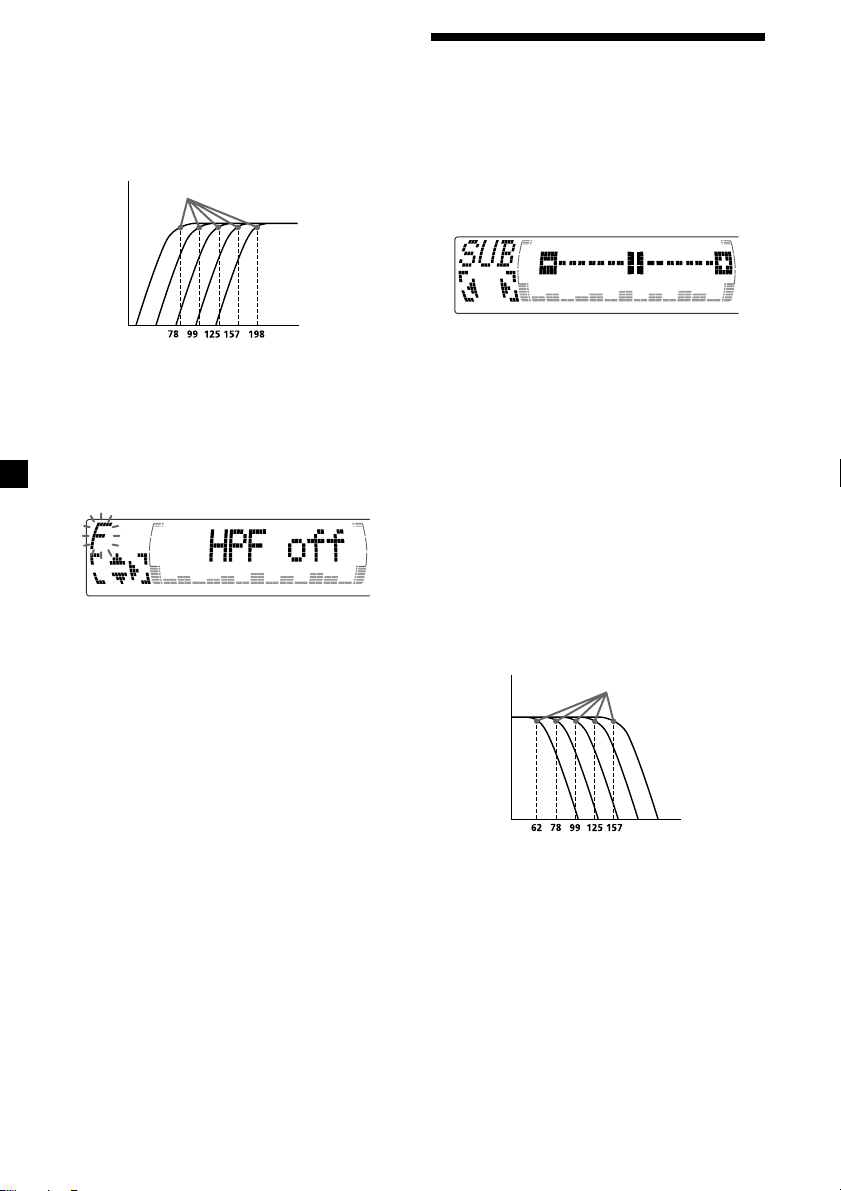
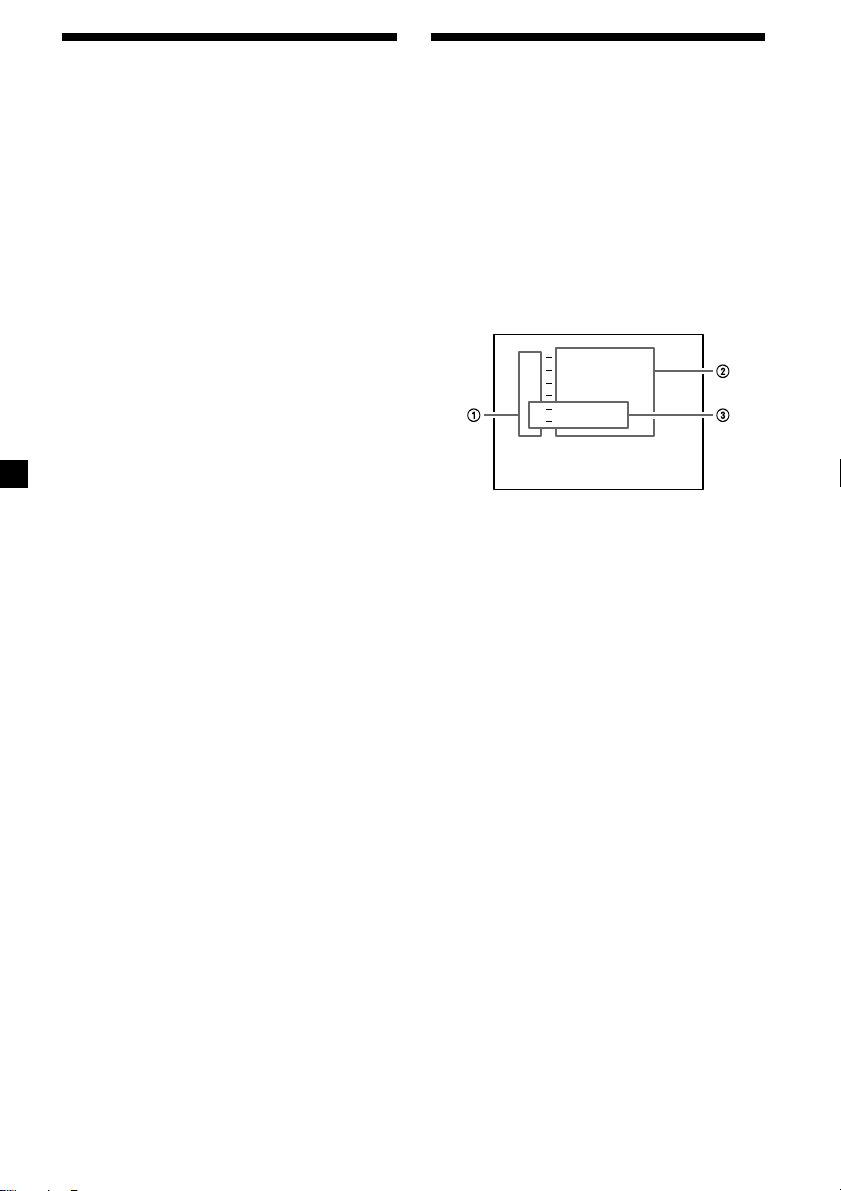
Adjusting the cut-off frequency
and the output volume level for
the front/rear speakers
To match the characteristics of the installed
speaker system, you can adjust the output
volume level and select the cut-off frequency
of the speakers.
Cut-off frequency
Level
Adjusting the volume of
the subwoofer(s)
1 Press (SOURCE) to select a source (tuner,
CD, or MD).
2 Press (SOUND) repeatedly until “SUB”
appears.
Frequency (Hz)
1 Press (MENU).
2 Press M or m repeatedly to select “Front
HPF” or “Rear HPF”
3 Press (ENTER).
4 Press < or , to select the cut-off
frequency.
off y 78 Hz y 99 Hz y 125 Hz y 157 Hz y
198 Hz
5 Press M or m to adjust the volume level.
The volume is adjustable by 1 dB steps
from –12 dB to +12 dB.
Tip
When you lower the volume all the way down,
“ATT” appears and the cut-off frequency is
disabled.
6 Press (MENU) twice.
When the effect setting is complete, the
normal playback mode appears.
3 Press < or , to adjust the volume.
After three seconds, the display returns to
the normal playback mode.
Tip
When you press (VOL) repeatedly to adjust the
volume all the way down, “Sub ATT” appears and
the cutout frequency of the subwoofer is disabled.
Adjusting the frequency of the
subwoofer(s)
To match the characteristics of the connected
subwoofer(s), you can cut out the unwanted
high and middle frequency signals entering
the subwoofer(s). By setting the cut-off
frequency (see the diagram below), the
subwoofer(s) will output only low frequency
signals so you can get a clearer sound image.
Cut-off frequency
Level
Frequency (Hz)
1 Press (MENU).
2 Press M or m repeatedly until “SUB LPF”
appears.
22
Page 23
3 Press (ENTER).
4 Press < or , to select the desired cut-
off frequency.
The cut-off frequency in the display
changes as follows:
62 y 78 y 99 y 125 y 157 y off
Other Functions
You can also control the unit with a rotary
commander (optional).
Labeling the rotary
commander
5 Press M or m to adjust the volume.
6 Press (MENU) twice.
After the frequency setting is complete, the
display returns to the normal playback
mode.
Listening to each
programme source in its
registered DSO
— Source Sound Memory (SSM)
Each time you return to the same source, you
can hear the same DSO menu and equalizer
curve registered for that source, even after
changing the programme source or turning the
unit off and then on again.
Depending on how you mount the rotary
commander, attach the appropriate label as
shown in the illustration below.
SOUND
MODE
DSPL
D
S
P
L
M
O
D
E
S
O
U
N
D
23
Page 24
Using the rotary
commander
The rotary commander works by pressing
buttons and/or rotating controls.
You can also control an optional CD/MD unit
with the rotary commander.
By pressing buttons
(the SOURCE and MODE buttons)
(SOURCE)
(MODE)
Each time you press (SOURCE), the
source changes as follows:
Tuner t CD t MD* t TV*
* If the corresponding optional equipment is
not connected, these items will not appear.
By rotating the control
(the SEEK/AMS control)
Rotate the control momentarily and
release it to:
•Locate a specific track on a disc. Rotate
and hold the control until you locate the
specific point in a track, then release it to
start playback.
•Tune in stations automatically. Rotate and
hold the control to find a specific station.
By pushing in and rotating the
control (the PRESET/DISC control)
Pressing (MODE) changes the operation
in the following ways:
• Tuner: FM1 t FM2 t FM3 t AM1 t AM2
• CD unit: CD1 t CD2 t …
• MD unit*: MD1 t MD2 t …
• TV/Video*: TV1 t TV2 t AUX
* If the corresponding optional equipment is
not connected, the item will not appear.
24
Push in and rotate the control to:
•Receive the stations memorized on the
number buttons.
•Change the disc.
Page 25
Other operations
Rotate the VOL control to
adjust the volume.
Press (ATT) to
attenuate the
sound.
OFF
Press (OFF) to
turn off the unit.
Changing the operative direction
The operative direction of controls is factoryset as shown below.
To increase
To decrease
Press (SOUND) to
adjust sound
menu.
Press (DSPL) to display
the memorized names.
Tip
If your car has no ACC (accessory) position on the
ignition key switch, be sure to press (OFF) for two
seconds to turn off the clock indication after
turning off the engine.
If you need to mount the rotary commander on
the right hand side of the steering column, you
can reverse the operative direction.
Press (SOUND) for two seconds while
pushing the VOL control.
Tip
You can also change the operative direction of
these controls with the unit (see “Changing the
sound and display settings” on page 26).
25
Page 26

Adjusting the sound
characteristics
Changing the sound and
display settings
You can adjust the bass, treble, balance, and
fader.
You can store the bass and treble levels
independently for each source.
1 Select the item you want to adjust by
pressing (SOUND) repeatedly.
Each time you press (SOUND), the item
changes as follows:
CDX-M750:
EQ (equalizer) t POS (listening position) t
BAL (left-right) t F (front) t R (rear) t
SUB (subwoofer)
CDX-M650/M600:
BAS (bass) t TRE (treble) t BAL (left-right)
t FAD (front-rear) t SUB (subwoofer)
2 Adjust the selected item by pressing <
or ,.
When adjusting with the rotary
commander, press (SOUND) and rotate the
VOL control.
Note
Adjust within three seconds after selecting the
item.
Attenuating the sound
Press (ATT) on the card remote
commander or rotary commander .
“ATT on” appears momentarily.
To restore the previous volume level, press
(ATT) again.
The following items can be set:
Set (Setting)
•Clock (page 9)
•Beep — to turn the beeps on or off.
•RM (Rotary Commander) — to change the
operative direction of the controls of the
rotary commander.
— Select “norm” to use the rotary
commander as the factory-set position.
— Select “rev” when you mount the rotary
commander on the right side of the
steering column.
•English/French/Spanish — to change the
display language to English, French, or
Spanish.
Dis (Display)
•D.Info (Dual Information) — to display the
clock and the play mode at the same time (on)
or to display the information alternately (off).
•SA (Spectrum Analyzer) — to change the
display pattern of the equalizer display
(page 28).
•Dimmer — to change the brightness of the
display (When the illumination cord
connected).
— Select “Auto” to dim the display only
when you turn the lights on.
— Select “on” to dim the display.
— Select “off” to deactivate Dimmer.
•Contrast — to adjust the contrast if the
indications in the display are not
recognizable because of the unit‘s installed
position.
•M.Dspl (Motion Display) — to turn the
motion display on or off.
•A.Scrl (Auto Scroll) (page 11)
Tip
When the interface cable of a car telephone is
connected to the ATT lead, the unit decreases the
volume automatically when a telephone call comes
in (Telephone ATT function).
26
Page 27
Snd (Sound)
•EQ Tune*1 (Equalizer tuning) — to adjust the
frequency and volume level of the equalizer
curve.
•Front HPF*1 (High pass filter for the front
pre-output) — to select the cut-off frequency
of the front pre-output.
•Rear HPF*1 (High pass filter for the rear pre-
output) — to select the cut-off frequency of
the rear pre-output.
•SUB LPF*1 (Low pass filter for the subwoofer
output) — to select the cut-off frequency of
the subwoofer output.
•HPF*2*3 (High pass filter for the pre-output)
— to select the cut-off frequency of the preoutput.
•LPF*2*3 (Low pass filter for the subwoofer
output) — to select the cut-off frequency of
the subwoofer output.
•Loud (Loudness)*2 — to enjoy bass even at
low volumes. The bass will be reinforced.
*1CDX-M750 only
2
CDX-M650 only
*
3
CDX-M600 only
*
1 Press (MENU).
4 Press (ENTER).
After the mode setting is completed, the
display returns to normal play mode.
Boosting the bass sound
— D-bass (CDX-M600 only)
You can enjoy a clear and powerful bass
sound.
The D-bass function boosts the low and high
frequency signal with a sharper curve than
conventional bass boost.
You can hear the bass line more clearly even
while the vocal volume remains the same. You
can emphasize and adjust the bass sound
easily with the D-BASS button.
D-BASS 3
Level
0dB
D-BASS 2
D-BASS 1
Frequency (Hz)
D-BASS 3
D-BASS 2
D-BASS 1
2 Press M or m repeatedly until the desired
item appears.
Each time you press m, the item changes as
follows:
Example
Clock t Beep t RM t English/French/
Spanish t D.Info t SA t Dimmer t
Contrast t M.Dspl t A.Scrl*
Front HPF*2 t Rear HPF*2 t Sub LPF*2 t
3*4
t LPF*3*4 t Loud*
HPF*
*1When no CD or MD is playing, this item will
not appear.
2
CDX-M750 only
*
3
*
CDX-M650 only
4
CDX-M600 only
*
Note
The displayed item will differ depending on
the source.
Tip
You can easily switch among categories (“Set,”
“Snd,” “P/M” (Play Mode) and “Dis”) by
pressing M or m for two seconds.
1
t EQ Tune*2 t
3
3 Press , to select the desired setting
(Example: on or off) or press < or ,
repeatedly to select the frequency
(Example: off, 78 Hz or 125 Hz).
For the “Contrast” setting, pressing ,
makes the contrast higher, and pressing <
makes the contrast lower.
Adjusting the bass curve
Press (D-BASS) repeatedly to select the
desired bass curve.
As the D-BASS number increases so does
the effect.
D-BASS 1 t D-BASS 2 t D-BASS 3 t D-BASS off
Note
The bass sound may distort at same volume. If the
bass sound distorts, select less effective bass curve.
27
Page 28
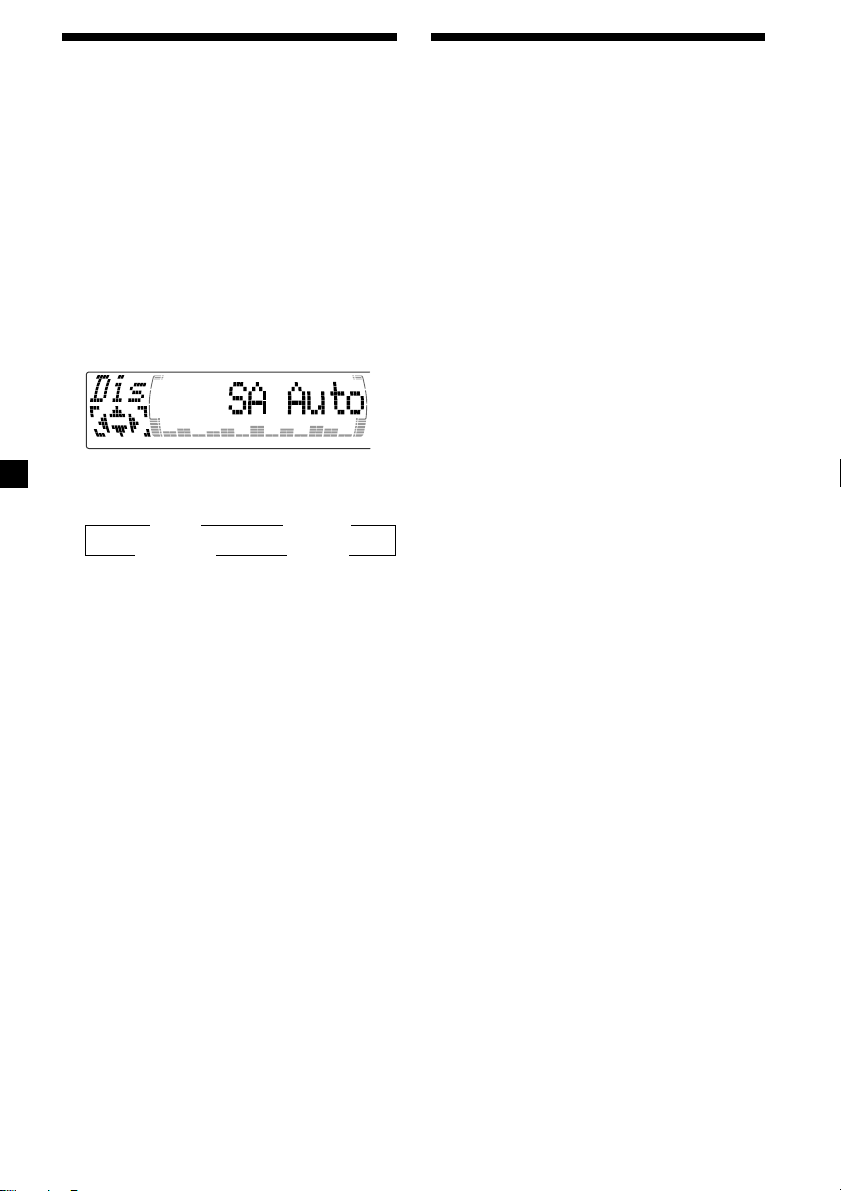
Selecting the spectrum
analyzer
The sound signal level is displayed on a
spectrum analyzer. You can select a display
pattern from 1 to 6, or the automatic display
mode.
1 Press (SOURCE) to select a source (tuner,
CD, or MD).
2 Press (MENU).
3 Press M or m repeatedly until “SA”
appears.
4 Press < or , repeatedly to select the
desired setting.
B SA 1 bB … SA 6 b
B SA Auto* bB SA off b
* All of these display patterns appear one by
one automatically.
5 Press (ENTER).
Adjusting the sound and
frequency of the equalizer
preamplifier
This unit can also control an optional equalizer
preamplifier.
This lets you add some effects to the sound
field of the currently selected source.
For details, refer to the instructions manual
supplied with the equalizer preamplifier.
(CDX-M650 only)
28
Page 29

With Optional Equipment
TV/Video
Memorizing TV channels
automatically
You can connect an optional TV tuner and TV
monitor to this unit.
Watching the TV
1 Press (SOURCE) repeatedly until “TV”
appears.
2 Press (MODE) repeatedly to select the
desired TV band.
Watching a video
1 Press (SOURCE) repeatedly until “TV”
appears.
2 Press (MODE) repeatedly to select
“AUX.”
Play the video.
Notes
•“AUX 2” appears if the VIDEO 2 terminal of the
TV monitor is selected.
• The indication automatically switched to
“AUX 1” soon after “AUX” is displayed.
The unit selects the TV channels with the
strongest signals and memorizes them in the
order of their frequency.
Caution
When tuning in a station while driving, use
Best Tuning Memory to prevent accidents.
1 Press (SOURCE) repeatedly until “TV”
appears.
2 Press (MENU), then press M or m until
“Auto Mem” appears.
3 Press (ENTER).
The unit stores TV channels in the order of
their frequencies on the number buttons.
A beep sounds when the setting is stored.
Notes
• The unit does not store TV channels with weak
signals. If only a few TV channels can be
received, some number buttons will remain
empty.
• When a preset number is indicated in the display,
the unit starts storing TV channels from the one
currently displayed.
29
Page 30
Memorizing only the
desired TV channels
Storing the TV channel
names
You can store up to 12 channels (six each for
TV1 and TV2) on the number buttons in the
order of your choice.
1 Press (SOURCE) repeatedly until “TV”
appears.
2 Press < or , to tune in the TV channel
you want to store on each number
button.
3 Press and hold the desired number
button ((1) to (6)) of the unit until you
hear a beep sound.
The number button indication and “Mem”
appear in the display.
Note
If you try to store another channel on the same
number button, the previously stored channel will
be erased.
Follow the steps in “Storing the station
names” (page 18).
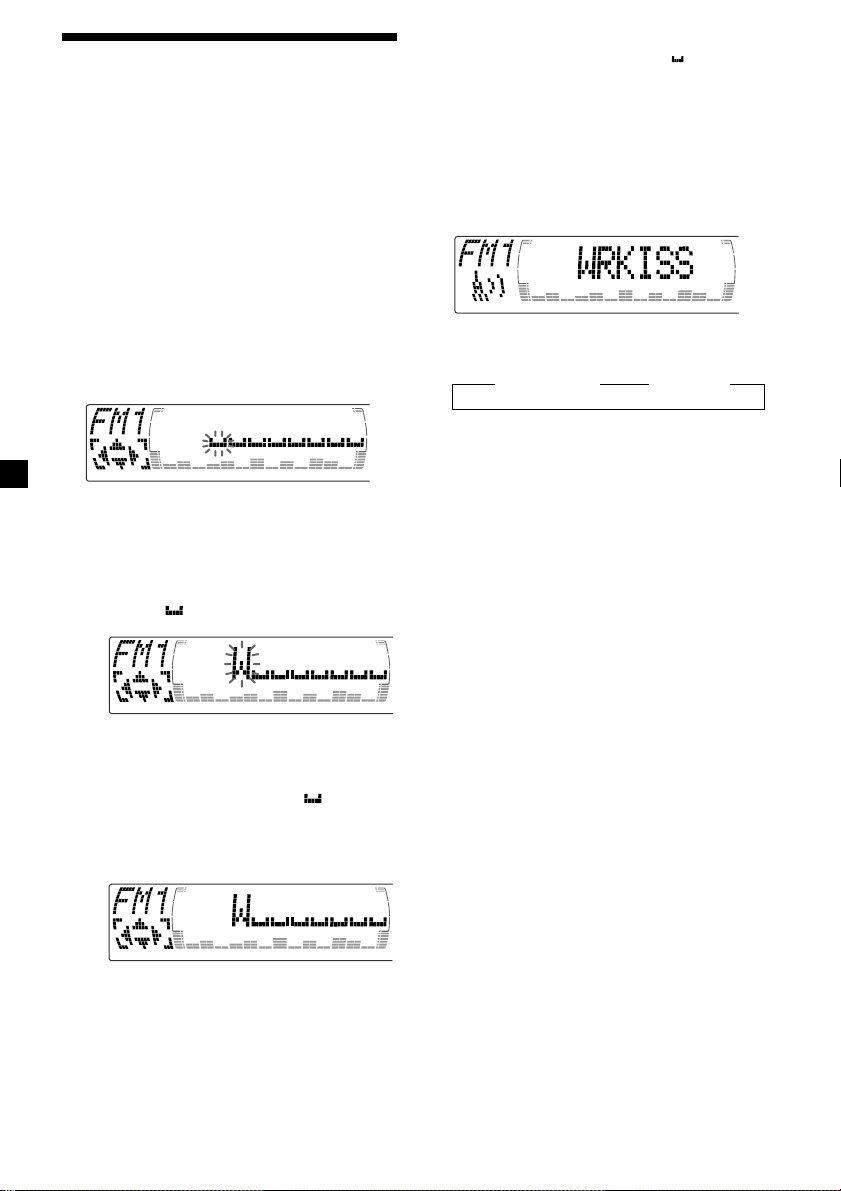
Displaying the TV or radio station
names
Press (LIST) during TV or radio
reception.
Example: When receiving the FM1 band
FM
1
1
W
C
B
W
B
L
W
K
T
WR K I
1
0
1
0
S
S
U
S
S
.9
1
.7
2
2
3
4
5
6
1 Preset numbers
2 Stored station names
3 Frequencies*
* If the name of a station is not stored, the
frequency of that station will be displayed
instead.
Notes
• It may take some time before all indications
appear in the display.
• The TV channel does not appear during list
display.
• The contents of the preset memory cannot be
listed when the unit is in simultaneous play
mode (page 31).
30
Turning off the display
During radio reception, press (LIST)
again.
During TV reception, the list display on the
TV monitor will automatically turn off after
a few seconds.
Page 31

Displaying the
information stored on
discs
Press (LIST) during CD/MD playback.
Example: When CD unit 1 is selected.
CD 1
1
S
C
H
U
B
E
O
Z
A
R
T
A
C
H
I
S
Z
T
H
O
P
I
N
*
*****
******
?
?
1
RT
2
M
3
B
4
L
5
C
6
7
8
9
1 0
1 Disc numbers
2 Titles stored as custom files
3 No disc is loaded*
4 No stored titles*
5 TOC information has not been identified yet*
*1A blank space is displayed next to a disc
number represents empty slots in the disc
magazine.
2
If a title is not registered in the custom file,
*
“******” is displayed.
3
If the disc information has not yet been read
*
by the unit, “?” is displayed.
Notes
• It may take some time before all indications
appear in the display.
• The TV channel does not appear during list
display.
• The contents of the preset memory cannot be
listed when the unit is in the simultaneous play
mode.
2
Turning off the display
Press (LIST) again.
Watching the TV or video
while listening to a CD or
— Simultaneous Play
MD
The simultaneous play function does not work
while you are listening to the radio.
1 Press (MENU), then press M or m
repeatedly until “Simul Sel” appears.
2 Press (ENTER).
3 Press <.
4 Press (SOURCE) repeatedly to select CD
3
or MD.
5 Press ,.
6 Press (SOURCE) repeatedly until “TV”
appears, then press (MODE) repeatedly
to select a TV or video.
Each time you press (MODE), the item
changes as follows:
TV 1 t TV 2 t V 1 (VIDEO 1)
7 Press (ENTER).
Simultaneous Play starts.
If you are already watching the TV or video
31
Page 32

and want to listen to a CD or MD as well,
follow the same steps.
Returning to normal mode
To cancel the CD or MD, select “– – –” in
step 4.
To cancel the TV or video, select “– – –”
in step 6.
Note
If you press Z (EJECT) on a CD/MD unit while the
unit is in simultaneous play mode, Simultaneous
Play is canceled.
Additional
Information
Maintenance
Fuse replacement
When replacing the fuse, be sure to use one
matching the amperage rating stated on the
original fuse. If the fuse blows, check the
power connection and replace the fuse. If the
fuse blows again after replacement, there may
be an internal malfunction. In such a case,
consult your nearest Sony dealer.
Fuse (10 A)
Warning
Never use a fuse with an amperage rating
exceeding the one supplied with the unit as
this could damage the unit.
32
Page 33

Replacing the lithium battery
When the battery becomes weak, the range of
the card remote commander becomes shorter.
Replace the battery with a new CR2025 lithium
battery.
Dismounting the unit
With the front panel open
1 Press (OPEN) of the unit, then press the
clip inside the front cover with a thin
screwdriver, and gently pry the front
cover free.
x
+ side up
Notes on lithium battery
•Keep the lithium battery out of the reach of
children. Should the battery be swallowed,
immediately consult a doctor.
•Wipe the battery with a dry cloth to assure a
good contact.
•Be sure to observe the correct polarity when
installing the battery.
•Do not hold the battery with metallic
tweezers, otherwise a short-circuit may
occur.
WARNING
Battery may explode if mistreated.
Do not recharge, disassemble, or dispose of
in fire.
2 Repeat step 1 on the left side.
The front cover is removed.
3 Use a thin screwdriver to push in the clip
on the left side of the unit, then pull out
the left side of the unit until the catch
clears the mounting.
4 Repeat step 3 on the right side.
5 Slide the unit out of the mounting.
33
Page 34

If the front panel does not open
because of a blown fuse
1 Press the clip inside the front cover with
a release key (supplied), and pry the
front cover free.
Release key (supplied)
2 Repeat step 1 on the left side.
The front cover is removed.
3 Use a release key to push in the clip on
the left side of the unit, then pull out the
left side of the unit until the catch clears
the mounting.
4 Repeat step 3 on the right side.
5 Slide the unit out of the mounting.
34
Page 35

Specifications
AUDIO POWER SPECIFICATIONS
POWER OUTPUT AND TOTAL HARMONIC DISTORTION
19 watts per channel minimum continuous average power into
4 ohms, 4 channels driven from 20 Hz to 20 kHz with no more
than 1 % total harmonic distortion.
Other specifications
CD player section
System Compact disc digital audio
Signal-to-noise ratio 90 dB
Frequency response 10 – 20,000 Hz
Wow and flutter Below measurable limit
Laser Diode Properties
Material GaAlAs
Wavelength 780 nm
Emission Duration Continuous
Laser output power Less than 44.6 µW*
* This output is the value measured at a distance
of 200 mm from the objective lens surface on the
Optical Pick-up Block.
system
Tuner section
FM
Tuning range 87.5 - 107.9 MHz
Antenna terminal External antenna connector
Intermediate frequency 10.7 MHz/450 kHz
Usable sensitivity 8 dBf
Selectivity 75 dB at 400 kHz
Signal-to-noise ratio 66 dB (stereo),
Harmonic distortion at 1 kHz
Separation 35 dB at 1 kHz
Frequency response 30 – 15,000 Hz
72 dB (mono)
0.6 % (stereo),
0.3 % (mono)
AM
Tuning range 530 - 1,710 kHz
Antenna terminal External antenna connector
Intermediate frequency 10.7 MHz/450 kHz
Sensitivity 30 µV
Power amplifier section
Outputs Speaker outputs
Speaker impedance 4 – 8 ohms
Maximum power output 50 W × 4 (at 4 ohms)
General
Outputs Audio outputs (3)
Inputs Telephone ATT control
Tone controls (CDX-M650, CDX-M600 only)
Power requirements 12 V DC car battery
Dimensions Approx. 178 × 50 × 182 mm
Mounting dimensions Approx. 182 × 53 × 163 mm
Mass Approx. 1.5 kg (3 lb. 5 oz.)
Supplied accessories Card remote commander
Optional accessories Rotary commander
Optional equipment CD changer (10 discs)
Design and specifications are subject to change
without notice.
Power antenna relay
control lead
Power amplifier control
lead
Illumination control lead
Bass ±9 dB at 100 Hz
Treble ±9 dB at 10 kHz
(negative ground)
1
/8 × 2 × 7 1/4 in.)
(7
(w/h/d)
1
/4 × 2 1/8 × 6 1/2 in.)
(7
(w/h/d)
RM-X94 (CDX-M650
only)
RM-X93 (CDX-M600
only)
RM-X92 (CDX-M750
only)
Parts for installation and
connections (1 set)
RM-X4S
BUS cable (supplied with
an RCA pin cord)
RC-61 (1 m), RC-62 (2 m)
Compact disc single
adapter CSA-8
CDX-838, CDX-737,
CDX-636
MD changer (6 discs)
MDX-65
Other CD/MD changers
with the Sony-BUS system
Source selector XA-C30
TV tuner XT-40V
Digital equalizer
preamplifier (CDX-M650
only)
XDP-210EQ, XDP-4000X
35
Page 36

Troubleshooting guide
The following checklist will help you remedy the problems you may encounter with your unit.
Before going through the checklist below, check the connection and operating procedures.
General
Problem
No sound.
The contents of the memory
have been erased.
No beep sound.
The sound is noisy.
CD/MD playback
Problem
A disc cannot be loaded.
Playback does not begin.
A disc is automatically ejected.
CD will not be ejected.
The operation buttons do not
function.
The sound skips due to
vibration.
The sound skips.
Cannot turn off the “--------”
indication.
Cause/Solution
•Cancel the ATT function.
•Set the fader control to the center position for two-speaker
system.
•Press (+) of the VOL button to adjust the volume.
•The power cord or battery has been disconnected.
•The reset button has been pressed.
t Store again into the memory.
The beep sound is cancelled (page 26).
You are using a mobile phone.
Cause/Solution
•Another CD is already loaded.
•The CD is forcibly inserted upside down or in the wrong
way.
Defective MD or dirty CD.
The ambient temperature exceeds 50°C (122°F).
You have closed the front panel or pushed the disc forcibly
into the unit while the unit was ejecting the disc after you
pressed Z.
t Press the reset button.
Press the reset button.
•The unit is installed at an angle of more than 60°.
•The unit is not installed in a sturdy part of the car.
A dirty or defective disc.
You cannot label CDs unless you connect a CD unit with the
custom file function.
t Press (LIST) for two seconds.
36
Page 37

Radio reception
Problem
Preset tuning is not possible.
The stations cannot be received.
The sound is hampered by
noises.
Automatic tuning is not
possible.
The “ST” indication flashes.
Interference occurs during FM
reception.
DSP functions
Problem
No sound, or sound is too low.
Cause/Solution
•Store the correct frequency in the memory.
•The broadcast signal is too weak.
Connect a power antenna control lead (blue) or accessory
power supply lead (red) to the power supply lead of a car’s
antenna booster. (Only when your car has built-in FM/AM
antenna in the rear/side glass.)
The broadcast signal is too weak.
t Use manual tuning.
•Tune in the frequency accurately.
•The broadcast signal is too weak.
t Set to the Mono mode (page 17).
The Wide mode is selected.
t Set the IF mode to IF Auto (page 17).
Cause/Solution
The volume of the speakers may have been automatically
lowered in order to maximize the effect of the listening
position adjustment.
t Press < or , to adjust the balance.
The speaker balance can be set separately for DSP on mode
and DSP off mode (page 20).
37
Page 38

Error displays (when an optional CD/MD unit is connected)
The following indications will flash for about five seconds, and an alarm sound will be heard.
Display
NO Mag
NO Disc
NG Discs
Error
Blank
PushReset
Not Ready
High Temp
*1 When an error occurs during playback of an MD or CD, the disc number of the MD or CD does not
appear in the display.
*2 The disc number of the disc causing the error appears in the display.
If the above-mentioned solutions do not help improve the situation, consult your nearest Sony
dealer.
Cause
The disc magazine is not inserted in
the CD/MD unit.
No disc is inserted in the CD/MD
unit.
A CD/MD cannot play because of
some problem (dirty CD, defective MD
etc.).
A CD is dirty or inserted upside
2
down.*
1
*
An MD does not playback because of
some problem.*
1
No tracks have been recorded on an
*
2
MD.*
The CD/MD unit cannot be operated
because of some problem.
The lid of the MD unit is open or the
MDs are not inserted properly.
The ambient temperature is more than
50°C (122°F).
2
Solution
Insert the magazine in the CD/MD
unit.
Insert discs in the CD/MD unit.
Insert another CD/MD.
Clean or insert the CD correctly.
Insert another MD.
Play an MD with recorded tracks
on it.
Press the reset button on the unit.
Close the lid or insert the MDs
properly.
Wait until the temperature goes
down below 50°C (122°F).
38
Page 39

39
Page 40

Félicitations !
Précautions
Nous vous remercions d’avoir fait l’acquisition
d’un lecteur de disques compact Sony. Cet
appareil vous permet d’exploiter de multiples
fonctions d’utilisation à l’aide des accessoires
de commande ci-dessous:
Accessoire fourni
Télécommande à carte
RM-X94 (pour le CDX-M650)
RM-X93 (pour le CDX-M600)
RM-X92 (pour le CDX-M750)
Accessoire en option
Satellite de commande RM-X4S
En plus de la lecture CD et de l’utilisation de la
radio, vous pouvez étendre votre système en
raccordant des unités CD/MD*1 en option.
Si vous utilisez cet appareil ou si vous
raccordez un appareil de CD en option doté de
la fonction CD TEXT, les informations CD
TEXT apparaîtront dans la fenêtre d’affichage
lorsque vous reproduirez un disque CD
TEXT*2.
*1Vous pouvez raccorder des changeurs MD, des
changeurs CD, des lecteurs MD ou des lecteurs
CD.
2
Un disque CD TEXT est un CD audio qui
*
comprend des informations telles que le titre du
disque, le nom de l’artiste et les titres des
plages.
Ces informations sont enregistrées sur le disque.
•Si votre voiture est parquée en plein soleil et
si la température à l’intérieur de l’habitacle a
considérablement augmenté, laissez refroidir
l’appareil avant de l’utiliser.
•Si l’appareil n’est pas alimenté, vérifiez
d’abord les connexions. Si tout est en ordre,
vérifiez le fusible.
•Si votre voiture est équipée d’une antenne
électrique, elle se déploiera automatiquement
lorsque vous utiliserez l’appareil.
•N’utilisez pas la fonction de fichier
personnalisé pendant que vous conduisez ou
que vous effectuez toute autre opération qui
pourrait distraire votre attention de la
conduite.
Si vous avez des questions ou des problèmes
concernant le fonctionnement de cet appareil
qui ne sont pas abordés dans le présent mode
d’emploi, veuillez consulter votre revendeur
Sony.
Condensation d’humidité
Les jours de pluie ou dans les régions très
humides, de l’humidité risque de se condenser
sur les lentilles à l’intérieur du lecteur CD. Si
cela se produit, l’appareil ne fonctionnera pas
correctement. Dans ce cas, retirez le disque et
attendez environ une heure que l’humidité se
soit évaporée.
2
Page 41

Remarques sur la
manipulation des CD
Un disque souillé ou défectueux peut
occasionner des pertes de son en cours de
lecture. Pour bénéficier d’un son optimal,
saisissez les disques par les bords. Pour que les
disques restent propres, n’en touchez jamais la
surface.
Remarques sur les disques
Si vous utilisez les disques décrits ci-dessous,
le résidu adhésif risque de provoquer l’arrêt de
la rotation du CD et d’entraîner un
dysfonctionnement ou d’endommager vos
disques.
N’utilisez pas de CD de seconde main ou de
location qui présentent des résidus adhésifs à
la surface (par exemple d’étiquettes décollées
ou d’encre, de colle dépassant de l’étiquette).
Résidus de colle.
L’encre colle.
Ne collez pas de papier ni de bande adhésive
sur le disque.
N’exposez pas les disques au rayonnement
direct du soleil ou à des sources de chaleur
telles que des conduits d’air chaud. De même,
ne les laissez pas dans une voiture parquée en
plein soleil où la température à l’intérieur de
l’habitacle risque d’augmenter dans des
proportions considérables.
Avant d’écouter un disque, nettoyez-le à l’aide
d’un chiffon de nettoyage disponible en
option. Essuyez les disques en allant du centre
vers l’extérieur.
N’utilisez pas de CD de location avec
d’anciennes étiquettes qui commencent à se
décoller.
Les étiquettes qui
commencent à se décoller
laissent des résidus
adhésifs.
N’utilisez pas vos CD avec des étiquettes ou
des autocollants apposés dessus.
Les étiquettes sont fixées.
Lecture de CD de 8 cm (3 po.)
Utilisez l’adaptateur pour disque compact de
8 cm (3 po.) Sony en option (CSA-8) pour
éviter d’endommager le lecteur de CD.
Remarques sur les disques CD-R
•Vous pouvez lire des CD-R (CD
enregistrables) sur cet appareil. Suivant les
spécificités de l’appareil enregistreur ou des
CD-R proprement dits, il est cependant
possible que certains disques CD-R ne
puissent pas être lus avec cet appareil.
•Vous ne pouvez pas lire de disques CD-R
non finalisés (la finalisation est indispensable
pour permettre la lecture des disques CD-R
enregistrés sur le lecteur CD audio).
•Vous ne pouvez pas lire de CD-RW (CD
réinscriptibles) sur cet appareil.
N’utilisez pas de solvants tels que du benzène,
du diluant, des nettoyants disponibles dans le
commerce ou des sprays antistatiques destinés
aux disques analogiques en vinyle.
3
Page 42

Table des matières
Emplacement des commandes .......................... 5
Préparation
Réinitialisation de l’appareil ............................. 8
Mise sous/hors tension de l’appareil .............. 8
Comment utiliser le menu ................................. 8
Réglage de l’horloge ........................................... 9
Lecteur CD
Appareil CD/MD (en option)
Ecouter un CD
(avec cet appareil uniquement) ................. 10
Lecture de plages répétée
— Lecture répétée ........................................ 12
Lecture de plages dans un ordre quelconque
— Lecture aléatoire...................................... 12
Identification d’un CD
— Mémo de disque (Pour un appareil CD
doté de la fonction de fichier de
personnalisation) ......................................... 13
Localisation d’un disque par son titre
— Répertoire (Pour un appareil CD doté de
la fonction de fichier de personnalisation ou
un appareil MD)........................................... 14
Sélection de plages déterminées pour la lecture
— Bloc (Pour un appareil CD doté de la
fonction de fichier de personnalisation) ... 15
Radio
Mémorisation automatique des stations
— Mémorisation du meilleur accord
(BTM) ............................................................. 16
Mémorisation de stations déterminées .......... 16
Réception des stations présélectionnées ........ 17
Mémorisation de noms de stations
— Mémorisation des stations..................... 18
Localisation d’une station par son nom
— Répertoire ................................................ 19
Autres fonctions
Etiquetage du satellite de commande ............ 23
Utilisation du satellite de commande ............ 24
Réglage des caractéristiques du son ............... 26
Coupure du son ................................................. 26
Modification des réglages du son et de
l’affichage ...................................................... 26
Renforcement des graves
— D-bass (CDX-M600 seulement)............. 27
Sélection de l’analyseur de spectre ................. 28
Réglage du son et de la fréquence du
préamplificateur égaliseur
(CDX-M650 seulement) ............................... 28
Appareils optionnels Télévision/
Vidéo
Regarder la télévision ....................................... 29
Regarder une source vidéo .............................. 29
Mémorisation automatique des chaînes de
télévision ....................................................... 29
Mémorisation de chaînes de télévision
particulières .................................................. 30
Mémorisation des noms des chaînes de
télévision ....................................................... 30
Affichage des informations mémorisées sur
les disques ..................................................... 31
Regarder la télévision ou une source vidéo tout
en écoutant un CD ou un MD
— Lecture simultanée ................................. 31
Informations complémentaires
Entretien ............................................................. 32
Démontage de l’appareil .................................. 33
Spécifications ..................................................... 35
Dépannage ......................................................... 36
DSP (CDX-M750 seulement)
Réglage de l’égaliseur ....................................... 19
Sélection de la position d’écoute..................... 20
Sélection d’un menu de niveau sonore
— Dynamic Soundstage Organizer
(DSO) ............................................................. 21
Réglage de la balance (BAL) ............................ 21
Réglage de la balance avant/arrière .............. 21
Réglage du volume des haut-parleurs
d’extrêmes graves ........................................ 22
Ecoute de chaque source programme avec le
DSO enregistré
— Source Sound Memory (SSM) ............... 23
4
Page 43

Emplacement des commandes
Télécommande
à carte
Référez-vous aux pages indiquées pour plus de détails.
1 Touche OFF 8, 10
2 Touche MENU 9, 12, 13, 14, 15, 16, 17,
18, 22, 27, 28, 29, 31
3 Touche SOURCE (TUNER/CD/MD/TV)
8, 10, 11, 14, 16, 17, 19, 20, 21, 22, 28,
29, 30, 31
4 Touches
8, 9, 11, 12, 15, 16, 17, 19, 20, 21, 22, 23,
26, 28, 30, 31
Détecteur automatique de musique
(./>) 11
Recherche manuelle (m/M) 11
Recherche 16, 28
5 Touche SOUND 19, 20, 21, 22, 26
6 Touche DSPL (changement de mode
d’affichage) 10, 11, 13, 18, 19, 25
7 Touche ATT (atténuation) 26
8 CDX-M750:
Touches DSO (Dynamic Soundstage
Organizer) 21
CDX-M600:
Touche D-BASS 27
9 Touche OPEN/CLOSE 10
q; Touche LIST 13, 14, 18, 19, 30, 31
qa
Touches M/m (PRST/DISC
12, 13, 14, 15, 17, 18, 19, 20, 22, 23, 27,
28
Pendant la lecture d’un CD/MD:
</, (
SEEK/AMS –/+)
Répertoire 14, 19, 30, 31
+/–) 8, 9, 11,
Changement de disque 11
OFF
MENU LIST
SEEK SEEK
SOUND
DSPL MODE
DSO
DISC
SOURCE
DISC
VOLATT
qs Touche ENTER 9, 11, 13, 14, 15, 16, 17,
qd Touche MODE 10, 14, 16, 17, 29, 31
qf Touches VOL (Réglage du volume)
Un appareil mis hors tension en appuyant sur
la touche pendant deux secondes sur la touche
(OFF) ne peut être contrôlé au moyen de la
télécommande carte sauf si la touche
(SOURCE) de l’appareil est actionnée ou si un
CD est introduit de manière à activer
l’appareil.
OPEN/CLOSE
ENTER
En cours de réception radio:
Sélection des stations de présélection
17
En cours de réception téléviseur:
Sélection de bande 29
18, 19, 20, 22, 23, 27, 29, 31
Pendant la lecture d’un CD/MD:
Sélection d’appareil CD/MD 10, 14
En cours de réception radio:
Sélection de gamme 16, 17
En cours de réception télévisée :
Sélection d’unité 29
5
Page 44

Emplacement des commandes
Face de sécurité
Face de commande
P
S
L
OFF
D
SOURCE
M
E
O
D
REP SHUF
123456
MENU
S
O
U
N
D
DISC
DSO
DISC
LIST
ENTER
CLOSE
CDX-M750/M650/M600
6
Page 45

Les touches correspondantes de
l’appareil contrôlent les mêmes
fonctions que celles de la
télécommande à carte.
17 Touche de réinitialisation 8
2 Fenêtre d’affichage principale
3 Touche OPEN
4qf Récepteur de télécommande à carte
5 Touches de réglage du volume
6
Touche Z (éjection) 10
8 Touche DSPL (changement de mode
d’affichage)
9 Fenêtre d’affichage secondaire
q; Touche MENU
qa
Touches DISC/PRST
haut/bas)
Touches SEEK/AMS –/+ (curseur vers la
gauche/droite)
qs CDX-M750:
Touche DSO
CDX-M600:
Touche D-BASS
qd Touche LIST
qg Touche OFF* 8
qh Touche MODE
qj Touche SOURCE
qk Touches numériques
En cours de réception radio:
Sélection du numéro de présélection
16, 17
Pendant la lecture d’un CD/MD:
(1) REP 12
(2) SHUF 12
En cours de réception téléviseur:
Sélection du numéro de présélection
30
ql Touche SOUND
w; Touche ENTER
wa Touche CLOSE
+/– (curseur vers le
16
* Avertissement en cas d’installation
dans une voiture dont le contact ne
comporte pas de position ACC
(accessoires)
Appuyez sur la touche (OFF) de l’appareil
pendant deux secondes pour désactiver
l’affichage de l’horloge après avoir coupé
le moteur.
Lorsque vous appuyez brièvement sur
(OFF), l’affichage de l’horloge ne s’éteint pas
et cela provoque une usure de la batterie.
7
Page 46

Préparation
Réinitialisation de
l’appareil
Avant la première mise en service de l’appareil
ou après avoir remplacé la batterie de la
voiture, vous devez réinitialiser l’appareil.
Appuyez sur la touche de réinitialisation à
l’aide d’un objet pointu comme un stylo à bille.
Touche de réinitialisation
Remarque
Une pression sur la touche de réinitialisation
effacera le réglage de l’horloge, les préréglages en
mémoire et d’autres fonctions mémorisées.
Mise sous/hors tension de
l’appareil
Mise sous tension de l’appareil
Appuyez sur (SOURCE) ou introduisez un CD
dans l’appareil. Pour plus de détails sur le
fonctionnement, reportez-vous à la page 10
(CD/MD) et à la page 16 (radio).
Mise hors tension de l’appareil
Appuyez sur (OFF) pour arrêter la lecture
CD/MD ou la réception FM/AM
(l’illumination de la touche et l’affichage
restent activés).
Appuyez sur (OFF) pendant deux secondes
pour mettre l’appareil complètement hors
tension.
Remarque
Si le contact de votre voiture ne comporte pas de
position ACC, n’oubliez pas de mettre l’appareil
hors tension en appuyant sur la touche (OFF)
pendant deux secondes afin d’éviter de mettre
votre batterie à plat.
Comment utiliser le menu
Cet appareil s’utilise en sélectionnant les
options dans un menu.
Pour sélectionner, entrez d’abord en mode de
menu et choisissez
choisissez
</,
M/m
(haut/bas), ou
(gauche/droite).
M/m
M
DISC
SEEK SEEK
SOURCE
DISC
: pour sélectionner vers
le haut
m
: pour sélectionner vers
le bas
</,
DISC
SEEK SEEK
SOURCE
,
<
: pour
sélectionner
vers la gauche
DISC
: pour
sélectionner
vers la droite
8
Page 47

Réglage de l’horloge
L’horloge à affichage numérique fonctionne
suivant un cycle de 12 heures.
Exemple: Pour régler l’horloge sur 10:08
1 Appuyez sur (MENU), puis appuyez
plusieurs fois sur
“Clock” apparaisse.
1 Appuyez sur (ENTER).
Les chiffres des heures clignotent.
M ou m
jusqu’à ce que
Remarque
Pendant le réglage initial, l’indication de l’horloge
apparaît lorsque l’appareil est hors tension.
Lorsque le mode D.info est sur “on”, l’heure est
toujours affichée (à l’exeption de certaines
fonctions du mode SA) (page 26).
2 Appuyez sur
l’heure.
3 Appuyez sur ,.
Les chiffres des minutes clignotent.
4 Appuyez sur
les minutes.
M ou m
M ou m
2 Appuyez sur (ENTER).
L’horloge démarre.
pour sélectionner
pour sélectionner
9
Page 48

Lecteur CD
Appareil CD/MD
(en option)
Quand la dernière plage du CD est
terminée
L’indication du numéro de plage revient à “1”,
et la lecture reprend à partir de la première
plage du CD.
En plus de la lecture d’un CD avec cet appareil
seul, vous pouvez également commander des
appareils CD/MD externes.
Si vous raccordez une unité CD en option
dotée de la fonction CD TEXT et la fonction de
fichier de personnalisation, les informations
CD TEXT apparaissent dans la fenêtre
d’affichage pendant la lecture des disques CD
TEXT.
Ecouter un CD
(avec cet appareil uniquement)
1 Appuyez sur la touche (OPEN/CLOSE) de
la télécommande carte et introduisez
une cassette.
La lecture démarre automatiquement.
Avec l’étiquette vers le haut
2 Appuyez sur la touche (OPEN/CLOSE) de
la télécommande carte pour refermer le
panneau frontal.
Si un CD se trouve déjà dans l’appareil,
appuyez plusieurs fois sur (SOURCE) jusqu’à
ce que “CD” apparaisse pour démarrer la
lecture.
Numéro de la plage
Remarque
Pour écouter un CD de 8 cm (3 po.), utilisez
l’adaptateur pour CD single optionnel Sony
(CSA-8).
Indication CD
Temps de
lecture écoulé
Pour Appuyez sur
Arrêter la lecture (OFF)
Ejecter le CD (OPEN/CLOSE) et ensuite
sur Z
Lecture d’un CD ou d’un MD
(avec l’appareil CD/MD en option)
1 Appuyez plusieurs fois sur (SOURCE)
pour sélectionner “CD” ou “MD.”
2 Appuyez sur (MODE) jusqu’à ce que
l’unité désirée apparaisse.
La lecture CD/MD démarre.
Tous les disques de l’appareil CD/MD en
cours sont reproduits à partir du haut.
Changement du paramètre affiché
Chaque fois que vous appuyez sur (DSPL) en
cours de lecture CD, disque CD TEXT ou MD,
l’affichage change selon la séquence suivante:
Numéro de disque*1/Numéro de la plage/
Temps de lecture écoulé
Titre du disque*
*1Lorsqu’un appareil CD/MD en option est
raccordé.
*2Si vous n’avez pas identifié le CD ou le disque
CD TEXT (“Identification d’un CD” à la page 13)
ou s’il n’y a pas de titre de disque préenregistré
sur le MD, l’indication “NO D.Name” apparaît
brièvement dans la fenêtre d’affichage.
3
Lorsque vous reproduisez un disque CD TEXT, le
*
nom de l’artiste apparaît dans la fenêtre
d’affichage après le titre du disque.
(Uniquement pour les disques CD TEXT incluant
le nom de l’artiste.)
4
Si une plage d’un disque CD TEXT ou d’un MD
*
n’a pas de titre préenregistré, l’indication “NO
T.Name” apparaît brièvement dans la fenêtre
d’affichage.
V
V
2
/Nom de l’artiste*
V
Titre de la plage*
3
4
10
Page 49

Après que vous avez sélectionné le paramètre
voulu, l’affichage revient automatiquement au
mode d’affichage défilant au bout de quelques
secondes.
En mode d’affichage défilant, toutes les
options défilent dans la fenêtre d’affichage un
par un dans l’ordre.
Remarque
Si vous utilisez des étiquettes personnalisées, elles
auront toujours priorité sur les informations CD
TEXT d’origine lorsque de telles informations sont
affichées.
Conseil
Le mode de défilement d’affichage peut être
désactivé. (Voir “Modification des réglages du son
et de l’affichage” à la page 26.)
Défilement automatique du titre
d’un disque — Défilement automatique
Si le titre du disque, le nom de l’artiste ou le
titre des plages d’un MD ou d’un disque CD
TEXT dépasse 10 caractères et si la fonction de
défilement automatique (Auto Scroll) est
activée, les informations défilent
automatiquement dans la fenêtre d’affichage
comme suit:
• Le nom du disque apparaît lorsque le disque a
changé (si le nom du disque est sélectionné
comme option d’affichage).
• Le nom de la plage apparaît lorsque la plage a
changé (si le nom de la plage est sélectionné
comme option d’affichage).
• Le nom du disque ou de la plage apparaît en
fonction du réglage lorsque vous appuyez sur
(SOURCE) pour sélectionner un MD ou un disque
CD TEXT.
Si vous appuyez sur (DSPL) pour changer le
paramètre affiché, le titre du disque ou de la
plage du disque CD TEXT ou MD défile
automatiquement, que la fonction soit activée
ou non.
1 En cours de lecture, appuyez sur (MENU).
2 Appuyez plusieurs fois sur
jusqu’à ce que “A.Scrl” apparaisse.
3 Appuyez sur
“A.Scrl on”.
,
pour sélectionner
M ou m
4 Appuyez sur (ENTER).
Remarque
Pour certains disques CD TEXT comptant beaucoup
de caractères, les cas suivants peuvent se présenter:
— Certains caractères ne sont pas affichés.
— Le défilement automatique est inopérant.
Localisation d’une plage
déterminée
— Détecteur automatique de musique
(AMS)
En cours de lecture, appuyez brièvement
sur
< ou ,
pour chaque plage que
vous désirez sauter.
< (.) :
Pour localiser
les plages
précédentes
DISC
SEEK SEEK
SOURCE
DISC
, (>) :
Pour localiser
les plages
suivantes
Localisation d’un passage
déterminé sur une plage
— Recherche manuelle
En cours de lecture, appuyez et
maintenez enfoncé
< ou ,
. Relâchez-le
lorsque vous avez localisé l’endroit
désiré.
DISC
< (m) :
Pour
chercher
vers l’arrière
Remarque
Si “
fenêtre d’affichage, vous avez atteint le début ou
la fin du disque et vous ne pouvez pas aller plus
loin.
SEEK SEEK
SOURCE
DISC
” ou “ ” apparaît dans la
, (M) :
Pour chercher
vers l’avant
Localisation d’un disque
— Sélection de disque
Lorsqu’un appareil CD/MD en option est
raccordé, appuyez sur
sélectionner le disque désiré.
M (DISC +) : Pour les disques suivants
SEEK SEEK
DISC
SOURCE
DISC
M ou m
pour
Pour désactiver la fonction de défilement
automatique, sélectionnez “A.Scrl off” à l’étape
3.
m (DISC –) : Pour les disques précédents
Le disque désiré dans l’appareil CD/MD en
option en cours entame la lecture.
11
Page 50

Lecture de plages répétée
— Lecture répétée
La lecture du CD de l’appareil principal se
répète automatiquement à la fin du disque.
Pour la lecture répétée, vous pouvez
sélectionner:
•Repeat 1 – pour répéter une plage.
•Repeat 2 – pour répéter un disque dans
l’appareil CD/MD en option.
1 Pendant la lecture, appuyez sur (MENU).
Lecture de plages dans un
ordre quelconque
— Lecture aléatoire
Vous pouvez sélectionner:
•Shuf 1 – pour reproduire les plages du
disque en cours dans un ordre aléatoire.
•Shuf 2 – pour lire les plages dans l’appareil
CD/MD en option dans un ordre aléatoire.
•Shuf all – pour lire toutes les plages dans les
appareils CD/MD en option dans un ordre
aléatoire.
2 Appuyez plusieurs fois sur M ou m
jusqu’à ce que “Repeat” apparaisse.
3 Appuyez plusieurs fois sur , jusqu’à ce
que le réglage désiré apparaisse dans la
fenêtre d’affichage.
B Repeat 1 B Repeat 2*
Repeat off b
* “Repeat 2” n’est disponible que lorsque vous
connectez un ou plusieurs lecteurs CD en
option, ou lorsque vous connectez les lecteurs
MD en option.
La lecture répétée démarre.
Pour revenir au mode de lecture normale,
sélectionnez “Repeat off” à l’étape 3.
Conseil
Si vous sélectionnez le mode à l’aide des touches
de l’appareil, appuyez plusieurs fois sur (1) (REP)
jusqu’à ce que le mode désiré apparaisse.
1 Pendant la lecture, appuyez sur (MENU).
2 Appuyez plusieurs fois sur M ou m
jusqu’à ce que “Shuf” apparaisse.
3 Appuyez plusieurs fois sur , jusqu’à ce
que le réglage désiré apparaisse dans la
fenêtre d’affichage.
B Shuf 1 B Shuf 2* B Shuf All*
Shuf off b
* “Shuf 2” et “Shuf all” ne sont disponibles que
lorsque vous connectez un ou plusieurs
lecteurs CD en option, ou lorsque vous
connectez les lecteurs MD en option.
La lecture aléatoire démarre.
Pour revenir au mode de lecture normale,
sélectionnez “Shuf off” à l’étape 3.
Conseil
Si vous sélectionnez le mode à l’aide des touches
de l’appareil, appuyez plusieurs fois sur (2) (SHUF)
jusqu’à ce que le mode désiré apparaisse.
12
Page 51

Identification d’un CD
—
Mémo de disque (Pour un appareil CD
doté de la fonction de fichier de
personnalisation)
Vous pouvez identifier chaque disque au
moyen d’un nom personnalisé. Vous pouvez
entrer jusqu’à huit caractères pour un disque.
Si vous identifiez un CD, vous pouvez localiser
le disque par nom (page 14) et sélectionner les
plages spécifiques pour la lecture (page 15).
1 Lancez la lecture du disque que vous
désirez identifier.
2 Appuyez sur (MENU), puis appuyez
plusieurs fois sur M ou m jusqu’à ce que
“Name Edit” apparaisse.
3 Appuyez sur (ENTER).
Mode d’édition de nom
3 Répétez les étapes 1 et 2 pour
introduire le titre en entier.
5 Pour revenir en mode de lecture CD
normal, appuyez sur (ENTER).
Conseils
• Pour supprimer ou corriger un titre, introduisez
” pour chaque caractère.
un “
• Il y a une autre méthode pour identifier un CD.
Maintenez enfoncé (LIST) pendant deux
secondes au lieu des étapes 2 et 3. Vous pouvez
également terminer l’opération en maintenant
enfoncé (LIST) pendant deux secondes au lieu
de l’étape 5.
Affichage du mémo de disque
Appuyez sur (DSPL) pendant la lecture
d’un CD ou d’un disque CD TEXT.
Chaque fois que vous appuyez sur la
touche (DSPL) en cours de lecture d’un CD
ou d’un disque CD TEXT, le paramètre
change selon la séquence suivante:
4 Introduisez les caractères.
1 Appuyez plusieurs fois sur M pour
sélectionner les caractères désirés.
(A t B t C t ··· Z t 0 t 1 t 2 t
··· 9 t + t – t * t / t \ t > t <
t . t )
Si vous appuyez plusieurs fois sur m, les
caractères apparaîtront dans l’ordre
inverse.
Si vous souhaitez insérer un espace
entre des caractères, sélectionnez
“ ”.
2 Appuyez sur , après avoir localisé le
caractère désiré.
Le caractère suivant se met à clignoter.
Si vous appuyez sur <, le caractère
précédent se met à clignoter.
V
1
Numéro de disque*
Temps de lecture écoulé
Nom du mémo de disque
Titre de la plage*
*1Lorsqu’un appareil CD en option est
raccordé.
*2Si vous raccordez une unité CD en option
doté de la fonction CD TEXT, les
informations CD TEXT apparaissent dans la
fenêtre d’affichage quand vous reproduisez
un disque CD TEXT.
Remarque
N’utilisez pas la fonction de fichier personnalisé
pendant que vous conduisez ou que vous effectuez
toute autre opération qui pourrait distraire votre
attention de la conduite.
/Numéro de plage/
V
V
2
13
Page 52

Suppression du mémo de disque
1 Appuyez plusieurs fois sur (SOURCE)
pour sélectionner le “CD.”
2 Appuyez plusieurs fois sur (MODE) pour
sélectionner le lecteur CD avec la
fonction de fichier personnalisé.
3 Appuyez sur (MENU), puis appuyez
plusieurs fois sur M ou m jusqu’à ce que
“Name Del” apparaisse.
4 Appuyez sur (ENTER).
5 Appuyez plusieurs fois sur M ou m pour
sélectionner le nom du disque que vous
désirez effacer.
6 Appuyez sur (ENTER) pendant deux
secondes.
Le titre est effacé.
Répétez les étapes 5 et 6 pour effacer
d’autres titres.
Localisation d’un disque
par son titre
— Répertoire (Pour un appareil CD doté de
la fonction de fichier de personnalisation ou
un appareil MD)
Cette fonction est opérante avec les disques
auxquels vous avez attribué un titre
personnalisé. Pour plus d’informations sur les
noms des mémos de disque, reportez-vous à
“Identification d’un CD” (page 13).
1 Appuyez sur (LIST).
Le titre attribué au disque en cours apparaît
dans la fenêtre d’affichage.
Lorsque vous assignez un nom de mémo de
disque à un disque CD TEXT, il a priorité
sur les informations CD TEXT d’origine.
7 Appuyez deux fois sur (MENU).
L’appareil revient en mode de lecture CD
normale.
Remarques
• Lorsque l’identification personnalisée est
supprimée, les informations CD TEXT d’origine
apparaîtront dans la fenêtre d’affichage.
• Lorsque vous effacez tous les noms de disques,
“No Data” apparaît à l’étape 6.
2 Appuyez plusieurs fois sur M (DISC +) ou
m (DISC –) jusqu’à ce que vous trouviez le
disque désiré.
3 Appuyez sur (ENTER) pour reproduire le
disque.
Remarques
• Les titres des plages ne s’affichent pas pendant la
lecture d’un disque CD TEXT ou d’un MD.
• S’il n’y a pas de disque dans le magasin,
l’indication “NO Disc” apparaît dans la fenêtre
d’affichage.
• Si un disque n’a pas été attribué à un fichier
personnalisé, l’indication “********” apparaît
dans la fenêtre d’affichage.
• Si les informations relatives au disque n’ont pas
encore été lues par l’appareil, l’indication “?”
apparaît dans la fenêtre d’affichage. Pour
exécuter le chargement, appuyez d’abord sur la
touche numérique et choisissez ensuite le disque
qui n’a pas été chargé.
• Certaines lettres ne peuvent être affichées
pendant la lecture d’un disque CD TEXT ou d’un
MD.
• Si un système de télévision en option est
raccordé, le nom du mémo de disque apparaît
sur l’écran du téléviseur mais pas dans la fenêtre
d’affichage de l’appareil.
14
Page 53

Sélection de plages
déterminées pour la
lecture
doté de la fonction de fichier de
personnalisation)
Si vous identifiez le disque, vous pouvez régler
l’appareil pour qu’il ignore ou reproduise les
plages de votre choix.
— Bloc (Pour un appareil CD
Lecture de plages déterminées
Vous pouvez sélectionner:
•“Bank on” — pour reproduire les plages avec
le réglage “Play”.
•“Bank inv” (Inverse) — pour reproduire les
plages avec le réglage “Skip”.
1 En cours de lecture, appuyez sur (MENU),
puis appuyez plusieurs fois de suite sur
M ou m jusqu’à ce que l’indication “Bank”
apparaisse.
1 Lancez la lecture du disque que vous
désirez identifier.
2 Appuyez sur (MENU), puis appuyez
plusieurs fois sur M ou m jusqu’à ce que
“Bank Sel” apparaisse.
3 Appuyez sur (ENTER).
Mode de lecture de bloc
4 Identifiez les plages.
1 Appuyez plusieurs fois sur < ou ,
pour sélectionner la plage que vous
désirez identifier.
2 Appuyez plusieurs fois sur (ENTER)
pour sélectionner “Play” ou “Skip”.
5 Répétez l’étape 4 pour choisir “Play” ou
“Skip” pour toutes les plages.
6 Appuyez deux fois sur (MENU).
L’appareil revient au mode de lecture CD
normale.
Remarques
• Vous pouvez régler “Play” ou “Skip” pour un
maximum de 24 plages.
• Vous ne pouvez pas régler “Skip” pour toutes les
plages d’un CD.
2 Appuyez plusieurs fois sur , jusqu’à ce
que le réglage désiré apparaisse.
B Bank on B Bank inv
Bank off b
3 Appuyez sur (ENTER).
La lecture démarre à partir de la plage
suivant la plage en cours.
Pour revenir au mode de lecture normale,
sélectionnez “Bank off” à l’étape 2.
15
Page 54

Radio
Mémorisation
automatique des stations
— Mémorisation du meilleur accord (BTM)
L’appareil sélectionne les stations de radio
émettant avec le signal le plus puissant et les
mémorise dans l’ordre de leur fréquence. Vous
pouvez mémoriser jusqu’à 6 stations dans
chaque bande (FM1, FM2, FM3, AM1 et AM2).
Attention
Pour syntoniser des stations pendant que vous
conduisez, nous vous conseillons d’utiliser la
fonction de mémorisation du meilleur accord
(BTM) de façon à éviter les accidents.
1 Appuyez plusieurs fois sur (SOURCE)
pour sélectionner le syntoniseur.
Chaque fois que vous appuyez sur
(SOURCE), la source change comme suit:
B Syntoniseur B CD B MD* B TV*
* Si l’équipement correspondant en option
n’est pas raccordé, le paramètre n’apparaîtra
pas.
Remarques
• L’appareil ne mémorise pas les stations émettant
avec de faibles signaux. Si seulement quelques
stations sont captables, certaines touches
numériques conserveront leur réglage préalable.
• Si un numéro est indiqué dans la fenêtre
d’affichage, l’appareil commence la
mémorisation des stations à partir de la station
affichée.
• S’il n’y a pas de CD dans l’appareil, seule la
bande du syntoniseur apparaît, même si vous
appuyez sur (SOURCE).
Mémorisation de stations
déterminées
Vous pouvez présélectionner jusqu’à 18
stations FM (6 sous FM1, FM2 et FM3), 12
stations AM (6 sous AM1 et AM2) dans l’ordre
de votre choix.
1 Appuyez plusieurs fois sur (SOURCE)
pour sélectionner le syntoniseur.
2 Appuyez plusieurs fois sur (MODE) pour
sélectionner la bande de féquence.
3 Appuyez sur . ou sur > de
l’appareil pour syntoniser la station que
vous désirez sauvegarder sous la touche
numérique.
2 Appuyez plusieurs fois sur (MODE) pour
sélectionner la bande de fréquence.
Chaque fois que vous appuyez sur
(MODE), la bande change comme suit:
B FM1 B FM2 B FM3
AM2 b AM1 b
3 Appuyez sur (MENU), puis appuyez
plusieurs fois sur M ou m jusqu’à ce que
“BTM” apparaisse.
4 Appuyez sur (ENTER).
L’appareil mémorise les stations sous les
touches numériques dans l’ordre de leur
fréquence.
Un bip retentit lorsque le réglage est
mémorisé.
16
4 Appuyez sur la touche numérique
désirée ((1) à (6)) de l’appareil jusqu’à
ce que “MEM” apparaisse.
Le numéro de la touche numérique de
présélection apparaît dans la fenêtre
d’affichage.
Remarque
Si vous essayez de mémoriser une autre station
sous une touche numérique déjà utilisée, la station
précédemment mémorisée est supprimée.
Page 55

Réception des stations
présélectionnées
1 Appuyez plusieurs fois de suite sur
(SOURCE) pour sélectionner le
syntoniseur.
2 Appuyez plusieurs fois sur (MODE) pour
sélectionner la bande de fréquence.
Si la réception FM est médiocre
— Mode monaural
1 En cours de réception radio, appuyez sur
(MENU), puis appuyez plusieurs fois de
suite sur M ou m jusqu’à ce que
l’indication “Mono” apparaisse.
2 Appuyez sur , jusqu’à ce que “Mono
on” apparaisse.
La qualité sonore s’améliore, mais le son
devient monaural (“ST” disparaît).
3 Appuyez plusieurs fois sur
M (présélection vers le haut) ou
m (présélection vers le bas) pour capter
les stations dans l’ordre de leur
mémorisation.
Conseil
Si vous choisissez de mémoriser la station à l’aide
des touches de l’appareil, appuyez sur la touche
numérique ((1) à (6)) sous laquelle la station
désirée est sauvegardée.
Si vous ne parvenez pas à
syntoniser une station
présélectionnée
Appuyez sur < ou , pour rechercher la
station (syntonisation automatique).
Le balayage s’arrête lorsque l’appareil capte
une station. Appuyez plusieurs fois sur
< ou , jusqu’à ce que la station désirée
est captée.
Remarque
Si la syntonisation automatique s’arrête trop
fréquemment, appuyez sur (MENU), puis appuyez
plusieurs fois sur M ou m jusqu’à ce que “Local”
(mode de recherche locale) s’affiche. Ensuite,
appuyez sur , pour sélectionner “Local on”.
Appuyez sur (ENTER).
Seules les stations dont les signaux sont
suffisamment puissants seront accordées.
Conseils
• Lorsque vous sélectionnez le réglage “Local on”,
“LCL Seek” apparaît pendant que l’appareil
recherche une station.
• Si vous connaissez la fréquence de la station que
vous désirez écouter, appuyez et maintenez
enfoncé < ou , jusqu’à ce que la fréquence
désirée apparaisse (syntonisation manuelle).
3 Appuyez sur (ENTER).
Pour revenir en mode de lecture normale,
sélectionnez “Mono off” à l’étape 2.
Si la réception FM stéréo devient
monaurale
Si des interférences se produisent, la fonction
“IF Auto” de cet appareil élimine
automatiquement les parasites et rétrécit la
fréquence de réception. En pareil cas, certaines
retransmissions FM stéréo peuvent devenir
monaurales. Si vous préférez écouter de telles
émissions en stéréo, commutez manuellement
le réglage “Wide”.
1 En cours de réception radio, appuyez sur
(MENU), puis appuyez plusieurs fois de
suite sur M ou m jusqu’à ce que
l’indication “IF Auto” apparaisse.
2 Appuyez sur , jusqu’à ce que “Wide”
apparaisse.
3 Appuyez sur (ENTER).
Remarque
Lorsque vous élargissez le réglage de la fréquence
de réception du signal (mode “Wide”), des
interférences peuvent se produire.
17
Page 56

Mémorisation de noms de
stations — Mémorisation des stations
Vous pouvez attribuer un nom à chaque
station de radio et l’enregistrer dans la
mémoire. Le nom de la station syntonisée
apparaît dans la fenêtre d’affichage. Vous
pouvez introduire jusqu’à huit caractères par
station.
Enregistrement de noms de stations
1 Syntonisez une station dont vous
souhaitez mémoriser le nom.
2 Appuyez sur (MENU), puis appuyez
plusieurs fois sur M ou m jusqu’à ce que
“Name edit” apparaisse.
5 Pour revenir au mode de réception radio
normal, appuyez sur (ENTER).
Conseils
• Pour supprimer ou corriger un nom, sélectionnez
un “ ” (tiret inférieur) pour chacun des
caractères.
• Il y a une autre méthode pour sauvegarder les
noms des stations. Maintenez enfoncé (LIST)
pendant deux secondes au lieu des étapes 2 et 3.
Vous pouvez également terminer l’opération en
maintenant enfoncé (LIST) pendant deux
secondes au lieu de l’étape 5.
Affichage du nom de la station
Appuyez sur (DSPL) pendant la
réception radio.
3 Appuyez sur (ENTER).
4 Introduisez les caractères.
1 Appuyez plusieurs fois sur M pour
sélectionner les caractères désirés.
(A t B t C t ··· Z t 0 t 1 t 2 t
··· 9 t + t – t * t / t \ t > t <
t . t )
Si vous appuyez plusieurs fois sur m, les
caractères apparaissent dans l’ordre
inverse.
Si vous souhaitez insérer un espace
entre des caractères, sélectionnez “ ”.
2 Appuyez sur , après avoir localisé le
caractère désiré.
Le caractère suivant se met à clignoter.
Chaque fois que vous appuyez sur (DSPL),
l’affichage change selon la séquence
suivante:
Nom de la station* Fréquence
BB
* Si le nom de la station n’a été enregistré,
l’indication “NO Name” apparaît pendant
une seconde dans la fenêtre d’affichage.
Suppression des noms de station
1 Syntonisez la station dont vous voulez
supprimer le nom.
2 Appuyez sur (MENU), puis appuyez
plusieurs fois sur M ou m jusqu’à ce que
“Name Del” apparaisse.
3 Appuyez sur (ENTER).
4 Appuyez sur M ou m pour sélectionner le
nom de la station que vous voulez
effacer.
5 Appuyez sur (ENTER) pendant deux
secondes.
Le titre est effacé.
Répétez les étapes 1 à 4 si vous désirez
effacer d’autres noms.
Si vous appuyez sur <, le caractère
précédent se met à clignoter.
3 Répétez les étapes 1 et 2 pour
introduire le titre en entier.
18
6 Appuyez deux fois sur (MENU).
L’appareil revient en mode de réception
radio normal.
Remarque
Lorsque vous effacez tous les noms de stations,
“NO Data” apparaît à l’étape 5.
Page 57

Localisation d’une station
par son nom — Répertoire
1 Appuyez brièvement sur (LIST).
Le nom assigné à la station actuellement
accordée apparaît dans la fenêtre
d’affichage.
DSP (CDX-M750 seulement)
Réglage de l’égaliseur
Vous pouvez sélectionner une courbe
d’égalisation pour cinq genres musicaux
(Rock, Vocal, Groove, Techno et Custom).
Vous pouvez mémoriser et ajuster la fréquence
et le niveau des réglages de l’égaliseur.
2 Appuyez plusieurs fois sur M ou m
jusqu’à ce que vous trouviez la station
voulue.
Lorsqu’aucun nom n’est assigné à la station
sélectionnée, la fréquence apparaît dans la
fenêtre d’affichage.
3 Appuyez sur (ENTER) pour syntoniser la
station voulue.
Remarque
Lorsque vous raccordez un syntoniseur TV,
l’indication de liste n’apparaîtra pas dans la
fenêtre d’affichage de l’appareil.
Sélection d’une courbe
d’égalisation
1 Appuyez sur (SOURCE) pour sélectionner
une source (radio, CD ou MD).
2 Appuyez plusieurs fois de suite sur
(SOUND) jusqu’à ce que l’indication “EQ”
apparaisse.
3 Appuyez plusieurs fois sur < ou ,
pour sélectionner la courbe d’égalisation
voulue.
Rock y Vocal y Groove y Techno y
Custom y off
Pour annuler l’effet d’égalisation,
sélectionnez “off”. Au bout de trois
secondes, la fenêtre d’affichage revient au
mode de lecture normal.
19
Page 58

Réglage de la courbe d’égalisation
1 Appuyez sur (MENU).
2 Appuyez plusieurs fois de suite sur M ou
m jusqu’à ce que l’indication “EQ Tune”
apparaisse.
3 Appuyez sur (ENTER).
4 Appuyez plusieurs fois sur < ou ,
pour sélectionner la courbe d’égalisation
voulue.
Rock y Vocal y Groove y Techno y
Custom y off
5 Appuyez sur (ENTER).
6 Appuyez sur < ou , pour sélectionner
la fréquence voulue.
62 Hz y 157 Hz y 396 Hz y 1,0 kHz y
2,5 kHz y 6,3 kHz y 16,0 kHz
7 Appuyez sur M ou m pour sélectionner le
niveau voulu.
Le volume est réglable par incréments de 1
dB dans une plage comprise entre –12 dB et
+12 dB.
Pour restaurer la courbe d’égalisation par
défaut, appuyez sur (ENTER) pendant
deux secondes.
Sélection de la position
d’écoute
Vous pouvez définir le retard avec lequel le
son diffusé par les haut-parleurs atteint les
auditeurs.
De cette façon, l’appareil peut simuler un
champ sonore naturel de telle sorte que vous
avez l’impression de vous trouver au centre du
champ sonore, où que vous soyez assis dans la
voiture.
Fenêtre
d’affichage
POS
All
21
POS
Front
POS
3
Front-R
POS
Front-L
POS
Rear
POS
off
1 Appuyez sur (SOURCE) pour sélectionner
une source (radio, CD ou MD).
2 Appuyez brièvement sur (SOUND)
jusqu’à ce que l’indication “POS”
apparaisse.
Centre du champ
sonore
Réglage normal
(1 + 2 + 3)
Avant de l’habitacle
(1 + 2)
Avant droit (2)
Avant gauche (1)
Arrière de
l’habitacle (3)
Annuler
8 Appuyez deux fois sur (MENU).
Lorsque vous avez terminé le réglage de
l’effet, le mode de lecture normale apparaît.
20
3 Appuyez plusieurs fois sur < ou ,
pour sélectionner la position d’écoute
voulue.
All y Front y Front-R y Front-L y Rear y
off
Les positions d’écoute apparaissent dans
l’ordre indiqué ci-dessus.
Pour désactiver le mode POS, sélectionnez
“off”.
Après trois secondes, la fenêtre d’affichage
revient en mode d’affichage normal.
Page 59

Sélection d’un menu de
niveau sonore
— Dynamic Soundstage Organizer (DSO)
Si vos haut-parleurs sont installés dans la
partie inférieure des portières, le son est
diffusé par le bas et risque de ce fait de ne pas
être très clair.
La fonction DSO (Dynamic Soundstage
Organizer) crée davantage un son d’ambiance
comme s’il y avait des haut-parleurs installés
dans le tableau de bord (haut-parleurs
virtuels).
Menu de niveau sonore
Signification des présélections mémorisées
DSO 1 – 3 Haut-parleurs virtuels
(standard)
DSO Wide Haut-parleurs virtuels
(élargi)
DSO off Annuler
Réglage de la balance
(BAL)
Vous pouvez ajuster la balance sonore entre les
haut-parleurs gauche et droit.
1 Appuyez sur (SOURCE) pour sélectionner
une source (radio, CD ou MD).
2 Appuyez plusieurs fois de suite sur
(SOUND) jusqu’à ce que l’indication
“BAL” apparaisse.
3 Appuyez sur < ou , pour ajuster la
balance.
Après trois secondes, la fenêtre d’affichage
revient en mode d’affichage normal.
Image des haut-parleurs virtuels
2
*
3
*
*1Standard
2
Large
*
3
Position des haut-parleurs (partie inférieure des
*
portières avant)
1
*
1
*
2
*
3
*
Sélection d’un DSO
1 Appuyez sur (SOURCE) pour sélectionner
une source (radio, CD ou MD).
2 Appuyez plusieurs fois sur (DSO) pour
sélectionner le mode DSO voulu.
B 1 B 2 B 3 B Wide
off b
Pour désactiver le mode DSO, sélectionnez
“off”.
Après trois secondes, la fenêtre d’affichage
revient en mode d’affichage normal.
Réglage de la balance
avant/arrière
1 Appuyez sur (SOURCE) pour sélectionner
une source (radio, CD ou MD).
2 Appuyez plusieurs fois de suite sur
(SOUND) jusqu’à ce que l’indication “F”
pour les haut-parleurs avant ou “R” pour
les haut-parleurs arrière apparaisse.
3 Appuyez sur < ou , pour ajuster le
volume des haut-parleurs avant/arrière.
Après trois secondes, la fenêtre d’affichage
revient en mode d’affichage normal.
21
Page 60

Réglage de la fréquence de
coupure et du niveau du volume de
sortie pour les haut-parleurs avant/
arrière
Pour faire correspondre les caractéristiques du
système de haut-parleurs installé, vous pouvez
régler le niveau du volume de sortie et la
fréquence de coupure des haut-parleurs.
Fréquence de coupure
Niveau
Fréquence (Hz)
1 Appuyez sur (MENU).
2 Appuyez plusieurs fois de suite sur
M ou m pour sélectionner “Front HPF” ou
“Rear HPF”.
3 Appuyez sur (ENTER).
4 Appuyez sur < ou , pour sélectionner
la fréquence de coupure.
off y 78 Hz y 99 Hz y 125 Hz y 157 Hz y
198 Hz
5 Appuyez sur M ou m pour régler le
niveau du volume.
Le volume est réglable par incréments de 1
dB dans une plage comprise entre –12 dB et
+12 dB.
Conseil
Si vous baissez complètement le volume,
l’indication “ATT” apparaît et la fréquence de
coupure est désactivée.
Réglage du volume des
haut-parleurs d’extrêmes
graves
1 Appuyez sur (SOURCE) pour sélectionner
une source (radio, CD ou MD).
2 Appuyez plusieurs fois de suite sur
(SOUND) jusqu’à ce que l’indication
“SUB” apparaisse.
3 Appuyez sur < ou , pour régler le
niveau du volume.
Après trois secondes, la fenêtre d’affichage
revient en mode d’affichage normal.
Conseil
Lorsque vous appuyez plusieurs fois sur (VOL)
pour couper le volume, “Sub ATT” apparaît et la
fréquence de coupure du haut-parleur d’extrême
grave est désactivée.
Réglage de la fréquence des hautparleurs d’extrêmes graves
Suivant les spécifications des haut-parleurs
d’extrêmes graves raccordés, vous pouvez
supprimer les signaux de haute et de moyenne
fréquences transmis aux haut-parleurs
d’extrêmes graves. Si vous activez la fréquence
de coupure (voir diagramme ci-dessous), les
haut-parleurs d’extrêmes graves ne
transmettront que des signaux de basse
fréquence de façon à obtenir une image sonore
plus claire.
Fréquence de coupure
Niveau
6 Appuyez deux fois sur (MENU).
Lorsque vous avez terminé le réglage de
l’effet, le mode de lecture normale apparaît.
22
Fréquence (Hz)
1 Appuyez sur (MENU).
2 Appuyez plusieurs fois de suite sur M ou
m jusqu’à ce que l’indication “SUB LPF”
apparaisse.
Page 61

3 Appuyez sur (ENTER).
4 Appuyez sur < ou , pour sélectionner
la fréquence de coupure voulue.
La fréquence de coupure dans la fenêtre
d’affichage change comme suit :
62 y 78 y 99 y 125 y 157 y off
5 Appuyez sur M ou m pour régler le
volume.
6 Appuyez deux fois sur (MENU).
Lorsque vous avez terminé le réglage de la
fréquence, l’affichage revient au mode de
lecture normale.
Ecoute de chaque source
programme avec le DSO
enregistré
— Source Sound Memory (SSM)
Chaque fois que vous revenez à la même
source, vous pouvez écouter le son avec le
même menu DSO et la même courbe
d’égalisation enregistrés pour cette source
même après avoir changé de source
programme ou mis l’appareil hors et puis de
nouveau sous tension.
Autres fonctions
Vous pouvez commander l’appareil au moyen
d’un satellite de commande (en option).
Etiquetage du satellite de
commande
Suivant la position de montage du satellite de
commande, apposez les étiquettes appropriées
comme indiqué dans l’illustration ci-dessous.
SOUND
MODE
DSPL
DSPL
MODE
SOUND
23
Page 62

Utilisation du satellite de
commande
Le satellite de commande fonctionne en
appuyant sur les touches et/ou en tournant les
commandes du satellite.
Vous pouvez également commander un
appareil CD/MD en option au moyen d’un
satellite de commande.
En appuyant sur une touche
(les touches SOURCE et MODE)
(SOURCE)
(MODE)
En faisant tourner la commande
(la commande SEEK/AMS)
Faites tourner brièvement le satellite et
relâchez-le pour:
•Localiser une plage spécifique sur un
disque. Tournez et maintenez la
commande jusqu’à ce que vous ayez
localisé l’endroit spécifique d’une plage,
ensuite relâchez-la pour entamer la
lecture.
•Syntoniser automatiquement les stations
de radio. Faites tourner et maintenez le
satellite pour trouver une station
spécifique.
Chaque fois que vous appuyez sur
(SOURCE), la source change selon la
séquence suivante:
Syntoniseur t CD t MD* t TV*
* Si l’appareil en option correspondant n’est
pas connecté, ces élément n’apparaîtront pas.
Une pression sur (MODE) change les
paramètres comme suit:
• Syntoniseur: FM1 t FM2 t FM3 t AM1 t
AM2
• Unité CD: CD1 t CD2 t …
• Unité MD*: MD1 t MD2 t …
• Télévision/Vidéo*: TV1 t TV2 t AUX
* Si l’équipement en option correspondant
n’est pas raccordé, le paramètre n’apparaîtra
pas.
En enfonçant et en faisant tourner
la commande
(la commande PRESET/DISC)
Appuyez et tournez la commande pour:
•Recevoir les stations mémorisées sur les
touches de présélection.
•Changer le disque.
24
Page 63

Autres opérations
Faites tourner la commande
VOL pour régler le volume.
Appuyez sur (DSPL) pour
afficher les titres mémorisés.
Conseil
Si votre voiture n’est pas équipée d’une position
ACC (accessoire) au niveau du barillet de contact,
veillez à appuyer sur (OFF) de l’appareil pendant
deux secondes pour désactiver l’affichage de
l’horloge après avoir coupé le moteur.
Appuyez sur
(ATT) pour
couper le son.
OFF
Appuyez sur (OFF)
pour éteindre
l’appareil.
Appuyez sur (SOUND)
pour régler le menu
audio.
Modification du sens de
fonctionnement
Le sens de fonctionnement des commandes est
réglé en usine comme illustré ci-dessous.
Pour augmenter
Pour diminuer
Si vous devez monter le satellite de commande
du côté droit de la colonne de direction, vous
pouvez inverser le sens de fonctionnement des
commandes.
Appuyez sur (SOUND) pendant deux
secondes tout en maintenant la
commande VOL enfoncée.
Conseil
Vous pouvez également modifier le sens de
fonctionnement de ces commandes au moyen de
l’appareil (voir “Modification des réglages du son
et de l’affichage” à la page 26).
25
Page 64

Réglage des
caractéristiques du son
Modification des réglages
du son et de l’affichage
Vous pouvez régler les graves, les aiguës ainsi
que la balance gauche-droite et la balance
avant-arrière.
Vous pouvez enregistrer les niveaux de graves
et d’aiguës indépendamment pour chaque
source.
1 Sélectionnez le paramètre que vous
voulez régler en appuyant plusieurs fois
de suite sur (SOUND).
Chaque fois que vous appuyez sur
(SOUND), les paramètres changent selon la
séquence suivante:
CDX-M750:
EQ (égaliseur) t POS (position d’écoute) t
BAL (balance gauche-droite) t F (avant) t
R (arrière) t SUB (haut-parleur d’extrême
grave)
CDX-M650/M600:
BAS (graves) t TRE (aiguës) t BAL (balance
gauche-droite) t FAD (balance avant-arrière)
t SUB (haut-parleur d’extrêmes-graves)
2 Réglez l’option sélectionnée en appuyant
sur < ou ,.
Lors du réglage à l’aide du satellite de
commande, appuyez sur (SOUND) et faites
tourner la commande VOL.
Remarque
Effectuez ce réglage dans les trois secondes après
avoir sélectionné le paramètre.
Coupure du son
Appuyez sur (ATT) de la télécommande
à carte ou sur le satellite de commande.
“ATT on” apparaît brièvement.
Pour restaurer le niveau précédent du volume,
appuyez à nouveau sur (ATT).
Les options suivantes peuvent être réglées:
Set (Réglage)
•Clock (page 9)
•Beep — pour activer ou désactiver le bip
sonore.
•RM (satellite de commande) — pour inverser
le sens de fonctionnement des commandes
du satellite en option.
— Sélectionnez “norm” pour utiliser le
satellite de commande dans la position
définie par défaut.
— Sélectionnez “rev” si vous montez le
satellite de commande du côté droit de la
colonne de direction.
•English/French/Spanish — pour commuter
l’affichage en anglais, en français ou en
espagnol.
Dis (Affichage)
•D.Info (double information) — pour afficher
simultanément l’horloge et le mode de
lecture (on) ou pour afficher ces informations
alternativement (off).
•SA (analyseur de spectre) — pour changer le
mode d’affichage de la fenêtre d’affichage de
l’égaliseur (page 28).
•Dimmer (gradateur) — pour régler l’intensité
lumineuse de l’affichage (lorsque le câble
d’illumination est connecté).
— Sélectionnez “Auto” pour atténuer
l’intensité lumineuse de la fenêtre
d’affichage uniquement lorsque les phares
sont allumés.
— Sélectionnez “on” pour foncer l’affichage.
— Sélectionnez “off” pour désactiver le
gradateur d’intensité lumineuse.
•Contrast — pour régler le contraste si les
indications de la fenêtre d’affichage ne sont
pas visibles en reison de la position
d’installation de l’appareil.
•M.Dspl (Défilement d’affichage) — pour
activer/désactiver le défilement de l’affichage.
•A.Scrl (défilement automatique) (page 11)
Conseil
Lorsque le câble d’interface d’un téléphone de
voiture est raccordé au fil ATT, l’appareil diminue
le volume automatiquement lorsqu’un appel
téléphonique entre (fonction Telephone ATT).
26
Page 65

Snd (Son)
•EQ Tune*1 (syntonisation d’égaliseur) —
pour ajuster le niveau de fréquence et de
volume de la courbe d’égalisation.
•Front HPF*1 (filtre passe-haut pour la
présortie frontale) — pour sélectionner la
fréquence de coupure de la présortie avant.
•Rear HPF*1 (filtre passe-haut pour la
présortie arrière) — pour sélectionner la
fréquence de coupure de la présortie arrière.
•SUB LPF*1 (filtre passe-bas pour la sortie du
haut-parleur d’extrêmes graves) — pour
sélectionner la fréquence de coupure de la
sortie de haut-parleur d’extrêmes graves.
•HPF*2*3 (filtre passe-haut pour la présortie)
— pour sélectionner la fréquence de coupure
de la présortie.
•LPF*2*3 (filtre passe-bas pour la sortie du
haut-parleur d’extrêmes-graves) — pour
sélectionner la fréquence de coupure de la
sortie du haut-parleur d’extrêmes-graves.
•Loud (correction physiologique)*2 — pour
exploiter les graves même à faible volume.
Les fréquences graves seront accentuées.
*1 CDX-M750 seulement
2
CDX-M650 seulement
*
3
*
CDX-M600 seulement
1 Appuyez sur (MENU).
2 Appuyez plusieurs fois sur M ou m
jusqu’à ce que l’option désirée
apparaisse.
Chaque fois que vous appuyez sur m,
l’option change comme suit:
Exemple
Clock t Beep t RM t English/French/
Spanish t D.Info t SA t Dimmer t
Contrast t M.Dspl t A.Scrl*
Front HPF*2 t Rear HPF*2 t Sub LPF*2 t
3*4
t LPF*3*4 t Loud*
HPF*
*1Lorsqu’aucun CD ou MD n’est en cours de
lecture, ce paramètre n’apparaît pas.
*2CDX-M750 seulement
3
CDX-M650 seulement
*
4
*
CDX-M600 seulement
Remarque
Le paramètre affiché changera en fonction de
la source.
Conseil
Vous pouvez aisément commuter les catégories
(“Set”‚ “Snd,” “Snd” (son) et “Dis”) en
appuyant sur M ou m pendant deux secondes.
1
t EQ Tune*2 t
4
3 Appuyez sur , pour sélectionner le
réglage voulu (exemple : on ou off) ou
appuyez plusieurs fois de suite sur
< ou , pour sélectionner la fréquence
(exemple : coupure, 78 Hz ou 125 Hz).
Pour le réglage de “Contrast”, appuyez sur
la touche , pour accentuer le contraste et
sur la touche < pour l’atténuer.
4 Appuyez sur (ENTER).
Une fois que le réglage de mode est
terminé, la fenêtre d’affichage revient au
mode de lecture normale.
Renforcement des graves
— D-bass (CDX-M600 seulement)
Vous pouvez exploiter des graves puissantes et
sonores.
La fonction D-bass renforce les signaux de
basse et haute fréquence suivant une courbe
plus précise que les systèmes classiques de
renforcement des graves.
Vous pouvez profiter de graves plus
cristallines même si le volume des voix reste
identique. Vous pouvez accentuer et régler les
graves simplement à l’aide de la touche
D-BASS.
D-BASS 3
D-BASS 2
Niveau
0dB
D-BASS 1
Fréquence (Hz)
Réglage de la courbe des graves
Appuyez plusieurs fois de suite sur
(D-BASS) pour sélectionner la courbe des
graves voulue.
L’effet s’intensifie à mesure que la valeur
D-BASS augmente.
D-BASS 1 t D-BASS 2 t D-BASS 3 t D-BASS off
Remarque
Les graves peuvent être distordues au même
volume. Si les graves sont distordues, sélectionnez
une courbe de graves moins efficace.
D-BASS 3
D-BASS 2
D-BASS 1
27
Page 66

Sélection de l’analyseur
de spectre
Le niveau du signal audio est affiché sur un
analyseur de spectre. Vous pouvez
sélectionner un mode d’affichage de 1 à 6 ou le
mode d’affichage automatique.
1 Appuyez sur (SOURCE) pour
sélectionner une source (syntoniseur, CD
ou MD).
2 Appuyez sur (MENU).
3 Appuyez plusieurs fois de suite sur M ou
m jusqu’à ce que l’indication “SA”
apparaisse.
4 Appuyez plusieurs fois sur < ou ,
pour sélectionner le réglage voulu.
B SA 1 bB … SA 6 b
B SA Auto* bB SA off b
* Tous ces modes apparaissent automatiquement
les uns après les autres.
Réglage du son et de la
fréquence du
préamplificateur égaliseur
(CDX-M650 seulement)
Cet appareil peut également commander un
préamplificateur égaliseur en option.
Cela vous permet d’ajouter des effets au
champ sonore de la source sélectionnée.
Pour plus de détails, reportez-vous au mode
d’emploi qui accompagne votre
préamplificateur égaliseur.
5 Appuyez sur (ENTER).
28
Page 67

Avec un appareil en option
Appareils optionnels
Télévision/Vidéo
Vous pouvez raccorder un syntoniseur et un
moniteur du téléviseur en option à cet
appareil.
Regarder la télévision
1 Appuyez plusieurs fois de suite sur
(SOURCE) jusqu’à ce que l’indication
“TV” apparaisse.
2 Appuyez plusieurs fois sur (MODE) pour
sélectionner la bande de télévision désirée.
Mémorisation
automatique des chaînes
de télévision
L’appareil sélectionne les chaînes de télévision
émettant avec les signaux les plus puissants et
les mémorise dans l’ordre de leur fréquence.
Attention
Pour syntoniser des stations pendant que vous
conduisez, nous vous conseillons d’utiliser la
fonction de mémorisation du meilleur accord
(BTM) de façon à éviter les accidents.
1 Appuyez plusieurs fois de suite sur
(SOURCE) jusqu’à ce que l’indication
“TV” apparaisse.
2 Appuyez sur (MENU), puis appuyez
plusieurs fois sur M ou m jusqu’à ce que
“Auto Mem” apparaisse.
Regarder une source vidéo
1 Appuyez plusieurs fois de suite sur
(SOURCE) jusqu’à ce que l’indication
“TV” apparaisse.
2 Appuyez plusieurs fois de suite sur
(MODE) pour sélectionner “AUX”.
Démarrez la lecture de la source vidéo.
Remarques
• L’indication “AUX 2” apparaît si la borne VIDEO
2 du moniteur de téléviseur est sélectionnée.
• L’indication passe automatiquement à “AUX 1”
peu après que “AUX” s’est affiché.
3 Appuyez sur (ENTER).
L’appareil mémorise les chaînes de
télévision dans l’ordre de leur fréquence
sous les touches numériques.
La mémorisation du réglage est confirmée
par un bip sonore.
Remarques
• L’appareil ne mémorise pas les chaînes émettant
avec un faible signal. Si seules quelques chaînes
de télévision sont captables, certaines touches
numériques resteront inemployées.
• Si un numéro de présélection est indiqué dans
l’affichage, l’appareil entame la mémorisation
des chaînes de télévision à partir de celle qui est
affichée.
29
Page 68

Mémorisation de chaînes
de télévision particulières
Mémorisation des noms
des chaînes de télévision
Vous pouvez mémoriser jusqu’a 12 canaux (6
pour TV1 et TV2) sous les touches numériques
dans l’ordre de votre choix.
1 Appuyez plusieurs fois de suite sur
(SOURCE) jusqu’à ce que l’indication
“TV” apparaisse.
2 Appuyez sur < ou , pour syntoniser la
chaîne de télévision que vous désirez
sauvegarder sous chaque touche
numérique.
3 Maintenez la touche numérique ((1) à
(6)) de l’appareil enfoncée jusqu’à ce
que vous entendiez un bip sonore.
L’indication de la touche numérique et
“Mem” apparaissent dans la fenêtre
d’affichage.
Remarque
Si vous essayez de mémoriser une autre chaîne
sous une touche numérique déjà occupée, la
chaîne précédemment mémorisée est effacée.
Exécutez la procédure de “Mémorisation
de noms de stations” (page 18).
Affichage des noms des stations de
télévision ou de radio
Appuyez sur (LIST) en cours de réception
télévisée ou radio.
Exemple: Réception de la bande FM1
FM
1
1
W
C
B
W
B
L
W
K
T
WR K I
1
0
1
0
S
S
U
S
S
.9
1
.7
2
2
3
4
5
6
1 Numéros de présélection
2 Noms des stations présélectionnées
3 Fréquences*
* Si aucun nom n’a été mémorisé pour une
station donnée, c’est la fréquence de cette
station qui apparaît dans l’affichage.
Remarques
• Il peut falloir un certain temps avant que toutes
les indications apparaissent dans la fenêtre
d’affichage.
• La chaîne de télévision n’apparaît pas pendant
que la liste est affichée.
• Le contenu de la mémoire de présélections ne
peut être affiché lorsque l’appareil se trouve en
mode de lecture simultanée (page 31).
30
Désactivation de l’affichage
En cours de réception radio, appuyez à
nouveau sur (LIST).
En cours de réception télévisée, l’affichage
de la liste sur le moniteur de télévision est
automatiquement désactivé au bout de
quelques secondes.
Page 69

Affichage des
informations mémorisées
sur les disques
Appuyez sur (LIST) en cours de lecture
CD/MD.
Exemple: Si l’unité CD 1 est sélectionnée.
CD 1
1
S
C
H
U
B
E
Z
A
C
H
I
S
Z
O
P
*****
?
?
2
RT
R
T
T
I
N
1
2
M
O
3
B
A
4
L
5
C
H
6
7
*
8
******
9
1 0
1 Numéros des disques
2 Titres mémorisés comme fichiers personnalisés
3 Ne contient pas de disque*
4 Aucun titre mémorisé*
5 Table des matières en cours d’identification*
*1Un espace blanc affiché à côté d’un numéro
de disque représente un logement vide dans
le magasin à disques.
2
Si aucun titre n’a été enregistré dans le
*
fichier personnalisé, l’indication “******”
s’affiche.
3
Si les informations de disque n’ont pas
*
encore été lues par l’appareil, “?” s’affiche.
Remarques
• Il peut falloir un certain temps avant que toutes
les indications apparaissent dans la fenêtre
d’affichage.
• La chaîne de télévision n’apparaît pas pendant
que la liste est affichée.
• Le contenu de la mémoire de présélections ne
peut être affiché lorsque l’appareil se trouve en
mode de lecture simultanée.
Désactivation de l’affichage
Appuyez à nouveau sur (LIST).
Regarder la télévision ou
une source vidéo tout en
écoutant un CD ou un MD
— Lecture simultanée
La fonction de lecture simultanée est
inopérante pendant que vous écoutez la radio.
1 Appuyez sur (MENU), puis appuyez
plusieurs fois de suite sur M ou m jusqu’à
ce que l’indication “Simul Sel”
apparaisse.
2 Appuyez sur (ENTER).
3 Appuyez sur <.
3
4 Appuyez plusieurs fois sur (SOURCE)
pour sélectionner CD ou MD.
5 Appuyez sur ,.
6 Appuyez plusieurs fois sur (SOURCE)
jusqu’à ce que “TV” apparaisse, puis
appuyez plusieurs fois sur (MODE) pour
sélectionner TV ou VIDEO.
Chaque fois que vous appuyez sur
(MODE), le paramètre change comme suit:
TV 1 t TV 2 t V 1 (VIDEO 1)
7 Appuyez sur (ENTER).
La lecture simultanée commence.
Si vous regardez déjà la télévision ou la source
vidéo et désirez écouter un CD ou MD
également, suivez les mêmes étapes.
31
Page 70

Pour revenir au mode normal
Pour désactiver la lecture CD ou MD,
sélectionnez “– – –” à l’étape 4.
Pour désactiver le téléviseur ou la source
vidéo, sélectionnez “– – –” à l’étape 6.
Remarque
Si vous appuyez sur Z (EJECT) d’un appareil CD/MD
pendant que l’appareil est en mode de lecture
simultanée, la lecture simultanée est annulée.
Informations
complémentaires
Entretien
Remplacement du fusible
En cas de remplacement du fusible, veillez à
utiliser un fusible dont l’intensité correspond à
celle inscrite sur le fusible. Si le fusible grille,
vérifiez le branchement de l’alimentation et
remplacez le fusible. Si le fusible grille une
nouvelle fois après avoir été remplacé, cela
peut révéler une défaillance interne de
l’appareil. Dans ce cas, consultez un revendeur
Sony.
Fusible (10 A)
Avertissement
N’utilisez jamais de fusible dont l’intensité
dépasse celle du fusible fourni avec l’appareil,
car vous risqueriez d’endommager l’appareil.
32
Page 71

Remplacement de la pile au lithium
Lorsque la pile s’affaiblit, la portée efficace de
la télécommande à carte se raccourcit.
Remplacer la pile par une nouvelle pile au
lithium CR2025.
Démontage de l’appareil
Le panneau frontal étant ouvert
1 Appuyez sur (OPEN) de l’appareil, puis
appuyez sur l’attache à l’intérieur du
panneau frontal à l’aide d’un fin
tournevis et dégagez doucement le
panneau frontal.
x
côté + vers le haut
Remarques sur la pile au lithium
•Gardez la pile au lithium hors de portée des
enfants. En cas d’ingestion de la pile,
consultez immédiatement un médecin.
•Nettoyez la pile au moyen d’un chiffon sec
pour assurer un contact optimal.
•Veillez à respecter les polarités correctes lors
de la mise en place de la pile.
•Ne saisissez pas la pile avec des pinces
métalliques, car cela risque de provoquer un
court-circuit.
AVERTISSEMENT
Si la pile est malmenée, elle risque
d’exploser.
Il est interdit de la recharger, de la démonter
ou de la jeter au feu.
2 Répétez l’étape 1 du côté gauche.
Le couvercle avant est retiré.
3 Utilisez un fin tournevis pour enfoncer
l’attache du côté gauche de l’appareil,
puis tirez le côté gauche de l’appareil
jusqu’au dégagement complet du côté
gauche.
4 Répétez l’étape 3 du côté droit.
5 Sortez l’appareil de son emplacement.
33
Page 72

Si le panneau frontal ne s’ouvre
pas parce qu’un fusible est grillé
1 Appuyez sur l’attache à l’intérieur du
couvercle frontal à l’aide de la clé de
dégagement (fournie), et libérez le
couvercle frontal.
Clé de dégagement (fournie)
2 Répétez l’étape 1 du côté gauche.
Le couvercle avant est retiré.
3 Utilisez la clé de dégagement pour
pousser l’attache sur le côté gauche de
l’appareil, puis retirez le côté gauche de
l’appareil jusqu’au dégagement complet.
4 Répétez l’étape 3 du côté droit.
5 Sortez l’appareil de son emplacement.
34
Page 73

Spécifications
Lecteur CD
Système Système audio numérique
Rapport signal-bruit 90 dB
Réponse en fréquence 10 – 20.000 Hz
Pleurage et scintillement En dessous du seuil
à disques compacts
mesurable
Radio
FM
Plage de syntonisation 87,5 – 107,9 MHz
Borne d’antenne Connecteur d’antenne
Fréquence intermédiaire 10,7 MHz/450 KHz
Sensibilité utile 8 dBf
Sélectivité 75 dB à 400 kHz
Rapport signal-bruit 66 dB (stéréo),
Distorsion harmonique à 1 kHz
Séparation 35 dB à 1 kHz
Réponse en fréquence 30 – 15.000 Hz
externe
72 dB (mono)
0,6 % (stéréo),
0,3 % (mono)
AM
Plage de syntonisation 530 – 1.710 kHz
Borne d’antenne Connecteur d’antenne
Fréquence intermédiaire 10,7 MHz/450 kHz
Sensibilité 30 µV
externe
Amplificateur de puissance
Sorties Sorties pour haut-parleurs
Impédance de haut-parleurs
Puissance utile maximum 50 W × 4 (à 4 ohms)
4 – 8 ohms
Caractéristiques générales
Sorties Sorties audio (3)
Entrées Fil de commande de mise
Fil de commande de relais
d’antenne électrique
Fil de commande
d’amplificateur de
puissance
en sourdine du téléphone
Fil de commande
d’éclairage
Commandes de tonalité
(CDX-M650, CDX-M600 seulement)
Puissance de raccordement
Dimensions Approx. 178 × 50 × 182 mm
Dimensions de montage Approx. 182 × 53 × 163 mm
Poids Approx. 1,5 kg (3 liv.
Accessoires fournis Télécommande à carte
Accessoires optionnels Satellite de commande
Appareils optionnels Changeur de CD
La conception et les spécifications sont sujettes à
modifications sans préavis.
Graves ±9 dB à 100 Hz
Aiguës ±9 dB à 10 kHz
Batterie de voiture
12 V CC (masse négative)
1
/8 × 2 × 7 1/4 po.)
(7
(L × H × P)
1
/4 × 2 1/8 × 6 1/2 po.)
(7
(L × H × P)
5 on.)
RM-X94
(CDX-M650 seulement)
RM-X93
(CDX-M600 seulement)
RM-X92
(CDX-M750 seulement)
Eléments d’installation et
de raccordement (1 jeu)
RM-X4S
Câble BUS (fourni avec un
cordon à broche RCA)
RC-61 (1 m), RC-62 (2 m)
Adaptateur de disque
compact single CSA-8
(10 disques)
CDX-838, CDX-737,
CDX-636
Changeur MD (6 disques)
MDX-65
Autres changeurs CD/MD
avec le système de BUS
Sony
Sélecteur de source
XA-C30
Syntoniseur de télévision
XT-40V
Préamplificateur
numérique (CDX-M650
seulement)
XDP-210EQ, XDP-4000X
35
Page 74

Dépannage
La liste de contrôles suivante vous aidera à remédier aux problèmes que vous pourriez rencontrer
avec cet appareil.
Avant de passer en revue la liste de contrôles ci-dessous, vérifiez les procédures de raccordement
et d’utilisation.
Généralités
Problème
Pas de son.
Le contenu de la mémoire a été
effacé.
Aucun bip sonore.
Le son est parasité.
Lecture CD/MD
Problème
Impossible d’introduire un
disque.
La lecture ne démarre pas.
Un disque est éjecté
automatiquement.
Le CD n’est pas éjecté.
Les touches de commande sont
inopérantes.
Le son saute à la suite de
vibrations.
Le son saute.
Impossible d’éteindre
l’indication “--------”.
Cause/Solution
•Annulez la fonction ATT.
•Réglez la commande de balance avant-arrière sur la position
centrale, si vous utilisez un système à 2 haut-parleurs.
•Appuyez sur (+) du bouton VOL pour régler le volume.
•Le cordon d’alimentation ou la batterie a été déconnecté.
•La touche de réinitialisation a été enfoncée.
t Recommencez la procédure d’enregistrement dans la
mémoire.
Le bip sonore a été désactivé (page 26).
Vous êtes en train d’utiliser un téléphone mobile.
Cause/Solution
•Un autre CD a déjà été introduit dans l’appareil.
•Le CD est introduit à l’envers en forçant ou dans le mauvais
sens.
MD défectueux ou CD poussièreux.
La température ambiante dépasse 50°C (122°F).
Vous avez refermé le panneau frontal ou forcé en enfonçant le
disque à l’intérieur de l’appareil alors que l’appareil était en
train d’éjecter le disque après que vous avez appuyé sur Z.
t Appuyez sur la touche de réinitialisation.
Appuyez sur la touche de réinitialisation.
•L’appareil est installé suivant un angle de plus de 60˚.
•L’appareil n’a pas été installé à un endroit suffisamment
stable de la voiture.
Un disque encrassé ou défectueux.
Vous ne pouvez pas identifier de CD à moins que vous ne
raccordiez l’appareil CD à l’aide de la fonction de fichier
personnalisé.
t Appuyez sur (LIST) pendant deux secondes.
36
Page 75

Réception radio
Problème
Impossible de syntoniser une
présélection.
Impossible de recevoir les
stations.
Le son comporte des parasites.
La syntonisation automatique
est impossible.
L’indication “ST” clignote.
Des interférences se produisent
en cours de réception FM.
Fonctions DSP
Problème
Pas de son, ou le son est trop
faible.
Cause/Solution
•Mémorisez la fréquence correcte.
•Le signal d’émission est trop faible.
Raccordez un fil de commande d’antenne électrique (bleu) ou
un fil d’alimentation d’accessoire (rouge) au câble
d’alimentation de l’amplificateur d’antenne de la voiture.
(Uniquement si votre voiture est équipée d’une antenne FM/
AM intégrée dans la vitre arrière/latérale.)
Le signal d’émission est trop faible.
t Utilisez la syntonisation manuelle.
•Accordez la fréquence avec précision.
•Le signal d’émission est trop faible.
t Activez le mode Mono (page 17).
Le mode Wide est sélectionné.
t Réglez le mode IF sur IF Auto (page 17).
Cause/Solution
Le volume des haut-parleurs a peut-être été baissé
automatiquement de façon à maximaliser l’effet du réglage de
la position d’écoute.
t Appuyez sur < ou , pour ajuster la balance.
La balance des haut-parleurs peut être réglée séparément
pour le mode d’activation du DSP et le mode de
désactivation du DSP (page 20).
37
Page 76

Affichages d’erreur (lorsque l’unité CD/MD en option est raccordée)
Les indications suivantes clignotent pendant environ cinq secondes et un bip d’alarme retentit.
Affichage
NO Mag
NO Disc
NG Discs
Error
Blank
PushReset
Not Ready
High Temp
*1 Si une erreur se produit pendant la lecture d’un MD ou d’un CD, le numéro du MD ou du CD n’apparaît
pas dans la fenêtre d’affichage.
*2Le numéro du disque qui pose un problème apparaît dans la fenêtre d’affichage.
Cause
Le magasin à disques n’a pas été
introduit dans l’unité CD/MD.
Il n’y a aucun disque dans l’unité
CD/MD.
La lecture d’un CD/MD ne démarre
pas en raison d’un problème (CD
souillé, MD défectueux, etc.).
Un CD est souillé ou a été introduit à
l’envers.*
1
*
Un MD n’est pas reproduit en raison
d’un problème.*
Aucune plage n’a été enregistrée sur
1
*
un MD.*
L’unité CD/MD ne peut fonctionner
en raison d’un problème.
Le couvercle du MD s’ouvre ou les
MD ne sont pas introduits
correctement.
La température ambiante est
supérieure à 50°C (122°F).
2
2
2
Solution
Introduisez le magasin dans
l’appareil CD/MD.
Introduisez des disques dans
l’unité CD/MD.
Introduisez un autre CD/MD.
Nettoyez ou introduisez
correctement le CD.
Introduisez un autre MD.
Choisissez un MD sur lequel des
plages ont été enregistrées.
Appuyez sur la touche de
réinitialisation de l’appareil.
Fermez le couvercle ou remettez les
MD en place correctement.
Attendez que la température
descende sous les 50°C (122°F).
Si les solutions proposées ci-dessus ne permettent pas de remédier au problème, veuillez consulter
votre revendeur Sony.
38
Page 77

39
Page 78

¡Bienvenido!
Precauciones
Gracias por adquirir el reproductor de discos
compactos/minidiscos. Esta unidad permite
disfrutar de varias funciones mediante el uso
de los siguientes accesorios de control:
Accesorio suministrados
Control remoto de tarjeta
RM-X94 (para el CDX-M650)
RM-X93 (para el CDX-M600)
RM-X92 (para el CDX-M750)
Accesorio opcional
Mando rotativo RM-X4S
Además de las operaciones de reproducción de
CD/MD y radio, puede ampliar el sistema
mediante la conexión de una unidad opcional
de CD/MD*1.
Cuando utilice esta unidad o una opcional de
CD conectada con función CD TEXT, la
información CD TEXT aparecerá en el visor al
reproducir discos CD TEXT*2.
*1Es posible conectar un cambiador de MD, un
cambiador de CD, un reproductor de MD o un
reproductor de CD.
2
Un disco CD TEXT es un CD de audio que incluye
*
información, como el nombre del disco, el
nombre del artista y los nombres de los temas.
Esta información está grabada en el disco.
•Si aparca el automóvil bajo la luz solar
directa y se produce un considerable
aumento de temperatura en su interior, deje
que la unidad se enfríe antes de utilizarla.
•Si la unidad no recibe alimentación,
compruebe las conexiones en primer lugar. Si
todo está en orden, examine el fusible.
•Si los altavoces no emiten sonido con un
sistema de dos altavoces, ajuste el control de
equilibrio entre altavoces en la posición
central.
•No utilice la función de archivo
personalizado mientras conduce. Tampoco
realice ninguna función que pueda distraer
su atención de la conducción.
Si desea realizar alguna consulta o solucionar
algún problema referentes a la unidad que no
aparezcan en este manual, póngase en contacto
con el proveedor Sony más próximo.
Condensación de humedad
En días lluviosos o en zonas muy húmedas, es
posible que se condense humedad en las lentes
del interior del reproductor de CD. Si esto
ocurre, ésta no funcionará correctamente. En
este caso, extraiga el MD y espere durante una
hora aproximadamente hasta que se evapore la
humedad.
2
Page 79

Notas sobre los discos
compactos
Un disco sucio o defectuoso puede causar
pérdidas de sonido durante la reproducción de
CD. Para obtener un sonido óptimo, manipule
el disco de la siguiente forma.
Tome el disco por los bordes y no toque la
superficie sin etiqueta.
Notas sobre los discos
Si emplea los discos descritos a continuación,
el residuo adherente puede causar que el CD
deje de girar y producir fallos de
funcionamiento o dañar los discos.
No utilice discos compactos de segunda mano
o de alquiler que tengan residuos adherentes
en la superficie (por ejemplo, de adhesivos
despegados o tinta, o de restos de pegamento
de los adhesivos).
Residuos adherentes.
Tinta adherente.
No adhiera papel ni cinta en los discos.
No exponga los discos a la luz solar directa ni
a fuentes térmicas, como conductos de aire
caliente. No deje los discos en un automóvil
aparcado bajo la luz solar directa, en cuyo
interior pueda producirse un considerable
aumento de temperatura.
Antes de reproducir un disco, frótelo con un
paño limpiador opcional. Hágalo en la
dirección de las flechas de la ilustración.
No utilice disolventes tales como bencina,
diluyentes, limpiadores disponibles en las
tiendas del ramo ni aerosoles destinados a
discos analógicos.
No utilice discos compactos de alquiler con
etiquetas viejas que estén comenzando a
despegarse.
Adhesivos que empiezan a
despegarse y dejan un
residuo adherente.
No emplee discos compactos con etiquetas o
adhesivos fijados.
Etiquetas adheridas.
Al reproducir discs compactos de
8 cm (3 pulgadas)
Utilice el adaptador opcional para discos
compactos sencillos de Sony (CSA-8) para
proteger el reproductor de CD contra daños.
Notas sobre discos CD-R
•Es posible reproducir discos CD-R (discos
compactos grabables) en esta unidad. No
obstante, algunos discos CD-R no podrán
reproducirse en esta unidad en función de las
condiciones del equipo de grabación o del
propio disco CD-R.
•No es posible reproducir discos CD-R no
finalizados (es preciso que los discos CD-R
grabados estén finalizados para poder
reproducirse en el reproductor de CD de
audio).
•No es posible reproducir discos CD-RW
(discos compactos reescribibles) en este
reproductor.
3
Page 80

Indice
Localización de los controles ............................. 5
Procedimientos iniciales
Restauración de la unidad ................................. 8
Activación/desactivación de la unidad ........... 8
Utilización del menú .......................................... 8
Ajuste del reloj ..................................................... 9
Reproductor de CD
Unidad de CD/MD (opcional)
Reproducción de discos compactos
(sólo con esta unidad) ................................. 10
Reproducción repetida de temas
— Reproducción repetida........................... 12
Reproducción de temas en orden aleatorio
— Reproducción aleatoria .......................... 12
Asignación de títulos a los discos compactos
— Memorando de discos
(unidad de CD con función de archivo
personalizado) .............................................. 13
Localización de discos mediante el título
— Función de listado (unidad de CD con
función de archivo personalizado o unidad
de MD)........................................................... 14
Selección de temas específicos para su
reproducción
— Función de banco (unidad de CD con
función de archivo personalizado)............ 15
Radio
Memorización automática de emisoras
— Memorización de la mejor sintonía
(BTM) ............................................................. 16
Memorización de las emisoras deseadas ....... 16
Recepción de emisoras memorizadas ............ 17
Almacenamiento de nombres de emisora
— Memo de emisora ................................... 18
Localización de una emisora por nombre
— Listado ...................................................... 19
DSP (Sólo CDX-M750)
Ajuste del ecualizador ...................................... 19
Selección de la posición de escucha ............... 20
Selección de un menú Soundstage
— Organizador Soundstage dinámico
(DSO) ............................................................. 21
Ajuste del balance (BAL) ................................. 21
Ajuste de la atenuación frontal y posterior ... 21
Ajuste del volumen de los altavoces
potenciadores de graves ............................. 22
Escucha de cada fuente de programa con su
DSO registrado
— Memoria de sonido fuente (SSM) ......... 23
Otras funciones
Etiquetado del mando rotativo ....................... 23
Uso del mando rotativo ................................... 24
Ajuste de las características de sonido ........... 26
Atenuación del sonido ..................................... 26
Cambio de los ajustes de sonido y
visualización ................................................. 26
Refuerzo de los graves
— D-bass (Sólo CDX-M600) ....................... 27
Selección del analizador de espectro .............. 28
Ajuste del sonido y la frecuencia del
preamplificador ecualizador
(sólo CDX-M650).......................................... 28
TV/Vídeo
Visualización de la TV ...................................... 29
Visualización de un video ............................... 29
Memorización automática de
canales de TV................................................ 29
Memorización únicamente de determinados
canales de TV................................................ 30
Almacenamiento de los nombres de los
canales de TV................................................ 30
Visualización de la información
almacenada en discos .................................. 31
Visualización de la TV o de video mientras se
escucha un CD o un MD
— Reproducción simultánea ...................... 31
Información complementaria
Mantenimiento .................................................. 32
Desmontaje de la unidad ................................. 33
Especificaciones ................................................. 35
Guía de solución de problemas ...................... 36
4
Page 81

Localización de los controles
control remoto
OFF
OPEN/CLOSE
DSO
de tarjeta
MENU LIST
SEEK SEEK
SOUND
DSPL MODE
Consulte las páginas indicadas para obtener más información.
1 Botón OFF 8, 10
2 Botón MENU 9, 12, 13, 14, 15, 16, 17, 18,
22, 27, 28, 29, 31
3 Botón SOURCE (TUNER/CD/MD/TV)
8, 10, 11, 14, 16, 17, 19, 20, 21, 22, 28,
29, 30, 31
4 Botones </, (SEEK/AMS –/+)
8, 9, 11, 12, 15, 16, 17, 19, 20, 21, 22, 23,
26, 28, 30, 31
Sensor de música automático (./>) 11
Búsqueda manual (m/M) 11
Búsqueda 16, 28
5 Botón SOUND 19, 20, 21, 22, 26
6 Botón DSPL (cambio del modo de
indicación) 10, 11, 13, 18, 19, 25
7 Botón ATT (atenuar) 26
8 CDX-M750:
Botón DSO (organizador dinámico de
sonido de baja frecuencia) 21
CDX-M600:
Botón D-BASS 27
9 Botón OPEN/CLOSE 10
0 Botón LIST 13, 14, 18, 19, 30, 31
Listado 14, 19, 30, 31
DISC
SOURCE
DISC
ENTER
VOLATT
qa Botones M/m (PRST/DISC +/–)
8, 9, 11, 12, 13, 14, 15, 17, 18, 19, 20, 22,
23, 27, 28
Durante la reproducción de CD/MD:
Durante la recepción de la radio:
Durante la recepción de TV:
qs Botón ENTER 9, 11, 13, 14, 15, 16, 17,
18, 19, 20, 22, 23, 27, 29, 31
qd Botón MODE 10, 14, 16, 17, 29, 31
Durante la reproducción de CD/MD:
Durante la recepción de la radio:
Durante la recepción de TV:
qf VOL (control de volumen)
No es posible utilizar con el control remoto de
tarjeta una unidad que se haya apagado
presionando (OFF) durante dos segundos, a
menos que presione (SOURCE) en la unidad o
que inserte un CD para que ésta se active
primero.
Cambio de discos 11
Selección de emisoras
memorizadas 17
Selección de banda (BANDO) 29
Selección de unidad de CD/MD
10, 14
Selección de banda (BAND) 16, 17
Selección de unidad 29
5
Page 82

Localización de los controles
Lado de seguridad
Lado de utilización
P
S
L
OFF
D
SOURCE
M
E
O
D
REP SHUF
123456
S
O
MENU
U
N
D
DISC
DSO
DISC
LIST
ENTER
CLOSE
CDX-M750/M650/M600
6
Page 83

Los botones correspondientes de la
unidad controlan las mismas funciones
que los del control remoto de tarjeta.
1 7 Botón de restauración 8
2 Visualizador principal
3 Botón OPEN
4 qf Receptor para el control remoto de
tarjeta
5 Botones de ajuste de volumen
6 Botón Z (expulsión) 10
8 Botón DSPL (cambio del modo de
indicación)
9 Visualizador secundario
0 Botón MENU
qa Botón DISC/PRST +/– (cursor arriba/
abajo)
Botón SEEK/AMS –/+ (cursor izquierda/
derecha) 16
qs CDX-M750:
Botón DSO
CDX-M600:
Botón D-BASS
qd Botón LIST
qg Botón OFF* 8
qh Botón MODE
qj Botón SOURCE
qk Botones numéricos
Durante la reproducción de la radio:
Selección de número de memorización
16, 17
Durante la reproducción de CD/MD:
(1) REP 12
(2) SHUF 12
Durante la recepción de TV:
Selección de número de memorización
30
ql Botón SOUND
w; Botón ENTER
wa Botón CLOSE
* Advertencia sobre la instalación en
un automóvil que no disponga de
posición ACC (accesorios) en el
interruptor de la llave de
encendido
Asegúrese de presionar (OFF) en la
unidad durante dos segundos para
desactivar la indicación del reloj
después de apagar el motor.
Si presiona (OFF) sólo
momentáneamente, la indicación del
reloj no se desactivará y esto causará el
desgaste de la batería.
7
Page 84

Procedimientos
iniciales
Restauración de la unidad
Antes de utilizar la unidad por primera vez o
después de sustituir la batería del automóvil,
es necesario restaurar dicha unidad.
Presione el botón de restauración con un objeto
puntiagudo, como un bolígrafo.
Botón de restauración
Nota
Al presione el botón de restauración, se borrará el
ajuste del reloj, la memoria predefinida y algunas
funciones memorizadas.
Activación/desactivación
de la unidad
Activación de la unidad
Presione (SOURCE) o inserte un disco en la
unidad.
Para obtener más información sobre el
funcionamiento, consulte las páginas 10 (CD/
MD) y 16 (radio).
Desactivación de la unidad
Presione (OFF) para detener la reproducción
de CD/MD o la recepción de FM/AM (la
iluminación de las teclas y el visualizador
permanecerán activados).
Presione (OFF) durante dos segundos para
apagar completamente la unidad.
Nota
Si el automóvil no dispone de posición ACC en la
llave del interruptor de encendido, asegúrese de
desactivar la unidad presionando (OFF) durante
dos segundos para evitar el desgaste de la batería
del automóvil.
Utilización del menú
Esta unidad se utiliza mediante la selección de
elementos en un menú.
Para realizar una selección, entre en el modo
de menús y elija y M/m (elija arriba/abajo), o
</, (izquierda/derecha).
M/m
M : para seleccionar
DISC
SEEK SEEK
SOURCE
DISC
hacia arriba
m : para seleccionar
hacia abajo
</,
DISC
SEEK SEEK
SOURCE
< :para
seleccionar
hacia la
izquierda
DISC
, : para
seleccionar
hacia la
derecha
8
Page 85

Ajuste del reloj
El reloj dispone de una indicación digital de 12
horas.
Ejemplo: Para ajustar el reloj en 10:08
1 Presione (MENU) y, a continuación, M o
m varias veces hasta que aparezca
“Clock”.
1 Presione (ENTER).
Los dígitos de la hora parpadean.
2 Presione M o m para ajustar la hora.
3 Presione ,.
Nota
Con el ajuste inicial, la indicación del reloj aparece
mientras la unidad está apagada.
Si selecciona el ajuste “on” del elemento “D.Info”
(página 26), podrá ver la índicación del reloj en la
parte superior del visualizador mientras disfruta de
cualquier fuente (excepto para algunas funciones
del modo SA).
Los dígitos de los minutos parpadean.
4 Presione M o m para ajustar los
minutos.
2 Presione (ENTER).
El reloj se pone en funcionamiento.
9
Page 86

Reproductor de CD
Unidad de CD/MD
(opcional)
Cuando finalice el último tema del
CD
La indicación del número de tema volverá a
mostrar el valor “1”, y la reproducción volverá
a iniciarse desde el primer tema del CD.
Además de reproducir un disco con esta
unidad, también puede controlar unidades
externas de CD/MD.
Si conecta una unidad opcional de CD con las
funciones CD TEXT y de archivo
personalizado, la información CD TEXT
aparecerá en el visualizador al reproducir
discos CD TEXT.
Reproducción de discos
compactos
(sólo con esta unidad)
1 Presione (OPEN/CLOSE) en el control
remoto de tarjeta e inserte un cassette.
La reproducción se iniciará
automáticamente.
Lado de la etiqueta hacia arriba
2 Presione (OPEN/CLOSE) en el control
remoto de tarjeta para cerrar el panel
frontal.
Para Presione
Detener la reproducción (OFF)
Expulsar el CD (OPEN/CLOSE) y, a
continuación, Z
Reproducción de discos compactos
(CD) o de minidiscos (MD)
(con una unidad opcional de CD/MD)
1 Presione (SOURCE) varias veces para
seleccionar “CD” o “MD”.
2 Presione (MODE) hasta que aparezca la
unidad que desee.
Se inicia la reproducción de CD/MD.
Todos los discos de la unidad actual de
CD/MD se reproducen desde el principio.
Cambio de los elementos del visor
Cada vez que presione (DSPL) durante la
reproducción de CD, CD TEXT o MD, el
elemento cambiará de la siguiente forma:
V
1
Número del disco*
Tiempo de reproducción transcurrido
Título del disco*
/Número del tema/
V
2
/Nombre del cantante*
V
Título del tema*
3
4
Si ya hay un CD insertado, presione
(SOURCE) varias veces hasta que aparezca
“CD”.
Indicación de CD
Número de tema
Nota
Para reproducir un CD de 8 cm (3 pulgadas), utilice
el adaptador opcional para discos compactos
sencillos de Sony (CSA-8).
Tiempo de reproducción
transcurrido
10
*1Con una unidad opcional de CD/MD conectada.
2
Si no ha asignado título al disco CD o CD TEXT
*
(“Asignación de títulos a los discos compactos”,
página 13) o si no hay ningún título de disco
registrado en el MD, el visualizador mostrará
“NO D.Name” momentáneamente.
3
Si reproduce un disco CD TEXT, el nombre del
*
artista aparecerá en el visualizador después del
título del disco. (Sólo para discos CD TEXT con
nombre del artista.)
4
Si el título del tema de un disco CD TEXT o MD
*
no está previamente registrado, el visualizador
mostrará “NO T.Name” momentáneamente.
Page 87

Una vez seleccionado el elemento deseado, el
visualizador cambiará automáticamente al
modo de desplazamiento de indicaciones
después de unos segundos.
En el modo de desplazamiento de
indicaciones, todos los elementos anteriores se
desplazan por el visualizador de uno en uno
por orden.
Nota
Si utiliza etiquetas personalizadas, siempre
tendrán prioridad sobre la información original de
CD TEXT cuando ésta aparezca en el visualizador.
Consejo
Es posible desactivar el modo de desplazamiento
de indicaciones. (Consulte “Cambio de los ajustes
de sonido y visualización” en la página 26.)
Desplazamiento automático del
título de un disco
— Desplazamiento automático
Si el título del disco, el nombre del artista o el
título del tema de un disco MD o CD TEXT
supera los 10 caracteres y la función de
desplazamiento automático está activada, la
información se desplazará automáticamente
por el visualizador de la siguiente forma:
• El título del disco aparece al cambiar el disco (si
el título del disco se selecciona como elemento
de visualización).
• El título del tema aparece al cambiar el tema (si
el título del tema se selecciona como elemento
de visualización).
• El título del disco o del tema aparece en función
del ajuste al presionar (SOURCE) para
seleccionar un MD o un disco CD TEXT.
Si presionar (DSPL) para cambiar el elemento
mostrado, el título del disco o del tema del
disco CD TEXT o del MD se desplaza
automáticamente tanto si activa como si
desactiva la función.
1
Durante la reproducción, presione (MENU).
2 Presione M o m varias veces hasta que
aparezca “A.Scrl”.
3 Presione , para seleccionar “A.Scrl on”.
Nota
Con algunos discos CD TEXT con un gran número
de caracteres, pueden producirse las siguientes
situaciones:
— Algunos de los caracteres no se muestran.
— La función de desplazamiento automático no
funciona.
Localización de un tema específico
— Sensor de música automático (AMS)
Durante la reproducción, presione < o
, momentáneamente para cada tema
que desee omitir.
< (.) :
Para
localizar
temas
anteriores
DISC
SEEK SEEK
SOURCE
DISC
, (>) :
Para localizar
temas
posteriores
Localización de un punto específico
de un tema — Búsqueda manual
Durante la reproducción, mantenga
presionado < o ,. Deje de pulsarlo
cuando encuentre el punto que desee.
DISC
< (m) :
Para buscar
hacia atrás
Nota
Si “
visualizador, significa que ha llegado al principio o
al final del disco, por lo que no podrá continuar.
SEEK SEEK
SOURCE
DISC
” o “ ” aparece en el
, (M) :
Para buscar
hacia delante
Localización de discos
— Selección de discos
Si hay una unidad opcional de CD/MD
conectada, presione M o m para
seleccionar el disco deseado.
M (DISC +) : Para los discos posteriores
DISC
SEEK SEEK
SOURCE
DISC
4 Presione (ENTER).
Para cancelar la función de desplazamiento
automático, seleccione “A.Scrl off” en el paso
3 anterior.
m (DISC –) : Para los discos anteriores
El disco deseado de la unidad actual de
CD/MD opcional comenzará a
reproducirse.
11
Page 88

Reproducción repetida de
temas — Reproducción repetida
El CD de la unidad principal se repetirá
automáticamente al llegar al final. Para la
reproducción repetida, es posible seleccionar:
•Repeat 1 – para repetir un tema.
•Repeat 2 – para repetir el disco que se
encuentre en la unidad opcional de CD/MD.
1 Durante la reproducción, presione
(MENU).
Reproducción de temas en
orden aleatorio
— Reproducción aleatoria
Es posible seleccionar:
•Shuf 1 – para reproducir los temas del disco
actual en orden aleatorio.
•Shuf 2 – para reproducir los temas de la
unidad actual de CD/MD en orden aleatorio.
•Shuf all – para reproducir todos los temas de
todas las unidades opcionales de CD/MD en
orden aleatorio.
2 Presione M o m varias veces hasta que
aparezca “Repeat”.
3 Presione , varias veces hasta que el
ajuste deseado aparezca en el
visualizador.
B Repeat 1 B Repeat 2*
Repeat off b
* “Repeat 2” sólo se encuentra disponible
cuando se conectan una o más unidades
opcionales de CD, o las unidades opcionales
de MD.
Se inicia la reproducción repetida.
Para recuperar el modo de reproducción
normal, seleccione “Repeat off” en el anterior
paso 3.
Consejo
Si selecciona el modo con los botones de la unidad,
presione (1) (REP) varias veces hasta que aparezca
el modo deseado.
1 Durante la reproducción, presione
(MENU).
2 Presione M o m varias veces hasta que
aparezca “Shuf”.
3 Presione , varias veces hasta que el
ajuste deseado aparezca en el
visualizador.
B Shuf 1 B Shuf 2* B Shuf All*
Shuf off b
*
“Shuf 2” y Shuf all sólo se encuentran
disponibles cuando se conectan una o más
unidades opcionales de CD, o las unidades
opcionales de MD.
Se inicia la reproducción en orden aleatorio.
Para volver al modo de reproducción normal,
seleccione “Shuf off” en el paso 3.
Consejo
Si selecciona el modo con los botones de la unidad,
presione (2) (SHUF) varias veces hasta que
aparezca el modo deseado.
12
Page 89

Asignación de títulos a los
discos compactos
— Memorando de discos
(unidad de CD con función de archivo
personalizado)
Es posible asignar un título personalizado a
cada disco, utilizando un máximo de ocho
caracteres para cada uno de éstos. La
asignación de títulos permitirá localizar discos
mediante el título (página 14) y seleccionar
temas específicos para su reproducción
(página 15).
1 Comience a reproducir el disco al que
desee asignar título.
2 Presione (MENU) y, a continuación, M o
m varias veces hasta que aparezca
“Name Edit”.
3 Presione (ENTER).
Modo de edición de títulos
4 Introduzca los caracteres.
1 Presione M varias veces para
seleccionar los caracteres deseados.
(A t B t C t ··· Z t 0 t 1 t 2 t
··· 9 t + t – t * t / t \ t > t <
t . t )
3 Repita los pasos 1 y 2 para
introducir el título completo.
5 Para volver al modo normal de
reproducción de CD, presione (ENTER)
durante dos segundos.
Consejos
• Para borrar o corregir un nombre, introduzca
“ ” por cada carácter.
• Existe otro método para comenzar a asignar
título al CD. Mantenga presionado (LIST)
durante dos segundos en lugar de realizar los
pasos 2 y 3. También puede completar la
operación manteniendo presiona (LIST) durante
dos segundos en lugar de realizar el paso 5.
Visualización del memorando de
discos
Presione (DSPL) durante la reproducción
de un CD o de un disco CD TEXT.
Cada vez que presione (DSPL) durante la
reproducción de un CD o de un disco CD
TEXT, los elementos cambiarán de la
siguiente forma:
V
1
Número del disco*
Tiempo de reproducción transcurrido
Nombre del memorando de discos
/Número del tema/
V
V
Título del tema*
2
Si presiona m varias veces, los caracteres
aparecerán en orden inverso.
Si desea introducir un espacio en blanco
entre caracteres, seleccione “ ”.
2 Presione , después de localizar el
carácter deseado.
El siguiente carácter parpadeará.
Si presiona <, el carácter anterior
parpadeará.
*1Con una unidad opcional de CD conectada.
2
*
Si conecta una unidad opcional de CD con la
función CD TEXT, el visualizador mostrará la
información CD TEXT al reproducir discos CD
TEXT.
Nota
No utilice la función de archivo personalizado
mientras conduce. Tampoco realice ninguna
función que pueda distraer su atención de la
conducción.
13
Page 90

Borrado del memorando de discos
1 Presione (SOURCE) varias veces para
seleccionar “CD”.
2 Presione (MODE) varias veces para
seleccionar la unidad de CD con función
de archivo personalizado.
3 Presione (MENU) y, a continuación, pulse
M o m varias veces hasta que aparezca
“Name Del”.
Localización de discos
mediante el título — Función
de listado (unidad de CD con función de
archivo personalizado o unidad de MD)
Esta función puede utilizarse con discos a los
que se ha asignado un título personalizado.
Para obtener más información sobre los títulos
de disco, consulte “Asignación de títulos a los
discos compactos” (página 13).
4 Presione (ENTER) .
5 Presione M o m varias veces para
seleccionar el nombre de disco que desee
borrar.
6 Presione (ENTER) durante dos segundos.
El nombre se borrará.
Repita los pasos 5 y 6 para borrar otros
nombres.
7 Presione (MENU) dos veces.
La unidad vuelve al modo normal de
reproducción de CD.
Notas
• Si se borra el nombre personalizado, el
visualizador mostrará la información CD TEXT
original.
• Si borra todos los nombres de los discos, “No
Data” aparecerá en el paso 6.
1 Presione (LIST).
El título asignado al disco actual aparece en
el visor.
Si asigna una etiqueta de memorando de
discos a un disco CD TEXT, tendrá
prioridad sobre la información CD TEXT
original.
2 Presione M (DISC +) o m (DISC –) varias
veces hasta que encuentre el disco
deseado.
3 Presione (ENTER) para reproducir el
disco.
Notas
• Los títulos de los temas no aparecen durante la
reproducción de discos CD TEXT o MD.
• Si no hay discos en el cargador, el visualizador
mostrará “NO Disc”.
• Si no se ha asignado un archivo personalizado a
un disco, aparecerá “********” en el
visualizador.
• Si la unidad no ha leído la información de discos,
el visor mostrará “?”. Para introducir el disco,
presione en primer lugar el botón numérico y, a
continuación, seleccione el disco que no se ha
introducido.
• No es posible mostrar ciertas letras durante la
reproducción de discos CD TEXT o MD.
• Si conecta un sistema opcional de TV, el nombre
del memorando de discos aparecerá en la
pantalla del sistema de TV y no en el visualizador
de la unidad.
14
Page 91

Selección de temas
específicos para su
reproducción
— Función de banco (unidad de CD con
función de archivo personalizado)
Si asigna una etiqueta al disco, puede
programar la unidad para omitir o reproducir
los temas que desee.
Reproducción sólo de temas
específicos
Es posible seleccionar:
•“Bank on” – para reproducir los temas con el
ajuste “Play”.
•“Bank inv” (Inverso) – para reproducir los
temas con el ajuste “Skip”.
1 Durante la reproducción, presione
(MENU) y, a continuación, M o m varias
veces hasta que aparezca “Bank”.
1 Comience a reproducir el disco al que
desee asignar título.
2 Presione (MENU) y, a continuación, pulse
M o m varias veces hasta que aparezca
“Bank Sel”.
3 Presione (ENTER).
Modo de edición de banco
4 Asigne título a los temas.
1 Presione < o , varias veces para
seleccionar el tema al que desee
etiquetar.
2 Presione (ENTER) varias veces para
seleccionar “Play” o “Skip”.
5 Repita el paso 4 para definir “Play”
(reproducción) o “Skip” (omisión) para
todos los temas.
6 Presione (MENU) dos veces.
La unidad vuelve al modo normal de
reproducción de CD.
2 Presione , varias veces hasta que
aparezca el ajuste deseado.
B Bank on B Bank inv
Bank off b
3 Presione (ENTER).
La reproducción se inicia a partir del tema
siguiente.
Para recuperar el modo de reproducción
normal, seleccione “Bank off” en el anterior
paso 2.
Notas
• Es posible definir el modo “Play” y “Skip” para
un máximo de 24 temas.
• No es posible definir el modo “Skip” para todos
los temas de un CD.
15
Page 92

Radio
Memorización automática
de emisoras
— Memorización de la mejor sintonía (BTM)
Esta unidad selecciona las emisoras de señal
más intensa y las memoriza por orden de
frecuencia. Es posible almacenar hasta 6
emisoras de cada banda (FM1, FM2, FM3,
AM1, y AM2).
Precaución
Para sintonizar emisoras mientras maneja
conducción, utilice la función de
memorización de la mejor sintonía para evitar
accidentes.
1 Presione (SOURCE) varias veces para
seleccionar el sintonizador.
Cada vez que presione (SOURCE), la fuente
cambia de la siguiente forma:
B Tuner B CD B MD* B TV*
* Si el equipo opcional correspondiente no está
conectado, el elemento no aparecerá.
2 Presione (MODE) varias veces para
seleccionar la banda.
Cada vez que presione (MODE), la banda
cambia de la siguiente forma:
B FM1 B FM2 B FM3
AM2 b AM1b
3 Presione (MENU) y, a continuación,
presione M o m varias veces hasta que
aparezca “BTM”.
Notas
• La unidad no almacena emisoras de señales
débiles. Si sólo pueden recibirse unas pocas
emisoras, algunos botones numéricos
conservarán sus ajustes anteriores.
• Si el visualizador muestra algún número, la
unidad almacenará las emisoras a partir del
mostrado en el visualizador.
• Si no hay ningún CD en la unidad, sólo aparecerá
la banda del sintonizador incluso si presiona
(SOURCE).
Memorización de las
emisoras deseadas
Es posible memorizar hasta 18 emisoras de FM
(6 para FM1, 6 para FM2 y 6 para FM3) y hasta
12 emisoras de AM (6 para AM1 y 6 para
AM2) en el orden que desee.
1 Presione (SOURCE) varias veces para
seleccionar el sintonizador.
2 Presione (MODE) varias veces para
seleccionar la banda.
3 Presione . o > en la unidad para
sintonizar la emisora que desee
almacenar en el botón numérico.
4 Mantenga presionado el botón numérico
que desee ((1) a (6)) hasta que aparezca
“MEM”.
En el visualizador aparecerá la indicación
del botón numérico.
Nota
Si almacena otra emisora en el mismo botón
numérico, la emisora previamente almacenada se
borrará.
4 Presione (ENTER).
La unidad almacena en los botones
numéricos las emisoras por orden de
frecuencia.
La unidad emite un pitido al almacenar el
ajuste.
16
Page 93

Recepción de emisoras
memorizadas
1 Presione (SOURCE) varias veces para
seleccionar el sintonizador.
2 Presione (MODE) varias veces para
seleccionar la banda.
3 Presione M (memorización hacia arriba) o
m (memorización hacia abajo) varias
veces para recibir las emisoras en el
orden en que están almacenadas en la
memoria.
Consejo
Si ha memorizado las emisoras con los botones de
la unidad, presione el botón ((1) a (6)) en el que
está almacenada la emisora deseada.
Si no puede sintonizar una emisora
programada
Presione < o , para buscar la emisora
(sintonización automática).
La exploración se detiene cuando la unidad
recibe una emisora. Presione < o , varias
veces hasta que se reciba la emisora
deseada.
Si la recepción de FM en estéreo es
de mala calidad
— Modo monofónico
1 Durante la recepción de la radio,
presione (MENU) y, a continuación, M o
m varias veces hasta que aparezca
“Mono”.
2 Presione , hasta que aparezca
“Mono on”.
El sonido mejorará, aunque será
monofónico (la indicación “ST”
desaparecerá).
3 Presione (ENTER).
Para volver al modo normal, seleccione
“Mono off” en el anterior paso 2.
Si la emisión de FM en estéreo se
recibe en monofónico
Si se producen interferencias, la función
“IF Auto” de esta unidad evitará
automáticamente los ruidos y estrechará la
frecuencia de recepción. En tales casos, es
posible que algunas emisiones de FM en
estéreo se reciban en monofónico. Si desea
escuchar tales emisiones en estéreo, cambie
manualmente al ajuste “Wide”.
Nota
Si la sintonización automática se detiene con
demasiada frecuencia, presione (MENU) y, a
continuación, M o m varias veces hasta que
aparezca “Local” (modo de búsqueda local). A
continuación, presione , para seleccionar “Local
on”. presione (ENTER).
Sólo se sintonizarán las emisoras de señal
relativamente intensa.
Consejos
• Si selecciona el ajuste “Local on”, aparecerá
“LCL Seek” mientras la unidad busca las
emisoras.
• Si sabe cuál es la frecuencia de la emisora que
desea escuchar, mantenga presionado
< o , hasta que aparezca la frecuencia
deseada (sintonización manual).
1 Durante la recepción de la radio,
presione (MENU) y, a continuación,
M o m varias veces hasta que aparezca
“IF Auto”.
2 Presione , hasta que aparezca “Wide”.
3 Presione (ENTER).
Nota
Si amplía el ajuste de recepción de la señal de
frecuencia (modo “Wide”), es posible que se
produzcan interferencias.
17
Page 94

Almacenamiento de
nombres de emisora
— Memo de emisora
Es posible asignar un nombre a cada emisora
de radio y almacenarlo en la memoria. El
nombre de la emisora sintonizada aparece en
el vislualizador. Es posible asignar un nombre
con hasta ocho caracteres a una emisora.
Almacenamiento de nombres de
emisora
1 Sintonice una emisora cuyo nombre
desee almacenar.
2 Presione (MENU) y, a continuación,
presione M o m varias veces hasta que
aparezca la indicación “Name edit”.
3 Presione (ENTER) .
3 Repita los pasos 1 y 2 para
introducir el nombre completo.
5 Para volver a la recepción de radio
normal, presione (ENTER).
Consejo
• Para borrar o corregir un nombre, introduzca
” para cada carácter.
“
• Hay otra forma de empezar a almacenar los
nombres de las emisoras. Presione (LIST) durante
dos segundos en lugar de los pasos 2 y 3.
También puede finalizar la operación
presionando (LIST) durante dos segundos en
lugar del paso 5.
Visualización del nombre de
emisora
Presione (DSPL) durante la recepción de
radio.
Cada vez que presione (DSPL), el elemento
cambiará de la siguiente forma:
B Nombre de emisora* B Frecuencia
4 Introduzca los caracteres.
1 Presione M varias veces para
seleccionar los caracteres deseados.
(A t B t C t ··· Z t 0 t 1 t 2 t
··· 9 t + t – t * t / t \ t > t <
t . t )
Si presiona m varias veces, los caracteres
aparecerán en orden inverso.
Si desea insertar un espacio en blanco
entre los caracteres, seleccione “ ”.
2 Presione , una vez localizado el
carácter deseado.
El siguiente carácter parpadea.
Si presiona <, parpadeará el carácter
anterior.
18
* Si el nombre de emisora no se almacena, la
indicación “NO Name” aparecerá en el
visualizador durante un segundo.
Borrado del nombre de emisora
1 Sintonice una emisora cuyo nombre
desee borrar.
2 Presione (MENU) y, a continuación,
presione M o m varias veces hasta que
aparezca la indicación “Name Del”.
3 Presione (ENTER).
4 Presione M o m para seleccionar el
nombre de emisora que desee borrar.
5 Presione (ENTER) durante dos segundos.
El nombre se borra.
Repita los pasos 1 a 4 si desea borrar otros
nombres.
6 Presione (MENU) dos veces.
La unidad vuelve a la recepción de radio
normal.
Nota
Una vez borrados todos los nombres de emisora, la
indicación “NO Data” aparecerá en el paso 5.
Page 95

Localización de una
emisora por nombre
— Listado
DSP (Sólo CDX-M750)
1 Presione (LIST).
El nombre asignado a la emisora
sintonizada aparece en el visualizador.
2 Presione M o m varias veces hasta que
encuentre la emisora deseada.
Si no hay ningún nombre asignado a la
emisora seleccionada, la frecuencia aparece
en el visualizador.
3 Presione (ENTER) para sintonizar la
emisora deseada.
Nota
Si conecta un sintonizador de TV, la indicación de
listado no aparecerá en el visualizador de la
unidad.
Ajuste del ecualizador
Es posible seleccionar una curva de
ecualizador para cinco tipos de música (Rock,
Vocal, Groove, Techno y Custom).
Puede almacenar y definir los ajustes del
ecualizador de frecuencia y nivel.
Selección de la curva de
ecualizador
1 Presione (SOURCE) para seleccionar una
fuente (sintonizador, CD o MD).
2 Presione (SOUND) varias veces hasta que
aparezca “EQ”.
3 Presione < o , para seleccionar la
curva de ecualizador que desee.
Rock y Vocal y Groove y Techno y
Custom y off
Para cancelar el efecto de ecualización,
seleccione “off.” Transcurridos tres
segundos, el visualizador volverá al modo
de reproducción normal.
19
Page 96

Ajuste de la curva de ecualizador
1 Presione (MENU).
2 Presione M o m varias veces hasta que
aparezca “EQ Tune”.
3 Presione (ENTER) .
4 Presione < o , para seleccionar la
curva de ecualizador que desee.
Rock y Vocal y Groove y Techno y
Custom y off
5 Presione (ENTER) .
6 Presione < o , para seleccionar la
frecuencia deseada.
62 Hz y 157 Hz y 396 Hz y 1.0 kHz y
2.5 kHz y 6.3 kHz y 16.0 kHz
Selección de la posición
de escucha
Puede ajustar un tiempo de retardo para que el
sonido llegue a los oyentes desde los altavoces.
De esta forma, la unidad puede simular un
campo sonoro natural que produzca la
sensación de encontrarse en el centro de dicho
campo independientemente de dónde se siente
dentro del automóvil.
Centro del campo
sonoro
Ajuste normal
(1 + 2 + 3)
Parte frontal
(1 + 2)
Parte frontal
derecha (2)
Parte frontal
izquierda (1)
Parte posterior
(3)
Cancelación
3
21
Visualizador
POS
All
POS
Front
POS
Front-R
POS
Front-L
POS
Rear
POS
off
7 Presione M o m para seleccionar el nivel
deseado.
El volumen puede ajustarse en intervalos
de 1 dB de –12 dB a +12 dB.
Para restaurar la curva de ecualizador
ajustada en fábrica, presione (ENTER)
durante dos segundos.
8 Presione (MENU) dos veces.
Una vez completado el ajuste de efecto,
aparece el modo de reproducción normal.
1 Presione (SOURCE) para seleccionar una
fuente (sintonizador, CD o MD).
2 Presione (SOUND) varias veces hasta que
aparezca “POS”.
3 Presione < o , para seleccionar la
posición de audición que desee.
All y Front y Front-R y Front-L y Rear y
off
Las posiciones de audición aparecen en el
orden mostrado anteriormente.
Para cancelar el modo POS, seleccione
“off”.
Transcurridos tres segundos, el visualizador
vuelve al modo de reproducción normal.
20
Page 97

Selección de un menú
Soundstage
— Organizador Soundstage dinámico (DSO)
Si los altavoces están instalados en la parte
inferior de las puertas, el sonido se recibirá
desde abajo y puede no ser nítido.
La función DSO (Organizador Soundstage
Dinámico) crea un sonido más ambiental como
si hubiera altavoces en el salpicadero
(altavoces virtuales).
Menú Soundstage
Predefinición de Significado
memoria
DSO 1 – 3 Altavoces virtuales
(estándar)
DSO Wide Altavoces virtuales
(grandes)
DSO off Cancelación
Ajuste del balance (BAL)
Es posible ajustar el balance de sonido entre
los altavoces izquierdos y derechos.
1 Presione (SOURCE) para seleccionar una
fuente (sintonizador, CD o MD).
2 Presione (SOUND) varias veces hasta que
aparezca “BAL”.
3 Presione < o , para ajustar el balance.
Transcurridos tres segundos, el visor
vuelve al modo de reproducción normal.
Imagen de los altavoces virtuales
1
*
1
*
2
*
3
*
*1Estándar
2
*
Grandes
3
Posición real de los altavoces (parte inferior de
*
las puertas frontales)
2
*
3
*
Selección del DSO
1 Presione (SOURCE) para seleccionar una
fuente (sintonizador, CD o MD).
2 Presione (DSO) para seleccionar el modo
DSO que desee.
B 1 B 2 B 3 B wide
off b
Para cancelar el modo DSO, seleccione
“off.”
Transcurridos tres segundos, el visualizador
vuelve al modo de reproducción normal.
Ajuste de la atenuación
frontal y posterior
1 Presione (SOURCE) para seleccionar una
fuente (sintonizador, CD o MD).
2 Presione (SOUND) varias veces hasta que
aparezca “F” para los altavoces
delanteros o “R” para los altavoces
traseros.
3 Presione < o , para ajustar el volumen
de los altavoces frontales/posteriores.
Transcurridos tres segundos, el visualizador
vuelve al modo de reproducción normal.
21
Page 98

Ajuste de la frecuencia de corte y
del nivel de volumen de salida de
los altavoces frontales/posteriores
Es posible ajustar el nivel de volumen de
salida y la frecuencia de corte de los altavoces
para que coincidan con las características del
sistema de altavoces instalado.
Frecuencia de corte
Nivel
Frecuencia (Hz)
1 Presione (MENU).
2 Presione M o m varias veces para
seleccionar “Front HPF” o “Rear HPF”.
3 Presione (ENTER) .
4 Presione < o , para seleccionar la
frecuencia de corte.
off y 78 Hz y 99 Hz y 125 Hz y
157 Hz y 198 Hz
5 Presione M o m para ajustar el nivel de
volumen.
El volumen puede ajustarse en intervalos
de 1 dB de –12 dB + 12 dB.
Consejo
Al reducir el volumen al mínimo, aparecerá la
indicación “ATT” y se desactivará la frecuencia
de corte.
Ajuste del volumen de los
altavoces potenciadores
de graves
1 Presione (SOURCE) para seleccionar una
fuente (sintonizador, CD o MD).
2 Presione (SOUND) varias veces hasta que
aparezca “SUB”.
3 Presione < o , para ajustar el nivel de
volumen.
Transcurridos tres segundos, el visualizador
vuelve al modo normal de reproducción.
Consejo
Si presiona (VOL) varias veces para ajustar el
volumen al mínimo, aparecerá “Sub ATT” y la
frecuencia de corte del altavoz potenciador de
graves se desactivará.
Ajuste de la frecuencia de los
altavoces potenciadores de graves
Para adaptarse a las características de los
altavoces potenciadores de graves conectados,
es posible interrumpir las señales de frecuencia
media y alta no deseadas que se introducen en
dichos altavoces. Mediante el ajuste de la
frecuencia de corte (consulte el diagrama que
aparece a continuación), los altavoces
potenciadores de graves emitirán solamente
las señales de baja frecuencia para obtener una
imagen de sonido más nítida.
Frecuencia de corte
Nivel
6 Presione (MENU) dos veces.
Una vez completado el ajuste de efecto,
aparece el modo de reproducción normal.
22
Frecuencia (Hz)
1 Presione (MENU).
2 Presione M o m varias veces hasta que
aparezca “SUB LPF”.
Page 99

3 Presione (ENTER).
4 Presione < o , para seleccionar la
frecuencia de corte que desee.
La frecuencia de corte cambiará de la
siguiente forma en el visualizador:
62 y 78 y 99 y 125 y 157 y off
5 Presione M o m para ajustar el volumen.
6 Presione (MENU) dos veces.
Una vez completado el ajuste de frecuencia,
el visualizador vuelve a mostrar el modo de
reproducción normal.
Escucha de cada fuente de
programa con su DSO
registrado
— Memoria de sonido fuente (SSM)
Cada vez que recupere la misma fuente, podrá
escuchar el mismo menú DSO y curva del
ecualizador registrados para esa fuente,
incluso después de cambiar la fuente de
programa o de apagar la unidad y encenderla
de nuevo.
Otras funciones
Esta unidad también puede controlarse con el
mando rotativo (opcional).
Etiquetado del mando
rotativo
En función de cómo monte el mando rotativo,
adhiera la etiqueta adecuada como se muestra
en la siguiente ilustración.
SOUND
MODE
DSPL
DSPL
MODE
SOUND
23
Page 100

Uso del mando rotativo
El mando rotativo funciona presionando los
botones y/o girando los controles.
También es posible controlar una unidad
opcional de CD/MD con el mando rotativo.
Mediante la presión de los botones
(SOURCE y MODE)
(SOURCE)
(MODE)
Cada vez que presione (SOURCE), la
fuente cambiará de la siguiente forma:
Sintonizador t CD t MD* t TV*
* Si el equipo opcional correspondiente no está
conectado, el elemento no aparecerá.
Al presionar (MODE), el funcionamiento
cambiará de la siguiente forma:
• Sintonizador: FM1 t FM2 t FM3 t
AM1 t AM2
• Unidad de CD: CD1 t CD2 t …
• Unidad de MD*: MD1 t MD2 t …
• TV/Video*: TV1 t TV2 t AUX
Mediante el giro del control
(SEEK/AMS)
Gire el control momentáneamente y
suéltelo para:
•Localizar un tema específico de un disco.
Gire y mantenga girado el control hasta
localizar el punto específico de un tema y,
a continuación, suéltelo para iniciar la
reproducción.
•Sintonizar emisoras automáticamente.
Gire el control y manténgalo así para
buscar una emisora específica.
Mediante la presión y giro del
control (PRESET/DISC)
* Si el equipo opcional correspondiente no está
conectado, el elemento no aparecerá.
24
Presione y gire el control para:
•Recibir emisoras memorizadas en los
botones numéricos.
•Cambiar el disco.
 Loading...