

Page 1
FM/AM
Compact Disc
Player
3-237-612-11 (1)
Operating Instructions
Mode d’emploi
Owner’s Record
The model and serial numbers are located on the bottom of the unit.
Record these numbers in the space provided below.
Refer to these numbers whenever you call upon your Sony dealer regarding this
product.
Model No. CDX-L600X Serial No.
For installation and connections, see the supplied installation/connections
manual.
En ce qui concerne l’installation et les connexions, consulter le manuel
d’installation/raccordement fourni.
US
FR
CDX-L600X
© 2002 Sony Corporation
Page 2

Warning
Welcome !
This equipment has been tested and found to
comply with the limits for a Class B digital
device, pursuant to Part 15 of the FCC Rules.
These limits are designed to provide
reasonable protection against harmful
interference in a residential installation. This
equipment generates, uses, and can radiate
radio frequency energy and, if not installed
and used in accordance with the instructions,
may cause harmful interference to radio
communications. However, there is no
guarantee that interference will not occur in a
particular installation. If this equipment does
cause harmful interference to radio or
television reception, which can be determined
by turning the equipment off and on, the user
is encouraged to try to correct the interference
by one or more of the following measures:
— Reorient or relocate the receiving antenna.
— Increase the separation between the
equipment and receiver.
— Connect the equipment into an outlet on a
circuit different from that to which the
receiver is connected.
— Consult the dealer or an experienced radio/
TV technician for help.
You are cautioned that any changes or
modifications not expressly approved in this
manual could void your authority to operate
this equipment.
CAUTION
The use of optical instruments with this
product will increase eye hazard.
Thank you for purchasing this Sony Compact
Disc Player. You can enjoy its various features
even more with:
•CD TEXT information (displayed when a CD
TEXT disc* is played).
•Supplied controller accessories
Card remote commander RM-X114
•Optional controller accessories
Rotary commander RM-X4S
* A CD TEXT disc is an audio CD that includes
information such as the disc name, artist name,
and track names. This information is recorded on
the disc.
2
Page 3

Table of Contents
Location of controls .................................................. 4
Precautions ................................................................ 6
Notes on discs ........................................................... 6
Getting Started
Resetting the unit ................................................. 7
Detaching the front panel ................................... 8
Setting the clock ................................................... 9
CD Player
Playing a disc ........................................................ 9
Display items ...................................................... 10
Playing tracks repeatedly
— Repeat Play ............................................... 10
Playing tracks in random order
— Shuffle Play ............................................... 10
Radio
Storing stations automatically
— Best Tuning Memory (BTM) ................... 11
Receiving the stored stations ............................ 11
Storing only the desired stations ..................... 12
Storing station names
— Station Memo ........................................... 12
Locating a station by name
— List-up ....................................................... 13
Other Functions
Using the rotary commander ........................... 14
Adjusting the sound characteristics ................ 15
Quickly attenuating the sound ........................ 15
Changing the sound and display settings
— Menu .......................................................... 16
Selecting the sound position
— “My Best sound Position (MBP)” .......... 17
Setting the equalizer .......................................... 17
Additional Information
Maintenance........................................................ 18
Removing the unit ............................................. 19
Specifications ...................................................... 20
Troubleshooting.................................................. 21
Error displays/Messages .................................. 22
3
Page 4
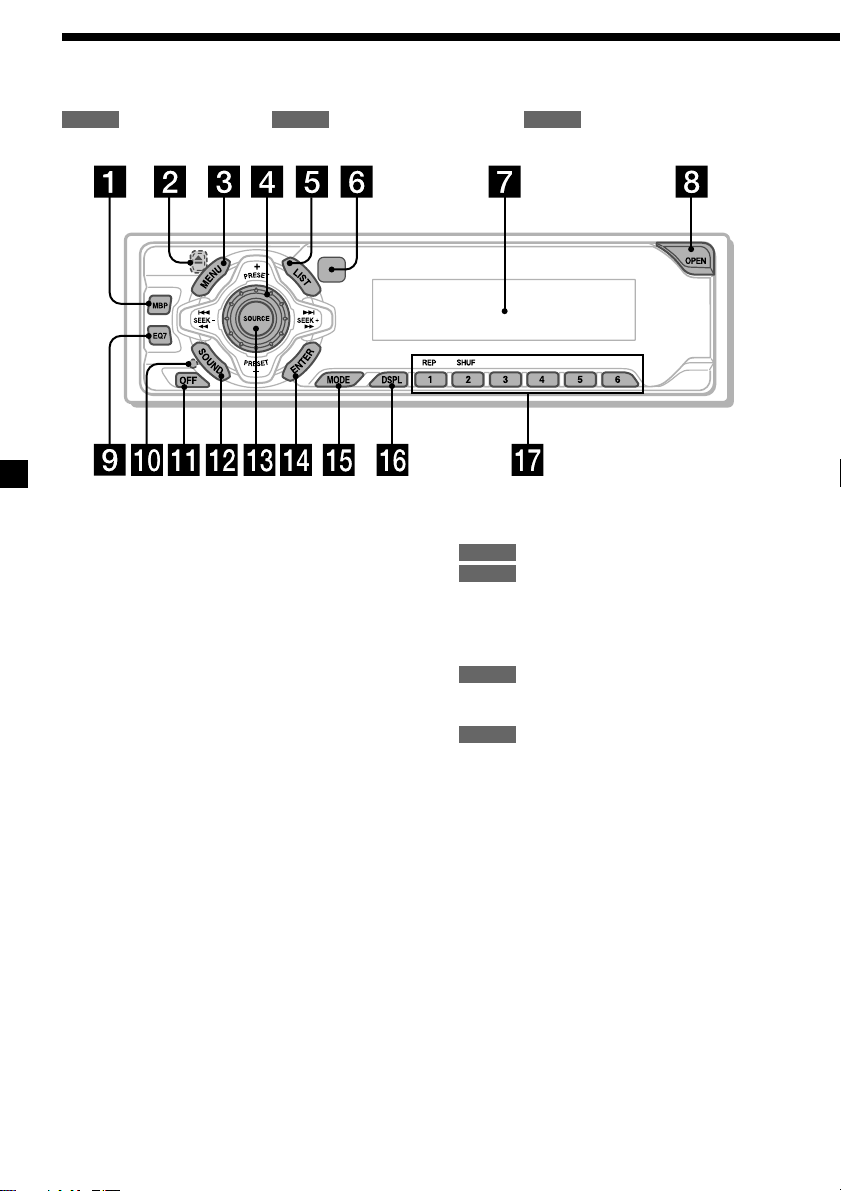
Location of controls
Refer to the pages listed for details.
: During Playback : During radio reception : During menu mode
CD RADIO
1
MBP (My Best sound Position) button
2 Z (eject) button (located on the front side
of the unit, behind the front panel) 9
3 MENU button 9, 11, 12, 13, 16, 18
4 Volume control dial
5 LIST button 13
6 Receptor for the card remote
commander
7 Display window
8 OPEN button 8, 9
9 EQ7 button 17
0 RESET button (located on the front side of
the unit, behind the front panel) 7
qa OFF (Stop/Power off) button* 8, 9
qs SOUND button 15, 17
qd SOURCE (Power on/Radio/CD) button
8, 9, 11, 12, 17
17
qf ENTER button
13
RADIO
9, 11, 12, 13, 16, 18
MENU
qg MODE button 11, 12
qh DSPL (display mode change) button
10, 13
qj Number buttons
RADIO
* Warning when installing in a car
without an ACC (accessory) position
on the ignition key switch
Be sure to press (OFF) on the unit for 2
seconds to turn off the clock display after
turning off the engine.
Otherwise, the clock display does not turn
off and this causes battery drain.
MENU
CD
(1) REP 10
(2) SHUF 10
11, 12
CDX-L600X
4
Page 5
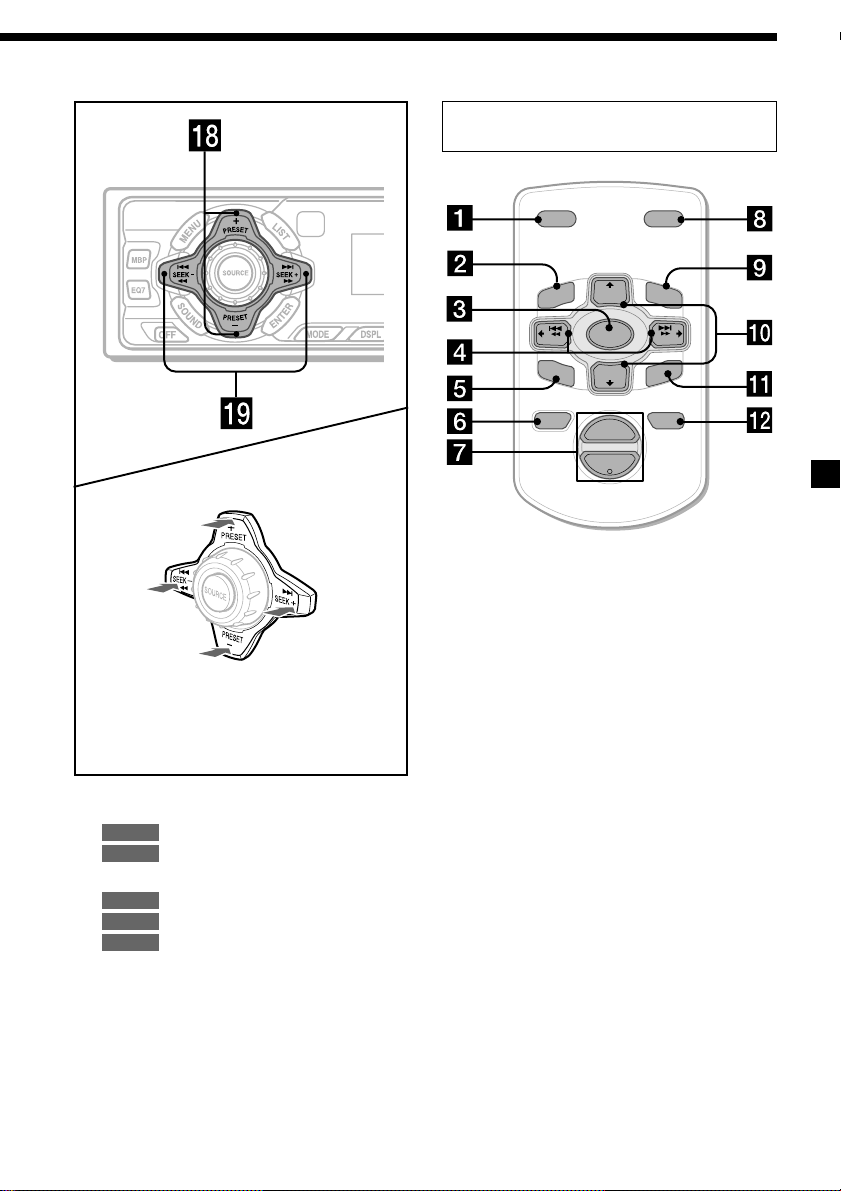
Card remote commander
RM-X114
DSPL MODE
+
PRESET
DISC
LIST
+
U
N
E
M
(PRESET)
(+): to select upwards
(SEEK)
(+):to select
rightwards
/>
(SEEK)
(–): to select
leftwards/
.
(PRESET)
(–): to select downwards
In menu mode, the currently selectable
button (s) of these four are indicated with a
“M” in the display.
qk PRESET buttons (+/–)
11, 13
RADIO
9, 11, 12, 13, 16, 18
MENU
ql SEEK buttons (–/+) 15
9
CD
11, 12
RADIO
9, 12, 16, 18
MENU
SEEK
SO
SOURCE
–
UN
DISC
D
PRESET –
+
VOL
+
SEEK
–
ENTER
ATTOFF
–
The corresponding buttons of the card
remote commander control the same
functions as those on this unit.
1 DSPL button
2 MENU button
3 SOURCE button
4 SEEK (</,) buttons
5 SOUND button
6 OFF button
7 VOL (+/–) buttons
8 MODE button
9 LIST button
0 PRESET (M/m) buttons
qa ENTER button
qs ATT button
Note
If the unit is turned off by pressing (OFF) for 2
seconds, it cannot be operated with the card
remote commander unless (SOURCE) on the unit is
pressed, or a disc is inserted to activate the unit
first.
Tip
Refer to “Replacing the lithium battery” for details
on how to replace the batteries (page 19).
5
Page 6
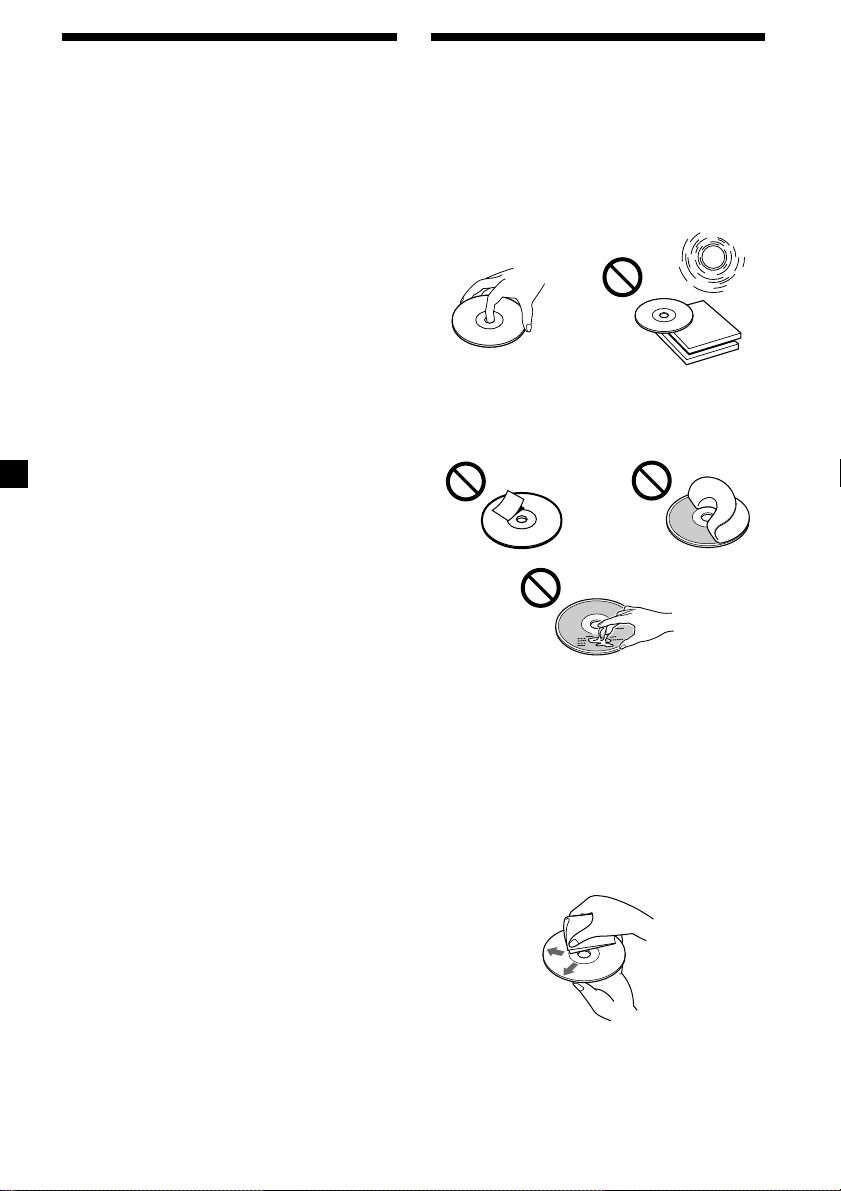
Precautions
Notes on discs
•If your car was parked in direct sunlight,
allow the unit to cool off before operating it.
•Power antennas will extend automatically
while the unit is operating.
If you have any questions or problems
concerning your unit that are not covered in
this manual, please consult your nearest Sony
dealer.
Moisture condensation
On a rainy day or in a very damp area,
moisture condensation may occur inside the
lenses and display of the unit. Should this
occur, the unit will not operate properly. In
such a case, remove the disc and wait for about
an hour until the moisture has evaporated.
To maintain high sound quality
Be careful not to splash juice or other soft
drinks onto the unit or discs.
•To keep the disc clean, do not touch the
surface. Handle the disc by its edge.
•Keep your discs in their cases or disc
magazines when not in use. Do not subject
the discs to heat/high temperature. Avoid
leaving them in parked cars or on
dashboards/rear trays.
•Do not attach labels, or use discs with sticky
ink/residue. Such discs may stop spinning
when used, causing a malfunction, or may
ruin the disc.
•Discs with special shapes (heart-shaped
discs, octagonal discs, etc.) cannot be played
on this unit. Attempting to do so may
damage the unit. Do not use such discs.
• You cannot play 8 cm (3 in.) CDs.
•Before playing, clean the discs with a
commercially available cleaning cloth. Wipe
each disc from the center out. Do not use
solvents such as benzine, thinner,
commercially available cleaners, or antistatic
spray intended for analog discs.
6
Page 7
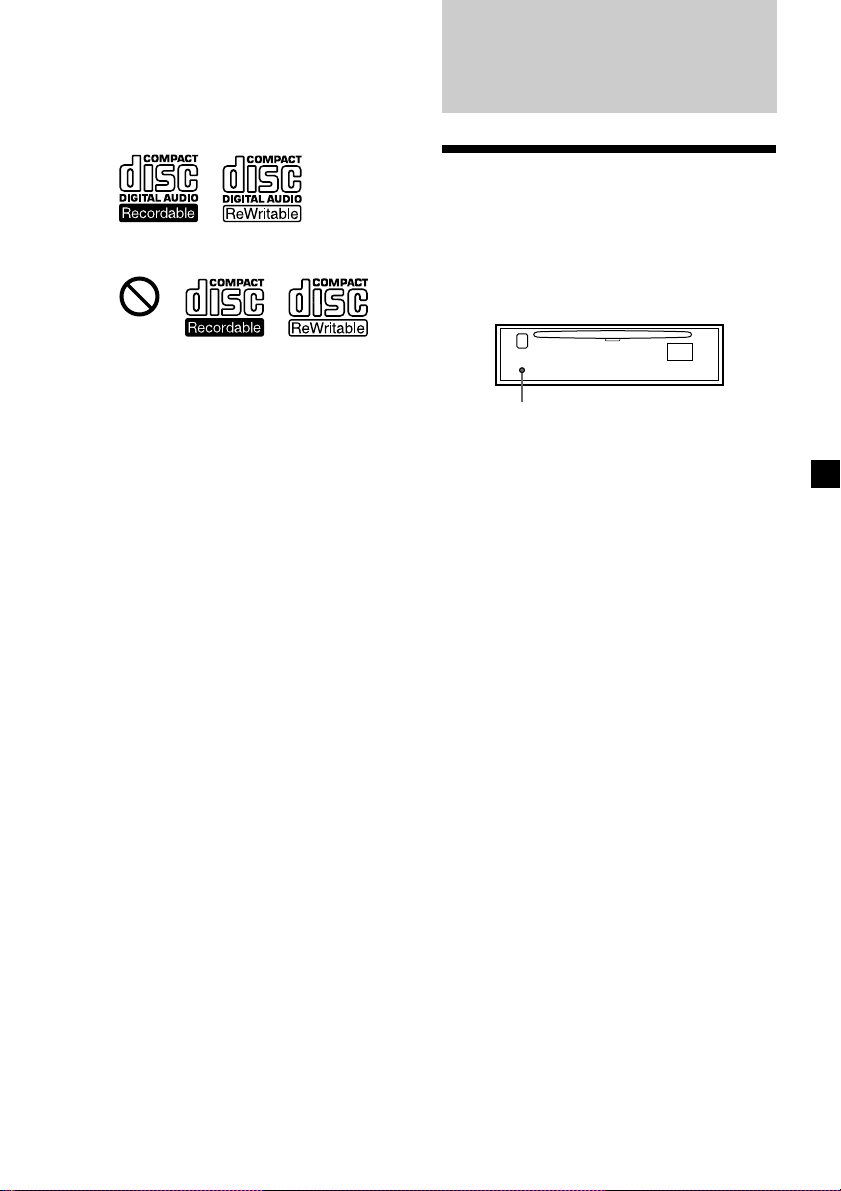
Notes on CD-R/CD-RW discs
•You can play CD-Rs (recordable CDs)/CDRWs (rewritable CDs) designed for audio use
on this unit.
Look for these marks to distinguish CD-Rs/
CD-RWs for audio use.
Getting Started
These marks denote that a disc is not for
audio use.
•Some CD-Rs/CD-RWs (depending on the
equipment used for its recording or the
condition of the disc) may not play on this
unit.
•You cannot play a CD-R/CD-RW that is not
finalized*.
* A process necessary for a recorded CD-R/CD-RW
disc to be played on the audio CD player.
Resetting the unit
Before operating the unit for the first time or
after replacing the car battery, you must reset
the unit.
Remove the front panel and press the RESET
button with a pointed object, such as a ballpoint pen.
RESET button
Note
Pressing the RESET button will erase the clock
setting and some stored contents.
7
Page 8
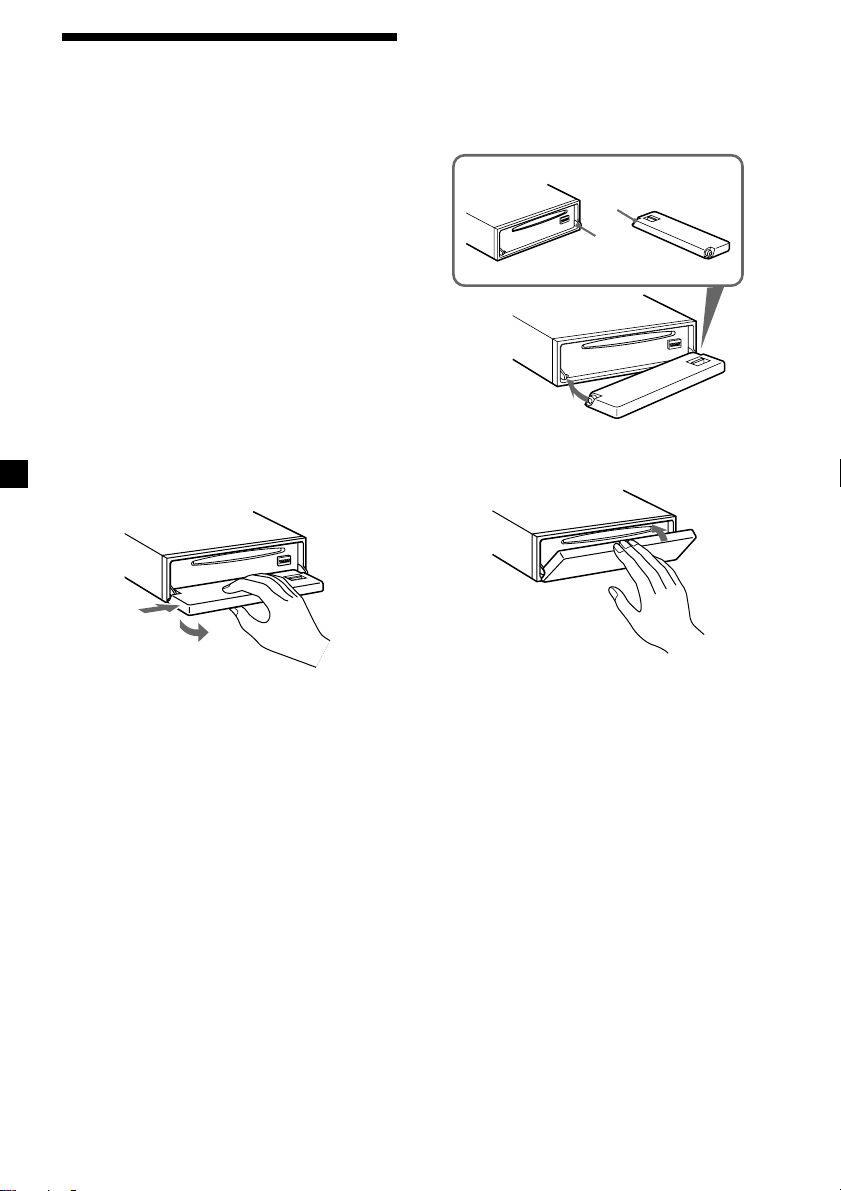
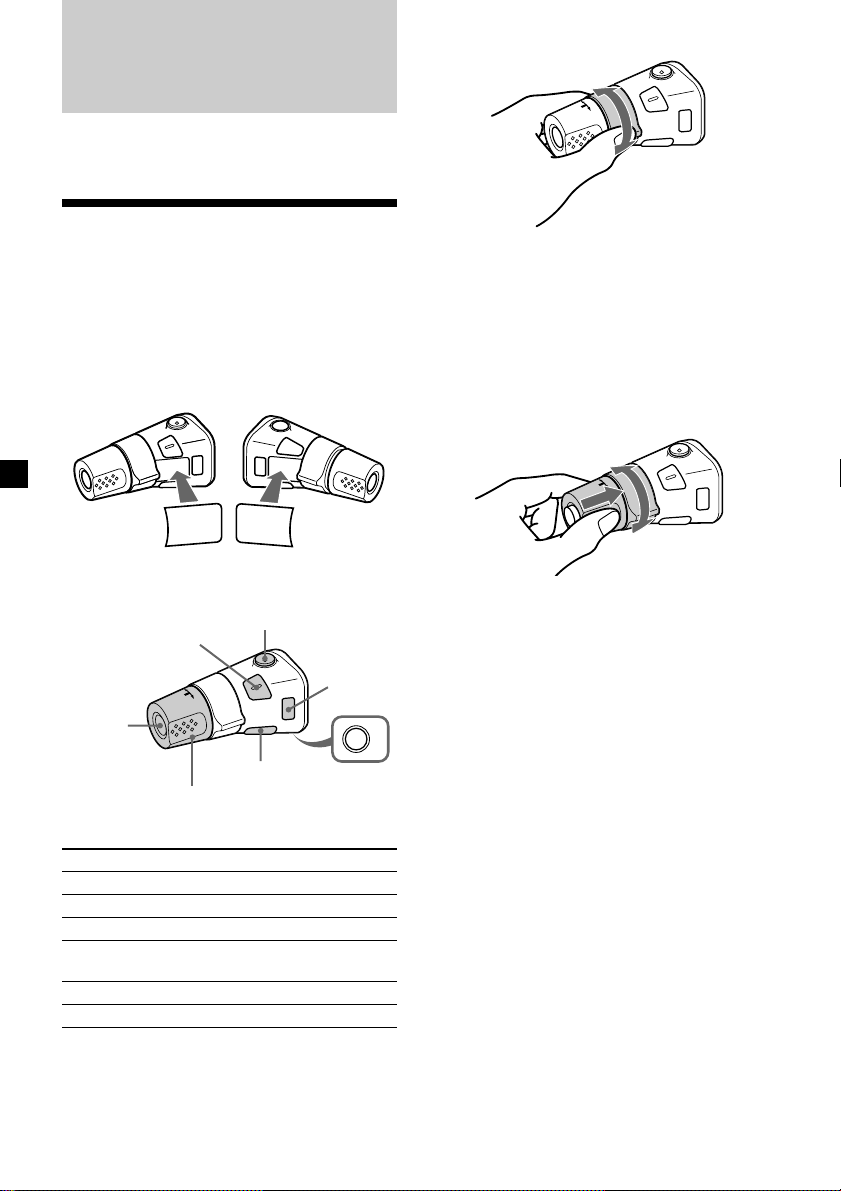
Detaching the front panel
You can detach the front panel of this unit to
protect the unit from being stolen.
Caution alarm
If you turn the ignition switch to the OFF
position without removing the front panel, the
caution alarm will beep for a few seconds.
If you connect an optional amplifier and do not
use the built-in amplifier, the beep sound will
be deactivated.
1 Press (OFF)*.
CD playback or radio reception stops (the
key illumination and display remain on).
* If your car has no ACC position on the
ignition switch, be sure to turn the unit off by
pressing (OFF) for 2 seconds to avoid car
battery drain.
Attaching the front panel
Place hole A of the front panel onto the
spindle B on the unit, then lightly push the
left side in.
Press (SOURCE) (or insert a CD) to operate the
unit.
A
B
2 Press (OPEN), then slide the front panel
to the right, and gently pull out the left
end of the front panel.
1
2
Notes
• If you detach the panel while the unit is still
turned on, the power will turn off automatically
to prevent the speakers from being damaged.
• Do not drop or put excessive pressure on the
front panel and its display window.
• Do not subject the front panel to heat/high
temperature or moisture. Avoid leaving it in
parked cars or on dashboards/rear trays.
Tip
When carrying the front panel with you, use the
supplied front panel case.
x
Note
Do not put anything on the inner surface of the
front panel.
8
Page 9
Setting the clock
The clock uses a 12-hour digital indication.
Example: To set the clock to 10:08
1 Press (MENU), then press either side of
(PRESET) repeatedly until “CLOCK”
appears.
1 Press (ENTER).
The hour indication flashes.
2 Press either side of (PRESET) to set
the hour.
CD Player
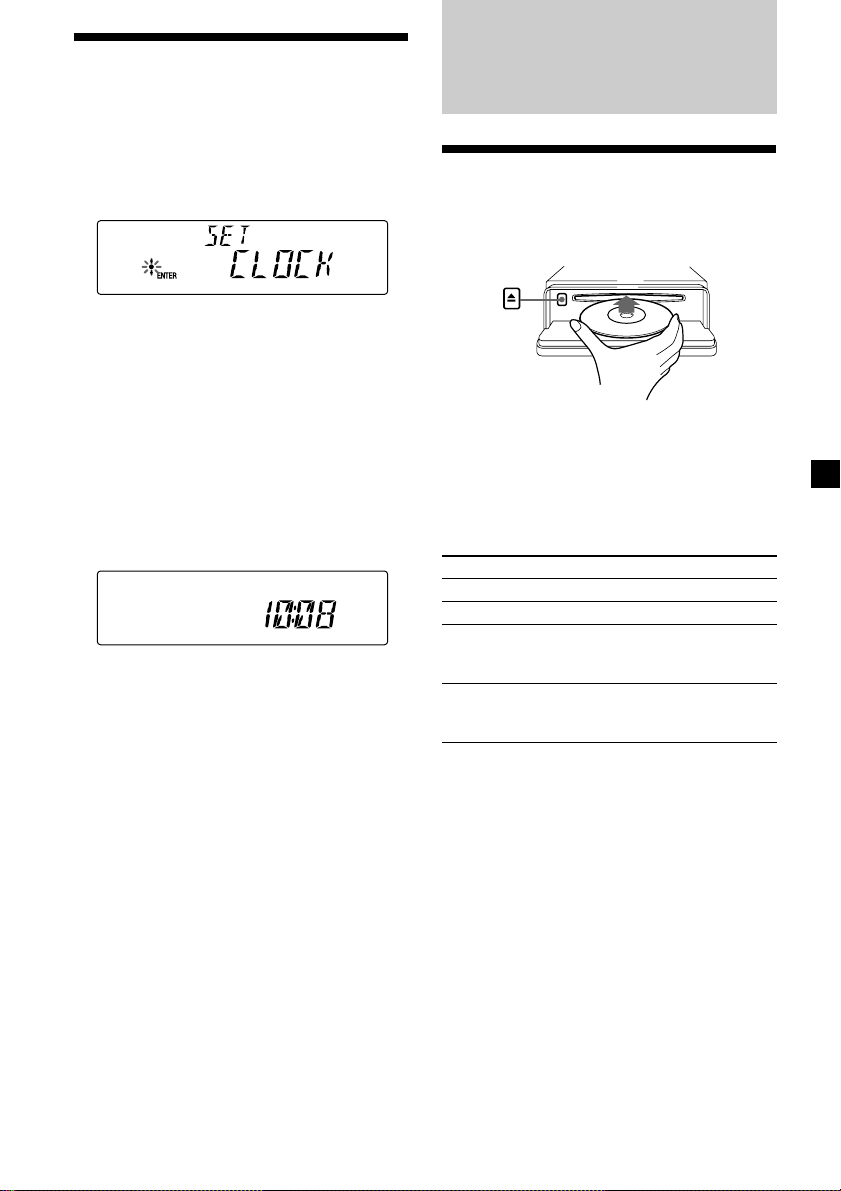
Playing a disc
1 Press (OPEN) and insert the disc
(labeled side up).
3 Press the (+) side of (SEEK).
The minute indication flashes.
4 Press either side of (PRESET) to set
the minute.
2 Press (ENTER).
The clock starts. After the clock setting is
completed, the display returns to normal
play mode.
Tip
When D.INFO mode is set to ON, the time is always
displayed (page 16).
2 Close the front panel.
Playback starts automatically.
If a disc is already inserted, press (SOURCE)
repeatedly until “CD” appears to start
playback.
To Press
Stop playback (OFF)
Eject the disc (OPEN) then Z
Skip tracks (SEEK) (./>)
– Automatic [once for each track]
Music Sensor
Fast-forward/ (SEEK) (m/M)
reverse [hold to desired point]
– Manual Search
Note
When the last track on the disc is over, playback
restarts from the first track of the disc.
9
Page 10

Display items
When the disc/track changes, any prerecorded
title of the new disc/track is automatically
displayed (if the Auto Scroll function is set to
“ON,” names exceeding 8 characters will be
scrolled (page 16)).
Displayable items
• Music source
• Clock
• Function
Displayable items
• Disc name*1/artist name*
• Track title*
• Elapsed playing time
To Press
Switch display (DSPL)
item
*1“NO NAME” indicates there is no prerecorded
name to display.
*2Only for CD TEXT discs with the artist name.
1
2
Playing tracks repeatedly
— Repeat Play
The current track will repeat itself when it
reaches the end.
During playback, press (1) (REP)
repeatedly until “REP-1” appears in the
display.
Repeat Play starts.
To return to normal play mode, select
“REP-OFF.”
Playing tracks in random
order — Shuffle Play
You can select to play the tracks on the current
disc in random order.
During playback, press (2) (SHUF)
repeatedly until “SHUF-1” appears in the
display.
Shuffle Play starts.
To return to normal play mode, select
“SHUF-OFF.”
Notes
• Some characters cannot be displayed.
• For some CD TEXT discs with very many
characters, information may not scroll.
• This unit cannot display the artist name for each
track of a CD TEXT disc.
10
Page 11

Radio
Receiving the stored
stations
The unit can store up to 6 stations per band
(FM1, FM2, FM3, AM1, and AM2).
Caution
When tuning in stations while driving, use
Best Tuning Memory to prevent accidents.
Storing stations
automatically
— Best Tuning Memory (BTM)
The unit selects the stations with the strongest
signals within the selected band, and stores
them in the order of their frequency.
1 Press (SOURCE) repeatedly to select the
radio.
2 Press (MODE) repeatedly to select the
band.
3 Press (MENU), then press either side of
(PRESET) repeatedly until “BTM”
appears.
4 Press (ENTER).
A beep sounds when the setting is stored.
Notes
• If only a few stations can be received due to
weak signals, some number buttons will retain
their former settings.
• When a number is indicated in the display, the
unit starts storing stations from the one currently
displayed.
1 Press (SOURCE) repeatedly to select the
radio.
2 Press (MODE) repeatedly to select the
band.
3 Press the number button ((1) to (6)) on
which the desired station is stored.
Tip
Press either side of (PRESET) to receive the
stations in the order they are stored in the memory
(Preset Search function).
If preset tuning does not work
Press either side of (SEEK) to search for
the station (automatic tuning).
Scanning stops when the unit receives a
station. Repeat until the desired station is
received.
Tips
• If automatic tuning stops too frequently, turn on
the Local Seek to limit seek to stations with
stronger signals (see “Changing the sound and
display settings,” page 16).
• If you know the frequency of the station you
want to listen to, press and hold either side of
(SEEK) to locate the approximate frequency,
then press (SEEK) repeatedly to fine adjust to
the desired frequency (manual tuning).
If FM stereo reception is poor
Select monaural reception mode.
(see “Changing the sound and display
settings,” page 16).
The sound improves, but becomes
monaural (“ST” disappears).
Note
If interference occurs, this unit will automatically
narrow the reception frequency to eliminate noise
(IF AUTO function). In such cases, some FM stereo
broadcasts may become monaural while in the
stereo reception mode.
Tip
To always hear FM stereo broadcasts in stereo, you
can change the IF AUTO setting and widen the
frequency signal reception (see “Changing the
sound and display settings,” page 16). Note that
some interference may occur in this setting.
11
Page 12
Storing only the desired
stations
You can manually preset the desired stations
on any chosen number button.
1 Press (SOURCE) repeatedly to select the
radio.
2 Press (MODE) repeatedly to select the
band.
Storing station names
— Station Memo
You can assign a name to each radio station
and store it in memory. The name of the
station currently tuned in appears in the
display. You can assign a name using up to 8
characters for a station.
Storing the station names
1 Tune in a station whose name you want
to store.
3 Press either side of (SEEK) to tune in the
station that you want to store.
4 Press the desired number button ((1) to
(6)) for 2 seconds until “MEM” appears.
The number button indication appears in
the display.
Note
If you try to store another station on the same
number button, the previously stored station will
be erased.
2 Press (MENU), then press either side of
(PRESET) repeatedly until “NAMEEDIT”
appears.
3 Press (ENTER).
4 Enter the characters.
1 Press the (+)*1 side of (PRESET)
repeatedly to select the desired
character.
A t B t C … t 0 t 1 t 2 …
t + t – t * … t _*2 t A
*1For reverse order, press the (–) side of
(PRESET).
2
(blank space)
*
2 Press the (+) side of (SEEK) after
locating the desired character.
If you press the (–) side of (SEEK), you
can move back to the left.
12
3 Repeat steps 1 and 2 to enter the
entire name.
5 Press (ENTER).
Page 13

Tips
• Simply overwrite or enter “_” to correct or erase
a name.
• There is another way to start storing station
names: Press (LIST) for 2 seconds instead of
performing steps 2 and 3. You can also complete
the operation by pressing (LIST) for 2 seconds
instead of step 5.
Displaying the station name
Switch the display item to frequency or station
name*.
To Press
Switch display (DSPL) during radio
item reception
* If the station name is not stored, “NO NAME”
appears in the display for one second.
Erasing the station name
1 During radio reception, press (MENU),
then press either side of (PRESET)
repeatedly until “NAME DEL” appears.
2 Press (ENTER).
3 Press either side of (PRESET) repeatedly
to select the station whose name you
want to erase.
Locating a station by
name — List-up
1 During radio reception, press (LIST).
The name assigned to the station currently
tuned appears in the display.
2 Press either side of (PRESET) repeatedly
until you find the desired station.
If no name is assigned to the selected
station, the frequency appears in the
display.
3 Press (ENTER) to tune in the desired
station.
4 Press (ENTER) for 2 seconds.
The name is erased.
Repeat steps 3 to 4 if you want to erase
other names.
5 Press (MENU) twice.
The unit returns to normal radio reception
mode.
Note
If you have already erased all of the station names,
“NO DATA” appears in step 4.
13
Page 14
Other Functions
You can also control the unit with a rotary
commander (optional).
Using the rotary
commander
First, attach the appropriate label depending
on how you want to mount the rotary
commander.
The rotary commander works by pressing
buttons and/or rotating controls.
By rotating the control
SEEK/AMS
control
Rotate and release to:
– Skip tracks.
– Tune in stations automatically.
Rotate, hold, and release to:
– Fast-forward/reverse a track.
– find a station manually.
By pushing in and rotating the
control
SOUND
MODE
DSPL
DSPL
M
ODE
SOUND
By pressing buttons
(SOUND)
(SOURCE)
Rotate the VOL control
to adjust the volume.
Press To
(SOURCE) Change source (radio/CD)
(MODE) Change radio band
(ATT) Attenuate sound
(OFF)* Stop playback or radio
(SOUND) Adjust the sound menu
(DSPL) Change the display item
* If your car has no ACC (accessory) position on the
ignition key switch, be sure to press (OFF) for 2
seconds to turn off the clock indication after
turning off the ignition.
(ATT)
(DSPL)
reception
(MODE)
(OFF)
PRESET
control
Push in and rotate the control to:
– Receive preset stations.
OFF
14
Page 15

Changing the operative direction
The operative direction of controls is factoryset as shown below.
To increase
Adjusting the sound
characteristics
You can adjust the bass, treble, balance, and
fader.
The bass and treble levels can be stored
independently for each source.
To decrease
If you need to mount the rotary commander on
the right hand side of the steering column, you
can reverse the operative direction.
Press (SOUND) for 2 seconds while
pushing the VOL control.
1 Select the item you want to adjust by
pressing (SOUND) repeatedly.
Each time you press (SOUND), the item
changes as follows:
BAS (bass) t TRE (treble) t
BAL (left-right) t FAD (front-rear)
2 Adjust the selected item by pressing
either side of (SEEK).
When adjusting with the rotary
commander, press (SOUND) and rotate the
VOL control.
Note
Adjust within 3 seconds after selecting the item.
Quickly attenuating the
sound
(With the rotary commander or the card
remote commander)
Press (ATT) on the rotary commander or
card remote commander.
After “ATT-ON” momentarily appears, the
“ATT” appears in the display.
To restore the previous volume level, press
(ATT) again.
15
Page 16

Changing the sound and
display settings — Menu
The following items can be set:
SET (Set Up)
•CLOCK (page 9)
•BEEP — to turn the beeps on or off.
•RM (Rotary Commander) — to change the
operative direction of the controls of the
rotary commander.
— Select “NORM” to use the rotary
commander as the factory-set position.
— Select “REV” when you mount the rotary
commander on the right side of the
steering column.
DSPL (Display)
•D.INFO (Dual Information) — to display the
clock and the play mode at the same time
(ON).
•M.DSPL (Motion Display) — to select the
Motion Display mode from “1,” “2,” and
“OFF.”
— Select “1” to show decoration lines in the
display and activate Demo display.
— Select “2” to show decoration lines in the
display and deactivate Demo display.
— Select “OFF” to deactivate the Motion
Display.
•A.SCRL (Auto Scroll)
— Select “ON” to scroll all automatically
displayed names exceeding 8 characters.
— When Auto scroll is set to off and the
disc/track name is changed, the disc/
track name does not scroll.
SND (Sound)
•LOUD (Loudness) — to enjoy bass and treble
even at low volumes. The bass and treble will
be reinforced.
P/M (Play Mode)
•LOCAL-ON/OFF (Local seek mode)
(page 11)
— Select “ON” to only tune into stations
with stronger signals.
•MONO-ON/OFF (Monaural mode) (page 11)
— Select “ON” to hear FM stereo broadcast
in monaural. Select “OFF” to return to
normal mode.
•IF AUTO/WIDE (page 11)
1 Press (MENU).
To set A.SCRL, press (MENU) during CD
Playback.
2 Press either side of (PRESET) repeatedly
until the desired item appears.
3 Press the (+) side of (SEEK) to select the
desired setting (Example: ON or OFF).
4 Press (ENTER).
After the mode setting is completed, the
display returns to normal play mode.
Note
The displayed item will differ depending on the
source.
Tip
You can easily switch among categories (“SET,”
“DSPL,” “SND,” “P/M,” and “EDIT”) by pressing
either side of (PRESET) for 2 seconds.
16
Page 17

Selecting the sound
position
— “My Best sound Position (MBP)”
When you drive without passengers, you can
enjoy the most comfortable sound
environment with “My Best sound Position.”
“My Best sound Position” has two presets,
which adjust the sound level of balance and
fader. You can select one very easily with the
MBP button.
Display
window
MBP-A
MBP-B
Balance Level Fader Level
Right
– 4dB
Left
Front
0
0
– 4dB
0
0
Rear
– 4dB
– 4dB
Setting the equalizer
You can select an equalizer curve for seven
music types (VOCAL, CLUB, JAZZ, NEW
AGE, ROCK, CUSTOM, and XPLOD).
You can store and adjust the equalizer settings
for frequency and level.
Selecting the equalizer curve
1 Press (SOURCE) to select a source (radio
or CD).
2 Press (EQ7) repeatedly until the desired
equalizer curve appears.
Each time you press (EQ7), the item
changes.
MBP-OFF
Press (MBP) repeatedly for the desired
listening position.
The mode of “My Best sound Position” is
shown in the display in order of the table.
After one second, the display goes back to
the normal playback mode.
If you want to adjust the sound level of
balance and fader more precisely, you can
do it using the (SOUND) button. (See
“Adjusting the sound characteristics” on
page 15.)
Notes
• When the BAL (balance) or FAD (fader) in
“Adjusting the sound characteristics” (page 15) is
adjusted, the MBP setting returns to OFF.
• When MBP is set to OFF, the BAL and FAD setting
is activated.
0
0
0
0
To cancel the equalizing effect, select
“OFF.”
After 3 seconds, the display returns to the
normal playback mode.
continue to next page t
17
Page 18

Adjusting the equalizer curve
1 Press (MENU).
2 Press either side of (PRESET) repeatedly
until “EQ7 TUNE” appears, then press
(ENTER).
3 Press either side of (SEEK) to select the
desired equalizer curve, then press
(ENTER).
Each time you press (SEEK), the item
changes.
4 Select the desired frequency and level.
1 Press either side of (SEEK) to select
the desired frequency.
Each time you press (SEEK), the
frequency changes.
62 Hz y 157 Hz y 396 Hz
y 1.0 kHz y 2.5 kHz y 6.3 kHz
y 16.0 kHz
2 Press either side of (PRESET) to
adjust the desired volume level.
The volume level is adjustable by 1 dB
steps from –10 dB to +10 dB.
To restore the factory-set equalizer
curve, press (ENTER) for two seconds.
5 Press (MENU) twice.
When the effect setting is complete, the
normal playback mode appears.
Additional
Information
Maintenance
Fuse replacement
When replacing the fuse, be sure to use one
matching the amperage rating stated on the
original fuse. If the fuse blows, check the
power connection and replace the fuse. If the
fuse blows again after replacement, there may
be an internal malfunction. In such a case,
consult your nearest Sony dealer.
Fuse (10 A)
Warning
Never use a fuse with an amperage rating
exceeding the one supplied with the unit as
this could damage the unit.
Cleaning the connectors
The unit may not function properly if the
connectors between the unit and the front
panel are not clean. In order to prevent this,
detach the front panel (page 8) and clean the
connectors with a cotton swab dipped in
alcohol. Do not apply too much force.
Otherwise, the connectors may be damaged.
18
Main unit
Back of the front panel
Page 19

Notes
• For safety, turn off the ignition before cleaning
the connectors, and remove the key from the
ignition switch.
• Never touch the connectors directly with your
fingers or with any metal device.
Removing the unit
1 Remove the front cover
1 Detach the front panel (page 8).
Replacing the lithium battery
Under normal conditions, batteries will last
approximately 1 year. (The service life may be
shorter, depending on the conditions of use.)
When the battery becomes weak, the range of
the card remote commander becomes shorter.
Replace the battery with a new CR2025 lithium
battery.
x
+ side up
2 Press the clip inside the front cover
with a thin screwdriver.
3 Repeat step 2 for the other side.
2 Remove the unit
1 Use a thin screwdriver to push in the
clip on the left side of the unit, then
pull out the left side of the unit until
the catch clears the mounting.
4 mm
(3/16 in.)
2 Repeat step 1 for the right side.
3 Slide the unit out of its mounting.
Notes on lithium battery
•Keep the lithium battery out of the reach of
children. Should the battery be swallowed,
immediately consult a doctor.
•Wipe the battery with a dry cloth to assure a
good contact.
•Be sure to observe the correct polarity when
installing the battery.
•Do not hold the battery with metallic
tweezers, otherwise a short-circuit may
occur.
WARNING
Battery may explode if mistreated.
Do not recharge, disassemble, or dispose of
in fire.
19
Page 20

Specifications
AUDIO POWER SPECIFICATIONS
POWER OUTPUT AND TOTAL HARMONIC DISTORTION
23.2 watts per channel minimum continuous average power into
4 ohms, 4 channels driven from 20 Hz to 20 kHz with no more
than 5% total harmonic distortion.
CD player section
Signal-to-noise ratio 90 dB
Frequency response 10 – 20,000 Hz
Wow and flutter Below measurable limit
Laser Diode Properties
Material GaAlAs
Wavelength 780 nm
Emission Duration Continuous
Laser output power Less than 44.6 µW*
* This output is the value measured at a distance
of 200 mm from the objective lens surface on the
Optical Pick-up Block.
Tuner section
FM
Tuning range 87.5 – 107.9 MHz
Antenna terminal External antenna connector
Intermediate frequency 10.7 MHz/450 kHz
Usable sensitivity 8 dBf
Selectivity 75 dB at 400 kHz
Signal-to-noise ratio 66 dB (stereo),
Harmonic distortion at 1 kHz
Separation 35 dB at 1 kHz
Frequency response 30 – 15,000 Hz
AM
Tuning range 530 – 1,710 kHz
Antenna terminal External antenna connector
Intermediate frequency 10.7 MHz/450 kHz
Sensitivity 30 µV
72 dB (mono)
0.6 % (stereo),
0.3 % (mono)
Power amplifier section
Outputs Speaker outputs
Speaker impedance 4 – 8 ohms
Maximum power output 52 W × 4 (at 4 ohms)
(sure seal connectors)
General
Outputs Audio outputs
Input Telephone ATT control
Tone controls Bass ±10 dB at 62 Hz
Loudness +8 dB at 100 Hz
Power requirements 12 V DC car battery
Dimensions Approx. 178 × 50 × 176 mm
Mounting dimensions Approx. 182 × 53 × 161 mm
Mass Approx. 1.2 kg
Supplied accessories Parts for installation and
Optional accessories Rotary commander
Power antenna relay
control lead
Power amplifier control
lead
lead
Treble ±10 dB at 16 kHz
+2 dB at 10 kHz
(negative ground)
1
/8 × 2 × 7 in.)
(7
(w/h/d)
1
/4 × 2 1/8 × 6 3/8 in.)
(7
(w/h/d)
(2 lb 10 oz.)
connections (1 set)
Front panel case (1)
Card remote commander
RM-X114
RM-X4S
20
Note
This unit cannot be connected to a digital
preamplifier or an equalizer.
Design and specifications are subject to change
without notice.
Page 21

Troubleshooting
The following checklist will help you remedy
problems you may encounter with your unit.
Before going through the checklist below,
check the connection and operating
procedures.
General
No sound.
•Rotate the volume control dial clockwise to
adjust the volume.
•Cancel the ATT function.
•Set the fader control to the center position
for a 2-speaker system.
The contents of the memory have been
erased.
•The RESET button has been pressed.
t Store again into the memory.
•The power cord or battery has been
disconnected.
•The power connecting cord is not
connected properly.
No beep sound.
The beep sound is cancelled (page 16).
Indications disappear from/do not appear in
the display.
•The clock display disappears if you press
(OFF) for 2 seconds.
t Press (OFF) again for 2 seconds to
display the clock.
•Remove the front panel and clean the
connectors. See “Cleaning the connectors”
(page 18) for details.
Stored stations and correct time are erased.
The fuse has blown.
Makes noise when the ignition key is in the
ON, ACC, or OFF position.
The leads are not matched correctly with the
car’s accessory power connector.
No power is being supplied to the unit.
•Check the connection. If everything is in
order, check the fuse.
•The car does not have an ACC position.
t Press (SOURCE) (or insert a disc) to
turn on the unit.
The power is continuously supplied to the
unit.
The car does not have an ACC position.
The power antenna does not extend.
The power antenna does not have a relay
box.
CD playback
A disc cannot be loaded.
•Another CD is already loaded.
•The CD is forcibly inserted upside down or
in the wrong way.
Playback does not begin.
•Dirty or defective disc.
•CD-R/CD-RW that is not finalized.
•You tried to playback a CD-R/CD-RW not
designed for audio use.
•Some CD-Rs/CD-RWs may not play due
to its recording equipment or the disc
condition.
A disc is automatically ejected.
The ambient temperature exceeds 50°C
(122°F).
The operation buttons do not function.
CD will not be ejected.
Press the RESET button.
The sound skips from vibration.
•The unit is installed at an angle of more
than 60°.
•The unit is not installed in a sturdy part of
the car.
The sound skips.
Dirty or defective disc.
continue to next page t
21
Page 22

Radio reception
Preset tuning is not possible.
•Store the correct frequency in the memory.
•The broadcast signal is too weak.
The stations cannot be received.
The sound is hampered by noises.
•Connect a power antenna control lead
(blue) or accessory power supply lead
(red) to the power supply lead of a car’s
antenna booster. (Only when your car has
built-in FM/AM antenna in the rear/side
glass.)
•Check the connection of the car antenna.
•The auto antenna will not go up.
t Check the connection of the power
antenna control lead.
•Check the frequency.
Automatic tuning is not possible.
•The local seek mode is set to “ON.”
t Set the local seek mode to “OFF”
(page 16).
•The broadcast signal is too weak.
t Perform manual tuning.
The “ST” indication flashes.
•Tune in the frequency accurately.
•The broadcast signal is too weak.
t Set to the monaural reception mode
(page 16).
A program broadcast in stereo is heard in
monaural.
The unit is in monaural reception mode.
t Cancel monaural reception mode
(page 16).
Interference occurs during FM reception.
The wide mode is selected.
t Set the IF mode to “IF AUTO” (page 16).
Error displays/Messages
Error displays
The following indications will flash for about 5
seconds, and an alarm sound will be heard.
ERROR
•A CD is dirty or inserted upside down.
t Clean or insert the CD correctly.
•A CD cannot play because of some
problem.
t Insert another CD.
HI TEMP
The ambient temperature is more than 50°C
(122°F).
t Wait until the temperature goes down
below 50°C (122°F).
RESET
The CD unit cannot be operated because of
some problem.
t Press the RESET button on the unit.
If these solutions do not help improve the
situation, consult your nearest Sony dealer.
Messages
L.SEEK +/–
The Local Seek mode is on during automatic
tuning (page 11).
“ ” or “ ”
You have reached the beginning or the end
of the disc and you cannot go any further.
22
Page 23

23
Page 24

Félicitations !
Nous vous remercions d’avoir fait l’acquisition
d’un lecteur de disques compacts Sony. Vous
pourrez exploiter les multiples fonctions
d’utilisation de cet appareil à l’aide des
accessoires ci-dessous :
•Informations CD TEXT (affichées lorsqu’un
disque CD TEXT* est reproduit).
•Accessoires de commande fournis
Télécommande à carte RM-X114
•Accessoires de commande optionnels
Satellite de commande RM-X4S
* Un disque CD TEXT est un CD audio qui
comprend des informations telles que le titre du
disque, le nom de l’artiste et les titres des plages.
Ces informations sont enregistrées sur le disque.
2
Page 25

Table des matières
Emplacement des commandes ............................... 4
Précautions ................................................................ 6
Remarques sur les disques ...................................... 6
Préparation
Réinitialisation de l’appareil............................... 7
Dépose de la façade ............................................. 8
Réglage de l’horloge ............................................ 9
Lecteur CD
Lecture d’un disque ............................................. 9
Rubriques d’affichage........................................ 10
Lecture de plages répétée
— Lecture répétée ......................................... 10
Lecture de plages dans un ordre quelconque
— Lecture aléatoire....................................... 10
Radio
Stockage automatique des stations
— Mémorisation du meilleur accord
(BTM) .............................................................. 11
Réception des stations stockées ....................... 11
Mémorisation des stations de votre choix
uniquement.................................................... 12
Mémorisation de noms de stations
— Mémorisation des stations...................... 12
Localisation d’une station par son nom
— Répertoire.................................................. 13
Autres fonctions
Utilisation du satellite de commande ............. 14
Réglage des caractéristiques du son ................ 15
Mise en sourdine rapide du son ...................... 15
Modification des réglages du son et de
l’affichage
— Menu .......................................................... 16
Sélection de la position du son
— “Mes réglages favoris (MBP)” ............... 17
Réglage de l’égaliseur ........................................ 17
Informations complémentaires
Entretien .............................................................. 18
Démontage de l’appareil ................................... 19
Spécifications ...................................................... 20
Dépannage .......................................................... 21
Affichages d’erreur/Messages ......................... 22
3
Page 26

Emplacement des commandes
Référez-vous aux pages indiquées pour plus de détails.
: En cours de lecture : En cours de réception radio : En mode menu
CD RADIO
MENU
CDX-L600X
1 Touche
2 Touche Z (éjection) (située à l’avant de
3 Touche MENU 9, 11, 12, 13, 16, 18
4 Molette de contrôle du volume
5 Touche LIST 13
6 Récepteur de télécommande à carte
7 Fenêtre d’affichage
8 Touche OPEN 8, 9
9 Touche EQ7 17
0 Touche RESET (située à l’avant de
qa Touche OFF (Arrêt/Mise hors tension)*
qs Touche SOUND 15, 17
qd Touche SOURCE (Mise sous tension/
MBP (
Mes réglages favoris) 17
l’appareil, derrière le panneau frontal)
9
l’appareil, derrière le panneau frontal) 7
8, 9
Radio/CD) 8, 9, 11, 12, 17
qf Touche ENTER
13
RADIO
9, 11, 12, 13, 16, 18
MENU
qg Touche MODE 11, 12
qh Touche DSPL (changement de mode
d’affichage) 10, 13
qj Touches numériques
CD
(1) REP 10
(2) SHUF 10
11, 12
RADIO
* Avertissement en cas d’installation
dans une voiture dont le contact ne
comporte pas de position ACC
(accessoires)
Appuyez sur la touche (OFF) de l’appareil
pendant 2 secondes pour désactiver
l’affichage de l’horloge après avoir coupé
le moteur.
Sinon l’affichage de l’horloge n’est pas
désactivé et cela risque de décharger la
batterie.
4
Page 27

Télécommande à carte RM-X114
DSPL MODE
+
PRESET
DISC
LIST
+
U
N
E
M
(+) : pour sélectionner vers le haut
(PRESET)
(SEEK)
(+) : pour
sélectionner
vers la
(SEEK)
(–) :pour
droite/
>
sélectionner
vers la
gauche/.
(PRESET)
(–) :pour sélectionner vers le bas
En mode menu, la (les) touche(s) pouvant être
sélectionnée(s) parmi ces quatre touches est
(sont) indiquée(s) par une “M” dans l’affichage.
qk Touches PRESET (+/–)
11, 13
RADIO
9, 11, 12, 13, 16, 18
MENU
ql Touches SEEK (–/+) 15
9
CD
11, 12
RADIO
9, 12, 16, 18
MENU
SEEK
SO
SOURCE
–
UN
DISC
D
PRESET –
+
VOL
+
SEEK
–
ENTER
ATTOFF
–
Les touches correspondantes de la
télécommande à carte remplissent la
même fonction que celles de l’appareil.
1 Touche DSPL
2 Touche MENU
3 Touche SOURCE
4 Touches SEEK (</,)
5 Touche SOUND
6 Touche OFF
7 Touches VOL (+/–)
8 Touche MODE
9 Touche LIST
0 Touches PRESET (M/m)
qa Touche ENTER
qs Touche ATT
Remarque
Si vous désactivez l’appareil en appuyant sur (OFF)
pendant 2 secondes, il ne peut plus être activé avec
la télécommande à carte, sauf si la touche
(SOURCE) de l’appareil est enfoncée ou si un
disque est inséré dans le lecteur pour activer
l’appareil.
Conseil
Reportez-vous au paragraphe “Remplacement de
la pile au lithium” pour obtenir des informations
détaillées sur le remplacement de la pile (page 19).
5
Page 28

Précautions
Remarques sur les disques
•Si votre voiture est restée garée en plein
soleil, laissez refroidir l’appareil avant de
l’utiliser.
•Les antennes électriques se déploient
automatiquement lorsque l’appareil est mis
sous tension.
Si vous avez des questions ou des problèmes
concernant le fonctionnement de cet appareil
qui ne sont pas abordés dans le présent mode
d’emploi, veuillez consulter votre revendeur
Sony.
Condensation d’humidité
Par temps de pluie ou dans des régions très
humides, de l’humidité risque de se condenser
sur les lentilles et dans la fenêtre d’affichage de
l’appareil. Si cela se produit, l’appareil ne
fonctionnera pas correctement. Si c’est le cas,
retirez le disque et attendez environ une heure
que l’humidité se soit évaporée.
Pour conserver un son de haute
qualité
Veillez à ne pas renverser de jus de fruit ou de
boissons sucrées sur l’appareil ni sur les
disques.
•Ne touchez pas la surface des disques pour
ne pas les salir. Saisissez le disque par les
bords.
•Laissez vos disques dans leur boîtier ou dans
leur étui de rangement lorsqu’ils ne sont pas
utilisés. N’exposez pas les disques à la
chaleur ou à des températures élevées. Evitez
de les laisser dans une voiture en
stationnement, sur le tableau de bord ou la
plage arrière.
•Ne collez pas d’étiquettes sur les disques et
n’utilisez pas de disques rendus collants par
de l’encre/des résidus. Ces disques risquent
de s’arrêter en cours de lecture, en créant un
dysfonctionnement ou être définitivement
endommagés.
•Les disques ayant une forme spéciale (en
forme de cœur, octogonaux, etc.) ne peuvent
pas être lus par ce lecteur. Vous risquez
d’endommager votre appareil si vous essayez
de le faire. N’utilisez pas ce type de disques.
• Vous ne pouvez pas écouter de CD de 8 cm
(3 po.).
•Avant la lecture, nettoyez les disques avec un
chiffon de nettoyage disponible dans le
commerce. Essuyez chaque disque en partant
du centre vers l’extérieur. N’utilisez pas de
solvants tels que la benzine, les diluants, les
produits de nettoyage vendus dans le
commerce ou les sprays antistatiques
destinés aux disques analogiques.
6
Page 29

Remarques sur les disques CD-R/CDRW
•Vous pouvez lire des CD-R (CD
enregistrables)/CD-RW (CD réinscriptibles)
audio avec cet appareil.
Repérez cette marque pour distinguer les
CD-R/CD-RW à usage audio.
Cette marque indique que le CD n’est pas à
usage audio.
•Il est possible ce lecteur ne puisse pas lire
certains CD-R/CD-RW (selon l’équipement
utilisé pour l’enregistrement ou l’état du
disque).
•Vous ne pouvez pas lire de disques CD-R/
CD-RW non finalisés*.
* Processus nécessaire pour qu’un disque CD-R/CD-
RW puisse être lu sur un lecteur CD audio.
Préparation
Réinitialisation de
l’appareil
Avant la première mise en service de l’appareil
ou après avoir remplacé la batterie de la
voiture, vous devez réinitialiser l’appareil.
Retirez la façade et appuyez sur la touche
RESET à l’aide d’un objet pointu comme un
stylo à bille.
Touche RESET
Remarque
Une pression sur la touche RESET efface l’heure et
certaines fonctions mémorisées.
7
Page 30

Dépose de la façade
Vous pouvez retirer la façade de cet appareil
pour le protéger contre le vol.
Avertisseur
Si vous mettez la clé de contact en position
OFF sans ôter la façade, l’alarme retentira
pendant quelques secondes.
Si vous raccordez un amplificateur de
puissance et que vous n’utilisez pas
l’amplificateur intégré, le bip sonore est
désactivé.
1 Appuyez sur (OFF) *.
La lecture CD ou l’écoute de la radio
s’arrête (l’éclairage des touches et
l’affichage restent apparents).
* Si le commutateur d’allumage de votre
voiture n’est pas doté d’une position ACC
(accessoire) au niveau du commutateur
d’allumage, assurez-vous de désactiver l’unité
en appuyant sur (OFF) pendant 2 secondes
pour éviter de décharger la batterie.
2 Appuyez sur (OPEN), puis faites glisser
la façade vers la droite et dégagez
doucement son côté gauche.
Fixation de la façade
Placez l’orifice A de la façade sur la broche B
de l’appareil, puis poussez doucement la
façade vers le côté gauche en exerçant une
pression.
Appuyez sur (SOURCE) (ou insérez un CD)
pour activer l’appareil.
A
B
x
1
2
Remarques
• Si vous retirez la façade alors que l’appareil est
toujours sous tension, l’alimentation est coupée
automatiquement de manière à éviter
d’endommager les haut-parleurs.
• N’exercez pas de pression excessive sur la façade
ni sur la fenêtre d’affichage.
• N’exposez pas la façade à la chaleur, à des
températures élevées ou à l’humidité. Evitez de
la laisser dans une voiture en stationnement, sur
le tableau de bord ou la plage arrière.
Conseil
Lorsque vous emmenez la façade, glissez-la dans
l’étui spécial fourni.
8
Remarque
Ne rien poser sur la surface interne de la façade.
Page 31

Réglage de l’horloge
L’horloge à affichage numérique fonctionne
suivant un cycle de 12 heures.
Exemple : Pour régler l’horloge sur 10:08
1 Appuyez sur (MENU), puis appuyez
plusieurs fois sur un des côtés de
(PRESET) jusqu’à ce que “CLOCK”
apparaisse.
1 Appuyez sur (ENTER).
Les chiffres des heures clignotent.
2 Appuyez sur l’un des côtés de
(PRESET) pour sélectionner l’heure.
3 Appuyez sur le côté (+) de (SEEK).
Les chiffres des minutes clignotent.
4 Appuyez sur n’importe quel côté de
(PRESET) pour sélectionner les
minutes.
2 Appuyez sur (ENTER).
L’horloge démarre. Après que le réglage de
l’horloge est terminé, l’affichage revient au
mode de lecture normal.
Conseil
Lorsque le mode D.INFO est sur ON, l’heure est
toujours affichée (page 16).
Lecteur CD
Lecture d’un disque
1 Appuyez sur (OPEN) et introduisez le
disque (avec l’étiquette vers le haut).
2 Refermez la façade.
La lecture démarre automatiquement.
Si un disque se trouve déjà dans l’appareil,
appuyez plusieurs fois sur (SOURCE) jusqu’à ce
que “CD” apparaisse pour démarrer la lecture.
Pour Appuyez sur
Arrêter la lecture (OFF)
Ejecter le disque (OPEN) et ensuite sur Z
Passer d’une (SEEK) (./>)
piste à l’autre [une fois pour chaque piste]
– Détecteur
automatique
de musique
Avance/ (SEEK) (m/M)
retour rapide [maintenir la touche
– Recherche enfoncée jusqu’à
manuelle l’endroit souhaité]
Remarque
Lorsque la dernière piste du disque est terminée, la
lecture reprend à partir de la première piste du
CD.
9
Page 32

Rubriques d’affichage
Après avoir changé le disque/la piste, les titres
préenregistrés du nouveau disque/de la
nouvelle piste sont automatiquement affichés
(si la fonction de défilement automatique,
Auto Scroll, est réglée sur “ON”, les noms
dépassant 8 caractères défileront dans la
fenêtre d’affichage (page 16)).
Rubriques affichables
• Source de musique
• Horloge
• Fonction
Rubriques affichables
• Nom du disque*1/nom de l’artiste*
• Titre de la piste*
• Temps de lecture écoulé
Pour Appuyez sur
Passer d’une (DSPL)
rubrique d’affichage
à l’autre
1
2
Lecture de plages répétée
— Lecture répétée
La lecture de la piste en cours se répète jusqu’à
la fin du disque.
En cours de lecture, appuyez plusieurs
fois sur (1) (REP) jusqu’à ce que “REP-1”
apparaisse dans l’affichage.
La lecture répétée démarre.
Pour revenir au mode de lecture normale,
sélectionnez “REP-OFF”.
Lecture de plages dans un
ordre quelconque
— Lecture aléatoire
Vous pouvez choisir de reproduire les pistes
du disque en cours dans un ordre aléatoire.
En cours de lecture, appuyez plusieurs
fois sur (2) (SHUF) jusqu’à ce que
“SHUF-1” apparaisse dans l’affichage.
La lecture aléatoire démarre.
Pour revenir au mode de lecture normale,
sélectionnez “SHUF-OFF”.
*1“NO NAME” indique qu’il n’existe aucun nom
préenregistré à afficher.
*2Uniquement pour les disques CD TEXT
comprenant le nom de l’artiste.
Remarques
• Certains caractères ne peuvent pas être affichés.
• Il est possible que le défilement automatique ne
fonctionne pas pour certains disques CD TEXT
contenant beaucoup de caractères.
• Cet appareil ne peut pas afficher le nom de
l’artiste de chaque piste d’un disque CD TEXT.
10
Page 33

Radio
Réception des stations
stockées
L’appareil peut mémoriser jusqu’à 6 stations
pour chaque bande (FM1, FM2, FM3, AM1 et
AM2).
Attention
Pour syntoniser des stations pendant que vous
conduisez, nous vous conseillons d’utiliser la
fonction de mémorisation du meilleur accord
(BTM) de façon à éviter les accidents.
Stockage automatique des
stations
— Mémorisation du meilleur accord (BTM)
L’appareil sélectionne les stations émettant les
signaux les plus puissants pour la bande
sélectionnée et les mémorise selon l’ordre des
fréquences.
1 Appuyez plusieurs fois sur (SOURCE)
pour sélectionner la radio.
2 Appuyez plusieurs fois sur (MODE) pour
sélectionner la bande de fréquence.
3 Appuyez sur (MENU), puis appuyez
plusieurs fois sur un des côtés de
(PRESET) jusqu’à ce que “BTM”
apparaisse.
4 Appuyez sur (ENTER).
Un bip retentit lorsque le réglage est
mémorisé.
Remarques
• Si quelques stations seulement peuvent être
captées en raison de faibles signaux, certaines
touches numériques conserveront leur réglage
préalable.
• Si un numéro est indiqué dans la fenêtre
d’affichage, l’appareil commence la
mémorisation des stations à partir de la station
affichée.
1 Appuyez plusieurs fois de suite sur
(SOURCE) pour sélectionner la radio.
2 Appuyez plusieurs fois sur (MODE) pour
sélectionner la bande de fréquence.
3 Appuyez sur la touche numérique ((1) à
(6)) sous laquelle la station désirée est
mémorisée.
Conseil
Appuyez sur l’un des côtés de (PRESET) pour
capter les stations dans l’ordre de leur présence en
mémoire (Fonction de recherche de présélection).
Si la syntonisation de la station
présélectionnée ne fonctionne pas
Appuyez sur l’un des côtés de
(SEEK) pour rechercher la station
(syntonisation automatique).
Le balayage s’arrête lorsque l’appareil capte
une station. Recommencez jusqu’à ce que la
station souhaitée soit captée.
Conseils
• Si la syntonisation automatique s’arrête trop
fréquemment, activez la recherche locale (Local
Seek) pour limiter la recherche aux stations
émettant les signaux les plus puissants (reportezvous à “Modification des réglages du son et de
l’affichage”, page 16).
• Si vous connaissez la fréquence de la station que
vous désirez écouter, appuyez sur l’un des côtés
de la touche (SEEK) et maintenez-le enfoncé
pour localiser la fréquence approximative, puis
appuyez plusieurs fois de suite sur (SEEK) pour
trouver la fréquence souhaitée (syntonisation
manuelle).
Si la réception FM est médiocre
Sélectionnez le mode de réception
monaural.
(reportez-vous à “Modification des réglages
du son et de l’affichage”, page 16).
La qualité sonore est améliorée mais le son
est diffusé en mode monaural (l’indication
“ST” disparaît).
Remarque
Si des interférences se produisent, cet appareil
diminuera automatiquement la fréquence de
réception pour éliminer les bruits parasites
(fonction IF AUTO). Dans ce cas, certaines émissions
FM stéréo peuvent être captées en mode monaural
alors que le mode de réception stéréo est activé.
Suite à la page suivante t
11
Page 34

Conseil
Pour écouter en permanence des émissions FM
stéréo en stéréo, vous pouvez modifier le réglage
IF AUTO et élargir la réception des signaux de
fréquence (voir “Modification des réglages du son
et de l’affichage”, page 16). Notez que ce réglage
peut produire certaines interférences.
Mémorisation des stations
de votre choix
uniquement
Vous pouvez présélectionner manuellement
les stations souhaitées sur n’importe quelle
touche de votre choix.
Mémorisation de noms de
stations
— Mémorisation des stations
Vous pouvez attribuer un nom à chaque
station de radio et l’enregistrer dans la
mémoire. Le nom de la station syntonisée
apparaît dans la fenêtre d’affichage. Vous
pouvez introduire jusqu’à 8 caractères par
station.
Enregistrement de noms de
stations
1 Syntonisez une station dont vous
souhaitez mémoriser le nom.
1 Appuyez plusieurs fois sur (SOURCE)
pour sélectionner la radio.
2 Appuyez plusieurs fois sur (MODE) pour
sélectionner la bande de féquence.
3 Appuyez sur l’un des côtés de (SEEK)
pour syntoniser la station que vous
souhaitez mémoriser.
4 Appuyez sur la touche numérique ((1) à
(6)) voulue pendant 2 secondes jusqu’à
ce que l’indication “MEM” apparaisse.
Le numéro de la touche numérique de
présélection apparaît dans la fenêtre
d’affichage.
Remarque
Si vous essayez de mémoriser une autre station
sous une touche numérique déjà utilisée, la station
précédemment mémorisée est supprimée.
2 Appuyez sur (MENU), puis appuyez
plusieurs fois sur un des côtés de
(PRESET) jusqu’à ce que “NAMEEDIT”
apparaisse.
3 Appuyez sur (ENTER).
4 Introduisez les caractères.
1 Appuyez plusieurs fois sur le côté
(+)*1 de (PRESET) pour sélectionner le
caractère désiré.
A t B t C … t 0 t 1 t 2 …
t + t – t * … t _*2 t A
*1Pour l’ordre inverse, appuyez sur le côté
(–) de (PRESET).
*2(espace)
2 Appuyez sur le côté (+) de (SEEK)
après avoir localisé le caractère désiré.
Si vous appuyez sur le côté (–) de
(SEEK), vous pouvez revenir vers la
gauche.
12
3 Répétez les étapes 1 et 2 pour
introduire le titre en entier.
5 Appuyez sur (ENTER).
Page 35

Conseils
• Procédez par écrasement “_” pour corriger ou
effacer un nom.
• Il existe une autre méthode pour mémoriser des
noms de station : Appuyez sur (LIST) pendant
2 secondes au lieu d’effectuer les étapes 2 et 3.
Vous pouvez également achever l’opération en
appuyant sur (LIST) pendant 2 secondes au lieu
d’effectuer l’étape 5.
Affichage du nom de la station
Passez à la rubrique d’affichage de la
fréquence ou du nom de la station*.
Pour Appuyez sur
Passer d’une (DSPL) en cours de
rubrique d’affichage réception radio
à l’autre
* Si le nom de la station n’est pas mémorisé,
l’indication “NO NAME” apparaît dans
l’affichage pendant une seconde.
Suppression des noms de station
1 Pendant une réception radio, appuyez
sur (MENU), puis appuyez plusieurs fois
de suite sur l’un des côtés de
(PRESET) jusqu’à ce que l’indication
“NAME DEL” apparaisse.
2 Appuyez sur (ENTER).
Localisation d’une station
par son nom — Répertoire
1 Pendant la réception radio, appuyez sur
(LIST).
Le nom assigné à la station actuellement
syntonisée apparaît dans la fenêtre
d’affichage.
2 Appuyez plusieurs fois sur l’un des côtés
de (PRESET) jusqu’à ce que vous
trouviez la station voulue.
Si aucun nom n’est attribué à la station
sélectionnée, la fréquence apparaît dans la
fenêtre d’affichage.
3 Appuyez sur (ENTER) pour syntoniser la
station voulue.
3 Appuyez plusieurs fois de suite sur l’un
des côtés de (PRESET) pour sélectionner
le nom de la station que vous souhaitez
effacer.
4 Appuyez sur (ENTER) pendant
2 secondes.
Le titre est effacé.
Recommencez les étapes 3 et 4 si vous
souhaitez effacer d’autres noms.
5 Appuyez deux fois sur (MENU).
L’appareil revient en mode de réception
radio normal.
Remarque
Si vous avez déjà effacé tous les noms de station,
l’indication “NO DATA” apparaît à l’étape 4.
13
Page 36

Autres fonctions
* Si votre voiture n’est pas équipée d’une position
ACC (accessoire) au niveau du contact, appuyez
sur (OFF) pendant 2 secondes pour désactiver
l’affichage de l’horloge après avoir coupé le
moteur.
Vous pouvez commander l’appareil au moyen
d’un satellite de commande (en option).
Utilisation du satellite de
commande
Apposez tout d’abord l’étiquette appropriée
suivant la position de montage du satellite de
commande.
Le satellite de commande fonctionne en
appuyant sur les touches et/ou les commandes
du satellite.
D
N
U
O
S
O
M
P
S
D
En appuyant sur une touche
(SOUND)
(SOURCE)
Faites tourner la commande
VOL pour régler le volume.
DSPL
MODE
E
D
SOUND
L
(ATT)
(MODE)
OFF
(DSPL)
(OFF)
En faisant tourner la commande
commande
SEEK/AMS
Tournez le bouton et relâchez-le pour :
– Sauter des pistes.
– Syntoniser automatiquement des stations
de radio.
Maintenez la commande en la tournant
et relâchez-la pour :
– Avancer/revenir rapidement au début
d’une piste.
– Trouver manuellement une station radio.
En enfonçant et en faisant tourner
la commande
commande
PRESET
Appuyez et tournez la commande pour :
– Recevoir des stations mémorisées.
Appuyez sur Pour
(SOURCE) Changer de source
(radio/CD)
(MODE) Changer la bande de
fréquences radio
(ATT) Réduire le son
(OFF)* Arrêter la lecture ou la
réception radio
(SOUND) Régler le menu son
(DSPL) Changer de rubrique
d’affichage
14
Page 37

Modification du sens de
fonctionnement
Le sens de fonctionnement des commandes est
réglé en usine comme illustré ci-dessous.
Pour
augmenter
Réglage des
caractéristiques du son
Vous pouvez régler les graves, les aigus ainsi
que la balance gauche-droite et la balance
avant-arrière.
Vous pouvez mémoriser les niveaux de graves
et d’aigus pour chaque source.
Pour
diminuer
Si vous devez monter le satellite de commande
du côté droit de la colonne de direction, vous
pouvez inverser le sens de fonctionnement des
commandes.
Appuyez sur (SOUND) pendant 2 secondes
tout en maintenant la commande VOL
enfoncée.
1 Sélectionnez le paramètre que vous
voulez régler en appuyant plusieurs fois
de suite sur (SOUND).
Chaque fois que vous appuyez sur
(SOUND), les paramètres changent selon la
séquence suivante :
BAS (graves) t TRE (aigus) t
BAL (balance gauche-droite) t
FAD (balance avant-arrière)
2 Réglez l’option sélectionnée en appuyant
sur l’un des côtés de (SEEK).
Lors du réglage à l’aide du satellite de
commande, appuyez sur (SOUND) et faites
tourner la commande VOL.
Remarque
Effectuez le réglage dans les 3 secondes après
avoir sélectionné l’option.
Mise en sourdine rapide
du son
(Avec le satellite de commande ou la
télécommande à carte)
Appuyez sur (ATT) du satellite de
commande ou de la télécommande à
carte.
Après l’affichage momentané de
“ATT-ON”, l’indication “ATT” apparaît.
Pour restaurer le niveau précédent du volume,
appuyez à nouveau sur (ATT).
15
Page 38

Modification des réglages
du son et de l’affichage
— Menu
Les options suivantes peuvent être réglées :
SET (réglage)
•CLOCK (page 9)
•BEEP — pour activer ou désactiver le bip sonore.
•RM (satellite de télécommande) — pour
inverser le sens de fonctionnement des
commandes du satellite.
— Sélectionnez “NORM” pour utiliser le
satellite de commande dans la position
définie par défaut.
— Sélectionnez “REV” si vous montez le
satellite de commande du côté droit de la
colonne de direction.
DSPL (affichage)
•D.INFO (double information) — pour
afficher simultanément l’horloge et le mode
de lecture (ON).
•M.DSPL (Défilement d’affichage) — pour
sélectionner le mode Défilement d’affichage à
partir de “1”, “2” et “OFF”.
— Sélectionnez “1” pour que les lignes
décoratives apparaissent sur l’affichage et
pour activer l’affichage Demo.
— Sélectionnez “2” pour que les lignes
décoratives apparaissent sur l’affichage et
pour désactiver l’affichage Demo.
— Sélectionnez “OFF” pour désactiver le
défilement d’affichage.
•A.SCRL (défilement automatique)
— Sélectionnez “ON” pour faire défiler
automatiquement tous les noms affichés
composés de plus de 8 caractères.
— Lorsque le défilement automatique est
réglé sur off et que le nom du disque/de
la piste est modifié, celui-ci ne défile pas.
SND (Son)
•LOUD (Loudness) — pour profiter des
graves et des aigus même à faible volume.
Les graves et les aigus sont renforcés.
P/M (mode de lecture)
•LOCAL-ON/OFF (mode de recherche local)
(page 11)
— Sélectionnez “ON” pour syntoniser
uniquement les stations radio émettant
des signaux plus puissants.
•MONO-ON/OFF (mode monaural)
(page 11)
— Sélectionnez “ON” pour écouter
l’émission FM stéréo en monaural.
Sélectionnez “OFF” pour revenir en mode
normal.
•IF AUTO/WIDE (page 11)
16
1 Appuyez sur (MENU).
Pour activer la fonction A.SCRL, appuyez
sur (MENU) pendant la lecture du CD.
2 Appuyez plusieurs fois sur l’un des côtés
de (PRESET) jusqu’à ce que l’option
désirée apparaisse.
3 Appuyez sur le côté (+) de (SEEK) pour
sélectionner le réglage désiré (Exemple :
ON ou OFF).
4 Appuyez sur (ENTER).
Une fois que le réglage de mode est
terminé, la fenêtre d’affichage revient au
mode de lecture normale.
Remarque
Le paramètre affiché changera en fonction de la
source.
Conseil
Vous pouvez aisément commuter les catégories
(“SET”‚ “DSPL”‚ “SND”‚ “P/M”, et “EDIT”) en
appuyant sur l’un des côtés de la touche (PRESET)
pendant 2 secondes.
Page 39

Sélection de la position du
son
— “Mes réglages favoris (MBP)”
Lorsque vous conduisez sans passager, vous
pouvez profiter de l’environnement sonore le
plus agréable avec “Mes réglages favoris”.
“Mes réglages favoris” dispose de deux
réglages prédéfinis qui permettent d’ajuster le
niveau sonore de la balance gauche-droite et
de la balance avant-arrière. Vous pouvez
sélectionner l’un de ces réglages très
facilement avec la touche MBP.
Fenêtre
d’affichage
MBP-A
MBP-B
Niveau de la
balance
Droite
– 4dB
0
Gauche
Niveau de la balance
Avant
0
– 4dB
avant-arrière
Arrière
0
– 4dB
0
– 4dB
Réglage de l’égaliseur
Il est possible de sélectionner une courbe de
l’égaliseur pour sept types de musique
(musique VOCAL, CLUB, JAZZ, NEW AGE,
ROCK, CUSTOM et XPLOD).
Vous pouvez mémoriser les réglages de
fréquence et de niveau de l’égaliseur.
Réglage de la courbe de l’égaliseur
1 Appuyez sur (SOURCE) pour sélectionner
une source (radio ou CD).
2 Appuyez plusieurs fois sur (EQ7) jusqu’à
ce que la courbe de l’égaliseur souhaitée
apparaisse.
Chaque fois que vous appuyez sur (EQ7),
la rubrique change.
MBP-OFF
Appuyez plusieurs fois de suite sur
(MBP) pour obtenir la position d’écoute
souhaitée.
Le mode de “Mes réglages favoris” est
indiqué sur l’affichage dans l’ordre du
tableau.
L’affichage revient au mode de lecture
normale après une seconde.
Si vous souhaitez régler plus précisément le
niveau sonore de la balance gauche-droite
et de la balance avant-arrière, utilisez la
touche (SOUND). (Reportez-vous à
“Réglage des caractéristiques du son”,
page 15.)
Remarques
• Lorsque BAL (balance) ou FAD (fader) son réglés
dans “Réglage des caractéristiques du son” (page
15), le réglage MBP passe sur OFF.
• Lorsque MBP est réglé sur OFF, les réglages BAL
et FAD sont activés.
0
0
0
0
Pour annuler l’effet de l’égaliseur,
sélectionnez “OFF”.
L’affichage revient en mode de lecture
normale après 3 secondes.
Suite à la page suivante t
17
Page 40

Réglage de la courbe de l’égaliseur
1 Appuyez sur (MENU).
2 Appuyez plusieurs fois de suite sur l’un
des côtés de (PRESET) jusqu’à ce que
“EQ7 TUNE” apparaisse, puis appuyez sur
(ENTER).
Informations
complémentaires
Entretien
3 Appuyez sur l’un des côtés de (SEEK)
pour sélectionner la courbe de l’égaliseur
souhaitée, puis appuyez sur (ENTER).
Chaque fois que vous appuyez sur (SEEK),
la rubrique change.
4 Sélectionnez la fréquence et le niveau
souhaités.
1 Appuyez sur l’un des côtés de (SEEK)
pour sélectionner la fréquence
souhaitée.
La fréquence change chaque fois que
vous appuyez sur (SEEK).
62 Hz y 157 Hz y 396 Hz
y 1.0 kHz y 2.5 kHz y 6.3 kHz
y 16.0 kHz
2 Appuyez sur l’un des côtés de
(PRESET) pour régler le volume
souhaité.
Le volume peut être réglé par pas de
1 dB, de –10 dB à +10 dB.
Pour restaurer la courbe de l’égaliseur
définie par défaut, appuyez sur
(ENTER) pendant 2 secondes.
5 Appuyez deux fois sur (MENU).
Lorsque le réglage de l’effet est terminé, le
mode de lecture normale apparaît.
Remplacement du fusible
En cas de remplacement du fusible, veillez à
utiliser un fusible dont l’intensité correspond à
celle inscrite sur le fusible. Si le fusible grille,
vérifiez le branchement de l’alimentation et
remplacez le fusible. Si le fusible grille une
nouvelle fois après avoir été remplacé, cela
peut révéler une défaillance interne de
l’appareil. Dans ce cas, consultez un revendeur
Sony.
Fusible (10 A)
Avertissement
N’utilisez jamais de fusible dont l’intensité
dépasse celle du fusible fourni avec l’appareil,
car vous risqueriez d’endommager l’appareil.
Nettoyage des connecteurs
L’appareil ne peut pas fonctionner
correctement si les connecteurs entre l’appareil
et la façade sont souillés. Pour éviter cela,
enlevez la façade (page 8) et nettoyez les
connecteurs à l’aide d’un coton-tige imbibé
d’alcool. N’exercez pas une pression trop forte.
Sinon, vous risquez d’endommager les
connecteurs.
18
Appareil principal
Arrière de la façade
Page 41

Remarques
• Pour plus de sécurité, coupez le moteur avant de
nettoyer les connecteurs et retirez la clé de
contact.
• Ne touchez jamais les connecteurs directement
avec les doigts ou avec un appareil métallique.
Démontage de l’appareil
1 Démontage du panneau avant
1 Enlevez la façade (page 8).
Remplacement de la pile au lithium
Dans des conditions d’utilisation normales, les
piles durent environ un an. (La durée de
fonctionnement peut être plus courte, en
fonction des conditions d’utilisation.)
Lorsque la pile s’affaiblit, la portée efficace de
la télécommande à carte se raccourcit.
Remplacez la pile par une nouvelle pile au
lithium CR2025.
x
cöté + vers le haut
2 Appuyez sur l’attache du panneau
avant à l’aide d’un tournevis fin.
3 Répétez l’étape 2 pour l’autre côté.
2 Démontez l’appareil
1 Utilisez un fin tournevis pour
enfoncer l’attache du côté gauche de
l’appareil, puis retirez le côté gauche
de l’appareil jusqu’à son dégagement
complet.
4 mm
(3/16 po.)
2 Répétez l’étape 1 du côté droit.
3 Sortez l’appareil de son emplacement.
Remarques sur la pile au lithium
•Gardez la pile au lithium hors de portée des
enfants. En cas d’ingestion de la pile,
consultez immédiatement un médecin.
•Nettoyez la pile au moyen d’un chiffon sec
pour assurer un contact optimal.
•Veillez à respecter les polarités correctes lors
de la mise en place de la pile.
•Ne saisissez pas la pile avec des pinces
métalliques, car cela risque de provoquer un
court-circuit.
AVERTISSEMENT
Si vous ne manipulez pas la pile
correctement, elle risque d’exploser.
Il est interdit de la recharger, de la démonter
ou de la jeter au feu.
19
Page 42

Spécifications
Lecteur CD
Rapport signal-bruit 90 dB
Réponse en fréquence 10 – 20.000 Hz
Pleurage et scintillement En dessous du seuil
mesurable
Radio
FM
Plage de syntonisation 87,5 – 107,9 MHz
Borne d’antenne Connecteur d’antenne
Fréquence intermédiaire 10,7 MHz/450 KHz
Sensibilité utile 8 dBf
Sélectivité 75 dB à 400 kHz
Rapport signal-bruit 66 dB (stéréo),
Distorsion harmonique à 1 kHz
Séparation 35 dB à 1 kHz
Réponse en fréquence 30 – 15.000 Hz
externe
72 dB (mono)
0,6 % (stéréo),
0,3 % (mono)
AM
Plage de syntonisation 530 – 1.710 kHz
Borne d’antenne Connecteur d’antenne
Fréquence intermédiaire 10,7 MHz/450 kHz
Sensibilité 30 µV
externe
Amplificateur de puissance
Sorties Sorties pour haut-parleurs
Impédance de haut-parleurs
Puissance utile maximum 52 W × 4 (à 4 ohms)
(connecteurs de sécurité)
4 – 8 ohms
Caractéristiques générales
Sorties Sorties audio
Entrée Fil de commande de mise
Commandes de tonalité Graves ±10 dB à 62 Hz
Intensité sonore +8 dB à 100 Hz
Puissance de raccordement
Dimensions Approx. 178 × 50 × 176 mm
Dimensions de montage Approx. 182 × 53 × 161 mm
Poids Approx. 1,2 kg
Accessoires fournis Eléments d’installation et
Accessoires optionnels Satellite de télécommande
Remarque
Cet appareil ne peut pas être branché sur un
préamplificateur ou un égaliseur numérique.
La conception et les spécifications sont sujettes à
modifications sans préavis.
Fil de commande de relais
d’antenne électrique
Fil de commande
d’amplificateur de
puissance
en sourdine du téléphone
Aigus ±10 dB à 16 kHz
+2 dB à 10 kHz
Batterie de voiture
12 V CC (masse négative)
1
/8 × 2 × 7 po.)
(7
(L × H × P)
1
/4 × 2 1/8 × 6 3/8 po.)
(7
(L × H × P)
(2 liv. 10 on.)
de raccordement (1 jeu)
Etui pour la façade (1)
Télécommande à carte
RM-X114
RM-X4S
20
Page 43

Dépannage
La liste de contrôle suivante vous aidera à
remédier aux problèmes que vous pourriez
rencontrer avec cet appareil.
Avant de passer en revue la liste de contrôle
ci-dessous, vérifiez les procédures de
raccordement et d’utilisation.
Généralités
Pas de son.
•Faites tourner la molette dans le sens
horaire pour régler le volume.
•Annulez la fonction ATT.
•Réglez la commande de balance avant-
arrière sur la position centrale, si vous
utilisez un système à 2 haut-parleurs.
Le contenu de la mémoire a été effacé.
•La touche RESET a été enfoncée.
t Recommencez la procédure
d’enregistrement dans la mémoire.
•Le cordon d’alimentation ou la batterie a
été déconnecté.
•Le raccordement du cordon d’alimentation
n’est pas réalisé correctement.
Aucun bip sonore.
Le bip sonore a été désactivé (page 16).
Aucune indication n’apparaît dans la
fenêtre d’affichage.
•L’affichage de l’heure disparaît si vous
appuyez sur (OFF) pendant 2 secondes.
t Appuyez de nouveau sur (OFF) pendant
2 secondes pour afficher l’heure.
•Déposez la façade et nettoyez les connecteurs.
Pour plus de détails, voir la procédure
“Nettoyage des connecteurs” (page 18).
Les stations mémorisées et l’heure correcte
sont effacées.
Le fusible est hors-service.
Emission de bruit lorsque la clé de contact
est en position ON, ACC ou OFF.
Les fils ne sont pas raccordés correctement
au connecteur d’alimentation de l’accessoire
de la voiture.
L’appareil n’est pas alimenté.
•Vérifiez le raccordement. Si tout est en
ordre, vérifiez le fusible.
•La voiture ne possède pas de position ACC.
t Appuyez sur (SOURCE) (ou insérez un
disque) pour mettre l’appareil sous
tension.
L’appareil est alimenté en continu.
La voiture ne possède pas de position ACC.
L’antenne électrique ne se déploie pas.
L’antenne électrique ne possède pas de relais.
Lecture CD
Impossible d’introduire un disque.
•Un autre CD a déjà été introduit dans
l’appareil.
•Le CD est introduit à l’envers en forçant ou
dans le mauvais sens.
La lecture ne démarre pas.
•Un disque encrassé ou défectueux.
•Le CD-R/CD-RW n’est pas finalisé.
•Vous avez essayé de lire un CD-R/CD-RW
qui n’est pas conçu pour une utilisation
audio.
•Certains CD-R/CD-RW ne peuvent pas
être lus selon l’appareil utilisé pour
l’enregistrement ou l’état du disque.
Un disque est éjecté automatiquement.
La température ambiante dépasse 50°C (122°F).
Les touches de commande sont inopérantes.
Le CD n’est pas éjecté.
Appuyez sur la touche RESET.
Le son saute à la suite de vibrations.
•L’appareil est installé suivant un angle de
plus de 60˚.
•L’appareil n’a pas été installé à un endroit
suffisamment stable de la voiture.
Le son saute.
Le disque est encrassé ou défectueux.
Suite à la page suivante t
21
Page 44

Réception radio
Impossible de syntoniser une présélection.
•Mémorisez la fréquence correcte.
•Le signal d’émission est trop faible.
Impossible de recevoir les stations.
Le son comporte des parasites.
•Raccordez un fil de commande d’antenne
électrique (bleu) ou un fil d’alimentation
d’accessoire (rouge) au câble d’alimentation
de l’amplificateur d’antenne de la voiture.
(Uniquement si votre voiture est équipée
d’une antenne FM/AM intégrée dans la
vitre arrière/latérale.)
•Vérifiez le raccordement de l’antenne de la
voiture.
•L’antenne automatique ne se déploie pas.
t Vérifiez le raccordement du fil de
commande de l’antenne électrique.
•Vérifiez la fréquence.
La syntonisation automatique est
impossible.
•Le mode de recherche local est réglé sur “ON”.
t Réglez le mode de recherche local sur
“OFF” (page 16).
•Le signal d’émission est trop faible.
t Utilisez la syntonisation manuelle.
L’indication “ST” clignote.
•Accordez la fréquence avec précision.
•Le signal d’émission est trop faible.
t Activez le mode de réception monaural
(page 16).
Une émission de programme stéréo est
captée en monaural.
L’appareil est en mode de réception
monaural.
t Désactivez le mode de réception
monaural (page 16)
Des interférences se produisent en cours de
réception FM.
Le mode large est sélectionné.
t Réglez le mode IF sur “IF AUTO”
(page 16).
Affichages d’erreur/
Messages
Affichages d’erreur
Les indications suivantes clignotent pendant
environ 5 secondes et un bip d’alarme retentit.
ERROR
•Un CD est souillé ou a été introduit à
l’envers.
t Nettoyez ou introduisez correctement
le CD.
•Un CD ne peut pas être reproduit en
raison d’un problème.
t Introduisez un autre CD.
HI TEMP
La température ambiante est supérieure à
50°C (122°F).
t Attendez que la température descende
sous les 50°C (122°F).
RESET
L’unité CD ne peut fonctionner en raison
d’un problème.
t Appuyez sur la touche RESET de
l’appareil.
Si ces solutions ne permettent pas d’améliorer
la situation, consultez votre revendeur Sony le
plus proche.
Messages
L.SEEK +/–
Le mode de recherche local (Local Seek) est
activé au cours de la syntonisation
automatique (page 11).
“ ” ou “ ”
Vous avez atteint le début ou la fin du
disque et vous ne pouvez pas aller plus loin.
Sony Corporation Printed in Korea
22
 Loading...