

Page 1
FM/MW/LW
Compact Disc
Player
3-227-661-32 (1)
FM/MW/LW Compact Disc Player
Operating Instructions
Návod k obsluze
Instrukcje Obsługi
Kullanım kılavuzu
Инструкция по эксплуатации
For installation and connections, see the supplied installation/connections manual.
Informace o instalaci a zapojení naleznete v přiložené příručce Instalace/zapojení.
Szczegóły dotyczące instalacji i podłączeń, proszę sprawdzić w dostarczonym,
osobnym podreczniku.
Kurma ve bağlantı işlemleri için ünite beraberındeki Kurma/Bagiantıiar kıiavuzuna
bakınız.
Перед установкой и подсоединениями прочитайте прилагаемую инструкцию по
установке и подсоединению.
CDX-L550X CDX-L550V
GB
CZ
PL
TR
RU
CDX-L550
© 2001 Sony Corporation
Page 2

Welcome!
Thank you for purchas in g t hi s Sony Compact
Disc Player. You can enjoy its various f eat ures
even more with:
• CD TEXT in formation (displayed when a C D
TEXT disc*
• Optional controller accessories
Rotary comm ander RM-X4S
* A CD TEXT disc is an audio CD that includes
information such as the disc na m e, artist name, and
track names. This information is recorded on the
disc.
is played).
2
Page 3

Table of Contents
Location of controls . . . . . . . . . . . . . . . . . . . 4
Precautions . . . . . . . . . . . . . . . . . . . . . . . . . . 5
Notes on discs . . . . . . . . . . . . . . . . . . . . . . . . 6
Getting Started
Resetting the unit. . . . . . . . . . . . . . . . . . . . . . 7
Detaching the front panel . . . . . . . . . . . . . . . 7
Setting the clock . . . . . . . . . . . . . . . . . . . . . . 8
CD Player
Playing a disc. . . . . . . . . . . . . . . . . . . . . . . . . 9
Display items. . . . . . . . . . . . . . . . . . . . . . . . . 9
Playing tracks repeatedly
— Repeat Play . . . . . . . . . . . . . . . . . . . . 10
Playing tracks in ra ndom order
— Shuffle Play . . . . . . . . . . . . . . . . . . . . 10
Radio
Storing stations automatically
— Best Tuning Memory (BTM). . . . . . . 10
Receiving the stored stations. . . . . . . . . . . . 11
Storing only the desired stations . . . . . . . . . 11
RDS
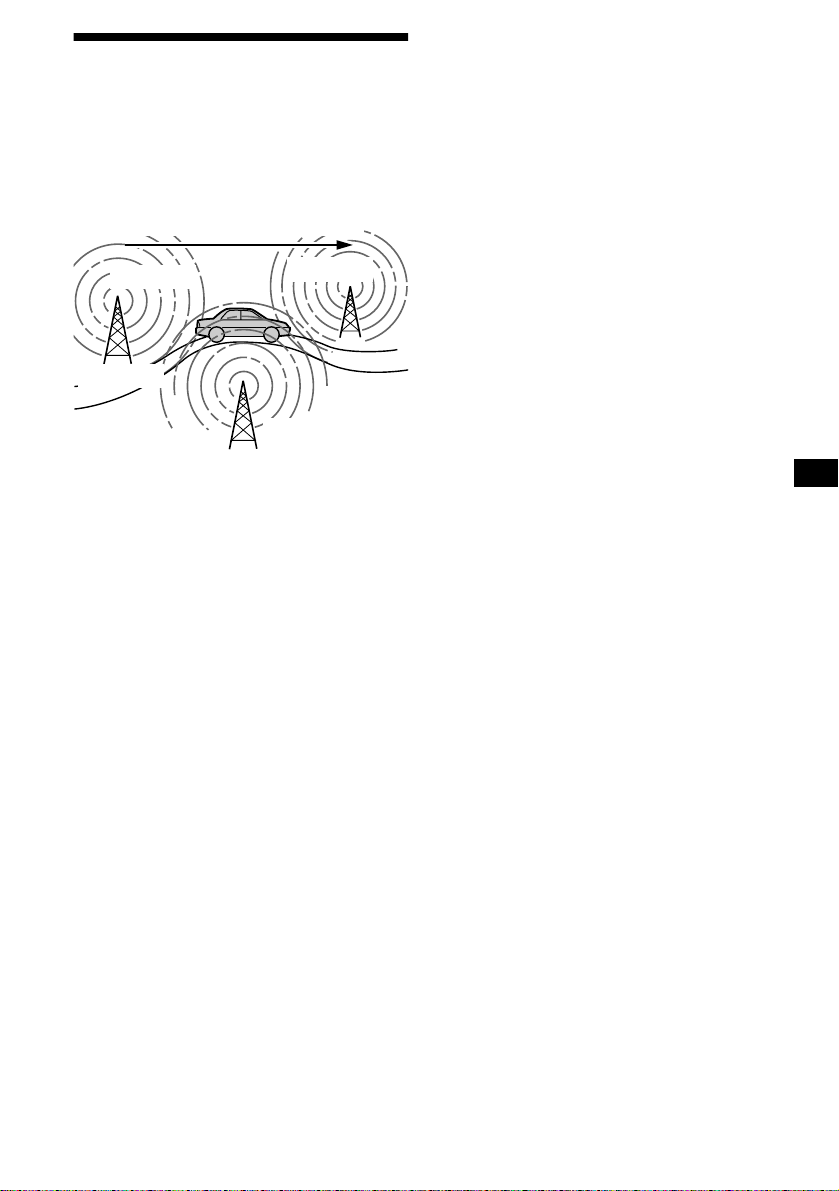
Overview of RDS . . . . . . . . . . . . . . . . . . . . 12
Automatic retuning for best reception results
— AF function . . . . . . . . . . . . . . . . . . . . 13
Receiving traffic an nouncements
— TA/TP . . . . . . . . . . . . . . . . . . . . . . . . 14
Presetting RDS stations with AF and TA
setting. . . . . . . . . . . . . . . . . . . . . . . . . . . 14
Tuning in stations by programme type
— PTY . . . . . . . . . . . . . . . . . . . . . . . . . . 15
Setting the clock automatically
— CT . . . . . . . . . . . . . . . . . . . . . . . . . . . 16
Other Functions
Using the rotary commander. . . . . . . . . . . . 16
Adjusting the sound characteristics . . . . . . 18
Quickly attenuating the sound . . . . . . . . . . 18
Changing the sound and display setting s
— Menu . . . . . . . . . . . . . . . . . . . . . . . . . 18
Selecting the sound position
— My Best sound Position (MBP). . . . 19
Setting the equalizer . . . . . . . . . . . . . . . . . . 20
Additional Information
Maintenance . . . . . . . . . . . . . . . . . . . . . . . . 21
Removing the unit. . . . . . . . . . . . . . . . . . . . 21
Specifications . . . . . . . . . . . . . . . . . . . . . . . 22
Troubleshooting . . . . . . . . . . . . . . . . . . . . . 23
Error displays/Messages. . . . . . . . . . . . . . . 24
3
Page 4
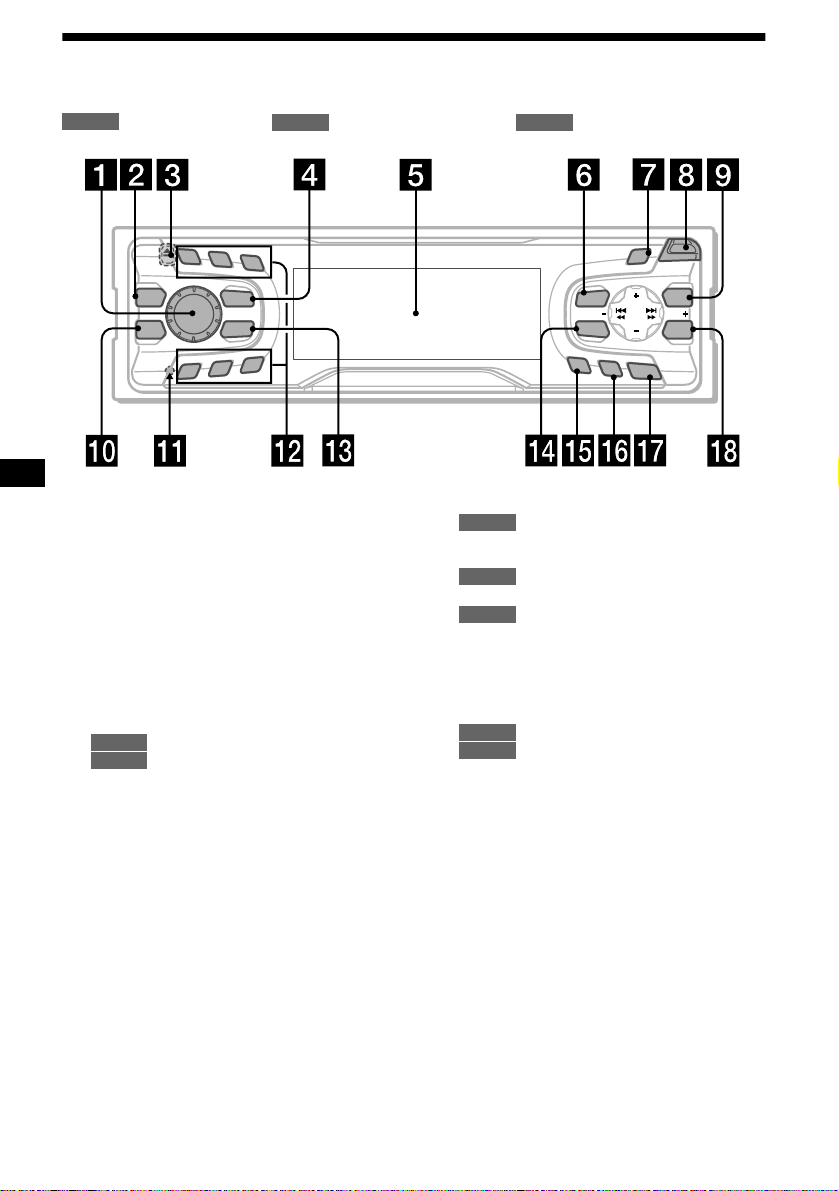
Location of controls
Refer to the pages listed for details.
: During Playbac k : During radio re ception : During menu mode
CD
MBP
EQ 7
1
2
5
4
RADIO MENU
3
REP
SOURCE
MODE
SHUF
6
CDX-L550X/L550V/L550
MENU
SEEK
SOUND
AF
SCROLL
TA
S
O
P
E
N
S
E
E
R
T
DSPL
P
PTY
SEEK
ENTER
O
F
F
a Volume control dial 14
b MBP button 19
c Z (eject) button (located on the front side
of the unit, behind the front panel) 9
d SOURCE (Power on/Radio/CD) button
8, 9, 10, 11, 14, 20
e Display window
f MENU button 8, 10, 14, 16, 19, 20
g S (SCROLL) button 9
h OPEN button 7, 9
i PTY (DSPL) (programme type/display
mode change) button
9
CD
12, 15
RADIO
j EQ7 button 20
k RESET button (located on the front side of
the unit, behind the fr ont panel) 7
l Number buttons
CD
(3) REP 10
(6) SHUF 10
10, 11, 13, 14
RADIO
m MODE button
10, 11, 14
RADIO
n SOUND button 18, 19
o AF button 13, 14
p TA button 14
q OFF (Stop/Power off) button* 7, 9
r ENTER button
12
RADIO
8, 10, 14, 15, 16, 19, 20
MENU
* Warning when installing in a car without
an ACC (accessory) position on the
ignition switch
After turning off the ignition, be sure to press
(OFF) on the unit for 2 seconds to turn off the
clock d isplay.
Otherwise, the clock display does not turn off
and this causes battery drain.
4
Page 5
SCROLL
S
O
P
E
N
S
E
E
R
T
DSPL
P
PTY
SEEKSEEK
ENTER
O
F
F
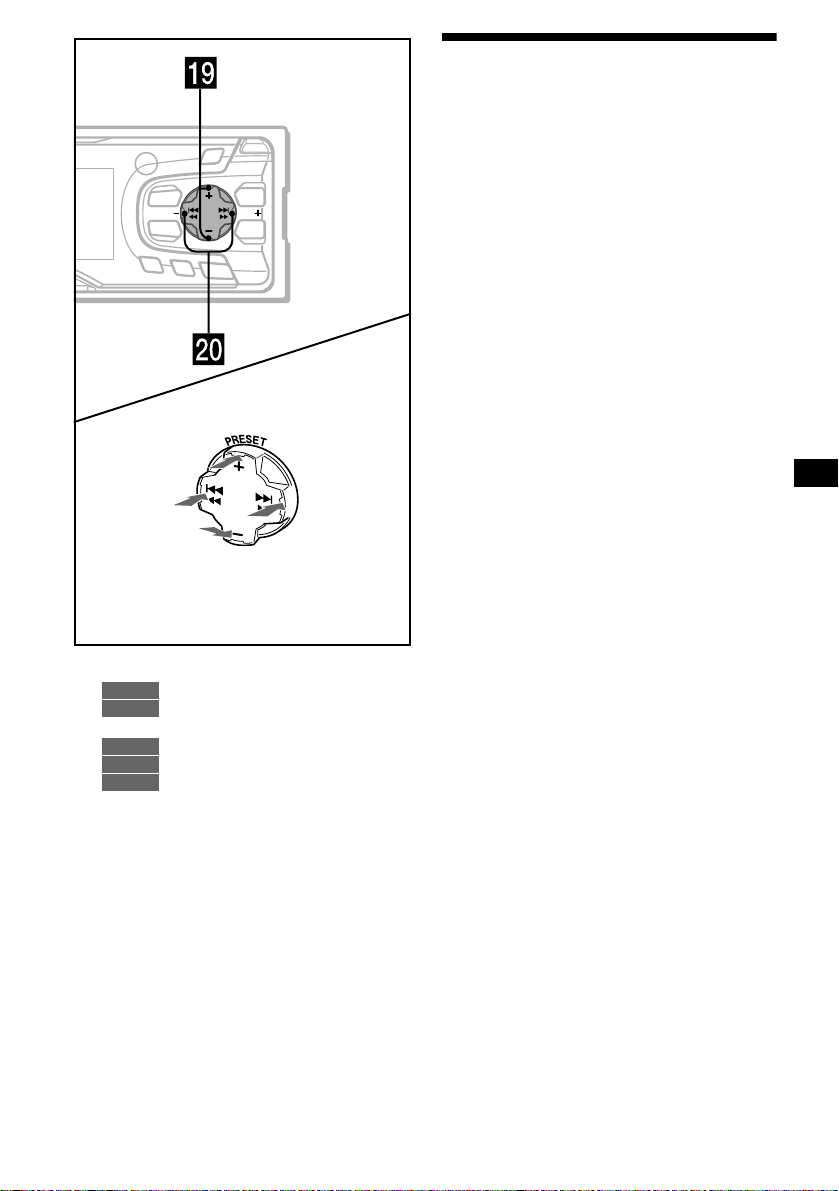
(PRESET)
(PRESET)
(SEEK)
(+): to select
rightwards/
>
AF
(SEEK)
(–): to select
leftwards/
.
MENU
SOUND
TA
(+): to select upwards
(–): to select downwards
In menu mode, the currently selectable button (s)
of these four are indicated with a “ M” in the display.
Precautions
• If your car was parked in direct sunlight , al low
the unit to cool off before operating it.
• Power aerials will extend automatically while
the unit is o perating.
If you have any questions or probl em s
concerning your unit that are not covered in this
manual, please consult your nearest S ony dealer.
Moisture condensation
On a rainy day or in a very dam p area, moisture
condensation may occur inside the lenses and
display of the unit. Should this occur, the unit
will not operate properly. In such a case, remo ve
the disc and wait for about an hour until the
moisture has evaporated.
To maintain high sound quality
Be careful not to splash jui ce or other soft drinks
onto the unit or discs.
s PRESET buttons (+/–)
11, 12, 15
RADIO
8, 10, 14, 16, 19, 20
MENU
t SEEK buttons (–/+)
9
CD
11, 13
RADIO
8, 16, 18, 19, 20
MENU
5
Page 6
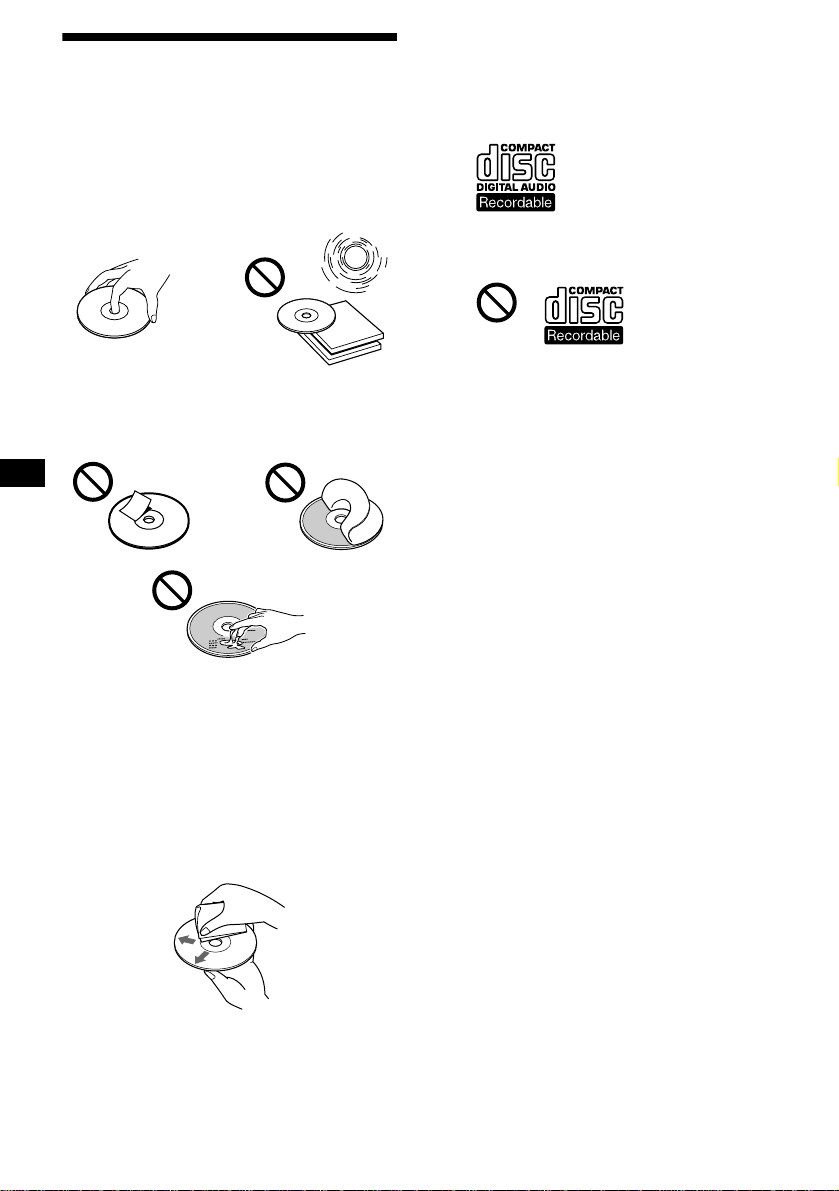
Notes on discs
• T o keep the disc clean, do not touch the surface.
Handle the disc by its edge.
• Keep your discs in their cases or disc
magazines when no t in use.
Do not subject the discs to heat/high
temperature. Avoid leaving them in parked cars
or on dashboards/rear trays.
Notes on CD-R/CD-RW discs
• You can play CD-Rs (re cordable CDs)
designed for audio use on this unit.
Look for this mark to distinguish CD-Rs for
audio use.
This mark denotes that a disc is not for audio
use.
• Do not attach labels, or use discs with sticky
ink/residue. Such discs may stop spinning
when used, causing a malfunction, or may ruin
the disc.
• Discs with non-standard shapes (e.g., heart,
square, star) ca nnot be played on this un it.
Attempting to do so may damage the unit. Do
not use such discs.
• You cannot play 8cm CDs .
• Before playing, clean the discs with a
commercially available cleaning cloth. Wipe
each disc from the centre out. Do not use
solvents such as benzin e, thinner , commercial ly
available cleaners, or antistatic spray intended
for analog discs.
• Some CD-Rs (depending on the eq ui pment
used for its recording or the condition of the
disc) may not play on this unit.
• You cannot play a CD-R that is not finalized*.
* A process necessary for a recorded CD-R disc to
be played on the audio CD player.
• You cannot play C D -RWs (rewritab le CDs) on
this unit.
6
Page 7
Getting Started
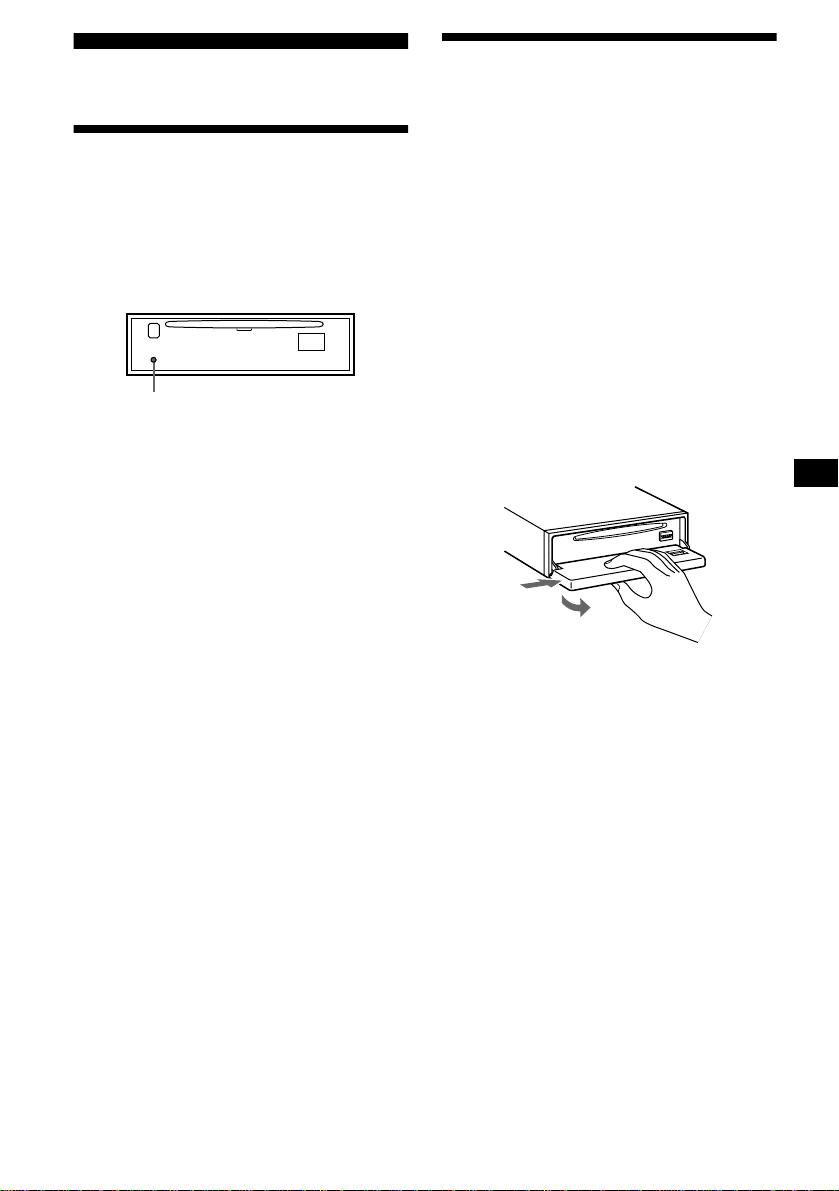
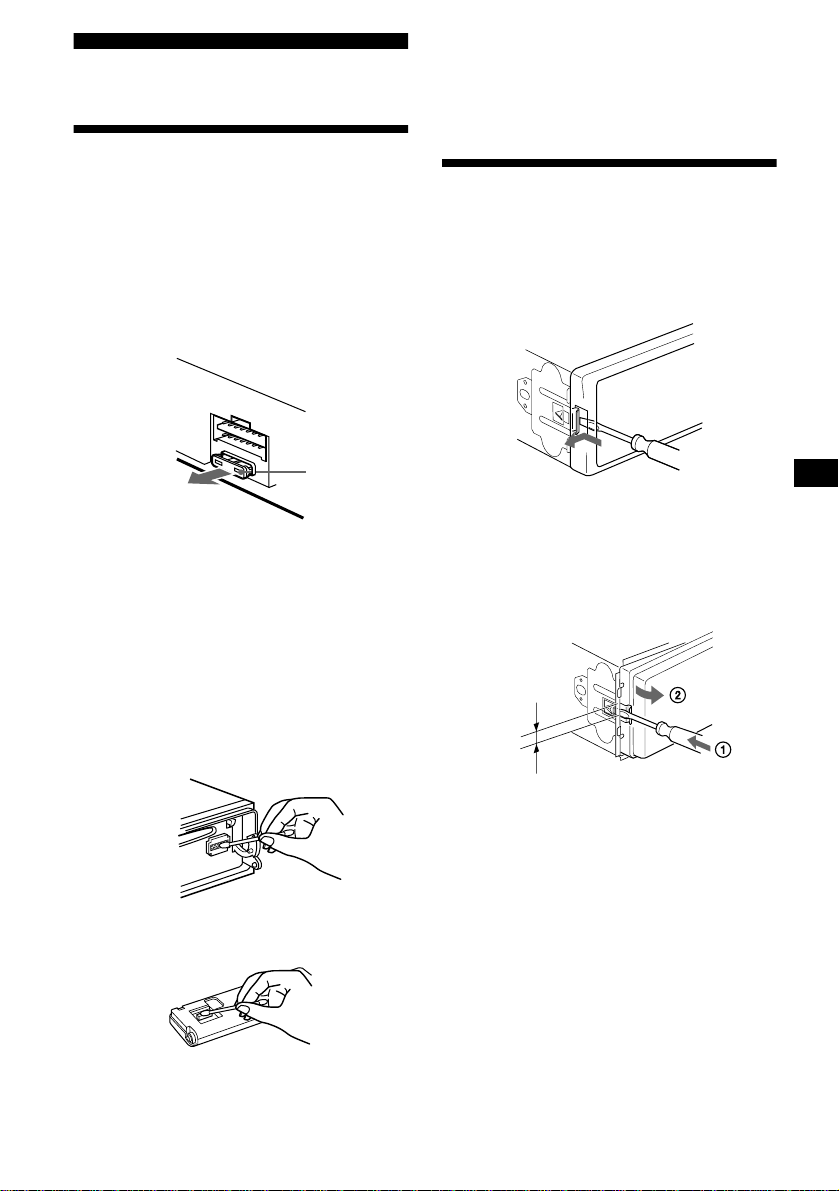
Detaching the front panel
You can detach the front panel of this unit to
protect the unit from being stolen.
Resetting the unit
Before operating the unit for the first time or
after replacing the car ba tte ry, you must re set the
unit.
Remove the front panel and press the RESET
button with a pointed object, such as a ballpoint
pen.
RESET button
Note
Pressing the RESET button will erase the clock setting
and some stored contents.
Caution alarm
If you turn the ignition switch to the OFF
position without removing the front panel, the
caution alarm will beep for a few seconds.
If you connect an op ti onal amplifier and do not
use the built-in amplifier, the beep sound will be
deactivated.
1 Press (OFF)*.
CD playback or radio reception stops (the key
illumination and display remain on).
* If your car has no ACC position on the ignition
switch, be sure to turn the unit off by pressing
(OFF) for 2 seconds to avoid car battery drain.
2 Press (OPEN), then slide the front panel
to the right, and gently pull out the left
end of the front panel.
1
2
Notes
• If you detach the panel while the unit is still turned
on, the power will turn off automatically to prevent
the speakers from being damaged.
• Do not drop or put excessive pressure on the front
panel and its display window.
• Do not subject the front panel to heat/high
temperature or moisture. Avoid leaving it in parked
cars or on dashboards/rear trays.
Tip
When carrying the front panel with you, use the
supplied front panel case.
continue to next page t
7
Page 8
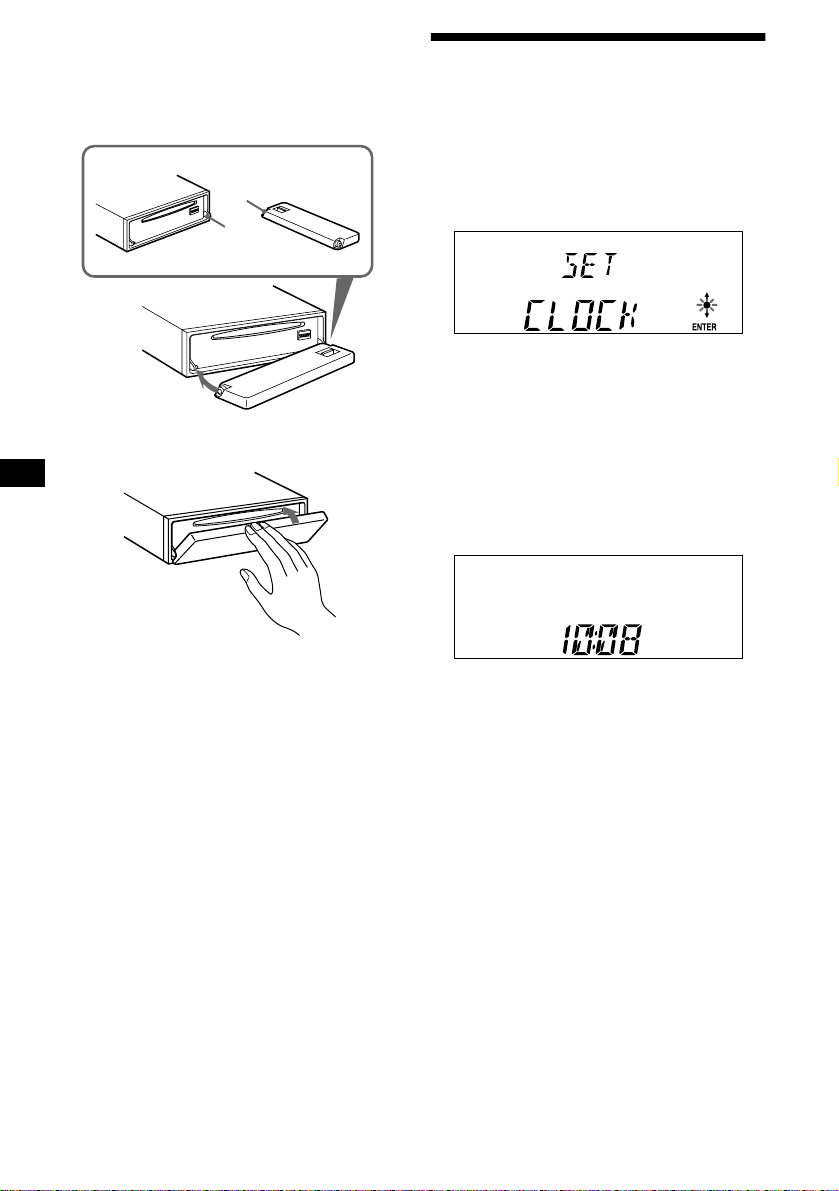
Attaching the front panel
Place hole A of the front panel onto the spindle
B on the unit, then lightly push the left side in.
Press (SOURCE) (or insert a CD) to operate the
unit.
A
B
x
Setting the clock
The clock uses a 24-hour digital indicati on.
Example: To set the clock to 10:08
1 Press (MENU), then press either side of
(PRESET) repeatedly until “CLOCK”
appears.
1Press (ENTER).
The hour indica tion flashes.
2Press either side of (PRESET) to set
the hour.
3Press the (+) side o f (SEEK).
The minute indi cation flashes.
4Press either side of (PRESET) to set
the minute.
2 Press (ENTER).
Note
Do not put anything on the inner surface of the front
panel.
8
The clock starts. Aft er th e cl ock setting is
completed, the display retu rn s to normal play
mode.
Tips
• You can set the clock automatically with the RDS
feature (page 16).
• When D.INFO mode is set to ON, the time is always
displayed (page 18).
Page 9
CD Player
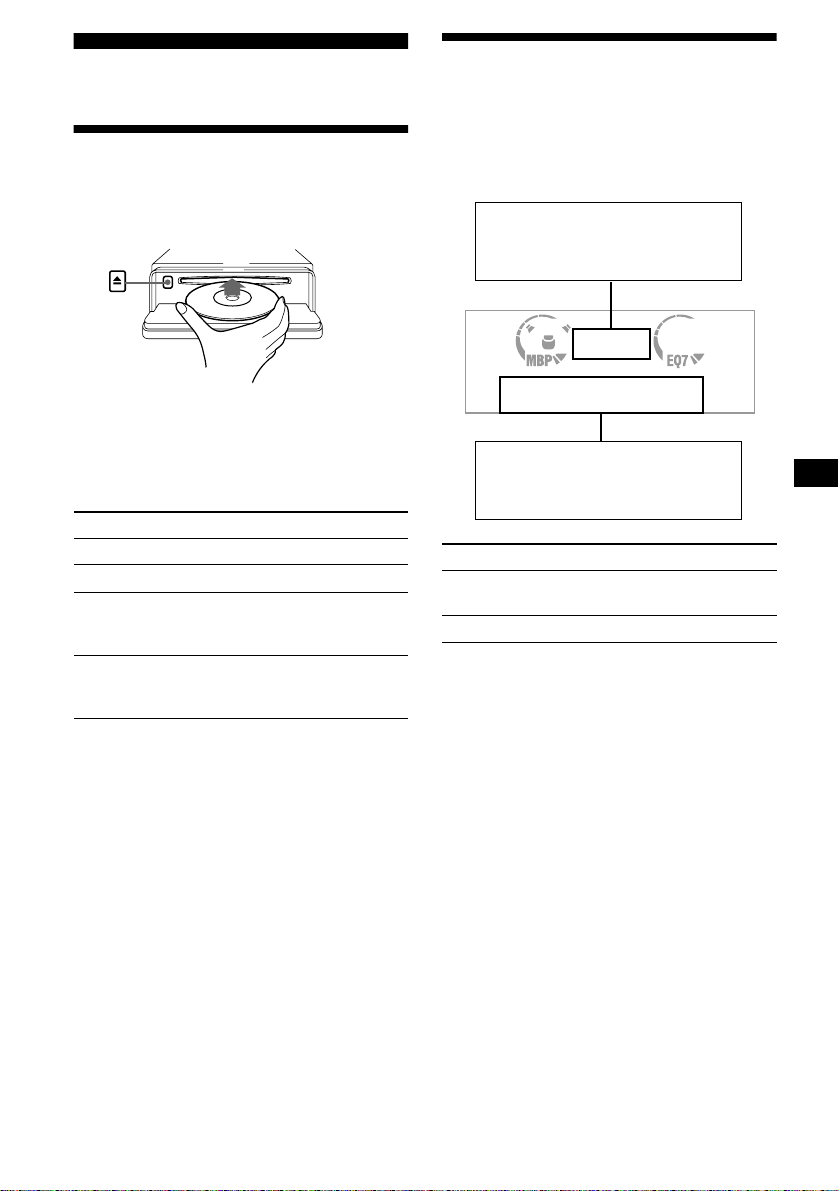
Playing a disc
1 Press (OPEN) and insert the disc
(labelled side up).
2 Close the front panel.
Playback starts automatically.
If a disc is already inserted, press (SOURCE)
repeatedly unti l “CD” appears to start playback.
To Press
Stop playba ck (OFF)
Eject the disc (OPEN) then Z
Skip tracks
–Au tomatic
Music Sensor
Fast-forward/
reverse
–Manual Search
Note
When the last track on the disc is over, playback
restarts from the first track of the disc.
(SEEK) (./>)
[once for each tr ack]
(SEEK) (m/M)
[hold to desired p o i nt ]
Display items
When the disc/track changes, any prerecorded
title* of the new disc/track is automatically
displayed (if the Auto Scroll function is set to
“ON,” names exceeding 8 characters will be
scrolled (page 18)) .
Displayable items
• Music source
• Clock
• Function
Displayable items
• Elapsed pl ayba ck time
• Disc nam e /a rtist name*
• Track title*
To Press
Switch display
item
Scroll display item (SCROLL)
* Only for CD TEXT discs with the artist name.
Notes
• Some characters cannot be displayed.
• For some CD TEXT discs with very many
characters, information may not scroll.
• This unit cannot display the artist name for each
track of a CD TEXT disc.
Tip
When Auto scroll is set to OFF and the disc/track
name is changed, the disc/track name does not scroll.
(RTY/DSPL)
9
Page 10

Playing tracks repeatedly
— Repeat Play
The current track will repeat itself when it
reaches the end.
During playback, press (3) (REP) until
“REP-ON“ appears in the display.
Repeat Play starts.
To return to normal play mode, select “REP-
OFF.”
Playing tracks in random order
— Shuffle Play
You can select to play the tracks on the current
disc in random order.
During playback, press (6) (SHUF)
repeatedly until “SHUF-ON“ appears in
the display.
Shuffle Play starts.
To return to normal play mode, select “SHUF-
OFF.”
Radio
The unit can store up t o 6 st ations per band
(FM1, FM2, FM3, MW, and LW).
Caution
When tuning in stat i ons while driving, use Best
Tuning Memory to prevent accidents .
Storing stations automatically
— Best Tuning Memory (BTM)
The unit selects the stations with the st r ongest
signals wit hi n t he selected ban d, and stores them
in the order of their frequency.
1 Press (SOURCE) repeatedly to select the
radio.
2 Press (MODE) repeatedly to select the
band.
3 Press (MENU), then press either side of
(PRESET) repeatedly until “BTM”
appears.
4 Press (ENTER).
A beep sounds when the setting is stored.
Notes
• If only a few stations can be received due to weak
signals, some number buttons will retain their former
settings.
• When a number is indicated in the display, the unit
starts storing stations from the one currently
displayed.
10
Page 11

Receiving the stored stations
1 Press (SOURCE) repeatedly to select the
radio.
2 Press (MODE) repeatedly to select the
band.
3 Press the number button ((1) to (6)) on
which the desired station is stored.
Tip
Press either side of (PRESET) to receive the stations
in the order they are stored in the memory (Preset
Search function).
If preset tuning does not work
Press either side of (SEEK) to search for
the station (automatic tuning).
Scanning stops when the unit receives a
station. Repeat un t il th e desired station is
received.
Tips
• If automatic tuning stops too frequently, turn on the
Local Seek to limit seek to stations with stronger
signals (page 19).
• If you know the frequency of the station you want to
listen to, press and hold either side of (SEEK) to
locate the approximate frequency, then press
(SEEK) repeatedly to fine adjust to the desired
frequency (manual tuning).
If FM stereo reception is poor
Select monaural reception mode (page
19).
The sound improves, but becomes monaural
(“ST” disappears).
Storing only the desired stations
You can manually preset the desired sta ti ons on
any chosen number button.
1 Press (SOURCE) repeatedly to select the
radio.
2 Press (MODE) repeatedly to select the
band.
3 Press either side of (SEEK) to tune in the
station that you want to store.
4 Press the desired number button ((1) to
(6)) for 2 seconds until “MEM” appears.
The number button indication appears in the
display.
Note
If you try to store another station on the same number
button, the previously stored station will be erased.
11
Page 12
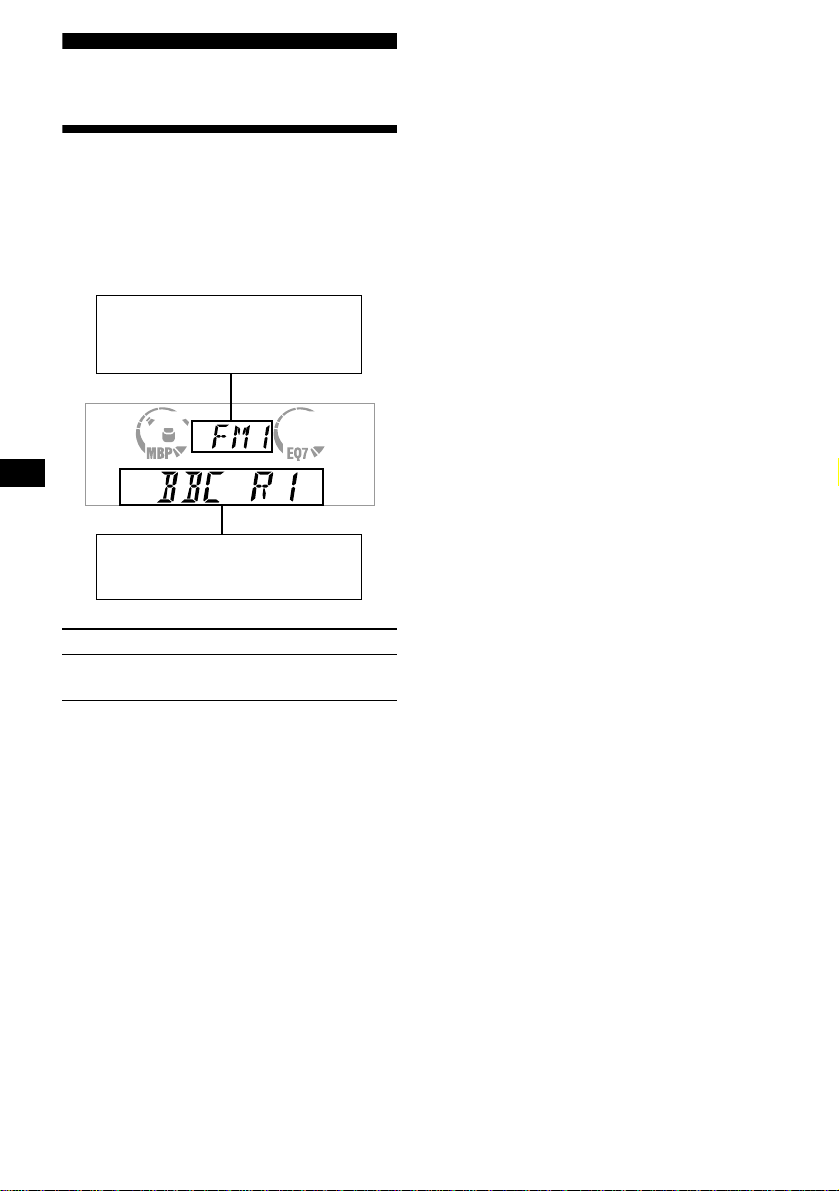
RDS
Overview of RDS
FM stations with Radio Data System (RDS)
service send in audible digital information along
with the regular radio programme signal. For
example, one of the fol lowing will be displayed
upon receiving a station with RDS capability.
Displayable ite m s
• Music source
• Clock
• Function
Displayable ite m s
•
Station name (freque ncy)
• Programme type
RDS services
RDS data offers you other conveniences, such as:
• Automatic retuning of a programme, helpful
during long-distance drives. — AF t page 13
• Receiving traffic announcements, even
when enjoyin g an other programme/s ource. —
TA t page 14
• Selecting stations by the type of programme
it broadcast s. — PTY t page 15
• Automatic clock time setting. — CT t page
16
Notes
• Depending on the country or region, not all of the
RDS functions are available.
• RDS may not work properly if the signal strength is
weak or if the station you are tuned to is not
transmitting RDS data.
To Press
Switch display
item
12
(PTY/DSPL)
Page 13
Automatic retuning for best reception results
— AF function
The alternative frequenc ies (AF) function allows
the radio to always tune into the area’s strongest
signal for the st at ion you are listening to.
Frequencies change automatically.
98.5 MHz
Station
1 Select an FM station (page 11).
2 Press (AF) repeatedly until “AF-ON”
appears.
The unit starts searching for an alternative
frequency with a s tro nger signal in the same
network.
If “NO AF” flashes, the currently tuned into
station does not have an alternative frequency.
Note
When there is no alternative frequency in the area or
when you do not need to search for one, turn the AF
function off by selecting “AF-OFF.”
96.0 MHz
102.5 MHz
Note
This function does not work in the United Kingdom
and in some other areas.
Local Link function
(United Kingdom only)
This function enables you to select other local
stations in the area, even if they are not stored on
your number buttons.
1 Press a number button ((1) to (6)) that
has a local station stored on it.
2 Within 5 seconds, press the number
button of the local station again.
3 Repeat this procedure until the desired
local station is received.
For stations without alternative
frequencies
Press either side of (SEEK) while the
station name is flashing (within 8
seconds).
The unit starts searching for another
frequency with the same PI (Programme
Identification) data (“PI SEEK” appears).
If the unit cannot find the same PI, the unit
returns to the previous ly selected freque ncy.
Staying with one regional programme
When AF function is on: t hi s unit’s factory-set
setting restricts reception to a specific region, so
you won’t be switched to another regional station
with a stronger frequency.
If you leave this regional progr am me’s reception
area or wo ul d l ik e t o t ak e advantage of th e wh ole
AF function, select “REG-OFF” from t he MENU
(page 19).
13
Page 14

Receiving traffic announcements
— TA/TP
By activating the Traffic Announcement (TA)
and Traffic Programme (TP), you can
automatically tune in an FM sta tion bro adcastin g
traffic announcements. These settings function
regardless of the current FM programme/source,
CD; the unit switches back to the origina l so ur ce
when the bulletin is over.
Presetting RDS stations with AF and TA setting
When you preset RDS stations, the unit stores
each station’s AF/TA setting (on/off) as well as
its frequency. You can select a different setting
(for AF, TA, or both) for individual preset
stations, or the same setting for all preset
stations. If you preset stations with “AF-ON” the
unit automatically stores stations with the
strongest radi o si gnal.
Press (TA) repeate dly until “TA-ON”
appears.
The unit starts searching for traffic
information stations.
“TP” indicates reception of such stations, and
“TA” flashes during an actual traffic
announcement. The unit will continue
searching for stations available with TP if
“NO TP” is indicated.
To cancel all traffic anno uncements, select “TA-
OFF.”
To Press
Cancel curren t
announcement
Tip
You can also cancel the current announcement by
pressing (SOURCE) or (MODE).
Presetting the volume of traffic
announcements
You can preset the volume level of the traffic
announcement s so you won’t miss hearing them.
(TA)
1 Turn the volume control dial to adjust
the desired volume level.
2 Press (TA) for 2 seconds.
“TA” appears and the setting is stored.
Presetting the same setting for all prese t
stations
1 Select an FM band (page 10).
2 Press (AF) and/or (TA) to select “AF-
ON” and/or “TA-ON.”
Note that selecting “AF-OFF” or “TA-OFF”
stores not only RD S st ations, but also nonRDS stations.
3 Press (MENU), then press either side of
(PRESET) repeatedly until “BTM”
appears.
4 Press (ENTER) until “BTM” flashes.
Presetting different settings for each
preset station
1 Select an FM band, and tune in the
desired station (page 11).
2 Press (AF) and/or (TA) to select “AF-
ON” and/or “TA-ON.”
3 Press the desired number button ((1) to
(6)) until “MEM” appears.
Repeat from step 1 t o pr eset other stations.
Receiving emergency announcements
If either AF or TA is on, the unit will switch to
emergency announceme nt s, if one comes in
while listening to an FM station or CD.
14
Page 15

Tuning in stations by programme type
— PTY
You can tune in a station by selecting the type of
programme you woul d like to listen to.
Programme types Display
News NEWS
Current Affairs AFFAIRS
Information INFO
Sports SPORT
Education EDUCATE
Drama DRAMA
Culture CULTURE
Science SCIENCE
Varied VARIED
Popular Music POP M
Rock Music ROCK M
Easy Listening EASY M
Light Classical LIGHT M
Classical CLASSICS
Other Music Type OTHER M
Weather WEATHER
Finance FINANCE
Children’s Programmes CHILDREN
Social Affairs SOCIAL A
Religion RELIGION
Phone In PHONE IN
Travel TRAVEL
Leisure LEISURE
Jazz Music JAZZ
Country Music COUNTRY
National Music NATION M
Oldies Music OLDIES
Folk Music FOLK M
Documentary DOCUMENT
1 Press (PTY/DSPL) during FM reception
until “PTY” appears.
The current programme type name ap pears if
the station is transmitting the PTY data.
“--------” appears if the rec e ived station is not
an RDS station, or if the RDS data is not
received.
2 Press (PRESET) repeatedly until the
desired programme type appears.
The programme t ypes appear in the order
shown in the table.
“--------” appears if the programme type is not
specified i n the RDS data .
3 Press (ENTER).
The unit starts sear ching for a station
broadcasting the selected programm e t ype.
Note
You cannot use this function in some countries whe re
no PTY (Programme Type selection) data is available.
15
Page 16
Setting the clock automatically
— CT
The CT (Clock Time) data from the RDS
transmission sets the clock automatic ally.
Other Functions
Yo u can also control the unit with a rotary
commander (optional).
1 During radio reception, press (MENU),
then press either side of (PRESET)
repeatedly until “CT-OFF” appears.
2 Press the (+) side of (SEEK) repeatedly
until “CT-ON” appears.
The clock is set.
3 Press (ENTER) to return to the normal
display.
To cancel the CT function, select “CT-OFF” in
step 2.
Notes
• The CT function may not work even though an RDS
station is being received.
• There might be a difference between the time set by
the CT function and the actual time.
Using the rotary commander
First, attach the app ro priate label depending on
how you want to mount the rot a ry commander.
The rotary commander works by pressing
buttons and/or rota ti ng controls.
SOUND
MODE
DSPL
By pressing buttons
(SOUND)
(SOURCE)
Rotate the VOL control
to adjust the volume.
Press To
(SOURCE)
(MODE)
Change source
(radio/CD)
Change
(radio band)
(ATT) Attenuate sound
(OFF)*
Stop playback or ra dio
reception
(SOUND) Adjust th e sound menu
(DSPL) Change the display item
DSPL
MODE
SOUND
(ATT)
(DSPL)
(MODE)
(OFF)
OFF
16
* If your car has no ACC (accessory) position on the
ignition key switch, be sure to press (OFF) for 2
seconds to turn off the clock indication after turning
off the ignition.
Page 17
By rotating the control
SEEK/AMS
control
Rotate and release to:
– Skip tracks.
– Tune in stations automatically.
Rotate, hold, and release to:
– Fast-forward/reverse a track.
– Find a station manually.
By pushing in and rotating the control
Changing the operative direction
The operative directi on of controls is factory-set
as shown below.
To increase
To decrease
If you need to mount the rotary commander on
the right hand side of the steering column, you
can reverse the operative direct io n.
PRESET
Push in and rotate the control to:
–Receive preset stations.
Press (SOUND) for 2 seconds while
pushing the VOL control.
Tip
You can also change the operative direction of these
controls with the unit (page 18).
17
Page 18

Adjusting the sound characteristics
You can adjust the bass, treble, balance, and
fader.
The bass and treble levels can be stored
independentl y for each source.
1 Select the item you want to adjust by
pressing (SOUND) repeatedly.
Each time you press (SOUND), the item
changes as foll ows:
BAS (bass) t TRE (treble) t BAL (leftright)
t FAD (front-rear)
2 Adjust the selected item by pressing
either side of (SEEK).
When adjusting with the rotary commander,
press (SOUND) and rotate the VOL control.
Note
Adjust within 3 seconds after selecting the item.
Quickly attenuating the sound
(With the rotary commander)
Press (ATT) on the rotary commander.
After “ATT-O N” momentarily appears, the
“ATT” ap pears in the display.
To restore the previous volume level, press
(ATT) again.
Tip
When the interface cable of a car telephone is
connected to the ATT lead, the unit decreases the
volume automatically when a telephone call comes in
(Telephone ATT function).
Changing the sound and display settings
— Menu
The following items can be set:
SET (Set Up)
• CLOCK (page 8)
• CT (Clock Time) (page 16)
• BEEP — to turn the beeps on or off.
• RM (Rotary Commander) — to change the
operative direction of the controls of the rotary
commander.
– Select “NORM” to use t he rotary commander
as the factory-set position.
– Select “REV” when you mount the rotary
commander on the ri ght side of the steerin g
column.
DSPL (Display)
• D.INFO (Dual Information) — to display the
clock and the play mode at the same time (on).
• AMBER/GREEN — to change the
illumination colour to amber or green (CDXL550 only)
• DIM (Dimmer) — to change the brightness of
the display (CDX - L550V only).
– Select “ON” to dim the display.
– Select “OFF” to deactivate the Dimmer.
• M.DSPL (Mot io n D i splay) — to sele ct the
Motion Display mode from “1,” “2,” and
“OFF.”
– Select “1” to show decoration lines in the
display and activate Demo dis pl ay.
– Select “2” to show decoration lines in the
display and deactivate Demo di s play.
– Select “OFF” to deactivate the Motion
Display.
• A.SCRL (Auto Scrol l)
– Select “ON” to scroll all automatically
displayed nam es exceeding 8 characters.
– When Auto scroll is set to off and the d i sc/
track name is changed, the disc/track nam e
does not scroll.
18
SND (Sound)
• LOUD (Loudness) — to enjoy ba ss and treble
even at low volumes. The bass and treble will
be reinforced.
Page 19
P/M (Play Mode)
• LOCAL-ON/OFF (Local seek mode) (page 11)
– Select “ON” to only tune into stations with
stronger signals.
• MONO-ON/OFF (Monaural mode) (page 11)
– Select “ON” to hear FM stereo broadcast in
monaural. Select “OFF” to return to normal
mode.
• REG-ON/OFF (Reg ional) (pag e 13)
1 Press (MENU).
To set A.SCRL, press (MENU) during CD
Playback.
2 Press either side of (PRESET)
repeatedly until the desired item
appears.
3 Press the (+) side of (SEEK) to select
the desired setting (Example: ON or
OFF).
4 Press (ENTER).
After the mode setting is completed, the
display returns to norma l p lay mode.
Note
The displayed item will differ depending on the source.
Tip
You can easily switch among categories (“SET,”
“DSPL,” “SND,” and “P/M”) by pressing either side of
(PRESET) for 2 seconds.
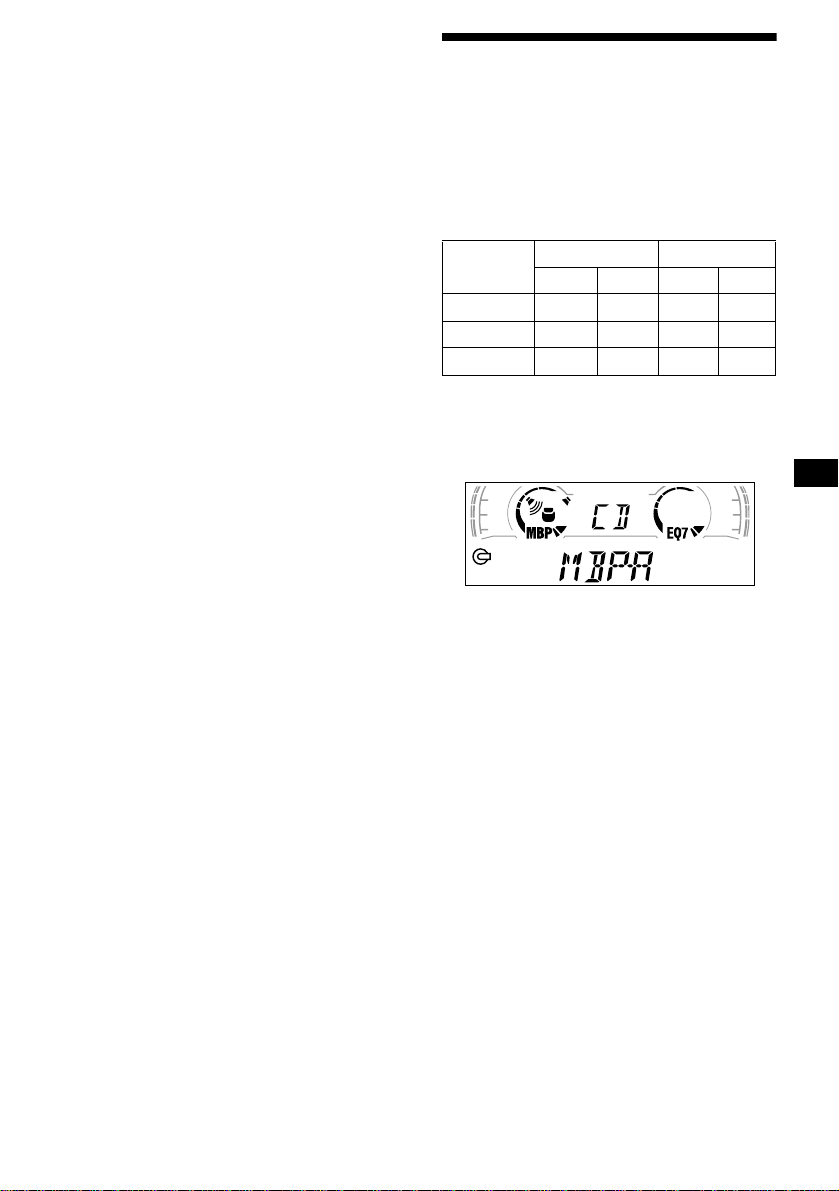
Selecting the sound position
— My Best sound Position (MBP )
When you drive without pa ss engers, you can
enjoy the most comfortable soun d environment
with “My Best sound Position.”
“My Best sound Position” has two presets, which
adjust the sound level of bala nce and fader. You
can select one very easily with the MBP button.
Display
window
MBP-A
MBP-B 0 – 4 dB 0 – 4 dB
MBP-OFF
Press (MBP) repeatedly for the desired
listening position.
The mode of “My Best sound Position” is
shown in the display in or der of the table.
After one second, the display goes back to the
normal playback mode.
If you want to adjust the sound level of
balance and fader more precisely, you can do
it using the (SOUND) button (page 18 ).
Notes
• When the BAL (balance) or FAD (fader) in “Adjusting
the sound ch ar a c teri s ti c s” (page 18) is adjusted, the
MBP setting returns OFF.
• When MBP in set to OFF, the BAL and FAD setting
is activated.
Balance Level Fader Level
Right Left Front Rear
– 4 dB 0 0 – 4 dB
0000
19
Page 20
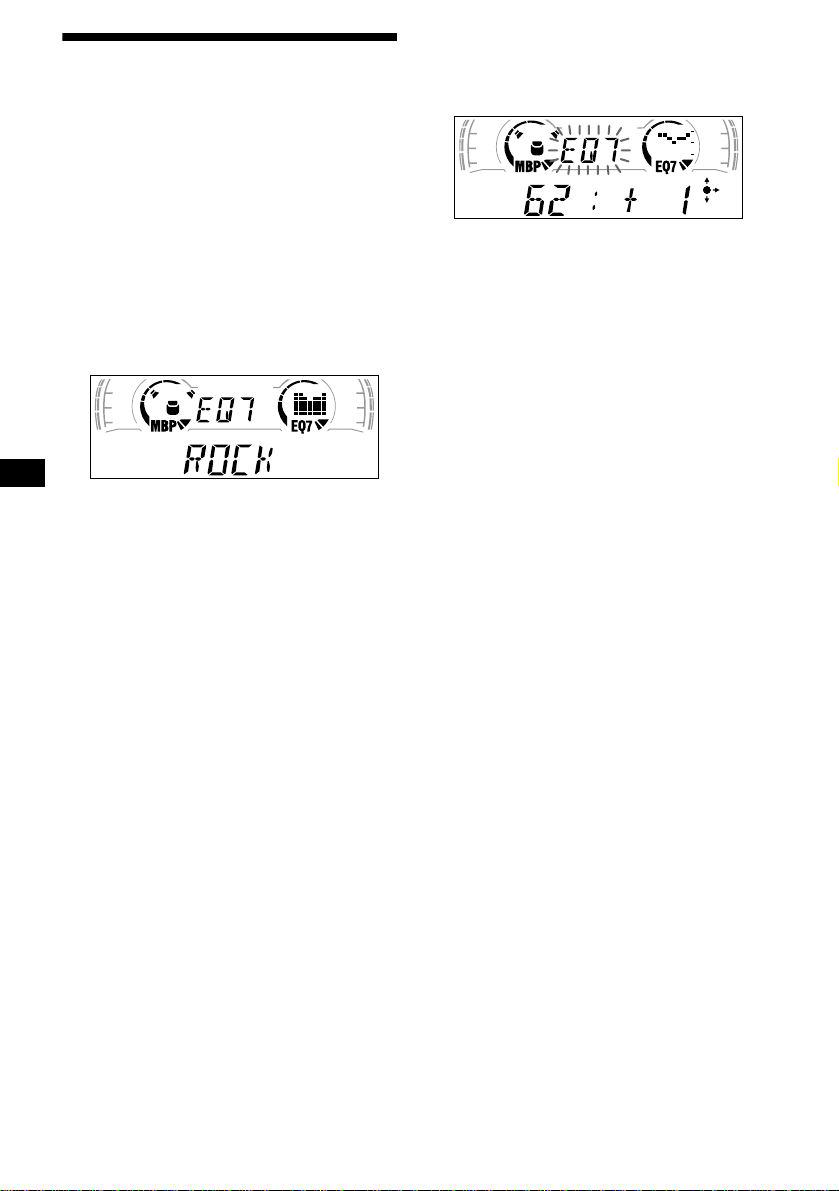
Setting the equalizer
You can select an equalizer curve for seven
music types (VOCAL, CLUB, JAZZ, NEW
AGE, ROCK, CUSTOM, and XPLOD).
You can store and adjust the equalizer settings
for frequency and level.
2Press either side of ( PR ESET ) to
adjust the desired volume level.
The volume level is adjustable by 1 dB
steps from –10 dB to +10 dB.
Selecting the equalizer curve
1 Press (SOURCE) to select a source
(radio or CD).
2 Press (EQ7) repeatedly until the
desired equalizer curve.
Each time you press (EQ7), the item
changes.
T o cancel the equ al izing effect, select “OFF.”
After three seconds, the display returns to the
normal playback mode.
Adjusting the equalizer curve
1 Press (MENU).
2 Press either side of (PRESET)
repeatedly until “EQ7 TUNE” appears,
then press (ENTER).
3 Press either side of (SEEK) to select
the desired equalizer curve, then
press (ENTER).
Each time you press (SEEK), the item
changes.
4 Select the desired frequency and level.
1 Press either side of (SEEK) to select
the desired frequency.
Each time you press ( SEEK) , the
frequency changes .
To restore the factory-set equalizer curve,
press (ENTER) for 2 secon d s.
5 Press (MENU) twice.
When the effect setting is complete, the
normal playback mode appears.
20
62 (Hz) y 157 (Hz) y 396 (Hz) y
1k (Hz) y 2.5k (Hz) y 6.3k (Hz) y
16k (Hz)
Page 21
Additional Information
Maintenance
Fuse replacement
When replacing t he fuse, be sure to use one
matching the amperage rating stated on the
original fuse. If the fuse blows, check the power
connection and replace the fuse. If the fuse blows
again after replacement, there may be an internal
malfunction. In su ch a case, consult your neares t
Sony dealer.
Fuse (10 A)
Warning
Never use a fuse with an amperage rating
exceeding the one supplied with the unit as this
could damage the u ni t.
Cleaning the connectors
The unit may not function properly if the
connectors between the unit and the front panel
are not clean. In order to prevent this, detach the
front panel (p age 7) and clean the conn ectors
with a cotton swab dipped in alcohol . D o not
apply too much force. Otherwise, the connectors
may be damaged.
Notes
• For safety, turn off the ignition before cleaning the
connectors, and remove the key from the ignition
switch.
• Never touch the connectors directly with your fingers
or with any metal device.
Removing the unit
1 Remove the front cover
1 Detach the front panel (page 7).
2 Press the clip inside the front cover
with a thin screwdriver.
3 Repeat step 2
2 Remove the unit
1 Use a thin screwdriver to push in
the clip on the left side of the unit,
then pull out the left side of the unit
until the catch clears the mounting.
4mm
2 Repeat step 1 for the right side.
3 Slide the unit out of its mounting.
for the other side.
Main unit
Back of the front panel
21
Page 22

Specifications
CD Player section
Signal-to-noise ratio 90 dB
Frequency response 10 – 20,000 Hz
Wow and flutter Below measurable limit
Tuner section
FM
Tuning range 87.5 – 108.0 MHz
Aerial terminal External aerial connector
Intermediate frequency 10.7 MHz/450 kHz
Usable sensitivity 8 dBf
Selectivity 75 dB at 400 kHz
Signal-to-noise ratio 66 dB (stereo),
Harmonic distortion at 1 kHz
Separation 35 dB at 1 kHz
Frequency response 30 – 15,000 Hz
72 dB (mono)
0.6 % (stereo),
0.3 % (mono)
MW/LW
Tuning range MW: 531 – 1,602 kHz
Aerial terminal External aerial connector
Intermediate frequency 10.7 MHz/450 kHz
Sensitivity MW: 30 µV
LW: 153 – 279 kHz
LW: 40 µV
Power amplifier section
Outputs Speaker outputs
Speaker impedance 4 – 8 ohms
Maximum power output 50 W × 4 (at 4 ohms)
(sure seal connectors)
General
Outputs Audio outputs
Inputs Telephone ATT control lead
Tone controls Bass ±8 dB at 100 Hz
Power requirements 12 V DC car battery
Dimensions Approx. 178 × 50 × 177
Mounting dimensions Approx. 182 × 53 × 161
Mass Approx. 1.2 kg
Supplied accessories Parts for installation and
Optional accessories Ro tary commander
Note
This unit cannot be connected to a digital preamplifier
or an equalizer.
Design and specifications are subject to chan ge
without notice.
Power aerial relay control
lead
Power amplifier co ntro l lead
Remote controller imput
connector
Aerial input connector
Treble ±8 dB at 10 kHz
(negativ e eart h )
mm (w/h/d)
mm (w/h/d)
connections (1 set)
Front panel case (1)
RM-X4S
22
Page 23

Troubleshooting
The following checklist will help you remedy
problems you may encounter with your unit.
Before going t hrough the checkli st below, check
the connection and operating procedur es .
General
No sound.
• Rotate the volume co ntrol dial clockwise t o
adjust the volume.
• Cancel the ATT function.
• Set the fader control to the centre positio n for
a 2-speaker system.
The contents of the memory have been
erased.
• The RESET button has been pressed.
t Store again into the memory.
• The power cord or battery h as been
disconnected.
• The power connecting cor d i s not connected
properly.
No beep sound.
The beep sound is cancelled (page 18).
Indications disappear from/do not appear in
the display.
• The clock display dis appears if you press
(OFF) for 2 seconds.
t Press (OFF) again for 2 seconds to
display the clock.
• Remove the front panel and clean the
connectors. See “Cleaning the connectors”
(page 21) for details.
Stored stations and correct time are erased.
The fuse has blown.
Makes noise when the ignition key is in the
ON, ACC, or OFF position.
The leads are not matched correctly with the
car’s accessory power connecto r.
No power is being supplied to the unit.
• Check the connect i on. If everything is in
order, check the fuse.
• The car does not have an ACC position.
t Press (SOURCE) (or insert a disc) to turn
on the unit.
The power is continuously supplied to the
unit.
The car does not have an ACC position.
The power aerial does not extend.
The power aerial does not have a relay box.
CD playback
A disc cannot be loaded.
• Another CD is already loaded.
• The CD is forcibly inserted upside down or
in the wrong way.
Playback doe s not begin.
• Dirty or defec tive disc.
• CD-R that is not finalized, or a CD-RW.
• You tried to playback a CD-R not designed
for audio use.
• Some CD-Rs may not play due to its
recording equipment or the disc condition.
A disc is automatically ejected.
The ambient temp erature exceeds 50°C.
CD will not be ejected.
The operation buttons do not function.
Press the RESET button.
The sound skips from vibration.
• The unit is installed at an angle of more than
60°.
• The unit is not installed in a sturdy part of
the car.
The sound skips.
Dirty or defective disc.
Radio reception
Preset tuning is not possible.
• Store the correct frequency in the memory.
• The broadcast signal is too weak.
The stations cannot be received.
The sound is hampered by noises.
• Connect a power aerial control lead (blue) or
accessory power supply lead (red) to the
power supply lead of a car’s aerial booster.
(Only when your car ha s built-in FM/MW/
LW aerial in the rear/side glass.)
• Check the connection of the car aerial.
• The auto aerial will not go up.
t Check the connection of the power aerial
control lead.
• Check the frequency.
Automatic tuning is not possible.
• The local seek mode is set to “ON.”
t Set the local seek mode to “OFF.” (page
19)
• The broadcast signal is too weak.
t Perform manual tuning.
continue to next page t
23
Page 24
The “ST” indication flashes.
• Tune in the frequency accurately.
• The broadcast sign al is to o w eak.
t Set to the monaural reception mode (page
19).
A programme broadcast in stereo is heard
in monaural.
The unit is in monaural reception mode.
t Canc el mo naural reception mod e (page
19).
RDS
The SEEK starts after a few seconds of
listening.
The station is non- TP or has weak signal.
t Press (AF) or (TA) repeatedly until “AF-
OFF” or “TA-OFF” appears.
No traffic announcements.
• Activate “TA.”
• The station does not br oadcast any traffic
announcements de spite being TP.
t Tune in another station.
PTY displays “--------.”
• The current station is not an RDS station.
• RDS data has not bee n received.
• The station does no t sp ecify the programm e
type.
Error displays/Messages
Error displays
The following indications will flash for about 5
seconds, and an ala rm sound will be heard.
ERROR*
HI TEMP
RESET
*1 When an error occurs during playback of a CD, the
*2 The disc number of the disc causing the error
If these solutions do not help improve the
situation, consult your nearest Sony dealer.
L.SEEK +/–
NO AF
“” or “”
1
A CD is dirty or inserted upside down.*
2
t Clean or insert the CD correctly.
The ambient temperature is more than 50°C.
t Wait until the temperature goes down
below 50°C.
The unit cannot be op er at ed because of some
problem.
t Press the RESET button on the uni t.
disc number of the CD does not appear in the
display.
appears in the display.
Messages
The Local Seek mode is on during automatic
tuning (page 11 ).
There is no alternat ive frequ ency f or the
current station.
You have reached the beginning or the end of
the disc and you cann ot go any further.
24
Page 25

Page 26

Vítejte!
Děkujeme vám, že jste se rozhodli pro koupi
přehrávače kompaktních disků Sony. Budete
moci využít celou řadu funkcí a následující
příslušenství:
• Informace CD TEXT (zobrazované při přehrávání disku CD TEXT*).
• Volitelná příslušenství k přístroji
Otočný ovladač RM-X4S
* Disk CD TEXT je zvukový kompaktní disk obsahující
informace, jako je název disku, jméno interpreta a
názvy skladeb. Tyto informace jsou zaznamenány
na disk.
2
Page 27

Obsah
Umístění ovládacích prvků . . . . . . . . . . . . 4
Bezpečnostní opatření . . . . . . . . . . . . . . . . 5
Poznámky týkající se disků . . . . . . . . . . . . 6
Uvedení do provozu
Vynulování přístroje. . . . . . . . . . . . . . . . . . 7
Sejmutí předního panelu . . . . . . . . . . . . . . 7
Nastavení hodin. . . . . . . . . . . . . . . . . . . . . . 8
Přehrávač CD
Přehrávání disku . . . . . . . . . . . . . . . . . . . . . 9
Informace na displeji . . . . . . . . . . . . . . . . . 9
Opakované přehrávání
— Funkce Repeat. . . . . . . . . . . . . . . . . 10
Přehrávání stop v náhodném pořadí
— Funkce Shuffle. . . . . . . . . . . . . . . . . 10
Rozhlasový přijímač
Automatické ukládání stanic
— Funkce BTM (Best Tuning
Memory) . . . . . . . . . . . . . . . . . . . . . . . . 10
Příjem uložených stanic . . . . . . . . . . . . . . 11
Ukládání pouze požadovaných stanic. . . 11
Systém RDS
Základní informace o systému RDS . . . 12
Automatické přeladění stanice
— Funkce AF. . . . . . . . . . . . . . . . . . . . 13
Příjem dopravních hlášení
— Funkce TA/TP. . . . . . . . . . . . . . . . . 14
Předvolení stanic RDS s nastavením funkcí
AF a TA . . . . . . . . . . . . . . . . . . . . . . . . 14
Naladění stanice podle typu programu
— Funkce PTY. . . . . . . . . . . . . . . . . . . 15
Automatické nastavení hodin
— Funkce CT . . . . . . . . . . . . . . . . . . . . 16
Další funkce
Použití otočného ovladače. . . . . . . . . . . . 16
Nastavení zabarvení zvuku . . . . . . . . . . . 18
Rychlé ztlumení zvuku
(Pomocí otočného ovladače) . . . . . . . 18
Změna nastavení zvuku a zobrazení
— Funkce menu. . . . . . . . . . . . . . . . . . 18
Výběr nejlepšího zvuku
— Nejlepší zvuková pozice (MBP) . . 19
Nastavení ekvalizéru . . . . . . . . . . . . . . . . 20
Doplňující informace
Údržba . . . . . . . . . . . . . . . . . . . . . . . . . . . . 21
Vyjmutí přístroje. . . . . . . . . . . . . . . . . . . . 21
Technické údaje . . . . . . . . . . . . . . . . . . . . 22
Odstraňování problémů. . . . . . . . . . . . . . 23
Chybové zprávy/Zprávy na displeji . . . . 24
3
Page 28

Umístění ovládacích prvků
Na uvedených stranách naleznete podrobné informace.
: Při přehrávání : Při příjmu rozhlasového vysílání : V režimu Menu
CD
1
MBP
EQ 7
4
1 Ovladač hlasitosti 14
RADIO MENU
2
3
REP
SOURCE
MODE
SHUF
6
5
CDX-L550X/L550V/L550
qs Číselná tlačítka
2 Tlačítko MBP 19
3 Tlačítko Z (vysunutí) (umístěné na přední
straně přístroje za předním panelem) 9
4 Tlačítko SOURCE (zapnuto/rádio/CD) 8,
9, 10, 11, 14, 20
5 Displej
6 Tlačítko MENU 8, 10, 14, 16, 19, 20
7 Tlačítko S (SCROLL) 9
8 Tlačítko OPEN 7, 9
9 Tlačítko PTY (DSPL)
9
CD
RADIO
12, 15
qd Tlačítko MODE
qf Tlačítko SOUND 18, 19
qg Tlačítko AF 13, 14
qh Tlačítko TA 14
qj Tlačítko OFF (stop/vypnuto)* 7, 9
qk Tlačítko ENTER
0 Tlačítko EQ7 20
qa Tlačítko RESET (umístěné na přední straně
přístroje za předním panelem) 7
*Upozornění pro instalaci do vozu, u
něhož nemá spínací skříňka polohu
ACC pro příslušenství
Po vypnutí motoru klíčkem zapalování nezapomeňte vypnout zobrazení hodin stisknutím
tlačítka
sekund).
Pokud tak neučiníte, zobrazení hodin se
nevypne a baterie se bude vybíjet.
SCROLL
S
S
E
E
R
T
DSPL
P
MENU
SEEK
SOUND
AF
TA
SEEK
O
F
F
CD
(3) REP 10
(6) SHUF 10
10, 11, 13, 14
RADIO
10, 11, 14
RADIO
12
RADIO
8, 10, 14, 15, 16, 19, 20
MENU
(OFF) na přístroji (asi po dobu dvou
O
P
E
PTY
ENTER
N
4
Page 29

SCROLL
S
O
P
E
N
S
E
E
R
T
DSPL
P
MENU
SOUND
AF
(SEEK)
(–): výběr vlevo/
.
TA
PTY
SEEKSEEK
ENTER
O
F
F
(PRESET)
(+): výběr nahoru
(PRESET)
(–): výběr dolů
(SEEK)
(+): výběr
vpravo/>
V režimu Menu jsou na displeji z těchto čtyř
tlačítek označena symbolem „M“ tlačítka, jejichž
stisknutí má v aktuálním stavu smysl.
Bezpečnostní opatření
• Pokud bylo vaše auto zaparkováno na
přímém slunci, nechte přístroj před
použitím vychladnout.
• Anténa se po zapnutí přístroje vysune
automaticky.
Budete-li mít jakékoli otázky nebo vyskytnou-li se při použití přístroje problémy, které
nejsou popsány v této příručce, obra$te se na
nejbližší zastoupení společnosti Sony.
Kondenzace vlhkosti
Za deště nebo ve velmi vlhkém prostředí
může dojít ke kondenzaci par na čočkách
a na displeji přístroje. Pokud nastane tato
situace, nebude přístroj fungovat správně.
V tom případě vyjměte disk a počkejte
přibližně 1 hodinu, dokud přístroj nevyschne.
Zachování vysoké kvality zvuku
Dbejte na to, aby se přístroj nebo disky nedostaly do kontaktu s limonádou nebo s jinými
nápoji.
ql Tlačítka PRESET (+/–)
RADIO
MENU
11, 12, 15
8, 10, 14, 16, 19, 20
w; Tlačítka SEEK (–/+)
9
CD
RADIO
MENU
11, 13
8, 16, 18, 19, 20
5
Page 30
Poznámky týkající se
disků
• Chcete-li udržet povrch disků čistý, nedo-
týkejte se jej. Vždy držte disky pouze za
okraje.
• Disky, které právě nepoužíváte, uchovávej-
te v krabičkách nebo zásobnících na disky.
Nevystavujte disky vysokým teplotám.
Nenechávejte je v zaparkovaném autě na
palubní desce nebo pod zadním oknem.
• Na disky nelepte štítky a nepoužívejte disky
se zbytky lepidla nebo s nezaschlým inkoustem. Takové disky se mohou v přehrávači
zastavit nebo jej poškodit.
Poznámky týkající se disků CD-R/
CD-RW
• V tomto přístroji lze přehrávat disky CD-R
(nahrávatelné) určené pro záznam zvuku.
Disky CD-R určené pro záznam zvuku jsou
označeny následujícím symbolem.
Následující symbol znamená, že disk není
určen pro záznam zvuku.
• Některé disky CD-R (v závislosti na zaříze-
ní použitém pro záznam na disk a na vlastnostech disku) nemusí přístroj přehrát.
• Není možné přehrávat neukončené* disky
CD-R.
* Způsob zpracování nutný pro přehrávání
nahraného disku CD-R v přehrávačích zvukových
kompaktních disků.
• Na tomto přehrávači nelze přehrávat disky
CD-RW (přepisovatelné kompaktní disky).
• Na přístroji není možné přehrávat disky
zvláštních tvarů (srdcové, čtvercové či
hvězdicové atd.). Pokud se o to pokusíte,
můžete přístroj poškodit. Takové disky
nepoužívejte.
• V přístroji nelze přehrávat disky o průměru
8 cm.
• Před začátkem přehrávání očistěte disk čis-
ticím hadříkem (k dostání ve specializovaných obchodech). Disk čistěte směrem od
středu k okraji. Nepoužívejte čisticí prostředky jako např. benzin, ředidla, čističe
nebo antistatické spreje určené pro
gramofonové desky.
6
Page 31

Uvedení do provozu
Sejmutí předního panelu
Sejmutím předního panelu můžete přístroj
zabezpečit před odcizením.
Vynulování přístroje
Před prvním použitím nebo po výměně autobaterie musíte přístroj vynulovat.
Sejměte přední panel a špičatým předmětem
(např. hrotem propisovací tužky) stiskněte
tlačítko RESET.
Tlačítko RESET
Poznámka
Stisknutím tlačítka RESET vynulujete nastavení času
a smažete některé údaje uložené v paměti.
Výstražný signál
Pokud vypnete motor klíčkem zapalování
a nesejmete při tom přední panel přístroje,
ozve se na několik sekund výstražný zvukový
signál.
Připojíte-li přídavný zesilovač a nepoužijete
vestavěný zesilovač, nebude zvukový signál
aktivován.
1 Stiskněte tlačítko (OFF)*.
Přehrávání disku CD nebo rozhlasové
stanice se zastaví (podsvícení tlačítek a
displej zůstanou zapnuté).
* Pokud nemá spínací skříňka vašeho vozu polo-
hu ACC pro příslušenství, nezapomeňte přístroj
vypnout stisknutím tlačítka (OFF) po dobu 2 se-
kund, jinak se bude autobaterie vybíjet.
2 Stiskněte tlačítko (OPEN), posuňte před-
ní panel vpravo a opatrně jej vytáhněte
za levý okraj.
1
2
Poznámky
• Jestliže přední panel sejmete v okamžiku, kdy je
přístroj zapnutý, přístroj se automaticky vypne, aby
se zabránilo poškození reproduktorů.
• Přední panel chraňte před nárazy a nevystavujte
přední panel a okénko displeje nadměrnému tlaku.
• Chraňte přední panel před vysokými teplotami
a vlhkostí. Nenechávejte jej v zaparkovaném autě
na palubní desce nebo pod zadním oknem.
Tip
Při přenášení předního panelu použijte dodávané
pouzdro.
pokračování na další straně t
7
Page 32

Připojení předního panelu
Umístěte otvor A předního panelu na čep B
na přístroji a poté jemně nasate levou stranu panelu.
Stisknutím tlačítka (SOURCE) (nebo vložením disku) přístroj zapnete.
A
B
x
Nastavení hodin
Hodiny zobrazují čas digitálně ve 24hodino-
vém režimu.
Příklad: Nastavení hodin na 10:08
1 Stiskněte tlačítko (MENU) a poté opa-
kovaně stiskněte jednu stranu tlačítka
(PRESET), dokud se neobjeví indikátor
„CLOCK“.
1 Stiskněte tlačítko (ENTER).
Zobrazený čas začne blikat.
2 Pomocí ovladače (PRESET) nastavte
počet hodin.
3 Stiskněte stranu (+) ovladače (SEEK).
Indikátor minut začne blikat.
4 Pomocí ovladače (PRESET) nastavte
počet minut.
2 Stiskněte tlačítko (ENTER).
Poznámka
Na vnitřní plochu předního panelu nelepte žádné
nálepky.
8
Hodiny se spustí. Jakmile dokončíte
nastavení hodin, vrátí se zobrazení na displeji
k normálnímu režimu přehrávání.
Tipy
• Hodiny můžete nastavit také automaticky pomocí
funkce RDS (str. 16).
• Je-li zapnut režim D.INFO (hodnota ON), bude čas
zobrazen trvale (str. 18).
Page 33

Přehrávač CD
Přehrávání disku
1 Stiskněte tlačítko (OPEN) a vložte disk
(potištěnou stranou nahoru).
2 Zavřete přední panel.
Automaticky se spustí přehrávání.
Informace na displeji
V okamžiku, kdy se změní disk nebo přehrávaná stopa, se na displeji automaticky zobrazí
předem uložený název* nového disku nebo
stopy (pokud je zapnuta funkce Auto Scroll,
budou se názvy delší než 8 znaků na displeji
posouvat (str. 18)).
Zobrazované informace
• Zdroj zvuku
• Hodiny
• Funkce
Pokud je disk již vložen, stiskněte opakovaně
tlačítko (SOURCE), dokud se nezobrazí
indikátor „CD“ a nespustí se přehrávání.
Funkce Tlačítko
Zastavení
přehrávání
Vysunutí disku (OPEN) a poté Z
Přechod mezi
stopami
– (funkce AMS)
Rychlý pohyb
vpřed/vzad
– (ruční hledání)
Poznámka
Po přehrání poslední stopy na disku začne přístroj
přehrávat disk znovu od začátku.
(OFF)
(SEEK) (./>)
[jednou pro každou stopu]
(SEEK) (m/M)
[podržet až k hledanému
místu]
Zobrazované informace
• Uplynulá doba přehrávání
• Název disku/jméno autora*
• Název stopy*
Funkce Tlačítko
Přepnutí položky
(PTY/DSPL)
displeje
Přesouvání
položky na displeji
* Platí pouze pro disky CD TEXT obsahující jméno
autora.
Poznámky
• Některé znaky není možné zobrazit.
• Informace se nemusí posouvat pro některé disky
CD TEXT obsahující velmi dlouhé názvy.
• Tento přístroj nezobrazuje jméno autora pro každou
stopu disku CD TEXT.
Tip
Je-li funkce Auto Scroll vypnuta (hodnota OFF) a
změní-li se název disku nebo stopy, nebude se text
po displeji posouvat.
(SCROLL)
9
Page 34

Opakované přehrávání
— Funkce Repeat
Po dosažení konce dojde k opakování
aktuální stopy.
Během přehrávání stiskněte tlačítko (3)
(REP), dokud se na displeji nezobrazí
indikátor
Spustí se opakované přehrávání.
Chcete-li se vrátit k normálnímu režimu,
vyberte režim „REP-OFF“.
„REP-ON“.
Přehrávání stop
v náhodném pořadí
— Funkce Shuffle
Můžete zvolit přehrávání stop na aktuálním
disku v náhodném pořadí.
Během přehrávání stiskněte opakovaně
tlačítko (6) (SHUF), dokud se na displeji
nezobrazí indikátor
Spustí se náhodné přehrávání.
Chcete-li se vrátit k normálnímu režimu,
vyberte režim „SHUF-OFF“.
„SHUF-ON“.
Rozhlasový přijímač
V přístroji lze uložit až 6 stanic pro každé
pásmo (FM1, FM2, FM3, MW a LW).
Upozornění
Při ladění stanic během řízení využijte funkci
BTM (Best Tuning Memory), budete se tak
moci lépe soustředit na jízdu.
Automatické ukládání
stanic
— Funkce BTM (Best Tuning Memory)
Přístroj vybírá v určeném pásmu stanice,
které mají nejsilnější signál, a ukládá je
v pořadí podle jejich frekvencí.
1 Opakovaným stisknutím tlačítka
(SOURCE) vyberte režim Radio.
2 Opakovaným stisknutím tlačítka (MODE)
vyberte požadované pásmo.
3 Stiskněte tlačítko (MENU), poté opako-
vaně stiskněte libovolnou stranu ovladače (PRESET), dokud se nezobrazí
indikátor „BTM“.
4 Stiskněte tlačítko (ENTER).
Uložení nastavení je doprovázeno zvukovým
signálem.
Poznámky
• Pokud je počet stanic kvůli slabému signálu malý,
zůstane na některých číselných tlačítkách uchováno
předchozí nastavení.
• Jakmile se na displeji zobrazí číslo, začne přístroj
ukládat stanice. Jako první bude uložena aktuálně
zobrazená stanice.
10
Page 35

Příjem uložených stanic
1 Opakovaným stisknutím tlačítka
(SOURCE) vyberte režim Radio.
2 Opakovaným stisknutím tlačítka (MODE)
vyberte požadované pásmo.
3 Stiskněte číselné tlačítko ((1) až (6)),
pod které chcete uložit požadovanou
stanici.
Tip
Stisknutím libovolné strany ovladače (PRESET)
můžete přijímat stanice v pořadí, v němž jsou uloženy
v paměti (funkce vyhledávání předladěných stanic).
Pokud ladění předvoleb nefunguje
Stanici můžete vyhledat stisknutím
libovolné strany ovladače (SEEK)
(automatické ladění).
Prohledávání se zastaví, jakmile je stanice
naladěna. Postup opakujte, dokud nenaladíte
požadovanou stanici.
Tipy
• Jestliže se automatické ladění zastavuje příliš často,
zapněte funkci vyhledávání lokálních stanic, aby se
vyhledávání omezilo na stanice se silnějším
signálem (str. 19).
• Pokud znáte frekvenci stanice, kterou chcete po-
slouchat, vyhledejte přibližnou frekvenci stisknutím
libovolné strany ovladače (SEEK) a poté opakova-
ným stisknutím ovladače (SEEK) dolate požadovanou frekvenci (ruční ladění).
Ukládání pouze
požadovaných stanic
Stanice můžete ručně uložit pod libovolné
číselné tlačítko.
1 Opakovaným stisknutím tlačítka
(SOURCE) vyberte režim Radio.
2 Opakovaným stisknutím tlačítka (MODE)
vyberte požadované pásmo.
3 Opakovaným stisknutím libovolné strany
ovladače (SEEK) nalate stanici, kterou
chcete uložit do paměti.
4 Stiskněte číselné tlačítko ((1) až (6)) po
dobu 2 sekund, dokud se nezobrazí
indikátor „MEM“.
Na displeji se zobrazí příslušné číslo tlačítka.
Poznámka
Pokud chcete pod stejné tlačítko uložit další stanici,
bude předchozí uložená stanice vymazána.
Je-li příjem v pásmu FM špatný
Zvolte monofonní režim příjmu (str. 19).
Zvuk se zlepší, ale bude pouze monofonní
(zmizí indikátor „ST“).
11
Page 36

Systém RDS
Základní informace
osystému RDS
Služba RDS (Radio Data System) umožňuje
stanicím v pásmu FM vysílat doprovodné
digitální informace spolu s běžným signálem
rozhlasového vysílání. Při poslechu stanice
se signálem RDS se může zobrazit některá
z následujících položek.
Položky na displeji
• Zdroj zvuku
• Hodiny
• Funkce
Položky na displeji
• Název stanice (frekvence)
• Typ programu
Služby RDS
Služby RDS umožňují různé funkce:
• Automatické přeladění programu, což je
velmi užitečná funkce při dlouhých jízdách.
AF
t str. 13
• Příjem dopravních informací, a to i během
poslechu jiného programu či zdroje.
TA
t str. 14
• Výběr stanic podle typu vysílaného
programu. PTY
• Automatické nastavení času. CT
Poznámky
• Některé funkce RDS nemusí být v některých zemích
nebo oblastech k dispozici.
• Funkce RDS nebude fungovat správně, pokud je
signál příliš slabý nebo pokud naladěná stanice
nevysílá signál RDS.
t str. 15
t str. 16
Funkce Tlačítko
Přepínání
zobrazené
položky
12
(PTY/DSPL)
Page 37

Automatické přeladění
stanice
— Funkce AF
Funkce AF (alternativní frekvence)
umožňuje naladění nejsilnějšího signálu
poslouchané stanice.
Frekvence se mění automaticky.
98,5 MHz
Stanice
1 Vyberte stanici FM (str. 11).
2 Stiskněte opakovaně tlačítko (AF),
dokud se nezobrazí indikátor „AF-ON“.
Přístroj začne vyhledávat alternativní stanici
se silnějším signálem ve stejné síti.
Pokud bliká indikátor „NO AF“, nemá právě
naladěná stanice alternativní frekvenci.
Poznámka
Není-li ve vaší oblasti k dispozici žádná alternativní
frekvence, vypněte funkci AF výběrem režimu „AFOFF“.
96,0 MHz
102,5 MHz
Poznámka
Tato funkce nefunguje ve Velké Británii a v některých
dalších zemích.
Funkce lokálního vyhledávání
(pouze ve Velké Británii)
Tato funkce umožňuje výběr dalších
lokálních stanic ve vaší zemi, i když nejsou
uloženy pod číselnými tlačítky.
1 Stiskněte číselné tlačítko ((1) až (6)),
pod kterým je uložena lokální stanice.
2 Během 5 sekund stiskněte opět číselné
tlačítko pro volbu lokální stanice.
3 Tento postup opakujte, dokud nenaladíte
požadovanou lokální stanici.
Stanice bez alternativních frekvencí
Zatímco bliká název stanice (do 8 sekund),
stiskněte libovolnou stranu ovladače
(SEEK).
Přístroj začne vyhledávat jinou frekvenci se
stejným kódem PI (Programme Identification).(Zobrazí se indikátor „PI SEEK“.)
Pokud přístroj nenajde žádnou stanici se
stejným kódem PI, vrátí se k dříve vybrané
frekvenci.
Poslech jednoho regionálního
programu
Funkce AF je zapnuta: toto tovární nastavení
omezuje příjem na určitý region, takže nebude docházet k přepínání na jinou regionální
stanici se silnějším signálem.
Chcete-li ponechat takto vybranou oblast
nebo chcete-li využít dalších možností funkce
AF, vyberte z nabídky MENU režim „REGOFF“ (str. 19).
13
Page 38

Příjem dopravních hlášení
— Funkce TA/TP
Funkce TA (Traffic Announcement - dopravní hlášení) a TP (Traffic Programme dopravní programy) umožňují automaticky
naladit stanici FM, která vysílá dopravní
hlášení. Nastavení funguje bez ohledu na
aktuální poslouchaný program FM, zdroj
nebo přehrávač CD. Po ukončení
zpravodajství začne přístroj znovu vysílat
původní zdroj.
Stiskněte opakovaně tlačítko (TA),
dokud se nezobrazí indikátor „TAON“.
Přístroj začne vyhledávat stanice vysílající
dopravní informace.
Příjem stanice s tímto typem informací je označen indikátorem „TP“. Během aktuálního
dopravního hlášení bliká indikátor „TA“.
Zobrazí-li se na displeji indikátor „NO TP“,
bude přístroj pokračovat ve vyhledávání
stanic vysílajících dopravní informace.
Chcete-li vypnout poslech dopravních
hlášení, zvolte režim „TA-OFF“.
Funkce Tlačítko
Zrušení aktuálního hlášení (TA)
Tip
Aktuální hlášení můžete zrušit také stisknutím tlačítka
(SOURCE) nebo (MODE).
Nastavení hlasitosti dopravních hlášení
Hlasitost dopravních hlášení můžete předem
nastavit tak, abyste tato hlášení nepřeslechli.
1 Otočením voliče nastavte požadovanou
hlasitost.
2 Stiskněte na dvě sekundy tlačítko (TA).
Zobrazí se indikátor „TA“ a nastavení bude
uloženo.
Příjem nouzových hlášení
Tato hlášení uslyšíte pouze tehdy, je-li při
poslechu stanice FM nebo disku CD zapnuta
funkce AF nebo TA.
Předvolení stanic RDS
s nastavením funkcí AF
aTA
Pokud předvolíte stanice RDS, přístroj uloží
kromě frekvence i nastavení funkcí AF a TA.
Pro jednotlivé předvolené stanice můžete
vybrat různá nastavení (AF, TA či obou
funkcí), nebo můžete vybrat stejné nastavení
pro všechny stanice. Pokud provedete před-
volbu stanic s nastavením „AF-ON“, přístroj
automaticky uloží stanice s nejsilnějším
signálem.
Stejné nastavení pro všechny
předvolené stanice
1 Vyberte pásmo FM (str. 11).
2 Stisknutím tlačítka (AF) nebo tlačítka
(TA) vyberte režim „AF-ON“ nebo „TAON“.
Nezapomeňte že při výběru režimu „AFOFF“ nebo „TA-OFF“ budou uloženy nejen
stanice se signálem RDS, ale i stanice bez
RDS.
3 Stiskněte tlačítko (MENU) a poté
opakovaně stiskněte libovolnou stranu
ovladače (PRESET), dokud se nezobrazí
indikátor „BTM“.
4 Stiskněte tlačítko (ENTER), dokud
nezačne indikátor „BTM“ blikat.
Různá nastavení pro jednotlivé
předvolené stanice
1 Vyberte pásmo FM a nalate požadova-
nou stanici (str. 11).
2 Stisknutím tlačítka (AF) nebo tlačítka
(TA) vyberte režim „AF-ON“ nebo „TAON“.
3 Stiskněte požadované číselné tlačítko
((1) až (6)), dokud se nezobrazí
indikátor „MEM“.
Opakujte uvedený postup od kroku 1 pro
další stanice.
14
Page 39

Naladění stanice podle
typu programu
— Funkce PTY
Požadovanou stanici můžete vyhledat podle
typu programu, který chcete poslouchat.
1 Během poslechu stanice v pásmu FM
stiskněte tlačítko (PTY/DSPL), dokud se
nezobrazí indikátor „PTY“.
Typy programů Indikátor
Zprávy NEWS
Aktuální události AFFAIRS
Informace INFO
Sport SPORT
Vzdělání EDUCATE
Divadlo DRAMA
Kultura CULTURE
Věda SCIENCE
Různé VARIED
Populární hudba POP M
Rocková hudba ROCK M
Střední proud EASY M
Lehčí vážná hudba LIGHT M
Vážná hudba CLASSICS
Ostatní druhy hudby OTHER M
Poč así WEATHE R
Finance FINANCE
Dětské programy CHILDREN
Zprávy ze společnosti SOCIAL A
Náboženství RELIGION
Kontaktní pořady PHONE IN
Cestování TRAVEL
Vo lný č as LE IS UR E
Jaz z JAZ Z
Country COUNTRY
Lidová hudba NATION M
Věčně zelené melodie OLDIES
Folk FO LK M
Dokumentární pořady DOCUMENT
Jestliže stanice vysílá údaje PTY, zobrazí se
na displeji indikátor právě vysílaného typu
programu.
Jestliže stanice nevysílá signál RDS nebo
není-li možné signál RDS přijímat, zobrazí se
indikátor „--------“.
2 Stiskněte opakovaně tlačítko
(PRESET), dokud se nezobrazí
požadovaný typ programu.
Typy programů se zobrazují v pořadí
uvedeném v tabulce.
Pokud není v signálu RDS typ programu
uveden, zobrazí se indikátor „--------“.
3 Stiskněte tlačítko (ENTER).
Přístroj začne vyhledávat stanici vysílající
vybraný typ programu.
Poznámka
V zemích, kde nejsou vysílány údaje PTY (typ
programu), nemůžete tuto funkci používat.
15
Page 40

Automatické nastavení
hodin
— Funkce CT
Hodiny se automaticky nastavují pomocí
signálu CT (Clock Time) přenášeného
pomocí signálu RDS.
1 Během poslechu rozhlasové stanice
stiskněte tlačítko (MENU) a poté
opakovaně stiskněte libovolnou stranu
ovladače (PRESET), dokud se nezobrazí
indikátor „CT-OFF“.
Další funkce
Tento přístroj můžete ovládat také otočným
ovladačem (volitelný doplněk).
Použití otočného
ovladače
Nejprve nalepte na otočný ovladač nálepku.
Nálepku vyberte podle umístění ovladače.
Otočný ovladač obsahuje tlačítka a otočné
voliče.
2 Opakovaně stiskněte stranu (+) ovladače
(SEEK), dokud se nezobrazí indikátor
„CT-ON“.
Hodiny jsou nastaveny.
3 Stisknutím tlačítka (ENTER) se vrátíte
k běžnému zobrazení na displeji.
Chcete-li vypnout funkci CT, vyberte v kroku
2 indikátor „CT-OFF“.
Poznámky
• Může se stát, že funkce CT nebude fungovat,
ačkoliv je přijímána stanice se signálem RDS.
• Čas nastavený funkcí CT nemusí být přesný.
SOUND
MODE
DSPL
MODE
SOUND
DSPL
Tlačítka
(SOUND)
(SOURCE)
Otočný volič VOL pro
nastavení hlasitosti.
Tlačítko Funkce
(SOURCE)
(MODE)
(ATT) Ztlumení zvuku
(OFF)*
(SOUND) Nastavení zvuku pomocí nabídky
(DSPL) Změna zobrazené položky
Změna zdroje
(rádio/CD)
Změna režimu (rozhlasové
pásmo)
Zastavení přehrávání či příjmu
rozhlasového vysílání
(ATT)
(DSPL)
(MODE)
(OFF)
OFF
16
* Pokud spínací skříňka vašeho vozu nemá polohu
ACC pro příslušenství, nezapomeňte po vypnutí
motoru klíčkem zapalování stisknout na 2 sekundy
tlačítko (OFF), čímž se vypne zobrazení času.
Page 41

Otočení voliče
Volič SEEK/
AMS
Otočením a uvolněním můžete:
– Přeskakovat stopy.
– Automaticky ladit stanice.
Otáčením, podržením a uvolněním
můžete:
–Rychle převíjet skladbu dopředu
a dozadu.
–Ručně vyhledávat stanice.
Stlačení otočného voliče
Volič PRESET
Změna směru ovládání
Směr ovládání ovladačů je výrobcem
nastaven tak, jak je uvedeno na obrázku.
Zvyšování
Snižování
Potřebujete-li upevnit otočný ovladač na
pravou stranu sloupku volantu, můžete směr
ovládání otočit.
Stiskněte na dobu 2 sekund tlačítko
(SOUND) a stlačte přitom volič VOL.
Tip
Směr ovládání voličů můžete změnit také na přístroji
(str. 18).
Stlačením a otočením voliče můžete:
– Přijímat předvolené stanice.
17
Page 42

Nastavení zabarvení zvuku
Můžete nastavit basy a výšky a pravolevé či
předozadní vyvážení.
Nastavení basů a výšek lze uložit pro
jednotlivé zdroje zvláš.
1 Opakovaným stisknutím tlačítka
(SOUND) vyberte položku, kterou chcete
nastavit.
Při každém stisknutí tlačítka (SOUND) se
položka změní takto:
BAS (basy) t TRE (výšky) t BAL
(pravolevé) t FAD (předozadní)
2 Vybranou položku upravte pomocí
ovladače (SEEK).
Provádíte-li úpravy otočným ovladačem,
stiskněte tlačítko (SOUND) a otočte voličem
VOL.
Poznámka
Nastavení provete do 3 sekund po výběru položky.
Rychlé ztlumení zvuku
(Pomocí otočného ovladače)
Stiskněte tlačítko (ATT) na otočném
ovladači.
Na okamžik se zobrazí indikátor „ATT-ON“
a poté indikátor „ATT“.
Chcete-li obnovit původní nastavení hlasitosti, stiskněte znovu tlačítko (ATT).
Tip
Je-li kabel rozhraní telefonu v automobilu připojen ke
kabelu ATT, sníží se při přijetí telefonického hovoru
automaticky hlasitost (funkce Telephone ATT).
Změna nastavení zvuku
a zobrazení
— Funkce menu
Můžete nastavit následující položky:
SET (Nastavení)
• CLOCK (str. 8)
• CT (nastavení času) (str. 16)
• BEEP — zapnutí a vypnutí zvukových
signálů.
• RM (otočný ovladač) — změna směru
ovládání voličů na otočném ovladači.
– Chcete-li používat otočný ovladač tak, jak
je nastaven od výrobce, vyberte režim
„NORM“.
– Chcete-li upevnit otočný ovladač na
pravou stranu sloupku volantu, vyberte
režim „REV“.
DSPL (displej)
• D.INFO (dvojí informace) — zobrazení
hodin i režimu přehrávání (ON).
• AMBER/GREEN — změna barvy
osvětlení na oranžovou nebo zelenou
(pouze model CDX-L550).
• DIM (ztlumení) — změna jasu displeje
(pouze model CDX-L550V).
– Chcete-li displej ztlumit, vyberte hodnotu
„ON“.
– V opačném případě vyberte hodnotu
„OFF“.
• M.DSPL (akční displej) — výběr režimu
akčního displeje mezi hodnotami „1“, „2“
a „OFF“.
– Chcete-li zobrazit na displeji ozdobné čáry a
aktivovat režim Demo, vyberte hodnotu „1“.
– Chcete-li zobrazit na displeji ozdobné čáry a
vypnout režim Demo, vyberte hodnotu „2“.
– Chcete-li vypnout akční displej, vyberte
hodnotu „OFF“.
• A.SCRL (automatické rolování)
– Chcete-li automaticky rolovat všechny
zobrazené názvy delší než 8 znaků, vyberte
hodnotu „ON“.
– Je-li automatické rolování vypnuto a změní-
li se název disku či stopy, nebude název
disku či stopy rolován.
18
SND (zvuk)
• LOUD (hlasitost) - potěšení z basů a výšek
i při nízké hlasitosti. Basy a výšky budou
zvýrazněny.
Page 43

P/M (režim přehrávání)
• LOCAL-ON/OFF (režim vyhledávání
lokálních stanic) (str. 11)
– Vyberete-li hodnotu „ON“, naladí se pouze
stanice s nejsilnějším signálem.
• MONO-ON/OFF (monofonní režim)
(str. 11)
– Vyberete-li hodnotu „ON“, uslyšíte
stereofonní vysílání v pásmu FM
monofonně. Do normálního režimu se
vrátíte výběrem hodnoty „OFF“.
• REG-ON/OFF (regionální stanice) (str. 13)
1 Stiskněte tlačítko (MENU).
Chcete-li nastavit funkci A.SCRL, stiskněte
během přehrávání disku CD tlačítko
(MENU).
2 Opakovaně stiskněte libovolnou stranu
ovladače (PRESET), dokud se nezobrazí
požadovaná položka.
3 Stiskněte stranu (+) ovladače (SEEK)
a vyberte požadované nastavení
(příklad: ON nebo OFF).
4 Stiskněte tlačítko (ENTER).
Po dokončení nastavení režimu se zobrazení
na displeji vrátí k normálnímu režimu
přehrávání.
Poznámka
Zobrazená položka se bude měnit v závislosti na
zdroji.
Tip
Můžete snadno přepínat mezi kategoriemi („SET“,
„DSPL“, „SND“, „P/M“) stisknutím jedné ze stran
ovladače (PRESET) na 2 sekundy.
Výběr nejlepšího zvuku
— Nejlepší zvuková pozice (MBP)
Jedete-li autem sami, můžete si vychutnat co
nejlepší zvuk díky funkci MBP (My Best
sound Position).
Funkce MBP má dvě předvolby pro pravolevé a předozadní vyvážení zvuku. Jednu z nich
lze snadno nastavit pomocí tlačítka MBP.
Pravolevé
Indikátor
MBP-A – 4 dB 0 0 – 4 dB
MBP-B 0 – 4 dB 0 – 4 dB
MBP-OFF 0000
Opakovaným stisknutím tlačítka (MBP)
vyberte požadovaný režim poslechu.
Režimy funkce MBP se zobrazují v pořadí
uvedeném v tabulce.
Po uplynutí jedné sekundy se zobrazení na
displeji vrátí do běžného režimu přehrávání.
Chcete-li nastavit zvukové vyvážení přesněji,
použijte tlačítko (SOUND) (str. 18).
Poznámky
• Je-li použito vyvážení (BAL) nebo prolínání (FAD)
podle pokynů v části „Nastavení zabarvení zvuku“
(strana 18), vypne se nastavení MBP (poloha OFF).
• Při vypnutí nastavení MBP (poloha OFF), se aktivují
nastavení BAL a FAD.
vyvážení
Vpravo Vlevo Vpředu Vzadu
Předozadní
vyvážení
19
Page 44

Nastavení ekvalizéru
Křivku ekvalizéru můžete zvolit pro sedm
hudebních žánrů (VOCAL, CLUB, JAZZ,
NEW AGE, ROCK, CUSTOM a XPLOD).
Nastavení ekvalizéru můžete změnit a uložit.
Výběr křivky ekvalizéru
2 Stisknutím libovolné strany ovladače
(PRESET) nastavte požadovanou
úroveň hlasitosti.
Úroveň hlasitosti lze nastavit po 1 dB od
–10 dB do +10 dB.
1 Stisknutím tlačítka (SOURCE) vyberte
požadovaný zdroj (rádio, přehrávač CD).
2 Stiskněte opakovaně tlačítko (EQ7),
dokud nedosáhnete požadované křivky
ekvalizéru.
Položka se změní při každém stisknutí
tlačítka (EQ7).
Efekt ekvalizéru zrušíte výběrem hodnoty
„OFF“. Po třech sekundách se zobrazení na
displeji vrátí do běžného režimu přehrávání.
Nastavení křivky ekvalizéru
1 Stiskněte tlačítko (MENU).
2 Stiskněte opakovaně libovolnou stranu
ovladače (PRESET), dokud se nezobrazí
indikátor „EQ7 TUNE“. Poté stiskněte
tlačítko (ENTER).
3 Stisknutím libovolné strany ovladače
(SEEK) vyberte požadovanou křivku
ekvalizéru. Poté stiskněte tlačítko
(ENTER).
Položka se změní při každém stisknutí
ovladače (SEEK).
4 Vyberte požadovanou frekvenci
aúroveň.
1 Stisknutím libovolné strany ovladače
(SEEK) vyberte požadovanou
frekvenci.
Frekvence se změní při každém stisknutí
ovladače (SEEK).
Chcete-li obnovit nastavení křivky
ekvalizéru podle výrobce, stiskněte tlačítko
(ENTER) po dobu 2 sekund.
5 Stiskněte dvakrát tlačítko (MENU).
Jakmile nastavení dokončíte, zobrazí se na
displeji běžný režim přehrávání.
20
62 (Hz) y 157 (Hz) y 396 (Hz) y
1k (Hz) y 2.5k (Hz) y 6.3k (Hz) y
16k (Hz)
Page 45

Doplňující informace
Údržba
Výměna pojistky
Při výměně pojistky zkontrolujte, že používáte pojistku stejné hodnoty, jakou má původní
pojistka. Jestliže se pojistka přepálí, zkontrolujte zapojení napájení a pojistku vyměňte.
Pokud se pojistka po výměně opět přepálí,
může být důvodem porucha přístroje. V takovém případě se obrate na nejbližší zastoupení společnosti Sony.
Poznámky
• Pro vaši bezpečnost doporučujeme před čištěním
kontaktů vypnout zapalování a vyjmout klíček ze
spínací sk říňky.
• Nikdy se konektorů nedotýkejte prsty ani žádným
kovovým předmětem.
Vyjmutí přístroje
1 Sejmutí předního krytu
1 Sejměte přední kryt (str. 7).
2 Pomocí tenkého šroubováku stiskněte
svorku v předním krytu.
Pojistka (10 A)
Varování
Nikdy nepoužívejte pojistky s vyšší ampérovou hodnotou, než jakou má pojistka dodávaná s přístrojem, protože by mohlo dojít
k poškození přístroje.
Čištění konektorů
Pokud jsou kontakty konektoru mezi přístrojem a předním panelem zašpiněné, nemusí
přístroj řádně fungovat. V tom případě sejměte přední panel (str. 7) a vyčistěte konektory pomocí bavlněného smotku navlhčeného alkoholem. Nepoužívejte příliš velkou
sílu. Pokud to váš problém nevyřeší, je
možné, že je konektor poškozen.
Přístroj
3 Opakujte krok 2 na druhé straně
krytu.
2 Vyjměte přístroj
1 Pomocí tenkého šroubováku stiskněte
svorku na levé straně přístroje
a potom zatáhněte za levou stranu
přístroje, dokud se západka neuvolní.
4 mm
2 Opakujte krok 1 pro pravou stranu.
3 Vysuňte přístroj z montážního otvoru.
Zadní plocha předního panelu
21
Page 46

Technické údaje
Přehrávač CD
Odstup signál/šum 90 dB
Frekvenční rozsah 10 – 20 000 Hz
Zkreslení Pod hranicí měřitelnosti
Rozhlasový přijímač
FM
Rozsah ladění 87,5 – 108,0 MHz
Anténa Zdířka pro externí anténu
Mezifrekvence 10,7 MHz/450 kHz
Citlivost 8 dBf
Selektivita 75 dB při 400 kHz
Odstup signál/šum 66 dB (stereo),
Harmonické zkreslení při 1 kHz
Odstup kanálů 35 dB při 1 kHz
Frekvenční rozsah 30 – 15 000 Hz
72 dB (mono)
0,6 % (stereo),
0,3 % (mono)
MW/LW
Rozsah ladění MW: 531 – 1 602 kHz
Anténa Zdířka pro externí anténu
Mezifrekvence 10,7 MHz/450 kHz
Citlivost MW: 30 µV
LW: 153 – 279 kHz
LW: 4 0 µV
Výkonový zesilovač
Výstup Reproduktorové výstupy
Impedance repr. 4 – 8 ohmů
Maximální výkon 50 W × 4 (při impedanci 4
(zajištěné konektory)
ohmy)
Obecné údaje
Výstupy Zvukové výstupy
Vstupy Telefonní řídicí signál
Tónové korekce Basy ±8 dB při 100 Hz
Napájení 12 V, stejnosměrné,
Rozměry Přibl. 178 × 50 × 177 mm
Montážní rozměry Přibl. 182 × 53 × 161 mm
Hmotnost Přibl. 1,2 kg
Dodávané příslušenství
Volitelné příslušenství
Poznámka
Tento přístroj není možné připojit k digitálnímu
předzesilovači nebo ekvalizéru.
Vzhled a technické parametry mohou být změněny
bez předchozího upozornění.
Výstup pro relé ovládající
vysouvání antény
Výstup pro výkonový
zesilovač
ATT
Vstupní kone ktor
dálkového ovladače
Vstupní konektor antény
Výšky ±8 dB při 10 kHz
autobaterie (záporné
ukostření)
(š/v/h)
(š/v/h)
Díly pro instalaci
a připojení (1 sada)
Pouzdro na přední panel
(1)
Otočný ovladač
RM-X4S
22
Page 47

Odstraňování problémů
Následující přehled vám pomůže při odstraňování problémů, se kterými se můžete při
používání přístroje setkat.
Před provedením následujících postupů
zkontrolujte správnost připojení a použití
přístroje.
Všeobecné
Žádný zvuk.
• Otočte ovladačem hlasitosti ve směru
hodinových ručiček.
• Vypněte funkci ATT.
• Používáte-li systém dvou reproduktorů,
nastavte vyvážení do střední polohy.
Obsah paměti byl vymazán.
• Bylo stisknuto tlačítko RESET.
t Znovu uložte do paměti potřebná data.
• Byl odpojen napájecí kabel od baterie.
• Napájecí kabel není správně připojen.
Neozývají se zvukové signály.
Zvukové signály jsou vypnuté (str. 18).
Na displeji se nezobrazují indikátory.
• Zobrazení času zmizí, pokud stisknete
tlačítko (OFF) po dobu 2 sekund.
t Dalším stisknutím tlačítka (OFF) po
dobu 2 sekund obnovte zobrazení času.
• Sejměte přední panel a vyčistěte konektory.
Podrobnosti naleznete v části „Čištění
konektorů“ (str. 21).
Došlo k vymazání uložených stanic a času.
Přepálila se pojistka.
Je-li klíč zapalování v poloze ON, ACC nebo
OFF, ozývá se šum.
Vodiče nejsou správně připojeny k napájecímu konektoru pro příslušenství vozu.
Přístroj není napájen.
• Zkontrolujte připojení. Je-li vše v pořádku,
zkontrolujte pojistku.
• Zapalovací skříňka nemá polohu ACC pro
příslušenství.
t Stisknutím tlačítka (SOURCE) (nebo
vložením disku) přístroj zapněte.
Přístroj je napájen nepřetržitě.
Zapalovací skříňka nemá polohu ACC pro
příslušenství.
Anténa se nevysouvá.
Anténa není vybavena příslušným relé.
Přehrávač CD
Do přístroje nelze vložit disk.
• V přístroji je již vložen jiný disk.
• Disk byl vložen obráceně nebo nesprávným
způsobem.
Přehrávání se nespustí.
• Zašpiněný nebo poškozený disk.
• Neukončený nahrávatelný disk CD-R nebo
přepisovací disk CD-RW.
• Pokusili jste se přehrát disk CD-R, který
není určen pro záznam zvuku.
• Některé disky CD-R přístroj nemusí umět
přehrát kvůli použitému nahrávacímu
zařízení nebo vlastnostem disku.
Disk se automaticky vysune.
Teplota okolí překročila 50 «C.
CD nebude vysunut.
Ovládací tlačítka nefungují.
Stiskněte tlačítko RESET.
Zvuk je přerušován následkem vibrací.
• Přístroj byl instalován v úhlu větším než
60«.
• Přístroj nebyl instalován v dostatečně
robustní části vozu.
Zvuk přeskakuje.
Zašpiněný nebo poškozený disk.
Příjem rozhlasového vysílání
Nelze ladit předvolené stanice.
• Uložte do paměti správné frekvence.
• Přijímaný signál je příliš slabý.
Nelze přijímat rozhlasové stanice.
Zvuk je překryt šumem.
• Připojte řídicí vodič vysouvání antény
(modrý) nebo vodič pro napájení příslušenství (červený) k napájecímu vodiči
anténního zesilovač. (Pouze v případě, že je
vůz vybaven FM/MW/LW anténou v zadním
nebo bočním okně.)
• Zkontrolujte připojení antény.
• Anténa se nevysouvá.
t Zkontrolujte zapojení napájecího vodiče
vysouvání antény.
• Zkontrolujte frekvenci.
Automatické ladění není možné.
• Je zapnutý režim vyhledávání lokálních
stanic (poloha „ON“).
t Nastavte režim vyhledávání lokálních
stanic na hodnotu „OFF“ (str. 19).
• Přijímaný signál je příliš slabý.
t Nalate stanici ručně.
Bliká indikátor „ST“.
• Nalate frekvenci přesněji.
• Přijímaný signál je příliš slabý.
t Nastavte monofonní režim příjmu
(str. 19).
pokračování na další straně t
23
Page 48

Stereofonní program se reprodukuje
monofonně.
Přístroj je v monofonním režimu příjmu.
t Vypněte monofonní režim příjmu (str. 19).
Chybové zprávy/Zprávy
na displeji
Funkce RDS
Po několika sekundách poslechu se spustí
funkce SEEK.
Stanice nevysílá signál TP nebo je signál
slabý.
t Stiskněte opakovaně tlačítko (AF) nebo
(TA), dokud se nezobrazí indikátor „AF-
OFF“ nebo „TA-OFF“.
Nepřijímají se dopravní informace.
• Zapněte funkci „TA“.
• Stanice nevysílá dopravní informace i když
vysílá signál TP.
t Nalate jinou stanici.
Funkce PTY zobrazuje „--------“.
• Aktuální stanice nevysílá signál RDS.
• Data RDS nebylo možné přijmout.
• Stanice nevysílá informaci o typu programu.
Chybové zprávy
Následující zprávy budou blikat přibližně
5 sekund a ozve se zvukový signál.
ERROR*
HI TEMP
RESET
*1 Dojde-li k chybě během přehrávání disku CD, na
*2 Číslo chybného disku se zobrazí na displeji.
1
Disk CD je zašpiněný nebo byl vložen
obráceně.*
t Vyčistěte disk nebo jej vložte správným
Teplota okolí překročila 50 «C.
t Vyčkejte dokud teplota neklesne pod 50
Jednotka CD nemůže z nějakého důvodu
pracovat.
t Stiskněte jednotce tlačítko RESET na
displeji se nezobrazí číslo disku.
2
způsobem.
«C.
jednotce.
Pokud se nepodaří pomocí těchto postupů
váš problém vyřešit, obrate se na nejbližšího
prodejce výrobků Sony.
Zprávy na displeji
L.SEEK +/–
Během automatického ladění je aktivní
funkce vyhledávání lokálních stanic (str. 11).
NO AF
Pro tuto stanici není k dispozici alternativní
frekvence.
„“ nebo „“
Dosáhli jste začátku nebo konce disku a není
možné dále pokračovat.
24
Page 49

Page 50

Witamy!
Dziękujemy za zakupienie odtwarzacza płyt
kompaktowych firmy Sony. Na jeszcze lepsze
wykorzystanie jego różnorodnych funkcji
pozwolą nabyte dodatkowo:
• Informacje CD TEXT (wyświetlane w
przypadku odtwarzania płyty CD TEXT,
zawierającej dodatkowe informacje
tekstowe*2).
• Opcjonalne akcesoria sterowania
Pilot rotacyjny RM-X4S
* Płyta CD TEXT jest dźwiękową płytą CD zawierającą
dodatkowe dane, takie jak tytuł dysku, nazwisko
wykonawcy oraz tytuły wszystkich utworów.
Informacje te są zakodowane na płycie.
2
Page 51

Spis treści
Rozmieszczenie przycisków. . . . . . . . . . . . 4
Środki ostrożności. . . . . . . . . . . . . . . . . . . . 5
Uwagi dotyczące płyt CD. . . . . . . . . . . . . . 6
Przygotowania wstępne
Zerowanie urządzenia . . . . . . . . . . . . . . . . 7
Zdejmowanie panelu przedniego . . . . . . . 7
Ustawianie zegara. . . . . . . . . . . . . . . . . . . . 8
Odtwarzacz CD
Odtwarzanie płyty CD
(za pomocą tego urządzenia) . . . . . . . . 9
Elementy wyświetlacza. . . . . . . . . . . . . . . . 9
Cykliczne odtwarzanie utworów
— funkcja Repeat Play . . . . . . . . . . . . 10
Odtwarzanie utworów w kolejności losowej
— funkcja Shuffle Play. . . . . . . . . . . . . 10
Radio
Automatyczne programowanie stacji
nadawczych
— funkcja zapamiętywania najlepszego
dostrojenia (BTM) . . . . . . . . . . . . . . . . 10
Odbieranie zaprogramowanych stacji
nadawczych . . . . . . . . . . . . . . . . . . . . . . 11
Programowanie wyłącznie wybranych stacji
nadawczych . . . . . . . . . . . . . . . . . . . . . . 11
RDS
Opis funkcji RDS . . . . . . . . . . . . . . . . . . . 12
Automatyczne dostrajanie w celu
uzyskania najlepszego odbioru
— funkcja AF. . . . . . . . . . . . . . . . . . . . 13
Odbieranie komunikatów o ruchu
drogowym
— funkcja TA/TP. . . . . . . . . . . . . . . . . 14
Programowanie stacji nadawczych
oferujących serwis RDS
z ustawieniami funkcji AF i TA. . . . . 14
Dostrajanie się do stacji nadawczych za
pomocą funkcji wyboru typu programu
— funkcja PTY. . . . . . . . . . . . . . . . . . . 15
Automatyczne ustawianie zegara
— funkcja CT . . . . . . . . . . . . . . . . . . . . 16
Pozostałe funkcje
Korzystanie z pilota rotacyjnego . . . . . . 16
Ustawianie cech dźwięku. . . . . . . . . . . . . 18
Szybkie wyciszanie dźwięku
(przy użyciu pilota rotacyjnego). . . . . 18
Zmiana ustawień dźwięku i wyświetlacza
— menu. . . . . . . . . . . . . . . . . . . . . . . . . 18
Wybieranie ustawienia dźwięku
— moje ulubione ustawienie dźwięku
(MBP) . . . . . . . . . . . . . . . . . . . . . . . . . . 19
Ustawianie korektora dźwięku. . . . . . . . 20
Informacje dodatkowe
Konserwacja . . . . . . . . . . . . . . . . . . . . . . . 21
Wyjmowanie urządzenia . . . . . . . . . . . . . 21
Dane techniczne . . . . . . . . . . . . . . . . . . . . 22
Rozwiązywanie problemów. . . . . . . . . . . 23
Wizualne ostrzeżenia o błędach/
Komunikaty . . . . . . . . . . . . . . . . . . . . . 24
3
Page 52

Rozmieszczenie przycisków
Szczegółowe opisy podane są na oznaczonych stronach.
: Podczas odtwarzania : Podczas odbioru audycji radiowych
CD
: Podczas pracy w trybie menu
MENU
1
2
REP
MBP
EQ 7
SOURCE
MODE
SHUF
5
4
RADIO
3
6
CDX-L550X/L550V/L550
MENU
SEEK
SOUND
AF
SCROLL
TA
S
O
P
E
N
S
E
E
R
T
DSPL
P
PTY
SEEK
ENTER
O
FF
1 Pokrętło regulacji głośności 14
2 Przycisk MBP 19
3 Z przycisk (wysunięcie płyty)
(umieszczony z przodu urządzenia, pod
panelem przednim) 9
4 Przycisk wyboru źródła (włączanie
zasilania/radio/CD) 8, 9, 10, 11, 14, 20
5 Okienko wyświetlacza
6 Przycisk MENU 8, 10, 14, 16, 19, 20
7 Przycisk S (SCROLL) 9
8 Przycisk OPEN 7, 9
9 Przycisk PTY (DSPL)
9
CD
12, 15
RADIO
0 Przycisk EQ7 20
qa Przycisk RESET (umieszczony z przodu
urządzenia, pod panelem przednim) 7
qs Przyciski numeryczne
CD
(3) REP 10
(6) SHUF 10
10, 11, 13, 14
RADIO
qd Przycisk MODE
10, 11, 14
RADIO
qf Przycisk SOUND 18, 19
qg Przycisk AF 13, 14
qh Przycisk TA 14
qj Przycisk OFF (zatrzymanie/wyłączenie
zasilania)* 7, 9
qk Przycisk ENTER
12
RADIO
8, 10, 14, 15, 16, 19, 20
MENU
Ostrzeżenie dotyczące instalowania
*
urządzenia w samochodzie niemającym w
stacyjce pozycji kluczyka ACC (akcesoria)
Po wyłączeniu stacyjki należy wcisnąć
przycisk (OFF) i przytrzymać go przez 2
sekundy w celu wyłączenia wyświetlania
wskazań zegara.
Zaniedbanie powyższej czynności
spowoduje, że wyświetlacz zegara
pozostanie włączony, co może doprowadzić
do rozładowania akumulatora.
4
Page 53

SCROLL
S
O
P
E
N
S
E
E
R
T
DSPL
P
MENU
SOUND
AF
TA
(+): służy do wybierania
wyższych wartości ustawień
(SEEK)
(–): służy do
wybierania
pozycji
wcześniejszych
/.
(–): służy do wybierania
W trybie menu, przycisk aktualnie wybrany
spośród tych czterech przycisków oznaczony jest
na wyświetlaczu symbolem
PTY
SEEKSEEK
ENTER
O
F
F
(PRESET)
(PRESET)
mniejszych wartości
M
.
(SEEK)
(+): służy do
wybierania
pozycji
późniejszych
/>
Środki ostrożności
• Jeżeli pojazd był zaparkowany w
nasłonecznionym miejscu, przed
rozpoczęciem użytkowania urządzenia
należy odczekać, aż ulegnie ono
ochłodzeniu.
• Antena z napędem elektrycznym wysunie
się automatycznie po włączeniu urządzenia.
Aby uzyskać odpowiedź na pytania lub
rozwiązać problemy, które nie zostały
omówione w tym podręczniku, należy
zwrócić się do najbliższego przedstawiciela
firmy Sony.
Kondensacja wilgoci
Podczas deszczu lub w miejscu o wysokiej
wilgotności powietrza może nastąpić
kondensacja wilgoci na soczewkach
znajdujących się wewnątrz urządzenia oraz
na wyświetlaczu. W takim wypadku
urządzenie nie będzie działać prawidłowo.
Należy wówczas wyjąć płytę CD i odczekać
około godziny, aż wilgoć wyparuje.
Aby zachować wysoką jakość dźwięku
Należy zachować ostrożność, aby nie rozlać
soku lub innych napojów na urządzenie lub
płyty CD.
ql Przyciski PRESET (+/–)
11, 12, 15
RADIO
8, 10, 14, 16, 19, 20
MENU
w; Przyciski SEEK (–/+)
9
CD
11, 13
RADIO
8, 16, 18, 19, 20
MENU
5
Page 54

Uwagi dotyczące płyt CD
• W celu utrzymywania płyt CD w czystości
nie należy dotykać ich powierzchni palcami.
Płyty CD należy chwytać wyłącznie za
krawędzie.
•Nieużywane płyty CD należy
przechowywać w ich opakowaniach lub
magazynkach płyt kompaktowych.
Nie należy narażać płyt CD na działanie
wysokiej temperatury. Należy unikać
pozostawiania płyt CD w zaparkowanym
pojeździe, szczególnie na desce rozdzielczej
lub na tylnej półce.
•Na płyty CD nie należy naklejać etykiet.
Nie wolno także używać płyt zabrudzonych
resztkami kleju lub tuszu. Takie płyty CD
mogą przestać się obracać w trakcie
odtwarzania, doprowadzając do awarii
urządzeniu lub zniszczenia płyty CD.
• Przed rozpoczęciem odtwarzania płytę CD
należy wyczyścić specjalną ściereczką
dostępną w handlu. Płyty CD należy
przecierać od środka ku krawędzi. Do
czyszczenia nie wolno używać
rozpuszczalników, takich jak benzyna lub
dostępne w handlu środki do czyszczenia,
jak również antystatycznych środków do
czyszczenia płyt analogowych.
Uwagi dotyczące dysków CD-R/
CD-RW
• Urządzenie to umożliwia odtwarzanie
dysków CD-R (dysków CD z możliwością
zapisu) przeznaczonych do pracy w
urządzeniach audio.
Szukaj tego znaku, aby rozpoznać dyski
CD-R przeznaczone do pracy w
urządzeniach audio.
• Za pomocą tego urządzenia nie można
odtwarzać płyt o niestandardowych
kształtach (np. w ksztalcie serca, kwadratu
lub gwiazdy). Próby odtwarzania takich płyt
mogą spowodować uszkodzenie urządzenia.
Nie należy używać tego typu płyt.
• Nie można odtwarzać płyt CD o średnicy
8cm.
6
Ten znak oznacza, że dysk nie jest
przeznaczony do pracy w urządzeniach
audio.
•Niektórych dysków CD-R (w zależności od
urządzenia, na którym nagrano płytę lub od
stanu dysku) nie można odtwarzać przy
użyciu tego urządzenia.
• Niemożliwe jest odtwarzanie dysku CD-R,
który nie został sfinalizowany*.
* Czynności niezbędne do odtwarzania nagranych
dysków CD-R przy użyciu odtwarzacza płyt CD.
• Za pomocą tego urządzenia nie można
odtwarzać płyt CD-RW (płyt CD z
możliwością wielokrotnego zapisu).
Page 55

Przygotowania
wstępne
Zerowanie urządzenia
Urządzenie należy wyzerować przed
rozpoczęciem jego eksploatacji lub po
wymianie akumulatora pojazdu.
Zdejmij panel przedni i wciśnij przycisk
RESET, używając do tego celu przedmiotu o
cienkim końcu, na przykład długopisu.
Przycisk RESET
Uwaga
Naciśnięcie przycisku RESET spowoduje skasowanie
ustawień zegara i niektórych zapamiętanych funkcji.
Zdejmowanie panelu przedniego
Możliwe jest zdjęcie panelu przedniego w
celu zabezpieczenia urządzenia przed
kradzieżą.
Alarm ostrzegawczy
Jeżeli panel przedni nie zostanie zdjęty, to po
przełączeniu kluczyka stacyjki w położenie
OFF włączy się na kilka sekund alarm
ostrzegawczy.
Sygnalizacja dźwiękowa zostaje wyłączona w
przypadku podłączenia opcjonalnego
wzmacniacza mocy i niekorzystania z
wzmacniacza wbudowanego w urządzenie.
Wciśnij przycisk (OFF)*.
1
Odtwarzanie CD lub odbiór stacji
radiowej zostają przerwane
(podświetlenie przycisków oraz
wyświetlacza pozostaje włączone).
* Jeżeli stacyjka pojazdu nie ma położenia ACC
(akcesoria), należy wyłączyć urządzenie,
wciskając i przytrzymując przez 2 sekundy
przycisk (OFF), co pozwoli zapobiec
rozładowaniu się akumulatora.
Wciśnij przycisk (OPEN), a następnie
2
przesuń panel przedni w prawo i
delikatnie odciągnij lewy koniec panelu.
1
2
Uwagi
• Podczas zdejmowania panelu przedniego przy
włączonym urządzeniu, zasilanie zostanie
automatycznie odłączone; ma to na celu
niedopuszczenie do uszkodzenia głośników.
• Nie należy zbyt mocno naciskać na żadną część
panelu i okienka wyświetlacza oraz uważać, aby go
nie upuścić.
• Nie należy narażać panelu przedniego na działanie
wysokich temperatur lub wilgoci. Należy unikać
pozostawiania go w zaparkowanym pojeździe, w
szczególności na desce rozdzielczej lub na tylnej
półce.
Wskazówka
Panel przedni należy przenosić w specjalnym etui
stanowiącym wyposażenie urządzenia.
ciąg dalszy na następnej stronie t
7
Page 56

Mocowanie panelu przedniego
Włóż trzpień B w znajdujący się w panelu
przednim otwór A, a następnie lekko wciśnij
lewą stronę panelu.
Wciśnij przycisk (SOURCE) (lub włóż płytę
CD), aby uruchomić urządzenie.
A
B
Ustawianie zegara
W zegarze zastosowane zostały wskazania
cyfrowe w układzie 24-godzinnym.
Przykład: Aby ustawić zegar na godzinę 10:08
Naciśnij przycisk (MENU), a następnie
1
kilkakrotnie naciśnij dowolną stronę
przycisku (PRESET), aż wyświetlone
zostanie wskazanie „CLOCK”.
x
Uwaga
Nie należy umieszczać żadnych przedmiotów na
wewnętrznej powierzchni panelu przedniego.
1 Naciśnij przycisk
(ENTER)
.
Zacznie migać wskaźnik godziny.
2 Naciśnij dowolną stronę przycisku
(PRESET)
3 Przyciśnij stronę (+) przycisku
w celu ustawienia godziny.
(SEEK)
Zacznie migać wskaźnik minut.
4 Naciśnij dowolną stronę przycisku
(PRESET)
Naciśnij przycisk
2
w celu ustawienia minut.
(ENTER)
.
Zegar zacznie działać. Po zakończeniu
ustawiania zegara na wyświetlaczu
ponownie pojawiają się wskaźniki
zwykłego trybu odtwarzania.
Wskazówki
• Możliwe jest automatyczne ustawienie prawidłowych
wskazań zegara za pomocą funkcji systemu danych
radiowych RDS (strona 16).
• Jeżeli tryb D.INFO jest włączony (pozycja ON), czas
jest zawsze wyświetlany (strona 18).
.
8
Page 57

Odtwarzacz CD
Odtwarzanie płyty CD
(za pomocą tego urządzenia)
Wciśnij przycisk (OPEN) i włóż płytę CD
1
(zadrukowaną stroną do góry).
Zamknij panel przedni.
2
Odtwarzanie rozpoczyna się automatycznie
Jeżeli w urządzeniu znajduje się już płyta CD,
to w celu rozpoczęcia odtwarzania należy
kilkakrotnie nacisnąć przycisk (SOURCE), aż
na wyświetlaczu pojawi się wskazanie „CD”.
Aby Należy nacisnąć
Zatrzymać
odtwarzanie
Wyj ąć pły tę CD (OPEN), a następnie Z
Pominąć niektóre
tytuły
– Funkcja
automatycznego
wyszukiwania
utworów
Szybkie
przesuwanie do
przodu/do tyłu
– Funkcja
ręcznego
wyszukiwania
utworów
Uwaga
Po zakończeniu odtwarzania ostatniego utworu na
płycie CD rozpoczyna się ponowne odtwarzanie
pierwszego utworu.
(OFF)
(SEEK) (./>)
[jeden raz dla każdego
utworu]
(SEEK) (m/M)
[przytrzymać do
wymaganego punktu]
Elementy wyświetlacza
Przy zmianie płyty CD/utworu, każda
uprzednio zapisana nazwa* nowej płyty CD/
utworu zostanie automatycznie wyświetlona
na wyświetlaczu (jeżeli włączona jest funkcja
Auto Scroll, to nazwy o długości
przekraczającej 8 znaków zostaną
przewinięte (strona 18)).
Pozycje pokazywane na
wyświetlaczu:
• Żródło muzyki
• Zegar
• Funkcja
Pozycje pokazywane na
wyświetlaczu:
• Czas odtworzonych płyt
• Nazwa płyty CD/nazwisko
wykonawcy*
• Tyt uł u t w o r u*
Aby Należy nacisnąć
Przejść do innej
pozycji
Przewinąć pozycje
wyświetlacza
* Dotyczy wyłącznie płyt CD TEXT z zapisanym
nazwiskiem wykonawcy.
Uwagi
• Niektórych znaków nie można wyświetlić.
• W pr zypadku niektór ych płyt CD TEXT z
informacjami tekstowymi zapisanymi z użyciem
wielu znaków funkcja przewijania tekstu może nie
działać.
• To urządzenie nie jest w stanie wyświetlać nazwiska
wykonawcy dla każdego utworu na płycie CD TEXT.
Wskazówka
Jeżeli zmiana płyty/utworu nastąpi przy wyłączonej
funkcji Auto Scroll (ustawienie OFF), to nazwa płyty/
utworu nie będzie przewijana.
(PTY/DSPL)
(SCROLL)
9
Page 58

Cykliczne odtwarzanie
utworów
— funkcja Repeat Play
Bieżący utwór będzie powtórnie odtwarzany.
Podczas odtwarzania należy kilkakrotnie
nacisnąć przycisk (3) (REP), aż do
wyświetlenia napisu „REP-ON”.
Rozpoczyna się odtwarzanie w trybie Repeat
Play.
Aby powrócić to trybu normalnego
odtwarzania, należy wybrać ustawienie
„REP-OFF”.
Odtwarzanie utworów w
kolejności losowej
— funkcja Shuffle Play
Utwory z bieżącej płyty można odtwarzać w
przypadkowej kolejności.
Podczas odtwarzania należy kilkakrotnie
nacisnąć przycisk (6) (SHUF), aż do
wyświetlenia napisu „SHUF-ON”.
Rozpoczyna się odtwarzanie utworów w
trybie Shuffle Play.
Aby powrócić to trybu normalnego
odtwarzania, należy wybrać ustawienie
„SHUF-OFF”.
Radio
Można zakodować do 6 stacji nadawczych dla
każdego z pasm (FM1, FM2, FM3, MW i
LW ) .
Ostrzeżenie
Ze względu na bezpieczeństwo jazdy, do
strojenia radia podczas prowadzenia pojazdu
należy korzystać z funkcji Best Tuning
Memory (funkcja zapamiętywania
najlepszego dostrojenia).
Automatyczne
programowanie stacji
nadawczych
— funkcja zapamiętywania
najlepszego dostrojenia (BTM)
Urządzenie dokonuje wyboru stacji
nadawczych o najsilniejszym sygnale w
obrębie wybranego pasma i zapisuje je w
kolejności ich częstotliwości nadawania.
Naciśnij kilkakrotnie przycisk (SOURCE),
1
aby wybrać pozycję radio.
Naciśnij kilkakrotnie przycisk (MODE),
2
aby wybrać pasmo.
Naciśnij przycisk (MENU), a następnie
3
kilkukrotnie naciśnij dowolną stronę
przycisku (PRESET), aż do pojawienia się
wskazania „BTM”.
Naciśnij przycisk (ENTER).
4
Zapisanie stacji w pamięci sprzętu jest
potwierdzane sygnałem akustycznym.
Uwagi
• Jeżeli ze wzglę du na niski poziom odbieranych
sygnałów możliwy jest odbiór jedynie kilku stacji
nadawczych, niektóre przyciski numeryczne
zachowają swoje poprzednie ustawienia.
• Jeżeli na wyświetlaczu widoczny jest wskaźnik
numeryczny, urządzenie rozpoczyna programowanie
stacji od aktualnie wyświetlanego numeru.
10
Page 59

Odbieranie zaprogramowanych stacji nadawczych
Programowanie
wyłącznie wybranych
stacji nadawczych
Naciśnij kilkakrotnie przycisk (SOURCE),
1
aby wybrać pozycję radio.
Naciśnij kilkakrotnie przycisk (MODE),
2
aby wybrać pasmo.
Naciśnij przycisk numeryczny ((1) do
3
(6)), pod którym zapisano daną stację
nadawczą.
Wskazówka
Naciśnięcie jednej ze stron przycisku (PRESET)
umożliwia odbiór stacji nadawczych w kolejności, w
której zostały wprowadzone do pamięci (funkcja
Preset Search).
Jeżeli funkcja zaprogramowanego
dostrojenia nie działa
Naciśnij dowolną stronę przycisku
(SEEK) w celu wyszukania stacji
nadawczej (strojenie automatyczne).
Przeszukiwanie zostaje zakończone w
momencie odebrania sygnału stacji
nadawczej. Powtarzaj opisaną czynność, aż
do znalezienia żądanej stacji nadawczej.
Wskazówki
• Jeżeli automatyczne dostrajanie zatrzymuje się zbyt
często, należy włączyć funkcję Local Seek
(przeszukiwanie lokalne) w celu ograniczenia
wyszukiwania do stacji nadawczych o silniejszych
sygnałach (strona 19).
• Jeżeli znana jest częstotliwość poszukiwanej stacji
nadawczej, należy nacisnąć i przytrzymać jedną ze
stron przycisku (SEEK) w celu wyszukania
przybliżonej wartości tej częstotliwości, a następnie
kilkakrotnie nacisnąć przycisk (SEEK), aby
dokładnie dostroić się do żądanej częstotliwości
(dostrajanie ręczne).
Pod przyciskami numerycznymi można
zaprogramować swoje ulubione stacje
nadawcze.
Naciśnij kilkakrotnie przycisk (SOURCE),
1
aby wybrać pozycję radio.
Naciśnij kilkakrotnie przycisk (MODE),
2
aby wybrać pasmo.
Naciśnij jedną ze stron przycisku (SEEK)
3
w celu dostrojenia urządzenia do stacji,
która ma zostać zaprogramowana.
Przytrzymaj wciśnięty wybrany przycisk
4
numeryczny ((1) do (6)) przez 2
sekundy, aż do wyświetlenia wskaźnika
„MEM”.
Na wyświetlaczu ukazuje się cyfra
odpowiadająca wybranemu przyciskowi
numerycznemu.
Uwaga
Zapisanie nowej stacji nadawczej pod zajętym
przyciskiem numerycznym anuluje poprzednio
dokonany zapis.
Jeżeli jakość odbioru stereofonicznego
w paśmie FM jest niezadowalająca
Wybierz tryb odbioru monofonicznego
(strona 19).
Jakość dźwięku poprawi się, lecz odbiór
stanie się monofoniczny (wskaźnik „ST”
zniknie).
11
Page 60

RDS
Opis funkcji RDS
W wypadku stacji radiowych FM oferujących
usługę RDS (ang. Radio Data System, system
danych radiowych) razem ze zwykłym
sygnałem programu emitowane są
niesłyszalne dane cyfrowe. Na przykład,
podczas odbierania sygnału ze stacji
nadających w systemie RDS na wyświetlaczu
może ukazać się jedno z poniższych wskazań.
Wyświetlane pozycje:
• Żródło muzyki
•Zegar
•Funkcja
Wyświetlane pozycje:
• Nazwa stacji (częstotliwość)
• Rodzaj programu
Usługi RDS
System danych cyfrowych RDS oferuje
użytkownikowi takie udogodnienia, jak:
Automatyczne powtórne dostrojenie
•
wybranej stacji nadawczej, przydatne
podczas podróżowania na długich trasach.
— AF t strona 13
• Odbieranie komunikatów o ruchu
drogowym, nawet w trakcie słuchania
innego programu radiowego lub odbierania
sygnału z innego źródła. — TA t strona 14
•Wybieranie stacji nadawczych według
rodzaju programu nadawanego przez daną
stację. — PTY t strona 15
• Automatyc z n a regulacja zegara. — CT t
strona 16
Aby Należy nacisnąć
Przełączyć
wyświetlaną
pozycję
(PTY/DSPL)
12
Page 61

Uwagi
• Dostępność wszystkich funkcji RDS zależy od kraju i
rejonu.
• Funkcja RDS może nie działać prawidłowo, jeżeli
emitowany sygnał jest zbyt słaby lub jeżeli
dostrojona stacja nie transmituje serwisu RDS.
Automatyczne
dostrajanie w celu
uzyskania najlepszego
odbioru
— funkcja AF
Funkcja częstotliwości alternatywnych (AF)
umożliwia automatyczne dostrajanie tunera
do najsilniejszego sygnału na danym
obszarze, jeżeli odbierana stacja nadaje na
kilku częstotliwościach.
Zmiana częstotliwości następuje automatycznie.
98,5 MHz
Stacja
Wybierz stację nadającą w paśmie FM
1
(strona 11).
Naciśnij kilkakrotnie przycisk (AF), aż do
2
pojawienia się wskazania „AF-ON”.
Urządzenie rozpoczyna wyszukiwanie
silniejszego sygnału nadawanego w tej samej
sieci na częstotliwości alternatywnej.
Migające wskazanie „NO AF” oznacza, że
aktualnie odbierana stacja nie nadaje na
częstotliwości alternatywnej.
Uwaga
Jeżeli na danym obszarze brak jest częstotliwości
alternatywnej lub jeżeli nie występuje potrzeba jej
wyszukania, funkcję AF należy wyłączyć, wybierając
pozycję „AF-OFF.”
96,0 MHz
102,5 MHz
Postępowanie w przypadku stacji
nieposiadających alternatywnych
częstotliwości nadawania
Przy migającej nazwie stacji nadawczej
naciśnij jedną ze stron przycisku (SEEK)
(w przeciągu 8 sekund).
Urządzenie rozpoczyna wyszukiwanie innej
częstotliwości o tych samych danych PI
(dane identyfikacyjne programu) (pojawia
się wskazanie „PI SEEK”).
Jeśli nie można znaleźć tych samych danych
PI, urządzenie powraca do uprzednio
wybranej częstotliwości.
Stały odbiór wybranego programu
regionalnego
Gdy funkcja AF jest włączona: urządzenie
zostało fabrycznie ustawione na ograniczenie
odbioru do konkretnego regionu, w związku z
czym nie będzie następowało przełączanie do
innej stacji regionalnej o silniejszym sygnale
nadawczym.
W przypadku opuszczenia danego obszaru
odbioru programu regionalnego lub aby
wykorzystać wszystkie możliwości oferowane
przez funkcję AF, należy z MENU wybrać
funkcję „REG-OFF” (strona 19).
Uwaga
Wyżej opisana funkcja nie działa w Wielkiej Brytanii i w
kilku innych regionach.
Funkcja połączenia lokalnego
(dotyczy wyłącznie Wielkiej Brytanii)
Funkcja połączenia lokalnego umożliwia
wybranie innych lokalnych stacji nadających
na danym obszarze, nawet wówczas gdy nie
są one zaprogramowane pod przyciskami
numerycznymi.
Naciśnij przycisk numeryczny ((1) do
1
(6)), pod którym zaprogramowana
zastała lokalna stacja nadawcza.
W przeciągu 5 sekund ponownie naciśnij
2
przycisk numeryczny lokalnej stacji
nadawczej.
Powtarzaj wyżej opisane czynności do
3
momentu uzyskania odbioru wybranej,
lokalnej stacji nadawczej.
13
Page 62

Odbieranie komunikatów
o ruchu drogowym
— funkcja TA/TP
Uruchomienie funkcji komunikatów o ruchu
drogowym (TA) oraz funkcji programu o
ruchu drogowym (TP) umożliwia
automatyczne dostrajanie urządzenia do stacji
FM nadającej komunikaty o ruchu drogowym.
Funkcja ta działa niezależnie od aktualnie
odbieranego programu w paśmie FM, czy
odtwarzania CD. Po odebraniu komunikatu
urządzenie przełącza się ponownie na odbiór
sygnału z pierwotnego źródła.
Naciśnij kilkakrotnie przycisk (TA),
aż do pojawienia się wskazania „TAON”.
Urządzenie rozpoczyna wyszukiwanie
stacji nadających informacje o ruchu
drogowym.
Symbol „TP” na wyświetlaczu wskazuje
dostrojenie do takiej stacji; natomiast
podczas odbierania aktualnego
komunikatu o ruchu drogowym, na
ekranie miga symbol „TA”. Jeżeli na
wyświetlaczu pojawia się symbol „NO
TP”, urządzenie będzie kontynuowało
wyszukiwanie stacji nadawczych
oferujących serwis TP.
Aby anulować wszystkie komunikaty o ruchu
drogowym, wybierz ustawienie „TA-OFF.”
Naciśnij przycisk (TA) i przytrzymaj
2
przez 2 sekundy.
Ukazuje się wskaźnik „TA” i ustawienie
zostaje zapisane w pamięci.
Odbieranie komunikatów alarmowych
Jeśli funkcja AF lub TA jest włączona
podczas odbioru programu nadawanego
przez stację w paśmie FM lub podczas
odtwarzania płyt CD.
Programowanie stacji
nadawczych oferujących
serwis RDS
z ustawieniami funkcji
AF i TA
Podczas programowania stacji oferujących
serwis RDS urządzenie zapamiętuje
ustawienie funkcji AF/TA (włączona/
wyłączona) dla każdej z tych stacji, jak
również jej częstotliwość nadawania.
Możliwe jest wybranie odrębnych ustawień
(dotyczących funkcji AF, TA lub obu funkcji)
dla poszczególnych programowanych stacji
nadawczych oferujących serwis RDS lub
wybranie tego samego ustawienia dla
wszystkich tych stacji. W przypadku
programowania stacji przy ustawieniu „AFON” urządzenie automatycznie zachowuje w
pamięci stacje nadawcze o najsilniejszym
sygnale radiowym.
Aby Należy nacisnąć
Anulować
bieżący
komunikat
Wskazówka
Bieżący komunikat można również anulować,
naciskając przycisk (SOURCE) lub (MODE).
Ustawianie poziomu głośności
komunikatów o ruchu drogowym
Aby zapewnić optymalny odbiór
komunikatów o ruchu drogowym można
uprzednio ustawić odpowiedni poziom
głośności ich odtwarzania.
Za pomocą pokrętła regulacji głośności
1
ustaw żądany poziom głośności.
(TA)
14
Programowanie tego samego ustawienia
dla wszystkich zaprogramowanych stacji
nadawczych
Wybierz pasmo FM (strona 10).
1
Naciśnij przycisk (AF) i/lub (TA) w celu
2
wybrania ustawienia „AF-ON” i/lub „TAON”.
Należy zauważyć, że wybranie pozycji „AFOFF” lub „TA-OFF” powoduje zapisanie w
pamięci nie tylko stacji oferujących serwis
RDS, lecz również stacji pasma FM
nieoferujących tego serwisu.
Naciśnij przycisk (MENU), a następnie
3
kilkakrotnie naciśnij dowolną stronę
przycisku (PRESET), aż do pojawienia się
wskazania „BTM”.
Wciśnij przycisk (ENTER), aż wskazanie
4
„BTM” zacznie migać.
Page 63

Programowanie różnych ustawień dla
wszystkich zaprogramowanych stacji
nadawczych
Wybierz pasmo FM i dostrój urząd enie
1
do żądanej stacji nadawczej (strona 11).
Naciśnij przycisk (AF) i/lub (TA) w celu
2
wybrania ustawienia „AF-ON” i/lub „TAON”.
Przytrzymaj wciśnięty wybrany przycisk
3
numeryczny ((1) do (6)), aż wyświetlone
zostanie wskazanie „MEM”.
W celu zaprogramowania dalszych stacji
nadawczych powtórz czynności, poczynając
od kroku 1.
Dostrajanie się do stacji
nadawczych za pomocą
funkcji wyboru typu
programu
— funkcja PTY
Poszukiwaną stację nadawczą można
zlokalizować przez wybranie rodzaju
programu, którego chcemy słuchać.
Programy dla dzieci CHILDREN
Zagadnienia społeczne SOCIAL A
Religia RELIGION
Programy z
telefonicznym udziałem
słuchaczy
Podróże TRAVEL
Odpoczynek LEISURE
Muzyka jazzowa JAZZ
Muzyka country COUNTRY
Muzyka narodowa NATION M
Stare przeboje OLDIES
Muzyka ludowa FOLK M
Programy
dokumentalne
Uwaga
Korzystanie z tej funkcji nie jest możliwe w krajach, w
których niedostępny jest serwis PTY (serwis oferujący
wybór programu na podstawie jego rodzaju).
Podczas odbioru sygnału stacji w
1
paśmie FM wciśnij przycisk
(PTY/DSPL), aż do wyświetlenia
wskazania „PTY”.
PHONE IN
DOCUMENT
Rodzaje programów Wyświetlacz
Wiadomości NEWS
Wydarzenia aktualne AFFAIRS
Informacje INFO
Sport SPORT
Oświata EDUCATE
Teatr DRAMA
Kul tura CU LTURE
Nauka SCIENCE
Różne VARIED
Muzyka popularna POP M
Muzyka rockowa ROCK M
Muzyka relaksująca EASY M
Lekka muzyka
klasyczna
Muzyka klasyczna CLASSICS
Inne rodzaje muzyki OTHER M
Pogoda WEATHER
Finanse FINANCE
LIGHT M
Nazwa rodzaju programu zostanie
wyświetlona, jeżeli stacja nadawcza
transmituje dane PTY.
Wskaźnik „--------” ukazuje się, jeżeli
odbierana stacja nadawcza nie jest stacją
oferującą serwis RDS lub sygnał danych
RDS nie został odebrany.
Naciśnij kilkakrotnie przycisk
2
(PRESET), aż do wyświetlenia żądanej
nazwy rodzaju programu.
Rodzaje programów są wyświetlane w
kolejności podanej w tabeli
Symbol „--------” pojawia się na wyświetlaczu
wówczas, gdy dany rodzaj programu nie
został określony w pakiecie danych RDS.
Naciśnij przycisk (ENTER).
3
Urządzenie rozpoczyna wyszukiwanie stacji
nadawczej transmitującej wybrany rodzaj
programu.
15
Page 64

Automatyczne
ustawianie zegara
— funkcja CT
Dane CT (czas zegarowy) umożliwiają
automatyczną regulację wskazań zegara
przez funkcję RDS.
Podczas odbioru programu radiowego
1
naciśnij przycisk (MENU), a następnie
kilkakrotnie naciśnij jedną ze stron
przycisku (PRESET), aż do ukazania się
wskazania „CT-OFF”.
Naciśnij kilkakrotnie stronę przycisku
2
(SEEK) oznaczoną symbolem (+), aż do
ukazania się wskazania „CT-ON”.
Zegar jest teraz ustawiony.
Naciśnij przycisk (ENTER), aby
3
przywrócić normalny stan wyświetlacza.
Aby anulować funkcję CT, należy w kroku 2
wybrać ustawienie „CT-OFF”.
Uwagi
• Funkcja CT może nie działać pomimo odbierania
stacji nadawczej oferującej serwis RDS.
• Godzina nastawiona w tr ybie CT może nieco różnić
się od czasu rzeczywistego.
Pozostałe funkcje
Niniejsze urządzenie mogą być sterowane za
pomocą pilota rotacyjnego
opcjonalne)
.
Korzystanie z pilota
rotacyjnego
Pierwszym krokiem jest przyklejenie
odpowiedniej etykietki, której wybór zależy
od miejsca zamocowania pilota rotacyjnego.
Pilot rotacyjny działa przez naciskanie
przycisków i/lub obracanie pokręteł
regulacyjnych.
SOUND
MODE
DSPL
Przez naciskanie przycisków
(SOUND)
(SOURCE)
Aby ustawić wymagany poziom głośności,
należy obracać pokrętłem regulacji głośności
(wyposażenie
DSPL
MODE
SOUND
(ATT)
(DSPL)
(MODE)
(OFF)
OFF
16
Naciśnij Aby
(SOURCE)
(MODE)
(ATT)
(OFF)*
(SOUND)
(DSPL)
Zmienić źródło sygnału
(radio/CD)
Zmienić tryb pracy
(pasmo radiowe)
Wyciszyć dźwięk
Przerwać odtwarzanie lub
odbiór stacji
radiowej
Dokonać regulacji ustawień
menu SOUND
Zmienić wyświetlane
wskazanie
Page 65

* Jeżeli stacyjka samochodu nie umożliwia
przełączenia kluczyka w położenie ACC (akcesoria),
należy po wyłączeniu zapłonu wcisnąć i przytrzymać
przez 2 sekundy przycisk (OFF) w celu wyłączenia
wskazań zegara.
Przez obracanie pokrętła
Pokrętło
SEEK/AMS
Obróć i zwolnij, aby:
– Pominąć niektóre utwory,
– Automatycznie dostroić się do stacji
nadawczych.
Obróć, przytrzymaj i zwolnij, aby:
– Przewinąć dany utwór do przodu/do
tyłu,
– Odszukać ręcznie stację nadawczą.
Przez wciśnięcie i obrócenie pokrętła
Pokrętło
PRESET
Zmiana kierunku działania
Kierunek działania pokręteł regulacyjnych
jest ustawiony fabrycznie, tak jak pokazano
na rysunku poniżej.
Zwiększanie
Zmniejszanie
Jeżeli pilot rotacyjny będzie montowany po
prawej stronie kolumny kierownicy, kierunek
działania pokręteł regulacyjnych można
zmienić dla wygody obsługującego.
Naciśnij przez 2 sekundy przycisk
(SOUND), wciskając jednocześnie
pokrętło regulacyjne VOL.
Wskazówka
Możliwa jest również zmiana kierunku działania tych
pokręteł regulacyjnych przy pomocy samego
urządzenia (strona 18).
Wciśnij i obróć pokrętło, aby:
– odbierać zaprogramowane stacje
nadawcze.
17
Page 66

Ustawianie cech
dźwięku
Możliwa jest regulacja tonów niskich, tonów
wysokich, balansu prawy-lewy i przód-tył.
Poziom tonów niskich i wysokich można
zaprogramować niezależnie dla każdego
źródła sygnału.
Wyboru pozycji przeznaczonej do
1
wyregulowania dokonuje się przez
kilkakrotne naciskanie przycisku
(SOUND).
Każdorazowe naciśnięcie przycisku
(SOUND) zmienia wybrany parametr w
następujący sposób:
BAS (tony niskie) t TRE (tony wysokie)
t BAL (lewy-prawy) t FAD (przód-tył)
Wyreguluj wybrany parametr, naciskając
2
jedną ze stron przycisku (SEEK).
Przy dokonywaniu regulacji za pomocą
pilota rotacyjnego, należy wcisnąć
przycisk (SOUND) i obracać pokrętłem
VOL.
Uwaga
Regulację należy przeprowadzić w przeciągu trzech
sekund od wybrania danego parametru.
Szybkie wyciszanie
dźwięku
(przy użyciu pilota rotacyjnego)
Naciśnij przycisk (ATT) na pilocie
rotacyjnym lub pilocie na podczerwień.
Po chwilowym pojawieniu się wskazania
„ATT-ON”, na wyświetlaczu ukazuje się
wskazanie „ATT”.
Aby przywrócić poprzedni poziom głośności,
należy ponownie nacisnąć przycisk
Wskazówka
Jeżeli kabel połączeniowy telefonu samochodowego
jest podłączony do przewodu ATT, to urządzenie
automatycznie wycisza poziom dźwięku w momencie
odbierania rozmowy telefonicznej (funkcja Telephone
AT T).
(ATT)
.
Zmiana ustawień
dźwięku i wyświetlacza
— menu
Możliwe jest ustawienie następujących
elementów:
SET (ustawianie)
• CLOCK (strona 8)
• CT (czas zegarowy) (strona 16)
•BEEP — aby włączyć lub wyłączyć
sygnalizację akustyczną.
• RM (pilot rotacyjny) — aby zmienić
kierunek działania pokręteł pilota
rotacyjnego.
–Wybierz pozycję „NORM” w celu
przywrócenia fabrycznych ustawień pilota
rotacyjnego.
–Wybierz pozycję „REV”, jeżeli pilot
rotacyjny będzie montowany po prawej
stronie kolumny kierownicy.
DSPL (wyświetlacz)
• D.INFO (podwójne informacje) — aby
równocześnie wyświetlić wskazania zegara
oraz tryb odtwarzania (ON).
• AMBER/GREEN — aby zmienić kolor
podświetlenia na pomarańczowy lub zielony
(dotyczy wyłącznie modelu CDX-L550).
•DIM (przyciemnianie) — aby zmienić
jasność wyświetlacza (dotyczy wyłącznie
modelu CDX-L550V).
–Wybierz ustawienie „ON”, aby przyciemnić
wyświetlacz.
–Wybierz ustawienie „OFF”, aby wyłączyć
funkcję przyciemniania.
•M.DSPL (wyświetlacz ruchomy) — aby
wybrać tryb pracy wyświetlacza ruchomego:
„1”, „2” lub „OFF”.
–Wybierz opcję „1”, aby na wyświetlaczu
były widoczne linie dekoracyjne i został
włączony tryb demonstracyjny.
–Wybierz opcję „2”, aby na wyświetlaczu
były widoczne linie dekoracyjne i został
wyłączony tryb demonstracyjny.
–Wybierz ustawienie „OFF”, aby wyłączyć
ruchomy wyświetlacz.
•A.SCRL (automatyczne przewijanie)
–Wybierz ustawienie „ON”, aby włączyć
funkcję automatycznego przewijania
nazw, których długość przekracza 8
znaków.
–Jeżeli funkcja automatycznego przewijania
jest wyłączona, to w przypadku zmiany
nazwy płyty CD lub utworu, nazwa ta nie
będzie przewijana.
18
Page 67

SND (dźwięk)
• LOUD — funkcja służąca do podbijania
poziomu tonów niskich i wysokich przy
niskim wzmocnieniu dźwięku. Powoduje
wzmocnienie odtwarzanych tonów niskich i
wysokich.
P/M (tryb odtwarzania)
• LOCAL-ON/OFF (tryb wyszukiwania stacji
lokalnych) (strona 11)
–Wybierz ustawienie „ON”, aby dostrajać
się wyłącznie do stacji nadawczych o
silniejszych sygnałach.
• MONO-ON/OFF (tryb monofoniczny)
(strona 11)
–Wybierz ustawienie „ON”, aby audycje
stereofoniczne nadawane w paśmie FM
były odtwarzane w wersji monofonicznej.
Wybierz ustawienie „OFF”, aby powrócić
do trybu normalnego.
• REG-ON/OFF (odbiór programów
regionalnych) (strona 13)
Naciśnij przycisk (MENU).
1
Aby ustawić funkcję A.SCRL, należy
podczas odtwarzania płyty CD nacisnąć
przycisk
Naciśnij kilkakrotnie jedną ze stron
2
przycisku (PRESET), aż do ukazania się
żądanej pozycji.
Kilkakrotnie wciśnij stronę przycisku
3
(SEEK) oznaczoną symbolem (+), aby
wybrać żądane ustawienie (na przykład:
ON lub OFF).
Naciśnij przycisk (ENTER).
4
Po zakończeniu ustawiania trybu pracy
wskazania wyświetlacza powracają do
normalnego trybu odtwarzania.
Uwaga
Pozycja widoczna na wyświetlaczu będzie różna w
zależności do źródła.
Wskazówka
Urządzenie łatwo przełącza się między
poszczególnymi kategoriami („SET,” „DSPL,” „SND,”
oraz „P/M,”), wciskając jedną ze stron przycisku
(PRESET) i przytrzymując ją przez 2 sekundy.
(MENU)
.
Wybieranie ustawienia
dźwięku
— moje ulubione ustawienie dźwięku
(MBP)
Podczas jazdy samochodem bez pasażerów,
kierowca może wybrać swoje ulubione
ustawienia akustyczne przy użyciu funkcji
Moje ulubione ustawienia dźwięku (MBP).
Funkcja MBP ma dwa zaprogramowane
ustawienia balansu lewy-prawy i przód-tył.
Za pomocą przycisku MBP można w łatwy
sposób wybrać jedno z nich.
Okienko
wyświetlacza
MBP-A – 4 dB 0 0 – 4 dB
MBP-B 0 – 4 dB 0 – 4 dB
MBP-OFF 0000
Naciśnij kilkakrotnie przycisk (MBP), aby
uzyskać odpowiednią lokalizację
dźwięku.
Tryb MBP jest wyświetlany w kolejności
podanej w tabeli.
Poziom balansu
prawy-lewy
Prawy Lewy Przód Tył
Po upływie sekundy wyświetlacz powraca
do normalnego trybu odtwarzania.
Poziom balansu prawy-lewy i przód-tył
można regulować bardziej precyzyjnie za
pomocą przycisku (SOUND) (strona 18).
Uwagi
• Gdy opcja BAL (balans) lub FAD (wyciszanie) w
sekcji “Regulacja charakterystyk dźwięku” (strona
18) zostanie ustawiona, ustawienie MBP powróci
do pozycji OFF (wyłączone).
• Po ustawieniu funkcji MBP w pozycji OFF,
ustawienia BAL i FAD zostaną uaktywnione.
Poziom
balansu
przód-tył
19
Page 68

Ustawianie korektora
dźwięku
Możliwe jest wybranie charakterystyki
korekcyjnej dla siedmiu rodzajów muzyki
(VOCAL, CLUB, JAZZ, NEW AGE,
ROCK, CUSTOM oraz XPLOD).
Możliwe jest zaprogramowanie ustawień
korektora dźwięku w odniesieniu do
częstotliwości i poziomu dźwięku.
Wybór charakterystyki korekcyjnej
Naciśnij przycisk (SOURCE), aby wybrać
1
źródło sygnału (tuner, CD lub MD).
Naciśnij kilkakrotnie przycisk (EQ7) w
2
celu wybrania żądanej charakterystyki
korekcyjnej.
Każde naciśnięcie przycisku (EQ7)
powoduje zmianę pozycji.
Aby anulować funkcję korekcji dźwięku,
należy wybrać pozycję „OFF”. Po upływie
3 sekund wyświetlacz powraca do
normalnego trybu odtwarzania.
Wybierz żądaną częstotliwość i poziom
4
dźwięku.
1 Naciśnij jedną ze stron przycisku
(SEEK), aby wybrać żądaną
częstotliwość.
Każde naciśnięcie przycisku (SEEK)
powoduje zmianę częstotliwości.
62 (Hz) y 157 (Hz) y 396 (Hz) y
1k (Hz) y 2.5k (Hz) y 6.3k (Hz) y
16k (Hz)
2 Naciśnij jedną ze stron przycisku
(DISC/PRESET), aby ustawić żądany
poziom głośności.
Poziom głośności może być regulowany co
1 dB od –10 dB do +10 dB.
Aby przywrócić fabrycznie ustawioną
charakterystykę korekcyjną, należy nacisnąć
przycisk (ENTER) i przytrzymać go przez 2
sekundy.
Naciśnij dwukrotnie przycisk (MENU).
5
Po zakończeniu ustawiania efektu
dźwiękowego zostaje przywrócony tryb
normalnego odtwarzania.
Regulacja charakterystyki korekcyjnej
Naciśnij przycisk (MENU).
1
Naciśnij kilkakrotnie jedną ze stron
2
przycisku (PRESET), aż do pojawienia się
na wyświetlaczu wskazania „EQ7 TUNE”,
a następnie naciśnij przycisk (ENTER).
Naciśnij jedną ze stron przycisku
3
(SEEK), aby wybrać żądaną
charakterystykę korekcyjną, a następnie
naciśnij przycisk (ENTER).
Każde naciśnięcie przycisku
powoduje zmianę pozycji.
(SEEK)
20
Page 69

Informacje dodatkowe
Konserwacja
Wymiana bezpiecznika
Podczas wymiany przepalonego bezpiecznika
należy użyć bezpiecznika o tej samej wartości
znamionowej natężenia prądu. W wypadku
przepalenia się bezpiecznika, należy upewnić
się, że zasilanie jest odłączone i wymienić
bezpiecznik. Jeżeli po wymianie bezpiecznika
przepali się on ponownie, prawdopodobnie
wystąpiło wewnętrzne uszkodzenie
urządzenia. W takim wypadku należy
skontaktować się z najbliższym
przedstawicielem firmy Sony.
Bezpiecznik
(10 A)
Wewnętrzna powierzchnia
panelu przedniego
Uwagi
• Ze względu na bezpieczeństwo, przed
przystąpieniem do czyszczenia złączy należy
wyłączyć zapłon i wyjąć kluczyk ze stacyjki.
• Nie należy dotykać złączy bezpośrednio palcami lub
metalowymi narzędziami.
Wyjmowanie urządzenia
Usuwanie przedniej osłony
1
1 Zdejmij panel przedni (strona 7).
2 Naciśnij zacisk w przedniej osłonie,
używając do tego celu cienkiego
wkrętaka.
Ostrzeżenie
Nie należy korzystać z bezpieczników o
wartości znamionowej natężenia prądu
przewyższającej tę wartość dla bezpiecznika
dostarczonego wraz z urządzeniem, ponieważ
może to doprowadzić do zniszczenia
urządzenia.
Czyszczenie złączy
Zanieczyszczone złącza pomiędzy
urządzeniem i panelem czołowym mogą
powodować nieprawidłowe działanie
urządzenia. Aby temu zapobiec, należy zdjąć
panel przedni (strona 7) i oczyścić złącza za
pomocą wacika nasączonego alkoholem.
Podczas czyszczenia nie należy naciskać zbyt
mocno. W przeciwnym wypadku może
nastąpić uszkodzenie złączy.
Część główna
3 Powtórz czynność opisaną w punkcie
2 dla przeciwległej strony.
Wyjmowanie urządzenia
2
1 Za pomocą cienkiego wkrętaka
naciśnij zacisk po lewej stronie
obudowy i pociągnij, aż zacisk
wysunie się poza element mocujący.
4mm
2 Powtórz czynność opisaną w punkcie
1 dla prawej strony.
3 Wysuń obudowę poza element
mocujący.
21
Page 70

Dane techniczne
Odtwarzacz CD
Względny poziom szumu
Pasmo przenoszenia 10 – 20,000 Hz
Kołysanie i drżenie dźwięku
90 dB
Poniżej możliwości
pomiaru
Tu ne r
UKF
Zakres częstotliwości 87,5 – 108,0 MHz
Podłączenie anteny Gniazdo anteny
Częstotliwość pośrednia
Czułość użyteczna 8 dBf
Selektywność 75 dB przy 400 kHz
Względny poziom szumu
Zniekształcenia harmoniczne przy 1 kHz
Separacja kanałów 35 dB przy 1 kHz
Pasmo przenoszenia 30 – 15.000 Hz
pasmo MW/LW
Zakres strojenia MW: 531 – 1,602 kHz
Podłączenie anteny Gniazdo anteny
Częstotliwość pośrednia
Czułość MW: 30 µV
zewnętrznej
10,7 MHz/450 kHz
66 dB (stereo),
72 dB (mono)
0,6 % (stereo),
0,3 % (mono)
Pasmo LW: 153 – 279 kHz
zewnętrznej
10,7 MHz/450 kHz
LW: 40 µV
Wzmacniacz mocy
Wyjścia Wyjścia głośnikowe
Impedancja głośników 4 – 8 omów
Maksymalna moc wyjściowa
(złącza typu „sure seal”)
50 W × 4 (przy 4 omach)
Ogólne
Wyjścia Wyjścia audio
Wejścia Przewód sterowania
Regulacja barwy dźwięku
Zasilanie Akumulator
Wymiary Około 178 × 50 × 177 mm
Wymiary montażowe Około 182 × 53 × 161 mm
Waga Około 1,2 kg
Załączone wyposażenie Elementy instalacyjne i
Akcesoria opcjonalne Pilot rotacyjny
Uwaga
To urządzenie nie może być podłączane do cyfrowego
przedwzmacniacza lub korektora.
Producent zastrzega sobie prawo zmiany projektu i
danych technicznych bez uprzedniego
powiadomienia.
Przewód sterujący
przekaźnika anteny
automatycznej
Przewód sterowania
wzmacniaczem mocy
telefonicznego ATT
Złącze wejściowe
zdalnego sterowania
Złącze wejściowe anteny
Tony niskie ±8 dB przy
100 Hz
Tony wysokie ±8 dB przy
10 kHz
samochodowy 12 V
(biegun ujemny
połączony z masą)
(szer./wys./gł.)
(szer./wys./gł.)
podłączeniowe
(1 komplet)
Etui na panel przedni (1)
RM-X4S
22
Page 71

Rozwiązywanie
problemów
Podany niżej wykaz czynności kontrolnych
służy jako pomoc przy usuwaniu
ewentualnych problemów, które mogą
wystąpić podczas eksploatacji urządzenia.
Przed skorzystaniem z wykazu czynności
kontrolnych, zaleca się sprawdzenie
podłączeń i czynności operacyjnych.
Ogólne
Brak dźwięku.
• Obróć pokrętło regulacji siły głosu zgodnie z
ruchem wskazówek zegara w celu
zwiększenia głośności.
• Wyłącz funkcję ATT.
• W przypadku systemu dwugłośnikowego
ustaw regulator balansu przód-tył (fader) w
położeniu środkowym.
Zawartość pamięci uległa skasowaniu.
• Naciśnięty został przycisk RESET.
t Dokonaj ponownego zapisu ustawień w
pamięci.
• Odłączony został przewód zasilający lub
akumulator.
• Przewód zasilający nie jest prawidłowo
podłączony.
Brak sygnału akustycznego.
Sygnał akustyczny został anulowany (strona
18).
Wskazania znikają lub nie pojawiają się na
wyświetlaczu.
• Wskazania zegara znikają po naciśnięciu
przycisku (OFF) i przytrzymaniu go przez 2
sekundy.
t Naciśnij ponownie przycisk (OFF) i
przytrzymaj go przez 2 sekundy, aby
wyświetlić wskazania zegara.
• Zdejmij panel przedni i oczyść złącza.
Zobacz sekcję „Czyszczenie złączy” (strona
21), gdzie podany został szczegółowy opis
tej czynności.
Skasowane zostały zaprogramowane stacje
nadawcze i prawidłowy czas.
Przepalił się bezpiecznik.
Trzaski w urządzeniu podczas przełączania
kluczyka w stacyjce do pozycji ON, ACC lub
OFF.
Podłączenie przewodów jest niezgodne z
pozycjami występującymi we wtyku przewodu
zasilania tego samochodu.
Brak zasilania urządzenia.
• Sprawdź podłączenie. Jeżeli podłączenie
zasilania jest prawidłowe, należy sprawdzić
bezpiecznik.
• Stacyjka samochodu nie ma pozycji ACC
(akcesoria).
t Naciśnij przycisk (SOURCE) (lub włóż
płytę CD), aby włączyć urządzenie.
Urządzenie jest zawsze zasilane.
Stacyjka samochodu nie ma pozycji ACC
(akcesoria).
Antena automatyczna nie wysuwa się.
Antena automatyczna nie ma przekaźnika.
Odtwarzanie płyty CD
Nie można włożyć płyty.
• W urządzeniu znajduje się już płyta CD.
• Płyta CD została włożona odwrotnie lub w
niewłaściwy sposób.
Po włożeniu płyty nie rozpoczyna się jej
odtwarzanie.
• Brudna lub uszkodzona płyta.
• Płyta CD-R, która nie została sfinalizowana,
lub płyta CD-RW.
• Nastąpiła próba odtworzenia płyty CD-R
nie przeznaczonej do zapisu dźwięku.
• Niektóre płyty CD-R mogą nie być
prawidłowo odtwarzane ze względu na
właściwości sprzętu, na którym zostały
nagrany lub ich zły stan.
Płyta jest automatycznie wysuwana.
Temperatura otoczenia przekracza 50 C.
Płyta CD nie zostaje wysunięta.
Nie działają przyciski operacyjne.
Naciśnij przycisk RESET.
Dźwięk przeskakuje na skutek wibracji.
• Urządzenie zostało zainstalowane pod
kątem większym niż 60 .
• Urządzenie nie zostało zainstalowane w
sztywnej części samochodu.
Dźwięk przeskakuje.
Brudna lub uszkodzona płyta.
Odbiór audycji radiowych
Programowane strojenie nie działa.
• Zaprogramuj w pamięci właściwą
częstotliwość.
• Sygnał radiowy jest zbyt słaby.
ciąg dalszy na następnej stronie t
23
Page 72

Nie można odbierać stacji.
Dźwięk jest zniekształcony szumami.
• Podłączy przewód sterowania anteną
(niebieski) lub dodatkowy przewód
zasilający (czerwony) do przewodu
zasilającego silniczek anteny automatycznej.
(Dotyc zy wy łączn ie przypad ków, gdy ant ena
FM/MW/LW samochodu jest wbudowana w
szybę tylną lub boczną.)
• Sprawdź podłączenie anteny
samochodowej.
• Antena samochodowa nie wysuwa się.
t Sprawdź podłączenie przewodu
sterującego anteny automatycznej.
• Sprawdź częstotliwość.
Automatyczne strojenie nie działa.
• Włączony jest tryb wyszukiwania lokalnego
(pozycja „ON”).
t
Ustaw tryb wyszukiwania lokalnego w
pozycji „OFF”. (strona 19)
• Sygnał radiowy jest zbyt słaby.
t Dokonaj ręcznego dostrojenia.
Wskaźnik „ST” miga.
• Dokonaj dokładnego dostrojenia
częstotliwości.
• Sygnał radiowy jest zbyt słaby.
t Ustaw tryb odbioru monofonicznego
(strona 19).
Program nadawany w wersji
stereofonicznej jest odbierany w wersji
monofonicznej.
Urządzenie znajduje się w trybie odbioru
monofonicznego.
t Anuluj tryb odbioru monofonicznego
(strona 19).
RDS
Funkcja wyszukiwania stacji nadawczych
SEEK włącza się po kilku sekundach
słuchania audycji.
Odbierana stacja nie emituje sygnałów TP lub
emituje zbyt słaby sygnał.
t Naciśnij kilkukrotnie przycisk (AF) lub
(TA) aż do pojawienia się wskazań „AF-
OFF” lub „TA-OFF”.
Brak komunikatów o ruchu drogowym.
• Włącz funkcję „TA”.
• Stacja nie nadaje komunikatów o ruchu
drogowym, pomimo że jest to stacja TP.
t Ustaw inną stację nadawczą.
Funkcja PTY wyświetla wskaźnik „--------”.
• Aktualnie odbierana stacja nie jest stacją
nadającą sygnał RDS.
• Dane RDS nie są odbierane.
• Aktualnie odbierania stacja nie określa
rodzaju nadawanego programu.
Wizualne ostrzeżenia o
błędach/Komunikaty
Wizualne ostrzeżenia o błędach
Podane niżej wskaźniki będą migać przez około
5 sekund i słyszalny będzie alarmowy sygnał
akustyczny.
ERROR*
HI TEMP
RESET
*1 Jeżeli w trakcie odtwarzania płyty CD wystąpi jakiś
*2 Numer płyty powodującej występowanie błędu
Jeżeli podane wyżej wskazówki nie pomogą
w usunięci usterki, należy skontaktować się z
najbliższym punktem sprzedaży sprzętu Sony.
L.SEEK +/–
NO AF
„” lub „”
1
Płyta CD jest zabrudzona lub włożona w
odwrotnej pozycji.*
t Oczyść lub prawidłowo włóż płytę CD.
Temperatura otoczenia przekracza 50 C.
t Odczekaj aż temperatura opadnie poniżej
50 C.
Odtwarzacz CD nie pracuje z powodu usterki.
t Wciśnij przycisk zerowania znajdujący się
w odtwarzaczu.
błąd, to numer płyty CD nie pojawia się na
wyświetlaczu.
pojawia się na wyświetlaczu.
2
Komunikaty
Tryb wyszukiwania lokalnego jest włączony
podczas strojenia automatycznego (strona
11).
Aktualnie odbierana stacja nadawcza nie
posiada częstotliwości alternatywnej.
Osiągnięty został początek lub koniec płyty i
nie można już przejść dalej.
24
Page 73

Page 74

Hoş Geldiniz !
Sony Compact Disc Player’ı satın aldığınız için
teşekkürler. Aşağıdaki bileşenleri kullanarak,
ürünün çeşitli özelliklerinden daha iyi
yararlanabilirsiniz:
•CD metin bilgisi (CD TEXT CD’si*
ındıgı
çal
•İsteğe bağlı denetleyici aksesuarlar
Döner kumanda RMX4S
* CD TEXT CD’si, CD adı, sanatçı adı ve parça adları
gibi bilgiler içeren bir ses CD’sidir. Bu bilgiler
CD’ye kayıtlıdır.
nda görüntülenir)
2
Page 75

çindekiler
İ
Kontrol düğmelerinin yerleri . . . . . . . . . . . 4
Önlemler . . . . . . . . . . . . . . . . . . . . . . . . . . . 5
CD’lerle ilgili notlar . . . . . . . . . . . . . . . . . . 6
Başlarken
Birimin ayarlarını sıfırlama. . . . . . . . . . . . . 7
Ön paneli çıkarma. . . . . . . . . . . . . . . . . . . . 7
Saati ayarlama. . . . . . . . . . . . . . . . . . . . . . . 8
CD Çalar
CD çalma . . . . . . . . . . . . . . . . . . . . . . . . . . 9
Ekran öğeleri . . . . . . . . . . . . . . . . . . . . . . . . 9
Parçaları yeniden çalma
— Repeat Play. . . . . . . . . . . . . . . . . . . . 10
Parçaları rasgele sırayla çalma
— Shuffle Play . . . . . . . . . . . . . . . . . . . 10
Radyo
İstasyonları otomatik olarak belleğe
kaydetme
— Best Tuning Memory (BTM) . . . . . 10
Kaydedilen istasyonları bulma . . . . . . . . . 11
Yalnızca istenen istasyonları kaydetme . . 11
RDS
RDS özelliklerine genel bakış . . . . . . . . . . 12
En iyi yayın kalitesi için otomatik yeniden
ayarlama
— AF işlevi . . . . . . . . . . . . . . . . . . . . . . 13
Trafik duyurularını dinleme
— TA/TP. . . . . . . . . . . . . . . . . . . . . . . . 14
AF ve TA ayarıyla RDS istasyonlarını
önceden ayarlama . . . . . . . . . . . . . . . . . 14
İstasyonları program türüne göre ayarlama
— PTY. . . . . . . . . . . . . . . . . . . . . . . . . . 15
Saati otomatik olarak ayarlama
— CT . . . . . . . . . . . . . . . . . . . . . . . . . . . 16
Diğer İşlevler
Döner kumandayı kullanma . . . . . . . . . . . 16
Ses özelliklerini ayarlama . . . . . . . . . . . . . 18
Sesi hızlı bir şekilde kısma
(Döner kumandayla). . . . . . . . . . . . . . . 18
Ses ve gösterge ayarlarını değiştirme
— Menu. . . . . . . . . . . . . . . . . . . . . . . . . 18
Ses konumunu seçme
— En iyi ses konumum (MBP). . . . . . . 19
Equalizer’ı ayarlama . . . . . . . . . . . . . . . . . 20
Ek Bilgi
Bakım. . . . . . . . . . . . . . . . . . . . . . . . . . . . . 21
Birimi çıkarma. . . . . . . . . . . . . . . . . . . . . . 21
Özellikler . . . . . . . . . . . . . . . . . . . . . . . . . . 22
Sorun giderme . . . . . . . . . . . . . . . . . . . . . . 23
Hata uyarıları / Mesajlar. . . . . . . . . . . . . . 24
3
Page 76

Kontrol düğmelerinin yerleri
Ü
Ü
Ayrıntılar için, numaraları verilen sayfalara bakın.
: Çalarken : Radyo yayını alınırken : Menü modundayken
CD
MBP
EQ 7
RADYO MEN
1
2
3
REP
SOURCE
MODE
SHUF
6
5
4
CDX-L550X/L550V/L550
MENU
SEEK
SOUND
AF
SCROLL
TA
S
O
P
EN
S
E
E
R
T
DSPL
P
PTY
SEEK
ENTER
O
FF
1 Ses düzeyi düğmesi 14
2 MBP düğmesi 19
3 Z (çıkarma) düğmesi (birimin ön
yüzünde, ön panelin arkasında yer alır) 9
4 SOURCE (Açma/Radyo/CD) düğmesi 8,
9, 10, 11, 14, 20
5 Ekran penceresi
6 MENU düğmesi 8, 10, 14, 16, 19, 20
7 S (SCROLL) düğmesi 9
8 OPEN düğmesi 7, 9
9999 PTY (DSPL) düğmesi
9
CD
12, 15
RADYO
q; EQ7 düğmesi 20
qa RESET düğmesi (birimin ön yüzünde, ön
panelin arkasında yer alır) 7
qs
qs Numara düğmeleri
qsqs
CD
(3) REP 10
(6) SHUF 10
qdqd
RADYO
10, 11, 14
10, 11, 13, 14
RADYO
qd
qd MODE düğmesi
qf SOUND düğmesi 18, 19
qg AF düğmesi 13, 14
qh TA d ü ğm es i 14
qj OFF (Durdurma/Kapatma) düğmesi* 7,
9
qk
qk ENTER düğmesi
qkqk
12
RADYO
8, 10, 14, 15, 16, 19, 20
MEN
* Kontakt anahtarı yuvasında ACC
(aksesuar) konumu olmayan bir arabaya
takarken dikkat
Motoru kapattıktan sonra, saat göstergesini
kapatmak için, birimin üzerindeki (OFF)
düğmesine 2 saniye süreyle bastığınızdan
emin olun.
Bunu yapmazsanız, saat göstergesi kapanmaz ve
akünün boşalmasına neden olur.
4
Page 77

SCROLL
Ü
Ü
S
O
P
E
N
S
E
E
R
T
DSPL
P
MENU
SOUND
AF
TA
(+): yukarıya doğru seçmek için
PTY
SEEKSEEK
ENTER
O
F
F
(PRESET)
Önlemler
•Arabanızı doğrudan güneş ışığına maruz kalacak
şekilde park ettiyseniz, birimi çalıştırmadan
önce, soğumasına izin verin.
•Birim çalıştırıldığında, güç antenleri otomatik
olarak çıkacaktır.
Biriminizle ilgili, bu el kitabının kapsamında
olmayan herhangi bir sorunuz veya sorununuz
olursa, lütfen size en yakın Sony satıcısına
danışın.
Nemin yoğunlaşması
Yağmurlu bir günde veya çok nemli bir bölgede,
merceklerin içinde veya birimin ekranında nem
yoğunlaşabilir. Bu durumda, birim düzgün
çalışmayacaktır. Sorunu gidermek için, CD’yi
çıkarın ve nem buharlaşana kadar, yaklaşık bir
saat bekleyin.
(SEEK)
(–): sola doğru/
seçmek için
.
(–): aşağı doğru seçmek için
Menü modundayken, bu dört düğmeden
seçilebilir olanları ekranda bir “
ql
ql PRESET düğmeleri (+/–)
qlql
RADYO
MEN
w;
w; SEEK düğmeleri (–/+)
w;w;
CD
RADYO
MEN
(PRESET)
M” ile gösterilir.
11, 12, 15
8, 10, 14, 16, 19, 20
9
11, 13
8, 16, 18, 19, 20
(SEEK)
(+): sağa doğru/
seçmek için
>
Yüksek ses kalitesi sağlamak için
Birimin veya CD’lerin üzerine içecek
sıçratmamaya özen gösterin.
5
Page 78

CD’lerle ilgili notlar
•CD’nin temiz kalması için, yüzeyine
dokunmayın. CD’yi kenarlarından tutun.
•CD’lerinizi kendi kaplarında veya CD
çantalarında saklayın.
CD’leri sıcağa veya yüksek ısıya maruz
bırakmayın. CD’leri, park edilmiş arabalarda
veya ön ya da arka konsollar üzerinde
bırakmaktan sakının.
CDR (kaydedilebilir CD’ler)/CDRW
(tekrar yazılabilir CD’ler) ile ilgili notlar
•Bu birimde, ses için tasarlanmış CDR’leri
(kaydedilebilir CD’ler) çalabilirsiniz.
Ses için kullanılabilen CDR’leri tanıyabilmek
için aşağıdaki ambleme bakın.
Bu amblem, CD’nin ses için
kullanılamayacağını gösterir.
•Etiket yapıştrımayın ve ayrıca yapışkan
mürekkepli ya da kalıntılı CD kullanmayın. Bu
tür CD’ler kullanım sırasında dönerken
durabilir, arızaya neden olabilir veya kendine
zarar verebilir.
•Standart sekli olmayan (ör., kalp, kare, yildiz)
CD’ler bu birimde çalinamaz. Tersini denemek
birime zarar verebilir. Bu tür CD’leri
kullanmayin.
•8 cm boyutundaki CD’leri çalamazsınız.
•Çalmadan önce, CD’yi bir temizleme beziyle
temizleyin. CD’leri ortadan dışa doğru silin.
Benzin, tiner gibi çözücü maddeler, temizlik
maddeleri veya analog CD’ler için geliştirilmiş
spreyler kullanmayın.
•Bazı CR’ler, (kayıt için kullanılan donatıya veya
CD’nin durumuna bağlı olarak) bu birimde
çalmayabilir.
•Tamamlanmamış* bir CDR’yi çalamazsınız.
* Üzerinde kayıt yapılmış bir CDR’nin CD çalarda
çalınabilmesi için gerekli bir yordam.
•Bu birimde CDRW’ler (tekrar yazilabilir
CD’ler) çalamazsiniz.
6
Page 79

Başlarken
Ön paneli çıkarma
Birimin çalınmasını önlemek için, ön panelini
sökebilirsiniz.
Birimin ayarlarını sıfırlama
Birimi ilk kez çalıştırmadan önce veya arabanın
aküsünü değiştirdikten sonra, birimi
sıfırlamalısınız.
Ön paneli çıkarın ve tükenmez kalem gibi
yuvarlak uçlu bir nesneyle RESET düğmesine
basın.
RESET düğmesi
Not
RESET düğmesine basmak, saat ayarını ve bazı
depolanmış içeriği silecektir.
Uyarı alarmı
Kontakt anahtarını, ön paneli çıkarmadan
OFF (kapalı) konumuna getirdiğinizde, birkaç
saniye süreyle uyarı alarmının bip sesi duyulur.
Yerleşik amplifikatör yerine başka bir
amplifikatör kullanırsanız, bip sesi devre dışı
kalır.
(OFF)* düğmesine basın.
1
CD çalmayı veya radyo yayınlarını almayı
durdurur (düğme ışıkları ve ekran açık
kalır).
* Arabanızın kontakt anahtarı yuvasında ACC
(aksesuar) konumu yoksa, araba aküsünün
boşalmasını önlemek için, birimi, 2 saniye
süreyle (OFF) düğmesine basarak
kapattığınızdan emin olun.
(OPEN) düğmesine basın, sonra ön
2
paneli sağa kaydırın ve ön panelin sol
kenarını dikkatlice dışarıya doğru çekin.
1
2
Notlar
• Ön paneli birim çalışır durumdayken çıkarırsanız,
hoparlörlerin zarar görmesini önlemek için, güç
otomatik olarak kesilir.
• Ön paneli düşürmeyin, ön panel veya ekran
penceresinin üstüne fazla ağırlık yüklenmesini
engelleyin.
• Ön paneli sıcağa, yüksek ısıya veya neme maruz
bırakmayın. Ön paneli, park edilmiş arabalarda
veya ön/arka konsollar üzerinde bırakmayın.
İpucu
Ön paneli beraberinizde taşırken, ürünle birlikte
verilen kutuyu kullanın.
devamı bir sonraki sayfada t
7
Page 80

Ön paneli takma
Ön panelin A deliğini, birimin üzerindeki B
milinin üzerine yerleştirin, sonra sol tarafı
hafifçe içe doğru bastırın.
Birimi çalıştırmak için (SOURCE) düğmesine
basın (veya bir CD yerleştirin).
A
B
x
Saati ayarlama
Saat 24 saatlik bir dijital gösterim kullanır.
Örnek: Saati 10:08 olarak ayarlama
1
(MENU) düğmesine, sonra “CLOCK”
görüntüleninceye dek (PRESET)
düğmesinin istediğiniz yanına birkaç kez
basın.
1
(ENTER) düğmesine basın.
Saat göstergesi yanıp sönmeye başlar.
2 Saati ayarlamak için, (PRESET)
düğmesinin istediğiniz yanına basın.
3
(SEEK) düğmesinin (+) yanına basın.
Dakika göstergesi yanıp sönmeye başlar.
4 Dakikayı ayarlamak için, (PRESET)
düğmesinin istediğiniz yanına basın.
2
(ENTER) düğmesine basın.
Not
Ön panelin iç yüzeyine hiçbir şey koymayın.
8
Saat çalışmaya başlar. Saat ayarı
tamamlandıktan sonra, gösterge yeniden
normal çalma moduna döner.
İpuçları
• RDS özelliğiyle saati otomatik olarak
ayarlayabilirisniz (sayfa 16).
• D.INFO modu ON (AÇIK) olarak ayarlıysa, saat her
zaman görüntülenir (sayfa 18).
Page 81

CD Çalar
CD çalma
(OPEN) düğmesine basın ve CD’yi
1
yerleştirin (etiketli tarafı yukarı gelecek
şekilde).
2
Ön paneli kapatın.
Çalma otomatik olarak başlar.
İçinde CD varsa, çalmayı başlatmak üzere
“CD” görüntüleninceye dek (SOURCE)
düğmesine birkaç kez basın.
Ekran öğeleri
CD veya parça değiştiğinde, yeni CD veya
parçanın önceden kaydedilmiş başlıkları*
otomatik ola rak görün tülenir (Auto Scr oll i şlevi
“ON” (AÇIK) olarak ayarlanmış olmalıdır; 8
karakteri geçen adlar kaydırılır (sayfa 18)).
Görüntülenebilir öğeler
•Müzik kaynağı
•Saat
•İşlev
Görüntülenebilir öğeler
•Geçen çalma süresi
•CD adı*/sanatçı adı*
•Parça başlığı*
Bunu yapmak için Bu düğmeye basın
Çalmayı durdurma (OFF)
CD’yi çıkarma (OPEN) sonra Z
Parçaları atlama
–Automatic
Music Sensor
Hızlı ileri/geri sarma
–El İle Arama
Not
CD’nin son parçası bittiğinde, yürütme, CD’nin ilk
parçasından yeniden başlar.
(SEEK) (./>)
[herbir parça için bir kez]
(SEEK) (m/M)
[istenen noktada durdurun]
Bunu yapmak için Bu düğmeye basın
Ekran öğeleri
arasında geçiş
yapmak
Ekran ögesini
kaydirmak
* Yalnızca sanatçı adlarının bulunduğu CD TEXT
CD’ler için.
Notlar
• Bazı karakterler görüntülenemez.
• Çok fazla karakter içeren bazı CD TEXT CD’lerde,
bilgi kaydırılamayabilir.
• Bu birim, CD TEXT CD’sindeki her parçanın sanatçı
adını görüntüleyemez.
İpucu
Auto scroll (Otomatik kaydırma) kapalıysa (OFF) ve
CD/parça adı değiştirilirse, CD/parça adı
kaydırılmaz.
(PTY/DSPL)
(SCROLL)
9
Page 82

Parçaları yeniden çalma
— Repeat Play
Geçerli parça, sona erdiğinde otomatik olarak
tekrarlanacaktır.
Çalma sırasında, ekranda “REPON”
görüntülenene kadar
düğmesine basın.
Yeniden Çalma başlar.
(3)
(REP)
Normal çalma moduna dönmek için, “REP
OFF” seçeneğini seçin.
Parçaları rasgele sırayla çalma
— Shuffle Play
Geçerli CD’nin parçaların rasgele sırayla
çalınmasını seçebilirsiniz.
Çalma sırasında, ekranda “SHUFON”
görüntülenene kadar
düğmesine basın.
Karışık Çalma başlar.
Normal çalma moduna dönmek için, “SHUF
OFF” seçeneğini seçin.
(6)
(SHUF)
Radyo
Birim, her bant için 6 istasyon depolayabilir
(FM1, FM2, FM3, MW ve LW).
Dikkat
Araba kullanırken istasyon aradığınızda,
dikkatinizi dağıtmamak ve kazaları önlemek
için Best Tuning Memory işlevini kullanın.
İstasyonları otomatik olarak
belleğe kaydetme
— Best Tuning Memory (BTM)
Birim, seçilen bantta bulunan en güçlü sinyale
sahip istasyonları seçer ve onları frekanslarına
göre sıralayarak belleğe kaydeder.
1
Radyoyu seçmek için birkaç kez
(SOURCE)
2
Bandı seçmek için birkaç kez
düğmesine basın.
(MENU)
3
görüntüleninceye dek birkaç kez
(PRESET)
basın.
(ENTER)
4
Ayar belleğe kaydedildiğinde bir bip sesi
duyulur.
Notlar
• Sinyallerin zayıflığından dolayı az sayıda istasyonun
yayını alınabiliyorsa, bazı sayı tuşları eski ayarlarını
saklayacaktır.
• Ekranda bir sayı gösterildiğinde, birim,
görüntülenen geçerli istasyondan itibaren
istasyonları belleğe kaydetmeye başlar.
düğmesine basın.
(MODE)
düğmesine, sonra “BTM”
düğmesinin istediğiniz yanına
düğmesine basın.
10
Page 83

Kaydedilen istasyonları
bulma
Yalnızca istenen istasyonları
kaydetme
1
Radyoyu seçmek için birkaç kez
(SOURCE) düğmesine basın.
2
Bandı seçmek için birkaç kez (MODE)
düğmesine basın.
3
Dilediğiniz istasyonun kayıtlı olduğu
numara tuşuna ((1) (6)) basın.
Öneri
(PRESET) düğmesinin bir yanına basarak,
istasyonları bellekte kayıtlı oldukları sırayla
bulabilirsiniz (Ayar Arama İşlevi).
Daha önce ayarlanan bir istasyonu
bulamıyorsanız
İstasyonu aramak için (SEEK)
düğmesinin bir yanına basın (otomatik
ayar).
Birim, bir istasyon bulduğunda arama durur.
Dilediğiniz istasyon bulununcaya dek bu işlemi
tekrarlayın.
Öneriler
• Otomatik ayar çok sık duruyorsa, “Local Seek”
(bölgesel arama modu) işlevini açarak aramayı
daha güçlü sinyali olan istasyonlarla sınırlayın
(sayfa 19).
• Dinlemek istediğiniz istasyonun frekansını
biliyorsanız, (SEEK) düğmesinin bir yanına basarak
yaklaşık frekansı bulun, sonra (SEEK) düğmesine
art arda basarak ince ayar yapın (el ile ayar).
FM stereo yayını zayıf ise
Mono yayın modunu seçin (sayfa 19).
Ses kalitesi artar, ancak monoya dönüşür
(“ST” görüntülenmez).
İstediğiniz istasyonları el ile numara tuşlarına
atayabilirsiniz.
1
Radyoyu seçmek için birkaç kez
(SOURCE) düğmesine basın.
2
Bandı seçmek için birkaç kez (MODE)
düğmesine basın.
(SEEK) düğmesinin bir yanına basarak,
3
kaydetmek istediğiniz istasyonu
ayarlayın.
4
“MEM” görülene dek, dilediğiniz numara
tuşuna ((1) (6)) iki saniye süreyle
basın.
Numara tuşu göstergesi görüntülenir.
Not
Aynı numara tuşuna ikinci bir istasyon kaydetmeyi
denerseniz, daha önce kaydettiğiniz istasyon silinir.
11
Page 84

RDS
RDS özelliklerine genel bakış
Radyo Veri Sistemi (RDS) servisi olan FM
istasyonları, normal radyo programı
sinyallerinin yanı sıra, duyulmayan sayısal
bilgiler gönderir. Örneğin, RDS kapasiteli bir
istasyon yayını aldığınızda aşağıdakilerden biri
görüntülenir.
Görüntülenebilir öğeler
•Müzik kaynağı
•Saat
•İşlev
Görüntülenebilir öğeler
•istasyon adı (frekans)
•program türü
RDS servisleri
RDS verileri, başka olanaklar da sağlar:
•Aracınızla uzun yolculuklarınızda yarar
sağlayan, belirli bir programı her konumda
otomatik olarak ayarlama özelliği. — AF t
sayfa 13
•Herhangi bir programı/kaynağı dinlerken
trafik duyuruları alma özelliği. — TA t sayfa
14
•İstasyonları, yayınladığı program türüne göre
seçme özelliği. — PTY t sayfa 15
•Otomatik saat ayarı. — CT t sayfa 16
Notlar
• Bulunduğunuz ülkeye veya bölgeye bağlı olarak
RDS işlevlerinin tümü kullanılamayabilir.
• Sinyal gücü düşükse veya ayarladığınız istasyon
RDS verileri aktarmıyorsa, RDS doğru şekilde
çalışmayabilir.
Bunu yapmak için Bu düğmeye basın
Görüntülenen
öğeyi değiştirmek
için
(PTY/DSPL)
12
Page 85

En iyi yayın kalitesi için
otomatik yeniden ayarlama
— AF işlevi
Alternatif frekans (AF) işlevi, radyonun
dinlemekte olduğunuz istasyonu bölgedeki en
güçlü sinyale ayarlamasını sağlar.
Frekanslar otomatik olarak değişir.
98,5 MHz
İstasyon
1
Bir FM istasyonu seçin (sayfa 11).
2
“AFON” görüntüleninceye dek (AF)
düğmesine art arda basın.
Birim, aynı ağda daha güçlü sinyali olan
alternatif bir frekans aramaya başlar.
“NO AF” yanıp sönerse, ayarlı olan istasyonun
alternatif frekansı yok demektir.
Not
Bölgede alternatif frekans yoksa veya aramanız
gerekmiyorsa, AF işlevini “AFOFF” seçeneğini
seçerek kapatın.
96,0 MHz
102,5 MHz
Not
Bu işlev, İngiltere ve diğer bölgelerin bazılarında
çalışmamaktadır.
Bölgesel bağlantı işlevi
(yalnızca Birleşik Krallık)
Bu işlev, numara tuşlarınıza kayıtlı olmasalar
da, bulunduğunuz yerde diğer bölgesel
istasyonlar seçmenize olanak verir.
1
Bölgesel bir istasyonun kayıtlı olduğu bir
numara tuşuna ((1) (6)) basın.
2
5 saniye içinde bölgesel istasyonun
numara tuşuna tekrar basın.
3
Dilediğiniz istasyon bulununcaya dek bu
işlemi tekrarlayın.
Alternatif frekansı olmayan istasyonlar
için
İstasyon adı yanıp sönerken (8 saniye
içinde) (SEEK) düğmesinin bir yanına
basın.
Birim, aynı PI (Program Kimliği) verisi olan
başka bir frekans aramaya başlar (“PI
SEEK” görüntülenir).
Birim aynı PI’yi bulamazsa, daha önce
seçilen frekansa döner.
Bölgesel bir programa ayarlı kalma
AF işlevi açık durumdayken: üretici tarafından
yapılmış olan bu ayar, birimin belirli bir
bölgedeki yayını almasını ve frekansı daha
güçlü olan başka bir bölgesel istasyona geçiş
yapmamasını sağlar.
Bu programın yayınlandığı bölgenin dışına
çıktığınızda veya AF işlevinden tam olarak
yararlanmak istediğinizde, MENU (sayfa 19)
içinde “REGOFF” seçeneğini seçin.
13
Page 86

Trafik duyurularını dinleme
— TA/TP
Trafik Duyuruları (TA) ve Trafik Programını
(TP) etkinleştirerek, trafik duyuruları yapan bir
FM istasyonunun otomatik olarak
ayarlanmasını sağlayabilirsiniz. Bu ayar,
dinlemekte olduğunuz FM programından/
kaynağından ve CD/MD’den bağımsız işlev
görür; trafik duyurusu sona erdiğinde birim
özgün kaynağa geçiş yapar.
“TAON” görüntüleninceye dek (TA)
düğmesine art arda basın.
Birim, trafik bilgisi veren istasyonlar aramaya
başlar.
“TP”, bu istasyonların bulunduğunu gösterir;
trafik duyurusu sırasında ise “TA” yanıp söner.
“NO TP” gösterilmiyorsa, birim TP işlevi olan
istasyonları aramayı sürdürür.
Trafik duyurularının tümünü iptal etmek için
“TAOFF” seçeneğini seçin.
Bunu yapmak
için
Geçerli duyuruyu
iptal etmek
Öneri
Geçerli duyuruyu ayrıca (SOURCE) veya (MODE)
düğmesine basarak da iptal edebilirsiniz.
Trafik duyurularının ses düzeylerini
önceden ayarlama
Trafik duyurularını duyabilmeniz için ses
düzeylerini önceden ayarlayabilirsiniz.
1
İstediğiniz ses düzeyini belirlemek için
ses düzeyi düğmesini çevirin.
2
2 saniye süreyle (TA) düğmesine basın.
“TA” görüntülenir ve ayar kaydedilir.
Acil duyuru yayınları
AF veya TA açık durumdayken, birim FM
istasyonu veya CD dinlediğiniz sırada gelen acil
duyurulara geçiş yapar.
Bu düğmeye basın
(TA)
AF ve TA ayarıyla RDS
istasyonlarını önceden
ayarlama
RDS istasyonlarını önceden ayarladığınızda,
birim her istasyonun AF/TA ayarını (açık/
kapalı) ve frekansını kaydeder. Ayarlanmış her
istasyon için farklı bir ayar (AF, TA veya her
ikisi) veya tümü için aynı ayarı seçebilirsiniz.
İstasyonları “AFON” ile önceden
ayarlarsanız, birim otomatik olarak radyo
sinyali en güçlü olan istasyonları kaydeder.
Ayarlanmış tüm istasyonlar için aynı
ayarı belirleme
1
Bir FM bandı seçin (sayfa 10).
(AF) ve/veya (TA) düğmesine basarak
2
“AFON” ve/veya “TAON” seçeneğini
seçin.
“AFOFF” veya “TAOFF” seçeneğinin
yalnızca RDS istasyonlarını değil, RDS
özelliği olmayan istasyonları da kaydedeceğini
unutmayın.
(MENU) düğmesine, sonra “BTM”
3
görüntüleninceye dek birkaç kez
(PRESET) düğmesinin bir yanına basın.
4
“BTM” yanıp sönmeye başlayıncaya dek
(ENTER) düğmesine basın.
Her ayarlanmış program için farklı ayar
belirleme
1
Bir FM bandı seçin ve dilediğiniz
istasyonu ayarlayın (sayfa 11).
(AF) ve/veya (TA) düğmesine basarak
2
“AFON” ve/veya “TAON” seçeneğini
seçin.
3
“MEM” görüntüleninceye dek,
dilediğiniz numara tuşuna ((1) (6))
basın.
Başka istasyonlar ayarlamak için işlemi
tekrarlayın.
14
Page 87

İstasyonları program türüne
göre ayarlama
— PTY
Bir istasyonu, dinlemek istediğiniz program
türünü seçerek ayarlayabilirsiniz.
FM yayını sırasında, “PTY”
1
görüntüleninceye dek (PTY/DSPL)
düğmesine basın.
Program türleri Ekran
Haberler NEWS
Güncel Olaylar AFFAIRS
Bilgi INFO
Spor SPORT
Eğitim EDUCATE
Tiy atr o DR AM A
Kültür CULTURE
Bilim SCIENCE
Çeşitli VARIED
Pop Mü ziğ i PO P M
Rock Müziği ROCK M
Hafif Müzik EASY M
Hafif Klasik LIGHT M
Klasik CLASSICS
Diğer Müzik Türü OTHER M
Hava Durumu WEATHER
Finans FINANCE
Çocuk Programları CHILDREN
Sosyal Etkinlikler SOCIAL A
Din RELIGION
Telefonla Katılım PHONE IN
Gezi TRAVEL
Eğlence LEISURE
Caz Müziği JAZZ
Country Müziği COUNTRY
Ulusal Müzik NATION M
Nostaljik Müzik OLDIES
Folk Müz iği FOL K M
Belgesel DOCUMENT
İstasyon PTY verilerini aktarıyorsa, geçerli
program türü adı görüntülenir.
Yayındaki istasyon RDS istasyonu değilse veya
RDS verileri alınmıyorsa, “”
görüntülenir.
İstediğiniz program türü
2
görüntüleninceye dek (PRESET)
düğmesine art arda basın.
Program türleri, tabloda gösterildikleri sırayla
görüntülenir.
Program türü RDS verilerinde
belirlenmemişse “” görüntülenir.
(ENTER) düğmesine basın.
3
Birim, seçili program türünü yayınlayan bir
istasyon aramaya başlar.
Not
PTY (program türü seçimi) verilerini desteklemeyen
ülkelerde bu işlevi kullanamazsınız.
15
Page 88

Saati otomatik olarak
ayarlama
— CT
RDS aktarımındaki CT (saat) verileri, saati
otomatik olarak ayarlar.
1
Radyo yayını sırasında, (MENU)
düğmesine, sonra “CTOFF”
görüntüleninceye dek (PRESET)
düğmesinin bir yanına art arda basın.
2
“CTON” görüntüleninceye dek (SEEK)
düğmesinin (+) tarafına art arda basın.
Saat ayarlanır.
3
Normal görünüme dönmek için (ENTER)
düğmesine basın.
CT işlevini iptal etmek için, 2. adımda “CT
OFF” seçeneğini seçin.
Notlar
• RDS istasyonu alındığı halde CT işlevi
çalışmayabilir.
• Geçerli saat ve CT işlevinin ayarladığı saat arasında
fark olabilir.
Diğer İşlevler
Birimi döner kumanda ile de yönetebilirsiniz
(isteğe bağlı)
Döner kumandayı kullanma
Önce, döner kumandayı monte edeceğiniz
şekle uygun etiketi yapıştırın.
Döner kumandayı, düğmelere basarak ve/veya
kontrolleri çevirerek çalıştırabilirsiniz.
Düğmelere basarak
(SOURCE)
.
SOUND
MODE
DSPL
(SOUND)
Ses düzeyini ayarlamak için
VOL kontrolünü çevirin.
DSPL
MODE
SOUND
(ATT)
(DSPL)
(MODE)
(OFF)
OFF
16
Bunu yapmak
için
(SOURCE) Kaynağı değiştirmek
(MODE) İşlemi değiştirmek
(ATT) Sesi kısmak
(OFF)* Müziği veya radyo
(SOUND) Ses menüsünü ayarlamak
(DSPL) Görüntülenen öğeyi
* Aracınızın kontak anahtarında ACC (aksesuar)
konumu yoksa, kontağı kapattıktan sonra saat
göstergesini kapatmak için iki saniye süreyle
(OFF) düğmesine basmayı unutmayın.
Bu düğmeye basın
(radyo/CD)
(radyo bandı)
yayınını durdurmak
değiştirmek
Page 89

Kontrolü çevirerek
SEEK/AMS
kontrolü
Çevirip bırakarak,
– Parçaları atlayabilirsiniz.
– İstasyonları otomatik olarak
ayarlayabilirsiniz.
Çevirip, tutup, sonra bırakarak,
– Parçayı ileri/geri alabilirsiniz.
– Bir istasyonu el ile bulabilirsiniz.
Kontrole basarak ve çevirerek
PRESET
İşlem yönünü değiştirme
Kontrollerin işlem yönü, üretici tarafından
aşağıdaki gibi ayarlanmıştır:
Artırmak için
Azaltmak için
Döner kumandayı direksiyonun sol tarafına
monte etme gereği duyarsanız, işlem yönünü
tersine çevirebilirsiniz.
VOL kontrolüne basarken, iki saniye
süreyle (SOUND) düğmesine basın.
Öneri
Bu kontrollerin işlem yönünü birimle de
değiştirebilirsiniz (sayfa 18).
Kontrole basarak ve çevirerek,
– Ayarlanmış istasyonları bulabilirsiniz.
17
Page 90

Ses özelliklerini ayarlama
Bas, tiz, denge ve kısma işlevlerini
ayar layab ili rsin iz.
Her kaynak için farklı bas ve tiz düzeyleri
kaydedebilirsiniz.
(SOUND) düğmesine art arda basarak
1
ayarlamak istediğiniz öğeyi seçin.
(SOUND) düğmesine her basışınızda öğe
aşağıdaki gibi değişir:
BAS (bas) t TRE (tiz) t BAL (solsağ)
t FAD (önarka)
(SEEK) düğmesinin bir yanına basarak
2
seçili öğeyi ayarlayın.
Döner kumandayla ayarlarken, (SOUND)
düğmesine basın ve VOL kontrolünü çevirin.
Not
Öğeyi seçtikten sonra 3 saniye içinde ayarlayın.
Sesi hızlı bir şekilde kısma
(Döner kumandayla)
Döner kumanda veya uzaktan
kumandanın üzerindeki (ATT)
düğmesine basın.
Önce kısa bir süre “ATTON”, ardından
“A T T ” g ö r ü n t ü l e n i r .
Önceki ses düzeyine dönmek için (A TT)
düğmesine tekrar basın.
Öneri
ATT girişine araç telefonu arayüz kablosu bağlıysa,
arama geldiğinde birim ses düzeyini otomatik olarak
alçaltır (telefon ATT işlevi).
Ses ve gösterge ayarlarını
değiştirme
— Menu
Aşağıdaki öğeler belirlenebilir:
SET (Ayar)
•CLOCK (sayfa 8)
•CT (Saat) (sayfa 16)
•BEEP — bip seslerini açar veya kapatır.
•RM (Döner Kumanda) — döner kumanda
kontrollerinin işlem yönünü değiştirir.
– Döner kumandayı, üreticinin belirlediği
ayarlarla kullanmak için “NORM” seçeneğini
seçin.
– Döner kumandayı direksiyonun sol tarafına
monte ederseniz, “REV” seçeneğini seçin.
DSPL (Ekran)
•D.INFO (ikili bilgi) — saati ve çalma modunu
birlikte görüntüler (açık).
•AMBER/GREEN — ışıklandırma rengini sarı
veya yeşil olarak değiştirir (yalnızca CDXL550).
•DIM (ışık kısıcı) — ekranın parlaklığını ayarlar
(yalnızca CDXL550V).
– Ekran parlaklığını azaltmak için “ON”
seçeneğini seçin.
– Işık kısıcıyı devre dışı bırakmak için “OFF”
seçeneğini seçin.
•M.DSPL (Hareketli Ekran) — “1,” “2” ve
“OFF” seçeneğinden Hareketli Ekran modunu
seçer.
– Ekranda süs çizgileri göstermek ve Demo
ekranını etkinleştirmek için “1” seçeneğini
seçin.
– Ekranda süs çizgileri göstermek ve Demo
ekranını devre dışı bırakmak için “2”
seçeneğini seçin.
– Hareketli ekranı devre dışı bırakmak için
“OFF” seçeneğini seçin.
•A.SCRL (Otomatik Kaydırma)
– Görüntülenen ve 8 karakteri aşan adların
tümünü otomatik olarak kaydırmak için “ON”
seçeneğini seçin.
– Otomatik kaydırma kapalı durumdaysa ve
CD/parça adı değiştirilirse, CD/parça adı
kaydırılmaz.
18
SND (Ses)
•LOUD (Yüksek ses) — alçak ses düzeylerinde
bas ve tiz seslerin duyulmasını sağlar. Bas ve tiz
sesler güçlendirilir.
Page 91

P/M (Çalma modu)
•LOCALON/OFF (Bölgesel arama modu)
(sayfa 11)
– Yalnızca güçlü sinyali olan istasyonları
dinlemek için “ON” seçeneğini seçin.
•MONOON/OFF (Mono modu) (sayfa 11)
– FM stereo yayınını mono olarak dinlemek için
“ON” seçeneğini seçin. Normal moda
dönmek için “OFF” seçeneğini seçin.
•REGON/OFF (Bölgesel) (sayfa 13)
(MENU) düğmesine basın.
1
A.SCRL ayarı yapmak için, CD çalarken
(MENU) düğmesine basın.
2
İstediğiniz öğe görüntüleninceye dek
(PRESET) düğmesinin bir yanına art arda
basın.
3
İstediğiniz ayarı seçmek için (SEEK)
düğmesinin (+) tarafına basın (Örnek:
ON veya OFF).
(ENTER) düğmesine basın.
4
Mod ayarı tamamlandıktan sonra, ekran
yeniden normal çalma moduna döner.
Not
Görüntülenen öğe, kaynağa göre farklılık gösterir.
Öneri
(PRESET) düğmesinin bir yanına 2 saniye süreyle
basarak kategoriler (“SET,” “DSPL,” “SND,” “P/M,”)
arasında kolayca geçiş yapabilirsiniz.
Ses konumunu seçme
— En iyi ses konumum (MBP)
Aracınızı yalnız kullanırken, “en iyi ses
konumum” özelliği ile müziğin zevkine tam
olarak varabilirsiniz.
“En iyi ses konumum” için, denge ve kısma ses
düzeyini ayarlayan iki ön ayar yapılabilirsiniz.
MBP düğmesi ile bunlardan birini kolayca
seçebilirsiniz.
Ekran
penceresi
MBPA – 4 dB 0 0 – 4 dB
MBPA 0 – 4 dB 0 – 4 dB
MBPOFF 0000
İstediğiniz dinleme konumu için (MBP)
düğmesine art arda basın.
“En iyi ses konumum” modu tablo sırasıyla
ekranda gösterilir.
Denge
Düzeyi
Sağ Sol Ön Arka
Kısma Düzeyi
Bir saniye sonra, ekran normal çalma moduna
döner.
Denge ve kısma ses düzeyi ayarlarını daha
hassas yapmak istediğinizde, (SOUND)
düğmesini kullanabilirsiniz (sayfa 18).
Notlar
• “Ses özelliklerini ayarlama” (sayfa 18) içindeki BAL
(denge) veya FAD (kisma) ayarlandıysa, MBP (en
iyi ses konumum) ayarı yeniden OFF (kapalı)
konuma döner.
• MBP, OFF (kapalı) konumuna getirilirse, BAL re
FAD ayarlari etkinleşir.
19
Page 92

Equalizer’ı ayarlama
Yedi ayrı müzik türü için equalizer eğrisi
seçebilirsiniz (VOCAL, CLUB, JAZZ, NEW
AGE, ROCK, COSTOM re XPLOD).
Frekans ve düzey equalizer ayarlarını
kaydedebilir ve değiştirebilirsiniz.
Equalizer eğrisi seçme
2 İstediğiniz ses düzeyini ayarlamak
için, (PRESET) düğmesinin bir yanına
basın.
Ses düzeyi, 1 dB’lik adımlarla –10 dB ve
+10 dB arasında ayarlanabilir.
1
Kaynağı (radyo veya CD) seçmek için
(SOURCE) düğmesine basın.
2
İstediğiniz equalizer eğrisine ulaşıncaya
dek (EQ7) düğmesine art arda basın.
(EQ7) düğmesine her basışınızda öğe değişir.
Equalizer’ı devre dışı bırakmak için “OFF”
seçeneğini seçin. Üç saniye sonra, ekran
normal çalma moduna döner.
Equalizer eğrisini ayarlama
(MENU) düğmesine basın.
1
2
“EQ7 TUNE” görüntüleninceye dek
(PRESET) düğmesinin bir yanına art arda
bastıktan sonra (ENTER) düğmesine
basın.
3
İstediğiniz equalizer eğrisini seçmek için
(SEEK) düğmesinin bir yanına bastıktan
sonra, (ENTER) düğmesine basın.
(SEEK) düğmesine her basışınızda öğe değişir.
4
İstediğiniz frekansı ve düzeyi seçin.
1 İstediğiniz frekansı seçmek için
(SEEK) bir yanına basın.
(SEEK) düğmesine her basışınızda frekans
değişir.
Üretici tarafından ayarlanan equalizer eğrisine
dönmek için 2 saniye süreyle (ENTER)
düğmesine basın.
5
İki kez (MENU) düğmesine basın.
Etki ayarı tamamlandığında, normal çalma
modu görüntülenir.
20
62 (Hz) y 157 (Hz) y 396 (Hz) y
1k (Hz) y 2.5k (Hz) y 6.3k (Hz) y
16k (Hz)
Page 93

Ek Bilgi
Bakım
Sigortayı değiştirme
Sigortayı değiştirirken, özgün sigortanın
üzerinde belirtilen amper değerine uygun bir
sigortayla değiştirmeye dikkat edin. Sigorta
yanarsa, güç bağlantısını denetleyin ve sigortayı
değiştirin. Sigorta değiştirildikten sonra tekrar
yanarsa, dahili bir arıza söz konusu demektir.
Bu durumda en yakın Sony satıcısına başvurun.
Sigorta (10 A)
Uyarı
Birime zarar verebileceğinden, hiçbir zaman
birimle birlikte verilen sigortanın amper
değerinin üzerinde bir sigorta kullanmayın.
Bağlantıları temizleme
Birim, ön panelle bağlantıları kirli olduğunda
doğru şekilde çalışmayabilir. Bunu önlemek
için, ön paneli sökün (sayfa 7) ve bağlantıları
alkole batırılmış pamuklu bir bezle temizleyi n.
Fazla güç uygulamayın. Aksi halde bağlantılar
zarar görebilir.
Notlar
• Güvenlik açısından, bağlantıları temizlemeden
önce kontağı kapatın ve kontak anahtarını çıkarın.
• Bağlantılara hiçbir zaman doğrudan
parmaklarınızla veya madeni bir nesneyle
dokunmayın.
Birimi çıkarma
1
Ön kapağı çıkarın.
1 Ön paneli sökün (sayfa 7).
2 Ön kapağın iç kısmındaki tırnağı ince
bir tornavida ile bastırın.
32. adımı diğer tarafta tekrarlayın.
2
Birimi çıkarın
1 İnce bir tornavida ile birimin sol
tarafındaki tırnağı itin, ardından
kavrama parçası montaj grubundan
kurtuluncaya dek birimin sol tarafını
dışarı çekin.
4mm
Ana birim
Ön panelin arka kısmı
21. adımı sağ tarafta tekrarlayın.
3 Birimi montaj yerinden kaydırarak
çıkarın.
21
Page 94

Özellikler
CD Çalar bölümü
Sinyalparazit oranı
Frekans duyarlığı 10 – 20,000 Hz
Dalgalanma Ölçülebilir düzeyin altında
90 dB
Radyo bölümü
FM
Ayar alanı 87,5 – 108,0 MHz
Anten Harici anten bağlantısı
Ara frekans 10,7 MHz/450 kHz
Kullanılabilir duyarlık
Seçicilik 75 dB at 400 kHz
Sinyalparazit oranı
1 kHz’de harmonik bozulma
Ayırma 1 kHz’de 35 dB
Frekans duyarlığı 30 – 15.000 Hz
MW/LW
Ayar alanı MW : 531 – 1,602 kHz
Anten Harici anten bağlantısı
Ara frekans 10,7 MHz/450 kHz
Duyar lık MW : 3 0 µV
8 dBf
66 dB (stereo),
72 dB (mono)
% 0,6 (stereo),
% 0,3 (mono)
LW : 153 – 279 kHz
LW : 40 µV
Güç amplifikatörü bölümü
Çıkı şlar Hop arlör çıkı şlar ı
Hopa rlör direnci 4 – 8 oh m
Azami güç çıkışı 50 W K
(emniyetli bağlantılar)
4 (4 ohm’da)
Genel
Çıkışlar Ses çıkışları
Girişler Telefon ATT kontrol
Ses tonu kontrolleri
Güç kaynağı 12 V DC araç akümülatörü
Boyutlar Yaklaşık 178
Montaj boyutları Yaklaşık 182 K 53 K 161
Ağırlık Yaklaşık. 1,2 kg
Ekteki aksesuarlar Takma ve bağlantı parçaları
İsteğe bağlı aksesuarlar
Not
Bu birim dijital bir preamplifikatöre veya equalizere
bağlanamaz.
Görünüm ve özelliklerde, önceden uyarılmaksızın
değişiklikler yapılabilir.
Elektrikli anten röle
kontrol kablosu
Amplifikatör kontrol
kablosu
kablosu
Uzaktan kumanda giriş
konektörü
Anten giris konektörü
Bas 100 Hz’de ±8 dB
Tiz 10 kHz’de ±8 dB
(eksi toprak )
mm (e/b/y)
mm (e/b/y)
(1 set)
Ön panel kasası (1)
Döner kumanda
RMX4S
50 K 177
K
22
Page 95

Sorun giderme
Aşağıdaki denetim listesini, biriminizde
oluşabilecek sorunları gidermek için
kullanabilirsiniz.
Listedeki denetimleri uygulamadan önce
bağlantını ve çalıştırma kurallarını denetleyin.
Genel
Ses yok.
•Ses düzeyi kontrol düğmesini saat yönünde
döndürerek ses düzeyini ayarlayın.
•ATT işlevini iptal edin.
•Kısma kontrolünü 2 hoparlör sistemi için
orta konuma ayarlayın.
Belleğin içeriği silinmiş.
•RESET düğmesine basmış olmalısınız.
tBelleğe tekrar kaydedin.
•Güç kablosu veya akümülatör bağlantısı
kesik.
•Güç bağlantı kablosu doğru şekilde bağlı
değil.
Bip sesi yok.
Bip sesi iptal edilmiş durumda (sayfa 18).
Ekrandaki göstergeler kayboluyor /
görüntülenmiyor.
•(OFF) düğmesine 2 saniye süreyle
bastığınızda saat göstergesi kayboluyor.
tSaati görüntülemek için, (OFF)
düğmesine tekrar 2 saniye süreyle basın.
•Ön paneli çıkarın ve bağlantıları
temizleyin. Ayrıntılı bilgi için,
“Bağlantıları temizleme” (sayfa 21)
bölümüne bakın.
Kayded ilen istas yonl ar v e saat ayar ı sil inm iş
durumda.
Sigorta yanmış.
Kontak anahtarı ON, ACC veya OFF
konumundayken parazit duyuluyor.
Kablolar, aracınızın aksesuar güç
bağlantısına uyum sağlamıyor.
Birime güç sağlanmıyor.
•Bağlantıyı kontrol edin. Her şey normal
görünüyorsa, sigortayı kontrol edin.
•Araçta ACC konumu bulunmuyor.
tBirimi açmak için (SOURCE)
düğmesine basın (veya bir CD
yerleştirin).
Birime devamlı olarak güç sağlanıyor.
Araçta ACC konumu bulunmuyor.
Elektrikli anten uzatılamıyor.
Elektrikli antenin röle kutusu yok.
CD çalma
CD yerleştirilemiyor.
•Başka bir CD yerleştirilmiş durumda.
•CD zorla ters veya yanlış şekilde
yerleştirilmiş.
CD çalmaya başlamıyor.
•CD kirli veya arızalı.
•CDR veya CDRW tamamlanmamış.
•Ses verisi için tasarlanmamış bir CDR
çalmaya çalışmış olmalısınız.
•Bazı CDR’ler kaydedildikleri donatı veya
CD durumu nedeniyle çalınamayabilir.
CD otomatik olarak çıkarılıyor.
Ortam sıcaklığı 50°C üzerinde.
CD çılmıyor
Çalıştırma düğmeleri işlev görmüyor.
RESET düğmesine basın.
Ses titreşimden atlama yapıyor.
•Birim 60° derecenin üzerinde bir açıda
monte edilmiş.
•Birim, aracın sağlam bir yerine monte
edilmemiş.
Ses atlama yapıyor.
CD kirli veya arızalı.
Radyo yayını
Ön ayar yapılamıyor.
•Belleğe doğru frekansı kaydedin.
•Yayın sinyali çok zayıf.
İstasyonlar alınamıyor.
Ses parazitli olarak çıkıyor.
•Aracın anten yükseltici güç kablosuna,
elektrikli anten kontrol kablosu (mavi) veya
aksesuar güç kablosu (kırmızı) bağlayın.
(Yalnızca aracınızın arka camında dahili
FM/MW/LW anteni varsa.)
•Araç anteninin bağlantısını kontrol edin.
•Otomatik anten açılmıyor.
tElektrikli anten bağlantı kontrol kablosu
bağlantısını kontrol edin.
•Frekansı kontrol edin.
Otomatik ayar yapılamıyor.
•Bölgesel arama modu “ON” olarak
ayarlanmı ş.
tBölgesel arama modunu “OFF” olarak
ayar layı n. ( sayf a 19 )
•Yayın sinyali çok zayıf.
tEl ile ayarlayın.
“ST” göstergesi yanıp sönüyor.
•Frekansı doğru şekilde ayarlayın.
•Yayın sinyali çok zayıf.
tMono yayın moduna geçin. (sayfa 19).
devamı bir sonraki sayfada t
23
Page 96

Stereo program yayını mono olarak
duyuluyor.
Birim mono yayın moduna ayarlanmış.
tMono yayın modunu iptal edin. (sayfa
19).
RDS
Birkaç saniye dinlemeden sonra SEEK
(arama) başlıyor.
İstasyonun TP özelliği yok veya sinyali zayıf.
t “AFOFF” veya “TAOFF”
görüntüleninceye dek (AF) veya (TA)
düğmesine art arda basın.
Trafik duyurusu yok.
•“TA” işlevini etkinleştirin.
•İstasyon TP olmasına karşın trafik
duyuruları yayınlamıyor.
tBaşka bir istasyon ayarlayın.
PTY “” gösteriyor.
•Ayarlı istasyon RDS istasyonu değil.
•RDS verileri alınmamış.
•İstasyon, program türünü belirlemiyor.
Hata uyarıları / Mesajlar
Hata uyarıları
Aşağıdaki uyarılar 5 saniye süreyle yanıp söner ve
bir uyarı sesi duyulur.
ERROR*
HI TEMP
RESET
*1 CD çalarken hata oluşursa, CD numarası ekranda
*2 Hataya neden olan CD’nin numarası görüntülenir.
Bu çözümler sorunun giderilmesine yardımcı
olmuyorsa, en yakın Sony satıcısına başvurun.
L.SEEK +/–
NO AF
“” veya “”
1
CD kirli veya ters yerleştirilmiş.*
2
tCD’yi temizleyin veya doğru şekilde
yerleştirin.
Ortam sıcaklığı 50°C üzerinde.
tSıcaklık 50°C altına düşünceye dek
bekleyin.
CD birimi bazı sorunlar nedeniyle
çalıştırılamıyor.
tBirimin RESET düğmesine basın.
görüntülenmez.
Mesajlar
Otomatik ayar sırasında bölgesel arama
modu açık (sayfa 11).
Dinlemekte olduğunuz istasyonun alternatif
frekansı yok.
CD’nin başına veya sonuna ulaşmış
durumdasınız ve daha geriye veya ileriye
gidemiyorsunuz.
24
Page 97

Page 98

Поздравляем с
покупкой!
Благодарим Вас за то, что Вы остановили
свой выбор на проигрывателе компактдисков Sony. Данный проигрыватель имеет
ряд новых характеристик:
• Информация CD TEXT (отображается,
когда воспроизводится диск с CD
TEXT*).
• Дополнительные устройства
управления
Поворотный дистанционный
переключатель RM-X4S
* Диск с CD TEXT - это звуковой компакт-диск,
содержащий такую информацию, как название
диска, имя исполнителя и названия композиций.
Эта информация записана на диске.
Пpоигpывaтeль компaктдиcков c диапазоном FM/
MW/LW
Cдeлaно в Taилaндe
2
Page 99

Содержание
Расположение органов управления. . . . 4
Меры предосторожности . . . . . . . . . . . . 5
Примечания относительно дисков . . . . 6
Начало работы
Переустановка параметров
устройства . . . . . . . . . . . . . . . . . . . . . . . 7
Снятие передней панели . . . . . . . . . . . . . 7
Установка часов . . . . . . . . . . . . . . . . . . . . 8
Проигрыватель компакт-дисков
Воспроизведение диска . . . . . . . . . . . . . . 9
Надписи на дисплее. . . . . . . . . . . . . . . . . . 9
Повторное воспроизведение
композиций
— Повтор воспроизведения . . . . . . . 10
Воспроизведение композиций в
случайной последовательности
— Перетасованное
воспроизведение . . . . . . . . . . . . . . . . . 10
Радиоприемник
Автоматическое сохранение
радиостанций в памяти
— Память оптимальной настройки
(BTM) . . . . . . . . . . . . . . . . . . . . . . . . . . 10
Прием радиостанций, сохраненных в
памяти . . . . . . . . . . . . . . . . . . . . . . . . . . 11
Сохранение в памяти только
необходимых радиостанций . . . . . . . 11
RDS
Обзор RDS. . . . . . . . . . . . . . . . . . . . . . . . 12
Автоматическая перенастройка для
достижения наилучшего приема
— Функция AF . . . . . . . . . . . . . . . . . . 13
Прием дорожных сообщений
— TA/TP. . . . . . . . . . . . . . . . . . . . . . . . 14
Предустановка станций RDS с
параметрами AF и TA . . . . . . . . . . . 14
Нахождение станции по типу
программы
— PTY. . . . . . . . . . . . . . . . . . . . . . . . . . 15
Автоматическая установка часов
— CT . . . . . . . . . . . . . . . . . . . . . . . . . . . 16
Другие функции
Использование поворотного
дистанционного переключателя. . . 16
Подстройка характеристик звука. . . . 18
Резкое снижение уровня громкости . . 18
(При помощи поворотного
дистанционного переключателя) . . 18
Изменение параметров звука и дисплея
— Меню . . . . . . . . . . . . . . . . . . . . . . . . 18
Выбор положения для прослушивания
— Любимое положение для
прослушивания (MBP) . . . . . . . . . . . 19
Настройка эквалайзера. . . . . . . . . . . . . 20
Дополнительная информация
Уход за аппаратом . . . . . . . . . . . . . . . . . 21
Демонтаж устройства . . . . . . . . . . . . . . 21
Технические характеристики. . . . . . . . 22
Устранение неполадок . . . . . . . . . . . . . 23
Индикация/Cообщения об
ошибках . . . . . . . . . . . . . . . . . . . . . . . . 24
3
Page 100

Расположение органов управления
Подробнее см. на указанных страницах.
: Во время воспроизведения : При приеме радиопередач : В режиме
CD
работы меню
1
2
3
REP
MBP
EQ 7
SOURCE
MODE
SHUF
6
5
4
RADIO MENU
SCROLL
P
MENU
SEEK
SOUND
AF
TA
CDX-L550X/L550V/L550
S
O
P
EN
S
E
E
R
T
DSPL
PTY
SEEK
ENTER
O
FF
1 Регулятор громкости 14
2 Кнопка MBP 19
3 Кнопка Z (извлечения диска)
(расположена под передней панелью)
9
4 Кнопка SOURCE (Питание вкл/радио/
компакт-диск) 8, 9, 10, 11, 14, 20
5 Окно дисплея
6 Кнопка MENU 8, 10, 14, 16, 19, 20
7 Кнопка S (SCROLL) 9
8 Кнопка OPEN 7, 9
9 Кнопка PTY (DSPL)
9
CD
12, 15
RADIO
q; Кнопка EQ7 20
qa Кнопка RESET
передней панелью)
(расположена под
7
qs Номерные кнопки
CD
(3) режим REP 10
(6) режим SHUF 10
10, 11, 13, 14
RADIO
qd Кнопка MODE
10, 11, 14
RADIO
qf Кнопка SOUND 18, 19
qg Кнопка AF 13, 14
qh Кнопка TA 14
qj Кнопка OFF (Стоп/Питание выкл)* 7, 9
qk Кнопка ENTER
12
RADIO
8, 10, 14, 15, 16, 19, 20
MENU
* Соблюдайте осторожность, выполняя
установку в автомобиле, в котором нет
положения ACC (принадлежности) в
замке зажигания
Обязательно нажмите кнопку (OFF) на
аппарате на 2 секунды, чтобы отключить
индикацию времени после выключения
зажигания.
Если этого не сделать, индикация
времени не отключается, что может
привести к разрядке аккумулятора.
4
 Loading...