

Page 1
3-257-789-12 (1)
FM/AM
Compact Disc Player
Operating Instructi on s
Инструкция по эксплуатации
For installation and connections, see the supplied installation/connections manual.
Перед установкой и подсоединениями прочитайте прилагаемую инструкцию по
установке и подсоединению.
CDX-L495EE
GB
RU
CDX-L490EE
© 2003 Sony Corporation
Page 2
Welcome !
Thank you for purchas in g t hi s Sony Compact
Disc Player. You can enjoy its various features
even more with:
• CD TEXT information
(displayed when a CD TEXT disc* is played).
• Optional controller accessory
Card remote commander RM-X114
* A CD TEXT disc is an audio CD that includes
information such as the disc name, artist name, and
track names. This information is recorded on the
disc.
This label is located on the bottom of the
chassis.
CAUTION INVISIBLE
VIEW DIRECTLY WITH OPTICAL INSTRUMENTS
LASER RADIATIONWHEN OPEN
DO NOT STARE INTO BEAM OR
This label is located on the drive unit’s internal
chassis.
2
Page 3

Table of Contents
Location of controls . . . . . . . . . . . . . . . . . . . 4
Precautions . . . . . . . . . . . . . . . . . . . . . . . . . . 5
Notes on discs . . . . . . . . . . . . . . . . . . . . . . . . 6
Getting Started
Resetting the unit. . . . . . . . . . . . . . . . . . . . . . 7
Detaching the front panel . . . . . . . . . . . . . . . 7
Setting the clock . . . . . . . . . . . . . . . . . . . . . . 8
CD Player
Playing a disc. . . . . . . . . . . . . . . . . . . . . . . . . 9
Display items. . . . . . . . . . . . . . . . . . . . . . . . . 9
Playing tracks repeatedly
— Repeat Play . . . . . . . . . . . . . . . . . . . . 10
Playing tracks in ra ndom order
— Shuffle Play . . . . . . . . . . . . . . . . . . . . 10
Radio
Storing stations automatically
— Best Tuning Memory (BTM). . . . . . . 10
Receiving the stored stations. . . . . . . . . . . . 11
Storing only the desired stations . . . . . . . . . 11
Other Functions
Adjusting the balance and fader . . . . . . . . . 12
Quickly attenuating the sound . . . . . . . . . . 12
Changing the sound and display setti ngs
— Menu . . . . . . . . . . . . . . . . . . . . . . . . . 12
Setting the equalizer (EQ3). . . . . . . . . . . . . 13
Additional Information
Maintenance . . . . . . . . . . . . . . . . . . . . . . . . 14
Removing the unit. . . . . . . . . . . . . . . . . . . . 15
Specifications . . . . . . . . . . . . . . . . . . . . . . . 16
Troubleshooting . . . . . . . . . . . . . . . . . . . . . 17
Error displays/Messages. . . . . . . . . . . . . . . 18
3
Page 4
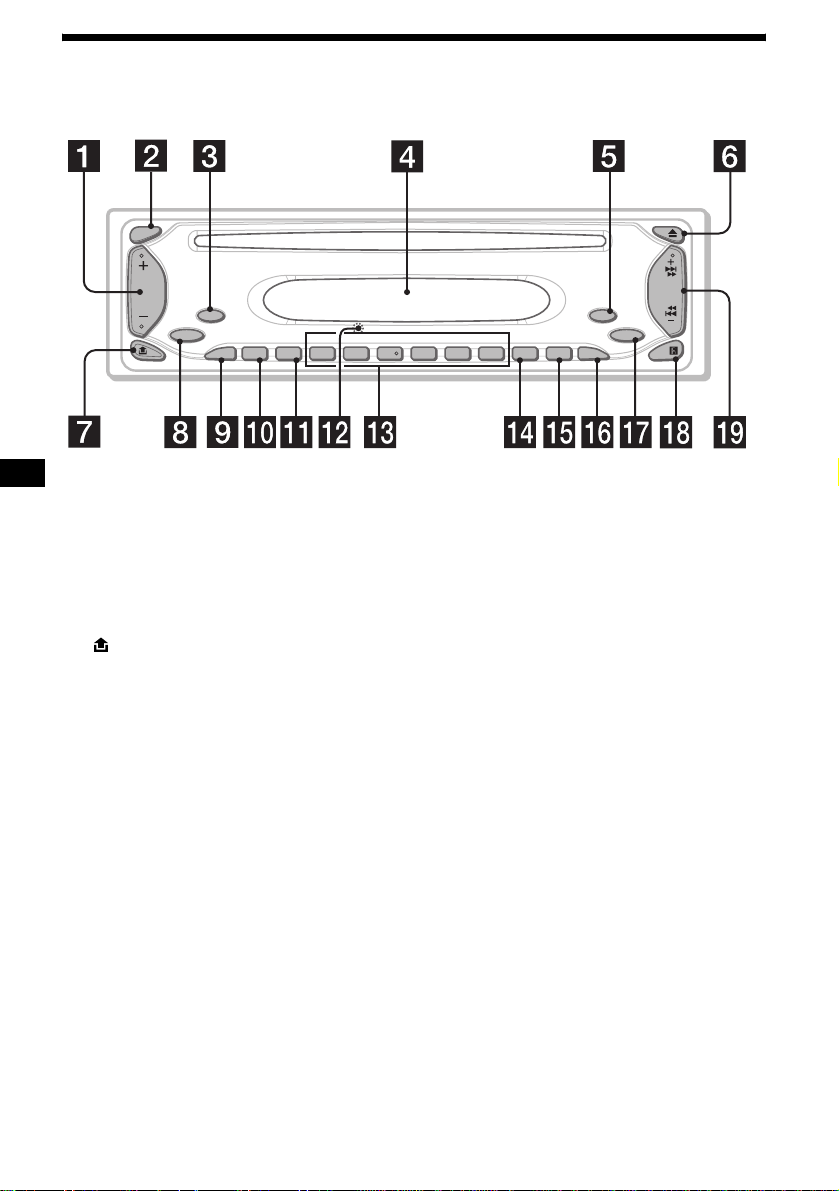
Location of controls
Refer to the pages listed for details.
SEL
MODE
SOURCE
BTMATT
SENS
123456
CDX-L495EE
CDX-L490EE
SEEK
OFF
EQ3
DSPL SHUF REP
a Volume +/– button
b SEL (select) button
Selecting items.
c MODE button
Changing the operation.
d Display window
e OFF (Stop/Power off) button* 7, 9
f Z (eject) button 9
g (front panel release) button 7
h SOURCE (Power on/Radio/CD) button
Selecting the source.
i ATT (attenuate) button 12
j BTM button 10
k SENS button 11
l RESET button (located on t he fron t side of
the unit, behind the fr ont panel) 7
m Number buttons
Radio:
Storing the desired station on each number
button.
n DSPL (display mode change) button
8, 9
o SHUF button 10
p REP button 10
q EQ3 button 13
r Receptor for the card remote
commander
s SEEK +/– button
Radio:
Tuning in stations automatically/finding a
station manually.
CD:
Skipping tracks/fast-forwarding, reversing a
track.
* Warning when installing in a car without
an ACC (accessory) position on the
ignition switch
After turning off the ignition, be sure to press
and hold (OFF) on the unit until the display
disappears.
Otherwise, the display does not turn off and this
causes battery drain.
4
Page 5
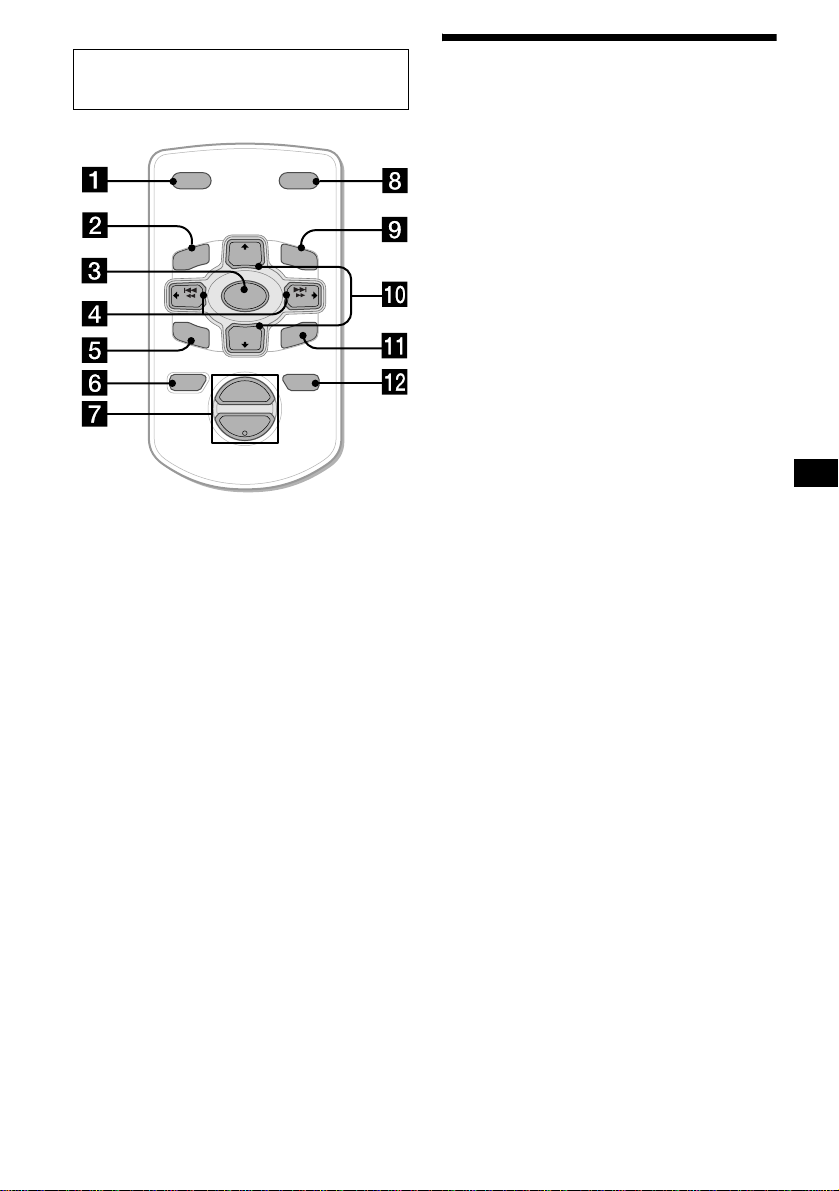
Card remote commander RM-X114
(optional)
DSPL MODE
+
PRESET
LIST
+
DISC
MENU
–
SEEK
SOUND
SOURCE
DISC
PRESET –
+
VOL
+
SEEK
R
–
TE
EN
ATTOFF
–
The corresponding buttons of the card
remote commander control the same
functions as those on this unit.
a DSPL button
b MENU button*
c SOURCE button
d SEEK (+/–) buttons
e SOUND button
f OFF button
g VOL (+/–) buttons
h MODE button
i LIST button*
j DISC*/PRESET (+/–) buttons
k ENTER button*
l ATT button
Precautions
• If your car has been parked in direct su nlight,
allow the unit to cool off befor e operating it.
• Power aerial will extend automatically while
the unit is o peratin g .
If you have any questions or probl em s
concerning your unit that are not covered in this
manual, please consult your neares t S ony d ea ler.
Moisture condensation
On a rainy day or in a very dam p area, moisture
condensation may occur inside the lenses and
display of the unit. Should this occur, the unit
will not operate properly. In such a case, remove
the disc and wait for about an hour until the
moisture has evaporated.
To maintain high sound quality
Be careful not to splash jui ce or other soft drinks
onto the unit or discs.
* Not available for this unit
Note
If the display disappears by pressing (OFF), it cannot
be operated with the card remote commander unless
(SOURCE) on the unit is pressed, or a disc is inserted
to activate the unit first.
Tip
Refer to “Replacing the lithium battery” for details on
how to replace the batteries (page 14).
5
Page 6
Notes on discs
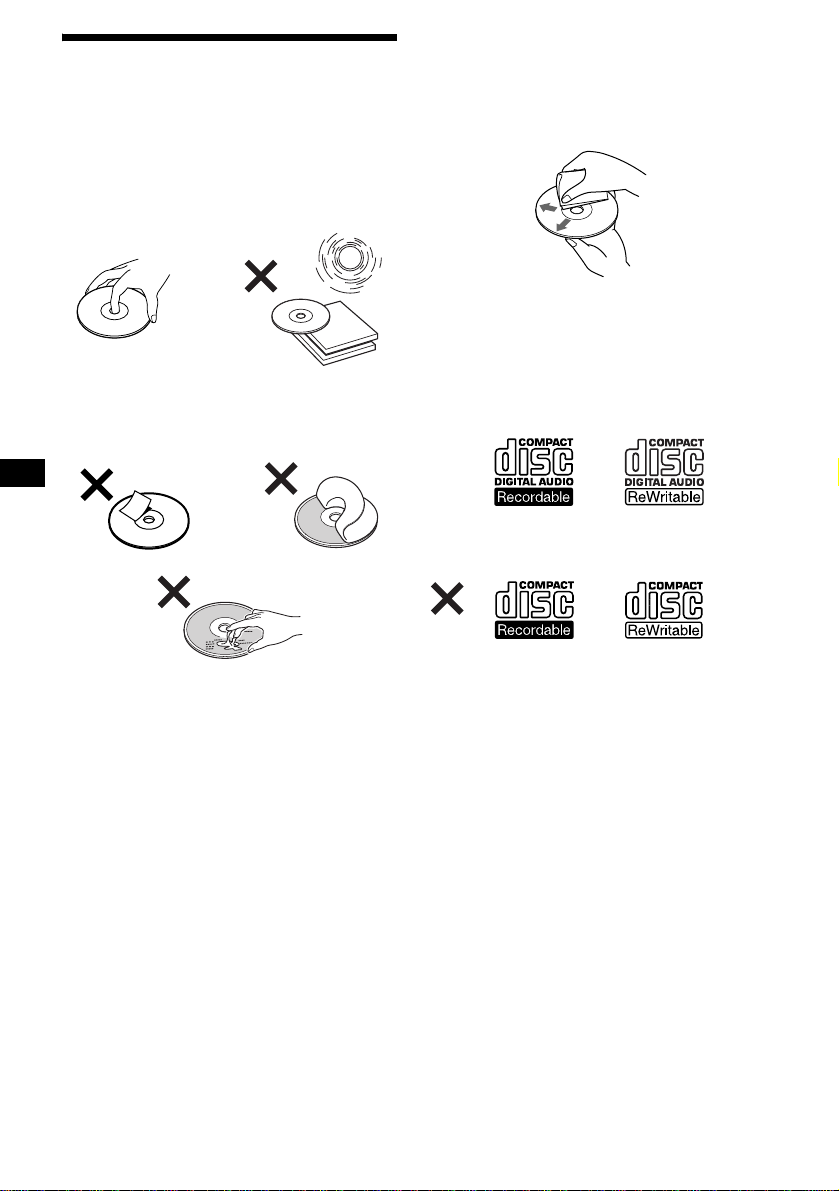
• To keep the disc clean, do not touch the surface.
Handle the disc by its edge.
• Keep your discs in the ir cases or disc
magazines when no t in use.
• Do not subject the discs to heat/high
temperature. Avoid leaving them in parked cars
or on dashboards/rear trays.
• Do not attach labels, or use discs with sticky
ink/residue. Such discs may stop spinning
when used, causing a malfunction, or may ruin
the disc.
• Before playing, cl ean the discs with a
commercially available cleaning cloth. Wipe
each disc from the centre out. Do not use
solvents such as benzi ne, thinner , commerc ially
available cleaners, or antistatic spray intended
for analog discs.
Notes on CD-R/CD-RW discs
• You can play CD-Rs (recordable CDs)/CDRWs (rewritable CDs) desi gned for audio us e
on this unit.
Look for these marks to distinguish CD-Rs/
CD-RWs for audio use .
These marks denote that a disc is not for audio
use.
• Do not use any discs with labels or stickers
attached.
The following malfunctions may result from
using such discs:
– Inability to eject a d is c (due to a label or
sticker peeling off and jamming the eject
mechanism).
– Inability to read audio data correctly (e.g.,
playback skippi ng, or no playback) d ue t o
heat shrinking of a sticker or label causing a
disc to warp.
• Discs with non-standard shapes (e.g., heart,
square, star) ca nnot be played on thi s un it .
Attempting to do so may damage the unit. Do
not use such discs.
• You cannot play 8 cm C D s.
6
• Some CD-Rs/CD-RWs (depend i ng on the
equipment used for its recording or the
condition of the di sc) may not play on thi s unit.
• You cannot play a CD-R/a CD - RW that is not
finalized*.
* A process necessary for a recorded CD-R/CD-RW
disc to be played on the audio CD player.
Page 7
Getting Started
Detaching the front panel
You can detach the front panel of this unit to
protect the unit from being stolen.
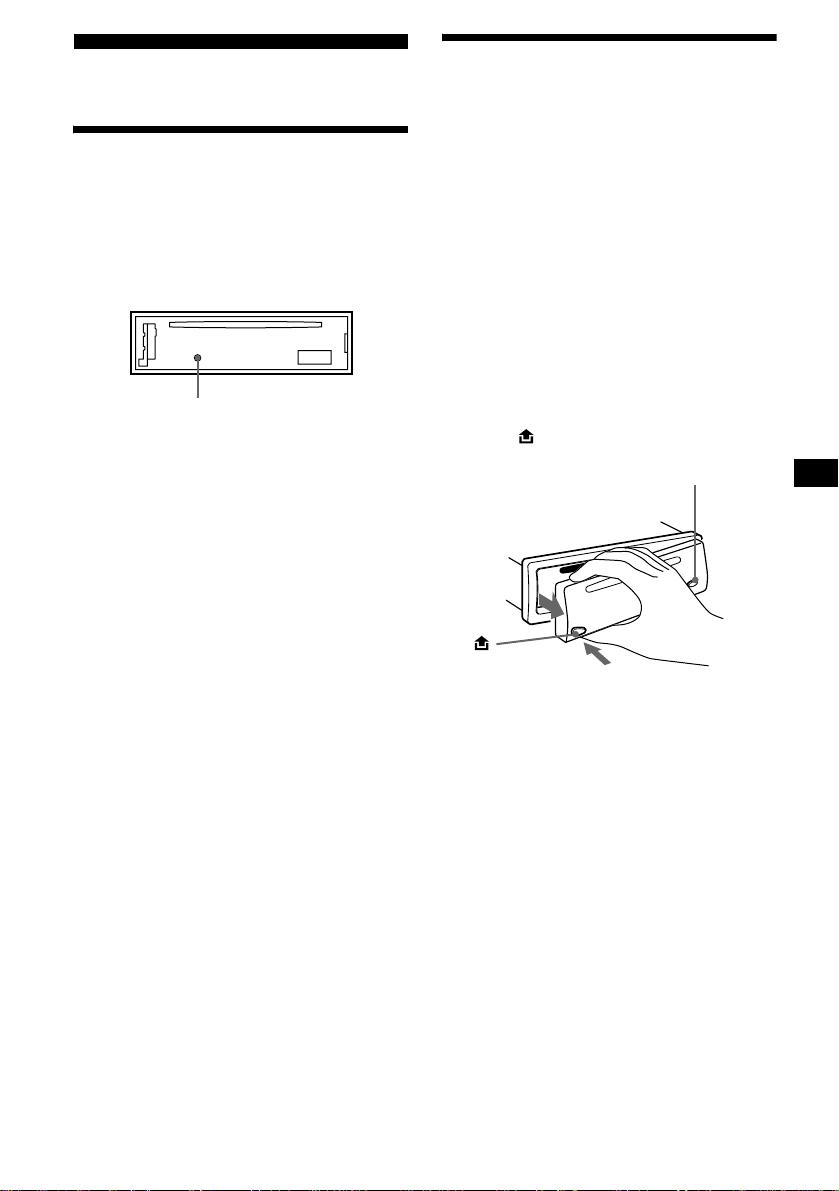
Resetting the unit
Before operating the unit for the first time, or
after replacing the car battery or changing the
connections, you must reset the unit.
Remove the front panel and press the RESET
button with a pointed object, such as a ballpoint
pen.
RESET button
Note
Pressing the RESET button will erase the clock setting
and some stored contents.
Caution alarm
If you turn the ignition switch to the OFF
position without removing the front panel, the
caution alarm will beep for a few seconds.
If you connect an op ti onal amplifier and do not
use the built-in amplifier, the beep sound will be
deactivated.
1 Press (OFF)*.
CD playback or radio reception stops (the key
illumination and display remain on).
* If your car has no ACC position on the ignition
switch, be sure to turn the unit off by pressing
(OFF) until the display disappears to avoid car
battery drain.
2 Press , then pull it off towards you.
(OFF)
Notes
• If you detach the panel while the unit is still turned
on, the power will turn off automatically to prevent
the speakers from being damaged.
• Do not drop or put excessive pressure on the front
panel and its display window.
• Do not subject the front panel to heat/high
temperature or moisture. Avoid leaving it in a parked
car or on a dashboard/rear tray.
Tip
When carrying the front panel with you, use the
supplied front panel case.
continue to next page t
7
Page 8
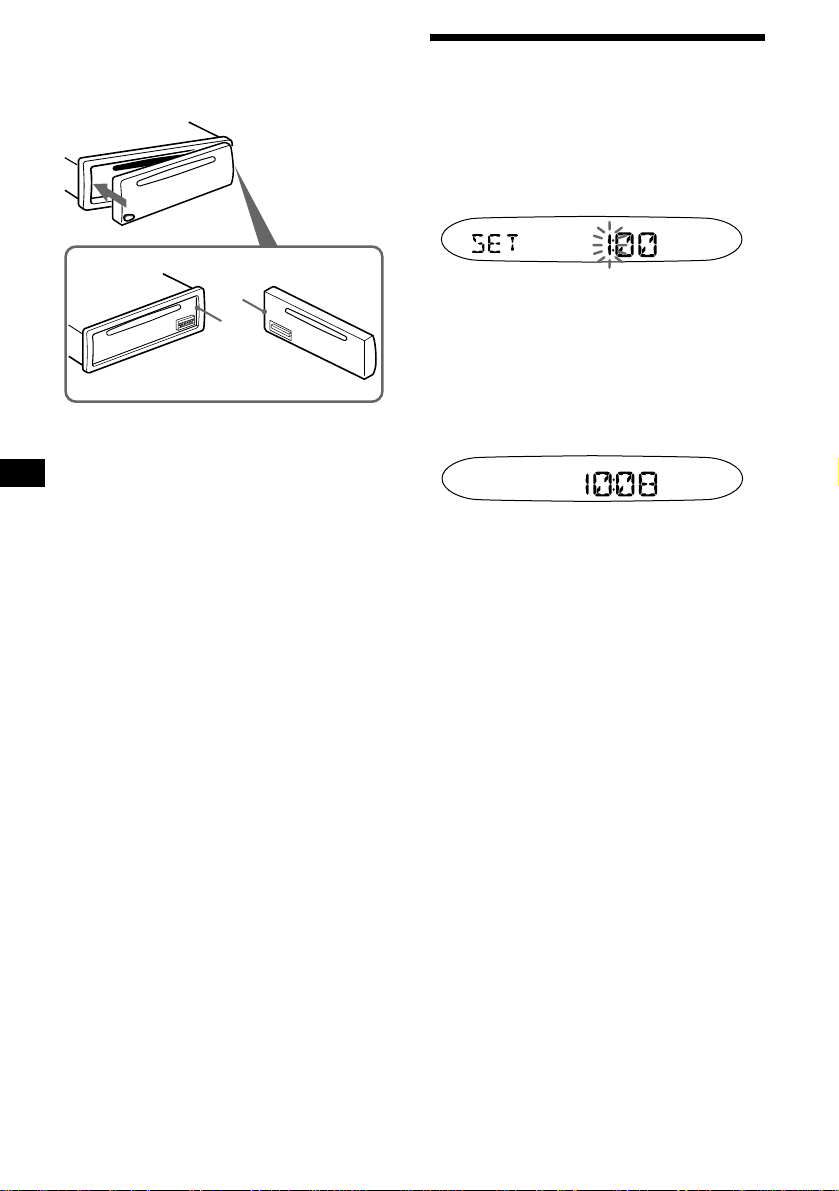
Attaching the front panel
Attach part A of the front panel to part B of the
unit as illustrated and push the left side into
position until it clicks.
Setting the clock
The clock uses a 24-hour digital indication.
Example: To set the clock to 10:08
1 Press (DSPL) for 2 seconds.
The hour indication flashes.
A
B
Note
Do not put anything on the inner surface of the front
panel.
1Press the volume +/– button to set
the hour.
2Press (SEL).
The minute indi cation flashes.
3Press the volume +/– button to set
the minute.
2 Press (DSPL).
The clock starts. Aft er th e cl ock setting is
completed, the display retu rn s to normal play
mode.
8
Page 9
CD Player
Playing a disc
Display items
When the track changes, any prerecorded title*1 of
the new track is automatically displayed (if the
Auto Scroll function is set to “ON,” names
exceeding 8 characters will be scrolled (page 12)).
Insert the disc (labelled side up).
Playback starts automatically.
If a disc is already inserted, pre ss (SOURCE)
repeatedly unti l “ C D ” appears to start playback.
To Press
Stop playba ck Z or (OFF)
Eject the disc Z
Skip tracks
–Automatic
Music Sensor
Fast-forward/
reverse
–Manual Search
Notes
• While the first/last track on the disc is playing, if
(SEEK) (–/+)
(./>)
[once for each tr ack]
(SEEK) (–/+)
(m/M)
[hold to desired p o i nt ]
(SEEK) (+) or (SEEK) (–) is pressed, playback
skips to the last/first track of the disc.
• When the last track on the disc is over, playback
restarts from the first track of the disc.
Source
Displayable items
• Track number/Elapsed playing time
• Disc name*
• Track name*
To Press
1
/Artist name*
1
2
Switch display item (D SPL)
*1 When pressing (DSPL), “NO NAME” indicates that
there is no prerecorded name to display.
*2 Only for CD TEXT discs with the artist name.
Notes
• Some characters cannot be displayed. Characters
and signs which cannot be displayed appear as “ *.”
• For some CD TEXT discs with very many
characters, information may not scroll.
• This unit cannot display the artist name for each
track of a CD TEXT disc.
Tip
When A.SCRL (Auto Scroll) is set to off and the disc/
track name is changed, the disc/track name does not
scroll.
9
Page 10

Playing tracks repeatedly
— Repeat Play
The current track will repeat itself when it
reaches the end.
During playback, press (REP)
repeatedly until “REP-ON” appears in
the display.
Repeat Play starts.
To return to normal play mode, select
“REP-OFF.”
Playing tracks in random
order
— Shuffle Play
You can select to pla y the tracks on the current
disc in random order.
During playback, press (SHUF)
repeatedly until “SHUF-ON” appears
in the display.
Shuffle Play starts.
To return to normal play mode, select
“SHUF-OFF.”
Radio
The unit can store up t o 6 st ations per band
(FM1, FM2, FM3*, AM1, and AM2).
Caution
When tuning in stat i ons while driving, use Best
Tuning Memory to prevent accidents .
* FM3 tuning range is 65 to 74 MHz (at 30kHz step).
Storing stations
automatically
— Best Tuning Memory (BTM)
The unit selects the stations with th e st rongest
signals wit hi n t he selected ban d, and stores th em
in the order of their frequency.
1 Press (SOURCE) repeatedly to select
the radio.
2 Press (MODE) repeatedly to select the
band.
3 Press (BTM) for 2 seconds.
The unit stores stations in the order of their
frequencies on the number buttons.
A beep sounds when the setting is stored.
Notes
• If only a few stations can be received due to weak
signals, some number buttons will retain their former
settings.
• When a number is indicated in the display, the unit
starts storing stations from the one currently
displayed.
10
Page 11
Receiving the stored stations
1 Press (SOURCE) repeatedly to select
the radio.
2 Press (MODE) repeatedly to select the
band.
3 Press the number button ((1) to (6))
on which the desired station is sto re d.
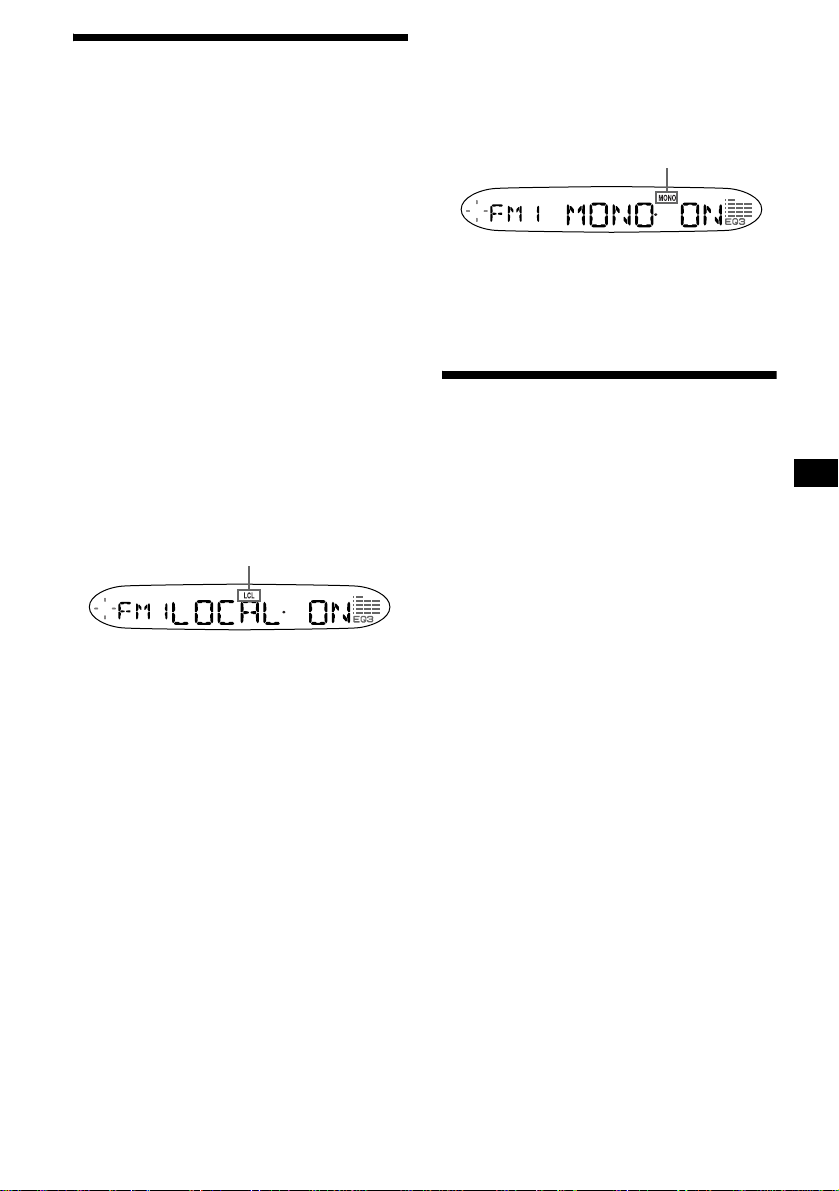
If FM stereo reception is poor
— Monaural Mode
During radio reception, press (SENS)
repeatedly until “MONO-ON” appears
in the displ ay.
“MONO” indicator is displayed.
If preset tuning does not work
— Automatic tuning/Local Seek Mode
Automatic tuning:
Press (SEEK) (+) or (SEEK) (–) to
search for the station.
Scanning stops when the unit receives a
station. Repeat the operation until the desired
station is rece ived.
Local Seek Mode:
If the automatic tuning stops too
frequently, press (SENS) repeatedly
until “LOCAL-ON” appears in the
display.
“LCL” indicator is displayed.
Only the stations with relatively strong
signals will be tuned in.
To cancel the lo cal seek mode, select “LOCALOFF.”
Tip
If you know the frequency of the station you want to
listen to, press and hold (SEEK) (+) or (SEEK) (–) to
locate the approximate frequency, then press
(SEEK) (+) or (SEEK) (–) repeatedly to fine adjust to
the desired frequency (manual tuning).
The sound improves, but becomes monaural
(“ST” disapp ears).
To return to normal radio reception mode, select
“MONO-OFF.”
Storing only the desired
stations
You can manually pr eset the desired sta ti ons on
any chosen number button.
1 Press (SOURCE) repeatedly to select
the radio.
2 Press (MODE) repeatedly to select the
band.
3 Press (SEEK) (+) or (SEEK) (–) to tune
in the stat i on that you wa nt to store.
4 Press the desired number button ((1)
to (6)) for 2 seconds until “MEM”
appears.
The number button indication appears in the
display.
Note
If you try to store another station on the same number
button, the previously stored station will be erased.
11
Page 12

Other Functions
Adjusting the balance and
fader
You can adjust the balanc e and fader.
1 Press (SEL) repeate dly until “BAL” or
“FAD” appears.
Each time you press (SEL), the item changes
as follows:
LOW* t MID* t HI* t
BAL (left-right)
* When EQ3 is activated (pa ge 13) .
2 Press the volume +/– button to adjust
the selected item.
Note
Adjust within 3 seconds after selecting the item.
Quickly attenuating the
sound
Press (ATT).
After “ATT-ON” momentarily appears, the
“ATT” appears in the di s pl ay.
t FAD (front-rear)
Changing the sound and
display settings
— Menu
The following items can be set:
SET (Set Up)
• A.SCRL (Auto Scroll)* (page 9)
• M.DSPL (Motion D isplay) — t h e
demonstration mode which appears when no
source is selected (e.g., tuner is turned off).
• BEEP — to turn the beeps on or off.
Selecting the desired item
Press (SEL) and the desired preset
number button simultaneously.
(SEL) + (3): A.SCRL*
(SEL) + (4): M.DSPL
(SEL) + (6): BEEP
*When no CD is playing, this item will not appear.
After the mode setting completed, the display
returns to normal play mode.
Note
The displayed item will differ depending on the source.
To cancel the item, press (SEL) and the preset
number button simultaneously again.
To restore the previous volume level, press
(ATT) again.
Tip
When the interface cable of a car telephone is
connected to the ATT lead, the unit decreases the
volume automatically when a telephone call comes in
(Telephone ATT function).
12
Page 13

Setting the equalizer (EQ3)
Yo u can select an equa l iz er curve for 7 music
types (XPLOD, VOCAL, CLUB, JAZZ, NEW
AGE, ROCK, CUSTOM, and OFF (equalizer
OFF)).
Yo u can store a different equalizer setting for
each source.
Selecting the equalizer curve
1 Press (SOURCE) to select a source
(Radio or CD).
2 Press (EQ3) repeatedly until the
desired equalizer cur ve.
Each time you pr ess (EQ3), the item
changes.
To cancel the equalizing effect, select “O FF.”
Adjusting the equalizer curve
You can store and adj ust the equalizer settings
for different tone ranges.
1 Press (SOURCE) to select a source
(Radio or CD).
2 Press (EQ3) repeatedly to select the
desired equalizer curve.
3 Adjusting the equalizer curve.
1 Press (SEL) repeatedly to select the
desired tone range.
Each time you press ( SEL ), the tone range
changes.
LOW t MID t HI (t BAL t FAD)
2 Press the volume +/ – button
repeatedly to adjust to the desired
volume level.
The volume l evel is adjustable by 1 dB
steps from –10 dB to +10 dB.
3 Repeat step 1 and 2 to adjust the
equalizer curve.
To restore the fac tory-set equalizer curve,
press (SEL) for 2 sec onds.
After 3 seconds, th e di splay returns to
normal play mode.
Note
When EQ3 is set to “OFF,” you cannot adjust the
equalizer curve settings.
13
Page 14

Additional Information
Maintenance
Fuse replacement
When replacing th e fuse, be sure to use one
matching the amperage rating stated on the
original fuse. I f t he fuse blows, check the powe r
connection and replace the fuse. If the fuse blows
again after replacement, there may be an internal
malfuncti on . In such a case, cons ult your neares t
Sony dealer.
Fuse (10 A)
Warning
Never use a fuse with an amperage rating
exceeding the one supplied with the unit as this
could damage the un it.
Cleaning the connectors
The unit may not functi on pr operly if the
connectors between the unit and the front panel
are not clean. In order to prevent this, detach the
front panel (page 7 ) and clean the connec t o r s
with a cotton swab dipped in alcohol. Do not
apply too much fo rce. Otherwise, th e connectors
may be damaged.
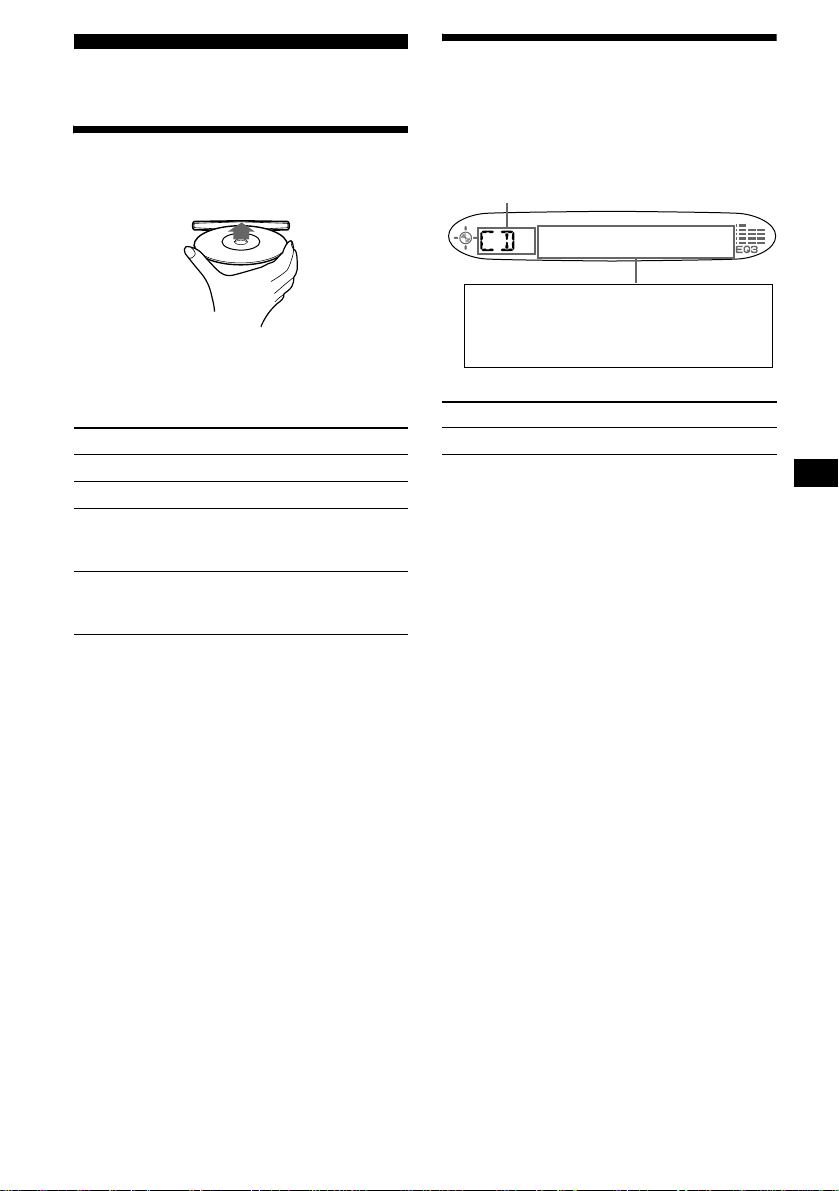
Replacing the lithium battery
Under normal conditions, batteries will last
approximately 1 y ear. (The servi ce life may be
shorter, depending on the conditions of use. )
When the batt ery bec omes wea k, the range o f the
card remote commander becomes shorter.
Replace the battery with a new CR2025 lithium
battery. Use of any other battery may present a
risk of fire or explosion.
x
+ side up
Notes on lithium battery
• Keep the lithium battery out of the reach of
children. Should the battery be swallowed,
immediately consult a doctor.
• Wipe the battery with a dry cloth to assure a
good contact.
• Be sure to observe the correct polarity when
installing the battery.
• Do not hold the battery with metallic tweezers,
otherwise a short-circuit may occur.
Main unit
Back of the front panel
Notes
• For safety, turn off the ignition before cleaning the
connectors, and remove the key from the ignition
switch.
• Never touch the connectors directly with your fingers
14
or with any metal device.
WARNING
Battery may explode if mistreated.
Do not recharge, disassemble, or dispose of
in fire.
Page 15

Removing the unit
1 Remove the protection collar.
1 Detach the front panel (page 7).
2 Engage the release keys together
with the protection collar.
2 Remove the unit.
1 Insert both release keys together
until t hey click.
Face the hook
inwards.
Orient the release
key correctly.
3 Pull out the release ke ys to remove
the protection collar.
2 Pull the releas e keys t o unseat the
unit.
3 Slide the unit out of the mounting.
15
Page 16

Specifications
CD Player section
Signal-to-noise ratio 90 dB
Frequency response 10 – 20,000 Hz
Wow and flutter Below measurable limit
Tuner section
FM
Tuning range FM1/FM2:
Aerial terminal External aerial connector
Intermediate frequency 10.7 MHz/450 kHz
Usable sensitivity 9 dBf
Selectivity 75 dB at 400 kHz
Signal-to-noise ratio 67 dB (stereo),
Harmonic distortion at 1 kHz
Separation 35 dB at 1 kHz
Frequency response 30 – 15,000 Hz
87.5 – 108 MHz
(at 50 kHz step)
FM3:
65 – 74 MHz
(at 30 kHz step)
69 dB (mono)
0.5 % (stereo),
0.3 % (mono)
AM
Tuning range 531 – 1,602 kHz
Aerial terminal External aerial connector
Intermediate frequency 10.7 MHz/450 kHz
Sensitivity 30 µV
Power amplifier section
Outputs Speaker outputs
Speaker impedance 4 – 8 ohms
Maximum power output 45 W × 4 (a t 4 ohms)
(sure seal connectors)
General
Outputs Audio outputs (rear)
Inputs Telephone ATT control
Tone controls Low:
Power requirements 12 V DC car battery
Dimensions Approx. 17 8 × 50 × 176 mm
Mounting dimensions Approx. 182 × 53 × 161 mm
Mass Approx. 1.2 kg
Supplied accessories Parts for installation and
Optional accessory Card remote commander
Design and specifications are subject to chan ge
without notice.
Power aerial relay control
terminal
terminal
±10 dB at 60 Hz (XPLOD)
Mid:
±10 dB at 1 kHz (XPLOD)
High:
±10 dB at 10 kHz (XPLOD)
(negativ e eart h )
(w/h/d)
(w/h/d)
connections
Front panel case (1)
RM-X114
16
Page 17

Troubleshooting
The following checklist will help you remedy
problems you may encounter with your un it.
Before going t hrough the checklist below, check
the connection and operating proced ur es.
General
No sound.
• Press the volume + button to adjust the
volume.
• Cancel the ATT function.
• Set the fader control to the centre posi tion for
a 2-speaker system.
The contents of the memory have been
erased.
• The RESET button has been pressed.
t Store again into the memory.
• The power cord or battery has been
disconnected.
• The power connecting cord is not connected
properly.
No beep sound.
• The beep sound is c anc el led (page 12).
• An optional power amplifier is connected
and you are not using the built-in amplifier.
The display disappears from/does not
appear in the display window.
• The display disappears if you press and hold
(OFF).
t Press and hold (OFF) again until the
display appe ar s.
• Remove the front panel and clean the
connectors. See “Cleaning the connectors”
(page 14) for details.
Stored stations and correct time are erased.
The fuse has blown.
Makes noise when the ignition key is in the
ON, ACC, or OFF position.
The leads are not matched correctly with the
car’s accessory power connec to r.
No power is being supplied to the unit.
• Check the connect ion. If everything is in
order, check the fuse.
• The car does not have an ACC position.
t Press (SOURCE) (or insert a disc) to turn
on the unit.
The power is continuously supplied to the
unit.
The car does not have an ACC position.
The power aerial does not extend.
The power aerial does not have a relay box.
CD playback
A disc cannot be loaded.
• Another CD is alread y loaded.
• The CD has been forcibly inser te d upside
down or in th e wr ong way.
Playback does not begin.
• Defective or dirty CD.
• CD-R/CD-RW that is not finalized.
• You tried to playback a CD-R/CD-RW not
designed for audio use.
• Some CD-Rs/CD-RWs may not play due to
its recording equipment or the disc
condition.
A disc is automatically ejected.
The ambient temp erature exceeds 50°C.
The operation buttons do not function.
CD will not be ejected.
Press the RESET button.
The sound skips from vibration.
• The unit is installed at an angle of more than
60°.
• The unit is not installed in a sturdy part of
the car.
The sound skips.
Dirty or defective disc.
continue to next page t
17
Page 18

Radio reception
Preset tuning is not possible.
• Store the correct frequency in the memory.
• The broadcast signal is too weak.
The stations cannot be received.
The sound is hampered by noises.
• Connect a power aerial control lead (blue) or
accessory power suppl y lead (red) to the
power supply lead of a ca r’s aerial booster
(only when your car has built-in FM/AM
aerial in the rear/side glass).
• Check the connect i on of the car aerial.
• The auto aerial will not go up.
t Ch ec k the connection of the power aer i al
control lead.
• Check the frequency.
Automatic tuning is not possible.
• The local seek mode is set to “ON.”
t S et th e local seek mode to “OFF” (page
11).
• The broadcast signal is too weak.
t Perform manual tuning.
The “ST” indication flashes.
• Tune in the frequency accurately.
• The broadcast signal is too weak.
t Set the monaural reception mode to
“ON” (page 11).
A programme broadcast in stereo is heard
in monaural.
The unit is in monaural reception mode.
t Cancel monaural reception mode (page
11).
Error displays/Messages
Error displays
The following indications will flash for about 5
seconds, and an ala rm sound will be he ar d.
ERROR
• A CD is dirty or inserted upside down.
t Clean or insert the CD correc tly.
• A CD cannot play because of some problem.
t Insert another CD.
FAILURE
The connection of speakers/amplifiers is
incorrect.
t See the installatio n guid e manual of this
model to check the connection.
HI TEMP
The ambient temperature is more than 50°C.
t Wait until the temperature goes down
below 50°C.
OFFSET
There may be an internal malfunction.
t Check the connection. If the error
indication remains on in the display,
consult your nearest Sony dealer.
RESET
The CD unit cannot be operated because of
some problem.
t Press the RES E T button on the unit.
Messages
L.SEEK +/–
The Local Seek mode is on during automatic
tuning (page 11 ).
“ ” or “ ”
Yo u have reached the beginning or th e end of
the disc and you cann ot go any further.
18
If these solutions do not help improve the
situation, consult your nearest Sony dealer.
Page 19

19
Page 20

Поздравляем с
покупкой!
Благодарим Вас за то, что Вы остановили
свой выбор на проигрывателе компактдисков Sony. Данный проигрыватель
имеет ряд новых характеристик:
• Информация CD TEXT
(отображается, когда воспроизводится
диск с CD TEXT*).
• Дополнительное вспомогательное
устройство для управления
Пульт дистанционного управления
RM-X114
* Диск с CD TEXT - это звуковой компакт-диск,
содержащий такую информацию, как название
диска, имя исполнителя и названия композиций.
Эта информация записана на диске.
Проигрыватель компактдисков с диапазоном FM/AM
Сделано в Таиланде
Этa этикeткa нaxодитcя в нижнeй чacти
шaccи.
CAUTION INVISIBLE
VIEW DIRECTLY WITH OPTICAL INSTRUMENTS
Этa этикeткa нaxодитcя нa внyтpeннeм
шaccи пpиводного ycтpойcтвa.
LASER RADIATIONWHEN OPEN
DO NOT STARE INTO BEAM OR
2
Page 21

Содержание
Расположение органов
управления . . . . . . . . . . . . . . . . . . . 4
Меры предосторожности. . . . . . . . . . . 5
Примечания относительно дисков . . . 6
Начало работы
Переустановка параметров
устройства . . . . . . . . . . . . . . . . . . . . 7
Снятие передней панели. . . . . . . . . . . 7
Установка часов. . . . . . . . . . . . . . . . . . 8
Проигрыватель компакт-дисков
Воспроизведение диска . . . . . . . . . . . 9
Надписи на дисплее. . . . . . . . . . . . . . . 9
Повторное воспроизведение
композиций
— Повтор воспроизведения . . . . . 10
Воспроизведение композиций в
случайной последовательности
— Перетасованное
воспроизведение . . . . . . . . . . . . . . 10
Радиоприемник
Автоматическое сохранение
радиостанций в памяти
— Память оптимальной настройки
(BTM) . . . . . . . . . . . . . . . . . . . . . . . . 10
Прием радиостанций, сохраненных в
памяти. . . . . . . . . . . . . . . . . . . . . . . 11
Сохранение в памяти только
необходимых радиостанций . . . . . 11
Другие функции
Настройка баланса и фейдера . . . . . 12
Резкое снижение уровня
громкости . . . . . . . . . . . . . . . . . . . . 12
Изменение параметров звука и
дисплея
— Меню. . . . . . . . . . . . . . . . . . . . . . 12
Настройка эквалайзера (EQ3) . . . . . 13
Дополнительная информация
Уход за аппаратом. . . . . . . . . . . . . . . 14
Извлечение устройства. . . . . . . . . . . 15
Технические характеристики . . . . . 17
Устранение неполадок . . . . . . . . . . . 18
Индикация/сообщения об
ошибках. . . . . . . . . . . . . . . . . . . . . . 19
3
Page 22

Расположение органов управления
Подробнее см. на указанных страницах.
SEL
MODE
SOURCE
BTMATT
SENS
123456
CDX-L495EE
CDX-L490EE
DSPL SHUF REP
SEEK
OFF
EQ3
a Кнопка регулятора громкости +/–
b Кнопка SEL (выбор)
Выбор элементов.
c Кнопка MODE
Изменение операции.
d Окно дисплея
e Кнопка OFF (Стоп/Питание выкл)*
7, 9
f Кнопка Z (извлечение диска) 9
g Кнопка (для снятия передней
панели) 7
h Кнопка SOURCE (Питание вкл/
радио/компакт-диск)
Выбор источника.
i Кнопка ATT (приглушение звука) 12
j Кнопка BTM 10
k Кнопка SENS 11
l Кнопка RESET (расположена под
передней панелью) 7
m Номерные кнопки
Радиоприемник:
сохранение нужной радиостанции с
назначением ей соответствующей
номерной кнопки.
n Кнопка DSPL (изменение режима
дисплея) 8, 9
o Кнопка SHUF 10
p Кнопка REP 10
q Кнопка EQ3 13
r Датчик пульта дистанционного
управления
s Кнопка SEEK +/–
Радиоприемник:
автоматическая настройка на
станции/поиск станции вручную.
Компакт-диск:
пропуск композиций/быстрая
прокрутка композиции вперед или
назад.
* Соблюдайте осторожность, выполняя
установку в автомобиле, в котором нет
положения ACC (принадлежности) в
замке зажигания
После выключения зажигания
обязательно нажмите кнопку (OFF) на
аппарате и удерживайте ее нажатой, пока
не погаснет дисплей.
Если этого не сделать, дисплей не
отключается, что может привести к
разрядке аккумулятора.
4
Page 23

Пульт дистанционного
управления RM-X114
(дополнительный)
DSPL MODE
+
PRESET
LIST
+
DISC
MENU
–
SEEK
SOUND
SOURCE
DISC
PRESET –
+
VOL
+
SEEK
R
–
TE
N
E
ATTOFF
–
Кнопки на пульте дистанционного
управления с такими же
обозначениями, что и на устройстве,
управляют теми же функциями.
a Кнопка DSPL
b Кнопка MENU*
c Кнопка SOURCE
d Кнопки SEEK (+/–)
e Кнопка SOUND
f Кнопка OFF
g Кнопки VOL (+/–)
h Кнопка MODE
i Кнопка LIST*
j Кнопки DISC*/PRESET (+/–)
k Кнопка ENTER*
l Кнопка ATT
Меры
предосторожности
• Если автомобиль был припаркован в
солнечном месте, не включайте
устройство до тех пор, пока оно не
охладится.
• При работе устройства автоматически
выдвигается приемная антенна.
В случае возникновения вопросов или
проблем, касающихся данного
устройства, которые не описаны в
данном руководстве, обратитесь к
ближайшему дилеру Sony.
Конденсация влаги
В дождливый день или при нахождении в
месте с повышенной влажностью на
линзах или дисплее устройства может
конденсироваться влага. Это может
привести к неправильной работе
устройства. В этом случае извлеките
диск и подождите приблизительно час,
пока не испарится влага.
Для поддержания высокого
качества звука
Будьте осторожны и не проливайте сок
или другие напитки на устройство или
диски.
* Отсутствует на данном устройстве
Примечание
Если дисплей отключается с помощью кнопки
(OFF), то им невозможно будет управлять с
пульта дистанционного управления, пока на
устройстве не будет нажата кнопка (SOURCE) или
не будет вставлен диск для приведения
устройства в активное состояние.
Совет
Подробные инструкции по замене батареек см. в
разделе “Замена литиевой батарейки” (стр. 15).
5
Page 24

Примечания
относительно дисков
• Чтобы диск оставался чистым, не
прикасайтесь к его поверхности. Диск
следует брать за края.
• Когда диски не используются, храните
их в футлярах или в магазинах для
дисков.
• Не подвергайте диски воздействию
тепла/высокой температуры.
Старайтесь не оставлять их в
припаркованной машине или на
приборной доске/полочке за задними
сиденьями.
• Не прикрепляйте наклейки и не
используйте диски с остатками чернил
или клея на них. Использование таких
дисков может привести к остановке их
вращения, неправильной работе или
повреждению.
• Диски нестандартной формы (например, в
форме сердца, квадрата, звезды) нельзя
воспроизводить на этом аппарате. В
противном случае это может привести к
повреждению аппарата. Не пользуйтесь
такими дисками.
• Нельзя воспроизводить компакт-диски
диаметром 8 см.
• Перед воспроизведением протрите
компакт-диск имеющейся в продаже
чистящей тканью. Протирайте компактдиск в направлении от центра к краям. Не
пользуйтесь растворителями, такими как
бензин, разбавитель, а также
имеющимися в продаже чистящими
средствами или антистатическими
аэрозолями, предназначенными для
виниловых пластинок.
Примечания относительно дисков
CD-R/CD-RW
• На этом устройстве можно
воспроизводить диски CD-R
(записываемые компакт-диски)/CD-RW
(перезаписываемые компакт-диски),
предназначенные для воспроизведения
звука.
Эти символы означают, что диски CD-R/
CD-RW предназначены для
воспроизведения звука.
• Не используйте диски с ярлыками и
клейкими наклейками.
В результате использования таких
дисков могут возникнуть следующие
неполадки:
– не удается извлечь диск (так как
отклеился ярлык или наклейка, что
привело к затору в механизме
извлечения диска).
– не удается правильно прочесть
аудиоданные (например, скачки при
воспроизведении или отсутствие
воспроизведения) из-за того, что
ярлык или наклейка
деформировались от тепла, что
привело к перекосу диска.
6
Эти символы означают, что диск не
предназначен для воспроизведения
звука.
• Некоторые диски CD-R/CD-RW (в
зависимости от аппаратуры, на которой
выполнялась запись, или состояния
самого диска) могут не
воспроизводиться на данном аппарате.
• Нельзя воспроизвести незакрытый*
диск CD-R/CD-RW.
* Процесс, необходимый, чтобы записанный диск
CD-R/CD-RW можно было воспроизводить на
проигрывателе звуковых компакт-дисков.
Page 25

Начало работы
Переустановка
параметров устройства
Перед первым включением устройства
или после замены автомобильного
аккумулятора, а также после изменения
схемы подключения следует
переустановить параметры устройства.
Снимите переднюю панель и нажмите
кнопку RESET с помощью заостренного
предмета, например, шариковой ручки.
Кнопка RESET
Примечание
При нажатии кнопки RESET происходит стирание
установок времени и некоторых других
занесенных в память параметров.
Снятие передней
панели
Для предотвращения кражи аппарата Вы
можете снять с него переднюю панель.
Предупреждающий сигнал
Если Вы, повернув ключ зажигания,
перевели его в положение OFF, не
отсоединив переднюю панель, в течение
нескольких секунд будет слышен
предупредительный звуковой сигнал.
Если Вы не пользуетесь встроенным
усилителем, а подключаете
дополнительный, звуковой сигнал
включаться не будет.
1 Нажмите кнопку (OFF)*.
Воспроизведение компакт-диска или
прием радиопрограмм прекращается
(подсветка клавиш и индикация на
дисплее остаются).
* Если в замке зажигания на автомобиле нет
положения ACC, во избежание разрядки
аккумулятора не забудьте выключить
аппарат, нажав и удерживая кнопку (OFF),
пока не погаснет экран.
2 Нажмите кнопку , затем снимите
панель, потянув на себя.
(OFF)
Примечания
• Если Вы снимаете панель при включенном
питании, оно автоматически отключается во
избежание повреждения громкоговорителей.
• Старайтесь не ронять переднюю панель. Не
надавливайте слишком сильно на переднюю
панель и ее окошко дисплея.
• Не подвергайте переднюю панель воздействию
тепла/высокой температуры или влажности.
Старайтесь не оставлять ее в припаркованной
машине или на приборной доске/полочке за
задним сиденьем.
Совет
Если Вы уносите переднюю панель с собой,
поместите ее в прилагаемый специальный
футляр.
продолжение на следующей странице
t
7
Page 26

Установка передней панели
Прикрепите часть A передней панели к
части B аппарата, как показано на
рисунке, и установите левую сторону на
место до щелчка.
Установка часов
Часы данного аппарата имеют
24-часовую индикацию.
Пример: установка часов на 10:08
1 Нажмите на 2 секунды кнопку
(DSPL).
Начинает мигать индикатор часа.
A
B
Примечание
Не ставьте ничего на внутреннюю поверхность
передней панели.
1Нажмите клавишу регулировки
громкости +/– для установки
значения часа.
2Нажмите кнопку (SEL).
Начинает мигать индикатор минут.
3Нажмите клавишу регулировки
громкости +/– для установки
значения минут.
2 Нажмите кнопку (DSPL).
Часы начнут отсчет времени. По
окончании установки часов дисплей
возвращается в обычный режим
индикации воспроизведения.
8
Page 27

Проигрыватель
компакт-дисков
Воспроизведение
диска
Надписи на дисплее
При смене композиции автоматически
отображается предварительно
записанное название*
композиции (если для функции Auto Scroll
- автоматическая прокрутка установлено значение “ON,” названия
длиной более 8 символов отображаются
бегущей строкой (стр. 12)).
1
новой
Вставьте диск (этикеткой вверх).
Воспроизведение начнется
автоматически.
Если компакт-диск уже вставлен, то для
начала воспроизведения несколько раз
нажмите клавишу (SOURCE), чтобы на
дисплее появилась надпись “CD”.
Чтобы Нажмите
Остановить
Z или (OFF)
воспроизведение
Извлечь диск Z
Пропустить
композиции
– Автоматический
музыкальный
(SEEK) (–/+)
(./>)
[один раз для каждой
композиции]
сенсор
Переместиться
вперед/назад
– Ручной поиск
(SEEK) (–/+)
(m/M)
[удерживайте до
нужного места]
Примечания
• Если во время воспроизведения первой/
последней композиции на диске нажать кнопку
(SEEK) (+) или (SEEK) (–), воспроизведение
первой/последней композиции начнется заново.
• После завершения последней композиции на
диске воспроизведение возобновляется с
первой композиции.
Источник
Отображаемые надписи
• Номер композиции/Истекшее
время воспроизведения
•
Название диска
исполнителя
• Название композиции*
Чтобы Нажмите
Переключить
2
*
(DSPL)
*1/Имя
1
индикацию на
дисплее
*1 Надпись “NO NAME” (без названия),
отображаемая при нажатии кнопки (DSPL),
означает, что название предварительно не
записано и отображать нечего.
*2 Только для дисков с CD TEXT и содержащих
имя исполнителя.
Примечания
• Некоторые символы могут не отображаться.
Символы и знаки, которые не могут быть
отображены, отображаются символом “*”.
• Информация в виде бегущей строки может не
отображаться для некоторых дисков с CD TEXT,
содержащих слишком много символов.
• Данное устройство не может отображать имя
исполнителя для каждой композиции,
имеющейся на диске с CD TEXT.
Совет
Если название диска/композиции меняется после
выключения функции A.SCRL (автоматическая
прокрутка), новое название не отображается
бегущей строкой.
9
Page 28

Повторное
воспроизведение
композиций
— Повтор воспроизведения
Каждый раз после окончания текущей
композиции она будет повторяться.
Во время воспроизведения
нажимайте кнопку (REP), пока на
дисплее не отобразится индикация
“REP-ON”.
Включится режим повторного
воспроизведения.
Чтобы вернуться в режим обычного
воспроизведения, выберите
“REP-OFF”.
Воспроизведение
композиций в
случайной
последовательности
— Перетасованное воспроизведение
Композиции на текущем диске можно
воспроизводить в случайной
последовательности.
Во время воспроизведения
нажимайте кнопку (SHUF), пока на
дисплее не отобразится индикация
“SHUF-ON”.
Включится режим перетасованного
воспроизведения.
Чтобы вернуться в режим обычного
воспроизведения, выберите “SHUF-OFF”.
Радиоприемник
Данное устройство может хранить в
памяти до 6 станций в каждом диапазоне
(FM1, FM2, FM3*, AM1 и AM2).
Предупреждение
При настройке станции во время
управления автомобилем используйте
функцию памяти оптимальной настройки
для предотвращения возникновения
аварийных ситуаций.
* Диапазон настройки FM3 - 65 – 74 МГц
(шаг 30 кГц).
Автоматическое
сохранение
радиостанций в памяти
— Память оптимальной настройки
(BTM)
Устройство выбирает станции с наиболее
сильным в данном диапазоне сигналом и
запоминает их в порядке рабочих частот.
1 Нажимайте кнопку (SOURCE), чтобы
выбрать радиоприемник.
2 Нажмите несколько раз кнопку
(MODE) для выбора диапазона.
3 Нажмите на 2 секунды кнопку
(BTM).
Радиостанции закрепляются за
номерными кнопками и хранятся в
памяти аппарата в порядке их рабочих
частот.
При занесении станции в память
раздается звуковой сигнал.
Примечания
• Если из-за слабого сигнала принимается
ограниченное число радиостанций, для
некоторых номерных кнопок сохранятся старые
настройки.
• Когда на дисплее отображается цифра,
устройство запоминает станции, начиная с той,
которая отображается в текущий момент.
10
Page 29

Прием радиостанций,
сохраненных в памяти
1 Нажмите несколько раз кнопку
(SOURCE), чтобы выбрать
радиоприемник.
2 Нажмите несколько раз кнопку
(MODE), чтобы выбрать диапазон.
3 Нажмите номерную кнопку (от (1)
до (6)), соответствующую
сохраненной радиостанции.
Если настройка на заданную
станцию не работает
— Автоматическая настройка/
Режим местного поиска
Автоматическая настройка
Для поиска станции нажмите
(SEEK) (+) или (SEEK) (–).
Поиск остановится, когда устройство
найдет радиостанцию. Повторяйте
процедуру, пока не будет найдена
нужная радиостанция.
Режим местного поиска
Если автоматическая настройка
прерывается слишком часто,
нажимайте (SENS), пока на дисплее
не появится индикация “LOCAL-ON”.
Отобразится индикация “LCL”.
Настройка будет выполняться только
на станции с относительно сильными
сигналами.
Для отмены режима местного поиска
нажмите “LOCAL-OFF”.
Совет
Если известна частота радиостанции, которую
требуется прослушать, нажмите и удерживайте
(SEEK) (+) или (SEEK) (–), пока не будет найдена
приблизительная частота, затем нажимайте
(SEEK) (+) или (SEEK) (–) для точной настройки
нужной частоты (ручная настройка).
При плохом качестве приема
стереосигнала в диапазоне FM
— Монофонический режим
При приеме радиопередачи
нажимайте кнопку (SENS), пока на
дисплее не отобразится индикация
“MONO-ON”.
Отобразится индикация “MONO”.
Качество звука повышается, но
сигнал становится монофоническим
(исчезает индикация “ST”).
Чтобы вернуться в режим обычного
приема радиопрограмм, выберите
“MONO-OFF”.
Сохранение в памяти
только необходимых
радиостанций
Можно вручную задать нужную
радиостанцию для любой выбранной
номерной кнопки.
1 Нажимайте кнопку (SOURCE), чтобы
выбрать радиоприемник.
2 Нажмите несколько раз кнопку
(MODE) для выбора диапазона.
3 Нажимайте (SEEK) (+) или (SEEK) (–)
для настройки на радиостанцию,
которую следует сохранить в
памяти.
4 Нажмите нужную номерную кнопку
(от (1) до (6)) и не отпускайте ее в
течение 2 секунд, пока не
отобразится индикация “MEM”.
На дисплее отображается индикация,
соответствующая номерной кнопке.
Примечание
При попытке сохранить другую радиостанцию для
одной и той же номерной кнопки предыдущая
радиостанция будет удалена.
11
Page 30

Другие функции
Настройка баланса и
фейдера
Можно отрегулировать баланс каналов и
фейдер.
1 Нажимайте кнопку (SEL), пока не
отобразится индикация “BAL” или
“FAD”.
При каждом последующем нажатии
кнопки (SEL) параметр меняется
следующим образом:
LOW (НИЗКИЕ)* t MID (СРЕДНИЕ)*
t HI (ВЫСОКИЕ)* t
BAL (баланс левого-правого
каналов)
задних громкоговорителей)
* Когда активизирована функция эквалайзера
EQ3 (стр. 13).
2 Нажмите кнопку регулировки
громкости +/–, чтобы настроить
выбранный параметр.
Примечание
После выбора параметра настройку следует
начать не позднее, чем через 3 секунды.
Резкое снижение
уровня громкости
Нажмите кнопку (ATT).
После кратковременного отображения
индикации “ATT-ON” на дисплее
появляется индикация “ATT”.
t FAD (баланс передних-
Изменение параметров
звука и дисплея
— Меню
Можно установить следующие
параметры:
SET (установка)
• A.SCRL (автоматическая прокрутка)*
(стр. 9)
• M.DSPL (движущийся дисплей) —
демонстрационный режим,
отображаемый, когда источник не
выбран (например, радиоприемник
выключен).
• BEEP — включение/выключение
звукового сигнала.
Выбор нужного параметра
Одновременно нажмите кнопку
(SEL) и нужную заданную
номерную кнопку.
(SEL) + (3): A.SCRL*
(SEL) + (4): M.DSPL
(SEL) + (6): Звуковой сигнал
* Когда компакт-диск не воспроизводится, эта
индикация отображаться не будет.
По окончании установки режима дисплей
возвращается в обычный режим
индикации воспроизведения.
Примечание
Для разных источников могут отображаться
различные надписи.
Еще раз одновременно нажмите (SEL) и
нужную заданную номерную кнопку,
чтобы отменить параметр.
Для восстановления предыдущего
уровня громкости еще раз нажмите
кнопку (ATT).
Совет
Если интерфейсный кабель автомобильного
телефона подключен к проводу ATT, то при
поступлении телефонного звонка проигрыватель
автоматически снижает громкость (функция
Telephone ATT).
12
Page 31

Настройка
эквалайзера (EQ3)
Настройка кривой эквалайзера
Можно сохранять и выполнять настройки
эквалайзера для различных диапазонов
частот.
Кривую эквалайзера можно выбрать для
7 музыкальных типов (XPLOD
(ЭКСПЛОД), VOCAL (ВОКАЛ), CLUB
(КЛУБ), JAZZ (ДЖАЗ), NEW-AGE (НЬЮЭЙДЖ), ROCK (РОК), CUSTOM
(ЗАДАВАЕМЫЙ) и OFF (ВЫКЛ)).
Для каждого источника можно сохранить
различные настройки эквалайзера.
Выбор кривой эквалайзера
1 Нажмите кнопку (SOURCE) для
выбора источника (радиоприемник
или компакт-диск).
2 Нажимайте кнопку (EQ3), пока не
появится требуемая кривая
эквалайзера.
При каждом последующем нажатии
кнопки (EQ3) надпись изменяется.
Чтобы отключить эффект
эквалайзера, выберите “OFF”.
1 Нажмите кнопку (SOURCE) для
выбора источника (радиоприемник
или компакт-диск).
2 Нажмите кнопку (EQ3) несколько
раз, чтобы выбрать нужную кривую
эквалайзера.
3 Настройка кривой эквалайзера.
1 Нажмите кнопку (SEL) несколько
раз, чтобы выбрать нужный
диапазон частот.
При каждом последующем нажатии
кнопки (SEL) диапазон частот
изменяется.
LOW (НИЗКИЕ) t MID (СРЕДНИЕ) t
HI (ВЫСОКИЕ) (t BAL (баланс
левого-правого каналов
баланс передних-задних
FAD (
громкоговорителей
2 Нажимайте на кнопку
регулировки громкости +/–,
чтобы настроить необходимый
уровень громкости.
Уровень громкости настраивается в
диапазоне от –10 дБ до +10 дБ с
шагом 1 дБ.
3 Повторите шаги 1 и 2 для
настройки кривой эквалайзера.
Чтобы восстановить кривую
эквалайзера, установленную на
заводе-изготовителе, нажмите
кнопку (SEL) на 2 секунды.
Через 3 секунды на дисплее
появится индикация обычного
режима воспроизведения.
Примечание
Нельзя настроить кривую эквалайзера, если для
EQ3 установлено значение “OFF”.
) t
))
13
Page 32

Дополнительная
ь
информация
Уход за аппаратом
Замена предохранителя
При замене предохранителей
обязательно используйте только те,
которые соответствуют силе тока,
указанной на изначально установленном
предохранителе. Если перегорел
предохранитель, проверьте соединение и
замените предохранитель. Если после
замены предохранитель снова
перегорел, это может означать
неисправность устройства. В этом случае
обратитесь к ближайшему дилеру Sony.
Предохранител
(10 A)
Чистка контактов
Устройство может не работать
надлежащим образом из-за загрязнения
контактов, служащих для соединения
передней панели с устройством. Во
избежание этого отсоедините переднюю
панель (стр. 7) и протрите контакты
ватным тампоном, смоченным в спирте.
Не прикладывайте излишних усилий. В
противном случае можно повредить
контакты.
Основное устройство
Обратная сторона передней панели
Примечания
• В целях безопасности выключайте зажигание
до отсоединения разъемов и извлечения ключа
из замка зажигания.
• Никогда не прикасайтесь к контактам пальцами
или металлическими предметами.
Внимание
Никогда не используйте предохранитель
выше номинала предохранителя,
поставляемого вместе с устройством, так
как это может привести к повреждению
устройства.
14
Page 33

Замена литиевой батарейки
При нормальных условиях срок действия
батареек составляет приблизительно 1
год (срок службы может быть меньше в
зависимости от условий эксплуатации).
Когда батарейка разряжается, дальность
действия пульта дистанционного
управления уменьшается. Замените
батарейку на новую литиевую батарейку
CR2025. При использовании другой
батарейки существует опасность
возгорания или взрыва.
x
стороной + вверх
Извлечение устройства
1 Снимите защитную манжету.
1 Снимите переднюю панель (стр. 7).
2 Для снятия защитной манжеты
используйте ключи для
демонтажа.
Держите ключ для демонтажа
надлежащим образом.
3 Потяните на себя ключи для
демонтажа, чтобы снять
защитную манжету.
Примечания относительно литиевой
батарейки
• Храните литиевую батарейку в месте,
недоступном для детей. Если батарейка
будет случайно проглочена, немедленно
обратитесь к врачу.
• Для обеспечения надежного контакта
протрите батарейку сухой тканью.
• При установке батарейки соблюдайте
полярность.
• Не берите батарейку металлическим
пинцетом - это может вызвать короткое
замыкание.
ВНИМАНИЕ!
При неправильном обращении
батарейка может взорваться.
Не перезаряжать, не разбирать, не
подносить к огню.
продолжение на следующей странице
t
15
Page 34

2 Извлеките устройство.
1 Вставьте одновременно оба
ключа для демонтажа до щелчка.
Направьте
крючок
внутрь.
2 Потяните ключи для демонтажа,
чтобы извлечь устройство.
3 Выдвиньте аппарат из
монтажной панели.
16
Page 35

Технические характеристики
Проигрыватель компакт-дисков
Отношение “сигнал/шум”
Диапазон воспроизводимых частот
Низкочастотная и высокочастотная детонация
90 дБ
10 – 20000 Гц
Ниже уровня
обнаружения
Тюнер
FM
Диапазон настройки FM1/FM2:
Антенное гнездо Разъем внешней
Промежуточная частота
Используемая чувствительность
Избирательность 75 дБ при 400 кГц
Отношение “сигнал/шум”
Коэффициент гармонических искажений при
1 кГц
Разделение 35 дБ при 1 кГц
Диапазон воспроизводимых частот
AM
Диапазон настройки 531 – 1602 кГц
Антенное гнездо Разъем внешней
Промежуточная частота
Чувствительность 30 µВ
87,5 – 108 МГц
(шаг 50 кГц)
FM3:
65 – 74 МГц
(шаг 30 кГц)
антенны
10,7 МГц/450 кГц
9 дБф
67 дБ (стерео),
69 дБ (моно)
0,5 % (стерео),
0,3 % (моно)
30 – 15000 Гц
антенны
10,7 МГц/450 кГц
Общие
Выходы Аудиовыходы
Входы Терминал управления
Регуляторы тембра Низкие:
Требования к источнику питания
Габариты Прибл. 178 × 50 × 176 мм
Монтажные габариты Прибл. 182 × 53 × 161 мм
Масса Прибл. 1,2 кг
Входящие в комплект принадлежности
Дополнительная принадлежность
Конструкция и характеристики могут изменяться
без предварительного уведомления.
(задняя панель)
Терминал релейного
управления приемной
антенной
функцией Telephone
ATT
±10 дБ при 60 Гц
(XPLOD)
Средние:
±10 дБ при 1 кГц
(XPLOD)
Высокие:
±10 дБ при 10 кГц
(XPLOD)
Автомобильный
аккумулятор 12 В пост.
тока
(отрицательное
заземление)
(ш/в/г)
(ш/в/г)
Детали для установки и
подключений
Футляр для передней
панели (1)
Пульт дистанционного
управления
RM-X114
Усилитель мощности
Выходы Выходы для
Номинальное сопротивление
громкоговорителей
Максимальная выходная мощность
громкоговорителей
(с соединительными
фиксаторами)
4 – 8 Ом
45 Вт × 4 (при 4 Ом)
17
Page 36

Устранение неполадок
Приводимый ниже проверочный
перечень поможет Вам в устранении
большинства проблем, которые могут
возникнуть с Вашим устройством.
Перед ознакомлением с
нижеприведенной таблицей обратитесь к
разделам по подключению и
эксплуатации устройства.
Общие
Нет звука.
• Нажмите кнопку регулировки
громкости +, чтобы отрегулировать
громкость.
• Отключите функцию ATT.
• При использовании системы с 2
громкоговорителями установите
регулятор фейдера в среднее
положение.
Удалены данные из памяти.
• Была нажата кнопка RESET.
t Сохраните данные в память еще раз.
• Кабель питания или аккумулятор был
отсоединен.
• Кабель питания не подсоединен
надлежащим образом.
Не слышен звуковой сигнал.
• Функция звукового сигнала
отключена (стр. 12).
• Подключен дополнительный
усилитель, и не используется
встроенный усилитель мощности.
Пропала/не отображается индикация в
окне дисплея.
• Дисплей отключится, если нажать и
удерживать кнопку (OFF).
t Нажмите и удерживайте кнопку
(OFF) снова, пока не дисплей не
включится.
• Снимите переднюю панель и
протрите контакты. Подробные
сведения см. в разделе “Чистка
контактов” (стр. 14).
Из памяти удалены
запрограммированные радиостанции и
установка времени.
Перегорел предохранитель.
Слышен шум, когда ключ зажигания
находится в положении ON, ACC или OFF.
Провода неправильно подсоединены к
разъему электропитания
вспомогательного оборудования
автомобиля.
На аппарат не подается питание.
• Проверьте соединение. Если все
соединения выполнены правильно,
проверьте предохранитель.
• В автомобиле отсутствует положение
ACC ключа зажигания.
t Нажмите кнопку (SOURCE)
(или вставьте диск), чтобы
включить устройство.
На аппарат постоянно подается питание.
В автомобиле отсутствует положение
ACC ключа зажигания.
Приемная антенна не выдвигается.
В приемной антенне отсутствует реле.
Воспроизведение компакт-дисков
Диск не вставляется.
• Уже вставлен другой компакт-диск.
• Компакт-диск вставлен с усилием, не
той стороной или неправильно.
Воспроизведение не начинается.
• Компакт-диск поврежден или
загрязнен.
• Вставлен незакрытый диск CD-R/
CD-RW.
• Попытка воспроизведения диска
CD-R/CD-RW, не предназначенного
для прослушивания.
• Некоторые диски CD-R/CD-RW
невозможно воспроизводить по
причинам, зависящим от
оборудования, на которых они были
записаны, или от состояния диска.
Диск автоматически выталкивается.
Температура в салоне превышает 50°C.
Не работают кнопки управления.
Компакт-диск не выталкивается.
Нажмите кнопку RESET.
Из-за вибрации происходят провалы
звука.
• Аппарат установлен под углом,
превышающим 60°.
• Место установки аппарата в
автомобиле подвержено вибрации.
Имеют место провалы звука.
Диск загрязнен или поврежден.
18
Page 37

Прием радиопрограмм
Не удается выполнить предварительную
настройку.
• Введите в память правильную
частоту.
• Передаваемый радиосигнал слишком
слаб.
Станция не принимается.
Звук сопровождается помехами.
• Подсоедините провод питания
приемной антенны (синий) или провод
питания вспомогательного
оборудования (красный) к проводу
питания усилителя антенны
автомобиля (если на заднем/боковом
стекле имеется встроенная антенна
диапазона FM/AM).
• Проверьте подсоединение
автомобильной антенны.
• Не выдвигается автомобильная
антенна.
t Проверьте подсоединение провода
питания приемной антенны.
• Проверьте частоту.
Не удается выполнить автоматическую
настройку.
• Для режима местного поиска
установлен параметр “ON”.
t Установите для режима местного
поиска значение “OFF” (стр. 11).
• Передаваемый радиосигнал слишком
слаб.
t Выполните ручную настройку.
Мигает надпись “ST”.
• Выполните точную настройку
частоты.
• Передаваемый радиосигнал слишком
слаб.
t Установите режим
монофонического приема в
положение “ON” (стр. 11).
Стреопрограммы принимаются как
монофонические.
Аппарат находится в режиме
монофонического приема
радиопрограмм.
t Отключите режим
монофонического приема (стр. 11).
Индикация/сообщения
об ошибках
Индикация об ошибках
Следующая индикация будет мигать в
течение 5 секунд, и будет слышен
предупредительный звуковой сигнал.
ERROR
• Компакт-диск загрязнен или
вставлен нижней стороной вверх.
t Почистите или правильно
установите компакт-диск.
• Компакт-диск невозможно
воспроизвести из-за наличия
проблемы.
t Вставьте другой компакт-диск.
FAILURE
Громкоговорители/усилители
подключены неправильно.
t Для проверки подключения см.
руководство по установке.
HI TEMP
Температура в салоне превышает 50°C.
t Подождите, пока температура
опустится ниже 50°C.
OFFSET
Это может означать неисправность
устройства.
t Проверьте соединение. Если
сообщение об ошибке не исчезает с
дисплея, обратитесь к ближайшему
дилеру Sony.
RESET
Работа проигрывателя компакт-дисков
по какой-то причине невозможна.
t Нажмите кнопку RESET на
устройстве.
Сообщения
L.SEEK +/–
Во время автоматической настройки
включен режим местного поиска
(стр. 11).
“ ” или “ ”
Достигнуто начало или конец диска, и
продолжение невозможно.
Если в результате предлагаемых
действий неполадка не будет устранена,
обратитесь за помощью к ближайшему
дилеру Sony.
19
Page 38

Page 39

Page 40

Sony Corporation Printed in Thailand
 Loading...