

Page 1

FM/AM
Compact Disc
Player
3-237-526-11 (1)
Operating Instructions
Mode d'emploi
Owner’s Record
The model and serial numbers are located on the bottom of the unit.
Record the serial number in the space provided below.
Refer to these numbers whenever you call upon your Sony dealer regarding this
product.
Model No. CDX-L300 Serial No.
For installation and connections, see the supplied installation/connections
manual.
En ce qui concerne l’installation et les connexions, consulter le manuel
d’installation/connexions fourni.
US
FR
CDX-L300
2002 Sony Corporation
Page 2

Welcome !
Warning
Thank you for purchasing this Sony Compact
Disc Player. You can enjoy its various features.
This equipment has been tested and found to
comply with the limits for a Class B digital
device, pursuant to Part 15 of the FCC Rules.
These limits are designed to provide
reasonable protection against harmful
interference in a residential installation. This
equipment generates, uses, and can radiate
radio frequency energy and, if not installed
and used in accordance with the instructions,
may cause harmful interference to radio
communications. However, there is no
guarantee that interference will not occur in a
particular installation. If this equipment does
cause harmful interference to radio or
television reception, which can be determined
by turning the equipment off and on, the user
is encouraged to try to correct the interference
by one or more of the following measures:
— Reorient or relocate the receiving antenna.
— Increase the separation between the
equipment and receiver.
— Connect the equipment into an outlet on a
circuit different from that to which the
receiver is connected.
— Consult the dealer or an experienced radio/
TV technician for help.
You are cautioned that any changes or
modifications not expressly approved in this
manual could void your authority to operate
this equipment.
CAUTION
The use of optical instruments with this
product will increase eye hazard.
2
Page 3

Table of Contents
Location of controls ............................................. 4
Precautions ............................................................ 5
Notes on discs ....................................................... 5
Getting Started
Resetting the unit ................................................. 6
Setting the clock ................................................... 7
CD Player
Playing a disc ........................................................ 7
Display items ........................................................ 8
Playing tracks repeatedly
— Repeat Play ................................................. 8
Playing tracks in random order
— Shuffle Play ................................................. 8
Radio
Storing stations automatically
— Best Tuning Memory (BTM) ..................... 9
Storing only the desired stations ....................... 9
Receiving the stored stations ............................ 10
Other Functions
Adjusting the sound characteristics ................ 11
Quickly attenuating the sound ........................ 11
Canceling the beep sound ................................. 11
Selecting the sound position
— My Best sound Position (MBP) .............. 12
Boosting the bass sound
— D-bass ........................................................ 12
Additional Information
Maintenance........................................................ 13
Removing the unit ............................................. 13
Specifications ...................................................... 15
Troubleshooting.................................................. 16
Error displays ..................................................... 17
3
Page 4
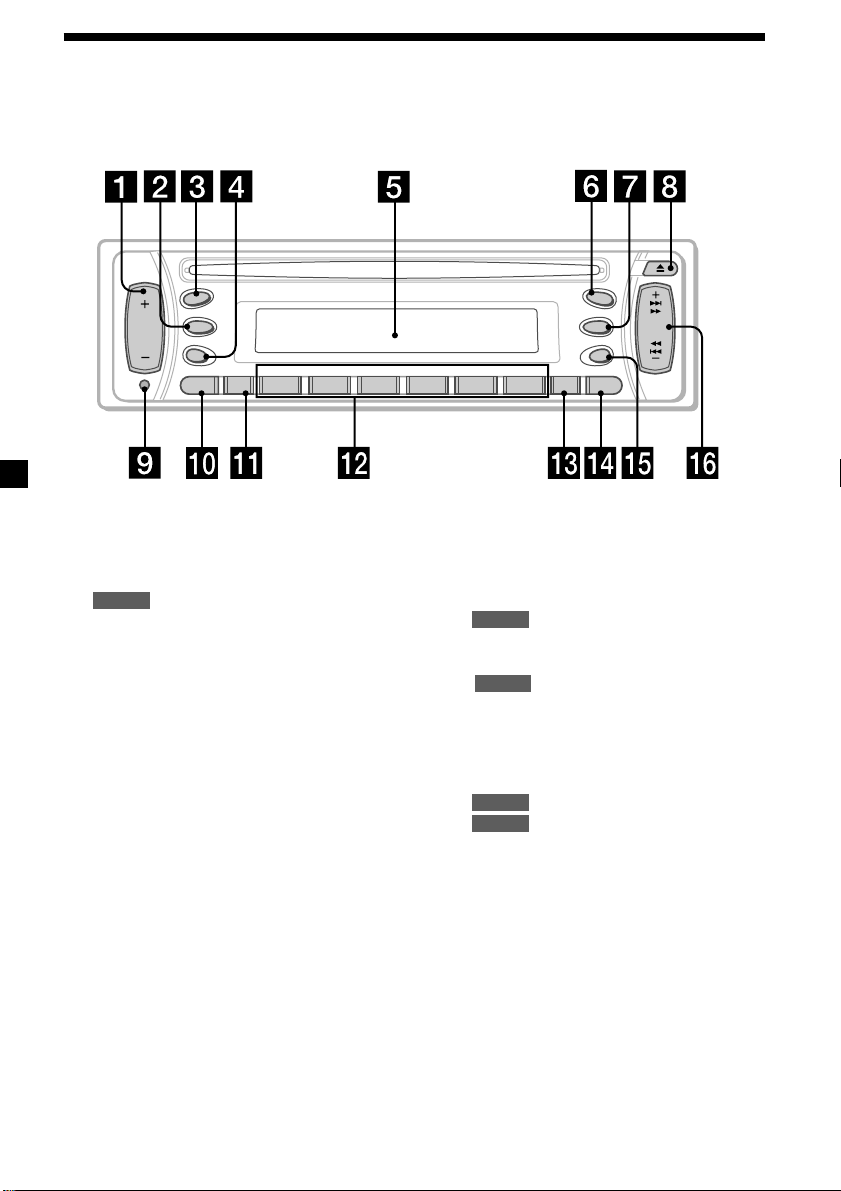
Location of controls
Refer to the pages listed for details.
SOURCE
SRC
MODE
SEL
ATT
SENS
DISC
1
1 Volume +/– button 7, 11
2 MODE button
RADIO 9, 10
3 SRC (SOURCE) (TUNER/CD) button 7, 9,
10
4 SEL (select) button 7, 11, 12
5 Display window
6
MBP (My Best sound Position) button
12
7 D (D-BASS) button 12
8 Z (eject) button 7
9 Reset button 6
REP SHUF BL SKIP ATA MTL
65432
CDX-L300
q; ATT (attenuate) button 11
qa SENS button 10
qs Number buttons
CD
(3) REP 8
(4) SHUF 8
RADIO 9, 10, 11
qd BTM (Best Tuning Memory) button 9
qf DSPL (display mode change) button 7,
8
qg OFF button* 7
qh SEEK/AMS +/– button
CD 7
RADIO 9, 10
MBP
D-BASS
D
OFF
BTM DSPL
SEEK
AMS
* Warning when installing in a car
without an ACC (accessory) position
on the ignition key switch
Be sure to press (OFF) on the unit for 2
seconds to turn off the clock display
after turning off the engine.
Otherwise, the clock display does not turn
off and this causes battery drain.
4
Page 5
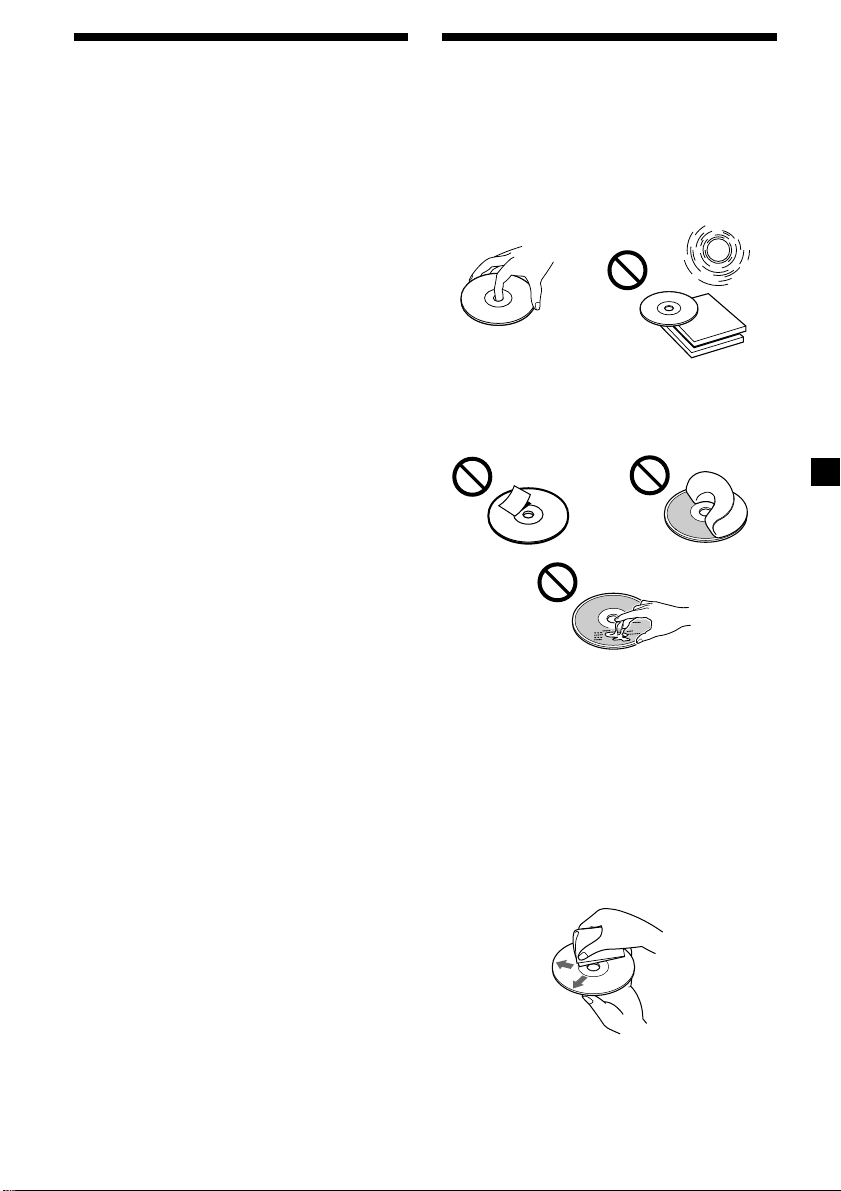
Precautions
Notes on discs
•If your car was parked in direct sunlight,
allow the unit to cool off before operating it.
•Power antennas will extend automatically
while the unit is operating.
If you have any questions or problems
concerning your unit that are not covered in
this manual, please consult your nearest Sony
dealer.
Moisture condensation
On a rainy day or in a very damp area,
moisture condensation may occur inside the
lenses and display of the unit. Should this
occur, the unit will not operate properly. In
such a case, remove the disc and wait for about
an hour until the moisture has evaporated.
To maintain high sound quality
Be careful not to splash juice or other soft
drinks onto the unit or discs.
•To keep the disc clean, do not touch the
surface. Handle the disc by its edge.
•Keep your discs in their cases or disc
magazines when not in use. Do not subject
the discs to heat/high temperature. Avoid
leaving them in parked cars or on
dashboards/rear trays.
•Do not attach labels, or use discs with sticky
ink/residue. Such discs may stop spinning
when used, causing a malfunction, or may
ruin the disc.
•Discs with non-standard shapes (e.g., heart,
square, star) cannot be played on this unit.
Attempting to do so may damage the unit.
Do not use such discs.
•You cannot play 8cm (3in.) CDs.
•Before playing, clean the discs with a
commercially available cleaning cloth. Wipe
each disc from the center out. Do not use
solvents such as benzine, thinner,
commercially available cleaners, or antistatic
spray intended for analog discs.
continue to next page t
5
Page 6
Notes on CD-R/CD-RW discs
•You can play CD-Rs (recordable CDs)/CDRWs (rewritable CDs) designed for audio use
on this unit.
Look for these marks to distinguish CD-Rs/
CD-RWs for audio use.
Getting Started
These marks denote that a disc is not for
audio use.
•Some CD-Rs/CD-RWs (depending on the
equipment used for its recording or the
condition of the disc) may not play on this
unit.
•You cannot play a CD-R/CD-RW that is not
finalized*.
* A process necessary for a recorded CD-R/CD-RW
disc to be played on the audio CD player.
Resetting the unit
Before operating the unit for the first time or
after replacing the car battery, you must reset
the unit.
Press the reset button with a pointed object,
such as a ball-point pen.
Reset button
Note
Pressing the reset button will erase the clock
setting and some stored contents.
6
Page 7
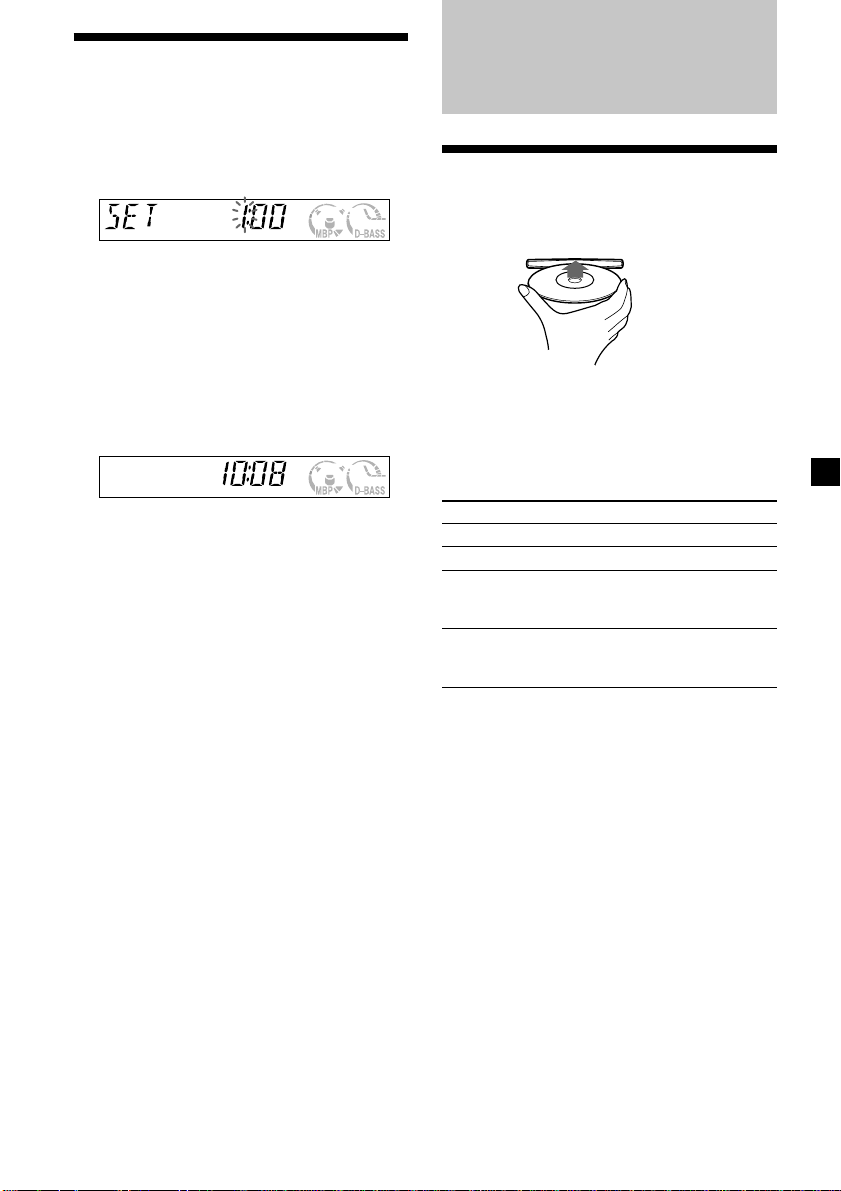
Setting the clock
The clock uses a 12-hour digital indication.
Example: To set the clock to 10:08
1 Press (DSPL) for 2 seconds.
The hour indication flashes.
1 Press either side of the volume +/–
button to set the hour.
2 Press (SEL).
The minute indication flashes.
3 Press either side of the volume +/–
button to set the minute.
CD Player
Playing a disc
Insert the disc (labeled side up).
Playback starts automatically.
2 Press (DSPL).
The clock starts. After the clock setting is
completed, the display returns to normal
play mode.
If a disc is already inserted, press (SRC)
repeatedly until “CD” appears to start
playback.
To Press
Stop playback Z or (OFF)
Eject the disc Z
Skip tracks (SEEK/AMS) (./>)
– Automatic [once for each track]
Music Sensor
Fast-forward/ (SEEK/AMS) (m/M)
reverse [hold to desired point]
– Manual Search
Note
When the last track on the disc is over, playback
restarts from the first track of the disc.
7
Page 8

Display items
Displayable items
• Clock
Source
Track number
To Press
Switch display (DSPL)
item
• Elapsed playing time
Playing tracks repeatedly
— Repeat Play
The current track will repeat itself when it
reaches the end.
During playback, press (3) (REP)
repeatedly until “REP” indicator appears
in the display.
Repeat Play starts.
To return to normal play mode, press (3)
(REP) again.
Playing tracks in random order — Shuffle Play
You can select to play the tracks on the current
disc in random order.
During playback, press (4) (SHUF)
repeatedly until “SHUF” indicator
appears in the display.
Shuffle Play starts.
To return to normal play mode, press (4)
(SHUF) again.
8
Page 9

Radio
Storing only the desired stations
The unit can store up to 6 stations per band
(FM1, FM2, FM3, and AM1, AM2).
Caution
When tuning in stations while driving, use
Best Tuning Memory to prevent accidents.
Storing stations
automatically
— Best Tuning Memory (BTM)
The unit selects the stations with the strongest
signals within the selected band, and stores
them in the order of their frequency.
1 Press (SRC) repeatedly to select the
radio.
2 Press (MODE) repeatedly to select the
band.
3 Press (BTM) for 2 seconds.
The unit stores stations in the order of their
frequencies on the number buttons. A beep
sounds when the setting is stored.
Notes
• If only a few stations can be received due to
weak signals, some number buttons will retain
their former settings.
• When a number is indicated in the display, the
unit starts storing stations from the one currently
displayed.
You can manually preset the desired stations
on any chosen number button.
1 Press (SRC) repeatedly to select the
radio.
2 Press (MODE) repeatedly to select the
band.
3 Press either side of (SEEK/AMS) to tune
in the station that you want to store.
4 Press the desired number button ((1) to
(6)) until “MEM” appears.
The number button indication appears in
the display.
Note
If you try to store another station on the same
number button, the previously stored station will
be erased.
9
Page 10

Receiving the stored stations
1 Press (SRC) repeatedly to select the
radio.
2 Press (MODE) repeatedly to select the
band.
If FM stereo reception is poor
— Monaural Mode
During radio reception, press (SENS)
repeatedly until “MONO” indicator
appears.
“MONO” indicator is displayed.
3 Press the number button ((1) to (6)) on
which the desired station is stored.
If preset tuning does not work
— Automatic tuning/ Local Seek Mode
Automatic tuning:
Press either side of (SEEK/AMS) to search
for the station.
Scanning stops when the unit receives a
station. Press either side of (SEEK/AMS)
repeatedly until the desired station is
received.
Local Seek Mode:
If the automatic tuning stops too
frequently, press (SENS) repeatedly until
“LCL” indicator appears.
“LCL” indicator is displayed.
Only the stations with relatively strong
signals will be tuned in.
Tip
If you know the frequency of the station you want
to listen to, press either side of (SEEK/AMS) until
the desired frequency appears (manual tuning).
The sound improves, but becomes
monaural (“ST” disappears).
To return to normal, press (SENS) again.
10
Page 11

Other Functions
Adjusting the sound characteristics
You can adjust the bass, treble, balance, and
fader.
The bass and treble levels can be stored
independently for each source.
1 Select the item you want to adjust by
pressing (SEL) repeatedly.
Each time you press (SEL), the item
changes as follows:
BAS (bass) t TRE (treble) t
BAL (left-right) t FAD (front-rear)
2 Adjust the selected item by pressing
either side of the volume +/– button.
Note
Adjust within 3 seconds after selecting the item.
Quickly attenuating the sound
Press (ATT).
The “ATT” indicator appears in the
display.
To restore the previous volume level, press
(ATT) again.
Canceling the beep sound
Press (6) while pressing (SEL) down.
To activate the beep sound again, press these
buttons again.
Note
If you connect an optional power amplifier and do
not use the built-in amplifier, the beep sound will
be deactivated.
11
Page 12

Selecting the sound
position
— My Best sound Position (MBP)
When you drive without passengers, you can
enjoy the most comfortable sound environment
with “My Best sound Position.”
“My Best sound Position” has two presets,
which adjust the sound level of balance and
fader. You can select one very easily with the
MBP button.
Display
window
MBP-A
MBP-B
MBP-OFF
Press (MBP) repeatedly for the desired
listening position.
The mode of “My Best sound Position” is
shown in the display in order of the table.
If you want to adjust the sound level of
balance and fader more precisely, you can do
it using the (SEL) button (See “Adjusting the
sound characteristics”).
Balance Level Fader Level
Right
– 4dB
Left
Front
0
0
– 4dB
0
0
0
0
0
Rear
– 4dB
– 4dB
0
Boosting the bass sound
— D-bass
You can enjoy a clear and powerful bass sound.
The D-bass function boosts the low frequency
signal and high frequency signal with a sharper
curve than conventional bass boost.
You can hear the bass line more clearly even
while the vocal volume remains the same. You
can emphasize and adjust the bass sound easily
with (D) (D-BASS) button.
D.BASS-3
Level
0dB
Adjusting the bass curve
Note
The bass sound may distort at same volume. If the
bass sound distorts, select less effective bass curve.
D.BASS-2
D.BASS-1
Frequency (Hz)
D.BASS-3
D.BASS-2
D.BASS-1
Press (D) (D-BASS) repeatedly to select
the desired bass curve.
As the D-BASS number increases so does the
effect.
Notes
• When the BAL (balance) or FAD (fader) in
"Adjusting the sound characteristics" is adjusted,
the MBP setting returns OFF.
• When MBP is set to OFF, the BAL and FAD setting
is activated.
12
Page 13

Additional
Information
Maintenance
Fuse replacement
When replacing the fuse, be sure to use one
matching the amperage rating stated on the
original fuse. If the fuse blows, check the
power connection and replace the fuse. If the
fuse blows again after replacement, there may
be an internal malfunction. In such a case,
consult your nearest Sony dealer.
Fuse (10 A)
Warning
Never use a fuse with an amperage rating
exceeding the one supplied with the unit as
this could damage the unit.
Removing the unit
1 Insert the supplied tool between the unit
and the frame, and rotate 90° to release
the hidden mounting spring. Repeat on
the opposite side and remove the frame.
10 mm (13/32 in.)
90°
continue to next page t
13
Page 14

2 Insert a flathead screwdriver between
the bracket and mounting spring. Gently
pry the spring toward the unit while
pulling the unit out a little. Repeat on
the opposite side and remove the unit.
4 mm (3/16 in.)
14
Page 15

Specifications
AUDIO POWER SPECIFICATIONS
POWER OUTPUT AND TOTAL HARMONIC DISTORTION
22 watts per channel minimum continuous average power into
4 ohms, 4 channels driven from 20 Hz to 20 kHz with no more
than 5 % total harmonic distortion.
CD player section
Signal-to-noise ratio 90 dB
Frequency response 10 – 20,000 Hz
Wow and flutter Below measurable limit
Laser Diode Properties
Material GaAlAs
Wavelength 780 nm
Emission Duration Continuous
Laser output power Less than 44.6 µW*
* This output is the value measured at a distance
of 200 mm from the objective lens surface on
the Optical Pick-up Block.
Tuner section
FM
Tuning range 87.5 – 107.9 MHz
Antenna terminal External antenna connector
Intermediate frequency 10.7 MHz
Usable sensitivity 11 dBf
Selectivity 75 dB at 400 kHz
Signal-to-noise ratio 65 dB (stereo),
Harmonic distortion at 1 kHz
Separation 33 dB at 1 kHz
Frequency response 30 – 15,000 Hz
AM
Tuning range 530 – 1,710 kHz
Antenna terminal External antenna connector
Intermediate frequency 10.7 MHz/450 kHz
Sensitivity 30 µV
68 dB (mono)
0.7 % (stereo),
0.5 % (mono)
Power amplifier section
Outputs Speaker outputs
Speaker impedance 4 – 8 ohms
Maximum power output 45 W × 4 (at 4 ohms)
(sure seal connectors)
General
Outputs Audio output
Tone controls Bass ±10 dB at 20 Hz
Power requirements 12 V DC car battery
Dimensions Approx.
Mounting dimensions Approx. 182 × 53 × 161
Mass Approx. 1.2 kg (2 lb. 10
Supplied accessory Parts for installation and
Design and specifications are subject to change
without notice.
Power antenna relay
control lead
Power amplifier control
lead
Treble ±10 dB at 20 kHz
(negative earth)
178 × 50 × 176 mm
1
/8 × 2 × 7 in.)
(7
(w/h/d)
1
mm (7
/4 × 2 1/8 × 6 3/8
in.)
(w/h/d)
oz.)
connections (1 set)
15
Page 16

Troubleshooting
The following checklist will help you remedy
problems you may encounter with your unit.
Before going through the checklist below,
check the connection and operating
procedures.
General
No sound.
• Adjust the volume with volume + button.
• Cancel the ATT function.
• Set the fader control to the center position
for a 2-speaker system.
The contents of the memory have been
erased.
• The reset button has been pressed.
t Store again into the memory.
• The power cord or battery has been
disconnected.
• The power connecting cord is not
connected properly.
No beep sound.
• An optional power amplifier is connected
and you are not using the built-in
amplifier.
• The beep sound is canceled.
Indications disappear from/do not appear in
the display.
• The clock display disappears if you press
(OFF) for 2 seconds.
tPress (OFF) again for 2 seconds to
display the clock.
Stored stations and correct time are erased.
The fuse has blown.
Makes noise when the ignition key is in the
ON, ACC, or OFF position.
The leads are not matched correctly with the
car’s accessory power connector.
No power is being supplied to the unit.
• Check the connection. If everything is in
order, check the fuse.
• The car does not have an ACC position.
t Press (SRC) (or insert a disc) to turn on
the unit.
The power is continuously supplied to the
unit.
The car does not have an ACC position.
The power antenna does not extend.
The power antenna does not have a relay
box.
CD playback
A disc cannot be loaded.
• Another CD is already loaded.
• The CD is forcibly inserted upside down or
in the wrong way.
Playback does not begin.
• Dirty or defective disc.
• CD-R that is not finalized.
• You tried to playback a CD-R not designed
for audio use.
• Some CD-Rs may not play due to its
recording equipment or the disc condition.
A disc is automatically ejected.
The ambient temperature exceeds 50°C.
CD will not be ejected.
The operation buttons do not function.
Press the reset button.
The sound skips from vibration.
• The unit is installed at an angle of more
than 60°.
• The unit is not installed in a sturdy part of
the car.
The sound skips.
Dirty or defective disc.
Radio reception
Preset tuning is not possible.
• Store the correct frequency in the memory.
• The broadcast signal is too weak.
The stations cannot be received.
The sound is hampered by noises.
• Connect a power antenna control lead
(blue) or accessory power supply lead
(red) to the power supply lead of a car’s
antenna booster. (Only when your car has
built-in FM/AM antenna in the rear/side
glass.)
• Check the connection of the car antenna.
• The auto antenna will not go up.
t Check the connection of the power
antenna control lead.
• Check the frequency.
Automatic tuning is not possible.
• The local seek mode is set to “ON.”
t Set the local seek mode to “OFF”.
• The broadcast signal is too weak.
t Perform manual tuning.
The “ST” indication flashes.
• Tune in the frequency accurately.
• The broadcast signal is too weak.
t Set to the monaural reception mode.
16
Page 17

A program broadcast in stereo is heard in
monaural.
The unit is in monaural reception mode.
t Cancel monaural reception mode.
Error displays
Error displays
The following indications will flash for a
while.
E-04
A CD is dirty or inserted upside down.
t Clean or insert the CD correctly.
E-99
The CD unit cannot be operated because of
some problem.
t Press the reset button on the unit.
If these solutions do not help improve the
situation, consult your nearest Sony dealer.
17
Page 18

Félicitations !
Nous vous remercions d’avoir fait l’acquisition
de ce lecteur de disques compacts Sony. Cet
appareil se distingue par de nombreuses
caractéristiques fonctionnelles.
2
Page 19

Table des matières
Emplacement des commandes ........................... 4
Précautions ............................................................ 5
Remarques sur les disques ................................. 5
Préparation
Réinitialisation de l’appareil............................... 6
Réglage de l’horloge ............................................ 7
Lecteur CD
Lecture d’un disque ............................................. 7
Rubriques d’affichage.......................................... 8
Lecture de plages répétée
— Lecture répétée ........................................... 8
Lecture de plages dans un ordre quelconque
— Lecture aléatoire......................................... 8
Radio
Mémorisation automatique des stations
— Mémorisation du meilleur accord
(BTM) ............................................................... 9
Mémoriser uniquement les stations
souhaitées......................................................... 9
Ecoute des stations mémorisées....................... 10
Autres fonctions
Réglage des caractéristiques du son ................ 11
Atténuation rapide du son ............................... 11
Désactivation du bip sonore ............................. 11
Sélection des réglages favoris — Mes réglages
favoris (MBP) ................................................. 12
Renforcement des graves
— D-bass ........................................................ 12
Informations complémentaires
Entretien .............................................................. 13
Retrait de l’appareil ........................................... 13
Spécifications ...................................................... 15
Dépannage .......................................................... 16
Affichages d’erreur ............................................ 17
3
Page 20

Emplacement des commandes
Pour plus de détails, reportez-vous aux pages indiquées.
SOURCE
SRC
MODE
SEL
ATT
SENS
DISC
1
1 Touche volume +/– 7, 11
2 Touche MODE
RADIO 9, 10
3 Touche SRC (SOURCE) (TUNER/CD)
7, 9, 10
4 Touche SEL (sélection) 7, 11, 12
5 Fenêtre d’affichage
6 Touche MBP (Mes réglages favoris)
12
7 Touche D (D-BASS) 12
8
Touche Z (éjection)
7
9 Touche de réinitialisation 6
REP SHUF BL SKIP ATA MTL
65432
CDX-L300
0 Touche ATT (mise en sourdine) 11
qa Touche SENS 10
qs Touches numériques
CD
(3) REP 8
(4) SHUF 8
RADIO 9, 10, 11
qd Touche BTM (Mémorisation du
meilleur accord
qf Touche DSPL (modification du mode
d’affichage) 7, 8
qg Touche OFF* 7
qh Touche SEEK/AMS +/–
CD 7
RADIO 9, 10
MBP
D-BASS
D
OFF
BTM DSPL
) 9
SEEK
AMS
* Avertissement en cas
d’installation dans une voiture
dont le contact ne comporte pas
de position ACC (accessoires)
Assurez-vous d’appuyer sur la touche
(OFF) de l’appareil pendant 2
secondes pour désactiver l’affichage
de l’horloge après avoir arrêté le
moteur du véhicule.
Dans le cas contraire, l’affichage de
l’horloge n’est pas désactivé et cela
4
décharge la batterie.
Page 21

Précautions
•Si votre véhicule était garé en plein soleil,
laissez l’appareil refroidir avant de le faire
fonctionner.
•Les antennes électriques se déploient
automatiquement lorsque vous utiliserez
l’appareil.
Si vous avez des questions ou des problèmes
concernant le fonctionnement de cet appareil
qui ne sont pas abordés dans le présent mode
d’emploi, veuillez consulter votre revendeur
Sony.
Condensation d’humidité
Par temps de pluie ou dans les régions très
humides, de l’humidité risque de se condenser
sur les lentilles à l’intérieur de l’appareil. Si
cela se produit, l’appareil ne fonctionnera pas
correctement. En pareil cas, retirez le disque et
attendez environ une heure que l’humidité se
soit évaporée.
Pour conserver un son de haute
qualité
Evitez de renverser du jus de fruit ou des
boissons sucrées sur l’appareil ou les disques.
Remarques sur les disques
•Pour garder le disque propre, évitez d’en
toucher la surface. Saisissez le disque par les
bords.
•Gardez les disques dans leurs boîtiers ou
dans des étuis de rangement lorsqu’ils ne
sont pas utilisés. N’exposez pas les disques à
la chaleur/à des températures élevées. Evitez
de les laisser dans une voiture en
stationnement, sur le tableau de bord ou la
plage arrière.
•Ne collez pas d’étiquettes sur les disques ou
n’utilisez pas de disques rendus collants par
de l’encre/des résidus. De tels disques
peuvent s’arrêter en cours de lecture créant
un dysfonctionnement ou ils peuvent être
endommagés.
•Les disques de forme non standard (par ex.
en forme de cœur, de carré, d’étoile) ne
peuvent pas être lus sur cet appareil. Vous
risquez d’endommager votre appareil si vous
essayez de le faire. N’utilisez pas de tels
disques.
•Vous ne pouvez pas écouter de CD 8 cm
(3 pouces.).
•Avant la lecture, nettoyez les disques avec un
chiffon de nettoyage disponible dans le
commerce. Essuyez chaque disque en partant
du centre. N’utilisez pas de solvants tels que de
la benzine, du diluant, des produits de
nettoyage vendus dans le commerce ou des
vaporisateurs anti-statiques destinés aux
disques analogiques.
page suivante t
5
Page 22

Remarques sur les disques CD-R/CDRW
•Vous pouvez lire des CD-R (CD
enregistrables)/CD-RW (CD réinscriptibles)
audio avec cet appareil.
Repérez ces marques pour distinguer les CDR/CD-RW à usage audio.
Ces marques indiquent que le CD n’est pas à
usage audio.
•Il est possible que ce lecteur ne puisse pas lire
certains CD-R/CD-RW (selon l’équipement
utilisé pour l’enregistrement ou l’état du
disque).
•Vous ne pouvez pas lire de disques CD-R/
CD-RW non finalisés*.
* Processus nécessaire pour qu’un disque CD-R/CD-
RW puisse être lu sur un lecteur CD audio.
Préparation
Réinitialisation de
l’appareil
Avant la première mise en service de l’appareil
ou après avoir remplacé la batterie de la voiture,
vous devez réinitialiser l’appareil.
Retirez la façade et appuyez sur la touche de
réinitialisation à l’aide d’un objet pointu comme
un stylo à bille.
Touche de réinitialisation
Remarque
Une pression sur la touche de réinitialisation
effacera l’heure et certaines fonctions mémorisées.
6
Page 23

Réglage de l’horloge
L’horloge à affichage numérique fonctionne
suivant un cycle de 12 heures.
Exemple : Pour régler l’heure sur 10:08
1 Appuyez sur (DSPL) pendant 2 secondes.
L’indication des heures se met à clignoter.
1 Appuyez sur l’un des côtés de la
touche volume +/– pour régler l’heure.
2 Appuyez sur (SEL).
L’indication des minutes se met à
clignoter.
3 Appuyez sur l’un des côtés de la
touche volume +/– pour régler les
minutes.
2 Appuyez sur (DSPL).
L’horloge démarre. Lorsque le réglage de
l’horloge est terminé, l’affichage revient au
mode de lecture normal.
Lecteur CD
Lecture d’un disque
Insérez le disque (avec l’étiquette vers le
haut).
La lecture démarre automatiquement.
Si un CD se trouve déjà dans l’appareil,
appuyez plusieurs fois de suite sur (SRC)
jusqu’à ce que “CD” apparaisse pour démarrer
la lecture.
Pour Appuyez sur
Arrêter la lecture Z ou(OFF)
Ejecter le CD Z
Passer d’une (SEEK/AMS) (./>)
plage à l’autre [une fois pour chaque
– Capteur de plage]
musique
automatique
Avance rapide/ (SEEK/AMS) (m/M)
Retour [maintenir jusqu’à
– Recherche l’endroit souhaité]
manuelle
Remarque
Lorsque la dernière plage du disque est terminée,
la lecture reprend à partir de la première plage du
CD.
7
Page 24

Rubriques d’affichage
Rubriques affichables
• Heure
Source
Numéro de plage
Pour Appuyer sur
Modifier la rubrique (DSPL)
d’affichage
• Temps de lecture écoulé
Lecture de plages répétée
— Lecture répétée
La lecture du CD de l’appareil principal se
répète automatiquement à la fin du disque.
Au cours de la lecture, appuyez plusieurs
fois sur (3) (REP) jusqu’à l’affichage de
l’indication “REP”.
La lecture répétée démarre.
Pour revenir au mode de lecture normale,
ré-appuyez sur (3) (REP).
Lecture de plages dans un
ordre quelconque
— Lecture aléatoire
Vous pouvez choisir d’écouter les plages du
disque selon un ordre aléatoire.
Au cours de la lecture, appuyez sur (4)
(SHUF) plusieurs fois jusqu’à l’affichage
de l’indication “SHUF”.
La lecture aléatoire démarre.
Pour revenir au mode de lecture normale,
ré-appuyez sur (4) (SHUF).
8
Page 25

Radio
Mémoriser uniquement les
stations souhaitées
Vous pouvez mémoriser jusqu’à 6 stations
dans chaque bande (FM1, FM2, FM3 et AM1,
AM2).
Attention
Pour syntoniser des stations pendant que vous
conduisez, nous vous conseillons d’utiliser la
fonction de mémorisation du meilleur accord
(BTM) de façon à éviter les accidents.
Mémorisation
automatique des stations
— Mémorisation du meilleur accord (BTM)
L’appareil sélectionne les stations de radio
émettant avec le signal le plus puissant et les
mémorise dans l’ordre de leur fréquence.
1 Appuyez plusieurs fois sur (SRC) pour
sélectionner la radio.
2 Appuyez plusieurs fois sur (MODE) pour
sélectionner la bande de fréquence.
3 Appuyez sur (BTM) pendant 2 secondes.
L’appareil mémorise les stations sous les
touches numériques dans l’ordre de leur
fréquence. Un bip retentit lorsque le réglage
est mémorisé.
Remarques
• Si seulement quelques stations sont captables,
certaines touches numériques conserveront leur
réglage préalable.
• Si un numéro est indiqué dans la fenêtre
d’affichage, l’appareil commence la
mémorisation des stations à partir de la station
affichée.
Vous pouvez mémoriser manuellement les
stations souhaitées sur n’importe quelle touche
numérique.
1 Appuyez plusieurs fois de suite sur
(SRC) pour sélectionner le syntoniseur.
2 Appuyez plusieurs fois de suite sur
(MODE) pour sélectionner la bande de
fréquence.
3 Appuyez sur l’un des deux côtés de
(SEEK/AMS) pour accorder la station que
vous souhaitez mémoriser.
4 Appuyez sur la touche numérique
souhaitée ((1) à (6)) jusqu’à l’affichage
de l’indication “MEM”.
Le numéro de la touche numérique de
présélection apparaît dans la fenêtre
d’affichage.
Remarque
Si vous essayez de mémoriser une autre station
sous une touche numérique déjà utilisée, la station
précédemment mémorisée est supprimée.
9
Page 26

Ecoute des stations
mémorisées
1 Appuyez plusieurs fois sur (SRC) pour
sélectionner la radio.
2 Appuyez plusieurs fois de suite sur
(MODE)pour sélectionner la bande de
fréquence.
3 Appuyez sur la touche numérique ((1) à
(6)) sous laquelle la station désirée est
mémorisée.
Si l’accord prédéfini ne fonctionne
pas
— Syntonisation automatique/ Mode
recherche locale
Syntonisation automatique :
Appuyez sur l’un des côtés de
(SEEK/AMS) pour rechercher la station.
Le balayage s’arrête lorsque l’appareil capte
une station. Appuyez sur l’un des côtés de
(SEEK/AMS) jusqu’à ce que la station
désirée soit captée.
Mode recherche locale :
Si la recherche automatique des
fréquences s’arrête trop souvent,
appuyez sur la touche (SENS) de façon
répétée jusqu’à ce que “LCL” s’affiche.
Si la réception FM est faible
— Mode monaural
Au cours de la réception radio, appuyez
sur (SENS)plusieurs fois jusqu’à
l’affichage de l’indication “MONO”.
L’indication “MONO” est affichée.
La qualité sonore s’en trouve améliorée,
mais le son est diffusé en mode monaural
(l’indication “ST” disparaît).
Pour revenir au mode normal, ré-appuyez sur
(SENS).
L’indication “LCL” est affichée.
Seules les stations dont les signaux sont
suffisamment puissants seront accordées.
Conseil
Si vous connaissez la fréquence de la station que
vous désirez écouter, appuyez et maintenez enfoncé
le côté de (SEEK/AMS) jusqu’à ce que la fréquence
désirée apparaisse (syntonisation manuelle).
10
Page 27

Autres fonctions
Atténuation rapide du son
Appuyez sur (ATT).
L’indication “ATT” s’affiche.
Réglage des
caractéristiques du son
Vous pouvez régler les graves, les aiguës ainsi
que la balance gauche-droite et la balance
avant-arrière.
Vous pouvez mémoriser les niveaux de graves
et d’aigus pour chaque source.
1 Sélectionnez le paramètre que vous
voulez régler en appuyant plusieurs fois
de suite sur (SEL).
Chaque fois que vous appuyez sur (SEL),
la source change comme suit :
BAS (graves) t TRE (aiguës) t BAL (balance
gauche - droite) t FAD (balance avant arrière)
2 Réglez l’élément sélectionné en
appuyant sur l’un des deux côtés de la
touche du volume +/–.
Remarque
Effectuez ce réglage dans les 3 secondes après
avoir sélectionné les options.
Pour restaurer le niveau précédent du volume,
appuyez à nouveau sur (ATT).
Désactivation du bip
sonore
Appuyez sur (6) tout en maintenant
(SEL) enfoncé.
Pour réactiver le bip sonore, appuyez à
nouveau sur ces touches.
Remarque
Si vous raccordez un amplificateur de puissance en
option et si vous n'utilisez pas l'amplificateur
intégré, le signal sonore est désactivé.
11
Page 28

Sélection des réglages
favoris — Mes réglages favoris (MBP)
Renforcement des graves
— D-bass
Lorsque vous voyagez seul, “Mes réglages
favoris” vous permet de bénéficier d’un
environnement sonore confortable.
“Mes réglages favoris” dispose de deux
préréglages qui règlent le niveau de son de la
balance gauche-droite et de la balance avantarrière. Vous pouvez sélectionner l’une ou
l’autre facilement avec la touche MBP.
Fenêtre
d’affichage
MBP-A
MBP-B
MBP-OFF
Niveau de balance
Droite
– 4dB
0
0
Niveau d’équilibrage
Gauche
0
– 4dB
0
avant-arrière
Avant
0
0
0
Arrière
– 4dB
– 4dB
0
Appuyez sur (MBP) plusieurs fois jusqu’à
ce que la position d’écoute voulue soit
sélectionnée.
Le mode “Mes réglages favoris” est affiché
selon l’ordre indiqué dans le tableau.
Si vous souhaitez régler le niveau sonore de
la balance et de l’équilibrage avant-arrière
avec une plus grande précision, utilisez le
bouton (SEL) (reportez-vous à la section "
Réglage des caractéristiques du son").
Vous pouvez obtenir des graves claires et
puissantes. La fonction D-bass renforce les
signaux de basse fréquence et les signaux de
haute fréquence avec une courbe plus tendue
qu’une fonction d’accentuation classique.
Vous entendez plus distinctement les graves,
même si le volume de la partie vocale reste au
même niveau. Vous pouvez renforcer et ajuster
les graves à l’aide de la touche (D) (D-BASS).
D.BASS-3
Niveau
0dB
D.BASS-2
D.BASS-1
Fréquence (Hz)
D.BASS-3
D.BASS-2
D.BASS-1
Réglage de la courbe des graves
Appuyez plusieurs fois de suite sur
(D) (D-BASS) pour sélectionner la courbe
des graves voulue.
L’effet s’intensifie à mesure que la valeur
D-BASS augmente.
Remarque
Les graves peuvent être distordues au même
volume. Si les graves sont distordues, sélectionnez
une courbe de graves moins efficace.
Remarques
• Lorsque BAL (balance) ou FAD (fader) son réglés
dans “Réglage des caractéristiques du son” (page
15), le réglage MBP passe sur OFF.
• Lorsque MBP est réglé sur OFF, les réglages BAL
et FAD sont activés.
12
Page 29

Informations
complémentaires
Entretien
Remplacement du fusible
En cas de remplacement du fusible, veillez à
utiliser un fusible dont l’intensité correspond à
celle inscrite sur le fusible. Si le fusible grille,
vérifiez le branchement de l’alimentation et
remplacez le fusible. Si le fusible grille une
nouvelle fois après avoir été remplacé, cela
peut révéler une défaillance interne de
l’appareil. Le cas échéant, consultez un
revendeur Sony.
Fusible (10 A)
Avertissement
N’utilisez jamais de fusible dont l’intensité
dépasse celle du fusible fourni avec l’appareil,
car vous risqueriez d’endommager l’appareil.
Retrait de l’appareil
1 Insérez l’outil fourni entre l’appareil et le
cadre et faites-le pivoter de 90º de
manière à dégager le ressort de montage
dissimulé. Répétez l’opération de l’autre
côté et retirez le cadre.
13
10 mm (
/32 in.)
90°
page suivante t
13
Page 30

2 Insérez un tournevis à lame plate entre
le support et le ressort de montage.
Exercez un léger mouvement de levier en
direction de l’appareil tout en tirant un
peu sur l’appareil. Répétez l’opération de
l’autre côté et retirez l’appareil.
4 mm (3/16 in.)
14
Page 31

Spécifications
Lecteur CD
Rapport signal-bruit 90 dB
Réponse en fréquence 10 – 20.000 Hz
Pleurage et scintillement En dessous du seuil
mesurable
Radio
FM
Plage de syntonisation 87,5 – 107,9 MHz
Borne d’antenne Connecteur d’antenne
Fréquence intermédiaire 10,7 MHz
Sensibilité utile 11 dBf
Sélectivité 75 dB à 400 kHz
Rapport signal-bruit 65 dB (stéréo),
Distorsion harmonique à 1 kHz
Séparation 33 dB à 1 kHz
Réponse en fréquence 30 – 15.000 Hz
AM
Plage de syntonisation 530 – 1.710 kHz
Borne d’antenne Connecteur d’antenne
Fréquence intermédiaire 10,7 MHz/450 kHz
Sensibilité 30 µV
externe
68 dB (mono)
0,7 % (stéréo),
0,5 % (mono)
externe
Amplificateur de puissance
Sorties Sorties pour haut-parleurs
Impédance de haut-parleurs
Puissance utile maximum 45 W × 4 (à 4 ohms)
(connecteurs de sécurité)
4 – 8 ohms
Caractéristiques générales
Sorties Sorties audio
Commandes de tonalité Graves ±10 dB à 20 Hz
Puissance de raccordement
Dimensions Approx. 178 × 50 × 176 mm
Dimensions de montage Approx. 182 × 53 × 161 mm
Poids Approx. 1,2 kg (2 liv. 10
Accessoires fournis Eléments d’installation et
La conception et les spécifications sont sujettes à
modifications sans préavis.
Fil de commande de relais
d’antenne électrique
Fil de commande
d’amplificateur de
puissance
Aiguës ±10 dB à 20 kHz
Batterie de voiture
12 V CC (masse négative)
1
/8 × 2 × 7 po.)
(7
(L × H × P)
1
/4 × 2 × 6 3/8 po.)
(7
(L × H × P)
on.)
de raccordement (1 jeu)
15
Page 32

Dépannage
La liste de contrôles suivante vous aidera à
remédier aux problèmes que vous pourriez
rencontrer avec cet appareil.
Avant de passer en revue la liste de contrôle cidessous, vérifiez les procédures de
raccordement et d’utilisation.
Généralités
Pas de son.
• Réglez le volume avec la touche volume +.
• Annulez la fonction ATT.
• Réglez la commande de la balance avant
arrière dans la position centrale pour un
système avec deux enceintes.
Le contenu de la mémoire a été effacé.
• La touche de réinitialisation a été
enfoncée.
t Recommencez la procédure
d’enregistrement dans la mémoire.
• Le cordon d’alimentation ou la batterie a
été déconnecté.
• Le cordon d’alimentation n’est pas
raccordé correctement.
Aucun bip sonore.
• Un amplificateur de puissance en option
est raccordé et vous n’employez pas
l’amplificateur intégré.
• Le bip sonore est désactivé.
Aucune indication n’apparaît dans la
fenêtre d’affichage.
• L’affichage de l’horloge disparaît si vous
appuyez sur (OFF) pendant 2 secondes.
t Appuyez une nouvelle fois sur (OFF)
pendant 2 secondes pour afficher
l’horloge.
Les stations mémorisées et l’heure sont
effacées.
Le fusible a grillé.
Des sons sont émis lorsque la clé de contact
est sur la position ON, ACC ou OFF.
Les fils de commande ne correspondent pas
au connecteur d’alimentation de l’accessoire
du véhicule.
Aucune alimentation ne parvient à
l’appareil.
• Vérifiez les raccordements. Si tout est en
ordre, vérifiez le fusible.
• Le véhicule ne dispose pas de position
ACC.
t Appuyez sur (SRC) (ou insérez un
disque) pour allumer l’appareil.
L’appareil est alimenté en continu.
Le véhicule n’a pas de position ACC.
L’antenne électrique ne sort pas.
L’antenne électrique n’a pas de relais.
Lecture CD
Impossible d’introduire un disque.
• Un autre disque est déjà en place.
• Le CD est introduit à l’envers ou dans le
mauvais sens.
La lecture ne commence pas.
• Disque encrassé ou défectueux.
• Le CD-R n’est pas finalisé.
• Vous avez essayé de lire un CD-R qui n’est
pas conçu pour l’usage audio.
• Il est possible que ce lecteur ne lise pas
certains CD-R selon l’équipement utilisé
pour l’enregistrement ou l’état du disque.
Un disque est éjecté automatiquement.
La température ambiante dépasse 50°C.
Le CD n’est pas éjecté.
Les touches de commande sont inopérantes.
Appuyez sur la touche de réinitialisation.
Le son est irrégulier à cause des vibrations.
• L’appareil est installé suivant un angle de
plus de 60˚.
• L’appareil n’a pas été installé à un endroit
suffisamment stable de la voiture.
Le son saute.
Disque encrassé ou défectueux.
Réception radio
Impossible de syntoniser une présélection.
• Enregistrez la fréquence correcte dans la
mémoire.
• Le signal d’émission est trop faible.
Impossible de recevoir les stations.
Le son comporte des parasites.
• Raccordez un fil de commande d’antenne
électrique (bleu) ou un fil d’alimentation
d’accessoire (rouge) au câble
d’alimentation de l’amplificateur
d’antenne de la voiture. (Uniquement si
votre voiture est équipée d’une antenne
FM/AM intégrée dans la vitre arrière/
latérale.)
• Vérifiez les connexions de l’antenne du
véhicule.
• L’antenne automatique ne sort pas.
t Vérifiez les connexions du fil de
commande de l’antenne électrique.
• Vérifiez la fréquence.
16
Page 33

La syntonisation automatique est
impossible.
• Le mode de recherche local est réglé sur
“ON”.
t Réglez le mode de recherche local sur
“OFF”.
• Le signal d’émission est trop faible.
t Effectuez un accord manuel.
L’indication “ST” clignote.
• Syntonisez la fréquence correctement.
• Le signal d’émission est trop faible.
t Sélectionnez le mode de réception
monaural.
Une émission diffusée en stéréo est
entendue en monaural.
L’appareil est en mode de réception
monaural.
t Annulez le mode de réception monaural.
Affichages d’erreur
Affichages d’erreur
Les indications suivantes clignotent pour un
moment.
E-04
Un CD est souillé ou a été introduit à
l’envers.
t Nettoyez ou introduisez correctement le
CD.
E-99
Le lecteur CD ne peut pas fonctionner en
raison de problèmes rencontrés.
t Appuyez sur la touche de réinitialisation
de l’appareil.
Si les solutions proposées ci-dessus ne
permettent pas de remédier au problème,
veuillez consulter votre revendeur Sony.
17
Page 34

18
Page 35

19
Page 36

Sony Corporation Printed in Korea
 Loading...