

Page 1
3-283-552-31 (1)
©
FM/AM
Compact Disc Player
Operating Instructions
Manu al de instr uc ciones
To cancel the demonstration (Demo) display, see page 16.
Para cancelar la pantalla de demostración (Demo), consulte la página 19.
GB
ES
CDX-GT970US
2008 Sony Corporation
Page 2
For installation and connections, see the
supplied installation/connections manual.
This label is located on the bottom of the
chassis.
“ATRAC”, “ATRAC AD”, SonicStage and their
logos are trademarks of Sony Corporation.
“WALKMAN” and “WALKMAN” logo are
registered trademarks of Sony Corporation.
Microsoft, Windows Media,
and the Windows logo are
trademarks or registered
Corporation in the United States and/or other
countries.
Warning if your car’s ignition has no
ACC position
Be sure to set the Auto Off function (page 16).
The unit will shut off completely and
automatically in the set time after the unit is
turned off, which prevents battery drain.
If you do not set the Auto Off function, press
and hold (OFF) until the display disappears
each time you turn the ignition off.
trademarks of Microsoft
2
Page 3

Table of Contents
Welcome ! . . . . . . . . . . . . . . . . . . . . . . . . . . . . . 4
Getting Started
Resetting the unit. . . . . . . . . . . . . . . . . . . . . . . . 4
Preparing the card remote commander . . . . . . . 4
Setting the clock . . . . . . . . . . . . . . . . . . . . . . . . 4
Detaching the front panel . . . . . . . . . . . . . . . . . 5
Attaching the front panel . . . . . . . . . . . . . . . 5
Inserting the disc in the unit . . . . . . . . . . . . . . . 5
Ejecting the disc . . . . . . . . . . . . . . . . . . . . . . 5
Adjusting the angle of the front panel . . . . . . . . 5
Location of controls and basic
operations
Main unit. . . . . . . . . . . . . . . . . . . . . . . . . . . . 6
Card remote commander RM-X156 . . . . . . . 8
Searching for a track
— Quick-BrowZer . . . . . . . . . . . . . . . . . . . 10
Searching by skip items
— Jump mode. . . . . . . . . . . . . . . . . . . . . . . 11
CD
Display items . . . . . . . . . . . . . . . . . . . . . . . 12
Repeat play . . . . . . . . . . . . . . . . . . . . . . . . . 12
Shuffle play. . . . . . . . . . . . . . . . . . . . . . . . . 12
Radio
Other functions
Changing the sound settings . . . . . . . . . . . . . . 15
Adjusting the sound characteristics . . . . . . 15
Customizing the equalizer curve
— EQ3 Tune . . . . . . . . . . . . . . . . . . . . . . . 15
Adjusting setup items — MENU . . . . . . . . . . 16
Using optional equipment. . . . . . . . . . . . . . . . 17
Auxiliary audio equipment. . . . . . . . . . . . . 17
CD/MD changer . . . . . . . . . . . . . . . . . . . . . 17
Rotary commander RM-X4S . . . . . . . . . . . 18
Additional Information
Precautions . . . . . . . . . . . . . . . . . . . . . . . . . . . 19
Notes on discs . . . . . . . . . . . . . . . . . . . . . . 19
About USB devices . . . . . . . . . . . . . . . . . . 20
Playback order of MP3/WMA/AAC files
(CD-R/RW or Mass Storage Class) . . . . . . 20
About MP3 files . . . . . . . . . . . . . . . . . . . . . 20
About WMA files. . . . . . . . . . . . . . . . . . . . 20
About AAC files . . . . . . . . . . . . . . . . . . . . 21
Maintenance . . . . . . . . . . . . . . . . . . . . . . . . . . 21
Removing the unit. . . . . . . . . . . . . . . . . . . . . . 21
Specifications . . . . . . . . . . . . . . . . . . . . . . . . . 22
Troubleshooting . . . . . . . . . . . . . . . . . . . . . . . 23
Error displays/Messages. . . . . . . . . . . . . . . 24
Storing and receiving stations . . . . . . . . . . . . . 12
Storing automatically — BTM . . . . . . . . . . 12
Storing manually. . . . . . . . . . . . . . . . . . . . . 12
Receiving the stored stations . . . . . . . . . . . 12
Tuning automatically . . . . . . . . . . . . . . . . . 13
Receiving a station through a list
— LIST . . . . . . . . . . . . . . . . . . . . . . . . . . . . 13
USB devices
USB device playback . . . . . . . . . . . . . . . . . 13
Display items . . . . . . . . . . . . . . . . . . . . . . . 13
Listening to music on a Mass Storage
Class type audio device. . . . . . . . . . . . . . . . 14
Listening to music on a “Walkman”
(ATRAC Audio Device). . . . . . . . . . . . . . . 14
3
Page 4
Welcome !
Getting Started
Thank you for purchasing this Sony Compact
Disc Player. You can enjoy your drive with the
following functions.
• CD playback
You can play CD-DA (also containing CD
TEXT), CD-R/CD-RW (MP3/WMA/AAC files
(page 19)).
Type of discs Label on the disc
CD-DA
MP3
WMA
AAC
• Radio reception
– You can store up to 6 stations per band (FM1,
FM2, FM3, AM1 and AM2).
– BTM (Best Tuning Memory): The unit selects
strong signal stations and stores them.
• Search function
– Quick-BrowZer: You can quickly and easily
search for a track in the CD and USB device
connected to this unit (page 10).
• Sound adjustment
– EQ3 parametric: You can choose any one
of 7 preset equalizer curves, and adjust as
desired.
– DSO (Dynamic Soundstage Organizer):
Creates a more ambient sound field, using
virtual speaker synthesis, to enhance the
sound of speakers, even if they are installed
low in the door.
– Digital Music Plus (DM+): Improves
digitally compressed sound, such as MP3.
• Image setting
You can set various display images on the unit.
• Optional device operation
– USB device: A Mass Storage Class USB
device or “Walkman” (ATRAC Audio
Device) can be connected to the rear USB
terminal. For details on usable devices, please
refer to About USB devices (page 20) or the
Sony support website (page 25).
– CD/MD changers: CD/MD changers can be
connected to the Sony BUS at the rear of the
unit.
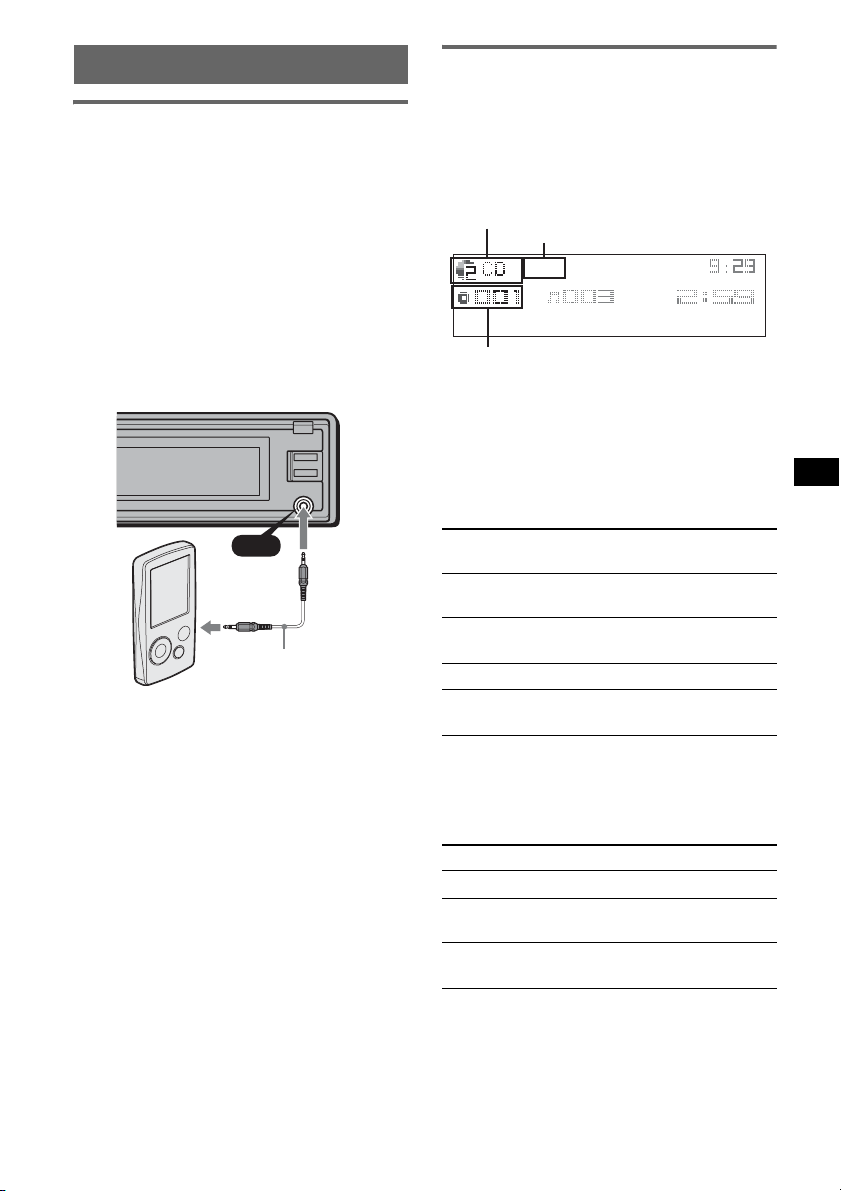
• Auxiliary equipment connection
An AUX input jack on the front of the unit
allows connection of a portable audio device.
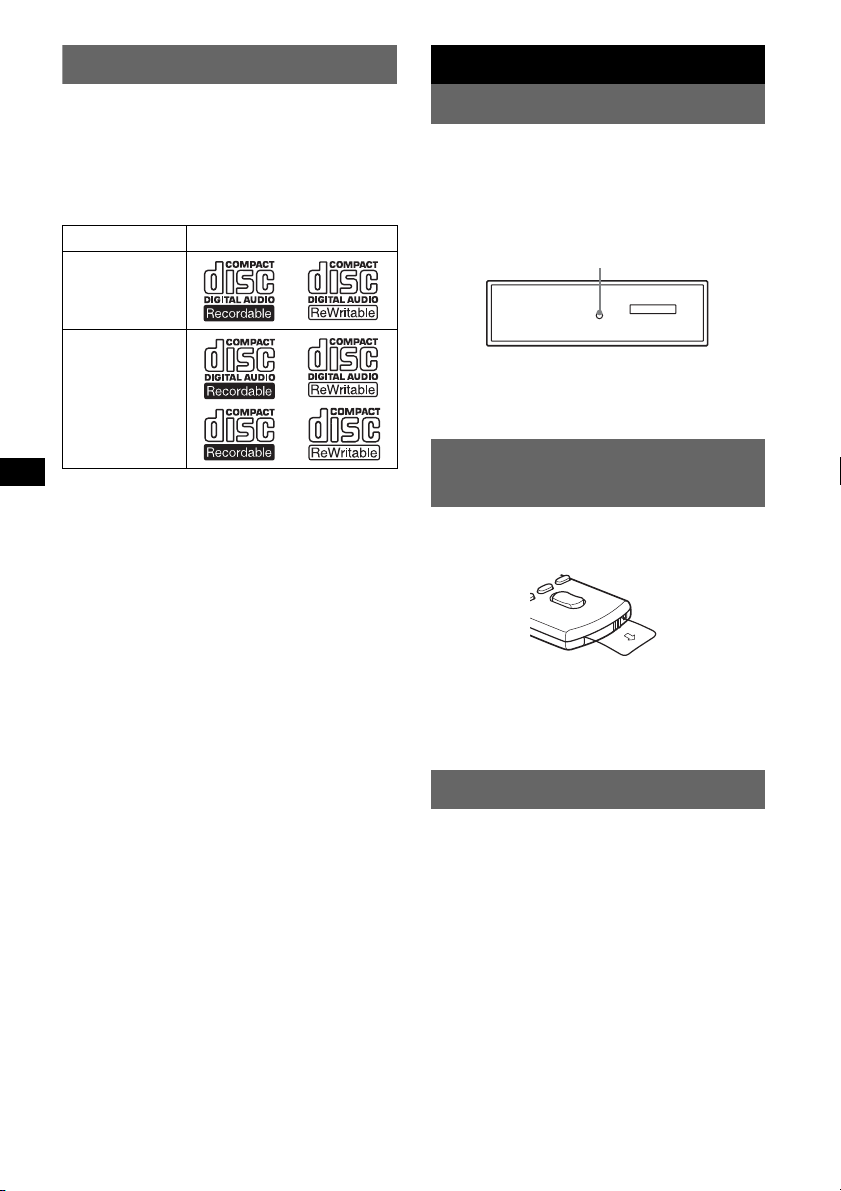
Resetting the unit
Before operating the unit for the first time, or
after replacing the car battery or changing the
connections, you must reset the unit.
Detach the front panel and press the RESET
button with a pointed object, such as a ball-point
pen.
RESET button
Note
Pressing the RESET button will erase the clock setting
and some stored contents.
Preparing the card remote
commander
Before using the card remote commander for the
first time, remove the insulation film.
Tip
For how to replace the battery, see “Replacing the
lithium battery of the card remote commander” on
page 21.
Setting the clock
The clock uses a 12-hour digital indication.
1 Press and hold the multi way encoder.
2 Rotate the multi way encoder until
“Clock Adjust” appears, then press it.
The clock adjustment display appears.
3 Rotate the multi way encoder to set
the hour and minute.
To move the digital indication, push the multi
way encoder left/right.
4 After setting the minute, press the
multi way encoder.
The clock starts.
4
Page 5
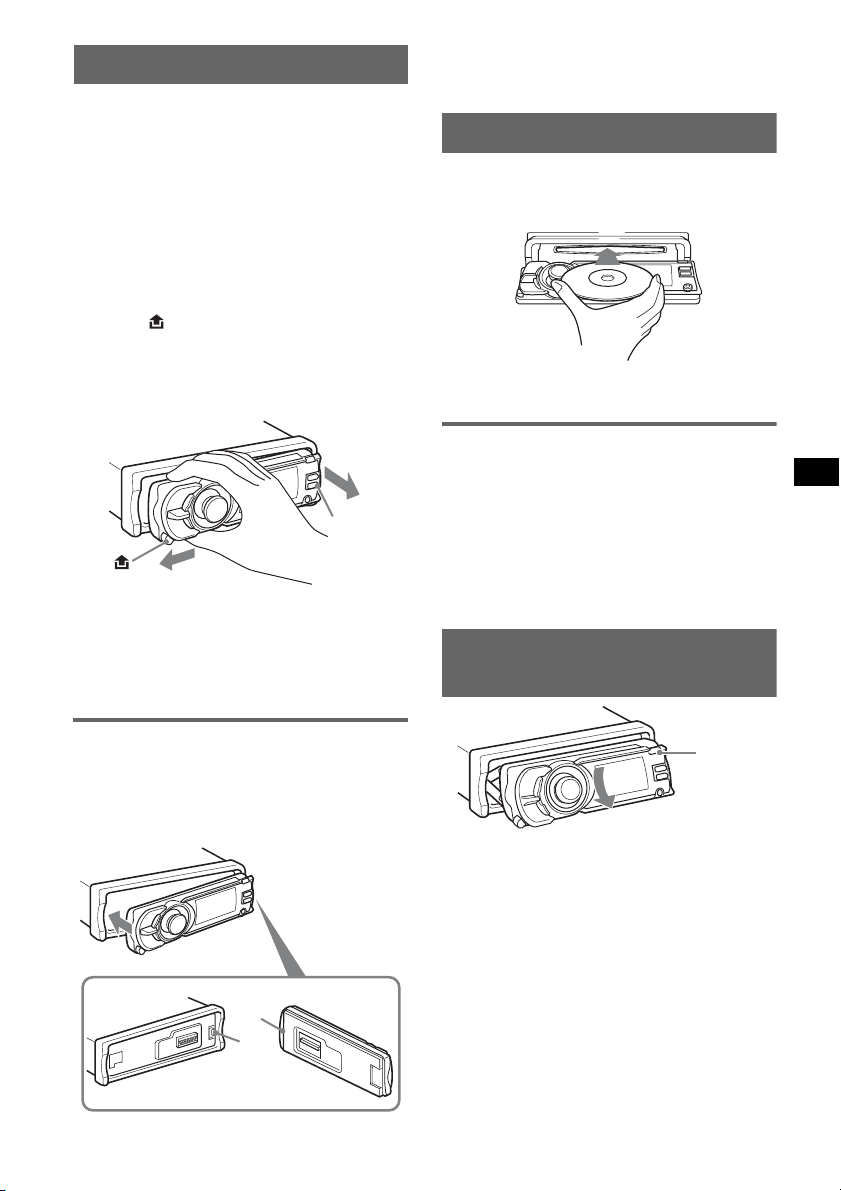
Detaching the front panel
You can detach the front panel of this unit to
prevent theft.
Caution alarm
If you turn the ignition switch to the OFF
position without detaching the front panel, the
caution alarm will sound for a few seconds.
The alarm will only sound if the built-in
amplifier is used.
1 Press (OFF).
The unit is turned off.
2 Press .
The left side of front panel is released.
3 Slide the front panel to the left, then
gently pull out the front panel towards
you.
(OFF)
Notes
• Do not drop or put excessive pressure on the front
panel and display window.
• Do not subject the front panel to heat/high
temperature or moisture. Avoid leaving it in a parked
car or on a dashboard/rear tray.
Note
Do not put anything on the inner surface of the front
panel.
Inserting the disc in the unit
1 Press Z.
The front panel slides down automatically.
2 Insert the disc (label side up).
The front panel slides up automatically, then
playback starts automatically.
Ejecting the disc
1 Press Z.
The front panel slides down automatically,
then the disc is ejected.
2 Press Z to close the front panel.
Note
The front panel slides up automatically after 15
seconds of the front panel sliding down.
Adjusting the angle of the front
panel
Attaching the front panel
Place the hole A of the front panel onto the
spindle B on the unit, then lightly push the left
side in.
Press (SOURCE) on the unit (or insert a disc) to
operate the unit.
A
B
(ANGLE)
1 Press and hold (ANGLE) repeatedly
until the front panel is angled
accordingly.
The front panel can be set to 3 positions.
To return the front panel to its default position,
press and hold (ANGLE) repeatedly until the
front panel is returned to its default position.
Tips
• After the front panel slides down (to insert the disc),
it returns to the position you set again automatically.
• The front panel angle you set is stored in the unit.
When turning the ignition off, the angle returns to its
default position, then turning the ignition on, the front
panel is angled you set.
5
Page 6
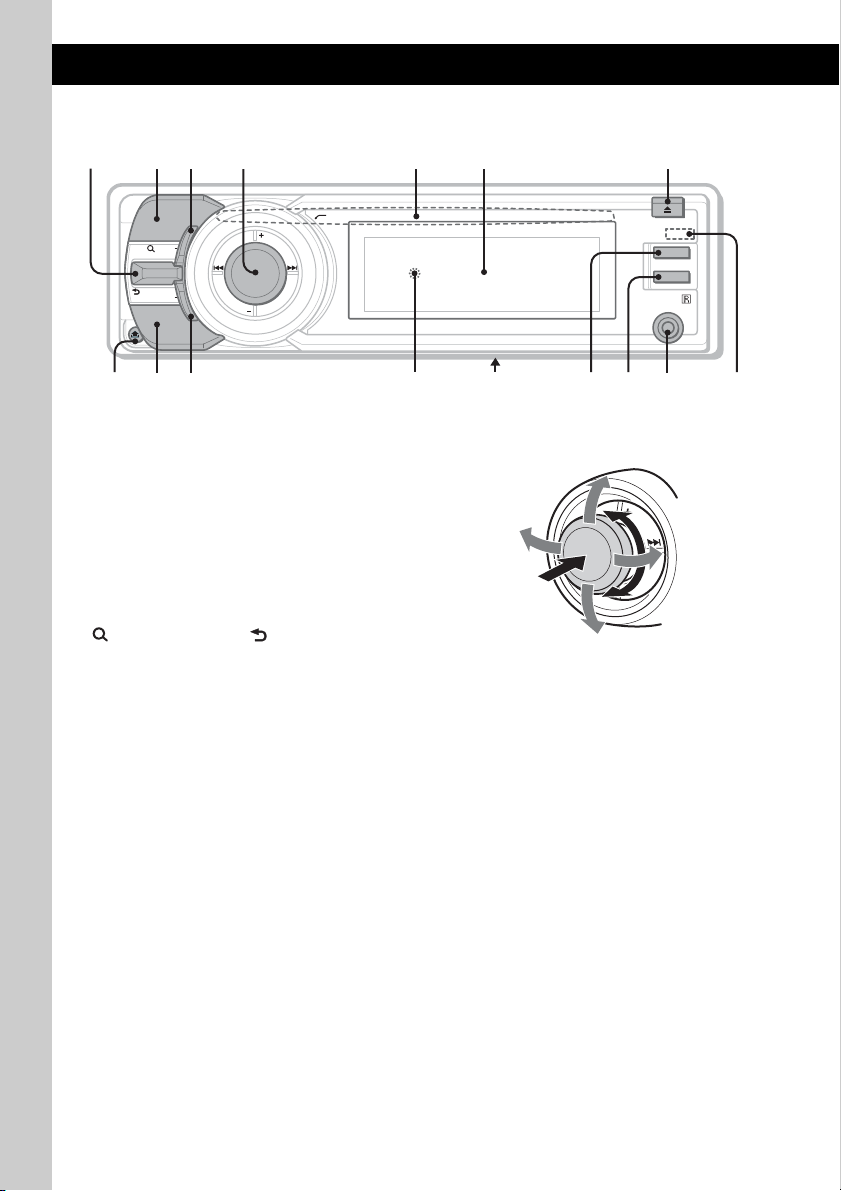
Location of controls and basic operations
89 qdq
q
q
q
q
q
Main unit
123 645 7
PUSH ENTER / SOUND / MENU
MODE
LIST/
BROWSE
BACK
SOURCE
SHUF
DSPL
SCRL
OFF
AUX
;
This section contains instructions on the location
of controls and basic operations. For details, see
the respective pages.
For USB device operation, see “USB devices” on
page 13, or for optional device (CD/MD changer,
etc.) operation, see “Using optional equipment”
on page 17.
The corresponding buttons on the card remote
commander control the same functions as those
on the unit.
A (LIST/BROWSE)/ (BACK) control
Push (LIST/BROWSE) up: to list up
(Radio); enter the Quick-BrowZer mode
(CD/USB).
Push (BACK) down: return to the previous
display.
B MODE button page 12
To select the radio band (FM/AM)*
the play mode of ATRAC Audio Device.
C SHUF (shuffle) button page 12, 14
1
; select
a
D Multi way encoder
s
Rotate to: Adjust the volume/select a menu
item.
Push up/down/left/right to: Select a menu
item.
Press to: Enter sound setting/apply a setting.
Press and hold to: Enter menu.
CD/USB:
Push up/down to:
– Skip albums (push)*
– Skip albums continuously (push and
2
hold)*
Push left/right to:
– Skip tracks (push).
– Skip tracks continuously (push, then push
– Reverse/fast-forward a track (push and
Radio:
Push up/down to:
– Receive stored station.
Push left/right to:
– Tune in stations automatically (push).
– Find a station manually (push and hold).
.
again within about 2 seconds and hold).
hold).
f
2
.
g
h
6
Page 7

E Disc slot page 5
To insert the disc.
F Display window
G Z (eject)/ANGLE button page 5
To eject the disc/slide down the front panel
(press); angle the front panel in 3 positions
(press and hold).
H (front panel release) button page 5
I SOURCE button
To power on; change the source (Radio/CD/
USB/AUX)*
1
.
J DSPL (display) button page 12
To change display items.
K RESET button (Location behind the front
panel) page 4
L Frequency select switch (located on the
bottom of the unit)
See “Frequency select switch” in the
supplied installation/connections manual.
M SCRL (scroll) button
To scroll the display item.
N OFF button
To power off; stop the source.
O AUX input jack page 17
To connect a portable audio device.
P Receptor for the card remote
commander
*1 In the case of a CD/MD changer being connected;
when (SOURCE) is pressed, the connected device
(“MD”) will appear in the display, depending on
which device is connected. Furthermore, if
(MODE) is pressed, you can switch the changer.
*2 When an MP3/WMA/AAC is played.
7
Page 8
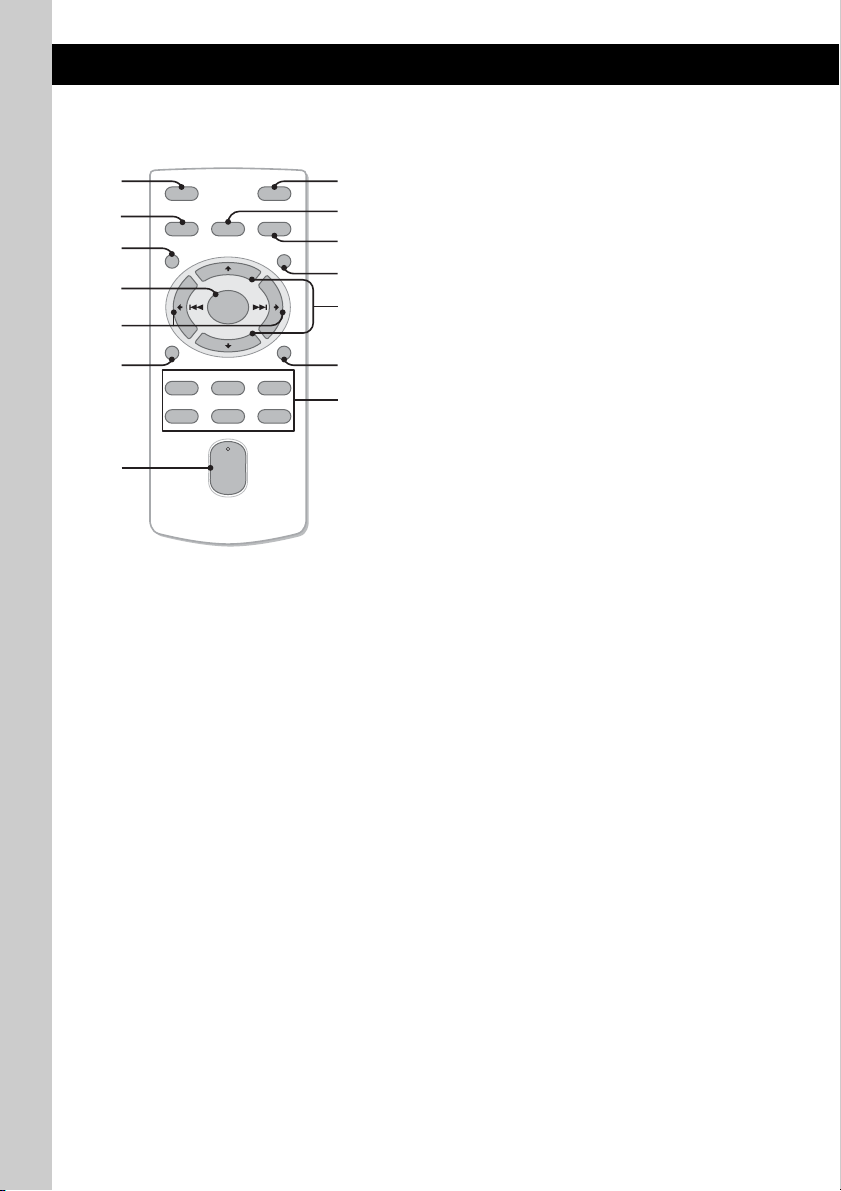
Card remote commander
RM-X156
1
2
3
4
5
6
7
OFF
SOURCE SOUND
MENU LIST
+
ENTER
–
DSPL
REP SHUF
132
465
+
VOL
–
ATT
MODE
SCRL
PAU SE
8
9
0
qa
qs
qd
qf
Remove the insulation film before use (page 4).
A OFF button
To power off; stop the source.
B SOURCE button
To power on; change the source (Radio/CD/
USB/AUX).
C MENU button
To enter menu.
D ENTER button
To apply a setting.
E </, (SEEK –/+) buttons
The same as pushing the multi way encoder
left/right on the unit.
Setup, sound setting, etc., can be operated by
< ,.
F DSPL (display) button
To change display items.
G VOL (volume) +/– button
To adjust volume.
8
Page 9

H ATT (attenuate) button
To attenuate the sound. To cancel, press
again.
I SOUND button
To enter sound setting.
J MODE button
To select the radio band (FM/AM); select the
play mode of ATRAC Audio Device.
K LIST button
To list up (Radio); enter the Quick-BrowZer
mode (CD/USB).
L M/m (+/–) buttons
The same as pushing the multi way encoder
up/down on the unit.
Setup, sound setting, etc., can be operated by
M m.
M SCRL (scroll) button
To scroll the display item.
N Number buttons
CD/USB:
(1): REP page 12, 14
(2): SHUF page 12, 14
(6): PAUSE
To pause playback. To cancel, press
again.
Radio:
To receive stored stations (press); store
stations (press and hold).
Note
If the unit is turned off and the display disappears, it
cannot be operated with the card remote commander
unless (SOURCE) on the unit is pressed, or a disc is
inserted to activate the unit first.
9
Page 10
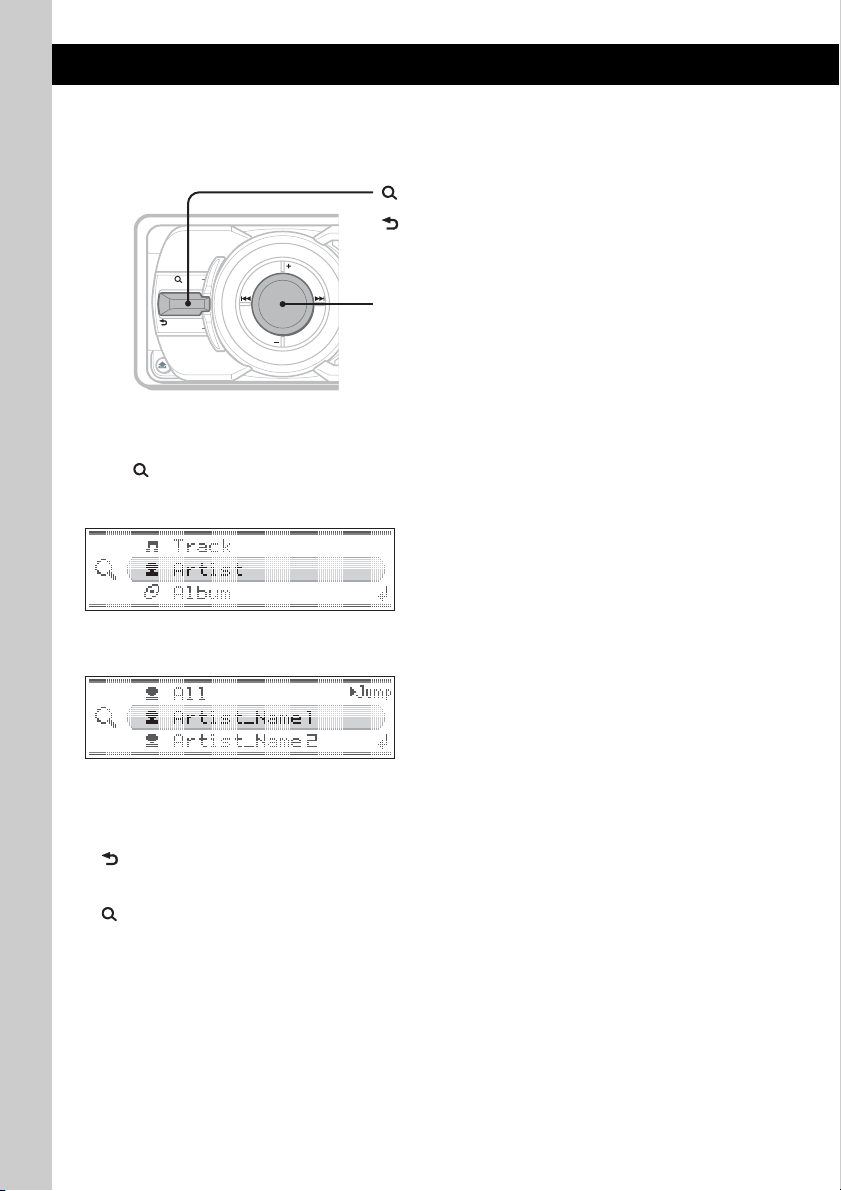
Searching for a track — Quick-BrowZer
You can search for a track in a CD or USB device (“Walkman”/Mass Storage Class) easily by category.
(LIST/BROWSE):
To enter/exit the Quick-BrowZer mode.
(BACK):
To return to the previous display.
MODE
LIST/
SHUF
BROWSE
BACK
SOURCE
DSPL
Multi way encoder:
To select the item (rotate); confirm the item (press).
1 Push (LIST/BROWSE) up.
The unit enters the Quick-BrowZer mode, and the list of search categories appears.
Display items differ, depending on the type of device or disc.
2 Rotate the multi way encoder to select the desired search category, then press it to
confirm.
3 Repeat step 2 until the desired track is selected.
Playback starts.
To return to the previous display
Push (BACK) down.
To exit the Quick-BrowZer mode
Push (LIST/BROWSE) up.
Notes
• When entering the Quick-BrowZer mode, the repeat/shuffle setting is canceled.
• Depending on the USB device, display items may not appear correctly.
• Depending on the USB device, no sound may output during the Quick-BrowZer mode.
10
Page 11
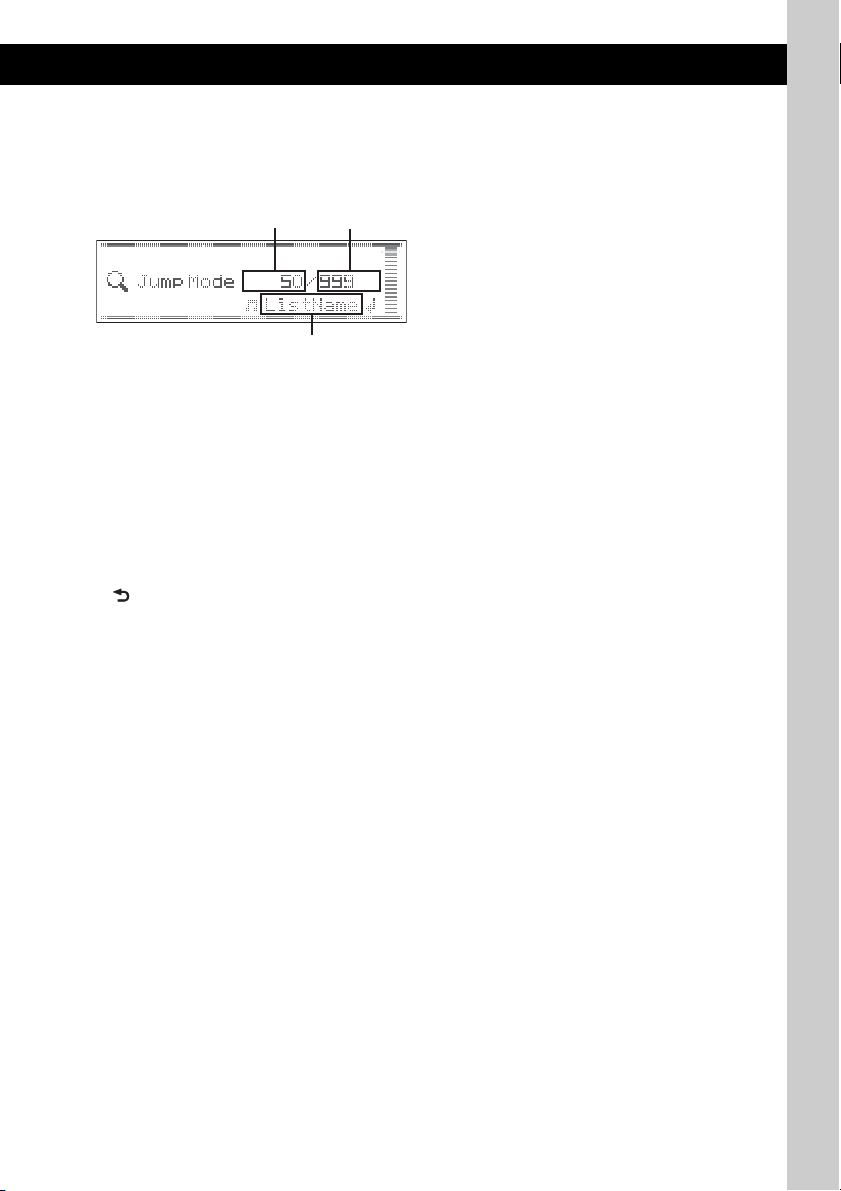
Searching by skip items — Jump mode
A
C
When many items are in category, you can search the desired item quickly.
1 Push the multi way encoder right, in Quick-BrowZer mode.
The following display appears.
B
A Current item number
B Total item number in the current layer
C Item name
2 Rotate the multi way encoder to select the desired item, or one near the desired item.
It skips in steps of 10% of the total item number.
3 Press the multi way encoder.
The display returns to the Quick-BrowZer mode and the selected item appears.
4 Rotate the multi way encoder to select the desired item and press it.
Playback starts if the selected item is a track.
To cancel Jump mode
Push (BACK) or push the multi way encoder left.
11
Page 12
CD
C
For details on selecting a CD/MD changer, see
page 17.
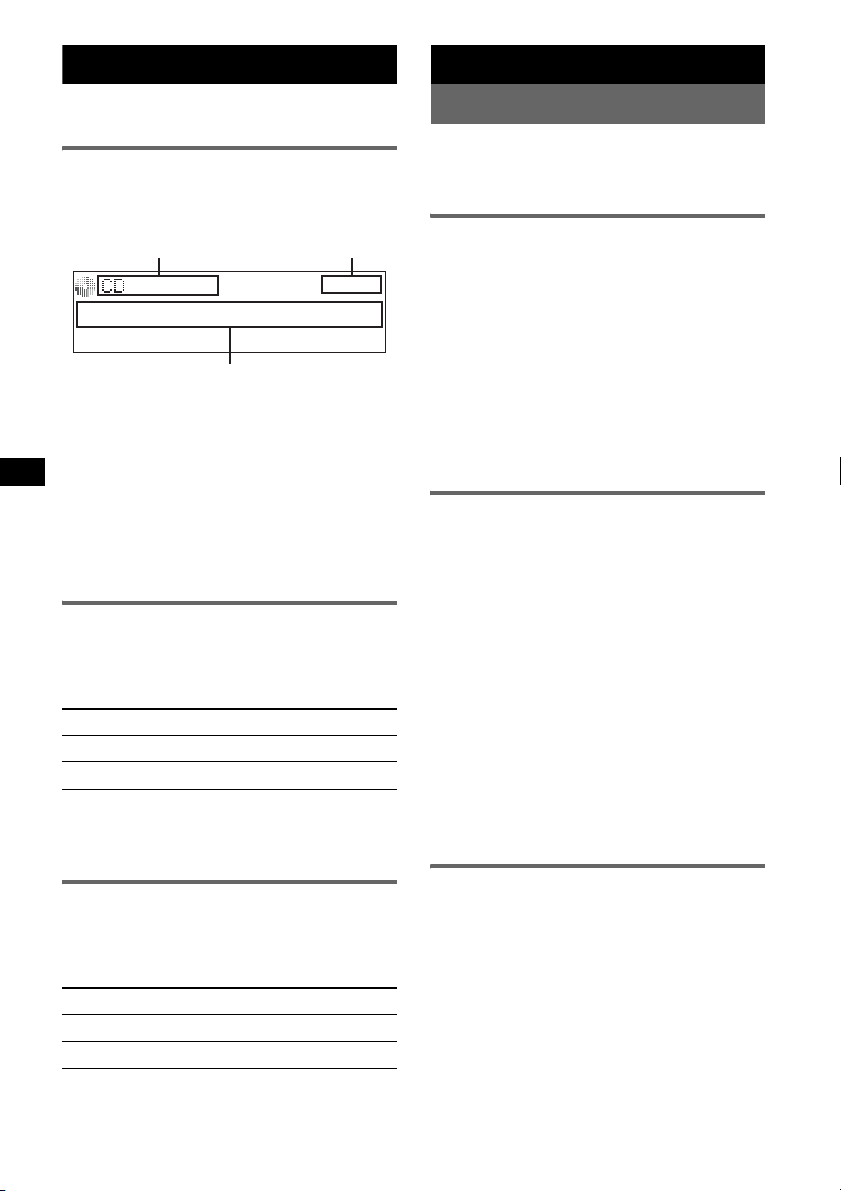
Display items
Example: when you set Info (information) mode
to “All” (page 16).
A
A Source (CD/WMA/MP3/AAC) indication
B Clock
C Album number/Track number/Elapsed
playing time, Track name, Disc name, Artist
name, Album name
To change display items C, press (DSPL).
Tip
Displayed items will differ, depending on the disc type,
recorded format and settings. For details on MP3/
WMA/AAC, see page 20.
Repeat play
1 During playback, press (1) (REP) on
the card remote commander until the
desired setting appears.
Select To play
Repeat Track track repeatedly.
Repeat Album* album repeatedly.
* When an MP3/WMA/AAC is played.
To return to normal play mode, select “Repeat
off.”
Shuffle play
1 During playback, press (SHUF)
repeatedly until the desired setting
appears.
Select To play
Shuffle Album* album in random order.
Shuffle Disc disc in random order.
* When an MP3/WMA/AAC is played.
To return to normal play mode, select “Shuffle
off.”
12
B
Radio
Storing and receiving stations
Caution
When tuning in stations while driving, use Best
Tuning Memory (BTM) to prevent an accident.
Storing automatically — BTM
1 Press (SOURCE) repeatedly until
“TUNER” appears.
To change the band, press (MODE)
repeatedly. You can select from FM1, FM2,
FM3, AM1 or AM2.
2 Press and hold the multi way encoder.
3 Rotate the multi way encoder until
“BTM” appears, then press it.
The unit stores stations in order of frequency
in the preset list.
A beep sounds when the setting is stored.
Storing manually
1 While receiving the station that you
want to store, push (LIST) up.
The preset list appears.
2 Rotate the multi way encoder to select
the preset number.
3 Push and hold the multi way encoder
until “MEM” appears.
(with the card remote commander)
1 While receiving the station that you
want to store, press and hold a
number button ((1) to (6)) until
“MEM” appears.
Note
If you try to store another station on the same number
button, the previously stored station will be replaced.
Receiving the stored stations
1 Select the band, then push the multi
way encoder up/down.
(with the card remote commander)
1 Select the band, then press a number
button ((1) to (6)).
Page 13
Tuning automatically
C
1 Select the band, then push the multi
way encoder left/right to search for the
station.
Scanning stops when the unit receives a
station. Repeat this procedure until the
desired station is received.
Tip
If you know the frequency of the station you want to
listen to, push and hold the multi way encoder left/right
to quickly locate the approximate frequency, then push
the multi way encoder left/right repeatedly to fine
adjust to the desired frequency (manual tuning).
Receiving a station through a list
— LIST
You can list up the frequency.
1 Select the band, then push (LIST) up.
The preset list appears.
2 Rotate the multi way encoder until the
desired station appears.
3 Press the multi way encoder to receive
the station.
The display returns to normal reception
mode.
USB devices
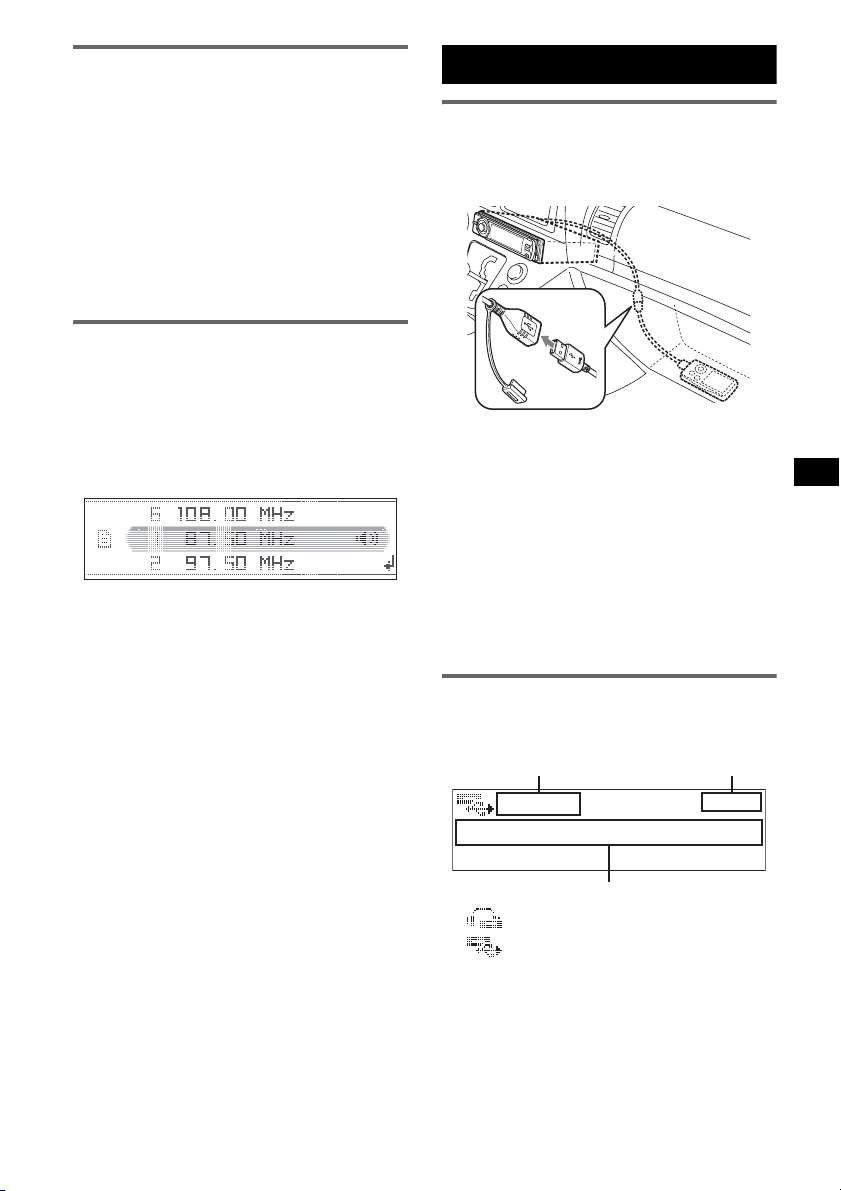
USB device playback
1 Remove the USB cap from the USB
connector and connect the USB
device to the USB connector.
Playback starts.
If a USB device is already connected, to start
playback, press (SOURCE) repeatedly until
“USB” appears.
Press (OFF) to stop playback.
Notes
• Before removing a USB device, be sure to stop
playback first. If you remove your USB device during
playback, data in the USB device may be damaged.
• Do not use USB devices so large or heavy that they
may fall down due to vibration, or cause a loose
connection.
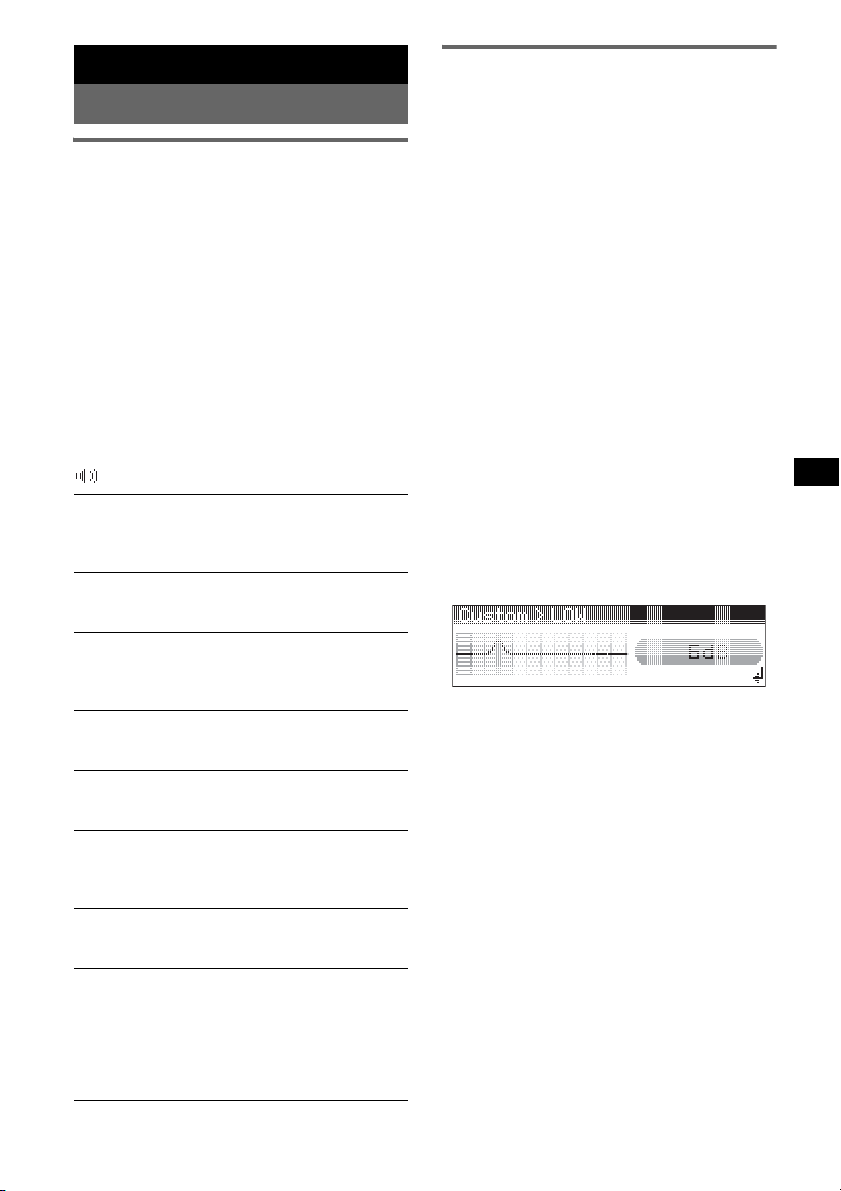
Display items
Example: when you set Info (information) mode
to “All” (page 16).
A
A ATRAC/WMA/MP3/AAC indication*
WMA/MP3/AAC indication*
B Clock
C Folder number/Track number/Elapsed
playing time, Track name, Artist name,
Album name
*1 When an ATRAC Audio Device is connected.
*2 When a Mass Storage Class Device is connected.
continue to next page t
B
2
1
13
Page 14

To change display items C, press (DSPL).
Tip
Displayed items will differ, depending on the recorded
format and settings. For details on MP3/WMA/AAC/
ATRAC, see page 21.
Note
The display differs depending on the Mass Storage
Class type USB device, and ATRAC Audio Device.
Listening to music on a Mass
Storage Class type audio device
Repeat and shuffle play
1 During playback, press (1) (REP) on the card
remote commander or (SHUF) on the unit
repeatedly until the desired setting appears.
Select To play
Repeat Track track repeatedly.
Repeat Album album repeatedly.
Shuffle Album album in random order.
Shuffle Device device in random order.
To return to normal play mode, select “Repeat
off” or “Shuffle off.”
Listening to music on a “Walkman”
(ATRAC Audio Device)
1 During playback, press (MODE)
repeatedly until the desired setting
appears.
The item changes as follows:
Album Mode t Track Mode t Genre
Mode t Playlist Mode* t Artist Mode
* May not appear depending on the device.
Repeat and shuffle play
1 During playback, press (1) (REP) on the card
remote commander or (SHUF) on the unit
repeatedly until the desired setting appears.
Select To play
Repeat Track track repeatedly.
Repeat Album album repeatedly.
Repeat Artist artist repeatedly.
Repeat Playlist playlist repeatedly.
Repeat Genre genre repeatedly.
Shuffle Album album in random order.
Shuffle Artist artist in random order.
Shuffle Playlist playlist in random order.
Shuffle Genre genre in random order.
Shuffle Device device in random order.
To return to normal play mode, select “Repeat
off” or “Shuffle off.”
14
Page 15
Other functions
Changing the sound settings
Adjusting the sound
characteristics
1 Press the multi way encoder.
2 Rotate the multi way encoder until the
desired menu item appears, then
press it.
3 Rotate the multi way encoder to select
the setting, then press it.
The setting is complete.
After 3 seconds, the setting is complete and
the display returns to normal play/reception
mode.
The following items can be set (follow the page
reference for details):
“
z” indicates the default settings.
EQ3 parametric
To select an equalizer type: “Xplod,” “Vocal,”
“Edge,” “Cruise,” “Space,” “Gravity,” “Custom”
or “off” (
DM+*
To set the DM+ function “on” (z) or “off”
(page 4).
DSO
To select the DSO mode: “1,” “2,” “3” or “off”
(
the effect.
Balance
To adjust the balance between the right and left
speakers: “R10” – “0” (
Fader
To adjust the balance between the front and rear
speakers: “F10” – “0” (
Subwoofer
To adjust the subwoofer volume: “+10” – “0”
(
(“– ∞” is displayed at the lowest setting.)
LPF (Low Pass Filter)
To select the subwoofer cut-off frequency: “off”
(
AUX Level*
To adjust the volume level for each connected
auxiliary equipment. This setting negates the
need to adjust the volume level between sources
(page 17).
Adjustable level: “+18 dB” – “0 dB” (
“–8 dB”
*1 When CD/USB source is activated.
*2 When AUX source is activated.
z).
1
z). The larger the number, the more enhanced
z) – “L10”
z) – “R10”
z) – “–10”
z), “125Hz” or “78Hz.”
2
z) –
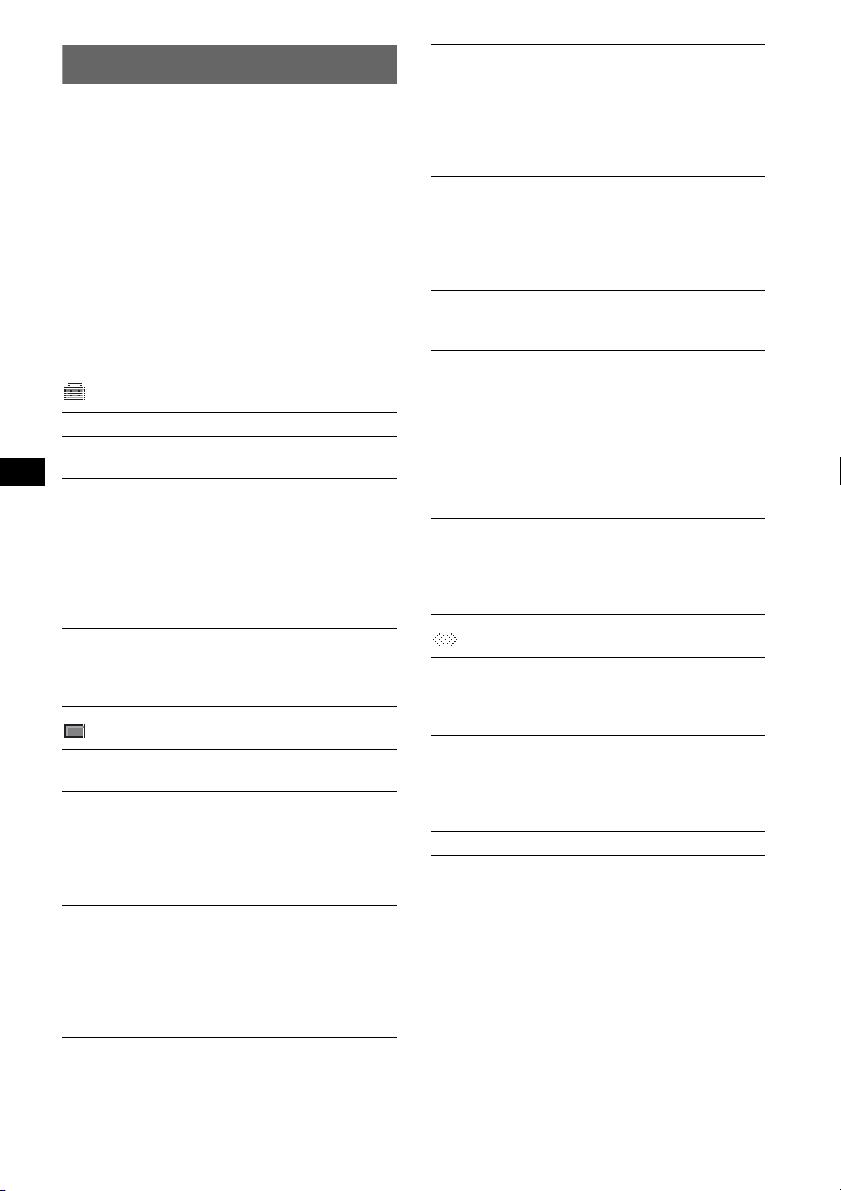
Customizing the equalizer curve
— EQ3 Tune
“Custom” of EQ3 allows you to make your own
equalizer settings.
1 Select a source, then press the multi
way encoder.
2 Rotate the multi way encoder to select
“EQ3 parametric,” then press it.
3 Rotate the multi way encoder to select
“Custom,” then push it right.
4 Rotate the multi way encoder to select
“EQ3 Mode Tune,” then press it.
5 Rotate the multi way encoder to select
the desired frequency range from
“LOW,” “MID” or “HI,” then press it.
6 Rotate the multi way encoder to select
the center frequency you wish to
adjust, then press it.
Selectable frequency in each range:
LOW: 60 Hz or 100 Hz
MID: 500 Hz or 1.0 kHz
HI: 10.0 kHz or 12.5 kHz
7 Rotate the multi way encoder to adjust
the equalizer curve.
The volume level is adjustable in 1 dB steps,
from –10 dB to +10 dB.
8 Press the multi way encoder.
Repeat steps 5 to 8 to adjust other frequency
ranges.
9 Push (BACK) down twice.
The display returns to normal play/reception
mode.
To restore the factory-set equalizer curve,
select “EQ3 Mode Initialize” and “Yes” in
step 4.
Tip
Other equalizer types are also adjustable.
15
Page 16
Adjusting setup items — MENU
1 Press and hold the multi way encoder.
2 Rotate the multi way encoder until the
desired menu item appears, then
press it.
3 Rotate the multi way encoder to select
the setting, then press it.
The setting is complete.
4 Push (BACK) down.
The display returns to normal play/reception
mode.
The following items can be set (follow the page
reference for details):
“
z” indicates the default settings.
Setup
Clock Adjust (page 4)
Beep
To s et “o n” (z) or “off.”
RM (Rotary Commander)
To change the operative direction of the rotary
commander controls.
– “NORM” (
the factory-set position.
– “REV”: when you mount the rotary
commander on the right side of the steering
column.
Auto off
To shut off automatically after a desired time
when the unit is turned off: “NO” (
“30 min” or “60 min.”
Display
Demo
To s et “o n” (z) or “off.”
Image
To set various display images.
– “Movie 1 (
– “SA 1 – 3”: to display the Spectrum Analyzer.
– “Wall.P 1 – 3”: to display a wallpaper.
– “off”: to not display any image.
Auto Image
To set various display images.
– “All”: to step repeatedly through the display
images in all display modes.
–“Movie” (
– “SA”: to display the Spectrum Analyzer.
– “off”: to not display any image.
z): to use the rotary commander in
z), “30 sec,”
(Demonstration)
z) – 3”: to display a movie.
z): to display a movie.
Info (Information)
To display the items (depending on the source,
etc.).
–“Simple” (
z): to not display any items.
– “All”: to display all items.
– “Clear”: to have items automatically
disappear.
Dimmer
To change the brightness of the display.
–“Auto” (
z): to dim the display automatically
when you turn lights on.
– “on”: to dim the display.
– “off”: to deactivate the dimmer.
Illumination
To change the illumination color: “Blue” (
z),
“Red” or “Green.”
Black Out
To turn off the illumination automatically for
any source (for example, during CD playback/
radio reception, etc.).
– “Black Out on”*
1
: to turn off the illumination
if no operation is performed for 5 seconds.
– “Black Out off” (
z): to deactivate the Black
Out function.
To bring the light back on, press any button.
Auto Scroll
To scroll long displayed item automatically
when the disc/album/group/track is changed.
–“on” (
z): to scroll.
– “off”: to not scroll.
Receive Mode
Local (Local seek mode)
–“off” (
z): to tune normal reception.
– “on”: to only tune into stations with stronger
signals.
2
Mono*
(Monaural mode)
To improve poor FM reception, select monaural
reception mode.
–“off” (
z): to hear stereo broadcast in stereo.
– “on”: to hear stereo broadcasts in monaural.
BTM (page 12)
*1 When the Black Out function is activated, the unit
cannot be operated with the card remote
commander.
*2 When FM is received.
16
Page 17
Using optional equipment
CD/MD changer
Auxiliary audio equipment
By connecting an optional portable audio device
to the AUX input jack (stereo mini jack) on the
unit and then simply selecting the source, you
can listen on your car speakers. The volume level
is adjustable for any difference between the unit
and the portable audio device. Follow the
procedure below:
Connecting the portable audio
device
1 Turn off the portable audio device.
2 Connect to the unit.
The source automatically switches to “AUX.”
AUX
AUX
Connecting cord*
(not supplied)
* Be sure to use a straight type plug.
3 Turn down the volume on the unit.
4 Start playback of the portable audio device at a
moderate volume.
5 Set your usual listening volume on the unit.
6 Adjust the input level (page 15).
Adjust the volume level
Be sure to adjust the volume for each connected
audio device before playback.
1 Turn down the volume on the unit.
2 Press (SOURCE) repeatedly until “AUX”
appears.
“AUX Audio” appears.
3 Start playback of the portable audio device at a
moderate volume.
4 Set your usual listening volume on the unit.
5 Adjust the input level (page 15).
Selecting the changer
1 Press (SOURCE) repeatedly until “CD” or
“MD” appears.
2 Press (MODE) repeatedly until the desired
changer appears.
Unit number, MP3 indication*
LP2/LP4 indication*
Disc/Album number
1
2
Playback starts.
*1 When an MP3 is played.
*2 When MDLP disc is played.
Skipping albums and discs
1 During playback, push the multi way encoder
up/down.
To skip
Push the multi way encoder
up/down
album and release (hold for a
moment).
album
continuously
within 2 seconds of first
releasing.
discs repeatedly.
discs
continuously
then, press again within 2
seconds and hold.
Repeat and shuffle play
1 During playback, press (1) (REP) on the card
remote commander or (SHUF) on the unit
repeatedly until the desired setting appears.
Select To play
Repeat Disc*1disc repeatedly.
Shuffle
Changer
Shuffle All*
*1 When one or more CD changers, or two or more
MD changers are connected.
*2 Available when two or more MD changers are
connected and one is playback.
tracks in the changer in random
order.
2
tracks in all units in random
order.
continue to next page t
17
Page 18
To return to normal play mode, select “Repeat
off” or “Shuffle off.”
Tip
“Shuffle All” will not shuffle tracks between CD units
and MD changers.
Locating a disc by name — LIST
You can select a disc from the list when a CD
changer with CD TEXT capability, or MD
changer is connected.
If you assign a name to a disc, the name appears
on the list.
1 During playback, push (LIST) up.
The disc number or disc name appears.
2 Rotate the multi way encoder until the desired
disc appears.
3 Press the multi way encoder to play the disc.
The display returns to normal play mode.
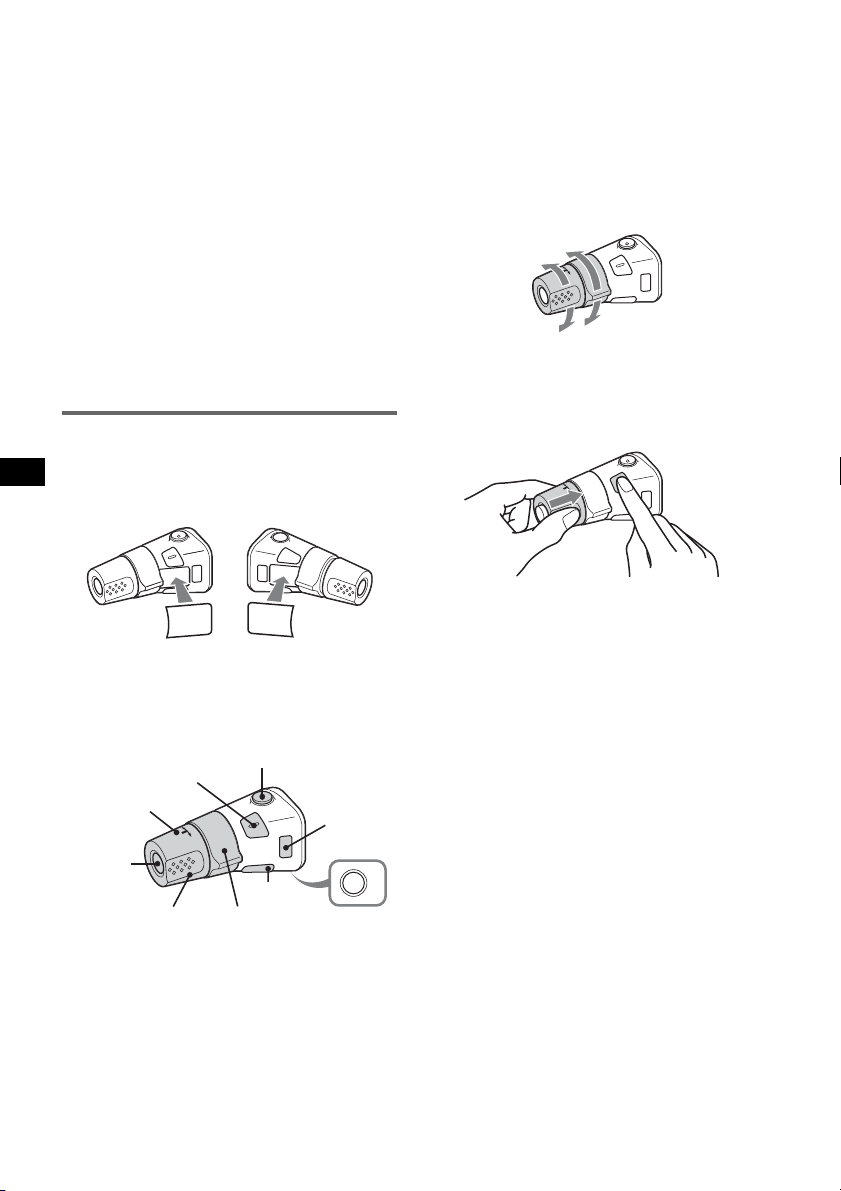
Rotary commander RM-X4S
Attaching the label
Attach the indication label depending on how
you mount the rotary commander.
D
S
D
N
U
SO
E
D
O
M
PL
S
D
P
L
M
O
D
E
S
O
U
N
D
• VOL (volume) control
The same as the multi way encoder on the unit
(rotate).
• SEEK/AMS control
The same as pushing the multi way encoder
left/right on the unit (rotate, or rotate and hold).
Changing the operative direction
The operative direction of the controls is factoryset as shown below.
To increase
To decrease
If you need to mount the rotary commander on
the right hand side of the steering column, you
can reverse the operative direction.
1 While pushing the VOL control, press and
hold (SOUND).
Location of controls
The corresponding buttons on the rotary
commander control the same functions as those
on this unit.
SOUND
PRESET/
DISC
SOURCE
VOL
ATT
DSPL
SEEK/ AMS
The following controls on the rotary commander
require a different operation from the unit.
• ATT (attenuate) button
To attenuate the sound. To cancel, press again.
• SOUND button
To enter sound setting.
• PRESET/DISC control
The same as rotating the multi way encoder on
the unit (push in and rotate).
18
MODE
OFF
OFF
Page 19
Additional Information
Precautions
• If your car has been parked in direct sunlight,
allow the unit to cool off before operating it.
• Power antenna (aerial) will extend automatically
while the unit is operating.
Moisture condensation
On a rainy day or in a very damp area, moisture
condensation may occur inside the lenses and
display of the unit. Should this occur, the unit will
not operate properly. In such a case, remove the disc
and wait for about an hour until the moisture has
evaporated.
To maintain high sound quality
Be careful not to splash juice or other soft drinks
onto the unit or discs.
Notes on discs
• To keep a disc clean, do not touch its surface.
Handle the disc by its edge.
• Keep your discs in their cases or disc magazines
when not in use.
• Do not subject discs to heat/high temperature.
Avoid leaving them in a parked car or on a
dashboard/rear tray.
• Do not attach labels, or use discs with sticky ink/
residue. Such discs may stop spinning when used,
causing a malfunction, or may ruin the disc.
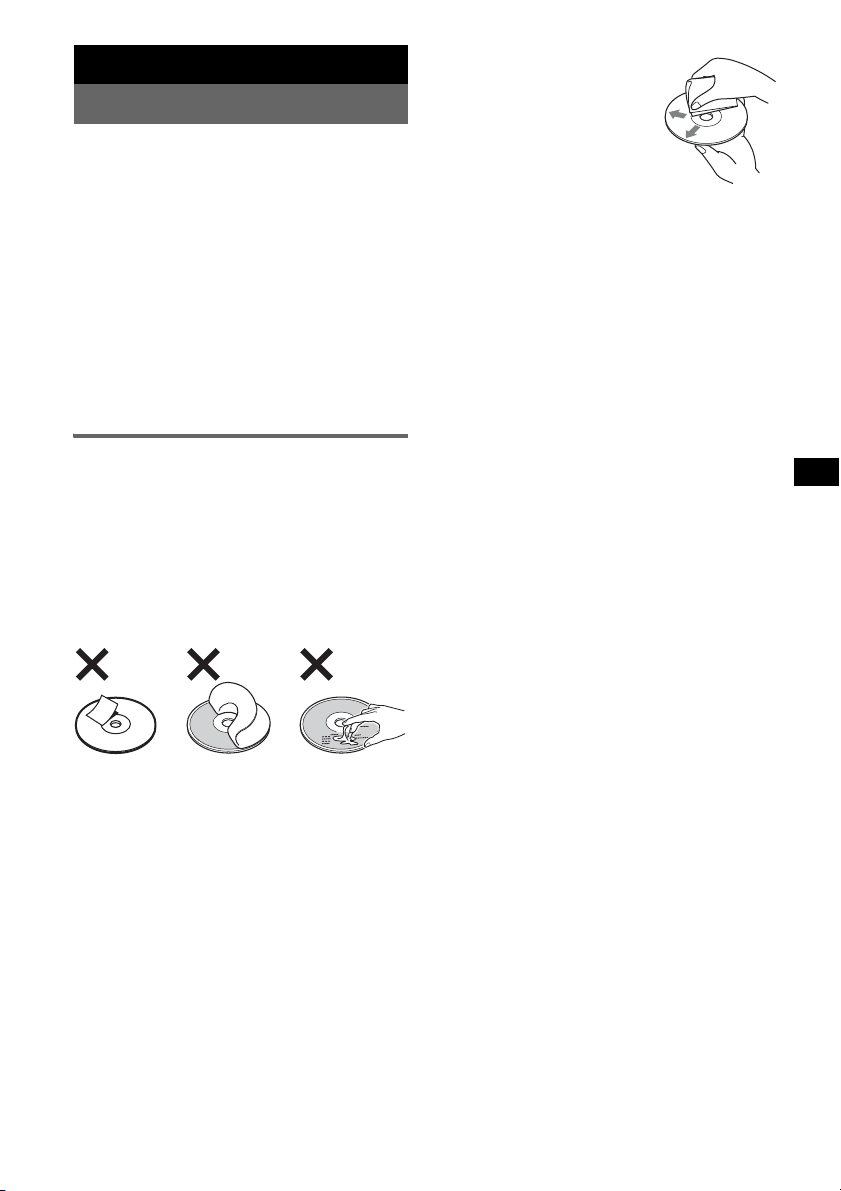
• Before playing, clean the discs
with a commercially available
cleaning cloth. Wipe each disc
from the center out. Do not use
solvents such as benzine,
thinner, commercially available
cleaners, or antistatic spray
intended for analog discs.
Notes on CD-R/CD-RW discs
• Some CD-Rs/CD-RWs (depending on the
equipment used for its recording or the condition
of the disc) may not play on this unit.
• You cannot play a CD-R/a CD-RW that is not
finalized.
• The unit is compatible with the ISO 9660 level 1/
level 2 format, Joliet/Romeo in the expansion
format, and Multi Session.
• The maximum number of:
– folders (albums): 150 (including root and empty
folders).
– files (tracks) and folders contained in a disc: 300
(if a folder/file names contain many characters,
this number may become less than 300).
– displayable characters for a folder/file name is
32 (Joliet), or 64 (Romeo).
• When the disc is recorded in Multi Session, only
the first track of the first session format is
recognized and played (any other format is
skipped). The priority of the format is CD-DA and
MP3/WMA/AAC.
– When the first track is a CD-DA, only CD-DA of
the first session is played.
– When the first track is not a CD-DA, the MP3/
WMA/AAC session is played. If the disc has no
data in any of these formats, “NO Music” is
displayed.
• Do not use any discs with labels or stickers
attached.
The following malfunctions may result from using
such discs:
– Inability to eject a disc (due to a label or sticker
peeling off and jamming the eject mechanism).
– Inability to read audio data correctly (e.g.,
playback skipping, or no playback) due to heat
shrinking of a sticker or label causing a disc to
warp.
• Discs with non-standard shapes (e.g., heart,
square, star) cannot be played on this unit.
Attempting to do so may damage the unit. Do not
use such discs.
• You cannot play 8 cm (3
1
/4 in) CDs.
Music discs encoded with copyright
protection technologies
This product is designed to play back discs that
conform to the Compact Disc (CD) standard.
Recently, various music discs encoded with
copyright protection technologies are marketed by
some record companies. Please be aware that among
those discs, there are some that do not conform to
the CD standard and may not be playable by this
product.
Note on DualDiscs
A DualDisc is a two sided disc product which
mates DVD recorded material on one side with
digital audio material on the other side. However,
since the audio material side does not conform to
the Compact Disc (CD) standard, playback on this
product is not guaranteed.
19
Page 20

About USB devices
• Mass Storage Class and ATRAC Audio Device
type USB devices compliant with the USB
standard can be used. However, this unit cannot
recognize USB devices via a USB HUB. For
details on the compatibility of your USB device,
visit the Sony support website (page 25).
• Corresponding codec is different according to
device type.
– Mass Storage Class: MP3/WMA/AAC
– ATRAC Audio Device: ATRAC/MP3/WMA/
AAC
• DRM (Digital Rights Management) files other
than ATRAC may not be played.
• The maximum number of displayable data is as
follows.
Mass Storage Class:
– folders (albums): 128, files (tracks) per folder:
500
ATRAC Audio Device: ATRAC/MP3/WMA/AAC
– albums/artists/playlists/genres: 65,535, tracks:
65,535
Notes
• When using a cable, use the one supplied with the
USB device to connect.
• Do not use a USB device that is so large or heavy it
may interfere with driving operations.
• Do not leave a USB device in a parked car, as
malfunction may result.
• It may take time for playback to begin, depending on
the amount of recorded data.
• Backup of data in a USB device is recommended.
Playback order of MP3/WMA/AAC
files (CD-R/RW or Mass Storage
Class)
MP3/WMA/AAC
Folder
(album)
MP3/WMA/
AAC file
(track)
About MP3 files
• MP3, which stands for MPEG-1 Audio Layer-3, is
a music file compression format standard. It
compresses audio CD data to approximately 1/10
of its original size.
• ID3 tag versions 1.0, 1.1, 2.2, 2.3 and 2.4 apply to
MP3 only. ID3 tag is 15/30 characters (1.0 and
1.1), or 63/126 characters (2.2, 2.3 and 2.4).
• When naming an MP3 file, be sure to add the file
extension “.mp3” to the file name.
• During playback or fast-forward/reverse of a VBR
(variable bit rate) MP3 file, elapsed playing time
may not display accurately.
Note
If you play a high-bit-rate MP3, such as 320 kbps,
sound may be intermittent.
20
About WMA files
• WMA, which stands for Windows Media Audio,
is a music file compression format standard. It
compresses audio CD data to approximately 1/22*
of its original size.
• WMA tag is 63 characters.
• When naming a WMA file, be sure to add the file
extension “.wma” to the file name.
• During playback or fast-forward/reverse of a VBR
(variable bit rate) WMA file, elapsed playing time
may not display accurately.
* only for 64 kbps
Note
Playback of a lossless compression file is not
supported.
Page 21
About AAC files
• AAC, which stands for Advanced Audio Coding,
is a music file compression format standard. It
compresses audio CD data to approximately 1/11*
of its original size.
• AAC tag is 126 characters.
• When naming an AAC file, be sure to add the file
extension “.m4a” to the file name.
• During playback or fast-forward/reverse of a VBR
(variable bit rate) AAC file, elapsed playing time
may not display accurately.
* only for 128 kbps
Note
Playback of the following AAC files is not supported.
– lossless compression
– copyright-protected
If you have any questions or problems concerning
your unit that are not covered in this manual, consult
your nearest Sony dealer.
Maintenance
Fuse replacement
When replacing the fuse, be
sure to use one matching the
amperage rating stated on the
original fuse. If the fuse blows,
check the power connection and
replace the fuse. If the fuse
blows again after replacement,
there may be an internal
malfunction. In such a case,
consult your nearest Sony
dealer.
Fuse (10 A)
Cleaning the connectors
The unit may not function properly if the connectors
between the unit and the front panel are not clean. In
order to prevent this, detach the front panel (page 5)
and clean the connectors with a cotton swab. Do not
apply too much force. Otherwise, the connectors
may be damaged.
Replacing the lithium battery of the
card remote commander
Under normal conditions, the battery will last
approximately 1 year. (The service life may be
shorter, depending on the conditions of use.)
When the battery becomes weak, the range of the
card remote commander becomes shorter. Replace
the battery with a new CR2025 lithium battery. Use
of any other battery may present a risk of fire or
explosion.
+ side up
2
c
1
Notes on the lithium battery
• Keep the lithium battery out of the reach of children.
Should the battery be swallowed, immediately
consult a doctor.
• Wipe the battery with a dry cloth to assure a good
contact.
• Be sure to observe the correct polarity when
installing the battery.
• Do not hold the battery with metallic tweezers,
otherwise a shor t-circuit may occur.
WARNING
Battery may explode if mistreated.
Do not recharge, disassemble, or dispose of
in fire.
Back of the front
panel
Notes
• For safety, tur n off the ignition before cleaning the
connectors, and remove the key from the ignition
switch.
• Never touch the connectors directly with your fingers
or with any metal device.
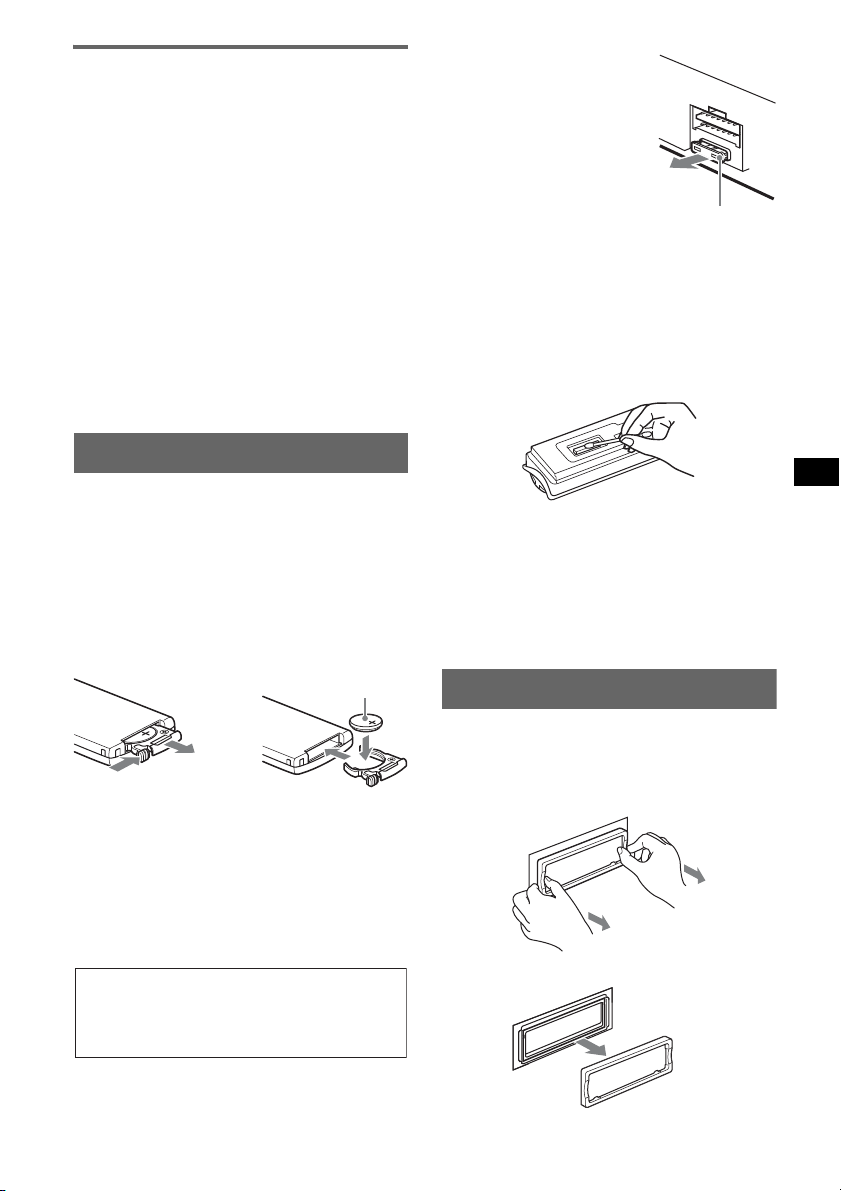
Removing the unit
1 Remove the protection collar.
1 Detach the front panel (page 5).
2 Pinch both edges of the protection collar,
then pull it out.
x
continue to next page t
21
Page 22
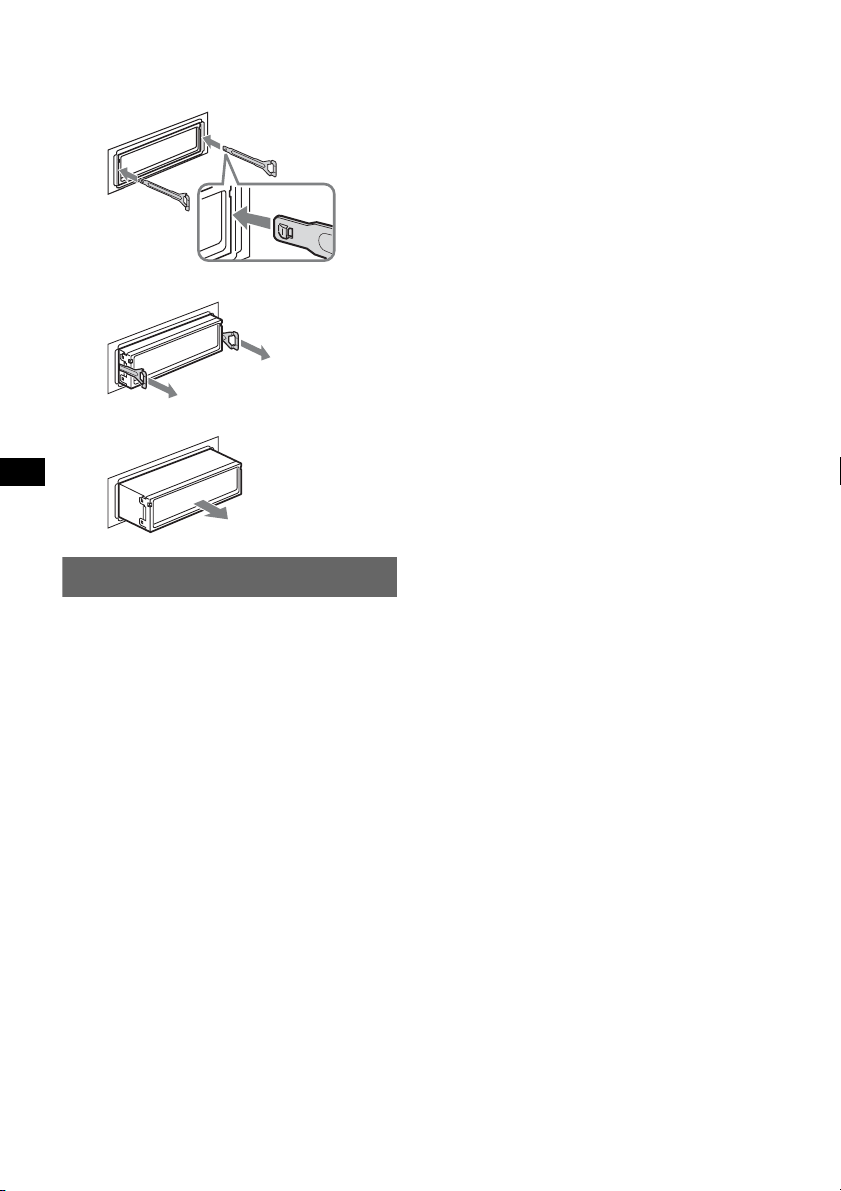
2 Remove the unit.
1 Insert both release keys simultaneously
until they click.
2 Pull the release keys to unseat the unit.
3 Slide the unit out of the mounting.
Specifications
CD Player section
Signal-to-noise ratio: 120 dB
Frequency response: 10 – 20,000 Hz
Wow and flutter: Below measurable limit
Tuner section
FM
Tuning range:
87.5 – 108.0 MHz (at 50 kHz step)
87.5 – 107.9 MHz (at 200 kHz step)
FM tuning interval: 50 kHz/200 kHz switchable
Antenna (aerial) terminal:
External antenna (aerial) connector
Intermediate frequency: 10.7 MHz/450 kHz
Usable sensitivity: 9 dBf
Selectivity: 75 dB at 400 kHz
Signal-to-noise ratio: 67 dB (stereo), 69 dB (mono)
Harmonic distortion at 1 kHz: 0.5 % (stereo),
0.3 % (mono)
Separation: 35 dB at 1 kHz
Frequency response: 30 – 15,000 Hz
AM
Tuning range:
531 – 1,602 kHz (at 9 kHz step)
530 – 1,710 kHz (at 10 kHz step)
AM tuning interval: 9kHz/10kHz switchable
Antenna (aerial) terminal:
External antenna (aerial) connector
Intermediate frequency: 10.7 MHz/450 kHz
Sensitivity: 30 µV
22
Hook facing
inwards.
USB Player section
Interface: USB (Full-speed)
Maximum current: 500mA
Power amplifier section
Outputs: Speaker outputs (sure seal connectors)
Speaker impedance: 4 – 8 ohms
Maximum power output: 52 W × 4 (at 4 ohms)
General
Outputs:
Audio outputs terminal (front/rear)
Subwoofer output terminal (mono)
Power antenna (aerial) relay control terminal
Power amplifier control terminal
Inputs:
Telephone ATT control terminal
Illumination control terminal
BUS control input terminal
BUS audio input terminal
Remote controller input terminal
Antenna (aerial) input terminal
AUX input jack (stereo mini jack)
USB signal input terminal
Tone controls:
Low: ±10 dB at 60 Hz (XPLOD)
Mid: ±10 dB at 1 kHz (XPLOD)
High: ±10 dB at 10 kHz (XPLOD)
Power requirements: 12 V DC car battery
(negative ground (earth))
Dimensions: Approx. 178 × 50 × 190 mm
1
(7
/8 × 2 × 71/2 in) (w/h/d)
Mounting dimensions: Approx. 182 × 53 × 163 mm
1
(7
/4 × 21/8 × 61/2 in) (w/h/d)
Mass: Approx. 1.6 kg (3 lb 9 oz)
Supplied accessories:
Card remote commander: RM-X156
Parts for installation and connections (1 set)
Optional accessories/equipment:
Rotary commander: RM-X4S
BUS cable (supplied with an RCA pin cord):
RC-61 (1 m), RC-62 (2 m)
CD changer (10 discs): CDX-757MX, CDX-656X
AUX-IN selector: XA-300
Interface adaptor for iPod: XA-120IP
Your dealer may not handle some of the above
listed accessories. Please ask the dealer for
detailed information.
US and foreign patents licensed from Dolby
Laboratories.
MPEG Layer-3 audio coding technology and
patents licensed from Fraunhofer IIS and Thomson.
This product is protected by certain intellectual
property rights of Microsoft Corporation. Use or
distribution of such technology outside of this
product is prohibited without a license from
Microsoft or an authorized Microsoft subsidiary.
Page 23
Content providers are using the digital rights
management technology for Windows Media
contained in this device (“WM-DRM”) to protect
the integrity of their content (“Secure Content”) so
that their intellectual property, including copyright,
in such content is not misappropriated.
This device uses WM-DRM software to play
Secure Content (“WM-DRM Software”). If the
security of the WM-DRM Software in this device
has been compromised, owners of Secure Content
(“Secure Content Owners”) may request that
Microsoft revoke the WM-DRM Software’s right
to acquire new licenses to copy, display and/or
play Secure Content. Revocation does not alter the
WM-DRM Software’s ability to play unprotected
content. A list of revoked WM-DRM Software is
sent to your device whenever you download a
license for Secure Content from the Internet or
from a PC. Microsoft may, in conjunction with
such license, also download revocation lists onto
your device on behalf of Secure Content Owners.
Note
This unit cannot be connected to a digital preamplifier
or an equalizer which is Sony BUS system compatible.
Design and specifications are subject to change
without notice.
• Halogenated flame retardants are not used in the
certain printed wiring boards.
• Halogenated flame retardants are not used in
cabinets.
• Packaging cushions are made from paper.
Troubleshooting
The following checklist will help you remedy
problems you may encounter with your unit.
Before going through the checklist below, check the
connection and operating procedures.
General
No power is being supplied to the unit.
• Check the connection. If everything is in order, check
the fuse.
• If the unit is turned off and the display disappears, it
cannot be operated with the remote commander.
t Turn on the unit.
The power antenna (aerial) does not extend.
The power antenna (aerial) does not have a relay box.
No sound.
• The volume is too low.
• The ATT function is activated, or the Telephone ATT
function (when the interface cable of a car telephone
is connected to the ATT lead) is activated.
• The position of the fader control “FAD” is not set for
a 2-speaker system.
• The CD changer is incompatible with the disc (MP3/
WMA/AAC).
t Play back with a Sony MP3 compatible CD
changer, or this unit.
No beep sound.
• The beep sound is canceled (page 16).
• An optional power amplifier is connected and you are
not using the built-in amplifier.
The contents of the memory have been erased.
• The RESET button has been pressed.
t Store again into the memory.
• The power supply lead or battery has been
disconnected.
• The power supply lead is not connected properly.
Stored stations and correct time are erased.
The fuse has blown.
Makes noise when the position of the ignition
is switched.
The leads are not matched correctly with the car’s
accessory power connector.
During playback or reception, demonstration
mode starts.
If no operation is performed for 5 minutes with “Demo
on” set, demonstration mode starts.
t Set “Demo off” (page 16).
The display disappears from/does not appear
in the display window.
• The dimmer is set “Dimmer on” (page 16).
• The angle of the front panel is not proper.
t Adjust the angle of the front panel by pressing
and hold (ANGLE) (page 5).
• The display disappears if you press and hold (OFF).
t Press and hold (OFF) on the unit until the
display appears.
• The connectors are dirty (page 21).
The Auto Off function does not operate.
The unit is turned on. The Auto Off function activates
after turning off the unit.
t Turn off the unit.
The display disappears while the unit is
operating.
The Black Out function is set to on (page 16).
Card remote commander operation is not
possible.
• If the Black Out function is activated (no lighting),
card remote commander operation is not possible
(page 16).
• Make sure the insulation film has been removed
(page 4).
continue to next page t
23
Page 24

DSO does not function.
Depending on the type of car interior or type of music,
DSO may not have a desirable effect.
The images change automatically.
In Auto Image mode, the selected image cannot be
displayed.
t To display selected image only, set to “Auto Image
off” (page 16).
Any display items do not display.
t Set to “Info All” (page 16).
Cannot adjust the volume level.
The portable audio device was not connected when
AUX was selected as (SOURCE).
t Connect the portable audio device to the AUX input
jack.
CD/MD playback
The disc cannot be loaded.
• Another disc is already loaded.
• The disc has been forcibly inserted upside down or in
the wrong way.
The disc does not playback.
• Defective or dirty disc.
• The CD-Rs/CD-RWs are not for audio use (page 19).
MP3/WMA/AAC files take longer to play back
than others.
The following discs take a longer time to start
playback.
– a disc recorded with a complicated tree structure.
– a disc recorded in Multi Session.
– a disc to which data can be added.
The display items do not scroll.
• For discs with very many characters, those may not
scroll.
• “Auto Scroll” is set to off.
tSet to “Auto Scroll on” (page 16) or press
(SCRL) on the card remote commander.
The sound skips.
• Installation is not correct.
tInstall the unit at an angle of less than 45° in a
sturdy part of the car.
• Defective or dirty disc.
The operation buttons do not function.
The disc will not eject.
Press the RESET button (page 4).
Radio reception
The stations cannot be received.
The sound is hampered by noises.
• Connect a power antenna (aerial) control lead (blue)
or accessory power supply lead (red) to the power
supply lead of a car’s antenna (aerial) booster (only
when your car has built-in FM/AM antenna (aerial)
in the rear/side glass).
• Check the connection of the car antenna (aerial).
• The auto antenna (aerial) will not go up.
t Check the connection of the power antenna
(aerial) control lead.
• Check the frequency.
• When the DSO mode is on, the sound is sometimes
hampered by noises.
t Set the DSO mode to “off” (page 15).
Preset tuning is not possible.
• Store the correct frequency in the memory.
• The broadcast signal is too weak.
Automatic tuning is not possible.
• The local seek mode is set to “on.”
t Set to “Local off” (page 16).
• The broadcast signal is too weak.
t Perform manual tuning.
During FM reception, the “ST” indication
flashes.
• Tune in the frequency accurately.
• The broadcast signal is too weak.
t Set to “Mono on” (page 16).
An FM program broadcast in stereo is heard in
monaural.
The unit is in monaural reception mode.
t Set to “Mono off” (page 16).
USB playback
You cannot play back items via a USB HUB.
This unit cannot recognize USB devices via a USB
HUB.
Cannot play back items.
A USB does not work.
t Reconnect it.
A beep sounds.
During playback, the USB device has been
disconnected.
t Before disconnecting a USB device, make sure to
stop playback first for data protection.
The sound is intermittent.
The sound may be intermittent at a high-bit-rate of
more than 320 kbps.
24
Error displays/Messages
Blank Disc
Tracks have not been recorded on the MD.
t Play an MD with recorded tracks.
Checking
The unit is confirming the connection of a USB device.
t Wait until confirming the connection is finished.
1
*
Page 25

2
Error*
• The disc is dirty or inserted upside down.*
t Clean or insert the disc correctly.
• A blank disc has been inserted.
• The disc cannot play because of some problem.
t Insert another disc.
• USB device was not automatically recognized.
t Reconnect it again.
•Press Z to remove the disc.
Failure
The connection of speakers/amplifiers is incorrect.
tSee the installation guide manual of this model to
check the connection.
Hubs Not Supported
USB HUB is not supported on this unit.
Load
The changer is loading the disc.
tWait until loading is complete.
Local Seek +/–
The local seek mode is on during automatic tuning.
NO Album Name
An album name is not written in the track.
NO Artist Name
An artist name is not written in the track.
NO Device
(SOURCE) is selected without a USB device
connected. A USB device or a USB cable has been
disconnected during playback.
tBe sure to connect a USB device and USB cable.
NO Disc
The disc is not inserted in the CD/MD changer.
tInsert discs in the changer.
NO Disc Name
A disc/album/group/track name is not written in the
track.
NO ID3 Tag*
ID3 tag information is not written in the MP3 file.
NO Magazine
The disc magazine is not inserted in the CD changer.
tInsert the magazine in the changer.
NO Music
The disc/USB device does not contain a music file.
tInsert a music CD in this unit or MP3 playable
changer.
tConnect a USB device with a music file in it.
NO Track
3
1
The selected item in the USB device does not
contain an album/track.
NO Track Name
A track name is not written in the track.
Not Read
The disc information has not been read by the unit.
tLoad the disc, then select it on the list.
Not Ready
The lid of the MD changer is open or the MDs are not
inserted properly.
tClose the lid or insert the MDs properly.
Not Supported
The connected USB device is not supported.
t Connect a USB device of Mass Storage Class
(page 20).
Offset
There may be an internal malfunction.
t Check the connection. If the error indication
remains on in the display, consult your nearest
Sony dealer.
Overload
USB device is overloaded.
t Disconnect the USB device, then change the source
by pressing (SOURCE).
t Indicates that the USB device is out of order, or an
unsupported device is connected.
Read
The unit is reading all track and album/group
information on the disc/USB device.
t Wait until reading is complete and playback starts
automatically. Depending on the disc/USB device
structure, it may take more than a minute.
Push Reset
The CD unit and CD/MD changer cannot be operated
because of some problem.
t Press the RESET button (page 4).
“” or “”
During fast-forward or reverse, you have reached the
beginning or the end of the disc and you cannot go any
further.
“”
The character cannot be displayed with the unit.
*1 The disc number of the disc causing the error
appears in the display.
*2 If an error occurs during playback of a CD or MD,
the disc number of the CD or MD does not appear
in the display.
*3 When a CD changer is connected.
If these solutions do not help improve the situation,
consult your nearest Sony dealer.
If you take the unit to be repaired because of CD
playback trouble, bring the disc that was used at the
time the problem began.
Support site
If you have any questions or for the latest
support information on this product, please
visit the web site below:
Customers in Latin America:
http://esupport.sony.com/ES/LA/
Customers in Pan Asia:
http://www.css.ap.sony.com/
http://www.sony-asia.com/caraudio/
25
Page 26

Autoestéreo para disco compacto
Para obtener información sobre la instalación
y las conexiones, consulte el manual de
instalación/conexiones suministrado.
Esta etiqueta está situada en la parte inferior
del chasis.
“ATRAC ”, “ATR AC AD ”, S on icSt ag e y s us
respectivos logotipos son marcas comerciales de
Sony Corporation.
“WALKMAN” y el logotipo de “WALKMAN”
son marcas comerciales registradas de Sony
Corporation.
Microsoft, Windows Media
y el logotipo de Windows
son marcas comerciales o
registradas de Microsoft Corporation en
Estados Unidos o en otros países.
marcas comerciales
Advertencia: si el encendido del
automóvil no dispone de una posición
ACC
Asegúrese de ajustar la función de
desconexión automática (página 18).
La unidad se apagará completa y
automáticamente en el tiempo establecido
después de apagarla, lo cual evita que se agote
la batería.
Si no ajusta la función de desconexión
automática, mantenga presionado (OFF) hasta
que se apague la pantalla cada vez que apague
el motor.
2
Page 27

Tabla de contenido
Bienvenido. . . . . . . . . . . . . . . . . . . . . . . . . . . . . 4
Procedimientos iniciales
Restauración de la unidad . . . . . . . . . . . . . . . . . 5
Preparación del control remoto de tarjeta . . . . . 5
Ajuste del reloj . . . . . . . . . . . . . . . . . . . . . . . . . 5
Extracción del panel frontal. . . . . . . . . . . . . . . . 6
Colocación del panel frontal. . . . . . . . . . . . . 6
Inserción del disco en la unidad . . . . . . . . . . . . 6
Expulsión del disco. . . . . . . . . . . . . . . . . . . . 7
Ajuste del ángulo del panel frontal . . . . . . . . . . 7
Ubicación de los controles y
operaciones básicas
Unidad principal . . . . . . . . . . . . . . . . . . . . . . 8
Control remoto de tarjeta RM-X156. . . . . . 10
Búsqueda de una pista
— Quick-BrowZer . . . . . . . . . . . . . . . . . . . 12
Búsqueda por omisión de elementos
— modo de Omisión. . . . . . . . . . . . . . . . . . 13
CD
Elementos de la pantalla . . . . . . . . . . . . . . . 14
Reproducción repetida . . . . . . . . . . . . . . . . 14
Reproducción aleatoria . . . . . . . . . . . . . . . . 14
Radio
Otras funciones
Cambio de los ajustes de sonido . . . . . . . . . . . 17
Ajuste de las características de sonido. . . . 17
Personalización de la curva de ecualizador
— EQ3 Tune . . . . . . . . . . . . . . . . . . . . . . . 18
Ajuste de los elementos de configuración
— MENU . . . . . . . . . . . . . . . . . . . . . . . . . . . . 18
Uso de equipo opcional. . . . . . . . . . . . . . . . . . 19
Equipo de audio auxiliar . . . . . . . . . . . . . . 19
Cambiador de CD/MD . . . . . . . . . . . . . . . . 20
Mando rotatorio RM-X4S . . . . . . . . . . . . . 21
Información complementaria
Precauciones . . . . . . . . . . . . . . . . . . . . . . . . . . 22
Notas sobre los discos . . . . . . . . . . . . . . . . 22
Acerca de los dispositivos USB . . . . . . . . . 23
Orden de reproducción de los archivos
MP3/WMA/AAC (CD-R/RW o clase de
almacenamiento masivo) . . . . . . . . . . . . . . 23
Acerca de los archivos MP3. . . . . . . . . . . . 23
Acerca de los archivos WMA . . . . . . . . . . 23
Acerca de los archivos AAC . . . . . . . . . . . 23
Mantenimiento . . . . . . . . . . . . . . . . . . . . . . . . 24
Extracción de la unidad. . . . . . . . . . . . . . . . . . 24
Especificaciones . . . . . . . . . . . . . . . . . . . . . . . 25
Solución de problemas . . . . . . . . . . . . . . . . . . 26
Mensajes/indicaciones de error . . . . . . . . . 28
Almacenamiento y recepción de emisoras . . . 15
Almacenamiento automático — BTM . . . . 15
Almacenamiento manual . . . . . . . . . . . . . . 15
Recepción de las emisoras almacenadas. . . 15
Sintonización automática . . . . . . . . . . . . . . 15
Sintonización de una emisora mediante una
lista — LIST . . . . . . . . . . . . . . . . . . . . . . . . 15
Dispositivos USB
Reproducción en el dispositivo USB . . . . . 16
Elementos de la pantalla . . . . . . . . . . . . . . . 16
Audición en un dispositivo de audio de
almacenamiento masivo . . . . . . . . . . . . . . . 16
Escucha de música en un “Walkman”
(dispositivo de audio ATRAC). . . . . . . . . . 17
3
Page 28

Bienvenido
Gracias por adquirir este reproductor de discos
compactos Sony. Mientras maneja puede
disfrutar de las funciones siguientes.
• Reproducción de CD
Puede reproducir discos CD-DA (incluidos CD
TEXT) y CD-R/CD-RW (archivos MP3/WMA/
AAC (página 22)).
Tipos de discos Etiqueta del disco
CD-DA
MP3
WMA
AAC
• Recepción de radio
– Puede almacenar hasta 6 emisoras de radio
por banda (FM1, FM2, FM3, AM1 y AM2).
– BTM (Memoria de la mejor sintonía): la
unidad selecciona las emisoras que emiten la
señal más intensa y las almacena.
• Función búsqueda
– Quick-BrowZer: permite buscar
rápidamente una pista en el CD o dispositivo
USB conectado a esta unidad (página 12).
• Ajuste del sonido
– EQ3 parametric: es posible seleccionar
entre 7 curvas de ecualizador predefinidas y
ajustarlas como desee.
– DSO (Organizador de sonido de baja
frecuencia dinámico): permite crear un campo
de sonido más ambiental, utilizando una
síntesis de altavoces virtuales para mejorar el
sonido de los altavoces, incluso si éstos están
instalados en una posición baja en la puerta.
– Digital Music Plus (DM+): mejora el
sonido comprimido digitalmente, como en el
caso de archivos MP3.
• Configuración de imagen
Es posible establecer que se muestren distintas
imágenes en la unidad.
• Funcionamiento de una unidad
opcional
– Dispositivo USB: es posible conectar al
terminal USB posterior un dispositivo de
almacenamiento masivo de tipo USB o un
“Walkman” (dispositivo de audio ATRAC).
Para obtener más información sobre los
dispositivos que se pueden utilizar, consulte
“Acerca de los dispositivos USB” (página 23)
o el sitio Web de servicio técnico de Sony
(página 29).
– Cambiadores de CD/MD: es posible
conectar cambiadores de CD/MD al BUS de
Sony en la parte posterior de la unidad.
• Conexión de equipos auxiliares
La toma de entrada AUX situada en la parte
frontal de la unidad permite conectar
dispositivos de audio portátiles.
4
Page 29

Procedimientos iniciales
Ajuste del reloj
Restauración de la unidad
Antes de utilizar la unidad por primera vez, o
después de reemplazar la batería del automóvil o
de cambiar las conexiones, debe restaurar la
unidad.
Extraiga el panel frontal y presione el botón
RESET con un objeto puntiagudo, como por
ejemplo un bolígrafo.
Botón RESET
Nota
Al presionar el botón RESET, se borra el ajuste del
reloj y algunos contenidos memorizados.
Preparación del control remoto
de tarjeta
Antes de utilizar el control remoto de tarjeta por
primera vez, retire la película aislante.
El reloj emplea una indicación digital de
12 horas.
1 Mantenga presionado el codificador
multidireccional.
2 Gire el codificador multidireccional
hasta que aparezca “Clock Adjust” y, a
continuación, presiónelo.
Aparece la pantalla de ajuste del reloj.
3 Gire el codificador multidireccional
para ajustar la hora y los minutos.
Para mover la indicación digital, presione el
codificador multidireccional hacia la
izquierda o hacia la derecha.
4 Una vez ajustados los minutos,
presione el codificador
multidireccional.
El reloj se pone en funcionamiento.
Sugerencia
Si desea obtener información sobre cómo sustituir la
pila, consulte “Sustitución de la pila de litio del control
remoto de tarjeta” en la página 24.
5
Page 30

Extracción del panel frontal
Puede extraer el panel frontal de la unidad para
evitar que la roben.
Alarma de precaución
Si gira el interruptor de la llave de encendido
hasta la posición OFF sin haber extraído el panel
frontal, la alarma de precaución sonará durante
unos segundos.
La alarma sonará solamente si se utiliza el
amplificador incorporado.
1 Presione (OFF).
La unidad se apaga.
2 Presione .
El lado izquierdo del panel frontal queda
suelto.
3 Deslice el panel frontal hacia la
izquierda y, a continuación, tire de
éste hacia usted.
Colocación del panel frontal
Coloque el orificio A del panel frontal en el eje
B de la unidad y, a continuación, presione
ligeramente el lado izquierdo hacia adentro.
Presione (SOURCE) en la unidad (o inserte un
disco) para utilizarla.
A
B
Nota
No coloque nada sobre la superficie interior del panel
frontal.
(OFF)
Notas
• No deje caer ni ejerza excesiva presión sobre el
panel frontal y el visualizador.
• No someta el panel frontal al calor ni a temperaturas
altas o excesiva humedad. Evite dejarlo en un
automóvil estacionado o sobre el tablero o la
bandeja trasera.
Inserción del disco en la unidad
1 Presione Z.
El panel frontal se desliza hacia abajo
automáticamente.
2 Inserte el disco (con la etiqueta
orientada hacia arriba).
El panel frontal se desliza hacia arriba
automáticamente y se inicia la reproducción.
6
Page 31

Expulsión del disco
1 Presione Z.
El panel frontal se desliza hacia abajo
automáticamente y se expulsa el disco.
2 Presione Z para cerrar el panel
frontal.
Nota
El panel frontal se desliza hacia arriba
automáticamente 15 segundos después de deslizarse
hacia abajo.
Ajuste del ángulo del panel
frontal
(ANGLE)
1 Mantenga presionado (ANGLE) varias
veces hasta que se ajuste el ángulo
del panel frontal.
El panel frontal puede ajustarse en
3 posiciones.
Para colocar el panel frontal en la posición
predeterminada, mantenga presionado (ANGLE)
varias veces hasta que éste se sitúe en la posición
predeterminada.
Sugerencias
• Cuando el panel frontal se desliza hacia abajo (para
insertar el disco), éste vuelve a la posición que
había ajustado automáticamente.
• El ángulo del panel frontal ajustado se almacena en
la unidad. Al girar la llave de encendido hacia la
posición de apagado, el ángulo vuelve a su posición
predeterminada y, cuando se enciende, el panel
frontal se sitúa en el ángulo que ajustó.
7
Page 32

Ubicación de los controles y operaciones básicas
89 qdq
q
q
q
q
q
Unidad principal
123 645 7
PUSH ENTER / SOUND / MENU
MODE
LIST/
BROWSE
BACK
SOURCE
SHUF
DSPL
SCRL
OFF
AUX
;
Este apartado contiene instrucciones acerca de la
ubicación de los controles y las operaciones
básicas. Si desea obtener más información,
consulte las páginas correspondientes.
Funcionamiento de una unidad USB, consulte
“Dispositivos USB” en la página 16, o de una
unidad opcional (cambiador CD/MD, etc.),
consulte “Uso de equipo opcional” en la
página 19.
Los botones correspondientes en el control
remoto de tarjeta controlan las mismas funciones
que los de la unidad.
A Control (LIST/BROWSE)/
(BACK)
Presione (LIST/BROWSE) hacia arriba: para
visualizar un listado (Radio); acceda al modo
Quick-BrowZer (CD/USB).
Presione (BACK) hacia abajo: para volver a
la pantalla anterior.
B Botón MODE página 15
Para seleccionar la banda de radio (FM/
1
AM)*
; seleccione el modo de reproducción
del dispositivo de audio ATRAC.
C Botón SHUF (aleatorio) página 14, 16
8
a
D Codificador multidireccional
s
Gírelo para: ajustar el volumen/seleccionar
un elemento de menú.
Presiónelo hacia arriba/abajo/izquierda/
derecha para: seleccionar un elemento de
menú.
Presiónelo para: introducir un ajuste de
sonido/aplicar un ajuste.
Manténgalo presionado para: entrar en el
menú.
CD/USB:
Presiónelo hacia arriba/abajo para:
– omitir álbumes (presionar)*
– omitir álbumes en forma continua
(manténgalo presionado)*
Presiónelo hacia la izquierda/derecha para:
– omitir pistas (presionar).
– omitir pistas en forma continuada
(presiónelo una vez, vuelva a presionarlo
transcurridos aproximadamente 2 segundos
y manténgalo presionado).
– retroceder o avanzar una pista (manténgalo
presionado).
Radio:
Presiónelo hacia arriba/abajo para:
– recibir una emisora almacenada.
Presiónelo hacia la izquierda/derecha para:
– sintonizar emisoras en forma automática
(presionar).
– buscar emisoras en forma manual
(manténgalo presionado).
f
2
2
.
g
.
h
Page 33

E Ranura del disco página 6
Para insertar el disco.
F Visualizador
G Botón Z (expulsar)/ANGLE página 7
Para expulsar el disco o deslizar hacia abajo
el panel frontal (presionar); para ajustar el
ángulo del panel frontal en 3 posiciones
distintas (mantener presionado).
H Botón (liberación del panel frontal)
página 6
I Botón SOURCE
Para encender la unidad; para cambiar la
fuente (Radio/CD/USB/AUX)*
1
.
J Botón DSPL (pantalla) página 14
Para cambiar los elementos en pantalla.
K Botón RESET (ubicado detrás del panel
frontal) página 5
L Selector de frecuencias (ubicado en la
parte inferior de la unidad)
Consulte “Selector de frecuencias” en el
manual de instalación/conexiones
suministrado.
M Botón SCRL (desplazamiento)
Para desplazar el elemento de la pantalla.
N Botón OFF
Para apagar la unidad; detener la fuente.
O Toma de entrada AUX página 19
Para conectar un dispositivo de audio
portátil.
P Receptor del control remoto de tarjeta
*1
En caso de que esté conectado un cambiador de
CD/MD; si presiona
conectado (“MD”) aparecerá en la pantalla en
función del dispositivo que esté conectado. Además,
(MODE)
si pulsa
*2 Cuando se reproduce un archivo MP3/WMA/AAC.
(SOURCE)
, podrá cambiar el cargador.
, el dispositivo
9
Page 34

Control remoto de tarjeta
RM-X156
1
2
3
4
5
6
7
OFF
SOURCE SOUND
MENU LIST
+
ENTER
–
DSPL
REP SHUF
132
465
+
VOL
–
ATT
MODE
SCRL
PAU SE
8
9
0
qa
qs
qd
qf
Retire la película de aislamiento antes de usar la
unidad (página 5).
A Botón OFF
Para apagar la unidad; detener la fuente.
B Botón SOURCE
Para encender la unidad; para cambiar la
fuente (Radio/CD/USB/AUX).
C Botón MENU
Para entrar en el menú.
D Botón ENTER
Para aplicar un ajuste.
E Botones </, (SEEK –/+)
Realizan las mismas funciones que cuando se
presiona el codificador multidireccional hacia
la izquierda o hacia la derecha en la unidad.
Es posible ajustar la configuración, los
ajustes de sonido, etc. mediante < ,.
F Botón DSPL (pantalla)
Para cambiar los elementos en pantalla.
G Botón VOL (volumen) +/–
Para ajustar el volumen.
10
Page 35

H Botón ATT (atenuación)
Para atenuar el sonido. Para cancelar esta
función, vuelva a presionarlo.
I Botón SOUND
Para introducir los ajustes de sonido.
J Botón MODE
Para seleccionar la banda de radio (FM/AM);
seleccione el modo de reproducción del
dispositivo de audio ATRAC.
K Botón LIST
Para visualizar un listado (Radio); acceda al
modo Quick-BrowZer (CD/USB).
L Botones M/m (+/–)
Realizan las mismas funciones que cuando
se presiona el codificador multidireccional
hacia arriba o hacia abajo en la unidad.
Es posible ajustar la configuración, los
ajustes de sonido, etc. mediante M m.
M Botón SCRL (desplazamiento)
Para desplazar el elemento de la pantalla.
N Botones numéricos
CD/USB:
(1): REP página 14, 16
(2): SHUF página 14, 16
(6): PAUSE
Para hacer una pausa en la
reproducción. Para cancelar esta
función, vuelva a presionarlo.
Radio:
Para recibir las emisoras almacenadas
(presionar); para almacenar emisoras
(mantener presionado).
Nota
Si la unidad está apagada y desaparece la indicación
de pantalla, no se podrá utilizar con el control remoto de
tarjeta salvo que se presione
se inserte un disco para activarla en primer lugar.
(SOURCE)
en la unidad o
11
Page 36

Búsqueda de una pista — Quick-BrowZer
Puede buscar una pista en un CD o dispositivo USB (“Walkman”/dispositivo de almacenamiento
masivo) fácilmente por categoría.
(LIST/BROWSE):
Para acceder al modo Quick-BrowZer o salir de él.
(BACK):
Para volver a la pantalla anterior.
MODE
LIST/
SHUF
BROWSE
BACK
SOURCE
DSPL
Codificador multidireccional:
Para seleccionar el elemento (girar);
para confirmar el elemento (presionar).
1 Presione (LIST/BROWSE) hacia arriba.
La unidad accede al modo Quick-BrowZer y aparece la lista de categorías de búsqueda.
Los elementos de la pantalla varían, en función del tipo de dispositivo o disco.
2 Gire el codificador multidireccional para seleccionar la categoría de búsqueda
deseada y, a continuación, presiónelo para confirmarla.
3 Repita el paso 2 hasta que se selecciona la pista deseada.
Se inicia la reproducción.
Para volver a la pantalla anterior
Presione (BACK) hacia abajo.
Para salir del modo Quick-BrowZer
Presione (LIST/BROWSE) hacia arriba.
Notas
• Al acceder al modo Quick-BrowZer, se cancela el ajuste de reproducción repetida/aleatoria.
• En función del dispositivo USB, los elementos de la pantalla pueden no aparecer correctamente.
• En función del dispositivo USB, es posible que no se emita sonido durante el modo Quick-BrowZer.
12
Page 37

Búsqueda por omisión de elementos — modo de Omisión
A
C
Cuando varios elementos se encuentran dentro de una misma categoría puede encontrar el elemento
deseado rápidamente.
1 Presione el codificador multidireccional hacia la derecha, en modo Quick-BrowZer.
Aparecerá la siguiente pantalla.
B
A Número del elemento actual
B Número total de elementos en la capa actual
C Nombre de elemento
2 Gire el codificador multidireccional para seleccionar el elemento deseado o uno
próximo a él.
Salta en incrementos del 10 % del número total de elementos.
3 Presione el codificador multidireccional.
Vuelve a la pantalla del modo Quick-BrowZer y aparece el elemento seleccionado.
4 Gire el codificador multidireccional para seleccionar el elemento deseado y
presiónelo.
Si ele elemento seleccionado es una pista empieza la reproducción.
Para cancela el modo de Omisión
Presione (BACK) o presione el codificador multidireccional a la izquierda.
13
Page 38

CD
C
Para obtener más detalles sobre cómo seleccionar
un cambiador de CD/MD, consulte la página 20.
Elementos de la pantalla
Ejemplo: al ajustar el modo Info (información)
en “All” (página 19).
A
A Indicación de la fuente (CD/WMA/MP3/
AAC)
B Reloj
C Número de álbum/Número de pista/Tiempo
de reproducción transcurrido, Nombre de la
pista, Nombre del disco, Nombre de artista,
Nombre del álbum
Para cambiar los elementos de la pantalla C,
presione (DSPL).
Sugerencia
Los elementos que se muestran variarán en función
del tipo de disco, el formato de grabación y los
ajustes. Si desea obtener más información acerca de
los archivos MP3/WMA/AAC, consulte la página 23.
B
Reproducción aleatoria
1 Durante la reproducción, presione
(SHUF) varias veces hasta que
aparezca el ajuste deseado.
Seleccione Para reproducir
Shuffle Album* álbumes en orden
Shuffle Disc discos en orden
* Cuando se reproduce un archivo MP3/WMA/AAC.
Para regresar al modo de reproducción normal,
seleccione “Shuffle off
aleatorio.
aleatorio.
”.
Reproducción repetida
1 Durante la reproducción, presione
(1) (REP) en el control remoto de
tarjeta hasta que aparezca el ajuste
deseado.
Seleccione Para reproducir
Repeat Track pistas en forma repetida.
Repeat Album* álbumes en forma
* Cuando se reproduce un archivo MP3/WMA/AAC.
Para regresar al modo de reproducción normal,
seleccione “Repeat off
repetida.
”.
14
Page 39

Radio
Almacenamiento y recepción
de emisoras
Precaución
Para sintonizar emisoras mientras maneja, utilice
la función BTM (Memoria de la mejor sintonía)
para evitar accidentes.
Almacenamiento automático
— BTM
1 Presione (SOURCE) varias veces hasta
que aparezca “TUNER”.
Para cambiar de banda, presione (MODE)
varias veces. Puede seleccionar entre FM1,
FM2, FM3, AM1 y AM2.
2 Mantenga presionado el codificador
multidireccional.
3 Gire el codificador multidireccional
hasta que aparezca “BTM” y, a
continuación, presiónelo.
La unidad almacena las emisoras en el orden
de frecuencia de la lista de presintonías.
La unidad emite un pitido al almacenar el
ajuste.
Almacenamiento manual
1 Cuando reciba la emisora que desea
almacenar, presione el botón (LIST)
hacia arriba.
Aparecerá la lista de presintonías.
2 Gire el codificador multidireccional
para seleccionar el número de
presintonía.
3 Manténgalo presionado hasta que
aparezca “MEM”.
(con el control remoto de tarjeta)
1 Mientras recibe la emisora que desea
almacenar, mantenga presionado un
botón numérico (de (1) a (6)) hasta
que aparezca “MEM”.
Nota
Si intenta almacenar otra emisora en el mismo botón
numérico, se reemplazará la que estaba almacenada
previamente.
Recepción de las emisoras
almacenadas
1 Seleccione la banda y, a continuación,
presione el codificador
multidireccional hacia arriba o hacia
abajo.
(con el control remoto de tarjeta)
1 Seleccione la banda y, a continuación,
presione un botón numérico (de (1) a
(6)).
Sintonización automática
1 Seleccione la banda y presione el
codificador multidireccional hacia la
izquierda o hacia la derecha para
buscar la emisora.
La búsqueda se detiene cuando la unidad
recibe una emisora. Repita este
procedimiento hasta recibir la emisora
deseada.
Sugerencia
Si conoce la frecuencia de la emisora que desea
escuchar, mantenga presionado el codificador
multidireccional hacia la izquierda o hacia la derecha
para localizar rápidamente la frecuencia aproximada
y, a continuación, presione dicho codificador hacia la
izquierda o hacia la derecha varias veces para ajustar
la frecuencia deseada con mayor precisión
(sintonización manual).
Sintonización de una emisora
mediante una lista — LIST
Puede visualizar un listado de las frecuencias.
1 Seleccione la banda y, a continuación,
presione el botón (LIST) hacia arriba.
Aparecerá la lista de presintonías.
2 Gire el codificador multidireccional
hasta que aparezca la emisora
deseada.
3 Presione el codificador
multidireccional para recibir la
emisora.
La pantalla vuelve al modo de recepción
normal.
15
Page 40

Dispositivos USB
C
Reproducción en el dispositivo
USB
1 Retire el capuchón del conector USB y
conecte el dispositivo USB al conector
USB.
Se inicia la reproducción.
Si ya hay un dispositivo USB conectado,
presione (SOURCE) varias veces hasta que
aparezca “USB” para empezar la reproducción.
Presione (OFF) para detener la reproducción.
Notas
• Antes de extraer un dispositivo USB, asegúrese de
que se ha detenido la reproducción. Si extrae el
dispositivo USB durante la reproducción, es posible
que se dañe la información contenida en el
dispositivo USB.
• No utilice dispositivos USB demasiado grandes o
pesados, ya que se podrán caer debido a la
vibración, o bien, provocar una conexión deficiente.
Elementos de la pantalla
Ejemplo: al ajustar el modo Info (información)
en “All” (página 19).
A
B
*1 Cuando se conecta un dispositivo de audio
AT RA C.
*2 Cuando se conecta un dispositivo de
almacenamiento masivo.
Para cambiar los elementos de la pantalla C,
presione (DSPL).
Sugerencia
Los elementos que se muestran variarán en función
del formato de grabación y los ajustes. Para obtener
más información acerca de los archivos MP3/WMA/
AAC/ATRAC, consulte la página 23.
Nota
La visualización variará en función del dispositivo de
almacenamiento masivo USB y del dispositivo de
audio ATRAC.
Audición en un dispositivo de
audio de almacenamiento masivo
Reproducción repetida y aleatoria
1 Durante la reproducción, presione (1) (REP)
en el control remoto de tarjeta o (SHUF) en la
unidad varias veces hasta que aparezca el
ajuste deseado.
Seleccione Para reproducir
Repeat Track pistas en forma repetida.
Repeat Album álbumes en forma
Shuffle Album álbumes en orden
Shuffle Device dispositivos en orden
Para regresar al modo de reproducción normal,
seleccione “Repeat off” o “Shuffle off”.
repetida.
aleatorio.
aleatorio.
A Indicador ATRAC/WMA/MP3/AAC*
Indicador WMA/MP3/AAC*
B Reloj
C Número de carpeta/Número de pista/Tiempo
de reproducción transcurrido, Nombre de la
pista, Nombre del artista, Nombre del álbum
16
1
2
Page 41

Escucha de música en un
“Walkman” (dispositivo de audio
ATRAC)
1 Durante la reproducción, presione
(MODE) varias veces hasta que
aparezca el ajuste deseado.
El elemento cambia de la manera siguiente:
Album Mode t Track Mode t Genre
Mode t Playlist Mode* t Artist Mode
* Puede que no esté visible dependiendo del
dispositivo.
Reproducción repetida y aleatoria
1 Durante la reproducción, presione (1) (REP)
en el control remoto de tarjeta o (SHUF) en la
unidad varias veces hasta que aparezca el
ajuste deseado.
Seleccione Para reproducir
Repeat Track pistas en forma repetida.
Repeat Album álbumes en forma
repetida.
Repeat Artist artistas en forma
repetida.
Repeat Playlist listas de reproducción en
forma repetida.
Repeat Genre género en forma
repetida.
Shuffle Album álbumes en orden
aleatorio.
Shuffle Artist artistas en orden
aleatorio.
Shuffle Playlist listas de reproducción en
orden aleatorio.
Shuffle Genre género en orden
aleatorio.
Shuffle Device dispositivos en orden
aleatorio.
Para regresar al modo de reproducción normal,
seleccione “Repeat off” o “Shuffle off”.
Otras funciones
Cambio de los ajustes de
sonido
Ajuste de las características de
sonido
1 Presione el codificador
multidireccional.
2 Gírelo hasta que aparezca el elemento
de menú deseado y, a continuación,
presiónelo.
3 Gire el codificador multidireccional
para seleccionar el ajuste y, a
continuación, presiónelo.
El ajuste finalizó.
Después de 3 segundos, se completa el ajuste
y la pantalla vuelve al modo de reproducción/
recepción normal.
Se pueden ajustar los elementos siguientes
(consulte la referencia de página para obtener
más información):
“
z” indica el ajuste predeterminado.
EQ3 parametric
Para seleccionar un tipo de ecualizador:
“Xplod”, “Vocal”, “Edge”, “Cruise”, “Space”,
“Gravity”, “Custom” u “off” (
1
DM+*
Para ajustar la función DM+ en “on” (z) u “off”
(página 4).
DSO
Para seleccionar el modo DSO: “1”, “2”, “3” u
“off” (
z). Cuanto mayor sea el número, mejor
será el efecto.
Balance
Para ajustar el balance entre los altavoces
derecho e izquierdo: “R10” – “0” (
Fader
Para ajustar el balance entre los altavoces frontal
y posterior: “F10” – “0” (
Subwoofer
Para ajustar el volumen del altavoz potenciador
de graves: “+10” – “0” (
(“– ∞” aparecerá con el valor más bajo.)
LPF (Filtro de paso bajo)
Para seleccionar la frecuencia de corte del
altavoz potenciador de graves: “off” (
“125Hz” o “78Hz”.
z).
z) – “L10”
z) – “R10”
z) – “–10”
z),
continúa en la página siguiente t
17
Page 42

AUX Level*
Para ajustar el nivel de volumen de cada equipo
auxiliar conectado. Este ajuste elimina la
necesidad de ajustar el nivel de volumen entre
fuentes (página 19).
Niveles que se pueden ajustar: “+18 dB” –
“0 dB” (
*1 Si está activada la fuente CD/USB.
*2 Si está activada la fuente AUX.
2
z) – “–8 dB”
Personalización de la curva de
ecualizador — EQ3 Tune
“Custom” de EQ3 le permite realizar sus propios
ajustes en el ecualizador.
1 Seleccione una fuente y, a
continuación, presione el codificador
multidireccional.
2 Gire el codificador multidireccional
para seleccionar “EQ3 parametric” y, a
continuación, presiónelo.
3 Gire el codificador multidireccional
para seleccionar “Custom” y, a
continuación, presiónelo hacia la
derecha.
4 Gire el codificador multidireccional
para seleccionar “EQ3 Mode Tune” y, a
continuación, presiónelo.
5 Gire el codificador multidireccional
para seleccionar el rango de
frecuencias que desee entre “LOW”,
“MID” o “HI” y, a continuación,
presiónelo.
6 Gire el codificador multidireccional
para seleccionar la frecuencia central
que desea ajustar y, a continuación,
presiónelo.
Frecuencias que se pueden seleccionar en
cada rango:
LOW: 60 Hz o 100 Hz
MID: 500 Hz o 1,0 kHz
HI: 10,0 kHz o 12,5 kHz
7 Gire el codificador multidireccional
para ajustar la curva de ecualizador.
El nivel de volumen puede ajustarse en
intervalos de 1 dB entre –10 dB y +10 dB.
8 Presione el codificador
multidireccional.
Repita los pasos de 5 a 8 para ajustar el resto
de rangos de frecuencia.
9 Presione (BACK) hacia abajo dos
veces.
La pantalla vuelve al modo de reproducción/
recepción normal.
Para ajustar la curva de ecualizador
predeterminada de fábrica, seleccione “EQ3
Mode Initialize” y “Yes” en el paso 4.
Sugerencia
También es posible ajustar otros tipos de ecualizador.
Ajuste de los elementos de
configuración — MENU
1 Mantenga presionado el codificador
multidireccional.
2 Gírelo hasta que aparezca el elemento
de menú deseado y, a continuación,
presiónelo.
3 Gire el codificador multidireccional
para seleccionar el ajuste y, a
continuación, presiónelo.
El ajuste finalizó.
4 Presione (BACK) hacia abajo.
La pantalla vuelve al modo de reproducción/
recepción normal.
Se pueden ajustar los elementos siguientes
(consulte la referencia de página para obtener
más información):
“
z” indica el ajuste predeterminado.
Setup
Clock Adjust (página 5)
Beep
Para ajustar “on” (z) u “off”.
RM (Mando rotatorio)
Para cambiar la dirección de funcionamiento de
los controles del mando rotatorio.
–“NORM” (
la posición ajustada en fábrica.
– “REV”: cuando monte el mando rotatorio del
lado derecho de la columna de dirección.
Auto off
Para desconectar la alimentación
automáticamente una vez transcurrido un período
de tiempo deseado cuando la unidad está
apagada: “NO” (
“60 min”.
z): para usar el mando rotatorio en
z), “30 sec”, “30 min” o
18
Page 43

Display Receive Mode
(Demostración)
Demo
Para ajustar “on” (z) u “off”.
Image
Para establecer que se muestren distintas
imágenes.
– “Movie 1 (
z) – 3”: para visualizar una
película.
– “SA 1 – 3”: para visualizar el analizador de
espectro.
– “Wall.P 1 – 3”: para visualizar un papel tapiz.
– “off”: para no visualizar ninguna imagen.
Auto Image
Para establecer que se muestren distintas
imágenes.
– “All”: para visualizar repetidamente las
imágenes en todos los modos de pantalla.
– “Movie” (
z): para visualizar una película.
– “SA”: para visualizar el analizador de
espectro.
– “off”: para no visualizar ninguna imagen.
Info (Información)
Para mostrar los elementos (en función de la
fuente, etc.).
–“Simple” (
z): para no mostrar ningún
elemento.
– “All”: para mostrar todos los elementos.
– “Clear”: para que los elementos desaparezcan
automáticamente.
Dimmer
Para cambiar el brillo de la pantalla.
–“Auto” (
z): para que la pantalla se atenúe
automáticamente al encender la luz.
– “on”: para atenuar la pantalla.
– “off”: para desactivar el atenuador.
Illumination
Para cambiar el color de la iluminación, ajuste
“Blue” (
z), “Red” o “Green”.
Black Out
Para desactivar la iluminación de una fuente
automáticamente (por ejemplo, durante la
reproducción de un CD/recepción de radio,
etc.).
– “Black Out on”*
1
: para desactivar la
iluminación si no se efectúa ninguna
operación durante 5 segundos.
– “Black Out off” (
z): para desactivar la función
de apagar la iluminación.
Para volver a activar la luz, presione cualquier
botón.
Auto Scroll
Para desplazar automáticamente los elementos
de la pantalla cuando se cambia de disco, álbum,
grupo o pista.
–“on” (
z): para desplazarlo.
– “off”: para no desplazarlo.
Local (Modo de búsqueda local)
– “off” (
z): para ajustar la recepción normal.
– “on”: para que se sintonicen solamente las
emisoras de señal más intensa.
2
Mono*
(Modo monoaural)
Para mejorar una recepción de FM defectuosa,
seleccione el modo de recepción monoaural.
– “off” (
z): para escuchar las emisiones estéreo
en estéreo.
– “on”: para escuchar las emisiones estéreo en
monoaural.
BTM (página 15)
*1 Cuando la función de desactivación de la pantalla
está activada, la unidad no se puede utilizar con el
control remoto de tarjeta.
*2 Cuando se recibe FM.
Uso de equipo opcional
Equipo de audio auxiliar
Si conecta un dispositivo de audio portátil
opcional a la toma de entrada AUX (minitoma
estéreo) de la unidad y simplemente selecciona la
fuente, podrá escuchar por los altavoces del
automóvil. Puede ajustar cualquier diferencia en
el nivel de volumen entre la unidad y el
dispositivo de audio portátil. Siga este
procedimiento:
Conexión del dispositivo de audio
portátil
1 Apague el dispositivo de audio portátil.
2 Conéctelo a la unidad.
La fuente cambiará automáticamente a
“AU X”.
* Asegúrese de utilizar una clavija recta.
continúa en la página siguiente t
AUX
AUX
Cable de conexión*
(no suministrado)
19
Page 44

3 Baje el volumen de la unidad.
4 Inicie la reproducción en el dispositivo de
audio portátil con un volumen moderado.
5 Seleccione el volumen acostumbrado en la
unidad.
6 Ajuste el nivel de entrada (página 18).
Ajuste del nivel de volumen
Asegúrese de ajustar el volumen de cada equipo
de audio conectado antes de la reproducción.
1 Baje el volumen de la unidad.
2 Presione (SOURCE) varias veces hasta que
aparezca “AUX”.
Aparecerá “AUX Audio”.
3 Inicie la reproducción en el dispositivo de
audio portátil con un volumen moderado.
4 Seleccione el volumen habitual en la unidad.
5 Ajuste el nivel de entrada (página 18).
Omisión de álbumes y discos
1 Durante la reproducción, presione el
codificador multidireccional hacia arriba o
hacia abajo.
Para omitir
un álbum y suéltelo (manténgalo
un álbum
continuamente
discos varias veces.
discos
continuamente
Presione el codificador
multidireccional hacia arriba
o hacia abajo
presionado durante un
momento).
antes de que transcurran
2 segundos después de haberlo
soltado por primera vez.
a continuación, vuelva a
presionarlo antes de que
transcurran 2 segundos y
manténgalo presionado.
Cambiador de CD/MD
Selección del cambiador
1 Presione (SOURCE) varias veces hasta que
aparezca “CD” o “MD”.
2 Presione (MODE) varias veces hasta que
aparezca el cambiador deseado.
Número de unidad, indicación MP3*
Indicación LP2/LP4*
Número del disco/álbum
Se inicia la reproducción.
*1 Cuando se reproduce un archivo MP3.
*2 Cuando se reproduce un disco MDLP.
1
2
Reproducción repetida y aleatoria
1 Durante la reproducción, presione (1) (REP)
en el control remoto de tarjeta o (SHUF) en la
unidad varias veces hasta que aparezca el
ajuste deseado.
Seleccione Para reproducir
Repeat Disc*1un disco varias veces.
Shuffle
Changer
Shuffle All*
*1 Si se conectaron uno o más cambiadores de CD, o
dos o más cambiadores de MD.
*2 Disponible si se conectaron dos o más
cambiadores de MD y uno se encuentra en modo
de reproducción.
Para regresar al modo de reproducción normal,
seleccione “Repeat off” o “Shuffle off”.
Sugerencia
“Shuffle All” no reproduce las pistas en orden aleatorio
entre unidades de CD y cambiadores de MD.
las pistas del cambiador en
orden aleatorio.
2
las pistas de todas las unidades
en orden aleatorio.
20
Page 45

Localización de discos por nombre
— LIST
Puede seleccionar un disco de la lista cuando
haya conectado un cambiador de CD con
capacidad para CD TEXT, o un cambiador de
MD.
Si asigna un nombre al disco, el nombre aparece
en la lista.
1 Durante la reproducción, presione (LIST)
hacia arriba.
Aparece el número o el nombre del disco.
2 Gire el codificador multidireccional hasta que
aparezca el disco deseado.
3 Presiónelo para reproducir el disco.
La pantalla vuelve al modo de reproducción
normal.
• Botón ATT (atenuación)
Para atenuar el sonido. Para cancelar esta
función, vuelva a presionarlo.
• Botón SOUND
Para introducir los ajustes de sonido.
• Control PRESET/DISC
Realiza las mismas funciones que cuando se
gira el codificador multidireccional en la
unidad (presionar y girar).
• Control VOL (volumen)
Realiza las mismas funciones que cuando se
gira el codificador multidireccional en la
unidad (girar).
• Control SEEK/AMS
Realiza las mismas funciones que cuando se
presiona el codificador multidireccional hacia
la izquierda o hacia la derecha en la unidad
(girar o girar y mantener presionado).
Mando rotatorio RM-X4S
Colocación de la etiqueta
Coloque la etiqueta de indicación según el modo
en que instale el mando rotatorio.
D
S
D
N
U
O
S
E
D
O
M
L
SP
D
P
L
M
O
D
E
S
O
U
N
D
Ubicación de los controles
Los botones correspondientes en el mando
rotatorio controlan las mismas funciones que los
de esta unidad.
SOUND
PRESET/
DISC
SOURCE
VOL
La operación de los controles siguientes del
mando rotatorio es distinta que en la unidad.
ATT
DSPL
SEEK/ AMS
MODE
OFF
OFF
Cambio del sentido de
funcionamiento
El sentido de funcionamiento de los controles
está ajustado de fábrica como se muestra a
continuación.
Para aumentar
Para disminuir
Si necesita instalar el mando rotatorio en el lado
derecho de la columna de la dirección, puede
invertir el sentido de funcionamiento.
1 Mientras presiona el control VOL, mantenga
presionado (SOUND).
21
Page 46

Información complementaria
Precauciones
• Si estaciona el automóvil bajo la luz directa del
sol, deje que la unidad se enfríe antes de usarla.
• La antena motorizada se extenderá
automáticamente mientras la unidad se encuentre
en funcionamiento.
Condensación de humedad
En días lluviosos o en zonas muy húmedas, es
posible que se condense humedad en el interior de
las lentes y la pantalla de la unidad. Si esto ocurre, la
unidad no funcionará de forma correcta. En tal caso,
extraiga el disco y espere una hora
aproximadamente hasta que se haya evaporado la
humedad.
Para mantener una alta calidad de
sonido
Asegúrese de no derramar jugos ni refrescos sobre
la unidad o los discos.
Notas sobre los discos
• Para mantener los discos limpios, no toque su
superficie. Tómelos por los bordes.
• Guarde los discos en sus cajas o en los cargadores
de discos cuando no los use.
• No someta los discos al calor ni a altas
temperaturas. Evite dejarlos en un automóvil
estacionado, o sobre el tablero o la bandeja trasera.
• No adhiera etiquetas ni utilice discos con residuos
de pegamento o tinta. Tales discos pueden dejar de
girar durante el uso, lo que provocará una falla de
funcionamiento o daños en el disco.
• Antes de reproducir discos,
límpielos con un paño de
limpieza disponible en el
mercado. Hágalo desde el
centro hacia los bordes. No
utilice disolventes como
bencina, diluyentes, productos
de limpieza comerciales ni
aerosoles antiestáticos para
discos analógicos.
Notas sobre los discos CD-R/CD-RW
• Según el estado del disco o el equipo utilizado
para su grabación, es posible que algunos discos
CD-R/CD-RW no puedan reproducirse en esta
unidad.
• No es posible reproducir un disco CD-R/CD-RW
que no esté finalizado.
• La unidad es compatible con la norma ISO 9660
de formato de nivel 1/nivel 2, con la norma Joliet/
Romeo en cuanto al formato de expansión y con
Multi Session.
• Cantidad máxima de:
– carpetas (álbumes): 150 (incluidas la carpeta raíz
y las carpetas vacías).
– archivos (pistas) y carpetas contenidas en un
disco: 300 (si un nombre de archivo o carpeta
contiene muchos caracteres, este número puede
ser inferior a 300).
– caracteres que se pueden visualizar en el nombre
de una carpeta/archivo: 32 (Joliet) o 64 (Romeo).
• Si el disco se grabó en Multi Session, solamente se
reconoce y reproduce la primera pista del formato
de la primera sesión (cualquier otro formato se
omitirá). La prioridad del formato es CD-DA y
MP3/WMA/AAC.
– Cuando la primera pista es un CD-DA,
solamente se reproduce el CD-DA de la primera
sesión.
– Cuando la primera pista no es un CD-DA, se
reproduce una sesión de MP3/WMA/AAC. Si el
disco no contiene datos en ninguno de estos
formatos, aparece “NO Music”.
• No use discos con etiquetas o autoadhesivos.
Su uso puede producir las siguientes fallas de
funcionamiento:
– Imposibilidad de expulsar el disco (dado que se
despegó la etiqueta o el autoadhesivo y se
obstruye el mecanismo de expulsión).
– Imposibilidad de leer los datos de audio
correctamente (por ejemplo, se interrumpe la
reproducción o simplemente no la hay) debido a
que el calor contrae el autoadhesivo o la etiqueta
y hace que el disco se deforme.
• No se pueden reproducir en esta unidad discos con
formas no estandarizadas (por ejemplo, formas de
corazón, cuadrado o estrella). Si lo intenta, puede
dañar la unidad. No use este tipo de discos.
• No es posible reproducir discos compactos de
8 cm.
22
Discos de música codificados con
tecnologías de protección de los
derechos de autor
Este producto se diseñó para reproducir discos que
cumplen con el estándar Compact Disc (CD).
Recientemente, algunas compañías discográficas
comercializan discos de música codificados con
tecnologías de protección de derechos de autor.
Tenga en cuenta que, entre estos discos, algunos no
cumplen con el estándar CD, por lo que no podrán
reproducirse con este producto.
Nota sobre discos DualDisc
Un DualDisc es un disco de dos caras que combina
material grabado en DVD en una cara con material
de audio digital en la otra cara. Sin embargo, como
el lado del material de audio no cumple con la
norma Compact Disc (CD), no es seguro que la
reproducción pueda hacerse en este producto.
Page 47

Acerca de los dispositivos USB
• Es posible utilizar dispositivos de almacenamiento
masivo y dispositivos de audio ATRAC tipo USB
que cumplan con el estándar USB. Sin embargo,
esta unidad no puede reconocer dispositivos USB
a través de un concentrador USB. Para obtener
más información acerca de la compatibilidad del
dispositivo USB, visite el sitio Web de soporte
técnico de Sony (página 29).
• El códec correspondiente difiere en función del
tipo de dispositivo.
– Almacenamiento masivo: MP3/WMA/AAC
– Dispositivo de audio ATRAC: ATRAC/MP3/
WMA/AAC
• Es posible que no se puedan reproducir archivos
DRM (gestión de derechos digitales) distintos de
AT RA C .
• El número máximo de datos que se pueden
visualizar es el siguiente.
Almacenamiento masivo:
– carpetas (álbumes): 128, archivos (pistas) por
carpeta: 500
Dispositivo de audio ATRAC: ATRAC/MP3/
WMA/AAC
– álbumes/artistas/listas de reproducción/géneros:
65 535, pistas: 65 535
Notas
• Cuando utilice un cable, use el que se ha
suministrado para la conexión con el dispositivo
USB.
• No utilice un dispositivo USB que sea tan grande o
pesado que pueda interferir con las maniobras de
conducción.
• No deje un dispositivo USB dentro de un automóvil
estacionado, ya que podrían producirse fallas de
funcionamiento.
• Es posible que el inicio de la reproducción demore
un poco, en función de la cantidad de datos
grabados.
• Se recomienda realizar una copia de seguridad de
los datos almacenados en los dispositivos USB.
Orden de reproducción de los
archivos MP3/WMA/AAC (CD-R/RW
o clase de almacenamiento
masivo)
MP3/WMA/AAC
Carpeta
(álbum)
Archivo MP3/
WMA/AAC
(pista)
Acerca de los archivos MP3
• MP3, que significa MPEG-1 Audio Layer-3, es un
formato estándar que permite comprimir archivos
de música. Comprime los datos de CD de audio a
aproximadamente 1/10 de su tamaño original.
• Las versiones 1.0, 1.1, 2.2, 2.3 y 2.4 del indicador
ID3 se aplican solamente a archivos MP3. El
indicador ID3 puede tener entre 15/30 caracteres
(versiones 1.0 y 1.1) o entre 63/126 (versiones 2.2,
2.3 y 2.4).
• Al asignar un nombre a un archivo MP3,
asegúrese de añadir la extensión “.mp3” al nombre
del archivo.
• Durante la reproducción de un archivo MP3 de
VBR (Velocidad de bits variable) o al avanzar o
retroceder rápidamente, es posible que el tiempo
de reproducción transcurrido no se muestre con
precisión.
Nota
Si reproduce un archivo MP3 de alta velocidad de bits,
como 320 kbps, el sonido puede ser discontinuo.
Acerca de los archivos WMA
• WMA, que significa Windows Media Audio, es un
formato estándar de compresión de archivos de
música. Comprime los datos de CD de audio a
aproximadamente 1/22* de su tamaño original.
• El indicador de WMA tiene 63 caracteres.
• Al asignar un nombre a un archivo WMA,
asegúrese de añadir la extensión “.wma” al
nombre del archivo.
• Durante la reproducción de un archivo WMA de
VBR (Velocidad de bits variable) o al avanzar o
retroceder rápidamente, es posible que el tiempo
de reproducción transcurrido no se muestre con
precisión.
* solamente los de 64 kbps
Nota
No es posible reproducir archivos con compresión sin
pérdidas.
Acerca de los archivos AAC
• AAC, que significa Advanced Audio Coding, es
un formato estándar de compresión de archivos de
música. Comprime los datos de CD de audio a
aproximadamente 1/11* de su tamaño original.
• El indicador AAC tiene 126 caracteres.
• Al asignar un nombre a un archivo AAC,
asegúrese de añadir la extensión “.m4a” al nombre
del archivo.
• Durante la reproducción de un archivo AAC de
VBR (Velocidad de bits variable) o al avanzar o
retroceder rápidamente, es posible que el tiempo
de reproducción transcurrido no se muestre con
precisión.
* solamente los de 128 kbps
continúa en la página siguiente t
23
Page 48

Nota
1
No es posible reproducir los archivos AAC que se
indican a continuación.
– archivos con formato de compresión sin pérdida
– archivos protegidos por derechos de autor
Si desea realizar alguna consulta o solucionar algún
problema relativo a la unidad que no se trate en este
manual, póngase en contacto con el distribuidor
Sony más cercano.
Mantenimiento
Limpieza de los conectores
Es posible que la unidad no funcione correctamente
si los conectores entre ésta y el panel frontal están
sucios. Para evitar esta situación, extraiga el panel
frontal (página 6) y limpie los conectores con un
hisopo de algodón. No aplique demasiada fuerza, ya
que podría dañar los conectores.
Sustitución de la pila de litio del
control remoto de tarjeta
En condiciones normales, la pila dura
aproximadamente 1 año. (La duración puede ser
menor en función de las condiciones de uso.)
El alcance del control remoto de tarjeta disminuye a
medida que se agota la pila. Sustitúyala por una pila
de litio CR2025 nueva. El uso de cualquier otra pila
podría provocar un incendio o una explosión.
Lado + hacia arriba
2
c
Notas sobre la pila de litio
• Mantenga la pila de litio fuera del alcance de los
niños. Si se ingiriese, póngase en contacto
inmediatamente con un médico.
• Limpie la pila con un paño seco para garantizar un
contacto óptimo.
• Asegúrese de observar la polaridad correcta al
instalarla.
• No sujete la pila con pinzas metálicas, ya que podría
producirse un cortocircuito.
ADVERTENCIA
La pila puede explotar si no se emplea
adecuadamente.
No recargue la pila; tampoco la desmonte ni
la arroje al fuego.
Parte posterior
del panel frontal
Notas
• Por razones de seguridad, apague el motor antes de
limpiar los conectores y extraiga la llave del
interruptor de encendido.
• No toque nunca los conectores directamente con los
dedos ni con ningún dispositivo metálico.
Extracción de la unidad
1 Extraiga el marco de protección.
1Extraiga el panel frontal (página 6).
2Sujete el marco de protección por ambos
bordes y extráigalo.
x
Sustitución del fusible
Al sustituir el fusible, asegúrese
de utilizar uno cuyo amperaje
coincida con el especificado en
el original. Si el fusible se
funde, verifique la conexión de
alimentación y sustitúyalo. Si el
fusible vuelve a fundirse
después de sustituirlo, es
posible que exista alguna falla
de funcionamiento interno. En
tal caso, consulte con el
distribuidor Sony más cercano.
24
Fusible (10 A)
2 Extraiga la unidad.
1Inserte las dos llaves de liberación
simultáneamente hasta escuchar un clic.
El gancho debe
mirar hacia
adentro.
Page 49

2 Tire de las llaves de liberación para extraer
la unidad.
3 Deslice la unidad para extraerla del marco.
Especificaciones
Sección del reproductor de CD
Relación señal-ruido: 120 dB
Respuesta de frecuencia: de 10 a 20 000 Hz
Fluctuación y trémolo: inferior al límite medible
Sección del sintonizador
FM
Rango de sintonización:
de 87,5 a 108,0 MHz (a intervalos de 50 kHz)
de 87,5 a 107,9 MHz (a intervalos de 200 kHz)
Intervalo de sintonización de FM:
50 kHz/200 kHz conmutable
Terminal de antena: conector de antena externa
Frecuencia intermedia: 10,7 MHz/450 kHz
Sensibilidad útil: 9 dBf
Selectividad: 75 dB a 400 kHz
Relación señal-ruido: 67 dB (estéreo), 69 dB (mono)
Distorsión armónica a 1 kHz: 0,5 % (estéreo),
0,3 % (mono)
Separación: 35 dB a 1 kHz
Respuesta de frecuencia: de 30 a 15 000 Hz
AM
Rango de sintonización:
de 531 a 1 602 kHz (a intervalos de 9 kHz)
de 530 a 1 710 kHz (a intervalos de 10 kHz)
Intervalo de sintonización de AM:
9 kHz/10 kHz conmutable
Terminal de antena: conector de antena externa
Frecuencia intermedia: 10,7 MHz/450 kHz
Sensibilidad: 30 µV
Sección del reproductor USB
Interfaz: USB (velocidad máxima)
Corriente máxima: 500 mA
Sección del amplificador de potencia
Salidas: salidas de altavoz (conectores de sellado
seguro)
Impedancia de altavoces: de 4 a 8 Ω
Salida máxima de potencia: 52 W × 4 (a 4 Ω)
Generales
Salidas:
Terminal de salidas de audio (frontal/posterior)
Terminal de salida de altavoz potenciador de
graves (mono)
Terminal de control del relé de la antena
motorizada
Terminal de control del amplificador de potencia
Entradas:
Terminal de control ATT de teléfono
Terminal de control de iluminación
Terminal de entrada de control BUS
Terminal de entrada de audio BUS
Terminal de entrada del control remoto
Terminal de entrada de la antena
Toma de entrada AUX (minitoma estéreo)
Terminal de entrada de señal USB
Controles de tono:
Graves: ±10 dB a 60 Hz (XPLOD)
Medios: ±10 dB a 1 kHz (XPLOD)
Agudos: ±10 dB a 10 kHz (XPLOD)
Requisitos de alimentación: batería de automóvil de
cc 12 V (masa negativa)
Dimensiones: aprox. 178 × 50 × 190 mm (an/al/prf)
Dimensiones de montaje: aprox. 182 × 53 × 163 mm
(an/al/prf)
Peso: aprox. 1,6 kg
Accesorios suministrados:
Control remoto de tarjeta: RM-X156
Componentes de instalación y conexiones
(1 juego)
Equipo y accesorios opcionales:
Mando rotatorio: RM-X4S
Cable BUS (suministrado con un cable con
terminales RCA): RC-61 (1 m), RC-62 (2 m)
Cambiador de CD (10 discos): CDX-757MX,
CDX-656X
Selector AUX-IN: XA-300
Adaptador de interfaz para iPod: XA-120IP
Es posible que su distribuidor no comercialice
algunos de los accesorios que figuran en la lista
anterior. Si desea obtener más detalles, póngase en
contacto con su distribuidor.
Patentes de los EE.UU. y otros países usados con
licencia de Dolby Laboratories.
Tecnología de codificación de audio MPEG
Layer-3 y patentes bajo licencia de Fraunhofer IIS
y Thomson.
Este producto está protegido por los derechos de
propiedad intelectual de Microsoft Corporation.
Queda prohibido el uso o la distribución de esta
tecnología fuera de este producto si no se dispone
de una licencia de Microsoft o una división
autorizada de Microsoft.
continúa en la página siguiente t
25
Page 50

Los proveedores de contenidos utilizan la
tecnología de gestión de derechos digitales para
Windows Media contenida en este dispositivo
(“WM-DRM”) para proteger la integridad de su
contenido (“Contenido seguro”) para que no se
realice un uso inapropiado de su propiedad
intelectual, incluyendo el copyright.
Este dispositivo utiliza software WM-DRM para
reproducir Contenido seguro (“Software WMDRM”). Si la seguridad del Software WM-DRM
de este dispositivo está en peligro, los propietarios
de los Contenido seguro (“Propietarios del
contenido seguro”) pueden solicitar que Microsoft
revoque el derecho del Software WM-DRM a
adquirir nuevas licencias para copiar, visualizar y/o
reproducir Contenido seguro. La revocación no
afecta a la capacidad del Software WM-DRM para
reproducir contenido no protegido. Se envía al
dispositivo una lista del Software WM-DRM
revocado cuando descarga una licencia para
Contenido seguro de Internet o de un PC. En
conjunción con esta licencia, Microsoft puede
descargar también listas de revocación en su
dispositivo de parte del programa de propietarios
de contenidos seguros.
Nota
Esta unidad no puede conectarse a un
preamplificador digital ni a un ecualizador que sea
compatible con el sistema BUS de Sony.
El diseño y las especificaciones están sujetos a
cambios sin previo aviso.
• Ciertas placas del circuito impreso no contienen
retardantes de llama halogenados.
• Los chasis impresos no contienen retardantes de
llama halogenados.
• Para el material de relleno y protección se ha
utilizado papel.
Solución de problemas
La siguiente lista de comprobación le ayudará a
solucionar los problemas que puedan producirse con
la unidad.
Antes de consultarla, revise los procedimientos de
conexión y de funcionamiento.
Generales
La unidad no recibe alimentación.
• Revise la conexión. Si todo está en orden, compruebe
el fusible.
• Si la unidad está apagada y la pantalla desaparece, no
se puede operar con el control remoto.
tEncienda la unidad.
La antena motorizada no se extiende.
La antena motorizada no dispone de una caja de relé.
26
No se emite el sonido.
• El volumen es demasiado bajo.
• La función ATT está activada o la función ATT de
teléfono (cuando se conecta el cable de interfaz de un
teléfono para automóvil al cable ATT) está activada.
• La posición del control de equilibrio “FAD” no está
ajustada para un sistema de 2 altavoces.
• El cambiador de CD no es compatible con el formato
del disco (MP3/WMA/AAC).
t Reproduzca con un cambiador de CD de Sony
compatible con MP3 o con esta unidad.
No se escuchan pitidos.
• El sonido de los pitidos está cancelado (página 18).
• Se encuentra conectado un amplificador de potencia
opcional y no está usando el amplificador integrado.
El contenido de la memoria se borró.
• Presionó el botón RESET.
t Vuelva a almacenar los datos en la memoria.
• Se desconectó el cable de fuente de alimentación o la
batería.
• El cable de fuente de alimentación no está conectado
correctamente.
Las emisoras almacenadas y la hora correcta
se borraron.
El fusible se fundió.
Se escucha ruido cuando se cambia la
posición de la llave de encendido.
Los cables no se conectaron en forma correcta al
conector de alimentación auxiliar del automóvil.
Durante la reproducción o la recepción, el
modo demostración se inicia.
Si no se realiza ninguna operación durante 5 minutos y
la opción “Demo on” está ajustada, se inicia el modo
de demostración.
t Ajuste “Demo off” (página 19).
Las indicaciones desaparecen de la pantalla o
no aparecen en ella.
• El atenuador está ajustado en “Dimmer on”
(página 19).
• El ángulo del panel frontal no es el adecuado.
t Para ajustar el ángulo del panel frontal, mantenga
presionado (ANGLE) (página 7).
• La pantalla se apaga si mantiene presionado (OFF).
t Mantenga presionado (OFF) en la unidad hasta
que se ilumine la pantalla.
• Los conectores están sucios (página 24).
La función de desconexión automática no
funciona.
La unidad está encendida. La función de desconexión
automática se activa después de apagar la unidad.
t Apague la unidad.
La pantalla se apaga mientras la unidad se
encuentra en funcionamiento.
La función de desactivar pantalla está activada
(página 19).
No es posible utilizar la unidad mediante el
control remoto de tarjeta.
• Si se activa la función de desactivar pantalla (no hay
iluminación), no será posible utilizar el control
remoto de tarjeta (página 19).
• Asegúrese de que ha retirado la lámina de
aislamiento (página 5).
Page 51

La función DSO no está disponible.
Según el tipo de interior del automóvil o el tipo de
música, DSO puede no producir el efecto deseado.
Las imágenes cambian automáticamente.
En el modo Auto Image (imagen automática), no se
puede visualizar la imagen seleccionada.
tPara visualizar solamente la imagen seleccionada,
ajuste “Auto Image off” (página 19).
No se visualiza ningún elemento de la pantalla.
tAjuste “Info All” (página 19).
No es posible ajustar el nivel de volumen.
El dispositivo de audio portátil no estaba conectado
cuando se seleccionó AUX en (SOURCE).
tConecte el dispositivo de audio portátil a la toma de
entrada AUX.
Reproducción de CD/MD
No es posible insertar el disco.
• Ya hay un disco insertado.
• El disco se insertó a la fuerza al revés o de forma
incorrecta.
No se inicia la reproducción.
• Disco defectuoso o sucio.
• Los discos CD-R/CD-RW no son para audio
(página 22).
Los archivos MP3/WMA/AAC tardan más
tiempo en reproducirse que los demás.
El inicio de la reproducción de los siguientes discos
tarda algo más de tiempo.
– disco grabado con una estructura de árbol
complicada.
– disco grabado en Multi Session.
– disco al que es posible añadir datos.
Los elementos de pantalla no se desplazan.
• En el caso de discos con muchos caracteres, es
posible que éstos no se desplacen.
• La opción “Auto Scroll” está desactivada.
t Ajuste “Auto Scroll on” (página 19) o presione
(SCRL) en el control remoto de tarjeta.
Se producen saltos de sonido.
• La instalación no es correcta.
t Instale la unidad en un ángulo inferior a 45° en
una parte firme del automóvil.
• Disco defectuoso o sucio.
Los botones de operación no funcionan.
El disco no se expulsa.
Presione el botón RESET (página 5).
Recepción de radio
No es posible recibir las emisoras.
Hay ruidos que obstaculizan el sonido.
• Conecte un cable de control de antena motorizada
(azul) o un cable de fuente de alimentación auxiliar
(rojo) al cable de fuente de alimentación del
amplificador de antena del automóvil (solamente
cuando el automóvil tenga una antena de FM/AM
integrada en el cristal posterior o lateral).
• Compruebe la conexión de la antena del automóvil.
• La antena automática no se extiende.
t Compruebe la conexión del cable de control de la
antena motorizada.
• Revise la frecuencia.
• Cuando el modo DSO está activado, el sonido se
escucha ocasionalmente con ruido.
t Ajuste el modo DSO en “off” (página 17).
No es posible utilizar la sintonización
programada.
• Almacene la frecuencia correcta en la memoria.
• La señal de emisión es demasiado débil.
No es posible utilizar la sintonización
automática.
• El modo de búsqueda local está ajustado en “on”.
t Ajuste “Local off” (página 19).
• La señal de emisión es demasiado débil.
t Use la sintonización manual.
Durante la recepción de FM, la indicación “ST”
parpadea.
• Sintonice la frecuencia con precisión.
• La señal de emisión es demasiado débil.
t Ajuste “Mono on” (página 19).
Un programa de FM emitido en estéreo se
escucha en monoaural.
La unidad se encuentra en el modo de recepción
monoaural.
t Ajuste “Mono off” (página 19).
Reproducción USB
No es posible reproducir elementos a través de
un concentrador USB.
Esta unidad no puede reconocer dispositivos USB a
través de un concentrador USB.
No se pueden reproducir elementos.
Un dispositivo USB no funciona.
t Vuelva a conectarlo.
Suena un pitido.
El dispositivo USB se ha desconectado durante la
reproducción.
t Antes de desconectar un dispositivo USB,
asegúrese de que se ha detenido la reproducción
para proteger los datos.
El sonido es discontinuo.
Es posible que la discontinuidad del sonido se deba a
una tasa alta de bits de más de 320 kbps.
27
Page 52

Mensajes/indicaciones de error
Blank Disc
No hay pistas grabadas en el MD.
t Reproduzca un MD que tenga pistas grabadas.
Checking
La unidad está confirmando la conexión de un
dispositivo USB.
t Espere a que aparezca la confirmación de que la
conexión ha finalizado.
2
Error*
• El disco está sucio o se insertó al revés.*
tLímpielo o insértelo de forma correcta.
• Se insertó un disco vacío.
• El disco no se reproduce debido a algún problema.
tInserte otro disco.
• El dispositivo USB no ha sido reconocido
automáticamente.
tConéctelo nuevamente.
• Presione Z para extraer el disco.
Failure
La conexión de los altavoces y amplificadores es
incorrecta.
t Consulte el manual de instalación de este modelo
para revisar la conexión.
Hubs Not Supported
El concentrador USB no es compatible con esta
unidad.
Load
El cambiador está cargando el disco.
t Espere hasta que finalice.
Local Seek +/–
El modo de búsqueda local está activado durante la
sintonización automática.
NO Album Name
No se grabó ningún nombre de álbum en la pista.
NO Artist Name
No se grabó ningún nombre de artista en la pista.
NO Device
(SOURCE) se selecciona sin que esté conectado un
dispositivo USB. Se ha desconectado un dispositivo
USB o un cable USB durante la reproducción.
t Asegúrese de conectar un dispositivo USB y un
cable USB.
NO Disc
El disco no está insertado en el cambiador de CD/MD.
t Inserte los discos en el cambiador.
NO Disc Name
No se grabó un nombre de disco/álbum/grupo/pista en
la pista.
NO ID3 Tag*
3
No se grabó la información del indicador ID3 en el
archivo MP3.
NO Magazine
El cargador de discos no está insertado en el cambiador
de CD.
t Inserte el cargador en el cambiador.
1
*
28
NO Music
El disco o dispositivo USB no contiene ningún archivo
de música.
t Inserte un CD de música en esta unidad o en un
cambiador con capacidad para reproducir MP3.
t Conecte un dispositivo USB que contenga algún
archivo de música.
NO Track
El elemento seleccionado en el dispositivo USB no
contiene ningún álbum/pista.
NO Track Name
1
No se grabó ningún nombre de pista en la pista.
Not Read
La unidad no puede leer la información del disco.
t Cargue el disco y, a continuación, selecciónelo en
la lista.
Not Ready
La tapa del cambiador de MD está abierta o los MD no
están insertados correctamente.
t Cierre la tapa o inserte los MD correctamente.
Not Supported
El dispositivo USB conectado no es compatible.
t Conecte un dispositivo USB de almacenamiento
masivo (página 23).
Offset
Es posible que se haya producido una falla interna.
t Revise la conexión. Si el indicador de error
permanece en pantalla, póngase en contacto con el
distribuidor Sony más cercano.
Overload
El dispositivo USB está sobrecargado.
t Desconecte el dispositivo USB y, a continuación,
presione (SOURCE) para cambiar la fuente.
t Indica que el dispositivo USB está fuera de
servicio, o que hay un dispositivo incompatible
conectado.
Read
La unidad está leyendo toda la información de grupos
y álbumes del disco o del dispositivo USB.
t Espere hasta que finalice la lectura y se inicie la
reproducción automáticamente. Es posible que
demore más de un minuto en función de la
estructura del disco o del dispositivo USB.
Push Reset
La unidad de CD y el cambiador de CD/MD no pueden
utilizarse debido a algún problema.
t Presione el botón RESET (página 5).
“” o “”
Durante la operación de avance o retroceso rápido,
llegó al principio o al final del disco, por lo que no es
posible continuar.
“”
No se puede mostrar el carácter con la unidad.
*1 La pantalla muestra el número del disco que causa
el error.
*2 Si se produce un error durante la reproducción de
un CD o MD, el número de disco del CD o MD no
aparece en pantalla.
*3 Si se conecta un cambiador de CD.
Page 53

Si estas soluciones no ayudan a mejorar la situación,
póngase en contacto con el distribuidor Sony más
cercano.
Si entrega la unidad para su reparación a causa de
problemas en la reproducción de CD, lleve el disco
que se utilizó cuando se produjo el problema.
Sitio Web de soporte técnico en
línea
Para resolver cualquier duda u obtener la
información más reciente sobre el soporte
técnico de este producto, visite el siguiente
sitio Web:
Clientes de Latinoamérica:
http://esupport.sony.com/ES/LA/
Clientes en Pan Asia:
http://www.css.ap.sony.com/
http://www.sony-asia.com/caraudio/
29
Page 54

۲۷
Page 55

زا ﻰﻫﺎﮔآ رﻮﻈﻨﻣ ﻪﺑ ﺎﻳ لاﻮﺳ ﻪﻧﻮﮔ ﺮﻫ ﻦﺘﺷاد ترﻮﺻ رد
,لﻮﺼﺤﻣ ﻦﻳا درﻮﻣ رد ﻰﻧﺎﺒﻴﺘﺸﭘ تﺎﻋﻼﻃا ﻦﻳﺮﺗﺪﻳﺪﺟ
:ﺪﻴﻨﻛ نﺪﻳد ﺮﻳز ﺖﻳﺎﺳ بو زا ﺎﻔﻄﻟ
:
http://esupport.sony.com/ES/LA/
:
http://www.css.ap.sony.com/
http://www.sony-asia.com/caraudio/
۲۶
Page 56

هﺎﮕﺘﺳد رد هﺪﺷ بﺎﺨﺘﻧا ﻢﺘﻳآ
.ﺪﺷﺎﺑ ﻰﻤﻧ كاﺮﺗ/مﻮﺒﻟآ ىوﺎﺣ
USB
.ﺖﺳا هﺪﺸﻧ ﻪﺘﺷﻮﻧ كاﺮﺗ رد كاﺮﺗ مﺎﻧ
.ﺖﺳا هﺪﺸﻧ هﺪﻧاﻮﺧ هﺎﮕﺘﺳد ﻂﺳﻮﺗ ﻚﺴﻳد تﺎﻋﻼﻃا
.ﺪﻴﻨﻛ بﺎﺨﺘﻧا ﺖﺴﻴﻟ زا ار نآ ﺲﭙﺳ ,ﺪﻴﻨﻛ ىراﺬﮔرﺎﺑ ار ﻚﺴﻳد
.ﺪﺷﺎﺑ ﻪﺘﺷاد دﻮﺟو ﻰﻠﺧاد دﺮﻜﻠﻤﻋ ءﻮﺳ ﻚﻳ ﺖﺳا ﻦﻜﻤﻣ
Sony
ﻰﻧﻮﺳ هﺪﻨﺷوﺮﻓ ﻦﻳﺮﺘﻜﻳدﺰﻧ ﺎﺑ ,ﺪﻧﺎﻣ ﻰﻣ ﻰﻗﺎﺑ ﺶﻳﺎﻤﻧ
.ﺪﻴﻳﺎﻤﻧ ترﻮﺸﻣ دﻮﺧ
.ﺖﺳا هﺪﺷ ﻞﺻو هﺪﺸﻧ ﻰﻧﺎﺒﻴﺘﺸﭘ هﺎﮕﺘﺳد
ﺮﺑ هوﺮﮔ/مﻮﺒﻟآ و كاﺮﺗ تﺎﻋﻼﻃا مﺎﻤﺗ نﺪﻧاﻮﺧ لﺎﺣ رد هﺎﮕﺘﺳد
USB .ﺪﺷﺎﺑ ﻰﻣ
هﺎﮕﺘﺳد/ﻚﺴﻳد رﺎﺘﺧﺎﺳ ﻪﺑ ﻪﺘﺴﺑ .دﻮﺷ
USB ﻦﻜﻤﻣ ﻦﻳا ,
.ﺪﺸﻜﺑ لﻮﻃ ﻪﻘﻴﻗد ﻚﻳ زا ﺮﺘﺸﻴﺑ ﺖﺳا
.ﺪﻧﻮﺷ ﻪﺘﻓﺮﮔ رﺎﻜﺑ ﻰﻠﻜﺸﻣ
نﺎﻳﺎﭘ ﺎﻳ اﺪﺘﺑا ﻪﺑ ﺎﻤﺷ ,ﻮﻠﺟ ﻪﺑ ﻊﻳﺮﺳ ﺎﻳ ﻦﺘﻓر ﺐﻘﻋ ﻦﻴﺣ رد
.ﺪﻳوﺮﺑ ﺶﻴﭘ ﻦﻳا زا ﺶﻴﺑ ﺪﻴﻧاﻮﺗ ﻰﻤﻧ و ﺪﻳا هﺪﻴﺳر ﻚﺴﻳد
.دﻮﺷ هداد ﺶﻳﺎﻤﻧ هﺎﮕﺘﺳد ﻂﺳﻮﺗ ﺪﻧاﻮﺗ ﻰﻤﻧ ﺮﺘﻛارﺎﻛ
ﺶﻳﺎﻤﻧ ﻪﺤﻔﺻ رد دﻮﺷ ﻰﻣ ﺎﻄﺧ ﺚﻋﺎﺑ ﻪﻛ ﻰﻜﺴﻳد ﻚﺴﻳد هرﺎﻤﺷ
ﻚﻳ ﺶﺨﭘ ﻦﻴﺣ رد ﺮﮔا
CD
ﺎﻳ
,ﺪﺘﻓﺎﻴﺑ قﺎﻔﺗا ﺎﻄﺧ ﻚﻳ
.دﻮﺷ ﻰﻤﻧ ﺮﻫﺎﻇ ﺶﻳﺎﻤﻧ ﻪﺤﻔﺻ رد
.دﻮﺷ ﻰﻣ ﻞﺻو
MD
CD
ﺎﻳ
MD
هﺪﻨﻨﻛ ﺾﻳﻮﻌﺗ ﻚﻳ ﻪﻛ ﻰﻣﺎﮕﻨﻫ
,ﺪﻨﻨﻛ ﻰﻤﻧ دﺎﺠﻳا ﻂﻳاﺮﺷ دﻮﺒﻬﺑ رد ﻰﻜﻤﻛ ﺎﻫ ﻞﺣ هار ﻦﻳا ﺮﮔا
ﻰﻧﻮﺳ هﺪﻨﺷوﺮﻓ ﻦﻳﺮﺘﻜﻳدﺰﻧ ﺎﺑ
Sony.ﺪﻴﻳﺎﻤﻧ ترﻮﺸﻣ دﻮﺧ
CDﺮﻴﻤﻌﺗ ىاﺮﺑ
ﺶﺨﭘ رد ﻞﻜﺸﻣ ﻞﻴﻟد ﻪﺑ ار هﺎﮕﺘﺳد ﺎﻤﺷ ﺮﮔا
هدﺎﻔﺘﺳا درﻮﻣ ﻞﻜﺸﻣ زوﺮﺑ مﺎﮕﻨﻫ رد ﻪﻛ ﻰﻜﺴﻳد ,ﺪﻳﺮﺑ ﻰﻣ
.ﺪﻳروﺎﻴﺑ هاﺮﻤﻫ ﺰﻴﻧ ار ﺖﺳا ﻪﺘﻓﺮﮔ راﺮﻗ
۲۵
NO Track
NO Track Name
Not Read
Not Ready
هﺪﻨﻨﻛ ﺾﻳﻮﻌﺗ شﻮﭘردMD ﺎﻳ ﺖﺳا زﺎﺑ MDﺢﻴﺤﺻ رﻮﻄﺑ ﺎﻫ
.ﺪﻧا هﺪﺸﻧ دراو
Not Supported
هﺎﮕﺘﺳدUSB.دﻮﺷ ﻰﻤﻧ ﻰﻧﺎﺒﻴﺘﺸﭘ هﺪﺷ ﻞﺻو
.(۲۰ ﻪﺤﻔﺻ)
Offset
Overload
هﺎﮕﺘﺳدUSB.ﺖﺳا هﺪﺷ ىراﺬﮔرﺎﺑ دﺎﻳز
(SOURCE).ﺪﻴﻫد ﺮﻴﻴﻐﺗ
هﺎﮕﺘﺳد/ﻚﺴﻳد ىور
Push Reset
هﺎﮕﺘﺳدCD هﺪﻨﻨﻛ ﺾﻳﻮﻌﺗ و CD/MDﻪﺑ ﺎﻨﺑ ﺪﻨﻧاﻮﺗ ﻰﻤﻧ
.دﻮﺷ ﻰﻣ ﺮﻫﺎﻇ
ﻚﺴﻳد هرﺎﻤﺷ
CD
T
T ﺎﻳ ﺪﻳﺪﻨﺒﺑ ار شﻮﭘردMD.ﺪﻴﻨﻛ دراو ﺢﻴﺤﺻ رﻮﻄﺑ ار ﺎﻫ
T هﺎﮕﺘﺳد ﻚﻳUSBﺪﻴﻨﻛ ﻞﺻو ار هﻮﺒﻧا ىزﺎﺳ هﺮﻴﺧذ ﻪﺘﺳد
Tﻪﺤﻔﺻ ىور ﺮﺑ ﺎﻄﺧ ﺮﮕﻧﺎﺸﻧ ﺮﮔا .ﺪﻴﻨﻛ ﻰﻨﻴﺑزﺎﺑ ار لﺎﺼﺗا
TهﺎﮕﺘﺳدUSB نداد رﺎﺸﻓ ﺎﺑ ار ﻊﺒﻨﻣ ﺲﭙﺳ ,ﺪﻴﻨﻛ ﻊﻄﻗ ار
Tهﺎﮕﺘﺳد ﻪﻛ ﺖﺳا ﻰﻨﻌﻣ ﻦﻳا ﻪﺑUSB ﻚﻳ ﺎﻳ ,ﺖﺳا باﺮﺧ
Read
Tعوﺮﺷ رﺎﻛدﻮﺧ رﻮﻄﺑ ﺶﺨﭘ و دﻮﺷ مﺎﻤﺗ نﺪﻧاﻮﺧ ﺎﺗ ﺪﻴﻨﻛ ﺮﺒﺻ
T ﻪﻤﻛدRESET.(۴ ﻪﺤﻔﺻ) ﺪﻴﻫد رﺎﺸﻓ ار
ﺎﻄﺧ ىﺎﻫ مﺎﻐﻴﭘ/ﺎﻫ ﺶﻳﺎﻤﻧ
۱
هﺎﮕﺘﺳد لﺎﺼﺗا ﺪﻴﻳﺎﺗ لﺎﺣ رد هﺎﮕﺘﺳدUSB.ﺪﺷﺎﺑ ﻰﻣ
۱
.ﺪﻴﻫد رﺎﺸﻓ ﻚﺴﻳد ندﺮﻛ جرﺎﺧ ىاﺮﺑ ار
.ﺖﺳا ﺖﺳردﺎﻧ ﺎﻫ هﺪﻨﻨﻛ ﺖﻳﻮﻘﺗ/ﺎﻫﻮﮔﺪﻨﻠﺑ لﺎﺼﺗا
Hubs Not Supported
.ﺖﺳا ﻚﺴﻳد ىراﺬﮔرﺎﺑ لﺎﺣ رد هﺪﻨﻨﻛ ﺾﻳﻮﻌﺗ
.ﺖﺳا ﻦﺷور رﺎﻛدﻮﺧ ﻰﺑﺎﻳ جﻮﻣ ﻦﻴﺣ رد ﻰﻠﺤﻣ ىﻮﺠﺘﺴﺟ ﺖﻟﺎﺣ
.ﺖﺳا هﺪﺸﻧ ﻪﺘﺷﻮﻧ كاﺮﺗ رد مﻮﺒﻟآ ﻚﻳ مﺎﻧ
.ﺖﺳا هﺪﺸﻧ ﻪﺘﺷﻮﻧ كاﺮﺗ رد ﺪﻨﻣﺮﻨﻫ مﺎﻧ
هﺎﮕﺘﺳد لﺎﺼﺗا نوﺪﺑ
ﻚﻳ .ﺖﺳا هﺪﺷ بﺎﺨﺘﻧا
.ﺖﺳا هﺪﺷ ﻊﻄﻗ ﺶﺨﭘ ﻦﻴﺣ رد
"" ﺎﻳ ""
""
*۱
*۲
.ﺖﺳا هﺪﺸﻧ ﻪﺘﺷﻮﻧ كاﺮﺗ رد كاﺮﺗ/هوﺮﮔ/مﻮﺒﻟآ/ﻚﺴﻳد مﺎﻧ
*۳
USB
USB
هﺪﻨﻨﻛ ﺾﻳﻮﻌﺗ رد ﻚﺴﻳد نﺰﺨﻣCD.ﺖﺳا هﺪﺸﻧ دراو
ﻞﺑﺎﻛ ﻚﻳ ﺎﻳ
هﺪﻨﻨﻛ ﺾﻳﻮﻌﺗ رد ﻚﺴﻳدCD/MD.ﺖﺳا هﺪﺸﻧ دراو
Blank Disc
ىور ﺮﺑ ﺎﻫ كاﺮﺗMD.ﺪﻧا هﺪﺸﻧ ﻂﺒﺿ *
T ﻚﻳMD.ﺪﻴﻨﻛ ﺶﺨﭘ ار هﺪﺷ ﻂﺒﺿ ىﺎﻫ كاﺮﺗ ﺎﺑ
Checking
T.دﺮﻴﮔ نﺎﻳﺎﭘ لﺎﺼﺗا ﺪﻴﻳﺎﺗ ﺎﺗ ﺪﻴﻧﺎﻤﺑ ﺮﻈﺘﻨﻣ
۲
*Error
T.ﺪﻴﻨﻛ دراو ﺢﻴﺤﺻ رﻮﻄﺑ ﺎﻳ ﺪﻴﻨﻛ ﺰﻴﻤﺗ ار ﻚﺴﻳد
T.ﺪﻴﻨﻛ دراو ار ىﺮﮕﻳد ﻚﺴﻳد
T.ﺪﻴﻨﻛ ﻞﺻو هرﺎﺑود ار نآ
Z
Failure
Tلﺎﺼﺗا ﻰﻨﻴﺑزﺎﺑ ىاﺮﺑ ار لﺪﻣ ﻦﻳا لﺎﺼﺗا ﺐﺼﻧ ىﺎﻤﻨﻫار
.ﺪﻴﻳﺎﻤﻧ ﻪﻈﺣﻼﻣ
بﺎﻫUSB.دﻮﺷ ﻰﻤﻧ ﻰﻧﺎﺒﻴﺘﺸﭘ هﺎﮕﺘﺳد ﻦﻳا ﺎﺑ
Load
T.دﻮﺷ ﻞﻣﺎﻛ ىراﺬﮔرﺎﺑ ﺎﺗ ﺪﻴﻨﻛ ﺮﺒﺻ
Local Seek +/–
NO Album Name
NO Artist Name
NO Device
(SOURCE)
هﺎﮕﺘﺳد
USB
T هﺎﮕﺘﺳد ﻚﻳ ﻪﻛ ﺪﻳﻮﺷ ﻦﺌﻤﻄﻣUSB ﻞﺑﺎﻛ وUSB ﻞﺻو ار
.ﺪﻴﻨﻛ ﻰﻣ
NO Disc
T.ﺪﻴﻨﻛ دراو هﺪﻨﻨﻛ ﺾﻳﻮﻌﺗ رد ار ﺎﻫ ﻚﺴﻳد
NO Disc Name
۳
*NO ID3 Tag
ﺐﺴﭼﺮﺑ تﺎﻋﻼﻃاID3 ﻞﻳﺎﻓ رد MP3.ﺖﺳا هﺪﺸﻧ ﻪﺘﺷﻮﻧ
NO Magazine
T.ﺪﻴﻨﻛ دراو هﺪﻨﻨﻛ ﺾﻳﻮﻌﺗ رد ار نﺰﺨﻣ
NO Music
هﺎﮕﺘﺳد/ﻚﺴﻳدUSB.ﺖﺴﻴﻧ ﻰﻘﻴﺳﻮﻣ ﻞﻳﺎﻓ ىوﺎﺣ
Tﻚﻳ CD ﻞﺑﺎﻗ هﺪﻨﻨﻛ ﺾﻳﻮﻌﺗ ﺎﻳ هﺎﮕﺘﺳد ﻦﻳا ﻪﺑ ار ﻰﻘﻴﺳﻮﻣ
ﺶﺨﭘ MP3.ﺪﻴﻨﻛ دراو
T هﺎﮕﺘﺳد ﻚﻳ USB.ﺪﻴﻨﻛ ﻞﺻو نآ رد ﻰﻘﻴﺳﻮﻣ ﻞﻳﺎﻓ ﺎﺑ ار
• .ﺖﺳا هﺪﺷ دراو ﻪﺗ و ﺮﺳ ﺎﻳ ﺖﺳا ?ﻴﺜﻛ ﻚﺴﻳد*
•.ﺖﺳا هﺪﺷ دراو ﻰﻟﺎﺧ ﻚﺴﻳد ﻚﻳ
•.دﻮﺷ ﺶﺨﭘ ﺪﻧاﻮﺗ ﻰﻤﻧ ﻰﻠﻜﺸﻣ ﻞﻴﻟد ﻪﺑ ﻚﺴﻳد
• هﺎﮕﺘﺳد USB .ﺪﺸﻧ هداد ﺺﻴﺨﺸﺗ رﺎﻛدﻮﺧ رﻮﻄﺑ
•
Page 57

ﻮﻳدار ﺖﻓﺎﻳرد
.دﺮﻛ ﺖﻓﺎﻳرد ناﻮﺗ ﻰﻤﻧ ار ﺎﻫ هﺎﮕﺘﺴﻳا
.دﻮﺷ ﻰﻣ ﻞﺘﺨﻣ ﺎﻫ ﺖﻳزارﺎﭘ ﻂﺳﻮﺗ اﺪﺻ
ﻞﻴﺒﻣﻮﺗا ﻦﺘﻧآ هﺪﻨﻨﻛ ﺖﻳﻮﻘﺗ ﻚﻳ قﺮﺑ ﻊﺒﻨﻣ ﻢﻴﺳ ﻪﺑ ار (ﺰﻣﺮﻗ)
ﻦﺘﻧآ ىاراد ﺎﻤﺷ ﻞﻴﺒﻣﻮﺗا ﻪﻛ ﻰﻣﺎﮕﻨﻫ ﺎﻬﻨﺗ) ﺪﻴﻨﻛ ﻞﺻو
FM/
AM.(ﺪﺷﺎﺑ ﻰﻣ ىرﺎﻨﻛ/ﺐﻘﻋ ﻪﺸﻴﺷ رد ﻰﻠﺧاد
T.ﺪﻴﻨﻛ ﻰﻨﻴﺑزﺎﺑ ار ﻰﻗﺮﺑ ﻦﺘﻧآ لﺮﺘﻨﻛ ﻢﻴﺳ لﺎﺼﺗا
.دﻮﺷ ﻰﻣ لﻼﺘﺧا رﺎﭼد ﺖﻳزارﺎﭘ
.(۱۵ ﻪﺤﻔﺻ) ﺪﻴﻫد راﺮﻗ
"off"
Tﺔﻟﺎﺣ
DSO
ىور ﺮﺑ ار
.ﺖﺴﻴﻧ ﻦﻜﻤﻣ هﺪﺷ ﻢﻴﻈﻨﺗ ﺶﻴﭘ زا ﻰﺑﺎﻳ جﻮﻣ
.ﺖﺴﻴﻧ ﻦﻜﻤﻣ رﺎﻛدﻮﺧ ﻰﺑﺎﻳ جﻮﻣ
"on"
.دراد راﺮﻗ
.(۱۶ ﻪﺤﻔﺻ) ﺪﻴﻨﻛ ﻢﻴﻈﻨﺗ
"
Local off
T ىور ﺮﺑ
"
T.ﺪﻴﻫد مﺎﺠﻧا ار ﻰﺘﺳد ﻰﺑﺎﻳ جﻮﻣ
ﺖﻓﺎﻳرد ﻦﻴﺣ ردFM ﺮﮕﻧﺎﺸﻧ ,"ST".ﺪﻧز ﻰﻣ ﻚﻤﺸﭼ
T"Mono on".(۱۶ ﻪﺤﻔﺻ) ﺪﻴﻨﻛ ﻢﻴﻈﻨﺗ ار
ﻪﻣﺎﻧﺮﺑ ﺶﺨﭘ ﻚﻳ
.دﻮﺷ ﻰﻣ هﺪﻴﻨﺷ لارﻮﻧﻮﻣ ترﻮﺼﺑ ﻮﻳﺮﺘﺳا رد
FM
.دراد راﺮﻗ لارﻮﻧﻮﻣ ﺖﻓﺎﻳرد ﺖﻟﺎﺣ رد هﺎﮕﺘﺳد
T"Mono off".(۱۶ ﻪﺤﻔﺻ) ﺪﻴﻨﻛ ﻢﻴﻈﻨﺗ ار
ﺶﺨﭘ
USB
بﺎﻫ ﻖﻳﺮﻃ زا ار ﺎﻫ ﻢﺘﻳآ ﺪﻴﻧاﻮﺗ ﻰﻤﻧ ﺎﻤﺷUSB.ﺪﻴﻨﻛ ﺶﺨﭘ
ىﺎﻫ هﺎﮕﺘﺳد ﺪﻧاﻮﺗ ﻰﻤﻧ هﺎﮕﺘﺳد ﻦﻳاUSBبﺎﻫ ﻖﻳﺮﻃ زا ار
USB.ﺪﻫد ﺺﻴﺨﺸﺗ
.دﺮﻛ ﺶﺨﭘ ار ﺎﻫ ﻢﺘﻳآ ناﻮﺗ ﻰﻤﻧ
ﻚﻳUSB.ﺪﻨﻛ ﻰﻤﻧ رﺎﻛ
T.ﺪﻴﻨﻛ ﻞﺻو هرﺎﺑود ار نآ
.ﺪﺳر ﻰﻣ شﻮﮔ ﻪﺑ قﻮﺑ ىاﺪﺻ ﻚﻳ
هﺎﮕﺘﺳد ,ﺶﺨﭘ ﻦﻴﺣ ردUSB.ﺖﺳا هﺪﺷ ﻊﻄﻗ
.ﺪﻴﻨﻛ ?ﻗﻮﺘﻣ ﺎﻫ هداد زا ﺖﻈﻓﺎﺤﻣ ىاﺮﺑ
T هﺎﮕﺘﺳد ﻚﻳ ندﺮﻛ ﻊﻄﻗ زا ﺶﻴﭘUSBار ﺶﺨﭘ ﺎﻤﺘﺣ اﺪﺘﺑا ,
.دﻮﺷ ﻰﻣ ﻞﺻو و ﻊﻄﻗ اﺪﺻ
رد ﺖﻴﺑ ﻮﻠﻴﻛ ۳۲۰زا ﺮﺘﺸﻴﺑ ىﻻﺎﺑ ﺖﻴﺑ خﺮﻧ رد ﺖﺳا ﻦﻜﻤﻣ اﺪﺻ
.دﻮﺷ ﻞﺻو و ﻊﻄﻗ ﻪﻴﻧﺎﺛ
.دﻮﺷ ﻰﻣ ﻮﺤﻣ ﺶﻳﺎﻤﻧ ﻪﺤﻔﺻ ﺖﺳا رﺎﻛ لﺎﺣ رد هﺎﮕﺘﺳد ﻪﻜﻴﻟﺎﺣ رد
.(۱۶ ﻪﺤﻔﺻ) ﺖﺳا هﺪﺷ ﻢﻴﻈﻨﺗ ﻦﺷور ىور ﺮﺑ ﻞﻣﺎﻛ ﻊﻄﻗ دﺮﻜﻠﻤﻋ
.ﺖﺴﻴﻧ ﻦﻜﻤﻣ ترﺎﻛ رود هار زا لﺮﺘﻨﻛ هﺎﮕﺘﺳد تﺎﻴﻠﻤﻋ
•ﻰﺒﻧﺎﺟ قﺮﺑ ﻊﺒﻨﻣ ﻢﻴﺳ ﺎﻳ (ﻰﺑآ) ﻰﻗﺮﺑ ﻦﺘﻧآ لﺮﺘﻨﻛ ﻢﻴﺳ ﻚﻳ
.(۱۶ ﻪﺤﻔﺻ) ﺖﺴﻴﻧ ﻦﻜﻤﻣ ترﺎﻛ رود هار زا لﺮﺘﻨﻛ هﺎﮕﺘﺳد
•.ﺪﻴﻨﻛ ﻰﻨﻴﺑزﺎﺑ ار ﻞﻴﺒﻣﻮﺗا ﻦﺘﻧآ لﺎﺼﺗا
•.ﺖﻓر ﺪﻫاﻮﺨﻧ ﻻﺎﺑ رﺎﻛدﻮﺧ ﻦﺘﻧآ
•.ﺪﻴﻨﻛ ﻰﻨﻴﺑزﺎﺑ ار ﺲﻧﺎﻛﺮﻓ
• ﺔﻟﺎﺣ ﻪﻛ ﻰﻣﺎﮕﻨﻫDSOﺎﺑ تﺎﻗوا ﻰﻫﺎﮔ اﺪﺻ ,ﺖﺳا ﻦﺷور
•.ﺪﻴﻨﻛ هﺮﻴﺧذ ار ﻪﻈﻓﺎﺣ رد ﺢﻴﺤﺻ ﺲﻧﺎﻛﺮﻓ
•.ﺖﺳا ?ﻴﻌﺿ رﺎﻴﺴﺑ ﺶﺨﭘ لﺎﻨﮕﻴﺳ
• ىور ﺮﺑ ﻰﻠﺤﻣ ىﻮﺠﺘﺴﺟ ﺖﻟﺎﺣ
•.ﺖﺳا ?ﻴﻌﺿ رﺎﻴﺴﺑ ﺶﺨﭘ لﺎﻨﮕﻴﺳ
•.ﺪﻴﻨﻛ ﻰﺑﺎﻳ جﻮﻣ ﺢﻴﺤﺻ رﻮﻄﺑ ار ﺲﻧﺎﻛﺮﻓ
•.ﺖﺳا ?ﻴﻌﺿ رﺎﻴﺴﺑ ﺶﺨﭘ لﺎﻨﮕﻴﺳ
ار هﺪﺷ بﺎﺨﺘﻧا ﺮﻳﻮﺼﺗ ناﻮﺗ ﻰﻤﻧ رﺎﻛدﻮﺧ ﺮﻳﻮﺼﺗ ﺖﻟﺎﺣ رد
.ﺪﻧﻮﺷ ﻰﻤﻧ هداد ﺶﻳﺎﻤﻧ ,ﺶﻳﺎﻤﻧ ﻪﺤﻔﺻ ىﺎﻫ ﻢﺘﻳآ مﺎﻤﺗ
,ﻰﻘﻴﺳﻮﻣ عﻮﻧ ﺎﻳ ﻞﻴﺒﻣﻮﺗا ﻞﺧاد عﻮﻧ ﻪﺑ ﻪﺘﺴﺑDSOﺖﺳا ﻦﻜﻤﻣ
.ﺪﺷﺎﺒﻧ رادرﻮﺧﺮﺑ هاﻮﺨﻟد درﻮﻣ هﻮﻠﺟ زا
.ﺪﻨﻨﻛ ﻰﻣ ﺮﻴﻴﻐﺗ رﺎﻛدﻮﺧ رﻮﻄﺑ ﺮﻳوﺎﺼﺗ
.دﺮﻛ ﻢﻴﻈﻨﺗ ار اﺪﺻ ﺢﻄﺳ ناﻮﺗ ﻰﻤﻧ
.ﺪﺸﻧ ﻞﺻو ﻞﻤﺣ ﻞﺑﺎﻗ ﻰﺗﻮﺻ هﺎﮕﺘﺳد
.دﺮﻛ ىراﺬﮔرﺎﺑ ناﻮﺗ ﻰﻤﻧ ار ﻚﺴﻳد
.دﻮﺷ ﻰﻤﻧ ﺶﺨﭘ ﻚﺴﻳد
.(۱۹ ﻪﺤﻔﺻ) ﺪﻨﺘﺴﻴﻧ ﻰﺗﻮﺻ هدﺎﻔﺘﺳا ىاﺮﺑ ﺎﻫ
نآ ﺶﺨﭘ ﺎﺗ ﺪﻨﺸﻛ ﻰﻣ لﻮﻃ ىﺮﺘﺸﻴﺑ نﺎﻣز تﺪﻣ ﺮﻳز ىﺎﻫ ﻚﺴﻳد
.هﺪﻴﭽﻴﭘ ﺖﺧرد رﺎﺘﺧﺎﺳ ﻚﻳ ﺎﺑ هﺪﺷ ﻂﺒﺿ ﻚﺴﻳد ﻚﻳ -
Multi Session
.
ىا ﻪﺴﻠﺟ ﺪﻨﭼ ترﻮﺼﺑ هﺪﺷ ﻂﺒﺿ ﻚﺴﻳد ﻚﻳ -
.ﺪﻧﻮﺷ ﻪﻓﺎﺿا نآ ﻪﺑ ﺪﻨﻧاﻮﺗ ﻰﻣ ﺎﻫ هداد ﻪﻛ ﻚﺴﻳد ﻚﻳ -
.دﺮﻛ روﺮﻣ ناﻮﺗ ﻰﻤﻧ ار ﺶﻳﺎﻤﻧ ىﺎﻫ ﻢﺘﻳآ
ﻦﻜﻤﻣ ﺎﻫ نآ ,ﺮﺘﻛارﺎﻛ ىدﺎﻳز رﺎﻴﺴﺑ داﺪﻌﺗ ﺎﺑ ﺎﻫ ﻚﺴﻳد ىاﺮﺑ
.ﺪﻧﻮﺸﻧ روﺮﻣ ﺖﺳا
.ﺪﻴﻨﻛ ﺐﺼﻧ ﻞﻴﺒﻣﻮﺗا زا
.ﺪﻨﻨﻛ ﻰﻤﻧ رﺎﻛ ىﺮﻴﮔرﺎﻜﺑ ىﺎﻫ ﻪﻤﻛد
.ﺪﺷ ﺪﻫاﻮﺨﻧ جرﺎﺧ ﻚﺴﻳد
.(۴ ﻪﺤﻔﺻ)
.داد ﺶﻳﺎﻤﻧ
off".(۱۶ ﻪﺤﻔﺻ) ﺪﻴﻨﻛ ﻢﻴﻈﻨﺗ
ﻪﻛ ﻰﻣﺎﮕﻨﻫAUX ناﻮﻨﻋ ﻪﺑ (SOURCE),دﻮﺑ هﺪﺷ بﺎﺨﺘﻧا
.ﺪﻴﻨﻛ
CD/MD
ىﺎﻫ ﻞﻳﺎﻓ ﺶﺨﭘMP3/WMA/AACﺮﮕﻳد ىﺎﻫ ﻞﻳﺎﻓ زا ﺮﺘﺸﻴﺑ
.ﺪﺸﻛ ﻰﻣ لﻮﻃ
.دﻮﺷ عوﺮﺷ ﺎﻫ
"Auto Scroll" ىور ﺮﺑ off.ﺖﺳا هﺪﺷ ﻢﻴﻈﻨﺗ
(SCRL).ﺪﻴﻫد رﺎﺸﻓ ار
.دﻮﺷ ﻰﻣ در اﺪﺻ
•تﺎﻴﻠﻤﻋ ,(ﻰﻳﺎﻨﺷور نوﺪﺑ) ﺪﺷﺎﺑ لﺎﻌﻓ ﻞﻣﺎﻛ ﻊﻄﻗ دﺮﻜﻠﻤﻋ ﺮﮔا
•ﺖﺳا هﺪﺷ ﻪﺘﺷادﺮﺑ ﻖﻳﺎﻋ ﺶﻛور ﻪﻛ ﺪﻴﻨﻛ ﻞﺻﺎﺣ نﺎﻨﻴﻤﻃا
DSO.ﺪﻨﻛ ﻰﻤﻧ ﻞﻤﻋ
T ﻪﺑ ,هﺪﺷ بﺎﺨﺘﻧا ﺮﻳﻮﺼﺗ ﺎﻬﻨﺗ ﺶﻳﺎﻤﻧ ىاﺮﺑ"Auto Image
T ﻪﺑ"Info All".(۱۶ ﻪﺤﻔﺻ) ﺪﻴﻨﻛ ﻢﻴﻈﻨﺗ
T ىدورو ﺶﻴﻓ ﻪﺑ ار ﻞﻤﺣ ﻞﺑﺎﻗ ﻰﺗﻮﺻ هﺎﮕﺘﺳدAUXﻞﺻو
ﺶﺨﭘ
•.ﺖﺳا هﺪﺷ ىراﺬﮔرﺎﺑ ﻞﺒﻗ زا ﺮﮕﻳد ﻚﺴﻳد ﻚﻳ
•.ﺖﺳا هﺪﺷ دراو هﺎﺒﺘﺷا ﺖﻬﺟ رد ﺎﻳ ﻪﺗ و ﺮﺳ رﺎﺒﺟا ﺎﺑ ﻚﺴﻳد
•.?ﻴﺜﻛ ﺎﻳ بﻮﻴﻌﻣ ﻚﺴﻳد
•CD-R/CD-RW
•
•
T ﻪﺑ"Auto Scroll on" ﺎﺑ ﺪﻴﻨﻛ ﻢﻴﻈﻨﺗ (۱۶ ﻪﺤﻔﺻ)
•.ﺪﺷﺎﺑ ﻰﻤﻧ ﺢﻴﺤﺻ ﺐﺼﻧ
Tﻢﻜﺤﻣ ﺖﻤﺴﻗ ﻚﻳ رد ﻪﺟرد ۴۵ ﻪﻳواز ﻚﻳ رد ار هﺎﮕﺘﺳد
•.?ﻴﺜﻛ ﺎﻳ بﻮﻴﻌﻣ ﻚﺴﻳد
ﻪﻤﻛد RESET.(۴ ﻪﺤﻔﺻ) ﺪﻴﻫد رﺎﺸﻓ ار
۲۴
Page 58

.دﻮﺷ ﻪﺘﻓﺮﮔ رﺎﻜﺑ رود هار زا لﺮﺘﻨﻛ ﺎﺑ ﺪﻧاﻮﺗ ﻰﻤﻧ نآ
.ﺪﺷﺎﺑ ﻰﻤﻧ ﺖﻳﻮﻘﺗ هﺎﮕﺘﺴﻳا ىاراد ﻰﻗﺮﺑ ﻦﺘﻧآ
ﻢﻴﺳ ﻪﺑ ﻞﻴﺒﻣﻮﺗا ﻚﻳ ﻂﺑار ﻞﺑﺎﻛ ﻪﻛAT Tلﺎﻌﻓ (دﻮﺷ ﻰﻣ ﻞﺻو
.ﺖﺳا هﺪﺸﻧ ﻢﻴﻈﻨﺗ ﻮﮔﺪﻨﻠﺑ
رﺎﮔزﺎﺳ (
MP3/WMA/AAC
) ﻚﺴﻳد ﺖﻣﺮﻓ ﺎﺑ
ﺎﺑ ﻖﺒﻄﻨﻣ Sony MP3ﺎﺑ ﺎﻳ ,
CD
.ﺪﻴﻨﻛ ﺶﺨﭘ هﺎﮕﺘﺳد ﻦﻳا
.ﺪﻴﻨﻛ ﻰﻤﻧ هدﺎﻔﺘﺳا ﻰﻠﺧاد هﺪﻨﻨﻛ ﺖﻳﻮﻘﺗ
.ﺖﺳا هﺪﺷ كﺎﭘ ﻪﻈﻓﺎﺣ تﺎﻳﻮﺘﺤﻣ
.ﺖﺳا هﺪﺷ كﺎﭘ ﺢﻴﺤﺻ نﺎﻣز و هﺪﺷ هﺮﻴﺧذ ىﺎﻫ هﺎﮕﺘﺴﻳا
.ﺪﻨﻛ ﻰﻣ ﺖﻳزارﺎﭘ ﺪﻴﻟﻮﺗ دﻮﺷ ﻰﻣ هﺪﻧﺎﺧﺮﭼ ﭻﻴﺋﻮﺳ ﻪﻛ ﻰﻣﺎﮕﻨﻫ
ﻖﻴﺒﻄﺗ ﻞﻴﺒﻣﻮﺗا ﻰﺒﻧﺎﺟ قﺮﺑ هﺪﻨﻫد لﺎﺼﺗا ﺎﺑ ﺢﻴﺤﺻ رﻮﻄﺑ ﺎﻫ ﻢﻴﺳ
.دﻮﺷ ﻰﻣ عوﺮﺷ ﺶﻳﺎﻤﻧ ﺖﻴﻌﺿو ,ﺖﻓﺎﻳرد ﺎﻳ ﺶﺨﭘ ﻦﻴﺣ رد
ﻢﻴﻈﻨﺗ زا ﺪﻌﺑ ﻰﺗﺎﻴﻠﻤﻋ ﭻﻴﻫ ﻪﻛ ﻰﺗرﻮﺻ رد"Demo on"۵ ىاﺮﺑ
.دﻮﺷ ﻰﻣ عوﺮﺷ ﺶﻳﺎﻤﻧ ﺖﻴﻌﺿو ,دﻮﺸﻧ مﺎﺠﻧا ﻪﻘﻴﻗد
.(۱۶ ﻪﺤﻔﺻ) ﺪﻴﻨﻛ ﻢﻴﻈﻨﺗ ار
نآ رد/دﻮﺷ ﻰﻣ ﻮﺤﻣ ﺶﻳﺎﻤﻧ ﻪﺤﻔﺻ هﺮﺠﻨﭘ زا ﺶﻳﺎﻤﻧ ﻪﺤﻔﺻ
.(۱۶ ﻪﺤﻔﺻ) ﺖﺳا هﺪﺷ ﻢﻴﻈﻨﺗ
"Dimmer on"
ﻦﺘﺷاد هﺎﮕﻧ و نداد رﺎﺸﻓ ﺎﺑ ار ﻰﻳﻮﻠﺟ ﻞﻧﺎﭘ ﻪﻳواز
.دﻮﺷ ﺮﻫﺎﻇ ﺶﻳﺎﻤﻧ ﻪﺤﻔﺻ
ﻪﻜﻨﻳا زا ﺪﻌﺑ رﺎﻛدﻮﺧ ﻰﺷﻮﻣﺎﺧ دﺮﻜﻠﻤﻋ .ﺖﺳا ﻦﺷور هﺎﮕﺘﺳد
.ﺪﻨﻛ ﻰﻤﻧ رﺎﻛ رﺎﻛدﻮﺧ ﻰﺷﻮﻣﺎﺧ دﺮﻜﻠﻤﻋ
.دﻮﺷ ﻰﻣ لﺎﻌﻓ ﺪﺷ شﻮﻣﺎﺧ هﺎﮕﺘﺳد
.ﺪﻴﻨﻛ شﻮﻣﺎﺧ ار هﺎﮕﺘﺳد
۲۳
ﺪﻳوﺮﺑ ﺪﻌﺑ ﻪﺤﻔﺻ ﻪﺑT
ﻰﻣﻮﻤﻋ دراﻮﻣ
.ﺪﺳر ﻰﻤﻧ هﺎﮕﺘﺳد ﻪﺑ قﺮﺑ
.ﺪﻴﻨﻛ ﻰﻨﻴﺑزﺎﺑ
T.ﺪﻴﻨﻛ ﻦﺷور ار هﺎﮕﺘﺳد
.دﻮﺷ ﻰﻤﻧ زﺎﺑ ﻰﻗﺮﺑ ﻦﺘﻧآ
.اﺪﺻ دﻮﺟو مﺪﻋ
AT T دﺮﻜﻠﻤﻋ ﺎﻳ ,دﻮﺷ ﻰﻣ لﺎﻌﻓ ATTﻰﻣﺎﮕﻨﻫ) ﻦﻔﻠﺗ
.دﻮﺷ ﻰﻣ
هﺪﻨﻨﻛ ﺾﻳﻮﻌﺗ
CD
.ﺖﺴﻴﻧ
T هﺪﻨﻨﻛ ﺾﻳﻮﻌﺗ ﻚﻳ ﺎﺑ
.ﭗﻴﺑ ىاﺪﺻ دﻮﺟو مﺪﻋ
T.ﺪﻴﻨﻛ هﺮﻴﺧذ ﻪﻈﻓﺎﺣ رد هرﺎﺑود
.ﺖﺳا هﺪﺷ ﺮﺠﻔﻨﻣ زﻮﻴﻓ
.ﺪﻧا هﺪﺸﻧ هداد
T
"Demo off"
.دﻮﺷ ﻰﻤﻧ ﺮﻫﺎﻇ
ىور ﺮﺑ هﺪﻨﻨﻛ رﺎﺗ
(ANGLE).(۵ ﻪﺤﻔﺻ) ﺪﻴﻨﻛ ﻢﻴﻈﻨﺗ
T
.دﻮﺷ ﻰﻣ ﻮﺤﻣ
T
(OFF)ﺎﺗ ﺪﻳراد هﺎﮕﻧ و هداد رﺎﺸﻓ ار هﺎﮕﺘﺳد ىور ﺮﺑ
T
زا زﻮﺠﻣ ىاراد ﻰﺟرﺎﺧ و هﺪﺤﺘﻣ تﻻﺎﻳا ىﺎﻫزﺎﻴﺘﻣا ﻖﺣ
ﻰﺒﻟاد ىﺎﻫ هﺎﮕﺸﻳﺎﻣزآDolby Laboratories.ﺪﻨﺷﺎﺑ ﻰﻣ
•ار زﻮﻴﻓ ,ﺖﺳا ﺐﺗﺮﻣ ﺰﻴﭼ ﻪﻤﻫ ﺮﮔا .ﺪﻴﻨﻛ ﻰﻨﻴﺑزﺎﺑ ار لﺎﺼﺗا
•,دﻮﺷ ﻰﻤﻧ ﺮﻫﺎﻇ ﺶﻳﺎﻤﻧ ﻪﺤﻔﺻ و ﺖﺳا شﻮﻣﺎﺧ هﺎﮕﺘﺳد ﺮﮔا
ﻪﻣﺎﻧزﺎﻴﺘﻣا و
Thomson
.
MPEG Layer-3
و
ﻰﺗﻮﺻ ىراﺬﮔﺰﻣر ىژﻮﻟﻮﻨﻜﺗ
Fraunhofer IIS
تﻻﻮﺼﺤﻣ ىﻮﻨﻌﻣ قﻮﻘﺣ ﻰﻌﻄﻗ ﺖﻇﺎﻔﺣ ﺖﺤﺗ لﻮﺼﺤﻣ ﻦﻳا
Microsoft Corporation
راﺮﻗ
ﺖﻓﺎﺳوﺮﻜﻳﺎﻣ ﺖﻛﺮﺷ
لﻮﺼﺤﻣ ﻦﻳا زا جرﺎﺧ ىروﺎﻨﻓ ﻦﻳا ﻊﻳزﻮﺗ ﺎﻳ هدﺎﻔﺘﺳا .دراد
Microsoft
ﺖﻛﺮﺷ ﺎﻳ
.ﺖﺳا عﻮﻨﻤﻣ
•.ﺖﺳا ﻢﻛ اﺪﺻ ﻪﺟرد
ىاﺮﺑ لﺎﺘﻴﺠﻳد قﻮﻘﺣ ﺖﻳﺮﻳﺪﻣ ىژﻮﻟﻮﻨﻜﺗ زا نﺎﮔﺪﻨﻨﻛﺪﻴﻟﻮﺗ
• دﺮﻜﻠﻤﻋ
• هﺪﻨﻨﻛ ﻮﺤﻣ لﺮﺘﻨﻛ ﺖﻴﻌﻗﻮﻣ"FAD"۲ ﻢﺘﺴﻴﺳ ﻚﻳ ىاﺮﺑ
•
ﻞﻣﺎﺷ ﺎﻫ نآ ىﻮﻨﻌﻣ قﻮﻘﺣ ﺎﺗ ﺪﻨﻨﻛ ﻰﻣ هدﺎﻔﺘﺳا
.دﺮﻴﮕﻧ راﺮﻗ ضرﺎﻌﺗ درﻮﻣ ﻰﺒﻟﺎﻄﻣ ﻦﻴﻨﭼ رد ﺮﺸﻧ قﻮﻘﺣ
ﺖﻓﺎﺳوﺮﻜﻳﺎﻣ ﺖﻛﺮﺷ زا زﻮﺠﻣ نوﺪﺑ
Microsoft
ﺖﻓﺎﺳوﺮﻜﻳﺎﻣ زﺎﺠﻣ ﻪﻌﺑﺎﺗ ىﺎﻫ
) دﻮﺧ ﺐﻟﺎﻄﻣ ﻰﮕﭼرﺎﭙﻜﻳ" ﻦﻤﻳا ﺐﻟﺎﻄﻣ ("Secure
راﺰﻓا مﺮﻧ ﻰﻨﻤﻳا ﻪﻛ ﻰﺗرﻮﺻ رد .ﺪﻨﻛWM-DRMﻦﻳا رد
•.(۱۶ ﻪﺤﻔﺻ) ﺖﺳا هﺪﺷ ﻮﻐﻟ ﭗﻴﺑ ىاﺪﺻ
•زا ﺎﻤﺷ و ﺖﺳا هﺪﺷ ﻞﺻو وﺮﻴﻧ ىرﺎﻴﺘﺧا هﺪﻨﻨﻛ ﺖﻳﻮﻘﺗ ﻚﻳ
ﻦﻤﻳا ﺐﻟﺎﻄﻣ نﺎﺒﺣﺎﺻ ,دﺮﻴﮔ راﺮﻗ ﻪﺤﻟﺎﺼﻣ درﻮﻣ هﺎﮕﺘﺳد
ﺖﻓﺎﺳوﺮﻜﻳﺎﻣ زا ﺖﺳا ﻦﻜﻤﻣMicrosoftﺪﻨﻨﻛ ﺎﺿﺎﻘﺗ
ﻮﻐﻟ ﻦﻤﻳا ﺐﻟﺎﻄﻣ ﺶﺨﭘ ﺎﻳ/و ﺶﻳﺎﻤﻧ ,ندﺮﻛ ﻰﭙﻛ رﻮﻈﻨﻣ ﻪﺑ
• ﻪﻤﻛدRESET.ﺖﺳا هﺪﺷ هداد رﺎﺸﻓ
راﺰﻓا مﺮﻧ ﻰﻳﺎﻧاﻮﺗ ,لﺎﻄﺑا .دﻮﺷWM-DRMىاﺮﺑ ار
•.ﺖﺳا هﺪﺷ اﺪﺟ ىﺮﻃﺎﺑ ﺎﻳ قﺮﺑ ىوﺮﻴﻧ ﻢﻴﺳ
•.ﺖﺳا هﺪﺸﻧ ﻞﺻو ﺢﻴﺤﺻ رﻮﻄﺑ قﺮﺑ ىوﺮﻴﻧ ﻢﻴﺳ
ﻰﻤﻧ راﺮﻗ ﺮﻴﺛﺎﺗ ﺖﺤﺗ هﺪﺷ ﺖﻈﻓﺎﺤﻣ ﺮﻴﻏ ﺐﻟﺎﻄﻣ ﺶﺨﭘ
ﺐﻟﺎﻄﻣ ىاﺮﺑ زﻮﺠﻣ دﻮﻠﻧاد ﻪﺑ ماﺪﻗا ﺎﻤﺷ ﻪﻛ نﺎﻣز ﺮﻫ .ﺪﻫد
ﺖﺴﻴﻟ ﻚﻳ ,ﺪﻴﻨﻛ ﻰﻣ ﺮﺗﻮﻴﭙﻣﺎﻛ ﻚﻳ زا ﺎﻳ ﺖﻧﺮﺘﻨﻳا زا ﻦﻤﻳا
ﺎﻤﺷ هﺎﮕﺘﺳد
ﺖﺳا ﻦﻜﻤﻣ
Microsoft
ﺖﻓﺎﺳوﺮﻜﻳﺎﻣ .دﻮﺷ ﻰﻣ لﺎﺳرا
فﺮﻃ زا ﺰﻴﻧ ار لﺎﻄﺑا ىﺎﻫ ﺖﺴﻴﻟ ىزﻮﺠﻣ ﻦﻴﻨﭼ ﺎﺑ هاﺮﻤﻫ
.ﺪﻨﻛ دﻮﻠﻧاد ﺎﻤﺷ هﺎﮕﺘﺳد ﻪﺑ ﻦﻤﻳا ﺐﻟﺎﻄﻣ نﺎﺒﺣﺎﺻ
ﻚﻳ ﺎﻳ لﺎﺘﻴﺠﻳد هﺪﻨﻨﻛ ﺖﻳﻮﻘﺗ ﺶﻴﭘ ﻚﻳ ﻪﺑ ﺪﻧاﻮﺗ ﻰﻤﻧ هﺎﮕﺘﺳد ﻦﻳا
.دﻮﺷ ﻞﺻو ﺖﺳا رﺎﮔزﺎﺳ
.ﺪﻨﺘﺴﻫ ﺮﻴﻴﻐﺗ ضﺮﻌﻣ رد ﻰﻠﺒﻗ عﻼﻃا نوﺪﺑ تﺎﺼﺨﺸﻣ و حﺮﻃ
•
•.ﺖﺴﻴﻧ ﺢﻴﺤﺻ ﻰﻳﻮﻠﺟ ﻞﻧﺎﭘ ﻪﻳواز
• ﺎﻤﺷ ﺮﮔا(OFF)ﺶﻳﺎﻤﻧ ﻪﺤﻔﺻ ﺪﻳراد هﺎﮕﻧ و هداد رﺎﺸﻓ ار
•.(۲۱ ﻪﺤﻔﺻ) ﺪﻨﺘﺴﻫ ?ﻴﺜﻛ ﺎﻫ هﺪﻨﻫد لﺎﺼﺗا
Sony BUS
.ﺪﻧا هﺪﺸﻧ هدﺎﻔﺘﺳا هﺪﺷ پﺎﭼ
زا ﻰﻀﻌﺑ ﺎﺗ دﺮﻛ ﺪﻫاﻮﺧ ﻚﻤﻛ ﺎﻤﺷ ﻪﺑ ﺮﻳز ﺖﺳﺮﻬﻓ
ﺪﻴﻨﻛ اﺪﻴﭘ دﻮﺧ هﺎﮕﺘﺳد ﺎﺑ ﺎﻤﺷ ﺖﺳا ﻦﻜﻤﻣ ﻪﻛ ﻰﺗﻼﻜﺸﻣ
و لﺎﺼﺗا ,ﺮﻳز ﺖﺳﺮﻬﻓ نﺪﻧاﻮﺧ زا ﺶﻴﭘ .ﺪﻴﻨﻛ ﻞﺣ ار
.ﺪﻴﻨﻛ ﻰﻨﻴﺑزﺎﺑ ار ﻰﺗﺎﻴﻠﻤﻋ ىﺎﻫﺪﻧور
زا زﻮﺠﻣ ﺖﺤﺗ ىﺎﻫ
زوﺪﻨﻳو ﻪﻧﺎﺳرWindows Mediaرد هﺪﺷ هﺪﻧﺎﺠﻨﮔ
) هﺎﮕﺘﺳد"WM-DRM"زا ﺖﻈﻓﺎﺤﻣ رﻮﻈﻨﻣ ﻪﺑ (
Content
راﺰﻓا مﺮﻧ زا هﺎﮕﺘﺳدWM-DRM ﺐﻟﺎﻄﻣ ﺶﺨﭘ ىاﺮﺑ
) ﻦﻤﻳا"راﺰﻓا مﺮﻧSoftware "WM-DRMﻰﻣ هدﺎﻔﺘﺳا (
)" ﻦﻤﻳا ﺐﻟﺎﻄﻣ نﺎﺒﺣﺎﺻ"Secure Content Owners(
راﺰﻓا مﺮﻧ قﻮﻘﺣWM-DRMﺪﻳﺪﺟ ىﺎﻫزﻮﺠﻣ ﺐﺴﻛ ىاﺮﺑ
راﺰﻓا مﺮﻧ زاWM-DRM ﻪﺑ هﺪﺷ لﺎﻄﺑا
ﻪﺘﻜﻧ
ﻢﺘﺴﻴﺳ ﺎﺑ ﻪﻛ رﺰﻳﻻﻮﻛا
•ﻰﺸﻛ ﻢﻴﺳ ىﺎﻫراﺪﻣ زا ﻰﻀﻌﺑ رد راد نژﻮﻟﺎﻫ ﻪﻠﻌﺷ ىﺎﻫ هﺪﻧرادزﺎﺑ
•.ﺪﻧا هﺪﺸﻧ هدﺎﻔﺘﺳا ﺎﻫ ﺖﻨﻴﺑﺎﻛ رد راد نژﻮﻟﺎﻫ ﻪﻠﻌﺷ ىﺎﻫ هﺪﻧرادزﺎﺑ
•.ﺖﺳا هﺪﺷ هدﺎﻔﺘﺳا ﺬﻏﺎﻛ زا ىﺪﻨﺑ ﻪﺘﺴﺑ ىﺎﻫ ﻚﺘﺸﻟﺎﺑ ىاﺮﺑ
ﻰﺑﺎﻳ ﺐﻴﻋ
Page 59

ﻰﺑﺎﻳ جﻮﻣ هدوﺪﺤﻣ
AM
:ﺰﺗﺮﻫﻮﻠﻴﻛ ۱۰/ﺰﺗﺮﻫﻮﻠﻴﻛ ۹ نﺎﻴﻣ ﺮﻴﻴﻐﺗ ﻞﺑﺎﻗ
: ﻦﺘﻧآ لﺎﻨﻴﻣﺮﺗ
ﻰﺟرﺎﺧ ﻦﺘﻧآ هﺪﻨﻫد لﺎﺼﺗا
:ﻂﺳﻮﺘﻣ ﺲﻧﺎﻛﺮﻓﺰﺗﺮﻫﻮﻠﻴﻛ ۴۵۰/ﺰﺗﺮﻫﺎﮕﻣ ۱۰٫۷
:ﺖﻴﺳﺎﺴﺣﺖﻟو وﺮﻜﻴﻣ ۳۰
ﺶﺨﭘ هﺎﮕﺘﺳد ﺶﺨﺑUSB
USB (ﻞﻣﺎﻛ ﺖﻋﺮﺳ)
۵۰۰ﺮﭙﻣآ ﻰﻠﻴﻣ
: ﻂﺳاو
: نﺎﻳﺮﺟ ﺮﺜﻛاﺪﺣ
قﺮﺑ هﺪﻨﻨﻛ ﺖﻳﻮﻘﺗ ﺶﺨﺑ
:ﺎﻫ ﻰﺟوﺮﺧ(ﻰﻌﻄﻗ ﺮﻬﻣ ىﺎﻫ هﺪﻨﻫد لﺎﺼﺗا) ﻮﮔﺪﻨﻠﺑ ىﺎﻫ ﻰﺟوﺮﺧ
:ﻮﮔﺪﻨﻠﺑ ﺲﻧاﺪﭙﻣاﻢﻫا ۸ ﺎﺗ ۴
:قﺮﺑ ﻰﺟوﺮﺧ ﺮﺜﻛاﺪﺣ(ﻢﻫا ۴ رد) ۴ × تاو ۵۲
ﻰﻣﻮﻤﻋ دراﻮﻣ
(ﻰﺘﺸﭘ/ﻰﻳﻮﻠﺟ) اﺪﺻ ىﺎﻫ ﻰﺟوﺮﺧ لﺎﻨﻴﻣﺮﺗ
(ﻮﻧﻮﻣ) ﻰﻋﺮﻓ ﺮﻓوو ﻰﺟوﺮﺧ لﺎﻨﻴﻣﺮﺗ
ﻰﻗﺮﺑ ﻦﺘﻧآ ﺖﻳﻮﻘﺗ لﺮﺘﻨﻛ لﺎﻨﻴﻣﺮﺗ
وﺮﻴﻧ هﺪﻨﻨﻛ ﺖﻳﻮﻘﺗ لﺮﺘﻨﻛ لﺎﻨﻴﻣﺮﺗ
AT Tﻦﻔﻠﺗ
ﻰﻳﺎﻨﺷور لﺮﺘﻨﻛ لﺎﻨﻴﻣﺮﺗ
BUS
لﺮﺘﻨﻛ ىدورو لﺎﻨﻴﻣﺮﺗ
ىاﺪﺻ ىدورو لﺎﻨﻴﻣﺮﺗBUS
رود هار زا هﺪﻨﻨﻛ لﺮﺘﻨﻛ ىدورو لﺎﻨﻴﻣﺮﺗ
ﻦﺘﻧآ ىدورو لﺎﻨﻴﻣﺮﺗ
AUX(ﻮﻳﺮﺘﺳا ﻚﭼﻮﻛ ﺶﻴﻓ)
USB
لﺎﻨﮕﻴﺳ ىدورو لﺎﻨﻴﻣﺮﺗ
(ﻖﻤﻋ/عﺎﻔﺗرا/ضﺮﻋ) ﺮﺘﻣ ﻰﻠﻴﻣ ۱۹۰ × ۵۰ × ۱۷۸ ﺎﺒﻳﺮﻘﺗ
:هﺪﺷ ﻪﻤﻴﻤﺿ ﻰﺒﻧﺎﺟ مزاﻮﻟ
RM-X156
:ترﺎﻛ رود هار زا لﺮﺘﻨﻛ هﺎﮕﺘﺳد
(ﻪﻋﻮﻤﺠﻣ ۱) تﻻﺎﺼﺗا و ﺐﺼﻧ ىاﺮﺑ تﺎﻌﻄﻗ
:ىرﺎﻴﺘﺧا تاﺰﻴﻬﺠﺗ/ﻰﺒﻧﺎﺟ مزاﻮﻟ
RM-X4S
:نادﺮﮔ هﺪﻨﻫد نﺎﻣﺮﻓ
CD:(ﻚﺴﻳد ۱۰) CDX-757MX ,
ىاﺮﺑ ﺲﻴﻓﺮﺘﻨﻳا رﻮﺘﭘادآiPod :XA-120IP
:ﺎﻫ ﻰﺟوﺮﺧ
:ﺎﻫ ىدورو
لﺮﺘﻨﻛ لﺎﻨﻴﻣﺮﺗ
ىدورو ﺶﻴﻓ
:نﻮﺗ ىﺎﻫ لﺮﺘﻨﻛ
± ﺰﺗﺮﻫ ۶۰ رد ﻞﺑ ﻰﺳد (XPLOD)
۱۰ :ﻦﻴﻳﺎﭘ
۱۰ :ﻂﺳﻮﺘﻣ± ﺰﺗﺮﻫﻮﻠﻴﻛ ۱ رد ﻞﺑ ﻰﺳد (XPLOD)
۱۰ :ﻻﺎﺑ± ﺰﺗﺮﻫﻮﻠﻴﻛ ۱۰ رد ﻞﺑ ﻰﺳد (XPLOD)
:زﺎﻴﻧ درﻮﻣ قﺮﺑﺖﻟو ۱۲ ﻢﻴﻘﺘﺴﻣ قﺮﺑ ﻞﻴﺒﻣﻮﺗا ىﺮﻃﺎﺑ
(ﻦﻴﻣز ﻰﻔﻨﻣ)
ﺐﺼﻧ دﺎﻌﺑا/ضﺮﻋ) ﺮﺘﻣ ﻰﻠﻴﻣ ۱۶۳ × ۵۳ × ۱۸۲ ﺎﺒﻳﺮﻘﺗ :
(ﻖﻤﻋ/عﺎﻔﺗرا
ﻞﺑﺎﻛBUS ﻦﻴﭘ ﻢﻴﺳ ﻚﻳ ﺎﺑ هﺪﺷ ﻪﻤﻴﻤﺿ) RCA:(
RC-61,(ﺮﺘﻣ ۱)RC-62 (ﺮﺘﻣ ۲)
هﺪﻨﻨﻛ ﺾﻳﻮﻌﺗ
CDX-656X
ﺮﮕﺑﺎﺨﺘﻧاAUX-IN :XA-300
دﺎﻌﺑا :
نزو:۶ ﺎﺒﻳﺮﻘﺗ٫مﺮﮔﻮﻠﻴﻛ ۱
هﺪﺷ ﺮﻛذ ﻰﺒﻧﺎﺟ مزاﻮﻟ زا ﻰﻀﻌﺑ ﺖﺳا ﻦﻜﻤﻣ ﺎﻤﺷ هﺪﻨﺷوﺮﻓ
ﻖﻴﻗد تﺎﻴﺋﺰﺟ ىاﺮﺑ ﺎﻔﻄﻟ .ﺪﻨﻜﻧ شوﺮﻓ و ﺪﻳﺮﺧ ار ﻻﺎﺑ رد
.ﺪﻴﻨﻛ ﻮﺟ و سﺮﭘ دﻮﺧ هﺪﻨﺷوﺮﻓ زا
1دراو نﺎﻣﺰﻤﻫ رﻮﻄﺑ ار ىزﺎﺳدازآ ىﺎﻫ ﺪﻴﻠﻛ ود ﺮﻫ
.ﺪﻨﻫد ﻚﻴﺗ ىاﺪﺻ ﺎﻫ نآ ﺎﺗ ﺪﻴﻨﻛ
ﻪﺑ ور بﻼﻗ
.ﻞﺧاد
.ﺪﻴﻨﻛ اﺪﺟ ار هﺎﮕﺘﺳد ﺎﺗ ﺪﻴﺸﻜﺑ ار ىزﺎﺳدازآ ىﺎﻫ ﺪﻴﻠﻛ
2
3.ﺪﻴﻧاﺰﻐﻠﺑ نوﺮﻴﺑ ﻪﺑ ﻪﻳﺎﭘ زا ار هﺎﮕﺘﺳد
تﺎﺼﺨﺸﻣ
هﺪﻨﻨﻛ ﺶﺨﭘ ﺶﺨﺑCD
:ﺖﻳزارﺎﭘ ﻪﺑ لﺎﻨﮕﻴﺳ ﺖﺒﺴﻧﻞﺑ ﻰﺳد ۱۲۰
(ﺰﺗﺮﻫﻮﻠﻴﻛ ۵۰ مﺎﮔ رد) ﺰﺗﺮﻫﺎﮕﻣ ۱۰۸٫۰ ﺎﺗ ۸۷٫۵
(ﺰﺗﺮﻫﻮﻠﻴﻛ ۲۰۰ مﺎﮔ رد) ﺰﺗﺮﻫﺎﮕﻣ ۱۰۷٫۹ ﺎﺗ ۸۷٫۵
ﺰﺗﺮﻫﻮﻠﻴﻛ ۲۰۰/ﺰﺗﺮﻫﻮﻠﻴﻛ ۵۰ نﺎﻴﻣ ﺮﻴﻴﻐﺗ ﻞﺑﺎﻗ
ﻰﺟرﺎﺧ ﻦﺘﻧآ هﺪﻨﻫد لﺎﺼﺗا
dBf۹
:ﺖﻳزارﺎﭘ ﻪﺑ لﺎﻨﮕﻴﺳ ﺖﺒﺴﻧﻰﺳد ۶۹ ,(ﻮﻳﺮﺘﺳا) ﻞﺑ ﻰﺳد ۶۷
:ﺰﺗﺮﻫﻮﻠﻴﻛ ۱ رد ﮓﻨﻫﺎﻤﻫ فاﺮﺤﻧا۰٫۳ ,(ﻮﻳﺮﺘﺳا) ﺪﺻرد ۰٫۵
:ﺲﻧﺎﻛﺮﻓ ﺦﺳﺎﭘ۰۰۰ ﺎﺗ ۱۰ , ﺰﺗﺮﻫ ۲۰
:شزﺮﻟ و اﺪﺻىﺮﻴﮔ هزاﺪﻧا ﻞﺑﺎﻗ ﺪﺣ زا ﺮﺗ ﻦﻴﻳﺎﭘ
بﺎﻳ جﻮﻣ ﺶﺨﺑ
ﻰﺑﺎﻳ جﻮﻣ هدوﺪﺤﻣ
FM:
: ﻦﺘﻧآ لﺎﻨﻴﻣﺮﺗ
:ﻂﺳﻮﺘﻣ ﺲﻧﺎﻛﺮﻓﺰﺗﺮﻫﻮﻠﻴﻛ ۴۵۰/ﺰﺗﺮﻫﺎﮕﻣ ۱۰٫۷
:هدﺎﻔﺘﺳا ﻞﺑﺎﻗ ﺖﻴﺳﺎﺴﺣ
:بﺎﺨﺘﻧا ﻖﺣﺰﺗﺮﻫ ﻮﻠﻴﻛ ۴۰۰ رد ﻞﺑ ﻰﺳد ۷۵
(ﻮﻧﻮﻣ) ﻞﺑ
(ﻮﻧﻮﻣ) ﺪﺻرد
:ﺲﻧﺎﻛﺮﻓ ﺦﺳﺎﭘ۰۰۰ ﺎﺗ ۳۰ , ﺰﺗﺮﻫ ۱۵
:ﻰﺑﺎﻳ جﻮﻣ هدوﺪﺤﻣ
۶۰۲ ﺎﺗ ۵۳۱,(ﺰﺗﺮﻫﻮﻠﻴﻛ ۹ مﺎﮔ رد) ﺰﺗﺮﻫﻮﻠﻴﻛ ۱
۷۱۰ ﺎﺗ ۵۳۰, (ﺰﺗﺮﻫﻮﻠﻴﻛ ۱۰ مﺎﮔ رد) ﺰﺗﺮﻫﻮﻠﻴﻛ ۱
:ﻰﻳاﺪﺟﺰﺗﺮﻫﻮﻠﻴﻛ ۱ رد ﻞﺑ ﻰﺳد ۳۵
2.ﺪﻴﻨﻛ جرﺎﺧ ار هﺎﮕﺘﺳد
FM
ﻣ:ﻰﺑﺎﻳ جﻮﻣ هدوﺪﺤ
AM
۲۲
Page 60

زﻮﻴﻓ ﻰﻨﻳﺰﮕﻳﺎﺟ
نﺎﻨﻴﻤﻃا ,زﻮﻴﻓ ندﺮﻛ ﻦﻳﺰﮕﻳﺎﺟ مﺎﮕﻨﻫ
ﺎﺑ ﻖﺑﺎﻄﻣ زﻮﻴﻓ ﻚﻳ زا ﻪﻛ ﺪﻴﻨﻛ ﻞﺻﺎﺣ
ﻰﻠﺻا زﻮﻴﻓ رد هﺪﺷ ﺮﻛذ ﺮﭙﻣآ ناﺰﻴﻣ
,ﺪﺷ ﺮﺠﻔﻨﻣ زﻮﻴﻓ ﺮﮔا .ﺪﻴﻨﻛ هدﺎﻔﺘﺳا
ار زﻮﻴﻓ و ﺪﻴﻨﻛ ﻰﻨﻴﺑزﺎﺑ ار قﺮﺑ لﺎﺼﺗا
زا ﺪﻌﺑ زﻮﻴﻓ ﺮﮔا .ﺪﻴﻨﻛ ﻦﻳﺰﮕﻳﺎﺟ
ﻦﻜﻤﻣ ,دﻮﺷ ﺮﺠﻔﻨﻣ هرﺎﺑود ﻰﻨﻳﺰﮕﻳﺎﺟ
(ﺮﭙﻣآ ۱۰) زﻮﻴﻓ
دﻮﺟو ﻰﻠﺧاد دﺮﻜﻠﻤﻋ ءﻮﺳ ﻚﻳ ﺖﺳا
ﺎﺑ ,ﻰﺘﻟﺎﺣ ﻦﻴﻨﭼ رد .ﺪﺷﺎﺑ ﻪﺘﺷاد
ﻰﻧﻮﺳ هﺪﻨﺷوﺮﻓ ﻦﻳﺮﺘﻜﻳدﺰﻧ
Sonyدﻮﺧ
.ﺪﻴﻳﺎﻤﻧ ترﻮﺸﻣ
ﺎﻫ هﺪﻨﻫد لﺎﺼﺗا ندﺮﻛ ﺰﻴﻤﺗ
ﻰﻳﻮﻠﺟ ﻞﻧﺎﭘ و هﺎﮕﺘﺳد نﺎﻴﻣ ﺎﻫ هﺪﻨﻫد لﺎﺼﺗا ﻪﻛ ﻰﺗرﻮﺻ رد
.ﺪﻨﻜﻧ ﻞﻤﻋ ﺢﻴﺤﺻ رﻮﻄﺑ ﺖﺳا ﻦﻜﻤﻣ هﺎﮕﺘﺳد ﺪﻨﺷﺎﺒﻧ ﺰﻴﻤﺗ
ﻪﺤﻔﺻ) ﺪﻴﻨﻛ اﺪﺟ ار ﻰﻳﻮﻠﺟ ﻞﻧﺎﭘ ,ﺮﻣا ﻦﻳا زا ىﺮﻴﮔﻮﻠﺟ ىاﺮﺑ
ﺰﻴﻤﺗ ىا ﻪﺒﻨﭘ هﺪﻨﻨﻛ كﺎﭘ ﻚﻳ ﺎﺑ ار ﺎﻫ هﺪﻨﻫد لﺎﺼﺗا و (۵
,ترﻮﺼﻨﻳا ﺮﻴﻏ رد .ﺪﻴﻨﻜﻧ دراو ار ﺪﺣ زا ﺶﻴﺑ ىوﺮﻴﻧ .ﺪﻴﻨﻛ
.ﺪﻨﻨﻴﺒﺑ ﻪﻣﺪﺻ ﺎﻫ هﺪﻨﻫد لﺎﺼﺗا ﺖﺳا ﻦﻜﻤﻣ
ﻰﻳﻮﻠﺟ ﻞﻧﺎﭘ ﺖﺸﭘ
ار قاﺮﺘﺣا ﺎﻫ هﺪﻨﻫد لﺎﺼﺗا ندﺮﻛ ﺰﻴﻤﺗ زا ﺶﻴﭘ ,ﻰﻨﻤﻳا رﻮﻈﻨﻣ ﻪﺑ
.ﺪﻴﻨﻛ جرﺎﺧ قاﺮﺘﺣا ﭻﻴﺋﻮﺳ زا ار ﺪﻴﻠﻛ و ,ﺪﻴﻨﻛ شﻮﻣﺎﺧ
ﻪﻧﻮﮔ ﺮﻫ ﺎﺑ ﺎﻳ دﻮﺧ نﺎﺘﺸﮕﻧا ﺎﺑ ﺎﻤﻴﻘﺘﺴﻣ ار ﺎﻫ هﺪﻨﻫد لﺎﺼﺗا ﺰﮔﺮﻫ
.ﺪﻴﻨﻜﻧ ﺲﻤﻟ ىﺰﻠﻓ هﺎﮕﺘﺳد
تﺎﻜﻧ
هﺎﮕﺘﺳد ندﺮﻛ جرﺎﺧ
ىﺎﻫ ﻞﻳﺎﻓ درﻮﻣ ردAAC
ىراﺬﮔﺪﻛ)
ﻪﺑ ار ﻰﺗﻮﺻ
Advanced Audio Coding
هدﺮﺸﻓ ﺖﻣﺮﻓ دراﺪﻧﺎﺘﺳا ﻚﻳ ,ﺪﺷﺎﺑ ﻰﻣ (ﻪﺘﻓﺮﺸﻴﭘ ﻰﺗﻮﺻ
ىﺎﻫ هداد نآ .ﺪﺷﺎﺑ ﻰﻣ ﻰﻘﻴﺳﻮﻣ ﻞﻳﺎﻓ ىزﺎﺳ
CD
.ﺪﻨﻛ ﻰﻣ هدﺮﺸﻓ نآ ﻰﻠﺻا هزاﺪﻧا
.ﺖﺳا ﺮﺘﻛارﺎﻛ
AAC ﺪﻧﻮﺴﭘ ﺎﻤﺘﺣ ,".m4a"
۱۲۶
.ﺪﻴﻨﻛ ﻪﻓﺎﺿا ﻞﻳﺎﻓ مﺎﻧ ﻪﺑ ار
AACعﻮﻧ
.دﻮﺸﻧ هداد ﺶﻳﺎﻤﻧ ﺢﻴﺤﺻ رﻮﻄﺑ ﺖﺳا ﻦﻜﻤﻣ
ﻪﻴﻧﺎﺛ رد ﺖﻴﺑ ﻮﻠﻴﻛ
.دﻮﺷ ﻰﻤﻧ ﻰﻧﺎﺒﻴﺘﺸﭘ ﺮﻳز
AAC
ناﺪﻘﻓ نوﺪﺑ ىزﺎﺳ هدﺮﺸﻓ-
ﺮﺸﻧ ﻖﺣ ﺎﺑ هﺪﺷ ﺖﻈﻓﺎﺤﻣ-
دﻮﺧ هﺎﮕﺘﺳد ﺎﺑ ﻪﻄﺑار رد ﻰﻠﻜﺸﻣ ﺎﻳ لاﻮﺳ ﻪﻧﻮﮔﺮﻫ ﺎﻤﺷ ﺮﮔا
ﻦﻳﺮﺘﻜﻳدﺰﻧ ﺎﺑ ,ﺖﺳا هﺪﺸﻧ ﺮﻛذ ﻪﭼﺮﺘﻓد ﻦﻳا رد ﻪﻛ ﺪﻳراد
Sony.ﺪﻴﻳﺎﻤﻧ ترﻮﺸﻣ دﻮﺧ
زا لﺮﺘﻨﻛ هﺎﮕﺘﺳد ﻰﻣﻮﻴﺘﻴﻟ ىﺮﻃﺎﺑ ندﺮﻛ ﻦﻳﺰﮕﻳﺎﺟ
ﻪﺘﺴﺑ) .ﺪﻨﻛ ﻰﻣ ﺮﻤﻋ لﺎﺳ ۱ ﺎﺒﻳﺮﻘﺗ ىﺮﻃﺎﺑ ,ﻰﻟﻮﻤﻌﻣ ﻂﻳاﺮﺷ رد
(.ﺪﺷﺎﺑ ﺮﺗ هﺎﺗﻮﻛ ﺖﺳا ﻦﻜﻤﻣ نآ رﺎﻛ ﺮﻤﻋ ,هدﺎﻔﺘﺳا ﻂﻳاﺮﺷ ﻪﺑ
•
•
رود هار زا لﺮﺘﻨﻛ دﺮﺑ ,دﻮﺷ ﻰﻣ ?ﻴﻌﺿ ىﺮﻃﺎﺑ ﻪﻛ ﻰﻣﺎﮕﻨﻫ
ﻰﻣﻮﻴﺘﻴﻟ ىﺮﺗﺎﺑ ﻚﺑ ﺎﺑ ار ىﺮﻃﺎﺑ .دﻮﺷ ﻰﻣ ﺮﺗ هﺎﺗﻮﻛ ترﺎﻛ
.ﺪﺷﺎﺑ ﻪﺘﺷاد ﻰﭘ رد رﺎﺠﻔﻧا ﺎﻳ ىزﻮﺳ ﺶﺗآ ﺮﻄﺧ ﺖﺳا
فﺮﻃ+ﻻﺎﺑ ﻪﺑ ور
?ﻔﺨﻣ ﻪﻛ
۱/
*
۱۱ ﺎﺒﻳﺮﻘﺗ
ىاﺮﺑ ﺎﻬﻨﺗ
۱۲۸
ىﺎﻫ ﻞﻴﻓ ﺶﺨﭘ
ﻰﻧﻮﺳ هﺪﻨﺷوﺮﻓ
ىراﺪﻬﮕﻧ
ترﺎﻛ رود هار
CR2025ﻦﻜﻤﻣ ﺮﮕﻳد ىﺮﻃﺎﺑ زا هدﺎﻔﺘﺳا .ﺪﻴﻨﻛ ﻦﻳﺰﮕﻳﺎﺟ
AAC
VBRهﺪﺷ ىﺮﭙﺳ ﺶﺨﭘ نﺎﻣز تﺪﻣ ,(ﺮﻴﻐﺘﻣ ﺖﻴﺑ خﺮﻧ)
•
• ﺐﺴﭼﺮﺑAAC
• ﻞﻳﺎﻓ ﻚﻳ ىراﺬﮕﻣﺎﻧ مﺎﮕﻨﻫ
• ﻞﻳﺎﻓ ﻚﻳ ﺐﻘﻋ/ﻮﻠﺟ ﻪﺑ ﻊﻳﺮﺳ ﺎﻳ ﺶﺨﭘ ﻦﻴﺣ رد
*
ﻪﺘﻜﻧ
۲۱
x
.ﺪﻴﺸﻜﺑ نوﺮﻴﺑ
1.ﺪﻴﻨﻛ جرﺎﺧ ار ﻆﻓﺎﺤﻣ ﻪﻧﺪﺑ
1.(۵ ﻪﺤﻔﺻ) ﺪﻴﻨﻛ جرﺎﺧ ار ﻰﻳﻮﻠﺟ ﻞﻧﺎﭘ
2ار نآ ﺲﭙﺳ و ,ﺪﻳﺮﻴﮕﺑ ار ﻆﻓﺎﺤﻣ ﻪﻧﺪﺑ ﻪﺒﻟ ود ﺮﻫ
ترﻮﺻ رد .ﺪﻳراد هﺎﮕﻧ نﺎﻛدﻮﻛ سﺮﺘﺳد زا رود ار ﻰﻣﻮﻴﺘﻴﻟ ىﺮﻃﺎﺑ
.ﺪﻴﻨﻛ ترﻮﺸﻣ ﻚﺷﺰﭘ ﻚﻳ ﺎﺑ ﻪﻠﺻﺎﻓﻼﺑ ,ىﺮﻃﺎﺑ نﺪﺷ هﺪﻴﻌﻠﺑ
لﺎﺼﺗا ندﻮﺑ ﻢﻟﺎﺳ زا ﺎﺗ ﺪﻴﻨﻛ ﺰﻴﻤﺗ ﻚﺸﺧ ﻪﭼرﺎﭘ ﻚﻳ ﺎﺑ ار ىﺮﻃﺎﺑ
ار ﺢﻴﺤﺻ ﺐﻄﻗ ىﺮﻃﺎﺑ ﺐﺼﻧ مﺎﮕﻨﻫ ﻪﻛ ﺪﻴﻨﻛ ﻞﺻﺎﺣ نﺎﻨﻴﻤﻃا
ﻚﻳ ترﻮﺼﻨﻳا ﺮﻴﻏ رد ,ﺪﻳراﺪﻧ هﺎﮕﻧ ار ىﺰﻠﻓ ىﺎﻫ ﻦﻣﺎﺿ ﺎﺑ ىﺮﻃﺎﺑ
.ﺪﺘﻔﻴﺑ قﺎﻔﺗا ﺖﺳا ﻦﻜﻤﻣ هﺎﺗﻮﻛ لﺎﺼﺗا
C
1
ﻰﻣﻮﻴﺘﻴﻟ ىﺮﻃﺎﺑ درﻮﻣ رد تﺎﻜﻧ
.ﺪﻳﻮﺷ ﻦﺌﻤﻄﻣ
.ﺪﻴﻨﻛ ﻰﻣ ﺖﻳﺎﻋر
2
•
•
•
•
راﺪﺸﻫ
ﺮﺠﻔﻨﻣ ﺖﺳا ﻦﻜﻤﻣ ﺖﺳردﺎﻧ لﺎﻤﻌﺘﺳا ترﻮﺻ رد ىﺮﻃﺎﺑ
.دﻮﺷ
رود ﺶﺗآ رد ﺎﻳ ,ﺪﻴﻨﻜﻧ زﺎﺑ ,ﺪﻴﻨﻜﻧ ژرﺎﺷ هرﺎﺑود
.ﺪﻳزاﺪﻧﺎﻴﻧ
ﺪﻳوﺮﺑ ﺪﻌﺑ ﻪﺤﻔﺻ ﻪﺑT
Page 61

ىﺎﻫ ﻞﻳﺎﻓ ﺶﺨﭘ ﺐﻴﺗﺮﺗMP3/WMA/AAC
MP3/WMA/
AAC
(مﻮﺒﻟآ) رﺪﻟﻮﻓ
AAC
(كاﺮﺗ)
ﻞﻳﺎﻓMP3/WMA/
ىﺎﻫ ﻞﻳﺎﻓ درﻮﻣ ردMP3
نآ .ﺖﺳا ﻰﻘﻴﺳﻮﻣ ﻞﻳﺎﻓ ىزﺎﺳ هدﺮﺸﻓ ﺖﻣﺮﻓ دراﺪﻧﺎﺘﺳا ﻚﻳ
ىﺎﻫ هداد
CDنآ ﻰﻠﺻا هزاﺪﻧا ۱/۱۰ ﺎﺒﻳﺮﻘﺗ ﺎﺗ ار ﻰﺗﻮﺻ
.ﺪﻨﻛ ﻰﻣ هدﺮﺸﻓ
1.0 ,1.1 ,2.2 ,2.3 و 2.4 راﻮﻧ زا ID3ﻪﺑ ﺎﻬﻨﺗ
MP3 راﻮﻧ .ﺪﻧراد دﺮﺑرﺎﻛ ID3۳۰ /) ﺮﺘﻛارﺎﻛ ۱۵1.0و
1.1) ﺮﺘﻛارﺎﻛ ۶۳/۱۲۶ ﺎﻳ ,(2.2 ,2.3 و 2.4.ﺖﺳا (
MP3ﻞﺻﺎﺣ نﺎﻨﻴﻤﻃا ,ﻞﻳﺎﻓ
ﻞﻳﺎﻓ ﺪﻧﻮﺴﭘ ﻪﻛ ﺪﻴﻨﻛ
".mp3".ﺪﻴﻨﻛ ﻪﻓﺎﺿا ﻞﻳﺎﻓ مﺎﻧ ﻪﺑ ار
VBR (ﺮﻴﻐﺘﻣ ﺖﻴﺑ خﺮﻧ) MP3ﺎﻳ
هﺪﺷ ىﺮﭙﺳ ﺶﺨﭘ نﺎﻣز ﺖﺳا ﻦﻜﻤﻣ ,ﻮﻠﺟ ﻪﺑ ﻊﻳﺮﺳ/ﺐﻘﻋ
.دﻮﺸﻧ هداد ﺶﻳﺎﻤﻧ ﺢﻴﺤﺻ رﻮﻄﺑ
ﻚﻳ ﺎﻤﺷ ﻪﻛ ﻰﺗرﻮﺻ رد
ﻮﻠﻴﻛ ۳۲۰ ﺪﻨﻧﺎﻣ ,ﻻﺎﺑ ﺖﻴﺑ خﺮﻧ ﺎﺑ
.دﻮﺷ ﻞﺻو و ﻊﻄﻗ اﺪﺻ ﻦﻜﻤﻣ ,ﺪﻴﻨﻛ ﻰﻣ ﺶﺨﭘ ار ﻪﻴﻧﺎﺛ رد ﺖﻴﺑ
MP3
ىﺎﻫ هﺎﮕﺘﺳد درﻮﻣ ردUSB
) CD-R/RW(هﻮﺒﻧا ىزﺎﺳ هﺮﻴﺧذ ﻪﺘﺳد ﺎﻳ
ﺪﻧاﻮﺗ ﻰﻤﻧ هﺎﮕﺘﺳد ﻦﻳا ,دﻮﺟو ﻦﻳا ﺎﺑ .ﺪﻨﺷﺎﺑ ﻰﻣ ىﺮﻴﮔرﺎﻜﺑ
USBزا ,دﻮﺧ
هﺎﮕﺘﺳد ىرﺎﮔزﺎﺳ درﻮﻣ رد تﺎﻴﺋﺰﺟ ىاﺮﺑ
ﻰﻧﻮﺳ ﻰﻧﺎﺒﻴﺘﺸﭘ ﺖﻳﺎﺳ بو
Sonyنﺪﻳد (۲۶ ﻪﺤﻔﺻ)
MP3/WMA/AAC
:هﻮﺒﻧا ىزﺎﺳ هﺮﻴﺧذ ﻪﺘﺳد
۱۲۸ ﺮﻫ رد (ﺎﻫ كاﺮﺗ) ﺎﻫ ﻞﻳﺎﻓ ,
.ﺪﻴﻨﻛ هدﺎﻔﺘﺳا لﺎﺼﺗا ىاﺮﺑ
.دﻮﺷ دﺮﻜﻠﻤﻋ ءﻮﺳ ﺚﻋﺎﺑ ﺖﺳا ﻦﻜﻤﻣ
هﺎﮕﺘﺳد رد ﺎﻫ هداد زا نﺎﺒﻴﺘﺸﭘ ﻰﭙﻛ دﺎﺠﻳا
ﻪﺘﻜﻧ
•MP3 ﺮﺼﺘﺨﻣ ﻪﻛ MPEG-1 Audio Layer-3,ﺪﺷﺎﺑ ﻰﻣ
:ﺎﻫ ﻪﺘﺳد/ﺶﺨﭘ ىﺎﻫ ﺖﺴﻴﻟ/ناﺪﻨﻣﺮﻨﻫ/ﺎﻫ مﻮﺒﻟآ-
• ىﺎﻫ ﻪﺨﺴﻧ
• ﻞﻳﺎﻓ ﻚﻳ ىراﺬﮕﻣﺎﻧ مﺎﮕﻨﻫ
هﺎﮕﺘﺳد ﺎﺑ هﺪﺷ ﻪﻤﻴﻤﺿ ﻞﺑﺎﻛ زا ,ﻞﺑﺎﻛ ﻚﻳ زا هدﺎﻔﺘﺳا مﺎﮕﻨﻫ
ﻦﻜﻤﻣ ﻪﻛ ﺖﺳا ﻦﻴﮕﻨﺳ ﺎﻳ گرﺰﺑ رﺪﻘﻧآ ﻪﻛ
• ﻞﻳﺎﻓ ﻚﻳ ﺶﺨﭘ ﻦﻴﺣ رد
.ﺪﻴﻨﻜﻧ هدﺎﻔﺘﺳا ﺪﻨﻛ دﺎﺠﻳا ﻞﺧاﺪﺗ ﻰﮔﺪﻨﻧار رﺎﻛ رد ﺖﺳا
اﺮﻳز ,ﺪﻴﻨﻜﻧ ﺎﻫر هﺪﺷ كرﺎﭘ ﻞﻴﺒﻣﻮﺗا ﻚﻳ رد ار
ﺶﺨﭘ عوﺮﺷ ,هﺪﺷ ﻂﺒﺿ ىﺎﻫ هداد ناﺰﻴﻣ ﻪﺑ ﻪﺘﺴﺑ ﺖﺳا ﻦﻜﻤﻣ
.دﻮﺷ ﻰﻣ ﻪﻴﺻﻮﺗ
USB
ﻰﺗﻮﺻ
ATRAC دراﺪﻧﺎﺘﺳا ﺎﺑ قﺎﺒﻄﻧا ﻞﺑﺎﻗ USBﻞﺑﺎﻗ
ىﺎﻫ هﺎﮕﺘﺳد
USB بﺎﻫ ﻖﻳﺮﻃ زا ار USB.ﺪﻫد ﺺﻴﺨﺸﺗ
.ﺪﻴﻳﺎﻤﻧ
AAC
ATRAC.ﺪﻧﻮﺷ ﺶﺨﭘ ﺪﻨﻧاﻮﺗ ﻰﻤﻧ
.ﺪﺷﺎﺑ
:(ﺎﻫ مﻮﺒﻟآ) ﺎﻫرﺪﻟﻮﻓ-
:رﺪﻟﻮﻓ
۵۰۰
ﻰﺗﻮﺻ هﺎﮕﺘﺳد:ATRAC ATRAC/MP3/WMA/AAC
۶۵۵۳۵ :ﺎﻫ كاﺮﺗ ,۶۵۵۳۵
USB
هﺎﮕﺘﺳد ﻚﻳ زا
USB
هﺎﮕﺘﺳد
USB
.ﺪﻣﺎﺠﻧﺎﻴﺑ لﻮﻃ ﻪﺑ ﻰﺗﺪﻣ
• ىﺎﻫ هﺎﮕﺘﺳدUSBهﺎﮕﺘﺳد و هﻮﺒﻧا ىزﺎﺳ هﺮﻴﺧذ ﻪﺘﺳد عﻮﻧ
•.ﺖﺳا توﺎﻔﺘﻣ هﺎﮕﺘﺳد عﻮﻧ ﻪﺑ ﻪﺘﺴﺑ ﻖﺒﻄﻨﻣ ىﺎﺸﮔﺰﻣر
- :هﻮﺒﻧا ىزﺎﺳ هﺮﻴﺧذ ﻪﺘﺳد
-ﻰﺗﻮﺻ هﺎﮕﺘﺳد:ATRAC ATRAC/MP3/WMA/
• ىﺎﻫ ﻞﻳﺎﻓDRMزا ﺮﻴﻏ ﻪﺑ (لﺎﺘﻴﺠﻳد قﻮﻘﺣ ﺖﻳﺮﻳﺪﻣ)
•ﻰﻣ ﺮﻳز ﺐﻴﺗﺮﺗ ﻪﺑ ﺶﻳﺎﻤﻧ ﻞﺑﺎﻗ ىﺎﻫ هداد داﺪﻌﺗ ﺮﺜﻛاﺪﺣ
تﺎﻜﻧ
•
•
•
•
•
ىﺎﻫ ﻞﻳﺎﻓ درﻮﻣ ردWMA
ىﺎﻫ هداد نآ .ﺖﺳا ﻰﻘﻴﺳﻮﻣ ﻞﻳﺎﻓ
CDﺎﺒﻳﺮﻘﺗ ﻪﺑ ار ﻰﺗﻮﺻ
WMAﺪﻴﻨﻛ ﻞﺻﺎﺣ نﺎﻨﻴﻤﻃا ,
WMAعﻮﻧ
.دﻮﺸﻧ هداد ﺶﻳﺎﻤﻧ ﺢﻴﺤﺻ رﻮﻄﺑ ﺖﺳا ﻦﻜﻤﻣ
ﻪﻴﻧﺎﺛ رد ﺖﻴﺑ ﻮﻠﻴﻛ ۶۴ ىاﺮﺑ ﺎﻬﻨﺗ
.دﻮﺷ ﻰﻤﻧ ﻰﻧﺎﺒﻴﺘﺸﭘ ناﺪﻘﻓ نوﺪﺑ هدﺮﺸﻓ ﻞﻳﺎﻓ ﺶﺨﭘ
•WMA زوﺪﻨﻳو ﻪﻧﺎﺳر ىاﺪﺻ ﺮﺼﺘﺨﻣ ﻪﻛ ,Windows
Media Audioىزﺎﺳ هدﺮﺸﻓ ﺖﻣﺮﻓ دراﺪﻧﺎﺘﺳا ﻚﻳ ,ﺖﺳا
*.ﺪﻨﻛ ﻰﻣ هدﺮﺸﻓ نآ ﻰﻠﺻا هزاﺪﻧا
۱/۲۲
WMA.ﺖﺳا ﺮﺘﻛارﺎﻛ ۶۳
• ﺐﺴﭼﺮﺑ
• ﻞﻳﺎﻓ ﻚﻳ ىراﺬﮕﻣﺎﻧ مﺎﮕﻨﻫ
ﻞﻳﺎﻓ ﺪﻧﻮﺴﭘ ﻪﻛ".wma".ﺪﻴﻨﻛ ﻰﻣ ﻪﻓﺎﺿا ﻞﻳﺎﻓ مﺎﻧ ﻪﺑ ار
• ﻞﻳﺎﻓ ﻚﻳ ﺐﻘﻋ/ﻮﻠﺟ ﻪﺑ ﻊﻳﺮﺳ ﺎﻳ ﺶﺨﭘ ﻦﻴﺣ رد
VBRهﺪﺷ ىﺮﭙﺳ ﺶﺨﭘ نﺎﻣز تﺪﻣ ,(ﺮﻴﻐﺘﻣ ﺖﻴﺑ خﺮﻧ)
*
ﻪﺘﻜﻧ
۲۰
Page 62

•ﺎﺑ ار ﺎﻫ ﻚﺴﻳد ,ندﺮﻛ ﺶﺨﭘ زا ﻞﺒﻗ
رد دﻮﺟﻮﻣ هﺪﻨﻨﻛ ﺰﻴﻤﺗ ﻪﭼرﺎﭘ ﻚﻳ
زا ار ﻚﺴﻳد ﺮﻫ .ﺪﻴﻨﻛ ﺰﻴﻤﺗ رازﺎﺑ
زا .ﺪﻴﻨﻛ ﺰﻴﻤﺗ نوﺮﻴﺑ ﻪﺑ ور نآ ﺰﻛﺮﻣ
ﺰﻴﻤﺗ ,ﺮﻨﻴﺗ ,ﻦﻳﺰﻨﺑ ﺮﻴﻈﻧ ﻰﻳﺎﻫ لﻼﺣ
ىﺮﭙﺳا ﺎﻳ ,رازﺎﺑ رد دﻮﺟﻮﻣ ىﺎﻫ هﺪﻨﻨﻛ
ﻚﺴﻳد ىاﺮﺑ هدﺎﻔﺘﺳا درﻮﻣ ﻦﻛﺎﺳ ﺮﻴﻏ
.ﺪﻴﻨﻜﻧ هدﺎﻔﺘﺳا گﻮﻟﺎﻧآ ىﺎﻫ
ىﺎﻫ ﻚﺴﻳد درﻮﻣ رد تﺎﻜﻧCD-R/CD-RW
• ىﺎﻫ ﻚﺴﻳد زا ﻰﻀﻌﺑCD-R/CD-RWتاﺰﻴﻬﺠﺗ ﻪﺑ ﻪﺘﺴﺑ)
ﺖﺳا ﻦﻜﻤﻣ (ﻚﺴﻳد ﻂﻳاﺮﺷ ﺎﻳ نآ ﻂﺒﺿ ىاﺮﺑ هدﺎﻔﺘﺳا درﻮﻣ
.ﺪﻧﻮﺸﻧ ﺶﺨﭘ هﺎﮕﺘﺳد ﻦﻳا ىور ﺮﺑ
• ﻚﻳ ﺪﻴﻧاﻮﺗ ﻰﻤﻧ ﺎﻤﺷ/CD-R ﻚﻳCD-RWﺰﻳﻻﺎﻨﻳﺎﻓ ﻪﻛ
.ﺪﻴﻨﻛ ﺶﺨﭘ ار ﺖﺳا هﺪﺸﻧ
• زا ۲ ﺢﻄﺳ/۱ ﺢﻄﺳ ﺖﻣﺮﻓ ﺎﺑ هﺎﮕﺘﺳدISO 9660 ,Joliet/
Romeo ىا ﻪﺴﻠﺟ ﺪﻨﭼ و ,ﻪﺘﻓﺎﻳ شﺮﺘﺴﮔ ﺖﻣﺮﻓ رد Multi
Session.ﺖﺳا رﺎﮔزﺎﺳ
•:داﺪﻌﺗ ﺮﺜﻛاﺪﺣ
Joliet) ۶۴ ﺎﻳ ,(Romeo.ﺪﺷﺎﺑ ﻰﻣ (
CD-DA.دﻮﺷ ﻰﻣ ﺶﺨﭘ ﻪﺴﻠﺟ ﻦﻴﻟوا
-
-
)۳۲
•
ﺎﺑ ﺖﻣﺮﻓ
- ﻚﻳ كاﺮﺗ ﻦﻴﻟوا ﻪﻛ ﻰﻣﺎﮕﻨﻫ
- كاﺮﺗ ﻦﻴﻟوا ﻪﻛ ﻰﻣﺎﮕﻨﻫ
Music".دﻮﺷ ﻰﻣ هداد ﺶﻳﺎﻤﻧ
.(ﻰﻟﺎﺧ و ﻪﺸﻳر ىﺎﻫرﺪﻟﻮﻓ ﻞﻣﺎﺷ) ۱۵۰ :(ﺎﻫ مﻮﺒﻟآ) ﺎﻫرﺪﻟﻮﻓ
:ﻚﺴﻳد ﻚﻳ رد دﻮﺟﻮﻣ ىﺎﻫرﺪﻟﻮﻓ و (ﺎﻫ كاﺮﺗ) ىﺎﻫ ﻞﻳﺎﻓ
ىرﺎﻴﺴﺑ ىﺎﻫﺮﺘﻛارﺎﻛ ىاراد ﻞﻳﺎﻓ/رﺪﻟﻮﻓ ﻚﻳ مﺎﻧ ﺮﮔا) ۳۰۰
.(ﺪﺷﺎﺑ ۳۰۰ زا ﺮﺘﻤﻛ ﺖﺳا ﻦﻜﻤﻣ داﺪﻌﺗ ﻦﻳا ,ﺪﺷﺎﺑ
ﻞﻳﺎﻓ/رﺪﻟﻮﻓ مﺎﻧ ىاﺮﺑ ﺶﻳﺎﻤﻧ ﻞﺑﺎﻗ ىﺎﻫﺮﺘﻛارﺎﻛ -
Multi Session
ﻂﺒﺿ
ىا ﻪﺴﻠﺟ ﺪﻨﭼ ترﻮﺼﺑ ﻚﺴﻳد ﻪﻛ ﻰﻣﺎﮕﻨﻫ
هﺪﺷ ﻰﻳﺎﺳﺎﻨﺷ ﻪﺴﻠﺟ ﺖﻣﺮﻓ ﻦﻴﻟوا زا كاﺮﺗ ﻦﻴﻟوا ﺎﻬﻨﺗ ,ﺖﺳا هﺪﺷ
.(دﻮﺷ ﻰﻣ در ىﺮﮕﻳد ﺖﻣﺮﻓ ﺮﻫ) دﻮﺷ ﻰﻣ ﺶﺨﭘ و
ﺖﻳﻮﻟوا
CD-DA و MP3/WMA/AAC.ﺪﺷﺎﺑ ﻰﻣ
CD-DAﺎﻬﻨﺗ ,ﺖﺳا
CD-DA ﻪﺴﻠﺟ ,ﺖﺴﻴﻧ MP3/
WMA/AACىا هداد ﭻﻴﻫ ﻚﺴﻳد ﺮﮔا .دﻮﺷ ﻰﻣ ﺶﺨﭘ
,ﺪﺷﺎﺑ ﻪﺘﺷاﺪﻧ ﺎﻫ ﺖﻣﺮﻓ ﻦﻳا زا ﻚﻳ ﭻﻴﻫ رد
"NO
ﻰﻓﺎﺿا تﺎﻋﻼﻃا
ﺎﻫرﺎﻄﺧا
•هﺪﺷ كرﺎﭘ ﺪﻴﺷرﻮﺧ ﻢﻴﻘﺘﺴﻣ رﻮﻧ ﺮﻳز رد ﺎﻤﺷ ﻞﻴﺒﻣﻮﺗا ﺮﮔا
.دﻮﺷ ﻚﻨﺧ ﺪﻴﻫد هزﺎﺟا هﺎﮕﺘﺳد ىﺮﻴﮔرﺎﻜﺑ زا ﺶﻴﭘ ,ﺖﺳا
•رﻮﻄﺑ ﻰﻗﺮﺑ ﻦﺘﻧآ دﻮﺷ ﻰﻣ ﻪﺘﻓﺮﮔ رﺎﻜﺑ هﺎﮕﺘﺳد ﻪﻛ ﻰﻣﺎﮕﻨﻫ
.ﺪﺷ ﺪﻫاﻮﺧ زﺎﺑ رﺎﻛدﻮﺧ
ﺖﺑﻮﻃر ﻊﻤﺠﺗ
ﻦﻜﻤﻣ ,كﺎﻨﻤﻧ رﺎﻴﺴﺑ ﻪﻘﻄﻨﻣ ﻚﻳ رد ﺎﻳ ﻰﻧارﺎﺑ زور ﻚﻳ رد
هﺎﮕﺘﺳد ﺶﻳﺎﻤﻧ ﻪﺤﻔﺻ و ﺎﻫﺰﻨﻟ ﻞﺧاد رد ﺖﺑﻮﻃر ﻊﻤﺠﺗ ﺖﺳا
رﻮﻄﺑ هﺎﮕﺘﺳد ,هﺪﻳﺪﭘ ﻦﻳا زوﺮﺑ ترﻮﺻ رد .ﺪﺘﻓﺎﻴﺑ قﺎﻔﺗا
جرﺎﺧ ار ﻚﺴﻳد ,ﻰﺘﻟﺎﺣ ﻦﻴﻨﭼ رد .دﺮﻛ ﺪﻫاﻮﺨﻧ رﺎﻛ ﺢﻴﺤﺻ
.دﻮﺷ ﺮﻴﺨﺒﺗ ﺖﺑﻮﻃر ﺎﺗ ﺪﻴﻨﻛ ﺮﺒﺻ ﺖﻋﺎﺳ ﻚﻳ دوﺪﺣ و ﺪﻴﻨﻛ
اﺪﺻ ىﻻﺎﺑ ﺖﻴﻔﻴﻛ ﻆﻔﺣ ىاﺮﺑ
ىور ﺮﺑ ار ﺮﮕﻳد ىﺎﻫ ﻰﻧﺪﻴﺷﻮﻧ ﺎﻳ هﻮﻴﻣ بآ ﺪﻴﺷﺎﺑ ﺐﻗاﺮﻣ
.ﺪﻳﺰﻳﺮﻧ ﺎﻫ ﻚﺴﻳد ﺎﻳ هﺎﮕﺘﺳد
ﺎﻫ ﻚﺴﻳد درﻮﻣ رد تﺎﻜﻧ
•ﺲﻤﻟ ار نآ ﺢﻄﺳ ,ﻚﺴﻳد ﻚﻳ ﻦﺘﺷاد هﺎﮕﻧ ﺰﻴﻤﺗ ىاﺮﺑ
.ﺪﻳﺮﻴﮕﺑ ﺖﺳد ﻪﺑ نآ هرﺎﻨﻛ زا ار ﻚﺴﻳد .ﺪﻴﻨﻜﻧ
•رد ﺪﻧﺮﻴﮔ ﻰﻤﻧ راﺮﻗ هدﺎﻔﺘﺳا درﻮﻣ ﻪﻛ ﻰﻧﺎﻣز رد ار ﺎﻫ ﻚﺴﻳد
.ﺪﻳراد هﺎﮕﻧ ﻚﺴﻳد ﺪﻠﺟ ﺎﻳ دﻮﺧ ﻪﺒﻌﺟ
•ﺎﻫر زا .ﺪﻴﻫﺪﻧ راﺮﻗ ﻻﺎﺑ/مﺮﮔ ىﺎﻣد ضﺮﻌﻣ رد ار ﺎﻫ ﻚﺴﻳد
/درﻮﺒﺷاد ﻚﻳ ﺎﻳ هﺪﺷ كرﺎﭘ ﻞﻴﺒﻣﻮﺗا ﻚﻳ رد ﺎﻫ نآ ندﺮﻛ
.ﺪﻴﻨﻛ بﺎﻨﺘﺟا ﺐﻘﻋ ﻰﻨﻴﺳ
•ﺖﻣﻼﻋ/ﺮﻫﻮﺟ ﺎﺑ ﺎﻫ ﻚﺴﻳد زا ﺎﻳ ,ﺪﻴﻧﺎﺒﺴﭽﻧ ار ﺎﻫ ﺐﺴﭼﺮﺑ
رد ﺖﺳا ﻦﻜﻤﻣ ﻰﻳﺎﻫ ﻚﺴﻳد ﻦﻴﻨﭼ .ﺪﻴﻨﻜﻧ هدﺎﻔﺘﺳا هﺪﻨﺒﺴﭼ
دﺮﻜﻠﻤﻋ ءﻮﺳ ﺚﻋﺎﺑ و ,ﺪﻨﺘﺴﻳﺎﺑ زﺎﺑ ﺶﺧﺮﭼ زا هدﺎﻔﺘﺳا ﻦﻴﺣ
.ﺪﻨﻨﻛ باﺮﺧ ار ﻚﺴﻳد ﺖﺳا ﻦﻜﻤﻣ ﺎﻳ ,ﺪﻧﻮﺷ
ىﺎﻫ ىژﻮﻟﻮﻨﻜﺗ ﺎﺑ ﻪﺘﻓﺎﻳ ﻪﻤﺗﺎﺧ ﻰﻘﻴﺳﻮﻣ ىﺎﻫ ﻚﺴﻳد
ﺮﺸﻧ ﻖﺣ ﺖﻈﻓﺎﺤﻣ
ﻚﺴﻳد دراﺪﻧﺎﺘﺳا ﺎﺑ ﻪﻛ ﻰﻳﺎﻫ ﻚﺴﻳد ﺶﺨﭘ ىاﺮﺑ هﺎﮕﺘﺳد ﻦﻳا
ﻚﺴﻳد ,اﺮﻴﺧا .ﺖﺳا هﺪﺷ ﻰﺣاﺮﻃ ﺪﻨﺘﺴﻫ ﻖﺑﺎﻄﻣ (
ﺮﺸﻧ ﻖﺣ ﺖﻈﻓﺎﺤﻣ ىﺎﻫ ىژﻮﻟﻮﻨﻜﺗ ﺎﺑ ﻪﻛ ﻰﻔﻠﺘﺨﻣ ﻰﻘﻴﺳﻮﻣ ىﺎﻫ
رازﺎﺑ ﻪﺑ ﻂﺒﺿ ىﺎﻫ ﺖﻛﺮﺷ زا ﻰﻀﻌﺑ ﻂﺳﻮﺗ ﺪﻧا هﺪﺷ ىراﺬﮔ ﺰﻣر
,ﺎﻫ ﻚﺴﻳد نآ نﺎﻴﻣ رد ﻪﻛ ﺪﻴﺷﺎﺑ هﺎﮔآ ﺎﻔﻄﻟ .ﺪﻧا هﺪﺷ ﻪﺿﺮﻋ
دراﺪﻧﺎﺘﺳا ﺎﺑ ﺖﺳا ﻦﻜﻤﻣ ﻪﻛ ﺪﻧراد دﻮﺟو ىداﺪﻌﺗ
CD
ﻖﺑﺎﻄﻣ
.ﺪﻧﻮﺸﻧ ﺶﺨﭘ لﻮﺼﺤﻣ ﻦﻳا ﻂﺳﻮﺗ ﺖﺳا ﻦﻜﻤﻣ و ﺪﻨﺷﺎﺒﻧ
ﻪﺒﻟود ىﺎﻫ ﻚﺴﻳد درﻮﻣ رد ﻪﺘﻜﻧ
تﺎﻳﻮﺘﺤﻣ ﻪﻛ ﺖﺳا ﻪﻓﺮﻃود ﻚﺴﻳد ﻚﻳ ﻪﺒﻟود ﻚﺴﻳد ﻚﻳ
ﻪﻜﻴﺋﺎﺠﻧآ زا ,ﻪﺘﺒﻟا .ﺪﻫد ﻰﻣ راﺮﻗ ﺮﮕﻳد فﺮﻃ رد ﻰﻟﺎﺘﻴﺠﻳد
) هدﺮﺸﻓ ﻚﺴﻳد دراﺪﻧﺎﺘﺳا ﺎﺑ ﻰﺗﻮﺻ تﺎﻳﻮﺘﺤﻣ فﺮﻃ
CD(
.دﻮﺷ ﻰﻤﻧ ﻦﻴﻤﻀﺗ هﺎﮕﺘﺳد ﻦﻳا ىور ﺮﺑ ﺶﺨﭘ ,ﺖﺴﻴﻧ ﻖﺑﺎﻄﻣ
۱۹
DVDﻰﺗﻮﺻ تﺎﻳﻮﺘﺤﻣ رﺎﻨﻛ رد ار فﺮﻃ ﻚﻳ رد
CD
) هدﺮﺸﻓ
هﺪﺷ ﻂﺒﺿ
.ﺪﻴﻨﻜﻧ هدﺎﻔﺘﺳا هﺪﻨﺒﺴﭼ داﻮﻣ ﺎﻳ ﺎﻫ ﺐﺴﭼﺮﺑ ﺎﺑ ﻰﻜﺴﻳد ﭻﻴﻫ زا
ﻦﻴﻨﭼ زا هدﺎﻔﺘﺳا ﺮﺛا ﺮﺑ ﺮﻳز ىﺎﻫدﺮﻜﻠﻤﻋ ءﻮﺳ ﺖﺳا ﻦﻜﻤﻣ
:ﺪﻧﻮﺷ دﺎﺠﻳا ﻰﻳﺎﻫ ﻚﺴﻳد
-ﻚﻳ نﺪﺷ هﺪﻨﻛ ﻞﻴﻟد ﻪﺑ) ﻚﺴﻳد ندﺮﻛ جرﺎﺧ رد ﻰﻧاﻮﺗﺎﻧ
.(جوﺮﺧ مﺰﻴﻧﺎﻜﻣ ندﺮﻛ دوﺪﺴﻣ و هﺪﻨﺒﺴﭼ ﺖﻣﻼﻋ ﺎﺑ ﺐﺴﭼﺮﺑ
-,لﺎﺜﻣ ىاﺮﺑ) ﻰﺗﻮﺻ ىﺎﻫ هاد ﺢﻴﺤﺻ نﺪﻧاﻮﺧ رد ﻰﻧاﻮﺗﺎﻧ
ىﺎﻣﺮﮔ نﺪﺷ ﻢﻛ ﻞﻴﻟد ﻪﺑ (ﺶﺨﭘ مﺪﻋ ﺎﻳ ,ﺶﺨﭘ ندﺮﻛ در
دﻮﺷ ﻰﻣ ﺚﻋﺎﺑ ﻪﻛ ﺐﺴﭼﺮﺑ ﺎﻳ هﺪﻨﺒﺴﭼ ﺖﻣﻼﻋ ﻚﻳ
.درادﺮﺑ بﺎﺗ ﻚﺴﻳد
.ﺪﻧﻮﺷ ﺶﺨﭘ هﺎﮕﺘﺳد ﻦﻳا رد ﺪﻨﻧاﻮﺗ ﻰﻤﻧ (هرﺎﺘﺳ ,ﻊﺑﺮﻣ
ﻪﺑ ﻪﻣﺪﺻ ﺚﻋﺎﺑ ﺪﻧاﻮﺗ ﻰﻣ ﻻﺎﺑ دراﻮﻣ مﺎﺠﻧا ىاﺮﺑ شﻼﺗ
.ﺪﻴﻨﻜﻧ هدﺎﻔﺘﺳا ﻰﻳﺎﻫ ﻚﺴﻳد ﻦﻴﻨﭼ زا .دﻮﺷ هﺎﮕﺘﺳد
•
•,ﺐﻠﻗ ,لﺎﺜﻣ ىاﺮﺑ) دراﺪﻧﺎﺘﺳا ﺮﻴﻏ ىﺎﻫ ﻞﻜﺷ ﺎﺑ ﺎﻫ ﻚﺴﻳد
•.ﺪﻴﻨﻛ ﺶﺨﭘ ار ىﺮﺘﻤﻴﺘﻧﺎﺳ ۸ ىﺎﻫ ﻚﺴﻳد ﺪﻴﻧاﻮﺗ ﻰﻤﻧ ﺎﻤﺷ
Page 63

.اﺪﺻ ﻢﻴﻈﻨﺗ ﻪﺑ ﻪﺑ دورو ىاﺮﺑ
ﻪﺑ) هﺎﮕﺘﺳد ىور ﻪﻫارﺪﻨﭼ راﺬﮔﺰﻣر نﺪﻧﺎﺧﺮﭼ ﺪﻨﻧﺎﻣ
.(ﺪﻴﻧﺎﺧﺮﭽﺑ و هداد رﺎﺸﻓ ﻞﺧاد
.(ﺪﻴﻧﺎﺧﺮﭽﺑ) هﺎﮕﺘﺳد ىور ﺮﺑ ﻪﻫار ﺪﻨﭼ راﺬﮔﺰﻣر ﺪﻨﻧﺎﻣ
ﺮﺑ ﺖﺳار/ﭗﭼ ﻪﺑ ﻪﻫار ﺪﻨﭼ راﺬﮔﺰﻣر نداد رﺎﺸﻓ ﺪﻨﻧﺎﻣ
.(ﺪﻳراد هﺎﮕﻧ و ﺪﻴﻧﺎﺧﺮﭽﺑ ﺎﻳ ,ﺪﻴﻧﺎﺧﺮﭽﺑ) هﺎﮕﺘﺳد ىور
ىﺮﻴﮔرﺎﻜﺑ ﺖﻬﺟ نداد ﺮﻴﻴﻐﺗ
هداد نﺎﺸﻧ ﺮﻳز رد ﻪﭽﻧآ ﺪﻨﻧﺎﻣ ﺎﻫ لﺮﺘﻨﻛ ىﺮﻴﮔرﺎﻜﺑ ﺖﻬﺟ
.ﺖﺳا هﺪﺷ ﻢﻴﻈﻨﺗ ﻪﻧﺎﺧرﺎﻛ رد ﺖﺳا هﺪﺷ
نداد ﺶﻳاﺰﻓا ىاﺮﺑ
• ﻪﻤﻛدSOUND
• لﺮﺘﻨﻛPRESET/DISC
• لﺮﺘﻨﻛVOL(اﺪﺻ ﻪﺟرد)
• لﺮﺘﻨﻛSEEK/AMS
,ﻰﻌﻴﺒﻃ ﺶﺨﭘ ﺔﻟﺎﺣ ﻪﺑ ﺖﺸﮔزﺎﺑ ىاﺮﺑ"Repeat off"ﺎﻳ
"Shuffle off".ﺪﻴﻨﻛ بﺎﺨﺘﻧا ار
هﺪﻨﻨﻛ ﺾﻳﻮﻌﺗ و
ىﺎﻫ هﺎﮕﺘﺳد نﺎﻴﻣ ار ﺎﻫ كاﺮﺗ
CD
.ﺪﻨﻨﻛ ﻰﻤﻧ ﺐﻴﻛﺮﺗ
"Shuffle All"
MD
مﺎﻧ سﺎﺳا ﺮﺑ ﻚﺴﻳد ﻚﻳ ﻞﺤﻣ ﻦﺘﻓﺎﻳ— LIST
هﺪﻨﻨﻛ ﺾﻳﻮﻌﺗ ﻚﻳ ﻪﻛ ﻰﻣﺎﮕﻨﻫ ﺪﻴﻧاﻮﺗ ﻰﻣ ﺎﻤﺷCDﺎﺑ
ﺖﻴﻠﺑﺎﻗCD TEXT هﺪﻨﻨﻛ ﺾﻳﻮﻌﺗ ﺎﻳ MDدﻮﺷ ﻰﻣ ﻞﺻو
.ﺪﻴﻨﻛ بﺎﺨﺘﻧا ﺖﺴﻴﻟ زا ار ﻚﺴﻳد ﻚﻳ
رد مﺎﻧ ,ﺪﻴﻨﻛ ﻦﻴﻴﻌﺗ ﻚﺴﻳد ﻚﻳ ىاﺮﺑ مﺎﻧ ﻚﻳ ﺎﻤﺷ ﺮﮔا
.دﻮﺷ ﻰﻣ ﺮﻫﺎﻇ ﺖﺴﻴﻟ
.دﻮﺷ ﻰﻣ ﺮﻫﺎﻇ ﻚﺴﻳد مﺎﻧ ﺎﻳ ﻚﺴﻳد هرﺎﻤﺷ
.دﻮﺷ
.ددﺮﮔ ﻰﻣ زﺎﺑ ىدﺎﻋ ﺶﺨﭘ ﺖﻟﺎﺣ ﻪﺑ ﺶﻳﺎﻤﻧ ﻪﺤﻔﺻ
هرﺎﺷا
ىﺎﻫ
1 ,ﺶﺨﭘ ﻦﻴﺣ رد(LIST).ﺪﻴﻫد رﺎﺸﻓ ﻻﺎﺑ ﻪﺑ ار
2ﺮﻫﺎﻇ هاﻮﺨﻟد ﻚﺴﻳد ﺎﺗ ﺪﻴﻧﺎﺧﺮﭽﺑ ار ﻪﻫار ﺪﻨﭼ راﺬﮔﺰﻣر
3.ﺪﻴﻫد رﺎﺸﻓ ﻚﺴﻳد ﺶﺨﭘ ىاﺮﺑ ار ﻪﻫار ﺪﻨﭼ راﺬﮔﺰﻣر
نداد ﺶﻫﺎﻛ ىاﺮﺑ
هرﺎﻨﻛ ىور ﺮﺑ نادﺮﮔ هﺪﻨﻫد نﺎﻣﺮﻓ ﺪﻳراد زﺎﻴﻧ ﺎﻤﺷ ﺮﮔا
ﺪﻴﻧاﻮﺗ ﻰﻣ ﺎﻤﺷ ,ﺪﻴﻫد رﺎﺸﻓ ار ﺖﻳاﺪﻫ نﻮﺘﺳ ﺖﺳار ﺖﻤﺳ
.ﺪﻴﻨﻛ ﺲﻜﻋﺮﺑ ار ىﺮﻴﮔرﺎﻜﺑ ﺖﻬﺟ
.ﺪﻳراد هﺎﮕﻧ و ﺪﻴﻫد
نادﺮﮔ هﺪﻨﻫد نﺎﻣﺮﻓRM-X4S
ﺐﺴﭼﺮﺑ ندﺮﻛ ﻞﺻو
ﺐﺴﭼﺮﺑ نادﺮﮔ هﺪﻨﻫد نﺎﻣﺮﻓ ندﺮﻛ ﺐﺼﻧ هﻮﺤﻧ ﻪﺑ ﻪﺘﺴﺑ
.ﺪﻴﻨﻛ ﻞﺻو ار ﺮﮕﻧﺎﺸﻧ
1 لﺮﺘﻨﻛ نداد رﺎﺸﻓ مﺎﮕﻨﻫVOL ,(SOUND)رﺎﺸﻓ ار
SOUND
DSPL
MODE
MODE
DSPL
SOUND
نﺎﻤﻫ نادﺮﮔ هﺪﻨﻫد نﺎﻣﺮﻓ ىور ﺮﺑ ﻖﺒﻄﻨﻣ ىﺎﻫ ﻪﻤﻛد
.ﺪﻴﻨﻛ ﻰﻣ لﺮﺘﻨﻛ ار هﺎﮕﺘﺳد ﻦﻳا ىور ﺮﺑ ىﺎﻫ دﺮﻜﻠﻤﻋ
ATT
DSPL
SEEK/AMS
PRESET/
DISC
SOURCE
SOUND
VOL
ﻚﻳ ﺪﻨﻣزﺎﻴﻧ نادﺮﮔ هﺪﻨﻫد نﺎﻣﺮﻓ ىور ﺮﺑ ﺮﮕﻳد ىﺎﻫ لﺮﺘﻨﻛ
.ﺪﻨﺘﺴﻫ هﺎﮕﺘﺳد زا توﺎﻔﺘﻣ تﺎﻴﻠﻤﻋ
رﺎﺸﻓ هرﺎﺑود ,ندﺮﻛ ﻮﻐﻟ ىاﺮﺑ .اﺪﺻ ندﺮﻛ كزﺎﻧ ىاﺮﺑ
ﺎﻫ لﺮﺘﻨﻛ ﻞﺤﻣ
MODE
OFF
OFF
.ﺪﻴﻫد
• ﻪﻤﻛدATT(ندﺮﻛ كزﺎﻧ)
۱۸
Page 64

هﺪﻨﻨﻛ ﺾﻳﻮﻌﺗCD/MD
ىرﺎﻴﺘﺧا تاﺰﻴﻬﺠﺗ زا هدﺎﻔﺘﺳا
۱
ﺮﮕﻧﺎﺸﻧ ,هﺎﮕﺘﺳد هرﺎﻤﺷMP3 *
۲
مﻮﺒﻟآ/ﻚﺴﻳد هرﺎﻤﺷ
ﻦﻴﻳﺎﭘ/ﻻﺎﺑ ﻪﺑ ار ﻪﻫار ﺪﻨﭼ راﺬﮔﺰﻣر
هﺎﮕﻧ ﻪﻈﺤﻟ ﻚﻳ ىاﺮﺑ) ﺪﻴﻨﻛ ﺎﻫر و
.ىزﺎﺳدازآ لوا ﻪﻴﻧﺎﺛ ۲ فﺮﻇ رد
ﻪﻴﻧﺎﺛ ۲ فﺮﻇ رد هرﺎﺑود ,ﺲﭙﺳ
.ﺪﻳراد هﺎﮕﻧ و ﺪﻴﻫد رﺎﺸﻓ هرﺎﺑود
.دﻮﺷ ﺮﻫﺎﻇ هاﻮﺨﻟد ﻢﻴﻈﻨﺗ ﺎﺗ ﺪﻴﻫد رﺎﺸﻓ رﺮﻜﻣ
ﺐﻴﺗﺮﺗ ﻪﺑ هﺪﻨﻨﻛ ﺾﻳﻮﻌﺗ رد ﺎﻫ كاﺮﺗ
ﻪﺑ ﺎﻫ هﺎﮕﺘﺳد مﺎﻤﺗ رد ﺎﻫ كاﺮﺗ
ىﺎﻫ هﺪﻨﻨﻛ ﺾﻳﻮﻌﺗ زا ﺮﺘﺸﻴﺑ ﺎﻳ ﻰﻜﻳ ﻪﻛ ﻰﻣﺎﮕﻨﻫ۱
CD
ﺎﻳ ود ﺎﻳ ,
.ﺪﻧا هﺪﺷ ﻞﺻو
و ﺪﻧا هﺪﺷ ﻞﺻو ﺮﺘﺸﻴﺑ ﺎﻳ
۱۷
هﺪﻨﻨﻛ ﺾﻳﻮﻌﺗ بﺎﺨﺘﻧا
.دﻮﺷ ﺮﻫﺎﻇ هاﻮﺨﻟد درﻮﻣ
ﺮﮕﻧﺎﺸﻧ* LP2/LP4
.دﻮﺷ ﻰﻣ عوﺮﺷ ﺶﺨﭘ
ﻚﻳ ﻪﻛ ﻰﻣﺎﮕﻨﻫ۱
.دﻮﺷ ﻰﻣ ﺶﺨﭘ
.دﻮﺷ ﻰﻣ ﺶﺨﭘ
MP3
ﻚﺴﻳد ﻪﻛ ﻰﻣﺎﮕﻨﻫ۲
MDLP
ﺎﻫ ﻚﺴﻳد و ﺎﻫ مﻮﺒﻟآ ندﺮﻛ در
.ﺪﻴﻫد رﺎﺸﻓ
.(ﺪﻳراد
ﻪﺘﺳﻮﻴﭘ رﻮﻄﺑ مﻮﺒﻟآ
.رﺮﻜﻣ رﻮﻄﺑ
ﻰﺒﻴﻛﺮﺗ و راﺮﻜﺗ ﺶﺨﭘ
ﺎﻳ ترﺎﻛ رود هار(SHUF)رﻮﻄﺑ ار هﺎﮕﺘﺳد ىور ﺮﺑ
ﺶﺨﭘ ىاﺮﺑ
۱
ﻪﺘﺳﻮﻴﭘ رﻮﻄﺑ ﻚﺴﻳد.
*Repeat Disc
.ﻰﻓدﺎﺼﺗ
۲
*Shuffle All
.ﻰﻓدﺎﺼﺗ ﺐﻴﺗﺮﺗ
MD
ىﺎﻫ هﺪﻨﻨﻛ ﺾﻳﻮﻌﺗ زا ﺮﺘﺸﻴﺑ
هﺪﻨﻨﻛ ﺾﻳﻮﻌﺗ ود ﻪﻛ ﻰﻣﺎﮕﻨﻫ۲
MD
.دﻮﺷ ﻰﻣ ﺶﺨﭘ ﻰﻜﻳ
"MD".دﻮﺷ ﺮﻫﺎﻇ
.ﺪﻴﻫد رﺎﺸﻓ
ندﺮﻛ در ىاﺮﺑ
مﻮﺒﻟآ
ﺎﻫ ﻚﺴﻳد
ﺎﻫ ﻚﺴﻳد
ﻪﺘﺳﻮﻴﭘ رﻮﻄﺑ
بﺎﺨﺘﻧا
Shuffle
Changer
1(SOURCE) ﺎﺗ ﺪﻴﻫد رﺎﺸﻓ رﺮﻜﻣ رﻮﻄﺑ ار "CD"ﺎﻳ
ﻪﺑ ىرﺎﻴﺘﺧا ﻞﻤﺣ ﻞﺑﺎﻗ ﻰﺗﻮﺻ هﺎﮕﺘﺳد ﻚﻳ ندﺮﻛ ﻞﺻو ﺎﺑ
2(MODE)هﺪﻨﻨﻛ ﺾﻳﻮﻌﺗ ﺎﺗ ﺪﻴﻫد رﺎﺸﻓ رﺮﻜﻣ رﻮﻄﺑ ار
زا ﺪﻴﻧاﻮﺗ ﻰﻣ ﺎﻤﺷ ,ﻊﺒﻨﻣ بﺎﺨﺘﻧا ﺎﻬﻨﺗ ﺲﭙﺳ و هﺎﮕﺘﺳد
ﻰﻓﺎﺿا ﻰﺗﻮﺻ تاﺰﻴﻬﺠﺗ
اﺪﺻ ناﺰﻴﻣ .ﺪﻴﻫد شﻮﮔ دﻮﺧ ﻞﻴﺒﻣﻮﺗا ىﺎﻫﻮﮔﺪﻨﻠﺑ ﻖﻳﺮﻃ
ﻞﻤﺣ ﻞﺑﺎﻗ ﻰﺗﻮﺻ هﺎﮕﺘﺳد و هﺎﮕﺘﺳد نﺎﻴﻣ توﺎﻔﺗ ﺮﻫ ىاﺮﺑ
:ﺪﻴﻨﻛ لﺎﺒﻧد ار ﺮﻳز ﺪﻧور .ﺖﺳا ﻢﻴﻈﻨﺗ ﻞﺑﺎﻗ
ﻞﻤﺣ ﻞﺑﺎﻗ ﻰﺗﻮﺻ هﺎﮕﺘﺳد ندﺮﻛ ﻞﺻو
ﻪﺑ رﺎﻛدﻮﺧ رﻮﻄﺑ ﻊﺒﻨﻣ "AUX".ﺪﻨﻛ ﻰﻣ ﺮﻴﻴﻐﺗ
*
*
AUX
1ﻦﻴﻳﺎﭘ/ﻻﺎﺑ ﻪﺑ ار ﻪﻫار ﺪﻨﭼ راﺬﮔﺰﻣر ,ﺶﺨﭘ ﻦﻴﺣ رد
AUX
لﺎﺼﺗا ﻢﻴﺳ*
(ﺖﺴﻴﻧ ﻪﻤﻴﻤﺿ)
ﺪﻴﻨﻛ ﻰﻣ هدﺎﻔﺘﺳا ﻢﻴﻘﺘﺴﻣ عﻮﻧ ﺶﻴﻓ ﻚﻳ زا ﻪﻛ ﺪﻴﻨﻛ ﻞﺻﺎﺣ نﺎﻨﻴﻤﻃا
.
.ﺪﻴﻨﻛ عوﺮﺷ
.ﺪﻴﻨﻛ ﻢﻴﻈﻨﺗ هﺎﮕﺘﺳد ىور ﺮﺑ ار دﻮﺧ لﻮﻤﻌﻣ نداد شﻮﮔ ىاﺪﺻ
1 ,ﺶﺨﭘ ﻦﻴﺣ رد(1)) REPزا لﺮﺘﻨﻛ هﺎﮕﺘﺳد ىور ﺮﺑ (
اﺪﺻ ﺢﻄﺳ ﻢﻴﻈﻨﺗ
هﺎﮕﺘﺳد ﺮﻫ ىاﺮﺑ اﺪﺻ ناﺰﻴﻣ ﻪﻛ ﺪﻴﻨﻛ ﻞﺻﺎﺣ نﺎﻨﻴﻤﻃا
.ﺪﻴﻨﻛ ﻢﻴﻈﻨﺗ ﺶﺨﭘ زا ﺶﻴﭘ ار هﺪﺷ ﻞﺻو ﻰﺗﻮﺻ
"AUX Audio".دﻮﺷ ﻰﻣ ﺮﻫﺎﻇ
*
*
.ﺪﻴﻨﻛ ﻢﻴﻈﻨﺗ هﺎﮕﺘﺳد ىور ﺮﺑ ار دﻮﺧ لﻮﻤﻌﻣ نداد شﻮﮔ ىاﺪﺻ
.ﺪﻴﻨﻛ عوﺮﺷ ﻂﺳﻮﺘﻣ
ىدورو ﺶﻴﻓAUXىور ﺮﺑ (ﻮﻳﺮﺘﺳا ﻚﭼﻮﻛ ﺶﻴﻓ)
1.ﺪﻴﻨﻛ شﻮﻣﺎﺧ ار ﻞﻤﺣ ﻞﺑﺎﻗ ﻰﺗﻮﺻ هﺎﮕﺘﺳد
2.ﺪﻴﻨﻛ ﻞﺻو هﺎﮕﺘﺳد ﻪﺑ
*
3.ﺪﻴﻨﻛ ﻢﻛ ار هﺎﮕﺘﺳد ىاﺪﺻ
4ﻂﺳﻮﺘﻣ ىاﺪﺻ ﺎﺑ ار ﻞﻤﺣ ﻞﺑﺎﻗ ﻰﺗﻮﺻ هﺎﮕﺘﺳد زا ﺶﺨﭘ
5
6.(۱۵ ﻪﺤﻔﺻ) ﺪﻴﻨﻛ ﻢﻴﻈﻨﺗ ار ىدورو ﺢﻄﺳ
1.ﺪﻴﻨﻛ ﻢﻛ ار هﺎﮕﺘﺳد ىاﺪﺻ
2(SOURCE) ﺎﺗ ﺪﻴﻫد رﺎﺸﻓ رﺮﻜﻣ رﻮﻄﺑ ار "AUX"
.دﻮﺷ ﺮﻫﺎﻇ
3ىاﺪﺻ ﻚﻳ ﺎﺑ ار ﻞﻤﺣ ﻞﺑﺎﻗ ﻰﺗﻮﺻ هﺎﮕﺘﺳد ﺶﺨﭘ
4
5.(۱۵ ﻪﺤﻔﺻ) ﺪﻴﻨﻛ ﻢﻴﻈﻨﺗ ار ىدورو ﺢﻄﺳ
Page 65

Info(تﺎﻋﻼﻃا)
.(هﺮﻴﻏ و ,ﻊﺒﻨﻣ ﻪﺑ ﻪﺘﺴﺑ) ﺎﻫ ﻢﺘﻳآ نداد ﺶﻳﺎﻤﻧ ىاﺮﺑ
"
Simple
.ﺎﻫ ﻢﺘﻳآ ﺶﻳﺎﻤﻧ مﺪﻋ ىاﺮﺑ :(
z
.ﺎﻫ ﻢﺘﻳآ مﺎﻤﺗ ﺶﻳﺎﻤﻧ ىاﺮﺑ :
.ﺎﻫ ﻢﺘﻳآ رﺎﻛدﻮﺧ نﺪﺷ ﻮﺤﻣ ىاﺮﺑ :
)
"
"
All
"
"
Clear
"
Dimmer
.ﺶﻳﺎﻤﻧ ﻪﺤﻔﺻ ﻰﻳﺎﻨﺷور ﺮﻴﻴﻐﺗ ىاﺮﺑ
.ﺪﻴﻨﻛ ﻰﻣ ﻦﺷور ار ﺎﻫ غاﺮﭼ ﻪﻛ ﻰﻣﺎﮕﻨﻫ ﺶﻳﺎﻤﻧ
.ﺶﻳﺎﻤﻧ ﻪﺤﻔﺻ ندﺮﻛ ﻚﻳرﺎﺗ ىاﺮﺑ :
.هﺪﻨﻨﻛ رﺎﺗ ندﺮﻛ لﺎﻌﻓﺮﻴﻏ ىاﺮﺑ :
"on"
"off"
Illumination
:ﻰﻳﺎﻨﺷور ﮓﻧر ﺮﻴﻴﻐﺗ ىاﺮﺑ"Blue") z ,("Red"ﺎﻳ
"Green".
Black Out
ىاﺮﺑ) ﻊﺒﻨﻣ ﺮﻫ ىاﺮﺑ رﺎﻛدﻮﺧ رﻮﻄﺑ ﻰﻳﺎﻨﺷور ندﺮﻛ شﻮﻣﺎﺧ ىاﺮﺑ
ﺶﺨﭘ ﻦﻴﺣ رد ,لﺎﺜﻣCD.(هﺮﻴﻏ و ,ﻮﻳدار ﺖﻓﺎﻳرد/
رد ﻰﻳﺎﻨﺷور ندﺮﻛ شﻮﻣﺎﺧ ىاﺮﺑ :
۱
.دﻮﺸﻧ مﺎﺠﻧا ﻪﻴﻧﺎﺛ ۵ ىاﺮﺑ ﻰﺗﺎﻴﻠﻤﻋ ﭻﻴﻫ ﻪﻛ ﻰﺗرﻮﺻ
.ﻞﻣﺎﻛ ﻊﻄﻗ
.ﺪﻴﻫد رﺎﺸﻓ ار ىا ﻪﻤﻛد ﺮﻫ ,رﻮﻧ نﺪﻧادﺮﮔزﺎﺑ ىاﺮﺑ
Auto Scroll
ﻪﻛ ﻰﻣﺎﮕﻨﻫ هﺪﺷ هداد ﺶﻳﺎﻤﻧ ﻢﺘﻳآ رﺎﻛدﻮﺧ روﺮﻣ ىاﺮﺑ
.ﺪﻨﻛ ﻰﻣ ﺮﻴﻴﻐﺗ كاﺮﺗ/هوﻮﮔ/مﻮﺒﻟآ/ﻚﺴﻳد
.ندﺮﻛ روﺮﻣ ىاﺮﺑ :(
z
ﺖﻓﺎﻳرد ﺖﻟﺎﺣ
Local (ﻰﻠﺤﻣ ىﻮﺠﺘﺴﺟ ﺖﻟﺎﺣ)
.ﺮﺘﻳﻮﻗ ىﺎﻫ لﺎﻨﮕﻴﺳ
۲
*Mono
(لارﻮﻧﻮﻣ ﺖﻟﺎﺣ)
?ﻴﻌﺿ ﺖﻓﺎﻳرد دﻮﺒﻬﺑ ىاﺮﺑFMلارﻮﻧﻮﻣ ﺖﻓﺎﻳرد ﺔﻟﺎﺣ ,
.ﺪﻴﻨﻛ بﺎﺨﺘﻧا ار
BTM (۱۲ ﻪﺤﻔﺻ)
هﺎﮕﺘﺳد ,ﺖﺳا لﺎﻌﻓ
. ﺖﻓﺮﮔ رﺎﻜﺑ ترﺎﻛ رود هار زا لﺮﺘﻨﻛ هﺎﮕﺘﺳد ﺎﺑ ناﻮﺗ ﻰﻤﻧ ار
Black Out
ﻞﻣﺎﻛ ﻊﻄﻗ دﺮﻜﻠﻤﻋ ﻪﻛ ﻰﻣﺎﮕﻨﻫ۱
ﻪﻛ ﻰﻣﺎﮕﻨﻫ۲
.دﻮﺷ ﻰﻣ ﺖﻓﺎﻳرد
FM
MENU
ﻢﻴﻈﻨﺗ ىﺎﻫ ﻢﺘﻳآ ندﺮﻛ ﻢﻴﻈﻨﺗ—
-
-
-
-"Auto") z(ﻪﺤﻔﺻ رﺎﻛدﻮﺧ ندﺮﻛ ﻚﻳرﺎﺗ ىاﺮﺑ :
.ﺪﻴﻫد رﺎﺸﻓ ار نآ ﺲﭙﺳ ,دﻮﺷ ﺮﻫﺎﻇ
.ﺪﻴﻫد رﺎﺸﻓ ار نآ ﺲﭙﺳ
.ﺖﺳا هﺪﺷ ﻞﻣﺎﻛ ﻢﻴﻈﻨﺗ
-
-
.ددﺮﮔ ﻰﻣ زﺎﺑ ىدﺎﻋ ﺖﻓﺎﻳرد/ﺶﺨﭘ ﺖﻟﺎﺣ ﻪﺑ ﺶﻳﺎﻤﻧ ﻪﺤﻔﺻ
.ﺪﻴﻫد رﺎﺸﻓ ﻦﻴﻳﺎﭘ ﻪﺑ ار
تﺎﻴﺋﺰﺟ ىاﺮﺑ) ﺪﻧﻮﺷ ﻢﻴﻈﻨﺗ ﺪﻨﻧاﻮﺗ ﻰﻣ ﺮﻳز ىﺎﻫ ﻢﺘﻳآ
:(ﺪﻴﻨﻛ لﺎﺒﻧد ار ﻊﺟﺮﻣ ﻪﺤﻔﺻ
-*"Black Out on"
"on"
"off"
-"Black Out off")z(دﺮﻜﻠﻤﻋ ندﺮﻛ لﺎﻌﻓﺮﻴﻏ ىاﺮﺑ :
هﺪﻨﻫد نﺎﻣﺮﻓ ىﺎﻫ لﺮﺘﻨﻛ ىﺮﻴﮔرﺎﻜﺑ ﺖﻬﺟ نداد ﺮﻴﻴﻐﺗ ىاﺮﺑ
.
) z ﺎﻳ (
نادﺮﮔ هﺪﻨﻫد نﺎﻣﺮﻓ زا هدﺎﻔﺘﺳا ىاﺮﺑ :(
.ﻪﻧﺎﺧرﺎﻛ ﻢﻴﻈﻨﺗ ﺶﻴﭘ ﺖﻴﻌﻗﻮﻣ رد
-"on")
-"off".ندﺮﻜﻧ روﺮﻣ ىاﺮﺑ :
.ﺪﻴﻨﻛ ﻰﻣ ﺐﺼﻧ ﺮﮕﺘﻳاﺪﻫ نﻮﺘﺳ ﺖﺳار ﺖﻤﺳ
ﻪﻛ ﻰﻣﺎﮕﻨﻫ هاﻮﺨﻟد نﺎﻣز تﺪﻣ زا ﺪﻌﺑ رﺎﻛدﻮﺧ ﻊﻄﻗ ىاﺮﺑ
z
,(sec" 30,"
: ﺖﺳا شﻮﻣﺎﺧ هﺎﮕﺘﺳد "NO")
-"off")z.ىدﺎﻋ ﺖﻓﺎﻳرد ﻰﺑﺎﻳ جﻮﻣ ىاﺮﺑ :(
-"on"ﺎﺑ ﺎﻫ هﺎﮕﺘﺴﻳا ىور ﺮﺑ ﻰﺑﺎﻳ جﻮﻣ ىاﺮﺑ ﺎﻬﻨﺗ :
-"off")z.ﻮﻳﺮﺘﺳا ترﻮﺼﺑ ﻮﻳﺮﺘﺳا ﺶﺨﭘ نﺪﻴﻨﺷ ىاﺮﺑ :(
-"on".لارﻮﻧﻮﻣ ترﻮﺼﺑ ﻮﻳﺮﺘﺳا ﺶﺨﭘ نﺪﻴﻨﺷ ىاﺮﺑ :
*
*
.ﻢﻠﻴﻓ ﻚﻳ ﺶﻳﺎﻤﻧ ىاﺮﺑ :
.?ﻠﺘﺨﻣ ﺶﻳﺎﻤﻧ ﺮﻳوﺎﺼﺗ ﻢﻴﻈﻨﺗ ىاﺮﺑ
.?ﻠﺘﺨﻣ ﺶﻳﺎﻤﻧ ﺮﻳوﺎﺼﺗ ﻢﻴﻈﻨﺗ ىاﺮﺑ
.ﺶﻳﺎﻤﻧ ﻪﺤﻔﺻ ىﺎﻫ ﺖﻟﺎﺣ مﺎﻤﺗ
.ﻢﻠﻴﻓ ﻚﻳ ﺶﻳﺎﻤﻧ ىاﺮﺑ :(
.?ﻴﻃ ﺮﮕﻠﻴﻠﺤﺗ ﺶﻳﺎﻤﻧ ىاﺮﺑ :
(BACK)
"z".ﺪﻫد ﻰﻣ نﺎﺸﻧ ار ضﺮﻓ ﺶﻴﭘ تﺎﻤﻴﻈﻨﺗ
ﻢﻴﻈﻨﺗ
Clock Adjust(۴ ﻪﺤﻔﺻ)
Beep
ندﺮﻛ ﻢﻴﻈﻨﺗ ىاﺮﺑ
RM (نادﺮﮔ هﺪﻨﻫد نﺎﻣﺮﻓ)
. نادﺮﮔ
z
Auto Off
ﺶﻳﺎﻤﻧ ﻪﺤﻔﺻ
Demo (ﻰﺸﻳﺎﻤﻧ ﻪﻧﻮﻤﻧ)
ﻢﻴﻈﻨﺗ ىاﺮﺑ"on" )z( ﺎﻳ "off".
Image
3
")z("Movie
1
3
".?ﻴﻃ ﺮﮕﻠﻴﻠﺤﺗ ﺶﻳﺎﻤﻧ ىاﺮﺑ :
3
".ﻪﻨﻴﻣز ﺲﻜﻋ ﻚﻳ ﺶﻳﺎﻤﻧ ىاﺮﺑ :
Auto Image
"
Movie
)
z
"
"SA"
1.ﺪﻳراد هﺎﮕﻧ و هداد رﺎﺸﻓ ار ﻪﻫار ﺪﻨﭼ راﺬﮔﺰﻣر
2هاﻮﺨﻟد ىﻮﻨﻣ ﻢﺘﻳآ ﺎﺗ ﺪﻴﻧﺎﺧﺮﭽﺑ ار ﻪﻫار ﺪﻨﭼ راﺬﮔﺰﻣر
3,ﺪﻴﻧﺎﺧﺮﭽﺑ ﻢﻴﻈﻨﺗ بﺎﺨﺘﻧا ىاﺮﺑ ار ﻪﻫار ﺪﻨﭼ راﺬﮔﺰﻣر
4
-"NORM")
-"REV"رد ار نادﺮﮔ هﺪﻨﻫد نﺎﻣﺮﻓ ﺎﻤﺷ ﻪﻛ ﻰﻣﺎﮕﻨﻫ :
"30 min" ﺎﻳ "60 min".
--
-"SA 1-
-"Wall.P 1-
-"off".ﺮﻳﻮﺼﺗ ﺶﻳﺎﻤﻧ مﺪﻋ ىاﺮﺑ :
-"All"رد ﺶﻳﺎﻤﻧ ﻪﺤﻔﺻ ﺮﻳوﺎﺼﺗ زا رﺮﻜﻣ رﻮﺒﻋ ىاﺮﺑ :
-
-
-"off".ﺮﻳﻮﺼﺗ ﺶﻳﺎﻤﻧ مﺪﻋ ىاﺮﺑ :
۱۶
Page 66

.دﻮﺷ ﻰﻣ لﺎﻌﻓ
.ﺖﺳا لﺎﻌﻓ
CD/USB
AUX
*
۱ ﻊﺒﻨﻣ ﻪﻛ ﻰﻣﺎﮕﻨﻫ
*
۲ ﻊﺒﻨﻣ ﻪﻛ ﻲﻣﺎﮕﻨﻫ
ﺎﻫدﺮﻜﻠﻤﻋ ﺮﻳﺎﺳ
رﺰﻳﻻﻮﻛا ﻰﻨﺤﻨﻣ ىزﺎﺳ ﻰﺷرﺎﻔﺳ— EQ3 Tune
.ﺪﻴﻫد مﺎﺠﻧا ار دﻮﺧ رﺰﻳﻻﻮﻛا
.ﺪﻴﻫد رﺎﺸﻓ ﻢﻴﻘﺘﺴﻣ ار نآ ﺲﭙﺳ ,ﺪﻴﻧﺎﺧﺮﭽﺑ
LOW"," "MID" ﺎﻳ HI","
.ﺪﻴﻫد رﺎﺸﻓ ار نآ ﺲﭙﺳ ,ﺪﻴﻧﺎﺧﺮﭽﺑ
.ﺪﻴﻫد رﺎﺸﻓ ار نآ ﺲﭙﺳ ,ﺪﻴﻧﺎﺧﺮﭽﺑ ﺪﻴﻨﻛ ﻢﻴﻈﻨﺗ ﺪﻴﻠﻳﺎﻣ
:هدوﺪﺤﻣ ﺮﻫ رد بﺎﺨﺘﻧا ﻞﺑﺎﻗ ﺲﻧﺎﻛﺮﻓ
ﺎﺗ ﻞﺑ ﻰﺳد -۱۰ زا ,ﻞﺑ ﻰﺳد ۱ ﻞﺻاﻮﻓ رد اﺪﺻ ﺢﻄﺳ
.ﺖﺳا ﻢﻴﻈﻨﺗ ﻞﺑﺎﻗ ﻞﺑ ﻰﺳد +۱۰
ﺲﻧﺎﻛﺮﻓ ىﺎﻫ هدوﺪﺤﻣ ﻢﻈﻨﺗ ىاﺮﺑ ار ۸ ﺎﺗ ۵ ﻞﺣاﺮﻣ
.ﺪﻴﻫد رﺎﺸﻓ ﻦﻴﻳﺎﭘ ﻪﺑ رﺎﺑ ود ار
ﻰﻣ زﺎﺑ ىدﺎﻋ ﺖﻓﺎﻳرد/ﺶﺨﭘ ﺖﻟﺎﺣ ﻪﺑ ﺶﻳﺎﻤﻧ ﻪﺤﻔﺻ
ﻢﻴﻈﻨﺗ ﺶﻴﭘ رﺰﻳﻻﻮﻛا ﻰﻨﺤﻨﻣ نﺪﻧادﺮﮔزﺎﺑ ىاﺮﺑ
.ﺪﻨﺘﺴﻫ ﻢﻴﻈﻨﺗ ﻞﺑﺎﻗ ﺰﻴﻧ رﺰﻳﻻﻮﻛا عاﻮﻧا ﺮﻳﺎﺳ
۱۵
"Custom" زا EQ3تﺎﻤﻴﻈﻨﺗ ﺎﺗ ﺪﻫد ﻰﻣ هزﺎﺟا ﺎﻤﺷ ﻪﺑ
.ﺪﻴﻫد رﺎﺸﻓ
parametric"ز .ﺪﻴﻫد رﺎﺸﻓ ار نآ ﺲﭙﺳ ,ﺪﻴﻧﺎﺧﺮﭽﺑ
Tune"ز .ﺪﻴﻫد رﺎﺸﻓ ار نآ ﺲﭙﺳ ,ﺪﻴﻧﺎﺧﺮﭽﺑ
نﺎﻴﻣ زا هاﻮﺨﻟد
LOW:ﺰﺗﺮﻫ ۱۰۰ ﺎﻳ ﺰﺗﺮﻫ۶۰
MIDﺰﺗﺮﻫ ﻮﻠﻴﻛ ۱٫۰ ﺎﻳ ﺰﺗﺮﻫ ۵۰۰:
HIﺰﺗﺮﻫ ﻮﻠﻴﻛ ۱۲٫۵ ﺎﻳ ﺰﺗﺮﻫ ﻮﻠﻴﻛ ۱۰٫۰:
.ﺪﻴﻧﺎﺧﺮﭽﺑ
.ﺪﻴﻨﻛ راﺮﻜﺗ ﺮﮕﻳد
(BACK)
.ددﺮﮔ
,ﻪﻧﺎﺧرﺎﻛ"EQ3 Mode Initialize" و "Yes"رد ار
ﻪﻠﺣﺮﻣ4.ﺪﻴﻨﻛ بﺎﺨﺘﻧا
هرﺎﺷا
اﺪﺻ تﺎﻤﻴﻈﻨﺗ نداد ﺮﻴﻴﻐﺗ
اﺪﺻ ىﺎﻫ ﻰﮔﮋﻳو ﻢﻴﻈﻨﺗ
1ار ﻪﻫار ﺪﻨﭼ راﺬﮔﺰﻣر ﺲﭙﺳ ,هدﺮﻛ بﺎﺨﺘﻧا ار ﻊﺒﻨﻣ ﻚﻳ
2 بﺎﺨﺘﻧا ىاﺮﺑ ار ﻪﻫار ﺪﻨﭼ راﺬﮔﺰﻣر"EQ3
3 بﺎﺨﺘﻧا ىاﺮﺑ ار ﻪﻫار ﺪﻨﭼ راﺬﮔﺰﻣر"Custom"
ﺶﻳﺎﻤﻧ ﻪﺤﻔﺻ و دﻮﺷ ﻰﻣ ﻞﻣﺎﻛ ﻢﻴﻈﻨﺗ ,ﻪﻴﻧﺎﺛ ۳ زا ﺪﻌﺑ
4 بﺎﺨﺘﻧا ىاﺮﺑ ار ﻪﻫار ﺪﻨﭼ راﺬﮔﺰﻣر"EQ3 Mode
.ددﺮﮔ ﻰﻣ زﺎﺑ ىدﺎﻋ ﺖﻓﺎﻳرد/ﺶﺨﭘ ﺖﻟﺎﺣ ﻪﺑ
ىاﺮﺑ ار ﻪﺤﻔﺻ ﻊﺟﺮﻣ) ﺪﻨﺷﺎﺑ ﻰﻣ ﻢﻴﻈﻨﺗ ﻞﺑﺎﻗ ﺮﻳز ىﺎﻫ ﻢﺘﻳآ
5ﺲﻧﺎﻛﺮﻓ هدوﺪﺤﻣ بﺎﺨﺘﻧا ىاﺮﺑ ار ﻪﻫار ﺪﻨﭼ راﺬﮔﺰﻣر
6ﻪﻛ ىﺰﻛﺮﻣ ﺲﻧﺎﻛﺮﻓ بﺎﺨﺘﻧا ىاﺮﺑ ار ﻪﻫار ﺪﻨﭼ راﺬﮔﺰﻣر
.(۴ ﻪﺤﻔﺻ)
7رﺰﻳﻻﻮﻛا ﻰﻨﺤﻨﻣ ﻢﻴﻈﻨﺗ ىاﺮﺑ ار ﻪﻫار ﺪﻨﭼ راﺬﮔﺰﻣر
"off"
)z.(
.ﺖﺳا ﺮﺘﺸﻴﺑ نآ ﺮﻴﺛﺎﺗ ,ﺪﺷﺎﺑ ﺮﺘﮔرﺰﺑ هرﺎﻤﺷ ﻪﭼ ﺮﻫ
:ﭗﭼ و ﺖﺳار ىﺎﻫﻮﮔﺪﻨﻠﺑ نﺎﻴﻣ نزاﻮﺗ ﻢﻴﻈﻨﺗ ىاﺮﺑ
"R10"
8.ﺪﻴﻫد رﺎﺸﻓ ار ﻪﻫار ﺪﻨﭼ راﺬﮔﺰﻣر
9
:ﻰﺒﻘﻋ و ﻰﻳﻮﻠﺟ ىﺎﻫﻮﮔﺪﻨﻠﺑ نﺎﻴﻣ نزاﻮﺗ ﻢﻴﻈﻨﺗ ىاﺮﺑ
"–10"
"
) z,(
ﻰﻓﺎﺿا تاﺰﻴﻬﺠﺗ زا ﻚﻳ ﺮﻫ ىاﺮﺑ اﺪﺻ ﺢﻄﺳ ﻢﻴﻈﻨﺗ ىاﺮﺑ
نﺎﻴﻣ اﺪﺻ ﺢﻄﺳ ﻢﻴﻈﻨﺗ ﻪﺑ زﺎﻴﻧ ﻢﻴﻈﻨﺗ ﻦﻳا .هﺪﺷ ﻞﺻو
8 dB
"
-
"
.ﺪﻴﻫد رﺎﺸﻓ ار ﻪﻫار ﺪﻨﭼ راﺬﮔﺰﻣر
.ﺪﻴﻫد رﺎﺸﻓ ار نآ ﺲﭙﺳ ,دﻮﺷ ﺮﻫﺎﻇ
.ﺪﻴﻫد رﺎﺸﻓ ار نآ ﺲﭙﺳ
.ﺖﺳا هﺪﺷ ﻞﻣﺎﻛ ﻢﻴﻈﻨﺗ
:(ﺪﻴﻨﻛ لﺎﺒﻧد تﺎﻴﺋﺰﺟ
EQ3 parametric
:رﺰﻳﻻﻮﻛا عﻮﻧ بﺎﺨﺘﻧا ىاﺮﺑXplod"," Vocal","
"
off
"
DSO
"3"
ﺎﻳ
-
"0"
) z - (
:ﻰﻋﺮﻓ ﺮﻓوو ﻊﻄﻗ ﺲﻧﺎﻛﺮﻓ بﺎﺨﺘﻧا ىاﺮﺑ
off
"
:1"," 2","
:ﻲﻋﺮﻓ ﺮﻓوو ىاﺪﺻ ﻢﻴﻈﻨﺗ ىاﺮﺑ
"+10"
"
78Hz
.
.(۱۷ ﻪﺤﻔﺻ) ﺪﻨﻛ ﻲﻣ ﻊﻓر ار ﻊﺑﺎﻨﻣ
") z- (
+18 dB
0 dB
"z".ﺪﻫد ﻰﻣ نﺎﺸﻧ ار ضﺮﻓ ﺶﻴﭘ تﺎﻤﻴﻈﻨﺗ
Edge"
," Cruise"," Space"," Gravity","
Custom"
," ﺎﻳ "off")z.(
۱
*DM+
دﺮﻜﻠﻤﻋ ﻢﻴﻈﻨﺗ ىاﺮﺑDM+ "on") z ﺎﻳ (
DSO
ﺖﻟﺎﺣ بﺎﺨﺘﻧا ىاﺮﺑ
Balance
-"0") z - ("L10"
Fader
"F10" - "0") z - ("R10"
Subwoofer
(ﻦﻴﻳﺎﭘ رﻮﺒﻋ ﺮﺘﻠﻴﻓ)
LPF
"
125Hz
ﺎﻳ
"
۲
*AUX Level
:ﻢﻴﻈﻨﺗ ﻞﺑﺎﻗ ﺢﻄﺳ"
" - "
1
2هاﻮﺨﻟد ىﻮﻨﻣ ﻢﺘﻳآ ﺎﺗ ﺪﻴﻧﺎﺧﺮﭽﺑ ار ﻪﻫار ﺪﻨﭼ راﺬﮔﺰﻣر
3,ﺪﻴﻧﺎﺧﺮﭽﺑ ﻢﻴﻈﻨﺗ بﺎﺨﺘﻧا ىاﺮﺑ ار ﻪﻫار ﺪﻨﭼ راﺬﮔﺰﻣر
)"– ∞"(.دﻮﺷ ﻰﻣ هداد ﺶﻳﺎﻤﻧ ﻢﻴﻈﻨﺗ ﻦﻳﺮﺗ ﻦﻴﻳﺎﭘ رد
"
Page 67

ﻚﻳ زا ﻰﻘﻴﺳﻮﻣ ﻪﺑ نداد شﻮﮔ"Walkman"
(
ATRAC
ﺎﺗ ﺪﻴﻫد رﺎﺸﻓ رﺮﻜﻣ رﻮﻄﺑ ار
(MODE)
.دﻮﺷ ﺮﻫﺎﻇ هاﻮﺨﻟد ﻢﻴﻈﻨﺗ
:ﺪﻨﻛ ﻰﻣ ﺮﻴﻴﻐﺗ ﺮﻳز ﺐﻴﺗﺮﺗ ﻪﺑ ﻢﺘﻳآ
Genre T Track Mode T Album Mode
Artist Mode T Playlist Mode
.دﻮﺸﻧ ﺮﻫﺎﻇ ﺖﺳا ﻦﻜﻤﻣ هﺎﮕﺘﺳد ﻪﺑ ﻪﺘﺴﺑ
ﻰﺗﻮﺻ هﺎﮕﺘﺳد)
,ﺶﺨﭘ ﻦﻴﺣ رد
*
T Mode
ار
(DSPL)
1
*
تﺎﻤﻴﻈﻨﺗ و هﺪﺷ ﻂﺒﺿ ﺖﻣﺮﻓ ﻪﺑ ﻪﺘﺴﺑ ,هﺪﺷ هداد ﺶﻳﺎﻤﻧ ىﺎﻫ ﻢﺘﻳآ
MP3/WMA/AAC/
و ,هﻮﺒﻧا ىزﺎﺳ هﺮﻴﺧذ ﻪﺘﺳد عﻮﻧ
ﺶﻳﺎﻤﻧ ﻪﺤﻔﺻ ىﺎﻫ ﻢﺘﻳآ ﺮﻴﻴﻐﺗ ىاﺮﺑ
,
C
.ﺪﻴﻫد رﺎﺸﻓ
هرﺎﺷا
درﻮﻣ رد تﺎﻴﺋﺰﺟ ىاﺮﺑ .ﺖﺷاد ﺪﻨﻫاﻮﺧ توﺎﻔﺗ
.ﺪﻴﻳﺎﻤﻧ ﻪﻈﺣﻼﻣ ار ۲۱ ﻪﺤﻔﺻ ,
هﺎﮕﺘﺳد ﻪﺑ ﻪﺘﺴﺑ ﺶﻳﺎﻤﻧ ﻪﺤﻔﺻ
USB
.ﺖﺳا توﺎﻔﺘﻣ
ATRAC
ATRAC
ﻰﺗﻮﺻ هﺎﮕﺘﺳد
ﻪﺘﻜﻧ
رﻮﻄﺑ ار هﺎﮕﺘﺳد ىور ﺮﺑ
(SHUF)
.دﻮﺷ ﺮﻫﺎﻇ هاﻮﺨﻟد ﻢﻴﻈﻨﺗ ﺎﺗ ﺪﻴﻫد رﺎﺸﻓ رﺮﻜﻣ
ﻰﻓدﺎﺼﺗ ﺐﻴﺗﺮﺗ ﻪﺑ ﺶﺨﭘ ﺖﺴﻴﻟ.
,ىدﺎﻋ ﺶﺨﭘ ﺖﻟﺎﺣ ﻪﺑ ﺖﺸﮔزﺎﺑ ىاﺮﺑ"Repeat off"ﺎﻳ
ﻰﺒﻴﻛﺮﺗ و راﺮﻜﺗ ﺶﺨﭘ
)REPزا هﺪﻨﻫد نﺎﻣﺮﻓ ىور ﺮﺑ (
(1)
ﺎﻳ ترﺎﻛ رود هار
بﺎﺨﺘﻧاﺶﺨﭘ ىاﺮﺑ
Repeat Track.رﺮﻜﻣ رﻮﻄﺑ كاﺮﺗ
Repeat Album.رﺮﻜﻣ رﻮﻄﺑ مﻮﺒﻟآ
Repeat Artist.رﺮﻜﻣ رﻮﻄﺑ ﺪﻨﻣﺮﻨﻫ
Repeat Playlist.رﺮﻜﻣ رﻮﻄﺑ ﺶﺨﭘ ﺖﺴﻴﻟ
Repeat Genre.رﺮﻜﻣ رﻮﻄﺑ ﻪﺘﺳد
Shuffle Albumﻰﻓدﺎﺼﺗ ﺐﻴﺗﺮﺗ ﻪﺑ مﻮﺒﻟآ.
Shuffle Artistﻰﻓدﺎﺼﺗ ﺐﻴﺗﺮﺗ ﻪﺑ ﺪﻨﻣﺮﻨﻫ.
Shuffle Playlist
Shuffle Genreﻰﻓدﺎﺼﺗ ﺐﻴﺗﺮﺗ ﻪﺑ ﻪﺘﺳد.
Shuffle Deviceﻰﻓدﺎﺼﺗ ﺐﻴﺗﺮﺗ ﻪﺑ هﺎﮕﺘﺳد.
"Shuffle off".ﺪﻴﻨﻛ بﺎﺨﺘﻧا ار
ﻰﺗﻮﺻ هﺎﮕﺘﺳد ﻚﻳ زا ﻰﻘﻴﺳﻮﻣ ﻪﺑ نداد شﻮﮔ
1,ﺶﺨﭘ ﻦﻴﺣ رد
رﺮﻜﻣ رﻮﻄﺑ ار هﺎﮕﺘﺳد ىور ﺮﺑ
هﻮﺒﻧا ىزﺎﺳ هﺮﻴﺧذ ﻪﺘﺳد عﻮﻧ
ﻲﺒﻴﻛﺮﺗ و راﺮﻜﺗ ﺶﺨﭘ
)REPهار زا هﺪﻨﻫد نﺎﻣﺮﻓ ىور ﺮﺑ(
(1)
ﺎﻳ ترﺎﻛ رود
(SHUF)
.دﻮﺷ ﺮﻫﺎﻇ هاﻮﺨﻟد ﻢﻴﻈﻨﺗ ﺎﺗ ﺪﻴﻫد رﺎﺸﻓ
بﺎﺨﺘﻧاﺶﺨﭘ ىاﺮﺑ
Repeat Track.رﺮﻜﻣ رﻮﻄﺑ كاﺮﺗ
Repeat Album.رﺮﻜﻣ رﻮﻄﺑ مﻮﺒﻟآ
Shuffle Albumﻰﻓدﺎﺼﺗ ﺐﻴﺗﺮﺗ ﻪﺑ مﻮﺒﻟآ.
Shuffle Deviceﻰﻓدﺎﺼﺗ ﺐﻴﺗﺮﺗ ﻪﺑ هﺎﮕﺘﺳد.
,ىدﺎﻋ ﺶﺨﭘ ﺖﻟﺎﺣ ﻪﺑ ﺖﺸﮔزﺎﺑ ىاﺮﺑ"Repeat off"ﺎﻳ
"Shuffle off".ﺪﻴﻨﻛ بﺎﺨﺘﻧا ار
1,ﺶﺨﭘ ﻦﻴﺣ رد
۱۴
Page 68

ىﺎﻫ هﺎﮕﺘﺳد
USB
هﺎﮕﺘﺳد ﺶﺨﭘUSB
USB هﺪﻨﻫد لﺎﺼﺗا ﻪﺑ ار USB.ﺪﻴﻨﻛ ﻞﺻو
هﺎﮕﺘﺳد
.دﻮﺷ ﻰﻣ عوﺮﺷ ﺶﺨﭘ
هﺎﮕﺘﺳد ﻚﻳ ﺮﮔاUSBىاﺮﺑ ,ﺖﺳا هﺪﺷ ﻞﺻو ﻞﺒﻗ زا
,ﺶﺨﭘ عوﺮﺷ(SOURCE)ﺎﺗ ﺪﻴﻫد رﺎﺸﻓ رﺮﻜﻣ رﻮﻄﺑ ار
"USB".دﻮﺷ ﺮﻫﺎﻇ
(OFF).ﺪﻴﻫد رﺎﺸﻓ ﺶﺨﭘ ?ﻗﻮﺗ ىاﺮﺑ ار
هﺎﮕﺘﺳد ندﺮﻛ جرﺎﺧ زا ﺶﻴﭘ
?ﻗﻮﺘﻣ ار ﺶﺨﭘ ﺎﻤﺘﺣ اﺪﺘﺑا ,
,ﺪﻴﻨﻛ جرﺎﺧ ﺶﺨﭘ ﻦﻴﺣ رد ار دﻮﺧ
.ﺪﻨﻨﻴﺒﺑ ﻪﻣﺪﺻ
ﻪﺑ ﺖﺳا ﻦﻜﻤﻣ ﻪﻛ ﻦﻴﮕﻨﺳ ﺎﻳ گرﺰﺑ رﺪﻘﻧآ
.ﺪﻴﻨﻜﻧ هدﺎﻔﺘﺳا ﺪﻧﻮﺷ راﺪﻳﺎﭘﺎﻧ لﺎﺼﺗا ﺚﻋﺎﺑ ﺎﻳ ﺪﻨﺘﻔﻴﺑ شزﺮﻟ ﻞﻴﻟد
USB
USB
USB
هﺎﮕﺘﺳد ﺎﻤﺷ ﺮﮔا .ﺪﻴﻨﻛ
هﺎﮕﺘﺳد رد ﺎﻫ هداد ﺖﺳا ﻦﻜﻤﻣ
ىﺎﻫ هﺎﮕﺘﺳد زا
USB
تﺎﻜﻧ
ﺶﻳﺎﻤﻧ ﻪﺤﻔﺻ ىﺎﻫ ﻢﺘﻳآ
ﺖﻟﺎﺣ ﺎﻤﺷ ﻪﻛ ﻰﻣﺎﮕﻨﻫ :لﺎﺜﻣInfoﻪﺑ ار (تﺎﻋﻼﻃا)
"All".(۱۶ ﻪﺤﻔﺻ) ﺪﻴﻨﻛ ﻰﻣ ﻢﻴﻈﻨﺗ
رﺎﻛدﻮﺧ ﻰﺑﺎﻳ جﻮﻣ
ﻪﺑ ار ﻪﻫار ﺪﻨﭼ راﺬﮔﺰﻣر ﺲﭙﺳ ,هدﺮﻛ بﺎﺨﺘﻧا ار ﺪﻧﺎﺑ
.دﻮﺷ ﻮﺠﺘﺴﺟ هﺎﮕﺘﺴﻳا ﺎﺗ ﺪﻴﻫد رﺎﺸﻓ ﺖﺳار/ﭗﭼ
ﺪﻨﻛ ﻰﻣ ﺖﻓﺎﻳرد ار هﺎﮕﺘﺴﻳا ﻚﻳ هﺎﮕﺘﺳد ﻪﻛ ﻰﻣﺎﮕﻨﻫ
1 شﻮﭘردUSB هﺪﻨﻫد لﺎﺼﺗا زا ار USBﺎﻳ ﺪﻴﻨﻛ جرﺎﺧ
ﺎﺗ ﺪﻴﻨﻛ راﺮﻜﺗ ار ﺪﻧور ﻦﻳا .دﻮﺷ ﻰﻣ ?ﻗﻮﺘﻣ ﻮﺠﺘﺴﺟ
.دﻮﺷ ﺖﻓﺎﻳرد هاﻮﺨﻟد درﻮﻣ هﺎﮕﺘﺴﻳا
ﻰﻣ ار ﺪﻴﻫد شﻮﮔ ﺪﻴﻫاﻮﺧ ﻰﻣ ﻪﻛ ﻰﻫﺎﮕﺘﺴﻳا ﺲﻧﺎﻛﺮﻓ ﺎﻤﺷ ﺮﮔا
ﺪﻳراد هﺎﮕﻧ و هداد رﺎﺸﻓ ﺖﺳار/ﭗﭼ ﻪﺑ ار ﻪﻫار ﺪﻨﭼ راﺬﮔﺰﻣر ,ﺪﻴﻧاد
ﺪﻨﭼ راﺬﮔﺰﻣر ﺲﭙﺳ ,ﺪﻴﺑﺎﻴﺑ ﺖﻋﺮﺳ ﻪﺑ ار ﻰﺒﻳﺮﻘﺗ ﺲﻧﺎﻛﺮﻓ ﻞﺤﻣ ﺎﺗ
درﻮﻣ ﺲﻧﺎﻛﺮﻓ ﻪﺑ ﺎﺗ ﺪﻴﻫد رﺎﺸﻓ ﺖﺳار/ﭗﭼ ﻪﺑ رﺮﻜﻣ رﻮﻄﺑ ار ﻪﻫار
—
LIST
.ﺪﻴﻫد نﺎﺸﻧ ﺖﺴﻴﻟ رد ار ﺲﻧﺎﻛﺮﻓ ﺪﻴﻧاﻮﺗ ﻰﻣ ﺎﻤﺷ
رﺎﺸﻓ ﻻﺎﺑ ﻪﺑ ار
•
•
.ددﺮﮔ ﻰﻣ زﺎﺑ ىدﺎﻋ ﺖﻓﺎﻳرد ﺖﻟﺎﺣ ﻪﺑ ﺶﻳﺎﻤﻧ ﻪﺤﻔﺻ
.(ﻰﺘﺳد ﻰﺑﺎﻳ جﻮﻣ) ﺪﻴﻨﻛ ﻖﻴﻗد ﻢﻴﻈﻨﺗ هاﻮﺨﻟد
ﺖﺴﻴﻟ ﻚﻳ ﻖﻳﺮﻃ زا هﺎﮕﺘﺴﻳا ﻚﻳ ﺖﻓﺎﻳرد
(LIST)
.دﻮﺷ ﻰﻣ ﺮﻫﺎﻇ هﺪﺷ ﻢﻴﻈﻨﺗ ﺶﻴﭘ زا ﺖﺴﻴﻟ
1
هرﺎﺷا
1 ﺲﭙﺳ ,ﺪﻴﻨﻛ بﺎﺨﺘﻧا ار ﺪﻧﺎﺑ
.ﺪﻴﻫد
2هاﻮﺨﻟد هﺎﮕﺘﺴﻳا ﺎﺗ ﺪﻴﻧﺎﺧﺮﭽﺑ ار ﻪﻫار ﺪﻨﭼ راﺬﮔﺰﻣر
.دﻮﺷ ﺮﻫﺎﻇ
3رﺎﺸﻓ هﺎﮕﺘﺴﻳا ﺖﻓﺎﻳرد ىاﺮﺑ ار ﻪﻫار ﺪﻨﭼ راﺬﮔﺰﻣر
.ﺪﻴﻫد
۱۳
*۱
.دﻮﺷ ﻰﻣ ﻞﺻو
ﺪﻳوﺮﺑ ﺪﻌﺑ ﻪﺤﻔﺻ ﻪﺑT
A
C
ﺮﮕﻧﺎﺸﻧ ATRAC/WMA/MP3/AAC
*۲
ﺮﮕﻧﺎﺸﻧ WMA/MP3/AAC
مﻮﺒﻟآ مﺎﻧ ,ﺪﻨﻣﺮﻨﻫ مﺎﻧ ,كاﺮﺗ مﺎﻧ ,هﺪﺷ
ATRAC
B
A
Bﺖﻋﺎﺳ
Cىﺮﭙﺳ ﺶﺨﭘ نﺎﻣز تﺪﻣ/كاﺮﺗ هرﺎﻤﺷ/رﺪﻟﻮﻓ هرﺎﻤﺷ
*
۱ ﻰﺗﻮﺻ هﺎﮕﺘﺳد ﻚﻳ ﻪﻛ ﻰﻣﺎﮕﻨﻫ
*
۲.دﻮﺷ ﻰﻣ ﻞﺻو هﻮﺒﻧا ىزﺎﺳ هﺮﻴﺧذ ﻪﺘﺳد هﺎﮕﺘﺳد ﻚﻳ ﻪﻛ ﻰﻣﺎﮕﻨﻫ
Page 69

ﻮﻳدار
CD
ﺎﻫ هﺎﮕﺘﺴﻳا ﺖﻓﺎﻳرد و ندﺮﻛ هﺮﻴﺧذ
طﺎﻴﺘﺣا
ﻪﻈﻓﺎﺣ ﻦﻳﺮﺘﻬﺑ زا ,ﻰﮔﺪﻨﻧار ﻦﻴﺣ رد ﺎﻫ هﺎﮕﺘﺴﻳا ﻰﺑﺎﻳ جﻮﻣ مﺎﮕﻨﻫ
) ﻰﺑﺎﻳ جﻮﻣBTM.ﺪﻴﻨﻛ هدﺎﻔﺘﺳا فدﺎﺼﺗ زا ىﺮﻴﮔﻮﻠﺟ ىاﺮﺑ (
رﺎﻛدﻮﺧ ندﺮﻛ هﺮﻴﺧذ— BTM
1(SOURCE)ﺎﺗ ﺪﻴﻫد رﺎﺸﻓ رﺮﻜﻣ رﻮﻄﺑ ار
"TUNER".دﻮﺷ ﺮﻫﺎﻇ
,ﺪﻧﺎﺑ نداد ﺮﻴﻴﻐﺗ ىاﺮﺑ(MODE)رﺎﺸﻓ رﺮﻜﻣ رﻮﻄﺑ ار
زا ﺪﻴﻧاﻮﺗ ﻰﻣ ﺎﻤﺷ .ﺪﻴﻫدFM1 ,FM2 ,FM3 ,AM1
ﺎﻳAM2.ﺪﻴﻨﻛ بﺎﺨﺘﻧا
2.ﺪﻳراد هﺎﮕﻧ و هداد رﺎﺸﻓ ار ﻪﻫار ﺪﻨﭼ راﺬﮔﺰﻣر
3 ﺎﺗ ﺪﻴﻫد رﺎﺸﻓ ار ﻪﻫار ﺪﻨﭼ راﺬﮔﺰﻣر"BTM"ﺮﻫﺎﻇ
.ﺪﻴﻫد رﺎﺸﻓ ار نآ ﺲﭙﺳ ,دﻮﺷ
ىور ﺮﺑ ﺲﻧﺎﻛﺮﻓ ﺐﻴﺗﺮﺗ ﻪﺑ ار ﺎﻫ هﺎﮕﺘﺴﻳا هﺎﮕﺘﺳد
.ﺪﻨﻛ ﻰﻣ هﺮﻴﺧذ هرﺎﻤﺷ ىﺎﻫ ﻪﻤﻛد
ﻪﺑ ﭗﻴﺑ ىاﺪﺻ ﻚﻳ دﻮﺷ ﻰﻣ هﺮﻴﺧذ ﻢﻴﻈﻨﺗ ﻪﻛ ﻰﻣﺎﮕﻨﻫ
.ﺪﺳر ﻰﻣ شﻮﮔ
ﻰﺘﺳد ندﺮﻛ هﺮﻴﺧذ
هﺮﻴﺧذ ﺪﻴﻫاﻮﺧ ﻰﻣ ﻪﻛ ﻰﻫﺎﮕﺘﺴﻳا ﺖﻓﺎﻳرد مﺎﮕﻨﻫ
.ﺪﻴﻫد رﺎﺸﻓ ﻻﺎﺑ ﻪﺑ ار
(LIST)
.دﻮﺷ ﻰﻣ ﺮﻫﺎﻇ هﺪﺷ ﻢﻴﻈﻨﺗ ﺶﻴﭘ زا ﺖﺴﻴﻟ
.ﺪﻴﻧﺎﺧﺮﭽﺑ هﺪﺷ ﻢﻴﻈﻨﺗ
"
(ترﺎﻛ رود هار زا لﺮﺘﻨﻛ هﺎﮕﺘﺳد ﺎﺑ)
(1) ﺎﺗ (6)هﺎﮕﻧ و هداد رﺎﺸﻓ ار (
) هرﺎﻤﺷ ﻪﻤﻛد ,ﺪﻴﻨﻛ
"MEM".دﻮﺷ ﺮﻫﺎﻇ
هﺮﻴﺧذ هرﺎﻤﺷ ﻪﻤﻛد نﺎﻤﻫ رد ار ىﺮﮕﻳد هﺎﮕﺘﺴﻳا ﺪﻴﻨﻛ ﻰﻌﺳ ﺎﻤﺷ ﺮﮔا
.ﺪﺷ ﺪﻫاﻮﺧ ﻦﻳﺰﮕﻳﺎﺟ ﻰﻠﺒﻗ هﺪﺷ هﺮﻴﺧذ هﺎﮕﺘﺴﻳا ,ﺪﻴﻨﻛ
هﺪﺷ هﺮﻴﺧذ ىﺎﻫ هﺎﮕﺘﺴﻳا ﺖﻓﺎﻳرد
ﻪﺑ ار ﻪﻫار ﺪﻨﭼ راﺬﮔﺰﻣر ﺲﭙﺳ ,هدﺮﻛ بﺎﺨﺘﻧا ار ﺪﻧﺎﺑ
.ﺪﻴﻫد رﺎﺸﻓ ﻦﻴﻳﺎﭘ/ﻻﺎﺑ
(ترﺎﻛ رود هار زا لﺮﺘﻨﻛ هﺎﮕﺘﺳد ﺎﺑ)
1
,ﺪﻴﻨﻛ
2ﺶﻴﭘ زا هرﺎﻤﺷ بﺎﺨﺘﻧا ىاﺮﺑ ار ﻪﻫار ﺪﻨﭼ راﺬﮔﺰﻣر
3ﺎﺗ ﺪﻳراد هﺎﮕﻧ و هداد رﺎﺸﻓ ار ﻪﻫار ﺪﻨﭼ راﺬﮔﺰﻣر
MEM".دﻮﺷ ﺮﻫﺎﻇ
1هﺮﻴﺧذ ﺪﻴﻫاﻮﺧ ﻰﻣ ﺎﻤﺷ ﻪﻛ ﻰﻫﺎﮕﺘﺴﻳا ﺖﻓﺎﻳرد مﺎﮕﻨﻫ
ﺎﺗ ﺪﻳراد
ﻪﺘﻜﻧ
1
1) هرﺎﻤﺷ ﻪﻤﻛد ﻚﻳ ﺲﭙﺳ ,ﺪﻴﻨﻛ بﺎﺨﺘﻧا ار ﺪﻧﺎﺑ(1)ﺎﺗ
(6).ﺪﻴﻫد رﺎﺸﻓ ار (
هﺪﻨﻨﻛ ﺾﻳﻮﻌﺗ ﻚﻳ بﺎﺨﺘﻧا درﻮﻣ رد تﺎﻴﺋﺰﺟ ىاﺮﺑ
CD/MD.ﺪﻴﻳﺎﻤﻧ ﻪﻈﺣﻼﻣ ار ۱۷ ﻪﺤﻔﺻ ,
ﺶﻳﺎﻤﻧ ىﺎﻫ ﻢﺘﻳآ
ﺖﻟﺎﺣ ﺎﻤﺷ ﻪﻛ ﻰﻣﺎﮕﻨﻫ:لﺎﺜﻣInfo ﻪﺑ ار (تﺎﻋﻼﻃا) "All"
.(۱۶ ﻪﺤﻔﺻ) ﺪﻴﻨﻛ ﻰﻣ ﻢﻴﻈﻨﺗ
A
C
B
مﻮﺒﻟآ مﺎﻧ ,ﺪﻨﻣﺮﻨﻫ مﺎﻧ ,ﻚﺴﻳد مﺎﻧ ,كاﺮﺗ مﺎﻧ ,هﺪﺷ
ىﺎﻫ ﻢﺘﻳآ ﺮﻴﻴﻐﺗ ىاﺮﺑC ,(DSPL).ﺪﻴﻫد رﺎﺸﻓ ار
و ﻂﺒﺿ ﺖﻣﺮﻓ ,ﻚﺴﻳد عﻮﻧ ﻪﺑ ﻪﺘﺴﺑ ,هﺪﺷ هداد ﺶﻳﺎﻤﻧ ىﺎﻫ ﻢﺘﻳآ
MP3/
درﻮﻣ رد تﺎﻴﺋﺰﺟ ىاﺮﺑ .دﻮﺑ ﺪﻨﻫاﻮﺧ توﺎﻔﺘﻣ تﺎﻤﻴﻈﻨﺗ
.ﺪﻴﻳﺎﻤﻧ ﻪﻈﺣﻼﻣ ار ۲۰ ﻪﺤﻔﺻ ,
هرﺎﺷا
WMA/AAC
راﺮﻜﺗ ﺶﺨﭘ
زا لﺮﺘﻨﻛ هﺎﮕﺘﺳد ىور ﺮﺑ
.دﻮﺷ ﺮﻫﺎﻇ هاﻮﺨﻟد ﻢﻴﻈﻨﺗ ﺎﺗ ﺪﻴﻫد رﺎﺸﻓ ار ترﺎﻛ رود هار
.دﻮﺷ ﻰﻣ ﺶﺨﭘ
(REP)
Repeat Track.رﺮﻜﻣ رﻮﻄﺑ كاﺮﺗ
*Repeat Album.رﺮﻜﻣ رﻮﻄﺑ مﻮﺒﻟآ
MP3/WMA/AAC
بﺎﺨﺘﻧاﺶﺨﭘ ىاﺮﺑ
ﻚﻳ ﻪﻛ ﻰﻣﺎﮕﻨﻫ
,ﺶﺨﭘ ﻦﻴﺣ رد
(1)
,ىدﺎﻋ ﺶﺨﭘ ﺖﻟﺎﺣ ﻪﺑ ﺖﺸﮔزﺎﺑ ىاﺮﺑ"Repeat off"ار
.ﺪﻴﻨﻛ بﺎﺨﺘﻧا
ﻰﺒﻴﻛﺮﺗ ﺶﺨﭘ
,ﺶﺨﭘ ﻦﻴﺣ رد(SHUF)ﺎﺗ ﺪﻴﻫد رﺎﺸﻓ رﺮﻜﻣ رﻮﻄﺑ ار
.دﻮﺷ ﺮﻫﺎﻇ هاﻮﺨﻟد ﻢﻴﻈﻨﺗ
بﺎﺨﺘﻧاﺶﺨﭘ ىاﺮﺑ
*Shuffle Albumﻰﻓدﺎﺼﺗ ﺐﻴﺗﺮﺗ ﻪﺑ مﻮﺒﻟآ.
Shuffle Discﻰﻓدﺎﺼﺗ ﺐﻴﺗﺮﺗ ﻪﺑ ﻚﺴﻳد.
.دﻮﺷ ﻰﻣ ﺶﺨﭘ
,ىدﺎﻋ ﺶﺨﭘ ﺖﻟﺎﺣ ﻪﺑ ﺖﺸﮔزﺎﺑ ىاﺮﺑ"Shuffle off"ار
MP3/WMA/AAC
ﻚﻳ ﻪﻛ ﻰﻣﺎﮕﻨﻫ
.ﺪﻴﻨﻛ بﺎﺨﺘﻧا
A) ﻊﺒﻨﻣ ﺮﮕﻧﺎﺸﻧ CD/WMA/MP3/AAC(
Bﺖﻋﺎﺳ
Cىﺮﭙﺳ ﺶﺨﭘ نﺎﻣز تﺪﻣ/كاﺮﺗ هرﺎﻤﺷ/مﻮﺒﻟآ هرﺎﻤﺷ
1
*
1
*
۱۲
Page 70

ﺎﻫ ﻢﺘﻳآ ندﺮﻛ در ﺎﺑ ﻮﺠﺘﺴﺟ—شﺮﭘ ﺖﻟﺎﺣ
A
.ﺪﻴﻨﻛ ﻮﺠﺘﺴﺟ ﺖﻋﺮﺳ ﻪﺑ ار هاﻮﺨﻟد ﻢﺘﻳآ ﺪﻴﻧاﻮﺗ ﻰﻣ ﺎﻤﺷ ,ﺪﻧراد دﻮﺟو ﻪﺘﺳد ﻚﻳ رد ىرﺎﻴﺴﺑ ىﺎﻫ ﻢﺘﻳآ ﻪﻛ ﻰﻣﺎﮕﻨﻫ
.دﻮﺷ ﻰﻣ ﺮﻫﺎﻇ ﺮﻳز ﺶﻳﺎﻤﻧ ﻪﺤﻔﺻ
B
C
Aﻰﻠﻌﻓ ﻢﺘﻳآ هرﺎﻤﺷ
Bﻰﻠﻌﻓ ﻪﻳﻻ رد ﻢﺘﻳآ هرﺎﻤﺷ ﻞﻛ
Cﻢﺘﻳآ مﺎﻧ
.دﻮﺷ ﻰﻣ در ﻢﺘﻳآ هرﺎﻤﺷ ﻞﻛ ﺪﺻرد ۱۰ ﻞﺻاﻮﻓ رد
ﺖﻟﺎﺣ ﻪﺑ ﺶﻳﺎﻤﻧ ﻪﺤﻔﺻQuick-BrowZer.دﻮﺷ ﻰﻣ ﺮﻫﺎﻇ هﺪﺷ بﺎﺨﺘﻧا ﻢﺘﻳآ و ددﺮﮔ ﻰﻣ زﺎﺑ
.دﻮﺷ ﻰﻣ عوﺮﺷ ﺶﺨﭘ ,ﺪﺷﺎﺑ كاﺮﺗ ﻚﻳ هﺪﺷ بﺎﺨﺘﻧا ﻢﺘﻳآ ﻪﻛ ﻰﺗرﻮﺻ رد
شﺮﭘ ﺖﻟﺎﺣ ﻮﻐﻟ ىاﺮﺑ
(BACK) .ﺪﻴﻫد رﺎﺸﻓ ﭗﭼ ﻪﺑ ار ﻪﻫار ﺪﻨﭼ راﺬﮔﺰﻣر ﺎﺑ ﺪﻴﻫد رﺎﺸﻓ ار
1 ﺖﻟﺎﺣ رد ار ﻪﻫار ﺪﻨﭼ راﺬﮔﺰﻣرQuick-BrowZer.ﺪﻴﻫد رﺎﺸﻓ ﺖﺳار ﻪﺑ
2.ﺪﻴﻧﺎﺧﺮﭽﺑ هاﻮﺨﻟد ﻢﺘﻳآ ﻪﺑ ﻚﻳدﺰﻧ ﺎﻳ ,هاﻮﺨﻟد ﻢﺘﻳآ بﺎﺨﺘﻧا ىاﺮﺑ ار ﻪﻫار ﺪﻨﭼ راﺬﮔﺰﻣر
3.ﺪﻴﻫد رﺎﺸﻓ ار ﻪﻫار ﺪﻨﭼ راﺬﮔﺰﻣر
4.ﺪﻴﻫد رﺎﺸﻓ ار نآ و ﺪﻴﻧﺎﺧﺮﭽﺑ هاﻮﺨﻟد ﻢﺘﻳآ بﺎﺨﺘﻧا ىاﺮﺑ ار ﻪﻫار ﺪﻨﭼ راﺬﮔﺰﻣر
۱۱
Page 71

ﻪﺘﺳد
/"
Walkman
كاﺮﺗ ﻚﻳ ىﻮﺠﺘﺴﺟ— Quick-BrowZer
"
ﻚﻳ رد كاﺮﺗ ﻚﻳ ىﻮﺠﺘﺴﺟ ﻪﺑ ﻪﺘﺳد سﺎﺳا ﺮﺑ ﻰﻧﺎﺳآ ﻪﺑ ﺪﻴﻧاﻮﺗ ﻰﻣ ﺎﻤﺷCD هﺎﮕﺘﺳد ﺎﻳ USB)
.ﺪﻳزادﺮﭙﺑ (هﻮﺒﻧا ىزﺎﺳ هﺮﻴﺧذ
(LIST/BROWSE):
ﺖﻟﺎﺣ زا جوﺮﺧ/دورو ىاﺮﺑQuick-
MODE
LIST/
BROWSE
BACK
SOURCE
SHUF
DSPL
ﻰﻠﺒﻗ ﺶﻳﺎﻤﻧ ﻪﺤﻔﺻ ﻪﺑ ﺖﺸﮔزﺎﺑ ىاﺮﺑ.
:لﺮﺘﻨﻛ ﻪﺟرد
ﺪﻴﻳﺎﺗ ;(ﺪﻴﻧﺎﺧﺮﭽﺑ) ﻢﺘﻳآ بﺎﺨﺘﻧا ىاﺮﺑ
.(ﺪﻴﻫد رﺎﺸﻓ) ﻢﺘﻳآ
ﺖﻟﺎﺣ دراو هﺎﮕﺘﺳدQuick-BrowZer.دﻮﺷ ﻰﻣ ﺮﻫﺎﻇ ﻮﺠﺘﺴﺟ ىﺎﻫ ﻪﺘﺳد ﺖﺴﻴﻟ و ,دﻮﺷ ﻰﻣ
.ﺪﻨﺘﺴﻫ توﺎﻔﺘﻣ ﻚﺴﻳد ﺎﻳ هﺎﮕﺘﺳد عﻮﻧ ﻪﺑ ﻪﺘﺴﺑ ,ﺶﻳﺎﻤﻧ ىﺎﻫ ﻢﺘﻳآ
BrowZer
.
(BACK):
1)LIST/BROWSE ( .ﺪﻴﻫد رﺎﺸﻓ ﻻﺎﺑ ﻪﺑ ار
2.ﺪﻴﻫد رﺎﺸﻓ ﺪﻴﻳﺎﺗ ىاﺮﺑ ار نآ ﺲﭙﺳ ,ﺪﻴﻧﺎﺧﺮﭽﺑ هاﻮﺨﻟد ىﻮﺠﺘﺴﺟ ﻪﺘﺳد بﺎﺨﺘﻧا ىاﺮﺑ ار ﻪﻫار ﺪﻨﭼ راﺬﮔﺰﻣر
.دﻮﺸﻧ جرﺎﺧ
ﻰﻠﺒﻗ ﺶﻳﺎﻤﻧ ﻪﺤﻔﺻ ﻪﺑ ﺖﺸﮔزﺎﺑ ىاﺮﺑ
.دﻮﺷ ﻰﻣ ﻮﻐﻟ ﻰﺒﻴﻛﺮﺗ/راﺮﻜﺗ ﻢﻴﻈﻨﺗ ,
.ﺪﻧﻮﺸﻧ ﺮﻫﺎﻇ ﺢﻴﺤﺻ رﻮﻄﺑ ﺖﺳا ﻦﻜﻤﻣ ﺶﻳﺎﻤﻧ ىﺎﻫ ﻢﺘﻳآ ,
Quick-BrowZer
ﺖﻟﺎﺣ ﻦﻴﺣ رد ﻰﻳاﺪﺻ ﭻﻴﻫ ﺖﺳا ﻦﻜﻤﻣ ,
Quick-BrowZer
.دﻮﺷ ﻰﻣ عوﺮﺷ ﺶﺨﭘ
(BACK) .ﺪﻴﻫد رﺎﺸﻓ ﻦﻴﻳﺎﭘ ﻪﺑ ار
ﺖﻟﺎﺣ زا جوﺮﺧ ىاﺮﺑQuick-BrowZer
(LIST/BROWSE) .ﺪﻴﻫد رﺎﺸﻓ ﻻﺎﺑ ﻪﺑ ار
ﺖﻟﺎﺣ ﻪﺑ دورو مﺎﮕﻨﻫ
هﺎﮕﺘﺳد ﻪﺑ ﻪﺘﺴﺑ
USB
هﺎﮕﺘﺳد ﻪﺑ ﻪﺘﺴﺑ
USB
3ﻪﻠﺣﺮﻣ 2.دﻮﺷ بﺎﺨﺘﻧا هاﻮﺨﻟد كاﺮﺗ ﺎﺗ ﺪﻴﻨﻛ راﺮﻜﺗ ار
تﺎﻜﻧ
•
•
•
۱۰
Page 72

ﻰﻤﻧ نآ ,دﻮﺷ ﻰﻣ ﻮﺤﻣ ﺶﻳﺎﻤﻧ ﻪﺤﻔﺻ و دﻮﺷ ﻰﻣ شﻮﻣﺎﺧ هﺎﮕﺘﺳد ﺮﮔا
ﻪﻜﻨﻳا ﺮﮕﻣ دﻮﺷ ﻪﺘﻓﺮﮔ رﺎﻜﺑ ترﺎﻛ رود هار زا لﺮﺘﻨﻛ هﺎﮕﺘﺳد ﺎﺑ ﺪﻧاﻮﺗ
ﻚﺴﻳد ﻚﻳ اﺪﺘﺑا ﺎﻳ ,دﻮﺷ هداد رﺎﺸﻓ هﺎﮕﺘﺳد ىور ﺮﺑ
.دﻮﺷ دراو هﺎﮕﺘﺳد ندﺮﻛ لﺎﻌﻓ ىاﺮﺑ
ﻪﺘﻜﻧ
(SOURCE)
8 ﻪﻤﻛدATT(ندﺮﻛ كزﺎﻧ)
.ﺪﻴﻫد رﺎﺸﻓ هرﺎﺑود ,ندﺮﻛ ﻮﻐﻟ ىاﺮﺑ .اﺪﺻ ندﺮﻛ كزﺎﻧ ىاﺮﺑ
9 ﻪﻤﻛدSOUND
.اﺪﺻ ﻢﻴﻈﻨﺗ ﻪﺑ دورو ىاﺮﺑ
q; ﻪﻤﻛدMODE
ﻮﻳدار ﺪﻧﺎﺑ بﺎﺨﺘﻧا ىاﺮﺑ)FM/AM(بﺎﺨﺘﻧا ;
ﻰﺗﻮﺻ هﺎﮕﺘﺳد ﺶﺨﭘ ﺖﻴﻌﺿوATRAC.
qa ﻪﻤﻛدLIST
ﺖﻟﺎﺣ ﻪﺑ دورو ;(ﻮﻳدار) ندﺮﻛ ﺖﺴﻴﻟ ىاﺮﺑQuick-
(CD/USB
) BrowZer.
qs ىﺎﻫ ﻪﻤﻛدM/m (+/–)
ﺮﺑ ﻦﻴﻳﺎﭘ/ﻻﺎﺑ ﻪﺑ ﻪﻫار ﺪﻨﭼ راﺬﮔﺰﻣر نداد رﺎﺸﻓ ﺪﻨﻧﺎﻣ
.هﺎﮕﺘﺳد ىور
ﺎﺑ ناﻮﺗ ﻰﻣ ار هﺮﻴﻏ و ,اﺪﺻ ﻢﻴﻈﻨﺗ ,ﻢﻴﻈﻨﺗ
.ﺖﻓﺮﮔ رﺎﻜﺑ
Mm
qd ﻪﻤﻛدSCRL(روﺮﻣ)
.ﺶﻳﺎﻤﻧ ﻢﺘﻳآ روﺮﻣ ىاﺮﺑ
qfهرﺎﻤﺷ ىﺎﻫ ﻪﻤﻛد
CD/USB:
(1):REP۱۲ ﻪﺤﻔﺻ ۱۴,
(2):SHUF۱۲ ﻪﺤﻔﺻ ۱۴,
(6):PAUSE
هرﺎﺑود ,ندﺮﻛ ﻮﻐﻟ ىاﺮﺑ .ﺶﺨﭘ ﺚﻜﻣ ىاﺮﺑ
.ﺪﻴﻫد رﺎﺸﻓ
:ﻮﻳدار
;(ﺪﻴﻫد رﺎﺸﻓ) هﺪﺷ هﺮﻴﺧذ ىﺎﻫ هﺎﮕﺘﺴﻳا ﺖﻓﺎﻳرد ىاﺮﺑ
.(ﺪﻳراد هﺎﮕﻧ و ﺪﻴﻫد رﺎﺸﻓ) ﺎﻫ هﺎﮕﺘﺴﻳا ندﺮﻛ هﺮﻴﺧذ
۹
Page 73

.(۴ ﻪﺤﻔﺻ) ﺪﻴﻨﻛ جرﺎﺧ ار ﻖﻳﺎﻋ ﺶﻛور ,هدﺎﻔﺘﺳا زا ﺶﻴﭘ
1 ﻪﻤﻛدOFF
.ﺪﻴﻨﻛ ﻊﻄﻗ ار ﻊﺒﻨﻣ ,ندﺮﻛ شﻮﻣﺎﺧ ىاﺮﺑ
2 ﻪﻤﻛدSOURCE
ﻮﻳدار) ﻊﺒﻨﻣ ,ندﺮﻛ ﻦﺷور ىاﺮﺑAUX/USB/CD/(
.ﺪﻴﻫد ﺮﻴﻴﻐﺗ ار
3 ﻪﻤﻛدMENU
.ﻮﻨﻣ ﻪﺑ دورو ىاﺮﺑ
4 ﻪﻤﻛدENTER
.ﻢﻴﻈﻨﺗ ﻚﻳ ىاﺮﺟا ىاﺮﺑ
5 ىﺎﻫ ﻪﻤﻛد</, (SEEK +/–)
ﺖﺳار/ﭗﭼ ﻪﺑ ﻪﻫار ﺪﻨﭼ راﺬﮔﺰﻣر نداد رﺎﺸﻓ ﺪﻨﻧﺎﻣ
.هﺎﮕﺘﺳد ىور ﺮﺑ
ﺎﺑ ناﻮﺗ ﻰﻣ ار هﺮﻴﻏ و ,اﺪﺻ ﻢﻴﻈﻨﺗ ,ﻢﻴﻈﻨﺗ< ,
.ﺖﻓﺮﮔ رﺎﻜﺑ
6 ﻪﻤﻛدDSPL(ﺶﻳﺎﻤﻧ ﻪﺤﻔﺻ)
.ﺶﻳﺎﻤﻧ ىﺎﻫ ﻢﺘﻳآ نداد ﺮﻴﻴﻐﺗ ىاﺮﺑ
7 ﻪﻤﻛدVOL +/–(اﺪﺻ ﻪﺟرد)
.اﺪﺻ ﻢﻴﻈﻨﺗ ىاﺮﺑ
1
2
3
4
5
6
7
ترﺎﻛ رود هار زا لﺮﺘﻨﻛ هﺎﮕﺘﺳد
RM-X156
OFF
SOURCE SOUND
MENU LIST
+
ENTER
–
DSPL
REP SHUF
132
465
+
VOL
–
ATT
MODE
SCRL
PAU SE
8
9
0
qa
qs
qd
qf
۸
Page 74

.ﻚﺴﻳد ندﺮﻛ دراو ىاﺮﺑ
ﻦﻴﻳﺎﭘ ﻪﺑ ﻰﻳﻮﻠﺟ ﻞﻧﺎﭘ نﺪﻧاﺰﻐﻟ/ﻚﺴﻳد جوﺮﺧ ىاﺮﺑ
ﻪﻳواز ۳ رد ﻰﻳﻮﻠﺟ ﻞﻧﺎﭘ نداد راﺮﻗ ;(ﺪﻴﻫد رﺎﺸﻓ)
.(ﺪﻳراد هﺎﮕﻧ و ﺪﻴﻫد رﺎﺸﻓ)
/ﻮﻳدار) ﻊﺒﻨﻣ ;هﺎﮕﺘﺳد ندﺮﻛ ﻦﺷور ىاﺮﺑUSB/CD
ﺪﻴﻫد ﺮﻴﻴﻐﺗ ار (*۱.
DSPL
(ﺶﻳﺎﻤﻧ) ۱۲ ﻪﺤﻔﺻ
.ﺶﻳﺎﻤﻧ ىﺎﻫ ﻢﺘﻳآ ﺮﻴﻴﻐﺗ ىاﺮﺑ
.ﺪﻴﻳﺎﻤﻧ ﻪﻈﺣﻼﻣ ار هﺪﺷ ﻪﻤﻴﻤﺿ
.ﺶﻳﺎﻤﻧ ﻢﺘﻳآ ندﺮﻛ روﺮﻣ ىاﺮﺑ
.ﺪﻴﻨﻛ ﻊﻄﻗ ار ﻊﺒﻨﻣ ;ندﺮﻛ شﻮﻣﺎﺧ ىاﺮﺑ
.ﻞﻤﺣ ﻞﺑﺎﻗ ﻰﺗﻮﺻ هﺎﮕﺘﺳد ﻚﻳ ندﺮﻛ ﻞﺻو ىاﺮﺑ
هﺪﻨﻨﻛ ﺾﻳﻮﻌﺗ لﺎﺼﺗا ترﻮﺻ رد ۱
ﻪﻛ ﻰﻣﺎﮕﻨﻫ ;
هﺎﮕﺘﺳد ماﺪﻛ ﻪﻜﻨﻳا ﻪﺑ ﻪﺘﺴﺑ ,دﻮﺷ ﻰﻣ هداد رﺎﺸﻓ
ﺶﻳﺎﻤﻧ ﻪﺤﻔﺻ رد (
(MODE)
,
CD/MD
"MD"
نداد رﺎﺸﻓ ترﻮﺻ رد ,ﻦﻴﻨﭽﻤﻫ .ﺪﺷ ﺪﻫاﻮﺧ ﺮﻫﺎﻇ
.دﻮﺷ ﻰﻣ ﺶﺨﭘ
) هﺪﺷ ﻞﺼﺘﻣ هﺎﮕﺘﺳد ,دﻮﺷ ﻰﻣ ﻞﺻو
.ﺪﻴﻫد ﺮﻴﻴﻐﺗ ار هﺪﻨﻨﻛ ﺾﻳﻮﻌﺗ ﺪﻴﻧاﻮﺗ ﻰﻣ ﺎﻤﺷ
MP3/WMA/AAC
(SOURCE)
ﻚﻳ ﻪﻛ ﻰﻣﺎﮕﻨﻫ ۲
5 ﻚﺴﻳد فﺎﻜﺷ۵ ﻪﺤﻔﺻ
6ﺶﻳﺎﻤﻧ هﺮﺠﻨﭘ
7ﻪﻤﻛدZ /(جوﺮﺧ) ANGLE۵ ﻪﺤﻔﺻ
8 ﻪﻤﻛد ) (ﻰﻳﻮﻠﺟ ﻞﻧﺎﭘ ىزﺎﺳدازآﻪﺤﻔﺻ ۵
9 ﻊﺒﻨﻣ ﻪﻤﻛدSOURCE
AUX
q; ﻪﻤﻛد
qa ﻪﻤﻛدRESET (ﻰﻳﻮﻠﺟ ﻞﻧﺎﭘ ﺖﺸﭘ ﻞﺤﻣ) ۴ ﻪﺤﻔﺻ
qs ﺲﻧﺎﻛﺮﻓ بﺎﺨﺘﻧا ﺪﻴﻠﻛ
"ﺲﻧﺎﻛﺮﻓ بﺎﺨﺘﻧا ﺪﻴﻠﻛ"تﻻﺎﺼﺗا/ﺐﺼﻧ ﻪﭼﺮﺘﻓد رد
qd ﻪﻤﻛدSCRL(روﺮﻣ)
qf شﻮﻣﺎﺧ ﻪﻤﻛدOFF
qg ىدورو ﺶﻴﻓAUX ۱۷ ﻪﺤﻔﺻ
qhترﺎﻛ رود هار زا لﺮﺘﻨﻛ هﺎﮕﺘﺳد ىاﺮﺑ هﺪﻨﻨﻛ ﺖﻓﺎﻳرد
*
*
۷
Page 75

ﻰﻠﺻا ىﺎﻫ تﺎﻴﻠﻤﻋ و ﺎﻫ لﺮﺘﻨﻛ ﻞﺤﻣ
89 qdq
q
q
q
q
q
ﻰﻠﺻا هﺎﮕﺘﺳد
123 645 7
PUSH ENTER / SOUND / MENU
MODE
LIST/
BROWSE
BACK
SOURCE
SHUF
DSPL
SCRL
OFF
AUX
;
.ﻮﻨﻣ ﻢﺘﻳآ ﻚﻳ بﺎﺨﺘﻧا/اﺪﺻ ﻢﻴﻈﻨﺗ :ىاﺮﺑ ﺪﻴﻧﺎﺧﺮﭽﺑ
بﺎﺨﺘﻧا :ىاﺮﺑ ﺪﻴﻫد رﺎﺸﻓ ﺖﺳار/ﭗﭼ/ﻦﻴﻳﺎﭘ/ﻻﺎﺑ ﻪﺑ
.ﻮﻨﻣ ﻢﺘﻳآ ﻚﻳ
.ﻢﻴﻈﻨﺗ ﻚﻳ ىاﺮﺟا/اﺪﺻ ﻢﻴﻈﻨﺗ ﻪﺑ دورو :ىاﺮﺑ ﺪﻴﻫد رﺎﺸﻓ
.ﻮﻨﻣ ﻪﺑ دورو :ىاﺮﺑ ﺪﻳراد هﺎﮕﻧ و ﺪﻴﻫد رﺎﺸﻓ
:CD/USB
:ىاﺮﺑ ﺪﻴﻫد رﺎﺸﻓ ﻦﻴﻳﺎﭘ/ﻻﺎﺑ ﻪﺑ
دوﺪﺣ
۲
-(ﺪﻴﻫد رﺎﺸﻓ) ﺎﻫ مﻮﺒﻟآ ندﺮﻛ در*۲.
-
-
-رﺎﺸﻓ) ﺪﻳﺮﺒﺑ ﻮﻠﺟ ﻪﺑ ﻊﻳﺮﺳ/ﺐﻘﻋ ﻪﺑ ار كاﺮﺗ ﻚﻳ
:ﻮﻳدار
-.هﺪﺷ هﺮﻴﺧذ هﺎﮕﺘﺴﻳا ﺖﻓﺎﻳرد
-.(ﺪﻴﻫد رﺎﺸﻓ) ﺎﻫ هﺎﮕﺘﺴﻳا رﺎﻛدﻮﺧ ﻰﺑﺎﻳ جﻮﻣ
-و ﺪﻴﻫد رﺎﺸﻓ) ﻰﺘﺳد رﻮﻄﺑ هﺎﮕﺘﺴﻳا ﻚﻳ ﻦﺘﻓﺎﻳ
۲
(ﺪﻳراد هﺎﮕﻧ و ﺪﻴﻫد رﺎﺸﻓ) ﺎﻫ مﻮﺒﻟآ ﻪﺘﺳﻮﻴﭘ ندﺮﻛ در
*
.
:ىاﺮﺑ ﺪﻴﻫد رﺎﺸﻓ ﺖﺳار/ﭗﭼ ﻪﺑ
.(ﺪﻴﻫد رﺎﺸﻓ) ﺎﻫ كاﺮﺗ ندﺮﻛ در -
فﺮﻇ ﺲﭙﺳ ,ﺪﻴﻫد رﺎﺸﻓ) ﺎﻫ كاﺮﺗ ﻪﺘﺳﻮﻴﭘ ندﺮﻛ در
.(ﺪﻳراد هﺎﮕﻧ و هداد رﺎﺸﻓ هرﺎﺑود ﻪﻴﻧﺎﺛ
.(ﺪﻳراد هﺎﮕﻧ و ﺪﻴﻫد
:ىاﺮﺑ ﺪﻴﻫد رﺎﺸﻓ ﻦﻴﻳﺎﭘ/ﻻﺎﺑ ﻪﺑ
:ىاﺮﺑ ﺪﻴﻫد رﺎﺸﻓ ﺖﺳار/ﭗﭼ ﻪﺑ
.(ﺪﻳراد هﺎﮕﻧ
a
4لﺮﺘﻨﻛ ﻪﺟرد
s
و ﺎﻫ لﺮﺘﻨﻛ ﻞﺤﻣ درﻮﻣ رد ﺎﻫ ﻞﻤﻌﻟارﻮﺘﺳد ىوﺎﺣ ﺶﺨﺑ ﻦﻳا
f
g
تﺎﺤﻔﺻ ,تﺎﻴﺋﺰﺟ ىاﺮﺑ .ﺪﺷﺎﺑ ﻰﻣ ﻪﻳﺎﭘ ىﺎﻫ تﺎﻴﻠﻤﻋ
.ﺪﻴﻳﺎﻤﻧ ﻪﻈﺣﻼﻣ ار ﻪﻃﻮﺑﺮﻣ
هﺎﮕﺘﺳد تﺎﻴﻠﻤﻋ ىاﺮﺑUSB ,
"
USBرد
ىﺎﻫ هﺎﮕﺘﺳد
"
هﺎﮕﺘﺳد تﺎﻴﻠﻤﻋ ىاﺮﺑ ﺎﻳ ,ﺪﻴﻳﺎﻤﻧ ﻪﻈﺣﻼﻣ ار ۱۳ ﻪﺤﻔﺻ
"
زا هدﺎﻔﺘﺳا
.ﺪﻴﻳﺎﻤﻧ ﻪﻈﺣﻼﻣ ار ۱۷ ﻪﺤﻔﺻ رد
هﺪﻨﻨﻛ ﺾﻳﻮﻌﺗ) ىرﺎﻴﺘﺧاCD/MD ,(هﺮﻴﻏ و ,
ىرﺎﻴﺘﺧا تاﺰﻴﻬﺠﺗ
"
نﺎﻤﻫ ترﺎﻛ رود هار زا لﺮﺘﻨﻛ هﺎﮕﺘﺳد ىور ﺮﺑ ﻖﺒﻄﻨﻣ ىﺎﻫ ﻪﻤﻛد
.ﺪﻨﻨﻛ ﻰﻣ لﺮﺘﻨﻛ ار ﺪﻧراد دﻮﺟو هﺎﮕﺘﺳد ىور ﺮﺑ ﻪﻛ ﻰﻳﺎﻫدﺮﻜﻠﻤﻋ
(BACK)
/
(LIST/BROWSE)
(LIST/BROWSE):ﺎﺗ ﺪﻴﻫد رﺎﺸﻓ ﻻﺎﺑ ﻪﺑ ار
ﺖﻟﺎﺣ دراو ;ﺪﻴﻨﻛ ﺖﺴﻴﻟ ار (ﻮﻳدار)Quick-
ﺪﻳﻮﺷ (CD/USB).
ﻰﻠﺒﻗ ﺶﻳﺎﻤﻧ ﻪﺤﻔﺻ ﻪﺑ ﺖﺸﮔزﺎﺑ.
بﺎﺨﺘﻧا ;
۱
) ﻮﻳدار ﺪﻧﺎﺑ بﺎﺨﺘﻧا ىاﺮﺑFM/AM(*
ﻰﺗﻮﺻ هﺎﮕﺘﺳد ﺶﺨﭘ ﺖﻟﺎﺣATRAC.
(ﺐﻴﻛﺮﺗ) ۱۲ﻪﺤﻔﺻ۱۴,
SHUF
h
1لﺮﺘﻨﻛ
BrowZer
(BACK):ىاﺮﺑ ﺪﻴﻫد رﺎﺸﻓ ﻦﻴﻳﺎﭘ ﻪﺑ ار
2 ﺖﻟﺎﺣ ﻪﻤﻛدMODE ۱۲ ﻪﺤﻔﺻ
3 ﻪﻤﻛد
۶
Page 76

.ﺪﻴﻫﺪﻧ راﺮﻗ ﻰﻳﻮﻠﺟ ﻞﻧﺎﭘ ﻰﻠﺧاد ﺢﻄﺳ ىور ﺮﺑ ار ىﺰﻴﭼ ﭻﻴﻫ
ﻪﺘﻜﻧ
ﻰﻳﻮﻠﺟ ﻞﻧﺎﭘ ندﺮﻛ اﺪﺟ
هﺎﮕﺘﺳد رد ﻚﺴﻳد ندﺮﻛ دراو
1Z.ﺪﻴﻫد رﺎﺸﻓ ار
.دﺰﻐﻟ ﻰﻣ ﻦﻴﻳﺎﭘ ﻪﺑ رﺎﻛدﻮﺧ رﻮﻄﺑ ﻰﻳﻮﻠﺟ ﻞﻧﺎﭘ
2.ﺪﻴﻨﻛ دراو (ﻻﺎﺑ ﻪﺑ ور ﺐﺴﭼﺮﺑ فﺮﻃ ﺎﺑ) ار ﻚﺴﻳد
ﺲﭙﺳ ,دﺰﻐﻟ ﻰﻣ ﻻﺎﺑ ﻪﺑ رﺎﻛدﻮﺧ رﻮﻄﺑ ﻰﻳﻮﻠﺟ ﻞﻧﺎﭘ
.دﻮﺷ ﻰﻣ عوﺮﺷ رﺎﻛدﻮﺧ رﻮﻄﺑ ﺶﺨﭘ
ﻚﺴﻳد ندﺮﻛ جرﺎﺧ
Z.ﺪﻴﻫد رﺎﺸﻓ ار
1
ﺲﭙﺳ ,دﺰﻐﻟ ﻰﻣ ﻦﻴﻳﺎﭘ ﻪﺑ رﺎﻛدﻮﺧ رﻮﻄﺑ ﻰﻳﻮﻠﺟ ﻞﻧﺎﭘ
.دﻮﺷ ﻰﻣ جرﺎﺧ ﻚﺴﻳد
2Z.ﺪﻴﻫد رﺎﺸﻓ ﻰﻳﻮﻠﺟ ﻞﻧﺎﭘ ﻦﺘﺴﺑ ىاﺮﺑ ار
.دﺰﻐﻟ ﻰﻣ ﻻﺎﺑ ﻪﺑ رﺎﻛدﻮﺧ رﻮﻄﺑ ,نﺪﻳﺰﻐﻟ ﻦﻴﻳﺎﭘ زا ﺲﭘ ﻪﻴﻧﺎﺛ۱۵ ﻰﻳﻮﻠﺟ ﻞﻧﺎﭘ
ﻪﺘﻜﻧ
ﻰﻳﻮﻠﺟ ﻞﻧﺎﭘ ﻪﻳواز ﻢﻴﻈﻨﺗ
ىﺮﻴﮔﻮﻠﺟ ىاﺮﺑ ار هﺎﮕﺘﺳد ﻦﻳا ﻰﻳﻮﻠﺟ ﻞﻧﺎﭘ ﺪﻴﻧاﻮﺗ ﻰﻣ ﺎﻤﺷ
.ﺪﻴﻨﻛ اﺪﺟ ىدزد زا
راﺪﺸﻫ ﮓﻧز
ﻪﺑ ﻰﻳﻮﻠﺟ ﻞﻧﺎﭘ ندﺮﻛ اﺪﺟ نوﺪﺑ ار قاﺮﺘﺣا ﭻﻴﺋﻮﺳ ﺎﻤﺷ ﺮﮔا
شﻮﻣﺎﺧ ﺖﻴﻌﻗﻮﻣ
ﺪﻨﭼ ىاﺮﺑ راﺪﺸﻫ ﮓﻧز ,ﺪﻴﻧﺎﺧﺮﭽﺑ
OFF
رد اﺪﺻ ﻪﺑ ﻰﻧﺎﻣز ﺎﻬﻨﺗ ﮓﻧز .ﺪﻣآ ﺪﻫاﻮﺧ رد اﺪﺻ ﻪﺑ ﻪﻴﻧﺎﺛ
.دﺮﻴﮕﺑ راﺮﻗ هدﺎﻔﺘﺳا درﻮﻣ ﻰﻠﺧاد هﺪﻨﻨﻛ ﺖﻳﻮﻘﺗ ﻪﻛ ﺪﻣآ ﺪﻫاﻮﺧ
1(OFF).ﺪﻴﻫد رﺎﺸﻓ ار
.دﻮﺷ ﻰﻣ شﻮﻣﺎﺧ هﺎﮕﺘﺳد
2.ﺪﻴﻫد رﺎﺸﻓ ار
.دﻮﺷ ﻰﻣ دازآ ﻰﻳﻮﻠﺟ ﻞﻧﺎﭘ ﭗﭼ ﺖﻤﺳ
3ﻞﻧﺎﭘ ﺲﭙﺳ ,ﺪﻴﻧاﺮﻐﻠﺑ ﭗﭼ ﺖﻤﺳ ﻪﺑ ار ﻰﻳﻮﻠﺟ ﻞﻧﺎﭘ
.ﺪﻴﺸﻜﺑ نوﺮﻴﺑ دﻮﺧ ﺖﻤﺳ ﻪﺑ مارآ ار ﻰﻳﻮﻠﺟ
(OFF)
تﺎﻜﻧ
ﺮﺑ ﺪﺣ زا ﺶﻴﺑ رﺎﺸﻓ ﺎﻳ ﺪﻳزاﺪﻧﺎﻴﻧ ار ﺶﻳﺎﻤﻧ هﺮﺠﻨﭘ و ﻰﻳﻮﻠﺟ ﻞﻧﺎﭘ
.ﺪﻴﻨﻜﻧ دراو ﺎﻫ نآ ىور
.ﺪﻴﻫﺪﻧ راﺮﻗ ﺖﺑﻮﻃر ﺎﻳ ﻻﺎﺑ/مﺮﮔ ىﺎﻣد ضﺮﻌﻣ رد ار ﻰﻳﻮﻠﺟ ﻞﻧﺎﭘ
ﻚﻳ ىور ﺮﺑ ﺎﻳ هﺪﺷ كرﺎﭘ ﻞﻴﺒﻣﻮﺗا ﻚﻳ رد نآ ندﺮﻛ ﺎﻫر زا
.ﺪﻴﻨﻛ ىراددﻮﺧ ﻰﺒﻘﻋ ﻰﻨﻴﺳ/درﻮﺒﺷاد
•
•
(ANGLE)
ﺎﺗ ﺪﻳراد هﺎﮕﻧ و هداد رﺎﺸﻓ رﺮﻜﻣ رﻮﻄﺑ ار
.دﺮﻴﮔ راﺮﻗ ﺐﺳﺎﻨﻣ ﻪﻳواز رد ﻰﻳﻮﻠﺟ ﻞﻧﺎﭘ
(ANGLE)
.دﺮﻛ ﻢﻴﻈﻨﺗ ﺖﻴﻌﻗﻮﻣ ۳ رد ناﻮﺗ ﻰﻣ ار ﻰﻳﻮﻠﺟ ﻞﻧﺎﭘ
,دﻮﺧ ﻪﻴﻟوا ﺖﻴﻌﻗﻮﻣ ﻪﺑ ﻰﻳﻮﻠﺟ ﻞﻧﺎﭘ نﺪﻧادﺮﮔزﺎﺑ ىاﺮﺑ
ﻞﻧﺎﭘ ﺎﺗ ﺪﻳراد هﺎﮕﻧ و هداد رﺎﺸﻓ رﺮﻜﻣ رﻮﻄﺑ ار
(ANGLE)
.ددﺮﮔزﺎﺑ دﻮﺧ ﻪﻴﻟوا ﺖﻴﻌﻗﻮﻣ ﻪﺑ ﻰﻳﻮﻠﺟ
,(ﻚﺴﻳد ندﺮﻛ دراو ىاﺮﺑ) دﺰﻐﻟ ﻰﻣ ﻦﻴﻳﺎﭘ ﻪﺑ ﻰﻳﻮﻠﺟ ﻞﻧﺎﭘ ﻪﻜﻨﻳا زا ﺪﻌﺑ
.ددﺮﮔ ﻰﻣ زﺎﺑ ﺪﻳدﺮﻛ ﻢﻴﻈﻨﺗ ﻪﻛ ﻰﺘﻴﻌﻗﻮﻣ ﻪﺑ رﺎﻛدﻮﺧ رﻮﻄﺑ هرﺎﺑود نآ
.دﻮﺷ ﻰﻣ هﺮﻴﺧذ هﺎﮕﺘﺳد رد ﺪﻳدﺮﻛ ﻢﻴﻈﻨﺗ ﻪﻛ ﻰﻳﻮﻠﺟ ﻞﻧﺎﭘ ﻪﻳواز
ﻰﻣ زﺎﺑ دﻮﺧ ﻪﻴﻟوا ﺖﻴﻌﻗﻮﻣ ﻪﺑ ﻪﻳواز ,قاﺮﺘﺣا ندﺮﻛ شﻮﻣﺎﺧ مﺎﮕﻨﻫ
ﺎﻤﺷ ﻪﻛ ىا ﻪﻳواز رد ﻰﻳﻮﻠﺟ ﻞﻧﺎﭘ ,قاﺮﺘﺣا ندﺮﻛ ﻦﺷور ﺎﺑ و ,ددﺮﮔ
۵
.دﺮﻴﮔ ﻰﻣ راﺮﻗ ﺪﻳدﺮﻛ ﻢﻴﻈﻨﺗ
تارﺎﺷا
1
•
•
ﻰﻳﻮﻠﺟ ﻞﻧﺎﭘ ندﺮﻛ ﻞﺻو
هﺎﮕﺘﺳد ىور ﺮﺑ
رﻮﺤﻣ ىور ﺮﺑ ار ﻰﻳﻮﻠﺟ ﻞﻧﺎﭘ زا
B
.ﺪﻴﺸﻜﺑ ﻞﺧاد ﻪﺑ ﻰﻣارآ ﻪﺑ ار ﭗﭼ فﺮﻃ ﺲﭙﺳ ,ﺪﻴﻫد راﺮﻗ
ﻚﻳ ﺎﻳ) ﺪﻴﻫد رﺎﺸﻓ ار هﺎﮕﺘﺳد ىور ﺮﺑ
.ﺪﻳﺮﻴﮔ رﺎﻜﺑ ار هﺎﮕﺘﺳد ﺎﺗ (ﺪﻴﻨﻛ دراو ار ﻚﺴﻳد
A
B
خارﻮﺳ
A
(SOURCE)
Page 77

هﺪﻨﻨﻛ ﺾﻳﻮﻌﺗ :CD/MDار
CD/MD
-ه ﺪﻨﻨﻛ ﺾﻳﻮﻌﺗ
ﻪﺑ ناﻮﺗ ﻰﻣSony BUS.دﺮﻛ ﻞﺻو هﺎﮕﺘﺳد ﺖﺸﭘ رد
ﻰﻓﺎﺿا ىدورو ﺶﻴﻓ ﻚﻳAUXهزﺎﺟا هﺎﮕﺘﺳد ىﻮﻠﺟ رد
.ﺪﻫد ﻰﻣ ار ﻞﻤﺣ ﻞﺑﺎﻗ ﻰﺗﻮﺻ هﺎﮕﺘﺳد ﻚﻳ لﺎﺼﺗا
رﺎﻛ ﻪﺑ عوﺮﺷ
هﺎﮕﺘﺳد دﺪﺠﻣ ﻢﻴﻈﻨﺗ
زا ﺪﻌﺑ ﺎﻳ ,رﺎﺑ ﻦﻴﻟوا ىاﺮﺑ هﺎﮕﺘﺳد ىﺮﻴﮔرﺎﻜﺑ زا ﺶﻴﭘ
,تﻻﺎﺼﺗا نداد ﺮﻴﻴﻐﺗ ﺎﻳ ﻞﻴﺒﻣﻮﺗا ىﺮﻃﺎﺑ ندﺮﻛ ﺾﻳﻮﻌﺗ
.ﺪﻴﻨﻛ دﺪﺠﻣ ﻢﻴﻈﻨﺗ ار هﺎﮕﺘﺳد ﺪﻳﺎﺑ ﺎﻤﺷ
ﻪﻤﻛد و ﺪﻴﻨﻛ اﺪﺟ ار ﻰﻳﻮﻠﺟ ﻞﻧﺎﭘRESETﻢﺴﺟ ﻚﻳ ﺎﺑ ار
.ﺪﻴﻫد رﺎﺸﻓ رﺎﻛدﻮﺧ ﻢﻠﻗ ﻚﻳ ﺪﻨﻧﺎﻣ ,ﺰﻴﺗ كﻮﻧ
ﻪﻤﻛدRESET
! ﺪﻣﺎﺷﻮﺧ
•ﻰﻓﺎﺿا تاﺰﻴﻬﺠﺗ لﺎﺼﺗا
ﻰﻧﻮﺳ هدﺮﺸﻓ ﻚﺴﻳد ﺶﺨﭘ هﺎﮕﺘﺳد ﻦﻳا ﺪﻳﺮﺧ زاSony
ﺎﺑ دﻮﺧ ﻰﮔﺪﻨﻧار زا ﺪﻴﻧاﻮﺗ ﻰﻣ ﺎﻤﺷ .ﻢﻳراﺰﮕﺳﺎﭙﺳ
.ﺪﻳﺮﺒﺑ تﺬﻟ ﺮﻳز ىﺎﻫدﺮﻜﻠﻤﻋ
ﺪﻴﻧاﻮﺗ ﻰﻣ ﺎﻤﺷCD-DA ﻞﻣﺎﺷ ﻦﻴﻨﭽﻤﻫ) CD TEXT(
.ﺪﻴﻨﻛ ﺶﺨﭘ ار ((۱۶ ﻪﺤﻔﺻ)
ﻚﺴﻳد ىور ﺐﺴﭼﺮﺑ
ﺎﻫ ﻚﺴﻳد عﻮﻧ
CD-DA
MP3
WMA
AAC
• ﺶﺨﭘCD
وCD-R/CD-RW ىﺎﻫ ﻞﻳﺎﻓ) MP3/WMA/AAC
هﺮﻴﺧذ تﺎﻳﻮﺘﺤﻣ ﻰﻀﻌﺑ و ﺖﻋﺎﺳ ﻢﻴﻈﻨﺗ
ﻪﻤﻛد نداد رﺎﺸﻓ
RESET
.دﺮﻛ ﺪﻫاﻮﺧ كﺎﭘ ار هﺪﺷ
ﻪﺘﻜﻧ
ترﺎﻛ رود هار زا لﺮﺘﻨﻛ هﺎﮕﺘﺳد ندﺮﻛ هدﺎﻣآ
ىاﺮﺑ ترﺎﻛ رود هار زا لﺮﺘﻨﻛ هﺎﮕﺘﺳد ىﺮﻴﮔرﺎﻜﺑ زا ﺶﻴﭘ
.ﺪﻳرادﺮﺑ ار ﻖﻳﺎﻋ ﺶﻛور ,رﺎﺑ ﻦﻴﻟوا
ﻰﻣﻮﻴﺘﻴﻟ ىﺮﻃﺎﺑ ندﺮﻛ ﻦﻳﺰﮕﻳﺎﺟ
.ﺪﻴﻳﺎﻤﻧ ﻪﻈﺣﻼﻣ ار ۲۱ ﻪﺤﻔﺻ رد
"
,ىﺮﻃﺎﺑ ﻰﻨﻳﺰﮕﻳﺎﺟ ﻰﮕﻧﻮﮕﭼ ىاﺮﺑ
"
ترﺎﻛ رود هار زا لﺮﺘﻨﻛ هﺎﮕﺘﺳد
هرﺎﺷا
ﺖﻋﺎﺳ ﻢﻴﻈﻨﺗ
.ﺪﻨﻛ ﻰﻣ هدﺎﻔﺘﺳا ﻪﺘﻋﺎﺳ ۱۲ لﺎﺘﻴﺠﻳد ﺮﮕﻧﺎﺸﻧ ﻚﻳ زا ﺖﻋﺎﺳ
1.ﺪﻳراد هﺎﮕﻧ و هداد رﺎﺸﻓ ار ﻪﻫار ﺪﻨﭼ راﺬﮔﺰﻣر
"Clock Adjust"
.ﺪﻴﻫد رﺎﺸﻓ ار نآ ﺲﭙﺳ ,ﺪﻴﻧﺎﺧﺮﭽﺑ دﻮﺷ ﺮﻫﺎﻇ
ﻪﻛ ﻰﺘﻗو ﺎﺗ ار ﻪﻫار ﺪﻨﭼ راﺬﮔﺰﻣر
.دﻮﺷ ﻰﻣ ﺮﻫﺎﻇ ﺖﻋﺎﺳ ﻢﻴﻈﻨﺗ ﺶﻳﺎﻤﻧ ﻪﺤﻔﺻ
.ﺪﻴﻧﺎﺧﺮﭽﺑ
ﺪﻨﭼ راﺬﮔﺰﻣر ,لﺎﺘﻴﺠﻳد ﺮﮕﻧﺎﺸﻧ نداد ﺖﻛﺮﺣ ىاﺮﺑ
.ﺪﻴﻫد رﺎﺸﻓ ﺖﺳار/ﭗﭼ ﻪﺑ ار ﻪﻫار
.دﻮﺷ ﻰﻣ عوﺮﺷ ﺖﻋﺎﺳ
2
3ﻪﻘﻴﻗد و ﺖﻋﺎﺳ ﻢﻴﻈﻨﺗ ىاﺮﺑ ار ﻪﻫار ﺪﻨﭼ راﺬﮔﺰﻣر
4.ﺪﻴﻫد رﺎﺸﻓ ار ﻪﻫار ﺪﻨﭼ راﺬﮔﺰﻣر ,ﻪﻘﻴﻗد ﻢﻴﻈﻨﺗ زا ﺪﻌﺑ
FM2 ,FM3 ,AM1 و AM2.ﺪﻴﻨﻛ هﺮﻴﺧذ ار (
ىﺎﻫ هﺎﮕﺘﺴﻳا هﺎﮕﺘﺳد :(ﻰﺑﺎﻳ جﻮﻣ ﻪﻈﻓﺎﺣ ﻦﻳﺮﺘﻬﺑ)
.ﺪﻨﻛ ﻰﻣ هﺮﻴﺧذ ار ﺎﻫ نآ و هدﺮﻛ بﺎﺨﺘﻧا ار ىﻮﻗ لﺎﻨﮕﻴﺳ
رد كاﺮﺗ ىﻮﺠﺘﺴﺟ ﻪﺑ ﻰﻧﺎﺳآCD هﺎﮕﺘﺳد و USB
.(۱۰ ﻪﺤﻔﺻ) ﺪﻳزادﺮﭙﺑ هﺎﮕﺘﺳد ﻦﻳا ﻪﺑ هﺪﺷ ﻞﺻو
,هدﺮﻛ بﺎﺨﺘﻧا ار هﺪﺷ ﻢﻴﻈﻨﺗ ﺶﻴﭘ زا رﺰﻳﻻﻮﻛا ﻰﻨﺤﻨﻣ
.ﺪﻴﻨﻛ ﻢﻴﻈﻨﺗ هاﻮﺨﻟد ﻪﺑ و
هزﻮﺣ ﻚﻳ ىزﺎﺠﻣ ىﻮﮔﺪﻨﻠﺑ ﺐﻴﻛﺮﺗ زا هدﺎﻔﺘﺳا ﺎﺑ
ار ﻮﮔﺪﻨﻠﺑ ىاﺪﺻ ﺎﺗ ,ﺪﻨﻛ ﻰﻣ دﺎﺠﻳا ﺮﺗﺮﻴﮔاﺮﻓ ىاﺪﺻ
رد ﺪﻨﻴﻳﺎﭘ ﺖﻤﺴﻗ رد ﺎﻫ نآ ﺮﮔا ﻰﺘﺣ ,ﺪﻨﻛ ﺖﻳﻮﻘﺗ
.ﺪﻨﺷﺎﺑ هﺪﺷ ﺐﺼﻧ
ﺪﻨﻧﺎﻣ ,ﻰﻟﺎﺘﻴﺠﻳد هﺪﺷMP3.ﺪﺸﺨﺑ ﻰﻣ دﻮﺒﻬﺑ ار
ىور ﺮﺑ ار ﻰﻔﻠﺘﺨﻣ ﺶﻳﺎﻤﻧ ﺮﻳوﺎﺼﺗ ﺪﻴﻧاﻮﺗ ﻰﻣ ﺎﻤﺷ
.ﺪﻴﻨﻛ ﻢﻴﻈﻨﺗ هﺎﮕﺘﺳد
ﻰﻣ (
ATRAC
ىاﺮﺑ .دﻮﺷ ﻞﺻو
Walkman
ﻰﺘﺸﭘ لﺎﻨﻴﻣﺮﺗ ﻪﺑ ﺪﻧاﻮﺗ
USB
ﺎﻳ هﻮﺒﻧا"
" ﻰﺗﻮﺻ هﺎﮕﺘﺳد)
رد ﻪﺑ ﺎﻔﻄﻟ ,هدﺎﻔﺘﺳا ﻞﺑﺎﻗ ىﺎﻫ هﺎﮕﺘﺳد درﻮﻣ رد تﺎﻴﺋﺰﺟ
ىﺎﻫ هﺎﮕﺘﺳد درﻮﻣ
ﺖﻳﺎﺳ بو ﺎﻳ (۲۰ ﻪﺤﻔﺻ)
.ﺪﻴﻳﺎﻤﻧ ﻪﻌﺟاﺮﻣ (۲۶ ﻪﺤﻔﺻ)
USB
Sony
ﻰﻧﻮﺳ ﻰﻧﺎﺒﻴﺘﺸﭘ
•ﻮﻳدار ﺖﻓﺎﻳرد
-) ﺪﻧﺎﺑ ﺮﻫ ىازا ﻪﺑ هﺎﮕﺘﺴﻳا ۶ ﺎﺗ ﺪﻴﻧاﻮﺗ ﻰﻣ ﺎﻤﺷFM1,
-BTM
•ﻮﺠﺘﺴﺟ دﺮﻜﻠﻤﻋ
- Quick-BrowZerو ﺖﻋﺮﺳ ﻪﺑ ﺪﻴﻧاﻮﺗ ﻰﻣ ﺎﻤﺷ :
•اﺪﺻ ﻢﻴﻈﻨﺗ
-EQ3 parametric۷ زا ﻚﻳ ﺮﻫ ﺪﻴﻧاﻮﺗ ﻰﻣ ﺎﻤﺷ :
-DSO:(ﻚﻴﻣﺎﻨﻳد ﻪﻨﺤﺻ ىاﺪﺻ هﺪﻨﻫد نﺎﻣزﺎﺳ)
-Digital Music plus DM+)(:هدﺮﺸﻓ ىاﺪﺻ
•ﺮﻳﻮﺼﺗ ﻢﻴﻈﻨﺗ
•ىرﺎﻴﺘﺧا هﺎﮕﺘﺳد ىﺮﻴﮔرﺎﻜﺑ
-هﺎﮕﺘﺳد USB هﺎﮕﺘﺳد ﻚﻳ :USBىزﺎﺳ هﺮﻴﺧذ ﻪﺘﺳد
۴
Page 78

تﺎﺟرﺪﻨﻣ ﺖﺳﺮﻬﻓ
ﺎﻫدﺮﻜﻠﻤﻋ ﺮﻳﺎﺳ
اﺪﺻ تﺎﻤﻴﻈﻨﺗ نداد ﺮﻴﻴﻐﺗ........................۱۵
اﺪﺻ ىﺎﻫ ﻰﮔﮋﻳو ﻢﻴﻈﻨﺗ........................۱۵
رﺰﻳﻻﻮﻛا ﻰﻨﺤﻨﻣ ىزﺎﺳ ﻰﺷرﺎﻔﺳTune — EQ3...۱۵
ﻢﻴﻈﻨﺗ ىﺎﻫ ﻢﺘﻳآ ندﺮﻛ ﻢﻴﻈﻨﺗ— MENU............۱۶
ىرﺎﻴﺘﺧا تاﺰﻴﻬﺠﺗ زا هدﺎﻔﺘﺳا.....................۱۷
ﻰﻓﺎﺿا ﻰﺗﻮﺻ تاﺰﻴﻬﺠﺗ.......................۱۷
هﺪﻨﻨﻛ ﺾﻳﻮﻌﺗCD/MD.......................۱۷
نادﺮﮔ هﺪﻨﻫد نﺎﻣﺮﻓRM-X4S.................۱۸
ترﺎﻛ رود هار زا لﺮﺘﻨﻛ هﺎﮕﺘﺳد ندﺮﻛ هدﺎﻣآ...........۴
ﻰﻓﺎﺿا تﺎﻋﻼﻃا
ﺎﻫرﺎﻄﺧا........................................۱۹
ﺎﻫ ﻚﺴﻳد درﻮﻣ رد تﺎﻜﻧ......................۱۹
ىﺎﻫ هﺎﮕﺘﺳد درﻮﻣ ردUSB....................۲۰
ىﺎﻫ ﻞﻳﺎﻓ ﺶﺨﭘ ﺐﻴﺗﺮﺗMP3/WMA/AAC
) CD-R/RW(هﻮﺒﻧا ىزﺎﺳ هﺮﻴﺧذ ﻪﺘﺳد ﺎﻳ.......۲۰
ىﺎﻫ ﻞﻳﺎﻓ درﻮﻣ ردMP3.......................۲۰
ىﺎﻫ ﻞﻳﺎﻓ درﻮﻣ ردWMA.....................۲۰
ىﺎﻫ ﻞﻳﺎﻓ درﻮﻣ ردAAC......................۲۱
ىراﺪﻬﮕﻧ.......................................۲۱
هﺎﮕﺘﺳد ندﺮﻛ جرﺎﺧ..............................۲۱
تﺎﺼﺨﺸﻣ......................................۲۲
ﻰﺑﺎﻳ ﺐﻴﻋ.......................................۲۳
ﺎﻄﺧ ىﺎﻫ مﺎﻐﻴﭘ/ﺎﻫ ﺶﻳﺎﻤﻧ.....................۲۵
ﻰﻠﺻا ىﺎﻫ تﺎﻴﻠﻤﻋ و ﺎﻫ لﺮﺘﻨﻛ ﻞﺤﻣ
ترﺎﻛ رود هار زا لﺮﺘﻨﻛ هﺎﮕﺘﺳدRM-X156.......۸
هﺎﮕﺘﺳد دﺪﺠﻣ ﻢﻴﻈﻨﺗ...............................۴
ﻰﻳﻮﻠﺟ ﻞﻧﺎﭘ ندﺮﻛ اﺪﺟ.............................۵
ﻰﻳﻮﻠﺟ ﻞﻧﺎﭘ ندﺮﻛ ﻞﺻو.........................۵
هﺎﮕﺘﺳد رد ﻚﺴﻳد ندﺮﻛ دراو.......................۵
ﻚﺴﻳد ندﺮﻛ جرﺎﺧ.............................۵
ﻰﻳﻮﻠﺟ ﻞﻧﺎﭘ ﻪﻳواز ﻢﻴﻈﻨﺗ............................۵
كاﺮﺗ ﻚﻳ ىﻮﺠﺘﺴﺟ— Quick-BrowZer......۱۰
ﺎﻫ ﻢﺘﻳآ ندﺮﻛ در ﺎﺑ ﻮﺠﺘﺴﺟ—شﺮﭘ ﺖﻟﺎﺣ .......۱۱
ﺶﻳﺎﻤﻧ ىﺎﻫ ﻢﺘﻳآ.............................۱۲
!ﺪﻣﺎﺷﻮﺧ.........................................۴
رﺎﻛ ﻪﺑ عوﺮﺷ
ﺖﻋﺎﺳ ﻢﻴﻈﻨﺗ......................................۴
ﻰﻠﺻا هﺎﮕﺘﺳد..................................۶
CD
راﺮﻜﺗ ﺶﺨﭘ.................................۱۲
ﻰﺒﻴﻛﺮﺗ ﺶﺨﭘ................................۱۲
ﻮﻳدار
ﺎﻫ هﺎﮕﺘﺴﻳا ﺖﻓﺎﻳرد و ندﺮﻛ هﺮﻴﺧذ.................۱۲
رﺎﻛدﻮﺧ ندﺮﻛ هﺮﻴﺧذ— BTM.................۱۲
ﻰﺘﺳد ندﺮﻛ هﺮﻴﺧذ............................۱۲
هﺪﺷ هﺮﻴﺧذ ىﺎﻫ هﺎﮕﺘﺴﻳا ﺖﻓﺎﻳرد...............۱۲
رﺎﻛدﻮﺧ ﻰﺑﺎﻳ جﻮﻣ.............................۱۳
ﻚﻳ ﻖﻳﺮﻃ زا هﺎﮕﺘﺴﻳا ﻚﻳ ﺖﻓﺎﻳرد
ﺖﺴﻴﻟ
— LIST..............................۱۳
ىﺎﻫ هﺎﮕﺘﺳدUSB
هﺎﮕﺘﺳد ﺶﺨﭘUSB..........................۱۳
ﺶﻳﺎﻤﻧ ﻪﺤﻔﺻ ىﺎﻫ ﻢﺘﻳآ.......................۱۳
ﻰﺗﻮﺻ هﺎﮕﺘﺳد ﻚﻳ زا ﻰﻘﻴﺳﻮﻣ ﻪﺑ نداد شﻮﮔ
هﻮﺒﻧا ىزﺎﺳ هﺮﻴﺧذ ﻪﺘﺳد عﻮﻧ ...................۱۴
ﻚﻳ زا ﻰﻘﻴﺳﻮﻣ ﻪﺑ نداد شﻮﮔ"Walkman"
ﻰﺗﻮﺻ هﺎﮕﺘﺳد)
(....................۱۴
ATRAC
۳
Page 79

تﻻﺎﺼﺗا/ﺐﺼﻧ ﻪﭼﺮﺘﻓد ,تﻻﺎﺼﺗا و ﺐﺼﻧ ىاﺮﺑ
.ﺪﻴﻳﺎﻤﻧ ﻪﻈﺣﻼﻣ ار هﺪﺷ ﻪﻤﻴﻤﺿ
.دراد راﺮﻗ ﻰﺳﺎﺷ ﻦﻴﻳﺎﭘ رد ﺖﻣﻼﻋ ﻦﻳا
"ATRAC" ,"ATRAC AD" ,SonicStageىﻮﮔﻮﻟ و
ﻰﻧﻮﺳ ﺖﻛﺮﺷ ىرﺎﺠﺗ ﻢﺋﻼﻋ ﺎﻫ نآSony Corporation
.ﺪﻨﺷﺎﺑ ﻰﻣ
"WALKMAN" ىﻮﮔﻮﻟ و"WALKMAN"ﻢﺋﻼﻋ
ﻰﻧﻮﺳ ﺖﻛﺮﺷ هﺪﺷ ﺖﺒﺛ ىرﺎﺠﺗ Sony Corporation ﻰﻣ
.ﺪﻨﺷﺎﺑ
مرآMicrosoft ,Windows
Media
و ,Windowsىرﺎﺠﺗ ﻢﺋﻼﻋ
ﺖﻛﺮﺷ هﺪﺷ ﺖﺒﺛ ىرﺎﺠﺗ ﻢﺋﻼﻋ ﺎﻳ
ﺖﻓﺎﺳوﺮﻜﻳﺎﻣMicrosoft Corporationتﻻﺎﻳا رد
.ﺪﻨﺷﺎﺑ ﻰﻣ ﺎﻫرﻮﺸﻛ ﺮﻳﺎﺳ ﺎﻳ/و هﺪﺤﺘﻣ
ىاراد ﺎﻤﺷ ﻞﻴﺒﻣﻮﺗا قاﺮﺘﺣا ﻪﻛ ﻰﺗرﻮﺻ رد راﺪﺸﻫ
ACCﺪﺷﺎﺑ ﻰﻤﻧ
ﺖﻴﻌﻗﻮﻣ
رﺎﻛدﻮﺧ ﻰﺷﻮﻣﺎﺧ دﺮﻜﻠﻤﻋ ﻪﻛ ﺪﻴﻨﻛ ﻞﺻﺎﺣ نﺎﻨﻴﻤﻃا
زا ﺪﻌﺑ هﺎﮕﺘﺳد .ﺪﻴﻨﻛ ﻰﻣ ﻢﻴﻈﻨﺗ ار (۱۶ ﻪﺤﻔﺻ)
رﺎﻛدﻮﺧ و ﻞﻣﺎﻛ رﻮﻄﺑ هﺪﺷ ﻦﻴﻴﻌﺗ نﺎﻣز رد ﻰﺷﻮﻣﺎﺧ
ىﺮﻴﮔﻮﻠﺟ ىﺮﻃﺎﺑ نﺪﺷ ﻰﻟﺎﺧ زا ﻪﻛ ,دﻮﺷ ﻰﻣ شﻮﻣﺎﺧ
.ﺪﻨﻛ ﻰﻣ
ﻰﻤﻧ ﻢﻴﻈﻨﺗ ار رﺎﻛدﻮﺧ ﻰﺷﻮﻣﺎﺧ دﺮﻜﻠﻤﻋ ﺎﻤﺷ ﺮﮔا
ﺪﻴﻨﻛ ﻰﻣ شﻮﻣﺎﺧ ار قاﺮﺘﺣا ﺎﻤﺷ ﻪﻛ رﺎﺑ ﺮﻫ ,ﺪﻴﻨﻛ
(OFF)ﻪﺤﻔﺻ ﻪﻛ ﻰﺘﻗو ﺎﺗ ﺪﻳراد هﺎﮕﻧ و هداد رﺎﺸﻓ ار
.دﻮﺷ ﻮﺤﻣ ﺶﻳﺎﻤﻧ
۲
Page 80

FM/AM
Compact Disc Player
PR
http://www.sony.net/
Sony Corporation
ﻰﺗﺎﻴﻠﻤﻋ ىﺎﻫ ﻞﻤﻌﻟارﻮﺘﺳد
) ﻰﺸﻳﺎﻤﻧ ﻪﻧﻮﻤﻧ ﻮﻐﻟ ىاﺮﺑDEMO.ﺪﻴﻳﺎﻤﻧ ﻪﻈﺣﻼﻣ ار ۱۶ ﻪﺤﻔﺻ ,(
CDX-GT970US
Printed in Thailand
 Loading...