

Page 1

3-752-147-21 (1)
COMPACT
FM/AM Compact Disc Player
CMGtTAL AUDIO
CDX-7520
Operating Instructions page 2
Before operating the unit, please read this manual thoroughly and retain it for
future reference.
Mode d’emploi page 23
Avant la mise en service de cet appareil, prière de lire attentivement ce mode
d’emploi que l’on conservera pour toute référence ultérieure.
SONY " j
1 OFF 1 U r
CD
MUTE ( - ^|sELECl^( -t- ') LOUD
For installation and connexion, see the supplied installationA»nnections
manual.
En ce qui concerne l’installation et les connexions, se reporter au manuel
d’installationfconnexions, fourni.
© 1990 by Sony Corporation
---------------------
------------------------
M.SCAN
A. M£M
-----------------------
SENS
4° 5°
iMANuf^
^
2°
3°
r^—.SEEK 4-1
liîl-' AMS '-»il
6°
и)
FM
AM
CD
Page 2

For the Customers in the United States
Owner’s Record
The mcxlel and serial numbers are loceted at
the bottom oi the imit. Record the serial
number In the space provided below. Refer to
these numbers whenever you call upon your
Sony dealer regarding this product
Model No. CDX-7520 Serial No. _________________
CAUTION
The use of optical instruments with this
product will increase eye hazard.
INFORMATION
This equipment generates and uses radio
frequency energy and If not installed and used
property, that is, in strict accordance with the
manufacturer's Instructions, may cause
interference to radto and television reception. It
has been type fested and found to comply with
the limits for a Class В computing device in
accordance with the specifications in Subpart J
of Part 15 of FCC Rules, which are designed to
provide reasorrable protection against such
interference in a tesidertoal installation. However,
there is no guatarftee that interference will not
occur in a particular installation, it this
equipment does cause interference to radio or
television reception, which can be determined
by turning the equipment off and on, the user
is encouraged to try to correct the interference
by one or more of the following measures:
Reorient the receiving antenna
Relocate the equipment with respect to the
receiver.
Move the equipment away from the receiver.
Plug the equipment into a different outlet so
that equipment and receiver are on different
branch circuita
If necessary, the user should consutl the dealer
or an experienced radio/tefevison technician for
additional suggestions. The user may find the
following booklet prepared by the Federal
Communications Commission heiptul; "How to
Identify and Resolve Ftedio-TV Interference
Problems”. This booklet is cwalable from the
US. Government Printing Office, Washington,
DC 20402, Stock Na 004^10000346-4.
Page 3

Table of Contents
Features
Features .................................................................3
Precautions ............................................................ 4
Location of controls
Adjusting a sound .................................................... 9
..................................................
CP Operation
Playing a disc
Enjoying the variety of CD playing modes . . 12
........................................................
10
Reception
Memorizing stations automatically ............................ 13
Memorizing only desired stations manually . 14
Tuning in automatically.............................................15
Tuning in manually
Specifications
Fuse replacement..................................
Troubleshooting guide
.................................................
.......................................................
................
.............................................
17
18
19
DIN-sizfid mobile CD player and FM/AM tuner
6
CD section
• Provided with 8 times over-sampling digital
filter fc»r dynamic sound reproduction
• Quick-recovery mechanism against sound
skipping.
When strong vibration causes sound skipping,
the player quickly relocate the point where the
play was interrupted.
• A 3Hnch (8 cm) CD can be played without an
adaptor.
Tuner section
• Automatic memory functbn stores a total of
24 stciions {18 FM and 6 AM stations) in
memory.
20
• Easy and quick tuning with preset buttons
while driving
Others
• Fader control for adjusting the volume of the
front and rear speakers in 4-speaker system
• Line outputs and auxiliary inputs for
connecting an optional power ampltfier,
equalizer and a cassette player
• Two color variation (amber or green) for
illumirtation
Page 4

Precautions
• Before operating the unit for the first time
or after replacing the battery, press the
reset button (page 6) with a ball-point
pen, etc., then start operating the unit.
• If your car was parked In direct sunlight and
there was a considerable rise in temperature
inside the car, allow the unit to cool off before
operating.
• If no power is being supplied to the unit,
check the connections first. If everything is in
order, check the fuse.
• If no sound comes from the speakers of a
2-speaker system, set the fader control to the
center position.
• As the laser beam used In this compact disc
player is harmful to the eyes, do not attempt
to disassemble the cabinet. Refer servicing to
qualified personnel only.
Notes on moisture condensation
On a rainy day or in a very damp area,
moisture may condense on the lenses Inside
the unit.
Should this occur, the unit will not operate In
this case, remove the disc and wait for about
an hour until the moisture evaporatea
If you have any question or problem concerning
your unit that is not covered in this manual,
please consult your nearest Sony dealer.
4
Page 5

Notes on discs
Heindle the disc by its edge, and to keep the
disc clean, do not touch the surfece.
TWs way
Cleaning discs
Before playing, dean the disc with an optional
deaning doth.
Wipe the disc in the direction of the anows.
Do not stick paper or tape.
r
Not this way
Do not expose the disc to direct sunlight or
heat sources such as hot air ducts, or leave it
in a car parked in direct sunlight where there
can be a considerable rise in the temperature.
Do not use solvents such as benzine, thinner,
commerdally available deaners or antistatic
spray intended for analog discs.
Page 6
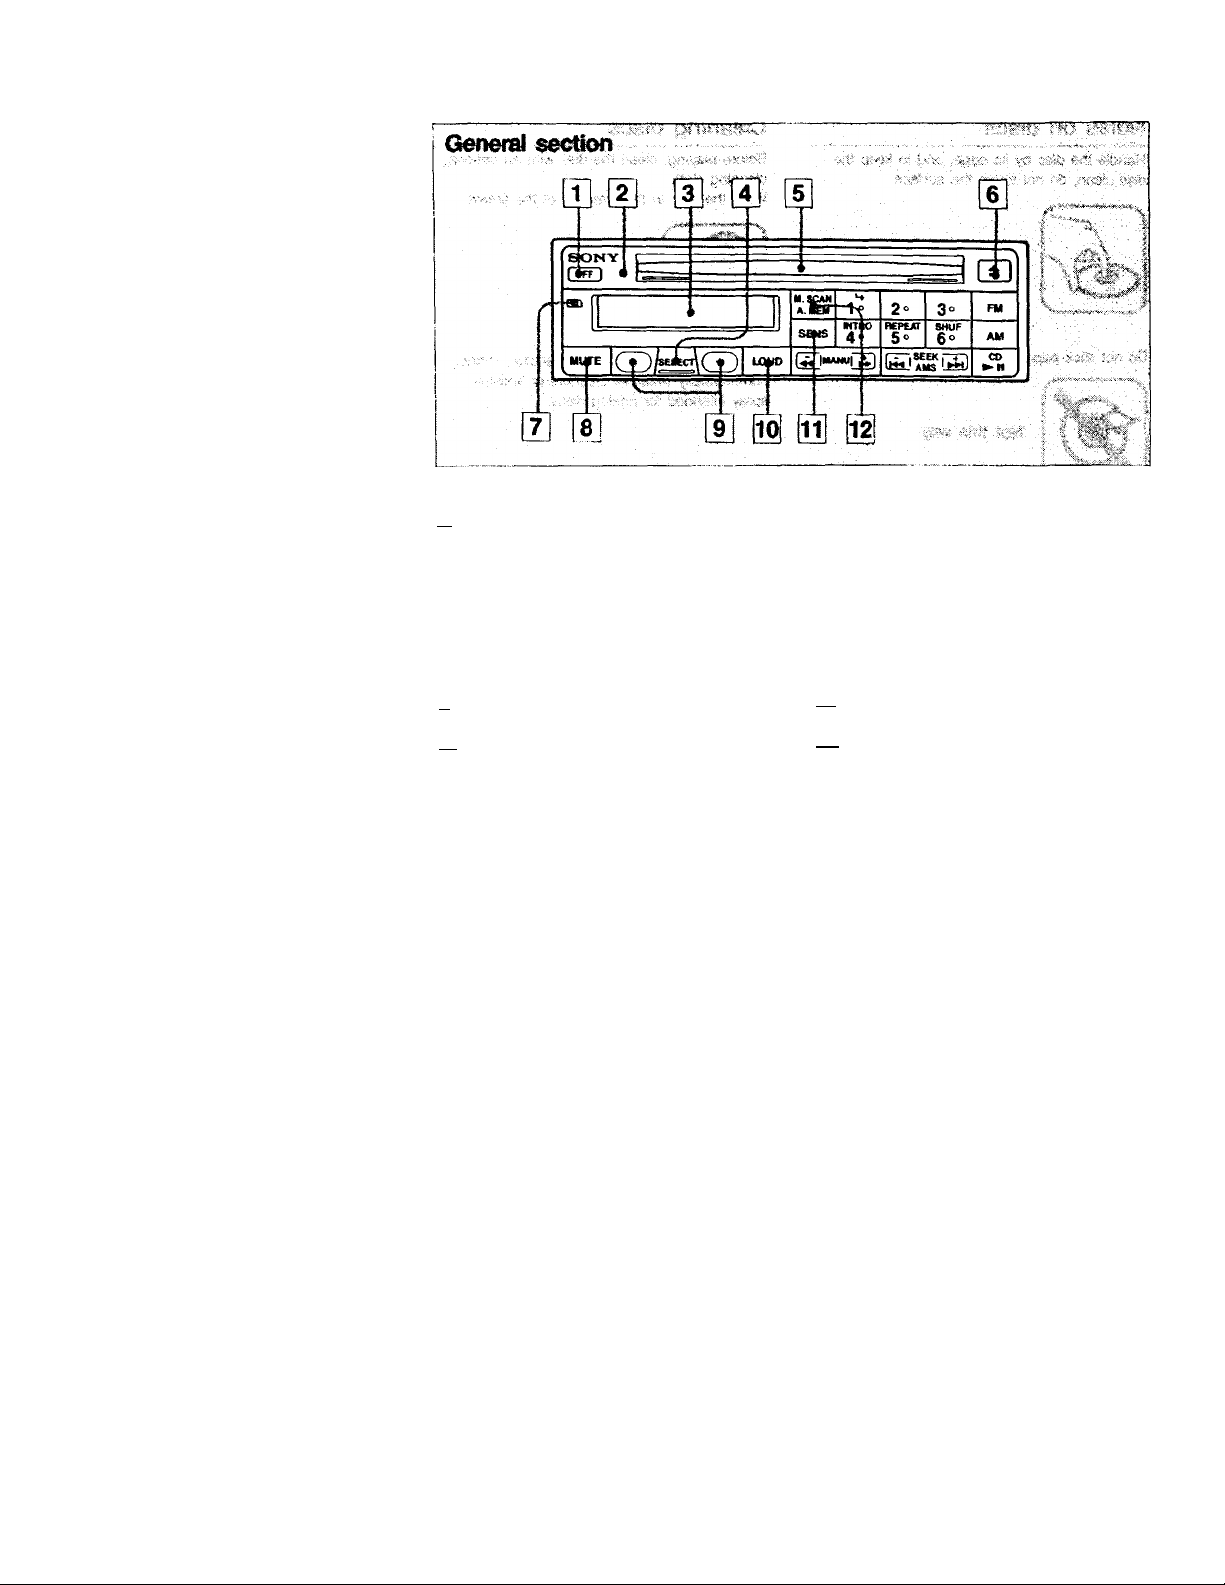
Location of Controls — Refer to the pages lixHcated in •.
m OFF (power off) button ^
¡XI Reset button O, O
IX] Display window
[4] SELECT (voiume/balance/bass/treble/
fader stiect) button O
in Disc insertion slot
fe] ± (eject) button Q
[7] ILL (illuminahon color change) button
Press to change the color of illumination.
Two colors, green and amber, are available.
[U MUTE button
Press to nrKMnentarily mute the sound.
Press again to restore the same level as
before.
[9] -/+ buttons 0
|iol LOUD (loudness) button
Press to reinforce bass and treble especially
when listening at low volume. To disengage
the button, press it again.
SENS button 0
[XI M.SCAN (nnemory scan) button 0
A. MEM (autonnatic memory) 0
fi
Page 7

Radio/CO section
Number During disc play
1
2
3
4
5
6 SHUF (shuffle) button ®
MANU-«^/»^ (manual search) button ® MANU +/- (manual tuning) button ®
AMS*HM/^button ^ SEEK +/- (automatic tuning) button
CD ► n (disc play/pause) button 0
AM (tuner on/band select) button ®
is] FM (tuner on/band select) button ®
’ Automatic Music Sensor
<-* (skipping to the top) button 0
—
—
INTRO button ®
REPEAT button #
During cBsc piay
During radio reception
Preset number buttons @
During radio rec^ion
7
Page 8

Location of Controls
If your car ignition key does not have the accessory position
The illumination on the tront panel Is iactoryeet to be turned on
even when not playing the unit. Howesrer, setting may cause
the car battery to run down when the unit is used in the car
which has no accessory position. To avoid this when using the
unit in such a car, set the selector located on the bottom to
OFF, then press the reset button, 'rbu can mate the illumirteftion
turned off when not playing the unit
8
Page 9

Adjusting a Sound
Controlling the volume/balance/bass/treble/fader
СЮ
CD
MUTE
I i
-/+ SELECT
.........
.
II 1 «4^
M.SCAN
-
SENS
-.1.“
........
4o
|MAMU|~X1
Display window
3°
¿1-.
6o
to“itr—,SEEK +CT
Ц23-' AMS L^±lJ
FM
AM
CO
-/+ button normally functions as
the volume control. Adjust the
level within three seconds after
selecting the desired control
mode with the SELECT button.
•Otherwise, the mode goes back
to the volume control mode.
Each time the SELECT
button is pressed, the
display indication will
change as (ollows.
1 Display
' window
L
BBS
TRE
3RL
EBB
b ni
у L I L
Control
mode
(-) button (-F) button
Bass For less bass
Treble
Baiance
Fader
Volume
For less treble
To decrease
the right-speaker
volume
To decrease the
rear-speaker
volume
For less volume For more volume
For more bass
For more treble
To decrease
the left-speaker
volume
To decrease the
front-speaker
volume
Page 10

Playing a Disc
1
Notes
• Do not insert a disc with the
label surtace down. Doing so
may damage the unit.
• Do not try to insert another
disc when one has been
already inserted. Doing so
may damage the unit.
10
At the end of the disc
The track number returns to 1
and play will be repeated from
the beginning of the disc
Important
Since the CD system offers a
wide dynamic range, the peaks
of the high ievel inputs are
recorded with high fidelily, and
the noise level is very low. Do
not turn up the volume while
listening to a portion with no
audio signals or vary low level
Inputs. If you do, the speakers
may be dWnaged when a peak
level portion is played.
Page 11

To stop the disc pte^
Press OFF.
To restart playing from the same point,
press te-M.
Ito pause tfto disc
play
Press ► a.
The display when you press the
button is as foUows;
-1-
''P Blinking
Track number
^Elapsed playing time
lb restart the play from the same point,
press ► n.
■fo tWncive Die (Ssc
Press .
Even if you set the ignition key to the off
position, you can remove the disc by
pressing a .
Locating a Particular Selection
Locating a selection in sequence (Automatic Music Sensor)
You can locate the beginning of a desired selection during play.
Note on a 3-Inch (8 cm) CD
■ybu can play a 3-inch (8 cm)
CD wilhcwt an adaptor.
It you press the FM or AM
button during the disc play
The disc play w8l slop automaticalty and the radio sound
will be heard.
Note on a 12 cm disc
If you leave the disc putting
into the slot after pressing the
button, the disc will be
inserted automatically in fifteen
seconds to protect the disc.
If you press the »• m button
within the fifteen seconds, the
disc will bo inseited and the
disc play start from the
beginning of the disc.
Tb kxsis the begtonirtg d the ^ecSort being
Press once
played
To locate the begirtning of the netd eefecQcto Press »HM once.
Press repeatedly to locate previous selections or selections ahead.
Locating a Particular Point in a Selection
Locating a point in sequence (Manual Search)
You can loc^e a particular point in a selection during play by
monitoring the high-speed sound.
To go batìk at higb ^peed
To go ahead at high speed
Keep pressed.
Keep ►► pressed.
Locating the Beginning of the Disc
Press I I'i
You can quickly locate the beginning of the disc being played.
Keeping the » button
pressed
The time counter displays
when you have passed the end
of the disc. To return to a
normal display, press ree or
button.
11
Page 12

iCPOpewttonl
Enjoying the Variety of CD Playing Modes
SONY
1 OFF t O 1
MtCAN
MOTE (''^fcajci^fT^I LOOP
A.M£M 1<
(^HMNuTg
WTM
4f
2^
REPCAT SHUF
5f 6f
siisiia
INTRO -
REPEAT
Raying the First Portions of Selections
\bu can play the first ten seconds of
MTRO
4°
eadi selection in oider.
If you find a desited setecfion. press the
button to cancel the moda The play
continues.
Playing Repeatedly—Repeat piay
REPEAT
5°
\bu can repeat a single selection To cancel
Press the button again.
-SHUF
H you press ttre INTRO button
during the shuffle play, the first
ten secortds of all selections
will be played in random order.
Playing in Random Order-shufne Piay
\bu can play the selections in
SHUF
random order.
To cancel
Press the button agan.
12
Page 13

iRadto Rccet^oni
(Automatic
Memorizing the Stations Automatically
Memory Function)
SONY 1
....................................
foin oL==---------------------------------------------------------------------------
CD
MUTE ( - )/seL£a\('T~) loud
.................................................... 1 ,
M.SCAN
А.Щм 2« 3°
ГШЮ
ПЕРЕДГ
4**
1
FM
or
AM
M.SCAN
A. MEM
Press to select a desired band.
The tuner turns on at the same time.
Press for more than two seconds.
The unit starts scanning the selected band
and memorizes the tuned stations on the
preset buttons 1 to 6 automatically.
-----------------------
SNUF
So
,■)
FM
ku
6«
ir~
M}u can memori2s a total ot 24
stations—6 stations on each band
(FM1, FM2, FM3,‘ Of AM), one
on each preset button.
1
In what order are stations
memorized?
The unit scans the band from
the lowest frequency to the
highest frequency twice. At the
first cycle, the unit scans only
the stations with considerably
strong signals. At the next
cycle, the minimum level of the
signal strength that can be
tuned will be lowered.
• Frequency range of the FM1,
FM2 and FM3 bands is
same.
Surveying What is Being Broadcasted on
the Preset Stations
M.SCAN
A. MEM
Press lightly.
Each memorized station will be scanned for
five seconds in order. (When the broadcast
of the memorized station is too weak, it
cannot be received.)
IQ
Page 14

I Racgo RecepBotTI
Memorizing Only Desired Stations Manually
Use this method to memorize
stations not memorized by the
automatic memroy function.
Important
Press to select a desired band.
1
The tuner turns on at the same tima
FM AM
or I______
Press to tune in a desired station, (page 15 or 17).
Each preset button has only
one memory for a band. The
previously memorized station
wW be erased when you errter
a new station of the same
barxl on the same preset
number button.
SIlMAHUlIS ^
Press for more than two seconds.
Ex. 1b memorize on the preset button 1
1o
The number of the pressed preset button
will be displayed and the station will be
memorized.
m ioH33>~
Receiving the Preset Station
1 Select a desired band. 2 Press a desired preset button Mghtiy.
14
Page 15

[Radio Reeetitani
Tuning in Automatically
Press to select a desired band.
1
The tuner turns on at the same time.
Use this method when you do
not know the frequency of
desired stations.
FM
Press to start scanning
For lower frequencies
Press to adjust the volume.
AM
or
The scanning automatically stops when a
station is tuned in. Repeat this step until a
desired station is tuned in.
r=—.SEEK
IMlJ AMS
i
For higher frequencies
15
Page 16

Tuning in Automaticaliy
When there are too many stations and the
scanning stops too frequently during
automatic tuning
SENS
Press
appears on the display window.
so that the LCX^L indicator
fwf W H3 0
Only the station with comparatively strong
signals can be tuned in.
When the FM stereo program is too weak
and noisy
SENS
Press
appears on the display window.
so that the MONO indicator
FW 1043 ©I
The noise wilt be reduced. The sound will
be monaural instead.
When an FM stereo program of suffident signd strength is tuned in
Fffl )0 H 3 €
The STEREO indicator appears and the
program is automatically received in stereo
The SENS button tunctions
as follows
When receiving an FM station
M WH3 1
^ Press SENS.
; 7^ m3 ^
^ Press SENS again.
~TtS~WW0
Press SENS
once again.
I
When receiving an AM station
.Press SENS.
ñi ÉW &
Press SENS again.
16
Page 17

Tuning in Manuaily
[SONY 1
_________________________^__________z:_____________
L22J ° C-r-"' ----------------------------------------------------------------------——t
CD
MUTE C^lsKLea\C^ UHio
M.6CAN
A. MEM
SENS
MTfK»
4®
IVPCi»
2« 3«
5®
i
8HUF
6®
d]'
~i? 1
FM
AM
1
For your safety while driving
Keep your eyes on the road
and use the automatic tuning
or the memory preset tuning!
Page 18

Specifications
CD player section
System Compact disc digttal audio
Frequency response 10-2(U)00 Hz ±3 dB
SignaMo-noise ratio 90 dB
Wow and flutter Bekm measurable Imit
Laser Diode Properties
system
Material
GaAIAs
Wavelength
780 nm
Emission Duration
Continuous
Laser out-put Power
Less than 4AB nV/*
* This output is the value measured
at a distance ol 200 mm from the
objective lens surface on the
O^ical Pick-up Block.
General
Power tequlremetss 12 V DC car battery (negative
Current (kain 800 mA (CD playback)
Operating temperature
Dimensione Approx. 160 x SO xl46 mm (w№d)
Weight Approx. 1.7 kg (3 lb 12 oz)
1bne controls Bass ±10 dB (100 Hz)
Supplied accessories
Optional accessories
ground)
2 A (during disc loading or eject)
-10^ to 50^ (15°F ID 120»F)
(7Vs>‘2x5V4ln.)
Treble ±10 dB (10 kHz)
Mounting hardware (1 set)
Mounting kit
Cleaning doth XP-CD1
Tuner section
FM AM
Tuning range 87S-1079 MHz
Atttenna terminal
Intermediate frequerxry
Usable sensitivity 12 dBf (1.1 ^V775 ohms)
Selectivity TSrffial ±400 kHz —
SignaMo-noise ratio
Harmonic cSslortion at 1 kHz
Stereo separation
Frequency response 30 Hz-15i000 Hz ±3 dB
Design and specifications subject to change without notice.
FM/AM external antenna connector
107 MHz
70 dB (tTxmaural)
65 dB (stereo)
03% (monaural)
03% (stereo)
35 dB
530-1.710 kHz
450 kHz
35,iV
55 dB
03%
-
/8
Page 19

Fuse Replacement
I the fuse blows, check the power connection
ind replace the fuse. If the fuse blows again
ifter replacement, there may be internal
nalfunction. In this case, consult your nearest
5ony dealer.
Wamlrtg
Jse the specified ampere fuse only.
Jse of a higher amperage fuse may cause
serious damage.
19
Page 20

Troubleshooting Guide
The following checks will assist in the conecllon ot most problems
which you may encounter with your unit.
Before going through the check list below, first refer back to the
conrrection and operating procedures.
CD player section
iNwble
Play does not begin. • The unit is in the pause mode Press ► II.
• Dusty or defective disc
• The ambient temperature is more than 50“C (120^
Disc cannot be loaded or the disc is
automatically ^ected.
The operation buttons do not work. The built-in microprocessor malfunctions. Press the
The sound skips due to vibration
Tuner section
1Nxi>ie
Preset tuning is not possible. • Memorize the correct frequency.
Automatic tuning is not possibla
The STEREO indicator flickers. • Tune in precisely.
• A disc is already loaded.
• The disc is inserted with the label surface downwards.
res^ button.
• The unit is installed at an angle of more than 20°.
• The unit is not installed on the sturdy part of a car.
• Dusty or defective disc
• The broadcast is weak. Use manual tuning.
The broadcast is weak. Use manual tuning.
• The broadcast is weak. Pré» the SENS button to
display the MONO indicator.
About the error code
The following codes flicker for about five seconds.
Ënor code
E-04
E-66
E-77
;V;,, ^ .
The disc is dirty or inserted upside-down. (In this case, the
disc will be ejected automatically.)
A CD-ROM disc is inserted.
The temperature is too high and the protection circuit has
been activated.
20
• Clean the disc.
• Insert the disc correctlyRemove the disc
Wait until the unit cools
off.
 Loading...