

SONY CDX 601 602 Service Manual
SERVICE MANUAL
CDX-601-602
Compact Disc Players
CONTENT’S:
Connections & Operations:.......................................................Page 2-5
Specifications:..............................................................................Page 5
Parts Lists:...............................................................................Page 6-18
PCBs/Schematics...................................................................Page 19-32
Gemini Sound Products Corp.
120 Clover Place P.O. Box 6928
Edison, NJ 08818-6928
732-738-9003 (Phone) • 732-738-9006 (Fax)
(1)
L
1234
1234
1234
1234
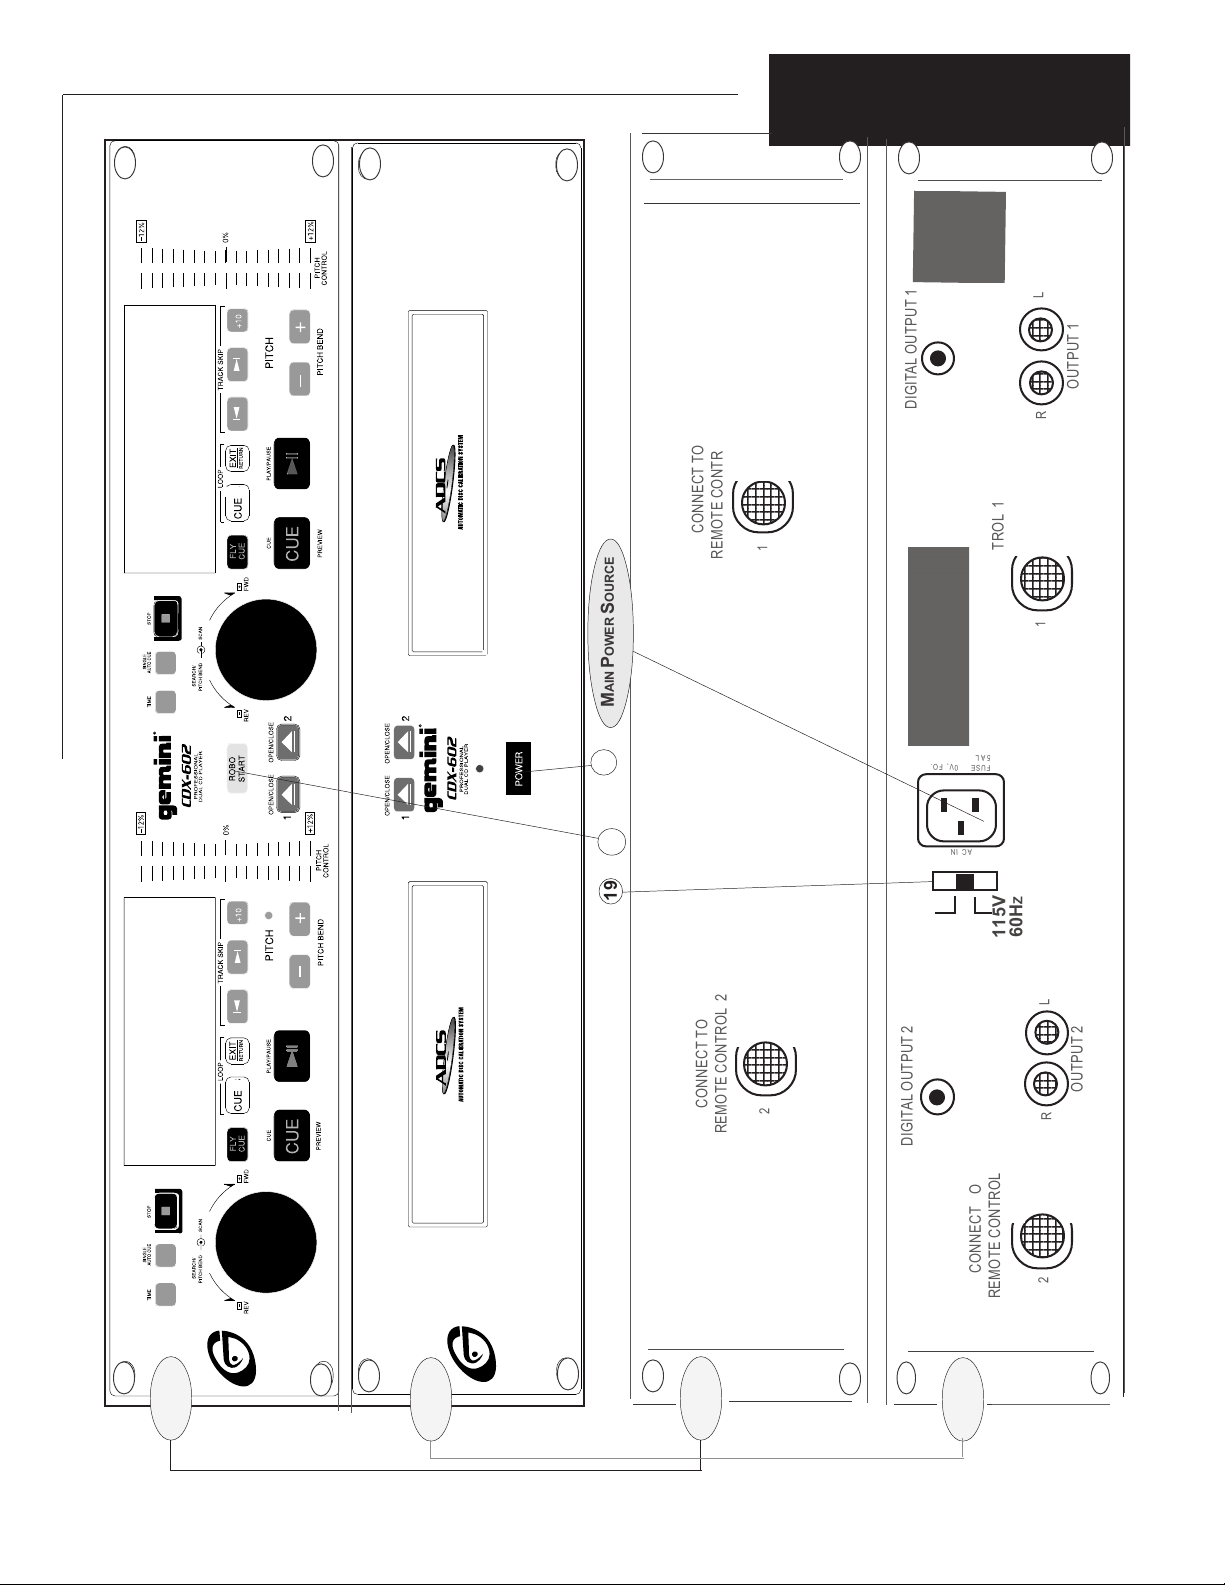
MAIN POWER SOURCE
1
25
19
CONNECT TO
1
REMOTE CONTROL 1
DIGITAL OUTPUT 1
CONNECT TO
5AL
FUSE 250V, FO.
AC IN
Z
50H
230V
OUTPUT 1
R
1
REMOTE CONTROL 1
Z
60H
115V
CDX-602CDX-602
CDX-602CDX-602
CDX-602
AA
A
AA
BB
B
BB
(2)
CONNECT TO
AA
A
AA
2
REMOTE CONTROL 2
DIGITAL OUTPUT 2
CONNECT TO
REMOTE CONTROL 2
BB
B
BB
L
OUTPUT 2
R
2
14
123
123
123
123
123
123
123
123
123
1
7
7A
6
45
CDX-601CDX-601
CDX-601CDX-601
CDX-601
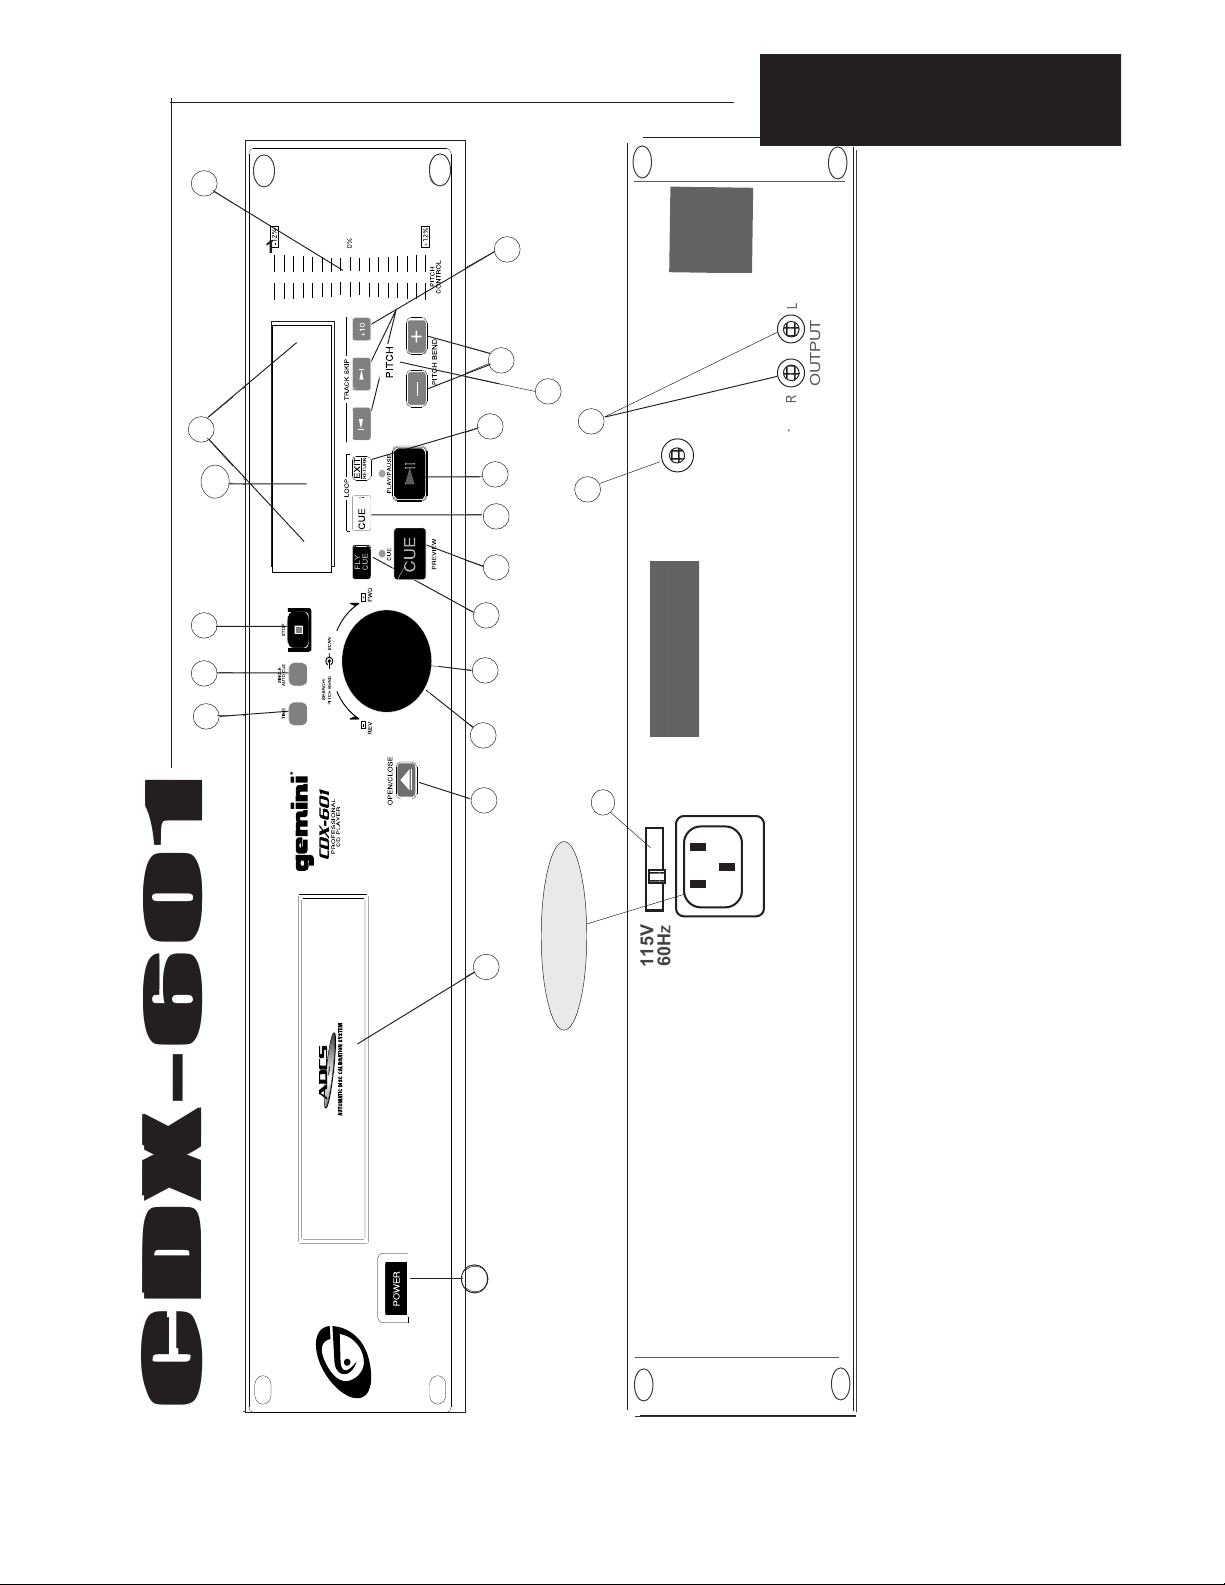
IMPORTANT NOTE
hile
the
W
CDX602
13
L
18
R
OUTPUT
12
16
17
21
DIGITAL OUTPUT
20
11
15
10
9
8
Z
3
2
19
50H
230V
Z
60H
115V
MAIN POWER SOURCE
22
1
is a
dual
CD
player,
most
of
the
functions
and
controls
of
the
CDX601
and
CDX602
are
similar
or
the
same.
To
eliminate
confusion,
only
the
CDX601
illustration
is
fully
numbered.
Controls
placed
in
different
locations
or
not
duplicated
are
the
ROBO
START
(25)
and
POWER
(1)
switches.
(3)

INTRODUCTION:
Congratulations on your purchase of a Gemini CDX-601 or CDX-602
CD Player. Your state-of-the-art professional CD Player is backed by a
three year warranty that excludes lasers, which are covered by a
separate one year warrenty. Prior to use of this unit, we suggest you
carefully read the following instructions.
Your Gemini CDX-601 CD Player or CDX-602 CD Player comes
equipped with ADCS (Automatic Disc Calibration System), a unique
state-of-the-art feature. CDs are produced by a variety of
manufacturers and recorded by many different professional companies
as well as the do-it-yourselfers at home. Therefore, all CDs do not play
the same. The ADCS (Automatic Disc Calibration System)
automatically adjusts the laser in your CDX-802 CD Player for each
individual CD you insert into the tray, to give you the best possible
performance for every CD you play regardless of how it was
manufactured or how it was recorded. With this exclusive system you
always get consistent and reliable performance as well as exceptional
sound quality every time you play a CD... any CD.
SAFETY CERTIFICATIONS:
Laser Diode Properties
Material: Ga - Al - As
Wavelength: 755 - 815 nm (25° C)
Laser Output: Continuous Wave, max. 0.5mW
LINE VOLTAGE SELECTION:
The Gemini CDX-600 series CD Players are dual voltage units operating
at 115 or 230 volts. Be sure to set the proper voltage:
1. Place the head of a screwdriver in the center of the VOLTAGE
SELECTOR (19) switch found on the rear panel.
2. Slide the switch to 115 or 230 volts.
3. Do not force or twist the switch. Excessive force may cause damage.
If the switch does not move smoothly, contact a qualified technician.
CONNECTIONS:
1. Plug one end of a set of RCA connectors into the two LINE OUTPUT
(21) jacks on the back of your CD unit.
2. Plug the other end of the RCA connectors into any of the available line
level input jacks on your mixer. If you are playing the CDX through a
receiver, you can plug the RCA connectors into the CD or AUX input
jacks located on the receiver. If there are no CD or AUX inputs, use
any line level (not phono) input.
FUNCTIONS:
POWER SWITCH: After making sure the VOLTAGE SELECTOR switch
is properly set, plug the unit in and press the POWER (1) button. The
unit will turn on. Pushing POWER a second time turns the unit off.
DISC TRAY: The DISC TRAY (2) is where the CD is held during loading,
unloading and playback. Pressing disc tray OPEN/CLOSE (3) opens or
closes the tray. The DISC TRAY holds both 12 cm and 8 cm CDs and
automatically closes after remaining open for three minutes. Note: The
tray will not open when the CDX is in the play mode.
OPEN/CLOSE BUTTON: Press OPEN/CLOSE (3) to load or remove
a CD from the DISC TRAY.
TRACK SKIP : The TRACK SKIP (13) buttons let you select the
track to play.
SEARCH JOG WHEEL: The SEARCH JOG WHEEL (9) has two functions.
Use the SEARCH JOG WHEEL to make fine adjustments in pause mode.
Use the SEARCH JOG WHEEL to bend the pitch for precise synchroni
zation in PLAY mode.
SEARCH DIAL: Use the SEARCH DIAL (8) to select the scanning
direction and speed of your CD. Turning the dial in a clockwise direction
scans forward while a counter-clockwise turn scans the track in
reverse. Scan speed increases as the dial is turned.
STOP
TIME: The TIME (4) button switches the time display between the three
FLY CUE: The FLY CUE (10) function lets you set cues “on the fly” with
CUE: With the unit in the Play mode (PLAY/PAUSE LED is green) and after
LOOP: After a cue point is programmed, pressing LOOP (11) while in the
EXIT/RETURN: Press loop EXIT/RETURN (12) to return to the beginning
SINGLE-AUTO CUE/CONTINUOUS: Pressing SINGLE-AUTO CUE/
PITCH CONTROL: Pushing PITCH CONTROL (17) activates the PITCH
PITCH BEND BUTTONS
DIGITAL OUTPUT JACK: Connecting any type of DAT, MD, HARD DRIVE,
: The STOP (6) button ends CD play.
available choices listed under DISPLAY.
the press of a button. Press FLY CUE when the disc reaches the
musical location you wish to make your cue or start point. The cue point
is now programmed. Press CUE (15) to return to the cue point. Press
PLAY/PAUSE and the unit starts from the pre-programmed spot.
the cue point has been programmed, pressing CUE (15) will cause the
CD player to enter the PAUSE mode (green PLAY/PAUSE LED blinks) at
the programmed cue point (the CUE LED glows yellow). Holding down
the cue button changes the function to PREVIEW and starts the CD from
the programmed cue point. Releasing the CUE button will return the CD
laser to the preset cue point.
PLAY mode (CUE LED blinks yellow) repeats the section between the
cue point and the point where the LOOP button was pressed. Press
EXIT/RETURN or PAUSE/PLAY to EXIT Loop repeat.
of the previously saved loop from normal play.
CONTINUOUS (5) activates the AUTO CUE FUNCTION. The Auto
Cue causes the CD to pause at the recorded beginning of the next track
and allows you to segue into the next song with no “dead” air. Pressing
SINGLE-AUTO CUE/CONTINUOUS a second time will activate the
CONTINUOUS function. This causes the CD to repeat play continuously
until SINGLE-AUTO CUE/CONTINUOUS is pressed a third time to
deactivate the CONTINUOUS function.
section of the unit (PITCH LED glows red). The pitch of the CD will
change according to the position of the PITCH SLIDE (14).
: Pushing the PITCH BEND (18) buttons
will automatically raise the pitch up to +4% or lower the pitch down
to -4% from the existing setting. Releasing the buttons returns pitch
to the original setting. Use this function to match the pitch bend when
mixing from one song to another.
or other such items which accept digital signals to the BNC (20) output
connector on the rear panel of your CDX allows you to record a digital
signal from CD.
DISPLAY: The DISPLAY (7) shows total tracks; track number; pitch value;
single-auto cue; continue (continuous play); and three different time
displays: track time elapsed, track time remaining and total time
remaining on disc. Time is measured in minutes, seconds and frames.
PLAYBACK DISPLAY: The PLAYBACK DISPLAY (7A) displays the
play time remaining for each track. The display flashes slowly when
the track has 15 seconds remaining and pulses rapidly when play
time is down to five seconds.
PLAY/PAUSE : Each press of PLAY/PAUSE (16) causes the operation
to change from PLAY to PAUSE or PAUSE to PLAY.
OPERATING INSTRUCTIONS:
1. Make sure that the VOLTAGE SELECTOR (19) switch, found on the
rear panel, is set for the proper voltage. Plug the unit in and press the
POWER (1) switch. The unit is ON. Pushing POWER a second time turns
the unit OFF.
2. Press OPEN/CLOSE (3) and place a CD in the DISC TRAY (2). Press
OPEN/CLOSE again. The tray will close.
3. Push TRACK SKIP (13) to select the track you wish to play.
4. Press PLAY/PAUSE (16) and the unit will instantly play.
(4)

FLY CUE & CUE INSTRUCTIONS:
The FLY CUE function lets you set cues “on the fly” with the press of
a button. Press FLY CUE when the disc reaches the musical location
you wish to make your cue or start point. The cue point is now
programmed. Press CUE to return to the cue point. Press PLAY/PAUSE
and the unit instantly starts from this pre-programmed spot.
IN CONTINUOUS MODE OR DURING NORMAL PLAY:
If you use the ROBO START function without SINGLE-AUTO
CUE MODE (in CONTINUOUS MODE or during normal play),
CD deck play does not alternate automatically. PAUSE must
be pressed on the playing deck for the second deck to play.
1. During normal play, set a cue point on the second CD deck.
AND/OR:
1. To pre-program a cue point (the spot on a CD at which you want
play to start) select the proper track and push PLAY/PAUSE so
the unit enters the PLAY mode (PLAY/PAUSE LED glows green).
When the CD reaches the approximate musical spot you wish to
make your cue, push PLAY/PAUSE so the unit enters the PAUSE
mode (PLAY/PAUSE LED blinks). Move the SEARCH JOG WHEEL
forward or in reverse until the precise spot at which you want CD
play to begin is located. Push PLAY/PAUSE.
The cue point is now programmed. Press CUE to return to this
pre-programmed cue point at any time. Push PLAY/PAUSE and
the unit will instantly play from the pre-selected spot.
2. To fine tune your pre-programmed cue point, push PLAY/PAUSE
so the unit enters the PLAY mode. Push the CUE button and the
CD will return to the cue point you programmed in step #1 and
begin play from that point. If you decide this cue or starting point
is okay, leave the unit alone until you are ready to play.
3. If, however, the selected spot is not exactly where you want it,
push the CUE button while the CD is playing and the disc will
return to the pre-programmed cue point.
Locate the exact spot on the CD at which you want play to start
by turning the SEARCH JOG WHEEL. Push PLAY/PAUSE to pre-
program this new cue point. Press the CUE button to pause play
at the new cue point. Push PLAY/PAUSE at any time and the unit
will play from the pre-selected spot.
TROUBLESHOOTING:
• If a disk will not play, check to see that it was loaded correctly
(label side up) and that the CD unit is on a flat, level, stable
surface. Check disc for dirt, scratches, spills, etc.
2. Press the ROBO START button to activate ROBO START.
3. Press PLAY/PAUSE BUTTON on the playing side to start play
from the cue point on the other CD deck.
NOTE: Pausing play in the middle of a track causes the other CD deck to play. When the new track
ends, play resumes on the first CD player from the point at which it was paused.
SPECIFICATIONS CDX-601/CDX-602:
GENERAL:
Type...........................................................................Compact Disc Player
Disc Type.................................Standard Compact discs (12 cm & 8 cm)
Time Display.....................Track Elapsed, Track Remain, or Total remain
Variable Pitch.........................................± 12% Slider with Resume Switch
Pitch Bend.....................................................................± 16% Maximum
Instant Start.............................................................Within 0.03 seconds
Track Selection.....................................................................1 to 99 Tracks
Installation...............................................................................19" each
Dimensions.......................................................................19” x 3.5” x 10”
Weight Per Unit................................................................................9.5 lbs.
AUDIO SECTION:
Quantization....................................1 Bit Linear/Channel, 3 Beam Laser
Oversampling Rate........................................................................8 Times
Sampling Frequency.......................................................................44.1 kHz
Frequency Response..........................................20 Hz to 20 kHz
Digital Output..............................................................................IEC958
Total Harmonic Distortion...............................................Less Than 0.05%
Signal to Noise Ratio......................................................................104 dB
Dynamic Range............................................................................98 dB
Channel Separation............................................................90 dB (1 KHz)
Output Level...................................................................1.9 Volts R.M.S.
Power Supply............................................AC 115/230V, 60/50 Hz
• If the disc spins but there is no sound, check the cable
connections. If they are okay, check your amplifier or receiver.
• If the CD skips, check it for dirt, oil or scratches. Do not assume
that the CD player or laser is defective. Many CDs are recorded
“out of spec” and skip on most or all CD players.
Before sending the unit to an authorized Gemini service technician,
insert a disc that plays properly in another unit.
CDX-602
ROBO START INSTRUCTIONS:
IN SINGLE-AUTO CUE MODE:
Use ROBO START (25) in SINGLE-AUTO CUE MODE (5) to alternate
play between the CDX-602’s two CD players (one track from one side,
then one from the other). In SINGLE-AUTO CUE MODE play starts
immediately with no blank or “dead” space. ROBO START causes one
side of the CD player to play when the other side is paused.
1. Engage SINGLE-AUTO CUE MODE with the SINGLE-AUTO CUE/
CONTINUOUS button.
2. Press the ROBO START (25) button to activate ROBO START.
Play will alternate between the two CD players. At the end of a track,
the playing side pauses and the other CD deck plays a track. At the end
of this track, the playing side pauses and the first CD deck resumes
play.
(5)

CDX-602(NEW)(MAIN UNIT)
PARTS LIST (MODEL NO.) (ORIGINAL MODEL)
ITEM PART NUMBER REV. Q'ty ENGLISH NAME
1 012-014A 1 PANEL CONTROL
2 031-040 1 TOP COVER
3 032-096 1 BOTTOM COVER
4 021-604 1 SUB PANEL
5 041-479 1 HEAT SINK
6 041-480 2 HEAT SINK -C
7 022-860 2 MOUNTING BRACKET
8 022-052 2 HOLDER TRANSFORMER
9
10 003-737 2 DESK DOOR
11 002-573 1 KNOB PUSH (DA)
12 003-743 1 PUSE KEY INLAY (DA)
13 002-576 1 KNOB PUSH KEY ASS'Y (C)
14 003-739 2 PR OTECTOR INLAY
15 003-711 1
HOLDER LED 3φ (7mm)
16 047-494 6 PCB SUPPORT
17 148-316 1 NAME PLATE (SMALL)
18 049-215 8 PAD FOOT
19
20 153-213 1 POLYFORM
21 196-107 3 SERIAL NO:LABEL
22 255-180 1 GIFT BOX
23 157-979 1 OWNER'S MANUAL
24 156-089 1 WARRANTY CARD
25 190-062 1 SILICA GEL
26 099-167 1 A LABEL
27 099-168 1 J LABEL
28 099-169 1 V LABEL
29 099-014 1 LABEL MADE IN TAIWAN
30 099-214 1 LABEL MADE IN CHINA
35 099-270 1 LABEL FDA
36 159-233 6 DOUBLE LABEL
37 003-581 2 SPACER (EVA)
38 160-008 1 PE BAG 85×100mm
39 160-009 1 PE BAG 230×300mm
40 160-044 1 PE BAG 160×250mm
41 160-052 1 PE BAG 650x650mm
42
43 121-002A 16 BAND-HEAD TAPPING SCREW
44 111-046A 14 BAND-HEAD TAPPING SCREW
45
46 101-043A 3 FLAT-HEAD MACHINE SCREW
47 110-172A 6 BAND-HEAD TAPPING SCREW/TWIN SCREW
48 110-174A 2 BAND-HEAD TAPPING SCREW
49 111-030 1 PAN-HEAD TAPPING SCREW
50 111-044A 4 BAND-HEAD TAPPING SCREW
51 111-057 6 FLAT-HEAD TAPPING SCREW

CDX-602(NEW)(MAIN UNIT)
PARTS LIST (MODEL NO.) (ORIGINAL MODEL)
ITEM PART NUMBER REV. Q'ty ENGLISH NAME
52
53 131-081 3 NUT/WASHER 3mm
54 143-007 2 SPRING WASHER
55
56 170-336 MASTER CARTON
57
58
59
60
1 262-393 2 PRINTED CIRCUIT BOARD CDX802-1
2 262-291 1 PRINTED CIRCUIT BOARD CD01-4
3 262-394 1 PRINTED CIRCUIT BOARD CDX802-2
4 262-395 2 PRINTED CIRCUIT BOARD CDX802-3
5
6 074-181 2 INTEGRATED CIRCUIT BA6218
7 074-182A 2 INTEGRATED CIRCUIT BA6392FP (AT6392H)
8 074-184 2 INTEGRATED CIRCUIT PCM1717E
9 074-074 1 INTEGRATED CIRCUIT NJM7805FA
10 074-185 1 INTEGRATED CIRCUIT NJM79L05
11 074-186 2 INTEGRATED CIRCUIT NJM317
12 074-104S 2 INTEGRATED CIRCUIT NJM4558LD (M5218AL,BA15218N)
13 074-191 2 INTEGRATED CIRCUIT CXA2550N
14 074-192 2 INTEGRATED CIRCUIT CXD3068Q
15 074-183B 2 INTEGRATED CIRCUIT P87C557E8 (P83C557E4)
16
17 076-137 2 TRANSISTOR 2SA954(L) OR 2SA817(Y)
18 076-104 2 TRANSISTOR 2SA1048 OR 2SA1317
19 076-095 4 TRANSISTOR 2SC2878
20 076-002 2 SILICON TRANSISTORS 2SC945 (Q)(P)
21 076-003 SILICON TRANSISTORS OR 2SC1815 (Y)(GR)
22
23 079-027 8 RECTIFIER DIODE 1N4002 (1N4003,1N4004)
24 079-003 10 SILICON DIODE 1N4148
25 080-118 1
LIGHT EMITTING DIODE (RED) 3φ
26 001-062A 2 CD PLAYER LOADER
27 058-021 2 CRYSTAL OSCILLATOR 16.9344MHz
28 058-022 2 CRYSTAL OSCILLATOR 16MHz
29
30 092-059 2 BNC CONNECTOR
31 161-173 2 2P RCA JACK
32 092-105 1 AC INLET
33 100-069 1 FUSE 20mm UL 1A AC250V
34
35 147-028 6
CHOKE COIL 3.3µH
36
37 059-229 1 POWER TRANSFORMER EI-57×30
115/230V IN 8.3V 0 8.3V 850mA,11.7V 0 11.7V 900mA
38 059-236 1 CHOKE EE25.4 24mH
39 059-237 1 FERRIT BEAD 14×28×9H

CDX-602(NEW)(MAIN UNIT)
PARTS LIST (MODEL NO.) (ORIGINAL MODEL)
ITEM PART NUMBER REV. Q'ty ENGLISH NAME
40
41 093-370 ☆ 1 AC CORD 18AWG×3C VW-1
42 093-371 ☆ 1 AC CORD 220V VDE
43 093-372N ☆ 1 AC CORD 230V BS
45
46
47 081-023 1 SLIDE SWITCH 2P2C UL
48 082-042F 2 TACT SWITCH
49 083-065F 1 POWER SWITCH UL
50
51 091-456 2 8P DIN MINI CONNECTOR WITH WIRE 1200mm
52 092-147 2 8P DIN MINI JACK
53 091-473 2 (RCA TYPE) CONNECTOR CORD 1M
54
55 050-029T 2
56 050-049T 3
57 050-146T 2
58 050-070 1
59 050-205 1
60 050-194 1
61 050-082 1
ELECTROLYTIC CAPACITOR 5φ 10µ/16V
ELECTROLYTIC CAPACITOR 6φ 100µ/16V
ELECTROLYTIC CAPACITOR 6φ 220µ/16V
ELECTROLYTIC CAPACITOR 10φ 470µ/16V
ELECTROLYTIC CAPACITOR 18φ×32 6800µ/25V
ELECTROLYTIC CAPACITOR 16φ 4700µ/16V
ELECTROLYTIC CAPACITOR 13φ 2200µ/16V
62
63 050-112T 2
64 050-115T 18
65 050-111T 2
66 050-113T 4
ELECTROLYTIC CAPACITOR MINI 4φ×8 4.7µ/16V
ELECTROLYTIC CAPACITOR MINI 4φ×8 10µ/16V
ELECTROLYTIC CAPACITOR MINI 4φ×8 22µ/16V
ELECTROLYTIC CAPACITOR MINI 4φ×8 1µ/16V
67
68 050-166T 4
69 050-174T 38
70 050-135T 2
ELECTROLYTIC CAPACITOR MINI 5φ×7 47µ/16V
ELECTROLYTIC CAPACITOR MINI 5φ×8 100µ/10V
ELECTROLYTIC CAPACITOR MINI 6φ×8 100µ/16V
71
72 055-062 2
METAL FILM CAPACITORS 0.1µ/275VAC
73
74 051-002T 2 CERAMIC CAPACITOR 2P/50V
75 051-020T 4 CERAMIC CAPACITOR 27P/50V
76 051-026T 14 CERAMIC CAPACITOR 47P/50V
77 051-030T 2 CERAMIC CAPACITOR 68P/50V
78 051-032T 2 CERAMIC CAPACITOR 82P/50V
79
80 051-042T 2 CERAMIC CAPACITOR 220P/50V
81 051-046T 4 CERAMIC CAPACITOR 330P/50V
82 051-050T 4 CERAMIC CAPACITOR 470P/50V
83 051-101T 4
84 051-156 1
CERAMIC CAPACITOR 0.0022µ/50V
CERAMIC CAPACITOR UL 0.0047µ/400V
85
86 054-001T 6
87 054-003T 4
88 054-006T 4
89 054-011T 2
POLYESTER CAPACITOR 0.001µ/50V
POLYESTER CAPACITOR 0.0015µ/50V
POLYESTER CAPACITOR 0.0027µ/50V
POLYESTER CAPACITOR 0.0068µ/50V

CDX-602(NEW)(MAIN UNIT)
PARTS LIST (MODEL NO.) (ORIGINAL MODEL)
ITEM PART NUMBER REV. Q'ty ENGLISH NAME
90 054-013T 8
91 054-015T 2
92 054-017T 2
93 054-022T 2
94 054-026T 47
95 054-032T 4
96
97 073-504 2
98 073-505 2
99 073-508 2
100
101 066-518 4
102 066-526 2
103 066-538 2
104 066-542 14
105 066-544 2
106 066-546 2
107
108 066-550 10
109 066-551 1
110 066-558 2
111 066-560 3
112 066-566 18
113 066-554 4
114 066-571 4
115 066-579 10
116 066-581 2
117 066-583 10
118 066-587 20
119 066-589 2
120 066-593 2
121
122 066-595 18
123 066-599 4
124 066-603 4
125 066-607 4
126 066-611 6
127 066-612 4
128 066-613 8
129
130 066-619 4
131 066-620 4
132 066-635 2
133 066-637 2
134
135 066-651 10
136 066-659 2
137 066-663 1
138
POLYESTER CAPACITOR 0.01µ/50V
POLYESTER CAPACITOR 0.015µ/50V
POLYESTER CAPACITOR 0.022µ/50V
POLYESTER CAPACITOR 0.047µ/50V
POLYESTER CAPACITOR 0.1µ/50V
POLYESTER CAPACITOR 0.33µ/50V
RESISTOR NETWORKS 6P 5R 10KΩ
RESISTOR NETWORKS 6P 5R 4.7KΩ
RESISTOR NETWORKS 6P 5R 47KΩ
1/8 W CARBON FILM RESISTOR S 10Ω
1/8 W CARBON FILM RESISTOR S 22Ω
1/8 W CARBON FILM RESISTOR S 68Ω
1/8 W CARBON FILM RESISTOR S 100Ω
1/8 W CARBON FILM RESISTOR S 120Ω
1/8 W CARBON FILM RESISTOR S 150Ω
1/8 W CARBON FILM RESISTOR S 220Ω
1/8 W CARBON FILM RESISTOR S 240Ω
1/8 W CARBON FILM RESISTOR S 470Ω
1/8 W CARBON FILM RESISTOR S 560Ω
1/8 W CARBON FILM RESISTOR S 0Ω
1/8 W CARBON FILM RESISTOR S 330Ω
1/8 W CARBON FILM RESISTOR S 1KΩ
1/8 W CARBON FILM RESISTOR S 2.2KΩ
1/8 W CARBON FILM RESISTOR S 2.7KΩ
1/8 W CARBON FILM RESISTOR S 3.3KΩ
1/8 W CARBON FILM RESISTOR S 4.7KΩ
1/8 W CARBON FILM RESISTOR S 5.6KΩ
1/8 W CARBON FILM RESISTOR S 8.2KΩ
1/8 W CARBON FILM RESISTOR S 10KΩ
1/8 W CARBON FILM RESISTOR S 15KΩ
1/8 W CARBON FILM RESISTOR S 22KΩ
1/8 W CARBON FILM RESISTOR S 33KΩ
1/8 W CARBON FILM RESISTOR S 47KΩ
1/8 W CARBON FILM RESISTOR S 51KΩ
1/8 W CARBON FILM RESISTOR S 56KΩ
1/8 W CARBON FILM RESISTOR S 100KΩ
1/8 W CARBON FILM RESISTOR S 110KΩ
1/8 W CARBON FILM RESISTOR S 470KΩ
1/8 W CARBON FILM RESISTOR S 560KΩ
1/8 W CARBON FILM RESISTOR S 1MΩ
1/8 W CARBON FILM RESISTOR S 2.2MΩ
1/8 W CARBON FILM RESISTOR S 3.3MΩ

CDX-602(NEW)(MAIN UNIT)
PARTS LIST (MODEL NO.) (ORIGINAL MODEL)
ITEM PART NUMBER REV. Q'ty ENGLISH NAME
139 060-702 46
140 060-702 25
141 060-702 26
142 060-702 2
143 060-702 17
144 060-702 23
145 060-702 15
146 060-702 2
JUMP WIRE "ㄇ" TYPE 0.5φ P=5mm T/52mm
JUMP WIRE "ㄇ" TYPE 0.5φ P=6mm T/52mm
JUMP WIRE "ㄇ" TYPE 0.5φ P=7.5mm T/52mm
JUMP WIRE "ㄇ" TYPE 0.5φ P=9mm T/52mm
JUMP WIRE "ㄇ" TYPE 0.5φ P=10mm T/52mm
JUMP WIRE "ㄇ" TYPE 0.5φ P=12.5mm T/52mm
JUMP WIRE "ㄇ" TYPE 0.5φ P=15mm T/52mm
JUMP WIRE "ㄇ" TYPE 0.5φ P=20mm T/52mm
147
148 092-146 2 3P PIN HEADER P=2.54 180°
149
150
151 092-150A 2 16P(P=1mm) CONNECTOR WAFER (FFC NONZIF BOTHSIDE CONTACT)
152 092-151A 2 5P(P=2mm) CONNECTOR WAFER (PH TYPE) JWT A2001 5P
153 092-152A 2 6P(P=2mm) CONNECTOR WAFER (PH TYPE) JWT A2001 6P
154 092-153A 2 2P(P=2mm) CONNECTOR WAFER (PH TYPE) JWT A2001 2P
155 092-154A 2 3P(P=2mm) CONNECTOR WAFER (PH TYPE) JWT A2001 3P
156
157 092-083A 2 3P(P=3.96mm) CONNECTOR WAFER (VH TYPE)
158 092-026A 2 3P CONNECTOR BASE B3B-XH-A 180°
159 092-027A 1 6P CONNECTOR BASE B6B-XH-A 180°
160 092-050A 2 8P CONNECTOR BASE B8B-XH-A 180°
161
162 094-204 2 16P FLAT CABLE 110mm P=1mm
163
164 091-457A 2 2P CONNECTOR WITH WIRE PH-2P 120mm
165 091-482A 1 3P CONNECTOR WITH WIRE VH-3P 220mm
166 091-483A 1 3P CONNECTOR WITH WIRE VH-3P 170mm
167 091-459A 1 3P CONNECTOR WITH WIRE PH-3P 250mm
168 091-503A 1 3P CONNECTOR WITH WIRE XH-3P 280mm
169 091-461A 1 3P CONNECTOR WITH WIRE XH-3P 400mm
170 091-500A 2 8P CONNECTOR WITH WIRE XH-8P 170mm
171 091-463A 2 5P CONNECTOR WITH WIRE PH-5P 120mm
172 091-464A 2 6P CONNECTOR WITH WIRE PH-6P 120mm
173
174 201-099 1 LEAD WIRE (BROWN) UL1617 AWG22 6×9 260mm
175
176 093-421 1 GROUND WIRE WITH RING TONGUE (BLACK) 210mm
177 161-027 1 CLOSED END CONNECTOR CE2
178
179 190-075 2
180 190-230 1
181 190-481 2
182 190-069 1
HEAT-SHRINK TUBING UL 28φ 35mm
HEAT-SHRINK TUBING UL 35φ 35mm
HEAT-SHRINK TUBING UL 4φ 10mm
HEAT-SHRINK TUBING UL 10φ 40mm
183
184 003-605 5 CABLE TIES CV-100
 Loading...