

Page 1
Installation
Installation
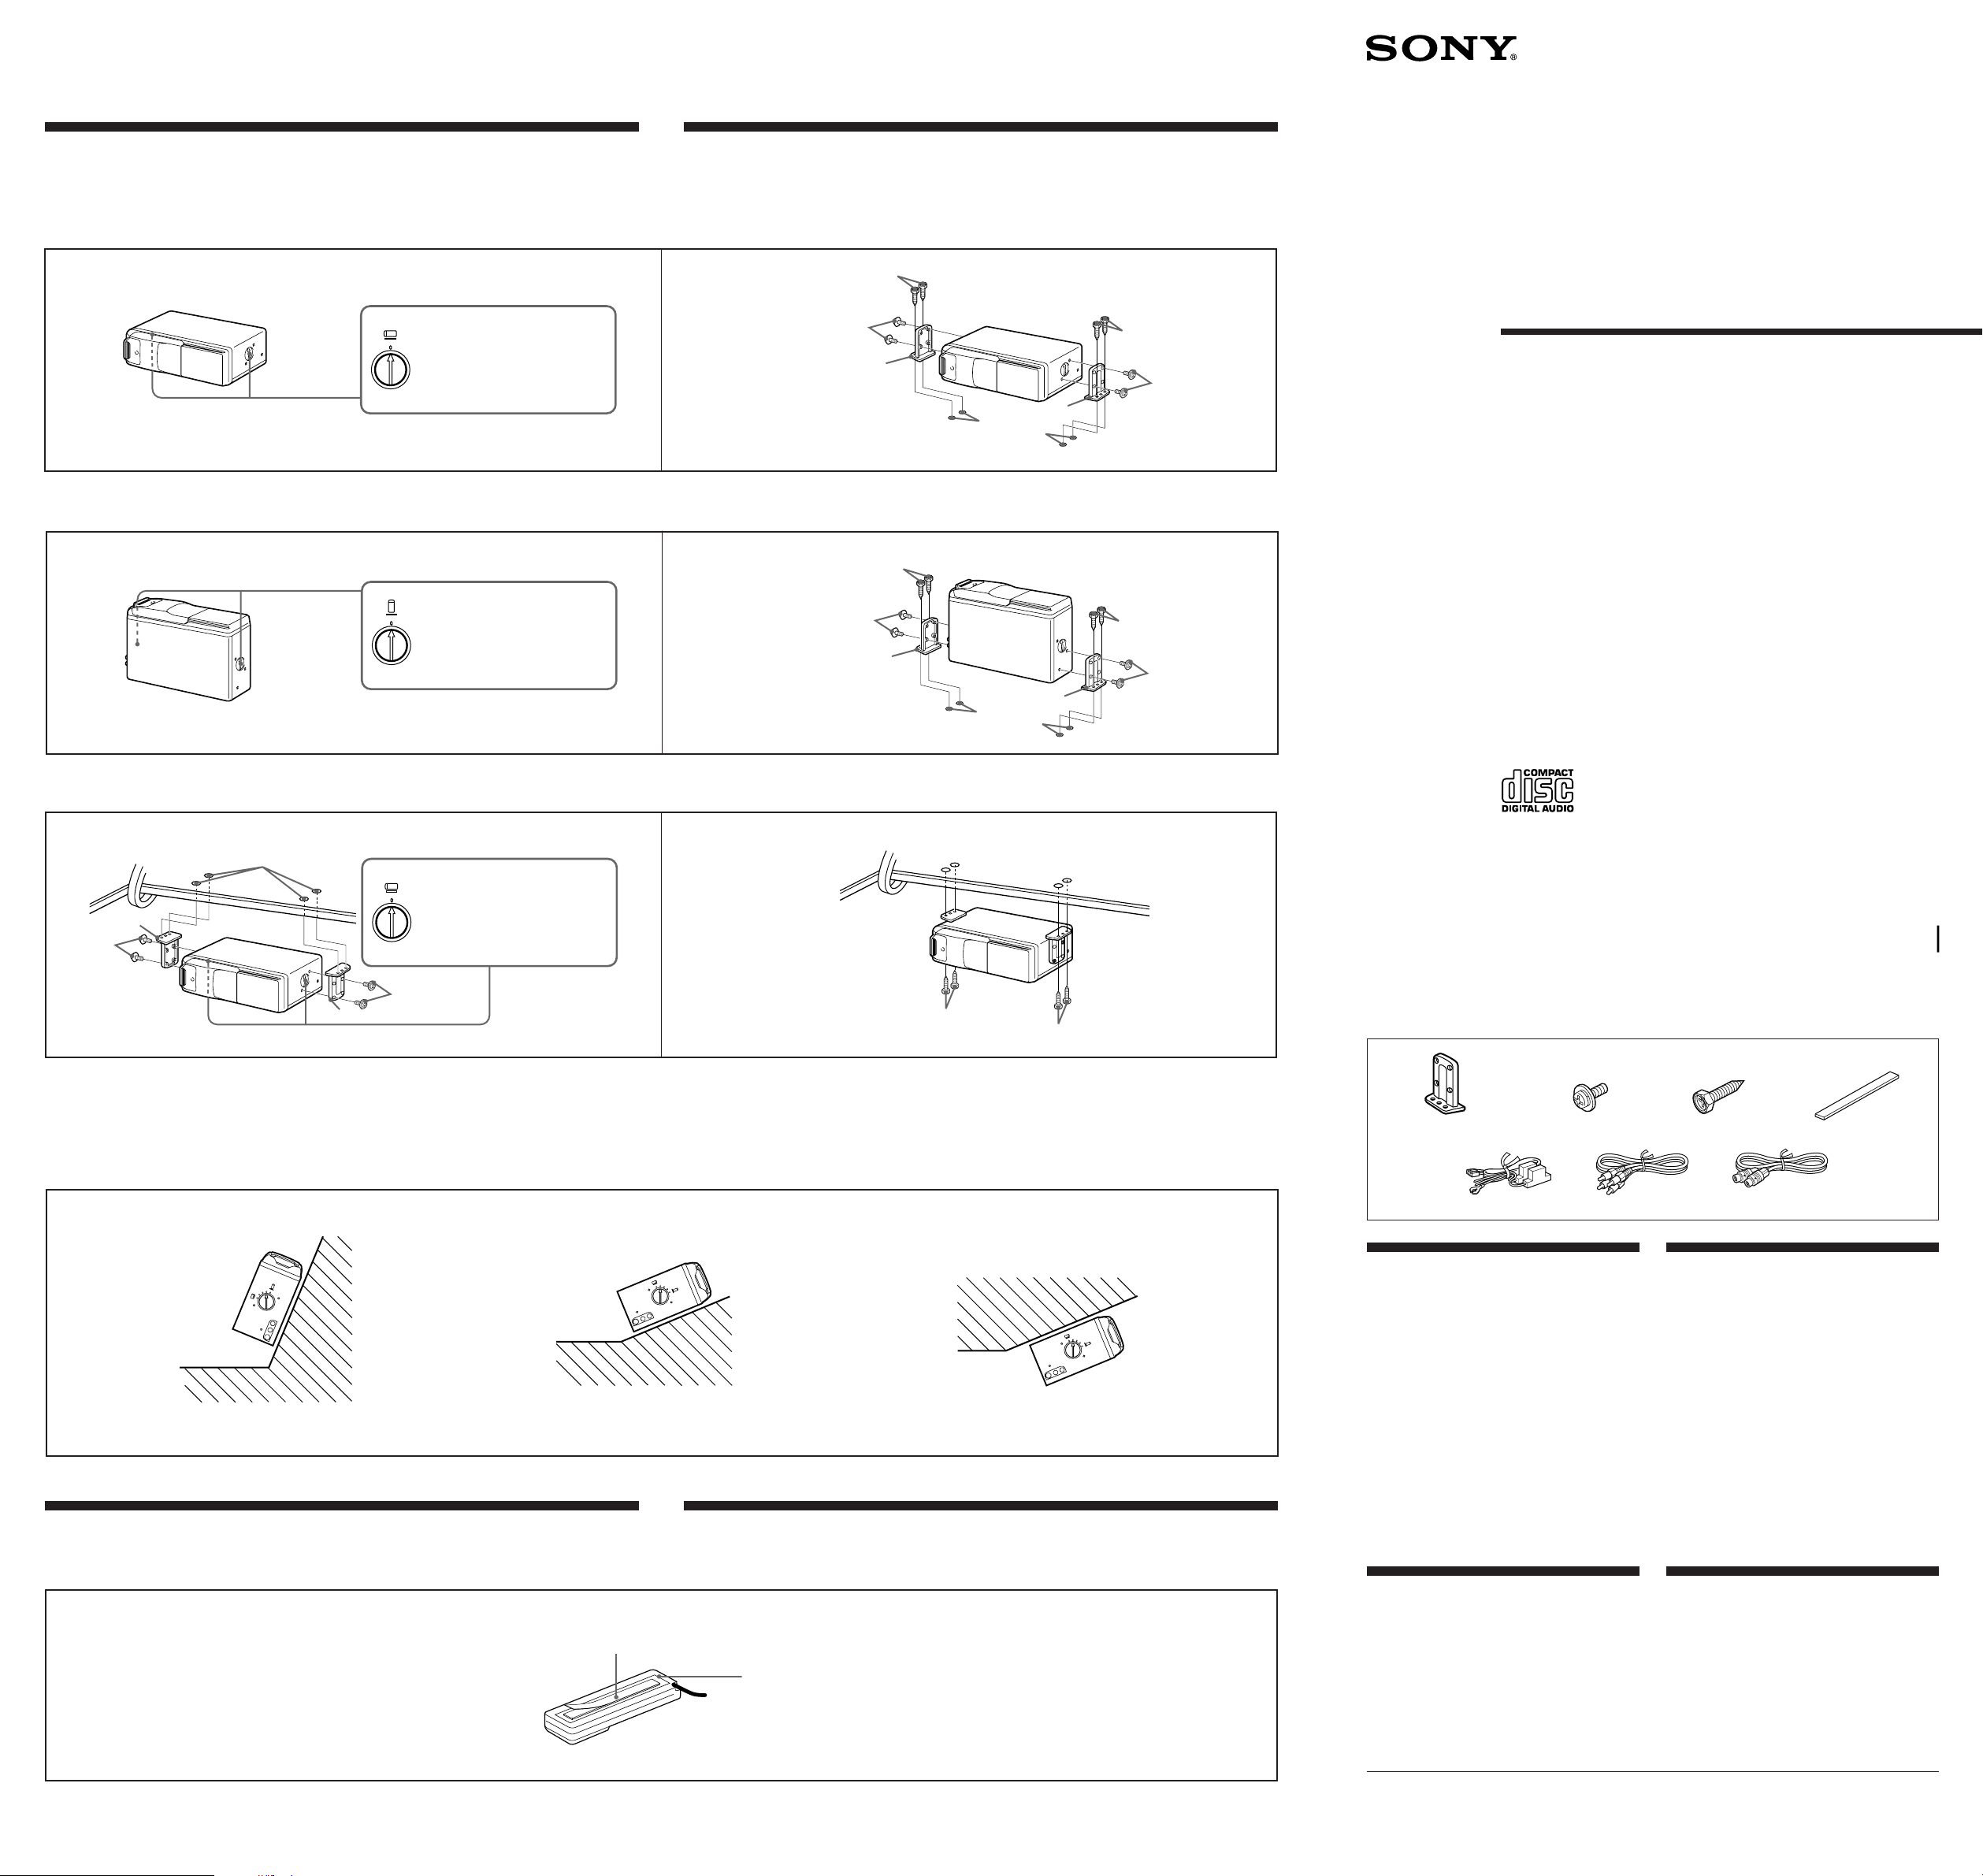
How to install the CD changer
When you install the CD changer, be careful not to damage wiring or equipment on the other side of the
mounting surface.
Horizontal installation
1
HORIZONTAL
Align with the marked position.
Alignez sur le repère.
Installation du changeur de CD
Quand vous installez le changeur de CD, veillez à ne pas endommager les câbles ou les instruments qui se
trouvent de l’autre côté.
Installation horizontale
2
Unit: mm (in.)
Unité: mm (po.)
Vertical installation Installation verticale
1
2
2
1
3
3
ø 3.5 (5/32)
1
3
2
Compact Disc
Changer System
Installation/Connections
Installation/Connexions
VERTICAL
Align with the marked position.
Alignez sur le repère.
2
Unit: mm (in.)
Unité: mm (po.)
Suspended installation Installation suspendue
Unit: mm (in.)
1
Unité: mm (po.)
1
2
When the unit is to be installed under the rear tray or in the trunk, observe the following.
•Choose the mounting location carefully so the unit can be installed horizontally.
•Make sure the unit does not hinder the movement of the trunk door.
ø 3.5 (5/32)
1
HORIZONTAL
2
2
Align with the marked position.
Alignez sur le repère.
Si vous comptez installer le changeur de CD sous la plage arrière par exemple ou dans le coffre, prenez les
précautions suivantes.
•Choisissez soigneusement l’emplacement pour que le changeur soit à l’horizontale.
•Vérifiez que le changeur ne gêne pas le ressort du capot, entre autres.
1
3
ø 3.5 (
3
2
1
5
/32)
CDX-415RF
Sony Corporation 1998 Printed in Japan
3
Parts for installation and
connections
The numbers in the list are keyed to those in the
instructions.
1
56
Pièces de montage et de
raccordement
Les numéros de la liste correspondent à celles
des instructions.
32
7
4
× 4 × 1× 4× 2
Inclined installation
After installing the unit, align the dials with one of the marks so the arrow comes as close to a
vertical position as possible.
VERTICAL
HORIZONTAL
Note
Be sure to align the left and right dials with the same mark.
Installing the wired remote
Use the supplied double-sided adhesive tape 4, and mount the wired remote in a suitable location where
it will not interfere with your driving.
4
Installation inclinée
Après avoir installé l’appareil, alignez les disques sur l’un des repères afin que la flèche soit aussi
proche que possible de la position verticale.
L
A
T
N
O
Z
I
R
V
O
H
E
R
T
I
C
A
L
L
A
T
N
O
Z
I
R
V
O
H
E
R
T
I
C
A
L
Remarque
Veillez à aligner les disques gauche et droite sur le même repère.
Installation de la télécommande à fil
Utilisez la bande à double face adhésive fournie 4 pour installer la télécommande à fil dans un endroit
qui ne risque pas de gêner la conduite.
The back of the wired remote
Dos de la télécommande à fil
× 1
CD changer
•Choose the mounting location carefully,
observing the following:
— Do not install the unit where it will be
subjected to hot air from the heater.
— Do not install the unit where it will be
subjected to direct sunlight.
— The fuel tank should not be damaged by the
tapping screws.
— There should be no wire harnesses or
pipelines under the place where you are
going to install the unit.
— The spare tire, tools, or other equipment in
or under the trunk should not be interfered
with or damaged by the screws or the unit
itself.
•Be sure to use only the supplied mounting
hardware for a safe and secure installation.
Wired remote
•Avoid mounting it where it may:
— hinder normal driving activities.
— jeopardize the passengers.
— be subjected to hot air from the heater.
— be subjected to direct sunlight.
•After installing the system, make sure the
whole system can be operated by the wired
remote.
5.5 m 5.5 m
× 1
× 1
Changeur de CD
•Choisir l’emplacement de montage en tenant
compte des observations suivantes:
— L’appareil ne peut pas être exposé au
courant d’air chaud du chauffage,
— ni être en plein soleil.
— Vérifiez que le réservoir d’essence ne risque
pas d’être endommagé par les vis
taraudeuses.
— Il ne doit pas y avoir de faisceaux de fils ou
de tuyaux à l’emplacement du montage.
— Vérifiez que l’appareil ou les vis ne risquent
pas d’endommager ou de gêner la roue de
secours, les outils ou un autre objet dans le
coffre.
•Pour garantir la sécurité de l’installation,
utilisez uniquement le matériel de montage
fourni.
Télécommande à fil
•Evitez de l’installer dans des endroits où elle
pourrait:
— gêner la conduite normale du véhicule,
— mettre les passagers en danger,
— être exposée au courant d’air chaud du
chauffage,
— être en plein soleil.
•Quand vous avez installé le système, vérifiez
que la télécommande à fil peut commander
tout le système.
*I-3-861-671-11*(1)
Page 2
CD
DISC TRACK
SHUF
REP
DISC
=+
+
–
(
OFF
P
(
AMS
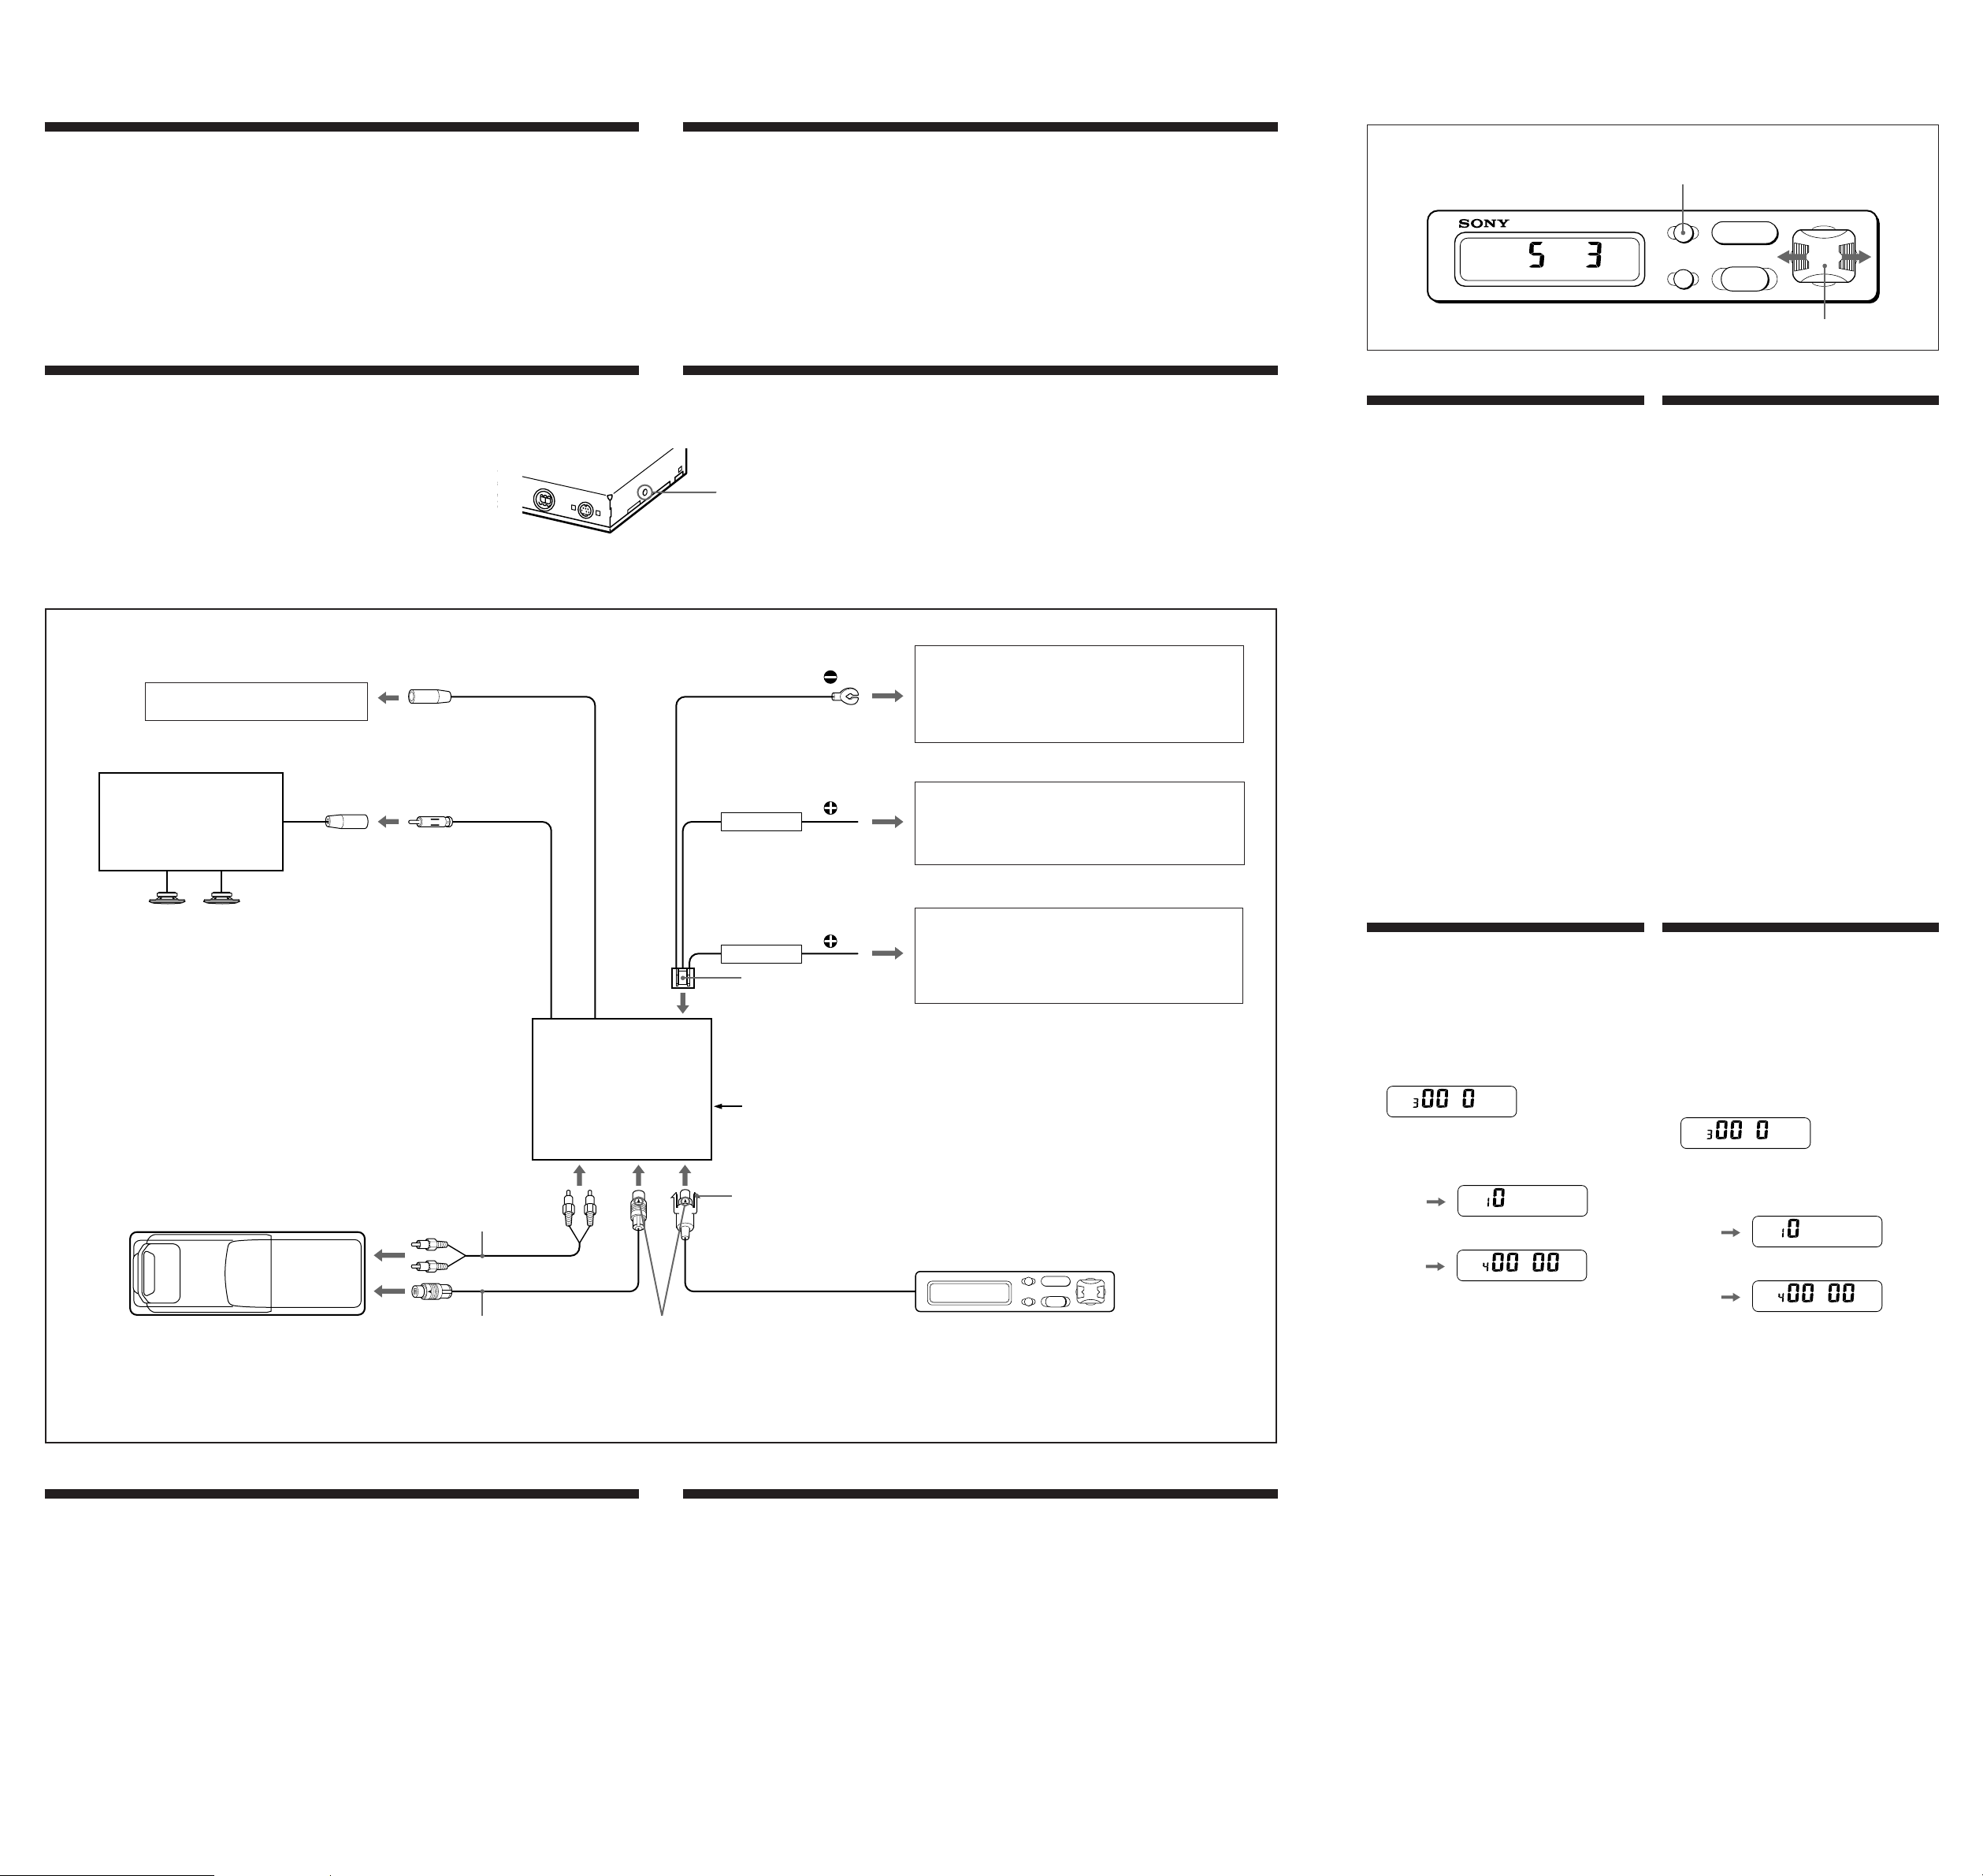
Connections
(
CD
LEVEL
(
CD
LEVEL
(
CD
LEVEL
Connexions
Caution
•This system is designed for negative ground 12 V
DC operation only.
•Before making connections, disconnect the
ground terminal of the car battery to avoid short
circuits.
•Connect the yellow and red power input leads
only after all other leads have been connected.
•Be sure to connect the red power input lead to
the positive 12 V power terminal which is
powered when the ignition switch is in the
accessory position.
•Run all ground wires to a common ground
point.
•Press RESET on the hideaway unit after
completing the connections.
•The use of optical instruments with this product
will increase eye hazard.
Reset button
Before operating the unit for the first time or after replacing the car battery, press RESET on the hideaway
unit with a ball-point pen, etc.
Précautions
•Ce système est conçu pour fonctionner sur
courant continu de 12 V avec masse négative.
•Avant d’effectuer les raccordements, débranchez
la borne de terre de la batterie du véhicule pour
éviter tout court-circuit.
•Branchez les fils d‘entrée d‘alimentation jaune et
rouge seulement après avoir terminé tous les
autres branchements.
Touche de réinitialisation
Avant la mise en service du système ou après avoir remplacé la batterie de voiture, appuyez sur la touche
de réinitialisation (RESET) sur le modulateur avec un stylo bille ou un autre objet pointu.
RESET button
Touche RESET
Connection diagram Diagrama de conexión
to the car antenna
à l‘antenne de voiture
Car audio
Autoradio
Fuse
Fusible
Antenna connector
Connecteur d‘antenne
Black
Noir
Yellow
Jaune
•Veillez à ne pas raccorder le fil rouge d‘entrée
d‘alimentation à la borne positive de 12 V qui est
alimentée quand la clé de contact est sur la
position accessoire.
•Rassemblez tous les fils de terre en un point
de masse commun.
•Quand vous avez terminé les connexions,
appuyez sur la touche RESET du modulateur.
to a metal point on the car
First connect the black ground lead, then connect the
yellow and red power input leads.
vers un point métallique de la voiture
Branchez d’abord le fil de masse noir et, ensuite, les fils
d’entrée d’alimentation jaune et rouge.
to the +12 V power terminal which is powered at all times
Be sure to connect the black ground lead first.
à la borne d’alimentation +12 V qui est alimentée en
permanence
Raccordez d’abord le fil de masse noir.
Wired remote (RM-X64) / Télécommande à fil (RM-X64)
Changing the transmitting
frequency
Because this unit processes CD playback sound
through an FM tuner, there may be interference
noise during CD playback. In this case change
the frequency of the modulated RF signal
transmitted from hideaway unit. The initial
setting is 88.3 MHz.
1 Press (REP) for more than two seconds.
2 Press either the left or right side of (AMS)
to select the frequency.
Each time you press (AMS), the frequency
changes as follows:
+ : 88.3 MHz n 88.5 MHz n 88.7 MHz n
88.9 MHz n 89.1 MHz n 89.3 MHz n
89.5 MHz n 89.7 MHz n 89.9 MHz n
= : 89.9 MHz n 89.7 MHz n 89.5 MHz n
89.3 MHz n 89.1 MHz n 88.9 MHz n
88.7 MHz n 88.5 MHz n 88.3 MHz
3 Press (REP) for more than two seconds.
Note
Be sure to set the frequency of your FM tuner to the
newly selected frequency.
REP
AMS
Changement de la fréquence de
transmission
Comme cet appareil traite le son de lecture CD
via un syntoniseur FM, il se peut qu’il y ait des
interférences durant la lecture du CD. Si c’est le
cas, changez la fréquence du signal FM modulé
transmis par le modulateur. Le réglage initial est
de 88,3 MHz.
1 Appuyez sur (REP) pendant plus de deux
secondes.
2 Appuyez sur la gauche ou la droite de
(AMS) pour choisir la fréquence.
A chaque pression sur la touche (AMS), la
fréquence change dans l’ordre suivant:
+ : 88,3 MHz n 88,5 MHz n 88,7 MHz n
88,9 MHz n 89,1 MHz n 89,3 MHz n
89,5 MHz n 89,7 MHz n 89,9 MHz n
= : 89,9 MHz n 89,7 MHz n 89,5 MHz n
89,3 MHz n 89,1 MHz n 88,9 MHz n
88,7 MHz n 88,5 MHz n 88,3 MHz
3 Appuyez sur (REP) pendant plus de deux
secondes.
Remarque
N’oubliez pas de régler votre tuner FM sur la
nouvelle fréquence choisie.
Speaker system
Système de haut-parleurs
Hideaway unit
Modulateur
6
CD changer
Changeur de CD
Note
Even though this system is connected with BUS cables, it doesn’t include the custom file function. If you connect
this CD changer to a Sony master unit which includes the custom file function, this function will not work.
7
Insert with the marks facing up
Insérez en dirigeant les repères vers le haut
Fuse
Fusible
Red
5
RESET button
Touche RESET
Insert the connector until it locks.
Insérez le connecteur jusqu’à ce qu’il s’enclenche.
Remarque
Ce système est raccordé par des câbles BUS; toutefois il n’a pas de fonction de fichier personnalisé. Même si vous
raccordez ce changeur CD à un appareil Sony doté de la fonction de fichier personnalisé, vous ne pourrez pas
vous servir du fichier.
Rouge
to the +12 V power terminal which is powered when the
ignition switch is in the accessory position
Be sure to connect the black ground lead first.
à la borne d’alimentation de +12 V qui est alimentée quand
la clé de contact est sur la position accessoire
Raccordez d’abord le fil de masse noir.
Wired Remote
Télécommande à fil
Changing the output level
You can select the output level of the CD
changer. Normally the initial output level is
adequate; change the level if necessary.
1 Press (REP) for more than two seconds.
2 Press (REP).
Initial setting
3 Press either the left or right side of (AMS)
to select the output level.
To decrease the output level
= :
To increase the output level
+ :
(
CD
LEVEL
4 Press (REP) for more than two seconds.
Changement du niveau de sortie
Vous pouvez sélectionner le niveau de sortie du
changeur de CD. Normalement, le système
fonctionne sur le niveau de sortie initial.
Changez-le si nécessaire.
1 Appuyez sur (REP) pendant plus de deux
secondes.
2 Appuyez sur (REP).
Réglage initial
3 Appuyez sur la gauche ou la droite de
(AMS) pour choisir le niveau.
Pour diminuer le niveau de sortie
=:
Pour augmenter le niveau de sortie
+ :
(
(
CD
LEVEL
CD
LEVEL
4 Appuyez sur (REP) pendant plus de deux
secondes.
Fuse replacement
If the fuse blows, check the power connection and
replace the fuse. If the fuse blows again after
replacement, there may be an internal malfunction.
Warning
Use a fuse with the specified amperage rating.
Use of a higher amperage fuse may cause serious
damage.
Remplacement du fusible
Si le fusible saute, vérifiez les connexions
d’alimentation et remplacez-le. Si le fusible saute à
nouveau quand vous venez de le remplacer, il
s’agit peut être d’un mauvais fonctionnement
interne.
Avertissement
Utilisez un fusible de l’ampérage spécifié.
L’utilisation d’un fusible d’ampérage supérieur
peut causer de sérieux dommages.
 Loading...