

Page 1
FM/MW/LW
Compact Disc
Player
3-043-127-41 (1)
Operating Instructions
Návod k obsluze
Instrukcje Obsługi
Kullanım kılavuzu
Инструкция по эксплуатации
For installation and connections, see the supplied installation/connections
manual.
Informace o instalaci a zapojení naleznete v přiložené příručce Instalace /
zapojení.
Szczegóły dotyczące instalacji i podłączeń, proszę sprawdzić w dostarczonym,
osobnym podręczniku
Kurma ve bağlantı işlemleri için ünite beraberindeki Kurma/Bağlantılar kılavuzuna
bakınız.
Перед установкой и подключениями обратитесь к прилагаемой инструкции
по установке и соединению.
GB
CZ
PL
TR
RU
CDX-2500R
2000 Sony Corporation
Page 2

Welcome !
Thank you for purchasing the Sony Compact
Disc Player. This unit lets you enjoy a variety
of features as well as an optional rotary
commander.
2
Page 3

Table of Contents
Location of controls ................................................. 4
Getting Started
Resetting the unit ................................................ 5
Detaching the front panel .................................. 5
Setting the clock .................................................. 6
CD Player
Listening to a CD ................................................ 7
Playing a CD in various modes ........................ 8
Radio
Memorising stations automatically
— Best Tuning Memory (BTM) ................... 8
Memorising only the desired stations .............. 9
Receiving the memorised stations .................... 9
RDS
Overview of the RDS function ........................ 10
Displaying the station name ............................ 10
Retuning the same programme automatically
— Alternative Frequencies (AF) ................ 11
Listening to traffic announcements ................ 12
Presetting the RDS stations with the AF and
TA data .......................................................... 13
Locating a station by programme type .......... 14
Setting the clock automatically ....................... 15
Additional Information
Precautions ......................................................... 19
Maintenance....................................................... 21
Dismounting the unit ....................................... 21
Specifications ..................................................... 22
Troubleshooting guide ..................................... 23
Other Functions
Labelling the rotary commander .................... 15
Using the rotary commander .......................... 16
Adjusting the sound characteristics ............... 17
Attenuating the sound ..................................... 17
Changing the sound and display settings ..... 18
Boosting the bass sound
— D-bass ....................................................... 19
3
Page 4

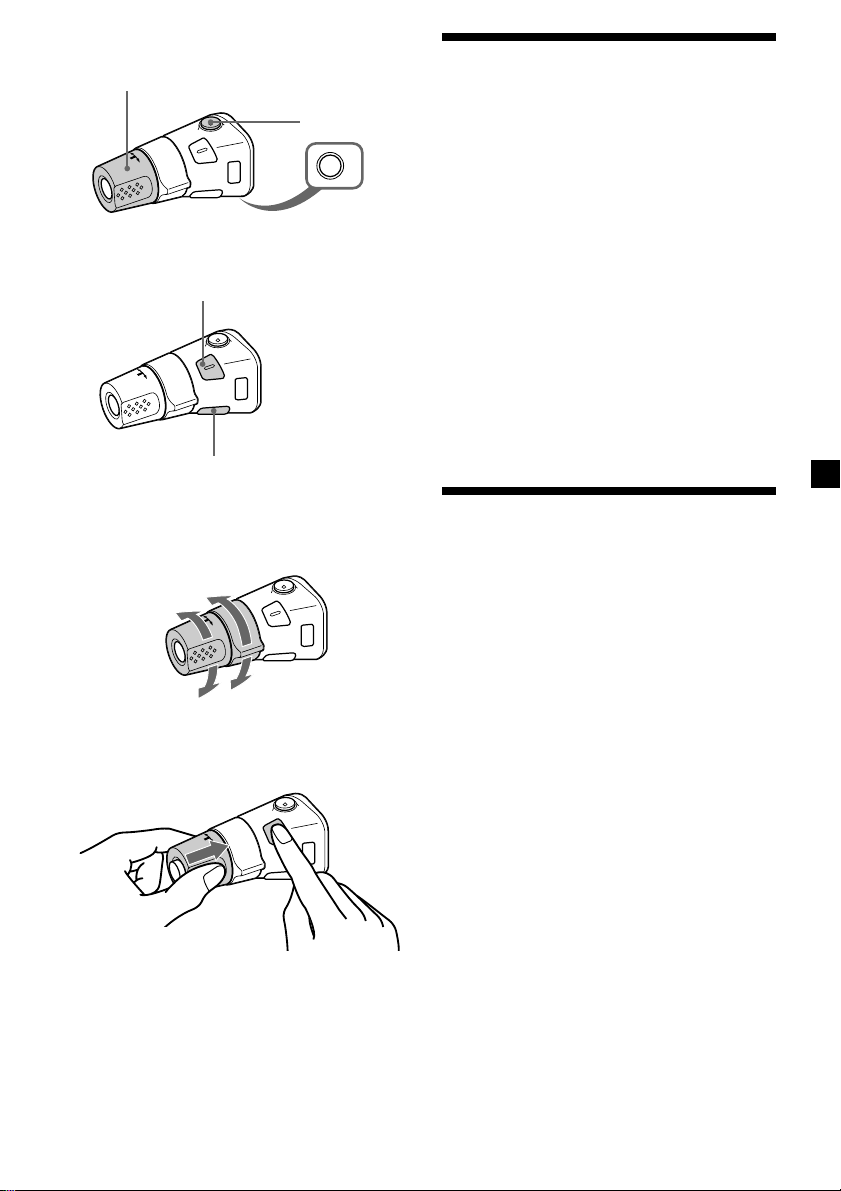
Location of controls
MODE
SEEK/AMS
SOURCE
RELEASE
SOUND
DSPL
D
OFF
SHIFT
2 3 4 5 6 7 8 9110
Refer to the pages for details.
1 SEEK/AMS (seek/Automatic Music
Sensor/manual search) control 7, 9, 11,
14
2 MODE (band/unit select) button 8, 9
3 SOURCE (source select) button 7, 8, 9,
13
4 Dial (volume/bass/treble/left-right/
front-rear) 6, 17
5 SOUND button 17
6 DSPL (display mode change) button
7, 10, 11
7 Display window
8 PTY button 14
9 6 (eject) button 7
0 AF/TA button 11, 12, 13
PTY
AF/TA
1
2
OFF
D - BASS
3
CDX–2500R
!¡ RELEASE (front panel release) button
5, 20
!™ Reset button (located on the front side
of the unit behind the front panel) 5
!£ OFF button* 5, 7
!¢ SHIFT button
PLAY MODE 8, 9, 10, 12, 13
REP 8
SET UP 6, 15, 18
SHUF 8
!∞ During radio reception:
Number buttons 9, 12, 13
!§ D-BASS control 19
*Warning when installing in a car
without ACC (accessory) position
on the ignition key switch
Be sure to press (OFF) on the unit for two
seconds to turn off the clock display after
turning off the engine.
When you press (OFF) momentarily, the
clock display does not turn off and this
causes battery wear.
4
Page 5
Getting Started
Resetting the unit
Before operating the unit for the first time or
after replacing the car battery, you must reset
the unit.
Remove the front panel and press the reset
button with a pointed object, such as a
ballpoint pen.
Reset button
Notes
• Pressing the reset button will erase the clock
setting and some memorised functions.
• When you connect the power supply cord to the
unit or reset the unit, wait for about 10 seconds
before you insert a disc. If you insert a disc within
these 10 seconds, the unit will not be reset, and
you will have to press the reset button again.
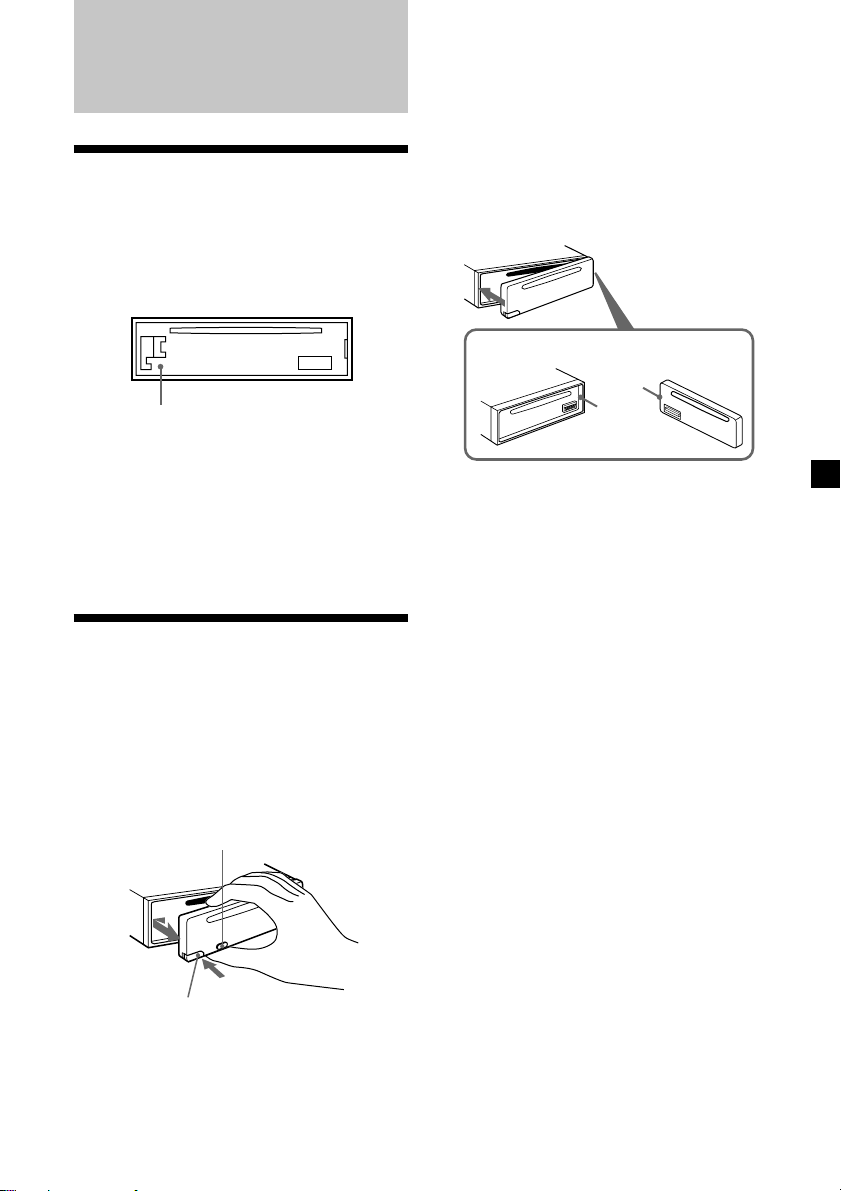
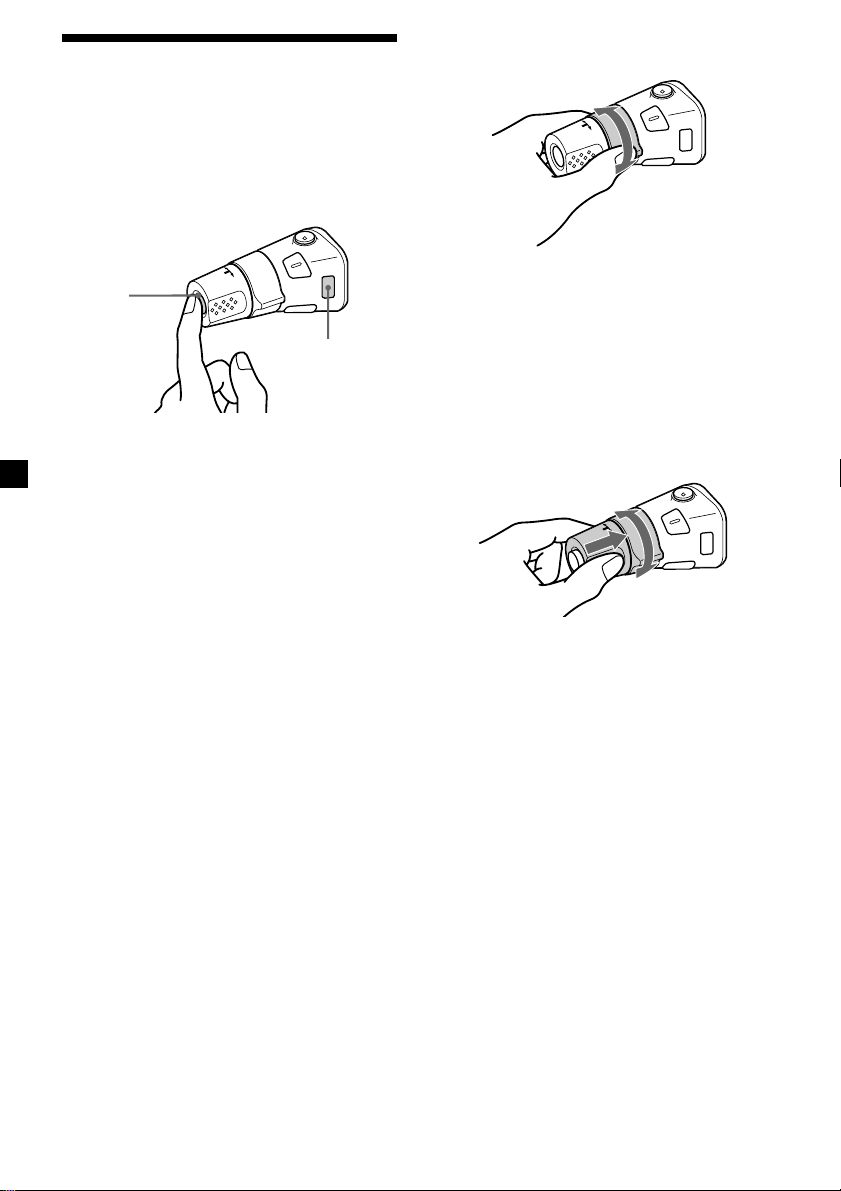
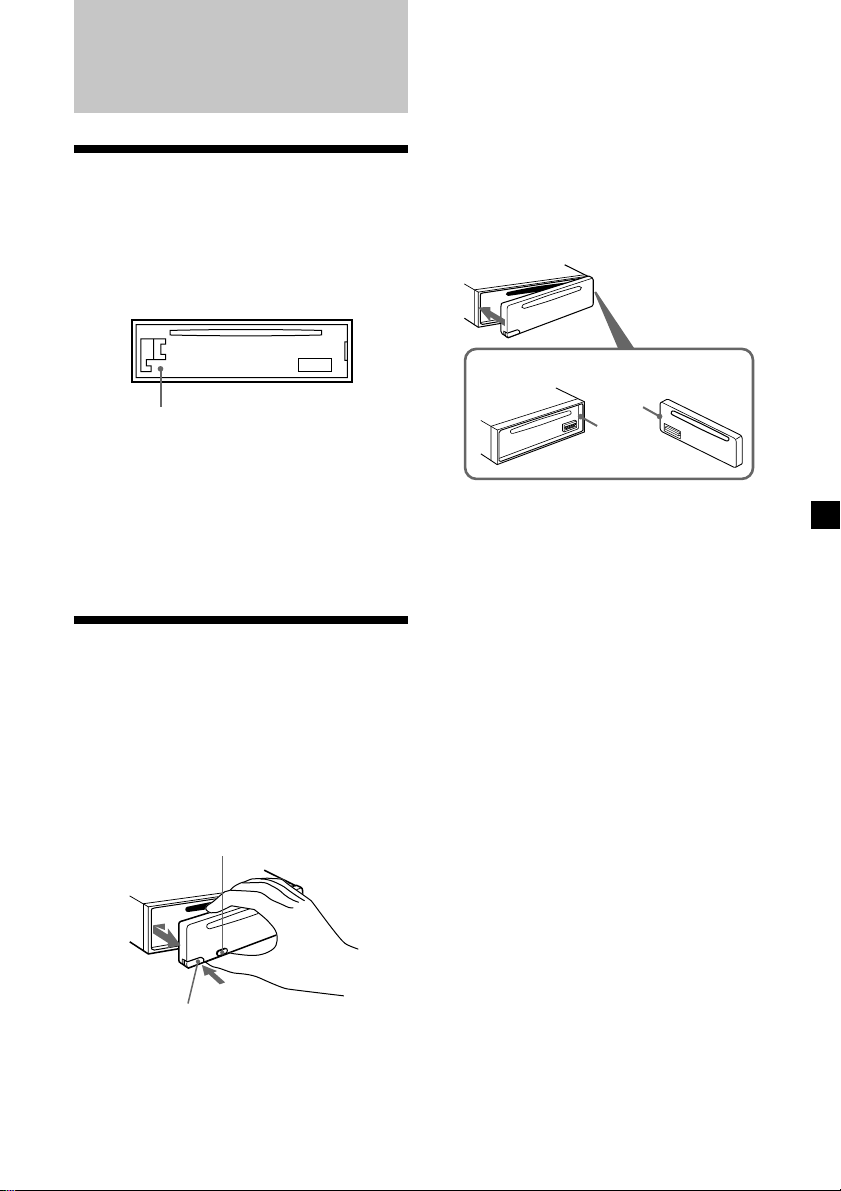
Detaching the front panel
You can detach the front panel of this unit to
protect the unit from being stolen.
1 Press (OFF).
2 Press (RELEASE), then slide the front
panel a little to the left, and pull it off
towards you.
(OFF)
Notes
• Be sure not to drop the panel when detaching it
from the unit.
• If you detach the panel while the unit is still
turned on, the power will turn off automatically
to prevent the speakers from being damaged.
• When carrying the front panel with you, use the
supplied front panel case.
Attaching the front panel
Attach part a of the front panel to part b of
the unit as illustrated and push until it clicks.
a
b
Notes
• Be sure not to attach the front panel upside
down.
• Do not press the front panel too hard against the
unit when attaching it.
• Do not press too hard or put excessive pressure
on the display window of the front panel.
• Do not expose the front panel to direct sunlight
or heat sources such as hot air ducts, and do not
leave it in a humid place. Never leave it on the
dashboard of a car parked in direct sunlight or
where there may be a considerable rise in
temperature.
Caution alarm
If you turn the ignition key switch to the OFF
position without removing the front panel, the
caution alarm will beep for a few seconds.
(RELEASE)
5
Page 6
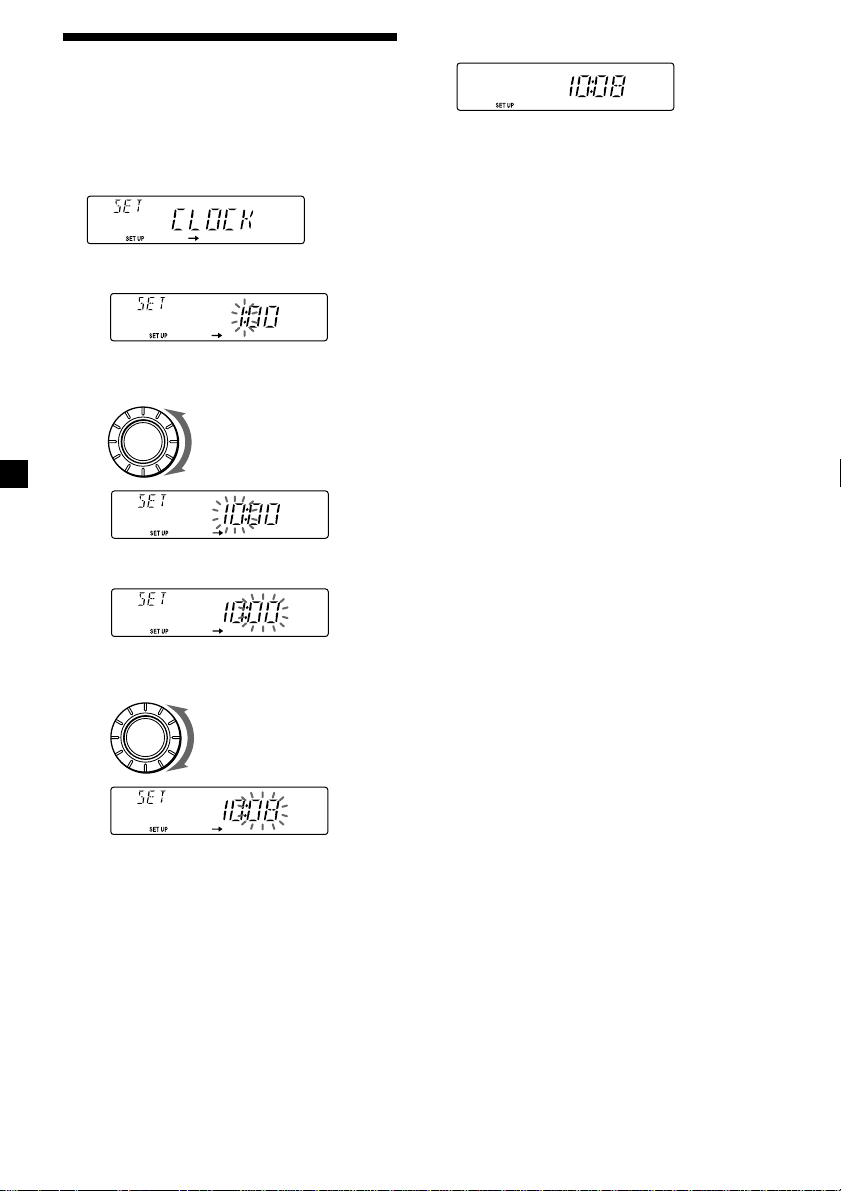
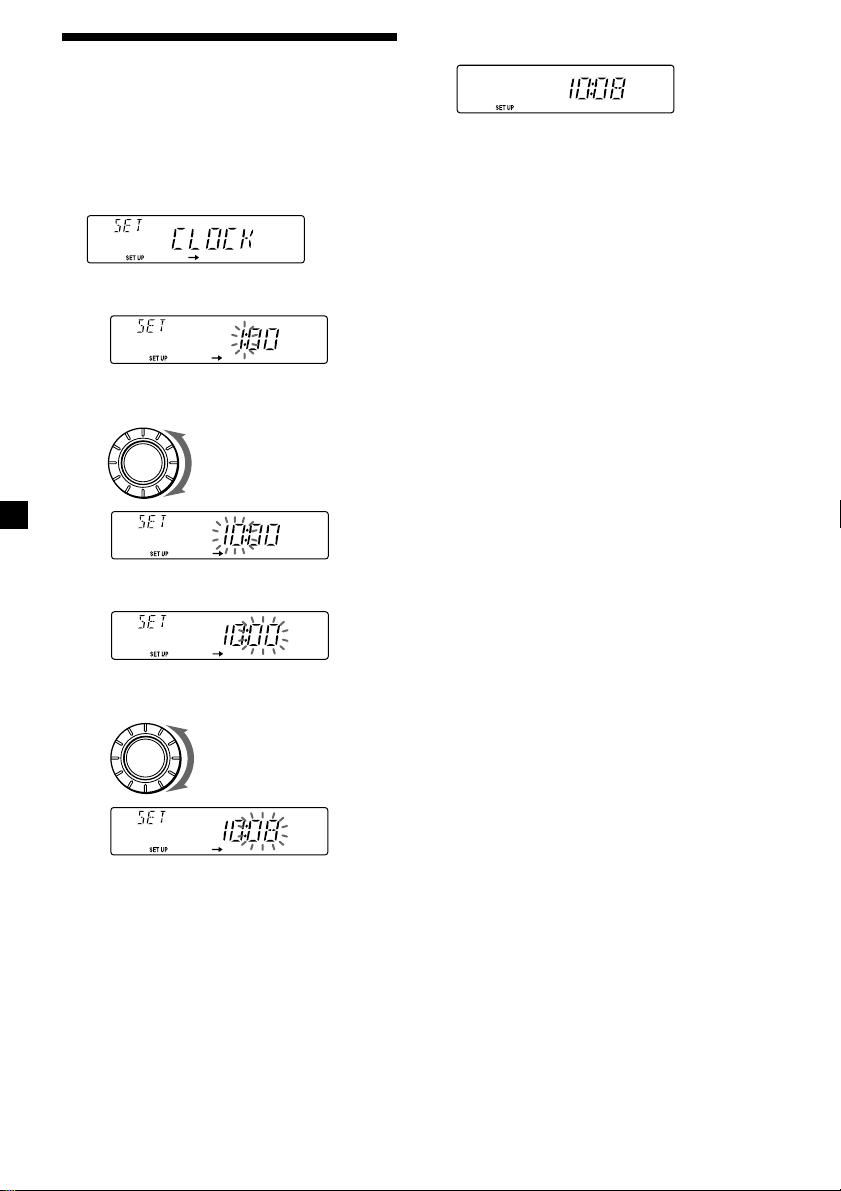
Setting the clock
The clock uses a 24-hour digital indication.
2 Press (SHIFT).
Example: To set the clock to 10:08
1 Press (SHIFT), then press (2) (SET UP)
repeatedly until “CLOCK” appears.
1 Press (4) (n).
The hour indication flashes.
2 Set the hour.
to go backward
SOURCE
to go forward
3 Press (4) (n).
The minute indication flashes.
4 Set the minute.
to go backward
SOURCE
to go forward
The clock starts.
3 Press (SHIFT).
After the clock setting is complete, the
display returns to normal playback mode.
6
Page 7
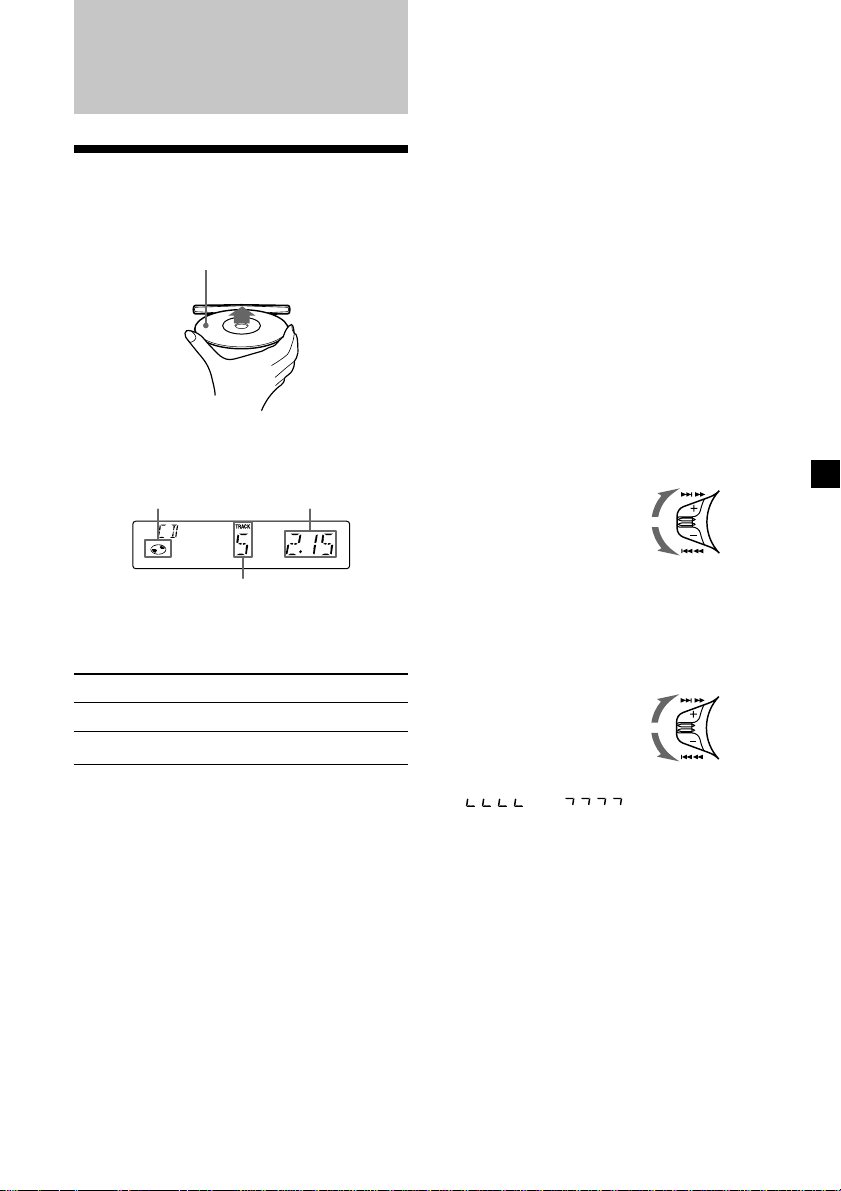
CD Player
Changing the display item
Each time you press (DSPL) during CD
playback, the item changes as follows:
Track number/Elapsed playing time ˜ Clock
Listening to a CD
Insert a CD.
Playback starts automatically.
Labelled side up
If a CD is already inserted, press (SOURCE)
repeatedly until “CD” appears to start
playback.
CD indication
Note
To play an 8 cm CD, use the optional Sony compact
disc single adapter (CSA-8).
To Press
Stop playback 6 or (OFF)
Eject the CD 6
Elapsed playing time
Track number
After you select the desired item, the display
will automatically change to the Motion
Display mode after a few seconds.
In the Motion Display mode, all the above
items are scrolled in the display one by one in
order.
Tip
The Motion Display mode can be turned off. (See
”Changing the sound and display settings” on
page 18).
Locating a specific track
— Automatic Music Sensor (AMS)
During playback, push the SEEK/AMS
control up or down and release for each
track you want to skip.
To locate succeeding tracks
To locate preceding tracks
SEEK/AMS
Locating a specific point in a track
— Manual Search
During playback, push the SEEK/AMS
control up or down and hold. Release
when you have found the desired point.
To search forward
To search backward
Note
If “
display, that means you have reached the
beginning or the end of the disc and you cannot
go any further.
” or “ ” appears in the
SEEK/AMS
7
Page 8
Playing a CD in various modes
You can play CDs in various modes:
•REP (Repeat Play) repeats the current track.
•SHUF (Shuffle Play) plays all the tracks in
random order.
Playing tracks repeatedly
— Repeat Play
1 During playback, press (SHIFT).
Every time you press (SHIFT), only the
items you can select light up.
DSPL
D
SHIFT
OFF
2 3 4 5 6 7 81
Radio
Memorising stations
automatically
— Best Tuning Memory (BTM)
The unit selects the stations with the strongest
signals and memorises them in the order of
their frequencies. You can store up to 10
stations on each band (FM1, FM2, MW, and
LW).
D
Caution
When tuning in stations while driving, use
Best Tuning Memory to prevent accidents.
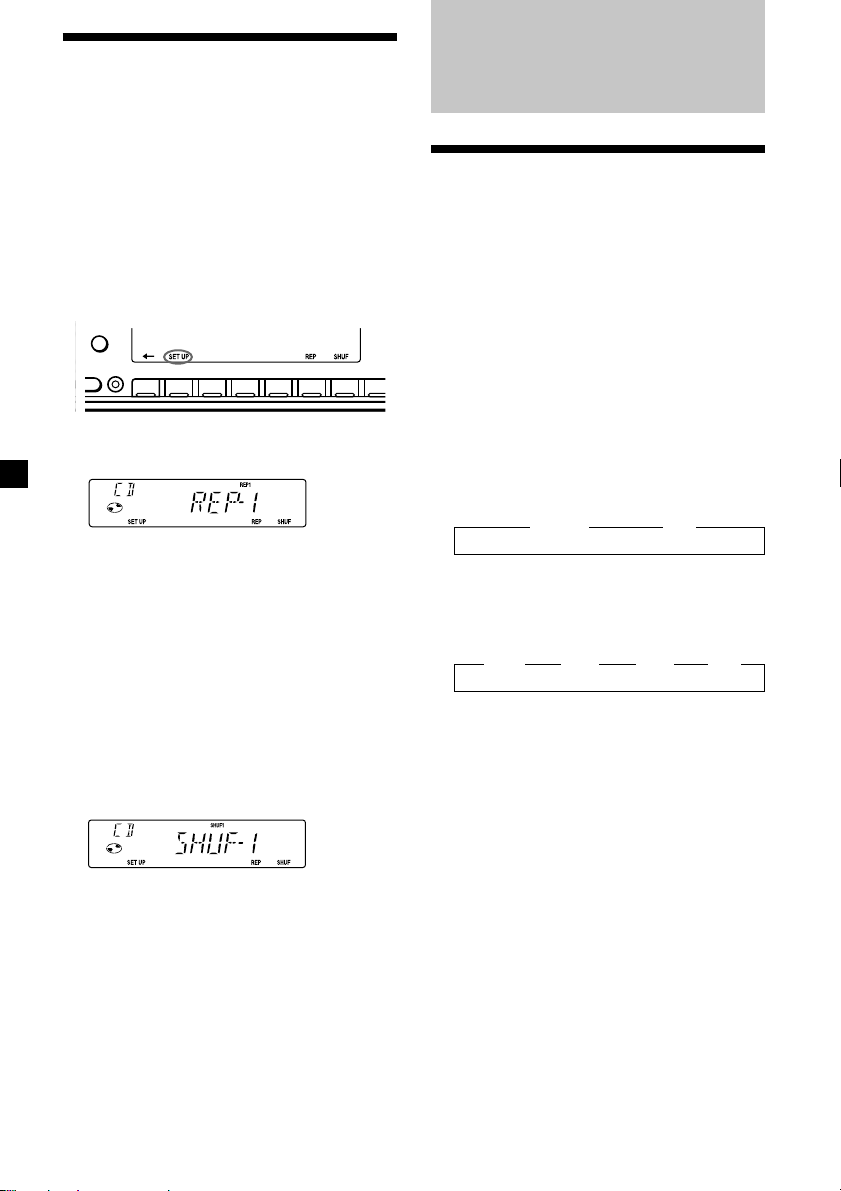
2 Press (6) (REP) repeatedly until ”REP-1“
appears.
Repeat Play starts.
3 Press (SHIFT).
To return to normal playback mode, select
“REP-OFF” in step 2 above.
Playing tracks in random order
— Shuffle Play
1 During playback, press (SHIFT).
2 Press (7) (SHUF) repeatedly until ”SHUF-
1“ appears.
Shuffle Play starts.
3 Press (SHIFT).
To return to normal playback mode, select
“SHUF-OFF” in step 2 above.
1 Press (SOURCE) repeatedly to select the
tuner.
Each time you press (SOURCE), the source
changes as follows:
z TUNER z CD
2 Press (MODE) repeatedly to select the
band.
Each time you press (MODE), the band
changes as follows:
z FM1 z FM2 z MW z LW
3 Press (SHIFT), then press (3) (PLAY
MODE) repeatedly until “B.T.M” appears.
4 Press (4) (n).
The unit stores stations in the order of their
frequencies on the number buttons.
A beep sounds when the setting is stored.
5 Press (SHIFT).
8
Page 9

Notes
• The unit does not store stations with weak
signals. If only a few stations can be received,
some number buttons will retain their former
setting.
• When a number is indicated in the display, the
unit starts storing stations from the one currently
displayed.
• If a CD is not in the unit, only the tuner band
appears even if you press (SOURCE).
Receiving the memorised stations
1 Press (SOURCE) repeatedly to select the
tuner.
2 Press (MODE) repeatedly to select the
band.
Memorising only the desired stations
You can preset up to 20 FM stations (10 each
for FM1 and 2), up to 10 MW stations, and up
to 10 LW stations in the order of your choice.
1 Press (SOURCE) repeatedly to select the
tuner.
2 Press (MODE) repeatedly to select the
band.
3 Push the SEEK/AMS control up or down
to tune in the station that you want to
store on the number button.
4 Press and hold the desired number
button ((1) to (10)) until “MEM”
appears.
The number button indication appears in
the display.
Note
If you try to store another station on the same
number button, the previously stored station will
be erased.
3 Press the number button ((1) to (10)) on
which the desired station is stored.
If you cannot tune in a preset
station
Push and release the SEEK/AMS control
up or down to search for the station
(automatic tuning).
Scanning stops when the unit receives a
station. Push the SEEK/AMS control up or
down repeatedly until the desired station is
received.
Note
If the automatic tuning stops too frequently, press
(SHIFT), then press (3) (PLAY MODE) repeatedly
until “LOCAL” (local seek mode) is displayed. Then
press (4) (n) to select “LOCAL-ON.” Press (SHIFT).
Only the stations with relatively strong signals will
be tuned in.
Tip
If you know the frequency of the station you want
to listen to, push the SEEK/AMS control up or
down and hold until the desired frequency
appears (manual tuning).
9
Page 10
If FM stereo reception is poor
— Monaural Mode
1 During radio reception, press (SHIFT),
then press (3) (PLAY MODE) repeatedly
until “MONO” appears.
RDS
2 Press (4) (n) repeatedly until “MONO-
ON“ appears.
The sound improves, but becomes
monaural (“ST” disappears).
3 Press (SHIFT).
To return to normal playback mode, select
“MONO-OFF” in step 2 above.
Changing the display item
Each time you press (DSPL), the item changes
as follows:
Frequency ˜ Clock
After you select the desired item, the display
will automatically change to the Motion
Display mode after a few seconds.
In the Motion Display mode, all the above
items are scrolled in the display one by one in
order.
Tip
The Motion Display mode can be turned off. (See
”Changing the sound and display settings” on
page 18).
Overview of the RDS function
Radio Data System (RDS) is a broadcasting
service that allows FM stations to send
additional digital information along with the
regular radio programme signal. Your car
stereo offers you a variety of services. Here are
just a few: retuning the same programme
automatically, listening to traffic
announcements, and locating a station by
programme type.
Notes
• Depending on the country or region, not all of
the RDS functions are available.
• RDS may not work properly if the signal strength
is weak or if the station you are tuned to is not
transmitting RDS data.
Displaying the station name
The name of the current station lights up in the
display.
Select an FM station (page 8).
When you tune in an FM station that
transmits RDS data, the station name
appears in the display.
10
Note
The “*” indication means that an RDS station is
being received.
Page 11
Changing the displayed item
Each time you press (DSPL), the item changes
as follows:
Frequency (Station Name) ˜ Clock
Note
When there is no alternative station in the area
and you do not need to search for an alternative
station, turn the AF function off by pressing
(AF/TA) repeatedly until “AF TA-OFF” appears.
After you select the desired item, the display
will automatically change to the Motion
Display mode after a few seconds.
In the Motion Display mode, all the above
items are scrolled in the display one by one in
order.
Tip
The Motion Display mode can be turned off. (See
”Changing the sound and display settings” on
page 18).
Note
“NO NAME” appears if the received station does
not transmit RDS data.
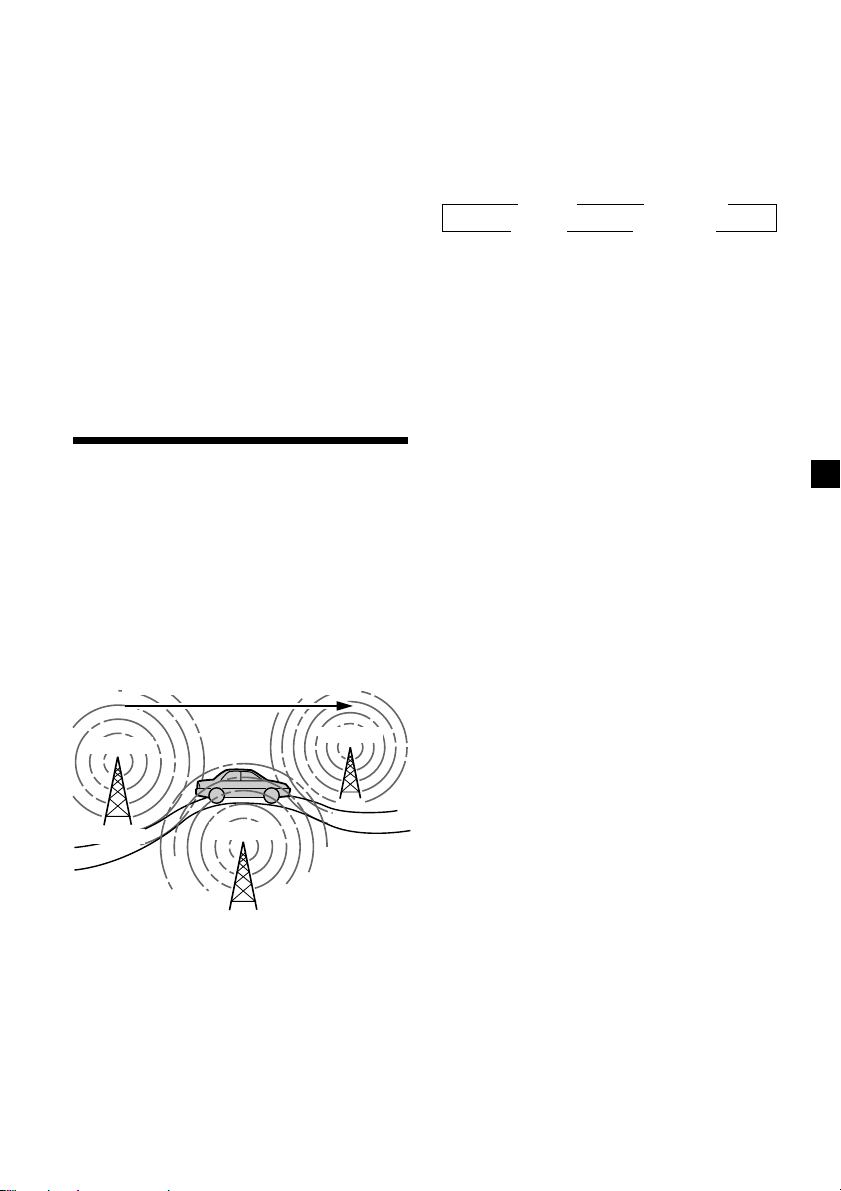
Retuning the same
programme automatically
— Alternative Frequencies (AF)
The Alternative Frequencies (AF) function
automatically selects and retunes the station
with the strongest signal in a network. By
using this function, you can continuously
listen to the same programme during a longdistance drive without having to retune the
station manually.
Frequencies change automatically.
Changing the displayed item
Each time you press (AF/TA), the item changes
as follows:
” TA-ON ” AF TA-ON*
AF-ON “ AF TA-OFF “
* Select this to turn on both the AF and TA
functions.
Notes
• When “NO AF” and the station name flash
alternately, it means that the unit cannot find an
alternative station in the network.
• If the station name starts flashing after selecting
a station with the AF function on, this indicates
that no alternative frequency is available. Push
the SEEK/AMS control up or down while the
station name is flashing (within eight seconds).
The unit starts searching for another frequency
with the same PI (Programme Identification) data
(“PI SEEK” appears and no sound is heard). If the
unit cannot find another frequency, “NO PI”
appears, and the unit returns to the previously
selected frequency.
continue to next page n
98.5MHz
Station
102.5MHz
96.0MHz
1 Select an FM station (page 8).
2 Press (AF/TA) repeatedly until “AF-ON”
appears.
The unit starts searching for an alternative
station with a stronger signal in the same
network.
11
Page 12

Listening to a regional programme
The “REG-ON” (regional on) function lets you
stay tuned to a regional programme without
being switched to another regional station.
(Note that you must turn the AF function on.)
The unit is factory preset to “REG-ON,” but if
you want to turn off the function, do the
following.
1 During radio reception, press (SHIFT),
then press (3) (PLAY MODE) repeatedly
until “REG” appears.
2 Press (4) (n) repeatedly until “REG-OFF”
appears.
3 Press (SHIFT).
Note that selecting “REG-OFF” might cause
the unit to switch to another regional
station within the same network.
To return to regional on, select “REG-ON” in
step 2 above.
Note
This function does not work in the United
Kingdom and in some other areas.
Local link function
(United Kingdom only)
The Local Link function lets you select other
local stations in the area, even if they are not
stored on your number buttons.
1 Press a number button that has a local
station stored on it.
Listening to traffic announcements
The Traffic Announcement (TA) and Traffic
Programme (TP) data let you automatically
tune in an FM station that is broadcasting
traffic announcements even if you are listening
to other programme sources.
Press (AF/TA) repeatedly until “TA-ON”
or “AF TA-ON” appears.
The unit starts searching for traffic
information stations. “TP” appears in the
display when the unit finds a station
broadcasting traffic announcements.
When the traffic announcement starts,
“TA” flashes. The flashing stops when the
traffic announcement is over.
Tip
If the traffic announcement starts while you are
listening to another programme source, the unit
automatically switches to the announcement and
goes back to the original source when the
announcement is over.
Notes
• “NO TP” flashes for five seconds if the received
station does not broadcast traffic
announcements. Then, the unit starts searching
for a station that broadcasts it.
• When “EON” appears with “TP” in the display,
the current station makes use of broadcast traffic
announcement of other stations in the same
network.
2 Within five seconds, press the number
button of the local station again.
3 Repeat this procedure until the desired
local station is received.
12
Page 13

To cancel the current traffic
announcement
Press (AF/TA) or (SOURCE).
To cancel all traffic announcements, turn off
the function by pressing (AF/TA) until
“AF TA-OFF” appears.
Presetting the volume of traffic
announcements
You can preset the volume level of the traffic
announcements beforehand so you won’t miss
the announcement. When a traffic
announcement starts, the volume will be
automatically adjusted to the preset level.
1 Select the desired volume level.
2 Press (AF/TA) for two seconds.
“TA” appears and the setting is stored.
Receiving emergency
announcements
If an emergency announcement comes in while
you are listening to the radio, the programme
will be automatically switched to it. If you are
listening to a source other than the radio, the
emergency announcements will be heard if
you set AF or TA to on. The unit will then
automatically switch to these announcements
no matter which source you are listening to at
the time.
Presetting the RDS stations with the AF and TA data
When you preset RDS stations, the unit stores
each station’s data as well as its frequency, so
you don’t have to turn on the AF or TA
function every time you tune in the preset
station. You can select a different setting (AF,
TA, or both) for individual preset stations, or
the same setting for all preset stations.
Presetting the same setting for all
preset stations
1 Select an FM band (page 8).
2 Press (AF/TA) repeatedly to select either
“AF-ON”, “TA-ON” or “AF TA-ON” (for
both AF and TA functions).
Note that selecting “AF TA-OFF” stores not
only RDS stations, but also non-RDS
stations.
3 Press (SHIFT), then press (3) (PLAY
MODE) repeatedly until “BTM” appears.
4 Press (4) (n) until ”B.T.M” flashes.
5 Press (SHIFT).
Presetting different settings for
each preset station
1 Select an FM band, and tune in the
desired station (page 9).
2 Press (AF/TA) repeatedly to select either
“AF-ON”, “TA-ON” or “AF TA-ON” (for
both AF and TA functions).
3 Press the desired number button until
“MEM” appears.
Repeat from step 1 to preset other stations.
Tip
If you want to change the preset AF and/or TA
setting after you tune in the preset station, you
can do so by turning the AF or TA function on or
off.
13
Page 14
Locating a station by programme type
You can locate the station you want by
selecting one of the programme types shown
below.
Programme types Display
News NEWS
Current Affairs AFFAIRS
Information INFO
Sports SPORT
Education EDUCATE
Drama DRAMA
Culture CULTURE
Science SCIENCE
Varied VARIED
Popular Music POP M
Rock Music ROCK M
Easy Listening EASY M
Light Classical LIGHT M
Classical CLASSICS
Other Music Type OTHER M
Weather WEATHER
Finance FINANCE
Children’s programmes CHILDREN
Social Affairs SOCIAL A
Religion RELIGION
Phone In PHONE IN
Travel TRAVEL
Leisure LEISURE
Jazz Music JAZZ
Country Music COUNTRY
National Music NATION M
Oldies Music OLDIES
Folk Music FOLK M
Documentary DOCUMENT
Not specified NONE
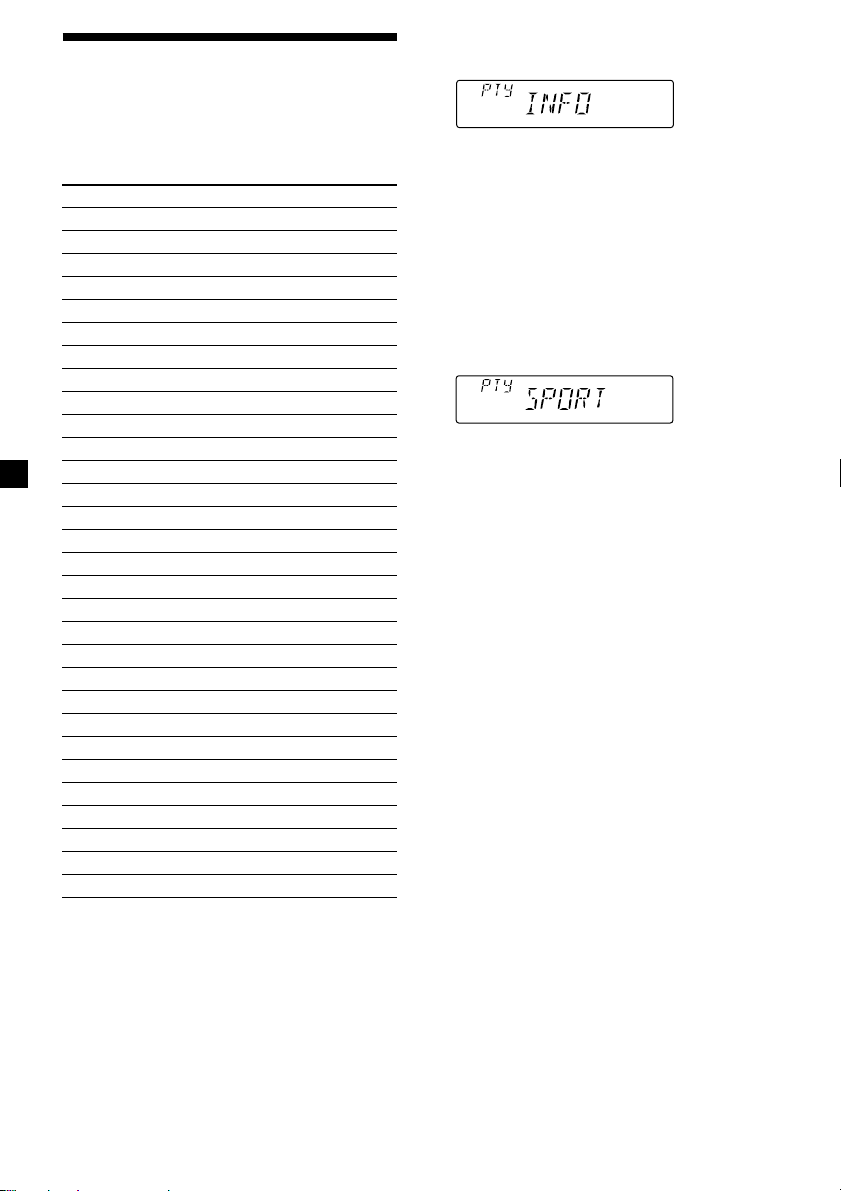
1 Press (PTY) during FM reception until
“PTY” appears.
The current programme type name appears
if the station is transmitting the PTY data.
“- - - - -” appears if the received station is
not an RDS station, or if the RDS data has
not been received.
2 Press (PTY) repeatedly until the desired
programme type appears.
The programme types appear in the order
shown in the above table. Note that you
cannot select “NONE” (Not specified) for
searching.
3 Push the SEEK/AMS control up or down.
The unit starts searching for a station
broadcasting the selected programme type.
When the unit finds the programme, the
programme type appears again for five
seconds.
“NO” and the programme type appear
alternately for five seconds if the unit
cannot find the programme type. It then
returns to the previous selected station.
Note
You cannot use this function in some countries
where no PTY (Programme Type selection) data is
available.
14
Page 15
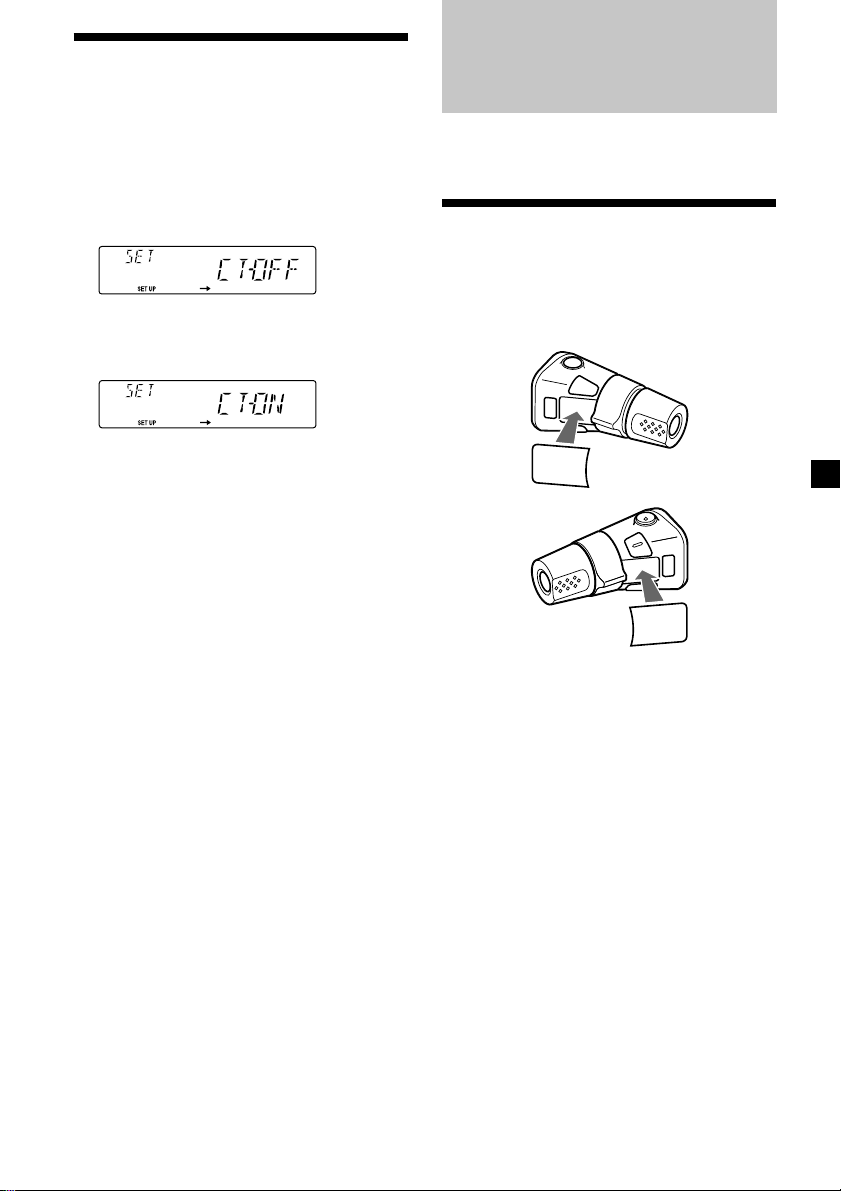
Setting the clock automatically
Other Functions
The CT (Clock Time) data from the RDS
transmission sets the clock automatically.
1 During radio reception, press (SHIFT),
then press (2) (SET UP) repeatedly until
“CT” appears.
2 Press (4) (n) repeatedly until “CT-ON”
appears.
The clock is set.
3 Press (SHIFT) to return to the normal
display.
To cancel the CT function
Select “CT-OFF” in step 2 above.
Notes
• The CT function may not work even though an
RDS station is being received.
• There might be a difference between the time
set by the CT function and the actual time.
You can also control this unit with an optional
rotary commander.
Labelling the rotary commander
Depending on how you mount the rotary
commander, attach the appropriate label as
shown in the illustration below.
LIST
MODE
SOUND
SOUND
MODE
LIST
15
Page 16
Using the rotary commander
The rotary commander works by pressing
buttons and/or rotating controls.
By pressing buttons
(the SOURCE and MODE buttons)
By rotating the control
(the SEEK/AMS control)
(SOURCE)
(MODE)
Each time you press (SOURCE), the
source changes as follows:
TUNER ˜ CD
Pressing (MODE) changes the operation
in the following ways;
• Tuner: FM1 n FM2 n MW n LW
Rotate the control momentarily and
release it to:
• Locate a specific track on a disc. Rotate
and hold the control until you locate the
specific point in a track, then release it to
start playback.
• Tune in stations automatically. Rotate and
hold the control to find a specific station.
By pushing in and rotating the
control (the PRESET/DISC control)
Push in and rotate the control to:
• Receive the stations memorised on the
number buttons.
16
Page 17
Other operations
Rotate the VOL control to
adjust the volume.
Press (SOUND) to adjust the
volume and sound menu.
Press (LIST) to display the programme
type names (FM tuner only).
Press (ATT) to
attenuate the
sound.
OFF
Press (OFF) to
turn off the
unit.
Adjusting the sound characteristics
You can adjust the bass, treble, balance, and
fader.
You can store the bass and treble levels
independently for each source.
1 Select the item you want to adjust by
pressing (SOUND) repeatedly.
VOL (volume) n BAS (bass) n
TRE (treble) n BAL (left-right) n
FAD (front-rear)
2 Adjust the selected item by rotating the
dial.
Adjust within three seconds after selecting
the item. (After three seconds, the dial
function reverts to volume control.)
Changing the operative direction
The operative direction of controls is factoryset as shown below.
To increase
To decrease
If you need to mount the rotary commander on
the right hand side of the steering column, you
can reverse the operative direction.
Press (SOUND) for two seconds while
pushing the VOL control.
Tip
You can also change the operative direction of
these controls with the unit (page 18).
Attenuating the sound
Press (ATT) on the optional rotary
commander.
“ATT-ON” flashes momentarily.
To restore the previous volume level, press
(ATT) again.
Tip
When the interface cable of a car telephone is
connected to the ATT lead, the unit decreases the
volume automatically when a telephone call comes
in (Telephone ATT function).
17
Page 18

Changing the sound and display settings
The following items can be set:
•CLOCK (page 6).
•CT (Clock Time) (page 15).
• D.INFO (Dual Information) - to display the
clock and the play mode at the same time
(ON) or to display the information
alternately (OFF).
• BEEP - to turn on or off the beeps.
• RM (Rotary Commander) - to change the
operative direction of the controls of the
rotary commander.
— Select “NORM” to use the rotary
commander as the factory-set position.
— Select “REV” when you mount the rotary
commander on the right side of the
steering column.
• M.DSPL (Motion Display) - to turn the
motion display on or off.
1 Press (SHIFT).
2 Press (2) (SET UP) repeatedly until the
desired item appears.
Each time you press (2) (SET UP), the item
changes as follows:
CLOCK n CT n D.INFO* n BEEP n RM n
M.DSPL
* When no CD or MD is playing, this item will
not appear.
Note
The displayed item will differ depending on
the source.
3 Press (4) (n) to select the desired
setting (Example: ON or OFF).
4 Press (SHIFT).
After the mode setting is complete, the
display returns to normal playback mode.
18
Page 19
Boosting the bass sound
— D-bass
You can enjoy a clear and powerful bass
sound. The D-bass function boosts the low
frequency signal with a sharper curve than
conventional bass boost.
You can hear the bass line more clearly even
while the vocal volume remains the same. You
can emphasize and adjust the bass sound
easily with the D-BASS control.
D-BASS 3
Level
0dB
Adjusting the bass curve
Turn the D-BASS control to adjust the
bass level (1, 2 or 3).
“D-BASS” appears in the display.
To cancel, turn the control to OFF.
Note
If the bass sound becomes distorted, adjust the DBASS control or volume.
D-BASS 2
D-BASS 1
Frequency (Hz)
Additional Information
Precautions
• If your car was parked in direct sunlight
resulting in a considerable rise in
temperature inside the car, allow the unit to
cool off before operating it.
• If no power is being supplied to the unit,
check the connections first. If everything is in
order, check the fuse.
• If no sound comes from the speakers of
2-speaker systems, set the fader control to the
centre position.
• If your car is equipped with a power aerial, it
will extend automatically while the unit is
operating.
If you have any questions or problems
concerning your unit that are not covered in
this manual, please consult your nearest Sony
dealer.
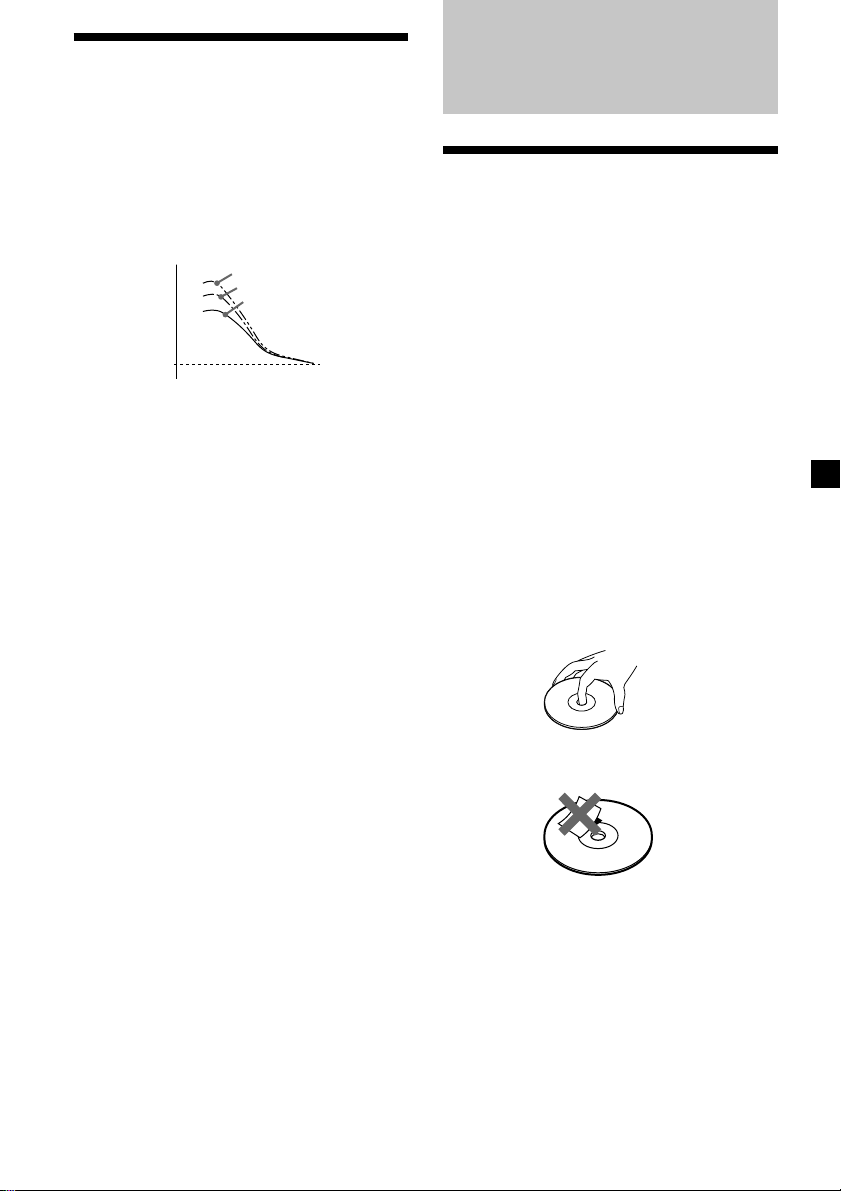
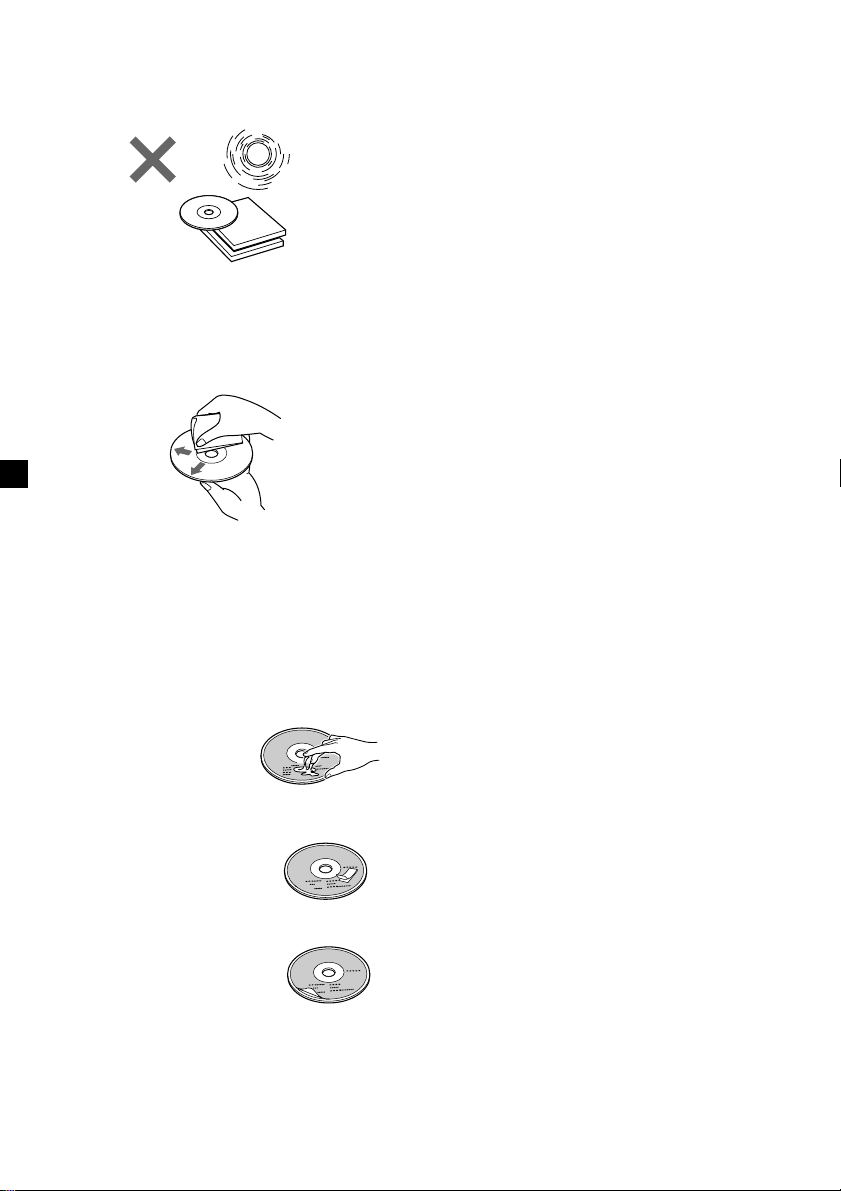
Notes on handling CDs
A dirty or defective disc may cause sound
dropouts while playing. To enjoy optimum
sound, handle the disc by its edge. To keep the
disc clean, do not touch the surface.
Do not stick paper or tape on the labelled
surface.
continue to next page n
19
Page 20
Do not expose the discs to direct sunlight or
heat sources such as hot air-ducts, or leave
them in a car parked in direct sunlight where
there can be a considerable rise in temperature
inside the car.
Before playing, clean the discs with an optional
cleaning cloth. Wipe each disc from the centre
out.
Do not use solvents such as benzine, thinner,
commercially available cleaners, or antistatic
spray intended for analog discs.
Notes on discs
If you use the discs explained below, the sticky
residue can cause the CD to stop spinning and
may cause malfunction or ruin your discs.
Notes on moisture condensation
On a rainy day or in a very damp area,
moisture may condense on the lenses inside
the CD player. Should this occur, the unit will
not operate properly. In this case, remove the
disc and wait for about an hour until the
moisture evaporates.
When you play 8 cm CDs
Use the optional Sony compact disc single
adapter (CSA-8) to protect the CD player from
damage.
Do not use second-hand or rental CDs that
have a sticky residue on the surface (for
example from peeled-off stickers or from ink,
or glue leaking from under the stickers).
There are paste residue
Ink is sticky
Do not use rental CDs with old labels that are
beginning to peel off.
Stickers that are beginning
to peel away, leaving a
sticky residue
Do not use your CDs with labels or stickers
attached.
Labels are attached
20
Page 21

Maintenance
Fuse replacement
When replacing the fuse, be sure to use one
matching the amperage rating stated on the
original fuse. If the fuse blows, check the
power connection and replace the fuse. If the
fuse blows again after replacement, there may
be an internal malfunction. In such a case,
consult your nearest Sony dealer.
Dismounting the unit
Release key
(supplied)
µ
Fuse (10 A)
Warning
Never use a fuse with an amperage rating
exceeding the one supplied with the unit as
this could damage the unit.
Cleaning the connectors
The unit may not function properly if the
connectors between the unit and the front
panel are not clean. In order to prevent this,
open the front panel by pressing (RELEASE),
then detach it and clean the connectors with a
cotton swab dipped in alcohol. Do not apply
too much force. Otherwise, the connectors may
be damaged.
Main unit
µ
µ
Pull the unit out while the release key is inserted.
Back of the front panel
Notes
• For safety, turn off the engine before cleaning
the connectors and remove the key from the
ignition switch.
• Never touch the connectors directly with your
fingers or any metal device.
21
Page 22

Specifications
CD player section
System Compact disc digital audio
Signal-to-noise ratio 80 dB
Frequency response 10 – 20,000 Hz
Wow and flutter Below measurable limit
system
Tuner section
FM
Tuning range 87.5 – 108.0 MHz
Aerial terminal External aerial connector
Intermediate frequency 10.7 MHz
Usable sensitivity 12 dBf
Selectivity 75 dB at 400 kHz
Signal-to-noise ratio 65 dB (stereo),
Harmonic distortion at 1 kHz
Separation 35 dB at 1 kHz
Frequency response 30 – 15,000 Hz
68 dB (mono)
0.8 % (stereo),
0.6 % (mono)
MW/LW
Tuning range MW: 531 – 1,602 kHz
Aerial terminal External aerial connector
Intermediate frequency 10.7 MHz/450 kHz
Sensitivity MW: 30 µV
LW: 153 – 281 kHz
LW: 50 µV
Power amplifier section
Outputs Speaker outputs
Speaker impedance 4 – 8 ohms
Maximum power output
(sure seal connectors)
45 W × 4 (at 4 ohms)
General
Outputs Power aerial relay control
Tone controls Bass ±8 dB at 100 Hz
Power requirements 12 V DC car battery
Dimensions Approx. 178 × 50 × 185 mm
Mounting dimensions Approx. 182 × 53 × 162 mm
Mass Approx. 1.2 kg
Supplied accessories Parts for installation and
Optional accessories Rotary Commander
Design and specifications are subject to change
without notice.
lead
Telephone ATT control
lead
Treble ±8 dB at 10 kHz
(negative ground)
(w/h/d)
(w/h/d)
connections (1 set)
Front panel case (1)
RM-X4S
Compact disc single
adapter CSA-8
22
Page 23
Troubleshooting guide
The following checklist will help you remedy the problems you may encounter with your unit.
Before going through the checklist below, check the connection and operating procedures.
General
Problem
No sound.
The contents of the memory
have been erased.
Indications do not appear in
the display.
No beep sound.
CD playback
Problem
A disc cannot be loaded.
Playback does not begin.
A disc is automatically ejected.
CD will not eject.
The operation buttons do not
function.
The sound skips due to
vibration.
Cause/Solution
•Cancel the ATT function.
•Set the fader control to the centre position for two-speaker
systems.
•Rotate the dial in a clockwise direction to adjust the volume.
• The power cord or battery has been disconnected.
• The reset button has been pressed.
n Store again into the memory.
Remove the front panel and clean the connectors. See “Cleaning
the connectors” (page 20) for details.
The beep sound is canceled (page 18).
Cause/Solution
•Another CD is already loaded.
•The CD is forcibly inserted upside down or in the wrong way
(MD).
Dirty CD.
The ambient temperature exceeds 50°C.
Press 6 for two seconds.
Press the reset button.
• The unit is installed at an angle of more than 60°.
• The unit is not installed in a sturdy part of the car.
continue to next page n
23
Page 24

Radio reception
Problem
Preset tuning is not possible.
Automatic tuning is not
possible.
The stations cannot be
received.
The sound is hampered by
noises.
The “ST” indication flashes.
Cause/Solution
• Memorise the correct frequency.
• The broadcast signal is too weak.
The broadcast signal is too weak.
n Use manual tuning.
Connect an power aerial control lead (blue) or accessory power
supply lead (red) to the power supply lead of a car’s aerial
booster. (When your car has built-in FM/MW/LW aerial in the
rear/side glass only.)
•Tune in the frequency accurately.
•The broadcast signal is too weak.
n Set to the MONO mode (page 10).
RDS
Problem
The SEEK starts after a few
seconds of listening.
No traffic announcements.
PTY displays “NONE.”
If the above-mentioned solutions do not help improve the situation, consult your nearest Sony
dealer.
Cause/Solution
The station is non-TP or has a weak signal.
n Press (AF/TA) repeatedly until “AF TA-OFF” appears.
•Activate “TA.”
•The station does not broadcast any traffic announcements
despite being TP.
n Tune to another station.
The station does not specify the programme type.
24
Page 25

Page 26

Vítejte!
Děkujeme vám, že jste se rozhodli pro koupi
Sony Compact Disc Player. Tento přístroj je
vybaven celou řadou různých funkcí stejně tak
jako přídavným otočným dálkovým
ovladačem.
2
Page 27

Obsah
Umístění ovládacích prvků .................................. 4
Uvedení do provozu
Vynulování přístroje ........................................ 5
Sejmutí předního panelu .................................5
Nastavení hodin .............................................. 6
CD Přehrávač
Poslech CD .....................................................7
Přehrávání CD v různých režimech ................. 8
Rádio
Automatické ukládání stanic do paměti
— Best Tuning Memory
(BTM) - pamě ladění ................................. 8
Ukládání pouze požadovaných stanic ............9
Poslech stanic, uložených do paměti ............. 9
RDS
Přehled funkcí RDS ....................................... 10
Znázornění jména stanice .............................10
Automatické znovunaladění stejného programu
— Alternative Frequencies (AF) - alternativní
frekvence ................................................. 11
Poslech dopravního hlášení .......................... 12
Přednastavení stanic RDS s údaji AF a TA ...13
Vyhledávání stanice podle druhu
programu ................................................. 14
Automatické nastavení hodin ....................... 15
Dodatečné informace
Bezpečnostní upozornění ............................. 19
Údržba .......................................................... 21
Demontáž přístroje ....................................... 21
Technické údaje ............................................ 22
Odstranění případných drobných závad ...... 23
Další funkce
Nalepení nálepky na otočný dálkový
ovladač.....................................................15
Použití otočného dálkového ovladače ..........16
Nastavení zabarvení zvuku ........................... 17
Ztlumení zvuku .............................................. 17
Změna nastavení zvuku a displeje ................18
Zvýraznění basů
— D-bass .................................................19
3
Page 28
Umístění ovládacích prvků
MODE
SEEK/AMS
SOURCE
RELEASE
SOUND
DSPL
D
OFF
SHIFT
2 3 4 5 6 7 8 9110
Na uvedených stranách naleznete podrobné informace.
1 Knoflík SEEK/AMS (vyhledávání/
automatický hudební senzor/manuální
vyhledávání) 7, 9, 11, 14
2 Tlačítko MODE (volba pásma/přístroje)
8, 9
3 Tlačítko SOURCE (volba zdroje) 7, 8, 9,
13
4 Ovládání (hlasitost/basy/výšky/vlevo-
0 Tlačítko AF/TA 11, 12, 13
!¡ Tlačítko RELEASE (uvolnění předního
!™ Tlačítko vynulování (umístěné na přední
!£ Tlačítko OFF* 5, 7
!¢ Tlačítko SHIFT
vpravo/vepředu-vzadu) 6, 17
5 Tlačítko SOUND 17
6 Tlačítko DSPL (změna režimu displeje)
7, 10, 11
7 Displej
8 Tlačítko PTY 14
9 Tlačítko 6 (vysunutí) 7
!∞ Během poslechu rádia:
!§ Knoflík D-BASS 19
PTY
AF/TA
1
2
OFF
D - BASS
3
CDX–2500R
panelu) 5, 20
straně přístroje za předním panelem) 5
PLAY MODE 8, 9, 10, 12, 13
REP 8
SET UP 6, 15, 18
SHUF 8
Číselná tlačítka 9, 12, 13
*Upozornění, jestliže instalujete
přístroj do auta bez mezipolohy pro
klíček od zapalování
Přesvědčte se, abyste po vypnutí motoru
stisknuli tlačítko (OFF) na přístroji na dvě
sekundy, aby zhasl displej s hodinami.
Stisknete-li tlačítko (OFF) pouze krátce,
nevypne se displej s hodinami a to vede k
vybíjení baterie.
4
Page 29
Uvedení do provozu
Vynulování přístroje
Než začnete s tímto přístrojem poprvé
pracovat nebo po každé výměně autobaterie
musíte přístroj vynulovat.
Sejměte přední panel a stiskněte tlačítko pro
vynulování špičatým nástrojem jako např.
tužkou.
Poznámky
• Dbejte na to, aby vám panel při snímání nevypadl z
ruky.
• Jestliže sejmete přední panel při zapnutém přístroji,
vypne se tento automaticky, aby nedošlo k
poškození reproduktorů.
• Když nosíte přední panel s sebou, ukládejte ho
vždy do příslušného pouzdra z příslušenství.
Nasazení předního panelu
Nasate stranu a předního panelu na stranu
b přístroje podle ilustrace a zatlačte na něj,
až zaklapne.
Tlačítko pro vynulování
Poznámky
• Stisknutím tlačítka reset budou vymazány hodiny a
některé funkce, uložené do paměti.
• Jestliže zapojíte do přístroje přívodní kabel nebo ho
vynulujete, počkejte 10 sekund, než vložíte disk.
Jestliže vložíte disk během těchto 10 sekund,
nebude přístroj vynulován a proto budete muset
stisknout tlačítko pro vynulování ještě jednou.
Sejmutí předního panelu
Máte možnost odstranit přední panel tohoto
přístroje, abyste tak zabránili jeho odcizení.
1 Stiskněte (OFF).
2 Stiskněte (RELEASE), potom posuňte
přední panel lehce doleva a sejměte ho
směrem k sobě.
(OFF)
a
b
Poznámky
• Při nasazování nepohybujte s panelem nahoru dolů.
• Při nasazování není třeba tlačit na přední panel
příliš silně.
• Netlačte silně ani nenarážejte ničím na displej na
předním panelu.
• Nevystavujte přední panel přímému slunečnímu
záření, zdrojům tepla jako např. vedení teplého
vzduchu, ani ho nenechávejte ve vlhkém prostředí.
Nikdy ho nenechávejte na přístrojové desce apod.
auta zaparkovaného na slunci, kdy by mohla
teplota uvnitř auta nepřiměřeně stoupnout.
Bezpečnostní upozornění
Jestliže vypnete klíček od zapalování, aniž
byste odstranili přední panel, začne na několik
sekund pípat bezpečnostní alarm.
(RELEASE)
5
Page 30
Nastavení hodin
Hodiny mají 24-hodinový ukazatel.
2 Stiskněte (SHIFT).
Příklad: nastavení hodin na 10:08
1 Stiskněte (SHIFT), potom tiskněte
opakovaně (2) (SET UP - nastavení),
dokud se neobjeví “CLOCK”.
1 Stiskněte (4) (n).
Indikace hodin bliká.
2 Nastavte hodinu.
dozadu
SOURCE
dopředu
3 Stiskněte (4) (n).
Indikace minut bliká.
4 Nastavte minuty.
dozadu
SOURCE
dopředu
Hodiny se rozejdou.
3 Stiskněte (SHIFT).
Jakmile dokončíte nastavení hodin, displej
se vrátí k normálnímu režimu přehrávání.
6
Page 31

CD Přehrávač
Změna položky na displeji
Při každém stisknutí tlačítka (DSPL) během
přehrávání CD se bude položka měnit
následovně:
Číslo skladby/uplynulá doba přehrávání ˜ hodiny
Poslech CD
Vložte CD.
Přehrávání se spustí automaticky.
Potištěnou stranou nahoru
Jetliže je CD již vložený, tiskněte opakovaně
(SOURCE), dokud se neobjeví “CD”, abyste
spustili přehrávání.
Indiakce CD
Poznámka
Chcete-li přehrávat 8 cm CD, použijte přídavný
adaptér Sony compact disc single (CSA-8).
Funkce Tlačítko
Zastavení přehrávání 6 nebo(OFF)
Vysunutí CD 6
Uplynulá doba přehrávání
Číslo skladby
Po zvolení požadované položky se displej po
několika sekundách automaticky přepne do
akčního režimu displeje.
V režimu akčního displeje se na displeji
postupně střídají všechny výše uvedené
položky.
Tip
Režim akčního displeje můžete vypnout. (Viz “Změna
nastavení zvuku a displeje” na straně 18).
Vyhledávání konkrétní skladby
— Automatic Music Sensor (AMS) automatický hudební senzor
Během přehrávání posunujte spínač
SEEK/AMS nahoru nebo dolů a uvolněte
ho pro každou skladbu, kterou chcete
přeskočit.
Vyhledávání následujících
skladeb
Vyhledávání předešlých
skladeb
SEEK/AMS
Vyhledávání konkrétního bodu ve
skladbě
— manuální vyhledávání
Během přehrávání posuňte spínač
SEEK/AMS nahoru nebo dolů a držte ho.
Uvolněte ho, jakmile naleznete
požadovaný bod.
Vyhledávání dopředu
SEEK/AMS
Vyhledávání dozadu
Poznámka
Jestliže se na displeji objeví “
“
začátek nebo na konec disku a nemůžete postupovat
dále.
”, znamená to, že jste se dostali na
” nebo
7
Page 32

Přehrávání CD v různých
režimech
CD můžete přehrávat v různých režimech:
•REP (Repeat Play - opakované přehrávání)
opakuje aktuální skladbu.
•SHUF (Shuffle Play - náhodné přehrávání)
přehrává všechny skladby v nahodilém
pořadí.
Opakované přehrávání skladeb
— opakované přehrávání
1 Během přehrávání stiskněte (SHIFT).
Při každém stisknutí (SHIFT) se rozsvítí
pouze ty položky, které mohou být zvoleny.
DSPL
D
SHIFT
OFF
2 Tiskněte opkovaně (6) (REP), dokud se
neobjeví “REP-1”.
Opakované přehrávání začíná.
2 3 4 5 6 7 81
Rádio
Automatické ukládání
stanic do paměti
— Best Tuning Memory (BTM) - pamě
ladění
Přístroj vybírá stanice s nejsilnějším signálem a
ukládá je do paměti v pořadí jejich frekvencí.
Pro každé vlnové pásmo můžete uložit do
paměti až 10 stanic (FM 1, FM 2, MW - SV a
LW - DV).
D
Pozor
Jestliže ladíte během řízení, používejte funkci
automatického ukládání stanic do paměti, aby
nedošlo k nehodě.
1 Tiskněte opakovaně (SOURCE)-zdroj,
abyste zadali přijímač.
Při každém stisknutí (SOURCE) se bude
zdroj měnit následovně:
z TUNER z CD
3 Stiskněte (SHIFT).
Chcete-li se vrátit k režimu normálního
přehrávání, zadejte “REP-OFF” v kroku 2 výše.
Přehrávání skladeb v nahodilém pořadí
— náhodné přehrávání
1 Během přehrávání stiskněte (SHIFT).
2 Tiskněte opaakovaně (7) (SHUF), dokud
se neobjeví “SHUF-1”.
Náhodné přehrávání začíná.
3 Stiskněte (SHIFT).
Chcete-li se vrátit k režimu normálního
přehrávání, zadejte “SHUF-OFF” v kroku 2
výše.
8
2 Tiskněte opakovaně (MODE), abyste
zadali požadované pásmo.
Při každém stisknutí tlačítka (MODE), se
pásma mění v následujícím pořadí:
z FM1 z FM2 z MW z LW
3 Stiskněte (SHIFT), potom tiskněte
opakovaně (3) (PLAY MODE) režim
přehrávání, dokud se neobjeví “B.T.M”.
4 Stiskněte (4) (n).
Přístroj uloží do paměti pod číselná tlačítka
stanice v pořadí jejich frekvencí.
Při uložení stanice do paměti zazní pípavý
tón.
5 Stiskněte (SHIFT).
Page 33

Poznámky
• Přístroj neuloží do paměti stanice s přiliš slabým
signálem. Jestliže lze naladit pouze několik stanic,
zůstane pod některými tlačítky jejich původní
nastavení.
• Jestliže je na displeji znázorněné číslo stanice,
bude přístroj ukládat stanice do paměti počínaje od
znázorněného čísla.
• Jestliže v přístroji není žádný CD, objeví se na
displeji pouze vlnové pásmo přijímače, i když
stisknete tlačítko (SOURCE).
Ukládání pouze
požadovaných stanic
Můžete uložit do paměti až 20 stanic na FM
(10 pro FM1 a 2), až 10 stanic na MW, až 10
stanic na LW podle vašeho přání.
1 Tiskněte opakovaně (SOURCE), abyste
zadali přijímač.
2 Tiskněte opakovaně (MODE), abyste
zadali požadované pásmo.
Poslech stanic,
uložených do paměti
1 Tiskněte opakovaně (SOURCE), abyste
zadali přijímač.
2 Tiskněte opakovaně (MODE), abyste
zadali požadované pásmo.
3 Stiskněte číselné tlačítko ((1) až (10))
pod kterým je požadovaná stanice
uložená.
Jestliže nemůžete naladit
přednastavenou stanici
Posuňte a uvolněte spínač SEEK/AMS
nahoru nebo dolů, abyste spustili
vyhledávání stanice (automatické
ladění).
Vyhledávání se zastaví, jakmile je stanice
naladěna. Posunujte opakovaně spínač
SEEK/AMS nahoru nebo dolů, dokud
nenaladíte požadovanou stanici.
3 Posuňte spínač SEEK/AMS nahoru nebo
dolů, abyste naladili stanici, kterou
chcete uložit do paměti a přiřadit ji
danému tlačítku.
4 Stiskněte a držte požadované číselné
tlačítko ((1) až (10)), dokud se na
displeji neobjeví “MEM”.
Na displeji se objeví číslo zadaného
tlačítka.
Poznámka
Jestliže se pokusíte uložit pod stejné tlačítko jinou
stanici, bude původně uložená stanice smazána.
Poznámka
Jestliže se automatické ladění zastavuje příliš často,
stiskněte (SHIFT), potom tiskněte opakovaně (3)
(PLAY MODE), dokud se neobjeví “LOCAL” (režim
lokálního vyhledávání). Potom stiskněte (4) (n),
abyste zadali “LOCAL-ON.” Stiskněte (SHIFT).
Nyní budou vyhledávány a laděny pouze stanice s
relativně silným signálem.
Tip
Jestliže znáte frekvenci stanice, kterou chcete
poslouchat, posuňte spínač SEEK/AMS nahoru nebo
dolů a držte ho, dokud se neobjeví požadovaná
frekvence (manuální ladění).
9
Page 34

Jestliže je stereofonní příjem na FM
rušený
— Monofonní režim
1 Během poslechu rádia stiskněte (SHIFT),
potom tiskněte opakovaně (3) (PLAY
MODE), dokud se neobjeví “MONO”.
2 Tiskněte opakovaně (4) (n), dokud se
neobjeví “MONO-ON”.
Kvalita zvuku se zlepší, zvuk však bude
monofonní (Indikace “ST” zmizí).
3 Stiskněte (SHIFT).
Chcete-li se vrátit zpět k normálnímu režimu
přehrávání, zadejte v kroku 2 výše “MONOOFF”.
Změna položek na displeji
Při každém stisknutí tlačítka (DSPL), se budou
položky měnit následovně:
Frekvence ˜ hodiny
Jakmile zadáte požadovanou položku, displej
se po několika sekundách automaticky změní
na akční displej.
Na akčním displeji se postupně střídají
všechny výše uvedené položky.
RDS
Přehled funkcí RDS
Radio Data System (RDS) je služba vysílacích
stanic, která umožňuje vysílat na pásmu FM
doprovodné digitální informace spolu s
běžnými signály rozhlasového vysílání. Vaše
stereofonní rádio vám nabízí celou řadu
služeb. Jen několik z nich: automatické
naladění stejného programu, poslech
dopravního hlášení, ladění stanic podle jejich
druhu.
Poznámky
• V závislosti na zemi a oblasti nemusí být všechny
funkce RDS dostupné.
• RDS nebude řádně fungovat, jestliže je signál příliš
slabý nebo jestliže naladěná stanice tyto signály
RDS nevysílá.
Znázornění jména
stanice
Tip
Akční displej může být vypnut. (Viz “Změna nastavení
zvuku a displeje” na straně 18).
10
Na displeji se objeví jméno právě naladěné
stanice.
Volba stanice FM (strana 8).
Jestliže naladíte stanici FM, která vysílá
údaje RDS, objeví se na displeji jméno
stanice.
Poznámka
Indikace “ *” znamená, že je přijímána stanice RDS.
Page 35

Změna položek na displeji
Při každém stisknutí tlačítka (DSPL), se
položky na displeji budou měnit následovně:
Frekvence (Jméno stanice) ˜ Hodiny
Jakmile zadáte požadovanou položku, displej
se po několika sekundách automaticky změní
na akční displej.
Na akčním displeji se postupně střídají
všechny výše uvedené položky.
Tip
Akční displej může být vypnut. (Viz “Změna nastavení
zvuku a displeje” na straně 18).
Poznámka
Jestliže naladěná stanice nevysílá údaje RDS, obejví
se na displeji “NO NAME” - žádné jméno.
Automatické
znovunaladění stejného
programu
— Alternative Frequencies (AF) alternativní frekvence
Funkce Alternativní frekvence (AF)
automaticky vybírá a přelauje vysílač s
nejsilnějším signálem v síti.
Při použití této funkce můžete průběžně
poslouchat stejný program i při dalekých
cestách, aniž byste museli dolaovat stanici
manuálně.
Frekvence se mění automaticky.
Poznámka
Jestliže ve vaší oblasti není žádná alternativní stanice
a jestliže tedy nepotřebujete vyhledávat žádnou
alternativní stanici, vypněte funkci AF opakovaným
stisknutím (AF/TA), dokud se na displeji neobjeví “AF
TA-OFF”.
Změna položek na displeji
Při každém stisknutí tlačítka (AF/TA), se
budou položky na displeji měnit následovně:
” TA-ON ” AF TA-ON*
AF-ON “ AF TA-OFF “
* Zadejte tuto položku, chcete-li zaktivovat obě
funkce AF a TA.
Poznámky
• Jestliže “NO AF” a jméno stanice střídavě svítí,
znamená to, že přístroj nemůže v síti najít
alternativní stanici.
• Jestliže po zadání stanice za pomoci funkce AF
začne jméno stanice blikat, znamená to, že není
dostupná žádná alternativní stanice. Posuňte
spínač SEEK/AMS nahoru nebo dolů. dokud bliká
jméno stanice (dp osmi sekund). Přístroj začne
vyhledávat další frekvenci se stejnou programovou
identifikací PI (Programme Identification) (na displeji
se objeví “PI SEEK” a zvuk se ztratí). Jestliže
přístroj nenalezne žádnou jinou frekvenci, objeví se
na displeji “NO PI” a přístroj se vrátí k původně
zadané frekvenci.
pokračování na další straně n
98,5MHz
Stanice
102,5MHz
96,0MHz
1 Zadejte stanici FM (strana 8).
2 Tiskněte opakovaně (AF/TA), aby se na
displeji objevilo “AF-ON”.
Přístroj začne vyhledávat alternativní stanici
se silnějším signálem ve stejné síti.
11
Page 36

Poslech regionálního programu
Funkce “REG-ON” (regionální) na tomto
přístroji vám umožňuje ponechat naladěný
regionální program, aniž by došlo k přepínání
na jiné regionální stanice. (Zapamatujte si, že
funkce AF musí zůstat zapnutá.) V tomto
přístroji je tato funkce výrobcem nastavena na
“REG-ON”, jestliže ji však chcete vypnout,
postupujte podle následujícího popisu
Poslech dopravního
hlášení
Funkce dopravní hlášení (TA) a dopravní
programy (TP) vám umožní automatické ladění
stanice FM, která vysílá dopravní hlášení, i
když posloucháte jiné zdroje.
1 Během poslechu rádia stiskněte (SHIFT),
potom tiskněte opakovaně (3) (PLAY
MODE), dokud se neobjeví “REG”.
2 Tiskněte opakovaně (4) (n) dokud se
neobjeví “REG-OFF”.
3 Stiskněte (SHIFT).
Zapamatujte si, že když zadáte “REG-OFF”
se může stát, že přístroj naladí jinou
regionální stanici ve stejné síti.
Chcete-li se vrátit zpět k poslechu
regionálního programu, zadejte v kroku 2 výše
“REG-ON”.
Poznámka
Tato funkce nefunguje ve Spojeném království a v
několika dalších zemích.
Funkce lokálního vyhledávání (pouze
ve Spojeném království)
Funkce lokálního vyhledávání vám umožňuje
ladit další lokální stanice ve vaší zemi, i když
tyto nejsou uložené do paměti.
1 Stiskněte číselné tlačítko, pod kterým je
uložená v paměti lokální stanice.
2 Během pěti sekund stiskněte opět
tlačítko pro volbu lokální stanice.
Tiskněte opakovaně (AF/TA), dokud se
neobjeví “TA-ON” nebo “AF TA-ON”.
Přístroj začne vyhledávat stanice, vysílající
dopravní hlášení. Jakmile nalezne stanici
vysílající dopravní hlášení, rozsvítí se na
displeji “TP”.
Na začátku dopravního hlášení začne “TA”
blikat, po skončení dopravního hlášení se
blikání zastaví.
Tip
Jestliže dopravní hlášení začne v době, kdy budete
poslouchat jiný zdroj programu, přístroj se
automaticky přepne na toto hlášení a po jeho
skončení se vrátí k původnímu zdroji programu.
Poznámky
• “NO TP” bude na displeji blikat pět sekund, jestliže
naladěná stanice nevysílá žádné dopravní hlášení.
Potom začne přístroj vyhledávat stanici, která vysílá
dopravní hlášení.
• Jestliže se na displeji objeví zároveň “EON” a “TP”
znamená to, že naladěná stanice používá dopravní
hlášení jiných stanic ve stejné síti.
3 Tento postup opakujte, dokud
nenaladíte požadovanou lokální stanici.
12
Page 37

Zrušení aktuálního dopravního hlášení
Stiskněte (AF/TA) nebo (SOURCE).
Chcete-li zrušit všechna dopravní hlášení,
vypněte tuto funkci stisknutím (AF/TA)
dokud se na displeji neobjeví “AF TA-OFF”.
Nastavení hlasitosti dopravních
hlášení
Máte možnost nastavit předem úroveň
hlasitosti dopravních hlášení, abyste tato
hlášení nepřeslechli. Na začátku dopravního
hlášení se hlasitost automaticky nastaví na
přednastavenou úroveň.
1 Zadejte požadovanou úroveň hlasitosti.
2 Stiskněte na dvě sekundy (AF/TA).
Na displeji se objeví “TA” a nastavení je
uloženo do paměti.
Příjem nouzových hlášení
Jestliže je vysíláno nouzové hlášení a vy
posloucháte rádio, bude program automaticky
přepnut na toto hlášení. Jestliže posloucháte
jiný zdroj než rádio, uslyšíte nouzové hlášení
pouze tehdy, když budete mít zapnutou funkci
AF nebo TA. Přístroj se potom automaticky
přepne na toto hlášení, bez ohledu na to, co
budete v tu dobu právě poslouchat.
Přednastavení stanic
RDS s údaji AF a TA
Když uložíte do paměti stanice RDS, přístroj
uloží průvodní údaje pro stanici stejně tak jako
její frekvenci, takže nemusíte při každém
naladění předladěné stanice zapínat funkce AF
nebo TA. Pro jednotlivé předladěné funkce
můžete zadat různá nastavení (AF, TA, nebo
obě) nebo ale také stejné nastavení pro
všechny předladěné stanice.
Stejné nastavení pro všechny
přednastavené stanice
1 Zadejte pásmo FM (strana 8).
2 Tiskněte opakovaně (AF/TA), abyste
zadali bu “AF-ON”, “TA-ON” nebo “AF
TA-ON” (pro obě funkce AF i TA).
Zapamatujte si, že zadáním “AF TA-OFF”
uložíte do paměti nejenom stanice s RDS,
ale také stanice bez RDS.
3 Stiskněte (SHIFT), potom tiskněte
opakovaně (3) (PLAY MODE), dokud se
neobjeví “BTM”.
4 Stiskněte (4) (n), aby začalo blikat
“B.T.M”.
5 Stiskněte (SHIFT).
Různá nastavení pro jednotlivé
přednastavené stanice
1 Zadejte pásmo FM a nalate
požadovanou stanici (strana 9).
2 Tiskněte opakovaně (AF/TA) a zadejte
bu “AF-ON”, “TA-ON” nebo “AF TAON” (pro obě funkce AF i TA).
3 Stiskněte požadované tlačítko pro volbu
stanice, aby se objevilo “MEM”.
Chcete-li nastavit jiné stanice, opakujte
postup od kroku 1.
Tip
Jestliže chcete po naladění stanice změnit nastavení
AF a/nebo TA, můžete tak učinit zapnutím/vypnutím
funkce AF nebo TA.
13
Page 38

Vyhledávání stanice
podle druhu programu
Požadovanou stanici můžete vyhledat
zadáním jednoho z druhů programů podle
tabulky níže.
Druh programu Displej
Zprávy NEWS
Aktuální události AFFAIRS
Informace INFO
Sport SPORT
Vzdělání EDUCATE
Divadlo DRAMA
Kultura CULTURE
Věda SCIENCE
Pestré prog. VARIED
Populární hudba POP M
Rocková hudba ROCK M
Zábavná hudba EASY M
Vážná hudba LIGHT M
Klasická hudba CLASSICS
Jiný druh hudby OTHER M
Počasí WEATHER
Finance FINANCE
Dětské programy CHILDREN
Sociální záležitosti SOCIAL A
Náboženství RELIGION
Telefonáty PHONE IN
Cestování TRAVEL
Volný čas LEISURE
Jazzová hudba JAZZ
Country COUNTRY
Lidová hudba NATION M
Oldies OLDIES
Folklórní hudba FOLK M
Dokumentární vys. DOCUMENT
Bez specifikace NONE
1 Stiskněte (PTY) během poslechu na FM,
aby se na displeji obejvilo “PTY”.
Jestliže stanice vysílá údaje PTY, objeví se
na displeji označení druhu právě
poslouchaného programu. Jestliže stanice
nevysílá RDS nebo jestliže není možné
přijímat signály RDS, objeví se na displeji
“- - - - -”.
2 Tiskněte opakovaně (PTY) aby se objevil
požadovaný druh programu.
Druh programu se objeví v pořadí
uvedeném v předchozí tabulce.
Zapamatujte si, že pro vyhledávání
nemůžete zadat “NONE” (bez specifikace).
3 Posuňte spínač SEEK/AMS nahoru nebo
dolů.
Přístroj začne s vyhledáváním stanice
vysílající zadaný druh programu. Jakmile je
program nalezen, objeví se na pět sekund
opět druh programu.
Jestliže přístroj zadaný druh programu
nenalezne, bude na displeji střídavě blikat
“NO” a druh programu po dobu pěti
sekund, přístroj se poté automaticky
přepne na přenos naposledy přijímané
stanice.
Poznámka
Tuto funkci nemůžete používat v některých zemích,
které nevysílají údaje PTY (Programme Type
selection - volba typu programu).
14
Page 39

Automatické nastavení
hodin
Další funkce
Při příjmu signálu CT (Clock Time - hodiny)
přenášeného pomocí RDS lze nastavit hodiny
na tomto přístroji automaticky.
1 Během poslechu rádia stiskněte (SHIFT),
potom tiskněte opakovaně (2) (SET UP),
aby se objevilo “CT”.
2 Tiskněte opakovaně (4) (n), aby se
objevilo “CT-ON”.
Hodiny jsou nastavené.
3 Stiskněte (SHIFT), abyste se vrátili k
normálnímu displeji.
Zrušení funkce CT
V kroku 2 výše zadejte “CT-OFF”.
Poznámky
• Může se stát, že funkce CT nebude fungovat i přes
příjem stanice RDS.
• Může se stát, že čas nastavený funkcí CT nebude
přesný.
Tento přístroj můžete také ovládat přídavným
otočným dálkovým ovladačem.
Nalepení nálepky na
otočný dálkový ovladač
Podle toho, kam otočný dálkový ovladač
umístíte, nalepte příslušnou nálepku podle
ilustrace níže.
LIST
MODE
SOUND
SOUND
MODE
LIST
15
Page 40

Použití otočného
dálkového ovladače
Dálkový ovladač reaguje na stisknutí tlačítek
a/nebo otáčení knoflíků.
Tlačítka
(tlačítka SOURCE - zdroj a MODE režim)
(SOURCE)
(MODE)
Otočný ovladač
(knoflík SEEK/AMS - vyhledávání)
Otáčejte krátce ovladačem a puste ho,
jestliže chcete:
•Vyhledávat konkrétní skladby na disku.
Otočte a držte ovladač, dokud
nenaleznete konkrétní bod ve skladbě,
potom ho uvolněte, abyste spustili
přehrávání.
•Automaticky ladit stanice. Otočte a držte
ovladač, abyste naladili konkrétní stanici.
Každým stisknutím tlačítka (SOURCE) zdroj, se zdroj mění následovně:
TUNER ˜ CD
Stisknutím (MODE) se funkce mění
následovně:
• Přijímač: FM1 n FM2 n MW n LW
Otáčení zatlačeného knoflíku
(PRESET/DISC - nastavení/disk)
Zatlačte ovladač a otáčejte jím, jestliže
chcete:
•Poslouchat přednastavené stanice,
přiřazené číselným tlačítkům.
16
Page 41

Další funkce
Otáčejte knoflíkem VOL, jestliže
chcete nastavit hlasitost.
Stiskněte
(ATT), chceteli ztlumit zvuk.
OFF
Stiskněte (OFF),
chcete-li přístroj
vypnout.
Stiskněte (SOUND), chcete-li nastavit
hlasitost nebo zabarvení zvuku.
Stiskněte (LIST), abyste vyvolali jména
druhů programů (pouze režim FM).
Změna směru funkce
Směr funkcí knoflíku je výrobcem nastaven
podle ilustrace níže.
Zvyšování
Nastavení zabarvení
zvuku
Můžete nastavit basy, výšky, vyvážení vlevo-
vpravo a vepředu-vzadu.
Pro každý zdroj můžete zadat zvláš úroveň
basů a výšek.
1 Zadejte položku, kterou chcete nastavit,
opakovaným tisknutím (SOUND).
VOL (hlasitost) n BAS (basy) n
TRE (výšky) n BAL (vlevo-vpravo) n
FAD (vepředu-vzadu)
2 Zadanou položku nastavte otáčením
knoflíku.
Položku nastavte do tří sekund po jejím
zadání. (Po třech sekundách bude knoflík
opět fungovat jako knoflík pro ovládání
hlasitosti).
Ztlumení zvuku
Stiskněte (ATT) na přídavném dálkovém
ovladači.
Na displeji krátce zabliká “ATT-ON”.
Snižování
Jestliže jste nuceni upevnit dálkový ovladač na
pravé straně sloupku volantu, můžete směr
funkcí otočit.
Stiskněte (SOUND) na dvě sekundy a
zatlačte přitom na knoflík VOL.
Tip
Máte možnost změnit směr funkcí daných knoflíků
přes přístroj (strana 18).
Chcete-li nastavit původní úroveň hlasitosti,
stiskněte opět (ATT).
Tip
Jestliže je spojovací kabel od autotelefonu zapojen
na kabel ATT, ztlumí přístroj automaticky hlasitost,
jakmile zazvoní telefon (funkce Telefon ATT).
17
Page 42

Změna nastavení zvuku
a displeje
Můžete nastavit následující položky:
•CLOCK - hodiny (strana 6).
•CT (automatické nastavení hodin) (strana 15).
•D.INFO (dvojí informace) - znázornění hodin
a režimu přehrávání zároveň (ON), nebo
střídavě (OFF).
•BEEP - zapnutí nebo vypnutí pípání.
•RM (otočný dálkový ovladač) - změna směru
funkcí ovládacích prvků na dálkovém
ovladači.
— Zadejte “NORM”, chcete-li používat
dálkový ovladač v nastavení, zadaném
výrobcem.
— Zadejte “REV”, chcete-li upevnit dálkový
ovladač na pravé straně sloupku volantu.
•M.DSPL (akční displej) - zapínání a vypínání
akčního displeje.
1 Stiskněte (SHIFT).
2 Tiskněte opakovaně (2) (SET UP),
dokud se neobjeví požadovaná položka.
Při každém stisknutí tlačítek (2) (SET UP),
se budou položky měnit následovně:
CLOCK n CT n D.INFO* n BEEP n RM n
M.DSPL
* Jestliže není přehráván ani CD ani MD, neobjeví
se tato položka.
Poznámka
Položka na displeji se bude měnit podle daného
zdroje.
3 Stiskněte (4) (n), abyste zadali
požadované nastavení (Příklad: ON nebo
OFF).
4 Stiskněte (SHIFT).
Když je nastavení ukončeno, objeví se
displej pro normání přehrávání.
18
Page 43

Zvýraznění basů — D-bass
Můžete se těšit z poslechu jasných a silných
basů. Funkce D-bass zvýrazňuje signály sa
nižšími frekvencemi a ostřejší křivkou než
konvenční zvýraznění basů.
Basy uslyšíte mnohem jasněji, i když budou
vokály nastaveny na stejnou hlasitost. Basy
můžete zvýraznit a nastavit snadno za pomoci
ovladače D-BASS.
D-BASS 3
D-BASS 2
Úroveň
0dB
Nastavení křivky basů
Otáčejte ovladačem D-BASS, abyste
nastavili úroveň basů (1, 2 nebo 3).
Na displeji se objeví “D-BASS”.
Chcete-li nastavení zrušit, otočte ovladač na
OFF - vypnuto.
Poznámka
Jsou-li basy zkreslené, nastavte je za pomoci tlačítka
D-BASS nebo tlačítka pro nastavení hlasitosti.
D-BASS 1
Frekvence (Hz)
Dodatečné
informace
Bezpečnostní
upozornění
•Bylo-li vaše auto zaparkováno na přímém
slunci a došlo-li k velkému zvýšení teploty
uvnitř auta, nechte přístroj vychladnout, než
ho uvedete do provozu.
• Není-li přístroj pod proudem, zkontrolujte
napřed jeho zapojení. Je-li vše v pořádku,
zkontrolujte pojistku.
•Jestliže se z reproduktorů neozývá žádný
zvuk, když jsou zapojené 2 reproduktory,
nastavte vyvážení reproduktorů do středové
polohy.
•Jestliže je vaše auto vybaveno elektrickou
anténou, zapamatujte si, že tato se bude
vysouvat automaticky, jakmile zapnete rádio.
Vyskytnou-li se další otázky nebo problémy
týkající se vašeho přístroje, které nejsou
popsány v tomto návodu k použití, obrate se
na nejbližší zastoupení firmy Sony.
Poznámky k zacházení s CDs
Zašpiněné nebo poškozené disky mohou vést
k přeskakování zvuku během přehrávání.
Abyste mohli poslouchat optimální zvuk,
sahejte na CD pouze na jeho hranách. Aby
zůstaly disky čisté, nedotýkejte se jejich
povrchu.
Na potištěnou stranu nelepte ani nálepky ani
lepící pásky.
pokračování na další straně n
19
Page 44

Nevystavujte disky přímému slunečnímu záření
ani zdrojům tepla jako jsou ventilátory,
nenechávejte je v autě zaparkovaném na
přímém slunci, kdy by mohla teplota uvnitř
auta nepřiměřeně stoupnout.
Před začátkem přehrávání očistěte CD jemnou
prachovkou. CD otírejte směrem od středu k
okrajům.
Nepoužívejte rozpouštědla jako je benzín,
ředidla, běžné čistící přípravky nebo
antistatický spray, určený pro analogové
disky.
Poznámky k diskům
Jestliže budete používat disky popsané níže,
mohou nalepené zbytky způsobit, že se CD
přestane točit a mohou vést k poruchám nebo
zničení vašeho disku.
Poznámky ke zkondenzování vlhkosti
Za velmi deštivých dnů nebo ve velmi vlhkém
prostředí může dojít ke zkondenzování vlhkosti
na čočkách uvnitř přehrávače CD. Jestliže k
tomu dojde, nebude přístroj řádně fungovat. V
tom případě vyjměte disk a počkejte nejméně
hodinu, dokud se vlhkost nevypaří.
Jestliže přehráváte 8 centimetrové
disky
Použijte přídavný adaptér Sony compact disc
single (CSA-8), abyste uchránili přehrávač CD
před poškozením.
Nepoužívejte disky, které jste koupili již
použité nebo z půjčovny, které mají na
povrchu nalepené zbytky (například od
sloupnutých nálepek, inkoustu nebo zbytky
lepidla nálepek).
Zde jsou zbytky lepidla
Inkoust je lepkavý
Nepoužívejte CD z půjčovny se starými
nálepkami, které se začínají odloupávat.
Nálepky, které se začínají
odloupávat, zanechávají
lepkavé zbytky
Nepoužívejte vaše Cd, na které byly
dodatečně nalepeny nálepky nebo štítky.
Nalepené štítky
20
Page 45

Údržba
Výměna pojistky
Při výměně pojistky se ujistěte, abyste použili
pojistku se správnou hodnotou, která je
uvedena na jejím povrchu. Jestliže pojistka
praskne, zkontrolujte zapojení proudu a
pojistku vyměňte. Jestliže pojistka po výměně
opět praskne, může to být v důsledku poruchy
přístroje. V tom případě se obrate na nejbližší
zastoupení Sony.
Demontáž přístroje
Uvolňovací klíč
(součást
příslušenství)
µ
Pojistka (10 A)
Upozornění
Nikdy nepoužívejte pojistky s vyšší ampérovou
hodnotou, než jaké jsou v přístroji, protože by
to mohlo způsobit poškození přístroje.
Čistění kontaktů
Jestliže jsou kontakty mezi přístrojem a
předním panelem znečistěné, nebude přístroj
fungovat řádně. Abyste tomu předešli,
uvolněte přední panel stisknutím tlačítka
(RELEASE), sejměte ho a potom vyčistěte
konektory smotkem bavlněného hadříku
navlhčeného v alkoholu. Na kontakty přitom
příliš netlačte, abyste je nepoškodili.
Přístroj
µ
µ
Vysuňte přístroj dopředu, uvolňovací klíč musí být
přitom zasunutý.
Zadní strana předního panelu
Poznámky
• Pro vaši bezpečnost vypněte motor před čistěním
konektorů a vytáhněte klíček od zapalování.
• Nikdy se nedotýkejte kontaktů přímo prsty ani
žádnými kovovými předměty.
21
Page 46

Technické údaje
Přehrávač CD
Systém Digitální audio systém pro
kompaktní disky
Odstup signálu od šumu 80 dB
Odpovídající kmitočet 10 – 20.000 Hz
Pomalé a rychlé kolísání Pod měřitelnou hranicí
Rádio
FM
Kmitočtový rozsah 87,5 – 108,0 MHz
Připojení antény Externí zdířka pro napojení
antény
Mezifrekvenční kmitočet 10,7 MHz
Citlivost 12 dBf
Selektivita 75 dB při 400 kHz
Odstup signálu od šumu 65 dB (stereo),
68 dB (mono)
Harmonická distorze při 1 kHz
0,8 % (stereo),
0,6 % (mono)
Rozlišení 35 dB při 1 kHz
Frekvence 30 – 15.000 Hz
MW/LW
Kmitočtový rozsah MW: 531 – 1.602 kHz
LW: 153 – 281 kHz
Připojení antény Externí zdířka pro napojení
antény
Mezifrekvenční kmitočet 10,7 MHz/450 kHz
Citlivost MW: 30 µV
LW: 50 µV
Zesilovač
Výstupy Výstupy pro reproduktory
(bezpečnostní konektory)
Impedance reproduktorů 4 – 8 ohmů
Maximální výstup
45 W × 4 (při 4 ohmech)
Všeobecně
Výstupy Pro kabel k elektrické
anténě
kabel k autotelefonu
Telephone ATT
Ovládání zvuku Basy ±8 dB při 100 Hz
Výšky ±8 dB při 10 kHz
Napájení autobaterie - stejnosměrný
proud 12 V DC
(záporné ukostření)
Rozměry Přibl. 178 × 50 × 185 mm
(š/v/h)
Rozměry pro montáž Přibl. 182 × 53 × 162 mm
(š/v/h)
Hmotnost Přibl. 1,2 kg
Dodávané příslušenství Součásti pro instalaci a
zapojení (1 souprava)
Pouzdro na přední panel
(1)
Doplňky, které lze dokoupit
Otočný dálkový ovladač
RM-X4S
Adaptér Compact disc
single CSA-8
Design a technické parametry mohou být změněny
bez předchozího upozornění.
22
Page 47

Odstranění případných drobných závad
Následující přehled vám pomůže odstranit většinu závad, se kterými se případně při obsluze
vašeho přístroje setkáte.
Než si přečtete následující přehled, seznamte se s instrukcemi pro napojení a obsluhu.
Všeobecně
Problém
Žádný zvuk.
Obsah paměti byl vymazán.
Na displeji nesvítí žádné
indikace.
Není slyšet pípání.
Přehrávání CD
Problém
Není možné vložit disk.
Přehrávání nezačne.
Došlo k automatickému
vysunutí disku.
Není možné vysunout CD.
Tlačítka pro ovládání nefungují.
Zvuk přeskakuje v následku
vibrací.
Příčina/Odstranění
• Zrušte funkci ATT.
• Nastavte kontrolu vyvážení do středové polohy při systému 2
reproduktorů.
• Otáčejte knoflíkem ve smyslu hodinových ručiček, abyste
nastavili hlasitost.
• Došlo k odpojení kabelu pro přívod proudu nebo baterie.
• Došlo ke stisknutí tlačítka na vynulování přístroje.
n Uložte údaje znovu do paměti.
Sejměte přední panel a vyčistěte konektory. Viz “Čistění
konektorů” (strana 20).
Pípání je vypnuté (strana 18).
Příčina/Odstranění
• Již je vložený jiný disk.
• CD byl silou zasunut horní stranou dolů nebo nesprávným
způsobem (MD).
Zašpiněný CD.
Okolní teplota se zvýšila na více než 50˚C.
Stiskněte 6 na dvě sekundy.
Stiskněte tlačítko na vynulování.
• Přístroj je instalován pod úhlem větším než 60˚.
• Přístroj není instalován na stabilním místě v autě.
pokračování na další straně n
23
Page 48

Poslech rádia
Problém
Není možné naladit stanici
uloženou v paměti.
Automatické ladění nefunguje.
Není možné naladit stanice.
Zvuk je rušený.
Indikátor “ST” bliká.
Příčina/Odstranění
• Zadejte správnou frekvenci.
• Vysílání je příliš slabé.
Vysílání je příliš slabé.
n Nalate stanice manuálně.
Zapojte kabel pro elektrické ovládání antény (modrý) nebo
přídavný kabel pro napájení antény (červený) na kabel pro
napájení zesilovače antény. (Pouze jestliže má Vaše auto
zabudovanou anténu FM/MW/LW na zadním/postranním skle.)
• Nalate přesně danou frekvenci.
• Vysílání je příliš slabé.
n Nastavte vysílání MONO (strana 10).
RDS
Problém
Funkce SEEK vyhledávání
začíná po několika sekundách
poslechu.
Žádná dopravní hlášení.
Funkce PTY ukazuje “NONE.”
Nepodaří-li se Vám odstranit závadu na základě uvedených postupů, obrate se na nejbližší
zastoupení firmy Sony.
Příčina/Odstranění
Stanice bez TP nebo se slabým signálem.
n Tiskněte opakovaně (AF/TA) , dokud se neobjeví “AF TA-
OFF”.
• Zaktivujte “TA.”
• Stanice nevysílá žádné dopravní hlášení i přes TP.
n Nalate jinou stanici.
Stanice neoznačuje druh programu.
24
Page 49

25
Page 50

Witamy !
Dziękujemy za zakupienie Odtwarzacza Płyt
Kompaktowych firmy Sony. Niniejszy sprzęt
posiada wiele funkcji uprzyjemniających
użytkowanie oraz może być obsługiwany przy
pomocy pilota zdalnego sterowania.
2
Page 51

Spis treści
Umiejscowienie kontrolek ...................................4
Przygotowanie sprzętu
Zerowanie sprzętu .......................................... 5
Zdejmowanie przedniego panelu.................... 5
Ustawienie zegara .......................................... 6
Odtwarzacz płyt CD
Słuchanie płyty CD ......................................... 7
Odtwarzanie płyty CD - różne tryby
odtwarzania ................................................ 8
Radio
Automatyczne zapisywanie pozycji stacji
radiowych w pamięci sprzętu
— tzw. “Best Tuning Memory” (BTM =
pamięć najlepszego strojenia).................... 8
Zapisywanie w pamięci sprzętu wyłącznie
pozycji wybranych stacji ............................9
Odbiór zaprogramowanych stacji
radiowych ................................................... 9
RDS
Funkcja RDS w skrócie ................................. 10
Wyświetlenie nazwy stacji ............................ 10
Automatyczne powtórne dostrojenie tego
samego programu
— funkcja alternatywnych zakresów
częstotliwości (AF) ................................... 11
Odbiór migawek o ruchu drogowym ............ 12
Programowanie pozycji stacji emitujących
RDS wraz z danymi AF i TA ..................... 13
Szukanie stacji wg. typu programu .............. 14
Automatyczne ustawienie zegara ................. 15
Informacje dodatkowe
Środki ostrożności ........................................19
Konserwacja ................................................. 21
Wymontowanie sprzętu ................................ 21
Dane techniczne ........................................... 22
Usuwanie usterek ......................................... 23
Inne funkcje
Oznakowanie rotacyjnego pilota zdalnego
sterowania ................................................ 15
Korzystanie z rotacyjnego pilota zdalnego
sterowania ................................................ 16
Regulacja charakterystyki dźwięku...............17
Wyciszanie dźwięku ......................................17
Zmiana ustawień dźwięku i wskazań ............ 18
Wzmacnianie tonów niskich
— funkcja D-bass .................................... 19
3
Page 52

Umiejscowienie kontrolek
MODE
SEEK/AMS
SOURCE
RELEASE
SOUND
DSPL
D
OFF
PTY
D - BASS
SHIFT
2 3 4 5 6 7 8 9110
Szczegółowe informacje znajdują się na stronach podanych obok opisu kontrolki.
1 Kontrolka SEEK/AMS (przeszukiwanie/
automatyczny czujnik muzyki/
przeszukiwanie manualne) - str. 7, 9,
11, 14
2 Przycisk MODE (wybór pasma/sprzętu)
- str. 8, 9
3 Przycisk SOURCE (wybór źródła) - str.
7, 8, 9, 13
4 Kontrolka (głośność/tony niskie/tony
wysokie/wyważenie lewych i prawych
głośników/wyważenie przednich i
tylnych głośników) - str. 6, 17
5 Przycisk SOUND - str. 17
6 Przycisk DSPL (wyświetlenie zmiany
trybu) - str. 7, 10, 11
!¡ Przycisk RELEASE (zwolnienie
przedniego panelu) - str. 5, 20
!™ Przycisk zerowania (znajduje się na
przodzie sprzętu pod przednim
panelem) - str. 5
!£ Przycisk OFF* - str. 5, 7
!¢ Przycisk SHIFT
Przycisk PLAY MODE - str. 8, 9, 10, 12,
13
Przycisk REP - str. 8
Przycisk SET UP - str. 6, 15, 18
Przycisk SHUF - str. 8
!∞ Podczas odbioru radia:
Przyciski numeryczne - str. 9, 12, 13
!§ Kontrolka D-BASS - str. 19
7 Okienko wyświetlacza
8 Przycisk PTY - str. 14
9 Przycisk 6 (wysunięcie) - str. 7
0 Przycisk AF/TA - str. 11, 12, 13
*Ostrzeżenie w przypadku montażu w
pojeździe nie posiadającym na
stacyjce pozycji ACC (pomocnicza
pozycja)
Przez dwie sekundy naciskać
umieszczony na sprzęcie przycisk (OFF)
aby po wyłączeniu silnika wyłączyła się
również świetlna sygnalizacja zegara.
Krótkie naciśnięcie przycisku (OFF) nie
wyłączy sygnalizacji świetlnej zegara i tym
sposobem spowoduje niepotrzebne zużycie
mocy akumulatora.
AF/TA
1
2
OFF
3
CDX–2500R
4
Page 53

Przygotowanie
sprzętu
Zerowanie sprzętu
Sprzęt musi zostać wyzerowany, jeżeli się
będzie z niego korzystało po raz pierwszy lub
jeżeli wymieniony został akumulator pojazdu.
Proszę zdjąć przedni panel i szpiczastym
przedmiotem (np. długopisem), nacisnąć
przycisk zerowania.
Przycisk zerowania
Uwagi
• Naciśnięcie przycisku zerowania powoduje
wymazanie ustawień zegara i niektórych funkcji
zapisanych w pamięci sprzętu.
• Po podłączeniu do sprzętu kabla zasilania lub po
wyzerowaniu sprzętu proszę odczekać przez mniej
więcej 10 sekund, przed umieszczeniem płyty.
Wsunięcie płyty przed upływem 10 sekund
spowoduje anulowanie uprzednio
przeprowadzonego zerowania sprzętu. W takim
przypadku należy ponownie nacisnąć przycisk
zerowania.
Zdejmowanie przedniego panelu
Zdjęcie przedniego panelu oferuje
zabezpieczenie sprzętu przed kradzieżą.
Uwagi
• Proszę uważać, by nie upuścić panelu podczas
zdejmowania.
• Jeżeli zdejmuje się panel gdy sprzęt jest nadal
włączony, zasilanie sprzętu wyłączy się
automatycznie aby zapobiec uszkodzeniu
głośników.
• Zabierając ze sobą przedni panel, proszę go
zawsze przechowywać w załączonym etui.
Zakładanie przedniego panelu
Proszę założyć przedni panel, tak by jego
strona oznakowana na ilustracji literą a
pasowała do strony korpusu oznakowanej na
rysunku literą b, następnie proszę go
docisnąć, tak by zaskoczył.
a
b
Uwagi
• Proszę zwrócić na to uwagę, by panel nie został
zamontowany do góry nogami.
• Nie należy zbyt silnie dociskać panelu przy
zakładaniu.
• Nie należy ani zbyt silnie naciskać, ani wywierać
silnego nacisku na okienko wyświetlacza
przedniego panelu.
• Przedni panel nie może być narażany na
bezpośrednie nasłonecznienie lub działanie źródeł
ciepła, takich jak przewody ogrzewania; nie należy
pozostawiać go w wilgotnym miejscu. Nigdy nie
należy kłaść na desce rozdzielczej w samochodzie,
zaparkowanym w silnie nasłonecznionym miejscu
lub narażonym na znaczny wzrost temperatury
wewnątrz pojazdu.
1 Proszę nacisnąć przycisk (OFF).
2 Proszę nacisnąć przycisk (RELEASE),
następnie przesunąć panel lekko w lewo
i zdjąć pociągając do siebie.
(OFF)
(RELEASE)
Alarm ostrzegawczy
Przekręcenie kluczyka zapłonu przed zdjęciem
panelu powoduje włączenie się
kilkusekundowego alarmu ostrzegawczego.
5
Page 54

Ustawienie zegara
Wskazania pory na zegarze bazują na
cyfrowym systemie 24-godzinnym.
Przykład: Ustawienie zegara na godzinę 10:08
1 Proszę nacisnąć przycisk (SHIFT),
następnie kilkakrotnie przycisk (2) (SET
UP) do momentu wyświetlenia symbolu
“CLOCK”.
1 Proszę nacisnąć przycisk (4) (n).
Wskazanie godziny miga.
2 Proszę ustawić godzinę.
cofanie się
SOURCE
przesunięcie do przodu
2 Proszę nacisnąć przycisk (SHIFT).
Zegar zaczyna chodzić.
3 Proszę nacisnąć przycisk (SHIFT).
Po zakończeniu ustawiania zegara,
wskazania wyświetlacza powracają do
wskazań dla normalnego odtwarzania.
3 Proszę nacisnąć przycisk (4) (n).
Wskazanie minut miga.
4 Proszę ustawić minuty.
cofanie się
SOURCE
przesunięcie do przodu
6
Page 55

Odtwarzacz płyt CD
Słuchanie płyty CD
Proszę wsunąć płytę CD do sprzętu.
Odtwarzanie rozpoczyna się
automatycznie.
Stroną z nadrukiem skierowaną do góry
Jeżeli płyta CD zastała uprzednio wsunięta,
proszę kilkakrotnie nacisnąć przycisk
(SOURCE) do momentu wyświetlenia symbolu
“CD”, celem rozpoczęcia odtwarzania
Wskaźnik CD
Numer nagrania
Uwaga
Aby odtworzyć płyty CD o średnicy 8 cm, proszę
korzystać z opcjonalnego adaptera firmy Sony
(CSA-8) dla singlowych płyt kompaktowych.
Aby Proszę nacisnąć
zatrzymać odtwarzanie 6 lub (OFF)
wysunąć płytę CD 6
Czas odtwarzania,
który już upłynął
przycisk
Zmiana wyświetlanego wskaźnika
Każde naciśnięcie przycisku (DSPL) podczas
odtwarzania płyty CD powoduje, że
wyświetlany wskaźnik zmienia się w
następujący sposób:
Numer nagrania/Czas odtwarzania, który już
upłynął ˜ Zegar
Po wybraniu żądanego wskaźnika po paru
sekundach nastąpi automatyczne włączenie
się trybu Motion Display (ruchomy,
przesuwający się ekranopis).
W trybie przesuwającego się ekranopisu
wszystkie powyższe wskaźniki zostaną po
kolei wyświetlone na ekranie.
Wskazówka
Tryb przesuwającego się ekranopisu może zostać
wyłączony. (Szczegóły są podane w rozdziale
“Zmiana ustawień dźwięku i wskazań” na stronie 18).
Szukanie określonego nagrania
— Automatyczny Czujnik Muzyki
(AMS)
Proszę podczas odtwarzania przesunąć
kontrolkę SEEK/AMS do góry lub w dół i
następnie zwolnić dla każdego z nagrań,
które ma zostać pominięte.
Aby zlokalizować
następne kolejności
nagranie
Aby zlokalizować
poprzednie nagranie
SEEK/AMS
Szukanie określonego miejsca w
nagraniu
— Szukanie manualne
Proszę podczas odtwarzania przesunąć
kontrolkę SEEK/AMS do góry lub w dół i
trzymać ją w tej pozycji. Zwolnić
kontrolkę po znalezieniu właściwego
miejsca.
Przeszukiwanie do przodu
SEEK/AMS
Przeszukiwanie wstecz
Uwaga
Jeżeli na wyświetlaczu wyświetlany jest symbol
“
zlokalizowano początek lub koniec płyty i
przeszukiwanie zostało zakończone.
” lub symbol “ ”, oznacza to, że
7
Page 56

Odtwarzanie płyty CD różne tryby odtwarzania
Płyta CD może być odtwarzana w różnych
trybach:
•Tryb REP (odtwarzanie z powtórzeniem) -
ponowne odtworzenie aktualnego nagrania.
•Tryb SHUF (odtwarzanie z wymieszaniem) -
odtwarzanie wszystkich nagrań w
przypadkowej kolejności.
Odtwarzanie nagrań z powtórzeniem
— Odtwarzanie z powtórzeniem
1 Proszę podczas odtwarzania nacisnąć
przycisk (SHIFT).
Każde naciśnięcie przycisku (SHIFT)
powoduje, podświetlenie wyłącznie tych
ustawień, których wyboru można dokonać.
DSPL
D
SHIFT
OFF
2 Proszę kilkakrotnie nacisnąć przycisk
(6) (REP) do momentu wyświetlenia
symbolu “REP-1”.
Rozpoczyna się odtwarzanie z powtórzeniem.
3 Proszę nacisnąć przycisk (SHIFT).
Celem powrócenia do normalnego trybu
odtwarzania, proszę wybrać pozycję “REPOFF” w ramach czynności opisanych powyżej
w punkcie 2.
Odtwarzanie nagrań w przypadkowej
kolejności
— Odtwarzanie z wymieszaniem
1 Proszę podczas odtwarzania nacisnąć
przycisk (SHIFT).
2 3 4 5 6 7 81
Radio
Automatyczne
zapisywanie pozycji
stacji radiowych w
pamięci sprzętu
— tzw. “Best Tuning Memory” (BTM =
pamięć najlepszego strojenia)
Sprzęt wybiera stacje o najsilniejszym sygnale
i zapisuje je w pamięci w kolejności
odpowiadającej kolejności ich częstotliwości.
Dla każdego pasma (FM1, FM2, MW i LW)
D
można zapisać w pamięci maksymalnie 10
stacji.
Uwaga
Jeżeli dostraja się stacje podczas
prowadzenia pojazdu, proszę korzystać z
funkcji “Best Tuning Memory”, aby
zagwarantować bezpieczeństwo jazdy.
1 Proszę kilkakrotnie nacisnąć przycisk
(SOURCE), celem wybrania tunera.
Każde naciśnięcie przycisku (SOURCE)
powoduje, że wyświetlane źródło zmienia
się w następujący sposób:
z TUNER z CD
2 Proszę kilkakrotnie nacisnąć przycisk
(MODE), celem wybrania pasma.
Każde naciśnięcie przycisku (MODE)
powoduje, że wyświetlane pasmo zmienia
się w następujący sposób:
z FM1 z FM2 z MW z LW
2 Proszę kilkakrotnie nacisnąć przycisk
(7) (SHUF) do momentu wyświetlenia
symbolu “SHUF-1”.
Rozpoczyna się odtwarzanie w
przypadkowej kolejności.
3 Proszę nacisnąć przycisk (SHIFT).
Celem powrócenia do normalnego trybu
odtwarzania, proszę wybrać pozycję “SHUFOFF” w ramach czynności opisanych powyżej
w punkcie 2.
8
3 Proszę nacisnąć przycisk (SHIFT),
następnie kilkakrotnie przycisk
(3) (PLAY MODE) do momentu
wyświetlenia symbolu “B.T.M”.
4 Proszę nacisnąć przycisk (4) (n).
Sprzęt zapisuje w pamięci pozycje stacji
radiowych pod odpowiednimi przyciskami
numerycznymi w kolejności zgodnej z
kolejnością ich częstotliwości.
Po zakodowaniu ustawienia włącza się
krótki sygnał akustyczny.
5 Proszę nacisnąć przycisk (SHIFT).
Page 57

Uwagi
• Sprzęt nie zapisuje w pamięci pozycji stacji,
których sygnał jest słaby. Jeżeli odbierany jest
sygnał tylko kilku stacji, część przycisków
numerycznych zachowa ich uprzednie
zaprogramowanie.
• Gdy na wyświetlaczu pojawia się numer, sprzęt
rozpoczyna zapisywanie pozycji stacji radiowych,
począwszy od aktualnie wyświetlanej stacji.
• Gdy w sprzęcie nie ma płyty CD, wyświetlane jest
tylko pasmo tunera, nawet jeżeli naciśnie się
przycisk (SOURCE).
Odbiór
zaprogramowanych
stacji radiowych
1 Proszę kilkakrotnie nacisnąć przycisk
(SOURCE), celem wybrania tunera.
2 Proszę kilkakrotnie nacisnąć przycisk
(MODE), celem wybrania pasma.
Zapisywanie w pamięci
sprzętu wyłącznie
pozycji wybranych stacji
Można zaprogramować w dowolnej wybranej
przez siebie kolejności do 20 stacji radiowych
w paśmie FM (po 10 dla FM1 i FM2), do 10
stacji w paśmie MW oraz maksymalnie 10
stacji radiowych w paśmie LW
1 Proszę kilkakrotnie nacisnąć przycisk
(SOURCE), celem wybrania tunera.
2 Proszę kilkakrotnie nacisnąć przycisk
(MODE), celem wybrania pasma.
3 Proszę przesunąć kontrolkę SEEK/AMS
do góry lub na dół, aby dostroić stację
radiową, której pozycja ma zostać
zaprogramowana pod wybranym
przyciskiem numerycznym.
4 Proszę nacisnąć i trzymać przyciśniętym
wybrany przycisk numeryczny (od (1)
do (10)) do momentu wyświetlenia
symbolu “MEM”.
Wskaźnik przycisku numerycznego pojawia
się na wyświetlaczu.
Uwaga
Gdy próbuje się zaprogramować pozycję drugiej
stacji radiowej pod tym samym przyciskiem
numerycznym, uprzednio zaprogramowana stacja
jest wymazywana.
3 Proszę nacisnąć przycisk numeryczny
(od (1) do (10)), pod którym jest
zaprogramowana wybrana stacja
radiowa.
Jeżeli nie można dostroić
zaprogramowanej stacji radiowej
Proszę przesunąć kontrolkę SEEK/AMS
do góry, lub w dół, i ją następnie
zwolnić, aby rozpocząć szukanie pozycji
stacji (automatyczne dostrajanie).
Przeszukiwanie kończy się w momencie
uzyskania odbioru stacji. Proszę
kilkakrotnie przesunąć do góry lub w dół
kontrolkę SEEK/AMS, do momentu
uzyskania odbioru żądanej stacji.
Uwaga
Jeżeli funkcja automatycznego strojenia jest zbyt
często przerywana, proszę nacisnąć przycisk
(SHIFT), następnie kilkakrotnie przycisk (3) (PLAY
MODE) do momentu wyświetlenia symbolu “LOCAL”
(tryb szukania lokalnych stacji). Wtedy proszę
nacisnąć przycisk (4) (n), celem wybrania pozycji
“LOCAL-ON”. Proszę nacisnąć przycisk (SHIFT).
Dostrajane będą wyłącznie stacje radiowe o
względnie silnym sygnale.
Wskazówka
Jeżeli częstotliwość stacji radiowej, której chce się
słuchać, jest Państwu znana, proszę przesunąć
kontrolkę SEEK/AMS do góry lub dół i przytrzymać ją
w tej pozycji do momentu wyświetlenia żądanej
częstotliwości (strojenie manualne).
9
Page 58

Jeżeli jakość odbioru
stereofonicznego w paśmie FM jest zła
— tryb monofoniczny
1 Proszę podczas odbioru radia nacisnąć
przycisk (SHIFT), następnie kilkakrotnie
przycisk (3) (PLAY MODE) do momentu
wyświetlenia symbolu “MONO”.
RDS
Funkcja RDS w skrócie
2 Proszę kilkakrotnie nacisnąć przycisk
(4) (n) do momentu wyświetlenia
symbolu “MONO-ON”.
Jakość odbieranego dźwięku ulega
poprawie, ale odbiór jest monofoniczny
(symbol “ST” gaśnie).
3 Proszę nacisnąć przycisk (SHIFT).
Celem powrócenia do normalnego trybu
odtwarzania, proszę w opisanym powyżej
punkcie 2 wybrać pozycję “MONO-OFF”.
Zmiana wyświetlanego wskaźnika
Każde naciśnięcie przycisku (DSPL)
powoduje następującą zmianę wyświetlanego
wskaźnika:
Częstotliwość ˜ Zegar
Parę sekund po wybraniu wskaźnika nastąpi
automatyczne włączenie się trybu Motion
Display (ruchomy ekranopis).
W tym trybie wszystkie wskaźniki zostaną po
kolei wyświetlone na ekranie.
Wskazówka
Tryb przesuwającego się ekranopisu może zostać
wyłączony. (Szczegóły są podane w rozdziale
“Zmiana ustawień dźwięku i wskazań” na stronie 18).
Radio Data System (RDS - radiowy system
danych) jest serwisem usługowym rozgłośni
radiowych pasma FM, umożliwijący stacjom
nadawczym tego pasma, emitowanie
dodatkowych informacji cyfrowych,
równolegle z normalnym sygnałem ich
programów. Nabyty stereofoniczny zestaw
samochodowy oferuje cały wachlarz usług
tego typu. Oto niektóre z nich: automatyczne,
powtórne strojenie wybranego programu,
migawki o ruchu drogowym i lokalizowanie
stacji nadawczych według rodzaju
nadawanych przez nie programów.
Uwagi
• Dostępność wszystkich funkcji RDS zależy od
danego kraju lub regionu.
• RDS może nie funkcjonować prawidłowo, jeżeli
sygnał jest słaby lub jeśli dostrojona stacja nie
emituje danych RDS.
Wyświetlenie nazwy
stacji
Nazwa aktualnie odbieranej stacji jest
widoczna na wyświetlaczu.
Wybór stacji w paśmie FM (str. 8).
Dostrojenie stacji nadawczej pasma FM
emitującej sygnały serwisu RDS, wywołuje
podświetlenie wskaźnika nazwy stacji.
10
Uwaga
Wskaźnik “ *” oznacza, że odbierana jest stacja
emitująca sygnał RDS.
Page 59

Zmiana wyświetlanego wskaźnika
Każde naciśnięcie przycisku (DSPL) powoduje
następującą zmianę wyświetlanego wskaźnika:
Częstotliwość (Nazwa stacji) ˜ Zegar
Parę sekund po wybraniu wskaźnika nastąpi
automatyczne włączenie się trybu Motion
Display (ruchomy ekranopis).
W tym trybie wszystkie powyższe wskaźniki
zostaną po kolei wyświetlone na ekranie.
Wskazówka
Tryb przesuwającego się ekranopisu może zostać
wyłączony. (Szczegóły są podane w rozdziale
“Zmiana ustawień dźwięku i wskazań” na stronie 18).
Uwaga
Na wyświetlaczu ukazuje się symbol “NO NAME”,
jeżeli odbierana stacja radiowa nie emituje danych
RDS.
Automatyczne powtórne
dostrojenie tego samego
programu
— funkcja alternatywnych zakresów
częstotliwości (AF)
Funkcja AF (alternatywnych częstotliwości)
wybiera automatycznie i ponownie dostraja
stację radiową o najsilniejszym sygnale. Ta
funkcja pozwala na nieprzerwany odbiór tego
samego programu radiowego podczas
długodystansowej jazdy bez konieczności
manualnego ponownego dostrajania stacji.
Automatyczna zmiana częstotliwości
98,5MHz
96,0MHz
1 Proszę wybrać stację w paśmie FM (str.
8).
2 Proszę kilkakrotnie nacisnąć przycisk
(AF/TA) do momentu wyświetlenia
symbolu “AF-ON”.
Sprzęt rozpoczyna szukanie alternatywnej
stacji o silniejszym sygnale w tej samej
sieci nadawczej.
Uwaga
Jeżeli w danym rejonie nie ma alternatywnej stacji lub
nie ma potrzeby poszukiwania jej, proszę wyłączyć
funkcję AF przez kilkakrotne naciskanie przycisku
(AF/TA) do momentu wyświetlenia wskaźnika “AF
TA-OFF”.
Zmiana wyświetlanego wskaźnika
Każde naciśnięcie przycisku (AF/TA)
powoduje następującą zmianę wyświetlanego
wskaźnika:
” TA-ON ” AF TA-ON*
AF-ON “ AF TA-OFF “
* Proszę wybrać tę pozycję, by włączyć zarówno
funkcję AF jak i funkcję TA.
Uwagi
• Jeżeli miga na zwmianę symbol “NO AF” i nazwa
stacji, oznacza to, że sprzęt nie może znaleźć
alteratywnej stacji w sieci nadawczej.
• Jeżeli nazwa stacji zaczyna migać po wybraniu
stacji przy pomocy funkcji AF, oznacza to, że nie
istnieje alternatywna częstotliwość. Proszę
przesunąć kontrolkę SEEK/AMS do góry lub w dół,
gdy nazwa stacji miga (w przeciągu ośmiu sekund).
Sprzęt rozpocznie szukanie innej częstotliwości
posiadającej takie same dane PI (identyfikator
programu) (ukazuje się symbol “PI SEEK” oraz
zanika dźwięk). Jeżeli sprzęt nie może znaleźć innej
częstotliwości, ukazuje się symbol “NO PI”, a
sprzęt powraca do uprzednio wybranej
częstotliwości.
Ciąg dalszy na następnej stronie n
Stacja
102,5MHz
11
Page 60

Odbiór regionalnego programu
radiowego
Funkcja “REG-ON” (odbiór programu
regionalnego aktywny) pozwala na stałe
dostrojenie do programu regionalnego bez
przełączania na odbiór innej stacji regionalnej.
(Proszę pamiętać o tym, że funkcja AF musi
być włączona). Ustawienie fabryczne jest
“REG-ON,” ale jeżeli chce się wyłączyć tę
funkcję, proszę postąpić w następujący
sposób.
Odbiór migawek o ruchu
drogowym
Migawki o ruchu drogowym (TA) i program
informacji drogowych (TP) pozwalają na
automatyczne dostrojenie stacji radiowej w
paśmie FM, transmitującej migawki o ruchu
drogowym, nawet jeżeli odbiera się program z
innego źródła.
1 Proszę podczas odbioru radia nacisnąć
przycisk (SHIFT), następnie kilkakrotnie
przycisk (3) (PLAY MODE) do momentu
wyświetlenia symbolu “REG”.
2 Proszę kilkakrotnie nacisnąć przycisk
(4) (n) do momentu wyświetlenia
symbolu “REG-OFF”.
3 Proszę nacisnąć przycisk (SHIFT).
Proszę wziąć pod uwagę, że wybór
ustawienia “REG-OFF” może
spowodować, przełączenie się sprzętu na
odbiór innej stacji regionalnej,
transmitującej sygnał w ramach tej samej
sieci nadawczej.
Celem uaktywnienia funkcji odbioru programu
regionalnego, proszę w ramach czynności
opisanych powyżej w punkcie 2 wybrać
ustawienie “REG-ON”.
Uwaga
Z tej funkcji nie można korzystać w Wielkiej Brytanii i
kilku innych regionach.
Funkcja lokalnego połączenia
(Tylko w Wielkiej Brytanii)
Funkcja lokalnego połączenia pozwala na
wybór innych stacji lokalnych w danym
regionie, nawet, jeżeli nie są one
zaprogramowane pod przyciskami
numerycznymi.
Proszę kilkakrotnie nacisnąć przycisk
(AF/TA) do momentu wyświetlenia
symbolu “TA-ON” lub “AF TA-ON”.
Sprzęt rozpoczyna szukanie stacji
radiowych emitujących informacje o ruchu
drogowym. Gdy znaleziona zostanie stacja
emitująca migawki o ruchu drogowym, na
wyświetlaczu pojawia się symbol “TP”.
Gdy rozpoczyna się emisja migawki o
ruchu drogowym, miga symbol “TA”. Po
zakończeniu migawki symbol ten przestaje
migać.
Wskazówka
Jeżeli migawka o ruchu drogowym rozpocznie się,
gdy odbiera się inne źródło programu, sprzęt
automatycznie przełączy się na odbiór migawki, a
następnie po jej zakończeniu powróci do uprzednio
odbieranego źródła.
Uwagi
• Symbol “NO TP” miga przez pięć sekund, jeżeli
odbierana stacja radiowa nie transmitującej
migawek o ruchu drogowym. Wtedy sprzęt zaczyna
szukać stacji emitującej takie migawki.
• Jeżeli na wyświetlaczu pojawia się symbol “EON”
jednocześnie z symbolem “TP”, aktualnie
odbierana stacja radiowa korzysta z migawek o
ruchu drogowym emitowanych przez inne stacje
radiowe w tej samej sieci.
1 Proszę nacisnąć przycisk numeryczny,
pod którym jest zaprogramowana stacja
lokalna.
2 W przeciągu pięciu sekund proszę
nacisnąć ponownie przycisk
numeryczny stacji lokalnej.
3 Proszę powtórzyć opisane powyżej
czynności do momentu uzyskania
odbioru pożądanej stacji lokalnej.
12
Page 61

Wyłączanie aktualnej migawki o ruchu
drogowym
Proszę nacisnąć przycisk (AF/TA) lub
przycisk (SOURCE).
Aby wyłączyć wszystkie migawki o ruchu
drogowym, proszę wyłączyć tę funkcję
naciskając przycisk (AF/TA) do momentu
wyświetlenia symbolu “AF TA-OFF”.
Programowanie poziomu głośności dla
odbioru migawek o ruchu drogowym
Można uprzednio zaprogramować poziom
głośności dla obioru migawek o ruchu
drogowym, aby umożliwić wyraźny odbiór
informacji. Gdy rozpoczyna się emisja migawki
o ruchu drogowym, poziom głośności zostanie
automatycznie dopasowany do uprzednio
nastawionego.
1 Proszę wybrać poziom głośności.
2 Proszę przez dwie sekundy naciskać
przycisk (AF/TA).
Pojawia się symbol “TA”, a ustawienie jest
zaprogramowane w pamięci sprzętu.
Odbiór ogłoszeń alarmowych
Jeżeli podczas odbioru radia jest emitowane
ogłoszenie alarmowe, program się na nie
automatycznie przełączy. Jeżeli korzysta się z
innego niż radio źródła, ogłoszenie alarmowe
będzie odbierane, jeżeli funkcja AF lub TA jest
włączona. Wtedy sprzęt przełączy się
automatycznie na odbiór tych ogłoszeń, bez
względu na to, z jakiego źródła się w danym
momencie korzysta.
Programowanie pozycji
stacji emitujących RDS
wraz z danymi AF i TA
Gdy programuje się pozycje stacji emitujących
RDS, sprzęt zapisuje w pamięci dane dla każdej
stacji oraz jej częstotliwość, dlatego też nie
musi się włączać funkcji AF lub TA przy każdym
dostrojeniu zaprogramowanej stacji. Do wyboru
są różne nastawienia (AF, TA lub oba) dla
każdej z zaprogramowanych stacji można też
wybrać jedno ustawienie dla wszystkich
zaprogramowanych stacji radiowych.
Programowanie tego samego
nastawienia dla wszystkich zapisanych
w pamięci sprzętu stacji radiowych
1 Proszę wybrać pasmo FM (str. 8).
2 Proszę kilkakrotnie nacisnąć przycisk
(AF/TA), celem wybrania albo pozycji
“AF-ON”, “TA-ON” lub “AF TA-ON” (obie
funkcje - AF i TA).
Proszę wziąć pod uwagę, że wybranie
ustawienia “AF TA-OFF” powoduje
zapisanie w pamięci nie tylko stacji
emitujących sygnały RDS, lecz także stacji
radiowych nie emitujących RDS.
3 Proszę nacisnąć przycisk (SHIFT),
następnie kilkakrotnie przycisk
(3) (PLAY MODE) do momentu
wyświetlenia symbolu “BTM”.
4 Proszę naciskać przycisk (4) (n) do
momentu, gdy symbol “B.T.M” będzie
migał.
5 Proszę nacisnąć przycisk (SHIFT).
Programowanie różnych ustawień dla
każdej z zapisanych w pamięci sprzętu
stacji radiowych
1 Proszę wybrać pasmo FM i dostroić
wybraną stację radiową (str. 9).
2 Proszę kilkakrotnie nacisnąć przycisk
(AF/TA), celem wybrania albo “AF-ON”,
“TA-ON” lub “AF TA-ON” (obie funkcje AF i TA).
3 Proszę nacisnąć właściwy przycisk
numeryczny do momentu wyświetlenia
symbolu “MEM”.
Proszę powtórzyć czynności opisane w
punkcie 1, celem zaprogramowania innych
stacji.
Wskazówka
Jeżeli chce się zmienić zaprogramowane ustawienie
dla AF i/lub TA po dostrojeniu zaprogramowanej
stacji, można to zrobić włączając lub wyłączając
funkcję AF lub TA.
13
Page 62

Szukanie stacji wg. typu programu
Można szukać stacji radiowej wybierając jeden
z typów programu podanych poniżej.
Typ programu Wskaźnik
Wiadomości NEWS
Wydarzenia aktualne AFFAIRS
Informacje INFO
Sport SPORT
Edukacja EDUCATE
Dramaturgia DRAMA
Kultura CULTURE
Nauka SCIENCE
Różne VARIED
Muzyka popularna POP M
Muzyka rockowa ROCK M
Lekka muzyka EASY M
Lekka muzyka klasyczna LIGHT M
Muzyka klasyczna CLASSICS
Inne rodzaje muzyki OTHER M
Pogoda WEATHER
Finanse FINANCE
Programy dla dzieci CHILDREN
Sprawy społeczne SOCIAL A
Religia RELIGION
Programy z telefonicznym PHONE IN
udziałem słuchaczy
Podróże TRAVEL
Odpoczynek LEISURE
Muzyka jazzowa JAZZ
Muzyka country COUNTRY
Muzyka narodowa NATION M
Stare szlagiery OLDIES
Muzyka ludowa FOLK M
Programy dokumentalne DOCUMENT
Nie zdefiniowane NONE
programy
1 Proszę podczas odbioru w paśmie FM
nacisnąć przycisk (PTY) do momentu
wyświetlenia symbolu “PTY”.
Jeżeli stacja radiowa emituje dane PTY,
wyświetlana jest nazwa aktualnego typu
programu. Jeżeli pojawi się symbol
“- - - - -”, oznacza to, że ta odbierana
stacja nie emituje RDS, lub że dane RDS
nie zostały odebrane przez radio.
2 Proszę kilkakrotnie nacisnąć przycisk
(PTY) do momentu wyświetlenia
pożądanego typu programu.
Typ programu jest wyświetlany w
kolejności podanej w powyższej tabelce.
Proszę wziąć pod uwagę, że nie można
wybrać typu “NONE” (nie zdefiniowane
programy) jako kryterium szukania stacji.
3 Proszę przesunąć kontrolkę SEEK/AMS
do góry lub na dół.
Sprzęt rozpoczyna szukanie stacji
radiowych, emitujących wybrany typ
programu. Gdy sprzęt znajdzie ten
program, na wyświetlaczu ukazuje się
ponownie typ programu przez pięć sekund.
Jeżeli sprzęt nie może znaleźć typu
programu, na wyświetlaczu pojawia się na
zmianę przez pięć sekund symbol “NO” i
typ programu. Następnie sprzęt powraca
do odbioru uprzednio wybranej stacji
radiowej.
Uwaga
Z tej funkcji nie można korzystać w krajach, w
których nie są emitowane dane PTY (wybór typu
programu).
14
Page 63

Automatyczne ustawienie zegara
Inne funkcje
Zegar jest automatycznie ustawiany przy
pomocy danych CT (ustawienie zegara)
przekazywanych wraz z RDS.
1 Proszę podczas odbioru radia nacisnąć
przycisk (SHIFT), następnie kilkakrotnie
przycisk (2) (SET UP) do momentu
wyświetlenia symbolu “CT”.
2 Proszę kilkakrotnie nacisnąć przycisk
(4) (n) do momentu wyświetlenia
symbolu “CT-ON”.
Zegar jest ustawiony.
3 Proszę nacisnąć przycisk (SHIFT), celem
powrócenia do normalnych wskazań
wyświetlacza.
Anulowanie funkcji CT
Proszę w ramach czynności opisanych
w punkcie 2 powyżej wybrać ustawienie
“CT-OFF”.
Uwagi
• Nawet jeśli odbierana jest stacja emitująca RDS,
funkcja CT może nie działać.
• Pomiędzy ustawieniem zegara wykonanym przez
funkcję CT i aktualną porą może wystąpić
rozbieżność.
Niniejszy sprzęt może być także obsługiwany
przy pomocy rotacyjnego pilota zdalnego
sterowania.
Oznakowanie rotacyjnego pilota zdalnego sterowania
W zależności od tego, jak zostanie
zamontowany pilot, proszę przykleić właściwą
nalepkę, zgodnie ze sposobem zilustrowanym
poniżej.
LIST
MODE
SOUND
SOUND
MODE
LIST
15
Page 64

Korzystanie z rotacyjnego pilota zdalnego sterowania
Rotacyjny pilot zdalnego sterowania działa
przez naciskanie oraz/lub przekręcanie
kontrolek.
Korzystanie z przycisków
(przyciski SOURCE i MODE)
(SOURCE)
(MODE)
Przekręcanie kontrolek
(kontrolka SEEK/AMS)
Proszę przez moment przekręcić
kontrolkę i ją następnie zwolnić, aby:
•Znaleźć na płycie dane nagranie. Proszę
przekręcić i przytrzymać kontrolkę w tej
pozycji, jeżeli chce się znaleźć określone
miejsce w nagraniu, następnie proszę ją
zwolnić, by rozpocząć odtwarzanie.
•Automatycznie dostroić stacje radiowe.
Proszę przekręcić i przytrzymać kontrolkę
w tej pozycji, jeżeli chce się znaleźć
określoną stację radiową.
Każde naciśnięcie przycisku (SOURCE)
powoduje następującą zmianę źródła:
TUNER ˜ CD
Naciśnięcie przycisku (MODE) zmienia
tryb pracy sprzętu w następujący
sposób:
• Tuner: FM1 n FM2 n MW n LW
Wciśnięcie i przekręcenie kontrolki
(kontrolka PRESET/DISC)
Proszę wcisnąć i przekręcić kontrolkę,
aby:
•Odbierać stacje radiowe
zaprogramowane w pamięci sprzętu pod
przyciskami numerycznymi.
16
Page 65

Pozostałe operacje
Proszę przekręcić kontrolkę
VOL w celu wyregulowania
poziomu głośności.
Proszę nacisnąć przycisk (SOUND)
w celu wyregulowania poziomu
głośności i menu dźwięku.
Proszę nacisnąć przycisk (LIST) w
celu wyświetlenia nazw typów
programów (tylko dla pasma FM).
Proszę nacisnąć
przycisk (ATT) w
celu wyciszenia
dźwięku.
Proszę nacisnąć
przycisk (OFF) w
celu wyłączenia
sprzętu
Zmiana kierunku obsługi
Kierunek obsługi kontrolek jest ustawiony
fabrycznie w sposób zilustrowany poniżej.
Podniesienie
Regulacja
charakterystyki dźwięku
Można wyregulować tony niskie, tony
wysokie, wyważenie i zanikanie.
OFF
Dla każdego źródła można zaprogramować
indywidualne poziomy niskich i wysokich
tonów.
1 Proszę wybrać ustawienie, które ma
zostać wyregulowane przyciskając kilka
razy przycisk (SOUND).
VOL (poziom głośności) n BAS (tony
niskie) n TRE (tony wysokie) n
BAL (wyważenie lewy-prawy) n
FAD (wyważenie przód-tył)
2 Proszę przekręcając pokrętło
wyregulować wybrane ustawienie.
Proszę wykonać regulację w przeciągu
trzech sekund od wybrania ustawienia. Po
upływie tego czasu, pokrętło ponownie
służy do regulacji poziomu głośności.
Wyciszanie dźwięku
Proszę nacisnąć przycisk (ATT) na
opcjonalnym rotacyjnym pilocie
zdalnego sterowania.
Przez chwilę miga symbol “ATT-ON”.
Obniżenie
Jeżeli rotacyjny pilot zdalnego sterowania
musi zostać zamontowany po prawej stronie
kierownicy, można zmienić kierunek obsługi.
Proszę nacisnąć przez dwie sekundy
przycisk (SOUND) wciskając
jednocześnie kontrolkę VOL.
Wskazówka
Kierunek obsługi tych kontrolek może też być
zmieniony przy pomocy sprzętu (str. 18).
Proszę ponownie nacisnąć przycisk (ATT),
celem wznowienia poprzedniego ustawienia
poziomu głośności.
Wskazówka
Jeżeli kabel interfejsowy telefonu samochodowego
jest podłączony do złącza ATT, poziom głośności
sprzętu obniża się automatycznie gdy dzwoni telefon
(funkcja telefonu ATT).
17
Page 66

Zmiana ustawień
dźwięku i wskazań
Zaprogramować można ustawienia
następujących funkcji:
•CLOCK (zegar) (str. 6).
•CT (wskazania zegara) (str. 15).
•D.INFO (podwójna informacja) - jednoczesne
wyświetlanie wskazań zegara i trybu
odtwarzania (ON) lub wyświetlanie ich na
zmianę (OFF).
•BEEP - włączenie lub wyłączenie sygnału
akustycznego.
•RM (rotacyjny pilot zdalnego sterowania) -
zmiana kierunku obsługi kontrolek
rotacyjnego pilota zdalnego sterowania.
— Proszę wybrać “NORM”, jeżeli chce się
korzystać z rotacyjnego pilota z
zachowaniem ustawień fabrycznych.
— Proszę wybrać “REV”, jeżeli rotacyjny
pilot zdalnego sterowania będzie
zamontowany po prawej stronie
kierownicy.
•M.DSPL (przesuwający się ekranopis) -
włączenie lub wyłączenie przesuwającego
się ekranopisu.
1 Proszę nacisnąć przycisk (SHIFT).
2 Proszę nacisnąć kilkakrotnie przycisk
(2) (SET UP) do momentu wyświetlenia
pożądanego ustawienia.
Każde naciśnięcie przycisku (2) (SET UP)
powoduje, że wskazania zmieniają się w
następujący sposób:
CLOCK n CT n D.INFO* n BEEP n RM n
M.DSPL
* Jeżeli nie jest odtwarzana płyta CD lub MD, to
wskazanie zostanie pominięte.
Uwaga
Wyświetlane wskazanie może być inne, w
zależności od źródła.
3 Proszę nacisnąć przycisk (4) (n),
celem wybrania odpowiedniego
ustawienia (np.: ON lub OFF).
4 Proszę nacisnąć przycisk (SHIFT).
Po zakończeniu ustawiania trybu,
wyświetlacz powraca do wyświetlania
wskazań normalnego trybu odtwarzania.
18
Page 67

Wzmacnianie tonów
niskich — funkcja D-bass
Można rozkoszować się pełnymi i czystymi
tonami niskimi. Funkcja D-bass wzmacnia
sygnał o niskiej częstotliwości posiadającej
ostrzejszą krzywą niż w przypadku
normalnego wzmacniania tonów niskich.
Tony niskie są wyraźniej odbierane, nawet
jeżeli nie zmieni się poziomu głośności. Przy
pomocy kontrolki D-BASS można w prosty
sposób wzmocnić i wyregulować tony niskie.
D-BASS 3
D-BASS 2
Poziom
0dB
Regulacja krzywej tonów niskich
Proszę przekręcić kontrolkę D-BASS w
celu wyregulowania poziomu tonów
niskich (1, 2 lub 3).
Na wyświetlaczu pojawia się symbol “DBASS”.
Proszę przekręcić kontrolkę na pozycję OFF,
aby anulować korzystanie z tej funkcji.
Uwaga
Jeżeli w tonach niskich występują zakłócenia, proszę
wyregulować kontrolkę D-BASS lub poziom
głośności.
D-BASS 1
Częstotliwość (Hz)
Informacje dodatkowe
Środki ostrożności
•Jeżeli samochód był zaparkowany w silnie
nasłonecznionym miejscu, w jego wnętrzu
wzrosła silnie temperatura. Proszę odczekać,
by temperatura sprzętu obniżyła się, zanim
zacznie się z niego korzystać.
•Jeżeli sprzęt nie jest zasilany proszę wpierw
skontrolować podłączenia. Jeżeli wszystko
jest w porządku, proszę skontrolować
bezpiecznik.
•Jeżeli z głośników w systemie dwu-
głośnikowym nie jest słyszalny dźwięk,
proszę przestawić kotrolkę wyciszania na
pozycję środkową.
•Jeżeli pojazd jest wyposażony w zasilaną
antenę, wysunie się ona automatycznie, gdy
korzysta się ze sprzętu.
Jeżeli macie Państwo jakiekolwiek pytania lub
problemy związane ze sprzętem, które nie są
opisane w niniejszej instrukcji obsługi, proszę
skontaktować się z najbliższym punktem
sprzedaży firmy Sony.
Uwagi na temat korzystania z płyt CD
Zabrudzona lub uszkodzona płyta CD może
spowodować zanikanie dźwięku podszas
odtwarzania. Aby móc się prawdziwie
rozkoszować dźwiękiem o optymalnej jakości,
należy zawsze trzymać płytę CD za jej
krawędź. Aby jej nie zabrudzić, nigdy nie
należy dotykać jej powierzchni.
Nie należy przyklejać papieru lub taśmy na
stronie z nadrukiem.
Ciąg dalszy na następnej stronie n
19
Page 68

Nie należy poddawać płyt CD działaniu
bezpośrednich promieni słonecznych lub
źródeł ciepła, jak np. gorących przewodów
ogrzewania; także nie należy pozostawiać ich
w pojeździe zaparkowanym w silnie
nasłonecznionym miejscu, ponieważ
temperatura we wnętrzu pojazdu może silnie
wzrosnąć.
Proszę przed odtwarzaniem przetrzeć płytę
opcjonalną miękką ściereczką. Proszę
przecierać w kierunku od środka do krawędzi.
Nie należy używać rozcieńczalników, jak np.
benzyna, rozcieńczalnik, dostępne w handlu
środki czyszczące lub spray antystatyczny
przeznaczony dla płyt analogowych.
Uwagi na temat płyt CD
Jeżeli będzie się korzystać z płyt opisanych
poniżej, lepkie pozostałości mogą
spowodować, że płyta CD przestanie się
obracać, oraz że płyty nie będą prawidłowo
funkcjonować lub zostaną zniszczone.
Uwagi o gromadzeniu się wilgoci
W deszczowym dniu lub w bardzo wilgotnym
regionie na soczewce we wnętrzu odtwarza
płyt CD może się zebrać wilgoć. Jeżeli ma to
miejsce, sprzęt nie będzie prawidłowo
funkcjonował. W takim wypadku proszę wyjąć
płytę CD i odczekać przez mniej więcej
godzinę, by wilgoć mogła wyparować.
Odtwarzanie płyt CD o średnicy 8 cm
Proszę korzystać z opcjonalnego adaptera
firmy Sony (CSA-8) dla singlowych płyt
kompaktowych, aby zabezpieczyć odtwarzacz
płyt CD przed uszkodzeniem.
Nie należy korzystać z używanych lub
wypożyczonych płyt CD, na których
powierzchni są lepkie pozostałości (np. resztki
kleju z nalepki, lub atrament, albo klej,
wyciekający spod nalepki).
Tutaj są rozsmarowane
pozostałości
Atrament jest lepki
Nie należy korzystać z wypożyczonych płyt CD
posiadających stare nalepki, które się odklejają.
Nalepki zaczynają się
odklejać i na płycie
pozostaje lepka masa
Nie należy korzystać z płyt CD z nalepkami lub
etykietami.
Naklejona nalepka
20
Page 69

Konserwacja
Wymiana bezpiecznika
Wymieniając bezpiecznik proszę się upewnić,
że podana na nowym bezpieczniku wartość
amperów jest zgodna z wartością podaną na
oryginalnym bezpieczniku. Jeżeli bezpiecznik
się przepali, proszę skontrolować podłączenia
zasilania i wymienić bezpiecznik. Jeżeli
bezpiecznik się ponownie przepali, może być
to symptomem wewnętrznego defektu
sprzętu. W takim wypadku proszę
skontaktować się z najbliższym punktem
sprzedaży firmy Sony.
Bezpiecznik (10 A)
Uwagi
• Proszę ze względów bezpieczeństwa wyłączyć
silnik i wyjąć klucz ze stacyjki, przed
oczyszczeniem złączy.
• Nigdy nie należy dotykać złącz palcami lub
metalowymi przedmiotami.
Wymontowanie sprzętu
Klucz zwalniający
(załączony)
µ
Ostrzeżenie
Nigdy nie należy korzystać z bezpieczników o
wartości amperów przekraczającej wartość
podaną na bezpieczniku dostarczonym ze
sprzętem, ponieważ może to spowodować
uszkodzenie sprzętu.
Czyszczenie złączy
Sprzęt może nie funkcjonować prawidłowo,
jeżeli złącza pomiędzy korpusem sprzętu i
przednim panelem są zabrudzone. Aby temu
zapobiec, proszę otworzyć przedni panel
naciskając przycisk (RELEASE), następnie go
zdjąć i oczyścić złącza korzystając z wacika
zwilżonego w alkoholu. Nie należy zbyt silnie
dociskać, ponieważ w ten sposób można
uszkodzić złącza.
Korpus sprzętu
Tylna strona przedniego panelu
µ
µ
Proszę wyciągnąć sprzęt przy założonym kluczu
zwalniającym.
21
Page 70

Dane techniczne
Odtwarzacz płyt CD
System System audio cyfrowych
płyt kompaktowych
Odstęp psofometryczny 80 dB
Odpowiedź częstotliwościowa
10 – 20.000 Hz
Kołysanie i drżenie dźwięku
Poniżej mierzalnego limitu
Tuner
Pasmo FM
Zakres strojenia 87,5 – 108,0 MHz
Gniazdo anteny Złącze anteny zewnętrznej
Częstotliwość pośrednia 10,7 MHz
Czułość użytkowa 12 dBf
Wyborczość 75 dB przy 400 kHz
Odstęp psofometryczny 65 dB (stereo),
68 dB (mono)
Zniekształcenie harmoniczne przy 1 kHz
0,8 % (stereo),
0,6 % (mono)
Rozdzielanie 35 dB przy 1 kHz
Odpowiedź częstotliwościowa
30 – 15.000 Hz
Pasmo MW/LW
Zakres strojenia MW: 531 – 1.602 kHz
LW: 153 – 281 kHz
Gniazdo anteny Złącze anteny zewnętrznej
Częstotliwość pośrednia 10,7 MHz/450 kHz
Wyborczość MW: 30 µV
LW: 50 µV
Wzmacniacz mocy
Wyjścia Wyjścia głośników
(złącza szczelne)
Impedancja głośników 4 – 8 Ohmów
Maksymalna moc na wyjściu
45 W × 4 (przy 4 Ohmach)
Ogólne
Wyjścia Przewód sterowania
Sterowanie dźwięku tony niskie ±8 dB przy
Zasilanie 12 V DC (prąd stały),
Wymiary Ok. 178 × 50 × 185 mm
Wymiary montażowe Ok. 182 × 53 × 162 mm
Ciężar Ok. 1,2 kg
Załączony osprzęt Części montażowe i
Osprzęt dodatkowy Rotacyjny pilot zdalnego
Wygląd zewnętrzny i dane techniczne mogą ulec
zmianie bez uprzedzenia.
przekaźnikiem anteny
Przewód sterowania
telefonu ATT
100 Hz
tony wysokie ±8 dB przy
10 kHz
akumulator
(uziemienie ujemne)
(szer./wys./głę.)
(szer./wys./głę.)
podłączeniowe (1 zestaw)
Etui dla przedniego panelu
(1)
sterowania RM-X4S
Adapter dla singlowych
płyt kompaktowych CSA-8
22
Page 71

Usuwanie usterek
Poniższa lista kontrolna pomoże Państwu usunąć ewentualne problemy, jakie mogą wystąpić w
połączeniu z Waszym odtwarzaczem.
Proszę wpierw skontrolować podłączenia i sposób eksploatacji, zanim się będzie korzystać z tej
listy kontrolnej.
Ogólne
Problem
Brak dźwięku
Dane zaprogramowane w
pamięci sprzętu zostały
wymazane.
Brak wskaźników na
wyświetlaczu
Brak sygnału dźwiękowego
Odtwarzanie płyty CD
Problem
Nie można wsunąć płyty CD
Odtwarzanie nie rozpoczyna się
Płyta jest automatycznie
wysuwana
Nie można wysunąć płyty CD
Przyciski obsługi pracy sprzętu
nie funkcjonują
Dźwięk zanika w wyniku
wstrząsów
Przyczyna/Sposób usunięcia usterki
• Proszę anulować funkcję ATT.
• Proszę ustawić kontrolkę wyciszania na pozycję środkową
dla systemu dwu-głośnikowego.
• Proszę przekręcić gałkę zgodnie z kierunkiem ruchu
wskazówek, celem wyregulowania poziomu głośności.
• Kabel zasilania lub akumulator były odłączone.
• Naciśnięty został przycisk zerowania.
n Proszę ponownie zaprogramować w pamięci sprzętu.
Proszę zdjąć przedni panel i oczyścić złącza. Szczegóły są
podane w rozdziale “Czyszczenie złączy” (str. 20).
Sygnał dźwiękowy jest wyłączony (str.18).
Przyczyna/Sposób usunięcia usterki
• W odtwarzaczu jest już jedna płyta CD.
• Płytę wsunięto na siłę do góry nogami lub w nieprawidłowy
sposób (dysk MD).
Brudna płyta CD.
Temperatura otoczenia przekracza 50˚C.
Proszę nacisnąć przez dwie sekundy przycisk 6.
Proszę nacisnąć przycisk zerowania.
• Kąt montażu sprzętu przekracza 60˚.
• Sprzęt nie został zamontowany w sztywnej części pojazdu.
Ciąg dalszy na następnej stronie n
23
Page 72

Odbiór radia
Problem
Zaprogramowane dostrojenie
nie jest możliwe
Automatyczne dostrojenie nie
jest możliwe
Nie można odebrać stacji
radiowych
Dźwięk jest zniekształcony,
występują szumy
Wskaźnik “ST” miga
RDS
Problem
Funkcja szukania SEEK
rozpoczyna po kilku minutach
odbioru
Brak migawek o ruchu
drogowym
Wyświetlana informacja PTY
jest “NONE.”
Przyczyna/Sposób usunięcia usterki
• Proszę zaprogramować prawidłowe częstotliwości.
• Emitowany sygnał jest za słaby.
Emitowany sygnał jest za słaby.
n Proszę manualnie dostroić.
Proszę podłączyć kabel zasilania sterowania anteny (niebieski)
lub kabel pomocniczego zasilania (czerwony) do kabla zasilania
wzmacniacza anteny samochodowej (tylko dla samochodów z
wbudowaną anteną dla pasm FM/MW/LW w tylnej/bocznej
szybie).
• Proszę precyzyjnie dostroić częstotliwość.
• Emitowany sygnał jest za słaby.
n Proszę przestawić na tryb MONO (str. 10).
Przyczyna/Sposób usunięcia usterki
Ta stacja nie przekazuje sygnału TP lub emitowany sygnał jest
słaby.
n Proszę kilkakrotnie nacisnąć przycisk (AF/TA) do momentu
wyświetlenia symbolu “AF TA-OFF”.
• Proszę włączyć “TA.”
• Ta stacja nie emituje żadnych migawek o ruchu drogowym,
mimo że emituje sygnał TP.
n Proszę dostroić inną stację.
Ta stacja nie przekazuje informacji na temat typu programu.
Jeżeli podane powyżej sposoby usuwania usterek nie przyczynią się do poprawy sytuacji, proszę
skontaktować się z najbliższym punktem sprzedaży firmy Sony.
24
Page 73

25
Page 74

Hoşgeldiniz !
Sony Compact Disk çaları satın aldığınız için
teşekkür ederiz. Bu ünite size çeşitli özelliklerin
yanı sıra tercihe bağlı bir döner kumandayı
zevkle kullanma imkanı sunuyor.
2
Page 75

İçindekiler
Kontrol düğmelerinin yerleri ................................ 4
Başlarken
Ünitenin ayarı .................................................. 5
Ön panelin sökülmesi......................................5
Saatin ayarlanması ......................................... 6
CD çalar
CD’nin dinlenmesi ...........................................7
CD’nin çeşitli kiplerde çalınması ..................... 8
Radyo
İstasyonların otomatik olarak hafızaya alınması
— Best Tuning Memory (BTM) .................. 8
Yalnız arzu edilen istasyonların hafızaya
alınması ...................................................... 9
Hafızaya alınmış istasyonların dinlenmesi ...... 9
RDS
RDS işlevine genel bakış ..............................10
İstasyon isminin görülmesi ............................10
Aynı programın otomatik olarak ayarlanması
— Alternative Frequencies (AF) ...............11
Trafik duyurularının dinlenmesi ..................... 12
RDS istasyonlarının AF ve TA verilerine
ayarlanması .............................................. 13
İstasyonun program tipine göre
yerleştirilmesi ........................................... 14
Saatin otomatik ayarı .................................... 15
Ek bilgi
Tedbirler ........................................................ 19
Bakım ............................................................21
Ünitenin sökülmesi ........................................ 21
Özellikler ....................................................... 22
Sorun arama kılavuzu ...................................23
Diğer İşlevler
Döner kumandanın etiketlendirilmesi ............15
Döner kumandanın kullanılması ................... 16
Ses özelliklerinin ayarlanması.......................17
Sesin kısılması ..............................................17
Ses ve gösterge ayarlarının değiştirilmesi .... 18
Basın yükseltilmesi
— D-bass ................................................. 19
3
Page 76

Kontrol düğmelerinin yerleri
MODE
SEEK/AMS
SOURCE
RELEASE
SOUND
DSPL
D
OFF
SHIFT
2 3 4 5 6 7 8 9110
Ayrıntılar için aşağıdaki sayfalara bakınız.
1 SEEK/AMS (arama/Automatic Music
Sensor/manüel arama) düğmesi 7, 9,
11, 14
2 MODE (band/ünite seçimi) tuşu 8, 9
3 SOURCE (kaynak seçimi) tuşu 7, 8, 9,
13
4 Kadran (ses/bas/tiz/sol-sağ/ön-arka) 6,
17
5 SOUND tuşu 17
6 DSPL (gösterge kipini değiştirme)
tuşu 7, 10, 11
7 Gösterge penceresi
8 PTY tuşu 14
9 6 (çıkarma) tuşu 7
!º AF/TA tuşu 11, 12, 13
PTY
AF/TA
1
2
OFF
D - BASS
3
CDX–2500R
!¡ RELEASE (ön paneli sökme) tuşu 5, 20
!™ Ayar tuşu (ünitenin ön yüzüne ön
panelin arkasına yerleştirilmiştir) 5
!£ OFF tuşu* 5, 7
!¢ SHIFT tuşu
PLAY MODE 8, 9, 10, 12, 13
REP 8
SET UP 6, 15, 18
SHUF 8
!∞ Radyo yayını sırasında:
Numara tuşları 9, 12, 13
!§ D-BASS düğmesi 19
*Kontakt anahtarı yuvasında ACC
(accessory) pozisyonu olmayan bir
otomobile kurarken dikkat
Motoru kapattıktan sonra ünitedeki (OFF)
düğmesine iki saniye için bastığınıza emin
olunuz.
(OFF) tuşuna bir an için basarsanız, saatin
göstergesi kapanmaz ve bu akünün
zayıflamasına neden olur.
4
Page 77

Başlarken
Ünitenin ayarı
Üniteyi ilk defa çalıştırmanızdan önce veya
otomobil aküsünü değiştirdikten sonra, üniteyi
tekrar ayarlamanız gereklidir.
Ön paneli çıkarınız ve ayar tuşuna tükenmez
kalem gibi sivri uçlu bir obje ile basınız.
Notlar
• Paneli üniteden sökerken düşürmemeye dikkat
ediniz.
• Paneli ünite açık durumda iken sökerseniz,
hoparlörlerin zarar görmemesi için güç otomatik
olarak kesilir.
• Ön paneli yanınızda taşıdığınızda, ünite
beraberindeki ön panel çantasını kullanınız.
Ön panelin takılması
Ön panelin a parçasını ünitenin b parçasına
gösterildiği üzere takınız ve yerine oturana
kadar itiniz.
Ayar tuşu
Notlar
• Ayar tuşuna basmak, saat ayarını ve bazı
kaydedilmiş işlevleri siler.
• Üniteye güç destek kablosu bağlarsanız veya
üniteyi tekrar ayarlarsanız, diski yerleştirmeden
önce 10 saniye için bekleyiniz. Eğer bu 10 saniye
içinde bir disk yerleştirirseniz, ünite ayarlanmaz ve
ayar tuşuna tekrar basmak zorunda kalırsınız.
Ön panelin sökülmesi
Üniteyi çalınmaktan korumak için bu ünitenin
ön panelini sökebilirsiniz.
1 (OFF) tuşuna basınız.
2 (RELEASE) tuşuna basınız, ardından ön
paneli biraz sola kaydırınız ve kendinize
doğru çekerek çıkarınız.
(OFF)
a
b
Notlar
• Ön paneli başaşağı takmamaya dikkat ediniz.
• Ön paneli takarken üniteye doğru sert şekilde
bastırmayınız.
• Ön panelin gösterge penceresine sert şekilde
bastırmayınız veya aşırı basınç uygulamayınız.
• Ön paneli direkt güneş ışığına veya sıcak hava
kanalları gibi ısı kaynaklarına maruz bırakmayınız
ve nemli bir yerde muhafaza etmeyiniz. Ön paneli
hiçbir zaman ısının bir hayli artabileceği direkt
güneş ışığına park edilmiş bir otomobilin kontrol
paneline koymayınız.
Dikkat ikazı
Ön paneli çıkarmadan kontakt anahtarını OFF
pozisyonuna getirirseniz, birkaç saniye için
dikkat ikazı çalar.
(RELEASE)
5
Page 78

Saatin ayarlanması
Saat 24 saat bazında dijital işaretler kullanır.
2 (SHIFT) tuşuna basınız.
Örnek: Saati 10:08’e ayarlamak
1 (SHIFT) tuşuna basınız, ardından
“CLOCK” görülene kadar tekrar tekrar
(2) (SET UP) tuşuna basınız.
1 (4) (n) tuşuna basınız.
Saat işareti yanıp söner.
2 Saati ayarlayınız.
geriye gitmek için
SOURCE
ileri gitmek için
3 (4) (n) tuşuna basınız.
Dakika işareti yanıp söner.
4 Dakikayı ayarlayınız.
geriye gitmek için
SOURCE
ileri gitmek için
Saat çalışmaya başlar.
3 (SHIFT) tuşuna basınız.
Saatin ayarı bittikten sonra, gösterge
normal çalış kipine geri döner.
6
Page 79

CD çalar
Gösterge biriminin değiştirilmesi
CD çalışı sırasında (DSPL) tuşuna her
bastığınızda, birimler aşağıdaki şekilde değişir:
Parça numarası/Geçen çalış süresi
˜˜
˜ Saat
˜˜
CD’nin dinlenmesi
Bir CD yerleştiriniz.
Çalış otomatik olarak başlar.
Üst yüzü etiketlenmiş
CD yerleştirilmiş ise çalış için CD görülene
kadar tekrar tekrar (SOURCE) tuşuna basınız.
CD işareti
Not
8 cm’lik bir CD çalmak için, tercihe bağlı Sony
compact disk tekli adaptörü (CSA-8) kullanınız.
şu tuşa basınız
Çalışı durdurmak için 6 veya (OFF)
CD’yi çıkarmak için 6
Geçen çalış süresi
Parça numarası
Arzu edilen birim seçildikten sonra, gösterge
bir kaç saniye sonra otomatik olarak Hareket
Göstergesi kipine geçer.
Hareket Göstergesi kipinde, tüm yukarıdaki
birimler birbiri ardına sırayla göstergeden
geçer.
Öneri
Hareket Göstergesi kipi kapatılabilir. (“Ses ve
gösterge ayarlarının değiştirilmesi” ne bakınız: Sayfa
18).
Özel bir parçanın bulunması
— Automatic Music Sensor (AMS)
Çalış sırasında, SEEK/AMS düğmesini
yukarı veya aşağı itiniz ve atlamak
istediğiniz her parça için bırakınız.
Sonraki parçaya gelmek için
Önceki parçaya dönmek için
SEEK/AMS
Parça içindeki belirli bir noktanın
bulunması
— Manüel arama
Çalış sırasında, SEEK/AMS düğmesini
yukarı veya aşağı itiniz ve tutunuz. Arzu
edilen noktayı bulduğunuz zaman
bırakınız.
ileri gitmek için
SEEK/AMS
geri gelmek için
Not
Göstergede “
bu diskin başlangıcına ve sonuna eriştiğinizi ve daha
fazla ilerleyemeyeceğinizi gösterir.
” veya “ ” görülür ise,
7
Page 80

CD’nin çeşitli kiplerde
çalınması
CD’yi çeşitli kiplerde çalabilirsiniz:
• REP (Repeat Play) Aynı parçayı tekrar eder.
• SHUF (Shuffle Play) Tüm parçaları rasgele
sıra ile çalar.
Parçaların tekrar tekrar çalınması
— Repeat Play
1 Çalış sırasında, (SHIFT) tuşuna basınız.
(SHIFT) tuşuna her bastığınızda, yalnız
seçtiğiniz birimlerin ışığı yanar.
DSPL
D
SHIFT
OFF
2 3 4 5 6 7 81
Radyo
İstasyonların otomatik
olarak hafızaya alınması
— Best Tuning Memory (BTM)
Ünite en güçlü sinyalleri yayan istasyonları
seçer ve onları frekansları sırasınca kaydeder.
Her bantta (FM1, FM2, MW, ve LW) en çok 10
istasyon kaydedebilirsiniz.
D
Dikkat
İstasyonları otomobil kullanırken
ayarlıyorsanız, kazaları önlemek için “Best
Tuning Memory” işlevini kullanınız.
2 “REP-1” görülene kadar tekrar tekrar
(6) (REP) tuşuna basınız.
Tekrar çalış başlar.
3 (SHIFT) tuşuna basınız.
Normal çalış kipine geri dönmek için, yukarıda
adım 2’deki “REP-OFF” işlevini seçiniz.
Parçaların rastgele sıra ile çalınması
— Shuffle Play
1 Çalış sırasında, (SHIFT) tuşuna basınız.
2 “SHUF-1” görülene kadar tekrar tekrar
(7) (SHUF) tuşuna basınız.
Rastgele çalış başlar.
3 (SHIFT) tuşuna basınız.
Normal çalış kipine geri dönmek için, yukarıda
adım 2’deki “SHUF-OFF” işlevini seçiniz.
1 Radyoyu seçmek için tekrar tekrar
(SOURCE) tuşuna basınız.
(SOURCE) tuşuna her bastığınızda, kaynak
aşağıdaki şekilde değişir:
zz
z TUNER
zz
zz
z CD
zz
2 Bandı seçmek için tekrar tekrar (MODE)
tuşuna basınız.
(MODE) tuşuna her bastığınızda, band
aşağıdaki şekilde değişir:
zz
z FM1
zz
zz
z FM2
zz
zz
z MW
zz
zz
z LW
zz
3 (SHIFT) tuşuna basınız, ardından
“B.T.M” görülene kadar tekrar tekrar
(3) (PLAY MODE) tuşuna basınız.
4 (4) (n) tuşuna basınız.
Ünite istasyonları frekans sırasına göre
numara tuşlarına kaydeder.
Ayar kaydedildiğinde bir uyarı sinyali
duyulur.
5 (SHIFT) tuşuna basınız.
8
Page 81

Notlar
• Ünite zayıf sinyal veren istasyonları kaydetmez.
Yalnız birkaç istasyon alınabiliyorsa, bazı numara
tuşları eski ayarlarını korur.
• Göstergede bir numara görülüyorsa, ünite
istasyonları görülen numaradan itibaren
kaydetmeye başlar.
• Ünitede CD yoksa (SOURCE) tuşuna bassanız
dahi, yalnız radyo bandı görülür.
Hafızaya alınmış
istasyonların dinlenmesi
1 Radyoyu seçmek için tekrar tekrar
(SOURCE) tuşuna basınız.
2 Bandı seçmek için tekrar tekrar (MODE)
tuşuna basınız.
Yalnız arzu edilen
istasyonların hafızaya
alınması
20 FM istasyonu (FM1 ve 2’nin her biri için 10),
10’a kadar MW istasyonu ve 10’a kadar LW
istasyonunu dilediğiniz sıra ile hafızaya
alabilirsiniz.
1 Radyoyu seçmek için tekrar tekrar
(SOURCE) tuşuna basınız.
2 Bandı seçmek için tekrar tekrar (MODE)
tuşuna basınız.
3 Numara tuşuna kaydetmek istediğiniz
istasyonu ayarlayana kadar SEEK/AMS
düğmesini yukarı veya aşağı doğru
itiniz.
4 “MEM” görülene kadar arzu edilen
numara tuşuna ((1) – (10)) basınız ve
tutunuz.
Göstergede numara tuşu işareti görülür.
Not
Başka bir istasyonu aynı numara tuşuna kaydetmeyi
denerseniz, daha önce kaydedilen istasyon silinir.
3 Arzu edilen istasyonun kayıtlı olduğu
numara tuşuna ((1) – (10)) basınız.
Daha önce ayarlanan bir istasyonu
bulamıyorsanız
İstasyonu aramak için SEEK/AMS
düğmesini yukarı veya aşağı itip
bırakınız (otomatik ayar).
Ünite bir istasyon bulduğunda tarama durur.
Dilediğiniz istasyonu bulana kadar SEEK/
AMS düğmesini tekrar tekrar yukarı veya
aşağı itiniz.
Not
Otomatik ayar çok sık duruyorsa (SHIFT) tuşuna
basınız, ardından “LOCAL” (yerli arama kipi) görülene
kadar tekrar tekrar (3) (PLAY MODE) tuşuna
basınız. Sonra “LOCAL-ON.” işlevini seçmek için
(4) (n) (SHIFT) tuşuna basınız.
Yalnız oldukça güçlü sinyal yayan istasyonlar
ayarlanacaktır.
Öneri
Dinlemek istediğiniz istasyonun frekansını
biliyorsanız, SEEK/AMS düğmesini dilediğiniz frekans
görülene kadar yukarı veya aşağı itip tutunuz (manüel
ayar).
9
Page 82

FM stereo yayını zayıf ise
— Mono Kipi
1 Radyo yayını sırasında, (SHIFT) tuşuna
basınız, ardından “MONO” görülene
kadar tekrar tekrar (3) (PLAY MODE)
tuşuna basınız.
2 “MONO-ON” görülene kadar tekrar
tekrar (4) (n) tuşuna basınız.
Ses yükselir, fakat mono olur (“ST”
kaybolur).
3 (SHIFT) tuşuna basınız.
Normal çalış kipine geri dönmek için, yukarıda
adım 2’deki “MONO-OFF” işlevini seçiniz.
Gösterge biriminin değiştirilmesi
(DSPL) tuşuna her bastığınızda, işaret
aşağıdaki şekilde değişir:
Frekans ˜ Saat
Dilediğiniz birimi seçtikten birkaç saniye sonra
gösterge otomatik olarak Hareket Göstergesi
Kipine geçer.
Hareket Göstergesi kipinde yukarıdaki tüm
işaretler sırayla göstergeden geçer.
Öneri
Hareket Göstergesi kipi kapatılabilir. (“Ses ve
gösterge ayarlarının değiştirilmesi” ne bakınız: Sayfa
18).
RDS
RDS işlevine genel bakış
Radyo Data System (RDS), FM istasyonlarının
normal radyo program sinyalleri ile ilave dijital
bilgi göndermesini sağlayan bir yayın servisidir.
Oto Stereo çeşitli servis imkanları sunmaktadır.
Bu imkanlardan birkaçı şunlardır: aynı
programı otomatik olarak tekrar ayarlamak,
trafik haberlerini dinlemek ve bir istasyonu
program türüne göre yerleştirmek.
Notlar
• Ülkeye ve bölgeye bağlı olarak RDS’nin tüm
işlevleri çalışmayabilir.
• Sinyal gücünün zayıf olduğu hallerde veya istasyon
RDS verileri aktarmaya ayarlanmamış ise RDS tam
anlamıyla çalışmayabilir.
İstasyon isminin
görülmesi
İstasyon isminin ışıkları göstergede görülür.
Bir FM istasyonu seçiniz (Sayfa 8).
RDS verisi aktaran bir FM istasyonu
ayarladığınızda, göstergede istasyonun
ismi görülür.
10
Not
“ *” işareti bir RDS istasyonunun ayarlandığını
gösterir.
Page 83

Göstergedeki birimlerin değiştirilmesi
(DSPL) tuşuna her bastığınızda, işaret
aşağıdaki şekilde değişir:
Frekans (İstasyon ismi)
˜˜
˜ Saat
˜˜
Not
Bölgede başka bir istasyon yoksa ve başka bir
istasyon aramanız gerekmiyorsa, AF işlevini “AF TAOFF” görülene kadar (AF/TA) tuşuna basarak
kapatınız.
Dilediğiniz birimi seçtikten birkaç saniye sonra
gösterge otomatik olarak Hareket Göstergesi
kipine geçer.
Hareket Göstergesi kipinde yukarıdaki tüm
birimler sırayla göstergeden geçer.
Öneri
Hareket Göstergesi kipi kapatılabilir. (“Ses ve
gösterge ayarlarının değiştirilmesi” ne bakınız: Sayfa
18).
Not
İstasyon RDS verileri aktarmıyorsa “NO NAME”
görülür.
Aynı programın otomatik
olarak ayarlanması
— Alternative Frequencies (AF)
Alternative Frequencies (AF) işlevi otomatik
olarak ağdaki en kuvvetli sinyali veren
istasyonu bulur ve ayarlar. Bu işlevi kullanarak
uzun bir yolculuk esnasında aynı programı
tekrar manüel bir ayar yapmak zorunda
kalmadan dinleyebilirsiniz.
Frekanslar otomatik olarak değişir.
98,5MHz
96,0MHz
Göstergedeki işareterin değiştirilmesi
(AF/TA) tuşuna her bastığınızda birim
aşağıdaki şekilde değişir:
””
” TA-ON
””
““
AF-ON
“ AF TA-OFF
““
* Bu işareti AF ve TA işlevlerini birden.
Notlar
• “NO AF” ve istasyonun ismi değişerek yanıp
sönüyorsa, bu ünitenin ağda başka bir istasyon
bulamadığı anlamına gelir.
• İstasyonun ismi AF işlevi açık olan bir istasyonu
seçtikten sonra yanıp sönüyorsa, bu başka bir
frekansın bulunamadığını gösterir. İstasyonun ismi
yanıp sönerken (sekiz saniye içinde) SEEK/AMS
düğmesini yukarı veya aşağı itiniz. Ünite aynı PI
(Programme Identification) verisine sahip başka bir
frekans aramaya başlar. (“PI SEEK” görülür ve ses
duyulmaz). Ünite başka bir frekans bulamazsa,
“NO PI” görülür ve ünite daha önce seçilen frekansa
döner.
””
” AF TA-ON*
””
““
“
““
Devamı ilerki sayfada n
İstasyon
102,5MHz
1 Bir FM istasyonu seçiniz (Sayfa 8).
2 “AF-ON” görülene kadar tekrar tekrar
(AF/TA) tuşuna basınız.
Ünite aynı ağda daha güçlü sinyal veren bir
diğer istasyonu aramaya başlar.
11
Page 84

Bölgesel bir programın dinlenmesi
“REG-ON” (bölgesel açık) işlevi başka bir
bölgesel istasyona atlamadan bölgesel
programlara ayarlı kalmanızı sağlar. (AF
işlevini açmanıza gerek kalmadan). Ünitenin
fabrika ayarı “REG-ON”, ancak bu işlevi
kapatmak istiyorsanız, aşağıdakileri yapınız.
1 Radyo yayını sırasında (SHIFT) tuşuna
basınız, ardından “REG” görülene kadar
tekrar tekrar (3) (PLAY MODE) tuşuna
basınız.
2 “REG-OFF” görülene kadar tekrar tekrar
(4) (n) tuşuna basınız.
3 (SHIFT) tuşuna basınız.
“REG-OFF” işlevini seçmenin ünitenin aynı
ağ içindeki başka bölgesel istasyonlara
geçmesine neden olabileceğini
unutmayınız.
Bölgeselin açık olması için yukarıda adım
2’deki “REG-ON” işlevini seçiniz.
Not
Bu işlev İngiltere’de ve diğer bazı bölgelerde
çalışmaz.
Yerli bağlantı işlevi
(yalnız İngiltere için geçerli)
Yerli bağlantı işlevi, ayarlarınızda kayıtlı
olmasa bile diğer yerli istasyonları seçmenizi
sağlar.
1 Bölgesel bir istasyonun kayıtlı olduğu
bir numara tuşuna basınız.
Trafik duyurularının
dinlenmesi
Traffic Announcement (TA) ve Traffic
Programme (TP) verileri başka program
kaynaklarını dinleseniz dahi otomatik olarak
trafik duyuruları yapan bir FM istasyonunu
ayarlamanızı sağlar.
“TA-ON” veya “AF TA-ON” görülene
kadar tekrar tekrar (AF/TA) tuşuna
basınız.
Ünite trafik duyuruları yapan istasyonları
aramaya başlar. Ünite trafik duyuruları
yayınlayan bir istasyon bulduğunda
göstergede “TA” yanıp söner. Yanıp sönme
trafik duyuruları bittiğinde son bulur.
Trafik duyuruları başlayınca göstergede
“TA” yanıp söner. Yanıp sönme trafik
duyuruları bittiğinde son bulur.
Öneri
Trafik duyuruları siz başka bir program kaynağını
dinlerken başlarsa, ünite otomatik olarak trafik
haberlerine geçer ve haberler bittiğinde otomatik
olarak daha önce dinlenilen program kaynağına
döner.
Notlar
• Dinlediğiniz istasyon trafik duyuruları
yayınlamıyorsa beş saniye boyunca “NO TP” yanıp
söner. Ardından, ünite trafik duyuruları yayınlayan
bir istasyon aramaya başlar.
• Göstergede “EON” “TP” ile beraber görülürse, o
zaman ayarlanan istasyon aynı ağdaki diğer
istasyonların trafik duyurularını yayınlıyordur.
2 Beş saniye içinde bölgesel istasyonun
numara tuşuna tekrar basınız.
3 Bu işlemi dilediğiniz bölgesel istasyonu
buluncaya kadar tekrarlayınız.
12
Page 85

Yayınlanan trafik duyurularının iptal
edilmesi
(AF/TA) veya (SOURCE) tuşuna basınız.
Tüm trafik duyurularını iptal etmek için, “AF”
görülene kadar (AF/TA) tuşuna basarak
kapatabilirsiniz.
Trafik duyurularının ses ayarı
Duyuruları kaçırmamak için trafik duyuruların
ses seviyesini önceden ayarlayabilirsiniz.
Trafik açıklamaları başladığında ses otomatik
olarak önceden ayarladığınız seviyeye gelir.
1 Dilediğiniz ses seviyesini seçiniz.
2 İki saniye için (AF/TA) tuşuna basınız.
“TA” görülür ve ayar kaydedilir.
Acil duyuruların dinlenmesi
Radyoyu dinlerken acil bir duyuru gelirse,
program otomatik olarak ona geçecektir.
Radyodan başka bir kaynağı dinliyorsanız,
yalnız AF veya TA açıksa duyulacaktır. Ünite,
bundan sonra, o sırada hangi kaynağı
dinlerseniz dinlayin otomatik olarak duyurulara
geçer.
RDS istasyonlarının AF
ve TA verilerine
ayarlanması
RDS istasyonlarını ayarlarken ünite istasyon
verilerini ve frekansları kaydeder, böylece
ayarladığınız istasyonu her dinleyişinizde AF
veya TA işlevlerini açmanız gerekmez.
Hafızaya alınmış istasyonlar için farklı bir ayar
(AF, TA, veya ikisi birden) veya tüm
kaydedilmiş istasyonlar için aynı ayarı
seçebilirsiniz.
Tüm ayarlanmış istasyonların aynı
ayara getirilmesi
1 Bir FM bandı seçiniz (Sayfa 8).
2 “AF-ON”, “TA-ON” veya “AF TA-ON” (AF
ve TA işlevlerinin ikisi birden) işlevini
seçmek için tekrar tekrar (AF/TA) tuşuna
basınız.
“AF TA-OFF” işlevini seçmezsiniz, yalnız
RDS istasyonları değil, RDS olmayan
istasyonlar da kaydedilir.
3 (SHIFT) tuşuna basınız, ardından tekrar
tekrar “BTM” görülene kadar (3) (PLAY
MODE) tuşuna basınız.
4 “B.T.M” yanıp sönene kadar (4) (n)
tuşuna basınız.
5 (SHIFT) tuşuna basınız.
Ayarlanmış kanalların ayrı ayrı ayarı
1 Bir FM bandı seçiniz ve arzu edilen
istasyonu ayarlayınız (Sayfa 9).
2 “AF-ON”, “TA-ON” veya “AF TA-ON” (AF
ve TA işlevlerinin ikisi birden) işlevini
seçmek için tekrar tekrar (AF/TA) tuşuna
basınız.
3 “MEM” görülene kadar arzu edilen
numara tuşuna basınız.
Başka istasyonları kaydetmek için adım
1’den itibaren tekrarlayınız.
Öneri
Önceden kaydedilmiş bir istasyonu ayarladıktan
sonra, hafızadaki AF ve/veya TA ayarlarını
değiştirmek isterseniz, bunu AF veya TA işlevlerini
açarak veya kapayarak yapabilirsiniz.
13
Page 86

İstasyonun program
tipine göre
yerleştirilmesi
Arzu ettiğiniz istasyonu aşağıda belirtilen
program tiplerine göre yerleştirebilirsiniz.
Program tipleri Gösterge
Haberler NEWS
Güncel Olaylar AFFAIRS
Enformasyon INFO
Spor SPORT
Eğitim EDUCATE
Drama DRAMA
Kültür CULTURE
Bilim SCIENCE
Çeşitli VARIED
Popüler Müzik POP M
Rock Müzik ROCK M
Hafif Müzik EASY M
Light Klasik LIGHT M
Klasik CLASSICS
Diğer Müzik Tipi OTHER M
Hava Durumu WEATHER
Finans FINANCE
Çocuk programları CHILDREN
Sosyal Olaylar SOCIAL A
Din RELIGION
Çağrı PHONE IN
Seyahat TRAVEL
Boş vakit LEISURE
Jazz Müzik JAZZ
Country Müzik COUNTRY
Milli Müzik NATION M
Oldies Müzik OLDIES
Folk Müzik FOLK M
Belgesel DOCUMENT
Belirsiz NONE
1 FM yayını sırasında “PTY” görülene
kadar (PTY) tuşuna basınız.
İstasyon PTY verileri yayınlamıyorsa
program tipinin ismi görülür. İstasyon eğer
RDS istasyonu değilse ve gönderilen RDS
verilerini alamıyorsa göstergede “- - - - -”
görülür.
2 Arzu edilen program tipi görülene kadar
tekrar tekrar (PTY) tuşuna basınız
Program tipleri yukarıdaki tablo sırası ile
görülür. Ararken “NONE” (Belirlenmemiş)
işlevini seçemeyeceğinizi unutmayınız.
3 SEEK/AMS düğmesini yukarı veya aşağı
doğru itiniz.
Ünite seçilen program tipinde yayın yapan
bir istasyonu aramaya başlar. Ünite
programı bulunca, program tipi göstergede
5 saniye süreyle tekrar görülür.
Ünite program tipini bulamazsa beş saniye
boyunca “NO” ve program tipi değişerek
yanıp söner. Ünite bunun ardından
önceden seçilen istasyona geri döner.
Not
Bu işlevi PTY (Programme Type selection) verisinin
bulunmadığı bazı ülkelerde kullanmazsınız.
14
Page 87

Saatin otomatik ayarı
RDS’den aktarılan CT (Saat Tarih) verisi saati
otomatik olarak ayarlar.
1 Radyo yayını sırasında, (SHIFT) tuşuna
basınız, ardından “CT” görülene kadar
tekrar tekrar (2) (SET UP) tuşuna
basınız.
2 “CT-ON” görülene kadar. tekrar tekrar
(4) (n) tuşuna basınız.
Saat ayarlanmış olur.
Diğer İşlevler
Bu üniteyi tercihe bağlı döner kumanda ile de
kontrol edebilirsiniz.
Döner kumandanın
etiketlendirilmesi
Döner kumandanın montajına göre uygun
etiketi aşağıdaki örnekte gösterildiği üzere
yapıştırınız.
3 Göstergenin normal haline dönmek için
(SHIFT) tuşuna basınız.
CT işlevinin iptal edilmesi
Yukarıda adım 2’deki “CT-OFF” işlevini
seçiniz.
Notlar
• Bir RDS istasyonu alınabildiği takdirde CT işlevi
çalışmayabilir.
• CT işlevi ile ayarlanan tarih ile gerçek tarih arasında
bir farklılık olabilir.
MODE
SOUND
LIST
SOUND
MODE
LIST
15
Page 88

Döner kumandanın
kullanılması
Döner kumanda tuşlara basarak ve/veya
kontrol düğmesini çevirerek çalışır.
Tuşlara basarak
(SOURCE ve MODE tuşları)
Kontrol düğmesini çevirerek
(SEEK/AMS düğmesi)
(SOURCE)
(MODE)
(SOURCE) tuşuna her bastığınızda
kaynak aşağıdaki şekilde değişir
˜˜
TUNER
˜ CD
˜˜
(MODE) tuşuna basmak işlemİ aşağıdaki
şekilde değiştirir;
• Radyo: FM1 n FM2 n MW n LW
Düğmeyi bir an çevirip bırakarak şunları
yapabilirsiniz:
• Diskteki belirli bir parçaya gelmek. Kontrol
düğmesini parçanın dilediğiniz bölümünü
belirleyene kadar çevirip tutunuz, çalmaya
başlaması için bırakınız.
• İstasyonları otomatik olarak ayarlamak.
Belirli bir kanalı bulmak için düğmeyi
çevirip tutunuz.
Kontrol düğmesini itip çevirerek
(PRESET/DISC düğmesi)
Kontrol düğmesini itip çevirerek şunu
yapabilirsiniz:
• Ayar tuşunda kayıtlı istasyonları dinlemek.
16
Page 89

Diğer işlemler
Sesi ayarlamak için VOL
düğmesini çeviriniz.
Sesi kısmak için
(ATT) tuşuna
basınız.
OFF
Ses özelliklerinin
ayarlanması
Bas, tiz, balans ve “fader” işlevlerini
ayarlayabilirsiniz.
Her kaynak için bas ve tiz seviyelerini ayrı ayrı
kaydedebilirsiniz.
Üniteyi kapatmak için
(OFF) tuşuna basınız.
Ses ve ses menüsünü ayarlamak
için (SOUND) tuşuna basınız.
Program tiplerinin isimlerini görmek için (LIST)
tuşuna basınız (yalnız FM kipinde).
İşlev yönün değiştirilmesi
Kontrol düğmesinin işlev yönü aşağıda
gösterildiği üzere fabrika ayarlıdır.
Yükseltmek için
Azaltmak için
Döner kumandayı direksiyonun sağ yanına
monte etmek istediğinizde, kontrol düğmesinin
işlev yönünü değiştirebilirsiniz.
1 (SOUND) tuşuna tekrar tekrar basarak
ayarlamak istediğiniz birimi seçiniz.
VOL (ses) n BAS (bas) n TRE (tiz) n
BAL (sol-sağ) n FAD (ön-arka)
2 Seçtiğiniz birimi kadranı çevirerek
ayarlayınız.
Birimi seçtikten sonraki üç saniye içinde
ayarlayınız. (Üç saniye sonra kadran işlevi
ses kontrolüne döner.)
Sesin kısılması
Tercihe bağlı döner kumandadaki (ATT)
tuşuna basınız.
“ATT-ON” bir an için yanıp söner.
Daha önceki ses seviyesine dönmek için tekrar
(ATT) tuşuna basınız.
Öneri
Otomobil telefonunuzun ara kablosu ATT kablosuna
bağlı ise, telefon geldiğinde ünite sesi otomatik olarak
kısar (Telefon ATT işlevi).
VOL düğmesini iterek (SOUND) tuşuna
iki saniye basınız.
Öneri
Üniteyle kontrol düğmelerinin işlev yönünü
değiştirebilirsiniz (Sayfa 18).
17
Page 90

Ses ve gösterge
ayarlarının değiştirilmesi
Aşağıdaki birimleri ayarlayabilirsiniz:
• CLOCK (Sayfa 6).
• CT (Saat Tarih) (Sayfa 15).
• D.INFO (Dual Information) - Saat ve çalış
kipinin aynı anda görülmesi için (ON) veya bu
bilgilerin değişerek görülmesi için (OFF).
• BEEP - uyarı sinyalini açmak veya kapatmak
için.
• RM (Döner kumanda) - Döner kumanda
düğmelerinin işlev yönünü değiştirmek için.
— Döner kumandayı fabrika ayarı ile
kullanmak için “NORM” işlevini seçiniz.
— Döner kumandayı direksiyonun sağ
yanına monte ederseniz “REV” işlevini
seçiniz.
• M.DSPL (Hareket Göstergesi) - Hareket
göstergesini açmak veya kapatmak için.
1 (SHIFT) tuşuna basınız.
2 Dilediğiniz birim görülene kadar tekrar
tekrar (2) (SET UP) tuşuna basınız.
(2) (SET UP) tuşuna her bastığınızda
işaret aşağıdaki şekilde değişir:
CLOCK n CT n D.INFO* n BEEP n RM n
M.DSPL
* CD veya MD çalmıyor ise bu birim görülmez.
Not
Göstergedeki birim kaynağa bağlı olarak değişiklik
gösterecektir.
3 Arzu edilen ayarı seçmek için (4) (n)
tuşuna basınız (Örnek: ON veya OFF).
4 (SHIFT) tuşuna basınız.
Kip ayarı bittikten sonra, gösterge normal
çalış kipine döner.
18
Page 91

Basın yükseltilmesi
— D-bass
Zevkle temiz ve güçlü bir bas dinleyebilirsiniz.
D-bass işlevinin alçak frekans sinyallerini
yükseltme eğrisi alışılagelmiş bas
güçlendiricilerinden daha keskindir.
Vokal seviyesi aynı kalsa da bası daha temiz
duyabilirsiniz. D-BASS düğmesi ile bası
kolaylıkla vurgulayabilir ve ayarlayabilirsiniz.
D-BASS 3
D-BASS 2
Seviye
0dB
Bas kavisinin ayarlanması
Bas seviyesini ayarlamak için D-BASS
düğmesini çeviriniz (1, 2 veya 3).
Göstergede “D-BASS” görülür.
İptal etmek için düğmeyi OFF pozisyonuna
çeviriniz.
Not
Bas kötü çıkıyorsa D-BASS düğmesini veya sesi
ayarlayınız.
D-BASS 1
Frekans (Hz)
Ek bilgi
Tedbirler
• Otomobilinizi iç ısının önemli ölçüde
artabileceği direkt güneş ışığına tabi bir yere
park ettiyseniz üniteyi çalıştırmadan önce
soğumasına izin veriniz.
• Eğer üniteye güç gitmiyorsa, önce
bağlantıları kontrol ediniz. Her şey yolunda
ise sigortayı kontrol ediniz.
• İki hoparlörlü sistemin hoparlörlerinden ses
gelmiyorsa “fader” kontrol düğmesini orta
pozisyona getiriniz.
• Otomobilinizde bir güç anteni tertibatı varsa
anten ünite çalıştığında otomatik olarak dışarı
çıkar.
Ünite hakkında bu kılavuzda yer almayan soru
ve sorunlarınız varsa, lütfen en yakın Sony
bayiine başvurunuz.
CD ile ilgili notlar
Kirli veya bozuk bir disk çalış esnasında ses
kesilmelerine neden olabilir. Azami ses kalitesi
için, diski kenarından tutunuz. Diski temiz
tutmak için yüzeyine dokunmayınız.
Etiketli yüzeye kağıt veya yapışkan
yapıştırmayınız.
Devamı ilerki sayfada n
19
Page 92

Diskleri direkt güneş ışığına veya sıcak hava
kanalları gibi ısı kaynaklarına maruz
bırakmayınız veya otomobilin iç ısısının önemli
ölçüde artabileceği direkt güneş ışığında park
edilmiş otomobilin içinde bırakmayınız.
Çalış öncesi diskleri tercihe bağlı bir temizleme
bezi ile temizleyiniz. Her diski merkezinden
dışarıya doğru siliniz.
Benzin, tiner, satışa sunulan temizleyiciler gibi
çözücü maddeler veya analog diskler için
geliştirilmiş antistatik sprey kullanmayınız.
Disk hakkında notlar
Disklerinizi aşağıda açıklandığı gibi
kullanmazsanız, yapışkan kalıntılar CD
hareketinin durmasına sebep olur. Bu da işlev
bozukluğuna neden olur veya disklerinize zarar
verir.
Nemin buharlaşması hakkında notlar
Yağmurlu bir günde veya çok nemli bir
bölgede, nem CD çaların içindeki lenslerin
üzerinde toplanabilir. Bu olursa, ünite tam
anlamıyla çalışmaz. Bu halde diski çıkarınız ve
nem buharlaşana dek bir saat kadar
bekleyiniz.
8 cm’lik CD’ler çaldığınızda
CD çalarınızı zarar görmesinden korumak için
tercihe bağlı Sony Compact Disk tekli adaptörü
(CSA-8) kullanınız.
Yüzeyinde yapışkan kalıntı (örneğin sökülmüş
yapışkandan veya mürekkepten veya
yapışkanın altındaki tutkaldan) bulunan ikinci
el veya kiralık CD’ler kullanmayınız.
Yapışkan kalıntı var
Mürekkep yapışkan
Dökülmeye başlayan eski etiket takılı kiralık
diskler kullanmayınız.
Yapışkan iz bırakan dökülmeye
yüz tutmuş yapışkanlar
CD’lerinizi etiket veya yapışkan yapıştırılmış
olarak kullanmayınız.
Etiketler yapıştırılmış
20
Page 93

Bakım
Sigortanın değiştirilmesi
Sigortayı değiştirirken sigortanın amper
gücüne uygun bir sigorta kullandığınıza emin
olunuz. Sigorta attığında güç bağlantısını
kontrol edip sigortayı değiştiriniz. Sigorta
değiştirildikten sonra tekrar atarsa, bu dahili bir
işlev bozukluğunu işaret eder. Böyle bir
durumda en yakın SONY bayiine başvurunuz.
Ünitenin sökülmesi
Söküm anahtarı
(ünite beraberinde)
µ
Sigorta (10 A)
Uyarı
Hiçbir zaman üniteye takılı sigortanın amper
gücünden daha güçlü bir sigorta takmayınız,
aksi takdirde üniteye zarar verebilirsiniz.
Könektörlerin temizlenmesi
Ünite ile ön panel arasındaki konektörler temiz
değil ise, ünite tam anlamıyla çalışmayabilir.
Bunu önlemek için (RELEASE) tuşuna basarak
ön paneli açınız, çıkarınız ve alkole batırılmış
bir pamuk çubuk ile temizleyiniz. Fazla kuvvet
kullanmayınız. Aksi takdirde konektörler zarar
görebilir.
Ana ünite
Ön panelin arkası
µ
µ
Söküm anahtarı takılı iken üniteyi çekerek
çıkarınız.
Notlar
• Emniyetiniz için konektörleri temizlemeden önce
motoru kapatınız ve anahtarı kontakt yuvasından
çıkarınız.
• Konektörlere hiçbir zaman parmaklarınızla veya
metal bir cisim ile dokunmayınız.
21
Page 94

Özellikler
CD çalar bölümü
Sistem Compact disk dijital ses
sistemi
Ses sinyal oranı 80 dB
Frekans cevabı 10 – 20.000 Hz
Titreme Ölçülebilir seviyenin altında
Radyo bölümü
FM
Ayar sırası 87,5 – 108,0 MHz
Anten terminali Harici anten konektörü
Ortalama frekans 10,7 MHz
Kullanılabilir ince ayar 12 dBf
Seçicilik 400 kHz’de 75 dB
Ses sinyal oranı 65 dB (stereo),
68 dB (mono)
Harmonik bozulma 1 kHz
0,8 % (stereo),
0,6 % (mono)
Separasyon 1 kHz’de 35 dB
Frekans cevabı 30 – 15.000 Hz
MW/LW
Ayar sırası MW: 531 – 1.602 kHz
LW: 153 – 281 kHz
Anten terminali Harici anten konektörü
Ortalama frekans 10,7 MHz/450 kHz
Duyarlılık MW: 30 µV
LW: 50 µV
Güç amplifikatör bölümü
Çıkışlar Hoparlör çıkışları
(mühürlü konektörler)
Hoparlör empedansı 4 – 8 ohms
Azami güç çıkışı 45 W × 4 (4 ohms’da)
Genel
Çıkışlar Güç anten yayın kontrol
Ton düğmeleri Bas 100 Hz’de ±8 dB
Güç gereksinimi 12 V DC otomobil aküsü
Boyutlar Azami 178 × 50 × 185 mm
Montaj boyutları Azami 182 × 53 × 162 mm
Ağırlık Azami 1,2 kg
Beraberindeki aksesuarlar
Tercihe bağlı aksesuarlar Döner kumanda RM-X4S
Dizayn ve özellikleri değiştirme hakkı mahfuzdur.
kablosu
Telefon
ATT kontrol kablosu
Tiz 10 kHz’de ±8 dB
(negatif toprak)
(e/y/b)
(e/y/b)
Kurma ve bağlantı
parçaları (1 set)
Ön panel çantası (1)
Compact disk tekli adaptör
CSA-8
22
Page 95

Sorun arama kılavuzu
Aşağıdaki kontrol listesi ünitenizde karşılaşacağınız sorunların büyük çoğunluğunun
düzeltilmesinde size yardımcı olacaktır.
Aşağıdaki kontrol listesine bakmadan önce, bağlantı ve işlev yöntemlerini gözden geçiriniz.
Genel
Sorun
Ses çıkmıyor.
Hafızanın içeriği silinmiş.
İşaretler göstergede
görülmüyor.
Uyarı sinyali yok.
CD çalınması
Sorun
Disk yüklenemiyor.
Çalış başlamıyor.
Disk otomatik olarak dışarı
çıkıyor.
CD çıkmıyor.
İşlev tuşları işlemiyor.
Ses vibrasyon yüzünden
atlıyor.
Sebep/Çözüm
• ATT işlevini iptal ediniz.
• İki hoparlörlü sistem için “fader” düğmesini orta pozisyona
getiriniz.
• Sesi ayarlamak için kadranı saatin yönünde çeviriniz.
• Güç kablosu veya akü bağlanmamış.
• Ayar tuşuna basılmış.
n Tekrar hafızaya kaydediniz.
Ön paneli çıkarınız ve könektörleri temizleyiniz. Detaylar için
“konektörlerin temizlenmesi” ne bakınız: (Sayfa 20).
Uyarı sinyali kapatılmış (Sayfa 18).
Sebep/Çözüm
• Başka bir CD yüklenmiş.
• CD yanlışlıkla ters yerleştirilmiş veya yalnış yere yerleştirilmiş
(MD).
Kirli CD.
Çevre sıcaklığı 50°C üzerinde.
İki saniye için 6 tuşuna basınız.
Ayar tuşuna basınız.
• Ünite 60° üzerinde bir açıyla monte edilmiş.
• Ünite otomobilin sağlam bir parçasına kurulmamış.
Devamı ilerki sayfada n
23
Page 96

Radyo yayını
Sorun
Hafızalı ayar olmuyor.
Otomatik ayar olmuyor.
İstasyonlar bulunamıyor.
Ses cızırtılarla bozuluyor.
“ST” işareti yanıp sönüyor.
Sebep/Çözüm
• Doğru frekansı hafızaya alınız.
• Yayın sinyali çok zayıf.
Yayın sinyali çok zayıf.
n Manüel ayarı kullanınız.
Anten kontrol kablosunu (mavi) veya ek güç destek kablosunu
(kırmızı) otomobilin anten kutusuna bağlayınız. (Yalnız
otomobilinizin arka/yan camda dahili FM/MW/LW anteni varsa.)
• İnce frekans ayarı yapınız.
• Yayın sinyali çok zayıf.
n MONO kipine ayarlayınız (Sayfa 10).
RDS
Sorun
SEEK birkaç saniye dinledikten
sonra başlar.
Trafik duyuruları yok.
PTY “NONE” birimini
gösteriyor.
Yukarıda açıklanan çözümler durumun düzelmesini sağlamıyorsa, en yakın Sony bayiine
başvurunuz.
Sebep/Çözüm
İstasyon bir TP istasyonu değil veya sinyalleri çok zayıf.
n “AF TA-OFF” görülene kadar (AF/TA) tuşuna basınız.
• “TA” işlevini çalıştırınız.
• İstasyon TP olduğu halde trafik duyuruları yayınlamıyor.
n Başka bir istasyonu ayarlayınız.
İstasyon program tipini ayrımsamıyor.
24
Page 97

25
Page 98

Поздравляем с
покупкой!
Благодарим Вас за то, приобретение
проигрывателя компакт-дисков Sony. Этот
аппарат дает Вам возможность
пользоваться широким кругом
разнообразных функций, а также отдельно
приобретенным поворотным
дистанционным переключателем.
Пpоигpывaтeль компaктдиcков c paдиопpиeмником
в диaпaзонax FM/MW/LW
Cдeлaно в Taилaндe
2
Page 99

Содержание
Расположение органов управления ................ 4
Подготовка к пользованию
Переустановка параметров .........................5
Отделение передней панели .......................5
Установка часов ........................................... 6
Проигрыватель компакт-дисков
Воспроизведение компакт-диска ............... 7
Воспроизведение компакт-диска в
различных режимах ................................. 8
Радиоприемник
Автоматическое занесение станций в
память
— Функция памяти оптимальной
настройки станции (ВТМ) ........................ 8
Занесение в память только желаемых
станций ...................................................... 9
Прием занесенных в память станций ......... 9
RDS
Обзор функции RDS ...................................10
Индикация названия станции .................... 10
Автоматическая перенастройка на ту же
программу
— альтернативные частоты (AF) .......... 11
Прослушивание дорожных сообщений .....12
Предустановка станций RDS с данными
AF и ТА .................................................... 13
Нахождение станции по типу
программы .............................................. 14
Автоматическая установка часов ............. 15
Дополнительная информация
Предостережения ....................................... 19
Уход за аппратом........................................21
Демонтаж аппарата .................................... 21
Технические характеристики ....................22
Устранение неполадок ............................... 23
Прочие функции
Наклейка ярлычка на поворотный
дистанционный переключатель ........... 15
Использование поворотного
дистанционного переключателя .......... 16
Подстройка характеристик звука .............17
Приглушение звука ..................................... 17
Изменение заданных параметров звука и
дисплея ................................................... 18
Усиление низкочастотных звуков
— D-bass ................................................. 19
3
Page 100

Расположение органов управления
MODE
SEEK/AMS
SOURCE
RELEASE
SOUND
DSPL
D
OFF
SHIFT
Более подробно см. на стр.
1 Рычажок SEEK/AMS (поиск/
Автоматический музыкальный
сенсор/поиск вручную) 7, 9, 11, 14
2 Кнопка MODE (выбор диапазона)
8, 9
3 Кнопка SOURCE (выбор источника)
7, 8, 9, 13
4 Регулятор (громкость/ низкие/
высокие/баланс левых-правых/
передних-задних) 6, 17
5 Кнопка SOUND 17
6 Кнопка DSPL (изменение режима
дисплея) 7, 10, 11
7 Окошко дисплея
8 Кнопка PTY 14
9 6 Кнопка (извлечение диска) 7
PTY
AF/TA
1
2
OFF
D - BASS
2 3 4 5 6 7 8 9110
3
CDX–2500R
0 Кнопка AF/TA 11, 12, 13
!¡ RELEASE (кнопка отделения
передней панели) 5, 20
!™ Кнопка переустановки (находится на
корпусе аппарата под передней
панелью) 5
!£ Кнопка OFF* 5, 7
!¢ Кнопка SHIFT
PLAY MODE 8, 9, 10, 12, 13
REP 8
SET UP 6, 15, 18
SHUF 8
!∞ Во время приема радиопередач:
Номерные кнопки 9, 12, 13
!§ Рукоятка D-BASS 19
*Предостережение относительно
аппаратуры, установленной в
автомобиле, замок зажигания в
котором не имеет отдельного
положения (ACC) для отключения
подсоединенной аппаратуры.
После выключения двигателя не
забывайте нажать на две секунды
кнопку (OFF) на аппарате, с тем чтобы
отключить циферблат часов.
При кратком нажатии (OFF) циферблат
не отключается, что ведет к разрядке
аккумуляторной батареи.
4
 Loading...