

Page 1
2-347-284-11(1)
Compact Disc Recorder
CDR-W33
Operating Instructions
Recordable
Thank you very much for purchasing this Sony product.
Sony products are designed with safety in mind. If electrical
products are used incorrectly, however, there is a risk of death
or serious injury, so be sure to obey the following to avoid
accidents.
TABLE OF CONTENTS
Safety .........................................
Getting Started ..........................
Location and Function of Parts
Discs ..........................................
Recording ..................................
Operations on the Disc’s TOC
Area ........................................
Playback ....................................
Control Terminal Functions
and Settings...........................
Setup Menu Operations............
Miscellaneous ...........................
2
5
6
9
10
18
23
27
28
29
2000 Sony Corporation
Page 2
WARNING
Notice for the Customers in
the United Kingdom
IMPORTANT
The wires in this mains lead are
coloured in accordance with the
following code:
Blue: Neutral
Brown: Live
As the colours of the wires in the mains
lead of this apparatus may not
correspond with the coloured markings
identifying the terminals in your plug,
proceed as follows:
The wire which is coloured blue must
be connected to the terminal which is
marked with the letter N or coloured
black.
The wire which is coloured brown
must be connected to the terminal
which is marked with the letter L or
coloured red. Do not connect either
wire to the earth terminal in the plug
which is marked by the letter E or by
the safety earth symbol I or coloured
green or green-and-yellow.
For customers in the U.S.A
To prevent fire or shock
hazard, do not expose the
unit to rain or moisture.
To avoid electrical shock, do
not open the cabinet. Refer
servicing to qualified
personnel only.
This symbol is intended to alert
the user to the presence of
uninsulated “dangerous
voltage” within the product’s
enclosure that may be of
sufficient magnitude to
constitute a risk of electric
shock to persons.
This symbol is intended to alert
the user to the presence of
important operating and
maintenance (servicing)
instructions in the literature
accompanying the appliance.
CAUTION
Use of this product other than
directed may result in injury.
DANGER
INVISIBLE LASER RADIATION WHEN OPEN.
AVOID DIRECT EXPOSURE TO BEAM.
DANGER
RADIATIONS INVISIBLES DU LASER EN CAS D’OUVERTURE.
EVITER TOUTE EXPOSITION DIRECTE AU FAISCEAU.
This label is located on the rear of the
unit.
CAUTION
You are cautioned that any changes or
modification not expressly approved in
this manual could void your authority
to operate this equipment.
INFORMATION
This equipment has been tested and
found to comply with the limits for a
Class B digital device, pursuant to Part
15 of the FCC Rules. These limits are
designed to provide reasonable
protection against harmful interference
in a residential installation. This
equipment generates, uses, and can
radiate radio frequency energy and, if
not installed and used in accordance
with the instructions, may cause
harmful interference to radio
communications.
However, there is no guarantee that
interference will not occur in a
particular installation. If this equipment
does cause harmful interference to
radio or television reception, which can
be determined by turning the
equipment off and on, the user is
encouraged to try to correct the
interference by one or more of the
following measures:
• Reorient or relocate the receiving
antenna.
• Increase the separation between the
equipment and receiver.
• Connect the equipment into an outlet
on a circuit different from that to
which the receiver is connected.
• Consult the dealer or an experienced
radio/TV technician for help.
For customers in Europe
The laser component in this product
is capable of emitting radiation
exceeding the limit for Class 1.
This appliance is classified as a CLASS
1 LASER product.
The CLASS 1 LASER PRODUCT
MARKING is located on the rear
exterior.
The following caution label is located
inside the unit.
For customers in Canada
This ClassB digital apparatus complies
With Canadian ICES-003.
CAUTION
TO PREVENT ELECTRIC SHOCK, DO
NOT USE THS POLARIZED AC PLUG
WITH AN EXTENSION CORD,
RECEPTACLE OR OTHER OUTLET
UNLESS THE BLADES CAN BE
FULLY INSERTED TO PREVENT
BLADE EXPOSURE.
ATTENTION
POUR PREVENIR LES CHOCS
ELECTRIQUES, NE PAS UTILISER
CETTE FICHE POLARISEE AVEC
UNPROLONGATEUR, UNE PRISE DE
COURANT OU UNE AUTRE SORITIE
DE COURANT SAUF SI LES LAMES
PEUVENT ETRE INSEREES A FOND
SANS EN LAISSER AUCUNE PARTIE
A DECOUVER T.
Setting the voltage selector
(voltage selector equipped
models only)
Check that the voltage selector on the
rear panel is set to the local power line
voltage. If not, set the selector to the
correct position using a screwdriver
before connecting the AC power cord to
a wall outlet.
VOLT AGE
SELECTOR
120V 230V
2
Page 3

Owner’s Record
The model and serial numbers are located on the rear of the
unit. Record the serial number in the space provided below.
Refer to them whenever you call upon your Sony dealer
regarding this product.
Model No. ___________
Serial No. ___________
IN NO EVENT SHALL SELLER BE
LIABLE FOR ANY DIRECT,
INCIDENTAL OR
CONSEQUENTIAL DAMAGES OF
ANY NATURE, OR LOSSES OR
EXPENSES RESULTING FROM
ANY DEFECTIVE PRODUCT OR
THE USE OF ANY PRODUCT.
Main Features
Compatible with both CD-R and CD-RW media
By performing a CD-R finalize operation, you can play
the CD on an ordinary CD player. Use CD-RW to
delete the recording. You can also use this product to
play ordinary CDs.
Sampling rate converter
You can record not only CD and MD 44.1 kHz digital
signals, but also 32 kHz and 48 kHz digital sources
such as DAT, satellite digital broadcasts, DVD, etc.,
using a digital connection.
24-bit A/D, D/A converter
The product is equipped with a 24-bit A/D, D/A
converter .
Precautions
On safety
• Should any solid object or liquid fall into the cabinet,
unplug the recorder and have it checked by qualified
personnel before operating it any further.
• Caution – The use of optical instruments with this
product will increase eye hazard.
On power sources
• Before operating the recorder, check that the
operating voltage of the recorder is identical with
your local power supply. The operating voltage is
indicated on the nameplate at the rear of the
recorder.
• The unit is not disconnected from the AC power
source (mains) as long as it is connected to the wall
outlet, even if the unit itself has been turned off.
• If you are not going to use the recorder for a long
time, be sure to disconnect the recorder from the
wall outlet. To disconnect the AC power cord, grasp
the plug itself; never pull the cord.
• AC power cord must be changed only at the
qualified service shop.
On condensation
If the recorder is brought directly from a cold to a
warm location, or is placed in a very damp room,
moisture may condense on the lenses inside the
recorder. Should this occur, the recorder may not
operate properly. In this case, remove the MD and
leave the recorder turned on for several hours until the
moisture evaporates.
On cleaning
Clean the cabinet, panel and controls with a soft cloth
slightly moistened with mild detergent solution. Do
not use any type of abrasive pad, scouring powder or
solvent such as alcohol or benzine.
Equipped with a Super Bit Mapping (SBM) filter
When converting 24-bit data to 16-bit data, you can
record at better than ordinary 16-bit sound quality by
weaving the least-significant 8-bit information into the
16-bit data recorded, rather than simply truncating the
data. (Enabled only with analog sound input.)
Equipped with digital equalizer and digital limiter
You can convert sound to high acoustic pressure and
prevent hard clips using the digital limiter.
You can change sound character using digital
equalizer. (Both are enabled only with analog input.)
Record disc name and track name in CD-TEXT format
You can record up to 23 characters each for disc name
and track name.
Equipped with skip setting function
You can create discs that play back by skipping
unwanted tracks from among those that have been
recorded. This setting is enabled all compatible CD-R
recorders.
Equipped with useful recording functions such as
fader function, mute recording, music sync
recording, and auto track marking.
Also equipped with numerous playback functions
in addition to normal playback, such as shuffle
mode, program mode, auto-pause, music scan, and
repeat play.
Equipped with both analog input/output and
digital input/output (optical and coaxial).
Supplied with special remote control that can be
used both wireless and wired.
You can use IBM-compatible keyboard with a PS/2
interface, instead of using the supplied remote
control.
If you have any questions or problems concerning
your recorder, please consult your nearest Sony dealer.
3
Page 4

TABLE OF CONTENTS
Getting Started
Removing Packaging 5
Connections 5
Location and Function of Parts
Front Panel Descriptions 6
Back Panel Descriptions 7
Remote Descriptions 8
Discs
Discs Recordable Using the CD Recorder 9
Handling Discs 9
Finalizing 9
Recording
Recording on a Disc 10
Recording Precautions 11
Switching Display During Recording 11
Adjusting the Recording Level 12
Adjusting Right and Left Level Balance 12
Monitoring Sound Inputs (Input Monitor) 12
Marking Track Numbers while Recording
(Track Marking) 12
Synchro-recording with the Input Source
(Music Synchro-recording) 13
Adding Mute Sections (Mute) 13
Fade-in /Fade-out Recording 14
DSP (Digital Signal Processing) Settings 14
Synchro-recording with a Sony CD Player
(CD Synchro-recording) 17
Digital Recording Without Sampling Rate
Converter 17
Playback
Playing a Disc 23
Switching Display During Playback 23
Playing a Specific Track 24
Pausing After Each Track (Auto-Pause) 24
Playing Tracks Repeatedly 24
Creating Your Own Program (Program Play) 25
Playing Tracks in Random Order
(Shuffle Play) 26
Music Scan 26
Control Terminal Functions and
Settings
Control-S Input Terminal (CTRL-S) 27
Keyboard Jack 27
Setup Menu Operations
Basic Setup Menu Operations 28
Setup Menu Table 28
Miscellaneous
Precautions 29
Dimensions 30
Specifications 31
Troubleshooting 32
Display Messages 33
Operations on the Disc’s TOC Area
Finalizing (FINALIZE) 18
Adding Track Name and Disc Name (NAME) 18
Setting Skip/Unskip Tracks 20
Unfinalizing 21
Erasing Tracks (TRACK ERASE) 22
Erasing All Tracks (DISC ERASE) 22
4
Page 5
Getting Started
Removing Packaging
This CD Recorder comes with the following items:
• Remote Control (remote) RM-CW1 (1)
• R6 (size-AA) batteries (2)
• Control-S connector cable (1)
If any of the above items are not enclosed, contact your
Sony dealer, or the Sony Service Center.
Inserting Batteries into the Remote
Insert two R6 (size-AA) batteries (supplied) with the +
and – properly oriented to the markings into the
battery compartment.
z
Under normal conditions, the batteries should last for
about six months.
When the remote no longer operates the recorder, replace
both batteries with new ones.
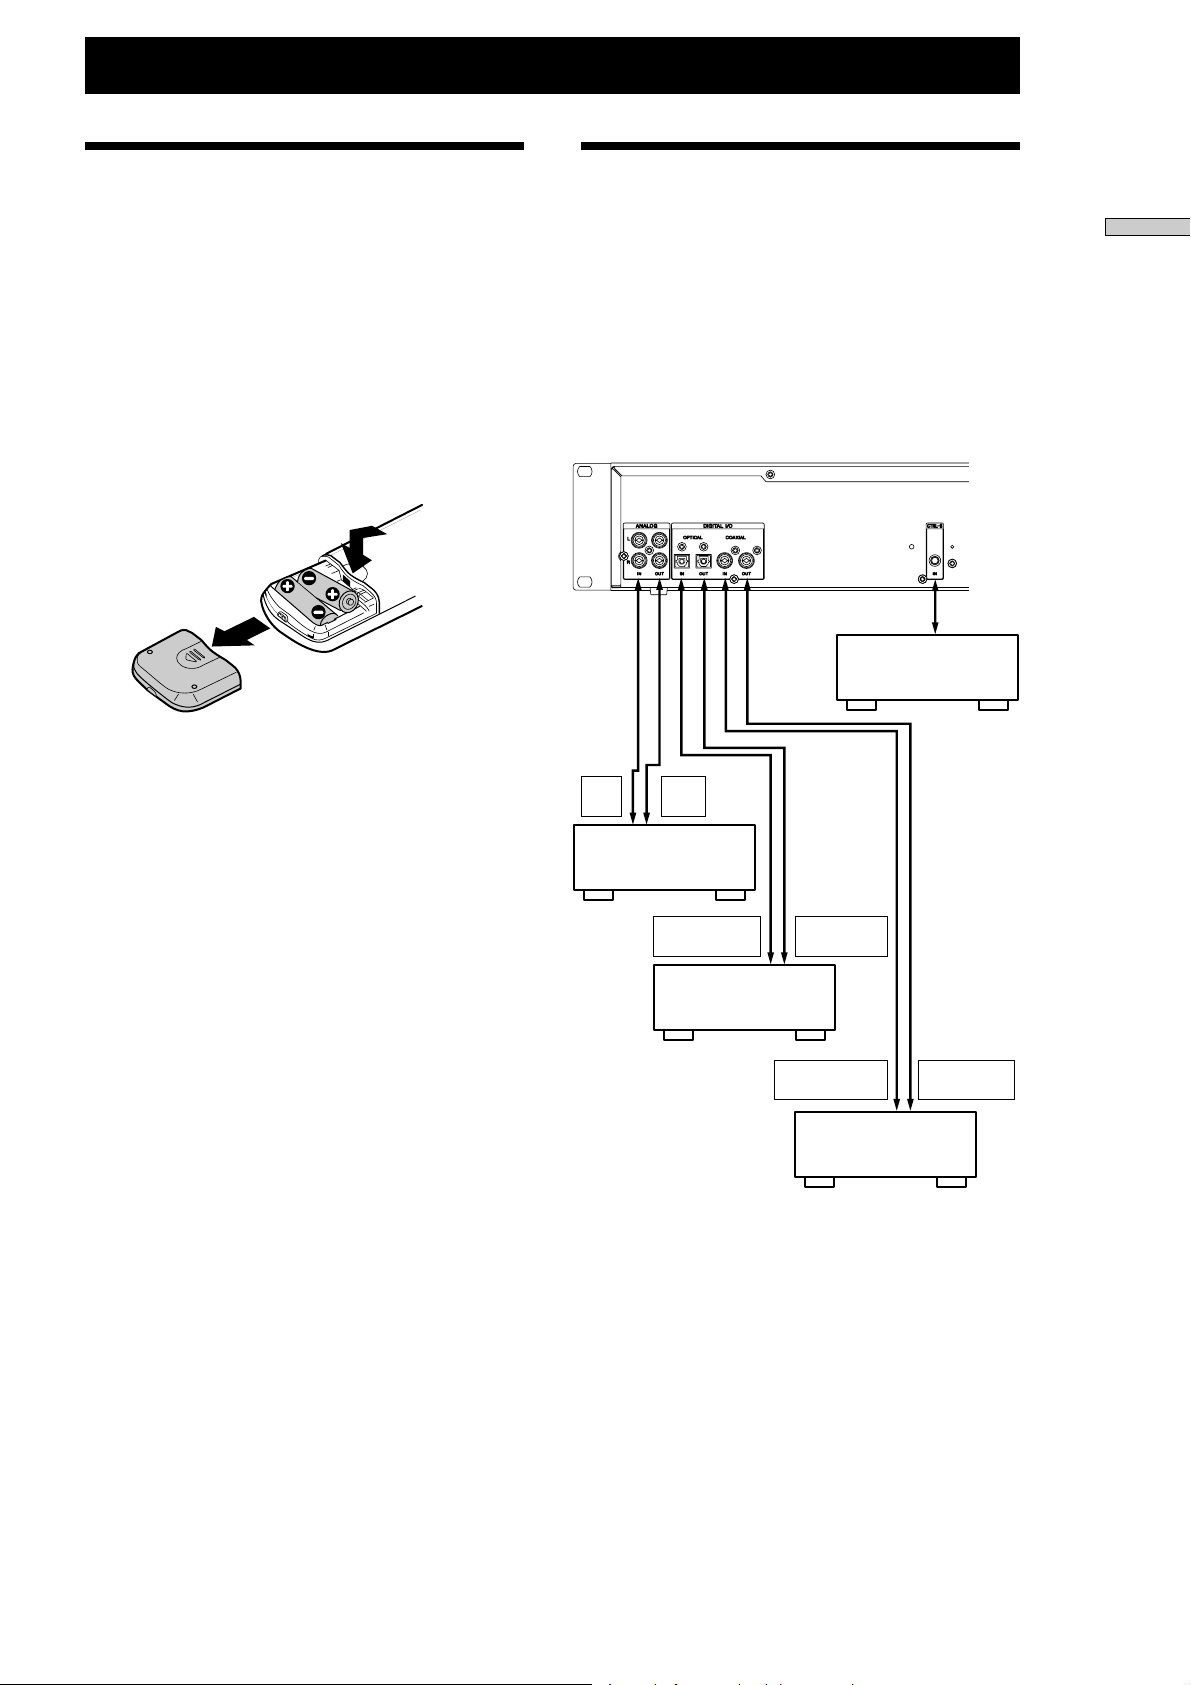
Connections
Connection Precautions
Before making connections, turn OFF the power
supply to all devices. Insert all plugs firmly, as an
improper connection may cause hum and noise. Use a
cable with sufficient length to ensure that the plug
does not come use due to shock or vibration.
Device connection example
ç
OUT
ç
IN
ç
Ç
Remote Control
(supplied)
or control unit
ç
ç
Getting Started
Caution
• If the batteries are inserted correctly, there is a danger of
leakage or damage. Be sure to observe the following:
— Insert the batteries with the ‘ and ’ terminals correctly
oriented.
— Do not use a new battery with an old one.
— Do not recharge the batteries.
— If not using the remote control for an extended period of
time, remove the batteries to avoid possible damage
from battery leakage and corrosion.
— If the batteries are leaking, wipe clean the battery holder,
and then replace with new batteries.
• When using the remote control, do not expose the remote
sensor to direct sunlight or a lighting apparatus. Doing so
may cause a malfunction.
Mixer
DIGITAL
OPTICAL OUT
CD Player,
DAT Recorder,
MD Recorder
: Direction of Signal
ç
DIGITAL
OPTICAL IN
DIGITAL
COAXIAL OUT
CD Player,
DAT Recorder,
MD Recorder
DIGITAL
COAXIAL IN
Keyboard connection and settings
Refer to Keyboard Jack, page 27.
z
The product is equipped with a sampling rate converter.
All digital input signals are converted to the sampling
frequency (44.1 kHz) for recording. Consequently, you
can make digital recordings using not only CDs and MDs,
but also DAT (32 kHz and 48 kHz) and digital
broadcasting (32 kHz and 48 kHz), which have different
sampling frequencies.
5
Page 6
Location and Function of Parts
89 !º!¡!
!£!∞!
@∞@§@¶@•#
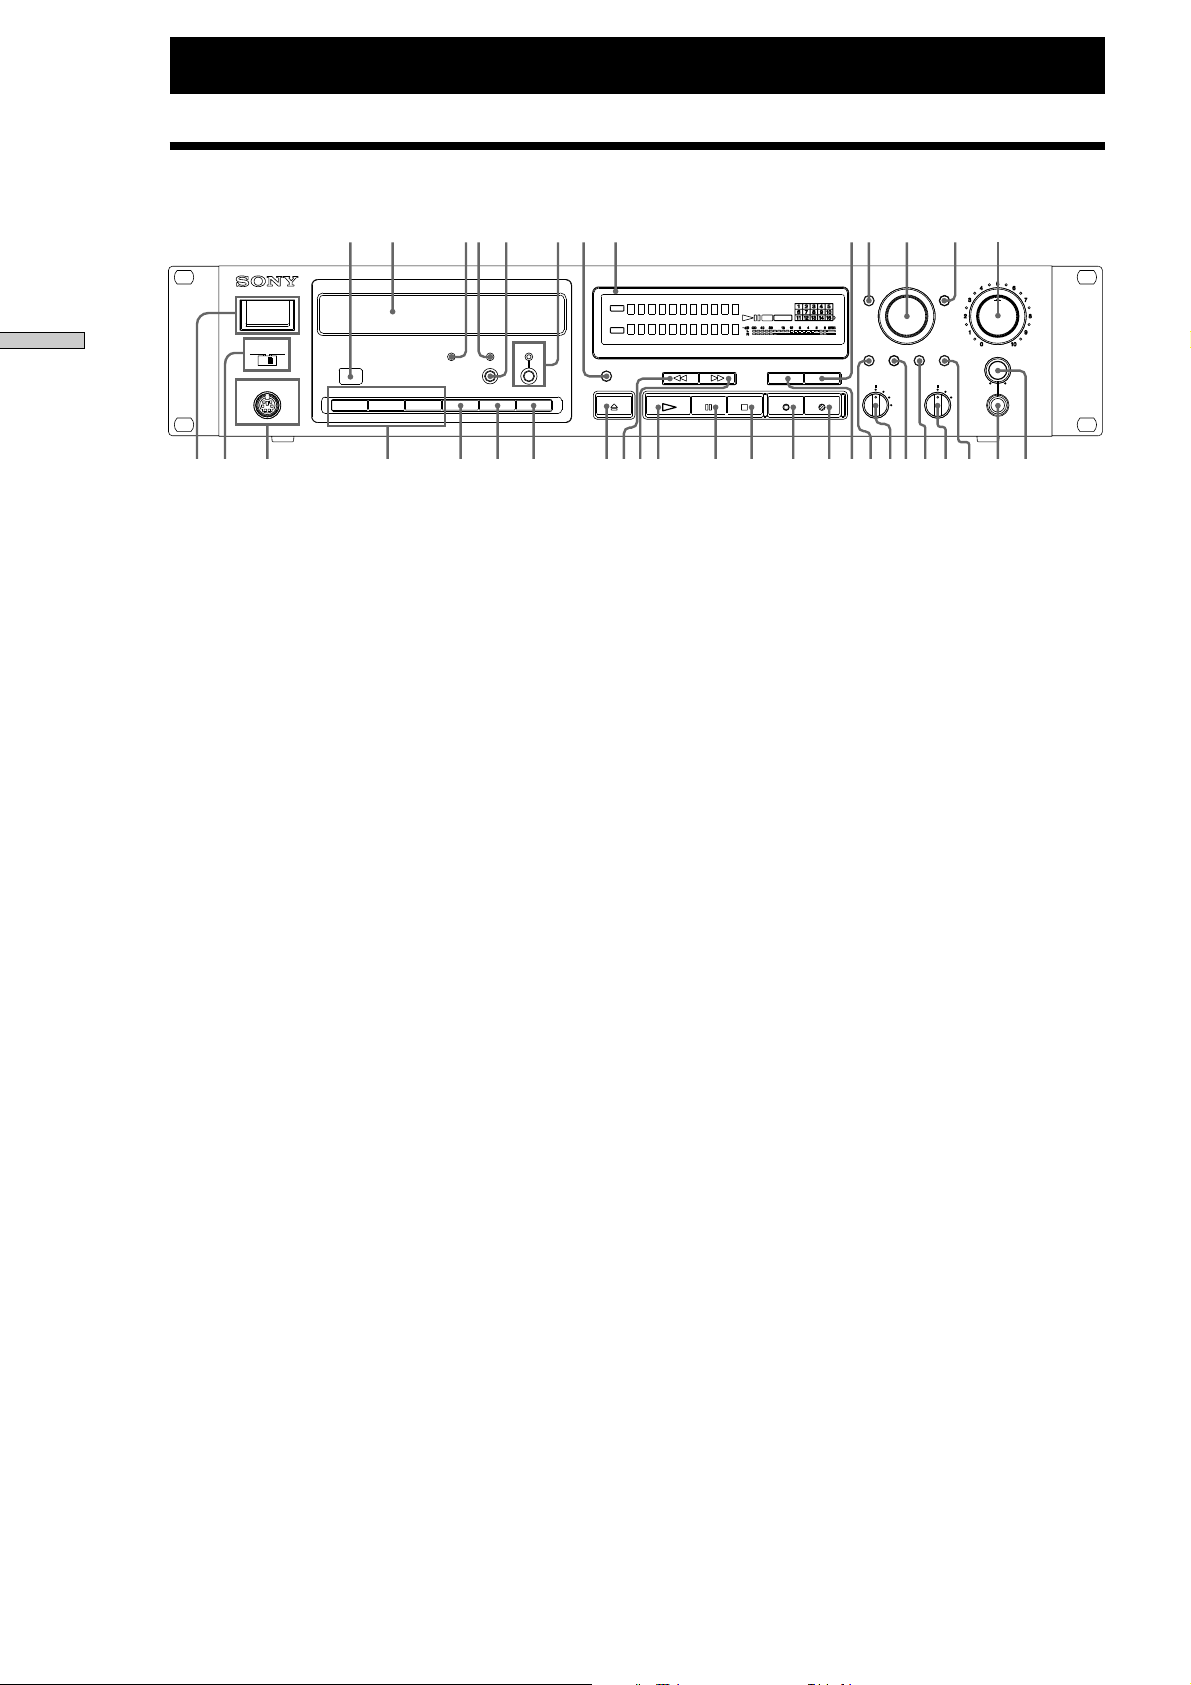
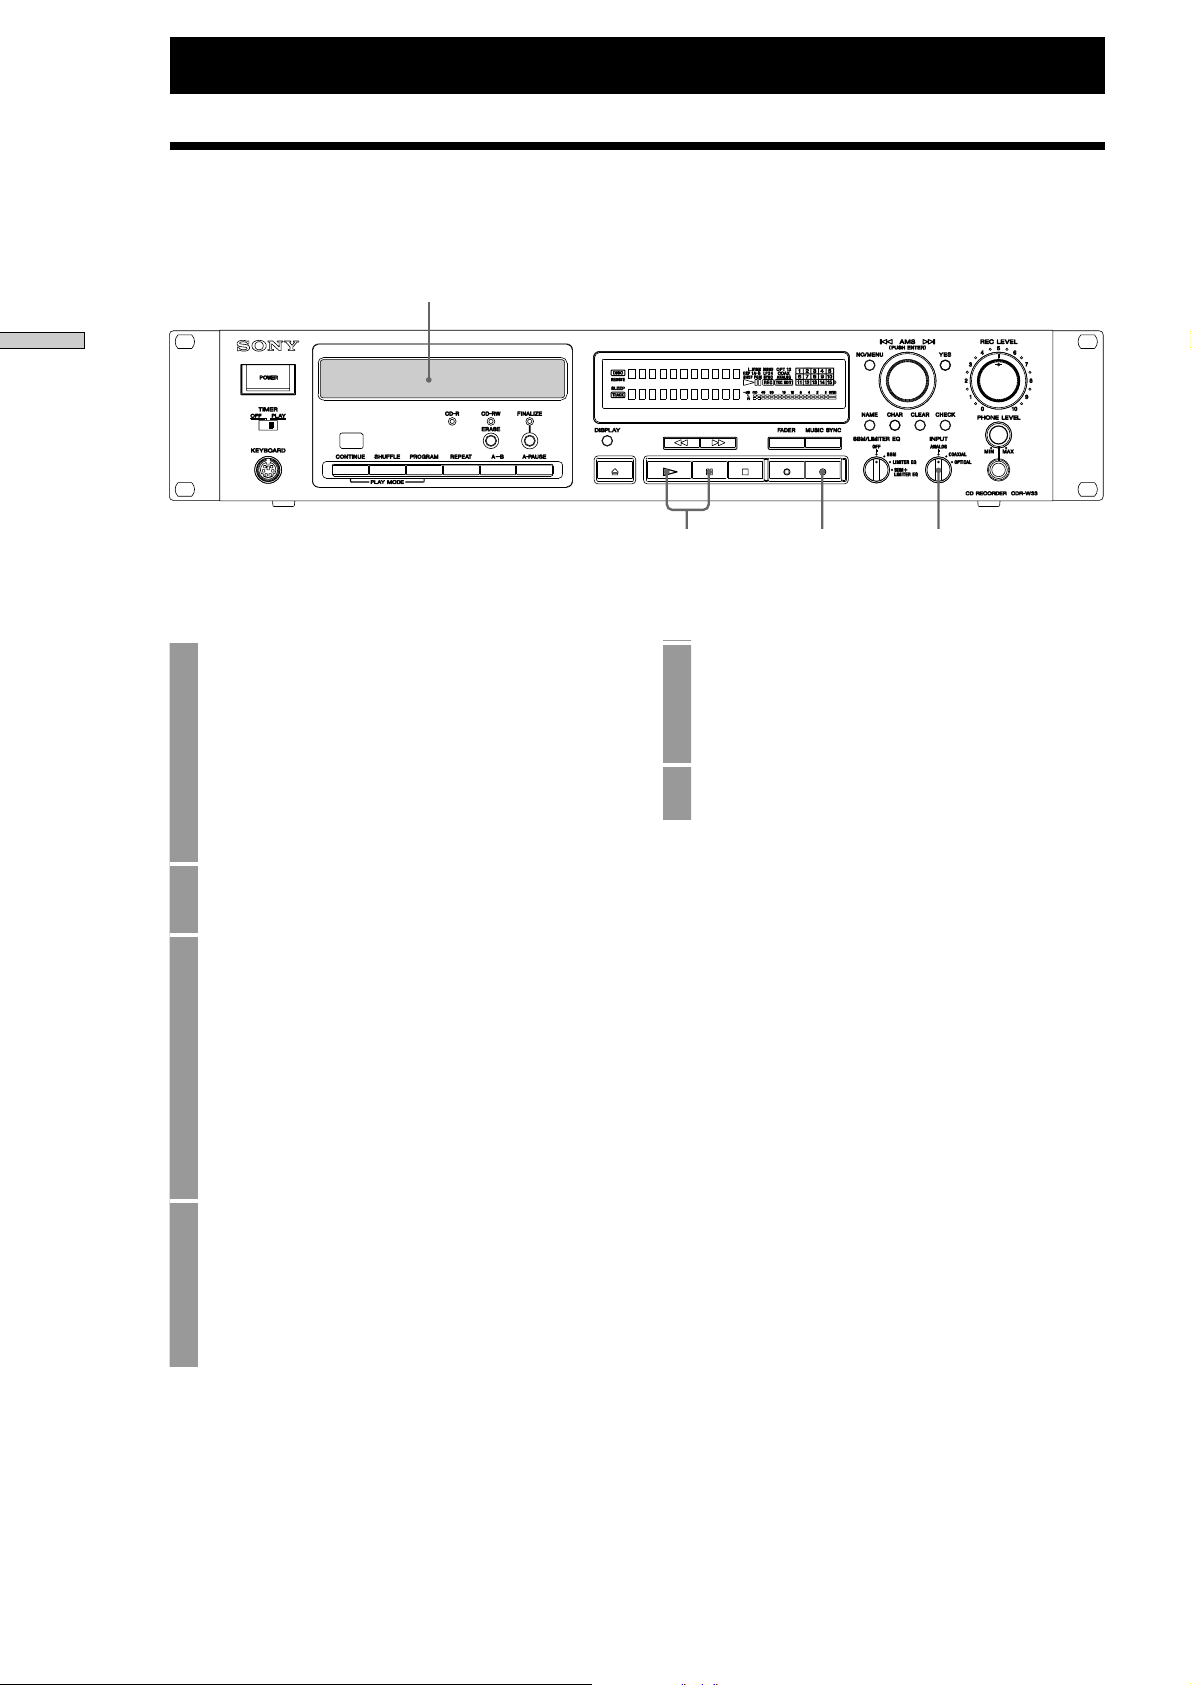
Front Panel Descriptions
Location and Function of Parts
1
2 3 4 5 6 7 !ª @º @¡ @™ @£ @¢@ª#£#º#¡#¢ #™ #¶ #§!¶!•!§
1 Power switch
Press to turn ON or OFF the CD recorder.
2 Timer selector
Use to set the timer to playing (PLAY). When set to
PLAY, the CD recorder will start playing
automatically when the power supply is turned
ON.
3 Keyboard jack
Connect a PS/2 interface keyboard (sold separately)
to this jack.
4 PLAY MODE
Use to select the desired play mode.
• CONTINUE button
Press this button for normal play.
• SHUFFLE button
Play the tracks in random order.
• PROGRAM button
Play tracks in selected order.
5 REPEAT button
Press to play tracks repeatedly.
6 A-B button
Pres to select Repeat A-B play.
7 A-PAUSE button
Pause automatically at the start of the next track to
be played.
8 Remote sensor
Operate by pointing the supplied remote control at
this sensor.
9 Disc insertion tray
Insert the disc here.
0 CD-R indicator
Lit when a CD-R is detected.
!¡ CD-RW indicator
Lit when a CD-RW is detected.
™
¢
!£ FINALIZE button and FINALIZE indicator
Press to finalize. When a finalized disc is inserted,
the indicator is lit.
!¢ Display window
Shows the status of the CD recorder.
!∞ DISPLAY button
Press to switch between disc information and track
time information.
!§ Z (OPEN/CLOSE) button
Press to open and close the disc tray.
!¶ M (Fast forward) button
Press to fast forward to the section you want to
play.
!• m (Fast backward) button
Press to rewind to the section you want to play.
!ª N (Play) button
Press to start play. In recording standby mode,
press to start recording.
@º X (Pause) button
Press to pause play or recording, and press again to
restart play or recording.
@¡ x (Stop) button
Press to stop play or recording.
@™ W (REC MUTE) button
Press to create a mute section during recording.
@£ z (REC) button
Press to record on the CD, monitor the input signal,
or mark track numbers.
@¢ FADER button
Press during recording to fade in and fade out.
∞
!™ ERASE button
Press to erase tracks, whole discs, or to unfinalize.
6
Page 7
Location and Function of Parts
@∞ MUSIC SYNC button
Press to start Music Synchro-recording.
@§ MENU/NO button
Use to select the Setup menu.
@¶ AMS control
Turn to locate tracks and select the input
characters.
@• YES button
Confirm the Setup menu selection.
@ª NAME button
Press to switch to name input mode.
#º CHAR button
Select the type of character to be input uppercase
letters, lowercase letters and number.
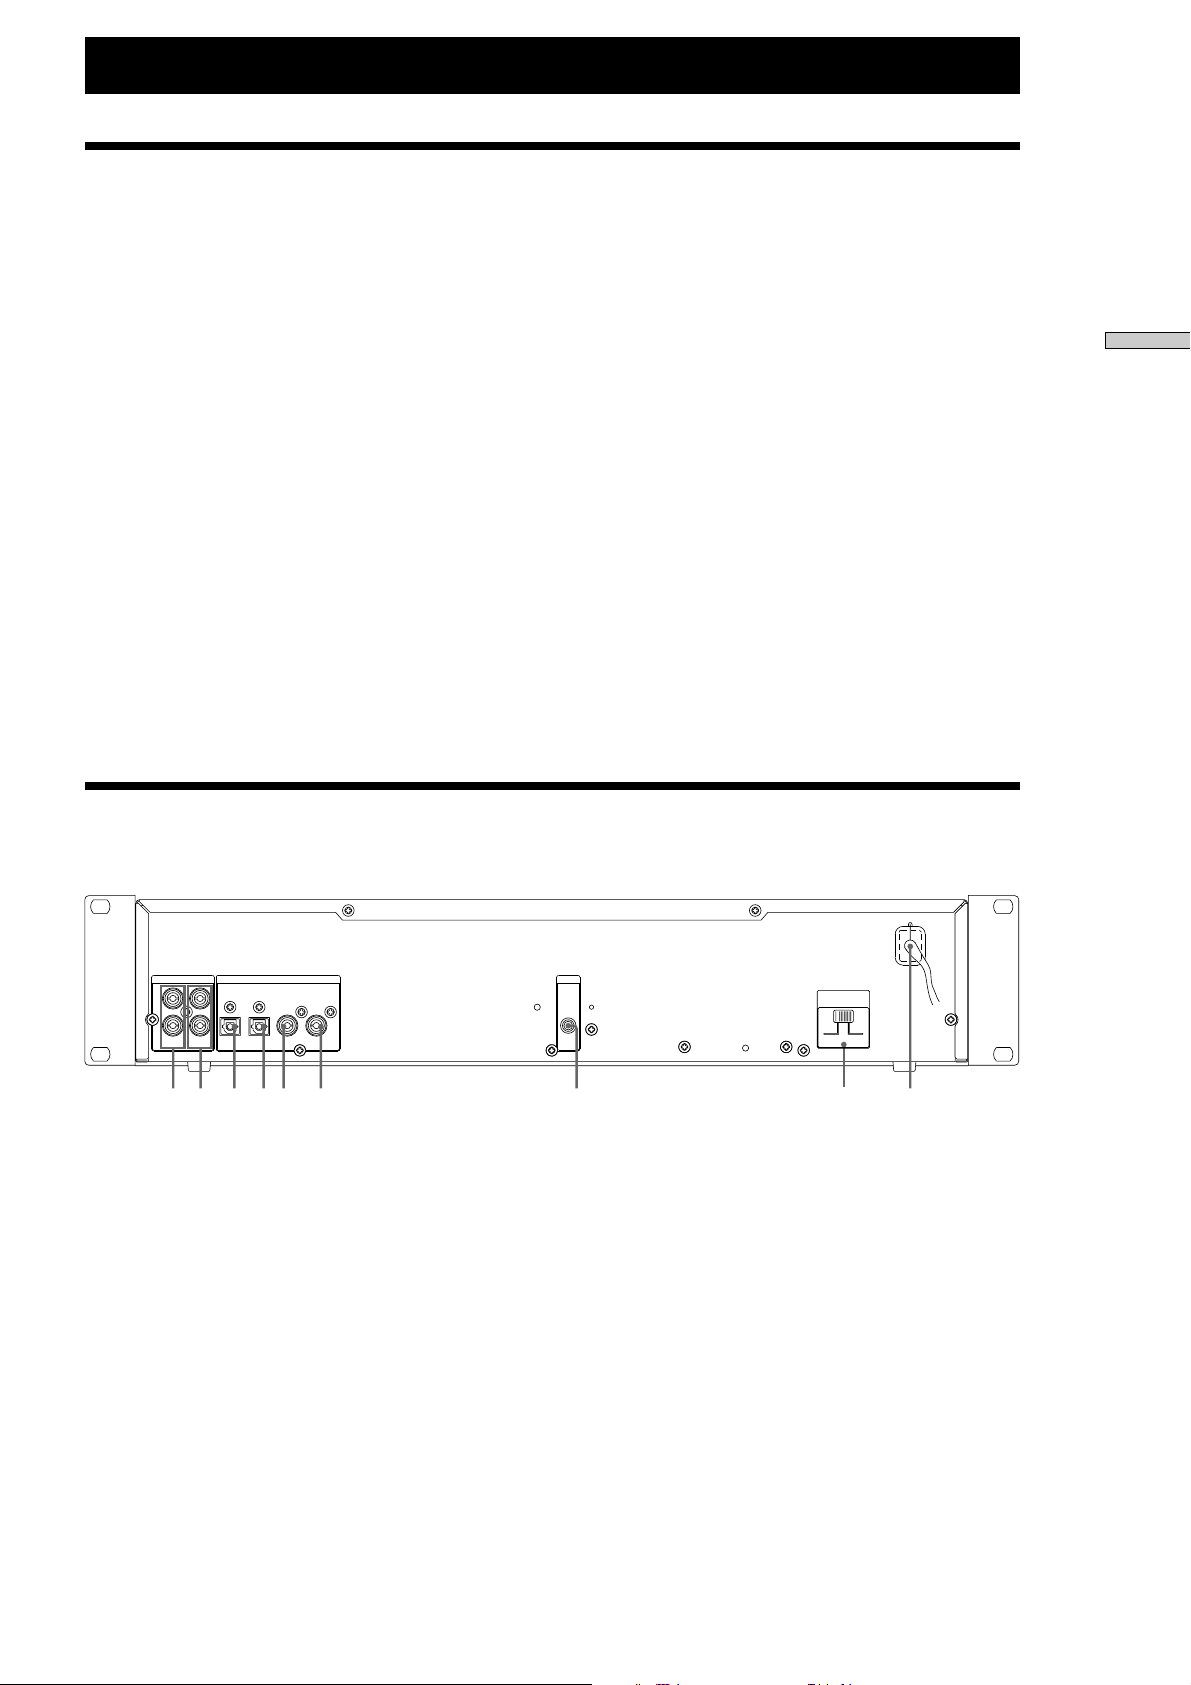
Back Panel Descriptions
#¡ CLEAR button
Clear the characters and program that has been
entered.
#™ CHECK button
Displays the program details.
#£ SBM/LIMITER/EQ control
Press to turn ON and OFF DSP (Digital Signal
Processing) effects.
#¢ INPUT switch
Select sound source to be input to the CD recorder.
#∞ REC LEVEL control
Use to adjust the analog input sound level.
#§ PHONE LEVEL control
Use to adjust the volume of the headphones.
#¶ PHONES jack
Connect headphones to this jack.
Location and Function of Parts
12 345 6 7 8
1 Analog input terminal
Connect to the analog output terminal of a mixer or
playback device.
2 Analog output terminal
Connect to the analog input terminal of a mixer,
amplifier or recorder.
3 Digital (optical) input terminal
Connect to the optical digital output terminal of a
digital device. Compatible with consumer digital
audio interface format.
4 Digital (optical) output terminal
Connect to the optical digital input terminal of a
digital device.
VOLTAGE
SELECTOR
120V 230V
9
5 Digital (coaxial) input terminal
Connect to the coaxial digital output terminal of a
digital device. Compatible with consumer digital
audio interface format.
6 Digital (coaxial) output terminal
Connect to the coaxial digital input terminal of a
digital device.
7 Control-S input terminal
Connect to the supplied remote controller or
another control device.
8 Power supply cable
Connect to the power outlet.
9 Voltage selector (Except for the US models)
Select 120V or 230V according to the local power
line voltage. (Refer to page 2)
7
Page 8
Location and Function of Parts
!
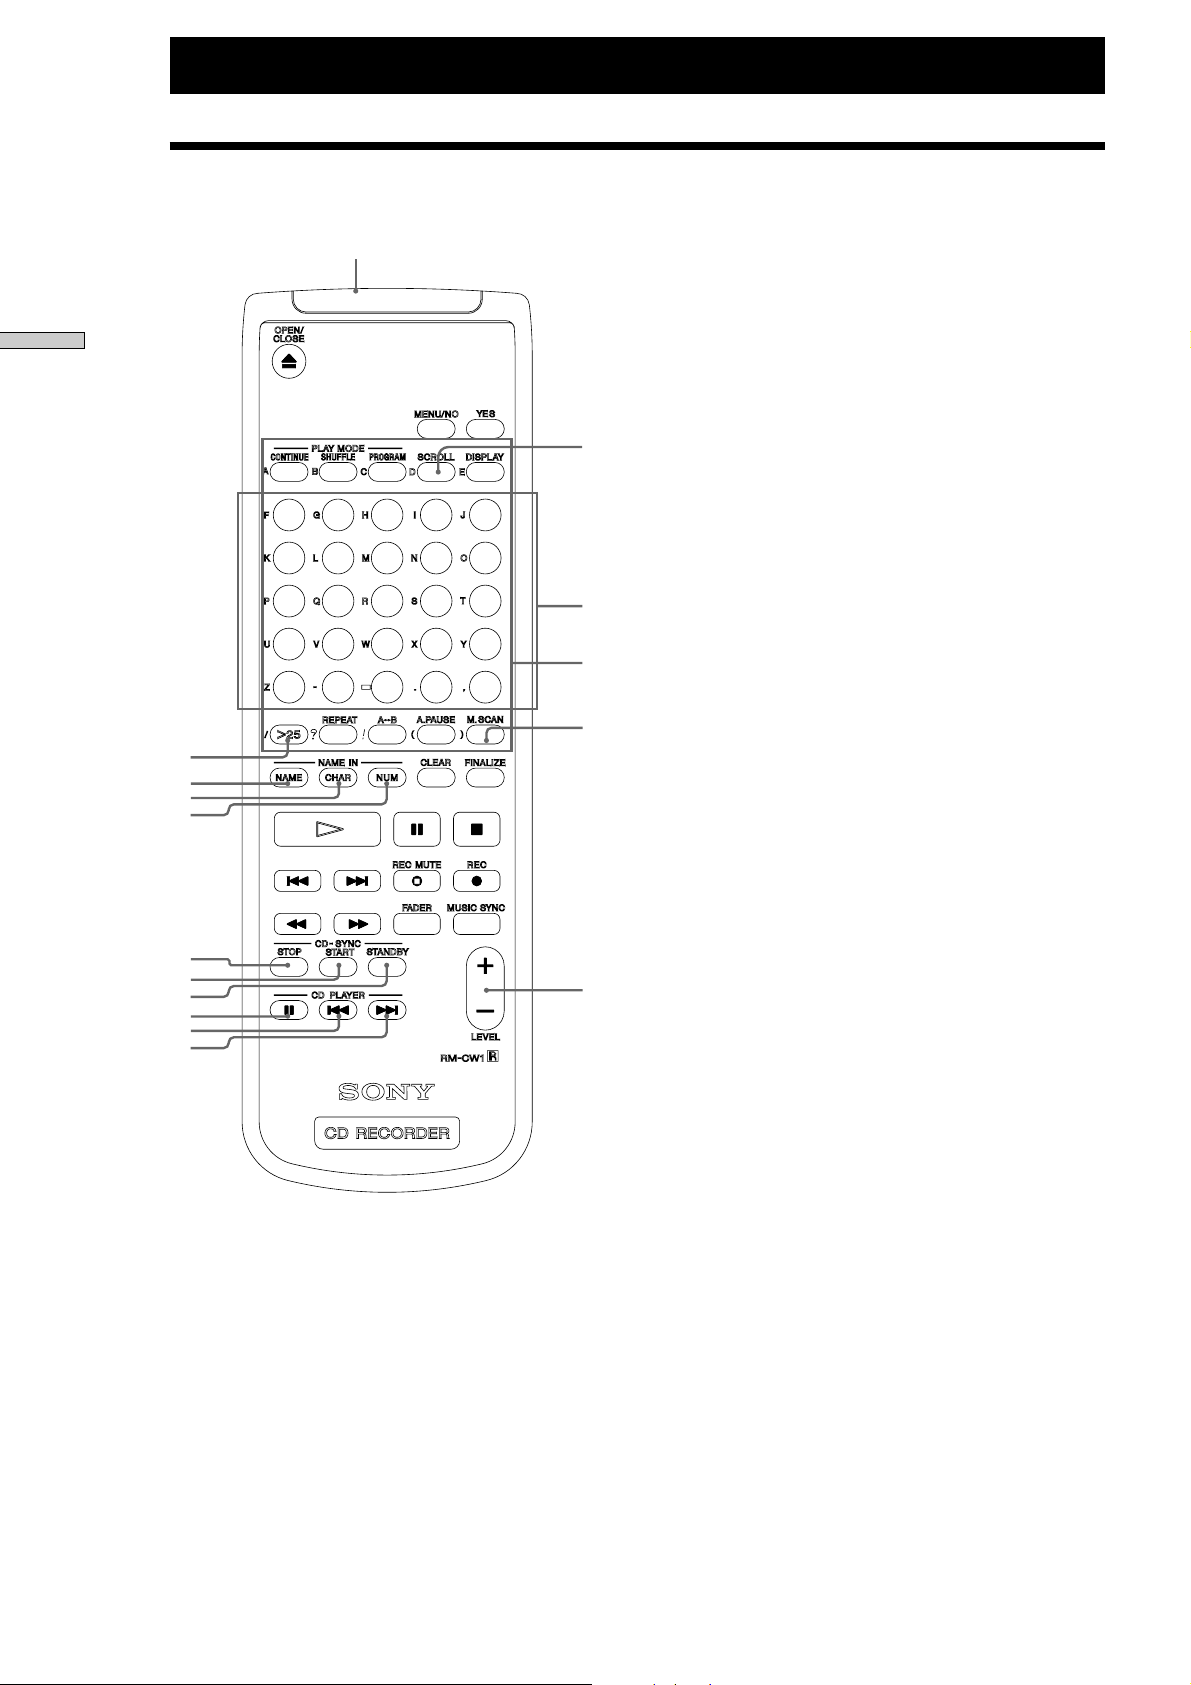
Remote Descriptions
§
NAME IN (NAME/CHAR/NUM/Character button)
5 NAME button
Press to add the name or change the name of a track
or disc.
Location and Function of Parts
1
6
11
16
21
3
5
6
7
9
!º
!¡
!™
!£
!¢
2345
78910
12 13 14 15
17 18 19 20
22 23 24 25
1
2
8
4
!∞
6 CHAR button
When entering characters using the remote, press to
select the type of characters to be input. You can
also switch between uppercase and lowercase
letters.
7 NUM button
When entering characters using the remote, press to
enter numbers using buttons 1 to 10. Here, button
10 enters the number 0.
8 Character button
When entering names, you can enter characters
using the orange display buttons. Buttons 1 to 10
can be used after switching between number and
alphabet inputs using the NUM and CHAR
buttons.
CD-SYNC (STOP/START/STANDBY)
By connecting a Sony CD player, you can make
recording easily.
The remote operates both the CD player and the CD
recorder, so install the CD player and CD recorder close
together.
9 STOP button
Press to stop CD Synchro-recording.
0 START button
Press to start CD Synchro-recording.
!¡ STANDBY button
Press to enter standby for CD Synchro-recording.
CD PLAYER (X/./>)
Use to output a Sony CD player remote signal. You can
perform the following operations using these buttons
instead of a CD player remote control.
!™ X button
The buttons on the remote with the same display as the
front panel have the same function. This section
explains the functions of buttons that are on the remote
only.
1 SCROLL button
Use to scroll the name of a track or disc.
2 Number buttons
Press to select a track number directly.
3 >25 button
Use to select a track number greater than 25.
4 M.SCAN (music scan) button
Press to start music scan.
8
Press to pause play.
!£ . button
Press to return to the start of the track currently
playing, or to the start of the previous track.
!¢ > button
Press to move to the start of the next track.
!∞ LEVEL +/- button
Use to adjust the digital input sound level without
entering the Setup menu.
!§ Control-S output terminal
By connecting the remote control to the control-S
terminal using the supplied cable, you can use the
remote control as a wired remote. Connecting the
plug to this terminal disables the infrared beam.
Page 9
Discs
Discs Recordable Using
the CD recorder
Use discs with the following markings or
inscriptions .
Recordable
FOR CONSUMER
FOR CONSUMER USE
FOR MUSIC USE ONLY
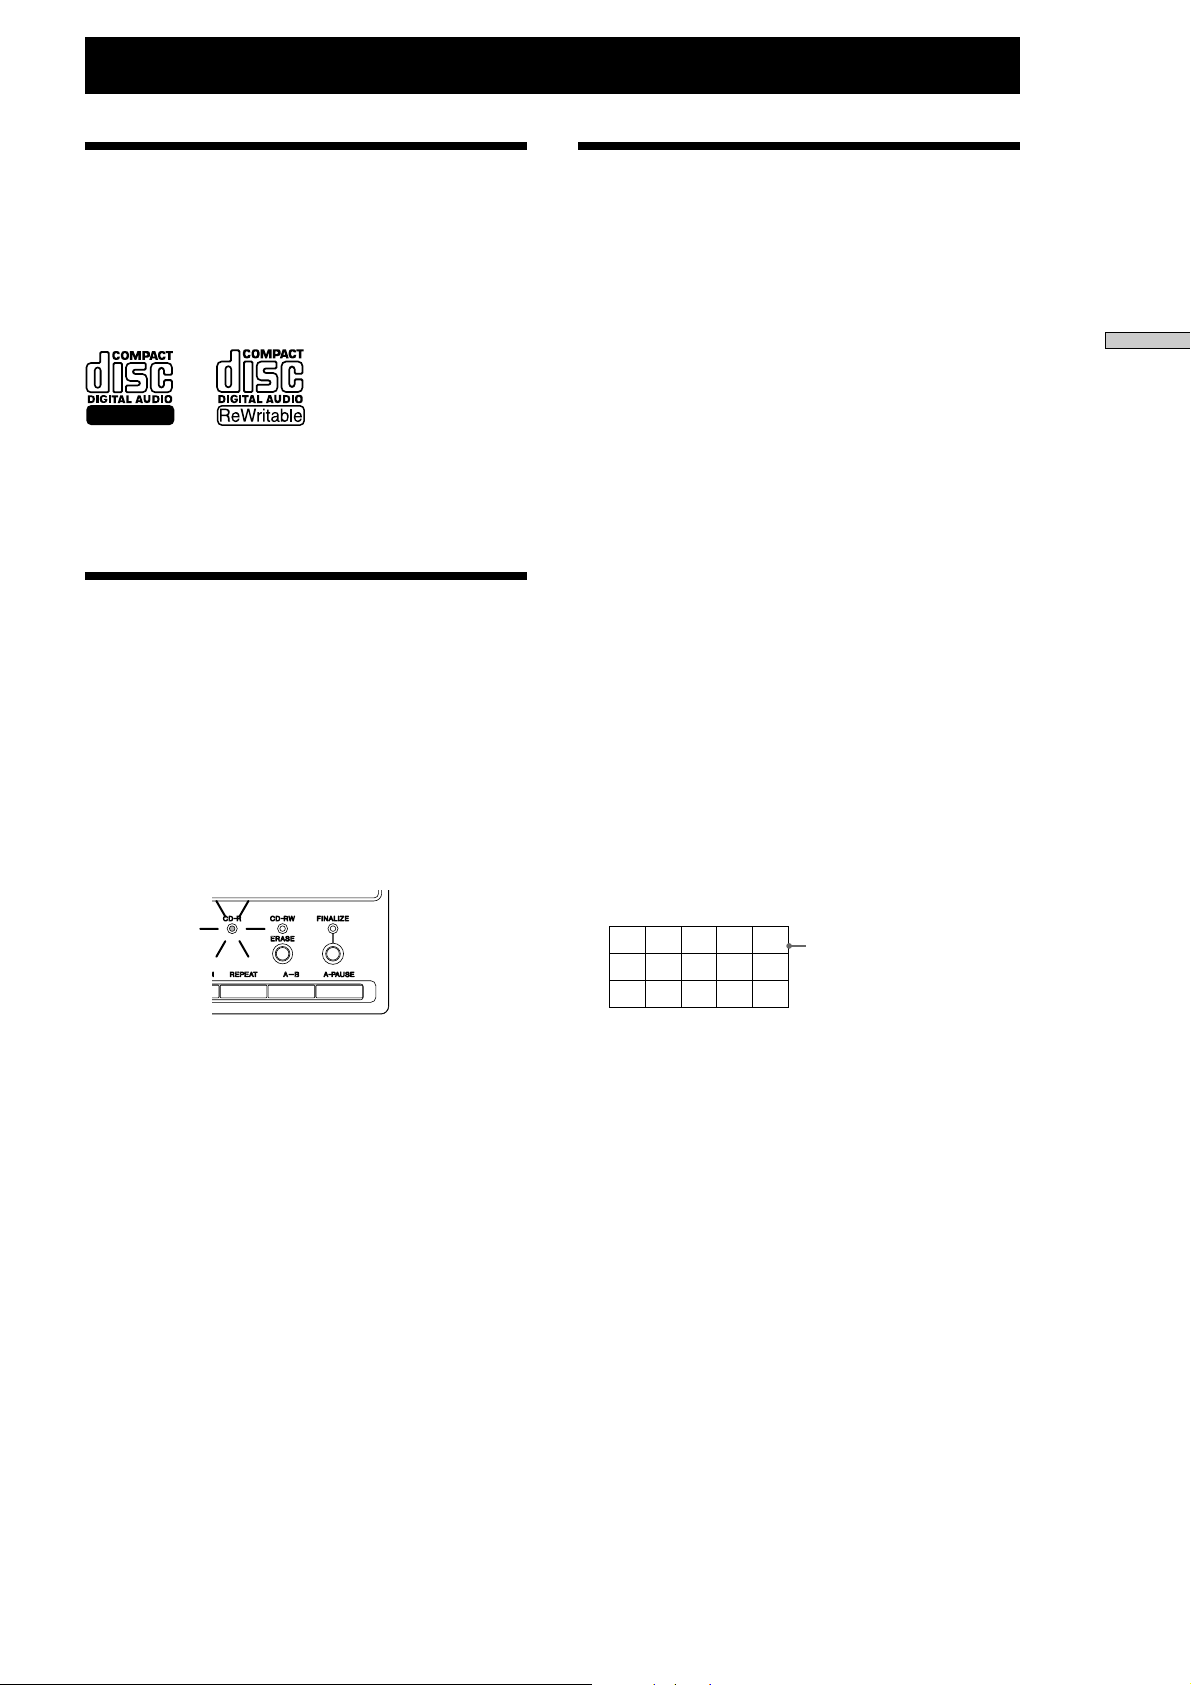
Handling Discs
You can record on CD-R disc only once. Tracks
recorded on CD-R disc cannot be erased.
Recordings on CD-RW disc can be erased and used
again.
When a CD-R or CD-RW disc is inserted into the CD
recorder, the indicator to show the type of disc will
light on the front panel. If a play-only CD is inserted,
the indicator will not light.
(Example: CD-R disc)
Finalizing
Finalizing is the process of writing a TOC (Table of
Contents, track time and other information) to a CD-R
or CD-RW disc. Before a disc is finalized, you can add
additional recordings, but after a disc is finalized,
further recording is disabled. Consequently, perform
finalizing after completing recordings to the disc.
CD-R Discs
Until a CD-R disc is finalized, it cannot be played on a
CD player. By finalizing, a CD-R disc can be played
on a CD player as well as on this CD recorder.
Unfinalized CD-R discs can be played on the CD
recorder regardless.
CD-RW Discs
By finalizing a CD-RW disc can be played on a CD-RWcompatible CD player, but depending on the physical
specifications, a CD-RW disc cannot be played on a CD
player that is not CD-RW-compatible.
Unfinalized CD-RW discs can be played on the CD
recorder regarless.
z
When finalizing, you can add disc and track names using
this CD recorder.
z
If a finalized disc is inserted, the finalized indicator will
light, and a frame will appear around the music calendar.
Compact Discs
Do not use malformed discs. Doing so may cause
damage to the CD recorder.
12345
678910
11 12 13 14 15
Music
Calender
9
Page 10
Recording
Recording
Recording on a Disc
2
135
1 Select the input signal using the INPUT switch
on the front panel.
ANALOG: Selects an analog signal input from
the analog terminal.
COAXIAL: Selects a digital signal input from
the digital coaxial terminal.
OPTICAL: Selects a digital signal input from the
digital optical terminal.
2 Insert a CD-R disc or CD-RW disc.
3 z Press the REC button.
Pressing the REC button enters recording
standby mode. (u [REC] will be displayed.)
The number of the next track to be recorded will
be displayed. The track number will flash while
the recorder is setting up, and when setup is
complete, the track number will remain lit and
the track time will be displayed. The input signal
is monitored from the output terminal.
4 Adjusting the recording level
During recording and when in recording
standby mode, the input signal level is displayed
in the level meter, so you can adjust the
recording level. Refer to page 12, “Adjusting the
Recording Level.”
5 Press the H or X button.
Recording will start, and the recording time will
be displayed. (N [REC] will be displayed.)
6 Start play on the input device.
To stop recording,
press the x button.
To pause recording,
press the X button.
The CD recorder will enter recording standby mode.
To restart recording,
Press the H button or the X button.
A new track number will start from the location at
which recording is restarted.
z
Silent pause function
If the digital input remains mute for 30 seconds, the CD
recorder will automatically pause recording. If making a
digital recording from a CD or MD, mute recording will
not continue after the source play has stopped.
10
Page 11
Recording
Recording Precautions
When recording on a previously recorded disc
Make sure to add the new recording after the existing
one. You cannot record while overwriting existing
recordings.
Track numbers
You cannot edit track numbers after recordings.
When starting a recording from stop mode, the track
number is added automatically following on from the
track number of the last completed recording. When
starting a recording from pause mode, the track
numbers are automatically contiguous.
For how to add track numbers during recording, refer
to page 12 “Marking Track Numbers while Recording
(Track Marking).”
Sampling Rate Converter
A sampling rate converter is built into the CD recorder,
so you can convert all digital input signals to the CD
sampling frequency (44.1 kHz) for recording.
Consequently, you can also record DAT and satellite
broadcast digital signals, which have a different
sampling frequency.
Writing to PMA (Program Memory Area)
When recording to a CD-R/RW disc, immediately after
the x button is pressed, the recorded track number and
track time information is automatically recorded in the
program memory area on the disc. If writing to the
PMA is not performed correctly, the recorded data is
disabled, and the disc itself can no longer be used.
To make sure of writing to the PMA after completing
recording, do not turn OFF the power supply to the CD
recorder under the following conditions.
• During recording.
• When in pause mode after a recording.
• After pressing the x button, while PMA Writing is
displayed. (Writing to the PMA takes approximately
5 seconds after recording has finished.)
Maximum Number of Tracks that can Be Recorded
on a Disc
Depending on the CD specifications, you can record a
maximum of 99 tracks on the CD-R/RW disc. Even if
there is still space to record more on the disc, you
cannot exceed 99 tracks. When the 99th track is being
recorded, you cannot pause recording by pressing the
X button. Stop the recording by pressing the x button.
Switching Display During
Recording
Pressing the DISPLAY button during recording
changes the display as follows.
Track recording time
DISC
L.SYNC
-dB
∞
L
R
12345
COAX
678910
11 12 13 14 15
REC
40 30 18 12 8 4 2 0 OVER
√
Recording time remaining on disc
√
L.SYNC
-dB
∞
L
R
DISC
Input signal recording level (coaxial and optical
inputs only)
In this display, you can adjust the recording level
by turning the AMS control.
DISC
z
You can hold the maximum level display on the level
L.SYNC
-dB
∞
L
R
meter until performing manual reset.
Using peak hold display while inputting signals in
recording mode and record standby mode before
actually making a recording, you can check the
maximum input signal value. Use this value to
calibrate the recording level adjustment.
To use peak hold display, turn ON the Peak Hold
setting in the Setup menu. Refer to page 28, “Setup
Menu Operations.”
To reset the peak hold display, use one of the
following two methods.
• Turn OFF and then ON again Peak Hold in the
setup menu.
• During recording mode or recording standby
mode, press the CLEAR button.
You can also use peak hold display when playing
discs.
12345
COAX
678910
11 12 13 14 15
REC
40 30 18 12 8 4 2 0 OVER
12345
COAX
678910
11 12 13 14 15
REC
40 30 18 12 8 4 2 0 OVER
Recording
Minimum Track Recording Time
You cannot record tracks less than 4 seconds long.
11
Page 12

Recording
Recording
Adjusting the Recording
Level
REC LEVEL
• Analog Inputs
You can adjust the recording level using the REC
LEVEL control on the front panel. Adjust the
recording level so that OVER on the level meter is
not normally lit.
• Digital Inputs
You can adjust the recording level using “COAX
Level” or “OPT Level” in the Setup menu.
Operations Using the Remote
You can adjust the level of the input signal
selected using the LEVEL +/- button.
• Monitor Outputs During Recording
During recording, the sounds recorded are output to
all the output terminals. With outputs to digital
output terminals during recording of digital (coaxial
or optical) inputs, however, input signals are output
without adjustment as monitor outputs.
Consequently, in this case sounds in which recording
level adjustments are not reflected are output, but the
sound recorded on the disc is the adjusted one.
Adjusting Right and Left
Level Balance
With analog inputs, you can adjust the left and right
volume balance using “ANA L/R Bal” in the Setup
menu. (With digital inputs, you cannot adjust the left
and right volume balance. Refer to page 28, “Setup
Menu Operations.”
Monitoring Sound Inputs
(Input Monitor)
If the z button is pressed when no disc has been
inserted, you can make the selected input signal a
monitor output. During input monitoring, if an analog
input is selected, “AD-DA” will be displayed. If a
digital input is selected, “-DA” will be displayed.
Marking Track Numbers
while Recording (Track
Marking)
There are two methods of adding track numbers:
Manual track marking, in which you can add track
numbers to suit your own timing, and auto track
marking, which adds track numbers automatically.
Select which method you want to use using “TrMark/
Lsync” in the Setup menu.
TrMark/Lsync
ON: Auto track marking is enabled. The L.SYNC
mark in the display window will light. In this
setting, you cannot mark track numbers
manually.
L.SYNC
ANALOG
REC
OFF: Auto track marking is disabled. Manual track
marking is enabled, and you can add track
numbers manually.
For Setup menu details, refer to page 28, “Setup Menu
Operations”.
Make the “TrMark/Lsync” settings in stop mode
before starting a recording. You cannot change the
“TrMark/Lsync” setting during recording or in
recording standby mode.
Marking Track Numbers Manually (Manual
Track Marking)
Manual track marking is only possible when “TrMark/
Lsync” is turned OFF (i.e., L.SYNC mark is not lit).
Press the z button during recording to add the track
number in the desired place.
Automatically Marking Track Number (Auto
Track Marking/Level Sync)
This function is enabled when “TrMark/Lsync” is
turned ON (i.e., L.SYNC mark is lit). The operation is
different for analog inputs and digital (coaxial or
optical) inputs.
12
Page 13

Analog Inputs (Level Sync)
Track numbers are added when the signal sinks below
the threshold for approximately 3 seconds, and then
rises above the threshold level again. Set the threshold
level using L.Sync Level in the Setup menu. For Setup
menu details, refer to page 28, “Setup Menu
Operations”.
Digital Inputs
When recording a CD, MD, or DAT, track numbers are
added according to changes in the track number sound
source. If recording a digital sound source other than
CD, MD, or DAT, track numbers are added depending
on level sync in the same way as analog signals.
z
The timing for adding track numbers with CD, MD, and
DAT sound sources is as follows:
CD: When the sound is detected after the input signal
track changes.
MD: When the input signal track changes.
DAT: When a start ID is detected.
Recording
Adding Mute Sections
(Mute)
You cannot edit tracks after recording as with an MD,
so the CD recorder is equipped with a mute function
with which to mute sections after a track as necessary.
Press the W button during recording…
PAUSE
Mute
REC MUTE
(Next yrack)
“REC Mute” will flash, and a mute section
approximately 4 seconds long will be added. The CD
recorder will then return to record standby mode.
RECORD ATANDBY
recording
(4 sec)
>
REC MUTE butten
Recording
Synchro-recording with
the Input Source
(Music Synchro-recording)
This function starts recording automatically from
recording standby mode, depending on the input
signal.
1 Select the input while in stop mode.
2 Press the MUSIC SYNC button.
The CD recorder will enter recording standby
mode in input signal waiting mode, and
“MUSIC SYNC” will flash. When the CD
recorder is ready, “SYNC” and “Ready” will
light.
3 Start playing the sound source you want to
record.
Recording will start automatically.
Press the W button after pausing from record
standby mode to add an approximately 4-second mute
section after the track that has just been recorded,
before returning to record wait mode once again.
Mute
recording
(4 sec)
>
PAUSEPAUSE
(Next yrack)
RECORD ATANDBY
REC MUTE butten
z
To create a mute section longer than 4 seconds, press and
hold the W button for the desired length of time you
require the mute section to last.
You cannot create a mute section at the start of a track
using the W button. Only one mute section can be
added to each track.
13
Page 14

Recording
ANALOG
input signal
TO RECORDING
BLOCK
A/D
converter
DIGITAL
equalizer
DIGITAL
limiter
SBM
(super bit
mapping)
Recording
Fade-in/Fade-out
Recording
Fading In Recordings
1 Make sure that the CD recorder is in recording
standby mode.
2 Press the FADER button.
Recording will begin once the last sound has
gone, and the volume will rise automatically to
the normal recording volume.
Fading Out Recordings
1 Make sure that the CD recorder is in recording
mode.
DSP (Digital Signal
Processing) Settings
You can make recordings of analog input signals while
applying the following processes: Digital equalizer,
digital limiter, and Super Bit Mapping. The block
diagram of the analog input signal part to the CD
recorder is shown below.
Using SBM (Super Bit Mapping)
To make recordings using the SBM filter, set the SBM/
LIMITER/EQ control to “SBM” or “SBM + LIMITER +
EQ”.
SBM/LIMITER/EQ
OFF
SBM
+
LIMITER
SBM
LIMITER + EQ
EQ
+
2 Press the FADER button.
The volume will automatically decrease and the
CD recorder will enter record standby mode.
z
Adjusting Fade-in/Fadeout Time
You can set the fade-in/fadeout time between 1 and
8 seconds, using “Fader Time” in the Setup menu
screen.
SBM Filter
The CD recorder is equipped with a 24-bit A/D
converter, but the CD format itself is set at 16 bits as the
universal standard. Consequently, you must convert
the data, which was A/D-converted using 24 bits, to 16
bits to record. In this case, the simplest method is to
omit the least-significant 8 bits of the 24-bit data. (This
happens when SBM is turned OFF.) This, however,
wastes much of the 24-bit data output from the A/D
conversion. Using SBM processing, the least-significant
8 bits of the 24-bit data is woven into the 16-bit data
while pushing outside of audible range the quantum
noise when converting to 16 bits, by creating in the
noise shaping filter frequency characteristics that take
account of human auditory characteristics. In this way,
although called 16-bit data, you can record the detailed
sound quality on the original 24-bit data without
degradation. In addition, SBM function operates
during recording, so discs recorded using SBM
processing reproduce the same sound quality when
played on other CD players.
z
Depending on the headphones and your system, SBM
effects may not be wholly effective.
14
Page 15

Recording
Using the Digital Limiter and Digital Equalizer
To make recordings using the limiter and equalizer
effects, set the “SBM/LIMITER/EQ” control to
“LIMITER + EQ” or “SBM + LIMITER + EQ”. Make
detailed settings for each item using the Setup menu.
For details, refer to page 28, “Setup Menu Operations”.
SBM/LIMITER/EQ
OFF
SBM
+
LIMITER
SBM
LIMITER + EQ
EQ
+
Digital Equalizer Setting
The CD recorder is equipped with a 3-band digital
equalizer, a shelving equalizer for bass and trable
frequency bands, and a parametric equalizer for
middle frequency band. Adjust the parameters to make
detailed settings using the Setup menu. For details,
refer to page 28, “Setup Menu Operations”.
Parameters and Variable Ranges
Bass frequency: 50 Hz to 1 kHz
Bass level: – 6.0 dB to 6.0 dB
Mid frequency: 100 Hz to 10 kHz
Mid level: – 6.0 dB to 6.0 dB
Mid width: Narrow/Mid/Wide
Treble frequency: 1 kHz to 12.5 kHz
Treble level: – 6.0 dB to 6.0 dB
z
Setting the band level parameter to high on the + side
may cause the signal level to rise to the clip level
internally, resulting in the sound warping. If this occurs,
lower the input level using the REC LEVEL control knob.
Recording
Equalizer Frequency Characteristics
Bass equalizer
Frequency = 50 Hz, 1 kHz when each level = ±6 dB.
Mid equalizer
Frequency = 100 Hz, 1 kHz, 10 kHz when each level =
±6 dB.
Treble equalizer
Frequency = 1 kHz, 12.5 kHz when each level = ±6 dB.
Mid equalizer
Frequency = 1 kHz and level = ±6 dB when width is
changed to 3 levels.
15
Page 16

Recording
Recording
Digital Limiter
The digital limiter, which is used when performing CD
mastering, can also be used without adjustment for
simulation processing. Low level parts of isgnal are
raised without distortion, and high level parts of signal
are processed using soft clip signal waveforms to
prevent hard clipping, so you can convert the entire
recorded acoustic pressure level without audibly
increasing distortion.
LIM Ratio Parameter (Limiter Ratio)
Variable range: 0% to 100% (0.00 dB to 6.02 dB).
The percentage is the effective ratio.
There is no effect at 0%. At 100%, the
maximum effect is yielded. Decibels
express the amount of gain for the
ratio (in the area of –20 dB maximum).
Waveform Variance During Limiter Operation
When input signal is below –20dB.
Signal level is doubled (when ratio = 100%)
Output waveform
Input waveform
Using Digital Limiter Effectively
1 Convert the signal to high level.
When setting the analog input recording level,
basically set the REC LEVEL control so that hard
clipping does not occur in the greatest part of the
level during A/D conversion. Even so, this may
result conversely in the entire level being too low. If
this is the case, when using the digital limiter, raise
the low recording level using soft clipping to
prevent audible distortion of high recording level.
2 Change the sound characteristic using soft
clipping.
Limiter soft clipping is an effect resembling
saturation on a tape recorder. Soft clipping is
performed on input signals exceeding –20 dB, so
setting a high level using the REC LEVEL control
and adjusting the effect ratio using the LIM Ratio
parameter achieves a forceful sound with little eargrating distortion.
Level Variance During Limiter Operation
When input signal is over –20dB.
Peak part of the signal is soft-clipped.
(When ratio = 100%)
Output waveform
Input waveform
Output level [dB]
0
-10
-20
6dB
-30
Ratio 100%
0%
Ratio 70%
4.6dB
Input level [dB]
0-10-20-30
16
Page 17

Recording
Synchro-recording with a
Sony CD Player
(CD Synchro-r ecording)
By connecting a Sony CD player to the CD recorder,
you can easily record from CDs just by pressing the CD
SYNC key on the remote. The remote operates both the
CD player and the CD recorder, so install the CD
player and CD recorder close together. (Use as a
wireless remote.) Enabling the CDP remote operation
function may cause incorrect operation, so make sure
the setting is disabled. For details, refer to page 28,
“Setup Menu Operations”.
CD-SYNC STANDBY
CD-SYNC START
CD-SYNC STOP
CD PLAYER P
6 Press the CD-SYNC STOP button on the remote
to stop recording at the desired position.
Note that with analog inputs, the CD recorder
will continue to record even if CD playback has
stopped.
To pause synchro recording, press the CD-SYNC
STANDBY button on the remote.
To restart recording, press the CD-SYNC START
button. The track number will change at the point
where the recording was paused.
You can also use the CD player remote during
CD synchro recording.
Press the STOP button to stop the CD player, and pause
the CD recorder.
Press the PAUSE button to pause the CD player, and
pause the CD recorder.
Press the PLAY button to restart CD synchro recording.
Recording
1 In the Setup menu, set CDP remote operation
function to “Disable”.
2 Insert the source disc in the CD player.
3 Insert a recordable disc into the CD recorder,
and select the input to suit the CD player
connection.
Turn ON the auto track marking from the Setup
menu as necessary to enable automatic track
numbering.
4 On the remote, press the CD-SYNC STANDBY
button.
The CD player changes to play standby, and the
CD recorder changes to recording standby mode.
5 Press the CD-SYNC START button on the
remote.
The CD recorder starts recording, and the
CD player starts to playing.
Digital Recording Without
Sampling Rate Converter
If recording digital signals at 44.1 kHz sampling
frequency from a CD or MD source, you can record
without using the sampling rate converter (SRC).
In the Setup menu, set the setup item to “44.1kDirect”.
For details, refer to page 26, “Setup Menu Operations”.
OFF: Use SRC to record.
ON: Do not use SRC to record.
Precautions
If recording sampling frequency signals of 32 kHz and
48 kHz using a DAT or BS tuner source, the setting is
disabled, and sampling rate converter is automatically
used during the recording. If sampling frequency of
input signal changes or switchs to other frequency, do
not use this function (i.e., turn OFF the 44.1kHzDirect
function) to stabilize the recording.
17
Page 18

Operations on the Disc’s TOC AreaOC Area
Operations on the Disc’s TOC Area
Finalizing (FINALIZE)
CD-R/CD-RW
CD-R discs can be played on ordinary CD players
when they have been finalized, but you cannot change
the disc status, such as adding additional tracks.
CD-RW discs can be played on CD-RW-compatible CD
players when they have been finalized. You can later
add or delete tracks on CD-RW discs by unfinalizing
(i.e., undoing the finalizing) them.
Once finalizing has started, it cannot be stopped.
Finalizing takes approximately 130 seconds from
start to finish. During this time, do not turn OFF the
power supply to the CD recorder, as this will
damage the TOC of disc, you will not be able to use
the disc again.
Operating Procedure
1 Press the FINALIZE button.
2 The CD recorder will enter check mode.
“Start?” and “ENTER/YES” will be displayed
alternately.
Adding Track Name and
Disc Name (NAME)
CD-R/CD-RW
You can add disc names and track names in to discs in
CD-text format. The disc names and track names that
have been entered are written to the disc when the disc
is finalized. Consequently, enter the names just before
finalizing the disc.
Note: Removing discs or turning OFF the power
supply before the disc is finalized but a name has been
entered will result in the name data being lost.
You can record up to 23 characters each for disc name
and track name.
You can use the following characters.
Alphabet: A to Z, and a to z.
Numbers: 0 to 9
Symbols: ! “ # $ % & ‘ ( ) * + , - . / : ; < = > ? @ [ ] ^ _
` { | } _ (blank)
After entering the name, if you try to remove the
disc without finalizing, the following warning
message will be displayed: “Text Edited sure Z?” If
you do not want to save the name, press the Z
button again within 4 seconds.
3 If you are ready to finalize, press the AMS
control or the YES button.
If you are not ready, press the MENU/NO
button. When finalizing starts, “Finalize” will
flash in the display. The countdown time
remaining until finalizing finishes will be
displayed.
4 When finalizing is completed, the FINALIZE
indicator will light.
Finalized discs cannot be finalized again. You cannot
finalize discs on which nothing has been recorded.
18
Page 19

Operations on the Disc’s TOC Area
Adding Names Using the CD recorder
1 In stop mode, press the NAME button.
2 Select whether you want to enter the disc name
or track number.
Make the selection by turning the AMS control,
and then press the AMS control or the YES
button.
3 Enter the name.
The cursor will flash to show the position of the
character being input. Turn the AMS control to
select the character, and then press the AMS
control to verify the character and move the
cursor one place to the right.
Use the m button and M button to move the
cursor position left and right.
Press the CLEAR button to delete the character
on which the cursor is positioned, and to move
all of the following characters one place back.
Press the CHAR button to select the character
type. Pressing the CHAR button cycles through
“A”,“ a”, and “0” once each time the button is
pressed. Having selected the character type, turn
the AMS control to select the desired character.
4 Once the character has been entered, press the
YES button.
The CD recorder will return to disc or track
number selection status.
5 Repeat steps 2 to 4 to enter the desired track
and disc name.
6 Finally, press the MENU/NO button to quit the
name input setup menu screen.
Adding Names Using the Remote
1 Press the NAME button.
2 Select whether you want to enter the disc name
or track number.
Press the . button and > button to make
the selection, and then press the YES button.
3 Enter the name.
You can make the selection using the .
button, > button, m button, and M button
in the same way as the main CD recorder, but
you can also enter the alphabet directly using the
remote using the following procedure.
Select the desired character type.
Press the CHAR button to switch between
uppercase and lowercase letters. When in
uppercase, “Selected AB” will be displayed, and
when in lowercase, “Selected ab” will be
displayed. Press the NUM button to enter
numbers directly. “Selected 12” will be
displayed.
Entering Characters
In alphabet input mode, you can enter the
characters A to Z and other symbols directly
using the remote. If number input is selected,
you can enter the numbers 0 to 9 directly, instead
of the letters F to O. (Use the 10 key to enter 0.)
When a character is entered, the cursor moves
one place to the right.
Press the CLEAR button to delete the character
on which the cursor is positioned, and to move
all of the following characters one place back.
4 Once the character has been entered, press the
YES button.
The CD recorder will return to disc or track
number selection status.
Operations on the Disc’s TOC Area
5 Repeat steps 2 to 4 to enter the desired track
and disc name.
6 Finally, press the MENU/NO button to quit the
name input setup menu screen.
19
Page 20

Operations on the Disc’s TOC Area
Operations on the Disc’s TOC Area
Adding Names Using a Personal Computer
Keyboard (Sold Separately)
For the basic keyboard settings, refer to page 27,
“Keyboard Terminal”.
1 Press the Num Lock (NAME) key to enter the
name input setup menu screen.
2 Select whether you want to enter the disc name
or track number.
Press the [Tab] key and [Shift + Tab] key to make
the selection, and then press the Enter key to
confirm.
3 Enter the name.
Enter the name using the keyboard as with a
personal computer .
Entering Lowercase Characters
Use the alphabet keys. (Use the [Shift] key +the
alphabet keys if Caps Lock is enabled).
Entering Uppercase Characters
Use the [Shift] key + the alphabet keys (Use the
alphabet keys, if Caps Lock is enabled).
Entering Numbers
Use the number keys to enter the numbers.
Canceling adding a name
To cancel the name adding, press the [ESC] key.
Switching Between Uppercase and Lowercase
Characters
Use the [Caps Lock] key to switch between
uppercase and lowercase characters.
Moving the Cursor
Use the [?] and [/] keys to move the cursor
left and right.
Deleting Characters
Position the cursor over the character you want
to delete, and then press the [Delete] key.
Deleting the Character Before the Cursor
To delete the character before the cursor, press
the [Back Space] key.
4 Once the character has been entered, press the
[Enter] key.
The CD recorder will return to disc or track
number selection status.
5 Repeat steps 2 to 4 to enter the desired track
and disc name.
6 Finally, press the MENU/NO button to quit the
name input setup menu screen.
Setting Skip/Unskip Tracks
CD-R/CD-RW
When playing a CD-R/RW disc that you have
recorded, you can skip tracks to which you do not
want to listen.
The skip function is determined by the
CD-R/RW specifications, and can be written on the
disc. Discs that have been set to skip can be played
with skipping by enabling the skip setting on a CD
recorder (CD player) that is skip function compatible.
(You cannot use skip play on CD recorders and CD
players that are not skip function compatible.)
Setting skip and unskip for tracks is only possible on
discs before they are finalized. After finalizing, the disc
setting cannot be changed.
Setting Skip/Unskip
1 In the Setup menu, select Skip/Unskip Track
Edit, and then press the AMS control or the
YES button.
This menu item is not displayed for discs that
have been finalized.
2 The recorded track numbers will be displayed.
The current setting status for the flashing track
number will be displayed as shown below.
DISC
Flashing
Tracks to be skipped: “Skip Tr”
Tracks not to be skipped: “Unskip Tr”
When the desired track number is flashing, press
the AMS control to change the skip/unskip
status for that track.
L.SYNC
-dB
∞
L
R
1 345
COAX
678910
11 12 13 14 15
40 30 18 12 8 4 2 0 OVER
3 To change the setting for another track, turn
the AMS control to select the track number.
4 When you have finished the settings for all the
tracks, press the YES button to confirm.
20
Page 21

Operations on the Disc’s TOC Area
5 “PMA Write?” will be displayed. Select
whether to record in the PMA area.
If you write to the PMA area, the setting
information will remain even if the disc is
removed from the CD recorder, and so remains
valid even if another disc is inserted. If not
writing to the PMA area, press the MENU/NO
button. The setting information will not be
written to the disc. In this case, the setting
information will be stored until the disc is
removed or the power is turned OFF.
z
You can play discs without the skip that has been set.
Turn OFF “Skip Play” in the menu. The skip setting will
be ignored, and all recorded tracks will be played.
z
Limits to the number of times you can write skip
information to the PMA area of a disc.
CD-R DISC:
The area to which skip information can be written on a
disc is limited. Consequently, write skip/unskip
information to the PMA area immediately before
removing the disc, and avoid writing the information an
unnecessary number of times. The number of times the
information can be written depends on the number of
tracks set at the time. The skip memory area in which
skip information is set, and the unskip memory area in
which previous skip settings are undone store 21 blocks
each. Each block can store a maximum of 6 tracks. For
example, recording a 7th skip track in one block will
result in a second block being used. The same is true for
the unskip operation. When all 21 blocks for both skip
and unskip have been used, you cannot make additional
settings.
Writing skip settings to the PMA.
Writing skip settings to the PMA.
123456
1
2Tr 3Tr 5Tr 8Tr
123456
2
4Tr 6Tr 7Tr
123456 7 tracks written to PMA 2nd time.
3
15Tr
123456
4
123456
5
10Tr 11Tr 13Tr
4 tracks written to PMA 1st time.
Unfinalizing
CD-RW
You can restore CD-RW disc to the status they were
immediately before the disc was finalized. This
operation is called unfinalizing. You cannot add further
recordings or delete tracks from a finalized CD-RW
disc, but can do so by unfinalizing the disc.
You cannot cancel an unfinalize operation once it
has started.
Unfinalizing takes approximately 80 seconds from
start to finish. During this time, do not turn OFF the
power supply to the CD recorder. The disc’s TOC
information will be corrupted, and you will no
longer be able to use the disc.
Operating Procedure
This operation is valid only with finalized CD-RW
discs.
1 Press the ERASE button.
“Start?” and “ENTER/YES” will be displayed
alternately for verification. Press the MENU/NO
button to quit.
2 Press the AMS button or the YES button.
“Unfinalize” will flash. The countdown time
remaining until unfinalizing finishes will be
displayed. When the display stops flashing,
unfinalizing is complete.
z
Unfinalizing discs with disc name and track name
information.
The information is stored until the disc is removed or the
power supply is turned OFF, in the same state as after it
was entered. Consequently, you can edit the information
or add other tracks names.
Operations on the disc’s TOC Area
123456
20
123456
21
CD-RW DISC:
There are no limits to the number of times you can write
to the PMA, but the maximum number of skip settings is
21 tracks.
21
Page 22

Operations on the Disc’s TOC Area
Operations on the disc’s TOC Area
Erasing Tracks
(TRACK ERASE)
CD-RW
You can erase tracks recorded on CD-RW discs. If
erasing, you can erase (a specified number of tracks
from) the last track recorded. (For example, you cannot
erase only the 5th track on a disc on which 10 tracks
have been recorded in total.) To delete tracks from a
CD-RW that has been finalized, first unfinalize on the
disc to enable the erase function.
You cannot stop a track erase operation it has
started.
Do not turn OFF the power supply to the CD
recorder while tracks are being erased. The disc’s
TOC information will be corrupted, and you will no
longer be able to use the disc.
Operating Procedure
1 Press the ERASE button.
Erasing All Tracks
(DISC ERSE)
CD-RW
You can delete all the tracks currently written to a CDRW disc, and reuse the disc. This operation is possible
regardless of whether or not the disc has been
finalized.
You cannot stop a disc erase operation once it has
started.
Erasing the disc takes approximately 90 seconds. Do
not turn OFF the power supply to the CD recorder
while tracks are being erased. The disc’s TOC
information will be corrupted, and you will no
longer be able to use the disc.
1 Press the ERASE button.
If the disc has not been finalized, the erase tracks
verification screen will be displayed. If the disc
has been finalized, the unfinalize verification
screen will be displayed.
2 If deleting multiple tracks, set the range of
tracks to be deleted by turning the AMS
control.
Press the MENU/NO button to quit.
3 Press the AMS control or the YES button.
Erasing will start, and “Track Erase” will flash.
When the display stops flashing, erasing is
complete.
z
The names of the erased tracks will also be erased at the
same time. If you have selected to erase all tracks, the
disc name will also be erased.
2 Press the ERASE button once again. “Disc
Erase Start?” will be displayed.
Press the MENU/NO button to quit.
3 Press the AMS control or the YES button.
“Disc Erase” will flash. The countdown time
remaining until erasing finishes will be
displayed. When the display stops flashing,
erasure is complete.
22
Page 23

PlaybackOC Area
Playing a Disc
1 Insert a disc.
When a disc is inserted, the CD recorder will
enter stop mode, and the following will be
displayed in the display window: Total number
of tracks on the disc, total recording time, and
the disc name (if a name has been added).
2 Press the H button.
The disc starts to play.
To stop play, press the x button.
To pause play, press the X button.
To restart play, press the H button or the X button.
To fast forward, press and hold the M button while
the disc is playing.
The disc will start to play normally from the point at
which you remove your finger.
To fast backward, press and hold the m button while
the disc is playing. The disc will start to play normally
from the point at which you remove your finger.
To remove the disc, press the Z button. If you press
the Z button while the disc is playing also, the
playback will stop and the tray will open, so you can
remove the disc.
z
You may become disable disc removal during play .
In the Setup menu, select Z mode. Refer to page 28,
“Setup Menu Operations”, for details.
Switching Display During
Playback
Pressing the DISPLAY button during recording
changes the display window as follows:
Current track number and elapsed track time
DISC
L.SYNC
-dB
∞
L
R
12345
678910
11 12 13 14 15
40 30 18 12 8 4 2 0 OVER
√
Current track number and remaining track time
DISC
Total remaining time of all tracks
√
L.SYNC
-dB
∞
L
R
12345
678910
11 12 13 14 15
40 30 18 12 8 4 2 0 OVER
(in CONTINUE/SHUFFLE mode)
DISC
L.SYNC
-dB
∞
L
R
12345
678910
11 12 13 14 15
40 30 18 12 8 4 2 0 OVER
Total remaining program time (in PROGRAM mode)
DISC
L.SYNC
PGM
-dB
∞
L
R
14
8
11
40 30 18 12 8 4 2 0 OVER
√
Current track number and index number
DISC
L.SYNC
-dB
∞
L
R
12345
678910
11 12 13 14 15
40 30 18 12 8 4 2 0 OVER
Playback
It the track title is stored on the disc in CD-textcompatible format, the title will be displayed in the
lower line of the window.
23
Page 24

Playback
Playback
Playing a Specific Track
Selecting previous or next tracks while playing or
paused (AMS track selection).
To select the start of a preceding or later track while
playing or paused, turn the AMS control. (AMS =
Automatic Music Sensor)
Turn the control to the right (>) to select a higher
track number, and to the left (.) to select a lower
track number. Performing an AMS control operation
during play will start the selected track from its
beginning, and performing an AMS control operation
during pause will move to the start of the selected
track, and then pause play.
Selecting Tracks Directly by Track Number (Direct
Selection)
You can select a track number directly using the
number buttons on the remote, or on a keyboard.
Making a selection during play will start the selected
track from its beginning, and making a selection
during pause will move to the start of the selected
track, and then pause play.
z
Directly Selecting Tracks with a Higher Track Number than
25
Press the >25 button, and then enter the number in the
order of 10s and units using the number buttons (1 to 10).
(Button 10 enters the number 0.)
Example: Selecting track No. 30
Press the buttons in the following order: >25
button, 3 button, 10 button.
Selecting Track Number Using the CD Recorder
Stop play, and then turn the AMS control until the
desired track is displayed. Next, press the H button to
start playing the selected track.
Playing Tracks Repeatedly
(Repeat Play)
Cycle between the following by pressing the REPEAT
button: Normal play n Repeat all tracks n Repeat 1
track n Normal play. Use the A-B button to operate AB repeat.
A - BRPEAT
Repeat All Tracks
Press the REPEAT button. “REP” will be displayed.
When the last track has finished playing, the CD
recorder will automatically return to the beginning and
start to play.
• In CONTINUE play mode, the disc will play in track
order from first to last, and then repeat again from
the start.
• In SHUFFLE play mode, when the last track has
finished playing, shuffle play will start again from
the beginning.
• In PROGRAM play mode, when all the programs
have finished playing, play will start again from the
first step of the program.
Repeat 1 Track
Press the REPEAT button. “REP 1” will be displayed,
and the current track will be played repeatedly. If autopause is turned ON, the CD recorder will automatically
pause at the start of the track each time.
A-B Repeat
Specify a part of the current track you want to listen to.
That part will play repeatedly. A-B Repeat can only be
used in CONTINUE play mode.
24
Pansing After Each Track
(Auto-Pause)
This function automatically pauses at the start of the
next track after the previous track has finished playing.
Turn ON and OFF the function by pressing the APAUSE button.
When Auto-Pause is ON, play automatically pauses at
the start of a track, and Auto Pause is displayed.
When Auto-Pause is OFF, play does not pause at the
start of a track, and continues to play the next track
normally.
1 During play, press the A-B button to specify the start
point of the part you want to repeat (point A).
“REP A-” will light, and “B” will flash.
2 Continue play as normal (or press the M button)
until the track reaches the end point of the part you
want to repeat (point B). Press the A-B button again
to specify point B.
“REP A-B” will light, and A-B repeat will start.
Page 25

Playback
To cancel A-B repeat and resume normal play, press
the REPEAT button.
To change the repeat area, press the A-B button while
playing A-B repeat.
The current point will become the new point A. Set a
new point B to start a new A-B repeat.
z
You cannot specify an A-B repeat play that straddles two
tracks.
z
You cannot use A-B repeat play on unfinalized discs.
5 Press the YES button, or wait 20 seconds for
the display to automatically quit setting mode.
Press the CLEAR button in program mode to
delete the last track from the program.
Press the CHECK button in program mode to
check the track order in the program.
Use the number buttons on the remote to select
tracks in program mode. And The selected track
numbers will be added to the end of the
program.
To start program play,
press the H button. Play starts in the order of tracks in
the program.
Playback
Creating Your Own
Program (Program Play)
You can program the play order of the tracks to which
you want to listen on the disc.
PROGRAM
Setting Program Details
1 In stop mode, press the PROGRAM button to
enter program play mode.
“PGM” is displayed in the display window.
2 Turn the AMS control to select the track
number. (The selected track will be added
after the last track in the program.)
To select tracks to be played during program play,
turn the AMS control to select tracks in the order of
tracks in the program.
z
You can program a maximum of 25 steps in one program,
or a total program time of 999 minutes.
z
Program details remain stored until the disc is removed,
or the power supply is turned OFF.
Upper line display: Number of steps and total
program time.
Lower line display: Track numbers in program
order.
3 Press the AMS control to confirm.
The display returns to next program track
selection.
4 Repeat steps 2 and 3 to set the desired
program.
25
Page 26

Playback
Playback
Playing Tracks in Random
Order (Shuffle Play)
You can play all tracks on the disc in random order.
SHUFFLE
1 Press the SHUFFLE button.
The CD recorder will enter shuffle play mode,
and “SHUF” will be displayed in the display
window.
2 Press the H button.
To select tracks during shuffle play, turn the AMS
control to the right to select the next track to be played.
If you turn the AMS control to the left, play will restart
from the start of the track currently playing. You
cannot select tracks that have already been played.
Music Scan
You can play the start of tracks one after the other for a
fixed time only to check the order of tracks.
M.SCAN
Press the M.SCAN button on the remote.
Press the H button during music scan to end music
scan an restart normal play from the current track.
In CONTINUE play mode: Play all tracks in track
order.
In SHUFFLE play mode: Play all tracks in random
order.
In PROGRAM play mode: Play all programmed
tracks in program order.
z
Adjusting Play Time for the Start of Tracks During Music
Scan
You can set the music scan time from 6 to 14 seconds
using “M.ScanTime” in the Setup menu screen. For
details, refer to page 28, “Setup Menu Operations”.
26
Page 27

Control Terminal Functions and Settings
Control-S Input Terminal
(CTRL-S)
The Control-S input terminal on the CD recorder can
perform control operations from external devices by
connecting external devices other than the supplied
remote control to system controller, which is equipped
with a CTRL-S terminal.
Controllable Functions
You can control all the same functions as with the
remote control. When the remote is plugged into the
control-S terminal, the infrared sensor is disabled.
Connecting a Keyboard
Connect the keyboard connector to the keyboard
terminal on the front panel of the CD recorder. The
keyboard will be enabled approximately 4 seconds
after connection.
Selecting Keyboard Type
Select whether the keyboard is Japanese or English
using the menu operations.
1 Press the MENU/NO button and turn the AMS
control. Display “PC Keyboard”, and then press the
AMS control or the YES button.
2 Turn the AMS control to select one of the following.
JP Type: Use a Japanese keyboard.
US type: Use an English keyboard.
3 Press the AMS control or YES button.
Control Terminal Functions and Settings
Keyboard Terminal
Installing a Keyboard
You can use any keyboard * that is IBM ** PC/AT or
compatible with a PS/2 interface. You can use either a
Japanese or English keyboard. (Recommended
keyboard: SONY KB-10.) Use a keyboard with a current
consumption of 120 mA max.
**IBM is a registered trademark of International
Business Machines Corporation.
* Power consumption must be 120mA or less.
MENU/NO
Esc F1 F2 F3 F4 F5 F6 F7 F8 F9 F10 F11 F12
~
!
1234567890
`
Tab
*
Caps Lock
Shift
Ctrl CtrlAlt Alt
Press the key corresponding to
the number to play that track
FINALIZE DISPLA Y
@# $% & '
QWERTY'UIOP
ASDFGHJKL
ZXCVBNM
PLAY MODE
^
SCROLL
REC MUTE
(
<
,
The functions of all the buttons on the CD recorder and
the remote are allocated to the keyboard, so you can
perform various operations using the keyboard instead
of the CD recorder and the remote. The key allocations
are shown in the following diagram.
Entering Track Names and Disc Name Using the
Keyboard
You can enter track names and disc name using the
keyboard. The keyboard is useful for directly entering
alphabet and numbers. For the operating procedure,
refer to page 18, “Adding Track Name and Disc Name
(NAME)”.
Enter track numbers
higher than 10
|
)
-
:
>
?
.
{
[
"
';
OPEN/CLOSE
FADER REPEAT
+
Backspace
=
|
}
\
]
Enter
Shift
A B REPEAT
Print
Screen
Insert
Delete End
CLEAR
Scroll
Lock
Home
MUSIC SCAN
Pause
Page
Up
Page
Down
NAME
Num
/*–
Lock
789
Home
456
1023
End
Ins
PgUp
PgDn
Del
+
Enter
*.: Shift + Tab
REC z: Shift + Enter
MUSIC SYNC: Ctrl + Enter
or YES
Press the key corresponding to
the number to play that track
(Use the 0 key to play track 10)
LEVEL UP
LEVEL DOWN
Adding Names
Use the Caps Lock key to switch between uppercase
and lowercase characters.
27
Page 28

Setup Menu OperationsOC Area
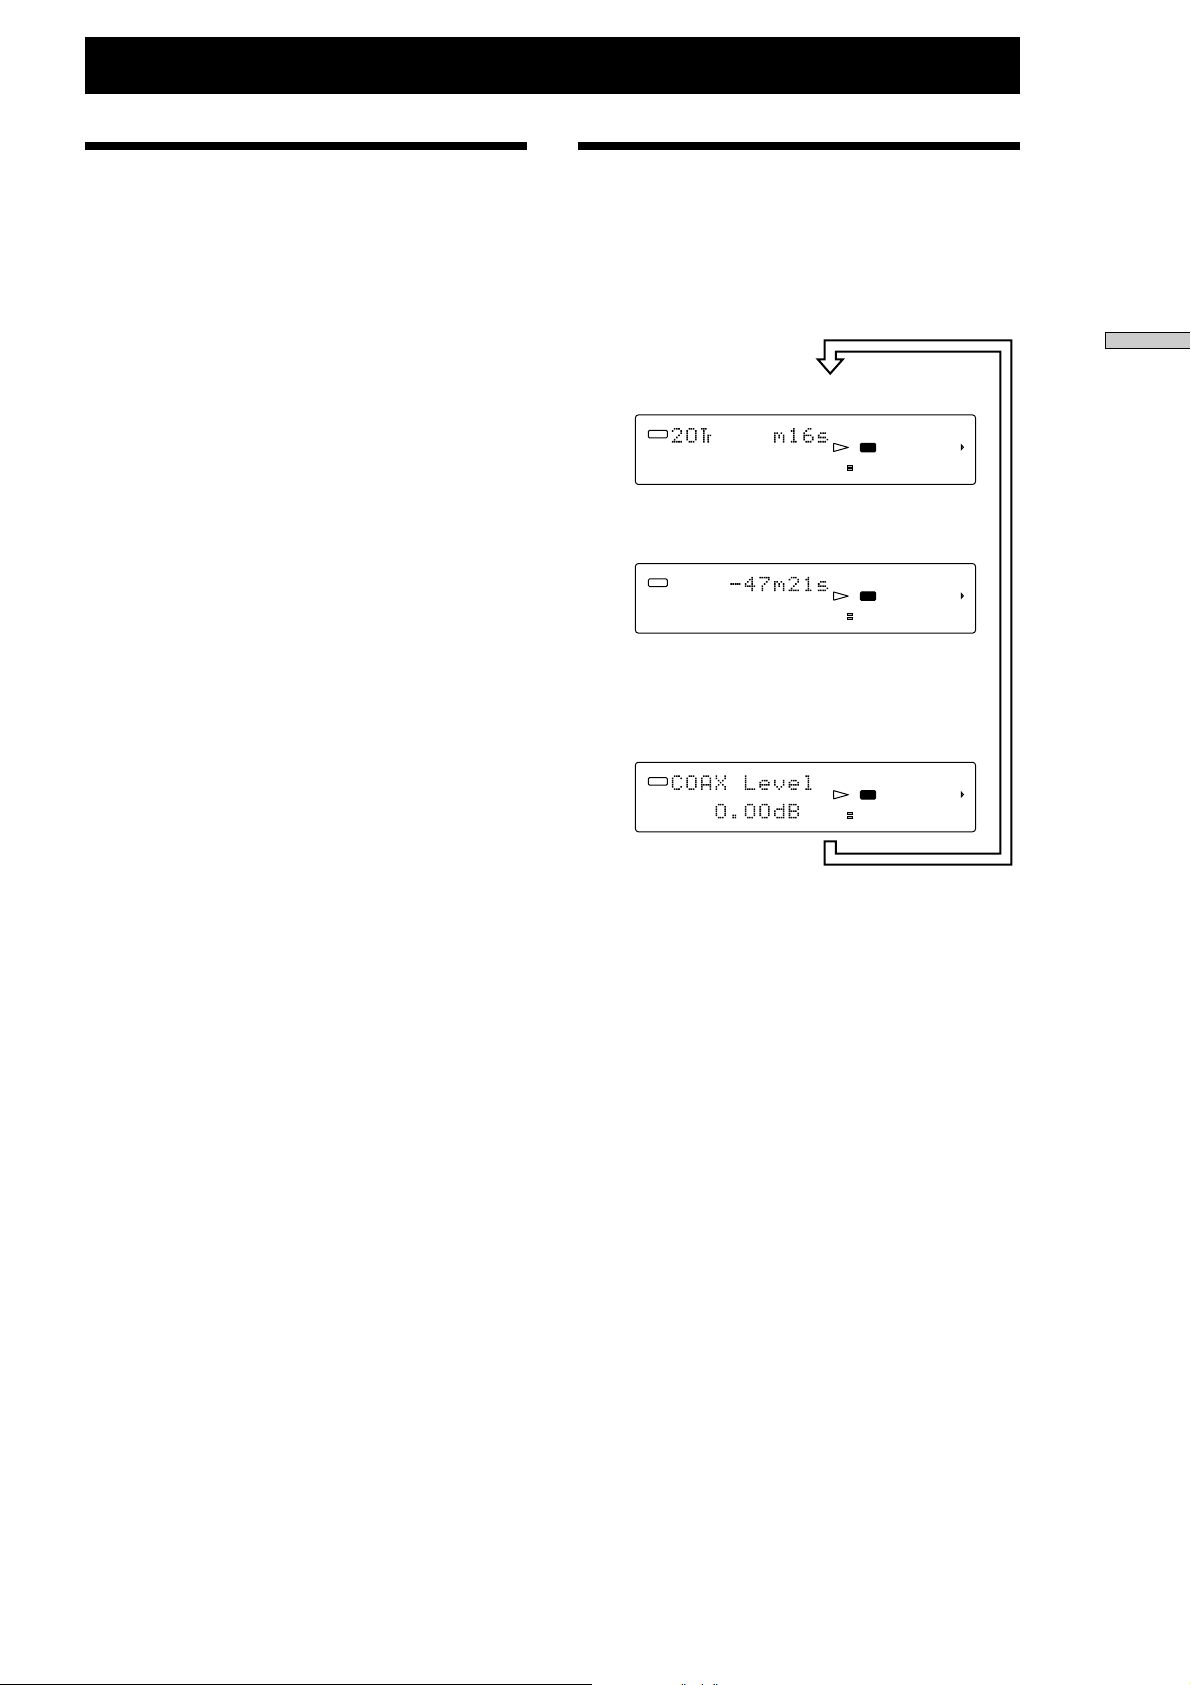
Basic Setup Menu
Operations
1 Press the MENU/NO button.
2 Turn the AMS control to select the desired
Setup Menu Operations
menu item.
The item title will be displayed in the upper line,
and the current item setting will be displayed in
the lower line.
3 If the desired item setting is displayed, press
the AMS control or the YES button.
The setting in the lower line will flash.
Setup Menu Table
The Setup menu items are shown in the following table.
Text Edit Disc/Tr Name
TrMark/Lsync
L.Sync Level
*
COAX Level
*
OPT Level
*
ANA L/R Bal
Fader Time
*
Bass Freq
*
Bass Level
*
Mid Freq
*
Mid Level
*
Mid Width
*
Treble Freq
*
Treble Level
*
LIM Ratio
44.1kDirect
Peak Hold
*
Skip/Unskip Track Edit
Skip Play
M.Scan Time
CDP RM Ctrl
4 Turn the AMS control to change the setting (set
value).
Items marked with a * in the table below changes
at this step.
5 Press the AMS control or the YES button, to
quit the setting changes.
The display will return to step 2.
The settings for items not marked with a * at this
step will cancel when the MENU/NO button is
pressed.
6 Press the MENU/NO button to quit the Setup
menu.
Enter disc name and track name.
Switch between auto track marking (level sinking) and
manual track marking.
Level sink operation threshold level.
Adjust sound level of coaxial digital input.
Adjust sound level of optical digital input.
Adjust LR balance during analog input recording.
Set fade-in/fadeout time during recording.
Set bass equalizer frequency.
Set bass equalizer level.
Set middle equalizer frequency.
Set middle equalizer level.
Set middle equalizer bandwidth.
Set treble equalizer frequency.
Set treble equalizer level.
Set limiter ratio (effective ratio).
Set recording not to use sampling rate encoder (SRC)
during 44.1 kHz digital input recording.
Set whether to leave level meter peak (maximum value)
display.
Set tracks to be skipped.
Set the play time for one track during music scan.
Set to enable/disable CD player remote.
ON/OFF
–72 dB to –48 dB (in 6dB steps)
Mute to 0.0 dB
Mute to 0.0 dB
RchMute to Center to LchMute
1 to 8 sec
50 Hz to 1 kHz
–6 dB to 6 dB
100 Hz to 10 kHz
–6 dB to 6 dB
Narrow/Mid/Wide
1 kHz to 12.5 kHz
–6 dB to 6 dB
0% to 100%
OFF (record using SRC)
ON (record without using SRC)
ON/OFF
ON/OFF
6 sec to 14 sec
Disable/Enable
28
Pc Keyboard
Z Mode
Set type of personal computer keyboard (sold separately).
Set to disable tray opening during play and pause.
JP type (Japanese keyboard)
US type (English keyboard)
N/X Enable (Possible to open)
N/X Disable (Not possible to open)
Page 29

Precautions
Condensation
Turning on the heating in a room when the weather is
cold may cause water droplets to form inside the CD
recorder. This is called condensation. If condensation
occurs, normal operation will be disabled and the disc
and parts may be damaged. In this case, remove the
disc and leave the CD recorder to stand with the power
supply turned ON for 1 hour, and then turn OFF the
power and ON again before using the CD recorder
normally. If normal operation is not restored even after
several hours, consult the Sony Service Center.
Disc Handling Precautions
Handling Discs
• Do not touch the signal surface (the side without
characters or printing) with your fingers and hands.
• Dust, scratches, and dirt may prevent normal play
and recording.
• If a disc is damaged or dirtied before recording,
normal recording will be disabled, so handle
recording discs with greater care than normal playonly discs.
• You can delete tracks recorded on CD-RW discs and
reuse the discs for recording as many times as you
like, so when reusing, be sure that you can record
correctly.
Miscellaneous
Storage
• Avoid places with direct sunlight, high temperature,
or high humidity, as this may cause warping or
discoloring of the disc.
• Store the disc in the proper case. Placing multiple
discs in one case may cause warping and scratching
of the discs.
Inserting Discs
• Check that the CD is firmly inserted within the tray
guides.
• Inserting the CD slanted may cause damage to the
disc or the CD recorder.
Disc Maintenance
• Fingerprints, dust, and dirt may cause incorrect
operation.
• Basically, take care not to dirty the signal side of the
disc.
• If the disc is dirty, gently wipe the disc clean from the
center outwards using a soft cloth.
• If the dirt is severe, wipe the disc gently with a soft,
damp cloth, and then dry the water using a dry
cloth.
• Do not use benzene, record cleaners, or static
prevention solutions on the disc, as these chemicals
may cause the disc to warp.
Miscellaneous
• Do not affix stickers to either the signal side or the
printed side of the disc. The disc’s center of gravity
may be upset, and correct reading and writing
disabled, or the CD may become stuck in the player
and unable to be removed, causing damage.
• If writing the disc details or similar directly onto the
surface of the label side (the side with characters or
printing) of the disc, use a soft-tipped pen such as a
felt pen.
• Writing forcefully with a hard-tipped pen such as a
ball pen may cause damage to the recording surface,
disabling the use of the disc.
29
Page 30

Miscellaneous
Miscellaneous
Dimensions
19541
265
430
364
482
To rackmount
The unit can be mounted on EIA 19-inch rack. Move
the four feet away and mount it on the rack.
To move them away, pull out the plastic pins piercing
them, then feet will be removed.
12 13
888
Unit : mm
30
Page 31

Specifications
Playable discs: CD, CD-R, CD-RW
Recordable discs: CD-R, CD-RW (for music use)
Recording method: Track At Once (TAO)
No. of channels: 2-channel stereo
Sampling Rate Converter: 32 kHz, 44.1 kHz, 48 kHz (auto-
select)
Frequency characteristics: 20 to 20,000 Hz, +0.3/–0.7 dB
Signal/Noise Ratio (S/N ratio):
98 dB (play), 92 dB (analog Rec
and Play) (A-weighted)
Dynamic range: 98 dB (play), 92 dB (analog Rec
and Play)
Wow and flutter* Below measurement limits
(±0.001% W. Peak).
Input Terminals
Terminal
name
Analog IN
Digital IN
Coaxial
Digital IN
Optical
Terminal
type
Pin jack × 2
Pin jack × 1
Coaxial
Square
connector
jack × 1
Input
impedance
47 kΩ
75 kΩ
Optical
wavelength
660 nm
Basic input
level
–4 dBu
0.5 Vp-p
±20%
—
Max. input
level
+12 dBu
—
—
Miscellaneous
Power requirements:
Where purchased Power requirements
U.S.A. and Canada 120VAC,60Hz
Other countries 120V/230V AC selectble,
50/60Hz
Power consumption: 15 W
Dimensions: 482 × 88 × 265 mm(19 × 3
(L × H × W) (Excluding protrusions)
Weight: 4.6 kg (10 lbs 3 oz)
Operating temperature:
5°C to 35°C
Storage temperature: –5°C to 60°C
Accessories Operating Instructions × 1
RM-CW1 Remote Control × 1
R6 (size-AA) batteries × 2
Control-S connector cord × 1
Accessories Sold Separately
Optical digital connector cable
Coaxial digital connector cable
CD-R (blank disc) CRM74
CD-RW (blank disc) CWM74
In the interests of improvement, specifications and dimensions
may be subject to change without notice.
1
/2 × 10 1/2 in.)
POC-15A or similar
VMC-10 or similar
Miscellaneous
Miscellaneous
Output Terminals
Terminal
name
Analog OUT
Digital OUT
Coaxial
Digital OUT
Optical
Phones
Terminal
type
Pin jack × 2
Pin jack × 1
Square
connector
jack × 1
Phone
jack
Control Terminals
Terminal name
Control-S IN
KEYBOARD
0 dBu = 0.775 V
Output
level
Max. + 8 dBu
0.5 Vp-p
Rated output
–18 dBm, optical
wavelength 660 nm
0 to 10 mW
(variable level)
Terminal type
Mini jack × 1
Mini Din 6P × 1
Impedance
more than 10kΩ
75Ω
—
32Ω
31
Page 32

Miscellaneous
Miscellaneous
Troubleshooting
“TOC Reading” is displayed for a long time.
, The CD recorder reads CD-text-compatible
characters. Consequently, it takes longer
compared with players that are not CD-textcompatible.
, 30 s to 1 min. is required to read TOC
information. This is not a malfunction.
, Is the disc inserted upside-down?
, Is the disc’s recording surface dirty?
, Depending on the disc, you may need to remove
it and reinsert it for the disc to operate correctly.
After “TOC Reading” has been displayed, “OPC
Adjust” is displayed.
, With CD-R/RW discs, laser power may need to
be adjusted (OPC Adjust) when the disc is
inserted for the first time, whether it is new or
has been previously recorded. In this case, OPC
adjust lasts for approximately 40 s.
The recorded data does not stay on the disc.
, If the power supply is turned OFF during
recording or while PMA Writing is displayed,
writing to the PMA area will be incorrect, and
the recording disabled. (Refer to page 11,
“Rcording Precautions”.)
Cannot add track numbers, even pressing the
z button during recording.
, Check if auto track marking is ON (L.SYNC is
lit). (Refer to page 12, “Adding Track Numbers
(Track Marking)”.)
Cannot play recorded discs on other CD
players.
, Has the disc been finalized? (Refer to page 18,
“Finalizing”.)
, Is the disc dirty or damaged? (Refer to page 29,
“Precautions”.)
, Even if the CD-RW disc is finalized, a CD-RW
disc cannot be played on a CD player that is not
CD-RW-compatible. (Refer to page 18,
“Finalizing”.)
“No Disc” is displayed, even with a disc
inserted.
, Check that the disc is properly inserted between
the guides (refer to page 29, “Disc Handling
Precautions”.)
Cannot play disc
, Is there anything recorded on the inserted disc?
, Check that the disc is a music disc (not a CD-
ROM, etc.)
, Condensation (water droplets inside the CD
recorder) must be considered. Remove the disc,
and leave the CD recorder to stand with the
power supply turned ON for 1 hour, and then
turn OFF the power supply and ON again
before trying to play the disc again. (Refer to
page 29, Precautions.)
Cannot record to disc
, Is a play-only music CD inserted?
, Has the CD-R/CD-RW disc been finalized?
(Refer to page 18, “Finalizing”.)
, Are there already 99 tracks recorded on the disc?
(Refer to page 11, “Recording Precautions”.)
, Is the Recordable space on the disc full? (Refer
to page 11, “Recording Precautions”.)
, Is the source device connected correctly? (Refer
to page 5, “Connections”.)
, Is the INPUT switch selection correct? (Refer to
page 10, “Recordingon a disc”.)
, Is the recording level set too low? (Refer to page
12, “Adjusting the Recording Level”.)
, Are you trying to record on a recordable disc?
Even though the parameters have been set,
the limiter and equalizer effects are not
operating.
, Set the SBM/LIMITER/EQ switch to LIMITER
+ EQ or SBM + LIMITER + EQ. (Refer to page
15, “Using the Digital Limiter and Digital
Equalizer”.)
, Limiter and equalizer effects are enabled for
analog recordings only. They are disabled
during play and for digital recordings.
, SBM is very delicate, so if monitoring using
headphones, depending on your system, the
effects may not be recognizable.
Cannot use the remote for operations.
, Have the remote’s batteries worn down? (Refer
to page 5, “Inserting Batteries into the Remote”.)
, Is there any obstruction between the remote and
the CD recorder? (When using the wireless
remote.)
, Is the sensor aimed at the CD recorder? (When
using the wireless remote.)
, Is the supplied cable attached to either the CD
recorder or the remote? (When using the
wireless remote.)
The disc name and track name that were
entered have been erased.
, If the power supply is turned OFF or the disc
removed before being finalized, the entered
names will be erased. (Refer to page 18,
“Finalizing”.)
32
Page 33

Display Messages
Miscellaneous
Message
No Disc
0Tr 0M00s
TOC Reading
OPC Adjust
Disc Error
PMA Writing
SkipPmaFull
Text Edited
sure Z?
Disc Full
Finalized
Tno Full
Cannot Rec
Cannot Erase
No Track
Cannot Copy
Meaning
Disc has not been inserted.
Time display when unrecorded disc is inserted.
Disc TOC information is read immediately after a disc is inserted.
Optimizing laser power for recording.
Disc is not inserted correctly. Cannot read disc information correctly.
Recording to PMA (Program Memory Area). Displayed after recording is stopped or skip
setting is verified. Do not turn OFF the power supply while this message is displayed.
PMA skip/unskip area is full. Cannot record new information.
This message is a warning that although a disc name or track name has been entered, you are
trying to remove the disc without finalizing. Press the Z button again within 4 seconds to
remove the disc. All entered information will, however, be lost. To store the name data, finalize
the disc before removal.
No more can be recorded on the disc.
Disc has been finalized, so no more tracks can be recorded.
The maximum number of tracks (99) have been recorded, so no more tracks can be recorded.
CD is play-only, so recording is not possible, or REC MUTE has been set at the start of the
unrecorded tracks.
CD is play-only, or is a CD-R (tracks cannot be erased).
Playing an unrecorded disc, or a disc on which all tracks have been set to skip.
Signal is not consumer digital audio format.
Miscellaneous
Din Unlock
Auto Pause
Timer Play
Open Lock
Skip Track
Cannot Mark Now L.Sync
OPC Full
PMA Full
Rec Error
Power supply is turned OFF to the recording source, or is not correctly connected.
Auto-pause function is ON, and CD recorder is in standby mode.
Timer play function has turned ON when the power supply was turned ON, and CD recorder is
in play mode.
Z mode is set to N/X Disable, and the Z button has been pressed during play or pause.
The selected track has been set to skip.
Attempting to mark track number manually while auto track marking has been set.
OPC recording area is full. Cannot perform OPC Adjust.
PMA recording area is full. (refer to page 21)
Error has occurred due to shock during recording.
33
Page 34

Printed in Japan
 Loading...