

Page 1
Compact Disc
Player
4-238-112-26(1)
Operating Instructions
Mode d’emploi
GB
FR
CDP-CX455
2002 Sony Corporation
Page 2
WARNING
Welcome!
To prevent fire or shock hazard, do not
expose the unit to rain or moisture.
To avoid electrical shock, do not open the cabinet. Refer
servicing to qualified personnel only.
This appliance is classified as a CLASS 1 LASER product.
This label is located on the rear exterior.
To prevent fire, do not Cover the ventilation of the apparatus with
newspapers, table-cloths, curtains, etc. And don’t place lighted candles
on the apparatus.
To prevent fire or shock hazard, do not place objects filled with liquids,
such as vases, on the apparatus.
Don’t throw away the battery with general house
waste, dispose of it correctly as chemical wastes.
For the customers in Canada
CAUTION
This Class B digital apparatus complies with Canadian ICES-
003.
CAUTION:
TO PREVENT ELECTRIC SHOCK, DO NOT USE THIS POLARIZED
AC PLUG WITH AN EXTENSION CORD, RECEPTACLE OR OTHER
OUTLET UNLESS THE BLADES CAN BE FULLY INSERTED TO
PREVENT BLADE EXPOSURE.
Thank you for purchasing this Sony Compact Disc Player.
Before operating the unit, please read this manual thoroughly
and retain it for future reference.
About This Manual
The instructions in this manual are for model CDP-CX455.
Conventions
• Instructions in this manual describe the controls on the
player.
You can also use the controls on the remote if they have the
same or similar names as those on the player.
• The following icons are used in this manual:
Indicates that you can do the task using the remote.
Z
Indicates hints and tips for making the task easier.
z
Notes on CDs
On handling CDs
• To keep the disc clean, handle the disc carefully.
• Do not stick paper or tape on the disc.
• Do not expose the disc to direct sunlight or heat sources
such as hot air ducts, nor leave it in a car parked in direct
sunlight as there can be considerable rise in temperature
inside the car.
• After removing a disc from the disc slot, store the disc in its
case.
On cleaning
• Before playing, clean the disc with a cleaning cloth. Wipe
the disc from the center out.
• Do not use solvents such as benzine, thinner, commercially
available cleaners or anti-static spray intended for vinyl
LPs.
GB
2
Page 3
Notes on CD-R and CD-RW discs
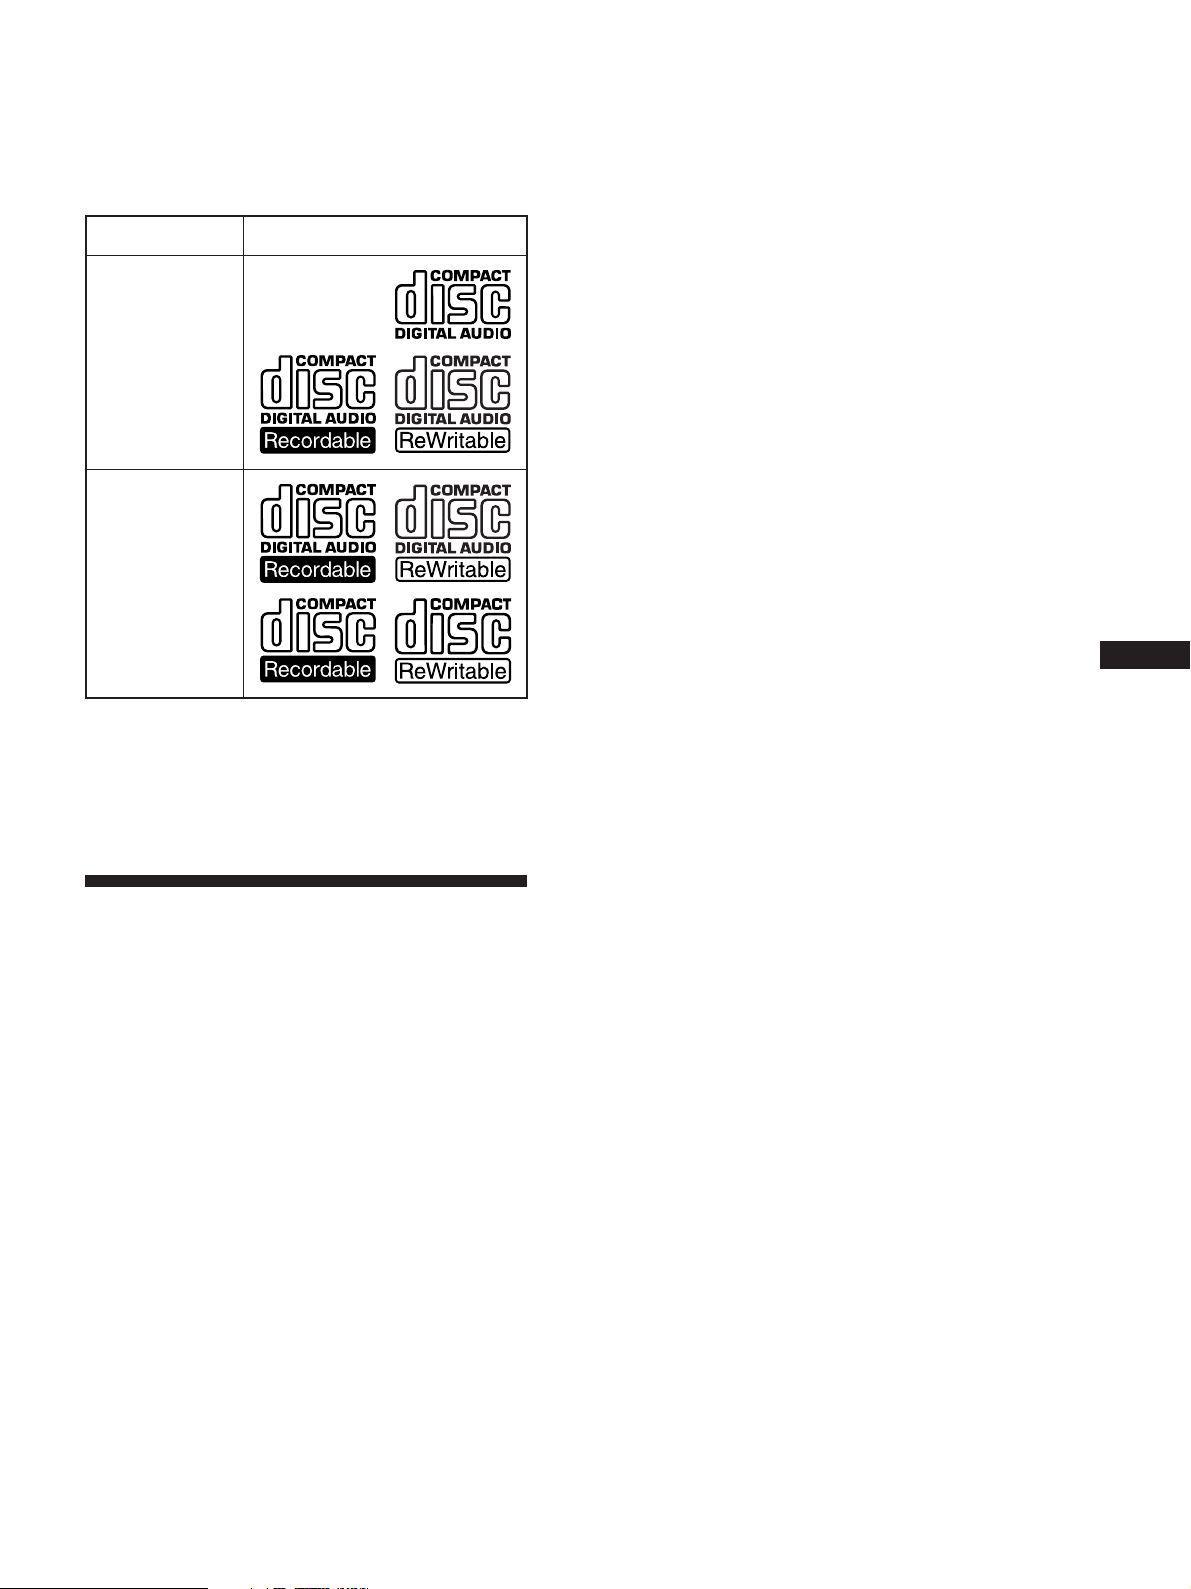
This unit can play the following discs:
Type of discs Label on the disc
Audio CD
MP3 files
• Some CD-Rs/CD-RWs (depending on the equipment used
for their recording or the condition of the disc) may not
play on this player.
• You cannot play a CD-R/CD-RW that is not finalized*.
*A process necessary for a recorded CD-R/CD-RW disc to
be played on the audio CD player.
About MP3 files
MP3 (MPEG 1 Audio Layer-3) is a standard technology
and format for compressing a sound sequence. The file
is compressed to about 1/10 of its original size. Sounds
outside the range of human hearing are compressed
while the sounds we can hear are not compressed.
Playback of some MP3 files may not be possible,
depending on the encoding.
The encoding method (i.e., the bit rate selected for
encoding) will affect the sound quality of the MP3 files
created. The bit rate typically used for MP3 files is
128 kbps.
Notes on discs
You can play MP3 files recorded on CD-ROMs, CD-Rs
(recordable CDs), and CD-RWs (rewritable CDs).
The disc must be in the ISO 9660*1 level 1 or level 2
format, or Joliet or Romeo in the expansion format.
You can use a disc recorded in Multi Session*2.
1
ISO 9660 Format
*
The most common international standard for the
logical format of files and folders on a CD-ROM.
There are several specification levels. In Level 1, file
names must be in the 8.3 format (no more than eight
characters in the name, no more than three
characters in the extension “.MP3”) and in capital
letters. Folder names can be no longer than eight
characters. There can be no more than eight nested
folder levels. Level 2 specifications allow file names
up to 31 characters long.
Each folder can have up to 8 trees.
For Joliet or Romeo in the expansion format, make
sure of the contents of the writing software, etc.
2
*
Multi Session
This is a recording method that enables adding of
data using the Track-At-Once method. Conventional
CDs begin at a CD control area called the Lead-in
and end at an area called Lead-out. A Multi Session
CD is a CD having multiple sessions, with each
segment from Lead-in to Lead-out regarded as a
single session.
CD-EXTRA: A format in which CD-DA (audio) data
are recorded in the tracks of session 1 and computer
data in the tracks of session 2.
Mixed CD: A format in which computer data are
recorded in the first track and CD-DA (audio) data in
the following tracks within a session.
GB
FR
(continued)
GB
3
Page 4
Notes
• With formats other than ISO 9660 level 1, folder names or
file names may not be displayed correctly.
• When naming, be sure to add the file extension “.MP3” to
the file name.
• If you up the extension “.MP3” to a file other than MP3, the
unit cannot recognize the file properly and will generate
random noise that could damage your speakers.
• The following discs take a longer time to start playback.
–a disc recorded with complicated tree structure.
–a disc recorded in Multi Session.
–a disc to which data can be added (non-finalized disc).
Cautions when playing a disc that is recorded in Multi
Session
CD-DA (audio) data or MP3 files stored on a Multi Session
CD may be subject to some restrictions on playback.
– If the disc begins with a CD-DA session, it is recognized
as a CD-DA (audio) disc, and playback continues until an
MP3 session is encountered.
– If the disc begins with an MP3 session, it is recognized as
an MP3 disc, and playback continues until a CD-DA
(audio) session is encountered.
– The playback range of an MP3 disc is determined by the
tree structure of files produced by analyzing of the disc.
–A disc with a mixed CD format will be recognized as a
CD-DA (audio) disc.
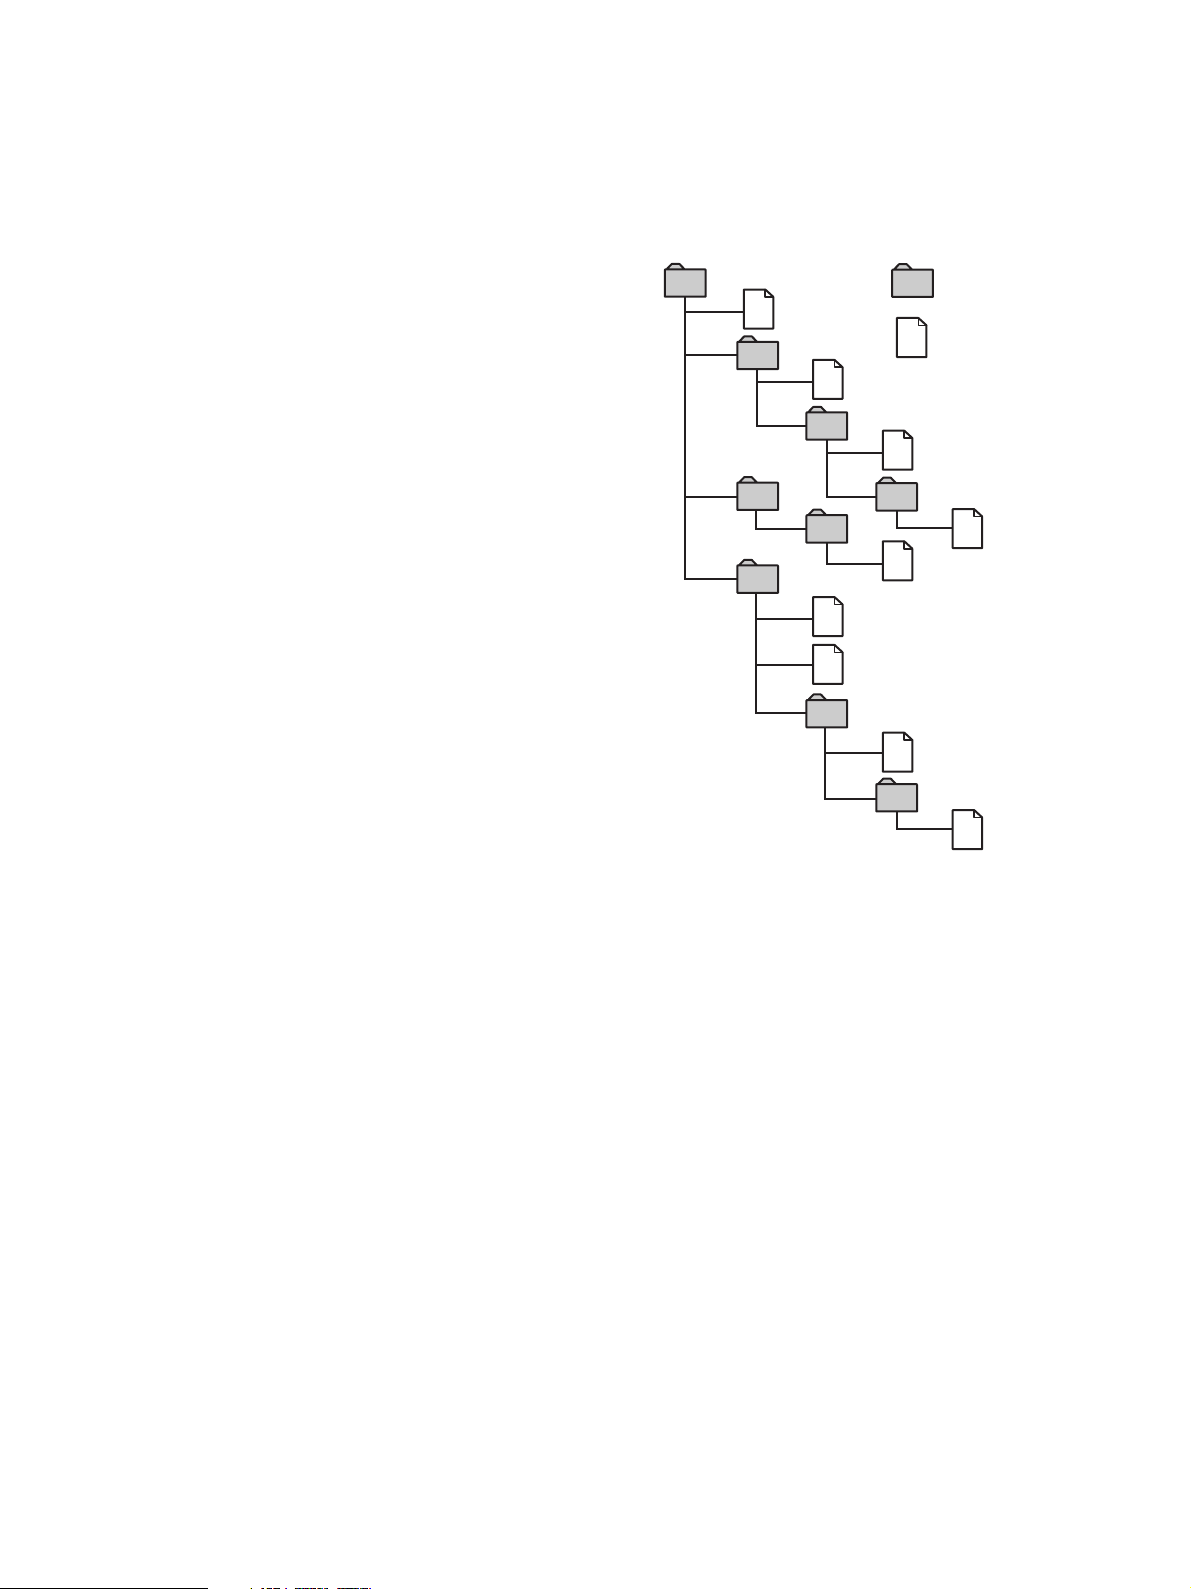
The playback order of the MP3 files
The playback order of the folders and files is as
follows:
1
Folder (album)
1
MP3 file (tracks)
2
2
3
3
4
5
6
6
7
5
4
7
8
8
9
Tree 1 Tree 2 Tree 3 Tree 4 Tree 5
Notes
•A folder that does not include an MP3 file is skipped.
• When you insert a disc with many trees, it takes a longer
time to start playback.
We recommend that you make only one or two trees for
each disc.
• Maximum folder number: 150 (including root folder and
empty folders)
• Maximum total number of MP3 files and folders: 300
• The CD player can play the MP3 files in a folder whose
depth in the folder tree is up to 8.
Tip
To specify a desired playback order, before the folder or file
name, input the order by number (e.g., “01”, “02”), then
record contents onto a disc. (The order differs depending on
the writing software.)
Note on playback of MP3 files
Depending on the encoding/writing software, recording
device, or the recording media used at the time an MP3 file is
recorded, you may encounter such problems as disabled
playback, sound interruptions, and noise.
GB
4
Page 5

TABLE OF CONTENTS
Getting Started
Unpacking.............................................................................................................................. 6
Hooking Up the System ....................................................................................................... 6
Connecting Another CD Player .......................................................................................... 8
Inserting CDs ......................................................................................................................... 9
Conserving power in standby mode................................................................................11
Playing CDs
Playing a CD ........................................................................................................................12
Using the Display ...............................................................................................................13
Locating a Specific Disc .....................................................................................................15
Specifying the Next Disc to Play ......................................................................................17
Playing Discs (Album) in Various Modes (Repeat/Shuffle Play) ...............................17
Creating Your Own Program (Program Play) ................................................................ 19
Using the Timer...................................................................................................................22
Fading In or Out..................................................................................................................22
Storing Information About CDs (Custom Files)
What You Can Do With the Custom Files .......................................................................23
Labeling Discs (Disc Name) .............................................................................................. 23
Storing Custom File Information Using a Keyboard..................................................... 26
Classifying Discs According to Artist Name (Artist File) ............................................. 27
Playing discs assigned the same Artist Name with one-touch of a TOP ARTIST
button (Top Artist Play) ..................................................................................................... 29
Using the Player with Another Component
Controlling Another CD Player (Advanced Mega Control) ......................................... 30
Playing Alternately (No-Delay Play/X-Fade Play) ....................................................... 31
Controlling the Player by Another Unit ..........................................................................32
Additional Information
Using the CONTROL A1II control system ......................................................................33
Precautions...........................................................................................................................34
Troubleshooting .................................................................................................................. 35
Specifications .......................................................................................................................36
Index
Index ..................................................................................................................................... 37
GB
5
Page 6
Getting Started
Getting Started
Unpacking
Check that you received the following items:
• Audio cord (1)
• Monaural (2P) mini-plug cord (1) (Connecting cord
for CONTROL A1II) (supplied for Canadian models
only)
• Remote commander (remote) (1)
• Size AA (LR6) batteries (2)
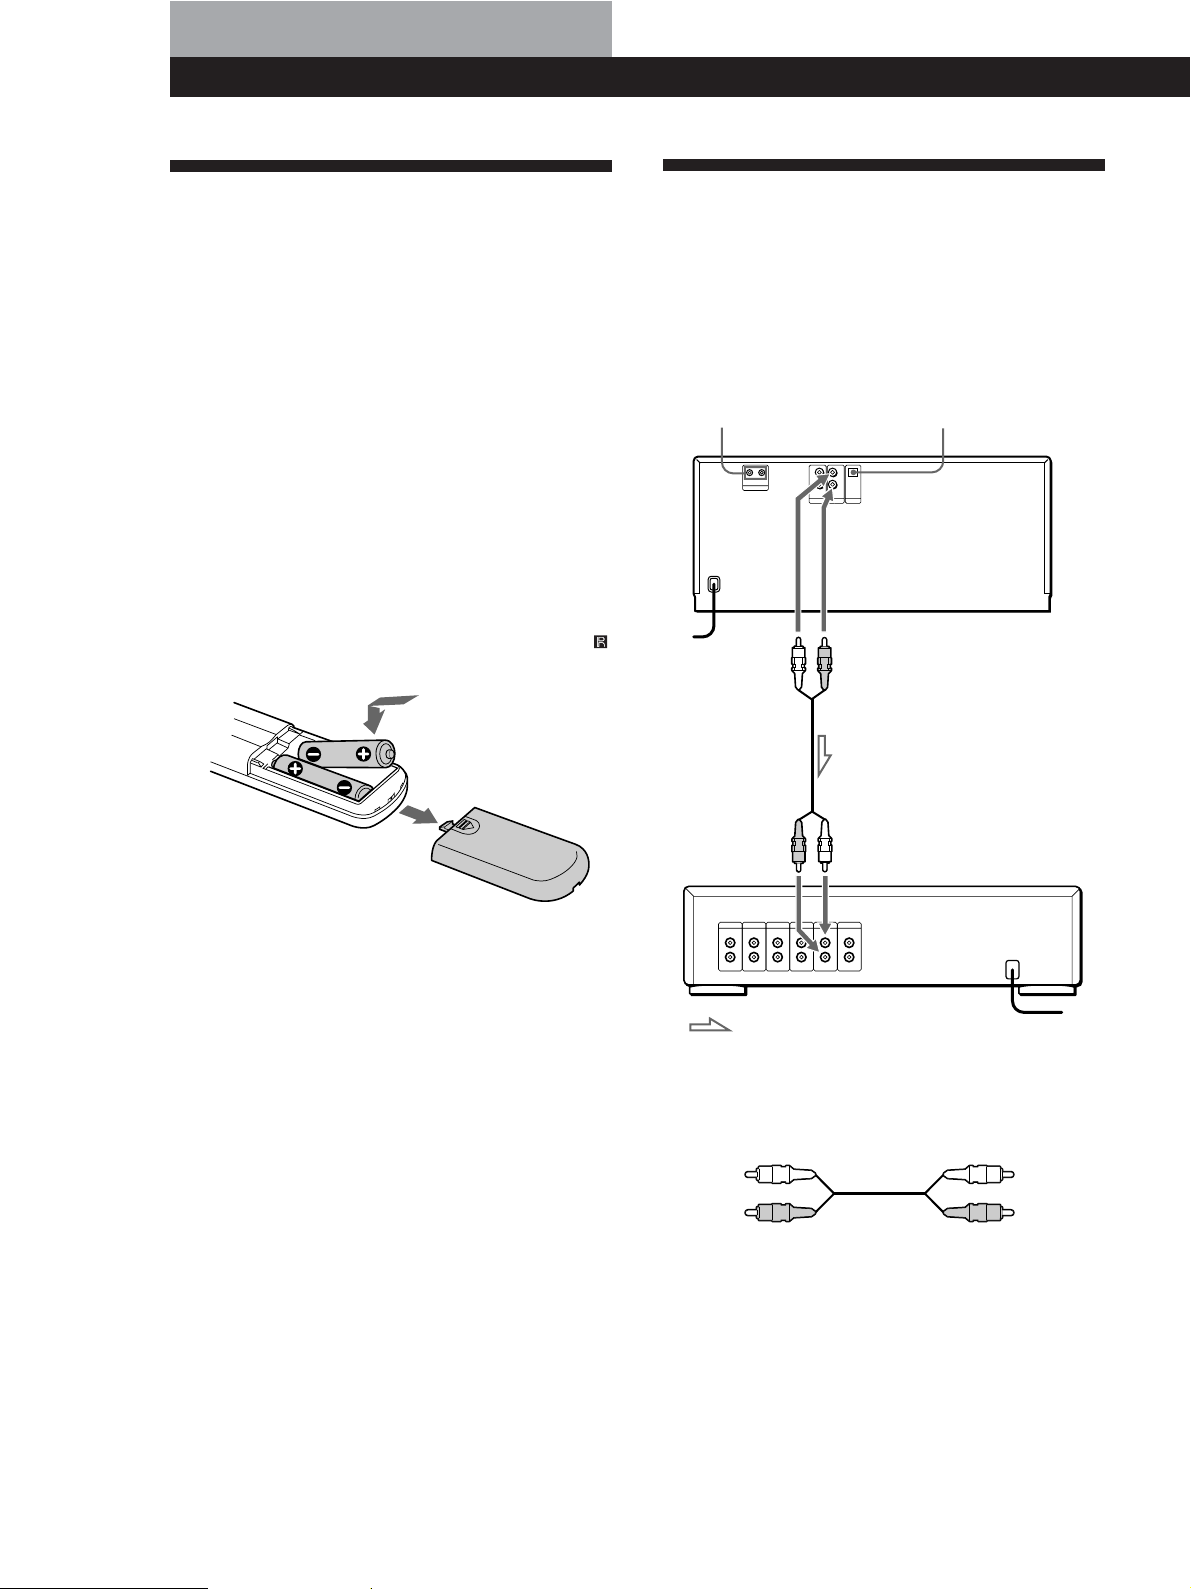
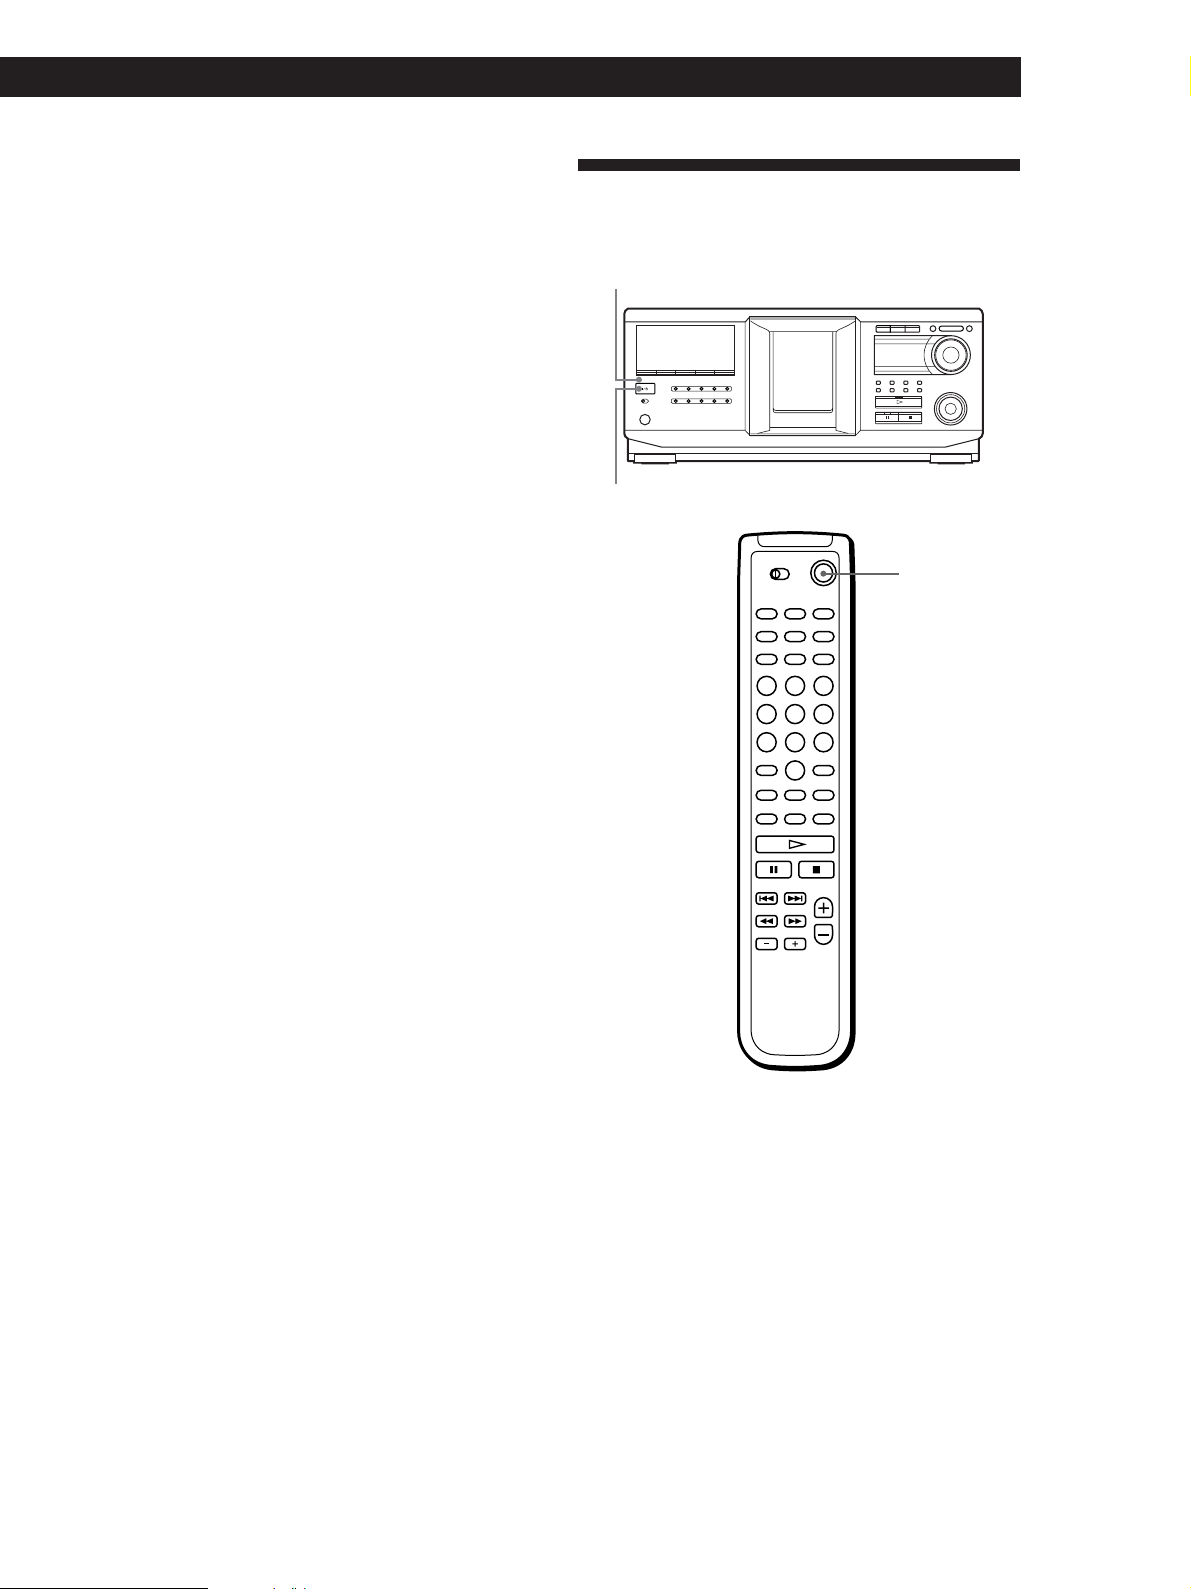
Inserting batteries into the remote
You can control the player using the supplied remote.
Insert two size AA (LR6) batteries (supplied) by
matching the + and – ends on the batteries to the
diagram inside the battery compartment.
Insert the negative (–) end first, then push in and down
until the positive (+) end clicks into position.
When using the remote, point it at the remote sensor
on the player.
Hooking Up the System
Overview
This section describes how to hook up the CD player to
an amplifier. Be sure to turn off the power of each
component before making the connections.
DIGITAL OUT
CONTROL A1II
To an AC outlet
To Analog
output (L)
To Analog
output (R)
(OPTICAL)
CD player
z When to replace batteries
With normal use, the batteries should last for about six
months. When the remote no longer operates the player,
replace all the batteries with new ones.
Notes
• Do not leave the remote near an extremely hot or humid
place.
• Do not drop any foreign object into the remote casing,
particularly when replacing the batteries.
• Do not expose the remote sensor to direct sunlight or leave
too near lighting apparatuses. Doing so may cause a
malfunction.
• If you do not use the remote for an extended period of time,
remove the batteries to avoid possible damage from battery
leakage and corrosion.
To audio input
: Signal flow
What cords will I need?
Audio cord (supplied) (1)
White
(L)
Red
(R)
Amplifier
To an AC outlet
White
(L)
Red
(R)
GB
6
Page 7
Getting StartedGetting Started
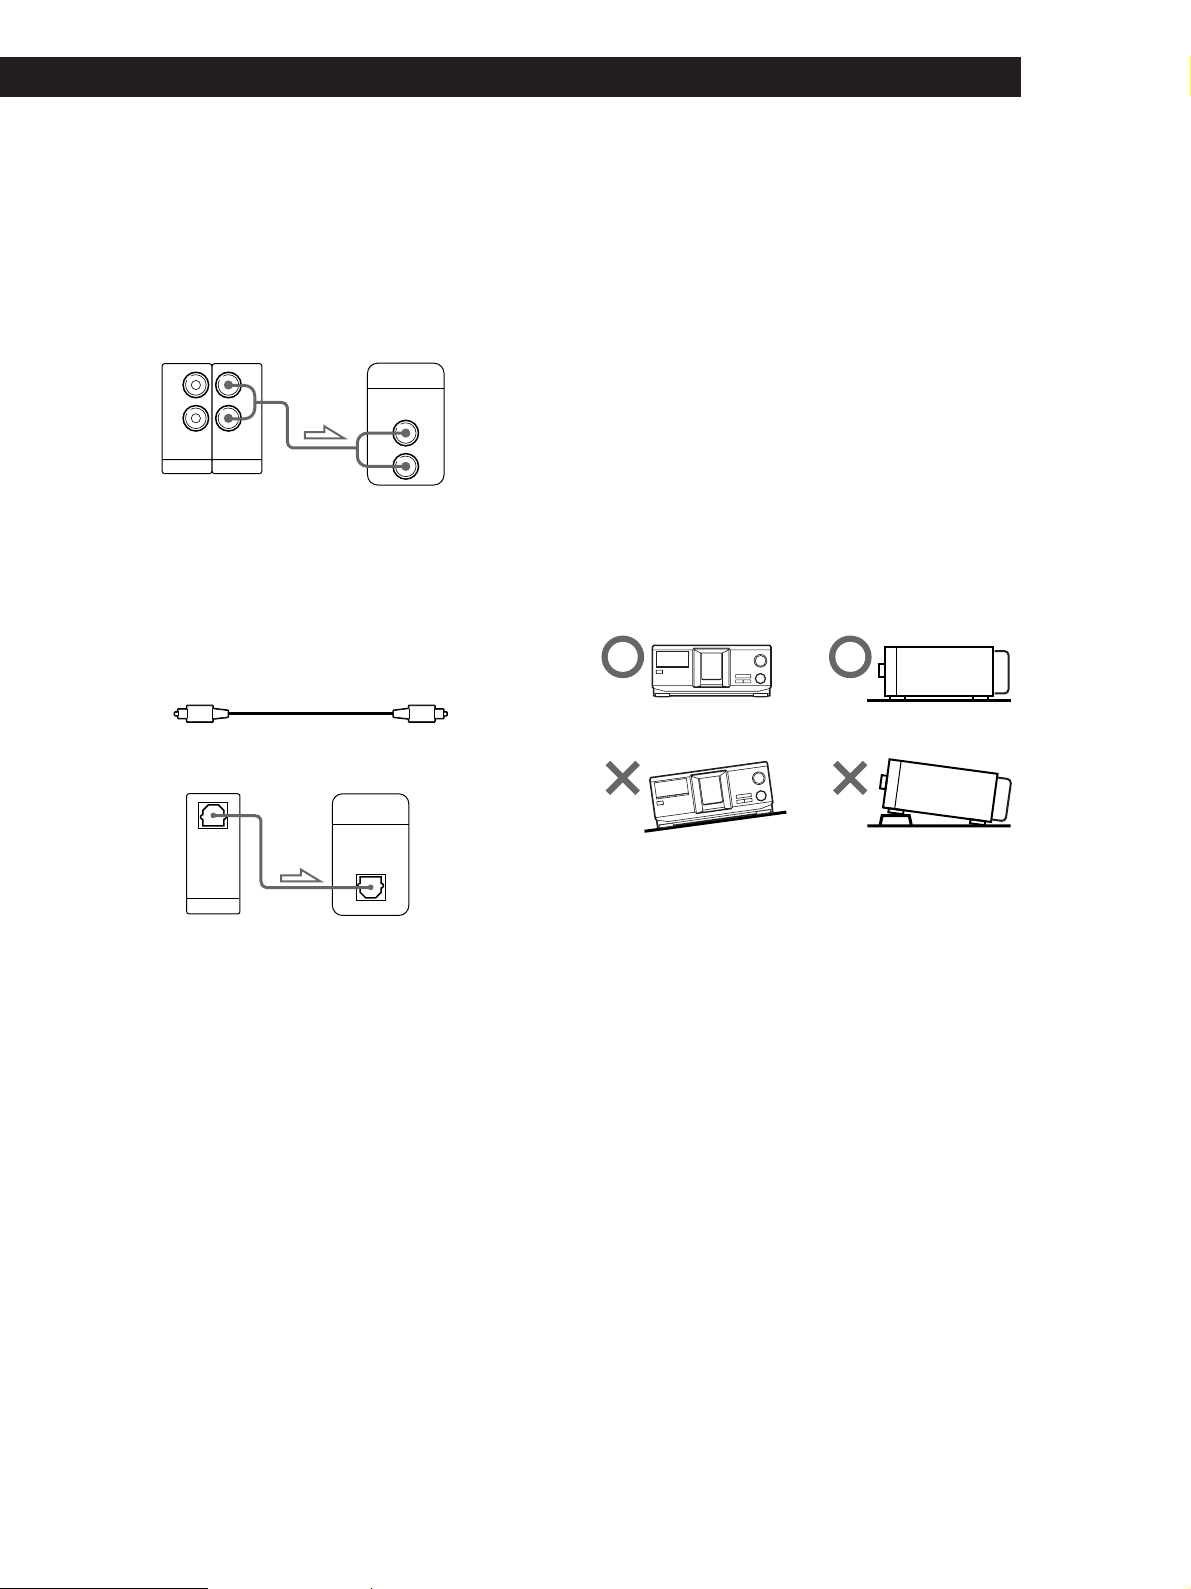
Hookups
When connecting an audio cord, be sure to match the
color-coded cord to the appropriate jacks on the
components: Red (right) to Red and White (left) to
White. Be sure to connect firmly to avoid hum and
noise.
CD player
L
R
2ND CD ANALOG
L
R
IN OUT
• If you have a digital component such as a digital
amplifier, D/A converter, DAT, or MD
Connect the component via the DIGITAL OUT (OPTICAL)
connector using an optical cable (not supplied). Take off the
cap and plug in the optical cable.
Note that you cannot use fading in or out (page 22).
Optical cable (not supplied)
Amplifier
INPUT
CD
L
R
z If you have a Sony component with the CONTROL
A1II (or CONTROL A1) jack
Connect the component via the CONTROL A1II (or
CONTROL A1) jack. You can simplify the operations of
audio systems composed of separate Sony components.
For details, see “Using the CONTROL A1II Control
System” on page 33.
Connecting the AC power cord
Connect the AC power cord to a wall outlet.
Note on placement of the player
Be sure to place the player on a flat, horizontal place.
If the player is left on a slanted position, it may cause a
malfunction or damage the player.
CD player Digital component
DIGITAL
INPUT
OPTICAL
OPTICAL
OUT
DIGITAL
Notes
• The playback from an MP3 file is not output from the
DIGITAL OUT (OPTICAL) connector.
• When you connect via the DIGITAL OUT (OPTICAL)
connector, noise may occur when you play CD software
other than music, such as a CD-ROM.
GB
7
Page 8
Getting Started
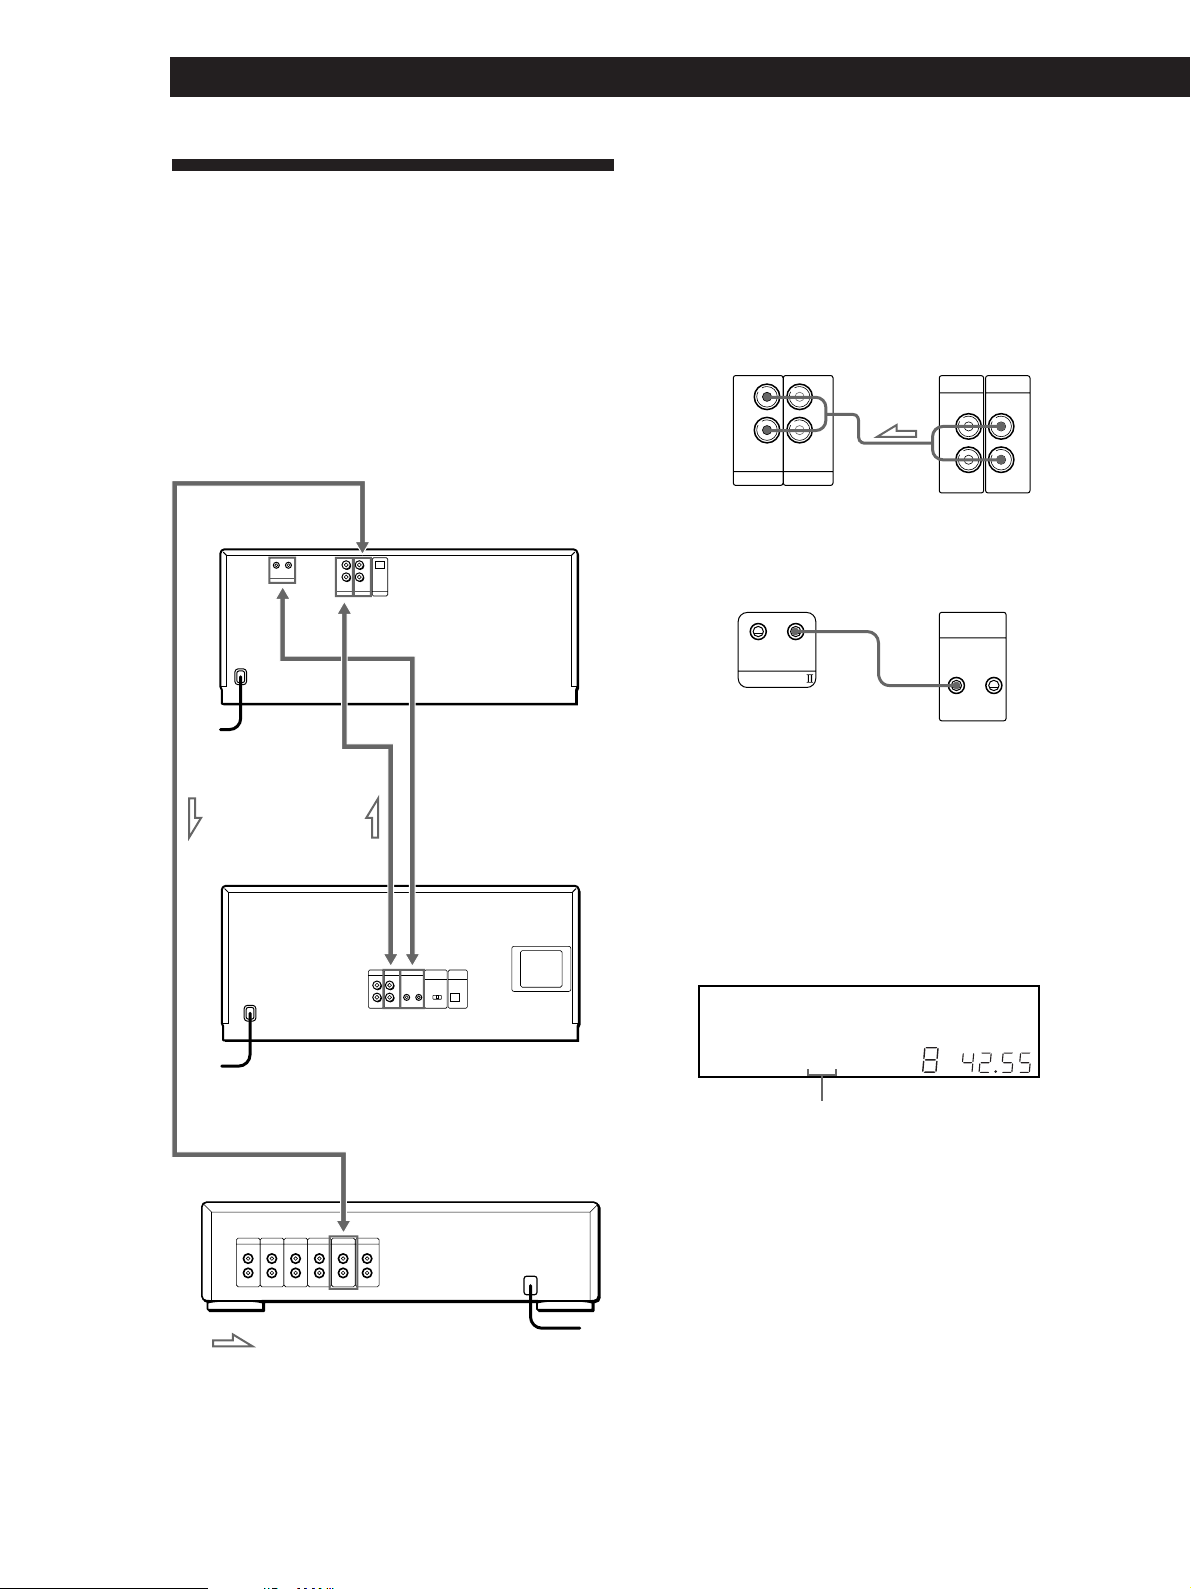
Connecting Another CD Player
If you have a Sony CD player in which 5, 50, 200, 300,
or 400 discs can be inserted and which is equipped
with the CONTROL A1II (or CONTROL A1) jack and
the command mode of that player can be set to CD3,
you can control that player as the second player with
this player. After connecting this player and an
amplifier, follow the procedure below.
Be sure to turn off the power of each player before
making this connection.
To ANALOG OUT
What cords will I need?
• Audio cord (1) (Use the cord supplied with the player to be
connected.)
• Monaural (2P) mini-plug cord (1) (supplied for Canadian
models only)
1 Connect the players with an audio cord (see also
“Hookups” on page 6).
CDP-CX455
L
R
2ND CD ANALOG
L
R
IN OUT
CDP-CX355, etc.
ANALOG
2ND CD
IN OUT
L
R
L
R
To an AC outlet
To audio output
To an AC outlet
To 2ND CD IN
To
CONTROL A1II
To audio input
CDP-CX455
CDP-CX355, etc.
Amplifier
2 Connect the players with a monaural (2P) mini-
plug cord.
CDP-CX455
CONTROL A1
CDP-CX355, etc.
CONTROL A1II
For details on this connection, see “Using the
CONTROL A1II Control System” on page 33.
3 Set the command mode of this player to CD1
(factory setting) or CD2, and set that of the second
player to CD3.
Check the display for the current command mode
of this player, if the mode is CD3, change the mode
as described on the next page.
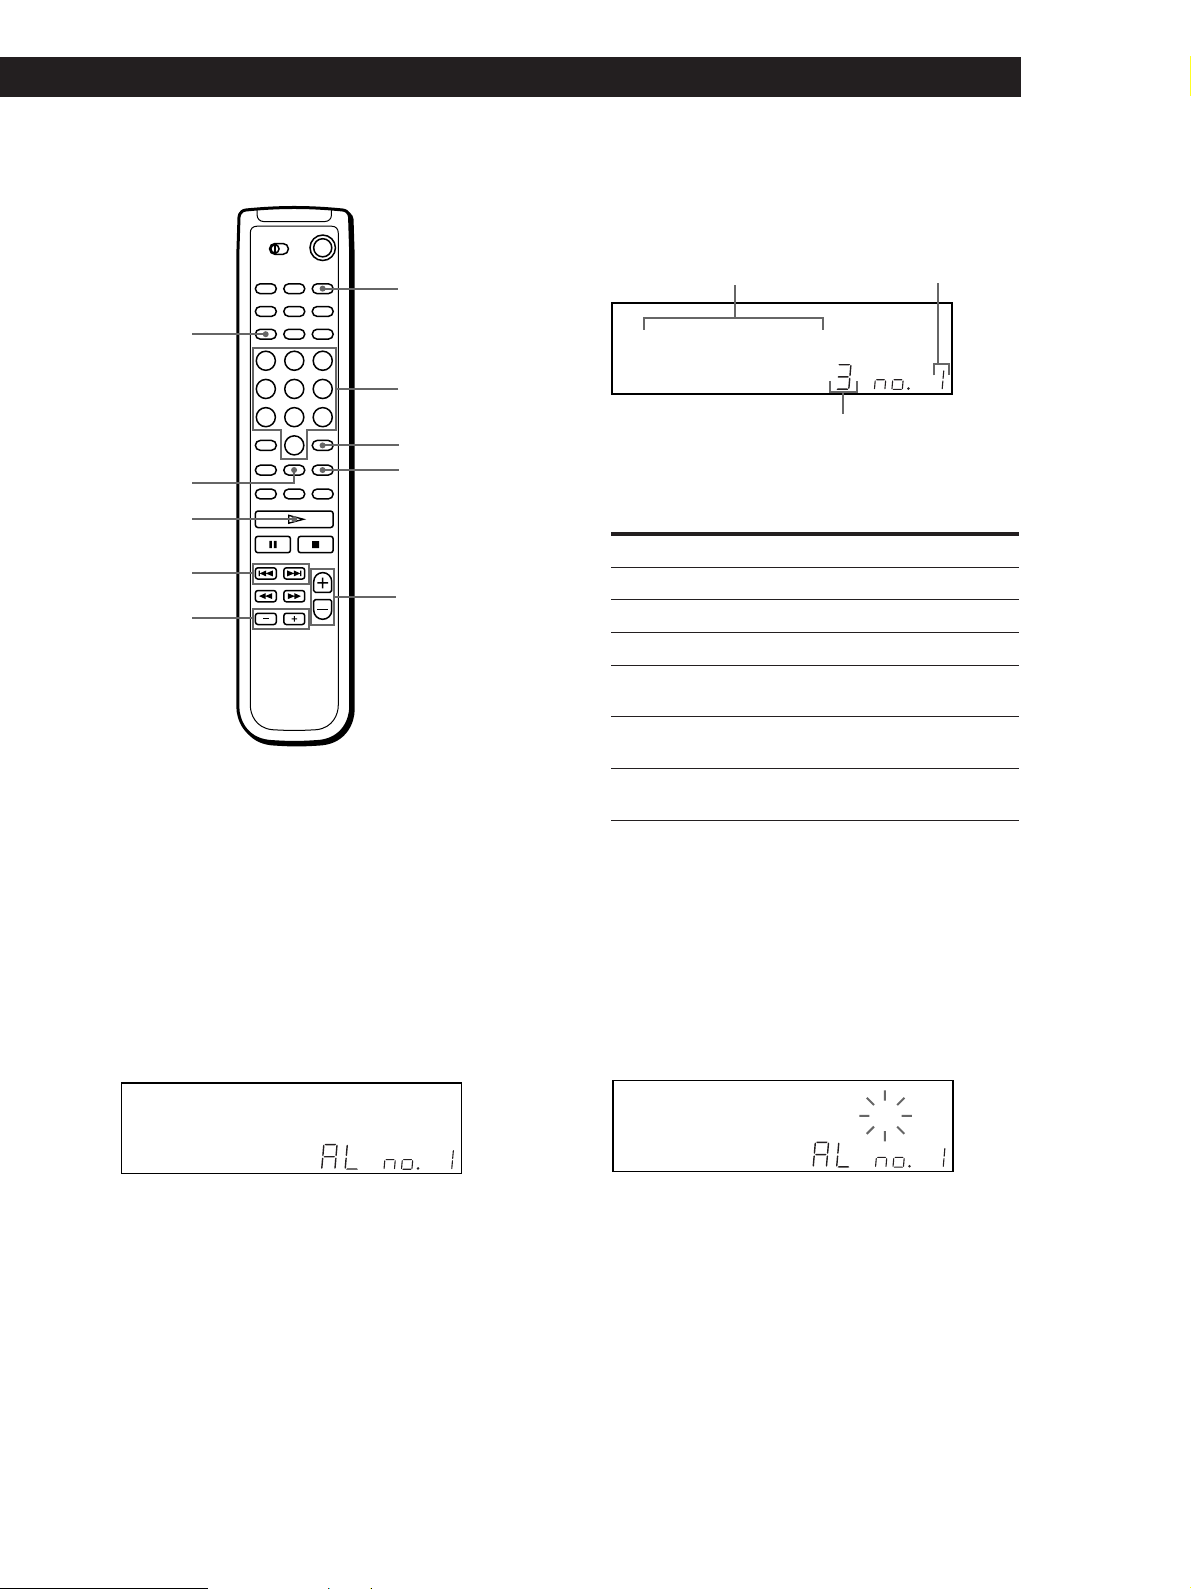
DISC
HITART.NEXT2nd
GROUPTRACK
SECSTEPMINART.
*DISC-1 *** ***
GROUP
1
ALL DISCS
PROGRAM 1 23 X-FADE DELETE
TEXTCDMULTI
NO DELAY
For details on how to operate the second player,
see “Controlling Another CD Player” on page 30
and “Playing Alternately” on page 31.
1
REPEATSHUFFLE
CD2 CD3
CD1
Current command mode
4 Connect the AC power cord of both players to an
AC outlet.
: Signal flow
GB
8
To an AC outlet
Page 9

Notes
• Do not connect any player other than the one used as the
second player to the 2ND CD IN jacks of this player.
• When connecting a second CD player, do not connect the
DIGITAL OUT (OPTICAL) connector of this player to the
amplifier.
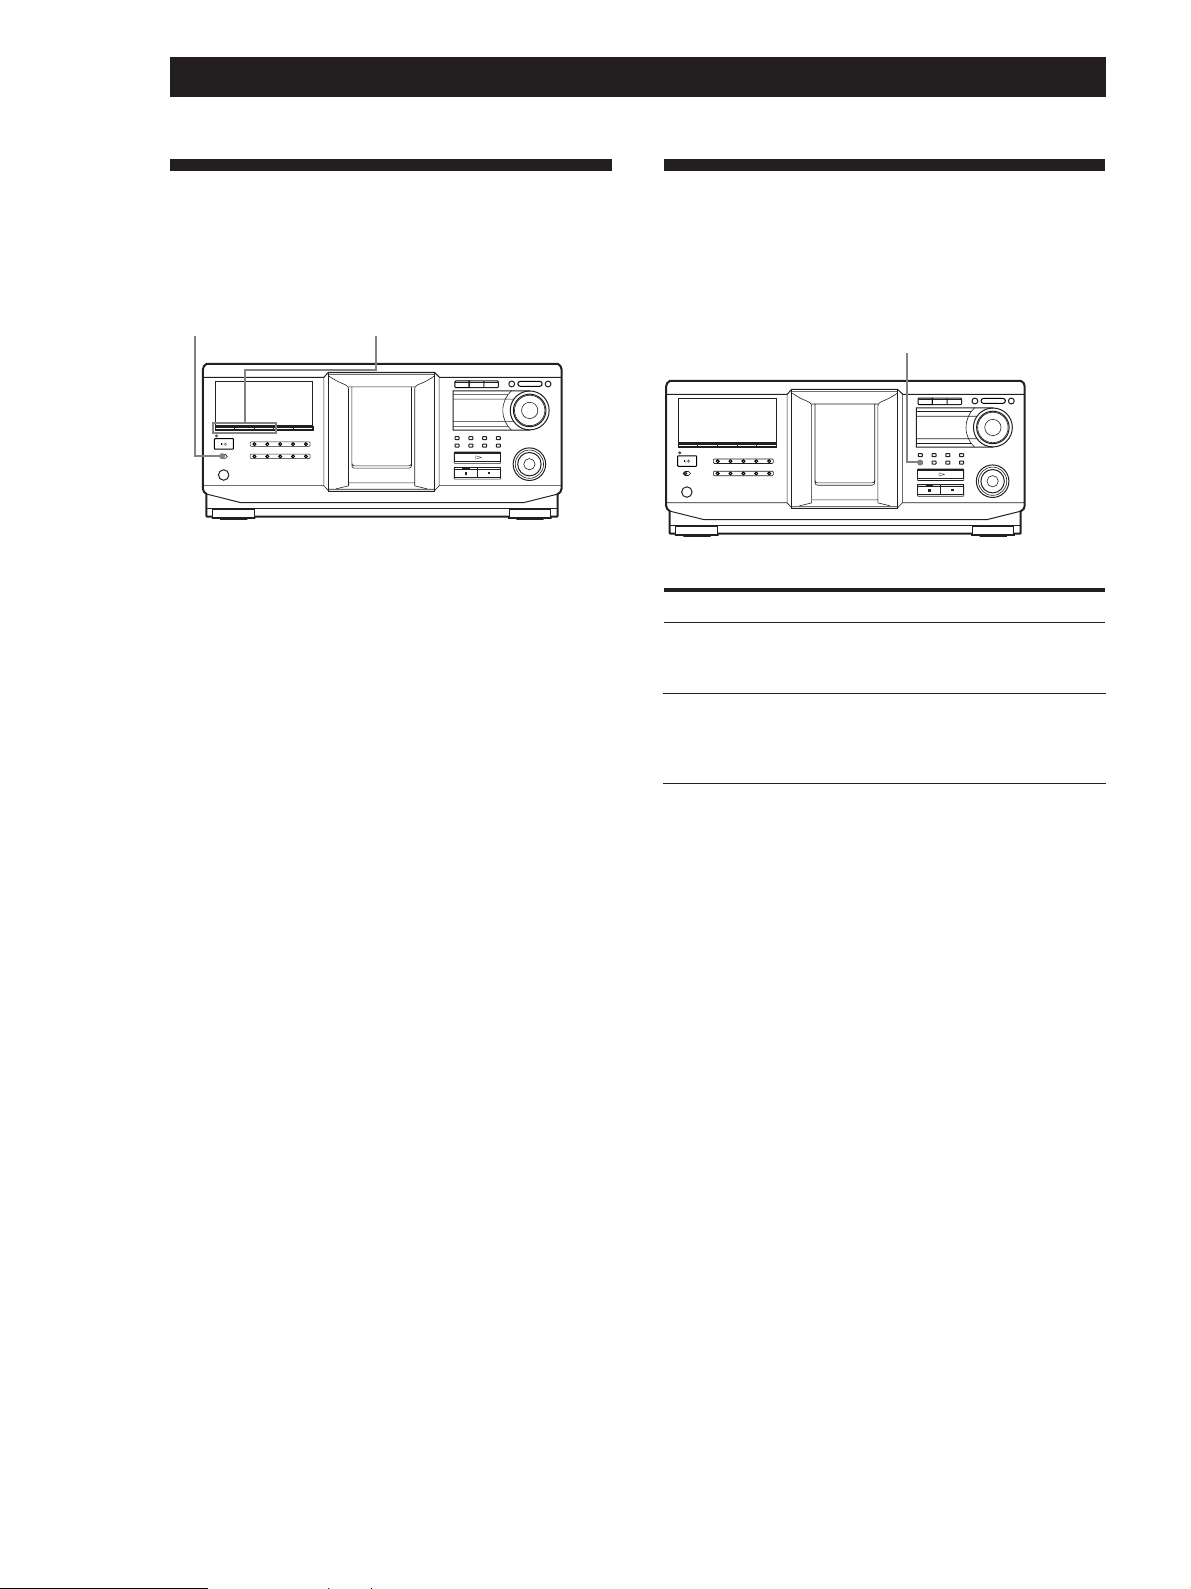
Changing the command mode of the player
Getting StartedGetting Started
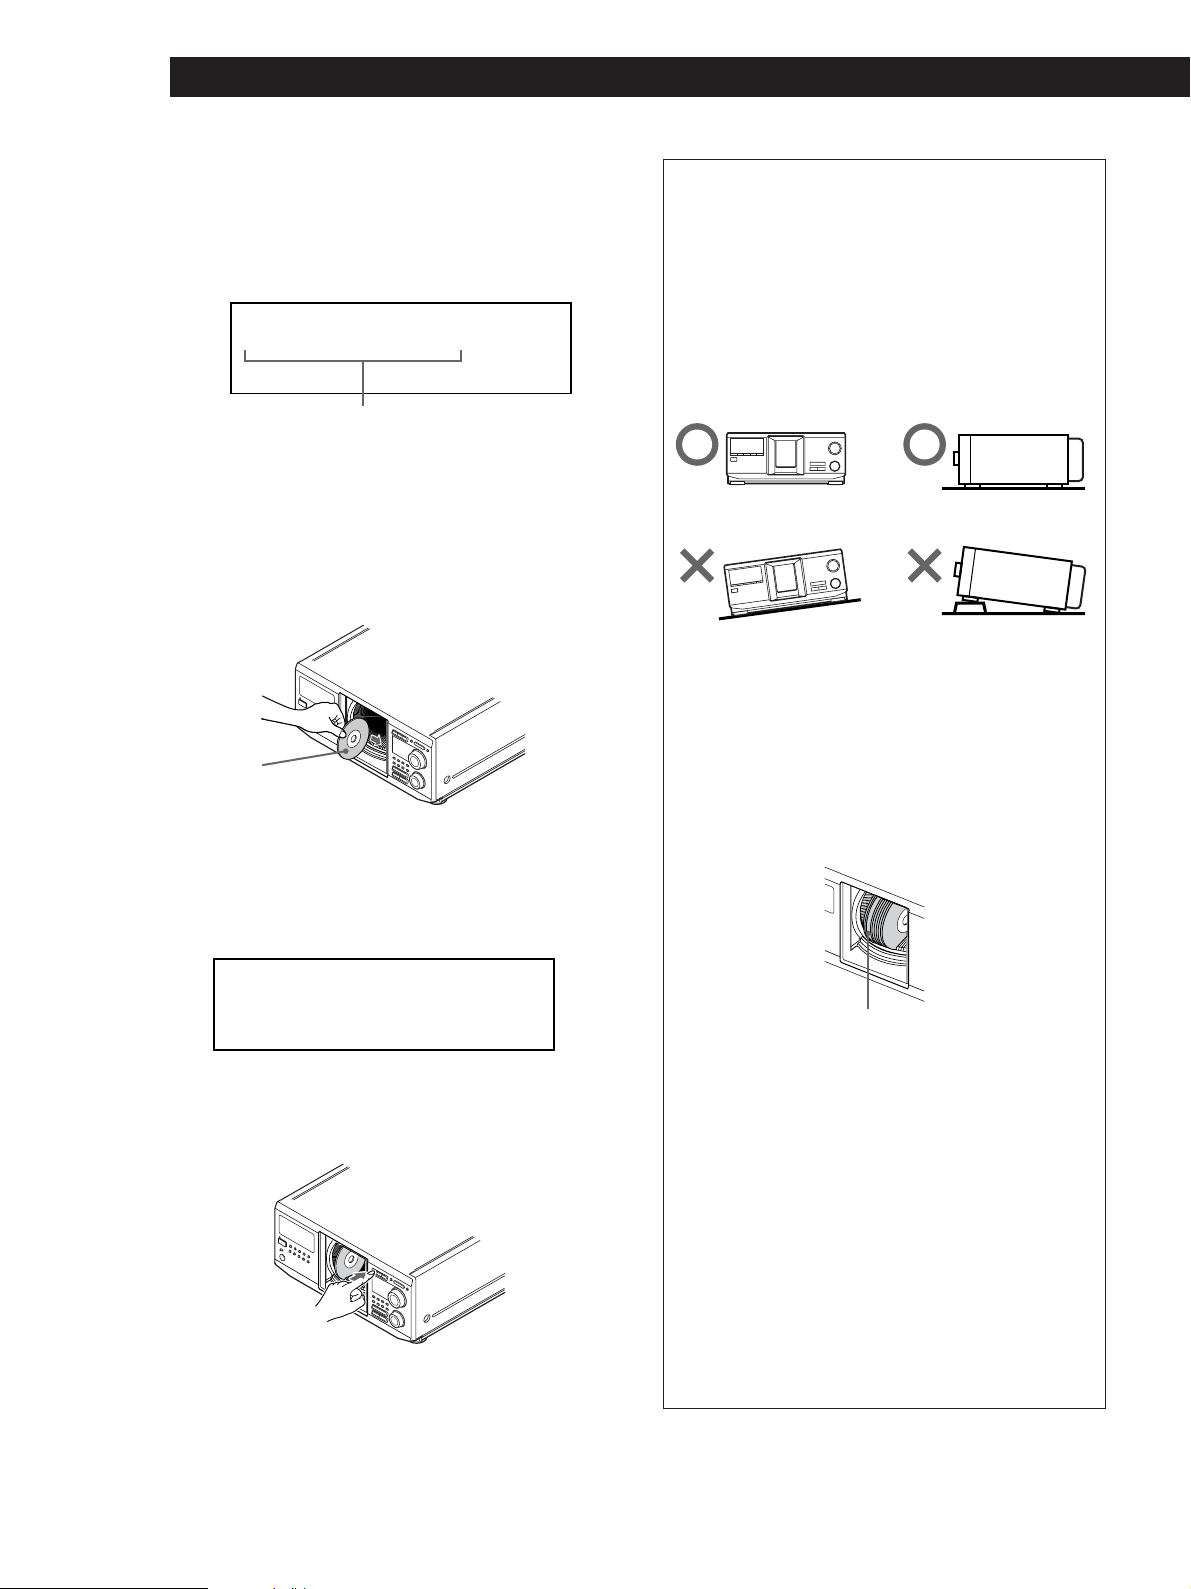
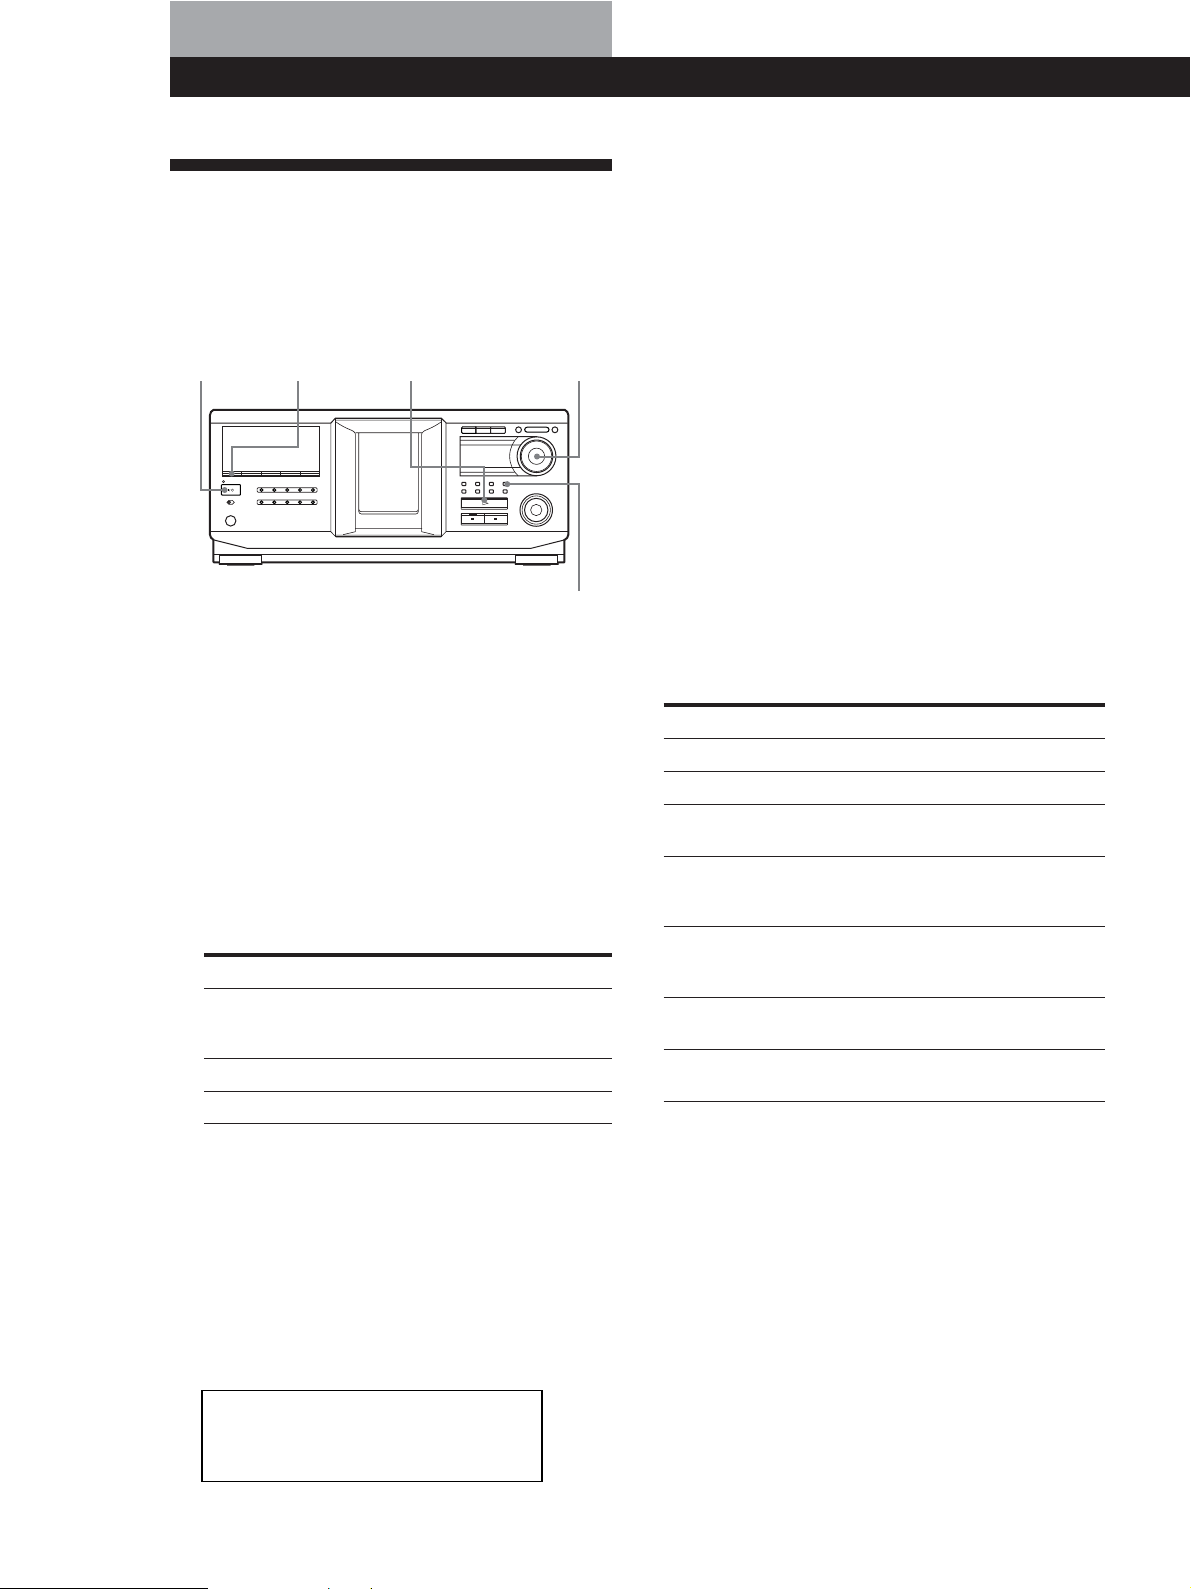
Inserting CDs
You can insert up to 400 discs into this player.
?/1
OPEN/CLOSE
JOG
MENU/NO
JOG
1 Press MENU/NO.
2 Turn the JOG dial until “COMMAND MODE?”
appears in the display.
3 Push the JOG dial.
The current command mode appears.
HITART.NEXT2nd DISC
GROUPTRACK
SECSTEPMINART.
* CD1[CD ]C2D3*
GROUP
1
ALL SDISC
PROGRAM 1 23 X-FADE DELETE
TEXTCDMULTI
REPEATSHUFFLE1
NO DELAY
Current command mode
CD1 CD2
CD3
Top view of the disc slot
Playing position
Rotary table
Loading position
1 Press ?/1 to turn on the player.
2 Open the front cover by pressing OPEN/CLOSE.
4 Turn the JOG dial to select CD1 or CD2, then push
the JOG dial again.
3 Turn the JOG dial until you find the disc slot
where you want to insert a disc, while checking the
disc number (written beside every slot and also
indicated in the small display).
I / 1
Disc slot at the loading position
Small
display
Disc number
(continued)
GB
9
Page 10
Getting Started
The disc number at the loading position appears in
the display. If the disc has a Disc Name (see page
23), the Disc Name appears instead of the disc
number. As you turn the JOG dial, the disc number
or the Disc Name changes.
DISC
HITART.NEXT2nd
GROUPTRACK
*DISC-2 **0 ***
1
ALL SDISC
PROGRAM 1 23 X-FADE DELETE
TEXTCDMULTI
NO DELAY
Disc number or the Disc Name
You can classify discs by using the Artist Name
function. This feature lets you easily find the disc
you want to play. For details, see “Classifying
Discs According to Artist Name (Artist File)” on
page 27.
4 Insert a disc with the label side facing right.
With the label side
facing right
After inserting the disc, you can enter the original
disc title to replace the disc number (see “Labeling
discs (Disc Name)” on page 23) so you can locate it
easily whenever you want to play it.
REPEATSHUFFLE 1
CD2
CD1
GROUP
CD3
CAUTION
• Do not insert an 8 cm (3-inch) CD adaptor.
The player cannot play an 8 cm CD. Do not insert an
8 cm (3-inch) CD or an 8 cm (3-inch) CD adaptor
SECSTEPMINART.
(CSA-8). It may damage the player and disc.
• Do not move the player after inserting discs.
• Be sure to place the player in a flat, horizontal
position. Do not place the player in a slanted
position.
• Do not move the player and avoid any physical
shock after inserting discs.
• When transporting the player, remove all discs
from the player.
• Make sure to insert the disc at a right angle to the
rotary table.
If the disc is not inserted into the slot completely (ex.
when you press A), reinsert the disc at a right angle
to the rotary table (or press A again).
10
DISC
HITART.NEXT2nd
GROUPTRACK
SONYHIT **S ***
1
ALL SDISC
PROGRAM 1 23 X-FADE DELETE
CDTEXT
MULTI
NO DELAY
5 Repeat steps 3 and 4 to insert more discs.
6 Close the front cover by pressing OPEN/CLOSE.
The rotary table turns and the disc slot at the
loading position is set to the playing position.
Always keep the front cover closed except when
inserting or removing discs.
GB
REPEATSHUFFLE 1
CD2
CD1
GROUP
CD3
SECSTEPMINART.
Disc that is not fully inserted
• Do not attach seals or stickers, etc. to CDs.
If seals or stickers, etc. are attached to a CD, the
player may not operate properly and the player or
the disc may be damaged.
Notes
• If you drop a disc into the player and/or the CD does
not go into the slot correctly, consult your nearest Sony
dealer.
• Make sure the rotary table comes to a complete stop
before inserting or removing discs.
• The front cover closes automatically when you press
H. Be careful not to put your hand into the player
after pressing H, otherwise your hand may be caught
in the front cover.
Page 11
Removing CDs
After following steps 1 to 3 of “Inserting CDs” on page
9, remove the discs. Then close the front cover.
Getting StartedGetting Started
Conserving power in standby mode
z To remove discs easily
After following steps 1 to 3 of “Inserting CDs” on page 9,
press A (DISC EJECT). The disc in the selected slot
moves up and you can remove the disc easily. When you
press A again, the disc returns to the loaded position. If
the disc does not return to the loaded position, reinsert
the disc.
STANDBY
?/1
?/1
Press ?/1 on the player or on the remote once.
z
While the player is in standby mode, the STANDBY
indicator on the player lights up.
To cancel standby mode
Press ?/1 on the player or on the remote once.
11
GB
Page 12
Playing CDs
Playing CDs
Playing a CD
You can play all the tracks or MP3 files on a disc in the
original order (Continuous Play). You can also play up
to 400 discs consecutively. Make sure you have
inserted the discs correctly as indicated on pages 9 and
10.
?/1
CONTINUE
H
ALBUM SELECT
1 Turn on the amplifier and select the CD playing
position.
JOG
z About the ALBUM SELECT button
While the button is off: The JOG dial selects discs.
While the button lights up: The JOG dial selects albums.
5 To play audio tracks, skip this step and go to step
7.
6 To select an album, press the ALBUM SELECT
button to cause it to light up, and then turn the
JOG dial until the desired album name appears in
the display.
Turn clockwise to select next album and turn
counterclockwise to select preceding album.
7 Push the JOG dial to start playing and adjust the
volume on the amplifier.
The selected disc is set to the playing position, and
the player plays all the discs from the selected one
(ALL DISCS), all the tracks once (1 DISC), or all the
MP3 files in the selected album once (ALBUM).
Operations you may want to do during play
2 Press ?/1 to turn on the player.
3 Press CONTINUE to select ALL DISCS, 1 DISC, or
ALBUM Continuous Play mode.
Each time you press CONTINUE, “ALL DISCS”,
“1 DISC”, or “ALBUM” appears alternately in the
display.
Be sure to stop playback before you change the
play mode with CONTINUE, SHUFFLE, or
PROGRAM.
When you select
ALL DISCS
1 DISC
ALBUM*
The player plays
All discs in the player consecutively
in the order of disc number. Empty
disc slots are skipped.
Only the one disc you have selected.
Only the one album.
* When a disc that contains no albums is played
with “ALBUM” selected, the disc is played in the
same way as when “1 DISC Continuous Play”
mode is selected.
4 Make sure the ALBUM SELECT button is off, then
turn the JOG dial until the desired disc number or
Disc Name (see page 23) appears in the display to
select the first disc (ALL DISCS) or the disc you
want (1 DISC).
DISC
HITART.NEXT2nd
GROUPTRACK
SECSTEPMINART.
To
Stop playback
Pause
Resume playing after
pause
Go to the next disc Z
Go back to the
preceding disc Z
Go to the next album
Z
Go back to the
preceding album Z
Do this
Press x.
Press X.
Press X or H.
Press DISC + once.
Hold down the button to skip other
discs.
Press DISC – once.
Hold down the button to skip other
discs.
Press ALBUM +.
Press ALBUM –.
12
GB
*DISC-2 **0 ***
1
ALL SDISC
PROGRAM 1 23 X-FADE DELETE
TEXTCDMULTI
NO DELAY
REPEATSHUFFLE 1
CD2
CD1
GROUP
CD3
Page 13
Playing CDs
Playing CDs
To
Go to a specific track
directly Z
Go to a point in a
track while monitoring
the sound Z
Go to a point in a track
by observing
the display Z
Go to the next track
(MP3 file*)
Go back to the
preceding track
(MP3 file*)
Stop playing and
remove the disc
* When “ALL DISCS” or “1 DISC” is selected, you can locate
all the MP3 files in the selected disc. When “ALBUM” is
selected, you can locate all the MP3 files in the selected
ALBUM.
Do this
Press the number button of the track
on the remote. When you directly
locate a track numbered over 10,
press >10 first, then the
corresponding number buttons.
Examples:
•To select track number 30 on a CD
recorded with 50 tracks, press >10,
then 3 and 10/0.
•To select track number 30 on a CD
recorded with 200 tracks, press
>10, then 10/0, 3 and 10/0.
Press m (backward)/M
(forward) on the remote and hold
down until you find the point.
Press m (backward)/M
(forward) on the remote and hold
down until you find the point
during pause. You will not hear the
sound during the operation.
Turn the l AMS L dial
clockwise by one click.
Turn the l AMS L dial
counterclockwise by one click.
Press OPEN/CLOSE.
Using the Display
You can check stored disc information, such as the Disc
Names (see page 23) or Artist Names (see page 27), by
using the display.
Unlike a normal CD, a CD TEXT disc includes
information such as the disc title or artist name. The
display shows the CD TEXT information so that you
can check the current disc title, artist name, and track
title. When the player detects a CD TEXT disc, “CD
TEXT” appears in the display.
DISPLAY TIME
Display information of the normal discs
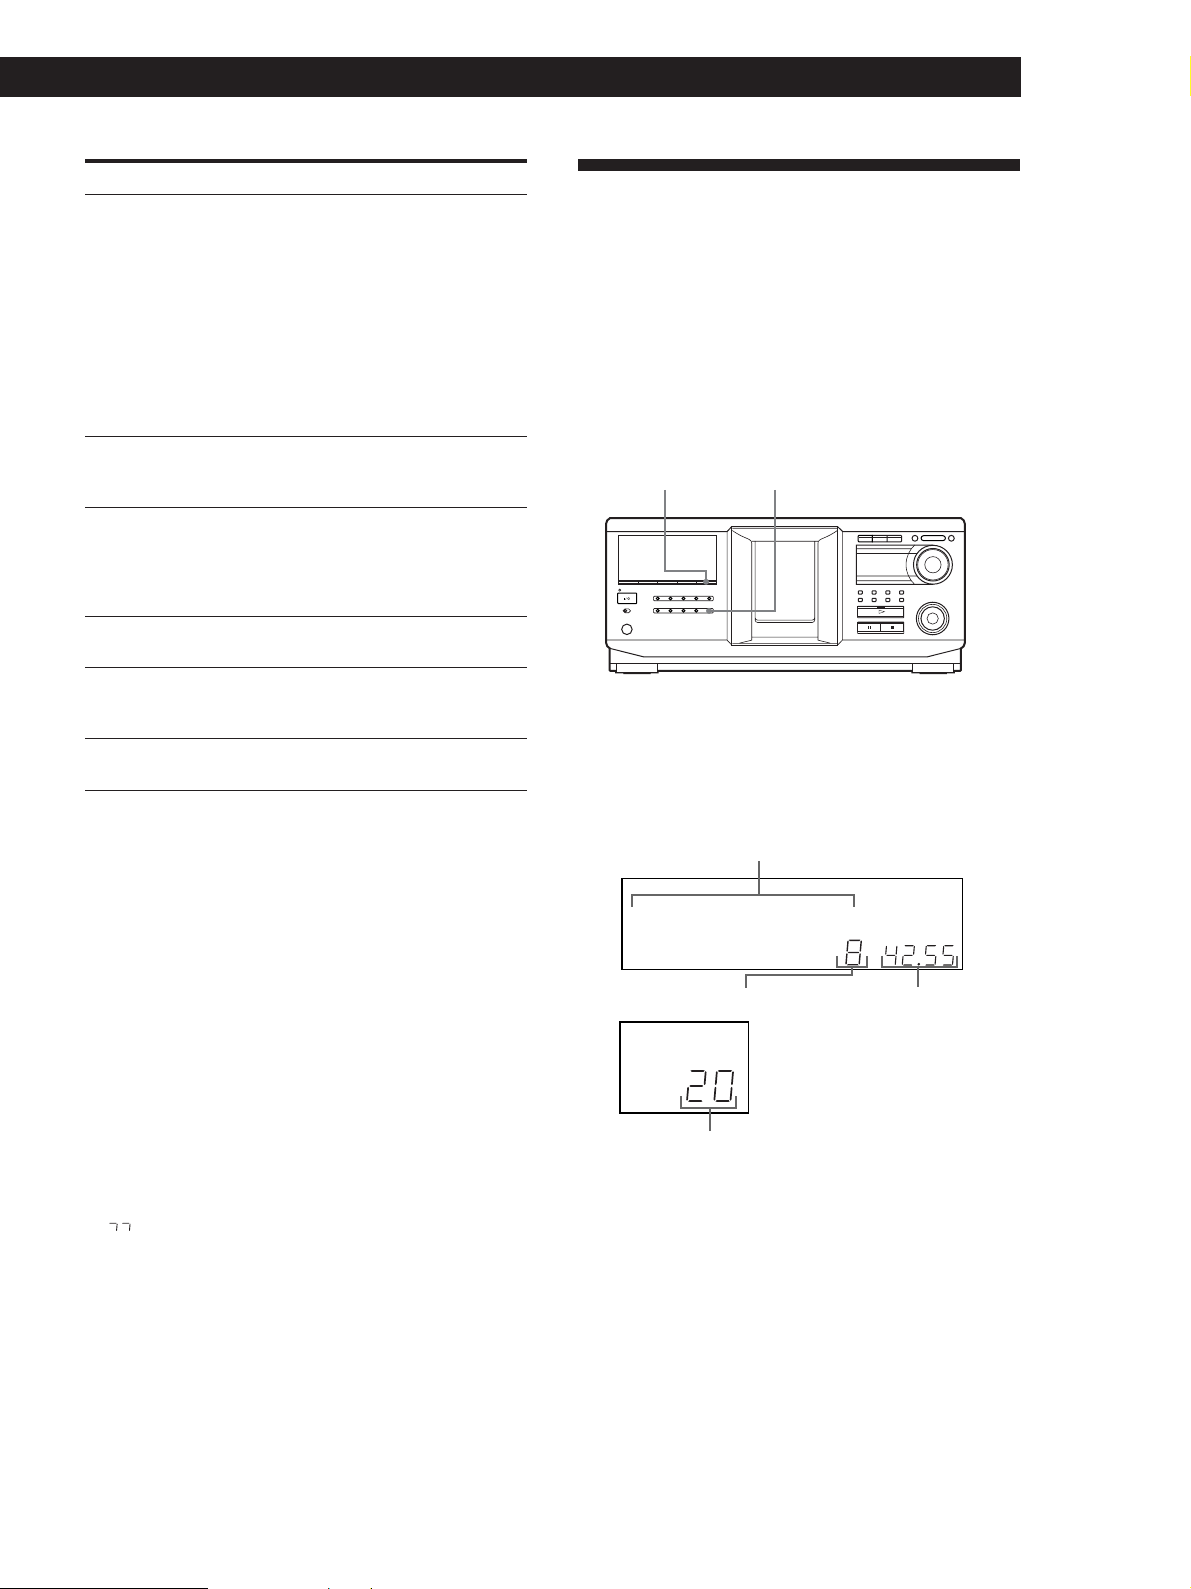
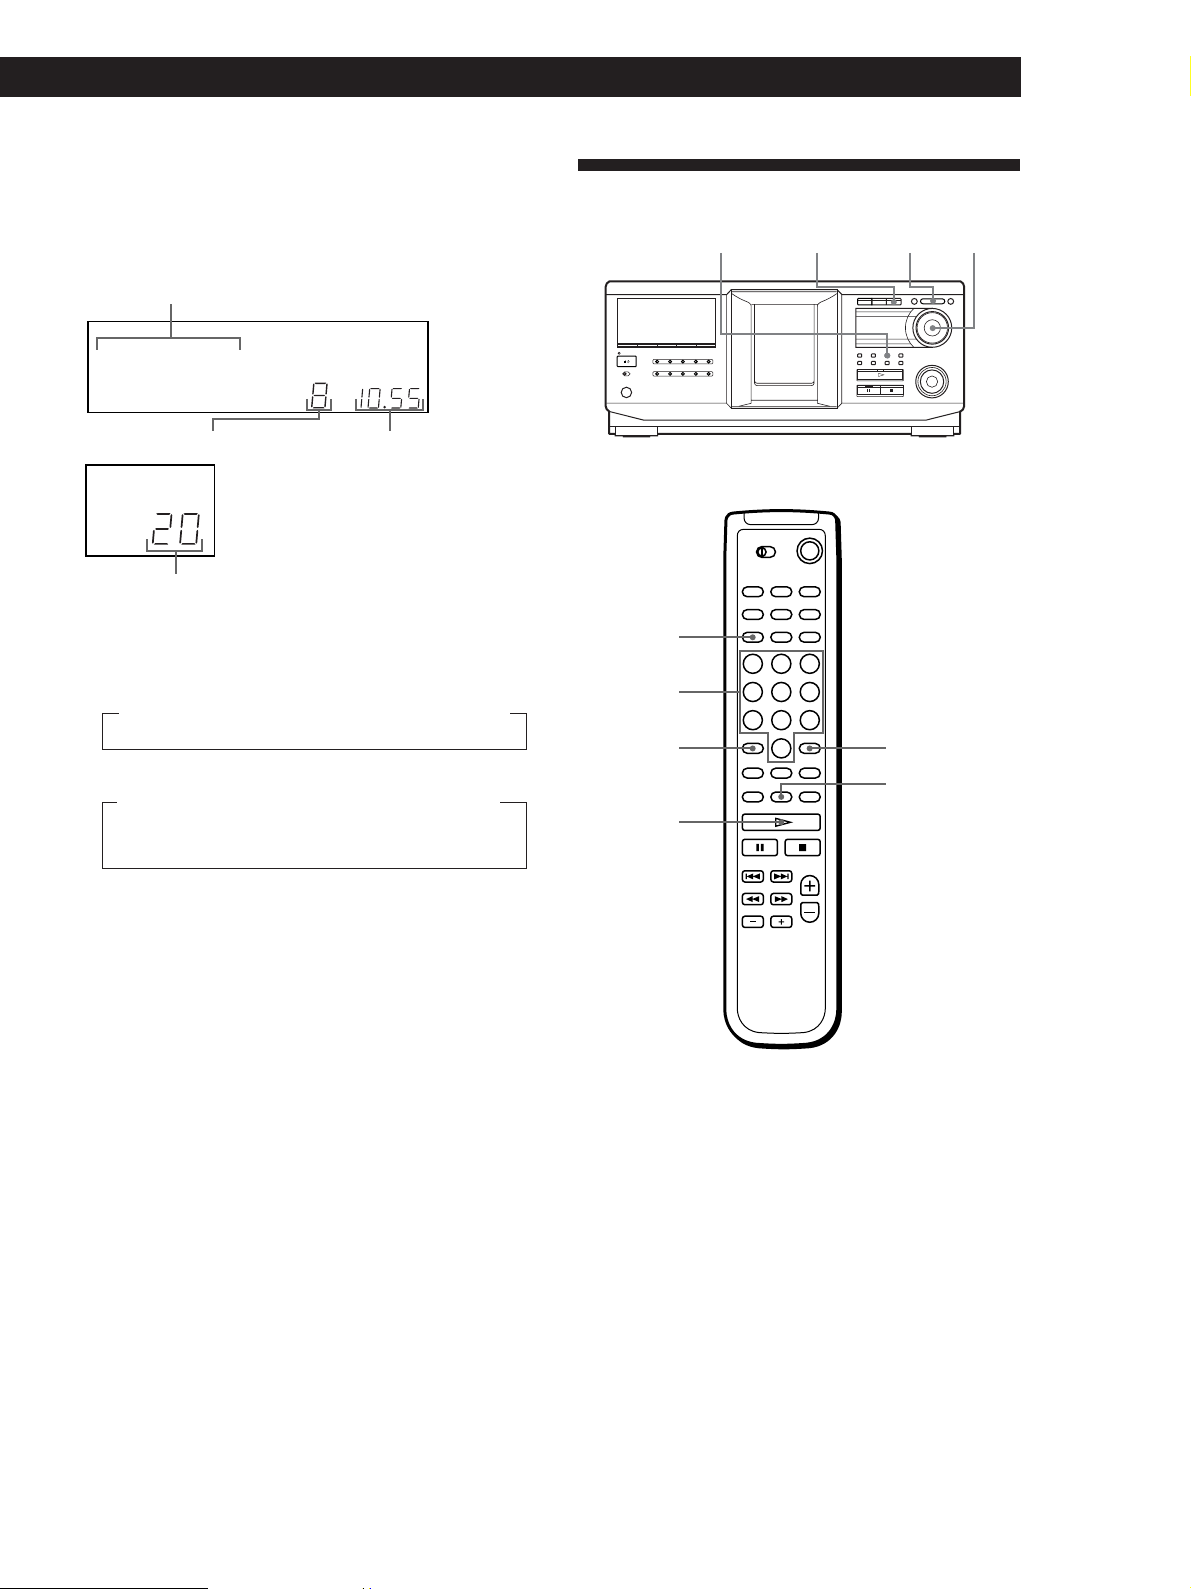
Display information in stop mode
The display shows the current disc number, total
number of tracks, and total playing time of the disc.
Current disc number or Disc Name etc.
DISC
HITART.NEXT2nd
GROUPTRACK
SECSTEPMINART.
z When the TOC reading is completed
When MP3 files on the disc are played back, ”MP3”
appears in the display.
z When you turn off the player
The player remembers the last playing disc and the play
mode: Continuous (on page 12), Shuffle (on page 17), or
Program (on page 19). When you turn on the player
again, the player plays the same disc in the same play
mode.
Note
If “ ” appears in the large display, the disc has reached the
end while you were pressing M. Turn the l AMS L
dial counterclockwise or press m to go back.
*DISC-2 **0 ***
1
ALL SDISC
PROGRAM 1 2 3 X-FADE DELETE
NEXT DISC
2nd PLAYER
DISC
NO DELAY
TEXTCDMULTI
Total number of tracks
Current disc number
REPEATSHUFFLE 1
CD2
CD1
GROUP
CD3
Total playing time
(continued)
13
GB
Page 14
Playing CDs
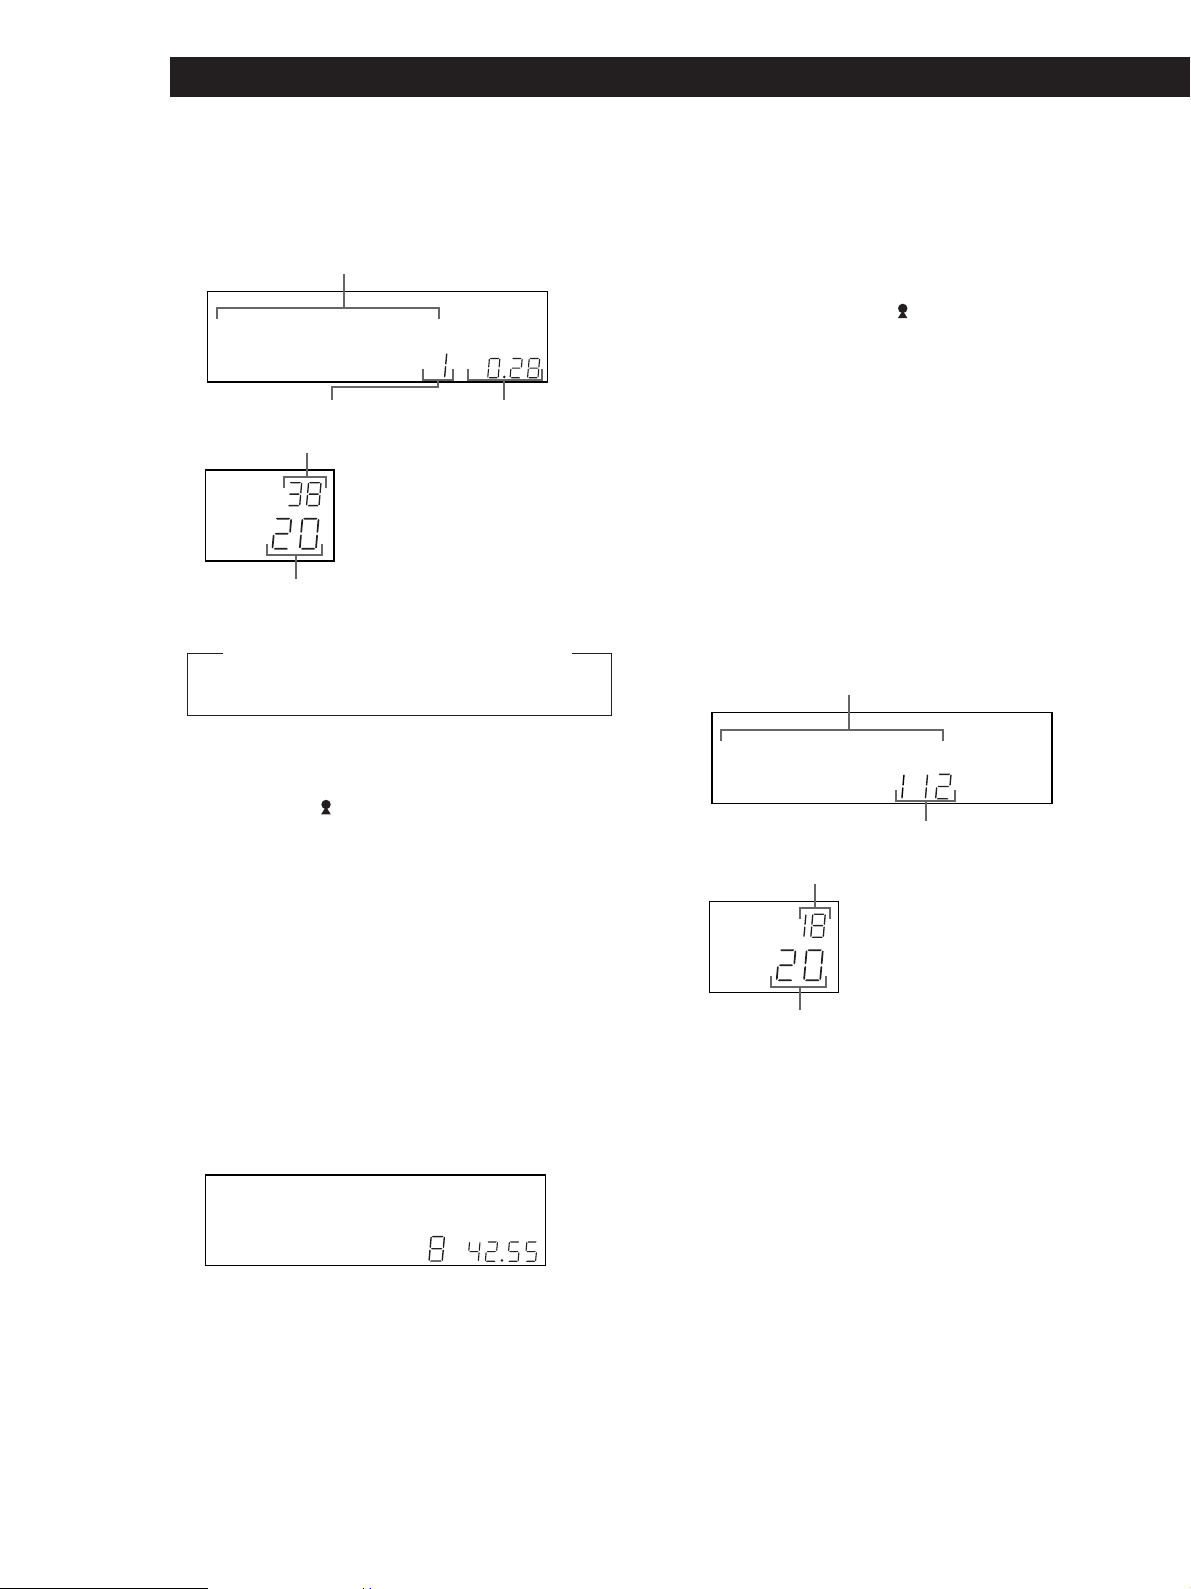
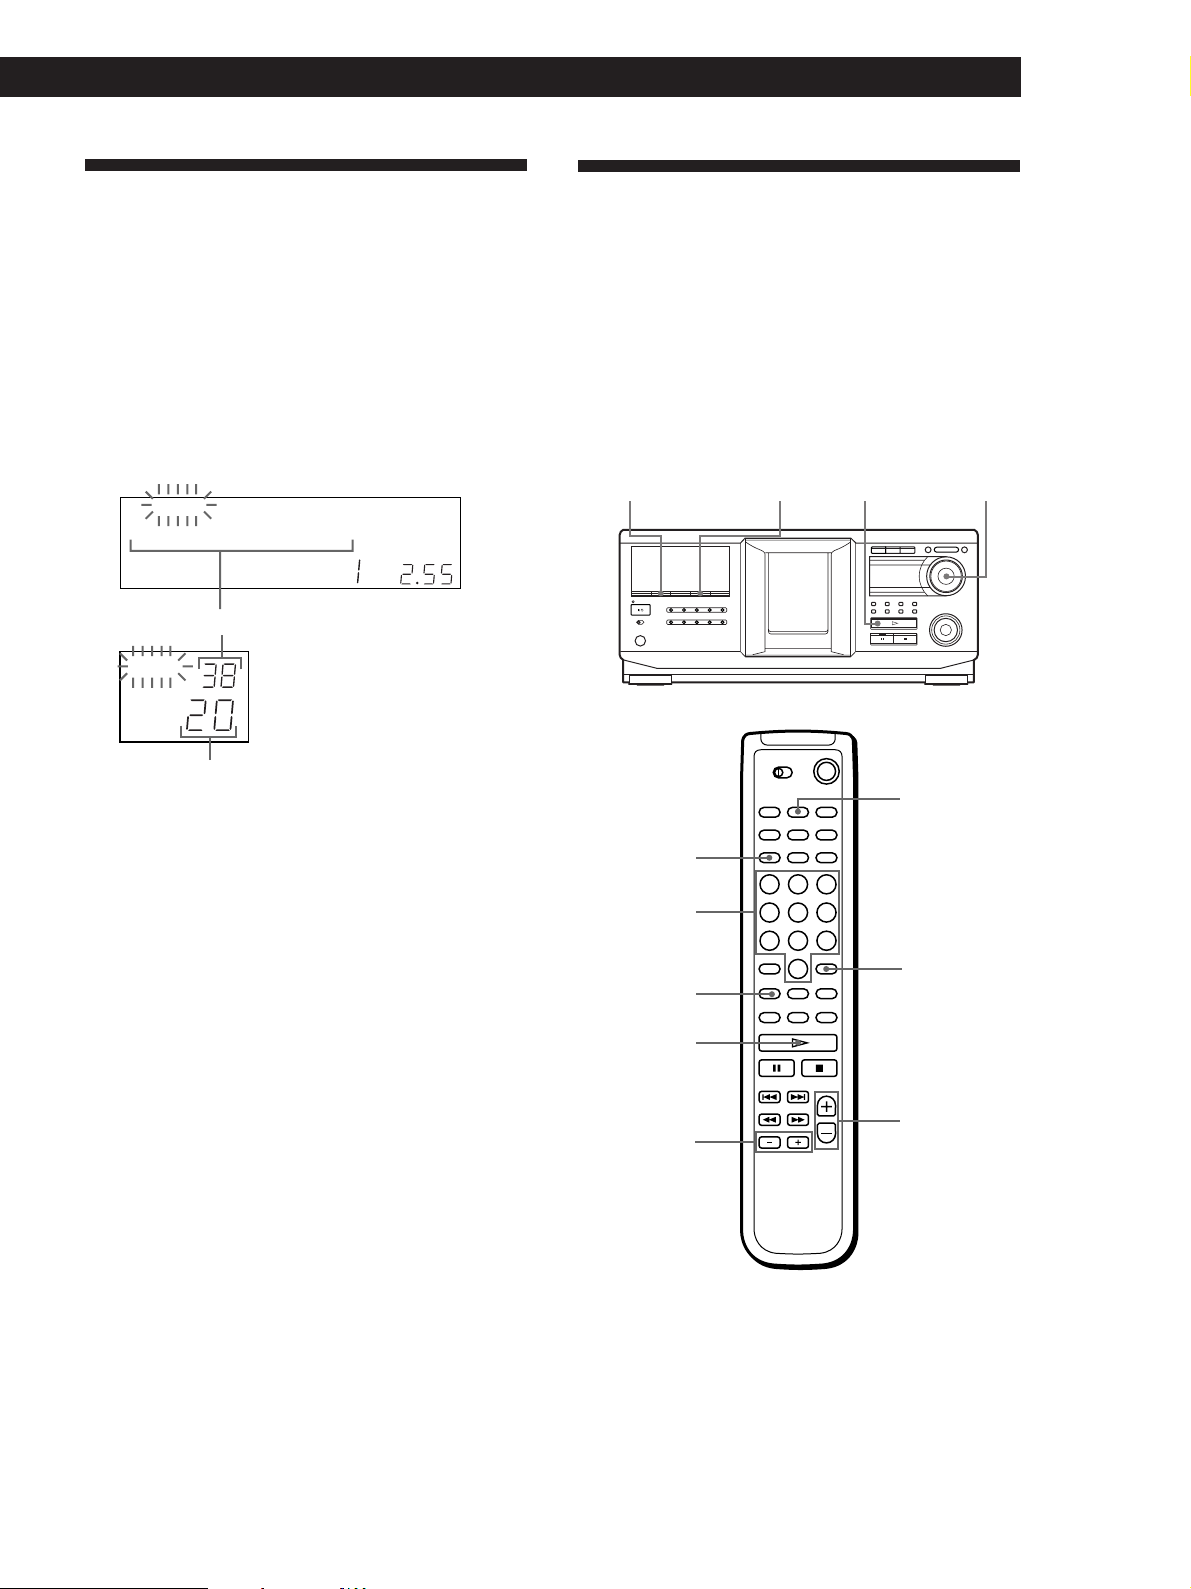
Display information of the playing disc
While playing a disc, the display shows the current
disc number, track number, playing time of the track,
and the next disc number.
Current disc number or Disc Name etc.
DISC
HITART.NEXT2nd
GROUPTRACK
SECSTEPMINART.
*DISC-2 **0 ***
1
ALL SDISC
PROGRAM 1 2 3 X-FADE DELETE
TEXTCDMULTI
NO DELAY
Current track number
Next disc number
NEXT
DISC
2nd PLAYER
DISC
Current disc number
*1Each time you press TIME, the display changes as follows:
Elapsed
ttt
playing time
of the track
The information is displayed as follows (in stop mode):
• When the Artist Name is assigned to the current
disc
Disc Name/
When no disc name is assigned to the current
disc, the current disc number is displayed.
• When no Artist Name is assigned to the current
disc
Disc Name
When no disc name is assigned to the current
disc, the current disc number is displayed.
GROUP
REPEATSHUFFLE 1
CD2
CD3
CD1
Playing time*
Remaining
time of the
track
Remaining
time of the
disc
Assigned Artist Name
1
Display information while playing a disc
The display shows the disc and track title alternately.
The information is displayed as follows (in stop mode):
• When the Artist Name is assigned to the current
disc
Disc title of CD TEXT/
Assigned Artist Name
• When no Artist Name is assigned to the current
disc
Disc title of CD TEXT/Artist name of CD TEXT
Each time you press DISPLAY, the display
changes as follows:
Disc title y Track title
Display information of MP3 discs
Display information in stop mode
The display shows the disc name or the album name,
total number of MP3 files in current album, total
number of albums*, and current disc number.
* When ALL DISCS or 1 DISC is selected.
Disc name or Album name
DISC
HITART.NEXT2nd
GROUPTRACK
SECSTEPMINART.
*DISC-2 **0 ***
1
ALL SDISC
TEXTCDMULTI
Total number of albums
NEXT DISC
2nd
ALBUM
DISC
REPEATSHUFFLE 1
MP3
CD2NO DELAY
CD3
Total number of MP3 files
in current album
14
Display information of CD TEXT discs
Display information in stop mode
The display shows the disc title. When you assign the
Artist Name (see page 27), the artist name also appears
and scrolls in the display.
DISC
HITART.NEXT2nd
TRACKALBUM
FADE
SONYHIT /HSite
GB
1
ALL SDISC
SHUFFLEPROGRAM 1 2 3 MP3 ID3
X-FADE
CDTEXT
REPEATALBUM 1
CD2NO DELAY
CD1
CD3
Current disc number
Page 15
Display information of the playing disc
The display shows the MP3 file name, MP3 file
number, playing time of the MP3 file, and current disc
number.
Playing CDs
Playing CDs
Locating a Specific Disc
HISTORY
JOGNAME SEARCH +100
MP3 file name*
1
TRACK
SECSTEPMINART.HITART.NEXT2nd
SONG-1 ****
MP3
CD2
GROUP
CD3
Playing time
ID3 tag
title/album/
artist
ALBUM
NO DELAY
TEXTCDMULTI
MP3 file number
NEXT DISC
2nd PLAYER
DISC
Current disc number
*1Each time you press DISPLAY, the display changes as
follows:
When the MP3 file does not have ID3 tag
t Disc name t Album (folder) name t MP3 file name
When the MP3 file has ID3 tag
t Disc name t Album (folder) name t
DISC
Number
buttons
>10
H
ENTER
HISTORY
MODE
Notes on MP3
• ID3 tag applies only to version 1.
• The ID3 tag character codes comply with ASCII and ISO
standards. Joliet format discs can only be displayed in
ASCII. Incompatible characters will be displayed as “ ”.
• In the following cases, elapsed playing time and time of the
track remaining may not be displayed accurately.
– when an MP3 file of VBR (variable bit rate) is played.
– during fast-forward/reverse.
• When an MP3 file is played, the remaining time of the disc
is not displayed.
Locating a disc on the player
Turn the JOG dial until the desired disc number or
Disc Name (see page 23) appears in the display. Push
the JOG dial to start play.
To skip discs quickly
Press +100. Each time you press +100, the player skips
100 discs.
(continued)
15
GB
Page 16
Playing CDs
Locating a disc directly using the remote Z
1 Press DISC.
2 Press the number button of the disc.
Example: To enter number 35
Press 3 then 5.
To enter number 100
Press 1, then 10/0 twice.
3 Press ENTER to start play.
Locating a disc by searching for a specific
Disc Name (Name Search)
You can search for and locate a desired disc by the first
character of the Disc Name (see page 23). The Name
Search function can display the Disc Name in
alphabetical order.
1 Press NAME SEARCH.
“NAME SEARCH” appears in the display.
2 Turn the JOG dial to find the desired disc.
As you turn the JOG dial, the Disc Names starting
with the input character appear in the display.
DISC
HITART.NEXT2nd
GROUPTRACK
SECSTEPMINART.
SONYHIT **S ***
1
ALL SDISC
PROGRAM 1 2 3 X-FADE DELETE
CDTEXT
MULTI
NO DELAY
The following characters are displayed as the first
character.
A B C D E F G H I J K L M N O P Q R S T U V W X
Y Z 0 1 2 3 4 5 6 7 8 9
REPEATSHUFFLE 1
CD2
CD1
CD3
GROUP
First character
To cancel Name Search
Press NAME SEARCH again.
Note
The Name Search function on the player does not work
during ALL DISCS shuffle play.
Locating a disc searching in the playback
history (History Search)
The player automatically stores the playback history of
ten discs that are recently played back for 30 seconds or
over. You can search and play a desired disc in the
playback history.
1 Press HISTORY.
The indicator on the HISTORY button lights up
and the disc number or Disc Name of the disc that
is recently stored in the playback history appears
in the display (History Mode).
2 Turn the JOG dial to select a desired disc.
Turn clockwise to select a previously stored disc
and turn counterclockwise to select a recently
stored disc.
3 Push the JOG dial to start playing the selected disc.
The indicator on the HISTORY button goes off and
the History Mode is canceled.
Notes
• You cannot edit the playback history.
• The player stores a single disc in the playback history only
once even if the disc is played several times.
• The playback history is stored only when the disc is played
in Continuous or 1 DISC Shuffle Play mode.
• You can select History Mode only when the disc is being
played in the Continuous mode or 1 DISC Shuffle Play
mode.
16
If “NOT FOUND” appears in the display while
inputting the first character with the JOG dial, no
disc has been labeled using the input character.
Notes
• When searching for input characters, blanks and
symbols before the first character in the Disc Name are
ignored.
• When searching for input characters, upper and lower
cases cannot be differentiated.
3 Push the JOG dial to select the disc.
In Program Play mode, the disc will be added to
the end of the program.
GB
Page 17
Playing CDs
Playing CDs
Specifying the Next Disc to Play
You can specify the next disc to play while playing a
disc in Continuous Play mode.
While playing a disc, turn the JOG dial. “NEXT DISC”
flashes in the display and the disc number or Disc
Name (see page 23) changes as you turn the JOG dial.
When the desired disc number or Disc Name appears
in the display, stop turning the JOG dial.
NEXT
DISC
HITART.2nd
GROUPTRACK
SECSTEPMINART.
*DISC-3 **8 ***
GROUP
NO DELAY
REPEATSHUFFLE 1
CD2
CD1
CD3
ALL SDISC
1
PROGRAM 1 2 3 X-FADE DELETE
CD TEXT
MULTI
Next disc number or the Disc Name
NEXT
DISC
2nd PLAYER
DISC
Current disc number
Playing Discs (Album) in Various Modes (Repeat/Shuffle Play)
You can play discs or tracks (MP3 files) repeatedly
(Repeat Play) in any play mode.
You can also have the player “shuffle” the tracks (MP3
files) and play in random order (Shuffle Play). The
player shuffles all the tracks on all discs or on the disc
you specify.
SHUFFLE JOGH
REPEAT
SHUFFLE
After the current disc is played, the next disc you have
specified starts playing.
If you want to skip to the next disc right away, push
the JOG dial while playing the current disc.
DISC
Number
buttons
ENTER
REPEAT
H
DISC +/–
ALBUM –/+
(continued)
17
GB
Page 18

Playing CDs
Playing repeatedly (Repeat Play)
Press REPEAT while playing a disc.
“REPEAT” appears in the display. The player repeats
the discs/tracks (MP3 files) as follows:
When the disc is played in
ALL DISCS Continuous
Play (page 12)
1 DISC Continuous Play
(page 12)
ALBUM Continuous Play
(page 12)
1 DISC Shuffle Play
(this page)
ALBUM Shuffle Play (this
page)
Program Play (page 19)
To cancel Repeat Play
Press REPEAT twice.
To repeat the current track (MP3 file)
While the track (MP3 file) you want is being played,
press REPEAT one or more times until “REPEAT 1”
appears in the display.
The player repeats
All tracks on all discs
All tracks on the current disc
All tracks on the current
album.
All tracks on the current disc
in random order
All tracks on the current album
in random order
The same program
Playing all tracks (MP3 files) on a specified
disc (album) in random order
Press SHUFFLE repeatedly until “1 DISC”
1
(“ALBUM”) and “SHUFFLE” appear in the
display.
2 Turn the JOG dial until the desired disc (album)
number appears in the display.
When using the remote, first press DISC, press the
number button of the disc, and then press ENTER,
or press ALBUM –/+ repeatedly.
3 Press H.
1 DISC (ALBUM) Shuffle Play starts.
“
” appears in the display while the player is
shuffling the tracks.
To cancel Shuffle Play
Press CONTINUE.
z You can go to the next disc during 1 DISC Shuffle
Play Z
Press DISC +.
Note
You cannot specify the next disc to play during Shuffle Play.
To cancel REPEAT 1 Play
Press REPEAT.
Notes on Repeat Play
• In all Repeat Play modes other than “REPEAT1,” playback
is repeated five times, and then stops.
• During “ALL DISCS SHUFFLE PLAY” mode, the only
Repeat Play mode that can be selected is “REPEAT1.”
Playing all tracks on all discs in random
order
1 Press SHUFFLE repeatedly until “ALL DISCS” and
“SHUFFLE” appear in the display.
2 Press H.
ALL DISCS Shuffle Play starts.
“
” appears in the display while the player is
shuffling the discs or the tracks.
Note
Even if ALL DISCS Random Play mode is selected, the player
may playback a single track two or more times.
18
GB
Page 19
Creating Your Own Program
Playing CDs
Playing CDs
4 If the ALBUM SELECT button is off, press ALBUM
SELECT.
(Program Play)
You can arrange the order of the tracks (MP3 files),
and/or discs (albums) to create three different
programs. A program can contain up to 32 “steps.”
One “step” may contain a track (file) or a whole disc
(album).
You can make programs using the controls on the
remote or on the player. However, the programming
procedures are different.
PROGRAM
CHECK
H
CLEAR
ALBUM SELECT
l AMS L
JOG
Creating a program on the player
1 Press PROGRAM until the desired program
number (PROGRAM 1, 2, or 3) appears in the
display.
If a program is already stored in the selected
program number, the last step of the program
appears in the display. When you want to erase the
whole program, hold down CLEAR until
“CLEAR” appears in the display (see page 20).
2 Turn the JOG dial until the desired disc number
appears in the display.
NEXT
HITART.2nd DISC
GROUPTRACK
SECSTEPMINART.
*DISC-2 **0 ***
SDISCALL
1
PROGRAM 1
CDTEXT
MULTI
NO DELAY
3 To program a whole disc, skip this step and go to
step 7.
To program a whole album or an MP3 file, go to
step 4.
To program an audio track, turn the l AMS
L dial until the desired track number appears in
the display and go to step 7.
NEXT
REPEATSHUFFLE 1
CD2
CD1
HITART.2nd DISC
CD3
GROUP
GROUPTRACK
SECSTEPMINART.
5 Turn the JOG dial until the desired album number
or album name appears in the display.
6 To program a whole album, skip this step and go
to step 7.
To program an MP3 file, turn the l AMS L
dial until the desired MP3 file number appears in
the display.
NEXT
HITART.2nd DISC
GROUPTRACK
SECSTEPMINART.
*DISC-2 **0 ***
SDISCALL
1
PROGRAM 1
CDTEXT
MULTI
NO DELAY
7 Push the JOG dial.
The disc being
programmed
NEXT
REPEATSHUFFLE 1
CD2
CD1
HITART.2nd DISC
CD3
GROUP
GROUPTRACK
File number
Playing order
SECSTEPMINART.
*DISC-2 **0 ***
SDISCALL
1
PROGRAM 1
CDTEXT
MULTI
NO DELAY
8 To program other discs (albums)/tracks (MP3
files), do the following:
To program
All tracks of another disc(s)
Other tracks on the same disc
Other tracks on other discs
All MP3 files of another
album(s)*
Other MP3 files on the same
album*
Other MP3 files on other
albums*
* To select MP3 files on another disc, be sure to perform
step 2 first.
9 Press H to start Program Play.
REPEATSHUFFLE 1
CD2
CD1
GROUP
CD3
The track
being programmed
Repeat Step(s)
2 and 7
3 and 7
2, 3, and 7
4, 5, and 7
6 and 7
4, 5, 6, and 7
*DISC-2 **0 ***
REPEATSHUFFLE 1
CD2
CD1
GROUP
CD3
Track number
MULTI
1
PROGRAM 1
CDTEXT
SDISCALL
NO DELAY
(continued)
19
GB
Page 20

Playing CDs
To cancel Program Play
Press CONTINUE.
z The programs remain even after Program Play ends
When you press H in Program Play mode, you can play
the same program again.
z The program remains until erased
Even if you replace discs, the programmed disc (album)
and track (MP3 file) numbers remain. Therefore, the
player will play the new disc (album) and track (MP3
file) numbers. However, the programmed disc (album)
and track (MP3 file) numbers that are not found in the
player or on the disc are deleted from the program, and
the rest of the program is played in the programmed
order.
z You can select the program number (PROGRAM 1,2,
or 3) by using the remote Z
Press PROGRAM on the remote repeatedly until the
desired program number appears in the display.
Note
If you select Artist Play mode (on page 29), Program Play will
be canceled.
Changing the programmed order
You can change your program before you start playing.
To
Erase a track (MP3 file) or disc
(album)
Erase the last track (MP3 file)
or disc (album) in the
program
Add tracks (MP3 file) or discs
(albums) to the end of the
program
You need to
Press CHECK until the track
(MP3 file) or disc (album)
you don’t want appears in
the display, then press
CLEAR.
Press CLEAR. Each time you
press the button, the last
programmed track (MP3 file)
or disc (album) will be
cleared.
Follow the programming
procedure.
Erasing the program stored in memory
1 Press PROGRAM repeatedly in stop mode until
the program number (PROGRAM 1, 2, or 3) you
want to erase appears in the display.
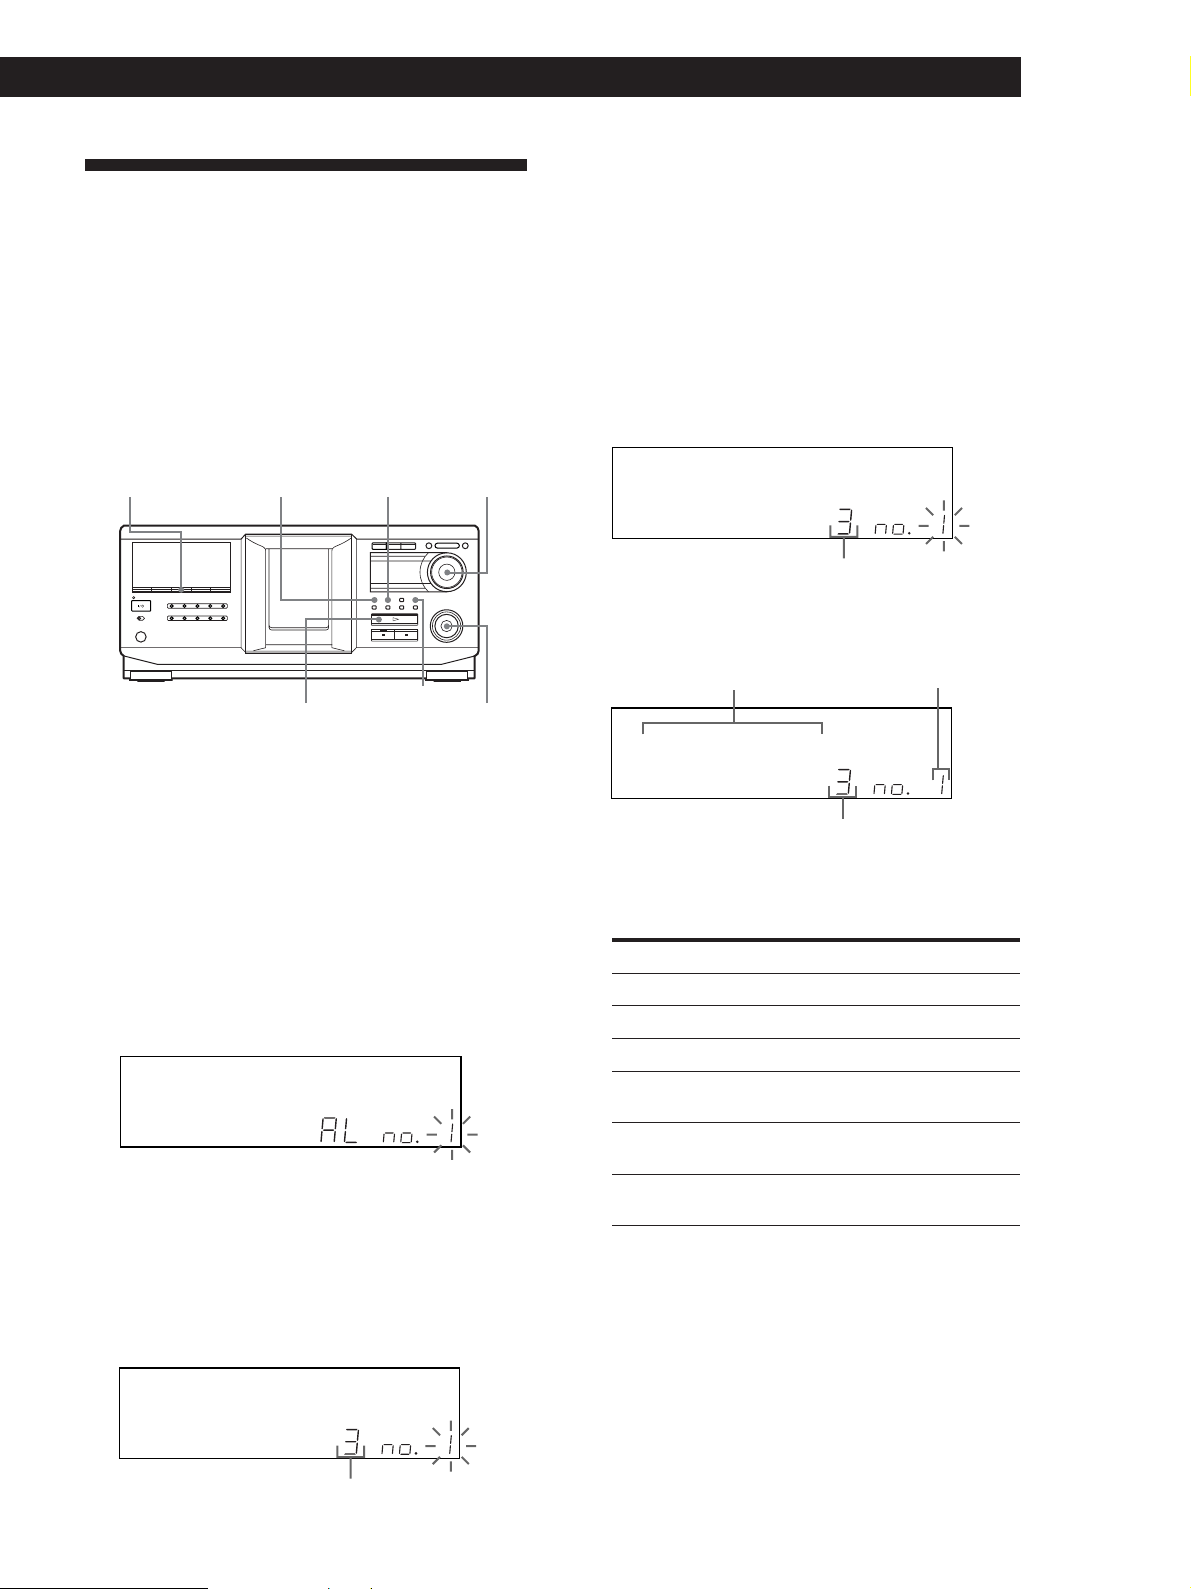
Checking the programmed order
You can check your program before or after you start
playing.
Press CHECK.
Each time you press this button, the display shows the
disc and track number (album name and MP3 file
number) of each step in the programmed order. (When
a whole disc (album) is programmed as one step, “AL”
appears instead of the track (MP3 file) number.) After
the last step in the program, the display shows “– END
–” and returns to the original display.
2 Press and hold CLEAR.
The “steps” will be erased one at a time, starting
with the last step in the program.
20
GB
Page 21
Playing CDs
Playing CDs
Creating a program using the remote Z
PROGRAM
DISC
Number
buttons
ENTER
CHECK
CLEAR
H
./>
DISC +/–
ALBUM –/+
1 Press PROGRAM until the number you want
(PROGRAM 1, 2, or 3) appears in the display.
2 Press DISC +/– until the desired disc number
appears in the display.
3 To program a whole disc, press ENTER and go to
step 7.
To program an album, skip this step and go to step
4.
To program an audio track or an MP3 file, skip this
step and go to step 6.
DISC
NEXT
HITART.2nd
GROUPTRACK
SECSTEPMINART.
*DISC-2 **0 ***
REPEATSHUFFLE 1
CD2
CD1
GROUP
CD3
MULTI
1
PROGRAM 1
CDTEXT
SDISCALL
NO DELAY
6 To program an audio track (MP3 file), press ./
> until the desired track number appears in the
display and press ENTER.
The disc being
programmed
NEXT
HITART.2nd DISC
GROUPTRACK
Playing order
SECSTEPMINART.
*DISC-2 **0 ***
SDISCALL
1
PROGRAM 1
CDTEXT
MULTI
NO DELAY
7 To program other discs (albums)/tracks (MP3
files), do the following:
To program
All tracks of another disc(s)
Other tracks on the same disc
Other tracks on other discs
All MP3 files of another
album(s)*
Other MP3 files on the same
album*
Other MP3 files on other
albums*
* To select MP3 files on another disc, be sure to perform
step 2 first.
8 Press ENTER or H to start Program Play.
z To program a whole disc
You can also create a program by following the
procedure below.
After performing step 1, press DISC, press the number
button of the disc, and then press ENTER.
DISC
NEXT
REPEATSHUFFLE 1
CD2
CD1
HITART.2nd
GROUP
CD3
The track
being programmed
GROUPTRACK
Repeat Step(s)
2 and 3
6
2, 3, and 6
4 and 5
6
4 and 6
SECSTEPMINART.
**DISC- * 2[0]*
GROUP
MULTI
1
CDTEXT
SDISCALL
PROGRAM 1
NO DELAY
REPEATSHUFFLE 1
CD2
CD1
CD3
4 Press ALBUM –/+ until the desired album number
appears in the display.
5 To program a whole album, press ENTER and go
to step 7.
To program an MP3 file, skip this step and go to
step 6.
To cancel Program Play
Press CONTINUE.
z You can check or change the program by pressing the
CHECK or CLEAR button on the remote Z
See page 20.
21
GB
Page 22
Playing CDs
Using the Timer
You can start playing a disc at any given time by
connecting a timer (not supplied). Refer also to the
instructions for the timer if you need help.
TIMER
1 Press one of the play mode buttons to select the
desired play mode.
2 Set TIMER on the player to PLAY.
3 Set the timer to the desired time, then stop the
power supply to the player (if necessary).
The player turns off. When the set time comes, the
player turns on and starts playing.
Play mode buttons
Fading In or Out
You can manually fade the sound in or out to prevent
tracks from starting or ending abruptly.
Note that you cannot use this effect when you use the
DIGITAL OUT (OPTICAL) connector.
FADER
To
Start play fading in
End play fading out
Press FADER
During pause. “FADE” flashes and
“FADE IN” appears in the display.
The play fades in.
When you want to start fading out.
“FADE” flashes and “FADE OUT”
appears in the display. The play
fades out and the player pauses.
4 After you have used the timer, set TIMER on the
player to OFF.
Note
When using a second player connected to the master player’s
CONTROL A1 connector (see page 8) and an externally
connected timer (not supplied), TIMER on the second player
must be set to OFF. Only TIMER on the master player should
be set to PLAY.
Note
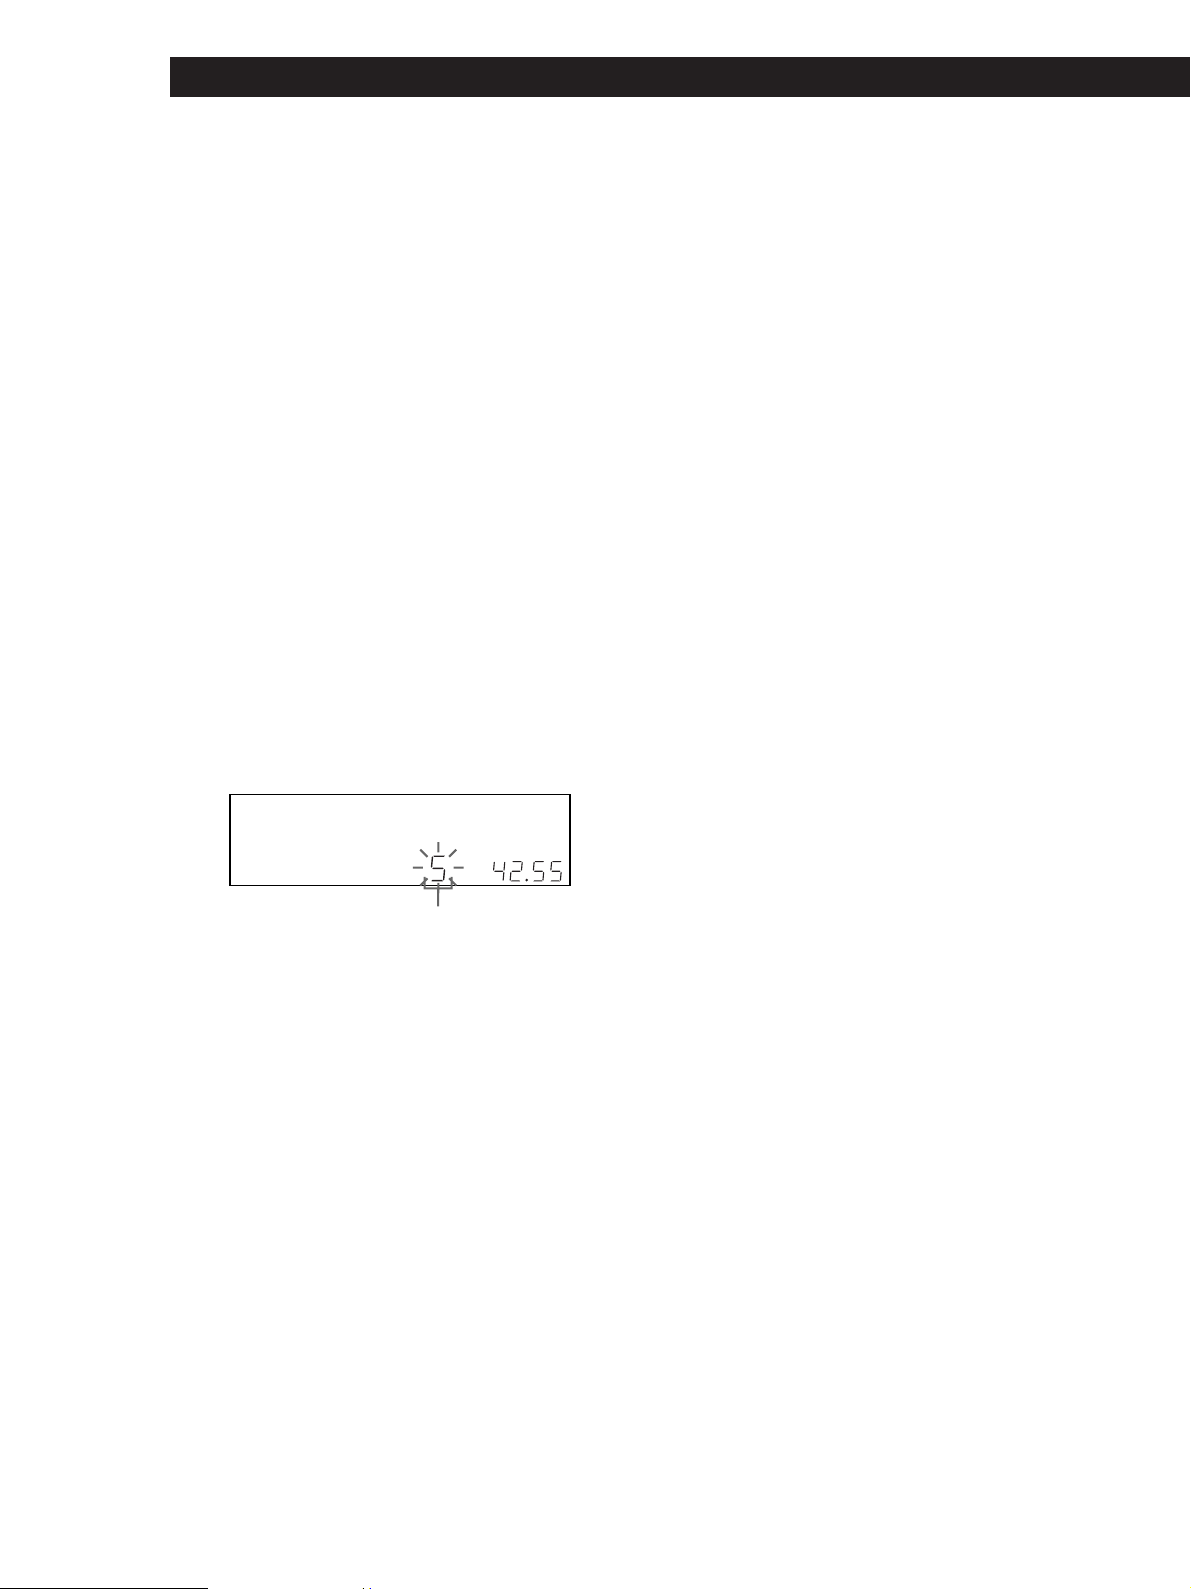
Fading lasts for about 5 seconds.
22
GB
Page 23
Storing Information About CDs (Custom Files)
Storing Information About CDs (Custom Files)
Storing Information About CDs (Custom Files)
What You Can Do With the Custom Files
The player can store two types of information called
“Custom Files” for each disc. Once you have stored
Custom Files for a disc, the player automatically recalls
what you have stored whenever you select the disc.
Note that Custom Files are erased if you do not use the
player for about one month.
You can store this information:
When you use
Disc Name (page 23)
Artist File (page 27)
Where are Custom Files stored?
Custom Files are stored not on the disc, but in the
player’s memory. Therefore you cannot use Custom
Files when you play the disc on other players.
You can
Label discs using up to 20
characters
Classify discs according to an
artist name
Labeling Discs (Disc Name)
You can label discs using up to 20 characters and have
the player display the Disc Name each time you select
the disc. The Disc Name can be anything you like, such
as a title, musician’s name, category, or date of
purchase. You can also label the discs in the second
player.
z When you select a CD TEXT disc
The disc title is automatically stored as the Disc Name.
If the disc title has more than 20 characters, only the first
20 characters of the disc title are stored (see page 13).
When you replace a disc with a CD TEXT disc, the disc
title of the CD TEXT disc is also stored automatically.
Note that you cannot change the Disc Name of a
CD TEXT disc.
z You can label discs while the front cover is open
Labeling discs on the player
MENU/NO
YES JOG
If you replace discs with Custom Files
The Custom File information you have stored remains,
since the Custom File information is assigned to each
slot. Erase all the Custom Files (Disc Name and Artist
File) of the old disc, and then file the new disc
information in the Custom Files.
Erasing all Custom Files of all discs
1 Press MENU/NO.
2 Turn the JOG dial until “ALL ERASE ?” appears.
3 Push the JOG dial.
“ALL ERASE ??” flashes.
4 Push the JOG dial.
“ALL ERASE” appears in the display, and all
Custom Files are erased.
Note
When you perform the operation as described above, all of
your own settings are deleted and the original factory settings
are restored.
CLEAR
l AMS L
1 Turn the JOG dial until the disc number to which
you want to assign a Disc Name appears in the
display.
When you label a disc with the front cover closed,
the disc number of the disc at the playing position
appears.
When you label a disc with the front cover open,
the disc number at the loading position appears.
2 Press MENU/NO.
“NAME IN ?” flashes.
3 Push the JOG dial.
The flashing cursor (
) appears.
(continued)
23
GB
Page 24

Storing Information About CDs (Custom Files)
4 Turn the JOG dial until the desired character
appears in the display.
The cursor disappears and the first space for the
Disc Name flashes.
As you turn the JOG dial clockwise, the characters
appear in the following order. Turn the JOG dial
counterclockwise to go in reverse order.
(space) A B C D E F G H I J K L M N O P Q R S T U
V W X Y Z a b c d e f g h i j k l m n o p q r s t u v w
x y z 0 1 2 3 4 5 6 7 8 9 ' – / , . ( ) : ! ? & + < > _ = " ;
DISC
`
HITART.NEXT2nd
GROUPTRACK
SECSTEPMINART.
# $ % @ *
S ****** ******
GROUP
NO DELAY
REPEATSHUFFLE 1
CD2
CD1
CD3
ALL SDISC
1
PROGRAM 1 2 3 X-FADE DELETE
TEXTCD
MULTI
5 Push the JOG dial to select the character.
The selected character lights up, and the flashing
cursor appears at the next space to be input.
DISC
HITART.NEXT2nd
GROUPTRACK
SECSTEPMINART.
S ****** ******
1
ALL SDISC
PROGRAM 1 2 3 X-FADE DELETE
TEXTCD
MULTI
NO DELAY
REPEATSHUFFLE 1
CD2
CD1
GROUP
CD3
Changing the Disc Name
1 Follow steps 1 to 3 in “Labeling discs on the
player” on page 23 to select the Disc Name you
want to change.
2 Turn the l AMS L dial to move the cursor to
the position you want to change.
When the cursor position is on a character, the
character flashes but when the cursor position is
on a blank space, the flashing cursor (
) appears
in the display.
To change characters
Turn the JOG dial until the desired character
appears in the display.
To add characters
Push the JOG dial. The new blank space appears
next to the selected character, then turn the JOG
dial until the desired character appears in the
display.
To erase characters
Press CLEAR. The selected character disappears.
3 Repeat step 2 to change more characters.
To make a correction
Move the cursor to the position that you want to change,
then press CLEAR and begin again by inputting the
correct characters.
6 Repeat steps 4 and 5 to input more characters.
7 Press YES to store the Disc Name.
The display shows the Disc Name.
DISC
HITART.NEXT2nd
GROUPTRACK
SECSTEPMINART.
SONYHIT **S ***
GROUP
NO DELAY
REPEATSHUFFLE 1
CD2
CD1
CD3
ALL SDISC
1
PROGRAM 1 2 3 X-FADE DELETE
CDTEXT
MULTI
Repeat steps 1 to 7 to assign Disc Names to other
discs.
z To change the character type quickly while inputting
characters
Press DISPLAY in step 4 above. The character on the
cursor changes to the first character of each character
type. Each time you press DISPLAY, the character type
changes as follows:
t A t a t 0 t ' t (space)
4 Press YES to store the Disc Name.
Erasing the Disc Name
1 Follow steps 1 to 3 in “Labeling discs on the
player” on page 23 to select the Disc Name you
want to erase.
2 Turn the l AMS L dial to move the cursor to
the first character, then press and hold CLEAR
until all the characters are erased.
3 Press YES.
The Disc Name disappears.
24
GB
Page 25

Storing Information About CDs (Custom Files)
Storing Information About CDs (Custom Files)
Labeling discs using the remote Z
SPACE
DISC
CHAR
DEL
Number
buttons
ENTER
NAME EDIT
CLEAR
/SELECT
./>
1 Press DISC.
2 Press the number button of the disc you want to
label, then press ENTER.
3 Press NAME EDIT/SELECT.
The flashing cursor (
) appears.
4 Press NAME EDIT/SELECT to find the desired
character type.
Each time you press the button, the character type
changes cyclically as follows:
Selected AB
t t
(capital letters)
Selected ab
(small letters)
Selected 12 (numbers) T
To select a symbol, select the capital or small letter
type. The selected character type appears in the
display.
DISC
HITART.NEXT2nd
GROUPTRACK
SECSTEPMINART.
******* ******
GROUP
NO DELAY
REPEATSHUFFLE 1
CD2
CD3
CD1
Character type
ALL SDISC
1
PROGRAM 1 2 3 X-FADE DELETE
TEXTCD
MULTI
5 To input a letter, press the number button
corresponding to the desired letter (indicated
beside each number button).
The cursor disappears and the first space for the
Disc Name flashes.
Each time you press the button, the letter changes
cyclically among the ones indicated beside the
button.
To input symbols, press the number button 1
repeatedly until the desired symbol appears in the
display.
ABC DEF&!?
JKL MNOGHI
TUV WXYZPQRS
>
10
ENTER
Characters
assigned to
each number
button
Example: To select the letter E
Press the number button 3 twice.
t D t E t F
Press 3. Press 3.
Press 3.
To input a space, press SPACE once.
To input a number, press NAME EDIT/SELECT
twice to change the character type, then press the
desired number button.
6 Press > to select the character.
The selected character lights up, and the flashing
cursor appears at the next space to be input.
You can also go to the next space by pressing other
number buttons.
7 Repeat Steps 4 through 6 to input more characters.
8 Press ENTER to store the Disc Name.
The Disc Name lights up in the display.
DISC
HITART.NEXT2nd
GROUPTRACK
SECSTEPMINART.
SONYHIT **S ***
1
ALL SDISC
PROGRAM 1 2 3 X-FADE DELETE
CDTEXT
MULTI
NO DELAY
Repeat Steps 1 through 8 to assign Disc Names to
other discs.
REPEATSHUFFLE 1
CD2
CD1
GROUP
CD3
(continued)
25
GB
Page 26

Storing Information About CDs (Custom Files)
z If you make a mistake while inputting the
character(s)
To correct a character that was input
1 Press . or > until the cursor moves to the
incorrect character.
DISC
HITART.NEXT2nd
GROUPTRACK
SECSTEPMINART.
SONYHET **S ***
1
ALL SDISC
PROGRAM 1 2 3 X-FADE DELETE
CDTEXT
MULTI
NO DELAY
REPEATSHUFFLE 1
CD2
CD1
GROUP
CD3
Storing Custom File Information Using a Keyboard
You can store the Disc Name for each disc, one by one,
using an IBM-compatible PC keyboard* (not supplied).
* The keyboard’s power consumption must be 120 mA or
less.
2 Press DEL to delete the incorrect character.
DISC
HITART.NEXT2nd
GROUPTRACK
SECSTEPMINART.
SONYHTS ******
1
ALL SDISC
PROGRAM 1 2 3 X-FADE DELETE
CDTEXT
MULTI
NO DELAY
3 Input the correct character.
DISC
REPEATSHUFFLE 1
CD2
CD1
HITART.NEXT2nd
CD3
GROUP
GROUPTRACK
SECSTEPMINART.
SONYHIT **S ***
GROUP
NO DELAY
REPEATSHUFFLE 1
CD2
CD1
CD3
ALL SDISC
1
PROGRAM 1 2 3 X-FADE DELETE
CDTEXT
MULTI
To correct the character currently being input
1 Press DEL to delete the incorrect character.
2 Input the correct character.
To insert a character(s) between the input characters
Press . or > until the cursor moves next to the
point you want to insert, and enter the character(s).
Keyboard jack
1 Connect a keyboard to the keyboard jack on the
front panel of the player.
2 After selecting the desired disc on the player, press
the Enter key.
26
GB
3 Input the desired characters, then press the Enter
key to store the information.
z You can delete all characters of a selected item
While holding down the Shift key, press the Delete key.
Notes
• If the cursor keys do not work correctly and you cannot
complete the task using the keyboard, disconnect the
keyboard then reconnect it to the player and try again.
• If the keyboard is not a USA model (shown below), the
characters may be input differently from those on the keys.
~
'
1!2@3#4$5%6^7&89(0)-
WER T Y U I OPQ
SDFGHJKLA
Caps Lock
XCVBNM<>Z
Shift
Ctrl Alt Alt Ctrl
-
+
=
}
{
]
[
Enter
?
Shift
Page 27

Storing Information About CDs (Custom Files)
Storing Information About CDs (Custom Files)
Classifying Discs According to Artist Name (Artist File)
You can classify discs by storing Artist Names into the
player and assigning them to each disc. Each Artist
Name can use up to 20 characters. Once you assign an
Artist Name to a disc, you can enjoy Continuous,
Shuffle, or Repeat Play within discs assigned same
Artist Name and you can search for the desired disc
easily. You can also store a category name instead of an
Artist Name. Up to 200 Artist Names can be stored.
CONTINUE SHUFFLE
ARTIST MODE
CLEAR MENU/NO
H
l AMS L
Storing the Artist Name
1 Press MENU/NO.
2 Turn the JOG dial until “ART.NAME IN?” appears
in the display.
3 Push the JOG dial.
“New Artist” flashes.
4 Push the JOG dial.
The flashing cursor (
) appears.
5 Turn the JOG dial until the desired character
appears in the display.
The cursor disappears and the first space for the
Artist Name flashes.
As you turn the JOG dial clockwise, the characters
appear in the following order. Turn the JOG dial
counterclockwise to go in reverse order.
JOG
6 Push the JOG dial to select the character.
The selected character lights up, and the flashing
cursor appears to indicate the next space to be
input.
To make a correction
Press CLEAR and begin again by inputting the correct
characters.
7 Repeat steps 5 and 6 to input more characters.
See also “Labeling discs on the player” on page 23
for details.
8 Press YES to store the Artist Name.
Changing the Artist Name
1 Follow steps 1 to 3 in “Storing the Artist Name” on
this page.
2 Turn the JOG dial until the artist name you want to
change appears in the display, then push the JOG
dial.
3 Turn the l AMS L dial to move the cursor to
the position you want to change.
When the cursor position is on the character, the
character flashes, and when the cursor position is
on a blank space, the cursor (
display.
To change characters
Turn the JOG dial until the desired character appears in
the display.
To add characters
Push the JOG dial. The new blank space appears next to
the selected character, then turn the JOG dial until the
desired character appears in the display.
To erase characters
Press CLEAR. The selected character disappears.
) appears in the
4 Repeat step 3 to change more characters.
5 Press YES to store the Artist Name.
(space) A B C D E F G H I J K L M N O P Q R S T U
V W X Y Z a b c d e f g h i j k l m n o p q r s t u v w
x y z 0 1 2 3 4 5 6 7 8 9 ' – / , . ( ) : ! ? & + < > _ = " ;
# $ % @ *
`
(continued)
27
GB
Page 28

Storing Information About CDs (Custom Files)
z You can also erase the Artist Name while assigning
the Artist Name
1 In step 2 above, turn the JOG dial until the Artist
Name you want to erase appears in the display, then
push the JOG dial.
2 Turn the l AMS L dial to move the cursor to the
first character, then press and hold CLEAR until all the
characters are erased.
3 Press YES.
The Artist Name and “ARTIST ERASE?” appear
alternately in the display.
4 Press YES.
The Artist Name is erased.
Erasing the Artist Name
1 Press MENU/NO.
2 Turn the JOG dial until “ARTIST FILE?” appears
in the display.
3 Push the JOG dial.
4 Turn the JOG dial until the desired Artist Name
appears in the display.
5 Turn the JOG dial until the desired Artist Name
appears in the display.
The Artist Names are displayed in alphabetical
order.
DISC
ART.
HITNEXT2nd
GROUPTRACK
SECSTEPMIN
MR.SONY ******
1
ALL SDISC
PROGRAM 1 2 3 X-FADE DELETE
TEXTCDMULTI
NO DELAY
6 Press the JOG dial to assign the Artist Name.
DISC
REPEATSHUFFLE 1
CD2
CD1
HITART.NEXT2nd
CD3
GROUP
GROUPTRACK
SECSTEPMINART.
*DISC-2 */0 * MR
1
ALL SDISC
PROGRAM 1 2 3 X-FADE DELETE
TEXTCDMULTI
NO DELAY
z You can assign an Artist Name to a disc while the
front cover is open
Notes
• You cannot assign an Artist Name to a disc when no Artist
Name is stored. In this case, “ARTIST FILE?” does not
appear in the display in step 3 above.
• You cannot assign an Artist Name to an album.
REPEATSHUFFLE 1
CD2
CD1
GROUP
CD3
5 Press and hold CLEAR for a few seconds.
Note
When you erase the Artist Name, the Artist File of the Artist
Name is also erased.
Assigning an Artist Name to a disc (Artist
File)
1 Turn the JOG dial to select the disc you want to
assign an Artist Name.
DISC
HITART.NEXT2nd
GROUPTRACK
SECSTEPMINART.
*DISC-2 **0 ***
1
ALL SDISC
PROGRAM 1 2 3 X-FADE DELETE
The disc to be assigned the artist name.
TEXTCDMULTI
NO DELAY
2 Press MENU/NO.
3 Turn the JOG dial until “ARTIST FILE?” appears
in the display.
4 Push the JOG dial.
REPEATSHUFFLE 1
CD2
CD1
GROUP
CD3
Removing the Artist Name from the disc
1 Turn the JOG dial to select the desired disc.
2 Press MENU/NO.
3 Turn the JOG dial until “ARTIST FILE?” appears
in the display.
4 Push the JOG dial.
5 Turn the JOG dial counterclockwise until “FILE
ERASE?” appears in the display, then push the
JOG dial.
The assigned Artist Name is removed from the
selected disc.
28
GB
Page 29

Storing Information About CDs (Custom Files)
Storing Information About CDs (Custom Files)
Playing discs assigned the same Artist
Name (Artist Play)
You can enjoy Continuous or Shuffle Play within discs
that are assigned the same Artist Name.
Playing discs assigned the
same Artist Name with onetouch of a TOP ARTIST button
1 Select the desired play mode before you start
playing.
When you select
ALL DISCS
Continuous Play
1 DISC Continuous
Play
ALBUM continuous
Play
ALL DISCS Shuffle
Play
1 DISC Shuffle
Play
ALBUM Shuffle Play
The player plays
All tracks on all discs assigned
same artist name consecutively
All tracks on the specified disc
assigned same artist name
consecutively
All tracks on the specified album
assigned same artist name
consecutively.
All tracks on all discs assigned
same artist name in random order
All tracks on the specified disc
assigned same artist name in
random order
All tracks on the specified album
assigned same artist name in
random order.
2 Press ARTIST MODE.
The ARTIST MODE button flashes.
3 Turn the JOG dial to select the desired Artist
Name.
4 Push the JOG dial.
The ARTIST MODE button lights up.
5 Turn the JOG dial to select the desired disc, then
push the JOG dial.
Artist play starts.
To cancel Artist Play
Press ARTIST MODE so that the ARTIST MODE
button goes off.
(Top Artist Play)
It is required to assign an Artist Name to each TOP
ARTIST 1 to 8 buttons beforehand.
To assign an Artist Name to a TOP ARTIST
button
1 Press MENU/NO.
2 Turn the JOG dial until “TOP ART. SET?” appears
in the display.
3 Push the JOG dial.
4 Turn the JOG dial to select the desired TOP
ARTIST button to which an Artist Name is to be
assigned.
During the selection, the selected button lights up
and “NO ENTRY”* appears in the display.
* When an Artist Name is assigned to the selected
button, the Artist Name appears.
5 Push the JOG dial.
6 Turn the JOG dial to select the desired Artist Name
to be assigned to the selected TOP ARTIST button.
As you turn the JOG dial clockwise, the Artist
Names appear in alphabetical order. Turn the JOG
dial counterclockwise to go in reverse order.
To cancel the Artist Name assignment, select “NO
ASSIGN?”
7 Push the JOG dial.
To play discs assigned the same Artist
Name by using the TOP ARTIST buttons
1 Press one of TOP ARTIST 1 to 8.
Top Artist Play starts.
z You can specify the disc to play when starting Artist
Play
After selecting the Artist Name, turn the JOG dial to
select the disc, then push the JOG dial.
Notes
• You cannot select an Artist Name if no discs are assigned to
that Artist Name.
• When no Artist Name is stored, “NO ENTRY” appears in
the display.
z You can play discs assigned to the TOP ARTIST
buttons by using the remote
1 Press TOP ARTIST.
2 Press the number button of the TOP ARTIST.
3 Press ENTER to start playback.
Z
29
GB
Page 30

Using the Player with Another Component
Using the Player with Another Component
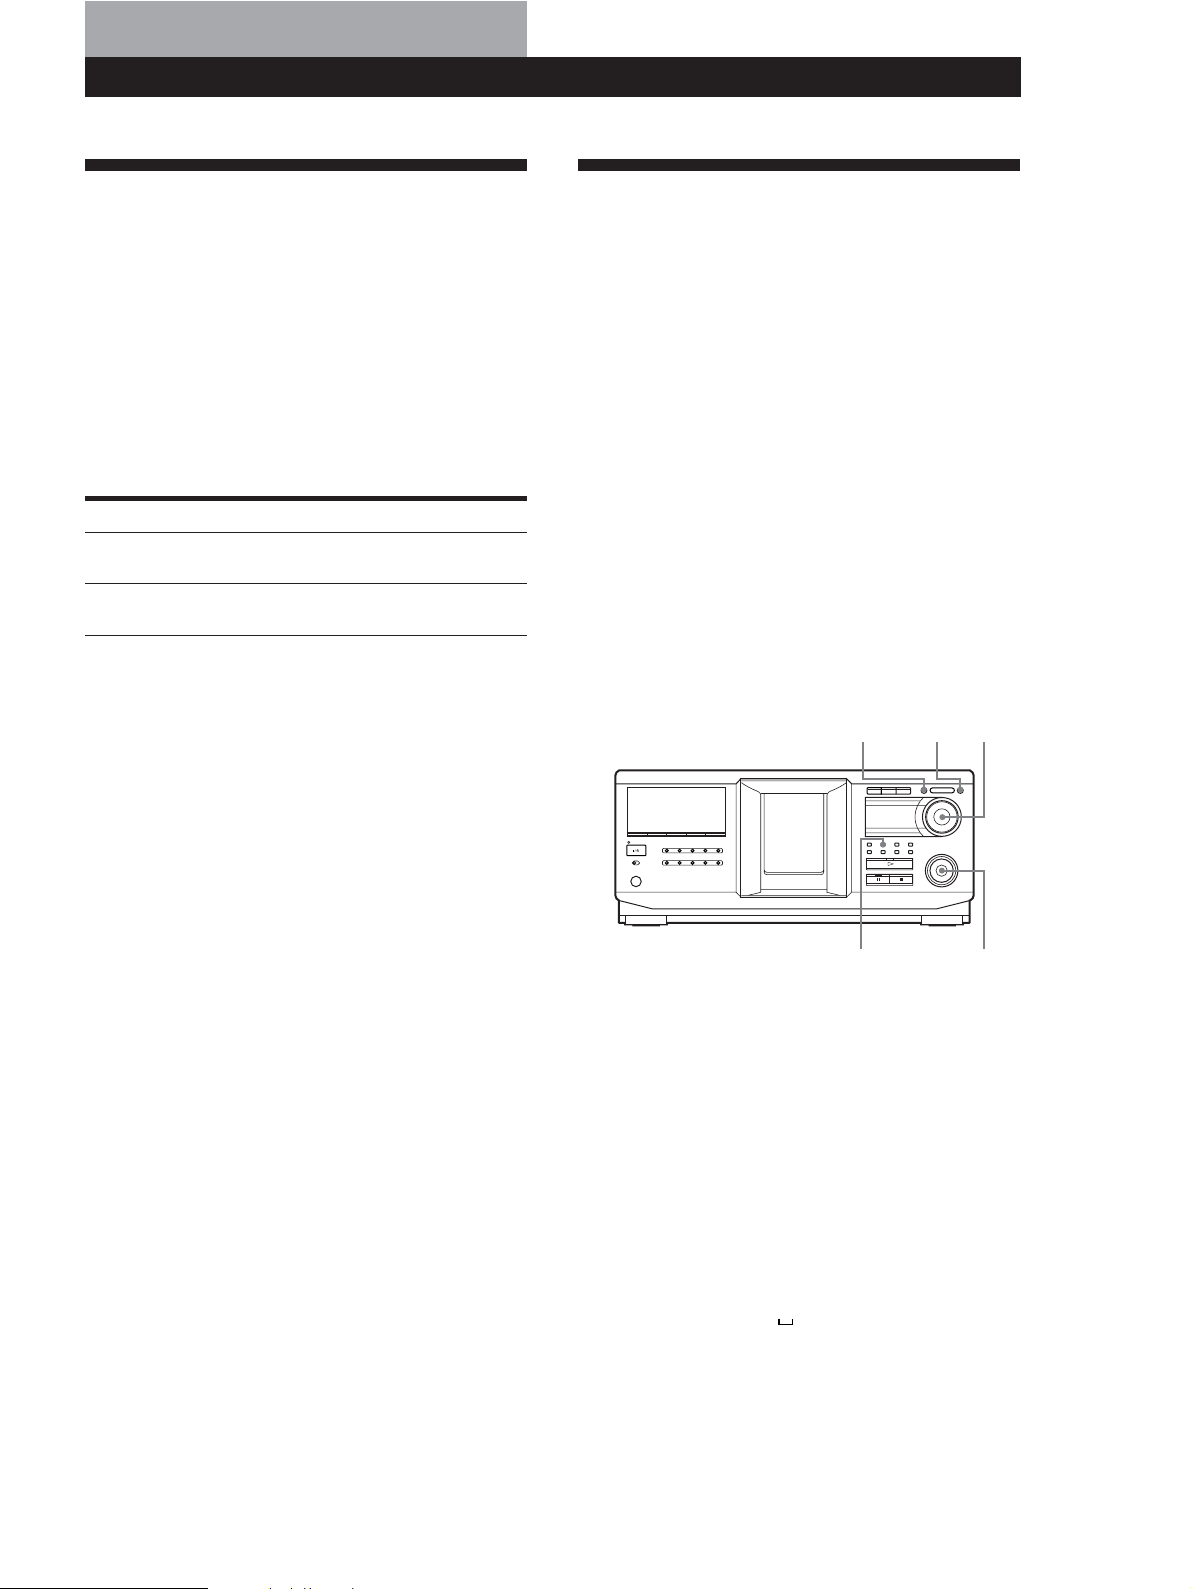
Controlling Another CD Player (Advanced Mega Control)
This unit can control a second CD player (see
“Connecting another CD player” on page 8). Even
when a second CD player is connected, the controls on
both of the units will function. When you press the
play button on either unit, the operating player stops
and the idle player starts. Make sure that “2nd
DETECTED” appears in this player’s display after
turning on both players. Note that, you cannot operate
all the functions of the second CD player (e.g. selecting
the desired album or a track whose track number is 99
or over with number buttons, etc.).
The controls indicated in the illustration below are
effective while the MEGA CONTROL button is lit.
To operate the master player, press MEGA CONTROL
so that the MEGA CONTROL button goes off, and to
operate the second player, press MEGA CONTROL so
that the MEGA CONTROL button lights up.
H
m/M
COMMAND MODE
selector
X
x
./>
Note
When a second player is connected to the master player’s
CONTROL A1II (or CONTROL A1) connector, be sure to play
MP3 files on the master player. In this configuration, MP3 files
may not play properly when played on the second player.
Play mode buttons
(CONTINUE/SHUFFLE/
PROGRAM/REPEAT)
Hl AMS L
MEGA
CONTROL MENU/NO
xX
JOG
1 Press MEGA CONTROL on this player.
The MEGA CONTROL button and “2nd” in the
display light up. The display shows the current
disc number or Disc Name of the second player.
2nd
DISC
HITAT.NEXT
GROUPTRACK
*DISC-4 *** ***
GROUP
HI LIGHT
CD1
REPEATSHUFFLE1
CD2
CD3
ALL SDISC
PROGRAM 1 2 3 DELETE FILE FADE
TEXTCDMULTI
Current disc number or the Disc Name
2 Select the desired play mode.
To program tracks, use the controls on the second
player.
3 Press H on this player to start playing.
The play starts and the display shows the current
disc, track numbers, and the playing time of the
track.
While the MEGA CONTROL button is lit, you can
control the second player with the controls on this
player.
SECSTEPMINAT.
30
To control the master player again
Press MEGA CONTROL. The MEGA CONTROL button goes
off and you can control the master player.
To control the second player directly using the supplied
remote Z
Set CD1/2/3 on the remote to CD3 which is the same position
as the COMMAND MODE selector on the rear panel of the
second player.
GB
Page 31

Storing Information About CDs (Custom Files)
Using the Player with Another Component
Storing Information About CDs (Custom Files)
Loading the Disc Names of the second CD
player
If the second CD player has the Disc Name function
(see page 23), you can load the Disc Names of the
second CD player into this player’s memory and
display them on this player.
1 Press MENU/NO.
2 Turn the JOG dial until “LOAD 2ndNAME?”
flashes in the display.
ART.DISC
HITART.NEXT2nd
GROUPTRACK
SECSTEPMIN
LOAD* 2n NAdME?
1
ALL SDISC
PROGRAM 1 2 3 X-FADE DELETE
TEXTCDMULTI
NO DELAY
3 Push the JOG dial.
This player starts loading. (Loading takes about
one minute.)
Labeling discs of the second CD player
You can label discs of the second CD player or change
the Disc Names loaded from the second CD player.
REPEATSHUFFLE 1
CD2
CD1
GROUP
CD3
Playing Alternately (No-Delay Play/X-Fade Play)
When you connect a second player, you can play tracks
in this player and those from the second player
alternately in any play mode (see “Connecting another
CD player” on page 8).
Select one of the following methods:
• No-Delay Play: The current player changes at each
track. Each time the current player changes to the
other player, the other player starts play without a
break in sound immediately after the current player
ends play. The other player skips the lead-in portion
and starts playing from where the sound actually
begins.
• X-Fade Play: The current player changes at each
track or at the specified interval. You can select the
interval, 30, 60, or 90 seconds. Each time the current
player changes to the other player, the sound from
both players is mixed. The current player ends play
by fading out, and the other player starts play by
fading in.
X-FADE NO DELAY
1 Press MEGA CONTROL.
The MEGA CONTROL button lights up.
2 Turn the JOG dial to select the disc you want to
assign a Disc Name to.
If the disc slot you select does not contain a disc,
“NO DISC” appears in the display.
3 Press MENU/NO.
“NAME IN?” appears.
4 Push the JOG dial.
5 Input the new Disc Name following the procedure
in “Labeling discs (Disc Name)” on page 23.
Note
The new Disc Names are stored on this player’s memory, so
you cannot display them on the second CD player.
H
1 Select the desired disc and play mode for each
player.
2 When you select No-Delay Play
Press NO DELAY.
“NO DELAY” appears in the display.
When you select X-Fade Play
Press X-FADE.
“X-FADE” appears in the display.
Each time you press the X-FADE button, the
indication appears as follows:
tX-FADE off t at track end t after 30 sec
after 90 sec T after 60 sec T
To change the current player each time a whole
track is finished, select “at track end.”
To change the current player at the specified
interval, press X-FADE repeatedly until the
interval you want appears in the display.
(continued)
31
GB
Page 32

Using the Player with Another Component
3 Press H to start playing.
The MEGA CONTROL button lights up when a
track in the second player is selected.
Controlling the Player by Another Unit
To cancel No-Delay/X-Fade Play
Press the corresponding button repeatedly until “NO
DELAY” or “X-FADE” disappears from the display. The
current player continues playing.
z You can change the method (No-Delay or X-Fade)
during play
Press the corresponding button (NO DELAY or X-FADE)
following the procedure in step 2.
z You can start X-Fade at any point of the track
Press FADER during X-Fade Play.
Even after you have set the X-Fade mode and started
X-Fade play, you can start X-Fade manually at any point
you like. Note that you cannot do this operation while
the sound from both players is mixed.
Notes
• Play starts from the second player if you start play while
the MEGA CONTROL button is lit.
• When one player has played all the discs or tracks in the
player ahead of the other player, play stops.
• Do not use the controls on the second player during
No-Delay/X-Fade Play. They may not work correctly.
When you connect the player to a Sony MD deck
compatible with the Mega Control function, or operate
a Sony MD deck by using computer software such as
“MD Editor,” you must set the player as described
below:
MENU/NO
YES
JOG
1 Press MENU/NO.
2 Turn the JOG dial until “CONTROL A1 ?” appears
in the display window.
3 Press YES.
“CONTROL A1??” appears in the display.
4 Press YES.
To return to normal setting
After following steps 1 and 2, and “CONTROL A1II ?” is
displayed, then press YES.
Notes
• You can perform the operation above correctly only when
you operate Disc 1 to Disc 200.
• You cannot operate this player correctly from another
player that does not have the CONTROL A1II jack. In this
case, operate the other player from this player.
32
GB
Page 33

Additional Information
Using the CONTROL A1II control system
Example
Additional Information
Additional Information
This player is compatible with the CONTROL A1II
Control System.
The CONTROL A1II control system was designed to
simplify the operation of audio systems composed of
separate Sony components. CONTROL A1II
connections provide a path for the transmission of
control signals that enable automatic operation and
control features usually associated with integrated
systems.
Currently, CONTROL A1II connections between a
Sony MD deck, CD player, amplifier (receiver), and
cassette deck provide automatic function selection and
synchronized recording.
In the future the CONTROL A1II connection will work
as a multifunction bus allowing you to control various
functions for each component.
Note
The CONTROL A1II control system is designed to maintain
upward compatibility as the control system is upgraded to
handle new functions. In this case, however, older
components will not be compatible with the new functions.
CONTROL A1II and CONTROL A1 compatibility
The CONTROL A1 control system has been updated to the
CONTROL A1II which is the standard system in the Sony 300
disc CD changer and other recent Sony components.
Components with CONTROL A1 jacks are compatible with
components with CONTROL A1II jacks, and can be connected
to each other. Basically, the majority of the functions available
with the CONTROL A1 control system will be available with
the CONTROL A1II control system. However, when making
connections between components with CONTROL A1 jacks
and components with CONTROL A1II jacks, the number of
functions that can be controlled may be limited depending on
the component. For detailed information, refer to the
operating instructions supplied with the component(s).
Amplifier CD
player
In the CONTROL A1II control system, the control signals flow
both ways, so there is no distinction of IN and OUT jacks. If a
component has more than one CONTROL A1II jack, you can
use either one, or connect different components to each jack.
MD
deck
Other
component
About the connecting cable
When a CONTROL A1II compatible component is not
supplied with a connecting cable, use a commercially
available monaural (2P) mini-plug cable less than 2 meters
long, with no resistance (such as the Sony RK-G69HG).
Basic functions of the CONTROL A1II
control system
Automatic function selection
When you connect CONTROL A1II compatible Sony
components using CONTROL A1II cables (not supplied), the
function selector on the amplifier (or receiver) automatically
switches to the correct input when you press the play button
on one of the connected components.
(For example, when you press H (play button) on the CD
player while the MD deck is playing, the function selector on
the amplifier switches from MD to CD.)
Notes
• This function works only when the components are
connected to the amplifier (or receiver) inputs according to
the names on the function buttons. Certain receivers allow
you to switch the names of the function buttons. In this
case, refer to the operating instructions supplied with the
receiver.
• When recording, do not play any components other than
the recording source. It will cause the automatic function
selection to operate.
Connecting the CONTROL A1II control
system
Connect monaural (2P) mini-plug cables in series to the
CONTROL A1II jacks on the back of each component.
You can connect up to ten CONTROL A1II compatible
components in any order. However, you can connect
only one of each type of component (i.e., 1 CD player, 1
MD deck, 1 tape deck and 1 receiver). (You may be able
to connect more than one CD player or MD deck,
depending on the model. Refer to the operating
instructions supplied with the respective component
for details.)
(continued)
33
GB
Page 34

Additional Information
Synchronized recording
This function lets you conduct synchronized recording
between the CD and the recording component.
Precautions
1 Set the source selector on the amplifier (or
receiver) to the CD.
2 Set the CD to playing pause mode (make sure both
the H and X indicators light together).
3 Set the recording component to recording pause
mode.
4 Press X on the deck.
The CD is automatically released from pause
mode, and recording begins shortly thereafter.
When play ends from the CD, recording stops.
Tip
Certain recorder components may be equipped with a special
synchronized recording function that uses the CONTROL
A1II Control System; like “CD Synchro Dubbing.” In this case,
refer to the Operating Instructions supplied with the recorder
component.
Note
Do not set more than one component to the pause mode.
On safety
• Caution — The use of optical instruments with this product
will increase eye hazard.
• Should any solid object or liquid fall into the cabinet,
unplug the player and have it checked by qualified
personnel before operating it any further.
On power sources
• Before operating the player, check that the operating
voltage of the player is identical with your local power
supply. The operating voltage is indicated on the nameplate
at the rear of the player.
• The unit is not disconnected from the AC power source
(mains) as long as it is connected to the wall outlet, even if
the unit itself has been turned off.
• If you are not going to use the player for a long time, be
sure to disconnect the player from the wall outlet. To
disconnect the AC power cord (mains lead), grasp the plug
itself; never pull the cord.
• The AC power cord must be changed only at the qualified
service shop.
On placement
• Place the player in a location with adequate ventilation to
prevent heat build-up in the player.
• Do not place the player on a soft surface such as a rug that
might block the ventilation holes on the bottom.
• Do not place the player in a location near heat sources, or in
a place subject to direct sunlight, excessive dust or
mechanical shock.
On operation
• If the player is brought directly from a cold to a warm
location, or is placed in a very damp room, moisture may
condense on the lenses inside the player. Should this occur,
the player may not operate properly. In this case, leave the
player turned on for about an hour until the moisture
evaporates.
On adjusting volume
• Do not turn up the volume while listening to a portion with
very low level inputs or no audio signals. If you do, the
speakers may be damaged when a peak level portion is
played.
On cleaning
• Clean the cabinet, panel and controls with a soft cloth
slightly moistened with a mild detergent solution. Do not
use any type of abrasive pad, scouring powder or solvent
such as alcohol or benzine.
On transportation
• When transporting the player, open the front cover then
remove all the discs from the player and turn the power off.
34
If you have any questions or problems concerning your
player, please consult your nearest Sony dealer.
GB
Page 35

Troubleshooting
If you experience any of the following difficulties while
using the player, use this troubleshooting guide to help
you remedy the problem. Should any problem persist,
consult your nearest Sony dealer.
There’s no sound.
,Check that the player is connected securely.
,Make sure you operate the amplifier correctly.
The CD does not play.
,There’s no CD inside the player (“–NO DISC–”
appears). Insert a CD.
,Insert the CD with the label side facing right.
,Clean the CD (see page 3).
,Moisture has condensed inside the player.
Remove the disc and leave the player turned on
for about an hour (see page 34).
The remote does not function.
,Remove obstacles in the path of the remote and
the player.
,Point the remote at the remote sensor
player.
,Be sure to set up the remote correctly.
,Replace all the batteries in the remote with new
ones if they are weak.
,Set the command mode of the remote according
to the command mode of the player.
on the
Additional Information
Additional Information
MP3 files take longer to play back than others.
,The following discs take a longer time to start
playback.
–a disc recorded with complicated tree
structure.
–a disc recorded in Multi Session.
–a disc to which data can be added (non-
finalized disc).
About ID3 tag version 2
Although not a malfunction, the following
occurs when an MP3 file containing ID3 tag
ver.2 is played:
– When skipping a portion of ID3 tag ver.2
(at the beginning of the track), sound is not
output. Skip time changes depending ID3
tag ver.2 capacity.
Example: At 64 kbytes, it is about 2 seconds
(with RealJukebox).
– The displayed elapsed playing time when
skipping a portion of ID3 tag ver.2 is
inaccurate. For MP3 files of a bit rate other
than 128 kbps, time is not displayed
accurately during playback.
– When an MP3 file is created with MP3
conversion software (ex. RealJukebox*), ID3
tag ver.2 will automatically be written.
* “RealJukebox is a registered trademark
of RealNetworks, Inc.”
As of December, 2001
The player functions incorrectly.
,The microcomputer chips may be operating
incorrectly. Disconnect the AC power cord, then
connect it back to the wall outlet to reset the
player.
MP3 files cannot be played back.
,Recording was not performed according to the
ISO 9660 level 1 or level 2 format, or the Joliet or
Romeo in the expansion format.
,The file extension “.MP3” is not added to the
file name.
,Files are not stored in MP3 format.
35
GB
Page 36

Additional Information
Specifications
Compact disc player
Laser Semiconductor laser (λ = 780 nm)
Laser output Max 44.6 µW*
Frequency response 20 Hz to 20 kHz ±0.5 dB
Signal-to-noise ratio More than 108 dB
Dynamic range More than 87 dB
Harmonic distortion Less than 0.009%
Emission duration: continuous
* This output is the value measured at
a distance of 200 mm from the
objective lens surface on the Optical
Pick-up block with 7 mm aperture.
Output
LINE OUT
DIGITAL OUT
(OPTICAL)
Jack
type
Phono
jacks
Optical
output
connector
Maximum
output
level
2 V
(at 50 kilohms)
–18 dBm
Load
impedance
Over 10 kilohms
Wave length: 660 nm
General
Power requirements
Where purchased
Canada
Europe
Power consumption 16 W
Dimensions (approx.) 430 × 189 × 537 mm
(w/h/d) (17 × 7 1/2 × 21 1/4 in.) incl. projecting
Mass (approx.) 8.8 kg (19 lbs 7 oz.)
Power requirements
120 V AC, 60 Hz
230 V AC, 50/60 Hz
1 W (at the Power Saving Mode)
parts
Supplied accessories
See page 6.
Design and specifications are subject to change without notice.
36
GB
Page 37

Index
Additional Information
Index
A, B
Advanced Mega Control 30
AMS 13
Artist name 27
Automatic Music Sensor. See
AMS
C
CD TEXT 13
Changing
Artist Name 27
Disc Name 24
Connecting
another CD player 8
system 6
Continuous Play 12
Controlling another CD
player 30
Custom Files
Artist File 27
Disc Name 23
what you can do with 23
D
Disc Name 23
E
Erasing
Artist Name 28
Custom Files 23
Disc Name 24
F
Fading 22
H
Handling CDs 3
History Search 16
Hookups
overview 6
I
Inserting CDs 9
J, K
JOG dial 9
M
MP3 file 3
N, O
Name Search 16
No-Delay Play 31
P, Q
Playback
Artist Name Play 29
Continuous Play 12
Playing alternately 31
Program Play 19
Repeat Play 17
Shuffle Play 17
X-Fade Play 31
Program
changing 20
checking 20
creating 19
erasing 20
R
Remote control 6
Repeating 17
Rotary table 9
S
Searching. See Locating
Shuffle Play 17
Specifying the next disc 17
Storing information about
CDs 23
T
Timer play 22
Top Artist Play 29
Troubleshooting 35
U, V, W
Unpacking 6
X, Y, Z
X-Fade Play 31
Names of controls
Buttons
ALBUM SELECT 12
ALBUM +/– 12
ARTIST MODE 29
CHAR 25
CHECK 20
CLEAR 20
CONTINUE 12
DEL 26
DISC 16
DISC +/– 12
DISPLAY 14
ENTER 16
FADER 22
HISTORY 16
HISTORY MODE 16
MEGA CONTROL 30
MENU/NO 9, 23
NAME EDIT/SELECT 25
NAME SEARCH 16
NO DELAY 31
Number 16
OPEN/CLOSE 9
PROGRAM 19
REPEAT 18
SHUFFLE 18
SPACE 25
TIME 14
TOP ARTIST 1–8 29
X-FADE 31
YES 24, 32
H 12
X 12
x 12
A 11
m/M 13
./> 13
> 10 13
+100 15
Control
JOG dial 9
l AMS L 13
Switches
COMMAND MODE 30
TIMER 22
?/1 12
Jacks
CONTROL A1II 7
DIGITAL OUT (OPTICAL) 7
2ND CD IN 8
L
Labeling a disc 23
Locating
by monitoring 13
by scanning 13
directly 16
using AMS 13
Others
Disc slots 9
Display 13
Front cover 9
Rotary table 9
6
37
GB
Page 38

AVERTISSEMENT
Bienvenue !
Pour prévenir tout risque d’incendie
ou d’électrocution, installez cet
appareil à l’abri de la pluie ou de
l’humidité.
Pour prévenir tout risque de décharge électrique, abstenezvous d’ouvrir le boîtier. Confiez l’entretien de votre lecteur
exclusivement à un personnel qualifié.
Cet appareil entre dans la catégorie des produits LASER DE
CLASSE 1.
L’étiquette est placée sur l’arrière de l’appareil.
Pour ne pas risquer un incendie, ne couvrez pas les orifices
d’aération de l’appareil avec des journaux, nappes, rideaux,
etc. Et ne placez pas de bougies allumées sur l’appareil.
Pour éviter tout incendie ou électrocution, ne pas placer
d’objet rempli de liquide, tel que vase, sur la chaîne.
Ne pas jeter les piles avec les ordures
ménagères. Les déposer aux endroits
préconisés pour les produits chimiques.
Pour les utilisateurs au Canada
ATTENTION
POUR PREVENIR LES CHOCS ELECTRIQUES, NE PAS
UTILISER CETTE FICHE POLARISEE AVEC UN
PROLONGATEUR, UNE PRISE DE COURANT OU UNE
AUTRE SORTIE DE COURANT, SAUF SI LES LAMES
PEUVENT ETRE INSEREES A FOND SANS EN LAISSER
AUCUNE PARTIE A DECOUVERT.
Merci d’avoir acheté ce lecteur de CD Sony. Avant d’utiliser le
produit, veuillez lire attentivement ce manuel, à conserver
pour référence ultérieure.
A propos de ce manuel
Les instructions contenues dans ce manuel portent sur le
modèle CDP-CX455.
Conventions
• Les instructions fournies dans ce manuel décrivent les
commandes du lecteur.
Vous pouvez également utiliser les touches de la
télécommande si elles portent le même nom (ou un nom
similaire) que celui de la commande du lecteur.
• Les icônes suivantes sont utilisées dans ce manuel :
Indique que vous pouvez effectuer l’opération à
l’aide de la télécommande.
Z
Fournit des conseils et des suggestions permettant
z
de faciliter l’opération.
Notes sur les CD
Manipulation des CD
• Pour que le disque reste propre, manipulez-le avec
précaution.
• Ne collez aucun papier ou autocollant sur le disque.
• N’exposez pas directement le disque au soleil ou à des
sources de chaleur telles que des conduits d’air chaud et ne
le laissez pas dans un véhicule exposé directement au soleil
car la température peut y être considérablement plus élevée
qu’à l’extérieur.
• Après avoir extrait un disque du logement de disque,
placez-le dans son boîtier.
Nettoyage
• Avant de lire un disque, nettoyez-le avec un chiffen de
nettoyage. Essuyez le disque du centre vers l’extérieur.
• N’utilisez aucun solvant (par exemple, benzine), diluant,
produit de nettoyage commercialisé ou vaporisateur
FR
2
antistatique conçu pour les disques vinyles.
Page 39

Notes sur les disques CD-R et CD-RW
Cet appareil peut lire les disques suivants:
Type de disque Etiquette sur le disque
CD audio
Fichiers MP3
• Certains CD-R/CD-RW (selon l’appareil utilisé pour leur
enregistrement ou l’état du disque) peuvent ne pas être
lisibles sur ce lecteur.
• Vous ne pouvez pas lire un CD-R/CD-RW non finalisé*.
* Un processus nécessaire pour lire un disque CD-R/CD-RW
enregistré sur le lecteur de CD audio.
A propos des fichiers MP3
MP3 (audio MPEG 1 couche 3) est une technologie et
un format standard pour la compression d’une
séquence sonore. Le fichier est comprimé à environ
e
1/10
de sa taille d’origine. Les sons hors de portée de
l’oreille humaine sont comprimés alors que les sons
audibles par l’homme ne le sont pas.
La lecture de certains fichiers MP3 peut être
impossible, selon leur codage.
La méthode de codage (c.-à-d. le débit binaire
sélectionné pour le codage) affectera la qualité sonore
des fichiers MP3 créés. Le débit binaire typique utilisé
pour les fichiers MP3 est 128 kbps.
Notes sur les disques
Vous pouvez lire des fichiers MP3 enregistrés sur des
CD-ROM, CD-R (CD enregistrables) et CD-RW (CD
réinscriptibles). Le disque doit être de format niveau 1
ou 2 ISO 9660*
d’expansion. Vous pouvez utiliser un disque enregistré
en multisession*
*1Format ISO 9660
La norme internationale la plus commune pour le
format logique des fichiers et dossiers sur un CDROM. Il y a plusieurs niveaux de spécifications. Au
niveau 1, les noms de fichier doivent être en format
8.3 (pas plus de 8 caractères par nom, pas plus de
trois caractères pour l’extension “.MP3”) et en
majuscules. Les noms de dossier ne doivent pas
avoir plus de 8 caractères. Il ne peut pas y avoir plus
de huit niveaux de dossiers imbriqués. Les
spécifications de niveau 2 permettent des noms de
fichiers de 31 caractères maximum.
Chaque dossier peut avoir jusqu’à 8 arborescences.
Pour Joliet ou Romeo dans le format d’expansion,
vérifiez le contenu du logiciel d’écriture etc.
2
*
Multisession
C’est une méthode d’enregistrement qui permet
d’ajouter des données en utilisant la méthode TrackAt-Once. Les CD conventionnels commencent par
une zone de contrôle de CD appelée zone blanche de
début de session et se terminent par une zone
blanche de fin de session. Un CD multisession est un
CD à sessions multiples, chaque segment entre les
zones blanches de début et de fin étant considéré
comme une session.
CD-EXTRA: Un format dans lequel les données CDDA (audio) sont enregistrées sur des pistes de
session 1 et les données d’ordinateur sur les pistes de
session 2.
CD mixte: Un format dans lequel les données
d’ordinateur sont enregistrées sur la première piste
et les données CD-DA (audio) sur les pistes
suivantes d’une session.
1
, ou Joliet ou Romeo dans le format
2
.
GB
FR
(à suivre)
FR
3
Page 40

Remarques
• Les noms de dossier et de fichier peuvent ne pas être
affichés correctement avec des formats autres que ISO 9660
niveau 1.
• Lors de la dénomination, n’oubliez pas d’ajouter l’extension
de fichier “.MP3” au nom du fichier.
• Si vous ajoutez l’extension “.MP3” à un fichier autre que
MP3, l’appareil ne peut pas reconnaître correctement le
fichier et produire un bruit aléatoire qui peut endommager
vos enceintes.
• La lecture met plus de temps à démarrer sur les disques
suivants:
– un disque enregistré avec une structure arborescente
complexe
– un disque enregistré en multisession
– un disque auquel des données peuvent être ajoutées
(disque non-finalisé).
Précautions pour la lecture d’un disque enregistré en
multisession
Les données CD-DA (audio) ou les fichiers MP3 stockés sur
un CD multisession peuvent être soumis à certaines
restrictions à la lecture.
– Si le disque commence par une session CD-DA, il est
reconnu comme disque CD-DA (audio), et la lecture
continue jusqu’à ce qu’une session MP3 soit atteinte.
– Si le disque commence par une session MP3, il est
reconnu comme disque MP3, et la lecture continue
jusqu’à ce qu’une session CD-DA (audio) soit atteinte.
– La plage de lecture d’un disque MP3 est déterminée par
l’arborescence des fichiers produits par analyse du
disque.
– Un disque de format CD mixte sera reconnu comme
disque CD-DA (audio).
Ordre de lecture des fichiers MP3
L’ordre de lecture des dossiers et fichiers est comme
suit:
1
Dossier (album)
1
Fichier MP3 (pistes)
2
2
3
3
4
5
6
6
7
5
4
7
8
8
9
Arborescence 1
Arborescence 2
Arborescence 3
Arborescence 4
Arborescence 5
Remarques
• Un dossier n’incluant pas de fichier MP3 est sauté.
• Quand vous insérez un disque avec de nombreuses
arborescences, le démarrage de la lecture demande plus de
temps.
Nous recommandons de faire seulement une ou deux
arborescences par disque.
• Nombre maximum de dossiers: 150 (dossier de base et
dossiers vides inclus)
• Nombre total maximum de fichiers MP3 et de fichiers: 300
• Le lecteur CD peut lire des fichiers MP3 dans un dossier à
profondeur d’arborescence jusqu’à 8.
Conseil
Pour spécifier l’ordre de lecture souhaité, avant le nom du
dossier ou fichier, entrez l’ordre par numéro (par ex. “01”,
“02”), puis enregistrez les matériaux sur le disque. (L’ordre
varie selon le logiciel d’écriture.)
Remarque sur la lecture des fichiers MP3
Selon le logiciel de codage/d’inscription, le dispositif
d’enregistrement ou le support d’enregistrement utilisés à
l’enregistrement du fichier MP3, vous pouvez avoir des
problèmes tels que lecture invalidée, interruptions de son et
bruit.
FR
4
Page 41

TABLE DES MATIERES
Préparation
Déballage................................................................................................................................ 6
Branchement du système..................................................................................................... 6
Connexion d’un autre lecteur de CD ................................................................................. 8
Insertion de disques ............................................................................................................. 9
Economie d’énergie en mode d’attente ........................................................................... 11
Lecture de disques
Lecture d’un disque ............................................................................................................ 12
Utilisation de l’affichage ....................................................................................................13
Localisation d’un disque spécifique................................................................................. 15
Spécification du prochain disque à lire ........................................................................... 17
Lecture de disques (Album) dans divers modes (lecture répétée/ aléatoire) ........... 17
Création de vos propres programmes (lecture programmée) ......................................19
Utilisation d’un programmateur ...................................................................................... 22
Dégradation en entrée ou en sortie .................................................................................. 22
Stockage d’informations sur les disques (fichiers de personnalisation)
Utilisation des fichiers de personnalisation ....................................................................23
Etiquetage de disques (nom de disque) .......................................................................... 23
Stockage des informations de fichiers de personnalisation via un clavier................. 26
Classement de disques en fonction du nom d’artiste (fichier d’artiste) ..................... 27
Lecture des disques auxquels est affecté le même nom d’artiste par simple pression
d’un bouton TOP ARTIST (lecture de vedette)............................................................... 29
Utilisation du lecteur avec un autre composant
Contrôle d’un autre lecteur de CD (fonction Advanced Mega Control) .................... 30
Lecture alternative (fonctions No-Delay Play/X-Fade Play) ....................................... 31
Contrôle du lecteur avec une autre unité ........................................................................32
Informations complémentaires
Utilisation du système de contrôle CONTROL A1II ..................................................... 33
Précautions .......................................................................................................................... 34
Guide de dépannage .......................................................................................................... 35
Spécifications .......................................................................................................................36
Index
Index ..................................................................................................................................... 37
FR
5
Page 42

Préparation
Préparation
Déballage
Vérifiez que les éléments suivants sont présents :
• Cordon audio (1)
• Cordon de mini-prise monophonique (2P) (1)
(cordon de raccordement pour CONTROL A1II )
(fourni uniquement avec les modèles canadiens)
• Télécommande (1)
• Piles LR6 (AA) (2)
Insertion des piles dans la télécommande
Vous pouvez contrôler le lecteur à l’aide de la
télécommande fournie. Insérez deux piles LR6 (AA)
(fournies) dans le compartiment à piles en respectant la
polarité + et – indiquée dans ce dernier.
Insérez d’abord l’extrémité négative (–), puis appuyez
dessus jusqu’à ce que l’extrémité positive (+)
s’enclenche dans la position appropriée.
Lorsque vous utilisez la télécommande, pointez-la vers
le capteur de télécommande
du lecteur.
Branchement du système
Présentation
Cette section décrit le branchement du lecteur de CD à
un amplificateur. Assurez-vous de mettre chaque
composant hors tension avant de procéder au
branchement.
DIGITAL OUT
CONTROL A1II
Vers une prise
murale (secteur)
Vers la sortie
analogique (G)
Vers la sortie
analogique (D)
(OPTICAL)
Lecteur de CD
z Quand remplacer les piles
Dans des conditions d’utilisation normales, les piles
offrent une vie de service d’environ 6 mois. Lorsque la
télécommande n’agit plus sur le lecteur, remplacez les
piles.
Remarques
• Ne laissez pas la télécommande dans un endroit trop chaud
ou humide.
• Ne faites pas tomber d’objets dans le boîtier de la
télécommande, en particulier lorsque vous remplacez les
batteries.
• N’exposez pas le capteur de télécommande au soleil ou ne
le laissez pas à proximité d’appareils d’éclairage. Vous
risqueriez sinon de provoquer un dysfonctionnement.
• Si vous envisagez de ne pas utiliser la télécommande
pendant une période prolongée, retirez les piles afin
d’éviter des dommages éventuels suite à une fuite et une
corrosion des piles.
Vers l’entrée
audio
: Sens du signal
Quels cordons utiliser ?
Cordon audio (fourni) (1)
Blanc
(G)
Rouge
(D)
Amplificateur
Vers une prise
murale (secteur)
Blanc
(G)
Rouge
(D)
FR
6
Page 43

Getting StartedPréparation
Connexions
Lors de la connexion d’un cordon audio, assurez-vous
de brancher le cordon à code couleur aux prises
appropriées : rouge (droite) sur rouge et blanc
(gauche) sur blanc. Effectuez fermement les connexions
afin d’éviter le bourdonnement et les parasites.
Lecteur de CD
L
R
2ND CD ANALOG
L
R
IN OUT
• Si vous possédez un composant numérique tel qu’un
amplificateur numérique, un convertisseur n-a ou un
lecteur DAT ou MD.
Branchez le composant via le connecteur DIGITAL OUT
(OPTICAL) à l’aide d’un câble optique (non fourni). Retirez
le capuchon et branchez le câble optique.
Notez que vous ne pouvez pas utiliser les fonctions Fading
in, Fading out (page 22).
Amplificateur
INPUT
CD
L
R
z Si vous avez un composant Sony doté d‘une prise
CONTROL A1II (ou CONTROL A1).
Connectez le composant via la prise CONTROL A1II (ou
CONTROL A1). Vous pouvez simplifier les opérations
sur des systèmes audio composés d’éléments Sony
séparés. Pour plus d’informations, reportez-vous à
“Utilisation du système de contrôle CONTROL A1II” à la
page 33.
Branchement du cordon d’alimentation
secteur
Branchez le cordon d’alimentation secteur dans une
prise murale.
Remarque sur le positionnement du lecteur
Assurez-vous de placer le lecteur sur une surface plane
et horizontale.
S’il repose sur une surface inclinée, il risque de mal
fonctionner ou d’être endommagé.
Câble optique (non fourni)
Lecteur de CD Composant numérique
DIGITAL
INPUT
OPTICAL
OPTICAL
OUT
DIGITAL
Remarques
• La lecture d’un fichier MP3 n’est pas sortie au connecteur
DIGITAL OUT (OPTICAL).
• Lorsque vous effectuez une connexion via le connecteur
DIGITAL OUT (OPTICAL), du bruit peut se produire
pendant la lecture d’un CD autre qu’un CD de musique
(par exemple un CD-ROM).
FR
7
Page 44

Préparation
Connexion d’un autre lecteur de CD
Si vous avez un lecteur de CD Sony pouvant recevoir 5,
50, 200, 300 ou 400 disques, doté d’une prise
CONTROL A1II (ou CONTROL A1) et dont le mode de
commande peut être défini sur CD3, vous pouvez
utiliser le présent lecteur pour contrôler ce lecteur en
tant que second lecteur. Une fois le présent lecteur
connecté à un amplificateur, procédez comme suit.
Assurez-vous de mettre chaque lecteur hors tension
avant de procéder au branchement.
Vers ANALOG OUT
CDP-CX455
Quels cordons utiliser ?
• Cordon audio (1) (Utilisez le cordon fourni avec le lecteur à
connecter.)
• Cordon à minifiche mono (2P) (1) (fourni uniquement avec
les modèles canadiens)
1 Connectez les lecteurs avec un cordon audio (voir
également “Connexions” à la page 6).
CDP-CX455
L
R
2ND CD ANALOG
L
R
IN OUT
CDP-CX355, etc.
ANALOG
2ND CD
IN OUT
L
R
L
R
2 Connectez les lecteurs avec un cordon à minifiche
mono (2P).
CDP-CX355, etc.CDP-CX455
CONTROL A1II
Vers une prise
murale (secteur)
Vers la sortie
audio
Vers une prise
murale (secteur)
Vers 2ND CD IN
Vers
CONTROL A1II
Vers l’entrée
audio
CDP-CX355, etc.
Amplificateur
CONTROL A1
Pour plus d’informations sur ce branchement, voir
“Utilisation du système de contrôle CONTROL
A1II”, page 33.
3 Définissez le mode de commande du présent
lecteur sur CD1 (paramètre par défaut) ou CD2, et
celui du second lecteur sur CD3.
Vérifiez à l’affichage le mode de commande
courant de ce lecteur et, si ce mode est CD3,
changez-le comme décrit à la page suivante.
DISC
HITART.NEXT2nd
GROUPTRACK
SECSTEPMINART.
*DISC-1 *** ***
GROUP
1
ALL DISCS
PROGRAM 1 2 3 X-FADE DELETE
TEXTCDMULTI
NO DELAY
Mode de commande actuel
Pour savoir comment utiliser le second lecteur,
reportez-vous aux sections “Contrôle d’un autre
lecteur de CD”, page 30, et “Lecture alternative”,
page 31.
REPEATSHUFFLE
CD1
1
CD2 CD3
4 Connectez le cordon d’alimentation secteur des
deux lecteurs à une prise murale.
: Sens du signal
FR
8
Vers une prise
murale (secteur)
Page 45

Remarques
• Ne connectez aux prises 2ND CD IN de ce lecteur aucun
lecteur autre que celui utilisé en tant que second lecteur.
• Lorsque vous connectez un second lecteur de CD, ne
connectez pas le connecteur DIGITAL OUT (OPTICAL) de
ce lecteur à l’amplificateur.
Changement du mode de commande du
lecteur
Getting StartedPréparation
Insertion de disques
Vous pouvez insérer jusqu’à 400 disques dans ce
lecteur.
?/1
OPEN/CLOSE
JOG
MENU/NO
1 Appuyez sur MENU/NO.
2 Tournez le bouton JOG jusqu’à ce que
“COMMAND MODE?” s’affiche.
3 Appuyez sur le bouton JOG.
Le mode de commande actuel s’affiche.
HITART.NEXT2nd DISC
GROUPTRACK
* CD1[CD ]C2D3*
GROUP
ALL SDISC
PROGRAM 1 2 3 X-FADE DELETE
TEXTCDMULTI
REPEATSHUFFLE1
1
NO DELAY
Mode de commande actuel
CD1 CD2
CD3
JOG
SECSTEPMINART.
Vue du dessus du logement de CD
Position de lecture
Table rotative
Position de
chargement
1 Appuyez sur ?/1 pour activer le lecteur.
2 Ouvrez le couvercle frontal en appuyant sur
OPEN/CLOSE.
4 Tournez le bouton JOG pour sélectionner CD1 ou
CD2, puis appuyez de nouveau dessus.
3 Tournez le bouton JOG jusqu’à ce que vous
trouviez le logement de disque dans lequel vous
souhaitez insérer votre disque, tout en vérifiant le
numéro de disque (figurant à côté de chaque
logement ainsi que dans le mini affichage).
I / 1
Logement de disque en position
de chargement
Mini
affichage
Numéro de
disque
(à suivre)
FR
9
Page 46

Préparation
Le numéro de disque au niveau de la position de
chargement s’affiche. Si le disque porte un nom de
disque (voir page 23), ce nom s’affiche à la place
du numéro de disque. A mesure que vous tournez
le bouton JOG, le numéro de disque ou le nom de
disque change.
DISC
HITART.NEXT2nd
GROUPTRACK
SECSTEPMINART.
*DISC-2 **0 ***
1
ALL SDISC
PROGRAM 1 2 3 X-FADE DELETE
TEXTCDMULTI
NO DELAY
Numéro ou nom de disque
Vous pouvez classer vos disques à l’aide de la
fonction du nom d’artiste. Cette fonction vous
permet de trouver aisément le disque que vous
souhaitez lire. Pour plus d’informations, reportezvous à “Classement de disques en fonction du nom
d’artiste (fichier d’artistes)”, page 27.
4 Insérez un disque, la face libellée tournée vers la
droite.
Face libellée
tournée vers la
droite
Une fois le disque inséré, vous pouvez entrer le
nom de disque original pour remplacer le numéro
de disque (reportez-vous à la section “Etiquetage
de disques (nom de disque)”, page 23), ce qui vous
permettra de localiser aisément votre disque
chaque fois que vous souhaitez en effectuer la
lecture.
HITART.NEXT2nd
DISC
REPEATSHUFFLE 1
CD2
CD1
CD3
GROUP
GROUPTRACK
SECSTEPMINART.
ATTENTION
• N’insérez pas un adaptateur de CD 8 cm (3-inch).
Le lecteur ne peut pas lire les CD 8 cm. N’insérez pas
un adaptateur de CD 8 cm (3-inch) ou un adaptateur
de CD 8 cm (3-inch) (CSA-8). Vous risqueriez
d’endommager le lecteur et le disque.
• Ne déplacez pas le lecteur après avoir inséré des
disques.
• Assurez-vous de placer le lecteur sur une surface
plane et horizontale. Ne le placez pas sur une
surface inclinée.
• Ne le déplacez pas et évitez tout choc physique
après avoir inséré des disques.
• Lorsque vous transportez le lecteur, retirez-en tous
les disques.
• Assurez-vous d’insérer le disque à angle droit par
rapport à la table rotative.
Si le disque n’est pas complètement inséré dans son
logement (par exemple, quand vous appuyez sur A),
réinsérez-le à angle droit par rapport à la table
rotative (ou appuyez à nouveau sur A).
10
SONYHIT **S ***
GROUP
NO DELAY
REPEATSHUFFLE 1
CD2
CD1
CD3
Disque qui n'est pas complètement inséré
• Ne collez pas d’étiquettes ou d’autocollants sur vos
disques.
Si vos disques portent des autocollants ou des
étiquettes, le lecteur risque de ne pas fonctionner
correctement et d’être endommagé, de même que les
disques.
Remarques
• Si vous faites tomber un disque dans le lecteur et/ou
que le disque ne rentre pas correctement dans le
logement, consultez votre revendeur Sony.
• Assurez-vous que la table rotative s’arrête
complètement avant d’insérer ou de retirer un disque
• Le couvercle frontal se referme automatiquement
lorsque vous appuyez sur H. N’introduisez pas la
main dans le lecteur après avoir appuyé sur H, car le
couvercle frontal risquerait alors de se refermer dessus.
ALL SDISC
1
PROGRAM 1 2 3 X-FADE DELETE
CDTEXT
MULTI
5 Répétez les étapes 3 et 4 pour insérer d’autres
disques.
6 Fermez le couvercle frontal en appuyant sur
OPEN/CLOSE.
La table rotative tourne et le logement de disque
en position de chargement passe en position de
lecture.
Le couvercle frontal doit toujours être fermé, sauf
lorsque vous insérez ou retirez un disque.
FR
Page 47

Retrait de disques
Une fois les étapes 1 à 3 de la section “Insertion de
disques”, page 9, terminées, retirez les disques.
Refermez ensuite le couvercle frontal.
z Pour retirer les disques aisément
Une fois les étapes 1 à 3 de la section “Insertion de
disques”, page 9, terminées, appuyez sur A (DISC
EJECT). Le disque inséré dans le logement sélectionné
remonte et vous pouvez le retirer. Lorsque vous appuyez
de nouveau sur A, le disque retourne en position de
chargement. S’il ne retourne pas en position de
chargement, réinsérez-le.
Getting StartedPréparation
Economie d’énergie en mode d’attente
STANDBY
?/1
?/1
Appuyez une fois sur ?/1 sur le lecteur ou la
télécommande.
z
Quand le lecteur est en mode d’attente, l’indicateur
STANDBY sur le lecteur est allumé.
Pour annuler le mode d’attente
Appuyez une fois sur ?/1 sur le lecteur ou la
télécommande.
11
FR
Page 48

Lecture de disques
Lecture de disques
Lecture d’un disque
Vous pouvez lire toutes les plages ou fichiers MP3
d’un disque dans l’ordre original (lecture continue).
Vous pouvez également lire jusqu’à 400 disques
consécutivement. Assurez-vous d’avoir inséré les
disques correctement, comme indiqué pages 9 et 10.
z A propos de la touche ALBUM SELECT
Quand la touche est éteinte: le bouton JOG sélectionne
des disques.
Quand la touche est allumée: le bouton JOG sélectionne
des albums.
5 Pour lire des plages audio, sautez cette étape et
passez à l’étape 7.
?/1
CONTINUE
H
ALBUM SELECT
JOG
1 Activez l’amplificateur et sélectionnez la position
de lecture de CD.
2 Appuyez sur ?/1 pour activer le lecteur.
3 Appuyez sur CONTINUE pour sélectionner le
mode de lecture continue ALL DISCS, 1 DISC ou
ALBUM.
Chaque fois que vous appuyez sur CONTINUE,
“ALL DISCS”, “1 DISC” ou “ALBUM” s’affiche
alternativement.
Arrêtez bien la lecture avant de changer de mode de
lecture: CONTINUE, SHUFFLE ou PROGRAM.
Lorsque vous
sélectionnez
ALL DISCS
1 DISC
ALBUM*
*A la lecture d’un disque ne contenant pas
d’album avec “ALBUM” sélectionné, le disque
est lu de la même manière que si le mode “1
DISC Continuous Play” était sélectionné.
Le lecteur lit
Tous les disques insérés de façon
consécutive dans l’ordre des numéros
de disques. Les logements de disque
vides sont ignorés.
Uniquement le disque sélectionné.
Seulement l’album unique.
6 Pour sélectionner un album, appuyez sur la touche
ALBUM SELECT pour l’allumer, puis tournez le
bouton JOG jusqu’à ce que le nom de l’album
souhaité s’affiche.
Tournez-le dans le sens horaire pour sélectionner
l’album suivant ou dans le sens anti-horaire pour
sélectionner l’album précédent.
7 Appuyez sur le bouton JOG pour commencer la
lecture et réglez le volume sur l’amplificateur.
Le disque sélectionné passe en position de lecture
et le lecteur effectue la lecture de tous les disques à
partir du disque sélectionné (ALL DISCS), la
lecture de toutes les plages une fois (1 DISC) ou la
lecture de tous les fichiers MP3 de l’album
sélectionné une fois (ALBUM).
Opérations possibles pendant la lecture
Pour
Arrêter la lecture
Faire une pause
Reprendre la lecture
après une pause
Passer au
disque suivant Z
Revenir au disque
précédent Z
Passer à l’album
suivant Z
Revenir à l’album
précédent Z
Procédez comme suit
Appuyez sur x.
Appuyez sur X.
Appuyez sur X ou H.
Appuyez sur DISC + une fois.
Maintenez le bouton enfoncé pour
sauter d’autres disques.
Appuyez sur DISC – une fois.
Maintenez le bouton enfoncé pour
sauter d’autres disques.
Appuyez sur ALBUM +.
Appuyez sur ALBUM –.
12
4 Vérifiez que la touche ALBUM SELECT est éteinte,
puis tournez le bouton JOG jusqu’à affichage du
numéro de disque ou du nom de disque désiré
(voir page 23) pour sélectionner le premier disque
(ALL DISCS) ou le disque de votre choix (1 DISC).
DISC
HITART.NEXT2nd
GROUPTRACK
SECSTEPMINART.
*DISC-2 **0 ***
1
ALL SDISC
FR
PROGRAM 1 2 3 X-FADE DELETE
TEXTCDMULTI
NO DELAY
REPEATSHUFFLE 1
CD2
CD1
GROUP
CD3
Page 49

Lecture de disques
Playing CDs
Pour
Passer directement
à une plage Z
Passer à un endroit
sur une plage tout en
contrôlant le son Z
Passer à un endroit
sur une plage tout en
observant l’affichage Z
Passer à la plage
suivante (fichier MP3*)
Revenir à la plage
précédente
(fichier MP3*)
Arrêter la lecture et
retirer le disque
* Quand “ALL DISCS” ou “1 DISC” est sélectionné, vous
pouvez localiser tous les fichiers MP3 sur le disque
sélectionné. Quand “ALBUM” est sélectionné, vous pouvez
localiser tous les fichiers MP3 de l’ALBUM sélectionné.
Procédez comme suit
Appuyez sur la touche numérique
correspondant à la plage sur la
télécommande. Lorsque vous
localisez directement une plage
numérotée au-delà de 10, appuyez
d’abord sur >10, puis sur les touches
numériques correspondantes.
Exemples:
•Pour sélectionner le numéro de
plage 30 sur un CD enregistré avec
50 plages, appuyez sur >10, puis 3
et 10/0.
•Pour sélectionner le numéro de
plage 30 sur un CD enregistré avec
200 plages, appuyez sur >10, puis
10/0, 3 et 10/0.
Appuyez sur m (arrière)/M
(avant) sur la télécommande et
maintenez la touche enfoncée
jusqu’à ce que vous trouviez
l’endroit.
Appuyez sur m (arrière)/M
(avant) sur la télécommande et
maintenez la touche enfoncée
jusqu’à ce que vous trouviez
l’endroit pendant la pause. Aucun
son n’est perçu pendant cette
opération.
Tournez le bouton l AMS L
dans le sens horaire en cliquant une
fois.
Tournez le bouton l AMS L
dans le sens anti-horaire en cliquant
une fois.
Appuyez sur OPEN/CLOSE.
Utilisation de l’affichage
Vous pouvez vérifier les informations de disque
stockées (par exemple, les noms de disques (voir page
23) ou les noms d’artistes (voir page 27)) à l’aide de
l’affichage.
Contrairement à un CD ordinaire, un disque CD TEXT
contient des informations telles que le nom de disque
ou le nom d’artiste. Les informations CD TEXT sont
affichées, ce qui vous permet de vérifier le nom du
disque courant, le nom d’artiste et le nom de plage.
Lorsque le lecteur détecte un disque CD TEXT, “CD
TEXT” s’affiche.
DISPLAY
TIME
Affichage des informations des disques
ordinaires
Affichage des informations en mode d’arrêt
L’affichage indique le numéro de disque courant, le
nombre total de plages et le temps de lecture total du
disque.
Numéro du disque ou nom du disque courant etc.
DISC
HITART.NEXT2nd
GROUPTRACK
SECSTEPMINART.
*DISC-2 **0 ***
1
ALL SDISC
PROGRAM 1 2 3 X-FADE DELETE
TEXTCDMULTI
NO DELAY
REPEATSHUFFLE 1
CD2
CD1
GROUP
CD3
z A la fin de la lecture du TOC
A la lecture de fichiers MP3 sur le disque, “MP3”
s’affiche.
z Lorsque vous désactivez le lecteur
Le lecteur se remémore le dernier disque lu et le mode de
lecture : Continu (page 12), Aléatoire (page 17) ou
Programme (page 19). Lorsque vous activez à nouveau le
lecteur, ce dernier lit le même disque dans le même mode
de lecture.
Remarque
Si “ ” apparaît dans le grand affichage, le disque s’est
terminé lorsque vous appuyiez sur M. Tournez le bouton
l AMS L dans le sens anti-horaire ou appuyez sur m
pour revenir en arrière.
Numéro total de plages
NEXT DISC
2nd PLAYER
DISC
Numéro de disque courant
Temps de lecture
total
(à suivre)
13
FR
Page 50

Lecture de disques
Affichage des informations du disque lu
Lors de la lecture d’un disque, l’affichage indique le
numéro de disque et le numéro de plage courants, le
temps de lecture de la plage et le numéro du disque
suivant.
Numéro du disque ou nom du disque courant etc.
DISC
HITART.NEXT2nd
GROUPTRACK
SECSTEPMINART.
*DISC-2 **0 ***
1
ALL SDISC
PROGRAM 1 2 3 X-FADE DELETE
TEXTCDMULTI
NO DELAY
Numéro de plage courant
Numéro du disque suivant
NEXT
DISC
2nd PLAYER
DISC
Numéro de disque courant
*1A chaque pression de TIME, l’affichage change comme suit:
Temps de
ttt
lecture
écoulé de la
plage
REPEATSHUFFLE 1
CD2
CD1
GROUP
CD3
Temps de
lecture
restant de la
plage
Temps de lecture*
Temps de
lecture restant
du disque
Affichage des informations pendant la lecture d’un disque
L’affichage indique le nom de disque et le nom de
plage alternativement.
Les informations sont affichées comme suit (en mode
d’arrêt) :
• Lorsqu’un nom d’artiste est affecté au disque
courant
Nom de disque du CD TEXT/
nom d’artiste
assigné
• Lorsqu’aucun nom d’artiste n’est affecté au
1
disque courant
Nom de disque du CD TEXT/nom d’artiste du
CD TEXT
A chaque pression de DISPLAY, l’affichage
change comme suit:
Titre de disque y Titre de plage
Affichage des informations de disques MP3
Affichage des informations en mode d’arrêt
L’affichage indique le nom du disque ou le nom de
l’album, le nombre total de fichiers MP3, le nombre
total d’albums* et le numéro de disque courant.
* Quand ALL DISCS ou 1 DISC est sélectionné.
Nom de disque ou nom d’album
Les informations sont affichées comme suit (en mode
d’arrêt) :
• Lorsqu’un nom d’artiste est affecté au disque
courant
Nom de disque/
nom d’artiste assigné
Quand aucun nom de disque n’est assigné au
disque courant, le numéro du disque courant est
affiché.
• Lorsqu’aucun nom d’artiste n’est affecté au
disque courant
Nom de disque
Quand aucun nom de disque n’est assigné au
disque courant, le numéro du disque courant est
affiché.
Affichage des informations de disques CD
TEXT
Affichage des informations à l’arrêt
L’affichage indique le nom de disque. Lorsque vous
assignez un nom d’artiste (voir page 27), le nom
d’artiste défile également à l’affichage.
DISC
HITART.NEXT2nd
TRACKALBUM
FADE
DISC
HITART.NEXT2nd
GROUPTRACK
*DISC-2 **0 ***
1
ALL SDISC
TEXTCDMULTI
Nombre total d’albums
NEXT DISC
2nd
ALBUM
DISC
Numéro de disque courant
REPEATSHUFFLE 1
MP3
CD2NO DELAY
CD3
Nombre total de fichiers
MP3 de l’album courant
SECSTEPMINART.
14
SONYHIT /HSite
1
ALL SDISC
SHUFFLEPROGRAM 1 2 3 MP3 ID3
X-FADE
CDTEXT
FR
REPEATALBUM 1
CD2NO DELAY
CD1
CD3
Page 51

Affichage des informations pendant la lecture d’un disque
L’affichage indique le nom de fichier MP3, le numéro
de fichier MP3, le temps de lecture du fichier MP3 et le
numéro de disque courant.
Nom de fichier MP3*
1
Lecture de disques
Playing CDs
Localisation d’un disque spécifique
JOGNAME SEARCH +100HISTORY
TRACK
SECSTEPMINART.HITART.NEXT2nd
SONG-1 ****
MP3
CD2
CD3
GROUP
Temps de lecture
Nom d’album
(dossier)
Nom d’album
(dossier)
Nom de
fichier MP3
Marqueur ID3
titre/album
/artiste
ALBUM
NO DELAY
TEXTCDMULTI
Numéro de fichier MP3
NEXT DISC
2nd PLAYER
DISC
Numéro de disque courant
*1A chaque pression de DISPLAY, l’affichage change comme
suit:
Lorsque le fichier MP3 n’a pas de marqueur ID3
t Nom de disque t t
Si le fichier MP3 a un marqueur ID3
t Nom de disque t t
Remarques sur MP3
• Le marqueur ID3 s’applique uniquement à la version 1.
• Les codes de caractères du marqueur ID3 sont conformes
aux normes ASCII et ISO. Le format Joliet peut aussi être
affiché en ASCII. Les caractères incompatibles seront
affichés sous la forme “ ”.
• Dans les cas suivants, le temps de lecture écoulé et le temps
de lecture restant peuvent ne pas être affichés correctement.
–à la lecture d’un fichier MP3 à VBR (débit binaire
variable).
– pendant l’avance/retour rapide.
•A la lecture d’un fichier MP3, le temps restant du disque
n’est pas affiché.
DISC
Touches
numériques
>10
H
ENTER
HISTORY
MODE
Localisation d’un disque du lecteur
Tournez le bouton JOG jusqu’à l’affichage du numéro
de disque ou nom de disque désiré (voir page 23).
Appuyez sur la touche JOG pour commencer la lecture.
Pour sauter des disques rapidement
Appuyez sur +100. Chaque fois que vous appuyez sur
+100, le lecteur saute 100 disques.
(à suivre)
15
FR
Page 52

Lecture de disques
Localisation directe d’un disque avec la
télécommande
Z
1 Appuyez sur DISC.
2 Appuyez sur la touche numérique correspondant
au disque.
Exemple: Pour introduire le numéro 35
Appuyez sur 3, puis sur 5.
Pour introduire le numéro 100
Appuyez sur 1, puis deux fois sur 10/0.
3 Appuyez sur ENTER pour démarrer la lecture.
Localisation d’un disque en recherchant un
nom de disque spécifique (recherche de
nom)
Vous pouvez rechercher et localiser un disque
spécifique à partir du premier caractère du nom de ce
disque (voir page 23). La fonction de recherche de nom
peut afficher les noms de disques dans l’ordre
alphabétique.
1 Appuyez sur NAME SEARCH.
“NAME SEARCH” s’affiche.
2 Tournez le bouton JOG pour trouver le disque
désiré.
A mesure que vous tournez le bouton JOG, les
noms de disques commençant par le caractère
entré s’affichent.
DISC
HITART.NEXT2nd
GROUPTRACK
SECSTEPMINART.
SONYHIT **S ***
1
ALL SDISC
PROGRAM 1 2 3 X-FADE DELETE
CDTEXT
MULTI
NO DELAY
Les caractères suivants sont affichés en tant que
premier caractère.
A B C D E F G H I J K L M N O P Q R S T U V W X
Y Z 0 1 2 3 4 5 6 7 8 9
Si “NOT FOUND” s’affiche pendant que vous
spécifiez le premier caractère à l’aide du bouton
JOG, aucun disque ne porte de nom contenant ce
caractère.
GROUP
REPEATSHUFFLE 1
CD2
CD3
CD1
Premier caractère
3 Appuyez sur le bouton JOG pour sélectionner le
disque.
En mode de lecture programmée, le disque est
ajouté à la fin du programme.
Pour annuler la fonction Name Search
Appuyez de nouveau sur NAME SEARCH.
Remarque
La fonction Name Search du lecteur ne fonctionne pas
pendant une lecture aléatoire ALL DISCS.
Localisation d’un disque en recherchant
dans l’historique de lecture (recherche
historique)
Le lecteur stocke l’historique de lecture de dix disques
qui ont été lus récemment pendant 30 secondes au
moins. Vous pouvez rechercher et lire un disque
spécifique dans l’historique de lecture.
1 Appuyez sur HISTORY.
Le témoin sur le bouton HISTORY s’allume et le
numéro de disque ou nom du disque le plus
récemment stocké dans l’historique de lecture
s’affiche (mode historique).
2 Tournez le bouton JOG pour sélectionner le disque
désiré.
Tournez-le dans le sens horaire pour sélectionner
un disque anciennement stocké ou dans le sens
anti-horaire pour sélectionner un disque
récemment stocké.
3 Appuyez sur le bouton JOG pour commencer la
lecture du disque sélectionné.
Le témoin sur le bouton HISTORY s’éteint et le
mode historique est annulé.
Remarques
• Vous pouvez éditer l’historique de lecture.
• Le lecteur stocke un disque dans l’historique de lecture
seulement une fois, même si le disque est lu plusieurs fois.
• L’historique de lecture est stocké seulement quand le
disque est lu en mode continu de lecture aléatoire 1 DISC.
• Vous pouvez sélectionner le Mode historique seulement
quand le disque est lu en mode continu ou en mode de
lecture aléatoire 1 DISC.
16
Remarques
• Lors de la recherche des caractères entrés, les espaces
et les symboles apparaissant avant le premier caractère
dans le nom du disque sont ignorés.
• Lors de la recherche des caractères entrés, aucune
distinction n’est faite entre les minuscules et les
majuscules.
FR
Page 53

Lecture de disques
Playing CDs
Spécification du prochain disque à lire
Vous pouvez spécifier le prochain disque à lire
pendant la lecture d’un disque en mode de lecture
continue.
Pendant la lecture d’un disque, tournez le bouton JOG.
Le message “NEXT DISC” clignote dans l’affichage et
le numéro ou le nom du disque (voir page 23) change à
mesure que vous tournez le bouton JOG.
Lorsque le numéro ou le nom du disque désiré
apparaît, cessez de tourner le bouton JOG.
NEXT
DISC
HITART.2nd
GROUPTRACK
SECSTEPMINART.
*DISC-3 **8 ***
GROUP
NO DELAY
REPEATSHUFFLE 1
CD2
CD1
CD3
ALL SDISC
1
PROGRAM 1 2 3 X-FADE DELETE
CD TEXT
MULTI
Numéro du disque suivant ou nom de disque
NEXT
DISC
2nd PLAYER
DISC
Lecture de disques (Album) dans divers modes (lecture répétée/ aléatoire)
Vous pouvez lire des disques ou des plages (fichiers
MP3) de façon répétée (lecture répétée) dans n’importe
quel mode de lecture.
Le lecteur peut également lire les plages (fichiers MP3)
dans un ordre au hasard (lecture aléatoire). Il effectue
une lecture aléatoire de toutes les plages sur tous les
disques ou sur un disque spécifique.
SHUFFLE JOGH
REPEAT
Numéro de disque courant
Une fois la lecture du disque courant terminée, la
lecture du disque suivant spécifié commence.
Pour passer immédiatement au disque suivant,
appuyez sur le bouton JOG pendant la lecture du
disque courant.
SHUFFLE
DISC
Touches
numériques
ENTER
REPEAT
H
DISC +/–
ALBUM –/+
17
FR
Page 54

Lecture de disques
Lecture répétée (Lecture répétée)
Appuyez sur REPEAT pendant la lecture d’un disque.
Le message “REPEAT” s’affiche. Le lecteur répète les
disques/plages (fichiers MP3) comme suit :
Lorsque le disque est lu
Dans le mode continu ALL
DISCS (page 12)
Dans le mode continu 1
DISC (page 12)
Dans le mode de lecture
continue ALBUM (page 12)
Dans le mode de lecture
aléatoire 1 DISC
(cette page)
Dans le mode de lecture
aléatoire ALBUM (cette
page)
Dans le mode de lecture
programmée (page 19)
Pour annuler le mode de lecture répétée
Appuyez sur REPEAT deux fois.
Le lecteur répète
Toutes les plages sur tous les
disques
Toutes les plages sur le disque
courant
Toutes les plages sur l’album
courant
Toutes les plages sur le disque
courant au hasard
Toutes les plages sur l’album
courant au hasard
Le même programme
Lecture de toutes les plages (fichiers MP3)
sur un disque (album) spécifique au hasard
Appuyez plusieurs fois sur SHUFFLE jusqu’à ce
1
que les messages “1 DISC” (“ALBUM”) et
“SHUFFLE” s’affichent.
2 Tournez le bouton JOG jusqu’à ce que le numéro
du disque (album) de votre choix s’affiche.
Lorsque vous utilisez la télécommande, appuyez
d’abord sur DISC, puis sur la touche numérique
correspondant au disque, ensuite sur ENTER ou
plusieurs fois sur ALBUM –/+.
3 Appuyez sur H.
La lecture aléatoire 1 DISC (ALBUM) commence.
“
” s’affiche pendant la lecture aléatoire des
plages.
Pour annuler le mode de lecture aléatoire
Appuyez sur CONTINUE.
z Vous pouvez passer au disque suivant pendant la
lecture aléatoire 1 DISC Z
Appuyez sur DISC +.
Pour répéter la plage courante (fichier MP3)
Pendant la lecture de la plage (fichiers MP3) de votre
choix, appuyez sur REPEAT une ou plusieurs fois
jusqu’à apparition du message “REPEAT 1”.
Pour annuler le mode de lecture REPEAT 1
Appuyez sur REPEAT.
Remarques sur la lecture répétée
• Dans tous les modes de lecture répétée autre que
“REPEAT1”, la lecture est répétée cinq fois, puis s’arrête.
• En mode “ALL DISCS SHUFFLE PLAY”, le seul mode de
lecture répétée sélectionnable est “REPEAT1”.
Lecture aléatoire de toutes les plages sur
tous les disques
1 Appuyez plusieurs fois sur SHUFFLE jusqu’à ce
que les messages “ALL DISCS” et “SHUFFLE”
s’affichent.
2 Appuyez sur H.
Le mode de lecture aléatoire ALL DISCS
commence.
“
” s’affiche pendant la lecture aléatoire des
disques ou des plages.
Remarque
Vous ne pouvez pas spécifier le disque suivant à lire pendant
la lecture aléatoire.
18
Remarque
Même si le mode de lecture aléatoire ALL DISCS Shuffle est
sélectionné, le lecteur peut lire une piste deux fois ou plus.
FR
Page 55

Création de vos propres
Lecture de disques
Playing CDs
4 Si la touche ALBUM SELECT est éteinte, appuyez
sur ALBUM SELECT.
programmes (lecture
programmée)
Vous pouvez définir l’ordre des plages (fichiers MP3)
et/ou disques (albums) afin de créer trois programmes
différents. Un programme peut contenir jusqu’à 32
“étapes“.
Une “étape” peut contenir une plage (fichier) ou un
disque (album) entier.
Vous pouvez créer des programmes à l’aide des
touches de la télécommande ou du lecteur. Néanmoins,
les procédures de programmation diffèrent.
PROGRAM
CHECK
H
CLEAR
ALBUM SELECT
l AMS L
JOG
Création d’un programme sur le lecteur
1 Appuyez sur PROGRAM jusqu’à affichage du
numéro de programme (PROGRAM 1, 2 ou 3)
désiré.
Si un programme est déjà mémorisé dans le
numéro de programme sélectionné, la dernière
étape du programme s’affiche. Pour effacer le
programme entier, maintenez la touche CLEAR
enfoncée jusqu’à affichage du message “CLEAR”
(voir page 20).
2 Tournez le bouton JOG jusqu’à ce que le numéro
du disque (album) de votre choix s’affiche.
NEXT
HITART.2nd DISC
GROUPTRACK
SECSTEPMINART.
*DISC-2 **0 ***
SDISCALL
1
PROGRAM 1
CDTEXT
MULTI
NO DELAY
3 Pour programmer un disque entier, sautez cette
étape et passez à l’étape 7.
Pour programmer un album entier ou un fichier
MP3, passez à l’étape 4.
Pour programmer une plage audio, tournez le
bouton l AMS L jusqu’à ce que le numéro
de la plage de votre choix s’affiche, et passez à
l’étape 7.
NEXT
REPEATSHUFFLE 1
CD2
CD1
HITART.2nd DISC
CD3
GROUP
GROUPTRACK
SECSTEPMINART.
5 Tournez le bouton JOG jusqu’à ce que le numéro
ou le nom de l’album désiré s’affiche.
6 Pour programmer un album entier, sautez cette
étape et passez à l’étape 7.
Pour programmer un fichier MP3, tournez le
bouton l AMS L jusqu’à ce que le numéro
du fichier MP3 de votre choix s’affiche.
NEXT
HITART.2nd DISC
GROUPTRACK
SECSTEPMINART.
*DISC-2 **0 ***
SDISCALL
1
PROGRAM 1
CDTEXT
MULTI
NO DELAY
7 Appuyez sur le bouton JOG.
Le disque en cours de
programmation
NEXT
REPEATSHUFFLE 1
CD2
CD1
HITART.2nd DISC
GROUP
CD3
Numéro de fichier
GROUPTRACK
Ordre de lecture
SECSTEPMINART.
*DISC-2 **0 ***
SDISCALL
1
PROGRAM 1
CDTEXT
MULTI
NO DELAY
8 Pour programmer d’autres disques (albums)/
plages (fichiers MP3), procédez comme suit :
Pour programmer
Toutes les plages d’un ou
d’autres disque(s)
D’autres plages sur le même
disque
D’autres plages sur d’autres
disques
Tous les fichiers MP3 d’un ou
d’autres albums*
D’autres fichiers MP3 sur le
même album*
D’autres fichiers MP3 sur
d’autres albums*
* Pour sélectionner des fichiers MP3 sur un autre disque,
effectuez d’abord l’étape 2.
9 Appuyez sur H pour lancer la lecture
programmée.
REPEATSHUFFLE 1
CD2
CD1
GROUP
CD3
La plage en cours de
programmation
Répétez les étapes
2 et 7
3 et 7
2, 3 et 7
4, 5 et 7
6 et 7
4, 5, 6 et 7
*DISC-2 **0 ***
REPEATSHUFFLE 1
CD2
CD1
GROUP
CD3
Numéro de plage
MULTI
1
PROGRAM 1
CDTEXT
SDISCALL
NO DELAY
(à suivre)
19
FR
Page 56

Lecture de disques
Pour annuler la lecture programmée
Appuyez sur CONTINUE.
z Les programmes sont conservés même après arrêt de
la lecture programmée
Lorsque vous appuyez sur H en mode de lecture
programmée, vous pouvez lire à nouveau le même
programme.
z Le programme est conservé jusqu’à son effacement
Même si vous changez de disque, les numéros de disque
(album) et plage (fichiers MP3) programmés sont
conservés. Le lecteur effectuera donc la lecture des
nouveaux numéros de disques (albums) et de plages
(fichiers MP3). Cependant, les numéros de disques
(albums) et de plages (fichiers MP3) introuvables dans le
lecteur ou sur le disque sont supprimés du programme et
le reste du programme est lu dans l’ordre programmé.
z Vous pouvez sélectionner le numéro de programme
(PROGRAM 1,2 ou 3) à l’aide de la télécommande Z
Appuyez sur PROGRAM sur la télécommande plusieurs
fois de suite jusqu’à affichage du numéro de programme
de votre choix.
Remarque
Si vous sélectionnez le mode de lecture d’artiste (page 29), la
lecture programmée est annulée.
Changement de l’ordre programmé
Vous pouvez changer votre programme avant de
commencer la lecture.
Pour
Effacer une plage (fichiers
MP3) ou un disque (album)
Effacer la dernière plage
(fichiers MP3) ou le dernier
disque (album) du
programme
Ajouter des plages (fichiers
MP3) ou des disques (albums)
à la fin du programme
Procédez comme suit
Appuyez sur CHECK
jusqu’à ce que la plage
(fichiers MP3) ou le disque
(album) indésirable s’affiche,
puis appuyez sur CLEAR.
Appuyez sur CLEAR.
Chaque fois que vous
appuyez sur ce bouton, la
dernière plage (fichiers MP3)
ou le dernier disque (album)
programmé est effacé.
Suivez la procédure de
programmation.
Effacement du programme stocké en
mémoire
1 Appuyez sur PROGRAM plusieurs fois de suite en
mode d’arrêt jusqu’à affichage du numéro du
programme (PROGRAM 1, 2 ou 3) à effacer.
Vérification du programme
Vous pouvez vérifier votre programme avant ou après
le début de la lecture.
Appuyez sur CHECK.
Chaque fois que vous appuyez sur ce bouton,
l’affichage indique le numéro de disque et de plage
(nom d’album et numéro de fichier MP3) de chaque
étape dans l’ordre de programmation. (Lorsqu’un
disque entier (album) est programmé en une seule
étape, le message “AL” s’affiche à la place du numéro
de plage (fichiers MP3).) A la suite de la dernière étape
du programme, le message “– END –” s’affiche et
l’affichage original est restauré.
2 Maintenez CLEAR pressé.
Les “étapes” seront effacées une à une, à
commencer par la dernière étape du programme.
20
FR
Page 57

Lecture de disques
Playing CDs
Création d’un programme à l’aide de la
télécommande Z
PROGRAM
DISC
Touches
numériques
ENTER
CHECK
CLEAR
H
./>
DISC +/–
ALBUM –/+
1 Appuyez sur PROGRAM jusqu’à affichage du
numéro (PROGRAM 1, 2 ou 3) désiré.
6 Pour programmer une plage audio (fichier MP3),
appuyez sur ./> jusqu’à l’affichage du
numéro de la plage souhaitée, puis sur ENTER.
Le disque en cours de
programmation
NEXT
HITART.2nd DISC
GROUPTRACK
Ordre de lecture
SECSTEPMINART.
*DISC-2 **0 ***
SDISCALL
1
PROGRAM 1
CDTEXT
MULTI
NO DELAY
7 Pour programmer d’autres disques (albums)/
plages (fichiers MP3), procédez comme suit :
Pour programmer
Toutes les plages d’un ou
d’autres disque(s)
D’autres plages sur le même
disque
D’autres plages sur d’autres
disques
Tous les fichiers MP3 d’un ou
d’autres albums*
D’autres fichiers MP3 sur le
même album*
D’autres fichiers MP3 sur
d’autres albums*
REPEATSHUFFLE 1
CD2
CD1
GROUP
CD3
La plage en cours de
programmation
Répétez la ou les
étapes
2 et 3
6
2, 3 et 6
4 et 5
6
4 et 6
2 Appuyez sur DISC +/– jusq’à l’affichage du
numero del disque souhaité.
3 Pour programmer un disque entier, appuyez sur
ENTER et passez à l’étape 7.
Pour programmer un album, sautez cette étape et
passez à l’étape 4.
Pour programmer une plage audio ou un fichier
MP3, sautez cette étapes et passez à l’étape 6.
DISC
NEXT
HITART.2nd
GROUPTRACK
SECSTEPMINART.
*DISC-2 **0 ***
SDISCALL
1
PROGRAM 1
CDTEXT
MULTI
NO DELAY
4 Appuyez sur ALBUM –/+ jusqu’à apparition du
numéro d’album souhaité sur l’affichage.
5 Pour programmer tout un album, appuyez sur
ENTER et passez à l’étape 7.
Pour programmez un fichier MP3 sautez cette
étape et passez à l’étape 6.
REPEATSHUFFLE 1
CD2
CD1
GROUP
CD3
* Pour sélectionner des fichiers MP3 sur un autre disque,
effectuez d’abord l’étape 2.
8 Appuyez sur ENTER ou sur H pour lancer la
lecture programmée.
z Pour programmer tout un disque
Vous pouvez aussi créer un programme en suivant la
procédure ci-dessous.
A l’exécution de l’étape 1, appuyez sur DISC, sur la
touche de numéro du disque, puis sur ENTER.
NEXT
DISC
HITART.2nd
GROUPTRACK
SECSTEPMINART.
**DISC- * 2[0]*
GROUP
NO DELAY
REPEATSHUFFLE 1
CD2
CD1
CD3
SDISCALL
1
PROGRAM 1
MULTI
CDTEXT
Pour annuler la lecture programmée
Appuyez sur CONTINUE.
z Vous pouvez vérifier ou changer le programme en
appuyant sur le bouton CHECK ou CLEAR de la
télécommande Z
Reportez-vous à la page 20.
21
FR
Page 58

Lecture de disques
Utilisation d’un programmateur
Vous pouvez commencer la lecture d’un disque à tout
moment en connectant un programmateur (non
fourni). Pour plus d’informations, reportez-vous
également aux instructions du programmateur.
TIMER
1 Appuyez sur l’un des boutons de mode de lecture
pour sélectionner le mode de lecture de votre
choix.
2 Sur le lecteur, définissez TIMER sur PLAY.
3 Définissez le programmateur sur l’heure de votre
choix, puis mettez le lecteur hors tension (si
nécessaire).
Le lecteur est désactivé. Lorsque l’heure définie est
atteinte, le lecteur s’active et commence la lecture.
Boutons de mode de lecture
Dégradation en entrée ou en sortie
Vous pouvez manuellement dégrader le son en entrée
ou en sortie pour empêcher un début ou une fin
brutale des plages.
Cette option n’est pas disponible lorsque vous utilisez
le connecteur DIGITAL OUT (OPTICAL).
FADER
Pour
Commencer la
dégradation en entrée
Terminer la
dégradation en sortie
Appuyez sur FADER
En pause, “FADE” clignote et
“FADE IN” s’affiche. La lecture de
dégradation en entrée a lieu.
Pour démarrer la dégradation en
sortie “FADE” clignote et “FADE
OUT” s’affiche. La lecture de
dégradation en sortie a lieu et le
lecteur marque une pause.
4 Après utilisation du programmateur, définissez
TIMER sur OFF sur le lecteur.
Remarque
A l'emploi d'un second lecteur raccordé au connecteur
CONTROL A1 du lecteur principal (voir la page 8) et d'un
programmateur extérieur (non fourni), TIMER doit être réglé
à OFF sur le second lecteur. Seul TIMER sur le lecteur
principal peut être réglé à PLAY.
Remarque
L’effet de dégradation dure environ 5 secondes.
22
FR
Page 59

Stockage d’informations sur les disques (fichiers de personnalisation)
Stockage d’informations sur les disques (fichiers de personnalisation)
Storing Information About CDs (Custom Files)
Utilisation des fichiers de personnalisation
Le lecteur peut stocker quatre types de données,
appelés “fichiers de personnalisation”, pour chaque
disque. Une fois que des fichiers de personnalisation
sont stockés pour un disque, le lecteur se remémore
automatiquement les données enregistrées chaque fois
que vous sélectionnez le disque. Les fichiers de
personnalisation sont effacés si vous n’utilisez pas le
lecteur pendant une période d’environ un mois.
Les données suivantes peuvent être
stockées :
Lorsque vous utilisez
Nom de disque
(page 23)
Fichier d’artiste
(page 27)
Emplacement de stockage des fichiers de
personnalisation
Les fichiers de personnalisation ne sont pas stockés sur
le disque, mais dans la mémoire du lecteur. Vous ne
pouvez donc pas les utiliser lorsque vous lisez le
disque sur un autre lecteur.
Vous pouvez
Etiqueter des disques en utilisant
jusqu’à 20 caractères
Classer des disques en fonction
du nom d’un artiste
Etiquetage de disques (nom de disque)
Vous pouvez étiqueter des disques avec 20 caractères
au maximum et faire afficher le nom de disque par le
lecteur chaque fois que vous sélectionnez le disque. Le
nom de disque peut être tout ce que vous souhaitez,
par exemple, un titre, le nom d’un musicien, une
catégorie ou la date d’achat. Vous pouvez également
étiqueter le disque du second lecteur.
z Lorsque vous sélectionnez un disque CD TEXT
Le titre de disque est automatiquement stocké en tant
que nom de disque.
S’il contient plus de 20 caractères, seuls les 20 premiers
caractères sont stockés (voir page 13).
Lorsque vous remplacez un disque par un disque CD
TEXT, le titre du disque CD TEXT est également stocké
automatiquement.
Vous ne pouvez pas changer le nom de disque d’un
disque CD TEXT.
z Vous pouvez étiqueter des disques même si le
panneau frontal est ouvert
Etiquetage de disques sur le lecteur
Si vous remplacez des disques ayant des
fichiers de personnalisation
Les données de fichiers de personnalisation sont
conservées, car elles sont assignées à chaque logement.
Effacez tous les fichiers de personnalisation (nom de
disque et fichier d’artiste) de l’ancien disque, puis
stockez les informations du nouveau disque dans les
fichiers de personnalisation.
Effacement de tous les fichiers de
personnalisation de tous les disques
1 Appuyez sur MENU/NO.
2 Tournez le bouton JOG jusqu’à apparition du
message “ALL ERASE ?”.
3 Appuyez sur le bouton JOG.
Le message “ALL ERASE ??” clignote.
4 Appuyez sur le bouton JOG.
Le message “ALL ERASE” s’affiche et les fichiers
de personnalisation sont effacés.
Remarque
Lorsque vous suivez l’opération décrite ci-dessus, tous vos
réglages personnalisés sont supprimés et les réglages d’usine
par défaut sont rétablis.
MENU/NO
CLEAR
YES
l AMS L
1 Tournez le bouton JOG jusqu’à affichage du
numéro du disque auquel vous souhaitez assigner
un nom.
Si le panneau frontal est fermé, le numéro du
disque en position de lecture s’affiche.
Si le panneau frontal est ouvert, le numéro du
disque en position de chargement s’affiche.
2 Appuyez sur MENU/NO.
Le message “NAME IN ?” clignote.
3 Appuyez sur le bouton JOG.
Le curseur clignotant (
) s’affiche.
JOG
(à suivre)
23
FR
Page 60

Stockage d’informations sur les disques (fichiers de personnalisation)
4 Tournez le bouton JOG jusqu’à ce que le caractère
de votre choix s’affiche.
Le curseur disparaît et le premier espace du nom
de disque clignote.
A mesure que vous tournez le bouton JOG dans le
sens horaire, les caractères s’affichent dans l’ordre
suivant. Tournez le bouton JOG dans le sens
inverse pour aller dans l’ordre inverse.
(espace) A B C D E F G H I J K L M N O P Q R S T
U V W X Y Z a b c d e f g h i j k l m n o p q r s t u v
w x y z 0 1 2 3 4 5 6 7 8 9 ' – / , . ( ) : ! ? & + < > _ = "
DISC
`
HITART.NEXT2nd
GROUPTRACK
SECSTEPMINART.
; # $ % @ *
S ****** ******
GROUP
NO DELAY
REPEATSHUFFLE 1
CD2
CD1
CD3
ALL SDISC
1
PROGRAM 1 2 3 X-FADE DELETE
TEXTCD
MULTI
5 Appuyez sur le bouton JOG pour sélectionner le
caractère.
Le caractère sélectionné s’allume et le curseur
clignotant apparaît dans l’emplacement suivant
pour la saisie.
DISC
HITART.NEXT2nd
GROUPTRACK
SECSTEPMINART.
S ****** ******
GROUP
NO DELAY
REPEATSHUFFLE 1
CD2
CD1
CD3
ALL SDISC
1
PROGRAM 1 2 3 X-FADE DELETE
TEXTCD
MULTI
Changement du nom de disque
1 Suivez les étapes 1 à 3 de la section “Etiquetage de
disques sur le lecteur”, page 23, pour sélectionner
le nom de disque à changer.
2 Tournez le bouton l AMS L pour déplacer le
curseur sur la position à changer.
Lorsque le curseur est sur un caractère, ce dernier
clignote, mais lorsqu’il est sur un espace, le curseur
clignotant (
) s’affiche.
Pour changer les caractères
Tournez le bouton JOG jusqu’à ce que le caractère
de votre choix s’affiche.
Pour ajouter des caractères
Appuyez sur le bouton JOG. Le nouvel espace
blanc apparaît à côté du caractère sélectionné.
Tournez alors le bouton JOG jusqu’à apparition du
caractère désiré.
Pour effacer des caractères
Appuyez sur CLEAR. Le caractère sélectionné
disparaît.
3 Répétez l’étape 2 pour changer d’autres caractères.
4 Appuyez sur YES pour stocker le nom de disque.
Pour effectuer une correction
Amenez le curseur sur la position que vous souhaitez
changer, puis appuyez sur CLEAR et saisissez les
caractères corrects.
6 Amenez le curseur sur la position que vous
souhaitez changer, puis appuyez les étapes 4 et 5
pour entrer d’autres caractères.
7 Appuyez sur YES pour stocker le nom de disque.
L’affichage indique le nom de disque.
DISC
HITART.NEXT2nd
GROUPTRACK
SECSTEPMINART.
SONYHIT **S ***
1
ALL SDISC
PROGRAM 1 2 3 X-FADE DELETE
CDTEXT
MULTI
NO DELAY
Répétez les étapes 1 à 7 pour affecter un nom à
d’autres disques.
z Pour changer rapidement le type de caractère
pendant la saisie des caractères
Appuyez sur DISPLAY (étape 4 ci-dessus). Le caractère
au niveau du curseur est remplacé par le premier
caractère de chaque type de caractère. Chaque fois que
vous appuyez sur DISPLAY, le type de caractère change
comme suit :
t A t a t 0 t ' t (espace)
REPEATSHUFFLE 1
CD2
CD1
GROUP
CD3
Effacement du nom de disque
1 Suivez les étapes 1 à 3 de la section “Etiquetage de
disques sur le lecteur”, page 23, pour sélectionner
le nom de disque à effacer.
2 Tournez le bouton l AMS L pour déplacer le
curseur sur le premier caractère, puis maintenez la
touche CLEAR enfoncée jusqu’à effacement de
tous les caractères.
3 Appuyez sur YES.
Le nom de disque disparaît.
24
FR
Page 61

Stockage d’informations sur les disques (fichiers de personnalisation)
Storing Information About CDs (Custom Files)
Etiquetage de disques via la télécommande
Z
SPACE
DISC
DEL
NAME EDIT
/SELECT
./>
CHAR
Tasti
numerici
ENTER
CLEAR
1 Appuyez sur DISC.
2 Appuyez sur la touche numérique correspondant
au disque à étiqueter, puis sur ENTER.
3 Appuyez sur NAME EDIT/SELECT.
Le curseur clignotant (
) s’affiche.
4 Appuyez sur NAME EDIT/SELECT pour choisir
le type de caractères de votre choix.
Chaque fois que vous appuyez sur ce bouton, les
types de caractères changent de façon cyclique
comme suit:
AB sélectionné
t t
(majuscules)
ab sélectionné
(minuscules)
12 sélectionné (nombres) T
Pour sélectionner un symbole, sélectionnez le type
de caractères majuscule ou minuscule. Le type de
caractères sélectionné s’affiche.
DISC
HITART.NEXT2nd
GROUPTRACK
SECSTEPMINART.
******* ******
GROUP
NO DELAY
REPEATSHUFFLE 1
CD2
CD3
CD1
Type de caractères
ALL SDISC
1
PROGRAM 1 2 3 X-FADE DELETE
TEXTCD
MULTI
5 Pour saisir un caractères , appuyez sur la touche
numérique correspondant à ce caractère (indiqué
à côté de chaque touche numérique).
Le curseur disparaît et le premier espace du nom
de disque clignote.
Chaque fois que vous appuyez sur le bouton, les
caractères indiqués à côté s’affichent tour à tour.
Pour saisir des symboles, appuyez sur la touche
numérique 1 plusieurs fois de suite jusqu’à
affichage du symbole de votre choix.
ABC DEF&!?
JKL MNOGHI
TUV WXYZPQRS
Caractères
>
10
ENTER
affectés à
chaque touche
numérique
Exemple : Pour sélectionner la lettre E
Appuyez sur la touche numérique 3
deux fois.
t D t E t F
Appuyez sur 3. Appuyez sur 3.
Appuyez sur 3.
Pour entrer un espace, appuyez sur SPACE une
fois.
Pour saisir un nombre, appuyez sur NAME EDIT/
SELECT deux fois pour changer le type de
caractères, puis sur la touche numérique désirée.
6 Appuyez sur > pour sélectionner le caractère.
Le caractère sélectionné s’allume et le curseur
clignotant apparaît dans l’emplacement suivant
pour la saisie.
Vous pouvez également passer à l’espace suivant
en appuyant sur une autre touche numérique.
7 Répétez les étapes 4 à 6 pour entrer d’autres
caractères.
8 Appuyez sur ENTER pour stocker le nom de
disque.
Ce dernier s’allume dans l’affichage.
DISC
HITART.NEXT2nd
GROUPTRACK
SECSTEPMINART.
SONYHIT **S ***
1
ALL SDISC
PROGRAM 1 2 3 X-FADE DELETE
CDTEXT
MULTI
NO DELAY
REPEATSHUFFLE 1
CD2
CD1
GROUP
CD3
Répétez les étapes 1 à 8 pour affecter un nom à
d’autres disques.
(à suivre)
25
FR
Page 62

Stockage d’informations sur les disques (fichiers de personnalisation)
z En cas d’erreur lors de la saisie d’un ou de caractères
Pour corriger un caractère saisi
1 Appuyez sur . ou > jusqu’à ce que le curseur se
place sur le caractère incorrect.
Stockage des informations de fichiers de personnalisation via un clavier
DISC
HITART.NEXT2nd
GROUPTRACK
SONYHET **S ***
1
ALL SDISC
PROGRAM 1 2 3 X-FADE DELETE
CDTEXT
MULTI
NO DELAY
REPEATSHUFFLE 1
CD2
CD1
GROUP
CD3
SECSTEPMINART.
Vous pouvez stocker le nom de disque de chaque
disque, un par un, à l’aide d’un clavier de PC
compatible IBM* (non fourni).
2 Appuyez sur DEL pour supprimer ce caractère.
DISC
HITART.NEXT2nd
GROUPTRACK
SECSTEPMINART.
SONYHTS ******
1
ALL SDISC
PROGRAM 1 2 3 X-FADE DELETE
CDTEXT
MULTI
NO DELAY
3 Saisissez le caractère correct.
DISC
REPEATSHUFFLE 1
CD2
CD1
HITART.NEXT2nd
CD3
GROUP
GROUPTRACK
SECSTEPMINART.
SONYHIT **S ***
1
ALL SDISC
PROGRAM 1 2 3 X-FADE DELETE
CDTEXT
MULTI
NO DELAY
Pour corriger le caractère en cours de saisie
1 Appuyez sur DEL pour supprimer ce caractère.
2 Saisissez le caractère correct.
Pour insérer un ou plusieurs caractères entre les
caractères saisis
Appuyez sur . ou > jusqu’à ce que le curseur se
place à côté du point d’insertion, puis saisissez le ou les
caractère(s).
REPEATSHUFFLE 1
CD2
CD1
GROUP
CD3
* La consommation électrique du clavier ne doit pas dépasser
120 mA.
Prise du clavier
1 Connectez un clavier à la prise de clavier sur le
panneau frontal du lecteur.
2 Une fois le disque désiré inséré dans le lecteur,
appuyez sur la touche Entrée.
26
3 Saisissez les caractères de votre choix, puis
appuyez sur la touche Entrée pour stocker les
informations.
z Vous pouvez supprimer tous les caractères d’un
élément sélectionné.
Tout en maintenant la touche MAJ enfoncée, appuyez sur
la touche Supprimer.
Remarques
• Si les touches du clavier ne fonctionnent pas correctement
et que vous ne pouvez pas terminer l’opération avec le
clavier, déconnectez ce dernier, puis reconnectez-le au
lecteur et réessayez.
• Si le clavier n’est pas un modèle USA (voir ci-dessous), il se
peut que les caractères ne soient pas saisis différemment
des caractères des touches.
~
'
1!2@3#4$5%6^7&89(0)-
WER T Y U I OPQ
SDFGHJKLA
Caps Lock
XCVBNM<>Z
Shift
Ctrl Alt Alt Ctrl
FR
-
+
=
}
{
]
[
Enter
?
Shift
Page 63

Stockage d’informations sur les disques (fichiers de personnalisation)
Storing Information About CDs (Custom Files)
6 Appuyez sur le bouton JOG pour sélectionner le
Classement de disques en fonction du nom d’artiste (fichier d’artiste)
Vous pouvez classifier des disques en stockant des
noms d’artistes sur le lecteur et en leur affectant des
noms d’artistes. Chaque nom d’artiste peut contenir
jusqu’à 20 caractères. Une fois un nom d’artiste affecté
à un disque, vous pouvez effectuer une lecture
continue, aléatoire ou répétée au sein des disques
auxquels le même nom d’artiste a été affecté et
aisément rechercher le disque de votre choix. Vous
pouvez également stocker un nom de catégorie à la
place d’un nom d’artiste. Vous pouvez stocker jusqu’à
200 noms d’artistes.
CONTINUE SHUFFLE
CLEAR MENU/NO
JOG
caractère.
Le caractère sélectionné s’allume et le curseur
clignotant apparaît dans l’emplacement suivant
pour la saisie.
Pour effectuer une correction
Appuyez sur CLEAR et saisissez les caractères corrects.
7 Répétez les étapes 5 et 6 pour entrer d’autres
caractères.
Pour plus d’informations, reportez-vous
également à la section “Etiquetage de disques sur
le lecteur”, page 23.
8 Appuyez sur YES pour stocker le nom d’artiste.
Changement du nom d’artiste
1 Suivez les étapes 1 à 3 de la section “Stockage du
nom d’artiste” sur cette page.
ARTIST MODE
H
l AMS L
Stockage du nom d’artiste
1 Appuyez sur MENU/NO.
2 Tournez le bouton JOG jusqu’à ce que le message
“ART.NAME IN?” s’affiche.
3 Appuyez sur le bouton JOG.
Le message “New Artist” clignote.
4 Appuyez sur le bouton JOG.
Le curseur clignotant (
) s’affiche.
5 Tournez le bouton JOG jusqu’à ce que le caractère
de votre choix s’affiche.
Le curseur disparaît et le premier espace du nom
d’artiste clignote.
A mesure que vous tournez le bouton JOG dans le
sens horaire, les caractères s’affichent dans l’ordre
suivant. Tournez le bouton JOG dans le sens
inverse pour aller dans l’ordre inverse.
2 Tournez le bouton JOG jusqu’à affichage du nom
d’artiste à changer, puis appuyez dessus.
3 Tournez le bouton l AMS L pour déplacer le
curseur sur la position à changer.
Lorsque le curseur est sur un caractère, ce dernier
clignote, mais lorsqu’il est sur un espace, le curseur
(
) s’affiche.
Pour changer les caractères
Tournez le bouton JOG jusqu’à ce que le caractère de
votre choix s’affiche.
Pour ajouter des caractères
Appuyez sur le bouton JOG. Le nouvel espace blanc
apparaît à côté du caractère sélectionné. Tournez alors le
bouton JOG jusqu’à apparition du caractère désiré.
Pour effacer des caractères
Appuyez sur CLEAR. Le caractère sélectionné disparaît.
4 Répétez l’étape 3 pour changer d’autres caractères.
5 Appuyez sur YES pour stocker le nom d’artiste.
(espace) A B C D E F G H I J K L M N O P Q R S T
U V W X Y Z a b c d e f g h i j k l m n o p q r s t u v
w x y z 0 1 2 3 4 5 6 7 8 9 ' – / , . ( ) : ! ? & + < > _ = "
; # $ % @ *
`
27
FR
Page 64

Stockage d’informations sur les disques (fichiers de personnalisation)
z Vous pouvez également effacer le nom d’artiste
pendant son affectation
1A l’étape 2 ci-dessus, tournez le bouton JOG jusqu’à
affichage du nom d’artiste à effacer, puis appuyez
dessus.
2 Tournez le bouton l AMS L pour déplacer le
curseur sur le premier caractère, puis maintenez la
touche CLEAR enfoncée jusqu’à effacement de tous les
caractères.
3 Appuyez sur YES.
Le nom d’artiste et le message “ARTIST ERASE?”
s’affichent de façon alternative.
4 Appuyez sur YES.
Le nom d’artiste est effacé.
Effacement du nom d’artiste
1 Appuyez sur MENU/NO.
2 Tournez le bouton JOG jusqu’à ce que le message
“ARTIST FILE?” s’affiche.
3 Appuyez sur le bouton JOG.
4 Tournez le bouton JOG jusqu’à ce que le nom
d’artiste désiré s’affiche.
5 Tournez le bouton JOG jusqu’à ce que le nom
d’artiste désiré s’affiche.
Les noms d’artistes sont affichés dans l’ordre
alphabétique.
DISC
ART.
HITNEXT2nd
GROUPTRACK
SECSTEPMIN
MR.SONY ******
1
ALL SDISC
PROGRAM 1 2 3 X-FADE DELETE
TEXTCDMULTI
NO DELAY
6 Appuyez sur le bouton JOG pour affecter un nom
d’artiste.
DISC
REPEATSHUFFLE 1
CD2
CD1
HITART.NEXT2nd
CD3
GROUP
GROUPTRACK
SECSTEPMINART.
*DISC-2 */0 * MR
1
ALL SDISC
PROGRAM 1 2 3 X-FADE DELETE
TEXTCDMULTI
NO DELAY
z Vous pouvez affecter un nom d’artiste à un disque
même si le panneau frontal est ouvert
Remarques
• Vous ne pouvez pas affecter un nom d’artiste à un disque si
aucun nom d’artiste n’est stocké. Dans ce cas, le message
“ARTIST FILE?” ne s’affiche pas (étape 3 ci-dessus).
• Vous ne pouvez pas affecter un nom d’artiste à un album.
REPEATSHUFFLE 1
CD2
CD1
GROUP
CD3
5 Appuyez sur la touche CLEAR et maintenez-la
enfoncée quelques secondes.
Remarque
Lorsque vous effacez le nom d’artiste, son fichier d’artiste est
également effacé.
Affectation d’un nom d’artiste à un disque
(fichier d’artiste)
1 Tournez le bouton JOG pour sélectionner le disque
auquel affecter un nom d’artiste.
DISC
HITART.NEXT2nd
GROUPTRACK
SECSTEPMINART.
*DISC-2 **0 ***
1
ALL SDISC
PROGRAM 1 2 3 X-FADE DELETE
Disque auquel affecter le nom d’artiste
TEXTCDMULTI
NO DELAY
2 Appuyez sur MENU/NO.
3 Tournez le bouton JOG jusqu’à ce que le message
“ARTIST FILE?” s’affiche.
REPEATSHUFFLE 1
CD2
CD1
GROUP
CD3
Suppression d’un nom d’artiste d’un disque
1 Tournez le bouton JOG pour sélectionner le disque
désiré.
2 Appuyez sur MENU/NO.
3 Tournez le bouton JOG jusqu’à ce que le message
“ARTIST FILE?” s’affiche.
4 Appuyez sur le bouton JOG.
5 Tournez le bouton JOG dans le sens anti-horaire
jusqu’à affichage du message “FILE ERASE?”, puis
appuyez sur ce même bouton.
Le nom d’artiste affecté est supprimé du disque
sélectionné.
28
4 Appuyez sur le bouton JOG.
FR
Page 65

Stockage d’informations sur les disques (fichiers de personnalisation)
Storing Information About CDs (Custom Files)
Lecture des disques auxquels est affecté le
même nom d’artiste (lecture d’artiste)
Vous pouvez effectuer une lecture continue ou
aléatoire des disques auxquels est affecté le même nom
d’artiste.
Lecture des disques auxquels
est affecté le même nom
d’artiste par simple pression
d’un bouton TOP ARTIST
1 Sélectionnez le mode de lecture de votre choix
avant de commencer la lecture.
(lecture de vedette)
Lorsque vous
sélectionnez
Le mode de lecture
aléatoire ALL DISKS
Le mode de lecture
continue 1 DISC
Le mode de lecture
continue ALBUM
Le mode de lecture
aléatoire ALL DISKS
Le mode de lecture
aléatoire 1 DISC
Le mode de lecture
aléatoire ALBUM
Le lecteur lit
Toutes les plages sur tous les
disques ayant reçu le même nom
d’artiste de façon consécutive
Toutes les plages sur le disque
spécifié ayant reçu le même nom
d’artiste de façon consécutive
Toutes les plages sur l’album
spécifié ayant reçu le même nom
d’artiste de façon consécutive
Toutes les plages sur tous les
disques ayant reçu le même nom
d’artiste de façon aléatoire
Toutes les plages sur le disque
spécifié ayant reçu le même nom
d’artiste de façon aléatoire
Toutes les plages sur l’album
spécifié ayant reçu le même nom
d’artiste de façon aléatoire
2 Appuyez sur ARTIST MODE.
La touche ARTIST MODE clignote.
3 Tournez le bouton JOG pour sélectionner le nom
d’artiste désiré.
4 Appuyez sur le bouton JOG.
La touche ARTIST MODE s’allume.
5 Tournez le bouton JOG pour sélectionner le disque
désiré, puis appuyez dessus.
La lecture d’artiste commence.
Vous devez préalablement affecter un nom d’artiste à
chaque bouton TOP ARTIST de 1 à 8.
Pour affecter un nom d’artiste à un bouton
TOP ARTIST
1 Appuyez sur MENU/NO.
2 Tournez le bouton JOG jusqu’à ce que “TOP ART.
SET?” s’affiche.
3 Appuyez sur le bouton JOG.
4 Tournez le bouton JOG pour sélectionner le bouton
TOP ARTIST désiré auquel un nom d’artiste doit
être affecté.
Pendant la sélection, le bouton sélectionné
s’allume et “NO ENTRY*” s’affiche.
* Quand un nom d’artiste est affecté au bouton
sélectionné, le nom d’artiste s’affiche.
5 Appuyez sur le bouton JOG.
6 Tournez le bouton JOG pour sélectionner le nom
d’artiste désiré, à affecter au bouton TOP ARTIST
sélectionné.
En tournant le bouton JOG dans le sens horaire, les
noms d’artistes apparaissent dans l’ordre
alphabétique. Tournez le bouton JOG dans le sens
anti-horaire pour aller dans l’ordre inverse.
Sélectionnez “NO ASSIGN?” pour annuler
l’affectation de nom d’artiste.
7 Appuyez sur le bouton JOG.
Pour annuler la lecture d’artiste
Appuyez sur la touche ARTIST MODE de sorte qu’elle
s’éteigne.
z Vous pouvez spécifier le disque à lire lorsque la
lecture d’artiste commence
Une fois le nom d’artiste sélectionné, tournez le bouton
JOG pour sélectionner le disque, puis appuyez dessus.
Remarques
• Vous ne pouvez pas sélectionner le nom d’artiste si aucun
disque n’est affecté à ce nom.
• Si aucun nom d’artiste n’est stocké, “NO ENTRY” s’affiche.
Pour lire des disques ayant reçu le même
nom d’artiste en utilisant les boutons TOP
ARTIST
1 Appuyez sur un des boutons TOP ARTIST de 1 à
8.
La lecture de vedette commence.
z Vous pouvez lire des disques affectés à des boutons
TOP ARTIST en utilisant la télécommande
1 Appuyez sur TOP ARTIST.
2 Appuyez sur la touche numérique de TOP ARTIST
souhaitée.
3 Appuyez sur ENTER pour démarrer la lecture.
Z
29
FR
Page 66

Utilisation du lecteur avec un autre composant
Utilisation du lecteur avec un autre composant
Contrôle d’un autre lecteur de CD (fonction Advanced Mega Control)
Cette unité peut contrôler un second lecteur de CD
(reportez-vous à la section “Connexion d’un autre
lecteur de CD”, page 8). Même lorsqu’un second
lecteur de CD est connecté, les commandes des deux
unités fonctionnent. Lorsque vous appuyez sur la
touche de lecture d’une des deux unités, le lecteur en
cours de fonctionnement s’arrête et le lecteur inactif est
lancé. Assurez-vous que le message “2nd DETECTED”
apparaît dans l’affichage de ce lecteur une fois les deux
lecteurs activés. Selon le lecteur, certaines fonctions du
second lecteur de CD peuvent ne pas être disponibles.
(par ex. sélection de l’album désiré ou d’une plage à
numéro de 99 ou plus avec les touches numériques
etc.).
Les commandes indiquées ci-dessous sont disponibles
lorsque le bouton MEGA CONTROL est allumé.
Pour contrôler le lecteur principal, appuyez sur MEGA
CONTROL de sorte que le bouton MEGA CONTROL
s’éteigne. Pour contrôler le second lecteur, appuyez sur
MEGA CONTROL de sorte que le bouton MEGA
CONTROL s’allume.
Remarque
Quand un second lecteur est raccordé au connecteur
CONTROL A1II (ou CONTROL A1) du lecteur principal, lisez
bien des fichiers MP3 sur le lecteur principal. Dans cette
configuration, les fichiers MP3 peuvent ne pas être lus
correctement sur le second lecteur.
m/M
1 Appuyez sur MEGA CONTROL sur ce lecteur.
Le bouton MEGA CONTROL et le message “2nd”
dans l’affichage s’allument. L’affichage indique le
numéro ou le nom du disque courant du second
lecteur.
2nd
*DISC-4 *** ***
ALL SDISC
PROGRAM 1 2 3 DELETE FILE FADE
Numéro ou nom du disque courant
H
X
Sélecteur
COMMAND
MODE
x
./>
CD2
CD3
GROUP
GROUPTRACK
SECSTEPMINAT.
HITAT.NEXT
DISC
REPEATSHUFFLE1
HI LIGHT
TEXTCDMULTI
CD1
30
2 Sélectionnez le mode de lecture de votre choix.
Boutons de mode de
lecture (CONTINUE/
SHUFFLE/PROGRAM/
REPEAT)
H
FR
MEGA
CONTROL
MENU/NO
l AMS L
xX
JOG
Pour programmer des plages, utilisez les
commandes du second lecteur.
3 Appuyez sur H sur ce lecteur pour commencer la
lecture.
La lecture commence et l’affichage indique le
disque courant, les numéros de plages et le temps
de lecture de la plage.
Pendant que le bouton MEGA CONTROL est
allumé, vous pouvez contrôler le second lecteur
avec les commandes de ce lecteur.
Pour contrôler à nouveau le lecteur principal
Appuyez sur MEGA CONTROL. Le bouton MEGA
CONTROL s’éteint et vous pouvez contrôler le lecteur
principal.
Pour contrôler directement le second lecteur à l’aide de la
télécommande fournie Z
Réglez CD1/2/3 de la télécommande sur CD3, qui
correspond à la position du sélecteur COMMAND MODE
situé sur le panneau arrière du second lecteur.
Page 67

Storing Information About CDs (Custom Files)
Utilisation du lecteur avec un autre composant
Storing Information About CDs (Custom Files)
Chargement des noms de disques du
second lecteur de CD
Si le second lecteur de CD est doté de la fonction de
nom de disque (voir page 23), vous pouvez charger les
noms de disques de ce second lecteur dans la mémoire
de ce lecteur et les afficher sur ce lecteur.
1 Appuyez sur MENU/NO.
2 Tournez le bouton JOG jusqu’à ce que le message
“LOAD 2ndNAME?” clignote.
ART.DISC
HITART.NEXT2nd
GROUPTRACK
SECSTEPMIN
LOAD* 2n NAdME?
1
ALL SDISC
PROGRAM 1 2 3 X-FADE DELETE
TEXTCDMULTI
NO DELAY
3 Appuyez sur le bouton JOG.
Ce lecteur commence le chargement. (Le
chargement prend environ une minute.)
Etiquetage des disques du second lecteur
de CD
Vous pouvez étiqueter les disques du second lecteur de
CD ou changer les noms de disques chargés à partir du
second lecteur.
REPEATSHUFFLE 1
CD2
CD1
GROUP
CD3
Lecture alternative (fonctions No-Delay Play/X-Fade Play)
Lorsque vous connectez un second lecteur, vous
pouvez lire les plages de ce lecteur et du second lecteur
alternativement, dans n’importe quel mode de lecture
(reportez-vous à la section “Connexion d’un autre
lecteur de CD”, page 8).
Sélectionnez l’une des options suivantes :
• No-Delay Play: Le lecteur courant change à chaque
plage. Chaque fois que le système passe à l’autre
lecteur, qui commence la lecture immédiatement
après que le lecteur précédent ait terminé la lecture
et sans qu’aucune pause dans le son n’ait lieu.
L’autre lecteur saute la position de lecture et
commence la lecture à partir de l’endroit où
commence le son.
• X-Fade Play: Le lecteur courant change à chaque
plage ou à l’intervalle spécifié. Vous pouvez
sélectionner l’intervalle 30, 60 ou 90 secondes.
Chaque fois que le système passe à l’autre lecteur, le
son des deux lecteurs est mélangé. Le lecteur courant
termine la lecture par une dégradation en sortie et le
nouveau lecteur la commence par une dégradation
en entrée.
X-FADE NO DELAY
1 Appuyez sur MEGA CONTROL.
La touche MEGA CONTROL s’allume.
2 Tournez le bouton JOG pour sélectionner le disque
auquel vous souhaitez affecter un nom.
Si l’emplacement de disque sélectionné ne contient
pas de disque, le message “NO DISC” s’affiche.
3 Appuyez sur MENU/NO.
Le message “NAME IN?” s’affiche.
4 Appuyez sur le bouton JOG.
5 Saisissez le nouveau nom de disque en suivant la
procédure de la section “Etiquetage de disques
(nom de disque)”, page 23.
Remarque
Les nouveaux noms de disques étant stockés dans la mémoire
de ce lecteur, vous ne pouvez pas les afficher sur le second
lecteur de CD.
H
1 Sélectionnez le disque et le mode de lecture désirés
pour chaque lecteur.
2 Lorsque vous sélectionnez No-Delay Play
Appuyez sur NO DELAY.
Le message “NO DELAY” s’affiche.
Lorsque vous sélectionnez X-Fade Play
Appuyez sur X-FADE.
Le message ”X-FADE” s’affiche.
Chaque fois que vous appuyez sur le bouton XFADE, les indications suivantes s’affichent :
tX-FADE off t at track end t after 30 sec
after 90 sec T after 60 sec T
Pour changer de lecteur chaque fois que la lecture
d’une plage est terminée, sélectionnez “at track
end.”
Pour changer de lecteur à l’intervalle spécifié,
appuyez sur X-FADE plusieurs fois de suite
jusqu’à affichage de l’intervalle souhaité.
(à suivre)
31
FR
Page 68

Utilisation du lecteur avec un autre composant
3 Appuyez sur H pour commencer la lecture.
Le bouton MEGA CONTROL s’allume lorsqu’une
plage du second lecteur est sélectionnée.
Contrôle du lecteur avec une autre unité
Pour annuler les fonctions No-Delay Play/X-Fade Play
Appuyez sur le bouton correspondant plusieurs fois de suite
jusqu’à affichage de “NO DELAY” ou “X-FADE”. Le lecteur
courant poursuit la lecture.
z Vous pouvez changer d’option (No-Delay ou X-Fade)
en cours de lecture
Appuyez sur le bouton correspondant (NO DELAY ou XFADE) en suivant la procédure de l’étape 2.
z Vous pouvez lancer X-Fade à n’importe quel endroit
de la plage
Appuyez sur FADER pendant l’exécution de la fonction
X-Fade Play.
Une fois en mode X-Fade, vous pouvez lancer ce mode à
tout moment manuellement. Vous ne pouvez pas
effectuer cette opération lorsque le son des deux lecteurs
est mélangé.
Remarques
• La lecture commence à partir du second lecteur si vous
lancez la lecture alors que le bouton MEGA CONTROL est
allumé.
• Lorsqu’un lecteur a lu tous les disques ou toutes les plages
avant l’autre lecteur, la lecture s’arrête.
• N’utilisez pas les commandes de l’autre lecteur pendant
l’exécution des fonctions No-Delay Play/X-Fade Play, car il
se peut qu’elles ne fonctionnent pas correctement.
Lorsque vous connectez le lecteur à une unité Sony
MD compatible avec la fonction Mega Control ou
utilisez une unité Sony MD via un logiciel tel que “MD
Editor,” vous devez configurer le lecteur comme suit :
MENU/NO
YES
JOG
1 Appuyez sur MENU/NO.
2 Tournez le bouton JOG jusqu’à ce que “CONTROL
A1 ?” s’affiche.
3 Appuyez sur YES.
“CONTROL A1??” s’affiche.
4 Appuyez sur YES.
Pour retourner à la configuration normale
Lorsque vous avez effectué les étapes 1 et 2 et que
"CONTROL A1II ?" est affiché, appuyez sur YES.
32
Remarques
• Vous ne pouvez effectuer l’opération ci-dessus qu’avec un
disque compris entre 1 et 200.
• Vous ne pouvez pas utiliser ce lecteur à partir d’un lecteur
non doté de la prise CONTROL A1II. Dans ce cas, utilisez
l’autre lecteur à partir de ce lecteur.
FR
Page 69

Utilisation du système de contrôle CONTROL A1II
Informations complémentairesInformations complémentaires
Exemple
Ce lecteur est compatible avec le système de contrôle
CONTROL A1II.
Le système de contrôle CONTROL A1II a été concu
pour simplifier les opérations eds systèmes audio
composés de composants Sony séparés. Les connexions
CONTROL A1II procurent une voie pour la
transmission de signaux de contrôle permettant le
fonctionnement automatique et de fonctions de
contrôle normalement associés avec les systèmes
intégrés.
Actuellement, les connexions CONTROL A1II entre
une platine MD, un lecteur de CD, un amplificateur
(récepteur) et une platine cassette Sony permettent la
sélection de fonctions et l’enregistrement synchronisé.
Dans l’avenir, les connexions CONTROL A1II
opéreront comme un bus multifonction vous
permettant de contrôler différentes fonctions de chaque
composant.
Remarque
Le système de commande CONTROL A1II est conçu pour
maintenir la compatibilité ascendante avec la mise à jour du
système de commande pour traiter de nouvelles fonctions.
Dans ce cas, les composants plus anciens ne seront toutefois
pas compatibles avec les nouvelles fonctions.
Compatibilité CONTROL A1II et CONTROL A1
Le système de commande CONTROL A1 a été mis à jour au
système CONTROL A1II, qui est le système standard pour le
changeur de CD 300 disques Sony et les autres composants
récents Sony.
Les composants avec prises CONTROL A1 sont compatibles
avec les composants avec prises CONTROL A1II, et peuvent
être connectés les uns aux autres. En principe, la plupart des
fonctions disponibles sur le système de commande
CONTROL A1 seront disponibles sur le système de
commande CONTROL A1II. Mais lors des connexions entre
des composants avec prises CONTROL A1 et composants
avec prises CONTROL A1II, le nombre de fonctions
contrôlables peut être limité selon le composant. Voir le mode
d’emploi fourni avec le ou les composants composants pour
les détails.
Amplificateur Lecteur
de CD
Comme les signaux de commande passent dans les deux sens
dans le système de commande CONTROL A1II, il n’y a donc
pas de distinction entre les prises IN et OUT. Si un composant
a plus d’une prise CONTROL A1II, vous pouvez en utiliser
une, ou bien connecter différents composants à chaque prise.
PlatineMDAutre
composant
Câble de connexion
Quand un composant compatible CONTROL A1II n’est pas
fourni avec un câble de connexion, utilisez un câble à
minifiche (2P) monorale disponible dans le commerce de
moins de 2 m de long, sans résistance (par ex. RK-G69HG
Sony).
Fonctions de base du système de
commande CONTROL A1II
Sélection automatique de fonction
Quand vous connectez des composants compatibles
CONTROL A1II Sony avec des câbles CONTROL A1II (non
fournis), le sélecteur de fonction de l’amplificateur (ou
récepteur) commute automatiquement à l’entrée correcte
quand vous appuyez sur la touche de lecture de l’un des
composants raccordés.
(Par exemple, quand vous appuyez sur H (touche de lecture)
sur le lecteur de CD alors que la platine MD est en cours de
lecture, le sélecteur de fonction sur l’amplificateur commute
de MD à CD.)
Remarques
• Cette fonction est opérante seulement quand les
composants sont connectés aux entrées de l’amplificateur
(ou récepteur) conformément aux noms des touches de
fonctions. Certains récepteurs vous permettent de
commuter les noms des touches de fonction. Dans ce cas,
consultez le mode d’emploi fourni avec le récepteur.
•A l’enregistrement, ne lisez aucun composant autre que la
source d’enregistrement. Cela pourrait provoquer
l’activation de la sélection automatique de fonction.
Connexion du système de commande
CONTROL A1II
Connectez les câbles à minifiches (2P) monorales en
série aux prises CONTROL A1II à l’arrière de chaque
composant. Vous pouvez connecter jusqu’à un
maximum de 10 composants compatibles CONTROL
A1II dans n’importe quel ordre. Mais vous pouvez
connecter seulement un seul composant de chaque
type (par ex. 1 lecteur de CD, 1 platine MD, 1 platine
cassette et 1 récepteur). (Il sera peut-être possible de
raccorder plus d’un lecteur de CD ou d’une platine
MD, selon le modèle. Voir le mode d’emploi fourni
avec les composants respectifs pour les détails.)
33
FR
Page 70

Informations complémentaires
Enregistrement synchronisé
Cette fonction vous permet d’effectuer un enregistrement
synchronisé entre le CD et le composant d’enregistrement.
Précautions
1 Définissez le sélecteur de source de l’amplificateur
(ou récepteur) sur CD.
2 Définissez le CD au mode pause d’enregistrement
(vérifiez que les deux indicateurs H et X
s’allument ensemble).
3 Définissez le composant d’enregistrement au mode
pause d’enregistrement.
4 Appuyez sur X sur la platine.
Le CD est automatiquement libéré du mode de
pause, et l’enregistrement commence peu après. A
la fin de la lecture du CD, l’enregistrement s’arrête.
Conseil
Certains composants enregistreurs peuvent être dotés d’une
fonction d’enregistrement synchronisé spéciale employant le
système de commande CONTROL A1II, par exemple “Copie
synchro de CD”. Dans ce cas, consultez le mode d’emploi
fourni avec le composant récepteur.
Remarque
Ne définissez pas le mode de pause pour plus d’un
composant.
Sécurité
• Attention –– L’utilisation d’instruments optiques avec ce
produit présente des risques accrus pour les yeux.
• Si des objets solides ou des liquides pénètrent à l’intérieur
du châssis, débranchez le lecteur et faites-le vérifier par un
technicien qualifié avant de le remettre en service.
Sources d’alimentation
• Avant d’utiliser le lecteur, vérifiez que la tension de
fonctionnement de ce dernier est identique à celle du
secteur. La tension de fonctionnement est indiquée sur la
plaquette signalétique située à l’arrière du lecteur.
• L’appareil n’est pas déconnecté de la source d’alimentation
s’il est branché à la prise murale, même si l’appareil luimême a été désactivé.
• Si vous n’allez pas utiliser le lecteur avant longtemps,
assurez-vous de le débrancher de la prise murale. Pour
déconnecter le cordon d’alimentation, saisissez la prise. Ne
tirez jamais sur le cordon.
• Ne remplacez le cordon d’alimentation que dans un centre
de réparation autorisé.
Emplacement
• Placez le lecteur dans un endroit suffisamment ventilé pour
éviter une accumulation de chaleur à l’intérieur.
• Ne le placez pas sur une surface molle (par exemple, un
tapis) susceptible d’obstruer les orifices de ventilation situés
au-dessous.
• Ne placez pas le lecteur à proximité de sources de chaleur
ni dans un endroit directement exposé au soleil, à des
poussières excessives ou à des chocs mécaniques.
Fonctionnement
• Si le lecteur est déplacé d’un endroit froid vers un endroit
chaud ou placé dans un endroit très humide, il peut
survenir une condensation d'humidité au niveau des
lentilles à l’intérieur. Le lecteur risque alors de ne pas
fonctionner correctement. Dans ce cas, laissez-le allumé
pendant environ une heure jusqu’à évaporation de
l'humidité.
Réglage du volume
• N’augmentez pas le volume si vous êtes en train d’écouter
un passage présentant des entrées de niveau très bas ou ne
présentant aucun signal audio car vous risqueriez
d’endommager les haut-parleurs lors de la lecture d’un
passage avec entrée de niveau très élevé.
Nettoyage
• Nettoyez le châssis, le panneau et les commandes à l’aide
d’un chiffon doux légèrement imbibé d’une solution
détergente non agressive. N’utilisez aucun tampon abrasif
aucune poudre à récurer ni aucun solvant tel que de l’alcool
ou du benzène.
Transport
• Lorsque vous transportez le lecteur, ouvrez le panneau
frontal et retirez-en tous les disques, puis mette le hors
tension.
34
Pour toute question ou tout problème relatif au lecteur,
FR
veuillez contacter votre revendeur Sony.
Page 71

Guide de dépannage
Si l’un des problèmes suivants survient pendant
l’utilisation du lecteur, reportez-vous à ce guide de
dépannage pour le résoudre. Si le problème persiste,
contactez votre revendeur Sony.
Il n’y a pas de son.
,Vérifiez que le lecteur est correctement
connecté.
,Assurez-vous que vous utilisez l’amplificateur
correctement.
Le lecteur ne lit pas le disque.
,Aucun disque n’est inséré dans le lecteur (le
message “–NO DISC–” s’affiche). Insérez un
disque.
,Insérez le disque, la face libellée tournée vers la
droite.
,Nettoyez le disque (voir page 3).
,Une condensation d'humidité a eu lieu à
l’intérieur du lecteur. Retirez le disque et laissez
le lecteur allumé pendant environ une heure
(voir page 34).
La télécommande ne fonctionne pas.
,Retirez les obstacles situés entre la
télécommande et le lecteur.
,Pointez la télécommande vers le capteur de
télécommande
,Assurez-vous d’avoir configuré correctement la
télécommande.
,Remplacez toutes les piles de la télécommande
par des nouvelles lorsqu’elles sont faibles.
,Définissez le mode de contrôle de la
télécommande en fonction de celui du lecteur.
du lecteur.
Informations complémentaires
La lecture des fichiers MP3 prend plus de temps que celle
des autres.
,Le commencement de la lecture exige plus de
temps pour les disques suivants.
– un disque enregistré avec une arborescence
complexe
– un disque enregistré en multisession
– un disque auquel des données peuvent être
ajoutées (non finalisé).
A propos du marqueur ID3 version 2
Bien qu’il ne s’agisse pas d’une anomalie, ce
qui suit survient à la lecture d’un fichier MP3
contenant un marqueur ID3 ver.2:
– Au saut d’une partie du marqueur ID3
ver.2 (au début de la plage), le son n’est pas
sorti. Le temps du saut varie selon la
capacité du marqueur ID3 ver. 2.
Exemple: A 64 ko, il est d’environ 2
secondes (avec RealJukebox).
– Le temps de lecture écoulé affiché au saut
d’une partie du marqueur ID3 ver.2 est
imprécis. Pour les fichiers MP3 à débit
binaire autre que 128 kbps, le temps n’est
pas affiché correctement pendant la lecture.
– Quand un fichier MP3 est créé avec un
logiciel de conversion MP3 (ex.
RealJukebox*), le marqueur ID3 ver. 2 sera
automatiquement inscrit.
* “RealJukebox est une marque de
fabrique déposée de RealNetworks,
Inc.”
En décembre 2001
Le lecteur ne fonctionne pas correctement.
,Les puces du micro-ordinateur ne fonctionnent
peut-être pas correctement. Débranchez le
cordon d’alimentation, puis rebranchez-le à la
prise murale pour réinitialiser le lecteur.
Les fichiers MP3 ne peuvent pas être lus.
,L’enregistrement n’a pas été exécuté
conformément au format niveau 1 ou 2 ISO
9660, ou Joliet ou Romeo dans le format
d’expansion.
,L’extension de fichier “.MP3” n’est pas ajoutée
au nom de fichier.
,Les fichiers ne sont pas stockés en format MP3.
35
FR
Page 72

Informations complémentaires
Spécifications
Lecteur de disque compact
Laser Laser semi-conducteur (λ = 780 nm)
Sortie laser Max 44,6 µW*
Réponse de fréquence 20 Hz à 20 kHz ±0,5 dB
Rapport signal/bruit Sup. à 108 dB
Plage dynamique Plus de 87 dB
Distorsion harmonique Moins de 0,009%
Durée d’émission : continue
* Il s’agit de la valeur mesurée à une
distance de 200 mm à partir de la
surface de la lentille de l’objectif sur
le bloc optique avec ouverture de
7 mm.
Sortie :
LINE OUT
DIGITAL OUT
(OPTICAL)
Type de
prise
Prises
phono
Connecteur
de sortie
optique
Niveau de
sortie
maximum
2 V (à 50
kilohms)
–18 dBm
Impédance de charge
Sup. à 10 kilohms
Longueur d’onde :
660 nm
Généralités
Alimentation
Lieu d’acquisition
Canada
Europe
Alimentation
120 V CA, 60 Hz
230 V CA, 50/60 Hz
36
Consommation électrique 16 W
1 W (en mode économie d’énergie)
Dimensions (approximatives) 430 × 189 × 537 mm
(l/h/p) (17 × 7 1/2 × 21 1/4 in.) pièces en
saillie incluses
Poids (approximatif) 8,8 kg (19 lbs 7 oz.)
Accessoires fournis
Reportez-vous à la page 6.
La conception et les spécifications sont sujettes à modifications
sans préavis.
FR
Page 73

Index
Index
A
Advanced Mega Control
(fonction) 30
AMS 13
Automatic Music Senser Voir
AMS
B
Bouton JOG 9
Branchement
Présentation 6
Système 6
C
CD TEXT 13
Changement
Nom d’artiste 27
Nom de disque 24
Connexions
Autre lecteur de CD 8
Présentation 6
Système 6
Contrôle d’un autre lecteur CD
30
D
Déballage 6
Dégradation 22
Dépannage 35
E
Effacement
Fichiers de personnalisation
28
Nom d’artiste 28
Nom de disque 24
Etiquetage d’un disque 23
F, G, H
Fichier MP3 3
Fichiers de personnalisation
Fichier d’artiste 27
Nom de disque 23
Utilisation 23
I, J, K
Insertion de CD 9
L
Lecture
Lecture aléatoire 17
Lecture alternative 31
Lecture avec programmateur
22
Lecture continue 12
Lecture de vedette 29
Lecture nom d’artiste 29
Lecture programmée 19
Lecture répétée 17
X-Fade Play 31
Localisation
Directe 16
En passant en revue 13
Par contrôle 13
Via AMS 13
M
Manipulation des CD 3
N, O
No-Delay Play 31
Nom d’artiste 7
Nom de disque 23
P, Q
Programme
Changement 20
Création 19
Effacement 20
Vérification 20
R
Recherche de nom 16
Recherche historique 16
Recherche Voir Localisation
Répétition 17
S
Spécification du disque
suivant 17
Stockage des informations sur
les CD 23
T, U, V, W
Table rotative 9
Télécommande 6
X, Y, Z
X-Fade Play 31
Nom des commandes
Boutons
ALBUM SELECT 12
ALBUM +/– 12
ARTIST MODE 29
CHAR 25
CHECK 20
CLEAR 20
CONTINUE 12
DEL 26
DISC 16
DISC +/– 16
DISPLAY
ENTER 16
FADER 22
HISTORY 16
HISTORY MODE 16
MEGA CONTROL 30
MENU/NO 9, 23
NAME EDIT/SELECT 25
NAME SEARCH 16
NO DELAY 31
Numérique 16
OPEN/CLOSE 9
PROGRAM 16
REPEAT 18
SHUFFLE 18
SPACE 25
TIME 14
TOP ARTIST 1–8 29
X-FADE 31
YES 24, 32
H 12
X 12
x 12
A 11
m/M 13
./> 13
> 10 13
+100 15
Commande
Bouton JOG 9
l AMS L 13
Commutateurs
COMMAND MODE 30
TIMER 22
?/1 12
Prises
CONTROL A1II 7
DIGITAL OUT (OPTICAL) 7
2ND CD IN 8
Autres
Affichage 13
Logements de disque 9
Couvercle frontal 9
Table rotative 9
6
37
FR
Page 74

38
FR
Page 75

39
FR
Page 76

40
Sony Corporation Printed in Malaysia
GB
 Loading...