

Page 1

CAMERA ADAPTOR
CA-530
電気製品は、安全のための注意事項を守らないと、
警告
このオペレーションマニュアルには、事故を防ぐための重要な注意事項
と製品の取り扱いかたを示してあります。このオペレーションマニュア
ルをよくお読みのうえ、製品を安全にお使いください。お読みになった
あとは、いつでも見られるところに必ず保管してください。
OPERATION MANUAL
火災や人身事故になることがあります。
[Japanese/English]
1st Edition (Revised 1)
Serial No. 15001 and Higher (SY)
Serial No. 35001 and Higher (J)
Page 2
安全のために
電気製品は、安全のための注意事項を守らないと、火災や感電などにより
死亡や大けがなど人身事故につながることがあり、危険です。
事故を防ぐために次のことを必ずお守りください。
安全のための注意事項を守る
2(J)〜5(J)ページの注意事項をよくお読みください。
定期点検を実施する
長期間安全に使用していただくために、定期点検を実施することをおすす
めします。点検の内容や費用については、ソニーのサービス担当者または
営業担当者にご相談ください。
故障したら使用を中止する
ソニーのサービス担当者、または営業担当者にご連絡ください。
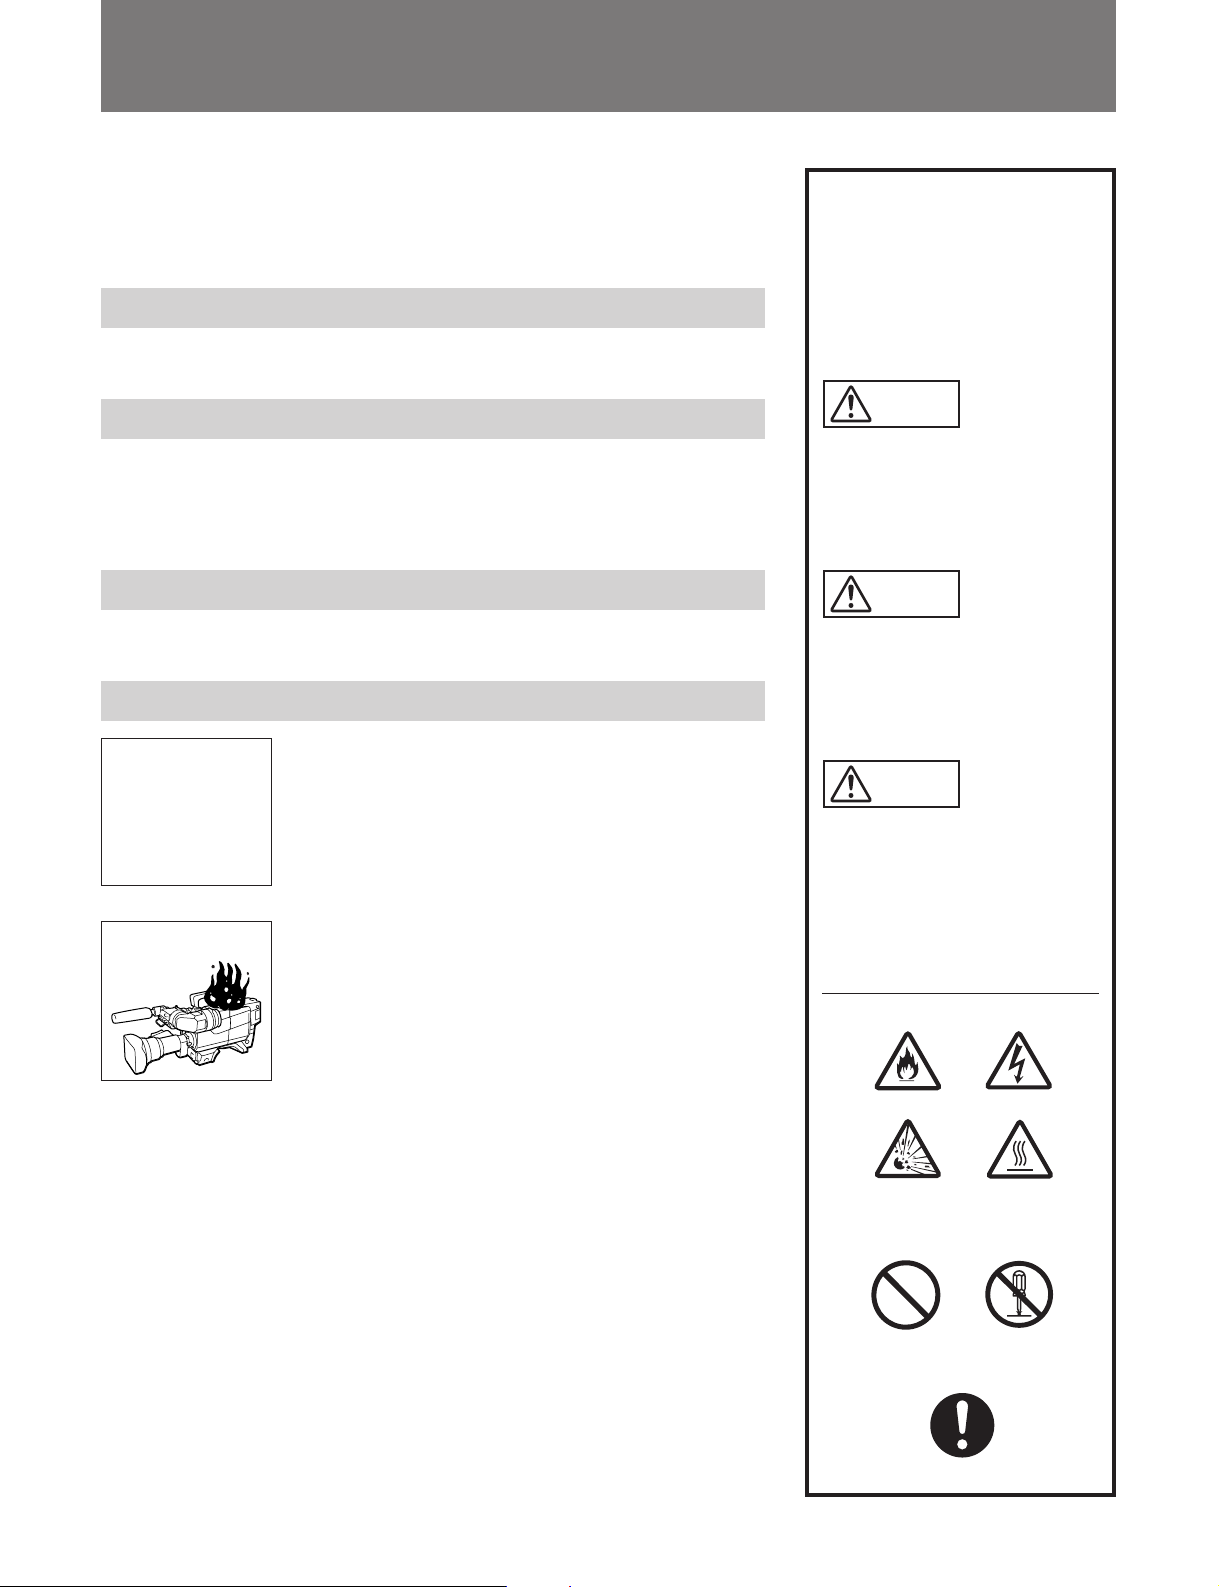
万一、異常が起きたら
1 電源を切る。
異常な音、
•
におい、煙
が出たら
落下させた
•
ら
炎が出たら
/
2 DC電源接続コードおよびVTR接続コードを抜
く。
3 ソニーのサービス担当者、または営業担当者
に修理を依頼する。
すぐに電源を切り、消火する。
/
警告表示の意味
このオペレーションマニュア
ルおよび製品では、次のよう
な表示をしています。表示の
内容をよく理解してから本文
をお読みください。
危険
この表示の注意事項を守らな
いと、火災・感電・破裂など
により死亡や大けがになるこ
とがあります。
警告
この表示の注意事項を守らな
いと、火災や感電などにより
死亡や大けがなど人身事故に
つながることがあります。
注意
この表示の注意事項を守らない
と、感電やその他の事故により
けがをしたり周辺の物品に損害
を与えたりすることがありま
す。
注意を促す記号
火災
破裂
行為を禁止する記号
禁止
行為を指示する記号
強制
感電
高温
分解禁止
Page 3

目次
警告 ......................................................................................................................
注意 ......................................................................................................................
電池についての安全上のご注意 .............................................................................
概要 ...........................................................................................................................
各部の名称と働き ....................................................................................................
準備 .........................................................................................................................
カ ラービデオカメラBVP-550への取り付け ...................................................... 10 (J)
付属のケー ブルホルダーの使いかた .............................................................. 11 (J)
接続 .........................................................................................................................
接続できる機器 ................................................................................................. 12 (J)
電源について .................................................................................................... 13 (J)
自己診断............................................................................................................ 14 (J)
仕様 .........................................................................................................................
2 (J)
3 (J)
4 (J)
6 (J)
7 (J)
10 (J)
12 (J)
16 (J)
日
本
語
1 (J)
Page 4
警告
分解禁止
禁止
禁止
下記の注意を守らないと、
感電火災
火災や感電により死亡や大けが につながることがあります。
分解しない、改造しない
分解したり、改造したりすると、感電の原因となります。
内部に水や異物を入れない
水や異物が入ると火災や感電の原因となります。
万一、水や異物が入ったときは、すぐに電源を切り、VTR接続ケーブルや
D C 電源ケーブルを抜いて、ソニーのサービス担当者または営業担当者に
ご相談ください。
VTR接続ケーブルやDC電源ケーブルを傷つけない
VT R接続ケーブルやDC 電源ケーブルを傷つけると、火災や感電の原因と
なります。
・ ケーブルを加工したり、傷つけたりしない。
・ 重いものをのせたり、引っ張ったりしない。
・ 熱器具に近づけたり、加熱したりしない。
・ ケーブルを抜くときは、必ずプラグを持って抜く。
万一、ケーブルが傷んだら、ソニーのサービス担当者に交換をご依頼くだ
さい。
禁止
強制
油煙、湯気、湿気、ほこりの多い場所では設置•使用しない
上記のような場所で設置・使用すると、火災や感電の原因となります。
指定された機器
指定以外の機器を使用すると、火災や感電の原因となります。
(AC-550、DVW-250
など)を使用する
2(J)
Page 5

注意
下記の注意を守らないと、
けがをしたり周辺の物品に損害を与えることがあります。
カメラ側の固定ねじを締める
カメラと一体化して運用するときは、カメラのショルダーパット部分にあ
る固定ねじをしっかり締めてください。固定ねじを締めずに使用するとカ
強制
メラとカメラアダプターが分離し、落下した機器でけがをすることがあり
ます。
3(J)
Page 6
電池についての安全上のご注意
ここでは、本機での使用が可能なソニー製ニカド電池とリチウムイオン電
池についての注意事項を記載しています。
万一、異常が起きたら
・ 煙が出たら
1機器の電源スイッチを切るか、バッテリーチャージャーの電源プラグ
を抜く。
2ソニーのサービス担当者に連絡する。
・ 電池の液が目に入ったら
すぐきれいな水で洗い、ただちに医師の治療を受ける。
・ 電池の液が皮膚や衣服に付いたら
すぐにきれいな水で洗い流す。
・ バッテリー収納部内で液が漏れたら
よくふき取ってから、新しい電池を入れる。
下記の注意事項を守らないと、破裂・発火・発熱・液漏れにより、死亡や
危険
大けがになることがあります。
警告
破裂
破裂
高温
高温
・ 充電には、ソニーの専用バッテリーチャージャーを使用する。
充電のしかたについては、バッテリーチャージャーの取扱説明書をよく
お読みください。
・ 火中に投入、加熱、はんだ付け、分解、改造をしない。
・ 分解、改造をしない。
・ 直射日光の当たるところ、炎天下の車内、ストーブのそばなど高温の場
所で、使用・放置・充電をしない。
・ ハンマーでたたくなどの強い衝撃を与えたり、踏みつけたりしない。
・ 接点部や‘ 極と’ 極をショートさせたり、金属製のものと一緒に携帯・
保管をしない。
下記の注意事項を守らないと、破裂・発熱・液漏れにより、死亡や大けが
などの人身事故になることがあります。
・ 所定の充電時間を超えても充電が完了しない場合は、充電をやめる。
・ 電池使用中や充電、保管時に異臭がしたり、発熱・液漏れ・変色・変形
などがあったときは、すぐに使用や充電をやめ、火気から遠ざける。
4(J)
Page 7

注意
下記の注意事項を守らないと、破裂・液漏れにより、けがをしたり周辺の
物品に損害を与えたりすることがあります。
破裂
・ 投げつけない。
・ 電池を使い切ったとき、長期間使わないときは、取り出しておいてくだ
さい。
・ 水や海水につけたり、濡らしたりしない。
5(J)
Page 8

概要
デジタル/アナログ信号伝送方式
低消費電力
各種入出力コネクターを装備
本機はカ ラービデオカメ ラBVP-550にポータブルVTRDVW-250やBVW-50などを接続す
るためのアダプ ターです。本機はBVP-550と一体化して使用します。
本機は以下のような特長を持っています。
デジタルとアナログのコ ンポーネ ント (Y/R−Y/B−Y) 信号およびアナロ グコンポジット
(VBS)信号による伝送を行います。
接続されたVTRに応じて、出力信号が自動的に切り換わります。
消費電力は約6Wです。省電力モードにして2W程度低減することができます。
• DC電源入出力コネクター
• R CP 接続コネクター
• V TR 接続コネクター
• SDI出力コネクター
• モニタービデオ出力コネク タ ー
• マイ ク入 力コネクター
• イ ヤホンジャ ッ ク
• 外部同期信号入力コネクター
6(J)
Page 9
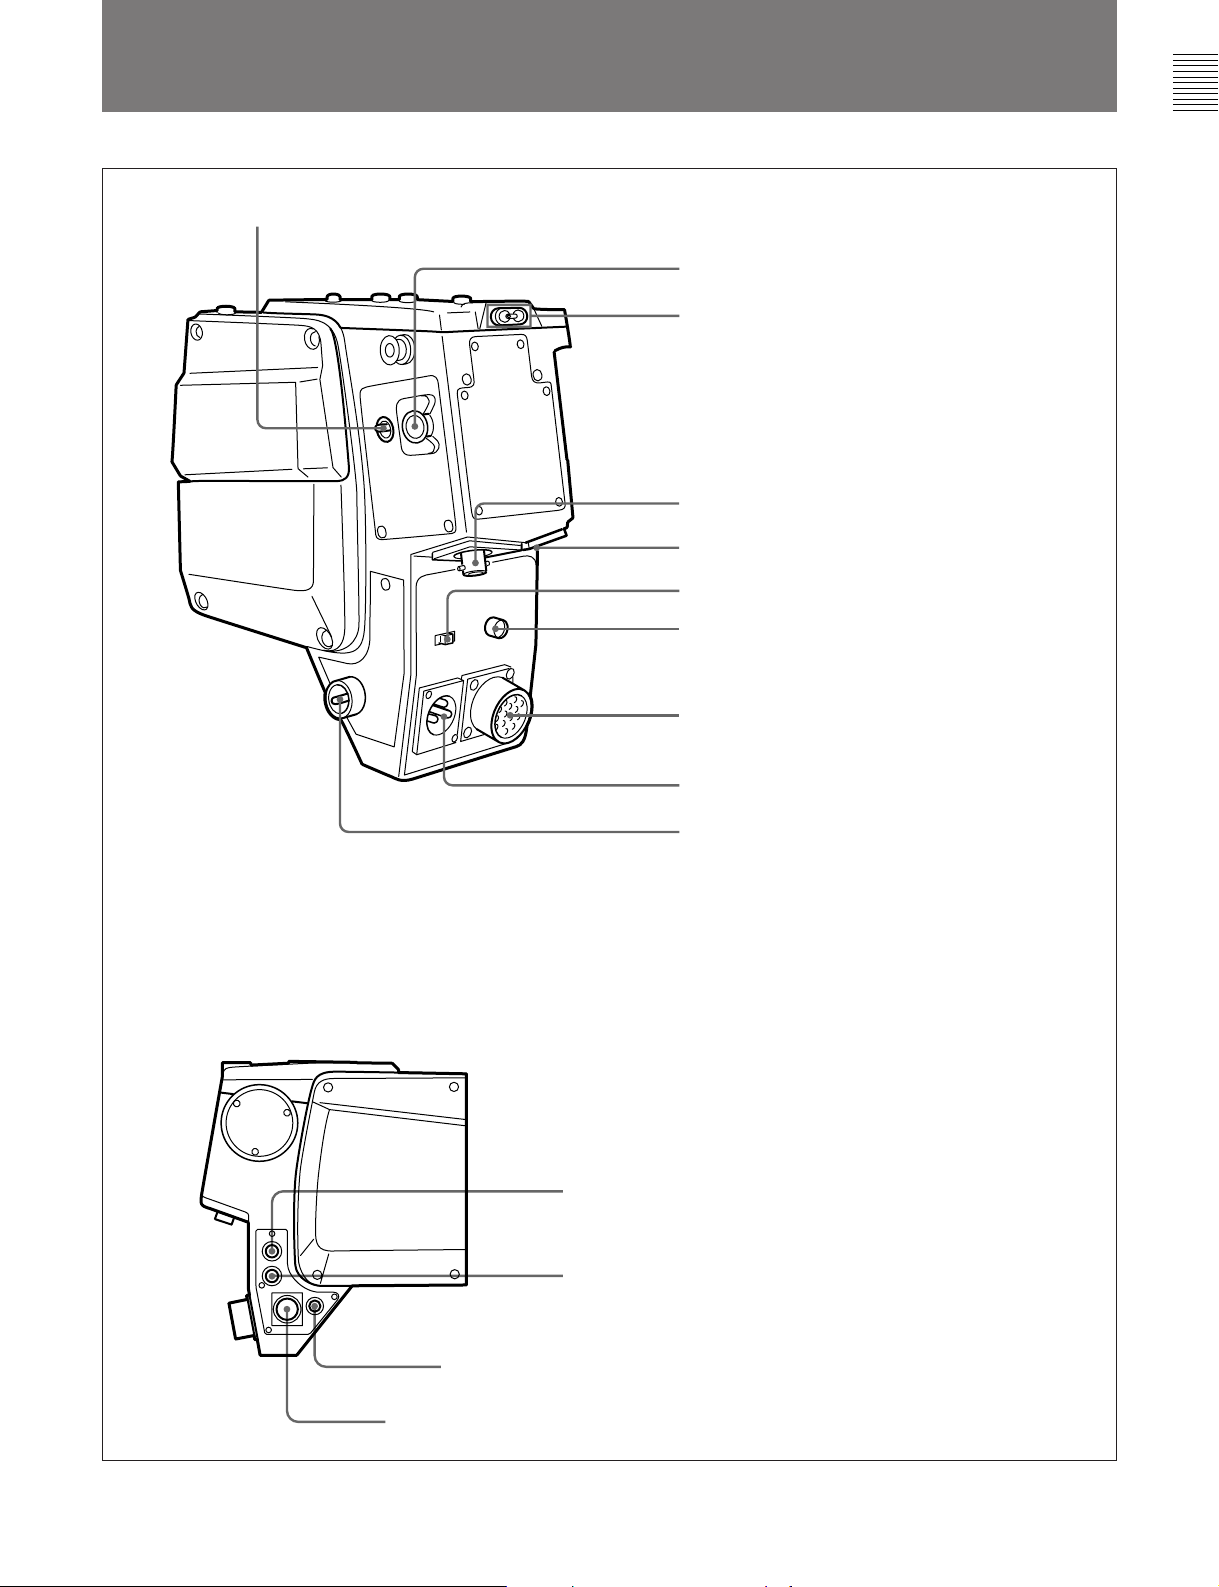
各部の名称と働き
1 AUDIO IND
スイッチ
2 MIC LEVEL
3 TALLY
4 SERIAL OUT
5 EARPHONEジャック
6 MIC POWER
7 REMOTE
8 VTR
9 MICコネクター
調整つまみ
ランプと
コネクター
コネクター
TALLY
コネクター
スイッチ
スイッチ
!£ DC OUT
!¡ GENLOCK IN
!™ MONITOR
コネクター
0 POWER
コネクター
コネクター
スイッチ
!¢ DC IN
コネクター
7(J)
Page 10

各部の名称と働き
1 AUDIO IND(
以下の2つのマイク入力のいずれかを選択します。
:BVP-550のMICINコネクターからのマイク入力
CH1
:本機のMICコネク ターからのマイ ク入力
CH2
本スイッチによる選択に応じて、下記の各音声信号が切り換わり
ます。
•ビ ューファインダー画面上にレベル表示するマイク音声
• VTRへ送出するアナログ音声信号
• EARPHONEジャック5から モニターするマイク音声(内部基板
でマイク音声が選択されている場合のみ。「5 EARPHONE
ジャック」の項参照。)
MIC LEVEL(
2
本機のSDI出力信号に重畳されるマイク音声レベルを調整しま
す。レベル調整した音声は、内部基板上のスイッチの設定に応じ
て、EARPHONEジャックからモニターするこ とができます
(「5EARPHONEジャック」の項参照)。また、 音声レベルはビュー
ファインダー画面上の音声レベル表示で確認することができま
す。
◆ ビューファイ ンダー画面上の音声レベル表示について詳しくは、BVP550の取扱説明書を参照してください。
3 TALLY(
TALLYスイッチがONのとき、TALLYランプは以下のように機能し
ます。
点滅:本機に接続したバッテリーの電圧が低下した、または
VTR側からバッテリー電圧低下信号を受信した。
点灯:本 機に 接 続した バッテリーが 完 全に 消 耗した、または
VTR側からバッテリー消耗信号を受信した。
TALLYスイッチがOFFのとき、TALLYランプは機能しません。
SERIAL OUT(
4
型
)
SMPTE259M規格のデジタル信号を出力します。SDI入力コネク
タ ー を備 えた機器(ビデオエディターなど)を接続 することができま
す。同軸ケーブル(インピーダンス75Ω)を使用し200mまでの伝送
が可能です。
POWERスイッチの設定がSDIOFFのときは使用できません。
オーディオ選択/レベル表示)スイッチ
マイク音声レベル)調整つまみ
タリー)ランプと
シリアルデータ出力)コネクター
TALLY
スイッチ
(BNC
5 EARPHONE(
イヤホンを接続します。内部基板上のスイッチの設定に応じて
VTR側からの音声またはカメラ側からのマイク入力音声のいずれ
かをモニタ ーすること ができます。出荷時の設定ではVTR側から
の音声がモニターできます。
◆ 内部基板上のスイッチの設定については、ソニーのサー ビス担当者に
お問い合わせください。
6 MIC POWER(
本機にDC+48Vファントム給電方式で動作するマイクを接 続し、
電源を供給するとき+48Vに設定します。
REMOTE(
7
リモー トコントロールパネルRCP-700シリーズまたはリモートコント
ロールユニットRM-B150を接続することができます。
RCP-700シリーズは別売りのCCA-5-10またはCCA-5-3ケーブル、
RM-B150はRM-B150に付属の専用ケーブルで接続します。
コネクター
VTR
8
映像信号、音声信号、コン トロール信号、電源などの入出力コネク
ターです。
VTRやACアダプターのCAMERAコネクターと接続します。
POWERスイッチ 0の設定がSDI OFFのときは、SDI信号は出力
されません。アナログ信号のみの出力となります。
マイク)コネクター
MIC (
9
外部マイク を接続します。
BVP-550のMICINコネクターと本機 のM ICコネクターに接続する
外部マイクは、それぞれAUDIO INDスイッチ1 のCH1とCH2に
対応します。
ファントム給電方式対応の外部マイクに電源(+48V)を供給する
場合は、MICPOWERスイッチ 6を+48Vに設定します。
POWER(電源)
!º
電源供給を切り換えます。
1 SDI OFF:省電力モードになり ます。デジタル系の電源が遮断
され、アナログ系のみ機能します。
¬:電源が遮断されます。本機は機能しません。
1 SDI ON:電源が供給され、本機全体が機能します。
イヤホン)ジャック
マイク電源)スイッチ
リモート)コネクター(8ピン
(26ピン)
(XLR型3ピン)
スイッチ
)
8(J)
Page 11

!¡ GENLOCK IN(
外部同期信号の入力コネクターです。
外部同期信号入力)コネクター
(BNC型)
MONITOR(
!™
内部基板上のスイッチの設定に応じてコンポジットビデオ(VBS)
信号またはモニター出力信号(BVP-550のビューファインダーへ出
力される信号と同じ) のいずれかを出力します。出荷時の設定で
は、モニター出力信号が出力されます。
◆ モニター出力信号について詳しくはBVP-550の取扱説明書をご覧くだ
さい。
◆ 内部基板上のスイッチの設定については、ソニーのサービス担当者に
お問い合わせください。
!£ DC OUT(DC
DC10.5V〜17V、最大200mAの電源出力コネクターです。
ご注意
消費電流が200mA以上の機器を接続すると、本機が故障するこ
とがあります。
DC IN(DC
!¢
ACアダプターまたはバッテ リ ーケース を接続します。
モニタービデオ出力)コネクター
電源出力)コネクター(4ピン
電源入力)コネクター(4ピン
)
(BNC型)
)
ご注意
VTRと接続していて、かつDCINコネクターに外部電源を接続す
ると、DCINコネクタ ーからの電源が優先されて供給されます。
9(J)
Page 12

準備
カラービデオカメラBVP-550への取り付け
以下のように組み立てると、BVP-550と本機の68ピンコネクター同士が接続されます。
1 BVP-550後部に本機を取り付ける。
上部を先に引っかけてから 、下部の端子部をカチッ と手ごたえがするまで押し込みま
す。
BVP-550
2 コインなどでネジを締める。
ネジを締める
から取り外すには
BVP-550のネジを止まるところまで ゆるめた 後、ネジを押し上げながら本機を取り外しま
す。
10(J)
ネジをゆるめる。
Page 13

付属のケーブルホルダーの使いかた
1 付属のM3ネジ(2本)で、ケーブルホルダ ーを取り付ける。
2 ケーブルに巻きつける。
M3ネジ(付属)
ケーブルホルダー
ケーブル
ケーブルホルダーからケーブルを外すには
引く
引き上げながら
11(J)
Page 14

接続
接続できる機器
本機に接続できる機器の例を以下に示します。
RM-B150
リモートコント
ロールユニット
ビデオモニター
RCP-700シリーズ
リモートコント
ロールパネル
マイクロホン
入力端子付き
SDI
エディターなど
MIC
REMOTE
SERIAL OUT
VTR DC IN
CA-530
ポータブルカメラ
BVP-550
アダプターAC-500/550
AC
リチウムイオンバッ
テリーアダプター
BKP-L551
ポータブルVTR DVW-250
VTRアダプターVA-5
ポータブルVTR BVV-5
接続されたVTRに応じて、出力ビデオ信号が自動的に切り換わります。
ポータブルVTR BVW-50
ポータブルVTR DVR-2
12(J)
デジタル信号
アナログ信号
(SDI)
Page 15

電源について
バッテリーパック使用時
D C I Nコネクターに電 源を接 続した場 合は、その電源が使用されます。その他の場合は、
本機に接続されたVTRから電源が供給されます。
ご注意
•ビューファインダーBVF-55は消費電力が大きいため、ポータブ ルV TRから電源を供給す
るときは使用できません。
• 本機とVTR間を10mのCCZケーブルで接続するときは、ケーブルによる損失が大き くな
るため、バッテリーによる運用時間が短くなることがあります。
バッテリーパックを使って 電源を 供給 する場 合は、 バッテリ ーパックをバッテリーケースに
収納し、本体に付属のスペーサー を用いて バッテリーケースを取り付けます。その後、バッ
テリ ーケースをD C INコネクターに接続します。
◆ バ ッ テリー ケー スの取 り 付けかたは、バッテ リーケース に付属のオペレーションマニュアルをご覧く
ださい。
バッテリーパックBP-90A
接続には、バッテリーケースDC-300を使います。
リチウムイオンバッテリーパック
接続には、リチウムイオンバッテリ ーアダプターBKP-L551を使います。
ご注意
バッテリ ーケースDC-L1/L90は直接CA-530に取り付けることはできません。
BP-L60/L90
13(J)
Page 16

自己診断
BVP-550または本機の基板に異常が検出されると、ビューフ ァインダー画面右上に「?」が
表示されます。異常が検出された基板は、BVP-550のOPERATIONメニューの9 ページ目
のDIAGNOSIS画面で確認することができます。
◆ BVP-550のメニューの構成や操作について詳しくは、BVP-550の取扱説明書をご覧ください。
ご注意
基板に異常が検出されたときは、ソニーのサー ビス担当者にご連絡ください。
異常が検出された基板を確認するには
以下の手順で操作します。
BVP-550
1
2,3
1 BVP-550のVFDISPスイッチをOFFからMENUに切り換える。
ビュ ー ファインダーにOPERATIONメニューが表示されます。
?マークが点滅
ページスクロールバー
<VF Display>
Zoom : Message:
SHUTT:
Iris : Mode :
: Filter :
Audio: White :
Tape : Gain :
Zebra:
?6
ページ番号
14(J)
Page 17

2 MENU/SELつまみ/ボタンを回して9ページ目のDIAGNOSIS画面を表示させる 。
<Diagnostic>
(OHB/PR)(CAM) (CA)
OHB: VA: VSE:
PR : AT: DVP:
SG: DC :
DA:
IF:
本機の基板
3 MENU/SELつまみ/ボタンを押す。
基板ごとに、「OK」(正常)または「NG」(異常)と表示されます。
<Diagnostic>
(OHB/PR)(CAM) (CA)
OHB: OK VA:OK VSE:OK
PR : OK AT:OK DVP:OK
SG:OK DC :OK
DA:OK
IF:OK
15(J)
Page 18

仕様
一般
消費電力 6W
動作温度 −20℃〜+45℃
保存温度 −20℃〜+50℃
外形寸法 115×212×195mm(幅×高さ×奥行き)
質量 2.0kg
オーディオ系
サンプリング周波数
48kHz
入力A/D量子化 20ビット/サンプル
ヘッドルーム 20dB
エンファシス OFF
デジタルオーディオのデジタルビデオへの重畳
SMPTE-272Mに準拠(5.3項を除く)
入出力コネクター
付属品
ケーブルホルダー(2)
バッテリースペーサー(1)
M3×6ネジ(4)
オペレーションマニュアル(1)
メンテナンスマニュアル(1)
別売り品
リチウムイオンバッテリーパックBP-L60/L90
リチウムイオンバッテリーアダプターBKP-L551
バッテリーパックBP-90A
バッテリーケースDC-300
仕様および外観は、改良のため予告なく変更することがあり
ますが、ご了承ください。
MIC XLR型3ピン、オス、−60dBuハイイン
ピーダンス、平衡
DCIN XLR型、4ピン、DC10.5〜17V
DCOUT 4ピン、DC10.5〜17V、最大200mA
GENLOCKIN BNC型、1Vp-p、75Ω
MONITOR BNC型、1Vp-p、75Ω
EARPHONE ミニジャック、8Ω
CAMERAI/F 68ピン×2
VTR CCZ型、26ピン
REMOTE 8ピン
SERIALOUT BNC型、0.8Vp-p、75Ω
シリアルコンポーネントビデオ出力
(オーディオ2チャンネル含む)
SMPTE-259/ITV-RBT.625
16(J)
Page 19

Page 20

WARNING
To prevent fire or shock hazard, do not
expose the unit to rain or moisture.
For the customers in USA
This equipment has been tested and found to comply with
the limits for a Class A digital device, pursuant to Part 15 of
the FCC Rules. These limits are designed to provide
reasonable protection against harmful interference when the
equipment is operated in a commercial environment. This
equipment generates, uses, and can radiate radio frequency
energy and, if not installed and used in accordance with the
instruction manual, may cause harmful interference to radio
communications. Operation of this equipment in a residential
area is likely to cause harmful interference in which case the
user will be required to correct the interference at his own
expense.
You are cautioned that any changes or modifications not
expressly approved in this manual could void your authority
to operate this equipment.
The shielded interface cable recommended in this manual
must be used with this equipment in order to comply with the
limits for a digital device pursuant to Subpart B of Part 15 of
FCC Rules.
Für Kunden in Deutschland
Dieses Produkt kann im kommerziellen und in begrenztem
Maße auch im industriellen Bereich eingesetzt werden.
Dies ist eine Einrichtung, welche die Funk-Entstörung nach
Klasse B besitzt.
18(E)
Page 21

Table of Contents
English
Overview............................................................................................... 2(E)
Location and Function of Parts and Controls .................................. 3(E)
Preparations ......................................................................................... 6(E)
Attaching the CA-530 to a BVP-550/550P Color
Video Camera .......................................................................6(E)
Using the Supplied Cable Clamp ....................................................7(E)
Connections .......................................................................................... 8(E)
Connectable Equipment ..................................................................8(E)
Power supply ...................................................................................9(E)
Self-Diagnosis ...............................................................................10(E)
Specifications...................................................................................... 12(E)
1(E)
Page 22

Overview
The CA-530 Camera Adaptor, to be attached to the BVP-550/550P Color
Video Camera, allows you to connect such portable VTRs as the DVW250/250P and the BVW-50/50P to the video camera.
It has the following features.
Digital/analog signal transmission
The CA-530 can transmit digital/analog component (Y/R-Y/B-Y) signals
and analog composite (VBS) signals.
It automatically switches its output signals according to the type of VTR
connected to it.
Low power consumption
The CA-530 consumes about 6 W of electricity. The power consumption
can be reduced by about 2 W in power saving mode.
Variety of input/output connectors
The CA-530 is equipped with the following connectors:
• DC power input/output connector
• Remote control panel connector
• VTR connector
• SDI output connector
• Monitor video output connector
• Microphone connector
• Earphone jack
•External gen-lock (generator lock) signal input connector
2(E)
Page 23

Location and Function of Parts and Controls
1 AUDIO IND switch
2 MIC LEVEL control
3 TALLY lamp and TALLY switch
4 SERIAL OUT connector
5 EARPHONE jack
6 MIC POWER switch
7 REMOTE connector
!¡ GENLOCK IN connector
!™ MONITOR connector
!£ DC OUT connector
8 VTR connector
9 MIC connector
0 POWER switch
!¢ DC IN connector
3(E)
Page 24

Location and Function of Parts and Controls
1 AUDIO IND (indicator) switch
Selects either of the following two microphone inputs.
CH1: Microphone input from the MIC IN connector
of the BVP-550/550P
CH2: Microphone input from the MIC connector of
the CA-530
The setting of this switch determines the contents of
the following signals.
•Microphone input whose audio level is indicated on
the viewfinder screen.
•Analog audio signals output to the VTR
•Microphone input monitored from the EARPHONE
jack 5 (This is only when the microphone input is
selected by an internal setting. See the section “5
EARPHONE jack”.)
2 MIC (microphone) LEVEL control
Adjusts the audio level of the microphone input to be
multiplexed on the SDI output signal of the CA-530.
Depending on an internal setting, you can monitor the
microphone audio adjusted with this control through
the EARPHONE jack (see the section “5
EARPHONE jack”). The microphone audio level is
indicated on the viewfinder screen.
For more information about the audio level indication on
the viewfinder screen, refer to the operation manual
provided with the BVP-550/550P.
3 TALLY lamp and TALLY switch
When the TALLY switch is set to ON, the TALLY
lamp functions as follows.
Flashes: The battery connected to the CA-530 is
about to exhaust, or a low-battery-voltage signal
has been received from the VTR.
Lights: The battery connected to the CA-530 has
completely exhausted, or a battery exhaustion
signal has been received from the VTR.
When the TALLY switch is set to OFF, the TALLY
lamp does not function.
4 SERIAL OUT (serial data output) connector
(BNC type)
Outputs a digital signal complying with the SMPTE
259M standard. You can connect equipment (for
example, a video editor) provided with an SDI input
connector to this connector. Signal transmission is
possible up to 200 m using a coaxial transmission
cable (impedance 75 ohms).
When the POWER switch is set to SDI OFF, this
connector does not function.
5 EARPHONE jack (minijack)
Connect an earphone. Depending on an internal
setting, you can monitor either the audio from the VTR
or the microphone input. The factory setting is for
monitoring the audio from the VTR.
For more information about the internal setting, contact
Sony service personnel.
6 MIC (microphone) POWER switch
When a microphone of phantom powering type is
connected to the CA-530, set this switch to +48V to
power the microphone.
7 REMOTE connector (8-pin)
Connect an RCP-700 series remote control panel or
RM-B150 remote control unit.
To connect an RCP-700 series: Use an optional
CCA-5-10 or CCA-5-3 cable.
To connect an RM-B150: Use the cable supplied
with it.
8 VTR connector (26-pin)
Connect to the CAMERA connector of a VTR or AC
adaptor to input or output video, audio and control
signals as well as a power supply.
When the POWER switch 0 is set to SDI OFF, the
SDI signal is not output from this connector. Analog
signals only are output.
9 MIC (microphone) connector (XLR type, 3-pin)
Connect an external microphone.
The microphones connected to the MIC IN connector
of the BVP-550/550P and the MIC connector of the
CA-530 correspond to the CH1 and CH2 settings of
the AUDIO IND switch 1, respectively.
To power an external microphone of phantom
powering type, set the MIC POWER switch 6 to
+48V.
!º POWER switch
Switches the power supply as follows.
11
1 SDI OFF: The CA-530 enters power saving mode.
11
The power supply to its digital system is shut off,
allowing only its analog system to function.
¬¬
¬: The power supply is shut off, disabling the CA-
¬¬
530.
11
1 SDI ON: The CA-530 is powered and all of its
11
functions are enabled.
4(E)
Page 25

!¡ GENLOCK IN (external gen-lock signal input)
connector (BNC type)
Use to input an external gen-lock (generator lock)
signal.
!™ MONITOR connector (BNC type)
Outputs either a composite video (VBS) signal or a
monitor signal (same as the signal output to the
viewfinder of the BVP-550/550P) depending on an
internal setting. The factory setting is for outputting
the monitor signal.
For more informaton about the monitor signal, refer to the
operation manual provided with the BVP-550/550P.
For more information about the internal setting, contact
Sony service personnel.
!£ DC OUT (direct current output) connector (4pin)
Outputs a d.c. power ranging from 10.5 V to 17 V with
a maximum rated output current of 200 mA.
Note
Connecting equipment that consumes more than 200
mA may cause the CA-530 to malfunction.
!¢ DC IN (direct current input) connector (4-pin)
Connect an AC adapter or battery case.
Note
When a VTR is connected to the CA-530 and an
external power supply is connected to the DC IN
connector of the CA-530, the power supplied from the
DC IN connector is used.
5(E)
Page 26

Preparations
Preparations
Attaching the CA-530 to a BVP-550/550P Color Video Camera
Attaching the CA-530 to a BVP-550/550P Color Video Camera as shown
below will connect the 68-pin connectors on the two units.
1 Attach the CA-530 to the rear of the BVP-550/550P.
Hook the upper part then push the lower part securely.
Removing the CA-530
2 Tighten the screw with a coin.
Tighten the screw.
Loosen the screw on the video camera until it idles and then remove the
CA-530 while pushing the screw.
6(E)
Loosen the screw.
Page 27

Using the Supplied Cable Clamp
1 Attach the cable clamp with the supplied two M3 screws.
2 Fasten the cable clamp around the cable.
M3 screws (supplied)
Cable clamp
Cable
Removing the cable clamp
2 loosen the clamp.
1While lifting this part,
7(E)
Page 28

Connections
PreparationsConnections
Connectable Equipment
You can connect equipment as shown below to the CA-530.
RM-B150
remote control unit
Video monitor
RCP-700
series remote control panel
Equipment, e.g. editor,
with SDI input connector
Microphone
MIC
REMOTE
SERIAL OUT
VTR
CA-530
DC IN
BVP-550/550P
portable camera
AC-500/500P/550/550P AC adaptor
BKP-L551 lithium
ion battery adaptor
DVW-250/250P portable VTR
VA-5/5P VTR adaptor
Digital signal (SDI)
Analog signal
BVV-5/5PS portable VTR
BVW-50/50P portable VTR
DVR-2/2P portable VTR
The appropriate output video signal is selected automatically according to the connected VTR.
8(E)
Page 29

Power Supply
When using a battery pack
When a power supply is connected to the DC IN connector, it powers the
CA-530; otherwise, the CA-530 uses the power supplied from the VTR
connected to it.
Notes
•Because of the large power consumption of the BVF-55/55CE
viewfinder, you cannot use the viewfinder when the CA-530 is powered
from the portable VTR connected to it.
•When the CA-530 is connected to a VTR with a 10 meter long CCZ
cable, the transmission loss along the long connection cable will shorten
the battery life.
When using a battery pack, place it in the battery case and attach the
battery case to the CA-530 using the supplied battery spacer, then connect
the connection cable of the battery case to the DC IN connector of the CA-
530.
For details on attaching the battery case, refer to the Operation Manual provided
with the battery case.
When using a BP-90A Battery Pack
Use the DC-300 Battery Case for connection to the CA-530.
When using a BP-L60/L90 Lithium lon Battery Pack
Use the BKP-L551 Lithium Ion Battery Adaptor.
Note
The DC-L1/L90 Battery Case cannot be directly attached to the CA-530.
9(E)
Page 30

Self-Diagnosis
If any internal board malfunction is detected in the BVP-550/550P or CA530, “?” appears in the upper right corner of the viewfinder screen. You
can determine the malfunctioning internal board on the DIAGNOSIS
screen (page 9) of the BVP-550/550P OPERATION menu.
For detailed information about the menu system of the BVP-550/550P, refer to the
operation manual provided with the BVP-550/550P.
Note
If any internal board is found malfunctioning, consult Sonny service
personnel.
To determine a malfunctioning internal board
Proceed as follows.
BVP-550/550P
1
2,3
1 Change the setting of the VF DISP switch of the BVP-550/550P from
OFF to MENU.
The OPERATION menu appears on the viewfinder screen.
“?” flashes.
Page scroll bar
<VF Display>
Zoom : Message:
SHUTT:
Iris : Mode :
: Filter :
Audio: White :
Tape : Gain :
Zebra:
?6
Page number
10(E)
Page 31

2 Turn the MENU/SEL knob/button so that the DIAGNOSIS screen
(page 9) appears.
<Diagnostic>
(OHB/PR)(CAM) (CA)
OHB: VA: VSE:
PR : AT: DVP:
SG: DC :
DA:
IF:
Internal boards of the
CA-530
3 Press the MENU/SEL knob/button.
Indication “OK” (good) or “NG” (no good) appears for each board.
<Diagnostic>
(OHB/PR)(CAM) (CA)
OHB: OK VA:OK VSE:OK
PR : OK AT:OK DVP:OK
SG:OK DC :OK
DA:OK
IF:OK
11(E)
Page 32

Connections
PreparationsSpecifications
General
Power consumption
6 W
Operating temperature
–20°C to +45°C (–4°F to +113°F)
Storage temperature
–20°C to +50°C (–4°F to +122°F)
Dimensions 115 × 212 × 195 mm (w/h/d)
Mass 2.0 kg (5 lb 8 oz)
5
/8 × 83/8 × 73/4 inches)
(4
Audio system
Sampling frequency
48 kHz
Input A/D quantization
20 bits/sample
Headroom 20 dB
Emphasis OFF
Digital audio superimposition on digital video
Complying to SMPTE-272M
(excluding clause 5.3)
Supplied accessories
Cable clamps (2)
Battery spacer (1)
M3 × 6 screws (4)
Operation manual (1)
Maintenance manual (1)
Optional accessories
BP-L60/L90 Lithium Ion Battery Pack
BKP-L551 Lithium Ion Battery Adaptor
BP-90A Battery Pack
DC-300 Battery Case
Design and specifications are subject to change
without notice.
Input/output connectors
MIC XLR type 3-pin, female, –60 dBu
high impedance, balanced
DC IN XLR type, 4-pin, DC 10.5 to 17V
DC OUT 4-pin, DC 10.5 to 17V, Max.
200mA
GENLOCK IN BNC type, 1Vp-p, 75 ohms
MONITOR BNC type, 1Vp-p, 75 ohms
EARPHONE Mini-stereo jack, 8 ohms
CAMERA I/F 68-pin × 2
VTR CCZ type, 26-pin
REMOTE 8-pin
SERIAL OUT BNC type, 0.8 Vp-p, 75 ohms
Serial component video output
(including 2 audio channels)
SMPTE-259/ITV-R BT.625
12(E)
Page 33

The material contained in this manual consists of
information that is the property of Sony Corporation and is
intended solely for use by the purchasers of the equipment
described in this manual.
Sony Corporation expressly prohibits the duplication of any
portion of this manual or the use thereof for any purpose
other than the operation or maintenance of the equipment
described in this manual without the express written
permission of Sony Corporation.
Le matériel contenu dans ce manuel consiste en
informations qui sont la propriété de Sony Corporation et
sont destinées exclusivement à l’usage des acquéreurs de
l’équipement décrit dans ce manuel.
Sony Corporation interdit formellement la copie de quelque
partie que ce soit de ce manuel ou son emploi pour tout
autre but que des opérations ou entretiens de l’équipement
à moins d’une permission écrite de Sony Corporation.
Das in dieser Anleitung enthaltene Material besteht aus
Informationen, die Eigentum der Sony Corporation sind,
und ausschließlich zum Gebrauch durch den Käufer der in
dieser Anleitung beschriebenen Ausrüstung bestimmt sind.
Die Sony Corporation untersagt ausdrücklich die
Vervielfältigung jeglicher Teile dieser Anleitung oder den
Gebrauch derselben für irgendeinen anderen Zweck als die
Bedienung oder Wartung der in dieser Anleitung
beschriebenen Ausrüstung ohne ausdrückliche schriftliche
Erlaubnis der Sony Corporation.
Page 34

CA-530(J, SY, 和, 英)
3-861-246-02(2)
Sony Corporation
Communication System Solutions Network Company
Printed in Belgium
2000.02.08
1997
 Loading...