

Page 1
IT
2-687-302-11 (1)
Blu-ray Disc Drive
Operating Instructions
JP
FR
DE
ES
IT
CS
BWU-100A
© 2006 Sony Corporation
Page 2
Safety Regulations
WARNING
You are cautioned that any changes or modifications not expressly approved in this manual
could void your authority to operate this equipment.
To reduce the risk of fire or electric shock, do not expose this apparatus to rain or moisture.
To avoid electrical shock, do not open the cabinet. Refer servicing to qualified personnel only.
CAUTION:
As the laser beam used in the BWU-100A is harmful to the eyes, do not attempt to disassemble
the cabinet. Refer servicing to qualified personnel only.
The use of optical instruments with this product will increase eye hazard.
The use of controls or adjustments or performance of procedures other than those specified
herein may result in hazardous radiation exposure.
The drive is designed to be incorporated into a computer-based system or unit which has an
enclosing cover. The drive may not be used as a stand-alone unit.
Do not open the drive unit; no user adjustments or serviceable parts are inside.
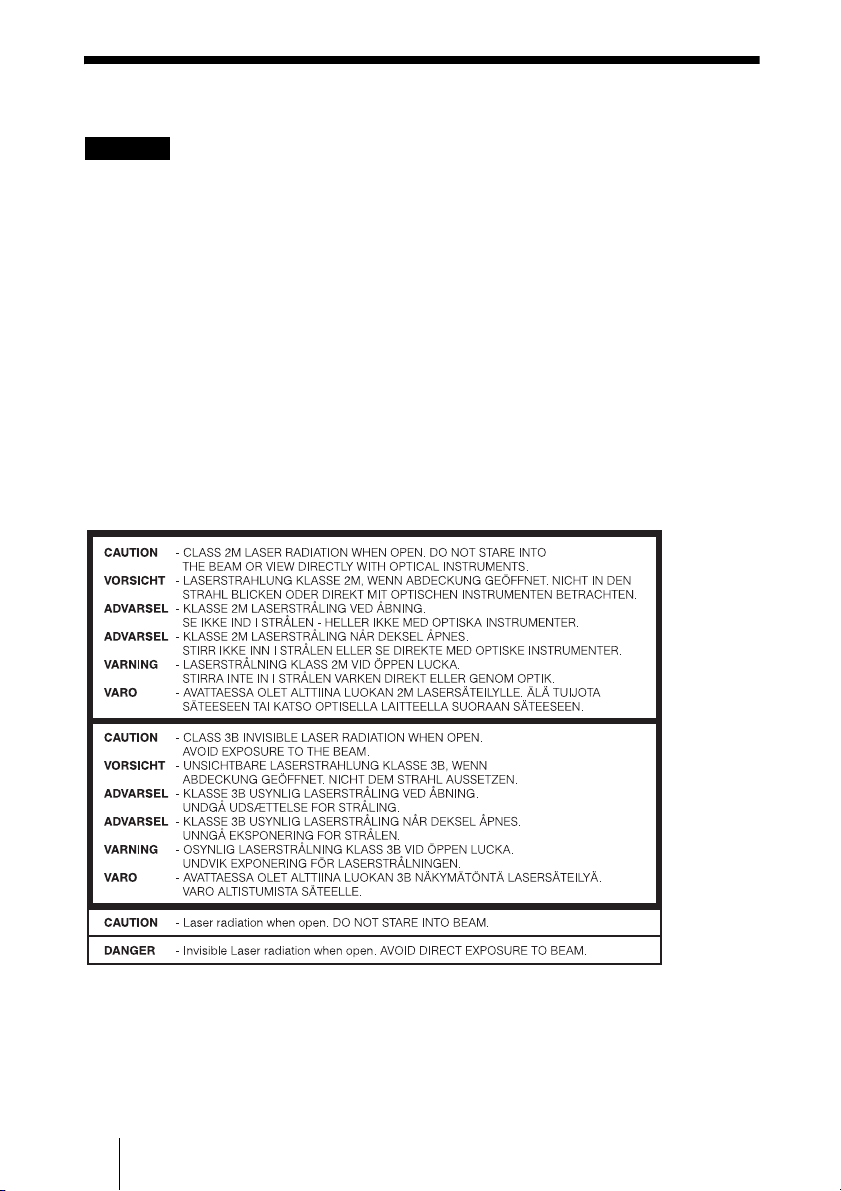
This label is located on the top of the drive unit enclosure.
Dieses Etikett befindet sich an der Oberseite des Laufwerksgehäuses.
2
Page 3
The BWU-100A is classified as a CLASS 1 LASER PRODUCT.
The CLASS 1 LASER PRODUCT label is located at the top of the enclosure.
Bei diesem BWU-100A handelt es sich um ein Laser-Produkt der Klasse 1.
Das Etikett mit der Aufschrift LASER KLASSE 1 PRODUKT befindet sich an der Oberseite
des Gehäses.
CE Sicherheitsbestimmungen
Diese Ausrüstung erfüllt die Europäischen EMC-Bestimmungen für die Verwendung in
folgender / folgenden Umgebung(en):
• Wohngegenden
• Gewerbegebiete
• Leichtindustriegebiete
(Diese Ausrüstung erfüllt die Bestimmungen der Norm EN55022, Klasse B.)
ELECTROSTATIC DISCHARGE NOTICE
Do not insert any foreign objects into the drive unit, since this may result in damage to the
drive.
Compliance Statements
Disposal of Old Electrical & Electronic Equipment (Applicable in the European
Union and other European countries with separate collection systems)
This symbol on the product or on its packaging indicates that this product shall
not be treated as household waste. Instead it shall be handed over to the applicable
collection point for the recycling of electrical and electronic equipment. By
ensuring this product is disposed of correctly, you will help prevent potential
negative consequences for the environment and human health, which could
otherwise be caused by inappropriate waste handling of this product. The
information about recycling of this product, please contact your local Civic Office, your
household waste disposal service or the shop where you purchased the product.
recycling of materials will help to conserve natural resources. For more detailed
3
Page 4

Table of Contents
Safety Regulations .......................... 2
Compliance Statements .................. 3
Introduction
Unpacking the Package Contents ... 6
Features ........................................... 6
System Requirements .....................7
Part Names and Functions .............. 8
Setup
Setting up the Drive ...................... 10
Appropriate Jumper Settings ........ 15
Replacing your current optical
drive with the drive .................... 15
Installing the drive as a second
drive ............................................ 16
Installing the drive as a third
drive ............................................ 17
Installing the drive as a fourth
drive ............................................ 18
Using Generic Software with the
Drive .............................................33
Compatible Discs ..........................34
Writable Disc Features ...............37
Recommended Writable Discs ...37
Precautions on Writing/Playing
Discs ..............................................40
Maximizing Performance ..............42
User Support Web Site ...............42
Updating the Firmware ...............42
Miscellaneous
Precautions for Use .......................43
Specifications ................................44
Support Overview .........................45
User Support Web Site ...............45
Update the Drive Firmware ........45
Product and Support
Information .................................45
Operation
Using the Supplied Software ........ 19
Supplied Software
Applications ...............................19
How to Install ............................. 20
Recording HDV Camcorder Video
to a Disc ........................................22
Camcorder Preparations ............. 22
Capture, Edit & Record .............. 23
Direct Recording ........................29
4
Page 5

• Pentium is a registrated trademark of Intel Corporation.
• Microsoft, MS, MS-DOS and Windows are registered trademarks of Microsoft Corporation.
• Other system and product names used herein are registered trademarks or trademarks of their
respective manufacturers, although the ™ and ® marks are not used in the text.
❑ Our product warranty is valid only when the supplied accessories (including software) are
used in the specified or recommended system environment, in accordance with the
documentation, and applies only to this Blu-ray disc drive. Our customer service and user
support apply only under these product warranty conditions.
❑ Please note that we cannot accept responsibility for failure of the computer or other
devices, incompatibility with special hardware, operating problems caused by improper
installation of software, loss of data, discs or other accidental or incidental damage that
might occur when using this product.
❑ The guarantee and user support for this product are valid only within the countries or sales
regions specified on the warranty card.
❑ Copyright laws prohibit the copying in part or in full of the supplied software and
documentation, or loaning the software, without obtaining permission of the copyright
holder.
❑ We cannot accept responsibility for any direct or indirect financial damage or loss of profit
that might occur when using the supplied software.
❑ The supplied software can only be used with this product.
❑ Specifications of the supplied software may be changed without notice in the interest of
product improvement.
Please Record Responsibly
Before copying anything onto a disc, please be sure that you are not violating copyright
laws. Most software companies allow you to make a backup or archive copy of software.
Check your software’s license agreement for details.
5
Page 6
B Introduction
Unpacking the Package Contents
Please verify that the package contains the
following when unpacking.
If any of these items appear to be missing
and/or damaged, please contact your dealer.
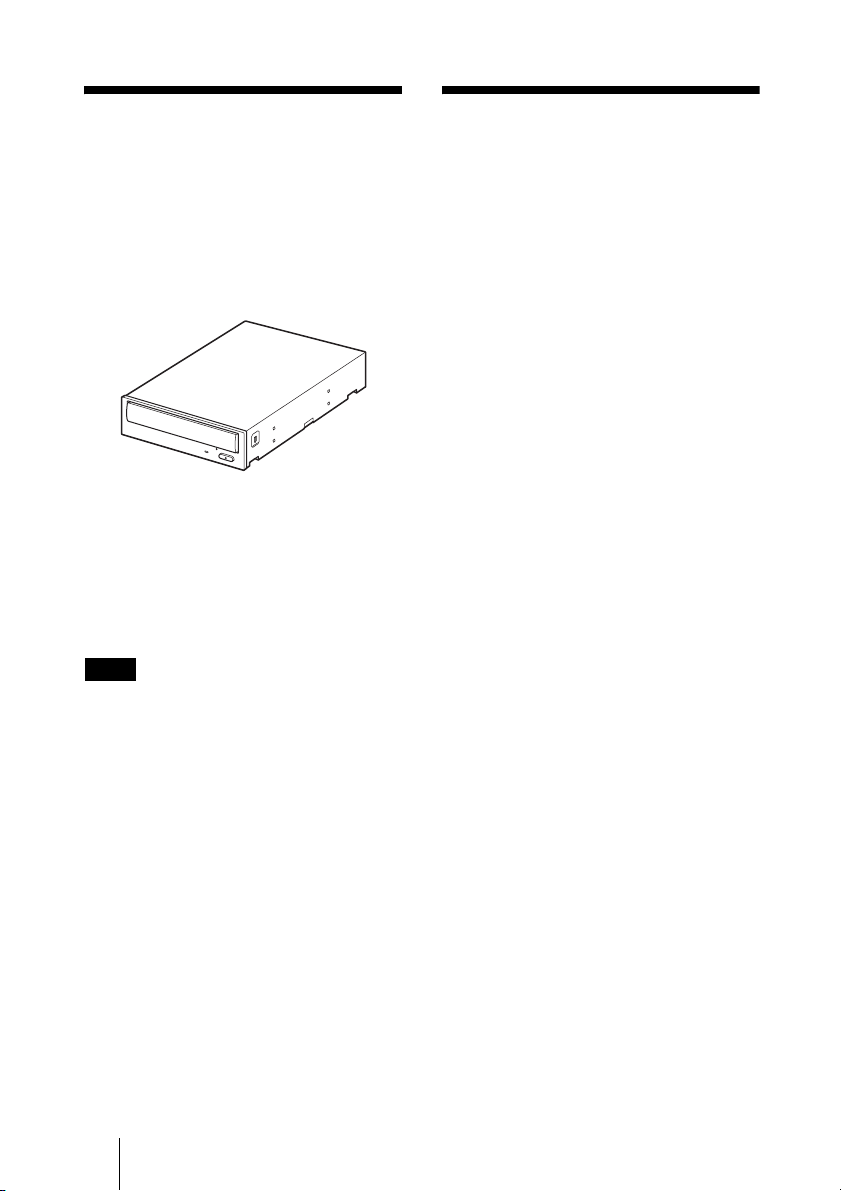
•Drive
•Screws (×4)
• HDV to Blu-ray Direct Recording Guide
• Operating instructions
(this document)
• Software disc
• Warranty card
Note
Make sure that you back up the supplied software
disc on another disc because the software disc is
not distributed independently.
Features
This product offers the following features.
❑ An internal BD/DVD/CD rewritable
drive with ATAPI (EIDE) interface for
computers.
❑ Can record HD video from an HDV
camcorder at 1080 HD resolution.
❑ Can write to BD-R 25GB, BD-R 50GB,
BD-RE 25GB and BD-RE 50GB discs at
2× speed
6
Page 7

System Requirements
The drive should be used with a system that
meets the following requirements
❑ PC/AT-compatible computer
❑ One available EIDE (ATAPI) interface
connection with DMA capability
❑ One empty 5-inch half-height drive bay
❑ One available internal +12 V/+5 V
power connector
3)
CD/DVD Burning
❑ CPU: Pentium III 800 MHz or faster
❑ 256 MB RAM or more
❑ 5.0 GB free HDD space or more
❑ Operating system: Windows 2000
Professional, Windows XP SP2 Home
Edition or Professional
BD AV Application
❑ CPU: Pentium 4, 3.0 GHz or faster
❑ 512 MB RAM or more
❑ 30 GB free HDD space or more
❑ Operating system: Windows XP SP2
Home Edition or Professional
❑ IEEE1394 (i.LINK) port (for HDV
camcorder connection)
❑ Recommend UXGA (1600 × 1200)
resolution computer display
❑ Appropriate graphics card supporting
UXGA (1600 × 1200) resolution
computer display
1)
.
2)
1)
The above requirements are the minimum
necessary requirements to write to disc
normally. Under actual operating conditions,
the requirements imposed by your software
must also be met. For details, refer to your
software documentation.
2)
The drive does not support connection to an
ATAPI interface extension card. Connect the
drive to the IDE (ATAPI) interface connector
of your computer’s motherboard.
3)
The drive consumes a lot of power when
operating at high speeds. You should therefore
make sure that the rated power output of the
power outlet where you connect all your drives
is sufficient to power all the drives, including
this one. For details about each drive’s power
consumption rating, refer to their
documentation.
Introduction
7
Page 8
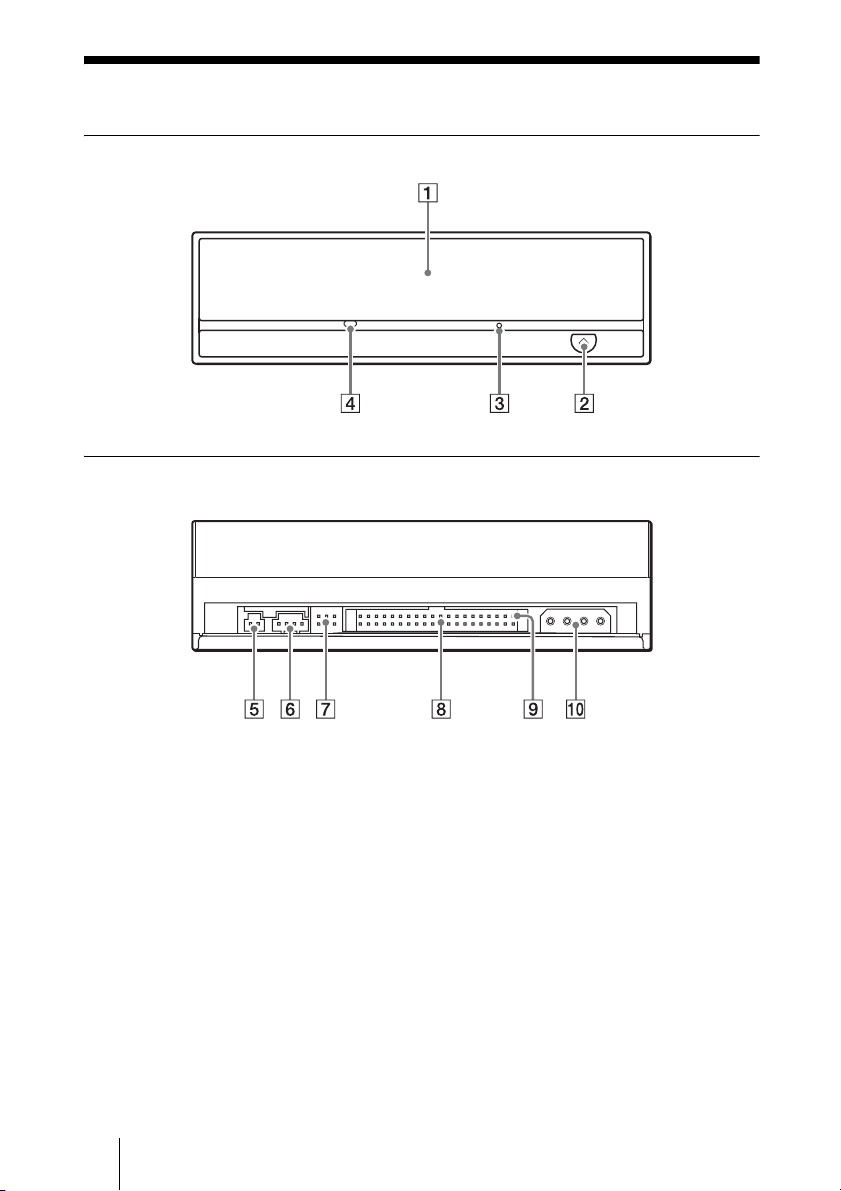
Part Names and Functions
Front Panel
Rear Panel
8
Page 9
A Disc tray
Insert discs here, label side up.
Hint
When you insert a disc into the drive, make
sure that it is under the four pins. When using
the drive vertically, make sure that you set the
disc inside the two lower pins.
B Eject button
Press to open and close the disc tray.
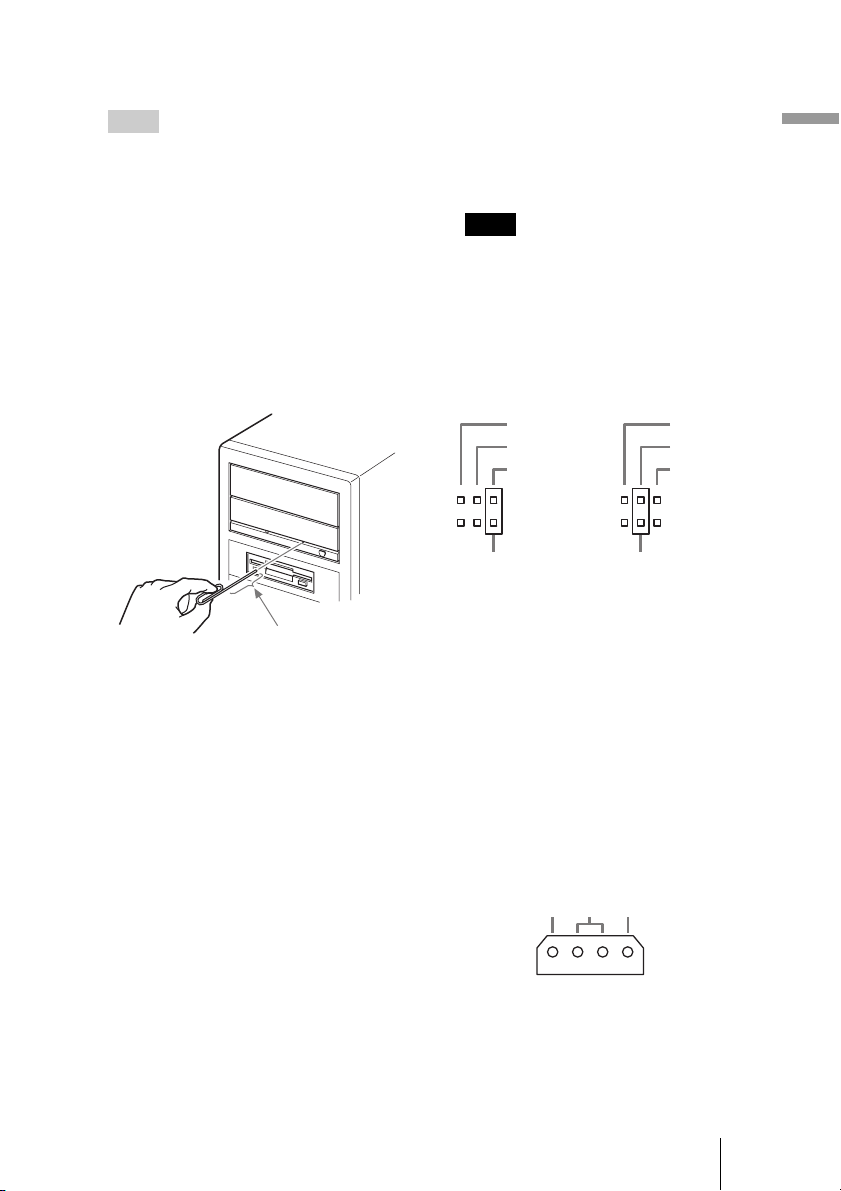
C Emergency eject hole
If you cannot open the disc tray with the
eject button, turn off your computer, and
then insert a thin, elongated object into
this hole to eject the disc tray manually.
E Do not use.
F Analog audio connector
Analog stereo audio output. Using an
audio cable, connect to the audio
connector of a computer with a sound
card.
Note
Connecting a cable other than an audio
cable or otherwise misusing the audio
connector may cause damage to the
product.
G Jumper
A jumper is set on the appropriate pins
before connecting the drive.
CSEL
SLAVE
MASTER
Jumper pinsJumper pins
CSEL
SLAVE
MASTER
Introduction
About 40 mm (1.6 in)
D Busy indicator
Indicates the drive status.
Blinking: Power on, disc recognition,
load/unload, data access, or
play audio.
Off: Polling command, other status.
H IDE connector
Connect to the computer with the IDE
flat cable.
I Pin 1
The location of this pin determines the
proper orientation of the connection
cable.
J Power connector
Connect the connector of the computer’s
internal power supply.
DC INPUT
5V GND 12V
9
Page 10
B Setup
Setting up the Drive
The installation and setup procedures outlined below assume that you are using
a standard computer. For details about how to install peripheral devices into
your computer, refer to the instructions supplied with your computer.
Before installing the drive
Referring to “Unpacking the Package Contents” on page 6, verify that the
contents of the drive package are complete.
Note
Avoid touching any exposed electronic conductors or contacts on the circuit boards of the
drive or your computer, as they can be damaged by electrostatic discharges from your body.
Make sure that you discharge any static electricity from your body before performing this
operation.
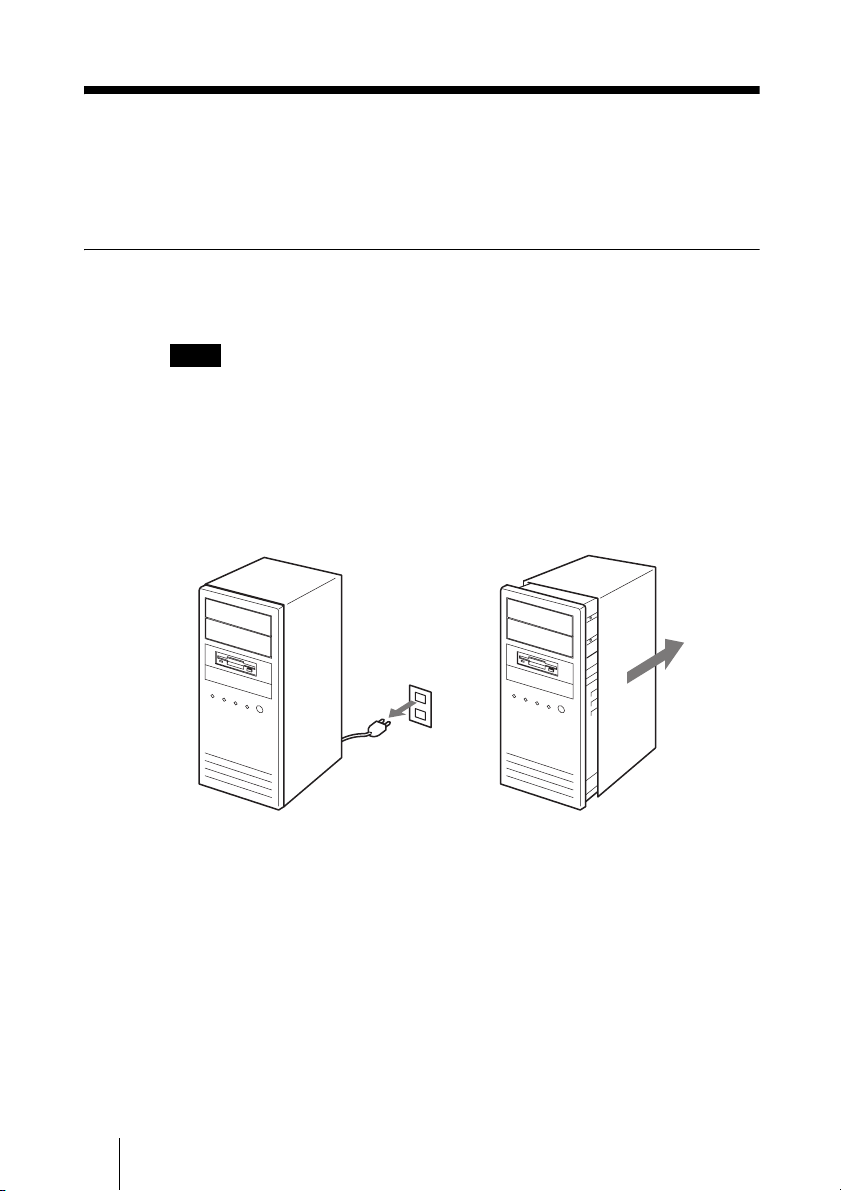
1 Turn off your computer, disconnect the power cable from the
outlet, and then remove the computer cover.
10
Page 11
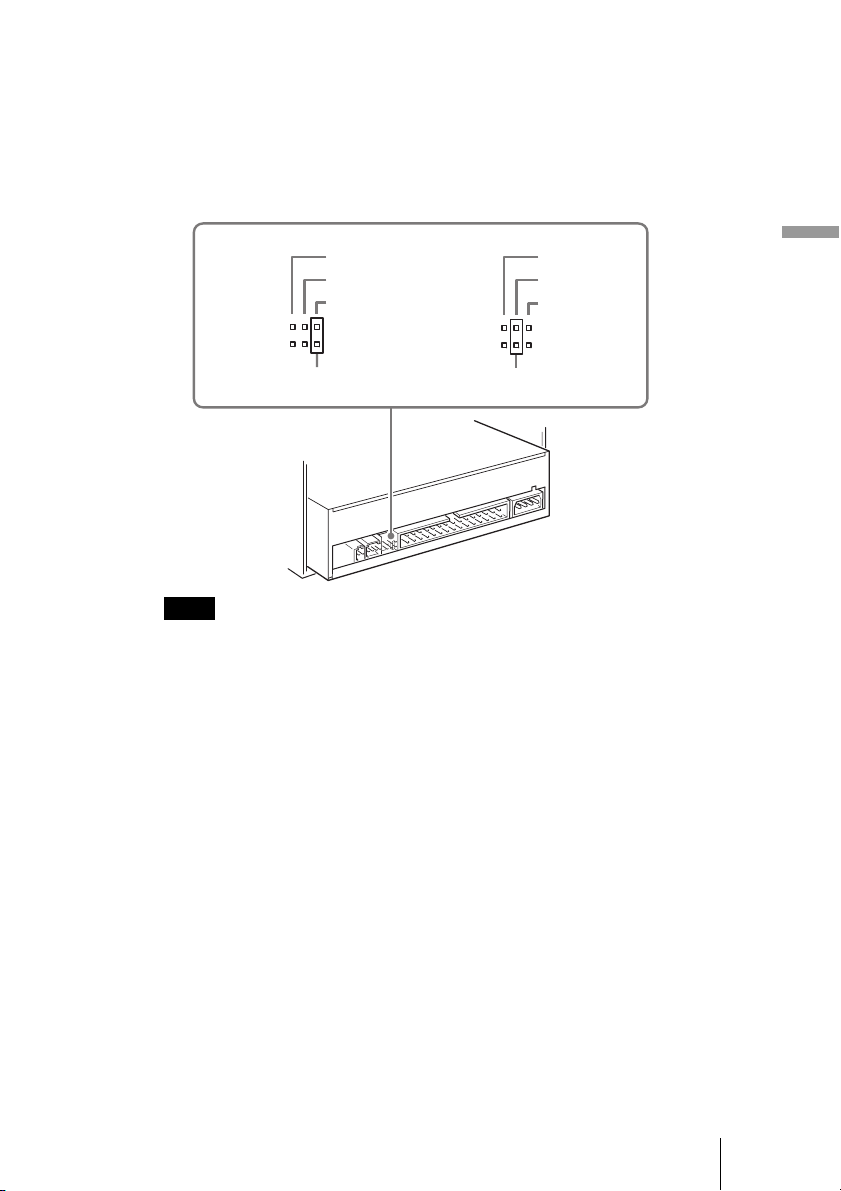
2 Determine which connection method you want to use, and then
adjust the jumper.
Depending on whether you want to connect the drive as MASTER or SLAVE,
place the jumper on the pins, as illustrated below.
If you are unsure of the appropriate jumper setting, see “Appropriate Jumper
Settings” on page 15.
CSEL
SLAVE
MASTER
Jumper Jumper
Notes
• If installing the drive to replace one using the CSEL jumper setting, place the jumper on
the CSEL pins of the drive before installing it.
• Only place the jumper vertically, as illustrated. Placing the jumper horizontally may
damage the drive and/or cause malfunctions.
CSEL
SLAVE
MASTER
Setup
11
Page 12
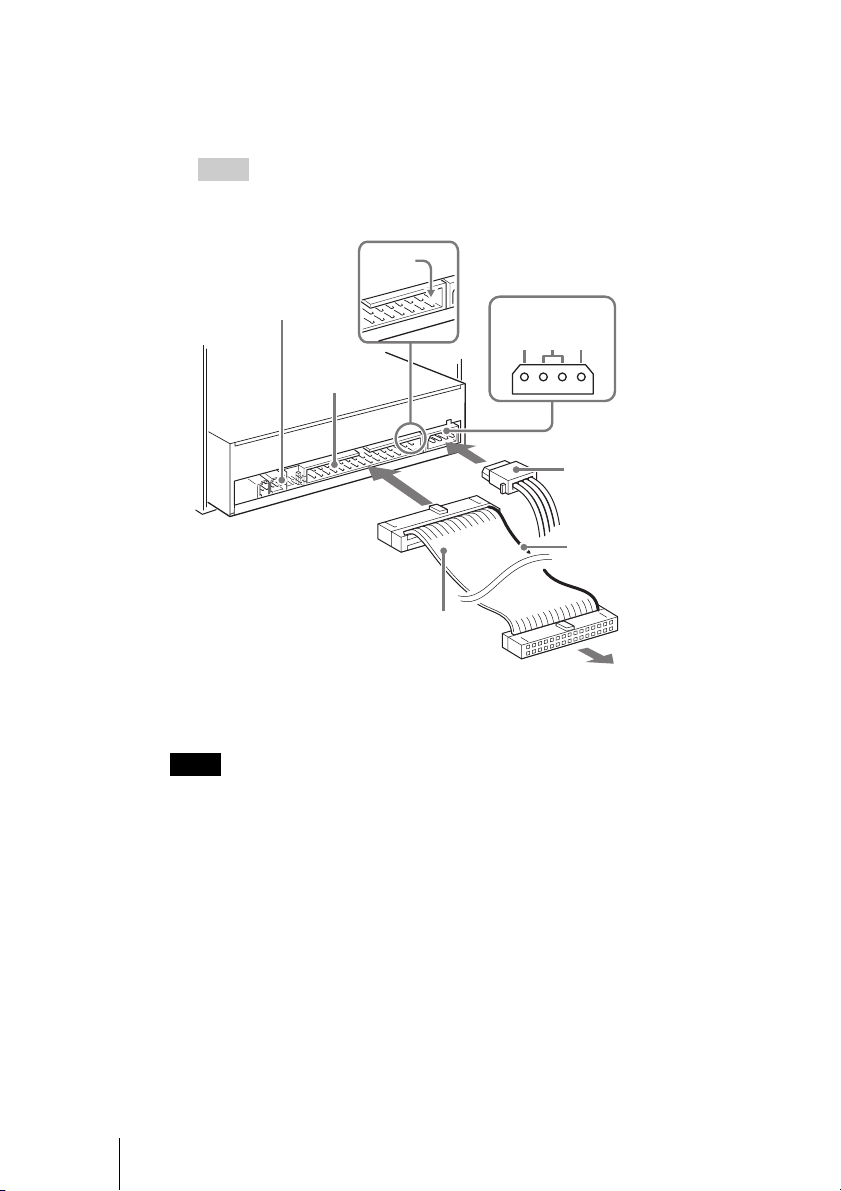
3 Connect the cables.
• Connect an unused power connector from the computer’s power supply to
the DC input (power input) connector of the drive.
• Connect the IDE flat cable to the IDE connector of the drive.
Hint
If your computer supports digital playback, you do not need to connect the audio cable
to the analog audio connector. Most computers support digital playback at this time.
Pin1
Analog audio
connector
IDE connector
IDE flat cable
Notes
• The side of the IDE flat cable with the red line indicates the pin 1 conductor. Verify that
the pin 1 side is connected to pin 1 on the motherboard.
• The power connector must be inserted with the inclined side upwards.
• If there is no spare power connector, you must use a “Y” adapter.
DC input connector
DC INPUT
5V GND12V
Power connector
Red (pin 1)
To computer
motherboard
12
Page 13
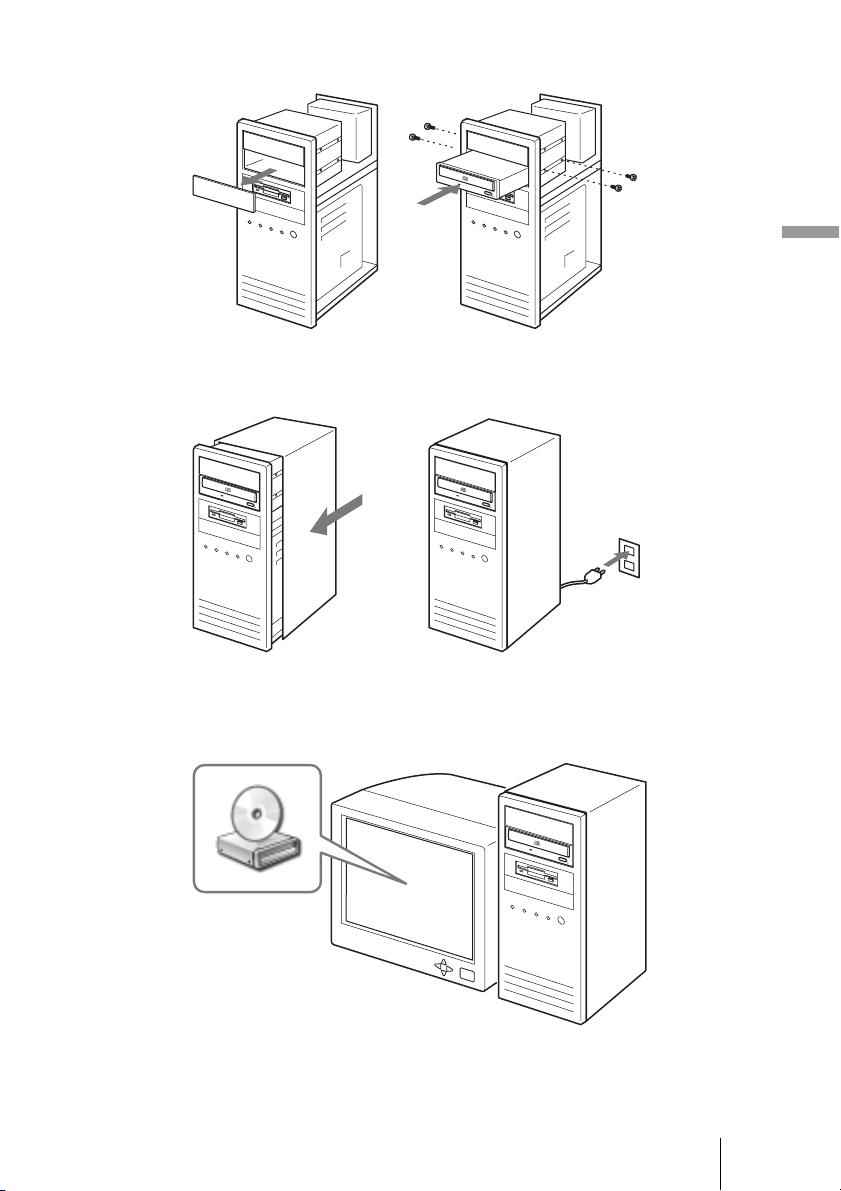
4 Install the drive into a 5-inch drive bay with the supplied screws.
5 Replace the computer cover, and then reconnect the power
cable to the outlet.
Setup
6 Start your computer, and make sure that the drive is detected.
On the Windows desktop, open [My Computer], and verify that a new drive
icon is displayed.
13
Page 14
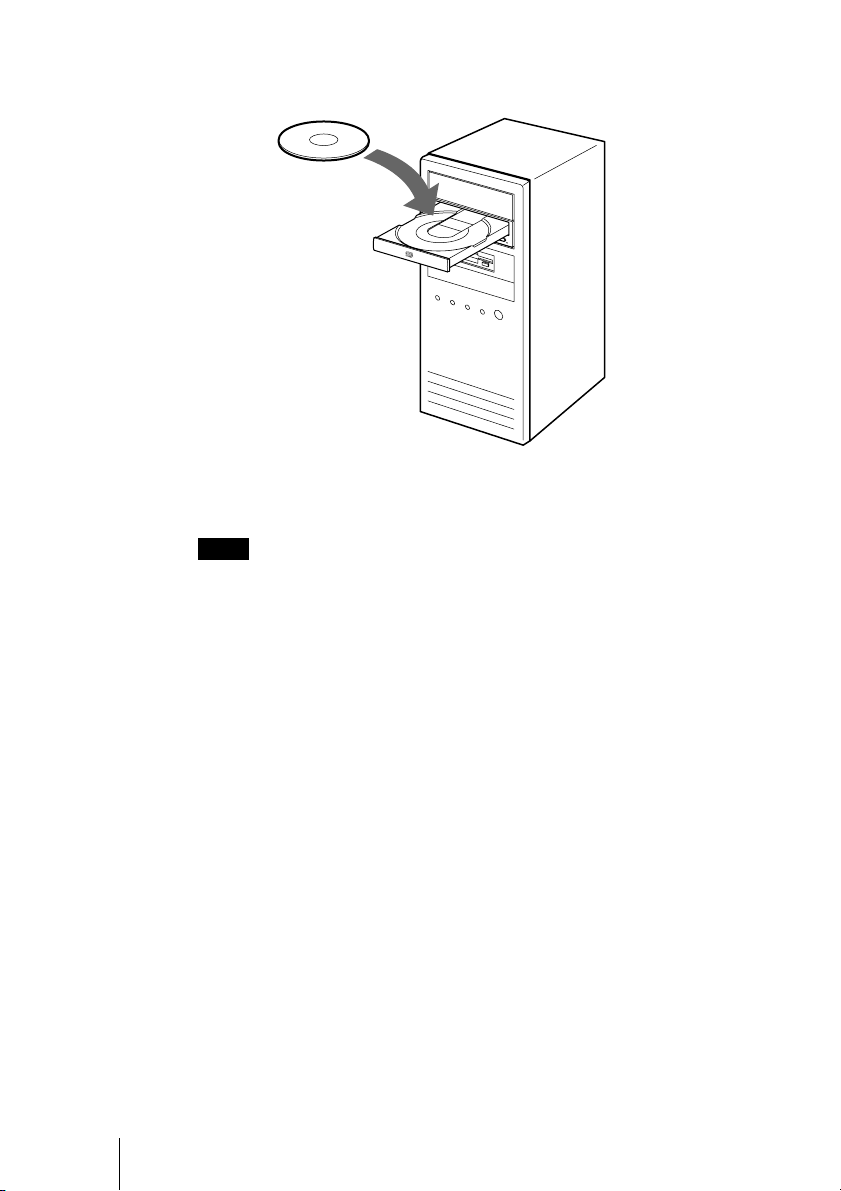
7 Insert the supplied software disc into the drive, and then install
the software on the disc.
Follow the instructions on the screen to complete the installation.
For details about the software on the supplied software disc, see “Supplied
Software Applications” on page 19.
Note
To install the supplied software, you need the Software CD-Key printed on the software
CD case. Keep this CD-Key in a secure place, because you will also need it for future
software updates.
14
Page 15
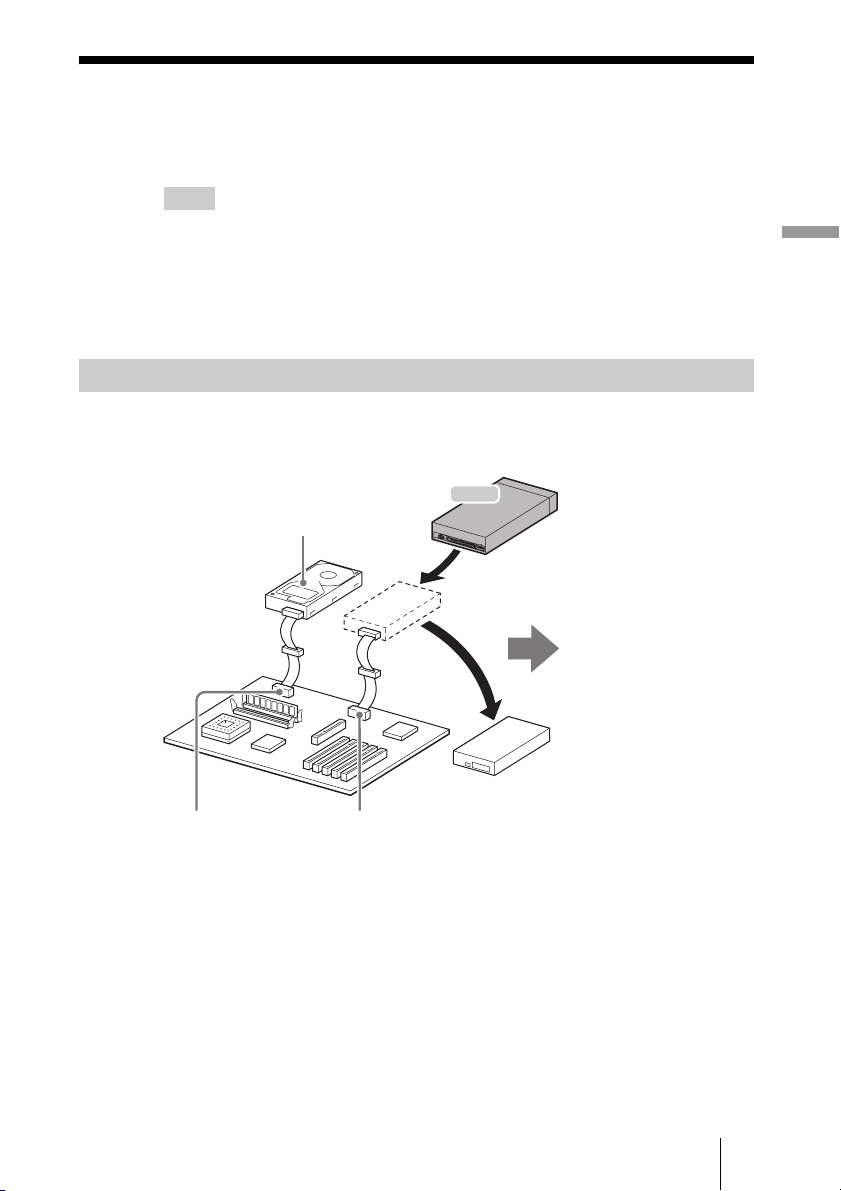
Appropriate Jumper Settings
Depending on the settings of your computer, use one of the following
configurations.
Hint
Your computer has two IDE connectors: a primary and a secondary connector. You can
connect up to two devices to each connector using cables (one master device and one slave
device per cable; hard disk, CD, or DVD drives, etc.). The hard disk of your computer is
normally connected on the primary IDE cable as the master device. Before connecting the
drive, refer to the items below to determine your situation, and then place the jumper in the
MASTER or SLAVE position.
Replacing your current optical drive with the drive
Connect the drive as follows.
Setup
1st drive
Hard disk drive (usually)
MASTER
Primary
IDE connector
Secondary
IDE connector
Drive
Use the same
setting as the
current drive’s
jumper setting.
Current optical
drive
15
Page 16
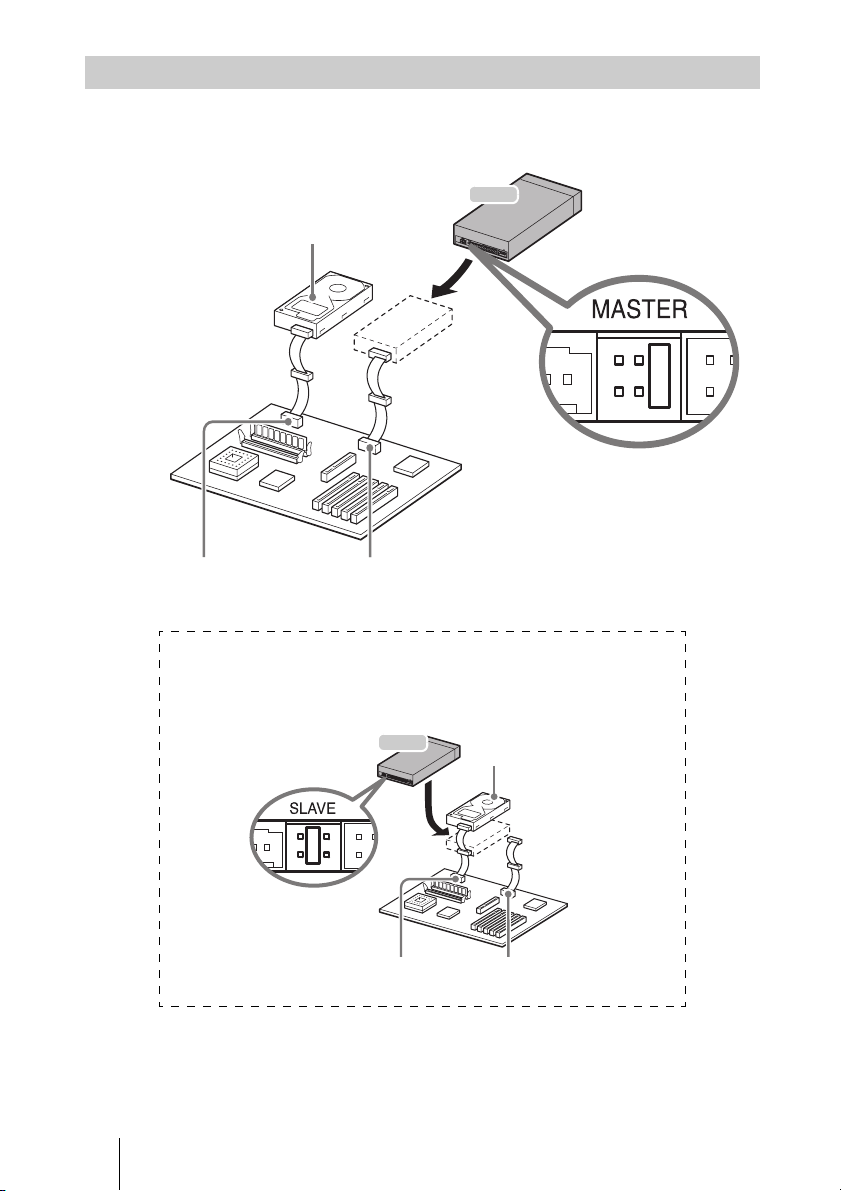
Installing the drive as a second drive
Connect the drive as follows.
2nd drive
1st drive
Hard disk drive (usually)
MASTER
Primary
IDE connector
The following configuration is also possible.
Secondary
IDE connector
2nd drive
Drive
Drive
Place the jumper in
the MASTER position.
1st drive
Hard disk drive (usually)
MASTER
16
Place the jumper
in the SLAVE
position.
Primary
IDE connector
Secondary
IDE connector
Page 17
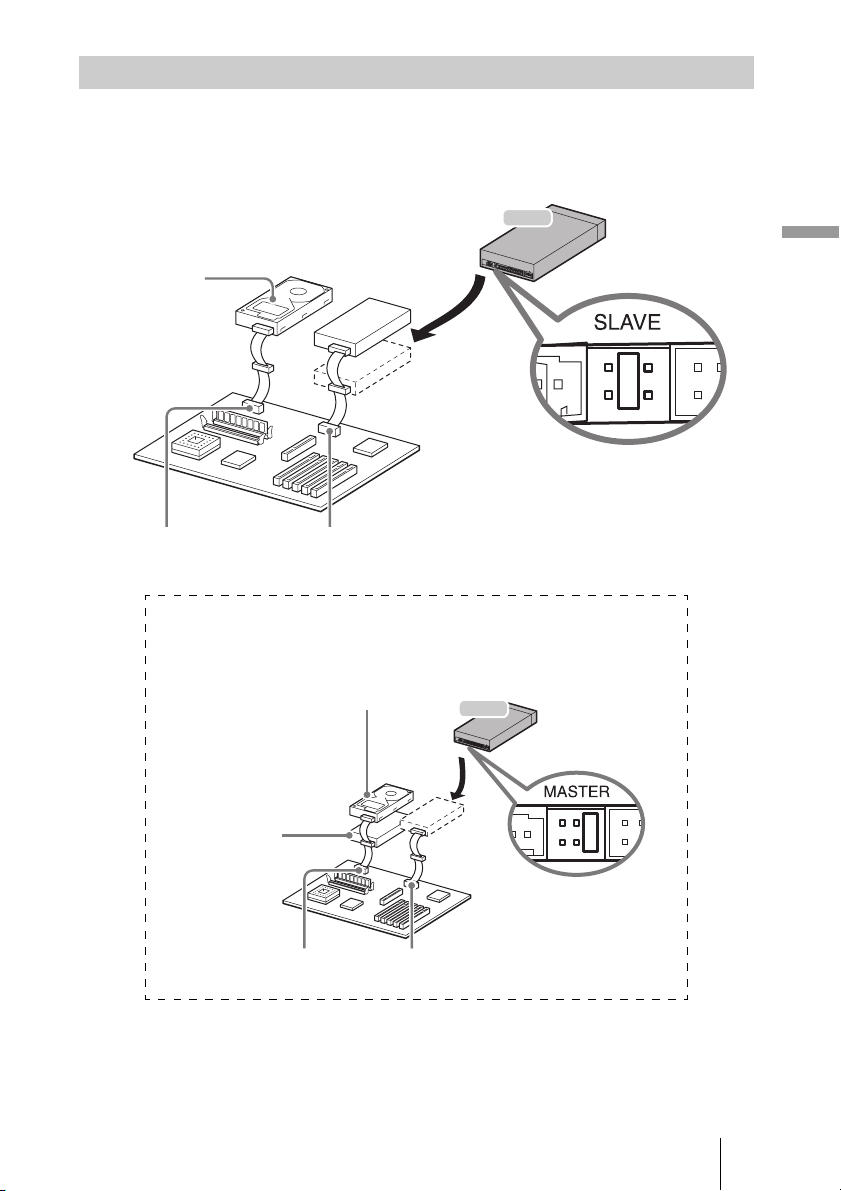
Installing the drive as a third drive
Connect the drive as follows.
1st drive
Hard disk drive (usually)
MASTER
2nd drive
Hard disk drive, or
DVD/CD drive, etc.
MASTER
3rd drive
Drive
Setup
Place the jumper in
the SLAVE position.
Primary
IDE connector
The following configuration is also possible.
Secondary
IDE connector
1st drive
Hard disk drive (usually)
MASTER
2nd drive
Hard disk drive, or
DVD/CD drive, etc.
SLAVE
Primary
IDE connector
3rd drive
Drive
Place the jumper
in the MASTER
position.
Secondary
IDE connector
17
Page 18
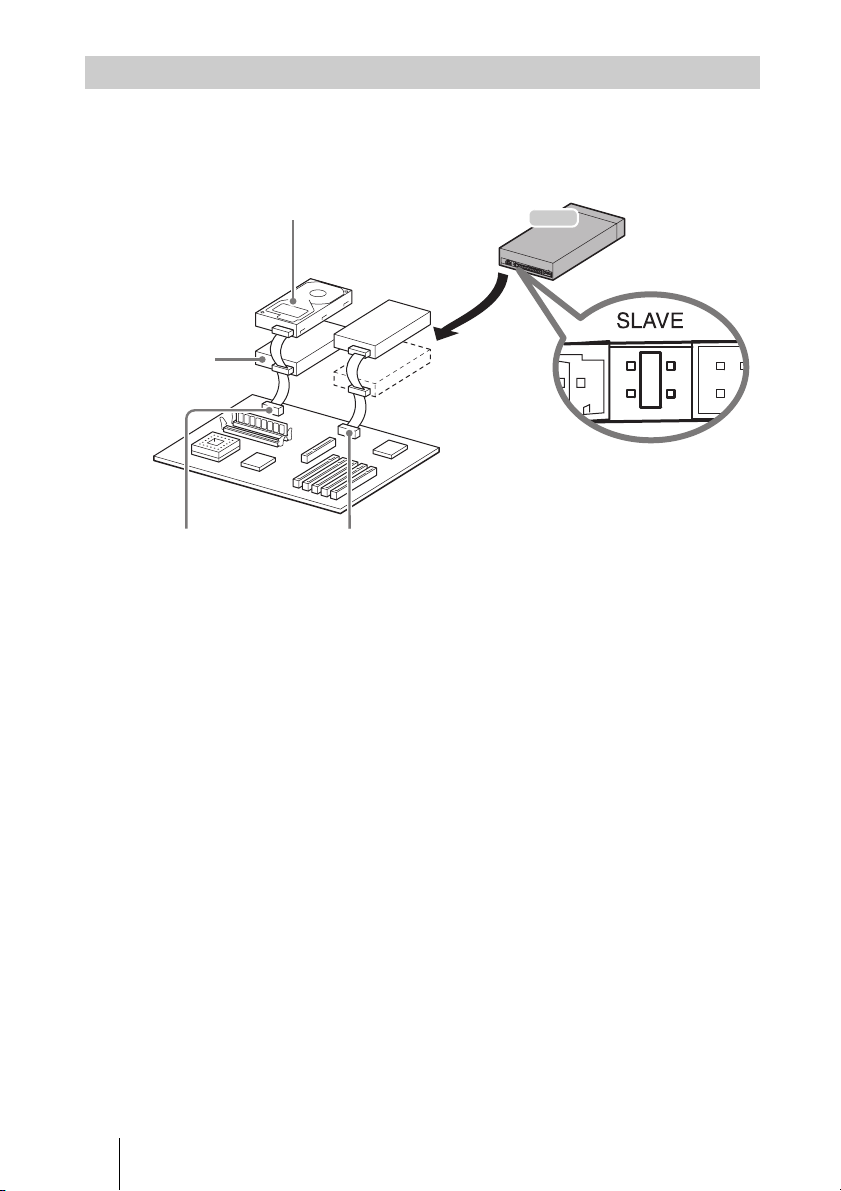
Installing the drive as a fourth drive
Connect the drive as follows.
2nd drive
Hard disk drive, or
DVD/CD drive, etc.
SLAVE
Primary
IDE connector
1st drive
Hard disk drive (usually)
MASTER
Secondary
IDE connector
4th drive
Drive
3nd drive
Hard disk drive, or
DVD/CD drive, etc.
MASTER
Place the jumper in
the SLAVE position.
18
Page 19

B Operation
Using the Supplied Software
CyberLink BD Solution is bundled with the drive as the supplied software.
CyberLink BD Solution is a software suite of several applications with
different purposes. By using the appropriate application, you can accomplish
a variety of tasks, such as creating CDs, DVDs, and BDs.
Supplied Software Applications
The supplied software, CyberLink BD Solution, includes the following
applications.
Note
For more detailed information and operating instructions for each application, refer to the
documents that came with the software.
PowerDVD
Play back video discs (including DVD-Video, Video-CD, and BDAV formats)
with this application.
Power2Go
Record data, music, and other files stored on your computer to DVD, BD, and
other discs with this writing application. It can also create bootable discs.
PowerProducer
Create video discs (including DVD-Video, Video-CD, and BDAV formats)
with this authoring application.
Operation
PowerDirector
Use this application to create your own original movie by collecting and
editing content, such as video footage and still images.
PowerDVD Copy
Duplicate your non-CSS protected (unencrypted) DVDs with this application.
PowerBackup
Archive and restore your data with this application.
PhotoNow!
Edit your photos and enhance image quality with this application.
Medi@Show
Create slideshows with this application. Then save your slideshows as
executable files, screensavers, HTML files for Internet publication, or in a
variety of other formats.
LabelPrint
Create and print disc labels and jackets with this application.
19
Page 20
InstantBurn
Format rewritable discs for drag-and-drop burning with this application. This
allows you to access the disc from Windows Explorer to read and write files,
as if it were a floppy disk.
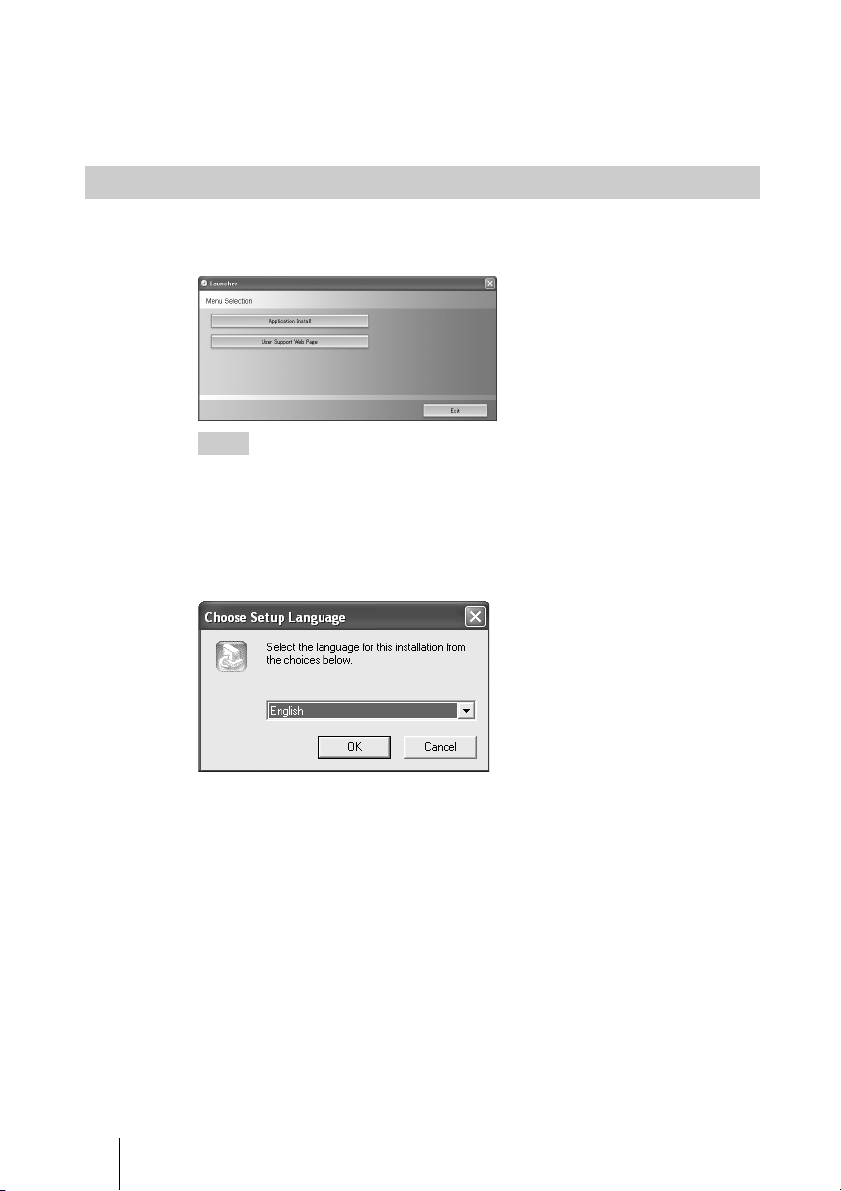
How to Install
1 Insert the supplied software CD-ROM into the drive.
The launcher starts automatically, and the following screen appears.
Hint
If the launcher does not start automatically, open My Computer in Windows, and doubleclick the drive icon.
2 Click [Application Install].
The CyberLink BD Solution installer launches, and a dialog box for selecting
the language to use during installation appears.
20
Page 21
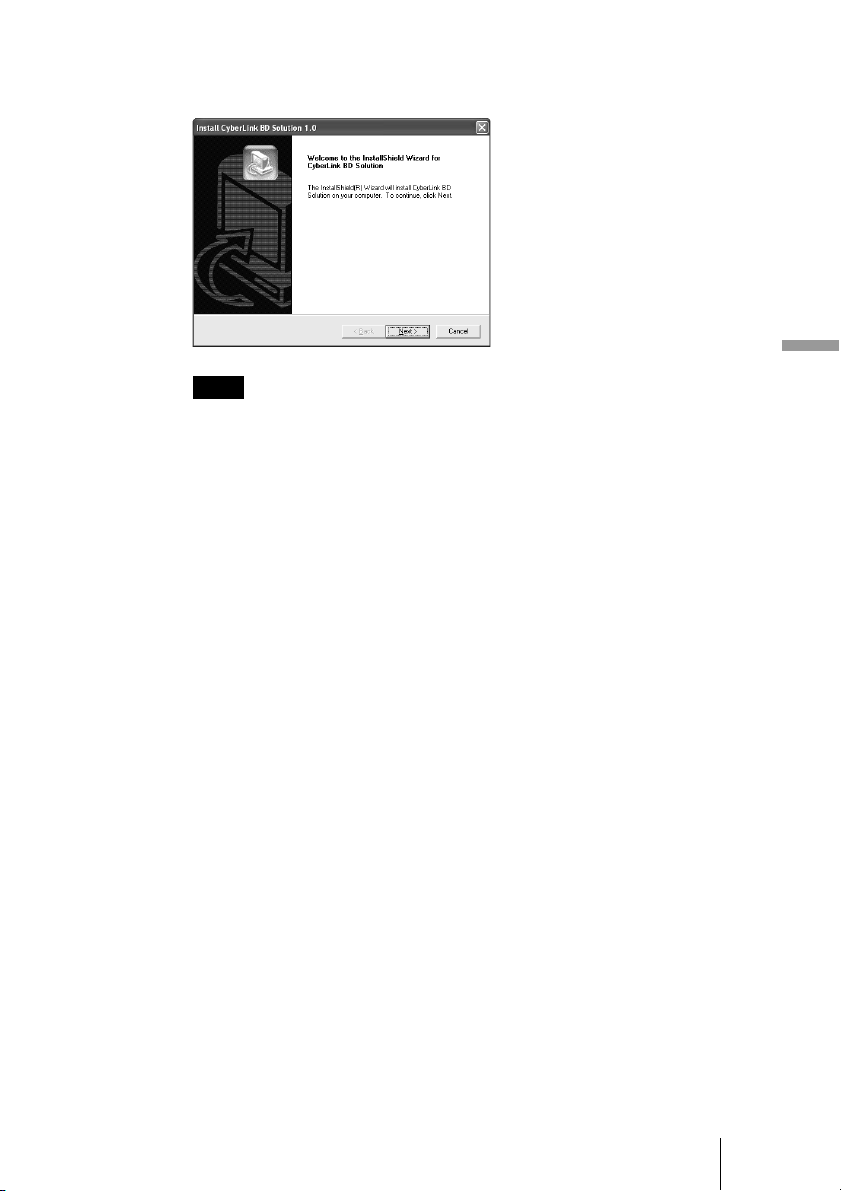
3 Select a language from the dropdown list, and then click [OK].
The next screen of the CyberLink BD Solution installer appears.
Note
To install the supplied software, you need the Software CD-Key printed on the software
CD case. Keep this CD-Key in a secure place, because you will also need it for future
software updates.
4 Follow the instructions on the screen to complete the installation.
Operation
21
Page 22

Recording HDV Camcorder Video to a Disc
This drive’s ability to handle large volumes of data makes it perfectly suited to
recording data-intensive high definition video. As an example of using the
supplied software, this section describes how to record video from an HDV
camcorder onto a BD.
Of the two methods available for recording camcorder video, one allows you
to edit video by temporarily capturing it to your computer before recording,
and the other method records directly onto a BD. This section describes both
of these operations.
Camcorder Preparations
To record images from an HDV camcorder, the following preparations are
required.
Note
For details on operating your HDV camcorder, refer to the operating instructions that came
with it.
• Connect your HDV camcorder to a power supply with the AC adapter, and
then connect the camcorder to your computer with an i.LINK cable.
• Turn on the HDV camcorder, and switch to the playback mode ([PLAY/
EDIT] mode, for example. The mode name may differ depending on your
camcorder model.).
• Turn off the DV output conversion option in the HDV camcorder settings
(so that HDV-format video is output without conversion to DV format).
22
Page 23
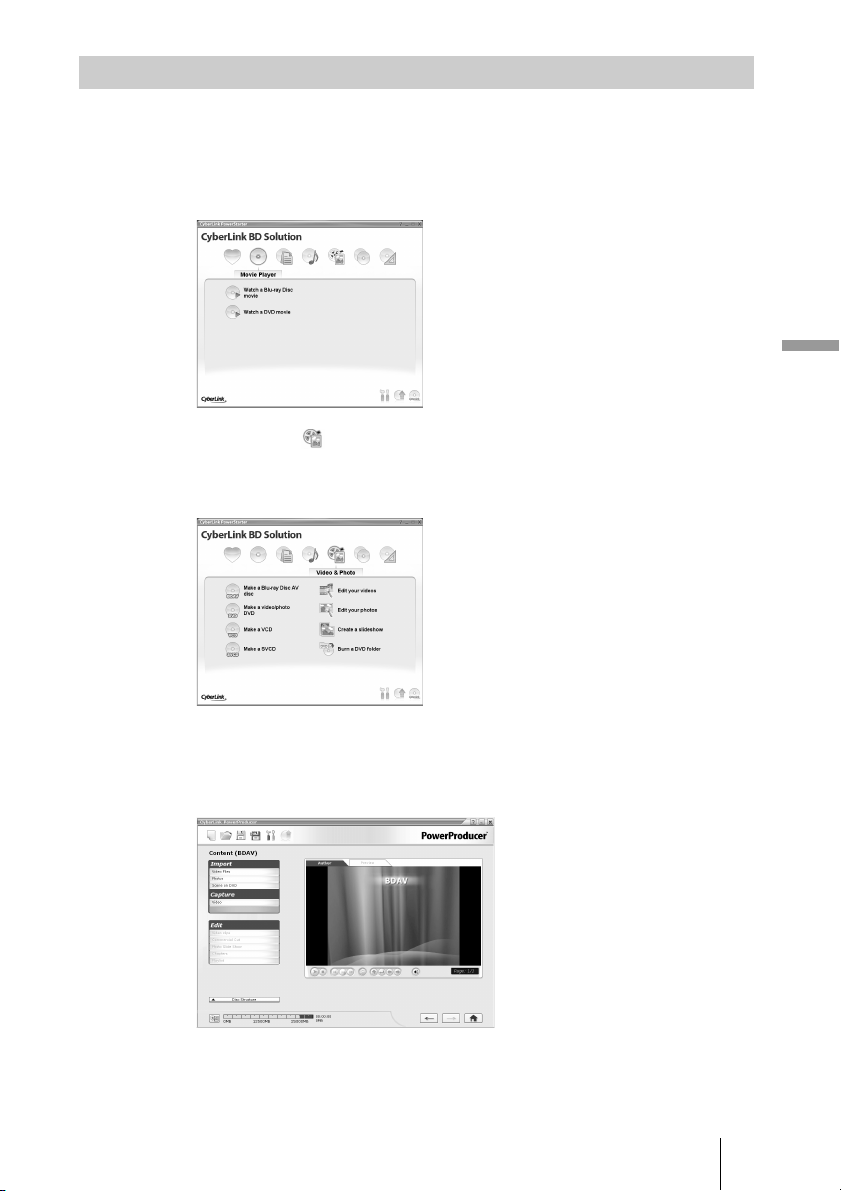
Capture, Edit & Record
1 Insert a writable Blu-ray disc into the drive.
2 Double-click the [CyberLink BD Solution] icon on the desktop.
CyberLink PowerStarter launches.
3 Point to the (Video & Photo) icon.
CyberLink PowerStarter switches to a list of icons for creating and editing
video discs.
Operation
4 Click [Make a Blu-ray Disc AV disc].
PowerProducer launches, and the screen for adding content to a disc
automatically appears.
23
Page 24
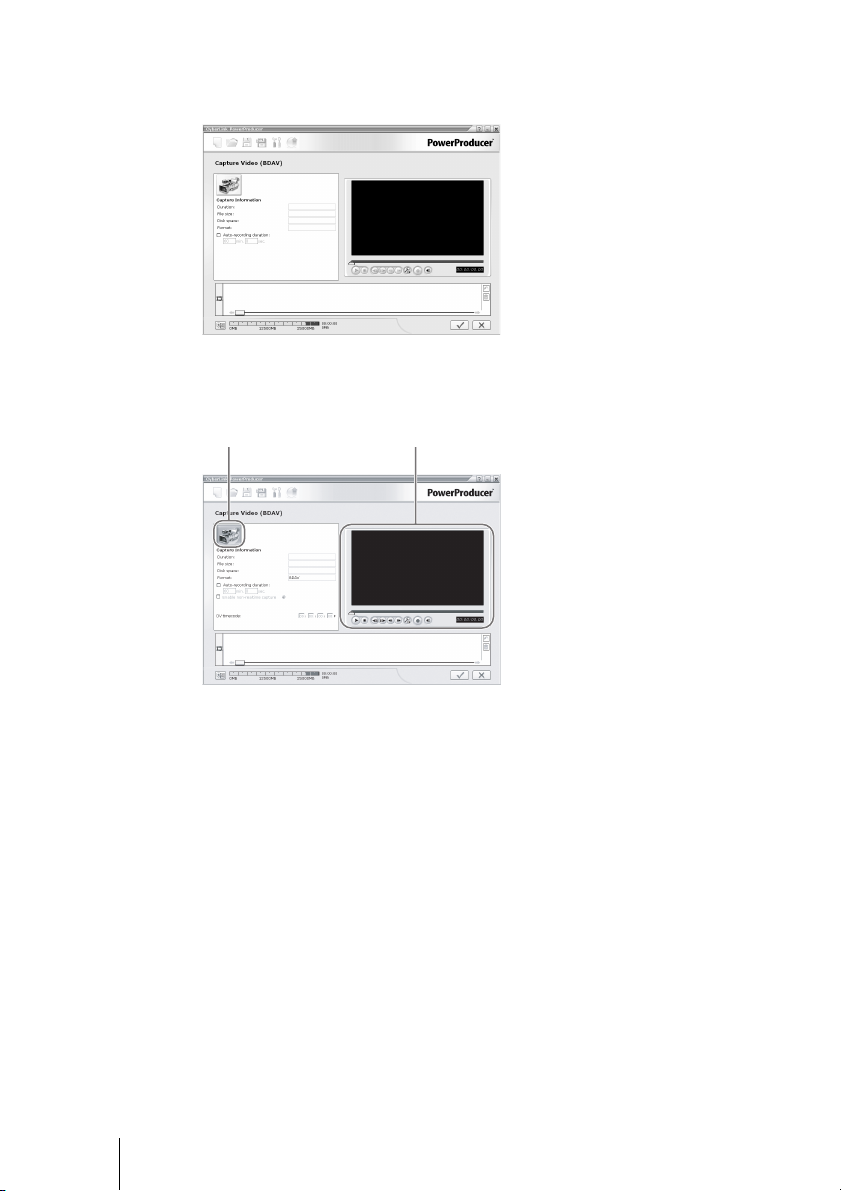
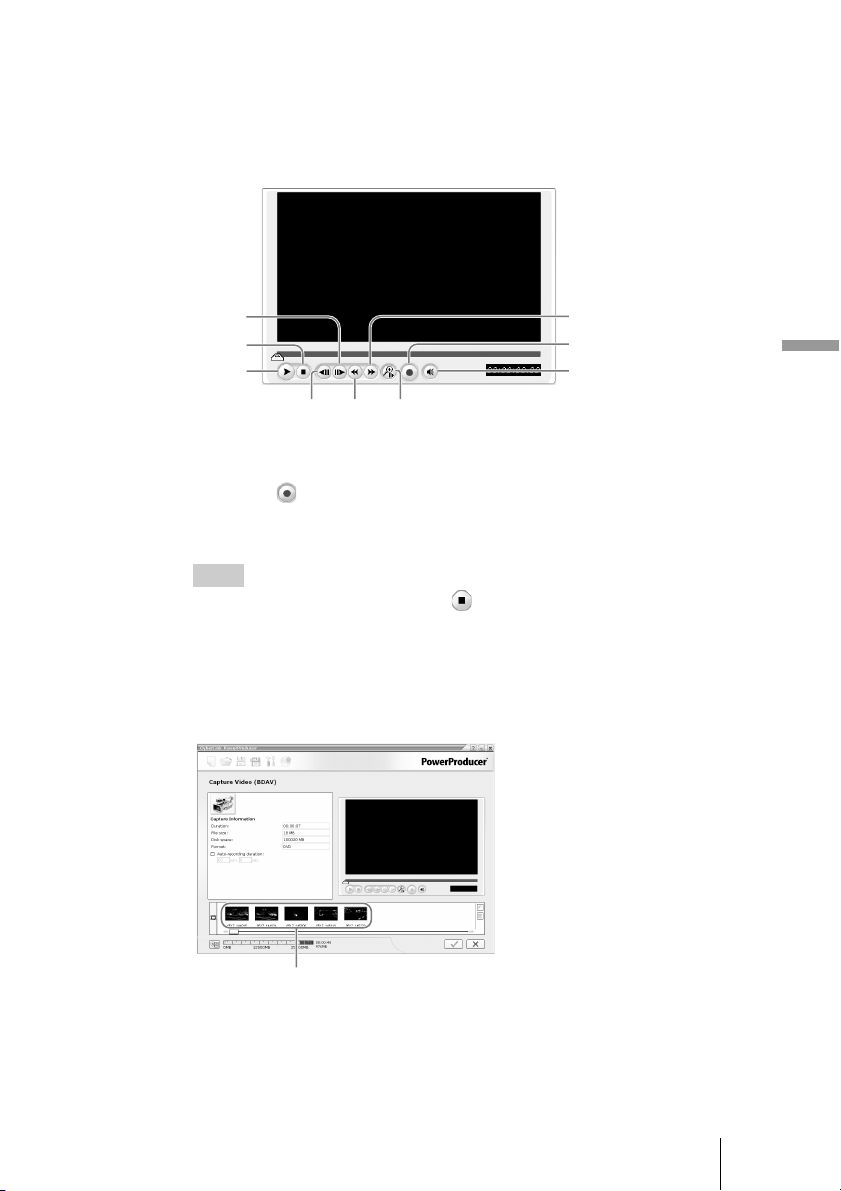
5 Under [Capture], click [Video].
PowerProducer switches to the capture screen.
6 Click the camcorder icon.
The playback controls are activated.
Camcorder icon Playback controls
24
Page 25
7 Use the playback controls and the preview window to cue the
desired recording start position on the DV tape.
The playback controls consist of the following buttons. You can use these
buttons to operate an HDV camcorder connected by i.LINK cable, from the
computer screen.
Next
frame
Stop
Play/
Pause
Previous
frame
Rewind
Zoom
increment
Fast
forward
Record
Volume/
Mute
8 Click the (Record) button.
Video capture starts.
When a blank area on the tape is reached, capture stops automatically.
Hint
To stop video capture at any time, click (Stop) in the playback controls.
9 Repeat steps 6 to 7 until you have finished capturing all the
desired video clips.
Captured video clips are added, in order, to the list at the bottom of the capture
screen.
Operation
Captured video clips
25
Page 26
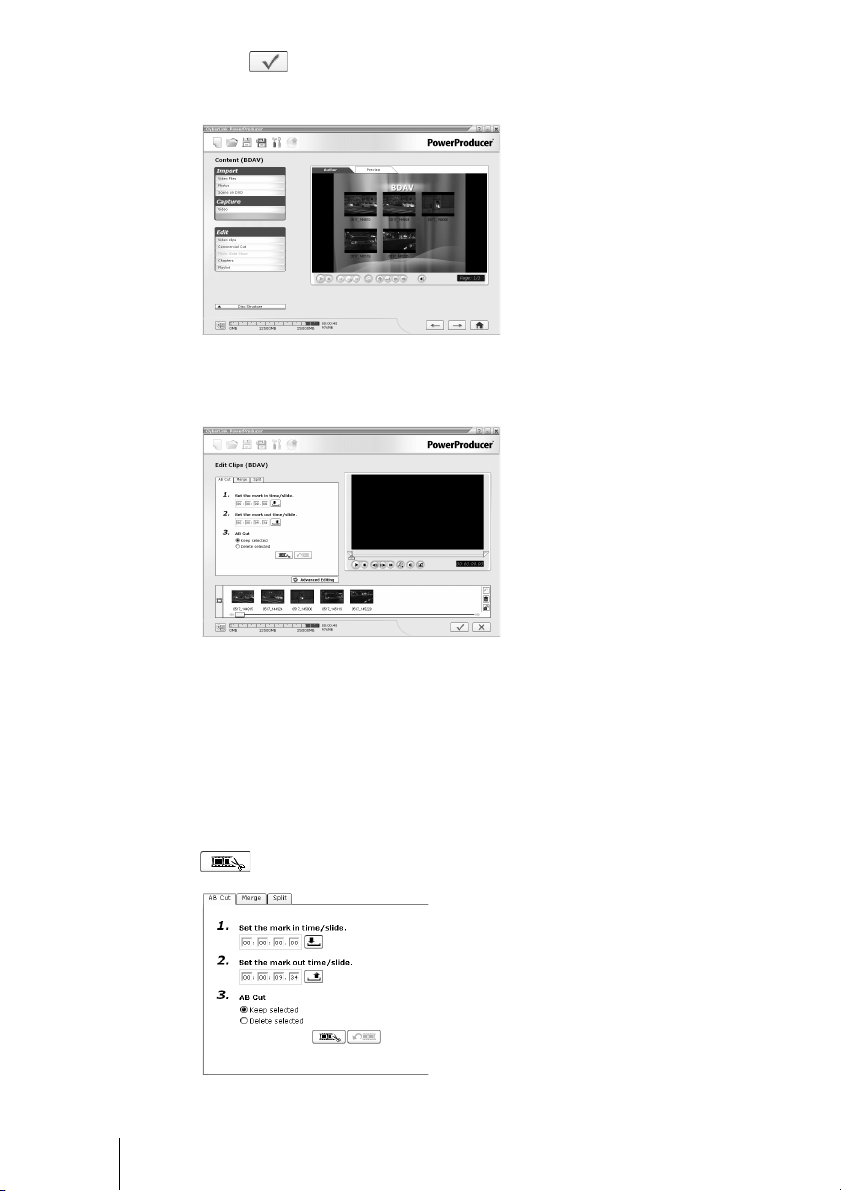
10 Click .
The capture screen closes, and the screen for adding content to a disc reappears.
11 To edit your video, click [Video clips] under [Edit].
The edit screen appears.
26
The edit screen consists of 3 tabs for switching between editing tasks, the list
of captured video clips, and the preview window. Select the desired thumbnail
in the list of video clips, click the appropriate tab to switch between editing
tasks, and then edit the clip.
[AB Cut] Tab
Use this tab to keep only a part of the selected video clip intact and delete
unnecessary portions which precede or follow that part. Enter a start position
(mark in time) and end position (mark out time) for the cut, and specify whether
to keep only or delete only the selected range. When you are satisfied, click
to perform the specified cut.
Page 27
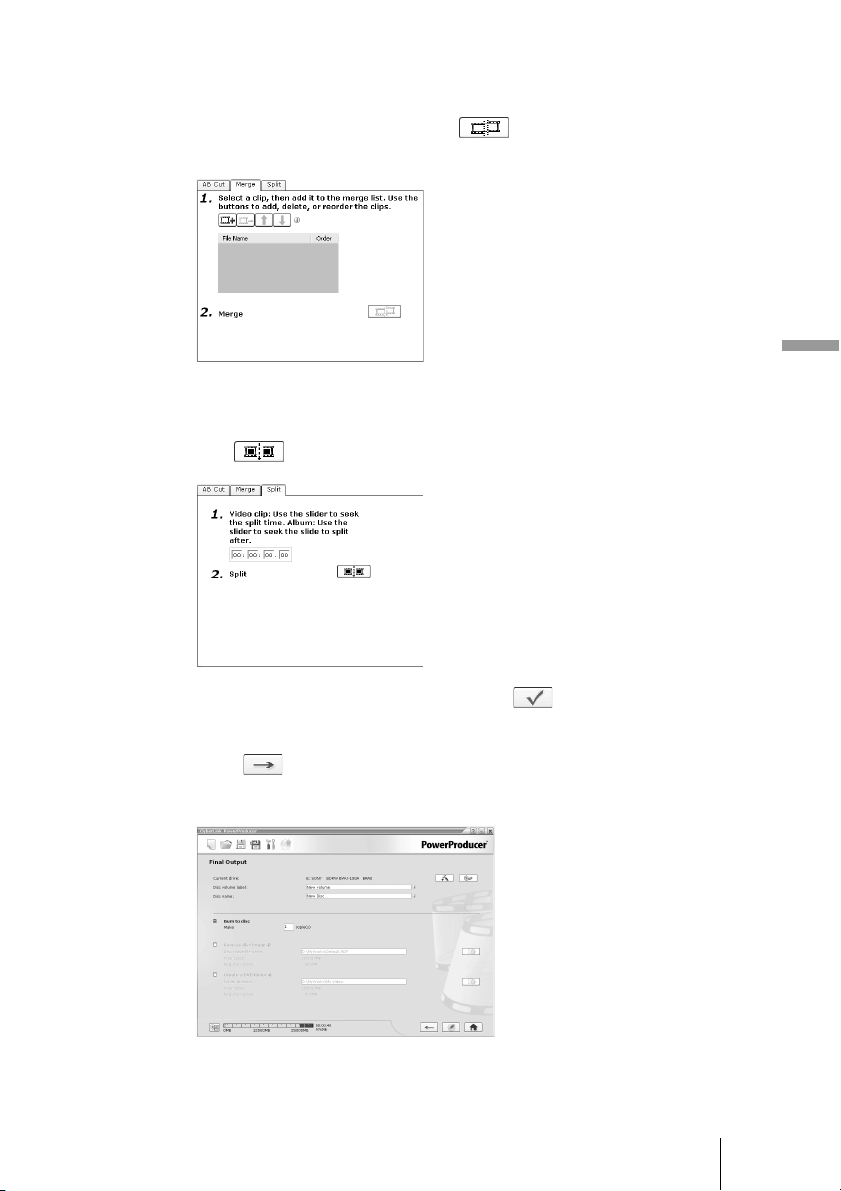
[Merge] Tab
Select video clips to merge, and add them to the list on the [Merge] tab in the
order you want to merge them. (This order can be changed after the clips are
added.) When you are satisfied, click to merge the specified video clips
into a single clip.
[Split] Tab
Select a video clip to split, and enter the desired split time, or use the slider to
cue the playback position at which to split the clip. When you are satisfied,
click to split the video clip at the specified position.
Operation
12 When you are finished editing, click .
The edit screen closes, and the screen for adding content to a disc reappears.
13 Click .
A screen for setting recording options appears.
27
Page 28
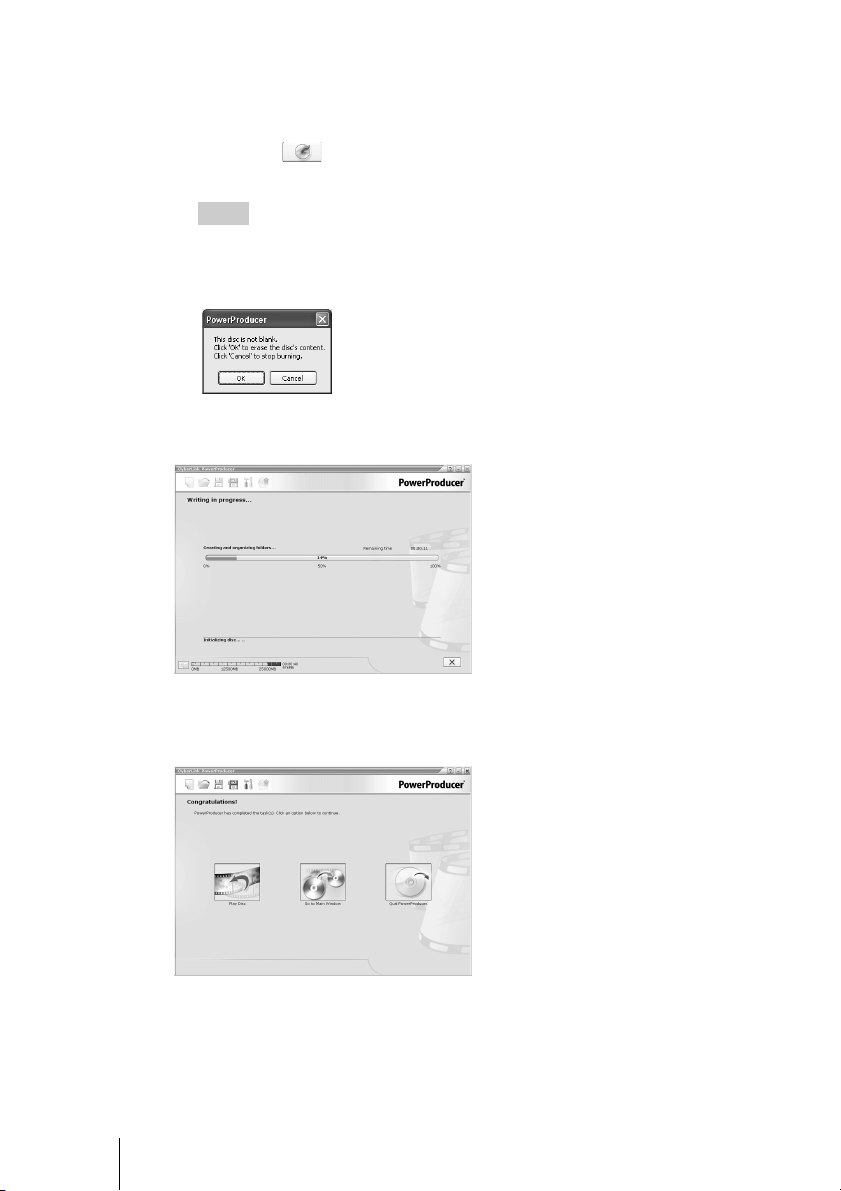
14 Set the recording options.
Enter a volume label and a name for the disc. Also, if you intend to make
multiple copies of the same disc, specify the number in the [copie(s)] box.
15 Click the (Burn) button.
Recording starts.
Hint
If the disc you inserted is not blank, the following message appears. To erase the entire
content of the disc and proceed with the recording, click [OK]. Otherwise, click [Cancel],
insert a blank disc, and start recording again.
The following progress screen appears, showing the progress of the recording.
28
When all processing finishes, the disc is automatically ejected, and the
following screen appears. This completes the recording of video to the disc.
Page 29
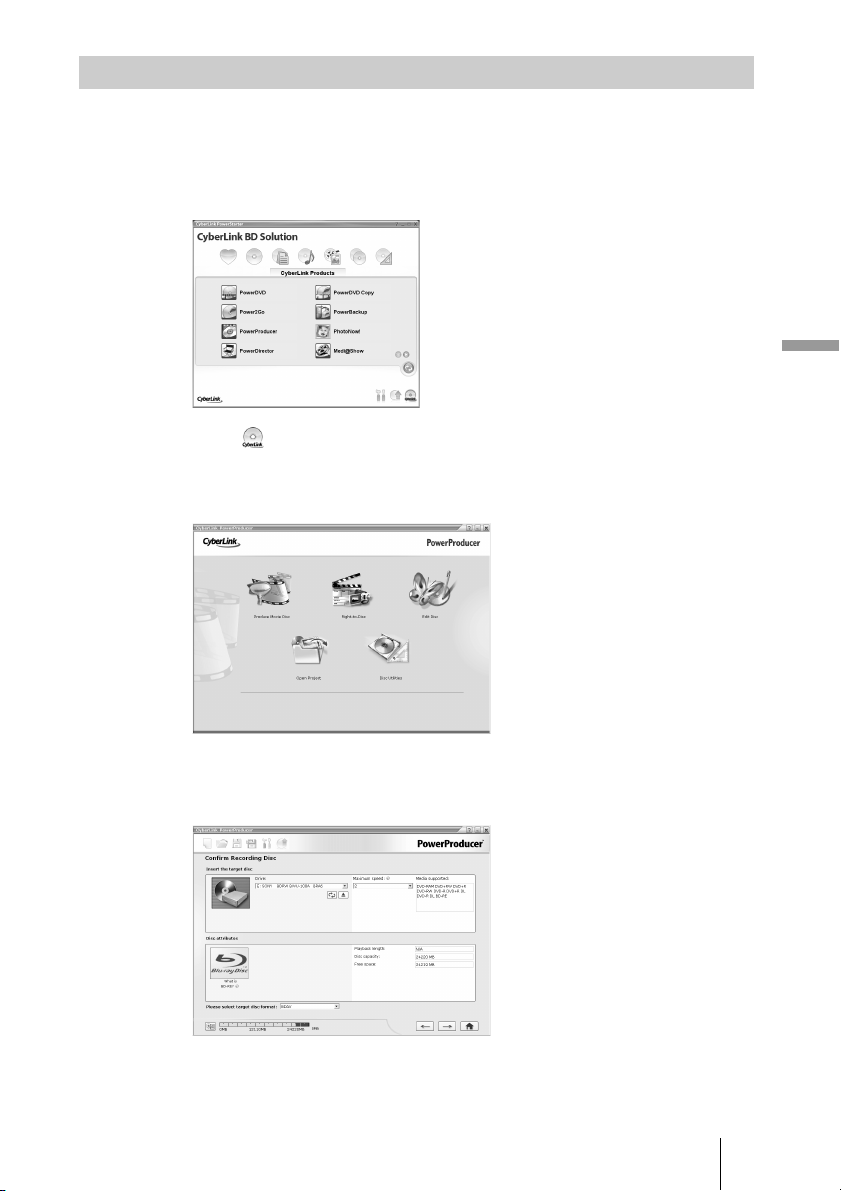
Direct Recording
1 Insert a writable Blu-ray disc into the drive.
2 Double-click the [CyberLink BD Solution] icon on the desktop.
CyberLink PowerStarter launches.
3 Click at the bottom right corner of the launcher, and then click
[PowerProducer].
PowerProducer launches.
Operation
4 Click [Right-to-Disc].
A screen appears for verifying the state of the drive and the disc.
29
Page 30
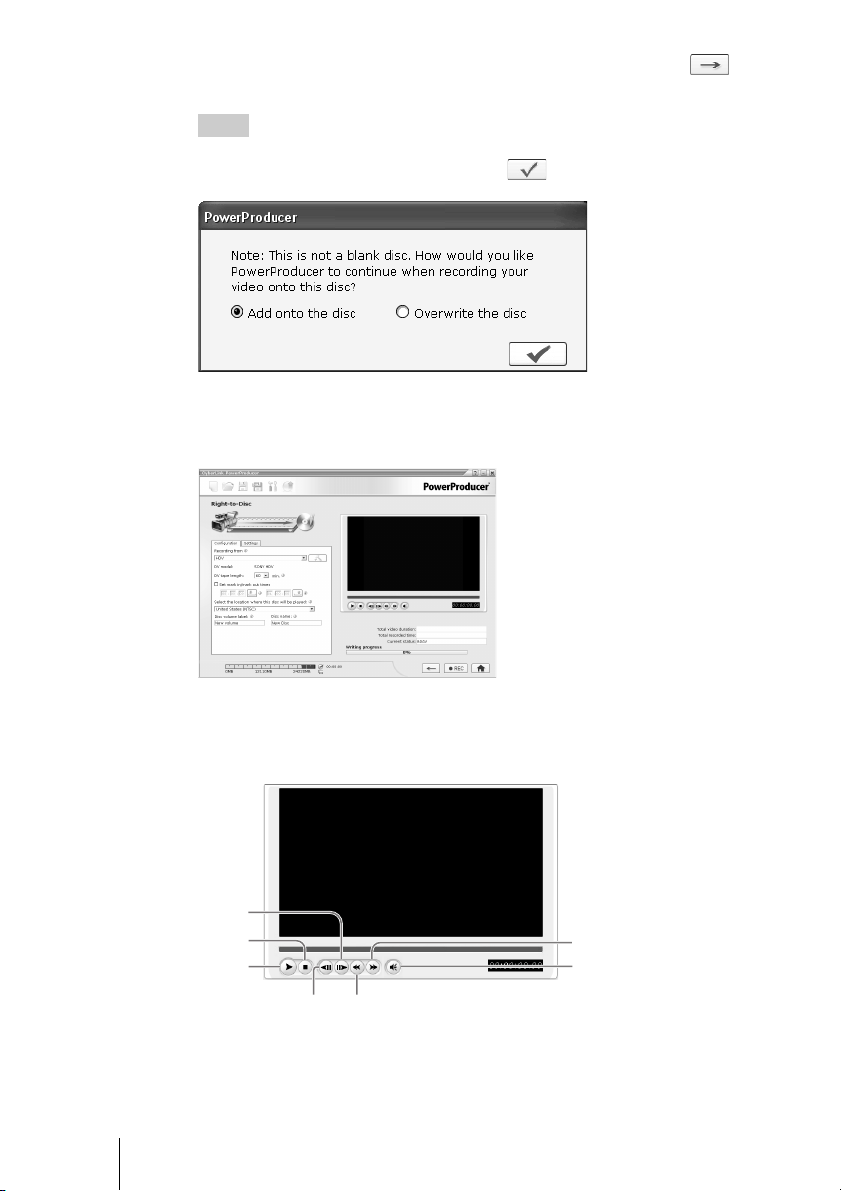
5 Verify the state of the drive and the disc, and then click .
A screen appears for you to start recording to the disc.
Hint
If the Blu-ray disc you inserted is not blank, the following dialog box appears. Select a
method for recording to the disc, and then click .
6 Use the playback controls and the preview window to cue the
desired recording start position on the DV tape.
30
The playback controls consist of the following buttons. You can use these
buttons to operate an HDV camcorder connected by i.LINK cable, from the
computer screen.
Next
frame
Stop
Play/
Pause
Previous
frame
Rewind
Fast
forward
Volume/
Mute
Page 31
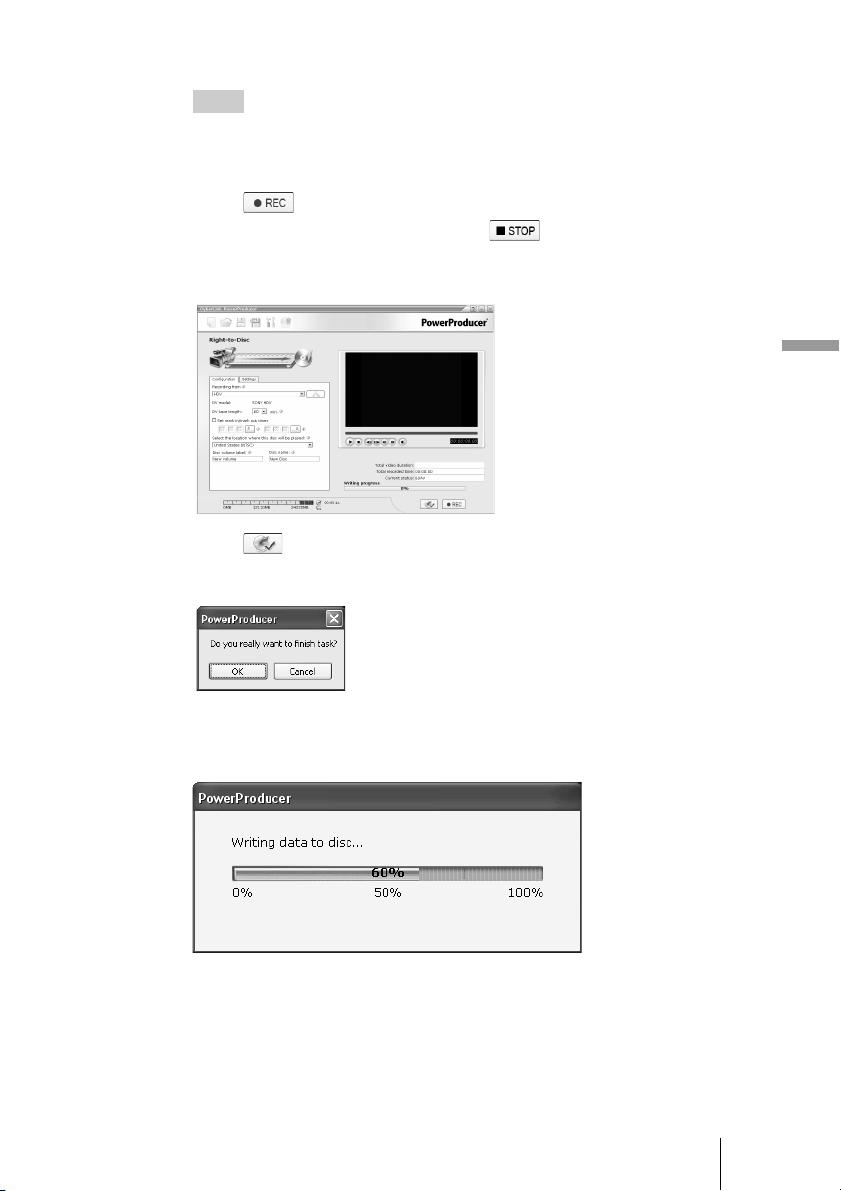
7 Enter a volume label and a name for the disc.
Hint
You are also free to specify a recording range with tape timecodes at this point. In this
case, enter a recording start position (mark in time) and a recording end position (mark
out time).
8 Click .
During recording, this button changes to . You can click this button at
any time to stop recording.
When a blank area on the tape is reached, recording stops automatically.
9 Click .
The following dialog box appears.
Operation
10 Click [OK].
The following screen appears.
31
Page 32

When processing finishes, the following screen appears. This completes direct
recording.
32
Page 33

Using Generic Software with the Drive
Using software other than the supplied software (such as generic software,
shareware, or freeware) to write data to disc with this drive is not under
warranty and Sony offers no customer service if problems arise from using
such software.
Make sure that the supplied writing software and generic writing software do
not coexist on your computer. Taking appropriate steps to avoid this situation,
especially in the case of packet writing software
prevent erratic operation of the software and/or computer.
1)
or a format utility2) will help
If the generic software you are using does not detect the drive correctly, visit
the Web site of the software manufacturer and update the software, as this may
solve the problem.
1)
Such as Roxio’s Drag-to-Disc, BHA’s B’s CLIP, and Sonic’s DLA.
2)
Such as BHA’s DVD-RAM Driver and Panasonic’s DVDForm.
Operation
33
Page 34
Compatible Discs
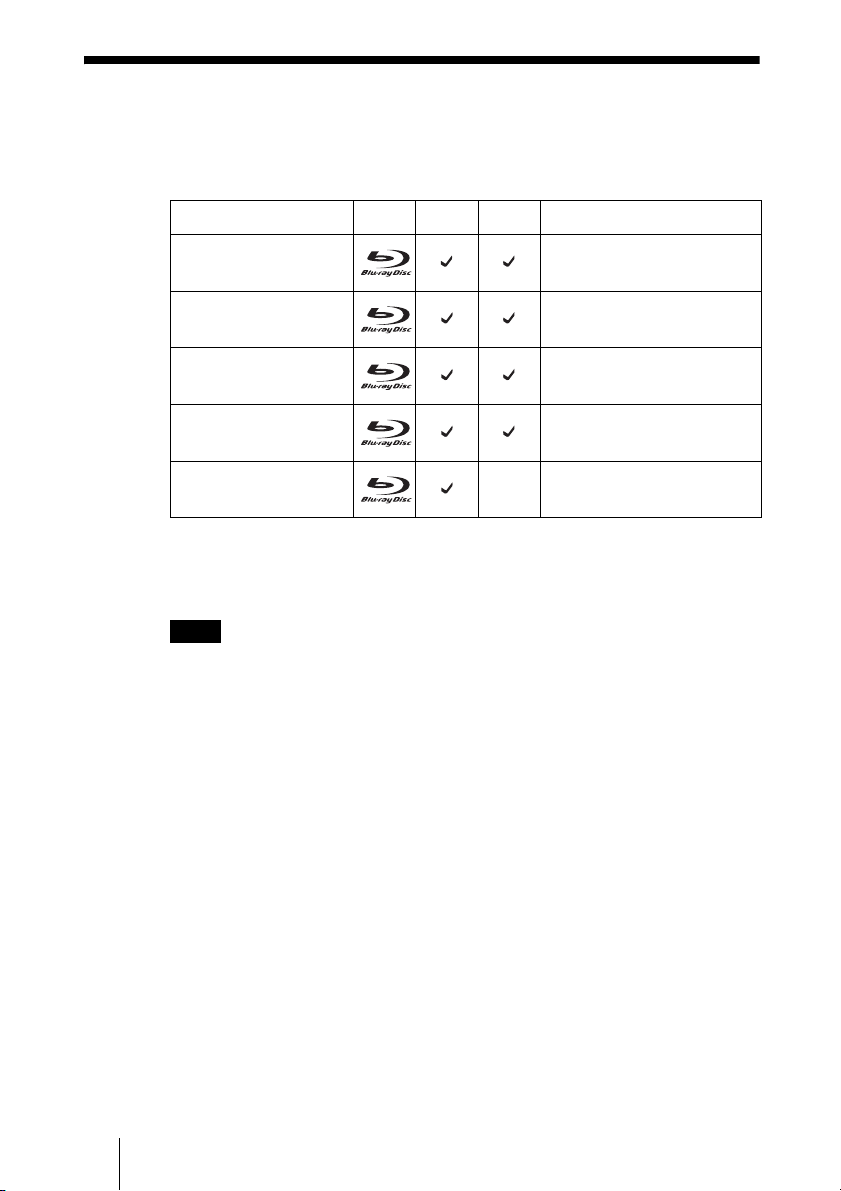
The following discs are compatible with the drive.
BD
Disc types Logo Read Write Write speed
1)
BD-R 25GB
BD-R 50GB
BD-RE 25GB
BD-RE 50GB
BD-ROM
1)
2)
Note
2)
Writing speed supported by the drive. Depending on your software and media, this speed
may vary. For more details on writing speed by disc type, access the user support web site
(see page 45).
A system environment sufficient to meet the demands of BD-ROM playback is required.
Speed supported by the disc
(max. 2×)
Speed supported by the disc
(max. 2×)
Speed supported by the disc
(max. 2×)
Speed supported by the disc
(max. 2×)
—
—
The drive cannot record to or playback the cartridge-encased discs that support
BD-RE Ver.1.0 (Blu-ray Disc Rewritable Format Ver.1.0).
34
Page 35
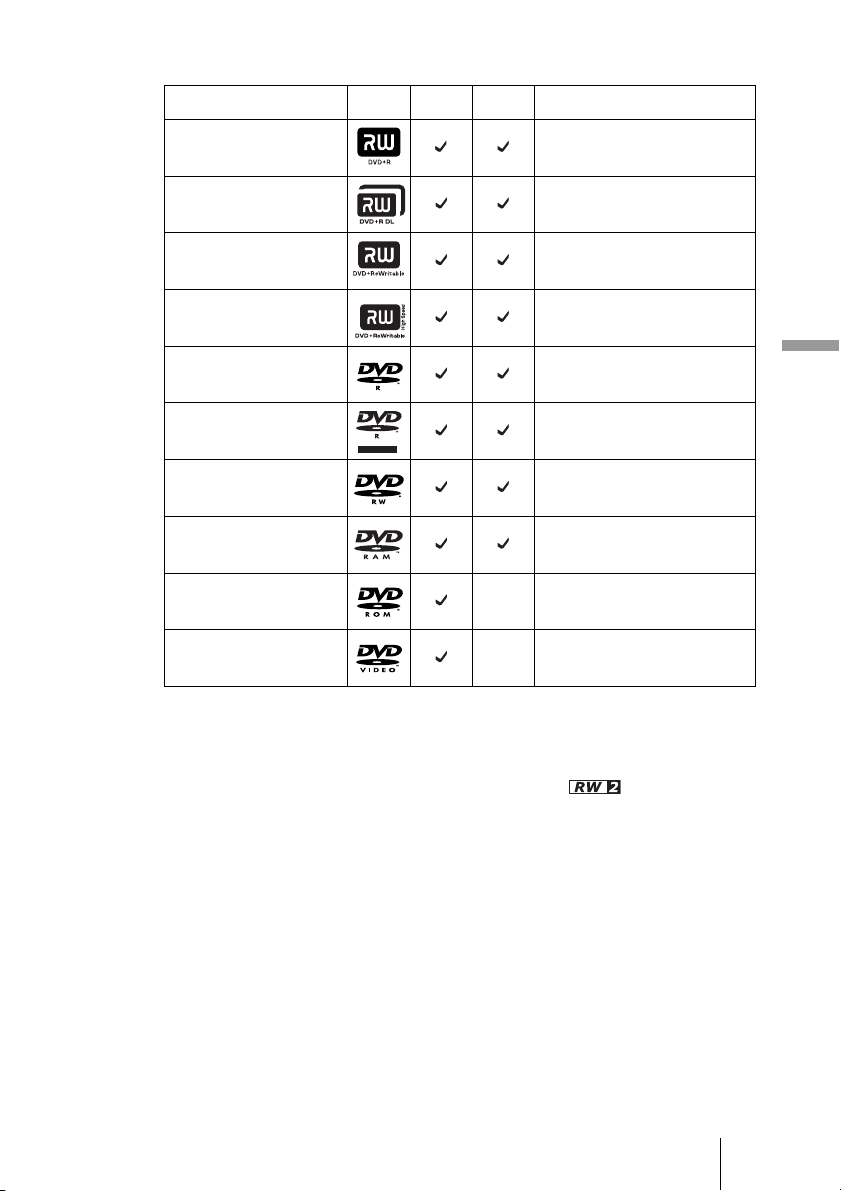
DVD
R DL
Disc types Logo Read Write Write speed
1)
DVD+R
DVD+R DL
(Double Layer)
DVD+RW
DVD+RW
(High Speed)
DVD-R
DVD-R DL
(Dual Layer)
DVD-RW
DVD-RAM
2)
3)
R DL
Speed supported by the disc
(max. 8×)
Speed supported by the disc
(max. 4×)
Speed supported by the disc
(max. 4×)
Speed supported by the disc
(max. 8×)
Speed supported by the disc
(max. 8×)
Speed supported by the disc
(max. 4×)
Speed supported by the disc
(max. 6×)
Speed supported by the disc
(max. 5×)
DVD-ROM — —
DVD-Video — —
1)
Writing speed supported by the drive. Depending on your software and media, this speed
may vary.
For more details on writing speed by disc type, access the user support web site (see
page 45).
2)
This drive is compatible with the DVD-RW disc displaying mark.
3)
Use a non-cartridge-type disc or a cartridge from which the disc can be ejected.
Operation
35
Page 36
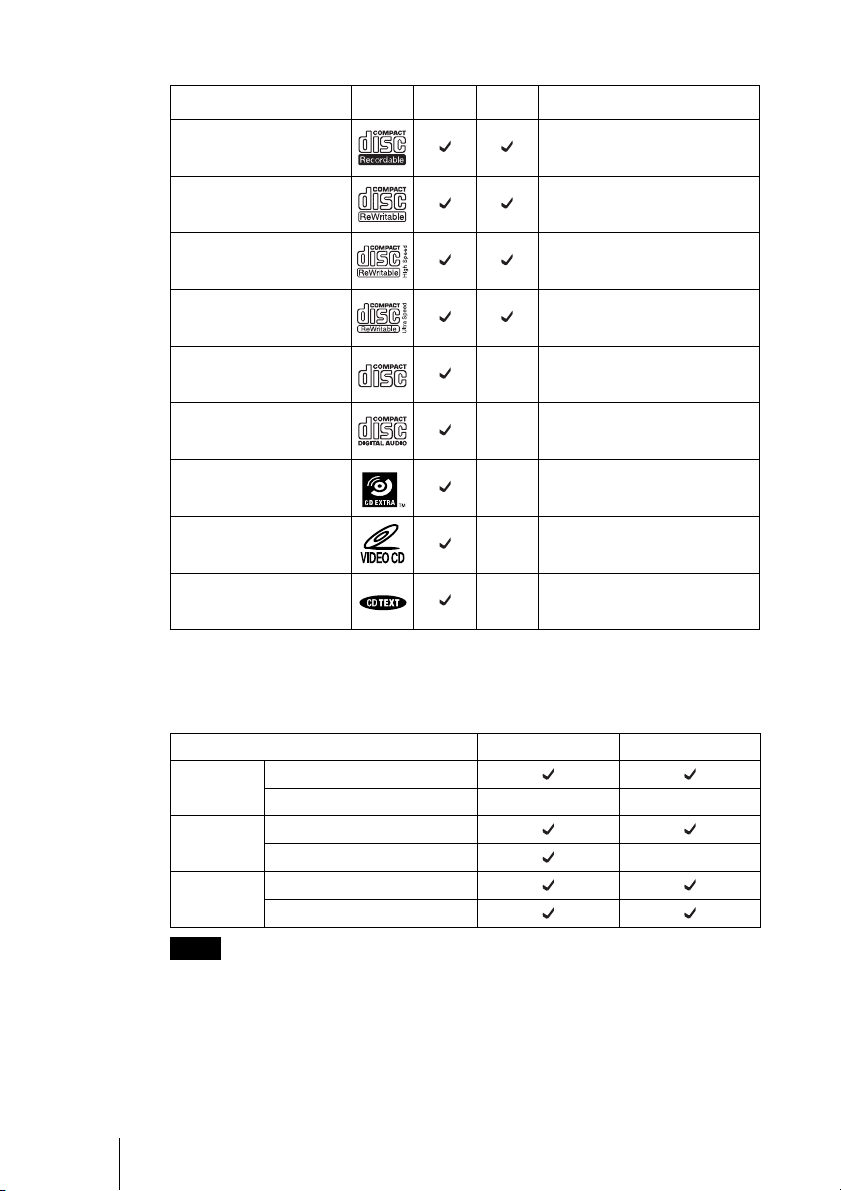
CD
Disc types Logo Read Write Write speed
CD-R
Speed supported by the disc
(max. 24×)
CD-RW
Speed supported by the disc
(max. 4×)
CD-RW
(High Speed)
CD-RW
(Ultra Speed)
CD-ROM
Speed supported by the disc
(max. 10×)
Speed supported by the disc
(max. 16×)
——
1)
CD-DA
(audio only)
CD Extra
Video C D
CD TEXT
1)
Writing speed supported by the drive. Depending on your software and media, this speed
may vary.
For more details on writing speed by disc type, access the user support web site (see
page 45).
——
——
——
——
Disc diameters Read Write
BD
DVD
CD
Notes
• Only round discs should be used with this drive. Attempting to read odd-shaped discs
(stars, hearts, card shape, etc.) may damage the drive.
• Operation is not guaranteed when writing to or playing back 99 minute discs.
• With 8 cm discs, you must place the drive horizontally.
• Do not use a Support 8 cm disc adapter.
• When using a double-sided disc, orient the drive horizontally.
12 cm
8 cm — —
12 cm
8 cm —
12 cm
8 cm
36
Page 37

Recommended Writable Discs
We recommend that you only use discs for which operation has been
guaranteed. You can obtain the latest list of writable discs for which operation
with this drive has been guaranteed at the user support Web site address (see
page 45 for details).
Note
You can safely use most disc formats that comply to the appropriate standards with this drive.
However, bear in mind that some generic discs do not comply to quality or performance
standards necessary for safe use with this drive. If you use such discs, the drive may
automatically adjust the writing speed, writing errors may occur, and discs that have been
written to may generate reading errors, etc.
Writable Disc Features
Writable CDs and compatibility
The drive can write to CD-R and CD-RW discs, when used with writing
software.
To play back (read) these CD-R and CD-RW discs on other CD-ROM drives,
make settings on the writing software according to the purpose of the data.
CD-R Discs
Data can be written to this type of disc only once, and once it has been written,
it cannot be erased. Music CDs created on CD-R disc media can be played on
standard CD players.
CD-RW Discs
Data can be written to and erased from this type of disc repeatedly. Typically,
a new CD-RW disc can be rewritten about 1,000 times.
Music CDs created on CD-RW disc media cannot be played on a CD player
unless it is designed to be CD-RW compatible.
High Speed CD-RW Discs
The drive can write to High Speed CD-RW disc media. Data written on High
Speed CD-RW discs can be read by standard CD-ROM drives.
Note
Drives that do not have the High Speed CD-RW logo cannot be used to write to High Speed
CD-RW discs. When writing or adding to such discs with a drive other than this one, make
sure that the drive has the High Speed CD-RW logo. Also, always set the writing speed to
that specified for the particular High Speed CD-RW disc media being used.
Operation
Ultra Speed CD-RW Discs
The drive can write to Ultra Speed CD-RW disc media. Data written on Ultra
Speed CD-RW discs can be read by standard CD-ROM drives.
37
Page 38

Note
Drives that do not have the Ultra Speed CD-RW logo cannot be used to write to Ultra Speed
CD-RW discs. When writing or adding to such discs with a drive other than this one, make
sure that the drive has the Ultra Speed CD-RW logo. Also, always set the writing speed to
that specified for the particular Ultra Speed CD-RW disc media being used.
Writing Speed
When writing to CD-R and CD-RW discs, set the writing speed to that
specified on the disc. Change the writing speed on the writing software.
About playback/reading compatibility in CDs
CD-R and CD-RW discs created with the drive can be read on most CD-ROM
drives. However, some older CD-ROM drives cannot read CD-RW discs.
In addition, CD-R music discs created and finalized with the drive can be
played on most CD players, however, there are some CD players and
automobile CD players that do not guarantee playback of CD-R discs.
Also, CD-R music discs created with the drive can be played back on many
standard CD players. However, depending on the type of your player, playback
of CD-R and CD-RW discs may not be supported.
Further, because of the differences in quality and characteristics between
various CD-ROM drive, CD player, CD-R disc, and CD-RW disc
manufacturers, playback may not be possible depending on the combination.
Writable DVDs and compatibility
The drive can write to DVD+R DL, DVD+R, DVD-R DL and DVD-R discs,
as well as to DVD+RW, DVD-RW and DVD-RAM discs, when used with
writing software. The playback (read) compatibility of data written by this
drive depends on the capabilities of the DVD-ROM drives or the DVD players
and on the logical format selected when the disc is recorded (written).
38
DVD+R DL/DVD+R/DVD-R DL/DVD-R Discs
Data can be written to this type of disc only once. Once it has been written, it
cannot be erased. Playback (read) compatibility of DVD+R and DVD-R discs
depends on the capability of the DVD-ROM drive and the DVD player and on
the logical format selected when it is recorded (written).
DVD+RW and DVD-RW Discs
Data can be repeatedly written to or erased from this type of disc. Typically, a
new DVD+RW or DVD-RW disc can be rewritten about 1,000 times.
Playback (read) compatibility of DVD+RW and DVD-RW discs depends on
the capability of the DVD-ROM drive and the DVD player and on the logical
format selected when it is recorded (written).
DVD-RAM Discs
Data can be repeatedly written to or erased from this type of disc. Typically, a
new DVD-RAM disc can be rewritten about 100,000 times. To play back (or
read the data on) a DVD-RAM disc, a DVD-ROM drive or DVD player that
supports DVD-RAM discs is required.
Page 39

About playback/reading compatibility in DVDs
DVD+R DL/DVD+R/DVD-R DL/DVD-R discs, as well as DVD+RW and
DVD-RW discs created and finalized with the drive can be played back on
almost all DVD-ROM drives. However depending on the type of your drive,
playback of DVD+R DL, DVD+RW, DVD-R DL, and DVD-RW discs may
not be supported.
In addition, some drives do not support multi-session (DVD+R DL/DVD+R/
DVD+RW) or multi-border (DVD-R DL/DVD-R/DVD-RW). In these cases,
you can only play back the disc in single-session (DVD+R DL/DVD+R/
DVD+RW) or single-border (DVD-R DL/DVD-R/DVD-RW).
Also, DVD-Video discs created with the drive can be played back on many
standard DVD players. However depending on the type of your player,
playback of DVD+RW and DVD-RW discs may not be supported.
Playback of DVD-RAM discs is only supported for DVD-RAM compatible
DVD drives and DVD players.
Further, because of the differences in quality and characteristics between
various DVD-ROM drive, DVD player, DVD+R DL disc, DVD+R disc,
DVD+RW disc, DVD-R DL disc, DVD-R disc, DVD-RW disc and DVDRAM disc manufacturers, playback may not be possible depending on the
combination. (Playback compatibility is not under warranty.)
Writable BDs and compatibility
This drive can write to BD-R 25GB, BD-R 50GB, BD-RE 25GB, and BD-RE
50GB discs when used with writing software. Data can be written to BD-R
25GB and BD-R 50GB discs only once, and once it has been written, it cannot
be erased. With BD-RE 25GB and BD-RE 50GB discs, data can be written and
erased repeatedly.
Operation
Note
This drive can write data in BDAV format only to BD-RE 25GB and BD-RE
50GB discs.
It cannot record to or playback the cartridge-encased discs that support BD-RE
Ver.1.0 (Blu-ray Disc Rewritable Format Ver.1.0).
Players designed for use with BD-RE Ver.1.0 discs cannot play back BDs
created with this drive.
About playback/reading compatibility
Data written to BDs with this drive can be read by BD drives that support the
BD-R Ver.1.0, and BD-RE Ver.2.0 formats.
Video recorded in BDAV format can only be played back on BD players or BD
drives with BD player application software which support the BD-R Ver.1.0
and BD-RE Ver.2.0 formats.
39
Page 40

Precautions on Writing/Playing Discs
Write speed and compatible discs
• When writing data to disc at high speeds, you must use the appropriate type
of disc.
• Configure the writing speed through your writing software. For details about
the setting procedures, refer to your writing software documentation.
• When writing data to disc, the drive may adjust the writing speed to the
quality of the disc in the drive. Depending on the transfer rate, there may also
be limitations on writing speeds.
DVD region codes
The playback of DVD-Video (DVD discs) is protected and controlled by a
region code setting. For the drive to play back DVD-Video, the region code on
the DVD disc, the region code of the drive, and the region code of the
DVD-Video software must all match.
With this drive, the region code can be set up to five times, including the initial
assignment (RPC phase 2
the setting becomes permanent and can no longer be changed. From this point
on, you are only able to play back DVD-Video whose region code matches the
one set the fifth time.
Do not attempt to make unauthorized changes to the region code. Any
problems resulting from doing so are not covered by the warranty.
Hint
You can change the region code of the drive on it’s properties dialog box accessible from the
Device Manager.
Precautions when playing back DVD-Video
DVD-Video disc playback conditions are sometimes determined by software
manufacturers. Because the drive plays back discs as determined by software
manufacturers, some drive functions may not always perform as expected.
When playing back DVD-Video, refer to the documentation accompanying
each disc.
DVD copy protection technology
Most DVD-Video discs on the market are protected against unauthorized
copy. Attempting to copy protected discs violates copyright laws.
1)
standard). After setting the region code five times,
1)
Region Playback Control (RPC) standard.
40
Page 41

Copy controlled CDs
This product is designed to play back discs conforming to the compact disc
(CD) standard. Audio CDs encoded with copyright protection technology are
now marketed by various record companies. Be aware that some of these discs
do not conform to the CD standard and you may not be able to play them back
with the drive. When using the drive as an audio CD player, only use audio
CDs with the following mark. Some of these discs are encoded in such a way
as to prevent sampling and/or copy, while others can only be played back
under certain conditions. For details, refer to the documentation of your audio
CD.
Attention Regarding DualDisc Software
A DualDisc is a two sided disc product which mates DVD recorded material on
one side with digital audio material on the other side.
However, since the audio material side does not conform to the Compact Disc
(CD) standard, playback on this product is not guaranteed.
Caution for BDAV
Video recorded in BDAV format can only be played back on BD players or BD
drives with BD player application software which support the BD-R Ver.1.0
and BD-RE Ver.2.0 formats.
Operation
Caution for BD-ROM Playback
The supplied application software cannot play back BD-ROM movies,
although the hardware of the BWU-100A drive supports BD-ROM playback.
41
Page 42

Maximizing Performance
User Support Web Site
Make sure that you use High Speed discs for which this operation has been
certified by Sony. For the latest information about these discs, visit the user
support Web site. When using discs other than those mentioned above, the
drive may limit writing speed to preserve a good reading quality.
Updating the Firmware
We recommend using the drive with the latest firmware as some problems
encountered when using the drive can be solved simply by updating the drive
firmware. Firmware updates are available on the user support Web site.
Hint
The firmware is the built-in software that makes the drive work.
For details about the user support web site, see page 45.
42
Page 43
B Miscellaneous
Precautions for Use
Operation and storage conditions
Avoid using or storing the drive in a hot or
humid location, or where it might be subject
to severe vibration or direct sunlight.
On transportation
• Please repack the drive in its original
carton when shipping by itself.
• If the drive is to be shipped while installed
in a PC, remove any disc beforehand.
Avoiding condensation problems
As much as possible, avoid sudden
temperature changes. Do not attempt to use
the drive immediately after moving it from a
cold to a warm location, or raising the room
temperature suddenly, as condensation may
form within the drive. If the temperature
changes suddenly while using the drive, stop
using it but keep the power on for at least an
hour.
• Do not store discs in dusty, dirty or humid
locations, in direct sunlight, or near heatgenerating devices.
• To protect important data, always keep
discs in their protective cases.
• Do not wipe writable discs to clean them
before recording data. Instead, use a
blower to remove any dust.
• Data may not record properly if a scratch
or dust is present on the unrecorded area of
writable discs. Use special care when
handling.
Miscellaneous
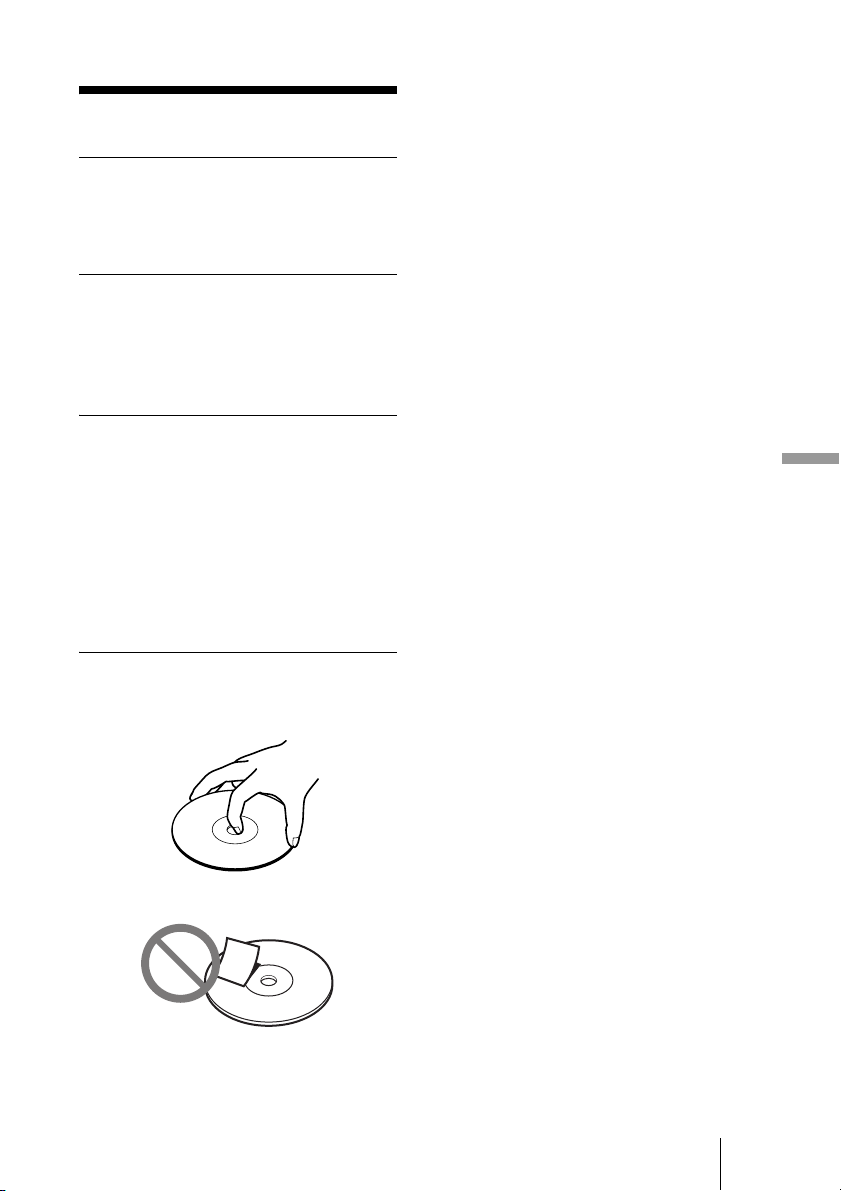
Handling discs
• Handle discs only by the edges. Never
touch the recording surface.
• Do not affix labels on discs.
43
Page 44

Specifications
Compatible discs Read Write
BD-R 2× 2×
BD-RE 2× 2×
BD-ROM 2x —
DVD+R 8×-CAV 8×-ZCLV
DVD+R Double Layer 8×-CAV 4×
DVD+RW 8×-CAV 8×-ZCLV
DVD-R 8×-CAV 8×-ZCLV
DVD-R Dual Layer 8×-CAV 4×
DVD-RW 8×-CAV 6×
DVD-RAM
DVD-ROM 8×-CAV —
DVD-Video 6×-CAV —
CD-R 32×-CAV 24×-ZCLV
CD-RW 24×-CAV 16×-ZCLV
CD-ROM 32×-CAV —
CD-DA 24×-CAV —
Disc diameters
BD 12 cm
DVD 12 cm
CD 12 cm
1)
2)
1)
8 cm
8 cm
8 cm
Use a non-cartridge-type disc or a cartridge
from which the disc can be ejected.
With 8 cm discs, you must place the drive
horizontally. Do not use a Support 8 cm disc
adapter.
Drive
Data transfer rate
BD: 9 MB/s (2× speed
DVD: 11 MB/s (8× speed
CD: 4.8 MB/s (32× speed
1)
Maximum data transfer rate depends on the
capabilities of the host computer.
Operating environment
Operating temperature
5 to 40 ºC
(max.) (max.)
5×-ZCLV 5×-ZCLV
——
2)
2)
1)
)
1)
)
1)
)
—
Power and miscellaneous
Power source
DC +5 V 1.4 A max.
DC +12 V 1.5 A max.
Size
Approx. 146 × 41.3 × 190 mm (W×H×D)
(excluding front panel)
Weight
Approx. 980 g (drive only)
Laser
BD
Wavelength: 400nm ~ 415nm
(Typical 405nm)
Output power: Read 0.53mW
Write 15.5mW
DVD
Wavelength: 648nm ~ 674nm
(Typical 658nm)
Output power: Read 1.2mW
Write 39mW
CD
Wavelength: 772nm ~ 805nm
(Typical 785nm)
Output power: Read 0.93mW
Write 55mW
Interface
Drive interface
ATAPI (EIDE) compliant
Buffer capacity
8 MB
Drive product number (Inquiry)
SONY BDRW BWU-100A
Design and specifications are subject to
change without notice.
44
Page 45

Support Overview
If you have problems with the drive, or are
unsure of a procedure or some other details,
please contact your Sony customer support
center.
Product and Support Information
Sony Global Sites Information
(As of June, 2006)
Product purchased in the USA:
http://sony.storagesupport.com/
User Support Web Site
You can find the following information on
this Web site. The information is
periodically updated, so we recommend that
you visit regularly.
• Information about the drive
• Information about the software supplied
with the drive
• Latest firmware
• Frequently asked questions
• Troubleshooting guide
• Certified compatible computers
• Certified compatible discs
• Operating instructions
•Et cetera
Accessing the user support Web
site
Insert the supplied software disc into the
drive, and in the [Menu Selection] screen,
click [User Support Web Page]. You can
also directly type the user support Web site
address (see Product and Support
Information for details) in the address box of
your Web browser.
Product purchased in Europe:
http://www.sonyisstorage.com/
Product purchased in Australia or New
Zealand:
http://www.sony.com.au/
About the Bundled Software
Detailed information about the supplied
software is available on the Web sites of the
software manufacturer.
http://www.cyberlink.com
Technical Support
Please consult the above sources before
calling with questions about using this
product, or with technical questions about
the drive or the supplied software. If using
telephone or e-mail support, please have the
following information available:
• Model number: BWU-100A
• Serial number
• Date and place of purchase
• Computer maker and model number
• Computer specifications (CPU speed,
memory size, OS version, etc.)
• Writing software used (version, etc.)
Miscellaneous
Update the Drive Firmware
Some problems encountered when using the
drive can be solved simply by updating the
drive firmware. Firmware updates are
available on the user support Web site.
Access the site, make sure that there is an
update for your firmware, and follow the
instructions on the screen to proceed with
download and installation.
Local technical support is only
available in the specified sales
regions. The customers in these
regions should be provided with a
warranty card for this product. For
contact information, refer to the
warranty card.
Note that technical support
conditions may vary according to
the locality, and that charges
and/or limited service may apply in
some regions.
45
Page 46

46
Page 47

Miscellaneous
47
Page 48

Sony Corporation Printed in Japan
Printed on 100% recycled paper using VOC
(Volatile Organic compound)-free vegetable oil based ink.
 Loading...