

Sony Bravia XBR-79X907B, Bravia XBR-79X905B, Bravia XBR-65X907B, Bravia XBR-65X905B Operating Instructions Manual
Television
Operating Instructions
(Setup Guide)
4-533-567-E3(1)
XBR-79X907B / 79X905B / 65X907B / 65X905B
Sony Customer Support
http://esupport.sony.com/ES/LA/
Please Do Not Return
the Product to the Store
Owner’s Record
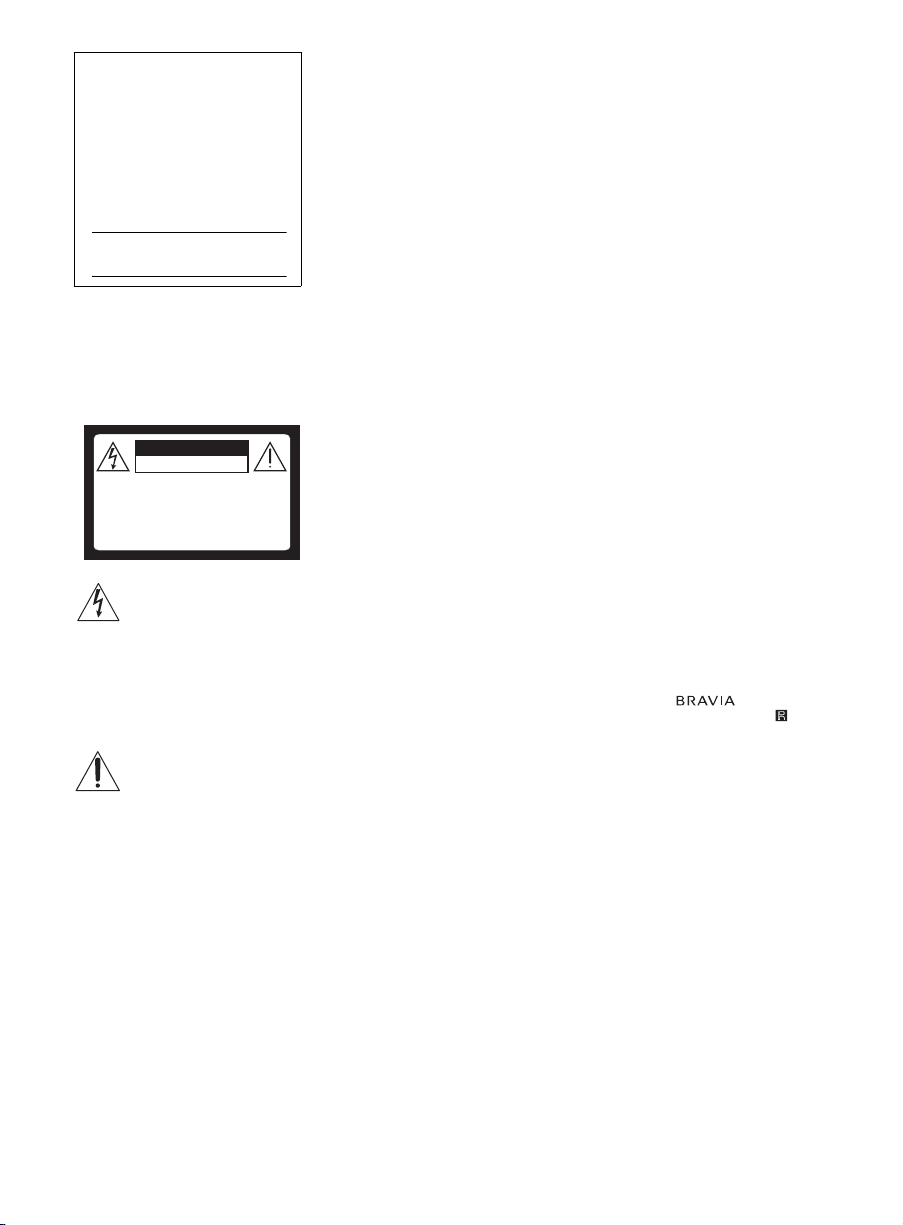
CAUTION
RISK OF ELECTRIC SHOCK
DO NOT OPEN
ATTENTION
RISQUE DE CHOC ÉLECTRIQUE,
NE PAS OUVRIR
PRECAUCION
RIESGO DE CHOQUE ELECTRICO
NO ABRIR
The model and serial numbers
are located at the side and rear
of the TV. Record these
numbers in the spaces provided
below. Refer to them whenever
you call upon your Sony dealer
regarding this TV.
Model Name
Serial No.
ADVERTENCIA
Para reducir el riesgo de incendio o
descargas eléctricas, no exponga
este producto a la humedad ni a la
lluvia.
This symbol is intended to
alert the user to the
presence of uninsulated
“dangerous voltage” within
the product enclosure that
may be of sufficient
magnitude to constitute a
risk of electric shock to
persons.
This symbol is intended to
alert the user to the
presence of important
operating and maintenance
(servicing) instructions in
the literature
accompanying the product.
El producto no debe estar expuesto a
goteos ni salpicaduras, ni se deben
colocar sobre él objetos con líquidos
como floreros.
PRECAUCIÓN
Para evitar descargas eléctricas y
exposición a contactos eléctricos, no
utilice este enchufe de corriente
alterna con un cable de extensión,
receptáculo u otro tomacorriente a
menos que los contactos eléctricos
puedan ser introducidos
completamente.
• Operate the TV only on 110-240 V
AC
2
Seguridad
• Algunas personas pueden
experimentar molestias (como
cansancio visual, fatiga o náuseas)
al mirar imágenes de video 3D o al
jugar con juegos 3D
estereoscópicos. Sony recomienda
que los usuarios descansen
regularmente al mirar videos 3D o
al jugar con juegos 3D
estereoscópicos. La duración y la
frecuencia de los descansos
necesarios varían según cada
persona. Usted debe decidir lo que
mejor funciona en su caso. Si
experimenta molestias, debe dejar
de mirar imágenes de video 3D o
de jugar juegos 3D
estereoscópicos hasta que éstas
desaparezcan. Consulte a su
médico si lo considera necesario.
También se recomienda leer
nuevamente (i) el manual de
instrucciones de cualquier otro
dispositivo o medio que se utilice
con el televisor y (ii) nuestro sitio
web
(http://esupport.sony.com/ES/LA/)
para obtener la última información.
La vista de los niños pequeños (en
especial los menores de seis años)
todavía está en desarrollo. Consulte
con su médico (a un pediatra o a
un oftalmólogo) antes de permitir
que niños pequeños miren
imágenes de video 3D o jueguen
juegos 3D estereoscópicos. Los
adultos deben supervisar a los
niños pequeños para asegurarse
de que sigan las recomendaciones
anteriores.
• No use, guarde ni deje los anteojos
3D o la batería cerca del fuego o en
lugares con temperaturas
elevadas, por ejemplo, superficies
o autos expuestos a la luz solar
directa.
• Cuando utilice la función 3D
simulado, tenga en cuenta que la
imagen que se muestra se
encuentra modificada de la imagen
original debido a la conversión
realizada por este televisor.
• Utilice el cable de alimentación de
ca especificado por Sony y que
corresponda al voltaje de la zona
donde vaya a utilizarlo.
• Por razones de seguridad, el
enchufe está diseñado de tal forma
que sólo puede conectarse en una
dirección en los tomacorrientes de
pared. Si no puede introducir
completamente los contactos del
enchufe en el tomacorriente,
póngase en contacto con su
distribuidor.
• Si se introduce algún objeto sólido
o cae líquido en la unidad,
desenchufe el televisor
inmediatamente y haga que sea
revisado por personal
especializado antes de volver a
operarlo.
• Desconecte el televisor si no va a
utilizarlo durante algunos días. Para
ello, tire del enchufe, nunca del
cable.
• Consulte la información sobre
seguridad en Folleto de
instrucciones de seguridad.
Información de licencias
The terms HDMI and HDMI HighDefinition Multimedia Interface, and
the HDMI Logo are trademarks or
registered trademarks of HDMI
Licensing LLC in the United States
and other countries.
Fergason Patent Properties, LLC:
Nº de patente de EE. UU. 5.717.422
Nº de patente de EE. UU. 6.816.141
Manufactured under license from
Dolby Laboratories. Dolby and the
double-D symbol are trademarks of
Dolby Laboratories.
“BRAVIA” y , S-Force,
Motionflow, BRAVIA Sync y son
marcas comerciales o marcas
registradas de Sony Corporation.
®
, el logotipo de DLNA y DLNA
DLNA
CERTIFIED
comerciales, marcas de servicio o
marcas de certificación de Digital
Living Network Alliance.
TrackID is a trademark or registered
trademark of Sony Mobile
Communications AB.
Gracenote, Gracenote eyeQ,
Gracenote VideoID, Gracenote Video
Explore, Gracenote MusicID, the
Gracenote logo and logotype, and the
“Powered by Gracenote” logo are
either registered trademarks or
trademarks of Gracenote in the
United States and/or other countries.
Opera
Software ASA. Copyright 1995-2014
Opera Software ASA. All rights
reserved.
®
son marcas
®
Devices SDK from Opera

Wi-Fi, Wi-Fi Direct and Miracast are
trademarks or registered trademarks
of Wi-Fi Alliance.
“Sony Entertainment Network logo”
and “Sony Entertainment Network”
are trademarks of Sony Corporation.
MHL, Mobile High-Definition Link and
the MHL Logo are trademarks or
registered trademarks of MHL
Licensing, LLC.
For DTS patents, see
http://patents.dts.com. Manufactured
under license from DTS Licensing
Limited DTS, the Symbol, & DTS and
the Symbol together are registered
trademarks, and DTS Digital Surround
is a trademark of DTS, Inc. © DTS,
Inc. All Rights Reserved.
Designed with UEI Technology™
Under License from Universal
Electronics Inc. Portions © UEI 20002013
The Bluetooth
are owned by the Bluetooth SIG, Inc.
and any use of such marks by Sony
Corporation is under license. Other
trademarks and trade names are
those of their respective owners.
The N Mark is a trademark or
registered trademark of NFC Forum,
Inc. in the United States and in other
countries.
®
word mark and logos
The 79 class has a 78.6 inch
(199.6 cm) and 65 class has a
64.5 inch (163.9 cm) viewable
image size (measured diagonally).
Location of the
identification label
Labels for the Model No. and Power
Supply rating are located on the rear
of the TV.
~
• The “x” that appears in the model
name corresponds to a numeric
digit, related to design, color or TV
system.
• The illustrations of the remote
control used in this manual are of
the RMF-YD003 (Touchpad Remote
Control) and RM-YD099 (IR
(infrared) Remote Control) unless
otherwise stated.
• The illustrations used in this manual
may differ depending on your TV
model.
• Retain this manual for future
reference.
3
La experiencia de TV BRAVIA®
4K
¡Gracias por elegir a Sony! Su nuevo TV
BRAVIA
4K”. Este documento le ayudará a
aprovechar su TV al máximo.
Registre su TV en:
http://esupport.sony.com/LA/perl/registration.pl
Los cuatro pasos para una
experiencia de TV 4K
TV, fuente, sonido y configuración.
®
le brinda una “Experiencia de TV
1 TV
Ahora que ya hizo la mejor elección en
tecnología LCD TV con retroiluminación
LED, retire todos los accesorios del
empaque antes de configurar su TV.
2 Fuente
Para disfrutar los increibles detalles de su
TV BRAVIA debe tener acceso a
programación HD, la cual se puede
obtener de las siguientes maneras:
• Solicitando a su proveedor servicio de
alta definición (4K).
Este TV muestra todas las señales de entrada de video en una resolución de 3 840 puntos ×
2 160 líneas.
• Recibiendo emisiones de HD por aire a
través de una antena para TV de alta
definición (HD) conectada directamente
a la parte posterior del TV.
Visite http://www.antennaweb.org para
recibir más información sobre la
selección y configuración de antena.
• A través de los reproductores Blu-ray
Disc™ de super alta resolución ó demás
equipos HD de Sony.
3 Sonido
Complete la experiencia de alta definición
con un sistema de sonido envolvente
BRAVIA Sync™ o un receptor de audio/
video de Sony.
4 Ajustes
Instale su TV y conecte sus fuentes.
Consulte la página 12 para ver ejemplos
de diagramas de conexión. Para obtener
la más alta calidad de experiencia 4K,
utilice los cables de HDMI (Interfaz
multimedia de alta definición) de Sony.
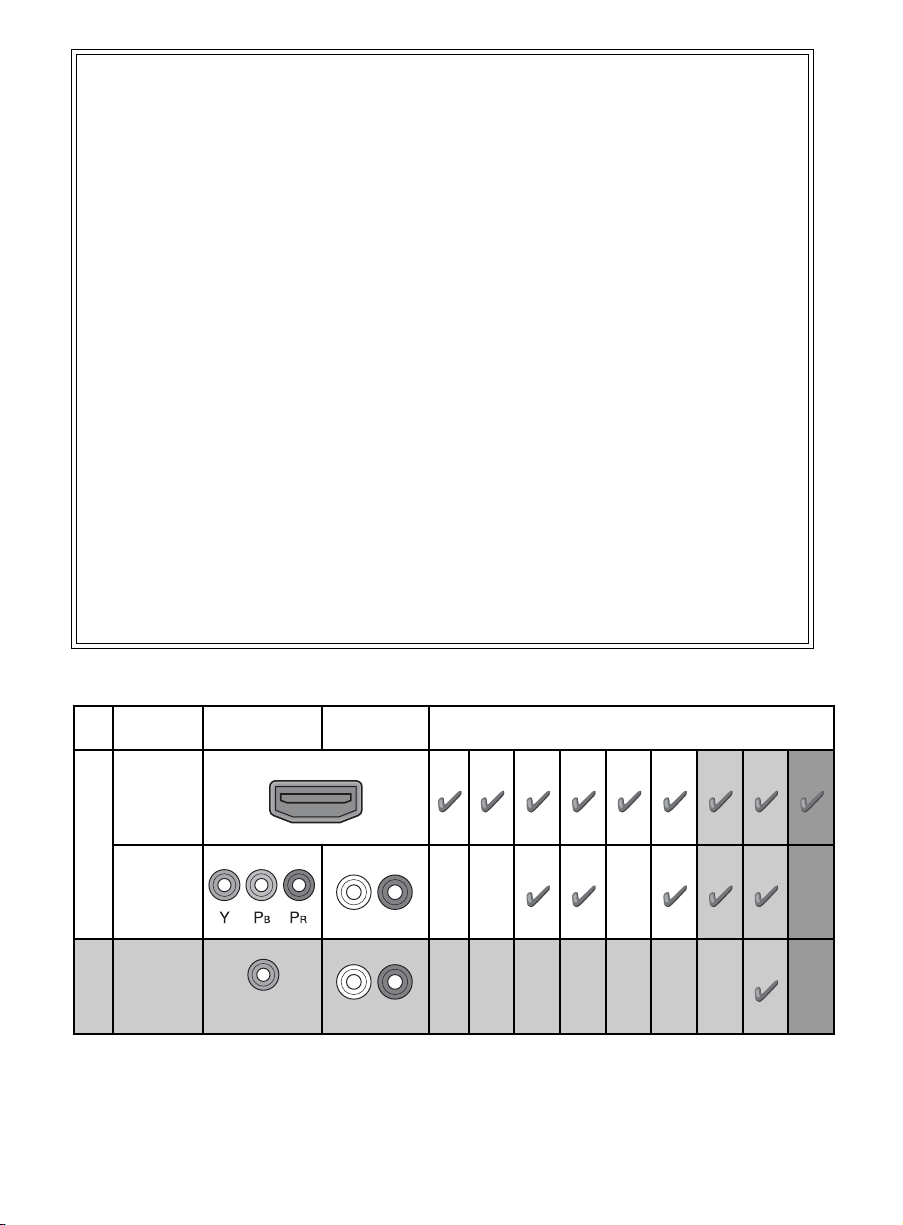
The following chart shows the high-definition (HD) and standard-definition (SD) video formats
supported by your BRAVIA TV inputs.
INPUT VIDEO AUDIO
4K*11080/24p/30p
SUPPORTED FORMATS
1080p*11080i
720/24p/30p
720p
*1480p/576p*2480i/576i*2PC*
3
HDMI
4K
/
HD
COMPONENT
Audio L/R
VIDEO
SD
*1For details of supported formats, refer to the “Specifications” in this manual.
*2576i, 576p: Not available with X907B model series.
*3For supported PC formats refer to the i-Manual.
Composite video
connection
Audio L/R
4

5

About this manual (Operating Instructions)
This manual explains how to setup your TV. For more
information on how to use your BRAVIA TV, refer to the
“Electronic manual”.
Operating Instructions
Electronic manual
(i-Manual)
Explains how to setup your TV such as connections,
initial setup, and basic operations.
For more information, see the i-Manual
Explains how to use all the features. See page 30 on
how to use the i-Manual.
Images and illustrations used in this manual may differ from
the actual screen.
6

Table of Contents
Getting Started
Checking the accessories........................................................................8
Inserting batteries into the remote control................................................8
Before setting up your TV.........................................................................9
1: Attaching the Table-Top Stand ..........................................................10
2: Connecting the TV..............................................................................12
3: Securing the TV..................................................................................18
4: Bundling the cables ...........................................................................20
5: Connecting the TV to the Internet.......................................................21
6: Running initial setup...........................................................................22
Watching TV ...........................................................................................23
Using the remote control ........................................................................24
Using Your BRAVIA TV
Discovering the contents you like (Discover).........................................26
Enjoying social networking while watching TV (Social Viewing) ............27
Selecting various contents and tools (Home Menu) ..............................27
Looking for Instructions
Looking for instructions in the
electronic manual (i-Manual)
Additional Information
Troubleshooting......................................................................................32
How to care for your BRAVIA TV ............................................................34
Specifications.........................................................................................35
Installing the TV to the Wall ....................................................................38
Installing the TV against a wall or enclosed area...................................40
B
...e;
7
Getting Started
Checking the accessories
IR Remote Control (1)*
Touchpad Remote Control (1)*
Size AAA batteries (4)
Cable clamper (3)
Table-Top Stand (2)
(XBR-65X90xB only)
Fixing screws for Table-Top Stand
(M5 × 16) (4)
(XBR-65X90xB only)
Wall-Mount Attachment (M6) (long) (2)
Wall-Mount Attachment (M5) (short) (2)
Active 3D Glasses (battery included) (2)
(XBR-65X90xB only)
Passive 3D Glasses (2)
(except XBR-65X90xB)
Camera cover (1)
Operating Instructions (this manual) and
other documents
Port Replicator accessories (set)
* Refer to the model name printed on the remote
control.
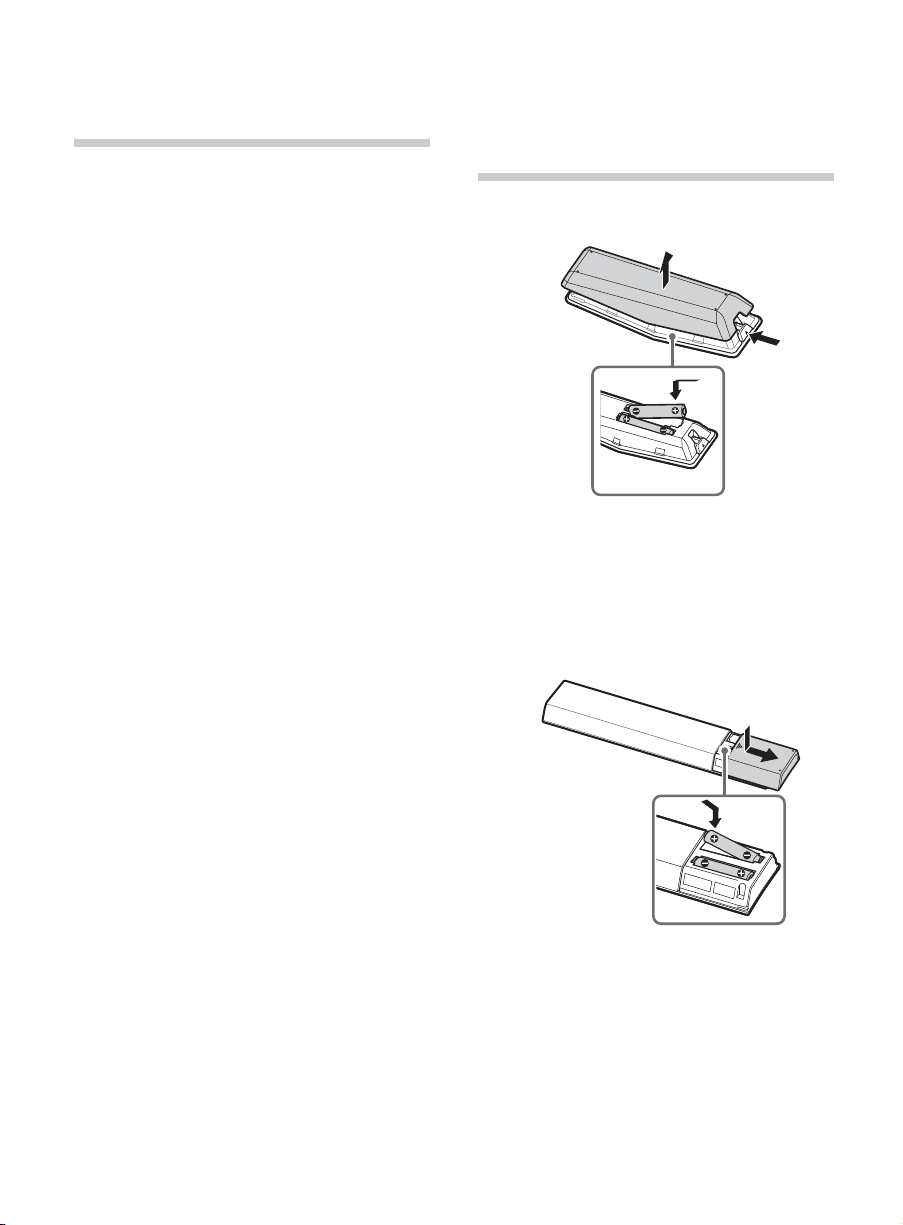
Inserting batteries into the remote control
Touchpad Remote Control
1 Remove the protection sheet.
2 Press the latch and lift the cover to open.
IR Remote Control
1 Remove the protection sheet.
2 Push and slide the cover to open.
8

x Guidelines for IR Remote Control
• Point your remote control directly at the
IR sensor located on your TV.
• Make sure that no objects are blocking
the path between the remote control and
the IR sensor on your TV.
• Fluorescent lamps can interfere with your
remote control; try turning off the
fluorescent lamps.
• If you are having problems with the
remote control, reinsert or replace your
batteries and make sure that they are
correctly inserted.
Before setting up your TV
Some TV models are packaged with a
detached Table-Top Stand so you can
mount your TV to a wall right away. See
page 38 (Installing the TV to the Wall) if you
want to mount the TV to a wall. If you are not
mounting the TV to a wall, you will need to
attach the Table-Top Stand. You will need a
Phillips screwdriver (not supplied) and the
supplied screws to complete the task. Look
for the supplied Table-Top Stand instruction
leaflet.
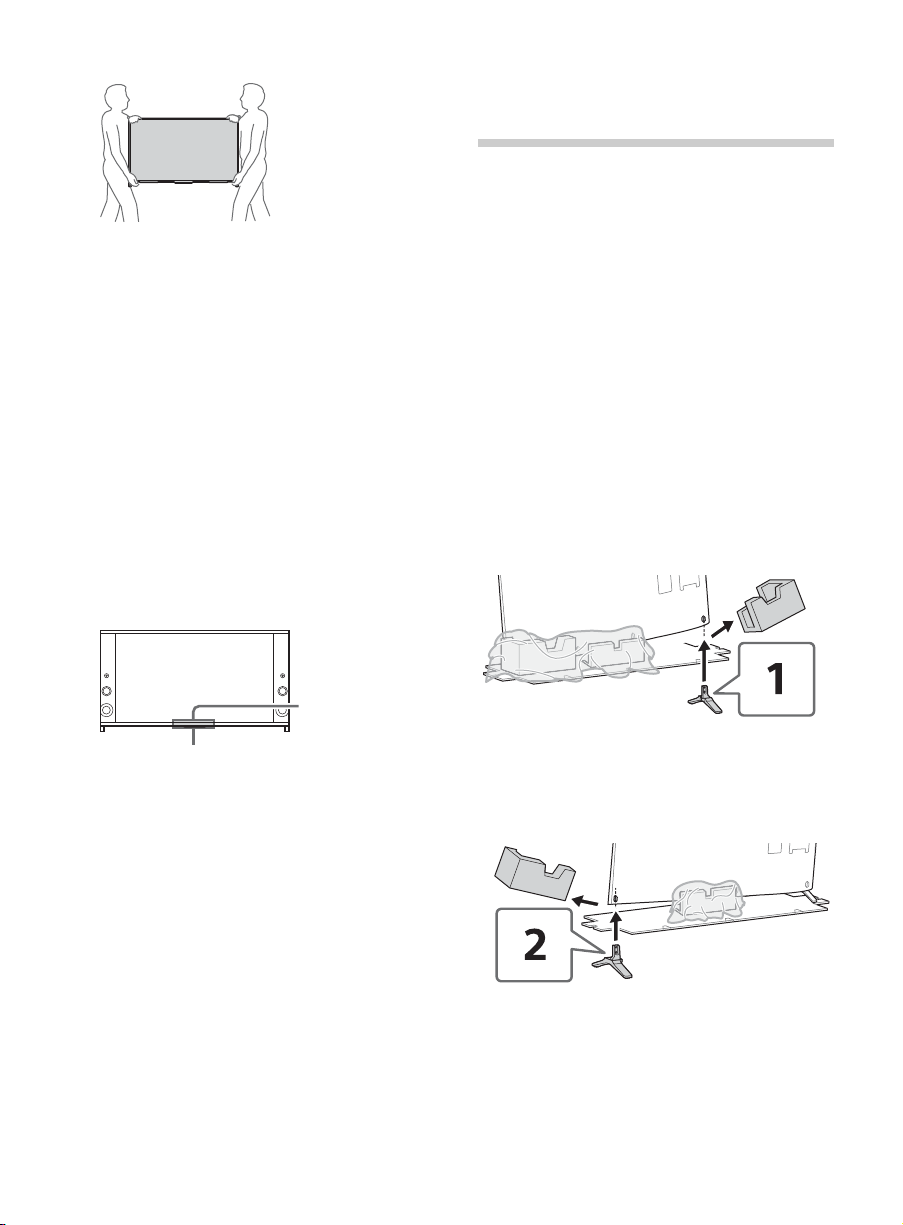
Be sure to consider the following while
setting up your TV:
• Disconnect all cables when carrying the
TV.
• Carry the TV with the adequate number
of people; larger size TVs require two or
more people (four or more people for
XBR-79X90xB).
• To avoid slipping and causing personal
injury, do not step on the TV protection
bag while unpacking the TV set.
• Correct hand placement while carrying
the TV is very important for safety and to
avoid damage.
Getting Started
~
• The image is merely illustrative, depending
on your model, the infrared receiver
positioning may be different of the
illustration.
XBR-79X90xB
(Continued)
9
XBR-65X90xB
IR Sensor
3D Sync
Transmitter
(XBR-65X90xB
only)
• Ensure your TV has adequate ventilation,
see page 40.
• For best picture quality, do not expose
the screen to direct illumination or
sunlight.
• Avoid installing the TV in a room with
reflective wall and floor materials.
• Avoid moving the TV from a cold area to
a warm area. Sudden room temperature
changes may cause moisture
condensation. This may cause the TV to
show poor picture and/or poor color.
Should this occur, allow moisture to
evaporate completely before powering
the TV on.
• Ensure that there are no objects in front
of the TV.
1: Attaching the
Table-Top Stand
x Recommended (edge position)
(XBR-65X90xB only)
Refer to the supplied Table-Top Stand
leaflet for proper attachment.
~
• Do not put stress on the LCD panel or the
frame around the screen.
• Be careful to not pinch your hands or the AC
power cord when you install the TV set to the
Table-Top Stand.
• Two or more people (four or more people for
XBR-79X90xB) are needed to carry out this
installation.
1 Remove the cushion of the right side 1,
and attach the Table-Top Stand to the
TV 2.
10
2 Repeat step 1 for the left side.
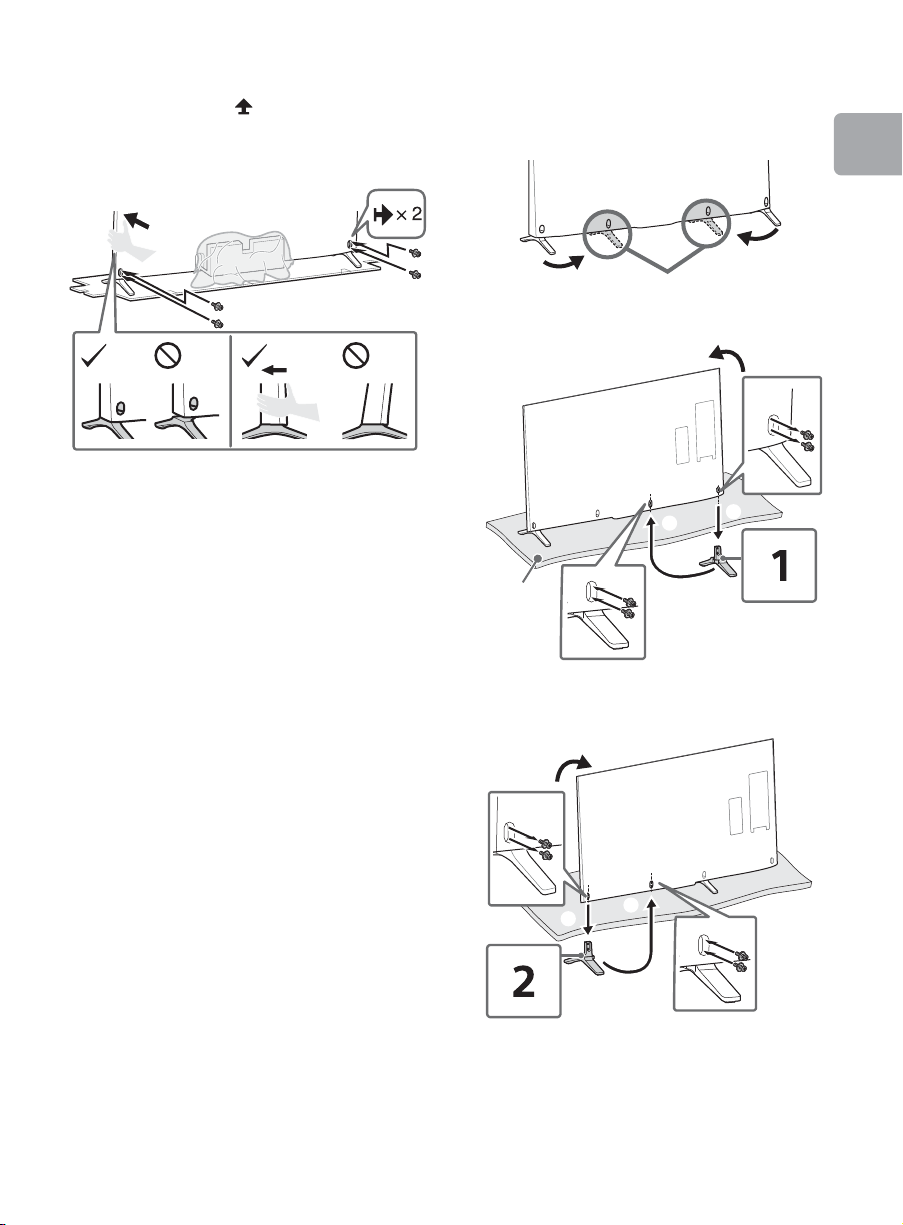
3 Fix the TV to the Table-Top Stand using
Middle position
1
2
3
Thick
cushion
1
3
2
the supplied screws.
The arrow marks indicate the location
of the screw holes used for securing the
Table-Top Stand.
~
• If using an electric screwdriver, set the
torque at approximately 1.5 N·m
{15 kgf·cm}.
x Alternative (middle position)
You can change the Table-Top Stand from
the edge to the middle position by referring
to the instructions below.
Getting Started
1
2
(Continued)
11
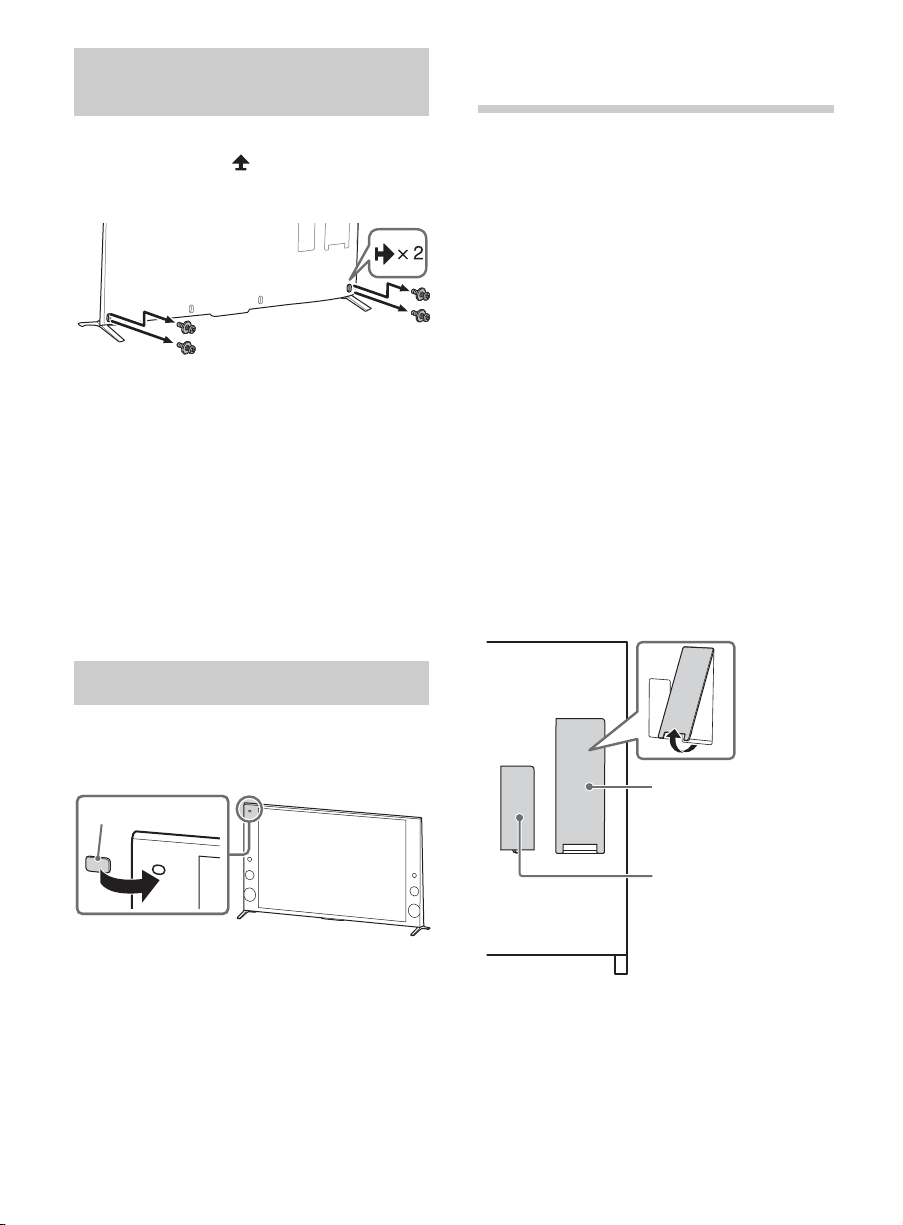
Detaching the Table-Top
Camera cover
Side terminal cover
Rear terminal cover
Stand from the TV
2: Connecting the TV
To detach the Table-Top Stand from the TV,
remove the screws .
~
• Do not remove the Table-Top Stand for any
reason other than to install corresponding
accessories on the TV.
• Be sure the TV is vertical before turning on.
To avoid uneven picture uniformity do not
power on the TV with the LCD panel facing
down.
• When attaching the Table-Top Stand again,
be sure to fasten the screws (previously
removed) to the original holes on the rear of
the TV.
Hiding the camera
~
• Use an antenna cable connector no greater
than 14 mm thick.
• When connecting the cable to the cable/
antenna, input finger tighten only, over
tightening the connection can damage the
TV.
• Before moving the TV, disconnect all of the
cables connected to the TV to prevent
damaging the TV when it is moved.
• Use an HDMI cable connector within 12 mm
(thickness) × 21 mm (width).
• Use Sony HDMI cable with “High Speed”
indication for HDMI connection.
• For connection with Port Replicator, refer to
the installation guide supplied with the Port
Replicator.
• For more information on connections, refer to
the i-Manual.
Detaching the side and rear terminal
covers
The side and rear terminal covers are
factory-attached to the TV.
Before connecting cables, remove the side
and rear terminal covers.
If you do not wish to use the camera, hide it
as illustrated.
12
~
• After connecting all cables, re-attach the
side terminal cover to the TV. For the rear
terminal cover, be sure to store the removed
cover in a safe place, keeping it away from
children.

x Shown with a Set Top Box with
900 mA MAX
5 V
900 mA MAX
5 V
Set Top Box
1.5 mm max.
(Reference drawing for an F type plug)
7 mm max.
Set Top Box
HDMI connection
x Shown with a Set Top Box with
COMPONENT connection
Getting Started
~
• Connect 4K devices (4K Media Player, 4K
Set Top Box, etc.) to the HDMI IN 2 or HDMI
IN 1 jack of the TV to enjoy copyright
protected content.
Recommendation for an F type plug
Projection of the inner wire from the
connection part must be less than 1.5 mm.
(Continued)
13
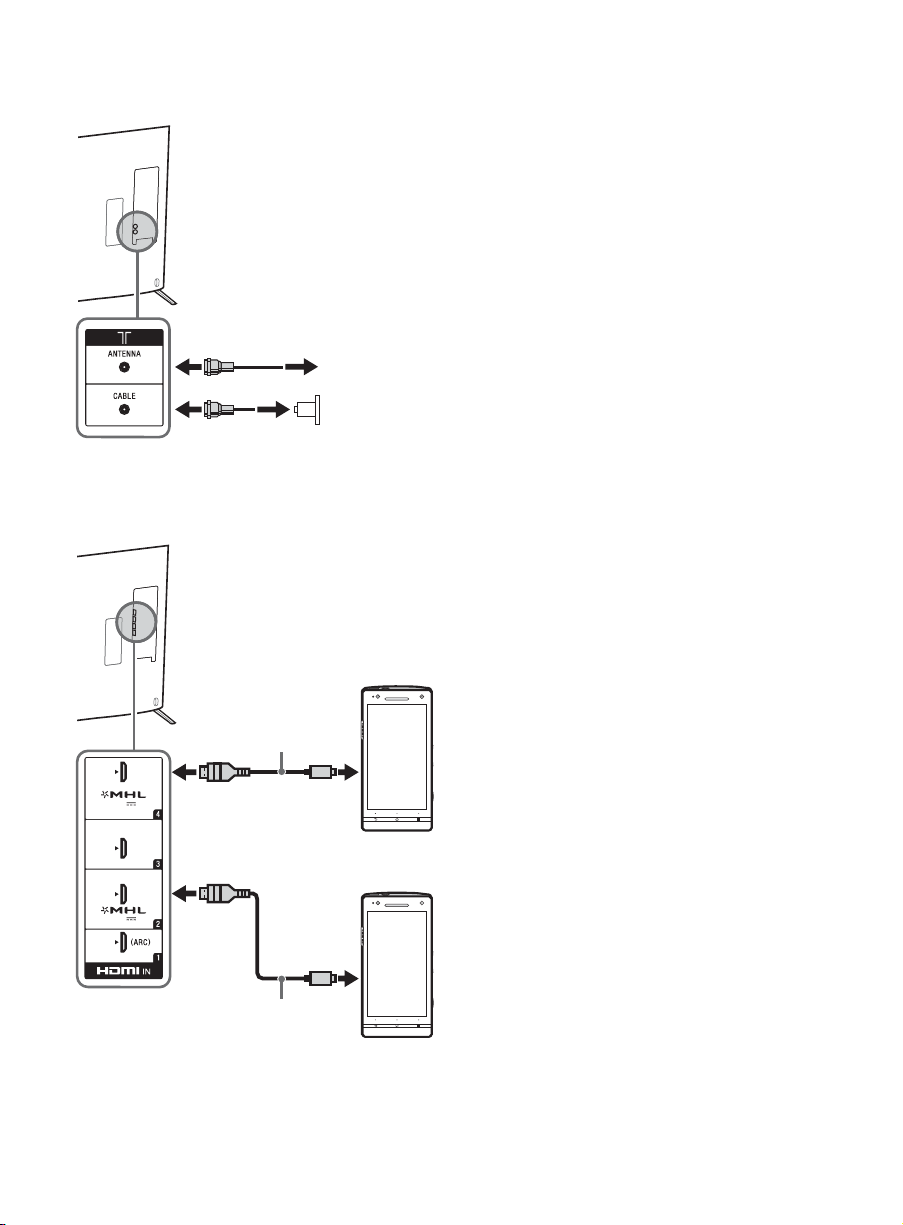
x Cable System or VHF/UHF Antenna
Cable
Antenna
900 mA MAX
5 V
900 mA MAX
5 V
Use authorized
MHL 3 CABLE
with MHL logo
Use authorized
MHL 2 CABLE
with MHL logo
MHL 2
device
MHL 3
device
System
x Shown with MHL device with MHL
connection
The TV simultaneously charges the MHLcompatible connected device while playing
photo/music/video files. You can use the TV
remote control to control the connected
MHL-compatible device.
~
• If Auto Input Change (MHL) is set to On, the
TV automatically switches to HDMI IN 2/MHL
or HDMI IN 4/MHL from other input when
MHL-compatible device is connected to
HDMI IN 2/MHL or HDMI IN 4/MHL jack. The
availability of Auto Input Change (MHL)
depends on whether the MHL-compatible
device can support this feature.
• If Charge MHL during Power Off is set to
On, you can continue charging the
MHL-compatible device even when the TV is
in standby mode.
• Connect the 4K smartphone or mobile
devices to the HDMI IN 2/MHL jack.
• Use authorized MHL 3 CABLE with MHL logo
for 4K smartphone or mobile devices.
14
 Loading...