

Sony BRAVIA KD-65X8500C, BRAVIA KD-49X8300C, BRAVIA KD-55X8500C, BRAVIA KD-43X8300C Reference Manual [en, zh]
Page 1

Television
Reference Guide
GB
CT
KD-65X8500C / 55X8500C / 49X8300C / 43X8300C
Page 2
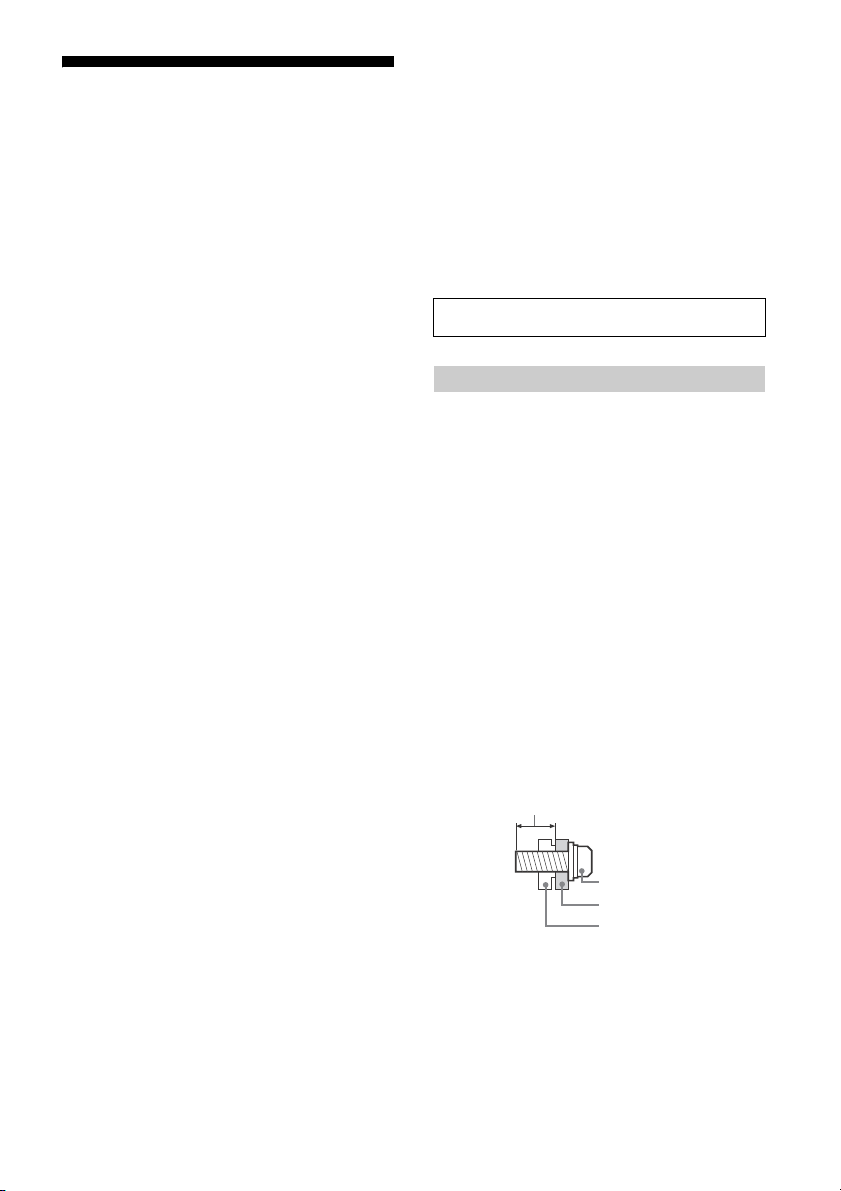
Table of Contents
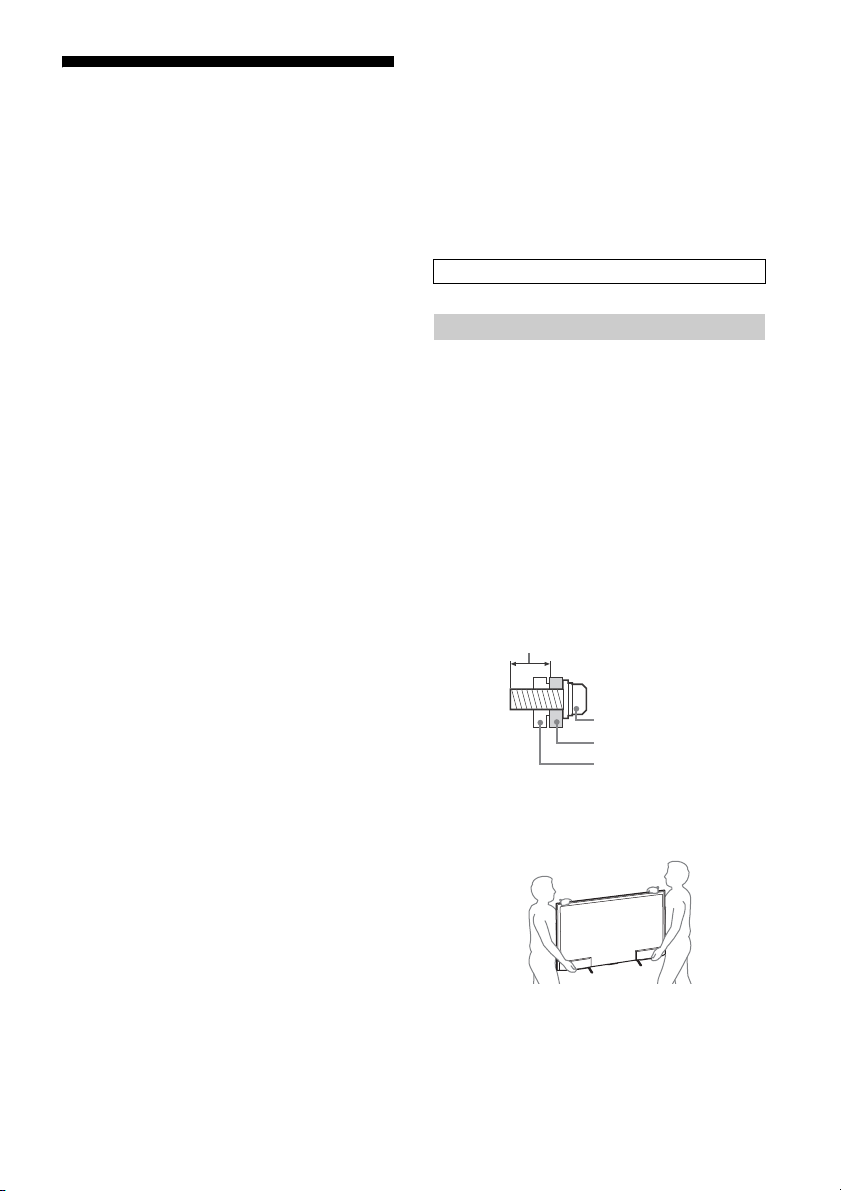
Screw
Wall-Mount Bracket
8 mm - 12 mm
TV’s rear cover
Safety Information . . . . . . . . . . . . . . . . . . . . .2
Precautions . . . . . . . . . . . . . . . . . . . . . . . . . . .4
Parts and Controls . . . . . . . . . . . . . . . . . . . 6
Controls and Indicators . . . . . . . . . . . . . . . . . 6
Inputs and Outputs . . . . . . . . . . . . . . . . . . . . 7
Using Remote Control . . . . . . . . . . . . . . . . 9
Remote Control Parts Description. . . . . . . . .9
Using the Touchpad Remote Control . . . . . 10
Launching the Touchpad Remote Control
Introduction/Tutorial . . . . . . . . . . . . . . . . . . 10
Connecting the TV . . . . . . . . . . . . . . . . . . .11
Installing the TV to the Wall . . . . . . . . . . 14
SU-WL450 . . . . . . . . . . . . . . . . . . . . . . . . . . . 15
Troubleshooting. . . . . . . . . . . . . . . . . . . . 19
Troubles and Solutions . . . . . . . . . . . . . . . . 19
Specifications . . . . . . . . . . . . . . . . . . . . . . 20
Introduction
Thank you for choosing this Sony product.
Before operating the TV, please read this manual thoroughly and
retain i t for future reference.
Note
• Before operating the TV, please read “Safety Information”
(page 2).
• Instructions about “Installing the TV to the Wall” are included
within this TV’s instructions manual.
• Images and illustrations used in Startup Guide and this manual
are for referenc e only and may differ from actual product
appearance.
Location of the identification label
Labels for the Model No. and Power Supply rating are located on
the rear of the TV.
This television is designed for use in Hong Kong and ensured
the usage in Hong Kong only.
Safety Information
WARNING
Batteries must not be exposed to excessive heat such as
sunshine, fire or the like.
Installation/Set-up
Install and use the TV set in accordance with the instructions
below in order to avoid any risk of fire, electrical shock or damage
and/or injuries.
Installation
• The TV set should be installed near an easily accessible AC
power outlet (mains socket).
• Place the TV set on a stable, level surface to avoid it from falling
down and cause personal injury or damage to the TV.
• Install the TV where it cannot be pulled, pushed, or knocked
over.
• Only qualified service personnel should carry out wall
installations.
• For safety reasons, it is strongly recommended that you use
Sony accessories, including :
Wall-Mount Bracket SU-WL450
• Be sure to use the screws supplied with the Wall-Mount Bracket
when attaching the Wall-Mount Bracket to the TV set. The
supplied screws are designed as indicated by illustration when
measured from the attaching surface of the Wall-Mount Bracket.
The diameter and length of the screws differ depending on the
Wall-Mount Bracket model.
Use of screws other than those supplied may result in internal
damage to the TV set or cause it to fall, etc.
GB
2
Tran spo rti ng
• Before transporting the TV set, disconnect all cables.
• Two or three people are needed to transport a large TV set.
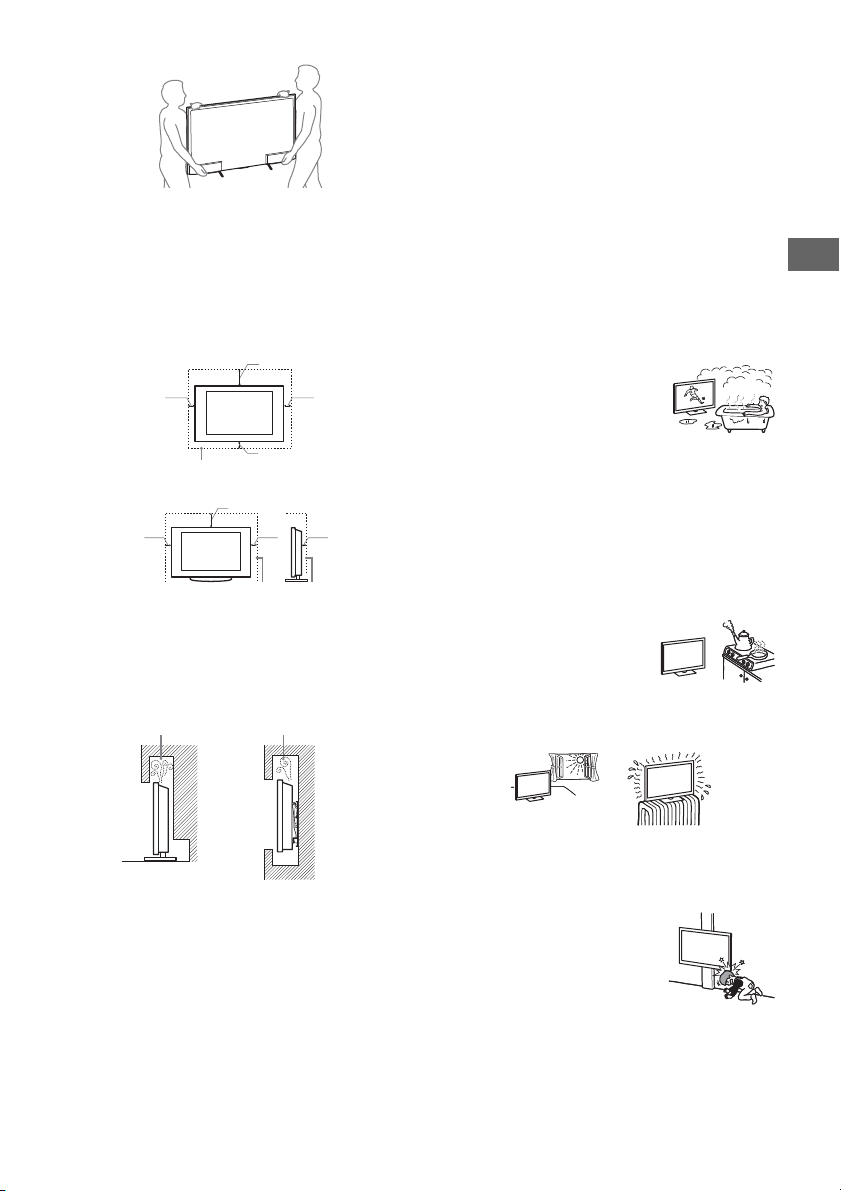
• When transporting the TV set by hand, hold it as shown below.
Do not put stress on the LCD panel and the frame around the
screen.
Page 3
• When transporting the TV set, do not subject it to jolts or
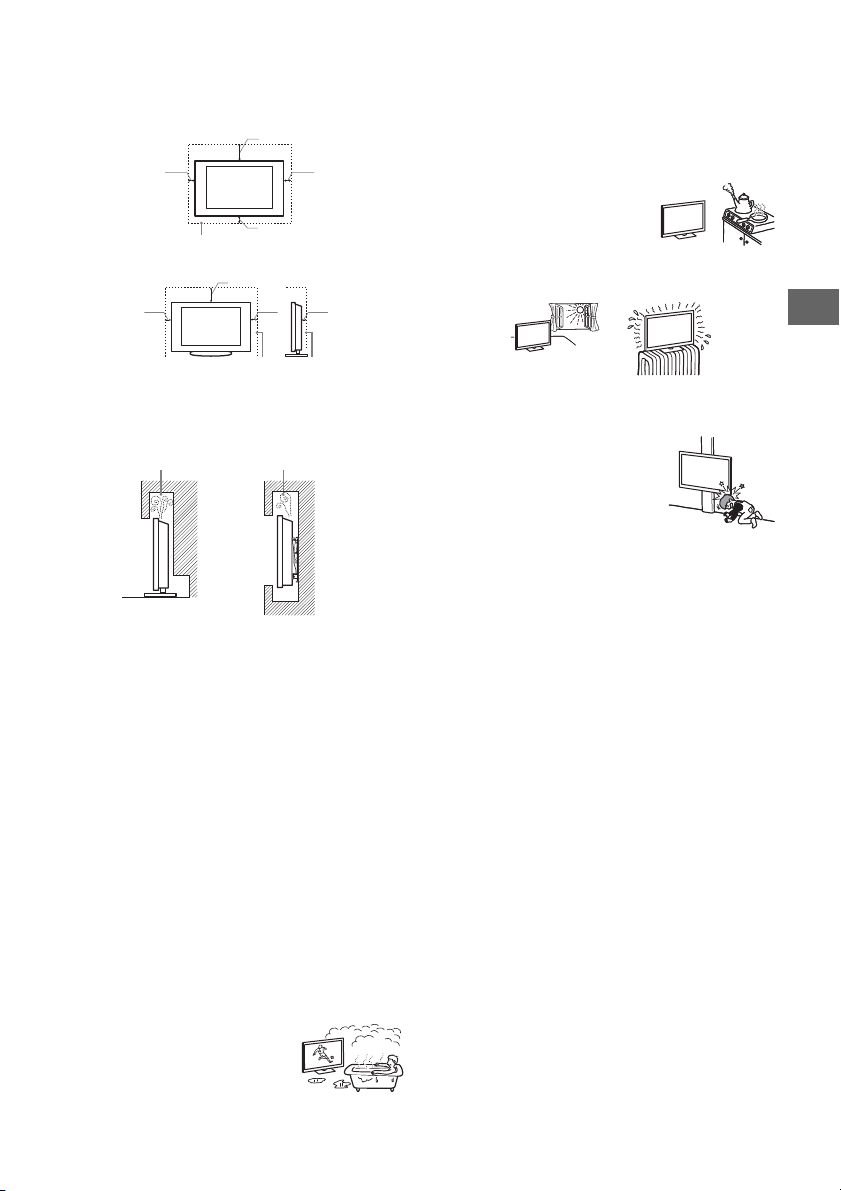
30 cm
10 cm
10 cm
10 cm
Leave at least this space around the set.
30 cm
10 cm
10 cm
Leave at least this space around the set.
6 cm
Air circulation is blocked.
Wall Wall
excessive v ibration.
• When transporting the TV set for repairs or when moving, pack
it using the original carton and packing material.
Ventilation
• Never cover the ventilation holes or insert anything in the
cabinet.
• Leave space around the TV set as shown below.
• It is strongly recommende d that you use a Sony Wall-Mount
Bracket in order to provide adequate air circulation.
Installed on the wall
Installed with stand
• To ensure proper ventilation and prevent the collection of dirt or
dust:
Do not lay the TV set flat, install upside down, backwards, or
sideways.
Do not place the TV set on a shelf, rug, bed or in a closet.
Do not cover the TV set with a cloth, such as curtains, or items
such as newspapers, etc.
Do not install the TV set as shown below.
Note
• Do not use the supplied AC power cord (mains lead) on any
other equipment.
• Do not pinch, bend, or twist the AC power cord (mains lead)
excessively. The core conductors may be exposed or broken.
• Do not modify the AC power cord (mains lead).
• Do not put anything heavy on the AC power cord (mains lead).
• Do not pull on the AC power cord (mains lead) itself when
disconnecting the AC power cord (mains lead).
• Do not connect too many appliances to the same AC power
outlet (mains socket).
• Do not use a poor fitting AC power outlet (mains socket).
Prohibited Usage
Do not install/use the TV set in locations, environments or
situations such as those listed below, or the TV set may
malfunction and cause a fire, electrical shock, damage and/or
injuries.
Location:
• Outdoors (in direct sunlight), at the seashore, on a ship or other
vessel, inside a vehicle, in medical institutions, unstable
locations, near water, rain, moisture or smoke.
• If the TV is placed in the changing room of
a public bath or hot spring, the TV may be
damaged by airborne sulfur, etc.
• For best picture quality, do not expose the screen to direct
illumination or sunlight.
• Avoid moving the TV from a cold area to a warm area. Sudden
room temperature changes may cause moisture condensation.
This may cause the TV to show poor picture and/or poor colour.
Should this occur, allow moisture to evaporate completely
before powering the TV on.
Environment:
• Places that are hot, humid, or excessively dusty; where insects
may enter; where it might be exposed to mechanical vibration,
near flammable objects (candles, etc). The TV set shall not be
exposed to dripping or splashing and no objects filled with
liquids, such as vases, shall be placed on the TV.
• Do not place the TV in a humid or dusty
space, or in a room with oily smoke or
steam (near cooking tables or
humidifiers). Fire, electric shock, or
warping may result.
• Do not install the TV in places subject to extreme temperature,
such as in direct sunlight, near a radiator or a heating vent. The
TV may overheat in such conditions which can cause
deformation of the enclosure and/or TV malfunction.
GB
AC power cord (mains lead)
Handle the AC power cord (mains lead) and outlet (mains socket)
as follows in order to avoid any risk of fire, electrical shock or
damage and/or injuries:
Insert the plug fully into the AC power outlet (mains socket).
Operate the TV set on a 220–240 V AC supply only.
When wiring cables, be sure to unplug the AC power cord
(mains lead) for your safety and take care not to catch your feet
on the cables.
Disconnect the AC power cord (mains lead) from the AC power
outlet (mains socket) before working on or moving the TV set.
Keep the AC power cord (mains lead) away from heat sources.
Unplug the AC power plug (mains plug) and clean it regularly. If
the plug is covered with dust and it picks up moisture, its
insulation may deteriorate, which could result in a fire.
Situation:
• Do not use when your hands are wet, with the cabinet removed,
or with attachments not recommended by the manufacturer.
Disconnect the TV set from AC power outlet (mains socket) and
antenna (aerial) during lightning storms.
• Do not install the TV so that it sticks out
into an open space. Injury or damage
from a person or object bumping into
the TV may result.
Broken pieces:
• Do not throw anything at the TV set. The screen glass may break
by the impact and cause serious injury.
• If the surface of the TV set cracks, do not touch it until you have
unplugged the AC power cord (mains lead). Otherwise electric
shock may result.
3
GB
Page 4
When not in use
• If you will not be using the TV set for several days, the TV set
should be disconnected from the AC power (mains) for
environmental and safety reasons.
• As the TV set is not disconnected from the AC power (mains)
when the TV set is just turned off, pull the plug from the AC
power outlet (mains socket) to disconnect the TV set
completely.
• However, some TV sets may have features that require the TV
set to be left in standby to work correctly.
For children
• Do not allow children to climb on the TV set.
• Keep small accessories out of the reach of children, so that they
are not mistakenly swallowed.
If the following problems occur...
Turn off the TV set and unplug the AC power cord (mains lead)
immediately if any of the following problems occur.
Ask your dealer or Sony service centre to have it checked by
qualified service personnel.
When:
AC power cord (mains lead) is damaged.
Poor fitting of AC power outlet (mains socket).
TV set is damaged by being dropped, hit or having something
thrown at it.
Any liquid or solid object falls through openings in the cabinet.
About LCD Monitor Temperature
When the LCD Monitor is used for an extended period, the panel
surrounds become warm. You may feel hot when touching there
by the hand.
Precautions
Viewing the TV
• View the TV in moderate light, as viewing the TV in poor light or
during long period of time, strains your eyes.
• When using headphones, adjust the volume so as to avoid
excessive levels, as hearing damage may result.
(3D compatible models only)
• Some people may experience discomfort (such as eye strain,
fatigue, or nausea) while watching 3D video images or playing
stereoscopic 3D games. Sony recommends that all viewers take
regular breaks while watching 3D video images or playing
stereoscopic 3D games. The length and frequency of necessary
breaks will vary from person to person. You must decide what
works best. If you experience any discomfort, you should stop
watching the 3D video images or playing stereoscopic 3D
games until the discomfort ends; consult a doctor if you believe
necessary. You should also review (i) the instruction manual of
any other device or media used with this television and (ii) our
website (http://www.sony-asia.com/support) for the latest
information. The vision of young children (especially those
under six years old) is still under development. Consult your
doctor (such as a pediatrician or eye doctor) before allowing
young children to watch 3D video images or play stereoscopic
3D games. Adults should supervise young children to ensure
they follow the recommendations listed above.
• Do not use, store, or leave the 3D Glasses or battery near a fire,
or in places with a high temp erature, e.g., in direct sunlight, or
in sun-heated cars.
LCD Screen
• Although the LCD screen is made with high-precision
technology and 99.99% or more of the pixels are effective, black
dots may appear or bright points of light (red, blue, or green)
may appear constantly on the LCD screen. This is a structural
property of the LCD screen and is not a malfunction.
• Do not push or scratch the front filter, or place objects on top of
this TV set. The image may be uneven or the LCD screen may be
damaged.
• If this TV set is used in a cold place, a smear may occur in the
picture or the picture may become dark. This does not indicate a
failure. These phenomena disappear as the temperature rises.
• Ghosting may occur when still pictures are displayed
continuously. It may disappear after a few moments.
• The screen and cabinet get warm when this TV set is in use. This
is not a malfunction.
• The LCD screen contains a small amount of liquid crystal. Follow
your local ordinances and regulations for disposal.
Handling and cleaning the screen surface/
cabinet of the TV set
Be sure to unplug the AC power cord (mains lead) connected to
the TV set from AC power outlet (mains socket) before cleaning.
To avoid material degradation or screen coating degradation,
observe the following precautions.
• To remove dust from the screen surface/cabinet, wipe gently
with a soft cloth. If dust is persistent, wipe with a soft cloth
slightly moistened with a diluted mild detergent solution.
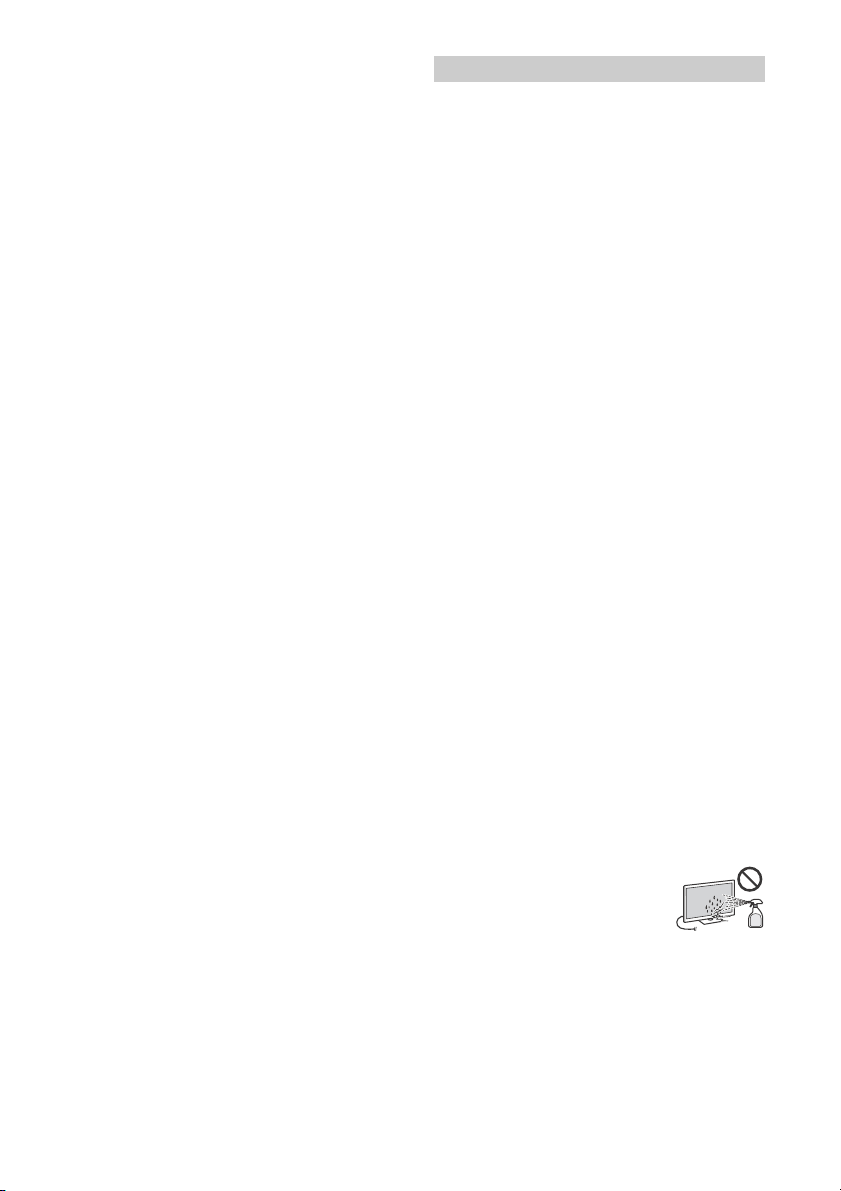
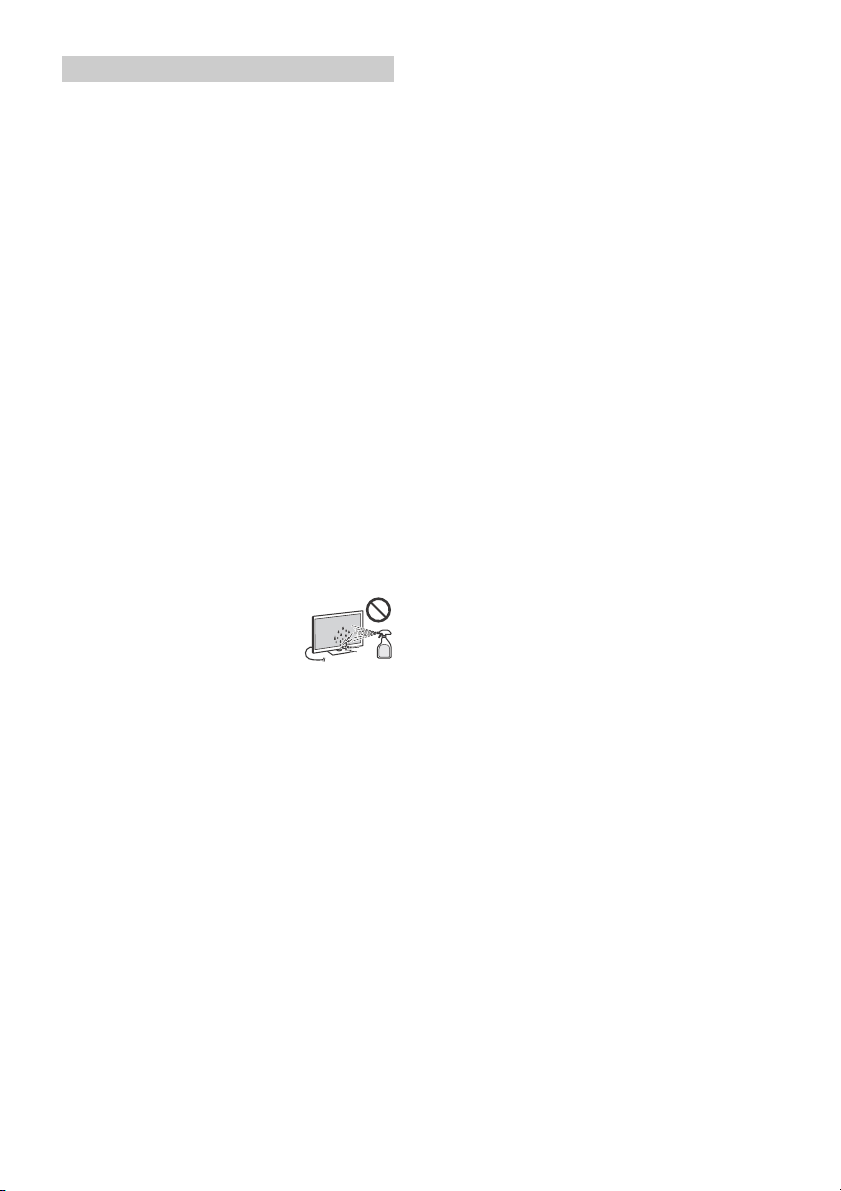
• Never spray water or detergent directly on
the TV set. It may drip to the bottom of the
screen or exterior parts and enter the TV set,
and may cause damage to the TV set.
• Never use any type of abrasive pad, alkaline/acid cleaner,
scouring powder, or volatile solvent, such as alcohol, benzene,
thinner or insecticide. Using such materials or maintaining
prolonged contact with rubber or vinyl materials may result in
damage to the screen surface and cabinet material.
• Periodic vacuuming of the ventilation openings is
recommended to ensure to proper ventilation.
• When adjusting the angle of the TV set, move it slowly so as to
prevent the TV set from moving or slipping off from its table
stand.
GB
4
Page 5

Optional Equipment
Keep optional components or any equipment emitting
electromagnetic radiation away from the TV set. Otherwise
picture distortion and/or noisy sound may occur.
Wireless Function of the unit
• Do not operate this unit near medical equipment (pacemaker,
etc.), as malfunction of the medical equipment may result.
• Although this unit transmits/receives scrambled signals, be
careful of unauthorised interception. We cannot be responsible
for any trouble as a result.
Caution about handling the remote control
• Observe the correct polarity when inserting batteries.
• Do not use different types of batteries together or mix old and
new batteries.
• Dispose of batteries in an environmentally friendly way. Certain
regions may regulate the disposal of batteries. Please consult
your local authority.
• Handle the remote control with care. Do not drop or step on it,
or spill liquid of any kind onto it.
• Do not place the remote control in a location near a heat source,
a place subject to direct sunlight, or a damp room.
GB
GB
5
Page 6
Parts and Controls
Ȫ
ȫ
Ȭ
ȭ
Controls and Indicators
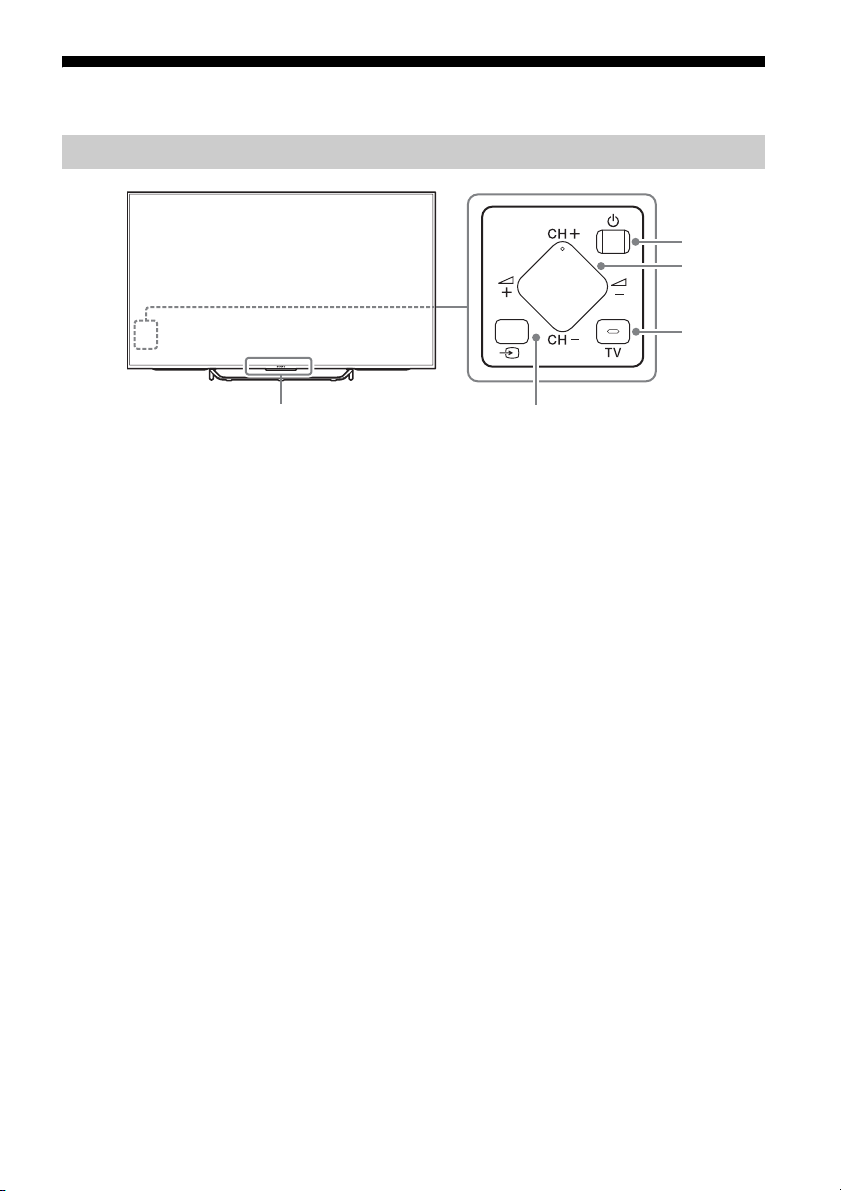
Remote Control sensor*1 / Light
1
sensor*
Trans mit ter*
The illumination LED lights up or blinks
according to the status of the TV.
•White
•Cyan
•Amber
/ Illumination LED / 3D Sync
1*2
When turning on the TV/picture off
mode/software update, etc.
When connecting with a mobile device
wirelessly.
Timer is set.
(Power)
CH +/- (Channel)
+/- (Volume)
TV
Switch to a TV channel or input from other
applications.
(Input select)
Display and select the input source.
*1 Do not place anything near the sensor.
*2 3D compatible models only.
GB
6
Page 7
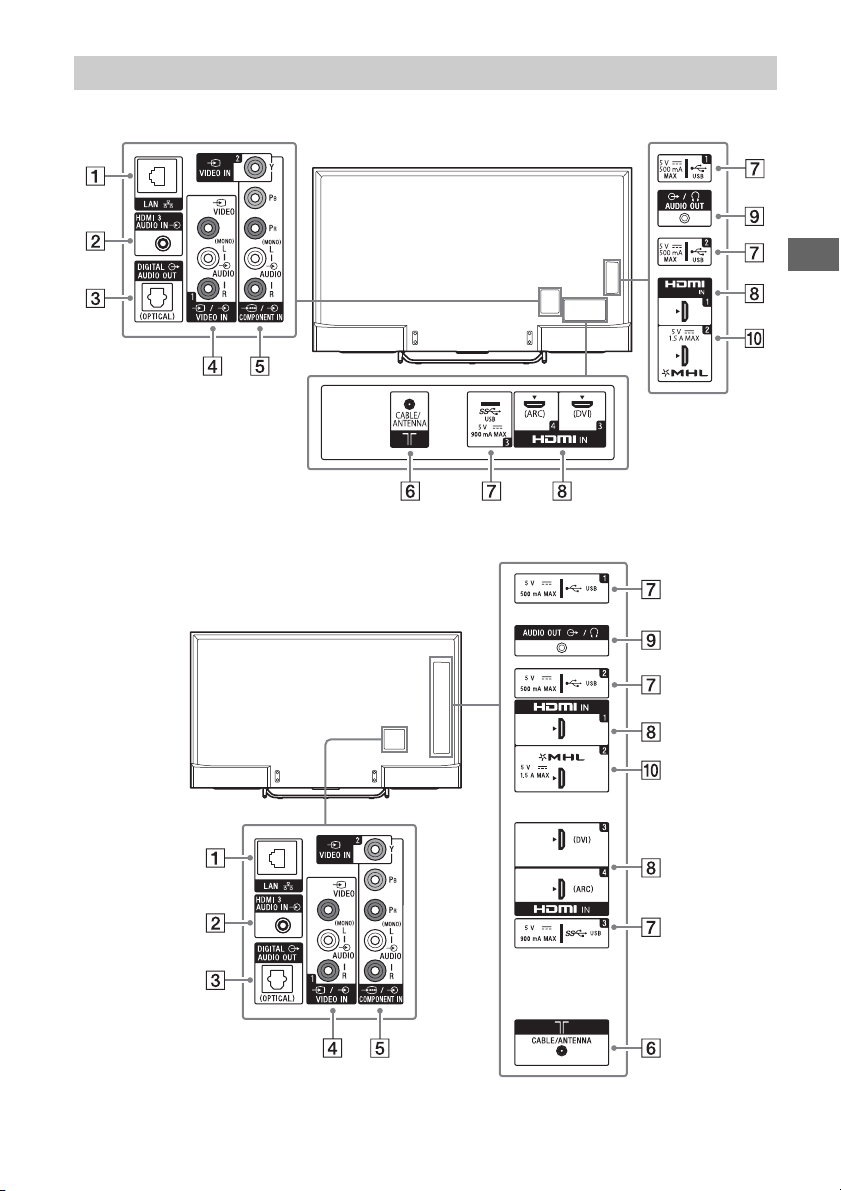
Inputs and Outputs
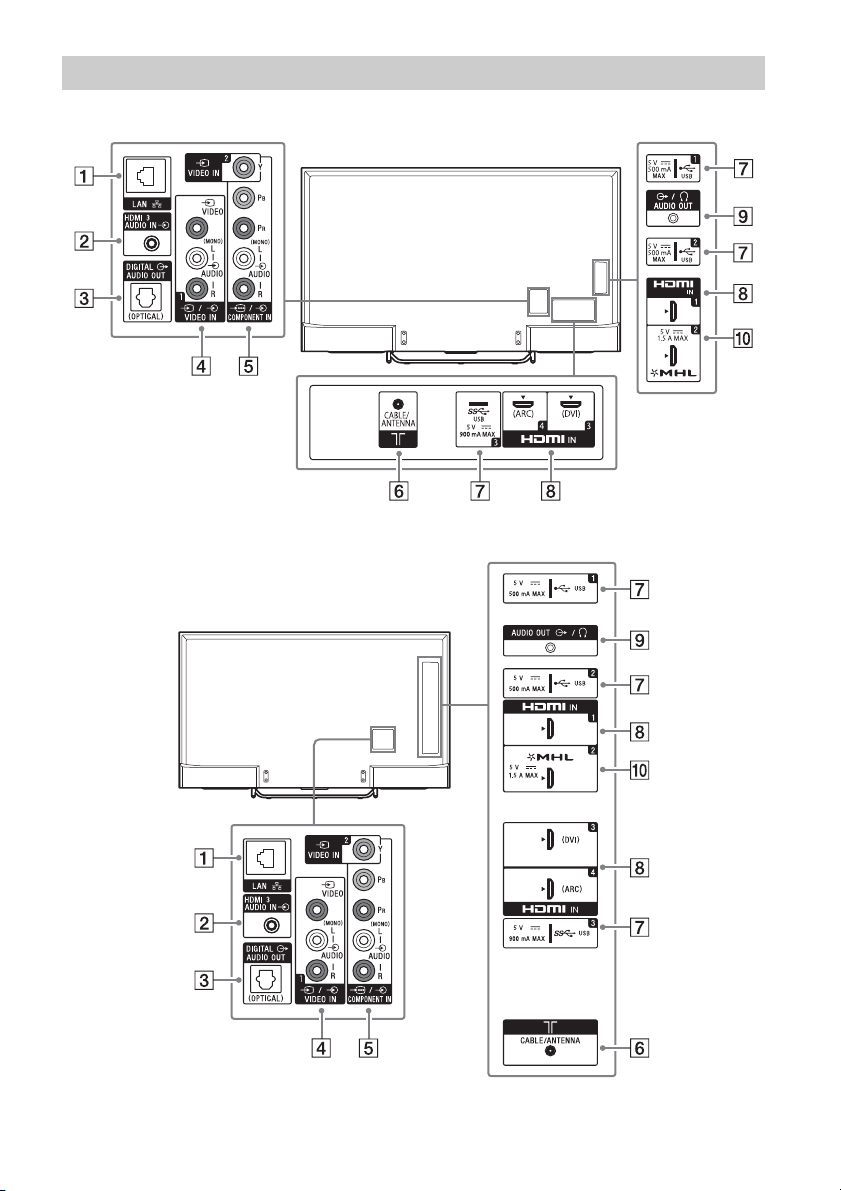
KD-65/55X8500C
KD-49/43X8300C
GB
GB
7
Page 8
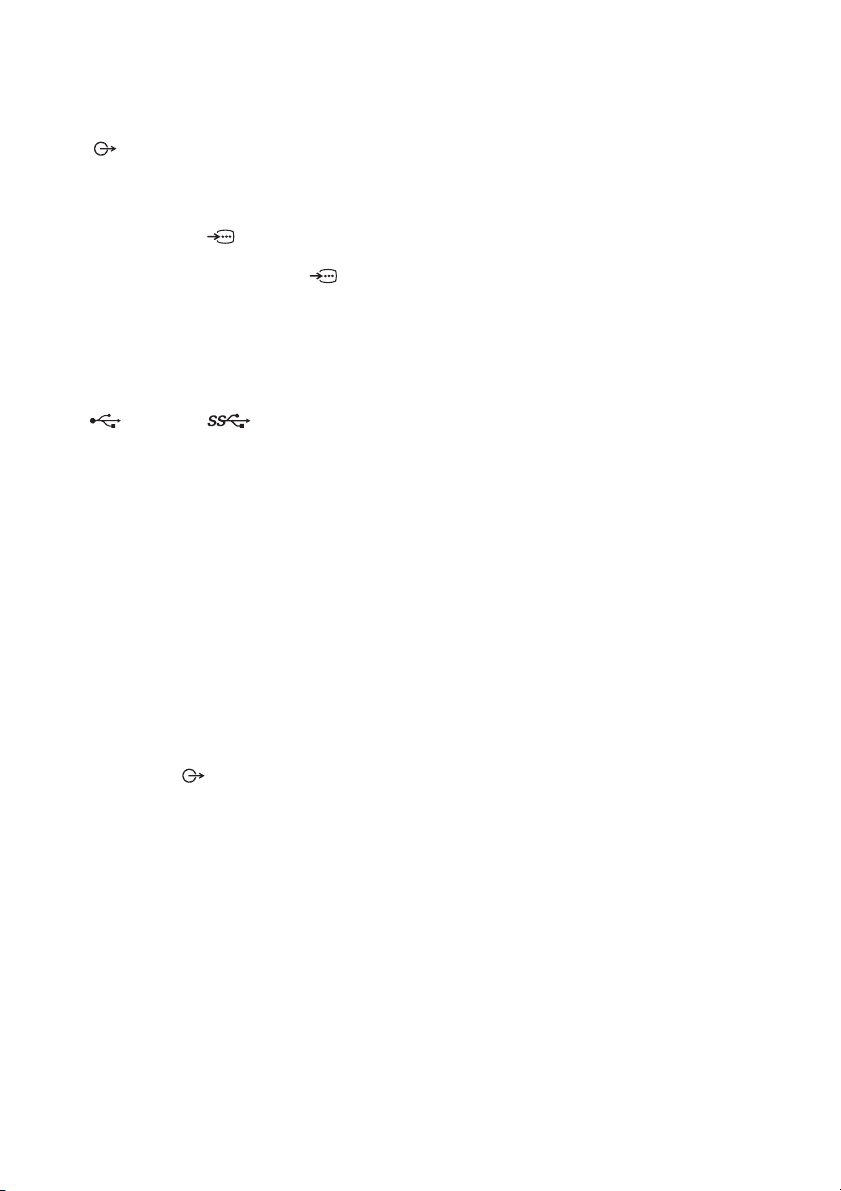
LAN
HDMI 3 AUDIO IN
For HDMI 3 analogue audio connection.
DIGITAL AUDIO OUT (OPTICAL)
/ VIDEO IN 1
For a composite connection*.
VIDEO IN 2, / COMPONENT IN
• For a composite connection:
Use VIDEO IN, and (L/R) of /
COMPONENT IN*.
• For a component connection:
Use Y, PB, PR, and (L/R).
CABLE/ANTENNA
Connect to your cable or antenna (aerial).
(USB 1/2), (USB 3)
• Connecting a large USB device may
interfere with other connected devices
beside it.
• When connecting a large USB device,
connect to the USB 1 jack.
HDMI IN 1/3/4
• If the device has a DVI jack, connect it to
HDMI IN 3 through a DVI - HDMI adaptor
interface (not supplied), and connect the
device's audio out jack to HDMI 3 AUDIO
IN.
• If connecting a digital audio system that is
compatible with Audio Return Channel
(ARC) technology, use HDMI IN 4. If not, an
additional connection with DIGITAL AUDIO
OUT (OPTICAL) is necessary.
AUDIO OUT /
To listen to the TV's sound through the
connected equipment, press HOME. Select
[Settings] [Sound] [Headphone/Audio
out] and then select the desired item.
HDMI IN 2/MHL
You can connect your MHL (Mobile Highdefinition Link) device using an HD quality
MHL cable.
* When connecting mono equipment, connect to the L
(MONO) audio jack.
GB
8
Page 9
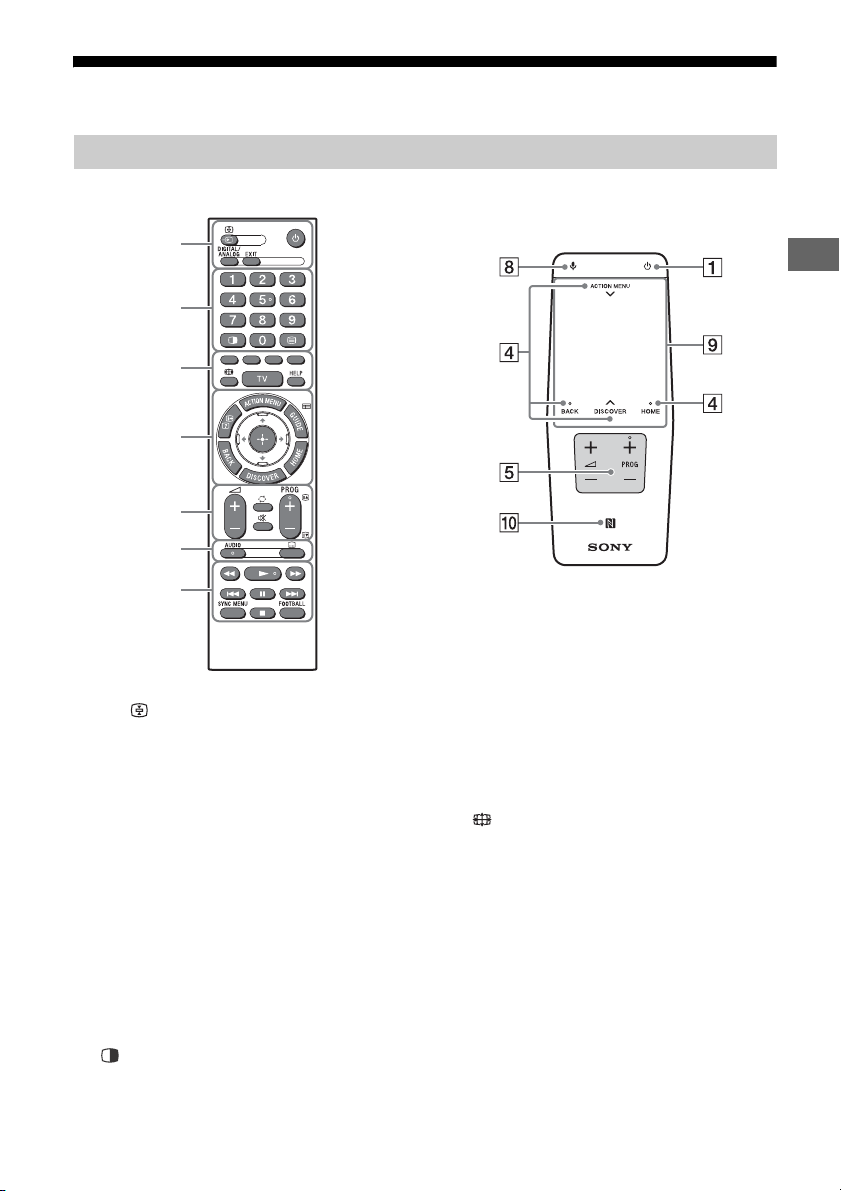
Using Remote Control
IR (infrared) Remote Control
Ȫ
ȩ
ȫ
Ȭ
ȭ
Ȯ
ȯ
Touchpad Remote Control
For models with supplied Touchpad Remote
Control.
Remote Control Parts Description
GB
/ (Input select/Text hold)
In TV mode: Display and select the input
source.
In Text mode: Hold the current page.
(TV standby)
Turn on or turn off the TV (standby mode).
DIGITAL/ANALOG
Switch between digital and analogue mode.
EXIT
Return to the previous screen or exit from
the menu. When an Interactive Application
service is available, press to exit from the
service.
Number buttons
(Twin picture/PIP)*
Display two pictures simultaneously.
1*2
(Text)
Display text information.
Colour buttons
Execute correspondent function at that time.
(Wide mode)
Change the screen format.
TV
Switch to a TV channel or input from other
applications.
HELP
Display Help Menu.
ACTION MENU
Display a list of contextual functions.
You can also display it by slide down your
finger from ACTION MENU on the Touchpad
Remote Control.
GB
9
Page 10
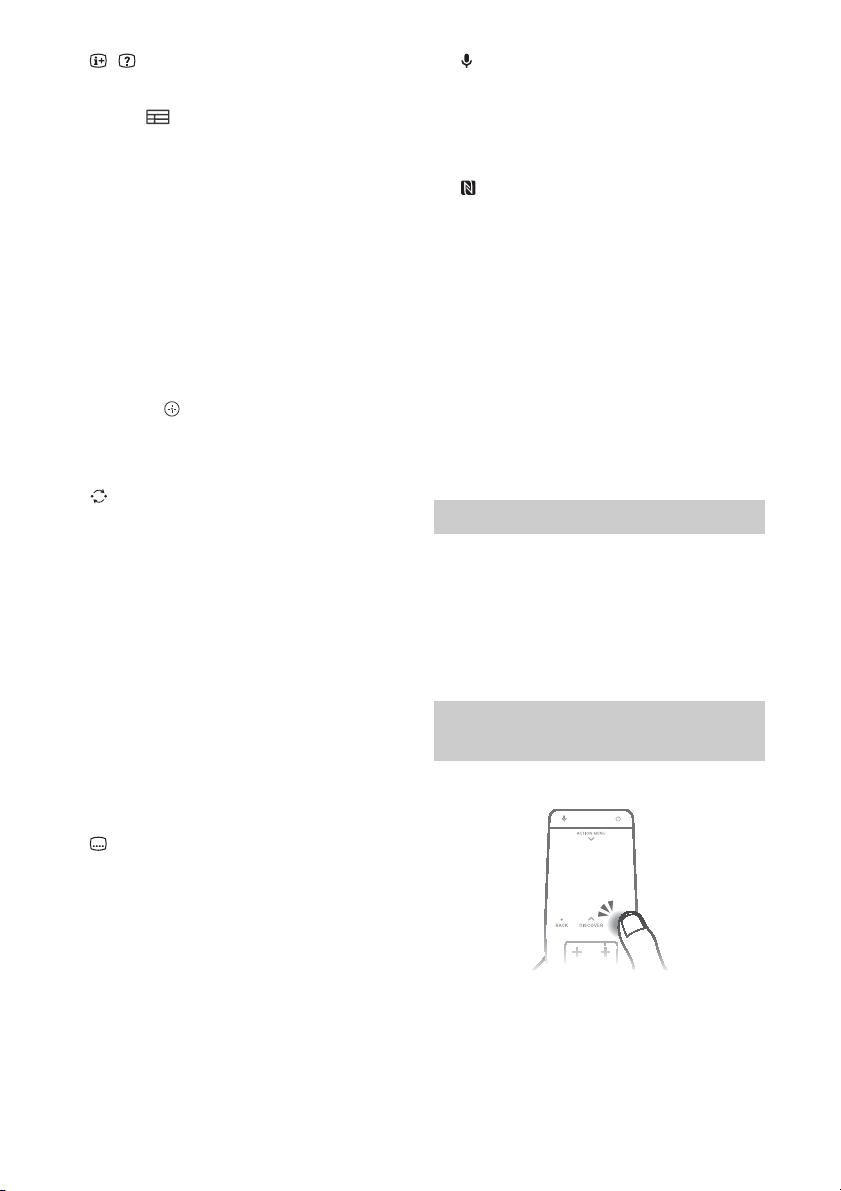
/ (Info/Text reveal)
Display information.
GUIDE/ *
Display the digital programme guide.
1
BACK
Return to previous screen.
HOME
Display the TV Home Menu.
DISCOVER
Bring up the Content Bar to search for
content.
You can also launch Content Bar by slide up
your finger from DISCOVER on the
Touchpad Remote Control.
//// (Item select/Enter)
+/– (Volume)
Adjust the volume.
(Jump)
Jump back and forth between two channels
or inputs. The TV alternates between the
current channel or input and the last
channel or input that was selected.
(Muting)
Mute the sound. Press again to restore the
sound.
PROG +/–//
In TV mode: Select the channel.
In Text mode: Select the next () or
previous () page.
AUDIO
Change the language for the programme
currently being viewed.
(Subtitle setting)
Turn subtitles on or off (when the feature is
available).
//////
Operate media contents on TV and
connected BRAVIA Sync-compatible device.
SYNC MENU
Display the BRAVIA Sync Menu.
FOOTBALL
Turn Live Football Mode on or off (when the
feature is available).
(Microphone)
Use Voice Function. (e.g., Search various
content by voice.)
Touchpad
Operate the TV with the touchpad.
(NFC)
Touch the device (e.g. some models of
Xperia) corresponding to the One-touch
mirroring function, then its screen is
displayed on the TV.
*1 The location, availability and function of remote
control button may var y depending on your country/
region/TV model.
*2 Twin Picture function will be available from July 2015.
You will receive Twin Picture function automatically
as a network software upgrade. Make sure your TV is
connected to the Internet. If you do not have a
network connection, you will be able to download
the software from the Sony support website using
your PC. For details on how to upgrade, please visit
the Sony support website.
Using the Touchpad Remote Control
Touchpad Remote Control can only be used
after pairing with the TV.
To pair, follow the pairing screen instruction.
Pairing screen can be displayed by pressing the
button on the TV for 5 seconds, or select
[Settings] - [Touchpad Remote Control settings]
- [Pair Touchpad Remote Control].
Launching the Touchpad Remote Control Introduction/Tutorial
1 Press HOME.
2 Select [Settings] - [Touchpad Remote
Control settings] - [Start Introduction/
Tutori al].
10
GB
Page 11
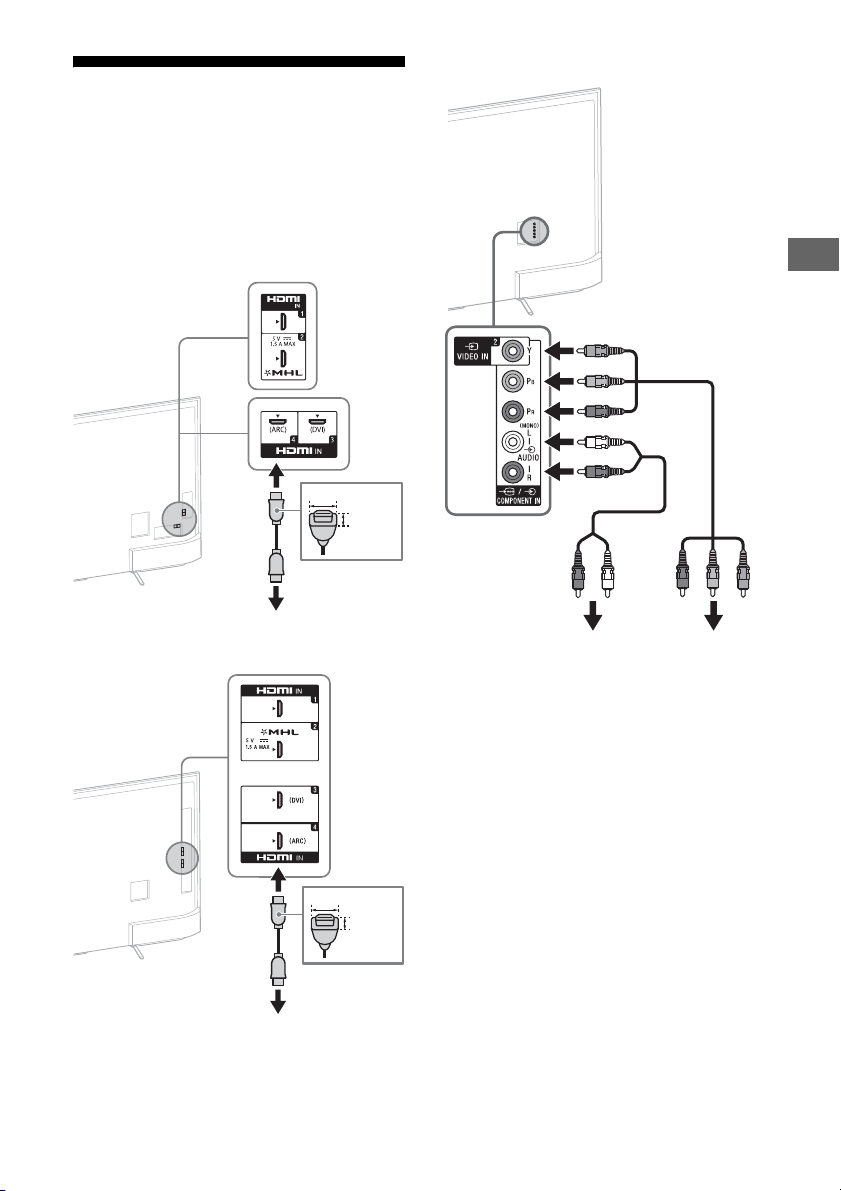
Connecting the TV
To H DMI OUT
< 12 mm
< 21 mm
To H D MI OU T
< 12 mm
< 21 mm
To A UDI O
OUT
To C OMP ONEN T
OUT (P
R/PB/Y)
Note
• To select an input device connected to the TV, press
.
• When connecting the cable to the Cable/Antenna,
input finger tighten only, over-tightening the
connection can damage the TV.
To connect with an HDMI cable
KD-65/55X8500C
To connect with component cables
GB
KD-49/43X8300C
GB
11
Page 12
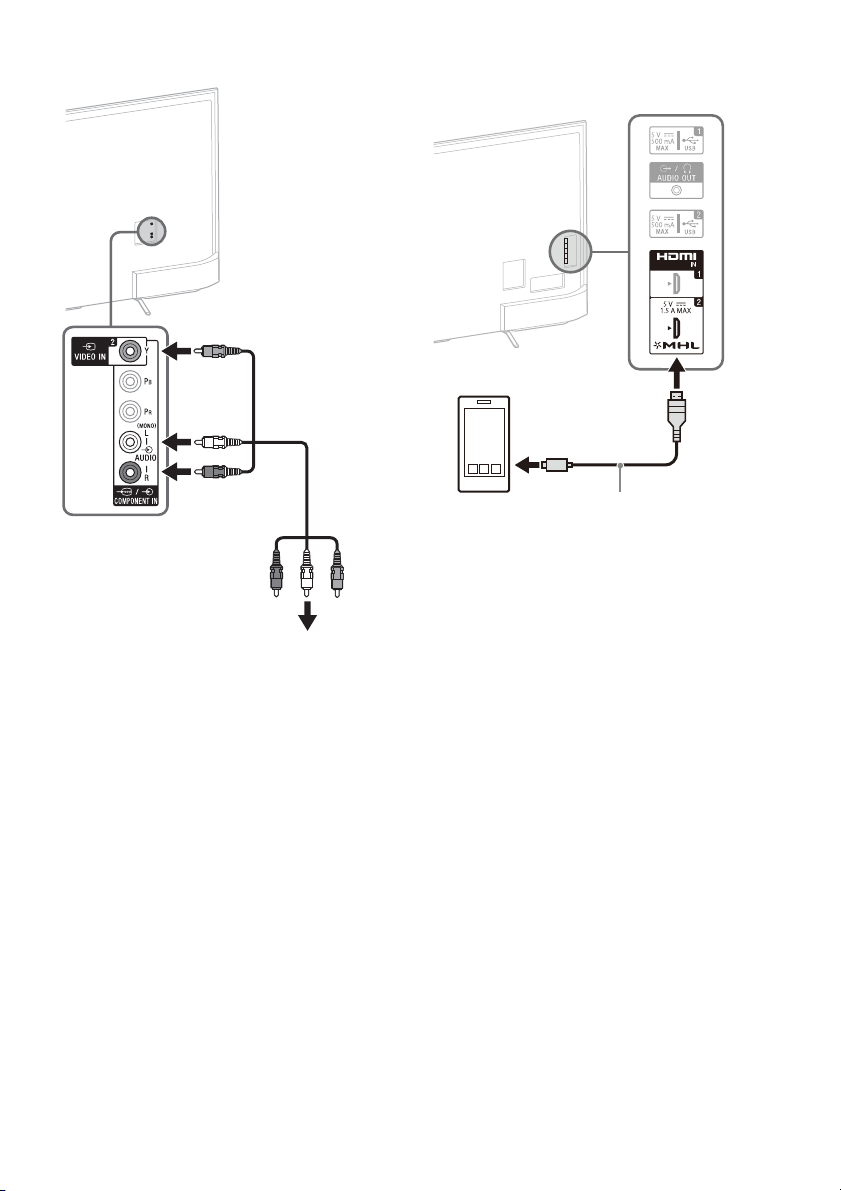
To connect with AV composite cables To connect MHL device
To VIDEO OUT
Use authorized MHL
CABLE with MHL logo
(not supplied)
MHL device
KD-65/55X8500C
12
GB
Page 13
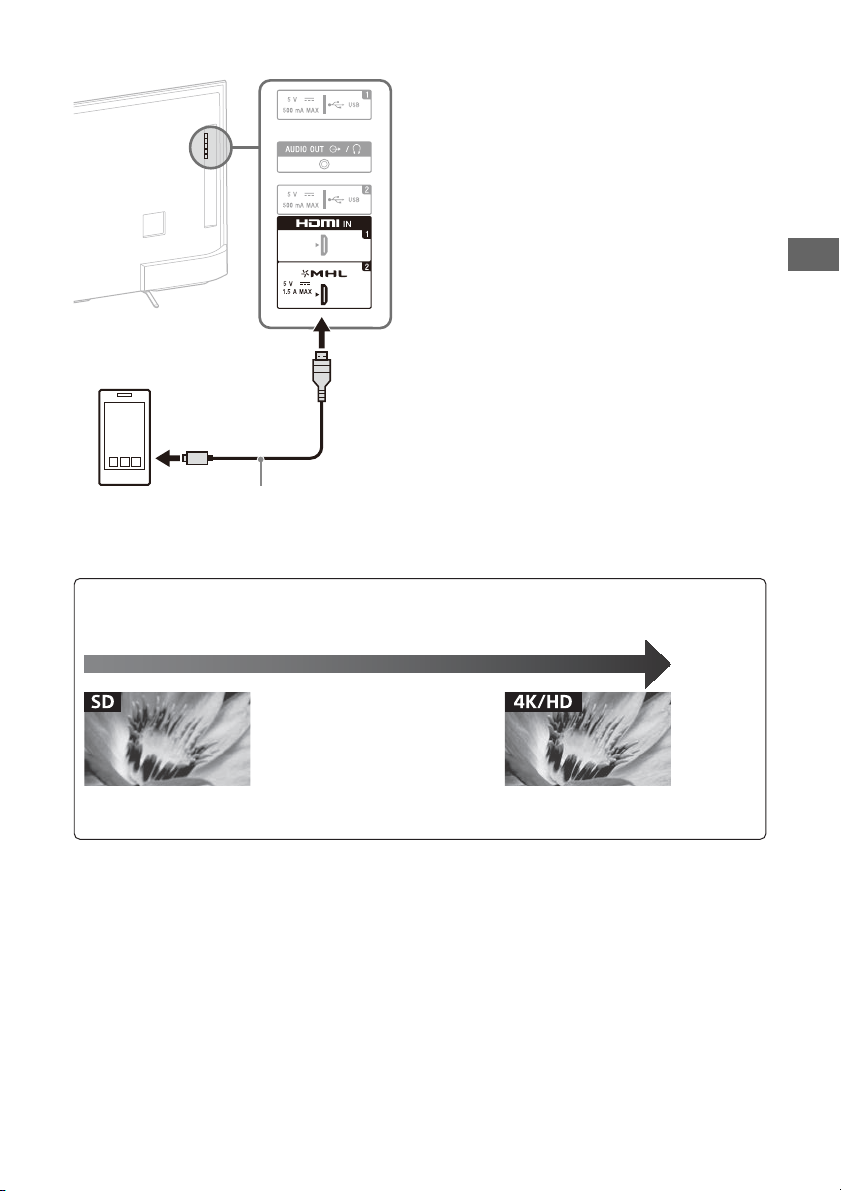
KD-49/43X8300C The TV simultaneously charges the MHL-
Use authorized MHL
CABLE with MHL logo
(not supplied)
MHL device
Picture Quality
• AV composite cable
• Antenna (aerial) cable
Standard definition (SD) videos have picture signals with a
vertical resolution of 480 (NTSC) or 576 (PAL/SECAM) lines.
•Component cable •HDMI cable
High definition (HD) videos have picture signals
with a vertical resolution of 720 or 1,080 lines.
(For 4K vertical resolution: 2,160 lines)
compatible connected device while playing
photo/music/video files. You can use the TV
remote control to control the connected MHLcompatible device.
Note
• If [MHL charging during standby] is set to [On], you
can continue charging the MHL-compatible device
even when the TV is in standby mode.
• Use authorized MHL 3 CABLE with MHL logo for 4K
smartphone or mobile devices.
GB
GB
13
Page 14
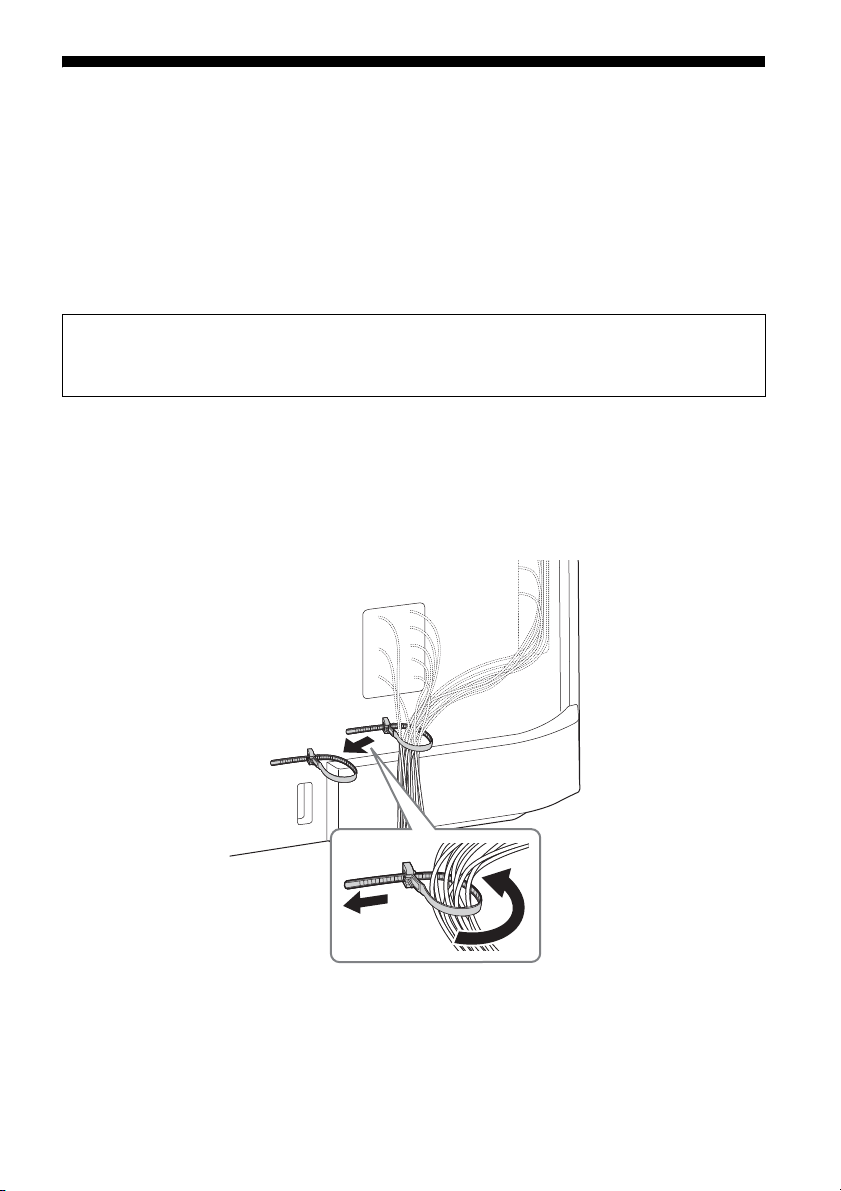
Installing the TV to the Wall
This TV’s instruction manual only shows the steps on preparing the installation of the TV before
installing to the wall.
To Customers:
For product protection and safety reasons, Sony strongly recommends that installation of your
TV be performed by Sony dealers or licensed contractors. Do not attempt to install it yourself.
To Sony Dealers and Contractors:
Provide full attention to safety during the installation, periodic maintenance and examination of
this product.
Sufficient expertise is required for installing this product, especially to determine the strength of the wall for
withstanding the TV’s weight. Be sure to entrust the attachment of this product to the wall to Sony dealers
or licensed contractors and pay adequate attention to safety during the installation. Sony is not liable for
any damage or injury caused by mishandling or improper installation.
Use the Wall-Mount Bracket SU-WL450 (not supplied) to install the TV to the wall.
When installing the Wall-Mount Bracket, also refer to the Operating Instructions and Installation Guide
supplied with the Wall-Mount Bracket.
Note
• Be sure to store the removed screws in a safe place, keeping them away from children.
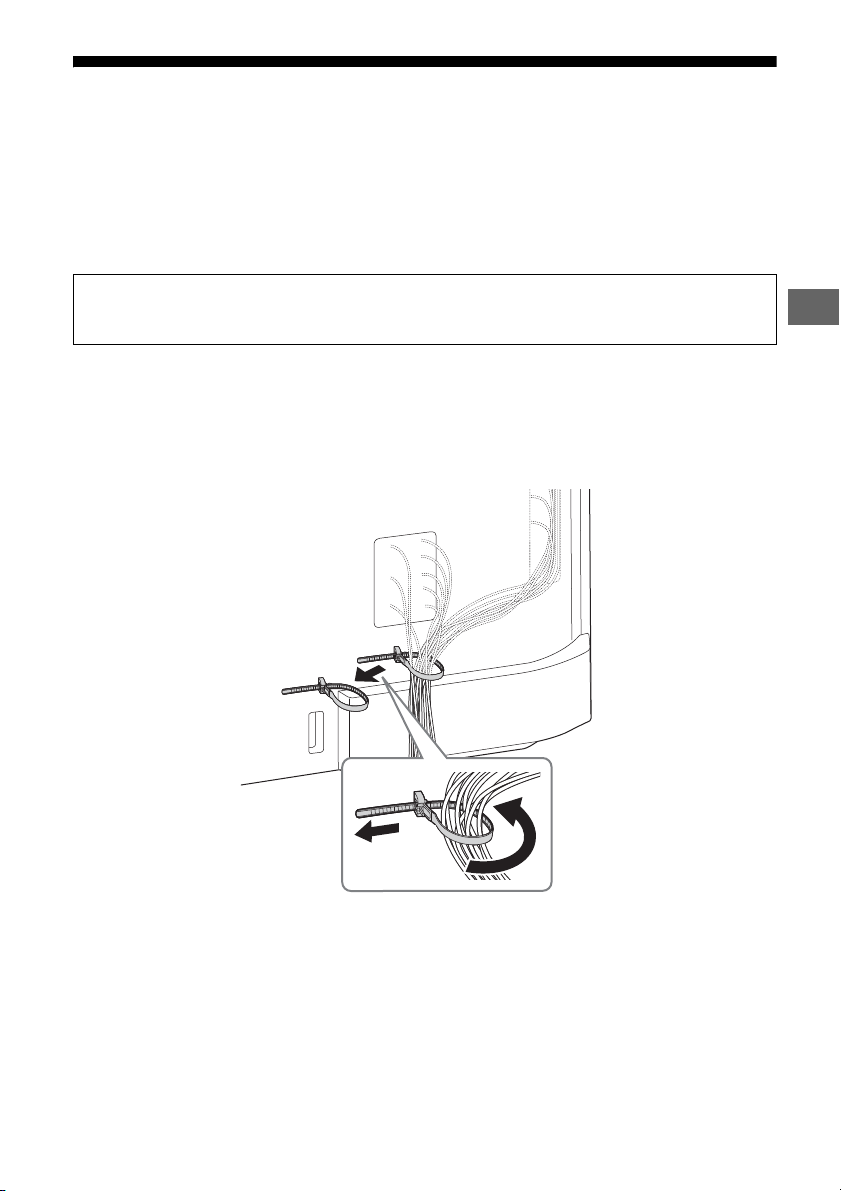
To change the cable management (KD-55X8500C, KD-49/43X8300C)
GB
14
Page 15
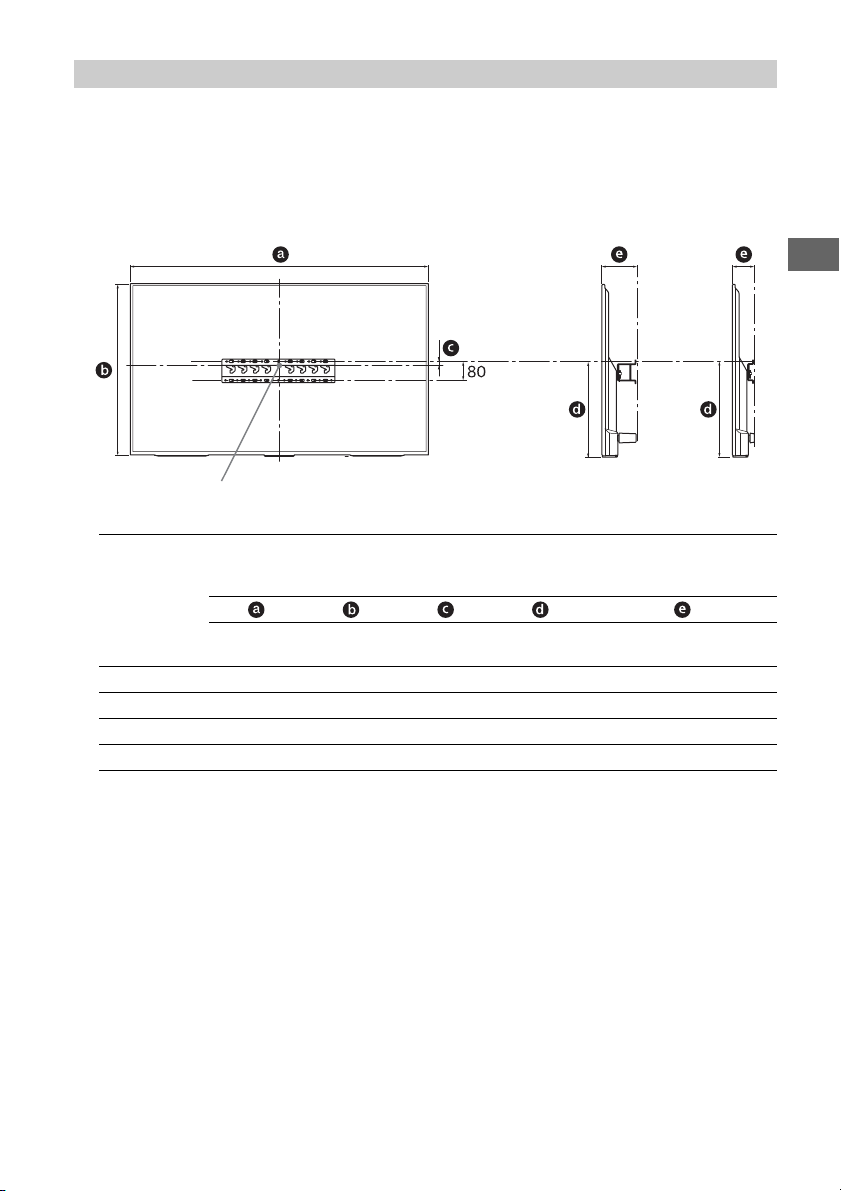
SU-WL450
Screen ce ntre point
Standard
mounting
Slim
mounting
1 Make sure that the wall has enough space for the TV and is capable of supporting a
weight of at least four times that of the TV.
Refer to the following table on installing the TV to the wall. See page 20-21 (Specifications)
for the TV’s weight.
Display dimensions
Model Name
KD-
65X8500C 1,453 844 21 450 133 91
55X8500C 1,236 722 116 485 115 73
49X8300C 1,093 643 206 536 107 65
43X8300C 961 568 191 483 107 65
Note
• Figures in the table may differ slightly depending on the installation.
• When your TV is installed on the wall, the upper side of the TV slightly leans forward.
Screen
centre
dimension
Length for mounting
Standard
mounting
mounting
GB
Unit: mm
Slim
GB
15
Page 16
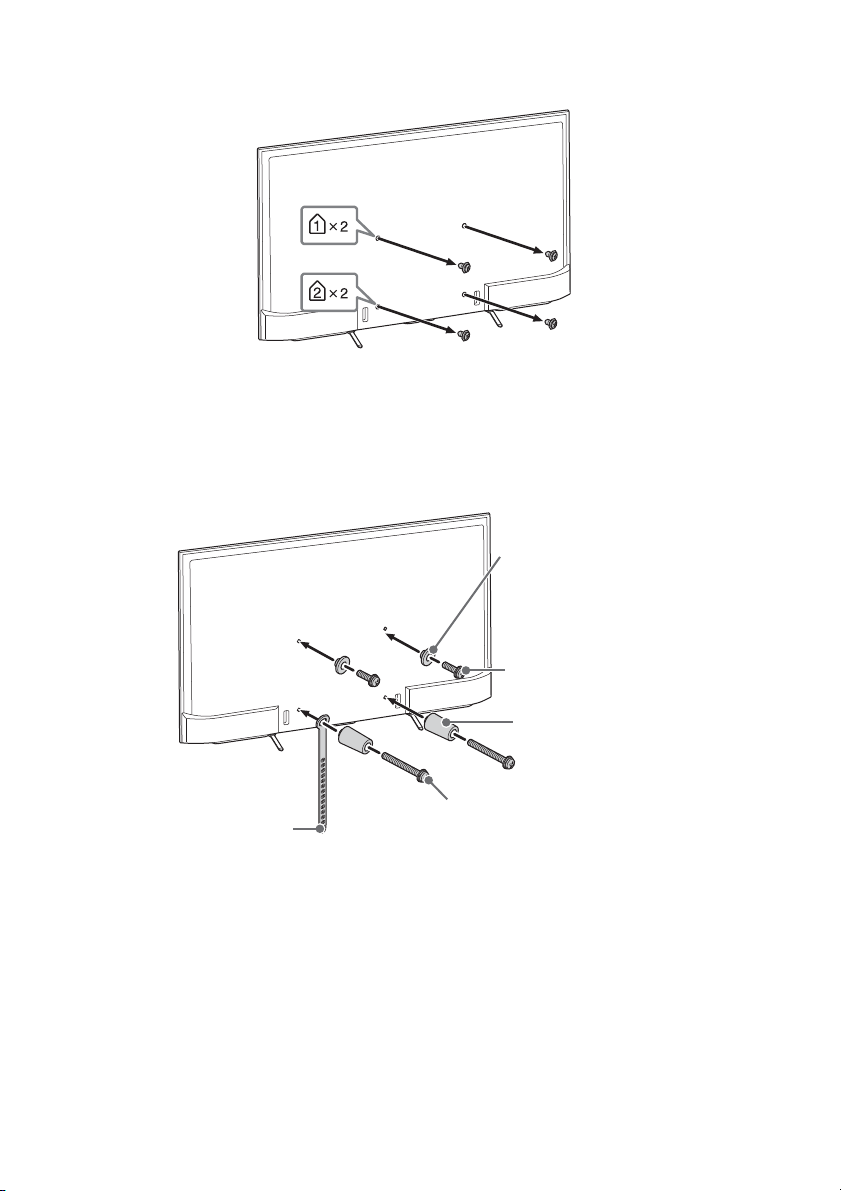
2 When installing the TV on the wall, remove the screws from the rear of the TV (KD-
Screw (+PSW 6 x 20)
Pulley
Screw (+PSW 6 x 50)
Belt
Spacer (60 mm)
65X8500C).
3 Attach the Attachment parts for Wall-Mount Bracket. Check the Attachment parts by
referring to “1” of the Wall-Mount Bracket Installation Guide.
Note
• If using an electric screwdriver, set the torque at approximately 1.5 N·m {15 kgf·cm}.
• Be sure to store the unused parts in a safe place for future use. Retain this manual for future reference.
Standard mounting
GB
16
Page 17
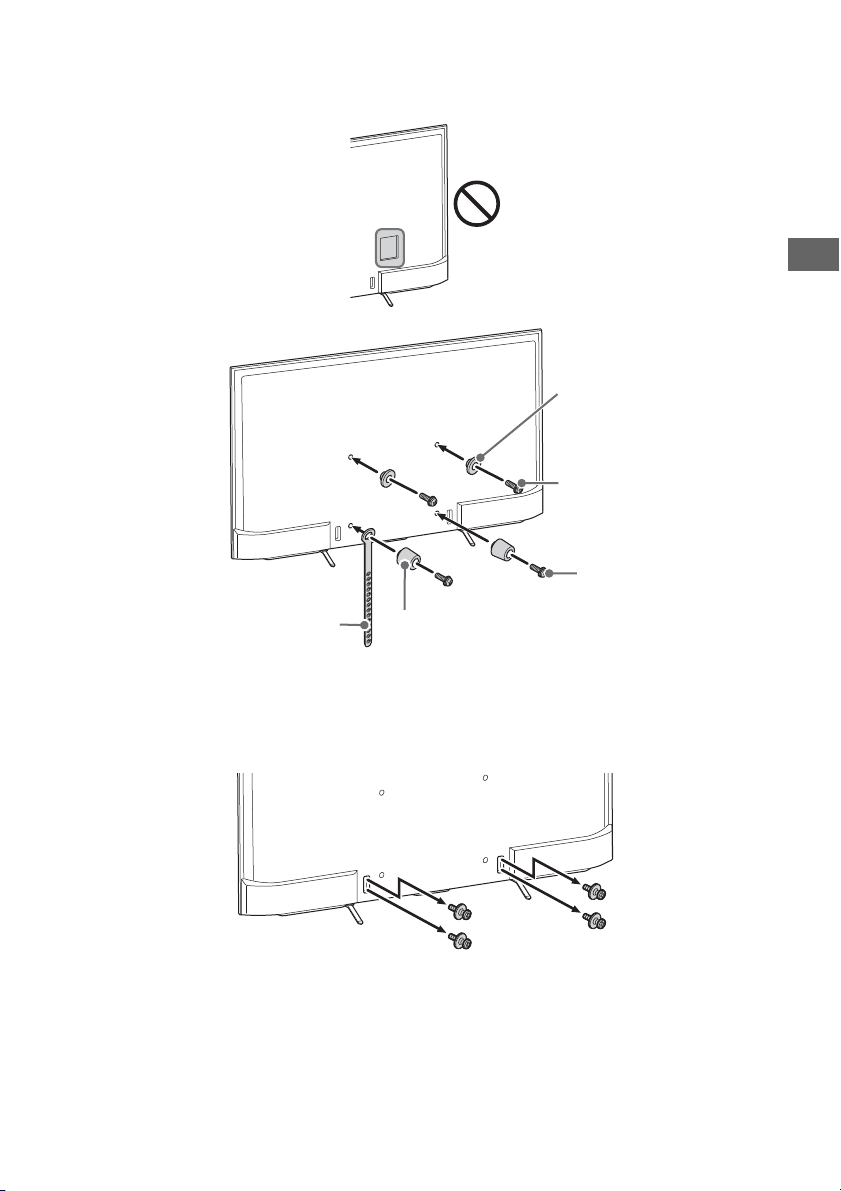
Slim mounting
Screw (+PSW 6 x 20)
Pulley
Screw (+PSW 6 x 20)
Belt
Spacer (20 mm)
Note
• You cannot use some of the terminals on the rear of the TV when using this mounting style.
GB
4 Connect necessary cables to the TV.
Note
• You cannot access to any terminal after installing the TV to the wall.
5 Detach the Table-Top Stand from the TV.
GB
17
Page 18
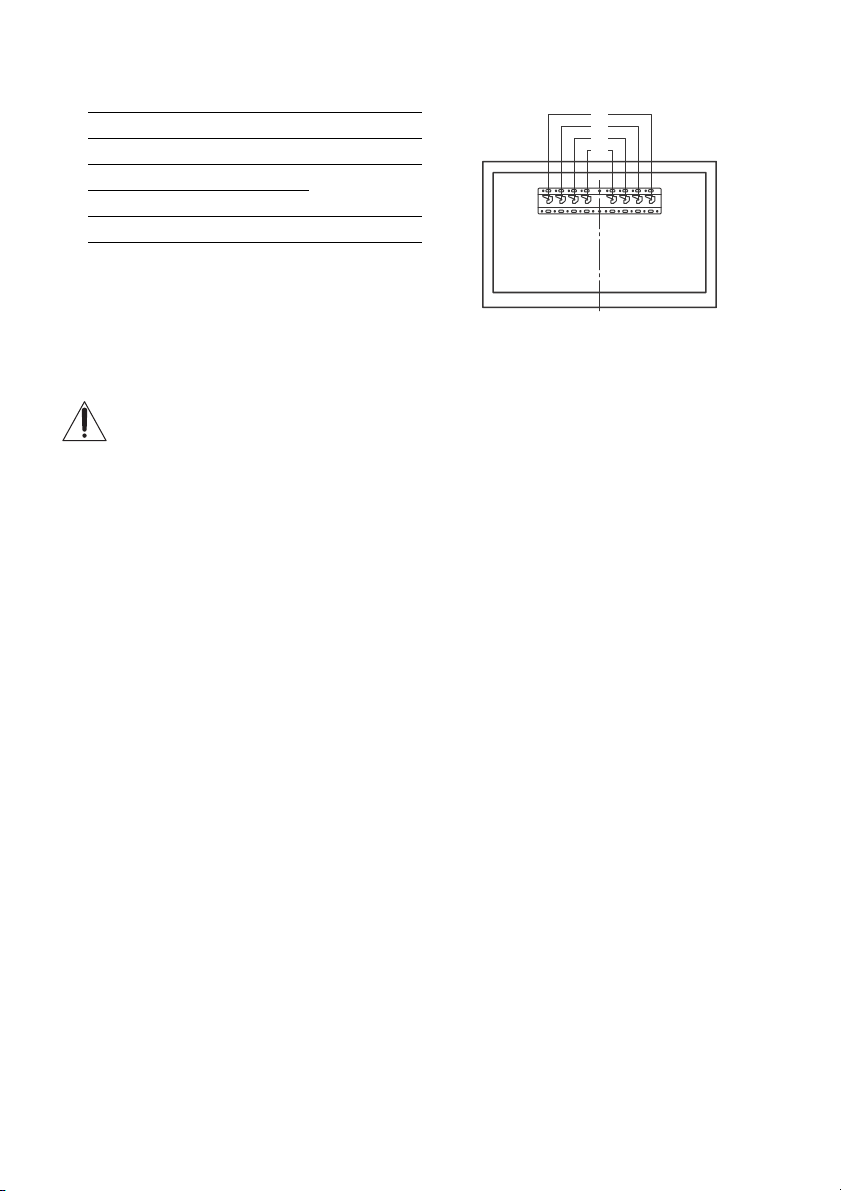
6 Install the TV to the Base. Refer to “5” of Installation Guide and “Installing the TV to the
a
b
c
d
Wall” of Operating Instructions supplied with the Wall-Mount Bracket.
Model Name KD- Hook location
65X8500C a
55X8500C
49X8300C
43X8300C c
Refer to the instructions supplied with the Wall-Mount Bracket for your model to install the TV on the wall.
b
18
GB
Page 19
Rear of TV
Troubleshooting
In order to keep your TV software up-to-date, it
is necessary to download the latest software
information via the digital broadcasting system
or internet and to update the software. Select
[Update Now] to start a software update. The
illumination LED flashes white while the
software is updating. Do not unplug the AC
power cord during the software update. If you
do, the software update may not finish
completely, and it may cause a software
malfunction. Software updates can take up to
30 minutes. If you do not wish to update the
software automatically, press HOME and select
[Help] [System software update]
[Automatic software download] [Off].
When you unplug the TV and plug it in again,
the TV may not be able to turn on for a while
even if you press the power button on the
remote control or the TV because it takes time
to initialize the system. Wait for about 10 to 20
seconds, then operate it again.
When the illumination LED is flashing red,
count how many times it flashes (interval
time is three seconds).
If the illumination LED flashes red, reset the TV
by disconnecting the AC power cord (mains
lead) for two minutes, then turn on the TV.
If the problem persists, contact your dealer or
Sony service centre with the number of times
the illumination LED flashes red (interval time is
three seconds). Disconnect the AC power cord
(mains lead), and inform your dealer or Sony
service centre.
When the illumination LED is not flashing,
check the items as follows.
You can also refer to [Troubleshooting] in the
Help Guide or perform self-diagnosis by
selecting [Help] [Self diagnostics]. If the
problem persists, have your TV serviced by
qualified service personnel.
Troubles and Solutions
There is no picture (screen is dark) and no
sound.
Check the antenna (aerial)/cable connection.
Connect the TV to the AC power (mains), and
press on the TV or remote control.
Some programmes cannot be tuned.
Check the antenna (aerial)/cable connection.
The remote control does not function.
Replace the batteries.
The [Parental lock] password has been
forgotten.
Enter 9999 for the PIN code. (PIN code 9999 is
always accepted.)
The TV surrounds become warm.
When the TV is used for an extended period, the
TV surrounds become warm.
You may feel hot when touching there by the
hand.
Frozen audio or video, a blank screen, or the
TV does not respond to TV or remote control
buttons.
Perform a simple reset of the TV by unplugging
the AC power cord (mains lead) for two minutes,
then plug it in again.
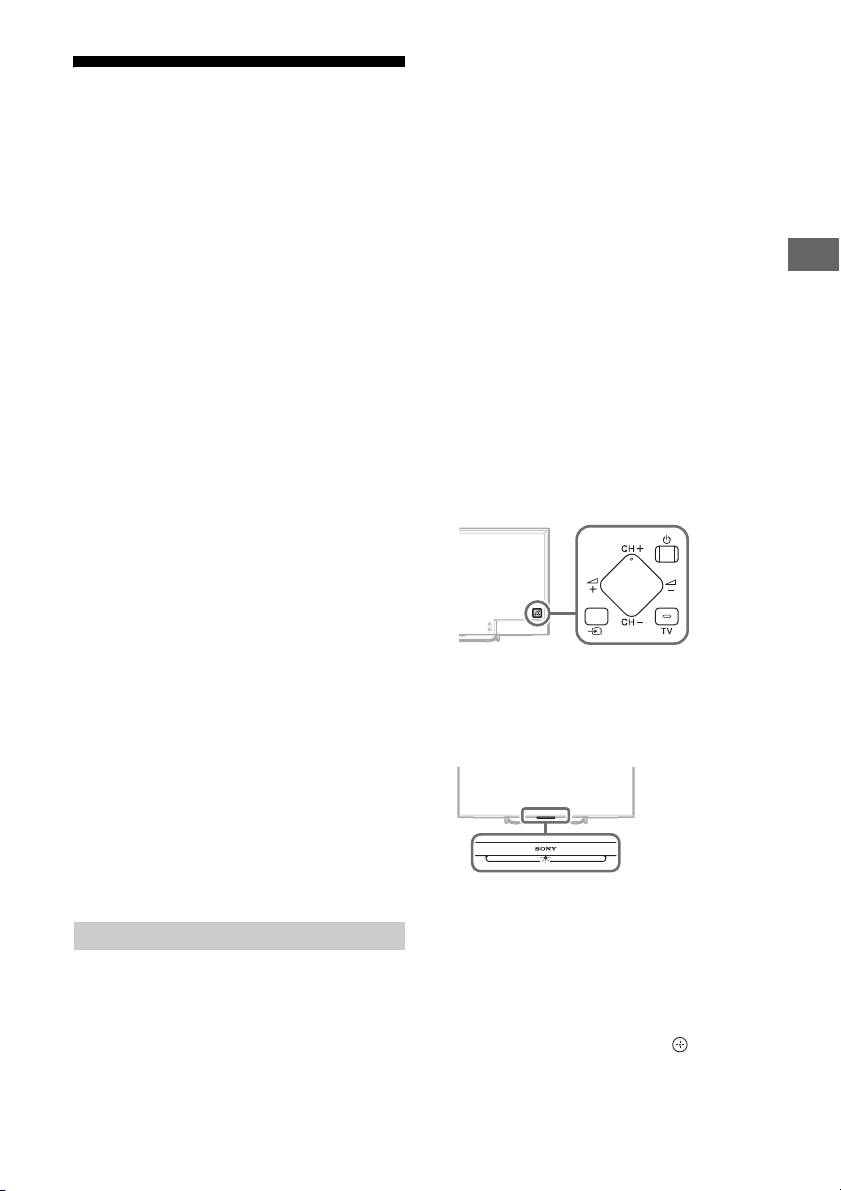
The , CH+/–, +/–, and TV buttons
cannot be located on the TV.
See below illustration for location of the buttons
on the TV.
The illumination LED is turned on.
If you do not wish to light up the illumination LED,
you can turn it off.
Press
HOME, then select [Settings] t
[Illumination LED] t [Off].
Cannot connect to a wireless router by WPS
(Wi-Fi Protected Setup).
• If you use WEP security, select [Easy] t [Wi-Fi] t
[Connect by scan list]. Then, select the network
name (SSID) you want to connect.
Cannot find the required network name in
network setup.
• Select [[Manual entry]] and press to enter
network name.
GB
GB
19
Page 20
Specifications
System
Pane l system
LCD (Liquid Crystal Display) Panel, LED Backlight
TV system
Analogue: B/G, I, D/K, M
Digital: DTMB
Colour/video system
Analogue: PAL, SECAM, NTSC3.58, NTSC4.43
Digital: Refer to the Help Guide
Channel coverage
Analogue: UHF/VHF/Cable
Digital: UHF
Sound output
10 W + 10 W
Wireless technology
Protocol IEEE802.11ac/a/b/g/n
Bluetooth Version 4.1
Input/Output jacks
Antenna (aerial)/cable
75 ohm external terminal for VHF/UHF
/ VIDEO IN 1
Video/Audio input (phono jacks)
/ COMPONENT IN
YPBPR (Component Video): 1080p (50, 60 Hz),
1080i (50, 60 Hz), 720p (50, 60 Hz), 576p, 576i,
480p, 480i
Audio input (phono jacks)
VIDEO IN 2
Video input (common phono pin with Y input)
HDMI IN 1, 2, 3, 4 (support 4K resolution)
Video (2D):
4096 × 2160p (50, 60 Hz)*
2
Hz)*
, 3840 × 2160p (50, 60 Hz)*1, 3840 × 2160p
(24, 25, 30 Hz), 1080p (30, 50, 60 Hz), 1080/24p,
1080i (50, 60 Hz), 720p (30, 50, 60 Hz), 720/24p,
576p, 576i, 480p, 480i, PC Formats
*1 YCbCr 4:2:0 / 8bit only
*2 3840 × 2160p is displayed when 4096 × 2160p is
input
Video (3D) (3D compatible models only):
Frame Packing: 1080p (30 Hz), 1080/24p, 1080i
(50, 60 Hz), 720p (30, 50, 60 Hz), 720/24p
Side-by-Side: 1080p (50, 60 Hz), 1080/24p,
1080i (50, 60 Hz), 720p (50, 60 Hz)
Over-Under: 1080p (30, 50, 60 Hz), 1080/24p,
1080i (50, 60 Hz), 720p (50, 60 Hz)
Audio: 5.1 channel linear PCM: 32, 44.1, 48, 88.2,
96, 176.4 and 192 kHz, 16, 20 and 24 bits, Dolby
Digital and DTS
ARC (Audio Return Channel) (HDMI IN 4 only)
1*2
, 4096 × 2160p (24
MHL (common with HDMI IN 2)
Video (2D):
4096 × 2160p (24 Hz)*, 3840 × 2160p (24, 25, 30
Hz), 1080p (30, 50, 60 Hz), 1080/24p, 1080i (50,
60 Hz), 720p (30, 50, 60 Hz), 720/24p, 576p, 576i,
480p, 480i
* 3840 × 2160p is displayed when 4096 × 2160p is
input
Video (3D) (3D compatible models only):
Frame Packing: 1080p (30 Hz), 1080/24p, 1080i
(50, 60 Hz), 720p (30, 50, 60 Hz), 720/24p
Side-by-Side: 1080p (50, 60 Hz), 1080/24p,
1080i (50, 60 Hz), 720p (50, 60 Hz)
Over-Under: 1080p (50, 60 Hz), 1080p (30 Hz),
1080/24p, 1080i (50, 60 Hz), 720p (50, 60 Hz)
Audio: 5.1 channel linear PCM: 32, 44.1, 48, 88.2,
96, 176.4 and 192 kHz, 16, 20 and 24 bits, Dolby
Digital and DTS
DIGITAL AUDIO OUT (OPTICAL)
Digital optical jack (Two channel linear PCM,
Dolby Digital and DTS)
HDMI 3 AUDIO IN
Analogue audio input (Stereo mini jack)
AUDIO OUT / (Stereo Mini Jack)
Headphone, Audio Output, Subwoofer
1, 2, 3
USB port 1 and 2 support High Speed USB
(USB2.0).
USB port 3 supports Super Speed USB (USB3.0)
LAN
10BASE-T/100BASE-TX connector (Depending on
the operating environment of the network,
connection speed may differ. 10BASE-T/100BASETX communication rate and communication
quality are not guaranteed for this TV.)
Others
Optional accessories
Touchpad Remote Control : RMF-TX100E (KD-49/
43X8300C)
Wall-Moun t Bracket: SU-WL450
Wireless subwoofer: SWF-BR100
MHL cable: DLC-MC10, DLC-MC20
Active 3D Glasses: TDG-BT500A (3D compatible
models only)
Operating temperature
0 ºC – 40 ºC
Operating humidity
10 % – 80 % RH (non-condensing)
20
GB
Page 21
Power and others
Power requirements
220 V - 240 V AC, 50 Hz
Screen size (measured diagonally) (Approx.)
KD-65X8500C: 65 inches / 163.9 cm
KD-55X8500C: 55 inches / 138.8 cm
KD-49X8300C: 49 inches / 123.2 cm
KD-43X8300C: 43 inches / 108.0 cm
Display resolution
3,840 pixels (horizontal) × 2,160 lines (vertical)
Power consumption
Indicated on the rear of the TV
Output Rating
USB 1/2: 5 V, 500 mA MAX
USB 3: 5 V, 900 mA MAX
MHL (HDMI IN 2): 5 V, 1.5 A MAX
Dimensions (Approx.) (w × h × d)
with Table-Top Stand
KD-65X8500C: 1,453 × 892 × 265 mm
KD-55X8500C: 1,236 × 759 × 222 mm
KD-49X8300C: 1,093 × 679 × 201 mm
KD-43X8300C: 961 × 604 × 189 mm
without Table-Top Stand
KD-65X8500C: 1,453 × 844 × 78 mm
KD-55X8500C: 1,236 × 722 × 60 mm
KD-49X8300C: 1,093 × 643 × 60 mm
KD-43X8300C: 961 × 568 × 60 mm
Mass (Approx.)
with Table-Top Stand
KD-65X8500C: 25.5 kg
KD-55X8500C: 21.0 kg
KD-49X8300C: 15.4 kg
KD-43X8300C: 12.8 kg
without Table-Top Stand
KD-65X8500C: 24.1 kg
KD-55X8500C: 19.9 kg
KD-49X8300C: 14.4 kg
KD-43X8300C: 11.8 kg
Note
• Optional accessories availability depends on
countries/region/TV model/stock.
• Design and specifications are subject to change
without notice.
• This TV set incorporates MHL 3.
Trademark information
• The terms HDMI and HDMI High-Definition
Multimedia Interface, and the HDMI Logo
are trademarks or registered trademarks of
HDMI Licensing LLC in the United States
and other countries.
• Manufactured under license from Dolby
Laboratories.
Dolby and the double-D symbol are
trademarks of Dolby Laboratories.
• “BRAVIA” and are trademarks of
Sony Corporation.
• Gracenote, Gracenote eyeQ, Gracenote
VideoID, Gracenote Video Explore, the
Gracenote logo and logotype, and the
“Powered by Gracenote” logo are either
registered trademarks or trademarks of
Gracenote in the United States and/or
other countries.
• Opera® Devices SDK from Opera Software
ASA. Copyright 1995-2014 Opera Software
ASA. All rights reserved.
• Wi-Fi, Wi-Fi Direct, Miracast and Wi-Fi
Protected Setup are trademarks or
registered trademarks of
Wi-Fi Alliance.
• MHL, Mobile High-Definition Link and the
MHL Logo are trademarks or registered
trademarks of MHL Licensing, LLC.
•For DTS patents, see
http://patents.dts.com.
Manufactured under license from DTS, Inc.
DTS, the Symbol, & DTS and the Symbol
together are registered trademarks, and
DTS Digital Surround is a trademark of DTS,
Inc. © DTS, Inc. All Rights Reserved.
• Designed with UEI Technology
Under License from Universal Electronics
Inc. Portions © UEI 2000 – 2014
• The Bluetooth® word mark and logos are
owned by the Bluetooth SIG, Inc. and any
use of such marks by Sony Corporation is
under license. Other trademarks and trade
names are those of their respective
owners.
• 2015 RealNetworks, Inc. Patents Pending.
All rights reserved. RealNetworks logo is a
trademark of RealNetworks, Inc.
• TUXERA is a registered trademark of Tuxera
Inc. in the US and other countries.
TM
GB
GB
21
Page 22
• USB-IF SuperSpeed USB Trident logo is a
registered trademark of USB Implementers
Forum, Inc.
For models with supplied Touchpad Remote
Control:
• The N Mark is a trademark or registered
trademark of NFC Forum, Inc. in the United
States and in other countries.
22
GB
Page 23

Page 24
目錄
螺絲
掛鉤 ( 底座 )
8 毫米 - 12 毫米
電視機後蓋
安全資訊 . . . . . . . . . . . . . . . . 2
預先注意事項 . . . . . . . . . . . . . . 4
組件及控件 . . . . . . . . . . . . . . . . . . . . . . . . . 5
控件及指示燈 . . . . . . . . . . . . . . 5
輸入及輸出 . . . . . . . . . . . . . . . 6
使用遙控器 . . . . . . . . . . . . . . . . . . . . . . . . . 8
遙控器組件說明 . . . . . . . . . . . . . 8
使用觸控板遙控器 . . . . . . . . . . . . 9
啟動觸控板遙控器簡介 / 教學 . . . . . . . 9
連接電視機 . . . . . . . . . . . . . 10
將電視機安裝在牆上 . . . . . . . . . 13
SU-WL450 . . . . . . . . . . . . . . . 14
故障排除 . . . . . . . . . . . . . . 18
故障及解決方案 . . . . . . . . . . . . 18
規格 . . . . . . . . . . . . . . . . 19
簡介
感謝您購買這項 Sony 產品。
使用電視機之前,請詳閱本手冊,並保留下來以便將來參考。
註
• 使用電視機之前,請詳讀 “ 安全資訊 ”( 第 2 頁 )。
• 有關 “將電視機安裝在牆上 ” 的指令已包含在這台電視機的說明手
冊。
• 入門指南和本說明書中使用的影像和插圖僅作參考並可能與實際產
品的外觀不同。
識別標籤的位置
電視機型號和電源等級的標籤位於電視機背面。
AC 電源供應器型號和序號的標籤位於 AC 電源供應器的底部。
本電視設計在香港使用,只保證能在香港使用。
安全資訊
警告
不可將電池曝露於如陽光、火或類似的過熱源。
安裝 / 設定
為了避免火災、觸電或損壞及 / 或受傷等危險,請遵照下列指示來安
裝和使用電視機。
安裝
• 應將電視機安裝在易於插拔的 AC 電源插座附近。
• 將電視機擺在平穩的水平表面上,以防止傾倒而造成人員的傷害或
者損及電視機。
• 應將電視機安裝在不容易被拉、推或碰倒之處。
• 僅可由合格的維修人員執行掛壁安裝。
• 為了安全起見,強烈建議您使用 Sony 配件,包括 :
壁掛式支架 SU-WL450
• 將掛鉤 ( 底座 )/ 壁掛式支架安裝於電視機上時,務必要使用隨附於
壁掛式支架的螺絲。隨附螺絲如插圖所示設計從掛鉤 ( 底座 )/ 壁
掛式支架安裝表面量起。
螺絲的直徑和長度會因為壁掛式支架的型號而有所不同。
使用隨附螺絲以外的螺絲可能會造成電視機內部損壞或者掉落等
等。
CT
2
搬動
• 搬動電視機之前,請斷開所有訊號線的連接。
• 大尺寸電視機需要兩到三人搬動。
• 用手搬動電視機時,請如下圖所示抓握。請勿對液晶面板以及螢幕
周圍的框邊施加壓力。
• 搬動電視機時,請勿使其受到搖晃或過度震動。
• 搬動電視機以進行維修或移動時,請使用原有的紙箱和包裝材料進
行包裝。
Page 25
通風
30 厘米
10 厘米
10 厘米
10 厘米
在電視機周圍至少留出所示的空間。
30 厘米
10 厘米
10 厘米
在電視機周圍至少留出所示的空間。
6厘米
空氣流通被阻擋。
牆壁 牆壁
• 切勿遮擋通風孔或將任何物體插入機殼內。
• 如下圖所示,在電視機周圍保留通風空間。
• 強烈建議您使用 Sony 壁掛式支架以確保足夠的空氣流通。
安裝在牆壁上
• 若要獲得最佳的畫面品質,請勿將螢幕放在直射光源或陽光下。
• 避免將電視機從寒冷的區域移至溫熱的區域。突然的室溫變化可能
導致濕氣凝結。這可能造成電視機顯示劣質圖像及 / 或暗淡的顏
色。如果發生這種情形,讓濕氣完全蒸發之後才開啟電視機。
環境:
• 炎熱、潮濕或太多灰塵的地方;昆蟲可能進入的地方;可能受到機
械式震動的地方;靠近易燃物體 (蠟燭等)的地方。不應該讓液體
滴濕或噴濕電視機,而且裝滿液體的物體 (例如花瓶)不應該擺在
電視機上。
• 不要放置電視機在潮濕或多塵的空間,或
有油煙或蒸氣的場所 (靠近灶台或加濕
器)。這可能導致火災、觸電或本機彎
曲。
安裝在底座上
• 為了確保正確通風及防止髒物或灰塵堆積:
請勿將電視機平放、上面朝下安裝、向後安裝或側面安裝。
請勿將電視機放置於架子、地毯、床或壁櫥中。
請勿用布 (如窗簾)或物件 (如報紙等)覆蓋電視機。
請勿如下圖所示安裝電視機。
AC 電源線
為了避免火災、觸電或損壞及 / 或受傷等危險,請遵照下列指示來處
理AC電源線和插座:
將插頭完全插入 AC 電源插座。
僅可在 220-240 V AC 電源上使用電視機。
連接訊號線時,為了安全起見請務必拔下 AC 電源線,以免被訊號線
絆到腳。
在進行作業或移動電視機之前,請從 AC 電源插座上斷開AC 電源線的
連接。
保持 AC 電源線遠離熱源。
拔下 AC 電源插頭,定期進行清潔。如果插頭上有積灰並帶有濕氣,
則其絕緣品質可能已經劣化,並可能會造成火災。
註
• 請勿將隨附的交流電源線用於任何其他設備。
• 請勿過度擰捏、彎曲或扭轉 AC 電源線。否則線芯可能會曝露在外或
折斷。
• 請勿改裝 AC 電源線。
• 請勿將任何重物放在 AC 電源線上。
• 斷開 AC 電源線連接時,請勿拉扯 AC 電源線。
• 請勿在相同的 AC 電源插座上連接太多設備。
• 請勿使用不適當的 AC 電源插座。
使用限制
請勿在下列地點、環境或情況條件下安裝 / 使用電視機,否則電視機
可能會發生故障並造成火災、觸電、損壞及 / 或受傷等危險。
地點:
• 室外 (在直射的陽光中),海邊,船上或其他船艦上,車內,醫療
機構中,不穩定的場所,靠近水、雨、濕氣或煙霧的地方。
• 如果放置電視機在公共浴室或溫泉的更衣室
內,電視機可能會被空降硫磺等損壞。
• 請勿將電視機安裝在會遭受極端溫度的位置,如陽光直射、靠近散
熱器或加熱裝置通風孔的地方。電視機在這種環境下可能會過熱而
導致外殼變形及 / 或電視機故障。
情況條件:
• 手濕,機殼拆除或採用非製造商所建議的配件時切勿使用本電視
機。出現雷電時請將電視機電源線從 AC 電源插座和天線拔下。
• 不要把電視機安裝在延伸出開放的空間。
這可能導致人或物體碰撞電視機而受傷或
損壞。
打破電視機螢幕:
• 請勿將任何物品丟向電視機。否則螢幕可能會因為受到撞擊而破裂
並造成嚴重傷害。
• 如果電視機的表層破裂,在拔下 AC 電源線以前請勿觸摸它。否則可
能導致觸電。
不使用時
• 如果您不使用電視機數天,為了環保和安全原因,應將電視機電源
線從 AC 電源插座上拔下。
• 關閉電視機電源時,電視機並未與 AC 電源斷開連接,請將插頭從 AC
電源插座上拔下以完全斷開電視機的電源連接。
• 但是,某些電視機可能具有需要將電視機保持在待命模式下才能正
常工作的特點。
對於兒童
• 請勿讓兒童爬上電視機。
• 將體積小的配件放在兒童拿不到的地方,以便不會被兒童誤吞。
如果出現下列問題 …
如果出現以下任何問題,請立刻關閉電視機並拔下 AC 電源線。
請諮詢您的經銷商或 Sony 服務中心以交由合格的服務人員進行檢
查。
當:
AC 電源線損壞。
AC 電源插座不適當。
電視機由於跌落、敲擊或撞擊而損壞。
任何液體或固體物件通過開口處掉入機殼內。
關於液晶螢幕溫度
長時間使用液晶螢幕時,面板周圍溫度會升高。
用手觸摸這些地方時可能會覺得很燙。
GB
CT
CT
3
Page 26
預先注意事項
觀賞電視
• 請在適當光線條件下觀賞電視,因為在光線不足條件下或長時間觀
賞電視會損傷您的眼睛。
• 使用耳機時,請調整音量以免音量過高損傷聽力。
( 僅限 3D 兼容型號 )
• 在觀看 3D 視訊影像或打立體的 3D 電玩期間, 有些人可能會感到不
適 (如眼睛疲勞、疲累或噁心)。Sony 建議所有觀賞者在 觀看 3D
視訊影像或打立體的 3D 電玩期間要定期休息。休息的長度和頻率
因人而異。由您自行決定。若您感到任何不適,請停止觀看 3D 視
訊影像或打立體的 3D 電玩,直到不適感消失;若有必要,請就醫。
關於最新資訊,也請您參閱 (i)用於電視機的其他設備或媒體的
使用說明書,以及 (ii)我們的網站
(http://www.sony-asia.com/support)。兒童 (尤其是低於六歲
的兒童)的視力還在發育。讓兒童觀看 3D 視訊影像或打立體的 3D
電玩前,請諮詢醫師 (如小兒科醫師或眼科醫師)。成人應監督兒
童,確保他們遵守上列建議事項。
• 不要在靠近火源或高溫地方如直射陽光或太陽曬熱的汽車內使用、
貯存或留下 3D 眼鏡或電池。
LCD 螢幕
• 雖然 LCD 螢幕採用最精密技術製造且 99.99% 以上的畫素有效,但還
是可能會出現黑點或 LCD 螢幕上可能會經常出現亮點 (紅、藍或綠
色)。這是 LCD 螢幕的結構特性,並不是故障。
• 請勿按壓或刮傷前濾光面板或在電視機頂部放置物件。畫面可能會
不均, 或者 LCD 螢幕可能會損壞。
• 如果在寒冷地點使用本電視機,畫面上可能會出現模糊或變暗。這
並不是故障。溫度上升後這些現象就會消失。
• 畫面靜止不動將會產生重影。片刻後該現象將消失。
• 電視機使用過程中,螢幕和機殼會變熱。這不是故障。
• LCD 螢幕包含少量液晶。請按照您當地的法規進行廢棄物處理。
使用和清潔電視機的螢幕表層 / 機殼
清潔前,務必將電視機的 AC 電源線從 AC 電源插座上斷開連接。
為了避免物質或螢幕塗層剝離,請遵照下列預先注意事項。
• 若要擦去螢幕表層 / 機殼上的灰塵,請用軟布輕輕擦拭。如果灰塵
較難除去,請用稍稍蘸有稀釋中性清潔溶劑的軟布進行擦拭。
• 絕對不能將水或清潔劑直接噴灑在電視上。液
體可能滴落在螢幕的底部或外部零件上並滲入
電視內,而毀壞電視。
• 切勿使用任何類型的磨砂墊、鹼性 / 酸性清潔劑、擦洗粉或揮發溶
劑,如酒精、汽油、稀釋劑或殺蟲劑。使用上述材料或與橡膠或乙
烯材料長時間接觸可能會造成螢幕表層和機殼材料的損壞。
• 建議您定期使用真空吸塵清理通風口以確保通風順暢。
• 當調整電視機的角度時,請慢慢地調動以防電視機從其桌面型底座
移動或滑落。
選購設備
將產生電磁輻射的選購元件或任何其他設備遠離電視機。否則可能會
造成畫面失真及 / 或噪聲。
本機的無線功能
• 請勿在醫療設備 (心臟起搏器等等)附近操作本機,這將導致該醫
療設備故障。
• 雖然本機發送 / 接收加擾信號,請小心未經授權的截取。我們不對
此造成的任何問題負責。
注意有關處理遠程控制
• 安裝電池時請注意正確的極性位置。
• 請勿同時使用不同類型的電池或混合使用新舊電池。
• 請以符合環境保護規定的方式來丟棄電池。特定地區可能有制訂廢
棄電池的相關規定。請向您當地的主管機關查詢。
• 請小心拿取遙控器。請勿讓遙控器掉落或踩在遙控器上,或是讓任
何液體濺到遙控器。
• 請勿將遙控器放置在接近熱源的地方,放置在受日光直射地方或潮
濕的房間。
CT
4
Page 27

組件及控件
Ȫ
ȫ
Ȭ
ȭ
控件及指示燈
GB
CT
遙控器感應器*1 / 光感應器
/ 3D 同步發射機
根據電視機的狀態,光飾 LED 會亮起或閃爍。
• 白色
開啟電視機 / 關閉畫面模式 / 軟體更新等
時。
• 青色
無線連接行動裝置時。
• 琥珀色
計時器已設定。
*1*2
*1
/ 照明 LED
( 電源 )
CH +/- ( 頻道 )
+/- ( 音量 )
TV
切換至一個電視頻道或從其他應用程式輸入。
( 輸入選擇 )
顯示並選擇輸入來源。
*1
請勿在感應器附近放置任何物品。
*2
僅限 3D 兼容型號。
CT
5
Page 28
輸入及輸出
KD-65/55X8500C
KD-49/43X8300C
CT
6
Page 29
LAN
HDMI 3 AUDIO IN
如為 HDMI 3 類比音訊連接。
DIGITAL AUDIO OUT (OPTICAL)
/ VIDEO IN 1
如為複合連接*。
VIDEO IN 2, / COMPONENT IN
• 如為複合連接︰
使用 VIDEO IN,以及 / COMPONENT
IN* 的 (L/R)。
• 如為組件連接︰
使用 Y、PB、PR 及 (L/R)。
CABLE/ANTENNA
連接至連接線或天線。
(USB 1/2), (USB 3)
• 連接大型 USB 裝置可能會干擾旁邊連接的其
他裝置。
• 連接大型 USB 裝置時,請連接至 USB 1 插
孔。
HDMI IN 1/3/4
• 如果裝置擁有 DVI 插孔,請透過 DVI HDMI 轉接器接口 (無附帶)將其連接至
HDMI IN 3,並將裝置的音訊輸出插孔連接至
HDMI 3 AUDIO IN。
• 如果連接與音訊回傳信道 (ARC) 技術相容的
數位音訊系統,請使用 HDMI IN 4。否則,
必須額外連接 DIGITAL AUDIO OUT
(OPTICAL)。
AUDIO OUT /
如需透過相連設備聆聽電視聲音,請按 HOME。
選擇 [ 設定 ] [聲音] [ 耳機 / 音訊輸
出 ],並選擇所需的項目。
HDMI IN 2/MHL
您可以使用高畫質 MHL 連接線連接 MHL (行
動高畫質連接技術)裝置。
*
連接單聲道設備時,請連接至 L (MONO) 音訊插孔。
GB
CT
CT
7
Page 30
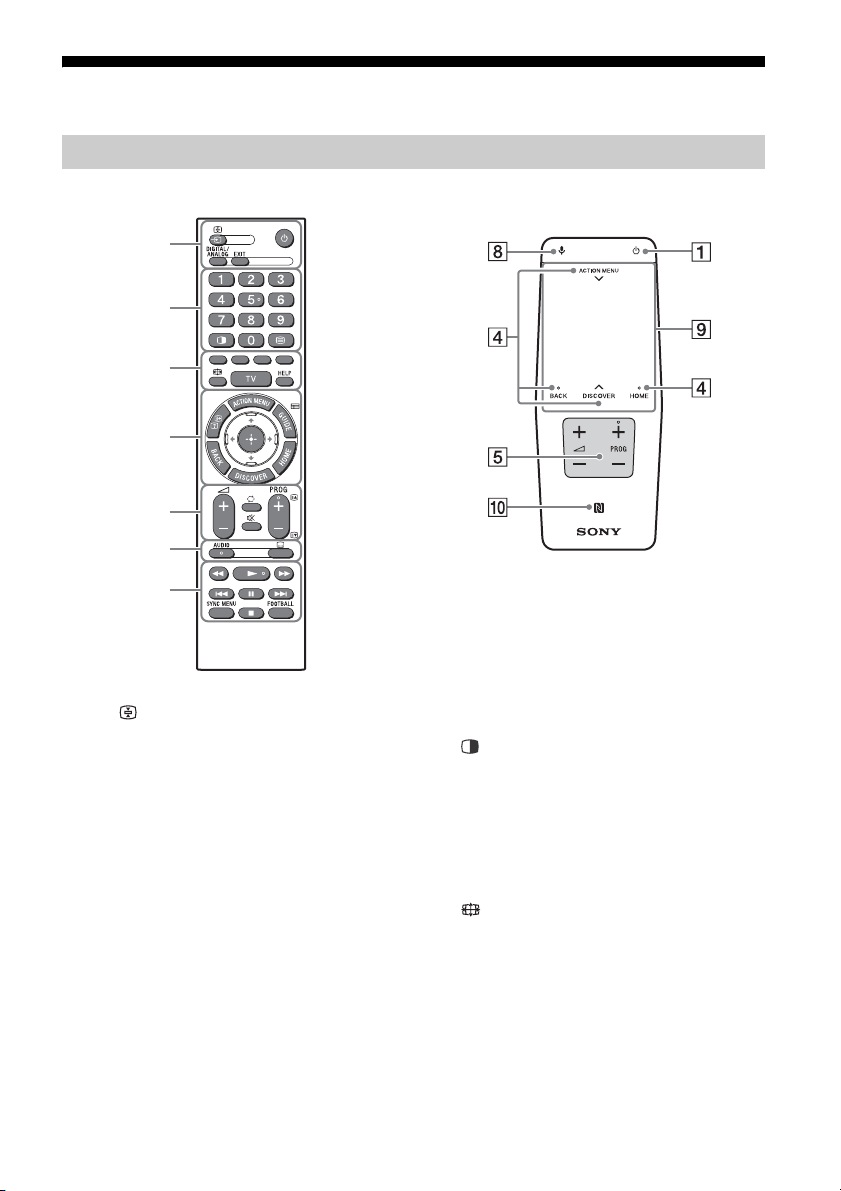
使用遙控器
IR (紅外)遙控器
Ȫ
ȩ
ȫ
Ȭ
ȭ
Ȯ
ȯ
觸控板遙控器
適用於隨附觸控板遙控器的型號。
遙控器組件說明
/ (輸入選擇/文字保留)
電視模式︰顯示並選擇輸入來源。
文字模式︰保留當前頁面。
( 電視待機 )
開啟或關閉電視機 (待機模式)。
DIGITAL/ANALOG
在數位及類比模式之間切換。
EXIT
返回至上一個畫面,或從選單退出。如果交互
式應用服務可供使用,按下即可退出服務。
CT
8
數字按鈕
( 雙重畫面 /PIP)
同時顯示兩個畫面。
( 文字 )
顯示文字資訊。
顏色按鈕
屆時執行相應的功能。
( 寬螢幕模式 )
變更螢幕格式。
TV
切換至一個電視頻道或從其他應用程式輸入。
HELP
顯示說明選單。
*1*2
Page 31

ACTION MENU
顯示情境功能清單。
您也可以透過在觸控板遙控器的 ACTION MENU
上向下滑動手指以顯示。
/ ( 顯現資訊 / 文字 )
顯示資訊。
GUIDE/
顯示數位節目指南。
*1
BACK
返回上一個畫面。
HOME
顯示電視主選單。
DISCOVER
調出內容列,搜尋內容。
您也可以透過在觸控板遙控器的 DISCOVER 上
向上滑動手指以啟動內容列。
//// ( 項目選擇 / 輸入 )
+/– ( 音量 )
調節音量。
( 跳轉 )
在兩個頻道或兩次輸入之間前後跳轉。電視在
當前頻道 / 輸入以及選擇的上一個頻道 / 輸入
之間交替切換。
( 靜音 )
將聲音消除。再次按下可恢復聲音。
PROG +/–//
電視模式︰選擇頻道。
文字模式︰選擇下一個 () 或上一個 ()
頁面。
AUDIO
變更目前觀看之節目的語言。
( 字幕設定 )
開啟或關閉字幕 (此功能可用時)。
//////
在電視機及相連的 BRAVIA Sync 相容裝置上操
作媒體內容。
SYNC MENU
顯示 BRAVIA 同步選單。
FOOTBALL
開啟或關閉實況足球模式 (此功能可用時)。
( 麥克風 )
使用語音功能。(例如,透過語音搜尋各種內
容。)
觸控板
使用觸控板操縱電視機。
(NFC)
輕觸設備 (如某些 Xperia 型號產品)的觸控
鏡射功能,其屏幕將顯示在電視機上。
*1
遙控器按鈕的位置、可用性與功能視您的國家 / 區域 /
電視機型號而可能略有不同。
*2
雙重畫面功能自 2015 年 7 月起提供。您將透過軟件
網絡升級自動接收雙重畫面功能。確保電視機已連接至
互聯網。如果連接網絡,您可以使用 PC 從 Sony 支援
網站下載軟件。關於如何升級的詳細資料,請瀏覽
Sony 支援網站。
使用觸控板遙控器
觸控板遙控器僅在與電視機配對後方可使用。
遵照以下配對屏幕說明進行配對。
按下 按鈕顯示配對屏幕 ( 該按鈕位於電視機
上,且需長按 5 秒),或選擇 [ 設定 ] - [ 觸控板
遙控器設定 ] - [ 配對觸控板遙控器 ]。
啟動觸控板遙控器簡介 / 教學
1 按下 HOME (首頁)鍵。
GB
CT
2 選擇 [設定 ] - [觸控板遙控器設定 ] - [開
始學習介紹 / 教學課程 ]。
9
CT
Page 32
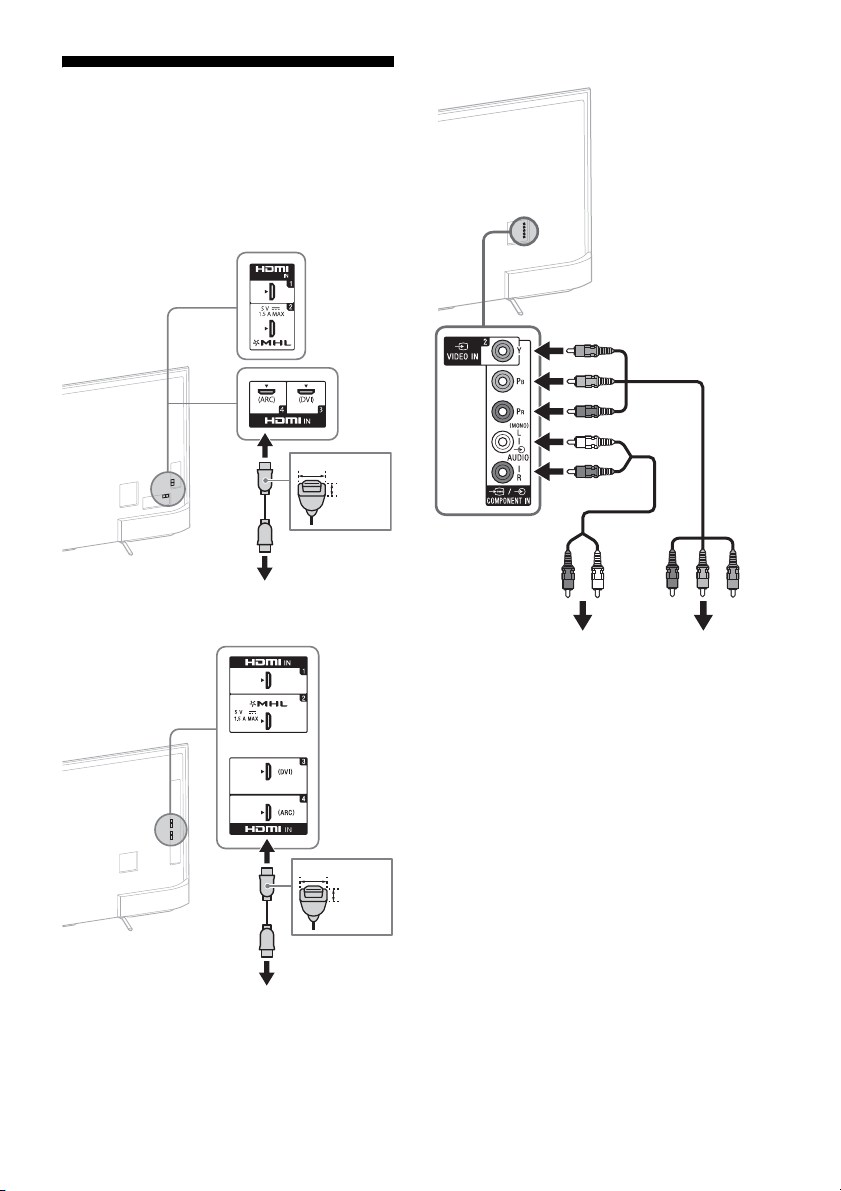
連接電視機
至 HDMI OUT
< 21 毫米
< 12 毫米
至 HDMI OUT
< 21 毫米
< 12 毫米
至 AUDIO OUT 至 COMPONENT OUT
(P
R/PB/Y)
註
• 要選擇已與電視機連線的輸入設備,請按 。
• 將連接線連接至連接線 / 天線,僅用手緊固,連接過緊可
能會損壞電視機。
以 HDMI 連接線連接
KD-65/55X8500C
KD-49/43X8300C
以色差纜線連接
CT
10
Page 33
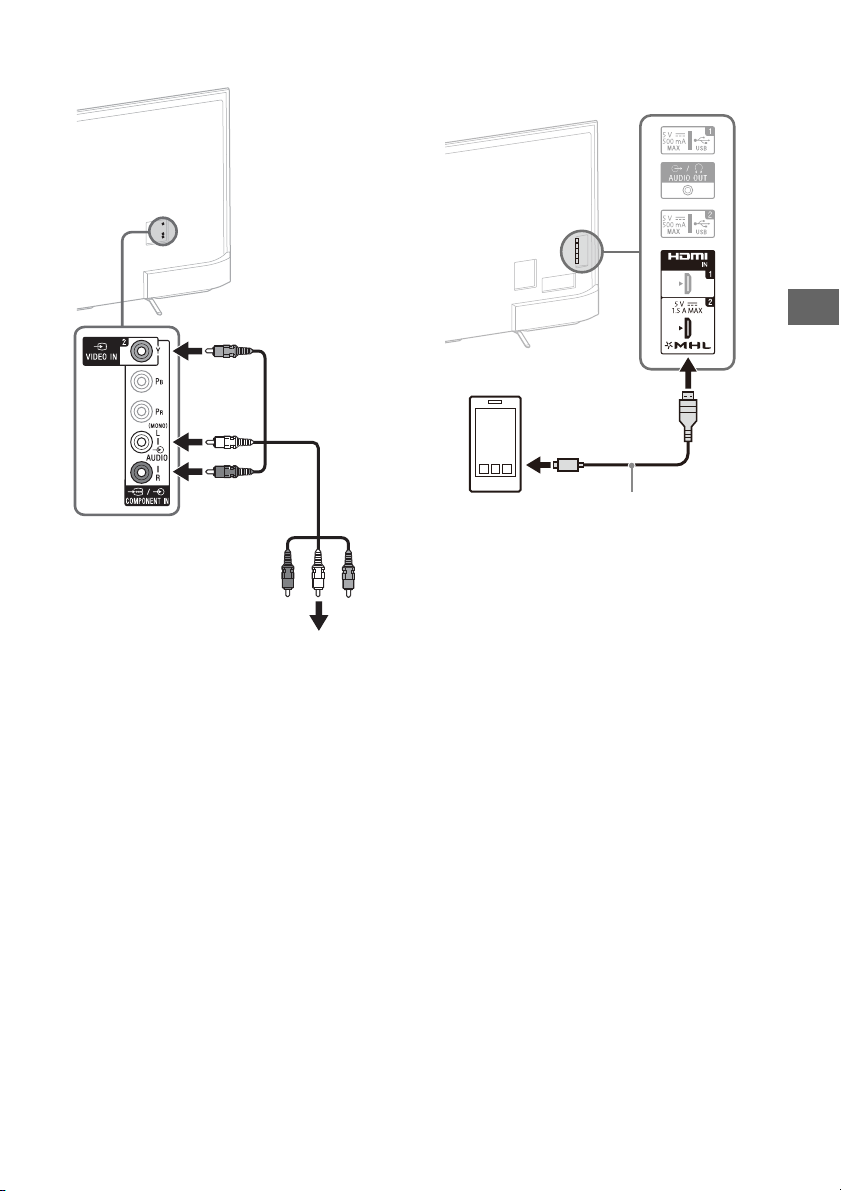
連接 AV 複合電纜 連結 MHL 設備
連接視訊輸出
使用帶有 MHL 標誌的
已授權 MHL 纜線 (未
附帶)
MHL 設備
KD-65/55X8500C
GB
CT
CT
11
Page 34
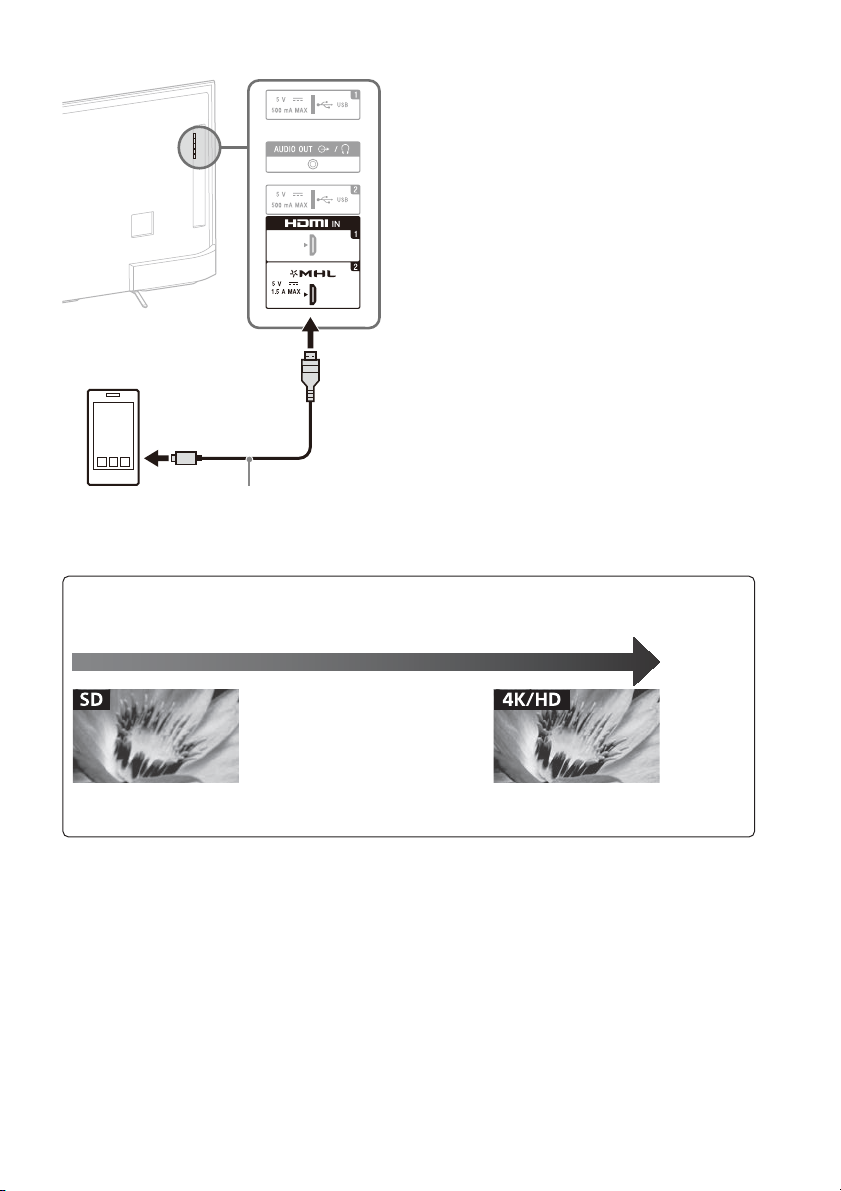
KD-49/43X8300C 電視機在播放照片 / 音樂 / 視訊檔案的同時可對連
使用帶有 MHL 標誌的
已授權 MHL 纜線 (未
附帶)
MHL 設備
圖像品質
• AV 複合訊號線
• 天線的連接訊號線
標準清晰度 (SD)視訊圖像信號的垂直解析度為 480 (NTSC)
或 576 (PAL/SECAM)條線。
• 色差訊號線 • HDMI 訊號線
高清晰度 (HD)視訊圖像信號的垂直解析度為 720
或1080條線。
(對於 4K 垂直解析度:2160 行)
線的 MHL- 兼容設備進行充電。您可以使用電視機
遙控器控制已連線的 MHL- 兼容設備。
註
• 當 [在待機狀態下為 MHL 充電] 設定為 [開]時,即使電視機已進入
待機模式,您也可以繼續為該 MHL- 兼容設備充電。
• 連線 4K 智能電話或行動設備應使用獲得授權並帶有 MHL 標誌的
MHL 3 線。
CT
12
Page 35
將電視機安裝在牆上
本電視機的使用說明書僅顯示安裝至牆壁之前的電視機安裝準備工作。
致客戶 :
出於產品保護及安全原因,Sony 強烈建議由 Sony 經銷商或授權的承包商安裝電視機。 請勿嘗試自
行安裝電視機。
致 Sony 經銷商和承包商 :
安裝、定期維護及檢查本產品時,請充分注意安全。
安裝本產品須具備充足的專業知識,確定牆壁是否能夠承受電視重量時尤為如此。務必委託 Sony
經銷商或授權的承包商將本產品安裝至牆壁上,並在安裝期間充分注意安全。對於因錯誤操作或
安裝不當引致的任何損害,Sony 概不負責。
使用壁掛式支架 SU-WL450 (無附帶)將電視機安裝至牆壁上。
安裝壁掛式支架時,亦請參閱壁掛式支架附帶的使用說明書及安裝指南。
註
• 務必將取下的螺絲存放在兒童接觸不到的安全位置。
變更連接線管理 (KD-55X8500C, KD-49/43X8300C)
GB
CT
CT
13
Page 36
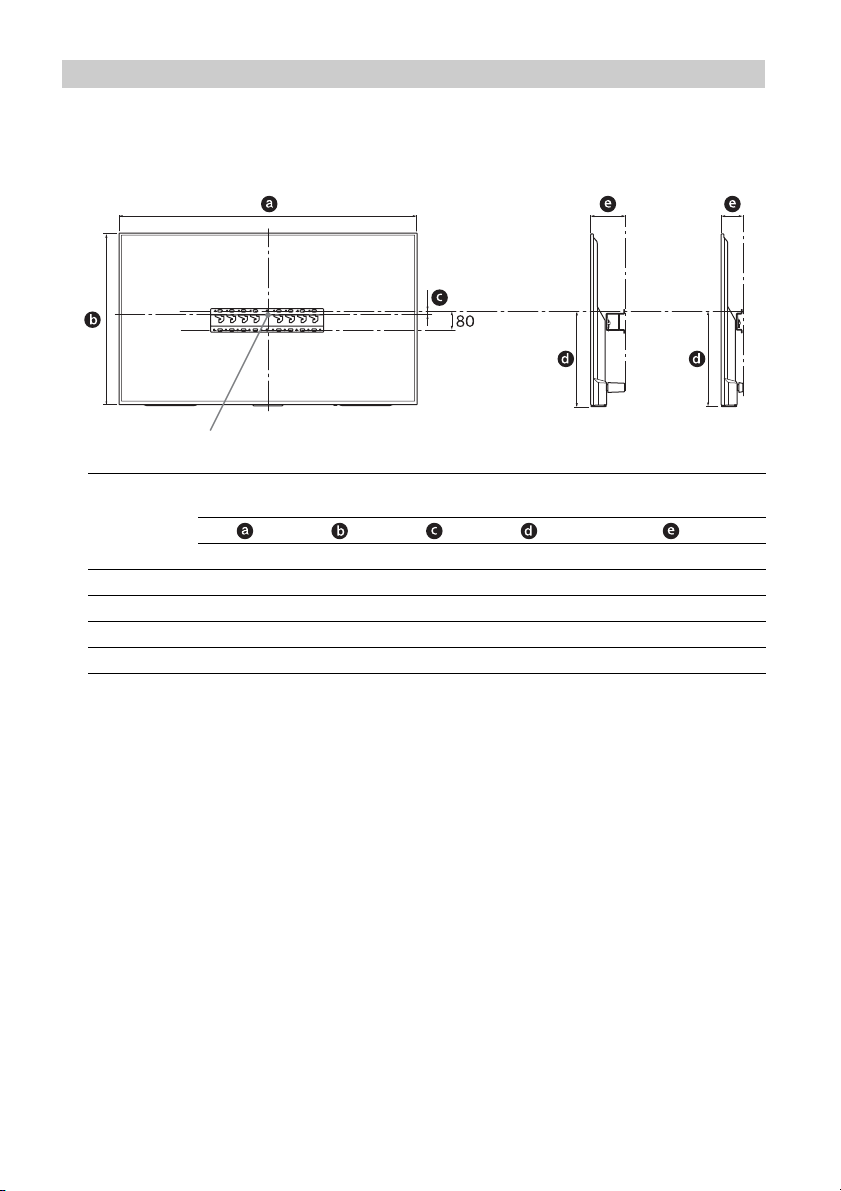
SU-WL450
螢幕中心點
標準安裝
簡易安裝
1 確保牆壁有足夠空間以及能支撐至少電視機四倍的重量。
請參閱以下列表有關在牆上安裝電視 機。請參閲第 19-20 頁 (規格)有關電視機的重量。
型號名稱
KD-
65X8500C 1453 844 21 450 133 91
55X8500C 1236 722 116 485 115 73
49X8300C 1093 643 206 536 107 65
43X8300C 961 568 191 483 107 65
註
• 製表內的數字視安裝而可能略有不同。
• 將電視機安裝至牆壁上後,電視機的上側略微前傾。
顯示幕
螢幕中心
尺寸
安裝的長度
標準安裝 簡易安裝
單元 : 毫米
14
CT
Page 37
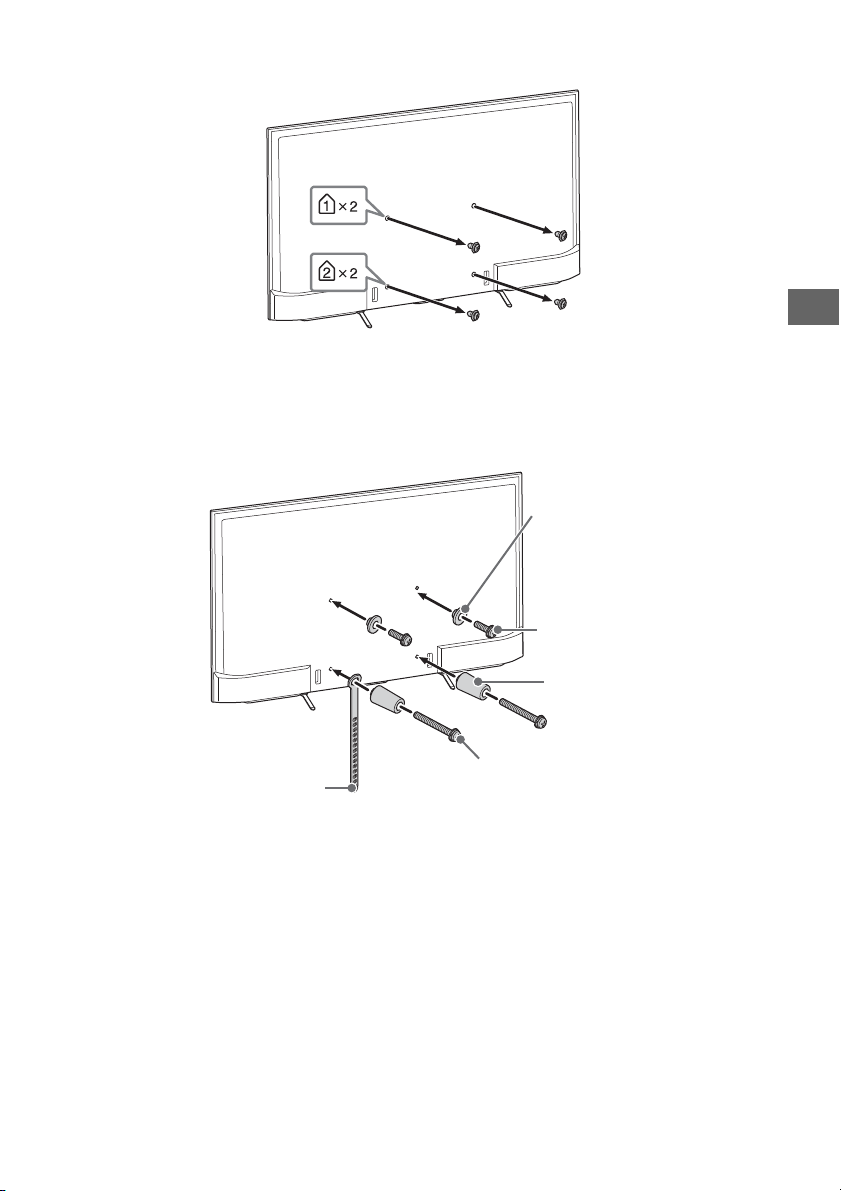
2 將電視機安裝到牆壁上時,請先取下電視機北面的螺絲 (KD-65X8500C)。
螺絲 (+PSW 6 x 20)
滑輪
螺絲 (+PSW 6 x 50)
皮帶
墊片 (60 毫米 )
3 安裝壁掛式支架的附件組件。參閱壁掛式支架安裝指南之 「1」,檢查附件組件。
註
• 使用電動螺絲刀時,請將扭力設定為約 1.5 N·m {15 kgf·cm}。
• 務必將未使用的組件存放於安全位置,以備日後使用。保管好本說明書,以供日後參考。
標準安裝
GB
CT
CT
15
Page 38
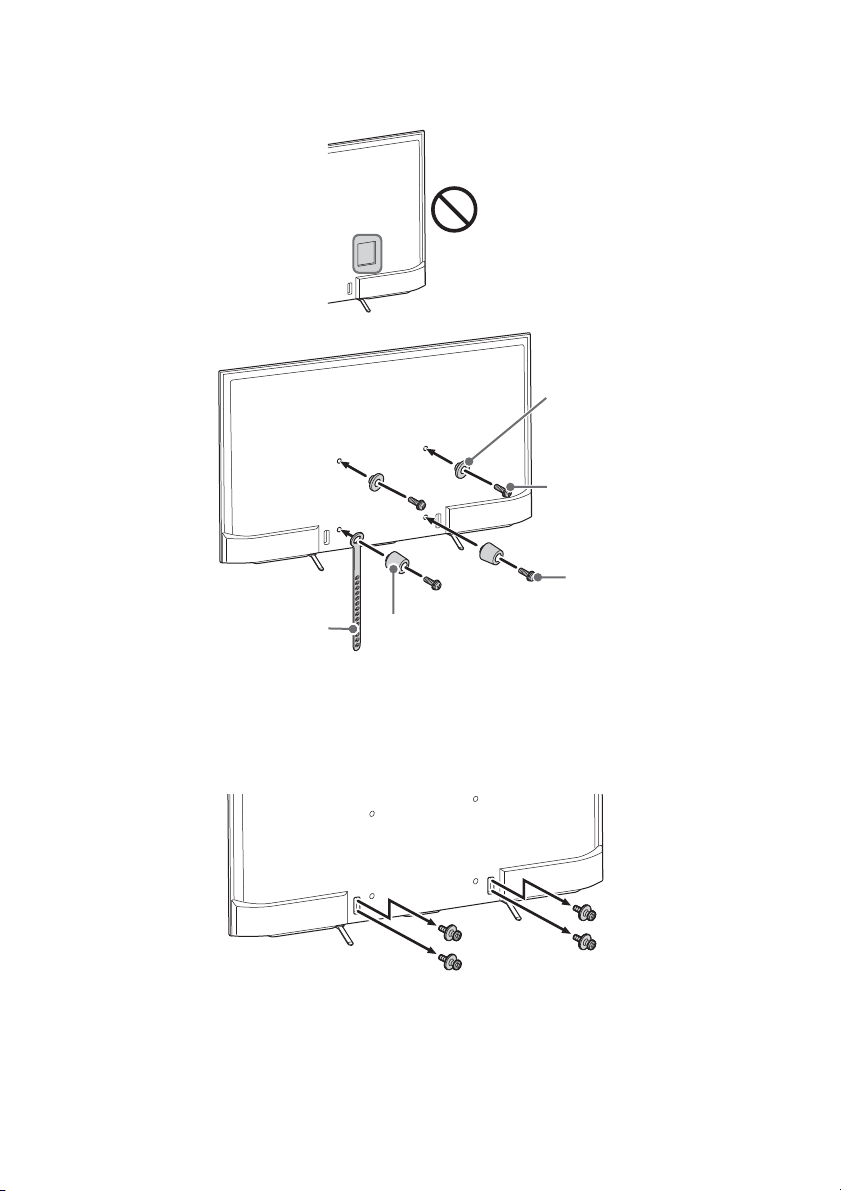
簡易安裝
螺絲 (+PSW 6 x 20)
滑輪
螺絲 (+PSW 6 x 20)
皮帶
墊片 (20 毫米 )
註
• 選用此安裝樣式,則無法使用電視機後面的某些端子。
4 將必要的連接線連接至電視機。
註
• 將電視機安裝至牆壁後,無法存取任何端子。
5 從電視機拆卸桌面底座。
CT
16
Page 39
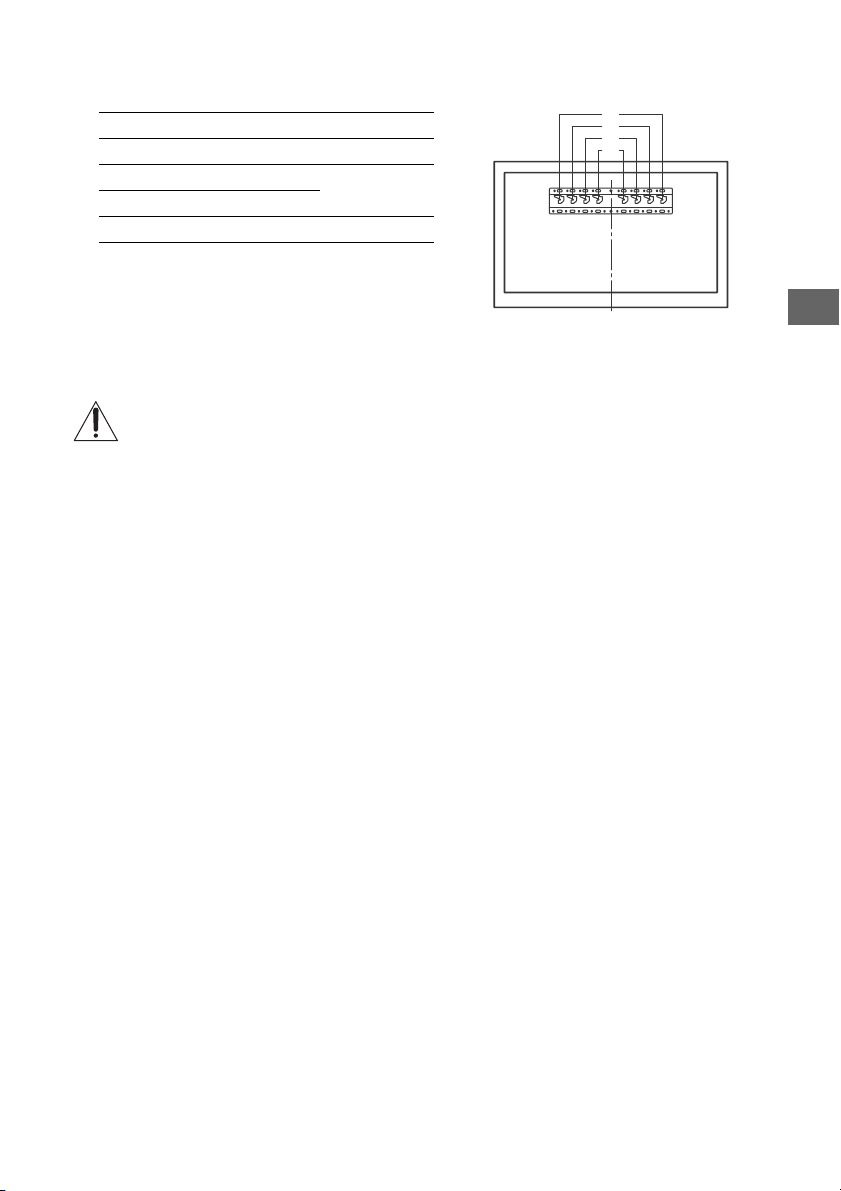
6 將電視機安裝至底座。請參閱壁掛式支架附帶的安裝指南之 「5」以及使用說明書之 「將電視機
a
b
c
d
安裝至牆壁」。
型號名稱 KD- 掛鉤位置
65X8500C a
55X8500C
49X8300C
43X8300C c
請參閱您所擁有機型之壁掛式支架附帶的說明書,將電視機安裝至牆壁。
b
GB
CT
CT
17
Page 40

故障排除
電視機背面
為了即時更新您的電視軟體,須透過數位廣播系統
或網路下載最新軟體資訊,從而更新軟體。選擇
[ 立即更新 ] 啟動產品更新。軟體更新時,照明
LED 閃白燈。軟體更新期間,請勿拔出交流電源
線。否則,軟體更新不會徹底完成,並且可能引致
軟體故障。軟體更新可能持續長達 30 分鐘。如果
您不想自動更新軟體,請按 HOME 並選擇
[說明] [ 系統軟體更新 ]
[ 軟體自動下載 ] [ 關 ]。
拔出電視機插頭並再次插入時,即使按遙控器或電
視機上的電源按鈕,電視機也可能無法開啟,因為
啟動系統需要時間。等待約 10 至 20 秒,然後重
新操作。
當照明 LED 閃紅燈時,計算閃爍次數 (間隔時間
為三秒)。
若光飾 LED 閃爍紅色,斷開 AC 電源線兩分鐘,
然後再開啟電視機,以此來重設電視機。
如果問題仍然存在,請聯繫您的經銷商或 Sony 服
務中心並告知照明 LED 閃紅燈的次數 (間隔時間
為三秒)。拔掉 AC 電源線,然後告訴您的經銷商
或 Sony 服務中心。
當照明 LED 沒有閃爍,檢查以下列表中的項目。
您也可參閱說明指南 中的 [ 故障排除 ]或通過選擇
[說明] [ 自行診斷 ] 以進行自行診斷。如果問
題仍然存在,請將您的電視機交給合格的維修人員
修理。
故障及解決方案
沒有畫面 (螢幕是黑的)也沒有聲音。
檢查天線 / 訊號線連接。
將電視機連接至 AC 電源,然後按電視機或遙控器上
的 。
無法調諧某些節目。
檢查天線 / 訊號線連接。
遙控器無效。
更換電池。
忘記 [ 親子鎖碼 ] 密碼。
PIN 碼輸入 9999。(PIN 碼 9999 總是可以接受。)
電視機周圍溫度升高。
當長時間使用電視機時,電視機周圍溫度會升高。
用手觸摸這些地方時可能會覺得很燙。
停頓音訊或視訊、空白螢幕或電視機對電視或遙控
器按鈕沒有反應。
拔下 AC 電源線兩分鐘之後再次連接以進行簡單的電
視機重設。
在電視機上找不到 , CH+/–, +/–,
和 TV 按鈕。
請參閲下圖有關電視機上按鈕的位置。
照明 LED 開啓。
如果您不要發光 LED 亮起,您可將之關閉。
按 HOME,然後選擇 [ 設定 ] t
[ 照明 LED] t [關]。
無法以 WPS 連接無線路由器 (Wi-Fi Protected
Setup)。
如果您使用WEP安全加密,選擇 [簡易] t [Wi-Fi]
t [ 依掃描清單連接 ]。然後,選擇您要連接的網絡
名稱 (SSID)。
無法在網絡設定中找到所需的網絡名稱。
選擇 [[ 手動輸入 ]] 和按 以輸入網絡名稱。
18
CT
Page 41
規格
系統
面板系統
LCD (液晶顯示)面板 , LED 背光源
電視系統
類比:B/G, I, D/K, M
數位:DTMB
彩色 / 視訊系統
類比:PAL, SECAM, NTSC3.58, NTSC4.43
數位:參閲說明指南
頻道涵蓋範圍
類比:UHF/VHF/ 訊號線
數位:UHF
聲音輸出
10 瓦 + 10 瓦
無線技術
IEEE802.11ac/a/b/g/n 協議
藍牙版本 4.1
輸入 / 輸出插孔
天線 / 訊號線
VHF/UHF 的 75 歐姆外接端子
/ VIDEO IN 1
視訊 / 音訊輸入 (phono 插孔)
/ COMPONENT IN
YPBPR ( 色差視頻 ):1080p (50, 60 Hz), 1080i
(50, 60 Hz), 720p (50, 60 Hz), 576p, 576i,
480p, 480i
音訊輸入 (phono 插孔)
VIDEO IN 2
視訊輸入 ( 備有 Y 輸入的常見 phono 針 )
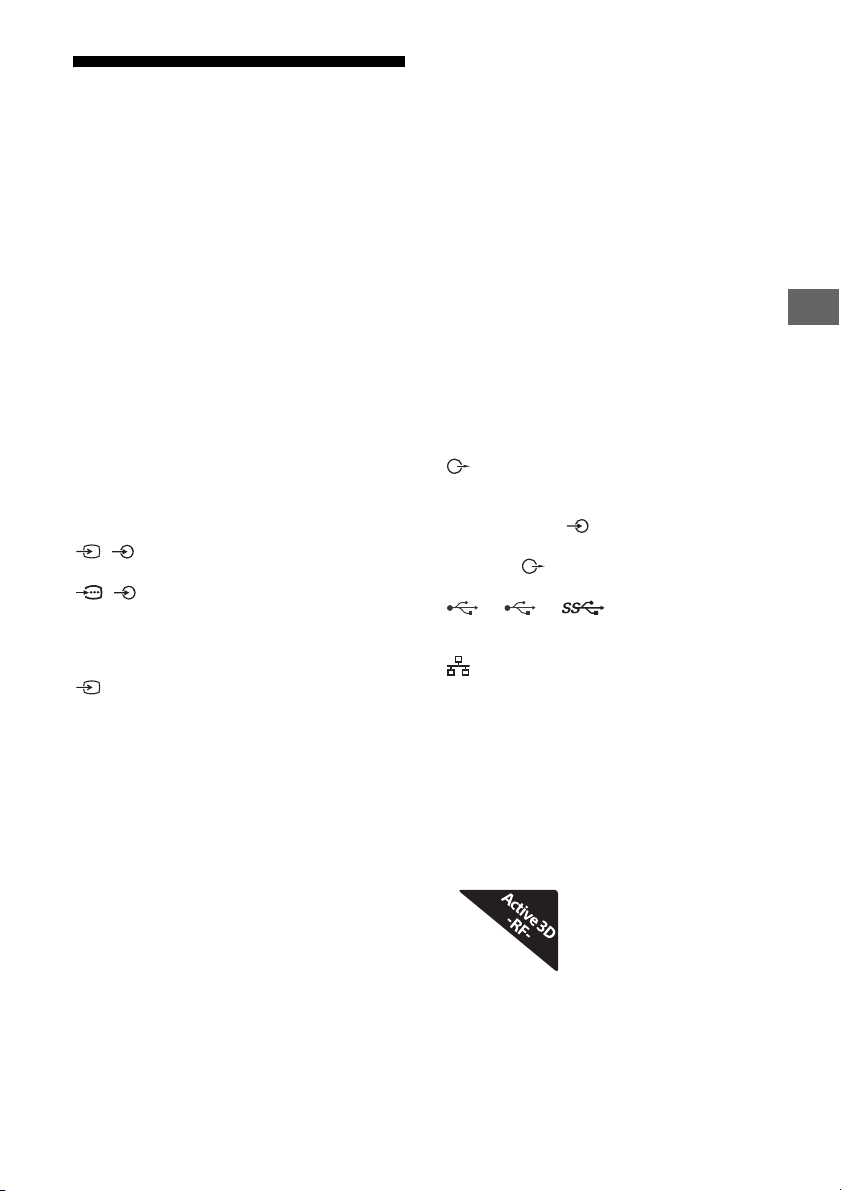
HDMI IN 1, 2, 3, 4 ( 支援 4K 解析度 )
視訊 (2D):
4096 × 2160p (50, 60 Hz)
2160p (24 Hz)
3840 × 2160p (24, 25, 30 Hz), 1080p (30, 50,
60 Hz), 1080/24p, 1080i (50, 60 Hz), 720p
(30, 50, 60 Hz), 720/24p, 576p, 576i, 480p,
480i, PC 格式
*1
僅限 YCbCr 4:2:0 / 8bit
*2
當輸入為 4096 × 2160p 時,顯示效果為 3840 ×
2160p
視訊 (3D)( 僅限 3D 兼容型號 ):
幀封裝:1080p (30 Hz), 1080/24p, 1080i (50,
60 Hz), 720p (30, 50, 60 Hz), 720/24p
並排:1080p (50, 60 Hz), 1080/24p,
1080i (50, 60 Hz), 720p (50, 60 Hz)
上下格式:1080p (30, 50, 60 Hz), 1080/24p,
1080i (50, 60 Hz), 720p (50, 60 Hz)
*2
, 3840 × 2160p (50, 60 Hz)*1,
*1*2
, 4096 ×
音訊:5.1 聲道線性 PCM:32,44.1, 48, 88.2,
96, 176.4 和 192 kHz, 16, 20 和 24 bits, Dolby
Digital 和 DTS
ARC (音頻回傳信道)(僅限 HDMI IN 4)
MHL ( 與 HDMI IN 2 共用 )
視訊 (2D):
4096 × 2160p (24 Hz)
25, 30 Hz), 1080p (30, 50, 60 Hz), 1080/24p,
1080i (50, 60 Hz), 720p (30, 50, 60 Hz),
720/24p, 576p, 576i, 480p, 480i
*
當輸入為 4096 × 2160p 時,顯示效果為 3840 ×
2160p
視訊 (3D)( 僅限 3D 兼容型號 ):
幀封裝:1080p (30 Hz), 1080/24p, 1080i (50,
60 Hz), 720p (30, 50, 60 Hz), 720/24p
並排:1080/24p, 1080i (50, 60 Hz),
720p (50, 60 Hz)
上下格式:1080p (30 Hz), 1080/24p,
1080i (50, 60 Hz), 720p (50, 60 Hz)
音訊:5.1 聲道線性 PCM:32, 44.1, 48, 88.2,
96, 176.4 和 192 kHz, 16, 20 和 24 bits, Dolby
Digital 和 DTS
*
, 3840 × 2160p (24,
DIGITAL AUDIO OUT (OPTICAL)
數位光纖插孔(兩聲道線性 PCM,Dolby Digital 和
DTS)
HDMI 3 AUDIO IN
類比音訊輸入 (立體聲迷你插孔)
AUDIO OUT / (立體聲迷你插孔)
耳機、音訊輸出、超低音揚聲器
1, 2, 3
USB 連接埠 1 和 2 支援高速 USB (USB2.0)
USB 連接埠 3 支援超快速 USB (USB3.0)
LAN
10BASE-T/100BASE-TX 接頭 (視網絡的作業環境而
定,連線速度可能不同。不保證本電視的 10BASE-T/
100BASE-TX 通訊率和通訊品質。)
其他
選用的配件
觸控板遙控器:RMF-TX100E (KD-49/43X8300C)
壁掛式支架 : SU-WL450
無線重低音揚聲器:SWF-BR100
MHL 訊號線:DLC-MC10, DLC-MC20
主動式 3D 眼鏡:TDG-BT500A ( 僅限 3D 兼容型號 )
作業溫度
0 ºC – 40 ºC
操作濕度
10 % - 80 % 相對濕度 (非冷凝)
GB
CT
CT
19
Page 42
電源和其他規格
電源需求
220 V – 240 V AC, 50 Hz
螢幕尺寸 (對角測量) ( 大約 )
KD-65X8500C: 65 英寸 / 163.9 厘米
KD-55X8500C: 55 英寸 / 138.8 厘米
KD-49X8300C: 49 英寸 / 123.2 厘米
KD-43X8300C: 43 英寸 / 108.0 厘米
顯示解析度
3840 點 ( 水平 ) × 2160 條線 (垂直)
耗電量
見電視機背面
輸出率
USB 1/2:5 V,500 mA 最大值
USB 3:5 V,900 mA 最大值
MHL (HDMI IN 2):5 V,1.5 A 最大值
尺寸 (大約)(寬 × 高 × 深)
包含桌面底座
KD-65X8500C: 1453 × 892 × 265 毫米
KD-55X8500C: 1236 × 759 × 222 毫米
KD-49X8300C: 1093 × 679 × 201 毫米
KD-43X8300C: 961 × 604 × 189 毫米
不含桌面底座
KD-65X8500C: 1453 × 844 × 78 毫米
KD-55X8500C: 1236 × 722 × 60 毫米
KD-49X8300C: 1093 × 643 × 60 毫米
KD-43X8300C: 961 × 568 × 60 毫米
質量 (大約)
包含桌面底座
KD-65X8500C: 25.5 千克
KD-55X8500C: 21.0 千克
KD-49X8300C: 15.4 千克
KD-43X8300C: 12.8 千克
不含桌面底座
KD-65X8500C: 24.1 千克
KD-55X8500C: 19.9 千克
KD-49X8300C: 14.4 千克
KD-43X8300C: 11.8 千克
註
• 選購配件的供應視國家 / 區域 / 電視機型號 / 存貨而定。
• 設計與規格可能變更而不事先通知。
• 本電視機採用 MHL 3。
• Gracenote、Gracenote eyeQ、Gracenote
VideoID、Gracenote Video Explore、
Gracenote 標誌和標誌字型以及 “Powered
by Gracenote” 標誌是 Gracenote 在美國和
/ 或其他國家的註冊商標或商標。
• Opera® Devices SDK from Opera Software
ASA. Copyright 1995-2014 Opera Software
ASA. All rights reserved。
• Wi-Fi,Wi-Fi Direct, Miracast 和
Protected Setup) 是 Wi-Fi Alliance 的商標
(Wi-Fi
或註冊商標。
• MHL、Mobile High-Definition Link 和 MHL
標誌是 MHL Licensing,LLC 的商標或注冊
商標。
• 有關 DTS 專利,請參閱
http://patents.dts.com。
由 DTS, Inc. 授權製造。
DTS、其標誌、& DTS 連同其標誌是註冊商
標,而 DTS Digital Surround 是 DTS, Inc.
的商標 © DTS, Inc.。
• Designed with UEI Technology
TM
Under
License from Universal Electronics Inc.
Portions © UEI 2000 - 2014
• Bluetooth® 字標和標誌乃 Bluetooth SIG,
Inc. 所有,Sony Corporation 在授權下使
用這些標記。其他的商標和商品名稱屬於其
各自的所有者。
• 2015 RealNetworks, Inc. 專利申請中。版
權所有。RealNetworks 標誌是
RealNetworks, Inc. 的商標。
• TUXERA 是 Tuxera Inc. 在美國及其他國家 /
地區的註冊商標。
• USB-IF 超快速 USB 是 Forum, Inc 公司的註
冊商標
商標資訊
• HDMI 和 HDMI High-Definition Multimedia
Interface 專用名詞以及 HDMI 標誌是 HDMI
Licensing LLC 在美國和其他國家的商標或註
冊商標。
• 本產品經過杜比實驗室的授權而製造。
Dolby 和雙 D 記號是杜比實驗室的註冊商標。
• “BRAVIA” 和 是 Sony
Corporation 的商標。
CT
20
Page 43

適用於隨附觸控板遙控器的型號 :
• N 標誌是 NFC Forum, Inc. 公司在美國和其
他國家的商標或註冊商標。
GB
CT
CT
21
Page 44
Customer Support and Contact:
用戶支援和聯絡:
©2015 Sony Corporation Printed in Japan 4-562-184-11(1)
 Loading...