

Page 1
Television
Reference Guide
4-748-702-11(1)
KD-65A9G / 55A9G
Page 2
Note
To a t ta ch t he Ta ble -Top
Stand, refer to the Setup
Guid
e.
Table of Contents
Safety Information . . . . . . . . . . . . . . . . . . . . . 2
Protecting the TV Screen (OLED TV) . . . . . . . 4
Parts and Controls . . . . . . . . . . . . . . . . . . . 5
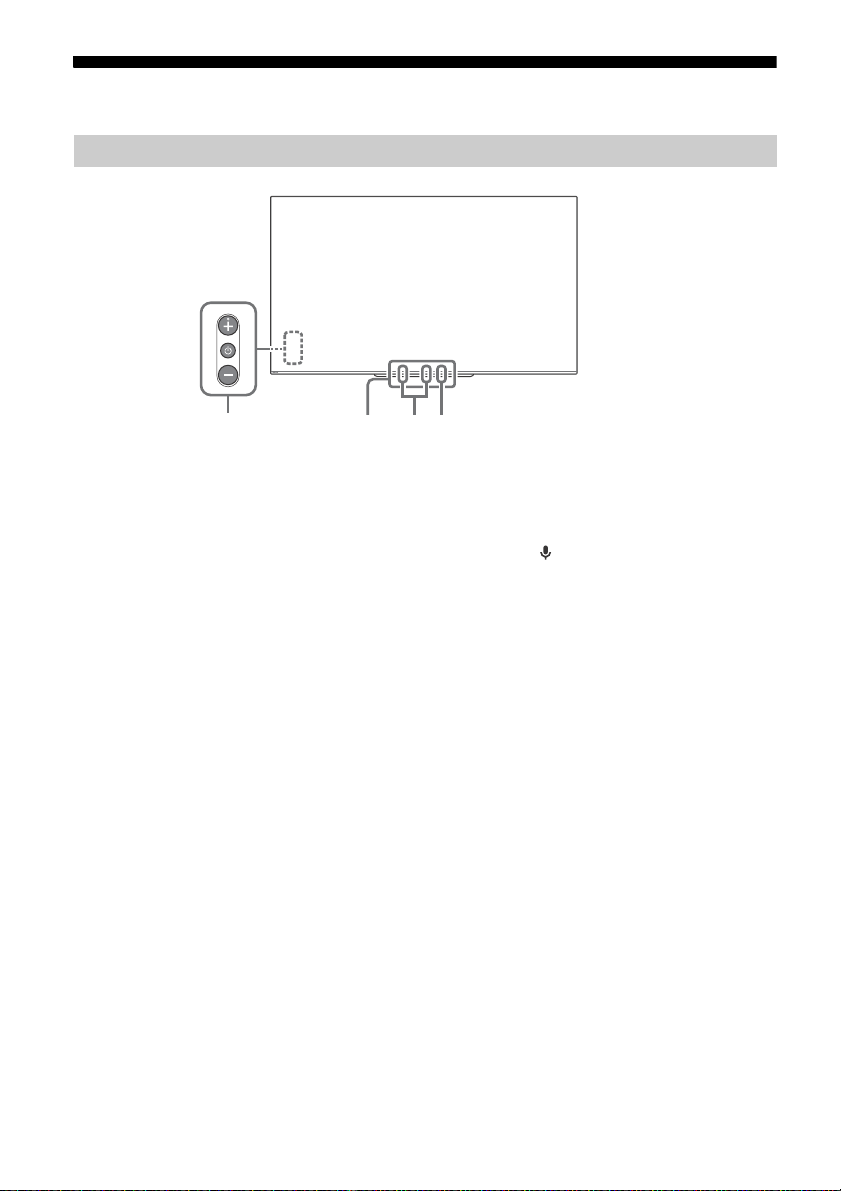
Controls and Indicators . . . . . . . . . . . . . . . . . 5
Using Remote Control . . . . . . . . . . . . . . . . 6
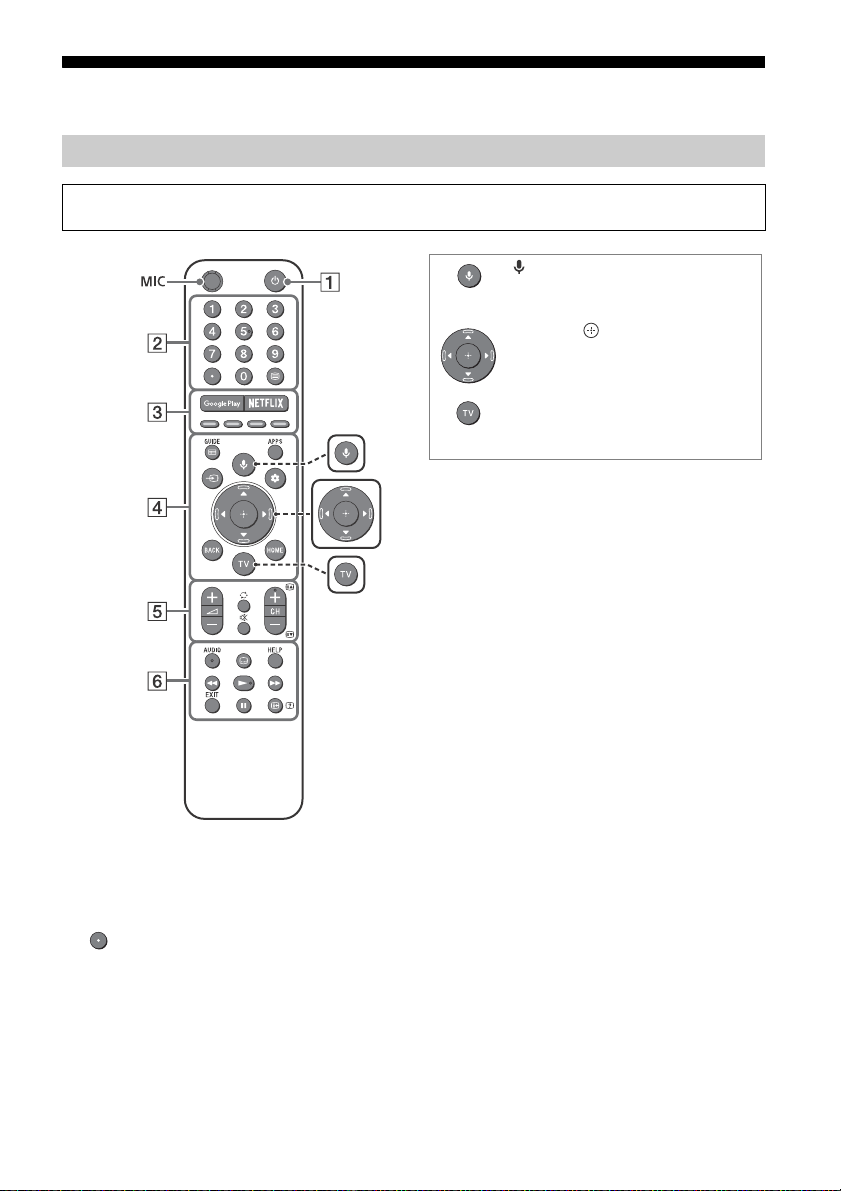
Remote Control Parts Description. . . . . . . . . 6
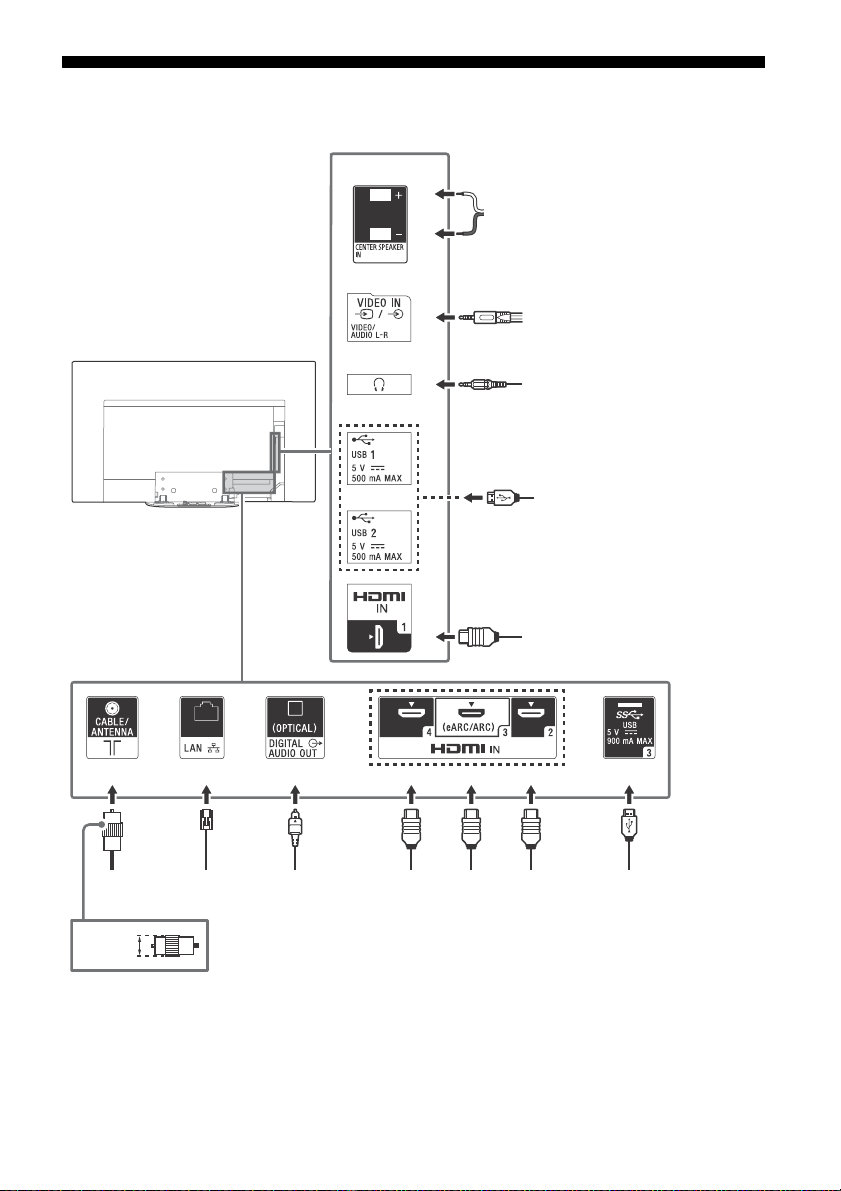
Connection Diagram . . . . . . . . . . . . . . . . . 8
Installing the TV to the Wall . . . . . . . . . . 10
Using the optional Wall-Mount Bracket . . . 10
Troubleshooting . . . . . . . . . . . . . . . . . . . . 12
Troubles and Solutions. . . . . . . . . . . . . . . . . 12
Specifications . . . . . . . . . . . . . . . . . . . . . . 13
Introduction
Thank you for choosi ng this Sony product.
Before operating the TV, please read this manual thoroughly and
retain it for fu ture ref erence.
• Before operating the TV, please read the “Safety Information”
(page
2).
• Read the sup plied Safety Information for additional safety
information.
• Instructio ns about “Installing the TV to the Wall” are included
within this TV’s instruction manual.
• Imag es and illust rations used in t he Setup Guid e and this
manual are for reference only and may differ from the actual
product.
Help
Find more troubleshooting and other useful information
directly from your TV. Press HELP on the remote control to
display a list of top ics, or to search by keyword.
Help Guide (Manual)
For more detailed information, select [He lp Guide] from the
Hel p men u on yo ur TV. You c an al so che ck the Help G uide from
your PC or smartphone (information provided on the back
cover of this manual).
Location of the identification label
Labels for the TV Model No. and Power Supply rating are located
on the rear of the TV. They can be found by removing the stand
cover .
Safety Information
Installation/Set-up
Install and use the TV s et in accordance with the instructio ns
below in order to avoid any risk of fire, electric shock or damage
and/or in juries.
Installation
• The TV se t should be insta lled near an easily accessible AC
power outlet (mains socket).
• Place the TV set o n a stable, level surface to prev ent it from
falling over an d causing personal inju ry or property damage.
• Install the TV where it cannot be pulled, pushed, or knocked
ove
r.
• Insta ll the TV so that the TV’s Table-Top Stand does not protrude
out from the TV stand (not supplied). If the TV’s Table-Top Stand
protrudes out from the TV stand, it may cause TV set to top ple
over, fall down, and cause personal injury or damage to the TV.
GB
2
Page 3
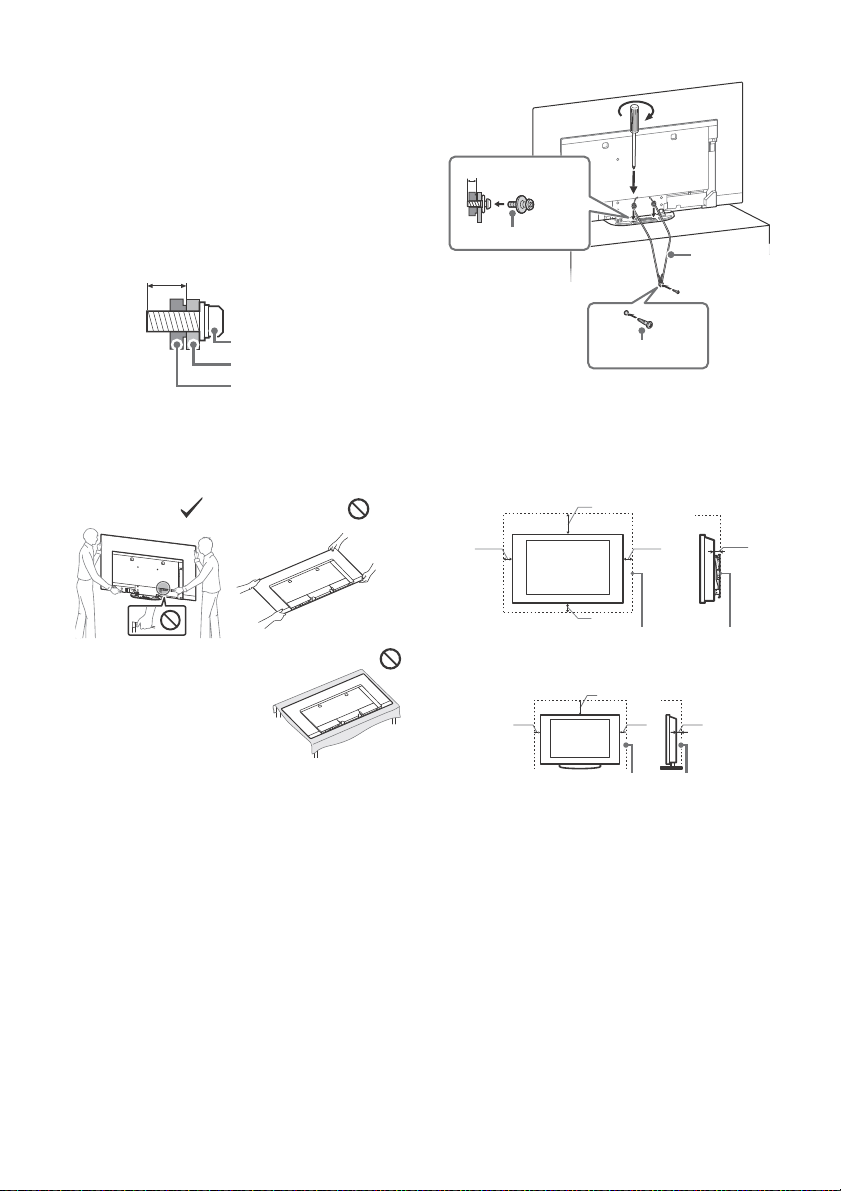
• For safety reasons, be sure to attach the center covers to the
Screw (M6)
Wall-M ount Bracket
9 mm - 13 mm
TV’s rear cover
M4 screw (not supplied)
1.5 N·m
{15 kgf·cm}
Screw (not supplied)
6 mm - 7 mm
Cord (not
supplied)
30 cm
10 cm 10 cm
10 cm
1 cm
Leave at least this much sp ace around the set.
30 cm
10 cm
10 cm
Leave at least this space around the set.
6 cm
rear of the TV when TV in Table-Top condition.
• Only qualified service personnel should carry out wall-mount
installations.
• For safety reasons, it is strongly recommended that yo u use
So
ny accessories, including:
Wall-Mou nt Bracket SU-WL450
• Be sure to use the screws supplied with the Wall-Mount Bracket
when attaching the Wall-Moun t Bracket to the TV set. The
supplied screws are designed as indicated by illustration when
measured from the attaching surface of the Wall-Mount Bracket.
The diameter and length of the screws differ depending on the
Wa
ll-Mount Bracket model.
Use of screws other than t hose supplied may result in internal
damage to the TV se t or cause it to fall, etc.
Topple prevention
Tran spo rti ng
• Before transporting the TV set, disconnect all cables.
• Two or three people are needed to transport a large TV set.
• When transpo rting the TV set by han d, hold it as shown below.
Do not put stress on the panel and the frame around th e screen.
• When hand ling or mounting the
set, do not lay down the TV.
TV
• When transpo rting the TV set, do
no
t subject it to jolts or excessive vi bration.
• When transpo rting the TV set for repairs or when moving, pack
it u
sing the original carton and packing material.
Ventilation
• Never cover the ventilation holes or insert anything into the
cabin et.
• Leave space around the TV set as shown below.
• It is strongly recomme nded that you use a Sony Wall-Mo unt
Brac
ket in order to provide adequate air circulation.
Installed on the wall
Installed with stand
• To ensure proper ventilation and prevent the collection of dirt or
dust:
Do not la y the TV set flat, install up side down, backwards, or
si
deways.
Do not pla ce the TV set on a shelf, rug, bed or in a closet.
Do not cover the TV set with a cloth , such as curtains, or items
such as newspapers, etc.
GB
3
Page 4
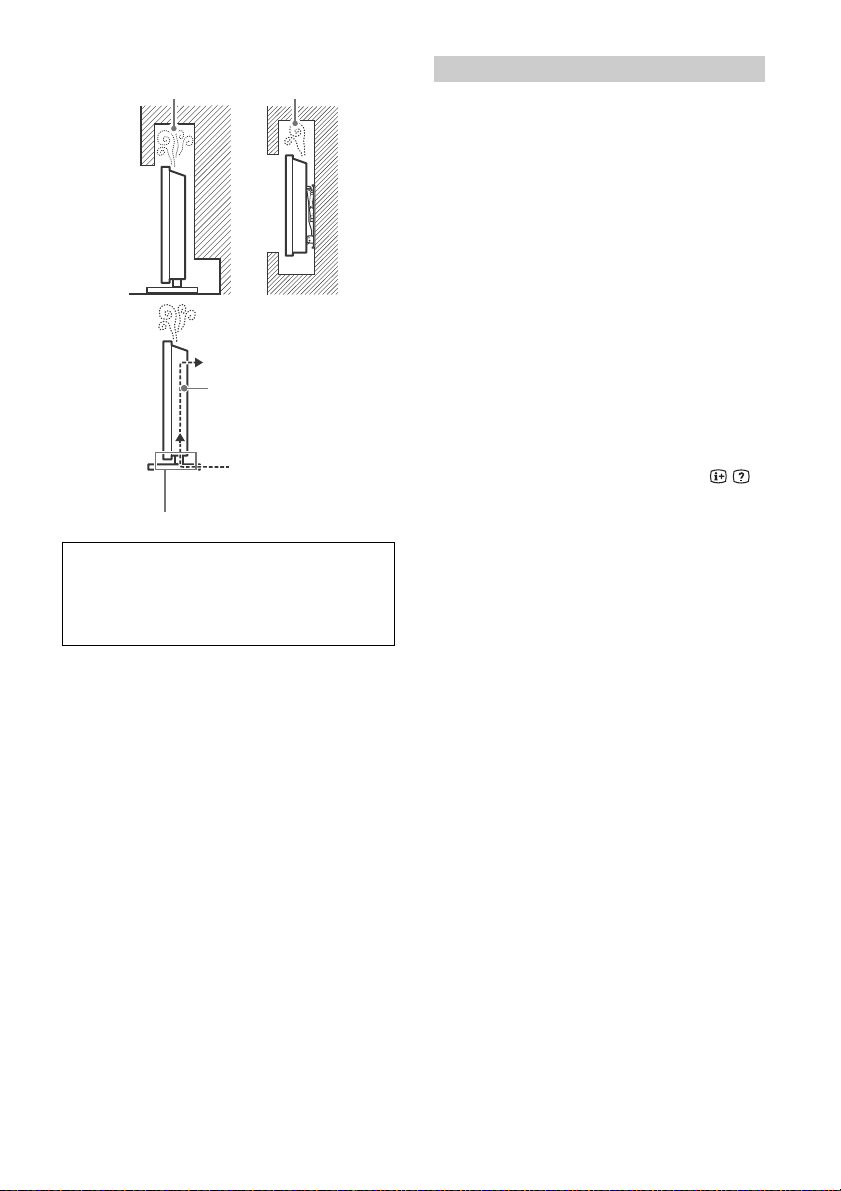
Do not in stall the TV set as shown b elow.
Do not block the air circulation area.
Air circulation
Wall
Air circulation is blocked.
Wall
This receiver complies with the minimum requirements as
spe
cified in Nat ional Telecommunication s Commission,
Memorandum Circular 02-03-2016, Re garding the Sale and
Labeling of ISDB-T Receivers, including Memorandum Circular
No. 01-0302017, Amending Certain Provisio ns of Section 2 of
NTC Memorandum Circular No. 02-03-2016 (S ale and Labeling
of ISDB-T Receivers).
Protecting the TV Screen (OLED TV)
Precautions to Protect the Screen from
Damage
Image retention
OLED TV‘s are susceptible to image retention (b urn-in) due to the
characteristics of the m aterials used. Image retention may occur if
images are displayed in the same location on the screen
repeatedly or over extended period s of time. This is not a
malfunction of the TV. Avoid displaying images that may cause
image rete ntion.
The following are examples of images that may
cause image retention:
• Content with black bars either on the top and bottom and/or
the left and ri ght sides of the screen. (for example, Letterboxed,
4:3 screen, Standard defini tion)
• Static images suc h as photos.
• Video gam es that might have static content in some part of the
sc
reen.
• On-screen menus, program guides, channel logos etc.
• Static content from ap plications.
• On-screen tickers , such as those used for n ews and headlines.
To reduce the risk of image retention:
• Sony recomm ends that you turn off the TV normally by pressing
the power button on the remote control or the TV.
• Fill the screen by changing [Wide mode] to eliminate the black
bars. Select [Wide m ode] other than [Norm al].
• Turn off the OSD (On Screen Display) by pressing the /
button, and turn off th e menus from connected eq uipment. For
de
tails, refer to the instruction m anuals for the connected
equipment.
• Avoid display ing static images with bright colors (including
white), clocks or logos on any portion of the screen.
• Set the picture settings based on the ambient conditions. The
Standard Picture is recommended for hom e use and when
viewing content that ofte n displays the station logo s, etc.
The TV has fo llowi ng feat ures to help re duce/p revent imag e
rete
ntion .
Panel ref resh
Panel refresh will automatically run to a djust the uniformity of the
TV screen after it has been in use for long periods of time. Panel
refresh can also be performed manually and should only be used
if image retention is very noticeable or you see the following
message: [Panel refresh did not finish…]
Caution:
• The Panel refresh function m ay affect the panel. A s a reference,
perform the Panel refresh only o nce a year, do not perform it
more than once a year as it may affect the usable life of the
panel.
• Panel refresh takes about one hour to complete.
• A white line may be displayed on the screen during the Panel
ref
resh, this is not a malfuncti on of the TV.
• Panel refresh will only work when the room temperature is
between 10 ºC and 40 ºC.
Pixel shift
Automatically moves the image on the screen to prevent image
retent ion.
Other feature
The screen brightness is automatically reduced when displaying
still image s, clocks, brigh t colors or logo s etc.
GB
4
Page 5
Parts and Controls
ȩ
ȬȫȪ
Controls and Indicators
(Power) / + / –
When the TV is off,
Press to power on.
Wh
en the TV is on,
Press and hold to
Press repeatedly to change the function,
th
en press + or – button to:
•Adjust the volume.
• Select the channel.
• Select the input source of TV.
Remote Control sensor*1 /
Light sensor*
The illumination LED lights up or blinks
according to the status of the TV.
For more information, refer to the Help
Guid
e.
ower off.
p
1
/ Illumination LED
Built-in MIC*2*
Use the hands-free built-in microphone for
voice search. To enable the built-in MIC,
follow the on-screen instructions when you
press the button.
Built-in MIC LED
The built-in MIC LED lights up in amber
when the built-in MIC is enabled. The builtin MIC LED can be disabled.*
*1 Do not place anything near the sensor.
*2 The voice search requires an Internet connection.
The voice search with the built-in MIC is available
only on limited region/country/language.
Standby power consumption will increase because
the built-in MIC is always listening when the voice
search with the built-in MIC is enabled.
*3 For more information, see the Online Help Guide
(page 2).
3
3
GB
5
Page 6
Using Remote Control
(Microphone)
Use voice search*. (e.g., Search
various content by voice.)
//// (Navigation D-Pad)
On screen menu navigation and
selection.
TV
Switch to a TV channel or input and
display the TV menu.
* The voice search requires an Internet connection.
Remote Control Parts Description
The remote control shape, location, availability and function of remote control buttons may vary
depending on your region/country/TV model.
(TV standby)
Turn on or turn off the TV (standby mode).
Number buttons
Use with the 0-9 buttons to select digital
channels.
(Text)
Display text information.
GB
6
Google Play
Access the “Google Play” online service.
NETFLIX (Only on limited region/
country/TV model)
Access the “NETFLIX” online service.
Color buttons
Execute corresponding function at that time.
Page 7

GUIDE/
Hint
Display the digital program guide.
APPS
Display a list of installed apps.
(Input select)
Display and select the input source, etc.
(Quick settings)
Display Quick Settings.
BACK
Return to the previous screen.
HOME
Display the TV Home Menu.
+/– (Volume)
Adjust the volume.
(Jump)
Jump back and forth between two channels
or inputs. The TV alternates between the
current channel or input and the last
channel or input that was selected.
(Mute)
Mute the sound. Press again to restore the
sound.
AUDIO
Select the sound of multilingual source or
dual sound for the program currently being
viewed (depend on program source).
(Subtitle setting)
Turn subtitles on or off (when the feature is
available).
HELP
Display the Help menu. Help Guide can be
accessed from here.
///
Operate media contents on the TV and
connected BRAVIA Sync-compatible device.
EXIT
Return to the previous screen or exit from
the menu. When an Interactive Application
service is available, press to exit from the
service.
/ (Info/Text reveal)
Display information.
• The accessibility shortcut service can be turned
on or off by pressing and holding .
CH +/–//
In TV mode: Select the channel.
In Text mode: Select the next () or
pr
evious () page.
GB
7
Page 8
Connection Diagram
Ȫ
ȩ
ȫ
Ȭ
Ȭ
ȭ
ȭ
Digital still
camera/
Camcorder/
USB storage
media
VCR/Video game equipment/
DVD player/Camcorder
HDMI
Device
< 14 mm
Cable/
Antenna
Router
Audio
System
with
Optical
Audio
Input
Audio
System
with
eARC/
ARC/HDMI
Device
HDMI
Device
Digital still camera/Camcorder/
USB storage media
Headphone
HDMI Device
AV Receiver
For more information on connections, refer to the Help Guide by pressing HELP on the remote control.
GB
8
Page 9
CENTER SPEAKER IN
Note
10 mm
3.5 mm
1234
1: L
2: Video
3: Ground
4: R
< 12 mm
< 21 mm
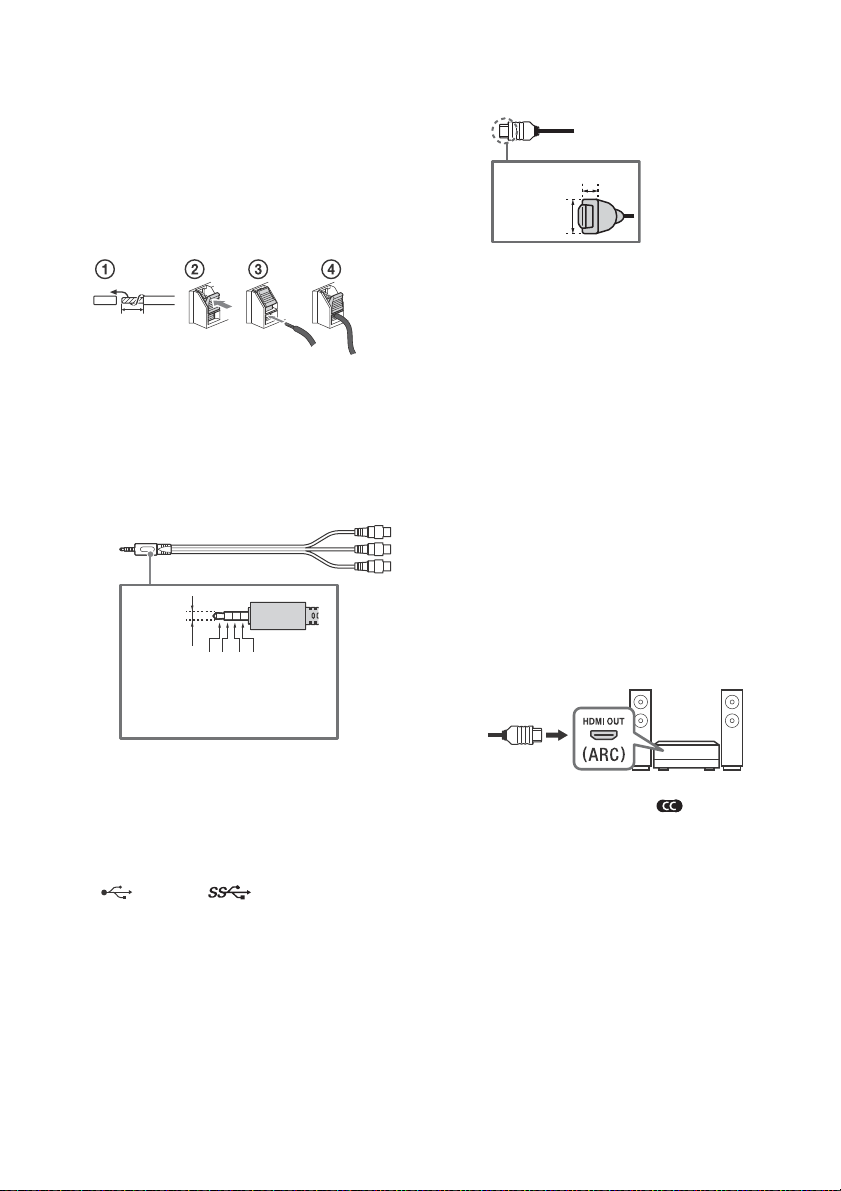
• To use your TV speakers as the center
speaker, connect the output of your AV
receiver to the CENTER SPEAKER IN on
your TV.
• Before connecting cables, disconnect the
AC
wer cord (mains lead) of both TV
po
and AV receiver.
• Make sure the [Speakers] is set to [Audio
sy
tem].
s
HDMI IN 1/2/3/4
• HDMI interface can transfer the digital
video and audio on a single cable.
•
To prevent hiss when not connecting the
ER SPEAKER IN to an AV receiver,
CENT
disable [TV center speaker mode]. For
details, refer to the Help Guide.
/ VIDEO IN
• For a composite connection, use an
Analog Extension Cable (not supplied).
•
(Headphone)
• Supports 3-pole stereo mini jack only.
• You cannot output sound from both the
he
adphone and the TV speakers at the
same time.
USB 1/2, USB 3
•Connecting a large USB device may
interfere with other connected devices
beside it.
• When connecting a large USB device,
c
nnect to the USB 1 port.
o
• To enjoy high quality 4K 50p/60p
contents, connect a Premium High Speed
HDMI cable and set the [HDMI signal
format] to [Enhanced format].
Do this setting individually for each
c
nnected HDMI IN terminal. For details of
o
supported formats, refer to the
“Specifications“ in this manual (page 13-
14).
• HD
MI IN 3 eARC/ARC (Enhanced Audio
Ret
urn Channel/Audio Return Channel)
Connect your audio system to the
HDMI IN 3 to route TV audio to your audio
sy
. An audio system that supports
stem
HDMI eARC/ARC can send video to the TV,
and receive audio from the TV via the
same HDMI cable. If your audio system
does not support HDMI eARC/ARC, an
additional connection with DIGITAL AUDIO
OUT (OPTICAL) is necessary.
• Use the HDMI cable with Ethernet to
c
nnect audio system with eARC.
o
• You cannot attach the side cover while the
cables are connected to side terminal.
• Be sure to store the side cover in a safe place for
ure use.
fut
GB
9
Page 10

Installing the TV to the Wall
Using the optional Wall-Mount Bracket
To Customers:
For product protection and safety reasons, Sony strongly recommends that installation of your TV be
pe
rformed by Sony dealers or licensed contractors. Do not attempt to install it yourself.
To Sony Dealers and Contractors:
Provide full attention to safety during the installation, periodic maintenance and examination of this
pr
duct.
o
Wall-Mount Bracket Installation Information
This TV’s instruction manual only provides the steps to prepare the TV for Wall-Mount installation
before it is installed on the wall.
For instructions on Wall-Mount Bracket installation, see the Installation Information (Wall-Mount
Br
acket) on the product page for your TV model.
http://www.sony-asia.com/support
Preparing for Wall-Mount Installation
Use the Wall-Mount Bracket SU-WL450 (not supplied) to install the TV to the wall.
Make sure to attach the Table-Top Stand before installing the TV to the wall by referring to the Setup
Guid
e.
• Prepare the TV for the Wall-Mount Bracket before making cable connections.
• Follow the instruction guide provided with the Wall-Mount Bracket for your model. Sufficient
e
pertise is required in installing this TV, especially to determine the strength of the wall for
x
withstanding the TV’s weight.
• Be sure to entrust the attachment of this product to the wall to Sony dealers or licensed contractors
a
d pay adequate attention to safety during the installation. Sony is not liable for any damage or
n
injury caused by mishandling or improper installation.
• The screws for Wall-Mount Bracket are not supplied.
• Be sure to store the unused screws and Table-Top Stand in a safe place until you are ready to
attach the Table-Top Stand. Keep the screws away from small children.
10
GB
Page 11
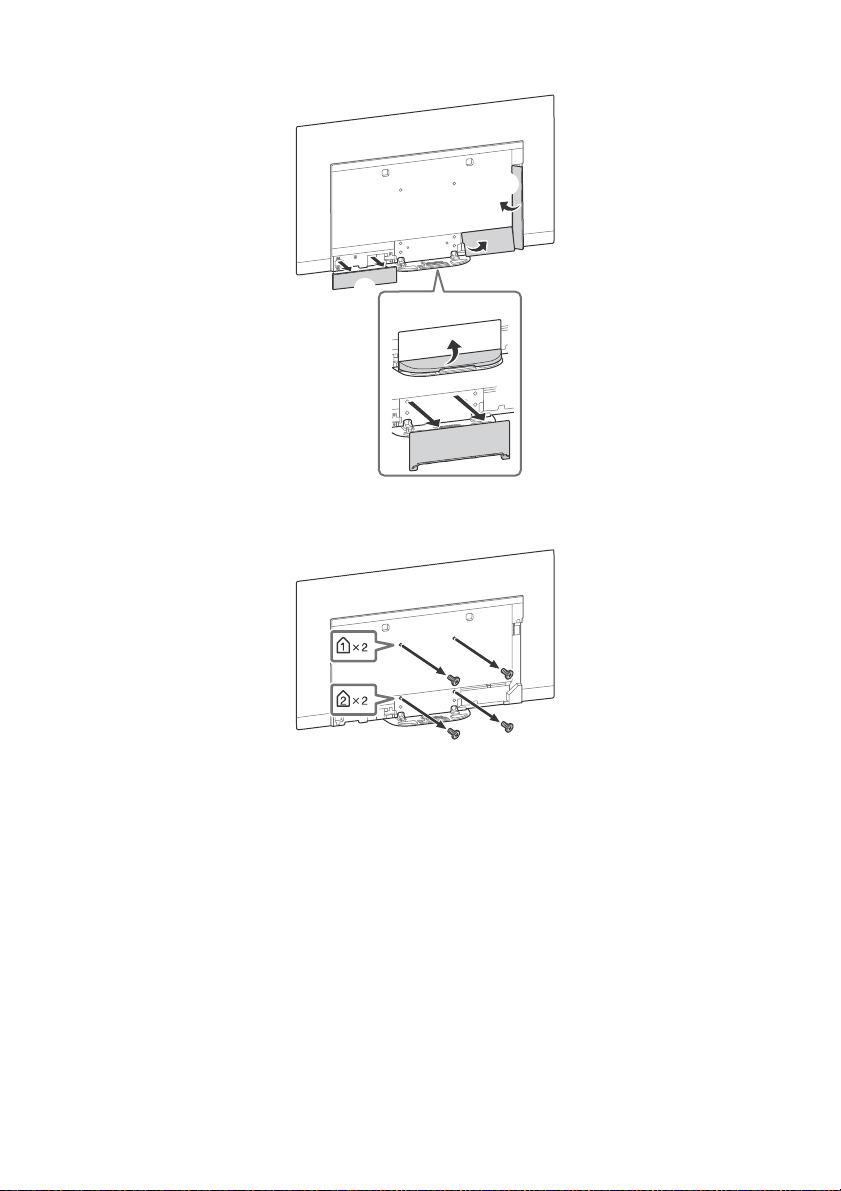
1 Remove the stand cover and terminal covers.
ʕ
2 Remove the screws from the rear of the TV.
GB
11
Page 12

Troubleshooting
Note
General troubleshooting for issues like: black
screen, no sound, frozen picture, TV does not
respond, or network is lost, do the following
steps.
1 Restart your TV by pressing the power button
on the remote control until a message
appears. The TV will restart. If the TV does not
recover, try unplugging the AC power cord
(mains lead). Then press the power button on
the TV and wait for two minutes, and plug in
the AC power cord (mains lead).
2 Refer to the Help menu by pressing HELP on
the remote control.
3 Connect your TV to the Internet and perform
a software update. Sony recommends you to
keep your TV software updated. Software
updates provide new features and
performance improvements.
4 Visit Sony support website (information
provided on the front cover of this manual).
When you plug in the TV, the TV may not be
able to turn on for a while even if you press
the power button on the remote control or
the TV.
It takes time to initialize the system. Wait for
abo
ut one minute, then operate it again.
Troubles and Solutions
When the illumination LED is flashing in red.
Count how many times it flashes (interval time is
three seconds).
Reboot the TV by disconnecting the AC power
co
rd (mains lead) until the illumination LED
stopped flashing in red, then turn on the TV.
If the problem persists, disconnect the AC power
co
rd (mains lead), and contact your dealer or Sony
service center with the number of times the
illumination LED flashes.
There is no picture (screen is dark) and no
sound.
Check the antenna/cable connection.
Connect the TV to the AC power (mains), and
press the power button on the TV or the remote
control.
Some programs cannot be tuned.
Check the antenna/cable connection.
The remote control does not function.
Replace the batteries.
The parental lock for broadcast password has
been forgotten.
Enter 4357 for the password and select [Change
password].
The TV surrounds become warm.
Whe n the TV is used for an extended period, the
TV surrounds become warm. You may feel hot
when touching there by the hand.
The screen becomes darker while watching
TV.
If the whole image or part of the image remains
still, the screen brightness will be gradually
reduced to prevent image retention. This is not a
malfunction of the TV.
You are concerned about image retention.
If the same image is displayed repeatedly or for
g periods of time, image retention may
lon
occur. To reduce image retention, we
recommend that you turn off the TV normally by
pressing the power button on the remote
control or the TV.
• Perform Panel refresh manually only when image
retention is particularly noticeable. As a reference,
perform it only once a year. Avoid performing it more
than once a year because it may affect the usable life
of the panel.
• Images that include clocks, logos and bright colors
(including white) easily cause image retention. Avoid
displaying these types of images for long periods of
time, otherwise image retention may occur.
A white line appears on the screen.
Panel refresh automatically runs after the TV has
been used for long periods of time to reduce
image retention. Panel refresh starts after the TV
is turned off and takes about one hour to
complete. A white line may be displayed on the
screen during the Panel refresh. This is not a
malfunction of the TV.
GB
12
Page 13

The message [Panel refresh did not finish…] is
displayed.
Panel refresh automatically runs after the TV has
been u
sed for long periods of time to reduce
image retention. If the TV is turned on, the AC
power cord (mains lead) is unplugged, or the
room temperature falls outside of the range
between 10 ºC and 40 ºC during the Panel
refresh, the process will not be completed and
this message will appear.
If Panel refresh started automatically, it will restart
when you turn off the TV with the remote control.
If Panel refresh initiated manually, you must
select it again.
Specifications
System
Panel system
OLED (Organic Light Emitting Diode) Panel
TV system
Analog: M
Digital: ISDB-T
Color system
NTSC/PAL N(Video Only)/PAL M(Video Only)
Channel coverage
Analog: UHF/VHF/Cable
Digital: UHF/VHF
Sound output
20 W + 20 W + 10 W + 10 W
Wireless technology
Protocol IEEE802.11ac/a/b/g/n
Bluetooth Version 4.2
Input/Output jacks
Antenna/cable
75 ohm external terminal for VHF/UHF
/ VIDEO IN
Video/Audio input (mini jack)
HDMI IN 1/2/3/4 (support 4K resolution, HDCP
2.3-compatible)
Video:
4096 × 2160p (50, 60 Hz)*
1
(24 Hz)*
, 3840 × 2160p (50, 60 Hz)*2,
3840 × 2160p (24, 25, 30 Hz), 1080p (30, 50,
60, 100, 120 Hz), 1080/24p, 1080i (50, 60 Hz),
72
0p (30, 50, 60 Hz), 720/24p, 576p, 480p,
PC Formats*
Audio:
In eARC (Enhanced Audio Return Channel)
mode
Refer to the Help Guide for details.
Except eARC mode
5.1 channel linear PCM: 32/44.1/48/88.2/96/
176
Dolby Digital Plus, DTS
eARC/ARC (Enhanced Audio Return Channel/
Audio Return Channel) (HDMI IN 3 only)
In eARC mode*
Refer to the Help Guide for details.
In ARC mode
Two channel linear PCM: 48 kHz 16 bits, Dolby
Digit
DIGITAL AUDIO OUT (OPTICAL)
Digital optical jack (Two channel linear PCM:
48 kHz 16 bits, Dolby Digital, DTS)
(Stereo mini jack)
Headphone
3
4
*
.4/192 kHz 16/20/24 bits, Dolby Digital,
4
al, Dolby Digital Plus, DTS
1*2
, 4096 × 2160p
GB
13
Page 14
1, 2, 3
Note
USB port 1 and 2 support High Speed USB
(USB 2.0)
USB port 3 supports Super Speed USB (USB 3.1
Gen
1)
LAN
10BASE-T/100BASE-TX connector (Depending on
the operating environment of the network,
connection speed may differ. The communication
rate and quality are not guaranteed.)
CENTER SPEAKER IN
Center speaker input terminal
Others
Optional accessories
Wall-Mount Bracket: SU-WL450
Operating temperature
0 ºC – 40 ºC
Power and others
Power requi rements
110 V - 240 V AC, 50/60 Hz
Screen size (measured diagonally) (Approx.)
KD-65A9G: 65 inches / 163.9 cm
KD-55A9G: 55 inches / 138.8 cm
Power consumptio n
KD-65A9G: 469 W
KD-55A9G: 373 W
Standby power consumption*5*
0.5 W
6
Display resolution
3,840 pixels (horizontal) × 2,160 lines (vertical)
Output Rating
USB 1/2
5 V , 500 mA MAX
USB 3
5 V , 900 mA MAX
Dimensions (Approx.) (w × h × d)
wi th Tab l e-Top S tan d
KD-65A9G: 1,447 × 838 × 255 mm
KD-55A9G: 1,226 × 714 × 255 mm
without Table-Top Stand
KD-65A9G: 1,447 × 834 × 40 mm
KD-55A9G: 1,226 × 710 × 40 mm
Mass (Approx.)
wi th Tab l e-Top S tan d
KD-65A9G: 24.8 kg
KD-55A9G: 22.3 kg
without Table-Top Stand
KD-65A9G: 21.2 kg
KD-55A9G: 18.7 kg
*1 When 4096 × 2160p is input and [Wide mode] is set
to [Normal], the resolution is displayed as 3840 ×
2160p. To display 4096 × 2160p, set [Wide mode]
setting to [Full 1] or [Full 2].
*2 To support 18 Gbps, set [HDMI signal format] to
[Enhanced format].
*3 Refer to t he Help Guide for details.
*4 eARC mode is active when [eARC mode] is set to
[Auto], [Speakers] is set to [Audio system] and eARC
compatible audio system is connected.
*5 Specified standby power is reached after the TV
finishes necessary internal processes.
*6 Standby power consumption will increase when
your TV is connected to the network.
• Optional accessories availability depends on
countries/region/TV model/stock.
• Design and specifications are subject to change
without notice.
Trademark Information
• The terms HDMI and HDMI High-Definition
Multimedia Interface, and the HDMI Logo
are trademarks or registered trademarks of
HDMI Licensing Administrator, Inc. in the
United States and other countries.
• Dolby, Dolby Vision, Dolby Audio, and the
e
-D symbol are trademarks of Dolby
doubl
Laboratories. Manufactured under license
from Dolby Laboratories. Confidential
unpublished works. Copyright ©1992-2015
Dolby Laboratories. All rights reserved.
•“BRAVIA”, and BRAVIA Sync are
trademarks or registered marks of Sony
o
rporation.
C
• Gracenote, the Gracenote logo and
type
logo
either registered trademarks or trademarks
of Gracenote, Inc. in the United States and/
or other countries.
• Vewd® Core. Copyright 1995-2019 Vewd
S
• Google, Google Play, Chromecast,
Y
marks and logos are trademarks of Google
LLC.
• Wi-Fi®, Wi-Fi Alliance® and Wi-Fi Direct® are
r
• The Wi-Fi CERTIFIED™ Logo is a
c
• For DTS patents, see http://
pa
license from DTS, Inc. DTS, the Symbol, &
DTS and the Symbol together are
registered trademarks, and DTS Digital
Surround is a trademark of DTS, Inc. © DTS,
Inc. All Rights Reserved.
, “Powered by Gracenote” logo are
o
ftware AS. All rights reserved.
o
uTube, Android TV and other related
egi
stered trademarks of Wi-Fi Alliance.
e
rtification mark of Wi-Fi Alliance.
t
ents.dts.com. Manufactured under
GB
14
Page 15

• The Bluetooth® word mark and logos are
registered trademarks owned by the
Bluetooth SIG, Inc. and any use of such
marks by Sony Corporation is under
license. Other trademarks and trade names
are those of their respective owners.
• Netflix is a registered trademark of Netflix,
.
c
In
• TUXERA is a registered trademark of Tuxera
nc.
in the US and other countries.
I
• USB-IF SuperSpeed USB Trident logo is a
egi
stered trademark of USB Implementers
r
Forum, Inc.
• All other trademarks are the property of
ir respective owners.
e
th
GB
15
Page 16
http://rd1.sony.net/help/tv/gusltn2/h_usltn/
Help Guide
© 2019 Sony Visual Products Inc. Printed in Malaysia
 Loading...