

Page 1

SONY»
3-859-784-11(1)
Microcassette Dictator
Operating Instructions
BM-535
Sony Corporation © 1997 Printed in Japan
Owner's Record
The model number is located at the bottom and the serial number is located
inside the tape holder. Record the model and serial numbers in the space
provided below. Refer to these numbers whenever you call upon your Sony
dealer regarding this product.
Model No.
Serial No.
WARNING
To prevent fire or shock hazard, do not expose the unit to
rain or moisture.
You are cautioned that any changes or modifications not expressly
approved in this manual could void your authority to operate this
equipment.
Welcome!
Thank you for purchasing the Sony Microcassette™ Dictator.
Some features are:
•Simple operation with a slide-type function lever.
• VOR (Voice Operated Recording) system that starts and stops
recording automatically in response to the sound, to save tapes
and batteries.
-•Three-digit tape counter for indexing the tape contents.
• LOCK switch prevents the unit from accidental operation.
•3-way powering system: batteries, AC house current and car
battery.
•Tape-end alarm sounds at the end of the tape.
Page 2
Operation Flow Chart
Insert the batteries.
-0-
Insert a cassette.
Select the tape speed i
I Set the TAPE COUNTER to 000.
Make sure that the LOCK switch is set to the
opposite direction of the arrow.
V
Start dictation with the built-in microphone.
Stop dictating.
Eject the cassette.
Hand the cassette to your secretary or transcriber without
rewinding the tape.
I Set the VOR switch to ON, if necessary.
Notes on oattenes
• Do not charge a dry battery.
• Do not use a new battery with an old one.
• Do not use different types of batteries.
• When you do not use the unit for a long time, remove the batteries to
avoid any damage caused by battery leakage and subsequent corrosion.
• Dry batteries will not be expended when another power source is
connected.
House Current
DC IN 3V
Use the AC-E30HG AC power adaptor (not supplied). Connect the
adaptor to the DC IN 3V jack and to a wall outlet. Do not use any
other AC power adaptor.
Polarity of the plug
Car Battery
Use the DCC-E130L car battery cprd (not supplied).
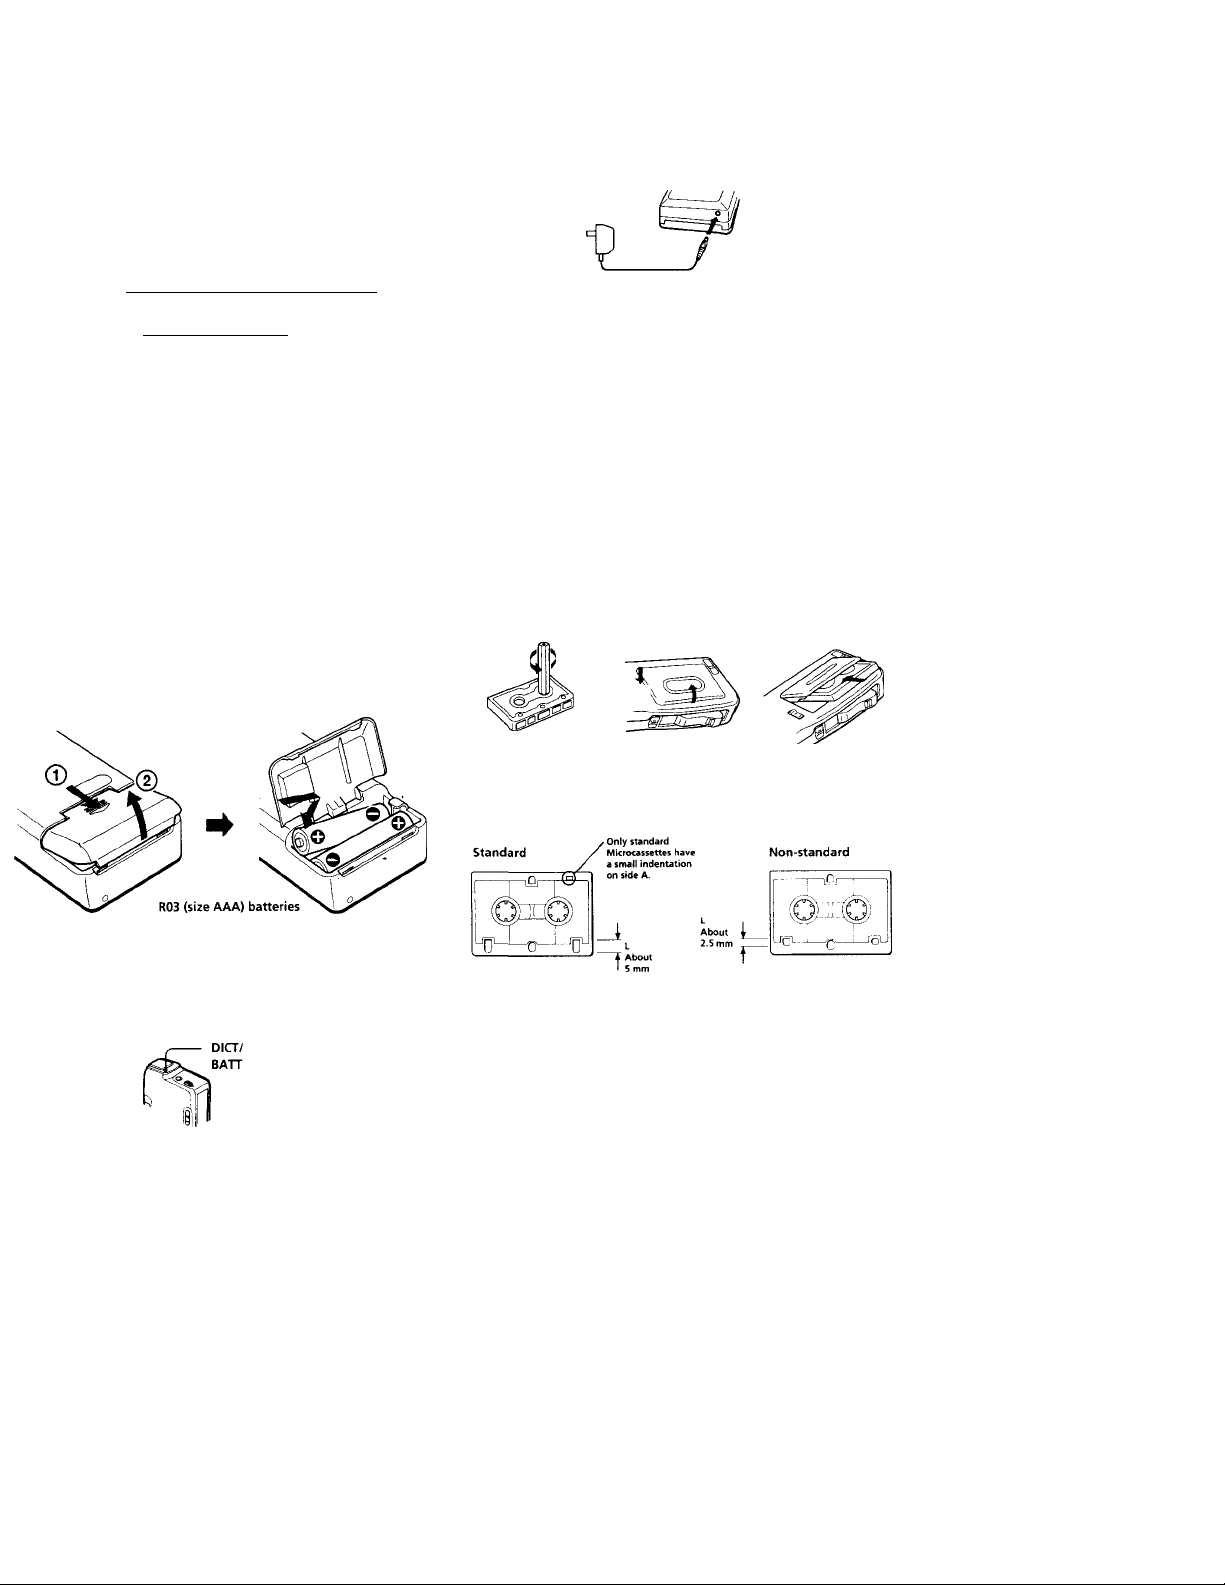
► Getting Started
Preparing a Power Source
Ihoose one of the following power sources
Dry Batteries
>Лаке sure that nothing is connected to the DC IN 3V jack.
1 Open the battery compartment lid.
2 Insert two size AAA (R03) batteries.
Afhen to replace the batteries
Replace the batteries with new ones when the DICT/BATT lamp
lims.
Inserting a Cassette
Before inserting the cassette, take up any slack in the tape with a
thick pencil.
EJECT ^
Use only standard Microcassettes with this unit.
Non-standard microcassettes cannot be used because their ”L”
dimension (see illustration) is different.
Votes on the DICT/BATT lamp
• After the batteries have been used for a while, the DICT/BATT lamp may
flicker with the playback sound when you turn up the volume; however,
this does not mean that you need to change the batteries.
• The unit will play back normally for a while even after the DICT/BATT
lamp dims. However, replace the batteries as soon as you can. If you do
not, subsequent recording will not be done correctly.
Page 3

► Operating the Unit Dictating with the Built-in Microphone
You can start and stop dictating simply by sliding the function
lever.
Before operating, make sure the following points.
•The LOCK switch is set to the opposite direction of the arrow.
•Set the VOR (Voice Operated Recording) switch to H or L, if
necessary.
DICT/BATT
~ Built-in
microphone
- Function
lever
■LOCK
EJECT
1
Slide the EJECT lever to open the cassette compartment lid.
2
Insert a cassette with the side to start dictating facing the lid.
3
Set the TAPE SPEED selector to the desired tape speed.
Recording time* Set to
60 minutes 2.4 cm»»
120 minutes
* Using both sides of the MC-60BM Microcassette.
** For optimum sound (recommended for normal use), set to 2.4 cm.
4
Slide up the function lever to DICT (dictation).
5
Speak into the microphone.
1.2 cm
The DICT/BATT lamp flashes depending on the strength of the
sound during recording .
To stop dictating, slide down the function lever to STOP.
To eject a cassette, slide the EJECT lever.
To economize the tapes and batteries
Set the VOR switch to H or L. The tape moves only when sound is
picked up, and stops automatically when sound is no longer
detected (The DICT/BATT indicator goes out.), thus the minimum
amount of tape is used.
If you want recording to start Set to
even with small sound H
only with a loud sound
L
- . '
To index the tape contents
Set the TAPE COUNTER to 000 by pushing the reset button before
dictating.
To monitor the recording
Connect an earphone to the EAR (earphone) jack.
To listen to the just-recorded contents while dictating
Slide down the function lever to B. SPACE (back space), and
release it at the desired point.
When a beep sounds and the DICT/BATT lamp goes out
The tape reaches the end. Slide the function lever to STOP.
To erase the entire tape contents
Use the BE-9H cassette eraser (not supplied).
Page 4

Listening to the Dictation
FF/CUE
■ Function
lever
EJECT
^ Additional Information Precautions
On power
•Operate the unit only on 3V DC.
For battery operation, use two size AAA (R03) batteries.
For AC operation, use the AC power adaptor recommended for
the unit. Do not use any other type.
•The nameplate indicating operating voltage, etc., is located inside
the cassette holder.
On location
• Do not leave the unit in a location near heat sources, or in a place
subject to direct sunlight, excessive dust or mechanical shock.
•Keep personal credit cards using magnetic coding or springwound watches etc. away from the unit to prevent possible
damage from the magnet used for the speaker.
Make sure that the LOCK switch is set to the opposite direction of
the arrow.
1 Slide the EJECT lever to open the cassette compartment lid.
2 Insert a cassette with the side to start listening facing the lid.
3 Set the TAPE SPEED selector to the same position as that in
recording.
4 Slide down the function lever to LISTEN.
5 Adjust VOL (volume).
6 To stop playback, slide up the function lever to STOP. To rewind the tape
Slide down the function lever at the B. SPACE (back space) and
release it at the desired point.
To rapidly advance the tape
Slide the FF/CUE lever in the direction of the arrow, with the
function lever set to STOP. To stop the tape, release the FF/CUE
lever.
To skip over unnecessary portions
During playback, slide the FF/CUE lever in the direction of the
arrow. When you release the lever, the unit will automatically
return to the playback mode.
For private listening
Connect the earphone to the EAR jack and the sound does not
come out through the speaker.
On operation
•Should any solid object or liquid fall into the unit, remove the
batteries or disconnect the AC power adaptor, and have the unit
checked by qualified personnel before operating it any further.
•Use only the CMicRocAsserTn'" with this unit.
•Two tape speeds can be selected for recording wifh the TAPE
SPEED selector: 2.4 cm/sec. CYu ips) or 1.2 cm/sec (’Vnips).
Match the playback speed to the recording speed. Select the 2.4
cm/sec tape speed for recording, if you play back the recorded
tape with another unit. Otherwise, the sound quality may be
changed.
If you have any questions or problems concerning your unit, please
consult your nearest Sony dealer.
Tips for Efficient Dictation
Before you start dictation
•Organize your thoughts.
•Make notes or an outline of what you want to dictate.
When you dictate
•Identify yourself. (Name, department, phone number)
• Indicate type of dictation. (Memo, letter, etc.)
•Give transcribing instructions. (Type of stationery, number of
copies and who they are for, envelopes, etc.)
•Specify distribution. (Names, address, etc.)
During dictation
•Relax and speak clearly at a normal speed.
•Short sentences are best.
• Include punctuation.
•Spell difficult or unusual words.
•Correct your mistakes. (Review and redictate.)
Page 5

Troubleshooting
Specifications
Should any problem persist after you have made these checks,
consult your nearest sony dealer.
The unit does not operate.
^ The LOCK switch is set to the direction of the arrow.
Cassette cannot be inserted.
4 You attempt to insert the cassette improperly.
The tape does not move.
■> The tape reaches its end. (Soon, a beep will sound.)
-> The function lever is set to STOP.
-> Battery polarity is incorrect.
Battery operation is attempted while the AC power adaptor
or the car battery cord is still connected to the DC IN 3V jack.
-> The AC power adaptor or car battery cord is not firmly
connected.
-> The VOR switch is set to H or L in recording.
No sound comes from the speaker
-> VOL is turned down completely.
-> The earphone is connected to the EAR jack.
Tape speed is excessively fast or too slow during playback mode.
■> The TAPE SPEED selector is not set correctly.
Recording cannot be made or is unsatisfactory.
-> The batteries are weak.
The record/playback head is contaminated. See "Mainte
nance."
■> VOR has been set to the improper position when VOR
function works.
Sound drop-outs, loss of high frequency sounds, or excessive noise.
The heads are dirty.
Recording cannot be erased completely.
■> The erase head is contaminated.
Tape
CMiCRocA5seTT€)'“ (normal position type)
Recording system
2-track 1-channel monaural
Speaker
Approx. 3.6cm (1 Vuin.) dia.
Tape speed
2.4 cm/s (’Yi6 ips), 1.2 cm/s (’%2ips)
Frequency response
300 to 4,000 Hz (at 2.4 cm/s)
Output
Earphone jack (minijack) for 8 - 300 ohms earphone
Power output
150 mW (at 10 % harmonic distortion)
Battery life
Continuous recording hours with the built-in microphone:
Approx. 9 hours (average) with alkaline batteries.
Power requirements
3VDC
• Two size AAA (R03) batteries (not supplied)
DC IN 3 V jack accepts:
• Sony AC-E30HG AC power adaptor (not supplied) for use on 120 V
AC, 60 Hz
• Sony DCC-E130L car battery cord (not supplied) for use on 12 V car
battery.
Dimensions (w/h/d) (incl. projecting parts and controls)
Approx. 60 X 129x 25.6 mm (w/h/d)
(2 Va X 5 Y32X 1 '/32 in.)
Mass
Approx. 155 g (5.5 oz.)
Approx. 185 g (6.60Z.) (incl. batteries and cassette)
Design and specifications are subject to change without notice.
Optional accessories
AC power adaptor AC-E30HG
Car battery cord DCC-E130L/E230
Microcassette MC-60BM, MC-30BM
Maintenance
To clean the tape heads and path
Pinch-roller
Wipe the heads, pinch roller and the capstan with a cotton swab
moistened with alcohol every 10 hours of use.
To clean the exterior
Use soft cloth slightly moistened in water. Do not use alcohol,
benzine or thinner.
Your dealer may not handle some of the above listed optional accessories.
Please ask the dealer for detailed information about the optional accessories
available in your country.
 Loading...