

SONY BG-1S Service Manual
CIRCUIT ADJUSTMENTS
4-1. ELECTRICAL ADJUSTMENTS
KV-20WS1
SECTION 4
Service adjustment to this model can be performed
with the supplied Remote Control Commander RM-836.
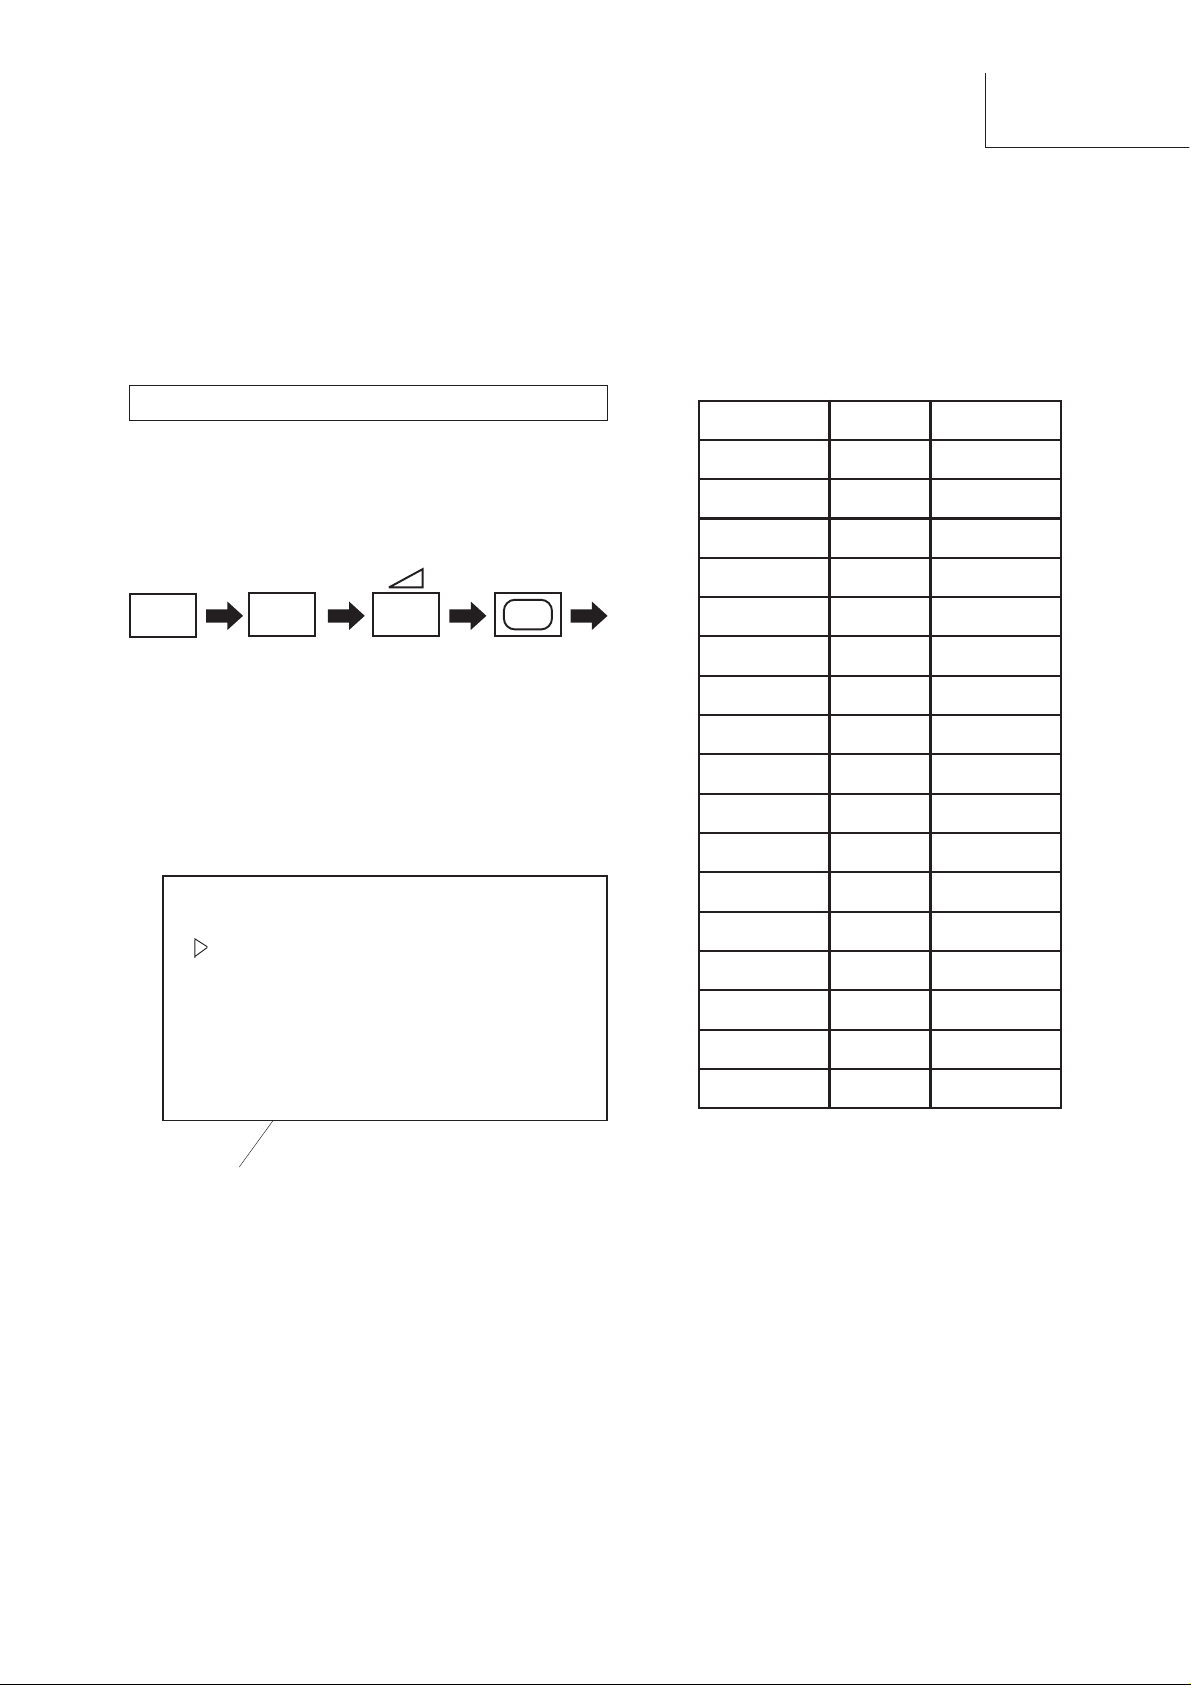
HOW TO ENTER INTO SERVICE MODE
1. Turn on the main power of the set and enter into
stand-by mode.
2. Press the following sequence of buttons on the Remote
Control Commander.
(ON SCREEN
DISPLAY)
+
5
(DIGIT 5)
+
(VOLUME +)
(TV)
"TT-- " will appear in the top right corner of the screen
Other status information will also be displayed.
3. Press the MENU button on the Remote Commander to
obtain the menu on the screen.
Adjust.
Range of adjustments available from the on screen menu
system.
tnemtsujdAteSegnaR
ezisV1236-0
hterbV2336-0
pmaniP2136-0
tlit.araP3436-0
raenilV2436-0
rrocrenroC5036-0
ezisH4336-0
sopV0036-0
sahpH2436-0
e
eulB6236-0
neerG2336-0
deR2436-0
16:9 ON
System
Text
AGC 33 00-63
PLL 32 00-63
V1 00-01 SONY BE-5
Software version
4. Press the Blue (Next) or Green (previous) buttons to
select the adjustment item from the table.
5. Press the Yellow (+) or Red (-) buttons to change the data
as required.
6. Turn off the power to quit the service mode when
adjustments are completed.
1klbVH0036-0
2klbVH0036-0
tnecV6036-0
xamiewZ6336-0
nimiewz8136-0
— 19 —

KV-20WS1
4-2. TEST MODE 2:
TT -- Mode is available by pressing the Test button twice, O.S.D 'TT --' appears. The functions described below are available
by pressing two digits. To release the 'TT --' mode, press 0 twice, press 'TEST' , press 'TV' or switch the TV into Stand-by mode.
00.ffoedoM'—TT'hctiwS
10.mumixamotlevelerutcipteS
20.muminimotlevelerutcipteS
30.%53otemulovteS
40.%05otemulov
teS
50.%56otemulovteS
60.%08otemulovteS
70.).xamssenthgirb,.xamerutcip(noitidnocgniegA
80
90.ymmuD
01.noitcnufoN
11y
21.ymmuD
31.ymmuD
41.ymmuD
51
61.seulavtesersaseulavdesulautcaevaS
71.no
81.ymmuD
91.ytiroirpBGR
02.noitcnufoN
12.noitcnufoN
22)serotStnereffiDmaceS/laP(
32.ssenthgirBbuS
42.noytiroirpBGR
.)%53=loV
mmuD
utciP,ssenthgirB
.)yromeM
ruoloCbuS
ulavgolanA(noitidnocgnippihS
52.EKDsmetsySnoitanitseD
62.U/IsmetsySnoitanitseD
72.'I/ImetsySnoitanitseD
82.ylnoGBnoitanitseD
92.ymmuD
13-03.n
23%05otlevelerutciP
yrotcafotTESERerase
,ffodehctiwsedom—TT,detcelessi1gorP,gnittes
,emuloVsdaeR-MVNotMORmorfgnittesyrotcafdaeR
seulavruoloCdnassenprahS,euH,er
rewoPtsaL(seulavdesulautcaehtotMORmorf
itarepOssenprahSelbasiD/elbanE
53-33.noitcnufoN
63.NOetumoiduA
73.ffoDSO
83.edomtnemtsujda2GretnE
93ssenthgirb-buS
04.noitcnufoN
14.MVNesilaitini-eR
24.ymmuD
34.sgnittesyrtemoeGesilaitini-eR
74-44ymmuD
84.MVNnih44otetybtsetMVNt
94etybtsetMVNesarE
05.noitcnufoN
15.smargorp001/06elggoT
oitcnufoN
eS
Note : For Test Modes 41 - 51, it is necessary to ensure that
the TV is set to Prog 59.
— 20 —
 Loading...