

Page 1
4-133-937-04(1)
お買い上げいただきありがとうございます。
電気製品は安全のための注意事項を守らないと、
火災や人身事故になることがあります。
この取扱説明書には、事故を防ぐための重要な注意事項と製品の
取り扱いかたを示してあります。この取扱説明書をよくお読みの
うえ、製品を安全にお使いください。お読みになったあとは、い
つでも見られるところに必ず保管してください。
BC-U2
© 2008 Sony Corporation
取扱説明書2ページ JP
Operating Instructions Page 12 GB
Manuel d’installation Page 21 FR
Installationsanleitung Seite 30 DE
Istruzioni per l’installazione Pagina 38 IT
Instrucciones de instalación Pagina 46 ES
CS
KR
Battery Charger
Printed in China
Page 2
安全のために
日本語
安全のために
ソニー製品は安全に十分に配慮して設計されています。しかし、電
気製品はすべて、まちがった使いかたをすると、火災や感電などに
より死亡や大けがなど人身事故につながることがあり、危険です。
事故を防ぐために次のことを必ずお守りください。
安全のための注意事項を守る
3 〜 5ページの注意事項をよくお読みください。
定期点検を実施する
長期間安全に使用していただくために、定期点検を実施することを
おすすめします。点検の内容や費用については、お買い上げ店にご
連絡ください。
故障したら使用を中止する
すぐに、お買い上げ店にご連絡ください。
万一、異常が起きたら
• 異常な音、におい、煙が出たら
• 落下させたら
m
a AC 電源コードや DC 接続コードを抜く。
b お買い上げ店にご相談ください。
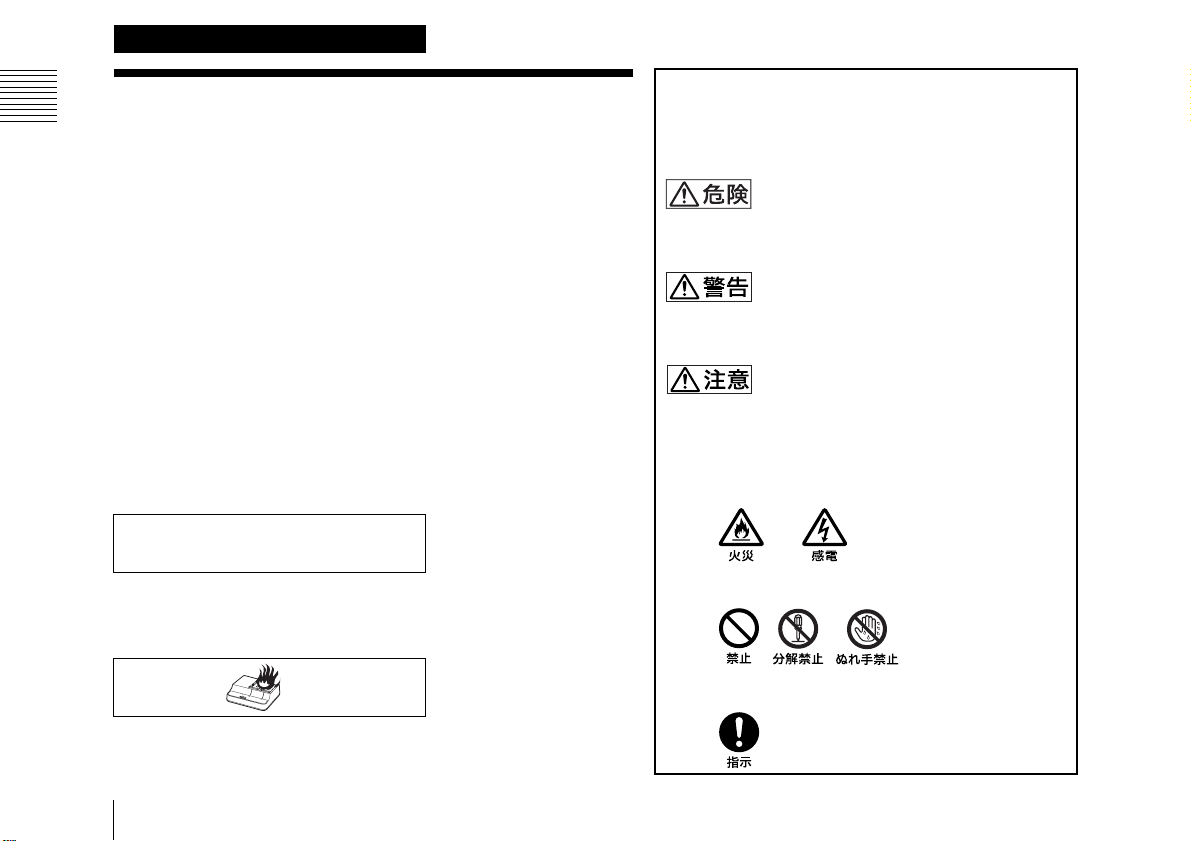
警告表示の意味
この取扱説明書および製品では、次のような表示をしてい
ます。表示の内容をよく理解してから本文をお読みくださ
い。
この表示の注意事項を守らないと、破裂・発火・発熱・液漏
れにより、死亡や大けがになることがあります。
この表示の注意事項を守らないと、火災や感電などにより
死亡や大けがなど人身事故につながることがあります。
この表示の注意事項を守らないと、感電やその他の事故に
よりけがをしたり周辺の物品に損害を与えたりすること
があります。
注意を促す記号
行為を禁止する記号
• 炎が出たら
m
すぐに AC 電源コードや DC 接続コードを抜き、消火する。
安全のために
2
行為を指示する記号
Page 3
下記の注意を守らないと、 火災や
感電により死亡や大けがにつな
がることがあります。
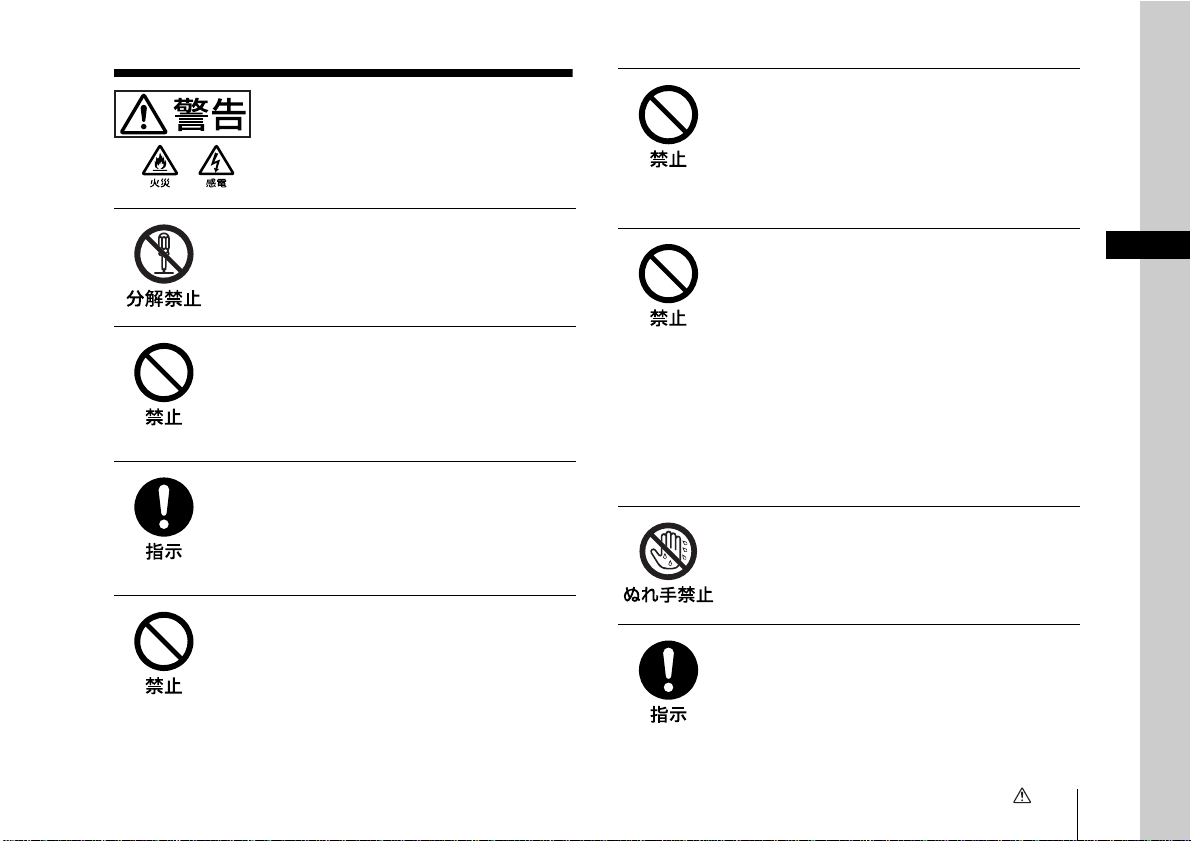
外装を外さない、改造しない
外装を外したり、改造したりすると、感電の
原因となります。
雨の当たる場所や、油煙、湯気、湿気、ほ
こりの多い場所では使用しない
上記のような場所やこの取扱説明書に記され
ている使用条件以外の環境に設置すると、火
災や感電の原因となることがあります。
コード類は正しく配置する
AC 電源コードや DC 接続ケーブルは、足に
引っかけると本機の落下や転倒などによりけ
がの原因となることがあります。
充分注意して接続・配置してください。
指定のバッテリーパック以外の充電には使
用しない
取扱説明書に指定されているバッテリーパッ
ク以外のものを充電すると、火災や感電の原
因となります。
直射日光の当たる場所や熱器具の近くに設
置・保管しない
内部の温度が上がり、火災や故障の原因とな
ることがあります。
真夏の、窓を閉め切った自動車内では 50 ℃を
超えることがありますので、ご注意ください。
AC 電源コードや DC 接続コードを傷つけ
ない
AC 電源コードや DC 接続コードを傷つける
と、火災や感電の原因となります。
• コードを加工したり、傷つけたりしない。
• 重いものをのせたり、引っ張ったりしない。
• 熱器具に近づけたり、加熱したりしない。
• コードを抜くときは、必ずプラグを持って
抜く。
万一、コードが傷んだら、お買い上げ店に交
換をご依頼ください。
ぬれた手で電源プラグをさわらない
ぬれた手で電源プラグを抜き差しすると、感
電の原因となることがあります。
AC 電源コードのプラグ及びコネクターは
突き当たるまで差し込む
真っ直ぐに突き当たるまで差し込まないと、
火災や感電の原因となります。
JP
警告
3
Page 4
注意/電池についての安全上のご注意
下記の注意を守らないと、 けがを
したり周辺の物品に
ことがあります。
損害を与える
電池についての安全上のご 注意
安定した場所に設置する
製品が倒れたり、搭載した機器が落下してけ
がをすることがあります。
十分な強度がある水平な場所に設置してくだ
さい。
付属の AC 電源コードを使う
付属の AC 電源コードを使わないと、火災や
感電の原因となることがあります。
運搬時には、AC 電源コードや DC 接続
ケーブルを取り外す
本機を運搬する際には、AC 電源コードおよ
び DC 接続ケーブルを必ず取り外してくださ
い。AC 電源コードや DC 接続ケーブルに
引っ掛かると、転倒や落下の原因となること
があります。
運搬時はバッテリーパックを掴まない
バッテリー固定部の破損により本機が落下し
てけがをするおそれがあります。
注意/電池についての安全上のご注意
4
電池の使い方を誤ると、液漏れ・発熱・破裂・発火・誤飲に
よる大けがや失明の原因となるので、次のことを必ず守って
ください。
万一、異常が起きたら
• 煙が出たら
1AC 電源コードや DC 接続コードを抜く。
2お買い上げ店にご相談ください。
• 電池の液が目に入ったら
すぐきれいな水で洗い、直ちに医師の治療を受ける。
• 電池の液が皮膚や衣服に付いたら
すぐにきれいな水で洗い流す。
• バッテリー収納部内で液が漏れたら
よくふきとってから、新しい電池を入れる。
ここでは、本機で使用可能なソニー製リチウムイオン電池に
ついての注意事項を記載しています。
• 充電には、ソニーの専用バッテリーチャージャーを使用す
る。
Page 5

• 火の中に投げ入れたり、加熱、半田付け、分解、改造をし
ない。
• 直射日光の当たるところ、炎天下の車内、ストーブのそば
など高温の場所で、使用・放置・充電をしない。
• ハンマーでたたくなどの強い衝撃を与えたり、踏みつけた
りしない。
• 接点部や 3 極と # 極をショートさせたり、金属製のものと
一緒に携帯・保管をしない。
• 所定の充電時間を超えても充電が完了しない場合は、充電
をやめる。
• 電池使用中や充電、保管時に異臭がしたり、発熱・液漏
れ・変色・変形などがあったときは、すぐに使用や充電を
やめる。
• 水や海水につけたり、濡らしたりしない。
充電のしかたについてはバッテリーチャージャーの取扱説明
書(本書)をよく読む。
その他の安全上のご注意
警告
本機は電源スイッチを備えていません。
設置の際には、容易に抜き差しできる、機器に近いコンセン
トに電源プラグを接続してください。
万一、異常が起きた際には、電源プラグを抜いてください。
直射日光の下や火気の近くなど、高温のところにバッテリー
を置かないでください。
注意
指定以外の電池に交換すると、破裂する危険があります。
必ず指定の電池に交換してください。
使用済みの電池は、国または地域の法令に従って処理してく
ださい。
機器を水滴のかかる場所に置かないでください。また水の
入った物、花瓶などを機器の上に置かないでください。
本機を壁との隙間などの狭い場所に設置して使用しないでく
ださい。
その他の安全上のご注意
重要
機器の名称と電気定格は、底面に表示されています。
その他の安全上のご注意
5
Page 6
目次
目次
警告 ....................................................................... 3
注意 ....................................................................... 4
電池についての安全上のご注意 ...................................4
その他の安全上のご注意...............................................5
概要 ................................................................................. 7
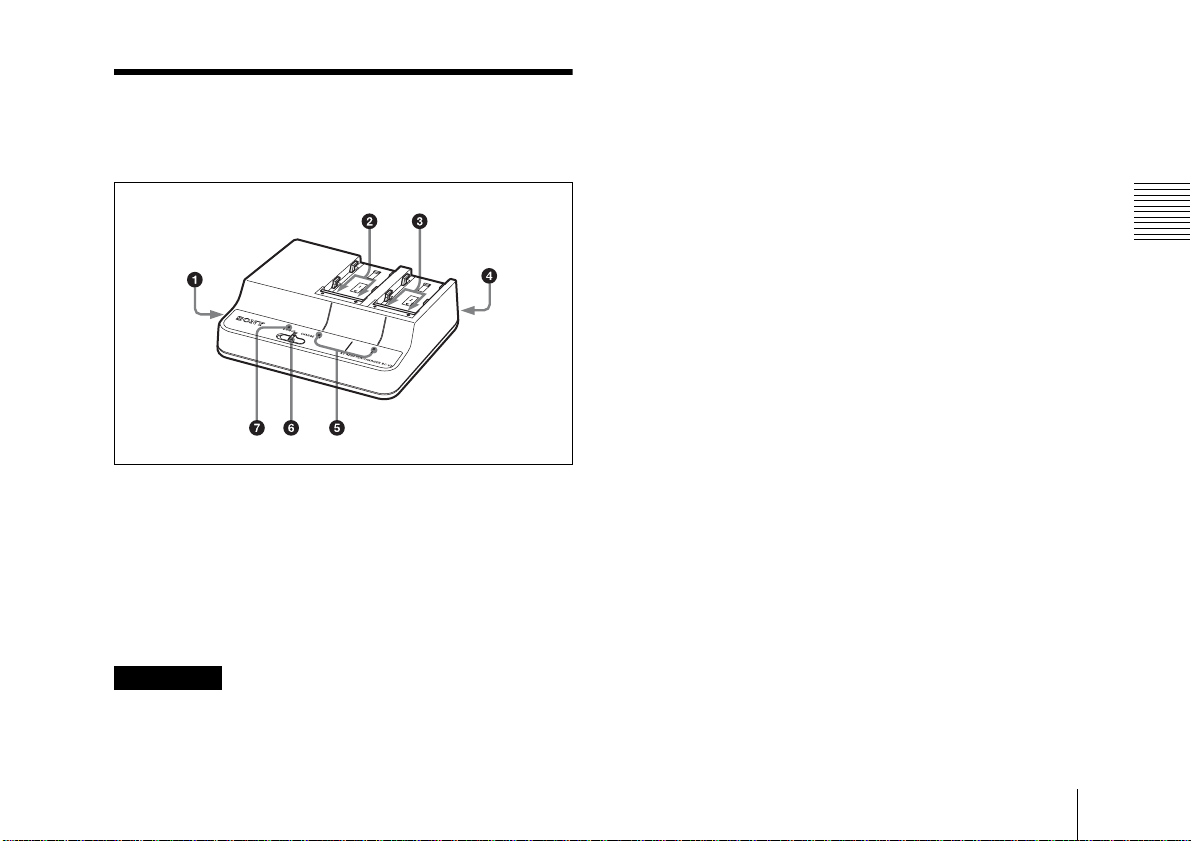
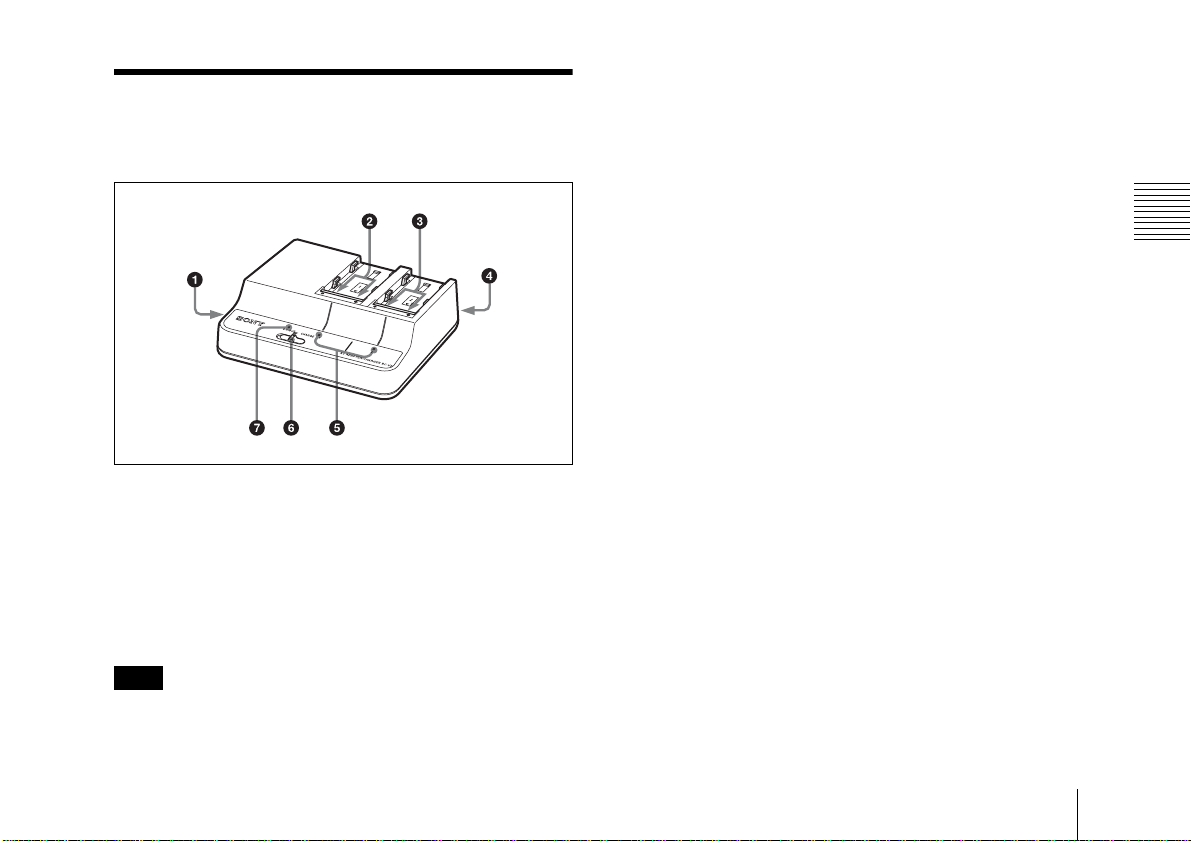
各部の名称と働き ..........................................................7
バッテリーを充電する...................................................8
主な仕様........................................................................11
目次
6
Page 7
概要
バッテリーチャージャー BC-U2 は、ソニーリチウムイオン
バッテリーパック BP-U30/U60/U90 用の充電器です。次の特
長を備えています。
• バッテリー2個を同時に充電できます(CHARGE モード
時)。同じ機種のバッテリー、または異なる機種のバッ
テリーを同時に充電できます。
• 機器に給電しながらバッテリー1個を充電できます(DC
OUT モード時)。
• 従来機種(BC-U1)と比べてフル充電の時間を約 20 分短
縮しました(BP-U60
ご注意
本機をご使用中に不具合が生じたときは、すぐにコンセント
から AC 電源コードを抜いて電源を遮断してください。
/U90 充電時)。
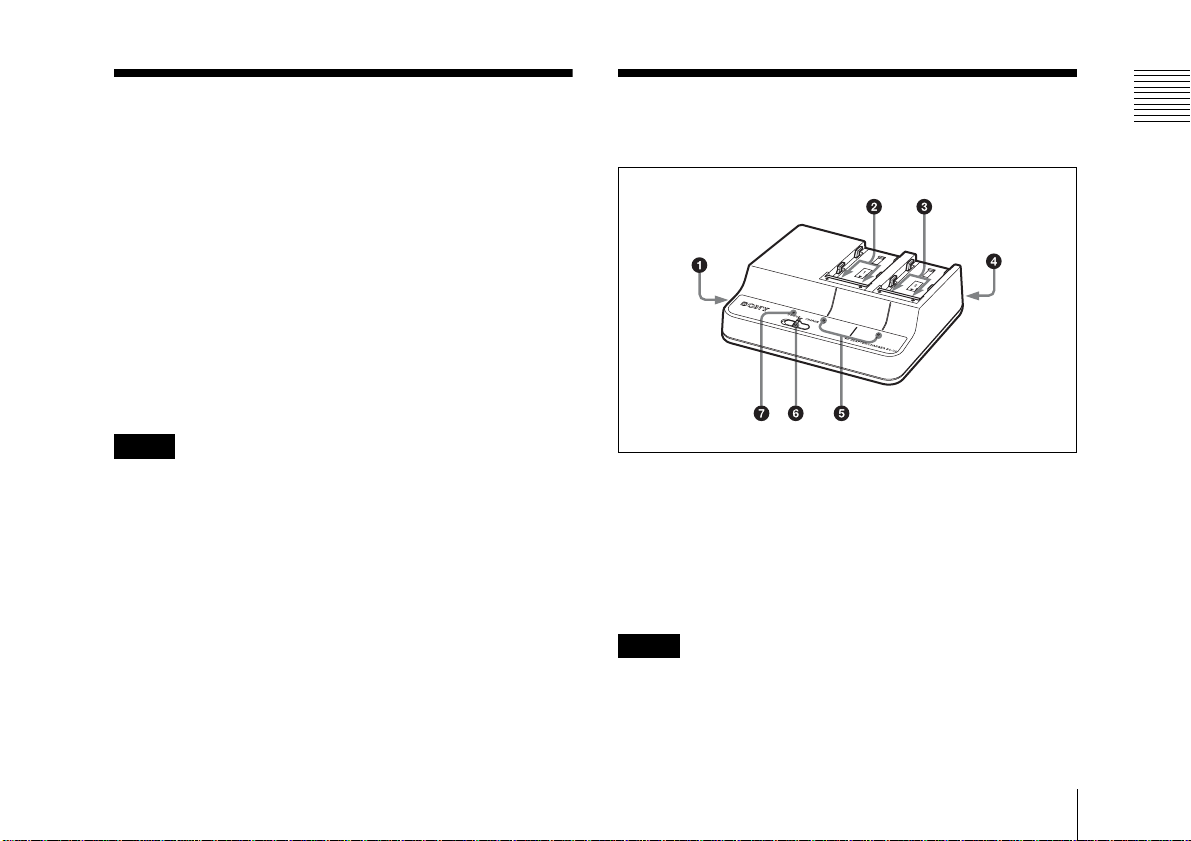
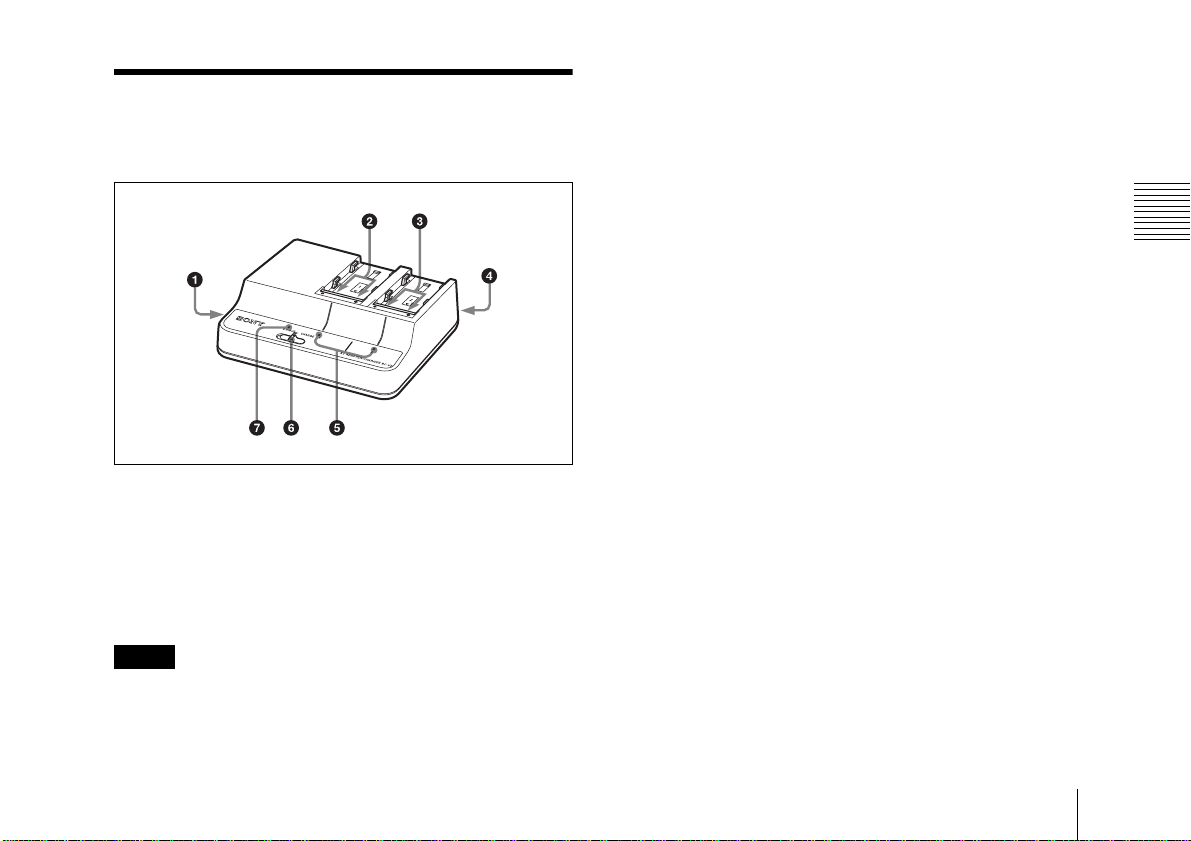
各部の名称と働き
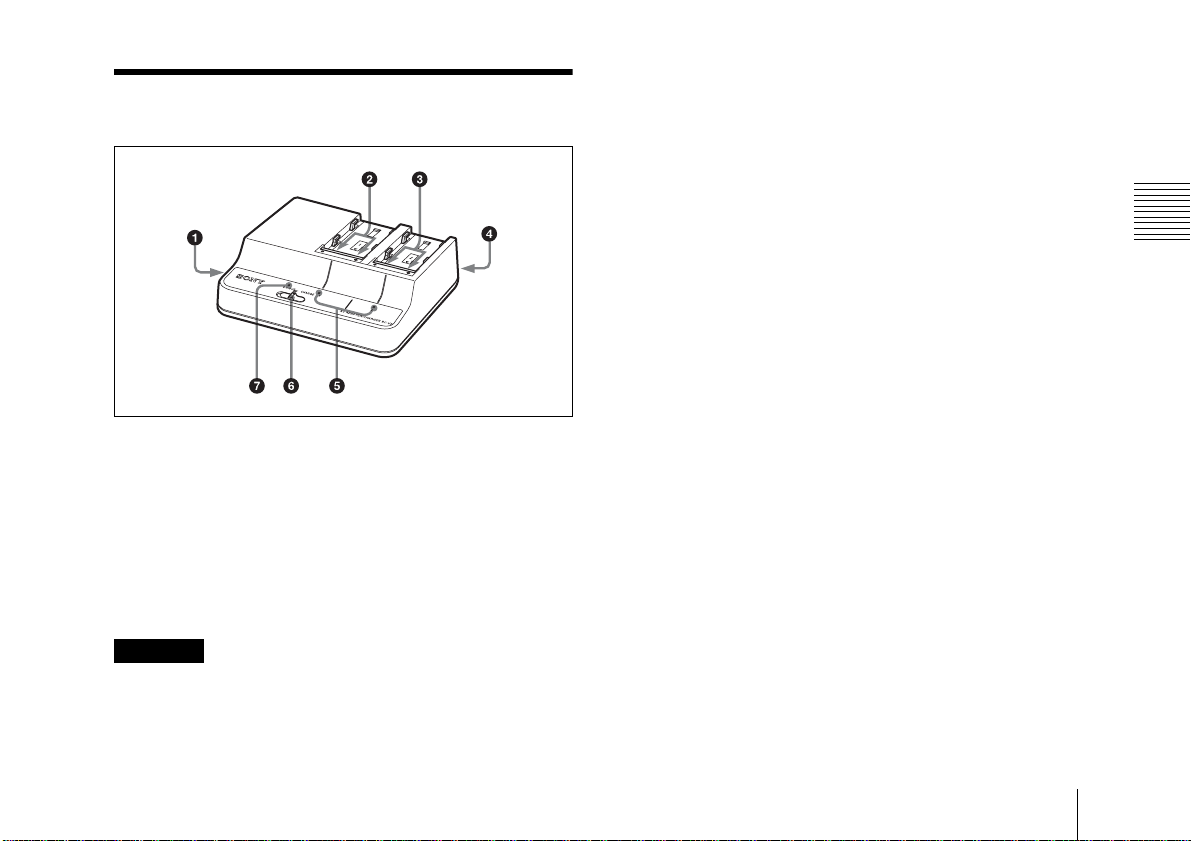
a DCOUT 端子
モード切換スイッチが DCOUT に設定されているとき、DC
電源出力ケーブル(付属)を介して機器に DC 電源を供給し
ます。
DC電源出力ケーブルの絶縁部が黒いプラグをこの端子に、絶
縁部が黄色のプラグを機器に接続してください。
ご注意
• 定格以上の機器と接続しないでください。
• 本機に接続される機器の消費電力によっては、本機が熱
くなることがありますが、これは故障ではありません。
発熱部に長時間触れないようにご注意ください。
概要/各部の名称と働き
概要/各部の名称と働き
7
Page 8
バッテリーを充電する
b チャンネル 1 充電端子
モード切換スイッチが CHARGE に設定されているとき、電
源を供給します。リチウムイオンバッテリーパック以外を充
電しようとしたときは、通電しません。
c チャンネル 2 充電端子
モード切換スイッチの設定にかかわらず電源を供給します。
リチウムイオンバッテリーパック以外を充電しようとしたと
きは、通電しません。
g DCOUT ランプ
モード切換スイッチを DCOUT に設定して、DC 電源を供給
しているとき、緑色に点灯します。
異常を検出すると消灯します。
バッテリーを充電する
d AC 電源入力端子
AC 電源コード(付属)で AC 電源に接続します。
e CHARGE ランプ
リチウムイオンバッテリーパックを充電しているときに点滅
または点灯して、充電状態を示します。
◆ 詳しくは、 「バッテリーを充電する」(8 ページ)をご覧ください。
f モード切換スイッチ
CHARGE:チャンネル 1 およびチャンネル 2 に取り付けた
リチウムイオンバッテリーパックを充電します。
DCOUT:DCOUT 端子から DC 電源を供給すると同時に、
チャンネル 2 に取り付けたリチウムイオンバッテリー
パックを充電します。(チャンネル 1 に取り付けたバッ
テリーパックは充電されません。)
バッテリーを充電する
8
バッテリーの充電時間
完全に放電したバッテリーパックのフル充電までの所要時間
は、以下のとおりです。(気温 25 ℃のとき。1 個のみ充電、2
個同時充電、BP-U30/U60/U90 の混在充電にかかわらず、充
電時間は変わりません。)
BP-U30:約 130 分
BP-U60:約 150 分
BP-U90:約 190 分
Page 9
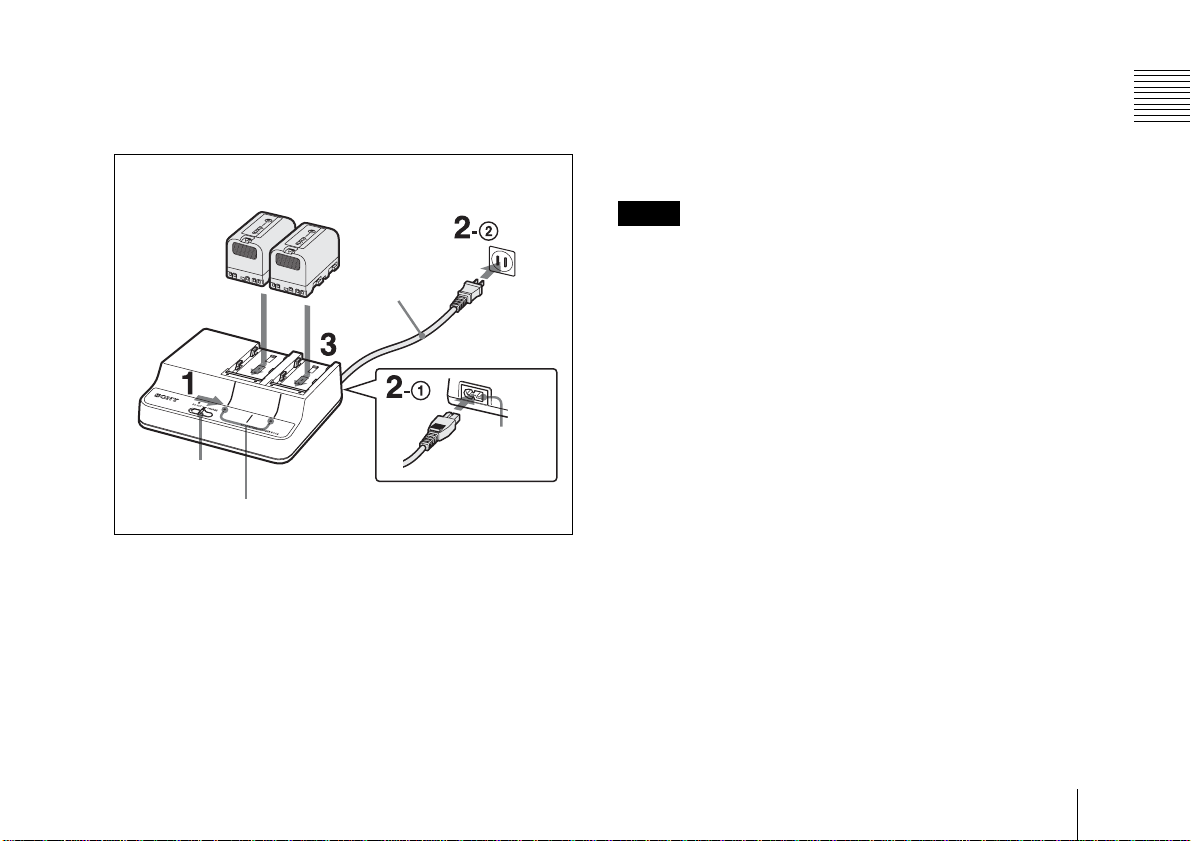
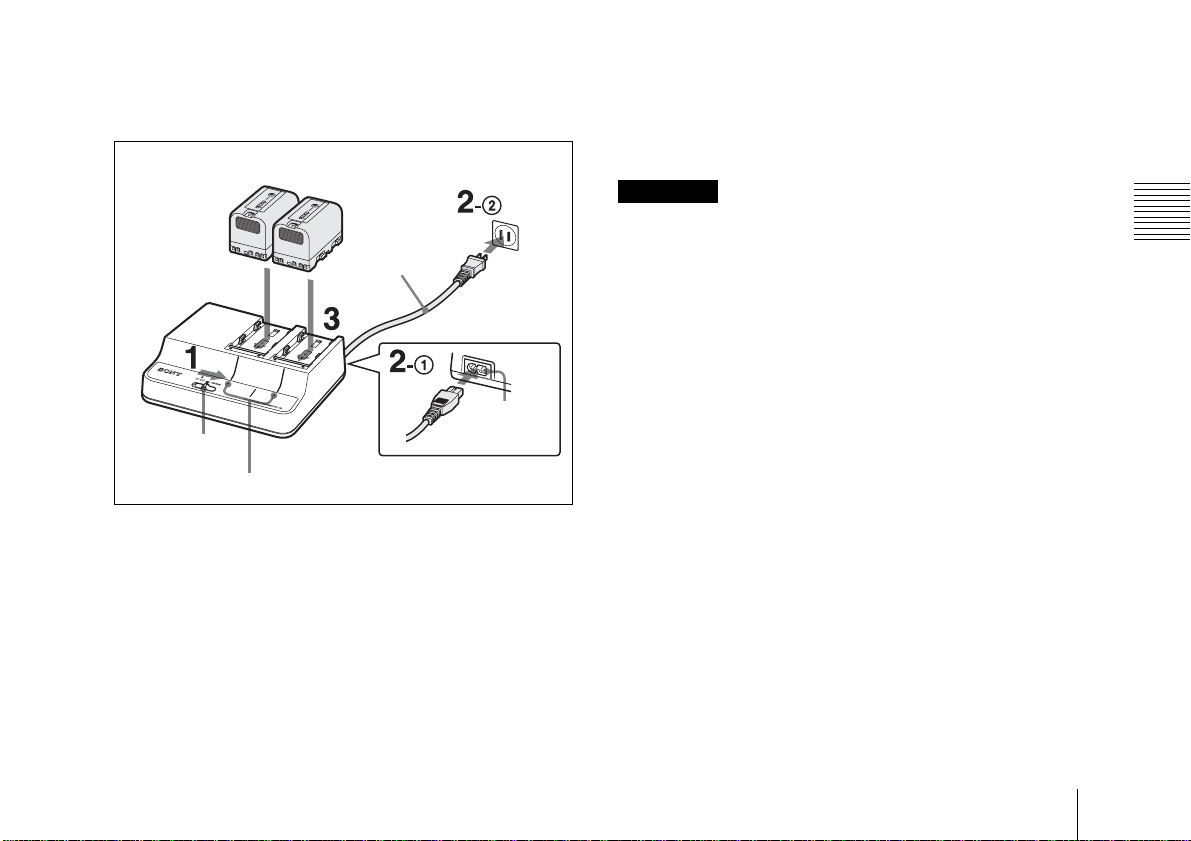
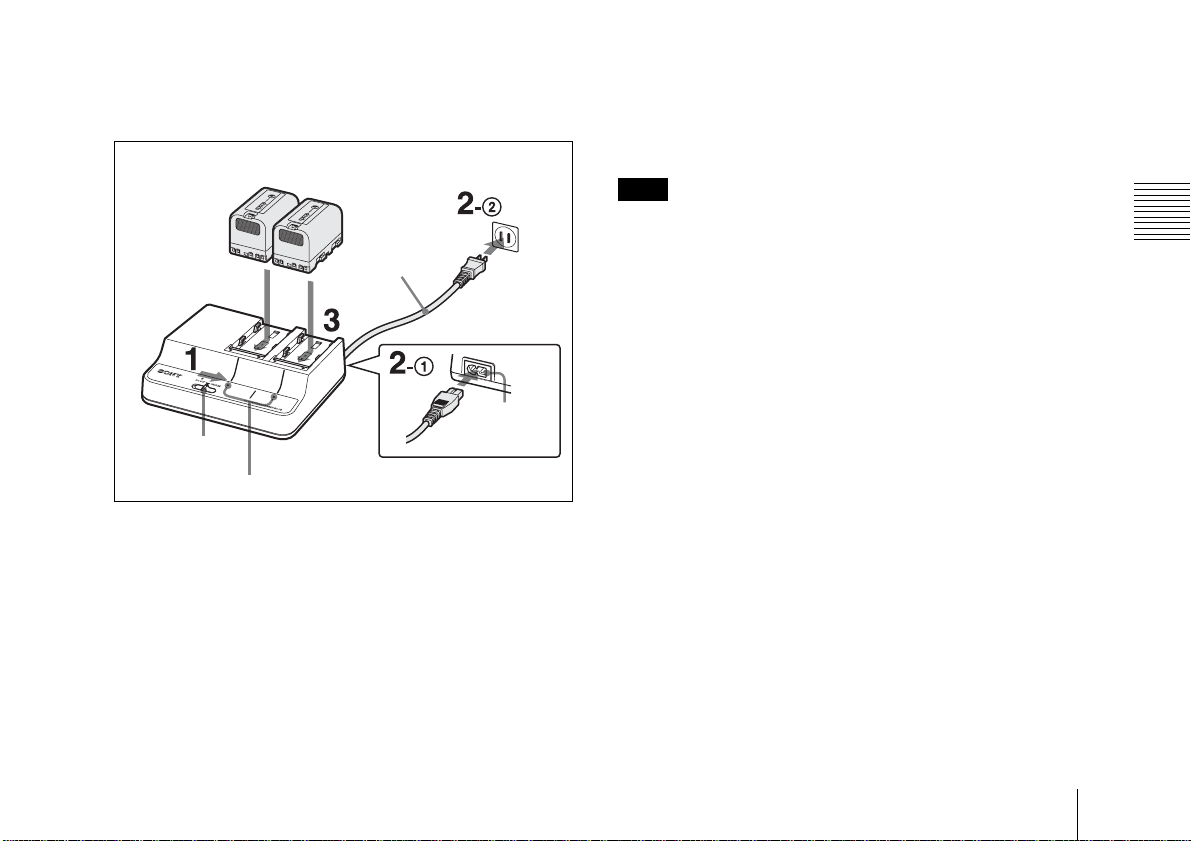
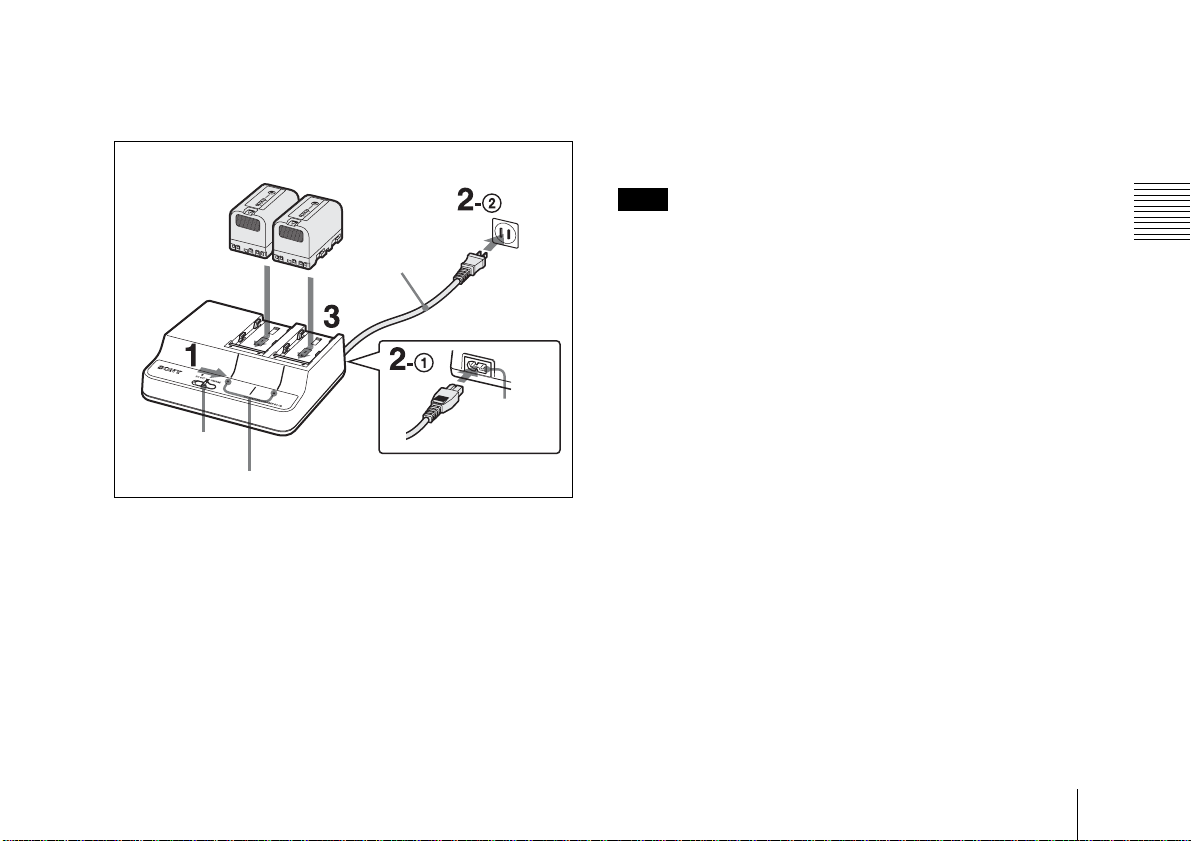
CHARGE モードで充電する
バッテリー 2 個(BP-U30 × 2、BP-U60 × 2、BP-U90 × 2、
または異なる機種のバッテリー2 個)を同時に充電できます。
リチウムイオンバッテリーパック
BP-U30/U60/U90
モード切換
スイッチ
CHARGE ランプ
AC 電源コード
(付属)
AC 電源コンセ
ントへ
AC 電源
入力端子
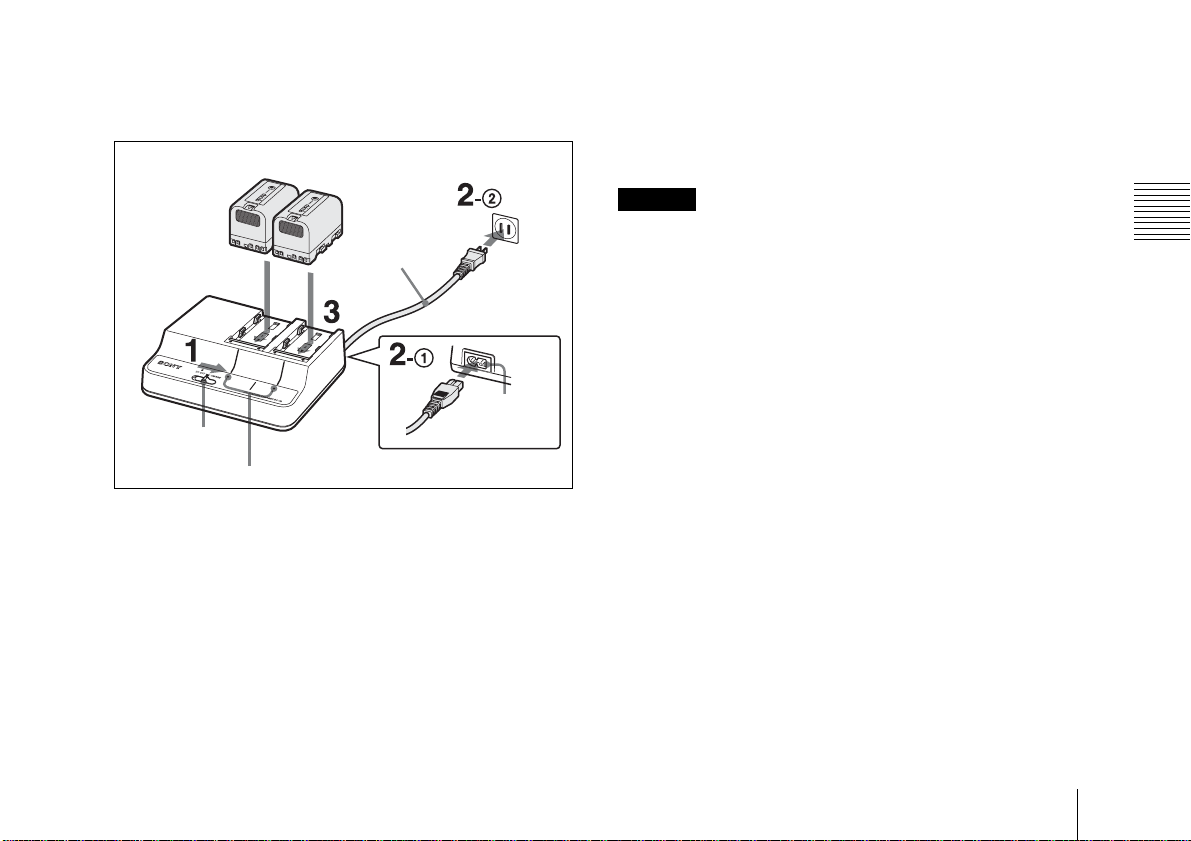
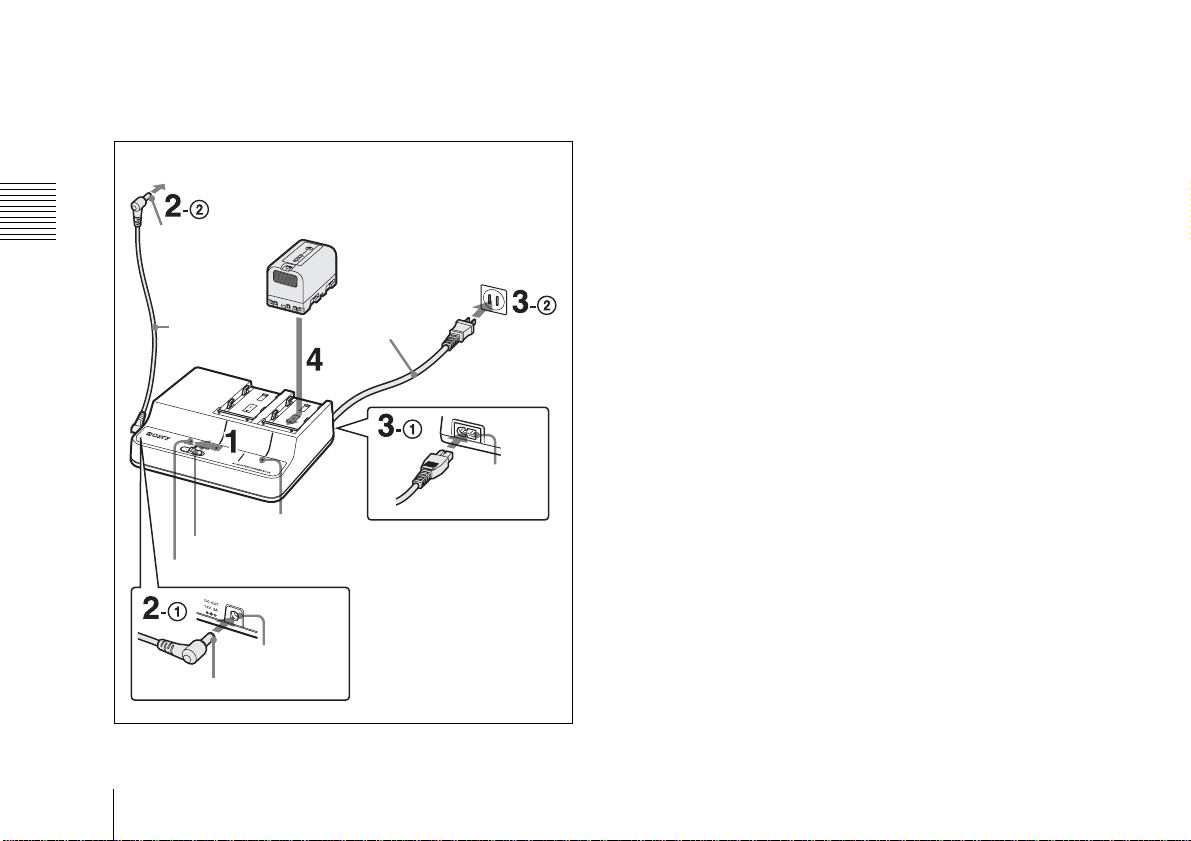
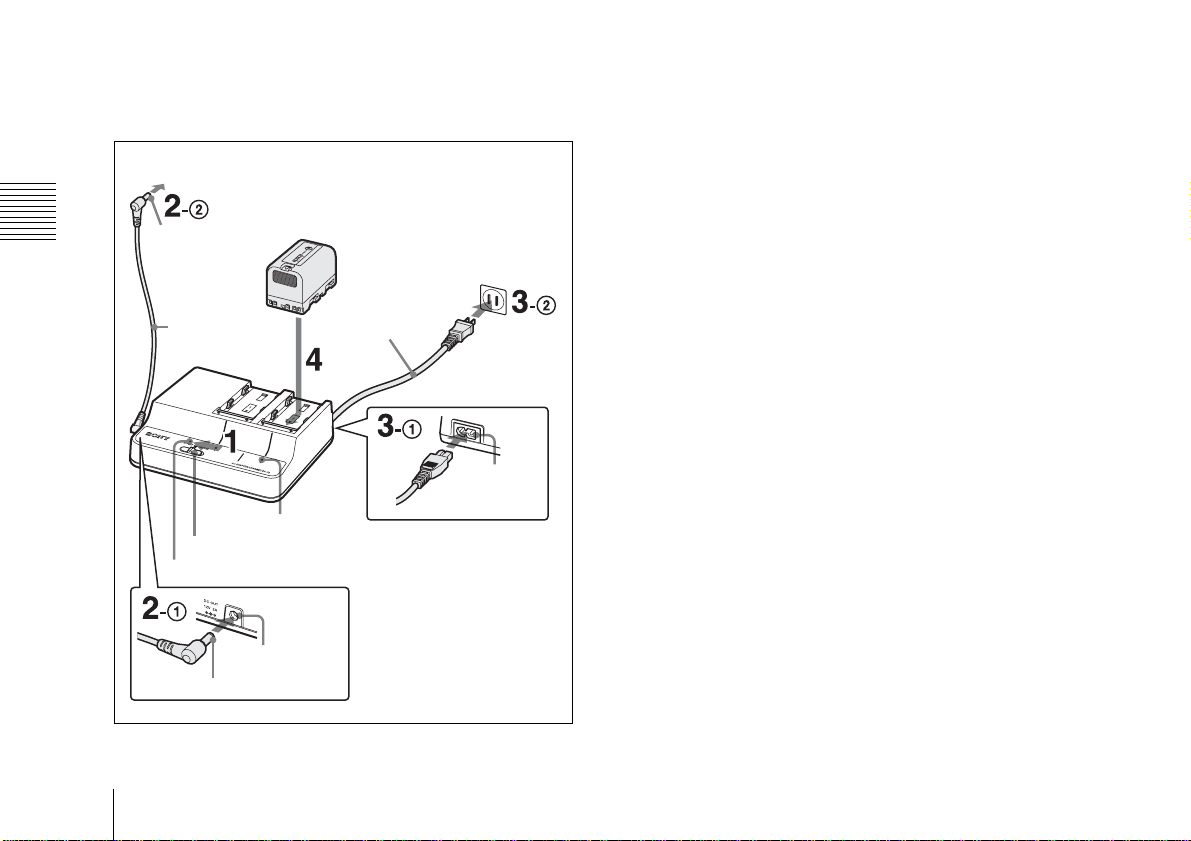
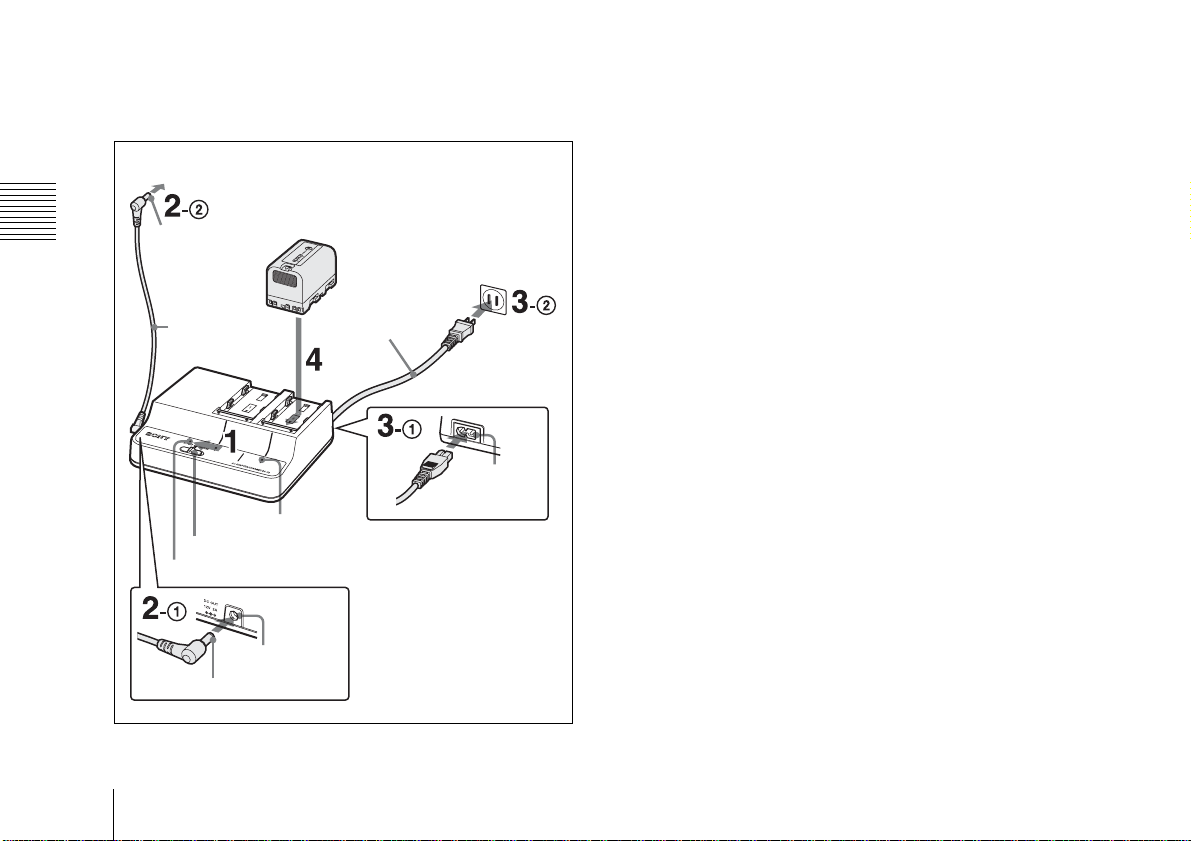
1 モード切換スイッチを CHARGE にする。
2 AC 電源コード(付属)を、1AC 電源入力端子に接続
し、2AC 電源コンセントに差し込む。
充電が始まり、CHARGE ランプが充電の状態を表示し
ます。
オレンジ色の点滅:充電 0% 〜 80%
緑色の点滅:充電 80% 以上
緑色の点灯:充電完了
ご注意
本機で充電可能なバッテリーパック以外を取り付けても、充
電は始まりません。指定のバッテリーをお使いください。
バッテリーを充電する
3 バッテリーパックを取り付ける。
バッテリーパックの▲マークを充電端子のほうに向けて
置き、矢印の方向にバッテリーをスライドさせます。
カチッとはまるまで、しっかり押し込んでください。
バッテリーを充電する
9
Page 10
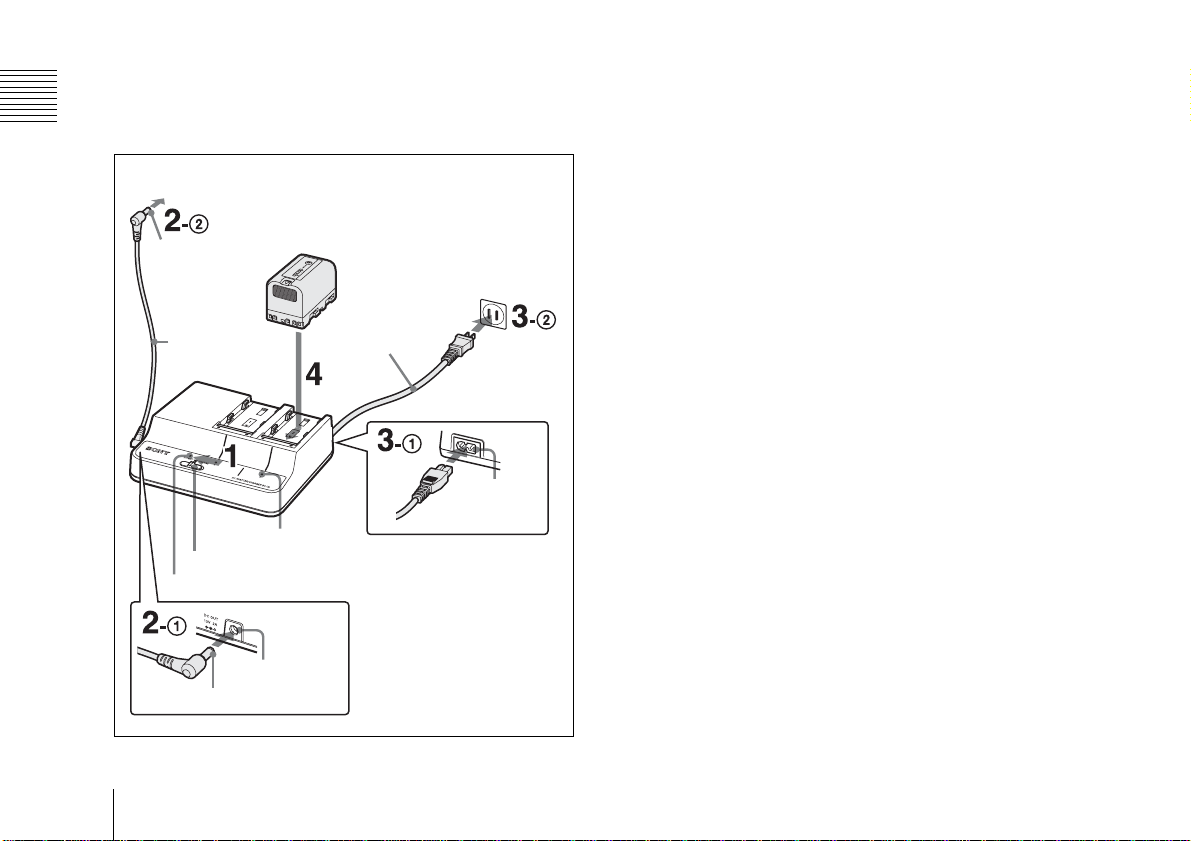
バッテリーを充電する
DCOUT モードで充電する
機器に給電しながらチャンネル 2 でバッテリーパックを充電
できます。
1 モード切換スイッチを DCOUT にする。
2 DC 電源出力ケーブル(付属)を、1DCOUT 端子に接
続し、2DC 電源を供給する機器に接続する。
DC 電源を供給する機器へ
リチウムイオンバッテリーパック
黄色
DC 電源出力
ケーブル(付属)
モード切換スイッチ
DCOUT ランプ
BP-U30/U60/U90
CHARGE ランプ
DCOUT 端子
黒
AC 電源コンセントへ
AC 電源コード
(付属)
AC 電源入力
端子
3 AC 電源コード(付属)を、1AC 電源入力端子に接続
し、2AC 電源コンセントに差し込む。
手順 2 で接続した機器に DC 電源が供給され、DCOUT
ランプが緑色に点灯します。
4 チャンネル 2 にバッテリーパックを取り付ける。
◆ 取り付け方については、前記「CHARGE モードで充電する」の
手順
3 をご覧ください。
バッテリーパックを取りはずす
バッテリーパックを取り付けたときと反対の方向にスライド
させて、上に持ち上げます。
異常を検出すると
CHARGE モードまたは DCOUT モードで充電中に下記の異
常を検出すると、CHARGE ランプがオレンジ色と緑色に交
互に点滅します。
• 充電開始後、急速充電に移行しないとき
• 規定時間内に充電が完了しないとき
• 充電電圧が上がりすぎたとき
• 内部電圧が上がりすぎたとき
• 内部電圧が下がりすぎたとき
バッテリーを充電する
10
Page 11
異常検出時の処置
すぐにコンセントからAC電源コードを抜いて電源を遮断し、
バッテリーパックを取りはずして、お買い上げ店にご相談く
ださい。
主な仕様
電源 AC100V 〜 240V、50/60Hz
消費電力 85W
定格入力容量 充電時:143VA(100V)、180VA(240V)
定格出力 充電時:16.4V、2.2A/1.5A
DC 出力時:12V、2.0A
動作温度 充電時:0 ℃〜 45 ℃
DC出力時:−5℃〜+45℃
保存温度 − 20 ℃〜+ 60 ℃
最大外形寸法 177.0×53.2×137.0mm(幅/高さ/奥行
き)
質量 約 650g(DC 電源出力ケーブルを含み、AC
電源コードを含まず)
付属品
AC 電源コード(部品番号:1-790-732-1x)(1)
DC 電源出力ケーブル(部品番号:1-836-195-1x)(1)
取扱説明書(1)
保証冊子(1)
仕様および外観は、改良のため予告なく変更することがあります
が、ご了承ください。
主な仕様
本機は「高調波電流規格JISC61000-3-2適合品」です。
お使いになる前に、必ず動作確認を行ってください。故障その
他に伴う営業上の機会損失等は保証期間中および保証期間経
過後にかかわらず、補償はいたしかねますのでご了承くださ
い。
主な仕様
11
Page 12
English
Before operating the unit, please read this manual thoroughly
and retain it for future reference.
Important Safety Instructions
• Read these instructions.
• Keep these instructions.
• Heed all warnings.
• Follow all instructions.
• Do not use this apparatus near water.
• Clean only with dry cloth.
• Do not block any ventilation openings. Install in accordance
with the manufacturer’s instructions.
• Do not install near any heat sources such as radiators, heat
registers, stoves, or other apparatus (including amplifiers)
that produce heat.
• Do not defeat the safety purpose of the polarized or
grounding-type plug. A polarized plug has two blades with
one wider than the other. A grounding type plug has two
blades and a third grounding prong. The wide blade or the
third prong is provided for your safety. If the provided plug
does not fit into your outlet, consult an electrician for
replacement of the obsolete outlet.
• Protect the power cord from being walked on or pinched
particularly at plugs, convenience receptacles, and the point
where they exit from the apparatus.
• Only use attachments/accessories specified by the
manufacturer.
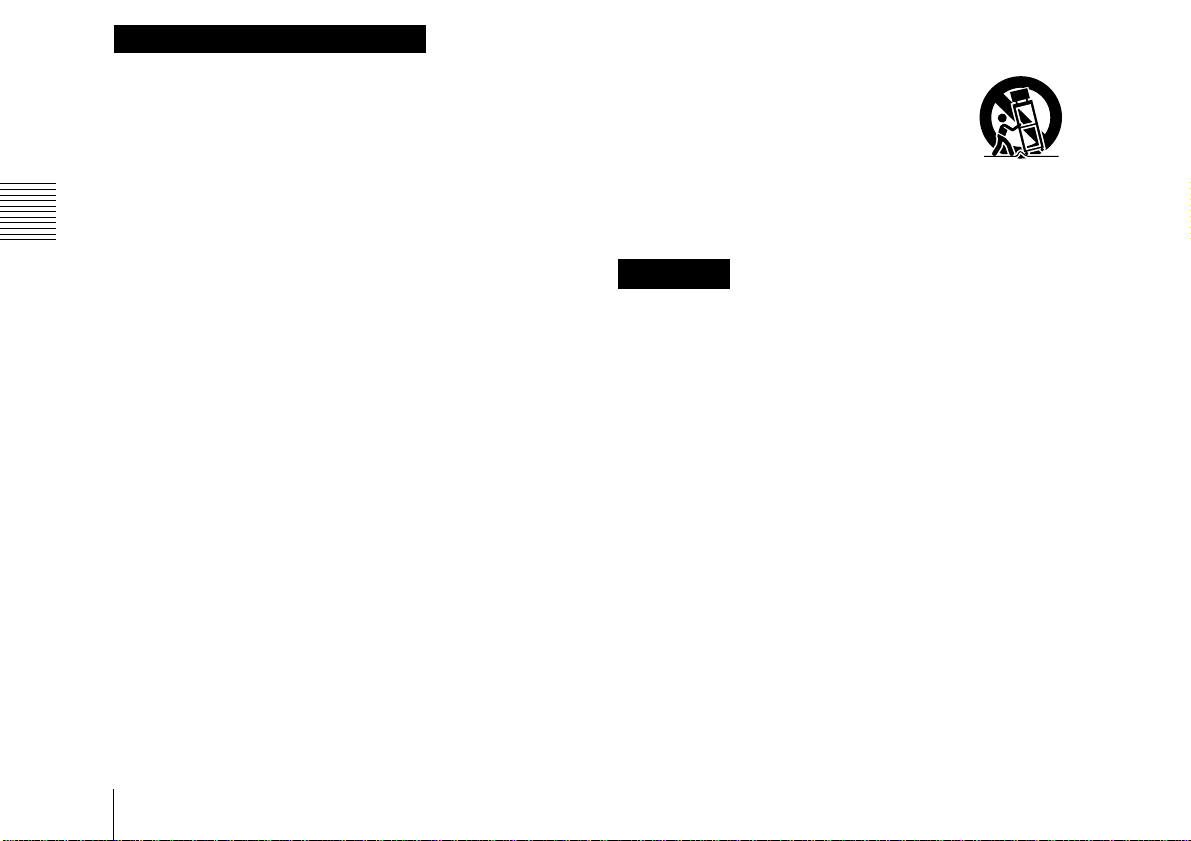
• Use only with the cart, stand, tripod,
bracket, or table specified by the
manufacturer, or sold with the apparatus.
When a cart is used, use caution when
moving the cart/apparatus combination to
avoid injury from tip-over.
• Unplug this apparatus during lightning storms or when
unused for long periods of time.
WARNING
To reduce the risk of fire or electric shock, do not
expose this apparatus to rain or moisture.
To avoid electrical shock, do not open the
cabinet.
WARNING
This unit has no power switch.
When installing the unit, connect the power plug to an easily
accessible socket-outlet near the unit. If a fault should occur
during operation of the unit, disconnect the power plug.
Batteries shall not be exposed to excessive heat such as
sunshine, fire or the like.
12
Page 13
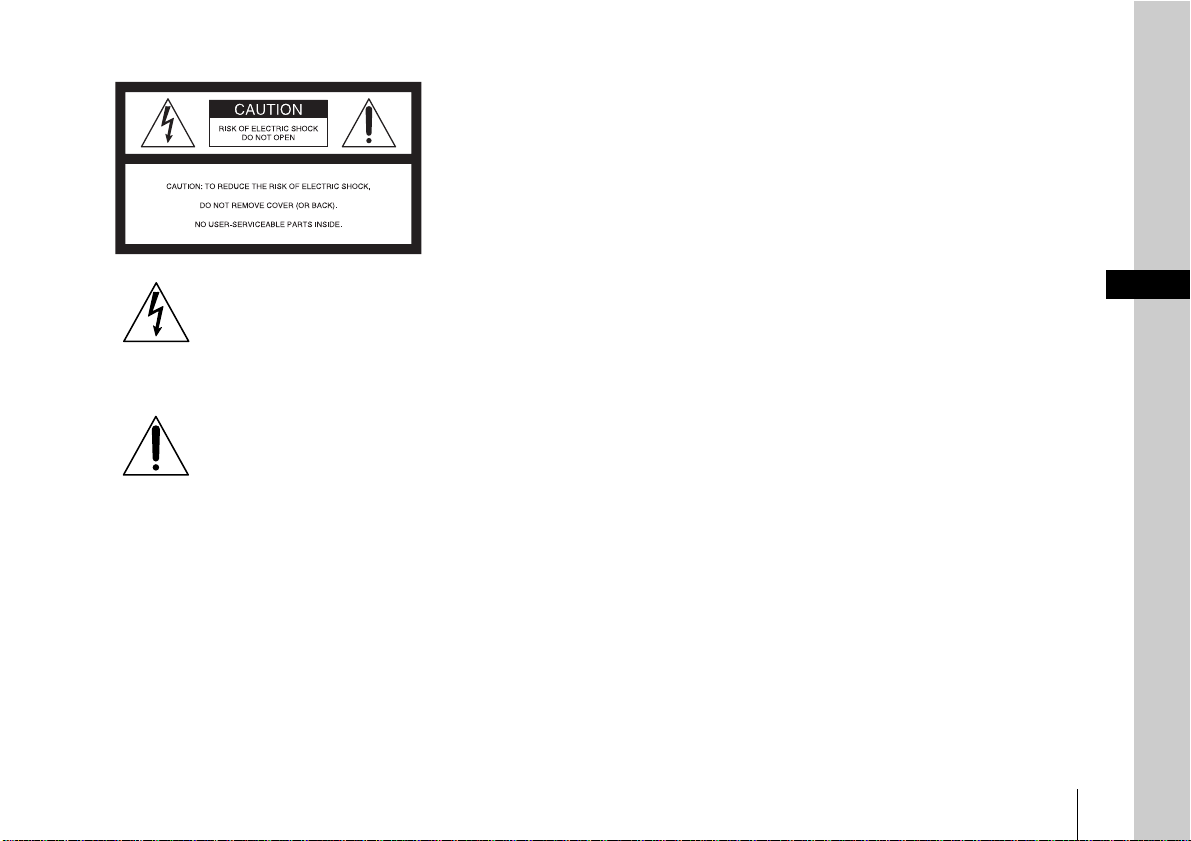
This symbol is intended to alert the user to the
presence of uninsulated “dangerous voltage”
within the product’s enclosure that may be of
sufficient magnitude to constitute a risk of electric
shock to persons.
This symbol is intended to alert the user to the
presence of important operating and maintenance
(servicing) instructions in the literature
accompanying the appliance.
WARNING: THIS WARNING IS APPLICABLE FOR USA
ONLY.
If used in USA, use the UL LISTED power cord specified
below.
DO NOT USE ANY OTHER POWER CORD.
Plug Cap Parallel blade
(NEMA 1-15P Configuration)
Cord Type NISPT-2 or SPT-2, two 16 or 18 AWG wires
Length Minimum 1.5 m (4 ft.11in.), Less than 2.5 m (8 ft.
3 in.)
Rating Minimum 7 A, 125 V
Using this unit at a voltage other than 120V may require the
use of a different line cord or attachment plug, or both.
WAR NING: THIS WARNING IS APPLICABLE FOR OTHER
COUNTRIES.
1. Use the approved Power Cord (2-core mains lead) /
Appliance Connector / Plug that conforms to the safety
regulations of each country if applicable.
2. Use the Power Cord (2-core mains lead) / Appliance
Connector / Plug conforming to the proper ratings (Voltage,
Ampere).
If you have questions on the use of the above Power Cord /
Appliance Connector / Plug, please consult a qualified service
personnel.
CAUTION
Danger of explosion if battery is incorrectly replaced.
Replace only with the same or equivalent type recommended
by the manufacturer.
When you dispose of the battery, you must obey the law in the
relative area or country.
The apparatus shall not be exposed to dripping or splashing.
No objects filled with liquids, such as vases, shall be placed on
the apparatus.
Never place the set in a confined space, such as a bookcase,
or built-in cabinet, unless proper ventilation is provided.
GB
13
Page 14

IMPORTANT
The nameplate is located on the bottom.
For the customers in the U.S.A.
This equipment has been tested and found to comply with the
limits for a Class B digital device, pursuant to Part 15 of the
FCC Rules. These limits are designed to provide reasonable
protection against harmful interference in a residential
installation. This equipment generates, uses, and can radiate
radio frequency energy and, if not installed and used in
accordance with the instruction manual, may cause harmful
interference to radio communications. However, there is no
guarantee that interference will not occur in a particular
installation. If this equipment does cause harmful interference
to radio or television reception, which can be determined by
turning the equipment off and on, the user is encouraged to try
to correct the interference by one or more of the following
measures:
— Reorient or relocate the receiving antenna.
— Increase the separation between the equipment and
receiver.
— Connect the equipment into an outlet on a circuit different
from that to which the receiver is connected.
— Consult the dealer or an experienced radio/TV technician
for help.
You are cautioned that any changes or modifications not
expressly approved in this manual could void your authority to
operate this equipment.
For the customers in Europe
This product with the CE marking complies with both the EMC
Directive and the Low Voltage Directive issued by the
Commission of the European Community.
Compliance with these directives implies conformity to the
following European standards:
• EN60065 : Product Safety
• EN55103-1 : Electromagnetic Interference (Emission)
• EN55103-2 : Electromagnetic Susceptibility (Immunity)
This product is intended for use in the following
Electromagnetic Environments:
E1 (residential), E2 (commercial and light industrial), E3
(urban outdoors), E4 (controlled EMC environment, ex. TV
studio).
The manufacturer of this product is Sony Corporation, 1-7-1
Konan, Minato-ku, Tokyo, Japan.
The Authorized Representative for EMC and product safety is
Sony Deutschland GmbH, Hedelfinger Strasse 61, 70327
Stuttgart, Germany.
All interface cables used to connect peripherals must be
shielded in order to comply with the limits for a digital device
pursuant to Subpart B of Part 15 of FCC Rules.
14
Page 15
For the customers in the U.S.A.
SONY LIMITED WARRANTY - Please visit
http://www.sony.com/psa/warranty
and complete terms and conditions of Sony’s limited
warranty applicable to this product.
for important information
For the customers in Canada
SONY LIMITED WARRANTY - Please visit
http://www.sonybiz.ca/solutions/Support.do
information and complete terms and conditions of Sony’s
limited warranty applicable to this product.
for important
For the customers in Europe
Sony Professional Solutions Europe - Standard Warranty
and Exceptions on Standard Warranty.
Please visit http://www.pro.sony.eu/warranty for important
information and complete terms and conditions.
For the customers in Korea
SONY LIMITED WARRANTY - Please visit
http://bpeng.sony.co.kr/handler/BPAS-Start
information and complete terms and conditions of Sony’s
limited warranty applicable to this product.
for important
15
Page 16

Table of Contents
Overview
Overview .....................................................................16
Location and Function of Parts ...............................17
Table of Contents / Overview
Charging Battery Packs ............................................18
Specifications ............................................................. 20
The BC-U2 Battery Charger charges the Sony BP-U30/U60/U90
Lithium-ion Battery Pack. It has the following features.
• In CHARGE mode, it can charge two battery packs
simultaneously (two batteries of the same model or two batteries
of different models).
• In DC OUT mode, it can charge one battery while supplying
power to a connected device.
• Charging time is about 20 minutes shorter than the previous
model (BC-U1) (when charging BP-U60/U90 batteries).
Note
If some trouble occurs when operating this unit, disconnect the AC
power cord from the AC power source to shut off power supply.
Table of Contents / Overview
16
Page 17
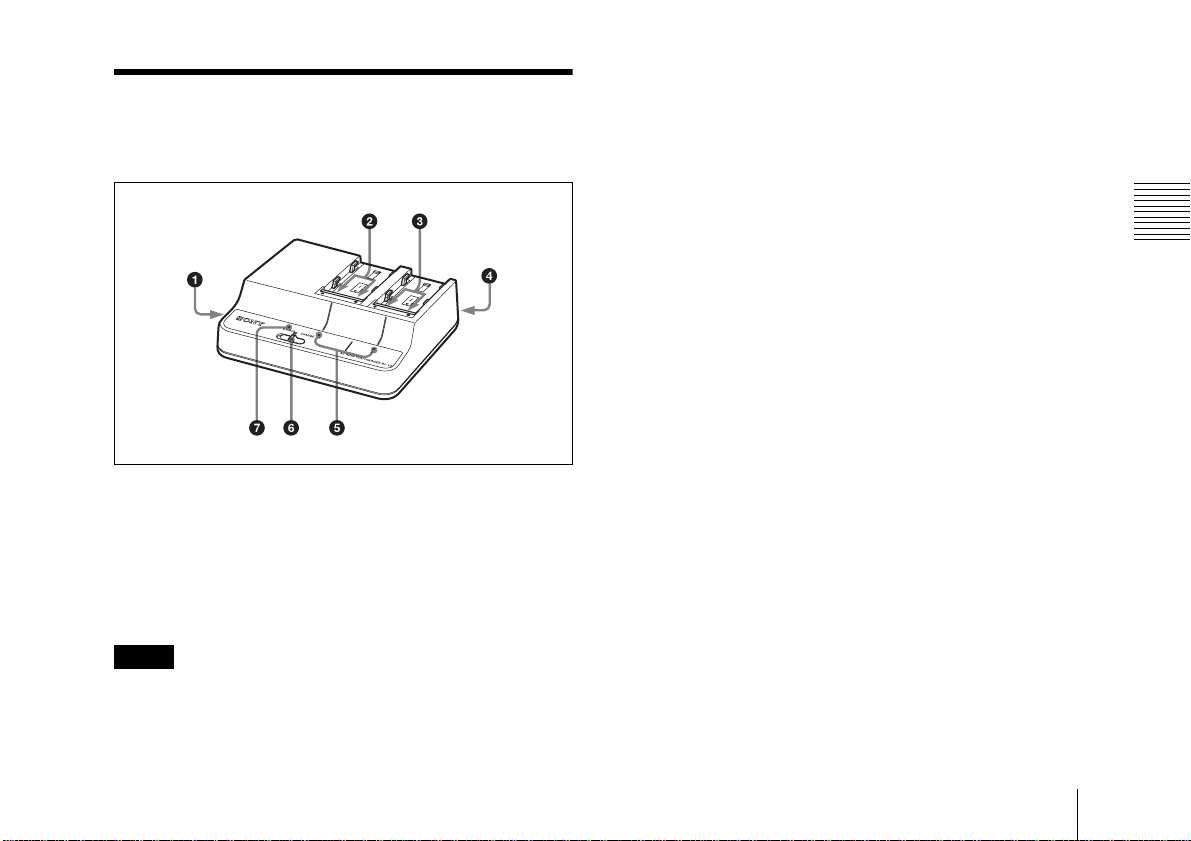
Location and Function of Parts
a DC OUT connector
Supplies DC power to a connected device via the supplied DC output
cable when the mode select switch is set to DC OUT.
The DC output cable has a plug with black insulation and a plug with
yellow insulation. Connect the plug with black insulation to this
apparatus and the plug with yellow insulation to the connected
device.
Notes
• Do not connect a device with power requirements higher than the
specified values.
• Depending on the power consumed by the connected device, the
apparatus may become warm. This is not a malfunction. Avoid
prolonged contact with the apparatus if it should become warm.
b Channel 1 charge connectors
Supplies power when the mode select switch is set to CHARGE.
The charging current is automatically blocked when a battery pack
other than a lithium-ion battery pack has been mistakenly attached.
c Channel 2 charge connectors
Supplies power regardless of the setting of the mode select switch.
The charging current is automatically blocked when a battery pack
other than a lithium-ion battery pack has been mistakenly attached.
d AC input connector
Connects to an AC power source via the AC power cord.
e CHARGE indicators
Shows the charging status of the attached battery packs during
charging of battery packs.
For details, see “Charging Battery Packs” on page 18.
f Mode select switch
CHARGE: Supplies power to lithium-ion battery packs connected
to channel 1 and channel 2.
DC OUT: Supplies DC power from the DC OUT connector, and at
the same time supplies power to a lithium-ion battery pack
connected to channel 2. (A battery pack connected to channel 1
is not charged.)
g DC OUT indicator
Lights in green when the mode select switch is set to DC OUT and
DC power is being supplied.
If some trouble is detected, the indicator goes dark.
Location and Function of Parts
Location and Function of Parts
17
Page 18
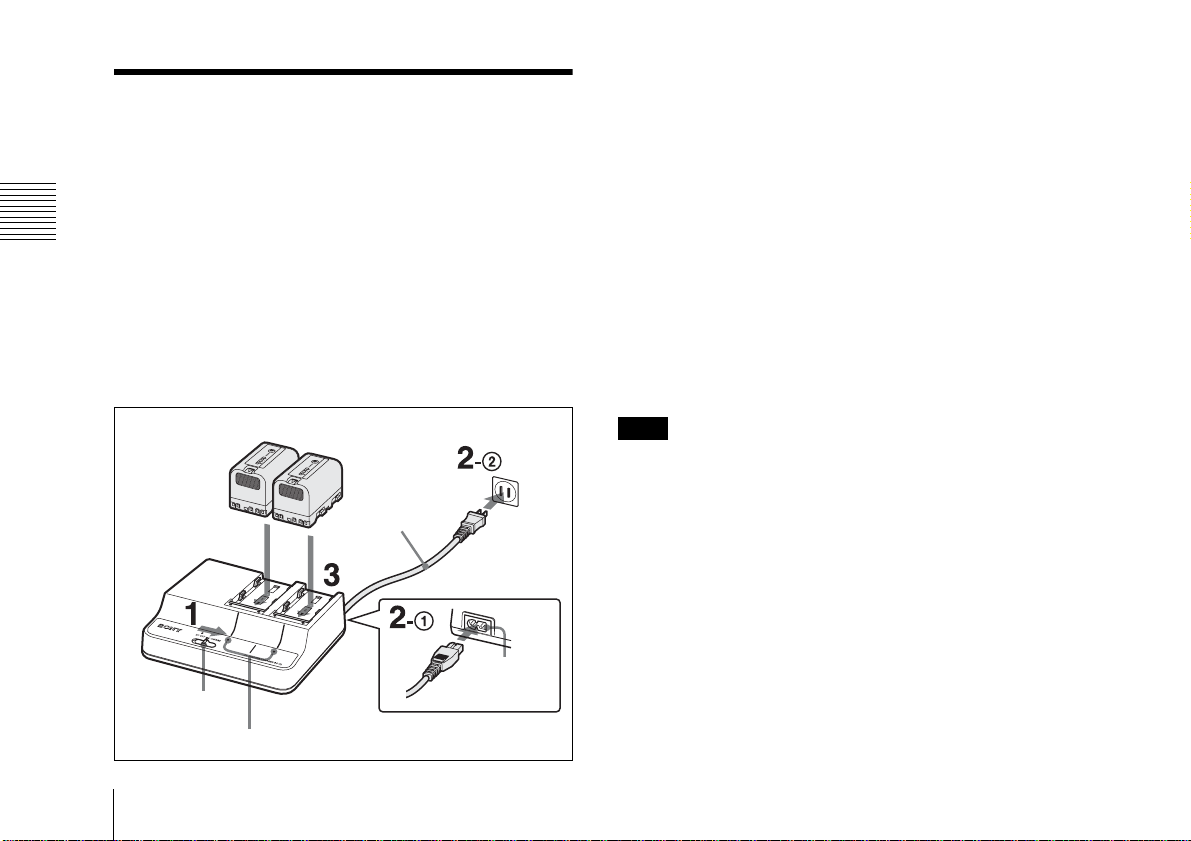
1 Set the mode select switch to CHARGE.
Charging Battery Packs
Charging time
The time to charge a completely exhausted battery pack to its full
capacity is shown below. (When the temperature is 25°C (77°F). The
Charging Battery Packs
charging time is not affected by whether one or two battery packs are
being charged, or by combinations of different battery models.)
BP-U30: approximately 130 minutes
BP-U60: approximately 150 minutes
BP-U90: approximately 190 minutes
Charging in CHARGE mode
You can charge two battery packs simultaneously (two batteries of
the same model or two batteries of different models).
2 Connect the AC power cord 1 to the AC input connector
and 2 to an AC power source.
3 Attach the battery packs.
Place the battery packs with the triangle marks facing the
charge connectors and slide them in the direction indicated by
the arrows.
Be sure to push the battery packs to engage the charge
connectors until they click.
Charging begins, and the CHARGE indicators show the
charging status.
Flashing in orange: Charged between 0 to 80%
Flashing in green: Charged over 80%
Lit in green: Fully charged
BP-U30/U60/U90 lithium-ion battery packs
Mode select switch
Charging Battery Packs
18
CHARGE indicators
AC power cord
To AC power source
AC input
connector
Note
The charging current is automatically blocked if a battery pack other
than a lithium-ion battery pack is attached. Be sure to charge
designated battery packs only.
Page 19
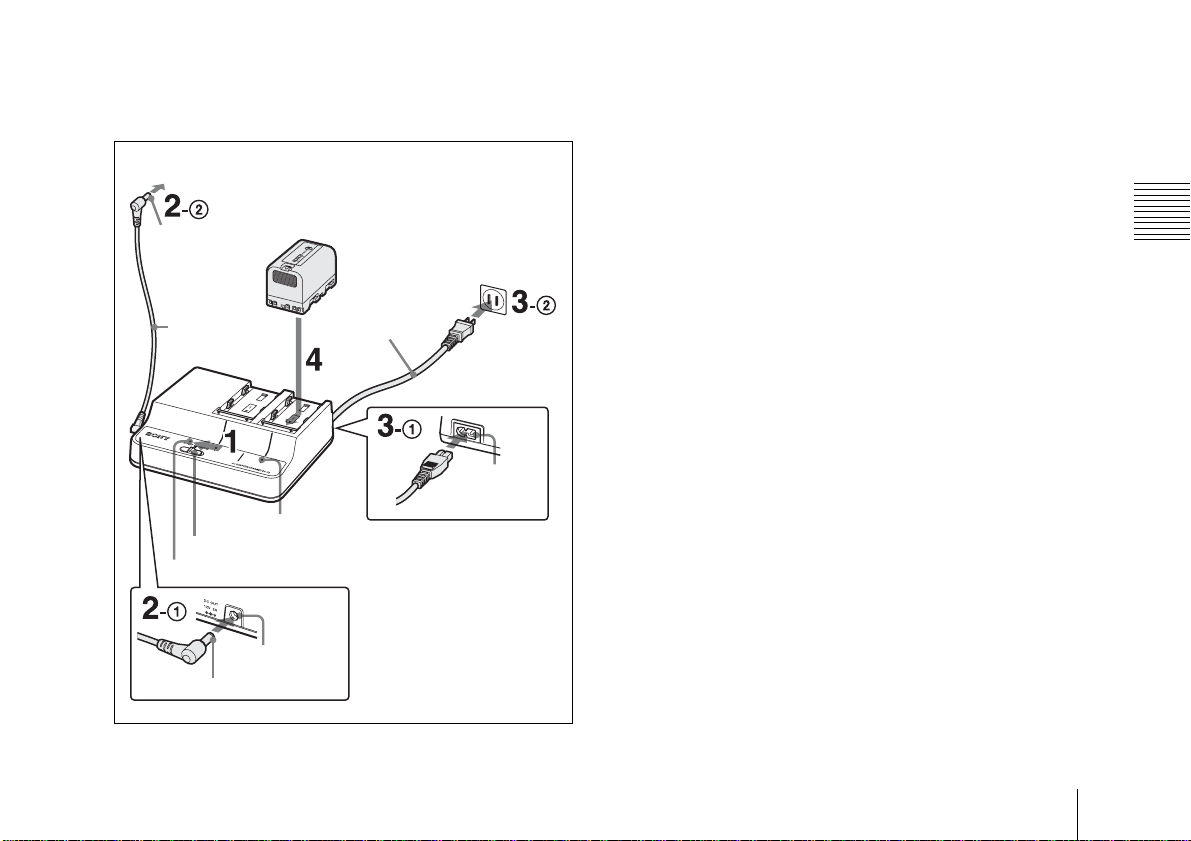
Charging in DC OUT mode
You can charge a battery pack on channel 2 while supplying power
to a connected device.
To DC powered device
BP-U30/U60/U90 lithium-ion
Yellow
DC output cable
(supplied)
Mode select switch
DC OUT indicator
battery pack
CHARGE indicator
DC OUT
connector
Black
AC power cord
To AC power source
AC input
connector
1 Set the mode select switch to DC OUT.
2 Connect the supplied DC output cable 1 to the DC OUT
connector and 2 to the DC powered device.
3 Connect the AC power cord 1 to the AC input connector
and 2 to an AC power source.
DC power is supplied to the device connected in step 2, and the
DC OUT indicator lights in green.
4 Attach a battery pack to channel 2.
See step 3 in “Charging in CHARGE mode” for information about how
to attach a battery pack.
Detaching a battery pack
Slide the attached battery pack in the opposite direction to that when
attaching then pull it up.
When an error is detected
When one of the following conditions is detected during charging in
CHARGE mode or DC OUT mode, the CHARGE indicator flashes
in orange and green alternately:
• After the start of charging, quick charging does not begin.
• Charging does not finish within a specified period.
• The voltage for battery charging has exceeded the specified level.
• The internal voltage has exceeded the specified level.
• The internal voltage has dropped below the specified level.
Charging Battery Packs
Charging Battery Packs
19
Page 20
Action to take if an error is detected
Immediately disconnect the AC power cord from the AC power
source, remove the battery packs, and contact the vendor from whom
you purchased the apparatus.
Specifications
Specifications
Voltage source 100 V to 240 V AC, 50/60 Hz
Power consumption 85 W
Current drain Charging: 143 VA (100 V), 180 VA (240V)
Output Charging: 16.4 V, 2.2 A/1.5 A
DC output: 12 V, 2.0 A
Peak inrush current (1) Power ON, current probe method: 65 A
(100 V)/95 A (240 V)
(2) Hot switching inrush current, measured in
accordance with European standard
EN55103-1: 29 A (230 V)
Operating temperature
Charging: 0°C to 45°C (32°F to 113°F)
DC output: −5°C to +45°C (23°F to 113°F)
Storage temperature −20°C to +60°C (−4°F to +140°F)
Dimensions (w/h/d) 177.0 × 53.2 × 137.0 mm
Mass Approx. 650 g (1 lb 6 oz) (including DC
1
(7 × 2
/8 × 5 1/2 inches)
output cable, not including AC power cord)
Note
Always verify that the unit is operating properly before use. SONY WILL
NOT BE LIABLE FOR DAMAGES OF ANY KIND INCLUDING, BUT
NOT LIMITED TO, COMPENSATION OR REIMBURSEMENT ON
ACCOUNT OF THE LOSS OF PRESENT OR PROSPECTIVE PROFITS
DUE TO FAILURE OF THIS UNIT, EITHER DURING THE
WARRANTY PERIOD OR AFTER EXPIRATION OF THE
WARRANTY, OR FOR ANY OTHER REASON WHATSOEVER.
Supplied accessories
DC output cable (Part number: 1-836-195-1x) (1)
Operating Instructions (1)
Warranty Booklet (1)
Design and specifications are subject to change without notice.
20
Specifications
Page 21
Français
Avant d’utiliser l’appareil, veuillez lire attentivement ce manuel
et le conserver pour future référence.
Consignes de sécurité importantes
• Lisez ces instructions.
• Conservez ces instructions.
• Tenez compte de tous les avertissements.
• Suivez toutes les instructions.
• N’utilisez pas cet appareil à proximité d’eau.
• Nettoyez cet appareil uniquement avec un chiffon sec.
• Ne bloquez aucun orifice de ventilation.
Installez cet appareil conformément aux instructions du
fabricant.
• Ne l’installez pas à proximité de sources de chaleur comme
des radiateurs, des registres de chaleur, des poêles ou
d’autres appareils (y compris des amplificateurs) produisant
de la chaleur.
• Ne désactivez pas le dispositif de sécurité de la fiche
polarisée ou avec mise à la terre. Une fiche polarisée
possède deux lames dont l’une est plus large que l’autre.
Une fiche avec mise à la terre possède deux lames et une
troisième broche de mise à la terre. La lame la plus large et
la troisième broche sont fournies pour votre sécurité. Si la
fiche fournie ne rentre pas dans votre prise de courant,
consultez un électricien afin qu’il remplace la prise obsolète.
• Protégez le cordon d’alimentation afin que personne ne
marche dessus et qu’il ne se coince pas, en particulier au
niveau de la fiche, de la prise de courant et à l’endroit où il
sort de l’appareil.
• N’utilisez que les fixations et accessoires indiqués par le
fabricant.
• Utilisez l’appareil uniquement avec le chariot, le
support, le trépied ou la table indiqué par le
fabricant ou vendu avec l’appareil. Lorsque vous
utilisez un chariot, faites attention lorsque vous
déplacez le chariot et l’appareil ensemble afin
d’éviter de vous blesser en cas de chute.
• Débranchez cet appareil en cas d’orage ou lorsqu’il n’est
pas utilisé pendant de longues périodes.
• Faites appel à un technicien qualifié pour toute réparation/
entretien. L’entretien/réparation est nécessaire lorsque
l’appareil a été endommagé de quelque façon que ce soit,
par exemple si le cordon ou la fiche d’alimentation a été
endommagé, si du liquide a été renversé ou si des objets
sont tombés dans l’appareil, si l’appareil a été exposé à la
pluie ou à l’humidité, s’il ne fonctionne pas normalement ou
s’il a subi une chute.
AVERTISSEMENT
Afin de réduire les risques d’incendie ou
d’électrocution, ne pas exposer cet appareil à la
pluie ou à l’humidité.
Afin d’écarter tout risque d’électrocution, garder
le coffret fermé.
AVERTISSEMENT
Cet appareil ne possède pas d’interrupteur d’alimentation.
Lors de l’installation de l’appareil, brancher le cordon
d’alimentation dans une prise murale facilement accessible
proche de l’appareil. En cas de problème lors du
fonctionnement de l’appareil, débrancher le cordon de la prise.
FR
21
Page 22
N’exposez pas les batteries à une chaleur excessive, au soleil
ou près d’un feu par exemple.
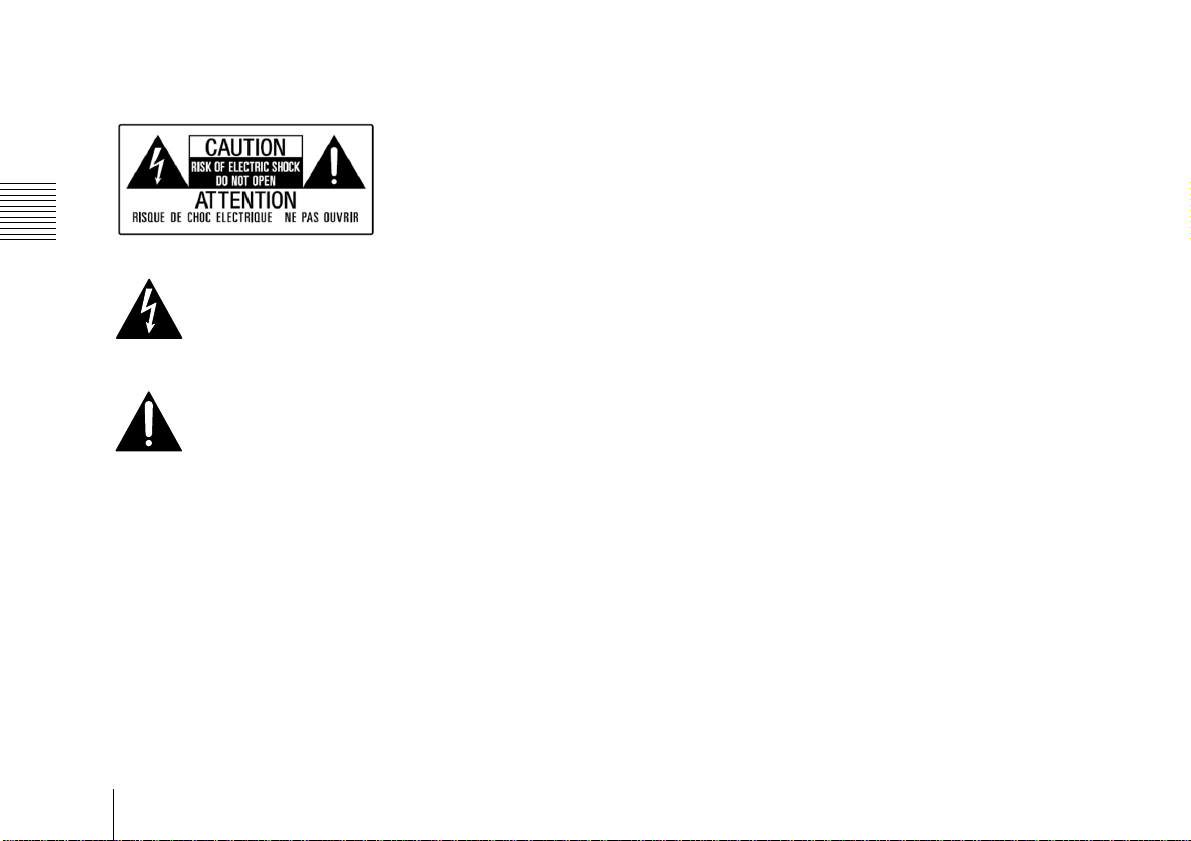
Ce symbole est destiné à avertir l’utilisateur de la
présence d’une « tension dangereuse » non
isolée dans l’enveloppe du produit, qui pourrait
être suffisamment importante pour représenter un
risque d’électrocution pour les personnes.
Ce symbole est destiné à avertir l’utilisateur de la
présence d’instructions d’utilisation et de
maintenance (entretien/réparation) importantes
dans la documentation accompagnant l’appareil.
ATTENTION
Il y a danger d’explosion s’il y a remplacement incorrect de la
batterie. Remplacer uniquement avec une batterie du même
type ou d’un type équivalent recommandé par le constructeur.
Lorsque vous mettez la batterie au rebut, vous devez
respecter la législation en vigueur dans le pays ou la région où
vous vous trouvez.
Eviter d’exposer l’appareil à un égouttement ou à des
éclaboussures. Ne placer aucun objet rempli de liquide,
comme un vase, sur l’appareil.
Ne placez pas l’ensemble dans un endroit confiné, par
exemple une bibliothèque ou un placard encastré, à moins
que l’endroit ne soit correctement ventilé.
IMPORTANT
La plaque signalétique se situe sous l’appareil.
Pour les clients en Europe
AVERTISSEMENT
1. Utilisez un cordon d’alimentation (câble secteur à 2 fils)/
fiche femelle/fiche mâle conformes à la réglementation de
sécurité locale applicable.
2. Utilisez un cordon d’alimentation (câble secteur à 2 fils)/
fiche femelle/fiche mâle avec des caractéristiques
nominales (tension, ampérage) appropriées.
Pour toute question sur l’utilisation du cordon d’alimentation/
fiche femelle/fiche mâle ci-dessus, consultez un technicien du
service après-vente qualifié.
Ce produit portant la marque CE est conforme à la fois à la
Directive sur la compatibilité électromagnétique (EMC) et à la
Directive sur les basses tensions émises par la Commission
de la Communauté Européenne.
La conformité à ces directives implique la conformité aux
normes européennes suivantes :
• EN60065 : Sécurité des produits
• EN55103-1 : Interférences électromagnétiques (émission)
• EN55103-2 : Sensibilité électromagnétique (immunité)
Ce produit est prévu pour être utilisé dans les environnements
électromagnétiques suivants :
22
Page 23
E1 (résidentiel), E2 (commercial et industrie légère),
E3 (urbain extérieur) et E4 (environnement EMC contrôlé,
ex. studio de télévision).
Le fabricant de ce produit est Sony Corporation, 1-7-1 Konan,
Minato-ku, Tokyo, Japon.
Le représentant autorisé pour EMC et la sécurité des produits
est Sony Deutschland GmbH, Hedelfinger Strasse 61,
70327 Stuttgart, Allemagne.
Pour les clients au Canada
GARANTIE LIMITÉE DE SONY - Rendez-vous sur
http://www.sonybiz.ca/solutions/Support.do
informations importantes et l’ensemble des termes et
conditions de la garantie limitée de Sony applicable à ce
produit.
pour obtenir les
23
Page 24
Table de matières
Aperçu
Aperçu ......................................................................... 24
Emplacement et fonctions des composants ......... 25
Table de matières / Aperçu
Chargement des packs de batteries ....................... 26
Spécifications ............................................................. 29
Le Chargeur de batteries BC-U2 charge le pack de batteries Lithiumion Sony BP-U30/U60/U90. Il possède les caractéristiques
suivantes.
• En mode CHARGE, il peut charger simultanément deux packs de
batteries (deux batteries du même modèle ou deux batteries de
modèles différents).
• En mode DC OUT, il peut charger une batterie tout en alimentant
un dispositif branché.
• La durée de chargement est environ de 20 minutes de moins que
le modèle précédent (BC-U1) (lors du chargement de batteries
BP-U60/U90).
Remarque
En cas de problèmes lors de l’utilisation de cette unité, débranchez
le cordon d’alimentation CA de la source d’alimentation CA pour
interrompre l’alimentation.
Table de matières / Aperçu
24
Page 25
Emplacement et fonctions des composants
a Connecteur DC OUT
Fournit une alimentation CC à un dispositif branché via le câble de
sortie CC lorsque l’interrupteur de sélection de mode est réglé sur
DC OUT.
Le câble de sortie CC dispose d’une fiche avec une isolation noire et
d’une fiche avec une isolation jaune. Branchez la fiche avec une
isolation noire à cet appareil et la fiche avec une isolation jaune au
dispositif branché.
Remarques
• Ne branchez pas un appareil avec des exigences d’alimentation
supérieures aux valeurs spécifiées.
• Selon le courant consommé par le dispositif branché, l’appareil
peut devenir chaud. Il ne s’agit pas d’un dysfonctionnement.
Évitez un contact prolongé avec l’appareil s’il devient chaud.
b Connecteurs de charge du canal 1
Fournit une alimentation lorsque l’interrupteur de sélection de mode
est réglé sur CHARGE.
Le courant de charge se bloque automatiquement lorsqu’un pack de
batteries autre que le pack de batteries lithium-ion a été branché par
erreur.
c Connecteurs de charge du canal 2
Fournit une alimentation quel que soit le réglage de l’interrupteur de
sélection de mode.
Le courant de charge se bloque automatiquement lorsqu’un pack de
batteries autre que le pack de batteries lithium-ion a été branché par
erreur.
d Connecteur d’entrée CA
Raccorde une source d’alimentation CA au moyen du cordon
d’alimentation CA.
e Indicateurs CHARGE
Indiquent l’état de chargement des packs de batteries branchés
pendant le chargement de packs de batteries.
Pour tout détail, voir « Chargement des packs de batteries » à la page 26.
f Interrupteur de sélection de mode
CHARGE : Fournit une alimentation aux packs de batteries
lithium-ion branchés au canal 1 et au canal 2.
DC OUT : Fournit une alimentation CC depuis le connecteur DC
OUT et fournit en même temps une alimentation à un pack de
batteries lithium-ion branché au canal 2. (Un pack de batteries
branché au canal 1 n’est pas chargé.)
Emplacement et fonctions des composants
Emplacement et fonctions des composants
25
Page 26
g Indicateur DC OUT
S’allume en vert lorsque l’interrupteur de sélection de mode est réglé
sur DC OUT et qu’une alimentation CC est fournie.
Si un problème est détecté, l’indicateur s’éteint.
Chargement des packs de batteries
Temps de charge
Le temps nécessaire pour charger au maximum un pack de batteries
Chargement des packs de batteries
complètement déchargé est indiqué ci-après. (Lorsque la
température est de 25°C (77°F). Le temps de chargement n’est pas
affecté par le nombre de packs de batteries, un ou deux, en cours de
chargement, ni par la combinaison de deux batteries de modèles
différents.)
BP-U30 : environ 130 minutes
BP-U60 : environ 150 minutes
BP-U90 : environ 190 minutes
Chargement des packs de batteries
26
Page 27
Chargement en mode CHARGE
Vous pouvez charger simultanément deux packs de batteries (deux
batteries du même modèle ou deux batteries de modèles différents).
Pack de batteries lithium-ion
BP-U30/U60/U90
Interrupteur de
sélection de
mode
Indicateurs CHARGE
Cordon
d’alimentation
CA
Vers une source
d’alimentation CA
Connecteur
d’entrée CA
1 Réglez l’interrupteur de sélection de mode sur CHARGE.
2 Branchez le cordon d’alimentation CA 1 au connecteur
d’entrée CA et 2 à une source d’alimentation CA.
3 Mettez en place les packs de batteries. Placez les packs de
batteries avec les repères triangulaires orientés vers les
connecteurs de charge et glissez-les dans le sens indiqué par
les flèches. Veillez à pousser les packs de batteries afin
d’engager les connecteurs de charge et à entendre un déclic.
Le chargement débute et les indicateurs CHARGE
indiquent l’état de chargement.
Clignotement orange : Chargé entre 0 et 80%
Clignotement vert : Chargé au dessus de 80%
Allumé en vert : Complètement chargé
Remarque
Le courant de charge se bloque automatiquement lorsqu’un pack de
batteries autre que le pack de batteries lithium-ion a été branché.
Veillez à charger des packs de batteries correspondant à ceux
désignés uniquement.
Chargement des packs de batteries
Chargement des packs de batteries
27
Page 28
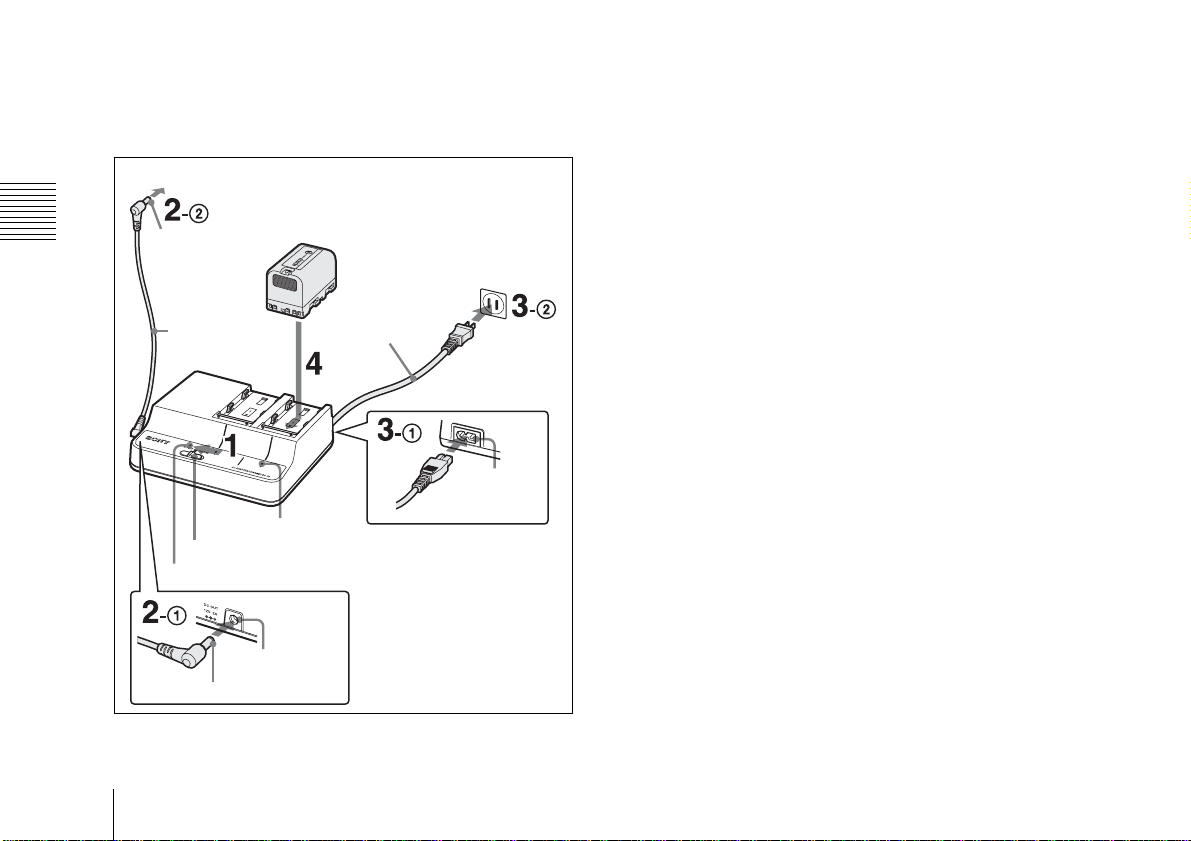
Chargement en mode DC OUT
Vous pouvez charger un pack de batteries sur le canal 2 pendant
qu’un dispositif branché est alimenté.
1 Réglez l’interrupteur de sélection de mode sur DC OUT.
2 Branchez le câble de sortie CC fourni 1 au connecteur DC
OUT et 2 au dispositif à alimentation CC.
Vers un dispositif à alimentation CC
Pack de batteries lithium-ion
Chargement des packs de batteries
Jaune
Câble de sortie
CC (fourni)
BP-U30/U60/U90
Cordon
d’alimentation CA
Vers une source
d’alimentation CA
3 Branchez le cordon d’alimentation CA 1 au connecteur
d’entrée CA et 2 à une source d’alimentation CA. Une
alimentation CC est fournie au dispositif branché à l’étape
2, et l’indicateur DC OUT s’allume en vert.
4 Mettez en place un pack de batteries sur le canal 2.
Consultez l’étape 3 dans « Chargement en mode CHARGE » pour en
savoir plus sur la façon de mettre en place un pack de batteries.
Retrait d’un pack de batteries
Glissez le pack de batteries branché dans le sens contraire à celui du
branchement, puis tirez vers le haut.
Si une erreur est détectée
Si l’une des conditions suivantes est détectée pendant le chargement
en mode CHARGE ou en mode DC OUT, l’indicateur CHARGE
clignote alternativement en orange et en vert :
• Après le début du chargement, le chargement rapide ne démarre
pas.
• Le chargement ne se termine pas dans le temps spécifié.
• La tension pour le chargement de la batterie a dépassé le niveau
spécifié.
• La tension interne a dépassé le niveau spécifié.
• La tension interne est descendue en dessous du niveau spécifié.
Indicateur CHARGE
Interrupteur de sélection de mode
Indicateur DC OUT
Connecteur
DC OUT
Noir
Connecteur
d’entrée CA
Chargement des packs de batteries
28
Page 29
Action à prendre si une erreur est détectée
Débranchez immédiatement le cordon d’alimentation CA de la
source d’alimentation CA, retirez les packs de batteries et contactez
le vendeur auprès duquel vous avez acheté l’appareil.
Spécifications
Source de tension 100 V à 240 V CA, 50/60 Hz
Consommation électrique
85 W
Débit de courant Chargement : 143 VA (100 V), 180 VA
(240 V)
Sortie Chargement : 16,4 V, 2,2 A/1,5 A
Sortie CC : 12 V, 2,0 A
Appel de courant de crête
(1) Mise sous tension (ON), méthode de
sondage du courant: 95 A (240 V), 65 A
(100 V)
(2) Mesuré conformément à la norme
européenne EN55103-1: 29 A (230 V)
Température de fonctionnement
Chargement : 0°C à 45°C (32°F à 113°F)
Sortie CC : –5°C à +45°C (23°F à 113°F)
Température de stockage
–20°C à +60°C (–4°F à +140°F)
Dimensions (l/h/p) 177,0 × 53,2 × 137,0 mm (7 × 2 1/8 × 5 1/2
pouces)
Poids Env. 650 g (1 lb. 6 oz) (avec le câble de sortie
CC, sans le cordon d’alimentation CA)
Accessoire fourni
Câble de sortie CC (Référence : 1-836-195-1x) (1)
Manuel d’installation (1)
Livret de garantie (1)
La conception et les spécifications sont sujettes à modification sans
préavis.
Spécifications
Remarque
Vérifiez toujours que l’appareil fonctionne correctement avant
l’utilisation. Sony n’assumera pas de responsabilité pour les
dommages de quelque sorte qu’ils soient, incluant mais ne se
limitant pas à la compensation ou au remboursement, à cause
de la perte de profits actuels ou futurs suite à la défaillance de
cet appareil, que ce soit pendant la période de garantie ou
après son expiration, ou pour toute autre raison quelle qu’elle
soit.
Spécifications
29
Page 30
Deutsch
Bitte lesen Sie dieses Handbuch vor der Benutzung des
Geräts sorgfältig durch und bewahren Sie es zum späteren
Nachschlagen auf.
WARNUNG
Um die Gefahr von Bränden oder elektrischen
Schlägen zu verringern, darf dieses Gerät nicht
Regen oder Feuchtigkeit ausgesetzt werden.
Um einen elektrischen Schlag zu vermeiden, darf
das Gehäuse nicht geöffnet werden.
WARNUNG
Dieses Gerät hat keinen Netzschalter.
Beim Einbau des Geräts muss das Netzkabel mit einer in der
Nähe des Geräts befindlichen, leicht zugänglichen
Wandsteckdose verbunden werden. Wenn während des
Betriebs eine Funktionsstörung auftritt, ziehen das Netzkabel
ab.
Akkus dürfen keinesfalls übermäßiger Wärmeeinwirkung
ausgesetzt werden, wie z.B. Sonneneinstrahlung, Feuer o. ä.
1. Verwenden Sie ein geprüftes Netzkabel (2-adriges
Stromkabel)/einen geprüften Geräteanschluss/einen
geprüften Stecker entsprechend den
Sicherheitsvorschriften, die im betreffenden Land gelten.
2. Verwenden Sie ein Netzkabel (2-adriges Stromkabel)/
einen Geräteanschluss/einen Stecker mit den geeigneten
Anschlusswerten (Volt, Ampere).
Wenn Sie Fragen zur Verwendung von Netzkabel/
Geräteanschluss/Stecker haben, wenden Sie sich bitte an
qualifiziertes Kundendienstpersonal.
VORSICHT
Explosionsgefahr bei Verwendung falscher Batterien.
Batterien nur durch den vom Hersteller empfohlenen oder
einen gleichwertigen Typ ersetzen.
Wenn Sie die Batterie entsorgen, müssen Sie die Gesetze der
jeweiligen Region und des jeweiligen Landes befolgen.
Das Gerät ist nicht tropf- und spritzwassergeschützt. Es
dürfen keine mit Flüssigkeiten gefüllten Gegenstände, z. B.
Vasen, darauf abgestellt werden.
Das Gerät nicht an Orten aufstellen, an denen keine
ausreichende Belüftung gewährleistet ist, z. B. in
Bücherregalen oder Einbauschränken.
WICHTIG
Das Namensschild befindet sich auf der Unterseite des
Gerätes.
Für Kunden in Europa
Dieses Produkt besitzt die CE-Kennzeichnung und erfüllt die
EMV-Richtlinie sowie die Niederspannungsrichtlinie der EGKommission.
Angewandte Normen:
• EN60065: Sicherheitsbestimmungen
• EN55103-1: Elektromagnetische Verträglichkeit
(Störaussendung)
• EN55103-2: Elektromagnetische Verträglichkeit
(Störfestigkeit)
30
Page 31
Für die folgenden elektromagnetischen Umgebungen:
E1 (Wohnbereich), E2 (kommerzieller und in beschränktem
Maße industrieller Bereich), E3 (Stadtbereich im Freien) und
E4 (kontrollierter EMV-Bereich, z.B. Fernsehstudio).
Der Hersteller dieses Produkts ist Sony Corporation, 1-7-1
Konan, Minato-ku, Tokyo, Japan.
Der autorisierte Repräsentant für EMV und Produktsicherheit
ist Sony Deutschland GmbH, Hedelfinger Strasse 61, 70327
Stuttgart, Deutschland.
DE
31
Page 32
Inhalt
Übersicht
Übersicht ..................................................................... 32
Lage und Funktion der Teile ....................................33
Inhalt / Übersicht
Aufladen von Akkus .................................................. 34
Spezifikationen ...........................................................37
Das Akkuladegerät BC-U2 dient zum Aufladen des Sony LithiumIonen-Akkus BP-U30/U60/U90. Es weist folgende
Leistungsmerkmale auf.
• Im CHARGE-Modus können gleichzeitig zwei Akkus desselben
Modells oder unterschiedlicher Modelle geladen werden.
• Im DC OUT-Modus kann ein Akku geladen werden, während ein
angeschlossenes Gerät mit Strom versorgt wird.
• Die Ladedauer ist ca. 20 Minuten kürzer als beim vorherigen
Modell (BC-U1) (beim Laden von BP-U60/U90-Akkus).
Hinweis
Wenn bei der Verwendung dieses Geräts Probleme auftreten,
unterbrechen Sie die Spannungsversorgung, indem Sie das
Netzkabel von der Wechselspannungsquelle abziehen.
Inhalt / Übersicht
32
Page 33
Lage und Funktion der Teile
Störung. Vermeiden Sie längeren Kontakt mit dem Apparat, falls
er warm werden sollte.
b Ladeanschluss Kanal 1
Liefert Strom, wenn der Moduswahlschalter auf CHARGE steht.
Der Ladestrom wird automatisch deaktiviert, wenn es sich beim
angebrachten Akku nicht um einen Lithium-Ionen-Akku handelt.
a DC OUT-Buchse
Versorgt ein über das mitgelieferte GleichspannungsAusgangskabel angeschlossenes Gerät mit Gleichspannung, wenn
der Moduswahlschalter auf DC OUT steht.
Das Gleichspannungs-Ausgangskabel hat einen Stecker mit
schwarzer Isolierung und einen Stecker mit gelber Isolierung.
Schließen Sie den Stecker mit schwarzer Isolierung an diesen
Apparat und den Stecker mit gelber Isolierung an das
angeschlossene Gerät an.
Hinweise
• Schließen Sie kein Gerät an, dessen Leistungsaufnahme die
angegebenen Nennwerte überschreitet.
• Abhängig vom Stromverbrauch des angeschlossenen Geräts
könnte der Apparat warm werden. Dabei handelt es sich um keine
c Ladeanschluss Kanal 2
Liefert unabhängig von der Einstellung des Moduswahlschalters
stets Strom.
Der Ladestrom wird automatisch deaktiviert, wenn es sich beim
angebrachten Akku nicht um einen Lithium-Ionen-Akku handelt.
d Eingangsanschluss für Wechselspannung
Zum Anschließen an eine Wechselspannungsquelle über das
mitgelieferte Netzkabel.
e Anzeigen CHARGE
Zeigen beim Laden von Akkus den Ladezustand der angebrachten
Akkus an.
Nähere Informationen finden Sie unter „Aufladen von Akkus“.
f Moduswahlschalter
CHARGE: Zum Aufladen von an Kanal 1 und Kanal 2
angeschlossenen Lithium-Ionen-Akkus.
DC OUT: Zur Versorgung mit Gleichspannung vom DC OUT-
Ausgang und gleichzeitig mit Strom von einem an Kanal 2
angeschlossenen Lithium-Ionen-Akku. (Ein an Kanal 1
angeschlossener Akku wird dabei nicht geladen.)
g Anzeige DC OUT
Leuchtet grün, wenn der Moduswahlschalter auf DC OUT
eingestellt ist und Gleichspannung ausgegeben wird.
Lage und Funktion der Teile
Lage und Funktion der Teile
33
Page 34
Wenn ein Fehler erkannt wird, erlischt die Anzeige.
Aufladen von Akkus
Ladedauer
Untenstehend ist die Ladedauer eines vollkommen entladenen
Akkus bis zur vollständigen Ladung aufgeführt. (Bei einer
Aufladen von Akkus
Temperatur von 25 °C. Die Ladedauer wird weder von der Anzahl
der geladenen Akkus noch davon beeinflusst, ob es sich um Akkus
gleicher oder verschiedener Modelle handelt.)
BP-U30: ca. 130 Minuten
BP-U60: ca. 150 Minuten
BP-U90: ca. 190 Minuten
Aufladen von Akkus
34
Page 35
Aufladen im CHARGE-Modus
Sie können gleichzeitig zwei Akkus desselben Modells oder
unterschiedlicher Modelle laden.
Moduswahlschalter
Anzeigen CHARGE
Lithium-Ionen-Akku
BP-U30/U60/U90
An Wechselspannungsquelle
Netzkabel
Eingang für
Wechselspannung
1 Stellen Sie den Moduswahlschalter auf CHARGE.
2 Schließen Sie das Gerät über das Netzkabel 1 an den
Eingang für Wechselspannung und 2 an die
Wechselspannungsquelle an.
3 Bringen Sie die Akkus an.
Richten Sie die Akkus so aus, dass die Dreiecksmarkierungen
auf die Ladeanschlüsse weisen und schieben Sie sie in
Pfeilrichtung.
Schieben Sie die Akkus auf die Ladeanschlüsse, bis ein
Klickgeräusch zu hören ist.
Der Ladevorgang beginnt und die Anzeigen CHARGE zeigen
den Ladezustand an.
Blinkt orange: Ladezustand zwischen 0 und 80 %
Blinkt grün: Ladezustand über 80 %
Leuchtet grün: Vollständig geladen
Hinweis
Der Ladestrom wird automatisch deaktiviert, wenn es sich beim
angebrachten Akku nicht um einen Lithium-Ionen-Akku handelt.
Achten Sie darauf, nur die angegebenen Akkus zu verwenden.
Aufladen von Akkus
Aufladen von Akkus
35
Page 36
Aufladen im DC OUT-Modus
Auf Kanal 2 kann ein Akku geladen werden, während ein
angeschlossenes Gerät mit Strom versorgt wird.
An mit Gleichspannung betriebenes Gerät
Lithium-Ionen-Akku
Aufladen von Akkus
Gelb
BP-U30/U60/U90
An Wechselspannungsquelle
1 Stellen Sie den Moduswahlschalter auf DC OUT.
2 Schließen Sie das mitgelieferte Gleichspannungs-
Ausgangskabel 1 an die DC OUT-Buchse und 2 das mit
Gleichspannung betriebene Gerät an.
3 Schließen Sie das Gerät über das Netzkabel 1 an den
Eingang für Wechselspannung und 2 an die
Wechselspannungsquelle an. Das in Schritt 2
angeschlossene Gerät wird mit Gleichspannung versorgt
und die Anzeige DC OUT leuchtet grün.
GleichspannungsAusgangskabel
(mitgeliefert)
Netzkabel
4 Bringen Sie einen Akku an Kanal 2 an.
Weitere Informationen zum Anbringen eines Akkus siehe Schritt 3 unter
„Aufladen im CHARGE-Modus“.
Abnehmen eines Akkus
Schieben Sie den Akku in die entgegengesetzte Richtung als beim
Anbringen und ziehen Sie den Akku nach oben.
Wenn ein Fehler erkannt wird
Wenn während des Ladevorgangs im CHARGE-Modus oder DC
OUT-Modus eine der folgenden Bedingungen auftritt, blinkt die
Anzeige CHARGE abwechselnd orange und grün:
• Das Schnellladen beginnt nach Beginn des Ladevorgangs nicht.
• Der Ladevorgang konnte innerhalb eines festgelegten Zeitraums
nicht abgeschlossen werden.
• Die Ladespannung für Akkus übersteigt den spezifizierten Wert.
• Die interne Spannung hat den spezifizierten Wert überschritten.
• Die interne Spannung ist unter den spezifizierten Wert gefallen.
Anzeige CHARGE
Moduswahlschalter
Anzeige DC OUT
DC OUTAusgang
Schwarz
Eingang für
Wechselspannung
Aufladen von Akkus
36
Page 37
Beim Auftreten eines Fehlers zu ergreifende
Maßnahme
Ziehen Sie umgehend das Netzkabel aus der Steckdose, entfernen
Sie die Akkus und wenden Sie sich an das Geschäft, in dem Sie den
Apparat gekauft haben.
Spezifikationen
Spannungsquelle 100 V bis 240 V AC, 50/60 Hz
Stromaufnahme 85 W
Stromverbrauch Laden: 143 VA (100 V), 180 VA (240 V)
Ausgang Laden: 16,4 V, 2,2 A/1,5 A
Gleichspannungsausgang:
12 V, 2,0 A
Spitzeneingangsstrom
(1) Power ON, Stromprüfmethode: 95 A
(240 V), 65 A (100 V)
(2) Einschaltstrom, gemessen nach
Europäischem Standard EN55103-1: 29 A
(230 V)
Betriebstemperatur Laden: 0 °C bis 45 °C
Gleichspannungsausgang:
–5 °C bis +45 °C
Lagerungstemperatur
–20 °C bis +60 °C
Abmessungen (B/H/T)
177,0 × 53,2 × 137,0 mm
Gewicht Etwa 650 g (mit Gleichspannungs-
Ausgangskabel, ohne Netzkabel)
Enthaltenes Zubehör
Gleichspannungs-Ausgangskabel (Teilenummer: 1-836-195-1x) (1)
Installationsanleitung (1)
Garantiehandbuch (1)
Änderungen, die dem technischen Fortschritt dienen, bleiben
vorbehalten.
Spezifikationen
Hinweis
Bestätigen Sie vor dem Gebrauch immer, dass das Gerät richtig
arbeitet. SONY KANN KEINE HAFTUNG FÜR SCHÄDEN
JEDER ART, EINSCHLIESSLICH ABER NICHT BEGRENZT
AUF KOMPENSATION ODER ERSTATTUNG, AUFGRUND
VON VERLUST VON AKTUELLEN ODER ERWARTETEN
PROFITEN DURCH FEHLFUNKTION DIESES GERÄTS
ODER AUS JEGLICHEM ANDEREN GRUND, ENTWEDER
WÄHREND DER GARANTIEFRIST ODER NACH ABLAUF
DER GARANTIEFRIST, ÜBERNEHMEN.
Spezifikationen
37
Page 38
Italiano
Leggere attentamente questo manuale prima di utilizzare
l’unità, e conservarlo per riferimenti futuri.
In caso di domande relative all’uso del cavo di alimentazione/
connettore per l’apparecchio/spina di cui sopra, rivolgersi al
personale qualificato.
ATTENZIONE
ATTENZIONE
Per ridurre il rischio di incendi o scosse
elettriche, non esporre questo apparato alla
pioggia o all’umidità.
Per evitare scosse elettriche, non aprire
l’involucro.
AVVERTENZA
Questo apparecchio non è dotato di un interruttore di
alimentazione.
Durante l’installazione dell’apparecchio, collegare il cavo di
alimentazione ad una presa di corrente facilmente accessibile
vicina all’apparecchio. Qualora si verifichi un guasto durante il
funzionamento dell’apparecchio, scollegare il cavo di
alimentazione.
Le batterie non devono essere esposte a fonti di calore
eccessivo come luce solare diretta, fuoco, ecc.
1. Utilizzare un cavo di alimentazione (a 2 anime)/connettore
per l’apparecchio/spina approvati che siano conformi alle
normative sulla sicurezza in vigore in ogni paese, se
applicabili.
2. Utilizzare un cavo di alimentazione (a 2 anime)/connettore
per l’apparecchio/spina conformi alla rete elettrica
(voltaggio, ampere).
Se una batteria non viene sostituita correttamente vi è il
rischio di esplosione. Sostituire una batteria con una uguale o
simile seguendo le raccomandazioni del produttore.
Per lo smaltimento della batteria, attenersi alle norme in
vigore nel paese di utilizzo.
L’apparecchio non deve essere esposto a gocciolamenti o
spruzzi. Non collocare sull’apparecchio oggetti contenenti
liquidi, come ad esempio vasi di fiori.
Evitare di installare l’apparecchio in uno spazio limitato, tipo in
una libreria o in un mobiletto incassato, senza sufficiente
ventilazione.
IMPORTANTE
La targhetta di identificazione è situata sul fondo.
Per i clienti in Europa
Questo prodotto recante il marchio CE è conforme sia alla
direttiva sulla compatibilità elettromagnetica (EMC) che alla
direttiva sulle basse tensioni emesse dalla Commissione della
Comunità Europea.
La conformità a queste direttive implica la conformità alle
seguenti normative europee:
• EN60065: Sicurezza dei prodotti
• EN55103-1: Interferenza elettromagnetica (Emissione)
• EN55103-2: Sensibilità ai disturbi elettromagnetici
(Immunità)
38
Page 39
Questo prodotto è destinato all’uso nei seguenti ambienti
elettromagnetici:
E1 (residenziali), E2 (commerciali e industriali leggeri),
E3 (esterni urbani) e E4 (ambienti EMC controllati, ad
esempio studi televisivi).
Il fabbricante di questo prodotto è la Sony Corporation,
1-7-1 Konan, Minato-ku, Tokyo, Giappone.
La rappresentanza autorizzata per EMC e la sicurezza
dei prodotti è la Sony Deutschland GmbH, Hedelfinger
Strasse 61, 70327 Stoccarda, Germania.
IT
39
Page 40
Sommario
Descrizione
Descrizione ................................................................. 40
Posizione e funzione delle parti .............................. 41
Sommario / Descrizione
Ricarica di gruppi batteria ........................................ 42
Caratteristiche tecniche ............................................ 45
Il caricabatterie BC-U2 carica la batteria agli ioni di litio Sony BPU30/U60/U90. Dispone delle seguenti funzioni.
• In modalità CHARGE è in grado di caricare due gruppi batteria
contemporaneamente (due batterie dello stesso modello o due
batterie di modelli diversi).
• In modalità DC OUT è in grado di caricare un gruppo batteria
mentre fornisce alimentazione ad un dispositivo collegato.
• La durata della ricarica è inferiore di circa 20 minuti rispetto al
modello precedente (BC-U1) (per la ricarica di batterie BP-U60/
U90).
Nota
Se nell’azionare questo dispositivo si verificano dei problemi,
scollegare il cavo di alimentazione CA dalla fonte di alimentazione
CA per arrestare l’alimentazione.
Sommario / Descrizione
40
Page 41
Posizione e funzione delle parti
a Connettore DC OUT
Fornisce alimentazione CC ad un dispositivo collegato tramite il
cavo di uscita CC in dotazione quando l’interruttore di selezione
modalità è impostato su DC OUT.
Il cavo di uscita CC dispone di una spina con isolamento nero e una
con isolamento giallo. Collegare la spina con isolamento nero
all’apparecchio e quella con isolamento giallo al dispositivo
collegato.
Note
• Non collegare un dispositivo con requisiti di alimentazione
superiori ai valori specificati.
• In base alla corrente consumata dal dispositivo collegato,
l’apparecchio potrebbe riscaldarsi. Non si tratta di guasto. Evitare
il contatto prolungato con l’apparecchio, se dovesse riscaldarsi.
b Connettori di carica canale 1
Forniscono alimentazione quando l’interruttore di selezione
modalità è impostato su CHARGE.
La corrente di carica viene automaticamente bloccata quando è stata
collegata per errore una batteria diversa da una batteria agli ioni di
litio.
c Connettori di carica canale 2
Forniscono alimentazione indipendentemente dall’impostazione
dell’interruttore di selezione modalità.
La corrente di carica viene automaticamente bloccata quando è stato
collegato per errore un gruppo batteria diverso da quello agli ioni di
litio.
d Connettore di ingresso CA
Consente di collegarsi ad una fonte di alimentazione CA utilizzando
il cavo di alimentazione CA.
e Indicatori CHARGE
Mostra lo stato di carica dei gruppi batteria inseriti durante la loro
carica.
Per maggiori dettagli, vedere “Ricarica di gruppi batteria”.
f Interruttore di selezione modalità
CHARGE: Fornisce alimentazione ai gruppi batteria collegati al
canale 1 e al canale 2.
DC OUT: Fornisce alimentazione CC dal connettore DC OUT e,
allo stesso tempo, al gruppo batteria collegato al canale 2 (non
viene caricato un gruppo batteria collegato al canale 1).
Posizione e funzione delle parti
Posizione e funzione delle parti
41
Page 42
g Indicatore DC OUT
Si illumina in verde quando l’interruttore di selezione modalità è
impostato su DC OUT e viene fornita alimentazione CC.
Se si rilevano degli inconvenienti, l’indicatore diventa scuro.
Ricarica di gruppi batteria
Ricarica di gruppi batteria
Tempo di ricarica
Qui sotto viene indicato il tempo necessario per ricaricare una
batteria completamente scarica fino alla massima capacità. (Quando
la temperatura è di 25°C. Il tempo di ricarica rimane lo stesso,
indipendentemente dal numero di gruppi batteria (uno o due) e dalla
combinazione di modelli di batteria ricaricati.)
BP-U30: circa 130 minuti
BP-U60: circa 150 minuti
BP-U90: circa 190 minuti
Ricarica di gruppi batteria
42
Page 43
Ricarica in modalità CHARGE
È possibile ricaricare contemporaneamente due gruppi batteria (due
batterie dello stesso modello o due batterie di modelli diversi).
Gruppi batteria agli ioni
di litio BP-U30/U60/U90
Interruttore di
selezione
modalità
Indicatori CHARGE
Alla fonte di alimentazione CA
Cavo di
alimentazione
CA
Connettore di
ingresso CA
1 Impostare l’interruttore di selezione modalità su CHARGE.
2 Collegare il cavo di alimentazione CA 1 al connettore di
ingresso CA e 2 ad una fonte di alimentazione CA.
3 Inserire i gruppi batteria.
Posizionare i gruppi batteria con i contrassegni dei triangoli
rivolti verso i connettori di carica e farli scorrere nella direzione
indicata dalle frecce.
Assicurarsi di spingere i gruppi batteria in modo da innestare i
connettori di carica fino ad udire un clic.
La procedura di ricarica inizia e gli indicatori CHARGE
mostrano lo stato di carica.
Lampeggio in arancio: Ricarica tra 0 e 80%
Lampeggio in verde: Ricarica di oltre l’80%
Illuminato in verde: Batteria completamente carica
Nota
La corrente di carica viene automaticamente bloccata quando è stata
collegata una batteria diversa da una batteria agli ioni di litio.
Accertarsi di ricaricare solamente i gruppi batteria designati.
Ricarica di gruppi batteria
Ricarica di gruppi batteria
43
Page 44
Ricarica in modalità DC OUT
È possibile caricare un gruppo batteria sul canale 2 mentre fornisce
alimentazione ad un dispositivo collegato.
Al dispositivo alimentato CC
Gruppo batteria agli ioni di litio
Ricarica di gruppi batteria
Giallo
Cavo di
uscita CC
(in dotazione)
BP-U30/U60/U90
Cavo di
alimentazione
CA
Alla fonte di
alimentazione CA
1 Impostare l’interruttore di selezione modalità su DC OUT.
2 Collegare il cavo di uscita CC in dotazione 1 al connettore
DC OUT e 2 al dispositivo alimentato CC.
3 Collegare il cavo di alimentazione CA 1 al connettore di
ingresso CA e 2 ad una fonte di alimentazione CA.
L’alimentazione CC viene fornita al dispositivo collegato nel
punto 2 e l’indicatore DC OUT si illumina in verde.
4 Inserire un gruppo batteria nel canale 2.
Vedere il punto 3 in “Ricarica in modalità CHARGE” per informazioni
su come inserire un gruppo batteria.
Rimozione della batteria
Far scorrere la batteria attaccata nella direzione opposta a quella di
attacco, quindi spingerla in alto.
Indicatore CHARGE
Interruttore di selezione modalità
Indicatore DC OUT
Connettore
DC OUT
Nero
Connettore di
ingresso CA
Quando si rileva un errore
Quando durante la ricarica viene rilevata una delle seguenti
condizioni in modalità CHARGE o DC OUT, l’indicatore CHARGE
lampeggia alternativamente in arancio e verde.
• Dopo l’inizio della ricarica, non inizia la procedura di ricarica
rapida.
• La ricarica non termina nel periodo specificato.
• La tensione per la ricarica della batteria ha superato il valore
specificato.
• La tensione interna ha superato il valore specificato.
• La tensione interna è scesa al di sotto del valore specificato.
Ricarica di gruppi batteria
44
Page 45
Azioni da intraprendere quando viene rilevato
un errore
Scollegare immediatamente il cavo di alimentazione CA dalla fonte
di alimentazione CA, rimuovere i gruppi batteria e contattare il
rivenditore dell’apparecchio.
Caratteristiche tecniche
Fonte di tensione da 100 V a 240 V CA, 50/60 Hz
Consumo 85 W
Assorbimento di corrente
Carica: 143 VA (100 V), 180 VA (240 V)
Uscita Carica: 16,4 V, 2,2 A/1,5 A
Uscita CC: 12 V, 2,0 A
Corrente di punta di entrata
(1) Stato di accensione (ON), metodo di
sondaggio corrente: 65 A (100 V)/ 95 A
(240 V)
(2) Corrente di entrata a commutazione a
caldo, misurata secondo la normativa europea
EN55103-1: 29 A (230 V)
Temperatura di utilizzo
Carica: da 0°C a 45°C
Uscita CC: da –5°C a +45°C
Temperatura di deposito
da –20°C a +60°C
Dimensioni (l/h/p) 177,0 × 53,2 × 137,0 mm
Peso Circa 650 g (compreso il cavo di uscita CC,
non compreso il cavo di alimentazione CA)
Accessori in dotazione
Cavo di uscita CC (codice: 1-836-195-1x) (1)
Istruzioni per l’installazione (1)
Garanzia (1)
Le caratteristiche di progettazione e di natura tecnica sono soggette
a modifiche senza preavviso.
Caratteristiche tecniche
Nota
Verificare sempre che l’apparecchio stia funzionando
correttamente prima di usarlo. LA SONY NON SARÀ
RESPONSABILE DI DANNI DI QUALSIASI TIPO,
COMPRESI, MA SENZA LIMITAZIONE A, RISARCIMENTI
O RIMBORSI A CAUSA DELLA PERDITA DI PROFITTI
ATTUALI O PREVISTI DOVUTA A GUASTI DI QUESTO
APPARECCHIO, SIA DURANTE IL PERIODO DI VALIDITÀ
DELLA GARANZIA SIA DOPO LA SCADENZA DELLA
GARANZIA, O PER QUALUNQUE ALTRA RAGIONE.
Caratteristiche tecniche
45
Page 46
Español
Antes de poner en funcionamiento la unidad, lea
detenidamente este manual y consérvelo para referencias
futuras.
ADVERTENCIA
Para reducir el riesgo de electrocución, no
exponga este aparato a la lluvia ni a la humedad.
Para evitar descargas eléctricas, no abra el
aparato.
ADVERTENCIA
Esta unidad no dispone de interruptor de alimentación.
Al instalar la unidad, conecte el cable de alimentación a una
toma de corriente fácilmente accesible cerca de la unidad. Si
se produce una anomalía durante el funcionamiento de la
unidad, desconecte los cables de alimentación.
No se deben exponer las baterías a una fuente de calor
excesivo como la luz del sol, el fuego o similar.
1. Utilice un cable de alimentación (cable de alimentación de
2 hilos)/conector/enchufe del aparato recomendado con
toma de tierra y que cumpla con la normativa de seguridad
de cada país, si procede.
2. Utilice un cable de alimentación (cable de alimentación de
2 hilos)/conector/enchufe del aparato que cumpla con los
valores nominales correspondientes en cuanto a tensión e
intensidad.
Si tiene alguna duda sobre el uso del cable de alimentación/
conector/enchufe del aparato, consulte a un técnico de
servicio cualificado.
PRECAUCIÓN
Peligro de explosión si se sustituye la batería por una del tipo
incorrecto. Reemplace la batería solamente por otra del
mismo tipo o de un tipo equivalente recomendado por el
fabricante.
Cuando deseche la batería, debe cumplir con las leyes de la
zona o del país.
No se debe exponer la unidad a goteos o salpicaduras.
Tampoco se deben colocar sobre la misma objetos llenos de
líquido, tales como un florero.
No instale el aparato en un lugar estrecho como en una
biblioteca o mueble integrado, a no ser que la ventilación sea
adecuada.
IMPORTANTE
La placa de características está situada en la parte inferior.
Para los clientes de Europa
Este producto con marcado CE cumple con las directivas de
compatibilidad electromagnética y baja tensión de la
Comisión Europea.
El cumplimiento de estas directivas implica la conformidad
con los siguientes estándares europeos:
• EN60065: Seguridad del producto
• EN55103-1: Interferencia electromagnética (Emisión)
• EN55103-2: Susceptibilidad electromagnética (Inmunidad)
Este producto está ha sido diseñado para utilizarse en los
entornos electromagnéticos siguientes:
E1 (zona residencial), E2 (zona comercial e industrial ligera),
E3 (exteriores urbanos), y E4 (entorno con EMC controlada,
p. ej., estudio de televisión).
46
Page 47
El fabricante de este producto es Sony Corporation, con
dirección en 1-7-1 Konan, Minato-ku, Tokio, Japón.
El Representante autorizado para EMC y seguridad del
producto es Sony Deutschland GmbH, Hedelfinger Strasse
61, 70327 Stuttgart, Alemania.
ES
47
Page 48
Índice
Descripción general
Descripción general ..................................................48
Ubicación y funciones de los componentes .......... 49
Índice / Descripción general
Carga de baterías ......................................................50
Especificaciones ........................................................ 53
El Cargador de baterías BC-U2 carga baterías de ión litio Sony BPU30/U60/U90. Cuenta con las siguientes funciones.
• En el modo CHARGE, puede cargar dos baterías
simultáneamente (dos baterías del mismo modelo o dos baterías
de diferentes modelos).
• En modo DC OUT, puede cargar una batería a la vez que
suministra alimentación a un dispositivo conectado.
• El tiempo de carga es unos 20 minutos inferior al del modelo
anterior (BC-U1) (al cargar baterías BP-U60/U90).
Nota
Si se produce una anomalía durante el funcionamiento de esta
unidad, desconecte el cable de alimentación de CA de la fuente de
alimentación de CA para desactivar la alimentación.
Índice / Descripción general
48
Page 49
Ubicación y funciones de los componentes
• Según el consumo del dispositivo conectado, el equipo podría
calentarse. No se trata de ningún fallo de funcionamiento. Evite el
contacto prolongado con el equipo si éste se calienta.
b Conectores de carga del canal 1
Suministra alimentación cuando el interruptor selector de modo está
ajustado en CHARGE.
La corriente de carga se bloquea de forma automática cuando se
monta por error una batería que no sea una batería de ión litio.
c Conectores de carga del canal 2
Suministra alimentación independientemente del ajuste del
interruptor selector de modo.
La corriente de carga se bloquea de forma automática cuando se
monta por error una batería que no sea una batería de ión litio.
d Conector de entrada de CA
Se conecta a una fuente de alimentación de CA utilizando el cable
de alimentación de CA.
Ubicación y funciones de los componentes
a Conector DC OUT
Suministra alimentación de CC a un dispositivo conectado a través
del cable de salida de CC facilitado cuando el interruptor selector de
modo está ajustado en DC OUT.
El cable de salida de CC tiene un enchufe con aislante negro y otro
con aislante amarillo. Conecte el enchufe con aislante negro al
equipo y el enchufe con aislante amarillo al dispositivo conectado.
Notas
• No conecte un dispositivo con requisitos de alimentación
superiores a los valores especificados.
e Indicadores CHARGE
Muestra el estado de carga de las baterías montadas durante la carga
de baterías.
Para más información, remítase a “Carga de baterías” en la página 50.
f Interruptor selector de modo
CHARGE: Suministra alimentación a baterías de ión litio
conectadas al canal 1 y al canal 2.
DC OUT: Suministra alimentación de CC desde el conector DC
OUT y, al mismo tiempo, a la batería de ión litio conectada al
canal 2. (Una batería conectada al canal 1 no se cargará.)
Ubicación y funciones de los componentes
49
Page 50
g Indicador DC OUT
Se ilumina en verde cuando el interruptor selector de modo está
ajustado en DC OUT y se está suministrando alimentación de CC.
Si se detecta alguna anomalía, el indicador se oscurece.
Carga de baterías
Carga de baterías
Tiempo de carga
A continuación se muestra el tiempo necesario para cargar hasta su
capacidad máxima una batería completamente agotada. (Cuando la
temperatura es de 25 °C (77 °F). El tiempo de carga no se ve
afectado al cargar una o dos baterías o por la combinación de
baterías de diferentes modelos.)
BP-U30: Aproximadamente 130 minutos
BP-U60: Aproximadamente 150 minutos
BP-U90: Aproximadamente 190 minutos
Carga de baterías
50
Page 51
Carga en modo CHARGE
Puede cargar dos baterías al mismo tiempo (dos baterías del mismo
modelo o dos baterías de diferentes modelos).
Interruptor
selector de
modo
Baterías de ión litio
BP-U30/U60/U90
Indicadores CHARGE
Cable de
alimentación
de CA
A la fuente de
alimentación de CA
Conector de
entrada de
CA
1 Ajuste el interruptor selector de modo en CHARGE.
2 Conecte el cable de alimentación de CA 1 en el conector
de entrada de CA y el 2 en una fuente de alimentación de
CA.
3 Monte las baterías.
Coloque las baterías con las marcas de triángulo mirando hacia
los conectores de carga y deslícelas en la dirección de las
flechas.
Empuje las baterías para acoplar los conectores de carga hasta
que se escuche un clic.
La carga comenzará y los indicadores CHARGE mostrarán el
estado de carga.
Naranja intermitente: Carga entre 0 y 80%
Verde intermitente: Carga superior al 80%
Encendido en verde: Totalmente cargada
Nota
La corriente de carga se bloquea de forma automática cuando se
monta una batería que no sea una batería de ión litio. Asegúrese de
cargar las baterías especificadas solamente.
Carga de baterías
Carga de baterías
51
Page 52
Carga en modo DC OUT
Puede cargar una batería en el canal 2 a la vez que suministra
alimentación a un dispositivo conectado.
A un dispositivo de alimentación de CC
Batería de ión litio
Carga de baterías
Amarillo
Cable de salida
de CC
(suministrado)
BP-U30/U60/U90
Cable de
alimentación
de CA
A la fuente de
alimentación de CA
1 Ajuste el interruptor selector de modo en DC OUT.
2 Conecte el cable de salida de CC 1 en el conector DC OUT
y el 2 en el dispositivo de alimentación de CC.
3 Conecte el cable de alimentación de CA 1 en el conector
de entrada de CA y el 2 en una fuente de alimentación de
CA.
Se suministra alimentación de CC al dispositivo conectado en
el paso 2, y el indicador DC OUT destella en verde.
4 Monte una batería en el canal 2.
Mire el paso 3 en “Carga en modo CHARGE” para información sobre
cómo montar una batería.
Desmontaje de una batería
Deslice la batería montada en dirección contraria a la de conexión y
después tire hacia arriba.
Cuando se detecta un error
Cuando se detecta uno de los siguientes estados durante la carga en
modo CHARGE o en modo DC OUT, el indicador CHARGE
destella en naranja y en verde alternativamente:
• Después del inicio de la carga, no comienza la carga rápida.
• La carga no termina en un periodo determinado.
• La tensión para la carga de la batería sobrepasa el nivel
determinado.
• La tensión interna sobrepasa el nivel determinado.
• La tensión interna cae por debajo del nivel determinado.
Indicador CHARGE
Interruptor selector de modo
Indicador DC OUT
Conector
DC OUT
Negro
Conector
de entrada
de CA
Carga de baterías
52
Page 53
Acciones tras detectarse un error
Desconecte de inmediato el cable de alimentación de CA de la
fuente de alimentación de CA, extraiga las baterías y póngase en
contacto con el proveedor del equipo.
Especificaciones
Fuente de voltaje 100 V a 240 V CA, 50/60 Hz
Consumo de alimentación
85 W
Consumo de corriente
Carga: 143 VA (100 V), 180 VA (240 V)
Salida Carga: 16,4 V, 2,2 A/1,5 A
Salida de CC: 12 V, 2,0 A
Pico de corriente de entrada
(1) Encendido (ON), método detector de
corriente: 65 A (100 V)/ 95 A (240 V)
(2) Corriente de entrada para conmutación en
marcha, medida de acuerdo con la norma
europea EN55103-1: 29 A (230 V)
Temperatura de funcionamiento
Carga: 0 °C a 45 °C (32 °F a 113 °F)
Salida de CC: –5 °C a +45 °C (23 °F a
113 °F)
Temperatura de almacenamiento
–20 °C a +60 °C (–4 °F a +140 °F)
Dimensiones (an./al./prof.)
177,0 × 53,2 × 137,0 mm (7 × 2 1/8 × 5 1/2
plug.)
Peso Aprox. 650 g (1 lbs. 6 oz.) (incluyendo cable
de salida de CC, no incluyendo cable de
alimentación de CA)
Accesorios suministrados
Cable de salida de CC (Número de pieza: 1-836-195-1x) (1)
Instrucciones de instalación (1)
Folleto de garantía (1)
El diseño y las especificaciones están sujetos a modificaciones sin
previo aviso.
Nota
Verifique siempre que esta unidad funciona correctamente antes
de utilizarlo. SONY NO SE HACE RESPONSIBLE POR
DAÑOS DE NINGÚN TIPO, INCLUYENDO PERO NO
LIMITADO A LA COMPENSACIÓN O PAGO POR LA
PÉRDIDA DE GANANCIAS PRESENTES O FUTURAS
DEBIDO AL FALLO DE ESTA UNIDAD, YA SEA DURANTE
LA VIGENCIA DE LA GARANTÍA O DESPUÉS DEL
VENCIMIENTO DE LA GARANTÍA NI POR CUALQUIER
OTRA RAZÓN.
Especificaciones
Especificaciones
53
Page 54
中文
机型名称:电源适配器 / 充电器
使用产品前请仔细阅读本书,并请妥善保管。
警告
请勿让本机被液体淋湿或溅湿。勿将花瓶等装有液体的容
器放置在本机上。
请勿将本机安装在狭窄的空间内,如书橱或壁橱,除非有
良好的通风。
为减少火灾或电击危险,请勿让本设备受到雨淋或
受潮。
为避免电击,请勿拆卸机壳。
重要
设备铭牌位于底部。
警告
此设备无电源开关。
在安装此设备时,者将电源线与电气插座连接,此电气插
座必须靠近该设备并且易于使用。在操作设备时如果发生
故障,者断开电源线。
电池不得过度受热,例如受阳光暴晒或投入火中等。
1. 请使用经过认可的电源线(2 芯电源线) / 设备接口 / 插
头,并且都要符合所在国家的安全法规。
2. 请使用符合特定额定值 (电压、电流)的电源线 (2 芯
电源线) / 设备接口 / 插头。
如果在使用上述电源线 / 设备接口 / 插头时有任何疑问,
请咨询合格的维修人员。
关于废弃产品的处理
请不要将废弃的产品与一般生活垃圾一同弃置。
正确处置废弃的产品有助于避免对环境和人类健康造成潜
在的负面影响。
具体的处理方法请遵循当地的规章制度。
注意
如果更换的电池不正确,就会有爆炸的危险。只更换同一
类型或制造商推荐的电池型号。
处理电池时,必须遵守相关地区或国家的法律。
54
Page 55
目录
简介 ......................................................................56
部件的位置和功能 ................................................56
对电池充电 ...........................................................57
规格说明 ...............................................................60
CS
目录
55
Page 56
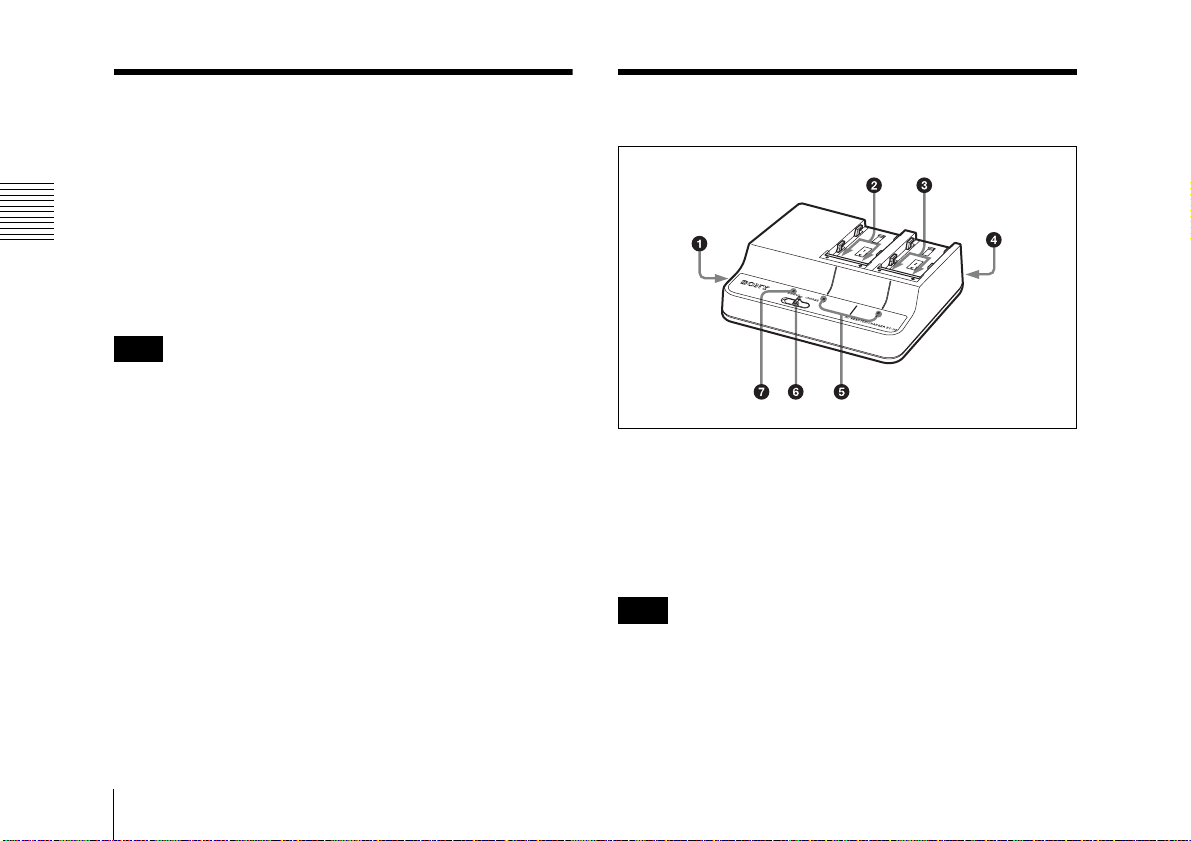
简介 / 部件的位置和功能
简介
BC-U2 电池充电器用于对 Sony BP-U30/U60/U90 锂电池进
行充电。它具有下列功能。
• 在 CHARGE 模式下,可以同时为两节电池充电(两节相
同型号的电池或两节不同型号的电池)。
• 在 DC OUT 模式下,可以在为连接的设备提供电源的同
时,对一节电池进行充电。
• 充电时间比以前的模式 (BC-U1)短大约 20 分钟 (对
BP-U60/U90 电池进行充电时)。
注意
操作此设备时如果出现故障,请从交流电源上断开交流电
源线以切断电源。
部件的位置和功能
a 直流输出接口
当模式选择开关设置为 DC OUT (直流输出)时,通过附
带的直流输出电缆,为连接的设备提供直流电源。
直流输出电缆有一个黑色绝缘插头和一个黄色绝缘插头。
请将黑色绝缘插头插入本机,黄色绝缘插头插入连接的设
备。
注意
• 不要连接电源要求高于指定值的设备。
• 根据已连接设备的消耗功率不同,本机可能会发热。这
并非故障。如果本机发热,请勿长时间地连接。
简介 / 部件的位置和功能
56
Page 57
b 通道 1 充电接口
在模式选择开关设置为 CHARGE 时提供电源。
如果误装入不是锂电池的电池,充电电流将自动被阻断。
c 通道 2 充电接口
无论模式选择开关如何设置,都提供电源。
如果误装入不是锂电池的电池,充电电流将自动被阻断。
d 交流输入接口
通过交流电源线连接到交流电源。
e CHARGE (充电)指示灯
在对电池进行充电时,显示所装入电池的充电状态。
有关详情,请参见第
f 模式选择开关
CHARGE:对连接到通道 1 和通道 2 的锂电池进行充电。
DC OUT:从 DC OUT (直流输出)接口提供直流电源,
同时对连接到通道 2 的锂电池进行充电。(不对连接
到通道 1 的电池进行充电。)
g DC OUT 指示灯
将模式选择开关设为 DC OUT (直流输出)以提供直流电
源时亮为绿色。
如果检测到问题,此指示灯将熄灭。
57
页中的 “对电池充电”。
对电池充电
充电时间在 CHARGE 模式下充电
将完全耗尽的电池充满所需的时间如下所示。(当温度为
25°C 时。充电时间不受正在充电的电池数量影响,也不受
不同电池型号组合的影响。)
BP-U30:约 130 分钟
BP-U60:约 150 分钟
BP-U90:约 190 分钟
对电池充电
对电池充电
57
Page 58
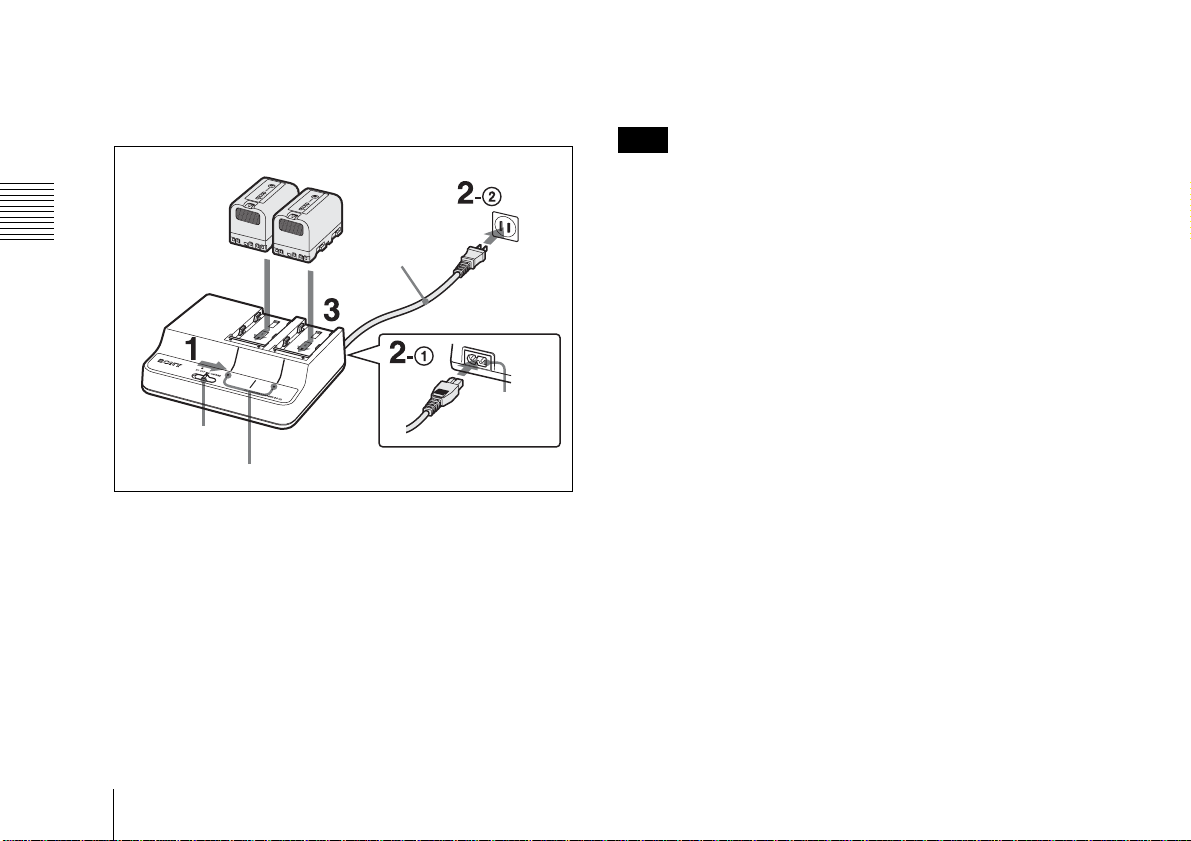
在 CHARGE 模式下充电
您可以同时为两节电池充电 (两节相同型号的电池或两节
不同型号的电池)。
BP-U30/U60/U90 锂电池
对电池充电
交流电源线
模式选择开关
CHARGE (充电)指示灯
至交流电源
交流输入
接口
绿色闪烁:充电量到 80% 以上
亮为绿色:已充满
注意
如果装入的电池不是锂电池,充电电流将自动被阻断。 务
必只对指定电池进行充电。
1 将模式选择开关设为 CHARGE (充电)。
2 将交流电源线 1 连接到交流输入接口,并将 2 连接到
交流电源。
3 装入电池。
放置电池,让三角标志面向充电接口,然后按箭头所
指方向将其推入。 务必将电池推到卡入充电接口,直
到发出咔嗒一声。
此时开始充电, CHARGE (充电)指示灯显示充电状
态。
橙色闪烁:充电量到 0 到 80% 之间
58
对电池充电
Page 59
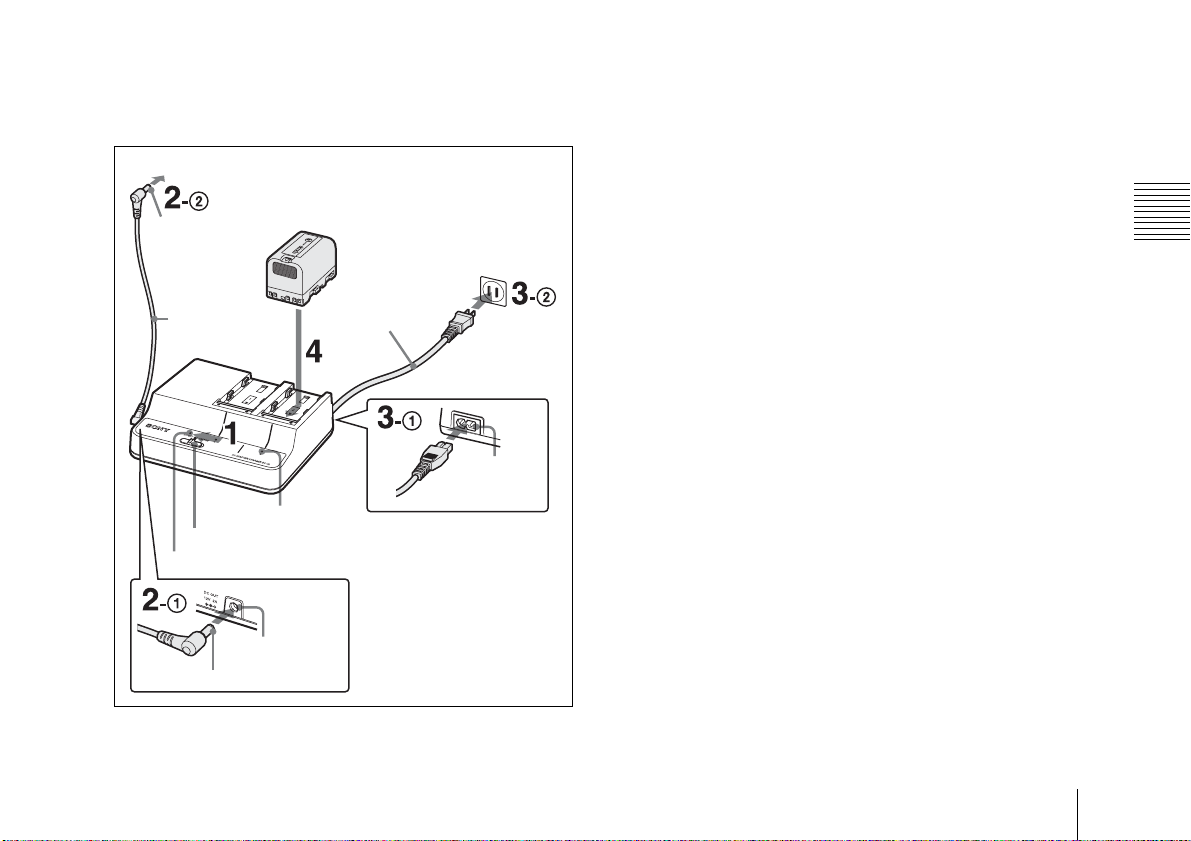
在 DC OUT 模式下充电
您可以同时对两节电池 (两节 BP-U30 电池、两节 BPU60 电池、或每种各一节)进行充电。
至直流电源设备
黄色
BP-U30/U60/U90 锂电池
至交流电源
1 将模式选择开关设置为 DC OUT。
2 将附带的直流输出电缆 1 连接到 DC OUT (直流输
出)接口并将 2 连接到直流供电设备。
3 将交流电源线 1 连接到交流输入接口,并将 2 连接到
交流电源。
已为步骤 2 中连接的设备提供了直流电源, DC OUT
(直流输出)指示灯亮为绿色。
对电池充电
直流输出电缆
(附带)
CHARGE (充电)指示灯
模式选择开关
DC OUT (直流输出)指示灯
DC OUT
(直流输出)
接口
黑色
交流电源线
交流输入接口
4 将电池装入通道 2。
有关如何装入电池的信息,请参见步骤3“在
CHARGE
分离电池
按照与装入电池时相反的方向滑动电池,然后向上拉出。
检测到错误时
如果在 CHARGE 模式或 DC OUT 模式下的充电过程中,
检测到以下情况之一, CHARGE (充电)指示灯将以橙色
和绿色交替闪烁:
• 开始充电后,快速充电不开始。
• 规定时间内未完成充电。
• 电池充电电压超过规定的电压。
• 内部电压超过规定的电压。
• 内部电压已下降到规定的电压以下。
检测到错误时应采取的措施
请立刻从交流电源上断开交流电源线的连接,取出电池,
并与出售本机的销售商联系。
模式下充电”。
对电池充电
59
Page 60
规格说明
规格说明
电压源 100 V 到 240 V 交流 , 50/60 Hz
功耗 85 W
漏电流 充电:143 VA (100 V), 180 VA (240 V)
输出 充电:16.4 V, 2.2 A/1.5 A
直流输出:12 V, 2.0 A
工作温度 充电:0°C 到 45°C
直流输出:−5°C 到 +45°C
储存温度 −20°C 到 +60°C
尺寸 (宽 / 高 / 厚)177.0 × 53.2 × 137.0 毫米
重量 大约 650 克 (包含直流输出电缆,不
包含交流电源线)
随机附件
直流输出电缆 (零件号:1-836-195-1x)(1)
操作手册 (1)
质保书 (1)
设计和规格如有更改,恕不另行通知。
注意
在使用前请始终确认本机运行正常。
无论保修期内外或基于任何理由, SONY 对任何损坏概
不负责。由于本机故障造成的现有损失或预期利润损
失,不作 (包括但不限于)退货或赔偿。
60
规格说明
Page 61
产品中有毒有害物质或元素的名称及含量
使用环境条件:
参考使用说明书中的操作条件
部件名称
实装基板 × ○ ○ ○ ○ ○
外壳 ×○○ ○ ○ ○
附属品 × ○ ○ ○ ○ ○
铅 (Pb) 汞 (Hg) 镉 (Cd) 六价铬 (Cr (VI)) 多溴联苯 (PBB) 多溴二苯醚 (PBDE)
○︰表示该有毒有害物质在该部件所有均质材料中的含量均在 SJ/T11363-2006 标准规定的限量要求以下。
×︰表示该有毒有害物质至少在该部件的某一均质材料中的含量超出 SJ/T11363-2006 标准规定的限量要求。
有毒有害物质或元素
W1-1
规格说明
规格说明
61
Page 62
한국어
본 기기를 작동하기 전에 반드시 본 설명서를 숙지하고 , 설명
서는 나중을 위해 잘 보관하십시오 .
경고
화재나 감전 위험을 방지하려면 장치가 물기나 습기
주의
배터리를 잘못 교체하면 폭발 위험이 있습니다.
제조업체에서 권장하는 것과 같거나 상응하는 배터리 타입으
로만 교체하십시오.
배터리를 처분할 때에는 반드시 해당 지역 또는 국가의 법률에
따르십시오.
에 노출되지 않도록 하십시오.
감전 위험이 있으므로 본체를 열지 마십 시오.
기기에 액체가 떨어지거나 튀지 않도록 해야 합니다. 꽃병과
같이 액체가 든 물체를 기기 위에 올려 놓아서는 안됩니다.
경고
이 기기에는 전원 스위치가 없습니다.
기기를 설치할 때 기기 근처의 접근이 용이한 벽면 콘센트에 전
원 코드를 연결해 주십시오. 기기를 조작하는 동안 오류가 발생
했을 경우에는 전원 코드를 뽑아 주십시오.
배터리가 직사 광선, 불 등과 같은 과도한 열에 노출되어서는
안됩니다.
1. 해당되는 각 국가의 안전 규정을 준수하는 승인된 전원 코
드(2 코어 메인 리드) / 어플라이언스 커넥터 / 플
용하십시오.
2. 정격 등급(전압 및 암페어)을 준수하는 전원 코드(2 코어 메
인 리드) / 어플라이언스 커넥터 / 플러그를 사용하십시오.
위의 전원 코드 / 어플라이언스 커넥터 / 플러그 사용에 관한 질
문은 자격 있는 전문 정비 요원에게 문의하십시오.
러그를 사
통풍이 잘 되지 않는 장소에서는 책장이나 붙박이 캐비닛과 같
은 여유공간이 없는 곳에 세트를 놓지 마십시오.
중요
명판은 바닥에 있습니다.
제조일자
명판의 일련번호에는 제조일자에 대한 정보가 포함되어 있습
니다.
11자리의 일련번호 중에 처음 네 자리는 제조년월을 나타냅니
다.
예:
0703
3000001
0703은 제조일자에 해당하는 2007년 3월을 나타냅니다.
62
Page 63
목차
개요
개요 ...................................................................... 63
각부의 위치 및 기능 ............................................. 64
배터리 팩 충전 ......................................................65
사양 ...................................................................... 67
BC-U2 배터리 충전기는 Sony BP-U30/U60/U90 리튬 이온 배터
리 팩을 충전합니다. 다음과 같은 특징이 있습니다.
•CHARGE
니다
• DC OUT 모드의 경우, 연결된 장치에 전원이 공급되는 동안
배터리 한 개를 충전할 수 있습니다.
• 기존 모델(BC-U1)보다 충전 시간이 20분 정도 짧아졌습니다
(BP-U60/U90 배터리를 충전할 경우).
참고
이 기기가 작동시 일부 문제가 발생할 경우에는 AC 전원에서
AC 전원 코드를 뽑아 전원 공급을 차단합니다.
모드에서 2개의 배터리 팩을 동시에 충전할 수 있습
(같은
모델의 배터리 2개 또는 다른 모델의 배터리 2개
).
KR
목차 / 개요
63
Page 64
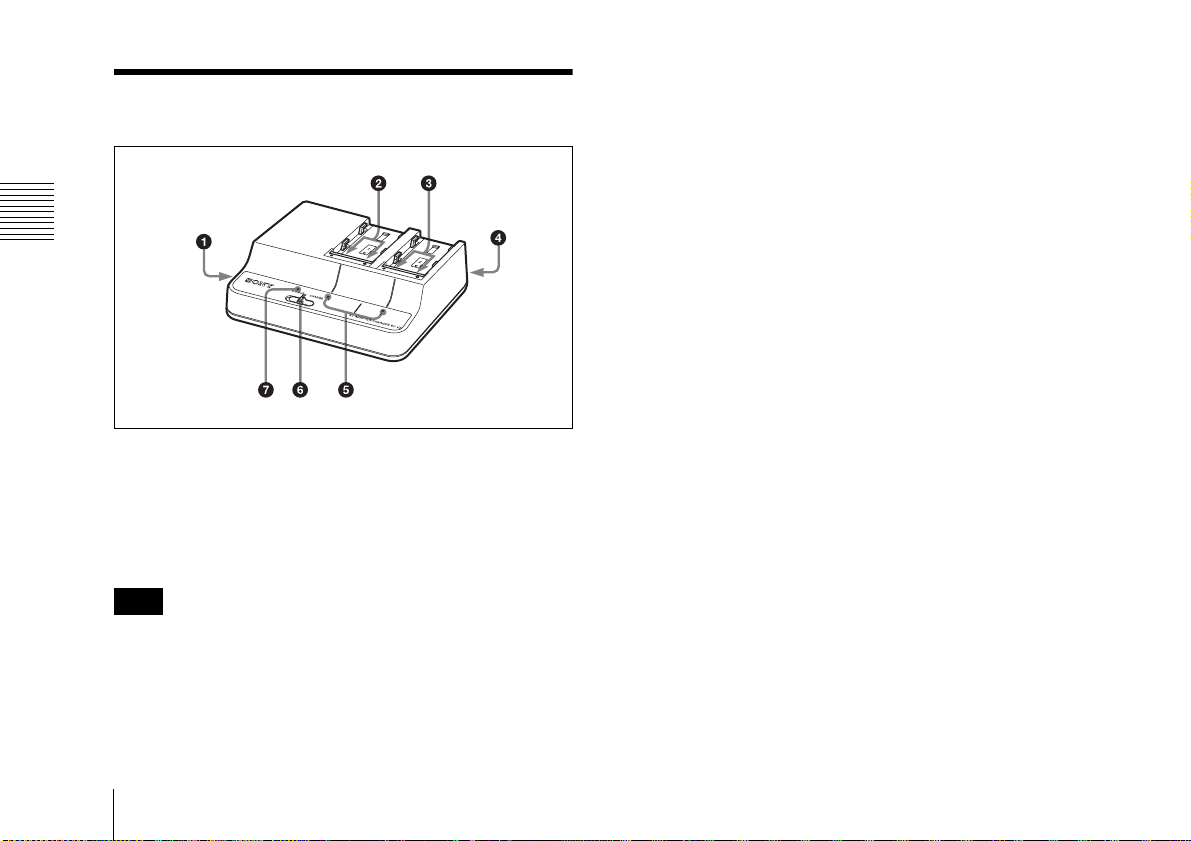
각부의 위치 및 기능
각부의 위치 및 기능
a DC OUT 커넥터
모드 선택 스위치가 DC OUT로 설정된 경우, 제공된 DC 출력 케
이블을 통해 연결된 장치에 DC 전원이 공급됩니다.
DC 출력 케이블에는 검정색 절연선과 노랑색 절연선이 있습니
다. 검정색 절연선은 본체에 접속하며, 노랑색 절연선은 연결된
장치에 접속합니다.
참고
• 장치에 규정값 이상의 공급 전원을 연결하지 마십시오.
• 연결된 장치가 전력을 소비하면서 기기에서 열이 발생할 수
있는데, 이것은 고장이 아닙니다. 만약 열이 발생하는 경우에
간 기기와 연결하지 말아 주십시오.
는 장시
b 채널1 충전 커넥터
모드 선택 스위치가 CHARGE로 설정되어 있으면 전원이 공급
됩니다.
리튬 이온 배터리 팩이 아닌 배터리 팩을 잘못 부착하면 충전 전
류가 자동으로 차단됩니다.
c 채널2 충전 커넥터
모드 선택 스위치의 설정에 관계없이 전원이 공급됩니다.
리튬 이온 배터리 팩이 아닌 배터리 팩을 잘못 접속하면 충전 전
류가 자동으로 차단됩니다.
d AC 입력 커넥터
AC 전원 코드를 통해 AC 전원에 연결합니다.
e CHARGE 표시등
배터리 팩을 충전하는 동안 접속된 배터리 팩의 충전 상태를 표
시합니다.
자세한 내용은 “배터리 팩 충전”을 참조하십시오
.
f 모드 선택 스위치
CHARGE: 채널1과 채널2에 접속된 리튬 이온 배터리 팩에 전
원을 공급합니다.
DC OUT: DC OUT 커넥터를 통해 DC 전원이 공급되며 동시에
채널2에 접속된 리튬 이온 배터리 팩에 전원이 공급됩니
다. (채널1에 접속된 배터리 팩은 충전되지 않음.)
g DC OUT 표시등
모드 선택 스위치가 DC OUT으로 설정되어 있고 DC 전원이 공
급 중이면 녹색으로 점등됩니다.
문제가 감지되면 인디케이터가 어두워집니다.
각부의 위치 및 기능
64
Page 65
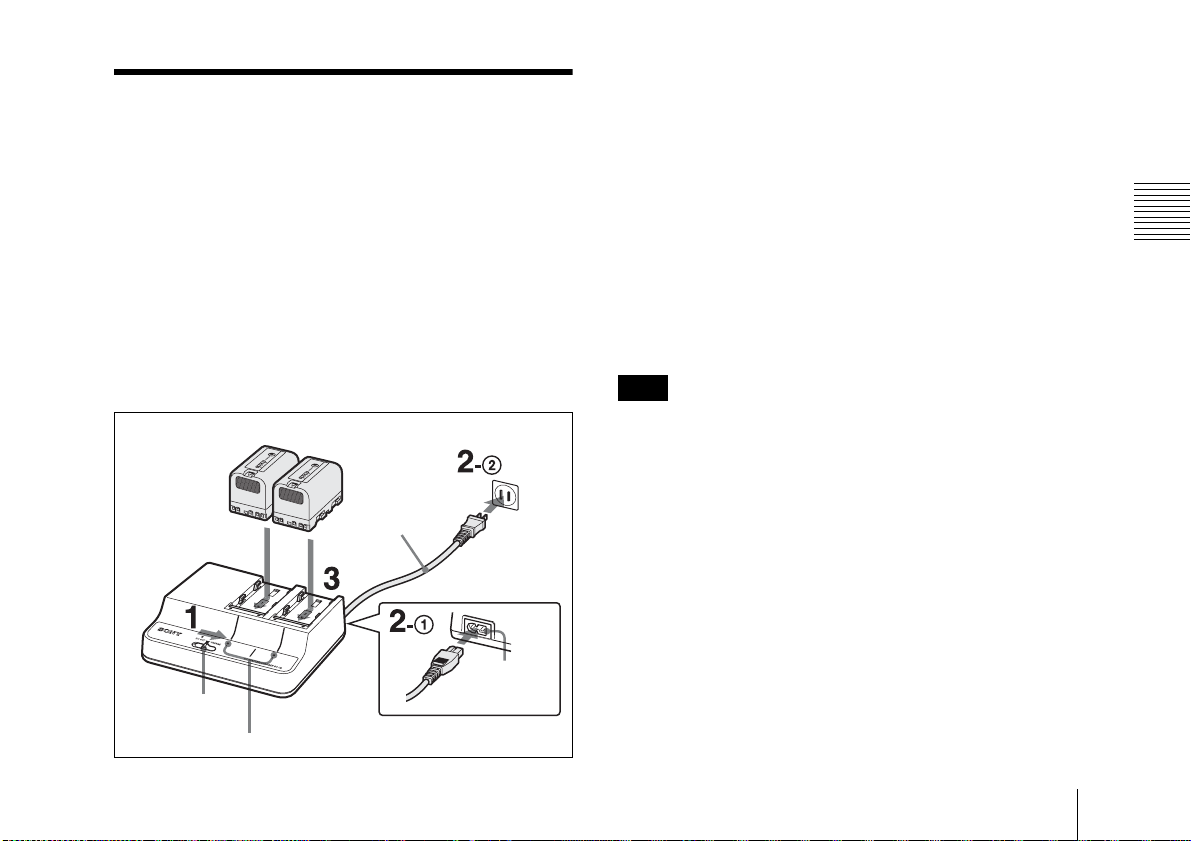
배터리 팩 충전
충전 시간
완전히 소비된 배터리 팩을 완전히 충전하는 데 소비되는 시간
은 다음과 같습니다. (온도가 25°C인 경우. 충전 시간은 충전하
는 배터리 팩의 개수 또는 다른 모델의 배터리 조합에 의해 영향
을 받지 않습니다.)
BP-U30: 약 130분
BP-U60: 약 150분
BP-U90: 약 190분
CHARGE 모드로 충전
CHARGE 모드에서 2 개의 배터리 팩을 동시에 충전할 수 있습
니다 ( 같은 모델의 배터리 2 개 또는 다른 모델의 배터리 2 개 ).
BP-U30/U60/U90 리튬 이온 배터리 팩
AC 전원 코드
AC 전원
1 모드 선택 스위치를 CHARGE로 설정합니다.
2 AC 전원 코드를 1AC 입력 커넥터와 2AC 전원에 연
결합니다.
3 배터리 팩을 부착합니다.
삼각형 표시가 충전 커넥터를 향하도록 배터리 팩을 놓고
화살표 방향으로 밀어 넣습니다. 충전 커넥터에 결합되도
록 딸깍 소리가 날 때까지 배터리 팩을 밀어넣습니다.
충전이 시작되고 CHARGE 표시등이 충전 상태를 표시합
니다.
주황색으로 점멸: 0~80% 충전됨
녹색으로 점멸: 80% 이상 충전됨
녹색으로 점등: 완전히 충전됨
참고
리튬 이온 배터리 팩이 아닌 배터리 팩을 부착하면 충전 전류가
자동으로 차단됩니다 . 지정된 배터리 팩만 충전
하십시오 .
배터리 팩 충전
모드 선택 스위치
CHARGE 표시등
AC 입력
커넥터
배터리 팩 충전
65
Page 66
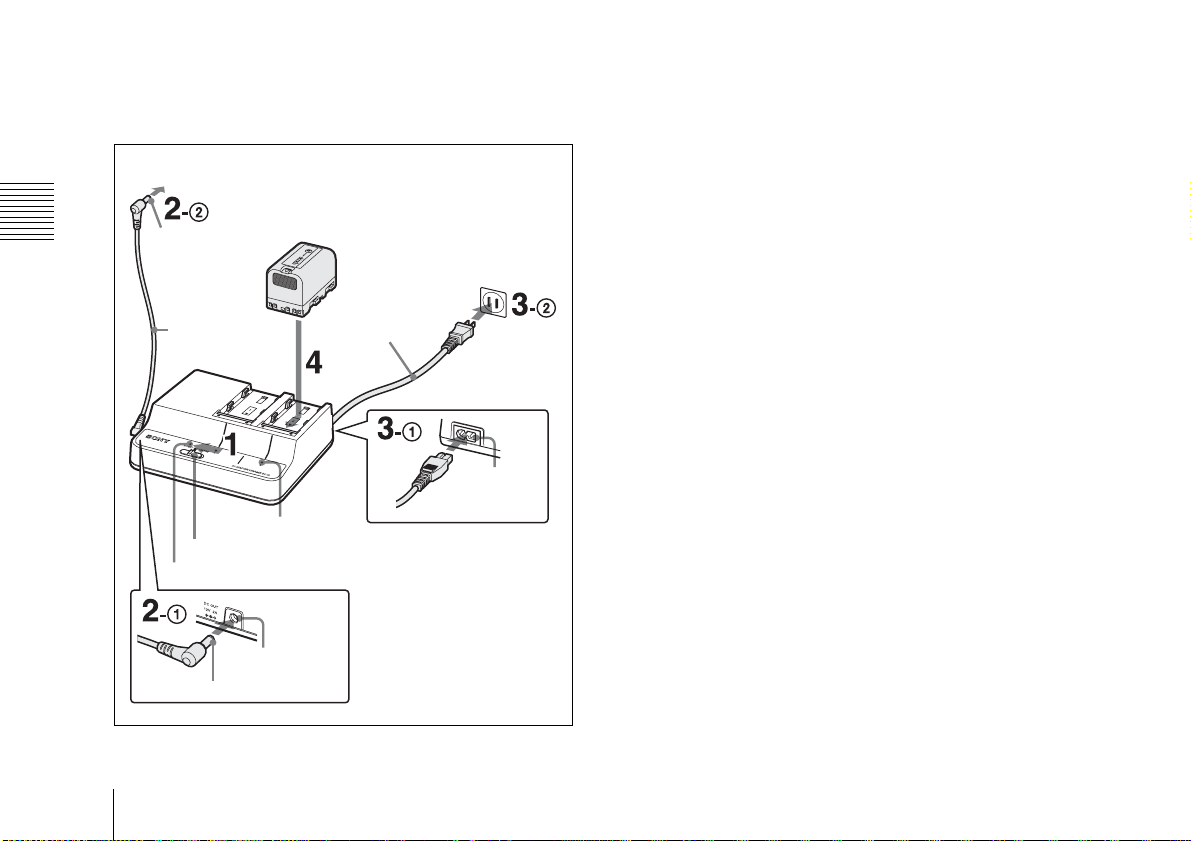
배터리 팩 충전
DC OUT 모드로 충전
장치에 전원이 공급되는 동안 채널 2 에서 배터리 팩을 충전할
수 있습니다 .
DC 전원 장치
BP-U30/U60/U90
노랑색
DC 출력 케이
블 ( 제공품 )
모드 선택 스위치
DC OUT 표시등
리튬 이온 배터리 팩
CHARGE 표시등
DC OUT
커넥터
검정색
AC 전원 코드
AC 전원
AC 입력
커넥터
1 모드 선택 스위치를 DC OUT로 설정합니다.
2 제공된 DC 출력 커넥터를 1DC OUT 커넥터와 2DC
전원 장치에 연결합니다.
3 AC 전원 코드를 1AC 입력 커넥터와 2AC 전원에 연
결합니다 .
2 단계에서 연결된 장치에 DC 전원이 공급되며 DC
OUT 표시등이 녹색으로 점등됩니다
.
4 채널2에 배터리 팩을 삽입합니다.
“CHARGE
법을
배터리 팩 분리
부착된 배터리 팩을 부착시의 반대 방향으로 민 다음 위로 당기
십시오.
오류가 검출된 경우
CHARGE 모드나 DC OUT 모드로 충전 시에 아래 항목 중 어느
하나라도 검출되면 CHARGE 표시등이 주황색과 녹색으로 번
갈아 점멸됩니다:
• 충전이 시작된 후 빠른 충전이 시작되지 않는 경우.
• 규정된 시간 내에 충전이 완료되지 않는 경우.
• 충전 중인 배터리의 전압이 규정 수준을 초과하는 경우.
• 내부 전압이 규정 수준을 초과하는 경우.
• 내부 전압이 규정 수준 아래로 떨어진 경우 .
오류가 검출되었을 경우의 조치
즉시 AC 전원 코드를 AC 전원 콘센트에서 뽑고 , 배터리 팩을
제거한 후 , 제품을 구입하신 판매점에 연락해 주십시오 .
모드로 충전”의 3단계에서 설명한 배터리 팩 접속 방
참조해 주십시오
.
66
배터리 팩 충전
Page 67
사양
전원 100V~240V AC, 50/60Hz
소비 전력 85W
전류 드레인 충전: 143VA(100V), 180VA(240V)
출력 충전: 16.4V, 2.2A/1.5A
DC 출력: 12V, 2.0A
작동 온도 충전: 0°C~45°C
DC 출력: ―5°C~+45°C
보관 온도 ―20°C~+60°C
크기(폭/높이/깊이)177.0×53.2×137.0mm
무게 약 650g(DC 출력 케이블 포함, AC 전원 코
드 미포함)
기본 제공 액세서리
DC 출력 케이블(부품 번호: 1-836-195-1x) (1)
취급 설명서(1)
보증서(1)
디자인 및 사양은 예고 없이 변경될 수 있습니다.
주의
사용 전에는 항상 정상적으로 작동하는지 확인하십시오.
SONY는 본체의 오류로 인한 현재 또는 장래 이익의 손실에
대한 손해에 대해서 보증기간 중이거나 보증기간 경과 후 또
는 어떠한 이유에도 상관없이 배상이나 변상에 대한 일체의
책임을 지지 않습니다.
사양
사양
67
 Loading...