

Page 1

BATTER Y CHARGER
BC-M150
電気製品は、安全のための注意事項を守らない
と、火災や人身事故になることがあります。
この取扱説明書には、事故を防ぐための重要な注意事項と製品の
取り扱いかたを示してあります。この取扱説明書をよくお読みの
うえ、製品を安全にお使いください。お読みになったあとは、
いつでも見られるところに必ず保管してください。
OPERATION MANUAL
[Japanese/English/French/German/Italian/Spanish]
1st Edition (Revised 1)
Page 2
日本語
安全のために
ソニー製品は安全に十分に配慮 して設計されています。しか
し、電気製品はまちが った使いかたを すると 、火災や感電など
により死亡や大けがなど人身事故につながるこ と が あり 、危険
です。
事故を防 ぐために次の ことを必ずお守りください。
安全のための注意事項を守る
2(JP)〜8(JP)ページの注意事項をよくお読みください。
定期点検を実施する
長期間安全に 使用していただくために、定期点検を実施す るこ
とをおすすめします。点検の内容や費用については、ソニーの
サービス担当者または営業担当者にご相談ください。
故障したら使用を中止する
ソニーのサービス担当者、または営業担当者にご連絡ください。
万一、異常が起きたら
1 電源を切る。
煙が出たら
•
異常な音、におい
•
がしたら
内部に水、異物が
•
入ったら
製品を落としたり
•
キャビネットを破
損したときは
,
2 バッテリ ーパック を外し、
電源コード、および接
続コードを抜く 。
3 ソニーのサービス担当
者、または営業担当者
に修理を依頼する。
警告表示の意味
このオペレーションマ
ニュアルおよび製品で
は、次のような表示をし
ています。表示の内容を
よく理解してから本文を
お読みください。
この表示の注意事項を守
らないと、破裂・発火・
発熱・液漏れなどにより
死亡や大けがになること
があります。
この表示の注意事項を守
らないと、火災や感電な
どにより死亡や大けがな
ど人身事故につながるこ
とがあります。
この表示の注意事項を守
らないと、感電やその他
の事故によりけがをした
り周辺の物品に損害を与
えたりすることがあり
ます。
注意を促す記号
行為を禁止する記号
行為を指示する記号
Page 3

目次
............................................................................
............................................................................
電池についての安全上のご注意 ......................................
その他の安全上のご注意.................................................
概要 .................................................................................
特長......................................................................................... 9(JP)
本機の充電方式について ................................................... 10(JP)
使用上のご注意 ............................................................
各部の名称と働き..........................................................
操作 ..............................................................................
バッテリーパックを取り付ける............................................... 19(JP)
充電を始める........................................................................ 20(JP)
バッテリーパックの情報を表示する..................................... 21(JP)
外部機器に電源を供給する................................................ 22(JP)
ニッケル水素バッテリ ーパックをリ フレッシュする
(BP-M50/M100のみ)..................................................23(JP)
仕様 ..............................................................................
2(JP)
4(JP)
6(JP)
8(JP)
9(JP)
13(JP)
16(JP)
19(JP)
24(JP)
日
本
語
1(JP)
Page 4
下記の注意を守らないと、
火災や感電により死亡や大けが
につながることがあります。
表示された電源電圧で使用する
機器に表示されたものと異なる電源電圧で使用すると、火災や感電の原
因とな り ます。
油煙、湯気、湿気、ほこりの多い場所では設置・使
用しない
上記のような場所で設置・使用すると、火災や感電の原因となることがあ
ります。取扱説明書に記されている使用条件以外の環境での使用は、火
災や感電の原因となることがあります。
指定のバッテリーパック以外の充電はしない
指定以外のバッテリーパックを充電すると、発火、発煙、感電の原因とな
ることがあります 。
2(JP)
内部に水や異物を入れない
水や異物が入ると火災や感電の原因となることがあります。万一、水や異
物が入っ たときは 、すぐに電源を切り、電源コードや接続コード を抜いて、
お買い上げ店またはソニーのサービス窓口およびサービス担当者にご相
談く ださい。
分解や改造をしない
分解や改造をすると、火災や感電、け が の原 因となることが あります 。内
部の点検や修理は、お買い上げ店またはソニーのサービス窓口および
サービス担当者にご依頼ください。
Page 5
電源コードやDCケーブルを傷つけない
AC
AC電源コードやDCケーブルを傷つけると、火災や感電の原因となりま
す。
• コー ドやケーブルを加工した り、傷つけた りし ない。
• 重いものをのせたり 、引っ張ったりしない。
• 熱器具に近づけたり、加熱したりしない。
• コー ドやケーブルを抜くときは、必ずプラ グ を持って抜 く。
万一、コー ドやケーブルが傷んだら、ソ ニーのサービス担当者に交換をご
依頼ください。
電源コードのプラグ及びコネクターは突き当たるま
で差し込む
真っすぐに突き当たる まで差し込まないと、火災や感電の 原因 となります。
3(JP)
Page 6
下記の注意を守らないと、けがをしたり周辺の物
損害を与えることがあります。
品に
付属の電源コードを使う
付属以外の電源コードを使う と、 感電や故障の原因となることがあります。
高温下では使用しない
高温の場所で本機を使用すると、火災、発火、発煙の原因となることがあ
ります。周囲の温度は40℃以下で使用してください。
長時間、直射日光のあたる場所に放置しないでください。
通風孔をふさがない
通風孔 をふさぐと内部に熱がこもり、 火災や故障の原因となることがありま
す。風通しをよくするために次の項目をお守りください。
• 壁から10cm以上離して設置する。
• 密閉された狭い場所に押 し込め な い 。
• 毛足の長い敷物(じゅうたんや布団など)の上に設置しない。
• 布などで包ま ない。
• あお向けや横倒し、逆 さまに しない。
4(JP)
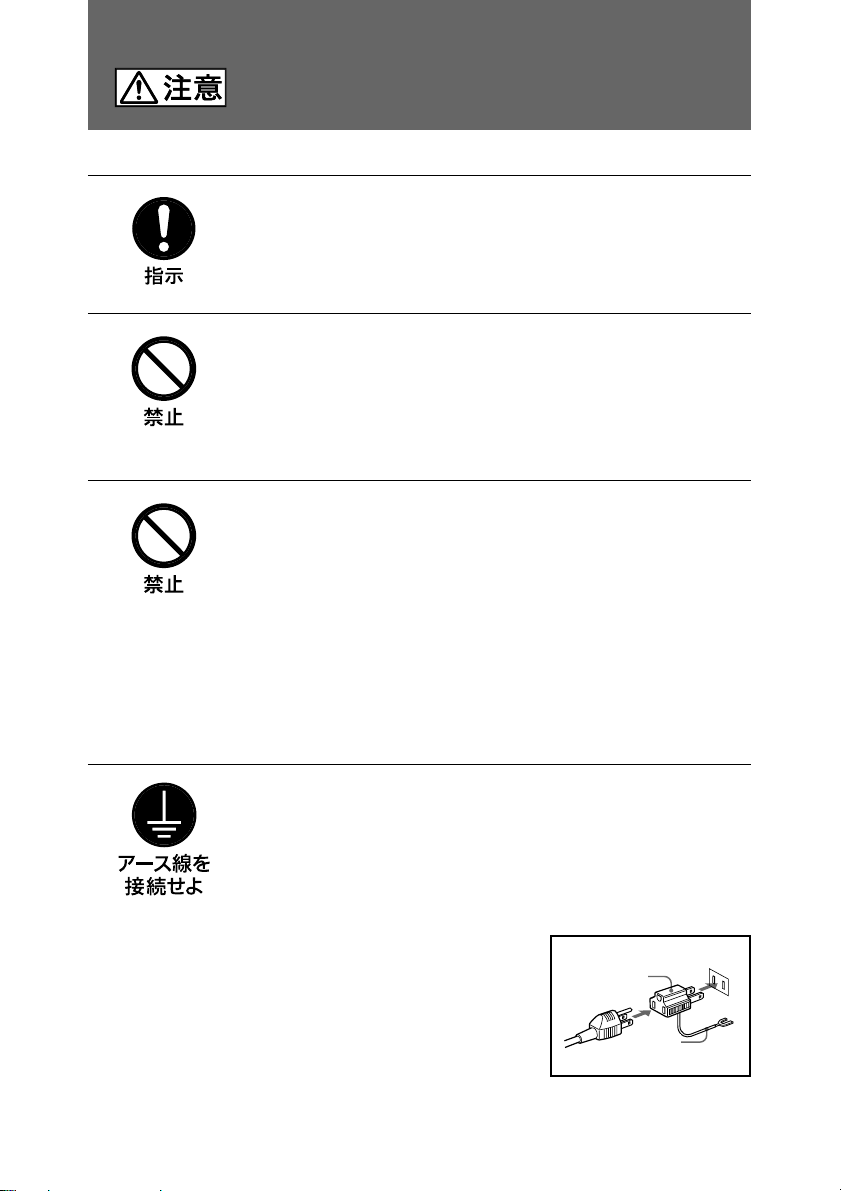
安全アースを接続する
安全アースを接続しないと、感電の原因となることがあります。次の方法
でアースを接続してください。
• 電源コンセントが
付属の電源コードを使用することで安全アースが接続されます。
• 電源コンセントが
付属の3極t2極変換プラグを使用し、
変換プラグから出ている緑色のアース線
を建物に備えられているアース端子に接
続してく ださい。
安全アースを接続できない場合は、ソニーのサービス担当者または営業担
当者にご相談ください。
極の場合
3
極の場合
2
変換プラグ
アース線
Page 7
定格出力を超えないよう、接続する機器の消費電力
を確認する
出力電力を超えて使用すると高温になり、故障の原因となることがありま
す。
ファンモーター開口を塞がない
ファンモーターの開口部を塞ぐと高温になり、故障の原因となる ことがあ り
ます。
5(JP)
Page 8
電池についての安全上のご注意
電池についての安全上のご注意
万一、異常が起きたら
煙が出たら
1機器の電源スイッチを切るか、バッ テリ ーチャージャーの電源プラグを
抜く 。
2お買い上げ店またはソ ニーの サービス窓口およびサービス担当者に連
絡する。
電池の液が目に入ったら
す ぐ きれいな水で洗い、直 ちに医師の治療を受ける。
下記の注意事項を守らないと、破裂・発火・発熱に
より、死亡や大けがにつながることがあります。
• 充電には、BC-M150などのソニーの専用バッテリーチャージャーを使用
する。
• 火の中に投げ入れたり、加熱・半田付けなどをしない。
• 分解、改造をしない。
危険防止の保護回路が壊れることがあります。
• 火のそばや炎天下などで、使用・放置・充電をしない。
危険防止の保護回路が誤動作したり、壊れたりすることがあります。
• ハンマーでたたく などの強い衝撃を与えたり、踏みつけたりし ない。
• 接点部をショートさせたり、 金属製のものと一緒に携帯・保管をしない。
6(JP)
Page 9
下記の注意事項を守らないと、破裂・発熱・液漏
れにより、死亡や大けがなどにつながることがあ
ります。
• 所定の充電時間を超えても充電が完了しない場合は、充電をやめる。
• 電池使用中や充電、保管時に異臭がしたり、発熱・液漏れ・変色・変
形などがあったときは、すぐに使用や充電をやめる。
• 今までと異なる ことに気がついた ときは、使用を中止して直ちに火気
よ り遠ざける。
• 容量、種類、銘柄の違う電池を混ぜて使用しない。
下記の注意事項を守らないと、破裂・液漏れにより、け
がをしたり周辺の物品に損害を与えたりすることがあり
ます。
• 投げつけない。
• 水や海水につけたり、濡らしたりしない。
• 複数の電池を直列に接続して使用しない。
7(JP)
Page 10

その他の安全上のご注意
重要
機器の名称と電気定格は、底面に表示されています。
• アース接続は、必ず主電源プラグを主電源に接続する前に行ってくだ
さい。また、アース接続を外す場合には、必ず主電源から主電源プラグ
を外 してから行っ てください。
• 機器は主電源コンセントの近くに設置し、遮断装置へ容易に手が届くよ
うにしなければならない。
• 機器を水滴のかかる場所に置かないこと。および水の入ったもの、花
瓶などを機器の上に置かないこと。
ご注意
日本国内で使用する 電 源コードセットは、電気用品安全法で定める基準を
満足した承認品が要求されます。ソニー推奨の電源コードセットをご使用
下さい。
8(JP)
Page 11

概要
特長
BC-M150は、リ チウムイオンバッテリ ーパック (BP-L40A、BP-L60A、BPIL75、BP-L90A)またはニッケル水素バッテリーパック(BP-M50、BPM100)を4本まで同時に装着して充電できるバッテリーチャ−ジャーで
す。また、外部機器へDC電源を供給することができます。
本のバッテリーパックを取り付け可能
4
リチウムイオンバッテリ ーパック(BP-L40A/L60A/L90A/IL75)とニッ ケル
水素バッテリーパック(BP-M50/M100)が混在した状態でも充電すること
ができます。1 〜 3 本のバッテリ ーパックを取り付けての充 電も可能で す。
効率的な充電動作
•リチウムイオンバッテ リーパックの場合は、 それぞれを80%まで充電した
あと、 4本同時にフル充電することによって短時間で充電できます。
• ニッケル 水 素バッテリ ーパックの場合は1本ずつ充電を行いますが、既
存のバッテリー チャージャーに比較して大幅な充電時間短縮を実現して
います。
◆詳しくは、「本機の充電方式について」( 1 0( J P )ペ ージ )をご覧く ださい。
小型・軽量
小型で軽量のため、持ち運びが簡単です。
自己診断機能
取り付けた バッテリーパックが 正 常 かどうかを診 断します。バッテリーパッ
クが正常に充 電されないときは、充電 表示イ ンジケーターが 赤く点滅し、
LCDにエラーNo.が表示されて異常を知ら せます。
表示
LCD
取り付けた バッテリーパックの 残 容 量、 充電時間、充放電回数などをLCD
に表示 します。(バッテリーパ ックに よっ て、表示できる内容は異なります。)
9(JP)
Page 12

概要
充電済みバッテリーパックの充電をスキップ
充電済みのバッテリーパ ック を本機に取 り 付けた場合は、充電を行わずに
充電完了を知らせます。
リフレッシュ機能(ニッケル水素バッテリーパック
充電時のみ)
M100
ニッケル水素バッテリーパックのメ モ リー効果をクリアするリフレッシュ機 能
を装備してい ま す 。リフレッシュ機 能は 、オートでもマ ニュアル でも設定 で
きます。
最大出力
別売りのDC接続ケーブルを使用して、外部機器に最大出力100Wの電
源を供給します。
ファンモーター動作
充電中または電源供給中は、内部冷却用ファンが回転します。
• 本機はリチウムイオンバッテリーパック(BP-L40A/L60A/L90A/
IL75)とニッケル水素バッテリーパック(BP-M50/M100)専用の
チャージャーです。
• DC-L1(NP-1B用アダプター)やDC-L90(BP-90A用アダプター)を
使用してニカドバッテリーパックを 充 電することは できませ ん。
までのDC電源供給
100W
BP-M50/
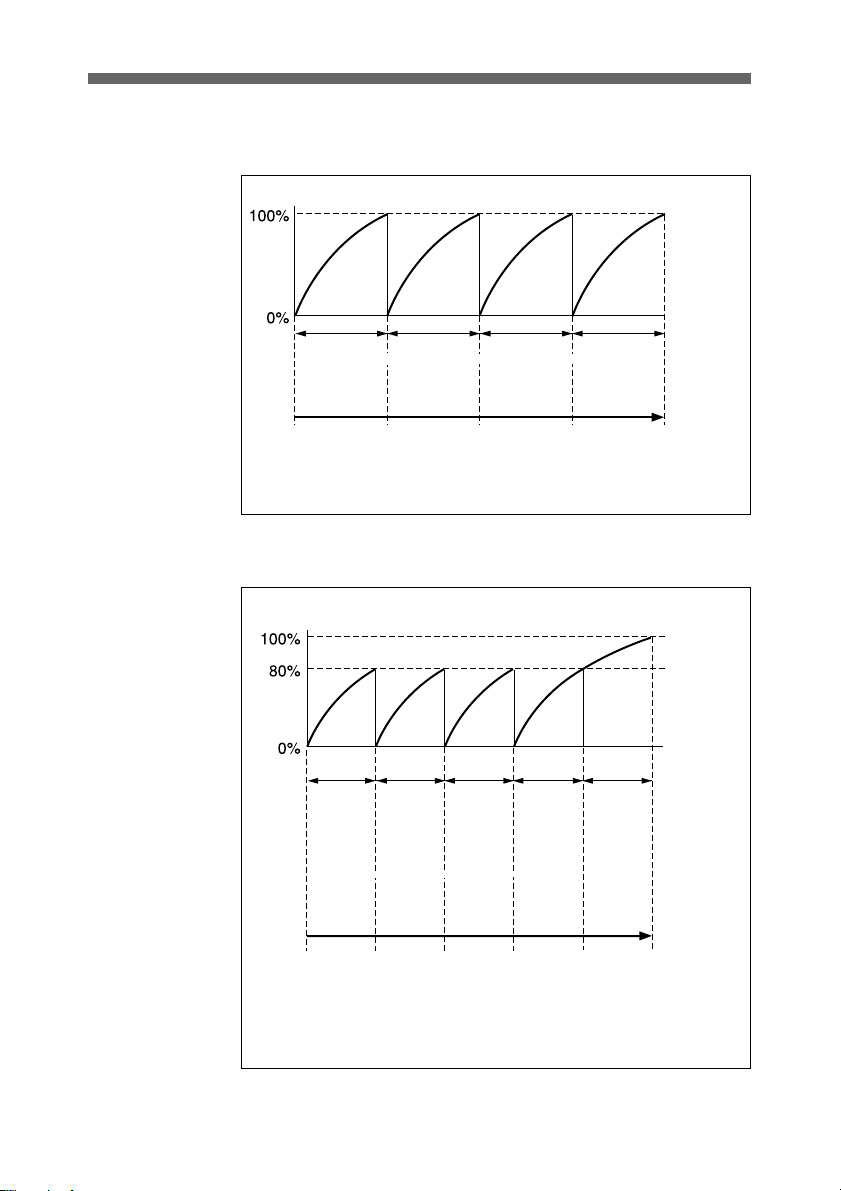
本機の充電方式について
リチウムイオンバッテリーパックの充電方式
本機は、取り付けられたバッテリ ーパックを、まず、取り付け部の 番号順に
1本ずつ 80%まで充電しま す。次に、すべてのバッテ リーパ ック を同時に
100%までフル充電します。
この 方 式により、 1本ずつ順番にフル充電していた従来の方式より、トータ
ルの充電時間を短縮しています。
10(JP)
Page 13
従来の方式(
充電量
BP-IL75を4
バッテリー
パック1の充
電(
分)
140
バッテリーパック1から4まで順番にフル充電します。
本充電する場合)
バッテリー
パック2の充
電(
分)
140
バッテリー
パック3の充
電(
分)
140
バッテリー
パック4の充
電(
分)
140
充電時間
計
560
分
本機の充電方式(
充電量
バッテ
リーパッ
ク1の充
電(65分)
バッテリーパック1から4まで順番に
まで充電します。そのため、4本のバッテリーパックを短時間で充
100%
電できます。
BP-IL75を4
バッテ
リーパッ
ク2の充
電(65分)
バッテ
リーパッ
ク3の充
電(65分)
本充電する場合)
バッテ
リーパッ
ク4の充電
(65分)
80%
バッテ
リーパッ
ク1〜4を
同時に充
電(80分)
充電し、その後4本同時に
充電時間
計
340
分
11(JP)
Page 14

概要
80 % までの充 電中に、充電中の バッテリ ーパックよ り番号の若 い取り付け
部にバッテリーパックを装 着 すると、充電中のバッテリーパックを80%まで
充電 し てから、新たに装着したバッテリーパックの80%までの充電を始め
ます。80%以上の充電中に、新しいバッテリーパックを装着すると、80%以
上の充電を中断し、新しいバッテリ ーパッ クの80%までの充電を始めます。
ニッケル水素バッテリーパックの充電方式
取り付け部の番号順に1本ずつフル充電します。充電中のバッテリーパッ
クより 番号の若い取り 付け部にバッテリーパックを装着すると、 充電中の
バッテリーパックをフル 充 電してから、新たに装着したバッテリーパックの
充電を始めます。
リチウムイオンバッテリーパックとニッケル水素バッテリーパックが混在
しているときの充電方式
取り 付け部の番号順に 、リチウムイオンバッテリーパックは80%まで充電し、
ニッケル水素 バッテリ ーパックはフ ル充電し ます。その後、リチウムイオン
バッテリーパックをまとめて100%までフル充電します。充電中のバッテリー
パックより番号の若い取り付け部にバッテリーパックを装 着 すると、 充電中
バッテリーパックを 8 0 % まで充 電 (またはフル充電)してから、新たに装着
したバッ テ リ ーパッ クの充電を始めます。
12(JP)
Page 15

使用上のご注意
バッテリーチャージャーについてのご注意
• 本機は、ソニー製のリチウムイオンバッテリーパック及びニッケル水素
バッテリ ーパックの充電専用です。他社製のバ ッテリーパ ック を充電する
と、発煙・発火などの危険性がありますのでおやめください。
• 周囲の温度が10℃〜30℃の範囲でお使いください。 温度が低かったり
高かっ たりすると充電しにくくなりますので 、10℃〜30℃での充電をおす
すめします。
• ほこ りや腐食性ガスがある場所でのご使用、保管は避けてください。
• 直射日光があたる場所でのご使用、保管は避けてください。
• 通気孔をふ さがないでください。
バッテリーパックについてのご注意
• 充電してあっても、自然に放電します。なるべく 、使用 直前に充 電し直し
てく ださい。
• バッテリ ーパックを持ち運ぶとき や保管するときは、機 器に取り付けるか、
お買い上げのときに入っていた梱包材に入れてください。
• なるべく 涼しいとこ ろ(約20℃)で保管し、充電は周囲の温度が10℃〜
30℃の所で行ってください。バッテリ ーパックを長 持 ちさせることが できま
す。
• 温度が低い(10℃以下)と、バッテリ ーパックの性 能が低 下し、バッテ
リーパックを使用できる時間が短くなります。 より長い時間ご使用になる
ために、ご使用前にバッテリーパックを室温(約20℃)に戻しておいて
ください。
• 予 備 の バッテリーパックを 準 備し て おくことを お すす めします 。
• 高温時の充電は、バッテ リー パックの記載容量 までの充電が行われませ
ん。充電完了(FULL)と表示されても、絶対容量は80%前後となりま
す。
• 購入直後のバッテリーパックを満充電にしても、公称容量値より少なく表
示されます。
公称容量値の定義:単セルを0.1Cで16時間充電した後、0.2Cレートで
放電した場合の平均容量
13(JP)
Page 16

使用上のご注意
• ニッケル 水素バッテリ ーパックの場 合、 30℃以上の環境下(バッテリー
パック内の温度が30℃以上の場合を含む)で充電を行うと、 10℃〜30
℃の環境下で充電したときと比べて充電時間が長くなり、 充電量が少な
くなります。
40℃の環境下での充電の場合、絶対容量は80%程度で充電が終了し
ます。この場合、温度を下げれば再充電が可能です。(ただし絶対容量
が90%以下の場合*
*1 過充電防止のため、充電量が90%以下にならないと充電は開始さ
れません。
リチウムイオン電池 は充電記憶メモリーの効果を持っていな いの で、充
電の前に使いきった り放電 したりする 必要はありません。
バッテリーパックを使用できる時間が大幅に短くなった場合は、寿命と 思
われます。新しい バッテリーパックをお買い 求 めく ださい。
バッテリーパックが高温または低温時の充電表示
バッテリーパックが高温状態および低温状態では、充電はできません。
バッテ リーチャージャー上部の充電表示インジケーター(下図)がオレンジ
色に点滅していると きは、バッテリ ーパッ クの温度が規定よりも高いまたは
低いため、充電可能な温度になるまで待機している状態で す。ただし、
規定時間内に充電可能な温度に ならないとエラーとなり、充電はされませ
ん。
1
)
14(JP)
充電表示インジケーター
左中央右
:オレンジ色に点滅
:消灯
Page 17

過放電状態のバッテリーパックの充電に関するご注意
たとえば、バッテリーパックをカムコーダ ーに 装 着してご 使 用の場 合 、 バッ
テリ ーが完全に放電する前にカムコーダーの VTR 機能が働かなくなりま
す。この状態でバッテリ ーパックを装着したままにしていると、バッテ リー
パックはさ らに放電され、過放電状態になります。過放電状態になった
INFO機能対応のバッテリーパックを充電をしようとすると、バッテリー
チャージャーではINFO機能対応と認識せず、INFO機能非対応のバッテ
リーパックとして充電されます。充電中に容量、充放電回数などの情報が
表示 されませんが、そ のまま充 電し て問 題は ありませ ん 。ある程度充電さ
れたところで バッテリーチャ ージ ャーか ら取り 外 し、再度取り付けるとINFO
機能対応のバッテリーパックとして認識され、充電中に容量、充放電回数
などの情報が表示されます。
どちらの充電方法でも、充電後の使用時にはINFO機能対応のバッテリー
パック と して動作 します。
メモリー効果について
ニッケル水素 バッテリ ーは、ニ ッカドバッテリーと同様に充電記憶メモリー
効果を持っています。充電のメモリーをリセットするには、 バッテ リーを使い
きるか、本機のリフレッシュ機 能を 使 います( 1 0( JP )、23(JP)ページ)。
15(JP)
Page 18

各部の名称と働き
各部の名称と働き
前面・上面
後面
1
POWER
スイッチとインジケーター
2 バッテリーパック取り付け部と充電表示インジケーター
(1〜4)
バッテリーパック取り外し
3
DC OUT
端子
ボタン
表示部とボタン
LCD
0
9
16(JP)
CHANNEL
REFRESH
ボタン
ボタン
将来の拡張用コネクター
4
5 プラグホルダー受け
6
7
8
端子
AC IN
表示部
LCD
DISPLAY
REFRESH
ボタン
MANUAL/AUTO
スイッチ
Page 19
1
POWER
(電源)スイッチとインジ
ケーター
本機の電源を入/切します。ONにすると電
源が入 り、インジケーターが 点 灯します。 電源
が入ると、バッテリーパックの充電または外
部機器への電源供給ができるようになりま
す。
2
バッテリーパック取り付け部と充電
表示インジケーター(
1〜4
)
リチウムイオンバッテリ ーパックまたはニッケ
ル水素バッテリーパック を取り付けます。 バッ
テリ ーパック を取り外すときは、取り外しボタ
ンを押しながら上に引き抜きます。
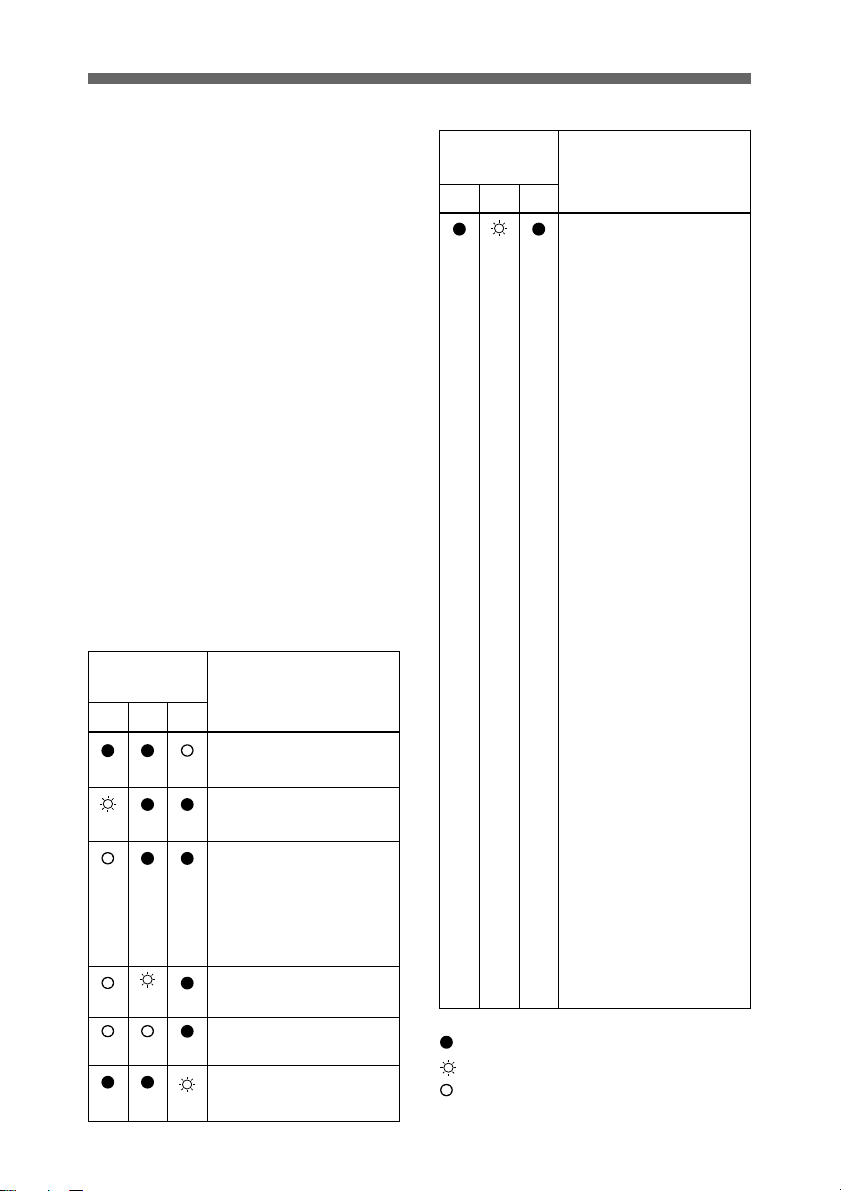
取 り付けられたバ ッテ リーパックの状態は、充
電表示インジケーター(各3個)の点灯/点滅
と色によって次のよう に表示されます。
インジケー
ターの状態
左中央右
(緑)
(緑)
(緑)
(緑)
(緑) (緑)
意味
DC電源供給中
(橙)
充電中(充電量80%未満)
フル充電待機中(充電量
80%)(バッテリーパックが1
個だけ取り付けられている
とき、この状態にはなり ま
せん。)
フル充電中(充電量81%
〜99%)
充電完了
ニッケル水素バッテリー
(赤)
パック リフレッシュ中
インジケー
ターの状態
左中央右
(赤/
緑)
:消灯
:点滅
:点灯
意味(エラー
次のいずれかの状態で
す。
• 電池内部の抵抗が大き
い(E-01)
• 電池内部の充電回路が
開放(E-02)
• 電池電圧が低い(E-03)
• 電池温度が充電可能状
態に戻らない(E-04)
• 電池が通信不能状態
(E-05)
• 充電時の各保護タイマー
以内に充電が終了し な
かった(E-06)
• 充電できないバッテリー
パックを取り付けた(E 07)
• 電池内の情報が読み込
めない(E-08)
• 充電器の出力電圧が規
定電圧以上(E-09)
• 充電器の出力電圧が出
ていない(E-10)
• 充電器の内蔵FANが停
止 してい る(E-20)
以上の場合、2〜3回充電
するか、充電器の電源を
ON/OFFしてみてくださ
い。それでも同じ症状が出
るときは、バッテリ ーパック
の不良と思われます。新し
いバッテリーパック に交換 し
てく ださい。
No.
)
17(JP)
Page 20
各部の名称と働き
3
DC OUT(DC
(
XLR、4
別売りのDC接続ケーブルを使用して、外部
機器に電源を供給します。ピンの極性は、4
番がプ ラス(+)、1番がマイナス(−)です。
ご注意
電源を供給しながらバッテリーパックの充電
はできません。また、 充電中に電源を供給す
ると、本機は充電を中断します。
4
付属のAC電源コードを使って、電源コンセ
ントと接続します。
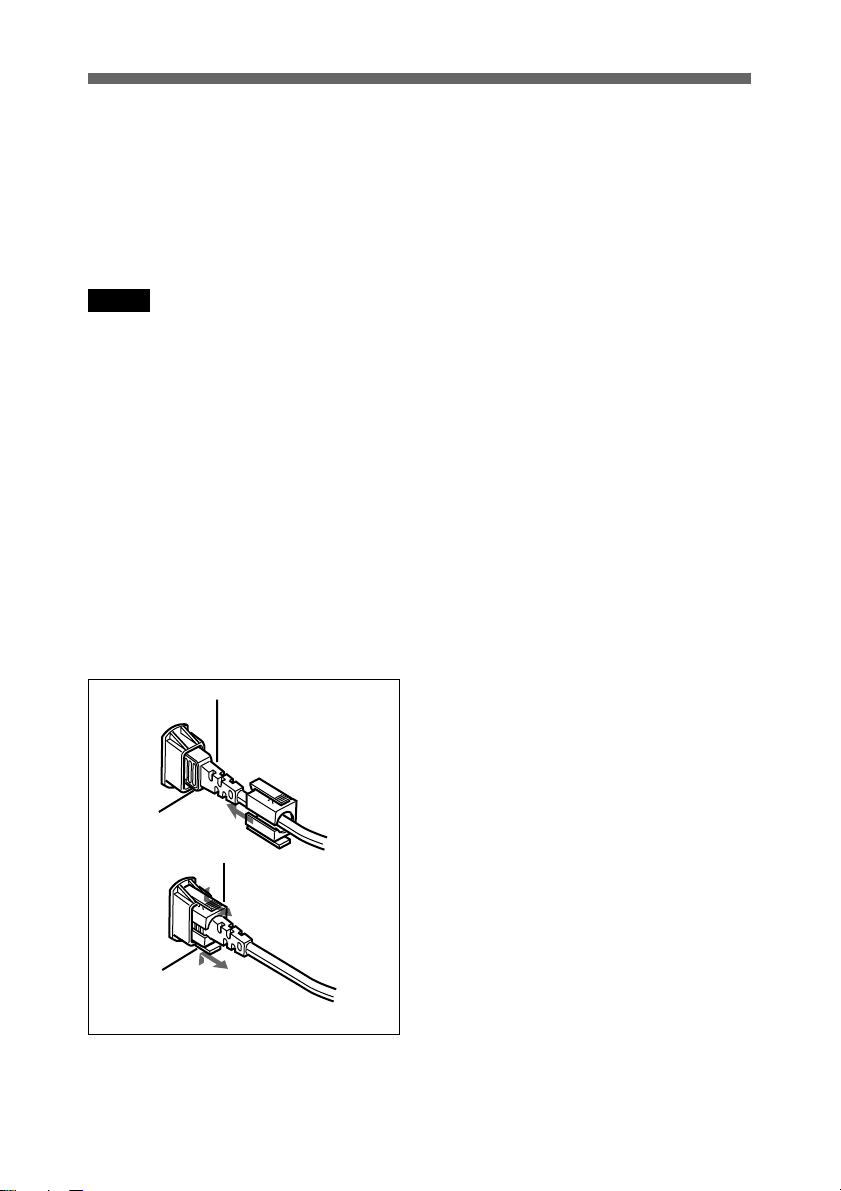
5
AC電源コードが外れないように、AC電源
コー ド に付属のプラ グホルダーを使って下図
のよ うに固定し ます。
外すときは
ピン、オス)
AC IN(AC
プラグホルダー受け
電源出力)端子
電源入力)端子
プラグホルダー
(AC電源コードに
付属)
6
バッテリ ー パックの情報やエラーメッセージな
どを表示します。
7
繰り返し押すと、充電中のバッテリーパックの
容量、充電の所要時間、充放電回数などの
情報をLCD表示部に表示します。
8
フレッシュ マニュアル
チ
ニッケル水素バッテリーパック(BP-M50/
M100)のリフ レッ シュ機能をオートまた は マ
ニュアルに設定します。
9
マニュアルで リフレッシュ機 能を 行う場合に、
リフレッシュしたいバッ テ リーパッ クを選択して
から このボタ ン を押します。
0
ボタン
繰り返し押して、本 機に 取り付けられたバッ
テリーパックを選択し ま す。
表示部
LCD
DISPLAY
(情報表示)ボタン
REFRESH MANUAL/AUTO
オート)スイッ
/
REFRESH
CHANNEL
(リフレッシュ)ボタン
(バッテリーパック選択)
(リ
18(JP)
Page 21

操作
バッテリーパックを取り付ける
充電したいバッテリーパックを下図のように取り付けます。
取り付ける
BC-M150
矢印にしたがって取り付ける。
取り外す
BC-M150
バッテリーパック取り外しボタンを押
しながら、上に引き抜く。
本機はリチウムイオンバッテリ ーパック(BP-L40A/L60A/IL75/L90A)およびニッ ケル水素バッ
テリーパック(BP-M50/M100)専用のチャージャーです。
DC-L1(NP-1B用アダプター)や DC-L90(BP-90A用アダプター)を使用してニカドバッテリー
パックを充電することはできません。
BP-L40A/L60A/IL75/
L90A/M50/M100
BP-L40A/L60A/IL75/
L90A/M50/M100
19(JP)
Page 22
操作
充電を始める
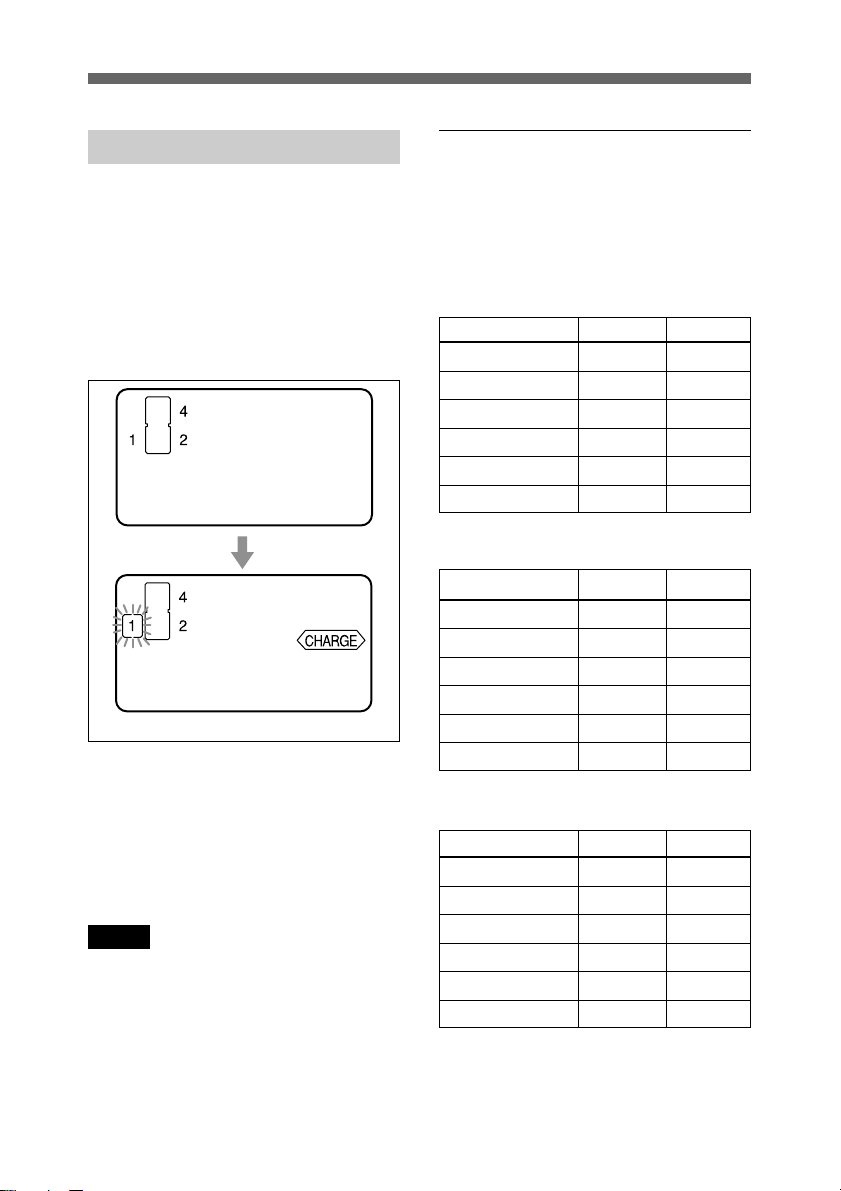
前面のPOWERスイッチを ON にします。
LCD 表示 部に、バッテリ ーパックが取り付け
ら れてい る取り付け部の番号が点灯します。
充電が始 まると、充電中の取り付け部の番号
が点滅する枠で囲まれ、「CHARGE」表示が
点灯します。
バッテリーパックについてのご注意
本機の性能は、適用バッテリーパック(BP-
L40A/L60A/L90A/IL75/M50/M100)に対
してのみ保証されています。適用バ ッテリー
パック以外には使用しないでください。
ご注意
電源を供給しながらバッテリ ーパックの充電
はできません。また、 充電中に電源を供給す
ると、本機は充電を中断します。
充電時間
完全に放電したバッテリーパックの およ その
充電時間は、以下のとおりです (周囲温度:
10℃〜30℃)。
バッテリーパック
バッテリーパック
BP-L40A 約60分 約125分
BP-L60A 約65分 約140分
BP-L90A 約90分 約180分
BP-IL75 約65分 約140分
BP-M50 ― 約70分
BP-M100 ― 約100分
バッテリーパック2本を充電する場合
バッテリーパック
BP-L40A 約120分 約190分
BP-L60A 約130分 約210分
BP-L90A 約180分 約270分
BP-IL75 約130分 約210分
BP-M50 ― 約140分
BP-M100 ― 約200分
バッテリーパック4本を充電する場合
バッテリーパック
BP-L40A 約240分 約305分
BP-L60A 約260分 約340分
BP-L90A 約360分 約450分
BP-IL75 約260分 約340分
BP-M50 ― 約280分
BP-M100 ― 約400分
本を充電する場合
1
充電 フル充電
80%
充電 フル充電
80%
充電 フル充電
80%
20(JP)
Page 23
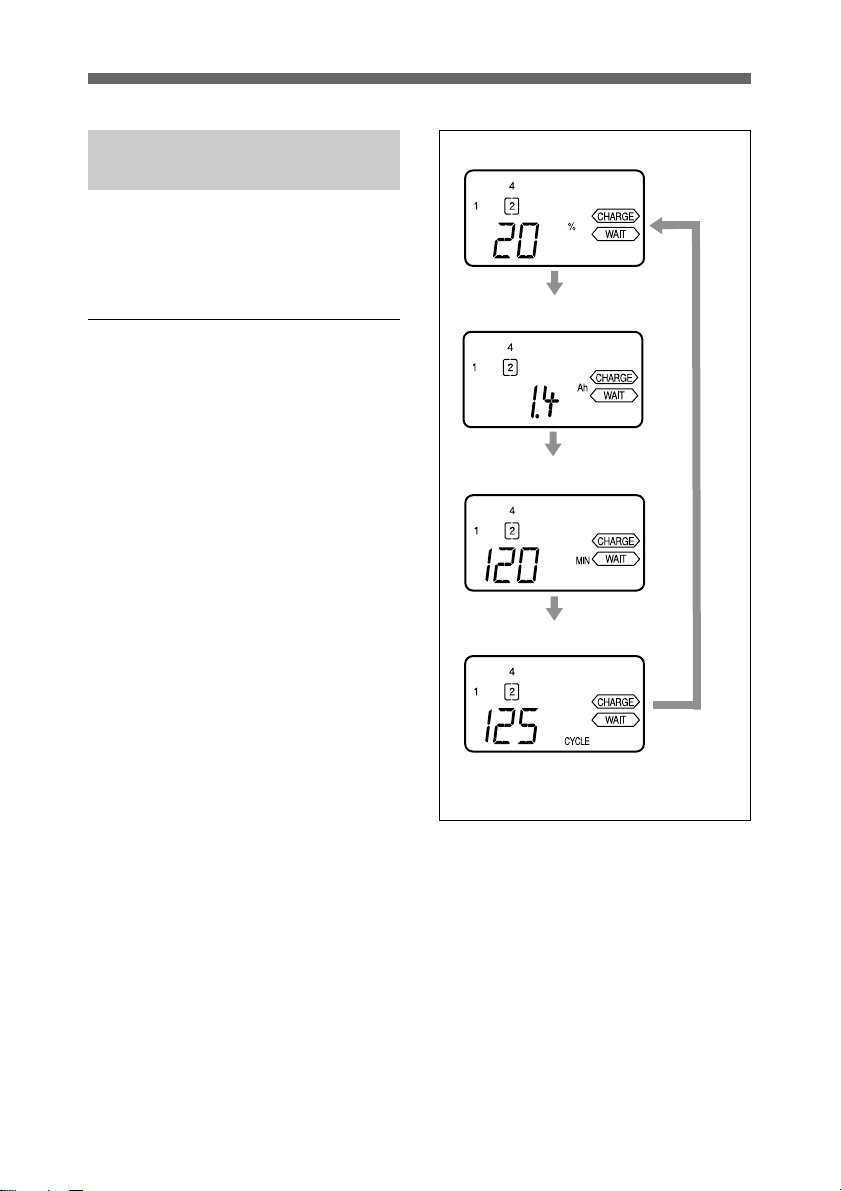
バッテリーパックの情報を 表示する
バッ テ リ ーパ ッ クの種類によって、表示される
情報は異なります。
バッテリーパックの容量(%)
押す
BP-IL75/M50/M100
の場合
1 情報を見たいバッテリーパ ックが取り付
けられている取り付け部の番号が枠で
囲まれる ま で、CHANNELボタンを繰り
返し押す。
2 DISPLAYボタンを繰り返し押して、見た
い情報をLCD表示部に表示させる。
DISPLAYボタンを最初に押すとバック
ライトが点灯し、その後は押すたびに、
情報は以下のように切り替わります。充
電待機中のバッテリーパックを選択した
ときは、「CHARGE」表示と「WAIT」表
示が点灯します。
バッテリーパックの容量(Ah)
押す
フル充電までの所要時間(分)
押す
今までの充放電回数
押す
交換時期を確認するには
CHANNELボタンで交換時期を確認したい
バッテリ ーパック を選択し、 LCD表示部の4
つのセグメ ント の点灯の状態でバッ テリーパッ
クの交換時期の目安を確認します。
21(JP)
Page 24
操作
新しいバッテリーパック
交換時期のバッテリーパック
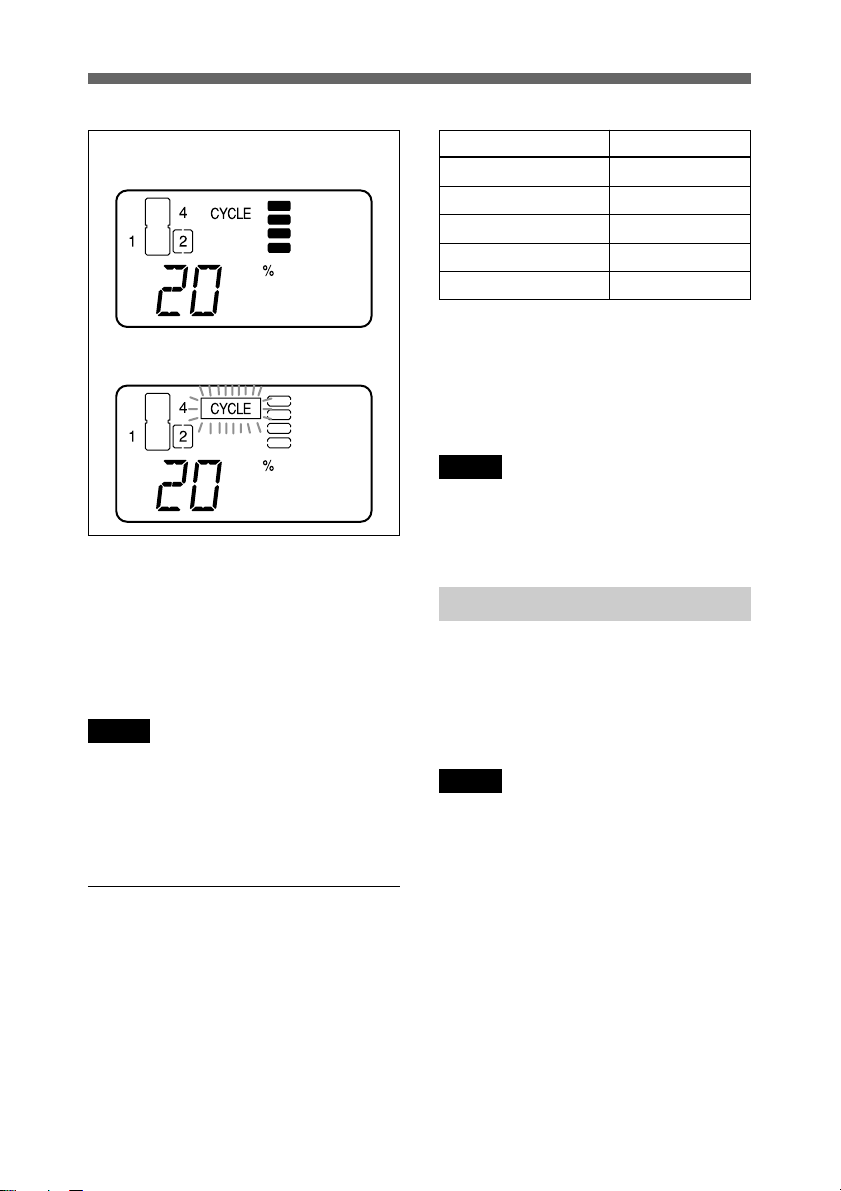
「CYCLE」表示の右の4つのセグメントの 点
灯の数によって、バッテリーの寿命の目安が
確認でき ます。交換時期が近づくと、4つのセ
グメントはすべて消え、「CYCLE」表示が点
滅します。
ご注意
表示されるバッテリーの交換時期はあくまで
目安です。取り扱いかたによっては、バッテ
リーの 寿 命 は 短くなることもあります。
BP-L40A/L60A/L90A
の場合
点灯セグメントの数 容量(%)
4つ 80%以上
3つ 80%〜60%
2つ 60%〜40%
1つ 40%〜20%
なし 20 % 〜 0 %
充電の所要時間を確認するには
CHANNELボタンで充電所要時間を確認し
たい バッテリーパックを選 択し、DISPLAYボ
タ ンを押します。
ご注意
表示される充電所要時間はあくまで目安で
す。
外部機器に電源を供給する
別売りの DC 接続ケーブ ルを使用して、本機
のDCOUT端子と外部機器の DC入力端子
を接続します。このとき、LCD表示部の
「DCOUT」表示が点灯します。
ご注意
電源を供給しながらバッテリ ーパックの充電
はできません。また、 充電中に電源を供給す
ると、本 機は 充 電を中 断します 。
バッテリーパックの容量を確認するには
CHANNELボタンで容量を確認したいバッ
テリーパックを選 択し、LCD表示部の4つの
セグメントの点灯の状態で容量を確認しま
す。
22(JP)
Page 25

ニッケル水素バッテリー
パックをリフレッシュする
(
BP-M50/M100
容量がまだ残っているニッケル水素バッテ
リ ーパックの充 電を繰り返 すと、メモリ ー効 果
(バッテリーの使用量が記憶される現象)によ
り、使用時間が短くなることがあります。ニッ
ケル水素バッテリーパックの持続時間が極端
に短くなった場合は、リフレッシュ機 能をお 使
いく ださい。
のみ)
リフレッシュが終了すると、自動的に通
常の充電が始まります 。
4 他に もリフレッシュしたいバッテリーパッ
クがあるときは、上記の手順2〜3を繰り
返す。
リフレッシュ 中 のバッテリーパックの情
報を表示すると、LCD表示部に
「REFRESH」表示が点灯し、リフレッ
シュ待機中のバッテリーパックの情報を
表示すると、「REFRESH」表示と
「WAIT」表示が点灯します。
自動でリフレッシュする
REFRESH MANUAL/AUTO ス イッチを
「AUTO」に合わせておくと、ニッケル水素
バッテリ ーパックが装着されたときに定期的に
自動でリフレッシュを行 います。
手動でリフレッシュする
1 REFRESHMANUAL/AUTOスイッチ
を「MANUAL」に合わせてお く。
2 ニッケル水素バッテリーパックを 装 着し、
CHANNELボタンでリフレッシュした い
バッテリーパックを 選 択 する。
3 REFRESHボタンを約1秒間押したまま
にす る。
LCD表示部のバックライトが点灯してい
ない場合は、一度押すとバックライトが
点灯し、二度目に押したままにするとリ
フレッシュが始まります 。
リフレッシュを中止するには
REFRESH MANUAL/AUTOスイッチが
「AUTO」に合わせてあるときは「MANUAL」
に合わせ、いったんバ ッテ リーパック をチャー
ジャーから外してく ださい。再びバッテ リ ー
パックを装着すると、リフレッシュ機 能は 解 除
され、充電が始まります。手動でのリフレッ
シュ 中に は、REFRESHボタンを約1秒間押
したままにし ても中 止できます。
ご注意
• 残容量が多いほど、リフレッシュには 時 間 が
かかります 。
• バッ テ リーの電圧によっては、リフレッシュ
ボタンを押してもリフレッシュ機 能が 働 かな
い場合があります。チャージャーが現在の
バッテ リーの電圧を検 出し、 リフレッシュの
必要がないと判断 した場合にはその まま充
電が始まります。
•リチウムイオンバッテリ ーパックには、 リフ
レ ッ シュ機能は働き ません。
23(JP)
Page 26

仕様
電源電圧 AC100〜240V、
50/60Hz
消費電力 160W
出力 DC16.8V、6A(最大)
(リ チウムイオンバッテ
リーパック 充 電 時 、DC
電源出力時)
DC19.5V、5A(最大)
(ニッケル水素バッテ
リーパック充電時)
使用温度 0℃〜+40℃
保存温度 −20℃〜+60℃
使用/保存湿度 20%〜90%RH
最大外形寸法 155×120×330mm
(高さ/幅/奥行き)
(突起含まず)
質量 約3.5kg
充電方式 定電圧定電流充電方式
+タイマー停止方式
充電制御方式 定電圧定電流充電制御
方式
急速充電電流 約6.0A(最大)
付属品 取扱説明書(1)
AC電源コード(1)
変換プラグ(1)
プラグホルダー (1)
エラーNo.ラベル(1)
別売りアクセサリー
DC接続ケーブル
CCDD-X2(2m)
仕様および外観は、改良のため予告なく変
更することがありますが、ご了承ください。
本機は「高調波ガイドライ ン適合品」です。
24(JP)
Page 27

Page 28
English
Important Safety
Instructions
• Read these instructions.
• Keep these instructions.
• Heed all warnings.
• Follow all instructions.
• Do not use this apparatus near water.
• Clean only with dry cloth.
• Do not block any ventilation openings.
Install in accordance with the
manufacturer’s instructions.
• Do not install near any heat sources such
as radiators, heat registers, stoves, or
other apparatus (including amplifiers)
that produce heat.
• Do not defeat the safety purpose of the
polarized or grounding-type plug. A
polarized plug has two blades with one
wider than the other. A grounding-type
plug has two blades and a third
grounding prong. The wide blade or the
third prong are provided for your safety.
If the provided plug does not fit into your
outlet, consult an electrician for
replacement of the obsolete outlet.
• Protect the power cord from being
walked on or pinched particularly at
plugs, convenience receptacles, and the
point where they exit from the apparatus.
• Only use attachments/accessories
specified by the manufacturer.
• Use only with the cart, stand, tripod,
bracket, or table specified by the
manufacturer, or sold with the apparatus.
When a cart is used, use
caution when moving the
cart/apparatus
combination to avoid
injury from tip-over.
• Unplug this apparatus during lightning
storms or when unused for long periods
of time.
• Refer all servicing to qualified service
personnel. Servicing is required when
the apparatus has been damaged in any
way, such as power-supply cord or plug
is damaged, liquid has been spilled or
objects have fallen into the apparatus, the
apparatus has been exposed to rain or
moisture, does not operate normally, or
has been dropped.
WARNING
To prevent fire or shock
hazard, do not expose the
unit to rain or moisture.
To avoid electrical shock,
do not open the cabinet.
Refer servicing to qualified
personnel only.
WARNING
THIS APPARATUS MUST BE
EARTHED.
This symbol is intended to
alert the user to the
presence of uninsulated
“dangerous voltage”
within the product’s
enclosure that may be of
sufficient magnitude to
constitute a risk of electric
shock to persons.
Page 29

This symbol is intended to
alert the user to the
presence of important
operating and
maintenance (servicing)
instructions in the
literature accompanying
the appliance.
WARNING: THIS WARNING IS
APPLICABLE FOR USA AND
CANADA.
If used in USA or Canada, use the UL
LISTED/CSA CERTIFIED power
cord specified below.
DO NOT USE ANY OTHER
POWER CORD.
Plug Cap Parallel blade with ground
pin (NEMA 5-15P
Configuration)
Cord Type SJT, three 16 or 18
AWG wires
Connector IEC 320 non-industrial
type configuration
Length Minimum 1.5 m (4 ft. 11
in.)
Rating Minimum 10 A, 125 V
WARNING: THIS WARNING IS
APPLICABLE FOR OTHER
COUNTRIES.
1. Use the approved power cord (3-
core mains lead)/appliance
connector/plug with earthingcontacts that conforms to the safety
regulations of each country if
applicable.
2. Use the power cord (3-core mains
lead)/appliance connector/plug
conforming to the proper ratings
(voltage, ampere).
If you have questions on the use of the
above power cord/appliance
connector/plug, please consult a
qualified service personnel.
CAUTION
The apparatus shall not be exposed to
dripping or splashing and no objects
filled with liquid, such as vases, shall
be placed on the apparatus.
IMPORTANT
The nameplate is located on the
bottom.
Warning:
Using this unit at a voltage other than
120 V may require the use of a
different line cord or attachment plug,
or both.
To reduce the risk of fire or electric
shock, refer servicing to qualified
service personnel.
Page 30

For the customers in the USA
This equipment has been tested and
found to comply with the limits for a
Class A digital device, pursuant to
Part 15 of the FCC Rules. These
limits are designed to provide
reasonable protection against harmful
interference when the equipment is
operated in a commercial
environment. This equipment
generates, uses, and can radiate radio
frequency energy and, if not installed
and used in accordance with the
instruction manual, may cause harmful
interference to radio communications.
Operation of this equipment in a
residential area is likely to cause
harmful interference in which case the
user will be required to correct the
interference at his own expense.
You are cautioned that any changes or
modifications not expressly approved
in this manual could void your
authority to operate this equipment.
• EN60065: Product Safety
• EN55103-1: Electromagnetic
Interference (Emission)
• EN55103-2: Electromagnetic
Susceptibility (Immunity)
This product is intended for use in the
following Electromagnetic
Environment(s):
E1 (residential), E2 (commercial and
light industrial), E3 (urban outdoors),
and E4 (controlled EMC environment,
ex. TV studio).
The shielded interface cable
recommended in this manual must be
used with this equipment in order to
comply with the limits for a digital
device pursuant to Subpart B of Part
15 of FCC Rules.
For the customers in Europe
This product with the CE marking
complies with both the EMC Directive
(89/336/EEC) and the Low Voltage
Directive (73/23/EEC) issued by the
Commission of the European
Community.
Compliance with these directives
implies conformity to the following
European standards:
Page 31

Table of Contents
Overview.................................................................... 2(EN)
Features...................................................................2(EN)
Charging system .....................................................3(EN)
Precautions ............................................................... 6(EN)
Location and Function of Parts............................... 9(EN)
Operation................................................................. 12(EN)
Connecting a battery pack ....................................12(EN)
Charging ...............................................................13(EN)
Displaying battery pack information ....................14(EN)
Supplying power to an external device................. 16(EN)
Refreshing the battery packs
(BP-M50/M100 only) .....................................16(EN)
Specifications ......................................................... 18(EN)
English
1(EN)
Page 32

Overview
Overview
Features
The BC-M150 Battery Charger is capable of simultaneous
charging of up to four of any following Lithium-ion Battery
Packs BP-L40A/L60A/IL75/L90A and Nickel Metal Hydride
Battery Packs BP-M50/M100, or to supply DC power to an
external device.
Simultaneous connection of up to four battery packs
The BC-M150 can connect and charge up to four battery packs
at the same time. These battery packs may be either the BPL40A, the BP-L60A, the BP-IL75, the BP-L90A, the BP-M50,
the BP-M100, or any mix of the battery packs mentioned
above.
Quick and efficient charging
• When charging the lithium-ion battery packs, the BC-M150
first charges each battery pack to 80% capacity. Then, it
simultaneously charges all battery packs to 100% capacity.
• The BC-M150 charges the nickel metal hydride battery packs
to 100% capacity in sequence. However, it takes less time
than conventional battery charger.
2(EN)
For details, see “Charging system” on page 3(EN).
Compact and lightweight
The BC-M150 is compact, lightweight, and easy to carry.
Diagnostics function
The BC-M150 checks each connected battery pack for
abnormalities. An indicator flashes red and an error indication
appears in the LCD section for any battery pack that cannot be
charged normally.
Battery information display
The information on the connected battery packs, such as
capacity of the battery packs, remaining charging time, number
of cycles of charge and discharge, appears in the display. Note,
however, that type of information depends on the type of the
battery packs.
Page 33

Skip function for fully charged batteries
If a fully charged battery pack is attached to the BC-M150,
nothing happens to the battery pack and the indicators show the
charging of the pack is complete.
Refresh function (for nickel metal hydride battery
packs BP-M50/M100 only)
The BC-M150 is provided with the refresh function to clear the
memory effect (phenomena by which the remaining battery
capacity is memorized) to fully discharge a battery pack before
charging.
Supply of up to 100 W of DC power
The BC-M150 can supply up to 100 watts of DC power to an
external device connected through an optional DC connecting
cable.
Cooling fan
An internal cooling fan turns on whenever the BC-M150 is
charging a battery pack or supplying power to an external
device.
• This unit is designed for charging Sony lithium-ion battery
packs (BP-L40A/L60A/IL75/L90A) and the nickel metal
hydride battery packs (BP-M50/M100).
• The DC-L1 (NP-1B adaptor) and DC-L90 (BP-90A
adaptor) cannot be used with this unit to charge nickelcadmium battery packs.
Charging system
Charging system of lithium-ion battery packs
When the BC-M150 is used to charge four lithium-ion battery
packs, it first charges each connected battery pack to 80%
capacity, in sequence. It then simultaneously charges all battery
packs to 100% capacity. In this way, it achieves more efficient
and faster charging than conventional systems in which each
battery is charged to 100% capacity before the next battery is
charged. Details about the new system and the charging times
are given below.
3(EN)
Page 34

Overview
Conventional charging systems (charging of four BPIL75 units)
Charging level
Charge
Charging
battery pack
1 (140
minutes)
Each battery pack is charged to 100% capacity
in sequence.
Charging
battery pack
2 (140
minutes)
Charging
battery pack
3 (140
minutes)
Charging
battery pack
4 (140
minutes)
time
Total 560
minutes
New charging system (charging four BP-IL75 units)
Charging level
4(EN)
Charge
time
Charg
ing
Charg
ing
Charg
ing
battery
pack 1
(65
minutes)
After the BC-M150 has charged one battery pack to 80%
capacity, it moves on to the next battery pack. When the last
battery pack is 80% charged, the BC-M150 begins
simultaneously charging all battery packs until they reach
100% capacity. In this way, battery packs are charged more
quickly than in previous systems.
battery
pack 2
(65
minutes)
battery
pack 3
(65
minutes)
Charg
battery
pack 4
(65
minutes)
ing
Charging
battery
packs 1
to 4 at the
same
time (80
minutes)
Total 340
minutes
Page 35

If you attach one battery pack on the battery attachment section
with a smaller number while the other battery pack is attached
on the battery attachment section with a greater number and it
is being charged to 80% capacity (e.g., when you attach a
battery pack on battery attachment section 1 while the battery
pack attached on the battery attachment section 3 is being
charged), charging of newly attached battery pack takes place
after the first battery pack is charged to 80% capacity.
If you attach a battery pack while the BC-M150 is charging
already attached battery packs to 100% capacity, charging to
100% capacity is canceled and charging of newly attached
battery pack to 80% capacity starts.
Charging system of nickel metal hydride battery packs
Each nickel metal hydride battery pack is charged to 100%
capacity in sequence. If you attach one battery pack on the
battery attachment section with a smaller number while the
other battery pack is attached on the battery attachment section
with a greater number and it is being charged, charging of
newly attached battery pack takes place after the first battery
pack is fully charged.
Charging system of mix of lithium-ion battery packs and nickel
metal hydride battery packs
The lithium-ion battery packs are charger to 80% capacity and
the nickel metal hydride battery packs are charged to 100%
capacity according to order of battery attachment section
number. Then, the BC-M150 simultaneously charges all the
lithium-ion battery packs to 100% capacity. If you attach one
battery pack on the battery attachment section with a smaller
number while the other battery pack is attached on the battery
attachment section with a greater number and it is being
charged, charging of newly attached battery pack takes place
after charging of the first battery pack finishes.
5(EN)
Page 36

Precautions
Precautions
On the battery charger
• The BC-M150 can be used exclusively with Sony Lithiumion Battery Packs and Nickel Metal Hydride Battery
Packs. Using this unit to charge other types of battery
packs or ones made by other manufacturers may result in
smoke or fire.
• Use the BC-M150 in an operating environment of 10˚C to
30˚C (50˚F to 86˚F). Since charging is difficult at low or high
temperatures, we recommend that battery packs be charged
between 10˚C and 30˚C (50˚F and 86˚F).
• Avoid using or storing the BC-M150 in dusty places or places
with corrosive gases.
• Avoid using or storing the BC-M150 in places exposed to
direct sunlight.
• Do not cover the ventilation holes.
On battery packs
• Even when fully charged, battery packs gradually lose their
charge naturally. Use the battery packs as soon as possible
after charging.
• Carry and store battery packs by installing them in your
equipment or by repacking them using the original packing
material.
• To prolong the life of battery packs, store them in a cool place
(about 20˚C (68˚F)), and charge in a place with an ambient
temperature between 10˚C and 30˚C (50˚F and 86˚F).
• When temperatures are 10˚C (50˚F) or lower, the
performance of a battery pack suffers and the usable time of a
battery pack becomes shorter. To get the longest usable time,
warm the battery packs to room temperature (about 20˚C
(68˚F)) before use.
• Carrying a spare battery pack is recommended.
• When charging with an ambient temperature between 30˚C
and 40˚C (86˚F and 104˚F), battery packs may not be charged
to its full capacity (printed on the surface of the battery pack).
Even if the charge indicators (or the display) show(s) that the
full charging is completed, actual charging amount may be
about 80% of full capacity.
6(EN)
Page 37

• When you attempt to charge a battery pack which has never
been charged before, the actual charging amount stays less
than 80% of nominal capacity*.
* Average capacity when a single cell is charged at 0.1C for 16 hours and
discharged at 0.2C.
• Charging of the nickel metal hydride battery pack when an
ambient temperature or the temperature of the battery pack
itself is more than 30˚C (50˚F), charging time will be longer
and charge amount will be less than the case of charging with
ambient or the battery pack temperature between 10˚C and
30˚C (50˚F and 86˚F).
When charging with temperature of 40˚C (104˚F), charging
finishes with 80% of full capacity. In this case, recharging is
possible with temperature of 30˚C (50˚F) or less. Note that
recharging is only possible for battery packs whose remaining
capacity is 90% or less to prevent excessive recharging.
Lithium-ion battery packs are free from memory effect.
There is no need to discharge them fully before recharging.
If the usable time of a battery pack becomes very short, it is
time to replace it with a new one.
Battery pack charge indicators at high or low
temperatures
The battery pack cannot be charged when it is too hot or too
cold. If a charge indicator at the top of the battery charger
(figure below) flashes orange, it means that the battery pack
temperature is above or below a given standard and that the
charger is waiting for the battery pack to return to a
temperature at which charging is possible. If the battery pack
does not return to the standard temperature within a given time,
an error arises and charging is not carried out.
Charge Indicators
Left Center Right
: flashing orange
: off
7(EN)
Page 38

Precautions
Note on charging an excessively drained battery
pack
If a battery pack is attached to a camcorder and is being used,
the power to the VTR section of the camcorder will be cut off
before the battery pack becomes fully drained. If the camcorder
remains on with the battery pack still attached, the battery pack
will be further drained. The result is an excessively drained
battery pack.
If you try to charge an excessively drained battery pack that
supports the INFO function, the battery charger will not
recognize it as an INFO function battery pack and will begin
charging it as if it were a battery pack without the INFO
function. In this case, charging will proceed without any
problem, but the battery capacity, number of charging cycles,
and other information will not be displayed during charging.
If the battery pack is removed after it has been charged a
certain amount, and then reattached to the battery charger, it
will be recognized as an INFO function battery pack and the
battery capacity, number of charging cycles, and other
information will be displayed as it continues to charge.
No matter in which way the battery pack is charged, after
charging has completed, the battery pack will operate as an
INFO function battery pack.
About memory effect
Nickel metal hydride battery packs suffer memory effect just
like the nickel cadmium battery packs. If this happens,
discharge the battery pack completely or use the refresh
function (pages 3(EN) and 16(EN)).
8(EN)
Page 39

Location and Function of Parts
Front and top panel
1 POWER switch
and indicator
2 Battery pack attachment sections (1 to 4)
and charge indicators
Battery pack
release button
3 DC OUT connector
Rear panel
Display and buttons
0 REFRESH button
9 CHANNEL button
4 AC IN connector
5 Plug holder receptacle
Reserved for future use.
6 Display
7 DISPLAY button
8 REFRESH MANUAL/
AUTO selector
9(EN)
Page 40

Location and Function of Parts
1 POWER switch and indicator
Turns the power on or off. When the
unit is turned on, the indicator lights
up and the charging of battery packs
or the supply of DC power to an
external device becomes possible.
2 Battery pack connection sections
(1 to 4) and charging indicators
These connect BP-L40A/L60A/IL75/
L90A/M50/M100 battery packs. To
disconnect a battery pack, press the
release button and pull the battery
pack upward.
The charging indicators show the
charging progress or results by
flashing or lighting red, orange or
green, as follows.
Indicator status
Left
Center Right
(G)
(G)
(G)
(G)
(G)
(G)
Meaning
Supply of DC power
to an external
(O)
device
Charging in
progress (0% to
80% capacity)
Charging wait
(charged to 80%
capacity; another
battery pack is being
charged). This
status arises only
when more than one
battery pack is
connected.
Charging in
progress (charged
to 81% capacity or
more)
End of charging
Refreshing of the
nickel metal hydride
(R)
battery pack is in
progress.
10(EN)
Indicator status Meaning (error
Left
Center Right
(R/G)
: Off
: Flashing
: On
No.)
One of the following
conditions exists.
•The battery
impedance is too
high (E-01).
•The charging circuit
of the battery pack
is open (E-02).
•The battery voltage
is too low (E-03).
•The battery
temperature is too
high or too low (E-
04).
•The charger cannot
communicate with
the battery pack (E-
05).
•Charging did not
finish within the
specified duration
(E-06).
•An incompatible
battery pack has
been connected (E-
07).
•The charger could
not read
information of
connected battery
pack (E-08).
•The output voltage
of the charger is too
high (E-09).
•The output voltage
of the charger is too
low (E-10).
•The internal fan has
stopped (E-20).
If any of the above
conditions occur, try
recharging the
battery pack two or
three more times, or
turn the charger off,
then turn it on again.
If the condition
persists, the battery
pack is probably
defective and should
be replaced.
O: Orange
G: Green
R: Red
Page 41

3 DC OUT (DC power supply)
connector (XLR, 4-pins, male)
Supplies power to an external device
through an optional DC connecting
cable. Pin 4 is the plus connector and
pin 1 the minus.
Note
The BC-M150 cannot charge a battery
pack at the same time it supplies DC
power to an external device. If you
begin using the unit to supply power
to an external device while charging a
battery pack, the charging stops.
4 AC IN (AC power input)
connector
Used to connect the charger to an AC
outlet through the supplied AC power
cord.
5 Plug holder receptacle
The supplied plug holder secures the
supplied AC power cord so that it will
not come loose from the charger.
6 Display
The information of the battery packs
or the error message appears here.
7 DISPLAY button
Press repeatedly to display the battery
pack information such as capacity,
remaining charging time, a number of
cycles of charge and discharge.
8 REFRESH MANUAL/AUTO
selector
Select to refresh the nickel metal
hydride battery packs manually or
automatically.
9 REFRESH button
Used to refresh the nickel metal
hydride battery packs manually.
0 CHANNEL button
Used to select the battery pack to
display the information or to refresh.
Plug holder
(supplied)
To remove the plug holder
receptacle
11(EN)
Page 42

Operation
Operation
Connecting a battery pack
Connect and disconnect a battery pack as shown below.
Connecting
BC-M150
Attach in the direction of the arrow.
BP-L40A/L60A/
IL75/L90A/M50/
M100
Disconnecting
BC-M150
Hold down the release button and
pull the battery pack upward.
Warning
BP-L40A/L60A/
IL75/L90A/M50/
M100
This unit is designed for charging Sony lithium-ion battery
packs (BP-L40A/L60A/IL75/L90A) and nickel metal hydride
battery packs (BP-M50/M100). The DC-L1 (NP-1B adaptor)
and DC-L90 (BP-90A adaptor) cannot be used to charge nickelcadmium battery packs.
12(EN)
Page 43

Charging
Turn the POWER switch ON to start
charging.
The number(s) of battery pack
connection section to which the
battery pack(s) is (are) attached
light(s) up in the display. After the
charging starts, flashing square
appears around the number of battery
pack connection section to which the
battery pack being charged is
connected, and the “CHARGE”
indicator lights up.
Note
The unit cannot charge a battery pack
at the same time it supplies DC power
to an external device. If you begin
using the unit to supply power to an
external device while charging a
battery pack, the charging stops.
Charging time
The appropriate charging times for
discharged batteries are as follows
(with an ambient temperature between
10˚C and 30˚C (50˚F and 86˚F)).
Charging time for one battery
pack
Battery pack Up to 80% Up to 100%
BP-L40A
BP-L60A Approx. 65
BP-IL75 Approx. 65
BP-L90A Approx. 90
BP-M50
BP-M100
Approx. 60
minutes
minutes
minutes
minutes
—
—
Approx. 125
minutes
Approx. 140
minutes
Approx. 140
minutes
Approx. 180
minutes
Approx. 70
minutes
Approx. 100
minutes
Note on battery packs
The performance of the BC-M150 is
guaranteed only for applicable battery
packs (BP-L40A/L60A/IL75/L90A/
M50/M100). Do not use it to charge
any other type of battery pack.
13(EN)
Page 44

Operation
Charging time for two battery
packs
Battery pack Up to 80% Up to 100%
BP-L40A Approx. 120
BP-L60A Approx. 130
BP-IL75 Approx. 130
BP-L90A Approx. 180
BP-M50 — Approx. 140
BP-M100
minutes
minutes
minutes
minutes
— Approx. 200
Approx. 190
minutes
Approx. 210
minutes
Approx. 210
minutes
Approx. 270
minutes
minutes
minutes
Charging time for four battery
packs
Battery pack Up to 80% Up to 100%
BP-L40A Approx. 240
minutes
BP-L60A Approx. 260
minutes
BP-IL75 Approx. 260
minutes
BP-L90A Approx. 360
minutes
BP-M50 — Approx. 280
BP-M100 — Approx. 400
Approx. 305
minutes
Approx. 340
minutes
Approx. 340
minutes
Approx. 450
minutes
minutes
minutes
Displaying battery pack information
Note that information to be displayed
depends on the type of the battery
packs.
BP-IL75/M50/M100
1 Press the CHANNEL button
repeatedly until the square appears
around the number of battery pack
connection section to which the
battery pack whose information is
to be displayed is attached.
2 Press the DISPLAY button
repeatedly until the information
that you want appears in the
display.
When you press the DISPLAY
button first time, the backlight
lights up. Then each time you
press the button, the information
changes as shown in the
illustration below. When a
battery pack waiting to be charged
is selected, “CHARGE” and
“WAIT” indications light up in
the display.
14(EN)
Page 45

Battery capacity (%)
Press
New battery pack
Battery capacity (Ah)
Press
Remaining charging time (min.)
Press
Number of cycles of
charge/discharge
Press
To check the remaining life of
the battery pack
Press the CHANNEL button
repeatedly to select the battery pack
whose remaining life to be checked,
then check the status of the four
segments in the display.
Battery pack almost at its end of
service time
The four segments to the right of the
“CYCLE” indication show the
approximate remaining service life of
the battery pack. When the battery
pack is almost at its end of service life
and needs replacing, all four segments
turn off and the “CYCLE” indication
flashes in the display.
Note
Displayed remaining battery life is
estimated value. Battery life may
even shortens depending on handling
of the battery packs.
BP-L40A/L60A/L90A
To check the battery capacity
Press the CHANNEL button
repeatedly to select the battery pack
whose capacity is to be checked, then
check the status of the four segments
in the display.
15(EN)
Page 46

Operation
Number of the
segments lighting up Capacity (%)
four 80% or more
three 60% to 80%
two 40% to 60%
one 20% to 40%
none 0% to 20%
To check the remaining
charging time
Press the CHANNEL button
repeatedly to select the battery pack
whose remaining charging time is to
be checked, then Press the DISPLAY
button.
Note
Displayed remaining charging time is
estimated value.
Supplying power to an external device
Refreshing the battery packs (BP-M50/M100 only)
If a nickel metal hydride battery pack
with remaining capacity is charged
repeatedly, the storage capacity of the
battery may be reduced due to
memory effect (phenomena by which
the remaining battery capacity is
memorized). To prevent against this
memory effect, the refresh function is
provided to fully discharge a battery
pack before charging.
To refresh the battery pack
automatically
Set the REFRESH MANUAL/AUTO
selector to “AUTO.” When the nickel
metal hydride battery pack is attached,
the BC-M150 detects it and
automatically refreshes it regularly.
Use an optional DC connecting cable
to connect the charger to the DC
power input connector of the device.
Note
The unit cannot charge a battery pack
at the same time it supplies DC power
to an external device. If you begin
using the unit to supply power to an
external device while charging a
battery pack, the charging stops.
16(EN)
To refresh the battery pack
manually
1 Set the REFRESH MANUAL/
AUTO selector to “MANUAL.”
2 Attach the nickel metal hydride
battery pack and press the
CHANNEL button repeatedly to
select it.
Page 47

3 Keep pressing the REFRESH
button for about a second.
When the display is not backlit,
press down the button twice to
start refreshing. Normal charging
starts automatically after the
refresh is completed.
4 To refresh more battery packs,
repeat steps 2 and 3.
When you check the information
of the battery pack being
refreshed, “REFRESH” indication
lights up; when you check the
information of the battery pack
waiting to be refreshed,
“REFRESH” and “WAIT”
indications light up in the display.
To cancel refreshing the battery
pack
When the REFRESH MANUAL/
AUTO selector is set to “AUTO,” set
it to “MANUAL,” then remove the
battery pack from the battery charger,
and then reattach it. When you
reattach the battery pack, normal
charging starts. While refreshing the
battery pack manually, you can also
keep pressing the REFRESH button
for about a second to cancel
refreshing.
• The charger detects the output
voltage of the attached battery pack.
If the voltage of the battery pack is
above certain level, the battery pack
is assumed that refreshing is
unnecessary. In this case, refreshing
does not take place even if the
REFRESH button is pressed and
normal charging starts, instead.
• You cannot refresh the lithium ion
battery packs.
Notes
• The time to take for refreshing
depends on the remaining capacity of
the battery pack. For shorter
refreshing time, it is recommended to
discharge the battery pack
completely before refreshing it.
17(EN)
Page 48

Specifications
Power requirements
120 V AC, 60 Hz (U.S.A.
and Canada)
100 to 240 V AC, 50/60 Hz
(except U.S.A. and
Canada)
Power consumption
Approx. 160 W
Output 16.8 V DC, 6 A (at
maximum) (for charging
the lithium-ion battery
pack or supplying DC
power to an external
device)
19.5 V DC, 5 A (at
maximum) (for charging
the nickel metal hydride
battery pack)
Peak inrush current
(1) Power ON, current probe
method: 50 A (240 V), 10
A (100 V)
(2) Hot switching inrush current,
measured in accordance
with European standard
EN55103-1: 20 A (230
V)
Operating temperature
0˚C to +40˚C (32˚F to
104˚F)
Storage temperature
–20˚C to +60˚C (–4˚F to
+140˚F)
Operating/storage humidity
20% to 90% RH
Dimensions
155 × 120 × 330 mm (h/w/
d) (6 1/8 × 4 3/4 × 13 inches)
Mass Approx. 3.5 kg (7 lb 10 oz)
Charge system
Constant voltage and
current charge system
with timer stop system
Charge control system
Constant voltage and
current charge control
system
Booster charge current
Approx. 6.0 A (at
maximum)
Supplied accessories
Operation Manual (1)
AC power cord (1)
Plug holder (1)
Sticker of error numbers
and their meanings (1)
Optional accessories
DC connecting cable
CCDD-X2 (2 meters)
Design and specifications are subject
to change without notice.
18(EN)
Page 49

Page 50

Français
AVERTISSEMENT
Afin d’éviter tout risque
d’incendie ou
d’électrocution, ne pas
exposer cet appareil à la
pluie ou à l’humidité.
Afin d’écarter tout risque
d’électrocution, garder le
coffret fermé. Ne confier
l’entretien de l’appareil
qu’à un personnel qualifié.
AVERTISSEMENT
CET APPAREIL DOIT ÊTRE
RELIÉ À LA TERRE.
AVERTISSEMENT
1. Utiliser un cordon d’alimentation
approuvé (conducteur
d’alimentation 3 âmes)/connecteur
d’appareil/prise avec contacts de
mise à la terre conforme aux règles
de sécurité de chaque pays si
applicable.
2. Utiliser un cordon d’alimentation
approuvé (conducteur
d’alimentation 3 âmes)/connecteur
d’appareil/prise conforme aux
valeurs nominales (tension,
ampérage) correctes.
ATTENTION
Cet appareil ne doit pas être exposé au
dégouttement ou aux éclaboussures et
aucun objet rempli de liquide, un vase
par exemple, ne doit être placé dessus.
IMPORTANT
La plaque signalétique est placée sur le
dessous.
Pour les clients européens
Ce produit portant la marque CE est
conforme à la fois à la Directive sur la
compatibilité électromagnétique
(EMC) (89/336/CEE) et à la Directive
sur les basses tensions (73/23/CEE)
émises par la Commission de la
Communauté Européenne.
La conformité à ces directives
implique la conformité aux normes
européennes suivantes:
• EN60065: Sécurité des produits
• EN55103-1: Interférences
électromagnétiques (émission)
• EN55103-2: Sensibilité
électromagnétique (immunité)
Ce produit est prévu pour être utilisé
dans les environnements
électromagnétiques suivants:
E1 (résidentiel), E2 (commercial et
industrie légère), E3 (urbain extérieur),
and E4 (environnement EMC contrôlé,
ex. studio de télévision).
S’adresser à un personnel de service
qualifié pour toute question
concernant l’emploi du cordon
d’alimentation/connecteur d’appareil/
prise ci-dessus.
Page 51

Table des matières
Aperçu ....................................................................... 2(FR)
Caractéristiques....................................................... 2(FR)
Système de charge .................................................. 3(FR)
Précautions ............................................................... 6(FR)
Emplacement et fonctions des organes
et commandes ..................................................... 9(FR)
Opération................................................................. 12(FR)
Connexion d’une batterie...................................... 12(FR)
Charge................................................................... 13(FR)
Affichage des informations de charge
de batterie ........................................................ 14(FR)
Alimentation d’un dispositif extérieur.................. 16(FR)
Rafraîchissement d’une batterie
(BP-M50/M100 seulement) ............................ 16(FR)
Spécifications ......................................................... 18(FR)
Français
1(FR)
Page 52

Aperçu
Aperçu
Le chargeur de batterie BC-M150 peut charger simultanément
jusqu’à quatre batteries aux ions lithium parmi les suivantes
BP-L40A/L60A/IL75/L90A et/ou batteries à l’hydrure
métallique nickel BP-M50/M100, ou fournir du courant CC à
un dispositif extérieur.
Caractéristiques
Connexion simultanée d’un maximum de quatre
batteries
Le BC-M150 peut connecter et charger jusqu’à quatre batteries
en même temps. Ces batteries sont ou bien des BP-L40A, BPL60A, BP-IL75, BP-L90A, BP-M50, BP-M100, ou tout
mélange des batteries précitées.
Charge rapide et efficace
• A la charge de batteries aux ions lithium, le BC-M150 charge
• Le BC-M150 charge en séquence les batteries à l’hydrure
d’abord chaque batterie jusqu’à 80% de sa capacité. Puis, il
charge simultanément toutes les batteries à 100%.
métallique nickel à 100% de leur capacité. Mais il le fait en
moins de temps que les chargeurs de batteries conventionnels.
2(FR)
Voir “Système de charge” à la page 3(FR).
Compact et léger
Le BC-M150 est compact, léger et facile à transporter.
Fonctions de diagnostic
Le BC-M50 contrôle les anomalies de chacune des batteries
connectées. Un indicateur clignote en rouge et une indication
d’erreur apparaît dans la section LCD pour toute batterie qui
peut pas être chargée normalement.
Affichage d’information sur les batteries
Les informations sur les batteries connectées, comme leur
capacité, le temps de charge restant, le nombre de cycles de
charge et de décharge, apparaissent sur l’afficheur. Notez
toutefois que le type d’information dépend du type des
batteries.
Page 53

Fonction de saut pour les batteries entièrement
chargées
Si une batterie entièrement chargée est fixée au BC-M150, il ne
lui arrive rien et les indicateurs montrent que sa charge est
complète.
Fonction de rafraîchissement (pour les batteries à
l’hydrure métallique nickel BP-M50/M100 seulement)
Le BC-M150 est doté d’une fonction de rafraîchissement qui
annule l’effet de mémoire (phénomène par lequel la capacité
restante de la batterie est mémorisée) pour décharger
complètement une batterie avant la charge.
Alimentation d’un maximum de 100 W CC
Le BC-M150 peut fournir jusqu’à 100 watts de courant CC à
un dispositif extérieur connecté via un câble de raccordement
CC en option.
Ventilateur de refroidissement
Le ventilateur de refroidissement interne s’active chaque fois
que le BC-M150 charge une batterie ou alimente un dispositif
extérieur.
• Cet appareil est consu pour charger des batteries aux ions
lithium Sony (BP-L40A/L60A/IL75/L90A) et batteries à
l’hydrure métallique nickel Sony (BP-M50/ M100).
• Le DC-L1 (adaptateur NP-1B) et le DC-L90 (adaptateur
BP-90A) ne peuvent pas être utilisés avec cet appareil pour
charger des batteries au cadmium-nickel.
Système de charge
Système de charge des batteries aux ions lithium
Quand le BC-M150 est utilisé pour charger quatre batteries aux
ions lithium, il charge chaque batterie connectée à 80% de sa
capacité, en séquence. Il charge ensuite simultanément toutes
les batteries à 100%. Il permet ainsi une charge plus efficace et
rapide que les systèmes conventionnels dans lesquels chaque
batterie est chargée à 100% de sa capacité avant la charge de la
batterie suivante. Les détails concernant ce nouveau système et
les temps de charge sont donnés ci-dessous.
3(FR)
Page 54

Aperçu
Systèmes de charge conventionnels (charge de
quatre BP-IL75)
Niveau de charge
Temps de
Charge de
la batterie 1
(140
minutes)
Chaque batterie est chargée à 100% de sa
capacité en séquence.
Charge de
la batterie 2
(140
minutes)
Charge de
la batterie 3
(140
minutes)
Charge de
la batterie
4(140
minutes)
charge
Total 540
minutes
Nouveau système de charge (charge de quatre
batteries BP-IL75)
4(FR)
Niveau de charge
C
Charge
de la
batterie
1 (65
minutes)
Après la charge d’une batterie à 80% de sa capacité, le BCM150 passe à la batterie suivante. Quand la dernière batterie
est chargée à 80%, il commence à charger simultanément
toutes les batteries jusqu’à 100% de leur capacité. Les
batteries sont ainsi chargées plus rapidement que dans les
systèmes antérieurs.
Charge
de la
batterie
2 (65
minutes)
Charge
de la
batterie
3 (65
minutes)
Charge
de la
batterie
4 (65
minutes)
harge
simultanée
des
batteries
1 à 4
(80
minutes)
Temps
de
charge
Total 340
minutes
Page 55

Si vous attachez une batterie à la section de connexion des
batteries de plus petit numéro alors qu’une autre batterie est
attachée à celle de plus grand numéro et en train d’être chargée
à 80% de sa capacité (à savoir si vous attachez une batterie à la
section 1 de connexion des batteries alors qu’une batterie est
attachée à la section 3 est en cours de charge), la charge de la
batterie nouvellement attachée s’effectuera après que la
première batterie sera chargée à 80%.
Si vous attachez une batterie alors que le BC-M150 charge déjà
les batteries attachées à 100%, la charge à 100% sera annulée
et la charge de la batterie nouvellement attachée à 80% de sa
capacité démarrera.
Système de charge des batteries à l’hydrure métallique nickel
Chaque batterie à l’hydrure métallique nickel est chargée à
100% de sa capacité en séquence. Si vous attachez une batterie
à la section de connexion des batteries de plus petit numéro
alors qu’une autre batterie est attachée à celle de plus grand
numéro et en cours de charge, la charge de la batterie
nouvellement attachée aura lieu une fois que la première
batterie sera entièrement chargée.
Système de charge pour un mélange de batteries aux ions
lithium et batteries à l’hydrure métallique nickel
Les batteries aux ions lithium sont chargées à 80% de leur
capacité et les batteries à l’hydrure métallique nickel à 100%
de leur capacité dans l’ordre des sections de connexion des
batteries. Ensuite, le BC-M150 chargera simultanément toutes
les batteries aux ions lithium à 100% de leur capacité. Si vous
attachez une batterie à la section de connexion des batteries de
plus petit numéro alors qu’une autre batterie est attachée à celle
de plus grand numéro et en cours de charge, la charge de la
batterie nouvellement attachée aura lieu après la fin de la
charge de la première.
5(FR)
Page 56

Précautions
Précautions
Chargeur de batterie
• Le BC-M150 peut être utilisé exclusivement avec des
batteries aux ions lithium Sony et des batteries à
l’hydrure métallique nickel Sony. L’emploi de cet appareil
pour charger d’autres types de batteries ou des batteries
d’autres fabricants peut provoquer de la fumée ou un
incendie.
• Utilisez le BC-M150 dans un environnement de
fonctionnement de 10 à 30˚C (50 à 86˚F) . Comme la charge
est difficile à basses et hautes températures, nous
recommandons la charge entre 10 et 30˚C (50 et 86˚F).
• Evitez d’utiliser ou de ranger le BC-M150 à un endroit
poussiéreux ou soumis à des gaz corrosifs.
• Evitez d’utiliser et de ranger le BC-M150 à un endroit exposé
en plein soleil.
• Ne couvrez pas les orifices de ventilation du chargeur.
Batteries
• Même entièrement chargées, les batteries se déchargent petit
à petit naturellement. Utilisez-les le plus rapidement possible
après la charge.
• Transportez et conservez les batteries dans l’équipement
d’utilisation ou bien remballez-les dans leur sac d’origine.
• Pour prolonger la vie de service des batteries, rangez-les à un
endroit frais (environ 20˚C (68˚F)) et chargez-les à un endroit
à température ambiante entre 10 et 30˚C (50 et 86˚F).
• A une température de 10˚C (50˚F) ou moins, les performances
de la batterie pourraient être affectées et son autonomie être
écourtée. Pour obtenir l’autonomie la plus longue, mettez les
batteries à température ambiante (environ 20˚C (68˚F)) avant
l’utilisation.
• Il est recommandé de se munir d’une batterie de rechange.
• A la charge à température ambiante entre 30˚C et 40˚C (86˚F
et 104˚F), les batteries peuvent ne pas être chargées à leur
pleine capacité (imprimée à la surface de la batterie). Même si
les indicateurs de charge (ou l’afficheur) indiquent que la
charge complète est achevée, la charge réelle peut être de
80% de la charge complète.
6(FR)
Page 57

• Si vous essayez de charger une batterie qui n’a jamais été
chargée auparavant, la charge réelle restera de moins de 80%
de la capacité nominale*.
* Capacité moyenne quand une seule cellule est chargée à 0,1C pendant 16
heures et déchargée à 0,2C.
• A la charge des batteries quand la température ambiante ou la
température de la batterie elle-même est de plus de 30˚C
(50˚F), le temps de charge sera plus long et la charge sera
plus faible que pour la charge quand la température ambiante
ou la température des batteries est entre 10˚C et 30˚C (50˚F et
86˚F).
A la charge à température de 40˚C (104˚F), la charge finit
avec 80% de la capacité totale. Dans ce cas, la recharge est
possible à 30˚C (50˚F) ou moins. Notez que la recharge est
seulement possible pour les batteries dont la capacité restante
est 90% ou moins pour éviter la recharge excessive.
Les batteries aux ions lithium sont sans effet de mémoire. Il
est inutile de les décharger complètement avant de les
recharger.
Si l’autonomie d’une batterie devient très courte, il est temps
de la remplacer par une neuve.
Indicateurs de charge de batterie à haute ou basse
température
La charge de la batterie est impossible quand il fait trop chaud
ou trop froid. Si un indicateur de charge en haut du chargeur de
batterie (figure ci-dessous) clignote en orange, cela signifie que
la température de la batterie est au-dessous ou au-dessous de la
norme donnée et que le chargeur attend que la batterie revienne
à une température à laquelle la charge est possible. Si la
batterie ne revient pas à la température standard pendant un
temps donné, une erreur survient et la charge ne se fait pas.
Gauche Centre Droit
Indicateurs de charge
: orange clignotant
: éteint
7(FR)
Page 58

Précautions
Remarque sur la charge d’une batterie trop
déchargée
Si une batterie est fixée à un camescope et utilisée,
l’alimentation de la section magnétoscope du camescope sera
coupée avant que la batterie soit complètement déchargée. Si
le camescope reste sous tension avec la batterie encore fixée,
elle sera encore plus déchargée. La batterie sera ainsi trop
déchargée.
Si vous essayez de charger une batterie trop déchargée
assistant la fonction INFO, le chargeur de batterie ne la
reconnaîtra pas comme une batterie à fonction INFO et
commencera à la charger comme s’il s’agissait d’une batterie
sans fonction INFO. Dans ce cas, la charge s’effectuera sans
problème, et les autres informations ne seront pas affichées
pendant la charge.
Si la batterie est retirée après avoir été chargée dans une
certaine mesure, puis réattachée au chargeur, elle sera
reconnue comme batterie à fonction INFO et la capacité de la
batterie, le nombre de cycles de charge et d’autres
informations seront affichés pendant la charge.
Quelle que soit la manière dont la batterie est chargée, une fois
la charge terminée, elle fonctionnera comme batterie à fonction
INFO.
Effet de mémoire
Les batteries à l’hydrure métallique nickel souffrent d’un effet
de mémoire, tout comme les batteries nickel-cadmium. Si
nécessaire, déchargez-les complètement ou recourez à la
fonction de rafraîchissement (pages 3(FR) et 16(FR)).
8(FR)
Page 59

Emplacement et fonctions des organes et commandes
Panneau avant et supérieur
1 Interrupteur POWER et témoin
2 Sections de connexion des batteries (1 à
4) et indicateurs de charge
Bouton de libération
de batterie
3 Connecteur DC OUT
Panneau arrière
Affichage et boutons
0 Bouton REFRESH
9 Bouton CHANNEL
4 Connecteur AC IN
5 Support de fiche
Réservé pour un emploi futur.
6 Affichage
7 Bouton DISPLAY
8 Sélecteur REFRESH
MANUAL/AUTO
9(FR)
Page 60

Emplacement et fonctions des organes et commandes
1 Interrupteur POWER et témoin
Met sous et hors tension. A la mise
sous tension, le témoin s’allume et la
charge des batteries ou l’alimentation
CC à un dispositif extérieur devient
possible.
2
Sections de connexion des batteries
(1 à 4) et indicateurs de charge
Elles connectent les batteries BPL40A/L60A/IL75/L90A/M50/M100.
Pour déconnecter une batterie,
appuyez sur le bouton de libération et
tirez la batterie vers le haut.
Les indicateurs de charge indiquent la
progression de la charge ou les
résultats en clignotant ou en
s’allumant en rouge, orange ou vert,
comme suit.
Etat des indicateurs
Gauche
Centre
(G)
(G)
(G)
(G)
(G)
(G)
Signification
Droit
Alimentation CC
d’un dispositif
(O)
extérieur
Charge en progrès
(0% à 80% de la
capacité)
Attente de charge
(chargée à 80% de
sa capacité; une
autre batterie est en
cours de charge).
Cet état survient
seulement quand
plus d’une batterie
est connectée.
Charge en cours
(chargée à 81% de
sa capacité ou plus)
Fin de la charge
Rafraîchissement de
la batterie à
(R)
l’hydrure métallique
nickel en progrès.
10(FR)
Etat des indicateurs
Gauche
Centre
Droit
(R/G)
: Désactivé
: Clignotant
: Activé
Signification
(erreur n˚)
Une des situations
suivantes existe.
•L’impédance de la
batterie est trop
élevée (E-01).
•Le circuit de charge
de la batterie est
ouvert (E-02).
•La tension de la
batterie est trop
faible (E-03)
•La température de la
batterie est trop
élevée ou trop
basse (E-04).
•Le chargeur ne pas
communiquer avec
la batterie (E-05).
•La charge ne s’est
pas achevée dans le
temps spécifié (E-
06).
•Une batterie
incompatible est
connectée (E-07).
•Le chargeur n’a pas
pu lire l’information
de la batterie
connectée (E-08).
•La tension de sortie
du chargeur est trop
élevée (E-09).
•La tension de sortie
du chargeur est trop
basse (E-10).
•Le ventilateur
interne s’est arrêté
(E-20).
Si une des situations
ci-dessus survient,
essayez de recharger
la batterie deux ou
trois fois encore, ou
de mettre le chargeur
hors tension, puis à
nouveau sous
tension. Si la situation
persiste, la batterie
est probablement
défectueuse et doit
être remplacée.
O: Orange
G: Vert
R: Rouge
Page 61

3 Connecteur DC OUT
(alimentation CC)(XLR, 4 broches,
mâle)
Alimente un dispositif extérieur via un
câble de connexion CC en option.
Connecteur + à 4 broches et
connecteur – à 1 broche.
Remarque
Le BC-M150 ne peut pas charger une
batterie et en même temps alimenter
en courant CC un dispositif extérieur.
Si vous commencez à utiliser
l’appareil pour alimenter un dispositif
extérieur pendant la charge d’une
batterie, la charge s’arrêtera.
6 Affichage
L’information de la batterie ou le
message d’erreur apparaît ici.
7 Bouton DISPLAY
Appuyez plusieurs fois pour afficher
les informations des batteries comme
la capacité, le temps de charge restant,
le nombre de cycles de charge et
décharge.
8 Sélecteur REFRESH MANUAL/
AUTO
Sélectionne le rafraîchissement
manuel ou automatique des batteries à
l’hydrure métallique nickel.
4 Connecteur d’entrée
d’alimentation secteur (AC IN)
Sert à connecter le chargeur à une
prise secteur avec un cordon
d’alimentation secteur fourni.
5 Support de fiche
Le support de fiche fourni maintient le
cordon de sorte qu’il ne se détache pas
du chargeur.
Support de
fiche (fourni)
Pour retirer le support de
fiche
9 Bouton REFRESH
Utilisé pour rafraîchir manuellement
les batteries à l’hydrure métallique
nickel.
0 Bouton CHANNEL
Sert à sélectionner la batterie pour
afficher les informations ou à
rafraîchir.
11(FR)
Page 62

Opération
Opération
Connexion d’une batterie
Connectez er déconnectez une batterie comme indiqué cidessous.
Connexion
BC-M150
Installez dans le sens de la flèche.
BP-L40A/L60A/
IL75/L90A/M50/
M100
Deconnexion
BC-M150
Maintenez sur le déclencheur et
tirez la batterie vers le haut.
Attention
BP-L40A/L60A/
IL75/L90A/M50/
M100
Cet appareil est conçu pour chargeur des batteries aux ions
lithium Sony (BP-L40A/L60A/IL75/L90A) et batteries à
l’hydrure métallique nickel Sony (BP-M50/M100).
Le DC-L1 (adaptateur NP-1B) et le DC-L90 (adaptateur BP90A) ne peuvent pas être utilisés pour charger des batteries au
cadmium-nickel.
12(FR)
Page 63

Charge
Mettre l’interrupteur POWER sur ON
pour démarrer la charge.
Le nombre de sections de connexion
de batterie auxquelles des batteries
dans lesquelles des installées
s’allument sur l’afficheur. Après le
démarrage de la charge, un carré
clignotant apparaît autour du numéro
des sections de connexion des
batteries dans lesquelles des batteries
en cours de charge sont installées, et
l’indicateur “CHARGE” s’allume.
Note
L’appareil ne peut pas charger une
batterie et en même temps alimenter
en courant CC un dispositif extérieur.
Si vous commencez par l’utiliser pour
alimenter un dispositif extérieur
pendant la charge d’une batterie, la
charge s’arrêtera.
Temps de charge
Les temps de charge appropriés pour
les batteries déchargées sont comme
suit (à température ambiante entre
10˚C et 30˚C (50˚F et 86˚F)).
Temps de charge d’une batterie
Batterie
BP-L40A Env. 60
BP-L60A Env. 65
BP-IL75 Env. 65
BP-L90A Env. 90
BP-M50
BP-M100 —
Jusqu’à 80%
minutes
minutes
minutes
minutes
—
Jusqu’à 100%
Env. 125
minutes
Env. 140
minutes
Env. 140
minutes
Env. 180
minutes
Env. 70
minutes
Env. 100
minutes
Remarque sur les batteries
La performance du BC-M150 est
garantie seulement pour les batteries
applicables (BP-L40A/L60A/IL75/
L90A/M50/M100). Ne chargez aucun
autre type de batterie sur cet appareil.
13(FR)
Page 64

Opération
Temps de charge de deux
batteries
Batterie
BP-L40A Env. 120
BP-L60A Env. 130
BP-IL75 Env. 130
BP-L90A Env. 180
BP-M50 — Env. 140
BP-M100
Jusqu’à 80%
minutes
minutes
minutes
minutes
— Env. 200
Jusqu’à 100%
Env. 190
minutes
Env. 210
minutes
Env. 210
minutes
Env. 270
minutes
minutes
minutes
Temps de charge de quatre
batteries
Batterie
BP-L40A Env. 240
BP-L60A Env. 260
BP-IL75 Env. 260
BP-L90A Env. 360
BP-M50 — Env. 280
BP-M100 — Env. 400
Jusqu’à 80%
minutes
minutes
minutes
minutes
Jusqu’à 100%
Env. 305
minutes
Env. 340
minutes
Env. 340
minutes
Env. 450
minutes
minutes
minutes
Affichage des informations de charge de batterie
Notez que les informations à afficher
dépendent du type de batterie.
BP-IL75/M50/M100
1 Appuyez plusieurs fois sur le
bouton CHANNEL jusqu’à ce que
le carré apparaisse autour du
numéro de la section de
connexion de batterie dans
laquelle est installée une batterie
avec informations à afficher.
2 Appuyez plusieurs fois sur le
bouton DISPLAY jusqu’à ce que
l’information souhaitée apparaisse
sur l’afficheur.
A la première pression du bouton
DISPLAY, le rétro-éclairage
s’allume. Puis, à chaque pression
du bouton, l’information change
comme indiqué sur l’illustration
ci-dessous. Quand une batterie en
attente de charge est sélectionnée,
les indications “CHARGE” et
“WAIT” s’allument sur
l’afficheur.
14(FR)
Page 65

Capacité de batterie (%)
Appuyez
Nouvelle batterie
Capacité de batterie (Ah)
Appuyez
Temps de charge restant (min.)
Appuyez
Nombre de cycles de
charge/décharge
Appuyez
Pour contrôler la vie de service
restante d’une batterie
Appuyez plusieurs fois sur
CHANNEL pour sélectionner la
batterie dont la vie de service doit être
contrôlée, puis vérifiez l’état des
quatre segments de l’afficheur.
Batterie pratiquement à la fin de sa vie
de service
Les quatre segments à droite de
l’indication “CYCLE” indiquent la vie
de service restante approximative de la
batterie. Quand la batterie est
pratiquement à la fin de sa vie de
service et doit être remplacée, les
quatre segments s’éteignent tous et
l’indication “CYCLE” clignote sur
l’afficheur.
Remarque
La vie de service restante de la batterie
affichée est une valeur estimée. La vie
de service peut être écourtée par la
manipulation des batteries.
BP-L40A/L60A/L90A
Pour vérifier la capacité de
batterie
Appuyez plusieurs fois sur le bouton
CHANNEL pour sélectionner la
batterie dont la capacité doit être
contrôlée, puis contrôler l’état des
quatre segments sur l’afficheur.
15(FR)
Page 66

Opération
Nombre de segments
allumés Capacité (%)
quatre 80% ou plus
trois 60% à 80%
deux 40% à 60%
un 20% à 40%
aucun 0% à 20%
Pour contrôler le temps de
charge restant
Appuyez plusieurs fois sur le bouton
CHANNEL pour sélectionner la
batterie dont le temps de charge
restant doit être contrôlé, puis appuyez
sur le bouton DISPLAY.
Remarque
Le temps de charge restant est une
valeur estimée.
Alimentation d’un dispositif extérieur
Utilisez un câble de raccordement CC
en option pour connecter le chargeur
au connecteur d’entrée d’alimentation
CC du dispositif.
Rafraîchissement d’une batterie (BP-M50/M100 seulement)
Si une batterie à l’hydrure métallique
nickel à capacité de charge restante est
chargée de manière répétée, sa
capacité de stockage de la batterie
pourra être réduite à cause de l’effet
de mémoire (phénomène qui
mémorise la capacité de charge
restante). Pour éviter cet effet de
mémoire, la fonction de
rafraîchissement est prévue pour
entièrement décharger la batterie avant
la charge.
Pour rafraîchir
automatiquement une
batterie
Réglez le sélecteur REFRESH
MANUAL/AUTO à “AUTO” quand
la batterie à l’hydrure métallique
nickel est attachée, le BC-M150 la
détecte et automatiquement la
rafraîchit régulièrement.
Remarque
L’appareil ne peut pas charger une
batterie et en même temps alimenter
en courant CC un dispositif extérieur.
Si vous commencez par l’utiliser pour
alimenter un dispositif extérieur
pendant la charge d’une batterie, la
charge s’arrêtera.
16(FR)
Pour rafraîchir la batterie
manuellement
1 Réglez le sélecteur REFRESH
MANUAL/AUTO à
“MANUAL”.
2 Attachez la batterie à l’hydrure
métallique nickel et appuyez
plusieurs fois sur le bouton
CHANNEL pour le sélectionner.
Page 67

3 Maintenez le bouton REFRESH
pressé environ une seconde.
Quand l’affichage n’est pas rétroéclairé, appuyez deux fois sur le
bouton pour démarrer le
rafraîchissement. La charge
normale démarrera après la fin du
rafraîchissement.
4 Pour rafraîchir plus de batteries,
répétez les étapes 2 et 3.
Au contrôle des informations de la
batterie en cours de
rafraîchissement, l’indication
“REFRESH” s’allume; au
contrôle des informations de la
batterie en attente de
rafraîchissement, les indications
“REFRESH” et “WAIT”
s’allument sur l’afficheur.
Pour annuler le rafraîchissement
d’une batterie
Quand le sélecteur REFRESH
MANUAL/AUTO est réglé à
“AUTO”, réglez-le à “MANUAL”,
retirez la batterie du chargeur de
batterie, puis réinstallez-la. A la
réinstallation, la charge normale
démarrera. Pendant le
rafraîchissement manuel de la batterie,
il est aussi possible de maintenir le
bouton REFRESH pressé environ une
seconde pour annuler le
rafraîchissement.
Remarques
• Le temps requis pour le
rafraîchissement dépend de la
capacité restante de la batterie
• Le chargeur détecte la tension de
sortie de la batterie connectée. Si
cette tension dépasse un certain
niveau, le rafraîchissement de la
batterie sera jugé inutile. Dans ce
cas, le rafraîchissement ne
s’effectuera pas même si le bouton
REFRESH est pressé, et la charge
normale s’effectuera à la place.
• Les batteries aux ions lithium ne
peuvent pas être rafraîchies.
17(FR)
Page 68

Spécifications
Spécifications
Alimentation
Secteur 120 V, 60 Hz
(Etats-Unis et Canada)
Secteur 100 à 240 V, 50/60
Hz (sauf pour les EtatsUnis et le Canada)
Consommation
Env. 160 W
Puissance 16,8 V c.c., 6 A (au
maximum) (pour la charge
des batteries aux ions
lithium ou l’alimentation
CC d’un dispositif
extérieur)
19,5 V c.c., 5 A (au
maximum) (pour la charge
des batteries à l’hydrure
métallique nickel)
Appel de courant crête
(1) Mise sous tension (ON), méthode
de sondage du courant: 50
A (240 V), 10 A (100 V)
(2) Mesuré conformément à la
norme européenne
EN55103-1: 20 A (230 V)
Température de fonctionnement
0 à 40˚C (32˚F à 104˚F)
Température de rangement
–20 à +60˚C (–4˚F à
+140˚F)
Humidité de fonctionnement/
rangement
20% à 90% RH
Dimensions (l/h/p)
155 × 120 × 330 mm (l/h/p)
(6 1/8 × 4 3/4 × 13 pouces)
Poids Env. 3,5 kg (7 livres 10
onces)
Système de charge
A tension et courant
constants, et système
d’arrêt par minuterie
Système de contrôle de charge
A tension et courants
constants
Courant de charge amplifié Env. 6,0
A (au maximum)
Accessoires fournis
Mode d’emploi (1)
Cordon d’alimentation (1)
Support de fiche (1)
Autocollant de numéros
d’erreur et leur
signification (1)
Accessoires en option
Câble de raccordement CC
CCDD-X2 (2 mètres)
Conception et spécifications sont
sujettes à modification sans préavis.
18(FR)
Page 69

Page 70

Deutsch
WARNUNG
Um Feuergefahr und die
Gefahr eines elektrischen
Schlages zu vermeiden,
darf das Gerät weder
Regen noch Feuchtigkeit
ausgesetzt werden.
Um einen elektrischen
Schlag zu vermeiden, darf
das Gehäuse nicht
geöffnet werden.
Überlassen Sie
Wartungsarbeiten stets
nur qualifiziertem
Fachpersonal.
WARNUNG
DIESES GERÄT MUSS
GEERDET WERDEN.
WARNUNG
1. Verwenden Sie Netzkabel
(dreiadrig), Geräteanschlüsse und
Netzkabelstecker mit Masseleitung,
die den Sicherheitsrichtlinien des
jeweiligen Landes entspricht.
2. Verwenden Sie Netzkabel
(dreiadrig), Geräteanschlüsse und
Netzkabelstecker mit Masseleitung,
die den vor Ort herrschenden
Spannungsanforderungen
(Spannung, Stromstärke)
entsprechen.
Bei Fragen über die Eignung und
Sicherheit von Netzkabeln (dreiadrig),
Geräteanschlüsse und
Netzkabelsteckern wenden Sie sich
bitte an einen qualifizierten
Elektrotechniker.
ACHTUNG
Das Gerät soll nicht
Flüssigkeitstropfen oder -spritzern
ausgesetzt werden, und es dürfen keine
mit Flüssigkeit gefüllten Gegenstände
wie etwa Vasen auf das Gerät gestellt
werden.
WICHTIG
Das Typenschild befindet sich an der
Unterseite.
Für Kunden in Europa
Dieses Produkt besitzt die CEKennzeichnung und erfüllt die EMVRichtlinie (89/336/EWG) sowie die
Niederspannungsrichtlinie (73/23/
EWG) der EG-Kommission.
Angewandte Normen:
• EN60065: Sicherheitsbestimmungen
• EN55103-1: Elektromagnetische
Verträglichkeit (Störaussendung)
• EN55103-2: Elektromagnetische
Verträglichkeit (Störfestigkeit),
für die folgenden elektromagnetischen
Umgebungen:
E1 (Wohnbereich), E2 (kommerzieller
und in beschränktern Maße
industrieller Bereich), E3 (Städtbereich
im Freien) und E4 (kontrollierter
EMV-Bereich, z.B. Fernsehstudio).
Page 71

Inhaltsverzeichnis
Kurzbeschreibung .................................................... 2(DE)
Merkmale ................................................................2(DE)
Ladesystem .............................................................3(DE)
Zur besonderen Beachtung..................................... 6(DE)
Lage und Funktion der Teile.................................... 9(DE)
Betrieb ..................................................................... 12(DE)
Anschleßen eines Akkus.......................................12(DE)
Laden ....................................................................13(DE)
Anzeige der Akku-Information.............................14(DE)
Anlegen von Strom an ein externes Gerät ............16(DE)
Refresh-Vorgang von Akkus
(nur BP-M50/M100) .......................................16(DE)
Technische Daten ................................................... 18(DE)
Deutsch
1(DE)
Page 72

Kurzbeschreibung
Kurzbeschreibung
Das Akku-Ladegerät BC-M150 ist in der Lage, gleichzeitig bis
zu vier der folgenden Lithiumionen-Akkus BP-L40A/L60A/
IL75/L90A und Nickel-Metallhydrid-Akkus BP-M50/M100
aufzuladen, oder Gleichstrom zu einem externen Gerät zu
liefern.
Merkmale
Gleichzeitiger Anschluss von bis zu vier Akkus
Der BC-M150 kann bis zu vier Akkus gleichzeitig aufnehmen
und laden. Diese Akkus können entweder der BP-L40A, der
BP-L60A, der BP-IL75, der BP-L90A, der BP-M50, der BPM100 oder jede Kombination der obigen Akkus sein.
Schnelles und effizientes Laden
• Beim Laden der Lithiumionen-Akkus lädt der BC-M150
zuerst jeden Akku zu 80% auf. Dann lädt er alle Akkus
gleichzeitig zu 100% auf.
• Der BC-M150 lädt die Nickel-Metallhydrid-Akkus der Reihe
nach zu 100% auf. Er benötigt dazu weniger Zeit als
herkömmliche Ladegeräte.
2(DE)
.Einzelheiten hierzu finden Sie unter “Ladesystem” auf Seite
3(DE).
Kompakt und leicht
Das BC-M150 ist kompakt, leicht und einfach zu
transportieren.
Diagnosefunktionen
Das BC-M150 überprüft alle angebrachten Akkus auf Defekte.
Bei nicht normal aufladbaren Akkus blinkt eine Warnanzeige
in Rot, und eine Fehleranzeige erscheint im LCD-Feld für
jeden dieser Akkus.
Akku-Informationsanzeige
Die Information auf den angeschlossenen Akkus, wie
Ladezustand der Akkus, restliche Ladezeit, Anzahl von Ladeund Entladezyklen erscheint im Display. Beachten Sie aber,
dass der Typ der Information vom Typ der Akkus abhängt.
Page 73

Überspringen-Funktion für voll geladene Akkus
Wenn ein voll geladener Akku an den BC-M150 angebracht
wird, passiert nichts mit dem Akku, und die Anzeigen zeigen
an, dass der Ladevorgang fertig ist.
Refresh-Funktion (nur für Nickel-Metallhydrid-Akkus
BP-M50/M100)
Das BC-M150 ist mit der Refresh-Funktion ausgestattet, um
den sogenannten Memory-Effekt (Nachwirkungseffekt, bei
dem sich der Akku die verbleibende Kapazität “merkt”), um
einen Akku vor dem Laden vollständig zu entladen.
Anlegen von bis zu 100 W Gleichstrom
Das BC-M150 kann bis zu 100 Watt Gleichstrom an ein
externes Gerät anlegen, das über ein optionales
Gleichstromkabel angeschlossen ist.
Kühlgebläse
Ein internes Kühlgebläse schaltet sich immer ein, wenn das
BC-M150 einen Akku auflädt oder Strom zu einem externen
Gerät liefert.
• Das vorliegende Gerät dient zum Laden von Sony-
Lithiumionen-Akkus (BP-L40A/L60A/IL75/L90A) und
Nickel-Metall-Hydrid-Akkus (BP-M50/M100) von Sony).
• DC-L1 (Adapter NP-1B) und DC-L90 (Adapter BP-90A)
kann nicht mit diesem Gerät zum Laden von NiCd-Akkus
dienen.
Ladesystem
Ladesystem von Lithiumionen-Akkus
Wenn das BC-M150 zum Aufladen von vier LithiumionenAkkus verwendet wird, lädt es zuerst jeden angeschlossenen
Akku der Reihe nach zu 80% auf. Dann lädt es alle Akkus
gleichzeitig zu 100% auf. Auf diese Weise wird ein
effizienterer und schnellerer Ladevorgang erreicht als bei
herkömmlichen Ladevorgängen, wo jeder Akku zu 100%
aufgeladen wird, bevor der nächste geladen wird. Einzelheiten
über das neue System und die Ladezeiten werden unten
aufgeführt.
3(DE)
Page 74

Kurzbeschreibung
Herkömmliche Ladesysteme (Laden von vier BP-IL75Einheiten)
Ladezustand
Neues Ladesystem (Laden von vier BP-IL75Einheiten)
Laden von
Akku
Minuten
Jeder Akku wird der Reihe nach zu 100%
aufgeladen.
1 (140
)
Laden von
Akku
2 (140
Minuten
)
Laden von
Akku
3 (140
Minuten
)
Laden von
Akku
4 (140
Minuten
)
Ladedauer
Gesamt
560
Minuten
4(DE)
Ladezustand
Laden
von
Akku 1
(65
Minuten)
Nachdem das BC-M150 einen Akku zu 80% aufgeladen hat,
geht es zum nächsten Akku weiter. Wenn der letzte Akku zu
80% aufgeladen ist, beginnt das BC-M150 mit dem
simultanen Aufladen aller Akkus, bis sie zu 100% geladen
sind. Auf diese Weise werden Akkus schneller geladen als bei
herkömmlichen Systemen.
Laden
von
Akku 2
(65
Minuten)
Laden
von
Akku 3
(65
Minuten)
Laden
von
Akku 4
(65
Minuten)
Gleichzeitiges
Laden von
Akku 1
bis 4 (80
Minuten
)
Gesamt 340
Minuten
Ladedauer
Page 75

Wenn Sie einen Akku an der Akkuladefläche mit der kleineren
Zahl anschließen, während der andere Akku an der
Akkuladefläche mit der größeren Zahl angeschlossen ist und zu
80% geladen ist (z.B. wenn Sie einen Akku an der
Akkuladefläche 1 anschließen, während ein an der
Akkuladefläche 3 angeschlossener Akku geladen wird), findet
das Aufladen des neu angeschlossenen Akkus erst statt,
nachdem der erste Akku zu 80% geladen ist.
Wenn Sie einen Akku anschließen, während das BC-M150
bereits angeschlossene Akkus zu 100% auflädt, wird das
Aufladen zu 100% abgebrochen, und das Laden des neu
angeschlossenen Akkus zu 80% startet.
Ladesystem für Nickel-Metallhydrid-Akkus
Jeder Nickel-Metallhydrid-Akku wird der Reihe nach zu 100%
aufgeladen. Wenn Sie einen Akku an der Akkuladefläche mit
der kleineren Zahl anschließen, während der andere Akku an
der Akkuladefläche mit der größeren Zahl angeschlossen ist
und dieser aufgeladen wird, findet das Aufladen des neu
angeschlossenen Akkus erst statt, nachdem der erste Akku voll
geladen ist.
Ladesystem einer Mischung von Lithiumionen-Akkus und
Nickel-Metallhydrid-Akkus
Die Lithiumionen-Akkus werden zu 80% aufgeladen, und die
Nickel-Metallhydrid-Akkus werden zu 100% aufgeladen, je
nach der Reihenfolge der Akku-Anschlusssektion. Dann lädt
das BC-M150 alle Lithiumionen-Akkus gleichzeitig auf 100%
Ladeniveau auf. Wenn Sie einen Akku an der Akkuladefläche
mit der kleineren Zahl anschließen, während der andere Akku
an der Akkuladefläche mit der größeren Zahl angeschlossen ist
und dieser aufgeladen wird, findet das Aufladen des neu
angeschlossenen Akkus erst statt, nachdem das Aufladen des
ersten Akkus beendet ist.
5(DE)
Page 76

Zur besonderen Beachtung
Zur besonderen Beachtung
Das Akkuladegerät
• Das BC-M150 kann ausschließlich mit LithiumionenAkkus und Nickel-Metallhydrid-Akkus von Sony
verwendet werden. Bei Verwendung dieses Geräts zum
Aufladen anderer Akkutypen oder Akkus anderer
Hersteller kann Rauch oder Feuer verursacht werden.
• Verwenden Sie das BC-M150 bei Umgebungstemperaturen
von 10 bis 30 °C. Da das Laden bei niedrigen oder hohen
Temperaturen problematisch ist, empfehlen sich
Temperaturen zwischen 10 und 30 °C als optimal.
• Das BC-M150 sollte nicht an Orten eingesetzt oder gelagert
werden, die hoher Staubbelastung oder korrodierenden Gasen
ausgesetzt sind.
• Auch Orte, die direkter Sonneneinstrahlung ausgesetzt sind,
eignen sich nicht für Einsatz oder Lagerung des
Akkuladegeräts.
• Sorgen Sie dafür, dass die Belüftungsöffnungen des Geräts
nicht blockiert werden.
Die Akkus
• Auch bei voller Aufladung ist bei Akkus eine Selbstentladung
unvermeidlich. Daher sollten Sie Akkus stets baldmöglichst
nach dem Aufladen einsetzen.
• Für Transport und Lagerung lassen Sie die Akkus im Gerät
eingesetzt oder legen sie in den Originalverpackungsbeutel
zurück.
• Um ihre Lebensdauer zu verlängern, sollten Akkus an einem
kühlen Ort (mit ca. 20 °C) aufbewahrt und bei
Umgebungstemperaturen zwischen 10 und 30 °C geladen
werden.
• Betrieb bei Temperaturen von 10 °C oder darunter
beeinträchtigt die Leistung von Akkus und verkürzt ihre
Betriebszeit. Um die längstmögliche Betriebszeit zu
erreichen, sollten die Akkus vor Gebrauch auf ca. 20 °C
Zimmertemperatur erwärmt werden.
• Es empfiehlt sich, stets Ersatzakkus bereitzuhalten.
• Beim Aufladen mit Umgebungstemperaturen zwischen 30°C
und 40°C kann es sein, dass Akkus nicht vollständig
aufgeladen werden (siehe Angaben außen auf Akku). Auch
wenn die Ladeanzeige(n) (oder das Display) anzeigt(en), dass
die vollständige Aufladung abgeschlossen ist, kann die
tatsächliche Ladung etwa 80% des vollen Ladezustands
betragen.
6(DE)
Page 77

• Wenn Sie versucht haben, einen Akku aufzuladen, der vorher
noch nie geladen wurde, bleibt der tatsächliche Ladezustand
unter 80% der Nennkapazität*.
* Das durchschnittliche Ladeniveau, wenn eine einzelne Zelle bei 0,1C für 16
Stunden aufgeladen und bei 0,2C entladen wird.
• Laden des Nickel-Metallhydrid-Akkus, wenn die
Umgebungstemperatur oder die Temperatur des Akkus selber
über 30°C Liegt, wird die Ladezeit verlängert und die
Ladestärke sinkt im Vergleich zum Laden bei
Umgebungstemperaturen oder Akkutemperaturen zwischen
10°C und 30°C.
Beim Laden mit einer Temperatur von 40°C wird der
Ladevorgang mit 80% der Vollladung beendet. In diesem Fall
ist Neuladen bei Temperaturen von 30°C oder weniger
möglich. Beachten Sie, dass Neuaufladen nur bei Akkus
möglich ist, deren restliche Kapazität 90% oder weniger
beträgt, um zu starkes Neuaufladen zu vermeiden.
Lithiumionen-Akkus sind frei vom Nachwirkungseffekt und
können daher trotz noch vorhandener Restladung wieder
aufgeladen werden.
Bei sehr kurzen Betriebszeiten ist der Akku gegen einen neuen
auszutauschen.
Akku-Ladeanzeigen bei hohen oder niedrigen
Temperaturen
Der Akku kann nicht geladen werden, wenn er zu heiß oder zu
kalt ist. Wenn eine Ladeanzeige oben auf dem Ladegerät (siehe
Abbildung unten) orangefarben blinkt, bedeutet dies, dass die
Akkutemperatur über oder unter einem vorgeschriebenen
Bereich ist und dass das Ladegerät darauf wartet, dass der
Akku auf einen Temperaturbereich zurückkehrt, bei dem Laden
möglich ist. Wenn der Akku nicht innerhalb einer festgelegten
Zeit auf die Standardtemperatur zurückkehrt, tritt ein Fehler
auf und Laden wird nicht ausgeführt.
Ladeanzeigen
Links Mitte Rechts
: Blinkt orangefarben
: Aus
7(DE)
Page 78

Zur besonderen Beachtung
Hinweis zum Laden eines extrem entladenen Akkus
Wenn ein Akku an einen Camcorder angebracht und verwendet
wird, wird der Cassettenrecorder teil des Camcorders
ausgeschaltet, bevor der Akku vollständig entladen ist. Wenn
der Camcorder bei angebrachtem Akku eingeschaltet bleibt,
wird der Akku noch weiter entladen. Das führt zu einem
extrem entladenen Akku.
Wenn Sie versuchen, einen extrem entladenen Akku zu starten,
der die INFO-Funktion unterstützt, erkennt das Ladegerät ihn
nicht als Akku mit INFO-Funktion und beginnt ihn zu laden
wie einen Akku ohne INFO-Funktion. In diesem Fall wird der
Ladevorgang problemlos ausgeführt, aber die Akkustärke,
Anzahl der Ladezyklen und andere Informationen werden beim
Laden nicht angezeigt.
Wenn der Akku entfernt wird, nachdem er zu einem
bestimmten Grad geladen wurde, und dann wieder an das
Ladegerät angebracht wird, wird er als Akku mit INFOFunktion erkannt, und die Akkustärke, Anzahl der Ladezyklen
und andere Informationen werden beim weiteren Laden
angezeigt.
Ungeachtet wie der Akku geladen wird, wenn der Ladevorgang
beendet ist, arbeitet der Akku wieder als Akku mit INFOFunktion.
Zum Nachwirkungseffekt (Memory-Effekt)
Nickel-Metall-Hydrid-Akkus leiden genauso unter diesem
Effekt wie Nickel-Cadmium-Akkus. Um diesem Effekt
entgegenzuwirken, entladen Sie die Akkus vollständig mit der
Refresh-Funktion (Seite 3(DE) und 16(DE)).
8(DE)
Page 79

Lage und Funktion der Teile
Vorder- und Oberseite
1 POWER-Schalter und Anzeige
2 Akkuladeflächen (1 bis 4) und Ladeanzeigen
Akku-Freigabetaste
3 DC OUT-Buchse
Rückseite
Display und Tasten
0 REFRESH-Taste
9 CHANNEL-Taste
4 AC IN-Buchse
5 Steckerhalteraufnahme
Reserviert für zukünftige Verwendung.
6 Display
7 DISPLAY-Taste
8 REFRESH MANUAL/
AUTO-Wahlschalter
9(DE)
Page 80

Lage und Funktion der Teile
1 POWER-Schalter und Anzeige
Schaltet den Betriebsstrom ein oder
aus. Wenn das Gerät eingeschaltet
wird, leuchtet die Anzeige auf, und
das Laden der Akkus oder die
Lieferung von Gleichstrom an ein
externes Gerät wird möglich.
2 Akkuladeflächen (1 bis 4) und
Ladeanzeigen
Diese verbinden die Akkus BP-L40A/
L60A/IL75/L90A/M50/M100. Zum
Abtrennen eines Akkus drücken Sie
die Freigabetaste und ziehen Sie den
Akku nach oben.
Die Ladeanzeigen zeigen den
Ladevorgang oder Ergebnisse durch
Blinken oder Leuchten in Rot,
Orangefarben oder Grün, wie folgt.
Anzeigezustand
Links
Mitte
(G)
(G)
(G)
(G)
(G)
(G)
Bedeutung
Rechts
Anlegen von
Gleichstrom an ein
(O)
externes Gerät
Ladevorgang läuft
(0% bis 80%
Ladeniveau)
Ladevorgang warten
(geladen zu 80%;
anderer Akku wird
geladen). Dieser
Status tritt nur auf,
wenn mehr als ein
Akku angeschlossen
ist.
Ladevorgang läuft
(geladen zu 81%
oder mehr)
Ende des
Ladevorgangs
Refresh-Vorgang
des Nickel-
(R)
Metallhydrid-Akkus
läuft.
10(DE)
Anzeigezustand Bedeutung (FehlerLinks
Mitte
(R/G)
: Aus
: Blinkt
: Ein
Nr.)
Rechts
Einer der folgenden
Zustände liegt vor.
•Die Akku-Impedanz ist
zu hoch (E-01).
•Der Ladeschaltkreis
des Akkus ist offen (E-
02).
•Die Batteriespannung
ist zu niedrig (E-03).
•Die Batterietemperatur
ist zu niedrig oder zu
hoch (E-04).
•Das Ladegerät kann
nicht mit dem Akku
kommunizieren (E-
05).
•Der Ladevorgang wird
nicht innerhalb des
vorgegebenen
Zeitraums beendet (E-
06).
•Ein inkompatibler
Akku wurde
angeschlossen (E-07).
•Das Ladegerät konnte
nicht die Information
vom angeschlossenen
Akku lesen (E-08).
•Die
Ausgabespannung
des Ladegeräts ist zu
hoch (E-09).
•Die
Ausgabespannung
des Ladegeräts ist zu
niedrig (E-10).
•Der interne Lüfter hat
gestoppt (E-20).
Wenn einer der beiden
obigen Zustände
auftritt, versuchen Sie,
den Akku zwei oder drei
weitere Male zu laden,
oder schalten Sie das
Ladegerät aus und
dann erneut ein. Wenn
der Zustand weiter
besteht, ist der Akku
wahrscheinlich defekt
und sollte ersetzt
werden.
O: Orangefarben
G: Grün
R: Rot
Page 81

3 DC OUT
(Gleichstromversorgung) Buchse
(XLR, 4-polig, männlich)
Liefert Strom zu einem externen Gerät
über ein optionales Gleichstromkabel.
Pol 4 ist der Plus-Kontakt und Pol 1
der Minus-Kontakt.
Steckerhalter
(mitgeliefert)
Hinweis
Das BC-M150 kann nicht einen Akku
aufladen, während es gleichzeitig
Gleichstrom an ein externes Gerät
liefert. Wenn Sie beginnen, Strom an
ein externes Gerät anzulegen, während
ein Akku aufgeladen wird, stoppt der
Ladevorgang des Akkus.
4 AC IN-Buchse
(Netzspannungseingang)
Dient zum Anschluß des
Akkuladegeräts an eine Netzsteckdose
über ein mitgeliefertes Netzkabel.
5 Steckerhalteraufnahme
Der mitgelieferte Steckerhalter sichert
das Kabel in seiner Lage, so daß es
sich nicht vom Akkuladegerät lösen
kann.
Entfernen der
Steckerhalter-Aufnahme
6 Display
Die Informationen der Akku, oder die
Fehlermeldung erscheint hier.
7 DISPLAY-Taste
Wiederholt drücken, um AkkuInformation wie Ladeniveau, restliche
Ladezeit und Anzahl von Lade- und
Entladezyklen anzuzeigen.
8 REFRESH MANUAL/AUTOWahlschalter
Dient zum Wählen von manuellem
oder automatischem Refresh des
Nickel-Metallhydrid-Akkus.
9 REFRESH-Taste
Dient zum manuellen Refresh des
Nickel-Metallhydrid-Akkus.
0 CHANNEL-Taste
Dient zum Wählen des Akkus zur
Anzeige der Information oder zum
Refresh.
11(DE)
Page 82

Betrieb
Betrieb
Anschleßen eines Akkus
Den Akku gemäß der folgenden Abbildung anschleßen und
abtrennen.
Anschleßen
BC-M150
In Pfeilrichtung aufsetzen.
BP-L40A/L60A/
IL75/L90A/M50/
M100
Abtrennen
BC-M150
Die Freigabetaste drücken und
gleichzeitig den Akku nach oben
abziehen.
Vorsicht
BP-L40A/L60A/
IL75/L90A/M50/
M100
Dieses Ladegerät dient zum Aufladen von Lithiumionen-Akkus
(BP-L40A/L60A/IL75/L90A) und Nickel-Metall-HydridAkkus (BP-M50/M100) von Sony. DC-L1 (Adapter NP-1B)
und DC-L90 (Adapter BP-90A) kann nicht zum Laden von
NiCd-Akkus dienen.
12(DE)
Page 83

Laden
Betätigen Sie den POWER-Schalter
zum Starten des Ladevorgangs auf
ON.
Die Nummer(n) der
Akkuladefläche(n) an der (denen) der
(die) Akku(s) angeschlossen ist (sind)
leuchtet(n) im Display auf. Nachdem
der Ladevorgang beginnt, erscheint
ein blinkendes Rechteck um die
Nummer der Akkuladefläche, an der
der geladene Akku angeschlossen ist,
und die “CHARGE”-Anzeige leuchtet
auf.
Hinweis
Das Gerät kann nicht einen Akku
aufladen, während es gleichzeitig
Gleichstrom an ein externes Gerät
liefert. Wenn Sie beginnen, Strom an
ein externes Gerät anzulegen, während
ein Akku aufgeladen wird, stoppt der
Ladevorgang des Akkus.
Ladezeit
Die geeigneten Ladezeiten für
entladene Akkus sind wie folgt (bei
einer Umgebungstemperatur zwischen
10°C und 30°C).
Ladezeit für einen Akku
Akku Bis zu 80% Bis zu 100%
BP-L40A Ca. 60
BP-L60A Ca. 65
BP-IL75 Ca. 65
BP-L90A Ca. 90
BP-M50 — Ca. 70
BP-M100 Ca. 100
Minuten
Minuten
Minuten
Minuten
—
Ca. 125
Minuten
Ca. 140
Minuten
Ca. 140
Minuten
Ca. 180
Minuten
Minuten
Minuten
Hinweis zu den Akkus
Die Leistung des BC-M150 gilt
ausschließlich für kompatible Akkus
(BP-L40A/L60A/IL75/L90A/M50/
M100). Laden Sie keinesfalls
andersartige Akkus auf.
13(DE)
Page 84

Betrieb
Ladezeit für zwei Akkus
Akku Bis zu 80% Bis zu 100%
BP-L40A Ca. 120
Minuten
BP-L60A Ca. 130
Minuten
BP-IL75 Ca. 130
Minuten
BP-L90A Ca. 180
Minuten
BP-M50 — Ca. 140
BP-M100
—
Ca. 190
Minuten
Ca. 210
Minuten
Ca. 210
Minuten
Ca. 270
Minuten
Minuten
Ca. 200
Minuten
Ladezeit für vier Akkus
Akku Bis zu 80% Bis zu 100%
BP-L40A Ca. 240
Minuten
BP-L60A Ca. 260
Minuten
BP-IL75 Ca. 260
Minuten
BP-L90A Ca. 360
Minuten
BP-M50 — Ca. 280
BP-M100 — Ca. 400
Ca. 305
Minuten
Ca. 340
Minuten
Ca. 340
Minuten
Ca. 450
Minuten
Minuten
Minuten
Anzeige der AkkuInformation
Beachten Sie, dass die anzuzeigende
Information vom Typ der Akkus
abhängt.
BP-IL75/M50/M100
1 Drücken Sie die CHANNEL-
Taste wiederholt, bis das
Rechteck um die Nummer der
Akkuladefläche erscheint, an die
der Akku, dessen Information
angezeigt werden soll,
angeschlossen ist.
2 Drücken Sie die DISPLAY-Taste
wiederholt, bis die gewünschte
Information im Display erscheint.
Wenn Sie die DISPLAY-Taste
zum ersten Mal drücken, leuchtet
die Rückbeleuchtung auf. Dann
wird bei jeder Tastenbetätigung
die Information weitergeschaltet,
wie in der Abbildung unten
gezeigt: Wenn ein auf das Laden
wartender Akku gewählt wird,
leuchten die Anzeigen
“CHARGE” und “WAIT” im
Display auf.
14(DE)
Page 85

Akkuladeniveau (%)
Drücken
Neuer Akku
Akkuladeniveau (Ah)
Drücken
Verbleibende Ladezeit (Min.)
Drücken
Anzahl der Lade- und
Entladezyklen
Drücken
Prüfen der restlichen
Lebensdauer des Akkus
Drücken Sie die CHANNEL-Taste
wiederholt, um den Akku zu wählen,
dessen Lebensdauer geprüft werden
soll, und prüfen Sie dann den Status
der vier Segmente im Display.
Der Akku hat fast das Ende seiner
Lebensdauer erreicht.
Die vier Segmente rechts neben der
“CYCLE”-Anzeige zeigen die
ungefähre restliche Lebensdauer des
Akkus. Wenn der Akku fast das Ende
seiner Lebensdauer erreicht hat und
ersetzt werden muss, schalten sich alle
vier Segmente aus, und die Anzeige
“CYCLE” blinkt im Display.
Hinweis
Die angezeigte restliche
Akkulebensdauer ist ein Schätzwert.
Die Akkulebensdauer kann je nach der
Behandlung der Akkus unterschiedlich
sein.
BP-L40A/L60A/L90A
Prüfen des Akkuladeniveaus
Drücken Sie die CHANNEL-Taste
wiederholt, um den Akku zu wählen,
dessen Ladeniveau geprüft werden
soll, und prüfen Sie dann den Status
der vier Segmente im Display.
15(DE)
Page 86

Betrieb
Anzahl der
aufleuchtenden
Segmente Ladeniveau (%)
vier 80% oder mehr
drei 60% bis 80%
zwei 40% bis 60%
eine 20% bis 40%
keine 0% bis 20%
Prüfen der restlichen Ladezeit
Drücken Sie die CHANNEL-Taste
wiederholt, um den Akku zu wählen,
dessen restliche Ladezeit geprüft
werden soll, und drücken Sie dann die
DISPLAY-Taste.
Hinweis
Die angezeigte restliche Ladezeit ist
ein Schätzwert.
Anlegen von Strom an ein externes Gerät
Verwenden Sie ein optionales
Gleichstromkabel zum Anschließen
des Ladegeräts an den
Gleichstromeingang des Geräts.
Hinweis
Das Gerät kann nicht einen Akku
aufladen, während es gleichzeitig
Gleichstrom an ein externes Gerät
liefert. Wenn Sie beginnen, Strom an
ein externes Gerät anzulegen, während
ein Akku aufgeladen wird, stoppt der
Ladevorgang des Akkus.
Refresh-Vorgang von Akkus (nur BP-M50/ M100)
Wenn ein Nickel-Metallhydrid-Akku
mit restlicher Ladung wiederholt
aufgeladen wird, kann die
Ladefähigkeit des Akkus aufgrund des
sogenannten Memory-Effekts
(Nachwirkungseffekt, bei dem sich der
Akku die verbleibende Kapazität
“merkt”) verringert werden. Um
diesen Memory-Effekt zu verhindern,
ist die Refresh-Funktion vorhanden,
um den Akku vor dem Laden
vollständig zu entladen.
Zum automatischen Refresh
des Akkus
Stellen Sie den REFRESH MANUAL/
AUTO-Wahlschalter auf “AUTO”.
Wenn der Nickel-Metallhydrid-Akku
angeschlossen wird, erkennt das BCM150 ihn und nimmt automatisch
regelmäßig den Refresh-Vorgang vor.
Zum manuellen Refresh des
Akkus
1 Stellen Sie den REFRESH
MANUAL/AUTO-Wahlschalter
auf “MANUAL”.
2 Schließen Sie den Nickel-
Metallhydrid-Akku an und
drücken Sie die CHANNEL-Taste
wiederholt zum Wählen.
16(DE)
Page 87

3 Halten Sie die REFRESH-Taste
etwa eine Sekunde lang gedrückt.
Wenn das Display nicht
rückbeleuchtet ist, drücken Sie die
Taste zweimal, um den RefreshVorgang zu starten. Normales
Laden startet automatisch,
nachdem der Refresh-Vorgang
abgeschlossen ist.
4 Um ein Refresh für weitere Akkus
vorzunehmen, wiederholen Sie
Schritt 2 und 3.
Wenn Sie die Information des
dem Refresh unterzogenen Akkus
prüfen, leuchtet die “REFRESH”Anzeige auf; wenn Sie die
Information des auf den Refresh
wartenden Akkus prüfen, leuchten
die Anzeigen “REFRESH” und
“WAIT” im Display auf.
Aufheben des Refresh des
Akkus
Wenn der REFRESH MANUAL/
AUTO-Wahlschalter auf “AUTO”
gestellt ist, stellen Sie ihn auf
“MANUAL”; dann nehmen Sie den
Akku vom Ladegerät ab, und
schließen Sie ihn wieder an. Wenn Sie
den Akku wieder anschließen, startet
der normale Ladevorgang. Während
der Refresh-Vorgang für den Akku
manuell ausgeführt wird, könen Sie
auch die REFRESH-Taste etwa eine
Sekunde lang drücken, um den
Refresh-Vorgang abzubrechen.
Hinweise
• Die erforderliche Refresh-Zeit richtet
sich nach der Restkapazität des
Akkus.
• Das Ladegerät erfasst die
Ausgangsspannung des angebrachten
Akkus. Übersteigt die AkkuSpannung einen bestimmten
Schwellenwert, so braucht der Akku
keinen Refresh-Vorgang. In diesem
Fall unterbleibt der RefreshVorgang, auch bei Drücken der
REFRESH-Taste, und stattdessen
beginnt der normale Ladevorgang.
• Lithiumionen-Akkus lassen keinen
Refresh-Vorgang zu.
17(DE)
Page 88

Technische Daten
Technische Daten
Anschlusswerte
100 bis 240 V, 50/60 Hz
Leistungsaufnahme
ca. 160 W
Ausgangswerte
16,8 V GS, 6 A (bei
Maximum) (zum Laden
eines Lithiumionen-Akkus
oder Anlegen von
Gleichstrom an ein
externes Gerät)
19.5 V GS, 5 A (bei
Maximum) (zum Laden
eines Nickel-MetallHydrid-Akkus)
Spitzenstrom
(1) Einschaltstrom, Stromsonde: 50
A (240 V), 10 A (100 V)
(2) Gemessen in EN55103-1: 20 A
(230 V)
Betriebstemperatur
0 bis +40 °C
Lagerungstemperatur
–20 bis +60 °C
Luftfeuchtigkeit bei Betrieb/Lagerung
20 bis 90 %, relativ
Abmessungen
155 × 120 × 330 mm (B/H/
T)
Gewicht Ca. 3,5 kg
Ladesystem
Ladesystem für
Konstantspannung und strom mit Timer-StoppSystem
Ladekontrollsystem
Ladekontrollsystem für
Konstantspannung und strom
Booster-Ladestrom
Ca. 6,0 A (bei Maximum)
Zubehör
Bedienungsanleitung (1)
Netzkabel (1)
Steckerhalter (1)
Aufkleber der
Fehlernummern und ihrer
Bedeutungen (1)
Sonderzubehör
Gleichstromkabel CCDD-
X2 (2 Meter)
Änderungen, die dem technischen
Fortschritt dienen, bleiben
vorbehalten.
18(DE)
Page 89

Page 90

Italiano
ATTENZIONE
Per evitare il pericolo di
incendi o scosse
elettriche, non esporre
l’apparecchio alla pioggia
o all’umidità.
Per evitare scosse
elettriche, non aprire
l’apparecchio. Per
eventuali riparazioni,
rivolgersi esclusivamente
a personale qualificato.
ATTENZIONE
QUESTO APPARECCHIO DEVE
ESSERE COLLEGATO A
MASSA.
ATTENZIONE
1. Usare il cavo di alimentazione
(cavo di alimentazione a tre nuclei)/
connettore apparecchio/spina con
contatti di messa a terra approvato
che sia conforme alle norme di
sicurezza di ciascun paese se
applicabile.
2. Usare il cavo di alimentazione
(cavo di alimentazione a tre nuclei)/
connettore apparecchio/spina con
contatti di messa a terra conforme ai
limiti di impiego (tensione,
amperaggio) appropriati.
CAUTELA
Questo apparecchio non deve essere
esposto a sgocciolamenti o schizzi e
nessun oggetto riempito con un
liquido, come un vaso di fiori, deve
essere collocato sull’apparecchio.
IMPORTANTE
La piastrina è situata sul fondo.
Per gli acquirenti in Europa
Questo prodotto con il marchio CE è
conforme sia con la Direttiva EMC
(89/336/CEE) e la Direttiva sulla bassa
tensione (73/23/CEE) promulgate dalla
Commissione della Comunità Europea.
La conformità con queste direttive
implica la conformità ai seguenti
standard europei:
• EN60065: Sicurezza prodotti
• EN55103-1: Inteferenze
elettromagnetiche (emissione)
• EN55103-2: Suscettibilità
elettromagnetica (immunità)
Questo prodotto è destinato all’uso nei
seguenti ambienti elettromagnetici:
E1 (residenziale), E2 (commercio e
industria leggera), E3 (esterni urbani)
ed E4 (ambiente EMC controllato,
p.es. studio televisivo).
In caso di dubbi sull’uso del cavo di
alimentazione/connettore apparecchio/
spina, consultare personale tecnico
qualificato.
Page 91

Indice
Descrizione ................................................................. 2(IT)
Caratteristiche .......................................................... 2(IT)
Sistema di carica ...................................................... 3(IT)
Avvertenze .................................................................. 6(IT)
Posizione e funzioni delle parti ................................. 9(IT)
Funzionamento ......................................................... 12(IT)
Applicazione di un blocco batteria ........................ 12(IT)
Carica ..................................................................... 13(IT)
Visualizzazione delle informazioni sul blocco
batteria.............................................................. 14(IT)
Alimentazione ad un apparecchio esterno ............. 16(IT)
Rinfrescamento dei blocchi batteria
(solo BP-M50/M100) ....................................... 16(IT)
Caratteristiche tecniche........................................... 18(IT)
Italiano
1(IT)
Page 92

Descrizione
Descrizione
Il caricabatterie BC-M150 è in grado di caricare
simultaneamente fino a quattro qualsiasi dei blocchi batteria a
ioni di litio BP-L40A/L60A/IL75/L90A e dei blocchi batteria a
idruro metallico di nichel BP-M50/M100 o di fornire
alimentazione CC ad un apparecchio esterno.
Caratteristiche
Possibilità di applicare fino a quattro blocchi batteria
per volta
Il BC-M150 permette di applicare e caricare fino a quattro
blocchi batteria contemporaneamente. Questi blocchi batteria
possono essere BP-L40A, BP-L60A, BP-IL75, BP-L90A, BPM50, BP-M100 o qualsiasi combinazione di questi tipi.
Carica rapida ed efficiente
• Quando carica blocchi batteria a ioni di litio, il BC-M150
prima carica ciascun blocco batteria all’80% della capacità.
Poi carica simultaneamente tutti i blocchi batteria al 100%
della capacità.
• Il BC-M150 carica i blocchi batteria all’idruro metallico di
nichel al 100% della capacità in sequenza. Richiede però un
tempo inferiore rispetto ad un caricabatterie convenzionale.
2(IT)
Per i dettagli, fare riferimento a “Sistema di carica” a pagina
3(IT).
Compatto e leggero
Il BC-M150 è compatto, leggero e facile da trasportare.
Funzioni di diagnostica
Il BC-M150 controlla eventuali anormalità che possono
verificarsi in ciascuno dei blocchi batteria collegati. Un
indicatore lampeggia in rosso e un’indicazione di errore appare
nella sezione LCD per qualsiasi blocco batteria chenon può
essere caricato normalmente.
Indicazioni di informazione sui blocchi batteria
Informazioni sui blocchi batteria applicati, come la capacità dei
blocchi batteria, il tempo di carica rimanente, il numero di cicli
di carica e scaricamento, appaiono sul display. Notare però che
il tipo di informazioni dipende dal tipo di blocco batteria. Note,
however, that type of information depends on the type of the
battery packs.
Page 93

Funzione di salto per blocchi batteria completamente
carichi
Se un blocco batteria completamente carico viene applicato al
BC-M150, non accade nulla al blocco batteria e gli indicatori
mostrano che la carica del blocco batteria è completa.
Funzione di rinfrescamento (solo per i blocchi
batteria all’idruro metallico di nichel BP-M50/M100)
Il BC-M150 è dotato di una funzione di rinfrescamento per
eliminare l’effetto memoria (un fenomeno in cui la capacità
rimanente del blocco batteria viene memorizzata), scaricando
completamente un blocco batteria prima di eseguire la carica.
In grado di fornire fino a 100 W di alimentazione CC
Il BC-M150 può fornire fino a 100 watt di alimentazione CC
ad un apparecchio esterno collegato tramite un cavo di
collegamento CC opzionale.
Ventola di raffreddamento
Una ventola di raffreddamento interna si attiva quando il BCM150 carica un blocco batteria o fornisce alimentazione ad un
apparecchio esterno.
• Questo apparecchio è stato progettatc per la carica blocchi
batteria a ioni di litio Sony (BP-L40A/L60A/IL75/L90A) e
blocchi batteria all’idruro metallico di nichel Sony (BPM50/M100).
• Il DC-L1 (adattatore per l’NP-1B) e il DC-L90 (adattatore
per il BP-90A) non possono essere usati con questo
apparecchio per caricare blocchi batteria al nichel-cadmio.
Sistema di carica
Sistema di carica per i blocchi batteria a ioni di litio
Quando si usa il BC-M150 per caricare quattro blocchi batteria
a ioni di litio, esso prima carica ciascun blocco batteria
applicato all’80% della capacità, in sequenza. Poi carica
simultaneamente tutti i blocchi batteria al 100% della capacità.
In questo modo è possibile ottenere una carica più rapida ed
efficiente che con i sistemi convenzionali in cui ciascun blocco
batteria viene caricato al 100% della capacità prima che sia
caricato il blocco batteria successivo. Vedere sotto per dettagli
sul nuovo sistema e i tempi di carica.
3(IT)
Page 94

Descrizione
Sistemi di carica convenzionali (carica di quattro BPIL75)
Livello di carica
Tempo di
4
minuti
)
carica
Totale
560
minuti
Carica del
blocco
batteria
(140
Ciascun blocco batteria viene caricato al 100%
della capacità in sequenza.
1
minuti
Carica del
blocco
batteria
)
(140
2
minuti
Carica del
blocco
batteria
)
(140
3
minuti
Carica del
blocco
batteria
)
(140
Nuovo sistema di carica (carica di quattro BP-IL75)
Livello di carica
4(IT)
Tempo di
carica
Carica
del
blocco
batteria
1 (65
minuti)
Dopo che il BC-M150 ha caricato un blocco batteria all’80%
della capacità, passa al blocco batteria successivo. Quando
l’ultimo blocco batteria è carico all’80%, il BC-M150 inizia a
caricare contemporaneamente tutti i blocchi batteria fino a che
raggiungono il 100% della capacità. In questo modo i blocchi
batteria sono caricati pù rapidamente che nei sistemi
precedenti.
Carica
del
blocco
batteria
2 (65
minuti)
Carica
del
blocco
batteria
3 (65
minuti)
Carica
del
blocco
batteria 4
(65
minuti)
Carica
contemporanea
del blocchi
batteria 1 - 4
(80
minuti
)
Totale 340
minuti
Page 95

Se si applica un blocco batteria ad una sezione di applicazione
blocco batteria con un numero più piccolo mentre un blocco
batteria è applicato ad una sezione di applicazione blocco
batteria con un numero più grande e sta venendo caricato
all’80% della capacità (p.es. quando si applica un blocco
batteria alla sezione di applicazione blocco batteria 1 durante la
carica del blocco batteria applicato alla sezione di applicazione
blocco batteria 3), la carica del nuovo blocco batteria applicato
inizia dopo che il primo blocco batteria è stato caricato all’80%
della capacità.
Se si applica un blocco batteria mentre il BC-M150 sta
caricando i blocchi batteria già applicati al 100% della
capacità, la carica al 100% della capacità viene annullata e
inizia invece la carica all’80% della capacità del nuovo blocco
batteria applicato.
Sistema di carica per i blocchi batteria all’idruro metallico di
nichel
Ciascun blocco batteria all’idruro metallico di nichel viene
caricato al 100% della capacità in sequenza. Se si applica un
blocco batteria ad una sezione di applicazione blocco batteria
con un numero più piccolo mentre un blocco batteria è
applicato ad una sezione di applicazione blocco batteria con un
numero più grande e sta venendo caricato, la carica del nuovo
blocco batteria applicato inizia dopo che il primo blocco
batteria è stato caricato completamente.
Sistema di carica per una miscela di blocchi batteria a ioni di
litio e blocchi batteria all’idruro metallico di nichel
I blocchi batteria a ioni di litio sono caricati all’80% della
capacità e i blocchi batteria all’idruro metallico di nichel sono
caricati al 100% della capacità secondo l’ordine numerico delle
sezioni di applicazione blocco batteria. Poi il BC-M150 carica
contemporaneamente tutti i blocchi batteria a ioni di litio al
100% della capacità. Se si applica un blocco batteria ad una
sezione di applicazione blocco batteria con un numero più
piccolo mentre un blocco batteria è applicato ad una sezione di
applicazione blocco batteria con un numero più grande e sta
venendo caricato, la carica del nuovo blocco batteria applicato
inizia dopo che la carica del primo blocco batteria è finita.
5(IT)
Page 96

Avvertenze
Avvertenze
Caricabatterie
• Il BC-M150 può essere usato esclusivamente con blocchi
• Usare il BC-M150 ad una temperatura di impiego compresa
• Evitare di usare o di riporre il BC-M150 in luoghi polverosi o
• Evitare di usare o di riporre il BC-M150 in luoghi esposti alla
• Non coprire i fori di ventilazione.
Blocchi batteria
• Anche quando sono completamente carichi, i blocchi batteria
• Trasportare e riporre i blocchi batteria installandoli
• Per prolungare la durata dei blocchi batteria, riporli in un
• Quando la temperatura è di 10°C o meno, le prestazioni di un
• Si consiglia di portare sempre con sé un blocco batteria di
• Quando si esegue la carica a temperature comprese tra 30°C e
• Quando si tenta di caricare un blocco batteria che non è mai
batteria a ioni di litio e blocchi batteria all’idruro
metallico di nichel Sony. L’uso di questo apparecchio per
caricare altri tipi di blocchi batteria o blocchi batteria di
altre marche può produrre fumo o fiamme.
fra 10°C e 30°C. Poiché la carica è difficile a basse o alte
temperature, consigliamo di caricare i blocchi batteria a
temperature comprese fra 10°C e 30°C.
in luoghi in cui sono presenti gas corrosivi.
luce solare diretta.
perdono naturalmente la loro carica gradualmente. Usare i
blocchi batteria il più presto possibile dopo averli caricati.
nell’apparecchio o reimballandoli servendosi del materiale di
imballaggio originale.
luogo fresco (20°C circa), e caricarli in un luogo con una
temperatura ambiente compresa fra 10°C e 30°C.
blocco batteria ne risentono e la durata di impiego del blocco
batteria si riduce. Per ottenere la durata di impiego più lunga
possibile, far riscaldare i blocchi batteria portandoli a
temperatura ambiente (20°C circa) prima di usarli.
riserva.
40°C, i blocchi batteria possono non essere caricati a capacità
completa (indicata sulla superficie dei blocchi batteria). Se
l’indicatore di carica (o il display) mostra che la carica è stata
completata, la quantità di carica effettiva può essere circa
l’80% della capacità completa.
stato caricato prima, la quantità di carica effettiva rimane
meno dell’80% della capacità nominale*.
* Capacità media quando si carica una singola cellula a 0,1C per 16 ore e si
scarica a 0,2C.
6(IT)
Page 97

• La carica di blocchi batteria all’idruro metallico di nichel
quando la temperatura ambiente o la temperatura del blocco
batteria è superiore a 30°C, il tempo di carica sarà più lungo e
la quantità di carica sarà inferiore rispetto alla carica eseguita
a temperature dell’ambiente o del blocco batteria comprese
tra 10°C e 30°C.
Quando si esegue la carica ad una temperatura di 40°C, la
carica termina all’80% della capacità completa. In questo
caso è possibile eseguire la ricarica a temperature di 30°C o
meno. Notare che la ricarica è possibile solo per blocchi
batteria la cui capacità rimanente è del 90% o meno, per
evitare una ricarica eccessiva.
I blocchi batteria a ioni di litio sono esenti da effetto
memoria. Non c’è bisogno di scaricarli completamente
prima di ricaricarli.
Se la durata di impiego di un blocco batteria si riduce
notevolmente, significa che è necessario sostituire il blocco
batteria con un altro nuovo.
Indicatori di carica blocco batteria a temperature alte
o basse
Il blocco batteria non può essere caricato quando è troppo
caldo o troppo freddo. Se un indicatore di caria sul
caricabatterie (figura sotto) lampeggia in arancione, questo
significa che la temperatura del blocco batteria è al di sopra o
al di sotto dello standard previsto e che il caricabatterie sta
attendendo che il blocco batteria ritorni ad una temperatura a
cui la carica è possibile. Se il blocco batteria non ritorna alla
temperatura standard entro un tempo predeterminato, si verifica
un errore e la carica non viene eseguita.
Indicatori di carica
Sinstro Centrale Destro
: lampeggia in arancione
: spento
7(IT)
Page 98

Avvertenze
Nota sulla carica di un blocco batteria
eccessivamente scarico
Se un blocco batteria è applicato ad una videocamera e viene
usato, la sezione VTR della videocamera si spegne prima che il
blocco batteria diventi completamente scarico. Se la
videocamera remane accesa con quel blocco batteria ancora
applicato, il blocco batteria si scarica ulteriormente. Il risultato
è un blocco batteria eccessivamente scarico.
Se si tenta di caricare un blocco batteria eccessivamente
scarico che supporta la funzione INFO, il caricabatterie non lo
riconosce come blocco batteria con funzione INFO e inizia la
carica come se si trattasse di un blocco batteria privo di
funzione INFO. In questo caso, la carica viene eseguita senza
problemi, ma la capacità del blocco batteria, il numero di cicli
di carica e altre informazioni non sono visualizzati durante la
carica.
Se il blocco batteria viene rimosso dopo che è stato caricato
parzialmente e quindi viene riapplicato al caricabatterie, viene
riconosciuto come blocco batteria con funzione INFO e la
capacità del blocco batteria, il numero di cicli di carica e altre
informazioni sono visualizzati quando la carica continua.
Indipendentemente dal modo in cui il blocco batteria viene
caricato, il blocco batteria funziona come blocco batteria con
funzione INFO.
Effetto memoria
8(IT)
I blocchi batteria all’idruro metallico di nichel sono soggetti
all’effetto memoria come i blocchi batteria al nichel-cadmio.
Se si dovesse verificare, scaricare completamente il blocco
batteria o usare la funzione di rinfresco (pagine 3(IT) e 16(IT)).
Page 99

Posizione e funzioni delle parti
Pannello anteriore e superiore
1 Interruttore POWER e indicatore
2 Sezioni di applicazione blocco batteria
(da 1 a 4) e indicatori di carica
Pulsante di sblocco
blocco batteria
3 Connettore DC OUT
Pannello posteriore
Display e pulsanti
0 Pulsante REFRESH
9 Pulsante CHANNEL
4 Connettore AC IN
5 Cavità portaspina
Riservato per usi futuri.
6 Display
7 Pulsante DISPLAY
8 Selettore REFRESH
MANUAL/AUTO
9(IT)
Page 100

Posizione e funzioni delle parti
1
Interruttore POWER e indicatore
Accende e spegne. Quando
l’apparecchio è acceso, l’indicatore si
illumina ed è possibile eseguire la
carica dei blocchi batteria o
l’alimentazione CC di un apparecchio
esterno.
2 Sezioni di applicazione blocco
batteria (da 1 a 4) e indicatori di
carica
Per l’applicazione di blocchi batteria
BP-L40A/L60A/IL75/L90A/M50/
M100. Per rimuovere un blocco
batteria, premere il pulsante di sblocco
e tirare il blocco batteria verso
l’alto.Gli indicatori di carica mostrano
il progresso o il risultato della carica
lampeggiando o illuminandosi in
rosso, arancione o verde, come segue.
Stato dell’indicatore
Centrale
Sinistro
(G)
(G)
(G)
(G)
(G)
(G)
Significato
Destro
Alimentazione CC
ad un apparecchio
(O)
esterno
Circa in corso (dallo
0% all’80% della
capacità)
Attesa di carica
(carico all’80% della
capacità; un altro
blocco batteria è in
fase di carica).
Questo stato si
verifica solo quando
sono applicati più
blocchi batteria.
Circa in corso
(carico all’81% della
capacità o più)
Fine della carica
Rinfrescamento del
blocco batteria
(R)
all’idruro metallico di
nichel in corso
10(IT)
Stato dell’indicatore
Sinistro
Centrale Destro
(R/G)
: Spento
: Lampeggiante
: Illuminato
Significato
(numero di errore)
Si è verificata una delle
seguenti condizioni.
•L’impedenza del
blocco batteria è
troppo alta (E-01).
•Il circuito di carica del
blocco batteria è
aperto (E-02).
•La tensione del
blocco batteria è
troppo bassa (E-03).
•La temperatura del
blocco batteria è
troppo alta o troppo
bassa (E-04).
•Il caricabatterie non
può comunicare con il
blocco batteria (E-
05).
•La carica non è finita
entro la durata
specificata (E-06).
•È stato applicato un
blocco batteria non
compatibile (E-07).
•Il caricabatterie non
ha potuto leggere le
informazioni del
blocco batteria
collegato (E-08).
•La tensione in uscita
del caricabatterie è
troppo alta (E-09).
•La tensione in uscita
del caricabatterie è
troppo bassa (E-10).
•La ventola interna si
è fermata (E-20).
Se si verifica una delle
condizioni sopra
indicate, provare a
ricaricare il blocco
batteria ancora due o
tre volte o a spegnere
il caricabatterie e
quindi riaccenderlo. Se
la condizione rimane
invariata, il blocco
batteria è
probabilmente
difettoso e va
sostituito.
O: Arancione
G: Verd
R: Rosso
 Loading...