

Page 1
RX100
Dome Interface Receiver
Installation
Guide
Building Block Video Ltd.,
17 Apex Park,
Diplocks Industrial Estate,
Hailsham, East Sussex, BN27 3JU UK.
Tel: +44(0)1323 842727
Fax: +44(0)1323 842728
Support: +44(0)1323 444600
www.bbvcctv.com
Page 2

TABLE OF CONTENTS
1. Pre-installation Checks and Safety Procedures 3
Unpacking 3
Important safety precautions 3
2. Introduction 5
General 5
Rx100 Technical specification 5
Transmitter compatibility chart 6
Cable connection method 7
Fig. 1 Wago cable connectors
Cable types 7
3. Installation 8
Operating voltage 8
Rx100 connections 8
Fig. 2 Rx100 pcb connections
4. Setup 9
Diagnostic aids 9
Cable length compensation 9
Fig. 3 Launch amplifier
5. System schematic diagrams 10/11
Fig. 4 Integration of dome into Tx1500 system
Fig. 5 Integration of dome into Tx1000 system
Fig. 6 Simple single camera system
Appendix A - Dome Connection Details 12
Appendix B - Troubleshooting 40
Version 1.17 29 Aug 08 Update Dennard page Customer pointed out that the address switches were
not mentioned.
Version 1.16 1 May 08 Update version numbers and J6 links for change to 16F887 processor.
Various corrections and amendments made.
Version 1.15 15 May 07 Removed old Borsatec and putting new Borsatec BT2790FF Dome
Version 1.14 22 Jan 06 Added page for Videcon VCP451 camera software V5V1.
Removed Mitsubishi CCD400 and Star MD100
Version 1.13 25 Mar 05 Added page for Videcon dome software V4V1.
Forward Vision MIC1 zoom proportional pan/tilt speed enabled F1V6
Removed RX100/24 issue 4 pcb page as obsolete
Modified back page products list.
Version 1.12 24 Nov 04 Added page for Kalatel Cyberdome software K1V1.
Also removed page for obsolete Bischke camera
Version 1.11 20 Oct 04 Added page for Vista PowerDome software V3V1
Version 1.10 22 Sept 04 Updated installation notes for FORWARD VISION and LILIN domes.
Rx100 installation manual V1.17 29 Aug 08.doc Page 2
Page 3

1. PRE-INSTALLATION CHECKS AND SAFETY PROCEDURES
UNPACKING
Check Packaging - Upon taking delivery of the unit, inspect the packaging for signs of damage. If damage has
occurred, advise the carriers and/or the suppliers immediately.
Check Contents - Upon taking delivery of the unit, unpack the unit carefully and check that all the items are
present and correct. If any items are missing or damaged, contact your equipment dealer.
Retain Packaging - The shipping carton is the safest container in which to transport the unit. Retain
undamaged packaging for possible future use.
IMPORTANT SAFETY PRECAUTIONS
Read Instructions - All relevant safety, installation and operating instructions should be read before attempting
to install, connect or operate the unit.
Retain Instructions - All safety, installation and operating instructions should be retained for future reference.
Heed Warnings - All warnings on the unit and in any relevant safety, installation or operating instructions
should be adhered to.
Cleaning - Unplug the unit from the power outlet before cleaning. Do not use liquid cleaners or aerosol
cleaners. Use a damp cloth for cleaning.
Attachments - Do not use attachments not recommended by the product manufacturer as they may cause
hazards.
Water and Moisture - Do not expose the internal electronics of this unit to water or dampness; for example, in
an unprotected outdoor installation, or in any area classified as a wet location. The unit as supplied conforms to
ingress protection rating IP 67. This rating will be affected by any holes made in the enclosure. Cable entry
points should be protected by the use of suitably rated glands and/or flexible conduit. It is not necessary to
make further holes in the enclosure for mounting purposes, as mounting holes are provided at the corners of the
enclosure outboard of the seal between enclosure and lid.
Accessories - Do not attach this unit to an unstable stand, bracket or mount. The unit may fall, causing serious
injury to a person and serious damage to the unit.
Power Sources - This unit should be operated only from the type of power source indicated on the
manufacturer’s label. If you are not sure of the type of power supply you intend to use, consult your equipment
dealer or local power company. For units intended to operate from battery power or other sources, refer to
operating instructions.
Power Connector - This unit is equipped with coaxial power connector mounted at the edge of the PCB for low
voltage power input. Do not attempt to alter this connector in any way.
Power Cord Protection - Power supply cords should be routed so that they are not likely to be trapped, pinched
or otherwise damaged by items in close proximity to them, whether inside the unit or outside it. Particular
attention should be paid to cords at plugs, connection units and the point of exit from the unit.
Overloading - Do not overload outlets and extension cords, as this can result in fire or electric shock.
Object and Li quid Entry - Never push objects of any kind into the unit, as they may touch dangerous voltage
points or short out parts that could result in fire or electric shock. Never spill liquid of any kind on or inside the
unit.
Servicing - Servicing of the unit should only be undertaken by qualified service personnel, as opening or
removing covers may expose you to dangerous voltages or other hazards.
Rx100 installation manual V1.17 29 Aug 08.doc Page 3
Page 4

Damage Requiring Service - Servicing by qualified personnel should be carried out under the following
conditions:
(a) When the power-supply cord or plug is damaged.
(b) If liquid has been spilled or objects have fallen into the unit
(c) If the internal electronics of the unit have been exposed to rain or water
(d) If the unit does not operate normally by following the operating instructions. Adjust only those
controls that are covered by the operating instructions, as improper adjustment of other controls may
result in damage and will often require extensive work by a qualified technician to restore the unit to
normal operation.
(e) If the unit has been dropped or the enclosure is damaged.
(f) If the unit exhibits a distinct change in performance. This indic ates a need for service.
Replacement Parts - If replacement parts are required, ensure that only replacement parts recommended by the
product manufacturer are used.
Safety Check - Upon completion of any service or repairs to the unit, safety checks should be performed to
ensure that the unit is in proper operating condition.
Pre-installation Checks - It is recommended that the unit be bench-tested prior to installation on the site.
Safety During Installation or Servicing - Particular care should be taken to isolate the dome in order to prevent
operation while engineering work is being carried out on the Rx100.
Adhere to Sa fety Standa rds - All normal safety precautions as laid down by British Standards and the Health
and Safety at Work Act should be observed.
WARNING
TO PREVENT DANGER OF FIRE OR SHOCK, DO NOT EXPOSE THE INTERNAL COMPONENTS OF THIS
EQUIPMENT TO RAIN OR MOISTURE.
The “lightning flash with arrowhead” symbol inside an equilateral triangle is used to warn the user of this
equipment that there are sufficiently high voltages within the enclosure to constitute a risk of electric shock.
The “exclamation point” symbol inside an equilateral triangle is used to alert the user of this equipment to
important operating and maintenance (servicing) instructions in the literature accompanying the appliance.
Rx100 installation manual V1.17 29 Aug 08.doc Page 4
Page 5

2. INTRODUCTION
GENERAL
The Rx100 telemetry interface is designed to allow control of a variety of integrated dome cameras using BBV’s
range of up-the-coax telemetry transmitters. See appendix A for a complete list of supported domes.
The Rx100 interface is supplied in an IP67 rated enclosure. It will be necessary to make suitable holes in the
enclosure to permit cable entry and exit. Adequately rated cable glands and or flexibl e conduit should be used at
all times to avoid compromising the protection afforded by the enclosure as supplied. Any holes made in the
enclosure for any other purpose should be sealed with a non-hardening waterproof sealant, taking care to ensure
that the internal electronics are not contaminated.
Rx100 TECHNICAL SPECIFICATION
Power Requirements: RX100 9-12V ac/dc – plug mounted PSU provided
RX100/24 – 24Vac or 230Vac
Current Consumption: RX100 - 100mA @ 12Vdc maximum
RX100/24 – 630mA @ 230Vac maximum
Features: • Serial data output 2 wire RS485/RS422.
• 4 alarm inputs.
• 1 N/C alarm output.
• Up to 16 pre-set positions can be stored within the Rx100.
• Relay capable of switching 1Kw of lighting.
Engineering Facilities: • Unit auto-tunes to the coaxial telemetry signal.
• LED readout for continual system status.
• Video launch amplifier provided with Gain and Lift controls.
• Colour-coded cage clamp terminals. Mains terminal connections:
Live, Neutral and Earth and Low Voltage.
Telemetry Signals: Telemetry signals either:
• up-the-coax (max distances, 250M of RG59 or 500M of CT125/RG11).
• or twisted pair 0-20mA current loop.
Video Input: 1v p-p 75Ω terminated input via BNC socket.
Video Output: 1v p-p to 4v p-p 75Ω impedance via BNC socket.
Up to 16 full-scene preset positions can be stored within the interface depending upon the model of dome.
Dimensions (external): RX100/WBX RX100/24/WBX
Width: 190 mm Width: 190mm
Length: 280 mm Length: 380mm
Height: 130 mm Height: 130mm
Weight: 1.0Kg 3.6Kg
Temperature range: -10° Celsius to +40° Celsius
Rx100 installation manual V1.17 29 Aug 08.doc Page 5
Page 6

TRANSMITTER COMPATABILITY CHART
Tx300 Tx400 Tx400DC Tx1000 Tx1000DC Tx1500
Variable
Speed
Fixed Speed
Zoom
Focus
Iris
Pre-sets
Patrols
Lights
Autopan
Camera
Functions
2 Speeds 2 Speeds
Proportional
Joystick
2 Speeds
9 9 9 9 9 9
9 9 9 9 9 9
9 9 9 9 9 9
9 9 9 9 9 9
- 8 8 16 16 16
- 2 2 2 2 2
9 9 9 9 9 9
-
-
9 9 9 9 9
9 9 9 9 9
Proportional
Joystick
Proportional
Joystick
Rx100 installation manual V1.17 29 Aug 08.doc Page 6
Page 7
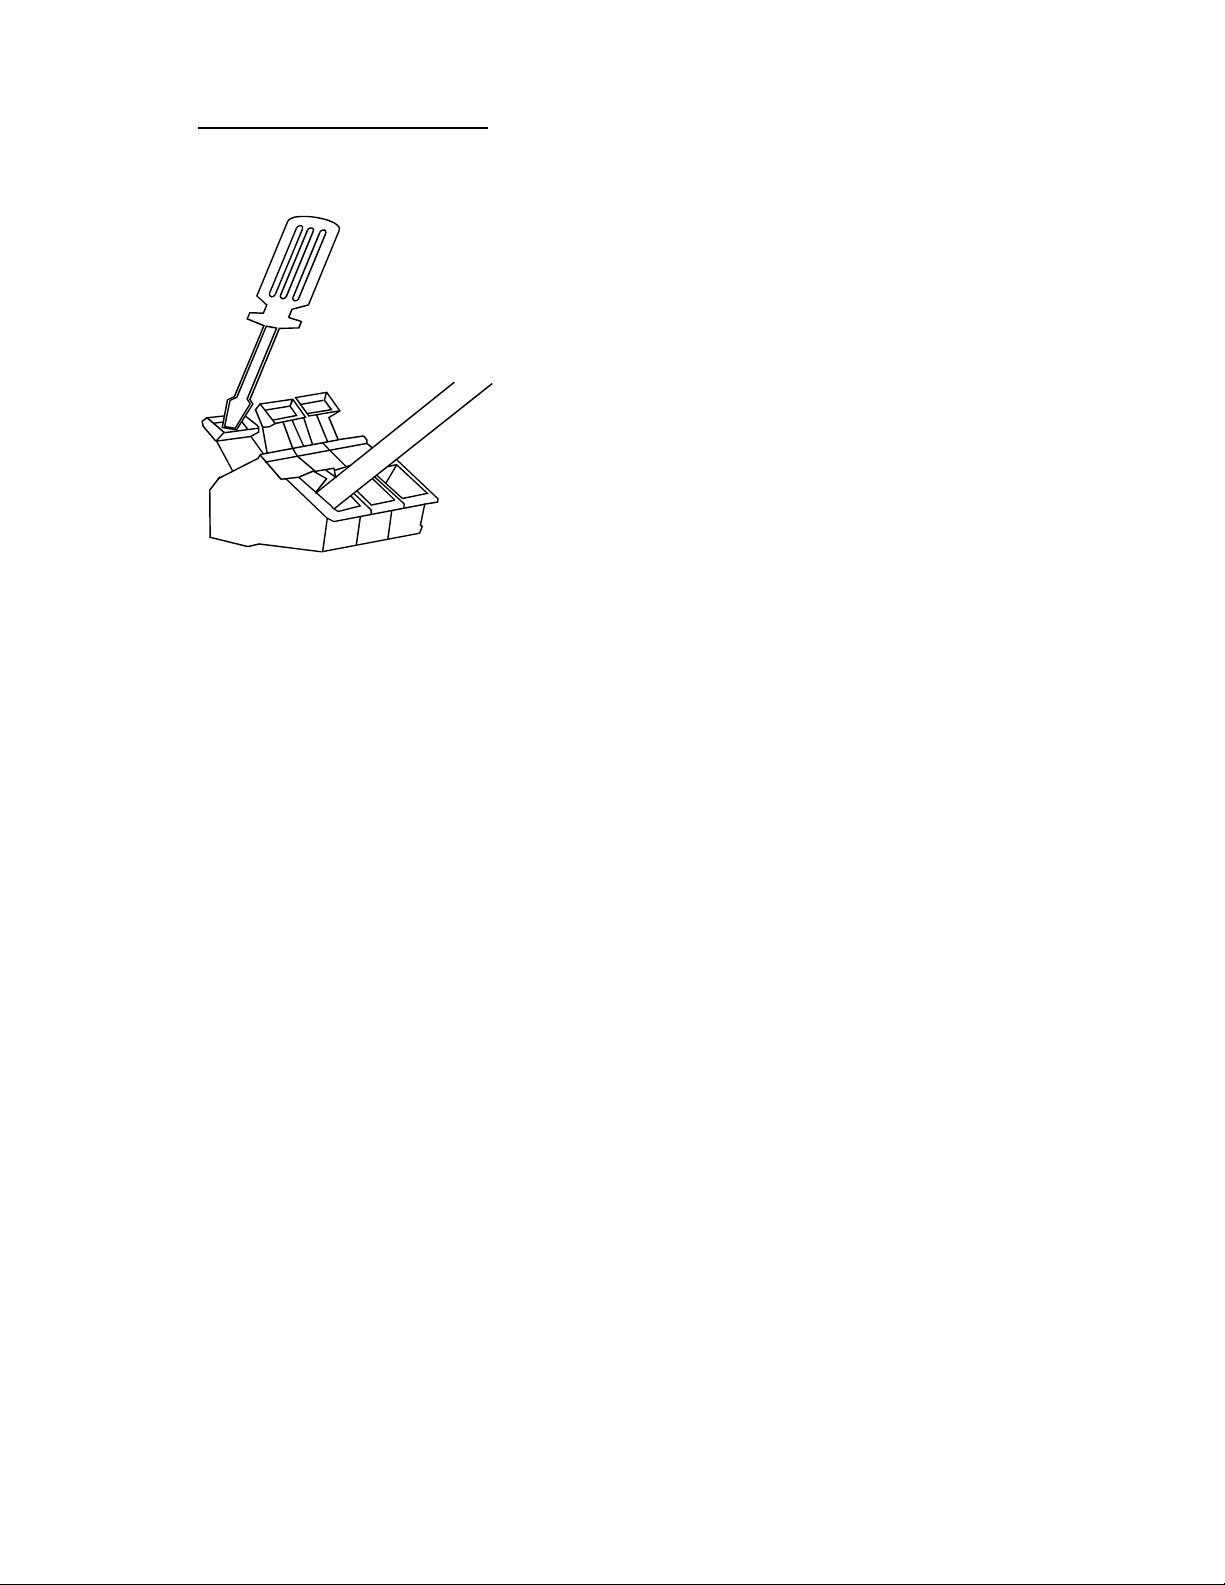
CABLE CONNECTION METHOD
Fig. 1: cage clamp connectors
The cage clamp PCB terminal block is a simple-to-use method of
attaching cables to PCBs quickly and easily. Prepare cables as
follows:
• Use only cable between 0.08 and 2.5 mm²
• Strip the cable to a length of 5 to 6 mm (0.23 in)
The correct method of attachment is as follows:
1. Press down the relevant terminal block lever with a suitable
screwdriver;
2. Insert wire;
3. Remove screwdriver.
The procedure for detaching wires is the reverse of the 3 attachment
steps, ensuring that power is disconnected before starting.
CABLING RECOMMENDATIONS FOR THE Rx100 INTERFACE.
Although BBV do not specify any particular type, manufacturer or supplier of cables, the following ESD
Electronic Services (01279 626777) cables have been used successfully for production and testing:
ESD Part Number: Description:
0222586G Coax Cable (Minimum Specification)
(100 m) RG59B/U ESD radio frequency coax cable to BS2316 and MIL-C-17
1/0.58mm copper-covered steel wire conductor with solid polythene dielectric, bare
copper wire braid and PVC sheath
Characteristic impedance: 75 Ohm
Capacitance: 22pF/ft
020966D Orange-Coloured Lighting Output Power Cable (1000 w)
(100 m) 3183Y PVC-insulated, 3-core cable
1.25mm
Current rating: 13 amp
0140467H 20mA Twisted Pair Cable (Minimum Specification)
(100 m) British Telecom spec CW 1308
2-core 1/0.5mm PVC-insulated
Maximum conductor resistance at 20 degrees Celsius: 97.8 ohms/km
² 40/0.2mm annealed copper conductor
Rx100 installation manual V1.17 29 Aug 08.doc Page 7
Page 8
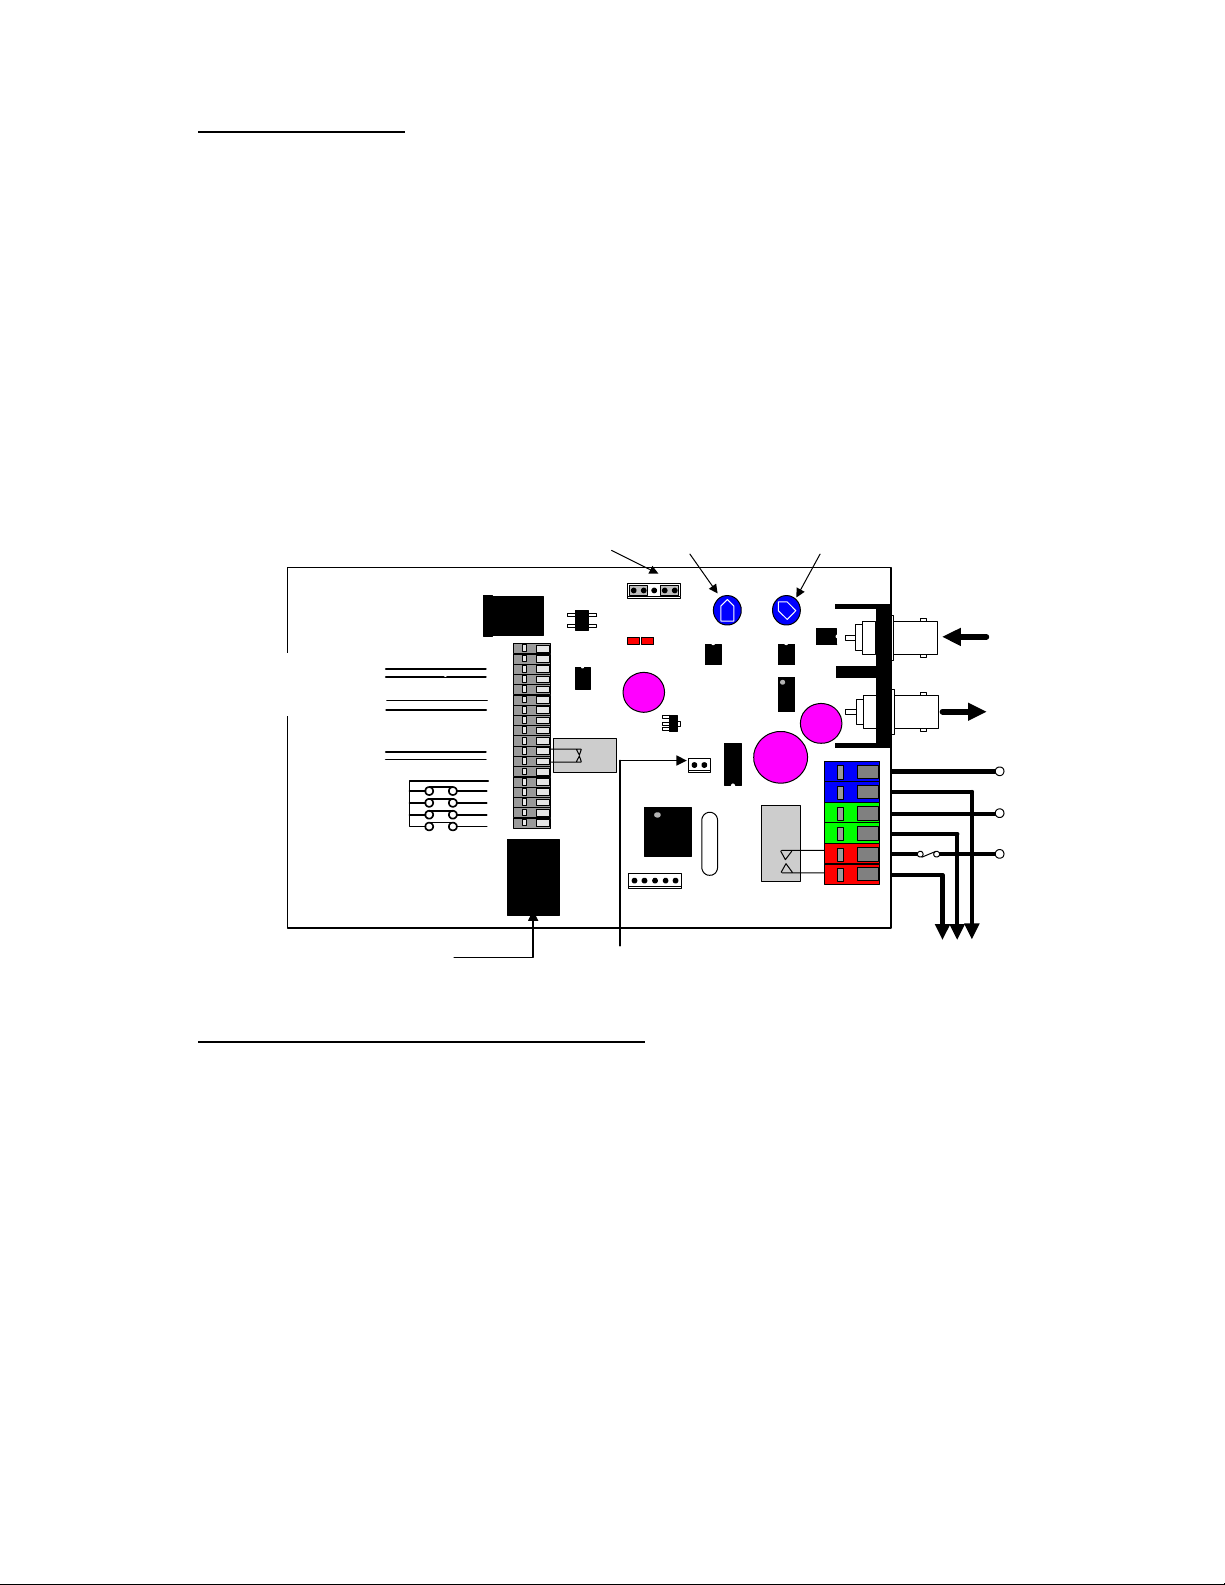
3. INSTALLATION
OPERATING VOLTAGE
The Rx100 requires all connections to the PCB to be made by the installer, and via terminal blocks or by plug
and socket. These connections are: power in, video in, video out, and serial data to dome. In addition
connections for alarm in, alarm out and lights if required are provided. See fig.2 below for correct connections.
The Rx100 is supplied pre-configured to suit the application for which it is intended, i.e. to control an integrated
dome camera.
IMPORTANT NOTE – If link J6/4-5 is removed it must be refitted to J6/3-4 position or the RX100 will
assume it is still fitted.
Fig. 2 Rx100 Iss6 PCB connections
J6 OPTION LINKS
POWER 9 - 12 V AC/DC
100mA MAX
J4
9-12V
supply
Twisted Pair IN from
telem transmitter
RS485 OUT to dome
N/C Alarm
OUT
Alarm
contacts IN
N/C
AC
AC
TP
TP
GND
C1
C2
C3
C4
GND
AOUT
AOUT
GND
GND
A1
A2
A3
A4
J3
J3
J7
Test LinkRS485 to Panasonic domes
Function Connector Type
Power In J4 2.1mm coaxial
or J3/AC-AC Grey WAGO
Video In CAMERA BNC SOCKET
Video Out TELEMETRY BNC SOCKET
Twisted Pair Telemetry J3/TP-TP Grey WAGO
Serial to dome J3/C1-C4-GND Grey WAGO
or J7 FCC68 (Fitted for Panasonic versions)
Alarm 1 contact in J3/A1-GND Grey WAGO (optional if alarm input required)
Alarm 2 contact in J3/A2-GND Grey WAGO (optional if alarm input required)
Alarm 3 contact in J3/A3-GND Grey WAGO (optional if alarm input required)
Alarm 4 contact in J3/A4-GND Grey WAGO (optional if alarm input required)
Alarm contact out J3/AOUT-AOUT Grey WAGO (optional if alarm input required)
Lighting relay J5 Coloured WAGO (optional if lights control required)
(clean contact between orange connectors)
Rx100 installation manual V1.17 29 Aug 08.doc Page 8
HF Lift Gain
J6/1-2
J6/4-5
5
1
CABLE
ERROR
Test
J1
pcb 97002 Iss 6
www.bbvcctv.com
GAINLIFT
RY1
BBV
CAMERA
TELEMETRY
J5
4 Amp 250V MAX
Lights Supply
SW LIVE EARTH NEUTRAL
Lights
Feed
Video In
from dome
Video Out
to transmitter
Neutral
Earth
Live
Page 9
4. SETUP
DIAGNOSTIC AIDS
Two red LEDs and one Green LED are mounted on-board to give simple system status information. Their
functions are as follows:
Cable LED
Regular Blinking - Telemetry and video signa ls are OK.
Blinking but mainly ON - No Telemetry from the transmitter.
Blinking but mainly OFF - No video from the camera.
Error LED
On - Telemetry transmission error.
Both LEDs
Off - No power or major PCB fault.
Data LED (Iss PCB 4 onwards only) - Will flash on and off very fast when data
is
being sent to the dome.
Test Link - Is used to confirm correct operation of the
Rx100 and dome and also that the RS485
connection is correct. Shorting the link after the
Rx100 is powered up will cause the dome to pan
left and zoom in. Removing the link will stop the
pan left and will zoom out the lens. This is
dependant on dome type.
All BBV equipment is designed to auto-tune and compensate for any discrepancies in the transmitted telemetry
signal; there are no further adjustments that need to be made.
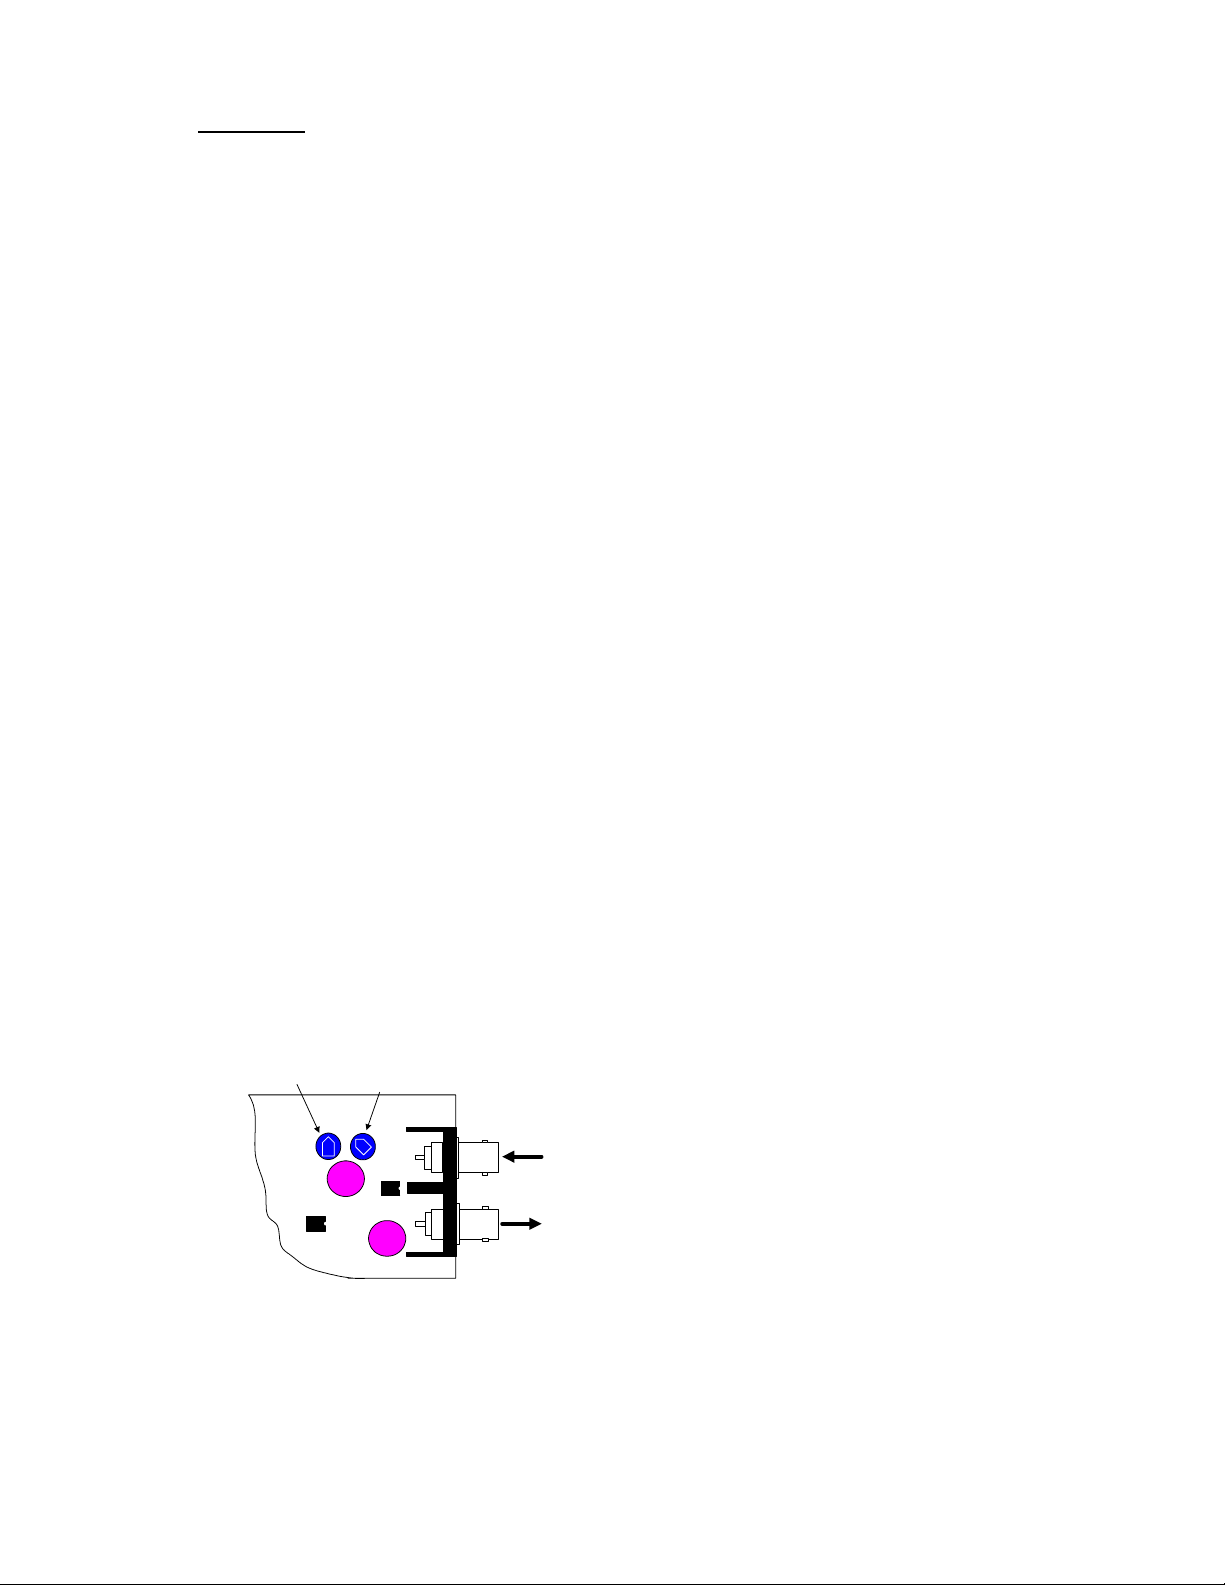
VIDEO LAUNCH AMPLIFIER AND CABLE LENGTH COMPENSATION
The interface features a video launch amplifier with two variable controls situated close to the BNC connectors:
Lift and Gain. These are pre-adjusted for a cable distance of 500m of CT125, and are adjustable to compensate
for video detail or signal losses if and when longer or shorter cable lengths are used to connect the telemetry
transmitter to the interface.
Fig. 3 Launch Amplifier
HF Lift
LIFT
Gain
GAIN
CAMERA
TELEMETRY
Video
from
dome
Video
to
transmitter
Default position adjusted for 500M of CT125.
For shorter cable lengths, turn the Gain control anti-clockwise until 1V p-p is present at the telemetry
transmitter. For longer cable lengths, turn the Gain control clockwise until 1V p-p is present at the telemetry
transmitter.
The purpose of each control is:
GAIN varies the overall signal level.
LIFT boosts the high frequency component of the video
signal. If the high frequency component is too low, picture
appears ‘washed out’ and lacking detail.
Rx100 installation manual V1.17 29 Aug 08.doc Page 9
Page 10
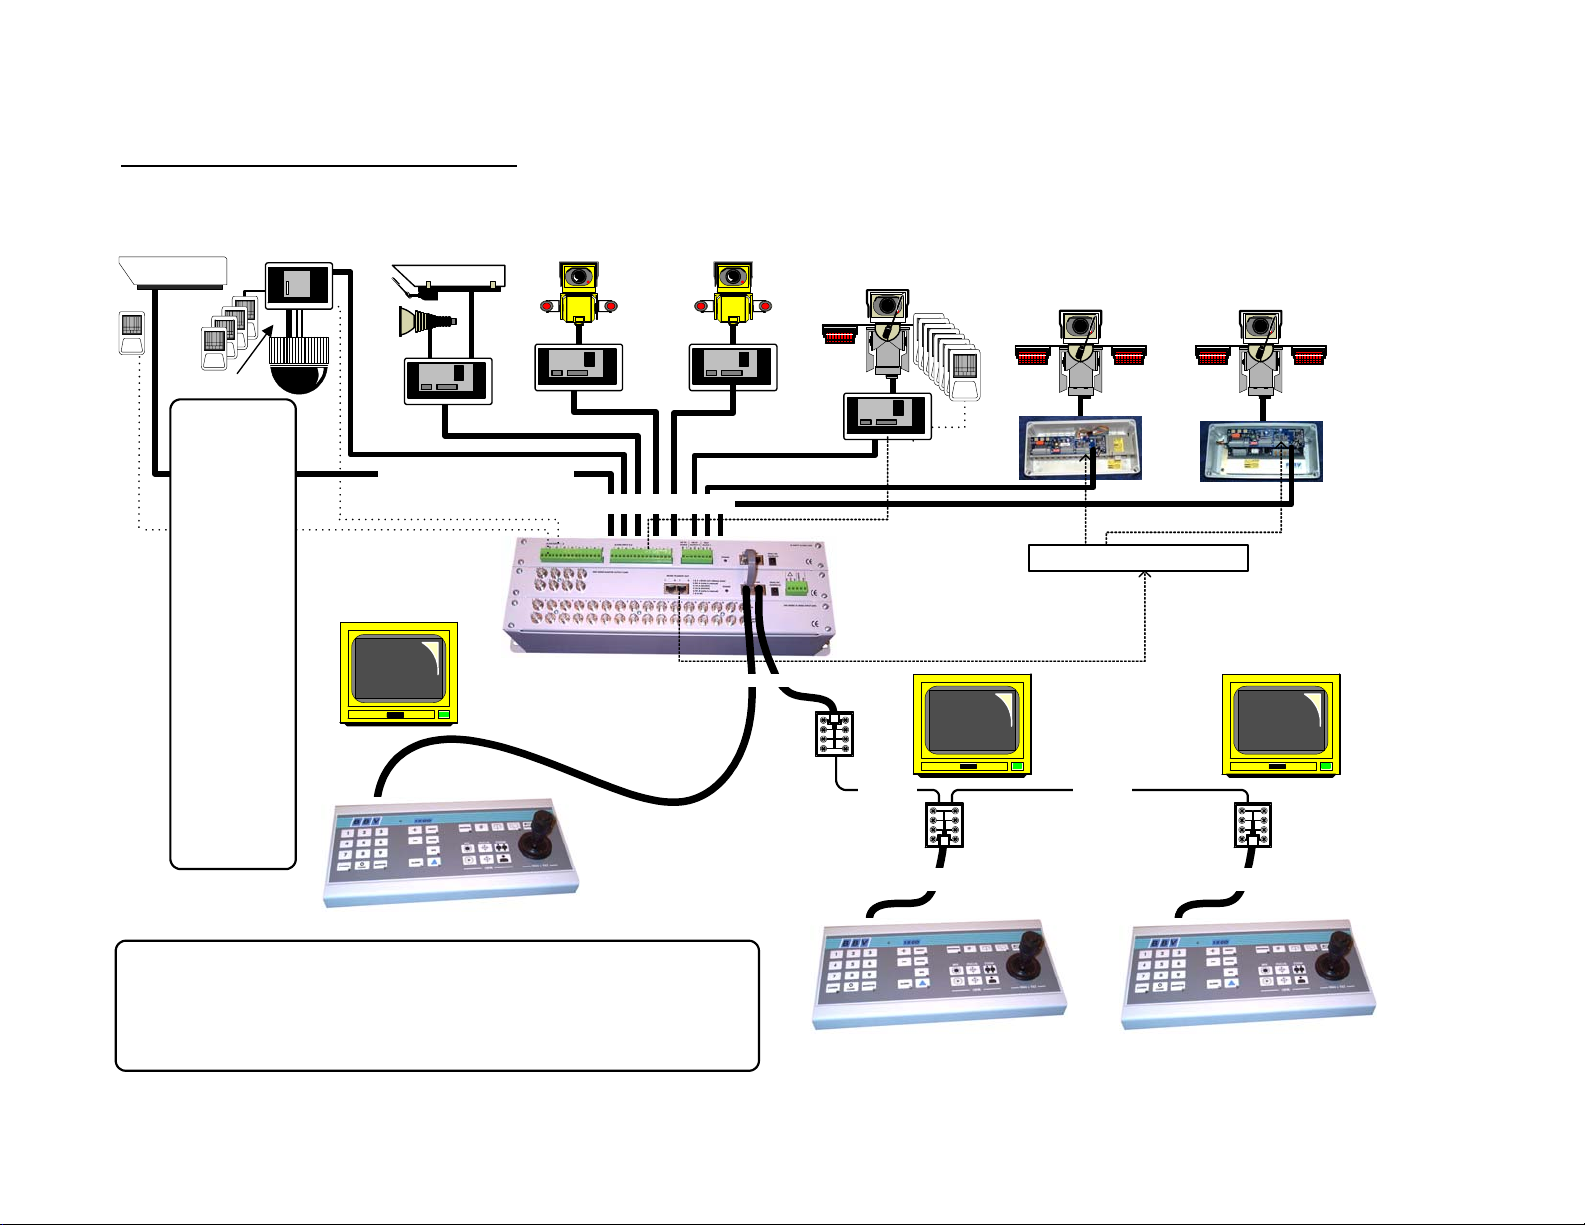
4. SYSTEM SCHEMATIC DIAGRAMS
static camera
STATIC
Rx100
dome camera
4 local alarms
Rx200
static camera with
lights/wash/wipe
Rx300
AC P/T Zoom/Focus
1 Aux.
Rx400P
AC P/T Zoom/Focus
16 Presets with 4 Aux.
Rx400DC
High & Variable speed
P/T Zoom/Focus
16 Preset with 3 Aux.
8 Local alarms
Fig.4
Expandable up to 96 cameras i n puts. 4 control positions including remote control via RS232/485 interface unit.
Up to 96 alarm inputs using 16 i nput alarm modules. BBV up-the- coax and RS485 telemetry as standa r d.
The STARCARD/CONVETER allows RS485 control of domes etc.
Simple control protocol to al low integration with 3rd part equipment.
video & data
Dome library includes:
Alltec Apollo
Chugai/Computar SMD
Dennard type 2050
Ulltrak/Diamond KD6
Dynacolor
Forward Vision MIC
*JVC TK-C675/675B
Kalatel Cyberdome
(1/1/02 or later)
Kenko Daiwa DMP15H1
Kenko Daiwa DMP16H3
MarkMercer D250MPT
Merit Li-Lin PIH717X
Panasonic WV-CSR400
Panasonic WV-CSR600
Panasonic WV-CSR650
Panasonic WV-CS850
Pelco SD5 'Spectra'
*Philips G3 (RS232)
Sanyo VCC9200P
Sensormatic Speed dome
Sony EVI-31D
Star MD100 & MD200
VCL TP domes
*Vicon Surveyor 2000
Videcon dom e
Vista PowerDome
*Rx100/24 230Vac
powered with 24Vac 100VA
output.
Call BBV for info.
Up-the-coax telemetry
250M RG59 / 500M CT125
TX1500/KBD
video in - coax
TX1500/16/8/16AL Matrix
Monitor 1-4 with OSD
Monitor 5-8 without OSD
B-BUS multidrop 4 wire RS422
Supplied 2M CAT5 cable
Poweres 1st keyboard.
Use RJ45 breakout boxes if > 2M
Cat5 RJ45 patch cable
RJ45 Breakout
Box
RS485 twisted pair
twin UTP twin UTP
RJ45 Breakout
Box
Cat5 RJ45 patch cable
TX1500/KBD
Rx45X AC
BBV RS485
AC Fixed Speed
P/T Zoom/Focus
32 Preset with 4 Aux.
8 Local alarms
RS485 twisted pair
RS485 StarCard
8 outputs
RJ45 Breakout
Box
Cat5 RJ45 patch cable
TX1500/KBD
Rx55X DC
BBV RS485
High & Variable speed
P/T Zoom/Focus
32 Preset with 3 Aux.
8 Local alarms
SYSTEM SCHEMATIC SHOWING INTEGRATION OF DOME INTO Tx1500 SYSTEM
Page 11
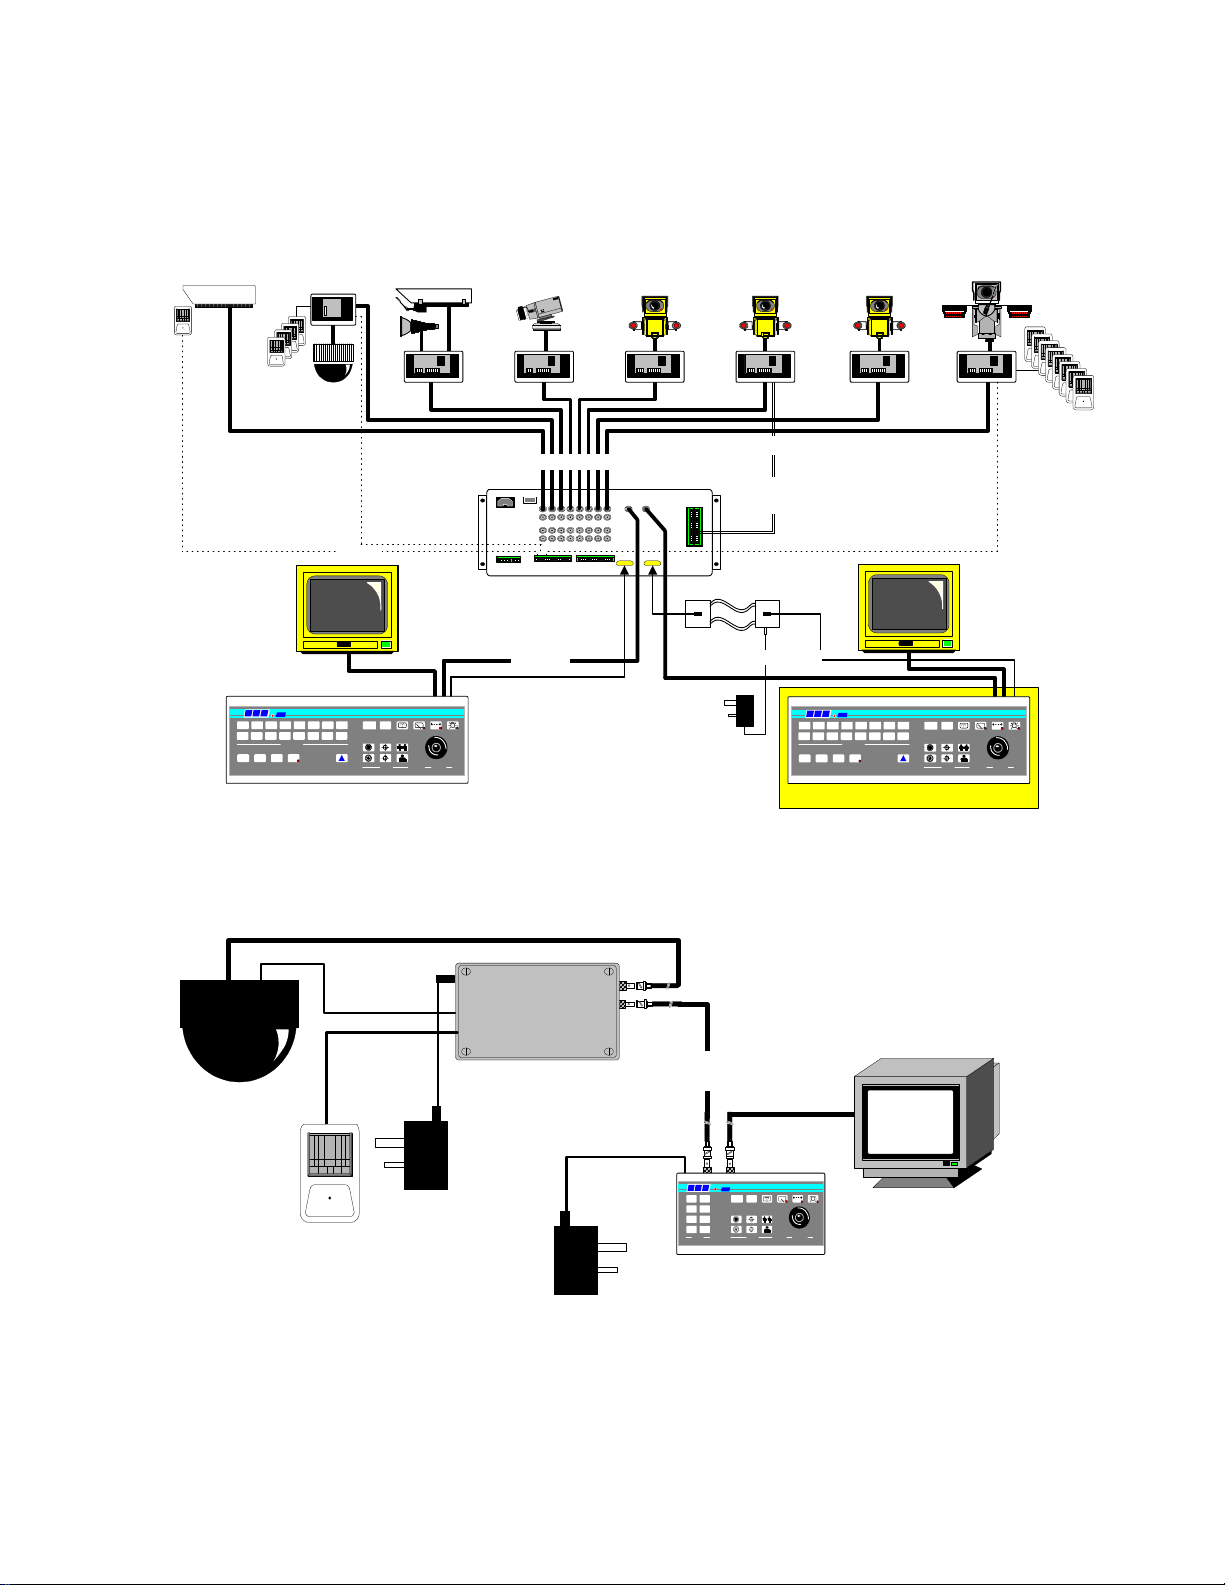
Fig.5
SYSTEM SCHEMATIC SHOWING INTEGRATION OF DOME INTO Tx1000 SYSTEM.
Rx300M
AC P/T Mitsubishi
CCD400 control
2 Aux.
static camera
STATIC
Rx100
dome camera
4 local alarms
Rx200
static camera with lights/
wash/wipe
Rx200
simple AC panner
Rx300
AC P/T Zoom/Focus
1 Aux.
Rx400P
AC P/T Zoom/Focus
16 Presets with 3 Aux.
Rx400DC
High & Variable speed
P/T Zoom/Focus
16 Preset with 3 Aux.
8 Local alarms
alarm cable
RS232 control Max distance - 50M
Optional TxLD available for extended
BBV
1000
910111213141516
CAMERA SELECT
MONITOR
PRESETPATROLSEQ
PROGRAM
87564312
IRIS FOCUS
#
BBV
LENS
LENS
AUTOPAN
ZOO
M
PAN +TILT
300
KEYBOARD 1
Fig. 6 SIMPLE SINGLE CAMERA SYSTEM
Video
Data
video in - coax
Optional Alarm Package
Tx1000/8 or 16 Base Unit
video out - coax
distances.
up-the-coax telemetry 250M-RG59, 500M-CT125
Twisted Pair telemetry.
Optional
Twisted Pair
Loop resistance < 300R
TxLD TxLD
Twin Twisted Pair
Optional TxLD link. Distance > 50M.
9V plug PSU
BBV
1000
910111213141516
CAMERA SELECT
MONITOR
PRESETPATROLSEQ
PROGRAM
87564312
IRIS FOCUS
OPTIONAL 2ND KEYBOARD
#
BBV
LENS
LENS
AUTOPAN
ZOO
M
PAN +TILT
300
Alarm
contact
Rx100 Interface
9V
PSU
250M-RG59
500M-CT125
BBV
400
12
43
56
87
PRESETS
PROGRAM
IRIS FOCUS
#
AUTOPAN
ZOOM
LENS
PAN +TILT
MONITOR
Tx400DC
9V
PSU
Page 12

Appendix A - Dome addendums & connection details
Rx100/24 iss. 4 pcb 13
360 Vision VisionDome 14
Borsatec BT2790FF Dome 15
Chugai SMD-08ll, SMD-12, SMD-12ll, SMD-20 31
Dennard 2050 16
Diamond-Smartscan 36
Dynacolor 7720 17
Forward Vision MIC1300 18
Gardiner Security Juno 14
JVC TK-C675E / TK-C675BE 19
Kalatel Cyberdome (1/1/2002 or later firmware) 20
Li-Lin PIH-717X/7000/7600/7625 21
Mark Mercer D250MPT 22
Panasonic WV-CSR400, WV-CSR600. WV-CSR650 23
Panasonic WV-CS850 24
Pelco Spectra dome & Esprit head (P protocol) 25
Philips AutoDome (RS232/485) 26/27
Samsung SCC-641 28
Sanyo VCC-9200P 31
Sensormatic speeddome (RS422 Only) 29
Sony EVI-D31, 1000 30
Star MD-800, MD-1200S, MD-1200H, MD-2000 31
Ultrak KD6 32
VCL-TP 33
Vicon Surveyor 34
Videcon Dome 35
Videcon VCP451 Camara 36
Vista PowerDome 37
Rx100 installation manual V1.17 29 Aug 08.doc Page 12
Page 13

BBV Rx100/24 Supply Additional information (iss. 6 pcb)
The RX100/24 can be powered from either 230Vac or 24Vac. The diagrams below shows the connections that
should be made for each supply voltage. Please note that when powered from 24Vac the 230Vac terminals will be
at mains voltages. To prevent the risk of shocks the fuse must be removed from the fuse holder and no connections
made to L and N. The 24Vac supply must be fused with a 315mA to protect the supply wiring.
Fig 9. RX100/24 iss. 6 pcb Connection details when operating from a 230Vac supply.
Important! When
operating the unit
230Vac Supply
24Vac 100VA
output to power dome
Fig 10. RX100/24 iss. 6 pcb Connection details when operating from a 24Vac supply.
from 24Vac, the fuse
from the 230Vac
connector fuse holder
must be removed. No
connections must be
made to this connector,
as it will have 230Vac
across the L & N
terminals.
24Vac
IMPORTANT! Remove fuse from fuseholder
and make no connection as these terminals
!
Rx100 installation manual V1.17 29 Aug 08.doc Page 13
will have 230Vac across L and N.
315mA Fuse
Supply
Page 14

BBV Rx100 Interface Receiver
Addendum to manual for the following domes:
360 Vision VisionDome
Gardiner Security Juno
Rx100 software RX1_31V2
Application Notes
The RX 100 provide the following functionality when controlling the above mentioned domes
Variable speed Pan/Tilt.
Zoom/Focus, Focus/Iris Override returning to auto after Zoom In/Out.
16 Full scene presets.
2 preset patrols.
Slow preset tour. Started by pressing AUTOPAN (As patrol 1 but slow speed movement and 10 second dwell)
5 minute datum/park driving to preset 1 or slow preset tour. Disabled by removing link J6/1-2
Program up to 16 privacy zones
Additional commands:
AUTOPAN: Pressing the AUTOPAN key will run the domes preset tour at slow speed between the patrol 1 pres et positions.
Advanced Features Tx400 Tx1000 Tx1500 DM DS/DS2/BX2 Mux
180 degree pan flip ‘#’ 1 '#' WASH 1 ’#’ *889 002 or *889 10 10 2
Privacy SET (enable) ‘#’ 2 '#' WIPE 2 ’#’ *889 003 or *889 10 10 3
Privacy CLEAR (disable) ‘#’ 3 '#' AUTOPAN 3 ’#’ *889 004 or *889 10 10 4
Reset dome param eters ‘#’ 4 '#' LIGHTS 4 ’#’ *889 005 or *889 10 10 5
The dome and Rx100 are linked using RS485 for control and video for the camera signal.
Rx100 Description Dome connection
J3-C1 TX-/B DJ3-C2 TX+/A D+
Notes:
The dome address must be set at 1 for all the camera s that are controlled using a Rx100. Check with the dome manual if you ha ve any doubts.
The alarm output relay ope ns for approx 5 seconds upon power up and following any active alarm input.
If the slow preset tour is running, start patrol 1 & 2 is inhibited. The dome will be driven to a preset following an alarm activation. 60 seconds after alarm, the
tour will restart. A manual goto preset and lens control will stop the tour leaving the AUTOPAN led on until the next manual pan command.
A datum/park mode is offered that drives the dome to preset 1 following 5 minutes of inactivity. This can be disabled by removing the link fitted across J6/pin
4 & 5. and refitting to J6/pin 3 & 4.
Privacy zone programming
The keystrokes shown assume use of a TX1500. Use the keystroke shown above if using another controller.
Programming a zone
The Rx100 can be used to program 16 privacy zones. The same procedure that is used to program a preset position is used to program or clear a privacy zone.
To instruct the Rx100 to program a privacy zone press 2# followed by program preset 1 – 16. The screen will then go blank showing that the privacy zone has
been set.
Clearing a zone
To clear/delete a privacy zone press 3# followed by program preset 1 – 16. The relevant privacy zone will then be disabled and the dome will move to show the
zone that has been disabled so that the zone can easily be re-enabled if disabled in error.
J6 Links
J6/1-2 fitted to enable the 5 minute datum mode. After 5 minutes of inactivity the dome will be driven to either preset 1 or a slow preset tour is started
depending upon link J6/4-5. J6/4-5 fitted = goto preset 1,J6/3-4 = start slow preset tour.
Intended for up-the-coax control.
When using 20mA TP telemetry control maybe slightly sluggish.
.
Rx100 installation manual V1.17 29 Aug 08.doc Page 14
Page 15

BBV Rx100 Interface Receiver
Addendum to manual for the following domes:
Borsatec BT2790FF Dome
Rx100 software RX1_B3V2
Application Notes
The RX100 provides the following functionality when controlling the above mentioned dome:
Variable speed Pan/Tilt.
16 Full scene presets.
2 RX100 preset patrols.
Pattern 1 learn and playback
2 preset patrols.
4 alarm inputs moving to preset 1 - 4
Additional commands:
Advanced Features Tx400 Tx1000 Tx1500 DM DS/DS2/BX2 Mux
Dome MENU ‘#’ 1 '#' WASH 1 ’#’ *889 002 or *889 10 10 2
(Preset 95)
Start Patten 1 ‘#’ 2 '#' WIPE 2 ’#’ *889 003 or *889 10 10 3
(Preset 81)
B L C. On OFF ‘#’ 3 '#' AUTOPAN 3 ’#’ *889 004 or *889 10 10 4
(Preset 93)
DAY NIGHT MODE ‘#’ 4 ‘#’ LIGHTS 4 ‘#’ *889 005 or *889 10 10 5
(Preset 152)
AUTOPAN calls scan - goto preset 66
LIGHTS operates the dome AUX 1 relay - goto preset 94
WIPER Disabled
WASH Disabled
RS485 control of dome using the following connections:
Rx100 Description Dome
J3-C1 TX/RX- Data- RX J3-C2 TX/RX+ Data+ RX+
Notes:
The alarm output relay ope ns for approx 5 seconds upon power up. This can be used to signal pow er loss, etc.
Set the Dome address to 1, SW1 1 ON, 2-8 OFF
Protocol - Protocol and Baud, SW2 1-7 OFF, 8 ON, P elco D - 2400 Baud
Shorting the TEST link after power up will pan the dome LEFT and ZOOM IN. Releasing the short will stop pan and zoom out. This is allows confirmation of
correct wiring and switch settings at the dome.
Link J6/3-4 – Dome enters preset pat rol after 5minutes of inactivity. Link J6/4-5 disabled.
Rx100 installation manual V1.17 29 Aug 08.doc Page 15
Page 16

BBV Rx 100 Interface Receiver
Addendum to manual for the following domes:
Dennard type 2050/2055/2060 dome.
Rx100 software RX1_D2V12
Application Notes
Variable speed Pan/Tilt.
Zoom/Focus, Autofocus
16 full scene presets (additional presets can be programmed using dome's menu)
2 preset patrols
4 alarm inputs driving to preset 1 - 4 or dome sequence 001 - 004, link selectable
Advanced Features Tx400DC Tx1000 Tx1500 DM Mux
Dome User Menu 1 ‘#’ '#' WASH 1 ‘#’ *889 002 or *889 10 10 2
Dome Supervisor Menu 2 ‘#’ '#' WIPE 2 ‘#’ *889 003 or *889 10 10 3
Dome Service Menu 3 ‘#’ '#' AUTOPAN 3 ‘#’ *889 004 or *889 10 10 4
The domes internal Sequence 001 can be started by pressing AUTOPAN. The sequence must be programmed
from the dome supervisor menu.
RS485 control of dome using the following co nn e ctions:
Rx100 Description Dome (old) Dom e (current) 7 pin socket
J3-C1 TX- Bs (White) Bs (Green) Pin 3
J3-C2 TX+ As (Orange) As (Yellow) Pin 4
The Dome must be addressed as 1 this is achieved by setting BLUE rotary sw. to 0 & YELLOW rotary sw. to 1
Notes:
The alarm output relay ope ns for approx 5 seconds upon power up and following local alarm activation.
Accessing the dome menus.
Press relevant key combination to display menu. To select highlighted menu item, perform a goto preset 1 function as follows:- Tx1000 Hold the PRESET key
and tap the CAM1 key, Tx400 press the PRESET1 key.
The cursor can be moved using the standard pan/tilt keys or joystick. If the cursor direction is reversed, the pan and tilt cursor directions can be reversed from
the SUPERVISOR, USER OPTIONS, CURSOR CONTROL REVERSE menu.
Presets positions greater than 17 can be programmed using the dome's menu and can be built into dome sequences. Please refer to dome manual for specific
instructions regarding programming of sequences.
Local alarm can trigger either a dome preset sequence or goto a preset position depending upon the link J6/4-5. Complex alarm handling can be offered using a
combination when used with the do me sequences. Eg wh en the lin k is f itted, an alarm can fo rce the d ome to a specific preset for a period. The dome can then
move to another preset position at a programmed speed. Useful if an alarm area is say a fence line or building line with several doors/windows. Please view
our web site for more information. www.bbvcctv.com
Links Function
J6/1-2 Enable datum mode if fitted (goto preset 1 after 2 minutes if inactivity)
J6/3, 4, 5 Select between presets or sequence following local alarm. Fitted to 4&5 = sequence 1-4, Fitted to 3&4 = preset 1-4
A TEST link is used to confirm correct operation of the Rx100 and dome and also that the RS485 connection is correct. Shorting the link after the Rx100 is
powered up will cause the dome to zoom in. Removing the link cause the dome to zoom out. The green data led should also flash to indicate RS485 sent to the
dome.
If the TEST link is shorted when power is applied to the Rx100 will cause a receiver self test function to start. This is an advanced function that BBV support
engineers may request during fault diagnosis. To stop the self test, remove the link and power the Rx100 off and on again.
To prevent difficulty when navigating through the dome menu local alarm input 1 is disabled for 4 minutes after the menu is
displayed. To enable the alarm when out of the menu ple ase press zoom in or zoom out. The alarm will then be re-enabled.
Rx100 installation manual V1.17 29 Aug 08.doc Page 16
Page 17

BBV Rx 100 Interface Receiver
Addendum to manual for the following dome:
Dynacolor 7720
COAXIAL TELEMETRY ONLY NOT 20mA
Rx100 software RX1_D4V7
Application Notes
Variable speed Pan/Tilt (single function at a time, pan or tilt or zoom or focus)
Zoom/Focus
16 full scene presets
2 preset patrols
4 alarm inputs driving to preset 1 – 4
Additional Features Tx400 Tx1000 Tx1500 DM Sprite DM/DS/DSL/DS2
Dome Menu and ENTER
Exit Dome Menu ‘#’ 2 ‘#’ WIPE 2 ‘#’ *889 003 *889 10 10 3
Dome Reset
Menu access – example using the Tx1500 system
Press 1# 1# will display the dome’s menu and put the Rx100 in menu mode. In this mode the joystick allows navigation and either IRIS
OPEN or IRIS CLOSE or 1# is used when ENTER is required. After exiting the menu, press 2# to set the Rx100 back into normal mode and
the joystick will then revert to pan/tilt control.
Dome Reset
This command will cause the dome to carry out a system reset, including erasing any preset positions and programming. This command must
be used with extreme caution. To activation the dome reset, the command must entered 3 times, eg for the Tx1500, press 4# 4# 4#.
Cruise
Recording: The dome has a built in cruise facility allowing the operator to record and playback a period of manual dome movement. The
exact procedure varies depending upon the control equipment and version of dome firmware. The example shown assumes that the dome is
controlled using a Tx1500.
To record the cruise, you must enter the dome menu using 1# 1# and navigate to the RECORD START entry within the CRUISE menu.
After pressing the ENTER command using 1# you must exit the dome menu using 2# to allow the joystick to be used to move the dome
around the intended area. To complete the cruise, press the Dome Menu command twice using 1# 2# to allow the joystick to be used to
navigate to the RECORD E ND line. Pressing t he ENTER command usin g 1# saves the crui se. Navigate ou t of the menu an d exit the dome
menu using 2#.
Playback: The cruise can be started by pressing the AUTOPAN key on the controller.
Return to home: Link J6/pin 4-5 if fitted will cause the dome to return to preset 8 after 5 minutes of inactivity. If function not required refit
link to J6/pin 3-4.
Speed select: Two versions of dome protocol are published. The early version has uses speeds 0 – 8 and the later version has speeds 0 – 15.
Link J6/1-2 when fitted selects the later version and removed the earlier version. If the dome speed controls are very ‘sluggish’ then try
operation with the link in the other position.
RS485 control of dome. Data rate, 96 00 Ba ud , No parity, 8 Data bits, 1 Stop bits
Connection details:
Dome Description Rx100
D- RS485 Data - J3/C1
D+ RS485 Data+ J3/C2
Notes:
The alarm output relay opens for approx 5 seconds upon power up. This can be used to signal power loss, etc.
Check with the DM multiplexer manual for exact procedure for entering * commands.
Dome switch settings:
(3 times) ‘#’ 4 ‘#’ LIGHTS 4 ‘#’ *889 005 *889 10 10 5
(twice) ‘#’ 1 '#' WASH 1 '#' *889 002 *889 10 10 2
Rx100 installation manual V1.17 29 Aug 08.doc Page 17
Page 18

Early dome - Set dome address to 1: 8 way switch 1 ON, 2-7 OFF. 4 way switch 1-3 ON, 4 OFF.
Later dome – Dome ID switch: 1 ON, 2-8 OFF. Duplex/Simplex switch:1-2 OFF. Dynacolor protocol S2:1-4 OFF, S1:1-3 ON
BBV Rx 100 Interface Receiver
Addendum to manual for the following domes:
Forward Vision protocol
including MIC1 300/400 series dome
and compatible equipment.
Rx100 software RX1_F1V8
Application Notes
Variable 16 speed Pan/Tilt.
Zoom/Focus
16 full scene presets
2 preset patrols
4 alarm inputs driving to preset 1 - 4
Advanced Features Tx400 Tx1000 Tx1500 DM Mux DSL/DS2/BX2
AUTO/MANUAL FOCUS TOGGLE ‘#’ 1 ‘#’ WASH 1 ‘#’ *889 002 or *889 10 10 2 (twice)
DIGITAL ZOOM ON/OFF ‘#’ 2 '#' WIPE 2 '#' *889 003 or *889 10 10 3
MANUAL/AUTO EXPOSURE ‘#’ 3 '#' AUTOPAN 3 '#' *889 004 or *889 10 10 4
IR FILTER IN/OUT ‘#’ 4 ‘#’ LIGHTS 4 ‘#’ *889 005 or *889 10 10 5
Version V4 of software has added su pp ort for PRIVACY ZONE programming. (TX1500 keystrokes shown)
ENABLE ALL SCENE 1 ‘#’ PROGRAM 1 PRESET (Whole screen)
DISABLE ALL SCENE 1 ‘#’ PROGRAM 2 PRESET (Whole screen)
TOGGLE CURSOR ON/OFF 1 ‘#’ PROGRAM 3 PRESET
ENABLE AROUND CURSOR 1 ‘#’ PROGRAM 4 PRESET (Centre of screen)
DISABLE AROUND CURSOR 1 ‘#’ PROGRAM 5 PRESET (Centre of screen)
DM DS2 example to ENABLE ALL SCENE as privacy.
*889 10 10 2 [PRESS AND HOLD ‘PRESET’] 1 [ENTER]
RS485 control of dome using the following co nn e ctions:
Rx100 Description Dome
J3-C1 RS485 IN(A) Yellow
J3-C2 RS485 IN(B) White
Notes:
The alarm output relay ope ns for approx 5 seconds upon power up and following local alarm activation.
A local alarm opening contact will cause the dome to move to the respective preset position. After 60 seconds the dome will revert to preset patrol if the patrol
was active before the alarm occurred.
Links Function
J6/4-5 Enable datum mode: Goto preset 1 or start Patrol 1 2 minutes after last activity. J6/3-4 = Function disabled.
J6/1-2 Select datum function: Fitted = goto preset 1, Removed = start Patrol 1
TEST link when shorted will drive the dome LEFT and ZOOM IN. Removing the short will stop pan and ZOOM OUT. This is used to gain confidence that the
wiring between Rx100 and dome is correct. The GREEN DATA le d will flash when a command is sent to the dome.
VERSION 6 now enables zoom proportional pan/tilt speed to improve manual control.
For correct operation, ensure that the dome/head address is set to 01.
Please contact Forward Vision for exact procedure on +44(0)870 011 3131.
Rx100 installation manual V1.17 29 Aug 08.doc Page 18
Page 19

BBV Rx 100 Interface Receiver
Addendum to manual for the following dome:
JVC TK-C655B/676/675B combination cameras
Rx100 software RX1_J2V4
Application Notes
The RX 100 provides the following functionality when controlling the above mentioned domes
Variable speed Pan/Tilt.
Zoom/Focus, Autofocus can be enabled/disabled from the dome menu.
16 Full scene presets.
2 preset patrols.
Slow patrol or dome autopan from controller AUTOPAN key
4 alarm inputs driving to preset 1 - 4.
Additional commands:
TK-C676 Tx400DC Tx1000 Tx1500 DM System Sprite, DS, DS2, BX2
OPEN MENU and BACK (Twice) ‘#’1’ #' WASH 1 ‘#’ *889 002 or *889 10 10 2
SET '#' 2 '#' WIPE 2 ‘#’ *889 003 or *889 10 10 3
Togggle ExDR '#' 3 '#' AUTOPAN 3 ‘#’ *889 004 or *889 10 10 4
Cycle Mono Mode '#' 4 '#' LIGHTS 4 ‘#’ *889 005 or *889 10 10 5
RS485 control of dome using the following connec tions:
Rx100 Description Dome connection
J3-C1 TX- CONTROL RX- (D)
J3-C2 TX+ CONTROL RX+ (C)
Notes:
The alarm output relay ope ns for approx 5 seconds upon power up. This can be used to signal pow er loss, etc.
Camera switch settings:
MACHINE ID – set both rotary switches to ‘0’
8 way DIL switch, all OFF apa rt from 8 which should be ON to enable the RS485 termination, point-to-point, simplex.
On screen display of preset position, HOME - P16 or MANUAL during manual control. The on screen display can be enabled/disabled using dome switch
SW3, ON = Display off, OFF = Display on.
J6 links.
J6/1-2: Link fitted across J6/1 and J6/2 (default) to allow the ExDR and MONO mode status to be displayed. Remove this link if you are programming a dome
camera title and do not want to display the ExDR and MONO sta t us.
J6/4-5: Fitted (default) dome will perform a slow patrol between programmed presets when AUTOPAN pressed. Removed and fitted to J6/3-4 will send
autopan start to the dome.
DOME MENU
Pressing #1 twice will display the dome’s menu. The joystick is then used to navigate through the dome menu. #2 sends a SET command to the dome and #1
twice whilst the menu is displayed sends a BACK command.
If the #1 command doesn’t work press a foc us key before sending #1.
Pressing #1 FOUR times within 2 seconds will displa y the dome’s service menu.
PRESET POSITIONS
The dome has a home preset position which is preset 00.
To enable this preset to be programmed when using the Rx100/JVC676 program ming preset 1. BBV Presets 2 – 16 re fer to the dome presets 2 – 16.
Rx100 installation manual V1.17 29 Aug 08.doc Page 19
Page 20

BBV Rx100 Interface Receiver
Addendum to manual for the following domes:
Kalatel Cyberdome (Firmware 1/1/02 or later)
Rx100 software RX1_K1V2
Application Notes
Variable speed Pan/Tilt.
Zoom/Focus/Iris
16 Full scene presets.
2 preset patrols. (PATROL1 = RX100 patrol and PATROL 2 = dome’s TOUR 03)
Shadow TOUR 1 playback using AUTOPAN key.
Menu navigation including programm i ng privacy zones etc
Advanced Features Tx1000 Tx1500 DM DS/DS2/BX2 Mux
Toggle MENU ON/OFF '#' WASH 1 ’#’ *889 002 or *889 10 10 2
Toggle PTZ/CURSOR '#' WIPE 2 ’#’ *889 003 or *889 10 10 3
(see GOTO PRESET 16 BELOW)
The dome and Rx100 are linked using RS485 for control and video for the camera signal.
Rx100 Description Dome connection
J3-C1 TX-/B RS485 B J3-C2 TX+/A RS485 A +
Notes:
The dome address must be set at 1 for all the cameras that are controlled using a Rx100. Check with the dome manual if you
have any doubts.
The alarm output relay opens for approx 5 seconds upon power up and following any active alarm input.
The dome will be driven to a preset following a local alarm activation. 60 seconds after alarm, the shadow tour will restart if
running when the alarm occured. A manual goto preset and lens control will stop the tour leaving the AUTOPAN led on until
the next manual pan command. If PATROL 1 was running when a local alarm occurs after 60 seconds the patrol will be
resumed.
The dome’s TOUR 3 must be programmed from within the domes menu. Please refer to the dome manual for details. 2
PATROL from TX1500 or PATROL 2 from TX1000 to start this tour.
Programming preset 1 will also program the dome’s home preset – 00.
Navigating the dome’s menu requires several key presses that may not be available with all controllers.
These key presses are simulated using GOTO PRESET commands as follows.
<1> – <9> = GOTO PRESET 1 – 9 <0> = GOTO PRESET 10
<SEQ> = GOTO PRESET 11 <ALARM> = GOTO PRESET 12 <1
<CLEAR> = GOTO PRESET 14 <SET> = GOTO PRESET 15
ST
> = GOTO PRESET 13
GOTO PRESET 16 - This is used to toggle the joystick between dome movement and cursor movement which is needed for
some menus eg preset and area titles.
The TEST link can be used to prove correct data connection between the RX100 and dome. When the link is fitted the dome
should pan left. Removing the link will stop the pan. Ensure that the link is removed before powering the RX100 on as this is
to enter diagnostics mode.
Due to the number of presets required to navigate in the dome menu the TX400 and TX400DC, which have 8 presets, will not
be able to navigate the menu fully.
Rx100 installation manual V1.17 29 Aug 08.doc Page 20
Page 21

BBV Rx 100 Interface Receiver
Addendum to manual for the following dome:
Merit Li-Lin
PIH-717X/7000/7600/7625 series
Rx100 software RX1_L1V8
Application Notes
Variable speed Pan/Tilt.
Zoom/Focus, Autofocus
16 full scene presets
2 preset patrols
4 alarm inputs driving to preset 1 - 4
Advanced Features Tx400 Tx1000 Tx1500 DM Sprite/DS/DSL/DS2/BX2
Toggle Menu display ‘#’ 1 ‘#’ WASH 1 ‘#’ *889 002 or *889 10 10 2
Enable Auto-Iris ‘#’ 2 '#' WIPE 2 ‘#’ *889 003 or *889 10 10 3
Dome reset step 1 ‘#’ 3 '#' AUTOPAN 3 '#' *889 004 or *889 10 10 4
Exit menu ‘#’ 4 '#' LIGHTS 4 '#' *889 005 or *889 10 10 5
Procedure to program preset positions. The procedure must be followed to program new preset positions and also to reprogram existing positions.
The keystrokes shown below assume use of a Tx1000.
1) Select GOTO PRESET number to program eg 1
Hold PRESET tap 1
2) Move dome to new position using joystick and lens keys.
3) Select PROGRAM PRESET to save new position.
Press PROGRAM 1 1
To stop dome from running its own internal Autopan move joysti c k then press AUTOPAN.
RS485 connections between Rx100 and dome.
PIH717(DB15) or PIH7000/7600 Description Rx100
Pin 14 TXDI- -Data J3/C1
Pin 15 TXDI+ +Data J3/C2
Notes:
The alarm output relay ope ns for approx 5 seconds upon power up. This can be used to signal pow er loss, etc.
A 2 minute datum mode is available. 2 minutes after the last manual command, the dome will either move to preset 1 or start an autopan. Fit link J6/1-2 to
enable this feature. J6/4-5 fitted = autopan, J6/3-4 fitted = goto preset 1.
All dome preset positions can be deleted using #3 followed by #4 within 1 second.
Check with the DM multiplexer manual for exact procedure for entering * commands.
IMPORTANT: Dome settings: Select dome address #1.
To aid diagnostics and confirm correct connection between the Rx100 and dome, the TEST link when shorted will drive the
dome LEFT until the short is removed. Whilst the Rx100 is sending data to the dome the GREEN DATA will flash.
V6 software – 1# now used to toggle menu display on/off. In previous versions this was used to toggle AUTOPAN which is
now not required with current generation of LiLin dome.
Rx100 installation manual V1.17 29 Aug 08.doc Page 21
Page 22

BBV Rx 100 Interface Receiver
Addendum to manual for the following domes:
Mark Mercer 150 and D250/500 series
Rx100 software RX1_M1V6
Application Notes
Variable speed Pan/Tilt.
Zoom/Focus override, Iris override
16 full scene presets
2 preset patrols
4 alarm inputs driving to preset 1 – 4
2 minute datum (park) mode, link selectable as either preset 1 or slow preset patrol.
Advanced Features Tx400 Tx1000 Tx1500 DM Mux/DS/DSL/DS2/BX2 etc
Pan ‘U’-turn (180deg flip) ‘#’ 1 '#' WASH 1 ‘#’ *889 002 or *889 10 10 2
Dome Reset ‘#’ 4 ‘#’ LIGHTS 4 ‘#’ *889 005 or *889 10 10 5
A slow preset patrol can be started by pressing AUTOPAN. The preset dwell is fixed at 20 seconds with a dome speed of 1.
RS485 control of dome using the following co nn e ctions:
Rx100 Description Dome 6 pin connector
J3-C1 TX/RX- RS485 B Pin 4 (RED)
J3-C2 TX/RX+ RS485 A Pin 3 (GREEN)
Notes:
The alarm output relay ope ns for approx 5 seconds upon power up and following a local alarm activation.
Links Function
J6/1-2 Enable 2 minute inactivity datum mode if the link is fitted.
J6/3,4,5 Select datum operation, J6/4-5 = goto prese t 1, J6/3-4 = start slow preset patrol.
Only operational whilst the dome is not running a patrol.
Rx100 installation manual V1.17 29 Aug 08.doc Page 22
Page 23

BBV Rx 100 Interface Receiver
Addendum to manual for the following domes:
Panasonic WV-CSR400 series.
WV-CSR600 series.
WV-CSR650 series.
Rx100 software RX1_P1V5B
Application Notes
Variable speed Pan/Tilt.
Zoom/Focus, Autofocus, Iris Open/Close (AutoFocus with 600 & 650 series)
16 full scene presets (600 & 650 series dome)
2 preset patrols (600 & 650 series dome)
4 alarm inputs driving to preset 1 - 4. (600 & 650 series dome )
Autopan
Advanced Features Tx400 Tx1000 Tx1500 DM Sprite/DSL/DS2/BX2
Entry/Exit Dome Menu ‘#’ 1 '#' WASH 1 ‘#’ *889 002 or *889 10 10 2
SET (select menu item) ‘#’ 2 '#' WIPE 2 ‘#’ *889 003 or *889 10 10 3
ESC (back to previous menu) ‘#’ 3 '#' AUTOPAN 3 ‘#’ *889 004 or *889 10 10 4
SPECIAL2 (for special menus) ‘#’ 4 '#' LIGHTS 4 ‘#’ *889 005 or *889 10 10 5
Autopan is started by selecting Autopan on the Transmitter. The Autopan stops can be programmed from within the dome
menu. Please refer to dome user manual for exact details.
RS485 control of dome. Connect dome FCC-68 plug into J7 of Rx100. If the dome cable requires extending, connect cores as
follows:
Dome Cable Description Rx100
Yellow Data- J3/C1
Green Data+ J3/C2
Notes:
The alarm output relay ope ns for approx 5 seconds upon power up. This can be used to signal pow er loss, etc.
Accessing the dome menus.
Press either '#'WASH , '#'1 or *889 002 key strokes to Enter Menu. Use Pan/Tilt to highlight item. Press either '#'WIPE, '#'2 or *889 003 key strokes to select
menu item. To exit from menu, press either '#'WASH, '#'1 or *889 002.
Check with the multiplexe r manual for exact procedure for ente ring * commands.
IMPORTANT: Dome settings: Select dome address 01. Communications must be 19200, N, 8, 1. If dome cannot be controlled, see dome manual section to
reset dome to factory default.
The Panasonic CS-850 can be controlled using an Rx100 with Rx1_P1V6 software order code RX100/Panasonic CS850.
The TEST link will pan the dome left whilst shorted. The video out BNC must be disconnected before the TEST link is fitted.
The GREEN DATA flashes when data is sent from the Rx100.
Rx100 installation manual V1.17 29 Aug 08.doc Page 23
Page 24

BBV Rx 100 Interface Receiver
Addendum to manual for the following domes:
Panasonic WV-CS850 / 860
Rx100 software RX1_P1V10
Application Notes
Variable speed Pan/Tilt.
Zoom/Focus, Autofocus, Iris Open/Close (Hold for auto-iris)
16 full scene presets
2 preset patrols
4 alarm inputs driving to preset 1 – 4
Autopan/Patrol learn-play using autopa n key
Advanced Features Tx400 Tx1000 Tx1500 DM Sprite/DS/DS2/BX2
ENTRY/EXIT Dome Menu ‘#’ 1 '#' WASH 1 ’#’ *889 002 or *889 10 10 2
SET (select menu item) ‘#’ 2 '#' WIPE 2 ’#’ *889 003 or *889 10 10 3
ESC (back to previous menu) ‘#’ 3 '#' AUTOPAN 3 ’#' *889 004 or *889 10 10 4
SPECIAL2 (for special menus) ‘#’ 4 '#' LIGHTS 4 '#' *889 005 or *889 10 10 5
A dome RESET ALL command can be sent by holding either ‘#’LIGHTS or ‘#’4 for 5 seconds when not within the menu. Care must be used with this
command as the dome is set to default and user settings are erased.
The dome’s internal PATROL can be LEARNED using the dome menu. Setting the AUTO PAN KEY to PATROL will allow the patrol to be PLAYED by
pressing AUTOPAN on the controller.
RS485 control of dome. Connect dome FCC-68 plug into J7 of Rx100. If the dome cable requires extending, connect cores as follows:
Dome Cable Description Rx100
Yellow Data- J3/C1
Green Data+ J3/C2
Notes:
The alarm output relay ope ns for approx 5 seconds upon power up. This can be used to signal pow er loss, etc.
Accessing the dome menus.
Press either '#'WASH , '#'1 or *889 002 key strokes to Enter Menu. Use Pan/Tilt to highlight item. Press either '#'WIPE, '#'2 or *889 003 key strokes to select
menu item. ‘#’WASH , ‘#’3 or *889 004 is used to ESCAPE back to previous menu. SPECIAL2 menus are accessed using ‘#’LIGHTS, ‘#’4 or *889 005. To
exit from menu, press either '#'WASH, '#'1 or *889 002.
Check with the multiplexe r manual for exact procedure for ente ring * commands.
Dome Switch settings: The following procedure must be followed to ensure that the dome is set-up correctly for terminated 4 wire RS485 at 19200 Baud and
address 1. Remove the dome from it’s base before each step and reconnect to the base after changing the switches.
Step 1: Address switches 2,4 and 5 ON
Step 2: Address switches 1,3,4 and 5 ON
Step 3: Address switches 1 and 8 ON. 4 Way switch 1 ON to select 4 wire, terminated RS485.
Panasonic WV-CSR400/600/650 domes can be controlled using a different version of Rx100 software. Please contact BBV for further information or check out
our web site www.bbvcctv.com
Rx100 installation manual V1.17 29 Aug 08.doc Page 24
Page 25

BBV Rx 100 Interface Receiver
Addendum to manual for the following dome:
Pelco Spectra (P-mode RS485 protocol)
Rx100 software RX1_P2V10
Application Notes
Variable speed Pan/Tilt.
Zoom/Focus, Autofocus
16 full scene presets
2 preset patrols
4 alarm inputs driving to preset 1 - 4
Dome Pattern definition and playback
Advanced Features Tx1000 Tx400 DM-Sprite DM-DSL/DS/DS2
Display dome menu (preset 95) '#' WASH '#' 1 *889 002 *889 10 10 2
Enter within menu (iris open ) '#' WIPE '#' 2 *889 003 *889 10 10 3
Pattern define start '#' AUTOPAN '#' 3 *889 004 *8 89 10 10 4
Pattern define stop ‘#’ LIGHTS ‘#’ 4 *889 005 *889 10 10 5
To record a Pattern, direct the camera to the required starting position. Hold '#' and tap 'AUTOPAN'. The dome will now record pan/tilt
and lens movement up to a time limit. To stop the recording, hold '#' and tap 'LIGHTS’. To play the recorded Pattern, press the AUTOPAN
key only. The dome will repeatedly run the Pattern until either the joystick is moved or an alarm occurs.
(The example shows Tx1000 keystrokes, please substitute the keystroke for the controller used.)
Menu access:
Use ‘#’ WASH to display menu. Navigate using the joystick and IRIS OPEN to select. When used with control systems without iris keys,
eg DM Digital Sprite Lite, use *889 003 or *889 10 10 3
Return to home: Can be prog r a mmed from the Dome menu.
RS485 control of dome. Data rate, 96 00 Ba ud , No parity, 8 Data bits, 1 Stop bits
Connection details:
Dome Description Rx100
RX- RS485(B) input J3/C1
RX+ RS485(A) input J3/C2
Notes:
The alarm output relay opens for approx 5 seconds upon power up. This can be used to signal power loss, etc.
Check with the DM multiplexer manual for exact procedure for entering * commands.
Dome settings: Select dome address 1, P-MODE PROTOCOL and 9600, N, 8, 1.
Link J6/1-2 is used to select the function that is used to drive the Esprit AUX outputs.
Function Link fitted Esprit AUX No Link removed Esprit AUX No
LIGHTS 1 2
WIPER 2 1
WASHER 3 3
Link J6/4-5 is used to enable 5 minute datum time to start preset patrol.
Link fitted = datum disabled and link removed = datum enabled.
Rx100 installation manual V1.17 29 Aug 08.doc Page 25
Page 26

BBV Rx 100 Interface Receiver
Addendum to manual for the following dome:
Philips AutoDome including G3A and G3B
(RS232 control only, not Bi-Phase compatible)
Rx100 software RX1_P3V11
Application Notes
Variable speed Pan/Tilt.. Zoom/Focus, Autofocus. 16 full scene presets. 2 preset patrols. 4 alarm in pu ts driving to preset 1 – 4.
Dome AutoPlay record & playback. Preshot title, Zone title, Menu Access
Advanced Features Tx400DC Tx1000 Tx1500 DM Sprite DS/DSL/DS2/BX2
Display Menu (
Program Zone Title
Record AutoPlay start/stop
RESET DOME!
RS232 control of dome. Data rate, 96 00 Ba ud , No parity, 8 Data bits, 1 Stop bits
Connection details:
Dome Description Rx100 or DMP100/124
RxD RS232 I/P J3/C1
Gnd Gnd J3/GND
Notes:
Configuration links:
J6/pin 1-2 is used to select the address that the unit outputs. Fitted(Default) = Address 1, Removed = Address 10,000.
Removing the link allows the receiver to be used as an alarm input unit for domes that are controlled using bi-phase telemetry. This will work with late model
domes with post 2002 software.
J6/pin3-4 – preset title text is programmed following a save preset command by autom at ically issuing a aux(62) command.
J6/pin4-5 (Default) – the preset text command is not sent and the existing text is retained.
The alarm output relay opens for approx 5 seconds upon power up. This can be used to signal power loss, etc.
The dome must be RS232 controllable. BI-PHASE domes cannot be controlled.
Dome settings: Select dome address #0 or #1. Communications must be 9600, N, 8, 1. The G3 Basic address is software programmable, however as default
the dome is addressed as #0. If the dome address is not #0 or #1 then the dome will require reprogramming using a Philips controller or removing link J6/1-2.
A TEST link is used to confirm correct operation of the Rx100 and dome and also that the RS485 connection is correct. Shorting the link after the Rx100 is
powered up will cause the dome to pan left and zoom in. Removing the link cause the dome to zoom out and stop panning left. The green data led should also
flash to indicate RS485 sent to the dome.
If the TEST link is shorted when power is applied to the Rx100 will cause a receiver self test function to start. This is an advanced function that BBV support
engineers may request during fault diagnosis. To stop the self test, remove the link and power the Rx100 off and on again.
Using the advanced features wh en u sin g a BBV Tx1000DC
Menu Access
Use the joystick to navigate the cursor. FOCUS FAR or FOCUS NEAR can be pressed to enter the next menu item or to return press either
IRIS OPEN or IRIS CLOSE. When completely out of the menu issue a goto preset command to put the interface into normal mode. Press
and HOLD PRESET whilst taping 1 will move to preshot 1.
Program Zone Title: Press and HOLD # and tap WIPE will allow the title for the current zone to be programmed.
Use the joystick as described on screen. Use the following keystrokes to program the text:
FOCUS NEAR – Select a current character, FOCUS FAR – Clear character, IRIS CLOSE – Backspace and IRIS OPEN – Return
Record Autoplay: Press and HOLD # and tap AUTOPAN will allow autoplay ‘A’ to be recorded.
Press FOCUS FAR or FOCUS NEAR to start the recording or IRIS CLOSE to abandon recording. Once recording has started, use the
joystick and focus keys as required. To end the recording, press and HOLD # and tap AUTOPAN. The recording can be replayed
continuously be pressing t he AUTOPAN key.
Reset dome def aults: Press and HOLD # and tap LIGH TS TWICE to display the dome’s software version. Repeating the key
strokes for a THIRD
USE WITH EXTREME CARE AS ALL THE DOME PROGRAMMING WILL BE LOST.
Programming preshot text
preshot 1 press PROGRAM 1 1. To program preshot 2 press PROGRAM 1 2. To program preset 14 press PROGRAM 1 14. After the
preshot has been programmed the interface issues an AUX 62 to display the preshot text menu. The same keystrokes are used to program
preshot text as when programming zone titles.
Rx100 installation manual V1.17 29 Aug 08.doc Page 26
Aux 46) '#' 1 ‘#’ WASH 1'#' *889 002 *889 10 10 2
(Aux 63) '#' 2 ‘#’ WIPE 2'#' *889 003 *889 10 10 3
(Aux 100) '#' 3 ‘#’ AUTOPAN 3'#' *889 004 *889 10 10 4
(Set 899) '#' 4 ‘#’ LIGHTS 4'#' *889 005 *889 10 10 5
: Press and HOLD # and tap WASH TWICE will display the dome ’s me nu .
time will issue a SET 899 to reset the dome including ALL PRESET POSITIONS.
. To program a preshot position press PROGRAM then 1 followed by number of the preshot. EG to program
Page 27

Using the advanced features wh en u sin g a BBV Tx400DC
Menu Access
Use the joystick to navigate the cursor. FOCUS FAR or FOCUS NEAR can be pressed to enter the next menu item or to return press either
IRIS OPEN or IRIS CLOSE. When completely out of the menu issue a goto preset command to put the Rx100 into normal mode. Press 1
will move to preshot 1.
: Press and HOLD # and tap 1 TWICE will display the dome’s menu
Program Zone Title: Press and HOLD # and tap 2 will allow the title for the current zone to be programmed.
Use the joystick as described on screen. Use the following keystrokes to program the text:
FOCUS NEAR – Select a current character, FOCUS FAR – Clear character, IRIS CLOSE – Backspace and IRIS OPEN – Return
Record Autoplay: Press and HOLD # and tap 3 allow autoplay ‘A’ to be recorded.
Press FOCUS FAR or FOCUS NEAR to start the recording or IRIS CLOSE to abandon recording. Once recording has started, use the
joystick and focus keys as required. To end the recording, press and HOLD # and tap 3. The recording can be replayed continuously be
pressing the AUTOPAN key.
Reset dome defaults: Press and HOLD # and tap 4 TWICE to display the dome’s software version. Repeating the key strokes for a
THIRD
time will issue a SET 899 to reset the dome including ALL PRESET POSITIONS.
USE WITH EXTREME CARE AS ALL THE DOME PROGRAMMING WILL BE LOST.
Programming preshot text
EG to program preshot 1 press and HOLD PROGRAM then tap 1. To program preshot 2 press and HOLD PROGRAM and tap 2. To
program preset 8 press and HOLD PROGRAM and tap 8. After the preshot has been programmed the Rx100 issues an AUX 62 to display
the preshot text menu. The same keystrokes are used to program preshot text as when programming zone t i t le s .
. To program a preshot position press and HOLD PROGRAM then tap the preshot require, 1 – 8.
Using the advanced features when us ing a DM S p rite an d Digital Sp rite keyboard.
The DM units use a series of * commands to access the advanced features. The Digital Sprite or DS does not have a ‘0’ key
instead the ‘10’ key is used when ever the ‘0’ key is mentioned. Eg to access the dome menu on a System Sprite you would
key *889 002 and on the Digital DS you would key in *889 10 10 2. The examples below assume control from the Digital
Sprite keyboard. If a System Sprite is used then please use the ‘0’ key whenever the ‘10’ key is mentioned.
Menu Access
Use the joystick to navigate the cursor. FOCUS FAR or FOCUS NEAR can be pressed to enter the next menu item or to return use *889 10
10 3 which simulates an iris command. When completely out of the menu issue a goto preset command to put the Rx100 into normal mode.
Pressing PRESET followed by 10 1 will goto preshot 1.
: *889 10 10 2 repeated TWICE will display the dome’s menu
Program Zone Title: *889 10 10 3 will allow the title for the current zone to be programmed.
Use the joystick as described on screen. Use the following keystrokes to program the text:
FOCUS NEAR – Select a current character, FOCUS FAR – Clear character, *889 10 10 4 – Backspace and *889 10 10 3 – Return
Record Autoplay: *889 10 10 4 will allow autoplay A to be recorded.
Press FOCUS FAR or FOCUS NEAR to start the recording or *889 10 10 3 to abandon recording. Once recording has started, use the
joystick and focus keys as required. To end the recording, press *889 10 10 4. The recording can be replayed continuously be pressing the
AUTOPAN key.
Reset dome defaults: *889 10 10 5 repeated TWICE to display the dome’s software version. Repeating the key strokes for a
THIRD
time will issue a SET 899 to reset the dome including ALL PRESET POSITIONS.
USE WITH EXTREME CARE AS ALL THE DOME PROGRAMMING WILL BE LOST.
Programming preshot text. To program a preshot position press and hold the PRESET button until the display asks for preset number.
Use the camera keys to enter a 2 digit number from 01 – 16. Use the 10 key to represent 0. After the preshot has been programmed the
Rx100 issues an AUX 62 to display the preshot text menu. The same keystrokes are used to program preshot text as when programming zone
titles. EG to program preshot 2, press and hold PRESET, wait for the display, press 10 then 2.
Control from DM Digital Sprite 2 systems
The new DM Digital Sprite 2 (DS2) keyboard now supports iris directly again. Therefore navigation through the menus will be ea sier.
Rx100 installation manual V1.17 29 Aug 08.doc Page 27
Page 28

BBV Rx100 & Rx100/24
Addendum to manual for the following domes:
Samsung SCC-641 Interface
Rx100 software RX1_S5V3
Application Notes
The Rx100 allows control of the following dome features: Variable speed Pan/Tilt, Zoom/Focus/Iris, 16 full scene presets,
2 preset patrols, 4 alarm inputs driving to preset 1 – 4, Dome Pattern 1 playback using the AUTOPAN key ,Menu Access
Advanced Features BBV Tx1000 BBV Tx400 DM Sprite DS/DSL
Display Menu (Twice) ' # ' WASH '#' 1 *889 002 *889 10 10 2
Turn Menu Off '#' WIPE '#' 2 *889 003 *889 10 10 3
ENTER within menu '#' AUTOPAN '#' 3 *8 89 00 4 *889 10 10 4
Dome FACTORY RESET '#' LIGHTS '#' 4 *889 005 *889 10 10 5
RS485 control of dome. Data rate link selectable using J6/1-2. Fitted = 9600,N,8,1 and removed = 19200,N,8,1
Connection details:
Dome RX100
RX- J3/C1
RX+ J3/C2
Notes:
J6/pin 1-2 is used to select the baud rate to drive the dome, either 9600 or 19200 baud.
Fitted(Default) = 9600,N,8,1 Removed = 19200,N,8,1(used if experience run on problems with 20mA telemetry)
The dome’s SW500 and SW501 switches must be set as follows:
SW500 sets the dome’s address to 01. 1 = ON, 2,3,4,5,6,7, 8 = OFF
SW501 is used to set the dome’s RS485 baud rate, Termination and protocol selection.
For 9600 baud set as follows: 1,2,3,5 = ON 4,6,7,8 = OFF
For 19200 baud set as follows: 1,2,3,4 = ON 5,6,7,8 = OFF
Menu Access when using a BBV Tx1000DC
Display Menu: Press and HOLD # and tap WASH TWICE
Use the joystick to navigate the cursor and HOLD # and tap AUTOPAN as ENTER.
Turn Menu Off: Press and HOLD # and tap WIPE
Dome FACTORY RESET: Press and HOLD # and tap LIGHTS THREE
Menu Access when using a BBV Tx400DC
Display Menu: Press and HOLD # and tap 1 TWICE
Use the joystick to navigate the cursor and HOLD # and tap 3 as ENTER.
Turn Menu Off: Press and HOLD # and tap 2
Dome FACTORY RESET: Press and HOLD # and tap 4 THREE
Menu Access when using DM DS/DSL/DS2
Display Menu: *889 10 10 2 TWICE
Use the joystick to navigate the cursor and *889 10 10 4 as ENTER.
Turn Menu Off: *889 10 10 3
Dome FACTORY RESET: *889 10 10 5 THREE
CAUTION – READ BEFORE PERFORMING A DOME FACTORY RESET!
USE WITH EXTREME CARE AS ALL THE DOME PROGRAMMING INCL UDING PRESET POSITIONS WILL BE
LOST.
Rx100 installation manual V1.17 29 Aug 08.doc Page 28
will display the dome’s menu.
times to return the dome to factory defaul ts.
will display the dome’s menu.
times to return the dome to factory defaults.
will display the dome’s menu.
times to return the dome to factory defaults.
Page 29

BBV Rx 100 Interface Receiver
Addendum to manual for the following domes:
Sensormatic Speeddome
Rx100 software RX1_S3V6
Coaxial telemetry ONLY. Not twisted pair!
Application Notes
Variable speed Pan/Tilt.
Zoom/Focus, Autofocus, Iris Open/Close
7 full scene presets
2 preset patrols
4 alarm inputs driving to preset 1 – 4
Pattern 1 define – play using Autopan key
Advanced Features Tx1000 Tx400 DM DS/DS2/BX2
Start/Stop PATTERN1 Definition '#' WASH '#' 1 *889 002 or *889 10 10 2
(Press AUTOPAN to Run Pattern1)
Dome Menu '#' LIGHTS '#' 4 *889 005 or *889 10 10 5
RS485 control of dome 4800 Baud, No parity, 8 data bits, 2 stop bits.
Dome Cable Description Rx100
RS422 IN-/Data In- Data-(B) J3/C1
RS422 IN+/Data In+ Data+(A) J3/C2
Notes:
The alarm output relay ope ns for approx 5 seconds upon power up. This can be used to signal pow er loss, etc.
Accessing the dome menus.
Press either '#'LIGHTS , '#'4 or *889 005 key strokes to Enter Menu. Use Pan/Tilt/zoom/focus functions are then used to navigate through menu structure.
Please refer to individual dome manual for exact operation of menu.
Check with the multiplexe r manual for exact procedure for ente ring * commands.
IMPORTANT:
Dome settings: Select dome address 01 or 001.
Communications must be 4800, N, 8, 2 – RS422, NOT SensorNet.
The interface software is based on 1997 protocol and has been tested with Ultradome IV, Ultradome VI and original Speeddome.
Link J6/1-2 used to enable/disable datum mode to start preset patrol.
Link fitted = datum disables
Link removed = datum enabled, start preset patrol after 60 seconds of inactivity
Rx100 installation manual V1.17 29 Aug 08.doc Page 29
Page 30

BBV Rx 100 Interface Receiver
Addendum to manual for the following camera:
Sony EVI-D31 Webcam
Rx100 software RXS4V3
Coaxial telemetry ONLY. Not twisted pair.
Application Notes
Variable speed Pan/Tilt.
Zoom/Focus, Autofocus with manual override (returns t o auto following zoom command)
6 full scene presets
2 preset patrols
4 alarm inputs driving to preset 1 – 4
Advanced Features Tx400 Tx1000 Tx1500 DM Sprite/DS2/BX2
Toggle Backlight compensation '#' ‘1’ ‘#’ WASH 1 ‘#’ *889 002 or 10 10 2
Cycle White Balance ‘#’ ‘2’ ‘#’ WIPE 2 ‘#’ *889 003 or 10 10 3
AUTO, INDOOR, OUTDOOR
Toggle AutoExposure/Bright mode ‘#’ ‘3’ ‘#’ AUTOPAN 3 ‘#’ *889 004 or 10 10 4
Iris keys used in Bright mode
Reset dome to default ‘#’ ‘4’ ‘#’ LIGHTS 4 ‘#’ *889 005 or 10 10 5
RS232 control of dome 9600 Baud, No parity, 8 data bits, 1 stop bit. The camera uses a sub-miniature 8 pin DIN socket. A
Sony supplied VISCA to DB9 RS232 cable may help with installation.
Connection details:
Camera Pin Description Rx100
5 Receive Data J3/C1
4 or 6 Ground J3/GND
Notes:
Link J6/1-2 selects a 5 minute datum mode. If fitted and no activity for 5 minutes, the camera will drive to either preset 1 or start PATROL 1 depending on link
J6/3,4,5, Fitted to J6/4&5 = Goto Preset 1 or fitted to J6/3&4 = start PATROL 1.
The alarm output relay ope ns for approx 5 seconds upon power up. This can be used to signal pow er loss, etc.
Check with the multiplexe r manual for exact procedure for ente ring * commands.
IMPORTANT:
Ensure that CAMERA NO switch on the camera rear panel is set to 1.
As communications is RS232 please limit cable from Rx100 to camera to less than 5M.
Rx100 installation manual V1.17 29 Aug 08.doc Page 30
Page 31

Rx 100 Interface Receiver
Addendum to manual for the following domes:
Chugai SMD-08II, SMD-12, SMD-12II, SMD-20
Sanyo VCC-9200P
Star MD-800, MD-1200S, MD-1200H, MD-2000
Rx100 software RX1_S2V6
Application Notes
The RX 100 provide the following functionality when controlling the above mentioned domes
Variable speed Pan/Tilt, from 0.8deg/sec to 120deg/sec.
Zoom/Focus, Autofocus following a Zoom In/Out.
(Autofocus enabled with link fitted on J6 pin 1&2)
16 Full scene presets.
2 preset patrols.
4 alarm inputs.
Additional commands:
AUTOPAN: Pressing the AUTOPAN key will run the domes in-built swing feature. Preset positions 1 & 8 must be
programmed before the swing is started. Preset 1 is the right hand stop, preset 8 is the left hand stop. Tilt and lens can be
adjusted whilst the dome is swinging.
180deg PAN AUTO FLIP is accomplished by pressing either '#'WASH on Tx1000 or '#'1 on Tx400.
DOME REMOTE RESET can be started by pressing either '#'LIGHTS on Tx1000 or '#'4 on Tx400.
RS485 control of dome using the following connections:
Rx100 Description Dome mounting bracket
J3-C1 TX/RX- Data- Pin 2
J3-C2 TX/RX+ Data+ Pin 1
Notes:
The alarm output relay ope ns for approx 2 seconds upon power up. This can be used to signal pow er loss, etc.
When programming a preset position, control is prohibited until the dome has stored the position into it's eeprom memory, approx 1-2 seconds.
Following a goto preset command, all further commands are ignored until the dome has reached it's preset position including any alarm input.
If swing is running, start patrol 1 & 2 is inhibited. The dome will be driven to a preset following an alarm activation. 60 seconds after alarm, swing will restart.
If a manual goto preset is pressed, the dome will stop swinging and move to the preset position. The AUTOPAN led will be on until the next manual pan
command.
Rx100 installation manual V1.17 29 Aug 08.doc Page 31
Page 32

BBV Rx100 Interface Receiver
Addendum to manual for the following dome:
Diamond/Ultrak KD6 Dome
Rx100 software RX1_D1V5
up-the-coax telemetry only. Not twisted pair
Application Notes
Variable speed Pan/Tilt.
Zoom/Focus, Iris override, Auto exposure ON/OFF
16 Full scene presets.
2 preset patrols.
4 alarm inputs driving to preset 1 - 4.
Advanced Features Tx400 Tx1000 TX1500 DM Mux or DS/DS2/BX2
DOME MENU (pshot 90) ‘#’1 '#' WASH 1’#’ *889 002 or *889 10 10 2
Auto Exposure (auto-iris) toggle (pshot 92) '#' 2 '#' WIPE 2’#’ *889 003 or *889 10 10 3
Program PTZ Tour1 toggle (pshot 83/86) '#' 3 ‘#' AUTOPAN 3’#’ *889 004 or *889 10 10 4
Start PTZ Tour1 (pshot 80) ‘#’ 4 ‘#’ LIGHTS 4’#’ *889 005 or *889 10 10 5
VectorScan 0 is started by pressing AUTOPAN and is programmed using the dome menu (see notes).
A datum or home facility is provided. This is link selectable to either move to preset 1 or start VectorScan 0. Link J6/1-2 fitted enables datum mode. Link
J6/4-5 fitted selects preset 1 and removed selects VectorSc an 0. The timeout is fixed at 5 minutes after the last movement command.
RS485 control of dome using the following connec tions:
Rx100 Description Dome connection
J3-C1 TX/RX- RXJ3-C2 TX/RX+ RX+
Notes:
The alarm output relay ope ns for approx 5 seconds upon power up. This can be used to signal pow er loss, etc.
Whilst within PATROL1, PATROL2, VECTORSCAN or PTZ Tour a local alarm input will drive the dome to the active alarm preset position at full speed.
The dome will remain in this position for approx 60 seconds, after which time the patrol, VectorScan etc will resume. Additionally, if the dome is running
PATROL1 or 2 a manual preset command will move the dome to this preset position for 60 seconds before continuing with the patrol.
The dome must be configured as follows:
Select 9600 Baud communications. To use the dome’s advanced features including the menu, select MAXPRO telemetry. The exact switch setting for
MAXPRO telemetry depends on the dome’s internal firmware version as below:
Version S4-1 S4-2 S4-3 S4-4
J/K closed open open open
H open closed open open
G closed open open closed
Three rotary switches set the dome address to 000. S1 = ‘0’, S2 = ‘0’, S3 = ‘0’.
The dome menu allows setting of several internal dome features. Once activated using ‘#’WASH etc, navigate using the pan/tilt direction keys/joystick.
Generally the IRIS OPEN key is used as a ENTER key and the IRIS CLOSE key is used as an ESCAPE key. The dome manual should explain in greater detail.
On screen text can be e nabled using the dome menu.
It is recommended that the dome is operated with the auto exposure set to ON to allow automatic compensation for varying lighting conditions.
Due to the dome protocol requirements, telemetry control is up-the-coax only
Rx1_D1V5)
. 20mA twisted pair telemetry is not currently supported. (Software version
Rx100 installation manual V1.17 29 Aug 08.doc Page 32
Page 33

BBV Rx 100 Interface Receiver
Addendum to manual for the following domes:
VCL TP protocol Microsphere/Orbiter range.
Rx100 software RX1_V1V10
Application Notes
The RX 100 provide the following functionality when controlling the above mentioned domes
Variable speed Pan/Tilt.
Zoom/Focus, Autofocus following a Zoom In/Out.
16 Full scene presets.
2 preset patrols.
Slow preset tour. Started by pressing AUTOPAN
5 minute datum/park driving to preset 8 disabled by removing link J6/4-5
Program up to 16 privacy zones
Additional commands:
AUTOPAN: Pressing the AUTOPAN key will run the domes preset tour at slow speed between the patrol 1 preset positions.
Advanced Features Tx400 Tx1000 Tx1500 DM DS/DS2/BX2 Mux
180 degree pan flip ‘#’ 1 '#' WASH 1 ’#’ *889 002 or *889 10 10 2
Privacy SET (Toggle Mono/Colour) ‘#’ 2 '#' WIPE 2 ’#’ *889 003 or *889 10 10 3
Privacy CLEAR (Auto Mono/Colour) ‘#’ 3 '#' AUTOPAN 3 ’#’ *889 004 or *889 10 10 4
Reset dome param eters ‘#’ 4 '#' LIGHTS 4 ’#’ *889 005 or *889 10 10 5
The dome and Rx100 are linked using RS485 for control and video for the camera signal.
Rx100 Description Dome connection
J3-C1 TX-/B DJ3-C2 TX+/A D+
Notes:
The dome address must be set at 1 for all the cameras that are controlled using a Rx100. With an Orbiter Gold, set the address to 1 with all switches of DILSW2
ON. Select VCL protocol with all switches of DILSW1 OFF. Check with the dome manual if you have any doubts.
The alarm output relay ope ns for approx 5 seconds upon power up and following any active alarm input.
If the slow preset tour is running, start patrol 1 & 2 is inhibited. The dome will be driven to a preset following an alarm activation. 60 seconds after alarm, the
tour will restart. A manual goto preset and lens control will stop the tour leaving the AUTOPAN led on until the next manual pan command.
A datum/park mode is offered that drives the dome to preset 8 following 5 minutes of inactivity. This can be disabled by removing the link fitted across J6/pin
4 & 5 and refitting to J6/pin 3 & 4.
Privacy zone programming
Link J6/1-2 must be fitted to allow programming of privacy zones.
– The keystrokes shown assume use of a TX1500. Use the keystroke shown above if using another controller.
Programming a zone
The Rx100 can be used to program 16 privacy zones, 100 – 115. The same procedure that is used to program a preset position is used to program or clear a
privacy zone. To instruct the Rx100 to program privacy press 2# followed by program preset 1 – 16. The screen will then go blank showing that the privacy
zone has been set.
Clearing a zone
To clear/delete a privacy zone press 3# followed by program preset 1 – 16. The relevant privacy zone will then be disabled.
Mono/Colour switching
If manual mono/colour switching is required then link J6/1-2 must be removed. This will disable the priva cy zone set/clear features.
.
Rx100 installation manual V1.17 29 Aug 08.doc Page 33
Page 34

BBV Rx 100 Interface Receiver
Addendum to manual for the following domes:
Vicon Surveyor 2000 dome.
Rx100 software RX1_V2V9
Application Notes
The RX 100 provide the following functionality when controlling the above dome.
Variable speed Pan/Tilt.
Zoom/Focus, Autofocus with manual override.
16 full scene presets (additional presets available using dome's menu)
2 preset patrols
4 alarm inputs driving to preset 1 - 4.
Additional commands:
RUN TOUR 80.
Pressing the AUTOPAN key will start the dome's Tour 80. The tour is programmable using the dome's menu and allows a
complex preset patrol, autopan or auto tour to be programmed. Refer to the dome programming manual for exact details.
Advanced Menu Feature Tx1500 Tx1000 Tx400DC DM Mux
*Dome Menu – Store preset 94 1 ‘#’ '#' WASH '#' 1 *889 002
(also AP once in menu)
AI (used as escape in menu) 2 ‘#’ '#' WIPE '#' 2 *889 003
AUX1 3 ‘#’ '#' AUTOPAN '#' 3 *889 004
AUX2 4 ‘#’ '#' LIGHTS '#' 4 *889 005
*Link J6/pin 1-2 must be fitted to access dome menu. Removing link will disable dome menu. On first entering the menu, the
dome may autopan and/or access the pan/tilt menu. This is acceptable and simply pressing the AI function will allow the main
menu to be displayed.
RS485 control of dome using the following connections:
Rx100 Description Dome Interface Board
J3-C1 TX/RX- COMM INJ3-C2 TX/RX+ COMM IN+
Notes:
The alarm output relay ope ns for approx 5 seconds upon power up. This can be used to signal pow er loss, etc.
If the dome's tour 80 is running, start patrol 1 & 2 is inhibited. The dome will be driven to a preset following an alarm activation. 60 seconds after alarm, the
tour will restart. A manual goto preset and lens control will stop the tour leaving the AUTOPAN led on until the next manual pan command.
Accessing the dome menu.
Press '#'1 to display menu. Use pan/tilt keys or joystick to move cursor. '#'1 now acts as the AP key and '#'2 as the AI key as described on screen. ‘#’3 and
‘#’4 are used as AUX1 and AUX2 during menu programming.
Presets positions greater than 17 can be programmed using the dome's menu. These can be built into Tour 80 which is started by pressing the AUTOPAN key.
Please refer to dome manual for specific instructions.
IMPORTANT:
Dome switch settings: S1 selects dome address, please set to address 2, S1/2=ON others OFF.
S2 is used to select control method and video standard. Set to VPS with S2/2=OFF. (SW2 all OFF)
For older versions of dome that do not support auto baud rate detect ensure that baud set for 9600.
Please check Vicon manual to confirm switch settings.
Rx100 installation manual V1.17 29 Aug 08.doc Page 34
Page 35

BBV Rx100 Interface Receiver
Addendum to manual for the following domes:
Videcon Dome
Rx100 software RX1_V4V2
Application Notes
The RX 100 provide the following functionality when controlling the above mentioned dome
Variable speed Pan/Tilt.
16 Full scene presets.
2 RX100 preset patrols.
Pattern Tour 1 learn and playback using AUTOPAN
Privacy zone support
IR Filter CUT using LIGHTS is link J6/1-2 fitted. Lights ON = FILTER OFF, Lights OFF = FILTER ON
Advanced Features Tx400 Tx1000 Tx1500 DM DS/DS2/BX2 Mux
Display MENU ‘#’ 1 '#' WASH 1 ’#’ *889 002 or *889 10 10 2
Display Privacy Menu ‘#’ 2 '#' WIPE 2 ’#’ *889 003 or *889 10 10 3
Record Pattern Tour 1 ‘#’ 3 '#' AUTOPAN 3 ’#’ *889 004 or *889 10 10 4
Stop Recording ‘#’ 4 ‘#’ LIGHTS 4 ‘#’ *889 005 or *889 10 10 5
Pattern Tour 1 playback = press AUTOPAN
The dome and Rx100 are linked using RS485 for control and video for the camera signal.
Rx100 Description Dome connection
J3-C1 TX-/B DJ3-C2 TX+/A D+
Notes:
The dome switches must be as follows to select Pelco P, 9600 baud and address 1.
SW1, 1 ON, 2-7 OFF. SW2, 1 & 2 ON, Protocol switch 1-4 all OFF
The alarm output relay opens for approx 5 seconds upon power up and following any active alarm input.
When navigating the dome’s menu or privacy setup use the joystick and IRIS OPEN and CLOSE.
The dome manual has detailed information on the menu structure and privacy setting.
J6 Links
J6/1-2 fitted to allow LIGHTS to swit ch th e IR CU T fi lte r ON/OFF when used with a day/n ig h t d o me.
Rx100 installation manual V1.17 29 Aug 08.doc Page 35
Page 36

BBV Rx100 Interface Receiver
Addendum to manual for the following camera:
Videcon VCP451 Camera
Rx100 software RX1_V5V1
Application Notes
The RX 100 provides control of Zoom and Focus and Menu Access.
Advanced Features Tx400 Tx1000 Tx1500 DM DS/DS2/BX2 Mux
Display MENU ‘#’ 1 '#' WASH 1 ’#’ *889 002 or *889 10 10 2
The camera and Rx100 are linked using RS485 for control and video for the camera signal.
Rx100 Description Camera connection
J3-C1 TX-/B RS485J3-C2 TX+/A RS485+
Notes:
Before controlling from the RX100 please enter the camera menu using the MENU button and set the following:
CAMERA ID – 001
PROTOCOL – P/D (The Rx100 uses PELCO D, 2400,N,8,1 to drive this camera)
The alarm output relay opens for approx 5 seconds upon power up and following any active alarm input.
To allow easy navigation in the camera menu the pan and tilt functions generate zoom and focus commands even when not
displaying the camera menu. This is NOT a fault!
To aid with confirming correction connection and operation fitting the TEST link to make the camera ZOOM IN and remove
to make the camera ZOOM OUT. If this is fine then the RX100 and camera are communicating correctly .
The camera manual has detailed information on the menu structure and privacy setting.
Rx100 installation manual V1.17 29 Aug 08.doc Page 36
Page 37

BBV Rx100 Interface Receiver
Addendum to manual for the following domes:
Vista PowerDome
Rx100 software RX1_V3V2
Application Notes
The RX 100 provide the following functionality when controlling the above mentioned dome
Variable speed Pan/Tilt.
Zoom/Focus, Focus/Iris Override returning to auto after Zoom In/Out.
16 Full scene presets.
2 preset patrols. (PATROL1 = RX100 patrol and PATROL 2 = dome’s TOUR 02)
Learned tour playback using AUTOPAN key.
5 minute datum/park driving to preset 1 or dome’s TOUR 2. Disabled by removing link J6/1-2
Program up to 16 privacy zones
Advanced Features Tx400 Tx1000 Tx1500 DM DS/DS2/BX2 Mux
Display MENU ‘#’ 1 '#' WASH 1 ’#’ *889 002 or *889 10 10 2
ENTER in MENU ‘#’ 2 '#' WIPE 2 ’#’ *889 003 or *889 10 10 3
ESC in MENU ‘#’ 3 '#' AUTOPAN 3 ’#’ *889 004 or *889 10 10 4
The dome and Rx100 are linked using RS485 for control and video for the camera signal.
Rx100 Description Dome connection
J3-C1 TX-/B RS485 B J3-C2 TX+/A RS485 A +
Notes:
The dome address must be set at 1 for all the cameras that are controlled using a Rx100. Check with the dome manual if you
have any doubts.
The alarm output relay opens for approx 5 seconds upon power up and following any active alarm input.
If the learned tour playback is running, start patrol 1 is inhibited. The dome will be driven to a preset following an alarm
activation. 60 seconds after alarm, the learned tour will restart. A manual goto preset and lens control will stop the tour
leaving the AUTOPAN led on until the next manual pan command.
J6 Links
J6/1-2 fitted to enable the 5 minute datum mode. After 5 minutes of inactivity the dome will be driven to either preset 1 or the
dome’s TOUR 2 is started depending upon link J6/3,4,5. J6/4-5 fitted = goto preset 1, J6/3-4 fitted = start dome TOUR 2.
The dome’s TOUR 2 must be programmed from within the domes menu. Please refer to the dome manual for details.
Rx100 installation manual V1.17 29 Aug 08.doc Page 37
Page 38

Appendix B - Trouble shooting guide.
Symptom: No video from interface.
Possible causes:
Camera is not powered or not connected to ‘CAMERA’ BNC on interface.
Check power and cabling.
Interface is not powered.
Check power.
Video out not connected to ‘TELEMETRY’ BNC on interface.
Check cabling.
If the after following the above check list video still not present then remove both BNCs from the interface
and connect together using a female/female barrel connector to check video path from camera to control
point.
Symptom: No camera control but lights relay operates with LIGHTS key on transmitter.
Possible causes:
Dome data cable is not connected correctly.
Check cabling, most commonly due to data cables swapped.
Dome configuration switches if fitted not set correctly.
Check configuration.
Symptom: No camera control and lights relay not operating.
Possible causes:
Interface not seeing Telemetry signal.
Check that telemetry is present on video cable using either oscilloscope or adjust v.hold on monitor to
view frame blanking period and check for black/white band. If missing, power down/up the transmitter.
Should this fail, swap video between working and non-working channels.
Earth loops can interrupt telemetry operation if sufficiently severe.
If hum bars are apparent, fit isolation transformer to coaxial cable.
Check cable and error LEDs on interface.
See SETUP section earlier in this manual for correct indication.
If the problem persists having followed the above steps, technical assistance can be received from
Building Block Video. Tel: +44 (0)1323 444600
Rx100 installation manual V1.17 29 Aug 08.doc Page 38
Page 39

--- Blank for your notes ---
Rx100 installation manual V1.17 29 Aug 08.doc Page 39
Page 40

Other BBV products.
Product Description
Single camera desktop telemetry transmitter with BBV up-the-coax &
TX300
20mA telemetry, Pan/Tilt/Lens & Lights
TX400
TX400DC
TX1000 MK2
TX1500
FBM range
RX100
RX200
RX300
RX400P
RX45X (AC)
RX55X (DC)
Multi RS485 protocol
and BBV up-the-coax
telemetry receivers
As TX300 inc Wash, Wipe, Autopan, 8 presets, preset patrol.
As TX400 including joystick for proportional Pan/Tilt control.
8 or 16 camera, 2 monitor telemetry tra n smitte r. Up to 2 keyboards.
BBV up-the-coax and RS422 standard with options for alarm inputs
and 20mA telemetry.
Mid size matrix 16 – 96 camera, 8 monitor. Up to 4 control positions
(keyboard & remote control) options for alarms, remote control, BBV
up-the-coax and RS485 telemetry.
Large size matrix. Configurable up to 4096 cameras and 64 monitor
outputs. Up to 8 control positions (keyboard & remote control) options
for alarms, remote control RS485 telemet ry with various options.
Please call to discuss requirements.
Dome Interface with options to drive a large library of dom e cameras.
BBV up-the-coax and 20mA telemetry.
AC receiver for Pan only heads or static cameras, Wash/Wipe/Lights.
BBV up-the-coax and 20mA telemetry.
AC receiver for Pan/Tilt/Zoo m/Fo c u s/Iris Override and 1 Au x ilia ry
output. BBV up-the-coax and 20mA telemetry.
AC full function receiver. PTZFI 4 Auxiliary outputs, 16 presets. BBV
up-the-coax and 20mA telemetry.
Multiple RS485/422 and BBV up-the-coax controllable AC and DC
receivers. These receivers are controlled from an expanding range of
serial protocols as listed below. 110/230Vac supply. PTZFI, 64 presets,
preset patrol, 8 local alarm inputs, 12V 500mA supply output. OSD for
remote diagnostics. 3 Aux. outputs RX55X or 4 Aux. outputs RX45X.
Optional Privacy board.
BBV RS485 and COAX,
PELCO P/D RS485,
VCL/HONEYWELL RS485,
PHILIPS/BOSCH RS485 (OPTIONAL BI-PHASE INPUT),
DENNARD RS485
SENSORMATIC/AD RS422
RX450/550
STARCARD
STARCARD/CONVERTER
ACCESSORIES
Rx100 installation manual V1.17 29 Aug 08.doc Page 40
PANASONIC RS485 Protocol only version of RX45X/55X.
8 * RS485 output, 2 wire simples RS422, 4 wire full-duplex RS422, 2
wire half-duplex RS485.
Optional STARCARD/CONVERTER offering protocol conversion to
drive an increasing range of 3
CTI/16 16 camera, RS422 to up-the-coax converter
TxLD (bidirectional RS422-RS232 converter)
98005 (bidirectional 20mA-RS232 converter)
AD RS422 (American Dynamics) protocol converters
rd
party protocols.
 Loading...