

Sony AIR-SA17TI User Manual
Wireless
Audio Transmitter
AIR-SA17Ti
©2009 Sony Corporation Printed in China
4-147-598-11(1)
Operating Instructions
Manual de instrucciones
(reverso)
Operations
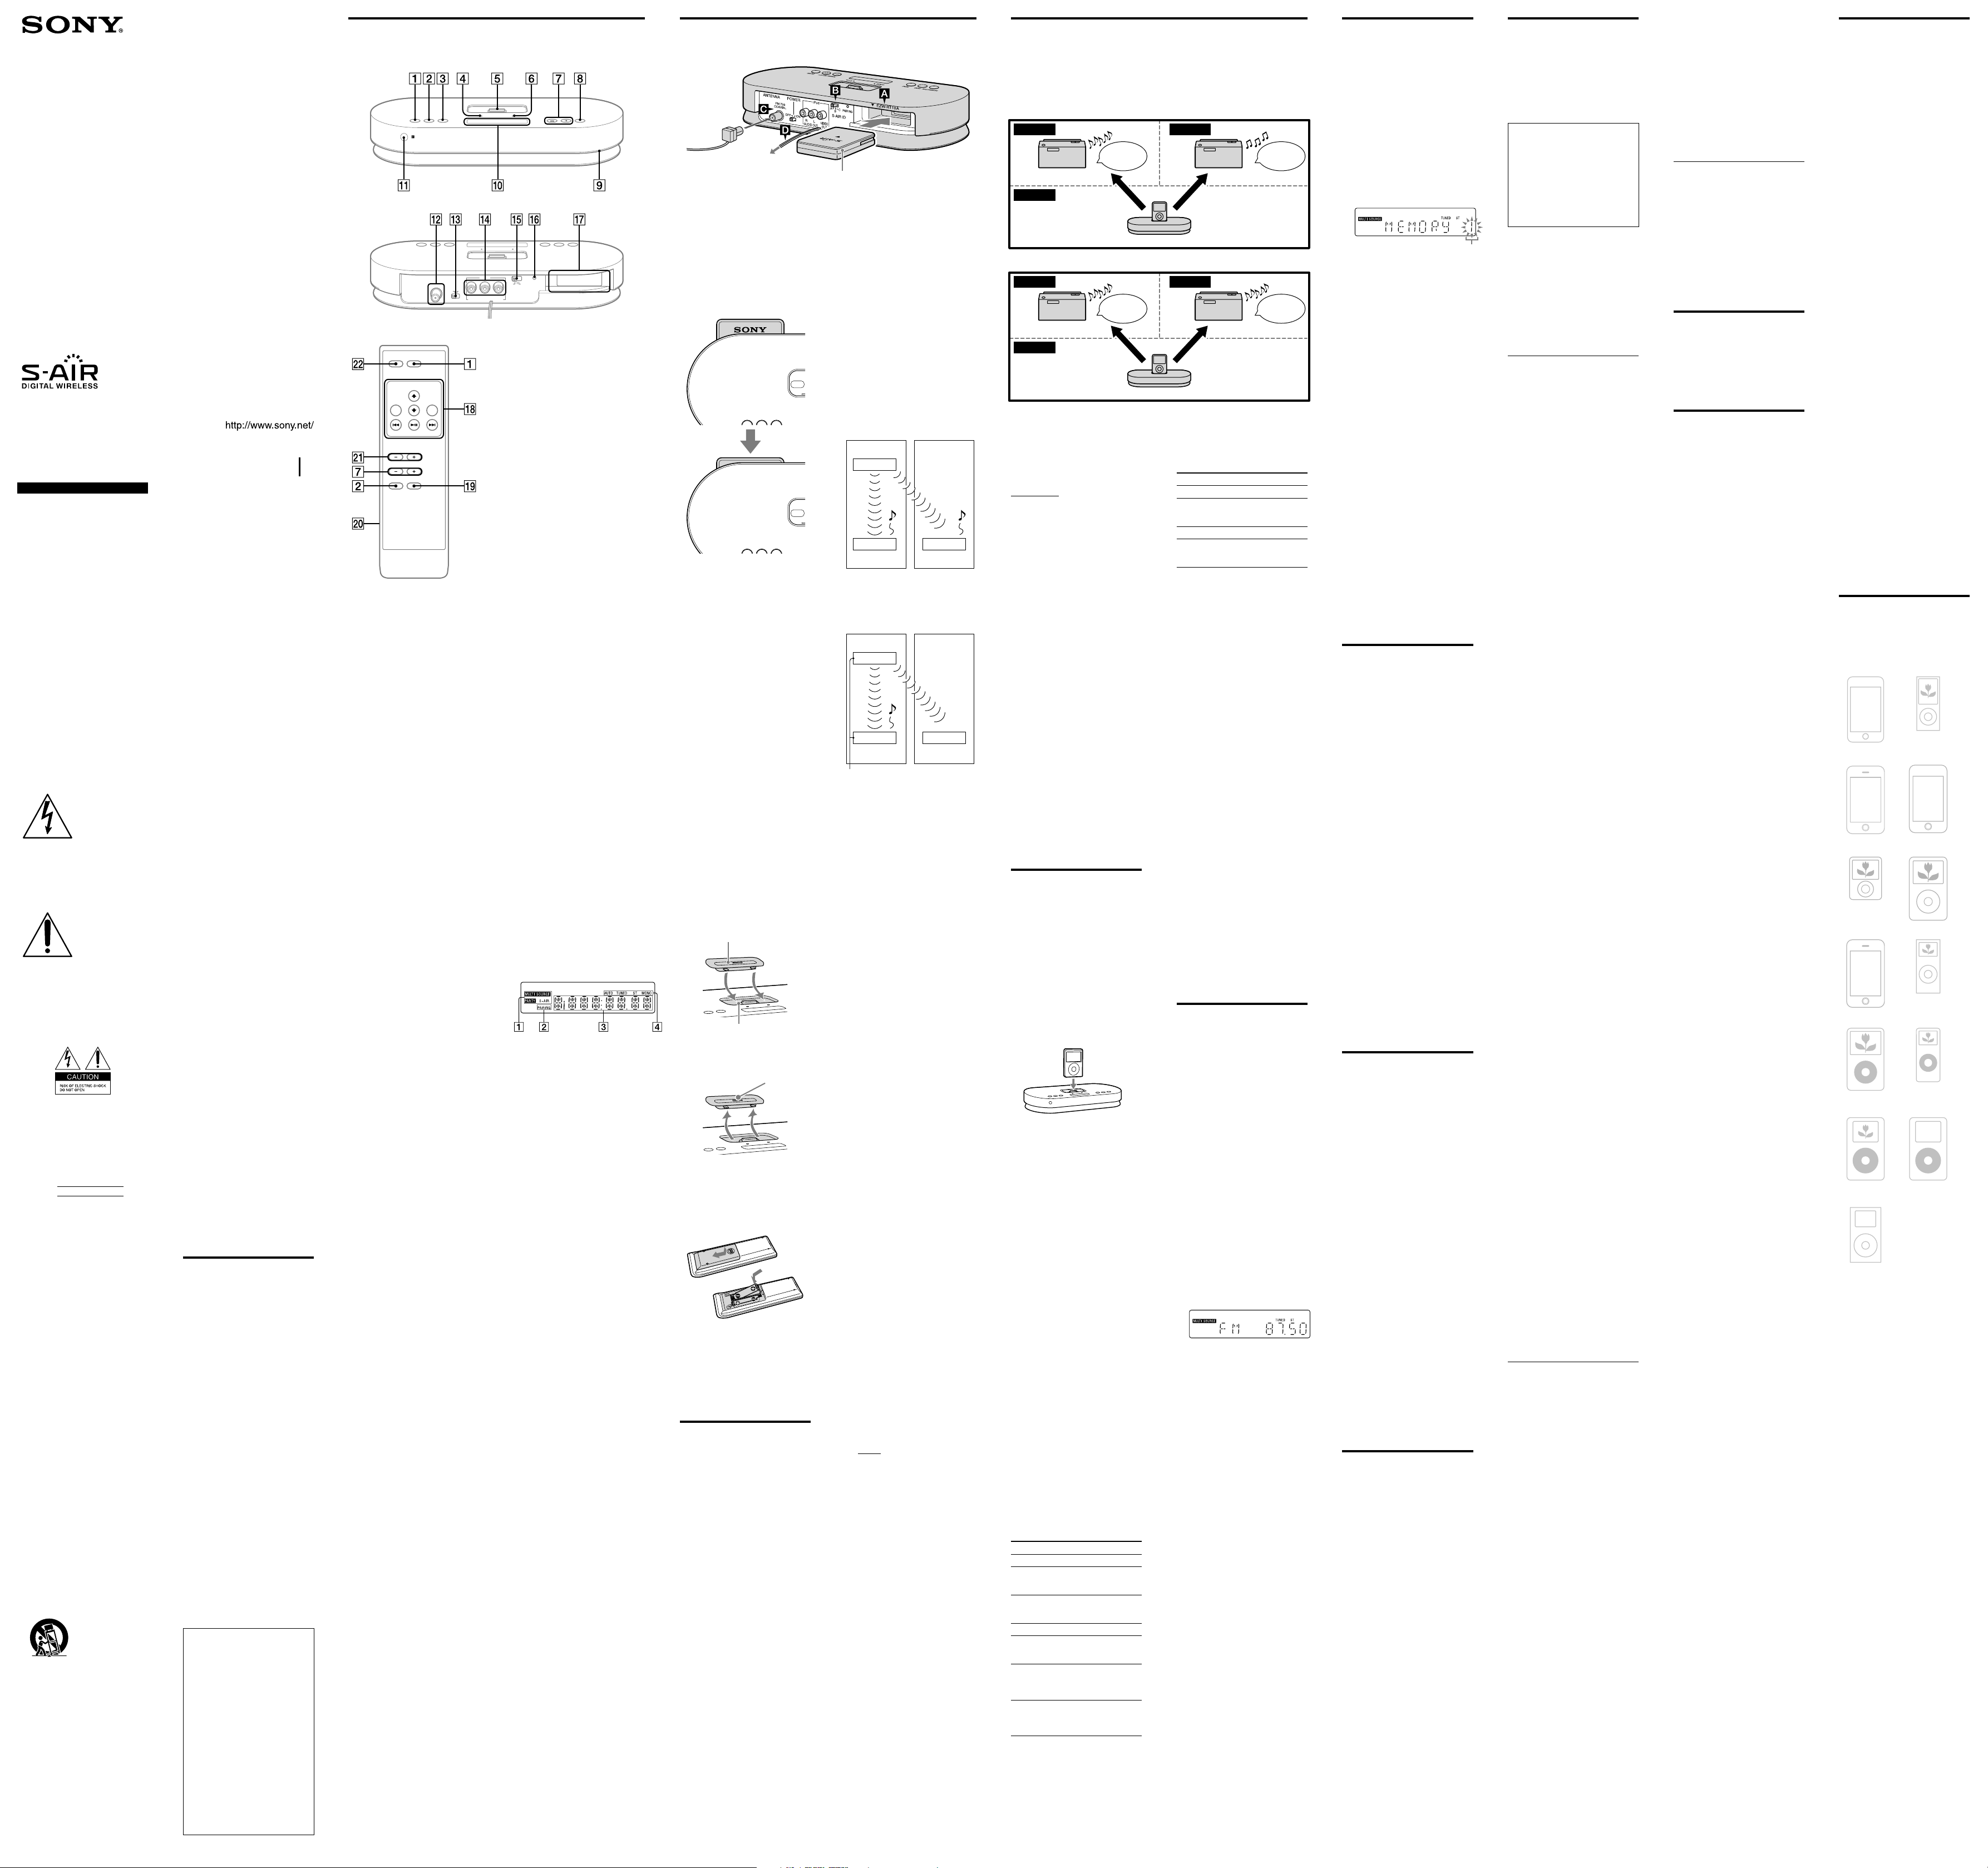
Selecting the S-AIR mode
When connecting to multiple sub units, you can listen to different sound sources on each
sub unit (MULTI SOURCE mode) or to the same sound source on both sub units
(PARTY mode) by selecting the S-AIR mode accordingly.
Use the main unit to set the S-AIR mode.
MULTI SOURCE mode
Main unit and iPod/iPhone
Bedroom
Sub unit (speaker, etc.)
Study room
Living room
iPod Tuner
Sub unit (speaker, etc.)
PARTY mode
Main unit and iPod/iPhone
BedroomStudy room
Living room
iPod iPod
Sub unit (speaker, etc.) Sub unit (speaker, etc.)
WARNING
To reduce the risk of fire or
electric shock, do not
expose this apparatus to
rain or moisture.
To reduce the risk of fire or electric
shock, do not expose this apparatus
to dripping or splashing, and do not
place objects filled with liquids, such
as vases, on the apparatus.
As the main plug is used to
disconnect the unit from the mains,
connect the unit to an easily
accessible AC outlet. Should you
notice an abnormality in the unit,
disconnect the main plug from the
AC outlet immediately.
The unit is not disconnected from the
mains as long as it is connected to the
AC outlet, even if the unit itself has
been turned off.
Do not install the appliance in a
confined space, such as a bookcase or
built-in cabinet.
Do not expose batteries or apparatus
with battery-installed to excessive
heat such as sunshine, fire or the like.
The nameplate is located on the
bottom exterior.
This symbol is
intended to alert the
user to the presence
of uninsulated
“dangerous voltage”
within the product’s
enclosure that may be
of sufficient
magnitude to
constitute a risk of
electric shock to
persons.
This symbol is
intended to alert the
user to the presence
of important
operating and
maintenance
(servicing)
instructions in the
literature
accompanying the
appliance.
The following indications are located
on the AC power supply unit.
Owner’s Record
The model and serial numbers are
located on the bottom of the unit.
Record these numbers in the space
provided below. Refer to them
whenever you call upon your Sony
dealer regarding this product.
Model No.
Serial No.
Important Safety Instructions
1) Read these instructions.
2) Keep these instructions.
3) Heed all warnings.
4) Follow all instructions.
5) Do not use this apparatus near
water.
6) Clean only with dry cloth.
7) Do not block any ventilation
openings. Install in accordance
with the manufacturer’s
instructions.
8) Do not install near any heat
sources such as radiators, heat
registers, stoves, or other apparatus
(including amplifiers) that produce
heat.
9) Do not defeat the safety purpose of
the polarized or grounding-type
plug. A polarized plug has two
blades with one wider than the
other. A grounding type plug has
two blades and a third grounding
prong. The wide blade or the third
prong are provided for your safety.
If the provided plug does not fit
into your outlet, consult an
electrician for replacement of the
obsolete outlet.
10) Protect the power cord from being
walked on or pinched particularly
at plugs, convenience receptacles,
and the point where they exit from
the apparatus.
11) Only use attachments/accessories
specified by the manufacturer.
12) Use only with the cart, stand,
tripod, bracket, or table specified
by the manufacturer, or sold with
the apparatus. When a cart is used,
use caution when moving the cart/
apparatus combination to avoid
injury from tip-over.
13) Unplug this apparatus during
lightning storms or when unused
for long periods of time.
14) Refer all servicing to qualified
service personnel. Servicing is
required when the apparatus has
been damaged in any way, such as
power-supply cord or plug is
damaged, liquid has been spilled or
objects have fallen into the
apparatus, the apparatus has been
exposed to rain or moisture, does
not operate normally, or has been
dropped.
NOTE:
This equipment has been tested and
found to comply with the limits for a
Class B digital device, pursuant to Part
15 of the FCC Rules. These limits are
designed to provide reasonable
protection against harmful interference
in a residential installation. This
equipment generates, uses and can
radiate radio frequency energy and, if
not installed and used in accordance
with the instructions, may cause
harmful interference to radio
communications. However, there is no
guarantee that interference will not
occur in a particular installation. If this
equipment does cause harmful
interference to radio or television
reception, which can be determined by
turning the equipment off and on, the
user is encouraged to try to correct the
interference by one or more of the
following measures:
Reorient or relocate the receiving
antenna.
Increase the separation between the
equipment and receiver.
Connect the equipment into an
outlet on a circuit different from
that to which the receiver is
connected.
Consult the dealer or an
experienced radio/TV technician
for help.
CAUTION
You are cautioned that any changes or
modifications not expressly approved
in this manual could void your
authority to operate this equipment.
For the wireless transceiver (EZW-RT10A)
This device complies with Part 15 of
the FCC Rules. Operation is subject to
the following two conditions: (1) this
device may not cause harmful
interference, and (2) this device must
accept any interference received,
including interference that may cause
undesired operation.
This equipment must not be co-located
or operated in conjunction with any
other antenna or transmitter.
This equipment complies with FCC
radiation exposure limits set forth for
uncontrolled equipment and meets the
FCC radio frequency (RF) Exposure
Guidelines in Supplement C to OET65.
This equipment should be installed
and operated with at least 20 cm and
more between the radiator and person’s
body (excluding extremities: hands,
wrists, feet and ankles).
“S-AIR” and its logo are trademarks of
Sony Corporation.
The Bluetooth word mark and logos are
owned by the Bluetooth SIG, Inc. and any
use of such marks by Sony Corporation is
under license. Other trademarks and trade
names are those of their respective owners.
iPod is a trademark of Apple Inc.,
registered in the U.S. and other countries.
iPhone is a trademark of Apple Inc.
All other trademarks and registered
trademarks are of their respective holders.
In this manual, ™ and ® marks are not
specified.
Features
The AIR-SA17Ti is an “S-AIR”
compatible product. It is also called the
“S-AIR main unit.”
Connecting the S-AIR main unit
(transmitter product, hereafter called
“main unit”) with an S-AIR sub unit
(receiver product, hereafter called “sub
unit”) using “S-AIR” technology, you
can use each unit in a remote location.
For example, you can install the sub
units, one in the study room and the
other in the bedroom, and then install
the main unit in the living room. You
can then listen to the music from the
main unit located in the living room by
controlling the sub units.
You can also connect the main unit to
an optional AV system (such as a TV),
and on this optional AV system you
can enjoy audio, video and photo
contents of an iPod/iPhone which is
connected to the main unit.
Using the coupling
function with the sub unit
and S-AIR remote
commander
This system is compatible with the
coupling function. The coupling
function establishes a connection
between a sub unit and an S-AIR
remote commander. For details, refer
to the Operating Instructions of the
S-AIR remote commander.
S-AIR (Sony Audio
Interactive Radio frequency)
Recent times have seen the rapid
spread of DVD media, Digital
Broadcasting, and other highquality media.
To ensure that the subtle nuances of
these high-quality media are
transmitted with no deterioration,
Sony has developed a technology
called “S-AIR” for the radio
transmission of digital audio signals
with no compression, and has
incorporated this technology into
the EZW-RT10A.
This technology transfers digital
audio signals with no compression
using the 2.4 GHz band range of
ISM band (Industrial, Scientific, and
Medical band), such as wireless
LANs and Bluetooth applications.
Getting Started
Hooking up the system
EZW-RT10A
Wireless transceiver
To a wall socket
Wireless transceiver
Insert the supplied wireless transceiver
(EZW-RT10A) securely into the EZWRT10A slot on the rear panel.
Check the orientation of the mark
when inserting the supplied wireless
transceiver (EZW-RT10A). Failure to
do so may result in damage to the unit.
Push to insert the wireless transceiver
firmly until you cannot see the SONY
logo mark from above.
Notes
Make sure to turn off the unit when
inserting or removing the supplied wireless
transceiver (EZW-RT10A). Failure to do so
may result in damage to the unit.
Do not touch the terminal of the supplied
wireless transceiver (EZW-RT10A).
Do not insert any device other than the
supplied wireless transceiver (EZWRT10A) into the EZW-RT10A slot.
S-AIR ID selector
Set the same S-AIR ID for the main
unit and sub unit. For details on setting
the S-AIR ID, see “Establishing the
S-AIR connection.”
FM antenna
Find a location and an orientation that
provide good reception, and then set
up the antenna.
Keep the antenna away from the power
supply cord to avoid picking up noise.
Power
Connect the power supply cord to a
wall socket.
To use the iPod/iPhone
Insert a Universal Dock Adapter into
the iPod/iPhone connector before use.
Use one of the supplied Universal
Dock Adapters with the main unit for
iPhone and iPhone 3G according to
the following.
‒ iPhone :
‒ iPhone 3G :
When you use other iPod models, use
the adapter supplied with your iPod
model, or purchase a compatible Dock
Adapter from Apple Inc.
Universal Dock Adapter
iPod/iPhone connector
To remove the Universal Dock
Adapter, pull it up with your fingernail
or a flat object using the slot inside the
adapter.
Slot
To use the remote
Slide and remove the battery
compartment lid, and insert the two
supplied R03 (size AAA) batteries,
side first, matching the polarities
shown below.
Remote (RM-ANU069)
Notes on using the remote
With normal use, the batteries should last
for about six months.
Do not mix an old battery with a new one
or mix different types of batteries.
If you do not use the remote for a long
period of time, remove the batteries to
avoid damage from battery leakage and
corrosion.
Establishing the
S-AIR connection
You can easily establish the connection
by setting the same S-AIR ID for the
unit and the sub unit.
For details on operation of the S-AIR
sub unit, refer to the Operating
Instructions supplied with the S-AIR
sub unit.
1 Check that the wireless
transceivers are inserted
securely to the unit and the sub
unit.
2 Turn on the unit and the sub
unit.
Set the POWER switch on the rear
panel to “ON.”
The POWER indicator on the unit
lights up.
For details about turning on the
sub unit, refer to the Operating
Instructions supplied with the
S-AIR sub unit.
3 Set the same S-AIR ID for the
unit and the sub unit.
Set the S-AIR ID selector on the
rear panel to the desired S-AIR ID.
Tip
The S-AIR ID is set at the factory to “A.”
4 Confirm the connection status.
Once the connection between the
main unit and the sub unit is
established, the S-AIR indicator on
the sub unit lights up and
“LINKED” appears in the display
of the sub unit for a few seconds.
Tip
Up to 10 sub units (optional) can be
connected with the main unit.
Identifying the unit with a
specific sub unit (Pairing
operation)
It is easy to set the same S-AIR ID for
the main unit and the sub unit to
establish the connection.
However, if a neighbor has an S-AIR
main unit with the same S-AIR ID as
your S-AIR main unit, the neighbor
may be able to hear the audio
transmitted from your main unit on
the neighbor’s system. Also, you may
be able to hear the audio transmitted
from your neighbor’s S-AIR main unit
on your system. To prevent this, you
can identify the main unit with a
specific sub unit by performing the
pairing operation.
Before pairing
The connection is established by the
S-AIR ID (example).
Your system Neighboring
system
ID A
Main unit
Sub unit Sub unit
ID A ID A
After pairing
The connection is established between
the paired main unit and sub unit.
Your system Neighboring
system
Pairing
ID A
Main unit
Sub unit Sub unit
ID A ID A
not connected
1 Place the sub unit to be paired
near the main unit.
Pair the main unit with the sub
unit one at a time.
2 Check that the power of the
main unit and the sub unit are
turned on.
3 Check that the S-AIR ID of the
main unit is the same as the
S-AIR ID of the sub unit.
4 Press the PAIRING button on
the rear panel of the main unit
using a pointed object.
5 Operate the sub unit to turn on
the pairing function.
For details on turning on the
pairing function, refer to the
Operating Instructions supplied
with the sub unit.
When pairing is performed, the
display on the main unit changes as
follows: “PAIRING”
“COMPLETE”
To cancel pairing
Change the S-AIR IDs of the main unit
and the sub unit to different S-AIR
IDs.
To stop the pairing operation
midway
Press the PAIRING button again.
To pair the main unit with
multiple sub units
Repeat steps 1 through 5.
If the S-AIR connection is
unstable
Since the S-AIR product uses radio
waves that share the same frequency
(2.4 GHz) as other wireless systems,
such as wireless LAN or Bluetooth
devices, interference or poor
transmission may result if you use
other wireless systems near the main
unit and/or the sub unit.
In this case, the connection may be
improved by changing the RF
CHANGE (Radio Frequency Change)
setting on the main unit.
1 Press SYSTEM MENU on the
unit.
2 Press TUNING/SELECT +/ on
the unit repeatedly until “RF
CHG” appears, then press
ENTER on the unit.
3 Press TUNING/SELECT +/ on
the unit repeatedly to select the
desired setting.
The default setting is underlined.
AUTO:
Normally select this setting. The
main unit changes the RF
CHANGE setting to “ON” or
“OFF” automatically.
ON:
The main unit transmits sound by
searching for the best channel for
transmission.
OFF:
The main unit transmits sound
using a fixed channel for
transmission. When you select this
setting, select the S-AIR ID that
provides the best connection.
4 Press ENTER on the unit to exit
the system menu.
Guide to parts and controls
Unit
Front panel
Rear panel
Remote (RM-ANU069)
ILLUMINATION
Press to change the illumination
brightness.
S-AIR MODE
Press to select the S-AIR mode.
SYSTEM MENU
Press to enter the system menu.
POWER indicator
Lights up when the unit is turned on.
iPod/iPhone connector
Place an iPod/iPhone on the connector
to listen to audio contents stored in the
iPod/iPhone.
You need to connect the supplied
Universal Dock Adapter first to use an
iPod/iPhone.
For details on the supplied Universal
Dock Adapters, refer to the
instructions supplied with the
Universal Dock Adapters.
S-AIR indicator
Lights up when the unit is turned on
with the supplied wireless transceiver
inserted.
Unit: TUNING/SELECT +/
Press to tune in the desired station.
Press to select a menu item.
Remote: TUNING +/
Press to tune in the desired station.
ENTER
Press to enter the settings.
Illumination
You can change the brightness using
ILLUMINATION .
Display
Remote sensor
ANTENNA jack
Connect the supplied FM lead
antenna.
POWER switch
Switch for turning the unit on or off.
iPod AUDIO OUT L/R jacks
iPod VIDEO OUT jack
Connect an optional AV system, such
as a TV, etc.
S-AIR ID selector
Select the S-AIR ID to connect with
the sub unit.
PAIRING button
Press to perform pairing.
EZW-RT10A slot
Insert the supplied wireless transceiver.
Buttons for controlling an
iPod/iPhone
(play/pause)
Press to start or pause playback.
/
Press to skip to the previous/next
track.
Hold down to find a point in a track.
MENU
Press to return to the previous menu.
Works much like the Menu button on
the iPod/iPhone.
/
Press to select a menu item or track for
playback.
ENTER
Press to execute the selected item or
play the selected track.
PARTY CH
Press to select the sound source when
the S-AIR mode is set to “PARTY.”
Battery compartment lid
PRESET +/
Press to select a preset station.
DISPLAY
Press to view the information on the
display.
Display
S-AIR mode indicator
PAIRING indicator
Text information
Tuner reception mode
Tuner reception
Press S-AIR MODE on the unit
or on the remote (RMANU069) repeatedly until the
desired S-AIR mode indicator
lights up in the display.
The default setting is underlined.
MULTI SOURCE:
Select this setting to listen to a different
sound source on each sub unit.
PARTY:
Select this setting to listen to the same
sound source on multiple sub units.
To select the S-AIR mode from
the system menu
1 Press SYSTEM MENU on the
unit.
2 Press TUNING/SELECT +/ on
the unit repeatedly until
“MODE” appears, then press
ENTER on the unit.
3 Press TUNING/SELECT +/ on
the unit repeatedly to select
“MULTI” or “PARTY,” then press
ENTER on the unit.
The selected S-AIR mode appears
on the display.
To check the S-AIR mode when
the display of the unit is turned
off
Press DISPLAY on the remote.
Notes
When you change the S-AIR mode, the
iPod channel is automatically selected for
the connected sub unit.
When connecting the unit to an S-AIR sub
unit (such as the AIR-SA10) which is not
compatible with the MULTI SOURCE
mode, set the unit to the PART Y mode.
You can then select the S-AIR channel
from the S-AIR sub unit.
Listening to iPod/
iPhone music using
the S-AIR connection
Use the sub unit to listen to the music
of an iPod/iPhone connected to the
unit.
You can control the connected iPod/
iPhone from either the unit or the sub
unit.
To use an iPod/iPhone, refer to the
user’s guide of your iPod/iPhone.
1 Place an iPod/iPhone on the
iPod/iPhone connector as
shown below.
Now, you are ready to listen to the
connected iPod/iPhone using the
sub unit.
2 Select the iPod channel.
When the S-AIR mode is set to
“PARTY”:
Press PARTY CH on the remote
repeatedly until “iPod” appears in
the display.
When the S-AIR mode is set to
“MULTI SOURCE”:
The iPod channel is internally
activated. Go to step 3.
3 Start playback.
Operate the iPod/iPhone to start
playing the music. You can also
operate the iPod/iPhone using the
remote (see “To control the iPod/
iPhone using the main unit”).
Using the sub units
1 Place an iPod/iPhone on the
iPod/iPhone connector on the
main unit.
2 Select the iPod channel.
Press S-AIR CH repeatedly until
“iPod” appears in the display.
3 Start playback.
Operate the iPod/iPhone to start
playing the music. You can also
operate the iPod/iPhone using the
remote (see “To control the iPod/
iPhone using the sub units”).
To control the iPod/iPhone
using the main unit
You can control your iPod/iPhone with
the following buttons on the remote.
To Press
Start playback.
Pause
playback.
To resume playback, press
again
Select a menu
or track for
playback.
/
You can scroll up or down the
iPod menus
Skip a track.
/
Find a point in
a track.
Hold down / during
playback, and release the
button at the desired point
Choose the
selected item.
ENTER
You can choose the selected
item much like the center
button on the iPod
Return to the
previous
menu.
MENU
You can return to the
previous menu much like the
Menu button on the iPod
To control the iPod/iPhone
using the sub units
You can control your iPod/iPhone with
the following buttons on the remote or
unit.
To Press
Start playback.
Pause
playback.
, or
To resume playback, press
or
Skip a track.
/
Find a point in
a track.
Hold down / during
playback, and release the
button at the desired point
To use the unit as a battery
charger
You can use the unit as a battery
charger for the iPod/iPhone when the
unit is on.
Charging begins when the iPod/iPhone
is placed on the iPod/iPhone
connector. Charging status appears in
the iPod/iPhone display. For details,
refer to the user’s guide of your iPod/
iPhone.
To stop charging the iPod/iPhone,
remove the iPod/iPhone or turn off the
unit.
Notes
When placing or removing the iPod/
iPhone, handle the iPod/iPhone in the
same angle as that of the iPod/iPhone
connector on the unit and do not twist or
sway the iPod/iPhone to prevent connector
damage.
Do not carry the unit with an iPod/iPhone
set on the connector. Doing so may cause a
malfunction.
When placing or removing the iPod/
iPhone, brace the unit with one hand and
take care not to press the controls of the
iPod/iPhone by mistake.
Before disconnecting the iPod/iPhone,
pause playback.
You cannot adjust the volume using the
unit.
The volume level does not change even if
adjusted on the iPod/iPhone.
The unit is designed for iPod/iPhone only.
You cannot connect any other portable
audio players.
Depending on the iPod/iPhone model you
are using and its status, operations using
the unit and the sub unit may not be
accepted or the wrong operations may be
performed.
Sony cannot accept responsibility in the
event that data recorded to iPod/iPhone is
lost or damaged when using an iPod/
iPhone with this S-AIR product.
Listening to the
radio using the
S-AIR connection
1 Select the tuner channel.
When the S-AIR mode is set to
“PARTY”:
Press PARTY CH on the remote
repeatedly until “TUNER” appears
in the display.
The display changes to “FM” and
the frequency after a short time.
When the S-AIR mode is set to
“MULTI SOURCE”:
The tuner channel is internally
activated.
2 Perform automatic tuning.
Press and hold TUNING +/ on
the remote (or TUNING/SELECT
+/ on the unit) until the
frequency indication changes and
then release.
“AUTO” lights up in the display.
Scanning stops automatically when
a station is tuned in, and then
“TUNED” and “ST” (for FM stereo
programs only) appear.
Using the sub units
When a radio station is tuned on the
main unit, you can listen to that station
by following the steps below.
To tune in a radio station using the sub
units, that station needs to be preset
beforehand (see “To call up a preset
radio station using the sub units”).
1 Select the tuner channel.
Press S-AIR CH repeatedly until
“TUNER” appears in the display.
The display changes to “FM” and
the frequency after a short time.
To tune in a station with a
weak signal
If “TUNED” does not appear and
scanning does not stop, press TUNING
+/ on the remote (or TUNING/
SELECT +/ on the unit) repeatedly
to tune in the desired station.
To reduce static noise on a
weak FM stereo station
1 Press SYSTEM MENU on the
unit.
2 Press TUNING/SELECT +/ on
the unit repeatedly until “FM
MODE” appears, then press
ENTER on the unit.
3 Press TUNING/SELECT +/ on
the unit repeatedly until
“MONO” appears, then press
ENTER on the unit.
There will be no stereo effect, but
the reception will improve.
Presetting radio
stations
You can preset your favorite radio
stations and tune them in instantly by
selecting the corresponding preset
number.
1 Tune in desired station.
See “Listening to the radio using
the S-AIR connection.”
2 Press SYSTEM MENU on the
unit.
3 Press TUNING/SELECT +/ on
the unit repeatedly until
“MEMORY” appears, then press
ENTER on the unit.
Preset number
4 Press TUNING/SELECT +/ on
the unit repeatedly to select
your desired preset number.
If another station is already
assigned to the selected preset
number, the station is replaced by
the new station.
5 Press ENTER on the unit.
6 Repeat steps 1 through 5 to
store other stations.
You can preset up to 20 stations.
The preset stations are retained for
about half a day even if you
disconnect the power supply cord
or if a power failure occurs.
To call up a preset radio station
using the main unit
Press PRESET +/– on the remote (RMANU069) repeatedly.
To call up a preset radio station
using the sub units
1 Preset radio stations on the
main unit (see “Presetting radio
stations”).
2 Select the tuner channel.
Press S-AIR CH +/– repeatedly
until “TUNER” appears in the
display.
3 Press PRESET +/– on the remote
(RM-ANU069) repeatedly to
select a preset station.
Using an optional
AV system
You can enjoy audio and video of the
connected iPod/iPhone with an
optional AV system.
1 Connect an optional AV system
(such as a TV, etc.) to the iPod
AUDIO OUT L/R jacks and/or the
iPod VIDEO OUT jack using an
optional audio cord and/or
video cable.
2 Place an iPod/iPhone on the
iPod/iPhone connector on the
unit.
3 Start playback of the iPod/
iPhone.
See “Listening to iPod/iPhone
music using the S-AIR connection.”
Notes
The tuner’s sound cannot be output
through the iPod AUDIO OUT L/R jacks.
Before enjoying video, adjust the video
settings on the iPod/iPhone to the
appropriate settings according to your
situation.
Regardless of whether the power of the
main unit is on/off, sound and/or video
will be output from the iPod AUDIO OUT
L/R jacks and/or the iPod VIDEO OUT
jack.
Tip
Even if you change the S-AIR mode or the
S-AIR channel using PARTY CH, audio and/
or video from the connected iPod/iPhone
will continue to be output from the iPod
AUDIO L/R jacks and/or the iPod VIDEO
OUT jack.
Changing the
display
Using the main unit
To view the information on the
display
Press DISPLAY on the remote (RMANU069).
Using the sub units
To change the information on
the display while the sub unit
is on
Press DISPLAY on the unit. Each time
you press the button, displayed
information will be changed. For
details about the information displayed
on an S-AIR sub unit, refer to the
Operating Instructions supplied with
the S-AIR sub unit.
About the information
transmitted from the main unit
Depending on the iPod/iPhone model
you are using, up to 16 characters of
the following information can be
viewed, for example, while playing the
iPod/iPhone.
– Track name
– Artist name
– Album name
– Elapsed playing time of the track
Characters that cannot be displayed
appear as “_.”
When listening to the radio, the
frequency is displayed.
Changing the
illumination
brightness
Press ILLUMINATION
repeatedly.
Each time you press the button, the
illumination brightness changes as
follows:
Bright Darkened Off
Troubleshooting
1 Make sure the power supply
cord is correctly and firmly
connected.
2 Find your problem in the
checklist below, and take the
indicated corrective action.
If the issue persists, contact your
nearest Sony dealer.
When bringing the product in for
repairs, be sure to bring in the
entire system (the unit, the sub
unit and wireless transceivers).
This product is a system product,
and the entire system is needed to
determine the location requiring
repair.
If “PROTECT” appears on the
display
Set the POWER switch on the rear
panel to “OFF” to turn off the unit, and
then unplug the power supply cord.
After checking that there is no
indication on the display, reconnect
the power supply cord and set the
POWER switch to “ON” to turn on the
unit. If the issue persists, contact your
nearest Sony dealer.
General
The remote does not function.
Remove any obstacles between the
remote and the remote sensor, and
position the unit and the sub unit
away from fluorescent lights.
Point the remote at the remote
sensor.
Move the remote closer to the unit.
Check whether you are using the
remote for the main unit to operate
the main unit and the remote for the
sub unit to operate the sub unit.
The S-AIR indicator on the unit is turned
off.
Check that the power supply cord is
connected securely and the unit is
turned on.
Check that the supplied wireless
transceiver is inserted securely to the
unit.
Connecting the main unit and the sub
unit is not possible. (The S-AIR indicator
on the unit is turned off and/or the S-AIR
indicator on the sub unit flashes.)
Check that the supplied wireless
transceivers are inserted securely to
the main unit and the sub unit.
If you use another S-AIR main unit,
place it more than 8 m away from
the main unit.
Confirm the S-AIR IDs of the main
unit and the sub unit.
The main unit is paired with another
S-AIR sub unit. Pair the main unit
with the sub unit you are using.
The main unit is paired with another
S-AIR sub unit. Cancel pairing.
Place so that the main unit and the
sub unit are separated from other
wireless devices.
Stop using any other wireless
devices.
The main unit or the sub unit is
turned off. Make sure the power
supply cord and/or the power cord
are connected and turn on the main
unit and the sub unit.
The S-AIR channel fails to change.
Check that the main unit and the
sub unit are connected properly.
If you are using an optional S-AIR
sub unit (such as the AIR-SA10)
which is not compatible with the
MULTI SOURCE mode, set the unit
to the PARTY mode.
There is no sound.
If you use another S-AIR main unit,
place it more than 8 m away from
the main unit.
Confirm the S-AIR IDs of the main
unit and the sub unit.
Check the pairing setting.
Place so that the main unit and the
sub unit are closer.
Stop using any equipment that
generates electromagnetic energy,
such as a microwave oven.
Place so that the main unit and the
sub unit are separated from other
wireless devices.
Stop using any other wireless
devices.
Change the S-AIR ID settings of the
main unit and the sub unit.
Turn off the main unit and the sub
unit and then turn them on again.
Check that the power supply cord
and/or the power cord are connected
securely and the main unit and the
sub unit are turned on.
Increase the volume of the sub unit.
Change the RF CHANGE setting on
the unit.
There is noise or the sound skips.
If you use another S-AIR main unit,
place it more than 8 m away from
the main unit.
Place so that the main unit and the
sub unit are closer.
Stop using any equipment that
generates electromagnetic energy,
such as a microwave oven.
Place so that the main unit and the
sub unit are separated from other
wireless devices.
Stop using any other wireless
devices.
Change the S-AIR ID settings of the
main unit and the sub unit.
Do not place a mobile phone near
the main unit and the sub unit, as
this may result in noise.
Change the RF CHANGE setting on
the unit.
iPod/iPhone
There is no sound.
Make sure the iPod/iPhone is
connected securely.
Make sure the iPod/iPhone is
playing music.
Adjust the volume of the sub unit.
Update your iPod/iPhone to use the
latest software.
The iPod/iPhone cannot be operated by
the main unit or the sub unit.
Check that the iPod/iPhone and the
main unit are connected properly
and that the unit and the sub unit
are connected properly.
Depending on the iPod/iPhone
model you are using and its status, it
may not be possible to operate the
iPod/iPhone using the main unit or
the sub unit.
Update your iPod/iPhone to use the
latest software.
The sound is distorted.
Turn down the volume of the sub
unit.
Set the “EQ” setting of the iPod/
iPhone to “Off” or “Flat.”
The iPod/iPhone cannot be charged.
Make sure the iPod/iPhone is
connected securely.
Check that the power supply cord is
connected securely and the unit is
turned on.
The iPod/iPhone track information
cannot be obtained.
Depending on the iPod/iPhone
model you are using and its status, it
may not be possible to obtain the
track information properly during
playback.
Up to 16 characters can be displayed
on the displays of the sub unit.
Check that the track information has
been entered into the iPod/iPhone.
Video/Photo image from the connected
iPod/iPhone does not appear on the TV
screen.
Make the connection according to
your AV system.
Switch the TV input to the video
input connected to the unit.
Check that the TV output setting on
the iPod/iPhone is on (Refer to the
user’s guide of your iPod/iPhone).
Check that the iPod/iPhone is
compatible with video output (Refer
to the user’s guide of your iPod/
iPhone).
Tuner
Severe hum or noise, or stations cannot
be received. (“TUNED” or “ST” flashes on
the display of the unit.)
Connect the antennas properly.
Find a location and orientation that
provide good reception, and then set
up the antenna again.
Keep the antenna away from the
power supply cord to avoid picking
up noise.
Connect a commercially available
external antenna.
Turn off nearby electrical
equipment.
Messages
CANCEL : Time out without pairing.
COMPLETE : Pairing is completed.
ID A : Sets the S-AIR ID to “A.”
ID B : Sets the S-AIR ID to “B.”
ID C : Sets the S-AIR ID to “C.”
PAIRING : Pairing is in progress.
Precautions
Notes on use of the S-AIR product
As the S-AIR product transmits
sound by radio waves, sound may
skip when radio waves are
obstructed. This is a characteristic of
radio waves and is not a
malfunction.
As the S-AIR product transmits
sound by radio waves, equipment
that generates electromagnetic
energy, such as a microwave oven,
may interfere with sound
transmission.
As the S-AIR product uses the radio
waves that share the same frequency
as other wireless systems, such as
wireless LAN or Bluetooth devices,
interference or poor transmission
may result. In this case, take the
following steps:
– Do not install the S-AIR product
near other wireless systems.
– Do not use the S-AIR product and
the other wireless systems at the
same time.
The transmission distance differs
depending on the usage
environment. Find a location where
transmission between the main unit
and the sub unit is most effective,
and install the main unit and the sub
unit there.
On safety
Completely disconnect the power
supply cord from the wall socket
(mains) if the unit is not going to be
used for an extended period of time.
When unplugging the unit, always
grip the plug. Never pull by the cord
itself.
Should any solid object or liquid get
into the unit, unplug the unit and
have it checked by qualified
personnel before operating them
again.
The power supply cord can be
changed only by a qualified service
facility.
On placement
Do not place the unit in an inclined
position or in locations that are
extremely hot, cold, dusty, dirty,
humid or lacking adequate
ventilation, subject to vibration,
direct sunlight or a bright light.
Be careful when placing the unit on
surfaces that have been specially
treated (for example, with wax, oil,
polish) as staining or discoloration
of the surface may result.
On heat buildup
Heat buildup in the unit during
operation is normal and is not cause
for alarm.
Cleaning the cabinet
Clean the cabinet with a soft dry cloth.
Do not use any type of abrasive pad,
scouring powder, or solvent, such as
thinner, benzine, or alcohol.
Specifications
Output
AUDIO OUT:
voltage 775 mV, impedance
47 kilohms
VIDEO OUT:
Max. output level 1 Vp-p,
unbalanced, Sync. negative, load
impedance 75 ohms (Composite
Video Out)
Wireless transceiver
(EZW-RT10A)
Communication System:
S-AIR Specification version 1.0
Frequency band:
2.4000 GHz 2.4835 GHz
Modulation method:
DSSS
Power requirements:
DC 3.3 V, 350 mA
Dimensions (w/h/d):
50 × 13 × 60 mm
(2 × 17/32 × 2 3/8 in.)
Mass:
24 g (1 oz.)
Tuner section
FM tuner:
Tuning range:
87.5 108.0 MHz (100 kHz
step)
Antenna:
FM lead antenna
Antenna terminals:
75 ohms unbalanced
Intermediate frequency:
10.7 MHz
General
Power requirements:
120 V AC, 60 Hz
Power consumption:
15 watts
Dimensions (w/h/d) (excluding the AC
power supply unit):
Approx. 295 × 43 × 110 mm
(11
5
/8 × 1 3/4 × 4 3/8 in.)
Mass (including the AC power supply
unit):
Approx. 1.1 kg (2 lb. 6.8 oz.)
Supplied accessories: Wireless
transceiver (EZW-RT10A) (1)/
Remote commander (RM-ANU069) (1)/
R03 (size AAA) batteries (2)/
FM lead antenna (1)/
Universal Dock Adapter for iPhone (1)/
Universal Dock Adapter for iPhone 3G
(1)
Design and specifications are subject
to change without notice.
Compatible iPod/
iPhone models
You can use the following iPod/iPhone
models on the unit. Update your iPod/
iPhone with the latest software before
using it.
iPod touch
2nd generation
iPod nano
4th generation
(video)
iPhone 3G
iPod touch
1st generation
iPod nano 3rd
generation (video)
iPod classic
iPhone
iPod nano 2nd
generation
(aluminum)
iPod 5th
generation (video)
iPod nano 1st
generation
iPod 4th generation
(color display)
iPod 4th
generation
iPod mini
Operaciones
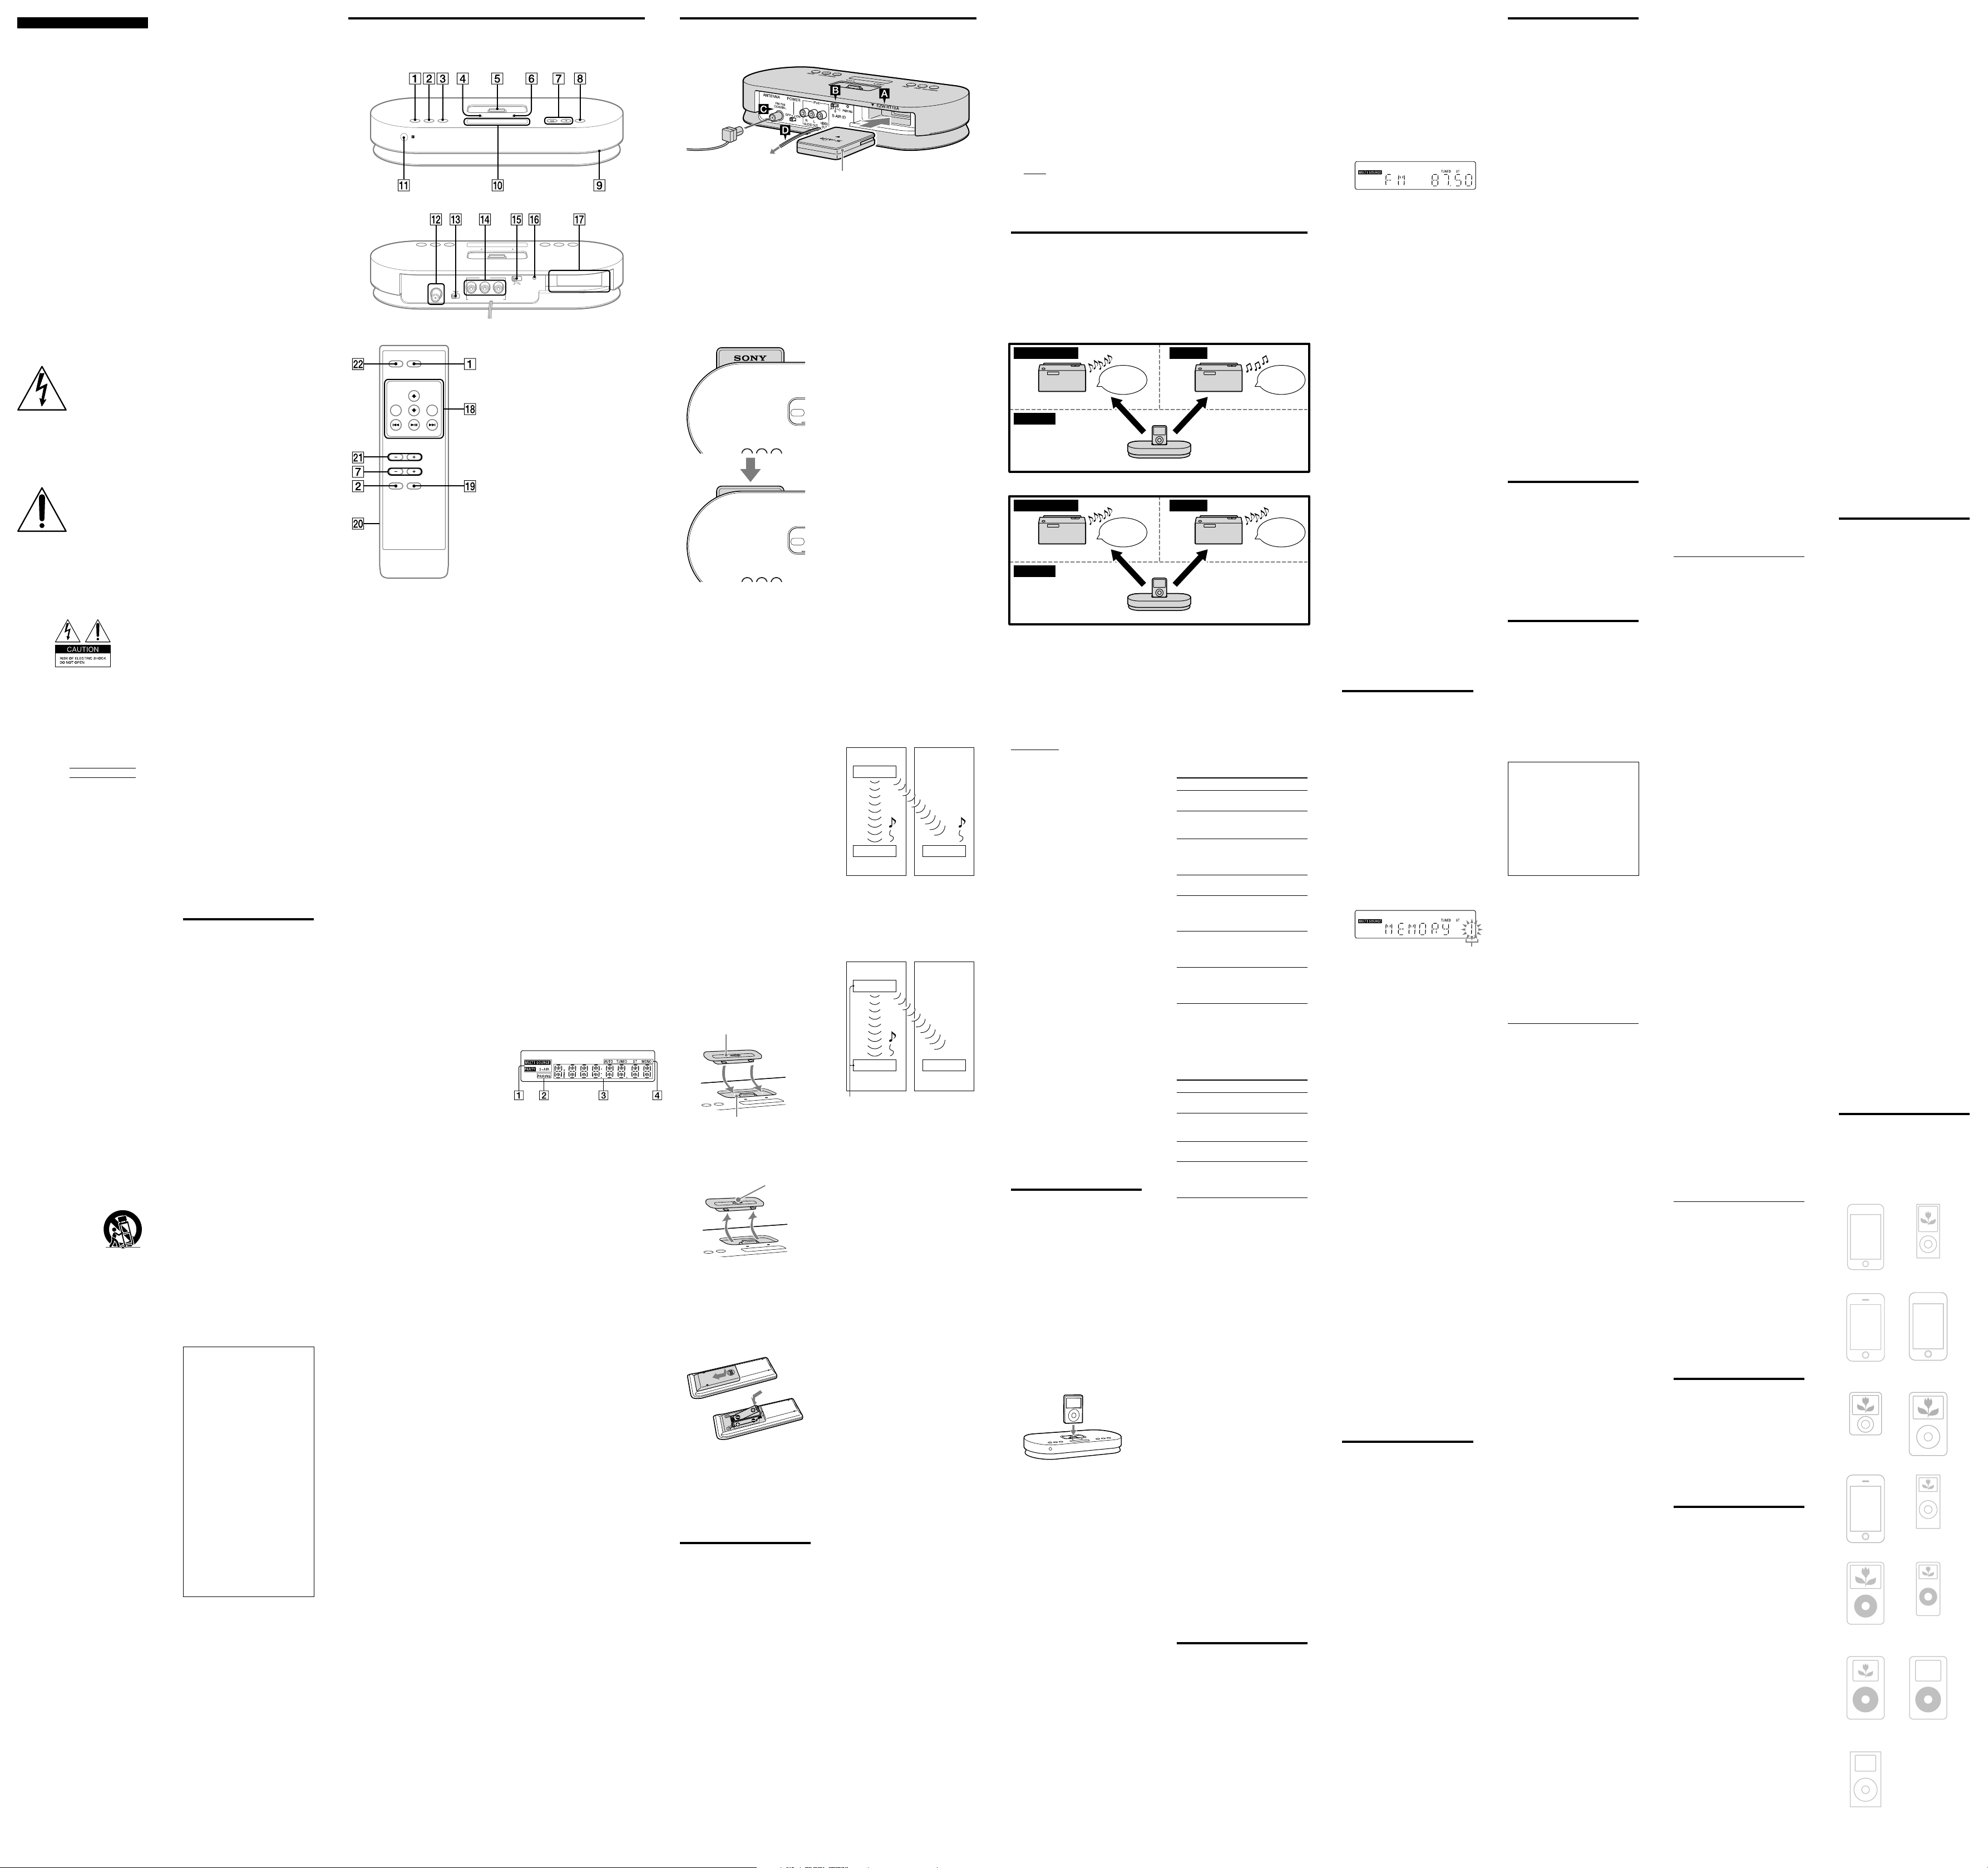
Selección del modo S-AIR
Al establecer la conexión con varias unidades secundarias, es posible escuchar diferentes
fuentes de sonido en cada unidad secundaria (modo MULTI SOURCE), o la misma
fuente de sonido en ambas unidades secundarias (modo PARTY) mediante la selección
del modo S-AIR correspondientemente.
Utilice la unidad principal para ajustar el modo S-AIR.
Modo MULTI SOURCE
Unidad principal y iPod/iPhone
Dormitorio
Unidad secundaria (altavoz, etc.)
Sala de estar
SintonizadoriPod
Unidad secundaria
(altavoz, etc.)
Habitación de estudio
Modo PARTY
Unidad principal y iPod/iPhone
Dormitorio
Sala de estar
iPod iPod
Unidad secundaria (altavoz, etc.) Unidad secundaria
(altavoz, etc.)
Habitación de estudio
ADVERTENCIA
Para reducir el riesgo de
incendios o electrocución,
no exponga el aparato a la
lluvia ni a la humedad.
Para reducir el riesgo de incendios o
descargas eléctricas, no exponga el
aparato a goteos o salpicaduras, y no
coloque sobre el aparato objetos que
contengan líquidos como, por
ejemplo, un jarrón.
Puesto que para desconectar la
unidad de la red eléctrica se utiliza la
clavija principal, conecte la unidad a
una toma de corriente de ca de fácil
acceso. Si detecta alguna anomalía en
la unidad, desconecte la clavija
principal de la toma de corriente de
ca inmediatamente.
La unidad no estará desconectada de
la red eléctrica mientras esté
conectada a la toma de corriente de
ca, aunque se haya apagado la propia
unidad.
No instale la unidad en un lugar de
espacio reducido, tal como en una
estantería para libros o una vitrina
empotrada.
No exponga las pilas ni los aparatos
con pilas insertadas a calor excesivo,
como la luz solar, el fuego o similares.
La placa de características se
encuentra en la parte inferior exterior.
Este símbolo es para
alertar al usuario
sobre la presencia de
una “peligrosa
tensión” sin aislar
dentro de la caja del
producto que podría
ser de suficiente
intensidad como para
constituir un riesgo de
sacudida eléctrica a
personas.
Este símbolo es para
alertar al usuario
sobre la presencia de
instrucciones de
operación y
mantenimiento
(servicio) importantes
en la documentación
que acompaña al
aparato.
Las siguientes indicaciones se
encuentran en la unidad de
alimentación de ca.
Anotaciones del propietario
Los números de modelo y de serie se
encuentran en la parte inferior de la
unidad.
Anote estos números en el espacio
provisto a continuación. Consúltelos
cuando acuda a su distribuidor Sony
en relación con este producto.
N.º de modelo
N.º de serie
Instrucciones de seguridad
importantes
1) Lea estas instrucciones.
2) Guarde estas instrucciones.
3) Preste atención a todas las
advertencias.
4) Siga todas las instrucciones.
5) No utilice este aparato cerca del
agua.
6) Límpielo solamente con un paño
seco.
7) No bloquee ninguna abertura de
ventilación. Instale el aparato de
acuerdo con las instrucciones del
fabricante.
8) No instale el aparato cerca de
fuentes de calor como radiadores,
rejillas de salida de calor, estufas, u
otros aparatos (incluidos
amplificadores) que produzcan
calor.
9) No anule la función de seguridad
de la clavija polarizada o de tipo
con puesta a tierra. Una clavija
polarizada tiene dos cuchillas con
una más ancha que la otra. Una
clavija de tipo con puesta a tierra
tiene dos cuchillas y una tercera
espiga de puesta a tierra. La
cuchilla ancha o la tercera espiga
están provistas para su seguridad.
Si la clavija provista no encaja en su
toma de corriente, consulte con un
electricista para que le reemplace la
toma de corriente obsoleta.
10) Proteja el cable de alimentación
para impedir que pueda ser pisado
o pinchado, particularmente en los
enchufes, tomas de corriente de
alargaderas, y puntos donde salen
del aparato.
11) Utilice solamente aditamentos/
accesorios especificados por el
fabricante.
12) Utilícelo solamente
con el carrito,
estante, trípode,
soporte, o mesa
especificado por el
fabricante, o vendido
con el aparato.
Cuando se utilice un
carrito, tenga
cuidado al mover la
combinación de
carrito/aparato para
evitar que se vuelque
y le ocasione heridas.
13) Desenchufe este aparato durante
las tormentas eléctricas o cuando
no lo vaya a utilizar durante largos
periodos de tiempo.
14) Solicite toda asistencia técnica a
personal cualificado. El servicio de
reparación será necesario cuando
el aparato haya sido dañado de
cualquier forma, tal como cuando
esté dañado el cable de
alimentación o la clavija, se haya
derramado líquido o hayan caído
objetos al interior del aparato, el
aparato haya sido expuesto a la
lluvia o humedad, no funcione
normalmente, o se haya dejado
caer.
NOTA:
Este equipo ha sido probado y se ha
encontrado que cumple con los
límites estipulados para un
dispositivo digital de Clase B, en
conformidad con el apartado 15 de
las normas de la FCC. Estos límites
están designados para ofrecer
protección razonable contra las
interferencias nocivas en una
instalación residencial. Este equipo
genera, utiliza y puede radiar energía
de radiofrecuencia y, si no se instala y
utiliza de acuerdo con las
instrucciones, podrá ocasionar
interferencias nocivas para las
comunicaciones de radio. Sin
embargo, no hay garantía de que no
vayan a ocurrir interferencias en una
instalación en particular. Si este
equipo ocasiona interferencias de
radio nocivas para la recepción de
radio o televisión, lo que podrá
determinarse apagando y
encendiendo el equipo, se sugiere que
el usuario intente corregir las
interferencias tomando una o más de
las medidas siguientes:
Reoriente o reubique la antena de
recepción.
Aumente la separación entre el
equipo y receptor.
Conecte el equipo a una toma de
corriente de un circuito diferente al
que está conectado el receptor.
Consulte al distribuidor o a un
técnico con experiencia en radio/
TV para que le ayude.
PRECAUCIÓN
Se le advierte que cualquier cambio o
modificación no autorizada
expresamente en este manual podrá
anular la autorización que usted tiene
para utilizar este equipo.
Para el transceptor inalámbrico
(EZW-RT10A)
Este dispositivo cumple con el
apartado 15 de las normas de la FCC.
El funcionamiento está sujeto a las
dos condiciones siguientes: (1) este
dispositivo no debe causar
interferencias nocivas, y (2) este
dispositivo debe aceptar cualquier
interferencia recibida, incluida una
interferencia que pueda causar una
operación no deseada.
Este equipo no debe co-ubicarse ni
utilizarse junto con ninguna otra
antena o transmisor.
Este equipo cumple con los límites de
exposición a la radiación establecidos
por la FCC para equipos no
controlados y satisface las directrices
de exposición a la radiofrecuencia
(RF) de la FCC según el suplemento
C de OET65.
Este equipo deberá ser instalado y
utilizado con una separación de al
menos 20 cm o más entre el radiador
y el cuerpo de la persona (excluidas
las extremidades: manos, muñecas,
pies y tobillos).
“S-AIR” y su logotipo son marcas
comerciales de Sony Corporation.
La marca de la palabra Bluetooth y sus
logotipos son propiedad de Bluetooth SIG,
Inc. y cualquier uso de estos por parte de
Sony Corporation se realiza bajo licencia.
Las demás marcas y nombres comerciales
pertenecen a sus respectivos propietarios.
iPod es una marca comercial de Apple Inc.
registrada en los Estados Unidos y en otros
países.
iPhone es una marca comercial de Apple
Inc.
El resto de marcas comerciales y marcas
comerciales registradas pertenecen a sus
respectivos propietarios.
En este manual, no se especifican las
marcas ™ y ®.
Características
El modelo AIR-SA17Ti es un producto
compatible con “S-AIR”. También se
denomina “unidad principal S-AIR”.
Si conecta la unidad principal S-AIR
(equipo transmisor, en adelante
denominado “unidad principal”) a una
unidad secundaria S-AIR (equipo
receptor, en adelante denominado
“unidad secundaria”) mediante la
tecnología “S-AIR”, es posible utilizar
cada unidad en una ubicación remota.
Por ejemplo, puede instalar las
unidades secundarias, una en el cuarto
de estudio y la otra en el dormitorio, y
después instalar la unidad principal en
la sala de estar. Entonces podrá
escuchar la música de la unidad
principal ubicada en la sala de estar
mediante el control de las unidades
secundarias.
También puede conectar la unidad
principal a un sistema de audio y vídeo
opcional (como un televisor) y
disfrutar en dicho sistema del
contenido de audio, vídeo y fotografías
de un iPod/iPhone conectado a la
unidad principal.
Utilización de la función
de acoplamiento con la
unidad secundaria y el
mando a distancia S-AIR
Este sistema es compatible con la
función de acoplamiento. La función
de acoplamiento establece una
conexión entre una unidad secundaria
y un mando a distancia S-AIR. Si desea
obtener más información, consulte el
manual de instrucciones del mando a
distancia S-AIR.
S-AIR (Sony Audio
Interactive Radio frequency
o Radiofrecuencia
interactiva de audio de
Sony)
En los últimos tiempos se ha visto
una rápida propagación del soporte
DVD, de la emisión digital y de
otros soportes de alta calidad.
Para garantizar la transmisión de los
sutiles matices de estos soportes de
alta calidad sin deterioro alguno,
Sony ha desarrollado una tecnología
denominada “S-AIR” para la
transmisión de señales de audio
digital sin compresión y ha
incorporado esta tecnología en el
EZW-RT10A.
Esta tecnología transfiere señales de
audio digital sin compresión
utilizando el rango de banda de 2,4
GHz de la banda ISM (Industrial,
Científica, y Médica), tal como las
aplicaciones LAN inalámbricas y
Bluetooth.
Procedimientos iniciales
Conexión del sistema
Transceptor inalámbrico
EZW-RT10A
A una toma de
corriente de pared
Transceptor inalámbrico
Inserte firmemente el transceptor
inalámbrico suministrado (EZWRT10A) en la ranura EZW-RT10A del
panel posterior de cada unidad.
Compruebe la orientación de la marca
al insertar el transceptor
inalámbrico suministrado (EZWRT10A). En caso contrario podría
ocasionar daños a la unidad.
Presione el transceptor inalámbrico
firmemente para insertarlo hasta que
no se vea la marca del logotipo SONY
en la parte superior.
Notas
Asegúrese de apagar la unidad cuando
inserte o extraiga el transceptor
inalámbrico suministrado (EZW-RT10A).
En caso contrario podría ocasionar daños
a la unidad.
No toque los terminales del transceptor
inalámbrico suministrado (EZW-RT10A).
No inserte otro dispositivo que no sea el
suministrado con el transceptor inalámbrico
(EZW-RT10A) en la ranura EZW-RT10A.
Selector de ID de S-AIR
Ajuste el mismo ID de S-AIR en la
unidad principal y en la unidad
secundaria. Para obtener más
información acerca de cómo ajustar el
ID de S-AIR, consulte “Establecimiento
de la conexión S-AIR”.
Antena de FM
Busque una ubicación y una
orientación desde la que se obtenga
una buena recepción y, a continuación,
instale la antena.
Mantenga la antena alejada del cable
de suministro de alimentación para
evitar captar ruido.
Alimentación
Conecte el cable de suministro de
alimentación a la toma de corriente de
pared.
Para utilizar el iPod/iPhone
Inserte un adaptador de acoplamiento
universal en el conector de iPod/
iPhone antes de utilizarlo. Utilice uno
de los adaptadores de acoplamiento
universals suministrados con la unidad
principal para iPhone e iPhone 3G tal
y como se indica a continuación.
‒ iPhone :
‒ iPhone 3G :
Si utiliza otros modelos de iPod, use el
adaptador suministrado con su modelo
de iPod o adquiera un adaptador de
acoplamiento compatible de Apple Inc.
Adaptador de acoplamiento de universal
Conector de iPod/iPhone
Para extraer el adaptador de
acoplamiento universal, empújelo
hacia arriba con la uña o con un objeto
plano utilizando la ranura del interior
del adaptador.
Ranura
Para utilizar el mando a distancia
Deslice y extraiga la tapa del
compartimiento de las pilas e inserte
las dos pilas R03 (tamaño AAA)
suministradas, el extremo en primer
lugar, de modo que las polaridades
coincidan como se muestra a
continuación.
Mando a distancia (RM-ANU069)
Notas acerca del uso del mando a distancia
En condiciones de uso normal, las pilas
deberían durar unos seis meses.
No mezcle pilas usadas con pilas nuevas, ni
diferentes tipos de pilas.
Si no va a utilizar el mando a distancia
durante un periodo de tiempo prolongado,
extraiga las pilas para evitar posibles daños
por fugas y corrosión de estas.
Establecimiento de
la conexión S-AIR
Es posible establecer la conexión
fácilmente mediante el ajuste del
mismo ID de S-AIR para esta unidad y
la unidad secundaria.
Si desea obtener más información
acerca del funcionamiento de la
unidad secundaria S-AIR, consulte el
manual de instrucciones suministrado
con la unidad secundaria S-AIR.
1 Compruebe que los
transceptores inalámbricos
están firmemente insertados en
la unidad y en la unidad
secundaria.
2 Encienda la unidad y la unidad
secundaria.
Ajuste el interruptor POWER del
panel posterior en “ON”.
El indicador POWER de la unidad
se ilumina.
Si desea obtener más información
acerca de encender la unidad
secundaria S-AIR, consulte el
manual de instrucciones
suministrado con la unidad
secundaria S-AIR.
3 Ajuste el mismo ID de S-AIR en
la unidad y en la unidad
secundaria.
Ajuste el selector ID de S-AIR del
panel posterior al ID de S-AIR que
desee.
Sugerencia
El ID de S-AIR se encuentra ajustado de
fábrica en “A”.
4 Confirme el estado de la
conexión.
Una vez establecida la conexión
entre la unidad principal y la
unidad secundaria, el indicador
S-AIR de la unidad secundaria se
ilumina y aparece “LINKED” en el
visualizador de la unidad
secundaria durante unos pocos
segundos.
Sugerencia
Se pueden conectar hasta 10 unidades
secundarias (opcional) con la unidad
principal.
Identificación de la
unidad principal con una
unidad secundaria
específica (Operación de
emparejamiento)
Es fácil establecer la conexión
ajustando el mismo ID de S-AIR para
la unidad principal y las unidades
secundarias.
Sin embargo, si un vecino tiene una
unidad principal S-AIR con el mismo
ID de S-AIR que el de su unidad
principal S-AIR, es posible que el
vecino oiga el audio transmitido desde
la unidad principal en su sistema.
Asimismo, es posible que usted oiga el
audio transmitido desde la unidad
principal S-AIR del vecino en su
sistema. Para evitar esto, puede
identificar la unidad principal con una
unidad secundaria específica
realizando la operación de
emparejamiento.
Antes de realizar el
emparejamiento
La conexión se establece mediante el
ID de S-AIR (ejemplo).
Su sistema Sistema del
vecino
ID A
Unidad principal
Unidad
secundaria
ID A ID A
Unidad
secundaria
Después de realizar el
emparejamiento
La conexión se establece entre la
unidad principal y la unidad
secundaria emparejadas.
Su sistema Sistema del
vecino
Emparejamiento
ID A
Unidad principal
ID A ID A
Unidad
secundaria
Unidad
secundaria
sin conexión
1 Coloque la unidad secundaria
que desea emparejar cerca de
la unidad principal.
Realice el emparejamiento de la
unidad principal con la unidad
secundaria a la vez.
2 Compruebe que la alimentación
de la unidad principal y de la
unidad secundaria está
conectada.
3 Compruebe que el ID de S-AIR
de la unidad principal es el
mismo que el ID de S-AIR de la
unidad secundaria.
4 Pulse el botón PAIRING de la
parte posterior del panel de la
unidad principal mediante un
objeto puntiagudo.
5 Utilice la unidad secundaria
para activar la función de
emparejamiento.
Para obtener más información
acerca de la función de
emparejamiento, consulte el
manual de instrucciones
suministrado con la unidad
secundaria.
Una vez realizado el
emparejamiento, el visualizador de
la unidad principal cambia de la
siguiente forma: “PAIRING”
“COMPLETE”
Para cancelar el
emparejamiento
Cambie los ID de S-AIR de la unidad
principal y de la unidad secundaria a
ID de S-AIR diferentes.
Para detener el
emparejamiento antes de
finalizar
Pulse el botón PAIRING otra vez.
Para emparejar la unidad
principal con varias unidades
secundarias
Repita los pasos del 1 al 5.
Si la conexión S-AIR es
inestable
Puesto que el producto S-AIR produce
ondas radioeléctricas que comparten la
misma frecuencia (2,4 GHz) que otros
sistemas inalámbricos como, por
ejemplo, las redes LAN inalámbricas o
los dispositivos Bluetooth, es posible
que se produzcan interferencias o que
la calidad de la transmisión sea
deficiente si se utilizan otros sistemas
inalámbricos cerca de la unidad
principal y/o la secundaria.
En ese caso, es posible que la conexión
mejore si se cambia el ajuste RF
CHANGE (Cambio de radiofrecuencia)
en la unidad principal.
Guía de componentes y controles
Unidad
Panel frontal
Panel posterior
Mando a distancia (RM-ANU069)
ILLUMINATION
Pulse para cambiar el brillo de la
iluminación.
S-AIR MODE
Pulse para seleccionar el modo S-AIR.
SYSTEM MENU
Pulse para entrar en el menú del
sistema.
Indicador POWER
Se ilumina cuando la unidad principal
está encendida.
Conector de iPod/iPhone
Coloque un iPod/iPhone en el
conector para escuchar el contenido de
audio almacenado en el iPod/iPhone.
Antes de utilizar un iPod/iPhone, es
necesario conectar el adaptador de
acoplamiento universal.
Para obtener más información acerca
de los adaptadores de acoplamiento
universales, consulte las instrucciones
suministradas con los adaptadores de
acoplamiento universales.
Indicador S-AIR
Se ilumina cuando la unidad principal
está encendida con el transceptor
inalámbrico suministrado insertado.
Unidad: TUNING/SELECT +/–
Pulse para sintonizar la emisora
deseada.
Pulse para seleccionar un elemento de
menú.
Mando a distancia:
TUNING +/–
Pulse para sintonizar la emisora
deseada.
ENTER
Pulse para introducir los ajustes.
Iluminación
Es posible cambiar el brillo mediante
ILLUMINATION .
Visualizador
Sensor remoto
Toma ANTENNA
Conecte la antena de cable de FM
suministrada.
Interruptor POWER
Interruptor para encender o apagar la
unidad.
Tomas iPod AUDIO OUT L/R
Toma iPod VIDEO OUT
Conecte un sistema de audio y vídeo
opcional, como un televisor, etc.
Selector de ID de S-AIR
Seleccione el ID de S-AIR para
conectar la unidad secundaria.
Botón PAIRING
Pulse para realizar el emparejamiento.
Ranura EZW-RT10A
Inserte el transceptor inalámbrico
suministrado.
Botones para el control de un
iPod/iPhone
(reproducción/pausa)
Pulse para iniciar o hacer una pausa en
la reproducción.
/
Pulse para saltar a la pista anterior/
siguiente.
Mantenga pulsado para encontrar un
punto en una pista.
MENU
Pulse para volver al menú anterior.
Funciona de forma similar al botón de
menú del iPod/iPhone.
/
Pulse para seleccionar un elemento de
menú o pista para reproducir.
ENTER
Pulse para ejecutar el elemento
seleccionado o reproducir la pista
seleccionada.
PARTY CH
Pulse para seleccionar la fuente de
sonido cuando el modo S-AIR está
ajustado en “PARTY”.
Tapa del compartimiento de
las pilas
PRESET +/–
Pulse para seleccionar una emisora
presintonizada.
DISPLAY
Pulse para ver la información en el
visualizador.
Visualizador
Indicador de modo S-AIR
Indicador PAIRING
Información de texto
Modo de recepción del
sintonizador
Recepción del sintonizador
Pulse S-AIR MODE en la
unidad o en el mando a
distancia (RM-ANU069)
varias veces hasta que el
indicador de modo S-AIR
deseado se ilumine en el
visualizador.
El ajuste predeterminado está
subrayado.
MULTI SOURCE:
seleccione este ajuste para escuchar
diferentes fuentes de sonido en cada
unidad secundaria.
PARTY:
seleccione este ajuste para escuchar la
misma fuente de sonido en múltiples
unidades secundarias.
Para seleccionar el modo S-AIR
desde el menú del sistema
1 Pulse SYSTEM MENU en la
unidad.
2 Pulse TUNING/SELECT +/–
varias veces en la unidad hasta
que aparezca “MODE” y, a
continuación, pulse ENTER en la
unidad.
3 Pulse TUNING/SELECT +/–
varias veces en la unidad hasta
que aparezca “MULTI” o
“PARTY” y, a continuación,
pulse ENTER en la unidad.
El modo S-AIR seleccionado
aparece en el visualizador.
Para comprobar el modo S-AIR
cuando el visualizador de la
unidad principal está apagado
Pulse DISPLAY en el mando a
distancia.
Notas
Cuando cambie el modo S-AIR, se
seleccionará automáticamente el canal del
iPod para las unidades secundarias
conectadas.
Cuando conecte la unidad principal a una
unidad secundaria S-AIR (tal como la
AIR-SA10) que no es compatible con el
modo MULTI SOURCE, ajuste la unidad
principal al modo PART Y. Después puede
seleccionar el canal S-AIR en la unidad
secundaria S-AIR .
Escucha de música
del iPod/iPhone
mediante la
conexión S-AIR
Utilice la unidad secundaria para
escuchar la música de un iPod/iPhone
conectado a la unidad.
Es posible controlar el iPod/iPhone
conectado desde la unidad o la unidad
secundaria.
Para utilizar un iPod/iPhone, consulte
la guía del usuario de su iPod/iPhone.
1 Coloque un iPod/iPhone en el
conector de iPod/iPhone tal y
como se muestra a
continuación.
Ahora ya está listo para escuchar el
iPod/iPhone conectado mediante
la unidad secundaria.
2 Seleccione el canal del iPod.
Cuando el modo S-AIR está
ajustado en “PARTY”:
Pulse PARTY CH en el mando a
distancia repetidamente hasta que
aparezca “iPod” en el visualizador.
Cuando el modo S-AIR está
ajustado en “MULTI SOURCE”:
El canal del iPod se activa
internamente. Vaya al paso 3.
3 Inicie la reproducción.
Opere el iPod/iPhone para iniciar
la reproducción de música.
También puede operar el iPod/
iPhone utilizando el mando a
distancia (consulte el apartado
“Para controlar el iPod/iPhone
mediante la unidad principal”).
Uso de las unidades
secundarias
1 Coloque un iPod/iPhone en el
conector de iPod/iPhone de la
unidad principal.
2 Seleccione el canal del iPod.
Pulse S-AIR CH varias veces hasta
que aparezca “iPod” en el
visualizador.
3 Inicie la reproducción.
Utilice el iPod/iPhone para iniciar la
reproducción de música. También
es posible utilizar el iPod/iPhone
mediante el mando a distancia
(consulte el apartado “Para
controlar el iPod/iPhone mediante
las unidades secundarias”).
Para controlar el iPod/iPhone
mediante la unidad principal
Es posible controlar el iPod/iPhone
con los siguientes botones del mando a
distancia.
Para Pulse
Iniciar la
reproducción.
Hacer una
pausa en la
reproducción.
Para reanudar la reproducción,
pulse otra vez
Seleccionar
un menú o
pista para
reproducir.
/
Puede desplazar hacia arriba o
hacia abajo los menús del iPod
Omitir una
pista.
/
Encontrar un
punto en una
pista.
Mantenga pulsado /
durante la reproducción, y
suelte el botón en el punto
deseado
Elegir el
elemento
seleccionado.
ENTER
Puede elegir el elemento
seleccionado de forma similar
a la del botón central del iPod
Regresar al
menú
anterior.
MENU
Puede regresar al menú
anterior de forma similar a la
del botón de menú del iPod
Para controlar el iPod/iPhone
mediante las unidades
secundarias
Es posible controlar el iPod/iPhone
con los siguientes botones del mando a
distancia o de la unidad.
Para Pulse
Iniciar la
reproducción.
Hacer una
pausa en la
reproducción.
, o
Para reanudar la reproducción,
pulse o
Omitir una
pista.
/
Encontrar un
punto en una
pista.
Mantenga pulsado /
durante la reproducción, y
suelte el botón en el punto
deseado
Para utilizar la unidad como un
cargador de batería
Es posible utilizar la unidad como un
cargador de batería para el iPod/iPhone
cuando la unidad está encendida.
La carga se inicia cuando el iPod/
iPhone está colocado en el conector de
iPod/iPhone. El estado de la carga se
muestra en el visualizador del iPod/
iPhone. Para obtener más información,
consulte la guía del usuario de su iPod/
iPhone.
Para detener la carga del iPod/iPhone,
retírelo o apague la unidad.
Notas
Cuando coloque o extraiga el iPod/iPhone,
sujételo en el mismo ángulo que el del
conector de iPod/iPhone de la unidad y no
lo retuerza ni lo balancee para evitar dañar
el conector de iPod/iPhone.
No traslade la unidad con un iPod/iPhone
colocado en el conector, ya que podría
ocasionar un mal funcionamiento.
Cuando coloque o extraiga el iPod/iPhone,
sujete la unidad con una mano y tenga
cuidado de no pulsar los controles del
iPod/iPhone por error.
Antes de desconectar el iPod/iPhone,
inserte una pausa en la reproducción.
No es posible ajustar el volumen mediante
la unidad.
El nivel de volumen no cambia aunque se
ajuste en el iPod/iPhone.
La unidad se ha diseñado únicamente para
iPod/iPhone. No es posible conectar
cualquier otro reproductor de audio portátil.
En función del modelo de iPod/iPhone
que esté utilizando y de su estado, es
posible que no se acepten las operaciones
efectuadas mediante la unidad y la unidad
secundaria, o que se lleven a cabo
operaciones incorrectas.
Sony declina toda responsabilidad en caso
de que se produzcan pérdidas o daños en
los datos grabados en el iPod/iPhone al
utilizarlo un iPod/iPhone con este
producto S-AIR.
Escucha de la radio
mediante la
conexión S-AIR
1 Seleccione el canal del
sintonizador.
Cuando el modo S-AIR está
ajustado en “PARTY”:
Pulse PARTY CH en el mando a
distancia varias veces hasta que
aparezca “TUNER” en el
visualizador.
El visualizador cambia a “FM” y la
frecuencia tras un corto tiempo.
Cuando el modo S-AIR está
ajustado en “MULTI SOURCE”:
El canal del sintonizador se activa
internamente.
2 Realice la sintonización
automática.
Mantenga pulsado TUNING +/– en
el mando a distancia (o TUNING/
SELECT +/– en la unidad) hasta
que la indicación de frecuencia
cambie y, a continuación, suéltelo.
“AUTO” se ilumina en el
visualizador. La exploración se
detiene automáticamente cuando se
sintoniza una emisora y, a
continuación, aparecen “TUNED” y
“ST” (para programas de FM
estéreo solamente).
Uso de las unidades
secundarias
Cuando se sintoniza una emisora de
radio en la unidad principal, puede
escuchar dicha emisora mediante los
pasos siguientes.
Para sintonizar una emisora de radio
mediante las unidades secundarias, es
necesario que se presintonice dicha
emisora previamente (consulte el
apartado “Para recuperar un emisora
de radio presintonizada mediante las
unidades secundarias”).
1 Seleccione el canal del
sintonizador.
Pulse S-AIR CH varias veces hasta
que aparezca “TUNER” en el
visualizador.
El visualizador cambia a “FM” y la
frecuencia tras unos minutos.
Para sintonizar una emisora
con señal débil
Si no aparece “TUNED” y la exploración
no se detiene, pulse TUNING +/– en el
mando a distancia (o TUNING/
SELECT +/– en la unidad) varias veces
para sintonizar la emisora deseada.
Para reducir el ruido estático de
un emisora de FM estéreo débil
1 Pulse SYSTEM MENU en la
unidad.
2 Pulse TUNING/SELECT +/–
varias veces en la unidad hasta
que aparezca “FM MODE” y, a
continuación, pulse ENTER en la
unidad.
3 Pulse TUNING/SELECT +/–
varias veces en la unidad hasta
que aparezca “MONO” y, a
continuación, pulse ENTER en la
unidad.
No habrá efecto estéreo, pero la
recepción mejorará.
Presintonización de
emisoras de radio
Es posible presintonizar sus emisoras
de radio favoritas y sintonizarlas de
forma instantánea mediante la
selección del número de presintonía
correspondiente.
1 Sintonice la emisora deseada.
Consulte el apartado “Escucha de
la radio mediante la conexión
S-AIR”.
2 Pulse SYSTEM MENU en la
unidad.
3 Pulse TUNING/SELECT +/–
varias veces en la unidad hasta
que aparezca “MEMORY” y, a
continuación, pulse ENTER en la
unidad.
Número de presintonía
4 Pulse TUNING/SELECT +/–
varias veces en la unidad para
seleccionar el número de
presintonía deseado.
Si ya existe otra emisora asignada
al número de presintonía
seleccionada, se reemplazará la
emisora con las nuevas emisoras.
5 Pulse ENTER en la unidad.
6 Repita los pasos 1 al 5 para
almacenar otras emisoras.
Es posible presintonizar hasta 20
emisoras. Las emisoras
presintonizadas se retienen durante
medio día aproximadamente
aunque se desconecte el cable de
suministro de alimentación o si se
produce un corte del suministro
eléctrico.
Para recuperar un emisora de
radio presintonizada mediante
la unidad principal
Pulse PRESET +/– en el mando a
distancia (RM-ANU069) varias veces.
Para recuperar un emisora de
radio presintonizada mediante
las unidades secundarias
1 Presintonice las emisoras de
radio en la unidad principal
(consulte el apartado
“Presintonización de emisoras
de radio”).
2 Seleccione el canal del
sintonizador.
Pulse S-AIR CH +/– varias veces
hasta que aparezca “TUNER” en el
visualizador.
3 Pulse PRESET +/– en el mando a
distancia (RM-ANU069) varias
veces para seleccionar una
emisora presintonizada.
Uso de un sistema
de audio y vídeo
opcional
Puede disfrutar del contenido de audio
y vídeo del iPod/iPhone conectado con
un sistema de audio y vídeo opcional.
1 Conecte un sistema de audio y
vídeo opcional (como un
televisor, etc.) a las tomas iPod
AUDIO OUT L/R y/o la toma iPod
VIDEO OUT mediante un cable
de audio y/o de vídeo opcional.
2 Coloque un iPod/iPhone en el
conector de iPod/iPhone de la
unidad.
3 Inicie la reproducción del iPod/
iPhone.
Consulte el aparatado “Escucha de
música del iPod/iPhone mediante
la conexión S-AIR”.
Notas
El sonido del sintonizador no se puede
emitir a través de las tomas iPod AUDIO
OUT L/R.
Antes de disfrutar del vídeo, realice los
ajustes de vídeo apropiados en el iPod/
iPhone de acuerdo con su situación.
Independientemente de que la
alimentación de la unidad principal esté
activada o desactivada, el sonido y/o vídeo
se emite a través de las tomas iPod AUDIO
OUT L/R y/o la toma iPod VIDEO OUT.
Sugerencia
Aunque cambie el modo S-AIR o el canal
S-AIR mediante PARTY CH, el audio y/o
vídeo del iPod/iPhone conectado se emitirá a
través de las tomas iPod AUDIO L/R y/o la
toma iPod VIDEO OUT.
Cambio de la
visualización
Uso de la unidad principal
Para ver la información en el
visualizador
Pulse DISPLAY en el mando a
distancia (RM-ANU069).
Uso de las unidades
secundarias
Para cambiar la información en
el visualizador mientras la
unidad secundaria está
encendida
Pulse DISPLAY en la unidad. Cada vez
que pulse el botón, la información que
se visualiza cambiará. Si desea obtener
más información acerca de la
información que se visualiza en la
unidad secundaria S-AIR, consulte el
manual de instrucciones suministrado
con la unidad secundaria S-AIR.
Acerca de la información
transmitida desde la unidad
principal
En función del modelo de iPod/iPhone
que utilice, es posible visualizar hasta
16 caracteres de la siguiente
información, por ejemplo, durante la
reproducción del iPod/iPhone.
– Nombre de la pista
– Nombre del artista
– Nombre del álbum
– Tiempo de reproducción
transcurrido de la pista
Los caracteres que no se pueden
visualizar aparecerán como “_”.
Al escuchar la radio, se muestra la
frecuencia.
Cambio del brillo de
la iluminación
Pulse ILLUMINATION varias
veces.
Cada vez que pulse el botón, el brillo
de la iluminación cambiará de la forma
siguiente:
Brillante Oscurecido Apagado
Solución de
problemas
1 Asegúrese de que el cable de
suministro de alimentación está
conectado correcta y
firmemente.
2 Localice su problema en la lista
de comprobación que aparece a
continuación y efectúe la acción
indicada para corregirlo.
Si el problema persiste, póngase en
contacto con el distribuidor Sony
más cercano. Cuando lleve el
producto a reparar, asegúrese de
llevar el sistema completo (la
unidad, la unidad secundaria y los
transceptores inalámbricos). Este
producto es un sistema integral y
para determinar la parte que hay
que reparar se necesita el sistema
entero.
Si aparece “PROTECT” en el
visualizador
Ajuste el interruptor POWER del panel
trasero a “OFF” para apagar la unidad,
y después desenchufe el cable de
suministro de alimentación. Después
de comprobar que no hay indicación
en el visualizador, vuelva a conectar el
cable de suministro de alimentación y
ajuste el interruptor POWER a “ON”
para encender la unidad. Si el
problema persiste, póngase en contacto
con el distribuidor Sony más cercano.
General
El mando a distancia no funciona.
Retire cualquier obstáculo que haya
entre el mando a distancia y el
sensor remoto, y coloque la unidad y
la unidad secundaria alejadas de
luces fluorescentes.
Apunte el mando a distancia hacia el
sensor remoto.
Acerque el mando a distancia a la
unidad.
Compruebe que está utilizando el
mando a distancia de la unidad
principal para controlar la unidad
principal y el mando a distancia de
la unidad secundaria para controlar
la unidad secundaria.
El indicador S-AIR de la unidad está
apagado.
Compruebe que el cable de
suministro de alimentación está
firmemente conectado y que la
unidad está encendida.
Compruebe que el transceptor
inalámbrico suministrado está
firmemente insertado en la unidad.
No es posible conectar la unidad
principal y la unidad secundaria. (El
indicador S-AIR de la unidad está
apagado y/o el indicador S-AIR de la
unidad secundaria parpadea).
Compruebe que los transceptores
inalámbricos suministrados están
firmemente insertados en la unidad
principal y en la unidad secundaria.
Si utiliza otra unidad principal
S-AIR, colóquela a más de 8 m de
distancia de la unidad principal.
Confirme los ID de S-AIR de la
unidad principal y de la unidad
secundaria.
La unidad principal está emparejada
con otra unidad secundaria S-AIR.
Empareje la unidad principal con la
unidad secundaria que está
utilizando.
La unidad principal está emparejada
con otra unidad secundaria S-AIR.
Cancele el emparejamiento.
Colóquelas de modo que la unidad
principal y la unidad secundaria
estén alejadas de otros dispositivos
inalámbricos.
Detenga el uso de otros dispositivos
inalámbricos.
La unidad principal o la unidad
secundaria está apagada. Asegúrese
de que el cable de suministro de
alimentación y/o el cable de
alimentación están conectados y
encienda la unidad principal y la
unidad secundaria.
No es posible cambiar el canal S-AIR.
Compruebe que la unidad principal
y la unidad secundaria están
conectadas correctamente.
Si utiliza una unidad S-AIR opcional
(como la AIR-SA10) que no es
compatible con el modo MULTI
SOURCE, ajuste la unidad en el
modo PARTY.
No hay sonido.
Si utiliza otra unidad principal
S-AIR, colóquela a más de 8 m de
distancia de la unidad principal.
Confirme los ID de S-AIR de la
unidad principal y de la unidad
secundaria.
Compruebe el ajuste de
emparejamiento.
Colóquelas de modo que la unidad
principal y la unidad secundaria
estén más cerca.
Detenga el uso de cualquier equipo
que genere energía electromagnética
como, por ejemplo, un horno
microondas.
Colóquelas de modo que la unidad
principal y la unidad secundaria
estén alejadas de otros dispositivos
inalámbricos.
Detenga el uso de otros dispositivos
inalámbricos.
Cambie los ajustes de ID de S-AIR
de la unidad principal y de la unidad
secundaria.
Apague la unidad principal y la
unidad secundaria y vuelva a
encenderlas.
Compruebe que el cable de
suministro de alimentación y/o el
cable de alimentación están
firmemente conectados y que la
unidad principal y la unidad
secundaria están encendidas.
Aumente el volumen de la unidad
secundaria.
Cambie el ajuste RF CHANGE en la
unidad.
Hay ruido o interrupciones del sonido.
Si utiliza otra unidad principal
S-AIR, colóquela a más de 8 m de
distancia de la unidad principal.
Colóquelas de modo que la unidad
principal y la unidad secundaria
estén más cerca.
Detenga el uso de cualquier equipo
que genere energía electromagnética
como, por ejemplo, un horno
microondas.
Colóquelas de modo que la unidad
principal y la unidad secundaria
estén alejadas de otros dispositivos
inalámbricos.
Detenga el uso de otros dispositivos
inalámbricos.
Cambie los ajustes de ID de S-AIR
de la unidad principal y de la unidad
secundaria.
No coloque un teléfono móvil cerca
de la unidad principal y de la unidad
secundaria, ya que se podría
producir ruido.
Cambie el ajuste RF CHANGE en la
unidad.
iPod/iPhone
No hay sonido.
Asegúrese de que el iPod/iPhone
está conectado firmemente.
Asegúrese de que el iPod/iPhone
está reproduciendo música.
Ajuste el volumen de la unidad
secundaria.
Actualice su iPod/iPhone para
utilizar el software más reciente.
No es posible controlar el iPod/iPhone
mediante la unidad principal o la
secundaria.
Compruebe que el iPod/iPhone y la
unidad principal están conectados
correctamente y que la unidad y la
unidad secundaria están firmemente
conectadas.
En función del modelo de iPod/
iPhone que utilice y su estado, es
posible que no pueda controlar el
iPod/iPhone mediante la unidad
principal o la secundaria.
Actualice su iPod/iPhone para
utilizar el software más reciente.
El sonido se distorsiona.
Baje el volumen de la unidad
secundaria.
Establezca el ajuste “EQ” del iPod/
iPhone en “Off” o “Flat”.
No es posible cargar el iPod/iPhone.
Asegúrese de que el iPod/iPhone
está conectado firmemente.
Compruebe que el cable de
suministro de alimentación está
firmemente conectado y que la
unidad está encendida.
No es posible obtener la información de
la pista del iPod/iPhone.
En función del modelo de iPod/
iPhone que esté utilizando y de su
estado, es posible que no se obtenga
la información de la pista
correctamente durante la
reproducción.
Se pueden visualizar hasta 16
caracteres en el visualizador de la
unidad secundaria.
Compruebe que se ha introducido la
información de la pista en el iPod/
iPhone.
La imagen de vídeo o fotografía del
iPod/iPhone conectado no aparecen en
la pantalla del televisor.
Realice la conexión de acuerdo con
su sistema de audio y vídeo.
Cambie la entrada de televisión a la
entrada de vídeo conectado a la
unidad.
Compruebe que el ajuste de salida
del televisor del iPod/iPhone está
activado (consulte la guía del
usuario de su iPod/iPhone).
Compruebe que el iPod/iPhone es
compatible con la salida de vídeo
(consulte la guía del usuario de su
iPod/iPhone).
Sintonizador
Se oyen zumbidos o ruido intensos, o no
es posible recibir las emisoras. (“TUNED”
o “ST” parpadea en el visualizador de la
unidad).
Conecte la antena correctamente.
Busque una ubicación y una
orientación desde la que se obtenga
una buena recepción y, a
continuación, instale la antena de
nuevo.
Mantenga la antena alejada del cable
de suministro de alimentación para
evitar captar ruido.
Conecte una antena externa
disponible en el mercado.
Apague los equipos eléctricos
cercanos.
Mensajes
CANCEL : interrupción sin
emparejamiento.
COMPLETE : se ha completado el
emparejamiento.
ID A : ajusta el ID de S-AIR en “A”.
ID B : ajusta el ID de S-AIR en “B”.
ID C : ajusta el ID de S-AIR en “C”.
PAIRING : se está realizando el
emparejamiento.
Precauciones
Notas sobre la utilización del producto
S-AIR
Puesto que el producto S-AIR
transmite sonido a través de ondas
radioeléctricas, es posible que se
produzcan saltos en el sonido si se
obstaculizan dichas ondas. Se trata
de una característica de las ondas
radioeléctricas y no de un fallo de
funcionamiento.
Puesto que el producto S-AIR
transmite sonido a través de ondas
radioeléctricas, los equipos que
generan energía electromagnética,
como un horno microondas, pueden
interferir en la transmisión del
sonido.
Puesto que el producto S-AIR utiliza
las ondas radioeléctricas que
comparten la misma frecuencia que
otros sistemas inalámbricos, tales
como redes LAN inalámbricas o
dispositivos Bluetooth, es posible
que se produzcan interferencias o
una transmisión deficiente. En este
caso, realice los pasos siguientes:
– No instale el producto S-AIR cerca
de otros sistemas inalámbricos.
– No utilice el producto S-AIR y los
otros sistemas inalámbricos al
mismo tiempo.
La distancia de transmisión varía en
función del entorno de uso. Busque
un lugar donde la transmisión entre
la unidad principal y la unidad
secundaria sea más efectiva, e instale
la unidad principal y la unidad
secundaria en él.
Seguridad
Si no va a utilizar la unidad durante
un periodo de tiempo prolongado,
desconecte completamente el cable
de suministro de alimentación de la
toma de corriente de pared. Para
desenchufar la unidad, sujete
siempre la clavija. No tire nunca del
cable.
Si se introduce algún objeto sólido o
líquido en la unidad, desenchúfela y
haga que la revise personal
especializado antes de volver a
utilizarla.
El cable de suministro de
alimentación solamente puede
cambiarse en un centro de servicio
técnico cualificado.
Ubicación
No coloque la unidad en posición
inclinada ni en lugares que sean muy
calientes, fríos, polvorientos, sucios,
húmedos o que carezcan de una
ventilación adecuada, o que estén
expuestos a vibración, luz solar
directa o una luz intensa.
Tenga cuidado cuando ponga la
unidad encima de superficies que
hayan sido tratadas especialmente
(por ejemplo, con cera, aceite,
abrillantador), ya que podrían
producirse manchas o decoloración
de la superficie.
Acumulación de calor
La acumulación de calor en la unidad
durante el funcionamiento es normal y
no debe ser causa de alarma.
Limpieza de la unidad
Limpie la unidad con un paño suave y
seco. No utilice ningún tipo de
estropajo abrasivo, limpiador en polvo,
ni disolvente, como diluyente, benzina
o alcohol.
Especificaciones
Salida
AUDIO OUT:
tensión 775 mV, impedancia
47 kilohmios
VIDEO OUT:
Nivel de salida máximo 1 Vp-p,
desbalanceada, sincronización
negativa, impedancia de carga 75
ohmios (Salida de vídeo
compuesta)
Transceptor inalámbrico
(EZW-RT10A)
Sistema de comunicación:
Especificación S-AIR, version
1.0
Banda de frecuencia:
2,4000 GHz – 2,4835 GHz
Método de modulación:
DSSS
Requisitos de alimentación:
cc3,3 V, 350 mA
Dimensiones (an/al/pr):
50 × 13 × 60 mm
Peso:
24 g
Sección del sintonizador
Sintonizador de FM:
Rango de sintonización:
87,5 – 108,0 MHz (pasos de
100 kHz)
Antena:
Antena de FM de cable
Terminales de antena:
75 ohm desbalanceada
Frecuencia intermedia:
10,7 MHz
General
Requisitos de alimentación:
ca de 120 V, 60 Hz
Consumo de energía:
15 W
Dimensiones (an/al/pr) (sin incluir la
unidad de suministro de alimentación
de ca):
aprox. 295 × 43 × 110 mm
Peso (incluyendo la unidad de
suministro de alimentación de ca):
aprox. 1,1 kg
Accesorios suministrados: Transceptor
inalámbrico (EZW-RT10A) (1)/
Mando a distancia (RM-ANU069) (1)/
Pilas R03 (tamaño AAA) (2)/
Antena de cable de FM (1)/
Adaptador de acoplamiento de
universal para iPhone (1)/
Adaptador de acoplamiento de
universal para iPhone 3G (1)
El diseño y las especificaciones están
sujetos a cambio sin aviso.
Modelos iPod/
iPhone compatibles
Es posible utilizar los siguientes
modelos de iPod/iPhone en la unidad.
Actualice su iPod/iPhone con el
software más reciente antes de
utilizarlo.
iPod touch de
segunda generación
iPod nano de
cuarta generación
(vídeo)
iPhone 3G
iPod touch de
primera
generación
iPod nano de
tercera generación
(vídeo)
iPod classic
iPhone
iPod nano de
segunda generación
(aluminio)
iPod de quinta
generación
(vídeo)
iPod nano de
primera
generación
iPod de cuarta
generación
(pantalla en color)
iPod de cuarta
generación
iPod mini
1 Pulse SYSTEM MENU en la
unidad.
2 Pulse TUNING/SELECT +/–
varias veces en la unidad hasta
que aparezca “RF CHG” y, a
continuación, pulse ENTER en la
unidad.
3 Pulse TUNING/SELECT +/–
varias veces en la unidad para
seleccionar el ajuste deseado.
El ajuste predeterminado está
subrayado.
AUTO:
normalmente, seleccione este
ajuste. La unidad principal
cambiará el ajuste RF CHANGE a
“ON” u “OFF” automáticamente.
ON:
la unidad principal transmite
sonido buscando el mejor canal
para la transmisión.
OFF:
la unidad principal transmite
sonido utilizando un canal fijo para
la transmisión. Cuando seleccione
este ajuste, seleccione el ID de
S-AIR que ofrezca la mejor
conexión.
4 Pulse ENTER en la unidad para
salir del menú del sistema.
 Loading...