

Sony AIBO ERS312 User Manual [fr]
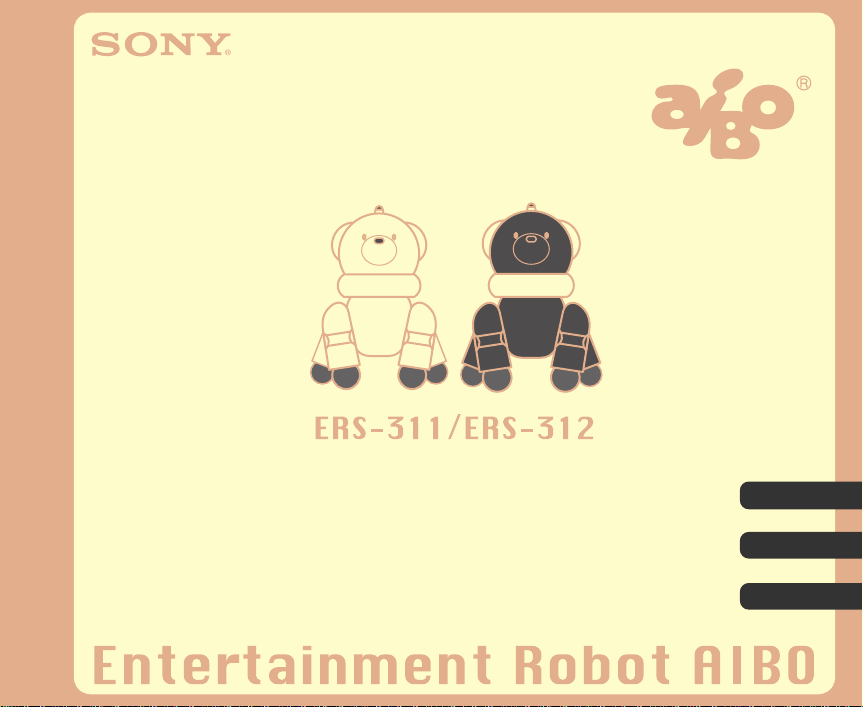
Entertainment Robot AIBO
ERS-311/312
4-657-307-11(1)
Operating Instructions
English
Français
Deutsch

For Customers in the U.S.A. and
Canada
Safety Information
Owner’s Record
The model number and serial number are located inside the cover of the unit
and on the side of the supplied AC adapter. Record the serial number in the
space provided below. Refer to the model and serial number whenever you
call upon your Sony AIBO Customer Link.
Model No. ERS-311/312
Serial No. ___________
Warning
• To prevent fire or shock hazard, do not expose the robot to rain or moisture.
• To avoid electrical shock, do not open the enclosure. Refer servicing to
qualified personnel only. (Contact the AIBO Customer Link.) (page 8)
• Periodically examine the AC adapter for conditions that may result in the
risk of fire, electrical shock, or injury to persons (such as damage to the
cords, blades, housing) and in the event of such conditions, the AC adapter
should not be used until properly repaired or replaced.
• Not Intended for Children Under 8 Years.
• Vérifiez périodiquement si l’adaptateur secteur ne présente pas des
conditions susceptibles de provoquer un incendie, des décharges électriques
ou des blessures aux personnes (comme des dommages aux câbles, aux
oreilles ou au boîtier) et, en présence de telles conditions, l’adaptateur
2
secteur ne peut plus être utilisé avant son réparation ou remplacement.
• Cet appareil n’est pas destiné aux enfants de moins de 8 ans.
DISPOSAL OF LITHIUM ION BATTERY
LITHIUM ION BATTERY
DISPOSE OF PROPERLY
You can return your unwanted lithium ion batteries to your nearest Sony
Service Center.
Note
In some areas the disposal of lithium ion batteries in household or business trash may be
prohibited.
For the Sony AIBO Customer Link call 1-800-427-2988 in the United States or
contact us via email at aibosupport@info.sel.sony.com.
! Do not handle damaged or leaking lithium ion battery.
! Danger of explosion if the battery is incorrectly replaced. Replace only with the ERA-
301B1. Use of another battery may present a risk of fire or explosion. Discard used
batteries according to the manufacturer’s instructions.
! The battery pack used in this device may present a fire or chemical burn hazard if
mistreated. Do not disassemble, heat above 140°F (60°C) or incinerate. Dispose of
used battery promptly. Keep away from children. Do not disassemble and do not
dispose of in fire.
RECYCLING LITIUM-ION RECHARGEABLE BATTERIES
Litium-ion rechargeable batteries are recyclable.
You can help preserve our environment by returning your used
rechargeable batteries to the collection and recycling location nearest you.
For more information regarding recycling of rechargeable batteries, call toll free
1-800-822-8837, or visit
Caution: Do not handle damaged or leaking litium-ion batteries.
http://www.rbrc.org/
En
3
3

Regulatory Information
This equipment has been tested and found to comply with the limits for a Class
B digital device, pursuant to Part 15 of the FCC Rules. These limits are
designed to provide reasonable protection against harmful interference in a
residential installation. This equipment generates, uses, and can radiate radio
frequency energy and, if not installed and used in accordance with the
instructions, may cause harmful interference to radio communications.
However, there is no guarantee that interference will not occur in a particular
installation. If this equipment does cause harmful interference to radio or
television reception, which can be determined by turning the equipment off
and on, the user is encouraged to try to correct the interference by one or more
of the following measures:
• Reorient or relocate the receiving antenna.
• Increase the separation between the equipment and receiver.
• Connect the equipment into an outlet on a circuit different from that to
which the receiver is connected.
• Consult the dealer or an experienced radio/TV technician for help.
You are cautioned that any changes or modifications not expressly approved in
this manual could void your authority to operate this equipment.
The shielded interface cable recommended in this manual must be used with
this equipment in order to comply with the limits for a digital device pursuant
to Subpart B of Part 15 of FCC Rules.
4

For Customers in Europe and
Australia
Safety Information
WARNING
• To prevent fire or shock hazard, do not expose the robot to rain or moisture.
• To avoid electrical shock, do not open the enclosure. Refer servicing to
qualified personnel only. (Contact the AIBO Customer Link.) (page 8)
• Periodically examine the AC adapter for conditions that may result in the
risk of fire, electric shock, or injury to persons (such as damage to the cords,
blades, housing) and in the event of such conditions, the AC adapter should
not be used until properly replaced.
• The robot is not intended or recommended for children under 8 years old.
• The robot must be used only with the recommended AC adapter (ERA201P1).
• The AC adapter is not a toy.
• Small parts can be swallowed.
• If the external flexible cable or cord is damaged, it must be replaced or
repaired only by the manufacturer, an authorised service agent or a similar
qualified person in order to avoid a hazard.
• All material for fastening or packing purposes are not part of the robot and
should be disregarded for children’s safety.
• For information regarding AC adapter, station, and lithium ion battery pack,
please refer to the manuals provided separately.
5
DISPOSAL OF LITHIUM ION BATTERY
! Do not handle damaged or leaking lithium ion batteries.
! Danger of explosion if the battery is incorrectly replaced. Replace only with
the ERA-301B1. Discard used batteries according to the manufacturer’s
instructions.
! The battery pack used in this device may present a fire or chemical burn
hazard if mistreated. Do not disassemble, heat above 60 °C
(140 °F ) or incinerate. Dispose of used battery promptly. Keep away from
children. Do not disassemble and do not dispose of in fire.
Voor de Klanten in Nederland (For customers in the
Netherlands)
Gooi de batterij niet weg, maar lever hem in als KCA.
Regulatory Information
This product has been tested and found to conform to the following Safety
Standards.
Toy Directive 88/378/EEC, EN50088/96 + A1/96 + A2/97, EN71-1/98, DIN
EN 71-2/01.94, DIN EN 71-3/03.95
EMC Directive 89/336/EEC
EMI EN55022/98, EN55014/93 + A1/97+A2/99, EN50081-1/92
EMS : EN55024/98, EN55014-2/97, EN61000-3-2/95, EN61000-3-3/95,
EN50082-1/97
6
AC Adapter and Lithium Ion Batteries have been tested all together as a
system and found to conform to the following Safety Standards.
LVD 73/23/EEC + 93/68/EEC
EN60950/92 + A1/93 + A2/93 + A3/95 + A4/97 + A11/97
EN60065/98
EN61558-1/97 + A1/98
EN61558-2-7/97
CE (EMC) Marking Conformity Remarks
a) This equipment complies with EN55022.
Class B digital for use in following areas : residential, business, and
light-industrial.
b) This product conforms with the following European Directive:
89/336/EEC (EMC directive)
Sony Corporation
6-7-35 Kitashinagawa, Shinagawa-ku, Tokyo 141-0001 JAPAN
Please keep all information for future reference.
7
Customer Support
How can you contact the AIBO Customer Link?
In the U.S.A. and Canada:
Call 1-800-427-2988 (U.S.A.)
Email address: aibosupport@info.sel.sony.com
In Europe:
English line: +44(0)-20-7365-2937
German line: +49(0)-69-9508-6309
French line: +33(0)-1-5569-5117
Email address: aibo@sonystyle-europe.com
In Australia:
+1300-36-2426 (toll free within Australia)
Email address: cicci@ap.sony.com
In Hong Kong:
+852-2345-2966
Email address: aibo_helpdesk@shk.sony.com.hk
In Singapore:
+65-473-8500
E-mail address: AIBO.Link@ap.sony.com
2001 Sony Corporation. Reproduction in whole or in part without
written permission is prohibited. All rights reserved.
8
910111213


Table of Contents
Introduction
What is AIBO?...............................................................................18
ERS-311/312 ..................................................................................19
Checking the supplied accessories .................................................21
Index to parts and controls .............................................................22
AIBO exterior .......................................................................... 22
AIBO’s inner unit .................................................................... 24
Stand ........................................................................................ 26
Charging the battery pack
Inserting the battery pack ...............................................................28
Charging the battery pack ..............................................................30
Playing with AIBO
Inserting or removing a “Memory Stick”.......................................36
Inserting a “Memory Stick”..................................................... 36
Removing the “Memory Stick” ............................................... 38
Starting up AIBO ...........................................................................39
14

When not playing with AIBO ........................................................41
Pausing AIBO .......................................................................... 41
Setting the volume level of the musical tone .................................42
Replacing the battery pack .............................................................44
Additional information
Notes on use ...................................................................................48
On handling AIBO................................................................... 48
Moisture condensation............................................................. 49
On handling the AC adapter .................................................... 50
On handling the battery pack................................................... 50
On cleaning.............................................................................. 50
Troubleshooting .............................................................................51
Clinic mode ............................................................................. 51
Changing AIBO to clinic mode ............................................... 51
Check list for clinic mode........................................................ 52
Symptoms and remedies.......................................................... 55
Limited warranty (for the U.S.A. only)..........................................59
Service procedure (for the U.S.A. only) ........................................62
Specifications .................................................................................63
Index...............................................................................................66
15

16
Introduction
This chapter introduces you to the Entertainment Robot AIBO
ERS-311/312.
Introduction
17
What is AIBO?
“AIBO” is the name given to the Sony entertainment robot.
Developed to encourage human and robot interaction,
AIBO creates and introduces you to new pleasures and
lifestyles.
The name “AIBO” is coined from the words “A.I.
(Artificial Intelligence),” “eye” and “robot.” In Japanese,
the word “aibou” means “partner” or “pal.”
For the newest information on AIBO, go to the following homepage:
http://www.aibo.com/
18

ERS-311/312
To comfortably coexist with people, AIBO ERS-311/312 was designed with
four legs, a head, and a tail, and a total of fifteen internal motors that enable it
to walk, sit, or lie down in a natural way. It can also use its horn light to
express emotions.
“OPEN-R” is the standard interface for the entertainment robot
system that Sony is actively promoting. This interface expands
the capability of the entertainment robot through a flexible
combination of hardware and interchangeable software to suit
various applications. AIBO ERS-311/312 conforms to the
OPEN-R version 1.1.1.
“AIBO,” the AIBO logo
registered trademarks of Sony Corporation. “Memory Stick,”
“
manual, the “” mark has been omitted.
,” and “ ” are trademarks of Sony Corporation. In this
, “OPEN-R,” and the OPEN-R logo are
Introduction
19

AIBO-ware “Memory Sticks”
To play with AIBO ERS-311/312, you must provide it with optional AIBOware “Memory Stick,” a variety of which are available, depending on how you
want to enjoy your AIBO. Without AIBO-ware, AIBO is just like a body
without a mind. AIBO-ware loaded from a “Memory Stick” works as AIBO’s
mind and determines its character and functions.
• An AIBO-ware “Memory Stick” is a “Memory Stick” created just for AIBO,
containing application software for operating AIBO.
• Before purchasing an AIBO-ware “Memory Stick,” make sure the AIBOware is compatible with your AIBO model.
AIBO
AIBO-ware “Memory Stick”
(not supplied)
You can select different AIBO-ware,
depending on the way you want to
enjoy AIBO. For example, there is
AIBO-ware for raising AIBO or for
giving it a different character.
Note
If you start up AIBO without inserting an AIBO-ware “Memory Stick,” AIBO enters
clinic mode in which its sensors and other parts are checked (page 51).
20
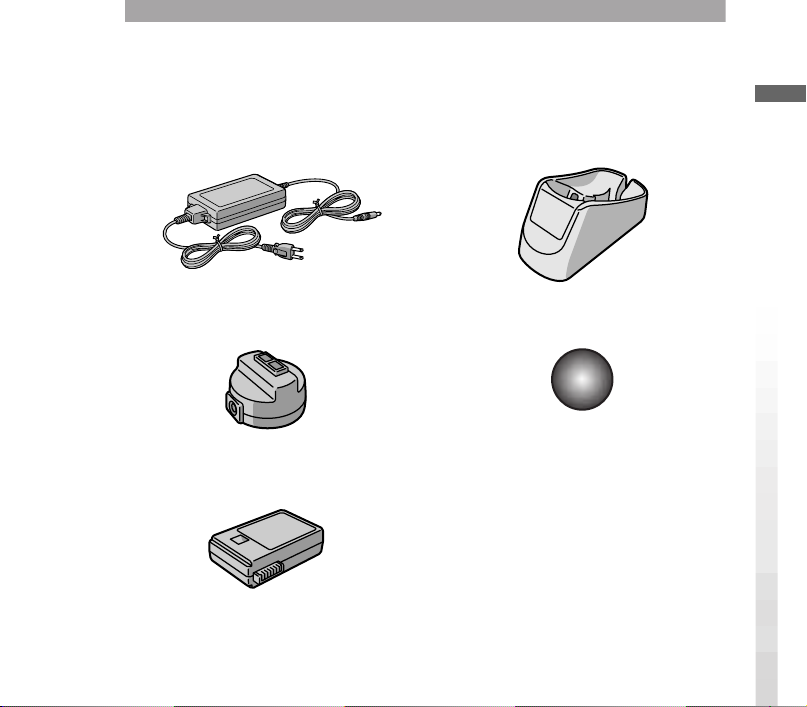
Checking the supplied accessories
Check to make sure you have the following items before you play with AIBO.
x AC adapter ERA-201P1 (1)
x AC adapter conversion
x Stand (1)
x Pink ball (1)
plug* (1)
x Lithium ion battery pack
ERA-301B1 (1)
* Keep cards with magnetic data strips or magnetic recording media away
from the AC adapter conversion plug. The data on such magnetic media may
be erased by the magnet within the conversion plug.
x Documentation
• AIBO Operating Instructions
• Congratulations on becoming a new
AIBO owner
Introduction
21
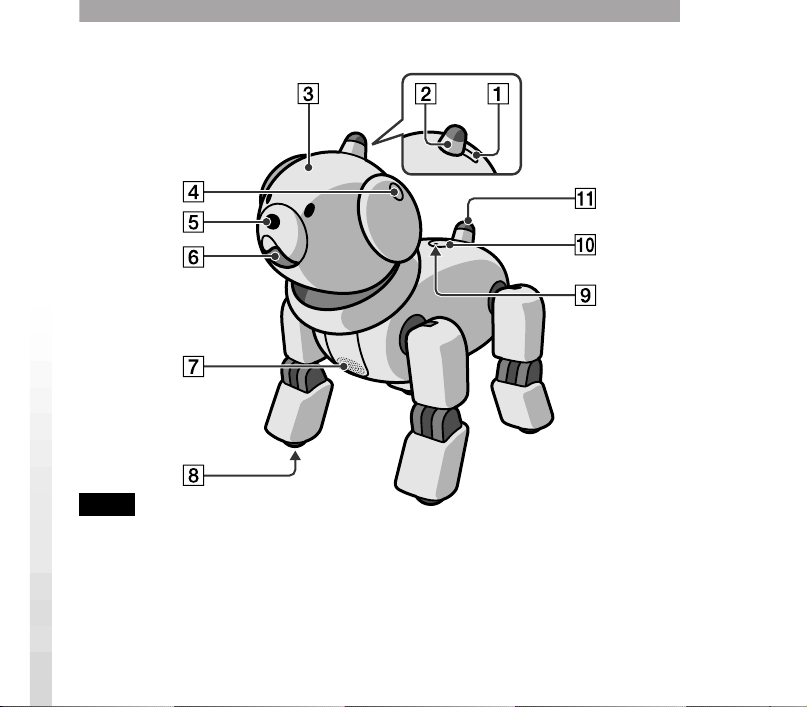
Index to parts and controls
AIBO exterior
Notes
• Do not attach stickers on AIBO’ s color camera (6) or distance sensor (5).
• Do not attach stickers onto or insert anything into AIBO’s joints or other movable
parts.
• When lifting AIBO, firmly grasp it by its back (page 39). Never lift it by its head,
ears, collar, legs, or tail.
• The gray area between AIBO’s chin and collar is not a switch. Do not insert your
22
fingers into this area as they may get caught and cause damage to AIBO.
1 Mode indicator (located behind
the horn)
Shows AIBO’s operation mode.
2 Horn light
Lights up in various colors to indicate
AIBO’s emotional state.
3 Head
A switch within AIBO’s head detects
movement whenever you gently push
AIBO’s head upward or downward.
9 Back light
•Lights up green when AIBO is in
active mode.
•Flashes green when AIBO is
preparing for pause mode.
•Lights up orange when the internal
battery pack is being charged.
•Flashes orange when an error has
occurred during charging.
•Turns off when AIBO is in pause
mode or the battery pack is
completely charged.
Introduction
4 Stereo microphone
Allows AIBO to pick up surrounding
sounds.
5 Distance sensor
AIBO uses this sensor to measure the
distance between it and an object.
6 Color camera
Allows AIBO to recognize the
objects by color, shape, and
movement.
7 Speaker
Emits various musical tones and
sound effects.
8 Paw switches
Located on the bottom of each paw.
q; Pause button
Press to activate AIBO or to pause
AIBO.
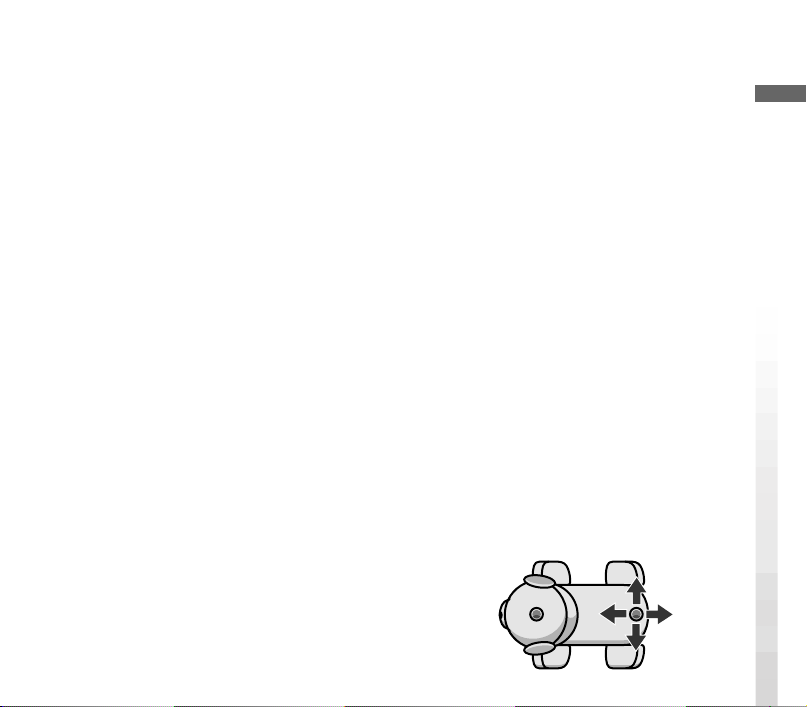
qa Tail switch
Used for giving AIBO commands.
This switch can be pushed in four
directions. The commands given
through the tail vary with the AIBOware used.
Movable in four directions
Front
Right
Back
Left
23
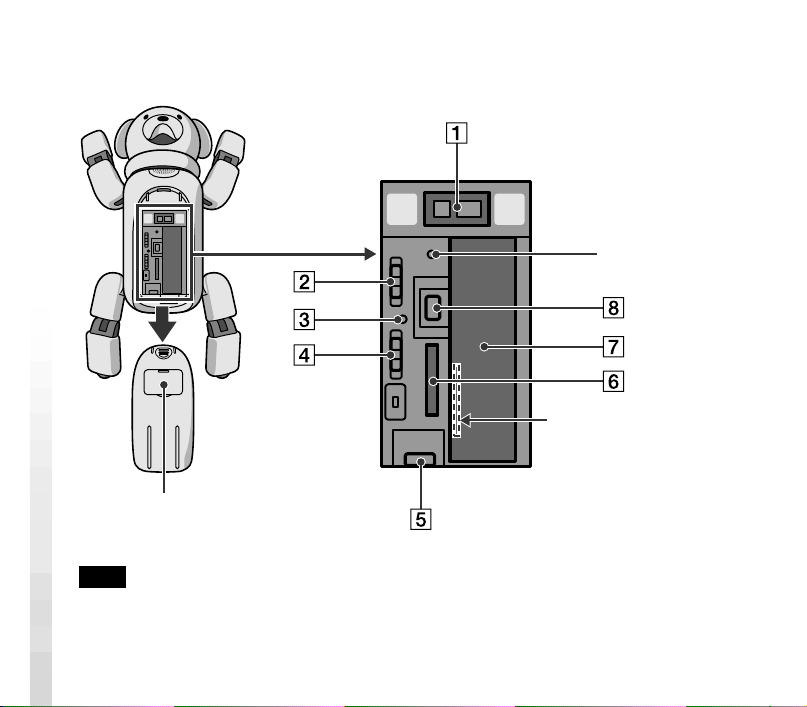
AIBO’s inner unit
The illustration shows AIBO with its cover removed.
*
Serial number
sticker (inside
the battery pack
compartment)
Shutter for charging terminal
Note
Do not touch the charging terminal with your hand. Doing so may soil the terminal and
cause poor contact.
24

1 Charging terminal
Connect the supplied AC adapter here
with the supplied AC adapter
conversion plug. When AIBO is
placed on the supplied stand with an
optional Energy Station Core
installed, this terminal directly
touches AIBO’s internal battery pack
to charge it.
2 VOLUME switch
Used to adjust the volume of the
speaker in four levels including mute.
3 “Memory Stick” access
indicator
Lights up while AIBO is accessing
the “Memory Stick.” During this
time, the Z button and the BATT Z
latch are deactivated. When this
indicator is lit, do not attempt to
remove the “Memory Stick.”
4 RESERVED switch
This switch is reserved for functions
to be added in the future.
5 BATT Z latch
Flip this latch towards AIBO’s tail to
remove the battery pack.
6 “Memory Stick” insertion slot
Insert the AIBO-ware “Memory
Stick” (not supplied) into this slot.
7 Battery pack insertion slot
Insert the supplied or an optional
lithium ion battery pack into this slot.
8 Z button
Press this button to remove the
“Memory Stick.”
Emergency release hole
*
When the “Memory Stick” or battery
pack cannot be removed because of a
mechanical problem, etc., insert a
pointed object into this hole and
push. Do not use anything that
breaks easily such as a toothpick.
Do not use this hole under normal
circumstances.
Introduction
25
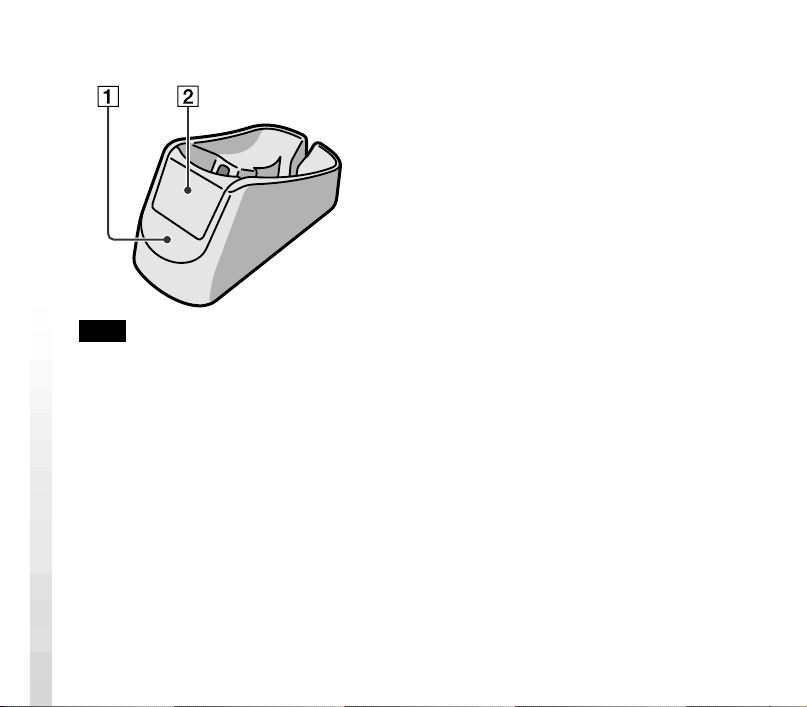
Stand
1 Stand
Place AIBO on the stand while it is in
pause mode or while it is charging.
2 Decoration plate
Remove this plate when the optional
Energy Station Core is attached to the
stand.
Note
The supplied stand is for use with AIBO ERS-311/312 only.
26
Charging the battery pack
This chapter explains how to charge AIBO’s battery pack.
Charging the battery pack
27
Inserting the battery pack
The battery pack supplied with AIBO comes partially charged. It is
recommended that you charge the battery pack fully before you play with
AIBO. To charge the battery pack, first insert it as described below.
1
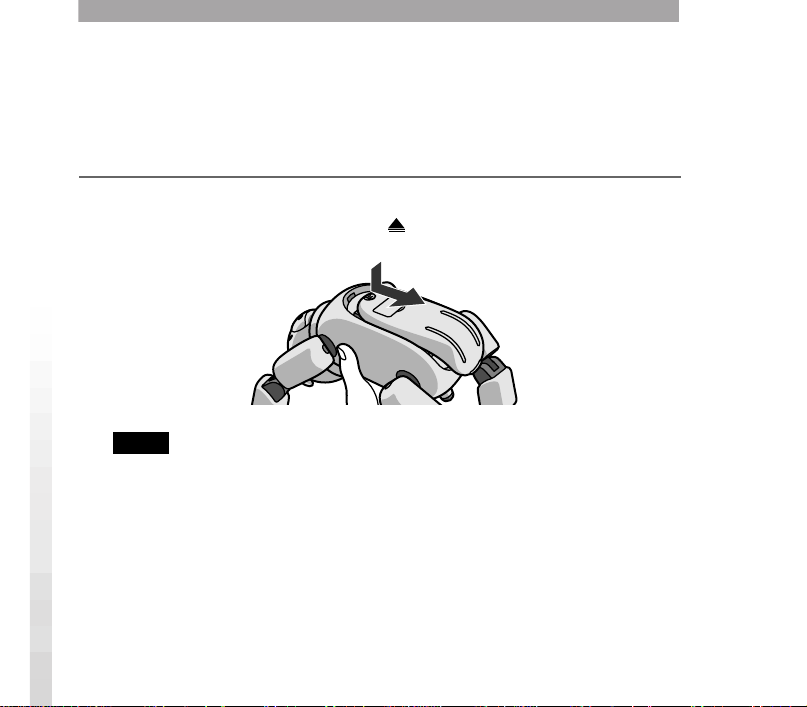
Grasp AIBO securely by the body, turn it upside down, and
remove its cover by pushing the mark towards AIBO’s tail.
Notes
• Lift AIBO by the body, not by its extremities. Do not hold AIBO by its collar.
Your finger may get caught between the collar and AIBO’s head or body.
• AIBO’s surface is very smooth. Be careful not to drop AIBO while lifting it.
• Do not touch the charging terminal with your hand. Doing so may soil the
terminal and cause poor contact.
• Use only the supplied battery pack type ERA-301B1.
28
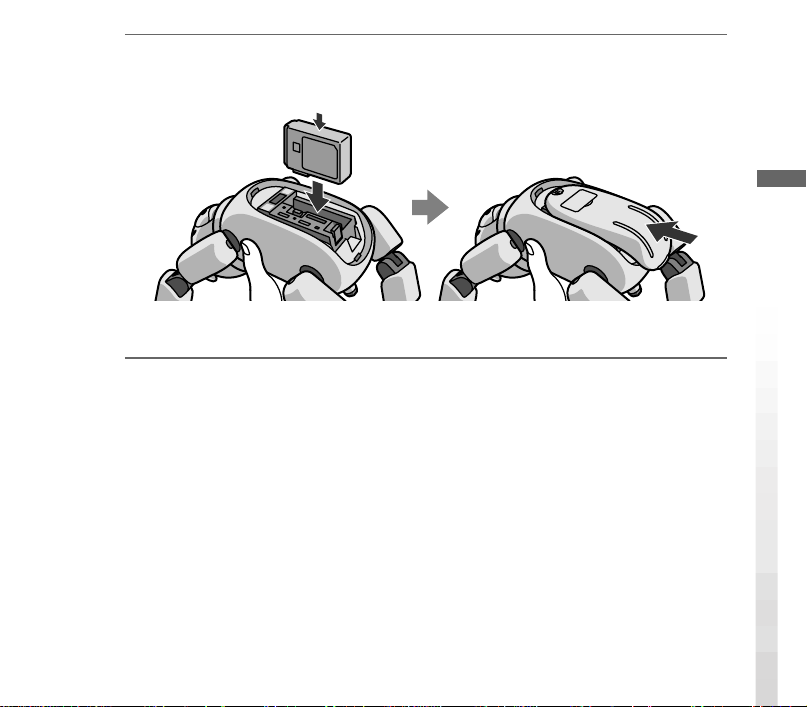
2
Insert the supplied battery pack in the direction of the arrow until
it clicks into place, and then replace the cover.
Push here.
For details on how to remove the battery pack, see page 44.
Charging the battery pack
29
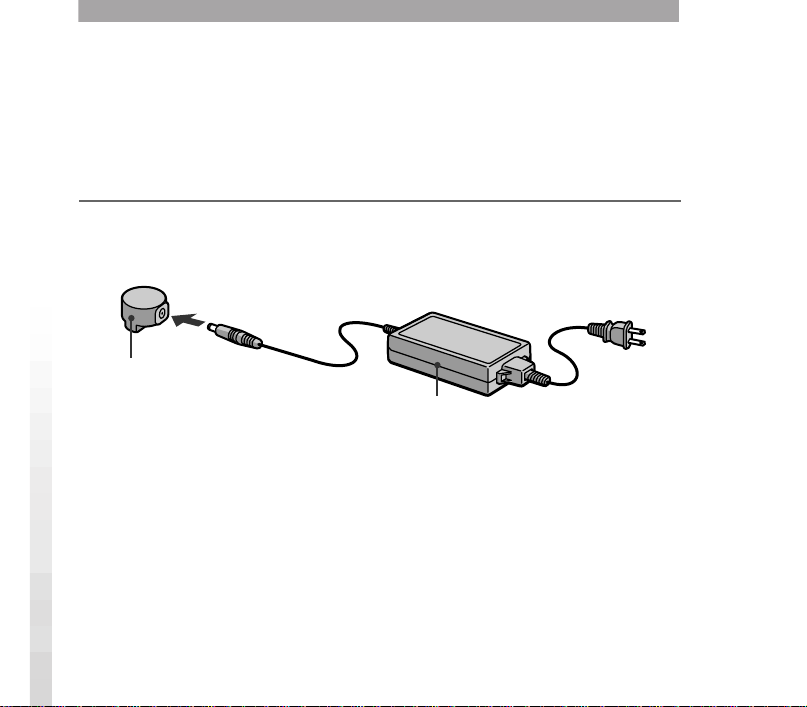
Charging the battery pack
You can use the supplied AC adapter and the conversion plug to charge the
battery pack while it is inserted into AIBO. It is recommended that you charge
the battery pack at room temperature (10° to 30°C (50° to 86°F)). At room
temperature, it takes about 2 hours to fully charge the battery pack.
1
Connect the AC adapter to the AC adapter conversion plug
securely.
AC adapter
conversion plug
AC adapter
30
 Loading...