

Page 1
13
Instructions
12
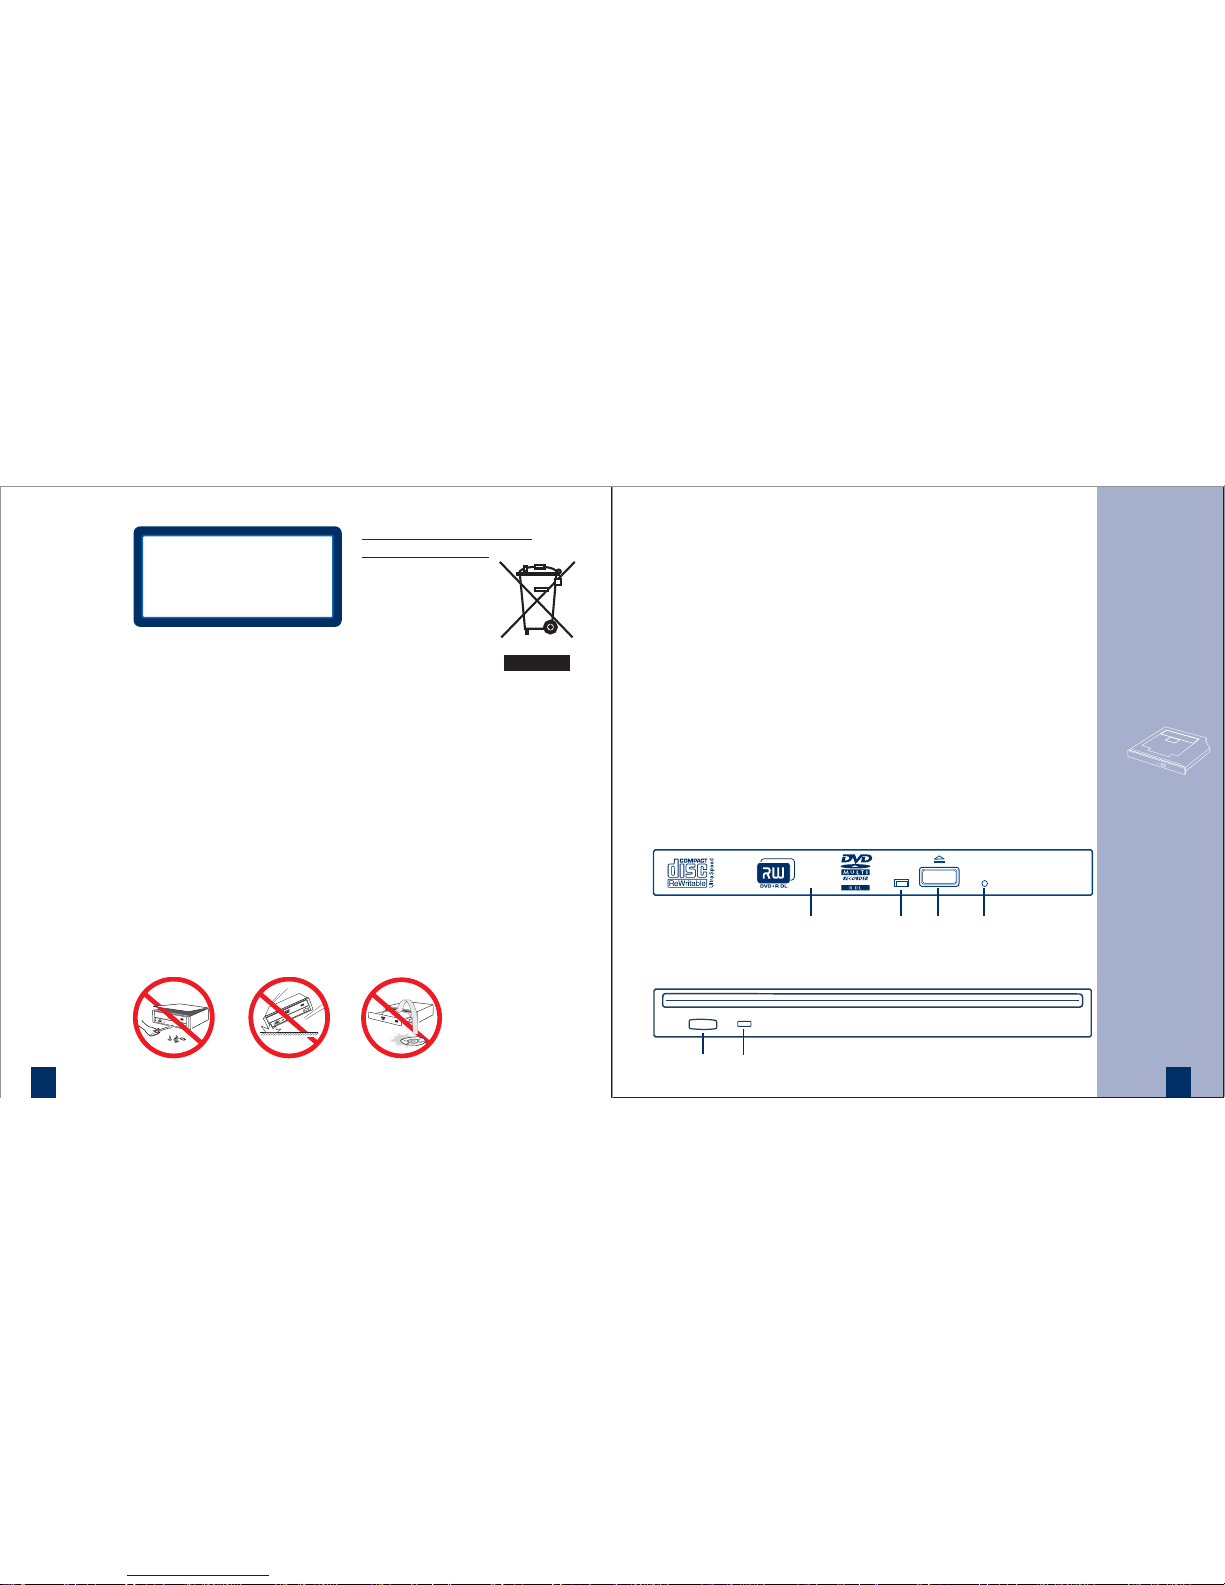
1 Front Panel
This panel prevents dust from
entering the DVD Writer and
opens automatically only
a little when the Eject button
is pushed.
2 Busy Indicator
This indicator lights during
data read and write operation.
3 Eject Button
This button is pressed to open
the disc tray/eject the disc
when the power is on.
4 Emergency Eject Hole*
Use to remove the disc from
the DVD Writer if the
electrical eject is disabled by
software or if power failure
occurs. (see „Emergency Eject“
for details)
Front View AD-5590, AD-759x
Internal ATAPI Drive Slimline DVD Writer
Names and Functions
1
2
3 4
English
CLASS 1 LASER PRODUCT
LASER KLASSE 1
LUOKAN 1 LASERLAITE
KLASS 1 LASERAPPARAT
Laser Safety Information
This drive employs a laser.
Do not remove the cover or attempt
to service this device when
connected due to the possibility of
eye damage.
CAUTION
The use of controls or adjustments
or performance of procedures other
than those specified herein may
result in hazardous radiation
exposure.
Laser Specification:
Semiconductor Laser: 330mW, 785nm;
280mW, 661nm
Disposal of Old Electrical &
Electronic Equipment
(Applicable in the EU
and other European
countries with separate
collection systems)
This symbol on the
product or on its
packaging indicates
that this product shall not be treated
as household waste. Instead it shall
be handed over to the applicable
collection point for the recycling of
electrical and electronic equipment.
By ensuring this product is disposed
of correctly, you will help prevent
potential negative consequences for
the environment and human health,
which could otherwise be caused by
inappropriate waste handling of this
product. The recycling of materials
will help to conserve natural
resources. For more detailed
information about recycling of this
product, please contact your local
Civic Office, your
household waste
disposal service
or the shop where
you purchased
the product.
Front View AD-763xA, AD-767xS (slot-in)
23
Page 2

15
Instructions
14
3. Connect the intended plug
with the socket on the back
of the Slimline DVD Writer.
4. Slide the Slimline DVD Writer
into the computer and fix it
in the computer cabinet with
4 screws.
To avoid damage to the DVD
Writer take care that the screws
do not reach more than 1.5 mm
into the Optiarc Writers cabinet.
5. Reassemble the computer and
close the housing cover. Refer
to the operation gudie that
came with the computer for
help with this step.
Drive usage
Inserting a Disc
1. Press the Eject button. The disc
tray will be ejected by about
10mm.
2. Pull the disc tray all the way
open by hand.
3. Set the disc into the shaft in
the centre of the tray with
the label side facing up.
4. Press the disc tray into the
DVD Writer calmly by hand.
Removing a Disc
1. Press the Eject button. The disc
tray will be ejected by about
10mm.
2. Pull the disc tray all the way
open by hand.
3. Lift the edge of the disc
strongly, pressing the shaft in
the centre of the tray.
4. Press the disc tray into the
DVD Writer drive calmly
by hand.
Note: If an eject prohibit
command has been received
from the computer, the disc
tray will not be ejected even if
the Eject button is pressed.
5 Connector
This Connector includes Power
and I/O BUS.
Installation
Configuration
The drive configures itself
independently through
the connector.
Note: Not all computer hardware
supports the intended automatic
configuration. Usually this
causes that after the drive
assembled the computer does
not boot any longer. In such
case the drives firmware must
by changed by qualified
personnel.
Installing in a host computer
While installing a slimline drive,
you have to consider that it’s
dimension and connector are
designed for usage in portable
computer and are standardized.
If the Slimline drive is not target
for a standard slimline system,
additional adapters must be
procured from an appropriate
expert trader.
1. Turn off the computer, other
peripherals and unplug all the
cords and cables. Then remove
the computer cover, face plate,
mounting clips, and keeper
bracket. Refer to the operation
gudie that came with your
computer for help with this step.
2. Slide the Slimline DVD Writer
into the computer in such a
way that you are able to
connect the intended plug.
Rear View
5
Page 3
17
Instructions
16
For Windows 3.xx don’t use the
32 bit hard disk access, because
this mode is not supported for
DVD drives.
If the reading function is available the next step is to achieve
the writing function provided by
the writing software. Please
insert your writing software CDROM into the DVD Writer and use
the information provided with
the software (if the installation
does not starting automatically
you have to activate the software
installation manually).
Support
For local support like hotline,
service or firmware updates please
check following Internet site:
http://www.sony-optiarc.eu
Emergency Eject*
The procedure described below
can be used to open the tray of
the Optiarc Writer if the EJECT
button is disabled by software or a
power failure occurs.
1. Turn off the power to the
Slimline DVD Writer.
2. If a disc inside still is spinning
wait until it stops.
3. Insert a steel rod (about 0.8 mm
in diameter) into the emergency
eject hole and push firmly until
the cartridge is ejected. A stiff
paper clip may be used as steel rod.
*) the slot-in drives AD-7630,
AD-733 and AD-7670 do not
have a emergency eject hole
Driver Installation
The software installation starts
with activating the reading function of the drive (CD-ROM).
If you are using the Slimline DVD
Writer with Windows 95/98/ME/
NT/2000/XP or IBM OS/2 Warp,
all necessary drivers will be
loaded automatically by the
operating system.
Drivers mentioned above are part
of the Operating Systems and are
not available from Sony Optiarc.
To use the IDE/ATAPI Slimline
DVD Writer with MS-DOS and
MS-Windows 3.x, you have to
install the attached driver software
before you can use the Optiarc
Writer for the first time.
Refer to the README.TXT file on
the driver disk for information
about installing this driver.
This drive supports RPC according
to SFF8090v4 (RPC-2). The final
setting/definition of the video
region code is determined by the
fifth DVD video region code change.
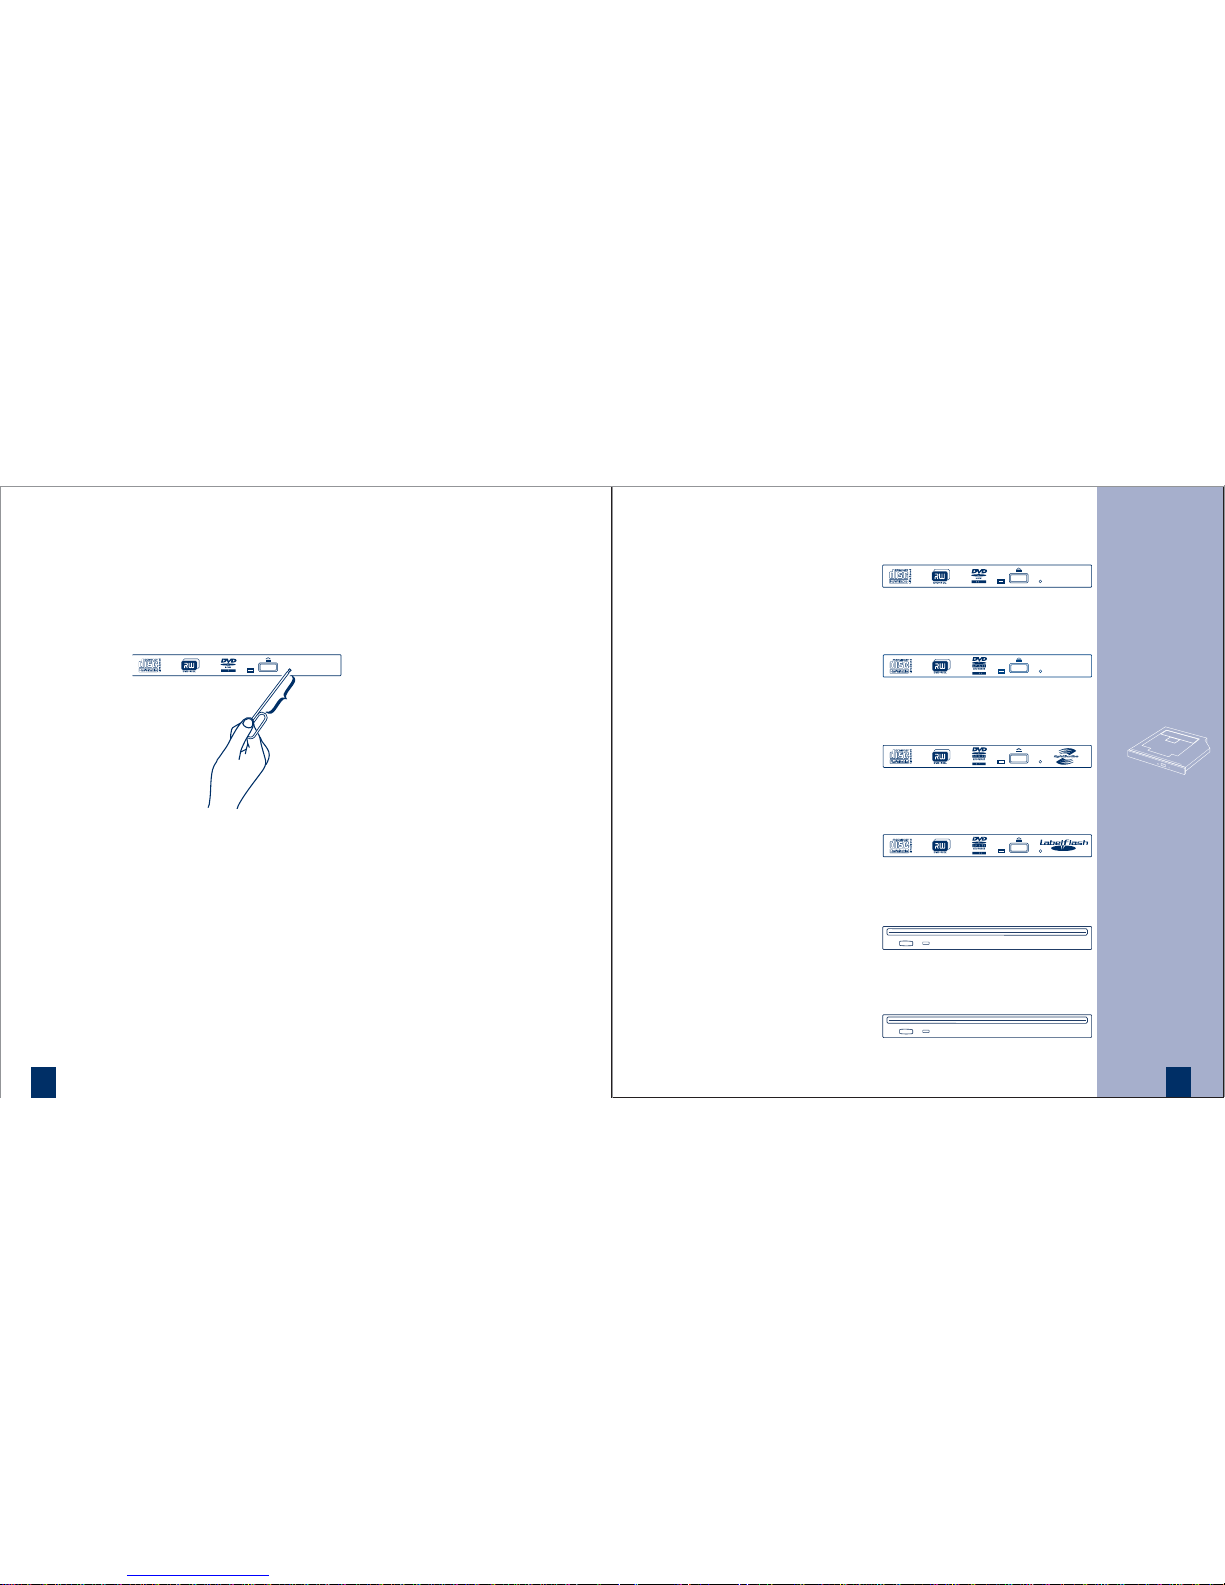
20 mm
AD-5590A/S
AD-7590A/S
AD-7591S
AD-7593A/S
AD-7630A, AD-7670S
AD-7633A
Page 4

General
Power Consumption (max.)
8 VA
(5V 1.6A)
Dimensions (WxHxD) 128 x 12.7 x 129 mm
Weight 0.174 kg
(AD-7630, AD-7633, AD-7670: 0.16 kg)
Noise ≤ 47.5 dB(A)
Storage temperature -40° to +65° C
Storage humidity 5% to 95 % RH,
noncondensing
Operating temp. +5° to +50° C
Operating humidity 20 % to 80 % RH,
noncondensing
Laser Specification 330mW,
784nm(CD)
300mW, 661nm (DVD)
In compliance wth MultiRead, PC-99,
PC-2001, MS Vista
Above specifications are subject to change.
Microsoft, Windows, and Windows Vista are
registered trademarks Microsoft Corporation,
Photo CD is a trademark of Kodak
cnicos • Dati tecnici • Specifications • Technische Date
Data-Section
Transfer Rate AD-5590A/S AD-7590A/S, AD-7591S, AD-7593A/S AD-7630A, AD-7633A, AD-7670S
read DVD-ROM 4500 -11000 KByte/sec (3.3-8x) 4500 -11000 KByte/sec (3.3-8x) 4500 -11000 KByte/sec (3.3-8x)
DVD+/-R 4500 -11000 KByte/sec (3.3-8x) 4500 -11000 KByte/sec (3.3-8x) 4500 -11000 KByte/sec (3.3-8x)
DVD+/-RW 4500 - 11000 KByte/sec (3.3-8x) 4500 - 11000 KByte/sec (3.3-8x) 4500 - 11000 KByte/sec (3.3-8x)
DVD-RAM ./. 4100 - 6900 KByte/sec (3-5x) 4100 - 6900 KByte/sec (3-5x)
CD-ROM, CD-R 1500 - 3600 KByte/sec (10-24x) 1500 - 3600 KByte/sec (10-24x) 1500 - 3600 KByte/sec(10-24x)
CD-RW, CD-DA 1500 - 3600 KByes/sec (10-24x) 1500 - 3600 KByte/sec (10-24x) 1500 - 3600 KByte/sec(10-24x)
CD-ROM XA 1050 - 2400 KByes/sec (7-16x) 1050 - 2400 KByes/sec (7-16x) 1050 - 2400 KByes/sec (7-16x
write DVD-R 4500 -11000 KByte/sec (3.3-8x) 4500 -11000 KByte/sec (3.3-8x) 4500 -11000 KByte/sec (3.3-8x)
supported speeds 8x/6x/4x/2x 8x/6x/4x/2x 8x/6x/4x/2x
DVD-R DL 3400 - 8300 KByte/sec (2.5-6x) 3400 - 8300 KByte/sec (2.5-6x) 2700 - 5500 KByte/sec (2-4x)
supported speeds 6x/4x/2x 6x/4x/2x 4x/2x
DVD-RW 2700 - 8200 KByte/sec (2-6x) 2700 - 8200 KByte/sec (2-6x) 2700 - 8200 KByte/sec (2-6x)
supported speeds 6x/4x/2x/1x 6x/4x/2x/1x 6x/4x/2x/1x
DVD-RAM ./. 4100 - 6900 KByte/sec (3-5x) 4100 - 6900 KByte/sec (3-5x)
supported speeds ./. 5x/3x/2x 5x/3x/2x
DVD+R 4500 -11000KByte/sec (3.3-8x) 4500 - 11000 KByte/sec (3.3-8x) 4500 - 11000 KByte/sec (3.3-8x)
supported speeds 8x/6x/4x/2.4x 8x/6x/4x/2.4x 8x/6x/4x/2.4x
DVD+R9 3400 - 8300 kByte/sec (2.5-6x) 3400 - 8300 kByte/sec (2.5-6x) 3300 - 5500 KByte/sec(2.4-4x)
supported speeds 6x/4x/2.4x 6x/4x/2.4x 4x/2.4x
DVD+RW 4500 - 11000 KByte/sec (3.3-8x) 4500 - 11000 KByte/sec (3.3-8x) 4500 - 11000 KByte/sec (3.3-8x)
supported speeds 8x/6x/4x/2.4x 8x/6x/4x/2.4x 8x/6x/4x/2.4x
CD-R 1500 - 3600 KByte/sec (10-24x) 1500 - 3600 KByte/sec (10-24x) 1500 - 3600 KByte/sec(10-24x)
supported speeds 24x/16x/8x 24x/16x/8x 24x/16x/8x
CD-RW 1200 - 3600 KByte/sec (8-24x) 1200 - 3600 KByte/sec (8-24x) 1200 - 2400 KByte/sec (8-16x)
supported speeds 24x/20x/10x/4x 24x/20x/10x/4x 16x/10x/4x
Write methods
DAO (disc at once), SAO (session at once), TAO (track at once) with zero gap,
variable or fixed packet, multisession
Access Time
DVD-ROM
(1/
3
stroke read, average)
180 msec 180 msec 190 msec
CD-ROM (
1
/3 stroke read, average) 150 msec 150 msec 190 msec
Memory Buffer 2 MByte 2 MByte 2 MByte
Interface A type: IDE/ATAPI SFF-8020 rev. 2.60, PIO Mode 4/Ultra DMA33 mode 2 support / S type: S-ATA I 1.5Gbps
Compatibility DVD-ROM, DVD-Video, DVD-R, +R, DVD-R, +RW, DVD-RW, +RW, High Sierra and ISO 9660, CD-ROM, CD-ROM XA,
CD-DA, CD-TEXT, CD-I (FMV), Enhanced Music CD (CD+), PhotoCD (SingleSession/MultiSession), VideoCD (WhiteBook)
 Loading...