

Page 1
3-058-903-11(1)
AV Cordless IR
Receiver
Operating Instructions
Mode d’emploi
IFT-R20
Sony Corporation C 2000 Printed in Japan
For the customers in the U.S.A.
Owner’s Record
The model number and the serial number are
located at the rear. Record these numbers in the
spaces provided below. Refer to them whenever
you call upon your Sony dealer regarding this
product.
Model No. IFT-R20
Serial No. _____________________________
WARNING
This equipment has been tested and found to
comply with the limits for a Class B digital
device, pursuant to Part 15 of the FCC Rules.
These limits are designed to provide reasonable
protection against harmful interference in a
residential installation. This equipment
generates, uses, and can radiate radio frequency
energy and, if not installed and used in
accordance with the instructions, may cause
harmful interference to radio communications.
However, there is no guarantee that interference
will not occur in a particular installation. If this
equipment does cause harmful interference to
radio or television reception, which can be
determined by turning the equipment off and
on, the user is encouraged to try to correct the
interference by one or more of the following
measures:
— Reorient or relocate the receiving antenna.
— Increase the separation between the equipment
and receiver.
— Connect the equipment into an outlet on a
circuit different from that to which the receiver
is connected.
— Consult the dealer or an experienced radio/TV
technician for help.
This device complies with Part 15 of the FCC
Rules. Operations is subject to the following two
conditions : (1) This device may not cause
harmful interference, and (2) this device must
accept any interference received, including
interference that may cause undesired operation.
You are cautioned that any changes or
modifications not expressly approved in this
manual could void your authority to operate this
equipment.
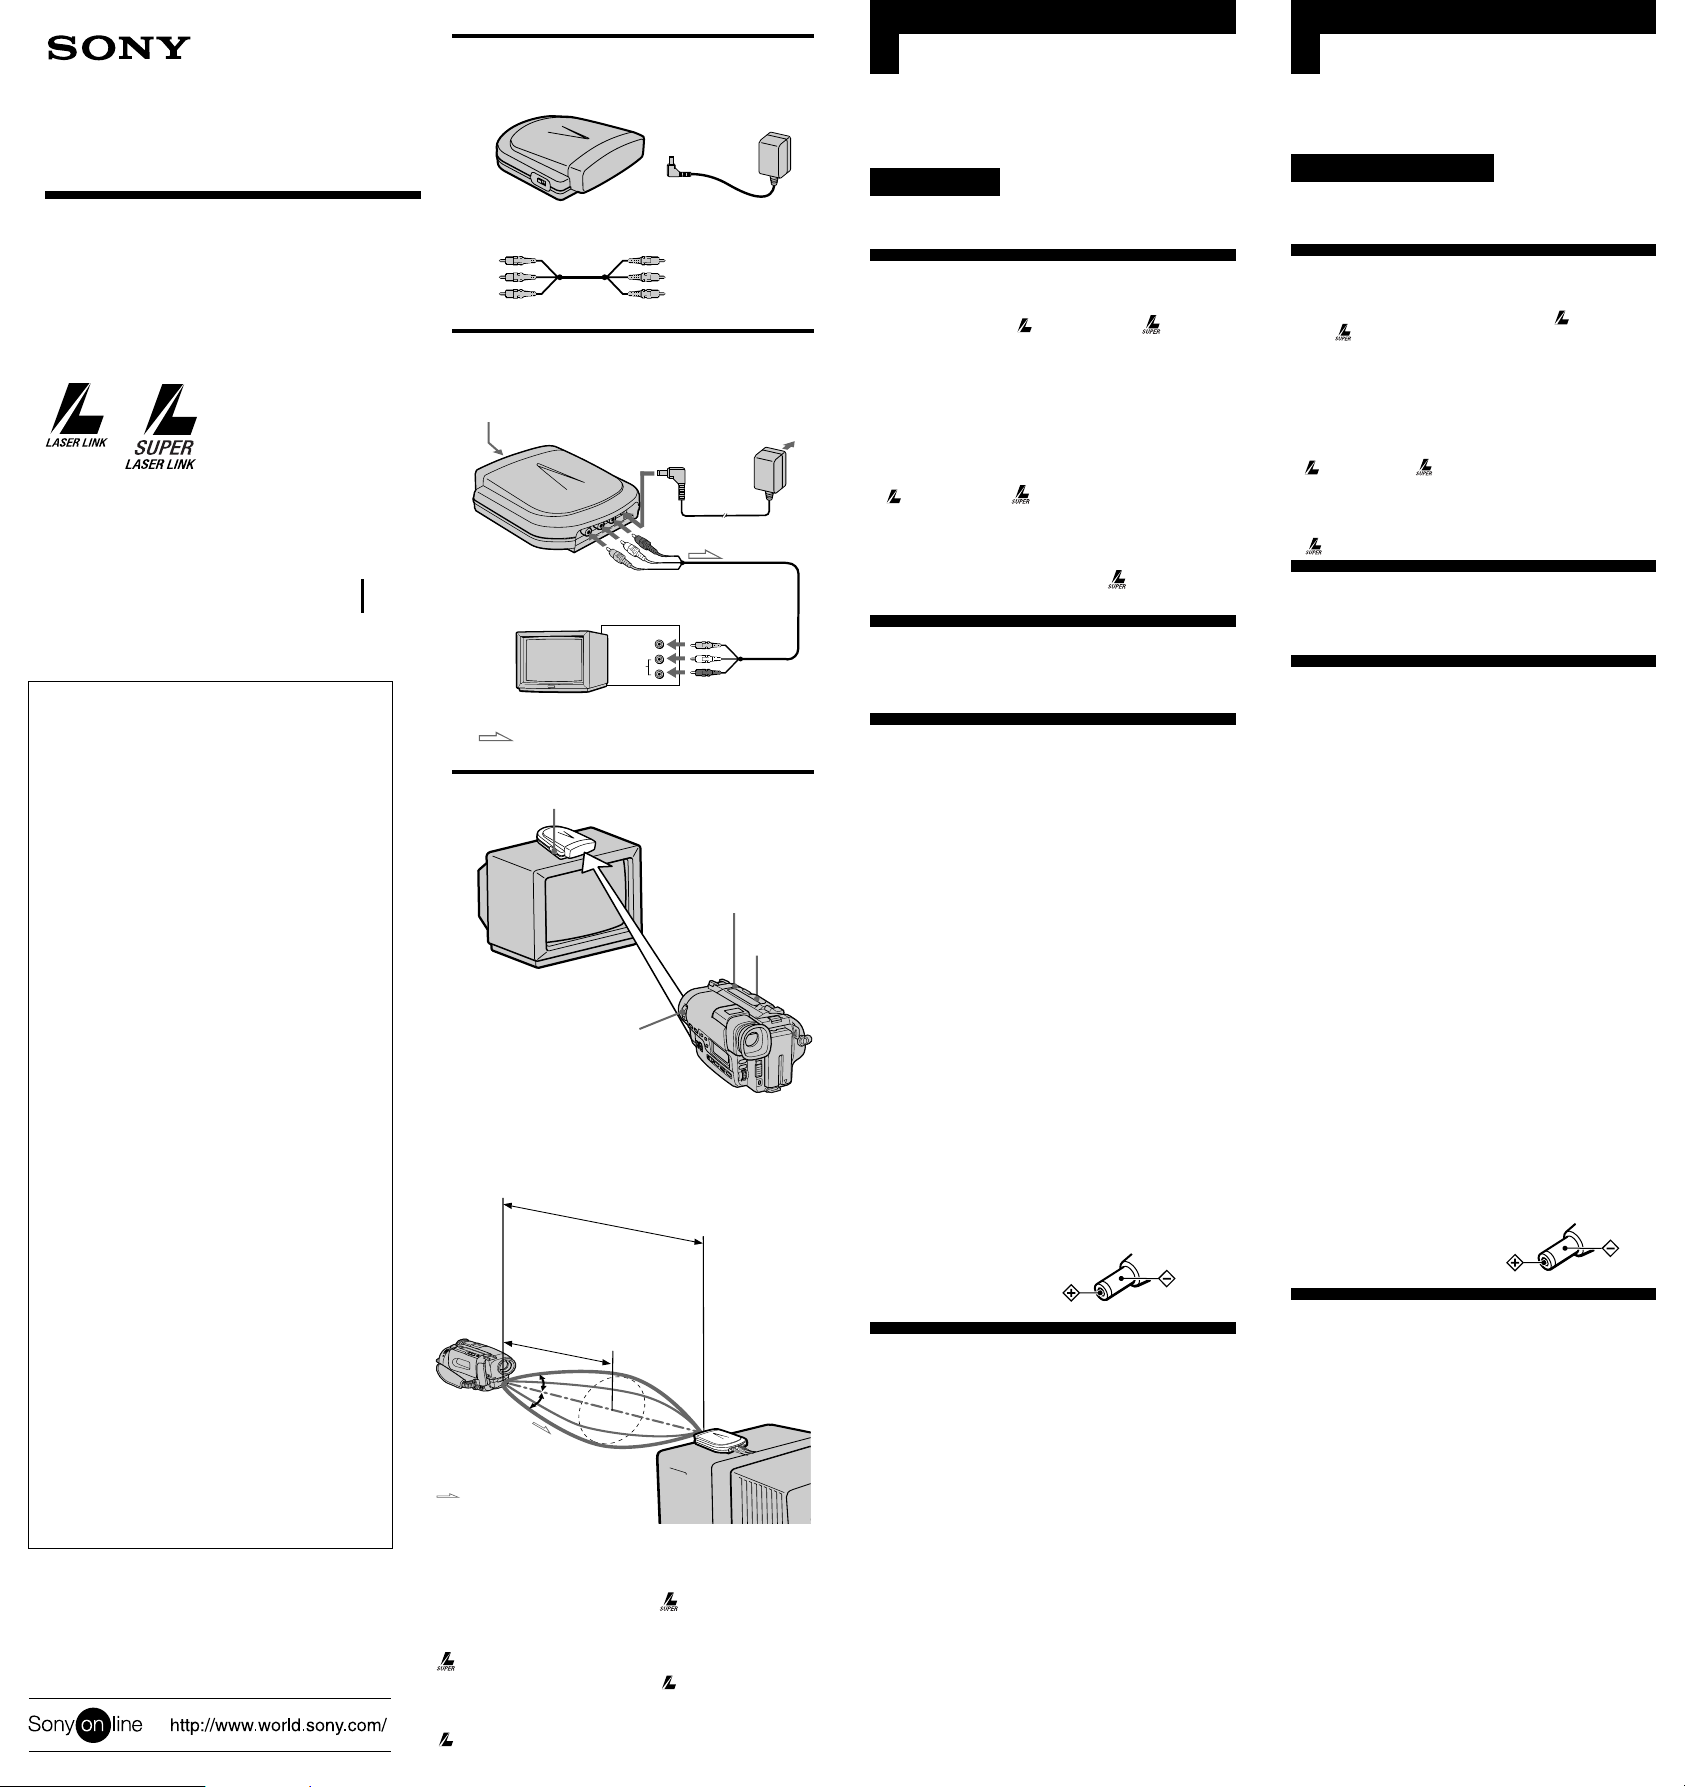
A
ab
c
B
IR sensor
Capteur infrarouge
2
DC IN 6 V
AUDIO OUT
1
VIDEO OUT
1
IN
VIDEO
AUDIO
Signal flow
Sens du signal
C
1
2
3
Coverage of the infrared rays
Zone de couverture des rayons infrarouges
* approx. 26 ft (8m)
* Env. 26 pi (8m)
** approx. 23 ft (7m)
** Env. 23 pi (7m)
* approx. 9~19 ft (3~6m)
* Env. 9~19 pi (3~6m)
** approx. 9~13 ft (3~4m)
** Env. 9~13 pi (3~4m)
5˚
5˚
Camcorder
Camescope
Signal flow
Sens du signal
* With Sony´s camcorder having S.LASER
LINK mark
* avec les camescopes Sony portant la marque
S.LASER LINK
** With Sony´s camcorder having LASER
LINK mark
** avec les camescopes Sony portant la marque
LASER LINK
2
4
6
Receiver
Récepteur
English
Before operating this AV Cordless IR Receiver,
read this manual thoroughly and retain it for future
use.
WARNING
To prevent fire or shock hazard, do not expose
the unit to rain or moisture.
Features
This AV cordless IR receiver uses infrared rays. If
your camcorder has LASER LINK/ S.LASER
LINK* function you will be able to use it in
combination with this unit, and have the picture
and sound transmitted optically. Cords no longer
being in the way, making any AV unit setup
possible.
• The camcorder can be a maximum of 26 feet
(8 m)** distance from its source.
• The sound and picture quality is not inferior to
using a cord type unit.
* LASER LINK/ SUPER LASER LINK are
systems which transmit and receive a picture by
using infrared rays. LASER LINK/SUPER
LASER LINK are trademarks of Sony
Corporation.
**With Sony´s camcorder having S.LASER
LINK mark.
Contents See illustration A
a Receiver b AC power adaptor
c A/V connecting cable
Preparation See illustration B
1 Connect the receiver to a TV with the
supplied A/V connecting cable.
Yellow plug : VIDEO
White plug : AUDIO L
Red plug : AUDIO R
2 Connect the supplied AC power adaptor
to the DC IN 6V jack then connect to an AC
outlet.
If your TV is already connected to a
VCR
Connect the receiver to the VCR’s LINE IN. Set the
input selector on the VCR to LINE.
If your TV or VCR is a monaural type
Connect the yellow plug for video and connect
only the white plug for audio on both the receiver
and the TV or VCR. With this connection the sound
is monaural.
Note
When connecting the receiver to a power source
use only the supplied AC power adaptor because
the polarity of the supplied adaptor is opposite that
of conventional adaptors. Do not use the supplied
AC power adaptor for other electric appliances
with a DC IN 6V jack.
Polarity of the plug
Using a cordless AV
system
Before playback insert a cassette in the camcorder.
(1) Set the power switch on the receiver to ON.
(2) Turn the TV on and set the TV/VCR selector on
the TV to VCR.
(3) Set the power switch on the camcorder to VTR
(PLAYER).
(4) Press S. LASER LINK/LASER LINK on the
camcorder. The lamp for S. LASER LINK/
LASER LINK lights.
(5) Adjust the angle and direction of both the
camcorder and receiver.
If the picture on the TV is distortion, press N
then adjust the position of the camcorder.
(6) Press N on the camcorder to start playback.
To cancel the super laser link/laser link
function
Press S.LASER LINK/LASER LINK on the
camcorder again. When not using turn the receiver
POWER OFF.
See illustration C
(Continued)
Français
Avant la mise en service du récepteur infrarouge AV,
prière de lire attentivemente ce mode d’emploi que l’on
conservera pour toute référence future.
AVERTISSEMENT
Pour éviter tout risque d’incendie ou de décharge
électrique, ne pas exposer cet appareil à la pluie ou à
l’humidité.
Caractéristiques
Le récepteur infrarouge AV utilise les rayons infrarouges.
Si votre camescope est doté de la fonction
LINK/ S.LASER LINK*, vous pourrez l’utiliser avec à
cet appareil. L’image et le son seront retransmis
optiquement, avec pour avantage l’élimination de cordons
encombrants et la possibilité d’opter pour différentes
configurations d’appareils audiovisuels.
• Le camescope peut être installé à environ 26 pieds
(8 m)** de la source.
• La qualité de l’image et du son est exactement identique
à celle obtenue avec une liaison classique.
LASER LINK/ SUPER LASER LINK est un
*
système de transmission et réception d’images utilisant
les rayons infrarouges. LASER LINK/SUPER LASER
LINK est une marque de fabrique de Sony Corporation.
** avec les camescopes Sony portant la marque
S.LASER LINK
LASER
Contenu Voir l’illustration A
a Récepteur b Adaptateur d’alimentation secteur
c Cordon de liaison audio/vidéo
Préparatifs Voir l’illustration B
1 Raccordez le récepteur à un téléviseur
avec le cordon de liaison audio/vidéo
fourni.
Fiche jaune: VIDEO
Fiche blanche: AUDIO L (gauche)
Fiche rouge: AUDIO R (droite)
2 Raccordez l’adaptateur d’alimentation
secteur fourni à la prise DC IN 6V puis à
une prise murale.
Si le téléviseur est déjà raccordé à un
magnétoscope
Raccordez le récepteur à la prise LINE IN du
magnétoscope et réglez le sélecteur d’entrée du
magnétoscope sur LINE.
Si le téléviseur ou magnétoscope est de
type monophonique
Raccordez la fiche jaune pour l’image et seulement la fiche
blanche pour le son au récepteur et au téléviseur ou
magnétoscope. Avec cette liaison, le son est
monophonique.
Remarque
N’utilisez que l’adaptateur d’alimentation secteur fourni
pour raccorder le récepteur au courant secteur, car la
polarité de l’adaptateur fourni est l’opposé de celle des
adaptateurs classiques. Ne pas utiliser l’adaptateur
d’alimentation secteur fourni pour d’autres appareils
électriques équipés d’une prise DC IN 6V.
Polarité de la fiche
Utilisation du système
infrarouge audio/vidéo
Avant de commencer la lecture, insérez une cassette dans
le camescope.
(1) Réglez l’interrupteur d’alimentation du récepteur sur
ON.
(2) Allumez le téléviseur et réglez le sélecteur téléviseur/
magnétoscope du téléviseur sur magnétoscope.
(3) Réglez l’interrupteur d’alimentation du camescope sur
VTR (PLAYER).
(4) Appuyez sur S. LASER LINK/LASER LINK sur le
camescope. Le voyant S. LASER LINK/LASER LINK
s’allume.
(5) Ajustez l’angle et la direction du camescope et du
récepteur.
Si l’image sur le téléviseur présente de la distorsion,
appuyez sur N puis ajustez la position du camescope.
(6) Appuyez sur N du camescope pour commencer la
lecture.
Pour désactiver la fonction SUPER LASER
LINK/LASER LINK
Appuyez à nouveau sur S.LASER LINK/LASER LINK sur
le camescope. Quand vous n’utilisez pas le récepteur,
éteignez-le.
Voir l’illustration C
(Voir page suivante)
Page 2

English Français
Notes
• Do not block the space between the receivers IR
sensor and the camcorder’s transmitter. If you do
the picture and sound will not function.
• The infrared rays will not penetrate walls or
opaque glass, the infrared receiver must be used
within the “in sight” area of the camcorder.
• Do not position the camcorder and receiver too
close. Noise and beats will appear as a result.
• Do not use this unit in combination with cordless
headphones or another unit of the same type.
Signal cancellation will result.
• The brightness of the camcorder’s infrared ray
emitter is not necessarily stabilized. This is not a
malfunction and does not affect the infrared
coverage distance.
• Be sure that no strong light sources such as direct
sunlight, inverter light, or powerful remote
signals block the path of the IR sensor on the
receiver. If it does the picture and sound will not
function, or distortion may result.
• Do not use in areas of strong electrical currents
or radio waves. If you do clear playback is not
possible.
• Do not use near a AM radio or tuner. If you do
radio or tuner interference will result.
• During use the unit will heat up, this is normal.
Troubleshooting
If you run into any problem using the unit, first
check the power supply source. Then use the
following table for troubleshooting. Should the
difficulty persist disconnect the power source and
contact your Sony dealer or local authorized Sony
service facility.
Trouble Cause and/or remedy
No picture and no sound at all
•The AC power adaptor is not
connected to an AC outlet.
b Connect the AC power adaptor to
an AC outlet.
•Connecting cord is not connected
correctly.
b Connect the connecting cord
correctly.
•Direct sunlight is shining on the
infrared sensor of the receiver.
b Avoid direct sunlight.
The infrared transmission system does not
operate
•The power of the receiver is turned
off (OFF).
b Press the power button to turn the
receiver (ON).
•The camcorder’s transmitter and the
receiver are not facing each other.
b Adjust the position and angle of
both units.
•The receiver is positioned too far
from the camcorder’s transmitter.
b Use the transmitter near the
infrared receiver.
Background noise and unclear picture
•The camcorder’s transmitter and
receiver are not facing each other.
b Adjust the position and angle and
unclear picture of both units.
•Another infrared emitting appliance
is operating.
b Stop operating it.
Precautions
On safety
• Unplug the AC power adaptor from the AC
outlet when it will not be used for a long period
of time. To disconnect the AC power adaptor,
pull it out by the plug. Never pull on the cord
itself.
• Do not open the cabinet. Refer servicing to
qualified personnel only.
• Be sure that nothing metallic comes into contact
with the metal parts of the AC power adaptor. If
it does a short may occur and the unit may be
damaged.
Operation
• Do not place the unit in a location where it is:
– Extremely hot or cold
– Dusty or dirty
– Very humid
– Vibrating
• Do not apply mechanical shock or drop the unit.
On cleaning and care
• Clean the cabinet with a soft cloth slightly
moistened with water or mild detergent solution.
• Do not use alcohol, benzene, or thinner to clean
the cabinet, as they may mar the finish.
For customers in European countries
If your TV has a 21-pin connector
(EUROCONNECTOR), use the 21-pin connector
supplied with the camcorder.
Specifications
Receiver
VIDEO output Phono jack (1)
AUDIO output Phono jacks (2:L,R): 327 mV,
DC input DC 6V
Operating temperature
Storage temperature –4°F to 140°F (–20°C to 60°C)
Dimensions Approx. 4 4/5 × 1 5/
Mass Approx. 6 1/2 oz (185 g)
AC power adaptor
For models purchased in the United States or
Canada
Input AC 120 V 60 Hz
Output DC 6 V 400 mA
For models purchased in the United Kingdom
Input AC 220-230 V 50/60 Hz
Output DC 6 V 700 mA
For models purchased in other European
countries
Input AC 220-230 V 50 Hz
Output DC 6 V 400 m
For models purchased in the Australia
Input AC 240 V 50 Hz
Output DC 6 V 700 mA
Supplied accessory AC power adaptor (1)
1 Vp-p, 75 ohms unbalanced,
sync negative
(when POWER is ON)
output impedance: less than
2.2 kilohms (when POWER
is ON)
32°F to 104°F (0°C to 40°C)
× 5 1/
8
5
inches (121 × 41 × 128 mm)
(w/h/d)
A/V connecting cable (1)
Remarques
• Ne pas obstruer l’espace entre le capteur infrarouge du
récepteur et l’émetteur du camescope, sinon l’image et le
son n’apparaîtront pas.
• Les rayons infrarouges ne traversent pas les murs ni le
verre opaque. Le récepteur doit être “en vue” du
camescope.
• Ne pas trop rapprocher le camescope du récepteur. Des
parasites et battements apparaissent quand le récepteur
et le camescope sont trop rapprochés.
• Ne pas utiliser le récepteur avec un casque sans fil ou
tout autre appareil de même type. Les signaux risquent
de s’annuler.
• La luminosité de l’émetteur du camescope de rayons
infrarouges n’est pas forcément stable. Il ne s’agit pas
d’un mauvais fonctionnement et la portée des rayons
infrarouges n’en est pas affectée.
• Assurez-vous qu’aucune source de lumière puissante,
soleil, lampe à circuit inverseur, signaux de
télécommande puissants, etc. ne bloquent les signaux
infrarouges envoyés par le récepteur, sinon l’image et le
son n’apparaîtront pas, ou ils présenteront de la
distorsion.
• Ne pas utiliser le récepteur dans les endroits exposés à
des courants électriques puissants ou aux ondes radio,
car il ne sera pas possible d’obtenir une lecture claire.
• Ne pas utiliser près d’une station radio AM ou d’un
tuner, sinon des interférences perturberont la réception
radio ou le tuner.
• Le récepteur chauffe quand il est allumé, mais c’est tout
à fait normal.
Guide de dépannage
En cas de problème, vérifiez la source d’alimentation et
reportez-vous au tableau suivant pour essayer de trouver
l’origine du problème. Si la difficulté persiste, malgré les
vérifications suivantes, débranchez le récepteur de la
source d’alimentation et contactez votre revendeur Sony
ou un centre de réparations agréé Sony.
Problème Causes et ou remèdes
Aucune image ni aucun son.
• L’adaptateur d’alimentation secteur n’est
pas branché sur une prise secteur.
b Raccordez-le à une prise secteur.
• Le cordon de liaison n’est pas
correctement raccordé.
b Raccordez-le correctement.
• La lumière du soleil atteint le capteur
infrarouge du récepteur.
b Évitez d’installer le récepteur en plein
soleil.
Le système de transmission infrarouge ne
fonctionne pas.
• Le récepteur est éteint (OFF).
b Appuyez sur l’interrupteur
d’alimentation pour allumer le
récepteur (ON).
• L’émetteur du camescope et le capteur du
récepteur ne sont pas face à face.
b Ajustez la position et l’angle des deux
appareils.
• Le récepteur est trop loin de l’émetteur du
camescope.
b Rapprochez le camescope du récepteur.
Bruit de fond et image floue.
• L’émetteur du camescope et le capteur du
récepteur ne sont pas face à face.
b Ajustez la position et l’angle des deux
appareils.
• Un autre appareil émettant des rayons
infrarouges est utilisé.
b Éteignez cet appareil.
Précautions
Sécurité
• Débranchez l’adaptateur d’alimentation secteur de la
prise murale si vous prévoyez de ne pas l’utiliser
pendant longtemps. Pour débrancher l’adaptateur, tirez
sur la prise. Ne jamais tirer sur le cordon.
• Ne pas ouvrir le coffret. Pour toute réparation, faites
appel à un professionnel seulement.
• Veillez à ce qu’aucun objet métallique ne touche les
parties métalliques de l’adaptateur. Il pourrait être
endommagé par un court-circuit.
Fonctionnement
• Ne pas installer le récepteur dans un endroit exposé:
– à des températures extrêmes
– à une poussière extrême
– à une humidité extrême
– à des vibrations
• Ne pas soumettre le récepteur à des chocs mécaniques et
ne pas le laisser tomber.
Nettoyage et entretien
• Nettoyez le coffret avec un chiffon doux légèrement
mouillé d’eau ou d’une solution détergente neutre.
• Ne pas utiliser d’alcool ni de diluant pour nettoyer le
coffret, car ils pourraient endommager la finition.
Pour les utilisateurs dans les pays
européens
Si votre téléviseur a une prise de péritélévision à 21
broches (Euroconnecteur), utilisez le connecteur à 21
broches livré avec le camescope.
Spécifications
Récepteur
Sortie VIDEO Prise cinch (1): 1 Vc-c
Sortie AUDIO Prises cinch (2: gauche et
Entrée DC DC 6 V
Température de fonctionnement
Température d’entreposage
Dimensions Env. 4
Poids Env. 6,5 on. (185 g)
Adaptateur d’alimentation secteur
Pour les modèles achetés aux Etats-Unis ou au Canada
Entrée Secteur 120 V, 60 Hz
Sortie CC 6 V, 400 mA
pour les modèles achetés au Royaume-Uni
Entrée Secteur 220-230 V, 50/60 Hz
Sortie CC 6 V, 700 mA
Pour les modèles achetés dans d’autres pays d’Europe
Entrée Secteur 220-230 V, 50 Hz
Sortie CC 6 V, 400 mA
Pour les modèles achetés en Australie
Entrée Secteur 240 V, 50 Hz
Sortie CC 6 V, 700 mA
Accessoire fourni Adaptateur d’alimentation
La conception et les spécifications peuvent être modifiées
sans préavis.
75 ohms, asymétrique, sync.
négative (sous tension)
droite): 327 mV,
impédance de sortie: inférieure
à 2,2 kilohms (sous tension)
32°F à 104°F (0°C à 40°C)
–4°F à 140°F (–20°C à 60°C)
4
/5 × 1 5/8 × 5 1/5 pouces
(121 × 41 × 128 mm)
(l/h/p)
secteur (1)
Cordon de liaison audio/vidéo
(1)
Design and specifications are subject to change
without notice.
 Loading...