

Page 1
X10 mini
User guide
Important information
Please read the Important information leaflet before you
use your mobile phone.
Some of the services and features described in this
User guide are not supported in all countries/regions or
by all networks and/or service providers in all areas.
Without limitation, this applies to the GSM International
Emergency Number 112. Please contact your network
operator or service provider to determine availability of
any specific service or feature and whether additional
access or usage fees apply.
Experience more. Discover
how.
Need help? Get more, do more. Miss nothing. Visit
www.sonyericsson.com/xperiax10mini to learn more about
your phone.
User guide in the phone
An extended User guide is available in your phone. The
extended User guide and more information is also available
at www.sonyericsson.com/support.
To access the User guide in your phone
1
From the Home screen, drag
upwards.
2
Find and tap User guide .
2
Getting started
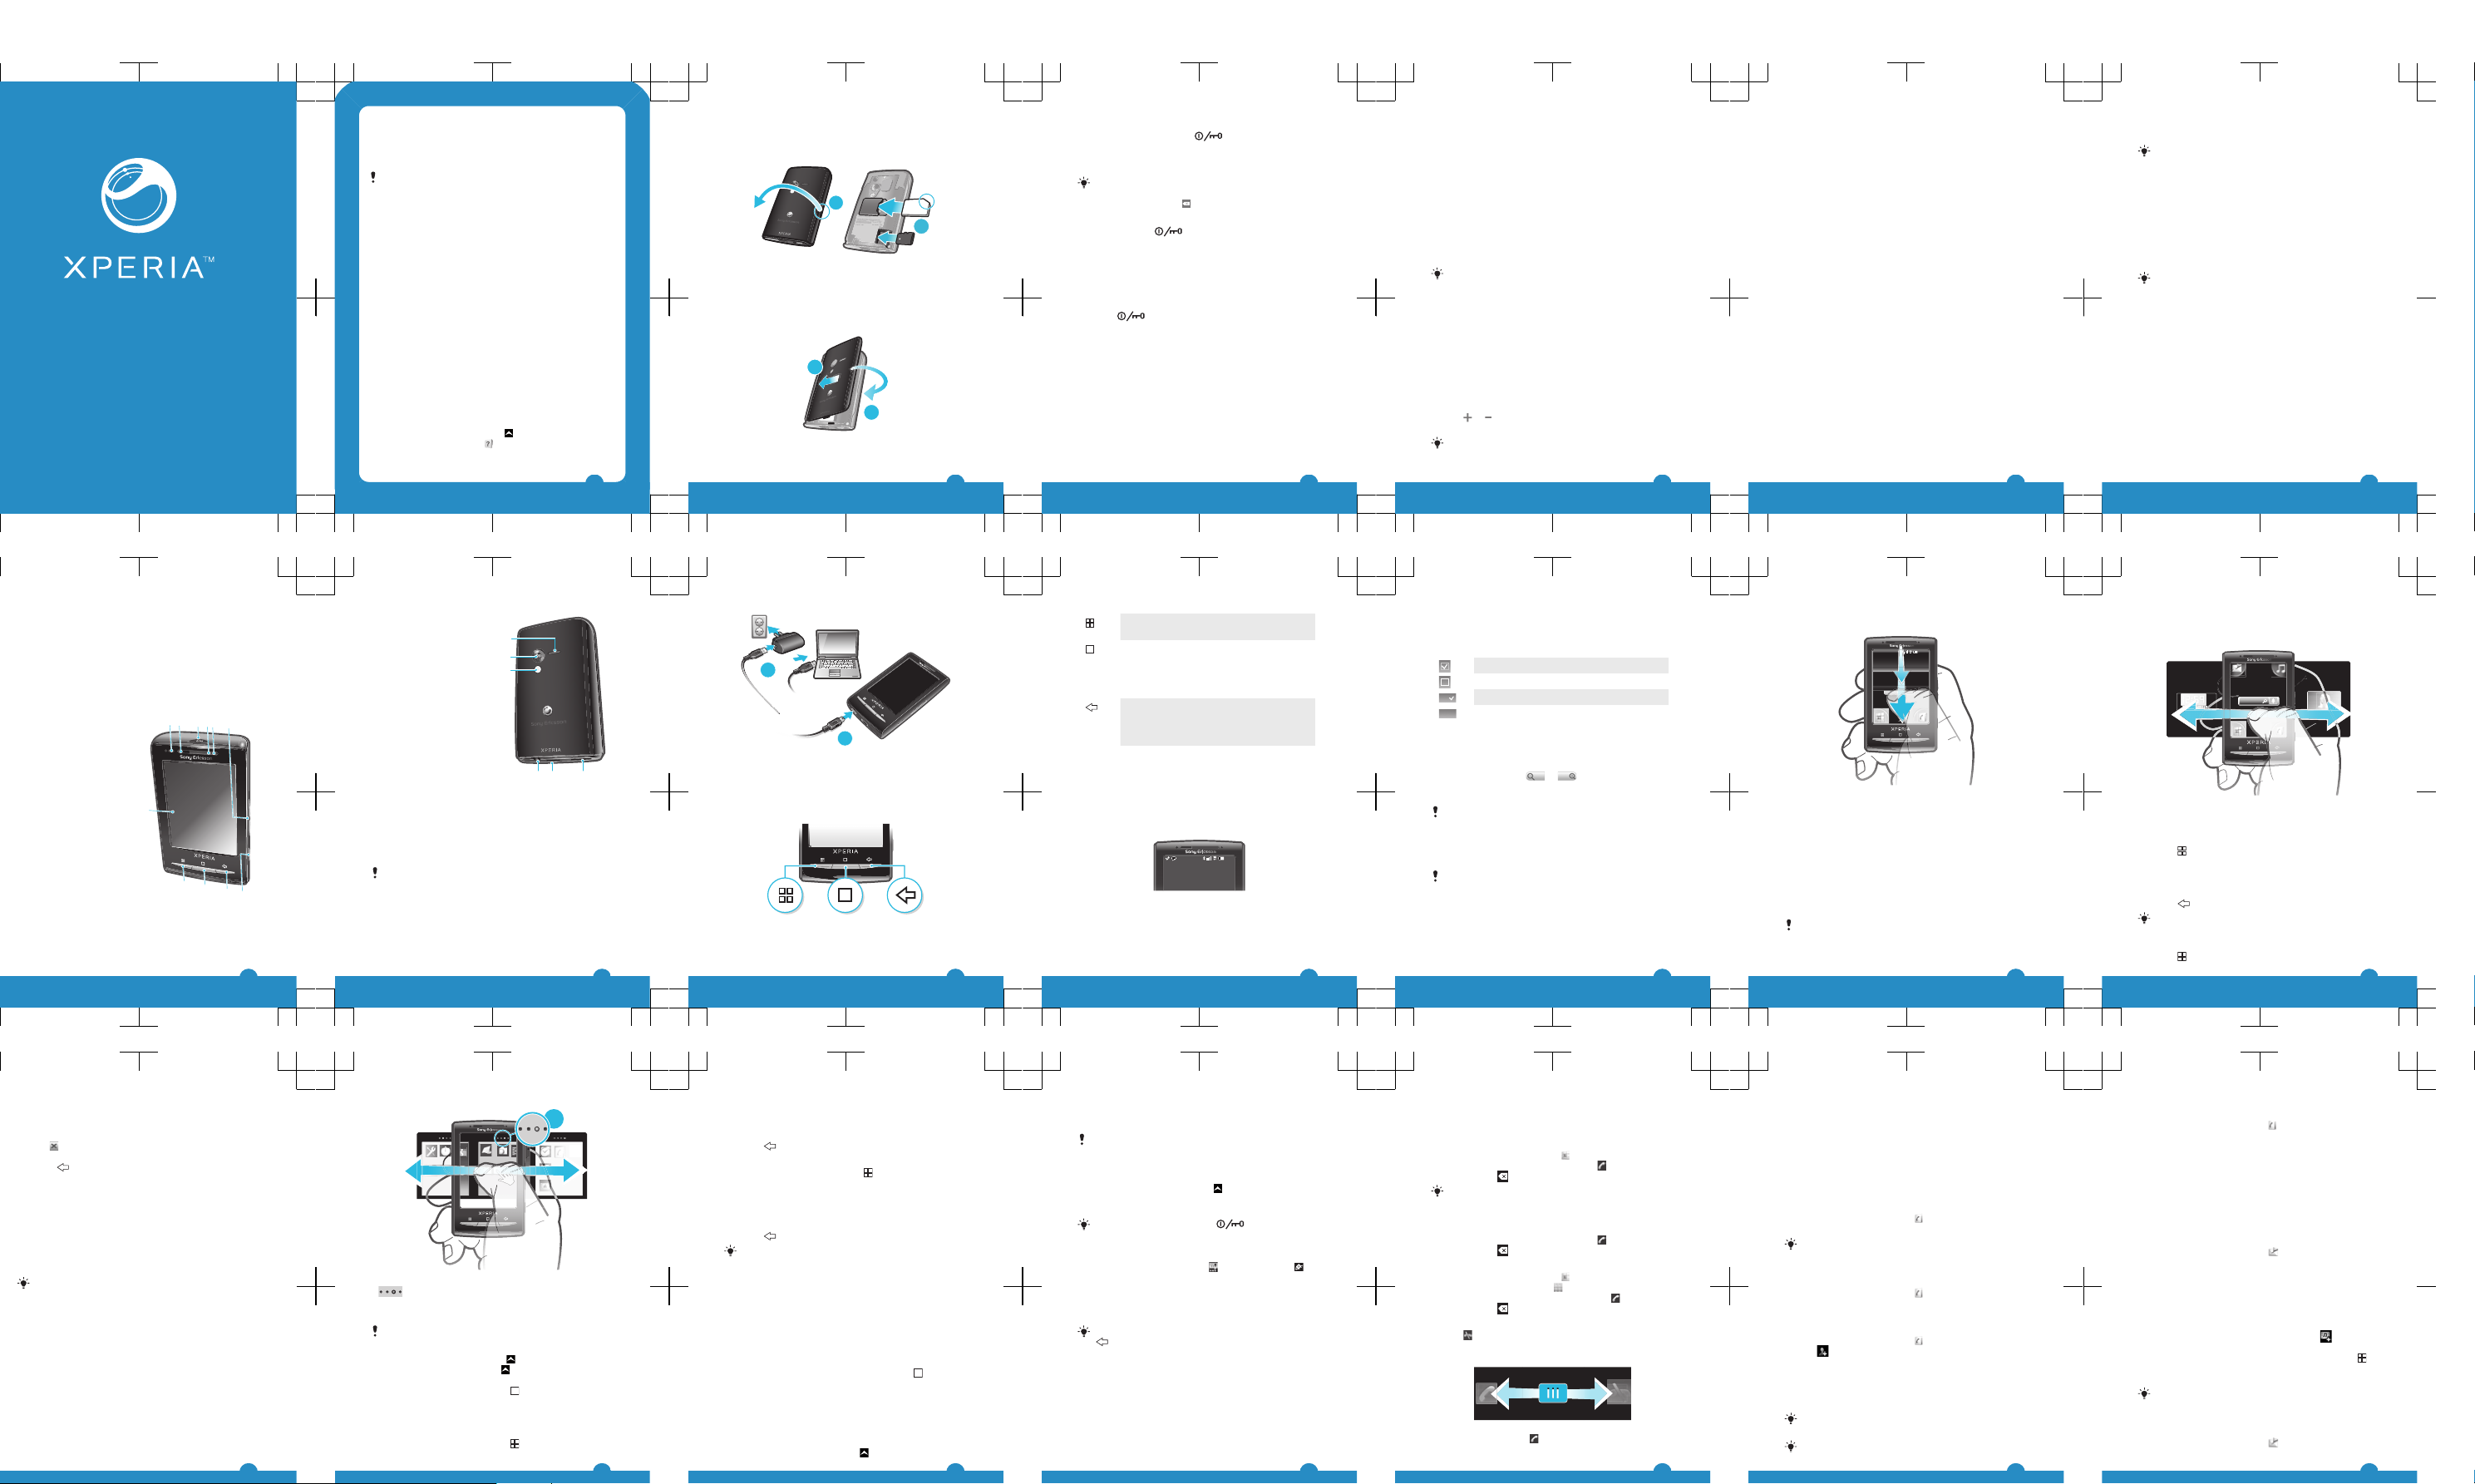
To insert the SIM card and the memory card
1
2
1
Remove the cover.
2
Slide the SIM card with the gold-coloured contacts facing
down and memory card with the gold-coloured contacts
facing up.
To attach the cover
1
2
•
Attach the cover to the back of the phone.
3
To turn on the phone
1
Press and hold down the key on the top of the
phone.
2
Enter your SIM card PIN, if requested, and select OK.
3
At first startup, follow the instructions in Setup guide.
Your PIN is supplied by your network operator. If you
want to correct a mistake made while entering your
SIM card PIN, press .
To turn off the phone
1
Press and hold
until the options menu opens.
2
In the options menu, tap Power off.
3
Tap OK.
To activate the screen
•
Press one of the hardware keys on the front of the phone.
The screen is also activated when you receive a call.
To lock the screen
•
Press
.
Starting your phone for the first time
The first time you start your phone, a setup guide lets you
enter essential phone settings, import contacts, and set up
your email and online services accounts. You can also
access the setup guide later from the phone settings.
To set the language
1
Scroll through the available languages list.
2
Tap the language you want to use in your phone. The
language is marked.
3
Tap Save.
4
Internet and messaging settings
In order to send messages and use the Internet you will
need a 2G/3G mobile data connection. For most mobile
phone networks and operators, settings for messaging and
the Internet will be preinstalled on the phone or downloaded
to your phone the first time you turn on the phone with a
SIM card inserted. If not, you can go to
www.sonyericsson.com/support
from your computer to
download the settings to your phone.
To import contacts from the SIM card
1
From the setup guide, tap Import contacts.
2
When you are asked to confirm if you want to import the
contacts from the SIM card to the phone, tap Yes.
By using Sony Ericsson Sync you can synchronise
contacts, bookmarks and calendar events between
your phone and your Sony Ericsson account. This way
you can transfer information from your old phone to
the Sony Ericsson account, and then transfer it to your
new phone. You can set up a Sony Ericsson account
from the Sony Ericsson Sync application in your
phone, or by going to www.sonyericsson.com/user
from your computer.
To set the time and date
1
From the setup guide, tap Time & date.
2
Unmark the Automatic checkbox, if it is marked.
3
Tap Set date or Set time.
4
Tap
or to adjust the date or hour and minute.
5
Tap Set.
While setting time, you can shift between 12-hour and
24-hour format. If you want to use AM and PM, you
have to unmark Use 24-hour format.
5
To create a new Google™ account in your phone
1
From the setup guide, tap Google account.
2
Tap Next.
3
Tap Create.
4
Enter your personal information and desired Google™
username. Tap Next.
5
Enter and confirm your password. Tap Next.
6
Select a security question and enter a personal answer
that only you know. You can also enter a secondary email
address to which your Google™ account information
could be sent in case you forget the information. Tap
Next.
7
To agree to the Google™ Terms of service, tap I agree,
Next.
8
Enter the security word displayed as an image. Tap
Next.
9
Mark the checkboxes to allow the additional Google™
services, or leave them blank if you do not agree to use
these services. Tap Next.
10
Tap Finish setup. Your new Google™ account has now
been created and set up to be used with the Google™
services in your phone.
To set up an existing Google™ account in your phone
1
From the setup guide, tap Google account.
2
Tap Next.
3
Tap Sign in.
4
Enter your Google™ username and password. Tap Sign
in to continue.
5
Mark the checkboxes to allow the additional Google™
services, or leave them blank if you do not agree to use
these services. Tap Next.
6
6
Tap Finish setup. Your Google™ account has now been
set up in your phone.
In most cases, your Google™ username is the first
part of your Google™ email address.
To set up an email account
1
From the setup guide, tap Email.
2
Tap Email address, enter your email address and tap
Next.
3
Enter your password and tap Done.
4
Tap Continue.
5
If the phone cannot download your email account
settings automatically, enter the account settings
manually.
If you need to enter the settings manually, contact
your email service provider for the correct email
account settings. For example, you need to know if
the account type is POP3 or IMAP.
Sony Ericsson Timescape™ settings
Sony Ericsson Timescape™ collects all the communication
events at one place and keeps you updated with messages,
missed calls from your contacts and friends in Facebook™
and Twitter™.
To set up a Facebook™ account
1
From the setup guide, tap Facebook.
2
Tap Username, enter your username and tap Next.
3
Enter your password and tap Done.
To set up a Twitter™ account
1
From the setup guide, tap Twitter.
2
Tap Username, enter your username and tap Next.
7
3
Enter your password and tap Done.
To exit the setup guide
•
When you are finished with the setup guide, tap Done.
Getting to know your phone
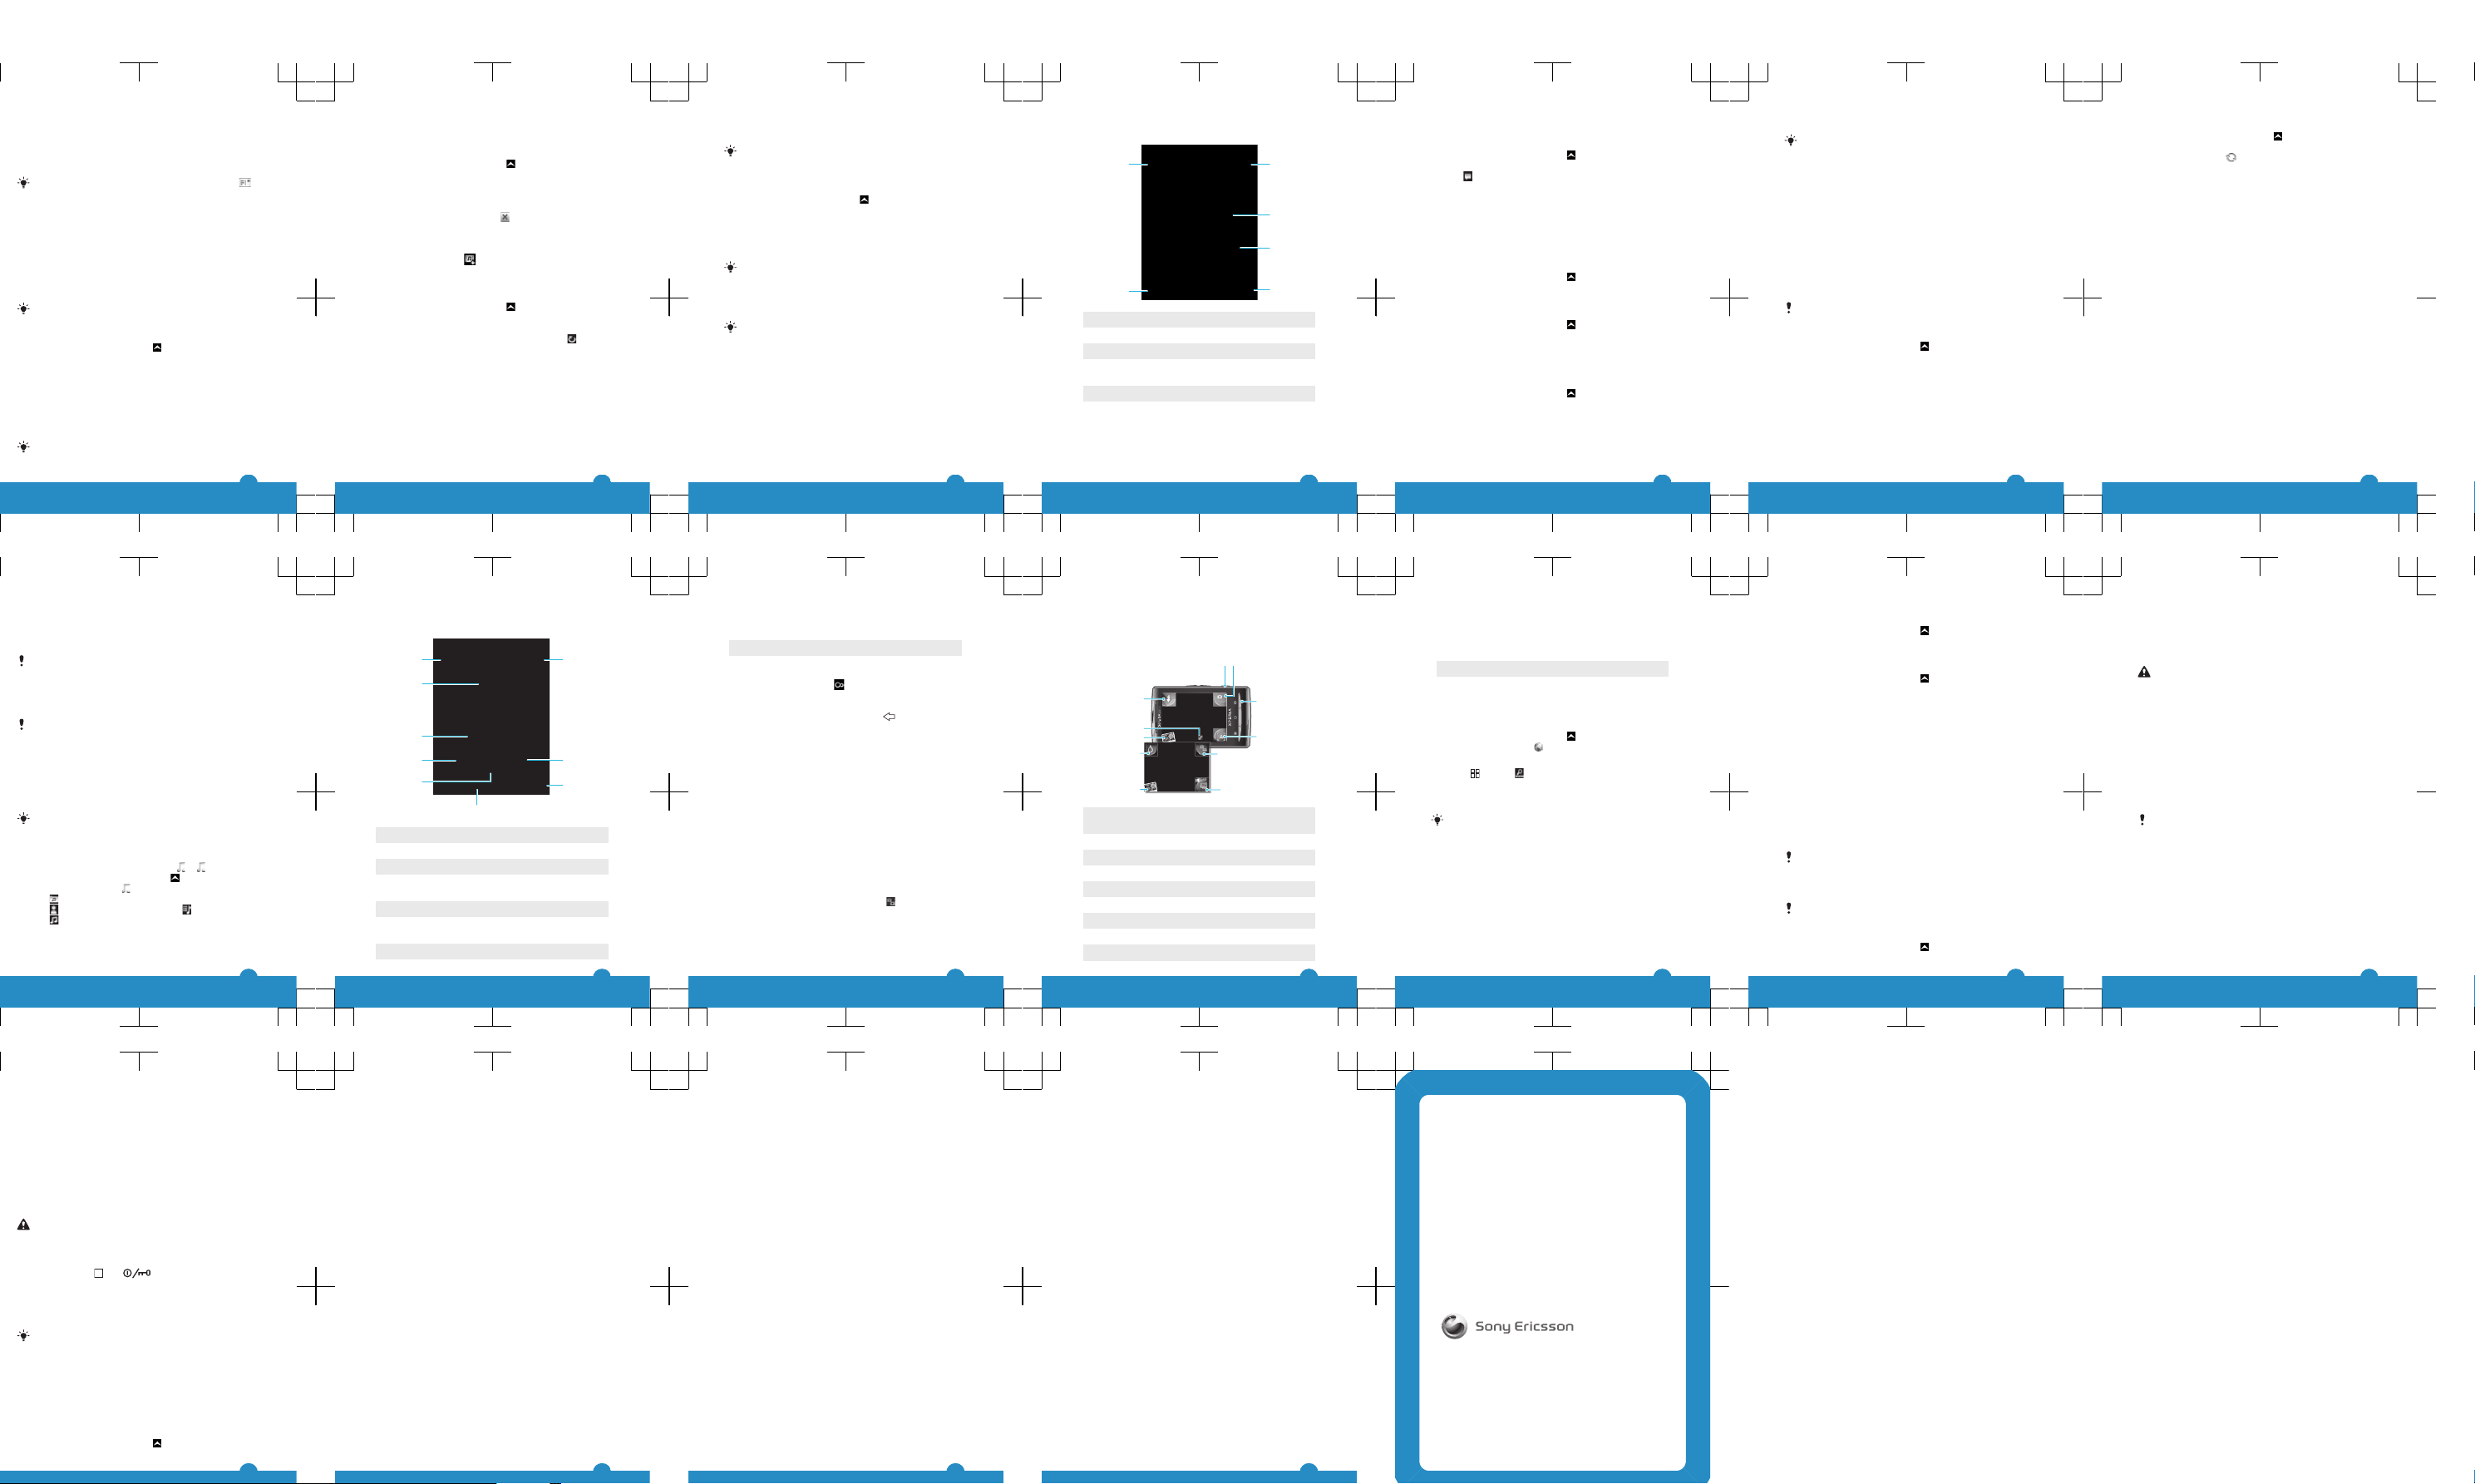
Phone overview
1 Notification LED
2
3
4
5
7
6
1
9
10
11
8
2 Ear speaker
3 Power key/screen lock
4 Proximity sensor
5 Light sensor
6 Volume key
7 Touch screen
8 Menu key
9 Home key
10 Back key
11 Camera key
8
12 Speaker
13
14
16
15 17
12
13 Camera lens
14 Camera light
15 Strap hole
16 3.5 mm headset
connector
17 Connector for charger/
USB cable
Charging the battery
The phone battery is partly charged when you buy the
phone. It may take a few minutes before the battery icon
appears on the screen when you connect the phone to a
power source. You can still use your phone while it is
charging.
The battery will start to discharge a little after it is fully
charged and then charges again after a certain time.
This is to extend battery life and may result in the
charge status showing a level below 100 percent.
9
1
2
To charge the phone using the power adapter
•
Connect the phone to a power outlet using the USB cable
and the power adapter.
Using the hardware keys
10
Menu Open a list of options available in the
current screen or application
Home•Go to the Home screen or to the
applications panes from any
application or screen
•
Open the recently used applications
window
Back•Go back to the previous screen
•
Close the onscreen keypad, a dialog
box, an options menu, or the
Notifications panel
Status bar
A status bar at the top of the screen displays phone status
information and notifications. Notification icons appear on
the left side of the status bar. Phone status icons appear on
the right side. From the status bar you can access the
notification panel.
11:37
Using the touch screen
To open or highlight an item
•
Tap the item.
11
To mark or unmark options
•
Tap the relevant checkbox or in some cases the right side
of the list option, to mark or unmark an option.
Marked checkbox
Unmarked checkbox
Marked list option
Unmarked list option
To pan
•
When this option is available, drag the screen to pan.
To zoom
•
When available, tap
or to zoom in or out.
•
Touch, hold and drag upwards or downwards to zoom in
or out.
You may have to drag your finger on the screen (in any
direction) to make the zoom icons appear.
Scrolling
You can scroll up or down, and on some webpages you can
also scroll to the sides.
Dragging or flicking will not activate anything on the
screen.
Notification panel
In the Notification panel, notification icons are displayed in
a detailed view. You can open notifications, such as
messages, reminders, or event notifications directly from
the Notification panel. You can also open running
applications such as the music player or the radio.
12
To open the Notification panel
January 7, 2010
11:37
No notication
20 January 2010
n
0
0
y
, 2
y
Janu
, 2
0
0
•
Drag the status bar downwards.
Home screen
The Home screen is the starting point of your phone. You
can personalise the Home screen by adding widgets, or by
changing the wallpaper and the applications in the corners.
When you add more than one widget, the Home screen
extends beyond the screen width. The corners on the
Home screen are used to access applications or
bookmarks quickly. You can add any application or
bookmark to the corners.
When you go to the Home screen, some applications
may continue to run in the background. If you do not
want applications to run in the background, you should
13
exit each application you have opened before going to
the Home screen.
Janua
7
, 2
0
0
y
,
To view the extended Home screen
•
Drag your finger to the sides of the screen.
To add widgets to the Home screen
1
Press .
2
Tap Arrange widgets.
3
Flick through the horizontal list of widgets and tap Add
widget.
4
Select a widget from the list.
5
Press
to exit the edit mode.
You can add more widgets by flicking through the
horizontal list and tapping Add widgets.
To delete a widget from the Home screen
1
Press
.
14
2
Tap Arrange widgets.
3
Flick horizontally across the screen and tap the widget
you want to delete.
4
Tap in the widget.
5
Tap Yes.
6
Press to exit the edit mode.
Orientation
The screen orientation can be changed from portrait to
landscape view. By default it is turned off, but you can set
to change automatically.
To set the screen orientation to automatic
1
From the Home screen, tap the applications bar.
2
Tap Settings > Sound & display.
3
Mark the Orientation check box.
If you do not set the screen orientation to automatic,
the phone stays in portrait orientation.
Applications panes
You can access your applications in the phone using the
applications panes. The applications panes extend beyond
the screen. You can create new panes and arrange the
applications after your preferences.
15
1
Shows which applications pane you are in
To open the applications panes
You can open the applications panes by different
ways.
•
From the Home screen, drag upwards.
•
From the Home screen, tap
.
•
Flick the Home screen upwards.
•
From the Home screen, press .
To browse the applications panes
•
From the applications panes, flick right or left.
To create a new applications pane
1
From the Home screen, press
.
16
2
Tap Arrange icons.
3
Touch and hold an item in the last pane until it vibrates
and then drag it to the right.
4
Press to exit the edit mode.
To move an application
1
From the Home screen, press .
2
Tap Arrange icons.
3
Touch and hold an item until it vibrates and drag it to one
of the corners or to another application pane. If you move
an item in the last applications pane, the pane switches
to the next pane.
4
Press
to exit the edit mode.
The items in the applications panes are not shortcuts
to the applications but the actual applications. When
you move an application from the applications panes
to corners or vice versa, the actual application gets
moved and not shortcut. There are no shortcuts to the
applications.
Recently used applications window
You can view and access recently used applications from
this window.
To open the recently used applications window
•
From any application, press and hold down
.
Phone settings overview
You can set up the phone to suit your requirements, for
example, Date & time, Wireless controls and Data
synchronization.
To change the phone language
1
From the Home screen, drag
upwards.
17
2
Find and tap Settings > Locale & text > Select locale.
3
Select an option.
If you choose the wrong language and cannot read the
menu texts, go to
www.sonyericsson.com/support
for
help.
To turn on Flight mode
1
From the Home screen, drag upwards.
2
Find and tap Settings > Wireless controls.
3
Mark the Airplane mode checkbox.
You can also press and hold to turn on Flight
mode.
Entering text
You can use multitap text input
or quick text input to
enter text. Quick text input uses a built-in dictionary.
Using the on-screen keypad
When you start an application or select a field that requires
text or numbers, the on-screen keypad appears.
You can close the keypad at any time by pressing
.
To display the keypad and enter text
•
Tap the text field and the keypad appears.
To change writing language
1
When you enter text, tap the language icon in the upper
right corner.
2
Select an option.
18
Calling
To make an emergency call
1
From the Home screen, tap .
2
Enter the emergency number and tap . To delete a
number, tap .
You can make an emergency call without a SIM card
inserted.
To make an emergency call while the SIM card is locked
1
Tap Emergency call.
2
Enter the emergency number and tap . To delete a
number, tap
.
To make a call
1
From the Home screen, tap .
2
If the call log is shown, tap
to enter the dial pad view.
3
Enter the number of the recipient and tap . To delete a
number, tap .
To end a call
•
Tap
.
To answer a call
•
Drag the indicator to
.
19
Contacts
In the Contacts application, you can enter information for
your personal contacts, for example, phone numbers and
email addresses. When you view a contact, you get quick
access to all communication with that contact. If you have
a synchronisation service account, you can synchronise
your phone contacts with the account contacts.
To view your contacts
•
From the Home screen, tap
to open the Contacts
application.
If you have not set up your phone for synchronisation
with a web service, or imported SIM contacts, you can
choose to do so the first time you open Contacts.
To call a contact
1
From the Home screen, tap
.
2
Tap the contact.
3
Tap the desired phone number of the contact.
To add a contact
1
From the Home screen, tap
.
2
Tap .
3
Tap Name, enter the name and tap Next.
4
Enter the phone number and tap Done.
5
Enter or select the desired additional information for the
contact, then scroll up and tap Save. To add additional
information fields, tap Add more.
The type of phone number is selected automatically.
You can tap the number type field to change it.
You can also add contacts from the call log.
20
To search for a contact
1
From the Home screen, tap .
2
Tap Search.
3
Enter the first letters of the contact name you are
searching for.
4
The hits appear in a list. If you get more than one hit, tap
the down arrow to see the full list of hits.
5
Scroll to and tap the desired contact.
SMS and MMS
To create and send a message
1
From the Home screen, tap .
2
Tap New message.
3
Tap Write message, enter your message text and tap
Next.
4
Tap to add a recipient.
5
To add a recipient, select a contact in the list. You can
also tap the text field, enter a number manually, and then
tap Done.
6
If you want to add a photo or a video, tap
and select
an option.
7
If you want to add, remove or edit recipients, press ,
then tap Edit recipients and edit the recipients.
8
When you are finished, tap Send.
If you stop creating the message, it will be saved as a
draft. The message thread will be tagged with the
word Draft.
To read a received message
1
From the Home screen, tap
.
21
Page 2
2
Tap a message thread.
3
If the message is not downloaded yet, tap the message
and then tap Download message.
4
If the received message contains music or a video, tap
the item and then tap View video or Play audio.
When you receive a text or multimedia message,
appears in the status bar. To read the message, you
can also drag the status bar downwards and tap the
received message when the status bar is open.
Email
You can use your phone to send and receive emails through
your regular email account. First, you need the correct
Internet settings in your phone. See Internet and
messaging settings on page 5.
For more information on entering text, see Entering
text on page 18.
To set up an email account in your phone
1
From the Home screen, drag upwards.
2
Find and tap Email.
3
Tap Email address, enter your email address and tap
Next.
4
Enter your password and tap Done.
5
Tap Continue.
6
If the phone cannot download your email account
settings automatically, you can proceed by entering the
account settings manually.
If you need to enter the settings manually, contact
your email service provider for the correct email
22
account settings. For example, you need to know if
the account type is POP3 or IMAP.
To create and send an email message
1
From the Home screen, drag upwards.
2
Find and tap Email.
3
Tap Write new.
4
Tap To: and enter the recipient's address, then tap
Done. You can add more recipients the same way, or
delete a recipient by tapping
.
5
Tap Subject, enter the subject and tap Done.
6
Tap Write email, enter the message text and tap
Done.
7
To attach a file, tap
and select the type of file to
attach.
8
Tap Send.
To receive and open email messages
1
From the Home screen, drag
upwards.
2
Find and tap Email.
3
Tap Inbox.
4
To update the inbox with new messages, tap .
5
To open and read a message, tap the message.
Sony Ericsson Timescape™
Sony Ericsson Timescape™ revolutionises your social
experience by collecting all your communications into one
view. Every event – Facebook or Twitter updates, text and
multimedia messages, missed calls – appears as a tile in a
chronological flow on the screen. You can see a snack-size
preview of an event before choosing to view the full content.
23
You can filter by event type to view all communications for
a contact.
The services and features described in this chapter
may not be supported in all countries/ regions or by
all networks and/or service providers in all areas.
To start Timescape™
1
From the Home screen, drag upwards.
2
Find and tap Timescape.
3
The first time you start Timescape, you can tap Log in
and log in to your Facebook or Twitter account to
receive Facebook and Twitter updates in Timescape. If
you do not want to log in, tap Continue.
If you are already logged in to Facebook, Twitter, or
another online service while setting up the phone for
the first time, when you start Timescape™, the
welcome screen will not be displayed and you are not
required to log in again.
If you are not logged in and you tap Continue, then
you can always log in from the Home screen by
tapping Settings > Sony Ericsson > Timescape™
settings.
24
The Timescape™ start screen
2
3
1
5
6
4
1 Tile filter icon
2 Status update icon
3 Go to contact icon
4 Refresh icon (only visible if you are logged in to a web
service account)
5 Timescape™ tiles, in chronological order
6 Tile content icon
25
Using Timescape™
To update your Facebook or Twitter status in Timescape™
1
From the Home screen, drag upwards.
2
Find and tap Timescape.
3
Tap
.
4
Tap Select services.
5
Use the toggles to select the services for which you want
to update your status. If you want to update your status
for a service you are not logged in to, tap the service and
log in to it. When you have selected the desired services,
tap Done.
6
Tap Edit status, enter your new status, and tap Send.
To view an event in Timescape™
1
From the Home screen, drag
upwards.
2
Find and tap Timescape.
3
Scroll to the tile for the desired event, then tap the tile.
To schedule web service content updates in Timescape™
1
From the Home screen, drag
upwards.
2
Find and tap Settings > Sony Ericsson > Timescape™
settings > Schedule updates.
3
Tap the desired option. If you select Manual, no
automatic updates will be made.
To log in to Facebook or Twitter
1
From the Home screen, drag
upwards.
2
Find and tap Settings > Sony Ericsson > Timescape™
settings > Services.
3
Tap the service you want to log in to.
26
4
Enter your login details.
When you have logged in to a web service, you can
update your status, or view updates from the web
service, in Timescape™.
Sony Ericsson Sync
Use the Sony Ericsson Sync application to synchronise
bookmarks, contacts and calendar events between your
phone and your Sony Ericsson account. At
www.sonyericsson.com/user you can then access, edit
and add information from any computer with an Internet
connection.
A Sony Ericsson account can be created and set up from
your phone, or you can create one at
www.sonyericsson.com/user.
Sony Ericsson Sync can be set up to connect to any
SyncML™ service.
To set up a Sony Ericsson account in your phone
1
From the Home screen, drag
upwards.
2
Find and tap Sony Ericsson Sync.
3
Tap Sony Ericsson Sync.
4
Follow the registration wizard to create a Sony Ericsson
account.
5
Mark the Sync interval checkbox and set the
synchronisation interval.
6
If you want to synchronise Bookmarks, Contacts and
Calendar, mark the relevant checkboxes.
7
Tap Save.
27
To synchronise using Sony Ericsson Sync
1
From the Home screen, drag upwards.
2
Find and tap Sony Ericsson Sync.
3
Tap the sync icon for any listed synchronisation
service to start the synchronisation.
PC Companion
PC Companion enables you to access and use additional
features and services connected to your phone, for example
the Media Go™ application, to transfer music, video and
pictures. You can also update your phone to get the latest
software available.
You need one of these operating systems to use the
Media Go™ application:
•
Microsoft® Windows 7
•
Microsoft® Windows Vista™
•
Microsoft® Windows® XP, Service Pack 3 or higher
Connect your phone and computer with a USB cable to
install and use PC Companion.
To install PC Companion
1
Connect your phone to a computer using a USB cable.
2
Tap Install PC Companion.
3
Computer: PC Companion automatically starts on your
computer after a few seconds. Follow the on-screen
instructions to install PC Companion.
To use PC Companion
1
Connect your phone to a computer using a USB cable.
2
Tap Connect your phone.
28
3
Computer: PC Companion automatically starts on your
computer after a few seconds.
To disconnect the USB cable safely
Do not disconnect the USB cable when transferring
content as this may corrupt the content.
1
Computer: Make sure that the hardware is safely
removed.
2
Disconnect the USB cable.
Computer instructions may vary depending on your
operating system. See the documentation of your
computer's operating system for more information.
Music
You can browse and listen to your music, audio books and
podcasts using the music player.
Use the Media Go™ application on your computer to
transfer content to and from the memory card in your
phone.
To play audio content
1
From the Home screen screen, tap . If does not
appear on the Home screen, drag upwards, then find
and tap Music player
.
2
Tap .
3
Tap to browse audio by artist. Tap to use playlists.
Tap
to browse audio by track.
4
Scroll up or down and browse to a track.
5
Tap a track to play it.
29
Music player overview
2
9
3
4
5
6
1
8
7
1 Browse the music on the memory card
2 Infinite button: find related material online
3 Cover art (if available)
4 Go to the previous track in the current play queue,
or rewind
5 Play/Pause button
6 Progress indicator: fast forward or rewind by
dragging or tapping
7 Time remaining of current track
30
8 Go to the next track in the current play queue, or fast
forward
9 View the current play queue
To explore related audio content
1
In the music player, tap .
2
Flick left or right to view results on available online services
(operator-dependent).
3
To return to the music player, press
.
Camera
You can take a photo or record a video by pressing the
camera key. Before taking a photo, you can improve it by
using the Scenes feature. You can use the flash or the light
when shooting or recording. You can share a photo or a
video with friends, or upload your photos and videos to a
web service. From the viewfinder, you can view an album
containing all photos and videos that you have taken using
the camera.
To activate the camera
•
Press the camera key.
To take a photo
1
Activate the camera.
2
If the still camera is not selected, tap
.
3
Point the camera towards the subject and press the
camera key halfway down to use auto-focus.
4
When the focus frame turns green, press the camera key
fully down. The photo is automatically saved on the
memory card. The photo appears in review mode.
31
5
To take another photo, press the camera key.
Viewfinder and camera controls
12
3
4
5
6
7
8
9
10
11
1 Camera key: Activate the camera/Take photos/
Record video
2 Switch between still and video camera
3 Go back one step or exit the camera
4 Select a scene (still camera)
5 Switch between still and video camera
6 Select video format (video camera)
7 View photos and videos
8 Turn on/off the light (video camera)
9 View photos and videos
32
10 Geotag icon: Indicates whether geotagging is
determined by GPS technology or the wireless
network. No icon indicates that geotagging is turned
off
11 Turn on/off the flash (still camera)
Web browser
To open the web browser
1
From the Home screen, drag upwards.
2
Find and tap Browser .
To go to a web page
1
Press
and tap .
2
Tap the text field to activate the keypad.
3
Enter a web address.
4
Tap Go.
If the screen orientation does not change
automatically when you turn the phone sideways,
mark the Orientation checkbox under Settings >
Sound & display.
Locking and protecting your
phone
IMEI number
Keep a copy of your IMEI (International Mobile Equipment
Identity) number in case your phone is stolen.
33
To view your IMEI number in the phone
1
From the Home screen, drag upwards.
2
Find and tap Settings > About phone > Status.
3
Scroll to IMEI to view the IMEI number.
To change the SIM card PIN
1
From the Home screen, drag upwards.
2
Find and tap Settings > Security & location > Set up
SIM card lock > Change SIM PIN.
3
Enter the old SIM card PIN and tap OK.
4
Enter the new SIM card PIN and tap OK.
Updating your phone
You can update your phone to the most recent software for
optimal performance and to get the latest enhancements.
Updates can be downloaded wirelessly directly from your
phone via the Internet by using a 2G/3G mobile data
connection, or by using a Wi-Fi™ network connection. By
connecting your phone to a computer with a USB cable,
you can also download updates from the PC Companion
application.
When you are using a 2G/3G mobile data connection
to connect to Internet from your phone, data
transmission charges may apply. Contact your
network operator for more information.
Make sure you back up and save all data contained in
your phone before you start updating the phone.
To download software updates wirelessly
1
From the Home screen, drag upwards.
34
2
Find and tap Settings > About phone > Software
update. Follow the on screen instructions to update your
phone.
To download software updates using a USB cable
Do not disconnect the USB cable when updating your
phone as this may corrupt the content. Make sure that
the hardware is safely removed from your computer
when you are finished.
1
Connect your phone to a computer using a USB cable. If
it is the first time you start PC Companion you have to
install it before moving on to the next step. Follow the onscreen instructions in the menu displayed in your phone
to install PC Companion.
2
Tap Connect your phone.
3
Computer: Wait a few seconds for PC Companion to
start. Click Support Zone > Software Update and follow
the on-screen instructions to update your phone.
While using PC Companion, you will also get
notifications whenever there are available software
updates for your phone.
Troubleshooting
Common questions
My phone is not working as expected
If you experience problems with your phone, check these
tips before you try anything else:
•
Restart your phone.
35
•
Remove and re-insert the SIM card. Then restart your
phone.
•
Force a restart of the phone if the phone hangs and can't
be restarted normally.
•
Update your phone. Even if you have the latest software,
updating your phone can improve software stability and
solve other problems. Updating your phone also ensures
optimal performance and provides the latest
enhancements.
•
Reset your phone.
Be patient while resetting your phone. Restarting the
phone while making a reset may damage the phone
permanently.
To force restart
•
Press and hold
and for five seconds and the
phone will automatically restart.
To force stop an application
•
When a popup window tells you that an application is not
responding, tap Force stop.
If you do not want to force stop an application, you
can wait for it to respond by tapping Cancel.
Resetting the phone
Resetting the phone deletes all data, including downloaded
applications, and resets the phone back to its initial state,
the state before you turned on the phone for the first time.
Make sure to back up important data you have on the phone
before you reset the phone.
To reset the phone
1
From the Home screen, drag
upwards.
36
2
Find and tap Settings > SD card, USB Mass Storage
& phone storage > Factory data reset > Reset
phone.
3
Enter your screen unlock pattern.
4
Tap Erase everything.
No battery charging icon appears when I start
charging the phone
It may take a few minutes before the battery icon appears
on the screen.
I cannot use Internet-based services
Make sure your subscription includes data download, and
that the Internet settings in your phone are correct.
See Internet and messaging settings on page 5 for more
information on how to download or change the Internet
settings. You can also download settings from
www.sonyericsson.com/support.
Error messages
No network coverage
•
Your phone is in flight mode. Make sure flight mode is off.
•
Your phone is not receiving any network signal, or the
received signal is too weak. Contact your network
operator and make sure that the network has coverage
where you are.
•
The SIM card is not working properly. Insert your SIM
card in another phone. If this works, it is probably your
phone that is causing the problem. In this case, contact
the nearest Sony Ericsson service center.
37
Emergency calls only
You are within range of a network, but you are not allowed
to use it. However, in an emergency, some network
operators allow you to call the international emergency
number 112.
SIM card is locked.
You have entered your PIN incorrectly 3 times in a row. To
unlock the phone, you need the PUK provided by your
operator.
SIM card is PUK-locked.
You have entered your PUK (Personal Unblocking Key)
incorrectly 10 times in a row. Please contact your service
provider.
Legal information
Sony Ericsson E10i/E10a
This User guide is published by Sony Ericsson Mobile Communications
AB or its local affiliated company, without any warranty. Improvements
and changes to this User guide necessitated by typographical errors,
inaccuracies of current information, or improvements to programs and/
or equipment, may be made by Sony Ericsson Mobile Communications
AB at any time and without notice. Such changes will, however, be
incorporated into new editions of this User guide.
All rights reserved.
©Sony Ericsson Mobile Communications AB, 2010
Publication number: 1234-2319.1
Your mobile phone has the capability to download, store and forward
additional content, e.g. ringtones. The use of such content may be
restricted or prohibited by rights of third parties, including but not limited
to restriction under applicable copyright laws. You, and not
Sony Ericsson, are entirely responsible for additional content that you
download to or forward from your mobile phone. Prior to your use of any
additional content, please verify that your intended use is properly
38
licensed or is otherwise authorized. Sony Ericsson does not guarantee
the accuracy, integrity or quality of any additional content or any other
third party content. Under no circumstances will Sony Ericsson be liable
in any way for your improper use of additional content or other third party
content.
This User guide may reference services or applications provided by third
parties. Use of such programming or services may require separate
registration with the third party provider and may be subject to additional
terms of use. For applications accessed on or through a third-party
website, please review such websites’ terms of use and applicable
privacy policy in advance. Sony Ericsson does not warrant or guarantee
the availability or performance of any third-party websites or offered
services.
The Liquid Identity logo, Xperia, Timescape and xperiax10mini are
trademarks or registered trademarks of Sony Ericsson Mobile
Communications AB.
Sony and "make.believe" are trademarks or registered trademarks of
Sony Corporation.
Media Go is a trademark or registered trademark of Sony Electronics Inc.
Google, Google Maps™, Picasa and Android are trademarks or
registered trademarks of Google, Inc.
Ericsson is a trademark or registered trademark of Telefonaktiebolaget
LM Ericsson.
Facebook is a trademark or a registered trademark of Facebook, Inc.
Twitter is a trademark or a registered trademark of Twitter, Inc.
Wi-Fi is a trademark or a registered trademark of the Wi-Fi Alliance.
Microsoft, Windows, Outlook, Windows Vista, Windows Server, Explorer,
Windows Media and ActiveSync are registered trademarks or trademarks
of Microsoft Corporation in the United States and/or other countries.
This product is protected by certain intellectual property rights of
Microsoft. Use or distribution of such technology outside of this product
is prohibited without a license from Microsoft.
Other product and company names mentioned herein may be the
trademarks of their respective owners. Any rights not expressly granted
herein are reserved. All other trademarks are property of their respective
owners.
All illustrations are for illustration only and may not accurately depict the
actual phone.
39
www.sonyericsson.com
Sony Ericsson Mobile Communications AB
SE-221 88 Lund, Sweden
1234-2319.1
Page 3
FCC Statement
Declaration of Conformity
Sony Ericsson E10a
UMTS HSPA band 1 2 5 GSM GPRS/EDGE 850/900/1800/1900
Page 4
Important Information
United States & Canada
THI S PHO NE MO DEL HAS BEEN CERTI FIE D IN COMPL IANCE
WIT H THE GOVE RNM ENT’S REQU IREME NTS FOR EXPOS URE
TO RADIO WAVE S.
The E10a Seri es mobil e pho nes h ave been desi gned to compl y
wit h app licab le safet y req uirem ent s for expo sure to radio wave s.
You r wir eless ph one i s a r adio tra nsmit ter a nd re cei ver. It is
des igned to not exc eed t he limit s* of ex pos ure t o r adio fre quenc y
(RF ) ene rgy s et by g overn menta l a uthor ities . The se li mit s est ablis h
per mitte d lev els of R F ene rgy f or the g enera l pop ulati on. The
gui delin es ar e b ased on st andar ds that were devel oped by
int ernat ional sc ienti fic o rgani zat ions throu gh pe riodi c a nd
tho rough eval uat ion o f sci entif ic studi es. T he st andar ds inclu de a
saf ety m argin de signe d to assur e t he sa fety of al l ind ivi duals ,
reg ardle ss of ag e and heal th.
The radi o wav e e xposu re gu ideli nes empl oy a unit of
mea surem ent k now n as the Specifi c Abs orp tion Rate (S AR). Test s
for SAR are c ond ucted usin g sta nda rdize d met hods with the
pho ne tr ansmi tti ng at its highe st certi fied power leve l i n all used
fre quenc y ban ds. Whil e the re ma y b e dif feren ces b etwee n t he SA R
lev els o f var iou s pho ne mo dels, th ey ar e all desi gned to meet the
rel evant guid eli nes f or ex posur e t o rad io wa ves. For m ore
inf ormat ion o n S AR, p lease refe r t o the safe and effic ien t use
cha pter in th e U ser G uide.
The high est S AR value as r eport ed to th e aut horit ies f or this
pho ne mo del w hen test ed fo r use by the ear i s 1.1 8 W/k g*, and
whe n wor n o n the body is 0.69 W/ kg* f or speec h and 1. 11 W/ kg*
for data call s. Body w orn meas ureme nts a re made w hile the phone
is in us e and wo rn on the body wit h a S ony E ricss on ac ces sory
sup plied with or des ignat ed for use with this ph one . It i s theref ore
rec ommen ded t hat only Eric sson and Sony Eric sson origi nal
acc essor ies b e u sed i n con junct ion with Sony Eric sson pho nes.
**B efore a ph one mode l is avail abl e for sale to t he pu bli c in the
US, it m ust b e t ested and cert ified by t he Fe der al Co mmuni catio ns
Com missi on (F CC) that it d oes n ot exce ed the limit esta blish ed by
2
Page 5

the gove rnmen t-a dopte d req uirem ent for safe expos ure*. Th e
tes ts ar e per for med i n pos ition s a nd lo catio ns (i .e., by the ear a nd
wor n on the bo dy) a s r equir ed by the FCC fo r e ach m odel. The FCC
has gran ted a n E quipm ent A uthor iza tion for this ph one m odel with
all repo rted SAR le vel s eva luate d as in complianc e wit h the FC C RF
exp osure guid eli nes. While ther e m ay be diff erenc es betwe en th e
SAR leve ls of va rious phon es, a ll mobil e pho nes g ran ted a n FCC
equ ipmen t aut hor izati on me et th e g overn ment requi rem ent f or
saf e exp osure . S AR in forma tion on this phone mode l i s on file at
the FCC and c an be fo und u nder the Disp lay G rant sec tion of
htt p://w ww.fc c.g ov/oe t/fcc id af ter sear ching on F CC
ID PY7 A3880 068. Add ition al infor mat ion o n S AR can be foun d on
the Cell ular Tel ecomm unica tions & Inter net A ssoci ati on (C TIA)
web site at ht tp: //www .phon efact s.n et.
* I n the Unit ed State s and Cana da, the SAR l imit for m obi le
pho nes u sed b y t he pu blic is 1. 6 w atts/ kilog ram ( W/k g) av erage d
ove r one gram of tiss ue. T he st and ard i ncorp orate s a marg in of
saf ety t o giv e a dditi onal prote cti on fo r the publ ic and t o acc ount
for any varia tio ns in meas ureme nts .
**T his p aragr aph is o nly a pplic abl e to auth ori ties and custome rs
in the U nited St ates.
3
Page 6

Important Information
Latin & South America
Rad io wa ve ex pos ure a nd Sp ecifi c A bsorp tion Rate (SA R)
inf ormat ion
The E10a Seri es mobil e pho nes h ave been desi gned to compl y
wit h app licab le safet y req uirem ent s for expo sure to radio wave s.
The se re quire men ts ar e bas ed on sc ienti fic g uidel ine s tha t inc lude
saf ety m argin s d esign ed to assu re the s afety of a ll perso ns,
reg ardle ss of ag e and heal th.
The radi o wav e e xposu re gu ideli nes empl oy a unit of
mea surem ent k now n as the S pecif ic Absor ption Rate , o r SAR .
Tes ts fo r SAR ar e con ducte d usi ng standardi sed m ethod s w ith t he
pho ne tr ansmi tti ng at its highe st certi fied power leve l i n all used
fre quenc y ban ds.
Whi le th ere m ay be di ffere nces bet ween the S AR le vel s of
var ious phone mo dels, they are all desi gned to me et th e r eleva nt
gui delin es fo r e xposu re to radi o w aves.
For more infor mat ion on SAR, pleas e refer to the safet y c hap ter
in the U ser G uid e.
SAR data info rma tion for r eside nts in c ountr ies t hat have
ado pted the S AR limit reco mmend ed by th e Int ernat ional
Com missi on on No n-Ion izing Radi ati on Pr otect ion ( ICNIR P), whic h
is 2 W/k g ave rag ed ov er te n (10 ) g ram o f tis sue ( for e xam ple
Eur opean Unio n, Japan , Bra zil a nd New Z ealan d):
The high est S AR value for this mod el ph one w hen t ested by
Son y Eri csson fo r use at t he ea r i s 1.1 6 W/k g (10 g).
8
Page 7
FCC Statement
Thi s dev ice c omp lies with Part 15 of th e FCC rule s.
Ope ratio n is sub ject to th e fol low ing t wo co nditi ons: (1)
Thi s dev ice m ay not c ause harmf ul inter feren ce, a nd (2 )
Thi s dev ice m ust acce pt an y int erf erenc e rec eived , inc lud ing
int erfer ence tha t may caus e und esi red o perat ion.
Any chan ge or mo dific ation not exp ressl y app roved by S ony
Eri csson may voi d the user 's au tho rity to op erate the equ ipmen t.
Thi s equ ipmen t h as be en te sted and foun d to compl y wit h t he
lim its f or a Cla ss B digit al de vic e, pu rsuan t to Part 15 of th e FCC
Rul es. Thes e l imi ts are desi gned to pro vid e reason able pro tecti on
aga inst harmf ul inter feren ce in a resid entia l ins talla tio n. Th is
equ ipmen t gen era tes, use s a nd ca n rad iate radio freque ncy e ner gy
and , if not inst all ed an d use d i n accord ance wit h the inst ruc tions ,
may caus e har mfu l int erfer ence to radio comm unica tions .
How ever, ther e i s no guar antee that inte rfe rence will not occu r in a
par ticul ar in sta llati on.
If this equip men t doe s cau se ha rmf ul in terfe rence to r adi o or
tel evisi on re cep tion, whic h can be dete rmine d by turni ng the
equ ipmen t off and on, t he user is encour aged to try to correct the
int erfer ence by one o r mor e of the foll owing meas ures:
•
Reo rient or r elo cate the r eceiv ing ante nna.
•
Inc rease the sep arati on be tween th e equ ipmen t and rece ive r.
•
Con nect the equi pment into an outl et on a cir cuit diffe ren t fro m
tha t to which th e rec eiver is c onn ected .
•
Con sult the d eal er or an e xperi enc ed ra dio/T V tec hnici an for
hel p.
11
Page 8
Industry Canada Statement
Thi s dev ice c omp lies with RSS-2 10 of In dustr y Can ada.
Ope ratio n is sub ject to th e fol low ing t wo co nditi ons : (1) this
dev ice m ay no t c ause interf ere nce, and (2 ) t his d evice must ac cept
any inte rfere nce , inc ludin g int erf erenc e tha t may ca use u ndesi red
ope ratio n of the devi ce.
Thi s Cla ss B dig ital appar atus com plies with Cana dian
ICE S-003 .
Cet appa reil num ériqu e de la cl ass e B e st co nform e à l a n orme
NMB -003 du Ca nad a.
12
Page 9
Declaration of Conformity for E10a
We, Sony Eric sso n Mob ile C ommun ica tions AB o f
Nya Vatt entor net
SE- 221 8 8 Lun d, Swede n
dec lare under ou r sol e res ponsi bil ity t hat o ur pr oduct
Son y Eri csson ty pe AA D-388 0068- BV
and in c ombin ati on wi th ou r acc ess ories , to whic h t his d eclar ati on
rel ates is in co nform ity w ith t he appro priat e sta ndard s E N 301
511 :V9.0 .2, E N 3 01 90 8-1:V 3.2.1 , E N 301 908- 2:V3. 2.1 , EN 300
440 -2:V1 .3.1, EN 300 328:V 1.7.1 , E N 301 489- 7:V1. 3.1 , EN 301
489 -17:V 2.1.1 , E N 301 48 9-24: V1.4. 1, EN 30 1 4 89-3: V1.4. 1 a nd
EN 60 95 0-1:2 006 foll owing the pro visio ns of , Rad io Equip ment
and Tele commu nic ation Term inal Equipme nt di rec tive 1999 /5/ EC.
Lun d, Ap ril 2 010
Dan Redi n,
Cor porat e Vic e P resid ent, Head of Devel opmen t
We fulfi l the re quire ments of t he R&TTE Dire ctive (199 9/5 /EC).
Ce produ it es t c onfor me au x dir ect ives de R& TTE ( 1999/ 5/E C).
Cum plimo s con lo s req uisit os de la Dire ctiva R&TT E – N orm as
sob re eq uipos de term inale s de radi o y t eleco munic aci ones (1999/
5/E C).
Ate ndemo s aos re quisi tos d a Dir etr iz R& TTE ( 1999/ 5/E C).
13
Page 10

www.sonyericsson.com
Sony Ericsson Mobile Communications AB
SE-221 88 Lund, Sweden
1228-6083.1
Page 11

Important information
Page 12

Sony Ericsson Consumer Web site
At www.s ony erics son.c om/ suppo rt th ere i s a s upp ort s ectio n
whe re he lp and t ips a re only a few cl icks away. He re yo u wil l f ind
the late st compu ter s oft ware updat es and t ips o n h ow to use
you r pro duc t mor e eff ici ently .
Service and support
You have ac cess to a por tfoli o of exc lusiv e ser vic e adv antag es
suc h as:
•
Glo bal a nd local Web sit es pr ovidi ng suppo rt.
•
A g lobal ne twork of C ont act C enter s.
•
An exten siv e net work of Sony Erics son serv ice p art ners.
•
A w arran ty perio d. Le arn more abou t t he wa rrant y c ondit ions in
the Limit ed warra ntyse ction .
At www.s ony erics son.c om/ suppo rt, y ou ca n fin d t he la test
sup port too ls an d inf orm ation . For op erato r-spe cif ic se rvice s a nd
fea tures , p lease cont act your netw ork oper ator.
You can als o con tact our Cont act C ent ers. If yo ur count ry/
reg ion i s n ot re prese nte d in the l ist belo w, pl eas e con tact you r
loc al de ale r. (C alls are char ged a cco rding to n ati onal rates ,
inc ludin g l ocal taxes , u nless the pho ne nu mber is a tol l-fre e
num ber.)
If your pro duct needs se rvice , ple ase cont act t he deale r fro m
who m it was purc hased , o r one of o ur servi ce pa rtn ers. For
war ranty cl aims, save pr oof o f pur cha se.
Guidelines for Safe and Efficient Use
Ple ase f oll ow th ese g uid eline s. Fa ilu re to do s o m ight
ent ail a po tenti al he alt h ris k or pro duct malfu nct ion. If in
dou bt as to its prope r f uncti on, h ave the produ ct
che cked by a cer tifie d s ervic e par tne r bef ore c har ging
or using it .
Recommendations for care and safe use of our products
•
Han dle w ith care and kee p in a cle an and d ust-f ree plac e.
2
Page 13

•
War ning! Ma y exp lod e if dispo sed of i n fir e.
•
Do not e xpo se to liqu id or mo istur e o r exc ess h umi dity.
•
For opti mum perf orman ce, the produ ct shoul d not
be opera ted in t emper atu res b elow -10 °C(+1 4°F) or
abo ve +4 5°C (+113 °F). Do not e xpose th e bat tery to
tem perat ure s abo ve +6 0°C (+140 °F).
•
Do not e xpo se to flam es or li t tob acc o pro ducts .
•
Do not d rop , thr ow or tr y to bend the prod uct.
•
Do not p ain t or attem pt to di sasse mbl e or modif y t he
pro duct. On ly So ny Er ics son a uthor ise d per sonne l
sho uld p erf orm s ervic e.
•
Con sult wit h aut horis ed medic al st aff and the
ins truct ion s of the m edi cal d evice ma nufac turer
bef ore u sin g the prod uct near pace mak ers o r oth er medic al
dev ices or equip ment.
•
Dis conti nue use of el ect ronic devi ces , or disab le the r adio
tra nsmit tin g fun ction ali ty of the dev ice, where re quire d or
req ueste d t o do so.
•
Do not u se where a po ten tiall y exp los ive a tmosp her e exi sts.
•
Do not p lac e the prod uct , or insta ll wirel ess e qui pment , in the
are a abo ve an ai r bag in a ca r.
•
Cau tion: Cr acked or brok en di spl ays m ay cr eat e sha rp ed ges
or splin ter s tha t cou ld be ha rmful up on co ntact .
•
Do not u se the B lueto oth Head set i n p ositi ons w her e it is
unc omfor tab le or will be subj ect t o p ressu re.
Children
War ning! Ke ep ou t o f the reac h o f chi ldren . D o not
all ow ch ild ren t o pla y w ith m obile ph ones or
acc essor ies . The y cou ld hurt thems elv es or othe rs.
Pro ducts ma y con tain sma ll pa rts t hat coul d bec ome deta ched
and crea te a cho king haz ard.
Power supply (Charger)
Con nect the char ger t o p ower sourc es as ma rked on the
pro duct. Do not use o utd oors or in da mp ar eas. Do not a lter or
sub ject the cord to d ama ge or stre ss. Unpl ug th e u nit b efore
3
Page 14

cle aning it . Nev er al ter the plug. If it d oes n ot fit i nto t he outle t,
hav e a p rop er ou tlet ins talle d by an elect ricia n. When a pow er
sup ply i s c onnec ted t her e is a sma ll drain of p owe r. To avoi d t his
sma ll en erg y was te, d isc onnec t the po wer s upply wh en th e
pro duct is fully char ged . Use of c har ging devic es that are n ot
Son y Eri css on br anded ma y pos e inc rea sed s afety ri sks.
Battery
New or i dle batt eries ca n hav e sho rt- term reduc ed capac ity.
Ful ly ch arg e the batt ery befo re in iti al us e. Us e f or th e int end ed
pur pose onl y. Ch arge the batt ery i n t emper ature s b etwee n
+5° C(+41 °F) and +45°C (+1 13°F) . Do not put the b att ery i nto
you r mou th. Do n ot le t t he ba ttery co ntact s tou ch anoth er me tal
obj ect. Tur n off the pro duct befor e r emovi ng th e b atter y.
Per forma nce depe nds o n t emper ature s, signa l str eng th, u sage
pat terns , f eatur es se lec ted a nd vo ice or d ata t ran smiss ions. On ly
Son y Eri css on se rvice pa rtner s sho uld remo ve or re place buil t-i n
bat terie s. Use o f bat ter ies t hat a re not S ony E ric sson brand ed
may pose in creas ed sa fet y ris ks. R epl ace t he ba tte ry on ly wi th
ano ther Son y Eri csson ba ttery that ha s bee n qua lif ied w ith t he
pro duct per the stand ard IEEE -1725 . U se of an u nqu alifi ed
bat tery may pres ent a ri sk of fire , e xplos ion, lea kage or ot her
haz ard.
Personal medical devices
Mob ile p hon es ma y aff ect impl anted me dical equi pme nt. R educe
ris k of int erfer ence by keepi ng a min imum dista nce of
15 cm(6 inc hes) betwe en the p hone and the devic e. Use t he
pho ne at yo ur ri ght e ar. Do n ot ca rry the phone in your brea st
poc ket. Tur n off the pho ne if you sus pect inter fer ence. For all
med ical dev ices, cons ult a ph ysici an and t he ma nuf actur er.
Driving
Som e veh icl e man ufact ure rs fo rbid the use of ph one s in their
veh icles un less a han dsf ree k it wi th an ex terna l a ntenn a sup por ts
the inst all ation . Che ck with the v ehi cle m anufa ctu rer's
rep resen tat ive t o be sur e tha t the mo bile phone or Blue tooth
4
Page 15

han dsfre e w ill n ot af fec t the elec tro nic s ystem s i n the vehi cle .
Ful l att ent ion s hould be give n to dri ving at al l t imes and l oca l
law s and re gulat ions res trict ing t he use o f wir ele ss de vices wh ile
dri ving mus t be obser ved .
GPS/Location based functions
Som e pro duc ts pr ovide GP S/Loc ation ba sed f uncti ons . Loc ation
det ermin ing func tiona lit y is provi ded “As is” a nd “With all fau lts”.
Son y Eri css on do es no t m ake a ny re pre senta tion or warra nty a s
to the a ccu racy of su ch locat ion i nfo rmati on.
Use of l oca tion- based in forma tion by the d evice ma y not be
uni nterr upt ed or erro r f ree a nd ma y a dditi onall y b e dep enden t o n
net work ser vice avail abi lity. Plea se note that fun ction ality ma y be
red uced or preve nted in certa in en vir onmen ts su ch as bu ildin g
int erior s o r are as ad jac ent t o bui ldi ngs.
Cau tion: Do not use G PS funct ional ity in a mann er which
cau ses d ist racti on fr om drivi ng.
Emergency calls
Cal ls ca nno t be guara nte ed un der a ll condi tions . N ever rely
sol ely u pon mobi le ph one s for esse nti al co mmuni cat ion. Calls
may not be possi ble i n a ll ar eas, on all n etwor ks, or w hen c ert ain
net work ser vices and/ or phone feat ure s are used .
Antenna
Use of a nte nna d evice s n ot ma rkete d b y Son y Eri css on co uld
dam age t he phone , red uce perf orman ce, and produ ce SAR
lev els a bov e the esta bli shed limit s. Do no t cov er the a ntenn a
wit h you r h and a s thi s a ffect s cal l q ualit y, po wer leve ls an d c an
sho rten tal k and stan dby time s.
Radio Frequency (RF) exposure and Specific Absorption
Rate (SAR)
Whe n the ph one o r Blu eto oth h andsf ree is t urned on , it emits
low leve ls of ra dio f req uency ener gy. Inte rnati ona l saf ety
gui delin es have been dev elope d thr oug h per iodic an d tho rough
eva luati on of sc ienti fic stud ies. The se gu ideli nes esta blish
5
Page 16

per mitte d l evels of r adi o wav e exp osu re. T he gu ide lines incl ude a
saf ety m arg in de signe d t o ass ure t he safet y of all pers ons a nd to
acc ount for any varia tio ns in meas ure ments .
Spe cific Ab sorpt ion R ate (SAR ) is use d to measu re radio
fre quenc y e nergy abso rbe d by the b ody when usin g a mobi le
pho ne. T he SAR v alue is deter mined at the highe st certi fied
pow er le vel in l abora tor y con ditio ns, but becau se the p hone is
des igned to use the m ini mum p ower nec essar y to acc ess t he
cho sen n etw ork, the a ctu al SA R lev el can b e wel l b elow this
val ue. T her e is no pr oof of d iffer enc e in safet y b ased on
dif feren ce in SA R val ue.
Pro ducts wi th ra dio t ran smitt ers s old in t he US mu st be
cer tifie d b y the Fede ral Comm unica tio ns Co mmiss ion (FCC ).
Whe n req uir ed, t ests are perf ormed wh en th e pho ne is pl aced at
the ear and when worn on the body. Fo r bod y-wor n o perat ion,
the phon e h as be en te ste d whe n pos iti oned a min imu m of
15 mm fr om the b ody w ith out a ny me tal part s in the vici nity of
the phon e o r whe n pro per ly us ed wi th an ap propr iat e
Son y Eri css on ac cesso ry and w orn o n t he bo dy.
For more in forma tion abo ut SA R and ra dio f reque ncy
exp osure , g o to: www. sonye ric sson. com/h eal th.
Flight mode
Blu etoot h a nd WL AN fu nct ional ity, if avail able in the d evice , c an
be enabl ed in Fl ight mod e but may be prohi bit ed on board ai rcraf t
or in ot her area s whe re radio tran smi ssion s are pr ohibi ted. In
suc h env iro nment s, pl eas e see k pro per auth orisa tio n bef ore
ena bling Bl uetoo th or WL AN fu nctio nal ity e ven i n F light mode .
Malware
Mal ware (sh ort f or ma lic ious softw are ) is softw are that can har m
the mobi le phone or o the r com puter s. Malwa re or ha rmful
app licat ion s can incl ude viru ses, wor ms, s pywar e, and o ther
unw anted pr ogram s. Wh ile the devic e d oes e mploy se curit y
mea sures to resi st su ch effor ts, S ony Eric sson doe s not warr ant
or repre sen t tha t t he de vice wil l be imp ervio us to th e int rod uctio n
of malwa re. You can h owe ver r educe th e ris k of mal ware attac ks
6
Page 17

by using ca re wh en do wnl oadin g con ten t or accep tin g
app licat ion s, re frain ing from open ing or r espon din g to messa ges
fro m unk now n sou rces, us ing t rustw ort hy se rvice s t o acc ess t he
Int ernet , a nd on ly do wnl oadin g con ten t to the m obi le ph one f rom
kno wn, r eli able sourc es.
Accessories
Use only So ny Er icsso n b rande d ori gin al ac cesso rie s and
cer tifie d s ervic e par tne rs. S ony Eric sson doe s not te st th ird -part y
acc essor ies . Acc essor ies may influ enc e RF expos ure , rad io
per forma nce , lou dness , e lectr ic sa fet y and othe r a reas. Thir dpar ty ac ces sorie s and pa rts m ay po se a ris k to you r hea lth o r
saf ety o r d ecrea se pe rfo rmanc e.
Accessible Solutions/Special Needs
In the U S, compa tible So ny Er icsso n p hones may off er
com patib ili ty wi th TT Y t ermin als ( wit h use of n ece ssary
acc essor y). For more inf ormat ion c all the Sony Eri csson Spec ial
Nee ds Ce nte r on 877 8 78 1996 (TTY) or 877 207 2 056 (voi ce),
or go to www.son yer icsso n-snc .co m.
Disposal of old electrical and electronic
equipment
Ele ctron ic equip ment and batt eries sh ould not b e
inc luded as hous ehold wa ste b ut sh oul d be left at an
app ropri ate coll ectio n p oint for r ecy cling . Thi s h elps preve nt
pot entia l n egati ve co nse quenc es fo r t he en viron men t and huma n
hea lth. Che ck lo cal r egu latio ns by co ntact ing y our loca l cit y
off ice, you r hou sehol d w aste dispo sal serv ice, the shop wher e
you purc has ed th e pro duc t or calli ng a Son y Eri css on Co ntact
Cen ter. Do not a ttemp t t o rem ove i nte rnal batte rie s. In terna l
bat terie s s hall be re mov ed on ly by a waste trea tme nt fa cilit y o r
tra ined ser vice profe ssi onal.
7
Page 18

Disposing of the battery
Che ck lo cal regu latio ns or ca ll a Son y Eri csson Co ntact
Cen ter f or infor matio n. Never use mun icipa l was te.
Memory card
If the p rod uct c omes com plete with a remov able mem ory c ard, it
is gener all y com patib le with the h and set p urcha sed but may n ot
be compa tib le wi th ot her devi ces o r t he ca pabil iti es of thei r
mem ory c ard s. Ch eck o the r dev ices for comp atibi lit y bef ore
pur chase or use. If t he produ ct is eq uippe d wit h a memo ry ca rd
rea der, che ck me mor y car d c ompat ibi lity befor e p urcha se or us e.
Mem ory c ard s are gene ral ly fo rmatt ed prior to s hip ping. To
ref ormat th e mem ory c ard , use a co mpa tible devi ce. Do n ot us e
the stan dar d ope ratin g s ystem form at when forma tti ng th e
mem ory c ard on a PC. For deta ils, ref er to the ope ratin g
ins truct ion s of the d evi ce or cont act cust omer sup port.
Warning!
If the d evi ce re quire s a n ada pter for inse rtion in to th e han dse t or
ano ther dev ice, do no t i nsert the car d dir ectly wi thout the
req uired ad apter .
Precautions on memory card use
•
Do not e xpo se th e mem ory card to m ois ture.
•
Do not t ouc h ter minal co nnect ions wit h you r han d o r any meta l
obj ect.
•
Do not s tri ke, b end, or drop the m emo ry ca rd.
•
Do not a tte mpt t o dis ass emble or m odi fy th e mem ory card .
•
Do not u se or st ore t he memor y car d i n hum id or co rrosi ve
loc ation s o r in exces siv e hea t suc h a s a c losed ca r in summe r,
in direc t s unlig ht or ne ar a heate r, etc.
•
Do not p res s or bend the end of th e m emory card ad apter with
exc essiv e f orce.
•
Do not l et dirt, dust , o r for eign obj ects get i nto the inser t p ort
of any m emo ry ca rd ad apt er.
•
Che ck yo u h ave i nsert ed the m emory ca rd co rrect ly.
8
Page 19

•
Ins ert t he memor y car d a s far as i t w ill g o int o a ny me mory
car d ada pte r nee ded. The memo ry ca rd may n ot op era te
pro perly un less fully in serte d.
•
We recom men d tha t you ma ke a backu p c opy o f imp ort ant
dat a. We ar e not resp ons ible for a ny loss or da mag e to conte nt
you stor e o n the memo ry card.
•
Rec orded da ta ma y be dam aged or lo st when you r emo ve th e
mem ory c ard or m emory ca rd ad apter , t urn o ff th e p ower while
for matti ng, read ing o r w ritin g dat a, or us e the me mory card in
loc ation s s ubjec t to sta tic e lectr ici ty or high el ectri cal f iel d
emi ssion s.
Protection of personal information
Era se pe rso nal d ata b efo re di sposi ng of th e pro duc t. To dele te
dat a, pe rfo rm a maste r r eset. Dele tin g dat a fro m t he ph one
mem ory d oes not ensur e t hat i t can not be r ecove red .
Son y Eri css on do es no t w arran t aga ins t rec overy of info rmati on
and does no t ass ume r esp onsib ility fo r dis closu re of an y
inf ormat ion even afte r a mast er re set .
Loudness warning!
Avo id vo lum e lev els t hat may be ha rmf ul to your he aring .
End User Licence Agreement
Sof tware de liver ed wi th this devic e a nd it s med ia is ow ned b y
Son y Eri css on Mo bile Com munic ation s A B, an d/or its affi liate d
com panie s a nd it s sup pli ers a nd li cen sors.
Son y Eri css on gr ants you a no n-exc lus ive l imite d l icenc e to
use the Sof tware sole ly in co njunc tio n wit h the De vice on wh ich
it is in sta lled or de liv ered. Owne rsh ip of the Sof tware is n ot sold,
tra nsfer red or o therw ise conv eyed.
Do not u se any m eans to disco ver t he sourc e cod e o r any
com ponen t o f the Soft war e, re produ ce and d istri but e the
Sof tware , o r mod ify t he Softw are. You are entit led to t ransf er
rig hts a nd oblig ation s t o the Soft war e to a thi rd party , sol ely
tog ether wi th th e Dev ice with whic h y ou re ceive d t he So ftwar e,
9
Page 20

pro vided th e thi rd pa rty agre es in wr iting to b e b ound by th e
ter ms of th is Li cence .
Thi s lic enc e exi sts t hro ughou t the us eful life of this Devic e. It
can be t erm inate d by tra nsfer ring you r rig hts t o t he De vice to a
thi rd pa rty in w ritin g.
Fai lure to compl y wit h a ny of thes e t erms and c ond ition s wil l
ter minat e t he li cence im media tely.
Son y Eri css on an d its th ird p arty sup plier s and li censo rs re tai n
all righ ts, titl e and in teres t in and to t he So ftw are. To th e e xtent
tha t the So ftwar e con tai ns ma teria l o r cod e of a t hird party , s uch
thi rd pa rti es sh all b e b enefi ciari es of th ese t erm s.
Thi s lic enc e is gover ned by t he la ws of Sw eden. Wh en
app licab le, the foreg oin g app lies to statu tory con sumer righ ts.
In the e ven t Sof tware ac compa nying or prov ided in
con junct ion with your de vice is pr ovi ded w ith a ddi tiona l ter ms
and cond iti ons, such pro visio ns sh all also gove rn your
pos sessi on and u sage of the S oftwa re.
Export regulations
Exp ort r egu latio ns: T his prod uct, inc ludin g any so ftwar e or
tec hnica l d ata c ontai ned in o r acc omp anyin g the pr oduct , may
be subje ct to im port and expo rt re gul ation s of the Euro pean
Uni on, t he Unite d Sta tes and other co untri es. T he user and a ny
pos sesso r o f the prod uct agre es to co mply stric tly with all suc h
reg ulati ons and ackno wle dges that it is th eir r esp onsib ility to
obt ain a ny requi red l ice nses to ex por t, re -expo rt, or i mport th is
pro duct. Wi thout limi tin g the fore goi ng, a nd as an exam ple, the
use r and an y pos sesso r o f the prod uct : (1) must no t kno wingl y
exp ort o r r e-exp ort P rod ucts to de sti natio ns id ent ified purs uan t
to Artic les in C hapte r I I of Europ ean Coun cil R egu latio n (EC )
133 4/200 0; (2), must com ply w ith U .S. gove rnmen t E xport
Adm inist rat ion R egula tio ns (" EAR", 15 C.F. R. §§ 73 0-774 , htt p:/ /
www .bis. doc .gov/ ) ad min ister ed by De partm ent o f C ommer ce,
Bur eau o f I ndust ry an d S ecuri ty; a nd (3) m ust c omp ly wi th
eco nomic sa nctio ns re gul ation s (30 C. F.R. §§ 50 0 e t. se q.,.,
htt p://w ww. treas .gov/ off ices/ enfor cem ent/o fac/) ad minis tered by
10
Page 21

the U.S. De partm ent o f T reasu ry, O ffi ce of Fore ign Asse ts
Con trol. Th e use r and an y pos sesso r o f the prod uct may not
tra nspor t o r del iver the prod uct, its acce ssori es or se parat e
sof tware to any count ry, regi on, e nti ty or pers on prohi bited by
the se re gul ation s.
Limited Warranty
Son y Eri css on Mo bile Com munic ation s A B, SE -221 88 Lund,
Swe den, (So ny Er icsso n) or it s loc al affil iated co mpany , pro vid es
thi s Lim ite d War ranty fo r you r mob ile phon e, or igi nal a ccess ory
del ivere d w ith y our m obi le ph one, and /or y our m obi le co mputi ng
pro duct (he reina fter ref erred to a s “ Produ ct”).
Sho uld y our Prod uct n eed warr anty ser vice, plea se retur n it to
the deal er from whom it was p urcha sed , or conta ct your local
Son y Eri css on Co ntact Ce nter (nati ona l rat es ma y a pply) or v isi t
www .sony eri csson .com to ge t fur the r inf ormat ion .
Our warranty
Sub ject to the c ondit ion s of this Lim ited Warra nty , Son y Eri css on
war rants th is Pr oduct to be f ree f rom defe cts i n d esign , mat eri al
and work man ship at th e t ime o f its or igina l pur cha se by a
con sumer . T his L imite d W arran ty wi ll last for a pe riod of tw o ( 2)
yea rs as fr om th e ori gin al da te of pu rchas e of the Prod uct f or
you r mob ile phon e, an d f or a perio d o f one (1) yea r fol lowin g t he
ori ginal pu rchas e dat e o f the Prod uct for all o rig inal acces sor ies
(su ch as th e bat tery, ch arger or h and sfree kit) wh ich m ay be
del ivere d w ith y our m obi le ph one.
What we will do
If, duri ng the w arran ty perio d, th is Produ ct fa ils to o perat e u nder
nor mal u se and s ervic e, due t o def ect s in desig n, mater ials or
wor kmans hip , Son y Eri css on au thori sed dist ribut ors or s ervic e
par tners , i n the coun try /regi on* w her e you purc has ed th e
Pro duct, wi ll, a t the ir optio n, ei the r rep air o r r eplac e the Pr oduct
in accor dan ce wi th th e t erms and c ond ition s sti pul ated herei n.
11
Page 22

Son y Eri css on an d its se rvice part ner s res erve the righ t to
cha rge a ha ndlin g fee if a re turne d P roduc t is fou nd no t to be
und er wa rra nty a ccord ing to t he co ndi tions belo w.
Ple ase n ote that some of your pers ona l set tings , d ownlo ads
and othe r i nform ation ma y be lost whe n you r Son y E ricss on
Pro duct is repai red o r r eplac ed. A t p resen t, So ny Erics son m ay
be preve nte d by appli cab le la w, ot her regu latio n o r tec hnica l
res trict ion s fro m mak ing a ba ckup cop y of certa in downl oads.
Son y Eri css on do es no t t ake a ny re spo nsibi lity for any lost
inf ormat ion of a ny ki nd and w ill n ot reimb urse you for any s uch
los s. Yo u s hould alwa ys make backu p c opies of a ll the
inf ormat ion stor ed on yo ur So ny Er ics son P roduc t s uch a s
dow nload s, calen dar a nd conta cts b efo re ha nding in your
Son y Eri css on Pr oduct fo r rep air o r r eplac ement .
Conditions
1.
Thi s Lim ite d War ranty is vali d onl y i f the orig ina l pro of of
pur chase fo r thi s Pro duc t iss ued b y a Sony Eric sso n aut horis ed
dea ler s pec ifyin g the da te of purc has e and seri al numbe r**, is
pre sente d w ith t he Pr odu ct to be r epa ired or re pla ced.
Son y Eri css on re serve s t he ri ght t o r efuse warr ant y ser vice if
thi s inf orm ation has bee n rem oved or chang ed af ter the origi nal
pur chase of the Produ ct from the d eal er.
2.
If Sony Eri csson repa irs or r eplac es the P roduc t, the r epair fo r
the defe ct conce rned, or the repla ced Prod uct s hal l be
war rante d f or th e rem ain ing t ime o f t he or igina l w arran ty pe rio d
or for n ine ty (9 0) da ys from the d ate of r epair , w hiche ver i s
lon ger. Rep air o r rep lac ement may inv olve the u se of
fun ction all y equ ivale nt recon ditio ned unit s. Re pla ced p arts or
com ponen ts will becom e t he pr opert y o f Son y Eri css on.
3.
Thi s war ran ty do es no t c over any f ail ure o f the Pr oduct due to
nor mal w ear and tear, or due to mi sus e, in cludi ng but n ot
lim ited to use i n oth er than the n orm al an d cus tom ary m anner ,
in accor dan ce wi th th e S ony E ricss on instr uctio ns for u se an d
mai ntena nce of t he Pr odu ct. N or do es this warra nty cove r any
fai lure of the P roduc t d ue to acci den t, so ftwar e o r har dware
12
Page 23

mod ifica tio n or adjus tme nt, a cts o f G od or dama ge resul ting
fro m liq uid .
A r echar gea ble b atter y c an be char ged and disch arg ed mo re
tha n a h und red t imes. Ho wever , it wil l eve ntual ly wear out –
thi s is not a de fect and corr espon ds to no rmal wea r and tear .
Whe n the ta lk-ti me or st andby time is noti ceabl y s horte r, it is
tim e to rep lace the b att ery. Sony Eri csson reco mme nds t hat
you use onl y bat terie s a nd ch arger s a pprov ed by
Son y Eri css on.
Min or va ria tions in d isp lay b right nes s and colo ur may o ccur
bet ween pho nes. There ma y be tiny bri ght o r dar k d ots o n the
dis play. Th ese a re ca lle d def ectiv e p ixels and occ ur wh en
ind ividu al dots have mal funct ioned an d can not be adjus ted.
Two defe cti ve pi xels are deem ed ac cep table .
Min or va ria tions in c ame ra im age a ppe aranc e may oc cur
bet ween pho nes. This is nothi ng un com mon a nd is no t
reg arded as a de fecti ve camer a mod ule .
4.
Sin ce th e c ellul ar sy ste m on which th e Pro duct is to op erate is
pro vided by a ca rrier in depen dent fro m Son y Eri css on,
Son y Eri css on wi ll no t b e res ponsi ble for the o per ation ,
ava ilabi lit y, co verag e, servi ces o r r ange of th at syste m.
5.
Thi s war ran ty do es no t c over Produ ct failu res c aus ed by
ins talla tio ns, m odifi cat ions, or r epa ir or open ing of t he Pr odu ct
per forme d b y a n on-So ny Erics son a uth orise d per son .
6.
The warr ant y doe s not co ver P roduc t f ailur es wh ich have been
cau sed b y u se of acce sso ries or ot her peri phera l d evice s whi ch
are not Son y Eri csson br anded orig ina l acc essor ies inte nded
for use wit h the Prod uct .
Son y Eri css on di sclai ms any a nd al l w arran ties, wh ether
exp ress or impli ed, f or failu res c aus ed to the Pro duct or
per ipher al devic es as a resul t of vir uses, troj an horse s,
spy ware, or othe r mal ici ous s oftwa re. Sony Eric sso n str ongly
rec ommen ds that you i nst all a pprop ria te vi rus p rot ectio n
sof tware on your Prod uct and any p eri phera l dev ice s
con necte d t o it, as a vai lable , and up date it re gul arly, to b ett er
pro tect you r dev ice. It is un derst ood , how ever, th at su ch
sof tware wi ll ne ver f ull y pro tect you r Pro duct or its p eriph era l
13
Page 24

dev ices and Sony Eric sso n dis claim s a ll wa rrant ies , whe ther
exp ress or impli ed, i n c ase o f fai lur e by such ant iviru s sof twa re
to fulfi l i ts in tende d p urpos e.
7.
Tam perin g w ith a ny of th e sea ls on th e Pro duct wil l voi d the
war ranty .
8.
THE RE AR E N O EXP RESS WAR RANTI ES, W HET HER W RITTE N
OR ORAL, OT HER T HAN T HIS PRIN TED L IMI TED W ARRAN TY.
ALL IMPL IED WARR ANTIE S, INCLU DING WIT HOUT
LIM ITATI ON THE I MPLIE D W ARRAN TIES OF
MER CHANT ABI LITY OR FI TNE SS FO R A P ART ICULA R
PUR POSE, AR E LIM ITED TO THE D URATI ON OF TH IS LI MIT ED
WAR RANTY . I N NO EVENT SH ALL S ONY E RIC SSON OR IT S
LIC ENSOR S B E LIA BLE F OR INCID ENTAL OR
CON SEQUE NTI AL DA MAGES OF ANY NATUR E W HATSO EVER,
INC LUDIN G B UT NO T LIM ITE D TO LOST PRO FITS OR
COM MERCI AL LOSS TO TH E F ULL E XTENT TH OSE D AMAGE S
CAN BE D ISC LAIME D BY LAW .
Som e cou ntr ies/s tates do not allow th e exc lusio n o r lim itati on of
inc ident al or co nsequ ent ial d amage s, or li mitat ion of t he du rat ion
of impli ed warra nties , s o the prec edi ng li mitat ion s or exclu sio ns
may not app ly to you.
The warr ant y pro vided do es no t aff ect the consu mer ’s
sta tutor y r ights unde r a pplic able leg islat ion i n f orce, nor the
con sumer ’s right s aga ins t the deal er arisi ng fr om their sale s /
pur chase co ntrac t.
*Geographical scope of the warranty
If you h ave purc hased yo ur Pr oduct in a co untry me mber of th e
Eur opean Ec onomi c Are a ( EEA) or in Sw itzer land or the R epubl ic
of Turke y, and s uch P rod uct w as in ten ded f or sa le in th e EEA or
in Switz erl and o r in Tur key, you c an have your Pro duct servi ced
in any E EA count ry or in Swit zerla nd or in Turk ey, unde r the
war ranty co nditi ons p rev ailin g in the coun try i n w hich you r equ ire
ser vicin g, provi ded t hat an i denti cal Prod uct i s s old i n suc h
cou ntry by an au thori sed Sony Eric sso n dis tribu tor . To find out if
you r Pro duc t is sold in the c ountr y y ou ar e in, pl ease call the
loc al So ny Erics son C ont act C enter . P lease obse rve that cert ain
14
Page 25

ser vices ma y not be a vai lable outs ide the count ry of or igina l
pur chase , f or ex ample , d ue to the fac t tha t you r P roduc t may
hav e an int erior or e xte rior which is diff erent fr om eq uival ent
mod els s old in o ther cou ntrie s. Pl eas e not e in add ition that it
may some tim es no t be pos sible to r epa ir SI M-loc ked Prod ucts.
** In so me count ries/ reg ions addit ion al in forma tio n (su ch as a
val id wa rra nty c ard) may be r eques ted .
Trademarks and acknowledgements
The Liqu id Ident ity l ogo and Xperi a a re tr adema rks or r egist ere d
tra demar ks of So ny Er ics son M obile Co mmuni catio ns AB.
Son y is a t radem ark o r a regi stere d t radem ark o f S ony
Cor porat ion .
Eri csson is a tr adema rk or re giste red trad emark of
Tel efona kti ebola get L M E ricss on.
Blu etoot h i s a t radem ark or a regi ste red t radem ark of B lueto oth
SIG Inc. an d any use of such mark by Sony Erics son is u nder
lic ense.
Oth er pr odu ct an d com pan y nam es me nti oned herei n m ay be the
tra demar ks of th eir r esp ectiv e own ers .
Any righ ts not e xpres sly gran ted h ere in ar e res erv ed.
15
Page 26

Support
Ang uilla 1- 800-0 80-9518
Ant igua an d
Bar buda
Arg entina 080 0-333-7 427
Aus tralia 130 0 650-0 50
The Bahama s 1-8 00-205- 6062
Bar bados 1-80 0-082 -9518
Bel gique/
Bel gië
Bel ize AN 815, PI N 559 7
Ber muda 1-80 0-083 -951 8
Bol ivia 800 -100-54 2
Bra sil 400 1-044 4
Can ada 1 8 66 766 9374
Cay man
Isl ands
Cen tral an d
Sou thern
Afr ica
Čes ká
rep ublika
Chi le 800 -646-42 5
Col ombia 018 00-09 66-080
Cos ta Rica 0 8 00 011 0400
Dan mark 333 1 282 8 quest ions. DK@su ppor t.son yericss on.co m
(To ll Free )
1-8 00-081- 9518
(To ll Free )
(nú mero gr atuit o)
(To ll Free )
(To ll Free )
(To ll Free )
02- 0745 16 11 que stion s.BE@ supp ort.s onyeric sson. com
(To ll Free )
(To ll Free )
(nú mero gr atuit o)
(li gação g ratui ta)
(To ll Free / sa ns
fra is)
1-8 00-084- 9518
(To ll Free )
+27 11 506 0123 que stions. CF@su pport.s onyer icsson. com
844 550 05 5 qu estions .CZ@s upport. sonye ricsson .com
(nú mero gr atuit o)
(nú mero gr atuit o)
(nú mero gr atuit o)
16
que stions. CO@su pport.s onyer icsson. com
que stions. CO@su pport.s onyer icsson. com
que stions. CO@su pport.s onyer icsson. com
que stions. AU@su pport.s onyer icsson. com
que stions. CO@su pport.s onyer icsson. com
que stions. CO@su pport.s onyer icsson. com
que stions. CO@su pport.s onyer icsson. com
que stions. CO@su pport.s onyer icsson. com
que stions. CO@su pport.s onyer icsson. com
que stions. BR@su pport.s onyer icsson. com
que stions. CA@su pport.s onyer icsson. com
que stions. CO@su pport.s onyer icsson. com
que stions. CO@su pport.s onyer icsson. com
que stions. CO@su pport.s onyer icsson. com
que stions. CO@su pport.s onyer icsson. com
Page 27

Deu tschlan d 0180 534 2 020
Dom inica 1- 800- 085-9 518
Ecu ador 1-8 00-01 02-5 0
Ees ti 06 0 32 03 2 que stions. EE@su pport.s onyer icsson. com
Egy pt/ مصر
Ελλ άδα
El Salvado r 800-6 323 (nú mero
Esp aña 902 180 57 6
Fra nce 09 69 32 21 21
Gua temala 1- 800-3 00-0 057
Haï ti/Ayit i A N 193 , PIN 5598
Hon duras AN 8 00012 2, PI N
Hon g Kong/ 香港+85 2 8203 8863 quest ions. HK@s uppor t.sonye ricss on.com
Hrv atska 062 000 0 00 qu estio ns.H R@sup port. sony erics son.com
Ind ia/ 180 0 11 1800 (Tol l
Ind onesia 021 2701388 que stions. ID@su pport.s onyer icsson. com
Ire land 18 50 5 45 88 8
Ita lia 06 4889520 6
Jam aica 1-8 00-44 2-34 71
(or tsüblic he
Geb ühren)
(To ll Free )
(nú mero gr atuit o)
167 27 que stions. EG@su pport.s onyer icsson. com
801 11 810 810
+30 210 89 9 19
19 (από κι νητ ό
τηλ έφωνο )
gra tuito)
(ta rifa lo cal)
09 69 32 2 1 22
(Xp eria™
uni quement )
(nú mero gr atuit o)
(nu méro gr atuit /
nim ewo gra tis)
559 9 (núme ro
gra tuito)
Fre e)
+91 (011)
390 11111
(Lo cal rat e)
(ta riffa l ocale )
(To ll Free )
que stions. DE@su pport.s onyer icsson. com
que stions. CO@su pport.s onyer icsson. com
que stions. CO@su pport.s onyer icsson. com
que stions. GR@su pport.s onyer icsson. com
que stions. CO@su pport.s onyer icsson. com
que stions. ES@su pport.s onyer icsson. com
que stions. FR@su pport.s onyer icsson. com
que stions. CO@su pport.s onyer icsson. com
que stions. CO@su pport.s onyer icsson. com
que stions. CO@su pport.s onyer icsson. com
que stions. IN@su pport.s onyer icsson. com
que stions. IE@su pport.s onyer icsson. com
que stions. IT@su pport.s onyer icsson. com
que stions. CO@su pport.s onyer icsson. com
17
Page 28

Κύπ ρο ς/
Kıb rıs
Lat vija 67 21 43 01 ques tions .LV@ suppo rt.sony erics son.com
Lie tuva 8 700 5503 0 q uesti ons.LT@ suppo rt.s onyer icsso n.co m
Mag yarorsz ág 01 8 80 4 7 47 qu estio ns.HU @sup port. sonyeri csson .com
Mal aysia 1800 -88-990 0
Mar oc/
Méx ico 0 18 00 00 0 472 2
Ned erland 090 0 899 8318 que stion s.NL@su pport .sonyer icsso n.com
Ned erlands e
Ant illen
New Zealan d 0800 -100-15 0
Nic aragua AN 180 0-016 6,
Nor ge 815 00 840
Öst erreich 081 0 200 245 quest ions. AT@supp ort.s onyeric sson. com
Pak istan/
Pan amá 00 800- 787-0 009
Par aguay 00 9 800 5 4 200 32
Per ú 0800- 532-3 8
Phi lippine s/
Pil ipinas
Pol ska + 48 22 22 77 44 4 quest ions. PL@supp ort.s onyeric sson. com
Por tugal 8 08 20 4 46 6
Rep ública
Dom inicana
Rom ânia +4 0 21 40 1 040 1 q uest ions. RO@su ppor t.son yericss on.co m
Sai nt Kitt s
and Nevis
080 0 90 90 9 quest ions. CY@supp ort.s onyeric sson. com
(To ll Free / be bas
tol )
+21 2 2 295 8 344 qu estio ns.MA@s uppor t.sonye ricss on.c om
المغرب
(nú mero gr atuit o)
001 -866-50 9-866 0
(gr atis nu mmer)
(To ll Free )
PIN 5600 ( númer o
gra tuito)
(lo kaltaks t)
021 - 111 22 55 7 3 quest ions. PK@su ppor t.son yericss on.co m
پاکستان
(nú mero gr atuit o)
(nú mero gr atuit o)
(nú mero gr atuit o)
+63 2 7891 860 que stions. PH@su pport.s onyer icsson. com
(ch amada l ocal)
1-8 00-751- 3370
(nú mero gr atuit o)
1-8 00-087- 9518
(To ll Free )
que stions. MY@su pport.s onyer icsson. com
que stions. MX@su pport.s onyer icsson. com
que stions. CO@su pport.s onyer icsson. com
que stions. NZ@su pport.s onyer icsson. com
que stions. CO@su pport.s onyer icsson. com
que stions. NO@su pport.s onyer icsson. com
que stions. CO@su pport.s onyer icsson. com
que stions. CO@su pport.s onyer icsson. com
que stions. CO@su pport.s onyer icsson. com
que stions. PT@su pport.s onyer icsson. com
que stions. CO@su pport.s onyer icsson. com
que stions. CO@su pport.s onyer icsson. com
18
Page 29

Sai nt Vinc ent
and the
Gre nadines
Sch weiz/
Sui sse/
Svi zzera
Sin gapore +6 5 674 4 0733 que stio ns.SG @supp ort. sonye ricsson .com
Slo venia 01 6 00 50 00 qu estio ns.SI@s uppor t.sonye ricss on.com
Slo vensko 02 5443 6443 ques tions .SK@sup port. sony erics son.c om
Sou th Afri ca 0 861 63222 2 q uestion s.ZA@ support .sony ericsso n.com
Sou th Κore a/
대한민 국
Suo mi 0 9 299 200 0 qu estio ns.FI @sup port. sonye rics son.c om
Sve rige 0 13 2 4 45 00
Tri nidad a nd
Tob ago
Tür kiye + 90 21 2 473 77 7 7 q uesti ons. TR@su pport .son yeric sson.co m
Uni ted
Kin gdom
Uni ted Sta tes 1 86 6 766 9374 que stions. US@su pport.s onyer icss on.co m
Uru guay 000-40 1-787 -013
Ven ezuela 0- 800-1 -00-225 0
Việ t Nam 1900 1525 (miễ n
Бел арусь
Бъл гария
Рос сия
Укр аїна
中国
台灣
ไทย
1-8 00-088- 9518
(To ll Free )
084 8 824 0 40 ques tions.C H@sup port.so nyeri csson.c om
(+8 2) 1588 4170 quest ions. KO@s uppor t.sonye ricss on.com
(lo kal tax a)
1-8 00-080- 9521
(To ll Free )
087 05 237 237
(Lo cal rat e)
(nú mero gr atuit o)
(nú mero gr atuit o)
phí )
8 8 2 00 36 1 000 1 ques tions.B Y@sup port.so nyeri csso n.com
080 0 1 877 8 ques tions.B G@sup port.so nyeri csso n.com
+7 (495) 7 87098 6 qu estions .RU@s upport. sonye rics son.c om
(+3 80) 44 590
151 5
+97 1 4 391 9 880 quest ions. JO@su ppor t.son yericss on.co m
الأردن
+97 1 4 391 9 880
الإمارات
(UA E)
العربية
المتحدة
+97 1 4 391 9 880 que stion s.KW@ supp ort.s onyer icss on.co m
الكويت
800 -8200-7 27 que stions. SA@su pport.s onyer icsson. com
المملكة
العربية
السعودية
+86 400 81 0 000 0 ques tions .CN@s upport. sonye rics son.c om
+88 6 2 256 25511 que stio ns.TW @supp ort. sonye ricsson .com
02 2483 03 0 q uesti ons.T H@su pport .sonyer icsso n.com
que stions. CO@su pport.s onyer icsson. com
que stions. SE@su pport.s onyer icsson. com
que stions. CO@su pport.s onyer icsson. com
que stions. GB@su pport.s onyer icsson. com
que stions. CO@su pport.s onyer icsson. com
que stions. CO@su pport.s onyer icsson. com
que stions. VN@su pport.s onyer icsson. com
que stions. UA@su pport.s onyer icsson. com
que stions. AE@su pport.s onyer icsson. com
19
Page 30

www.sonyericsson.com
Sony Ericsson Mobile Communications AB
SE-221 88 Lund, Sweden
1222-9269.2
 Loading...