

Sony A3880040 User Manual
User guide
T715
Thank you for purchasing a Sony Ericsson
T715/T715a.
For additional phone content, go to
www.sonyericsson.com/fun. Register now to get free online
storage and special offers at
www.sonyericsson.com/myphone.
For an extended User guide and product support, go to
www.sonyericsson.com/support
Please read the Important information before you use
your mobile phone.
Instruction symbols
These symbols may appear in the User guide:
Note
Tip
Warning
> Use a selection or navigation key to scroll and select.
See Navigation on page 10.
2
Getting started
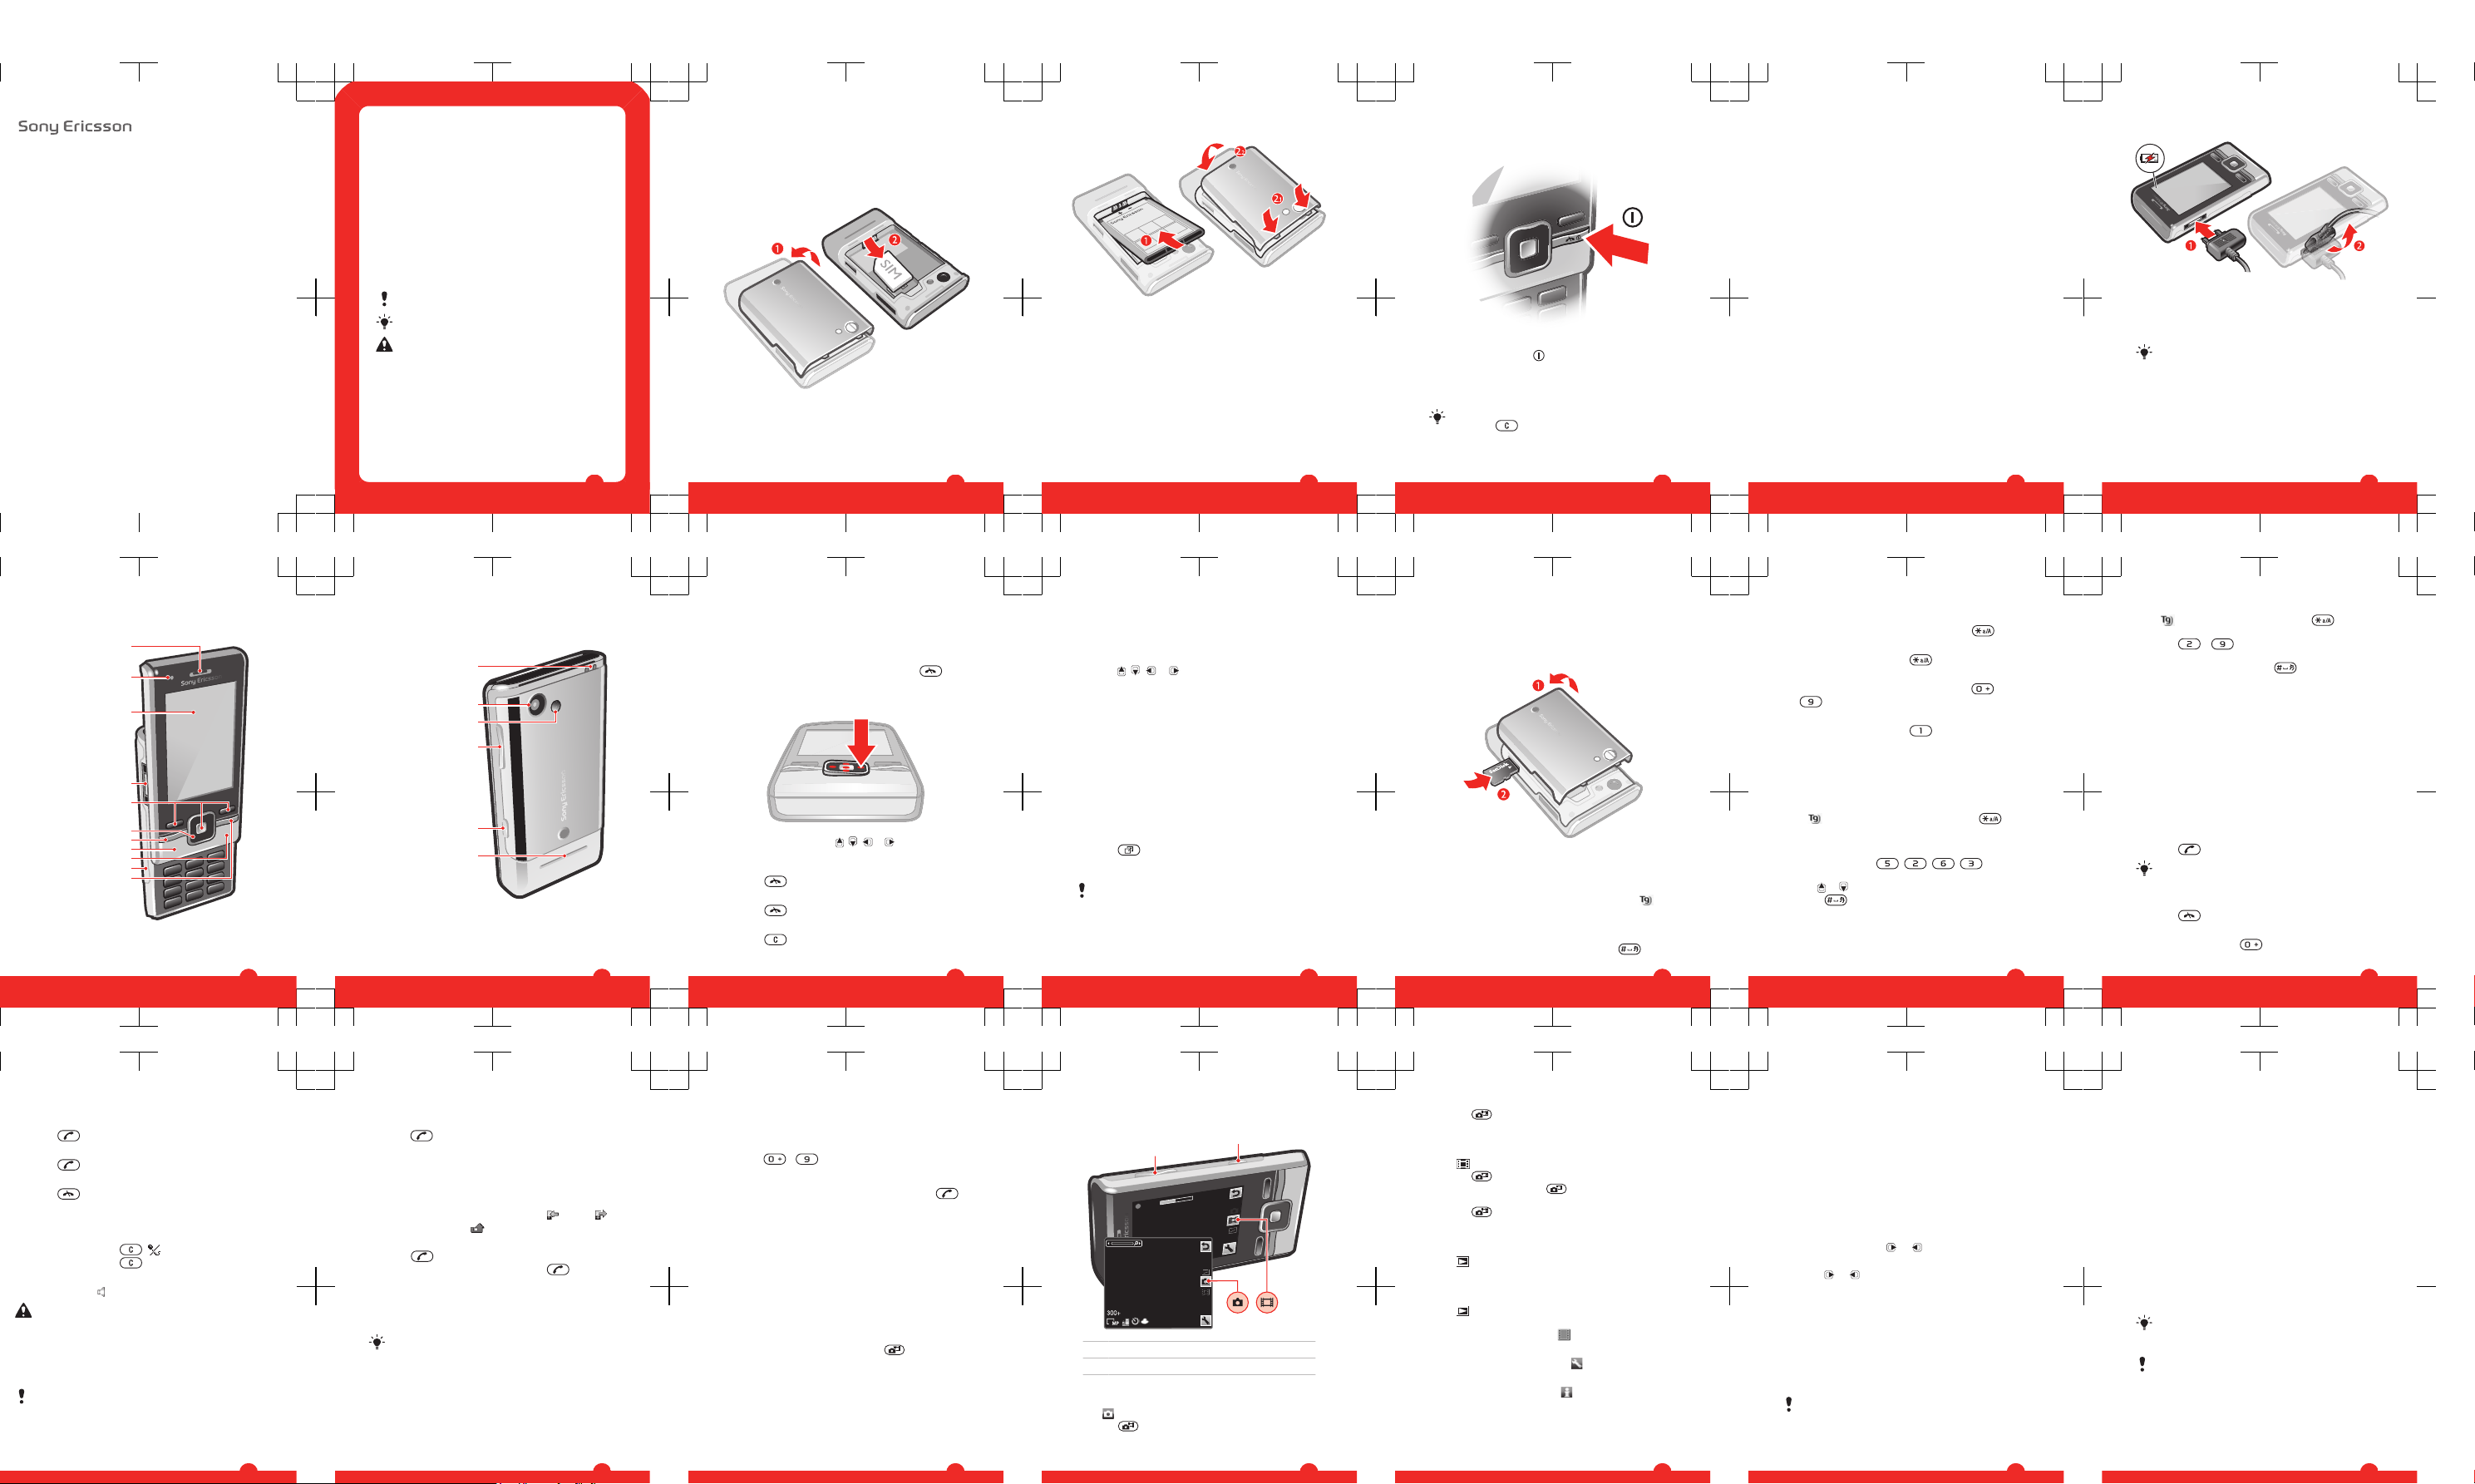
Assembly
Before you start using your phone, you need to insert a SIM
card and the battery.
To insert the SIM card
1
Remove the battery cover.
2
Slide the SIM card into its holder with the gold-coloured
contacts facing down.
3
To insert the battery
1
Insert the battery with the label side up and the
connectors facing each other.
2
Attach the battery cover.
4
Turning on the phone
To turn on the phone
1
Press and hold down .
2
Enter your SIM card PIN (Personal Identification Number),
if requested, and select OK.
3
Select a language.
4
Follow the instructions that appear.
If you want to correct a mistake when you enter your
PIN, press .
5
Help
In addition to this User guide, an extended User guide,
Feature guides and more information are available at
www.sonyericsson.com/support.
Help and information are also available in your phone.
To access the User guide
•
Select Menu > Settings > User help > User guide.
To view tips and tricks
•
Select Menu > Settings > User help > Tips and tricks.
To view information about functions
•
Scroll to a function and select Info, if available. In some
cases, Info appears under Options.
To view the phone status
•
Press the volume key. Phone, memory and battery
information is shown.
Charging the battery
The phone battery is partly charged when you buy it.
6
To charge the battery
1
Connect the charger to the phone. It takes approximately
2.5 hours to fully charge the battery. Press a key to view
the screen.
2
Remove the charger by tilting the plug upwards.
You can use your phone while it is charging. You can
charge the battery at any time and for more or less
than 2.5 hours. You can interrupt the charging without
damaging the battery.
7
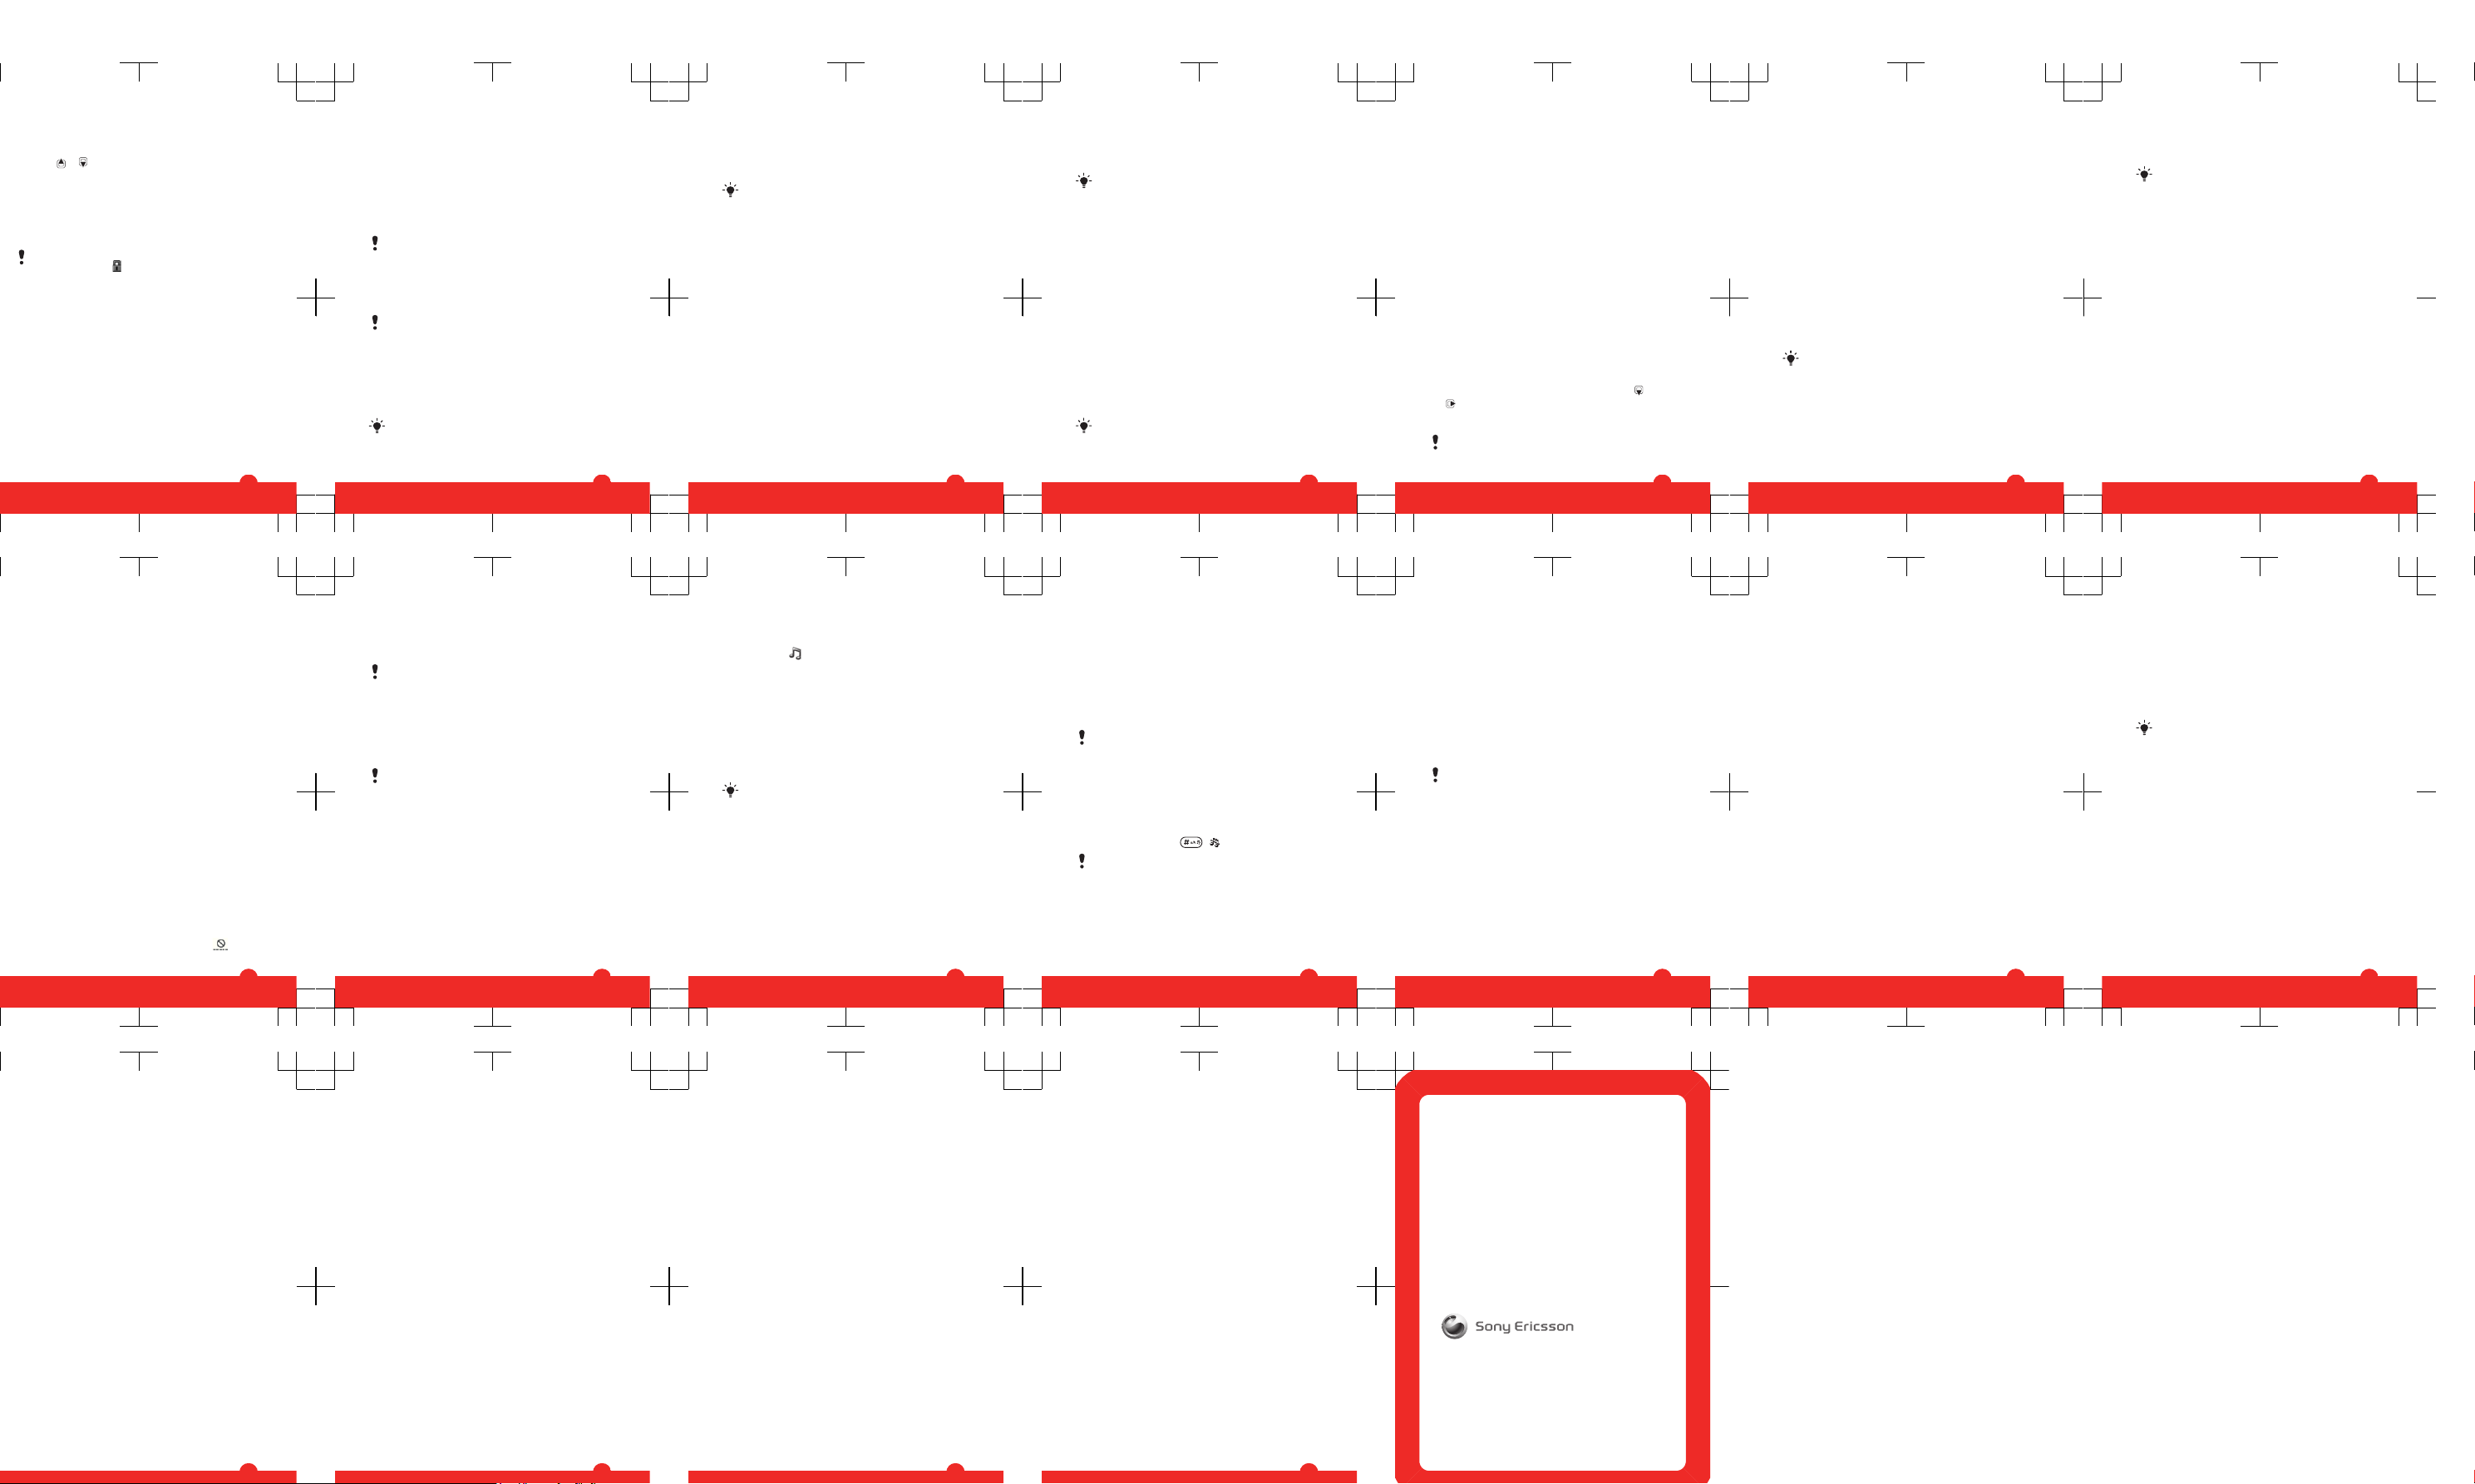
Phone overview
1 Ear speaker
2
3
5
6
4
7
8
10
11
1
9
2 Screen light
sensor
3 Screen
4 Connector for
charger,
handsfree and
USB cable
5 Selection keys
6 Navigation key
7 Call key
8 Activity menu key
9 C key (Clear)
10 Memory card slot
(under the cover)
11 End key, On/off
key
8
12 Strap hole
13
15
16
17
12
14
13 Main camera
14 Camera light
15 Volume, digital
zoom keys
16 Camera key
17 Loudspeaker
9
Navigation
To access the main menu
•
When Menu appears on the screen, press the centre
selection key to select Menu.
•
If Menu does not appear on the screen, press , and
then press the centre selection key to select Menu.
To navigate the phone menus
•
Press the navigation key
, , or to move through
the menus.
To end a function
•
Press
.
To return to standby
•
Press .
To delete items
•
Press to delete items such as numbers, letters,
pictures and sounds.
10
Shortcuts
You can use keypad shortcuts to go directly to functions
from standby.
To use navigation key shortcuts
•
Press , , or to go directly to a function.
To edit a navigation key shortcut
1
Select Menu > Settings > General > Shortcuts.
2
Scroll to an option and select Edit.
3
Scroll to a menu option and select Shortc..
Activity menu
The activity menu gives you quick access to:
•
New events – missed calls and new messages.
•
Running apps – applications that are running in the
background.
•
My shortcuts – add your favourite functions to access
them quickly.
•
Internet – quick access to the Internet.
To open the activity menu
•
Press .
Memory card
You may have to purchase a memory card separately.
Your phone supports a microSD™ memory card adding
more storage space to your phone. It can also be used as
a portable memory card with other compatible devices.
11
You can move content between a memory card and the
phone memory. See Handling content in the phone on
page 22.
To insert a memory card
•
Remove the battery cover and insert the memory card
with the gold-coloured contacts facing down.
Entering text
You can use multitap text input or T9™ Text Input to
enter text. The T9 Text Input method uses a built-in
dictionary.
To change writing language
•
When you enter text, press and hold down
.
12
To change text input method
•
When you enter text, press and hold down .
To shift between capitals and lower-case letters
•
When you enter text, press .
To enter numbers
•
When you enter text, press and hold down –
.
To enter full stops and commas
•
When you enter text, press
.
To enter a symbol
1
When you enter text, select Options > Add symbol.
2
Scroll to a symbol and select Insert.
To enter text using T9™ Text Input
1
Select, for example, Menu > Messaging > Write new >
Message.
2
If
is not displayed, press and hold down to
change to T9 Text Input.
3
Press each key only once, even if the letter you want is
not the first letter on the key. For example, to write the
word “Jane”, press
, , , . Write the
whole word before looking at the suggestions.
4
Use or to view suggestions.
5
Press to accept a suggestion and add a space.
To enter text using multitap text input
1
Select, for example, Menu > Messaging > Write new >
Message.
13
2
If is displayed, press and hold down to change
to multitap text input.
3
Press – repeatedly until the desired letter
appears.
4
When a word is written, press to add a space.
To add words to the built-in dictionary
1
When you enter text using T9 Text Input, select
Options > Spell word.
2
Write the word using multitap text input and select
Insert.
Calling
Making and receiving calls
You need to turn on your phone and be within range of a
network.
To make a call
1
Enter a phone number (with international country code
and area code, if applicable).
2
Press
.
You can call numbers from your contacts and call list.
See Contacts on page 16, and Call list on
page 16.
To end a call
•
Press .
To make international calls
1
Press and hold down until a “+” sign appears.
14
2
Enter the country code, area code (without the first zero)
and phone number.
3
Press .
To answer a call
•
Press .
To reject a call
•
Press
.
To change the ear speaker volume during a call
•
Press the volume key up or down.
To mute the microphone during a call
1
Press and hold down
. appears.
2
Press and hold down again to resume.
To turn on the loudspeaker during a call
•
Select SpkrOn.
appears.
Do not hold the phone to your ear when using the
loudspeaker. This could damage your hearing.
Emergency calls
Your phone supports international emergency numbers, for
example, 112 or 911. You can normally use these numbers
to make emergency calls in any country, with or without the
SIM card inserted, if you are within range of a network.
In some countries, other emergency numbers may also
be promoted. Your network operator may therefore
have saved additional local emergency numbers on the
SIM card.
15
To make an emergency call
•
Enter 112 (the international emergency number) and
press .
To view your local emergency numbers
1
Select Menu > Contacts.
2
Scroll to New contact and select Options > Special
numbers > Emergency nos..
Call list
You can view information about answered , dialled
and missed or rejected calls.
To call a number from the call list
1
Press
and scroll to a tab.
2
Scroll to a name or a number and press .
Contacts
You can save names, phone numbers and personal
information in Contacts. Information can be saved in the
phone memory or on the SIM card.
You can synchronise your contacts using the
Sony Ericsson PC Suite.
To add a phone contact
1
Select Menu > Contacts.
2
Scroll to New contact and select Add.
3
Enter the name and select OK.
4
Scroll to New number: and select Add.
5
Enter the number and select OK.
6
Select a number option.
7
Scroll between the tabs and add information to the fields.
16
8
Select Save.
Calling contacts
To call with Smart search
1
Press – to enter a sequence of (at least two)
digits. All entries which match the sequence of digits or
corresponding letters are shown in a list.
2
Scroll to a contact or a phone number and press .
To turn on or off Smart search
1
Select Menu > Settings > Calls > Smart search.
2
Select an option.
Imaging
You can take photos and record video clips to view, save
or send. You find saved photos and video clips in Media
and in File manager.
Using the camera
To activate the camera
•
From standby press and hold down
.
17
Viewfinder and camera keys
1
2
1 Activate the camera/Take photos/Record video
2 Zoom in or out
To take a photo
1
Activate the camera and press the navigation key to scroll
to
.
2
Press to take a photo. The photo is automatically
saved.
18
3
Press to return to the viewfinder to take another
photo.
To record a video clip
1
Activate the camera and press the navigation key to scroll
to
.
2
Press
fully down to start recording.
3
To stop recording, press fully down. The video clip
is automatically saved.
4
Press
to return to the viewfinder to record another
video clip.
To view photos
1
Activate the camera and press the navigation key to scroll
to .
2
Scroll through the photos.
To view video clips
1
Activate the camera and press the navigation key to scroll
to
.
2
Scroll to a video clip and press the centre selection key.
Video clips are indicated by in the upper left corner.
To change settings
•
Activate the camera and select .
To view information about settings
•
Scroll to a setting and select .
Music
You can listen to music, audio books and podcasts. Use
the Media Go™ application to transfer content to and from
19
your phone. For more information, see Transferring content
to and from a computer on page 25.
Music player
To play music
1
Select Menu > Media > Music.
2
Browse by category using the navigation key.
3
Scroll to a title and select Play.
To stop playing music
•
Press the centre selection key.
To fast forward and rewind
•
Press and hold down or .
To move between tracks
•
Press or .
To change the volume
•
Press the volume key up or down.
PlayNow™
When you select PlayNow™ you enter PlayNow™ arena,
where you can download music, games, ringtones, themes
and wallpapers. You can preview or listen to content before
you purchase and download it to your phone. If you cannot
use PlayNow™ and PlayNow™ arena, see I cannot use
Internet-based services on page 35.
This service is not available in all countries.
For extended functionality, you can also access the
PlayNow™ arena Web shop on a computer from
www.playnow-arena.com. For more information, go to
20
www.sonyericsson.com/support to read the PlayNow™
arena Feature guide.
To use PlayNow™
1
Select Menu > PlayNow™.
2
Scroll through PlayNow™ arena and follow the
instructions to preview and purchase content.
TrackID™
TrackID™ is a music recognition service. You can search
for title, artist and album name for a track you hear playing
through a loudspeaker or on the radio in your phone. If you
cannot use TrackID™, see I cannot use Internet-based
services on page 35.
To search for track information
•
When you hear a track through a loudspeaker, select
Menu > Entertainment > TrackID™ > Start.
•
When the radio in your phone is playing select Options >
TrackID™.
For best results, use TrackID™ in a quiet area.
Radio
Do not use your phone as a radio in places where this
is prohibited.
To turn on the radio
1
Connect a handsfree to the phone.
2
Select Menu > Radio.
Saving channels
You can save up to 20 preset channels.
21
To save channels automatically
•
Select Options > Auto save.
To switch between saved channels
•
Press or .
Transferring and handling
content
You can transfer and handle content such as pictures and
music.
You are not allowed to exchange some copyrightprotected material. identifies a protected item.
Handling content in the phone
You can use File manager to handle content saved in the
phone memory or on a memory card. Tabs and icons in File
manager show where the content is saved. If the memory
is full, delete some content to create space.
To select more than one item in a folder
1
Select Menu > Organiser > File manager.
2
Scroll to a folder and select Open.
3
Select Options > Mark > Mark several.
4
For each item you want to mark, scroll to the item and
select Mark.
To move items between the phone memory and the
memory card
1
Select Menu > Organiser > File manager.
2
Find an item and select Options > Manage file >
Move.
22
3
Select Memory card or Phone.
4
Scroll to a folder and select Open.
5
Select Paste.
Sending content to another phone
You can send content, for example, in messages or using
Bluetooth™ wireless technology.
To send content
1
Scroll to an item and select Options > Send.
2
Select a transfer method.
Make sure the receiving device supports the transfer
method you select.
Using a USB cable
You can connect your phone to a computer with a USB
cable. If you are using a PC, you are asked to install PC
Companion the first time you connect.
You may have to purchase a USB cable separately.
Only use a USB cable supported by your phone.
PC Companion
PC Companion lets you:
•
Explore content in your phone.
•
Use your phone as a modem.
•
Install PC Software used to synchronise, transfer and
back up phone content.
For more information, go to
www.sonyericsson.com/support to read Feature
guides.
23
To install PC Companion
1
Connect your phone to a PC with a USB cable supported
by your phone.
2
Computer: Follow the instructions.
To disconnect the USB cable safely
Do not disconnect the USB cable when transferring
content as this may corrupt the content.
1
Computer: Right-click the Safely Remove Hardware icon
in Windows Explorer.
2
Select the drives you want to disconnect. Select Stop.
3
Wait for Windows to notify you that it is safe to remove
the drive. Disconnect the USB cable.
Required operating systems
You need one of these operating systems to use Sony
Ericsson PC software:
•
Microsoft® Windows Vista™
•
Microsoft® Windows XP, Service Pack 2 or higher
Drag and drop content
You can drag and drop content between your phone, a
memory card and a computer in Microsoft Windows
Explorer.
To drag and drop content
1
Connect your phone to a computer using a USB cable.
2
Computer: Wait until the phone memory and memory
card appear as external disks in Windows Explorer.
3
Drag and drop selected files between the phone and the
computer.
24
Transferring content to and from a
computer
You can use Media Go™ to transfer media content between
your phone and a computer.
Media Go™ is available for download through PC
Companion or from www.sonyericsson.com/support.
To transfer content using Media Go™
1
Connect the phone to a computer with a USB cable
supported by your phone.
2
Computer: Select Start/Programs/Sony/Media Go™.
3
Select Transfer to or from Device using Media Go™ and
click OK.
4
Wait until the phone appears in Media Go™.
5
Move files between your phone and the computer in
Media Go™.
Backing up and restoring
You can back up and restore contacts, the calendar, tasks,
notes and bookmarks using the Sony Ericsson PC Suite.
Before backing up and restoring, you need to install the
Sony Ericsson PC Suite which is available through PC
Companion or from www.sonyericsson.com/support.
You can back up and restore contacts in your phone using
a memory card. You can move content between the
memory card and the phone memory. See Handling
content in the phone on page 22.
Back up your phone content regularly to make sure
you do not lose it.
25
To make a backup using the Sony Ericsson PC Suite
1
Computer: Start the Sony Ericsson PC Suite from Start/
Programs/Sony Ericsson/Sony Ericsson PC Suite.
2
Follow the instructions in the Sony Ericsson PC Suite for
how to connect.
3
Go to the backup and restore section in the
Sony Ericsson PC Suite and make a backup of your
phone content.
Messaging
To view a message from the inbox
1
Select Menu > Messaging > Messages > Inbox.
2
Scroll to the message and select View.
Sending messages
You can send messages from your phone. The maximum
size of a standard text message is 160 characters including
spaces if no other items are added to the message. If you
enter more than 160 characters, a second message is
created. Your messages are sent as one concatenated
message.
To create and send a message
1
Select Menu > Messaging > Write new > Message.
2
Enter text. To add items to the message, press
, scroll
and select an item.
3
Select Continue > Contacts look-up.
4
Select a recipient and select Send.
If you send a message to a group, you may be charged
for each member. Contact your service provider for
details.
26
Conversations
You can choose whether to view your messages in
Conversations or Inbox. A messaging conversation shows
all messaging communication between you and one of your
contacts.
To view messages in Conversations
•
Select Menu > Messaging > Inbox > the
Conversations tab.
•
Select Menu > Messaging > Conversations and select
a conversation.
To send a message from Conversations
1
Select Menu > Messaging.
2
Select Conversations, or select Inbox > the
Conversations tab.
3
Select a conversation.
4
Write a message and select Send.
Email
You can use standard email functions and your computer
email address in your phone.
You can synchronise your email using Microsoft®
Exchange ActiveSync® application.
Before using email
You can use the Basic setup to check if settings are
available for your email account or you can enter them
manually. You can also receive settings at
www.sonyericsson.com/support.
27
To create an email account for the first time
1
To start the basic setup, select Menu > Messaging >
Email.
2
Follow the instructions to create the account.
If you enter settings manually, you can contact your
email provider for more information. An email provider
could be the company that supplied your email
address.
To write and send an email message
1
Select Menu > Messaging > Email > Write new.
2
Select Add > Enter email address. Enter the email
address and select OK.
3
To add more recipients, scroll to To: and select Edit.
4
Scroll to an option and select Add > Enter email
address. Enter the email address and select OK. When
you are ready, select Done.
5
Select Edit and enter a subject. Select OK.
6
Select Edit and enter the text. Select OK.
7
Select Add and choose a file to attach.
8
Select Continue > Send.
To receive and read an email message
1
Select Menu > Messaging > Email > Inbox > Options
> Check new email.
2
Scroll to the message and select View.
Internet
If you cannot use the Internet, see I cannot use Internetbased services on page 35.
28
To start browsing
1
Select Search.
2
Enter a Web address, a search phrase or the name of a
bookmark.
3
Scroll to an item in the list and select Go to or Search.
To exit the browser
•
Select Options > Exit browser.
To create a bookmark
1
When you browse the Internet, select Options > Tools >
Add bookmark.
2
Enter a title and an address. Select Save.
More features
Flight mode
In Flight mode the network and radio transceivers are
turned off to prevent disturbance to sensitive equipment.
When the flight mode menu is activated you are asked to
select a mode the next time you turn on your phone:
•
Normal mode – full functionality
•
Flight mode – limited functionality
To activate the flight mode menu
•
Select Menu > Settings > General > Flight mode >
Continue > Show at startup.
To select flight mode
1
When the flight mode menu is activated, turn off your
phone.
2
Turn on your phone and select Flight mode.
appears.
29
Update Service
Your phone has software which you can update in order to
improve performance. You can access Update Service
using your phone or a PC with an Internet connection.
Accessing Update Service using your phone is not
possible in all countries/regions.
To view the current software in the phone
1
Select Menu > Settings > General > Update service.
2
Select Software version.
Update Service using a PC
You can update your phone using a USB cable and an
Internet-connected PC.
Make sure all personal data in your phone memory is
backed up before you perform an update using a PC.
See Backing up and restoring on page 25.
To use Update Service using a PC
•
Go to
www.sonyericsson.com/updateservice
.
Alarms
You can set a sound or the radio as an alarm signal. The
alarm sounds even if the phone is turned off. When the alarm
sounds you can silence it or turn it off.
To set the alarm
1
Select Menu > Alarms.
2
Scroll to an alarm and select Edit.
3
Scroll to Time: and select Edit.
4
Enter a time and select OK > Save.
30
To set the alarm signal
1
Select Menu > Alarms.
2
Scroll to an alarm and select Edit.
3
Scroll to the tab.
4
Scroll to Alarm signal: and select Edit.
5
Find and select an alarm signal. Select Save.
To silence the alarm
•
When the alarm sounds, press any key.
•
To repeat the alarm, select Snooze.
To turn off the alarm
•
When the alarm sounds, press any key, then select Turn
off.
Calendar
You can synchronise your calendar with a computer
calendar, with a calendar on the web or with a
Microsoft® Windows Server® (Outlook®)
application.
Appointments
You can add new appointments or reuse existing
appointments.
To add an appointment
1
Select Menu > Organiser > Calendar.
2
Select a date.
3
Scroll to New appointment and select Add.
4
Enter the information and confirm each entry.
5
Select Save.
To edit an appointment
1
Select Menu > Organiser > Calendar.
31
2
Select a date.
3
Scroll to an appointment and select View.
4
Select Options > Edit.
5
Edit the appointment and confirm each entry.
6
Select Save.
To set when reminders should sound
1
Select Menu > Organiser > Calendar.
2
Select a date.
3
Select Options > Advanced > Reminders.
4
Select an option.
A reminders option set in calendar affects a reminders
option set in tasks.
Ringtones
To set a ringtone
1
Select Menu > Settings > Sounds & alerts >
Ringtone.
2
Find and select a ringtone.
To turn off the ringtone
•
Press and hold down
. appears.
The alarm signal is not affected.
Locks
SIM card lock
This lock only protects your subscription. Your phone will
work with a new SIM card. If the lock is on, you have to enter
a PIN (Personal Identity Number).
If you enter your PIN incorrectly three times in a row, the SIM
card is blocked and you need to enter your PUK (Personal
32
Unblocking Key). Your PIN and PUK are supplied by your
network operator.
To unblock the SIM card
1
When PIN blocked appears, enter your PUK and select
OK.
2
Enter a new four-to-eight-digit PIN and select OK.
3
Re-enter the new PIN and select OK.
To edit the PIN
1
Select Menu > Settings > General > Security >
Locks > SIM protection > Change PIN.
2
Enter your PIN and select OK.
3
Enter a new four-to-eight-digit PIN and select OK.
4
Re-enter the new PIN and select OK.
If Codes do not match appears, you entered the new
PIN incorrectly. If Wrong PIN appears, followed by Old
PIN:, you entered your old PIN incorrectly.
Troubleshooting
Some problems can be fixed using Update Service. Using
Update Service on a regular basis will optimise the phone’s
performance. See Update Service on page 30.
Some problems will require you to call your network
operator.
For more support go to www.sonyericsson.com/support.
33
Common questions
I have problems with memory capacity or the phone
is working slowly
Restart your phone every day to free memory or do a
Master reset.
Master reset
If you select Reset settings, the changes that you have
made to settings will be deleted.
If you select Reset all, your settings and content, such as
contacts, messages, pictures, sounds and downloaded
games, will be deleted. You may also lose content that was
in the phone at purchase.
To reset the phone
1
Select Menu > Settings > General > Master reset.
2
Select an option.
3
Follow the instructions that appear.
I cannot charge the phone or battery capacity is low
The charger is not properly connected or the battery
connection is poor. Remove the battery and clean the
connectors.
The battery is worn out and needs to be replaced. See
Charging the battery on page 6.
No battery icon appears when I start charging the
phone
It may take a few minutes before the battery icon appears
on the screen.
Some menu options appear in grey
A service is not activated. Contact your network operator.
34
I cannot use Internet-based services
Your subscription does not include data capability. Settings
are missing or incorrect.
You can download settings using the Settings download
or from www.sonyericsson.com/support.
To download settings
1
Select Menu > Settings > User help > Settings
download.
2
Follow the instructions that appear.
Contact your network operator or service provider for
more information.
I cannot send messages from my phone
To send messages, you need to set a service centre
number. The number is supplied by your service provider
and is usually saved on the SIM card. If the number to your
service centre is not saved on your SIM card, you must enter
the number yourself.
To send most picture messages, you must set an MMS
profile and the address of your message server. If no MMS
profile or message server exists, you can receive all the
settings automatically from your network operator,
download settings using the Basic setup or at
www.sonyericsson.com/support.
To enter a service centre number
1
Select Menu > Settings > Connectivity > Message
settings > Text message and scroll to Service centre.
The number is shown if it is saved on the SIM card.
2
If there is no number shown, select Edit.
3
Scroll to New ServiceCentre and select Add.
35
4
Enter the number, including the international “+” sign and
country code.
5
Select Save.
To select an MMS profile
1
Select Menu > Settings > Connectivity > Message
settings > Picture message.
2
Select an existing profile or create a new one.
To set the message server address
1
Select Menu > Settings > Connectivity > Message
settings > Picture message.
2
Scroll to a profile and select Options > Edit.
3
Scroll to Message server and select Edit.
4
Enter the address and select OK > Save.
I cannot synchronise or transfer content between
my phone and my computer, when using a USB
cable.
The cable or software has not been properly installed. Go
to www.sonyericsson.com/support to read Feature guides
which contain detailed installation instructions and
troubleshooting sections.
Error messages
Insert SIM
There is no SIM card in your phone or you may have inserted
it incorrectly.
See To insert the SIM card on page 3.
The SIM card connectors need cleaning. If the card is
damaged, contact your network operator.
36
Insert correct SIM card
Your phone is set to work only with certain SIM cards.
Check if you are using the correct operator SIM card.
Wrong PIN/Wrong PIN2
You have entered your PIN or PIN2 incorrectly.
Enter the correct PIN or PIN2 and select Yes.
PIN blocked/PIN2 blocked
You have entered your PIN or PIN2 code incorrectly three
times in a row.
To unblock, see SIM card lock on page 32.
Codes do not match
Codes that you have entered do not match. When you want
to change a security code, for example your PIN, you have
to confirm the new code. See SIM card lock on page 32.
No netw. coverage
•
Your phone is in flight mode. See Flight mode on
page 29.
•
Your phone is not receiving any network signal, or the
received signal is too weak. Contact your network
operator and make sure that the network has coverage
where you are.
•
The SIM card is not working properly. Insert your SIM
card in another phone. If this works, it is probably your
phone that is causing the problem. Please contact the
nearest Sony Ericsson service location.
Emerg. calls only
You are within range of a network, but you are not allowed
to use it. However, in an emergency, some network
37
operators allow you to call the international emergency
number 112. See Emergency calls on page 15.
PUK blocked. Contact operator.
You entered your personal unblocking key code (PUK)
incorrectly 10 times in a row.
Legal information
Sony Ericsson T715/T715a
This User guide is published by Sony Ericsson Mobile Communications
AB or its local affiliated company, without any warranty. Improvements
and changes to this User guide necessitated by typographical errors,
inaccuracies of current information, or improvements to programs and/
or equipment, may be made by Sony Ericsson Mobile Communications
AB at any time and without notice. Such changes will, however, be
incorporated into new editions of this User guide.
All rights reserved.
©Sony Ericsson Mobile Communications AB, 2009
Publication number: 1226-2918.1
Attention: Some of the services and features described in this User
guide are not supported by all networks and/or service providers in all
areas. Without limitation, this applies to the GSM International
Emergency Number 112. Please contact your network operator or
service provider to determine availability of any specific service or
feature and whether additional access or usage fees apply.
Your mobile phone has the capability to download, store and forward
additional content, e.g. ringtones. The use of such content may be
restricted or prohibited by rights of third parties, including but not limited
to restriction under applicable copyright laws. You, and not
Sony Ericsson, are entirely responsible for additional content that you
download to or forward from your mobile phone. Prior to your use of any
additional content, please verify that your intended use is properly
licensed or is otherwise authorized. Sony Ericsson does not guarantee
the accuracy, integrity or quality of any additional content or any other
third party content. Under no circumstances will Sony Ericsson be liable
in any way for your improper use of additional content or other third party
content.
38
Bluetooth is a trademark or a registered trademark of Bluetooth SIG Inc.
and any use of such mark by Sony Ericsson is under license.
The Liquid Identity logo and PlayNow, are trademarks or registered
trademarks of Sony Ericsson Mobile Communications AB.
Sony is a trademark or registered trademark of Sony Corporation.
Media Go is a trademark or registered trademark of Sony Media Software
and Services.
microSD is a trademark or a registered trademark of SanDisk
Corporation.
Yahoo! Is a trademark or a registered trademark of Yahoo! Inc.
Ericsson is a trademark or registered trademark of Telefonaktiebolaget
LM Ericsson.
Microsoft, Windows, Outlook, Windows Vista, Windows Server and
ActiveSync are registered trademarks or trademarks of Microsoft
Corporation in the United States and/or other countries.
T9™ Text Input is a trademark or a registered trademark of Tegic
Communications. T9™ Text Input is licensed under one or more of the
following: U.S. Pat. Nos. 5,818,437, 5,953,541, 5,187,480, 5,945,928,
and 6,011,554; Canadian Pat. No. 1,331,057, United Kingdom Pat. No.
2238414B; Hong Kong Standard Pat. No. HK0940329; Republic of
Singapore Pat. No. 51383; Euro.Pat. No. 0 842 463(96927260.8) DE/DK,
FI, FR, IT, NL, PT, ES, SE, GB; and additional patents are pending
worldwide.
This product is protected by certain intellectual property rights of
Microsoft. Use or distribution of such technology outside of this product
is prohibited without a license from Microsoft.
Other product and company names mentioned herein may be the
trademarks of their respective owners.
Any rights not expressly granted herein are reserved.
All illustrations are for illustration only and may not accurately depict the
actual phone.
39
www.sonyericsson.com
Sony Ericsson Mobile Communications AB
SE-221 88 Lund, Sweden
1226-2918.1
FCC Statement
Declaration of Conformity
Sony Ericsson T715a
UMTS HSPA Band 1 2 5 GSM GPRS/EDGE 850/900/1800/1900
Important Information
United States & Canada
THI S PHO NE MODEL HAS BEE N CER TIFIE D IN COM PLIAN CE
WIT H THE GO VERNM ENT’S RE QUIRE MENTS FOR EXP OSURE
TO RADIO WA VES.
The T715 a S eries mobi le phone s hav e bee n d esign ed to
com ply w ith appl icabl e s afety requ ireme nts for expos ure to r adio
wav es. Y our wire less pho ne is a ra dio t ran smitt er an d r eceiv er. I t
is desig ned to n ot ex cee d the limi ts* o f e xposu re to ra dio
fre quenc y ( RF) e nergy se t by gover nment al autho ritie s. These
lim its e sta blish perm itt ed le vels of RF en ergy for t he gener al
pop ulati on. The guide lin es ar e bas ed on st andar ds th at were
dev elope d b y int ernat ion al sc ienti fic o rga nizat ions thr ough
per iodic an d tho rough ev aluat ion o f sci ent ific studi es. The
sta ndard s i nclud e a s afe ty ma rgin desig ned to a ssure th e saf ety
of all i ndi vidua ls, r ega rdles s of age a nd healt h.
The radi o w ave e xposu re guide lines empl oy a uni t of
mea surem ent know n as the Spec ific Absor pti on Ra te (S AR) .
Tes ts fo r S AR ar e con duc ted u sing stand ard ized metho ds with
the phon e t ransm ittin g a t its high est c ert ified powe r l evel in al l
use d fre que ncy b ands. Wh ile t here may b e d iffer ences be tween
the SAR lev els o f var iou s pho ne mo dels, th ey ar e all de signe d to
mee t the re levan t gui del ines for e xposu re to ra dio w ave s. Fo r
mor e inf orm ation on S AR, plea se re fer t o t he sa fe an d e ffici ent
use chap ter in t he Us er Guide .
The high est SAR value as repo rted to th e a uthor ities fo r thi s
pho ne mo del when test ed for u se by the ear is 1 .37 W /kg *, an d
whe n wor n o n the body is 0.63 W/kg * for sp eech and
0.9 0 W/k g* for d ata c all s. Bo dy wo rn me asu remen ts ar e m ade
whi le th e p hone is in us e and worn on t he body with a S ony
Eri csson ac cesso ry su ppl ied w ith o r des ign ated for u se with this
pho ne. I t i s the refor e r ecomm ended that on ly Er icsso n a nd So ny
Eri csson or igina l acc ess ories be u sed i n c onjun ction wi th So ny
Eri csson ph ones.
**B efore a phone mode l i s ava ilabl e for sa le to the pub lic i n the
US, it m ust be t ested an d cer tifie d by the Fede ral
2
Com munic ati ons C ommis sio n (FC C) th at it do es no t exc eed the
lim it es tab lishe d by the gove rnmen t-ado pte d req uirem ent for
saf e exp osu re*. The t est s are perf ormed in posi tions an d
loc ation s ( i.e., by t he ear a nd wo rn on th e bod y) as re quire d by
the FCC for each mode l. The F CC ha s gra nte d an Equip men t
Aut horiz ati on fo r thi s p hone model with al l rep orted SA R lev els
eva luate d a s in compl ian ce wi th th e FCC RF expo sure
gui delin es. Whil e the re may b e dif feren ces betw een t he SAR
lev els o f v ariou s pho nes , all mobi le ph one s gra nted an FCC
equ ipmen t a uthor izati on meet the g overn men t req uirem ent for
saf e exp osu re. S AR in for matio n on this pho ne mo del i s o n fil e at
the FCC and can be fo und unde r the Disp lay Gran t sec tio n of
htt p://w ww. fcc.g ov/oe t/f ccid after sear chi ng on FCC
ID PY7A3 880 040. Addit ion al in forma tion on SAR c an be fo und
on the C ell ular Telec omm unica tions & In ter net A ssoci ati on (C TIA)
web site at http: //www .phon efa cts.n et.
* I n the Un ited State s a nd Ca nada, the SAR limi t for mo bile
pho nes u sed by t he pu bli c is 1.6 w atts/ kil ogram (W/k g) avera ged
ove r one gr am of tiss ue. The stand ard i nco rpora tes a ma rgin of
saf ety t o g ive a dditi ona l pro tecti on fo r t he pu blic and to a ccoun t
for any var iatio ns in me asure ments .
**T his p ara graph is o nly appl icabl e to aut horit ies a nd
cus tomer s i n the Unit ed State s.
3
FCC Statement
Thi s dev ice comp lies wit h Par t 15 of th e F CC ru les.
Ope ratio n i s sub ject to the f ollow ing t wo condi tions : ( 1)
Thi s dev ice may not c aus e har mful inter fer ence, and (2)
Thi s dev ice must acce pt any i nterf erenc e r eceiv ed, i ncl uding
int erfer enc e tha t may ca use u ndesi red o per ation .
Any chan ge or mo dific ati on no t exp ressl y a pprov ed by So ny
Eri csson ma y voi d the us er's autho rity to opera te th e e quipm ent.
Thi s equ ipm ent h as be en teste d and foun d t o com ply w ith the
lim its f or a Cla ss B dig ital devic e, pu rsu ant t o Par t 1 5 of the F CC
Rul es. T hes e lim its a re desig ned t o pro vid e rea sonab le
pro tecti on again st ha rmf ul in terfe rence in a re siden tia l
ins talla tio n. Th is eq uip ment gener ates, us es an d can ra diate
rad io fr equ ency energ y a nd, i f not inst all ed an d use d i n
acc ordan ce with the i nst ructi ons, may c aus e har mful int erfer ence
to radio co mmuni catio ns. Howe ver, there is no g uaran tee that
int erfer enc e wil l not oc cur i n a p artic ula r ins talla tio n.
If this equ ipmen t doe s c ause harmf ul in ter feren ce to ra dio o r
tel evisi on recep tion, wh ich c an be dete rmi ned b y tur nin g the
equ ipmen t o ff an d on, th e use r is encou rag ed to try to corre ct
the inte rfe rence by o ne or mo re of the fol lowin g mea sur es:
•
Reo rient or relo cate the rece iving ante nna .
•
Inc rease th e sep arati on betwe en th e equ ipm ent a nd re cei ver.
•
Con nect the equi pment in to an outl et on a circu it di ffe rent
fro m tha t t o whi ch th e r eceiv er is conn ect ed.
•
Con sult the deal er or an expe rienc ed ra dio /TV t echni cia n for
hel p.
11

Industry Canada Statement
Thi s dev ice comp lies wit h RSS -210 of In dus try C anada .
Ope ratio n i s sub ject to the f ollow ing t wo condi tions : ( 1) th is
dev ice m ay not c ause int erfer ence, and (2) this devi ce must
acc ept a ny inter feren ce, incl uding inte rfe rence that ma y cau se
und esire d o perat ion o f t he de vice.
Thi s Cla ss B dig ital app aratu s com plies wi th Ca nadia n
ICE S-003 .
Cet appa rei l num ériqu e d e la class e B e st confo rme à la norm e
NMB -003 du Canad a.
12
Declaration of Conformity for T715a
We, Sony Er icsso n Mob ile C omm unica tions AB of
Nya Vatt ent ornet
SE- 221 8 8 L und, Swede n
dec lare und er ou r sol e r espon sibil ity t hat our produ ct
Son y Eri css on ty pe AA D-3 88004 0-BV
and in c omb inati on wi th our a ccess ories , t o whi ch th is
dec larat ion rela tes i s i n con formi ty wi th the a pprop ria te
sta ndard s E N 301 511: V9. 0.2, EN 30 1 908 -1: V3.2. 1, EN 30 1
908 -2:V3 .2. 1, EN 300 328 :V1.7 .1, E N 301 48 9-7:V 1.3.1 , E N 301
489 -17:V 1.3 .2 an d EN 60 950-1 :2006 foll owi ng th e pro vis ions
of, Radi o E quipm ent a nd Telec ommun icati on Termi nal
Equ ipmen t d irect ive 1999/ 5/EC .
Lun d, Ju ly 2009
Rik ko Sa kag uchi,
Cor porat e V ice P resid ent and Head of Cr eat ion & Deve lop ment
We fulfi l t he re quire men ts of the R&TTE Di recti ve (1 999 /5/EC ).
Ce produ it est c onfor me aux d irect ives de R&TTE (1999/5/E C).
Cum plimo s c on lo s req uis itos de la Dire cti va R& TTE – No rmas
sob re eq uip os de term ina les d e rad io y tel ecomu nicac ion es
(19 99/5/ EC).
Ate ndemo s a os re quisi tos da D iretr iz R& TTE (1999/ 5/E C).
13
www.sonyericsson.com
Sony Ericsson Mobile Communications AB
SE-221 88 Lund, Sweden
1229-8600.1
 Loading...