

Page 1

Contents
Getting started......................................................3
XPERIA™ X1 overview...............................................................3
Instruction symbols....................................................................3
Additional help...........................................................................3
SIM card and battery..................................................................3
Charging the battery..................................................................4
Memory card..............................................................................4
Turning on and off......................................................................4
Navigating..................................................................................5
Closing an application................................................................5
Status icons................................................................................5
Illuminations...............................................................................6
Entering information...................................................................6
Programs....................................................................................7
Settings......................................................................................7
Phone....................................................................9
Networks....................................................................................9
Making calls...............................................................................9
receiving calls.............................................................................9
Features.....................................................................................9
Setting up your phone........................................10
Basic settings...........................................................................10
Personalizing............................................................................10
Customizing Phone Settings and Services..............................10
Protecting the phone................................................................11
Other Settings..........................................................................11
Synchronizing......................................................12
Ways to synchronize................................................................12
Setting up synchronization.......................................................12
Starting synchronization...........................................................13
Synchronizing using a Bluetooth connection...........................13
Scheduled synchronization......................................................13
Changing which information is synchronized..........................13
Use Windows Mobile Device Center........................................13
This is a draft publication intended for internal use only.
Messaging...........................................................14
E-mail.......................................................................................14
SMS and MMS.........................................................................14
QuickGPS
Google Maps™ for mobile.......................................................19
Wayfinder Navigator™.............................................................19
.................................................................................19
Panels..................................................................20
Portrait and landscape views...................................................20
Choosing panels......................................................................20
Managing panels......................................................................21
3D Fish panel...........................................................................21
XPERIA Radio panel.................................................................21
Sony Ericsson panel.................................................................22
Media Xperience panel.............................................................23
Google™ panel........................................................................23
Microsoft Today panel.............................................................24
Downloading new panels.........................................................24
Multimedia...........................................................25
Windows Media® Player Mobile..............................................25
Using media files......................................................................25
Games......................................................................................25
Camera.....................................................................................25
Synchronizing music and video...............................................28
Transferring content.................................................................28
Important information.........................................29
Guidelines for safe and efficient use - addition........................29
Declaration of Conformity for X1..............................................29
Declaration of Conformity for X1a............................................29
FCC Statement.........................................................................29
Industry Canada Statement.....................................................30
Index....................................................................31
Browsing the Web...............................................16
Connecting to the Internet.......................................................16
Menu options...........................................................................16
Zooming...................................................................................16
Favorites...................................................................................16
Browsing previously visited Web pages..................................16
Personalizing............................................................................16
Web feeds ...............................................................................16
Calling while browsing.............................................................17
Getting connected..............................................17
Bluetooth™ technology............................................................17
Bluetooth™ modes..................................................................17
Bluetooth™ partnership...........................................................17
Connecting a Bluetooth™ handsfree or stereo headset..........18
Beaming information using a Bluetooth™ connection............18
Using your phone as a Bluetooth™ modem............................18
Wi-Fi/Wireless LAN..................................................................18
Windows Live Messenger........................................................19
GPS – Location-based services.........................19
Using the A-GPS......................................................................19
This is an Internet version of this publication. © Print only for private use.
1
Page 2

Sony Ericsson X1/X1a
X1: GSM 850/900/1800/1900 & UMTS I/II/VIII
X1a: GSM 850/900/1800/1900 & UMTS I/II/V
This User guide is published by Sony Ericsson Mobile Communications AB or its local
affiliated company, without any warranty. Improvements and changes to this User
guide necessitated by typographical errors, inaccuracies of current information, or
improvements to programs and/or equipment, may be made by Sony Ericsson Mobile
Communications AB at any time and without notice. Such changes will, however, be
incorporated into new editions of this User guide.
All rights reserved.
©Sony Ericsson Mobile Communications AB, 2008
Publication number: 1215-1000.1
Please note:
Some of the services in this User guide are not supported by all networks. This also
applies to the GSM International Emergency Number 112.
Please contact your network operator or service provider if you are in doubt whether
you can use a particular service or not.
Please read the Important information before you use your mobile phone.
Your mobile phone has the capability to download, store and forward additional
content, e.g. ringtones. The use of such content may be restricted or prohibited by
rights of third parties, including but not limited to restriction under applicable copyright
laws. You, and not Sony Ericsson, are entirely responsible for additional content that
you download to or forward from your mobile phone. Prior to your use of any additional
content, please verify that your intended use is properly licensed or is otherwise
authorized. Sony Ericsson does not guarantee the accuracy, integrity or quality of any
additional content or any other third party content. Under no circumstances will
Sony Ericsson be liable in any way for your improper use of additional content or other
third party content.
Some GPS features use the Internet. Sony Ericsson does not warrant the accuracy of
any directional services including but not limited to turn-by-turn navigational services.
Export Regulations: This product, including any software or technical data contained
in or accompanying the product, may be subject to U.S. export control laws, including
the U.S. Export Administration Act and its associated regulations and the U.S.
sanctions programs administered by the U.S. Treasury Department's Office of Foreign
Assets Control, and may be additionally subject to export or import regulations in other
countries. The user and any possessor of the product agrees to comply strictly with
all such regulations and acknowledges that it is their responsibility to obtain any
required licenses to export, re-export, or import this product. Without limitation this
product, including any software contained therein, may not be downloaded, or
otherwise exported or re-exported (i) into, or to a national or resident of, or an entity
in, Cuba, Iraq, Iran, North Korea, Sudan, Syria (as such listing may be revised from
time to time) or any country to which the U.S. has embargoed goods; or (ii) to any
person or entity on the U.S. Treasury Department's list of Specially Designated
Nationals or (iii) any person or entity on any other export prohibition list that may be
maintained from time to time by the United States Government, including but not
limited to the U.S. Commerce Department's Denied Persons List or Entity List, or the
U.S. State Department's Nonproliferation Sanctions List.
Your phone supports international emergency numbers, for example, 112 and 911.
These numbers can normally be used to make emergency calls in any country, with or
without the SIM card inserted, if a 3G (UMTS) or GSM network is within range. In some
countries, other emergency numbers may also be promoted. Your network operator
may therefore have saved additional local emergency numbers on the SIM card.
Bluetooth and the Bluetooth logo are trademarks or registered trademarks of Bluetooth
SIG Inc. and any use of such mark by Sony Ericsson is under license.
Wi-Fi is a trademark or a registered trademark of the Wi-Fi Alliance.
The Liquid Identity logo, XPERIA and X Panel, are trademarks or registered trademarks
of Sony Ericsson Mobile Communications AB.
Sony is a trademark or registered trademark of Sony Corporation.
YouTube, Picasa, Gmail, Google™ and Google Maps™ are trademarks or registered
This is a draft publication intended for internal use only.
trademarks of Google, Inc.
Wayfinder and Wayfinder Navigator are trademarks or registered trademarks of
Wayfinder Systems AB.
Ericsson is a trademark or registered trademark of Telefonaktiebolaget LM Ericsson.
Microsoft, ActiveSync, Windows, the Windows logo, Windows Live, PowerPoint,
Excel, OneNote, Outlook, and Vista are registered trademarks or trademarks of
Microsoft Corporation in the United States and/or other countries.
This product is protected by certain intellectual property rights of Microsoft. Use or
distribution of such technology outside of this product is prohibited without a license
from Microsoft.
Content owners use Windows Media digital rights management technology (WMDRM)
to protect their intellectual property, including copyrights. This device uses WMDRM
software to access WMDRM-protected content. If the WMDRM software fails to
protect the content, content owners may ask Microsoft to revoke the software's ability
to use WMDRM to play or copy protected content. Revocation does not affect
unprotected content. When you download licenses for protected content, you agree
that Microsoft may include a revocation list with the licenses. Content owners may
require you to upgrade WMDRM to access their content. If you decline an upgrade,
you will not be able to access content that requires the upgrade.
This product is licensed under the MPEG-4 visual and AVC patent portfolio licenses
for the personal and non-commercial use of a consumer for (i) encoding video in
compliance with the MPEG-4 visual standard ("MPEG-4 video") or the AVC standard
("AVC video") and/or (ii) decoding MPEG- 4 or AVC video that was encoded by a
consumer engaged in a personal and non-commercial activity and/or was obtained
from a video provider licensed by MPEG LA to provide MPEG-4 and/or AVC video. No
license is granted or shall be implied for any other use. Additional information including
that relating to promotional, internal and commercial uses and licensing may be
obtained from MPEG LA, L.L.C. See http://www.mpegla.com. MPEG Layer-3 audio
decoding technology licensed from Fraunhofer IIS and Thomson.
Java, JavaScript and Java-based trademarks and logos are trademarks or registered
trademarks of Sun Microsystems, Inc. in the U.S. and other countries.
End-user license agreement for Sun Java Platform, Micro Edition.
1. Restrictions: Software is confidential copyrighted information of Sun and title to all
copies is retained by Sun and/or its licensors. Customer shall not modify, decompile,
disassemble, decrypt, extract, or otherwise reverse engineer Software. Software may
not be leased, assigned, or sublicensed, in whole or in part.
2. Export Regulations: Software including technical data, is subject to U.S. export
control laws, including the U.S. Export Administration Act and its associated
regulations, and may be subject to export or import regulations in other countries.
Customer agrees to comply strictly with all such regulations and acknowledges that it
has the responsibility to obtain licenses to export, re-export, or import Software.
Software may not be downloaded, or otherwise exported or re-exported (i) into, or to
a national or resident of, Cuba, Iraq, Iran, North Korea, Libya, Sudan, Syria (as such
listing may be revised from time to time) or any country to which the U.S. has
embargoed goods; or (ii) to anyone on the U.S. Treasury Department's list of Specially
Designated Nations or the U.S. Commerce Department's Table of Denial Orders. 3.
Restricted rights: Use, duplication or disclosure by the United States government is
subject to the restrictions as set forth in the Rights in Technical Data and Computer
Software Clauses in DFARS 252.227-7013(c) (1) and FAR 52.227-19(c) (2) as
applicable.
Restricted Rights: Use, duplication or disclosure by the United States government is
subject to the restrictions as set forth in the Rights in Technical Data and Computer
Software Clauses in DFARS 252.227-7013(c) (1) (ii) and FAR 52.227-19(c) (2) as
applicable.
Other product and company names mentioned herein may be the trademarks of their
respective owners.
Any rights not expressly granted herein are reserved.
All illustrations are for illustration only and may not accurately depict the actual phone.
This User guide contains simulated screen images.
2
This is an Internet version of this publication. © Print only for private use.
Page 3
Getting started
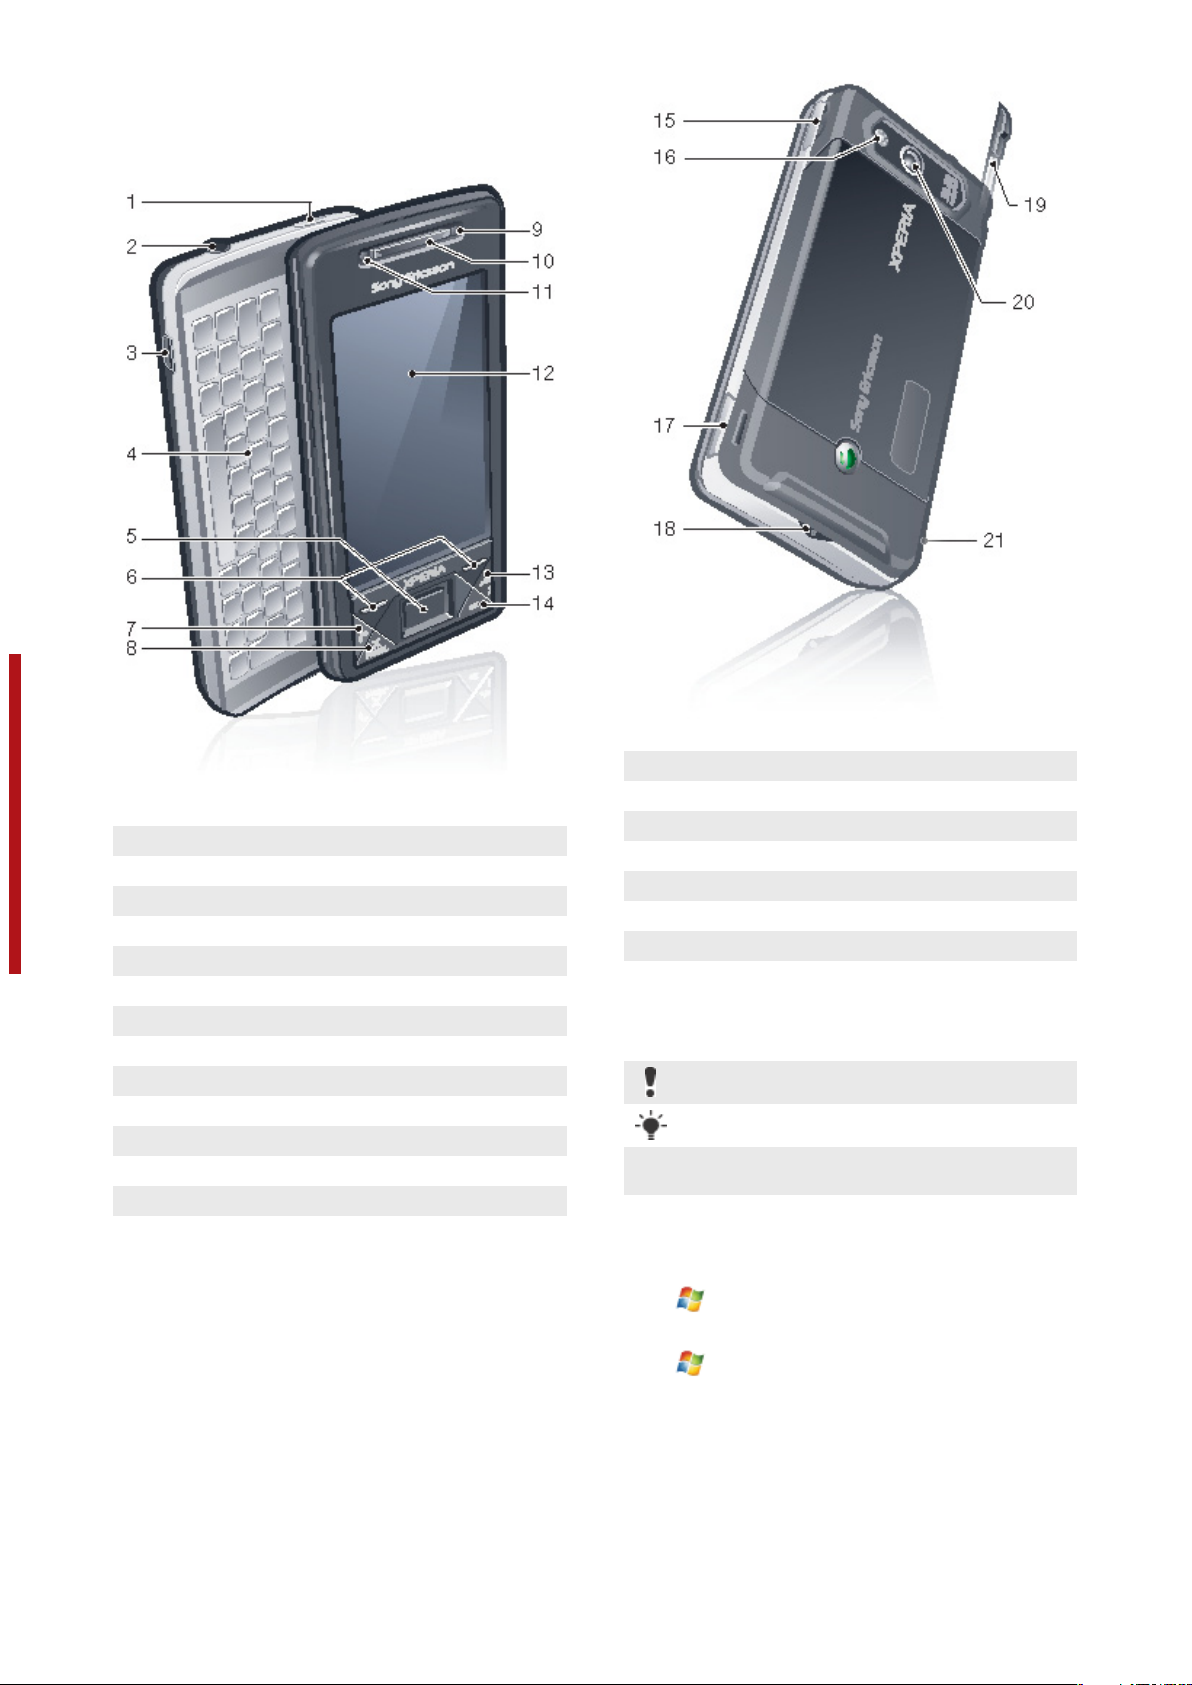
XPERIA™ X1 overview
1 Power key
2 3.5 mm headset connector
3 Connector for USB cable
4 Keyboard
This is a draft publication intended for internal use only.
5 Optical joystick/ENTER
6 Selection keys
7 Call key
8 XPERIA™ X1 panel key
9 Video call/front camera lens
10 Ear speaker
11 Light sensor
12 Touch screen
13 End call key
14 OK key
15 Volume key
16 Camera light
17 Camera key
18 Strap holder
19 Stylus
20 Camera lens
21 Loudspeaker
Instruction symbols
The following symbols appear in the User guide:
Note
Tip
>
Tap items or use the navigation key or joystick to scroll
and select
Additional help
To use the help in the phone
•
Tap > Help.
To use Getting started
•
Tap
> Programs > Getting started.
SIM card and battery
Before you start using the phone, you have to insert the SIM card
and the battery.
This is an Internet version of this publication. © Print only for private use.
Getting started
3
Page 4
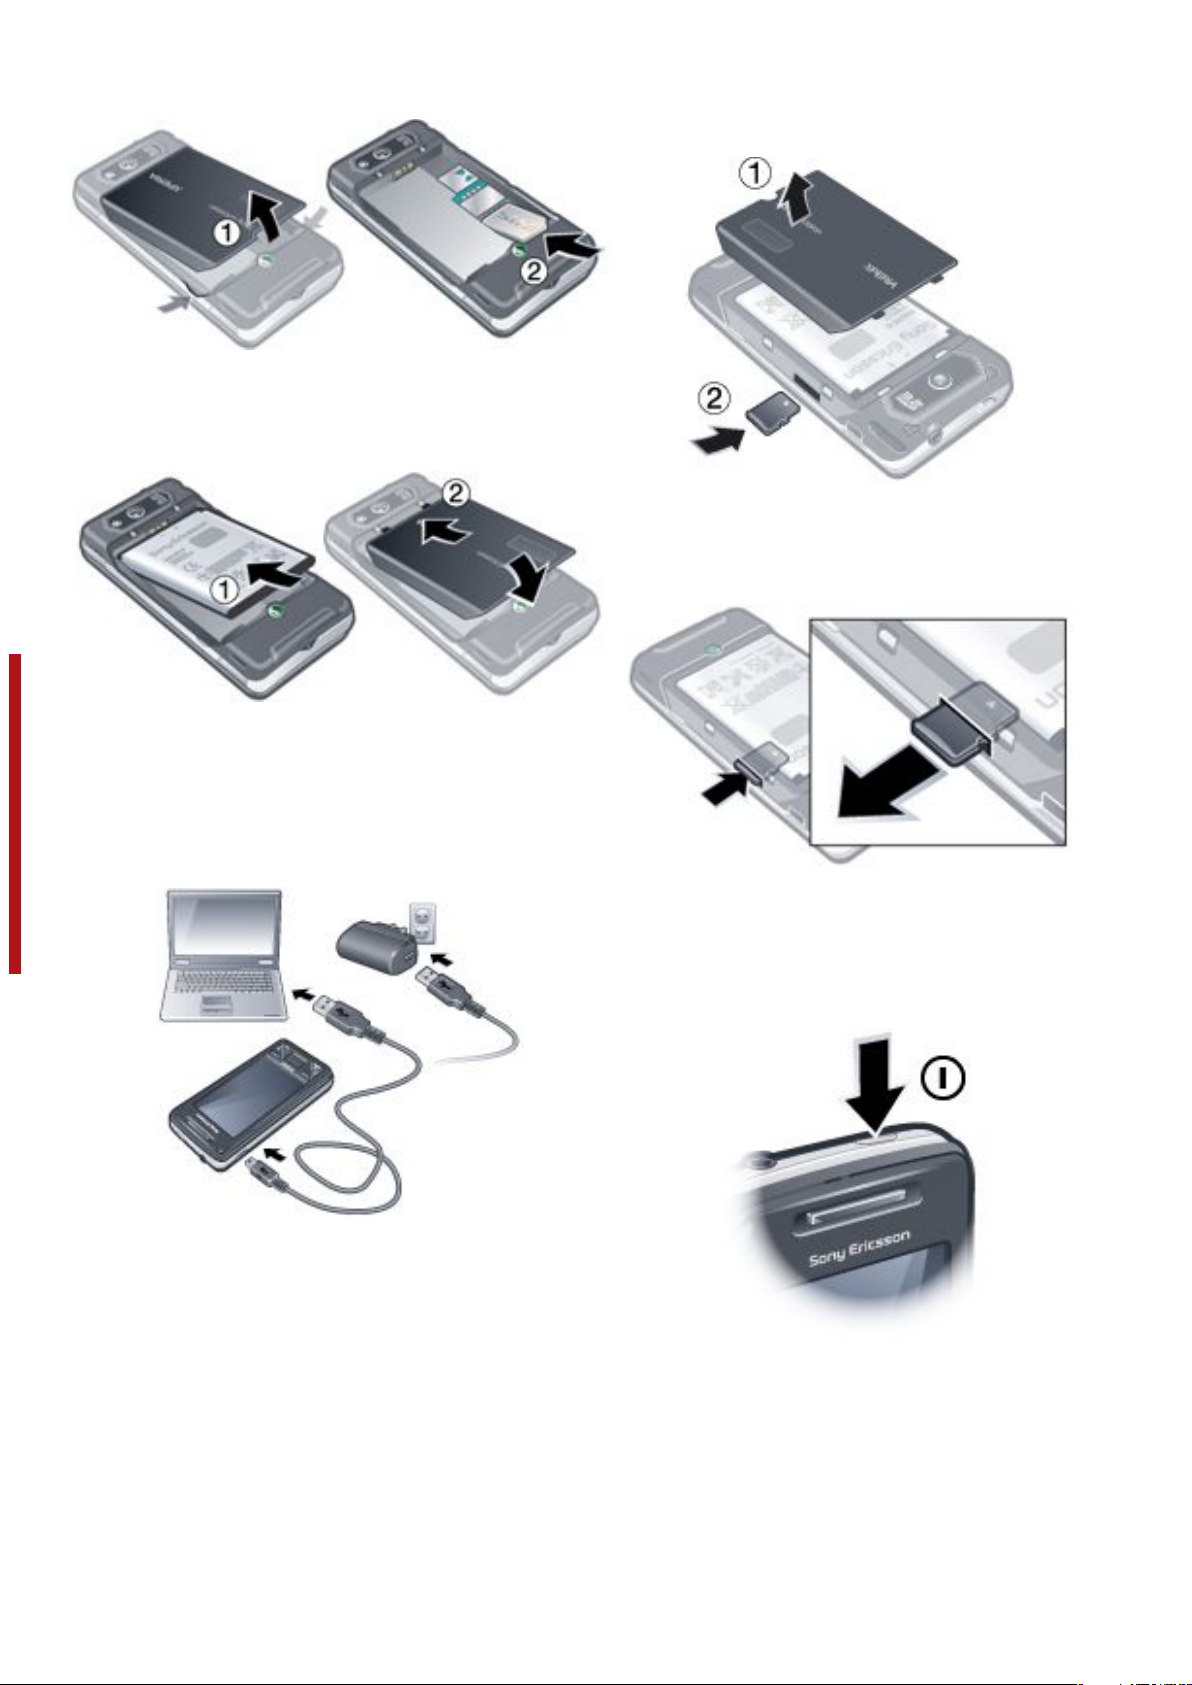
To insert SIM card
1
Remove the battery cover.
2
Slide the SIM card into its holder with the gold-colored
contacts facing down.
To insert the battery
Memory card
To insert a memory card
1
Remove the battery cover.
2
Insert the memory card with the gold-colored contacts facing
down.
To remove a memory card
1
Insert the battery with the label side up and the connectors
facing each other.
2
Slide the battery cover into place.
Charging the battery
The phone battery is partly charged when you buy it. You can
charge the phone in two ways.
This is a draft publication intended for internal use only.
To charge using the power adapter
•
Connect the phone to a power outlet using the included USB
cable and the power adapter.
To charge using a computer
•
Connect the phone to a USB port on your computer using the
included USB cable.
1
Remove the battery cover.
2
Press the edge of the memory card to release and remove it.
Turning on and off
To turn on the phone
1
Press and hold down the power key until the phone starts.
2
At first startup, a Quick Start wizard will guide you through the
initial settings.
To turn off the phone
1
Press and hold the power key until a message appears.
2
Tap Yes to turn off.
Getting started
4
This is an Internet version of this publication. © Print only for private use.
Page 5

To turn on sleep mode
•
Press the power key to turn off the screen temporarily and
switch the phone to sleep mode.
To turn off sleep mode
•
To activate the screen, press the power key. The phone is also
activated by opening the keyboard, or by receiving a call or a
message.
Navigating
You can use the following means to move around the screen:
•
Using the touchscreen with the stylus or your finger
•
Multi-directional navigation key
•
Optical joystick
Using the touch screen
To turn on or off the optical joystick
1
Tap > Settings > the System tab > Optical Joystick.
2
Mark or unmark the Enable Optical Joystick check box.
To use scrolling instead of highlight
1
Tap > Settings > the System tab > Optical Joystick.
2
Mark the Enable the scroll function in Internet Explorer,
Messaging and Contacts check box.
Closing an application
If you press
application, for example, Windows Media® Player, Browser.
To change functionality of the "X" button
1
Tap > Settings > System tab > Task Manager >
Button tab.
2
Mark check box if you want to End progams by tapping and
holding "X".
in any application window it closes the
•
To highlight or open an item, tap the item.
•
To copy, rename or send a file, tap and hold down the file or
folder. Select the preferred action from the options dialog.
•
To scroll, tap the screen and slide up or down. On some pages
you can also slide to the side.
•
To stop the screen from scrolling, tap the screen.
•
To pan a page, touch and hold on the screen, then drag your
finger.
•
To pan continuously, drag your finger towards the outer limits
of a page and hold. Release your finger to stop panning.
This is a draft publication intended for internal use only.
Using the navigation key
To use the navigation key
Status icons
You can select an icon to get more information or to start an
application. Below is a short description of icons appearing in the
status bar.
The following status icons might appear on your screen:
GPRS available Wi-Fi function
enabled
HSDPA available Scanning for
available Wi-Fi
connection
EDGE available Wi-Fi connected
3G/UMTS available Signal strength
GPRS in use No signal
•
Press the navigation key left, right, up or down to move
around the screen. Press the center of the navigation key to
select an item.
Using the optical joystick
You can move the highlight in any direction by letting your finger
glide over the navigation key. In Internet Explorer, messaging and
contacts, you can use the optical joystick to scroll instead.
This is an Internet version of this publication. © Print only for private use.
HSDPA in use Phone turned off
3G/UMTS in use Voice call in
progress
EDGE in use Call on hold
Connection is active Sound on
Getting started 5
Page 6
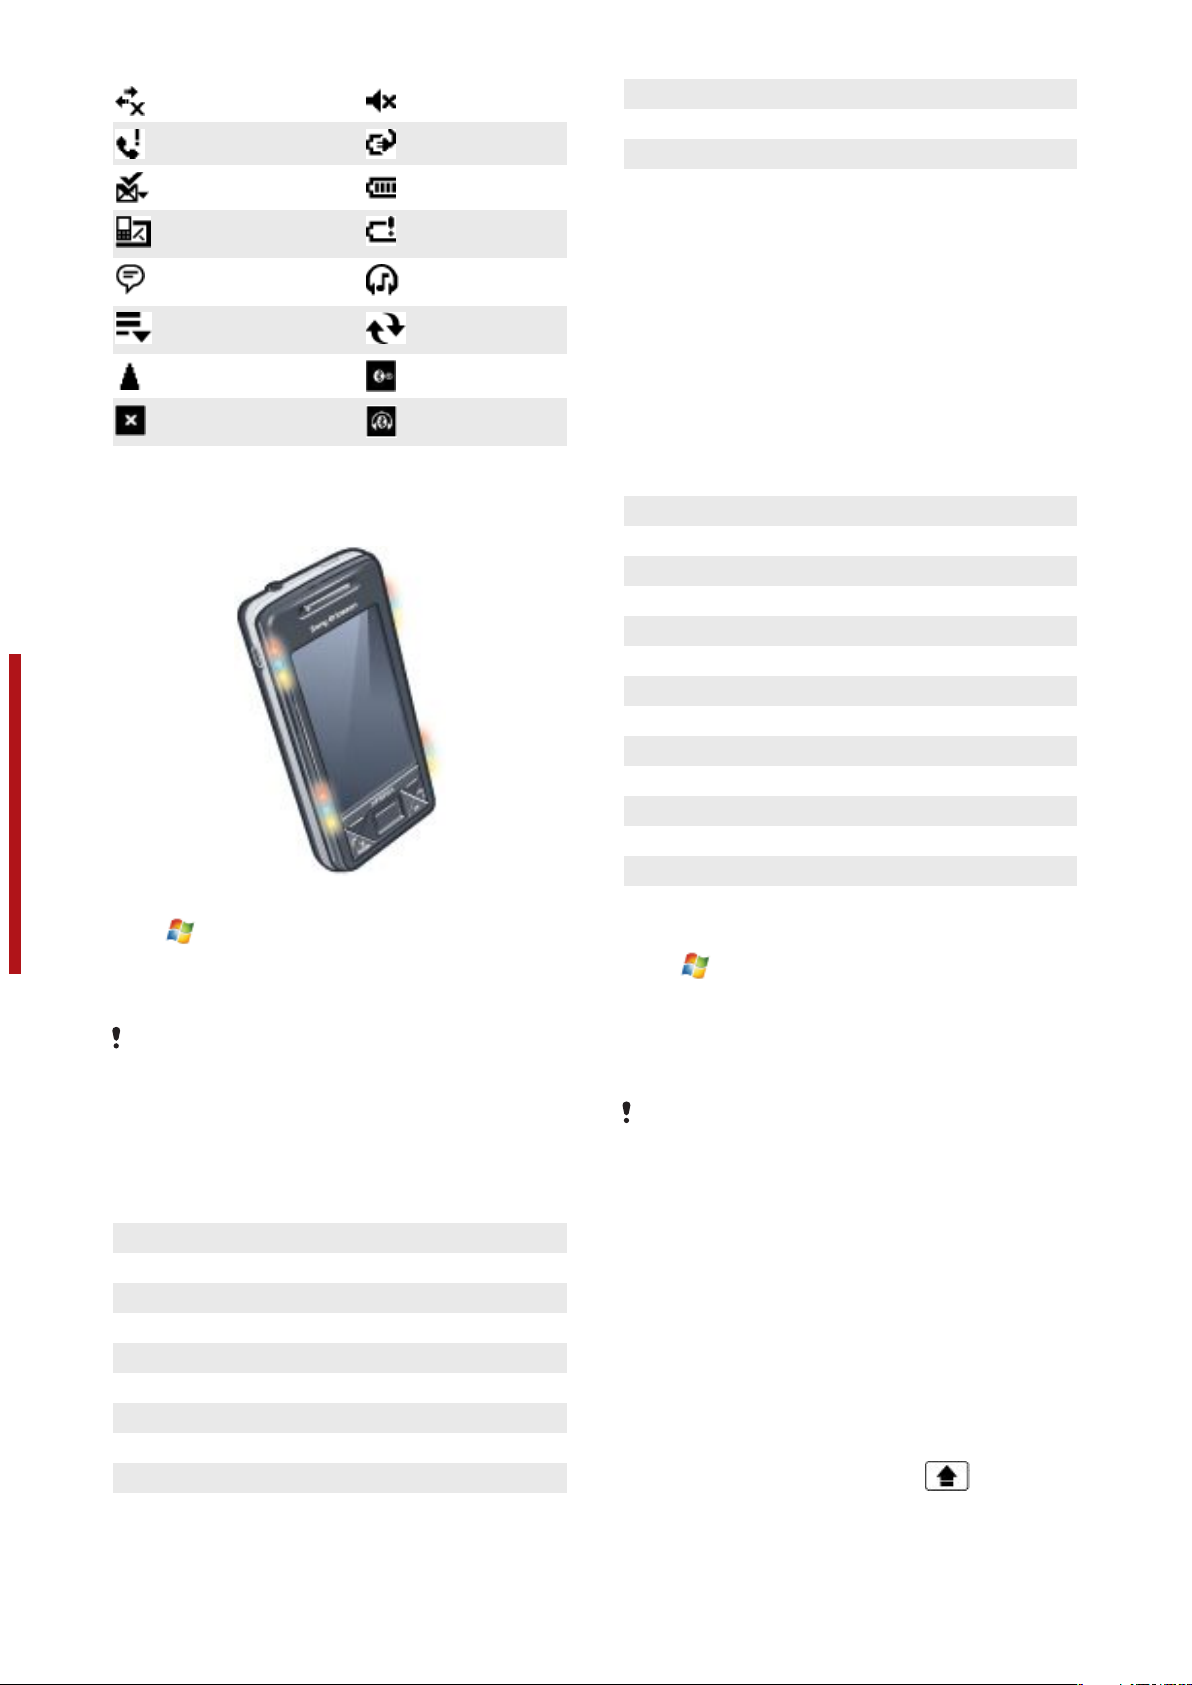
Connection is not active Sound off
Missed call Battery charging
New incoming MMS Battery full
Incoming call Green Three flashes slowly
MMS received Blue Short flash slowly
Boot up Mixed Once
New text message. SMS
notification of voice mail
Multiple notifications. Tap
to view all
Task manager Synchronization
Roaming Bluetooth on
Stop running program Bluetooth headset
Illuminations
You can set the four LEDs to notify events.
To set illuminations
•
Tap
This is a draft publication intended for internal use only.
To preview illumination
1
Select an event.
2
Tap Preview On.
Do not charge the phone while you are previewing illumination the charge illumination will be on and the preview function will not
work.
Illumination pattern for an event
All the illumination lights will flash on the same time, except when
the panel button is pressed, when the bottom left light will flash
only.
Event
Charging Mixed Slowly
Low battery Red Slowly
Panel (button pressed) Mixed Once
Panel (panel selected) Mixed Once
Missed call Mixed Two flashes slowly
Voicemail Mixed Two flashes slowly
Alarm /Calendar Violet Three flashes slowly
e-Mail received Violet Short flash slowly
SMS received Blue Short flash slowly
Instant message Blue Short flash slowly
> Settings > the System tab > Illumination.
Battery critically low
Bluetooth stereo
headset detected
ongoing
connected
Color Pattern
Illumination events priority
A higher priority event will override lower priority ones. For
example, incoming call illumination will appear when receiving
incoming call (higher priority) while the battery is being charged
(lower priority).
After the higher priority event expires, an illumination for a lower
priority event may appear again. For example, charging
illumination will appear after the incoming call is answered, if
charging is still going on and any other priority event (for example
e-mail received, have not occurred).
Events in illumination priority, ascending priority order
Charging/Charge pending
Missed call
Voice mail
Low battery
Alarm /Calendar
Panel (button pressed)
Panel (button selected)
e-Mail received
SMS received
MMS received
Instant message
Incoming call
Start (boot up)
To change the illumination time
1
Tap > Settings > Personal tab > Sounds &
Notifications > Notificationstab.
2
From the Event box, select an event, for example Phone:
Missed call.
3
Select Flash light for.
4
From the Flash light for box, select the time you want the light
to flash.
Default illumination time are set to 5 minutes for the following
events:
•
Instant Messaging
•
Messaging: New MMS
•
Messaging: New SMS
•
Phone: Missed call
•
Phone: Voice mail
•
Reminders.
Entering information
To enter text and characters, you can use:
•
the keyboard
•
the on-screen keyboard
•
handwriting recognition features such as Block Recognizer,
Letter Recognizer or Transcriber.
Using the keyboard
•
To type lowercase letters, press the keys.
•
To type a single uppercase letter, press and then press
the required letter key.
Getting started
6
This is an Internet version of this publication. © Print only for private use.
Page 7
•
To use all uppercase letters, press twice. To change
back to all lowercase letters, press again.
•
To type accented characters, press the letter key first, and
then press the until the required character appears.
•
To enter a number or a symbol (in blue at the upper right of
some keys), press and then press the key.
•
To use all number or symbol keys, press twice.
•
To open the symbol pad, press .
•
To verify entries or exit the program in use, press
Using the on-screen keyboard
•
In a program, tap
see a different input icon, tap the icon, tap
of the input icon, and then tap Keyboard.
•
To enter text and numbers, tap the keys on the on-screen
keyboard.
•
To hide the on-screen keyboard, tap
at the bottom of the screen. If you
Using handwriting features
•
In a program, tap an input icon at the bottom of the screen,
tap , and then tap a method.
•
For help writing characters using Block Recognizer, Letter
Recognizer or Transcriber, tap the question mark near the
writing area.
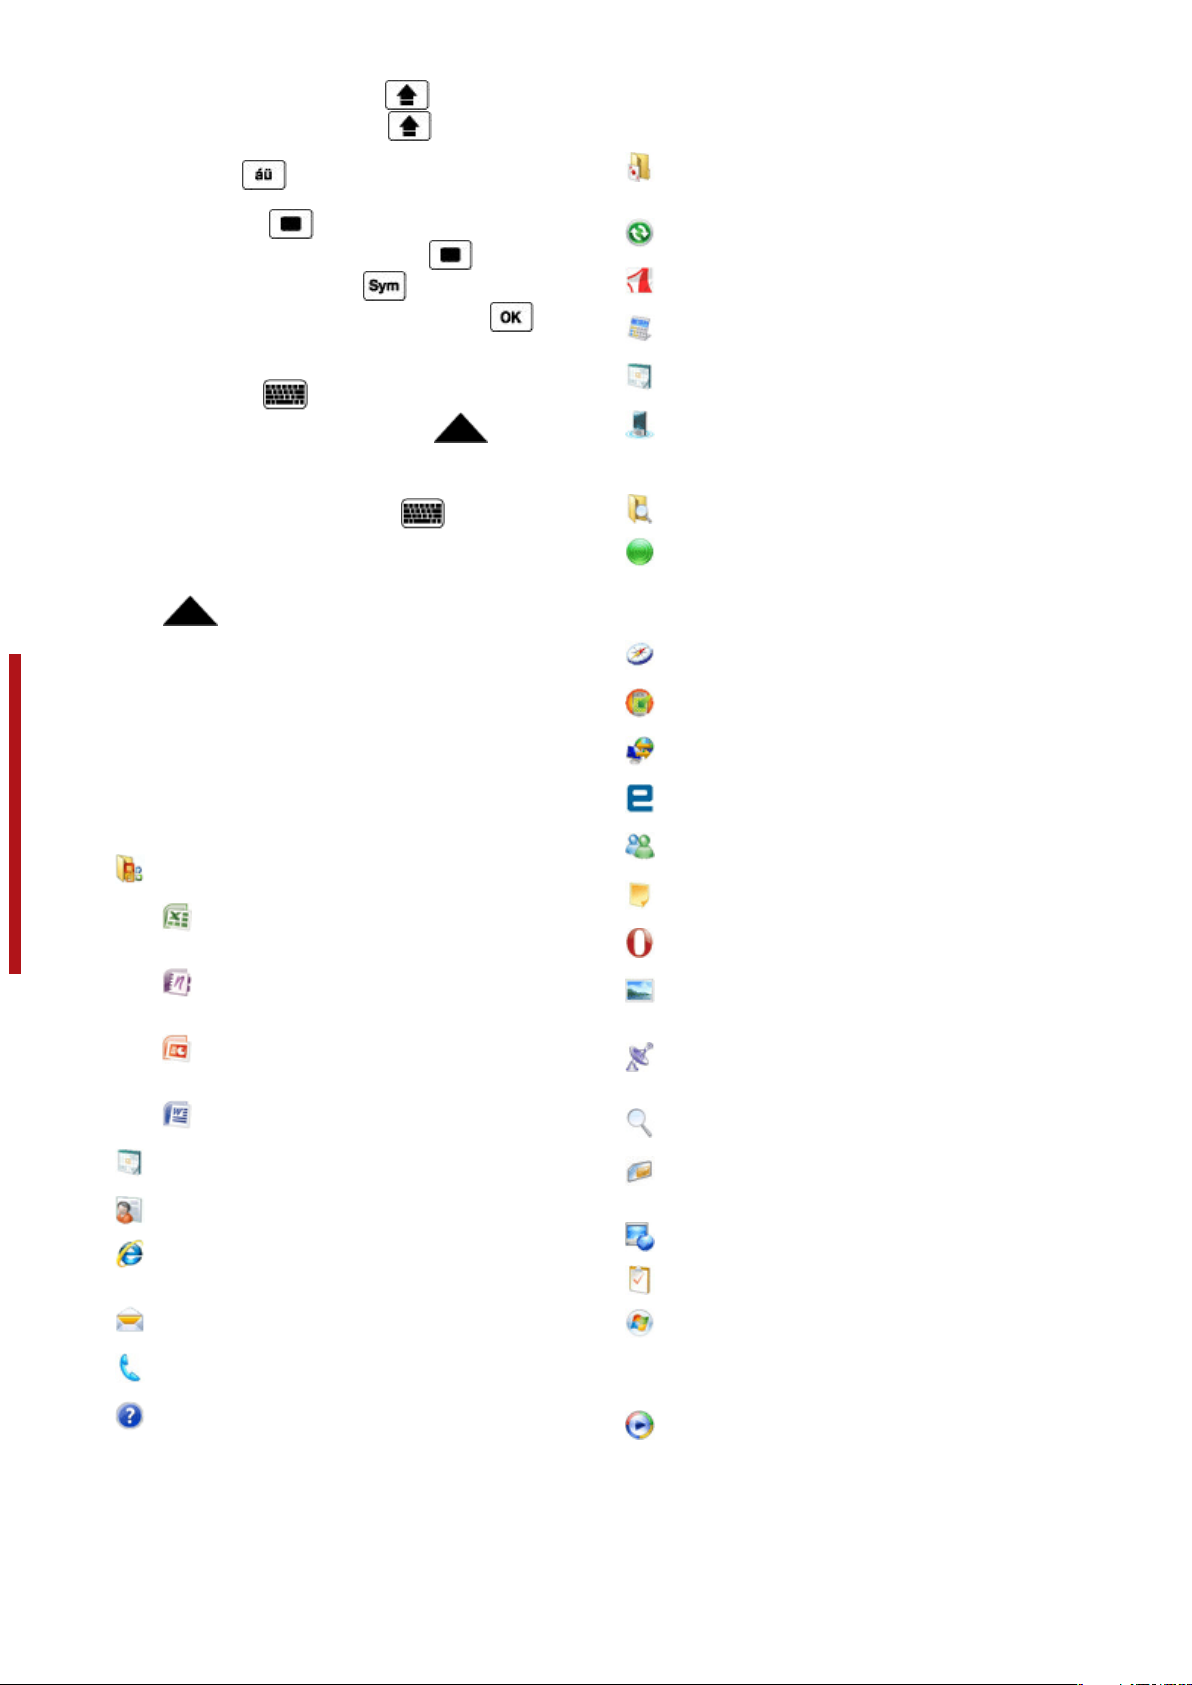
Programs
The following programs can be found in your phone.
Programs in the Start Menu
Description
Icon
Office Mobile – Use the complete suite of Microsoft®
Office applications for your phone.
Excel® Mobile – Create new
This is a draft publication intended for internal use only.
OneNote® Mobile - Make notes
PowerPoint® Mobile – View
Word Mobile – Create, view, and
Calendar – Keep track of your appointments and create
meeting requests.
Contacts – Keep track of your friends and colleagues.
Internet Explorer Mobile – Browse Web and WAP sites
as well as download new programs and files from the
Internet.
Messaging – Send and receive e-mails, text messages
and picture messages.
Phone – Make and receive calls, switch between calls,
and set up conference calling.
Help – See Help topics for the current screen or program.
workbooks or view and edit Excel
workbooks.
and gather information, all in one
place.
PowerPoint slides and
presentations.
edit Word documents.
.
.
to the right
Programs screen
Icon Description
Games – Play any of the four pre-installed games:
Astraware Sudoku, Bejeweled 2, Bubble Breaker and
Solitaire.
ActiveSync – Synchronize information between your
phone and a computer or the Exchange Server.
Adobe Reader LE – View PDF (Portable Document
Format) files in your phone.
Calculator – Perform basic calculations such as addition,
subtraction, multiplication, and division.
Calendar – Keep track of your appointments and create
meeting requests.
Comm Manager – Manage your phone’s connections
(including Wi-Fi and Bluetooth), turn off all connections
with Airplane Mode, turn the phone on or off, and enable
or disable the Direct Push function.
File Explorer – Organize and manage files in your phone.
Getting Started – Read how to manage basic functions
such as making a call and how to set up date & time, email, password, Bluetooth headset, background, ring
tone and how to transfer music. Tap on the links to
configure the settings for each area.
Google Maps – View your current location, find other
locations and calculate routes.
Handango InHand – Offers software and game
downloads for your phone.
Internet Sharing – Connect your phone to the Internet
using your phone data connection.
Java – Download and install Java applications, such as
games and tools, in your phone.
Messenger – This is the mobile version of Windows
Live™ Messenger.
Notes – Create handwritten or typed notes, drawings,
and voice recordings.
Opera – Opera Mobile browser that allows full HTML
browsing.
Pictures & Videos – View, organize and sort pictures,
animated GIFs and video files in your phone or a memory
card.
QuickGPS – Downloads satellite data over the Internet via
ActiveSync, Wi-Fi or GPRS to speed up the time for
determining your current GPS position.
Search – Search contacts, data, and other information in
your phone.
SIM Manager – Manage the contacts stored on your
USIM/SIM card. You can also copy USIM/SIM contents
to Contacts in your phone.
Streaming Media – Stream live or on-demand video.
Tasks – Keep track of your tasks.
Windows Live – Use this mobile version of Windows
Live™ to find information on the Web. Sign into your
Windows Live account to access your Live Mail
messages and send/receive instant messages in Live
Messenger.
Windows Media Player Mobile – Play back audio and
video files.
Settings
You can adjust the phone settings to suit the way you work.
This is an Internet version of this publication. © Print only for private use.
Getting started
7
Page 8
To see all available settings
1
Tap > Settings.
2
Tap the Personal, System, and Connections tabs located at
the bottom of the screen and enter your settings.
Personal tab
Icon Description
Buttons – Assign a program or function to a hardware
button.
Input – Set options for each of the input methods.
Lock – Set a password for your phone.
Menus – Set what programs will appear in the Start menu.
Owner Information – Enter your personal information in
your phone.
Phone – Customize phone settings such as ringtone, set
a PIN number for your USIM/SIM card, and more.
Sounds & Notifications – Enable sounds for events,
notifications, and more, and set the type of notification for
different events.
Today – Customize the appearance and the information
to be displayed on the Today screen.
TTY – Allows you to type messages back and forth,
instead of talking and listening. A perfect alternative for
people who are deaf, hard of hearing, or speech-impaired
to use the telephone to communicate.
System tab
Description
Icon
About – See basic information such as the Windows®
Mobile version and type of processor used in your phone.
You can also specify a name for your phone.
Certificates – See information about certificates that are
installed in your phone.
This is a draft publication intended for internal use only.
Clear Storage – Tap this icon only when you need to
remove all your data and files from the memory and reset
your phone to factory default settings.
Clock & Alarms – Set the phone clock to the date and
time of your locale or to a visiting time zone when you’re
traveling. Alarms can also be set at specified days and
times of a week.
Customer feedback – Make Windows® Mobile better by
participating in the Customer Experience Improvement
Program.
Device Information – See information about the firmware
version, hardware, identity and the Customer Info.
Encryption – Allow files on your memory card to be
encrypted. Encrypted files will be readable only in your
phone.
Error Reporting – Enable or disable the phone error
reporting function. When this function is enabled and a
program error occurs, technical data about the state of
the program and your phone will be logged in a text file
and delivered to Microsoft technical support if you
choose to send it.
External GPS – Set the appropriate GPS communication
ports, if required. You may need to do this when there are
programs in your phone that access GPS data or you
have connected a GPS receiver to your phone. See Help
for details.
Illumination – Enable or disable illumination for events
such as Charging, Low Battery, Missed call, Voicemail,
Alarm/Calendar, E-mail Received, Incoming Call and
more.
Key Lock – Lock the keys on your phone except for the
POWER key when the phone is in Sleep mode. This
ensures you will not switch the phone on by accident and
consume unnecessary power.
Managed Programs – See the installation history for
programs managed in your phone.
Memory – Check the phone memory allocation status
and memory card information. You can also stop
currently running programs.
Microphone AGC – Adjust the volume of your voice
automatically when you are recording.
Optical Joystick – Enable or disable the optical joystick,
enable cursor function on Internet Explorer, Messaging
and Contacts. Also set the sensitivity of the screen.
Power – Check the remaining battery power. You can
also set the timeout for turning off the display (switching
phone to Sleep mode) to conserve battery power.
Regional Settings – Set the regional configuration to use,
including the format for displaying numbers, currency,
date, and time in your phone.
Remove Programs – Remove programs you installed in
your phone.
Screen – Change the screen orientation, recalibrate the
screen, and change the screen text size.
Task Manager – Stop running programs and set the
button to end programs immediately when you tap
the button.
Windows Update – Link to the Microsoft Web site and
update Windows® Mobile in your phone with the latest
security patches or fixes.
Connections tab
Description
Icon
Advanced Network – Make advanced settings for your
Network
Beam – Set your phone to receive incoming Bluetooth
beams.
Bluetooth – Turn Bluetooth on, set your phone to visible
mode and scan for other Bluetooth devices.
Comm Manager – Manage your phone connections
(including Wi-Fi, GPRS, Bluetooth, and ActiveSync), turn
the phone on or off, switch to ringer/vibration mode, and
enable or disable the Direct Push function.
Connection Setup – Configure your phone data
connections, such as GPRS, WAP, and MMS, based on
the detected or selected network operator.
Connections – Set up one or more types of modem
connections for your phone, such as phone dial-up,
GPRS and more, so your phone can connect to the
Internet or a private local network.
Domain Enroll – Enrolling in a domain will connect your
phone with company resources.
USB to PC – Set a USB serial connection between your
phone and computer when there are problems
connecting ActiveSync.
Wi-Fi – Scan for available wireless networks.
Wireless LAN – See information about the active wireless
network, and customize Wi-Fi settings.
8 Getting started
This is an Internet version of this publication. © Print only for private use.
Page 9
Phone
Networks
Network coverage
To make or receive a phone call your phone must be within range
of a network.
Network settings
You can set how your phone should choose an available network
when you are outside your operator coverage area.
To enter the network settings
1
Press <HW Call key icon> and tap <Spanner icon>.
2
Tap the <Network> tab and enter the settings.
Making calls
Voice call
To make a call from Contacts
1
Open Contacts by tapping <Contacts icon> or by tapping
<Start> > <Contacts>.
2
Scroll to the contact you want to call.
3
Press <Lur icon>.
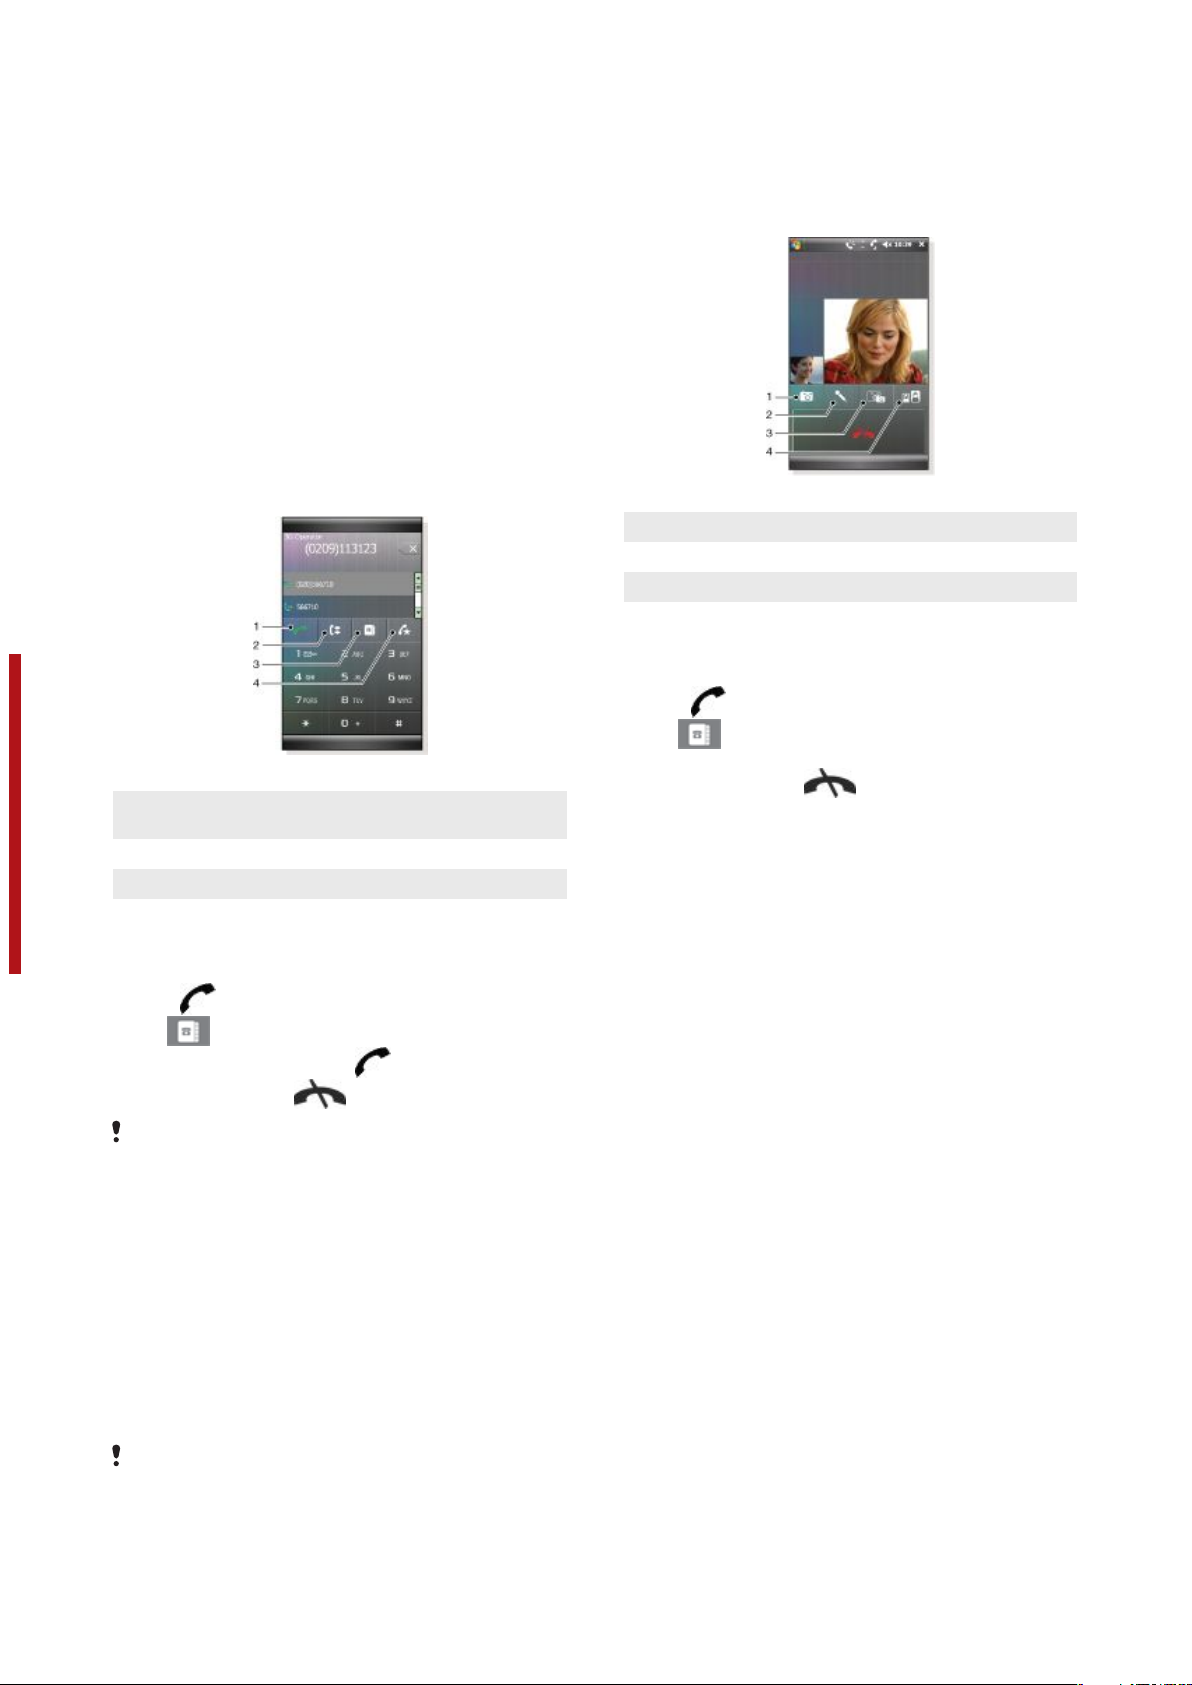
Video call
1 Camera on/off
2 Microphone on/off
3 Front (video) camera/Main camera
4 Switch views of how you and the other party are displayed.
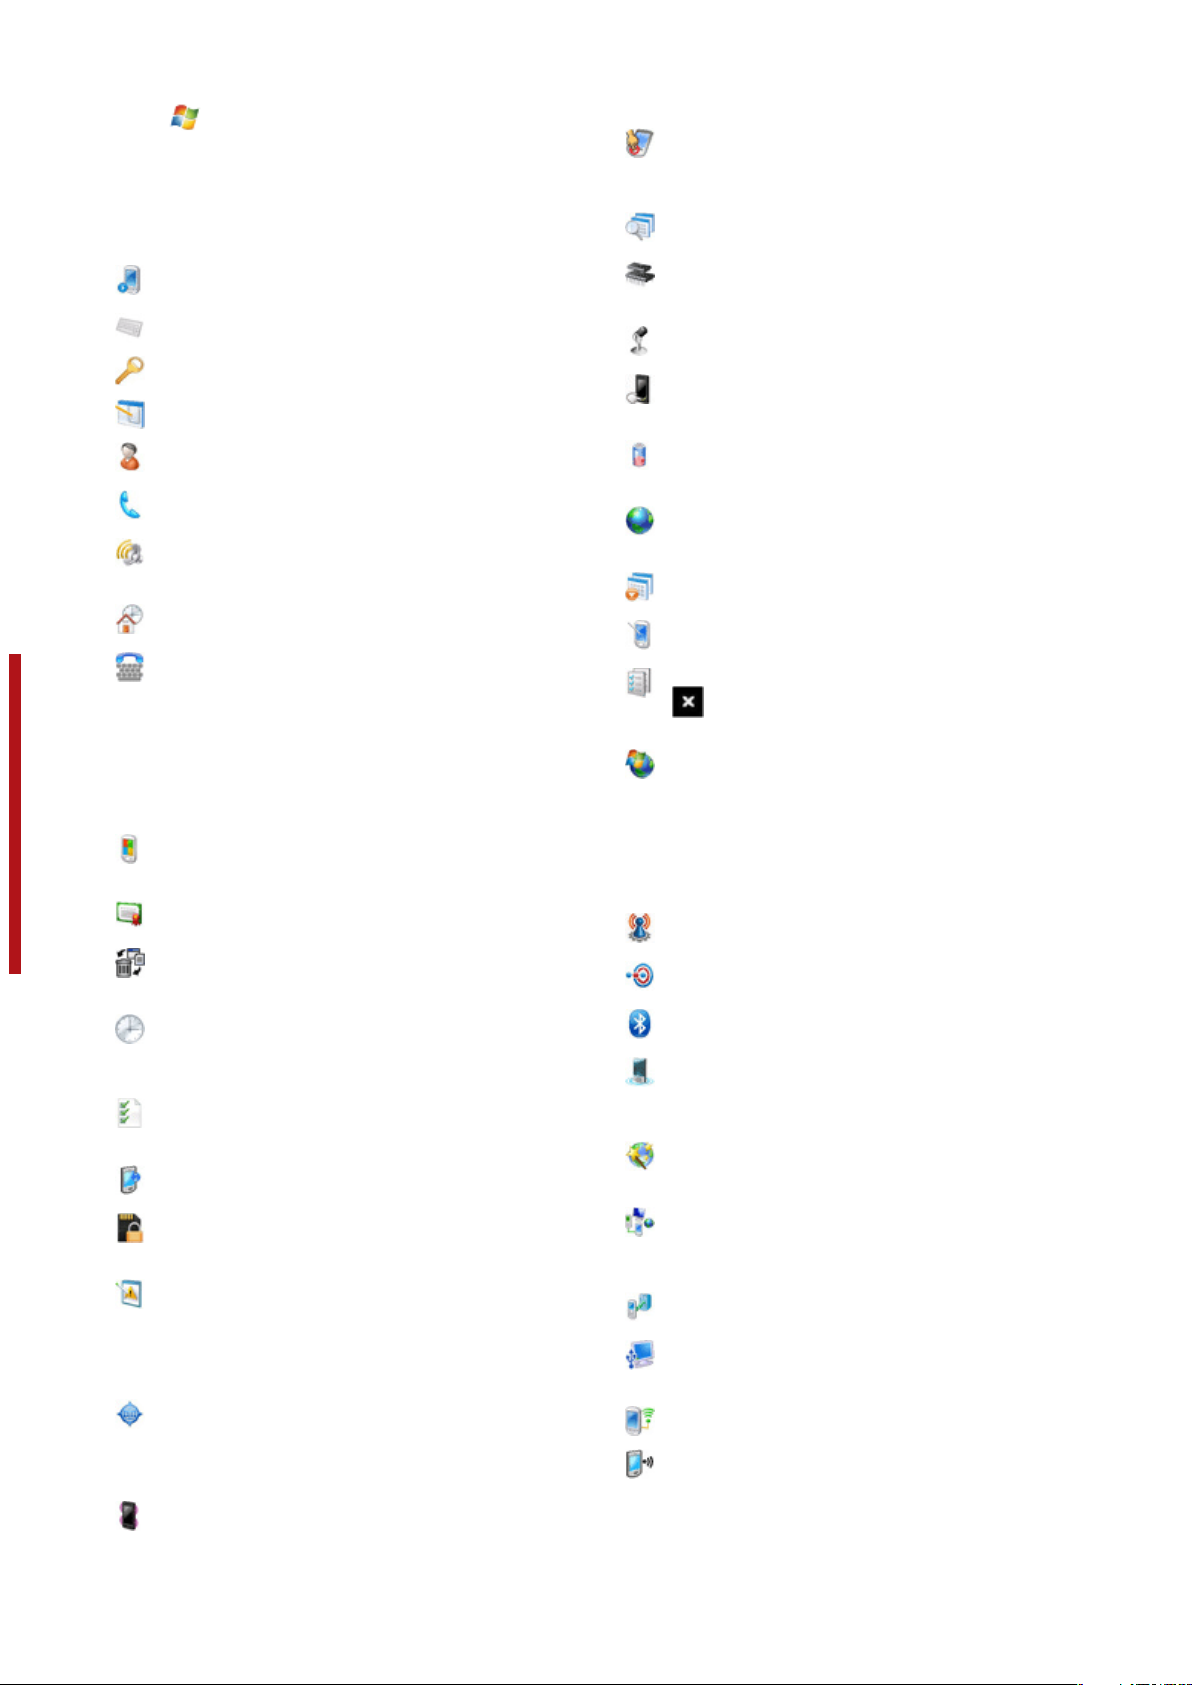
1 Tap to call a number you dialled using the phone keypad, or
a highlighted contact.
2 Call History
3 Contacts
4 Speed dial
This is a draft publication intended for internal use only.
To make a voice call
1
Press .
2
Tap
3
Scroll to a contact, then press .
4
To end the call, press
Make sure you do not block the speaker with your hand when
using the speakerphone.
.
To make an international call
1
Press <HW Call key icon>.
2
Tap and hold down < 0+ icon> to get the international call
prefix.
3
Enter the country/region code, area code (whithout the first
zero) and phone number.
4
Tap <SW Call key icon>.
To make an emergency call
1
Press <HW Call key icon>.
2
To display the virtual keypad, if not displayed, tap<keypad
icon>.
3
Dial the local emergency number, or look it up on the SIM
card, if available.
4
Tap <SW Call key icon>.
Usually no SIM card or PIN code is required for emergency calls,
but this can be operator-dependent. Contact your operator for
more information.
To make a video call
1
Press .
2
Tap
3
Scroll to a contact, then tap Menu > Video Call.
4
To end the call, press
.
.
receiving calls
To answer a call
•
Press <HW Call key icon>.
To reject a call with busy tone
•
Press <HW End call key icon>.
Features
Conference call
You can start a conference call when you have an ongoing call
.
and one or several calls on hold, or an incoming call during an
ongoing call.
To set up a conference call
1
Make a call.
2
Put the call on hold and make a new call, or accept a new
incoming call.
3
Tap Menu > Conference.
This is an Internet version of this publication. © Print only for private use.
Phone
9
Page 10

Setting up your phone
Basic settings
Owner information
Having owner information displayed on the Today screen makes
it easier for someone to return your phone to you if it is lost.
To enter owner information
1
Tap >Settings > Personal tab > Owner Information.
2
On the Identification tab, enter your personal information.
If you don’t see owner information on the Today screen, tap
>
Settings
>
Personal
the
Owner Info
check box and select ok.
To display owner information when the device is turned on
1
Tap >Settings > Personal tab > Owner Information.
2
On the Options tab, mark the Identification information
check box.
3
If you want additional text displayed, tap the Notes tab and
enter the text (for instance: Reward if found).
4
On the Options tab, mark the Notes check box then tap ok.
Time and date
To set time and date
•
Tap > Settings > the System tab > Clock & Alarms > the
Time tab.
To set time and date for a different location
1
Tap > Settings > System tab > Clock & Alarms > Time
tab.
2
Tap Visiting.
3
Select the correct time zone and change the time or date.
Regional settings
The style in which numbers, currency, dates, and times are
displayed is specified in regional settings.
To change regional settings
1
Tap >Settings >System tab > Regional Settings.
2
This is a draft publication intended for internal use only.
On the Region tab, select your region from the list.
3
To customize settings further, tap the appropriate tabs and
select the desired options.
Changing region does not change the Operating System
language of your phone.
The region you select determines which options will be available
on the other tabs.
Personalizing
Personalizing the Today Screen
The Today screen shows your upcoming appointments, active
tasks, and information about incoming messages. You can
customize what to display on the Today screen.
To customize the Today screen
1
Tap > Settings > Personal tab > Today.
2
On the Appearance tab, select the desired theme for the
background of the Today screen.
3
On the Items tab, select the items you want to appear on the
Today screen.
To change the order of items displayed on the Today screen, tap
the item, and tap
To use a custom background image
1
Tap > Settings > Personal tab > Today.
2
Mark the Use this picture as the background check box, and
tap Browse to view a list of your picture files.
3
Tap the file name of the picture you want to use.
Move Up
tab >
or
Today
. On the
Move Down
4
Tap ok.
To set options for displaying appointments on the Today
screen
1
Tap > Settings > Personal tab > Today.
2
Tap the Items tab.
3
Select Calendar and tap Options….
4
Do any of the following:
•
Select Next appointment to show only the next
appointment in your schedule, or Upcoming
appointments to show multiple appointments.
•
Unmark the Display all day events check box if you do not
want to display all-day events.
To set options for displaying tasks on the Today screen
Items
tab, mark
1
Tap
2
Tap the Items tab.
3
Select Tasks and tap Options….
4
Do any of the following:
•
•
> Settings > Personal tab > Today.
Under Display number of, mark check boxes for the type
of tasks you want to appear on the Today screen.
In the Category list, select whether to display only tasks
assigned to a specific category or to display all tasks.
Customize the Start menu
You can choose which items appear in the Start menu.
To customize the Start menu
1
Tap
2
Mark the check boxes of the items you want to appear in the
Start menu. You can select up to seven items.
> Settings > Personal tab > Menus.
Customizing Phone Settings and Services
You can customize phone settings, such as the ring type and
ringtone to be used for incoming calls, and the keypad tone to
be used when entering phone numbers. You can also set up your
device to use phone services such as Call Waiting, Call
Forwarding and more.
To access phone settings and services
•
Tap > Settings > Personal tab > Phone.
Ringer settings
To change ring type and ring tone for an incoming call
1
Tap > Settings > Personal tab > Sounds &
Notifications > Notifications tab.
2
Select Ring type.
3
Select Ring tone.
Keyboard tone
You can change the tone you hear when entering a phone
number on the keyboard. If set to Long tones, the tone is heard
continuously for as long as the number on the keyboard is
pressed. Use this setting if you are having trouble accomplishing
tasks that rely on tones from your phone such as accessing
messages from an answering machine. If set to Short tones, the
tone is heard only for one or two seconds. If set to Off, no tone
will be heard.
To set keyboard tone
1
Tap > Settings > Personal tab > Phone > Phone tab.
2
In the Keypad list, tap the option you want.
Phone services
Your phone can directly link to the mobile phone network, and
.
allow you to access and change the settings of various phone
services.. Phone services may include Call Forwarding, Call
Waiting, Voicemail and more. Contact your wireless service
provider to find out about the availability of phone services for
your phone.
Setting up your phone
10
This is an Internet version of this publication. © Print only for private use.
Page 11

To access and change settings of phone services
1
Tap > Settings > Personal tab > Phone > Services tab.
2
Select the service you want to use, then tap Get Settings....
3
Choose your desired options, then tap ok.
Storage, hard reset or updating the ROM system software.
Otherwise you will no longer be able to access the encrypted files
on the storage card. Use ActiveSync or Windows Mobile Device
Center to transfer files between your storage card and computer.
After the procedure, copy your files back to the storage card.
Networks
You can view which mobile phone networks are available and
arrange them in the order that you want your phone to access
them. For example, if your first preferred network is unavailable,
your phone will try to access your second preferred network.
To view available networks
1
Tap > Settings > Personal tab > Phone > Network tab.
2
Under Network selection, select Manual. The list of available
networks is then displayed.
To set preferred networks
1
Tap > Settings > Personal tab > Phone > Network tab.
2
Tap Set Networks and follow the instructions on the screen
to arrange the networks according to your preference.
3
After arranging the networks in the preferred order, tap ok to
return to the Network tab.
4
In the Network selection list, select Automatic.
5
Tap ok.
Protecting the phone
You can protect the phone from unauthorized or accidental use
by activating locks.
To activate SIM card lock
1
Tap > Settings > the Personal tab > Phone > the PIN/
PIN2 tab.
2
Mark the Require PIN when phone is used check box.
3
Tap ok.
Your PIN is supplied by your network operator.
To activate the phone lock
1
Tap > Settings > the Personal tab > Lock.
2
Mark the Prompt if device is unused for check box, and tap
a time.
3
Select Password type, confirm the password and tap ok.
To use key lock
This is a draft publication intended for internal use only.
1
Press the power button to turn off the screen temporarily and
switch the phone to sleep mode.
2
To wake up the phone, press the power button. The phone is
also awakened by opening the keyboard, or by receiving a
call or a message.
Alternatively, you can lock the keys by pressing and holding
. To unlock the keys, tap Unlock.
IMEI number
Keep a copy of your IMEI (International Mobile Equipment
Identity) number in case your phone is stolen.
To view your IMEI number
1
Press .
2
Tap .
To encrypt data on your storage card
1
On the Today screen, tap > Settings > System tab >
Encryption.
2
Mark Encrypt files placed on a storage card check box.
•
Encrypted files can be read only on the phone that encrypted
them.
•
Encrypted files are opened just like other files, provided you
are using the phone that encrypted them. There is no separate
step for you to take to read these files.
If Encrypt files placed on storage cards is or was enabled before,
then backup all files from the storage card before using Clear
Other Settings
Phone name
The phone name is used to identify your phone in the following
situations:
•
Synchronizing with a computer
•
Connecting to a network
•
Restoring information from a backup
If you synchronize multiple phones with the same computer, each
phone must have a unique name.
To change the phone name
1
Tap
2
Tap the Device ID tab.
3
Enter a name.
The phone name must begin with a letter, consist of letters from
A to Z, numbers from 0 to 9, and cannot contain spaces. Use the
underscore character to separate words.
Display settings
To increase or decrease the size of text on the screen
1
Tap > Settings > System tab > Screen > Text Size tab.
2
Move the slider to increase or decrease the text size.
Button settings
Your phone might come with programs already assigned to
hardware buttons. You can customize these buttons to open the
programs you use most, or to perform certain shortcuts.
To reassign programs or shortcuts to program buttons
1
Tap > Settings > Personal tab > Buttons.
2
A list of buttons and their current assignments are displayed
on the Program Buttons tab.
3
Tap the button you want to reassign. To help you identify the
buttons, there are numbers and icons representing the
original function of the button.
4
In the Assign a program box, tap the program or shortcut you
want to assign.
5
Tap ok.
To reassign a program button for switching between
Portrait and Landscape modes
1
Tap > Settings > Personal tab > Buttons.
2
On the Program Buttons tab, in the Select a button box, tap
the button you want to reassign, for example Left key.
3
In the Assign a program box, select Rotate Screen.
4
Tap ok.
You can now use your left program button (hardware button) to
switch between Landscape and Portrait modes. Note that you
cannot use it to control corresponding software keys any more.
Word completion options
Word completion helps you enter text faster by suggesting words
as you enter letters using the hardware keyboard or input
methods. You can set the number of suggested words to display,
when to show the word list and more.
To set Word completion on
1
Tap > Settings > Personal tab > Input > Word
Completion tab.
2
Make sure the Suggest words when entering text check box
is marked.
3
By default, the suggested word list appears whenever you
enter a space. To make the word list appear after letters are
entered, select the number of letters that you want to be
entered before displaying the word list.
> Settings > System tab > About.
This is an Internet version of this publication. © Print only for private use.
Setting up your phone
11
Page 12

4
The suggested word list shows up to four words by default.
You can change the number of words to display in the
suggested list.
5
Make sure the Enable Auto Correct check box is marked if
you want mistyped words to be corrected automatically.
The word database learns and adds more words as you enter new
words during text entry. To delete the added words and reset the
database back to the default, tap Clear Stored Entries.
Alarms and notifications
To set an alarm
1
Tap > Settings > System tab > Clock & Alarms >
Alarms tab.
2
Tap <Description> and enter a name for the alarm.
3
Tap the day of the week for the alarm. You can select multiple
days by tapping each desired day.
4
Tap the time to open a clock and set the time for the alarm.
5
Tap the alarm icon to specify the type of alarm you want. You
can choose a flashing light, a single sound, a repeating sound,
or vibration.
6
If you choose to play a sound, tap the list next to the Play
sound check box and tap the sound you want.
To choose how to be notified about events or actions
1
Tap
Notifications.
2
On the Sounds tab, choose how you want to be notified by
marking the appropriate check boxes.
3
On the Notifications tab, in Event, tap an event name and
choose how you want to be notified by marking the
appropriate check boxes. You can choose from several
options, such as a special sound, a message, or a flashing
light.
This is a draft publication intended for internal use only.
> Settings > Personal tab > Sounds &
Synchronizing
Synchronizing your data is a way to always have your information
up to date and carry it with you in your phone, where ever you
go. You can synchronize the following types of information
between your computer and your phone:
•
Microsoft® Outlook® information, such as Outlook e-mail,
contacts, calendar, tasks and notes.
•
Media, such as photos, videos and music.
•
Favorites, which is Web page bookmarks under Mobile
Favorites.
•
Files, such as Microsoft® Office documents, pdf files and
more.
Before you can synchronize, you need to install and set up
synchronization software on your computer. What you should do
is depending on if you are using Windows XP or Windows Vista.
For more information see To set up synchronization on Windows
XP and To set up synchronization on Windows Vista.
To install ActiveSync
1
Insert the software CD into the disc drive on your computer.
2
ActiveSync is available in English and several other
languages. Select the desired language and click Next.
3
Click Setup and Installation.
4
Select the ActiveSync check box and click Install.
5
Read the license terms and click Accept.
6
When installation is complete, click Done.
7
Finish the installation by clicking Close.
Ways to synchronize
After you have installed the synchronization software in your
computer, you can synchronize your phone with your computer
using one of the following methods:
•
USB connection - When you connect the USB
cable between your phone and your computer,
the synchronization process starts automatically.
•
Bluetooth connection - You must first set up a
Bluetooth partnership between your phone and
your computer before you can synchronize
information between them. For more information
about setting up a Bluetooth partnership, see
Bluetooth™ partnership. For information about
synchronizing through Bluetooth, see To
synchronize using a Bluetooth link.
•
Wireless connection - Synchronize with an
Exchange server using ActiveSync or Windows
Mobile Device Center.
Try to synchronize frequently in order to keep information up-todate in both your phone and your computer.
12
Synchronizing
Setting up synchronization
•
If your computer uses Windows XP® or other compatible
Windows operating system, you should use Microsoft
ActiveSync® 4.5 or later. You can find Microsoft ActiveSync®
on the CD that comes with the phone.
•
If your computer uses Windows Vista®, you should use
Windows® Mobile Device Center, which is part of Windows
Vista.
To set up synchronization on Windows XP
1
Install Microsoft ActiveSync® on your computer from the CD
that comes with the phone.
2
Connect the phone to your computer using the USB cable
that comes with the phone. The Synchronization Setup
Wizard automatically starts and guides you to create a
synchronization partnership.
3
Click Next on your computer.
4
To synchronize your phone with your computer, mark the
Synchronize directly with a server running Microsoft
Exchange check box and click Next.
5
Select the information types that you want to synchronize,
then click Next.
6
Click Finish.
This is an Internet version of this publication. © Print only for private use.
Page 13

To set up synchronization on Windows Vista
1
Connect the phone to your computer using the USB cable
that comes with the phone.
2
The Windows® Mobile Device Center automatically starts.
Click Set up your device.
3
Select the information types that you want to synchronize.
4
Type a name for the phone, and click Set Up.
Starting synchronization
To start synchronization from ActiveSync® on your
computer using USB
•
Connect the phone to your computer using the USB cable
that comes with the phone. ActiveSync® automatically opens
and the synchronization starts.
To start synchronization from the phone
1
Connect the phone to your computer using the USB cable
that comes with the phone.
2
Phone: Tap > Programs > ActiveSync.
3
Phone: Tap Sync.
To start synchronization from Windows® Mobile Device
Center on your computer
1
Connect the phone to your computer using the USB cable
that comes with the phone.
2
Computer: Click Start > All Programs > Windows Mobile
Device Center.
3
Computer: Click at the lower left part of the Windows®
Mobile Device Center window.
Synchronizing using a Bluetooth connection
You can connect and synchronize your phone with your
computer using a Bluetooth connection.
Your computer must have a built-in Bluetooth functionality or have
it installed with a Bluetooth adapter or dongle
To synchronize using a Bluetooth link
1
Set up Windows® Mobile Device Center or ActiveSync on
your computer. See Help in the phone for instructions.
2
In your phone, tap > Programs > ActiveSync.
3
Make sure the Bluetooth function in both your phone and your
computer is turned on and set to visible. For more information,
This is a draft publication intended for internal use only.
see To turn on Bluetooth™ functionality and make your phone
visible
4
5
.
Tap Menu > Connect via Bluetooth.
If this is the first time you connect to this computer using a
Bluetooth link, you must first complete the Bluetooth wizard
in your phone and set up a Bluetooth partnership between
your phone and the computer. For more information, see
Bluetooth™ partnership
To conserve battery power, turn off the Bluetooth function when
not in use.
.
Scheduled synchronization
Scheduled synchronization allows you to set specific times for
when your phone should connect and synchronize with the
Exchange server. This is an alternative to Direct Push, where all
changes and new items are immediately pushed from your phone
to your computer and from your computer to your phone.
With scheduled synchronization you can set a regular schedule
for synchronizing Outlook e-mails and other information. You can
set how often to synchronize during peak times (which usually
refer to your working hours) when e-mail volume is high, as well
as off-peak times when e-mail volume is low.
To set up scheduled synchronization
1
Tap
2
Tap Menu > Schedule.
3
Select a time interval in the Peak times box for how frequently
you want to receive e-mail.
4
Select a time interval in the Off-peak times box.
5
Mark the Send/receive when I click Send.
> Programs > ActiveSync.
6
Tap Adjust peak times to fit your schedule to set the days
and hours that make up your peak and off-peak times.
To disable all scheduled synchronization, set the values in the
Peak times
box and the
Off-peak times
box to
Manually
.
Changing which information is synchronized
You can change the information types and the amount of
information to synchronize for each type either on your device or
your computer. Follow the steps below to change
synchronization settings on your device.
Before changing synchronization settings on your phone it must
be disconnected from your computer.
To change which information is synchronized
1
Tap Start > Programs > ActiveSync.
2
Tap Menu > Options.
3
Select the check box for any items you want to synchronize.
4
To change synchronization settings for an information type,
select it and tap Settings. This will allow you to set the
download size limit, specify the time period of information to
download and more.
Use Windows Mobile Device Center
In Windows Mobile Device Center you can do the following:
•
Access synchronization settings to view and
change them.
•
Tag and transfer photos from your phone to the
Photo Gallery on your Windows Vista PC.
•
Synchronize music and video files using
Windows Media® Player. For more information,
see Windows Media® Player Mobile
•
View documents and other files in your phone.
See Windows Mobile Device Center Help for more information.
To access synchronization settings using Windows Vista
1
Click Start > All programs > Windows Mobile Device
Centeryour Windows Vista computer.
2
Click Mobile Device Settings.
To tag and transfer photos from your phone
1
Click Start > All Programs > Windows Mobile Device
Center on your Windows Vista computer.
2
Click Pictures, Music and Video > _new pictures/video clips
are available for import. A wizard will guide you through the
process.
To synchronize music and video files using Windows Media
Player
1
Click Start > All Programs > Windows Mobile Device
Center on your Windows Vista computer.
2
Click Pictures, Music and Video > Add media to your device
from Windows Media Player. For more information, see
Windows Media® Player Mobile.
To view documents and files in your phone
1
Click Start > All Programs > Windows Mobile Device
Center on your Windows Vista computer.
2
Click File Management > Browse the content of your
device.
This is an Internet version of this publication. © Print only for private use.
Synchronizing
13
Page 14

Messaging
Messaging is where your text messages (SMS), multimedia
messages (MMS), and e-mails are located. When you receive
new messages, you can open them from the Today screen.
Simply tap the type of message that you want to open.
To select a messaging account
1
Tap
2
From the account picker, select an account.
To select a messaging account from a message list
•
Tap Menu > <Go To> to switch to other types of messaging
accounts.
To configure message account settings
•
Tap Menu > Options on the account picker screen.
To configure message account settings from a message list
•
Tap Menu > Tools > Options.
You can get your e-mails in your phone. You may need the
following information from your network administrator:
•
Server address
•
Domain name
•
User name and password
To set up Microsoft® Outlook® e-mail through Exchange
server
1
Tap > Messaging > Setup E-mail.
2
Enter your e-mail address and password, select Save
password option, then tap Next.
3
Select Try to get the e-mail settings automatically from the
Internet, then tap Next.
4
If automatic settings could not be found, select Exchange
server in the Your e-mail provider list, then tap Next.
5
Tap Next again.
6
Mark the Attempt to detect Exchange Server Settings
automatically check box, then tap Next.
7
If server settings are not detected, enter them manually, then
tap Next.
8
Enter your user name, password and domain, then tap Next.
9
If prompted, enter the server address, then tap Next.
10
Select the data you want to sync, then tap Finish.
This is a draft publication intended for internal use only.
Some e-mail features depend on the Microsoft Exchange Server
version used in your company. Check with your network
administrator for the availability of these features.
To set up other types of e-mail accounts
1
Tap > Messaging > Setup E-mail.
2
Enter your e-mail address and password. Select Save
password option, then tap Next.
3
Select Try to get the e-mail settings automatically from the
Internet, then tap Next.
4
If automatic settings could not be found, select an option in
the Your e-mail provider list, then tap Next.
5
Enter your name and account display name, then tap Next.
6
If applicable enter incoming mail server address and account
type, then tap Next.
7
Enter your user name and password for the e-mail account,
select Save password option, then tap Next.
8
Tap Advanced Server Settings.
9
Select Network connection, then tap Done.
10
Enter the outgoing mail server address, then tap Next.
11
Select an option of Automatic Send/Receive, then tap
Finish.
Handling e-mail messages
To check for new e-mail
1
Tap > Messaging.
2
Tap your e-mail account.
3
Tap Menu > Send/Receive.
> Messaging.
To view an attachment
1
Tap > Messaging.
2
Tap desired e-mail account.
3
Tap desired e-mail.
4
Tap the attachment to download.
5
Tap the attachment again.
To write new e-mail
1
Tap
2
Tap desired e-mail account.
3
Tap Menu > New.
4
Enter the e-mail address manually or tap To: to add an
address from Contacts.
5
Enter subject.
6
Enter text.
7
To add an attachment tap Menu > Insert, and then select an
option.
8
Tap Send.
> Messaging.
To reply to an e-mail message
1
Tap > Messaging.
2
Tap desired e-mail account.
3
Tap desired e-mail.
4
Tap Menu > Reply.
5
Enter text, and then tap Send.
Direct push
Direct push technology enables you to receive new e-mails in
your phone as soon as they arrive in your inbox on the Exchange
server. This feature also works for items such as contacts,
calendar and tasks.
To turn on and off Direct push
1
Tap > Settings > the Connections tab > Comm
Manager.
2
Select an option for Microsoft Direct Push.
Frequent updates may be costly.
SMS and MMS
Before you use messaging you must have a service center
number. The number is supplied by your service provider and is
usually saved on the SIM card during the start-up. If not, contact
your operator.
To open an SMS or MMS
1
Tap > Messaging > SMS / MMS.
2
Tap desired SMS or MMS.
To navigate between folders
1
Tap
2
Tap Inbox.
3
Tap the folder you want to open.
To create and send an SMS
1
Tap
2
Tap Menu > New > SMS.
3
Enter the phone number manually or tap To: to add a phone
number from Contacts.
4
Enter text.
> Messaging > SMS / MMS.
> Messaging > SMS / MMS.
14
Messaging
This is an Internet version of this publication. © Print only for private use.
Page 15

5
Tap Send.
To request a delivery notification while composing a new
message
1
Tap Menu > Message Options....
2
Select the Request message delivery notifications check
box.
To always receive a delivery notification
1
In the text message list, tap Menu > Tools > Options.
2
Tap SMS / MMS.
3
Select the Request message delivery notifications check
box.
Receive text messages
Text messages are automatically received when the phone
function is turned on. When the phone is turned off, text
messages are held by your wireless service provider until the
next time the phone is turned on.
To copy text messages to the SIM card
1
Tap Messaging > SMS / MMS.
2
In the message list, select the text message you want to copy .
3
In the conversation list, select the text message you want to
copy.
4
Tap Menu > <Copy to SIM>.
To copy text messages from the SIM card
1
Tap Messaging > SMS / MMS.
2
In the message list, select the text message you want to copy.
3
Tap <Copy to Phone>.
Text messages stored on your SIM card are automatically
displayed in the Inbox folder. Copying them to your device results
in duplicate messages in the Inbox folder when your SIM card is
in use.
To create and send an MMS
1
Tap > Messaging > SMS / MMS.
2
Tap Menu > New > MMS.
3
Tap a template or tap Custom to open a blank picture
message.
4
Enter the phone number manually or tap Menu > Add
recipient to add a number from Contacts or Call History.
5
Enter a subject.
6
Tap
7
This is a draft publication intended for internal use only.
Tap Insert text here to enter text.
8
Tap Insert audio to insert audio.
9
Tap Send.
to insert a photo or a video clip.
6 Insert calendar appointment
To edit or delete a phrase on the My Text list, tap and hold a string,
then tap Edit or Delete from the shortcut menu. To create and add
a new phrase to the list, tap New.
Adding text to an MMS message
When you tap Insert text here in your MMS message, an empty
screen appears where you can enter your text. You can insert the
following types of information:
1 Enter your own text
2 Choose from common words or phrases from the My Text
list
3 Include a Favorites link
4 Add an emoticon
5 Insert contact information
This is an Internet version of this publication. © Print only for private use.
Messaging 15
Page 16

Browsing the Web
Connecting to the Internet
Connect to the Internet by using GPRS/HSPA or Wi-Fi. Before
connecting to the Internet by GPRS/HSPA you need settings
from your service provider. The settings are usually saved on the
SIM card during the start-up. If not, contact your operator.
To start browsing
1
Tap > Internet Explorer.
2
Enter the Web address in the address field, and then tap .
•
<Options> – Specify settings for Internet Explorer
•
<General tab> – Set the Home page (start page)
and the default character set used by Internet
explorer.
•
<Memory tab> – Release memory space by
setting for how long Web links should be saved
and by deleting saved Web files.
•
<Security tab> – the security settings help you
to avoid insecure Web pages. Cookies are files
that Web pages store on your phone that give
you access to different services on a Web page.
Menu options
Tap and hold the screen to open a menu with useful options.
Menu at the bottom of the screen provides you a lot of options
for Internet Explorer.
•
<Zoom out> – View a lager part of the Web site
•
<Home> – Open your start page
•
<Address Bar> – Open a new Web site. Enter a
Web address in the highlighted address bar.
•
Favorites... – Open a list with bookmarks to your
favorite web sites
•
Add to favorites – Add a bookmark to an open
Web site to Favorites. You can also create sub
folders to organise your favorites.
•
<Forward> – Return to the previously visited Web
page that you have left using the Back command
•
<Refresh> – Reload the current Web site
•
<View> – Open a sub menu and select how to
view the Web pages
•
<Edit> – Cut, copy or paste selected text
•
Tools – Open a sub menu where you can specify
settings for Internet Explorer.
View menu options
You can change the way that you view Web pages in Internet
Explorer to minimize scrolling and increase the page download
This is a draft publication intended for internal use only.
speed.
•
Zoom level – Select a zoom level that suits the current Web
site.
•
One column – Arranges the page into a column as wide as
the screen. This means you will rarely have to scroll
horizontally. This view usually downloads more quickly than
other views.
•
Fit to screen – Maintains a layout similar to what you see on
a desktop computer. This makes items smaller and arranges
the page so you can see most of it without having to scroll
horizontally.
•
Desktop – Keeps the same layout and size as a desktop
computer. This will require both horizontal and vertical
scrolling.
•
Full screen – This hides the menu bar and status bar and uses
the whole screen to display the Web page.
•
Show pictures – Clear this option to let the Web page
download quicker.
Tools menu options
The Tools menu contains useful settings and options for Internet
explorer.
•
History – View a list of the recently opened Web
sites. Select a site in the list to open it.
•
<Send Link> – Use one of the listed methods to
send a link to the current Web site to another
device
•
<Properties> – View information of the current
Web site
Zooming
To zoom in and out in a Web page
1
On a Web page, tap Menu > View > Zoom level.
2
Select an option.
To pan a page, touch and hold the screen, then move your finger.
To change Web page display
1
On a Web page, tap Menu > View.
2
Select an option.
Favorites
You can create and edit Favorites as quick links to your favorite
Web pages.
To add a favorite Web page
1
In Internet Explorer tap Menu > Add to favorites.
2
Enter a name, address and select the folder it will be saved
in, and then tap Add.
To go to a favorite Web page
1
In Internet Explorer tap Menu > Favorites....
2
Tap a favorite in the list.
Browsing previously visited Web pages
You can view Web pages you have previously visited.
To browse previously visited Web pages
1
In Internet Explorer tap Menu > Tools > History.
2
Tap a page title in the list.
Personalizing
To change home page
1
Browse to a Web page.
2
Tap Menu > Tools > Options > the General tab.
3
Tap Use current.
4
Tap ok.
To clear history
1
In Internet Explorer tap Menu > Tools > Options > the
Memory tab.
2
Tap Clear History.
3
Tap ok.
To clear cookies
1
In Internet Explorer tap Menu > Tools > Options > the
Security tab.
2
Tap Clear Cookies.
3
Tap ok.
Web feeds
You can subscribe to and download frequently updated content
such as news using Web feeds. Web feeds are accessed through
Sony Ericsson panel.
Browsing the Web
16
This is an Internet version of this publication. © Print only for private use.
Page 17

To add a Web feed
1
In Internet Explorer browse to a Web page with Web feeds.
2
Copy the URL by tapping and holding the URL, and then tap
Copy.
3
Go to the Sony Ericsson panel.
4
Tap Options > Web Feeds tab.
5
Tap the next available position.
6
Paste the URL into the address field at the top of the screen
by tapping and holding, and then tap Paste.
7
Select the number of blocks for the Web feed. Each block
contains two rows.
8
Tap ok.
To view Web feeds
1
In the Sony Ericsson panel tap the desired Web feed.
2
Choose the information you want to view, then tap Go to
Site.
To update Web feeds
•
In the Sony Ericsson panel tap Update.
To schedule Web feeds update
Getting connected
Bluetooth™ technology
Bluetooth™ technology enables wireless communication over
short distances. Devices with Bluetooth capabilities can
exchange information over a distance of about eight meters
without requiring a physical connection.
Bluetooth™ modes
Bluetooth™ functionality in your phone operates in three
different modes:
•
On – Bluetooth functionality is turned on. Your phone can
detect other Bluetooth-enabled devices, but they cannot
detect your phone.
•
Off – Bluetooth functionality is turned off. You can neither
send nor receive information over a Bluetooth link. Turn off
Bluetooth functionality when not in use to conserve battery
power, or in places where using a wireless device is
prohibited, such as on board an aircraft or in hospitals.
•
Visible – Bluetooth functionality is turned on, and other
Bluetooth-enabled devices can detect your phone.
By default, Bluetooth functionality is turned off. To have it turned
on by default, turn it on, then immediately turn off your phone.
When you next time turn on your phone, Bluetooth functionality
is on.
To turn on Bluetooth™ functionality and make your phone
visible
1
Tap > Settings > Connections tab > Bluetooth™ >
Mode tab.
2
Mark the Turn on Bluetooth and Make this device visible to
other devices check boxes.
3
Tap ok.
This is a draft publication intended for internal use only.
1
In the Sony Ericsson panel tap Options > General tab.
2
Select an option in Web Feeds Update Time.
3
Tap ok.
Frequent updates may be costly.
Calling while browsing
To make a call while browsing
•
Press .
Bluetooth™ partnership
A Bluetooth™ partnership is a relationship you create between
your phone and another Bluetooth-enabled device in order to
exchange information in a secure manner.
To create a Bluetooth™ partnership
1
Tap > Settings > Connections tab > Bluetooth™.
2
On the Devices tab, tap Add new device. Your phone will
then search for other Bluetooth devices and display them in
the box.
3
Tap the desired device name.
4
Tap Next.
5
Specify a passcode to establish a secure connection. The
passcode can be 1 to 16 characters.
6
Tap Next.
7
Wait for the paired device to accept the partnership. The
receiving party needs to enter the same passcode that you
specified.
8
The name of the paired device is displayed. You may edit and
enter a new name for it.
9
Mark the check boxes for the services you want to use from
the paired device.
10
Tap Finish.
Creating a Bluetooth partnership between two devices is a onetime process. Once a partnership is created, the devices will
recognize each other automatically when they are close enough
and have the Bluetooth function on. There is thus no need to enter
the passcode again.
To accept a Bluetooth™ partnership
1
Ensure that Bluetooth™ functionality is turned on and that
your phone is in visible mode.
2
Tap Yes when prompted to establish a partnership with the
other device.
3
Enter a passcode (the same passcode that is entered on the
device requesting the partnership) to establish a secure
connection. The passcode must be between 1 to 16
characters.
4
Tap Next.
This is an Internet version of this publication. © Print only for private use.
Getting connected
17
Page 18

5
Tap Finish. You can now exchange information with the
paired device.
To rename a Bluetooth partnership, tap and hold the name of the
partnership on the
then tap
Edit
To delete a Bluetooth partnership, tap and hold the name of the
partnership on the
then tap
Delete
.
.
Devices
tab of the Bluetooth settings screen,
Devices
tab of the Bluetooth settings screen,
Connecting a Bluetooth™ handsfree or stereo headset
For handsfree phone conversation, you can use a Bluetooth™
handsfree headset such as a car kit with your phone. Your phone
also supports A2DP (Advanced Audio Distribution Profile) which
means you can use a Bluetooth stereo headset for handsfree
phone conversations and for listening to stereo music.
To connect a Bluetooth™ handsfree or stereo headset
1
Make sure that both your phone and the Bluetooth™ headset
are turned on and within close range, and that the headset is
visible. Refer to the manufacturer’s documentation to find out
how to set the headset in visible mode.
2
Tap > Settings > Connections tab > Bluetooth.
3
On the Devices tab, tap Add new device. Your phone will
then search for other Bluetooth devices and display them in
the box.
4
Tap the name of the Bluetooth headset, then tap Next and
your phone will automatically pair with the Bluetooth headset.
5
Make sure the Hands Free check box is marked. If your
headset is a stereo headset, also make sure Wireless
Stereo is marked.
6
Tap Finish. While the Bluetooth stereo headset is connected,
the headset icon will appear on the title bar.
If a Bluetooth stereo headset is disconnected, turn on the headset
and repeat steps 1 to 3 above. Tap and hold the name of the
Bluetooth stereo headset and tap Set as Wireless Stereo.
Windows® Mobile will automatically try one of the preconfigured
passcodes (0000, 1111, 8888, 1234) to pair the Bluetooth headset
with the device. If this fails, you have to manually enter the
passcode delivered with your headset.
Beaming information using a Bluetooth™ connection
This is a draft publication intended for internal use only.
You can beam information, such as contacts, calendar items,
and tasks, as well as files from your phone to your computer or
to another Bluetooth™-enabled device.
If your computer does not have built-in Bluetooth capability, you
need to connect a Bluetooth adapter or dongle to your computer.
To receive all incoming beams in your phone
1
Tap > Settings > Connections tab > Beam.
2
Make sure the Receive all incoming beams check box is
marked.
To beam information to a computer
1
Turn on Bluetooth™ functionality in your phone, and make the
phone visible. For more information, see To turn on
Bluetooth™ functionality and make your phone visible.
2
Create a Bluetooth partnership, then enable your computer
to receive Bluetooth beams. If your computer has Windows
Vista or Windows XP SP2 and your computer’s Bluetooth
adapter is supported by your Windows version, do the
following:
1
In your computer, open Bluetooth Devices from the
Control Panel, then click the Options tab.
2
For Windows Vista, select Allow Bluetooth devices to find
this computer. For Windows XP SP2, select Turn
discovery on and Allow Bluetooth devices to connect to
this computer.
3
Create a Bluetooth partnership between your phone and
computer. For more information, see Bluetooth™
partnership.
4
In the Options tab of Bluetooth Devices, select Show the
Bluetooth icon in the notification area.
5
To enable your computer to receive Bluetooth beams,
right-click the Bluetooth icon at the bottom-right of your
computer screen and select Receive a File.
3
Now, you are ready to beam. In your phone, select an item to
beam. The item can be an appointment in your calendar, a
task, a contact card, or a file.
4
To beam a contact, tap Menu > Send Contact > Beam. To
beam other types of information, tap Menu > Beam [type of
item].
5
Tap the name of the device to which you want to beam.
6
If you beam a calendar item, task, or contact to your computer
and it is not automatically added to Outlook, select File >
Import and Export in Outlook to import it.
The default folder on your computer where beamed items are
stored may be C:\Documents and Settings\your_username\My
Documents in Windows XP or C:\Users\your_username\My
Documents in Windows Vista.
Using your phone as a Bluetooth™ modem
Through a Bluetooth™ connection you can connect your phone
to a notebook or desktop computer and use the phone as a
modem for the computer.
If your computer does not have built-in Bluetooth capability, you
need to connect a Bluetooth adapter or dongle to your computer.
For your computer to use the Internet connection of your phone,
activate Internet Sharing in your phone, then set up a Bluetooth
Personal Area Network (PAN) between the computer and your
phone.
To activate Internet Sharing and set up a PAN
1
In your phone, turn on Bluetooth™ functionality and set it to
visible mode.
2
Initiate a Bluetooth partnership from your phone. For more
information, see
3
Tap
4
Select Bluetooth PAN as the PC Connection.
5
From the Network Connection list, select the name of the
connection that your phone uses to connect to the Internet.
6
Tap Connect.
7
In your computer, set up a Bluetooth Personal Area Network
(PAN) with your phone.
For Windows Vista:
1
Click Start > Control Panel > Network and Internet >
Network and Sharing Center.
2
Click Manage network connections and then under
Personal Area Network, double-click Bluetooth Network
Connection.
3
In the Bluetooth Personal Area Network Devices dialog
box, select your phone, then click Connect.
For Windows XP SP2:
1
Click Start > Control Panel > Network Connections.
2
Under Personal Area Network, click Bluetooth Network
Connection.
3
Under Network Tasks, click View Bluetooth network
devices.
4
In the Bluetooth Personal Area Network Devices dialog
box, select your phone, then click Connect.
8
On the Internet Sharing screen in your phone, check that your
computer has been successfully connected to the Internet
using your phone as a Bluetooth modem.
To create a Bluetooth™ partnership
> Programs > Accessories > Internet Sharing.
.
Wi-Fi/Wireless LAN
You can connect your phone to a wireless network to access the
Internet. You can connect at home (personal network) or in public
access zones (hot spots).
•
Personal networks – usually protected. A pass phrase or a key
is required from the owner.
•
Hot spots – usually unprotected but often requires you to log
on the operator's service before you get Internet access.
To connect to a wireless network
1
In the Sony Ericsson panel tap .
2
Select a network and tap OK.
Getting connected
18
This is an Internet version of this publication. © Print only for private use.
Page 19

To turn on and off Wi-Fi
•
In the Sony Ericsson panel tap or .
Using Wi-Fi consumes battery power. Turn off Wi-Fi when not in
use.
Wi-Fi can also be turned on and off in Comm Manager.
Settings
Some settings depend on the network configuration. Check with
the network administrator for information regarding settings.
To change settings
1
Tap > Settings > the Connections tab > Wireless LAN.
2
Enter new settings, and then tap ok.
Status icons
Wi-Fi enabled
Scanning for available Wi-Fi connection
Wi-Fi connected
To turn Airplane Mode on or off
•
In the Sony Ericsson panel tap or .
Windows Live Messenger
Communicate online with Windows Live Messenger using your
existing Windows Live ID.
To set up Messenger
1
Tap > Programs > Messenger.
2
Tap Sign in and follow the instructions.
To sign in to Messenger
1
Tap > Programs > Messenger.
2
Tap Sign in.
To send an instant message
1
This is a draft publication intended for internal use only.
Tap > Programs > Messenger.
2
Select a contact in the list, then tap Send IM.
3
Enter your message, then tap Send.
GPS – Location-based services
Your phone is equipped with an A-GPS receiver that uses
satellite signals to calculate your location.
Using the A-GPS
When you use features that require the A-GPS receiver to find
your location, make sure you have a clear view of the sky. If the
A-GPS receiver does not find your location after a few minutes,
move to another location.
QuickGPS
QuickGPS lets you download current satellite position and timing
information from a server instead of from the satellites. This help
speed up the time for determining GPS position.
To use QuickGPS
1
Tap > Programs > QuickGPS.
2
Tap Download.
Google Maps™ for mobile
Google Maps™ lets you view your current location, find other
locations and calculate routes.
When you start Google Maps your approximate location is shown
using information from nearby mobile base towers. When the
GPS receiver finds your location, the GPS location replaces the
approximate location.
To use Google Maps
•
Tap > Programs > Google Maps.
To view help about Google Maps
•
In Google Maps, tap Menu > Help.
Wayfinder Navigator™
Wayfinder Navigator™ takes you to your destination by voice
guides. Wayfinder Navigator can be installed from the CD that
comes with the phone or downloaded from the Internet.
To install Wayfinder
•
Tap > Programs > Wayfinder.
To view help about Wayfinder
•
In Wayfinder, tap Menu > Help.
This is an Internet version of this publication. © Print only for private use.
GPS – Location-based services 19
Page 20

Panels
Panels are a new and exciting feature of the XPERIA X1. They are
one-touch access points to your favorite mobile experiences.
You can arrange them as you want and download new ones for
your phone at www.sonyericsson.com/fun.
Portrait and landscape views
Portrait views
Choosing panels
To open and close panel views
•
Press .
Panel view
Media Xperience
panel
Sony Ericsson
panel
Landscape views
Media Xperience panel
This is a draft publication intended for internal use only.
Sony Ericsson panel
Panel view
1 Panel.
2 Switch to card view.
3 Switch to setup view.
Card view
Panel view
The functions are the same for both portrait and landscape
views, and the panels will be explained in portrait view only.
20 Panels
This is an Internet version of this publication. © Print only for private use.
1 Switch to left handed card view and panel view.
Page 21

Setup view
1 Position for fixed Microsoft Today panel.
2 Position occupied by Sony Ericsson Panel 1, as an example.
3 Free position for a panel.
4 Return key.
5 Position occupied by XPERIA Radio Panel, as an example.
Managing panels
Switching between panels and applications
•
In a panel or an application, press to go to panel view.
•
In panel view, press to return to the most recently used
panel.
•
In an application you started from the Start menu, press
to return to the most recently used panel.
3D Fish panel
This panel is an eye-catcher and provides some basic
information. By tapping the screen, you can influence the
behavior of the fish. There are three or four fish, depending on
the state of your phone. The time and date follow the default
Windows format setting. The fish will follow your finger and react
to screen taps.
To open a panel
•
In a panel or card view, tap the panel.
To close a panel
•
Press .
To add a panel
1
In panel view, tap .
2
Tap
in a free position.
3
In the scroll list, tap the panel you want to use.
4
Tap Select.
5
Tap
to return to panel view.
This is a draft publication intended for internal use only.
To replace a panel
1
In panel view, tap .
2
Tap
of the panel you want to replace.
3
Tap of the selected panel.
4
In the list, tap the panel you want to use.
5
Tap Select.
6
Tap to return to panel view.
To remove a panel
1
In panel view, tap .
2
Tap of the panel you want to remove.
3
Tap
of the selected panel.
4
In the list, tap the No Panel option.
5
Tap Select.
6
to return to panel view.
Tap
To make settings, if this option is available
1
In panel view, tap .
2
Tap of the panel you want to set up.
3
Tap
4
Make your settings and tap ok.
5
Tap to return to panel view.
.
1 Demekin. The fish’s color turns red when battery charge is
below 10% of full.
2 Ranchu. The fish’s color turns to gold when there is an
unread message.
3 Wakin. The fish’s color is silver when sound is off.
4 Ryukin. If this fish is present there is a missed call.
XPERIA Radio panel
With this panel directly on your desktop, you control the FM
radio.
1 Preset stations. Six different radio channels can be stored.
A dot in the upper left corner of a key indicates an occupied
key.
2 Channel information.
3 RDS indicator.
4 Stereo/mono indicator.
5 Fine tune. Touch to fine-adjust.
This is an Internet version of this publication. © Print only for private use.
Panels 21
Page 22

6 Seek downwards.
7 Volume down. Tap and hold to decrease gradually.
8 Audio output to either earphones or the phone built-in
loudspeaker.
9 Clock, 12 or 24 hours format.
10 Current radio channel frequency.
11 Seek upwards.
12 Volume level bar. Tap and drag to adjust volume.
13 Volume up. Tap and hold to increase gradually.
14 Power.
To store a current radio channel
1
From the preset stations bar, tap a free key.
2
Tap and hold the key for more than 3 seconds.
To make settings
1
Press
2
Tap .
3
Tap
4
Tap
5
Make your settings and tap ok.
6
Tap
.
on the radio panel.
on the highlighted radio panel.
to return to panel view.
RDS indicators
RDS stands for Radio Data System and makes it possible to
receive extra information during reception of ordinary radio
programs. AF stands for Alternative Frequency. The radio
retunes to a different frequency providing the same station when
the received radio signal becomes too weak.
6 Appointments and shortcut to Calendar. Two
appointments can be shown for each block. Data is fetched
from Calendar.
7 Tasks and shortcut to Tasks. Two tasks can be shown for
each block. Data is fetched from Tasks.
8 Web Feeds reader. The set Web Feeds are shown
9 Shortcuts to set applications and recently used
applications.
10 Updates weather and Web Feeds.
11 Speed dialing entries.
12 Recently used applications.
13 Set up.
Connectivity buttons
Airplane Mode off
Airplane Mode on. Wi-Fi, Bluetooth™ and the phone
transmitter and receiver are switched off. Corresponding
icons are dimmed
Wi-Fi on
Wi-Fi off
Bluetooth on
Bluetooth off
Phone transmitter and receiver on
Phone transmitter and receiver off
Sony Ericsson panel
This panel shows time, calendar, weather and useful shortcuts
to control your phone and to show its status. You can set up the
panel to suit your needs. The panel is composed by a number of
small applications, called widgets. By tapping a widget, you start
the underlying application. The panel illustration shows an
This is a draft publication intended for internal use only.
example of how a panel can be set up.
1 Weather, date and temperature. Reflects the first city (City
1) set up in Options.
2 Clock and calendar. Reflects the city set up in Options.
Date format follows what is set up in Windows. Tap the
clock or calendar to adjust settings.
3 Shortcut to Messaging. Lights up when a message has
been received. Also shows the number of unread
messages.
4 Shortcut to the call list. Lights up when a call has been
missed. Also shows the number of missed calls.
5 Connectivity buttons.
Sound on
Sound off
Vibrating alert only
Design
The panel comprises ten blocks. You can use these blocks to
display widgets you choose. Some widgets take up more than
one block, and you can set up some widgets to appear in more
than one place
Blocks in portrait view
22 Panels
This is an Internet version of this publication. © Print only for private use.
Page 23

2 Blocks used.
3 Box for entering Web feeds addresses (URLs). Tap and hold
to open a menu with options.
4 Select the number of blocks to be shown for Web feeds.
Each block shows two rows of a Web feed.
Blocks in landscape view
Setting up
To set up the Sony Ericsson panel
•
Tap Options.
General tab
1 Blocks used. Red numbers mean too many blocks are set
up.
2 Color. Color theme for the panel.
3 Clock and Calendar. Clock and calendar layout.
4 City 1. Tap to select from cities and countries. Select
daylight saving time manually.
5 City 2. Tap to select from cities and countries. Select
daylight saving time manually.
6 Web Feeds update time interval. Web Feeds are updated
when the phone has an Internet connection and when Sony
Ericsson Panel 1 or Sony Ericsson Panel 2 is being used.
This is a draft publication intended for internal use only.
7 Connectivity Buttons.
8 Appointments. Select number of blocks for appointments
to be shown. 1 block shows two appointments and 2 blocks
show four appointments. 0 means that the appointment
widget is not shown at all.
9 Tasks. Select number of blocks for tasks to be shown. 1
block shows two tasks and 2 blocks show four tasks. 0
means that the tasks widget is not shown at all.
10 Temperature Scale. Celsius or Fahrenheit.
Web Feeds tab
To set up a preset Web feed
1
Tap a preset feed.
2
Select number of blocks.
To set up a new Web feed
1
Tap a position.
2
Select Other.
3
Enter the Web feeds address (URL).
4
Select number of blocks.
Launcher tab
1 Blocks used
2 Select number of blocks for shortcuts to applications,
speed dialling entries and recently used programs.
3 Recently used programs.
4 Move focus upwards.
5 Icon area. Each block of icons is numbered. Highlight an
icon and then select it to open a menu with options.
6 Shortcuts to applications.
7 Speed dialing entries.
8 Move focus downwards.
9 Sets shortcuts to files. The appropriate application will start
when the shortcut is tapped.
10 Sets speed dialing entries.
To set a shortcut to an application
1
In the icon area, tap an empty position.
2
Tap Set File Shortcut > +.
3
Select the application file.
To set a speed dialling entry
1
In the icon area, tap an empty position.
2
Tap Set Speed Dial > +.
3
Select an entry.
Position for Web feeds. Some are preset.
1
Media Xperience panel
With this panel, you can present various multimedia items, such
as photos, video clips, music and so on. You can use your finger
or the stylus to move between the different items. For more
information see Viewing photos and video clips.
Google™ panel
This panel enables search, maps, Picasa™, calendar and
Gmail™.
Due to configuration some of the panels may have to be
downloaded.
Panels 23
This is an Internet version of this publication. © Print only for private use.
Page 24

Microsoft Today panel
This panel shows useful information and shortcuts.
1 Time and date. Shortcut to Settings > System tab Clock &
Alarms
2 Getting started.
3 Owner information. Shortcut to Settings > Personal tab
Owner Information.
4 Unread messages. Shortcut to Messaging.
5 Active tasks. Shortcut to Tasks.
6 Active appointments. Shortcut to Calendar.
7 Windows Live sign in.
8 Windows Live search.
9 Device-lock status.
10 Key to Contacts.
11 Key to Calendar.
Picture storage
•
In phone memory: \My Documents\My Pictures\Camera.
•
On memory card: \Storage Card\DCIM.
Downloading new panels
To download a new panel with your phone
1
In the Internet browser, tap the bookmark for the Sony
Ericsson offline Web page.
2
Tap the link with the panel button.
3
On the Fun & Downloads Web page, choose your panel.
This is a draft publication intended for internal use only.
To add a panel
•
Follow the instructions in Choosing panels.
Slideshow panel
In the slideshow panel, you can show pictures you have taken
with the camera.
1 Selected picture.
2 Thumbnail carousel.
To move the carousel
•
Slide to the right or left anywhere on the screen.
To select a picture
•
In the carousel, tap a picture.
24 Panels
This is an Internet version of this publication. © Print only for private use.
Page 25

Multimedia
Windows Media® Player Mobile
You can use Windows Media® Player Mobile to play digital audio
and video files stored in your phone or on a network, such as on
a Web site.
To open Windows Media Player Mobile
•
Tap > Programs > Windows Media.
Tapping will close your Windows Media® Player. To change
the settings and let the music continue playing, tap
Settings >System
the
End progams by tapping and holding "X"
tab >
Task Manager
>
Button
Windows Media® Controls
check box.
>
tab and mark
To use the music player in the background
1
When you listen to music, tap .
2
Select an application.
3
Press to return to the music player.
Playlists
You can create playlists to organize your music. Tracks can be
added to more than one playlist. Deleting a playlist, or a track
from a playlist, does not delete the track from the memory, just
the reference to the track.
To add a track to a playlist
1
In the Media Xperience panel scroll to a track.
2
Tap Menu > Add track to playlist.
3
Tap a playlist.
To create a playlist
1
In the media Xperience panel tap Music > Playlists > Create
new playlist.
2
Enter a name and tapOk.
To add an album to a playlist
1
In the Media Xperience panel scroll to an album.
2
Tap Menu > Add album to playlist.
3
Tap a playlist.
To add an artist to a playlist
1
In the Media Xperience panel scroll to an artist.
2
Tap Menu > Add artist to playlist.
3
Tap a playlist.
To remove tracks from a playlist
1
In the Media Xperience panel scroll to a track.
2
Tap Menu > Remove from list.
1 Tap and drag to jump to any part of the video or audio
2 Visit WindowsMedia.com
3 Full screen
4 Mute/Unmute
5 Increase Volume
6 Decrease Volume
7 Go to the beginning of the current file or to the previous file
This is a draft publication intended for internal use only.
8 Play/Pause
9 Go to the next file
Using media files
You can browse and use media files using the Media Xperience
panel. Media files in your My documents folder in the phone and
on the memory card will be listed in the Media Xperience panel.
To play music
1
In the Media Xperience panel tap Music.
2
Scroll by category.
3
Tap a track to play it.
When you play WMA files, Windows Media Player is used
automatically.
To stop playing music
•
In the music player, tap .
Stereo portable handsfree
To use the handsfree
•
Connect the portable handsfree. Music stops when you
receive a call and resumes when the call has ended.
Streaming media
When you open links to streaming media content, for example,
YouTube™, in Internet Explorer, the Streaming Media
application automatically opens and starts playing the content.
Games
To play a game
•
In the Media Xperience panel tap Games and tap a game.
Camera
You can take photos and record video clips with audio using the
camera in the phone. You will find saved photos and video clips
in the Media Xperience panel under Pictures and Videos.
To fast forward and rewind
•
In the music player, tap or .
To move between tracks
•
In the music player, tap or .
To change the volume
•
Press the volume key up or down.
This is an Internet version of this publication. © Print only for private use.
Multimedia
25
Page 26

Using the camera
1 Zoom in or out
2 View photos and video clips
3 Video mode
4 Photo mode
5 Activate the camera/Take photos/Record video clips
To activate the camera
•
Press the camera button .
Do not record with a strong light source in the background. Use
a support or the self-timer to avoid a blurred picture.
To take a photo
1
Activate the camera and tap .
2
Press
3
When the dot and focus frame are green, press fully down to
take the photo.
halfway down to use auto focus.
To use zoom
•
Press the volume key up or down.
Zoom is only available when taking photos and with picture sizes
This is a draft publication intended for internal use only.
smaller than 3MP.
To record a video clip
1
Activate the camera and tap .
2
To use auto focus, press
and focus frame are green.
3
To start recording, press fully down.
4
To stop recording, press and hold down
To send a photo or a video clip
1
Activate the camera and tap .
2
Tap
3
Select if you want to send your item by E-mail or Picture
message.
.
To adjust brightness
•
When you use the camera or video recorder, press the
navigation key left or right to adjust brightness.
To view photos and videos
1
Activate the camera and tap .
2
Scroll to the item using
3
To view a video clip, tap .
halfway down until the dot
or .
To delete a photo or a video clip
1
When you have taken a photo or recorded a video clip, tap
.
2
Tap .
To change settings
1
Activate the camera and tap or .
2
and tap a button in the toolbar.
Tap
To view information about settings
1
Activate the camera and tap or .
2
Tap and then .
3
Tap a setting and then tap
4
Tap to return.
.
To exit the camera
•
Tap until you exit the camera.
The camera closes automatically if you do not use it for two
minutes.
Photo and video storage
You can save your photos and video clips either in the phone or
on the memory card.
To set storage location
1
Activate the camera, tap or .
2
Tap and then .
3
Tap
4
Tap Save To and select an option.
.
To view files in File Explorer
1
Tap > Programs > File Explorer.
2
Select phone memory or memory card and then tap My
Pictures or My Videos folder.
More camera features
With touch focus you can set the desired focus location in the
viewfinder by tapping the screen before taking the photo.
To set touch focus
1
Activate the camera and tap .
2
Tap
and then tap the Focus button in the toolbar.
3
Tap .
4
Tap
to return to the viewfinder.
5
Tap the screen to set focus. To reset focus, double-tap the
.
screen.
6
Take the photo.
To turn on the light
1
Activate the camera and tap or .
2
Tap
and then tap the Light button in the toolbar.
3
Tap .
4
Tap
to return to the viewfinder.
Camera viewfinder icons
In the camera viewfinder, icons show the current setting.
Photo camera viewfinder
The top bar displays:
26
Multimedia
•
Remaining number of photos you can take
This is an Internet version of this publication. © Print only for private use.
Page 27

•
Picture size (resolution)
•
Where photos are saved (phone memory or memory card)
The bottom bar displays:
• Shoot mode
• Scenes
• Focus
• White balance
• Light
•
Self-timer(2 or 10 seconds)
Video camera viewfinder
The top bar displays:
•
Video recording sound on/off
•
Where clips are saved (phone memory or memory card)
• Shoot mode
•
Recording status
•
Time remaining (when not recording) or recorded time (when
recording)
The bottom bar displays:
Shoot mode. Normal or Picture message,
where clips are adjusted in length, size and
quality to fit in an MMS.
To enter more camera settings
1
Activate the camera and tap
2
Tap and then tap .
3
Select General, Photo or Video, and enter the settings.
or .
Viewing photos and video clips
You can view your photos and video clips using the Media
Xperience panel.
• Shoot mode
• Scenes
• Focus
• White balance
• Light
•
Self-timer (2 or 10 seconds)
Overview of camera settings
To go to settings
1
Activate the camera and tap or .
2
Tap to view a menu for the most common settings.
Photo camera
This is a draft publication intended for internal use only.
Icon
Description
Scenes. Predefined settings for common photo
situations, includes Auto, Portrait, Landscape,
Twilight, Sports and Document
Focus. Predefined focus settings, includes
Touch, Auto, Macro and Infinite
Light
Shoot mode. Take one photo at a time using
Normal, or take a sequence of photos using
Multi-shot
To view recently taken photos
1
In the Media Xperience panel tap Pictures > Latest photos.
2
Scroll through the photos.
To view photos chronologically
1
In the Media Xperience panel tap Pictures > Camera album.
2
View photos by month.
To view photos in the Media Xperience media player
1
In the Media Xperience panel tap Pictures > Camera album.
2
Tap a month and then a photo.
Photo media player toolbar
Description
Icon
Information
Zoom
Rotate. Tap and hold the photo and rotate it. When you
release the photo, it snaps to the nearest 90 degree angle
Back to the previous menu
Previous picture
Start slideshow
Next picture
Delete photo
Video camera
Icon
Description
Scenes. Auto or Night mode
Focus. Predefined focus settings, includes
Auto, Macro and Infinite
Light
This is an Internet version of this publication. © Print only for private use.
To delete a photo
1
In the Media Xperience panel tap Pictures > Camera album.
2
Highlight a photo.
3
Tap to delete a photo.
To view a slideshow
1
In the Media Xperience panel tap Pictures > Camera album.
2
Tap a month and then a photo.
3
Tap to start the slideshow.
Multimedia
27
Page 28

To view video clips
1
In the Media Xperience panel tap Videos.
2
Tap the title of a video clip.
To delete a video clip
1
In the Media Xperience panel tap Videos.
2
Highlight the title of a video clip.
3
Tap Menu > Delete video.
Viewing pictures
You can view pictures which were not taken by the phone
camera, but are in the My documents/My pictures folder or on
the memory card.
To view pictures
1
In the Media Xperience panel tap Pictures > Pictures.
2
Scroll to a picture and tap to view it in full size.
Synchronizing music and video
When you connect the phone to your computer via the USB
cable, media content, for example, MP3 files, are automatically
synchronized according to how you have set up the
synchronization. The Media Xperience panel lists media files
placed in the following locations in the phone:
•
/My Documents/My Music/
•
/My Documents/My Videos/
•
the memory card
•
/My Documents/My pictures
•
/My Documents
You can synchronize media content placed in these locations
with your computer, and access it in the Media Xperience panel.
You have to set up the synchronization via Windows Media
Player on your computer, although you play music and videos
using the Media Xperience panel in the phone.
To set up synchronization
1
Computer: Install Windows Media Player version 11 (works
on Windows XP or later).
2
Computer: Set up synchronization as described in the
XPERIA™ X1 Getting started Quick guide. Make sure you
select the media items or information types you want to
synchronize.
3
Phone: If you use ActiveSync, tap > Programs >
ActiveSync > Menu > Options, and select the Media box.
4
Phone: Tap ok.
This is a draft publication intended for internal use only.
To synchronize music and video
1
Computer: Open Windows Media Player, and connect the
phone to your computer using the USB cable.
2
In the Device Setup Wizard, select Yes, search my computer
now (only if you have not searched for media on your
computer before).
3
When you see the phone or memory card, click Finish.
4
On the left panel of the Windows Media Player, right-click the
phone name/memory card, and then click Set up sync.
5
In the Device Setup dialog box, select Sync this device
automatically.
6
Select the playlist(s) you want to synchronize between your
computer and the phone, then click Add.
7
Click Finish. Synchronizing starts.
The next time you connect your computer and the phone while
Windows Media Player is running, synchronization will start
automatically.
To copy files between the phone and a computer
1
Connect the phone with the computer.
2
Computer using Active Sync: Click Explore in ActiveSync.
Computer using Windows Mobile Device Center: Click File
Management > Browse the contents of your device.
3
Computer: Copy files or folders between the devices using
standard Windows procedures.
Transferring content
You can copy files between the phone and a computer.
•
If your computer uses Windows XP® or other compatible
Windows operating systems, you should use Microsoft®
ActiveSync® 4.5 or later. You will find Microsoft®
ActiveSync® on the CD that comes with the phone.
•
If your computer uses Windows Vista®, you should use
Windows® Mobile Device Center, which is part of Windows
Vista.
28 Multimedia
This is an Internet version of this publication. © Print only for private use.
Page 29

Important information
Guidelines for safe and efficient use - addition
For optimal performance, use your Sony Ericsson Product in
temperatures between +14°F (-10°C) to +113°F (+45°C).
The battery should only be replaced with Sony Ericsson
approved batteries and they must be qualified to meet the IEEE
1725 standard.
This is a draft publication intended for internal use only.
Declaration of Conformity for X1
We, Sony Ericsson Mobile Communications AB of
Nya Vattentornet
SE-221 88 Lund, Sweden
declare under our sole responsibility that our product
Sony Ericsson type AAD-3880001-BV
and in combination with our accessories, to which this
declaration relates is in conformity with the appropriate
standards EN 301 511:V9.0.2, EN 301 908-1:V2.2.1, EN 301
908-2:V2.2.1, EN 300 328:V1.7.1, EN 300 440-1:V1.7.1, EN 300
440-2:V1.1.2, EN 301 489-7:V1.3.1, EN 301 489-17:V1.2.1, EN
301 489-24:V1.3.1, EN 301 489-3:V1.4.1, EN 60 950-1:2006
following the provisions of, Radio Equipment and
Telecommunication Terminal Equipment directive 1999/5/EC.
Lund, June 2008
Shoji Nemoto,
Head of Product Business Group GSM/UMTS
We fulfil the requirements of the R&TTE Directive (1999/5/EC).
Declaration of Conformity for X1a
We, Sony Ericsson Mobile Communications AB of
Nya Vattentornet
SE-221 88 Lund, Sweden
declare under our sole responsibility that our product
Sony Ericsson type AAD-3880002-BV
and in combination with our accessories, to which this
declaration relates is in conformity with the appropriate
standards EN 301 511:V9.0.2, EN 301 908-1:V2.2.1, EN 301
908-2:V2.2.1, EN 300 328:V1.7.1, EN 300 440-1:V1.7.1, EN 300
440-2:V1.1.2, EN 301 489-7:V1.3.1, EN 301 489-17:V1.2.1, EN
301 489-24:V1.3.1, EN 301 489-3:V1.4.1, EN 60 950-1:2006
following the provisions of, Radio Equipment and
Telecommunication Terminal Equipment directive 1999/5/EC.
Lund, June 2008
Shoji Nemoto,
Head of Product Business Group GSM/UMTS
We fulfil the requirements of the R&TTE Directive (1999/5/EC).
FCC Statement
This device complies with Part 15 of the FCC
rules. Operation is subject to the following two
conditions: (1) This device may not cause
harmful interference, and (2) This device must
accept any interference received, including
interference that may cause undesired operation.
Any change or modification not expressly approved by Sony
Ericsson may void the user's authority to operate the equipment.
This equipment has been tested and found to comply with the
limits for a Class B digital device, pursuant to Part 15 of the FCC
Rules. These limits are designed to provide reasonable
protection against harmful interference in a residential
installation. This equipment generates, uses and can radiate
radio frequency energy and, if not installed and used in
accordance with the instructions, may cause harmful
interference to radio communications. However, there is no
This is an Internet version of this publication. © Print only for private use.
Important information
29
Page 30

guarantee that interference will not occur in a particular
installation.
If this equipment does cause harmful interference to radio or
television reception, which can be determined by turning the
equipment off and on, the user is encouraged to try to correct
the interference by one or more of the following measures:
•
Reorient or relocate the receiving antenna.
•
Increase the separation between the equipment and receiver.
•
Connect the equipment into an outlet on a circuit different
from that to which the receiver is connected.
•
Consult the dealer or an experienced radio/TV technician for
help.
Industry Canada Statement
This device complies with RSS-210 of Industry Canada.
Operation is subject to the following two conditions: (1) this
device may not cause interference, and (2) this device must
accept any interference, including interference that may cause
undesired operation of the device.
This Class B digital apparatus complies with Canadian
ICES-003.
Cet appareil numérique de la classe B est conforme à la norme
NMB-003 du Canada.
This is a draft publication intended for internal use only.
30 Important information
This is an Internet version of this publication. © Print only for private use.
Page 31

Index
A
ActiveSync® ......................................................................... 12
Alarms .................................................................................. 12
B
Battery .................................................................................... 4
Bluetooth .............................................................................. 17
beaming information .................................................... 18
connecting a headset ................................................... 18
modem ......................................................................... 18
modes .......................................................................... 17
partnership ................................................................... 17
C
Calls ........................................................................................ 9
video call ........................................................................ 9
voice call ........................................................................ 9
Camera ................................................................................. 25
more features ............................................................... 26
settings ......................................................................... 27
storage ......................................................................... 26
using the camera .......................................................... 26
viewing ......................................................................... 27
Charging ................................................................................. 4
D
Direct push ........................................................................... 14
E
E-mail ................................................................................... 14
G
Games .................................................................................. 25
Google Maps™ .................................................................... 19
GPS ...................................................................................... 19
A-GPS .......................................................................... 19
QuickGPS ..................................................................... 19
Playlists
................................................................................ 25
S
scheduled
synchronization ............................................................ 13
SIM card ................................................................................. 4
Sleep mode ............................................................................ 5
SMS ...................................................................................... 14
Status icons ............................................................................ 5
Streaming media .................................................................. 25
Synchronizing ....................................................................... 12
setting up ..................................................................... 12
starting ......................................................................... 13
using a Bluetooth connection ...................................... 13
T
Touch screen .......................................................................... 5
V
Video call ................................................................................ 9
Voice call ................................................................................ 9
W
Wayfinder Navigator™ ......................................................... 19
Web
browsing previously visited Web pages ....................... 16
connecting .................................................................... 16
display options ............................................................. 16
favorites ........................................................................ 16
web feeds ..................................................................... 16
zooming ........................................................................ 16
Wi-Fi ..................................................................................... 18
Windows Live Messenger .................................................... 19
Windows Media® Player Mobile .......................................... 25
Word completion .................................................................. 11
I
Illuminations ........................................................................... 6
IMEI number ......................................................................... 11
J
This is a draft publication intended for internal use only.
Joystick .................................................................................. 5
K
Keyboard ................................................................................ 6
M
Memory card .......................................................................... 4
Messaging
e-mail ........................................................................... 14
SMS and MMS ............................................................. 14
Multimedia
camera ......................................................................... 25
games ........................................................................... 25
media files .................................................................... 25
streaming media ........................................................... 25
synchronizing music and video .................................... 28
transferring content ...................................................... 28
Windows Media® Player Mobile .................................. 25
N
Navigation key ........................................................................ 5
O
On/off ..................................................................................... 4
P
Panels ................................................................................... 20
choosing ....................................................................... 20
downloading new ......................................................... 24
managing ...................................................................... 21
This is an Internet version of this publication. © Print only for private use.
Index 31
 Loading...