

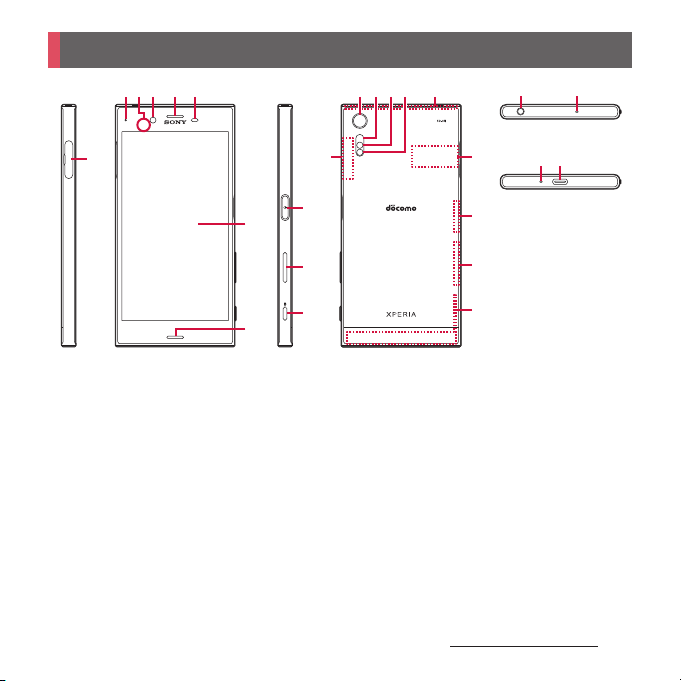
Part names and functions
cb d e f
a
g
h
a
docomo nano UIM card/microSD card slot
b
Notification LED
c
NFC/Osaifu-Keitai position for holding over
d
Front camera lens
e
Earpiece/Speaker
f
Proximity/light sensor : Detects a face getting closer
to the touch screen during a call and turns it off to
prevent misoperation, and helps with automatic
screen brightness control.
g
Tou ch s creen
h
Speaker
i O
Power key/Screen lock key/Fingerprint sensor
j
Volume key/Zoom key
k k
Camera key
l
Camera lens
RightLeft BackFront
r
s
t
u
*2
*2
v w
x y
Bottom
*2
*2
*2
Top
30
ml n o
p
q
i
j
k
m
Laser AF sensor
n
*1
RGBC-IR sensor
o
Flash/Photo light
p
LTE/FOMA/GPS antenna section
q
Wi-Fi/Bluetooth antenna section
r
s
t
u
v
w
x
y
*3
Nameplate
Wi-Fi antenna section
LTE ant enn a se cti on
LTE/FOMA antenna section
Headset jack
Second microphone : Reduces noise to make voice
to be listened easily.
Microphone
USB Type-C jack
Before Using the Terminal
*1 A sticker bearing mark is attached at the time of
purchase.
*2 The antenna is built into the terminal. Covering
around the antenna with your hand may affect the
quality of communications.
*3 A sticker bearing the CE mark, FCC ID, IMEI
information, etc. is attached. Please do not peel off
the sticker or remove the nameplate.
❖
Note
・
Do not put a sticker or other material on the
proximity/light sensor.
・
The back cover cannot be removed. Attempting to
remove the back cover with excessive force may
cause damage or malfunction.
・
The battery is built into the terminal and not removal.
nano UIM card
The docomo nano UIM card is an IC card
recorded user information such as your
phone number etc.
・
You can use the terminal with a docomonano
UIM card. If you have a
card, UIM, or FOMA card, bring it to a Shop to
replace it with a
・
When docomo nano UIM card is not inserted
to the terminal, making calls, packet
communication, etc. are not available.
・
For details on the docomo nano UIM card,
refer to the
・
If a microSD card is installed, be sure to
docomo nano UIM card manual.
unmount it (to disable reading/writing)
before installing or removing a docomo
nano UIM card (P.183).
・
Opening/closing the cover of the docomo
nano UIM card/microSD card slot (P.25).
■
Security codes of the docomo nano
UIM card
The docomo nano UIM card has a security
code called a PIN code. The code is set to
"0000" at subscription, which you can
change by yourself (P.170).
❖
Information
・
Please be careful not to touch or scratch the IC when
you handle the docomo nano UIM card. Doing
so may cause malfunction or damage.
Before Using the Terminal
docomo mini UIM
docomo nano UIM card.
31
Inserting nano UIM card
Remove the cover of the
1
ocomo
nano UIM card/microSD card
Pull the tray straight out from the
2
terminal.
With the IC side facing up, place
3
the docomo nano UIM card on the
tray.
・
Make sure that the cut corner of the
card is oriented properly.
・
Be sure to fit the docomo nano UIM card
into the tray so that it does not shift.
slot
Insert the tray with the card and
4
press it straight into the slot.
・
Be careful about the direction to insert
of the tray.
Firmly press the parts until the
5
tray is all the way in, and make
sure that there are no gaps
between the terminal and cover.
Before Using the Terminal
32
 Loading...