

Page 1
Introduction
Thank you for purchasing XperiaTM XZ1.
Before You Begin
Guide Usage Notes
Screenshots & Key Labels
Accessing Guide on Handset
Before You Begin
Xperia
Read "Safety Precautions" and this guide thoroughly beforehand for proper usage.
Accessible services may be limited by contract conditions.
Unauthorized copying of any part of this guide is prohibited.
Guide content subject to change without prior notice.
Contact SoftBank Customer Support, General Information if you find inaccuracies.
TM
XZ1 is referred to as "handset" in this guide.
Guide Usage Notes
Most operation descriptions are based on default settings.
Unless noted otherwise, descriptions are for Home Screen.
Some operation descriptions may be omitted.
In this guide and on handset, "abroad" means "outside Japan" with regard to handset/service
usage.
In this guide, microSD
TM
/microSDHCTM/microSDXCTM Card is referred to as "SD Card."
Screenshots & Key Labels
Screenshots and Key labels are provided for reference only. Actual handset windows, menus, etc.
may differ in appearance.
xperia-xz1_00_Introduction.docx
1
Page 2

Accessing Guide on Handset
Access this Guide on handset via Guide icon in Apps Menu or via Guide indicator on Status Bar.
Guide indicator is hidden on Status Bar by default. Follow these steps to show Guide indicator:
Access Guide Indicator on BACK
xperia-xz1_00_Introduction.docx
2
Page 3
Parts & Functions
Part
Description
Notification Lamp
Flashes for
notifications.
Lights while charging.
Front Camera
Use to shoot still
images, videos of
yourself, etc.
Earpiece/Speaker
Hear the other party's
voice here.
Also, hear sound
(music, videos, TV,
etc.) from here.
Proximity/Light
Sensor
Detects surrounding
brightness to
automatically adjust
Display or backlight
and prevent
Touchscreen
misoperation during a
call.
Display
Touchscreen-type
display, operate with
your fingers on
Display.
Handset (Front)
Handset (Back/Side)
Handset Keys
CE mark and FCC ID
Handset (Front)
xperia-xz1_01_Getting Started.docx
1
Page 4
Speaker
Listen to music as well
as video, TV, etc.
audio.
Part
Description
Second Mic
Reduces noise for
calling.
Headphone Port
Connect commercially
available headphones.
This port supports
tetrapolar headset that
conforms to the CTIA
standard.
Camera
Capture still images
and videos.
Wi-Fi® Antenna
Area
Internal Antenna for
Wi-Fi.
LaserAF Sensor
Autofocuses for
shooting based on
subject distance.
RGBC-IR Sensor
Automatically adjusts
white balance based
for shooting based on
the light source.
Flash/Photo Light
Use as camera flash
when taking photos,
etc.
Internal
Antenna/GPS
Antenna Area
Internal Antenna for
calls, data
communication and
GPS.
Wi-Fi®/Bluetooth®
Antenna Area
Internal Antenna for
Wi-Fi and Bluetooth®
feature.
NFC/Osaifu-Keitai
sticker is attached
Handset (Back/Side)
xperia-xz1_01_Getting Started.docx
2
Page 5
Detection Area
at time of purchase.
Nameplate
CE mark, FCC ID,
IMEI information
printed sticker is
attached. Do not
remove nameplate.
Internal Antenna
Area
Internal Antenna for
calls and data
communication.
SIM Card/SD Card
Slot
Insert SIM Card/SD
Card.
If SIM Card/SD Card
Slot Cover is pulled
out, handset reboots.
USB Type-CTM
Port
Connect USB Type-C
cable (commercially
available), etc.
Mic
Speak here.
Part
Description
Volume/Zoom
Up/Down Key
Adjust Volume.
Adjust Zoom while
using Camera.
Power
Key/Screen Lock
Key/Fingerprint
Sensor ( )
Long Press for power
on/off.
Press for sleep mode
on/off.
Or, use Fingerprint
authentication.
Camera Key
( )
Use as Camera
shutter.
Long Press to launch
Camera.
Handset Keys
xperia-xz1_01_Getting Started.docx
3
Page 6

CE mark and FCC ID
Open the slot cover, and insert a fingernail into the hook at the edge of the label tray, then pull it out
straight.
xperia-xz1_01_Getting Started.docx
4
Page 7
SIM Card
SIM Card is an IC card containing phone number and other customer information.
Inserting SIM Card
Removing SIM Card
SIM-Unlocking Handset
Inserting SIM Card
Always unmount SD Card beforehand.
Draw SIM Card/SD Card Slot Cover out using groove
Draw Tray out straight from handset
xperia-xz1_01_Getting Started.docx
5
Page 8
Set SIM Card into Tray with IC chip facing up
Check SIM Card orientation by notch.
Make sure SIM Card is in Tray securely.
Insert Tray with handset held level, and then press in straight
xperia-xz1_01_Getting Started.docx
6
Page 9
Check Tray orientation.
Push Tray all the way and press it down where indicated ○, and make sure there are no
gaps
Removing SIM Card
Always unmount SD Card beforehand.
Draw SIM Card/SD Card Slot Cover out using groove
xperia-xz1_01_Getting Started.docx
7
Page 10
Draw Tray out straight from handset
Remove SIM Card from Tray
xperia-xz1_01_Getting Started.docx
8
Page 11
Insert Tray with handset held level, and then press in straight
Check Tray orientation.
Push Tray all the way and press it down where indicated ○, and make sure there are no
gaps
xperia-xz1_01_Getting Started.docx
9
Page 12
SIM-Unlocking Handset
Handset can be SIM-unlocked. SIM-unlocking handset allows other-carrier SIM cards to be used
with it.
Some services, functions, etc. may have restrictions when an other-carrier SIM card is used.
SoftBank Corp. does not guarantee operation whatsoever.
For details, see SoftBank Website.
xperia-xz1_01_Getting Started.docx
10
Page 13
SD Card
Save data to internal storage or SD Card.
Handset supports SD Cards up to 256 GB. Some SD Cards may not operate properly.
Inserting SD Card
Removing SD Card
Formatting SD Card
SD Card Cautions
Data
Information stored on SD Card can become lost or changed accidentally or as a result of damage. It is
recommended that you keep a separate copy of important data. SoftBank Corp. is not responsible for
damages from data that is lost or changed.
Reading/Writing Data
Never power off while reading or writing data.
Battery Level
A low battery charge may prevent reading/writing to SD Card.
Handling SD Card
Use/keep SD Cards away from the reach of infants. May cause choking if swallowed.
Inserting SD Card
Draw SIM Card/SD Card Slot Cover out using groove
xperia-xz1_01_Getting Started.docx
11
Page 14
Draw Tray out straight from handset
Set SD Card into Tray with the metal terminals facing up
xperia-xz1_01_Getting Started.docx
12
Page 15

Make sure SD Card is in Tray securely.
Insert Tray with handset held level, and then press in straight
Check Tray orientation.
Push Tray all the way and press it down where indicated ○, and make sure there are no
gaps
xperia-xz1_01_Getting Started.docx
13
Page 16
Removing SD Card
Always unmount SD Card beforehand.
Draw SIM Card/SD Card Slot Cover out using groove
Draw Tray out straight from handset
xperia-xz1_01_Getting Started.docx
14
Page 17
Remove SD Card from Tray
Insert Tray with handset held level, and then press in straight
xperia-xz1_01_Getting Started.docx
15
Page 18
Check Tray orientation.
Push Tray all the way and press it down where indicated ○, and make sure there are no
gaps
Formatting SD Card
When using a new SD Card for the first time, always format it on handset.
Formatting erases all data on SD Card. Carefully check any SD Card that was used on another
device before formatting.
Charge Internal Battery while formatting, or format with adequate battery charge.
xperia-xz1_01_Getting Started.docx
16
Page 19
In Home Screen, (Apps) (Settings)
Storage & memory
xperia-xz1_01_Getting Started.docx
17
Page 20
Storage usage
SD Card Storage settings
xperia-xz1_01_Getting Started.docx
18
Page 21
Format ERASE & FORMAT
DONE
All data on SD Card is erased.
xperia-xz1_01_Getting Started.docx
19
Page 22
Charging Internal Battery
Charging with AC Charger
Charging with AC Charger
For details on AC Chargers and other peripheral equipment, see SoftBank SELECTION Website.
See instructions included with AC Charger. Operation using AC Charger (with USB Type-C Quick
Charge 3.0 capability) [ZSCAZX] (SoftBank SELECTION USB Type-C rapid charging AC Charger
[SB-AC17-TCQC]) is explained here.
Insert USB Type-C connector of AC Charger straight into USB Type-C Port
Unfold power plug of AC Charger and plug into household AC
xperia-xz1_01_Getting Started.docx
20
Page 23
Charging start sound sounds and Notification Lamp on handset lights up when charging starts.
When charging is complete, unplug AC Charger and remove USB Type-C connector of
AC Charger straight from handset
xperia-xz1_01_Getting Started.docx
21
Page 24

Power On/Off
Powering On
Powering Off
Powering On
(Long Press)
Lock Screen appears.
See "Unlocking Screen" to unlock the screen.
Startup wizard appears for the first time handset is powered on. Follow onscreen instructions.
Battery level is not sufficient if Notification Lamp flashes several times in red or low battery
indicator appears when is Pressed with handset powered off. Charge Internal Battery.
Powering Off
xperia-xz1_01_Getting Started.docx
22
Page 25
(Long Press)
Power off
Handset powers off.
xperia-xz1_01_Getting Started.docx
23
Page 26
Using Touchscreen
Handset uses a touchscreen-type Display. Operate with your fingers on Display.
Tap
Touch & Hold
Drag
Swipe/Flick
Pinch/Spread
Tap
Contact Display lightly and briefly.
Touch & Hold
Touch screen lightly and hold it for a while. When the screen changes, release finger.
xperia-xz1_01_Getting Started.docx
24
Page 27
Drag
Touch icon or other item lightly, move it where desired, and release finger.
Swipe/Flick
Contact Display lightly, then brush screen up/down or left/right.
Pinch/Spread
Contact Display lightly, then close/widen fingers.
xperia-xz1_01_Getting Started.docx
25
Page 28

xperia-xz1_01_Getting Started.docx
26
Page 29
Basic Operation
Home Screen & Applications List
Navigation Bar
Selecting Options and Navigating Screens
Menu Operations
Handset Settings and Making Settings
Portrait Orientation & Landscape Orientation
Home Screen & Applications List
Most handset operations start in Home Screen (appears at power on) or in applications list.
Navigation Bar
Tap icons on Navigation Bar (Display bottom) for the following functions/operations.
xperia-xz1_02_Basic Operations.docx
1
Page 30
Item
Description
(Back)
Return to previous screen. Appears as for
onscreen keyboard; Tap to close keyboard.
(Home)
Return to Home Screen.
(History)
Open listing of recently used applications and
activate or delete applications.
(Keyboard)
Change keyboard.
Selecting Options and Navigating Screens
Tap items, icons, onscreen keys, etc. to open assigned items.
Tap to go back to previous screen.
xperia-xz1_02_Basic Operations.docx
2
Page 31
Menu Operations
Tap for available settings and items.
xperia-xz1_02_Basic Operations.docx
3
Page 32

Screens may also have settings and items that are available by Touching & Holding Display.
xperia-xz1_02_Basic Operations.docx
4
Page 33

Handset Settings and Making Settings
In Home Screen, Tap (Apps) then Tap (Settings) to customize the operation of handset
functions.
Portrait Orientation & Landscape Orientation
The screen changes to landscape orientation when handset is rotated sideways.
Depending on the current screen, the orientation may not change even by changing handset
orientation.
xperia-xz1_02_Basic Operations.docx
5
Page 34

xperia-xz1_02_Basic Operations.docx
6
Page 35
Phone Number
Checking Your Phone Number
Checking Your Phone Number
In Home Screen, (Apps) (Contacts)
ME
xperia-xz1_02_Basic Operations.docx
7
Page 36

Check phone number.
xperia-xz1_02_Basic Operations.docx
8
Page 37
Silent Mode
Set ringtone, operation sounds, etc. not to sound to avoid disturbing others around you.
Using Silent Mode (Vibrate)
Using Silent Mode (Mute)
Using Silent Mode (Vibrate)
Press Volume Up or Down Key
On volume adjustment bar,
Icon on sound volume adjustment bar turns to (White) and Silent mode (Vibrate) is set.
Press Volume Up Key once while volume adjustment bar appears to exit Silent mode (Vibrate).
xperia-xz1_02_Basic Operations.docx
9
Page 38
Using Silent Mode (Mute)
Press Volume Up or Down Key
On volume adjustment bar, Press Volume Down Key
Icon on sound volume adjustment bar turns to (Gray) and Silent mode (Mute) is set.
Press Volume Up Key twice while volume adjustment bar appears to exit Silent mode (Mute).
xperia-xz1_02_Basic Operations.docx
10
Page 39
Text Entry
Keyboards
QWERTY Keyboard Layout
Switching Character Types (Entry Modes)
Keyboards
Enter text with onscreen QWERTY keyboard by Tapping each character individually, or use Gesture
input feature and slide finger from character to character to form words.
Tap to hide keyboard.
Touch & Hold text in text entry window to magnify in small balloon.
Input method is set to International keyboard (SwiftKey Keyboard) by default. To input Japanese,
Tap to change keyboard to XperiaTM Japanese keyboard.
QWERTY Keyboard Layout
① Change SwiftKey Keyboard settings.
② Enter a character. Touch & Hold character to show variant options.
xperia-xz1_02_Basic Operations.docx
11
Page 40
③ Switch between lower-case , upper-case , and caps .
④ Toggle entry modes.
⑤ Show entry candidates.
⑥ Delete a character before cursor.
⑦ , , , or appears depending on application. Confirm text input or
enter line break. Touch & Hold to show Emoticon/Pictogram/etc. list.
⑧ Enter a space. Double-tap to enter a period.
Switching Character Types (Entry Modes)
In QWERTY keyboard, Tap
Entry mode is changed to number and symbol mode.
To enter more symbols, Tap .
Tap to back to alphabet mode.
xperia-xz1_02_Basic Operations.docx
12
Page 41
Using a Google Account
Use a Google account and get more convenience with Google services. A Google account is
required to use some services or fully use some applications.
Creating a Google Account
Logging In with a Google Account
Google Account Cautions
Be careful not to forget your Google account mail address or password.
Creating a Google Account
In Home Screen, (Apps) (Settings)
xperia-xz1_02_Basic Operations.docx
13
Page 42
Accounts & sync Add account
Google
xperia-xz1_02_Basic Operations.docx
14
Page 43
Window for adding a Google account opens.
More options Create account
Enter First name Last name NEXT
xperia-xz1_02_Basic Operations.docx
15
Page 44
If confirmation appears, follow onscreen instructions.
Enter date of birth Select gender NEXT
xperia-xz1_02_Basic Operations.docx
16
Page 45
Enter user name (mail address) NEXT
If confirmation appears, follow onscreen instructions.
Enter password Enter password again (for confirmation) NEXT
xperia-xz1_02_Basic Operations.docx
17
Page 46
Check phone number NEXT
Phone number of your SIM Card is entered automatically.
xperia-xz1_02_Basic Operations.docx
18
Page 47
VERIFY
SMS is sent to the entered phone number.
If a phone number other than the one on your SIM Card is entered, confirmation screen appears.
Enter notified verification code Tap NEXT.
I AGREE
xperia-xz1_02_Basic Operations.docx
19
Page 48
A Google account is created.
NEXT
xperia-xz1_02_Basic Operations.docx
20
Page 49
Set Google service NEXT
Google account creation is completed.
Logging In with a Google Account
If an application is activated that requires a Google account, a window for adding a Google account
opens. Log in with a Google account you have so you can use the application.
In window for adding Google account, enter mail address NEXT
xperia-xz1_02_Basic Operations.docx
21
Page 50
Enter password NEXT
xperia-xz1_02_Basic Operations.docx
22
Page 51

Follow onscreen instructions
You are logged in to your Google account.
xperia-xz1_02_Basic Operations.docx
23
Page 52
Google Play
Download a variety of applications (free/paid) from Google Play. Change the setting of downloaded
applications to enable manual or automatic updates. Log in to your Google account beforehand.
Installing Free Applications
Purchasing Paid Applications
Updating Applications
Installing Applications
Many different kinds of applications can be installed on handset from Google Play (provided by
Google Inc.). SoftBank Corp. is not responsible in any way for user-installed applications (quality,
reliability, legality, fitness for a purpose, credibility, accuracy, etc.) or resulting malfunctions (viruses,
etc.).
Installing Free Applications
In Home Screen, (Apps) (Play Store)
xperia-xz1_02_Basic Operations.docx
24
Page 53
Google Play appears.
If confirmation appears, follow onscreen instructions.
Tap free application INSTALL
Application is downloaded and installed.
If confirmation appears, follow onscreen instructions
Purchasing Paid Applications
In Home Screen, (Apps) (Play Store)
xperia-xz1_02_Basic Operations.docx
25
Page 54
Google Play appears.
If confirmation appears, follow onscreen instructions.
Tap paid application Tap amount Follow onscreen instructions
Application is downloaded and installed.
Purchased Applications
Payment
Pay only once. Redownloads of uninstalled applications are free of charge.
On Other Android Devices
Install an application on any Android device under the same Google account for free.
Requesting Refunds
Refund is possible within a limited time. By requesting a refund, the application is deleted
and the charge is cancelled. A refund request is valid only once per one application.
In Google Play, My apps & games Tap application REFUND
Purchasing Applications
Purchase applications at your own risk. SoftBank Corp. is not responsible for any
xperia-xz1_02_Basic Operations.docx
26
Page 55
disadvantage resulting for user or third parties.
Updating Applications
In Home Screen, (Apps) (Play Store)
Google Play appears.
If confirmation appears, follow onscreen instructions.
My apps & games Tap application to update UPDATE
The application is downloaded and installed.
If confirmation appears, follow onscreen instructions.
Setting Application Updates
xperia-xz1_02_Basic Operations.docx
27
Page 56

Setting Automatic Updates for Applications
In Google Play, Settings Auto-update apps Set update method
Setting Automatic Updates for Individual Applications
In Google Play, My apps & games Tap application Auto-update ( )
If confirmation appears, follow onscreen instructions.
Automatic updates are unavailable for some applications.
xperia-xz1_02_Basic Operations.docx
28
Page 57
Security Codes/Operation Password
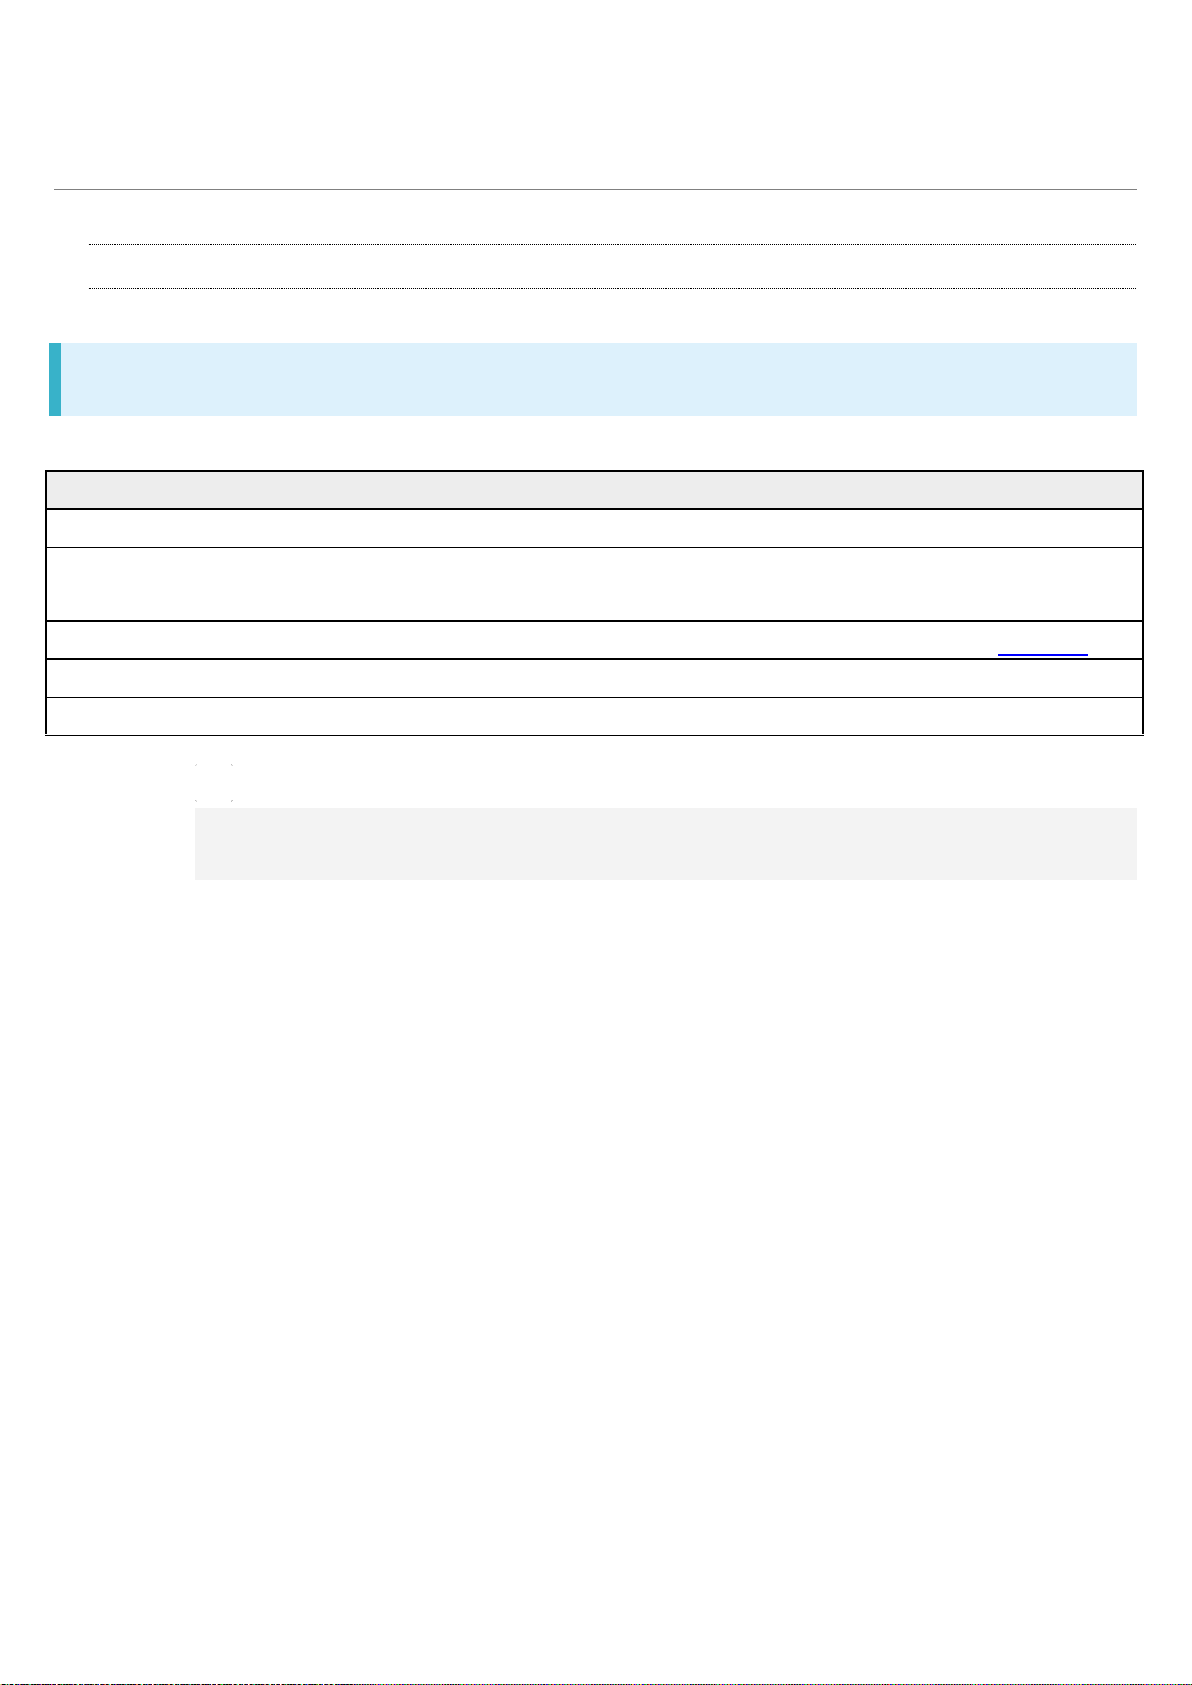
Code
Description
Operation Password
Code necessary to use handset functions.
Center Access Code
Four-digit code you have set in subscription
contract.
SIM PIN
Code for SIM Card. For details, see "SIM PIN."
PIN
Code for unlocking screen.
WPS PIN
Code for connecting to WPS devices.
Code Types
Code Types
The following codes are required for handset use.
PIN Types
In addition to the PIN for SIM Card, there is a different PIN for unlocking the screen and a
WPS PIN for connecting to WPS devices. Do not forget these codes.
xperia-xz1_02_Basic Operations.docx
29
Page 58
SIM PIN
SIM PIN is a code for SIM Card. It is used to prevent unauthorized use by others.
PIN is 9999 by default.
Enabling SIM PIN
Changing SIM PIN
Enabling SIM PIN
When PIN is enabled, a window for entering PIN appears to allow handset use each time handset is
powered on with SIM Card installed.
In Home Screen, (Apps) (Settings) Lock screen & security
xperia-xz1_02_Basic Operations.docx
30
Page 59
Set up SIM card lock Lock SIM card Enter PIN OK
PIN is enabled.
PIN Cautions
Entering incorrect PIN three consecutive times activates PIN Lock. To cancel, Personal
Unblocking Key (PUK) is required; contact Customer Service. Entering incorrect PUK ten
consecutive times locks SIM Card, disabling handset. For recovery, SIM Card must be
reissued at a SoftBank Shop (fees apply).
Changing SIM PIN
First enable SIM PIN to change PIN.
In Home Screen, (Apps) (Settings) Lock screen & security
xperia-xz1_02_Basic Operations.docx
31
Page 60

Set up SIM card lock Change SIM PIN Enter current PIN OK Enter new
PIN OK Re-enter new PIN OK
PIN is changed.
xperia-xz1_02_Basic Operations.docx
32
Page 61
Locking Screen
Display is locked after a set period of inactivity. Alternatively, Press for manual
screen lock. This saves battery power and prevents accidental Touchscreen operation.
Unlocking Screen
Unlocking Screen
In sleep mode (Screen lock active),
Lock Screen appears.
Touch or Flick screen upwards/left
xperia-xz1_02_Basic Operations.docx
33
Page 62

Screen is unlocked.
The method for unlocking the screen can be changed.
For fingerprint authentication, Touch with authentication finger to unlock screen.
xperia-xz1_02_Basic Operations.docx
34
Page 63
Updating Software
Check whether updates are required via the Internet, and update as required.
Updating Software
Before Updating Software
Saved data may be lost depending on condition of handset (malfunctioning, damaged, water seepage,
etc.). It is recommended that you back up important data before updating software. SoftBank Corp. is
not responsible for damages from loss of data.
Software Update makes a part of settings to the default.
Software Update Cautions
During Update
Handset cannot be used until software update is complete. It may take time to update software.
Signal during Update
Operate handset where signal reception is good and without changing location. Also operate with
adequate battery charge. Signal becoming weak or Internal Battery becoming low during an update
may cause an update failure. An update failure may disable handset.
If Using Other Functions
Other functions cannot be operated during a software update.
Updating Software
Automatic update is set by default. To update software manually, operate as follows.
In Home Screen, (Apps) (Settings)
xperia-xz1_02_Basic Operations.docx
35
Page 64
About phone
xperia-xz1_02_Basic Operations.docx
36
Page 65
System Update Software Update
Software Update window opens.
Software Update Follow onscreen instructions
Software is updated.
xperia-xz1_02_Basic Operations.docx
37
Page 66
Home Screen Basics
Item
Description
Status Bar
Drag down for Notifications Window. Drag Notifications Window down to
open Quick Settings.
Home Screen
Position
Current position among several Home Screen sheets.
Dock
Tap an icon to activate application or function. Customize with up to four
application shortcuts. Also, create folders.
Navigation Bar
Tap Key icon to operate. For Navigation Bar, see "Navigation Bar."
Customize Area
Place application shortcuts, folders, widgets freely.
Home Screen appears at power on; most handset operations start here. Customize
Home Screen with application shortcuts, widgets, and folders.
Layout
Toggling Home Screen Sheets
Layout
xperia-xz1_03_Handset Interface.docx
1
Page 67
Apps Key
Open applications list.
Toggling Home Screen Sheets
Home Screen consists of 20 sheets. Customize each Home Screen sheet with application shortcuts,
widgets, etc. to make handset more convenient. Flick Home Screen left/right to toggle sheets.
In any Home Screen sheet, Tap to return to Home Screen top sheet.
xperia-xz1_03_Handset Interface.docx
2
Page 68
Status Bar
① Notification Indicators
② Status Indicators
Indicator
Description
Launch Guide (Drag Status Bar down and open from Notifications Window)
Missed Call
Call Arriving/Calling/Dialing
Status Bar appears at the top of Display. Notification Indicators for new mail, etc. and Status
Indicators for handset appear here.
Status Bar Layout
Main Notification Indicators
Main Status Indicators
Status Bar Layout
Main Notification Indicators
Notification Indicators appearing in Status Bar include the following.
xperia-xz1_03_Handset Interface.docx
3
Page 69
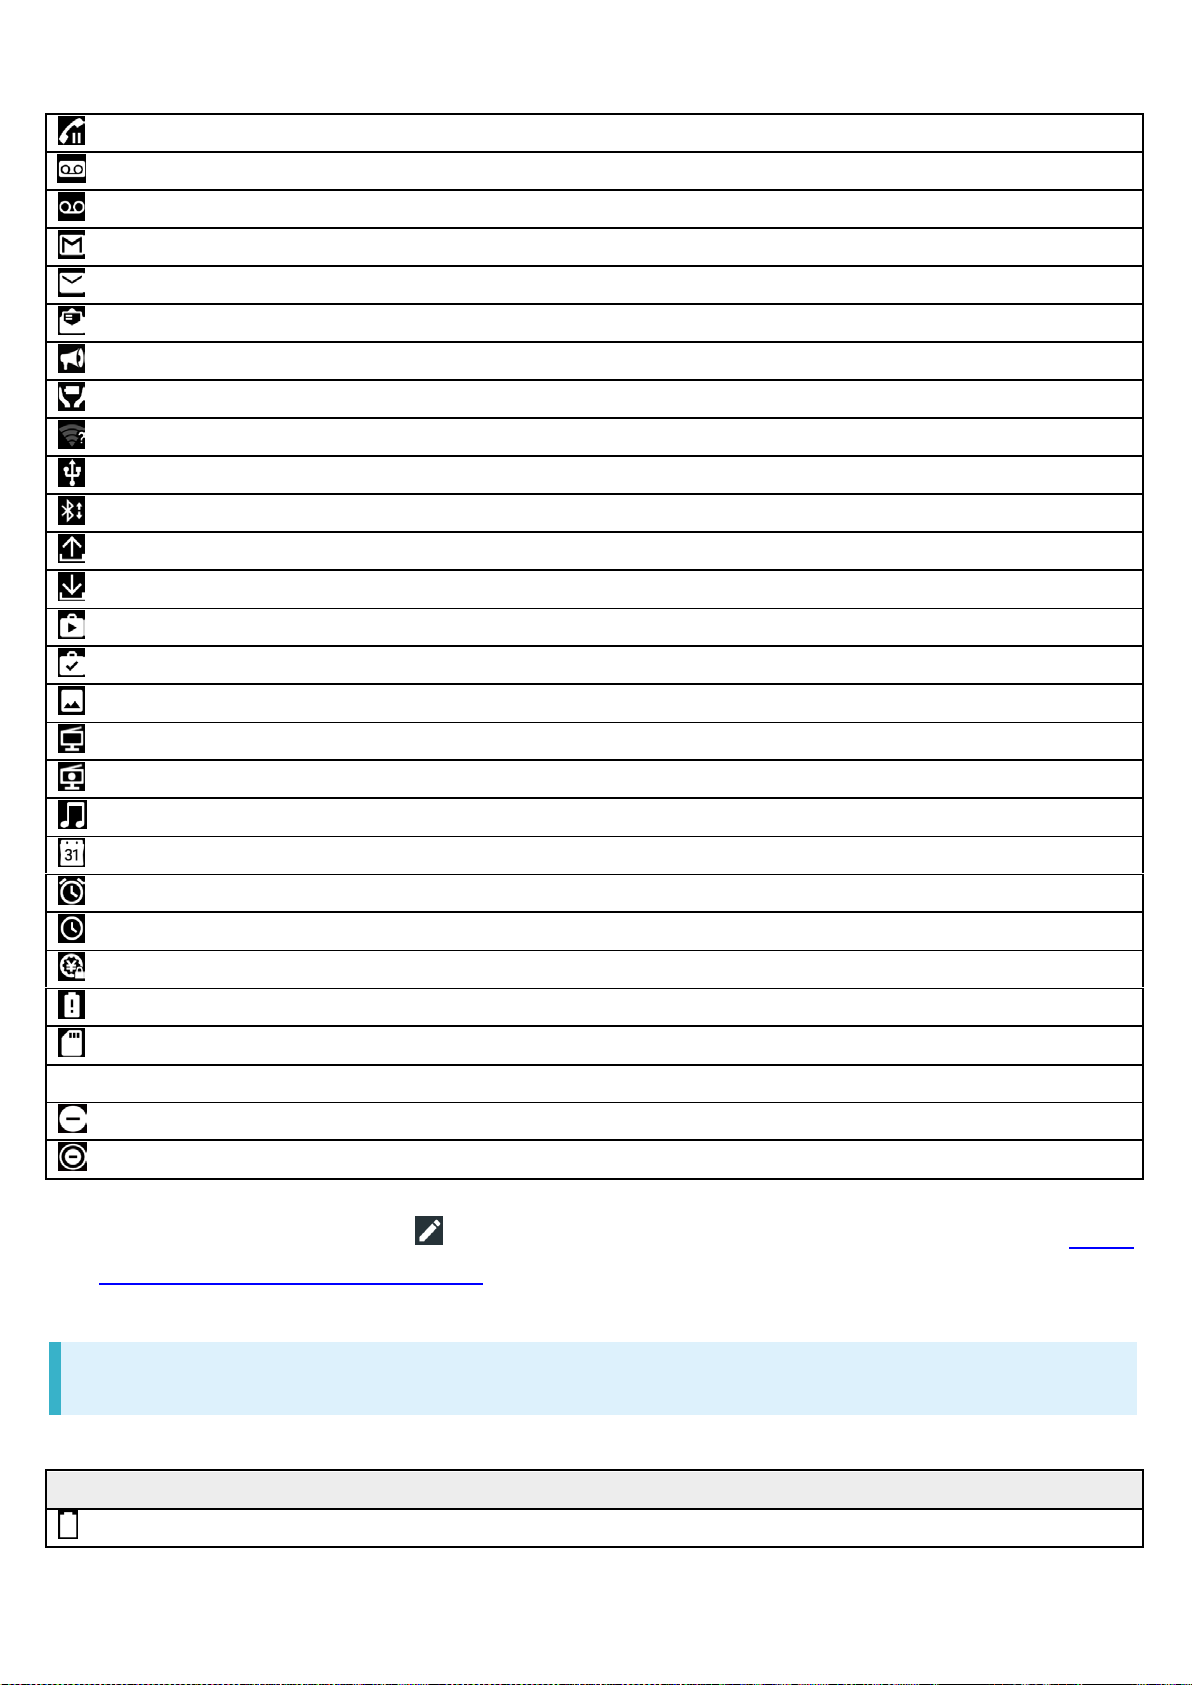
Call on Hold
New Recorded Message
New Voicemail
New Gmail/Email
New Email
New Text Message (SMS)/S! Mail
Urgent News
Notification that Emergency Mode Enabled
Wi-Fi Open Network Available
USB Connected
Sharing File via Bluetooth®
Data Uploading
Data Downloading
Application Update Available
Application Installation Complete
Screenshot Saved
Viewing TV1/Scheduled Viewing Started
Recording TV1/Scheduled Recording Started
Playing Back Music
Calendar Event Reminder
Snoozing/Unchecked Alarm
Stopwatch/Timer in Use
NFC/Osaifu-Keitai Locked
Low Battery Alert (15% or less)
SD Card Detected/Mounting
Software Update Notice, Downloading Complete, Stopped
"Alarms only" or "Total silence" Set for Do not disturb2
"Total silence" Set for Do not disturb2
1 Appears when switching to other window such as Home Screen.
Indicator
Description
Battery Full (100%)
2 Set from Quick Settings. Tap and enable "Do not disturb" beforehand. For details, see "Using
Notifications Window/Quick Settings."
Main Status Indicators
Status Indicators appearing in Status Bar include the following.
xperia-xz1_03_Handset Interface.docx
4
Page 70
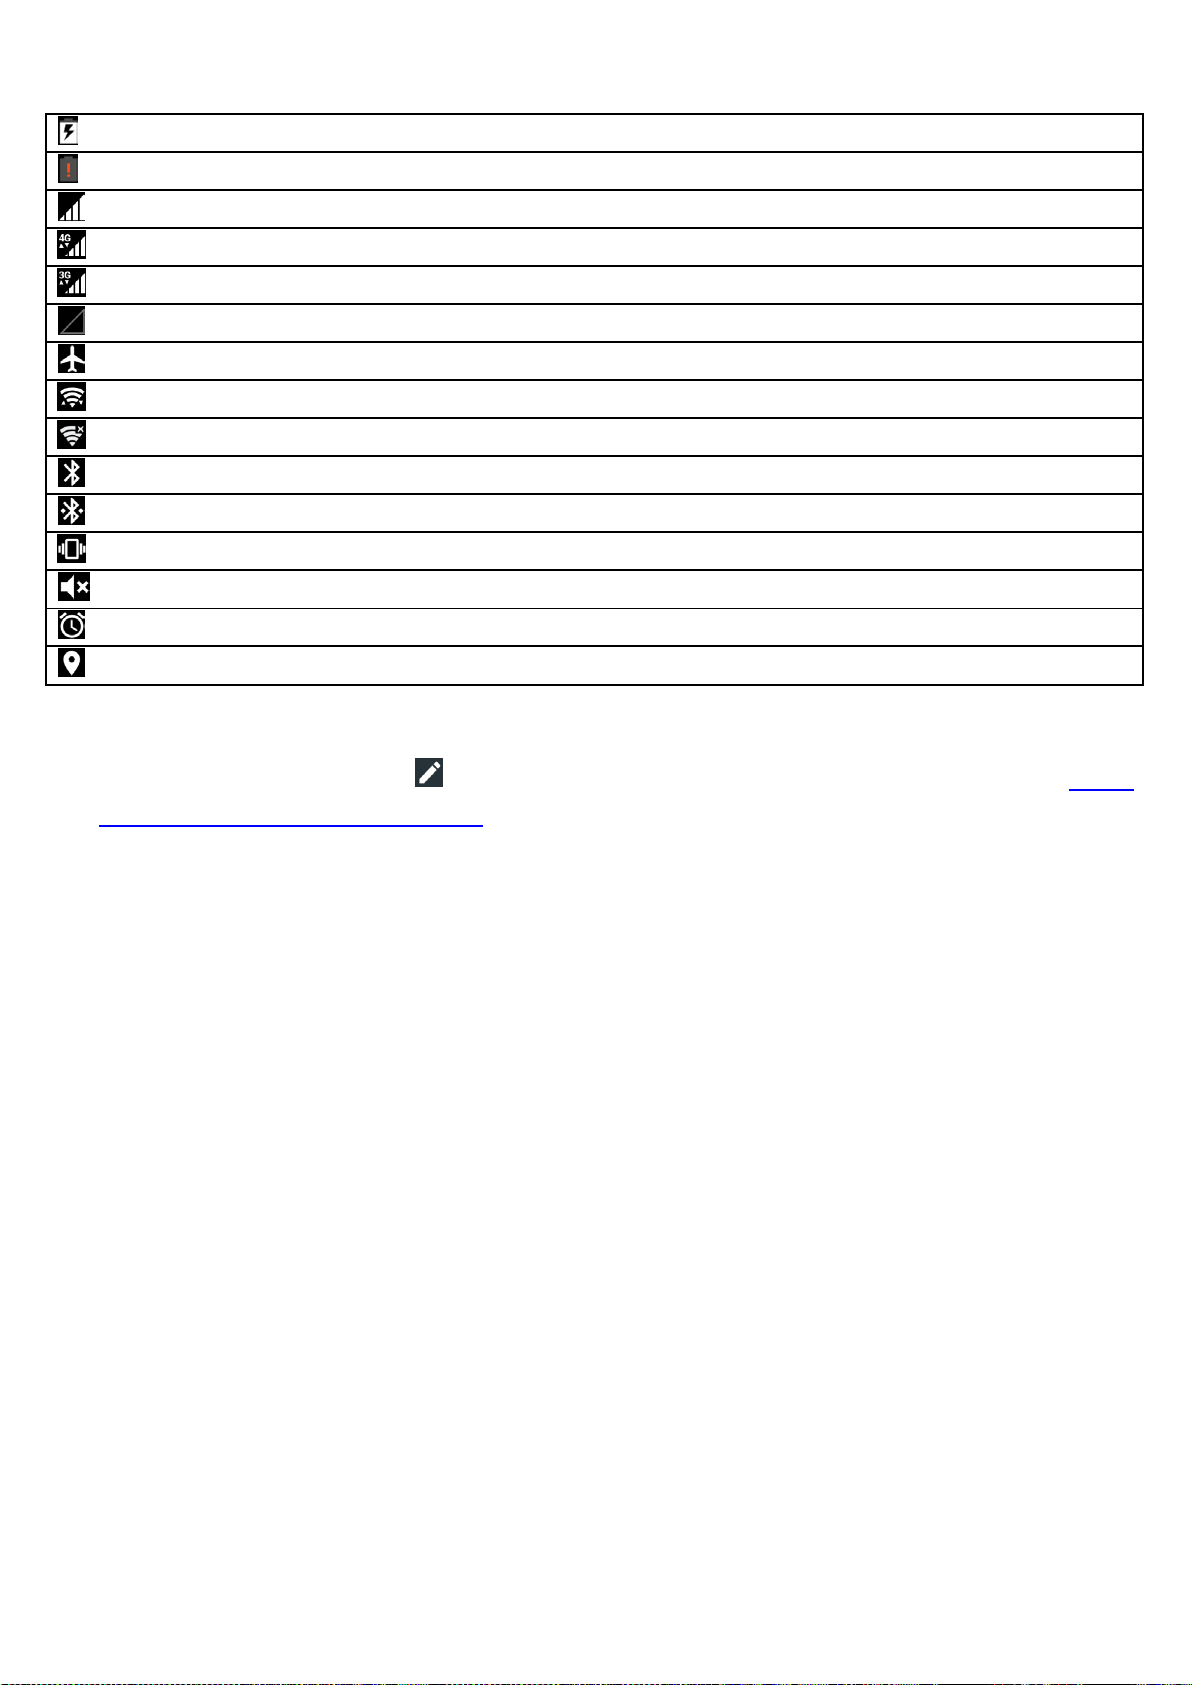
Battery Charging
Battery Low (5% or less)
Signal Strength
4G LTE/4G Data in Use1
3G Data in Use
No Signal
Airplane Mode
Wi-Fi Connected
Wi-Fi Connected without Internet Accessibility, or Unstable Wi-Fi Signal
Bluetooth® On
Bluetooth® Connected
Silent Mode (Vibrate)
Silent Mode (Mute)/"Alarms only" or "Total silence" Set for Do not disturb2
Alarm Set
Obtaining Current Location
1 Handset supports FDD-LTE (SoftBank 4G LTE) and AXGP (SoftBank 4G); indicator appears when
handset is connected to either. Handset connects to SoftBank 4G first.
2 Set from Quick Settings. Tap and enable "Do not disturb" beforehand. For details, see "Using
Notifications Window/Quick Settings."
xperia-xz1_03_Handset Interface.docx
5
Page 71
Using Notifications Window/Quick Settings
Check Notification Indicators and the details in Notifications Window. Tap icons on
Quick Settings to set each function on/off.
Opening Notifications Window/Quick Settings
Opening Notifications Window/Quick Settings
Drag Status Bar down
Notifications Window opens.
Drag Notifications Window down
xperia-xz1_03_Handset Interface.docx
6
Page 72
Quick Settings opens.
Alternatively, Tap to open Quick Settings.
Closing Notifications Window/Quick Settings
Drag Notifications Window/Quick Settings up
Alternatively, Tap to close Notifications Window/Quick Settings.
xperia-xz1_03_Handset Interface.docx
7
Page 73
Placing/Answering Calls
Learn calling basics, including handling incoming calls, and in-call operations.
Placing Calls
Answering Calls
Phone Function
Emergency Location Report
Making emergency calls (110, 119 or 118) automatically reports handset location to corresponding
agency (police, etc.). This system is referred to as Emergency Location Report, and notifies location
based on positioning from base stations.
Location Report does not incur registration/transmission fees.
Location/signal conditions affect positioning accuracy. Always provide location and call purpose.
Hiding Caller ID (using 184, etc.) cancels Location Report. However, corresponding agency may
obtain location information in life threatening situations.
Location Report is not sent for calls made while outside Japan.
VoLTE/VoLTE (HD+) and HD Voice
Handset supports VoLTE/VoLTE (HD+) and HD Voice for higher voice call quality.
Adjusting Volume of Call
Press Volume Up/Down Key.
Hints
Q Difficulty during call
A It may not be possible to make a call properly in a noisy location.
A When calling using Speaker, check the call volume. Raising the call volume may make calling
difficult.
Q Sound pops momentarily during a call
A Are you changing location while calling? Sound pops when signal is weak and handset switches
to a different area.
Emergency Call Cautions
xperia-xz1_04_Phone.docx
1
Page 74
Note that Airplane mode disables Emergency calls.
Placing Calls
In Home Screen, (Apps) (Phone)
Phone opens.
xperia-xz1_04_Phone.docx
2
Page 75
Call window opens.
Tap dialpad to enter the other party's number
Enter area code first for calling landline numbers.
xperia-xz1_04_Phone.docx
3
Page 76
Handset dials number. Call begins when other party answers.
To end the call,
xperia-xz1_04_Phone.docx
4
Page 77
Call ends.
Calling the Emergency Number When the Phone's Screen
is Locked
Flick Lock Screen EMERGENCY CALL/INFO Enter number for emergency
service
Available only when Screen lock is set to "Pattern," "PIN," or "Password."
Hints
Q Call does not connect
A Was the number dialed using the area code? Dial the number starting with "0."
A Are conditions for calling poor? Call again after moving where signal is good.
Answering Calls
When a call arrives, Drag to right
xperia-xz1_04_Phone.docx
5
Page 78
Call begins.
To end the call,
Call ends.
xperia-xz1_04_Phone.docx
6
Page 79
Arriving Call Operations
Cancelling Ringtone
Press Volume Up/Down Key when call is arriving
Alternatively, Press .
Rejecting Arriving Calls
Drag to left when call is arriving
xperia-xz1_04_Phone.docx
7
Page 80
Optional Services
Service
Description
Call Forwarding
Divert calls to a preset number when out of
service area or unable to answer.
Voicemail
Divert calls to a Voicemail Center to take
messages when out of service area or unable to
answer.
Call Waiting1
Answer calls during a call.
Group Calling1
Merge multiple calls.
Notify Caller ID
Send or hide your number when placing calls.
Call Barring
Restrict incoming/outgoing calls by conditions.
Use the following optional services.
Optional Services
Using Call Forwarding
Using Voicemail
Changing Call Waiting Settings
Using Group Calling
Using Caller ID Notification
Using Call Barring
Optional Services
Use the following optional services.
1 Requires separate subscription.
Using Call Forwarding
xperia-xz1_04_Phone.docx
8
Page 81
In Home Screen, (Apps) (Settings)
Call
Call settings open.
xperia-xz1_04_Phone.docx
9
Page 82
Voicemail/Call Forwarding
Voicemail/Call Forwarding settings open.
Activate Call Forwarding
xperia-xz1_04_Phone.docx
10
Page 83
All calls/Unanswered calls Enter phone number to forward to OK
If Unanswered calls is selected, set ring time.
Tap Contacts to select phone number to forward to from Contacts.
xperia-xz1_04_Phone.docx
11
Page 84
OK
Call Forwarding is activated.
Using Voicemail
In Home Screen, (Apps) (Settings)
Call
xperia-xz1_04_Phone.docx
12
Page 85
Call settings open.
Voicemail/Call Forwarding
Voicemail/Call Forwarding settings open.
xperia-xz1_04_Phone.docx
13
Page 86
Activate Voicemail
All calls/Unanswered calls
xperia-xz1_04_Phone.docx
14
Page 87
If Unanswered calls is selected, set ring time.
OK
Voicemail is activated.
When new message is recorded, appears on Status Bar. Drag Status Bar down and Tap new
voicemail then follow the voice prompts.
Changing Call Waiting Settings
This service requires subscription.
In Home Screen, (Apps) (Settings)
xperia-xz1_04_Phone.docx
15
Page 88
Call
Call settings open.
Additional settings
xperia-xz1_04_Phone.docx
16
Page 89
Call waiting ( )
Call Waiting is cancelled.
Tap Call waiting to toggle on ( )/off ( ).
If Call Waiting is set and a second call arrives during a call, Call Waiting tone is heard. Drag
xperia-xz1_04_Phone.docx
17
Page 90
right to answer.
Using Group Calling
This service requires subscription.
During a call, Add call
Call History opens.
Enter phone number
xperia-xz1_04_Phone.docx
18
Page 91
Call is added.
Alternatively, Tap contact in Call History to add call.
When the other party answers, Merge
xperia-xz1_04_Phone.docx
19
Page 92
Group Calling starts.
Using Caller ID Notification
In Home Screen, (Apps) (Settings)
Call
xperia-xz1_04_Phone.docx
20
Page 93
Call settings open.
Additional settings
xperia-xz1_04_Phone.docx
21
Page 94
Caller ID Hide number/Show number
Caller ID is set.
Using Call Barring
Restrict call and SMS.
If a call or SMS is attempted while calling is restricted, a message appears. Message may take
time to appear in some areas.
In Home Screen, (Apps) (Settings)
xperia-xz1_04_Phone.docx
22
Page 95
Call
Call settings open.
xperia-xz1_04_Phone.docx
23
Page 96
Call Barring
Tap target option to restrict
xperia-xz1_04_Phone.docx
24
Page 97

TURN ON
Call Barring is set.
To disable all call barring, Tap Deactivate Call Barring, then Tap TURN OFF.
xperia-xz1_04_Phone.docx
25
Page 98
Using Contacts
Save phone numbers, mail addresses, etc. to Contacts.
Adding New Contacts
Contacts Cautions
Information saved in Contacts may be lost or changed if Internal Battery is left uncharged for a long
period. Accident or malfunction may also cause loss or change to information. It is recommended that
you keep a separate copy of contacts and other important information. SoftBank Corp. is not
responsible for any damages from lost or changed contacts.
Adding New Contacts
In Home Screen, (Apps) (Contacts)
Contacts appear.
xperia-xz1_04_Phone.docx
26
Page 99
If confirmation appears, follow onscreen instructions.
Enter items SAVE
xperia-xz1_04_Phone.docx
27
Page 100
Contact is added.
Saving Contacts from Call Window
Save a number entered in call window directly to Contacts.
In Home Screen, (Apps) (Phone) Tap dialpad to enter number to
save Create new contact Enter each item SAVE
xperia-xz1_04_Phone.docx
28
 Loading...