

Training Manual
2005 SXRD
Disassembly Manual
Models: KDS-R50XBR1
KDS-R60XBR1
Disassembly
Course: TVP-21D
Table of Contents
Introduction ................................................................................................................................1
Overview ...........................................................................................................................1
Chapter 1 - Screen Frame Removal .........................................................................................2
Chapter 2 - Rear & Sub Plastic Cover Removal .....................................................................4
Chapter 3 - Chassis Assembly Removal .................................................................................
Chapter 4 - Optics Block & Fan Removal ................................................................................7
Chapter 5 - Power Supply Block Removal ............................................................................ 11
Chapter 6 - Q-Box & PD-Board Removal ...............................................................................13
Chapter 7 - DSU-Board Removal............................................................................................17
Chapter 8 - ASU & G Boards Removal ..................................................................................
Chapter 9 - Wire Routing Diagrams .......................................................................................
21
24
5
Introduction
Overview
This manual presents complete and concise step-by-step procedures for the disassembly of the chassis assemblies and the removal of all boards included in the 2005 SXRD chassis. As it is with any
chassis disassembly or assembly process, care must be taken to remove chassis components without damaging the boards, wiring, or the chassis itself.
The procedures in this manual guide you through effective and efficient disassembly and reassembly
processes for all areas in the 2005 SXRD chassis.
How to use this manual:
1) The manual can be sequentially followed from Chapter 1 through Chapter 7 for removal of
the major chassis assemblies and the individual boards.
Chapter 8 illustrates the Screen Frame Assembly Removal
Chapter 9 is a quick reference for wire routing throughout the chassis.
2) The chapters in the manual are also designed as stand alone procedures. Therefore,
you can go directly to any specific chapter and proceed to remove that particular assemble or
board. If the procedures in a previous chapter are necessary it is noted in steps 1 or 2 of the
stand-alone procedure.
1
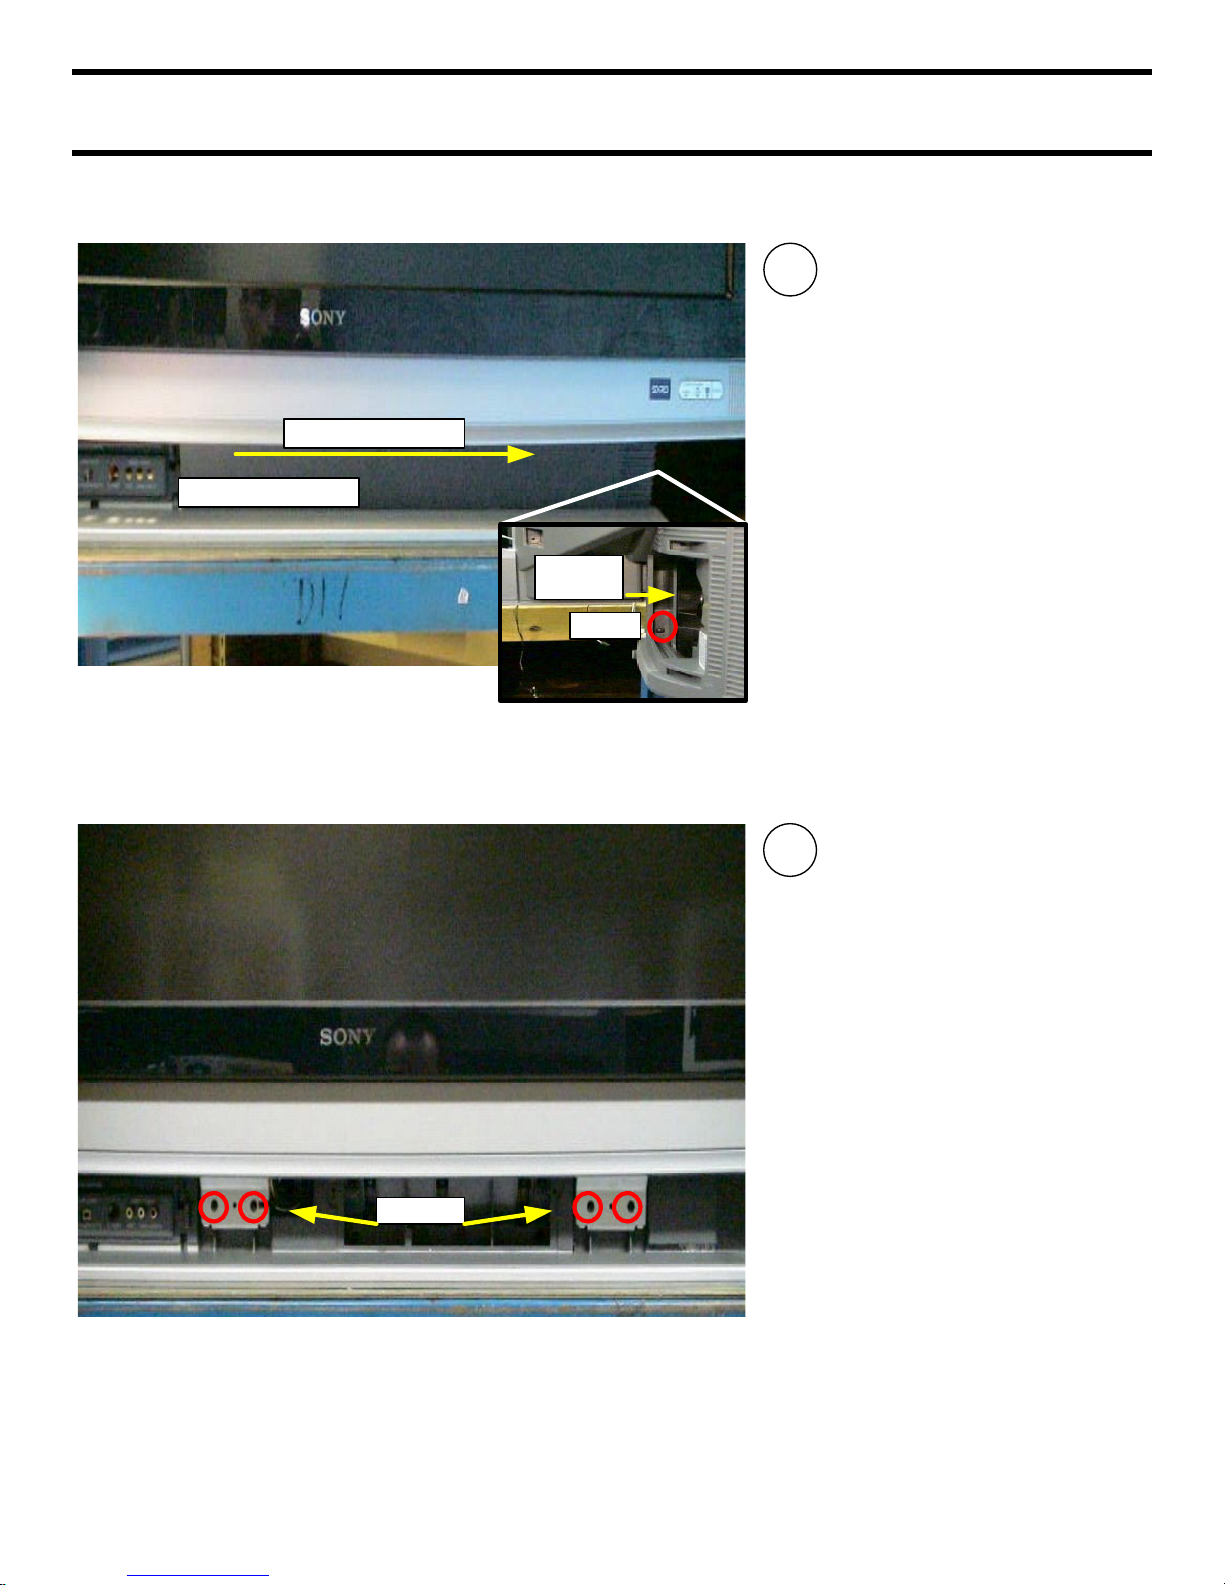
Chapter 1 - Screen Frame Removal
Screen Frame Removal
1
The lower front cover must be
removed to access the screws
that secure the two lower
screen
-frame brackets
Open the Lamp Door and
remove 1 screw in the lower
left hand corner when view
from the rear of the unit .
Slide front cover to the right
and remove.
Lower Front cover
Slide to the Right
Screw
Lamp
Housing
2
Remove 4 screws securing
the lower screen
-frame
brackets
.
Screws
2
Screws
Leave top -center
screw for last
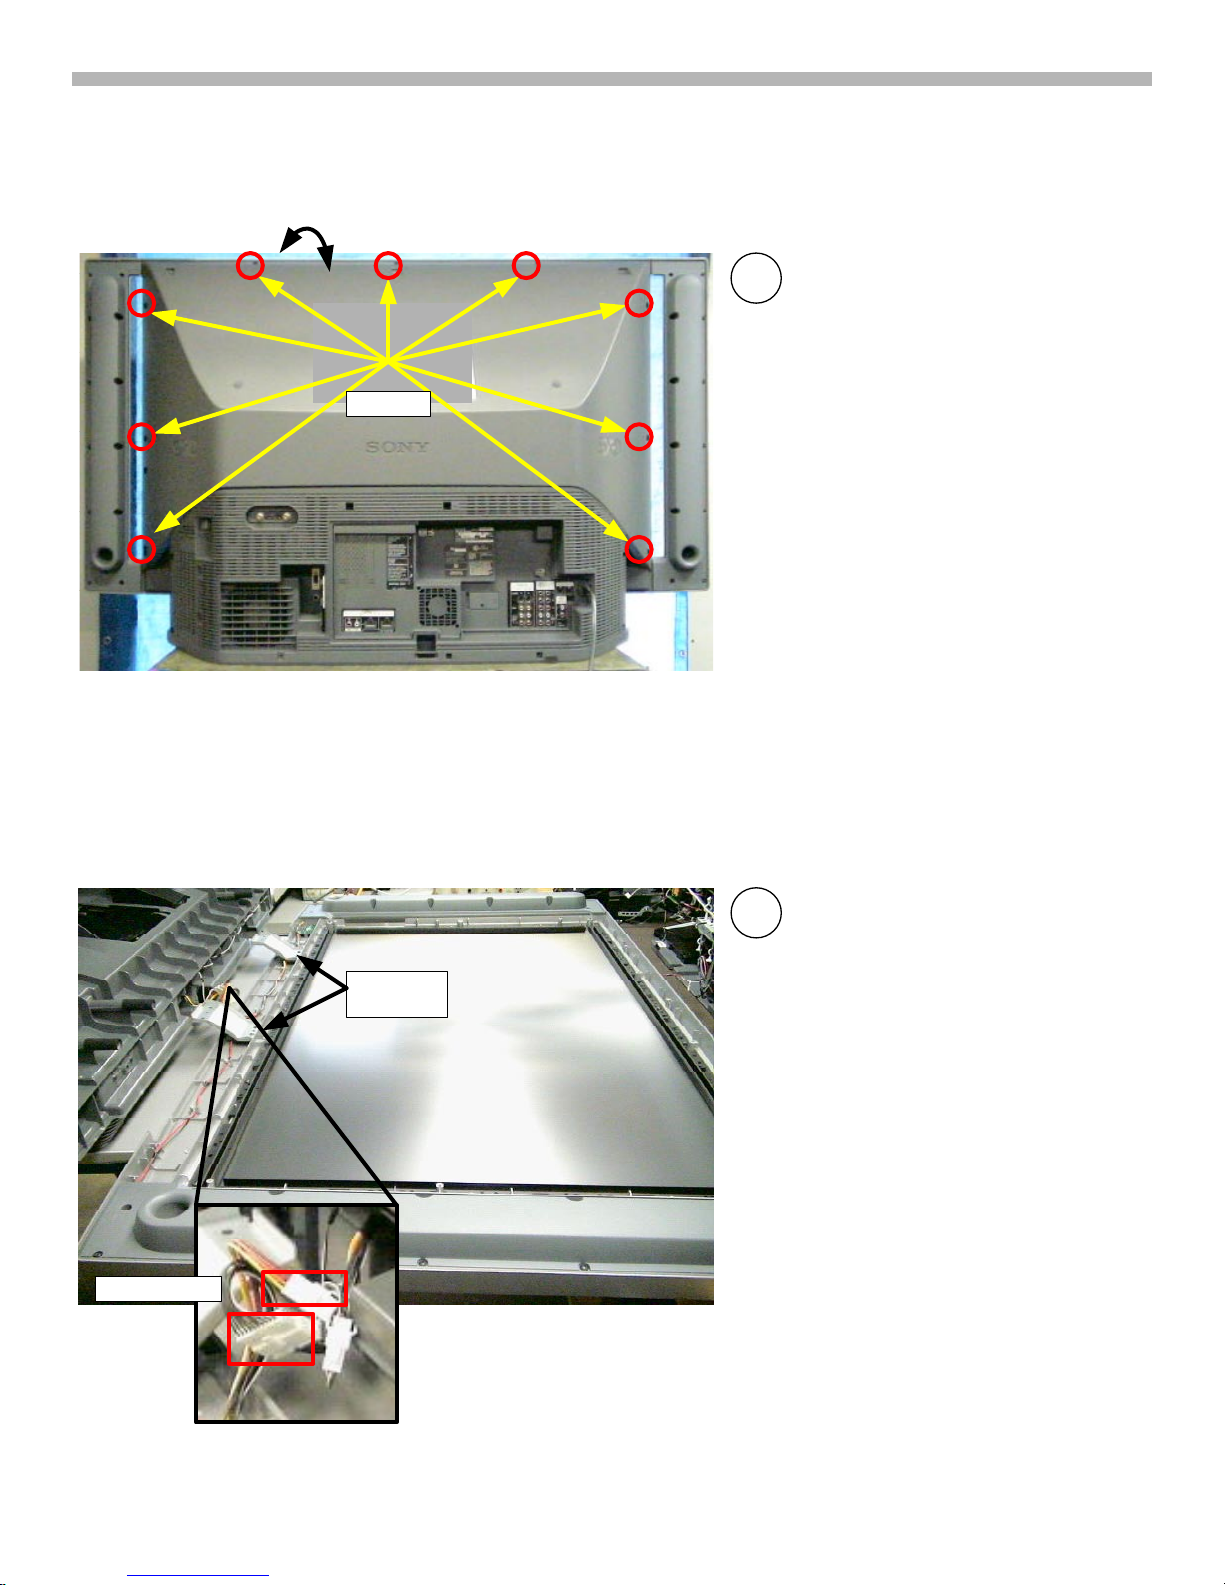
3
Remove 9 screws to release front
Screen Frame assembly.
CAUTION
: Leave the top-center
screw in place while removing the
eight other screws. Go around to the
front of the unit . Hold the screen
frame assembly and the rear mirror
assembly together at the top while
removing the last top
-center screw.
Pull the Screen Frame assembly off
and lay down on a soft pad.
Screen Frame Removal (cont.)
4
Disconnect 2 connectors
CAUTION: Do not stand the Screen
Frame assembly on the metal
brackets.
Connectors
Hold
Together
Metal
Brackets
1. Screen Frame Removal
3
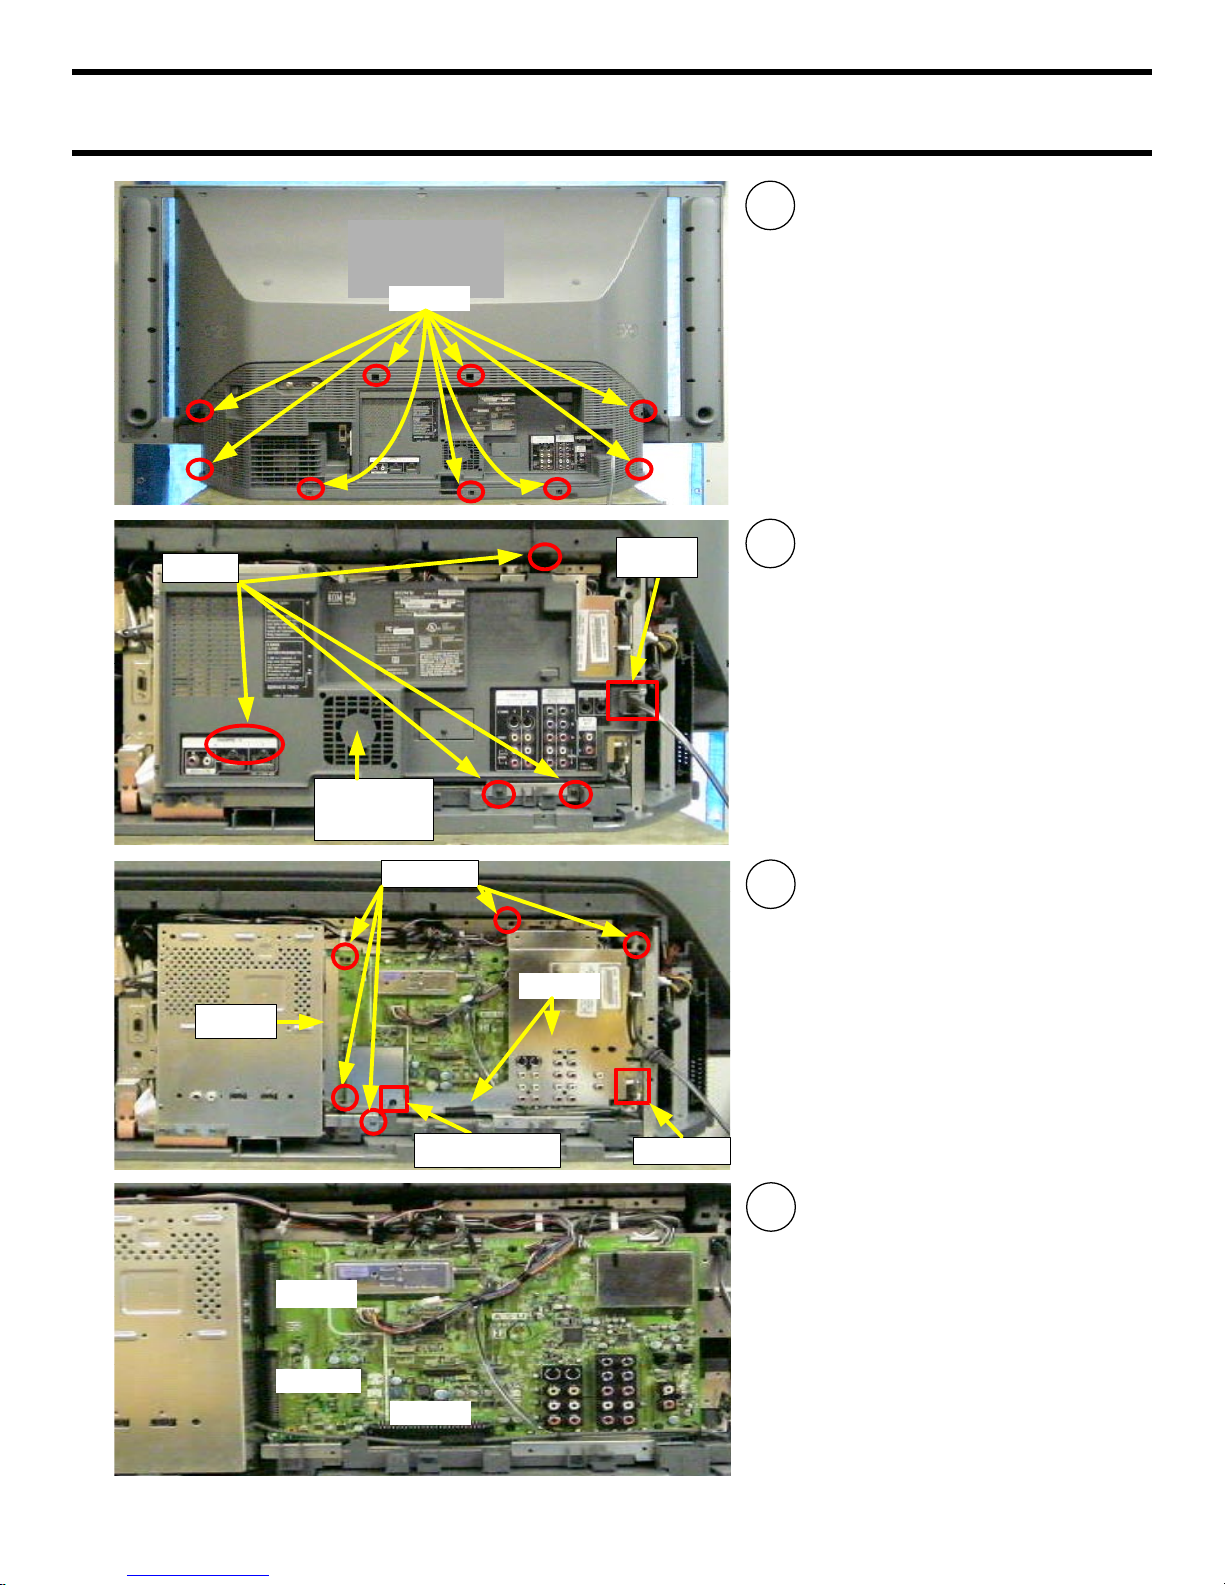
Chapter 2 - Rear & Sub Plastic Cover Removal
Screws
Rear and Sub Plastic Cover Removal & ASU-Board Access
1
Remove 9 screws and pull rear
plastic cover straight back and
off.
Detach
AC Cord
2
Remove 5 screws and detach
AC cord from the slot. Pull sub
plastic cover slowly straight
back and off.
NOTE
: Be careful of fan wire
and connector behind sub
cover. Disconnect fan cable to
completely remove cover
.
Screws
Shields
Screws
Release Wire Tie
Bracket
3
Remove 4 screws and release
the one wire tie. Slide the
bracket up slightly and pull off
.
Disconnect the S1-Board
Remove both shields to access
the ASU-Board.
CN2006
CN2010
CN2100
4
The ASU-Board can be probed
for troubleshooting at this point
of the disassembly process. It
can not be remove at this point .
Reference “ASU &
G-Board
Removal” section
.
S1-Board
Disconnect
fan cable
behind cover
4
Chapter 3 - Chassis Assembly Removal
Screw
2 Screws
3 Screws
Disconnect
C-Brd
Connector
1
Remove 6 screws and
disconnect the C
-Board ribbon
cable
(Gentle press the Tan tab
on the side of the connector to
release cable.
2
Remove the small cover (3 screw)
and disconnect C
-Board cables.
CAUTION:
Be extremely careful not to damage
C-Board cables while removing the
Chassis Assembly.
Screws
Small
Cover
Disconnect C-
Board cables
3
Lift
Tabs
Lift the two locking tabs and slide
chassis straight out until it is
stopped by the vertical bracket
(right side) .
CAUTION
:
Be extremely careful not to damage
C-Board cables when sliding the
chassis out. Gentle push cables
under the DMB assembly
.
Becareful of
Cables
Removal of Complete Chassis Assembly
Vertical Bracket
Bracket stops
chassis
Tan Tab
DMB
5
4
Slide Chassis out until it is stopped
by the vertical bracket. Before
attempting to remove the Chassis
assembly disconnect the wires as
illustrated in the photo
.
Removal of Complete Chassis Assembly (cont.)
Disconnect
Cables on each side of the
chassis assembly
Disconnect
Fan
connector
5
Angle the left side of Chassis
assembly out.
Slide the Chassis to the left (around
the vertical bracket and pull chassis
out.
CAUTION
:
Do not remove the vertical
bracket. This bracket is critical
support for the Upper mirror and
screen block.
Angle out
Slide to
the left
Around
vertical
bracket
6
Completely remove the Chassis
assembly and disconnect Lamp
Power Supply Block cable.
Power Block cable
Vertical
Bracket
3. Chassis Assembly Removal
6
1
Before the Optical Block can
be removed the Fan assembly
must be removed
.
First, remove cable clamp and
wire tape.
Tape
Clamp
2
Remove the 5 screws and the
vertical bracket next to the fan
assembly.
Screws
Vertical
Bracket
3
Detach the Power Supply
Block from the fan housing.
Disconnect the power supply
cable.
Remove wires from the two
wire holders.
Squeeze the small tabs at the
top of the board to remove
board and lay to the side
(the
red wires will remain
attached).
Squeeze Tabs
Disconnect
Power cable
Release
wires
Optics Block, Power Supply Block , and Fan Assembly Removal
Fan
Assembly
Chapter 4 - Optics Block & Fan Removal
7

Optics Block , Power Supply Block , and Fan Assembly Removal
(cont.)
4
Grasp the Fan assembly
and pull out to remove
.
5
To access the Optics Block
the gray plastic cover must
first be removed.
Remove the 8 screws
securing the Optics cover
.
Lift the 2 tabs, and carefully
slide cover back
.
Also remove vertical bracket
(1 screw).
CAUTION:
Lift the C-Board cables and
carefully feed them through
the slot in the plastic cover.
Optical
Block Cover
Screws
Lift Tabs
Feed cabling
through the slot
Power Supply
Block
Screws
Bracket
4. Optical Block & Fan Removal
8

4. Optical Block & Fan Removal
Optics Block , Power Supply Block , and Fan Assembly Removal
(cont.)
7
The lower front cover must be
removed to access the screws
that secure the Optics Block in
place.
Remove 1 screw behind the
cover in the lower right hand
corner.
Slide front cover to the right
and remove.
Remove the 4 screws
securing the Optics Block.
CAUTION
: Do Not Touch the
6 screws mounted in the black
plastic under the lower front
cover
Lower Front cover
Screw
Lamp
Housing
Slide to the Right
Screws
6
The Power Supply Block must
be removed with the Optics
Block because they are
attached by 1 internal screw
inside the Lamp Housing.
The left edge also blocks the
Optics Block from being
removed
.
To remove the Lamp Housing
lift the locking tab on the top of
the cover and pull up and out
.
T1-Board
Locking
Tab
Lamp
Housing
Power Supply
Block
Do Not Touch
9

4. Optical Block & Fan Removal
9
The Optics Block and Power
Supply Block slide out
together.
Remove one screw securing
the Lamp plug to disconnect
Power Supply Block from
Optics Block.
CAUTION
:
All cabling must be removed
from Optics Block. The
cabling does not come as part
of a new Optics Block.
Optics Block , Power Supply Block , and Fan Assembly Removal
(cont.)
Screw
8
CAUTION:
Take care not to damage
black plastic divider
(light
shield) when removing and
installing the Optics Block
.
Do not remove or damage
black tape on the lens. The
black tape reduces glare and
reflections
.
Plastic
divider
Tape
10

Chapter 5 - Power Supply Block Removal
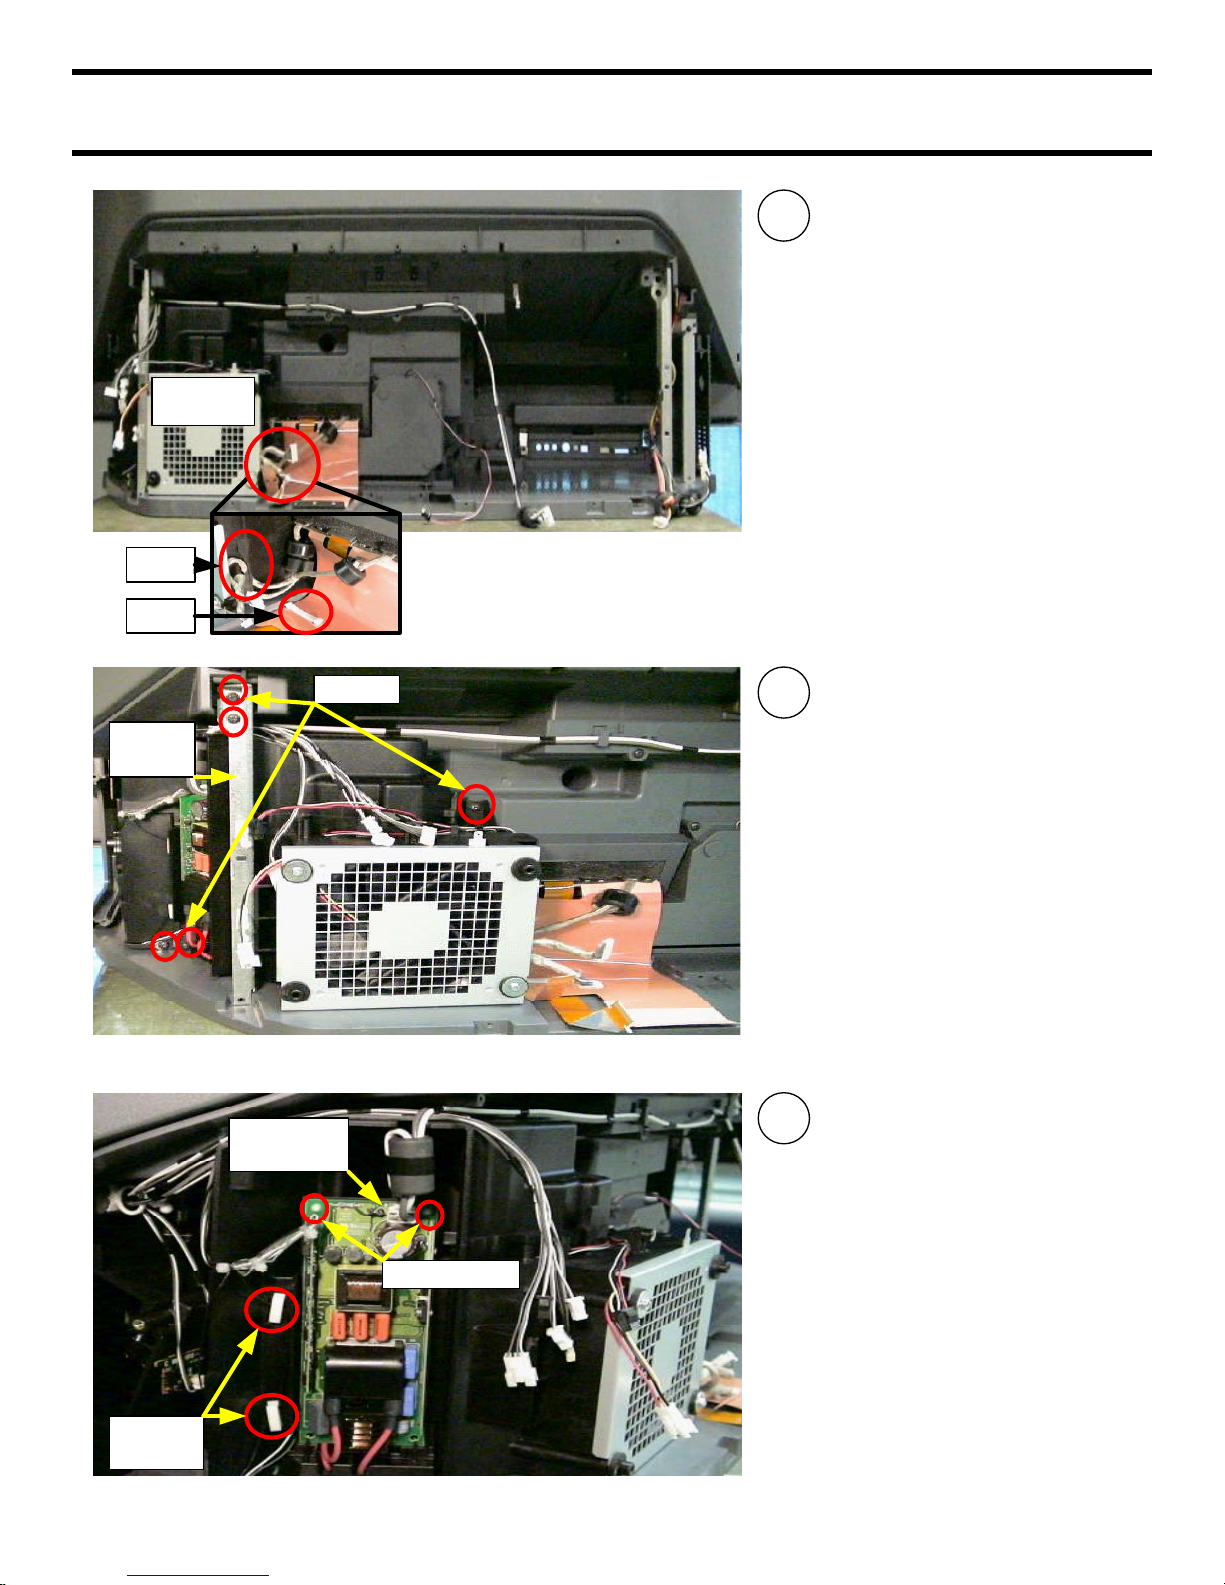
1
Use the following procedures to
remove the Power Supply Block
only without any other chassis
disassembly
.
Disconnect the power and sensor
cables
.
Release cables from 2 holders.
Squeeze the 2 upper white tabs
and dismount the Power Supply
Block
.
Power Supply Block (Only) Removal
2
Lay the Power Supply Block face
down to the side of the unit
.
Remove 1 screw securing the
cable guide
.
Remove 1 screw to dismount the
Lamp plug
.
CAUTION
: Be careful not to
damage the Lamp plug detector
switch when removing and
installing the Power Supply
Block
.
Squeeze Tabs
Disconnect
Cables
Release
Cables
Dismount
Lamp Jack
Screw
Slide
Jack out
Screw
Cable Guide
Detector
Switch
11

5. Power Supply Block Removal
Power Supply Block (Only) Removal (cont.)
Carefully Pull
assembly out
Direct the
Lamp Jack out
3
The Power Supply Block (including
the Lamp Plug & Cable Guide) is
pull out underneath the Fan
assembly.
Carefully direct the Lamp Plug
through the slot in the Lamp
housing. Note cable loop when re
installing Ballast.
CAUTION: Be careful not to
damage Lamp Plug detector switch.
12

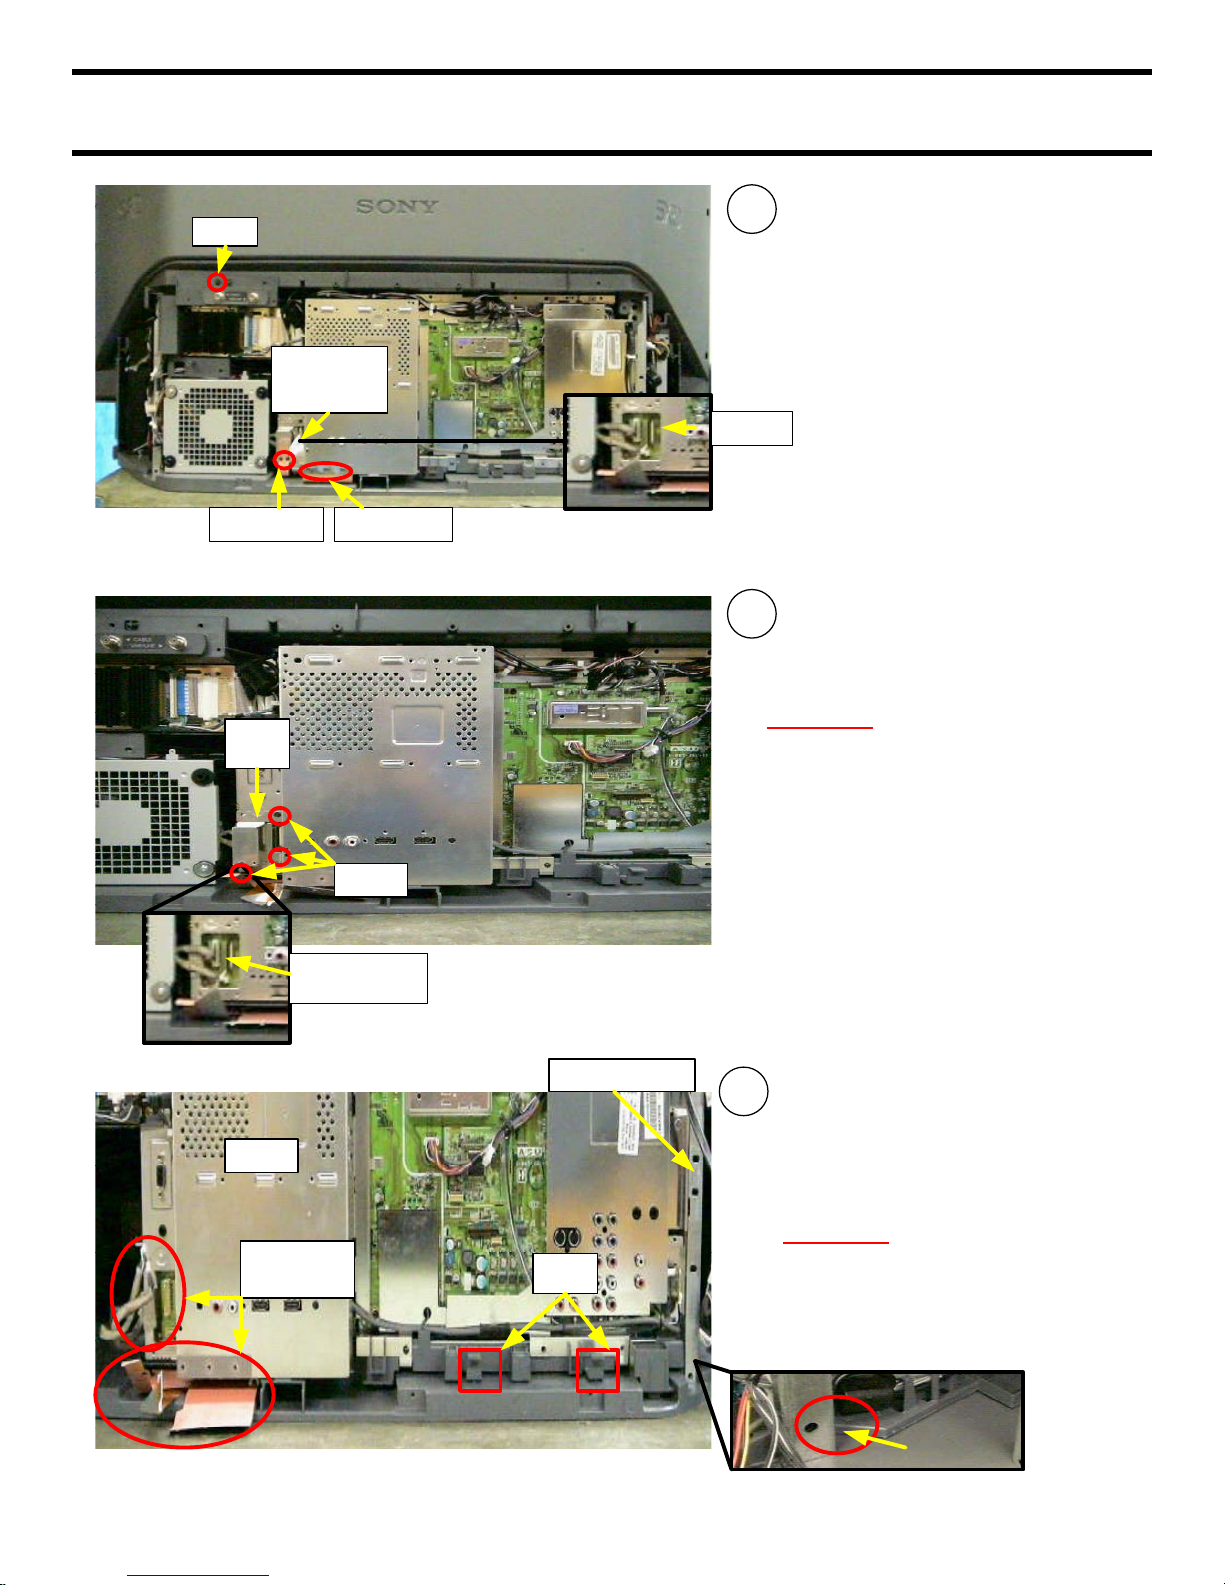
Chapter 6 - Q-Box & PD-Board Removal
Access & Removal of Q-Box & PD-Board
(Digital Module Block DMB )
1
The Chassis only needs to be
slightly slid out to access the
screws and wire holders to
access the Q
-Box and PDboard.
Reference the “Complete PCB
Chassis” section for details to
free and slide out the chassis
.
Remove all wires from wire
holders
.
Disconnect USB cable
Slide Out
Wire Holders
Wire Holders
USB Cable
2
Remove 16 screws, Small
Cover, and the Connector
Cover to remove DMB outer
shield
.
When all screws are removed,
pull the left
-side of the shield
out first to clear the i
-link
connectors on the right -side of
the shield
.
Once i-link connectors are clear
pull shield straight off
.
DMB Outer
Shield
Connector
Cover
Small
Cover
I-Link
Jack
Screws
(on side)
Screws
indicated by
red circles
13

Access & Removal of Q-Box & PD-Board (cont.)
(Digital Module Block DMB )
3
The Q-Box assembly and the
PD
-Board (HDMI) can now be
access and removed
.
To remove the PD
-Board
remove 2 screws, squeeze the
2 white tabs, and disconnect the
2 wires.
Q-Box
Assembly
PD-Board
Screws
Tabs
LVDS
Squeeze
side
-tabs
4
To remove the Q-Box module first
disconnect the CableCard ribbon
cable.
Remove 2 white cable clamps that
hold down the ribbon cable.
Disconnect the cable from the
CableCard board by lifting the Tan
connector tab
.
CAUTION
: Make sure that the blue
heat-sink pads remain in place .
Also insure that black plastic wire
protector remains in place.
Disconnect the LVDS cable located
at the bottom of the Q
-Box assembly
Heat-sink
Pads
Disconnect
Gently flip
up Tan Tab
Lift clamps
Disconnect
LVDS
Wire Protector
(under wires)
Disconnected
i-Link
6. Q-Box & PD-Board Removal
14

6. Q-Box & PD-Board Removal
Access & Removal of Q-Box & PD-Board (cont.)
(Digital Module Block DMB )
5
Remove 6 screws to free the Q Box assembly.
Firmly grasp the assembly at the
top and bottom and pull to
dislodge it from the chassis
frame
.
CAUTION: Be carefully not to pull
too far out and damage the wires
still connected
.
Screws
Peel Back tape
custom
6
Disconnect all cables on the QBox module except for the
CableCard ribbon cable. This
cable remains apart of the Q
-
Box
.
NOTE
: Reattach all wires
before securing the
replacement Q-Box to the
chassis assembly.
Disconnected
Wires
Disconnected Wires
Unscrew
RF
-connector
Disconnected
Wires
Pull wire out to
access connector
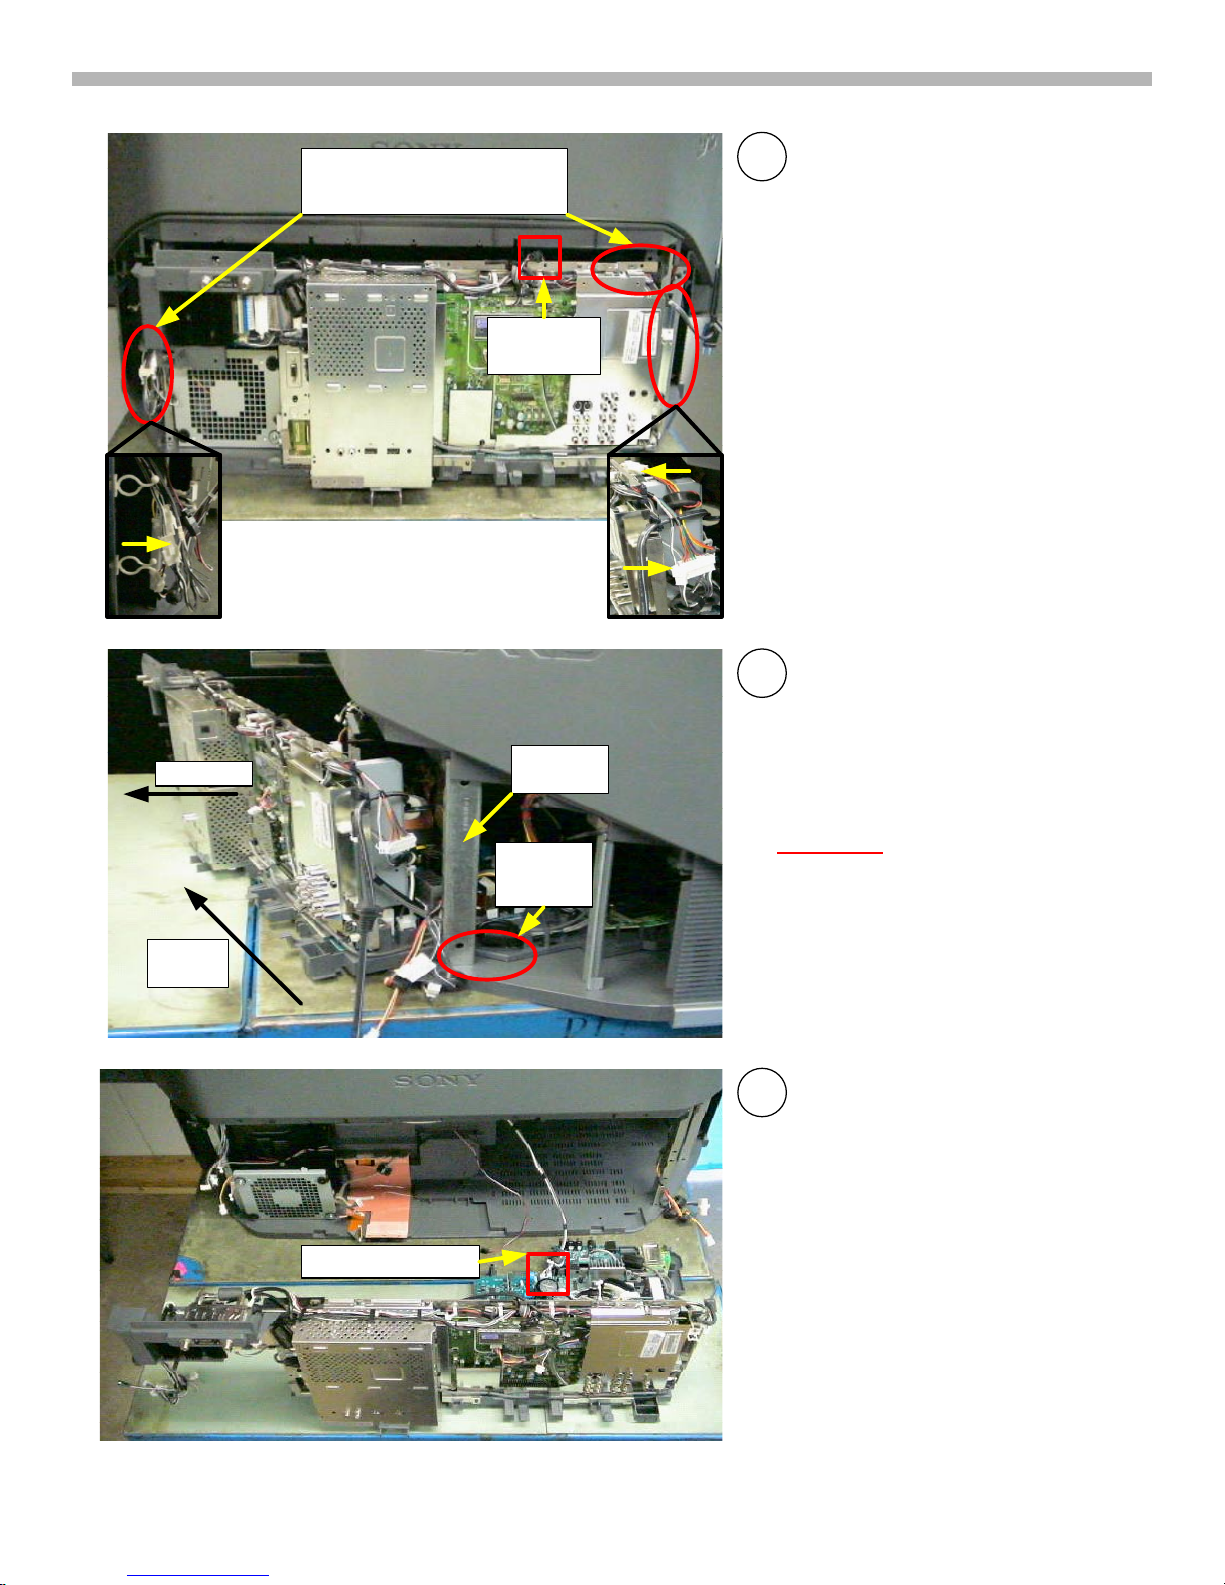
15

6. Q-Box & PD-Board Removal
Access & Removal of Q-Box & PD-Board (cont.)
(Digital Module Block DMB )
7
Q-Box assembly includes the
QM, QI, QT, and QH boards
.
16

Chapter 7 - DSU-Board Removal
1
To access the DSU-Board, remove
the Chassis assembly from the
Bottom Cabinet. For instructions on
removing the Chassis reference
Chapter 3
– Chassis Assembly
Removal.
DSU-Board Removal
2
After removing the Chassis
assembly, remove 16 screws and
the Connector Cover to remove
DMB outer shield.
When all screws are removed,
pull the left-side of the shield out
first to clear the i -link connectors
on the right-side of the shield.
Once i
-link connectors are clear
pull shield straight off.
Screws
Connector
Cover
17

DSU-Board Removal (cont.)
Q-Box
ASU-Board
CableCard
Push
Push
3
Grasp the top and bottom of the
framing holding the Q
-Box and
PD
-Board .
Push the framing to the left until
the two connectors between the
ASU
-Board and the DSU-Board
completely separate
.
DSU-Board
Under Shield
Separate
Connectors
4
Release wire wrap and
disconnect the two RFconnectors at the antenna
switch.
Connectors
PD-Board
Wire wrap
7. DSU-Board Removal
18

DSU-Board Removal (cont.)
5
Disconnect the CableCard ribbon
cable
(Reference Chapter 6 page
14 for procedure).
Detach CableCard assembly from
the Chassis assembly
.
Remove 3 screws
.
Lay the CableCard assembly to
the side
Screws
Connector
6
Grasp the top and bottom of the
DSU
-Board shield on the far left
side of the Chassis assembly
and pull out. The Q
-Box. PDBoard, and DSU-board will
swing outward together.
Pull
Pull
Swing out
7. DSU-Board Removal
19

7. DSU-Board Removal
DSU-Board Removal (cont.)
7
To remove the DSU-Board
continue to pull the DMB and
the DSU-Board assemblies
away from the Chassis frame
(swinging the assemblies to the
right).
Remove 6 screws, and squeeze
the two white tabs to release
the DSU
-Board from the shield .
CAUTION
: Do not attempt to
pull board off at this point
because connectors on both
sides of the board must first be
disconnected.
Disconnect all connectors on
Screws
Connectors
Tabs
Front-Side
Connectors
20

Chapter 8 - ASU & G Boards Removal
1
To access the ASU-Board and the GBoard, remove the Chassis assembly
from the Bottom Cabinet
(Reference
Chapter 3 – Chassis Assembly
Removal).
Remove the shields on the ASU
-
Board
(Reference Chapter 2 – Rear
and Sub Plastic Cover Removal).
ASU & G-Board Removal
2
Remove 5 screws from the DMB
shield. This will free the DMB and
DSU
-Board assembly so the
connectors in step 4 can be
separated.
Release 2 wire holders and
disconnect wires behind the ASU
-
Board as shown in the picture inset.
Wire Holders
Release wires
Disconnect
Disconnect
Shields
Screws
21

ASU & G-Board Removal (cont.)
3
Grasp one side of the Chassis
assembly at a time and pull up while
holding down the lower chassis
assembly until connector between
ASU
-Board and the G-Board begins
to separate
.
Repeat the above procedure with the
other side of the Chassis assembly
until the connector is completely
separated
.
Lift the complete ASU-Borad, DMB,
and DSU
-Board assembly off the G-
Board assembly and set to the side
.
Pull up
Pull up
Holder Down
Connector
DMB
ASU-Board
G-Board
4
To remove the ASU-Board first
remove connector cover
(2 screws
indicate by red circles) and separate
the connectors between the ASU Board and the DMB.
Connector
Cover
Separate
Connectors
Separate
Connector
8. ASU & G Boards Removal
22

ASU & G-Board Removal (cont.)
5
Disconnect all cables on the ASUBoard
.
Remove 4 screws, squeeze the 2
white tabs and lift ASU
-Board off
assembly
.
Disconnect
Screws
Tabs
ASU-Board
G-Board
Tabs
6
To removal the G-Board press the 4
gray tabs in and lift G-Board off the
lower chassis frame.
8. ASU & G Boards Removal
23

Chapter 9 - Wire Routing Diagrams
Wire Routing Diagrams
24

Wire Routing Diagrams (cont.)
9. Wire Routing Diagrams
25

Wire Routing Diagrams (cont.)
9. Wire Routing Diagrams
26

Wire Routing Diagrams (cont.)
9. Wire Routing Diagrams
27

9. Wire Routing Diagrams
Wire Routing Diagrams (cont.)
28

and i.Link are trademarks of Sony Electronics
TVP21D1005 10/14/05
Reproduction in whole or part without written permission is prohibited. All rights reserved
2004 Sony Electornics Inc.
EMCSA - A Service Company
1 Sony Drive
Park Ridge, New Jersey 07656
 Loading...