

Sony SELP1 8105G, α SELP18105G Operating Instructions Manual
SONY.
;;cml./::,~A:·
4-475-3 14-01 (1)
Interchangeable Lens
Objectif
interchangeable
jjJ~W!tl~
!{Xf&~BJ:I,dt
Operat1ng lnstruc_t1om
Mode
d ernplo1
df'
mstruce~ones
Manual
iY'I!li!!BJl'!l
E
PZ
1
8-10
Smm F4
GOSS
Qib.li
a
S
ELP18105G
hUp
:/ /www.
Printed in Japan
.
•
son
y.
ne
V
©2013 Sony Corporation
lllllllllllllllllllllllllllll
4475314010
lfi
w-1
~
"Y
w-2
rn~~Xo.>U~M~https://manualmachine.com/6~~·
IAJ'~
Jlll!)f":tl:tfJ11t(..f5A
1
~~~v:J7~~:>7cn~?~~7~
~~:>7".fl~~-
• u:..<77D:..<
j"<:'llllt:Jfilf/ llllt:ll;lgi_,b'<:';';'i'<9.
77-
t'
11
/ llllt:Jl;l<f(_,[;:jj;fiJ<:'g 0
2
L07c:IJ~?O)S~F.i\("<'?:J
8tltt<:I~!Dil><I:I-.Lt/7>.!H
L,§<:trll'S.~~JJICJI<:rn:f
1J'1J''b''Q*c~-=><
•
l//71;'llllt)filf 31::;'<'1;J:.IJ;I5(})1//7llllt)l;J:
9'L.,Jtt'5'Y{!tifl~tcl:L.\C(
• uY71!*1<1'lt<=,..Gi6i<t«L'c<rccoLI.
Jlll!)~l'L,fJ•1t(..f5A
l
n~?~L.t:J7IIllt>l<t~L,~$>:;>.rJ!IIL,t.:*
*
.Lt:J7".!&~~JJICJIL:@J
[i
~~X7-I'~U~f;JI:t.Q
il!ii!ii71-l~®~'lttJ'I1il"3'1~iiF~9'~0)"'~<:tc.ltJI~.
l/:J::Z:7-t'O)~ffl".f~9911J~*··
t-IEJ-
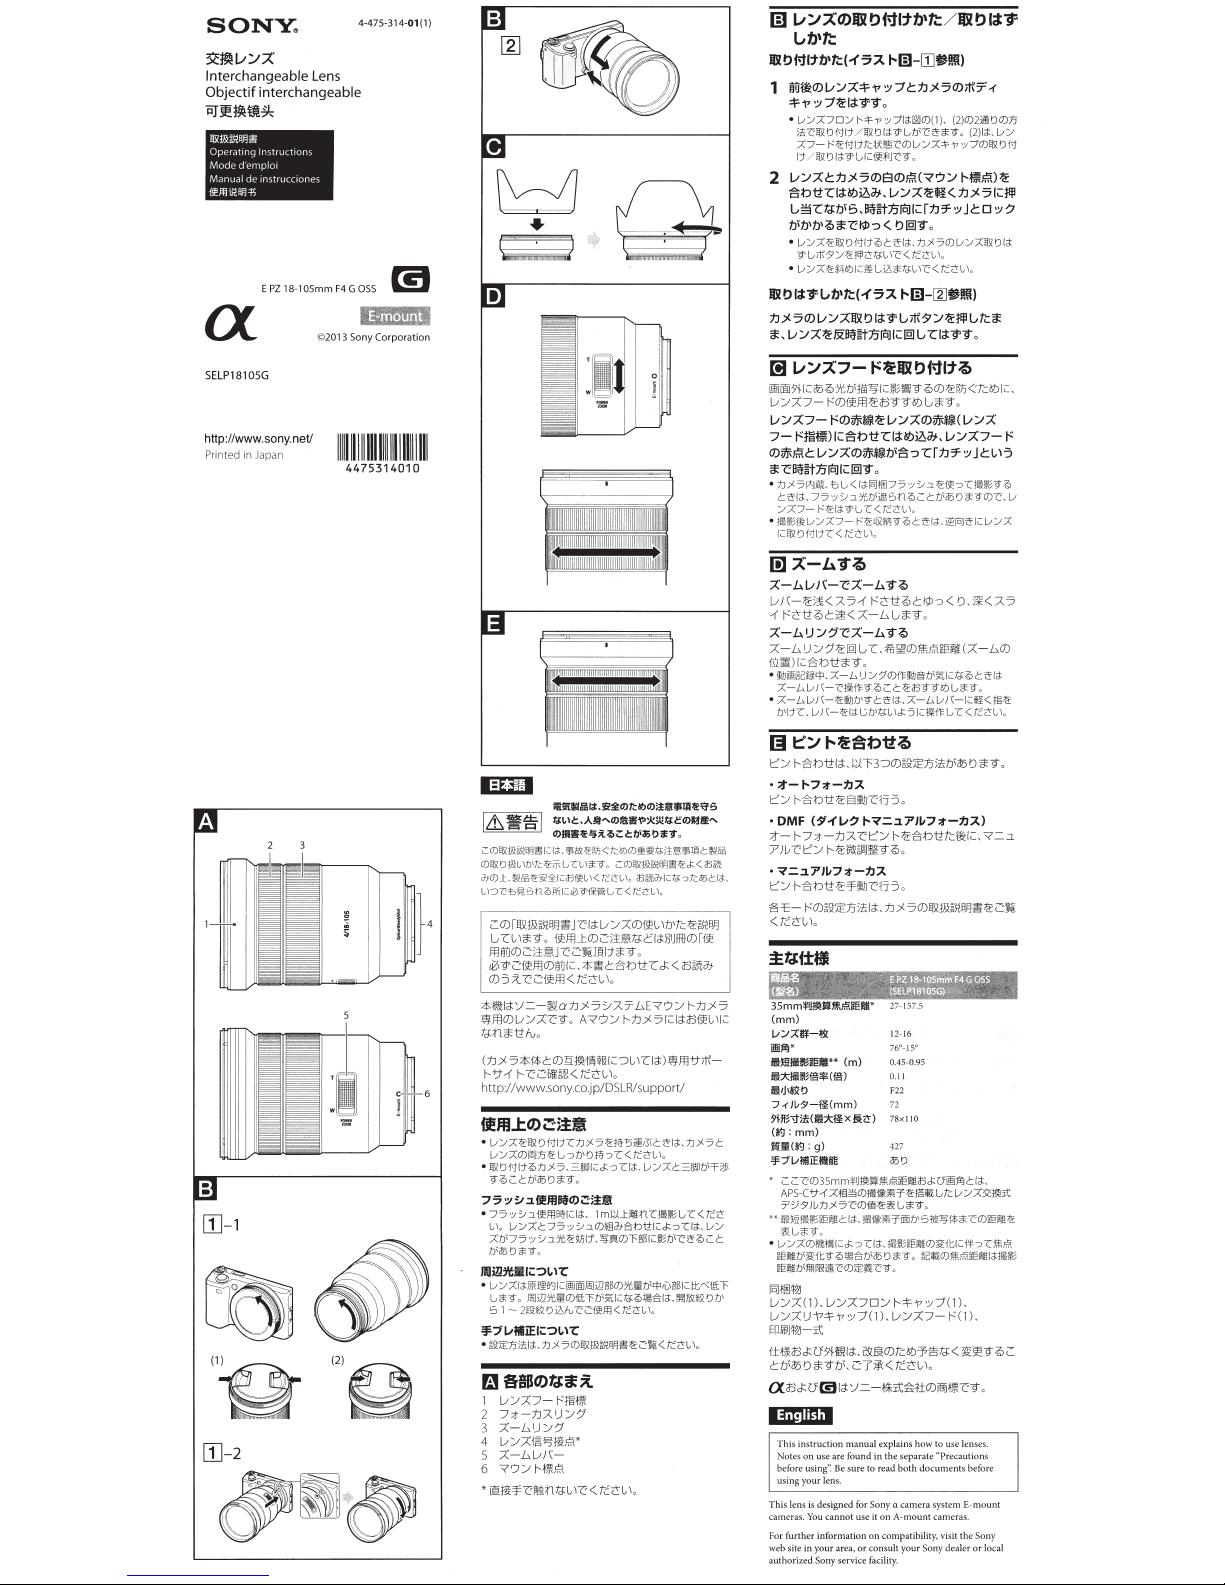
[I]
fi'P.\'1)
.
~~""'
:1ta:lllJ(])(l).
(2)(})2@0(])7J
(2)1;3:.
1!filftct<!il!<:'(})l/Y7~"
!:>1219
.
tCCL.\o
t-IEJ-
[g)
L,
<::1~~9
1//
y:J(])llllt)f')
H~F.i\J"'
<.
n~?I<:J!Il
:>
JC: D :>
?
fi'l!ll)
.
v:J77-f"O)#!*".fv:J70)#*B(v:;7
7-1"11!1~)
O)#Jiac
*c~~JJICJ1<=1219
•
•
l!l
;z·-L>vH-c7-L>V:Q
1/!l
..-r
7-L>•J:;::tc::7-L>V:Q
7 - L ')
lli
•
• 7 -
lEI
1::::;
·::t-t-7-r-1.1::1:
ll!llll
ilol3.f<:ll<1)1::1!><1);t
g:LII:.A
lfi
"<1)J!!;W\'>*!l!g:E<1)11!
<1)
111Jf
L:(I)!IIIWO>IIlJli'liCI<!.'Il!Y%'n<:tci1J(I)il!!!'fa;ilJJ'Illi11::l!l&\
O)ft!t)il}
L,rfJ
d:fO)_t,
~85~:?i::£1;:a=Jfi!\...
t.,r::>CtJ~Sn:QffJ(;:£,9"1*'SL?:"<tCCL,lo
C::O)r!ISIIDo>lB!ll!iJl'ld:
~rl~Y.~
/llilTiO)C::;.:t•
tt:,wc::~fflO)ilTil~
0)3:t
:$:lllld::
..
WfflO)l//::Z:l'Y.
trt1*i!lo.
(:IJ.)(7:$:!TcO)l'J:~ti!!'ffil~-=>c'nnw:m-11il(
~-11..-r
~cc::lii&~<tcc-c'·
http://www.sony.eo.jp/DSLR/support!
i!Jft..to.><::~-
•
L<.
-<Z1!!11101ilfc:I:Jx51!¥!'5i!Mil::i"l<l.:I:Jx51::
l/Y7(])i'J)J1;'1_,
• llllt)filf'6>1Jx5.=Wlt<:Jccoc:l<!.l/Y7c = Wln"f'Jt
9'6>L:C:b'0t)1<9.
7?:;~;t:~.iEI!IMa.>i:!
• 75y'Jo.i9'!!lH1it<=ta:.
l.,\o
l.;:Y7C::75'Y~.::lO)*fi<1J.j§-
7b'75
b'il5t)1fg,
lmi?l:l't
.
•
u/:Zl<llili
Gi'<o.
S 1
~2~*9:0il:::.fvC2~ffl<tD~l.'o
i¥7'vlliEIO:?LI~
• W:lf':>J)!l;!.IJ;I5(})llllilll!IBJll!l1!2'10(tccoL\,
~4;<9i:l:lfi~tJil'l'
'tc.1t£'if\ U
"(L,\*9
i(
tC~l-'o
1/
ffl
~O)c::~•tr~~~OOO)~
J l'C::'!ijj:j
.
cc::iieffl<tcc-l'·
c - !E:Ia:IJ.)(5::..-7.7'LEx?/
*l!fC:i'!ini!T~<sOl!J.i
Ax?/
cob't))1;coC:
i
:UI
1
m~J.l~nc:tii~jG
"-'
'J
o.
'lt1!~11.
"i'-'<(})T!llll<:l!ib'<:';';'3 L:l::
I<:?LI~
l!l!9'Jl<:
ii!liiii
~i2l!lll
~ill'/t
lil (})ffrTb'l<tl<:1iJ:'6>\!J;§l;J:
lU1
lii~'<JS
i!l
"
o
o
LO)E!XW.~EI,El;;c~J;:<
<f.)~(h(;:t&:
/::Z:O)iiel
i1*Y
.
~:IJ.)(51~1d:33fielll~
<to<OLI,
:
trtt!.:=J::JLict
(})'/tli!b''l''
CO~~
:>T.::35C.Id:
\b't~"'O>IB!l
~tJ.)(
c:<rcco
l//
C'
!llll
<:lt
«ffrT
.
IIIJ!'<Illt:lb'
moo.>tc:J:if~
1
1//7:7
- t'llllll'l
7;t-1J7.1J/1
2
3 7 -
L'J:J:f
4
1//71§~~,1':\*
5
::Z:-Ll/1(-
6
?'J:J
~lll'l,l':\
•
ill:~'¥c~~nr<>c
1c<
rc:t:c
'·
t::;
• DMF
;ot
7%<:'1:::/
•
,
I::/
§'E-
<tC.cc'o
7
(mm)
vY:ZB¥-t'l!
jj~*
lll
fl:;l:jlllljjgi!'(jg) 0
ii
7
nlf>'<J'
(I'J
f(;[
'¥:11/lililEfllllll!
•
••
•
IOJII!WJ
1//::Z:( 1),
l//::Z:IJt41'
EPlliJIZO-Jt
i±llW~0'7HJ!Id:.clU;>.O)tc.ltJ'f'6tr
C:IJ'®'J>fYIJ'
a
Gftl®jl
Th
cameras.
For further in
web
auth
1<:8tltt<:I~!Dil><I:I-.Lt/77-l"
v:J70)#**1J'
!:J~5~aBG(~~-75y';o.1;'~coc.E93
ci"t<~
.
75
y'Jo.'lt
Y7
7-
ro>,;ot<!WG
Jm~:W:u::.-'77
<=llll o fittt:
<
t
8-=>
z:rn7,
JC:c
.
n'ill!Sl13L:ciJ'<!lt:J1<9(})C:.l/
c:<rccol\
- t'1;'11Xll'Jo01::i"ta:.;;e[O]"'t<=l/Y7
r.:coc
.
'·
13
X-b.T.Q
- "';11<7.7
t'c-tt~cill'<::Z:-L~*"·
lill)l~&
!I.Dii!iilclli'l'.
7-Ll//(-<:'1~1~90L:c1!<10996'lG3'9.
Ll/1(-1!liJD'9ci"l<l
D'l1c.
~~
~15bttld:.UT3-::>0),£J'E1JiM'®'J*9·
~i'!inttz
-
~
"1'=:~.7J~7:t-:IJ::l:
~&t:>tt"''FiWJc1'J3
lil
lll~~~~*'
iJ\~b
-rlv7-~(mm)
:mm
(I'J : g) 427
L:L:<:'(})35mm'!'J
APS-C-11
'T'J71vtJx5<:'0)ill1!'&Gi'<9o
>il!ill~ij;ie~1C:l<l.l6fllllt.-i'iilib'
lJ<
(_,<J'g
l/Y7(})ll\!l.\ll
iEi!illb'll'fto'@lgl§n'i!liJ
iE1llb'I!I"R;ac(})JEl!l<:'1!'.
s~amt<t'..l=-
This instruction m anual explains how to use lenses.
Notes o n
before using': Be sure to read bot h doc
using y
is len
site in
or
ized S
..-r
roc-tt~cl1l:o<o
:J:7".f@~ r.
bt'*9·
l//(-1;'1;J:Gb'/i;LIJ;5
1i\>!10)fi1\,S\i!'~
7 - L
IJ
Y:7(})f~liJIOb'%:1C.ta;3
.7 -
'ft
(::Z:-LO)
Ll/1(
- l
i
<:lllf~G
c:<r.:'coLI,
;;1'<7.7
c;';'l
<:>l'<IO>,;o
t-~tit>'lt.Q
a!ihci'J
3.
(!!f1'v?
7
i" (IJ
s is designed for Sony a camera system E-mount
t-"1'=::~.71~7-r-:IJ::l:)
:t-tJ7.ct::;
~"'ii\&0/ilfl!g~,
t'
O),£)E;Ijj:/i(d:
;!:
)
(m
) 0.45-0.95
£jiX
!!!
co)
~"'&btttdrtl
o
.
:1J
;J.
50)JWj,\lO)IB)j~"'
.,.,.
76°-
15°
II
F22
72
78x
l
~. -x
10
i!SIJ
JI!!l>
~
o
us
our lens.
You
yo
ony service facility.
!l\.S\IEiil!<BJcO'il!i~C:l;J:
71§~(})1m~l!O
1//J:/0/
e are found in the separate «Precaut i
cannot usc it on A-mount cameras.
fo
rmation on compat ibility, visi t the Sony
ur area, or consult y
-i'
1!111ll
G
Tc
1/::; 7>"1!!it
S1~'l'l<t3'<:'(})iJ'iii;1!1;'
<:
JccoC:l<l.lll~le~11(})Jl'ftl
aeo
~
:>7(1).1//7:7-t'(l),
.
c::r5JX<tcc-c'·
-1't
ot~f±O)illllll'icY.
<:1'h<::!t.S<
0 acill(])!l\£ieiil!tal
oF'\'
Y7(1).
<
;;tl!'9~C::
ument
s before
our
Sony dealer
ons
or
;l
=.:~.
C::
'li'
.
l<!!fj
local
Notes
on
Use
•
When
carrying a camera with the lens attached, always firmly
hold both the camera and the lens.
• Some tripoli models
the
c<~mera
or
Precautions
• When using a flash, shoot at least
subject. With certain combinations
may partia
ll
y block the light
at the bottom
of
Vignetting
• When using the lens, the corners
than the center.
close the aperture
Shake
compensation
•
For
details
on
tn th e instruction manual supplied with the camera.
r.i!
Identifying
l Lens
hood
index
using
ring
2 Foc
3
Zooming
ring
4 L
ens
c
ontact
s~
5
Zoom
lever
Mo
unting index
6
"'Vo not
touch
G)
Attaching
To
attach
the
(See illustration
Remove the rear and front lens caps and the
camera body cap.
• You can attach/detach the front lens cap
and (2).
Whom
lens hood attached. use method (2).
2 Align the
the
white
index), then insert
mount and rotate
• Do not press the lens release button
mounting the lens.
mount
• Do not
To
remove
(See illustration
While holding down the lens release button on
the camera, rotate the lens counterclockwise
it
stops, then detach
until
liJ
Attaching
It is
recommended
and
ensure
maximum image quality.
Align the red line on
line on the lens (lens hood index), then insert
the lens hood into
clockwise until
dot
on the lens hood
on the lens.
•
Wl1en
using a built -
camera, remove the lens hood to avoid blocki
Wl1en
storing,
•
mzooming
Zooming
with
Slide
the
len·r
slightl y to
zoom
quickly.
Zooming
with
Rotate t
he
zoo
ming r ing
posilion
).
•
\Ve
recommend using the :mom lever for muting operation
noise
of
the zooming ring while recording movies.
the zoom lever with your finger lightly on th
• Move
prevent wrong operation.
Iii Focusing
There
arc
three
• Auto focus
The
camera
focuses automatically.
• OMF (Direct manual focus)
Aflcr
the
camera
adjustment manually.
• Manual focus
You focus manually.
For
details on
mode
supp
lied with
the
Specifications
Equivalent
35mm-formatfocal 27-157.5
th
'"
(mm)
leng
lens
groups-e
lem
of
view• 76°-
Angle
Minimum f
ocus""
Maximum magnification
Minimum
aperture
F
il
ter
diamete
r (mm)
Dimensions (maxim
d
iamete
r x height) (3 1/8 x 4 3/8)
mm
(in.))
(approx.,
Mass (approx.,g (oz)) 427 ( 15
Shake
compensatio
• The values shown above for equivalcnt35mm-format focal
length and
angle
Cameras equipped with an A
._.
Minimum focus is the distance from the image sensor to the
subjec
t.
• Depending on the lens mechanism, the focal length may
any change in shooting distance. The focal
change with
given
above assume the lens
may interfere with this
tripod used.
on
using a flash
the picture.
To
re-duce
this phenomena (called
by
I to 2 stops.
function
setting the shake compensation function, refer
the
the
lens contacts.
and
Detaching
lens
liJ-
you attach/detach
white
index on
index on
it
the
l~:ns
the
lens
liJ-[2].)
the
Lens Hood
that
you
use
the
the
lens
it
clicks
is
in
camera !lash or a tbsh supplied with the
fit the lens h
ood
the
zoom
zoom
the
zooming
to
the
ways
to
focus.
focuses in auto focus, you
settings, refer to
camera.
ents
(m (feet)) 0.45-0.95 (1.48-3.12)
(X)
um
n funct ion
of
view are for Interchangeable Lens Digital
le
ns
depending on
lm (3.3
feet) away from your
oflens
and flash , the lens
of
the flash, result ing in a shadow
of
the screen become darker
vig
Parts
the
Lens
[1].
)
in
two wars,
th~::
lens cap with the
the
lens barrel
the
camera (mounting
the
lens into
the
clockwise until
at an a ngle.
the
a lens
lens hood with the red
mount
into
aligned with
onto the lens backwards.
lever
slow
desired
12-16
0.11
f/22
72
78 x J
Yes
PS
-C si
is
focused at infinity.
camera
it
locks.
on
the camera when
lens.
hood
to
reduce
and rotate
place and the red
the
red line
ng
the flash light.
ly
and slide it full
ring
focal l
ength (zoom
<:
lever, to
can
make
the
instruction
15°
\0
.1)
ze<!
image sensor .
netting),
with
flare
y to
a fine
manual
lengths
Included
items
Lens ( I), Front l
L
Design
notice.
lX.
1
Votre o bject if est
E
pho
Pour
si
Sony
Remarques
• Lorsque vous portez
•
Precautions concernant l'emploi d'un flash
•
Vignetage
• Lorsque lbbjectif est
(1}
Fonction Antibouge
• P
m Identification
1 Rcpi're de
2 Bague de mise
3 Rague
4
5 Levier
6
*
G)
Pour poser l'objectif
(Voir
1 oeposez les capuchons d'objectif avant
it
2 Afignez
Pour
(Voir
Tout en appuyant sur le bouton
l'objectif sur l'appareil photo, tournez l'objectif
dans le
deposez l'objectif.
liJ
II
parasite
Alignez
rouge
inserez le parasoleilsur Ia
tournez-le dans le
s'encliquette
s'aligne sur Ia ligne rouge
• Lorsque vous utilisez
• Pour
ens
cap
(1
ens
hood
( l ), Set
and
and
t£1
1
if"
W
Cettc
notice explique
Les
remarques
"
Precautions
lire
le
s de ux
de
type
Sony
to a
rnonture
plus
d'informations
te
de Sony de
ou
a un se rvice apres-vente agree
tcnez toujours fermernent l'appareil photo et l'ohjcctif.
Certains modCies
photo ou
l'appareil
Si
vous utilisez
pieds)
l1u
sujet.
bloquer partiellement
aubasdel'image
que
sombres
vignetagc), fermez l'ouverture de I ou 2 crans.
our
le
detail sur
au mode d'emploi fourni avec l'apparcil photo.
vous
), Rear !ens cap (
of
print
ed
specifications
arc
are
trademarks
comment
sur
l'crnploi se
avant
toute
utilisation»
documents
avan
con\u pour
a.
line peut
pas
A.
sur
votre pays,
ou
sur
l'emploi
un
appareil photo
de
trCpieds pcuvcnt gCner l'objectif scion
le
trCpied
1111
flash, prcnez
AssociC
il certains types de flash, l'objcctifpeut
Ia
lumiCre
utilise,
les
lc
centr
e.
Pour rCduire ce phCnomi'ne (appelC
le rCglage
de
des
paraso
leil
au
point
de
zoom
Contacts
de
l'objectif~
de
zoom
Rephe
de
montage
Ne
touchez
pas
les co
ntacts
Pose
et
depose
!'illustration
arri@re
• Vous pouvez poser et JCposcr
avant de deux
capuch
{2).
sur le
(repere
sur Ia monture
tournez-le dans le
s'endiquette.
• N'appuyez pas sur
l'appareil photo lorsque
• Ne posez pas l'object if de biais.
deposer
!'illustration
sens
Fixation
est conseillC
et obtcnir
fa
de
l'objectif (repere
flash fourni avec un appareil photo, retirez
c!oviterdebloquerlalumii'reduflash.
ranger
li)-
et
le capuchon
fa<;ons,
(I)
on
d'objectif avec
fe
repere blanc du barillet d'objectif
rep@re
blanc
de
de
montage), puis posez l'objectif
de
l'appareif photo
sens
le
bouton de liberation de l'objectlf sur
l'objectif
li)-
antihoraire jusqu'it I' arret, puis
du
parasoleil
J'utiliser
un
parasoleil
Ia
meilleure
ligne rouge du parasoleil sur
sens
et
le
point
le
flash
le
parasoleil. insCrez-le
mzooming
Zooming
avec
le
Pou
ssez
plus
rapi
Zooming
T
ournez
du
zoo
m.)
11
est conse
•
bague lie zoom pendant ]'enreg i
d'enreg
•
DCplaccr.
le
levier pour
levier
le
levier
de
zoom
dement pour
un
avec Ia
bague
Ia
hague
de
zoom
iii
C d'utilis\·r
is
trer
le
bruit de Ia bague.
k levier
de
zoom avec
Cl'ite
r toute mauvaise manipulation.
lentement
zoom
sel
le
levier de zoom ilIa place
\),
documentation
subject
to
change
without
of
Sony
Corpo
ration.
se
sen•
ir
des
trouvent
t d'util ise r votre object
les appareils
etre utilise
Ia
compa
ad
lllilisC.
Ia
coins de
Ia
objectifs.
dans
les
sepan!es. Veu
photo a mont
pour
les appareils
tibilite,
cons
resscz-vous a u n re
Son~'·
avec ]Object if
photo
ii
au moins I m (3,3
du
flash ct produire un ombre
ICcran
dcvknncnt
fonction AntibougC, reportcz-
elements
dbbjectif.
de
l'objectif
[j]
.)
de
l'appareil photo.
Jes
c;tpuchons d'objectif
et
(2).
Si
I'
OUs
pusez/JCpnsez
le
parasoleil, utilisez
l'appareil photo
horaire de sorte qu'il
vous posez l'objectif.
[2]
image
de
monture d'objectif
horaire jusqu'
rouge du parasoleil
de
intCgrC
il
de
zoom
rapide
de
on
Ia
focale
st
rement de vidCos pour Cvitcr
le
doigt
Ia
et
.)
de
liberation
pour
rCduire
possible.
Ia
parasoleil), puis
it
ce
l'objectif.
d'un appareil photo ou
le
parasoleil pour
l'arrihe
de
l'ob
pour un
zoom
zoom
souha
itCe (position
<le
ICgCrement
a
Ia
page arriere)
(Suite
ill
ez
if.
ure
ultez lc
vendeur
dt·s~us,
plus
et
le
mCthodc
de
Ia
lumii're
ligne
et
qu'il
le
jecti
f.
lent et
Ia
appuyC sur
 Loading...