

SONOSAX MINIR82 User Manual

PROFESSIONAL PORTABLE
MULTITRACK RECORDER
SONOSAX
MINIR82
USER INTERFACE
Firmware version 4.2
Audio equipment manufacturer
SONOSAX SAS S.A.
Ch. de la Naz 38
1052 Le Mont s/Lausanne
Switzerland
Tél: +41 21 651 0101
Fax: +41 21 651 0109
Web: www.sonosax.ch / www.sonosax.com
Email: sonosax@sonosax.ch
Edition: May 2012

TABLE OF CONTENT
1. INTRODUCTION ..................................................................................................................................................3
2. POWERING THE UNIT ........................................................................................................................................3
3. PRINCIPLE OF OPERATION ..............................................................................................................................4
3.1.1 ARCHITECTURE - AUDIO PATH......................................................................................................................... 5
3.2 RECORDER MODE..............................................................................................................................................6
3.3 PLAYER MODE....................................................................................................................................................7
3.3.1 Contextual menu in Player mode .......................................................................................................................... 9
3.4 ADJUSTING THE HEADPHONE LEVEL...........................................................................................................10
3.5 SOLO MONITORING .........................................................................................................................................10
4. CONTEXTUAL MENU........................................................................................................................................11
4.1 MONITORING.....................................................................................................................................................12
4.1.1 Saving the configurations [PRESET] ..................................................................................................................12
4.2 LAST TAKE........................................................................................................................................................13
4.3 TAG LAST TAKE ...............................................................................................................................................13
4.4 UNIT STATUS ....................................................................................................................................................14
4.5 SETUP (CONFIGURATION'S MENUS) .............................................................................................................15
4.5.1 MENU's Tree Structure .......................................................................................................................................16
4.5.2 ROUTING SETTING...........................................................................................................................................17
4.5.3 RECORD SETTINGS .........................................................................................................................................18
4.5.4 INPUTS SETTINGS............................................................................................................................................ 20
4.5.5 TIME CODE SETTINGS ..................................................................................................................................... 21
4.5.6 USER SETTINGS ...............................................................................................................................................22
4.5.7 SYSTEM SETTINGS .......................................................................................................................................... 22
4.6 BROWSE FILES.................................................................................................................................................25
4.7 METADATA........................................................................................................................................................26
4.8 SWITCH OFF .....................................................................................................................................................27
5. MANAGING THE MINIR82................................................................................................................................28
5.1.1 Formatting the Hard Disk and CompactFlash card .............................................................................................28
5.1.2 Disk fragmentation .............................................................................................................................................. 28
5.1.3 USB 2.0 connection ............................................................................................................................................ 28
5.1.4 Alarms................................................................................................................................................................. 29
5.1.5 Errors handling.................................................................................................................................................... 29
5.1.6 Software up-date procedure................................................................................................................................ 30
6. APPENDIX..........................................................................................................................................................31
Example of a USER SETTING file ......................................................................................................................31
Organization on the HD and the CF Card ...........................................................................................................32
SONOSAX MINIR82 - User interface V4.2 Page 2 de 32
1. INTRODUCTION
This manual describes the user interface, the operating instructions and all functionalities related to the
Firmware version 4.2
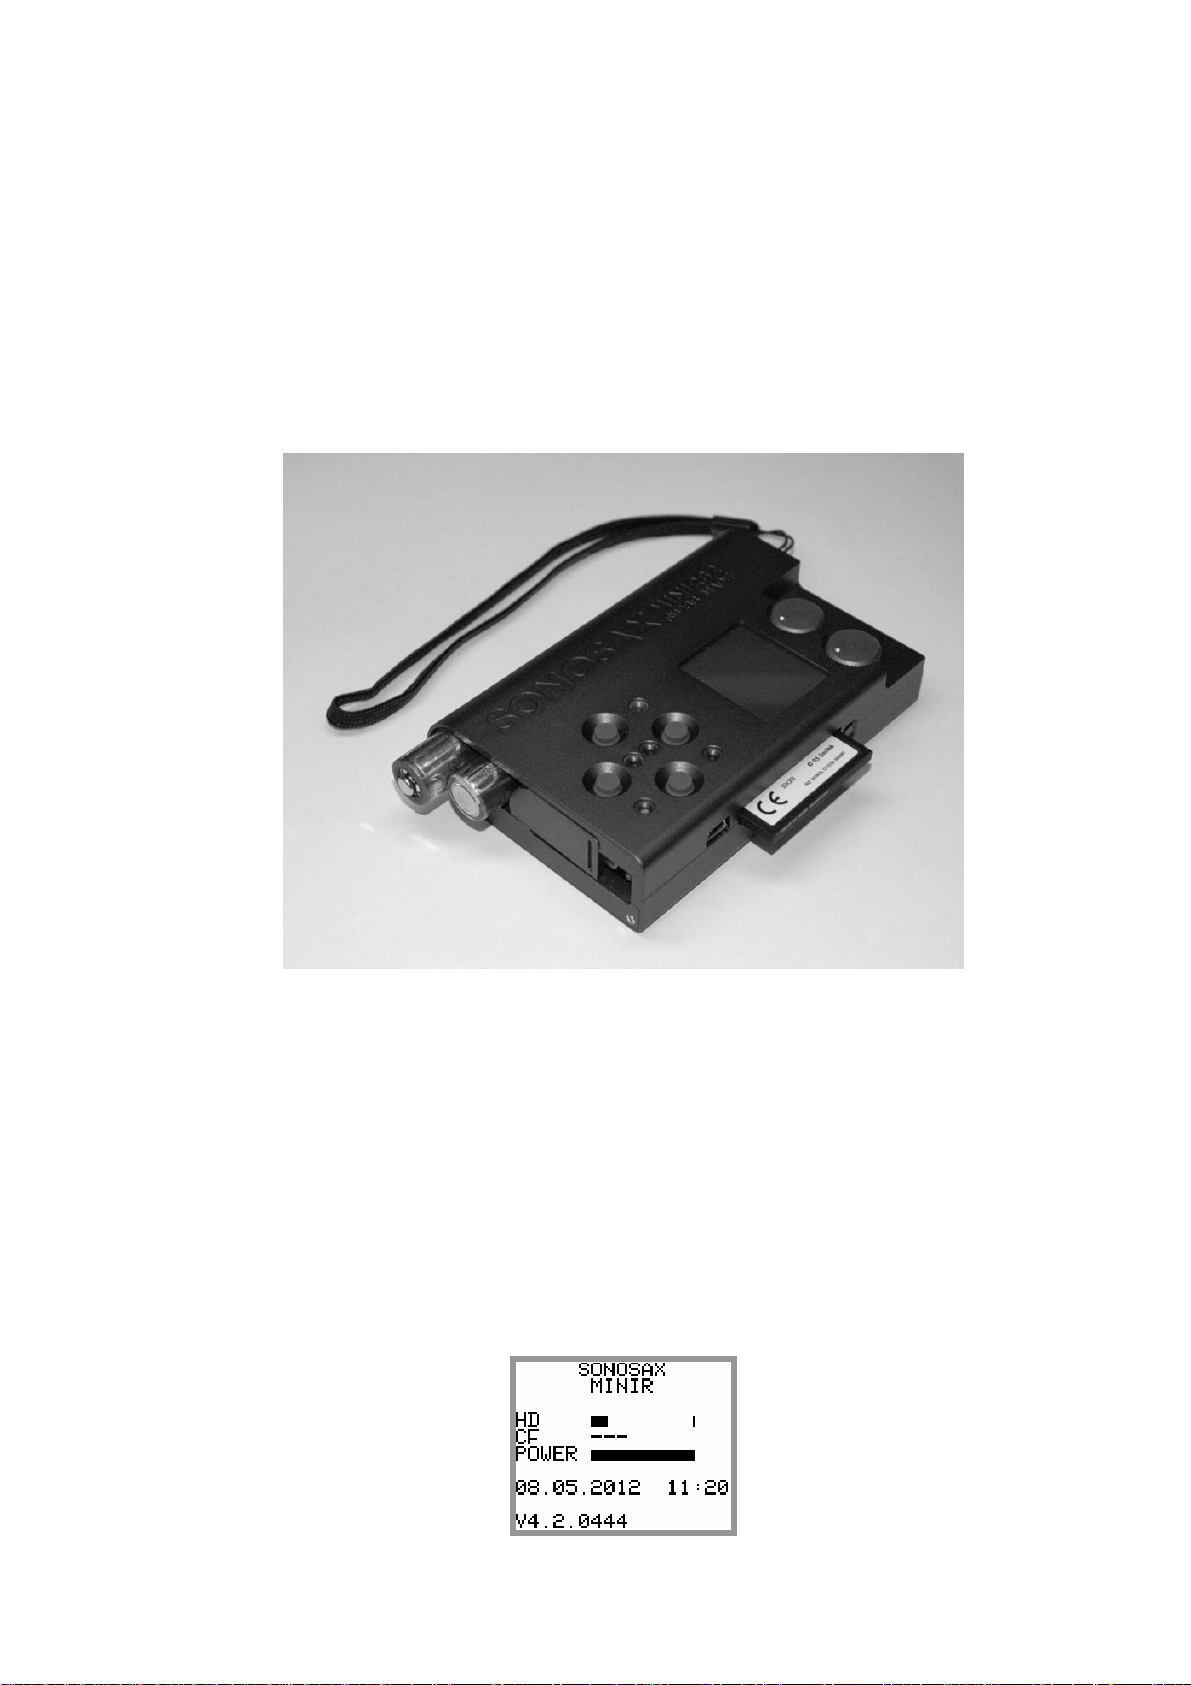
2. POWERING THE UNIT
External PSU: use only the optional SONOSAX power supply.
Batteries: use only rechargeable NiMh batteries; standard dry cell batteries can not safely power the
MINIR82. Insert batteries as shown in the picture below.
External DC supply: The MINIR82 can also be supplied from an external suitable DC source from 5 to 9 V.
A 2-meter long cable with the DC plug is available, part number V980010. For use with high capacity 12V
battery, a 9V to 18V DC/DC converter is available.
Powering On
Press simultaneously the UP and DOWN keys to turn ON the MINIR82
A boot up screen is displayed for approx. 2 seconds and shows the following information:
• The remaining free available space on the hard disc and on the Compact Flash card
• A power indication of either the batteries or the external PSU by means of a bar graph
• Date and Time
• The firmware version
SONOSAX MINIR82 - User interface V4.2 Page 3 de 32

3. PRINCIPLE OF OPERATION
User Interface
Left Channel LED
Red LED
LEFT Key
Green LED
Principle of operation
Status
The MINIR82 status is shown by means of the green or red "status" led's and the screen display. The
following status scenarios are possible:
• RECORD READY the Red LED is flashing, the MINIR82 is ready to start recording
• RECORDING the Red LED lights On steady, confirming that a recording is in progress.
• PLAYING the Green LED lights On steady, a take is being played
• PLAYER PAUSE the Green LED flashes, the Take being played is paused at current location.
• PLAYER STOP a Take is loaded ready to be played, no LED lights on nor flashes
Clipping LEDs
The "Left Channel" and "Right Channel" Led's shows two particular statuses that are either:
• Limiters: either the Left or the Right LED lights On independently when the Microphone Input signal
reaches a level of 2.5dB before clipping, thus activating the Limiter.
• Clipping: the Input signal is too high on the microphone A/D Converter, both Left and Right LED's
light On together
On screen Display and Keys
The main working page (Tracks Monitoring) displays the 8 Peak Meters.
The meter range starts at –72dBFs and goes up to 0dBFs in 1dB steps from –72dB up to –24dB
and in 0.5dB steps from –23.5dB up to 0dB.
A reference line at -9, -12, -18, or –20 dB can be displayed on screen (see configuration's menu)
The bottom line of the display shows the functions of the Keys. Conventionally, the UP and DOWN keys are
used to change the parameters, the Right key is used to "Select" and the Left Key to "Cancel".
A single Arrow symbol denotes that an action is achieved by briefly pushing the key.
A double Arrow symbol means that the key must be pushed longer to validate the action.
Display 10 lines x 17 characters
UP Key
Right Channel LED
RIGHT Key
DOWN Key
Light sensor
SONOSAX MINIR82 - User interface V4.2 Page 4 de 32
3.1.1 ARCHITECTURE - AUDIO PATH
The MINIR82 offers12 physical Input channels, up to 8 of these input channels can be used at the same
time. These 8 input channels are configured per pair:
• 1, 2: Microphone input or AES 1
• 3, 4: Line input or AES 2
• 5, 6: AES 3
• 7, 8: AES 4
The routing Matrix allows routing and mixing any input channel to any of the 10 tracks. The first 8 tracks are
dedicated for the hard disc (HD) and the 2 additional tracks for the Compact Flash card (CF).
The Monitoring can be configured by the user to listen any combination of these 10 tracks. However, the
display shows only the meters of the 8 hard disk tracks
Channel 1
Channel 2
Channel 3
Channel 4
Channel 5
Channel 6
Channel 7
Channel 8
Mixer
Tracks
1 2 3 4 5 6 7 8 9 10
Mixer coeficients
Modulometers values
Left
Right
Monitor config
Left
Right
Line out config
Monitor
Line out
Bits per sample
Wave encoder
FAT32 / ATA layer
Modulo-
meters
HDD CF
SONOSAX MINIR82 - User interface V4.2 Page 5 de 32
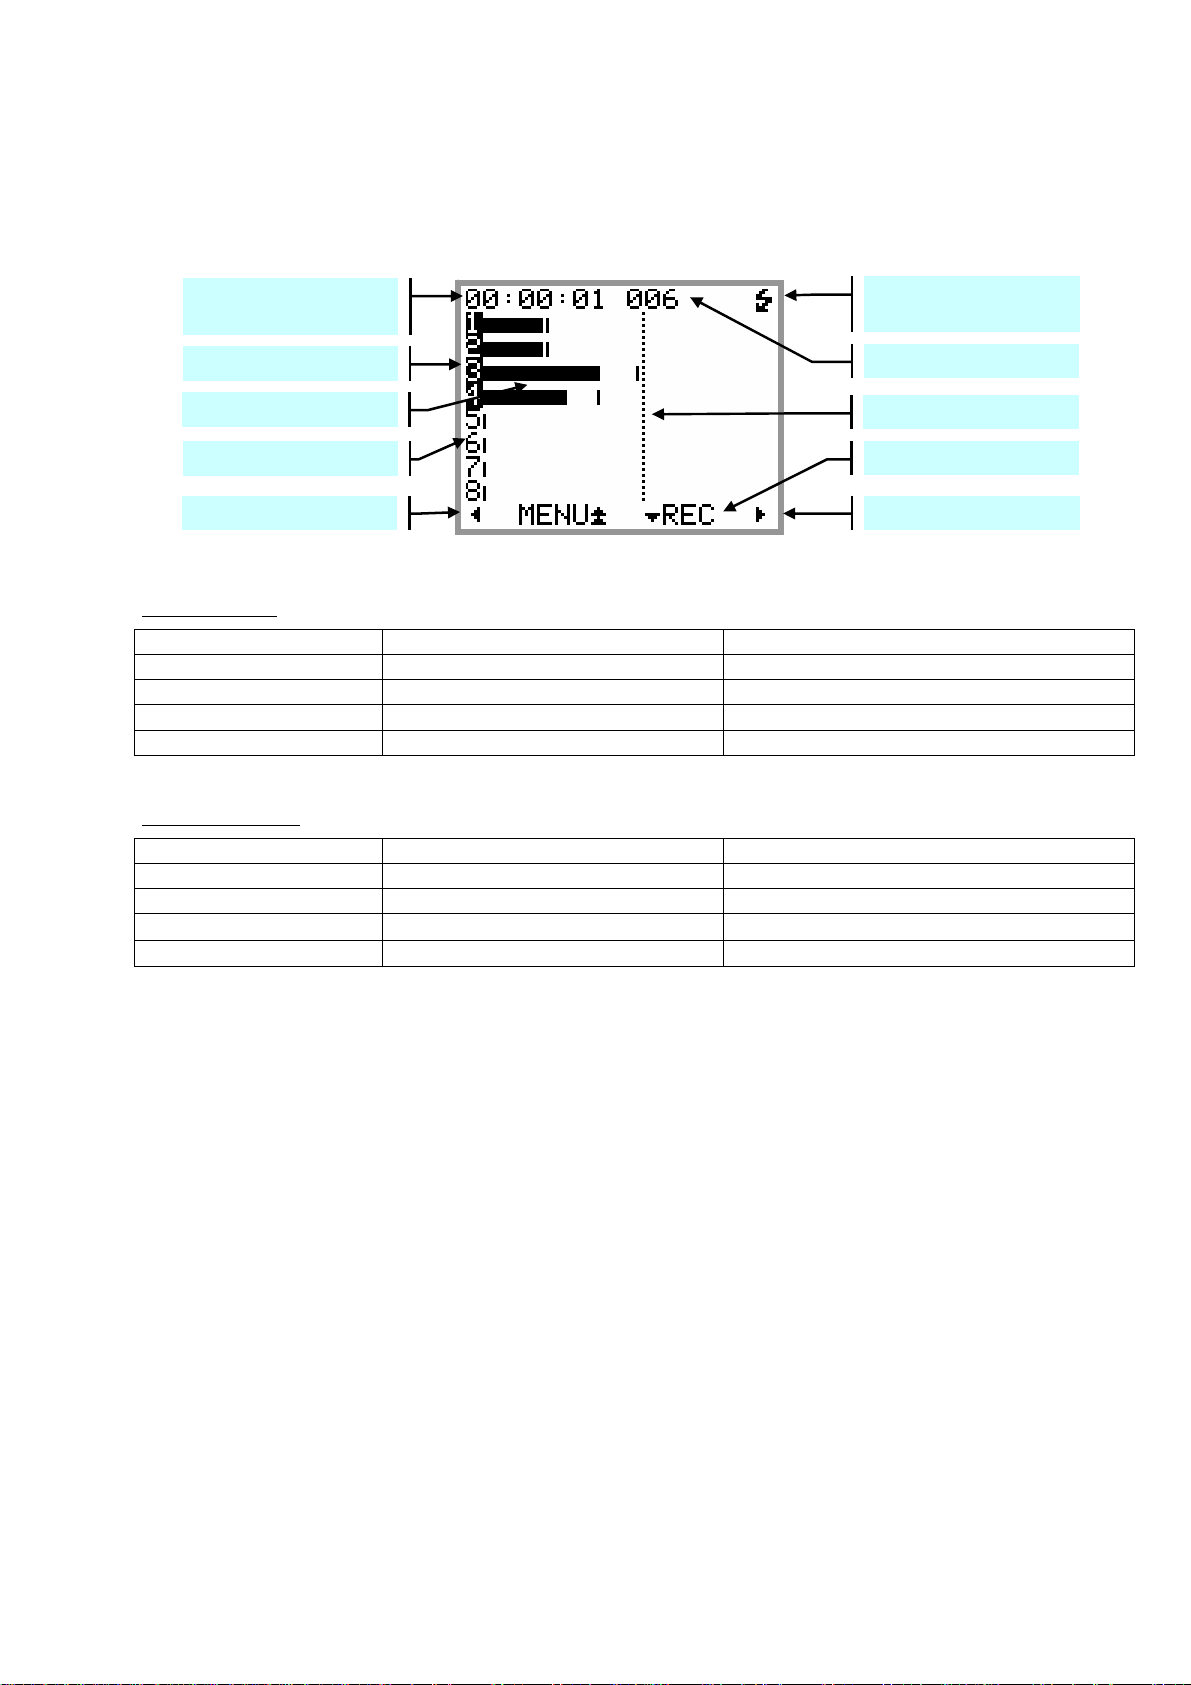
3.2 RECORDER MODE
The [TRACK MONITORING] page is the main page displayed by the MINIR82 while in Recorder mode. The
numbering from 1 to 8 is always displayed and corresponds to the tracks recorded on the hard disk. The
number of each active track (assigned in the matrix) appears in reverse video.
TimeCode or Program
Time of the TAKE
Indicates Battery charge or
external PSU
Active Tracks (armed)
TAKE number
Peak Meters
Reference level
Inactive Tracks
Action of the Keys
Volume control -
Volume control +
RECORD READY
Record Ready
: the red led is flashing
Key Short pressure Long pressure
LEFT Reduce the volume by step of 1 dB Reduce the volume continuously
RIGHT Increase the volume by step of 1 dB Increase the volume continuously
UP
Call the SOLO MONITORING page
Call the main contextual menu
DOWN Start Recording
While Recording
: the red led lights steady
Key Short pressure Long pressure
LEFT Reduce the volume by step of 1 dB Reduce the volume continuously
RIGHT Increase the volume by step of 1 dB Increase the volume continuously
UP
DOWN
Call the SOLO MONITORING page
Add an INDEX**
Call the main contextual menu
STOP Recording
** INDEX = New TAKE: pressing the DOWN key briefly while recording will create a new Take; the Take
number is automatically incremented by 1.
SONOSAX MINIR82 - User interface V4.2 Page 6 de 32

3.3 PLAYER MODE
r
y
When a TAKE is loaded either from the [LAST TAKE] menu or from the [BROWSE FILE] menu, the MINIR82
switches to PLAYER mode and automatically reconfigure the system with the same parameters as set
during the recording of that particular Take; Routing - Monitoring etc.
The main screen of the Player is very similar as this of the Recorder. Due to space limitation the bottom line
does not always displays the action of the Keys; posted information's depend on the status such as Playing Paused or Stopped; however calling additional functionalities such as the [SOLO MONITORING], the
[HEADPHONE VOLUME] or the [CONTEXTUAL MENU] is made as when in Recorder mode.
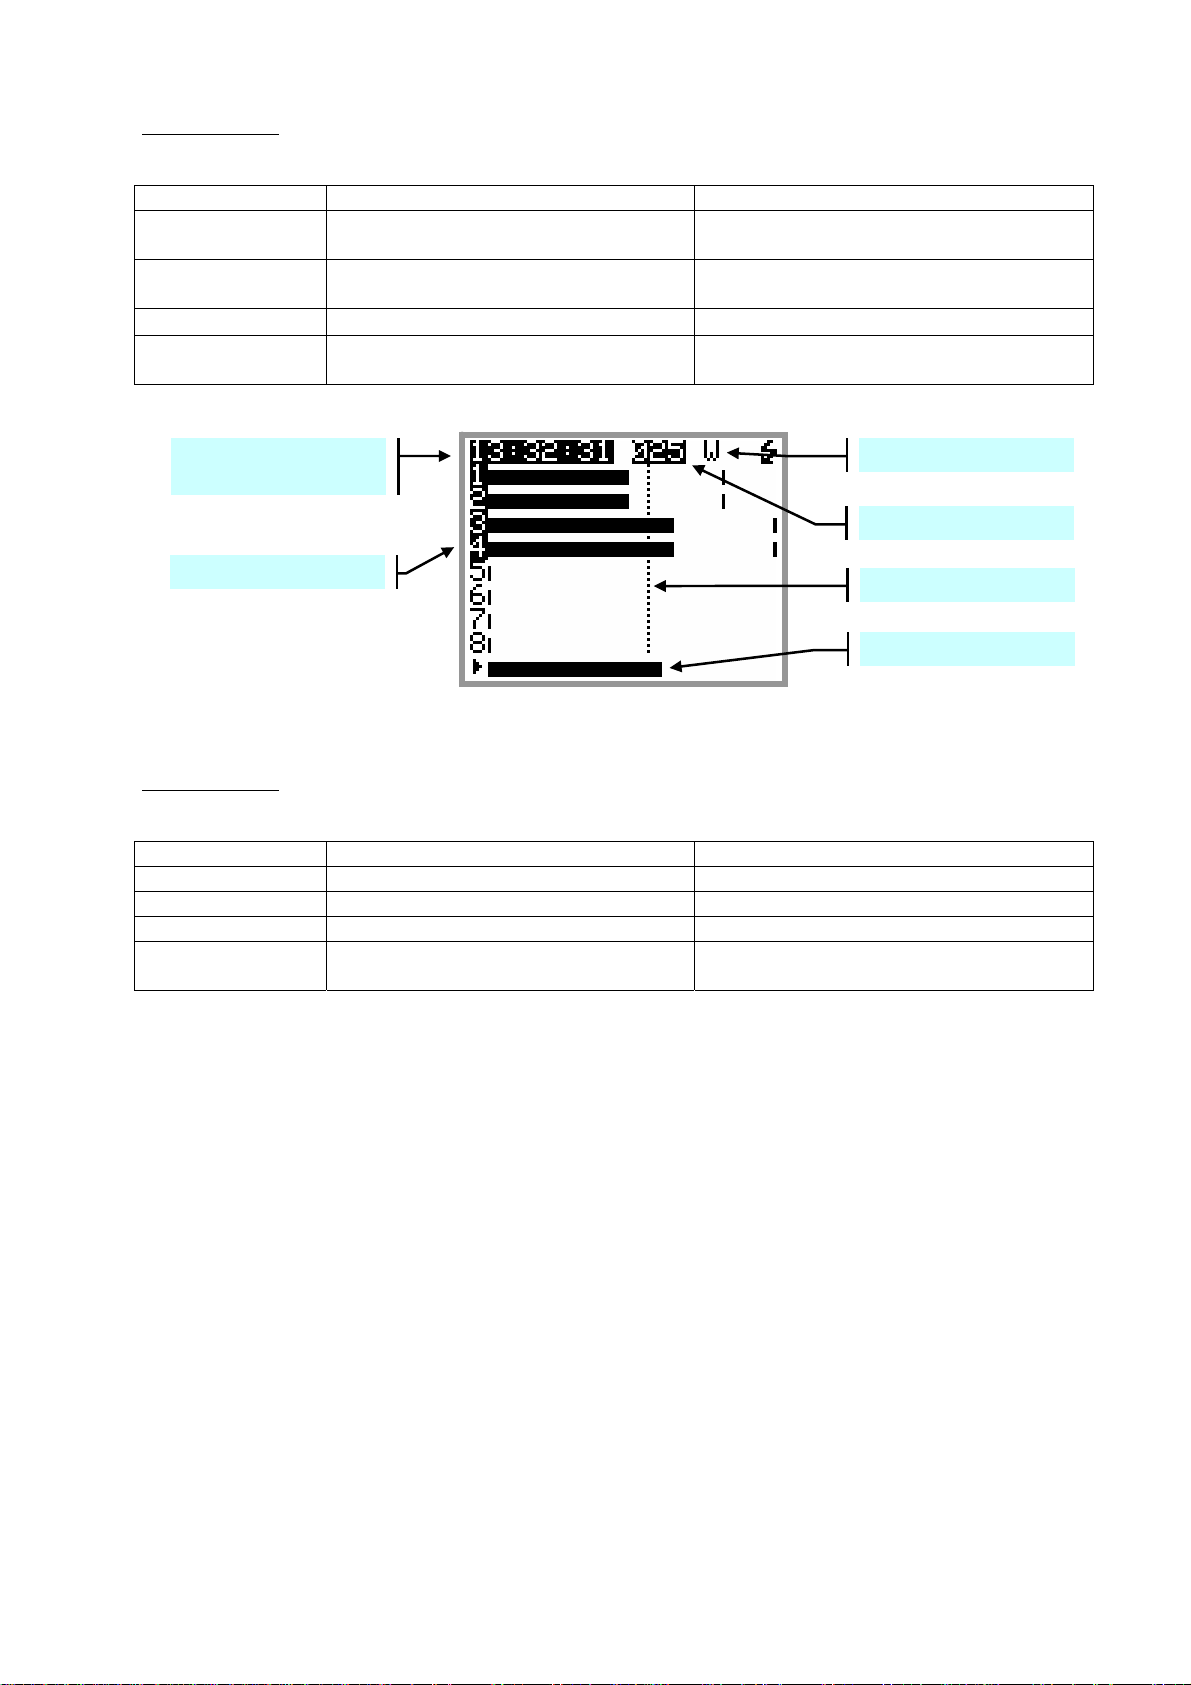
While Stopped:
when the Player is stopped, a pressure to the Left or the Right key calls a new screen
allowing a quick search of previous or next takes stored in the same folder ( such as the folder of the current
working days). The [BROWSE FILE] menu must be used to load a Take stored in a different folder.
TimeCode or Program
Time of the TAKE
Tag ( Wild Track )
TAKE number
Recorded Tracks
Reference Level
Call Previous Takes
Call Next Takes
STOPPED
Key Short pressure Long pressure
LEFT Call the TAKE Selection Menu ----------------RIGHT Call the TAKE Selection Menu ----------------UP ---------- Call the contextual menu
DOWN Start Playing
Searching through the stored Takes does not load the Take in the Player until it is confirmed by pressing the
UP key [LOAD].
The first line displays in reverse video the Time Code or the Program Time and Take nr of the Take which is
loaded in the Player; all other information's posted on the screen are related to the previous or next Takes.
When the selection corresponds to the Take which is currently loaded in the Player, the FileTag, the Scene
name and the Take Nr are posted in reverse video.
TimeCode or Program
Time of the loaded TAKE
FileTag
Scene name and Take N
TAKE number of the
currentl
Number of recorded tracks
loaded take
Creation Time
Duration of the Take
Call Previous Takes
Load the Take in the Player
Call Next Takes
TAKE SELECTION
Key Short pressure Long pressure
LEFT Scroll toward Previous Takes
RIGHT Scroll toward Next Takes
UP Load the Take in the Player
DOWN PLAY the currently loaded file
SONOSAX MINIR82 - User interface V4.2 Page 7 de 32
While Playing: the green Led lights steady, a progression bar is displayed at the bottom if the screen; the
left edge represents the beginning of the Take, the right edge represents the end of the Take.
Key Short pressure Long pressure
LEFT Reduce the headphone volume in
1dB steps
RIGHT Increase the headphone volume in
1dB steps
UP
Call [SOLO MONITORING] page
Reduce the volume continuously down to
minimum
Increase the volume continuously up to
maximum
Call the contextual menu
DOWN PAUSE at current location STOP playing, the cursor jump back to the
start of the take
TimeCode or Program
Time of the TAKE
Tag ( Wild Track )
TAKE number
Recorded Tracks
Reference Level
Progression bar
PLAYING or PAUSED
While Paused:
the green Led is flashing. The Left & Right Keys are used for searching within the loaded
Take in Fast Forward or Fast Rewind mode. The progression bar helps locating a specific position.
Key Short pressure Long pressure
LEFT ---------- Rewind at twice the play speed
RIGHT ---------- Forward at twice the play speed
UP ---------- Call the contextual menu
DOWN Start Playing Stop playing, the cursor jump back to the
start of the take
SONOSAX MINIR82 - User interface V4.2 Page 8 de 32
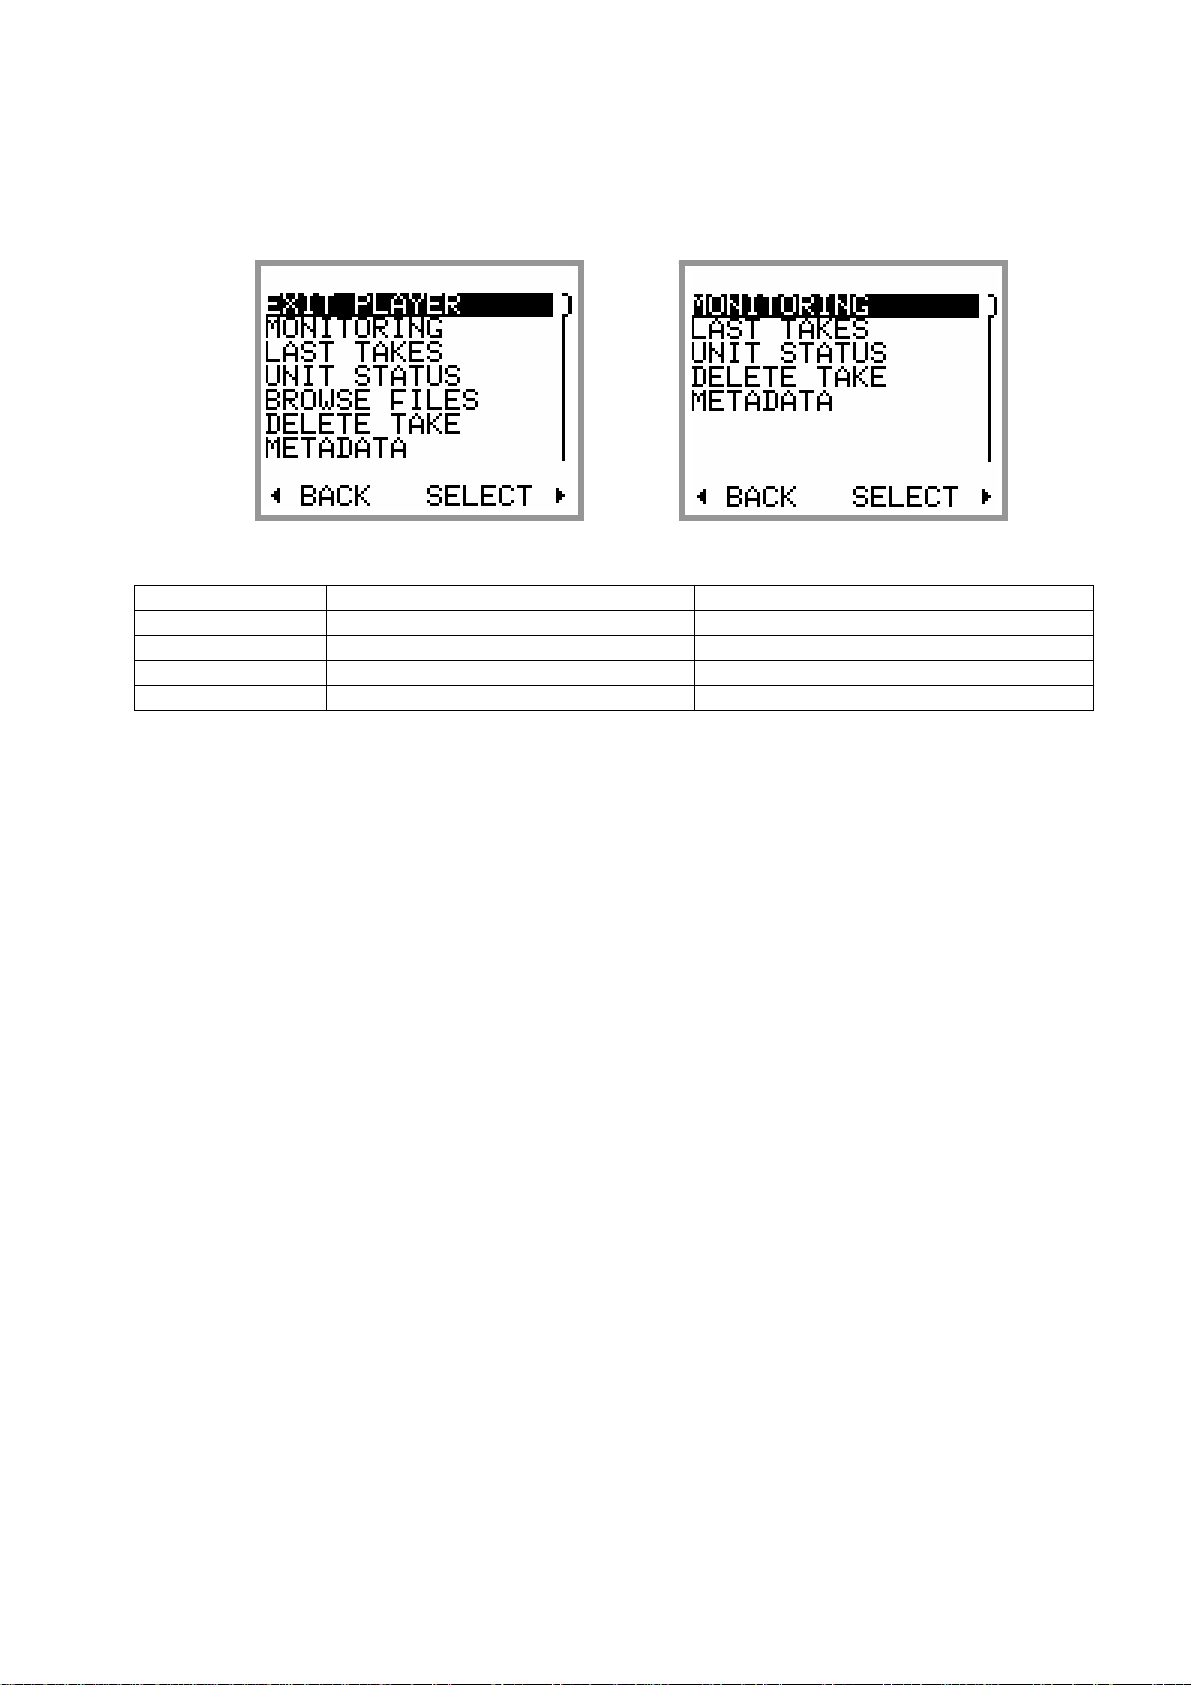
3.3.1 Contextual menu in Player mode
When the MINIR82 is in Player mode, the contextual menu differs from the main menu while in Recorder
mode and offers following sub-menus:
PLAYER STOPPED PLAYING or PAUSED
Key Short pressure Long pressure
LEFT Return to previous page ---------RIGHT Enter the selected sub-menu ---------UP Scroll the selection upward ---------DOWN Scroll the selection downward ----------
EXIT PLAYER: exits Player mode and returns to main [TRACK MONITORING] screen in Recorder mode
MONITORING: change the monitoring configuration for the [PHONES] output. These changes affect only
the current playback and do not change the configuration of the Record mode
LAST TAKES: accesses the directory of the last Takes
UNIT STATUS: shows the configuration parameters of the take which is loaded in the player as they were
set during the recording of that take. See also [UNIT STATUS] in the next chapter.
BROWSE FILES: accesses to the browser to search and playback recorded takes, see specific chapter
DELETE TAKE: the audio file(s) of the take is moved to the [TRASH] bin of the media from which the take
was loaded in the player (either the Hard disk or the CF Card)
METADATA: display and edit the metadata of the loaded Take; see specific chapter
SWITCH OFF: turns OFF the unit.
SONOSAX MINIR82 - User interface V4.2 Page 9 de 32
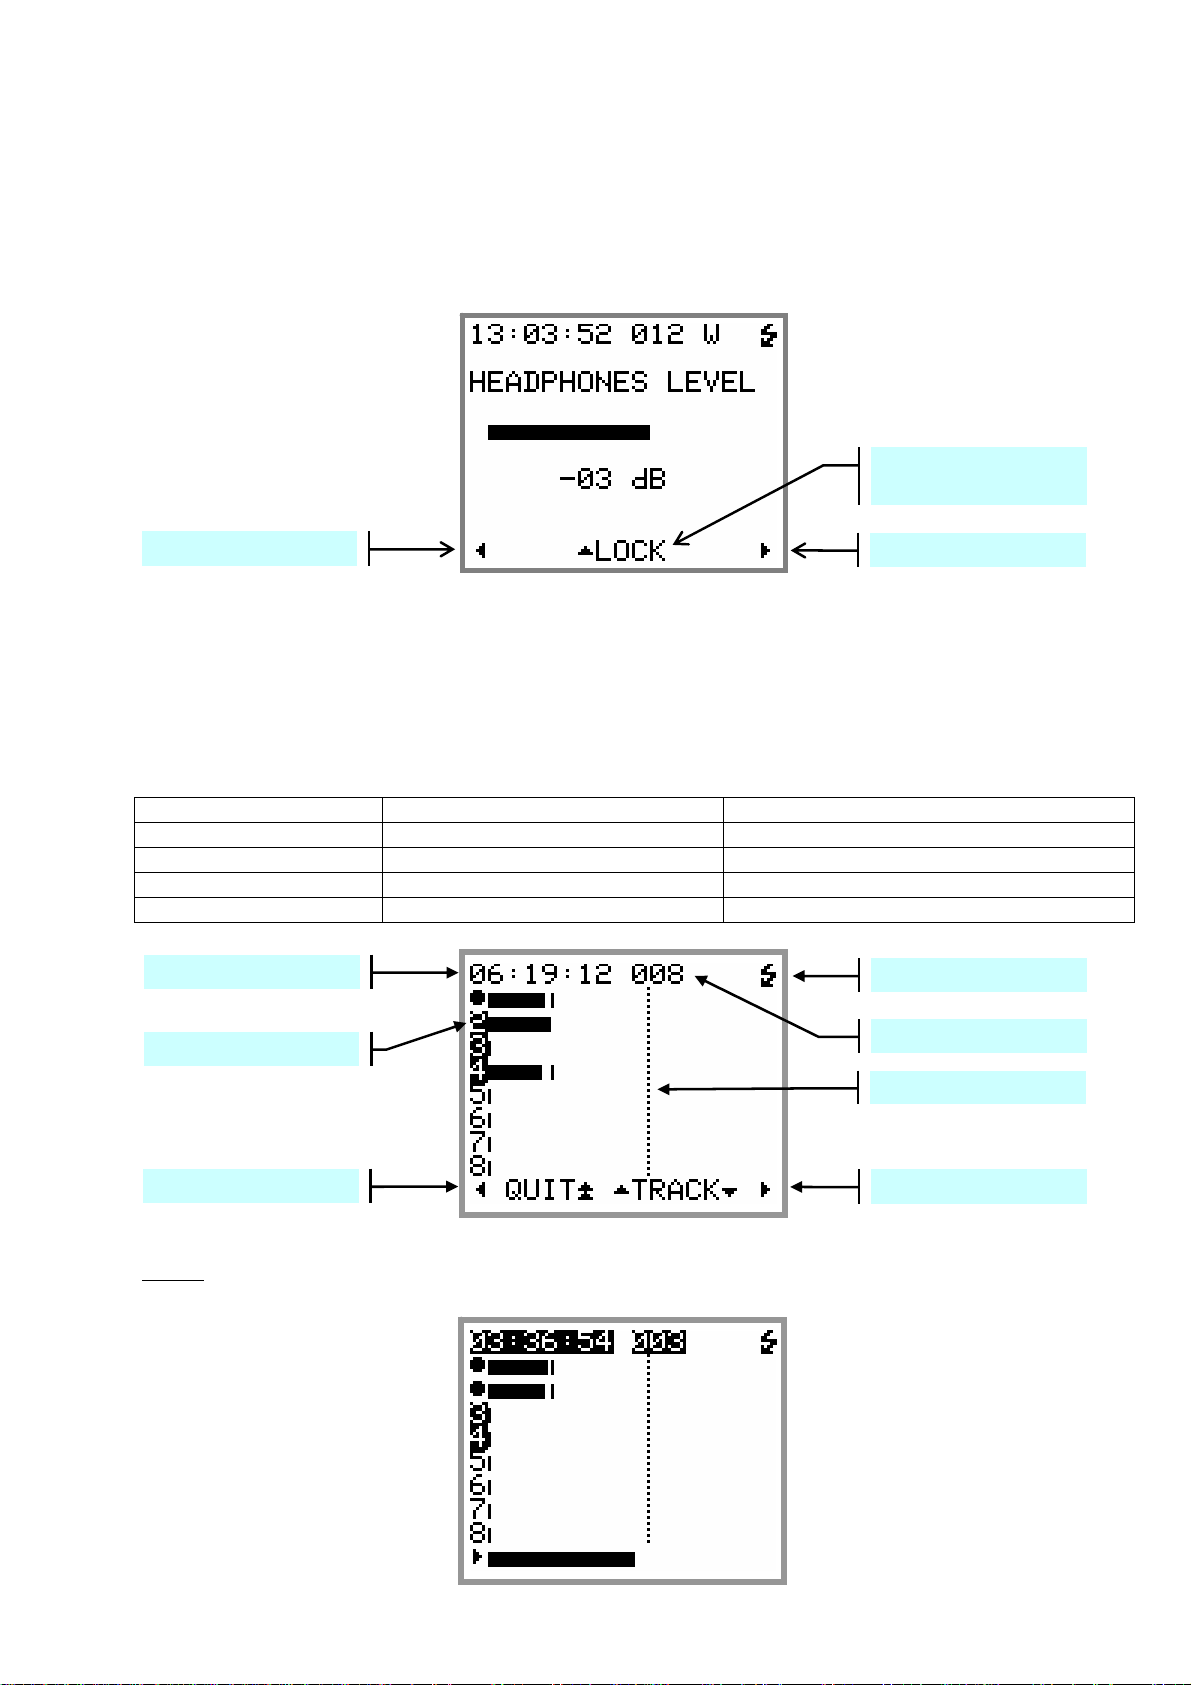
3.4 ADJUSTING THE HEADPHONE LEVEL
In Recorder mode or while Playing a Take, pressing the LEFT or RIGHT Key temporarily displays a screen
to show and adjust the headphone volume by means of a bar graph. The headphone volume is adjustable in
1 dB step from –30 dB to +18 dB.
While this screen is displayed, pressing the UP Key will lock the volume setting. Recall the screen and press
the UP Key again to unlock the volume setting.
Lock/Unlock the controls of
the Volume setting
Volume control -
Volume control +
3.5 SOLO MONITORING
The [SOLO MONITORING] page can only be accessed from the main [TRACK MONITORING] page while in
Recorder mode or while Playing a Take by briefly pressing the UP key, it allows listening to individual track
or pair of tracks.
The sequence of track's selection is: 1, 2, 1+2, 3, 4, 3+4, 5, 6, 5+6, 7, 8, 7+8.
Keys Short pressure Long pressure
LEFT Reduce the volume by step of 1 dB Reduce the volume continuously
RIGHT Increase the volume by step of 1 dB Increase the volume continuously
UP Select the previous track --DOWN Select the next track ---
Time Code (HH :MM :SS)
Battery charge indicator
Track heard in SOLO
TAKE number
Reference level
Volume control -
Volume control +
NOTE:
while Playing a Take, the bottom line shows a progression bar instead of the action of the
keys however the [SOLO MONITORING] page remain accessible by pushing the UP Key.
SONOSAX MINIR82 - User interface V4.2 Page 10 de 32
 Loading...