

Page 1
GERMAN AUDIO
AND DESIGN
Bedienungsanleitung
Operating manual
Mode d‘emploi
Istruzioni per l'uso
Handleiding
Betjeningsvejledning
PLATINUM
SO-2000
PLATTENSPIELER
TURNTABLE
PLATINE VINYLE
GIRADISCHI
PLATENSPELER
PLADESPILLER
Page 2

Gesamtinhaltsverzeichnis
DE Bedienungsanleitung........................................................................................................ 3
GB Operating manual .......................................................................................................... 26
FR Mode d'emploi ............................................................................................................... 48
IT Istruzioni per l'uso .......................................................................................................... 71
NL Handleiding ..................................................................................................................... 94
DK Betjeningsvejledning ................................................................................................... 117
2 © sonoro audio GmbH 2021
Page 3
DE
PLATINUM
SO-2000
PLATTENSPIELER
Bedienungsanleitung
© sonoro audio GmbH 2021 3
Page 4

Inhaltsverzeichnis
1. Einleitung .................................................................................................................... 5
2. Lernen Sie Ihren PLATINUM kennen ........................................................................ 5
2.1 Lieferumfang ..........................................................................................................................5
2.2 Bedienelemente und Anschlüsse .......................................................................................6
2.3 Technische Daten ..................................................................................................................8
3. Plattenspieler montieren ............................................................................................ 9
4. PLATINUM anschließen ........................................................................................... 13
5. Eine Aufnahme abspielen ........................................................................................ 14
6. Wenn die Wiedergabe beendet ist ........................................................................ 16
7. Verbindung mit Bluetooth-Gerät herstellen .......................................................... 16
8. Anschließen an einen Computer ............................................................................ 17
9. Wartung ..................................................................................................................... 18
10. Fehlerbehebung ....................................................................................................... 22
11. Garantie ..................................................................................................................... 24
Die Wortmarke Bluetooth® und die Logos sind Eigentum der Bluetooth SIG, Inc. und werden von der sonoro
audio GmbH in Lizenz verwendet. Andere Warenzeichen und Markennamen sind die ihrer entsprechenden
Eigentümer.
Qualcomm aptX ist ein Produkt von Qualcomm Technologies International, Ltd. Qualcomm ist ein
Markenzeichen von Qualcomm Incorporated und in den USA und in anderen Landern eingetragen. aptX ist
ein Markenzeichen von Qualcomm Technologies International, Ltd.und in den USA und in anderen Landern
eingetragen.
4 © sonoro audio GmbH 2021
Page 5
DE
Bedienungsanleitung
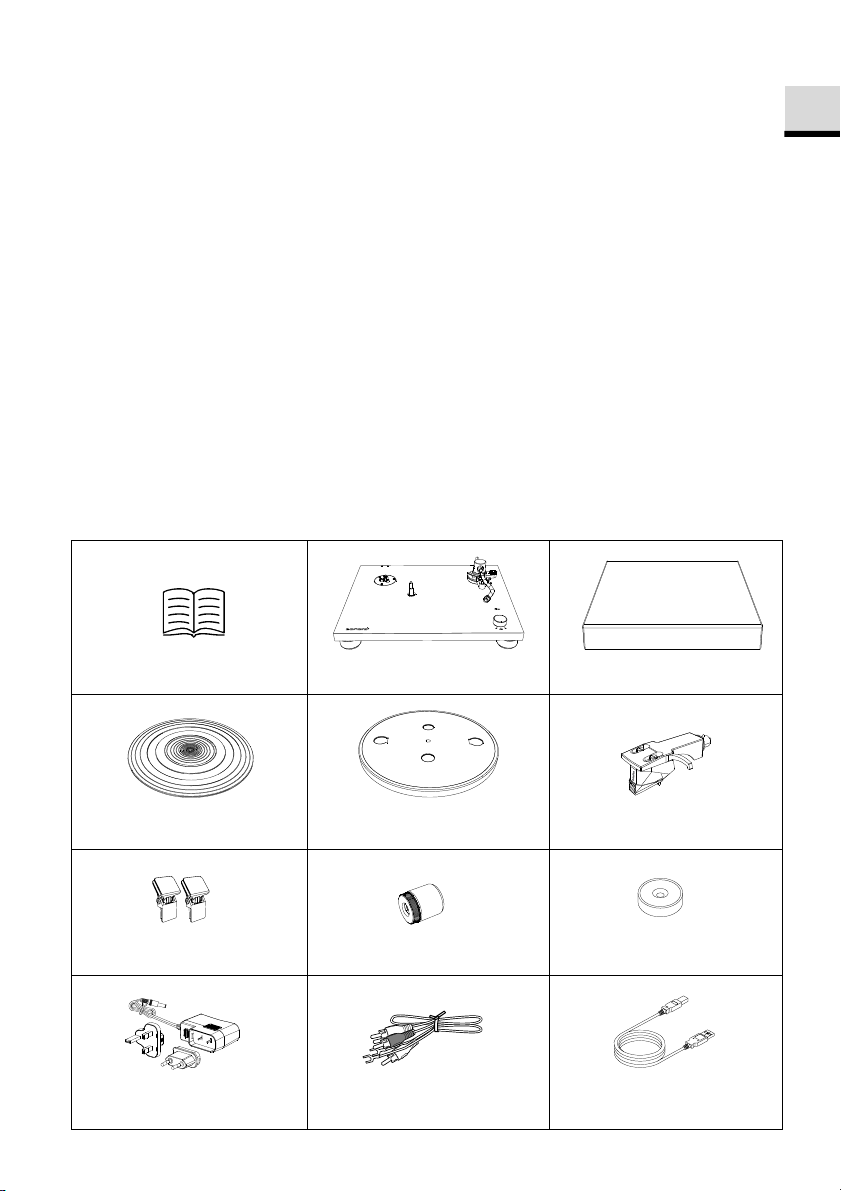
Plattenspieler
Staubschutzdeckel
Plattentellerauflage
Plattenteller und Antriebsriemen
Headshell mit Tonabnehmer
Scharniere für die Schutzhaube
Gegengewicht
45 RPM Adapter
(7” Single Adapter)
Steckernetzteil mit EU & UK
Adapter
Cinch Kabel
USB Kabel
1. Einleitung
Vielen Dank für den Kauf von PLATINUM. Diese Bedienungsanleitung enthält alle
Informationen, die für einen störungsfreien und sicheren Betrieb des PLATINUMs
erforderlich sind.
Es liegt in der Verantwortung des Benutzers sicherzustellen, dass der Plattenspieler sicher
positioniert, angeschlossen und verwendet wird. Die Bilder in dieser Bedienungsanleitung
sollen die, für den Betrieb des PLATINUM erforderlichen Maßnahmen veranschaulichen.
PLATINUM ist nur für den persönlichen Gebrauch bestimmt. Er ist nicht für den
kommerziellen Gebrauch bestimmt.
Viel Spaß mit Ihrem PLATINUM!
2. Lernen Sie Ihren PLATINUM kennen
2.1 Lieferumfang
Überprüfen Sie, ob die folgenden Teile enthalten sind.
© sonoro audio GmbH 2021 5
Page 6
2.2 Bedienelemente und Anschlüsse
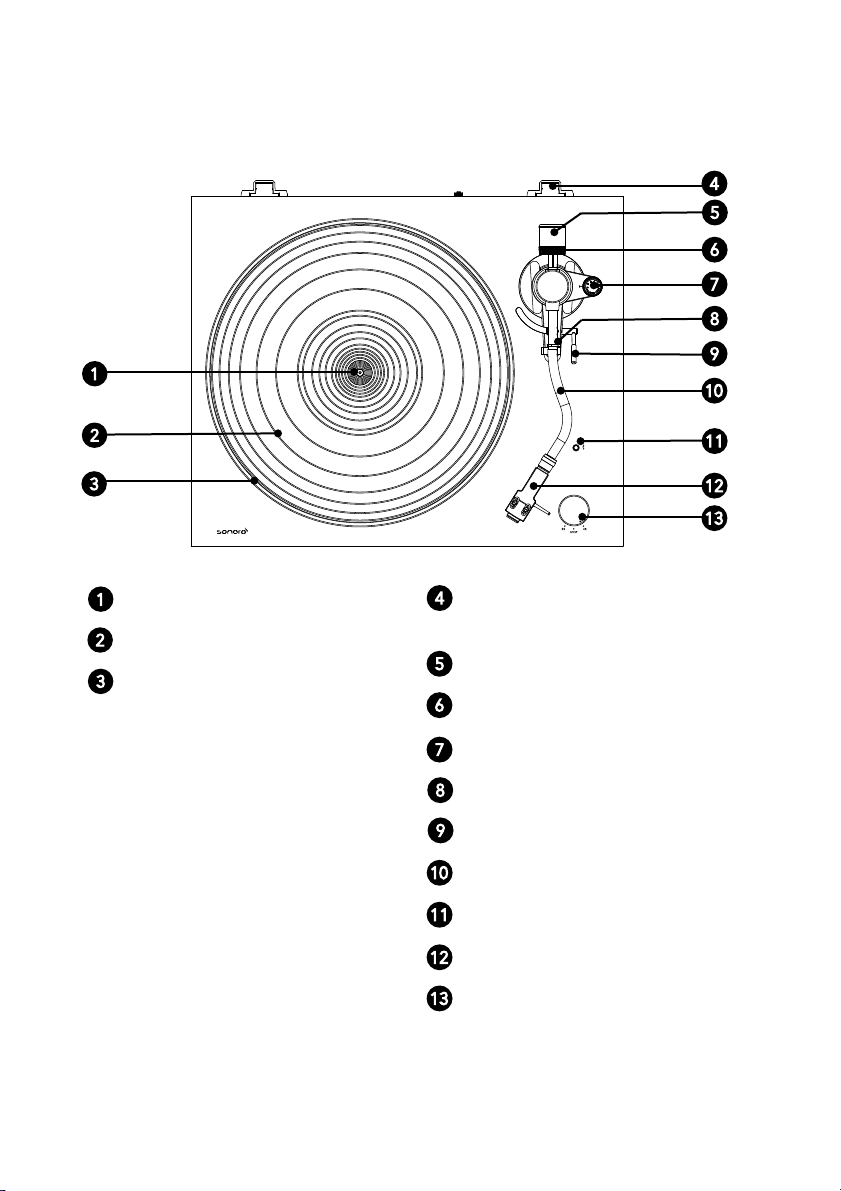
Draufsicht
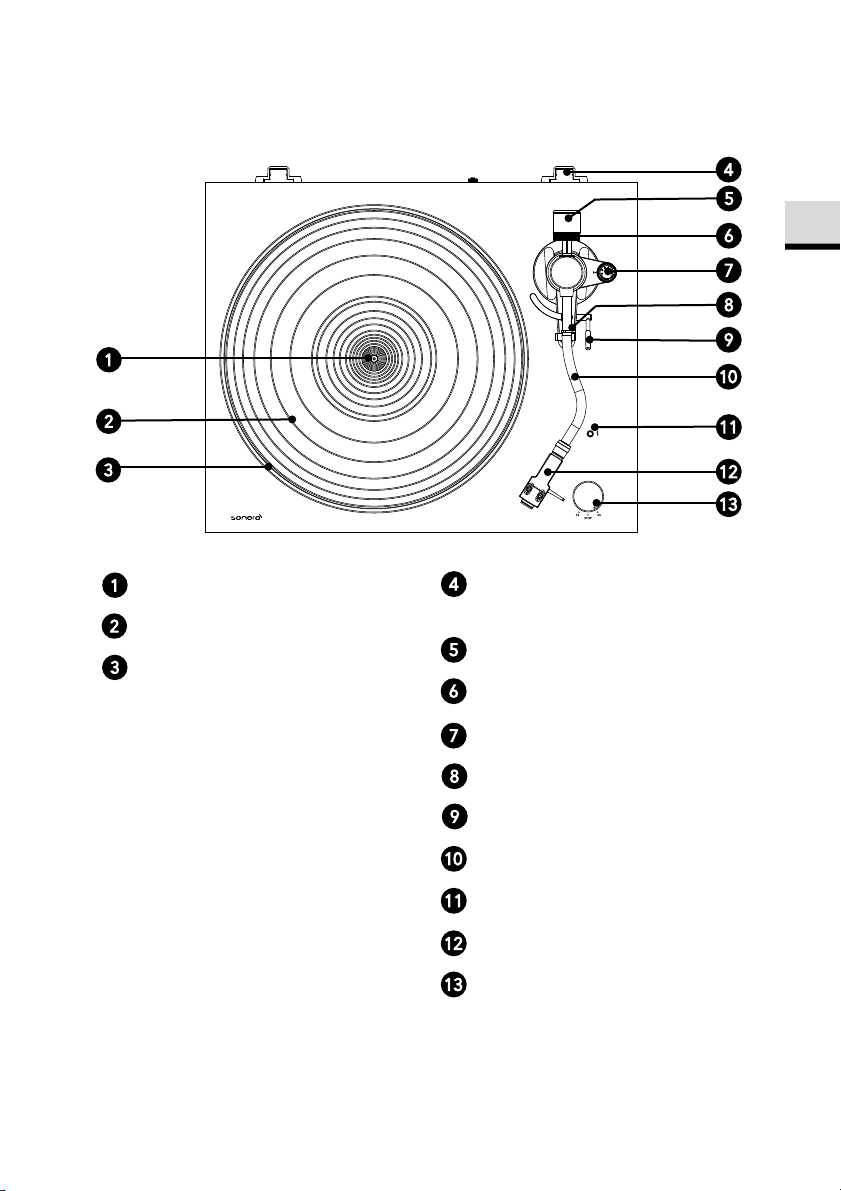
Achse
Plattentellerauflage
Plattenteller
6 © sonoro audio GmbH 2021
Scharnieraufnahme für die
Staubschutzhaube
Gegengewicht
Einstellskala
Anti-Skating-Skala
Tonarmauflage
Tonarmlift
Tonarm
Bluetooth-Anzeige / Pairing-Taste
Headshell mit Tonabnehmer
Geschwindigkeits-Wahlschalter
Page 7
DE
USB
PRE AMP
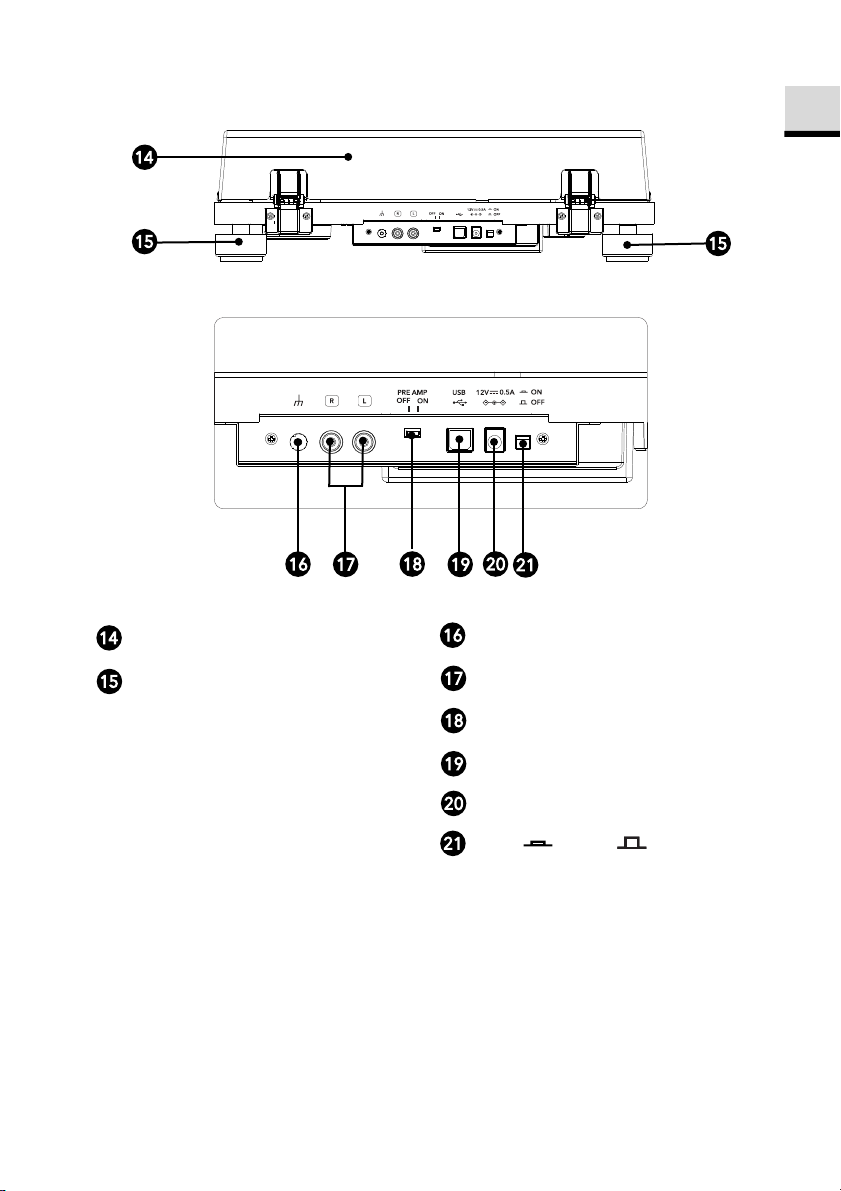
Rückansicht
Staubschutzdeckel
Masseanschluss
Gerätefüße
Cinch Audio-Ausgang
Vorverstärkerumschalter
USB Ausgang
Wechselstrom-Eingangsbuchse
EIN / AUS- TASTE
© sonoro audio GmbH 2021 7
Page 8

2-Geschwindigkeiten,
komplett manueller Betrieb
Gleichstrommotor, optisch
kontrolliert
Aluminiumdruckguss,
Durchmesser 300 mm
Gleichlaufschwankungen
< 0,15% (33 U/min) bei
3KHz
Signal-RauschVerhältnis
> 67 dB (A-gewichtet, 20KHz,
LPF)
Ausgangspegel
statisch ausbalancierter
S-förmiger Tonarm
Einstellbares
Auflagegewicht
Zulässiges
Tonabnehmergewicht
Empfohlene
Anschlussimpedanz
9,3 g (einschließlich
Anschlussdrähten)
USB 1.1oder höher
MAC OSX oder höher
Maximale
Ausgangsleistung
Abmessungen
( B x T x H)
ca. 420 x 356 x 125
mm
Austausch-Diamant
(separat erhältlich)
Ortofon 2M Red /
2M Blue
Golden Profit Electronics Ltd
Guangdong, China
Durchschnittliche
Effizienz im Betrieb
Effizienz bei geringer
Last (10 %)
Leistungsaufnahme
bei Nulllast
Technische Daten können ohne vorherige Ankündigung geändert werden.
2.3 Technische Daten
Plattenspieler
Typ
Antrieb Riemenantrieb
Motor
Geschwindigkeiten 33 1/3 U/min und 45 U/min
Plattenteller
USB-Anschluss
Unterstützte Formate
Windows 7 oder höher
Bluetooth
Bluetooth Version 4.0
Output class Klasse 2
Frequenzband 2,402 GHz – 2,480 GHz
Modulationsmethode FHSS
Profil A2DP 1.3
Unterstützte Codecs SBC, aptX Audio
Vorverstärker AUS
Vorverstärker EIN
5,5mV±3dB (1KHz, 5cm/s)
300 mV±3dB (1KHz, 5cm/s)
Ausgangsbuchsen Cinch
Reichweite ca. 10m
Allgemeines
10,0 dBm
Tonarm
Armtyp
Effektive Länge 224 mm
Überhang 19 mm
0 bis 2,5 g
5 bis 7,5 g
Tonabnehmer
Modell Ortofon 2M Red
Typ Moving Magnet
47.000 ohms
Verstärkeranschluss MM- Eingang
Ausgangsspannung 5,5mV (1KHz, 5 cm/s)
Nadeltyp Diamantschliff elliptisch
Radius der Stiftspitze r/R 8/18 μm
Auflagegewicht 1,6 - 2,0g (Standard1,8g)
Tonabnehmergewicht 7,2g
Headshell-Gewicht
Headshell-Überhang
8 © sonoro audio GmbH 2021
Schrauben, Muttern und
± 5 mm
Gewich ca. 3.9 kg
Betriebstemperatur 0 °C ~ +40 °C
Energieverbrauch
AUS
AN
0,1 W oder weniger
1,5 W oder weniger
Netzteil
Name und Anschrift
des Herstellers
Modellkennung GPE006D-120050-Z
Eingangsspannung AC 100 – 240 V
Eingangswechselstrom
Ausgangsspannung DC 12,0 V
Ausgangsstrom 0,5 A
Ausgangsleistung 6,0 W
Shayao Chenwu Village,
Shijie Town, Dongguan,
50 / 60 Hz
Mehr als 78,9%
70,0%
0,10 W oder weniger
Page 9
DE
Achse
Motorriemenscheibe
Klebeband
Antriebsriemen
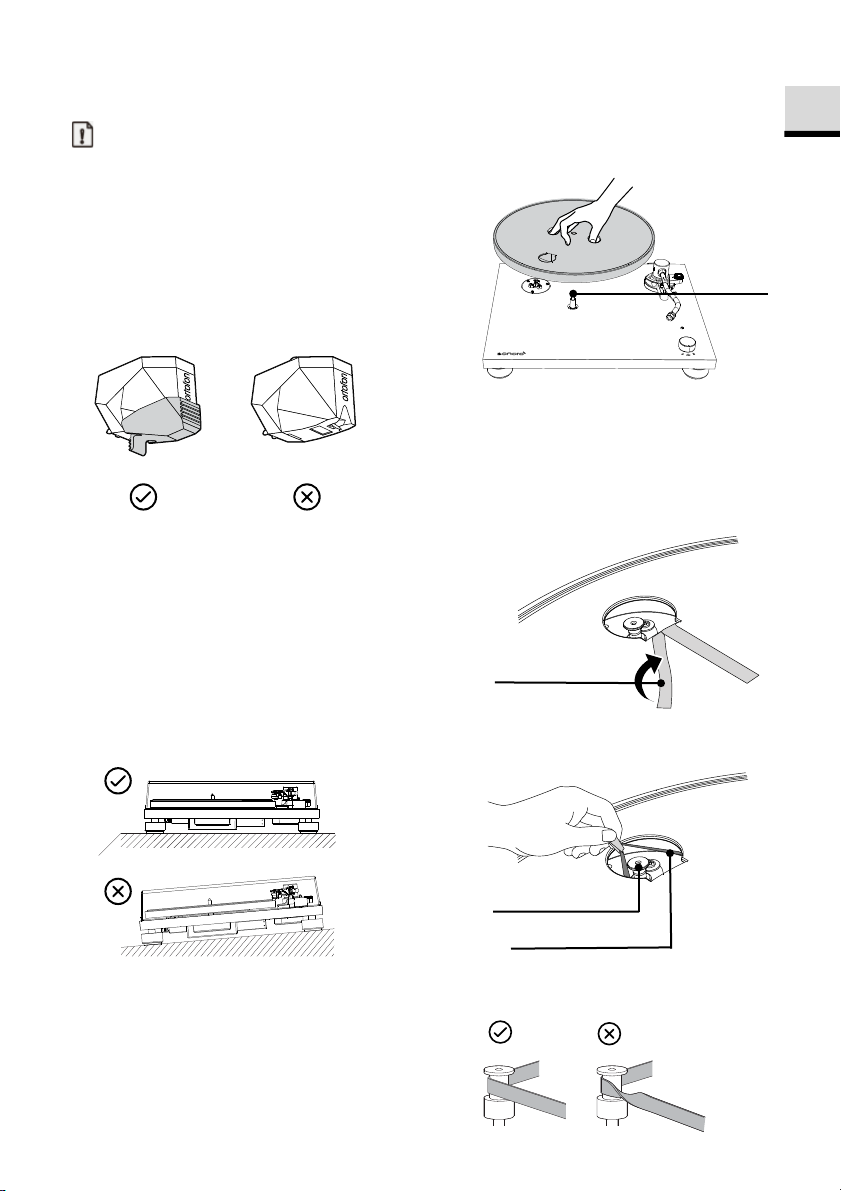
3. Plattenspieler montieren
Hinweis:
• PLATINUM muss vor der ersten Verwendung
zusammengebaut werden.
• Schließen Sie Ihren Plattenspieler erst mit
dem Netzteil an eine Steckdose an, wenn Sie
mit der Montage fertig sind.
• Über dem Abtastdiamanten befindet sich
eine Schutzabdeckung. Belassen Sie diese
beim Zusammenbau Ihres Plattenspielers
dort.
• Der Abtastdiamant ist eine hochpräzise
Komponente. Berühren Sie ihn nicht mit den
Fingern, und lassen Sie ihn nicht auf die Platte
fallen, da dies zu einer Beschädigung des
Diamanten führen kann.
• Entfernen Sie den Kabelbinder, mit dem der
Tonarm gesichert ist.
1. PLATINUM aufstellen
• Stellen Sie PLATINUM auf eine ebene, stabile
Fläche.
2. Platzieren Sie den Plattenteller
• Halten Sie den Plattenteller fest.
• Legen Sie den Plattenteller vorsichtig auf die
Achse.
• Drehen Sie den Plattenteller in die Position, in
der Sie die Motorriemenscheibe durch das
Kreisloch im Plattenteller sehen können.
3. Anbringen des Antriebsriemens
• Lösen Sie das Klebeband, ziehen Sie das rote
Band und halten Sie es fest.
• Dann legen Sie den Antriebsriemen um die
Motorriemenscheibe.
• Achten Sie darauf, dass sich der
Antriebsriemen nicht verdreht.
© sonoro audio GmbH 2021 9
Page 10
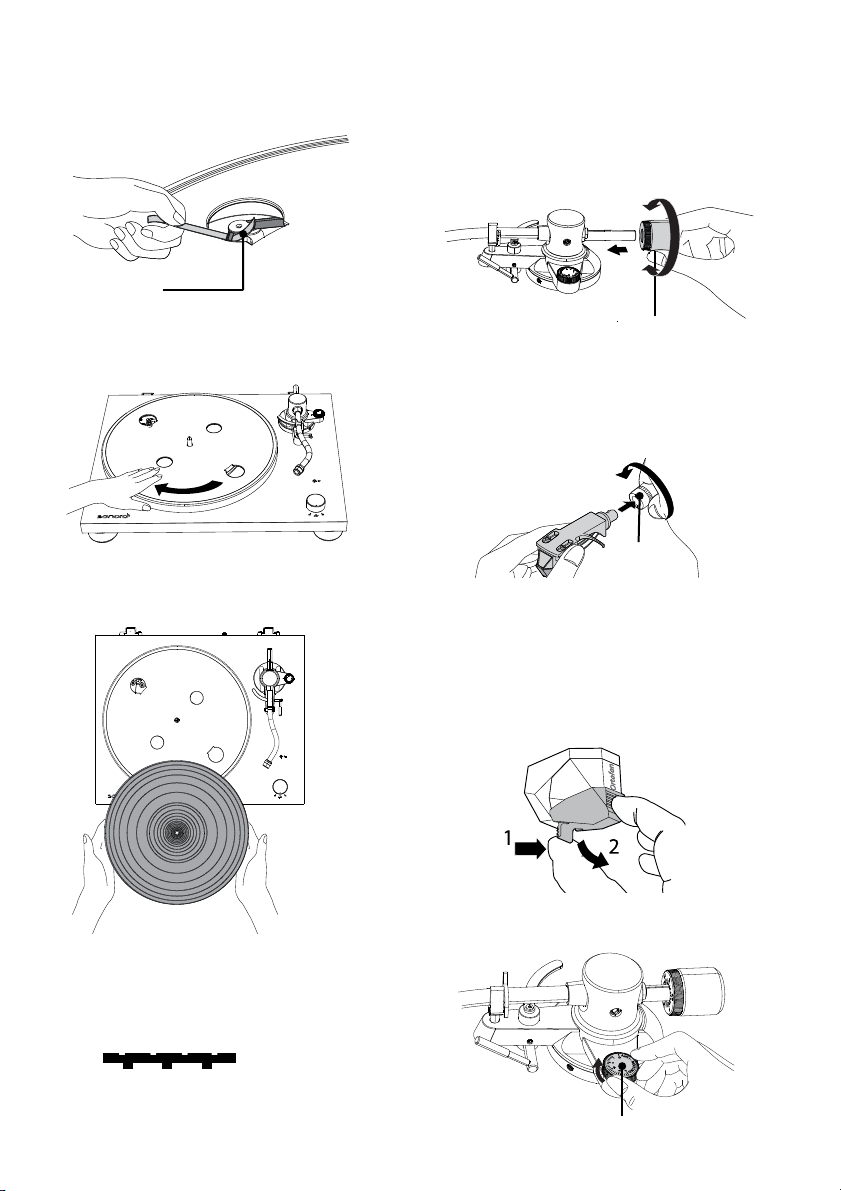
Kontermutter
Gegengewicht
Band
Anti-Skating-Skala
• Entfernen Sie das rote Band vom
Antriebsriemen.
5. Gegengewicht montieren
• Stecken Sie das Gegengewicht auf das Ende
des Tonarms und drehen Sie es langsam
gegen den Uhrzeigersinn, während Sie es
leicht drücken.
• Drehen Sie den Drehteller mehrmals um
sicherzustellen, dass der Antriebsriemen
sicher sitzt und sich reibungslos dreht.
6. Installieren des Headshells
• Setzen Sie das Headshell am vorderen Ende
des Tonarms ein.
•
Drehen Sie die Kontermutter im
Uhrzeigersinn, um es zu sichern.
4. Platzieren der Plattentellermatte
• Legen Sie die Matte auf den Plattenteller.
7. Entfernen der Schutzabdeckung vom
Abtastdiamanten
• Halten Sie die Schutzabdeckung von vorne
und hinten und drücken Sie dabei die
Verriegelung am hinteren Teil.
• Ziehen Sie die Abdeckung langsam nach
unten.
8. Einstellen der Tonarmbalance
• Die Matte hat eine Ober- und eine Unterseite.
• Stellen Sie die Anti-Skating-Skala auf Null.
Die Seite mit den geriffelten, konzentrischen
Kreisen sollte nach unten gelegt werden.
Oben
Unten
10 © sonoro audio GmbH 2021
Page 11
DE
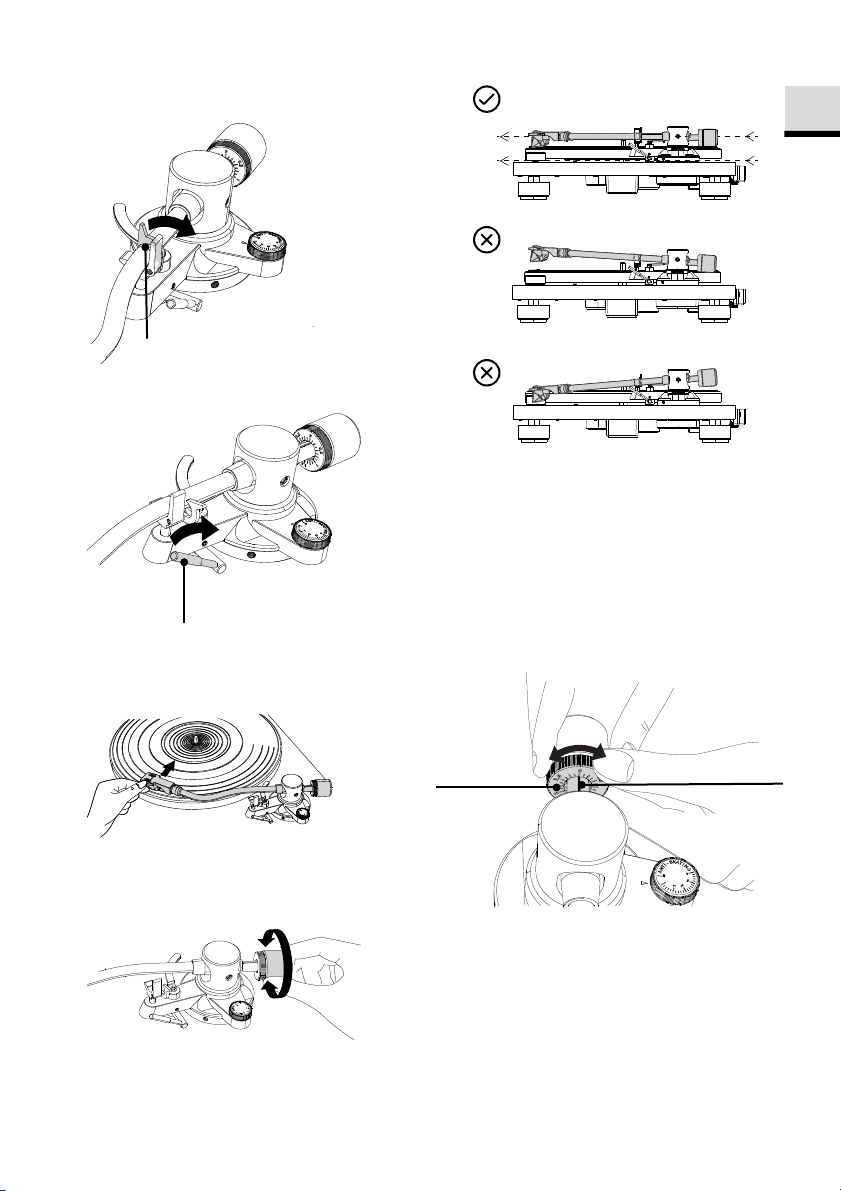
Tonarmklemme
Tonarmlift
Einstellmarkierung
Einstellskala
Gegengewicht
• Lösen Sie die Tonarmklemme
• Heben Sie den Tonarmlift an.
• Bringen Sie den Tonarm wieder in seine
ursprüngliche Position.
• Verriegeln Sie die Tonarmklemme.
9. Einstellen der Auflagekraft
• Halten Sie das Headshell mit dem Finger und
bewegen Sie den Tonarm über den
Plattenteller.
• Senken Sie den Tonarmlift ab.
• Stellen Sie das Gegengewicht so ein, dass der
Tonarm parallel zum Drehteller schwebt.
• Drehen Sie den Ring des Gegengewichts so,
dass die Mittellinie auf der Skala mit 0
ausgerichtet ist.
• Drehen Sie hierbei nur den Ring! Das
Gegengewicht darf sich nicht mitdrehen.
• Stellen Sie das Gegengewicht für den
Tonabnehmer passend ein, indem Sie
Gegengewicht und Skala gleichzeitig drehen.
© sonoro audio GmbH 2021 11
Page 12
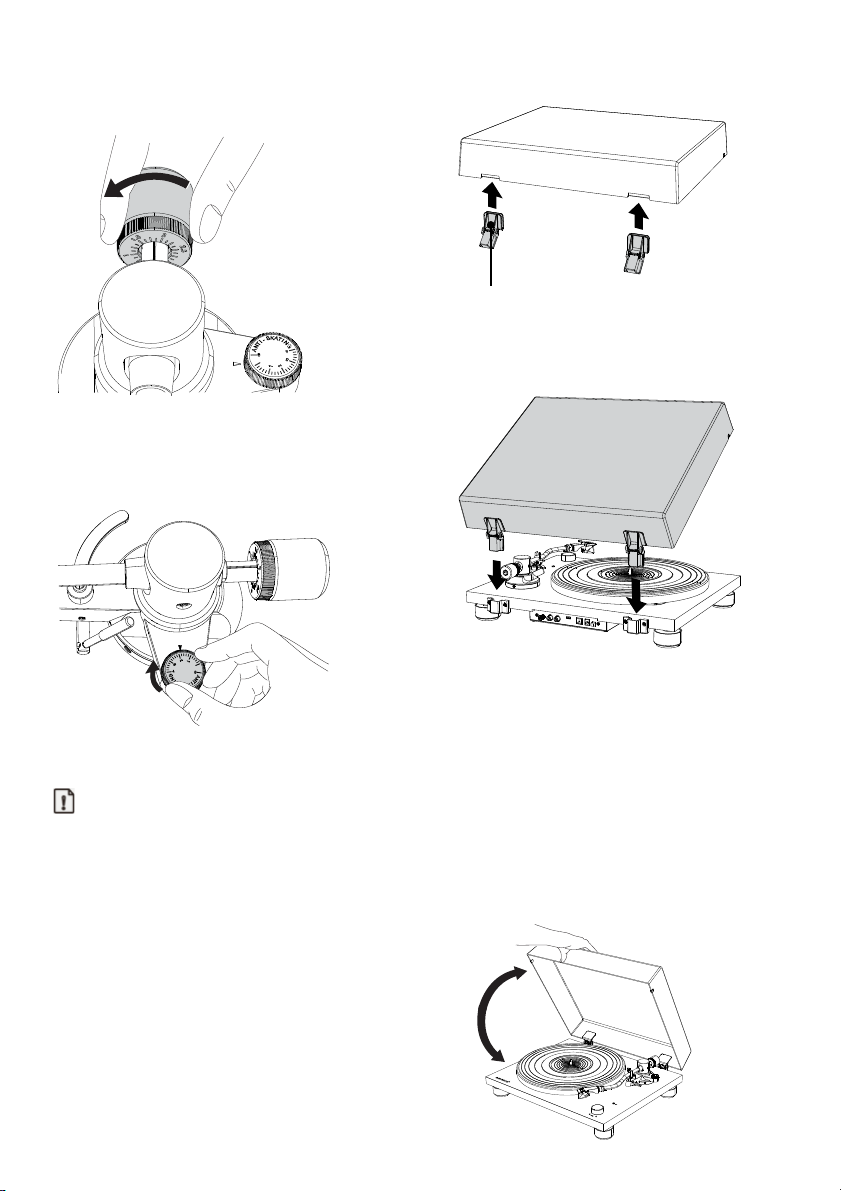
Scharniere
• Die empfohlene Auflagekraft des
mitgelieferten Tonabnehmers beträgt 1,8 g.
• Richten Sie die Scharniere entsprechend der
Halterungen auf der Rückseite des
Plattentellers aus und stecken Sie sie hinein.
10. Einstellen der Anti-Skating-Kraft
• Die Anti-Skating-Skala muss auf den gleichen
Wert, wie die Auflagekraft eingestellt werden;
für den mitgelieferten Tonabnehmer auf 1,8.
11. Installieren des Staubschutzdeckels
Hinweis:
• Der Staubschutzdeckel dient zum Schutz der
empfindlichen Komponenten des
Plattenspielers. Wenn er nicht verwendet
wird, sollte er geschlossen bleiben.
• Öffnen oder schließen Sie ihn nicht, während
12. Öffnen und Schließen der
Schutzabdeckung
Öffnen
• Halten Sie die Vorderkante der
Schutzabdeckung fest und heben Sie sie
vorsichtig bis zum Anschlag vollständig an.
• Die Schutzabdeckung bleibt in ihrer Position
offen.
Schließen
• Senken Sie die Staubschutzabdeckung
vorsichtig ab, bis sie geschlossen ist.
eine Aufnahme abgespielt wird.
• Achten Sie darauf, Ihre Finger beim Öffnen
und Schließen der Staubschutzhülle nicht
einzuklemmen.
• Legen Sie nichts auf den Staubschutzdeckel.
• Setzen Sie die Scharniere des
Staubschutzdeckels vollständig in die
Scharnierhalter ein.
12 © sonoro audio GmbH 2021
Page 13
DE
rundes Oberteil
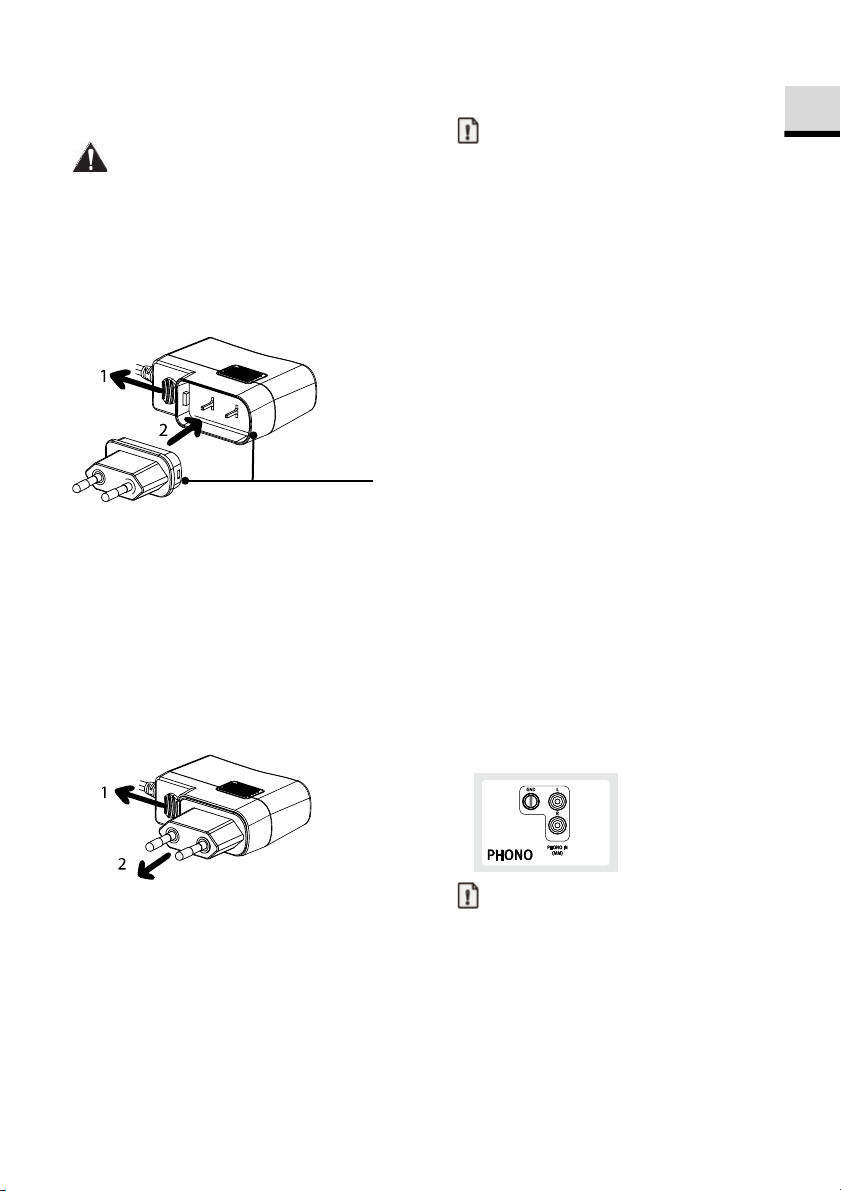
13. Anschließen und Auswechseln des
Netzsteckers
WARNUNG!
Risiko eines elektrischen Schlages!
• Stecken Sie den Netz-Adapter nicht alleine in
die Netzsteckdose.
• Stellen Sie sicher, dass Stecker und Adapter
ordnungsgemäß verriegelt sind.
Anschließen des Netzsteckers
4. PLATINUM anschließen
Hinweis:
• Der montierte Ortofon 2M RED Tonabnehmer
ist ein MM-Tonabnehmer. Stellen Sie daher
Ihr Audiosystem auf MM (nicht MC) ein.
• Stellen Sie sicher, dass das an PLATINUM
angeschlossene Audiosystem / Verstärker
ausgeschaltet und die Lautstärke niedrig
eingestellt ist.
• Bevor Sie Ihr Audiosystem und PLATINUM
einschalten, stellen Sie sicher, dass alle
Verbindungen ordnungsgemäß hergestellt
wurden, und wählen Sie die richtige
Vorverstärkereinstellung.
Andernfalls können laute Brummgeräusche
auftreten, die Ihr Audiosystem oder Ihre
Lautsprecher beschädigen können.
• Ziehen Sie den Clip nach unten und halten
Sie ihn fest.
• Stecken Sie die runde Ecke des Steckers in
den oberen Teil des Adapters.
• Stecken Sie den gewünschten Netzstecker
senkrecht in die Kontaktstifte des Adapters,
bis er vollständig nach innen gedrückt ist.
• Lösen Sie den Clip und verriegeln Sie den
Netzadapter.
Den Netzstecker lösen
1. Anschließen an ein Audiosystem / einen
Verstärker
• Verbinden Sie Ihr Audiosystem und
PLATINUM mit dem mitgelieferten CinchKabel.
• Wenn Ihr Audiosystem über einen
eingebauten Phono-Verstärker verfügt, ist
höchstwahrscheinlich ein Erdungsanschluss
vorhanden. Bitte schrauben Sie das
Erdungskabel auf beiden Seiten fest: An Ihr
Audiosystem und PLATINUM. Stecken Sie die
Cinch-Stecker in den Phono-Eingang Ihres
Audiosystems und den Ausgang von
PLATINUM.
• Ziehen Sie den Clip nach unten und halten
Sie ihn fest.
• Ziehen Sie den Netzadapter senkrecht aus
dem Netzteil.
© sonoro audio GmbH 2021 13
Hinweis:
• Der Erd-Anschluss von Platinum ist keine
Sicherheitserdung.
• Je nach Audiosystem kann das Anschließen
der Erd.- bzw. Masse-Leitung den
umgekehrten Effekt haben, dass das
Brummen und Rauschen zunimmt. In diesem
Fall muss die Erd- bzw. Masse-Leitung nicht
angeschlossen werden.
• Wir empfehlen den PLATINUM nicht mit dem
Erdungsanschluss eines MAESTROs zu
verbinden.
Page 14
USB
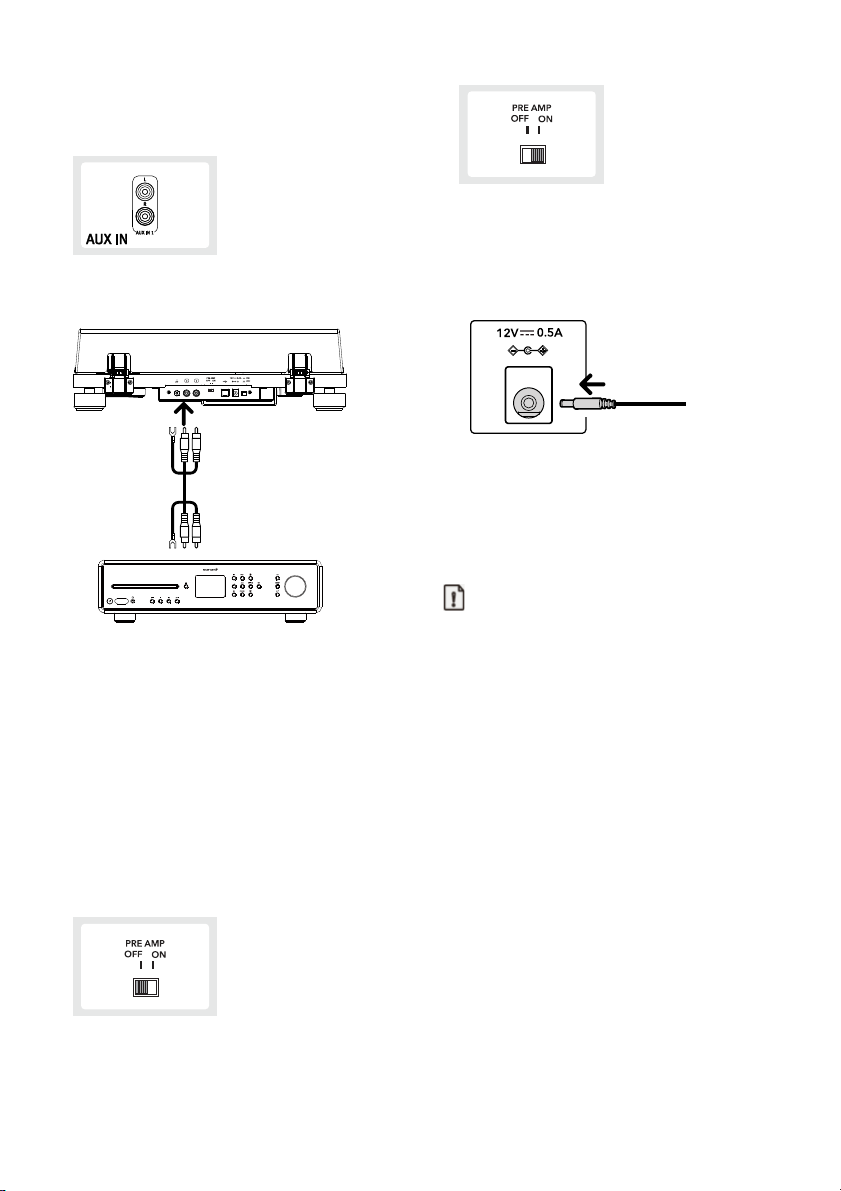
• Wenn Ihr Audiosystem keinen Phono-Eingang
hat, verwenden Sie einen freien Aux-In-CinchEingang.
3. Anschließen des Netzteils
• Der weiße Stecker ist für den linken Kanal, der
rote Stecker für den rechten Kanal.
• Nachdem Sie alle anderen Verbindungen
hergestellt haben, schließen Sie das
mitgelieferte Netzteil an die DCEingangsbuchse an.
• Stecken Sie das Steckernetzteil in eine
Netzsteckdose.
5. Eine Aufnahme
abspielen
Hinweis:
2. Einstellen des Vorverstärker-
Wahlschalters
Schalten Sie den Vorverstärkerschalter auf der
Rückseite von PLATINUM entsprechend den
Funktionen Ihres Audiosystems / Verstärkers, an
den PLATINUM angeschlossen ist:
• Den Schalter auf OFF stellen.
Wenn Ihr Audiosystem / Verstärker über eine
PHONO-Eingangsbuchse verfügt, kann
PLATINUM direkt daran angeschlossen
werden, indem der eingebaute Vorverstärker
durch Ausschalten umgangen wird.
• Den Schalter auf ON stellen.
Wenn Ihr Audiosystem / Verstärker keinen
Phono-Eingang hat, können Sie den
eingebauten Vorverstärker von PLATINUM
verwenden, indem Sie auf ON stellen.
14 © sonoro audio GmbH 2021
• Verringern Sie die Lautstärke des
Audiogeräts, bevor Sie eine Schallplatte
abspielen. Das laute, knisternde Geräusch,
das beim Eintauchen des Abtastdiamanten in
die Einlaufrille der Schallplatte entsteht, kann
die Lautsprecher oder das Audiogerät
beschädigen. Warten Sie, bis der
Tonabnehmer vollständig abgesenkt ist, und
stellen Sie dann die Lautstärke ein.
• Selbst neue Schallplatten können beim
Abspielen ein Knistern verursachen. Bitte
beachten Sie, dass dieses Geräusch für das
Abspielen von Schallplatten charakteristisch
ist.
• Legen Sie jeweils nur eine Schallplatte auf
den Plattenteller.
• Schließen Sie die Schutzabdeckung während
der Wiedergabe von Schallplatten, um
Verstauben zu vermeiden.
• Stoppen Sie die Drehung des Plattenspielers
während der Wiedergabe nicht.
• Während der Wiedergabe von Schallplatten
kann es zu Rückkopplungen kommen, wenn
die Lautstärke zu laut ist. Verringern Sie in
diesem Fall die Lautstärke des Verstärkers.
Page 15
DE
USB
PRE AMP
AUS
EIN
Schallplatte
45-RPM Adapter
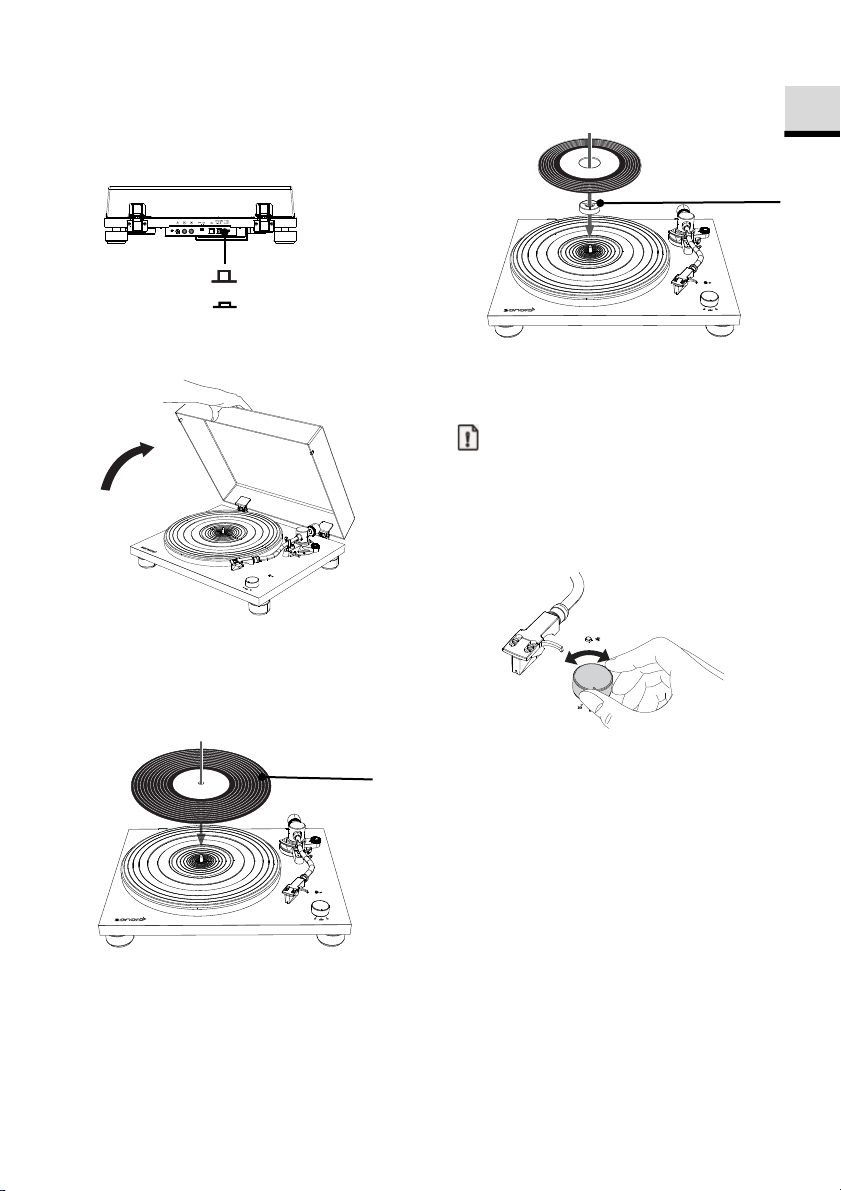
1. Schalten Sie den Plattenspieler ein.
• Drücken Sie die EIN / AUS-Taste auf der
Rückseite des Plattenspielers, um ihn
einzuschalten.
2. Öffnen Sie die Schutzabdeckung
vorsichtig.
•
Um Singles abzuspielen, benutzen Sie den
mitgelieferten Single-Adapter.
4. Benutzung des Geschwindigkeits-
Wahlschalter
Hinweis
• Die Abspieldrehzahl ist normalerweise auf
dem Plattenlabel angegeben.
• Die Drehzahl kann auf 33 oder 45 U / min
eingestellt werden. Wählen Sie die für die
Schallplatte geeignete Drehzahl.
3. Eine Schallplatte auflegen
•
Legen Sie die Schallplatte so auf die
Plattentellerauflage, dass sich die Achse im
Mittelloch der Platte befindet.
• Wenn der Geschwindigkeits-Wahlschalter auf
33 oder 45 gestellt ist, beginnt sich der
Plattenteller zu drehen.
5. Lösen Sie die Tonarmauflageklemme.
6. Heben Sie den Tonarmlift an.
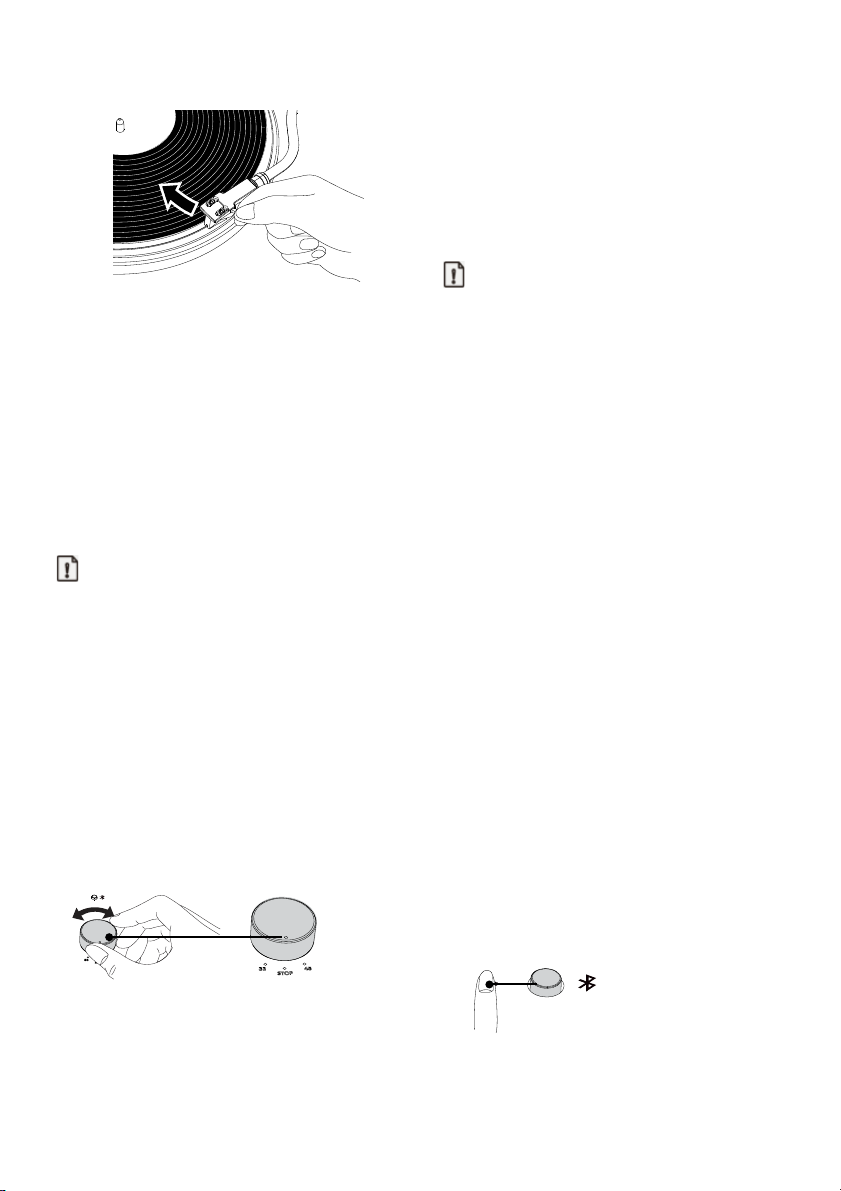
7. Führen Sie den Tonarm mit dem Finger
am Headshell über den Rand der
Schallplatte oder zu dem Titel, mit dem
Sie die Wiedergabe starten möchten.
© sonoro audio GmbH 2021 15
Page 16
Bluetooth-Anzeige /
Pairing-Taste
8. Absenken des Tonarms.
• Senken Sie den Tonarm mit Hilfe des
Tonarmlifts langsam ab, bis der
Abtastdiamant die Schallplatte berührt und
die Wiedergabe beginnt.
9. Schließen Sie vorsichtig die
Schutzabdeckung.
6. Wenn die Wiedergabe
beendet ist
Hinweis:
• PLATINUM ist ein manueller Plattenspieler. Er
stoppt nicht automatisch!
• Bitte heben Sie den Tonarm immer am Ende
einer Schallplatte an, um eine Beschädigung
des Abtastdiamanten und der Schallplatte zu
vermeiden.
1. Heben Sie den Tonarmheber an.
2. Den Tonarm zurückführen
• Bewegen Sie den Tonarm mit dem Finger am
3. Drehen Sie den Geschwindigkeits-
• Wenn der Plattenspieler stoppt, dreht sich
• Drücken Sie die EIN / AUS-Taste auf der
Headshell in seine ursprüngliche Position.
Wahlschalter in die Position
STOP.
der Plattenteller nicht.
Rückseite des Plattenspielers, um ihn
auszuschalten, wenn er nicht mehr verwendet
wird.
7. Verbindung mit Bluetooth-Gerät herstellen
PLATINUM kann eine Verbindung zu Bluetoothfähigen Geräten (z. B. Bluetooth-Lautsprechern
und Bluetooth-Kopfhörern) herstellen.
Hinweis:
• Die Reichweite liegt in einem Bereich von
ungefähr 10 Metern.
• Informationen zur Verwendung finden Sie in
der Bedienungsanleitung Ihrer BluetoothGeräte.
• Das Pairing kann je nach angeschlossenem
Gerät einige Zeit dauern.
• Wenn sich in der Nähe eingeschaltete
Bluetoothwiedergabegeräte befinden, mit
denen Sie keine Kopplung durchführen
möchten, deaktivieren Sie die BluetoothFunktion und versuchen Sie es erneut.
• Stellen Sie keine Verbindung zu Bluetooth-
Lautsprechern oder Kopfhörern her, für die
Sie die Lautstärke nicht einstellen können.
Einzelne Titel könnten mit sehr hohen
Lautstärken wiedergegeben werden.
• Sie können den Plattenspieler nicht mit
Smartphones, Fernsehgeräten oder
Computern usw. koppeln.
1. Bluetooth-Gerät zum ersten Mal koppeln
• Drücken Sie die BT-Taste am Plattenspieler,
um den Bluetooth-Verbindungsmodus zu
starten. Die Anzeige wird blau und blinkt
langsam.
• Drücken Sie die BT-Taste mindestens zwei
Sekunden lang erneut, um den PairingModus zu starten. Die blaue Anzeige blinkt
schnell.
• Nachdem der Plattenspieler in den Pairing-
Modus gewechselt ist, versetzen Sie das
andere Bluetooth-Gerät ebenfalls in den
Pairing-Modus.
16 © sonoro audio GmbH 2021
Page 17

DE
Betriebszustand
BT Anzeige (blau)
Warten
zu werden
durchgehendes Leuchten
• Das Pairing erfolgt automatisch. Wenn der
Plattenspieler und das Bluetooth-Gerät
verbunden sind, leuchtet die Anzeige
durchgängig.
2. Verbinden des gekoppelten Bluetooth-
Geräts
PLATINUM kann Informationen für bis zu 8
gekoppelte Geräte speichern. Sie müssen für
nachfolgende Verbindungen an bereits mit
dem Plattenspieler gekoppelte Geräte nicht
ein weiteres Mal koppeln.
• Drücken Sie die BT-Taste am Plattenspieler,
um den Verbindungsmodus zu starten. Die
Anzeige wird blau und blinkt langsam.
• Bereiten Sie das Bluetooth-Gerät für die
Verbindung vor.
• Das Pairing erfolgt automatisch. Wenn der
Plattenspieler und das Bluetooth-Gerät
verbunden sind, leuchtet die Pairing-Anzeige
durchgängig.
3. Trennen des gekoppelte Bluetooth-
Gerätes
• Drücken Sie die BT-Taste mindestens 2
Sekunden lang, um das gekoppelte
Bluetooth-Gerät vom Plattenspieler zu
trennen. Die Anzeige wird blau und blinkt
schnell.
• Drücken Sie im Bluetooths-Modus die BT-
Taste, um die Bluetooth-Funktion
auszuschalten.
• Wenn fünf Minuten lang kein Bluetooth-
Gerät gefunden wird, leuchtet die
Bluetooth-Anzeige nicht mehr.
• Nachfolgend finden Sie den BT-
Anzeigestatus für unterschiedliche
Betriebszustände.
Paaren
Verbindung
© sonoro audio GmbH 2021 17
Gerät
suchen
verbunden
verbunden
schnelles Blinken
langsames Blinken
8. Anschließen an einen Computer
Der Inhalt einer Schallplatte kann digital auf
einem Computer aufgezeichnet werden, wenn
der Plattenspieler mit dem mitgelieferten USBKabel (Typ B) an einen USB-Anschluss (Typ A)
des Computers angeschlossen wird.
Hinweis:
• Die USB-Ausgangssignale können nur zur
Aufnahme und nicht zur Wiedergabe
verwendet werden.
• Der Plattenspieler läuft mit Standard-
Windows- oder Mac-Treibern, sodass kein
spezieller Treiber installiert werden muss.
• Der Computer erkennt automatisch den USB-
Anschluss des Plattenspielers und identifiziert
ihn als
USB Audio CODEC.
• Sie müssen zuerst eine Software installieren,
die für die Audioaufnahme auf dem
Computer verwendet werden kann.
• Sie können die von Ihnen bevorzugte
Audioaufzeichnungssoftware separat
erwerben oder kostenlose Software wie z.B.
Audacity (https://www.audacityteam.org/) aus
dem Internet herunterladen.
• Wenn die Software nicht wunschgemäß
funktioniert, wenden Sie sich an Ihren
Computeradministrator, um Hilfe zu erhalten.
• Trennen Sie beim Aufnehmen mit einem
Computer nicht das USB-Kabel und schalten
Sie den Plattenspieler nicht in den StandbyModus.
• Die aufgenommene Musik ist nur für den
privaten Gebrauch bestimmt. Die
Verwendung der Musik über diese Grenze
hinaus erfordert die Erlaubnis der Inhaber des
Urheberrechts.
Page 18
USB
PRE AMP
USB Kabel
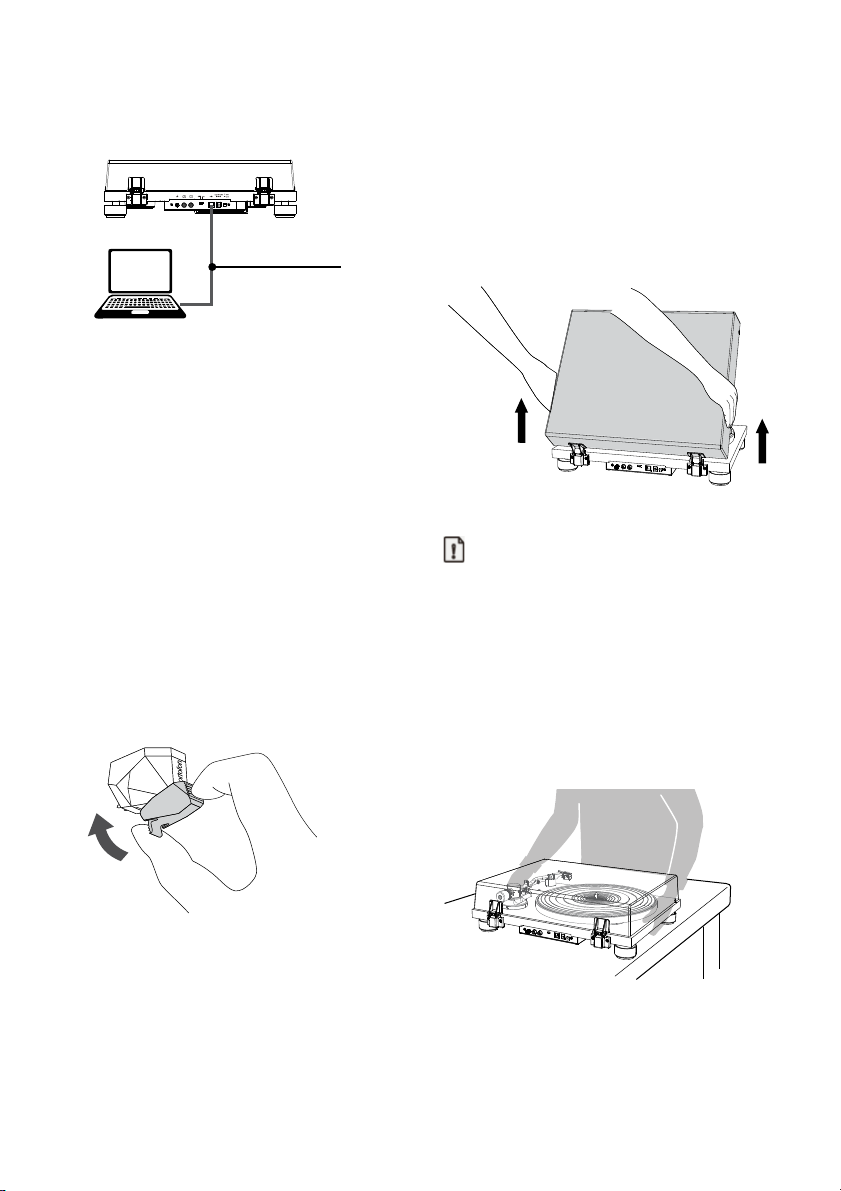
1. Schließen Sie einen Computer mit dem
mitgelieferten USB-Kabel an Ihren
PLATINUM an.
• Verwenden Sie keine chemischen Lösungen
wie Alkohol, Benzin oder Farbverdünner, die
das Finish beschädigen können.
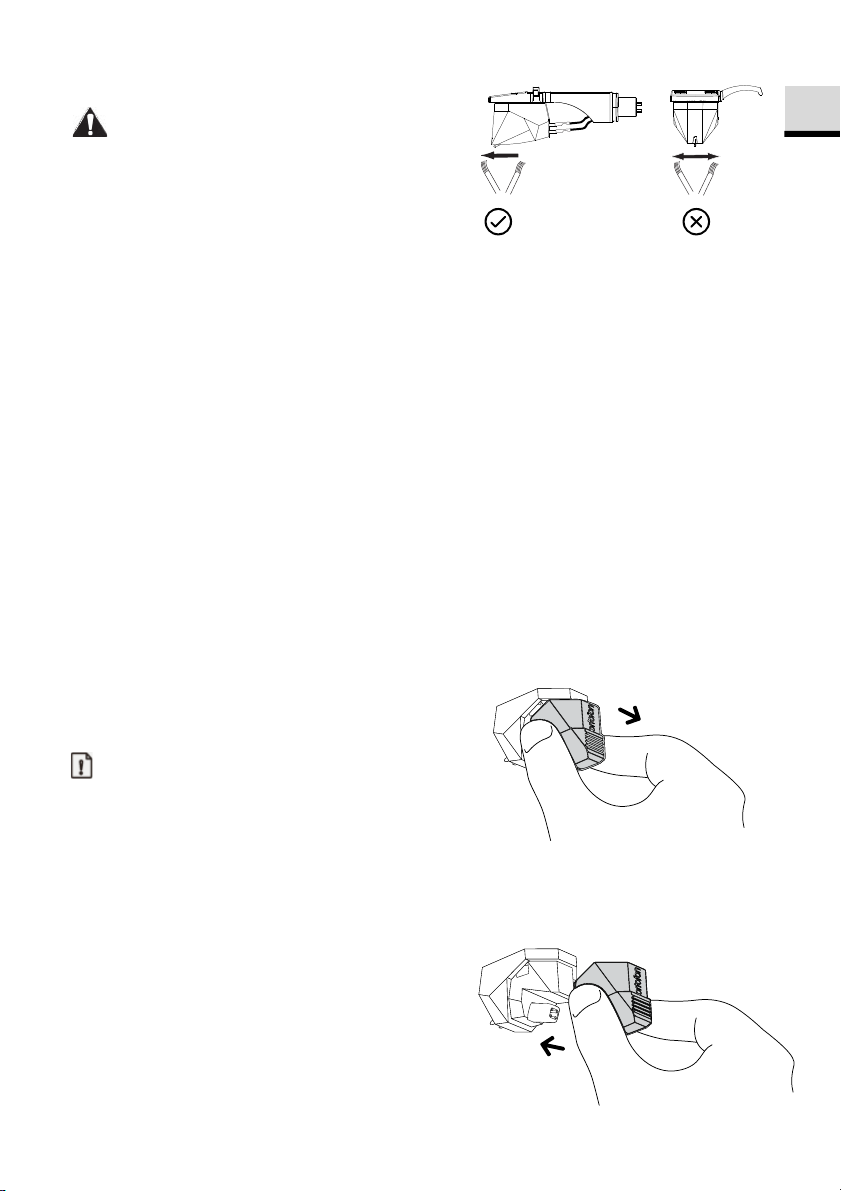
3. Entfernen des Staubschutzdeckels
• Um den Staubschutzdeckel vom
Plattenspieler zu entfernen, öffnen Sie ihn
vollständig, fassen Sie beide Seiten nahe der
Unterseite der Abdeckung und ziehen Sie sie
ihn dann vorsichtig nach oben heraus.
2. Drehen Sie den Drehknopf des
Geschwindigkeits-Wahlschalters, um die
Wiedergabe einer Schallplatte zu starten.
3. Verwenden Sie Ihre Software, um Titel
auf dem Computer zu speichern.
• Ausführliche Anweisungen zur Verwendung
der Anwendung und zum Übertragen von
Audiosignalen finden Sie im
Benutzerhandbuch der Software.
9. Wartung
1. Bringen Sie die Schutzabdeckung über
dem Abtastdiamant an.
• Halten Sie die Abdeckung vorn und hinten,
richten Sie sie an der Vorderseite des
Tonabnehmers aus und heben Sie sie
langsam an.
4. Plattenspieler transportieren
Hinweis:
• Verriegeln Sie die Tonarmauflageklemme.
• Schalten Sie den Plattenspieler aus und
ziehen Sie das Steckernetzteil aus der
Steckdose.
• Trennen Sie alle Verbindungskabel vom
Plattenteller.
• Bringen Sie die Schutzabdeckung über dem
Abtastdiamanten an.
•
Wenn Sie den Plattenspieler transportieren,
greifen Sie ihn sicher von unten.
2. Plattenspieler reinigen
• Reinigen Sie die Staubschutzhülle und den
Plattenspieler mit einem trockenen, weichen
Tuch.
• Wenn der Schmutz sich nicht einfach
entfernen lässt, verwenden Sie ein leicht
feuchtes Tuch und trocknen Sie den
Plattenspieler dann mit einem weichen und
trockenen Tuch.
• Passen Sie gegebenenfalls die Auflagekraft
und das Anti-Skating an.
18 © sonoro audio GmbH 2021
Page 19
DE
5. Transport oder Versand von PLATINUM
Vorsicht:
• Falls der Plattenspieler transportiert oder zur
Reparatur versendet werden muss,
verwenden Sie bitte die originale
Verpackung, diese bietet den besten Schutz.
• Wenn Sie die Originalverpackung verloren
haben, gehen Sie bitte wie folgt vor; wir
empfehlen, Luftpolsterfolie oder ähnlich
schützende Materialien zum Einwickeln zu
verwenden:
• Nehmen Sie die Staubschutzhülle ab und
wickeln Sie diese vorsichtig ein.
• Nehmen Sie den Plattenteller und die Matte
vorsichtig ab und wickeln Sie diese ebenfalls
ein.
• Bringen Sie die Nadelabdeckung an,
entfernen Sie das Headshell mit dem
Tonabnehmer und das Gegengewicht vom
Tonarm und wickeln diese sorgfältig ein.
• Verriegeln Sie die Tonarmklemme und
sichern Sie diese mit etwas Klebeband an
ihrem Platz.
• Wickeln Sie den Plattenspieler vorsichtig ein.
• Verwenden Sie bitte eine ausreichend stabile
und schützende Verpackung, um Schäden am
PLATINUM bei Transport oder Versand zu
verhindern.
6. Reinigen des Abtastdiamanten
Hinweis:
• Abtastdiamanten sind Präzisionsteile.
Behandeln Sie ihn daher vorsichtig, um ein
Verbiegen oder Beschädigen zu vermeiden.
Wenn der Träger verbogen oder der Diamant
beschädigt wird, kann er möglicherweise
nicht genau der Rille folgen und die
Schallplatten beschädigen oder eine andere
Fehlfunktion verursachen.
• Reinigen Sie den Abtastdiamanten nicht mit
Verdünner oder anderen Chemikalien.
• Verwenden Sie eine kleine Bürste (nicht im
Lieferumfang enthalten), wenn der Diamant
stark verschmutzt ist. Reinigen Sie ihn, indem
Sie die Bürste von hinten nach vorne
bewegen.
7. Ersetzen des Abtastdiamanten
Wenn der Abtastdiamant abgenutzt ist,
verschlechtert dies nicht nur die Klangqualität,
sondern kann auch Schallplatten beschädigen.
Ersetzen Sie den Abtastdiamanten nach ca.
1000 Stunden Wiedergabezeit durch einen von
uns angegebenen.
• Bitte verwenden Sie einen Abtastdiamanten
für ein Ortofon 2M RED / 2M Blue.
• Befolgen Sie die Anweisungen zum Ersetzen
im Handbuch des Ersatzdiamanten.
Abtastdiamanten entfernen
• Belassen Sie die Schutzabdeckung auf dem
Abtastdiamanten.
• Lösen Sie das Headshell vom Tonarm.
• Halten Sie den Tonabnehmer in einer Hand,
fassen Sie das Kunststoffstiftgehäuse des
Abtastdiamanten mit Daumen und
Zeigefinger der anderen Hand und ziehen Sie
ihn aus dem Tonabnehmer heraus.
Installieren eines neuen Abtastdiamanten
• Um einen Ersatzdiamanten zu installieren,
schieben Sie ihn vorsichtig von vorne in den
Tonabnehmer ein.
© sonoro audio GmbH 2021 19
Page 20
Signal
Farbe
Linker Kanal +
Weiss
Linker Kanal -
Blau
Rechter Kanal +
Rot
Linker Kanal -
Grün
52,8mm
Schraube
KunststoffUnterlegscheibe
Tonabnehmer
Kontakte
• Der Abtastdiamant muss vollständig im
Tonabnehmer stecken.
• Montieren Sie das Headshell auf den Tonarm.
8. Ersetzen des Tonabnehmers
Hinweis
:
• Serienmäßig wird PLATINUM mit einem
Ortofon 2M Red ausgeliefert.
• Wenn Sie einen anderen Tonabnehmer, als
• Ziehen Sie die Schrauben mit einem
Schlitzschraubendreher leicht an und stellen
Sie dann den Überhang ein.
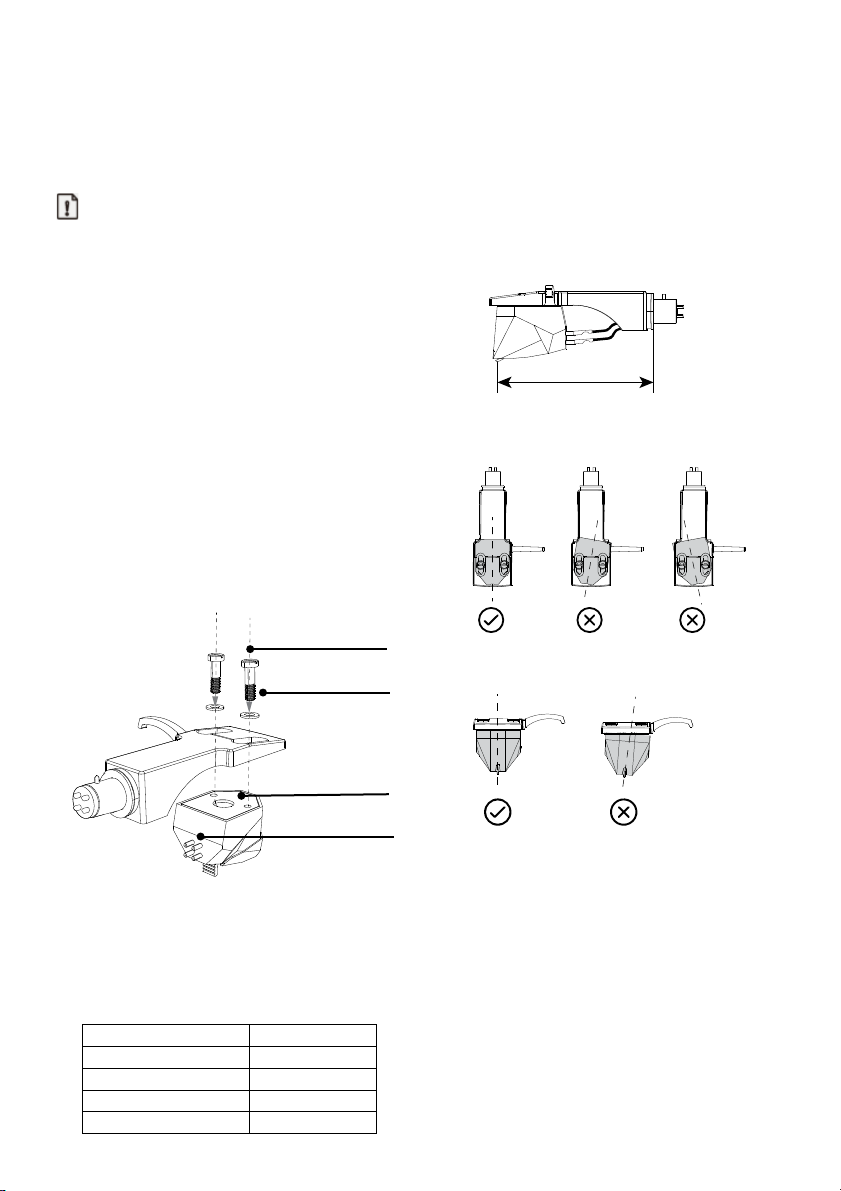
9. Den Überhang einstellen
• Bewegen Sie den Tonabnehmer, um den
Überhang so einzustellen, dass die
Abtastdiamantspitze 52,8 mm vom Ende des
Headshells entfernt ist.
Ortofon 2M Red verwenden, müssen Sie
möglicherweise den Überhang und das
Auflagegewicht, die Antiskatingkraft, sowie
die Höhe Ihres Tonarms anpassen. Im
Zweifelsfall wenden Sie sich bitte an Ihren
Fachhändler.
• Belassen Sie die Schutzabdeckung auf dem
Abtastdiamanten.
• Der Tonabnehmer muss parallel zu den
Außenkanten des Headshells montiert
warden.
• Entfernen Sie zuerst das Headshell vom
Tonarm.
• Entfernen Sie mit einem
Schlitzschraubendreher die
Installationsschrauben, Unterlegscheiben und
anschließend den Tonabnehmer aus dem
Headshell.
• Der Tonabnehmer muss gerade montiert
werden.
• Anweisungen zur Montage und zum
Anschließen der Headshell-Kabel finden Sie
in der Bedienungsanleitung des neuen
Tonabnehmers.
• Die Signale und Farben der Headshell-Kabel
sind unten aufgeführt.
• Ziehen Sie die Schrauben nach Abschluss der
Einstellungen fest an.
• Befestigen Sie das Headshell am Tonarm.
10. Anpassen der Tonarmhöhe
• Legen Sie eine Schallplatte auf den
Plattenteller.
• Senken Sie den Abtastdiamanten auf eine
Schallplatte und prüfen Sie, ob der Tonarm
parallel zur Schallplatte ist.
20 © sonoro audio GmbH 2021
Page 21
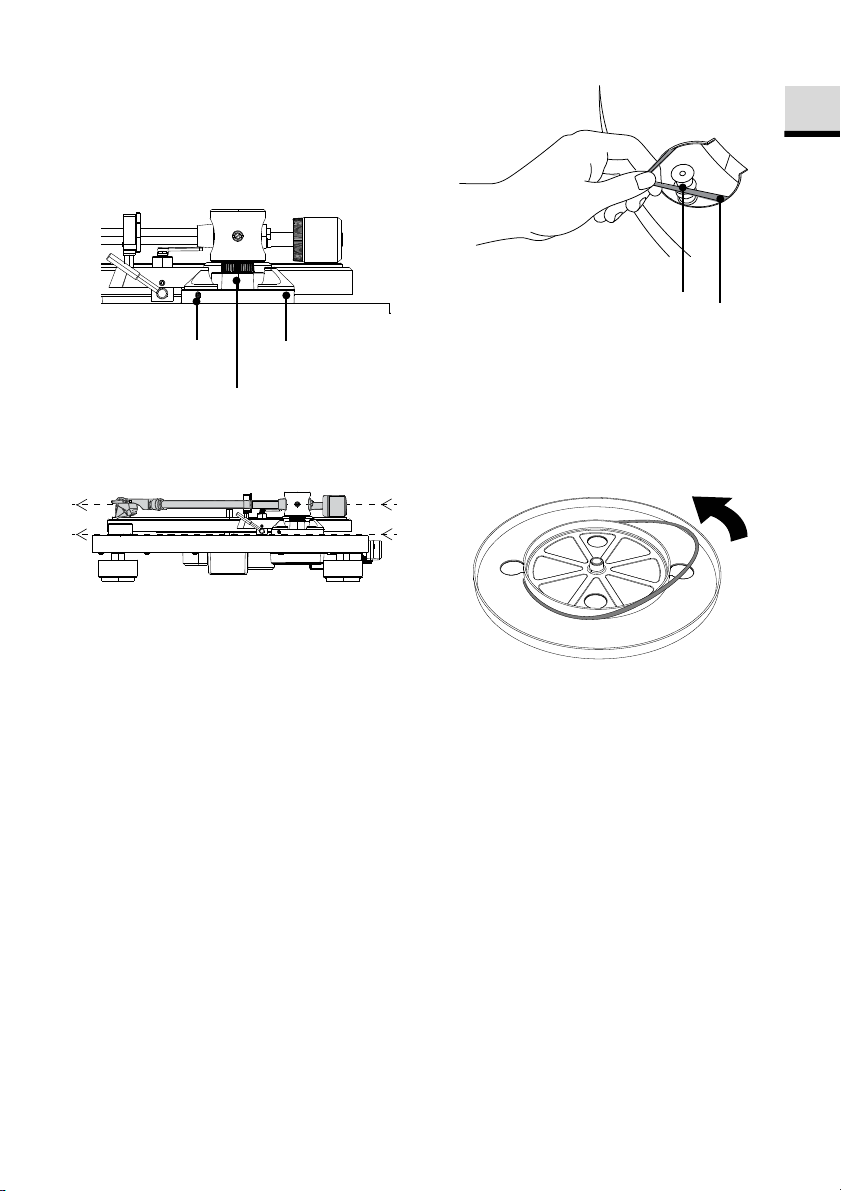
DE
Antriebsriemen
Motor-Riemenscheibe
Höhenverstellschraube
Tonarmbasis
Sockel
• Führen Sie einen 2-mm-Inbusschlüssel (nicht
im Lieferumfang enthalten) in das Loch der
Höhenverstellschraube und drehen Sie ihn
gegen den Uhrzeigersinn, um die
Tonarmbasis zu entriegeln.
• Halten Sie die Tonarmbasis und stellen Sie
die Höhe ein, bis der Tonarm parallel zur
Schallplatte verläuft.
• Stecken Sie Finger und Daumen in die
runden Löcher des Plattentellers, um ihn
hochzuheben.
• Drehen Sie den Plattenteller herum und
entfernen Sie den alten Antriebsriemen.
• Drehen Sie den Inbusschlüssel im
Uhrzeigersinn, um die Tonarmbasis zu
verriegeln.
• Passen Sie die Auflagekraft und das
Antiskating an.
11. Antriebsriemen austauschen
Der Antriebsriemen nutzt sich ab oder kann im
Laufe der Zeit sogar reißen. Ersetzen Sie ihn in
diesem Fall durch einen neuen. Wenden Sie
sich an Ihren Händler oder den Kundendienst,
um einen Ersatzantriebsriemen zu erhalten.
• Schalten Sie den Plattenspieler und das
angeschlossene Audiogerät aus und ziehen
Sie den Netzadapter aus der Steckdose.
• Entfernen Sie die Matte des Plattentellers.
• Drehen Sie den Plattenteller in die Position, in
der Sie die Motorriemenscheibe durch das
Kreisloch auf dem Plattenteller sehen können.
• Nehmen Sie den Antriebsriemen von der
Motor-Riemenscheibe.
• Wickeln Sie einen neuen Antriebsriemen um
den inneren Kreis des Plattentellers, während
Sie ihn umgedreht halten.
• Befolgen Sie die Schritte unter „Anbringen
des Antriebsriemens“, um die Montage
abzuschließen.
© sonoro audio GmbH 2021 21
Page 22

Fehler
Mögliche Ursache
Lösung
Der Plattenteller dreht sich
Der Netzadapter ist nicht
Stecken Sie den
Der Plattenspieler ist nicht
Prüfen Sie den Netzschalter
Der Plattenteller dreht sich,
Die Abdeckung ist noch auf
Entfernen Sie die
Der Tonarm ist nicht auf die
Senken Sie den Tonarm ab.
Der Diamant steckt nicht
Prüfen Sie den
Falsche Einstellung des
Wählen Sie die richtige
Das Auflagegewicht ist zu
Stellen Sie das
10. Fehlerbehebung
Bei allen elektrischen Geräten können Fehlfunktionen auftreten. Dies ist nicht unbedingt auf
einen Defekt zurückzuführen. Überprüfen Sie daher die folgende Tabelle, um festzustellen,
ob Sie das Problem selbst beheben können.
nicht.
aber es kommt kein Sound
oder er ist zu leise.
richtig eingesteckt.
im ON Modus.
dem Tonabnehmer.
Platte abgesenkt.
Falsche Einstellung beim
angeschlossenen
Audiosystem
Der Abtastdiamant ist
beschädigt.
korrekt im Tonabnehmer.
eingebauten
Vorverstärkers.
Netzadapter in eine
Steckdose.
auf der Rückseite des
Geräts.
Er muss gedrückt
sein.
Abdeckung.
Prüfen Sie die Einstellungen
des angeschlossenen
Audiosystems z.B. MC statt
MM.
Prüfen Sie den Diamanten
und ersetzen ihn
gegebenenfalls.
Tonabnehmer, schieben Sie
den Abtastdiamanten ggf.
vollständig ein.
Einstellung.
Wenn Sie einen Verstärker
mit Phono-Eingang
benutzen, muss der
Vorverstärker auf OFF
stehen.
Wenn Sie PLATINUM an
einen AUX-Eingang
angeschlossen haben, muss
der Vorverstärker auf ON
stehen.
hoch oder zu niedrig.
22 © sonoro audio GmbH 2021
Auflagegewicht ein.
Page 23

DE
Fehler
Mögliche Ursache
Lösung
Das Antiskating ist nicht
Stellen Sie das Antiskating
Die Schallplatte ist gewellt.
Wechseln Sie die
Starke Nebengeräusche.
Am Abtastdiamant oder auf
Entfernen Sie den Staub.
Wummernde Geräusche.
Der Plattenspieler wird
Entkoppeln Sie den
Die Musik wird zu schnell
Die
Stellen Sie die korrekte
Es kommt keine
Das Bluetoothgerät ist nicht
Stellen Sie an beiden
Der Abtastdiamant springt. Das Auflagegewicht ist zu
hoch oder zu niedrig.
korrekt eingestellt.
Die Schallplatte ist
verkratzt.
der Platte befindet sich
Staub.
durch Vibrationen über den
Boden oder nahestehende
Lautsprecher gestört.
oder zu langsam
wiedergegeben.
Brummen. Das Erdungskabel ist nicht
Abspielgeschwindigkeit ist
inkorrekt.
korrekt angeschlossen.
Je nach Audiosystem kann
das Anschliessen der
Erdleitung zu Brummen
führen.Masse-Leitung den
umgekehrten Effekt haben,
dass das.
Stellen Sie das
Auflagegewicht ein.
ein.
Schallplatte.
Wechseln Sie die
Schallplatte.
Plattenspieler von
Vibrationen.
Abspiegeschwindigkeit ein.
Überprüfen Sie, ob das
Erdungskabel korrekt
angeschlossen ist.
In diesem Fall darf die
Erdleitung nicht
angeschlossen werden.
Bluetoothverbindung
zustande.
Keine Verbindung zum
Smartphone
© sonoro audio GmbH 2021 23
mit PLATINUM verbunden.
Diese Funktion wird nicht
unterstützt.
Geräten Bluetooth aus und
wieder an und versuchen
Sie es erneut.
Verbinden Sie PLATINUM
mit einem BluetoothLautsprecher oder Kopfhörer.
Page 24

11. Garantie
Für die Geltendmachung von Garantieansprüchen gilt – ohne dass dadurch Ihre gesetzlichen
Rechte eingeschränkt werden – Folgendes:
•
Garantieansprüche können nur innerhalb eines Zeitraumes von max. 2 Jahren (1 Jahr in
Nordamerika und Australien) gerechnet ab Kaufdatum, geltend gemacht werden.
•
Innerhalb der Garantiezeit beseitigt sonoro audio GmbH nach eigener Wahl durch
Reparatur oder Austausch des PLATINUMs unentgeltlich alle Mängel, die auf Materialoder Herstellungsfehlern beruhen.
•
Bei Reklamationsfragen wenden Sie sich bitte an unseren Kundenservice. Die
Kontaktdaten finden Sie unter „Kontaktdaten“ oder unter sonoro.de
•
Mit Reparatur oder Austausch des PLATINUMs beginnt kein neuer Garantiezeitraum.
Maßgeblich bleibt der Garantiezeitraum von 2 Jahren (1 Jahr Nordamerika und
Australien) ab Kaufdatum.
•
Von der Garantie ausgenommen sind Schäden durch unsachgemäßen Gebrauch,
normaler Verschleiß und Verbrauch sowie Mängel, die den Wert oder die
Gebrauchstauglichkeit von PLATINUM nur unerheblich beeinflussen. Bei Eingriffen, die
nicht von dem von uns autorisierten Servicezentrum vorgenommen wurden, erlischt die
Garantie ebenfalls.
24 © sonoro audio GmbH 2021
Page 25

sonoro.de
Page 26
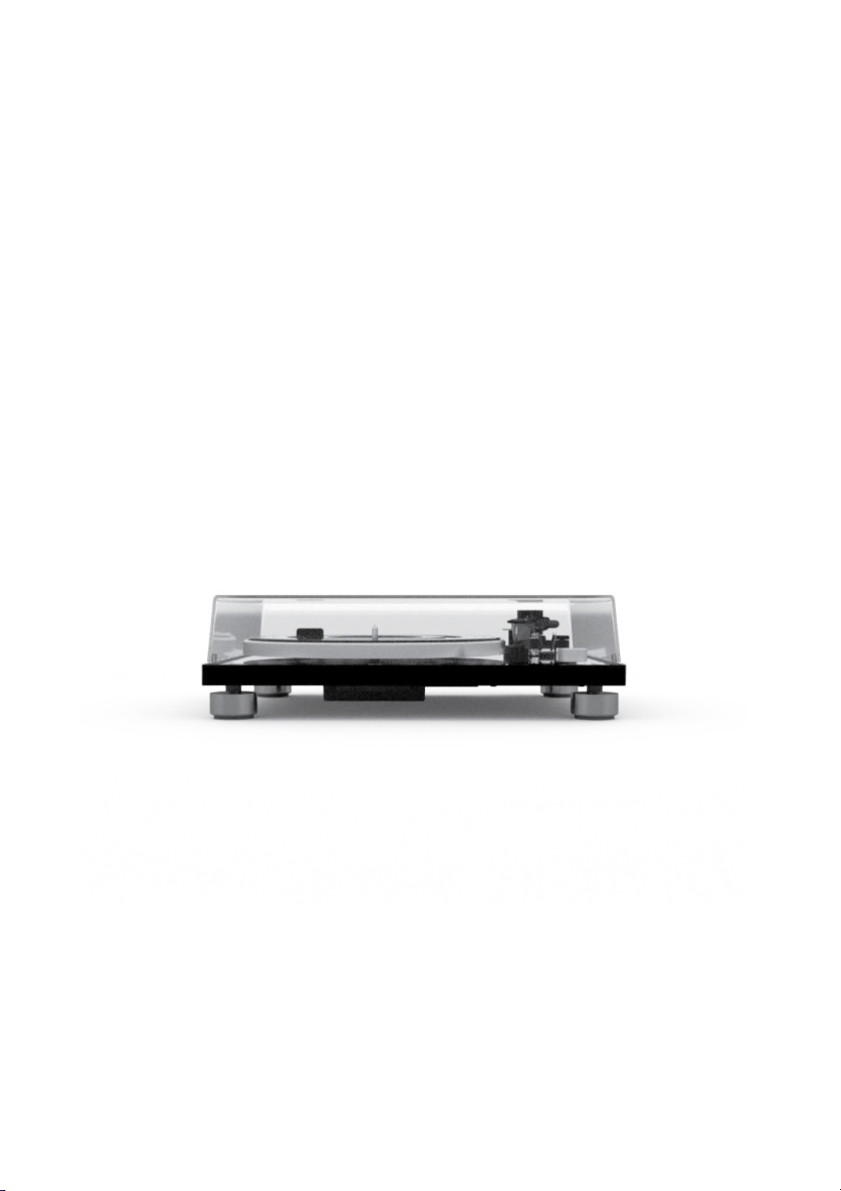
PLATINUM
SO-2000
TURNTABLE
Operating manual
26 © sonoro audio GmbH 2021
Page 27

GB
Table of contents
1. Introduction ............................................................................................................... 28
2. Getting to know your PLATINUM ............................................................................ 28
2.1 Scope of delivery ................................................................................................................ 28
2.2 Controls and ports .............................................................................................................. 29
2.3 Technical specifications ..................................................................................................... 31
3. Assembling the turntable ........................................................................................ 32
4. Connecting PLATINUM ............................................................................................ 36
5. Playing a record ........................................................................................................ 37
6. When playback finishes ............................................................................................ 39
7. Connecting with Bluetooth device ......................................................................... 39
8. Connecting to a computer ...................................................................................... 40
9. Maintenance .............................................................................................................. 41
10. Troubleshooting ....................................................................................................... 45
11. Warranty ..................................................................................................................... 46
The Bluetooth® word mark and logos are registered trademarks owned by the luetooth SIG, Inc. and any use of
such marks by sonoro audio GmbH is under license. Other trademarks and trade names are thoseoftheir
respective owners.
Qualcomm aptX is a product of Qualcomm Technologies, Inc. and/or its subsidiaries. Qualcomm is a trademark
of Qualcomm Incorporated, registered in the United States and other countries. apt X is a trademark of
Qualcomm Technologies International, Ltd., registered in the United States and other countries.
© sonoro audio GmbH 2021 27
Page 28
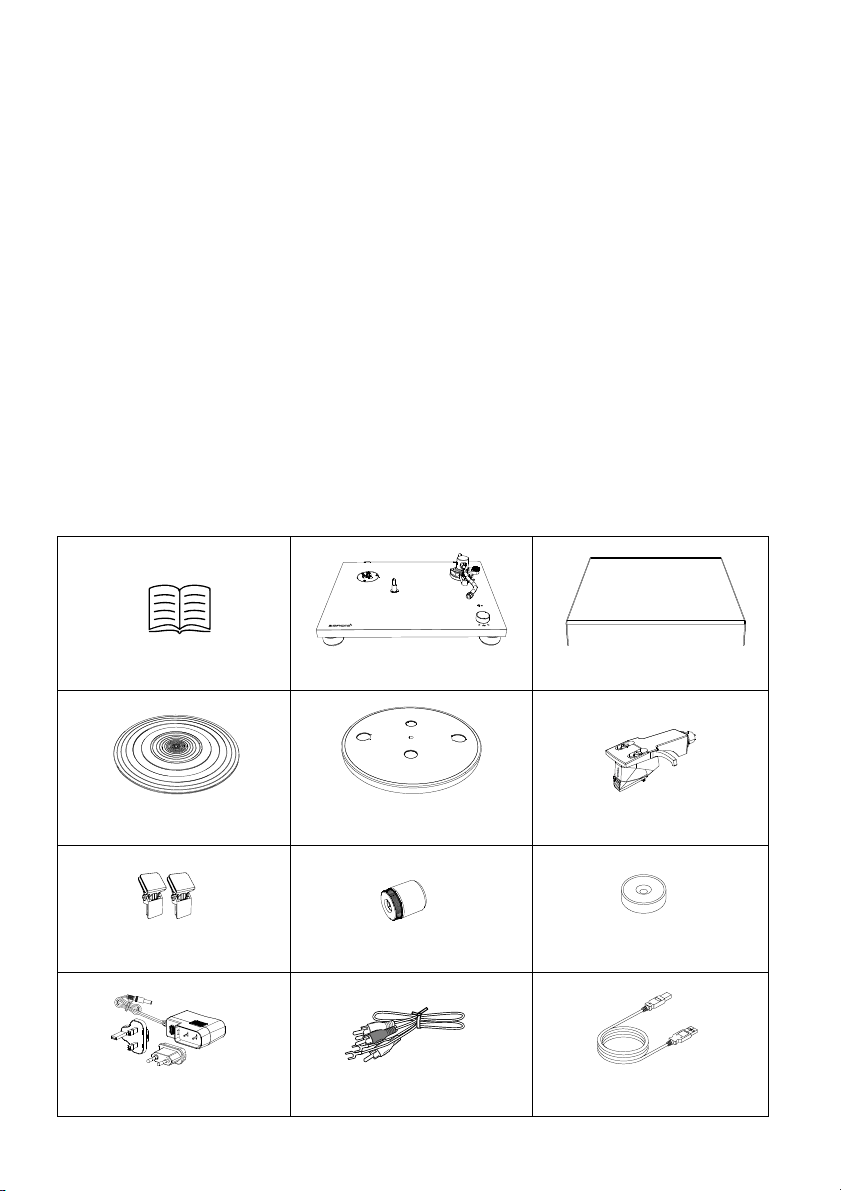
Manual
Turntable
Dust cover
Mat for the platter
Platter with drive belt
Headshell with cartridge
Dust cover hinge
Counterweight
45 RPM adapter
(7” single adapter)
AC adapter with EU & UK plug
RCA cable
USB cable
1. Introduction
Thank you for purchasing PLATINUM. This operating manual provides all the information
required for trouble-free and safe operation of the PLATINUM.
It is the users’ responsibility to make sure, the turntable is positioned, connected and used
in a safe way. The images in this operating manual are intended to illustrate the actions
necessary to operate the PLATINUM.
PLATINUM is intended for personal use only. It is not intended for commercial use.
Enjoy your PLATINUM!
2. Getting to know your PLATINUM
2.1 Scope of delivery
Check that the following parts are included.
28 © sonoro audio GmbH 2021
Page 29
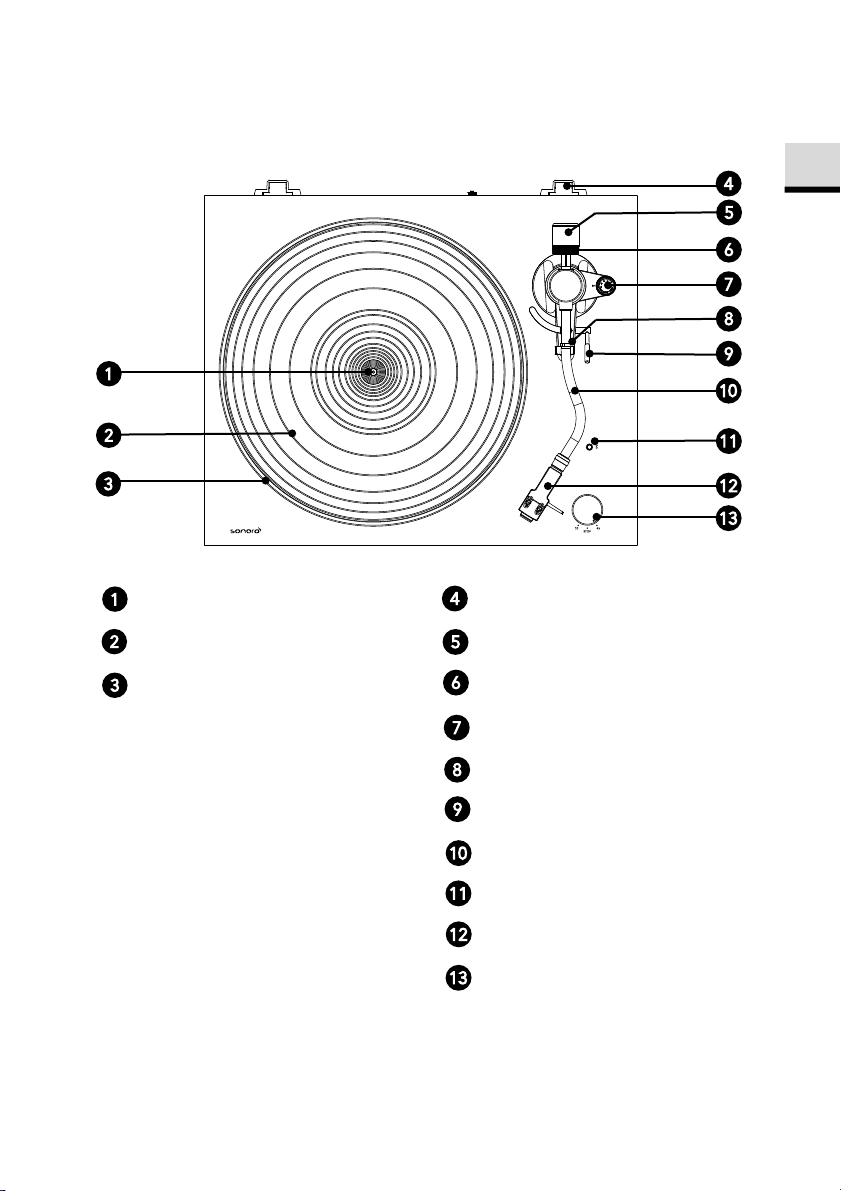
GB
2.2 Controls and ports
Top view
Spindle
Dust cover hinge holders
Mat for the platter
Platter
Counterweight
Tracking force gauge ring
Anti-skating dial
Tonearm rest with clamp
Tonearm lifter
Tonearm
Bluetooth indicator / Pairing button
Headshell with cartridge
Speed / STOP rotatory switch knob
© sonoro audio GmbH 2021 29
Page 30
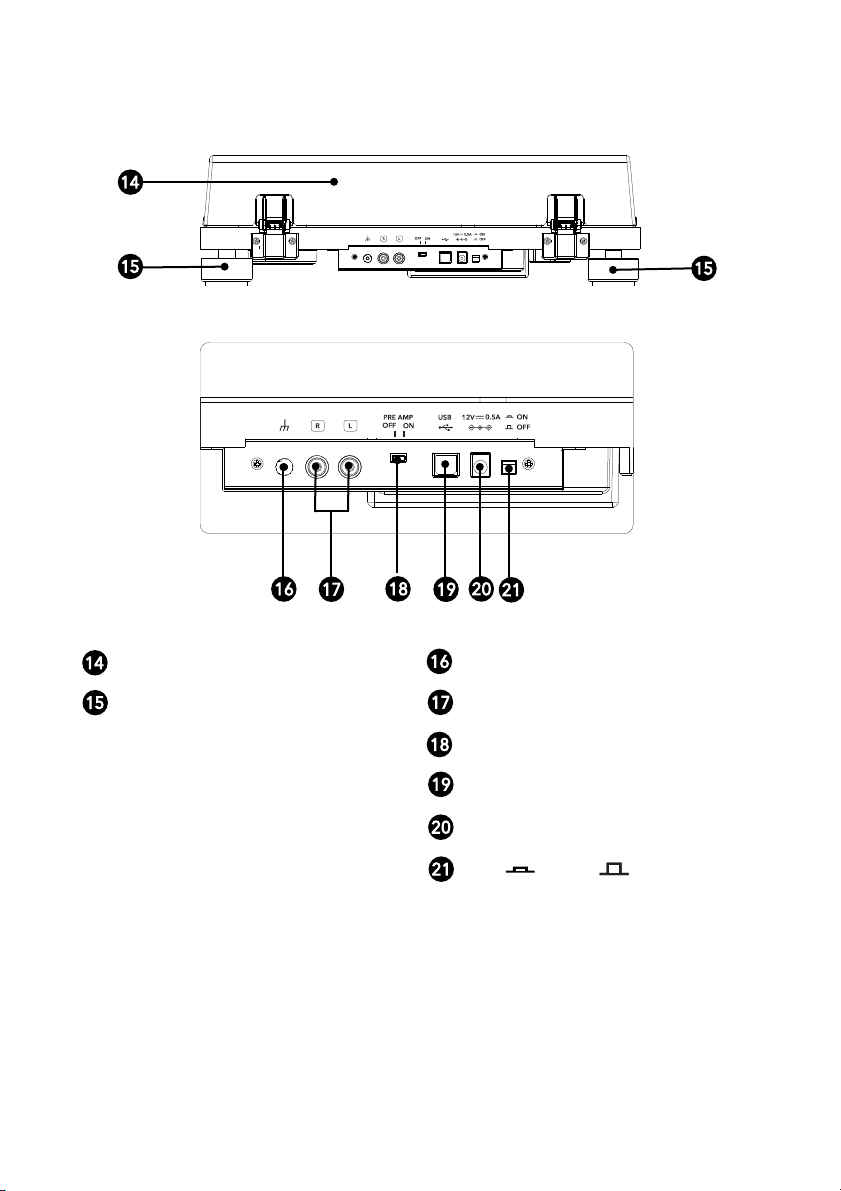
USB
PRE AMP
Rear side view
Dust cover
Grounding terminal
Feet
Stereo output terminals
Pre-amplifier selector switch
USB output
DC input jack
ON / OFF
30 © sonoro audio GmbH 2021
Page 31

GB
2-speed, fully manual
operation
Die-cast aluminum, diameter
300 mm
Signal to noise
ratio
> 67 dB (A-weighted, 20KHz,
LPF)
Output levels
Static balanced S-shaped
tonearm
Stylus pressure
adjustment range
Applicable cartridge
weight range
Recommended load
impedance
9.3 g (including screws,
nuts and lead wires)
Headshell overhang
adjustment
USB 1.1 Compliant
MAC OSX or above
Maximum output
power
Maximum
communication range
Dimension
( W x D x H)
Operating
temperature
Replacement stylus
(sold separately)
Ortofon 2M Red /
2M Blue
Golden Profit Electronics Ltd.
Guangdong, China
Average active
efficiency
Efficiency at low load
(10%)
No-load power
consumption
2.3 Technical specifications
Turntable
Type
Drive system Belt drive
Motor DC motor
Speed 33 1/3 RPM, 45 RPM
Turntable platter
Wow and flutter < 0.15% (33 RPM) at 3KHz
Pre-amplifier OFF
Pre-amplifier ON
5.5mV±3dB (1KHz, 5cm/sec)
300 mV±3dB (1KHz, 5cm/sec)
Output jacks RCA
Tone arm
Arm type
Effective length 224 mm
Overhang 19 mm
0 to 2.5 g
5 to 7.5 g
Cartridge
Model Ortofon 2M Red
Type Moving Magnet
47,000 ohms
USB port
Supporting interface
Windows 7 or above, or
Bluetooth
Bluetooth version 4.0
Output class Class 2
Frequency band 2.402 GHz - 2.480 GHz
Modulation method FHSS
Profile A2DP 1.3
Supported codecs SBC, aptX audio
10.0 dBm
approx. 10m
General
420 x 356 x 125 mm
Weight Approx. 3.9 kg
0 °C ~ +40 °C
Power consumption
OFF
ON
0.1W or less
1.5W or less
AC Adapter
Manufacturer’s name
and address
Shayao Chenwu Village,
Shijie Town, Dongguan,
Amplifier connection MM-input
Output voltage 5.5mV (1KHz, 5 cm/sec)
Stylus type Elliptical
Stylus tip radius r/R 8/18 μm
Tracking force range 1.6 to 2.0g (standard 1.8g)
Cartridge weight 7.2g
Headshell weight
Specifications are subject to change without notice.
© sonoro audio GmbH 2021 31
± 5 mm
Model identifier GPE006D-120050-Z
Input voltage AC 100 – 240 V
Input AC frequency 50 / 60 Hz
Output voltage DC 12.0 V
Output current 0.5 A
Output power 6.0 W
More than 78.9 %
70.0%
0.10 W or less
Page 32
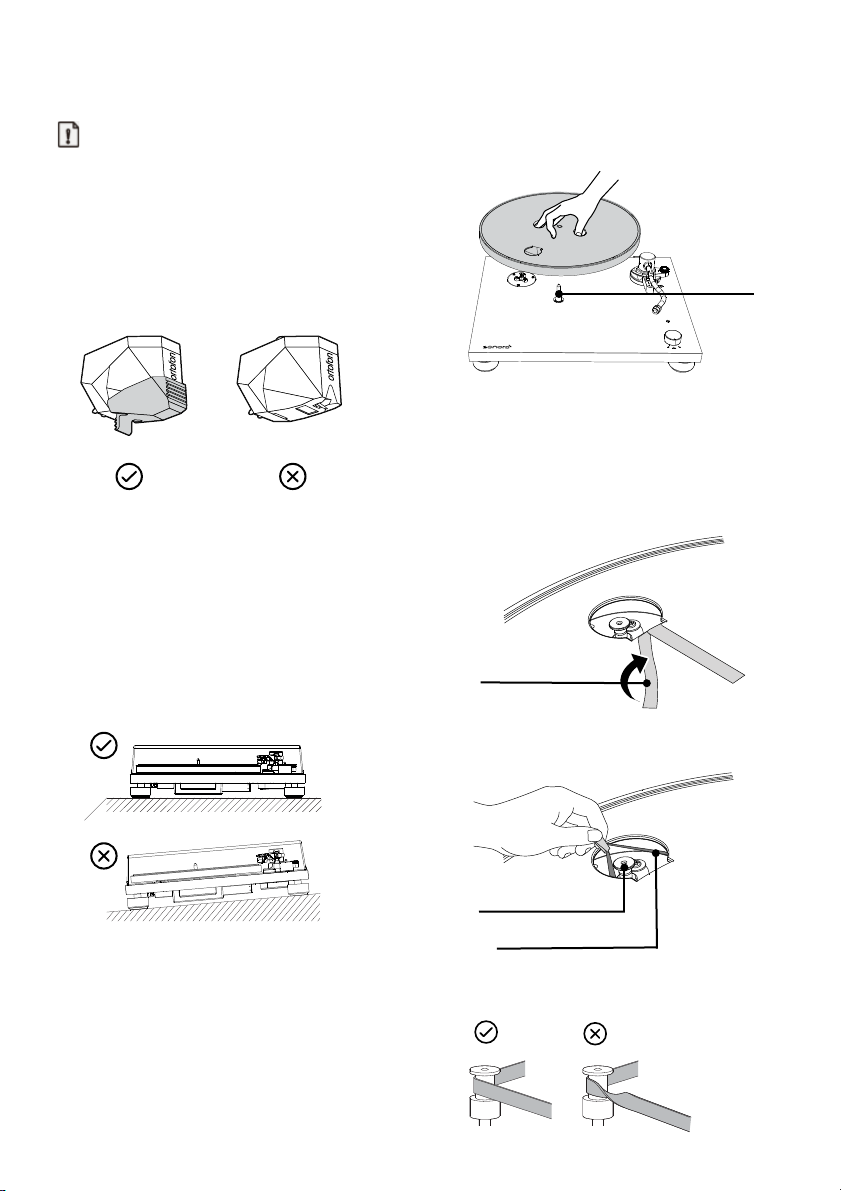
Spindle
Motor pulley
Adhesive tape
Drive belt
3. Assembling the turntable
Note:
• PLATINUM requires some assembly before
using it for the first time.
• Do not connect your turntable to a power
outlet with the AC adapter until you are
finished the assembly.
• There is a stylus protective cover which is
attached to the stylus. Keep the cover as you
assemble your turntable.
• The stylus is a high precision component. Do
not touch the stylus with your fingers, or
banging the stylus into the platter, may cause
damage to the stylus.
• Remove the cable tie used to secure the
tonearm at the time of delivery.
1. Placing PLATINUM
• Place it on a flat surface so that the record can
be accurately traced.
2. Placing the platter
• Hold the platter firmly.
• Place the platter on the spindle gently.
• Turn the platter to the position where you can
see the motor pulley through the circle hole
on the platter.
3. Attaching the drive belt
• Peel off the adhesive tape, pull and hold the
red ribbon.
• Then, hook the drive belt around the motor
pulley.
• Be careful not to let the drive belt become
twisted.
32 © sonoro audio GmbH 2021
Page 33
GB
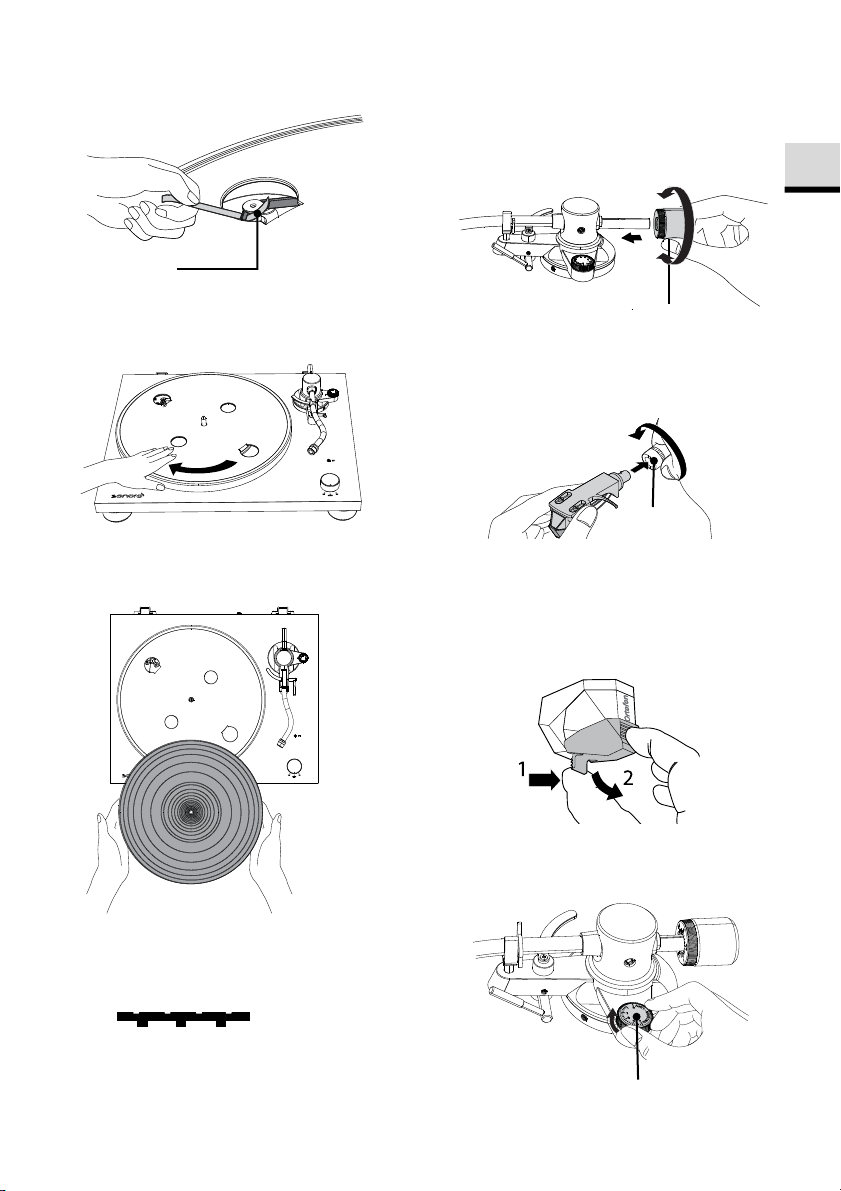
Lock nut
Counterweight
Ribbon
Anti-skating dial
• Remove the red ribbon from the drive belt.
• Rotate the turntable several times to make
sure that the drive belt is secure and rotating
smoothly.
4. Placing the mat
• Place the mat of the platter on the platter.
• The mat has a top and a bottom. The side
with the ridged concentric circles should be
placed down.
Top
Bottom
5. Installing the counterweight
• Place the counterweight over the end of
tonearm, and slowly turn it anti-clockwise
while gently pushing it.
6. Installing the headshell
• Insert the headshell on the end of tonearm.
• Turn the lock nut in the clockwise direction to
secure the headshell.
7. Removing the stylus protective cover
• Hold the stylus protective cover from its front
and back, and while pushing the latch on the
rear part.
• Slowly tile the cover downward.
8. Setting the tonearm balance
• Set the anti-skating dial to zero.
© sonoro audio GmbH 2021 33
Page 34
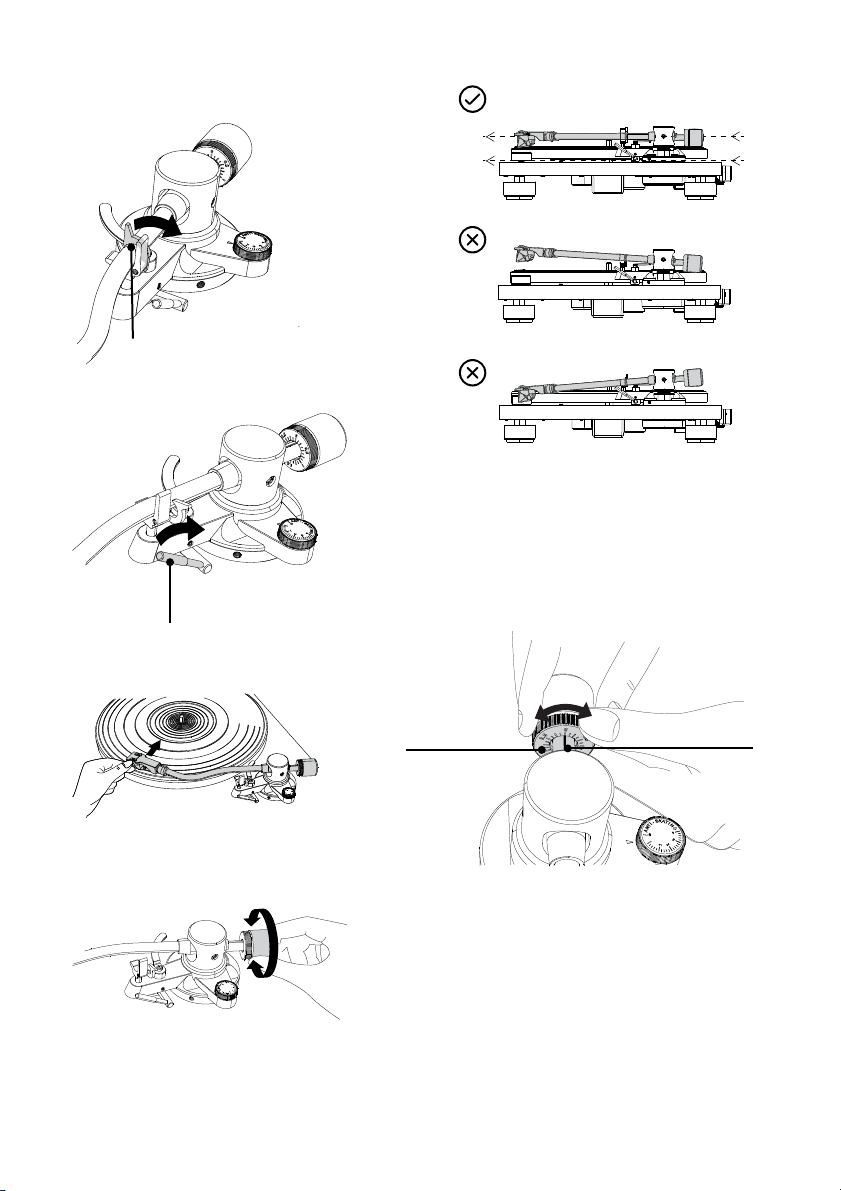
Tonearm rest clamp
Tonearm lifter
Center line
Tracking force
gauge ring
• Release the tonearm rest clamp.
• Raise the tonearm lifter.
• Return the tonearm to its original position.
• Lock the tonearm rest clamp.
9. Setting the tracking force
• Turn the tracking force gauge ring so that the
• Holding the finger lift of the headshell, move
the tonearm over the turntable.
• Lower the tonearm lifter.
• Adjust the counterweight so that the tonearm
is floating parallel to the turntable.
center line aligns with 0 on the scale.
• Only turn the ring. Be careful not to let the
counterweight turn.
• Turn the counterweight and the tracking force
gauge ring together so that the tracking force
gauge ring scale matches the stylus pressure
specified for the cartridge.
34 © sonoro audio GmbH 2021
Page 35
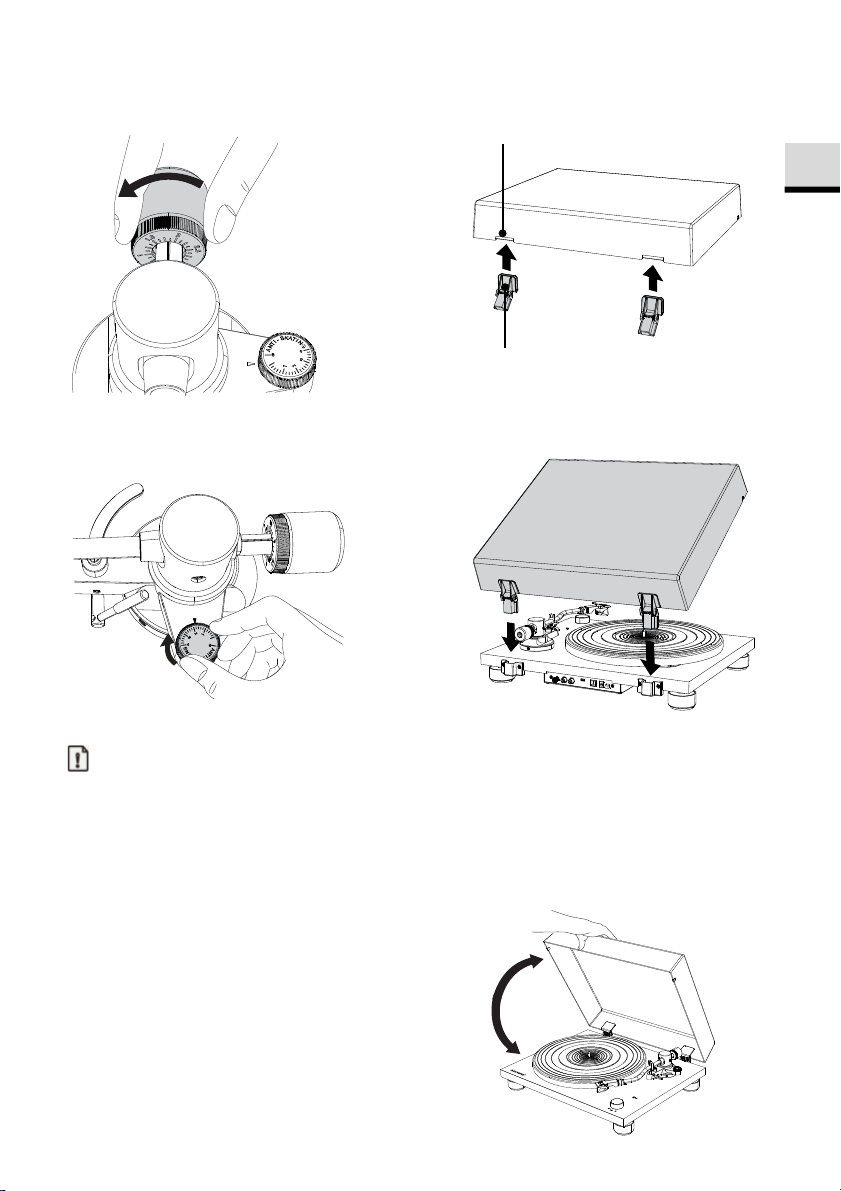
GB
Dust cover hinge
Hinge holder
• The recommended tracking force of the
included cartridge is 1.8g.
• Insert the dust cover hinges completely into
the hinge holders on the dust cover.
10. Setting the anti-skating dial
• Set the anti-skating value is the same as the
• Align the dust cover hinger with the hinger
holder on the rear of the turntable and push
in the dust cover.
tracking force gauge range value.
11. Installing the dust cover
Note:
• The dust cover is designed to protect the
turntable sensitive components. When the
product is not in use, it should remain close.
• Do not open or close it when a record is
playing.
• Be careful not to pinch your finger when
opening and closing the dust cover
12. Opening and closing the dust cover
Opening
• Hold the front edge of the dust cover and
gently lift it open completely until it stops.
• The dust cover will stay open in its positions.
Closing
• Gently lower the dust cover until it is closed.
• Do not place anything on the dust cover.
© sonoro audio GmbH 2021 35
Page 36
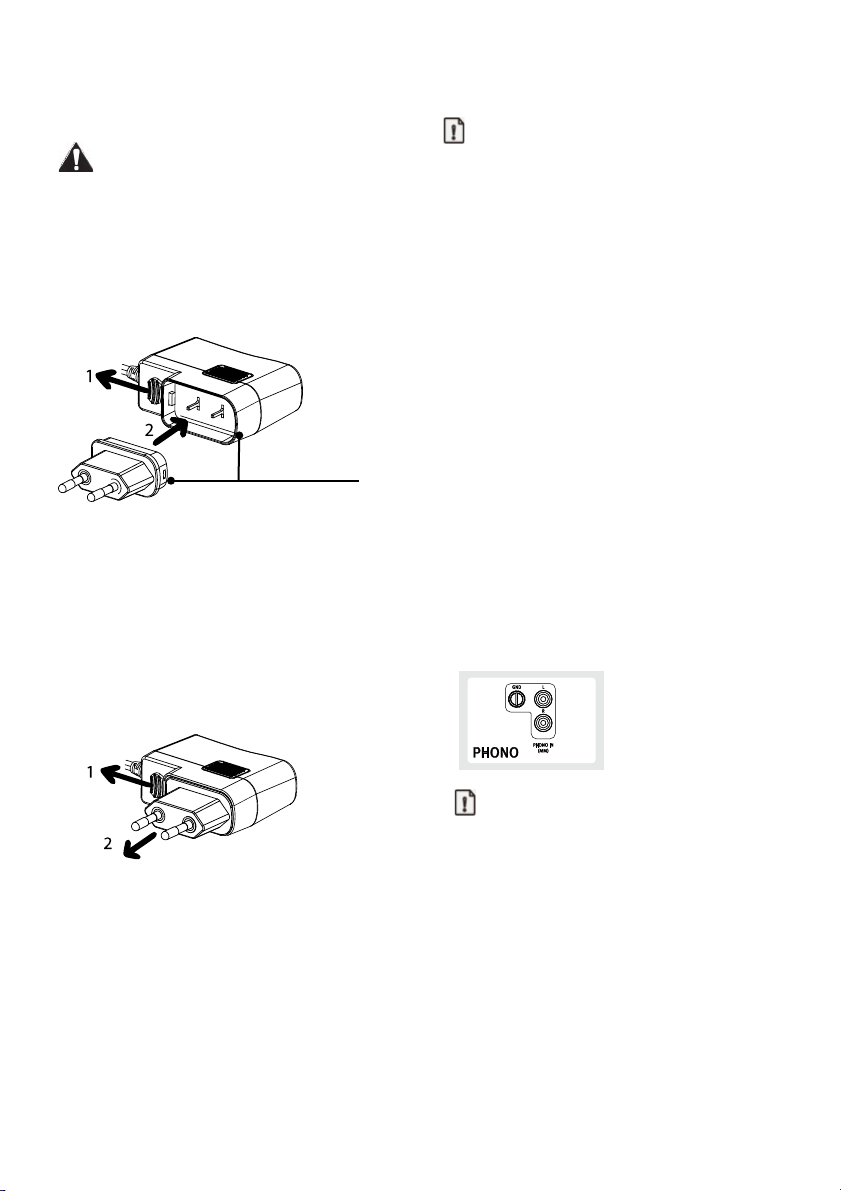
Round head
13. Attaching and detaching the AC
adapter’s power plug
WARNING!
Risk of electric shock!
• Do not insert power plug alone to the AC
inlet socket.
• Make sure plug and adapter are locked
thoroughly.
Attaching the power plug
4. Connecting PLATINUM
Note:
• The mounted Ortofon 2M RED cartridge is a
MM cartridge, so please set your audio
system to MM (not MC).
• Make sure the audio system / amplifier you
connected to PLATINUM is switched off and
its volume set low.
• Before turning on your audio system and
PLATINUM, make sure all connections are
made properly, and you choose the right preamplifier setting.
• Failures in doing so may lead into loud hum
noise which may damage your audio system
or speakers.
1. Connecting to an audio system /
amplifier
• Pull down the clip and hold it.
• Match the round corner of plug to the
adapter.
• Insert the desired power plug vertically into
the contact pins of the adapter until it
completely pushes inward.
• Release the clip and lock the power adapter
in place.
• Connect your audio system and PLATINUM
by using the delivered RCA cable.
• If your audio system has a built-in phono
amplifier, there most probably will be a
grounding terminal. Please screw the
grounding cables on both sides: Your audio
system and PLATINUM. As well plug the RCA
plugs into the phono input of your audio
system and the output of PLATINUM.
Detaching the power plug
• Pull down the clip and hold it.
• Pull the power plug vertically out of the power
supply.
36 © sonoro audio GmbH 2021
Note:
• The ground terminal of PLATINUM is not a
safety ground connection.
• Depending on the amplifier, connecting the
ground terminal might have the reverse effect
of increasing noise. In this case, it is not
necessary to connect the ground terminal.
• It is not recommended to connect
PLATINUM’s phono ground to MAESTRO’s
phono ground plate.
Page 37
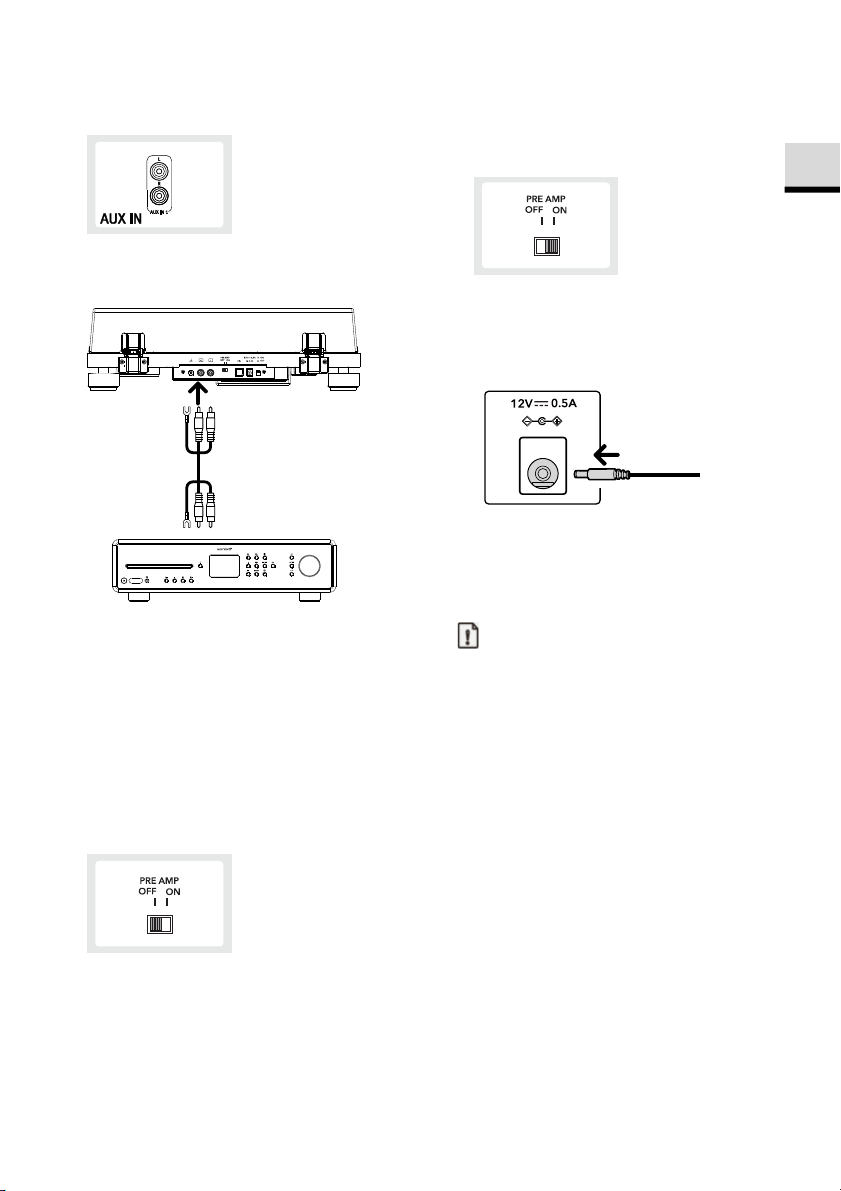
GB
USB
• If your audio system has no phono input, use
a free Aux-in RCA input.
• The white plug is for the left channel, the red
plug for the right channel.
• Set the switch to
If your audio system / amplifier has no phono
input, you can use the build-in pre-amplifier
of PLATINUM by switching it ON.
3. Connecting the AC adapter
ON position.
• After completing all other connections,
connect the included AC adapter to the DC
input socket.
• Insert the power supply into an AC inlet
socket.
2. Setting pre-amplifier selector switch
Switch the pre-amplifier switch on the back side
of PLATINUM according to the features of your
audio system / amplifier PLATINUM is
connected to:
• Set the switch to
OFF position.
If your audio system / amplifier has a PHONO
input jack, PLATINUM can be connected
directly to it, bypassing it’s built-in preamplifier by switching it
OFF.
5. Playing a record
Note:
• Before you play a record, turn down the audio
device’s volume. The loud, crackling noise
made by the tone arm descending and the
stylus coming into contact with the record
could damage the speakers or audio device.
Wait until the stylus has completely
descended, and then adjust the volume.
• Even new records may produce a crackling
noise when you play them. Please note that
this noise is a characteristic of playing records.
• Place only one record on the platter at a time.
• Close the turntable cover during record
playback to avoid dust.
• Do not stop turntable rotation during
playback.
• During record playback, feedback could
occur if the volume is too loud. If this
happens, lower the volume of the amplifier.
© sonoro audio GmbH 2021 37
Page 38
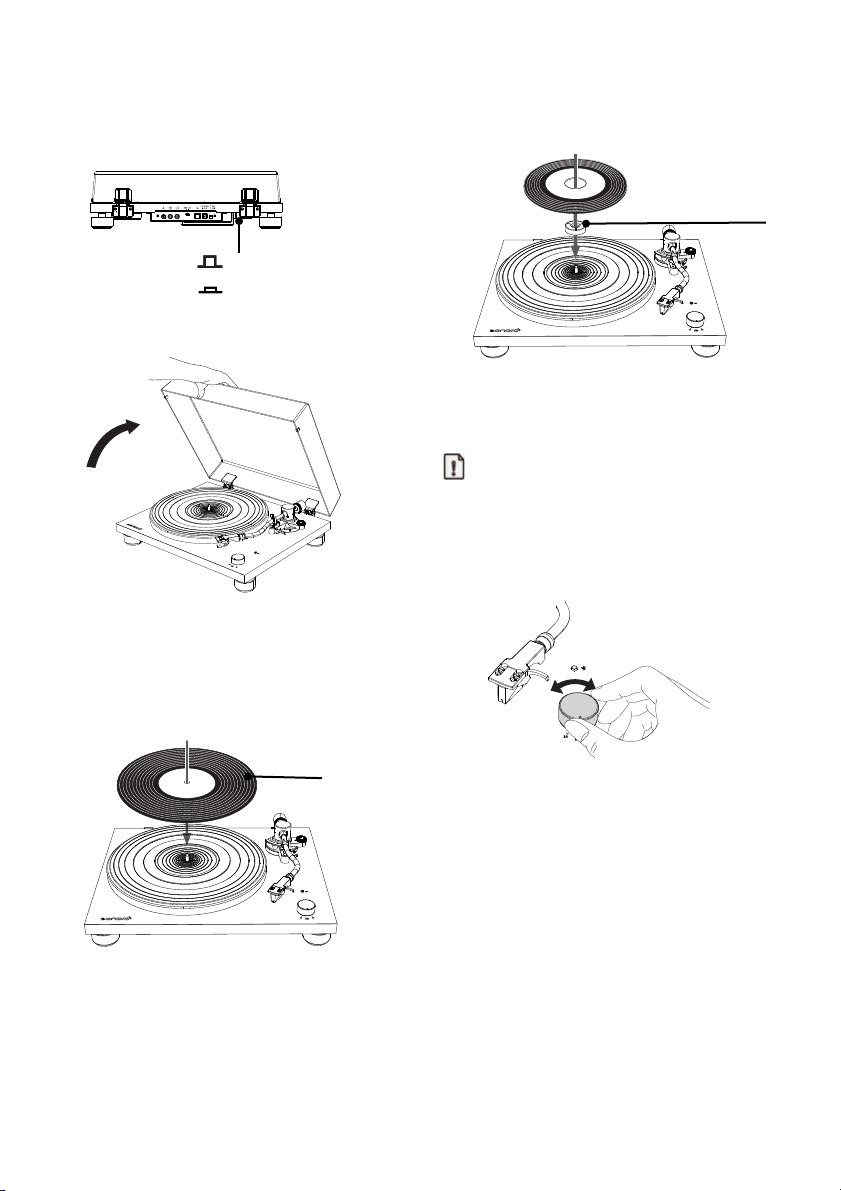
USB
PRE AMP
OFF
ON
Record
45-RPM adapter
1. Switch on the turntable.
• Press the ON/OFF button on the back of the
turntable to turn it on.
2. Open the dust cover gently.
•
To play 7-inch (17cm) records (EP records),
place the supplied 45 RPM adapter on the
spindle.
5. Use the Speed / STOP rotatory switch
knob
Note:
• The rotation speed is usually printed on the
center label of the record or the record jacket.
• The rotation speed can be set to 33 or 45
RPM. Select the rotation speed appropriate
3. Remove the stylus protective cover.
for the record.
4. Place a record on the platter
• Place the record on the mat of the platter
so that the center hole aligns with the
spindle.
38 © sonoro audio GmbH 2021
• When the Speed / STOP rotatory switch knob
is set to 33 or 45 position, the platter will start
rotating.
6. Release the tonearm rest clamp.
7. Raise the tonearm lifter.
Page 39
GB
Bluetooth indicator /
Pairing button
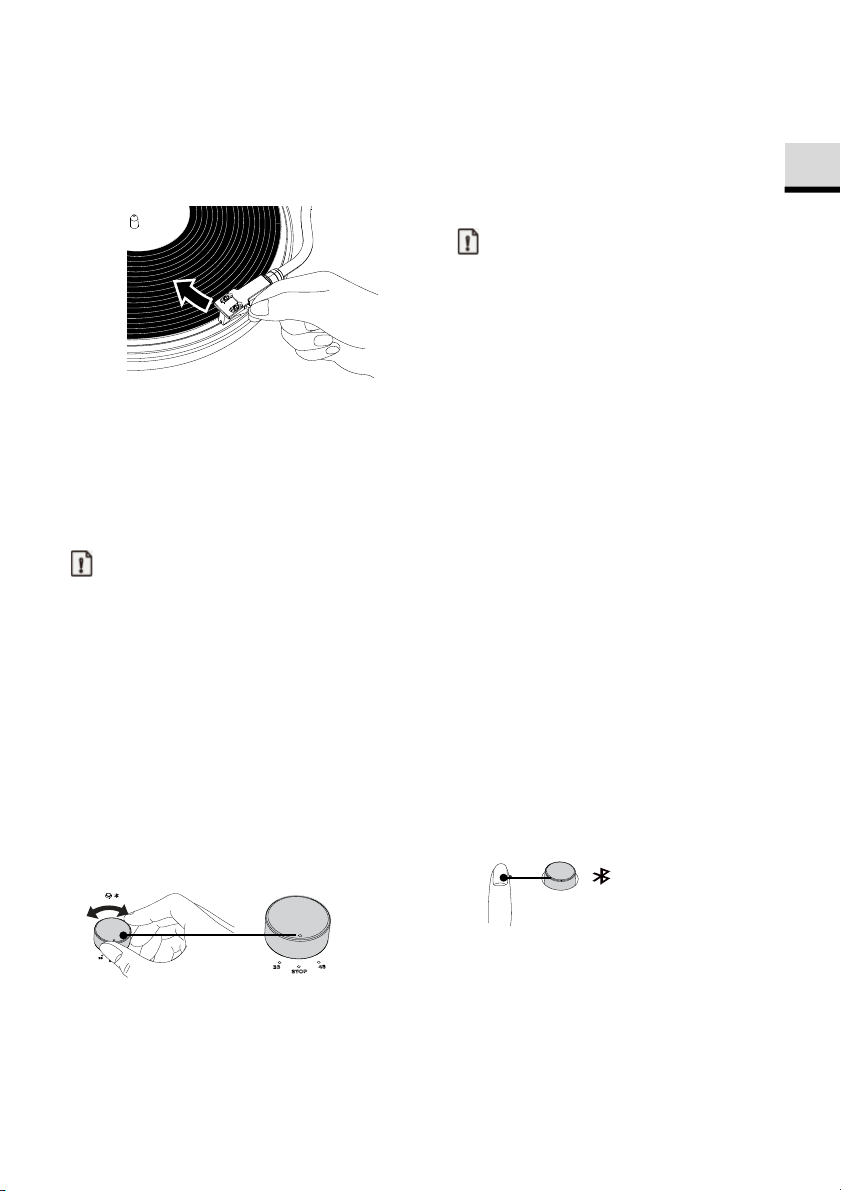
8. Holding the finger lift of the headshell,
move the tone arm over the edges of the
record or the track where you want to
start playback.
9. Lower the tonearm lifter.
• Lower the tone arm slowly until the stylus
touches the record and playback begins.
10. Gently close the dust cover.
6. When playback finishes
Note:
• PLATINUM is a manual record player. It will
not automatically stop!
• Please always lift the tonearm at the end of a
record to prevent damage of stylus and
record.
1. Raise the tonearm lifter.
2. Return the tonearm
• Holding the finger lift of the headshell, move
• Lock the tonearm rest clamp.
3. Rotate the Speed / STOP rotatory switch
the tone arm toward its original position.
knob to
STOP position.
7. Connecting with Bluetooth device
PLATINUM can connect to Bluetooth-enabled
devices (e.g. Bluetooth speakers and Bluetooth
headphone).
Note:
• Operating distance is within a range of
approximately 10 meters (30 feet).
• Refer to the operation manual of the
Bluetooth devices for information how to use
it.
• Pairing might take some time depending on
the connected device.
• If there are playback devices, which support
Bluetooth wireless technology nearby, that
have the Bluetooth function enabled, but
some of them are not the devices with which
you want to pair, disable their Bluetooth
function and try pairing again.
• Do not connect to Bluetooth speakers or
headphones for which you cannot adjust the
volume. Audio tracks may be played at very
loud volumes.
• You cannot pair the turntable with
smartphones, TVs, or computers, etc.
1. First time pairing Bluetooth device
• Press the BT button on the turntable to start
Bluetooth connection mode. The indicator
will become blue and blink slowly.
• Press the BT button again for at least two
seconds to start pairing mode. The blue
indicator will flash rapidly.
• After turntable enters pairing mode, put the
• When the turntable stops, the platter will not
rotate.
• Press the ON/OFF button on the back of the
turntable to turn it off if no longer to use.
© sonoro audio GmbH 2021 39
Bluetooth device into paring mode.
• Pairing is automatically done. When the
turntable and the Bluetooth device are
connected, the indicator will stay lit without
flashing.
Page 40
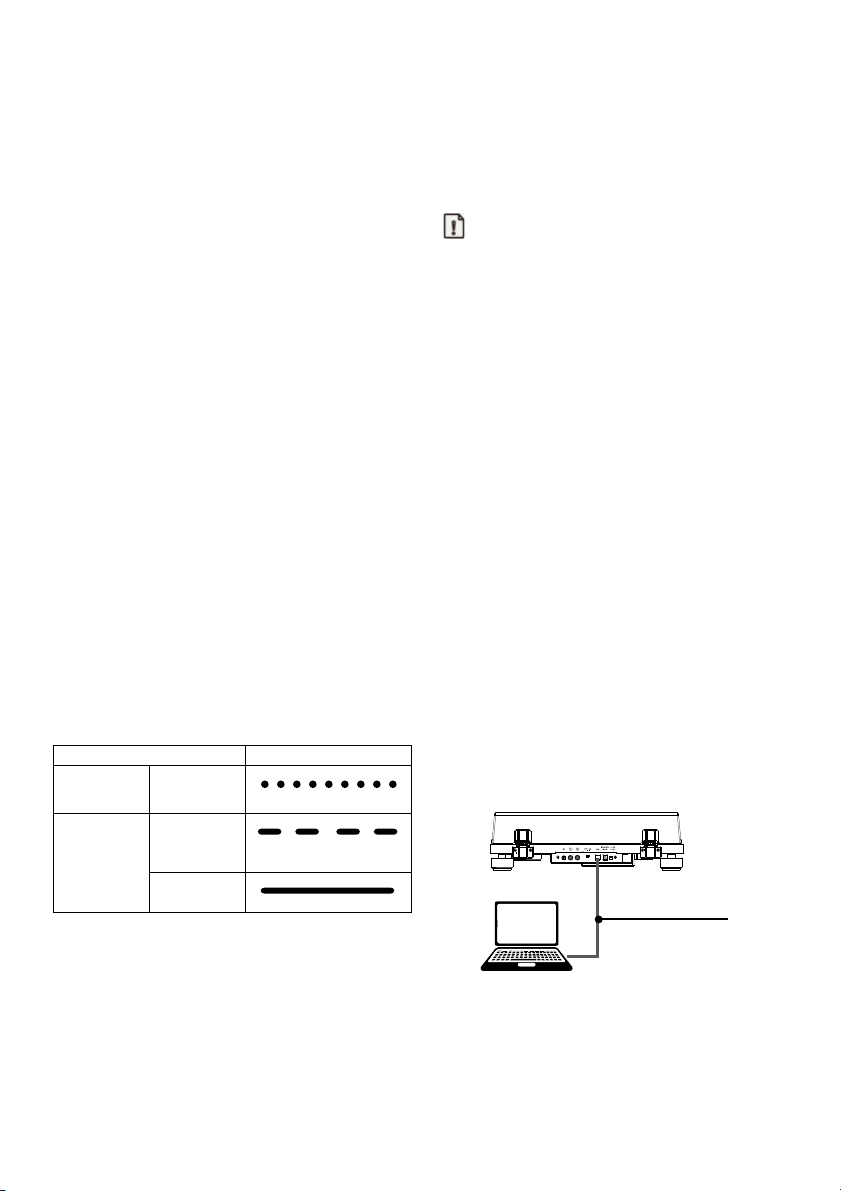
Operating status
BT indicator (blue)
Waiting
connected
Lit
USB
PRE AMP
USB cable
2. Connecting the paired Bluetooth device
PLATINUM can register information for up to
8 paired devices, you do not have to pair the
next or subsequent times you connect the
device to the turntable.
• Press the BT button on the turntable to start
connection mode. The indicator will become
blue and blink slowly.
• Make the Bluetooth device ready to connect.
• Pairing is automatically done. When the
turntable and the Bluetooth device are
connected, the pairing lamp will stay lit
without flashing.
3. Disconnecting the paired Bluetooth device
• Press the BT button for at least 2 seconds to
disconnect the paired Bluetooth device to
turntable. The indicator will become blue and
flash rapidly.
• Press the BT button in Bluetooth
connection mode, it will switch off the
Bluetooth function.
• If no Bluetooth device is found for five
minutes, Bluetooth indicator will become
unlit.
• Below is the BT indicator status for
different operating status.
Pairing
Connection
Searching
for device
to be
Connected
Fast blinking
Slow blinking
8. Connecting to a computer
The sound of a record can be digitally recorded
on a computer by using the provided USB cable
to connect the turntable (type B) to a USB port
(type A) of the computer.
Note:
• The USB output signals can be used only for
recording, not for playback.
• The turntable will run with the standard
Windows or Mac driver so there is no need to
install a special driver.
• The computer will automatically detect the
turntable’s USB port and identify as
Audio CODEC.
• You must first install software that can be used
for audio recording on the computer.
• You may purchase the audio recording
software that you prefer separately or
download free software such as Audacity
(https://www.audacityteam.org/), from the
Internet.
• If the application does not work successfully,
please contact your computer administrator
for help.
• When recording with a computer, do not
disconnect the USB cable and put the
turntable into standby.
• The recorded music is limited to private use
only. Use of the music beyond this limit
requires permission of the copyright holders.
1. Connect a computer to your turntable
with provided USB cable.
40 © sonoro audio GmbH 2021
2. Rotate the Speed rotatory switch knob to
start playing of a record.
3. Use your recording application to record
audio tracks onto the computer.
• For detail instructions on using the
application and transferring audio tracks,
refer to the application user guide.
USB
Page 41
GB
9. Maintenance
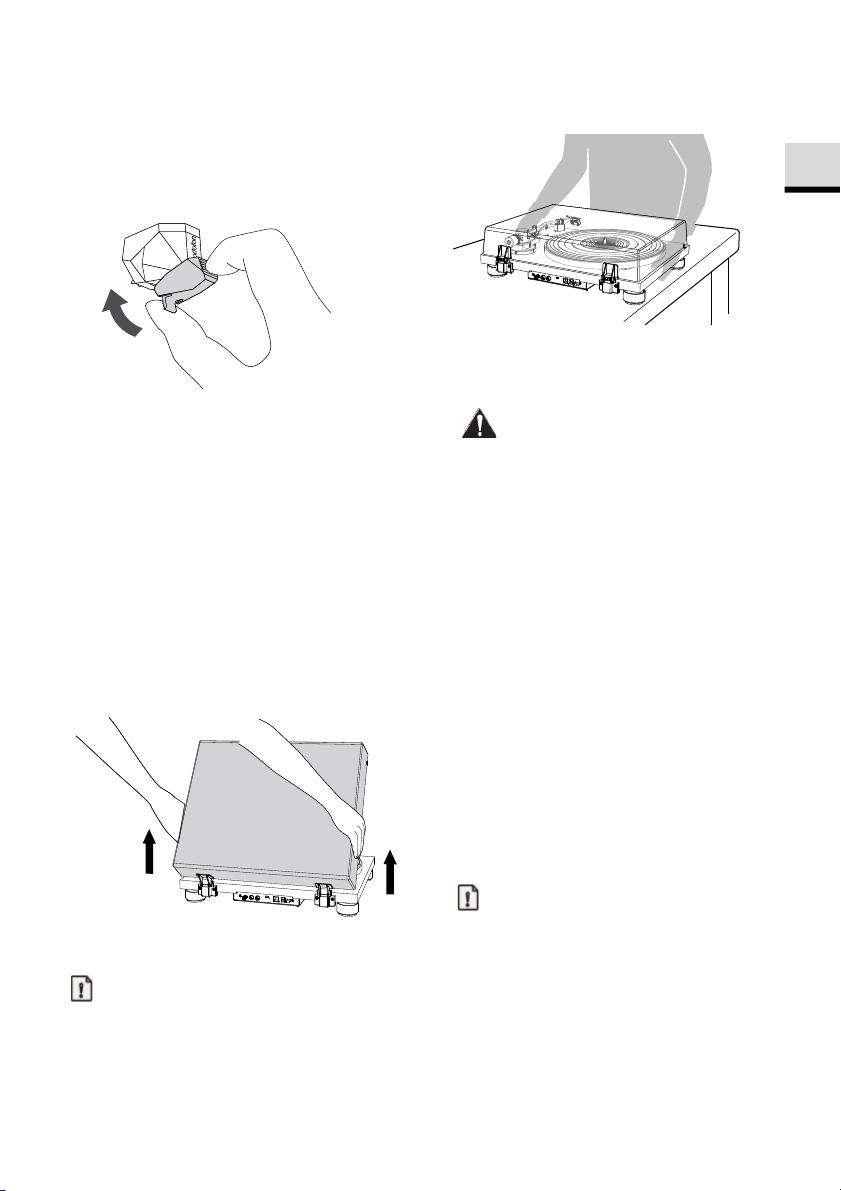
1. Attaching the stylus protective cover
• Hold the stylus protective cover from it front
and back, align with the front of the cartridge,
and slowly lift it.
• When you move the turntable, make sure that
you firmly hold the bottom of the turntable.
• Re-adjust the tracking force and the anti-
skating force if necessary.
2. Cleaning turntable
• Use a dry, soft cloth to clean the dust cover
and the turntable body.
• When it is hard to wipe off the soil, use a
slightly damp cloth and then dry turntable
with a soft and dry cloth.
• Do not use any chemical solution such as
alcohol, benzine, or paint thinner, that
damages the finish.
3. Remove the dust cover
• To remove the dust cover from the turntable,
fully open the dust cover, grasp both sides
near the bottom of the cover, and then gently
pull it out in the upward direction.
5. Transport or shipping turntable
Precaution:
• In case the turntable needs to be returned for
repair or transport to other places, original
packing provides a better protection for the
product during transportation and handling.
• If you lose the original packing, please use a
sufficiently stable and protective packing that
prevents damage to the PLATINUM.
• Take off the dust cover and carefully wrap
them.
• Take off the platter and mat and carefully
wrap them.
• Attach the stylus cover and remove the
headshell and counterweight from the
tonearm and carefully wrap them.
• Lock the tonearm rest clamp and tape it in
place.
• Carefully wrap the turntable in a bubble wrap
or similar soft and protecting material.
6. Cleaning the tip of the stylus
Note:
4. Moving turntable
Note:
• Lock the tonearm rest clamp.
• Switch off the turntable and unplug the AC
adapter.
• Disconnect all the connecting cables from the
turntable.
• Attach the stylus cover.
• Record styluses are precision parts, so handle
them carefully to avoid bending or damaging
their tips. If a stylus becomes bent or
damaged, it might not be able to follow the
audio groove precisely and could damage
records or cause another malfunction.
• Do not rub the stylus tip with thinner or other
chemicals.
© sonoro audio GmbH 2021 41
Page 42
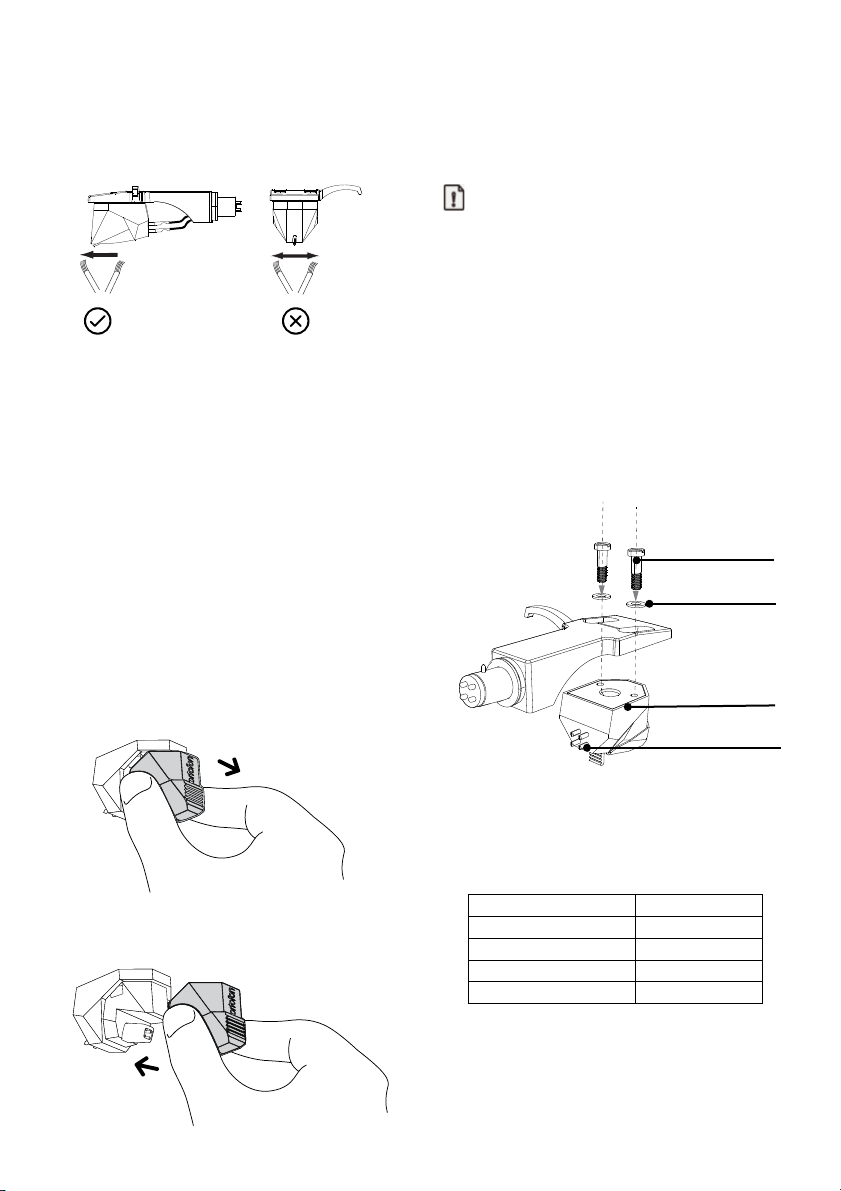
Signal
Color
Left channel +
White
Left channel -
Blue
Right channel +
Red
Right channel -
Green
Screw
Plastic washer
Cartridge
Shell leads
• Use a small brush (not included) if the stylus
tip is considerably dirty. Clean the stylus tip by
moving the brush from the rear to the front of
the stylus tip.
• The stylus assembly should be fully seated
into the cartridge.
• Mount the headshell onto the tonearm.
8. Replacing the cartridge
Note:
• The cartridge installed in this unit is
equivalent to Ortofon 2M Red.
• If you use another cartridge than Ortofon 2M
Red, you might need to adjust overhang and
7. Replacing the stylus
If the tip of the stylus become worn, not only will
it worsen the sound quality, it could also
damage records. After about 1000 hours of
playback time, replace the stylus with one that
we specify.
• Please use Ortofon 2M RED / 2M Blue
replacement stylus.
• Follow the replacement instructions in the
manual of the replacement stylus.
To remove old stylus
• Keep attaching the stylus protective cover on
the cartridge.
• Release the headshell from the tonearm.
• Hold the cartridge in one hand, grasp the
plastic stylus housing with thumb and
forefinger, and pull away from the cartridge.
weight, as well the height of your tonearm. If
in doubt, please ask your dealer.
• Keep attaching the stylus protective cover on
the cartridge.
• First remove the headshell from the tonearm.
• Use a non-metallic slotted screwdriver to
remove the installation screws, washers and,
and then remove the cartridge from the
headshell.
• Refer to the user manual for new cartridge for
mounting instruction and connecting to the
shell leads.
• The signals and colors of the shell leads are
shown below.
Installing a new replacement stylus
• To install replacement stylus, insert the new
stylus assembly into the cartridge.
• Use a non-metallic slotted screwdriver to
tighten the screws in both places, and then
adjust the overhang.
42 © sonoro audio GmbH 2021
Page 43
GB
52.8mm
Drive belt
Motor pulley
High adjustment
Screw hole
Tonearm base
Pedestal
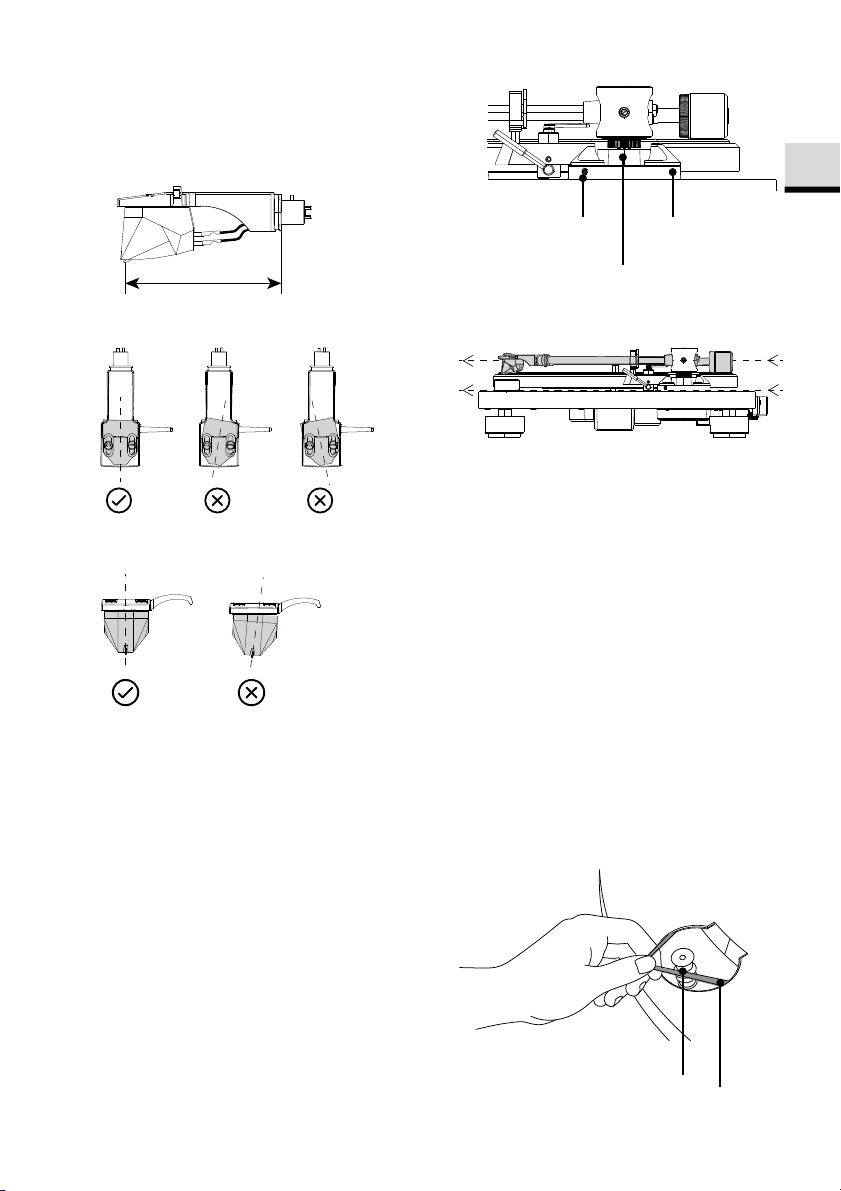
9. Adjust the overhang
• Move the cartridge to adjust the overhang in
such a way the stylus tip is at 52.8mm from
the headshell mounting end.
• The cartridge should be parallel on the
headshell when viewed from the top.
• Hold the tonearm base, and adjust the height
to make the tonearm level.
• The cartridge should also not tilt when viewed
from the side.
• After the adjustments are complete, tighten
the screws securely.
• Attach the headshell to the tonearm.
10. Adjust the tonearm height
• Place a record on the turntable.
• Place the stylus tip on a record and check that
the tonearm is parallel to the record.
• Insert the 2mm hex wrench (not included) into
the height adjustment screw hole and turn it
counterclockwise to unlock the tonearm base.
• Turn the hex wrench clockwise to lock the
tonearm base.
• Adjust the tonearm balance and tracking
force.
11. Replacing the drive belt
The drive belt will wear or may even break over
time. In such case, replace it with a new one. To
obtain a spare drive belt, contact your dealer or
the customer support.
• Turn off your turntable the connected audio
device and unplug the AC adapter from the
AC inlet.
• Remove the mat of the platter.
• Turn the platter to the position where you can
see the motor pulley through the circle hole
on the platter.
• Unhook the drive belt from the motor pulley.
© sonoro audio GmbH 2021 43
Page 44
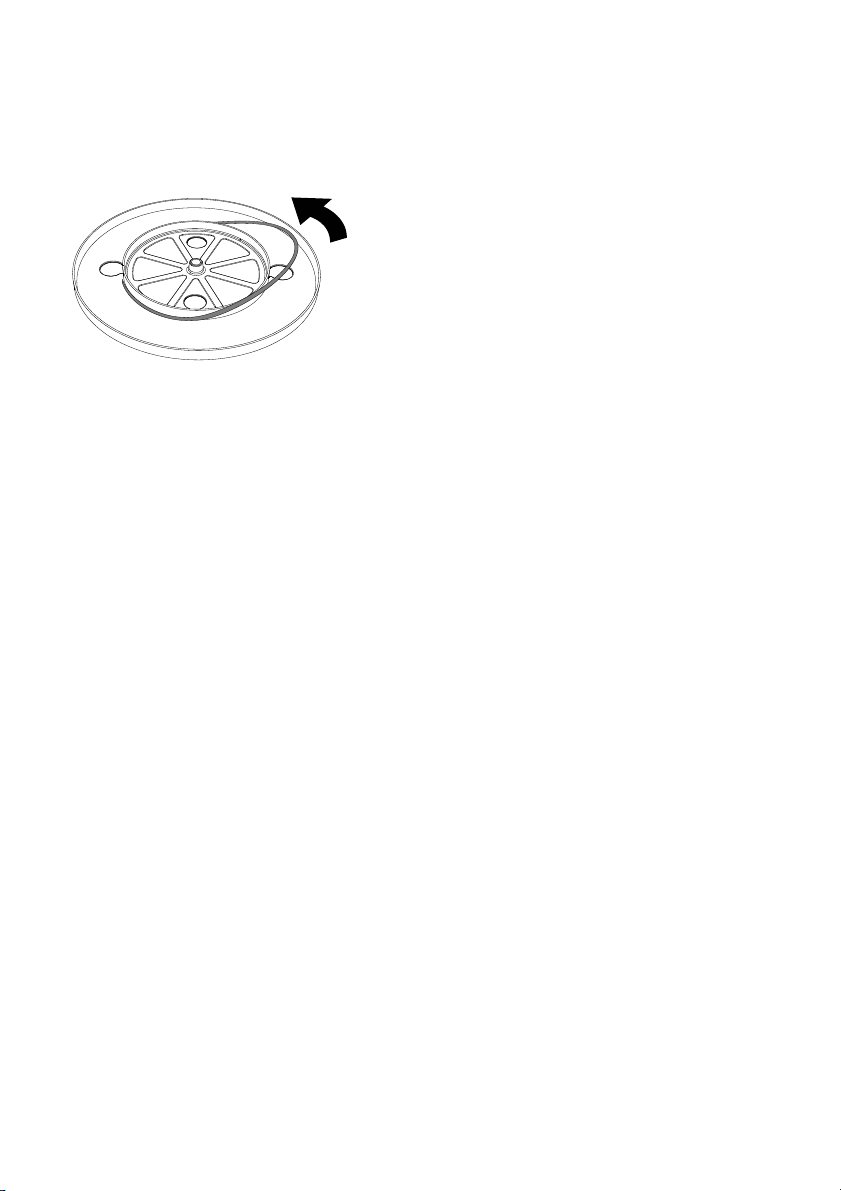
• Put your finger and thumb into the platter’s
round holes to hold the platter and remove
the platter.
• Turn the platter upside down and remove the
drive belt.
• Wind a new drive belt around the platter
while keeping it untwisted.
• Follow the steps in “Attaching the drive belt”
to finish the assembly.
44 © sonoro audio GmbH 2021
Page 45

GB
Malfunction
Possible cause
Solution
The platter does not spin.
The AC adapter is not
Plug the AC adapter into
Turntable does not switch
Check the power switch in
The platter spins, but there
Cartridge’s protective cover
Remove the cartridge’s
Tonearm is in lift position.
Lower the tonearm.
The stylus is not placed
Check the cartridge and
OFF
switch to the ON position.
The tracking force is set too
Adjust the tracking force.
The stylus skips.
The tracking force is set too
Adjust the tracking force.
Improperly set the anti-
Set the anti-skating value
tracking force.
The record is warped.
Change the record.
The record is scratched.
Change the record.
There is noise when the
There is dust on the
Clean the stylus’s tip with a
10. Troubleshooting
Malfunctions can occur with any electrical equipment. This is not necessarily due to a
defect. As such, you should check the following table to see if you can eliminate the
problem yourself.
is no sound or the volume is
not loud enough.
properly connected.
on.
is still close.
Wrong setting and input for
the connected equipment
(amplifier, etc.)
The stylus is damaged. Check the stylus and
correctly on the cartridge.
Wrong setting for the PRE
AMP selector switch.
the AC inlet socket.
rear side of turntable and it
should be in pressed down
position.
protective cover.
Check the setting for the
connected equipment are
correct.
replace it, if necessary
adjust it, if necessary.
Select the correct setting for
the pre-amplifier.
If using an amplifier with a
PHONO input jack, set this
switch to the
If connecting to the AUX
jack of an amplifier, set this
position.
record is playing.
© sonoro audio GmbH 2021 45
heavy.
light or too heavy.
skating value.
cartridge’s stylus tip.
same for the cartridge
commercially brush and
stylus cleaner. .
Page 46

Malfunction
Possible cause
Solution
There is howling sound.
The turntable is picking up
Decrease the vibrations or
There is humming noise
The ground terminal is not
Check the ground terminal,
connect.
Depending on the audio
Disconnect the ground
It is not possible to connect
It is not supporting.
Connect with a Bluetooth
The sound when the record
is playing either too fast or
too slow.
during playback.
Bluetooth connection is not
possible with the Bluetooth
devices
with smartphone.
excessive vibrations from
the floor, surface of the
walls, or nearby speakers.
The tuning speed is
incorrect set.
properly connected.
system, connecting to the
ground may lead to
humming noise.
Bluetooth device has not
paired with turntable.
put the turntable on a
surface that is not subject to
the effects of vibration.
Rotate the tuning speed
knob to correct speed for
the type of record being
played.
and it should properly
terminal.
Turn off and on both
Bluetooth device and
turntable and try pairing
again.
speaker or headphone.
11. Warranty
When submitting warranty claims, the following applies without restricting your legal rights:
•
Warranty claims can only be asserted within a period of max. 2 years (1 year in North
America and Australia), calculated from the date of purchase.
•
sonoro audio GmbH shall, at its own discretion, repair or replace PLATINUM free of
charge any defects caused by material or manufacturing defects within the warranty
period.
•
In case of a complaint, please contact our customer service department. You can find
contact details under “Contact data” or at www.sonoro.de.
•
No new warranty period begins following repair or replacement of PLATINUM. The
warranty period of 2 years (1 year in North America and Australia) from date of purchase
remains applicable.
•
Excluded from the warranty is damage caused by improper use, normal wear and tear,
as well as defects which only minimally affect the value or usability of PLATINUM. The
warranty also expires in case of any mo
center.
46 © sonoro audio GmbH 2021
difications not made by our authorized service
Page 47

sonoro.de
Page 48
PLATINUM
SO-2000
PLATINE VINYLE
Mode d'emploi
48 © sonoro audio GmbH 2021
Page 49

FR
Table des matières
1. Introduction ............................................................................................................... 50
2. Découvrez votre PLATINUM .................................................................................... 50
2.1 Contenu à la livraison ......................................................................................................... 50
2.2 Éléments de commande et branchements ..................................................................... 51
2.3 Données techniques .......................................................................................................... 53
3. Assemblage de la platine ........................................................................................ 54
4. Branchement de votre PLATINUM.......................................................................... 58
5. Lecture d'un enregistrement ................................................................................... 59
6. Une fois la lecture terminée .................................................................................... 61
7. Connexion à un appareil Bluetooth ....................................................................... 61
8. Connexion à un ordinateu ....................................................................................... 62
9. Entretien .................................................................................................................... 63
10. Dépannage ............................................................................................................... 67
11. Garantie ..................................................................................................................... 69
Le mot et les logos Bluetooth® sont des marques déposées propriétés de Bluetooth SIG, Inc. et toute
utilisation de ces marques par sonoro audio GmbH est fait sous licence. Les autres marques de
commerce appartiennent à leurs propriétaires respectifs.
Qualcomm aptX est un produit de Qualcomm Technologies International, Ltd. Qualcomm est une
marque de commerce de Qualcomm Incorporated, deposee aux Etats-Unis et dans d’autres pays.
aptX est une marque de commerce de Qualcomm Technologies International, Ltd., deposee aux Etats
Unis et dans d’autres pays.
© sonoro audio GmbH 2021 49
Page 50
Mode d'emploi
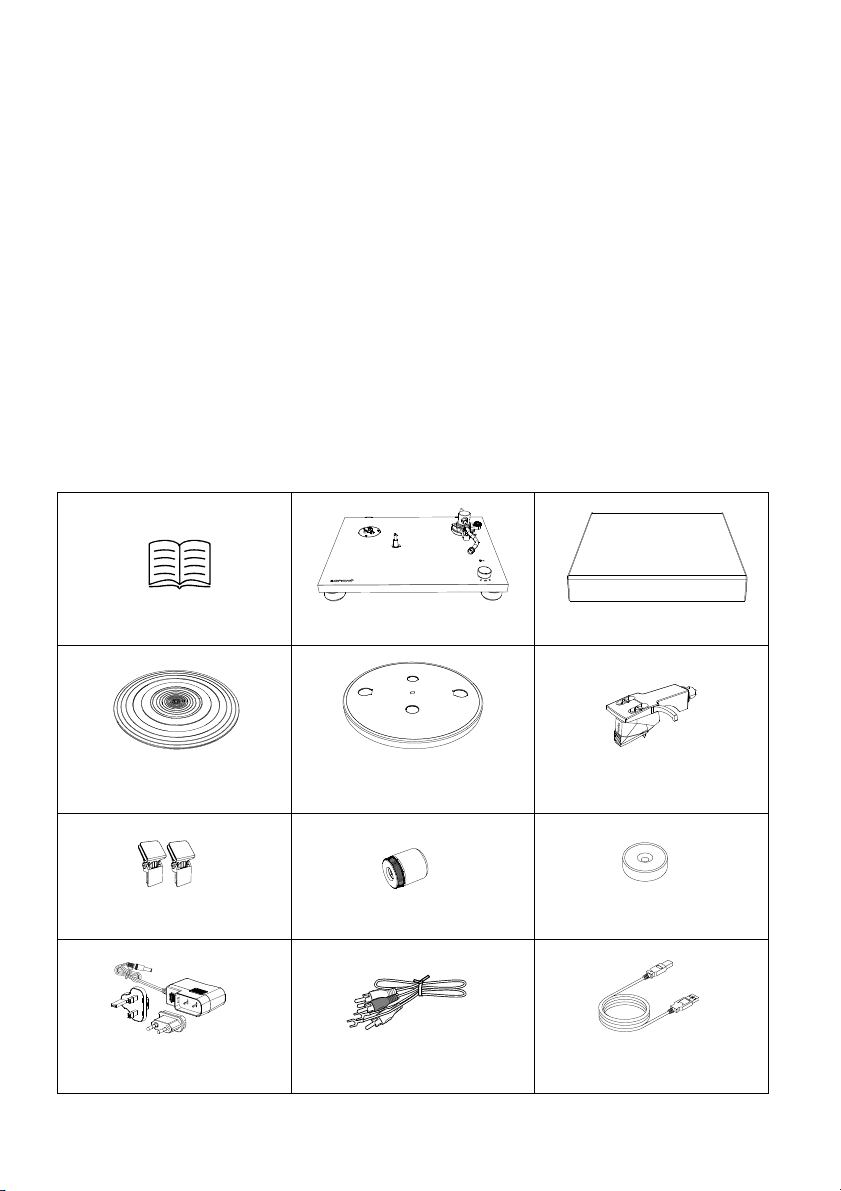
Platine
Couvercle anti-poussière
Couvre-plateau
Plateau et courroie
d'entraînement
Coque porte-cellule avec
cellule
Charnières pour le couvercle
de protection
Contrepoids
Adaptateur 45 tours
(adaptateur single de 7 po)
Bloc d'alimentation avec
adaptateur UE et UK
Câble RCA
Câble USB
1. Introduction
Merci d'avoir acheté PLATINUM. Ce mode d'emploi contient toutes les informations
nécessaires à une utilisation sure et sans problème de votre PLATINUM.
Il incombe à l'utilisateur de s'assurer que la platine est positionnée, branchée et utilisée en
toute sécurité. Les images de ce mode d'emploi sont destinées à illustrer les mesures
nécessaires à l'utilisation de votre PLATINUM.
PLATINUM est réservée à un usage personnel. Elle n'est pas destinée à un usage commercial.
Profitez bien de votre PLATINUM !
2. Découvrez votre PLATINUM
2.1 Contenu à la livraison
Vérifiez que les éléments suivants sont bien inclus.
50 © sonoro audio GmbH 2021
Page 51
FR
2.2 Éléments de commande et branchements
Vue en plan
Axe
Couvre-plateau
Plateau
Support de charnière pour le couvercle
anti-poussière
Contrepoids
Échelle de réglage
Échelle anti-patinage
Support du bras de lecture
Levier du bras de lecture
Bras de lecture
Témoin Bluetooth/bouton de couplage
Coque porte-cellule avec cellule
Sélecteur de vitesse
© sonoro audio GmbH 2021 51
Page 52
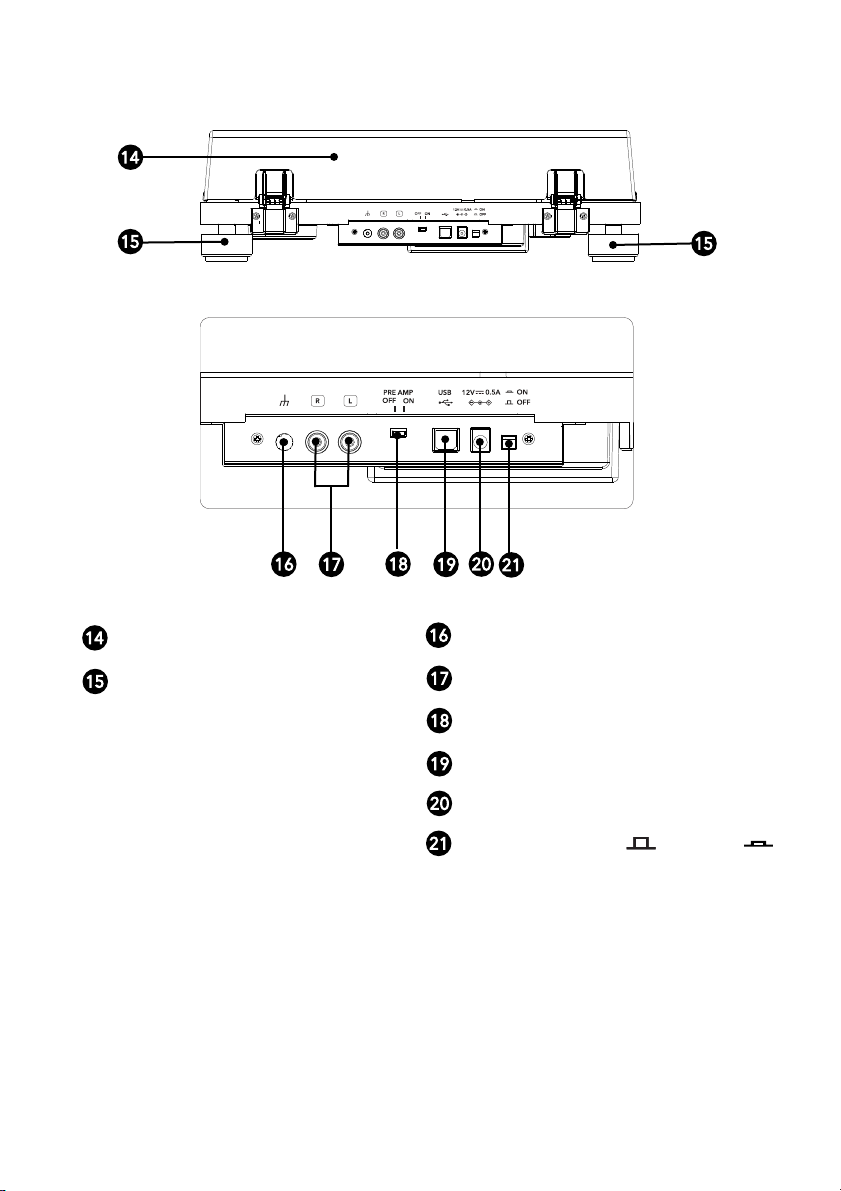
USB
PRE AMP
Vue de derrière
Couvercle anti-poussière
Mise à la terre
Pieds de l'appareil
Sortie audio RCA
Commutateur du préamplificateur
Sortie USB
Entrée d'alimentation CA
BOUTON MARCHE / ARRÊT
52 © sonoro audio GmbH 2021
Page 53

FR
2 vitesses, fonctionnement
entièrement manuel
Moteur à courant continu,
contrôlé optiquement
Aluminium moulé sous
pression, Diamètre 300 mm
Pleurage et
scintillement
Rapport
signal/bruit
> 67 dB (pondération A, 20
kHz, LPF)
Niveau de sortie
ALLUMÉ
300 mV ± 3 dB (1 KHz, 5cm/s)
Bras de lecture en forme de
S équilibré statiquement
Poids admissible de la
cellule
Impédance de
recommandée
Branchement de
l'amplificateur
Type de pointe de
lecture
Rayon de la pointe
du stylet
Poids de la coque
portecellule
9,3 g (vis, écrous, fils de
raccordement inclus)
Porte-à-faux de la
coque portecellule
USB 1.1 ou supérieur
MAC OSX ou supérieur
Puissance de sortie
maximale
Température de
fonctionnement
Diamant de
(vendu séparément)
Golden Profit Electronics Ltd
Guangdong, China
Courant alternatif
d'entrée
Efficacité moyenne
de fonctionnement
Efficacité à faible
charge (10 %)
Consommation
nulle
Les caractéristiques techniques peuvent être modifiées sans préavis.
2.3 Données techniques
Platine
Type
Mode d'entraînement
Entraînement par courroie
Moteur
Vitesses 33 1/3 tr/min et 45 tr/min
Plateau
< 0,15 % (33 tr/min) à 3 kHz
Préamplificateur
ÉTEINT
5,5 mV ± 3 dB (1 kHz, 5cm/s)
Prise de sortie RCA
Bras de lecture
Type de bras
Longueur effective 224 mm
Porte-à-faux 19 mm
Force d'appui réglable
De 0 à 2,5 g
De 5 à 7,5 g
Cellule
Modèle Ortofon 2M Red
Type Moving Magnet
Port USB
Formats pris en
charge
Windows 7 ou supérieur
Bluetooth
Version Bluetooth 4.0
Classe de sortie Classe 2
Bande de fréquences 2,402 gHz - 2,480 gHz
Méthode de modulation
FHSS
Profil A2DP 1.3
Codecs pris en charge SBC, aptX Audio
10 dBm
Portée Environ 10 m
Généralités
Dimensions (L x P x H) 420 x 356 x 125 mm
Poids Environ 3,9 kg
0 °C ~ +40 °C
Consommation
énergétique ÉTEINT
ALLUMÉ
remplacement
0,1 W ou moins
1,5 W ou moins
Ortofon 2M Red /
2M Blue
Bloc d'alimentation
Nom et adresse du
fabricant
Shayao Chenwu Village,
Shijie Town, Dongguan,
connexion
47 000 ohms
Entrée phono MM
Tension de sortie 5,5 mV (1 kHz, 5 cm/s)
Diamant elliptique
r/R 8/18 pm
Force d'appui 1,6 à 2,0 g (norme 1,8 g)
Poids de la cellule 7,2g
© sonoro audio GmbH 2021 53
± 5 mm
Identifiant du modèle GPE006D-120050-Z
Tension d'entrée CA 100 – 240 V
50 / 60 Hz
Tension de sortie CC 12,0 V
Courant de sortie 0,5 A
Puissance de sortie 6,0 W
Plus de 78,9 %
70,0%
électrique à charge
0,10 W ou moins
Page 54
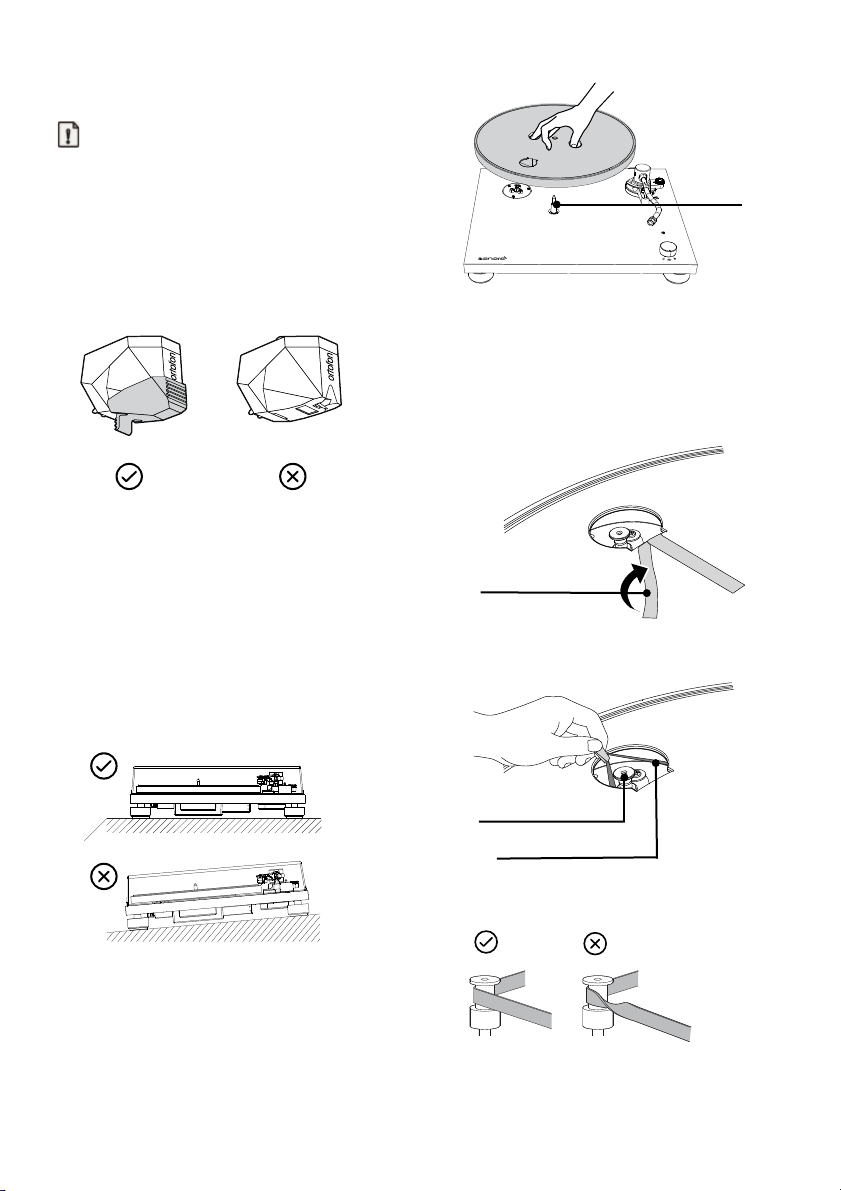
Axe
Poulie du moteur
Ruban adhésif
Courroie d'entraînement
3. Assemblage de la platine
Remarque:
• Votre PLATINUM doit être assemblée avant la
première utilisation.
• Ne branchez pas le bloc d'alimentation de
votre platine sur une prise secteur avant
d'avoir terminé l'installation.
• Le diamant de balayage dispose d'un
couvercle de protection. Laissez-le en place le
temps d'assembler votre platine.
• Le diamant de balayage est un composant de
haute précision. Ne le touchez pas avec vos
doigts et ne le laissez pas tomber sur le
plateau, car cela pourrait endommager le
diamant.
• Retirez le collier de serrage qui retient le bras
de lecture.
1. Mise en place de votre PLATINUM
• Placez votre PLATINUM sur une surface plane
et stable.
• Tournez le plateau de façon à voir la poulie
du moteur à travers le trou circulaire du
plateau.
3. Fixation de la courroie d'entraînement
• Détachez le ruban adhésif, tirez sur le ruban
rouge et tenez-le.
• Ensuite, placez la courroie d'entraînement
autour de la poulie du moteur.
• Veillez à ce que la courroie d'entraînement ne
soit pas vrillée.
2. Placement du plateau
• Maintenez le plateau
• Placez soigneusement le plateau sur l'axe.
• Retirez le ruban rouge de la courroie
d'entraînement.
54 © sonoro audio GmbH 2021
Page 55
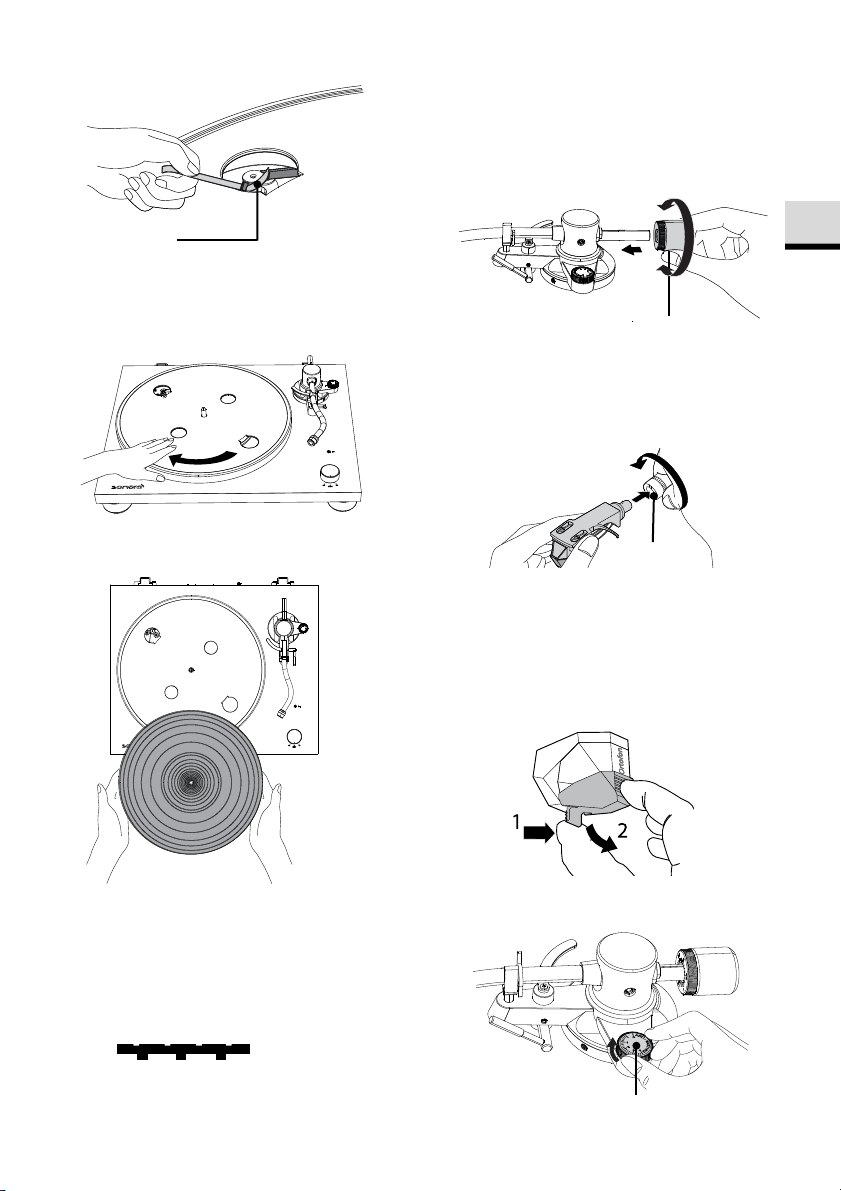
FR
Contre-écrou
Contrepoids
Bande
Échelle anti-patinage
5. Montage du contrepoids
• Placez le contrepoids sur l'extrémité du bras
de lecture, et tournez-le lentement dans le
sens inverse des aiguilles d'une montre, tout
en appuyant légèrement dessus.
• Faites tourner le plateau tournant plusieurs
fois pour vous assurer que la courroie
d'entraînement est bien en place et tourne
sans à-coups.
6. Mise en place de la coque porte-cellule
• Insérez la coque porte-cellule à l'extrémité
•
4. Placement du couvre-plateau
• Posez le couvre-plateau sur le plateau.
7. Retrait du couvercle de protection du
• Tenez le couvercle de protection par l'avant
• Tirez lentement sur le couvercle.
• Le couvre-plateau dispose d'une face
supérieure et d'une face inférieure. Lors de la
8. Réglage de l'équilibre du bras de lecture
• Réglez l'échelle anti-patinage sur zéro
pose, la face comprenant les cercles
concentriques ondulés doit être située en
dessous.
Dessus
Dessous
© sonoro audio GmbH 2021 55
avant du bras de lecture.
Tournez le contre-écrou dans le sens des
aiguilles d'une montre pour le bloquer.
diamant de balayage
et par l'arrière, tout en appuyant sur le
dispositif de verrouillage de la partie arrière.
Page 56
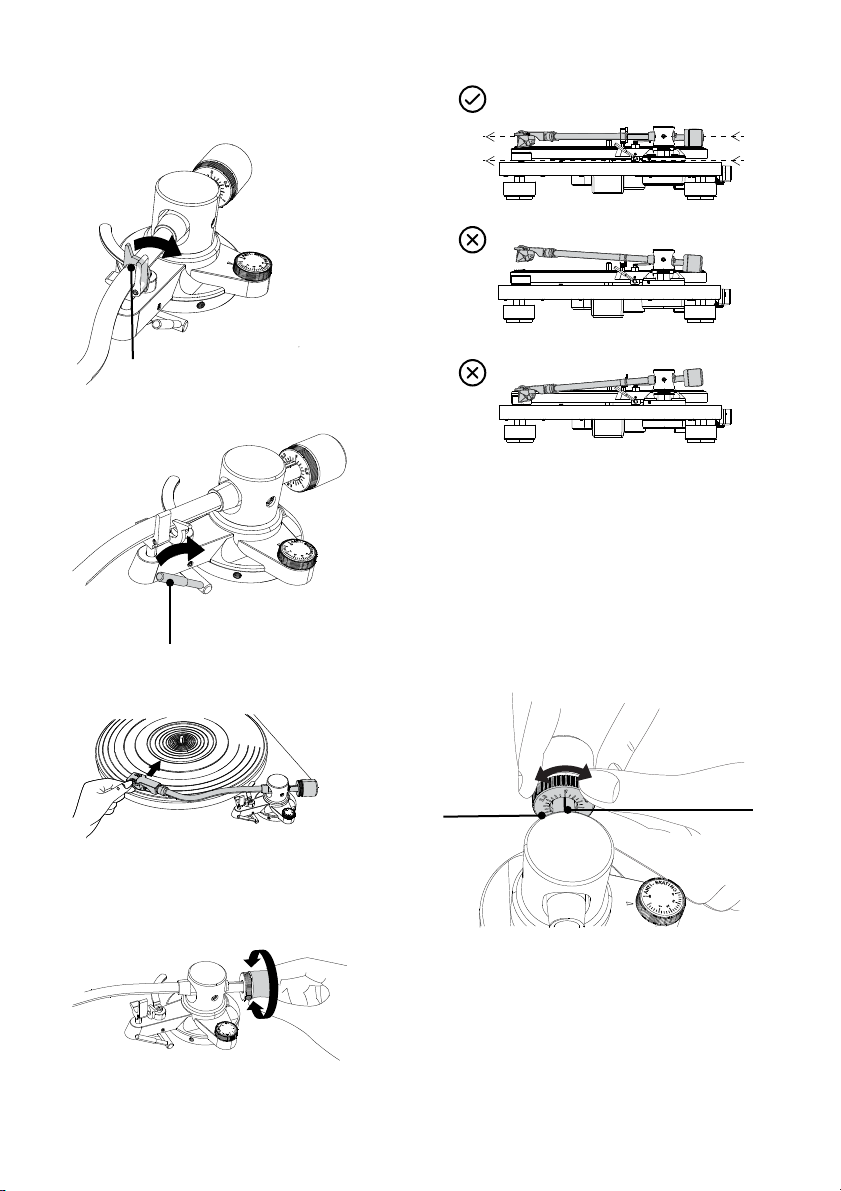
Bras de lecture
Levier du bras de lecture
Marques de repère
Échelle de réglage
Contrepoids
• Desserrez le collier de serrage du bras de
lecture.
• Soulevez le levier du bras de lecture.
• Remettez le bras de lecture dans sa position
initiale.
• Verrouillez le collier de serrage du bras de
lecture.
9. Réglage de la force d'appui
• Tenez la coque porte-cellule avec votre doigt,
et déplacez le bras de lecture sur la platine.
• Abaissez le levier du bras de lecture.
• Ajustez le contrepoids de manière à ce que le
bras de lecture lévite parallèlement au
plateau tournant.
56 © sonoro audio GmbH 2021
• Tournez l'anneau du contrepoids de manière
à ce que la ligne centrale de l'échelle soit
alignée sur 0.
• Il suffit de tourner l'anneau ! Le contrepoids
ne doit pas tourner.
• Ajustez le contrepoids pour la cellule en
tournant simultanément le contrepoids et
l'échelle.
Page 57
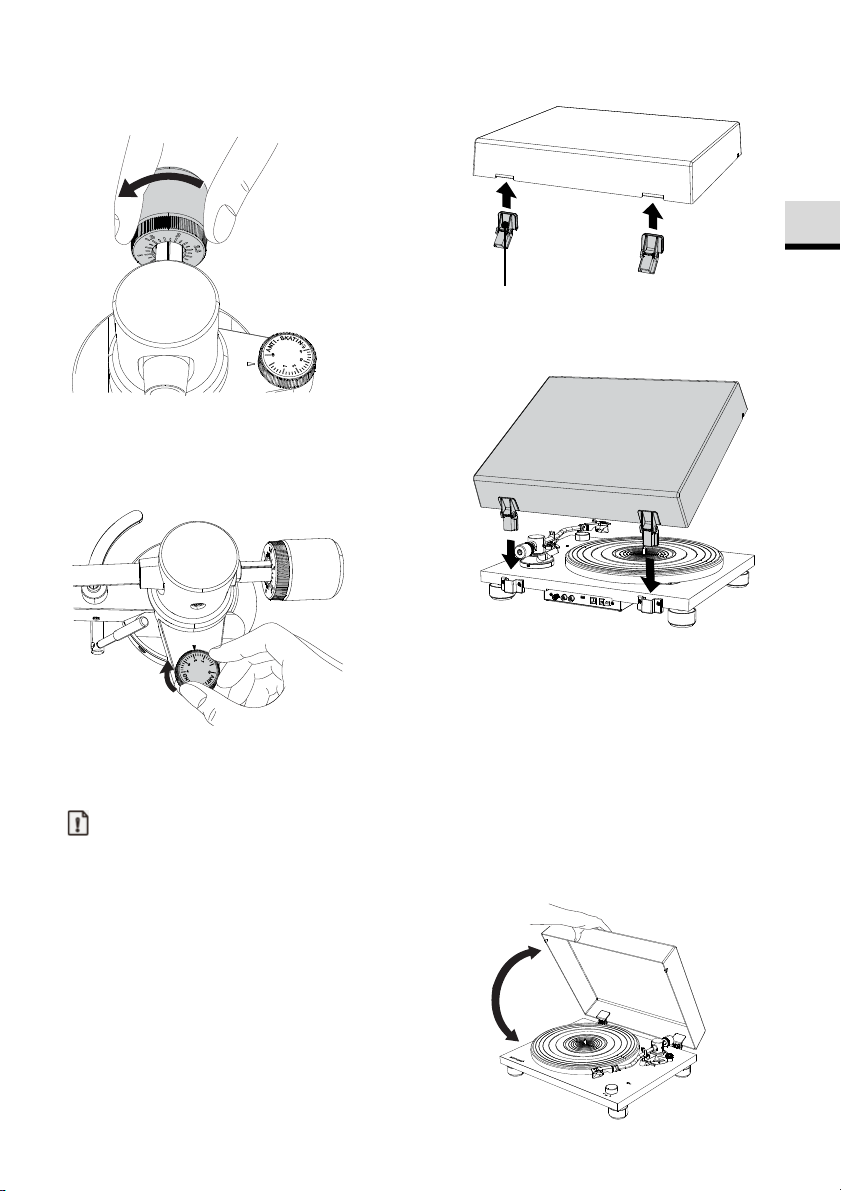
FR
Charnières
• La force d'appui recommandée pour la
cellule fournie est de 1,8 g.
• Alignez les charnières avec les supports situés
au dos du plateau et insérez-les.
10. Réglage de la force anti-patinage
• L'échelle anti-patinage doit être réglée à la
même valeur que la force d'appui ; pour la
cellule fournie, elle doit être réglée à 1,8.
11. Mise en place du couvercle anti-
poussière
Remarque:
• Le couvercle anti-poussière sert à protéger les
composants sensibles de votre platine.
Lorsque cette dernière n'est pas utilisée, le
12. Ouverture et fermeture du couvercle de
protection
Ouverture
• Tenez le bord avant du couvercle de
protection et soulevez-le jus-qu'à la butée
avec précaution.
• Le couvercle de protection reste ouvert dans
sa position.
Fermeture
• Abaissez le couvercle de protection avec
précaution jusqu'à ce qu'il soit fermé.
couvercle doit rester fermé.
• Ne l'ouvrez pas et ne le fermez pas pendant
la lecture d'un enregistrement.
• Faites attention à ne pas vous pincer le doigt
lorsque vous ouvrez et fermez le couvercle.
• Ne placez rien sur ce dernier
• Insérez complètement les charnières du
couvercle anti-poussière dans les supports de
charnières
© sonoro audio GmbH 2021 57
Page 58
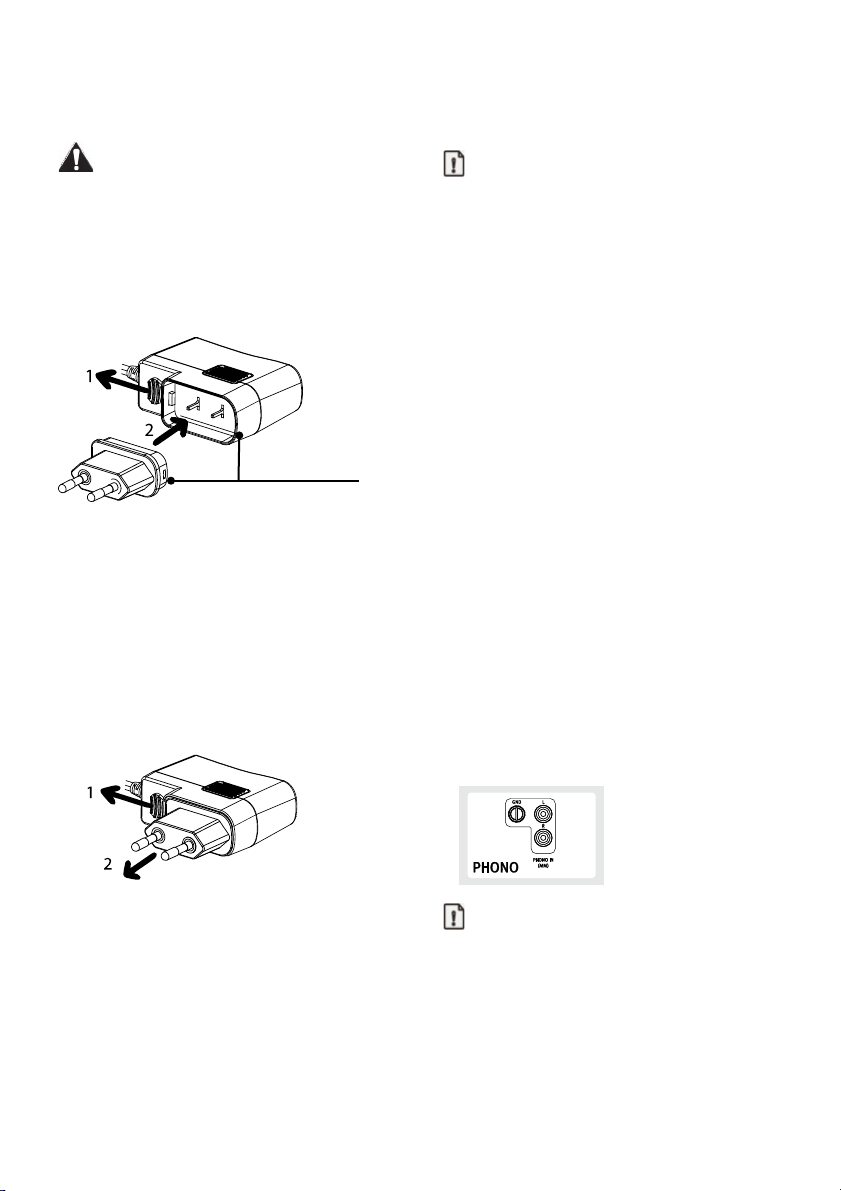
partie supérieure
ronde
13. Branchement et remplacement de la
fiche secteur
AVERTISSEMENT!
Risque d'électrocution !
• Ne branchez pas l'adaptateur secteur seul
dans la prise secteur.
• Assurez-vous que la prise et l'adaptateur sont
correctement verrouillés.
Branchement de la fiche secteur
4. Branchement de votre PLATINUM
Remarque:
• La cellule Ortofon 2M RED montée est une
cellule MM. Par conséquent, réglez votre
système audio sur MM (et non sur MC).
• Assurez-vous que le système
audio/l'amplificateur connecté à votre
PLATINUM est éteint, et que le volume est
réglé à un faible niveau.
• Avant d'allumer votre système audio et votre
PLATINUM, assurez-vous que tous les
branchements ont été effectués
correctement, et sélectionnez le bon réglage
du préamplificateur.
Dans le cas contraire, vous risquez d'entendre
de forts bourdonnements pouvant
• Tirez le clip vers le bas et tenez-le fermement.
• Insérez le coin rond de la prise dans la partie
supérieure de l'adaptateur.
• Insérez la fiche secteur souhaitée
verticalement dans les broches de contact de
l'adaptateur, jusqu'à ce qu'elle soit
complètement enfoncée.
• Desserrez le clip, et verrouillez l'adaptateur
secteur.
Débranchement de la fiche secteur
endommager votre système audio ou vos
hautparleurs.
1. Branchement à un système
audio/amplificateur
• Branchez votre système audio sur votre
PLATINUM avec le câble RCA fourni.
• Si votre système audio dispose d'un
amplificateur phono intégré, une connexion à
la terre est très probablement disponible.
Vissez le câble de mise à la terre des deux
côtés : à votre système audio et à votre
PLATINUM. Insérez les fiches RCA dans
l'entrée phono de votre système audio et la
sortie de votre PLATINUM.
• Tirez le clip vers le bas et tenez-le fermement.
• Tirez l'adaptateur secteur verticalement hors
du bloc d'alimentation.
58 © sonoro audio GmbH 2021
Remarque:
• La prise de terre de la platine n’apporte
aucune sécurité supplémentaire.
• Selon votre système audio, le raccordement
du fil de terre ou de mise à la terre peut, au
contraire, augmenter le bourdonnement et le
bruit. Dans ce cas, évitez de raccorder le fil de
terre ou de mise à la terre.
• Nous ne recommandons pas de connecter le
PLATINUM à la prise de terre d'un MAESTRO.
Page 59
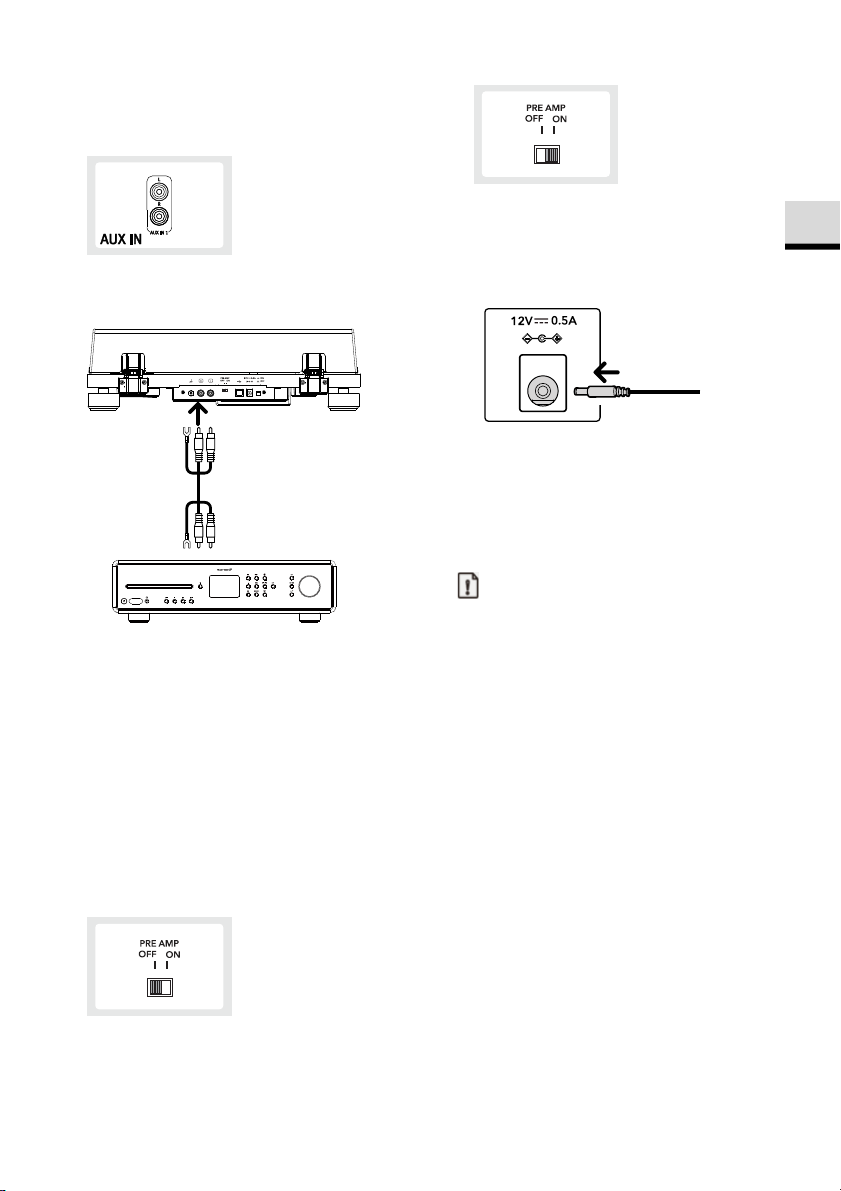
FR
USB
• Si votre système audio ne dispose pas d'une
entrée phono, utilisez une entrée auxiliaire In
RCA libre.
3. Raccordement du bloc d'alimentation
• La fiche blanche est destinée au canal de
gauche, la fiche rouge au canal de droite.
• Après avoir effectué tous les autres
branchements, connectez l'adaptateur
secteur fourni à la prise d'entrée CC.
• Branchez le bloc d'alimentation dans une
prise secteur.
5. Lecture d'un
enregistrement
Remarque:
2. Réglage du commutateur de sélection
du préamplificateur
Commutez l'interrupteur du préamplificateur à
l'arrière de votre PLATINUM selon les fonctions
du système audio/amplificateur auquel elle est
connectée :
• Placez l'interrupteur sur OFF.
Si votre système audio/amplificateur dispose
d'une prise d'entrée PHONO, votre
PLATINUM peut y être connectée
directement, en contournant le
préamplificateur intégré en l'éteignant.
• Placez l'interrupteur sur ON.
Si votre système audio/amplificateur ne
dispose pas d'une entrée phono, vous
pouvez utiliser le préamplificateur intégré à
votre PLATINUM en le réglant sur ON.
© sonoro audio GmbH 2021 59
• Réduisez le volume de l'appareil audio avant
de lire un disque. Le bruit fort et crépitant qui
est généré lorsque le diamant de balayage
est plongé dans le sillon du disque peut
endommager les haut-parleurs ou
l'équipement audio. Attendez que la cellule
soit complètement abaissée, puis réglez le
volume.
• Des crépitements peuvent être générés
même lors de la lecture d'un nouveau disque.
Veuillez noter que ce bruit est caractéristique
de la lecture de disques.
• Ne placez qu'un seul disque à la fois sur la
platine.
• Fermez le couvercle de protection pendant la
lecture des disques afin d'éviter que la
poussière ne s'y dépose.
• N'arrêtez pas la rotation de la platine pendant
la lecture.
• Pendant la lecture des disques, un effet larsen
peut se produire si le volume est trop fort.
Dans ce cas, réduisez le volume de
l'amplificateur.
1. Allumez la platine.
• Pour allumer la platine, appuyez sur le bouton
Page 60
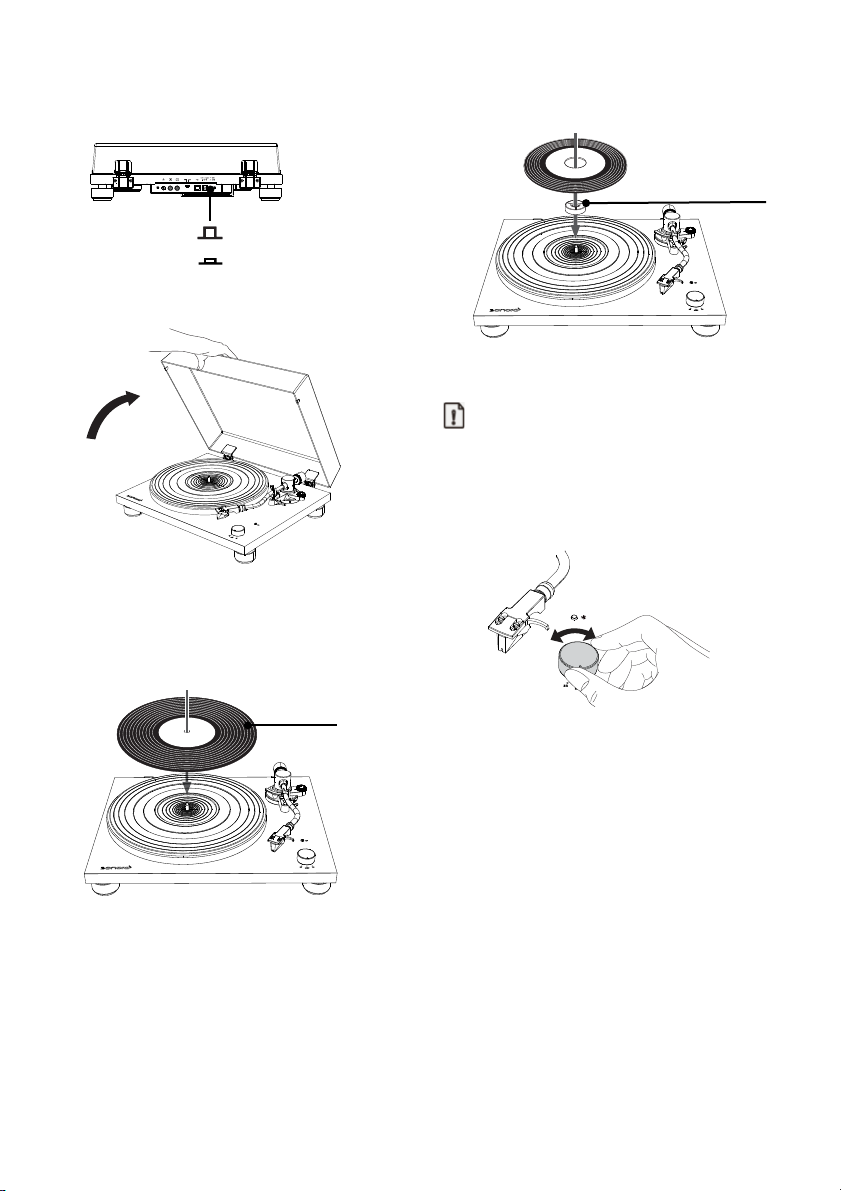
USB
PRE AMP
Disque
Adaptateur 45 tr/min
ARRÊT
MARCHE
MARCHE/ARRÊT situé au dos de cette
dernière.
2. Ouvrez le couvercle de protection avec
precaution.
3. Mettez un disque
•
Placez le disque sur le couvre-plateau, de
manière à ce que l'axe soit dans le trou
central du disque.
•
Pour jouer un single, utilisez l'adaptateur
single fourni.
4. Utilisez le sélecteur de vitesse
Remarque:
• La vitesse de lecture est normalement
indiquée sur le macaron du disque.
• La vitesse peut être réglée à 33 ou 45 tr/min.
Sélectionnez la vitesse appropriée pour le
disque.
• Lorsque le sélecteur de vitesse est réglé sur
33 ou 45, le plateau commence à tourner.
5. Desserrez la pince de support du bras de
lecture.
6. Soulevez le levier du bras de lecture.
7. Le doigt sur la coque porte-cellule,
déplacez le bras de lecture sur le bord
du disque ou sur la piste par laquelle
vous voulez commencer la lecture.
60 © sonoro audio GmbH 2021
Page 61
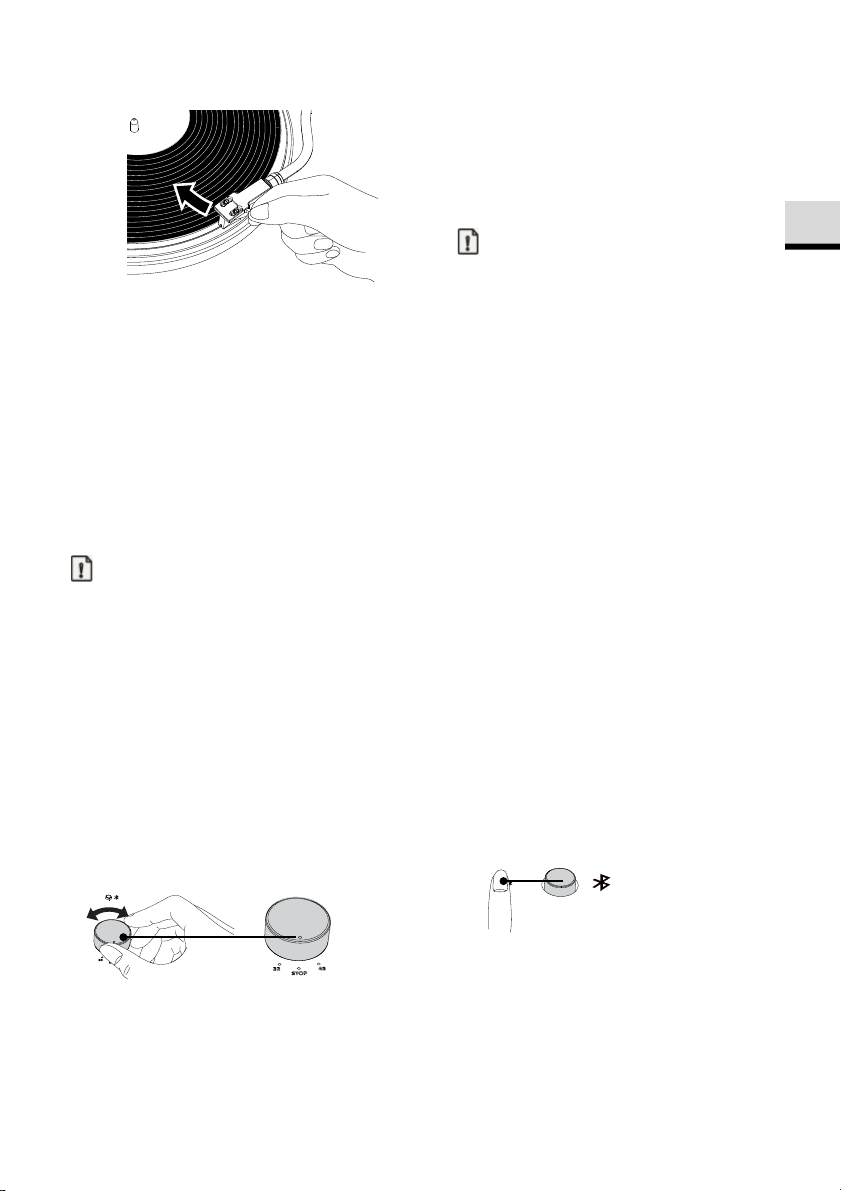
FR
Témoin
couplage
8. Abaissez le bras de lecture.
• Abaissez lentement le bras de lecture à l'aide
du levier du bras de lecture, jusqu'à ce que le
diamant de balayage touche le disque et que
la lecture commence.
9. Refermez le couvercle de protection
avec précaution.
6. Une fois la lecture
terminée
Remarque:
• PLATINUM est une platine manuelle. Elle ne
s'arrête pas automatiquement !
• À la fin d'un disque, veillez à toujours soulever
le bras de lecture afin d'éviter d'endommager
le diamant de balayage et le disque.
1. Soulevez le levier du bras de lecture.
2. Ramenez le bras de lecture
• Placez votre doigt sur la coque porte-cellule
3. Placez le sélecteur de vitesse sur la
pour ramener le bras de lecture dans sa
position initiale.
position
STOP.
7. Connexion à un appareil Bluetooth
PLATINUM peut se connecter à des appareils
compatibles Bluetooth (haut-parleurs, casques
et écouteurs Bluetooth).
Remarque:
• Sa portée est d'environ 10 mètres.
• Pour savoir comment utiliser cette fonction,
consultez le mode d'emploi de vos appareils
Bluetooth.
• Le couplage peut prendre un certain temps
en fonction de l'appareil connecté.
• Si des appareils de lecture Bluetooth sont
allumés à proximité et que vous ne souhaitez
pas les coupler, désactivez la fonction
Bluetooth et réessayez.
• Ne vous connectez pas à des haut-parleurs ou
à des écouteurs et casques Bluetooth dont
vous ne pouvez pas régler le volume. Les
pistes individuelles pourraient être lues à très
haut volume.
• Vous ne pouvez pas coupler la platine avec
des smartphones, des télévisions ou des
ordinateurs, etc.
1. Premier couplage d'un appareil Bluetooth
• Appuyez sur le bouton BT de la platine pour
lancer le mode de connexion Bluetooth. Le
témoin devient bleu et clignote lentement.
• Appuyez à nouveau sur le bouton BT pendant
au moins deux secondes pour lancer le mode
couplage. Le témoin bleu clignote
rapidement.
Bluetooth/bouton de
• Une fois que la platine est passée en mode
• Lorsque la platine s'arrête, le plateau ne
tourne pas.
• Appuyez sur le bouton MARCHE/ARRÊT situé
à l'arrière de la platine pour éteindre cette
dernière lorsqu'elle n'est plus utilisée.
© sonoro audio GmbH 2021 61
couplage, activez également le mode
couplage de l'autre appareil Bluetooth.
• Le couplage s'effectue automatiquement.
Lorsque la platine et l'appareil Bluetooth sont
connectés, le témoin reste allumé.
Page 62
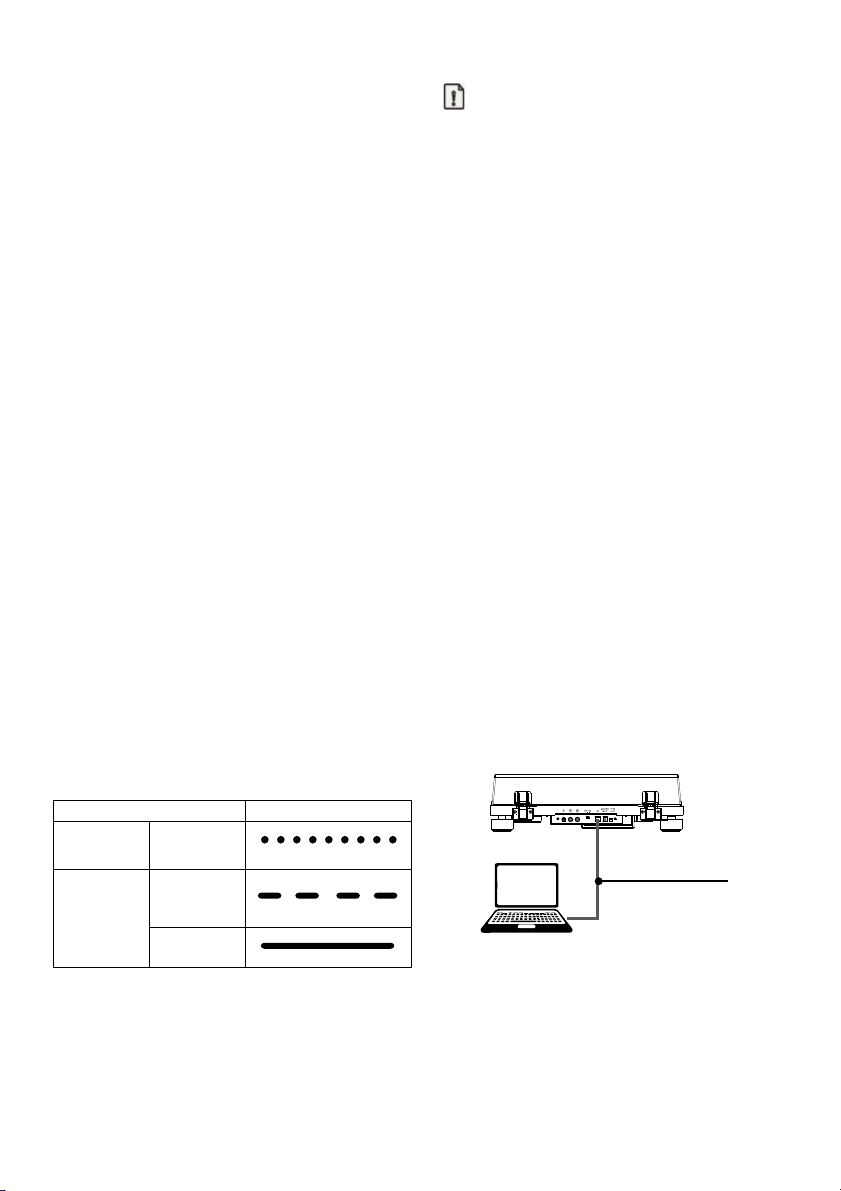
En fonctionnement
Témoin BT (bleu)
En attente
connexion
le témoin reste allumé
USB
PRE AMP
Câble USB
2. Connexion de l'appareil Bluetooth couplé
PLATINUM peut sauvegarder des
informations pour un maximum de 8
appareils couplés. Pour les connexions
ultérieures, vous n'avez pas besoin de
coupler de nouveau des appareils ayant déjà
été couplés avec la platine.
• Appuyez sur le bouton BT de la platine pour
lancer le mode de connexion. Le témoin
devient bleu et clignote lentement.
• Préparez l'appareil Bluetooth pour la
connexion.
• Le couplage s'effectue automatiquement.
Lorsque la platine et l'appareil Bluetooth sont
connectés, le témoin de couplage reste
allumé.
3. Déconnexion de l'appareil Bluetooth
couplé
• Appuyez sur le bouton BT pendant au moins
2 secondes pour déconnecter l'appareil
Bluetooth couplé de la platine. Le témoin
devient bleu et clignote rapidement.
• En mode Bluetooth, appuyez sur le bouton
BT pour désactiver la fonction Bluetooth.
• Si aucun appareil Bluetooth n'est trouvé
pendant cinq minutes, le témoin Bluetooth
ne s'éteint.
• Vous trouverez ci-dessous l'état d'affichage
du BT pour différents états de
fonctionnement.
Remarque:
• Les signaux de sortie USB ne peuvent être
utilisés que pour l'enregistrement, et non
pour la lecture.
• La platine fonctionne avec les pilotes
standard Windows ou Mac : aucun pilote
spécial n'est nécessaire.
• L'ordinateur détecte automatiquement le port
USB de la platine et l'identifie comme
USB
Audio CODEC.
• Vous devez d'abord installer un logiciel
permettant d'enregistrer du contenu audio
sur votre ordinateur.
• Vous pouvez acheter votre logiciel
d'enregistrement audio préféré séparément,
ou télécharger un logiciel gratuit tel
qu'Audacity (https://www.audacityteam.org/)
sur Internet.
• Si le logiciel ne fonctionne pas comme
souhaité, contactez votre administrateur
informatique afin d'obtenir de l'aide.
• Lorsque vous effectuez un enregistrement
avec un ordinateur, ne débranchez pas le
câble USB, et ne mettez pas la platine en
mode veille.
• La musique enregistrée est strictement
réservée à un usage privé. Toute autre
utilisation de la musique nécessite
l'autorisation des détenteurs des droits
d'auteur.
1. Connectez un ordinateur à votre
PLATINUM à l'aide du câble USB fourni.
Couplage
Connexion
Recherche
d'appareil
de
connecté
8. Connexion à un ordinateu
Le contenu d'un disque peut être enregistré
numériquement sur un ordinateur en
connectant la platine au port USB (type A) de
l'ordinateur avec le câble USB fourni (type B).
62 © sonoro audio GmbH 2021
clignotement rapide
clignotement len
2. Tournez le bouton de sélection de
vitesse pour lancer la lecture d'un
disque.
3. Utilisez votre logiciel pour enregistrer
des pistes sur votre ordinateur.
• Pour obtenir des instructions détaillées
quant à l'utilisation de l'application et au
transfert audio, veuillez vous référer au
mode d'emploi du logiciel.
Page 63
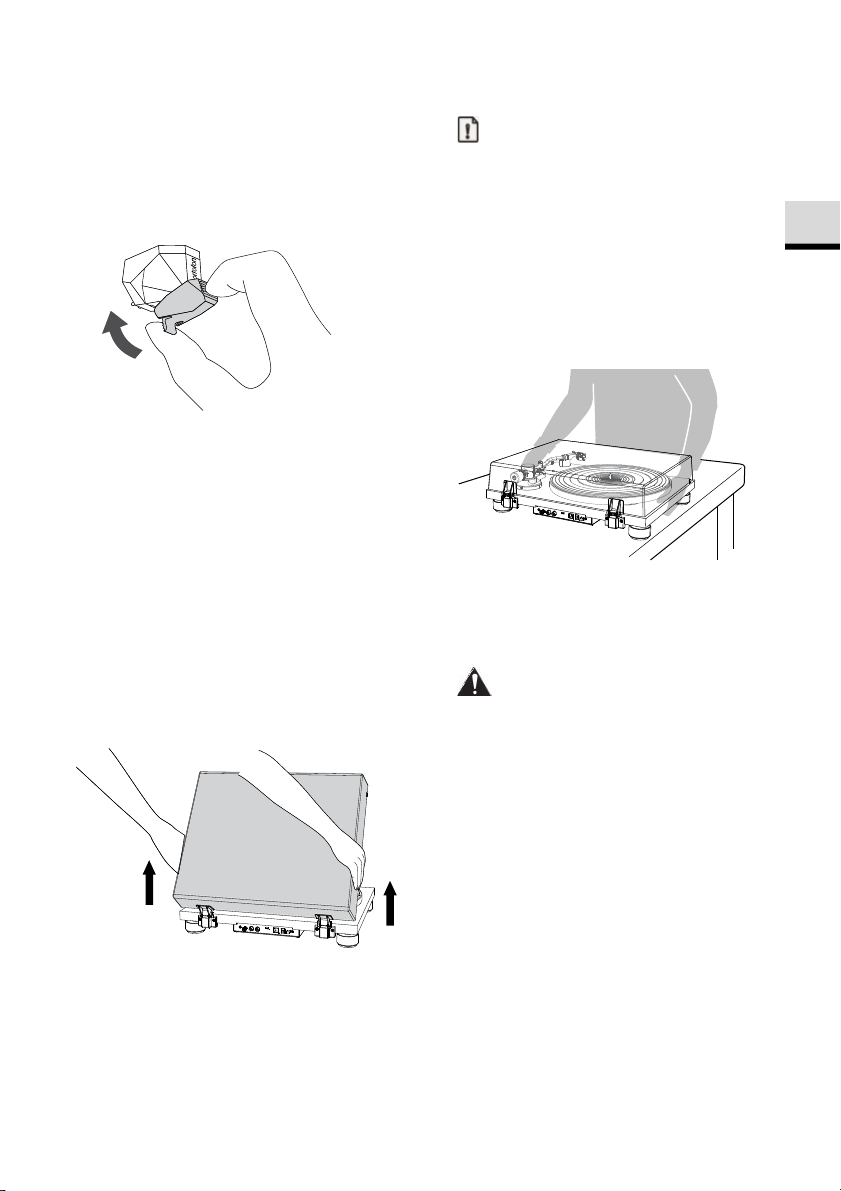
FR
9. Entretien
1. Placez le couvercle de protection sur le
diamant de balayage.
• Tenez le couvercle à l'avant et à l'arrière,
alignez chaque partie avec l'avant de la
cellule, et soulevez-les lentement.
4. Transport de la platine
Remarque:
• Verrouillez la pince du support du bras de
lecture.
• Éteignez la platine et débranchez le bloc
d'alimentation de la prise secteur.
• Débranchez tous les câbles de connexion du
plateau.
• Placez le couvercle de protection sur le
diamant de balayage.
• Lorsque vous transportez la platine, tenez-la
bien par le bas.
2. Nettoyage de la platine
• Nettoyez le couvercle anti-poussière et la
platine avec un chiffon sec et doux.
• Si la saleté ne s'enlève pas facilement, utilisez
un chiffon légèrement humide, puis séchez la
platine avec un chiffon doux et sec.
• N'utilisez pas de solutions chimiques telles
que de l'alcool, du benzène ou du diluant à
peinture, qui pourraient endommager la
finition.
3. Retrait du couvercle anti-poussière
• Pour retirer le couvercle anti-poussière de la
platine, ouvrez-le complètement, saisissez les
deux côtés près du fond du couvercle, puis
tirez-le doucement vers le haut.
• Ajustez la force d'appui et l'anti-patinage si
nécessaire.
5. Transport ou expédition de votre
PLATINUM
Attention :
• Si la platine doit être transportée ou envoyée
en réparation, veuillez utiliser l'emballage
d'origine, qui offre la meilleure protection.
• Si vous avez perdu l'emballage d'origine,
veuillez procéder comme suit ; nous vous
recommandons d'utiliser du papier bulle ou
des matériaux de protection similaires pour
l'emballage :
• Retirez le couvercle anti-poussière et
emballez-le avec précaution.
• Retirez soigneusement la platine et le tapis et
enveloppez-les également.
• Fixez le couvre-aiguille, retirez la coque porte-
cellule avec la cellule et le contrepoids du
bras de lecture et enveloppez-les avec
précaution.
• Verrouillez le clip du bras de lecture et fixez-le
en place avec du ruban adhésif.
• Emballez soigneusement la platine.
© sonoro audio GmbH 2021 63
Page 64
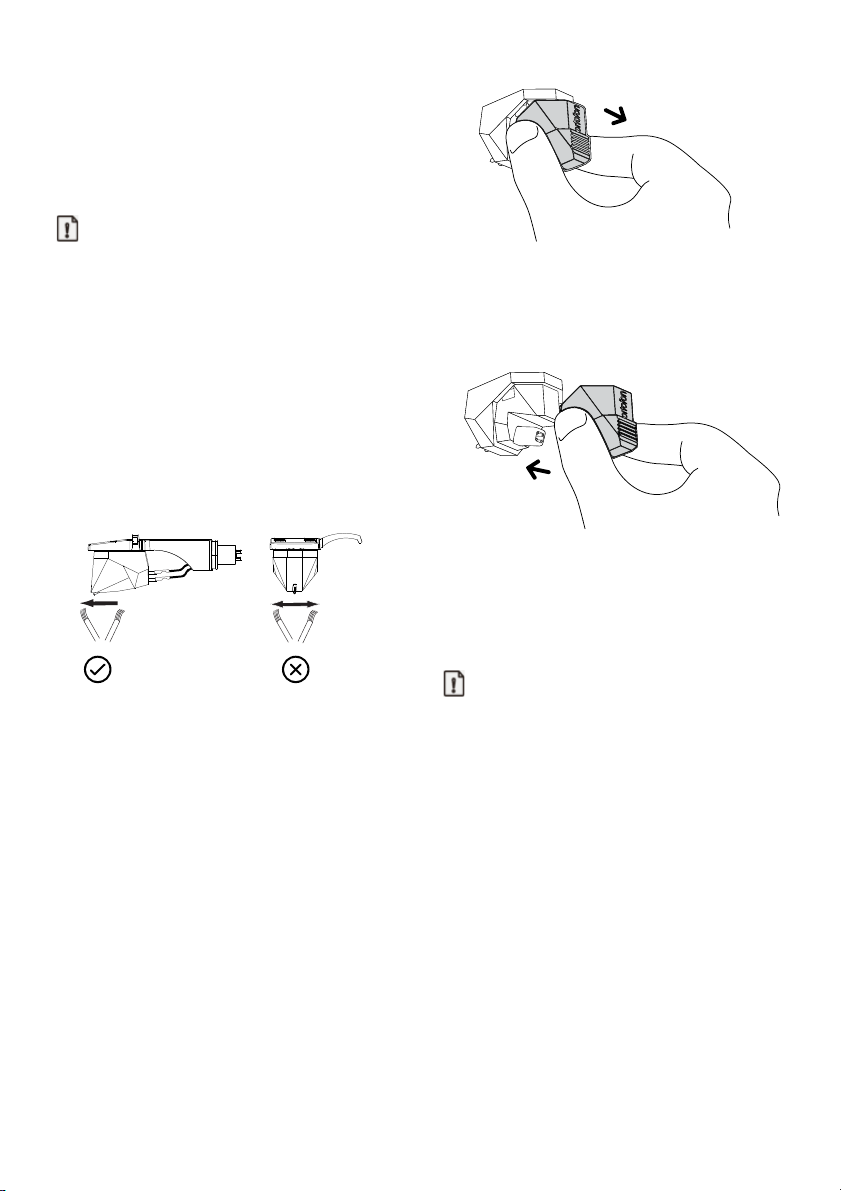
• Veuillez utiliser un emballage suffisamment
stable et protecteur pour éviter
d'endommager votre PLATINUM pendant le
transport ou l'expédition.
6. Nettoyage du diamant de balayage
Remarque:
• Les diamants de balayage sont des pièces de
précision. Il faut donc les manipuler avec
précaution pour éviter de les déformer ou de
les endommager. Si le support est plié, ou si
le diamant est endommagé, cela peut
l'empêcher de suivre le sillon avec exactitude,
et endommager les disques ou provoquer un
autre dysfonctionnement.
• Ne nettoyez pas le diamant de balayage avec
du diluant ou d'autres produits chimiques.
• Si le diamant est très sale, utilisez une petite
brosse (non fournie). Nettoyez-le en
déplaçant la brosse de l'arrière vers l'avant.
7. Remplacement du diamant de balayage
• Si le diamant de balayage est usé, non
seulement la qualité sonore se dégrade, mais
cela peut aussi endommager les disques.
Après environ 1000 heures, remplacez le
diamant de balayage de lecture par un des
diamants spécifiés par nos soins.
• Utilisez un diamant de balayage pour une
cellule Ortofon 2M RED / 2M BLUE.
• Pour le remplacement, suivez les instructions
du mode d'emploi du diamant de
remplacement.
Retrait du diamant de balayage
• Laissez le couvercle de protection sur le
diamant de balayage.
• Détachez la coque porte-cellule du bras de
lecture.
• Tenez la tête de lecture dans une main,
saisissez le boîtier en plastique du diamant de
balayage entre le pouce et l'index de l'autre
main, et tirez-le hors de la cellule.
Installation d'un nouveau diamant de
balayage
• Pour installer un diamant de remplacement,
insérez-le avec précaution dans la cellule, par
l'avant.
• Le diamant de balayage doit être entièrement
inséré dans la cellule.
• Montez la coque porte-cellule sur le bras de
lecture.
8. Remplacement de la cellule
Remarque
:
• Votre PLATINUM est équipée de série d'une
cellule Ortofon 2M Red.
• Si vous utilisez une autre cellule que l'Ortofon
2M Red, vous devrez peut-être régler le
porte-à-faux et la force d'appui, la force antipatinage et la hauteur de votre bras de
lecture. En cas de doute, veuillez contacter
votre revendeur.
• Laissez le couvercle de protection sur le
diamant de balayage.
• Retirez d'abord la coque porte-cellule du bras
de lecture.
• À l'aide d'un tournevis plat, retirez les vis de
montage, les rondelles, puis la cellule de la
coque porte-cellule.
64 © sonoro audio GmbH 2021
Page 65
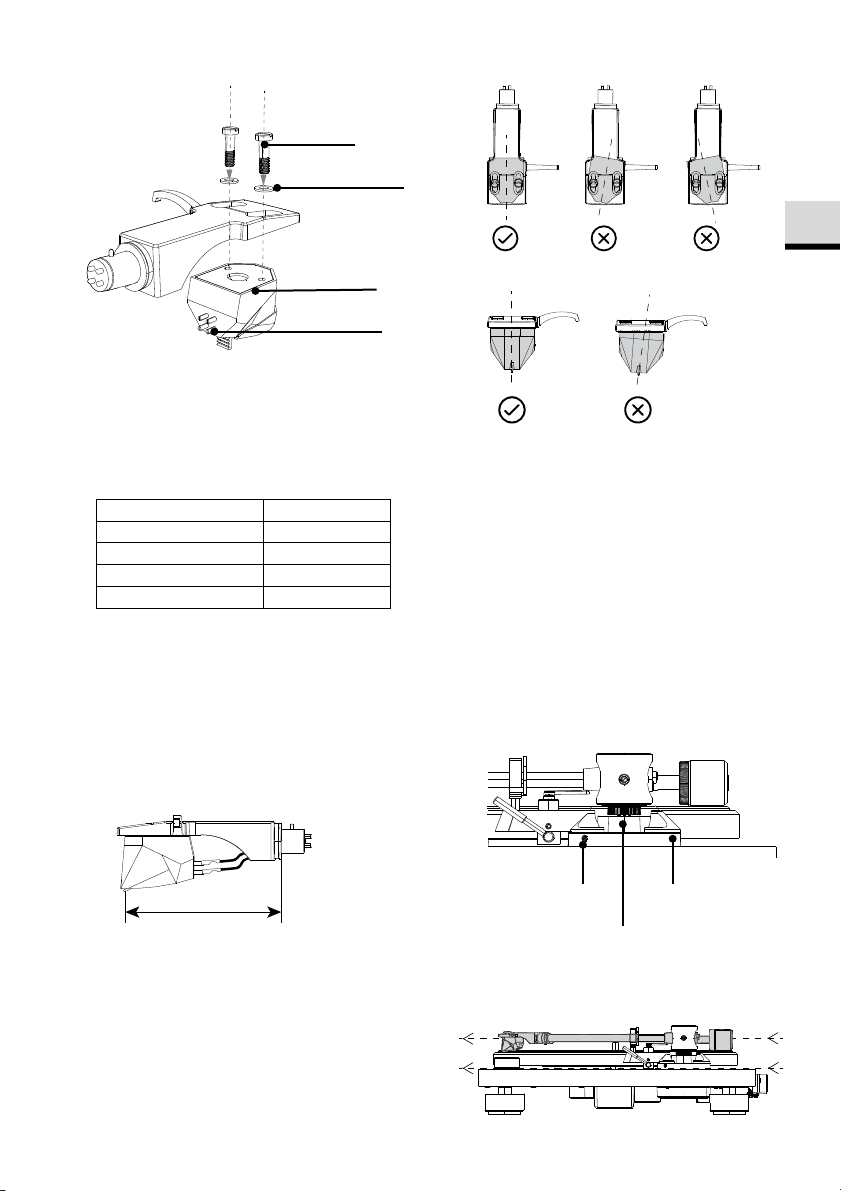
FR
Signal
Couleur
Canal gauche +
Blanc
Canal gauche -
Bleu
Canal droit +
Rouge
Canal gauche -
Vert
52,8mm
Vis
Rondelle en
plastique
Cellule
Vis de réglage
de la hauteur
Base du bras de lecture
Socle
Contact
• Pour savoir comment installer et connecter les
câbles de la coque porte-cellule, reportezvous au mode d'emploi de la nouvelle cellule.
• Les signaux et les couleurs des câbles de la
coque porte-cellule sont énumérés cidessous.
• Serrez légèrement les vis à l'aide d'un
tournevis plat, puis ajustez le porte-à-faux.
9. Ajustement du porte-à-faux
• Déplacez la cellule pour ajuster le porte-à-
faux, de manière à ce que la pointe du
diamant de balayage soit à 52,8 mm de
l'extrémité de la coque porte-cellule.
• La cellule doit être montée droite.
• Serrez les vis après avoir terminé les réglages.
• Fixez la coque porte-cellule sur le bras de
lecture.
10. Réglage de la hauteur du bras de lecture
• Placez un disque sur la platine.
• Abaissez le diamant de balayage sur le
disque, et vérifiez que le bras de lecture est
parallèle au disque.
• Insérez une clé Allen de 2 mm (non fournie)
dans le trou de la vis de réglage de la
hauteur, et tournez-la dans le sens inverse des
aiguilles d'une montre pour déverrouiller la
base du bras de lecture.
• La cellule doit être montée parallèlement aux
bords extérieurs de la coque porte-cellule.
© sonoro audio GmbH 2021 65
• Tenez la base du bras de lecture, et ajustez la
hauteur jusqu'à ce que ce dernier soit
parallèle au disque.
Page 66
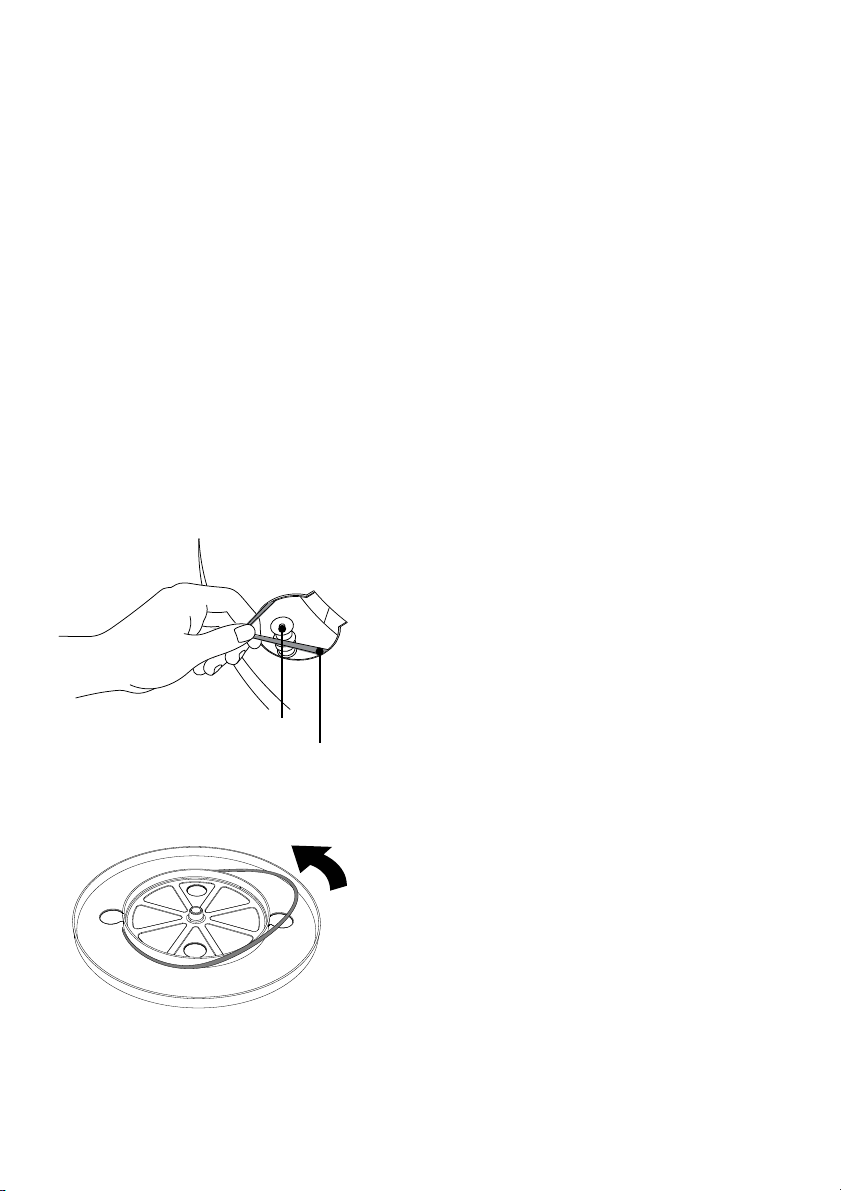
Courroie d'entraînement
Poulie du moteur
• Tournez la clé Allen dans le sens des aiguilles
d'une montre pour verrouiller la base du bras
de lecture.
• Ajustez la force d'appui et l'anti-patinage.
11. Remplacement de la courroie
d'entraînement
• La courroie d'entraînement s'use, ou peut
même rompre avec le temps. Dans ce cas,
remplacez-la par une nouvelle. Contactez
votre revendeur ou le service clientèle pour
obtenir une courroie d'entraînement de
remplacement.
• Éteignez la platine et l'appareil audio
connecté, puis débranchez l'adaptateur
secteur de la prise secteur.
• Retirez le tapis du plateau.
• Tournez le plateau de façon à voir la poulie
du moteur à travers le trou circulaire du
plateau.
• Retirez la courroie d'entraînement de la
poulie du moteur.
• Suivez les étapes de la rubrique « Fixation de
la courroie d'entraînement » pour terminer le
montage.
• Insérez vos doigts et votre pouce dans les
trous ronds du plateau pour le soulever.
• Retournez le plateau, et retirez l'ancienne
courroie d'entraînement.
• Enroulez une nouvelle courroie
d'entraînement autour du cercle intérieur du
plateau, tout en le tenant à l'envers.
66 © sonoro audio GmbH 2021
Page 67

FR
Dysfonctionnement
Cause éventuelle
Solution
Le plateau ne tourne pas.
L'adaptateur secteur n'est
Branchez l'adaptateur
La platine n'est pas en
Vérifiez l'interrupteur
La platine tourne, mais il n'y
Le couvercle est toujours
Retirez le couvercle.
Le bras de lecture n'est pas
Abaissez le bras de lecture.
Le diamant n'est pas
Vérifiez la cellule, insérez
Mauvais réglage du
Sélectionnez le bon
La force d'appui est trop
Ajustez la force d'appui.
10. Dépannage
Comme pour tout appareil électrique, des dysfonctionnements peuvent survenir. Cela n'est
pas nécessairement dû à un défaut. Par conséquent, consultez le tableau suivant pour voir
si vous pouvez régler le problème vousmême.
a pas de son, ou ce dernier
est trop faible.
pas branché correctement.
mode ON.
sur la cellule.
abaissé sur le disque.
Mauvais réglage du
système audio connecté.
Le diamant de balayage est
endommagé.
correctement positionné
dans la cellule.
préamplificateur intégré.
secteur dans une prise
secteur.
secteur à l'arrière de
l'appareil.
enfoncé.
Vérifiez les réglages du
système audio connecté,
par exemple MC au lieu de
MM.
Vérifiez le diamant, et
remplacez-le si besoin.
complètement le diamant
de balayage si nécessaire.
réglage.
Si vous utilisez un
amplificateur avec une
entrée phono, le
préamplificateur doit être
réglé sur OFF.
Si vous avez connecté
PLATINUM à une entrée
AUX, le préamplificateur
doit être réglé sur ON.
Il doit être
© sonoro audio GmbH 2021 67
élevée ou trop faible.
Page 68

Dysfonctionnement
Cause éventuelle
Solution
L'anti-patinage n'est pas
Ajustez l'anti-patinage.
Le disque est ondulé.
Changez le disque.
Bruit de fond important.
Il y a de la poussière sur le
Retirez la poussière.
Bruit d'explosion.
La platine est perturbée par
Isolez la platine des
La musique est jouée trop
La vitesse de lecture n'est
Réglez sur la bonne vitesse
Aucune connexion
L'appareil Bluetooth n'est
Désactivez et activez le
Aucune connexion à un
Cette fonction n'est pas
Connectez PLATINUM à un
Le diamant de balayage
saute.
vite ou trop lentement.
Bourdonnement Le câble de mise à la terre
La force d'appui est trop
élevée ou trop faible.
réglé correctement.
Le disque est rayé. Changez le disque.
diamant de balayage ou sur
le disque.
les vibrations du sol ou des
hautparleurs situés à
proximité.
pas la bonne.
n'est pas correctement
branché.
Selon le système audio, la
connexion du fil de terre
peut entraîner un
ronflement. Le fil de terre a
l'effet inverse.
Ajustez la force d'appui.
vibrations.
de lecture.
Vérifiez que le câble de
mise à la terre est
correctement branché.
Dans ce cas, le fil de terre
ne doit pas être connecté.
Bluetooth n'est établie.
smartphone.
pas connecté à PLATINUM.
prise en charge.
Bluetooth sur les deux
appareils, puis essayez à
nouveau.
haut-parleur, un casque, ou
des écouteurs Bluetooth.
68 © sonoro audio GmbH 2021
Page 69

FR
11. Garantie
Ce qui suit s'applique à la revendication de droits de garantie, sans limitation de vos droits
légaux:
•
Les demandes de garantie ne peuvent être effectuées que dans un délai maximum de 2
ans (1 an en Amérique du Nord et en Australie), à compter de la date d'achat.
•
Pendant la période de garantie, sonoro audio GmbH remédiera, à sa propre discrétion,
à tous les défauts causés par des dysfonctionnements matériels ou de fabrication, en
réparant ou en remplaçant gratuitement la PLATINUM.
•
Pour toute question relative aux plaintes, veuillez contacter notre service clientèle. Vous
en trouverez les coordonnées sous la rubrique « Coordonnées », ou sur le site sonoro.de
•
Aucune nouvelle période de garantie ne débute avec la réparation ou le remplacement
de la PLATINUM. La période de garantie de 2 ans (1 an en Amérique du Nord et en
Australie) à compter de la date d'achat reste applicable.
•
Sont exclus de la garantie les dommages dus à une mauvaise utilisation, à l'usure
normale et à la consommation, ainsi que les défauts qui n'affectent que de manière
insignifiante la valeur ou l'utilité de la PLATINUM. La garantie est également nulle en cas
d'interventions n'ayant pas été effectuées par le centre de service autorisé par nous.
© sonoro audio GmbH 2021 69
Page 70

sonoro.de
Page 71
IT
PLATINUM
SO-2000
GIRADISCHI
Istruzioni per l'uso
© sonoro audio GmbH 2021 71
Page 72

Indice
1. Introduzione .............................................................................................................. 73
2. Conoscere il PLATINUM .......................................................................................... 73
2.1 Materiale in dotazione ....................................................................................................... 73
2.2 Elementi di comando e collegamenti ............................................................................. 74
2.3 Dati tecnici ........................................................................................................................... 76
3. Montaggio del giradischi ........................................................................................ 77
4. Collegamento di PLATINUM ................................................................................... 81
5. Riproduzione di una registrazione .......................................................................... 82
6. Una volta conclusa la riproduzione ........................................................................ 84
7. Stabilimento di un collegamento con un dispositivo Bluetooth ......................... 84
8. Collegamento a un computer ................................................................................. 85
9. Manutenzione ........................................................................................................... 85
10. Risoluzione degli errori ............................................................................................ 90
11. Garanzia ..................................................................................................................... 92
Il wordmark Bluetooth® e i logotipi sono proprietà della Bluetooth SIG, Inc. e vengono utilizzati dalla sonoro
audio GmbH dietro licenza. Altri marchi e nomi commerciali appartengono ai rispettivi proprietari.
Qualcomm aptX è un prodotto di Qualcomm Technologies International, Ltd. Qualcomm è un marchio di
Qualcomm Incorporated, registrato negli Stati Uniti e in altri Paesi, utilizzato previa autorizzazione. aptX è un
marchio di Qualcomm Technologies International, Ltd., registrato negli Stati Uniti e in altri Paesi, utilizzato previa
autorizzazione.
72 © sonoro audio GmbH 2021
Page 73
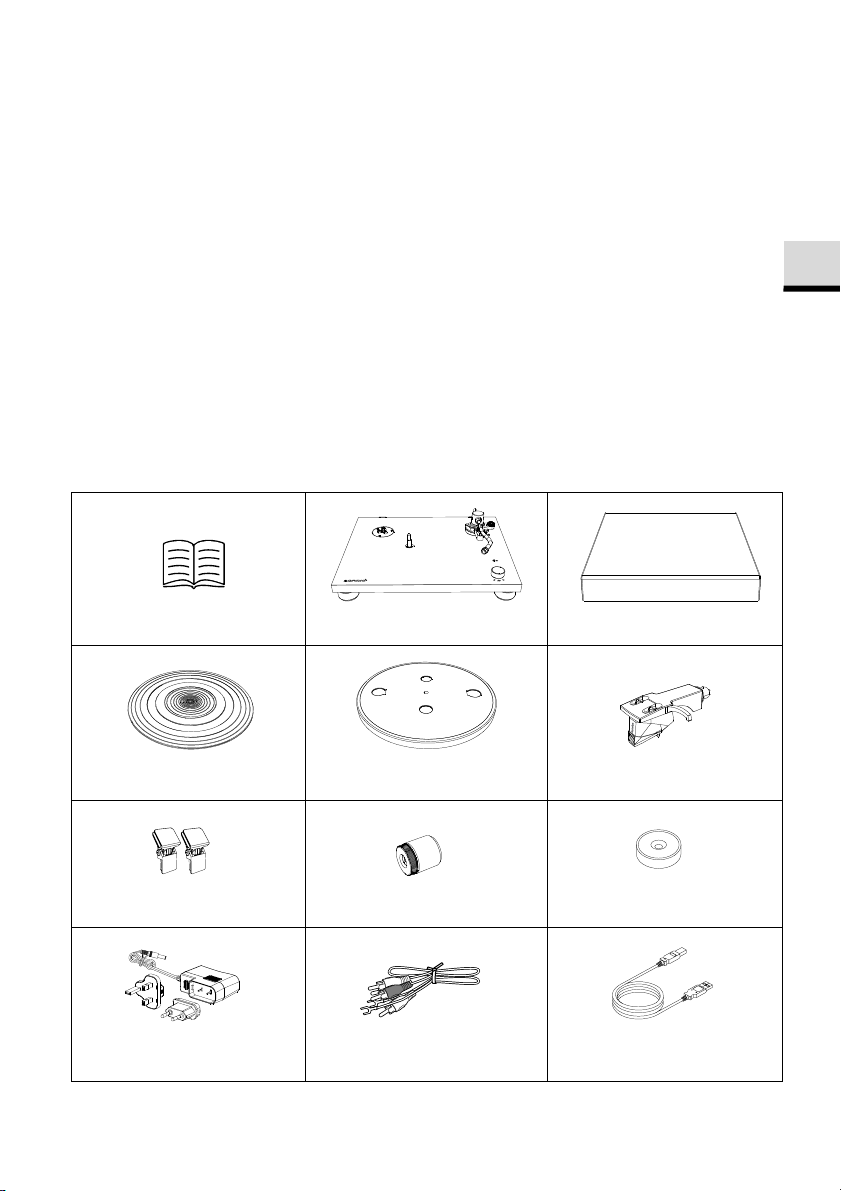
IT
Istruzioni per l'uso
Giradischi
Coperchio antipolvere
Tappetino
Piatto e cinghia di trasmissione
Portatestina con fonorivelatore
Cerniere per il coperchio
antipolvere
Contrappeso
Adattatore 45 giri
(adattatore per single da 7")
Alimentatore con spina con
adattatore UE e UK
Cavo cinch
Cavo USB
1. Introduzione
Vi ringraziamo per aver acquistato PLATINUM. Le presenti istruzioni per l'uso contengono
tutte le informazioni necessarie per un uso corretto e sicuro di PLATINUM.
È responsabilità dell'utilizzatore assicurare che il giradischi venga posizionato, collegato e
utilizzato in sicurezza. Le immagini di queste istruzioni per l'uso sono intese ad illustrare le
misure necessarie per il funzionamento di PLATINUM.
PLATINUM è destinato solo all'uso personale. Non è destinato all'uso commerciale.
Buon divertimento con il vostro PLATINUM!
2. Conoscere il PLATINUM
2.1 Materiale in dotazione
Controllare se sono presenti i seguenti elementi.
© sonoro audio GmbH 2021 73
Page 74
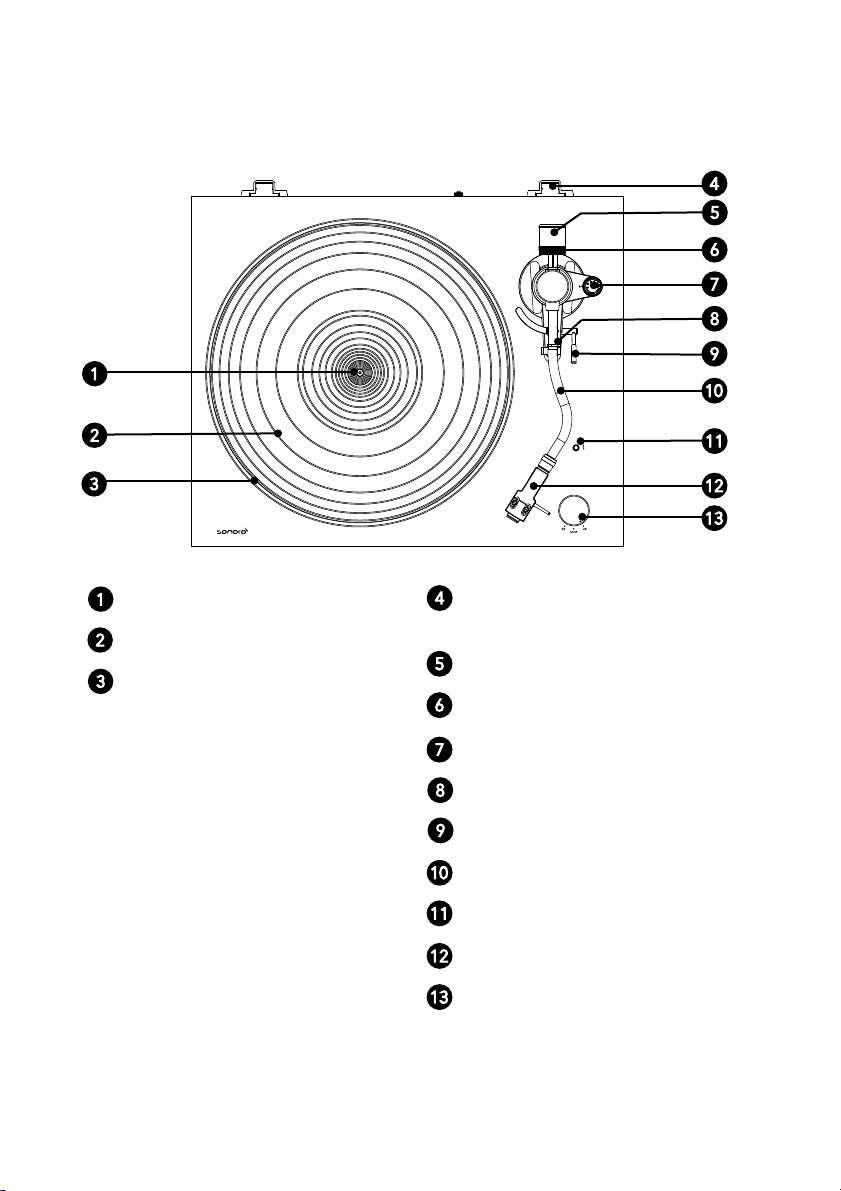
2.2 Elementi di comando e collegamenti
Vista dall'alto
Asse
Tappetino
Piatto
74 © sonoro audio GmbH 2021
Sede della cerniera per il coperchio
antipolvere
Contrappeso
Scala graduata di regolazione
Scala graduata dell'antiskating
Supporto del braccio
Leva del braccio
Braccio
Spia Bluetooth / tasto di accoppiamento
Portatestina con fonorivelatore
Selettore di velocità
Page 75
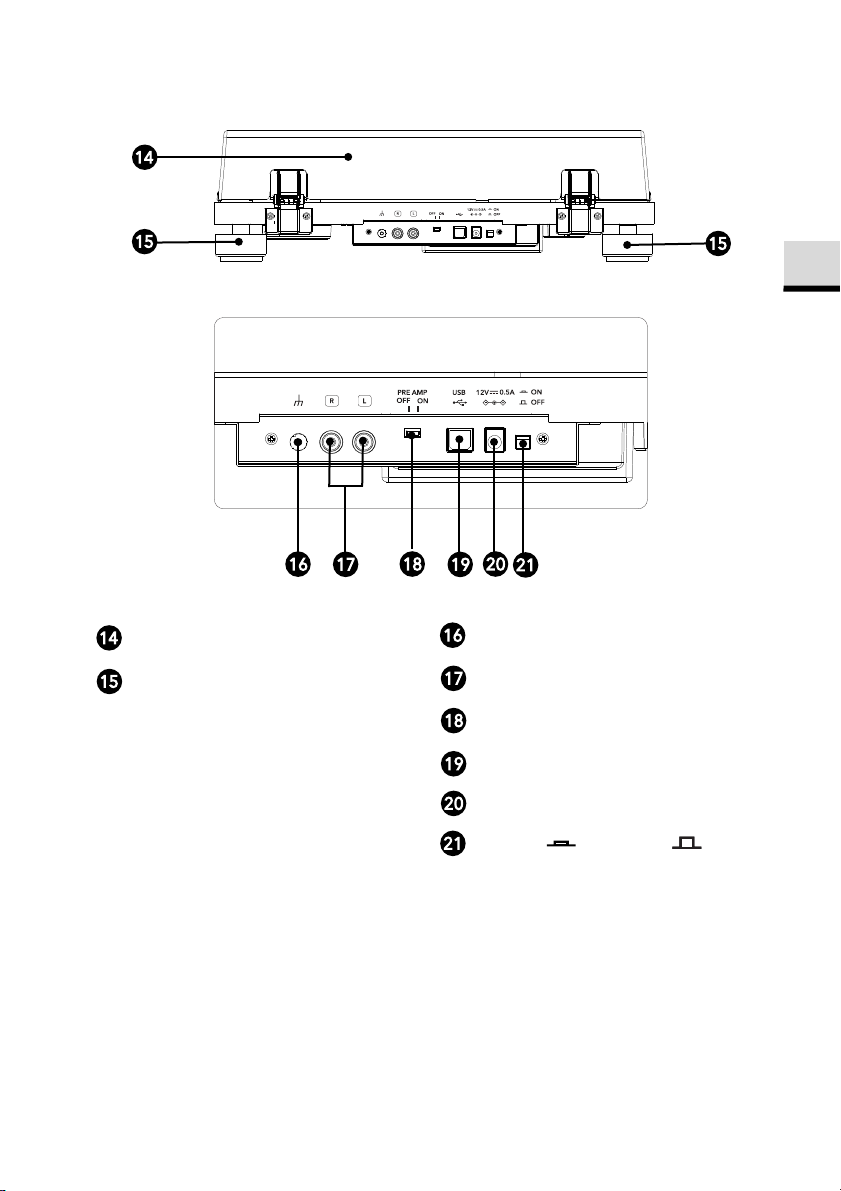
IT
USB
PRE AMP
Vista posteriore
Coperchio antipolvere
Collegamento a massa
Piedini
Uscita audio di tipo cinch
Commutatore preamplificatore
Uscita USB
Presa di ingresso a corrente alternata
TASTO ON / OFF
© sonoro audio GmbH 2021 75
Page 76

2 velocità, funzionamento
completamente manuale
Motore a corrente continua
a controllo ottico
Alluminio pressofuso,
diametro 300 mm
Fluttuazioni di
velocità
Rapporto
segnale/rumore
> 67 dB (ponderato A,
20KHz, LPF)
Livello di uscita
ON
300 mV±3dB (1KHz, 5cm/s)
Braccio a S a
bilanciamento statico
Forza di appoggio
regolabile
Peso ammesso del
fonorivelatore
Impedenza di
raccomandata
Collegamento
amplificatore
da 1,6 a 2,0 g (standard
1,8 g)
Peso del
portatestina
9,3 g (compresi i pesi di
viti, dadi e fili connettori)
Sporgenza del
portatestina
USB 1.1 o superiore
MAC OSX o superiore
Potenza di uscita
massima
circa 420 x 356 x 125
mm
Temperatura
d'esercizio
Diamante di ricambio
(disponibile a parte)
Ortofon 2M Red /
2M Blue
Nome e indirizzo del
Golden Profit Electronics Ltd
Guangdong, China
Corrente alternata di
ingresso
Efficienza media
funzionamento
Efficienza a carico
ridotto (10%)
Potenza assorbita
senza carico
I dati tecnici possono cambiare senza preavviso.
2.3 Dati tecnici
Giradischi
Tipo
Azionamento Trasmissione a cinghia
Motore
Velocità 33 1/3 giri/min e 45 giri/min
Piatto
< 0,15% (33 giri/min) a 3 KHz
Preamplificatore
OFF
5,5mV±3dB (1KHz, 5cm/s)
Prese di uscita Cinch
Braccio
Tipo di braccio
Lunghezza effettiva 224 mm
Sporgenza 19 mm
da 0 a 2,5 g
Collegamento USB
Formati supportati
Windows 7 o superiore
Bluetooth
Versione Bluetooth 4.0
Output class classe 2
Banda di frequenza 2,402 GHz – 2,480 GHz
Metodo di modulazione
FHSS
Profilo A2DP 1.3
Codec supportati SBC, aptX Audio
10,0 dBm
Portata circa 10m
Dati generali
Dimensioni (L x P x A)
Peso circa 3,9 kg
0 °C ~ +40 °C
Consumo di energia
OFF
ON
0,1 w o meno
1,5 w o meno
da 5 a 7,5 g
Alimentatore
Fonorivelatore
Modello Ortofon 2M Red
produttore
Tipo Moving Magnet
collegamento
47.000 ohm
Codice del modello GPE006D-120050-Z
Tensione di ingresso CA 100 – 240 V
Ingresso MM
Tensione di uscita 5,5mV (1KHz, 5 cm/s)
Tipo di ago Diamante ellittico
Raggio della punta r/R 8/18 pm
Forza di appoggio
Peso del fonorivelatore
76 © sonoro audio GmbH 2021
7,2g
± 5 mm
Tensione di uscita CC 12,0 V
Corrente di uscita 0,5 A
Potenza di uscita 6,0 W
durante il
Shayao Chenwu Village,
Shijie Town, Dongguan,
50 / 60 Hz
più del 78,9%
70,0%
0,10 w o meno
Page 77
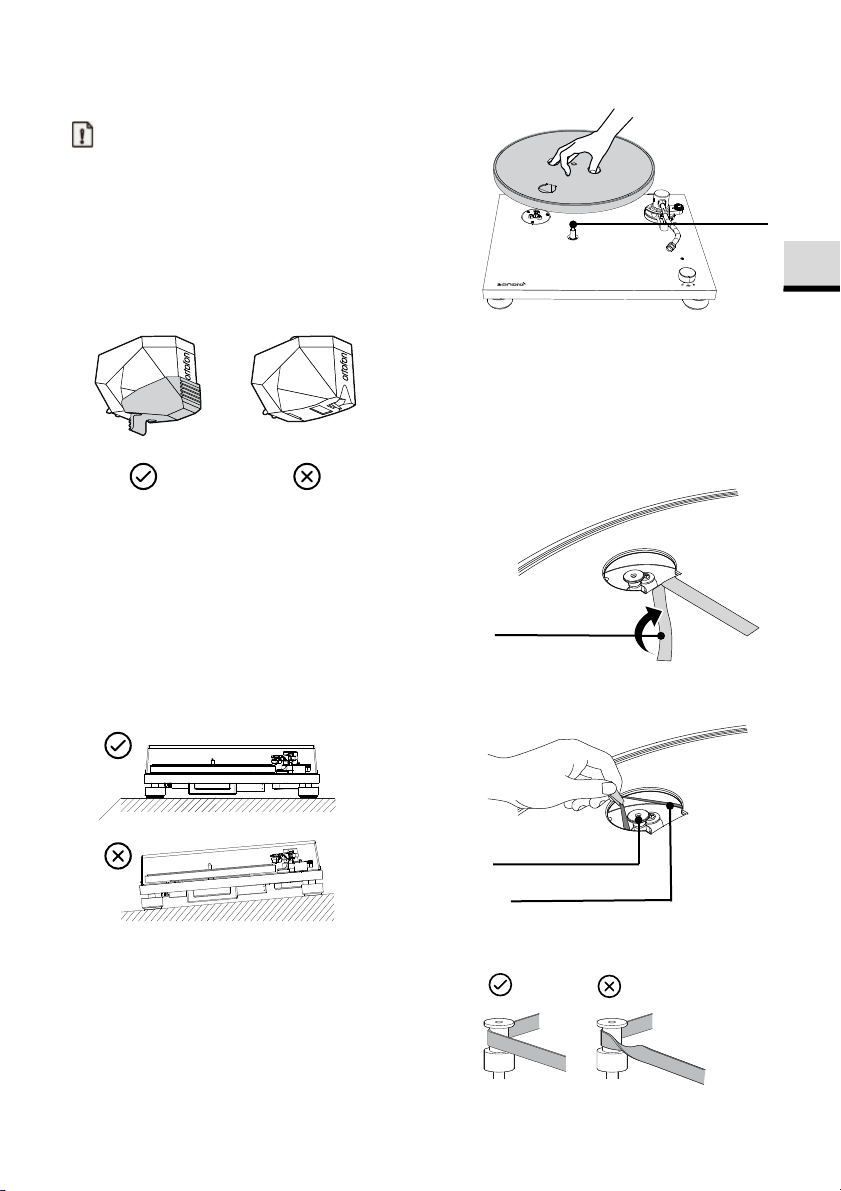
IT
Asse
Puleggia del motore
Nastro adesivo
Cinghia di rasmissione
3. Montaggio del giradischi
Nota:
• Il PLATINUM deve essere assemblato prima
del primo utilizzo.
• Collegare il giradischi ad una presa con
l'alimentatore solo dopo aver concluso il
montaggio.
• Sopra la testina si trova una copertura di
protezione. Lasciarla dove si trova durante
l'assemblaggio del giradischi.
• La testina è un componente di alta precisione.
Non toccarla con le dita e non lasciarla cadere
sul piatto, poiché ciò potrebbe danneggiare
l'ago.
• Rimuovere il serracavo con cui è fissato il
braccio.
1. Collocazione del PLATINUM
• Collocare il PLATINUM su una superficie
piana e stabile.
• Collocare il piatto sull'asse con attenzione.
• Ruotare il piatto nella posizione in cui si possa
vedere la puleggia del motore attraverso il
foro circolare del piatto.
3. Applicazione della cinghia di
trasmissione
• Staccare il nastro adesivo, tirare la fascetta
rossa e mantenerla ferma.
• Poi collocare la cinghia di trasmissione
intorno alla puleggia del motore.
2. Collocazione del piatto
• Assicurarsi di non torcere la cinghia di
trasmissione.
• Sostenere saldamente il piatto.
• Rimuovere la fascetta rossa dalla cinghia di
trasmissione.
© sonoro audio GmbH 2021 77
Page 78
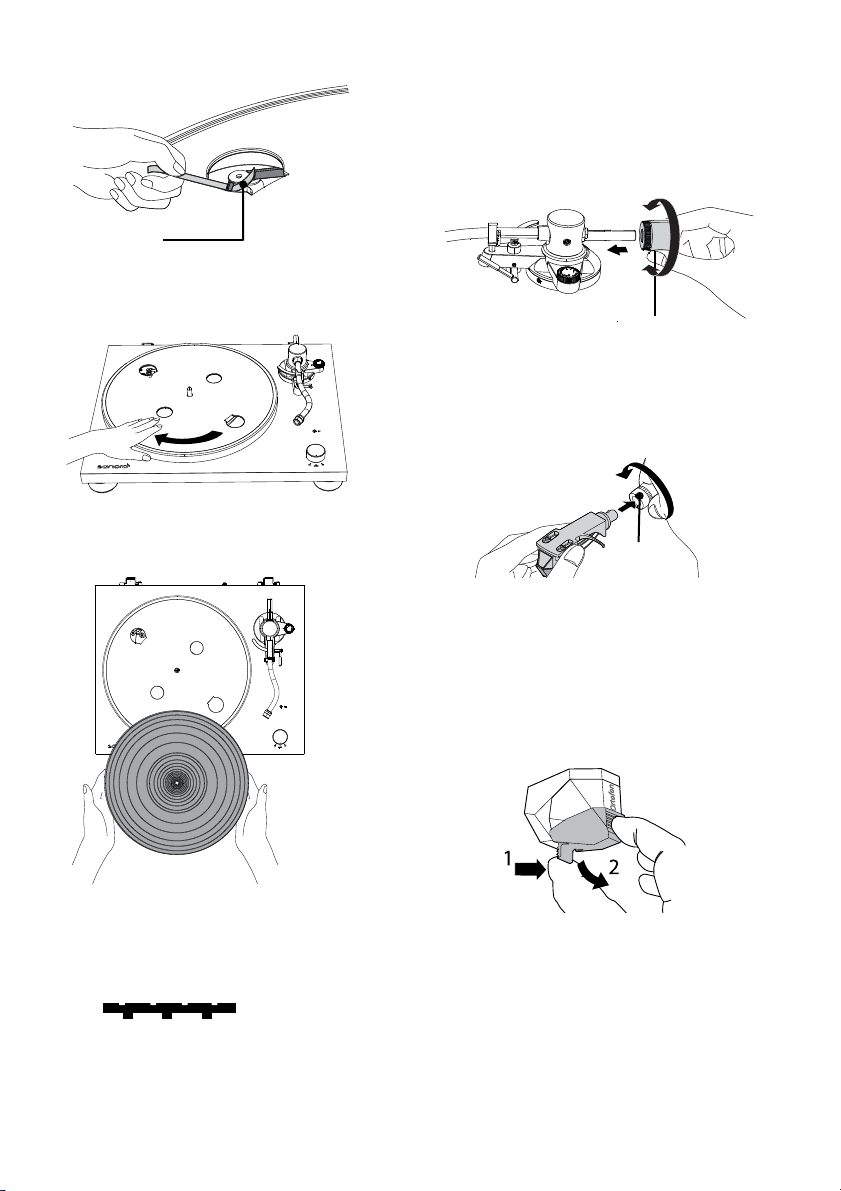
Controdado
Contrappeso
Fascetta
5. Montaggio del contrappeso
• Applicare il contrappeso all'estremità del
braccio e girarlo lentamente in senso
antiorario esercitando al tempo stesso una
leggera pressione.
• Ruotare più volte il piatto girevole per
assicurarsi che la cinghia di trasmissione sia
collocata saldamente e giri senza attrito.
6. Installazione del portatestina
• Inserire il portatestina sull'estremità anteriore
•
4. Collocazione del tappetino
• Collocare il tappetino sul piatto.
7. Rimozione della copertura di protezione
• Tenere la copertura di protezione dal lato
• Tirare lentamente la copertura di protezione
• Il tappetino ha un lato superiore e un lato
inferiore. Il lato con i cerchi concentrici
scanalati deve trovarsi in basso.
Sopra
Sotto
8. Regolazione del bilanciamento del
• Regolare la scala graduata dell'antiskating su
78 © sonoro audio GmbH 2021
del braccio.
Girare il controdado in senso orario per
fissarlo.
dalla testina
anteriore e da quello posteriore premendo al
tempo stesso il dispositivo di blocco della
sezione posteriore.
verso il basso.
braccio
zero.
Page 79
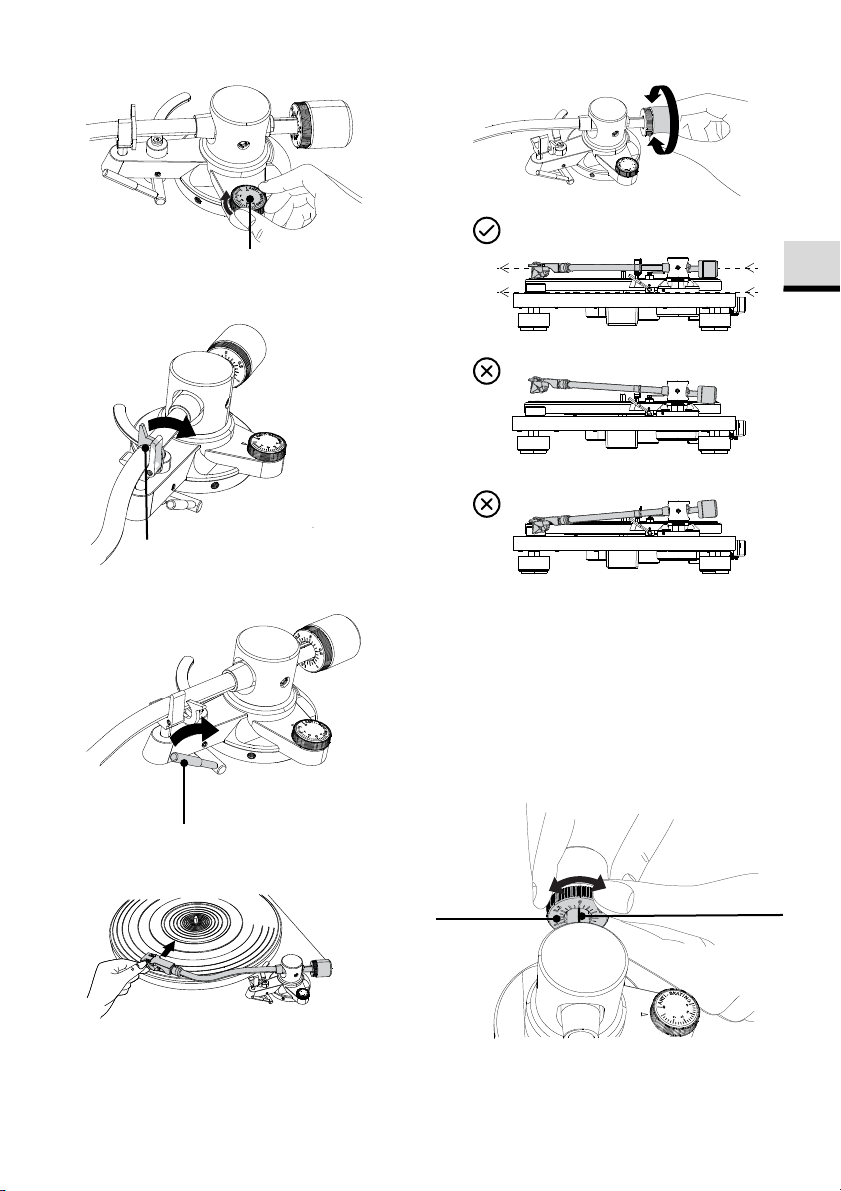
IT
Fermo del braccio
Leva del braccio
Scala graduata dell'antiskating
Segno di regolazione
Scala graduata
Contrappeso
• Allentare il fermo del braccio
• Sollevare la leva del braccio.
• Riportare il braccio nella sua posizione
originale.
• Bloccare il fermo del braccio.
9. Regolazione della forza di appoggio
• Girare la ghiera del contrappeso in modo che
la linea centrale sia rivolta sullo 0 della scala
graduata.
• Sostenere il portatestina con il dito e spostare
il braccio sopra il piatto.
• Abbassare la leva del braccio.
• Regolare il contrappeso in modo che il
braccio oscilli parallelamente al piatto
girevole.
© sonoro audio GmbH 2021 79
• Girare solo la ghiera! Il contrappeso non deve
girare.
di regolazione
• Regolare adeguatamente il contrappeso per
il fonorivelatore girando
contemporaneamente il contrappeso e la
scala graduata.
Page 80
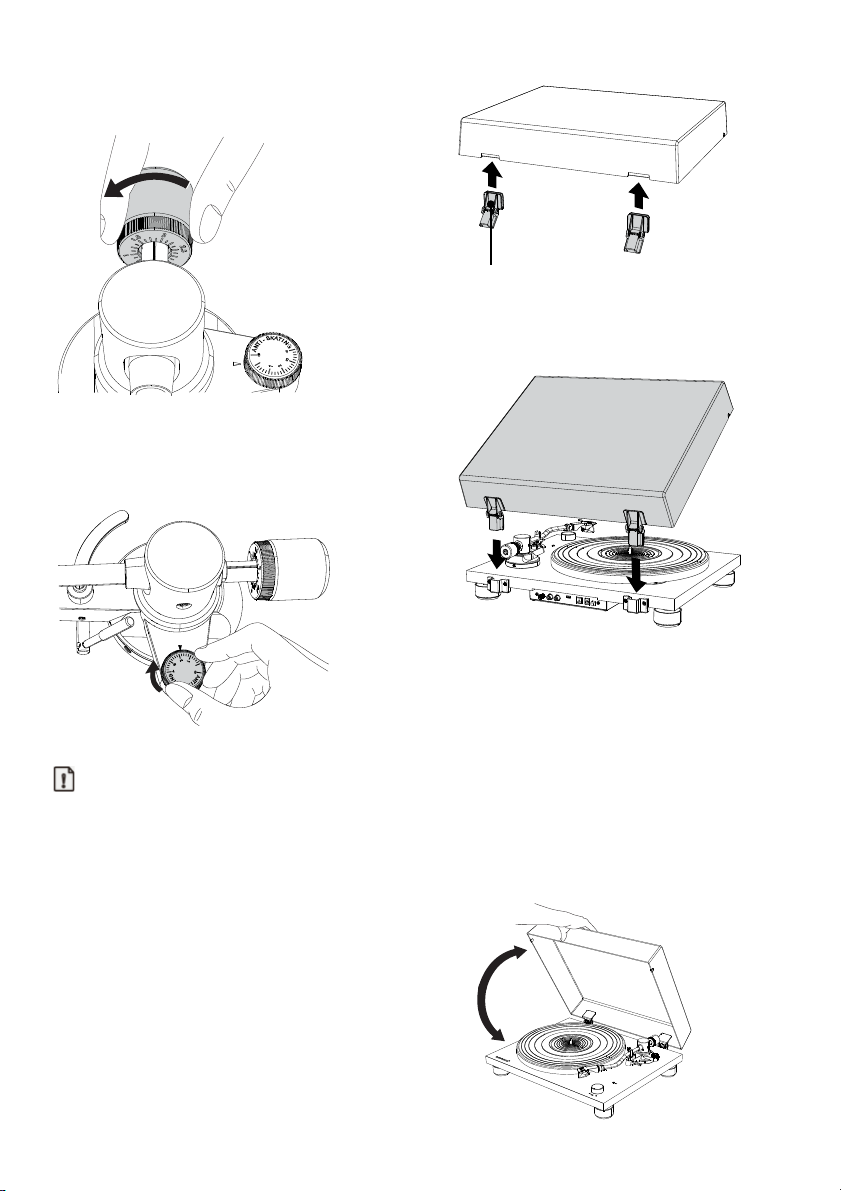
Cerniere
• La forza di appoggio raccomandata per il
fonorivelatore fornito è di 1,8 g.
• Orientare le cerniere sui supporti situati su
lato posteriore del piatto e inserirle nei
supporti.
10. Regolazione della forza dell'antiskating
• La scala graduata dell'antiskating deve essere
regolata sullo stesso valore della forza di
appoggio; per il fonorivelatore fornito, su 1,8.
11. Installazione del coperchio antipolvere
Nota:
• Il coperchio antipolvere serve a proteggere i
componenti sensibili del giradischi. Quando il
giradischi non è in uso, dovrebbe restare
chiuso.
• Non aprirlo né chiuderlo mentre viene
12. Apertura e chiusura della copertura di
protezione
Apertura
• Sostenere saldamente il bordo anteriore della
copertura di protezione e sollevarla con
attenzione completamente fino all'arresto.
• La copertura di protezione rimane aperta in
posizione.
Chiusura
• Abbassare con attenzione la copertura
antipolvere fino a chiuderla.
riprodotta una registrazione.
• Fare attenzione a non schiacciarsi le dita
quando si apre e si chiude il coperchio.
• Non collocare alcun oggetto sul coperchio
antipolvere.
• Inserire completamente le cerniere del
coperchio antipolvere nei supporti delle
cerniere.
80 © sonoro audio GmbH 2021
Page 81
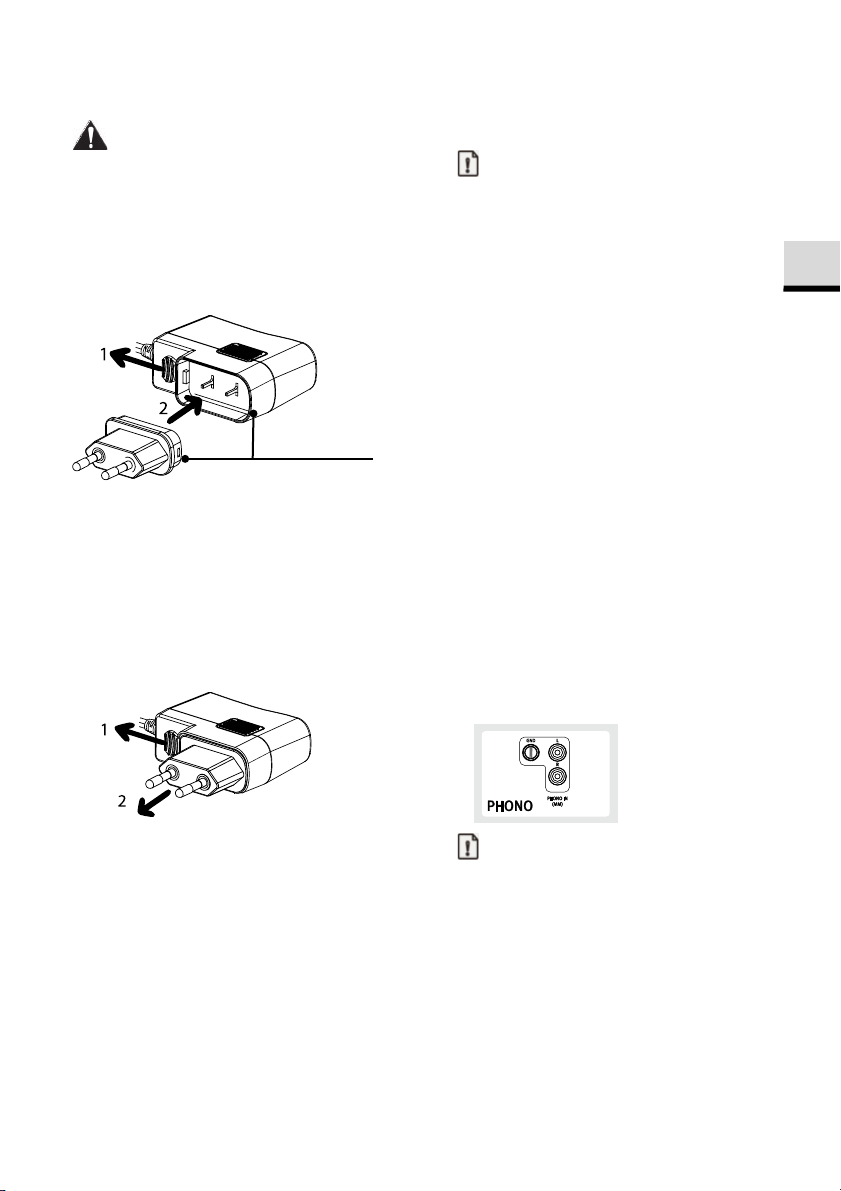
IT
Sezione superiore
tonda
13. Collegamento e sostituzione della spina
AVVERTENZA!
Rischio di scossa elettrica!
• Non inserire l'adattatore di rete da solo nella
presa di corrente.
• Assicurarsi che la spina e l'adattatore siano
serrati correttamente
Collegamento della spina
4. Collegamento di PLATINUM
Nota:
• Il fonorivelatore Ortofon 2M RED montato è
un fonorivelatore MM. Pertanto occorre
impostare il proprio sistema audio su MM
(non MC).
• Assicurarsi che il sistema audio/amplificatore
collegato a PLATINUM sia spento e che il
volume sia regolato su un livello basso.
• Prima di accendere il sistema audio e
PLATINUM, assicurarsi che tutti i collegamenti
siano stati stabiliti correttamente e selezionare
l'impostazione corretta del preamplificatore.
In caso contrario possono verificarsi forti
ronzii che potrebbero danneggiare il sistema
• Tirare il clip verso il basso e tenerlo fermo.
• Inserire l'angolo tondo della spina nella
sezione superiore dell'adattatore.
• Inserire la spina desiderata verticalmente nei
piedini di contatto dell'adattatore fino a
premerla completamente verso l'interno.
• Rilasciare il clip e serrare l'adattatore di rete.
Rimozione della spina
audio o gli altoparlanti.
1. Collegamento ad un sistema
audio/amplificatore
• Collegare il sistema audio e il PLATINUM con
il cavo cinch fornito.
• Se il sistema audio dispone di un
amplificatore Phono integrato, con ogni
probabilità è presente un terminale di messa
a terra. Avvitare saldamente il cavo di terra ai
due lati: al sistema audio e a PLATINUM.
Inserire gli spinotti nell'ingresso Phono del
sistema audio e nell'uscita di PLATINUM.
• Tirare il clip verso il basso e tenerlo fermo.
• Estrarre l'adattatore di rete dall'alimentatore
con un movimento verticale.
© sonoro audio GmbH 2021 81
Nota:
• Il collegamento di terra del PLATINUM non è
una messa a terra di sicurezza.
• A seconda del sistema audio, collegare il cavo
di terra o di massa può avere l’effetto
opposto, con un aumento di ronzio e fruscio.
In tal caso non bisogna collegare il cavo di
terra o di massa.
• Si sconsiglia di collegare il PLATINUM al
collegamento di terra di un MAESTRO.
Page 82
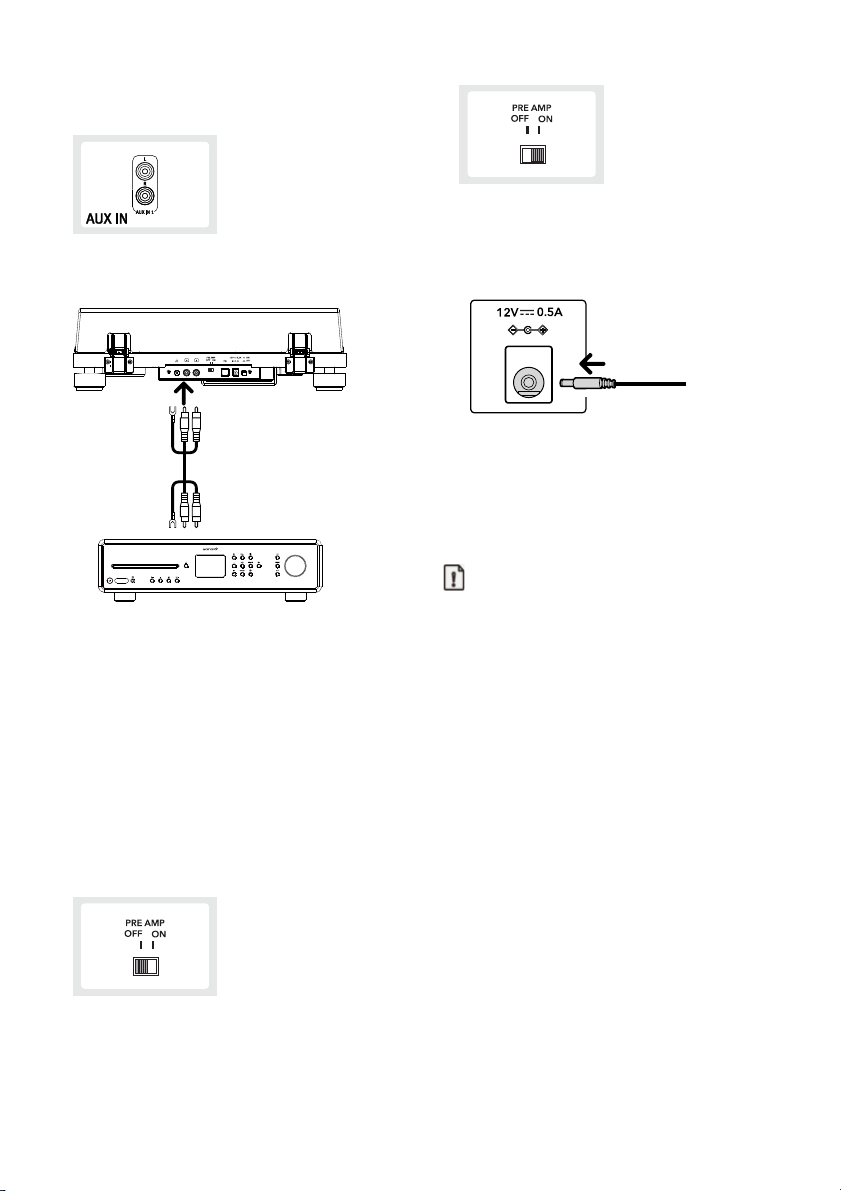
USB
• Se il sistema audio non ha un ingresso Phono,
utilizzare un ingresso cinch Aux In libero.
• Lo spinotto bianco è per il canale di sinistra,
lo spinotto rosso è per il canale di destra.
3. Collegamento dell'alimentatore
• Dopo aver stabilito gli altri collegamenti,
collegare l'alimentatore fornito alla presa di
ingresso CC.
• Inserire l'alimentatore con spina in una presa
di corrente.
5. Riproduzione di una
registrazione
Nota:
2. Impostazione del selettore del
preamplificatore
Commutare il selettore del preamplificatore del
lato posteriore di PLATINUM secondo le
funzioni del sistema audio/amplificatore a cui è
collegato PLATINUM:
• Portare il selettore su OFF
Se il sistema audio/amplificatore dispone di
una presa di ingresso PHONO, vi si può
collegare PLATINUM direttamente
spegnendo il preamplificatore integrato per
escluderlo.
• Portare il selettore su ON.
Se il sistema audio/amplificatore non dispone
di una presa di ingresso Phono, si può usare il
preamplificatore integrato di PLATINUM
portandolo su ON.
82 © sonoro audio GmbH 2021
• Abbassare il volume del dispositivo audio
prima di riprodurre un disco. Il forte fruscio
generato quando la testina si abbassa nel
solco iniziale del disco può danneggiare gli
altoparlanti o il dispositivo audio. Attendere il
completo abbassamento del fonorivelatore,
poi regolare il volume.
• Anche i dischi nuovi possono causare un
fruscio durante la riproduzione. Si tenga
presente che questo rumore è caratteristico
della riproduzione di dischi.
• Collocare un disco alla volta sul piatto.
• Per evitare l'accumulo di polvere, chiudere la
copertura di protezione durante la
riproduzione di dischi.
• Non arrestare la rotazione del giradischi
durante la riproduzione.
• Se il volume è troppo alto, durante la
riproduzione di dischi possono verificarsi
feedback acustici. In tal caso ridurre il volume
dell'amplificatore.
1. Accendere il giradischi.
• Premere il tasto ON/OFF sul lato posteriore
del giradischi per accenderlo.
Page 83
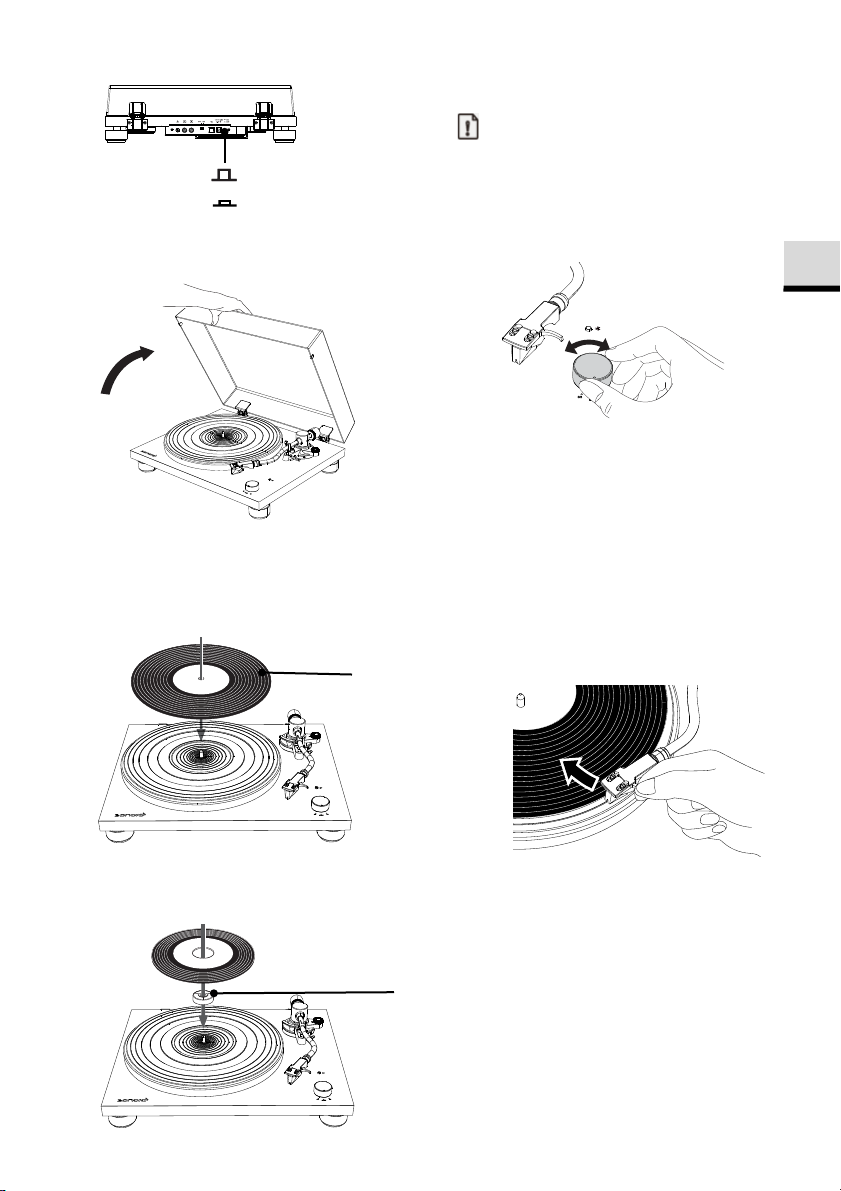
IT
USB
PRE AMP
Disco
Adattatore 45 giri
OFF
ON
2. Aprire con attenzione la copertura di
protezione.
4. Uso del selettore di velocità
Nota
• Di solito il numero di giri per la riproduzione è
indicato sull'etichetta del disco.
• Si può impostare il numero di giri su 33 o 45
giri/min. Scegliere il numero di giri adatto al
disco.
• Quando il selettore di velocità è impostato su
33 o 45, il piatto inizia a girare.
5. Allentare il fermo del supporto del
braccio.
6. Sollevare la leva del braccio.
7. Con il dito sul portatestina, condurre il
braccio sul bordo del disco o sul brano
con il quale si desidera iniziare la
riproduzione.
3. Collocazione di un disco
• Collocare il disco sul tappetino in modo
che l'asse venga a trovarsi nel foro centrale
del disco.
•
Per riprodurre single usare l'adattatore per
single fornito.
© sonoro audio GmbH 2021 83
8. Abbassamento del braccio
• Abbassare lentamente il braccio con l'aiuto
della leva del braccio finché la testina non
tocca il disco e inizia la riproduzione.
9. Chiudere con attenzione la copertura di
protezione.
Page 84
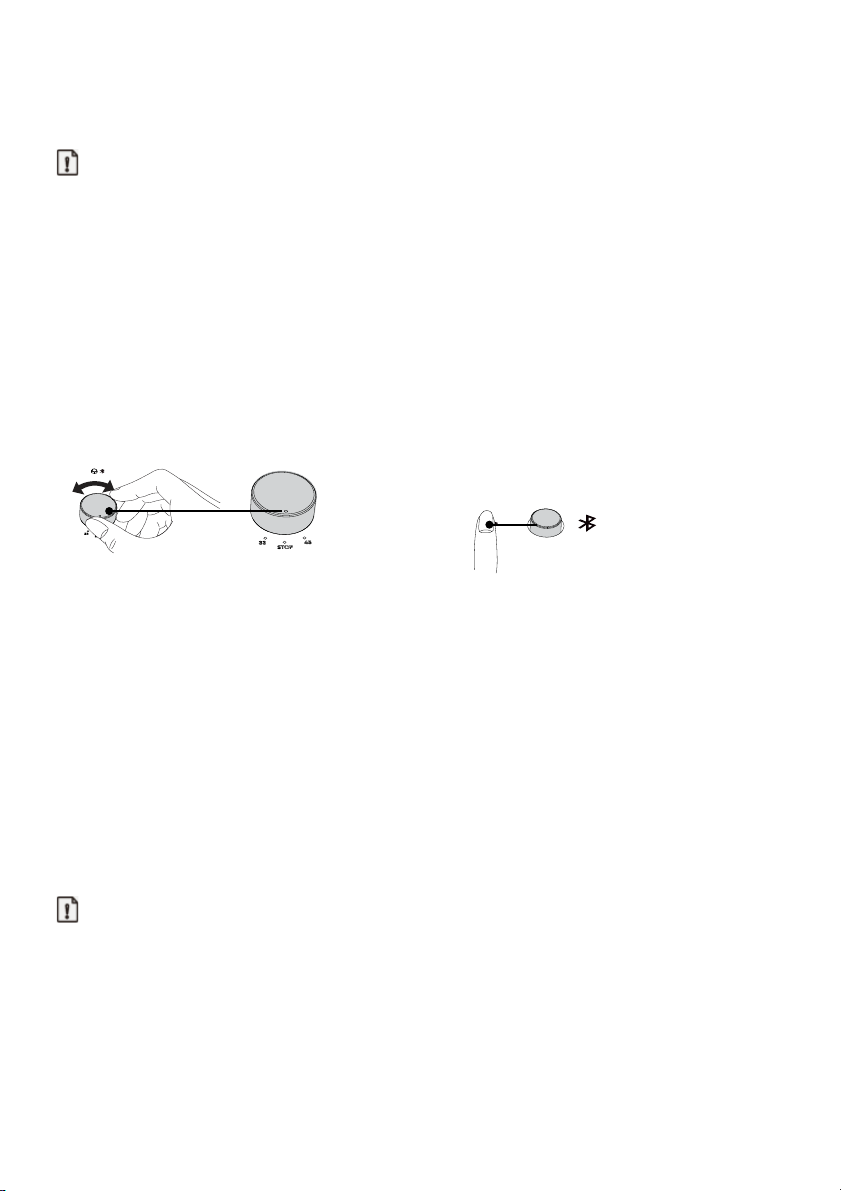
Spia Bluetooth / tasto
di accoppiamento
6. Una volta conclusa la riproduzione
Nota:
• PLATINUM è un giradischi manuale. Non si
arresta automaticamente!
• Al termine di un disco sollevare sempre il
braccio per evitare il danneggiamento della
testina e del disco.
1. Alzare la leva del braccio.
2. Ritorno del braccio
• Spostare nuovamente il braccio nella sua
3. Girare il selettore di velocità in posizione
posizione originale con il dito sul portatestina.
STOP.
disattivare la funzione Bluetooth e riprovare.
• Non stabilire un collegamento con
altoparlanti o cuffie Bluetooth per i quali non
sia possibile regolare il volume. È possibile
che alcuni brani vengano riprodotti a volume
molto alto.
• Non è possibile accoppiare il giradischi con
smartphone, televisori o computer.
1. Accoppiare il dispositivo Bluetooth per la
prima volta
• Premere il tasto BT del giradischi per avviare
la modalità di accoppiamento Bluetooth. La
spia diventa blu e lampeggia lentamente.
• Premere nuovamente il tasto BT per almeno
due secondi per avviare la modalità di
accoppiamento. La spia blu lampeggia
velocemente.
• Quando il giradischi si arresta, il piatto non
gira.
• Se non si prevede di usare ulteriormente il
giradischi, premere il tasto ON/OFF del lato
posteriore del giradischi per spegnerlo.
7. Stabilimento di un
collegamento con un
dispositivo Bluetooth
PLATINUM può stabilire un collegamento con
dispositivi compatibili con Bluetooth (ad es.
altoparlanti Bluetooth e cuffie Bluetooth).
Nota:
• La portata rientra in un ambito di circa 10
metri.
• Per informazioni sull'uso consultare le
istruzioni per l'uso dei dispositivi Bluetooth.
• In funzione del dispositivo collegato, per
l'accoppiamento può volerci un poco di
tempo.
• Se ci si trova vicino a dispositivi di
riproduzione Bluetooth accesi con i quali non
si riesce ad eseguire l'accoppiamento,
84 © sonoro audio GmbH 2021
• Dopo che il giradischi è passato alla modalità
di accoppiamento, mettere in modalità di
accoppiamento anche l'altro dispositivo
Bluetooth.
• L'accoppiamento avviene automaticamente.
Una volta che il giradischi e il dispositivo
Bluetooth sono collegati, la spia resta accesa
con luce fissa.
2. Collegamento del dispositivo Bluetooth
accoppiato
PLATINUM può memorizzare le informazioni
relative ad un massimo di 8 dispositivi
accoppiati. Non è necessario eseguire
nuovamente l'accoppiamento per i successivi
collegamenti a dispositivi che siano già stati
accoppiati una volta al giradischi.
• Premere il tasto BT del giradischi per avviare
la modalità di accoppiamento. La spia diventa
blu e lampeggia lentamente.
• Preparare il dispositivo Bluetooth al
collegamento.
• L'accoppiamento avviene automaticamente.
Una volta che il giradischi e il dispositivo
Bluetooth sono collegati, la spia di
accoppiamento resta accesa con luce fissa.
Page 85
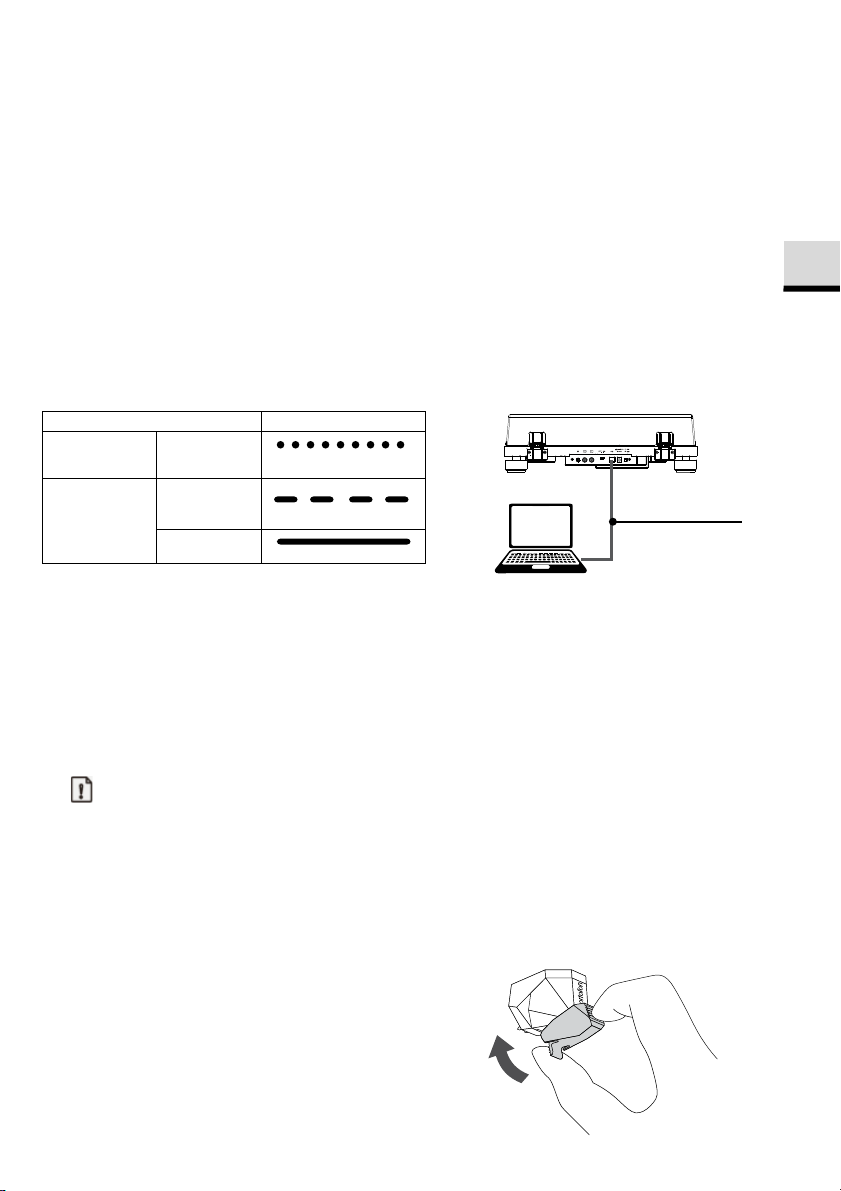
IT
Stato operativo
Spia BT (blu)
Luce fissa n
USB
PRE AMP
Cavo USB
3. Scollegamento del dispositivo Bluetooth
accoppiato
• Premere il tasto BT per almeno 2 secondi per
scollegare il dispositivo Bluetooth accoppiato
dal giradischi. La spia diventa blu e
lampeggia velocemente.
• In modalità Bluetooth, premere il tasto BT
per disattivare la funzione Bluetooth.
• Se durante cinque minuti non viene trovato
un dispositivo Bluetooth, la spia Bluetooth
non si accende più.
• Di seguito è riportato lo stato della spia BT
per i diversi stati operativi.
Accoppiamento
Collegamento
Ricerca
dispositivo
In attesa di
collegamento
Collegato
8. Collegamento a un
computer
Se si collega il giradischi ad un collegamento
USB (tipo A) del computer con il cavo USB
fornito (tipo B), è possibile registrare
digitalmente il contenuto di un disco su un
computer.
Nota:
• I segnali di uscita USB possono essere usati
solo per la registrazione, non per la
riproduzione.
• Il giradischi funziona con i driver standard di
Windows o Mac, pertanto non è necessario
installare driver specifici.
• Il computer riconosce automaticamente il
collegamento USB del giradischi e lo
identifica come
• Per prima cosa occorre installare un software
che possa essere utilizzato per le registrazioni
audio sul computer.
• È possibile acquistare separatamente il
software di registrazione audio preferito
oppure scaricare da internet un software
© sonoro audio GmbH 2021 85
USB Audio CODEC.
Lampeggiamento rapido
Lampeggiamento lento
gratuito come ad es. Audacity
(https://www.audacityteam.org/).
• Se il software non funziona come desiderato,
rivolgersi al proprio amministratore di sistema
per ottenere aiuto.
• Non scollegare il cavo USB durante la
registrazione con un computer e non mettere
il giradischi in modalità standby.
• La musica registrata è destinata solo ad uso
privato. L'uso della musica al di là di tale
limitazione richiede i permesso del titolare
del diritto d'autore.
1. Collegare il computer a PLATINUM con il
cavo USB fornito.
2. Ruotare la manopola del selettore di
velocità per avviare la riproduzione di un
disco.
3. Utilizzare il proprio software per salvare
brani sul computer.
• Per istruzioni dettagliate sull'uso
dell'applicazione e il trasferimento di
segnali audio consultare il manuale utente
del software.
9. Manutenzione
1. Applicare la copertura di protezione alla
testina.
• Sostenere la copertura dalla parte anteriore e
posteriore, allinearla rispetto al lato anteriore
del fonorivelatore e sollevarla lentamente.
Page 86
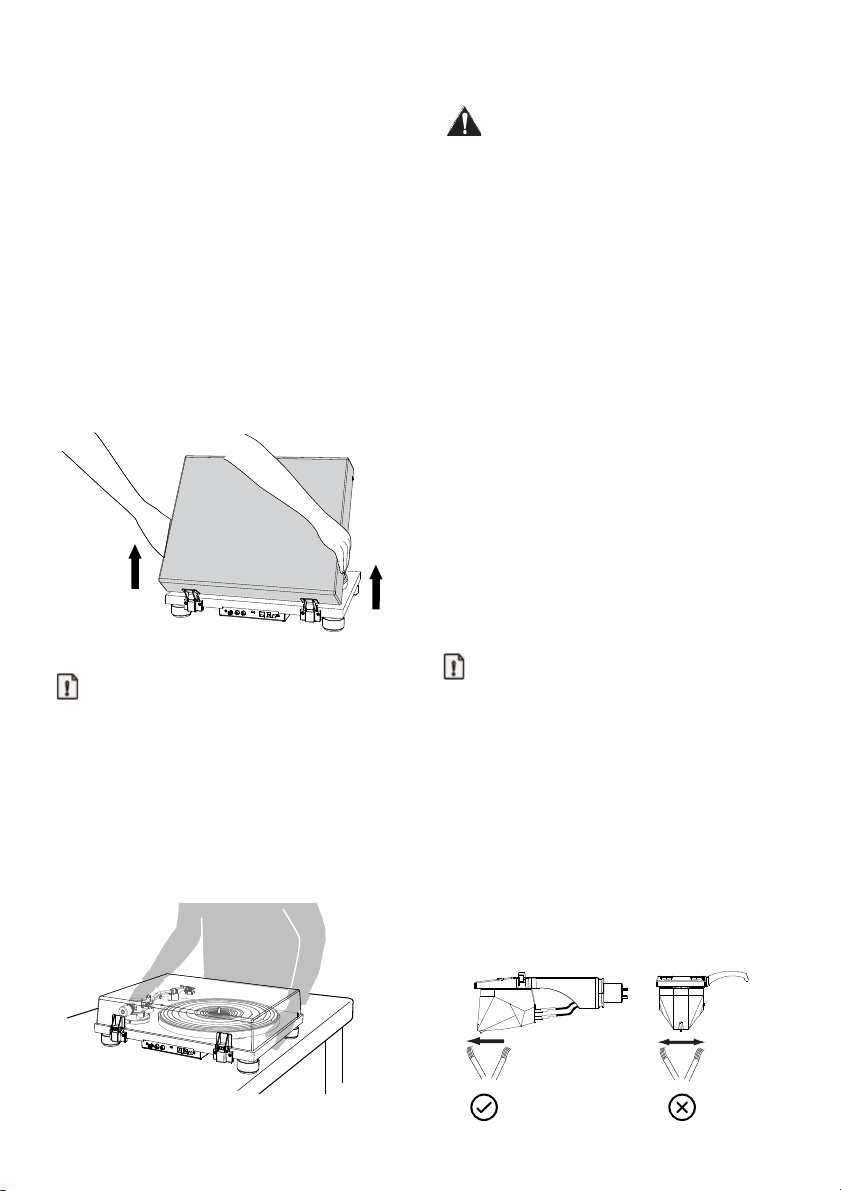
2. Pulizia del giradischi
• Pulire il coperchio antipolvere e il giradischi
con un panno asciutto e morbido.
• Se lo sporco non viene via facilmente
utilizzare un panno leggermente inumidito,
poi asciugare il giradischi con un panno
asciutto e morbido.
• Non usare soluzioni chimiche quali alcol,
benzina o diluenti per vernici, che potrebbero
danneggiare la finitura.
3. Rimozione del coperchio antipolvere
• Per togliere il coperchio antipolvere dal
giradischi, aprirlo completamente e
prenderlo da entrambi i lati vicino al lato
inferiore del coperchio, poi staccarlo con
cautela tirandolo verso l'alto.
5. Trasporto o spedizione di PLATINUM
Attenzione:
• Se si rende necessario trasportare il giradischi
o spedirlo a scopo di riparazione, utilizzare
l'imballaggio originale poiché offre la
migliore protezione.
• Se si è perso l'imballaggio originale,
procedere come segue; per avvolgere
l'apparecchio si consiglia di utilizzare pluriball
o materiali protettivi simili:
• Togliere il coperchio antipolvere e avvolgerlo
con precauzione.
• Togliere il piatto e il tappetino e avvolgere
anche questi.
• Applicare la copertura dell'ago, rimuovere il
portatestina con il fonorivelatore e il
contrappeso dal braccio e avvolgerli con cura.
• Bloccare il fermo del braccio e fissarlo al suo
posto con un poco di nastro adesivo.
• Avvolgere il giradischi con precauzione.
• Utilizzare un imballaggio abbastanza solido e
con un grado di protezione sufficiente per
evitare che PLATINUM subisca danni durante
il trasporto o la spedizione.
4. Trasporto del giradischi
Nota:
• Bloccare il fermo del supporto del braccio.
• Spegnere il giradischi e staccare
l'alimentatore con spina dalla presa.
• Scollegare tutti i cavi di collegamento dal
piatto.
• Applicare la copertura di protezione alla
testina.
• Quando si trasporta il giradischi, afferrarlo
saldamente dal basso.
• Eventualmente regolare la forza di appoggio
e l'antiskating.
86 © sonoro audio GmbH 2021
6. Pulizia della testina
Nota:
• Le testine sono componenti di precisione.
Pertanto trattarle con cura per evitare di
piegarle o danneggiarle. Se si piega il
supporto o si danneggia l'ago, è possibile
che esso non possa più seguire con
precisione il solco e che danneggi i dischi o
causi altri malfunzionamenti.
• Non pulire la testina con diluente o altri
prodotti chimici.
• Se l'ago è molto sporco, usare una piccola
spazzola (non compresa nel materiale in
dotazione). Pulirlo muovendo la spazzola da
dietro in avanti.
Page 87
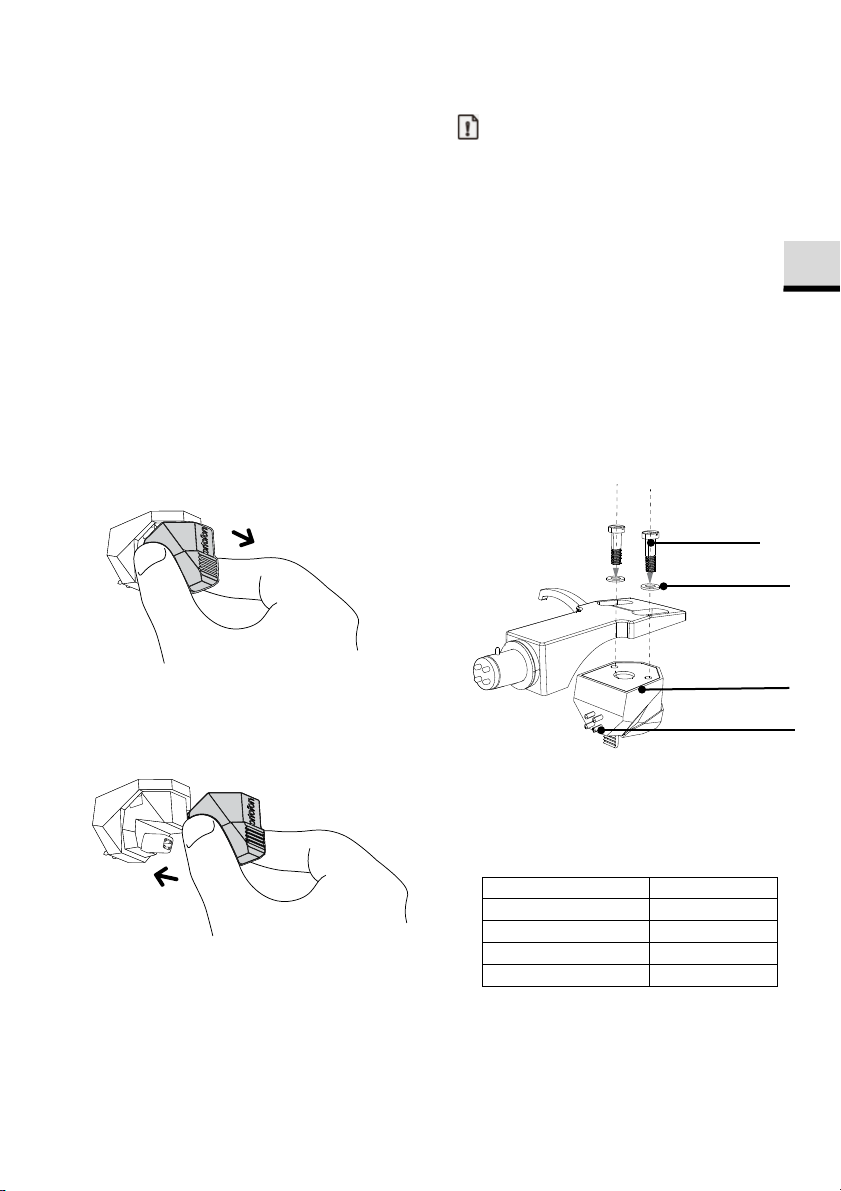
IT
Segnale
Colore
Canale di sinistra +
Bianco
Canale di sinistra -
Blu
Canale di destra +
Rosso
Canale di sinistra -
Verde
Vite
Rondella di
plastica
Fonorivelatore
Contatti
7. Sostituzione della testina
• Oltre a peggiorare la qualità del suono, una
testina consumata può anche danneggiare i
dischi. Dopo circa 1000 ore di riproduzione,
sostituire la testina con una di quelle da noi
indicate.
• Utilizzare una testina per Ortofon 2M RED /
2M Blue.
• Per la sostituzione seguire le istruzioni
riportate nel manuale della testina di
ricambio.
Rimozione della testina
• Lasciare la copertura di protezione sulla
testina.
• Staccare il portatestina dal braccio.
• Sostenere il fonorivelatore in una mano,
prendere l'alloggiamento di plastica della
testina con il pollice e l'indice dell'altra mano
e tirarlo staccandolo dal fonorivelatore.
Installazione di una nuova testina
• Per installare una testina sostitutiva, spingerla
dal davanti con precauzione nel
fonorivelatore
• La testina deve inserirsi completamente nel
fonorivelatore.
• Montare il portatestina sul braccio
© sonoro audio GmbH 2021 87
8. Sostituzione del fonorivelatore
Nota
:
• Di serie, il PLATINUM è fornito con un
Ortofon 2M Red.
• Se si utilizza un fonorivelatore diverso
dall'Ortofon 2M Red, è possibile che si renda
necessario adattare la sporgenza e la forza di
appoggio, la forza dell'antiskating e l'altezza
del braccio. In caso di dubbi rivolgersi al
proprio rivenditore specializzato.
• Lasciare la copertura di protezione sulla
testina.
• Per prima cosa rimuovere il portatestina dal
braccio.
• Con un cacciavite piatto, togliere le viti di
montaggio, le rondelle e infine il
fonorivelatore dal portatestina.
• Per istruzioni sul montaggio e il collegamento
dei cavi del portatestina consultare le
istruzioni per l'uso del nuovo fonorivelatore.
• I segnali e i colori dei cavi del portatestina
sono indicati di seguito.
• Stringere leggermente le viti con un
cacciavite piatto, poi regolare la sporgenza.
Page 88
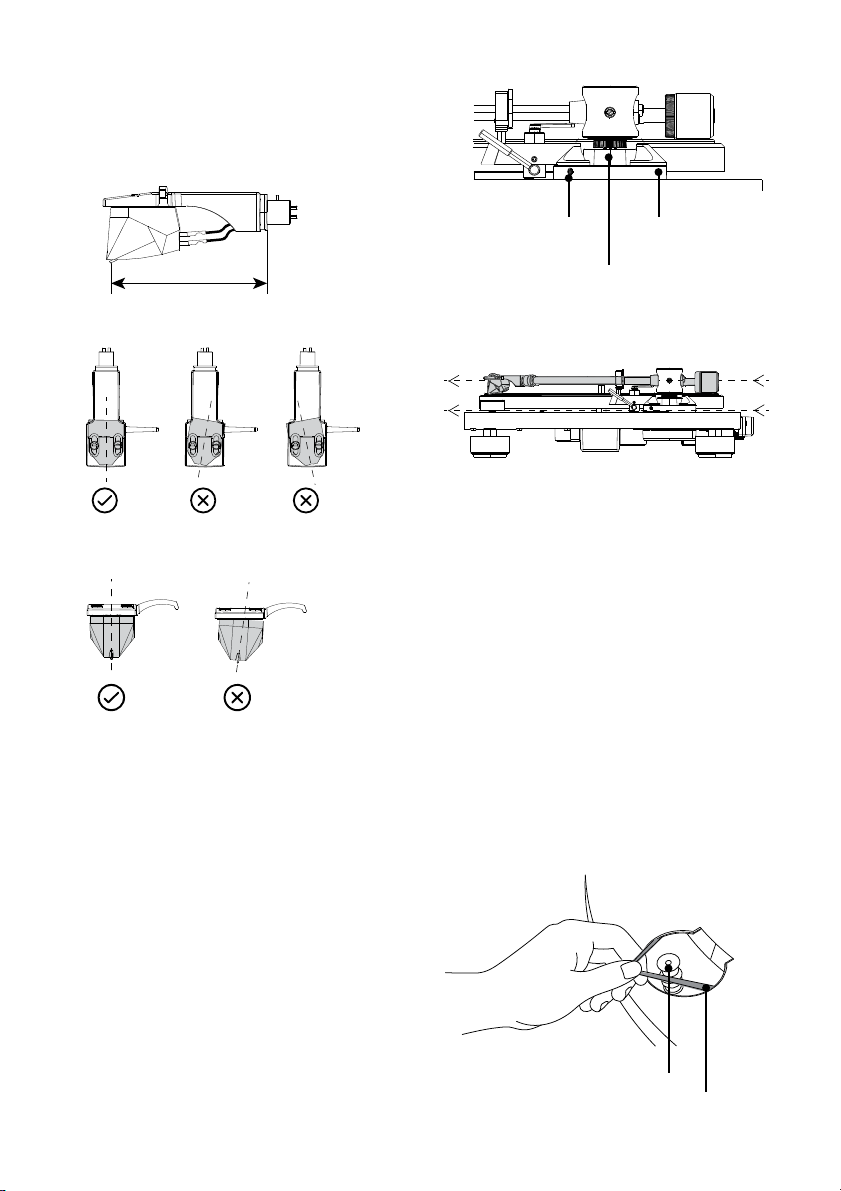
52,8mm
Cinghia di
trasmissione
Puleggia del motore
Vite di regolazione
dell'altezza
Base del braccio
Attacco
9. Regolazione della sporgenza
• Muovere il fonorivelatore per regolare la
sporgenza in modo che la punta della testina
disti 52,8 mm dall'estremità del portatestina.
• Il fonorivelatore va montato parallelamente ai
bordi esterni del portatestina.
• Sostenere la base del braccio e regolare
l'altezza finché il braccio non trascorre
parallelo al disco.
• Girare la brugola in senso orario per bloccare
• Il fonorivelatore deve essere montato dritto.
la base del braccio.
• Regolare la forza di appoggio e l'antiskating.
11. Sostituzione della cinghia di trasmissione
La cinghia di trasmissione si consuma e con il
passare del tempo può persino strapparsi. In tal
caso sostituirla con una nuova. Per ottenere una
cinghia di trasmissione di ricambio rivolgersi al
proprio rivenditore o al servizio clienti.
• Spegnere il giradischi e il dispositivo audio
• Una volta concluse le regolazioni stringere
saldamente le viti.
• Fissare il portatestina al braccio.
10. Regolazione dell'altezza del braccio
• Collocare un disco sul piatto.
• Abbassare la testina sul disco e controllare se
collegato e staccare l'adattatore di rete dalla
presa.
• Rimuovere il tappetino del piatto.
• Ruotare il piatto nella posizione in cui si possa
vedere la puleggia del motore attraverso il
foro circolare del piatto.
• Togliere la cinghia di trasmissione dalla
puleggia del motore.
il braccio è parallelo al disco.
• Inserire una brugola da 2 mm (non compresa
nel materiale in dotazione) nel foro della vite
di regolazione dell'altezza e girarla in senso
antiorario per sbloccare la base del braccio.
88 © sonoro audio GmbH 2021
Page 89
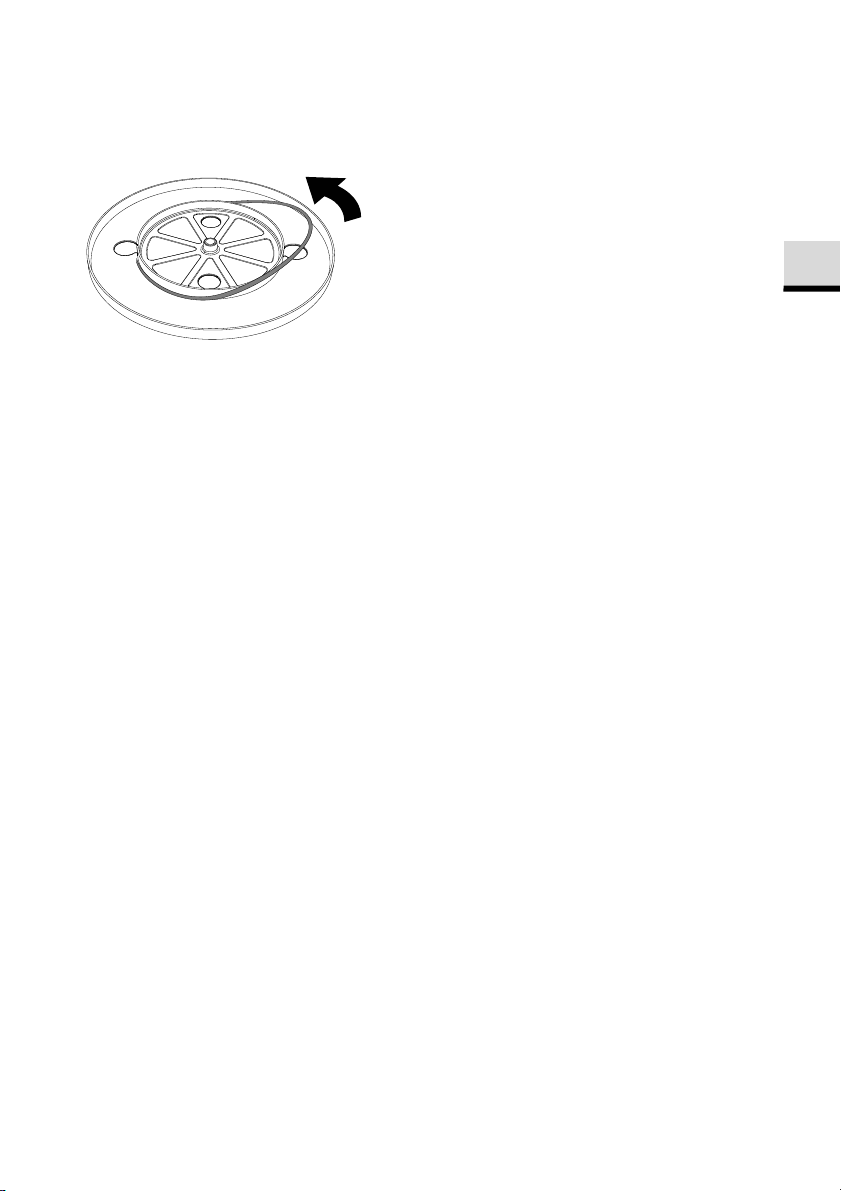
IT
• Infilare le dita e il pollice nei fori circolari del
piatto per sollevarlo.
• Capovolgere il piatto e rimuovere la vecchia
cinghia di trasmissione.
• Avvolgere la nuova cinghia di trasmissione
intorno al cerchio interno del piatto mentre lo
si mantiene capovolto.
• Per concludere il montaggio seguire i passi
indicati in "Applicazione della cinghia di
trasmissione".
© sonoro audio GmbH 2021 89
Page 90

Errore
Possibile causa
Soluzione
Il piatto non gira.
L'adattatore di rete non è
Inserire l'adattatore di rete
Il giradischi non è in
Controllare l'interruttore di
Il piatto gira ma non viene
La copertura è ancora
Togliere la copertura.
Il braccio non è abbassato
Abbassare il braccio.
La testina non è inserita
Controllare il fonorivelatore,
Impostazione erronea del
Selezionare l'impostazione
La forza di appoggio è
Regolare la forza di
10. Risoluzione degli errori
In tutti gli apparecchi elettrici possono verificarsi malfunzionamenti. La causa non è
necessariamente un difetto. Pertanto controllare la seguente tabella per stabilire se si può
risolvere il problema da soli.
emesso nessun suono
oppure il suono è troppo
basso.
collegato correttamente.
modalità ON.
applicata al fonorivelatore.
sul disco.
Impostazione sbagliata nel
sistema audio collegato
La testina è danneggiata. Controllare la testina ed
correttamente nel
fonorivelatore.
preamplificatore integrato.
in una presa.
rete del lato posteriore
dell'apparecchio. Deve
essere premuto.
Controllare le impostazioni
del sistema audio collegato,
ad es. MC invece di MM.
eventualmente sostituirla.
eventualmente inserire
completamente la testina.
corretta.
Se si utilizza un
amplificatore con ingresso
Phono, il preamplificatore
deve trovarsi su OFF.
Se si è collegato PLATINUM
ad un ingresso AUX, il
preamplificatore deve
trovarsi su ON.
troppo elevata o troppo
90 © sonoro audio GmbH 2021
ridotta.
appoggio.
Page 91

IT
Errore
Possibile causa
Soluzione
L'antiskating non è regolato
Regolare l'antiskating.
Il disco è ondulato.
Cambiare il disco.
Il disco è graffiato.
Cambiare il disco.
Forti fruscii.
Polvere sulla testina o sul
Rimuovere la polvere.
Brusii.
Il giradischi è disturbato da
Scollegare il giradischi dalle
La musica viene riprodotta
La velocità di riproduzione
Impostare la velocità di
A seconda del sistema
In questo caso il filo di terra
Non viene stabilito il
Il dispositivo Bluetooth non
Disattivare e riattivare il
Bluetooth in entrambi gli
apparecchi e riprovar
La testina salta. La forza di appoggio è
troppo elevata o troppo
ridotta.
correttamente.
disco.
vibrazioni trasmesse
attraverso il pavimento o gli
altoparlanti adiacenti.
troppo velocemente o
troppo lentamente.
Ronzii Il cavo di terra non è
non è corretta.
collegato correttamente.
audio, il collegamento del
cavo di terra può provocare
un ronzio, mentre il cavo di
terra ha l'effetto opposto.
Regolare la forza di
appoggio.
vibrazioni.
riproduzione corretta.
Controllare se il cavo di
terra è collegato
correttamente.
non deve essere collegato.
collegamento Bluetooth.
Nessun collegamento con
lo smartphone
© sonoro audio GmbH 2021 91
è collegato al PLATINUM.
Questa funzione non è
supportata.
e.
Collegare il PLATINUM ad
un altoparlante o una cuffia
Bluetooth.
Page 92

11. Garanzia
Per avvalersi della garanzia si applica quanto segue, senza limitazione dei diritti legali
dell'acquirente:
•
Le rivendicazioni di garanzia possono essere fatte valere entro un periodo di max. 2 anni
(1 anno nell'America del Nord e in Australia) a decorrere dalla data d'acquisto.
•
Entro il periodo di garanzia, sonoro audio GmbH elimina gratuitamente tutti i difetti
riconducibili ad errori di materiale o produzione, a propria scelta riparando o
sostituendo il PLATINUM.
•
In caso di reclami rivolgersi al nostro servizio clienti. I dati di contatto sono riportati alla
voce "Contatti" o all'indirizzo sonoro.de
•
La riparazione o sostituzione di PLATINUM non comportano l'inizio di un nuovo periodo
di garanzia. Resta determinante il periodo di garanzia di 2 anni (1 anno nell'America del
Nord e in Australia) a decorrere dalla data d'acquisto.
•
Sono esclusi dalla garanzia i danni causati da uso improprio, uso e usura normali e difetti
che influiscono in misura irrilevante sul valore o sulla funzionalità di PLATINUM. La
garanzia decade anche in caso di interventi non eseguiti dal centro di assistenza da noi
autorizzato.
92 © sonoro audio GmbH 2021
Page 93

sonoro.de
Page 94
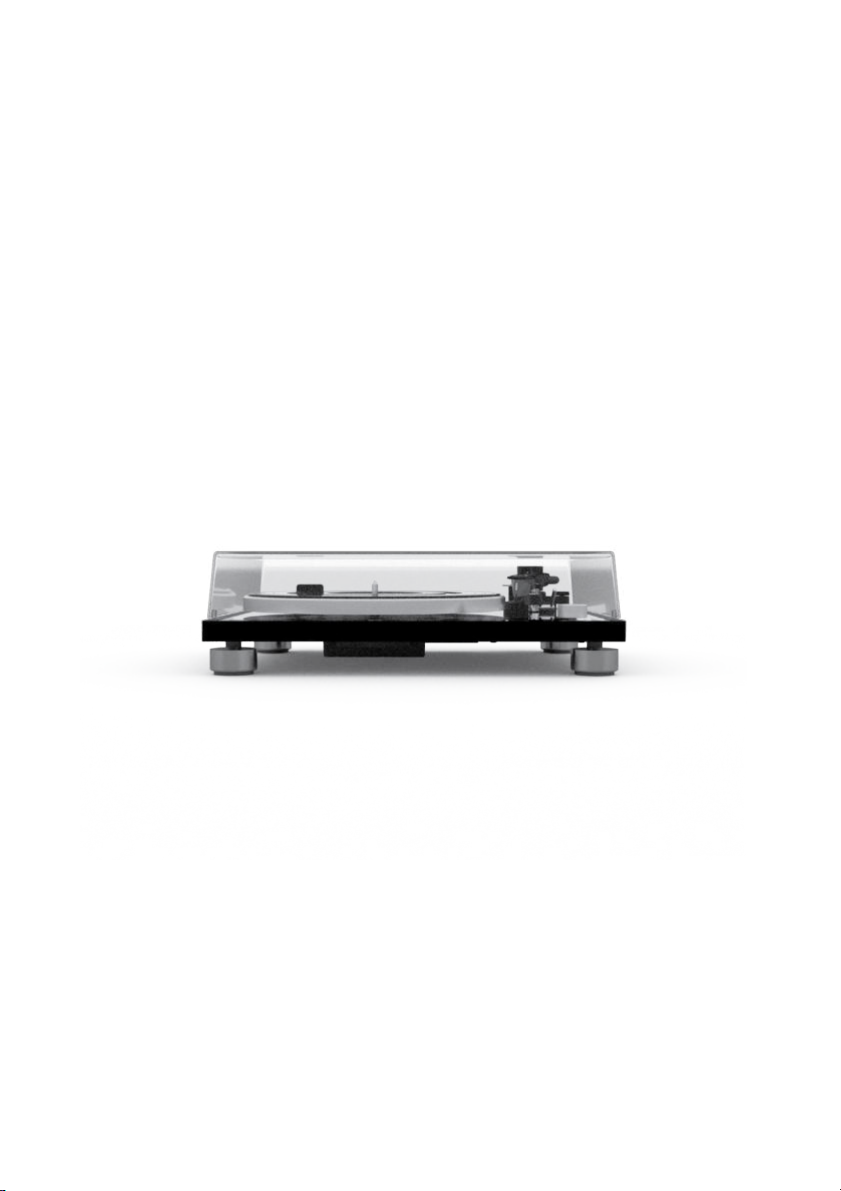
PLATINUM
SO-2000
PLATENSPELER
Handleiding
94 © sonoro audio GmbH 2021
Page 95

NL
Inhoudsopgave
1. Inleiding ..................................................................................................................... 96
2. Leer uw PLATINUM kennen ..................................................................................... 96
2.1 Leveringsomvang ............................................................................................................... 96
2.2 Bedieningselementen en aansluitingen .......................................................................... 97
2.3 Technische gegevens......................................................................................................... 99
3. Platenspeler monteren ........................................................................................... 100
4. PLATINUM aansluiten ............................................................................................ 104
5. Een opname afspelen ............................................................................................ 105
6. Wanneer het afspelen is beëindigd ..................................................................... 107
7. Verbinding met Bluetooth-apparaat tot stand brengen .................................... 107
8. Aansluiten op een computer ................................................................................. 108
9. Onderhoud ............................................................................................................. 109
10. Verhelpen van storingen ........................................................................................ 113
11. Garantie ................................................................................................................... 115
Het woordmerk Bluetooth® en de logo's zijn eigendom van Bluetooth SIG, Inc.; sonoro audio GmbH heeft een
licentie om deze te gebruiken. Andere handelsmerken en merknamen zijn die van de betreffende eigenaren.
Qualcomm aptX is een product van Qualcomm Technologies International, Ltd. Qualcomm is een handelsmerk
van Qualcomm Incorporated, geregistreerd in de Verenigde Staten en andere landen, en wordt gebruikt met
toestemming. aptX is een handelsmerk van Qualcomm Technologies International, Ltd., geregistreerd in de
Verenigde Staten en andere landen, en wordt gebruikt met toestemming.
© sonoro audio GmbH 2021 95
Page 96
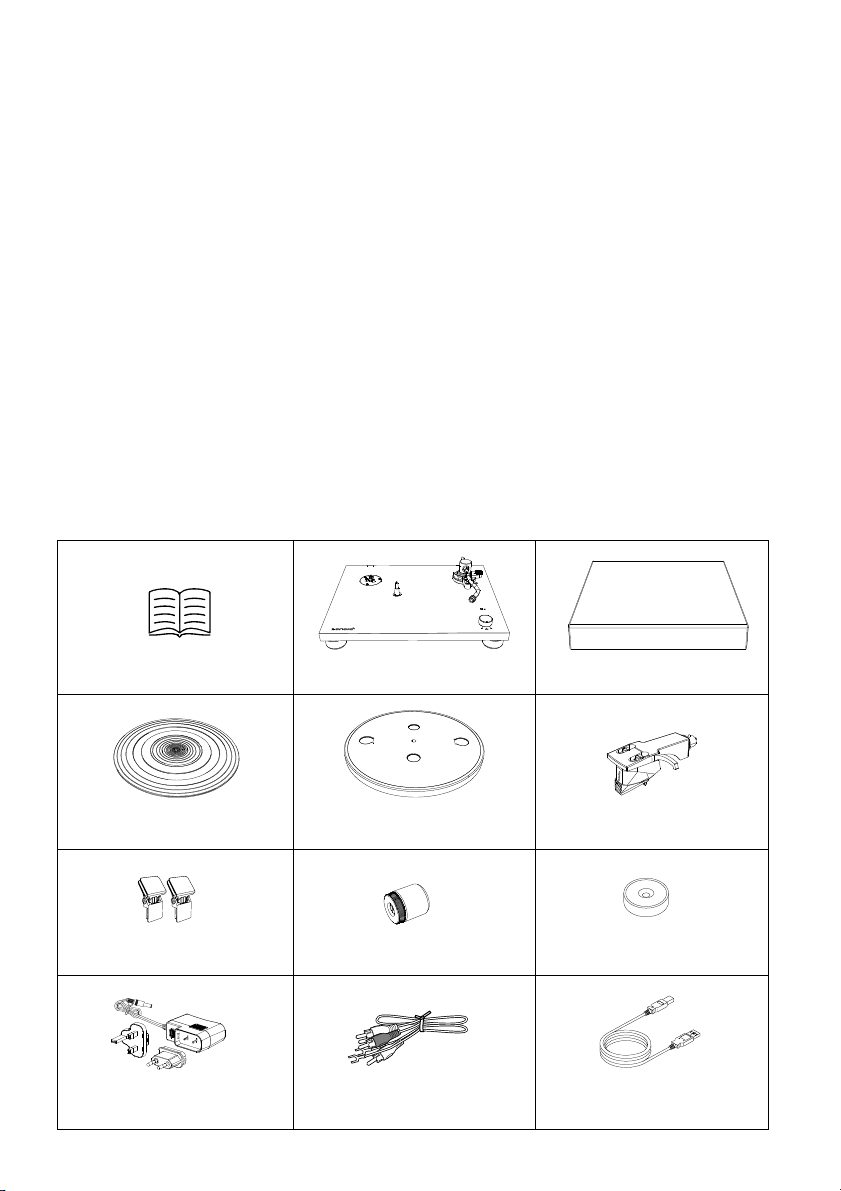
Handleiding
Platenspeler
Stofkap
Draaitafelmat
Draaitafel en riem
Headshell met pick-upelement
Scharnieren voor de
beschermkap
Contragewicht
45 t.p.m. adapter
(7” single adapter)
Stekkernetadapter met
EU & VK adapter
Cinch-kabel
USB-kabel
1. Inleiding
Hartelijk dank voor de aankoop van PLATINUM. Deze handleiding omvat alle gegevens die
zijn vereist voor een storingsvrije en veilige werking van de PLATINUM.
Het is de verantwoordelijkheid van de gebruiker om ervoor te zorgen dat de platenspeler
veilig is geplaatst, veilig is aangesloten en wordt gebruikt. De afbeeldingen in deze
handleiding dienen de maatregelen te illustreren die voor de werking van de PLATINUM
zijn vereist.
De PLATINUM is alleen bestemd voor persoonlijk gebruik. Deze is niet bestemd voor
commercieel gebruik.
Veel plezier met uw PLATINUM!
2. Leer uw PLATINUM kennen
2.1 Leveringsomvang
Controleer of de volgende delen zijn meegeleverd.
96 © sonoro audio GmbH 2021
Page 97
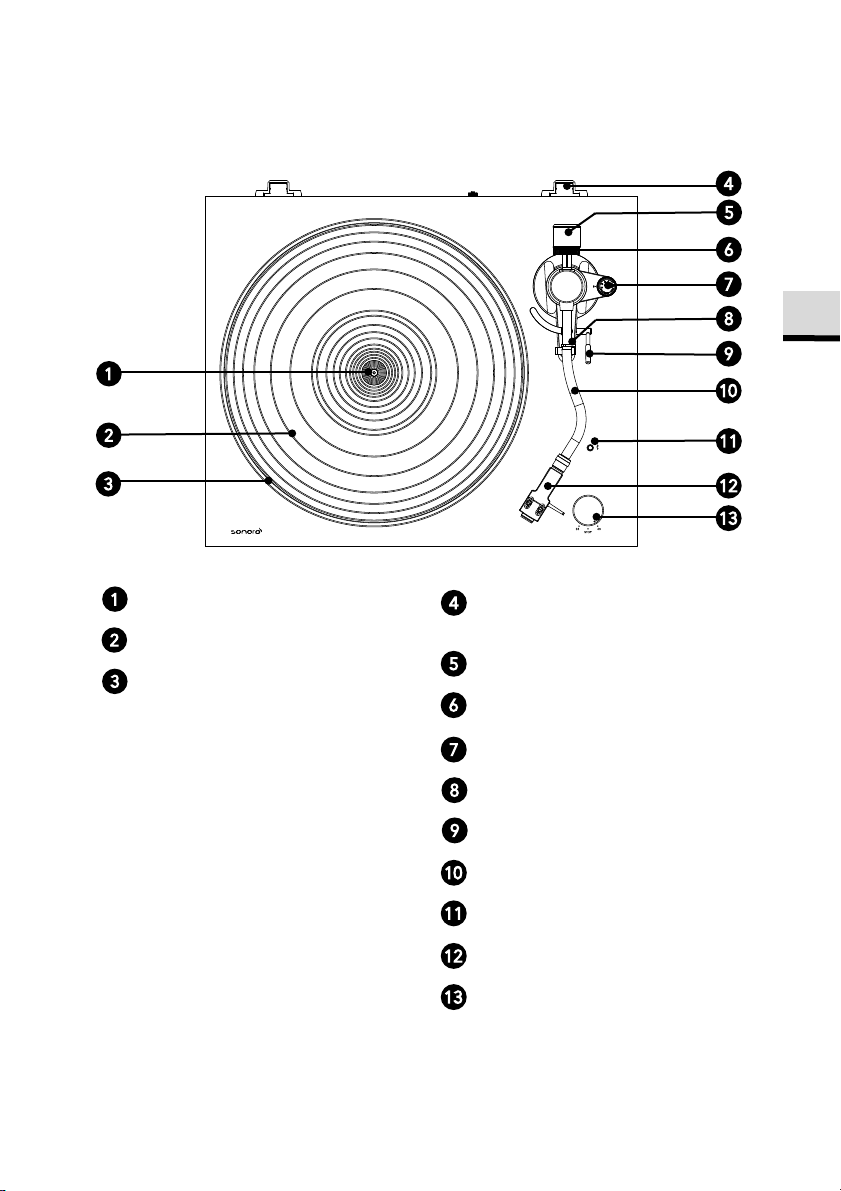
NL
2.2 Bedieningselementen en aansluitingen
Bovenaanzicht
As
Draaitafelmat
Draaitafel
© sonoro audio GmbH 2021 97
Scharnierhouder voor de
stofbeschermkap
Contragewicht
Instelschaal
Antiskating-schaalverdeling
Pick-uparmhouder
Pick-uparmlift
Pick-uparm
Bluetooth-weergave/pairing-toets
Headshell met pick-upelement
Keuzeschakelaar snelheid
Page 98
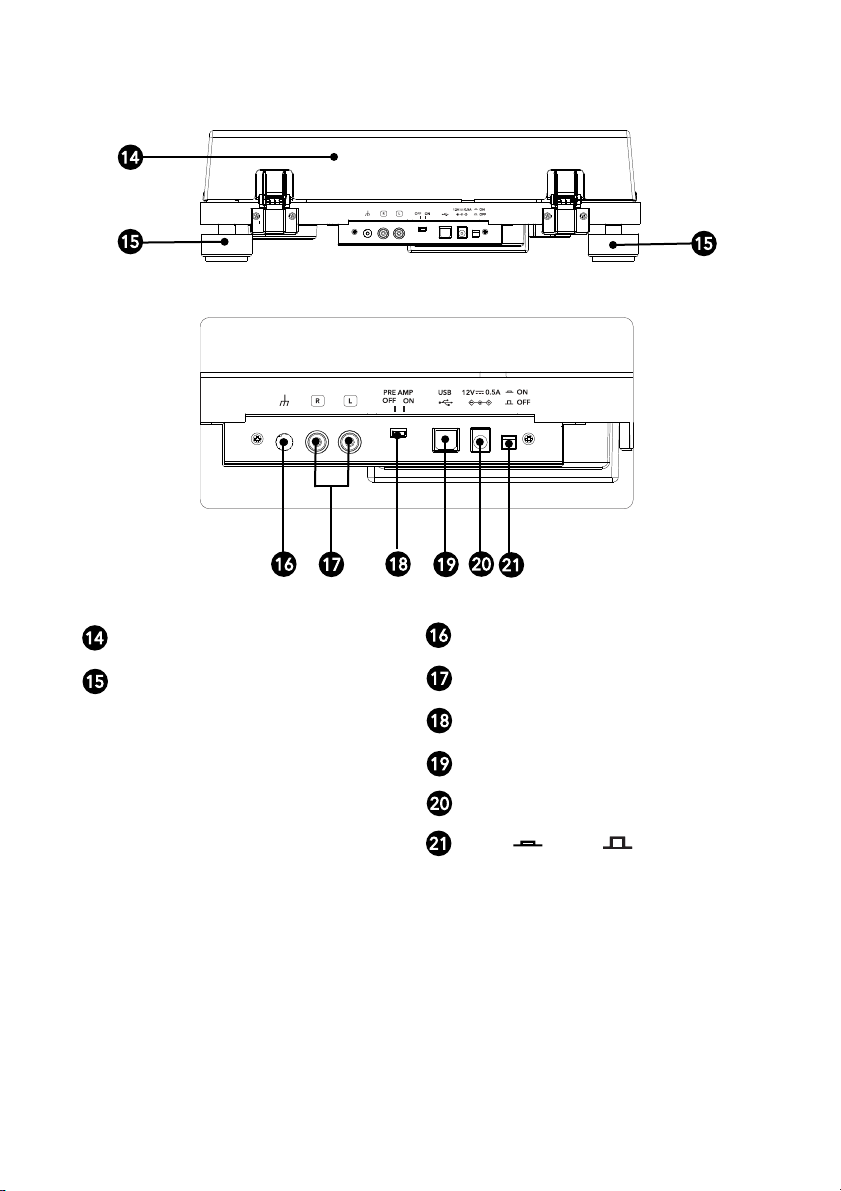
USB
PRE AMP
Achteraanzicht
Stofkap
Massa-aansluiting
Apparaatvoeten
Cinch-audio-uitgang
Omschakelaar voorversterker
USB-uitgang
Ingangsbus wisselstroom
AAN / UIT - TOETS
98 © sonoro audio GmbH 2021
Page 99

NL
2 snelheden, compleet
handmatige werking
Gelijkstroommotor, optisch
gecontroleerd
33 1/3 omw./min en 45
omw./min
Aluminiumgietwerk,
Doorsnede 300 mm
Gelijkloopschommelingenr
< 0,15% (33 omw./min) bij
3 KHz
Signaal-ruisverhouding
> 67 dB (A-gewogen, 20 KHz,
LPF)
Uitgangsniveau
statisch
vormige pick-uparm
Instelbare
naaldkracht
Toegestaan gewicht
pick-upelement
Aanbevolen
aansluitimpedantie
1,6 tot 2,0 g
(standaard 1,8 g)
Gewicht pickupelement
9,3 g (incl. Schroeven,
aansluitdraden)
USB 1.1 of later
OSX of later
Ondersteunde
Codecs
Maximaal
uitgangsvermogen
Afmetingen
(b x d x h)
ca. 420 x 356 x 125
mm
Vervangingsdiamant
(apart verkrijgbaar)
Ortofon 2M Red /
2M Blue
Golden Profit Electronics Ltd
Guangdong, China
Gemiddelde
bedrijf
Efficiëntie bij geringe
belasting (10%)
Technische gegevens kunnen zonder voorafgaande aankondiging worden gewijzigd.
2.3 Technische gegevens
Platenspeler
Type
Aandrijving Riemaandrijving
Motor
USB-aansluiting
Ondersteunde
formaten
Bluetooth
Bluetooth-versie 4.0
Output-klasse Klasse 2
Snelheden
Draaitafel
Frequentieband 2,402 GHz – 2,480 GHz
Modulatiemethode FHSS
Profiel A2DP 1.3
Voorversterker UIT
Voorversterker AAN
Uitgangsbussen Cinch
5,5mV±3dB (1KHz, 5cm/sec)
300 mV±3dB (1KHz, 5cm/sec)
Reikwijdte ca. 10m
Algemeen
Pick-uparm
Armtype
uitgebalanceerde S-
Effectieve lengte 224 mm
Overhang 19 mm
0 tot 2,5 g
5 tot 7,5 g
Pick-upelement
Model Ortofon 2M Red
Type Moving Magnet
47.000 ohms
Versterkeraansluiting MM-ingang
Uitgangsspanning 5,5 mV (1 KHz, 5 cm/sec)
Naaldtype Diamantslijpsel elliptisch
Radius punt r/R 8/18 pm
Naaldkracht
7,2g
Headshell-gewicht
Headshell-overhang
© sonoro audio GmbH 2021 99
moeren en
± 5 mm
Gewicht ca. 3.9 kg
Bedrijfstemperatuur 0 °C ~ +40 °C
Energieverbruik
UIT
AAN
Netadapter
Naam en adres van
de fabrikant
Modelidentificatie GPE006D-120050-Z
Ingangsspanning AC 100 – 240 V
Ingangswisselstroom
Uitgangsspanning DC 12,0 V
Uitgangsstroom 0,5 A
Uitgangsvermogen 6,0 W
efficiëntie in het
Verbruik bij nullast 0,10 W of minder
Windows 7 of later MAC
SBC, aptX Audio
10,0 dBm
0,1 W of minder
1,5 W of minder
Shayao Chenwu Village,
Shijie Town, Dongguan,
50 / 60 Hz
Meer dan 78,9%
70,0%
Page 100
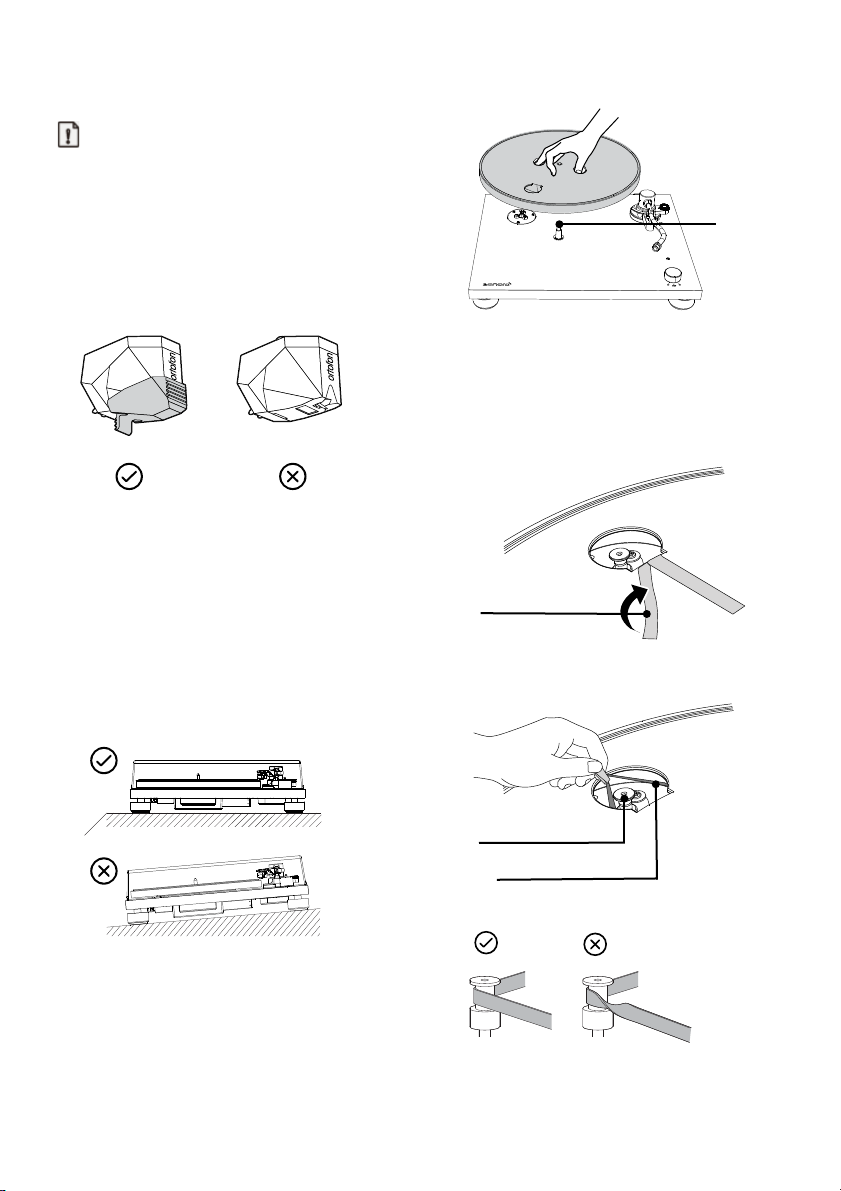
As
Motorriemschijf
Plakband
Riem
3. Platenspeler monteren
Aanwijzing:
• Voor het eerste gebruik moet de PLATINUM
in elkaar worden gezet.
• Sluit uw platenspeler pas met de netadapter
op een stopcontact aan wanneer u met de
montage klaar bent.
• Boven de aftastdiamant bevindt zich een
beschermingskapje. Laat dat daar zitten bij de
montage van uw platenspeler.
• De aftastdiamant is een uiterst precieze
component. Raak deze niet aan met uw
vingers en laat deze niet op de langspeelplaat
vallen, omdat de diamant daardoor kan
beschadigen.
• Verwijder de kabelbinders waarmee de pick-
uparm is gezekerd.
1. PLATINUM opstellen
• Stel de PLATINUM op een egaal, stevig
oppervlak op.
• Leg de draaitafel voorzichtig op de as.
• Draai de draaitafel naar de stand, waarin u de
motorriemschijf door het cirkelvormige gat in
de draaitafel kunt zien.
3. Aanbrengen van de riem
• Maak het plakband los. Trek aan de rode
band en houd deze vast.
• Leg dan de riem om de motorriemschijf.
• Let erop dat de riem niet wordt verdraaid.
2. Plaats de draaitafel
• Houd de draaitafel vast.
• Verwijder de rode band van de riem.
100 © sonoro audio GmbH 2021
 Loading...