

Page 1

L32V11B -AU
32" HD LCDTV
Page 2
..................................................................................................................6
.................................................................................................................6
..................................................................................................................7
...................................................................................................................8
.........................................................................................................9-11
....................................................................................................................10
Menu Operation Guide
............................................................................................................16
....................................................................................................18-20
............................................................................................................20
...........................................................................................................21-22
......................................................................................................23-24
PVR
......................................................................................................................24-27
..........................................................................................................27-28
..............................................................................................................29
........................................................................................................29-30
..............................................................................................................31
..........................................................................................................31-32
.................................................................................................................32
............................................................................................................35
.........................................................................................................1
.....................................................................................................2-5
.......................................................................................................6
......................................................................................................7-8
.......................................................................................9
............................................................................................10
...........................................................................................10
..........................................................................................11-15
..................................................................................................11
...........................................................................................11
.......................................................................12
............................................................................................13
.......................................................................................14
.....................................................................................15
.....................................................................................15
............................................................................................16-28
...................................................................................................16-18
................................................................................................29-32
...............................................................................33-34
Page 3
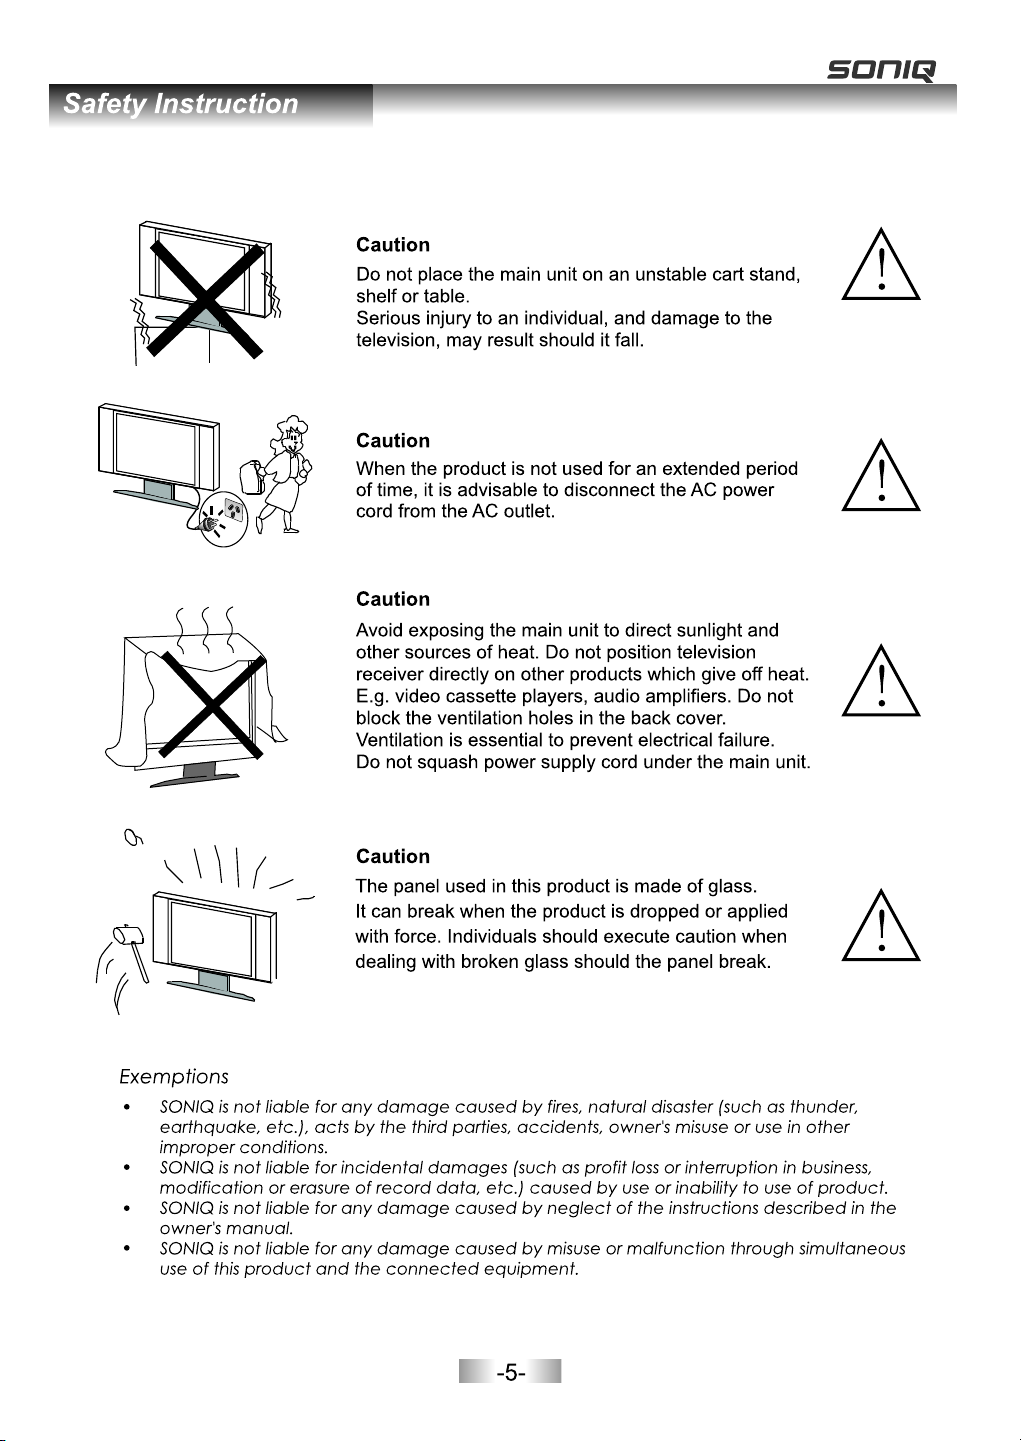
IMPORTANT INFORMATION
If a tele vision is not positioned in a sufficiently stable lo cati on, it c an be po tent iall y haza rdou s due to
Falling. Many injuries, particularly to chil dren , can be a void ed by ta king s impl e prec auti ons su ch as:
· Using c abinets or stands recommended by the manufacturer o f the televi sion .
· Only us ing furniture that can safely support the television.
· Ensur ing the television is not overhanging the e dge of t he sup port ing fu rnit ure.
· Not pla cing the tel evision on tall furniture (for example, cupbo ards o r book case s) wit hout
ancho ring both the furniture and the television to a suitable supp ort.
· Not sta ndin g the te levisions on cloth or other materials placed be twee n the te levi sion a nd
suppo rting furniture.
· Educating children about the dangers of climbing on furniture to reach the television or its controls.
Page 4
Page 5
Page 6
Page 7
Page 8
Page 9
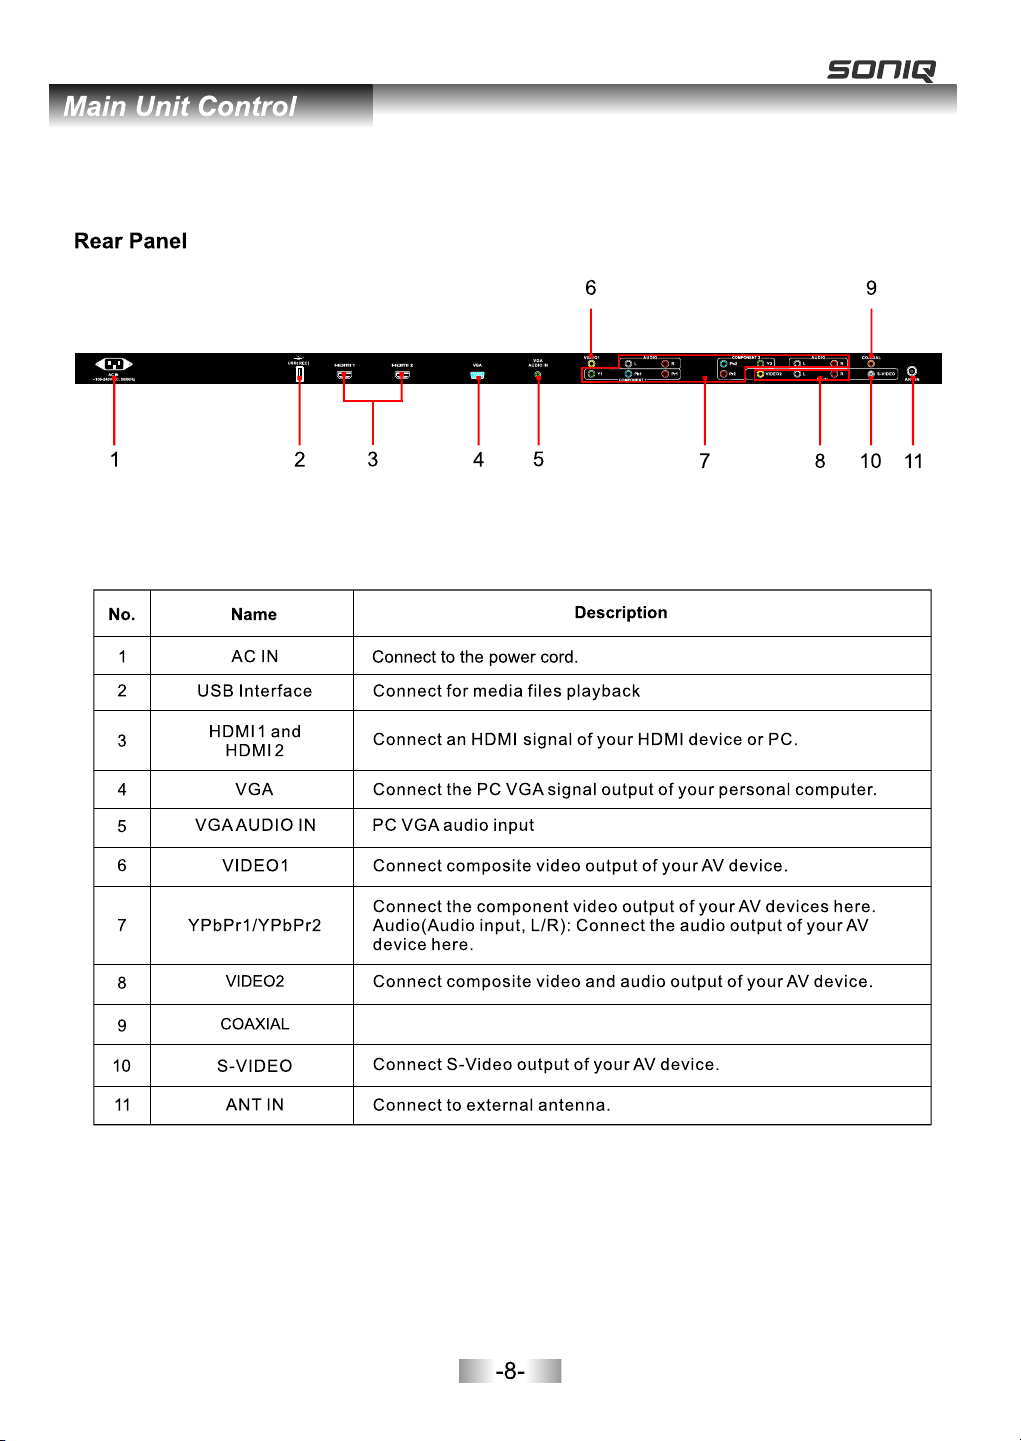
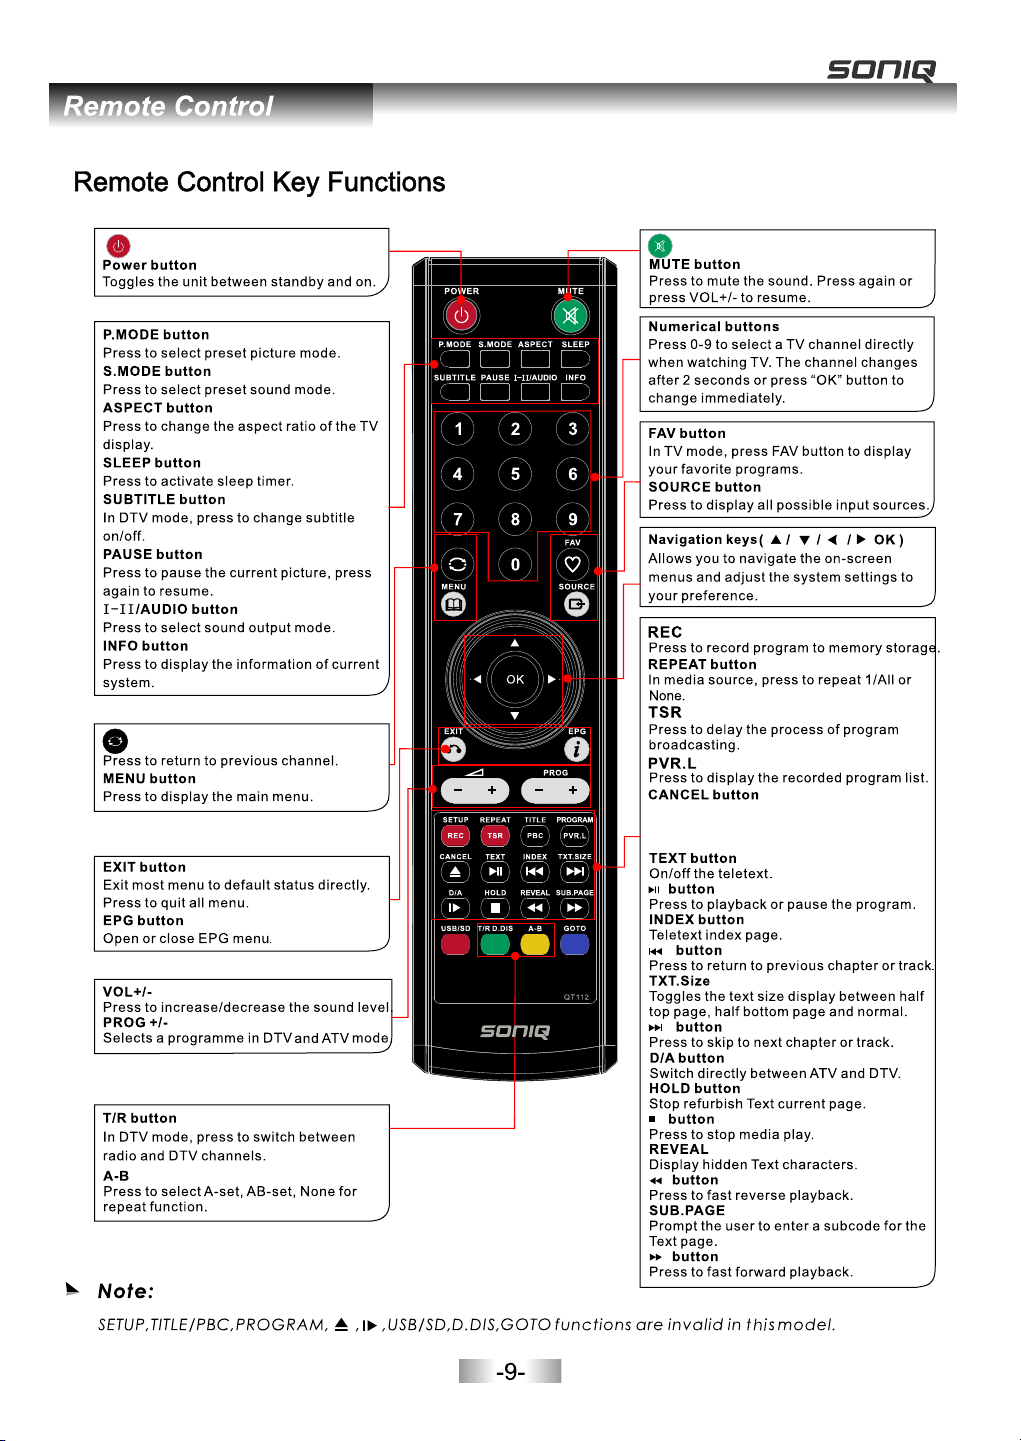
and pro gra m recordi ng.
Coaxi al Di gita l Audi o outp ut fo r Digi tal Am plif ier.
Page 10
Pres s Ca nce l bu tton on t he r emo te c ontro l
to ent er e ner gy s aving m od e whe n pl aying
musi c.
Page 11

-10-
Page 12
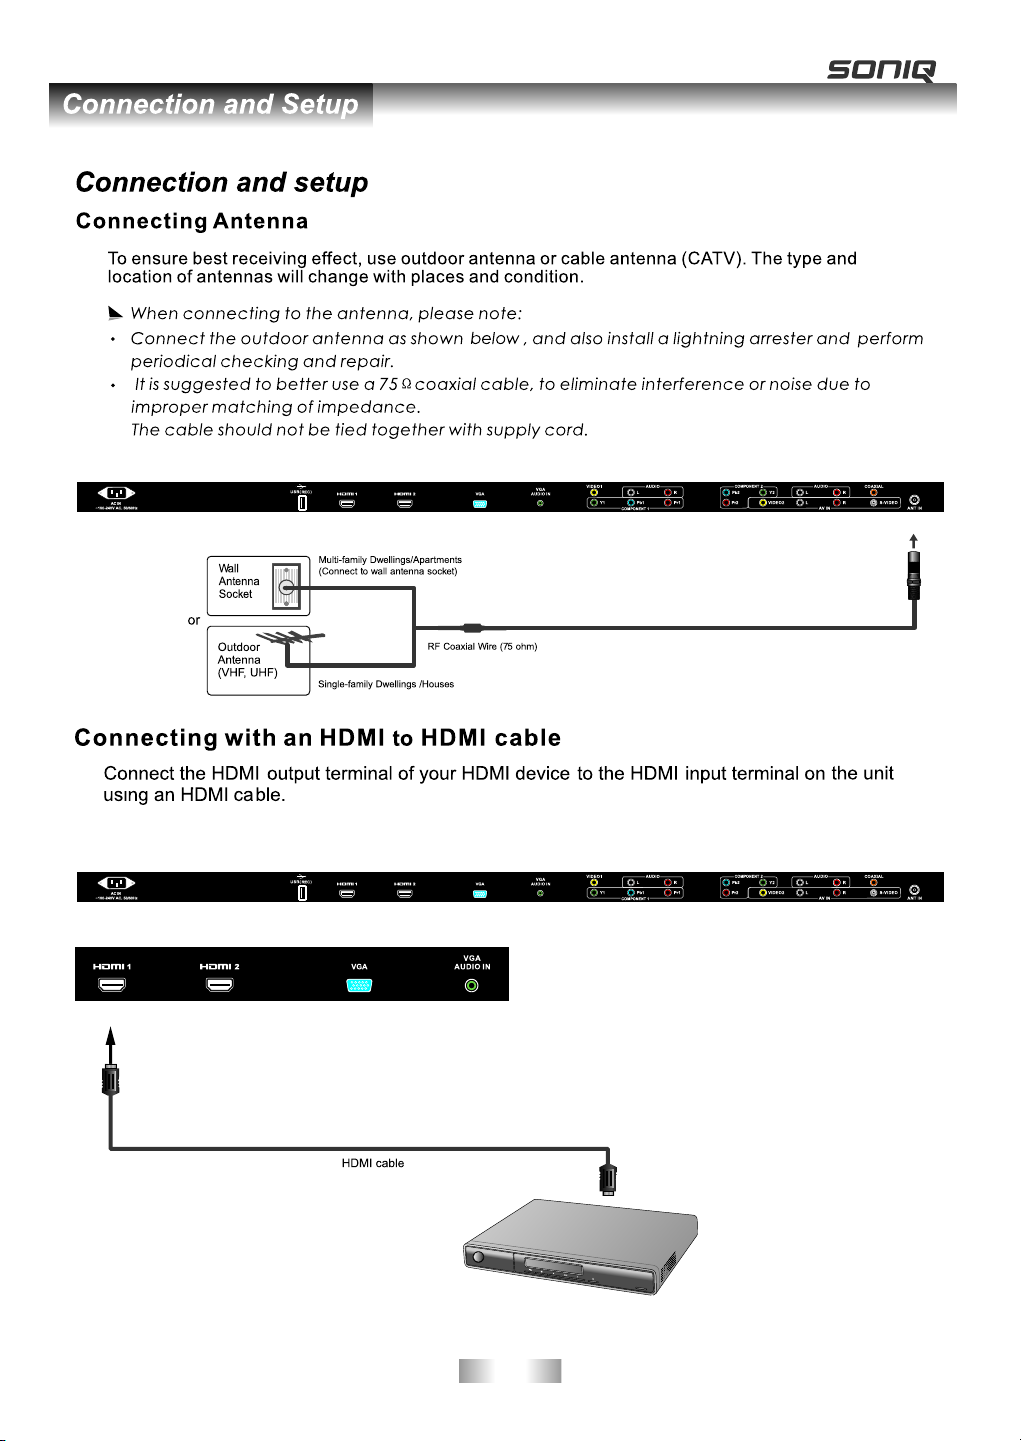
The an ten na ei the r can b e con nec ted f or mu lti -fa mil y dwe lli ngs or for single-family dwellings.
Blu -ray DVD Pl ayer
-11-
Page 13

-12-
Page 14

Set -Top B ox
-13-
Page 15

to the inpu t of the Audio Amplif ier using a Coaxi al cable.
Audio
-14-
Page 16

Insert US B device direct ly to the unit.
1.
2.
3.
4.
5.
6.
500mA
-15-
Page 17

DTV
ATV
AV1
AV2
S-Video
YPbPr1
YPbPr2
VGA
HDMI1
HDMI2
MEDIA
-16-
Page 18

VHF C H 6
INP UT FREQ. P ress OK t o searc h
Press t o hig hli ght Frequ enc y, the n inp ut fr eque ncy n umb er by press ing n umeric bu tto ns,
press O K to st art .
1------MHz
Press to s elect Frequ ency, press n umeri c buttons to in put fre quency numb er.
Then use t o highlight S earch ,press or to st art.
-17-
Page 19

7 7 Digi ta l
70 7 HD Di gi tal
71 7 Dig it al 1
72 7 Dig it al 2
73 7 Dig it al 3
77 7 Gui de
1 C-02
2 S-15
3 C-04
4 E/29
DTV
DTV
DTV
DTV
DTV
DTV
ATV
ATV
ATV
ATV
then
curre nt ch anne l
inclu ding Chan nel No., Ne two rk nam e, Mo dula tio n mode l, Si gnal q ual ity an d Sig nal st ren gth.
29
Network SBS Melb ourne
Modulation 64Q AM
99
Streng th
22
-18-
Page 20

Ene rgy Sav ing
-19-
Page 21

Select
Back Adjust
-20-
,
Page 22

Select
Back Adjust
-21-
Page 23

Press / button to select the living area where you are located,
WA GMT +8
-22-
Page 24

Select
Back Adjust
PVR F ile Sys tem
Vers ion Inf o
Not ava ilable in D TV.
PVR File System
Press OK to en ter t he PV R Fil e Sys tem . Users can chec k the i nfo rma tio n of the USB de vic e,
or format th e USB d evi ce.
-23-
Page 25

/60S / 70 S / 80S / 90S.
Allowing user to check the information of the unit.
PVR function is only available for DTV,includes Record,Timeshift and Playback
function.Record includes in time record and preserve record. In-time record can
be worked through REC key immediately, and preserve record needs to preserve
before.
Record and Playback can be done at the same time, which means record
DTV and playing USB equipment at the same time.Timeshift is another function for
both recording and playing together.
The following would explain in details.
PVR File SystemPVR File System
Enter PVR from OPTION menu, as follows:
OK
-24-
Page 26

Select Disk Select Disk
Choose the disc to store whatever content recording, as follows,default as C:
USB DiskUSB Disk
If not inserting USB equipment, it shows Not Find Any USB Device; If inserting USB equipment, it shows Pass.
FormatFormat
Format the USB disk, create PVR file system format to the USB disk.
Time Shift SizeTime Shift Size
Can’t be chosen. After Check PVR File System,it means the USB passed Mstar Format
can be used at Timeshift space,the size is chosen by clients when doing format.
SpeedSpeed
Can’t be chosen. After Check PVR File System,it shows the USB available speed .
PVR File System Type
C
Hi Sp eed F.
ALL
All
8
Check PVR File System:
Check PVR File System:
T
Fre
Check storage equipment PVR File System is well established.
Default as Start,OK/Enter and to inspect the USB files system and speed,
the processiong shows Checking…;
When no inserting USB,or inspection failed, it shows FAIL;
When inserting USB but didn’t pass Mstar Format,enter Format menu;
When inserting USB but inspecting unnormal partition, it shows No Partition Found.
If inspection is normal, it shows SUCCESS;
Channel – Recorder List
Channel – Recorder List
pattern for reference the menu is as follows:
Key Random Record OperationKey Random Record Operation
·Insert the memory equipment to the unit.
·Press "REC" button to start recording the current programm. The recording window will be
disappeared after few seconds, and a red icon with REC characters will be displayed
transparent
at the left side of the screen. Press HOLD button for stop.
·It is available for recording when the unit is in standby mode.
Pla y FB
9 Nin e Digit al
[00 :02:0 9]
FF Pre v. Nex t Pau se Sto p
(00 01216 MB)
REC
-25-
Page 27

PVR.L OperationPVR.L Operation
Press "PVR.L" button to display the recorded program list , select any of the items for watching.
Recorded List Programme
HI-5
INF O
OK
DELETE:Delete focused programme.
INFO:Pop out or close programme instruction.
INDEX:When no menu, press "PVR.L"; When it shows Recorded List menu,switch
recording programme orders.
OK:Play programme.focused
Up/Down:Up and Down to move Focus to select programme.
Preserve Record Operation
Press EPG directly to display the PROGRAMME GUIDE window, focuse on your favorite
channel that you want to record, then press REC button at the remote control to enter into
the RECORDER menu,and then you are required to set the recording time there,
press OK for confirm.
PROGRA MM E GU DE T IM E
04 Dec 1 2: 23
7 7 Digi ta l
70 7 HD Di gi ta l
71 7 Dig it al 1
72 7 Dig it al 2
73 7 Dig it al 3
77 7 Gui de
Rec ord
GOOD CHEF BAD CHEF
GOOD CHEF BAD CHEF
GOOD CHEF BAD CHEF
GOOD CHEF BAD CHEF
GOOD CHEF BAD CHEF
GOOD CHEF BAD CHEF
INF O Sch edule
IND EX
Rem ind
IND EX
RECO RD ER
7 7 Digi ta l
Star t Tim e
00 Min ut e
12 Hou r
Dec Mo nt h
04 Dat e
End Tim e
30 Min ut e
12 Hou r
Dec Mo nt h
04 Dat e
Mode O nc e
BAC K
-26-
Page 28

Press the green button(INFO) at the remote control to review the program information saved
in the list. Press the yellow button(Schedule) at the remote control to check the schedule list.
Sche du le L is t 12:2 2 04 t h De c
Tim e Date Prog ra mm eTi tle
12:2 4- 12 :2 6
12:2 5
Mon. 0 4 De c
Mon. 0 4 De c
Dele te
GOOD CHEF BAD CHEF
GOOD CHEF BAD CHEF
Chan ne l Na me
7 7 Digital
7 7 Digital
Press the blue button(Remind) to add current program to the list, and it will be switched on time.
Remi nd er s et ti ng
7 7 Digi ta l
00 Min ut e
12 Hou r
Dec Mo nt h
04 Dat e
Once Mod e
BAC K
Time Shift
Press to d elay the process of pr ogram.
[-0 0:01: 03/00 :08:0 0]
S
Pla y FB
FF Pre v. Nex t Pau se Sto p
03: 30
You ma y be re qui red t o inp ut th e pas swo rd (d efa ult as 0000).
OK
-27-
Page 29

-28-
Page 30

-29-
Page 31

OK
-30-
Page 32

-31-
Page 33

-32-
Page 34

-33-
Page 35

-34-
Page 36

140
697.7mm(H) X 392.3mm(V)
31.51 inches(800.4mm) diago nal
1200(Typ.)
1366 horiz. by 768 vert. pixels RGB horizontal
stripe arrangement
350 cd/m (Center 1 point) (Typ.)
8bit, 1 6,7 M color s
ANT IN
8W+8 W
869(L)x190(W)x655(H)mm
9.9
12.5
-35-
Page 37

MD11 06 15- 01
 Loading...