

Page 1
DA ombo Syste
i t Ph o n e / iPo d Dock
+
i400 - AU
MD110820-01
m
w
h i
B C
Page 2

i400
Instruction Manual
Thank you for purchasing the i400 Micro system. We strongly suggest
that you study these operating instruction carefully before attempting
to operate the unit, and that you note all of the listed precautions.
SAFE TY INSTRU CTION S
CAUTION: TO REDUCE THE RISK OF ELEC TR IC S HO CK , DO N OT
REMOVE AN Y COVER. NO USER-SERVICEABLE PAR TS I NS ID E,
REFER ANY SERVICING TO Q UA LI FI ED S ERVICE PERSONNEL.
IMPORTANT SAFETY I NS TR UC TI ON S
Please read this owner s guide.
Use proper power sources - Plug the product into a proper power source,
as described in the operating instructions or as marked on the product.
The mains plug is used as the disconnect device, the disconnect device
shall remain readily accessible.
Please take the time to follow the instructions in this owner s guide
carefully. It will help you set up and operate your system properly and
enjoy all of its advanced features.
The product label is located on the back of the product.
Please save this owner s guide for future reference.
To prevent risk of fire or electric shock, avoid overloading wall outlets,
extension cords, or integral convenience receptacles.
This product must be used indoors. It is neither designed nor tested for
outdoors, such as in recreation vehicles, or on boats.
Heed all warnings - on the product and in the owner s guide.
Do not use this apparatus near water or moisture. Do not use this
product near a bathtub, washbowl, kitchen sink, and laundry tub, in a
wet basement, near a swimming pool, or anywhere else that water or
moisture is present.
Only use attachments/accessories specified by the manufacturer.
Unplug this apparatus during lightning storms or when unused for
long periods of time - to prevent damage to this product.
Refer all servicing to qualified service personnel. Servicing is required
when the apparatus has been damaged in any way: such as liquid has
been spilled or objects have fallen into the apparatus; the apparatus
has been exposed to rain or moisture, does not operate normally, or
has been dropped - Do ot attempt to service this product yourself.
Opening or removing covers may expose you to dangerous voltages or
other hazards.
'
'
'
'
2
Welcome
Safety Instructions
1
CONTENTS
S I age 2-3
Introduction age 4
Function & Controls age 5
Getting tarted age 6
Listening to A adio age 10-13
Listening to M Radio age 13-14
Listening to a C age 15-16
General Operation age 7-9
istening to an iPodL age 17
Connecting External Audio Sources age 18
Advanced Operation age 18
Specifications
Care aintenance
Trouble Shooting age 21
Universal Dock Adapter age 19
P
P
Page 20
P
P
P
P
P
P
P
P
P
P
Page 19
S
D P
F
D
& M
nafet y struction
n
+
B R
Page 3
3
4
SAFE TY INSTRU CTION S
This symbol means that this unit is double insulated. An earth
connection is not required.
CAUTION
CLASS 1 LASER PRODUCT
Improper use or adjustment of performance may result in
hazardous radiation exposure.
LASER SAFETY
This unit employs a laser, only qualified service personnel
should attempt repair.
DANGER: Invisible laser radiation inside. Avoid direct exposure
to beam.
CAUTION: There is hazardous laser radiation when opening and
interlocking fail.
WEEE m ar king
Disposal of your old product
Your p ro du ct i s de si gn ed a nd m an uf ac tu re d wi th h ig h
quality materials and components, which can be recycled
and reused. When this crossed out wheeled bin symbol
is attached to a product it means the product is covered
by the European Directive 2002/96/EC.
Please make yourself aware of the local collection system
for electrical and electronic products.
Please act according to your local rules and do not dispose
of your old products with your normal household waste.
The correct disposal of your old product will help
prevent potential negative consequences for the
nvironment and human health.
This product complies with European low voltage
(2006/95/E C) an d el ec tr om ag ne ti c co mp at ib il it y
(2004/108/EC) directives.
INTR ODUCT ION
Contents: 1 x Main unit, 2 x Speakers, 1 x Remote control,
1 x Instruction book, 2 x AAA batteries & iPod adaptors.
FUNCTIONS & CONTROLS
Front & Rear Panels
1. PLAY/PAU SE b ut to n
2. STOP but to n
3. FUNCTION button
4. PREV button
5. NEXT but to n
6. CD Drawer
7. Display
8. STANDBY but to n
9. EJECT button
10. LOUD button
11. VOLUME control
12. DSP button
13. Headphone Output
(beneath the plastic cover)
14. iPodock
15. Telescopic An te nn a
16. Power Switch
17. Power Supply Input
18. L/R Speaker Outputs
19. AUX Inputs
7
14
1
2
3
4
5
6
8
9
10
11
12
13
15
16
17
18
19
Safety Instructions
Introduction
HEADPHONE
D
e
Page 4
5
6
FUNC TIONS & C ONTRO LS
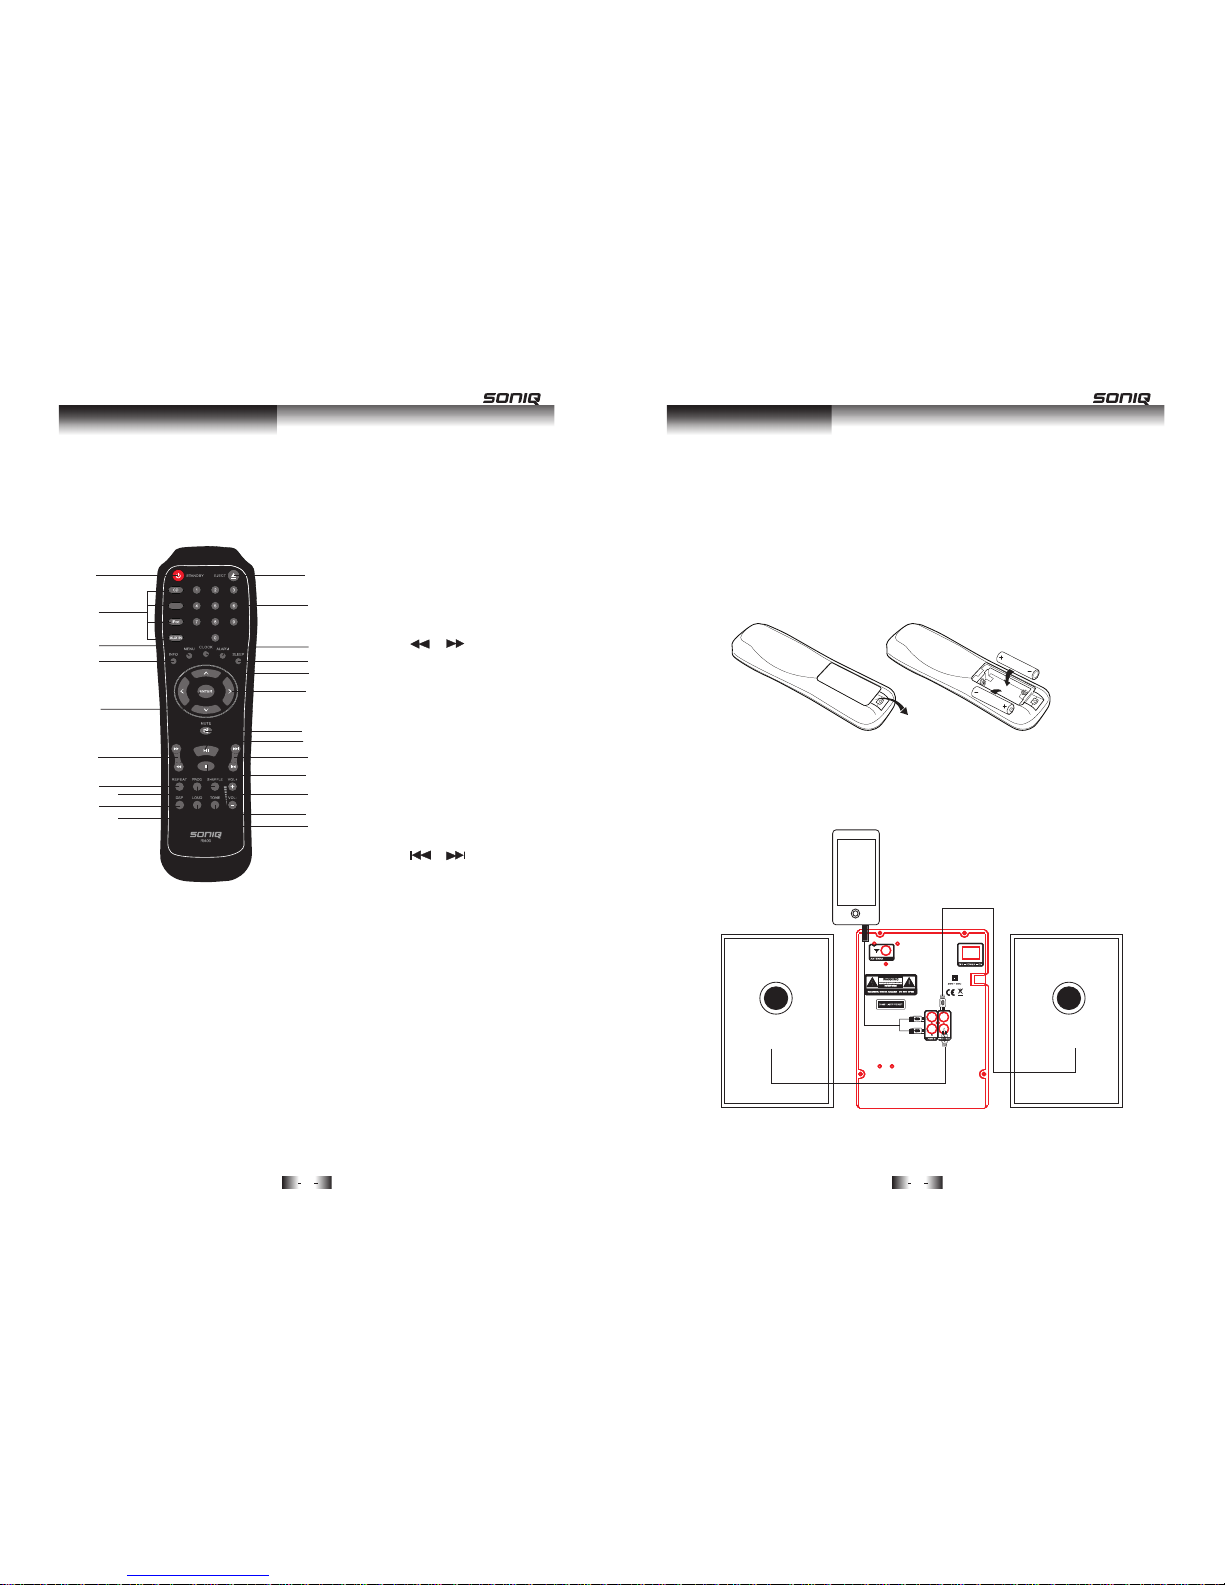
Remote Control
19. STANDBY but to n
20. FUNCTION buttons
21. MENU button
22. INFO button
23. ENTER button
24. / Buttons
25. REPEAT but to ns
26. PROGRAM button
27. DSP button
28. LOUD button
29. EJECT button
30. NUMERIC keys
31. ALARM button
32. SLEEP button
33. CLOCK button
34. NAVIGATIO N bu tt on s
35. MUTE button
36. PLAY/PAUS E bu tt on
37. / Buttons
38. STOP bu tt on
39. VOLUME+/- buttons
40. TON E bu tt on
41. SHUFFLE button
GETT ING STARTE D
Fitting the remote control batteries
1. Remove the p lastic battery co ve r as s ho wn b el ow.
2. Insert 2 x AAA batteries(supplied) as shown (take care to match the
polarities).
3. Replace the battery cover.
Making the connections
Below is a diagram showing how to connect the speakers and an
optional AUX connection for external audio sources such as MP3
players.
Functions & Controls
19
20
21
22
23
29
30
31
32
33
34
35
36
37
38
39
40
41
28
27
26
25
24
RIG HT SPEA KER
LEF T SPEAK ER
REA R PANEL
Getting Started
MP3 PLAYER
(cable not supplied)
DAB/FM
Page 5

GENE RAL OPERATIO N
Switching on the i400 for the first time
onnect the mains plug to a wall outlet.
xtend the pig tail antenna as far as it can go.
et the Power ON/OFF switch to ON to power on the unit.
4 T he r ad io w il l au to t un e an d op er at e th e qu ic k sc an .
During scan mode, the LCD will display a slide bar that indicates the
progress of the scan, and the amount of radio stations that have been
found so far. Once the scan has finished, the radio will select the first
alphanumeric station.
To listen to the stations that have been found, use the < / > buttons on
the remote or PREV/ NEXT (main unit) to cycle through. Each
time you press a button, the unit will skip to the next or previous stored
station. The radio will switch to display the station name.
Press the ENTER button (remote) to active the station.
Press the STANDBY button on either the unit or remote to put the
system into standby mode. To resume normal operation, press the
STANDBY button again.
Note: When you power on the unit from standby, the last used mode will
resume.
GENE RAL OPERATIO N
Setting the Time & Date
Clock settings must be completed in STAN DB Y mo de .
1. Press the CLOCK button on the remote.
2. Use the / buttons to adjust the digits, and the </> buttons to
skip to the next or previous setting.
3. Once all the time settings are finished, press the CLOCK button once
more to edit the Date settings the same way.
4. Once completed, pressing the CLOCK button to store the settings.
Setting Ala rm 1 & Alarm 2
Alarm settings must be operated in STAND BY mod e.
1. Press the ALARM button once, then use the / buttons to have
the alarm activated in Once, Weekdays, We ek en ds , All d ay s, o r
Al ar m of f.
2. Press the ALARM button twice to set the time. Use the / buttons
to adjust the digits, and the < / > bu tt on s to s kip t o t he n ex t or
previous setting. Once completed, the unit will store the settings
automatically
.
3 r es s th e AL AR M bu tt on t hr ee t im es , th en u se t he / b ut to ns t o
choose the mode which the alarm will function with.
4 r es s th e AL AR M bu tt on f ou r ti me s, u se t he / b ut to ns t o ad ju st
the volume.
When you press the ALARM button the fifth time, you will enter the
setting. Repeat steps 1-4 to set Alarm 2.
When an alarm is set, the icon will appear on the display.
7
8
<
>
<
>
<
>
<
>
<
>
General Operation
POWER ON
WELCOME
Scanning ... 12
16-09-2010
01:20:23
Alarm 1 Alarm 2
General Operation
. P
. P
.
.
.
.
1 C
2 E
3 S
Page 6

9
1
0
GENE RAL OPERATIO N
Sleep Timer
To use the s le ep tim er f un ct io n, t he u ni t ca nn ot b e in s ta nd by m od e.
1. To activate the timer, press the SLEEP button to open the option
screen.
2. In order to set the timer duration, you need to press the SLEEP
button repeatedly until you reach the period you require.
NOTE: The timer duration options are 10 minutes, 20 minutes, 30
minutes, 45 minutes, 60 minutes, 90 minutes, 120 minutes & OFF.
DSP effects
Pressing the DSP button repeatedl ycle h ro ug e Q presets
to alter the sound filed. You can choose from Jazz, Rock, Classic, Pop,
Live, Dance & Off.
Loudness function
This function will add a rounder bass sound at low levels.
Press the MUTE button to silence the output. Press again to resume.
NOTE: the mute indicator on the screen will disappear after 10s.
Tone contr ol s
Adjust the Bass & Treble tone controls.
1. Press the TONE button on the remote control.
2. The first adjustment is Volume. Use the VOL+/- button to adjust.
3. Press the TONE button again to edit the Bass. Use the VOL+/- buttons.
4. Press the TONE button once more to edit Treble. Use the VOL+/-
buttons.
Switching Modes
To switch between the available modes:CD, FM,DAB , iP od & A UX I N.
Press the FUNCTION button(unit) to cycle through the options or press
the relevant buttons on the remote control from CD, DAB / FM (press
twice to select FM), iPod & AUX IN.
Auto Scan Mode
1. To activate the full scan, press the MENU button,
2. When you see the <Autoscan> option, press the ENTER button.
The unit will search for all available DA t at io ns .
Storing Station Presets
It is avaibale to store 10 of your favourite stations. This will enable you
to access your favourite stations quickly and easily.
To store a preset, you must first be listening to the station that you
would like to save. Then press and hold one of the numeric buttons
from 1-0 to store the station under that number. You will see Preset X
stored appear on the display with X being the number you stored the
station under.
Recalling a Station Preset
To select a preset, just press the numeric button in DAB mo de t o
activate the station you stored.
Display Modes
Every time you press the INFO button on the remote control, the
display will cycle through the following display modes:
The information is displayed on the lower segment of the LCD display.
MUTE function
General Operation
Listening to DAB radio
+
+
+
+
+
LIST ENING TO DA B RADIO
+
B s
t of Ey to c t h a s
Page 7

11
1
2
LIST ENING TO DA B RADIO
Ensemble/ Multiplex (Group Name)
A multiplex/ensemble is a collection of radio stations that are bundled
and transmitted on one frequency. Th er e ar e na ti on al a nd l oc al
multiplexes.
Local ones contain stations that are specific to that area e.g. MXR West.
NOTE:
Bit Rate
This displays the type of broadcast you are receiving e.g. mono or
stereo and what bit rate is being used.
DLS (Dynamic label Segment)
Dynamic label segment is a scrolling message that the broadcaster
may include in their transmissions. This message usually includes
information, such as program detail etc.
Program Type
This describes the style or genre of music that is being broadca ted s
.g.
“Rock” or “Classical”
DL Scrolling text
Program Type
Ensemble Name
Channel Frequency
Bitrate
Signal Error
Signal Strength
Secondary Services
On some occasions you will see a “>” symbol directly after the name of
the station. This indicates that there are secondary services available
to that station. These secondary services contain extra services that
relate to the primary station, e.g. a sports station may want to add extra
commentaries. The secondary services are inserted directly after the
primary station.
Manual Tunin g
This can help you when aligning your aerial or when adding stations that
were missed in auto tuning.
1.Press the MENU button in DAB mod e, a nd u se t he < /> b ut to ns t o fi nd
<Manual tune>. Press the ENTER button to activate the manual tune
options.
2. Now use the</> buttons to cycle through the DA nsem bl es /
multiplexes from 5A to 13F.
3. Press the ENTER button to view the ensemble/multiplex details.
Press the ENTER button again to enter the multiplex.
4. To see what stations are present in the found ensemble/multiplex, just
press either </ > bu tt on s. W he n yo u’ ve s el ec te d a st at io n th at y ou
would like to listen to, just press the ENTER button.
5 . An tat io ns f ou nd d ur in g th e ma nu al t un e op er at io n wi ll b e added
to yo ur stati o n lis t.
Pruning
When the radio has performed Scan in several locations, you may find
there are stored stations that you can no longer receive. This function
automatically removes them from the stored station list.
1. Press the Menu button.
2. When the <Autoscan> option appears, use the </> buttons to find
<Prune>, press the ENTER button to select.
3. Use the</ uttons to select and press ENTER to select.
YES
e
Listening to DAB radio
+
Listening to DAB radio
+
+
LIST ENING TO DA B RADIO
+
+
+
DA od e
+
In
, which is different from what in normal radio mode.
,
frequency
groups together with several radio stations are
transmitted by one
DAB
+
B e
B m
y
s
S
(
)
> b
Page 8

LIST ENING TO FM R ADIO
See page 10(switching modes) to switch to FM.
Scanning for Stations
You ca n sc an u p or d ow n th e fr eq ue nc y range man ua ll y by p re ss in g th e
PREV / NEXT (main unit) or </> (remote) buttons to increase or
decrease the frequency in 0.05 increments. To scan through the
frequency range quickly, press the / buttons (remote), or press and
hold either PREV or NEXT ( main unit).
Once a station has been found, the scanning will stop automatically.
If no station is found, then the tuning will stop once it has cycled
through the entire FM band (87.5-108MHz).
Scan Modes
When the unit is performing auto scan you can set the sensitivity level
of the stations to be found. EG: storing signals only or all stations.
1. In FM mode, press the MENU button, when <Scan Setting> appears
on display, press the ENTER button to view the submenu.
2. Use the </> buttons to select either ALL STATIONS (which will detect
any station, even with a weak signal) or STRONG STATI ON ( wh ic h
will only detect stations with a good signal strength). Press the
ENTER button to select the required option.
3. When you perform a scan as described above in SCANNING FOR
STATI ON S, o nl y st at io ns f it ti ng t he a pp li ed s et ti ng w il l be d et ec te d.
Storing Station Presets
It is avaibale to store 10 of your favourite stations. This will enable you
to access your favourite stations quickly & easily.
To store a preset, you must first be listening to the station that you
would like to save. Then press and hold one of the numeric buttons
from 1-0 to store the station under that number. You will see Preset X
stored appear on the display with X being the number you stored the
station under.
Recallin g a Sta ti on P re se t
To select a preset, just press the numeric button in FM mo de t o
activate the station you stored.
Display Modes
Every time you press the “INFO” button, the display will cycle through
the following display modes:
LIST ENING TO FM R ADIO
Radio Text
As with DAB , t he b ro ad ca st er c an i nc lu de a s cr ol li ng t ex t th at d ispl ays
information about the current program. If radio text information is not
available, then the display will show <No Radio Text>.
Pro gram Type
This describes the style or genre of music that is being broadcast e.g.
“Rock” or “Classical”. If not programme type has been set, then
<NO PTY> will be displayed.
1
3
14
Program Ty pe
Audio Mode (S tereo /Mono )
Radio Text
Program Name
DRC (Dynamic Range Control)
Its function is to reduce the dynamic range of audio signal. The purpose
of this is to adapt the dynamic range of the audio signal so as to listen to
radio in a noisy environment.
NOTE: this is not available on some DAB stations.
1. Press the but to n.
2. When the <Autoscan> option appears, use the </> buttons to find
<DRC>, press the ENTER button to select.
3. Choose between DRC Off, DRC Low and DRC High using the </>
buttons.
4. Press the ENTER button to save the setting.
^
^
Listening to FM radio
Listening to DAB radio
+
LIST ENING TO DA B RADIO
+
+
MENU
+
Page 9

LIST ENING TO A CD
1 . Make s ur e yo u ar e in C D mo de , if n ot , pr es s th e CD b ut to n on t he
remo te o r pr es s th e FU NC TI ON b ut to n re pe at ed ly u nt il y ou r ea ch C D.
2. Press the EJECT button, when the disc drawer pops out, insert a disc
(label side facing upwards), press the EJECT button again to close.
3. When the door is closed “Loading disc” will appear on the display and
the unit detects how many tracks are found on the current disc, which
will be dis played on screen.
Note: When playing MP3 songs with Chinese name , t he Ch in es e
characters cannot be displayed properly.
4. Playback will begin automatically from Track 01.
5. To stop playback press the STO P bu tt on .
6. To pause playback press the PLAY/PAUSE / button during playback.
To resume playback press once more.
Skipping Tracks
To skip through the available tracks on a disc, press to skip to the
next track & for the previous track.
Fast Searching Tracks
To fast forward or rewind a track during playback, press either or
buttons respectively. Each press of the button increases the search
speed EG: 2x &4x the third press will resume normal playback.
Repeat Operation
1. During playback, pressing the REPEAT butto e pea t cu rr en t tr ac k.
2. Pressing the REPEAT button again will repeat all tracks on the disc.
3. To cancel the repeat function, press the REPEAT but to n fo r a th ir d
time.
LIST ENING TO A CD
Programme Playback
You ma y wa nt t o pl ay b ac k tr ac ks o f a CD i n a di fferent order rather
than the original order.
1. Press the PROGRAM button to enter the programme setup.
2. Use the </> buttons to skip between the play order numbers.
3. Set the play order track numbers using the numeric key.
For example: the diagram on the right, the unit plays track 02 as the
first track and track 14 as the second track.
4. When tracks 1-2 are set, use the / buttons to access further play
order screens. Repeat steps 2-3 for the remainder of the program
playlist.
5. When completed, use the </> buttons to scroll across to the arrow
on the right of the display and press the ENTER button to begin
playback.
Random Operation
Press the SHUFFLE button on the remote control. The CD contents will
be played once in a random order. Pressing the SHUFFLE button again
activates the RANDOM option. This will play the CD content in a random
fashion with some tracks being played a number of times. To cancel the
random operation press the SHUFFLE button again.
NOTE: this button is only available for CD.
Numeric Buttons
While listening to a CD, a specific track can be played by pressing the
relative digit buttons. For instance track 6 would be 06. To play track 12
you would press the 1 button then 2.
15
16
^
^
Listening to a CD
PRO GRAM IN PUT
PRO GRAM IN PUT
01 [ 00 ] 02 [ 00] 01 [0 2] 02 [14 ]
Pla y Order
Tra ck Nu mb er
Listening to a CD
to
n r
Page 10

LIST ENING TO AN iPod
Connecting an iPo o th e i4 00
1. Remove the plastic cov er f ro m th e do ck .
2. Insert the iPod / iPhone as shown . This unit is designed to make use
th e ad ap to r su pp lied with yo Pod. Should you not have access to
this adaptor, there are a set of adaptors supplied with this unit. For
more details, see page 19.
3. Switch to iPod mode. Press the iPod button on the remote or press
the FUNCTION button repeatedly until you reach iPod.
Playback Controls
Below is a list of functions .
PLAY/ PAUSE: Press once to begin playback, press again to pause.
STOP: Stops playback.
ENTER: This button works as the select button on an iPod.
:Skips to previous or next track.
REPEAT: As same as described in the CD section Page 15.
MENU: For some iPods, press this button to activate the iPod menu .
/
NAVIGATIO N BU TTONS: Pressing these will scroll up or down
through the iPod menu.
NOTE: When activatin g th e iP od m od e, i f th e iP od p ow er i s ve ry l ow,
the unit may not authenticate the accessory “Authenticated Is Fail!
Try Ag ai n! ” wi ll a pp ea r on the display. Leave the iPod docked for a few
minutes to charge, then remove and dock again.
It i vailable to connect an external audio source like an MP3 player
using a 3.5mm audio cable (not supplied).
CONN ECTIN G EXTER NAL AUDI O SOURC ES
External audio sources such as non iPod MP3 players can be
connected using a 3.5mm to RCA au di o (n ot s up pl ie d) .
1. Connect one end of the cable to the MP3 players headphone/ line
output and the other end to the AUX I N in pu t on t he b ac k of t he u ni t.
2. Press the FUNCTION button repeatedly until you reach the AUX-IN
option or press the AUX -I N bu tt on o n th e re mo te c on tr ol .
3. Adjust the volume.
NOTE: The volume output is effe ct ed b y th e vo lu me l ev el o n th e
source when using a headphone output ie: MP3 playe r. So m ak e
sure the volume is set to about 70-80 to avoid
d
istortion
).
ADVANCE D OPERATIO N
Factory Reset
There may be times when you need to reset the i400 back to its original
factory setting.
1. Pre ss t he M EN U bu tt on , th en u se t he < /> b ut to ns t o cy cl e th e op ti on s
until you reach <System>. Press the ENTER button.
2. When you see <Factory Reset>, press the ENTER button.
3. Select <Yes> using the </> buttons, then press ENTER to start the
reset process.
NOTE: Once the reset has taken place, you will lose all your stored
DA B a nd F M, a nd t he i nt er na l DA eg is tr y.
1
7
1
8
/
Listening to an iPod
Connecting External Audio Sources
+
+
B r
^
^
ur i
d t
s a
% (
Page 11

UNIV ERSAL DOC K ADAP TERS
SPEC IFICATIO NS
CARE AND MAI NTENA NCE
To clean the i400 Micro Sy stem
Ensure the unit is switched off and unplugged from any electrical outlet
Wipe the case with a slightly moist, lint- f ere cloth.
Do not use any cleaning fluids containing alcohol, ammonia or abrasives.
Do not spray an aerosol at or near the radio.
Do not allow liquids to spill or objects to drop into any openings.
Always use original packaging if it is necessary to transport the unit.
If this unit is used in a dusty environment, it may be necessary t o ha ve
the unit serviced at your local dealer periodically.
It is not advisable to allow large deposits of dust to accumulate within
the unit as it may prevent adequate cooling. Similarly dust deposits
which become damp can sometimes lead to electrical problems which
may cause severe damage to the delicate electronics within this unit.
1
9
2
0
CD Section
Channels
S/N Ratio
2.0 stereo
>=70
Radio Section
Tun in g Ra ng es
FM 87.5 - 108 MHZ
DAB BAND III 5A-13F
General
Output Power
2 x 5W RMS
Power Consumption
(Standby)
40W
0.6W
Input
AC 240V ~ 50Hz
Adapter
No.
iPod mini
iPod photo
iPod nano
5G iPod (with video)
5G iPod with video
iPod nano (2nd generation)
iPod nan o (3 r d gene ra ti on )
iPod touch
3
7
8
9
10
11
13
14
4GB & 6GB
40GB & 60GB
2GB & 4GB
30GB
60GB &80 GB
4G, 8GB, 16GB
4GB, 8GB &16GB
8GB & 16GB
iPod Description
Capacity
Universal Dock Adapter
Care and Maintenance
Page 12

TROU BLE SHO OTING
PROBLEM
CAUSE
SOLUTION
No S ound
Volume not t up
Signal re ce pt ion too low
Volu is to o hi gh
Adju st the main volume k no b
Adju st the ante nn a or mov e
the uni t to a str onger sig na l
locat io n
Stati c Sound
Sound i s
disto rt ed
Desired s ta ti on
not found
Wea k si gn al
Use the Man ual Tun e
funct io n
The di splay
shows
“SERVICE A”
No DAB c overa ge in yo ur
area .
Poor re ce ption
Adjus t th e po si tion of t he
aeria l
The rad io wi ll try t o re tune.
Perfo rm a s ca n.
The display is
blank
I can hear a
bur bling ise
on some
stati ons
Wea k si gn al
Try r e-posit io ni ng the ae rial
This may occur if t he
broad ca st er c hange s th e
label o f a se rv ic e or
removes a l ab el wh ile tu ned.
Check s ta ti on a vaila bi li ty
www.uk di gi ta lradi o. co m
Check s ta ti on a vaila bi li ty
www.uk di gi ta lradi o. co m
Trouble Shooting
“Aut hentic at ed
Is Fall! Try
aga in! ”
app ea rs
when I
s tch to
iPod
mod e.
The iPo d po we r ch arge is
too low.
Allow t he i Po d to c harge
for a few m in ut es , remov e
and re- do ck .
+
21
N/
urn ed
me
w
i
no
 Loading...