

Page 1
Mini Hi Fi System
H10-AU
MD111025-01
Page 2
Impo rtant N otice
◆
◆
◆
We are not responsible for servicing of the product if the serial numbers are different on the
packing box, warranty card and rear panel or if the serial number is modified or if there is no
warranty card.
Without written permission of Zhuhai Spark Electronic Equipment Co., Ltd., any enterprise
or individual is forbidden to copy, reproduce or retranslate any part of this manual in any
form.
Specification and information in the users' manual are only for reference and subject to
change without further notice.
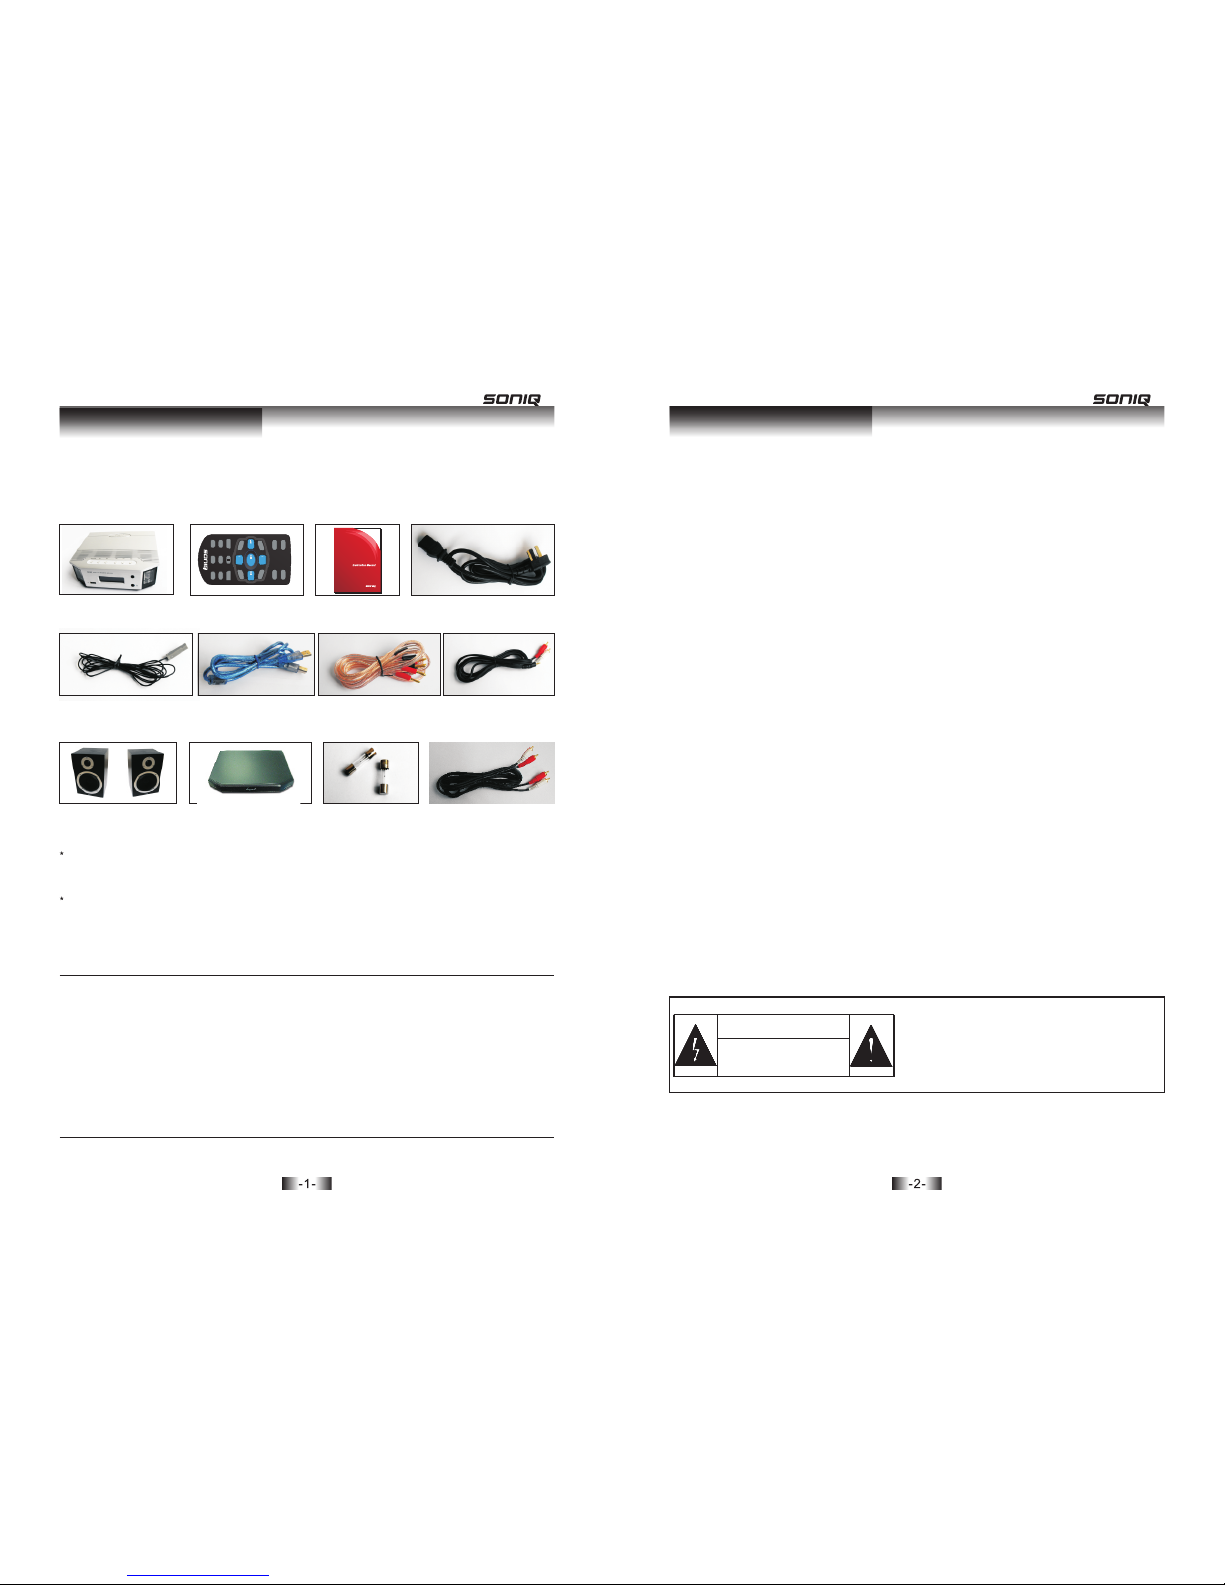
Please carefully check the package first and then open the package. Package contents include:
H10 amplifier: 1 piece
Remote Control: 1 piece
Instruction Manual:
1 piece
Power Cord: 1 piece
FM Antenna: 1 piece USB Cable: 1 piece
3.5 Converting Audio
Signal Cable: 1 piece
Speaker Cable: 1 pair
H10 Speaker: 1 pair
Amplifier Dock: 1 piece
Four-head RCA Audio
Signal Cable: 1 piece
Above accessories are for your reference and Spark Electronic Equipment Co., LTD reserve the rights to
change without further notice.
Main Fuse: 2 pieces
Note:All other parts except above are not included.
1. Please make sure local voltage level is matched with the input level of the amplifier, which
indicates on the rear panel.
2. Unplug the power cord if you are not going to use the product for an extended period of time.
3. Please keep the unit's ventilation open and install the amplifier at a well-ventilated place to
avoid troubles and fire hazard.
4. Handle with care in transit to avoid damage.
5. Keep the machine from moisture. Use the machine after making it dry.
6. To reduce the risk of electric shock, do not remove the cover.
7. Do not place any objects filled with liquids such as vases or some others on the machine or
around.
8. Do not attempt to service this product yourself. Opening the cover may expose you to
dangerous voltage or other hazards.
9. Clean only with dry cloth and unplug the power cord in advance.
10. Avoid metal articles dropping into the machine.
11. Lay flat and place the product steadily.
12. Keep the machine from its surrounding at least 10cm.
13. Do not place any inflammable on top of the machine.
14. Do not place the product near heat sources such as radiators, heat registers or other
products that produce heat.
15. Please use the original power cord together with the machine and make sure power socket
has been grounded.
16. If any troubles with the product please contact our company or our local agent.
CAUTION
RISK OF ELECTRONIC SHOCK
DO NOT OPEN
◆ To reduce the risk of electric shock, do not remove the cover.
◆ No user serviceable parts inside. Refer servicing to qualified
service personnel.
◆ To reduce the risk of fire or electronic shock, do not expose
the unit to rain or moisture.
Safety preca utions
Package Cont ents
/ATS
/CH-
USB
VOL-
BASS-
TRE-
REPEAT
FOLD
MUTE
FM
/TU-
PC-DAC
AUX
SELECT
/CH+
SHUFFLE
VOL+
BASS+
TRE+
MENU
/TU+
MEMORY/STOP
QT153
Mini Hi Fi System
H10-AU
Page 3
Front Panel
The lightning flash with arrowhead symbol, within an equilateral triangle, is intended
to alert users to the presence of uninsulated “dangerous voltage” within the product's
enclosure that may be of a sufficient magnitude risk shock to persons.
The exclamation point within an equilateral triangle is intended to alert the user to the
presence of important operation and maintenance (servicing) instructions in the
literature accompanying the appliance.
Safety preca utions
Please make sure local voltage level is matched with the input level of the amplifier, which
indicates on the rear panel. We are not responsible for the risks or hazards caused by improper
voltage.
Note:
3
4
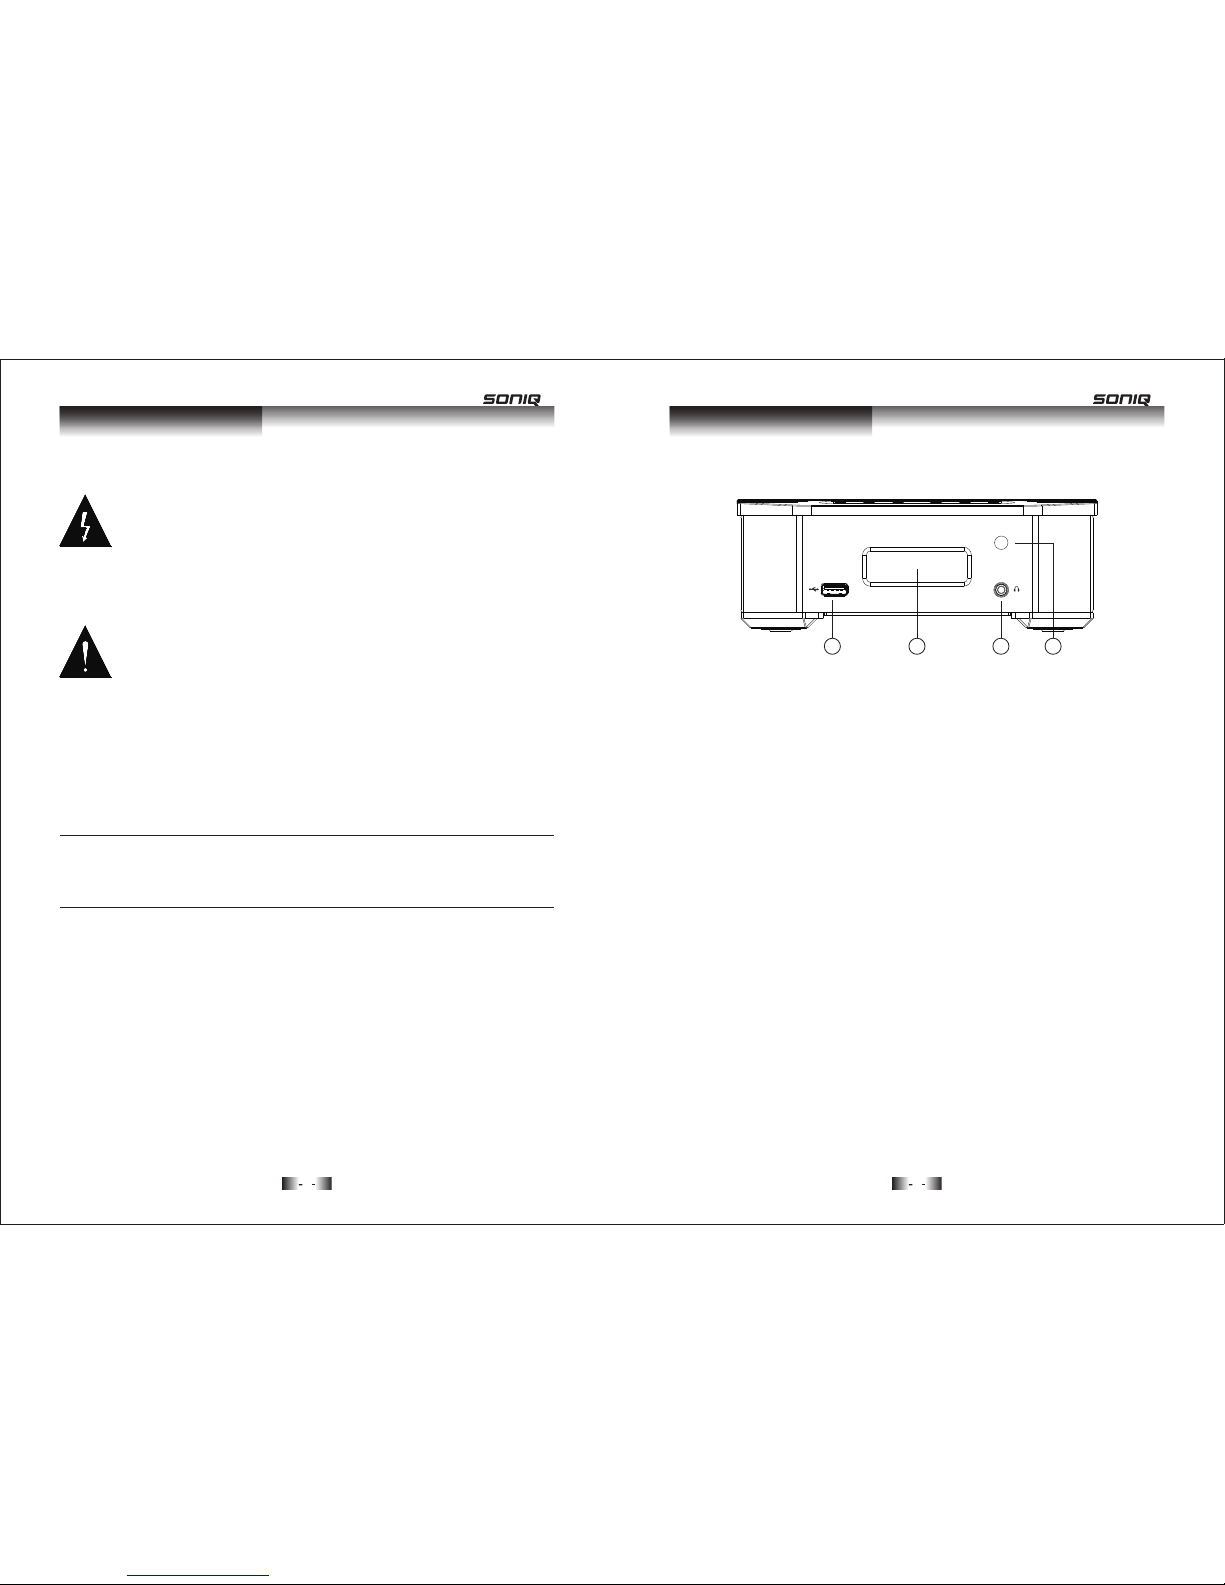
Pictu re I : Fr ont Vie w Pi cture o f H1 0
1 3
4
2
H10
①. Type A USB Socket
Used to connect with external USB storage device (U-disk, MP3 media player, Card reader,
etc).H10 can play MP3/WMA/AAC format of audio files stored in USB storage device.
②. LCD Display
Showing operation state of H10.
③. Headphone Jack
Designed with good sound headphone amplifying circuitry and help you enjoy the high-
qualified music alone.
④. IR Remote Sensor
Used to receive the code of remote control.
Page 4
Top PanelRear Panel
5
6
①. Type B USB Socket (PC-DAC)
Connect with computers.
. FM Antenna Socket
Connect with the FM Antenna.
③. AUX IN
Connect with sound source like DVD, MP3 player and Television.
. Right Channel Output (R+/R-)
. Left Channel output (L+/L-)
Connect the speaker with output terminals above. Please notice the right direction
indication of the cable and do not mix up the positive and the negative ends.
. Power Socket
AC power Input
. FUSE
Please replace the fuse with specification of T1.6A/250V.
. Power Switch
Turn on and turn off.
②
④
⑤
⑥
⑦
⑧
Pictu re : Back Vi ew P ictur e of H 10II
1
3
2
4
5
6
7
8
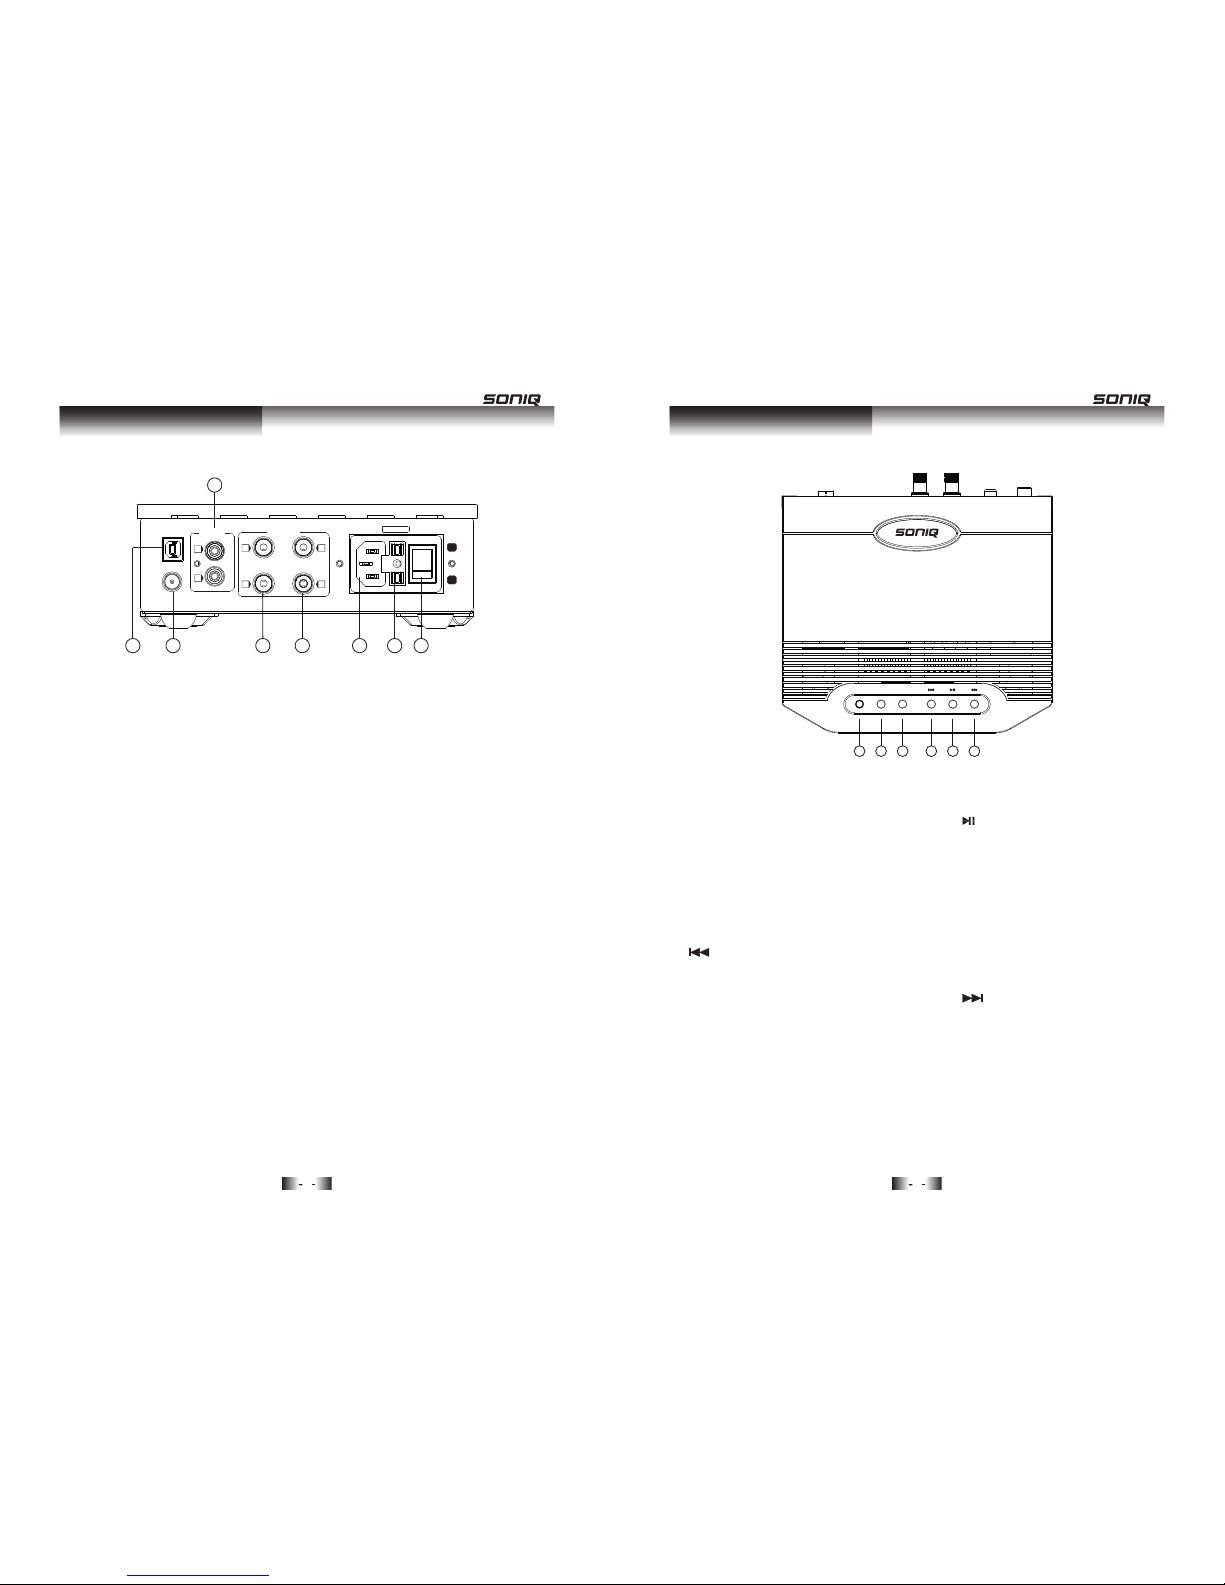
Pictu re I II : O ver Vie w Pi cture o f H1 0
2 3
6
5
4
1
①. SELECTOR
②. VOL-
Volume down
③. VOL+
Volume up
④.
USB Operation State:
Press once and it will repeat the current
track.Press twice in a short time it will
turn to previous track.
PC-DAC Operation State:
Turn to previous track
FM State:
Turn to previous radio station pre-stored
Select among USB, PC-DAC, FM and AUX
⑤.
USB Operation State:
Play or Pause
PC-DAC Operation State:
Play or Pause
FM State:
Press fo r 3 second s, and it will
start pr e-stori ng the rad io stati on
automatically
⑥.
USB Operation State:
Turn to next track
PC-DAC Operation State:
Turn to next track
FM State:
Turn to next radio station pre-stored
OFF
ON
TI. 6AL 2 50 V
PC-DA C
L+
L-
R+
R-
L
R
FM ANT
AUX IN
SPEAK ER
SELECTOR VOL- VOL+
Page 5

/ATS
/CH-
USB
VOL-
BASS-
TRE-
REPEAT
FOLD
MUTE
FM
/TU-
PC-D AC
AUX
SELECT
/CH+
SHUFFLE
VOL+
BASS+
TRE+
MENU
/TU+
MEMORY
Remote Contr olRemote Contr ol
7
8
1
5
10
13
16
2
4
7
15
18
14
6
17
8
9
11
12
3
Pictu re I V: Pi ct ure of Re mo te C ontro l
①.USB
Turn to U-Disk State
②.PC-DAC
Turn to PC-DAC State
③.FM/AM
Turn to FM State
④.AUX1/2
Turn to AUX1 State
⑤.
USB Operation State:
Press once and it will repeat the current track. Press twice in a short time it will turn to
previous track
PC-DAC Operation State:
Turn to previous track
FM State:
Turn to previous radio station pre-stored
/CH-
⑥.
USB Operation State:
Play or Pause
PC-DAC Operation State:
Play or Pause
FM State:
Press for 3 seconds, and it will start pre-
storing radio station automatically
⑦.
USB Operation State:
Turn to next track
PC-DAC Operation State:
Turn to next track
FM State:
Turn to next ra dio st ation pre-st ored
⑧.
USB Operation State:
Turn to the last ten tracks
FM State:
Turn to higher frequency
⑨.
USB Operation State:
Turn to the last ten tracks
FM State:
Turn to lower frequency
/ATS
/CH+
/TU+
/TU-
⑩.VOL-:Volume down
. /MEMORY
USB Operation State:
Stop
FM State:
Pre-store
.VOL+
Volume up
.BASS-
Bass down
.FOLD
USB Operation State:
Select next folder to play
.BASS+
Bass up
.TRE-
Treble down
.MUTE
Mute
.TRE+
Treble up
11
12
13
14
15
16
17
18
QT153
Page 6

System Conne ctionSystem Conne ction
9
10
①.Connect one end of the audio signal cables to the positive and negative from your speakers.
Red to Red and Black to Black.
② .Connect the other end of the audio signal cables to the positive and negative from the
amplifier. Red to Red and Black to Black.
③.Take the same way for both Left Channel and Right Channel Speakers.
④ .R refers to right channel while L represents left channel. Take above picture for your
reference.
1. Speaker Connection
◆ Please do not insert the power cord into the main socket before all other instruments are
well connected.
◆ Please take the right guidance for connection because wrong connection may cause noise
or low-grade function.
-
+
-
+
- + - +
Red Ter minal
L R
L
R
Loc ating the two spe akers
in r eve rse d irect ions w ill
w or s e n t he a co u st i c
fid elity s eriou sly!
Notice:To make
sure a better listening,
please keep the two
speakers in an
appropriate distance,
not too close.
Sch emati c Diagr am
of Sp eaker s
Note:
2. USB Storage Device Connection
Connect USB storage device like U-Disk or MP3 player with the amplifier and press“USB on
the remote control or“SELECTOR”on the top panel. Then the operation state will turn into“U
DISK” state and you can enjoy the music freely in the storage device.
”
(1).Compatible for U-Disk
①.Plug the U-Disk to USB socket in the front panel.
②.If it is playing music stored in the U-Disk, let it stop playing before unplugging the U-Disk.
“ ”
H10
(2).Compatible for Device with USB Cable
①.Connect the USB cable to the USB device.
②.Plug the USB cable to USB socket in the front panel.“ ”
H10
OFF
ON
TI.6AL 250V
PC-DAC
L+L-R+
R-
L
R
FM ANT
AUX IN
SPEAKER
Page 7

System Conne ctionSystem Conne ction
1211
①.Plug the storage card to a card reader.
②.Plug the card reader to the USB socket in the front panel.“ ”
(3).Compatible for Storage Card
H10
◆ Card Reader and USB cable are not attached with the machine.
◆ The machine will be at waiting state after recognizing the USB storage device. Press the
play key,and it will start playing.
Note:
3. Computer Connection
①.Plug the B end of USB cable to“PC-DAC”USB socket in the rear panel. Plug the A end of
USB cable to the computer USB socket. Press“SELECTOR”or“PC-DAC”on the remote
control, the sound source will switch to“PC-DAC”state.
②.Computer will recognize the USB sound card and use it as audio device.
③.Use USB cable with USB1.1 and USB 2.0 specification.
④.If the computer operation system is Windows 7/Vista/XP/2000 or Mac OS X, it can start the
device driver of the USB sound card.
⑤.Cut off the connection of the machine and computer if you don't use the PC-DAC function for
an extended period of time.
4. Other Audio Devices Connection
①.Other audio devices (DVD/CD/cell phone) can be connected to the AUX socket by audio
signal cable. It will become wonderful HI-FI audio system.
“ ”
OFF
ON
TI.6A L 250 V
PC-DAC
L+
L-
R+
R-
L
R
FM ANT
AUX IN
SPEAKER
OFF
ON
TI.6A L 250 V
PC-DAC
L+
L-
R+
R-
L
R
FM ANT
AUX IN
SPEAKER
Page 8

FM An tenna
System Conne ctionSystem Conne ction
1413
②.Connect the audio signal cable, then press“SELECTOR”on the panel or“AUX”on the remote
control, the sound source will turn to“AUX”state.
Don't connect the left and right channels in the reverse directions.
◆ Turn off the main power before finishing other connections.
◆
Note:
5. FM Antenna Connection
① .Connect FM antena to the FM ANT socket on the rear panel and extend it to the best
location.
“ ”
②.To receive the signals better, you can connect the FM antenna to an outdoor FM antenna. If
you really use an FM antenna, please pay attention to lightning protection.
FM A nt e nn a
To receive the signals better, please put the FM antenna away from the speaker, power cord
and USB cable.
Note:
OFF
ON
TI.6A L 250 V
PC-DAC
L+
L-
R+
R-
L
R
FM ANT
AUX IN
SPEAKER
OFF
ON
TI.6A L 250 V
PC-DAC
L+
L-
R+
R-
L
R
FM ANT
AUX IN
SPEAKER
OFF
ON
TI.6A L 250 V
PC-DAC
L+
L-
R+
R-
L
R
FM ANT
AUX IN
SPEAKER
Page 9

System Conne ctionSystem Conne ction
1615
6. Headphone Connection
H10 is a HI-FI power amplifier, as well as a headphone amplifier. You can enjoy the wonderful
music with the headphone.
H10
7. Power Cord Connection
①.
② . Press the power switch to“On”, and then the machine starts working; Press the power
switch to“Off”, and then the machine will stop.
Plug the power cord to the power socket after finishing other connections.
①.Place the remote control upside down.
②.Press the sunken position, and then buckle downward.
③.Place the new battery according to the positive electrode and negative electrode directions
listed on the battery stand.
④.Push the battery stand to the original position.
⑤.Change the battery when the remote control doesn't work.
8. Installation of Remote Control Battery
9. Remote Control Operation
①.Aim the remote control directly at the remote sensor.
②.In order to avoid weakening the controlling effect, please don't lay any obstacle between the
remote control and the remote sensor.
3V
CR202 5
CR202 5
3V
CR2025
CR2025
CR202 5×1
CR202 5×1
CAUTI ON
PLEASE REMOVE THE BATTERY
WHEN THE REMOTE CONTROL
IS NOT IN USE FOR LONG
PERIOD OF TIME
BATTERY TYPE:CR2025
RATED VOLT:3V/DC
Pay attention to the volume and listening time, in case that it will hurt your auditory system.
◆ Don't drop the remote control.
◆ Keep the remote control dry.
◆ Use the battery with specification of CR2025/3V.
◆ Do with the used battery (with chemical substance) properly.
①.Plug the headphone with 3.5 mm diameter to the headphone output jack in the front panel.
② .The machine will shut down the terminal signals from the left and right channels after the
headphone is plugged.
Note:
Note:
OFF
ON
TI.6A L 250 V
PC-DAC
L+
L-
R+
R-
L
R
FM ANT
AUX IN
SPEAKER
Page 10

Basic Operatio nBasic Operatio n
1817
1.Play music in USB Storage Device
You can do the following operations as you are instructed.
The machine supports the audio formats of mp3, wma and m4a, etc.
(1).Play
① .Select the USB model by pressing“SELECTOR”on the top panel or“USB”on the remote
control. The LCD screen will show:
②.Plug the USB storage device to the
③ .Press the“ ”on the top panel or“ ”on the remote control, it will start playing.The
display screen will show: “ ”,the current track and the time.
“ ”socket.
/ATS
(2).Suspend
①.When it is playing, press“ ”on the top panel or“ ”on the remote control, the machine
will suspend. The screen will show: “ ”.
②.Press the“ ”on the top panel or“ ”on the remote control again, the machine resumes.
/ATS
/ATS
(3).Stop
①.When it is playing, press the“ /MEMORY”on the remote control, the machine will stop. The
screen will show:“ ”.
②.Press the“ ”on the top panel or“ ”on the remote control again, the machine
resumes.
/ATS
(4).Select Forward/Backward
①.When it is playing, press twice in a short time the“ ”on the top panel or“ ”on the
remote control, it will turn to the previous track . If the current tack is the first one, it will turn
to the last track.
②.When it is playing, press the“ ”on the top panel or“ ”on the remote control, it will
turn to the next track. If the current track is the last one, it will turn to the first track.
/CH-
/CH+
(5).Select Forward/ Backward by 10 Tracks
①.When it is playing, press“ ”on the remote control, it will turn forward to the track lining
10 before the current one. If the current track lines within the first 10 tracks, it will stop
skipping.
②.When it is playing, press“ ”on the remote control, it will turn backward to the track lining
10 after the current one. If the current track lines within the first 10 tracks, it will stop
skipping.
/TU -
/TU +
(6).Select Folders
Select the folders in your U flash disk by pressing“FOLD”on the remote control.
(7).Audio Frequency Document Format
①.MP3
Sample Rate: 8K, 16K, 32K, 11.025K, 22.05K, 44.1K, 12K, 24K and 48K.
Bit Rate (Data Rate): 8-320 Kbps and variable bit rate.
②.WMA
Sample Rate: 8K, 16K, 32K, 11.025K, 22.05K, 44.1K, 12K, 24K and 48K.
Bit Rate (Data Rate): 5-320 Kbps and variable bit rate.
③.AAC
Sample Rate: 8K, 16K, 32K, 11.025K, 22.05K, 44.1K, 12K, 24K and 48K.
Bit Rate (Data Rate): 5-320 Kbps and variable bit rate.
Page 11

Basic Operatio nBasic Operatio n
2019
2. Listen to FM Broadcast
You can do the following operations as you are instructed.
(1).Tune Radio Stations Manually
① .Select the “TUNER FM” model by pressing“SELECTOR”on the top panel or“FM”on the
remote control. The LCD screen will show:
②.Select the radio station and set it at the best receiving state by pressing“ ”or“ ”on
the remote control. The step length of frequency is 0.1 MHz. The display screen will show
the frequency of the radio station.
/TU +
/TU-
(2).Prestore Radio Stations
You can prestore as many as 99 FM radio stations.
1) .Prestore the Radio Stations Automatically
Press the“ ”on the top panel or“ ”on the remote control for about 3 seconds, then
the machine can prestore the radio stations within the frequency of 87.5-108.0 MHz. In the
end, it will skip to the first station. The screen shows the station number and frequency.
/ATS
2) .Prestore the Radio Stations Manually
①.Tune to the station to be stored.
②.Press the“ /MEMORY”, and then the screen will show“MEM”.
③.Select the station number by pressing“ ”and“ ”on the top panel or“ ”and“ ”
on the remote control. The screen will show the station number.
④.Press the“ /MEMORY”again, and then the station is stored.
⑤.Repeat ①-④ steps to store other stations.
/CH- /CH+
(3).Listen to the Prestored Stations
Choose the stored stations by pressing“ ”and“ ”on the top panel or“ ”and“ ”
on the remote control. The screen will show the station number and frequency.
/CH- /CH+
(4) .Cancel the Prestored Stations
Press the“ /MEMORY”for about 3 seconds, it will cancel all the prestored stations.
3. Play Computer Music by USB Sound Card
You can do the following operations as you are instructed. Window Media Player or
Foobar2000 Player is recommended.
(1).Play
①.Select the USB sound card model by pressing“SELECTOR”on the top panel or“PC-DAC”on
the remote control. The LCD screen will show:
②. Press the“ ”on the top panel or“ ”on the remote control, the computer player will
start.
/ATS
(2).Suspend
①.When it is playing, press the“ ”on the top panel or“ ”on the remote control, and then
the player will suspend.
②.Press the“ ”on the top panel or“ ”on the remote control again, and then the player
will resume.
/ATS
/ATS
(3).Select Forward/Backward
①.When it is playing, press twice in a short time the“ ”on the top panel or“ ”on the
remote control, it will turn to the previous track. If the current track is the first one, it will skip
to the last track.
②.When it is playing, press the“ ”on the top panel or“ ”on the remote control, it will
turn to the next track. If the current track is the last one, it will skip to the first track.
/CH-
/CH+
Page 12

Specificat ionBasic Operatio n
2221
4. Sound Control
(1).MUTE
①.Press“MUTE”, and then the machine enters into mute state. The screen shows“MUTE”.
②.Press“MUTE”again or adjust the volume value, and then it will return to normal value.
(2) Turn up/down Volume
① .Press“VOL+”on the top panel or“VOL+”on the remote control to turn up the volume. The
screen will show the added volume value. Press“VOL-”on the top panel or“VOL-”on the
remote control to turn down the volume. The screen will show the decreased volume value.
②.You can adjust the volume between 0-32.
(3).Turn up/down Bass
① .Press“BASS+”on the remote control to turn up the bass. The screen will show the added
bass value. Press“BASS-”on the remote control to turn down the bass. The screen will show
the decreased bass value.
②.You can adjust the bass between -7~7.
(4).Turn up/down Treble
① .Press“TRE+”on the remote control to turn up the treble. The screen will show the added
treble value. Press“TRE-”on the remote control to turn down the treble. The screen will show
the decreased treble value.
②.You can adjust the treble between -7~7.
Adjust the bass and treble properly, in case that it worsens the tune. Tuning the bass value and
treble value to “0” is recommended.
Note:
1. H10 Power Amplifier
Power Output: 6W+6W (8Ω)
Frequency Response: 20Hz~22kHz (±1dB)
2. USB Storage Device
Support Type A USB Socket, Full Speed (12 Mbps)
3. FM Tuner
Tuner:FM Stereo
Frequency Range: 87.5~108.0 MHz (0.1 MHz Step Length)
Noise Limitation Sensitivity: 5uV
4. AUX Input Sensitivity
AUX IN(RCA):500 mV (RMS)
5. USB Sound Card
Support Type B USB Socket, Full Speed
Sample Rate: 32k, 44.1k, 48 kHz
6. Headphone Output
Headphone Socket:Stereo Headphone between 32Ω~300Ω
7. Speaker (H10)
Power: 50W
Impedance: 8Ω
Sensitivity: 89dB
Frequency Response: 60~24000Hz
8. Parameters
Alternative Voltage:100~240V,50/60Hz
Power Consumption:60W
Dimension of H10:188mm×165mm×68mm
Dimension of Speaker:178mm×165mm×172mm
Net Weight of Main Machine: 2.1 kg
Net Weight of Speaker: 6.5 kg
Working Condition: Temperature:-10 ~40 Moisture:20%~80%
Storage Condition:Temperature:-20 ~70 Moisture:20%~90%
°C °C
°C °C
Page 13

Troubl esh ooting
23
Problem
Power (LCD) is OFF
Power cord is not
well-connected
Please check the power cable
connection or power outlet
connection
Main fuse is out
Replace with the same
type and value fuse
Power (LCD) is ON
Volume is at ZERO
NO signal input
Check the function of
the sound source
Check the input selection and
switch to the proper input
Turn up the Volume
Sound Distortion
High input signal level
Turn down the volume
to suitable position
Cause
Remedy
Noise output
Sound field Positioning
is not so good
Signal input cables or
speaker cables are
wrongly connected
Reconnect it as suggested
in the manual
Ground of input signal cable
is open or bad contact of the
input signal cable
Components or circuits
are in trouble
Replace the input signal
cable with a new one
Please contact with local
agents or our company
NO Sound
Use the mute function
Cancel the mute function by
pressing“Mute” on the remote
control
 Loading...